Navigating complex challenges: creative competencies for contemporary leadership
Upload
khangminh22Category
view
1download
0
Emory University
COMPETENCIES AND CRITERIA for the Entry-Level PHYSICAL THERAPIST©
DIVISION OF PHYSICAL THERAPY DEPARTMENT OF REHABILITATION MEDICINE EMORY UNIVERSITY SCHOOL OF MEDICINE Revised 2017
Copyright © 1983 No part of this publication may be reproduced, stored in a retrieval system, or transmitted in any form, or by any means without prior written permission of the authors.
by
Catlin, P., Barrett, S., Binder-Macleod, S., Humberstone, N., Morgan,
J., Pearl, M., Tomberlin, J., Vine, P., and Wilder, E.
March 1983 Revised 2006 Revised 2009

2
Contents INTRODUCTION ........................................................................................................................................... 6
COMPETENCY AND CURRICULUM VALIDATION PROCEDURES .............................................................. 6
CRITERIA BOOK CONTENTS ..................................................................................................................... 8
SUMMARY ............................................................................................................................................... 8
COMPETENCY STATEMENTS ..................................................................................................................... 10
COMPETENCY IN PROVISION OF CARE ..................................................................................................... 11
COMPETENCY IN INTERPERSONAL COMMUNICATIONS........................................................................... 16
COMPETENCY IN THE TEACHING-LEARNING PROCESS ............................................................................. 21
COMPETENCY IN ADMINISTRATION ......................................................................................................... 23
COMPETENCY IN RESEARCH ..................................................................................................................... 26
COMPETENCY IN CONSULTATION............................................................................................................. 30
LONG-TERM CLINICAL INTERNSHIP .......................................................................................................... 33
COMPETENCY IN PROVISION OF CARE / SHORT-TERM CLINICAL EXPERIENCES ...................................... 58
COMPETENCY IN INTERPERSONAL COMMUNICATIONS / SHORT-TERM CLINICAL EXPERIENCES ............ 62
COMPETENCY IN THE TEACHING-LEARNING PROCESS / SHORT-TERM CLINICAL EXPERIENCES .............. 67
COMPETENCY IN ADMINISTRATION / SHORT-TERM CLINICAL EXPERIENCES .......................................... 69
CLINICAL EDUCATION / SHORT-TERM GENERAL MEDICAL CONDITIONS ............................................. 71
CLINICAL EDUCATION / SHORT-TERM MUSCULOSKELETAL REHABILITATION ..................................... 91
CLINICAL EDUCATION / SHORT-TERM ADULT NEUROREHABILITATION/PEDIATRIC REHABILITATION 109
CRITERIA SHEET DRAPING ......................................................................................................... 128
CRITERIA SHEET PALPATION ..................................................................................................... 133
CRITERIA SHEET Range of Motion Exercises in Cardinal and Diagonal Planes ................................. 138
CRITERIA SHEET GONIOMETRY ............................................................................................. 147
CRITERIA SHEET STANDARD PROCEDURE FOR GONIOMETRY .................................................. 154
INFORMATION SHEET MANUAL MUSCLE TESTING ............................................................. 177
CRITERIA SHEET MANUAL MUSCLE TESTING .......................................................................... 183
CRITERIA SHEET STANDARD PROCEDURE FOR MANUAL MUSCLE TESTING .................................... 186
CRITERIA SHEET SELECTION AND TEACHING OF EXERCISE ........................................................ 250
CRITERIA SHEET EXAMINATION OF THE SENSORY SYSTEM .............................................................. 252
CRITERIA SHEET SUPERFICIAL HEAT: INFRARED AND MOIST HEAT PACKS ...................................... 257

3
CRITERIA SHEET SUPERFICIAL HEAT – PARAFFIN .......................................................................... 261
CRITERIA SHEET APPLICATION OF COLD ......................................................................... 264
CRITERIA SHEET ULTRASOUND ............................................................................................... 267
CRITERIA SHEET MEDICAL DIATHERMY .................................................................................. 271
CRITERIA SHEET CERVICAL AND LUMBAR TRACTION; MOTORIZED AND STATIC ............................. 275
CRITERIA SHEET TRANCUTANEOUS ELECTRICAL NERVE STIMULATION (TENS) ............................... 279
CRITERIA SHEET IONTOPHORESIS WITH THE PHORESOR STIMULATOR ............................... 283
CRITERIA SHEET HIGH-VOLTAGE PULSED STIMULATION (HVPS) ...................................................... 286
CRITERIA SHEET NEUROMUSCULAR FUNCTIONAL ELECTRICAL STIMULATION (NFES) ..................... 290
CRITERIA SHEET ELECTRICAL STIMULATION (HIGH/LOW VOLT D. C., FARADIC & SINUSOIDAL A.C.) 294
INFORMATION SHEET ULTRAVIOLET ............................................................................................. 298
CRITERIA SHEET NERVE CONDUCTION ......................................................................................... 304
CRITERIA SHEET RELAXATION TECHNIQUES (PNF) ......................................................................... 308
INFORMATION SHEET PNF TREATMENT PROCEDURES .................................................................... 311
CRITERIA SHEET GROSS EVALUATION ........................................................................................... 318
INFORMATION SHEET BED MOBILITY ............................................................................................. 322
CRITERIA SHEET BED MOBILITY ................................................................................................... 323
CRITERIA SHEET BED POSITIONING ............................................................................................. 326
INFORMATION SHEET TRANSFERS ................................................................................................. 331
CRITERIA SHEET TRANSFERS ....................................................................................................... 332
INFORMATION SHEET STERILE TECHNIQUE .................................................................................... 339
PROCEDURE AND CRITERIA SHEET STERILE TECHNIQUE ................................................................... 341
CRITERIA SHEET VISUAL INSPECTION ........................................................................................... 346
CRITERIA SHEET EVALUATION OF TEMPERATURE ......................................................................... 352
CRITERIA SHEET EVALUATION OF BLOOD PRESSURE..................................................................... 354
CRITERIA SHEET EVALUATION OF VENTILATION ............................................................................ 357
CRITERIA SHEET PULSE RATE AND EVALUATION OF PERIPHERAL PULSES ....................................... 360
CRITERIA SHEET SENSORY ASSESSMENT ...................................................................................... 363
PROCEDURE AND CRITERIA SHEET EVALUATION AND TREATMENT OF FUNCTIONAL LIMITATIONS
................................................................................................................................................................ 369
CRITERIA SHEET TILT TABLE ..................................................................................... 375

4
INFORMATION SHEET MASSAGE ................................................................................................... 378
CRITERIA SHEET MASSAGE ......................................................................................................... 387
CRITERIA SHEET USE OF PERSONAL PROTECTIVE EQUIPMENT (PPE)............................................... 390
CRITERIA SHEET WOUND CARE / DRESSING CHANGES .................................................................. 392
CRITERIA SHEET SEQUENTIAL AND INTERMITTENT COMPRESSION PUMP (JOBST) ........................ 394
CRITERIA SHEET MEASUREMENT OF EQUIPMENT ......................................................................... 397
INFORMATION SHEET AMBULATION TRAINING: GAIT PATTERNS ..................................................... 401
INFORMATION SHEET AMBULATION TRAINING: SIT TO STAND/STAND TO SIT ................................. 406
CRITERIA SHEET AMBULATION TRAINING .................................................................................... 409
CRITERIA SHEET ASSESSMENT OF CLAUDICATION TIME OF THE LOWER EXTREMITIES ................... 412
CRITERIA SHEET BUERGER'S EXERCISES ....................................................................................... 414
PROCEDURE AND CRITERIA SHEET DOCUMENTATION-INITIAL EVALUATION .................................... 416
PROCEDURE AND CRITERIA SHEET DOCUMENTATION-PROGRESS NOTES ........................................ 419
INFORMATION SHEET HYDROTHERAPY AND HYDROKINETICS .......................................................... 421
INFORMATION SHEET HUBBARD TANK .......................................................................................... 428
CRITERIA SHEET HUBBARD TANK ................................................................................................ 431
INFORMATION SHEET WHIRLPOOL ............................................................................................... 436
CRITERIA SHEET WHIRLPOOL ..................................................................................................... 438
INFORMATION SHEET BANDAGING ............................................................................................... 442
CRITERIA SHEET BANDAGES FOR THE UPPER EXTREMITY .............................................................. 452
CRITERIA SHEET BANDAGES FOR THE LOWER EXTREMITY ............................................................. 456
CRITERIA SHEET ACE BANDAGING ............................................................................................... 460
ASSESSMENT OF THE UPPER EXTREMITY ARTERIAL CIRUCLATION: THE COMPRESSION TEST OF ALLEN
................................................................................................................................................................ 464
CRITERIA SHEET SEQUENCE OF STEPS IN CLINICAL ASSESSMENT OF CARDIOPULMONARY
PATIENT ................................................................................................................................................... 466
CRITERIA SHEET SURFACE MARKINGS .......................................................................................... 470
CRITERIA SHEET PULMONARY EVALUATION ................................................................................. 475
INFORMATION SHEET PERCUSSION OF THE CHEST ......................................................................... 479
CRITERIA SHEET PERCUSSION OF THE CHEST ............................................................................... 481
INFORMATION SHEET LUNG AUSCULTATION ................................................................................. 483

5
CRITERIA SHEET LUNG AUSCULTATION ....................................................................................... 485
INFORMATION SHEET BRONCHIAL DRAINAGE ............................................................................... 487
CRITERIA SHEET BRONCHIAL DRAINAGE ...................................................................................... 489
INFORMATION SHEET DIAPHRAGMATIC BREATHING PATTERN ........................................................ 494
INFORMATION SHEET PURSED LIP BREATHING ............................................................................... 495
CRITERIA SHEET PURSED LIP BREATHING ..................................................................................... 496
CRITERIA SHEET BREATHING EXERCISES ....................................................................................... 499
CRITERIA SHEET PRE-OPERATIVE INSTRUCTIONS .......................................................................... 502
INFORMATION SHEET ENERGY CONSERVATION .............................................................................. 506
INFORMATION SHEET CONDITIONING EXERCISE PROGRAMS........................................................... 508
CRITERIA SHEET GAIT ANALYSIS .................................................................................................. 512
CRITERIA SHEET EVALUATION OF THE CLIENT WITH AMPUTATION ................................................ 516
CRITERIA SHEET PROSTHETIC EVAL: BENCH ALIGNMENT WORKMANSHIP, DON/DOFF, ALIGNMENT
518
CRITERIA SHEET POSTURE EVALUATION ....................................................................................... 530
CRITERIA SHEET CIRCUMFERENCE, SEGMENTAL LENGTH, AND SITTING PELVIC HEIGHT ................ 534
CRITERIA SHEET SOFT TISSUE MOBILIZATION ................................................................................ 536
CRITERIA SHEET MUSCULOSEKELETAL EVALUATION: PERIPHERAL JOINTS ..................................... 539
INFORMATION SHEET JOINT MOBILIZATION .................................................................................. 543
CRITERIA SHEET JOINT MOBILIZATION ......................................................................................... 545
CRITERIA SHEET JOINT MANIPULATION ........................................................................................ 548
CRITERIA SHEET NEUROREHABILITATION COMPLEX PHILOSOPHY .................................................. 558
PROCEDURE AND CRITERIA SHEET GENERAL SCREENING FOR CNS DYSFUNCTION............................ 559
CRITERIA SHEET FUNCTIONAL EVALUATION ................................................................................. 566
INFORMATION SHEET ACTIVITIES OF DAILY LIVING ......................................................................... 568
CRITERIA SHEET STRUCTURING TREATMENT SESSIONS ................................................................. 573
CRITERIA SHEET PERCEPTUAL ASSESSMENT ................................................................................. 577
INFORMATION SHEET BRUNNSTROM STAGES................................................................................ 581
CRITERIA SHEET ROLLING IN BED ................................................................................................ 584
INFORMATION SHEET TRANSITION TO SHORT SIT ........................................................................... 587
INFORMATION SHEET TRANSITION TO STAND ................................................................................ 590

6
INTRODUCTION
This document presents the competencies of the professional degree program in physical therapy, the Doctor of Physical Therapy degree, offered through the Division of Physical Therapy, Department of Rehabilitation Medicine, Emory University School of Medicine. These competencies represent knowledge, skills, and abilities to be attained by students at the completion of the educational program. Each competency is defined in terms of component behaviors and related criteria for these component behaviors. The competencies, with their requisite component behaviors and criteria, are the foci of all classroom and clinical learning experiences within the curriculum1. Also, the competency and related components comprise the student behaviors, which are evaluated in both the classroom and clinic throughout the curriculum. The purpose of this book is to present all the competencies and criteria in one volume. This consolidation is important because these documents serve as the basis for student performance evaluation.
These competencies and component behaviors are the behaviors stated on the Clinical Education Evaluation Form to be evaluated during the student clinical affiliations. Likewise, the criteria sheets presented in this document explain the expected behaviors, as taught to the students at Emory. In that way, the criteria sheets serve as a definition of and as a reference for performance of specific component behaviors and for performance of specific physical therapy assessments and interventions. The document may be used to either instruct or diagnose/assess student behavior.
COMPETENCY AND CURRICULUM VALIDATION PROCEDURES
The competency statements and related criteria were initially formulated in 1974, when the professional education program was begun at Emory. These documents were originally (1975-1979), and continue to be, validated as explained below. The identification and development of the competency statements was based on input from a variety of sources. Using this input from the literature, the profession, experts, and the faculty, the general process for competency development was as follows.
First, a concept and characteristics of the health care system were articulated. Next, the general knowledge, skills, and abilities required of physical therapists, to meet the needs of and be consistent with the health care system characteristics, were identified. The knowledge, skills, and abilities were expressed in the form of competency statements. Content validity of the competency statements was determined by the following mechanisms: 1) a review of educational literature in general; 2) a review
1 The development of these materials was supported in part by the following sources: Special Project Grant No.
D12AH011 904-02, Department of Health, Education and Welfare, Public Health Service, Health Resource
Administration; Allied Health Manpower Grant No. 2C(74)III10-00018-07, Veterans Administration.

7
of current work related to competencies by the American Physical Therapy Association and other health professions and agencies; 3) content assessment of the developed competency statement by consultants and by this physical therapy faculty.
Concurrent with development of the competency statements, the competencies were defined in terms of components and criteria. The competency statements, per se, and the related components and criteria then were validated initially by a series of Delphi surveys. The purpose of the surveys was to validate each competency through survey participant judgment on the following parameters: 1) essentialness of each competency for entry level practice; 2) essentialness of each competency component for achievement of the related competency; 3) exhaustiveness of the components per competency; 4) correctness of sequence of the components per competency; and, 5) measurability/observability of the behavior specified in each component in a clinical setting. Delphi surveys were distributed nationwide to 140 physical therapists. Sixty-six useable responses were included in the analysis. The participating physical therapists comprised three groups: 1) clinical instructors participating in the clinical education of Emory University physical therapy students; 2) other physical therapy education programs; and, 3) content experts, who were knowledgeable regarding both scope of physical therapy practice and the specific content and skills implicit in the competencies. Eighty-seven percent of each respondent group judged the following competencies as essential to practice: 1) active recognition of the rights and dignity of the individual; 2) provision of physical therapy therapeutic service; 3) participation in the teaching-learning process; and, 4) consultation with others. Also, at least 94% of each of the respondent groups judged the remaining two competencies, i.e. participation in the administration of a physical therapy service and participation in the research process, as essential or useful to practice. In addition, all components of each competency were judged as useful or essential to the competency by at least 80% of the responders. In summary, no revisions of the competencies or components were indicated.
Next, a second Delphi survey was conducted to validate the criteria for each component of each competency according to the parameters of essentialness, exhaustiveness, observability, and sequence stated above. Again, the surveys were mailed nationwide to persons participating in the first Delphi and representing the three groups stated above. The sample of participants was 115 with 54 useable responses received. A minimum of 75% of responders judged each criterion per component per competency as essential or useful to attainment of the component/competency.
Following validation of the program competencies, curriculum validation procedures were initiated. Specific procedures included the following: 1) developing a curriculum matrix, i.e. matching course and class session objectives to competencies, components and criteria; 2) developing a matrix of the relationship of program competencies and components to professional competencies for entry level practice required for accreditation (Commission on Accreditation in Physical Therapy Education); and, 3) developing a matrix of the relationship of course and learning experience objectives to professional competencies required for accreditation. These three validation methods allowed cross validation from internal (program) and external (accreditation) sources for the following: 1) representativeness of program competencies in curriculum content/learning experience objectives; 2) representativeness of program competencies in professional/accreditation competencies; and, 3) representation of professional competencies in curriculum content/learning experiences. The finding of this analysis

8
indicated consistency of curriculum content with program and professional competencies. Specifically, the curriculum matrix demonstrated repetitive representation of program competencies and components in content/class session objectives. Likewise, matching program competencies and course objectives to professional competencies demonstrated consistent cross-representation.
The above validation studies continue to be conducted approximately every eight to ten years. The studies continue to be done as described above for the competencies, competency components, and related criteria and for the curriculum. The sample always is comprised of the three groups: 1) clinical educators working with Emory students; 2) clinical educators not involved with Emory but with other physical therapy education programs; and, 3) content experts. The criteria for judgments of essentialness, exhaustiveness, representativeness, observability, and sequence are that a minimum of 75% of responders agree regarding these characteristics. The curriculum matrices analyses required representation of each program competency and related components both in class and course objectives and of each professional competency in program competencies/components and in course and class session objectives. Competency/component/criteria changes are initiated based on changing physical therapy practices and on the results of these studies as necessary. Actually, however, the validation criteria always have been met, indicating that these competencies are updated and expressed sufficiently to accurately and completely reflect physical therapy practice and that the curriculum content reflects the competencies.
CRITERIA BOOK CONTENTS
This book is used by students, faculty, and clinical instructors in planning and implementing learning experiences and in evaluating student performance in the classroom and the clinic. The content of the book is ordered such that the competency statements are presented first. Next, each competency statement definition, in terms of components and criteria, is presented. The clinical education evaluation form then is presented to allow the reader and student to see the extent to which the components and criteria are used in clinical performance evaluation. Finally, all of the criteria sheets for the component behaviors “conduct the examination” and “administer the treatment program” for the provision of care competency are presented. These criteria sheets, and related information, are presented in order of presentation in the curriculum, i.e., in order of General Medicine, Musculoskeletal, and Neurorehabilitation Complexes, in which these assessments and interventions are initially taught. The Table of Contents specifies the individual examinations/interventions included.
SUMMARY
This compendium is considered a working document. Revalidation and revision of content will be implemented based on changing physical therapy practice. Also, these materials are not intended for use independent of an educational design incorporating the process skills underlying the competencies and the competencies, per se, throughout the curriculum. The faculty and students recognize that the methods presented in the criteria sheets for specific assessments/interventions may not represent the “only” way to perform a given procedure in any or various circumstances. For that reason, the student

9
is encouraged to learn a variety of approaches to a specific intervention and make judgments about the most effective approach for a given patient. Instead, the criteria are presented as an accepted method representative of prevailing practice and are communicated so both teacher and learner have a common understanding of content taught and of minimal, expected learner performance.
We welcome any and all comments and suggestions. In the meantime, we hope you find this document useful to you in optimizing student learning and performance in physical therapy practice.
Pamela A. Catlin, Ed.D., PT
Professor Emeritus
Division of Physical Therapy
Department of Rehabilitation Medicine
Emory University School of Medicine
Zoher Kapasi, PT, PhD, FAPTA
Director
Division of Physical Therapy
Department of Rehabilitation Medicine
Emory University School of Medicine

10
COMPETENCY STATEMENTS
The objectives of the professional Doctor of Physical Therapy program are to provide the student
with the following competencies:
1. Provision of care.
2. Interpersonal communications.
3. Teaching-learning process.
4. Administration.
5. Research.
6. Consultation.

COMPETENCIES AND CRITERIA Competency in Provision of Care
COMPETENCY IN PROVISION OF CARE
Upon graduation, the student will use the problem solving process in demonstration of areas of expertise through the application of research evidence or a theoretical framework of basic, behavioral, social, and medical sciences.
COMPONENTS AND CRITERIA
1. Identify symptoms and co-existing conditions of the client: A. Identifies problems reported by the client or client's family. (i.e. "What brings you in?") B. Identifies pathologies, impairments, functional limitations, or disabilities1 that could
compromise the client's medical safety and/or that relate to symptoms identified by: (1) Interview with the client and/or client's family to obtain client demographics, client's past
and present medical history, family medical history, review of systems (2) Observation of client during interview (3) Review of medical record to determine medical history, results of physical examination,
diagnostic tests, related treatment being received, laboratory values, medications, psychosocial status, and progress
(4) Consult with other health care workers
2. Differentiate symptoms presented and impairments (symptoms and/or signs) to be assessed based on: A. The client's medical safety B. The client's comfort C. Medical treatment priorities D. The client's functional, physiological, emotional, vocational, and social needs
3. Identify characteristics of relevant symptoms or conditions: A. Onset of symptoms identified as sudden or progressive; precipitating or concurrent
circumstances: (1) Identify nature/quality of symptoms (i.e. severity, descriptors, factors aggravating and
relieving symptoms) (2) Identify location/areas of impairments (signs or symptoms) even if seemingly unrelated to
iatrotropic stimulus (body diagram helpful) (3) Identify progression or stage (i.e. acute, intermittent, improving) (4) Identify previous or ongoing treatment (5) Formulate relationships between characteristics of symptoms and other findings (other
impairments) B. Relationship of impairments to other evaluative findings; specific statements of relationships of
symptoms to: (1) Physical examination
Division of Physical Therapy
Emory University

COMPETENCIES AND CRITERIA Competency in Provision of Care
12
(2) Other diagnostic tests (3) Lab values (4) Age related norms
4. Determine the priority of conditions to be assessed: A. Hypothesize the condition(s) represented by impairments and other findings. B. Initiate referrals to other health professionals, as indicated. C. Determine priority of conditions considering:
(1) Client medical safety (2) Client comfort (3) Medical treatment priorities (4) Information being sought from another source through referral initiation (5) Client's functional, physiologic, emotional, social, and vocational needs (6) Client age (7) Financial and other required resources
5. Identify and determine the rationale for procedures to examine the client's impairments or conditions. Specific statements of relationship of impairments to: A. Client's medical condition and treatment priorities B. Client's comfort and ability to assist in the procedure (i.e. follow directions) if necessary C. Explanation of mechanism by which the test(s) assesses movement and
physiologic/neuromusculoskeletal conditions of the client D. Explanation of the possible examination findings and implications of the findings E. Indication of the purpose served by the examination procedure(s) or test(s) as:
(1) To determine current status (2) To contribute to determination of diagnosis (3) To determine prognosis (4) To determine appropriate intervention plan and goals of interventions (5) To determine progress (6) To assess the appropriateness of an examination procedure to determine prognosis
F. Assessment of reliability of the procedure(s) G. Assessment of the accuracy of the procedure(s) based on the best current research evidence H. Identification of safety considerations I. Identification of possible undesirable consequences secondary to administration of the
procedure(s) J. Assessment of time constraints K. Determination of equipment, materials, and personnel resources necessary
L. Identification of financial considerations 6. Prepare to execute the examination:
A. Prepare self: (1) Review the procedure if necessary (2) Request assistance of other personnel if necessary
B. Prepare client/client's family: (1) Emotional, cognitive, and physical preparation
C. Prepare equipment, materials, and treatment areas: (1) Procure equipment, materials, and treatment areas (2) Determine safety and operational status of equipment

COMPETENCIES AND CRITERIA Competency in Provision of Care
13
(3) Calibrate equipment
7. Conduct the examination according to the criteria sheet for the specific procedures/tests
8. Evaluate the examination findings: A. State the results of the examination. B. Determine the relationship of examination findings to:
(1) Client's impairment(s), functional limitation(s), and/or disability(ies) (2) Progression and state of symptoms (3) Other diagnostic findings (4) Disease process (5) Medical history (6) Anatomic, biomechanical, physiologic, behavioral, biochemical or developmental bases for
movement (7) Intervention being received (8) Purpose of the examination
9. Establish a physical therapy diagnosis: A. Classify the movement disorder based on current literature or identify impairments most
related to the functional limitations: (1) That accounts for all pertinent impairments (2) Toward which intervention and intervention goals are directed
10. Determine the prognosis.
11. Establish intervention goals: A. Identify priority order of goals. B. Including interim and discharge goals/short term and long term goals based on:
(1) Impairments (2) Diagnoses (3) The client's personal and vocational goals (4) Measurable functional outcomes
12. Determine an intervention plan with rationale based on: A. The client's physiologic stability B. The client's comfort C. Priority of client and caregiver's needs D. Goals of the client and the client's family E. The client and caregiver's ability to participate in the intervention F. The diagnosed problem G. Related impairments, including current status, stage, progression, and duration H. Related medical intervention, including effect of the intervention on other interventions; effect
of other interventions on this specific intervention I. Explanation of the mechanism by which the intervention affects client's impairment(s),
functional ability(ies)/limitation(s), and/or disability(ies) J. The best current research evidence K. Explanation of the relationship of the possible results of interventions to the short and long
term goals and functional outcomes L. Explanation of the relationship of results to the client's program of care proposed by health
care team

COMPETENCIES AND CRITERIA Competency in Provision of Care
14
M. Assessment of time restraints N. Determination of equipment, materials, and personnel resources necessary O. Identification of financial considerations P. Assessment of resources available to client, family, aide
13. Administer the intervention according to the criteria sheet for the specific procedures
14. Assess the effects of the intervention: (1) State the effects of the intervention on:
(a) Impairment(s) (b) Functional ability(ies)/limitation(s) and/or disability(ies)
A. State the relationship of the effects of the intervention to: (1) Progression and stage of impairment(s) (2) Other diagnostic findings (3) Disease process (4) Medical history (5) Related interventions
B. State the status of: (1) Targeted functional outcomes (2) short term and long term goals
2. Modify the intervention and/or goals, as indicated based on: A. Client's medical safety B. Client's comfort C. Client's ability to provide required assistance D. Effect on impairment(s), functional ability(ies)/limitation(s), and/or disability(ies) E. Required client resources F. Current and future intervention priorities
3. Adhere to safety in provision of patient care: A. Assess the safety of the examination and/or intervention procedures. B. State the safety considerations. C. Prepare self, environment, and equipment/materials in accordance with the criteria for safety
listed in the criteria sheet for the examination and/or intervention. D. Monitor impairments during the examination and/or intervention. E. Assess the effects of the examination/intervention on impairments. F. Modify the examination/intervention based on client’s medical safety. G. Related impairments, including current status, stage, progression, and duration.
4. Record concisely and accurately in appropriate records according to the criteria sheet on “Documentation”: A. Including, but not limited to, initial, progress, and discharge notes B. Notes state, as appropriate:
(1) Subjective results (2) Objective results (3) Assessment (4) Plan (5) Intervention given

COMPETENCIES AND CRITERIA Competency in Provision of Care
15
1Reference: Guide to Physical Therapist Practice, Second Edition. Physical Therapy. 81(1), 2001.

COMPETENCIES AND CRITERIA Competency in Interpersonal Communications
COMPETENCY IN INTERPERSONAL COMMUNICATIONS
Upon graduation, the student will use the problem-solving process in demonstration of areas of
expertise and application of a theoretical framework of basic, behavioral, social, and medical sciences
on which to base the practice of physical therapy, including: an active recognition of the rights and
dignity of the individual in planning and administering programs of care.
COMPONENTS AND CRITERIA
The criteria and items on the evaluation form relate to any and all interactions the student has
during clinical education experiences. Examples include interactions with a client or client's family,
physician, clinical instructor or supervisor, telephone conversations, etc. Also, the criteria and
evaluation items refer only to responses of the student during an actual interaction, not to responses
by the student after an interaction. Specific examples are incorporated below.
18. Identify cognitive needs and resources of other person(s), including: A. Other person who may be the focus of communication for the student. This may include but
not be limited to the following: (1) Client (2) Client family or support persons (3) Clinical instructor or supervisor (4) Faculty (5) Supportive personnel/staff members
B. What the person needs to know regarding: (1) The relationship of the physical therapy program to the total program of care (2) The person's role in the program of care, affiliation, or system, in general (3) The student's objectives or interest in the program, affiliation of system, in general (4) The relationship of the subject of the communication to past or future communications
with the student or other persons Examples: Does the student identify that his/her instructor needs to know his/her interest in this clinical experience? Does the student identify that the client's wife needs to know her role in the treatment program?
C. Sources of information available to the other person(s) relative to the information being
sought: (1) Client family or support persons (2) Health professionals/co-workers (3) Other students (4) Clinical education instructor or supervisor
Division of Physical Therapy Emory University

COMPETENCIES AND CRITERIA Competency in Interpersonal Communications
17
(5) Faculty (6) Reference materials (7) Outside agencies
19. Identify emotional needs and resources of the other person through: A. Solicitation of how the person feels B. The verbal and non-verbal cues provided C. Use of interviewee-centered response:
The cognitive and emotional needs of another person are most often identified by focusing on the other person's verbal and nonverbal cues. These needs might be identified by giving interviewee-centered responses. Interviewee-centered responses are exhibited by, but not limited to the following:
VERBAL 1) Silence:
Silence is simply giving no verbal response. As a deliberate response, the use of silence implies that silence is the best response to be offered at that point in the interaction.
2) Restatement: Restatement is a verbal response designed to let the other person know he is being listened to and to let the other person hear what he/she has said. Restatement is accomplished by: a) Restating exactly what has been said, including using the first person
pronoun (I) b) Restating exactly what has been said, but using the second person pronoun
(you) c) Restating the significant parts of what has been said and restating, in
summary fashion 3) Clarification:
Clarification usually refers to responses made to clarify what the other person (interviewee) has said. Such responses are made by: a) Stating more simply to make clearer that which the other person said so
he/she can decide if the responses were what he/she had in mind b) Restating exactly what has been said, but using the second person pronoun
(you) c) Using your own words to clarify a response the other person had difficulty
stating clearly Clarification may also be used as a response to be sure you have understood what the other person said.
4) Reflection: Reflection responses express solely the feeling, tone of the other person’s responses; reflection response verbalizes only the feelings and attitudes that seem to lie behind the other person's words.
5) Interpretation: Interpretation responses attach meaning to what the other person has said. Interpretation may take one of two forms: a) Interpretation based on the other person's internal frame of reference b) Interpretation based on your internal frame of reference
NON-VERBAL

COMPETENCIES AND CRITERIA Competency in Interpersonal Communications
18
1) Maintaining eye contact 2) Head nodding 3) Maintaining a position facing the other person
D. Experiences and feelings of the person in similar or related interactions or situations E. Identification and use of relevant persons to clarify needs F. Identification of what the other person can contribute to his/her own emotional needs as well
as what people available to him/her can contribute: Examples: Does the student use interviewee-centered responses and identify that the client is afraid to attempt stairs using crutches? Does the student identify resources available to the client for dealing with his/her fears?
20. Identify cognitive needs and resources of self (student), including: A. What you (student) know or need to know about the other person (client and/or his/her
relevant others, clinical supervisor): (1) Relevant background (2) Client's interpretation of his/her medical background (3) Client's and relevant others' feeling about the clients condition (4) Expectations of client and relevant others (5) Related future plans
B. Sources of information available to you (student): (1) Yourself - education and experience (2) Present status, relevant goals, interest, values, and beliefs (3) Medical record or other reference materials (4) The client and relevant others (5) Other health professionals (6) Co-workers (7) Clinical instructor, supervisor, or coordinator (8) Faculty
21. Identify the emotional needs and resources of self (student), including: A. How you (student) feel about the other person (client and/or his/her relevant others, clinical
supervisor) B. How you (student) feel about your relationship with the other person C. Sources of emotional support available within you (student) which you can offer the
relationship: Examples: Does the student identify his/her willingness to participate in the development and maintenance of the relationship? Does the student identify his/her own experience in similar relationships?
22. Identify the roles of relevant persons, including: A. Student's responsibilities to the client B. Client's responsibilities in the treatment plan C. Person(s) primarily responsible for completing the task Examples: Does the student identify the role of the client's spouse in the transfer? Person(s) primarily concerned with supporting the emotional needs of the people involved
23. Respond to others in a way that fosters a positive change, including: A. Facilitating acceptance by the other person of ideas, attitudes, and feelings he/she has:
Example: The student allowed the client to feel sad. B. Movement of the other person toward the knowledge and/or attitudes desired:

COMPETENCIES AND CRITERIA Competency in Interpersonal Communications
19
Example: A client expresses concern or worry over a situation. The student responds to the client in such a way that the client is no longer needlessly concerned or is reassured that his concerns will be attended.
C. Responses appropriately related to the established needs of the other person(s) involved D. Responses appropriately related to the abilities and needs of self E. Use of verbal or non-verbal responses F. Listening , giving input to the person(s), and referral:
Giving input to the other person(s) is exhibited by, but not limited to verbal and nonverbal responses, which are interviewer-centered. Interviewer-centered responses are those initiated by the student and directed toward the other person(s) and /or nonverbal approaches to the other person(s). The following are interviewer-centered responses:
INTERVIEWER-CENTERED
VERBAL
NON-VERBAL
explanation
touching the other person(s)
encouragement
moving toward or positioning yourself close to the other persons
assurance suggestions advice Inappropriate responses to other people include the following:
approval-disapproval
rejection
criticism
scolding
ridicule
threat
contradiction
punishment
denial
24. Refer client and relevant others to another person if indicated by: A. Identifying when client or client’s relevant others needs exceed your abilities B. Identifying when client’s needs interfere with physical therapy care C. Identifying when therapist responses do not satisfy the client and relevant others D. Identifying when extent or nature of the needs cannot be identified by the therapist E. Identifying the health professional capable of meeting the client’s needs F. Referring the client to the appropriate health professional G. Following established institutional referral procedures Example: The client is concerned about his/her diet. The student suggests that he/she (client) speak with the dietitian.
25. Exhibit caring for the people with whom he/she is involved by: A. Accepting responsibilities:
Examples: Does the student keep appointments as scheduled? Does the student follow through on commitments made?
B. Exhibiting concern for others' well being and respect for others’ rights and dignity: Examples: The student arranges for privacy when needed for work with clients. The student presents himself in an inoffensive manner when dealing with others.
C. Supporting patient programs and departmental efforts:

COMPETENCIES AND CRITERIA Competency in Interpersonal Communications
20
Examples: When seeking assistance from an aide, the student acknowledges the aide’s response that he/she is taking care of another therapist’s request.
D. Utilizing appropriate interpersonal skills as previously identified: The question is not if the student cares but if the student exhibits caring in such a way that the people with whom the student is involved recognize the student cares.
26. Evaluate the effect of his/her response on the needs of other person(s) and self by: A. Recognizing the manner in which the other person responds, reacts to, or withdraws from
him/her: Example: The student can demonstrate and/or express awareness of his/her own responses: 1) which facilitate the other person's participation in the interaction, 2) which cause the other person to withdraw from the interaction.
B. Determining the effects of the interaction on the cognitive and emotional needs of the other person and of him/herself:
Example: The student identifies the failure of previous responses to meet needs. The student determines that his/her response to the client has increased the client's fear and confusion.
27. Modify his/her responses to meet the needs of the relevant others if indicated by: A. Eliminating or modifying responses which affect the interaction(s) negatively B. Selecting other response options to meet need demands C. Initiate modified responses D. Re-evaluate altered responses for attainment of identified needs. E. Continue modifications until needs are met

COMPETENCIES AND CRITERIA Competency in Research
21
COMPETENCY IN THE TEACHING-LEARNING PROCESS
Upon graduation, the student will use the problem solving process in demonstration of areas of
expertise and application of a theoretical framework of basic, behavioral, social, and medical sciences on which to base the practice of physical therapy, including: participation in planning, implementing, and evaluating the teaching-learning process.
COMPONENTS AND CRITERIA
28. Identify the needs of the learner/client, including: A. Identify what the learner needs to know B. What the learner needs to be able to do
29. Identify an appropriate level of learning or skill to be accomplished, including: A. Identification of the specific knowledge and/or skills the learner/client must already have to
participate in the learning experience and accomplish the intended objective B. Determination of the extent to which the learner/client has the prerequisite knowledge
and/or skills C. Determination of a way(s) to provide the prerequisite knowledge and skills if lacking
30. State what is to be learned, including: A. Observable behavior B. Who is to demonstrate the behavior C. Conditions under which the behavior is to be demonstrated D. Minimal level of acceptable behavior E. An implied domain of the behavior (i.e. cognitive, psychomotor, affective)
31. Make certain the learner/client understands the purpose for learning: A. Tell the learner/client why the behavior is to be learned B. Relate the learning experience/behavior to be learned to past experiences of the learner, to
present experiences of the learner, and to future experiences of the learner C. Ask the learner to state in his/her own words what is to be learned D. Ask the learner to state in his/her own words why he/she needs to learn what is being taught E. Ask the learner to state how what is being learned relates to other experiences in his/her
life
32. Explain what is to be learned: A. Provide the information or materials necessary for learning B. State the principles involved in the behavior C. Ask the learner/client to state, in his/her own words, the principles involved D. Provide the learner with cues in important features of the behavior
33. Demonstrate to the learner/client what is to be learned:
Division of Physical Therapy
Emory University

COMPETENCIES AND CRITERIA Competency in Research
22
A. Use appropriate materials or application examples B. Make the demonstration as similar as possible to the situation in which the learning is to be
used
34. Provide an opportunity for the learner/client to practice doing what is being learned: A. Make the practice situation as similar as possible to the actual situation(s) for which the learner is
being prepared B. Provide adequate practice C. Provide practice which requires that the activity of the learner is consistent with the
behavior stated in the objective D. Identify resources which are available to the learner/client beyond this experience, for
additional exposure as practice
35. Provide feedback on performance to the learner/client: A. Indicate the extent to which he/she is demonstrating what is being learned B. Make suggestions for improvement C. Provide additional information, explanation, or demonstration when necessary D. Assist the learner in identifying how he/she can determine the extent to which he/she is
demonstrating what is being learned
36. State some examples of use of what is being learned in the client's everyday life: A. Present several different kinds of examples B. Present examples as similar as possible to actual situations in the learner/client's life C. Incorporate principles and cues in the examples
37. Ask the learner/client to give examples of use of what is being learned in the client’s everyday life: A. Determine that the examples reflect actual, possible situations and understanding of principles
38. Determine that the learner/client has learned what is being taught: A. Identify and implement an activity which will allow demonstration of learning and which is:
(1) Consistent with the behavior stated in the objective (2) Consistent with the activities of the learning experience (3) Incorporates the conditions stated in the objective
B. Determine that the minimal level of acceptable performance is met

COMPETENCIES AND CRITERIA Competency in Research
23
COMPETENCY IN ADMINISTRATION
Upon graduation, the student will use the problem solving process in demonstration of areas of expertise and application of a theoretical framework of basic, behavioral, social, and medical sciences on which to base the practice of physical therapy, including: participation in the administration of a defined physical therapy service.
COMPONENTS AND CRITERIA
39. Identify the administrative structure to provide physical therapy services: A. Administrative structure/hierarchy B. Current staff positions/roles, lines of communication, and any future changes to provide quality C. Vision statement/philosophy of the department
40. Demonstrate Professional Behaviors: A. Maintain schedule throughout day, e.g. arrives on time, adheres to patient schedule B. Adhere to school/facility dress code C. Facilitate team environment to insure quality patient care:
(1) Effectively communicate to all staff members, patients, and families (2) Demonstrate flexibility in all areas within a team environment (3) Accept responsibility for facility needs and complete tasks in a timely manner (4) Take initiative to resolve problems (5) Request and/or provide assistance to co-workers as necessary
D. Demonstrate safe and legal practice: (1) Consistent with State Board Rules/Regulations (2) Follow APTA guidelines
(a) Practice in a manner consistent with the APTA Core Values1 (3) Demonstrate Ethical Practice
(a) Practice in a manner consistent with the APTA Code of Ethics2 (i) implement in response to an ethical situation, a plan of action that demonstrates
sound moral reasoning congruent with core professional ethics and values; and (ii) Report to the appropriate faculty suspected cases of fraud and abuse related to
the utilization of and payment for physical therapy and other health care services
(4) Comply with Centers for Medicare and Medicaid Services guidelines (5) Comply with HIPAA guidelines
41. Identify the overall goals of the physical therapy services provided:
Division of Physical Therapy
Emory University

COMPETENCIES AND CRITERIA Competency in Research
24
A. Patient/Client care: (1) Primary patient populations served (2) Levels of care able to provide (3) Resources available to ensure quality patient care (4) Identify the team members involved with providing physical therapy services
B. Other services/consultations available to meet the patient’s needs C. Educational opportunities:
(1) Students (2) Community education, e.g. presenting to school system a program on prevention of head
injuries, presenting to an industrial site, a back school (3) Health professionals:
(a) Academic setting (b) Conferences
(4) Other disciplines, e.g. teaching nursing assistants transfer techniques D. Current research efforts or efforts toward evidence-based practice within physical therapy
services
42. Identify the administrative needs of the physical therapy service: A. Daily clinical administration. Follows department/service policies and procedures for:
(1) Insurance coverage (2) Documentation (3) Informed consent (4) Incident reporting (5) Emergency response (6) Ordering equipment (7) Charges (8) Discharge planning
B. Ongoing departmental administrative activities (1) Budgeting:
(a) Sources of revenue for the department/organization directly affected by a staff physical therapist:
i. Sales of service ii. Sales of products
b. Sources of expenses for the department/organization directly affected by a staff physical therapist:
i. Salary ii. Benefits
iii. Education iv. Supplies/Equipment v. Travel
vi. Professional dues (2) Marketing:
(a) Main sources of referral to the department/organization (b) Main sources of competition for the department/organization (c) Strengths of the department including staff specialists, equipment, interdepartmental
relationships/communication, and referral relationships/communication (3) Physical plant utilization and needs of the physical therapy service (4) Outcomes management programs

COMPETENCIES AND CRITERIA Competency in Research
25
(5) Risk management programs (6) Quality care initiatives:
(a) JCAHO and CARF accreditation requirements (b) Continuous Quality Improvement (CQI) or other ongoing quality care program
43. Identify and provide a rationale for an effective method of resolving the administrative service needs: A. Establish a plan of action to resolve the problem:
(1) Support the philosophy/vision/goals of the service. (2) Consider all professional practice standards. (3) Determine the priorities of the administrative needs. (4) Identify resources necessary and available to implement the plan:
(a) Personnel (b) Finances (c) Physical space (d) Equipment/material (e) Time
(5) Develop a time schedule for implementation of the plan.
44. Implement the plan: A. Use personnel appropriately. B. Follow all professional practice standards.
45. Evaluate the extent to which the goals of the plan have been met as related to daily clinical and ongoing departmental administrative activities.
46. Modify the plan as necessary to meet the needs of the service: A. Identify a process for revising the plan of action. B. Implement modification of the plan.
_________________________________________
1 American Physical Therapy Association.
Professionalism in physical therapy: Core values BOD P05-04-02-03 [Amended BOD 08-03-04-10] Available at: http://www.apta.org/uploadedFiles/APTAorg/About_Us/Policies/Judicial_Legal/ProfessionalismCoreValues.pdf. Accessed April 27, 2016.
2 American Physical Therapy Association. Code of Ethics for the Physical Therapist. Available at: https://www.apta.org/uploadedFiles/APTAorg/About_Us/Policies/HOD/Ethics/CodeofEthics.pdf. Accessed April 27, 2016.

COMPETENCIES AND CRITERIA Competency in Research
26
COMPETENCY IN RESEARCH Upon graduation, the student will use the problem-solving process in demonstration of areas of
expertise and application of a theoretical frame-work of basic, behavioral, social, and medical sciences on which to base the practice of physical therapy, including: use of basic principles of research a) in planning and implementing the inquiry process and b) in the critical analysis of concepts and findings generated by self and others.
COMPONENTS AND CRITERIA
1. Identify the problem or question: A. Determine if a problem is stated or implied:
(1) State the criteria for a problem statement.
2. Synthesize current theory/literature supporting the identified problem: A. State how the theory/literature supports the identified problem and stimulated the
hypothesis(es). B. Evaluate the validity of the presented theory/information:
(1) State the principles and concepts of the subject matter. (2) State and give examples of the four ways of knowing.
C. Evaluate the relationship between the information and the problem: (1) State the principles and concepts of the subject matter.
D. Evaluate the relationship between the information and the hypothesis(es): (1) State the relationships inherent in the principles and concepts of the subject matter and the
information presented.
3. State the hypothesis(es): A. Summarize the theory substantiating the hypothesis. B. State the difference between a research, null, and alternate hypothesis:
(1) Define research, null, and alternate hypothesis. C. State the criteria for a hypothesis.
4. State the relationship between the problem and the hypothesis(es): A. Determine if the hypothesis(es) is testable:
(1) State how the data, which is measurable, is to be gathered:
Division of Physical Therapy
Emory University

COMPETENCIES AND CRITERIA Competency in Research
27
(a) Apply basic principles of measurement. (b) Determine sources of error of measurement (see 8).
(2) Identify the validity, with regard to the hypothesis, of the variable(s) being measured: (a) State relevant concepts of validity.
(3) Determine if the measure is sensitive to the change/relationship being measured.
5. State the variables: A. Determine and state the types of variables:
(1) Define the types of variables as independent, dependent, measured, active, manipulated, attribute, control, extraneous, or intervening.
B. Determine and state the operational definitions: (1) Define operational definition.
6. State the type of research represented: A. Identify a type of research appropriate for testing the hypothesis/answering the research
question. B. Differentiate the types of research: historical, experimental, descriptive, correlational,
developmental, case study, quasi-experimental.
7. State the population and sample: A. Identify a population and sample representative of the population to which the results are/are not
to be generalized. B. Differentiate population and sample:
(1) Define population.
8. Develop the research design: A. Determine how the sample is to be selected:
(1) Differentiate between random, purposive, stratified, cluster, and matching: (a) Define random, purposive, stratified, cluster, and matching.
B. State the relationship of the sample to the hypothesis: (1) State the extent to which the variables are represented in the sample:
(a) State the relationship between the characteristics of the sample and the variable. (2) State the extent to which the variables are applicable to the sample:
(a) State the relationship between the characteristics of the sample and the variable. (b) State the characteristics of the sample.
C. State the sample size and assignment to subgroups: (1) See 8a. (2) State the relationship between sample size and statistical analysis used; see 8.G.1.b.1.
D. State the research design presented: (1) Distinguish between each type of research design with regard to number of groups, method of
assignment to groups, number of observations and treatments per group, level of measurement: (a) Define each type of research design with regard to the above characteristics (8D.1.)
(2) Distinguish between research design and type of research: (a) Define research design.
E. State reliability considerations and controls present: (1) State sources of reliability (i.e. instrumentation, measures, measurement, measurement
protocol): (a) Define reliability.
(2) State methods of establishing and maintaining reliability:

COMPETENCIES AND CRITERIA Competency in Research
28
(a) Define inter/intra-rater reliability, repeated calibration, protocol, standardization. (3) State the extent to which reliability is present in the study:
(a) Interpret reliability data. (b) Define reliability coefficient, percent agreement.
F. State sources and controls of internal and external validity: (1) State the relationship between specific controls for internal and external validity and specific
research designs: (a) Define sources of internal and external validity and controls for each. (b) Define internal and external validity.
G. State the consistency between the research design and the statistical analysis(es): (1) State the relationships between the level of measurement, the type of variables, the number
of variables, the number of subjects, the number of groups, the number of observations and the assumptions of the analysis(es): (a) Distinguish between nominal, ordinal, and metric (interval and ratio) levels of
measurement: 1) Define the above levels of measurement
(b) State examples of research designs in which each of the following measures might be used (see 1 below): 1) Define and list the assumptions of the following parametric and non-parametric
measures:
9.
Parametric
Non-Parametric
Mean
Median
Variance
Mode
Standard deviation
Range
Standard error
Frequency
Independent Samples t-Test
Mann-Whitney
Paired Samples t-Test
Wilcoxon
Pearson’s r correlation Spearman’s rho correlation
Analysis of variance Kruskal-Wallis
Analysis of covariance
Friedman’s test
Multivariate analysis of variance
Chi square
Simple linear regression
Binomial test
10. Implement data collection: A. Select the sample; see 8A-D B. Establish and maintain reliability of measures; see 8E. C. Establish and maintain validity; see 8F. D. Analyze the data:
(1) Conduct appropriate parametric and non-parametric statistical tests; see 8G.1.b and 8G.
11. Present and interpret the data: A. Interpret the findings in terms of central tendency, dispersion, confidence intervals, probability of
the hypothesis(es), degree of correlation, alpha and beta levels, Types 1 and 2 errors: (1) State the relationships presented in tables and graphs:
(a) Define central tendency, dispersion, confidence interval, power, probability, alpha level, beta level, Types 1 and 2 errors.

COMPETENCIES AND CRITERIA Competency in Research
29
(2) List resources available to facilitate interpretation.
12. State the conclusion(s): A. State the relationship between the data and the conclusions. B. State the relationship between the conclusion(s) and the hypothesis (es). C. State the relationship between the conclusion(s) and the research design.
13. State the implications of the findings: A. Identify the usefulness of the findings:
(1) Distinguish between statistical and practical significance: (a) Define statistical and practical significance.
(2) State the relationship between the findings and the population. B. State whether the findings generate hypotheses, questions, and/or principles. C. State the relationship between the findings and previous findings.

COMPETENCIES AND CRITERIA Competency in Consultation
30
COMPETENCY IN CONSULTATION
Upon graduation, the student will use the problem-solving process in demonstration of areas of expertise and application of a theoretical framework of basic, behavioral, social and medical sciences on which to base the practice of physical therapy including: consultation with others for the purpose of providing comprehensive care.
COMPONENTS AND CRITERIA
1. Identify the program goals being addressed. A. Identifies goals reported by persons associated with the program through:
(1) Interview (2) Observation (3) Review of written proposals, records, reports, procedures or other related materials (4) Consultation with other health care workers
B. Identifies conflicting, related, or redundant goals C. Identifies the nature of the goals as related primarily to:
(1) Curative, palliative or preventive client care (2) Initiation, revision or expansion of:
(a) Client services (b) Educational services (c) Administrative organization and services (d) Research activities
D. Identifies the priority of goals.
2. Identify the discrepancy between the program status and the goals through consideration of: A. Current philosophy and focus of the program B. Availability and accessibility of the target population C. Current implementation of activities related to the proposed goal D. Current implementation of activities in conflict with the proposed goal E. Current financial status and projected financial needs to accomplish the goal F. Current space allocation and projected needs G. Current equipment and supplies and projected needs H. Current personnel expertise and manpower and projected needs I. Current communication mechanisms and liaisons and projected needs J. Current conflicting program commitments to other programs or persons K. Current evaluation mechanisms and outcomes
3. Identify his/her own and other health professionals’ contributions and resources considering: A. Expertise and experience
Division of Physical Therapy
Emory University

COMPETENCIES AND CRITERIA Competency in Consultation
31
B. Accessibility and availability C. Current administrative relationships D. Need for, form and amount of remuneration E. Purpose of, and responsibilities in, consultation F. Professional and legal parameters
4. Generate alternative methods for attaining the goal(s) including: A. Necessary revision or expansion of the program philosophy B. Time schedule for implementation C. Mechanisms for maintaining or providing:
(1) Accessibility and availability of the target population (2) Financial support (3) Recruitment and/or training of personnel (4) Reassignment of personnel responsibilities (5) Space, equipment and supplies (6) Communication mechanisms and liaisons (7) Other current or projected program activities (8) Evaluation of the program
D. Consideration of externally imposed guidelines, criteria and constraints
5. Determine the feasibility of the alternative methods considering: A. Priority of components of the program for attaining the goal B. Time involved in implementing each mechanism for providing and/or maintaining necessary
resources (outlined in 4C) C. Financial constraints D. Projected correlation of results of each of the alternatives and the program goal E. Projected impact of each of the alternatives on other:
(1) Current or projected program alternatives (2) Program commitments to other programs or persons
6. Assist in selection and implementation of a method for attaining the goal(s) based on: A. Feasibility as determined in 5 above:
(1) Selection of the most feasible method (2) Identification of contingency methods, as indicated
B. Purpose of, and responsibilities in, consultation
7. Evaluate progress toward attaining the goal considering: A. The nature of the goal(s) B. The priority of goals or components of a goal C. Time schedule for implementation of method D. Effect of method including:
(1) Training, use and expertise of personnel (2) Availability and accessibility of target population (3) Cost and financial status (4) Acquisition and/or use of space, equipment and other supplies (5) Communication mechanisms and liaisons
E. Other program commitments and activities F. Externally imposed guidelines, criteria and constraints G. Mechanisms of the evaluation
8. Document/report resolutions including:

COMPETENCIES AND CRITERIA Competency in Consultation
32
A. Statement of goal(s) B. Evaluative findings related to the goal(s) and components of the goal C. Decisions related to each goal or component and rationale for each decision D. Recommendations with rationale E. Use of appropriate format F. Submission to appropriate persons G. Maintenance of time schedule for the report
9. Modify methods and goals as indicated considering: A. Evaluation results and related decisions B. Program philosophy C. Re-prioritization of other program goals and activities since initiation of the method D. Resources and constraints E. Externally imposed guidelines, criteria and constraints F. Purpose of and responsibilities in consultation

COMPETENCIES AND CRITERIA Long-Term Clinical Competencies
33
LONG-TERM CLINICAL INTERNSHIP
EMORY UNIVERSITY INTERNSHIP
LONG-TERM CLINICAL EVALUATION DIVISION OF PHYSICAL THERAPY
EMORY UNIVERSITY
INTERNSHIP
LONG-TERM CLINICAL EVALUATION
Instructions
Welcome to the online “Long-Term Clinical Evaluation” of student performance for use during the clinical
internships. The online form is to be used in conjunction with competency documents provided by the Emory
Program, as well as criteria sheets found in the Emory Physical Therapy Entry Level Competencies and
Criteria manual available at your facility. For your convenience, you can access the competencies online. To
view a competency, click on the title you wish to review: Provision of Patient Care, Interpersonal
Communication, the Teaching-Learning Process, and Administration. Additionally, the criteria for each
individual item within a competency can be accessed by clicking on the highlighted item in the evaluation
form. A pop-up window will open with a description of the criteria.
After beginning the evaluation you can exit at any time, and your responses will be automatically saved as
long as you do not click the “Submit Evaluation” button. You may re-enter the evaluation to view or make
changes to your responses as many times as necessary, using the link provided in the email invitation, as
long as you have not submitted the form. When you re-enter the document, you will be given the option to
resume where you left off or start at the beginning.
Please hold the evaluation conference with your student before submitting the evaluation form. If your
facility requires a printed copy of this evaluation, you will have the option to download and print, or save a
Division of Physical Therapy
Emory University

COMPETENCIES AND CRITERIA Long-Term Clinical Competencies
34
PDF of your completed evaluation. Simply submit your evaluation using the “submit evaluation” button,
located on the last page of the evaluation form, and the directions for saving will appear on the “successful
submission” page.
Course Objectives
The student will use the problem-solving process to demonstrate competence and to apply the theoretical
frameworks of basic, behavioral, social, and medical sciences; as the basis for his/her practice of physical
therapy. This includes:
1. Examining and evaluating patients, and establishing an appropriate plan of care. 2. Providing appropriate therapeutic services. 3. Using the teaching-learning and interpersonal communication processes in interactions with
patients, health care providers and staff. 4. An active recognition of the rights and dignity of the individual in planning and administering
programs of care. 5. Participation in the administrative responsibilities of a clinical physical therapist. 6. Consultation with others in providing comprehensive care.
Feedback
It is expected that the clinical instructor (CI) provide student feedback throughout the clinical internship.
Daily sessions allow both student and CI to ask questions, present suggestions, and frequently set/assess
educational goals. On-going, continuous feedback fosters awareness of strengths and weaknesses, and
develops self-assessment skills.
Who Completes the Midterm and Final Evaluation Forms?
The CI and student individually complete the evaluation form online. If more than one CI provided
supervision during the first five weeks of the internship (midterm evaluation) or the last five weeks (final
evaluation), the therapist who had primary responsibility must be designated as “primary CI.” The primary CI
will collect and collate data from all supervising CIs involved during the appropriate time period; midterm or
final. The primary CI will input the ratings and comments into the online evaluation form and hold the
evaluation conference with the student.
When are the Evaluations Done?
The evaluation is to be done half-way into the internship (5 weeks) and at the end (10 weeks). Each
evaluation should assess student performance during the preceding 5 weeks only. In other words, behavior
which occurred during the first half of the affiliation should not influence the final evaluation.
How is the Online Clinical Education Evaluation Form Completed?
The form is divided into 4 sections/competencies: provision of patient care, interpersonal communication,
teaching-learning process, and administration. Observable behaviors to be graded are listed for each
competency, and a comments section is available for documenting specific details. All items are stated
positively. Caution should be exercised to prevent a “YES” bias in your responses.
Two items are pulled out of sequence from their respective competencies and graded first due to their
importance in clinical care. The first is #16: “Adhere to safety in provision of patient care”, and the second is

COMPETENCIES AND CRITERIA Long-Term Clinical Competencies
35
#40: “Demonstrate professional behavior.” The student will earn either a “YES” or a “NO” for these items and
must demonstrate appropriate behavior 100% of the time to receive a “YES.” The response is “NO” if met
less than 100% of the time. If “NO”, please estimate the percentage of time the student demonstrated the
behavior according to criteria and select that percentage from the drop down menu in the last column e.g.
(50-79%). Please use your clinical judgment to determine if the safety concern was a one-time event that is
typical during the learning process vs. one that is due to negligence, or one that is repeated over and over.
Scoring Example: #16: “Adhere to Safety”: If a client fell due to student negligence, this isolated incident
may warrant a “NO” response despite the individual demonstrating a safety concern only once.
A “NO” for either of these items warrants immediate attention and a telephone call to the student’s clinical
education advisor (Patricia Bridges – Director of Clinical Education 404-712-4132, Donna Smith –
Assistant Director of Clinical Education 404-727-4706, or Tami Phillips – Assistant Director of Clinical
Education 404-727-1350). A “NO” on either item may result in dismissal from the internship.
The remaining items on the form are scored with one of the following three responses: “YES”, “NO”, or “N/A”
(Not Applicable). Selection of a “YES” or “NO” response should be based on the student’s general behavior,
not isolated incidents.
Scoring Example: #12: “Determine an intervention plan with rationale”: If the student usually demonstrates a
behavior according to criteria, the appropriate response is “YES” (usually is defined as eight times out of ten
(80%) or better). The response is “NO” if met less than 80% of the time; please estimate the percentage of
time the student demonstrated a behavior according to criteria and select that percentage from the drop
down menu in the last column e.g. (50-79%).
If the CI did not have an opportunity to observe the student perform a behavior/item within a particular
competency (generally 3 observations or more should be sufficient), or there was not an opportunity for the
student to perform a behavior/item, “N/A” should be selected.
Please provide an explanation in the comments section for any “N/A” criteria, as well as, any time a student
is not meeting criteria (below 80%). For example, indicate the item number e.g. #34, followed by the
comment e.g. “The student needs to offer the patient an opportunity to practice the task learned under a
variety of circumstances” or #17c: “The student had only 2 opportunities to write discharge notes. She is
showing insight and improvement in this area.” Additionally, the comments boxes may be used for any
positive or constructive feedback regarding the behaviors/ items evaluated in each competency. The last
page of the evaluation form should be used to comment on overall performance.
Items related to patient examination and therapeutic interventions are numbered 7a, 7b, 7c, etc. for
“Examination Procedures” and 13a, 13b, 13c, etc. for “Therapeutic Interventions”. Additions may be added to
the list. There should be criteria sheets for most examination procedures and therapeutic interventions;
however, if there is an omission, please utilize the evidence-based method. Ideally, each time an
examination or intervention is performed; the student is evaluated based on criteria. He/she must
demonstrate each behavior included on the criteria sheet for an examination or treatment intervention to
have been performed to criteria. If performed accordingly, select “YES”; otherwise, “NO”. If the CI did not
have an opportunity to observe the student or if there was not an opportunity to perform a behavior; the
appropriate response is “N/A”.
The “Examination Procedures” (Item 7) and “Therapeutic Interventions” (Item 13) scores will be calculated
for you upon electronic submission of the evaluation form. For your information, the overall score for Item 7
will be calculated as follows: the total number of examinations performed to criteria (items you scored a
“Yes”) will be divided by the total number of examinations (items you scored a “Yes” or “No”). If the score is
80% or greater the student will receive a “YES” for Item 7 (conduct the examination according to the criteria
COMPETENCIES AND CRITERIA Long-Term Clinical Competencies
36
sheet for specific procedures/tests). Similarly, therapeutic interventions performed to criteria will be totaled
and divided by the total number of interventions performed. If the score is 80% or greater, the item will be
scored “YES” for Item 13 (administer the interventions according to the criteria sheets). If it does not appear
that the student will receive a “YES” for either of these 2 items, please contact the student’s clinical
education advisor for consultation.
As discussed earlier, all competencies should be responded to on the basis of the student’s
performance during the immediately preceding 5 weeks. The CI should be able to cite several examples
during the midterm/final conference for items with “YES” or “NO” responses chosen.
**IMPORTANT: The CI and student should electronically sign both evaluation forms. The CI/student
must personally enter his/her own name and date after the evaluation conference for this to be
considered a valid electronic signature.**
What is the Procedure for the Evaluation Conference?
After the student and CI complete the evaluation forms individually online, they SHOULD NOT click the
“Submit Evaluation” button. Simply close the browser window and responses will be automatically saved. To
access saved responses for the CI/student conference, click on the link provided in the email invitation.
Please hold the CI/student evaluation conference, and then submit the form electronically after the
conference.
The evaluation conference should be held in a private area with a computer. The CI and student should
review their evaluations simultaneously. Optimally, the student would bring a laptop to the clinic so that each
evaluation could be brought up on a separate computer, allowing the CI and student to scroll down through
sections of the form at the same time. A second option would be locating a computer lab or private office
with two computers. Finally, it is possible to open two browser windows on one computer by having: the CI
click on the link provided in the email invitation and once the form is open, minimize the browser window; the
student can then open a second browser window (i.e. Internet Explorer, Netscape, Mozilla etc.) and access
her email to click on the link provided in the email invitation; and the CI and student can then “maximize and
minimize” each browser window to see the two evaluation documents. Conversely, you may open and
review one document at a time if you prefer. Differences in responses between the CI’s form and the
student’s self-assessment are discussed with both persons offering examples to substantiate the chosen
response. If agreement is not reached, responses on the forms should remain and a comment entered.
At the end of the evaluation conference, the CI and student should sign both the CI evaluation and the
student self-assessment electronically. (Typing his/her name in the space provided on the "Signatures"
page is considered to be a signature. The CI/student must each personally enter his or her own name and
date after the evaluation conference for this to be considered a valid electronic signature.)
Upon completing the conference and signing these documents, press the submit button to send
each form. This should be done for the evaluation completed by the CI, as well as the evaluation completed
by the student. Printed copies of these forms do not need to be provided to the Emory Physical Therapy
program. If the affiliating facility requires a printed copy of this evaluation, you will have the option to
download and print or save a PDF of your completed evaluation, after you click the submit evaluation button
located on the last page of the evaluation form.
At this point, the student and CI can discuss the APTA Physical Therapy Student Evaluation: Clinical
Experience and Clinical Instruction form which is also completed online, printed, and signed by the student.
The CI is also asked to sign this form indicating he/she has reviewed the information contained in the
evaluation of the clinical education experience.

COMPETENCIES AND CRITERIA Long-Term Clinical Competencies
37
What Forms Does the Student Need to Return to Emory University, Division of Physical Therapy?
Due at Mid-term:
1) Clinical Site Orientation Checklist: return by mail; due no later than the close of business one week
after the mid-term evaluation conference
2) APTA Physical Therapy Student Evaluation: Clinical Experience and Clinical Instruction form: print,
submit, CI and student sign the hard copy, and return by mail; due no later than the close of
business one week after the mid-term evaluation conference. No FAXING!
3) CI Version: Online Clinical Education Evaluation Form: electronically submitted
4) Student Version: Online Clinical Education Evaluation Form: electronically submitted
.
Due at Final:
1) APTA Physical Therapy Student Evaluation: Clinical Experience and Clinical Instruction form: print,
submit, CI and student sign the hard copy, and return by mail; due no later than the close of
business one week after the final evaluation conference. No FAXING!
2) Clinical Education Facility Information form: email to Mrs. Bridgett Moore; due no later than the close
of business one week after the final evaluation conference
3) CI Version: Online Clinical Education Evaluation Form: electronically submitted
4) Student Version: Online Clinical Education Evaluation Form: electronically submitted
Mailing address for forms:
Mrs. Bridgett Moore Emory University School of Medicine, Division of Physical Therapy 1462 Clifton Road, Suite 312 Atlanta, GA 30322
If you would like a more detailed review of the instructions and a demonstration of how to complete the
Emory DPT evaluation form, please click the following link: http://youtu.be/V6rGOpnN3aQ
Please click the "Save and Continue" button below to begin the evaluation.

COMPETENCIES AND CRITERIA Long-Term Clinical Competencies
38
Please complete the following:
*STUDENT
*PRIMARY CLINICAL INSTRUCTOR
SECONDARY CLINICAL INSTRUCTOR (Optional)
*FACILITY
*DATE: FINAL (mm/dd/yyyy)
*COMPLETED BY
PROVISION OF PATIENT CARE Click the highlighted Item Below to View the Criteria. Given a client, the student was able to:
Provision Of Patient Care: (Did student meet
criteria?)
YES (100%) NO (0-99%)
Provision Of Patient Care: (If student did not meet
criteria at 100%, please indicate the percentage (0%-99%)
the student did meet criteria.)
Choose percentages from the drop-down
menu.
*16. Adhere to safety in provision of patient care. ☐ ☐ Choose an item. %
COMMENTS:

COMPETENCIES AND CRITERIA Long-Term Clinical Competencies
39
ADMINISTRATIVE PROCESS Click the highlighted Item Below to View the Criteria. Given a client, the student was able to:
COMMENTS:
Administrative Process: (Did student meet criteria?)
YES (100%) NO (0-99%)
Administrative Process: (If student did not meet
criteria at 100%, please indicate the percentage (0%-99%)
the student did meet criteria.)
Choose percentages from the drop-down menu.
*40. Demonstrate professional behavior. ☐ ☐ Choose an item. %

COMPETENCIES AND CRITERIA Long-Term Clinical Competencies
40
PROVISION OF PATIENT CARE Click the highlighted Item Below to View the Criteria. Given a client, the student was able to: Provision Of Patient Care:
(Did student meet criteria?)
Provision Of Patient Care: (If student did not meet
criteria at 80-100%, please
indicate the percentage (0%-79%)
the student did meet criteria.)
Choose percentages from the drop-down
menus. YES (80%-
100%) NO (0%-
79%) N/A
*1. Identify symptoms and coexisting conditions of the client.
☐ ☐ ☐ Choose an item. %
*2. Differentiate symptoms and impairments presented from symptoms and impairments to be assessed.
☐ ☐ ☐ Choose an item. %
*3a. Identify onset of symptoms. ☐ ☐ ☐ Choose an item. %
*3b. Identify the relationship of symptoms to other examination findings.
☐ ☐ ☐ Choose an item. %
*4. Determine the priority of conditions to be assessed.
☐ ☐ ☐ Choose an item. %
*5. Identify and determine the rationale for procedures to examine the client's impairments or conditions.
☐ ☐ ☐ Choose an item. %
*6. Prepare to execute the examination procedure. ☐ ☐ ☐ Choose an item. %
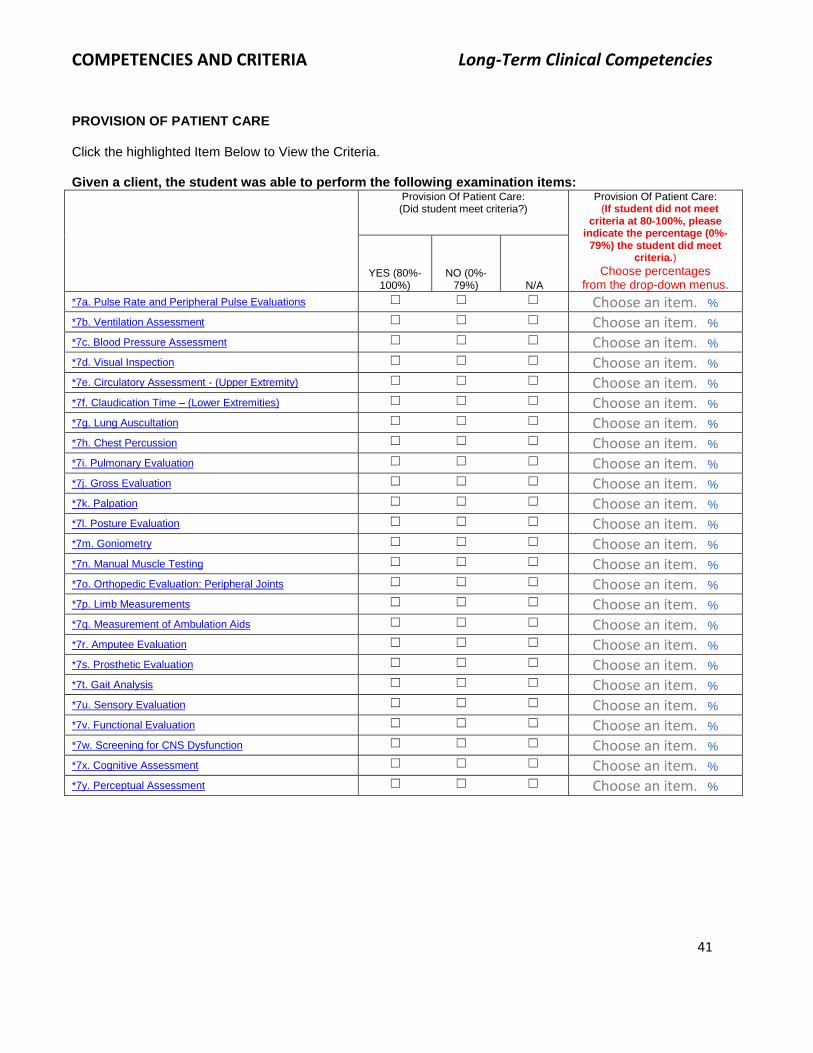
COMPETENCIES AND CRITERIA Long-Term Clinical Competencies
41
PROVISION OF PATIENT CARE Click the highlighted Item Below to View the Criteria. Given a client, the student was able to perform the following examination items: Provision Of Patient Care:
(Did student meet criteria?)
Provision Of Patient Care: (If student did not meet
criteria at 80-100%, please indicate the percentage (0%-
79%) the student did meet criteria.)
Choose percentages from the drop-down menus.
YES (80%-100%)
NO (0%-79%) N/A
*7a. Pulse Rate and Peripheral Pulse Evaluations ☐ ☐ ☐ Choose an item. %
*7b. Ventilation Assessment ☐ ☐ ☐ Choose an item. %
*7c. Blood Pressure Assessment ☐ ☐ ☐ Choose an item. %
*7d. Visual Inspection ☐ ☐ ☐ Choose an item. %
*7e. Circulatory Assessment - (Upper Extremity) ☐ ☐ ☐ Choose an item. %
*7f. Claudication Time – (Lower Extremities) ☐ ☐ ☐ Choose an item. %
*7g. Lung Auscultation ☐ ☐ ☐ Choose an item. %
*7h. Chest Percussion ☐ ☐ ☐ Choose an item. %
*7i. Pulmonary Evaluation ☐ ☐ ☐ Choose an item. %
*7j. Gross Evaluation ☐ ☐ ☐ Choose an item. %
*7k. Palpation ☐ ☐ ☐ Choose an item. %
*7l. Posture Evaluation ☐ ☐ ☐ Choose an item. %
*7m. Goniometry ☐ ☐ ☐ Choose an item. %
*7n. Manual Muscle Testing ☐ ☐ ☐ Choose an item. %
*7o. Orthopedic Evaluation: Peripheral Joints ☐ ☐ ☐ Choose an item. %
*7p. Limb Measurements ☐ ☐ ☐ Choose an item. %
*7q. Measurement of Ambulation Aids ☐ ☐ ☐ Choose an item. %
*7r. Amputee Evaluation ☐ ☐ ☐ Choose an item. %
*7s. Prosthetic Evaluation ☐ ☐ ☐ Choose an item. %
*7t. Gait Analysis ☐ ☐ ☐ Choose an item. %
*7u. Sensory Evaluation ☐ ☐ ☐ Choose an item. %
*7v. Functional Evaluation ☐ ☐ ☐ Choose an item. %
*7w. Screening for CNS Dysfunction ☐ ☐ ☐ Choose an item. %
*7x. Cognitive Assessment ☐ ☐ ☐ Choose an item. %
*7y. Perceptual Assessment ☐ ☐ ☐ Choose an item. %

COMPETENCIES AND CRITERIA Long-Term Clinical Competencies
42
ADDITIONAL EXAMINATION PROCEDURES OBSERVED OR PERFORMED BY THE STUDENT DURING THIS INTERNSHIP 1. Please name the first examination procedure.
Did student meet criteria?
YES (80%-100%)
NO (0%-79%) N/A
☐ ☐ ☐
If student did not meet criteria at 80%-100%, please indicate the percentage (0%-79%) the student did meet criteria.
Choose an item. %
2. Please name the second examination procedure.
Did student meet criteria?
YES (80%-100%)
NO (0%-79%) N/A
☐ ☐ ☐
If student did not meet criteria at 80%-100%, please indicate the percentage (0%-79%) the student did meet criteria.
Choose an item. %
3. Please name the third examination procedure.
Did student meet criteria?
YES (80%-100%)
NO (0%-79%) N/A
☐ ☐ ☐
If student did not meet criteria at 80%-100%, please indicate the percentage (0%-79%) the student did meet criteria.
Choose an item. %

COMPETENCIES AND CRITERIA Long-Term Clinical Competencies
43
4. Please name the fourth examination procedure.
Did student meet criteria?
YES (80%-100%)
NO (0%-79%) N/A
☐ ☐ ☐
If student did not meet criteria at 80%-100%, please indicate the percentage (0%-79%) the student did meet criteria.
Choose an item. %
5. Please name the fifth examination procedure.
Did student meet criteria?
YES (80%-100%)
NO (0%-79%) N/A
☐ ☐ ☐
If student did not meet criteria at 80%-100%, please indicate the percentage (0%-79%) the student did meet criteria.
Choose an item. %
6. Please name the sixth examination procedure.
Did student meet criteria?
YES (80%-100%)
NO (0%-79%) N/A
☐ ☐ ☐
If student did not meet criteria at 80%-100%, please indicate the percentage (0%-79%) the student did meet criteria.
Choose an item. %
7. Please name the seventh examination procedure.
Did student meet criteria?
YES (80%-100%)
NO (0%-79%) N/A
☐ ☐ ☐
If student did not meet criteria at 80%-100%, please indicate the percentage (0%-79%) the student did meet criteria.
Choose an item. %

COMPETENCIES AND CRITERIA Long-Term Clinical Competencies
44
8. Please name the eighth examination procedure.
Did student meet criteria?
YES (80%-100%)
NO (0%-79%) N/A
☐ ☐ ☐
If student did not meet criteria at 80%-100%, please indicate the percentage (0%-79%) the student did meet criteria.
Choose an item. %
9. Please name the ninth examination procedure.
Did student meet criteria?
YES (80%-100%)
NO (0%-79%) N/A
☐ ☐ ☐
If student did not meet criteria at 80%-100%, please indicate the percentage (0%-79%) the student did meet criteria.
Choose an item. %
10. Please name the tenth examination procedure.
Did student meet criteria?
YES (80%-100%)
NO (0%-79%) N/A
☐ ☐ ☐
If student did not meet criteria at 80%-100%, please indicate the percentage (0%-79%) the student did meet criteria.
Choose an item. %

COMPETENCIES AND CRITERIA Long-Term Clinical Competencies
45
Please list any other EXAMINATION PROCEDURES observed by the student during this clinical education experience but not practiced at least 3 times. Enter as many examination procedures as necessary and click the "Save and Continue" button when finished. If there are none simply save and continue.
PROVISION OF PATIENT CARE Click the highlighted Item Below to View the Criteria. Given a client, the student was able to: Provision Of Patient Care:
(Did student meet criteria?)
Provision Of Patient Care: (If student did not meet
criteria at 80-100%, please indicate the percentage (0%-79%)
the student did meet criteria.)
Choose percentages from the drop-down
menus. YES (80%-
100%) NO (0%-
79%) N/A
*8. Evaluate examination findings. ☐ ☐ ☐ Choose an item. %
*9. Establish a physical therapy diagnosis. ☐ ☐ ☐ Choose an item. %
*10. Determine the prognosis. ☐ ☐ ☐ Choose an item. %
*11. Establish intervention goals. ☐ ☐ ☐ Choose an item. %
*12. Determine an intervention plan with rationale. ☐ ☐ ☐ Choose an item. %

COMPETENCIES AND CRITERIA Long-Term Clinical Competencies
46
PROVISION OF PATIENT CARE Click the highlighted Item Below to View the Criteria. Given a client, the student was able to perform the following therapeutic interventions:
Provision Of Patient Care:
(Did student meet criteria?)
Provision Of Patient Care: (If student did not meet criteria
at 80-100%, please indicate the percentage (0%-79%)
the student did meet criteria.) Choose percentages
from the drop-down menus. YES (80%-
100%) NO (0%-
79%) N/A
*13a. Bed Mobility ☐ ☐ ☐ Choose an item. %
*13b. Draping ☐ ☐ ☐ Choose an item. %
*13c. Transfers ☐ ☐ ☐ Choose an item. %
*13d. Sterile Techniques ☐ ☐ ☐ Choose an item. %
*13e. Range of Motion ☐ ☐ ☐ Choose an item. %
*13f. Wound Care ☐ ☐ ☐ Choose an item. %
*13g. Ace Bandaging ☐ ☐ ☐ Choose an item. %
*13h. Whirlpool ☐ ☐ ☐ Choose an item. %
*13i. Hubbard Tank ☐ ☐ ☐ Choose an item. %
*13j. Bronchial Drainage ☐ ☐ ☐ Choose an item. %
*13k. Pursed Lips Breathing Exercises ☐ ☐ ☐ Choose an item. %
*13l. Breathing Exercises ☐ ☐ ☐ Choose an item. %
*13m. Pre-operative Instruction ☐ ☐ ☐ Choose an item. %
*13n. Massage ☐ ☐ ☐ Choose an item. %
*13o. Soft Tissue Mobilization ☐ ☐ ☐ Choose an item. %
*13p. Joint Mobilization ☐ ☐ ☐ Choose an item. %
*13q. Iontophoresis with Phoresor Stimulator ☐ ☐ ☐ Choose an item. %
*13r. High-Voltage Pulsed Stimulation ☐ ☐ ☐ Choose an item. %
*13s. Neuromuscular Functional Electrical Stimulation
☐ ☐ ☐ Choose an item. %
*13t. Moist Heat Pack ☐ ☐ ☐ Choose an item. %
*13u. Intermittent Compression Pump (Jobst) ☐ ☐ ☐ Choose an item. %
*13v. T.E.N.S. ☐ ☐ ☐ Choose an item. %
*13w. Ultrasound ☐ ☐ ☐ Choose an item. %
*13x. Medical Diathermy ☐ ☐ ☐ Choose an item. %
*13y Application of Cold ☐ ☐ ☐ Choose an item. %
*13z. Ambulation Training ☐ ☐ ☐ Choose an item. %
*13aa. Paraffin ☐ ☐ ☐ Choose an item. %
*13bb. Tilt Table ☐ ☐ ☐ Choose an item. %
*13cc. Cervical Traction ☐ ☐ ☐ Choose an item. %
*13dd. Lumbar Traction ☐ ☐ ☐ Choose an item. %
*13ee. Relaxation Technique (PNF) ☐ ☐ ☐ Choose an item. %
*13ff. Selection and Teaching of Exercise ☐ ☐ ☐ Choose an item. %
*13gg. Treatment of Functional Limitations ☐ ☐ ☐ Choose an item. %
*13hh. Structuring Treatment Sessions ☐ ☐ ☐ Choose an item. %

COMPETENCIES AND CRITERIA Long-Term Clinical Competencies
47
ADDITIONAL THERAPEUTIC INTERVENTIONS OBSERVED OR PERFORMED BY THE STUDENT DURING THIS INTERNSHIP 1. Please name the first therapeutic intervention.
Did student meet criteria?
YES (80%-100%)
NO (0%-79%) N/A
☐ ☐ ☐
If student did not meet criteria at 80%-100%, please indicate the percentage (0%-79%) the student did meet criteria.
Choose an item. %
2. Please name the second therapeutic intervention.
Did student meet criteria?
YES (80%-100%)
NO (0%-79%) N/A
☐ ☐ ☐
If student did not meet criteria at 80%-100%, please indicate the percentage (0%-79%) the student did meet criteria.
Choose an item. %
3. Please name the third therapeutic intervention.
Did student meet criteria?
YES (80%-100%)
NO (0%-79%) N/A
☐ ☐ ☐
If student did not meet criteria at 80%-100%, please indicate the percentage (0%-79%) the student did meet criteria.
Choose an item. %

COMPETENCIES AND CRITERIA Long-Term Clinical Competencies
48
4. Please name the fourth therapeutic intervention.
Did student meet criteria?
YES (80%-100%)
NO (0%-79%) N/A
☐ ☐ ☐
If student did not meet criteria at 80%-100%, please indicate the percentage (0%-79%) the student did meet criteria.
Choose an item. %
5. Please name the fifth therapeutic intervention.
Did student meet criteria?
YES (80%-100%)
NO (0%-79%) N/A
☐ ☐ ☐
If student did not meet criteria at 80%-100%, please indicate the percentage (0%-79%) the student did meet criteria.
Choose an item. %
6. Please name the sixth therapeutic intervention.
Did student meet criteria?
YES (80%-100%)
NO (0%-79%) N/A
☐ ☐ ☐
If student did not meet criteria at 80%-100%, please indicate the percentage (0%-79%) the student did meet criteria.
Choose an item. %

COMPETENCIES AND CRITERIA Long-Term Clinical Competencies
49
7. Please name the seventh therapeutic intervention.
Did student meet criteria?
YES (80%-100%)
NO (0%-79%) N/A
☐ ☐ ☐
If student did not meet criteria at 80%-100%, please indicate the percentage (0%-79%) the student did meet criteria.
Choose an item. %
8. Please name the eighth therapeutic intervention.
Did student meet criteria?
YES (80%-100%)
NO (0%-79%) N/A
☐ ☐ ☐
If student did not meet criteria at 80%-100%, please indicate the percentage (0%-79%) the student did meet criteria.
Choose an item. %
9. Please name the ninth therapeutic intervention.
Did student meet criteria?
YES (80%-100%)
NO (0%-79%) N/A
☐ ☐ ☐
If student did not meet criteria at 80%-100%, please indicate the percentage (0%-79%) the student did meet criteria.
Choose an item. %

COMPETENCIES AND CRITERIA Long-Term Clinical Competencies
50
10. Please name the tenth therapeutic intervention.
Did student meet criteria?
YES (80%-100%)
NO (0%-79%) N/A
☐ ☐ ☐
If student did not meet criteria at 80%-100%, please indicate the percentage (0%-79%) the student did meet criteria.
Choose an item. %
Please list any other THERAPEUTIC INTERVENTIONS observed by the student during this clinical education experience that the student did not have an opportunity to practice at least 3 times. Enter as many therapeutic interventions as necessary and click the "Save and Continue" button when finished. If there are none simply save and continue.

COMPETENCIES AND CRITERIA Long-Term Clinical Competencies
51
PROVISION OF PATIENT CARE Note: Question #16 is missing below because you have already completed that question above. Click the highlighted Item Below to View the Criteria.
Given a client, the student was able to: Provision Of Patient Care:
(Did student meet criteria?)
Provision Of Patient Care: (If student did not meet
criteria at 80-100%, please
indicate the percentage (0%-79%)
the student did meet criteria.)
Choose percentages from the drop-down
menus. YES (80%-
100%) NO (0%-
79%) N/A
*14. Assess the effects of the intervention. ☐ ☐ ☐ Choose an item. %
*15. Modify the intervention and/or goals as indicated.
☐ ☐ ☐ Choose an item. %
*17a. Document initial evaluation in appropriate records per Emory criteria sheets.
☐ ☐ ☐ Choose an item. %
17b. Document progress notes in appropriate records per Emory criteria sheets.
☐ ☐ ☐ Choose an item. %
17c. Document discharge notes in appropriate records per Emory criteria sheets.
☐ ☐ ☐ Choose an item. %
Comments:
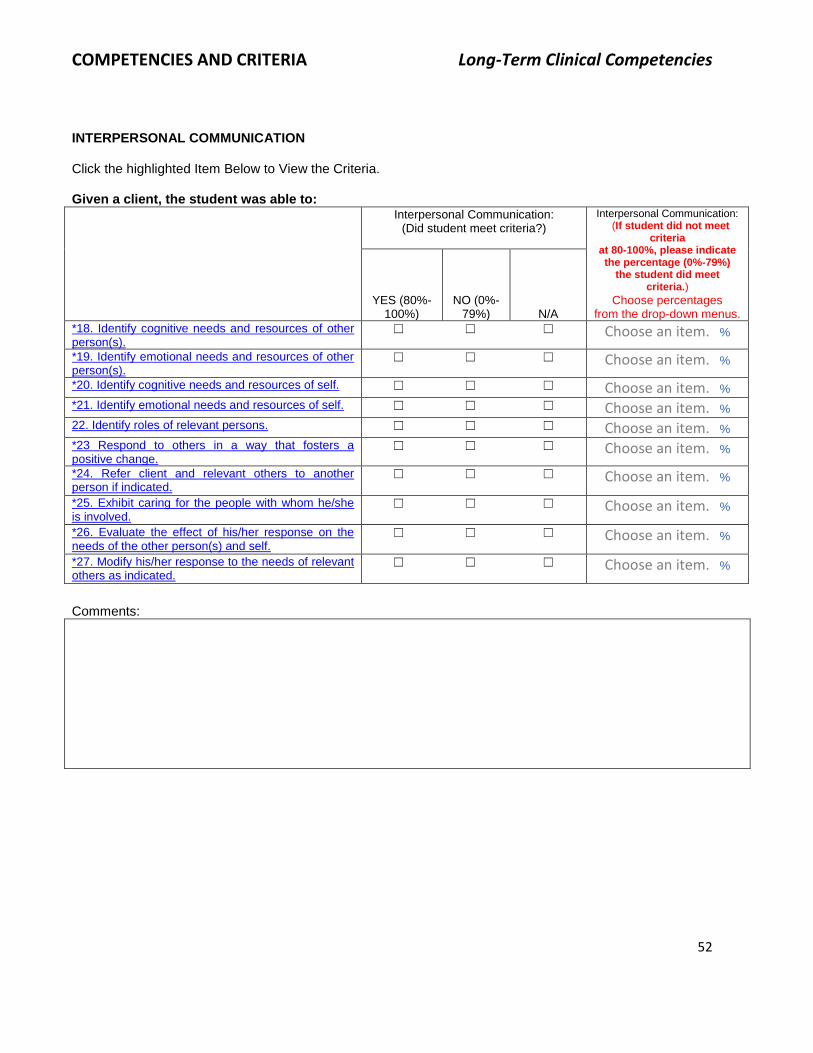
COMPETENCIES AND CRITERIA Long-Term Clinical Competencies
52
INTERPERSONAL COMMUNICATION Click the highlighted Item Below to View the Criteria. Given a client, the student was able to: Interpersonal Communication:
(Did student meet criteria?)
Interpersonal Communication: (If student did not meet
criteria at 80-100%, please indicate the percentage (0%-79%)
the student did meet criteria.)
Choose percentages from the drop-down menus.
YES (80%-100%)
NO (0%-79%) N/A
*18. Identify cognitive needs and resources of other person(s).
☐ ☐ ☐ Choose an item. %
*19. Identify emotional needs and resources of other person(s).
☐ ☐ ☐ Choose an item. %
*20. Identify cognitive needs and resources of self. ☐ ☐ ☐ Choose an item. %
*21. Identify emotional needs and resources of self. ☐ ☐ ☐ Choose an item. %
22. Identify roles of relevant persons. ☐ ☐ ☐ Choose an item. %
*23 Respond to others in a way that fosters a positive change.
☐ ☐ ☐ Choose an item. %
*24. Refer client and relevant others to another person if indicated.
☐ ☐ ☐ Choose an item. %
*25. Exhibit caring for the people with whom he/she is involved.
☐ ☐ ☐ Choose an item. %
*26. Evaluate the effect of his/her response on the needs of the other person(s) and self.
☐ ☐ ☐ Choose an item. %
*27. Modify his/her response to the needs of relevant others as indicated.
☐ ☐ ☐ Choose an item. %
Comments:

COMPETENCIES AND CRITERIA Long-Term Clinical Competencies
53
TEACHING-LEARNING
Click the highlighted Item Below to View the Criteria. Given a client, the student was able to: Teaching Learning:
(Did student meet criteria?)
Teaching Learning: (If student did not meet criteria
at 80-100%, please indicate the percentage (0%-79%)
the student did meet criteria.) Choose percentages
from the drop-down menus. YES (80%-
100%) NO (0%-
79%) N/A
*28. Identify the needs of the learner/client. ☐ ☐ ☐ Choose an item. %
*29. Identify an appropriate level of learning or skill to be accomplished in the learning experience.
☐ ☐ ☐ Choose an item. %
*30. State the behavior to be learned by the client/learner.
☐ ☐ ☐ Choose an item. %
*31. Make certain the learner/client understands the purpose (i.e., why they are learning what they are learning).
☐ ☐ ☐ Choose an item. %
*32. Explain what is to be learned. ☐ ☐ ☐ Choose an item. %
*33. Demonstrate to the learner/client what is to be learned.
☐ ☐ ☐ Choose an item. %
*34. Provide an opportunity for the learner/client to practice the behavior.
☐ ☐ ☐ Choose an item. %
*35. Give the learner/client feedback on performance of the desired behavior.
☐ ☐ ☐ Choose an item. %
*36. Give some examples of use of the behavior in the client's everyday life.
☐ ☐ ☐ Choose an item. %
*37. Solicit some examples from the client of use of the behavior in his/her everyday life.
☐ ☐ ☐ Choose an item. %
*38. Determine that the learner/client has learned what is being taught.
☐ ☐ ☐ Choose an item. %
Comments:

COMPETENCIES AND CRITERIA Long-Term Clinical Competencies
54
ADMINISTRATIVE PROCESS
Note: Question #40 is missing below because you have already completed that question above.
Click the highlighted Item Below to View the Criteria.
Given a client, the student was able to: Administrative Process:
(Did student meet criteria?)
Administrative Process: (If student did not meet criteria at 80-100%, please indicate the percentage (0%-79%)
the student did meet criteria.) Choose percentages
from the drop-down menus. YES (80%-
100%) NO (0%-
79%) N/A
*39. Identify the administrative structure to provide physical therapy services.
☐ ☐ ☐ Choose an item. %
*41. Identify the overall goals of the physical therapy services provided.
☐ ☐ ☐ Choose an item. %
*42. Identify the administrative needs of the physical therapy service.
☐ ☐ ☐ Choose an item. %
*43. Identify and provide a rationale for an effective method of resolving the administrative service needs.
☐ ☐ ☐ Choose an item. %
*44. Implement the plan. ☐ ☐ ☐ Choose an item. %
*45. Evaluate the extent to which the goals of the plan have been met as related to daily clinical and ongoing departmental administrative activities.
☐ ☐ ☐ Choose an item. %
*46. Modify the plan as necessary to meet the needs of the service.
☐ ☐ ☐ Choose an item. %
Comments:

COMPETENCIES AND CRITERIA Long-Term Clinical Competencies
55
Please provide comments about the Overall Performance of the student.
Please provide the following dates regarding student attendance:
Date(s) absent: (mm/dd/yyyy)
Date(s) made-up: (mm/dd/yyyy)
STUDENT:
*Name: *Date: (mm/dd/yyyy)
PRIMARY CLINICAL SUPERVISOR:
*Name:
*Date: (mm/dd/yyyy)
*Clinical Specialty Certification (cite the
specific certification or enter None):
Date of Clinical Specialty Certification: (mm/dd/yyyy)
*APTA Credentialed Clinical Instructor (Primary CI): ☐ Yes
☐ No
SECONDARY CLINICAL SUPERVISOR (Optional):
Name:
Date: (mm/dd/yyyy)
Clinical Specialty Certification (cite the
specific certification or enter None):
Date of Clinical Specialty Certification: (mm/dd/yyyy)
APTA Credentialed Clinical Instructor (Secondary CI):
☐ Yes
☐ No
Thank you for completing the online evaluation form. We welcome your feedback. Please type any recommendations you have about improving the tool in the box below.

COMPETENCIES AND CRITERIA Long-Term Clinical Competencies
56
Did you watch the power point demonstration on YouTube of how to complete the Emory DPT evaluation form?
☐ Yes
☐ No 3. Please rate your agreement with the following: Strongly Disagree Disagree Agree Strongly Agree
1. The power point format clarified the evaluation’s scoring procedures.
☐ ☐ ☐ ☐
2. The power point format clarified the timing for the evaluation and conference afterwards.
☐ ☐ ☐ ☐
3. The power point format effectively identified where to find specific resources to assist in my assessment of the student’s performance, such as where to find the location of definitions for criteria and competencies.
☐ ☐ ☐ ☐
4. I have a better understanding of why Emory DPT uses this specific evaluation form.
☐ ☐ ☐ ☐
5. The power point format kept me engaged while reviewing the instructions.
☐ ☐ ☐ ☐
6. The power point format made it easier to understand the instructions.
☐ ☐ ☐ ☐
7. I will use this presentation during my student’s internship as a resource and reference.
☐ ☐ ☐ ☐

COMPETENCIES AND CRITERIA Long-Term Clinical Competencies
57
You have completed the online evaluation of student performance.
WARNING!
DO NOT CLICK the "Submit Evaluation" button until after you have the CI/student conference. Please note that your responses are automatically saved when you exit the form. In order to access your saved evaluation form for the CI/student discussion, please click on the link provided in the email
invitation you received.
FINAL STEP FOR SUBMISSION After completing the CI/student conference, please click the "Submit
Evaluation" button below to submit your final responses. After clicking the “Submit Evaluation” button, you will have the option to download and print a PDF of your responses. A link (Download PDF) will be available on the upper left side of the next page you reach after clicking the “Submit Evaluation” button. Whether or not you decide to download a PDF of your evaluation, you must scroll to the bottom of the page and click the “Submit Evaluation” button a second time. This is
necessary to record your responses and exit the form. Thank you for completing the online evaluation!
Note: If you need to stop and complete the survey later, your responses on all previous pages will be automatically saved when you exit the evaluation. To save any responses on the current page, please click the "Save and Continue" button below before you exit the evaluation. When you are ready to complete the survey, simply click on the link in the email invitation you received and you will be able to resume where you left off or at the beginning if you prefer.

COMPETENCIES AND CRITERIA Short-Term Clinical Competencies
58
COMPETENCY IN PROVISION OF CARE / SHORT-TERM CLINICAL EXPERIENCES
Upon graduation, the student will use the problem solving process in demonstration of areas of
expertise through the application of research evidence or a theoretical framework of basic, behavioral,
social and medical sciences.
COMPONENTS AND CRITERIA
1. Identify symptoms and co-existing conditions of the client: A. Identifies problems reported by the client or client's family (i.e. "What brings you in?") B. Identifies pathologies, impairments, functional limitations, or disabilities1 that could compromise
the client's medical safety and/or that relate to symptoms identified by: (1) Interview with the client and/or client's family to obtain client demographics, client's past and
present medical history, family medical history, review of systems. (2) Observation of client during interview (3) Review of medical record to determine medical history, results of physical examination,
diagnostic tests, related treatment being received, laboratory values, medications, psychosocial status, and progress
(4) Consult with other health care workers
2. Differentiate symptoms presented and impairments (symptoms and/or signs) to be assessed based on: A. The client's medical safety B. The client's comfort C. Medical treatment priorities D. The client's functional, physiological, emotional, vocational, and social needs
3. Identify characteristics of relevant symptoms or conditions: A. Onset of symptoms; identifies as sudden or progressive, precipitating or concurrent circumstances:
(1) Identify nature/quality of symptoms (i.e. severity, descriptors, factors aggravating and relieving symptoms)
(2) Identify location/areas of impairments (signs or symptoms) even if seemingly unrelated to iatrotropic stimulus (body diagram helpful)
(3) Identify progression or stage (i.e. acute, intermittent, improving) (4) Identify previous or ongoing treatment (5) Formulate relationships between characteristics of symptoms and other findings (other
impairments). B. A relationship of impairments to other evaluative findings; specific statements of relationships of
symptoms to: (1) Physical examination
Division of Physical Therapy
Emory University

COMPETENCIES AND CRITERIA Short-Term Clinical Competencies
59
(2) Other diagnostic tests (3) Lab values (4) Age related norms
4. Determine the priority of conditions to be assessed: A. Hypothesize the condition(s) represented by impairments and other findings. B. Initiate referrals to other health professionals, as indicated. C. Determine priority of conditions considering:
(1) Client medical safety (2) Client comfort (3) Medical treatment priorities (4) Information being sought from another source through referral initiation (5) Client’s functional, physiologic, emotional, social and vocational needs (6) Client’s age (7) Financial and other required resources
5. Identify and determine the rationale for procedures to examine the client's impairments or conditions. Specific statements of relationship of impairments to: A. Client's medical condition and treatment priorities B. Client's comfort and ability to assist in the procedure (i.e. follow directions) if necessary C. Explanation of mechanism by which the test(s) assesses movement and
physiologic/neuromusculoskeletal conditions of the client D. Explanation of the possible examination findings and implications of the findings E. Indication of the purpose served by the examination procedure(s) or test(s) as:
(1) To determine current status (2) To contribute to determination of diagnosis (3) To determine prognosis (4) To determine appropriate intervention plan and goals of interventions (5) To determine progress (6) To assess the appropriateness of an examination procedure to determine prognosis
F. Assessment of reliability of the procedure(s) G. Assessment of the accuracy of the procedure based on the best current research evidence H. Identification of safety considerations I. Identification of possible undesirable consequences secondary to administration of the
procedure(s) J. Assessment of time constraints K. Determination of equipment, materials, and personnel resources necessary L. Identification of financial considerations
6. Prepare to execute the examination: A. Prepare self:
(1) Review the procedure if necessary. (2) Request assistance of other personnel if necessary.
B. Prepare client/client's family: (1) Emotional, cognitive and physical preparation
C. Prepare equipment, materials and treatment areas: (1) Procure equipment, materials, and treatment areas. (2) Determine safety and operational status of equipment. (3) Calibrate equipment.

COMPETENCIES AND CRITERIA Short-Term Clinical Competencies
60
7. Conduct the examination according to the criteria sheet for the specific procedures/tests.
8. Evaluate the examination findings: A. State the results of the examination. B. Determine the relationship of examination findings to:
(1) Client's impairment(s), functional limitation(s), and/or disability(ies) (2) Progression and state of symptoms (3) Other diagnostic findings (4) Disease process (5) Medical history (6) Anatomic, biomechanical, physiologic, behavioral, biochemical or developmental bases for
movement (7) Intervention being received (8) Purpose of the examination
9. Establish a physical therapy diagnosis: A. Classify the movement disorder based on current literature or identify impairments most related to
the functional limitations: (1) That accounts for all pertinent impairments (2) Toward which intervention and intervention goals are directed
10. Determine the prognosis.
11. Establish intervention goals: A. Identify priority order of goals. B. Including interim and discharge goals/short term and long term goals based on:
(1) Impairments (2) Diagnoses (3) The client's personal and vocational goals (4) Measurable functional outcomes
12. Determine an intervention plan with rationale based on: A. The client's physiologic stability B. The client's comfort C. Priority of client and caregiver's needs D. Goals of the client and the client's family E. The client and caregiver's ability to participate in the intervention F. The diagnosed problem G. Related impairments, including current status, stage, progression and duration H. Related medical intervention, including effect of the intervention on other interventions; effect of
other interventions on this specific intervention I. Explanation of the mechanism by which the intervention affects client's impairment(s), functional
ability(ies)/limitation(s), and/or disability(ies) J. The best current research evidence K. Explanation of the relationship of the possible results of interventions the short and long term
goals and functional outcomes L. Explanation of the relationship of results to the client's program of care proposed by health care
team M. Assessment of time restraints N. Determination of equipment, materials and personnel resources necessary O. Identification of financial considerations

COMPETENCIES AND CRITERIA Short-Term Clinical Competencies
61
P. Assessment of resources available to client, family, aide
13. Administer the intervention (according to the criteria sheet for the specific procedures).
14. Assess the effects of the intervention: A. State the effects of the intervention on:
(1) Impairment(s) (2) Functional ability(ies)/limitation(s) and/or disability(ies)
B. State the relationship of the effects of the intervention to: (1) Progression and stage of impairment(s) (2) Other diagnostic findings (3) Disease process (4) Medical history (5) Related interventions
C. State the status of: (1) Targeted functional outcomes (2) Short term and long term goals
15. Modify the intervention and/or goals, as indicated based on: A. Client's medical safety B. Client's comfort C. Client's ability to provide required assistance D. Effect on impairment(s), functional ability(ies)/limitation(s), and/or disability(ies) E. Required client resources F. Current and future intervention priorities
16. Adhere to safety in provision of patient care: A. Assess the safety of the examination and/or intervention procedures. B. State the safety considerations. C. Prepare self, environment and equipment/materials in accordance with the criteria for safety listed
in the criteria sheet for the examination and/or intervention. D. Monitor impairments during the examination and/or intervention. E. Assess the effects of the examination/intervention on impairments. F. Modify the examination/ intervention based on client’s medical safety and related impairments,
including current status, stage, progression and duration.
17. Record concisely and accurately in appropriate records according to the criteria sheet on “Documentation”: A. Including, but not limited to, initial, progress and discharge notes B. Notes state, as appropriate:
(1) Subjective results (2) Objective results (3) Assessment (4) Plan (5) Intervention given
__________________________
1Reference: Guide to Physical Therapist Practice, Second Edition. Physical Therapy. 81(1), 2001

COMPETENCIES AND CRITERIA Short-Term Clinical Competencies
62
COMPETENCY IN INTERPERSONAL COMMUNICATIONS / SHORT-TERM CLINICAL EXPERIENCES
Upon graduation, the student will use the problem solving process in demonstration of areas of expertise and application of a theoretical framework of basic, behavioral, social and medical sciences on which to base the practice of physical therapy, including: an active recognition of the rights and dignity of the individual in planning and administering programs of care.
COMPONENTS AND CRITERIA
The criteria and items on the evaluation form relate to any and all interactions the student has during clinical education experiences. Examples include interactions with a client or client's family, physician, clinical instructor or supervisor, telephone conversations, etc. Also, the criteria and evaluation items refer only to responses of the student during an actual interaction, not to responses by the student after an interaction. Specific examples are incorporated below.
18. Identify cognitive needs and resources of other person(s), including: A. Other person who may be the focus of communication for the student. This may include but not be
limited to the following: (1) Client (2) Client family or support persons (3) Clinical instructor or supervisor (4) Faculty (5) Supportive personnel - staff members
B. What the person needs to know regarding: (1) The relationship of the physical therapy program to the total program of care (2) The person's role in the program of care, affiliation, or system, in general (3) The student's objectives or interest in the program, affiliation of system, in general (4) The relationship of the subject of the communication to past or future communications with the
student or other persons Examples: Does the student identify that his/her instructor needs to know his/her interest in this clinical experience? Does the student identify that the client's wife needs to know her role in the treatment program?
C. Sources of information available to the other person(s) relative to the information being sought: (1) Client family or support persons (2) Health professionals - co-workers
Division of Physical Therapy
Emory University

COMPETENCIES AND CRITERIA Short-Term Clinical Competencies
63
(3) Other students (4) Clinical education instructor or supervisor (5) Faculty (6) Reference materials (7) Outside agencies
19. Identify emotional needs and resources of the other person through: A. Solicitation of how the person feels B. The verbal and non-verbal cues provided C. Use of interviewee-centered response
The cognitive and emotional needs of another person are most often identified by focusing on the other person's verbal and nonverbal cues. These needs might be identified by giving interviewee-centered responses. Interviewee-centered responses are exhibited by, but not limited to the following:
VERBAL 1) Silence:
Silence is simply giving no verbal response. As a deliberate response, the use of silence implies that silence is the best response to be offered at that point in the interaction.
2) Restatement: Restatement is a verbal response designed to let the other person know he is being listened to and to let the other person hear what he/she has said. Restatement is accomplished by: a) Restating exactly what has been said, including using the first person pronoun (I), b) Restating exactly what has been said, but using the second person pronoun (you), c) Restating the significant parts of what has been said and D) restating, in summary
fashion 3) Clarification:
Clarification usually refers to responses made to clarify what the other person (interviewee) has said. Such responses are made by: a) Stating more simply to make clearer that which the other person said so he/she
can decide if the responses were what he/she had in mind restating exactly what has been said, but using the second person pronoun (you)
b) Using your own words to clarify a response the other person had difficulty stating clearly
Clarification may also be used as a response to be sure you have understood what the other person said.
4) Reflection: Reflection responses express solely the feeling/tone of the other person’s responses; a reflection response verbalizes only the feelings and attitudes that seems to lie behind the other person's words.
5) Interpretation: Interpretation responses attach meaning to what the other person has said. Interpretation may take one of two forms: a) Interpretation based on the other person's internal frame of reference b) Interpretation based on your internal frame of reference
NON-VERBAL

COMPETENCIES AND CRITERIA Short-Term Clinical Competencies
64
1) Maintaining eye contact 2) Head nodding 3) Maintaining a position facing the other person
B. Experiences and feelings of the person in similar or related interactions or situations C. Identification and use of relevant persons to clarify needs
D. Identification of what the other person can contribute to his/her own emotional needs as well as what people available to him/her can contribute
Examples: Does the student use interviewee centered responses and identify that the client is afraid to attempt stairs using crutches? Does the student identify resources available to the client for dealing with his/her fears?
20. Identify cognitive needs and resources of self (student), including: A. What you (student) know or need to know about the other person (client and/or his relevant others,
clinical supervisor): (1) Relevant background (2) Client's interpretation of his/her medical background (3) Client's and relevant others' feeling about the clients condition (4) Expectations of client and relevant others (5) Related future plans
B. Sources of information available to you (student): (1) Yourself - education and experience (2) Present status, relevant goals, interest, values and beliefs (3) Medical record or other reference materials (4) The client and relevant others (5) Other health professionals (6) Co-workers (7) Clinical instructor, supervisor or coordinator (8) Faculty
21. Identify the emotional needs and resources of self (student), including: A. How you (student) feel about the other person (client and/or his relevant others, clinical supervisor) B. How you (student) feel about your relationship with the other person C. Sources of emotional support available within you (student) which you can offer the relationship Examples: Does the student identify his/her willingness to participate in the development and maintenance of the relationship? Does the student identify his/her own experience in similar relationships?
22. Identify the roles of relevant persons, including: A. Student's responsibilities to the client B. Client's responsibilities in the treatment plan C. Person(s) primarily responsible for completing the task
Examples: Does the student identify the role of the client's spouse in the transfer? D. Person(s) primarily concerned with supporting the emotional needs of the people involved
23. Respond to others in a way that fosters a positive change, including: A. Facilitating acceptance by the other person of ideas, attitudes, and feelings he/she has:
Example: The student allowed the client to feel sad. B. Movement of the other person toward the knowledge and/or attitudes desired

COMPETENCIES AND CRITERIA Short-Term Clinical Competencies
65
Example: A client expresses concern or worry over a situation. The student responds to the client in such a way that the client is no longer needlessly concerned or is reassured that his concerns will be attended.
C. Responses appropriately related to the established needs of the other person(s) involved D. Responses appropriately related to the abilities and needs of self E. Use of verbal or non-verbal responses F. Listening, giving input to the person(s) and referral
Giving input to the other person(s) is exhibited by, but not limited to, verbal and nonverbal responses which are interviewer-centered. Interviewer-centered responses are those initiated by the student and directed toward the other person(s) and /or nonverbal approaches to the other person(s). The following are interviewer-centered responses:
INTERVIEWER-CENTERED
VERBAL
NON-VERBAL
Explanation
Touching the other person(s)
Encouragement
Moving toward or positioning yourself close to the other persons
Assurance Suggestions Advice
Inappropriate responses to other people include the following:
Approval-disapproval
Rejection
Criticism
Scolding
Ridicule
Threat
Contradiction
Punishment
Denial
24. Refer client and relevant others to another person if indicated by: A. Identifying when client or client’s relevant others needs exceed your abilities B. Identifying when client’s needs interfere with physical therapy care C. Identifying when therapist responses do not satisfy the client and relevant others D. Identifying when extent or nature of the needs cannot be identified by the therapist E. Identifying the health professional capable of meeting the client’s needs F. Referring the client to the appropriate health professional G. Following established institutional referral procedures Example: The client is concerned about his/her diet. The student suggests that he/she (client) speak with the dietitian.
25. Exhibit caring for the people with whom he/she is involved by: A. Accepting responsibilities

COMPETENCIES AND CRITERIA Short-Term Clinical Competencies
66
Examples: Does the student keep appointments as scheduled? Does the student follow through on commitments made?
B. Exhibiting concern for others' well being and respect for others’ rights and dignity Examples: The student arranges for privacy when needed for work with clients. The student presents himself in an inoffensive manner when dealing with others.
C. Supporting patient programs and departmental efforts Examples: When seeking assistance from an aide, the student ignores the aides response that he/she is taking care of another therapist request.
D. Utilizing appropriate interpersonal skills as previously identified The question of item 25 is not if the student cares but if the student exhibits caring in such a way that the people with whom the student is involved recognize the student cares.
26. Evaluate the effect of his/her response on the needs of other person(s) and self by: A. Recognizing the manner in which the other person responds or reacts to or withdraws from him/her
Example: The student can demonstrate and/or express awareness of his/her own responses: 1) Which facilitate the other person's participation in the interaction 2) Which cause the other person to withdraw from the interaction
B. Determining the effects of the interaction on the cognitive and emotional needs of the other person and of him/herself
Example: The student identifies the failure of previous responses to meet needs. The student determines that his/her response to the client has increased the client's fear and confusion.
27. Modify his/her responses to meet the needs of the relevant others if indicated by: A. Eliminating or modifying responses which affect the interaction(s) negatively B. Selecting other response options to meet need demands C. Initiate modified responses D. Re-evaluate altered responses for attainment of identified needs. E. Continue modifications until needs are met

COMPETENCIES AND CRITERIA Short-Term Clinical Competencies
67
COMPETENCY IN THE TEACHING-LEARNING PROCESS / SHORT-TERM CLINICAL EXPERIENCES
Upon graduation, the student will use the problem-solving process in demonstration of areas of expertise and application of a theoretical framework of basic, behavioral, social and medical sciences on which to base the practice of physical therapy, including: participation in planning, implementing and evaluating the teaching learning process.
COMPONENTS AND CRITERIA
28. Identify the needs of the learner/client, including: A. Identify what the learner needs to know B. What the learner needs to be able to do
29. Identify an appropriate level of learning or skill to be accomplished, including: A. Identification of the specific knowledge and/or skills the learner/client must already have to
participate in the learning experience and accomplish the intended objective B. Determination of the extent to which the learner/client has the prerequisite knowledge and/or
skills C. Determination of a way(s) to provide the prerequisite knowledge and skills if lacking
30. State what is to be learned, including: A. Observable behavior B. Who is to demonstrate the behavior C. Conditions under which the behavior is to be demonstrated D. Minimal level of acceptable behavior E. An implied domain of the behavior (i.e. cognitive, psychomotor, affective)
31. Make certain the learner/client understands the purpose for learning: A. Tell the learner/client why the behavior is to be learned. B. Relate the learning experience/behavior to be learned to past experiences of the learner, to present
experiences of the learner and to future experiences of the learner. C. Ask the learner to state in his/her own words what is to be learned. D. Ask the learner to state in his/her own words why he/she needs to learn what is being taught. E. Ask the learner to state how what is being leaned relates to other experiences in his/her life.
32. Explain what is to be learned: A. Provide the information or materials necessary for learning. B. State the principles involved in the behavior. C. Ask the learner/client to state, in his/her own words, the principles involved. D. Provide the learner with cues in important features of the behavior.
Division of Physical Therapy
Emory University

COMPETENCIES AND CRITERIA Short-Term Clinical Competencies
68
33. Demonstrate to the learner/client what is to be learned: A. Use appropriate materials or application examples. B. Make the demonstration as similar as possible to the situation in which the learning is to be used.
34. Provide an opportunity for the learner/client to practice doing what is being learned: A. Make the practice situation as similar as possible to the actual situation(s) for which the learner is
being prepared. B. Provide adequate practice. C. Provide practice which requires that the activity of the learner is consistent with the
behavior stated in the objective. D. Identify resources which are available to the learner/client beyond this experience, for additional
exposure as practice.
35. Provide feedback on performance to the learner/client: A. Indicate the extent to which he/she is demonstrating what is being learned. B. Make suggestions for improvement. C. Provide additional information, explanation, or demonstration when necessary. D. Assist the learner in identifying how he/she can determine the extent to which he/she is
demonstrating what is being learned.
36. State some examples of use of what is being leaned in the client's everyday life: A. Present several different kinds of examples. B. Present examples as similar as possible to actual situations in the learner/client's life. C. Incorporate principles and cues in the examples.
37. Ask the learner/client to give examples of use of what is being learned in the client’s everyday life: A. Determine that the examples reflect actual, possible situations and understanding of principles.
38. Determine that the learner/client has learned what is being taught: A. Identify and implement an activity which will allow demonstration of learning and which is:
(1) Consistent with the behavior stated in the objective (2) Consistent with the activities of the learning experience (3) Incorporates the conditions stated in the objective
B. Determine that the minimal level of acceptable performance is met.

COMPETENCIES AND CRITERIA Short-Term Clinical Competencies
69
COMPETENCY IN ADMINISTRATION / SHORT-TERM CLINICAL EXPERIENCES
Upon graduation, the student will use the problem-solving process in demonstration of areas of expertise and application of a theoretical framework of basic, behavioral, social, and medical sciences on which to base the practice of physical therapy, including: participation in the administration of a defined physical therapy service.
COMPONENTS AND CRITERIA
39. Identify the administrative structure to provide physical therapy services: A. Administrative structure/hierarchy B. Current staff positions/roles, lines of communication, and any future changes to provide quality C. Vision statement/philosophy of the department
40. Demonstrate Professional Behaviors: A. Maintain schedule throughout day (e.g. arrives on time, adheres to patient schedule) B. Adhere to school/facility dress code C. Facilitate team environment to insure quality patient care:
(1) Effectively communicate to all staff members, patients, and families (2) Demonstrate flexibility in all areas within a team environment (3) Accept responsibility for facility needs and complete tasks in a timely manner (4) Take initiative to resolve problems (5) Request and/or provide assistance to co-workers as necessary
D. Demonstrate safe and legal practice: (1) Consistent with State Board Rules/Regulations (2) Follow APTA guidelines
(a) Practice in a manner consistent with the APTA Core Values1 (3) Demonstrate Ethical Practice
(a) Practice in a manner consistent with the APTA Code of Ethics2 (i) implement in response to an ethical situation, a plan of action that demonstrates
sound moral reasoning congruent with core professional ethics and values; and (ii) Report to the appropriate faculty suspected cases of fraud and abuse related to
the utilization of and payment for physical therapy and other health care services
(4) Comply with Centers for Medicare and Medicaid Services guidelines (5) Comply with HIPAA guidelines
41. Identify the overall goals of the physical therapy services provided: A. Patient/Client care:
Division of Physical Therapy
Emory University

COMPETENCIES AND CRITERIA Short-Term Clinical Competencies
70
(1) Primary patient populations served (2) Levels of care able to provide (3) Resources available to ensure quality patient care (4) Identify the team members involved with providing physical therapy services
B. Other services/consultations available to meet the patient’s needs C. Educational opportunities:
(1) Students (2) Community education (e.g. presenting to a school system a program on prevention of
head injuries, presenting to an industrial site, a back school) (3) Health professionals:
(a) Academic setting (b) Conferences
(4) Other disciplines (e.g. teaching nursing assistants transfer techniques) D. Current research efforts or efforts toward evidence-based practice within physical therapy
services
__________________________________________
1 American Physical Therapy Association.
Professionalism in physical therapy: Core values BOD P05-04-02-03 [Amended BOD 08-03-04-10] Available at: http://www.apta.org/uploadedFiles/APTAorg/About_Us/Policies/Judicial_Legal/ProfessionalismCoreValues.pdf. Accessed April 27, 2016.
2 American Physical Therapy Association. Code of Ethics for the Physical Therapist. Available at: https://www.apta.org/uploadedFiles/APTAorg/About_Us/Policies/HOD/Ethics/CodeofEthics.pdf. Accessed April 27, 2016.

COMPETENCIES AND CRITERIA Short-Term Clinical Competencies
71
CLINICAL EDUCATION / SHORT-TERM GENERAL MEDICAL CONDITIONS
EMORY UNIVERSITY DIVISION OF PHYSICAL THERAPY
CLINICAL SCIENCE GENERAL MEDICAL CONDITIONS
SHORT-TERM CLINICAL EDUCATION EXPERIENCE Instructions Welcome to the online Emory Evaluation of student performance for the General Medical Conditions clinical experience. A short online tutorial has been created to assist you with the completion of this form and can be found by clicking on the following link: http://youtu.be/GyuOh-pzxXk The online form is used in conjunction with competency and criteria sheets for Provision of Patient Care, Interpersonal Communication, the Teaching-Learning Process, and Administration included in the packet of information mailed to clinical instructors and center coordinators of clinical education, as well as the criteria sheets for examination and therapeutic interventions found in the Emory Physical Therapy Entry Level Competencies and Criteria manual available at your facility. For your convenience, you can access criteria sheets for Provision of Patient Care, Interpersonal Communication, Teaching-Learning, and Administration online. To view a competency and see the individual items/observable behaviors, click on the highlighted title. Additionally, criteria for each individual item/behavior within a competency can be accessed by clicking on the highlighted item in the evaluation form. A pop-up window will open with a description of the criteria. After beginning the evaluation, but before you click the “Submit Evaluation” button, you can:
EXIT at the end of each page and your responses will be automatically saved
RE-ENTER the evaluation to view or make changes using the link provided in the email invitation
RE-ENTER the document and resume where you left off or start at the beginning
Division of Physical Therapy
Emory University

COMPETENCIES AND CRITERIA Short-Term Clinical Competencies
72
Please hold the evaluation conference with your student before submitting the evaluation form! Course Objectives Items on the form are designed to measure the following general objectives during this clinical experience. Given patients with straight-forward general medical problems and limited comorbidities, the student will use the problem-solving process to assess patients and establish a plan of care, in accordance with Emory’s Provision of Patient Care criteria. Given patients with straight-forward general medical problems and limited comorbidities, the student will provide therapeutic services in accordance with Emory’s Provision of Patient Care criteria. The student will use the interpersonal communication and teaching-learning processes during interactions with patients, healthcare providers, and staff in accordance with Emory’s Interpersonal Communications and Teaching-Learning criteria. The student will demonstrate professional behavior in accordance with Emory’s Administration criteria. The student will identify the administrative structure and goals of the physical therapy department as described in the Administration criteria.
Feedback Daily feedback: It is expected that the clinical instructor (CI) provide the student feedback, present suggestions, and frequently set/assess educational goals. Periodic feedback: A thorough review of student performance (utilizing the evaluation form as a guide) is helpful at the end of the first week of the two-week block.
Who Completes the Final Short Term Evaluation Form? The CI and student each receive their OWN email link to THEIR copy of the form and should complete them independently. Do NOT share links. If a second CI has been working with the student, she should collaborate with the primary CI using one link/form. **IMPORTANT: The CI and student should electronically sign both evaluation forms. The CI/student must personally enter his/her own name and date after the evaluation conference for this to be considered a valid electronic signature.** When are the Evaluations completed? The final day of the two-week block is the only time a formal written evaluation is completed by both the CI and student. The evaluation is only based on the last week of the affiliation. How is the Online Clinical Education Evaluation Form Completed? The form is divided into 4 sections/competencies: provision of care, interpersonal communication, teaching-learning, and administration. Observable behaviors to be graded are listed for each competency, and a comments' section is provided. Each item evaluated will be scored as follows: 4 = Demonstrates Competency: Student performs all criteria for the item 80-100% of the time 3 = Developing Competency: Student performs all criteria for the item 50-79% of the time 2 = Beginning Competency: Student performs all criteria for the item 26 -49% of the time 1 = Rarely Competent: Student performs all criteria for the item 0-25% of the time N/A = Not applicable: Student did not have an opportunity to perform or did not have a sufficient number of opportunities to be evaluated (usually < 3) Scoring Example: #12: “Determine an intervention plan with rationale”: If the student correctly demonstrated this behavior according to criteria 80% of the time during the second week (8 times out of 10 or better), the appropriate response is “4”. If less than 80%, please estimate the percentage of time the student demonstrated a behavior according to criteria and select that scoring level. If the CI did not have an opportunity to observe the student or there was not sufficient opportunity, Not Applicable “N/A” should be selected. Two items are pulled out of sequence from their respective competencies and graded first due to their importance in clinical care. The first is #16: “Adhere to safety in provision of patient care”, and the second is #40: “Demonstrate professional behavior.” We expect the student will earn a “4 – Demonstrates Competency” for both of these items, and be at 100%. If the student is not earning a “4”, or is earning a “4” but demonstrating “red flags”, please contact one of the Directors of Clinical Education immediately (Patricia Bridges – 404-712-4132 or Tami Phillips – 404-727-1350). A “red flag” for either item may result in dismissal from the affiliation and/or remediation.

COMPETENCIES AND CRITERIA Short-Term Clinical Competencies
73
Please utilize the “Comments” boxes to:
provide constructive feedback, examples and suggestions for items requiring further practice
provide information about items marked N/A
provide positive feedback, examples, and suggestions What is the Procedure for the Evaluation Conference? After the student and CI complete the evaluation forms individually online, they SHOULD NOT click the “Submit Evaluation” button. Simply close the browser window and responses will be automatically saved. To access saved responses for the CI/student conference, click on the link provided in each individual’s email invitation. The CI and student should review their individual, completed evaluation forms in the conference. Differences in responses are discussed with both persons offering examples to substantiate the chosen response. If agreement is not reached, the responses on each form should remain and written comments made. At the end of the evaluation, both evaluation forms are signed electronically by the student and the clinical instructor. Clinical Instructors please indicate whether you have a clinical specialty certification and specify whether you are an APTA credentialed clinical instructor. If the affiliating facility requires a printed copy of this evaluation, you will have the option to download and print or save a PDF or your completed evaluation after you click the submit evaluation button, which is located on the last page of the evaluation form. Emory does not require a printed copy. Upon completing the conference and signing these documents, press the submit button to send each form.
At this point, the student and CI discuss the “APTA Physical Therapy Student Evaluation: Clinical Experience and Clinical Instruction” form which is completed by the student on-line and printed. In addition to the student signing the form, the CI signs the form indicating he/she has reviewed the information with the student.
What Forms Does the Student Need to Return to Emory University, Division of Physical Therapy? 1) Clinical Education Evaluation: Online submission on the last day of the clinical affiliation by both the CI and student individually. 2) APTA Physical Therapy Student Evaluation - Clinical Experience and Clinical Instruction: The student will:
1. FILL OUT the entire form online (including ALL of the CI’s information on the first page), but DO NOT SUBMIT YET.
2. PRINT THE FORM and 3. THEN submit online. 4. Ensure BOTH the student and the clinical instructor, sign the form. 5. Write a note to Mrs. Moore if any of the information entered online about the CI is missing on the
printed copy. Please let her know if the information was entered online, but did not print. Please also let her know what specific information was entered.
6. Hand-deliver the hard copy by the close of business Monday, immediately following the end of the two-week clinical block, to Suite 312, 1462 Clifton Road.
3) Clinical Site Orientation Checklist: The orientation checklist is due by the close of business Monday, immediately following the end of the two-week clinical block. Hand-deliver to Suite 312, 1462 Clifton Road.
Please click the "Save and Continue" button below to begin the evaluation.

COMPETENCIES AND CRITERIA Short-Term Clinical Competencies
74
Please complete the following:
*STUDENT
*PRIMARY CLINICAL INSTRUCTOR
SECONDARY CLINICAL INSTRUCTOR (Optional)
*FACILITY
*DATE: FINAL (mm/dd/yyyy)
*COMPLETED BY
PROVISION OF PATIENT CARE Please use the following scale to score the student: 4 = Demonstrates Competency: Student performs all criteria for the item 80-100% of the time 3 = Developing Competency: Student performs all criteria for the item 50-79% of the time 2 = Beginning to show competency- Student performs all criteria for the item 26 -49% of the time 1 = Rarely meets competency- Student performs all criteria for the item 0-25% of the time N/A not applicable Click the highlighted Item Below to View the Criteria. Given a client, the student was able to:
Provision of Patient Care
*16. Adhere to safety in provision of patient care. 4☐ 3☐ 2☐ 1☐ N/A☐ COMMENTS:

COMPETENCIES AND CRITERIA Short-Term Clinical Competencies
75
ADMINISTRATION Please use the following scale to score the student: 4 = Demonstrates Competency: Student performs all criteria for the item 80-100% of the time 3 = Developing Competency: Student performs all criteria for the item 50-79% of the time 2 = Beginning to show competency- Student performs all criteria for the item 26 -49% of the time 1 = Rarely meets competency- Student performs all criteria for the item 0-25% of the time N/A not applicable Click the highlighted Item Below to View the Criteria. In any and all circumstances during the clinical education experience, the student was able to:
COMMENTS:
Administrative Process
*40. Demonstrate professional behavior. 4☐ 3☐ 2☐ 1☐ N/A☐

COMPETENCIES AND CRITERIA Short-Term Clinical Competencies
76
PROVISION OF PATIENT CARE Please use the following scale to score the student: 4 = Demonstrates Competency: Student performs all criteria for the item 80-100% of the time 3 = Developing Competency: Student performs all criteria for the item 50-79% of the time 2 = Beginning to show competency- Student performs all criteria for the item 26 -49% of the time 1 = Rarely meets competency- Student performs all criteria for the item 0-25% of the time N/A not applicable Click the highlighted Item Below to View the Criteria. Given a client, the student was able to:
Provision of Patient Care *1. Identify symptoms and coexisting conditions of the client. 4☐ 3☐ 2☐ 1☐ N/A☐ *2. Differentiate symptoms and impairments presented from symptoms and impairments to be assessed.
4☐ 3☐ 2☐ 1☐ N/A☐
*3a. Identify onset of symptoms. 4☐ 3☐ 2☐ 1☐ N/A☐ *3b. Identify the relationship of symptoms to other examination findings.
4☐ 3☐ 2☐ 1☐ N/A☐
*4. Determine the priority of conditions to be assessed. 4☐ 3☐ 2☐ 1☐ N/A☐ *5. Identify and determine the rationale for procedures to examine the client's impairments or conditions.
4☐ 3☐ 2☐ 1☐ N/A☐
*6. Prepare to execute the examination procedure. 4☐ 3☐ 2☐ 1☐ N/A☐

COMPETENCIES AND CRITERIA Short-Term Clinical Competencies
77
PROVISION OF PATIENT CARE Please use the following scale to score the student: 4 = Demonstrates Competency: Student performs all criteria for the item 80-100% of the time 3 = Developing Competency: Student performs all criteria for the item 50-79% of the time 2 = Beginning to show competency- Student performs all criteria for the item 26 -49% of the time 1 = Rarely meets competency- Student performs all criteria for the item 0-25% of the time N/A not applicable Click the highlighted Item Below to View the Criteria. 7. Given a client, the student was able to conduct the examination according to the criteria sheet for the specificprocedure/tests listed below:
Provision of Patient Care *7a. Visual Inspection 4☐ 3☐ 2☐ 1☐ N/A☐
*7b. Blood Pressure Assessment 4☐ 3☐ 2☐ 1☐ N/A☐
*7c. Pulse Rate and Peripheral Pulse Evaluations 4☐ 3☐ 2☐ 1☐ N/A☐
*7d. Evaluation of Ventilation 4☐ 3☐ 2☐ 1☐ N/A☐
*7e. Lung Auscultation 4☐ 3☐ 2☐ 1☐ N/A☐
*7 f. Gross Evaluation 4☐ 3☐ 2☐ 1☐ N/A☐
*7g. Palpation 4☐ 3☐ 2☐ 1☐ N/A☐
*7h. Goniometry 4☐ 3☐ 2☐ 1☐ N/A☐
*7i. Manual Muscle Testing 4☐ 3☐ 2☐ 1☐ N/A☐
*7j. Sensory Assessment 4☐ 3☐ 2☐ 1☐ N/A☐
*7k. Functional Limitations (Functional Mobility Assessment) 4☐ 3☐ 2☐ 1☐ N/A☐
*7l. Pulmonary Evaluation 4☐ 3☐ 2☐ 1☐ N/A☐

COMPETENCIES AND CRITERIA Short-Term Clinical Competencies
78
PROVISION OF PATIENT CARE (Additional Examination Procedures) Please use the following scale to score the student: 4 = Demonstrates Competency: Student performs all criteria for the item 80-100% of the time 3 = Developing Competency: Student performs all criteria for the item 50-79% of the time 2 = Beginning to show competency- Student performs all criteria for the item 26 -49% of the time 1 = Rarely meets competency- Student performs all criteria for the item 0-25% of the time N/A not applicable Click the highlighted Item Below to View the Criteria. 7. Given a client, the student was able to conduct the examination according to the criteria sheet for the specific procedure/tests listed below:
Provision of Patient Care 7m. Other (list below if applicable)
4☐ 3☐ 2☐ 1☐ N/A☐ 7n. Other (list below if applicable) 4☐ 3☐ 2☐ 1☐ N/A☐ 7o. Other (list below if applicable) 4☐ 3☐ 2☐ 1☐ N/A☐ 7p. Other (list below if applicable) 4☐ 3☐ 2☐ 1☐ N/A☐ 7q. Other (list below if applicable) 4☐ 3☐ 2☐ 1☐ N/A☐ 7r. Other (list below if applicable) 4☐ 3☐ 2☐ 1☐ N/A☐ 7s. Other (list below if applicable)
4☐ 3☐ 2☐ 1☐ N/A☐ 7t. Other (list below if applicable) 4☐ 3☐ 2☐ 1☐ N/A☐ 7u. Other (list below if applicable) 4☐ 3☐ 2☐ 1☐ N/A☐ 7v. Other (list below if applicable) 4☐ 3☐ 2☐ 1☐ N/A☐ 7w. Other (list below if applicable) 4☐ 3☐ 2☐ 1☐ N/A☐ 7x. Other (list below if applicable) 4☐ 3☐ 2☐ 1☐ N/A☐ 7y. Other (list below if applicable) 4☐ 3☐ 2☐ 1☐ N/A☐ 7z. Other (list below if applicable) 4☐ 3☐ 2☐ 1☐ N/A☐
If 7m. "other" is applicable, list the procedure/test below.
If 7n. "other" is applicable, list the procedure/test below.
If 7o. "other" is applicable, list the procedure/test below.
If 7p. "other" is applicable, list the procedure/test below.
If 7q. "other" is applicable, list the procedure/test below.
If 7r. "other" is applicable, list the procedure/test below.

COMPETENCIES AND CRITERIA Short-Term Clinical Competencies
79
If 7s. "other" is applicable, list the procedure/test below.
If 7t. "other" is applicable, list the procedure/test below.
If 7u. "other" is applicable, list the procedure/test below.
If 7v. "other" is applicable, list the procedure/test below.
If 7w. "other" is applicable, list the procedure/test below.
If 7x. "other" is applicable, list the procedure/test below.
If 7y. "other" is applicable, list the procedure/test below.
If 7z. "other" is applicable, list the procedure/test below.

COMPETENCIES AND CRITERIA Short-Term Clinical Competencies
80
PROVISION OF PATIENT CARE Please use the following scale to score the student: 4 = Demonstrates Competency: Student performs all criteria for the item 80-100% of the time 3 = Developing Competency: Student performs all criteria for the item 50-79% of the time 2 = Beginning to show competency- Student performs all criteria for the item 26 -49% of the time 1 = Rarely meets competency- Student performs all criteria for the item 0-25% of the time N/A not applicable Click the highlighted Item Below to View the Criteria. Given a client, the student was able to:
Provision of Patient Care
*8. Evaluate examination findings. 4☐ 3☐ 2☐ 1☐ N/A☐ *9. Establish a physical therapy diagnosis. 4☐ 3☐ 2☐ 1☐ N/A☐ *10. Determine the prognosis. 4☐ 3☐ 2☐ 1☐ N/A☐ *11. Establish intervention goals. 4☐ 3☐ 2☐ 1☐ N/A☐ *12. Determine an intervention plan with rationale.
4☐ 3☐ 2☐ 1☐ N/A☐

COMPETENCIES AND CRITERIA Short-Term Clinical Competencies
81
PROVISION OF PATIENT CARE Please use the following scale to score the student: 4 = Demonstrates Competency: Student performs all criteria for the item 80-100% of the time 3 = Developing Competency: Student performs all criteria for the item 50-79% of the time 2 = Beginning to show competency- Student performs all criteria for the item 26 -49% of the time 1 = Rarely meets competency- Student performs all criteria for the item 0-25% of the time N/A not applicable Click the highlighted Item Below to View the Criteria. 13. Given a client, the student was able to administer the intervention according to the criteria sheet or evidence-based method for the specific procedures listed below.
Provision of Patient Care *13a. Draping 4☐ 3☐ 2☐ 1☐ N/A☐ *13b. Range of Motion 4☐ 3☐ 2☐ 1☐ N/A☐ *13c. Bed Mobility 4☐ 3☐ 2☐ 1☐ N/A☐ *13d. Transfers 4☐ 3☐ 2☐ 1☐ N/A☐ *13e. Measurement of Ambulation Aids 4☐ 3☐ 2☐ 1☐ N/A☐ *13f. Ambulation Training 4☐ 3☐ 2☐ 1☐ N/A☐ *13g. Selection and Teaching Exercise 4☐ 3☐ 2☐ 1☐ N/A☐ *13h. Breathing Exercises 4☐ 3☐ 2☐ 1☐ N/A☐ *13i. Pursed Lips Breathing Exercise 4☐ 3☐ 2☐ 1☐ N/A☐ *13j. Pre-operative Instruction 4☐ 3☐ 2☐ 1☐ N/A☐ *13k. Wound Care 4☐ 3☐ 2☐ 1☐ N/A☐ *13l. Application of Superficial Heat 4☐ 3☐ 2☐ 1☐ N/A☐ *13m. Application of Cold 4☐ 3☐ 2☐ 1☐ N/A☐

COMPETENCIES AND CRITERIA Short-Term Clinical Competencies
82
PROVISION OF PATIENT CARE (Additional Therapeutic Interventions) Please use the following scale to score the student: 4 = Demonstrates Competency: Student performs all criteria for the item 80-100% of the time 3 = Developing Competency: Student performs all criteria for the item 50-79% of the time 2 = Beginning to show competency- Student performs all criteria for the item 26 -49% of the time 1 = Rarely meets competency- Student performs all criteria for the item 0-25% of the time N/A not applicable Click the highlighted Item Below to View the Criteria. 13. Given a client, the student was able to administer the intervention according to the criteria sheet or evidence-based method for the specific procedures listed below.
Provision of Patient Care 13n. Other (list below if applicable) 4☐ 3☐ 2☐ 1☐ N/A☐ 13o. Other (list below if applicable) 4☐ 3☐ 2☐ 1☐ N/A☐ 13p. Other (list below if applicable) 4☐ 3☐ 2☐ 1☐ N/A☐ 13q. Other (list below if applicable) 4☐ 3☐ 2☐ 1☐ N/A☐ 13r. Other (list below if applicable)
4☐ 3☐ 2☐ 1☐ N/A☐ 13s. Other (list below if applicable) 4☐ 3☐ 2☐ 1☐ N/A☐ If 13n. "other" is applicable, list the procedure/test below.
If 13o. "other" is applicable, list the procedure/test below.
If 13p. "other" is applicable, list the procedure/test below.
If 13q. "other" is applicable, list the procedure/test below.
If 13r. "other" is applicable, list the procedure/test below.
If 13s. "other" is applicable, list the procedure/test below.

COMPETENCIES AND CRITERIA Short-Term Clinical Competencies
83
PROVISION OF PATIENT CARE Note: Question #16 is missing below because you have already completed that question above. Please use the following scale to score the student: 4 = Demonstrates Competency: Student performs all criteria for the item 80-100% of the time 3 = Developing Competency: Student performs all criteria for the item 50-79% of the time 2 = Beginning to show competency- Student performs all criteria for the item 26 -49% of the time 1 = Rarely meets competency- Student performs all criteria for the item 0-25% of the time N/A not applicable Click the highlighted Item Below to View the Criteria. Given a client, the student was able to:
Provision of Patient Care *14. Assess the effects of the intervention. 4☐ 3☐ 2☐ 1☐ N/A☐ *15. Modify the intervention and/or goals as indicated. 4☐ 3☐ 2☐ 1☐ N/A☐ *17a. Document subjective information correctly in appropriate notes. (Beginning at p. 504)
4☐ 3☐ 2☐ 1☐ N/A☐
17b. Document objective information correctly in appropriate notes.
4☐ 3☐ 2☐ 1☐ N/A☐
17c. Document assessment information correctly in appropriate notes.
4☐ 3☐ 2☐ 1☐ N/A☐
*17d. Document plan (physical therapist treatment plan) correctly in appropriate notes.
4☐ 3☐ 2☐ 1☐ N/A☐
Comments:

COMPETENCIES AND CRITERIA Short-Term Clinical Competencies
84
INTERPERSONAL COMMUNICATION Please use the following scale to score the student: 4 = Demonstrates Competency: Student performs all criteria for the item 80-100% of the time 3 = Developing Competency: Student performs all criteria for the item 50-79% of the time 2 = Beginning to show competency- Student performs all criteria for the item 26 -49% of the time 1 = Rarely meets competency- Student performs all criteria for the item 0-25% of the time N/A not applicable Click the highlighted Item Below to View the Criteria. In any and all interactions during the clinical education experience, the student was able to:
Interpersonal Skills
*18. Identify cognitive needs and resources of other person(s).
4☐ 3☐ 2☐ 1☐ N/A☐
*19. Identify emotional needs and resources of other person(s).
4☐ 3☐ 2☐ 1☐ N/A☐
*20. Identify cognitive needs and resources of self. 4☐ 3☐ 2☐ 1☐ N/A☐ *21. Identify emotional needs and resources of self. 4☐ 3☐ 2☐ 1☐ N/A☐ 22. Identify roles of relevant persons. 4☐ 3☐ 2☐ 1☐ N/A☐ *23 Respond to others in a way that fosters a positive change.
4☐ 3☐ 2☐ 1☐ N/A☐
*24. Refer client and relevant others to another person if indicated.
4☐ 3☐ 2☐ 1☐ N/A☐
*25. Exhibit caring for the people with whom he/she is involved.
4☐ 3☐ 2☐ 1☐ N/A☐
*26. Evaluate the effect of his/her response on the needs of the other person(s) and self.
4☐ 3☐ 2☐ 1☐ N/A☐
*27. Modify his/her response to the needs of relevant others as indicated.
4☐ 3☐ 2☐ 1☐ N/A☐
Comments:

COMPETENCIES AND CRITERIA Short-Term Clinical Competencies
85
TEACHING-LEARNING Please use the following scale to score the student: 4 = Demonstrates Competency: Student performs all criteria for the item 80-100% of the time 3 = Developing Competency: Student performs all criteria for the item 50-79% of the time 2 = Beginning to show competency- Student performs all criteria for the item 26 -49% of the time 1 = Rarely meets competency- Student performs all criteria for the item 0-25% of the time N/A not applicable Click the highlighted Item Below to View the Criteria. Given a client or other opportunities to plan, implement and evaluate the teaching learning process, the student was able to:
Teaching-Learning Process *28. Identify the needs of the learner/client. 4☐ 3☐ 2☐ 1☐ N/A☐ *29. Identify an appropriate level of learning or skill to be accomplished in the learning experience.
4☐ 3☐ 2☐ 1☐ N/A☐
*30. State the behavior to be learned by the client/learner. 4☐ 3☐ 2☐ 1☐ N/A☐ *31. Make certain the learner/client understands the purpose (i.e., why they are learning what they are learning).
4☐ 3☐ 2☐ 1☐ N/A☐
*32. Explain what is to be learned. 4☐ 3☐ 2☐ 1☐ N/A☐ *33. Demonstrate to the learner/client what is to be learned. 4☐ 3☐ 2☐ 1☐ N/A☐ *34. Provide an opportunity for the learner/client to practice the behavior.
4☐ 3☐ 2☐ 1☐ N/A☐
*35. Give the learner/client feedback on performance of the desired behavior.
4☐ 3☐ 2☐ 1☐ N/A☐
*36. Give some examples of use of the behavior in the client's everyday life.
4☐ 3☐ 2☐ 1☐ N/A☐
*37. Solicit some examples from the client of use of the behavior in his/her everyday life.
4☐ 3☐ 2☐ 1☐ N/A☐
*38. Determine that the learner/client has learned what is being taught.
4☐ 3☐ 2☐ 1☐ N/A☐
Comments:

COMPETENCIES AND CRITERIA Short-Term Clinical Competencies
86
ADMINISTRATION Note: Question #40 is missing below because you have already completed that question above.
Please use the following scale to score the student: 4 = Demonstrates Competency: Student performs all criteria for the item 80-100% of the time 3 = Developing Competency: Student performs all criteria for the item 50-79% of the time 2 = Beginning to show competency- Student performs all criteria for the item 26 -49% of the time 1 = Rarely meets competency- Student performs all criteria for the item 0-25% of the time N/A not applicable Click the highlighted Item Below to View the Criteria.
The student was able to demonstrate competency in the administrative process according to the objectives and criteria below:
Administrative Process *39. Identify the administrative structure to provide physical therapy services.
4☐ 3☐ 2☐ 1☐ N/A☐
*41. Identify the overall goals of the physical therapy services provided.
4☐ 3☐ 2☐ 1☐ N/A☐
Comments:

COMPETENCIES AND CRITERIA Short-Term Clinical Competencies
87
Please provide the following dates regarding student attendance:
Date(s) absent: (mm/dd/yyyy)
Date(s) made-up: (mm/dd/yyyy)
STUDENT:
*Name: *Date: (mm/dd/yyyy)
PRIMARY CLINICAL SUPERVISOR:
*Name:
*Date: (mm/dd/yyyy)
*Clinical Specialty Certification (cite the
specific certification or enter None):
Date of Clinical Specialty Certification: (mm/dd/yyyy)
*APTA Credentialed Clinical Instructor (Primary CI): ☐ Yes
☐ No
SECONDARY CLINICAL SUPERVISOR (Optional):
Name:
Date: (mm/dd/yyyy)
Clinical Specialty Certification (cite the
specific certification or enter None):
Date of Clinical Specialty Certification: (mm/dd/yyyy)
APTA Credentialed Clinical Instructor (Secondary CI):
☐ Yes
☐ No

COMPETENCIES AND CRITERIA Short-Term Clinical Competencies
88
1. How many minutes did it take you to complete the evaluation?
2. Did you complete the evaluation at one sitting, or did you start the evaluation, stop, and complete it at a later time?
☐ I completed the evaluation at one sitting
☐ I started the evaluation, stopped, and completed at a later time
3. Please rate your agreement with the following: Strongly Disagree Disagree Agree Strongly Agree
a. Based on the instructions provided, I understand how to score the Emory online clinical education evaluation of student performance.
☐ ☐ ☐ ☐
b. The process used to complete the Emory online clinical education evaluation was simple.
☐ ☐ ☐ ☐
c. It was convenient for me to complete the Emory clinical education evaluation online.
☐ ☐ ☐ ☐
d. I am familiar with the objectives and expectations of the Emory PT program for this experience.
☐ ☐ ☐ ☐
e. I understand how to use Emory criteria to rate student performance.
☐ ☐ ☐ ☐
4. If you disagreed or strongly disagreed with any of the above, please reference the item number and provide specific details.
5. Please provide any additional comments regarding your experience completing the online evaluation.

COMPETENCIES AND CRITERIA Short-Term Clinical Competencies
89
Did you watch the power point demonstration on YouTube of how to complete the Emory DPT evaluation form?
☐ Yes
☐ No 3. Please rate your agreement with the following: Strongly Disagree Disagree Agree Strongly Agree
1. The power point format clarified the evaluation’s scoring procedures.
☐ ☐ ☐ ☐
2. The power point format clarified the timing for the evaluation and conference afterwards.
☐ ☐ ☐ ☐
3. The power point format effectively identified where to find specific resources to assist in my assessment of the student’s performance, such as where to find the location of definitions for criteria and competencies.
☐ ☐ ☐ ☐
4. I have a better understanding of why Emory DPT uses this specific evaluation form.
☐ ☐ ☐ ☐
5. The power point format kept me engaged while reviewing the instructions.
☐ ☐ ☐ ☐
6. The power point format made it easier to understand the instructions.
☐ ☐ ☐ ☐
7. I will use this presentation during my student’s internship as a resource and reference.
☐ ☐ ☐ ☐

COMPETENCIES AND CRITERIA Short-Term Clinical Competencies
90
You have completed the online evaluation of student performance.
WARNING! DO NOT CLICK the "Submit Evaluation" button until after you have the CI/student conference. Please
note that your responses are automatically saved when you exit the form. In order to access your saved evaluation form for the CI/student discussion, please click on the link provided in the email
invitation you received. FINAL STEP FOR SUBMISSION After completing the CI/student conference, please click the "Submit
Evaluation" button below to submit your final responses. After clicking the “Submit Evaluation” button, you will have the option to download and print a PDF of your responses. A link (Download PDF) will be available on the upper left side of the next page you reach after clicking the “Submit Evaluation” button. Whether or not you decide to download a PDF of your evaluation, you must scroll to the bottom of the page and click the “Submit Evaluation” button a second time. This is
necessary to record your responses and exit the form. Thank you for completing the online evaluation!
Note: If you need to stop and complete the survey later, your responses on all previous pages will be automatically saved when you exit the evaluation. To save any responses on the
current page, please click the "Save and Continue" button below before you exit the evaluation. When you are ready to complete the survey, simply click on the link in the email invitation you
received and you will be able to resume where you left off or at the beginning if you prefer.

COMPETENCIES AND CRITERIA Short-Term Clinical Competencies
91
CLINICAL EDUCATION / SHORT-TERM MUSCULOSKELETAL REHABILITATION
MUSCULOSKELETAL CLINICAL EDUCATION EVALUATION
DIVISION OF PHYSICAL THERAPY EMORY UNIVERSITY
CLINICAL SCIENCE
MUSCULOSKELETAL REHABILITATION SHORT-TERM CLINICAL EDUCATION EXPERIENCE
Instructions Welcome to the on-line “Clinical Education Evaluation” of student performance for the Musculoskeletal Rehabilitation short term clinical education experience. The online form is to be used in conjunction with competency documents provided by the clinical coordinator, as well as criteria sheets found in the Emory Physical Therapy Entry Level Competencies and Criteria manual available at your facility. For your convenience, you can access the competencies online. To view a competency, click on the title you wish to review: Provision of Patient Care, Interpersonal Communication, the Teaching-Learning Process, and Administration. Additionally, the criteria for each individual item within a competency can be accessed by clicking on the highlighted item in the evaluation form. A pop-up window will open with a description of the criteria. After beginning the evaluation you can exit at any time, for any reason, and your responses will be automatically saved as long as you do not click the “Submit Evaluation” button. You may re-enter the evaluation to view or make changes to your responses as many times as necessary using the link provided in the email invitation, as long as you have not submitted the form. When you re-enter the document, you will be given the option to resume where you left off or start at the beginning. Please hold the evaluation conference with your student before submitting the evaluation form. If the affiliating facility requires a printed copy of this evaluation, you will have the option to download and print or save a PDF of your completed form after you click the "Submit Evaluation" button, which is located on the last page of the evaluation form.
Division of Physical Therapy
Emory University

COMPETENCIES AND CRITERIA Short-Term Clinical Competencies
92
Course Objectives Items on the form are designed to measure the following general objectives during this clinical experience.
Given adult patients with straight-forward orthopedic problems and limited comorbidities, the student will use the problem-solving process to assess patients and establish a plan of care, in accordance with Emory’s criteria described in the Provision of Patient Care criteria.
Given patients with straight-forward orthopedic problems and limited comorbidities, the student will provide therapeutic services in accordance with Emory's Provision of Patient Care criteria.
The student will use the interpersonal communication and teaching-learning processes during interactions with patients, healthcare providers, and staff in accordance with Emory’s Interpersonal Communications and Teaching-Learning criteria.
The student will demonstrate professional behavior in accordance with Emory’s Administration criteria.
Feedback Daily feedback: It is expected that the clinical instructor (CI) provide the student feedback, present suggestions, and frequently set/assess educational goals.
Periodic feedback: A thorough review of student performance (utilizing the evaluation form as a guide) is helpful at the end of the first week of the two-week block.
Who Completes the Final Short Term Evaluation Form? The CI and student individually complete their own version of the evaluation form online. If more than one CI provided supervision during the affiliation the therapist who had primary responsibility must be designated as “primary CI.” The primary CI will collect and collate data from all supervising CIs involved during the appropriate time period. The primary CI will input the ratings and comments into the online evaluation form and hold the evaluation conference with the student. When are the Evaluations completed? The evaluation is completed at the end of the affiliation. The final day of the two-week block is the only time a formal written evaluation by the CI and student should be performed. The evaluation is only based on the last week of the affiliation. How is the Online Clinical Education Evaluation Form Completed? The form is divided into 4 sections/competencies: provision of care, interpersonal communication, teaching-learning, and administration. Observable behaviors to be graded are listed for each competency, and a comments' section is provided. Each item evaluated will be scored as follows: 4 = Demonstrates Competency: Student performs all criteria for the item 80-100% of the time 3 = Developing Competency: Student performs all criteria for the item 50-79% of the time 2 = Beginning Competency: Student performs all criteria for the item 26 -49% of the time 1 = Rarely Competent: Student performs all criteria for the item 0-25% of the time N/A = Not applicable: Student did not have an opportunity to perform or did not have a sufficient number of opportunities to be evaluated (usually < 3) Scoring Example: #12: “Determine an intervention plan with rationale”: If the student correctly demonstrated this behavior according to criteria 80% of the time during the second week (8 times out of 10 or better), the appropriate response is “4”. If less than 80%, please estimate the percentage of time the student demonstrated a behavior according to criteria and select that scoring level. If the CI did not have an opportunity to observe the student or there was not sufficient opportunity, Not Applicable “N/A” should be selected.

COMPETENCIES AND CRITERIA Short-Term Clinical Competencies
93
Two items are pulled out of sequence from their respective competencies and graded first due to their importance in clinical care. The first is #16: “Adhere to safety in provision of patient care”, and the second is #40: “Demonstrate professional behavior.” We expect the student will earn a “4 – Demonstrates Competency” for both of these items, and be at 100%. If the student is not earning a “4”, or is earning a “4” but demonstrating “red flags”, please contact one of the Directors of Clinical Education immediately (Patricia Bridges – 404-712-4132 or Tami Phillips – 404-727-1350). A “red flag” for either item may result in dismissal from the affiliation and/or remediation.
Please utilize the “Comments” boxes to:
provide constructive feedback, examples and suggestions for items requiring further practice
provide information about items marked N/A
provide positive feedback, examples, and suggestions What is the Procedure for the Evaluation Conference? After the student and CI complete the evaluation forms individually online, they SHOULD NOT click the “Submit Evaluation” button. Simply close the browser window and responses will be automatically saved. To access saved responses for the CI/student conference, click on the link provided in each individual’s email invitation.
The CI and student should review their individual, completed evaluation forms in the conference. Differences in responses are discussed with both persons offering examples to substantiate the chosen response. If agreement is not reached, the responses on each form should remain and written comments made. At the end of the evaluation, both evaluation forms are signed electronically by the student and the clinical instructor. Clinical Instructors please indicate whether you have a clinical specialty certification and specify whether you are an APTA credentialed clinical instructor. If the affiliating facility requires a printed copy of this evaluation, you will have the option to download and print or save a PDF or your completed evaluation after you click the “Submit Evaluation” button, which is located on the last page of the evaluation form. Emory does not require a printed copy. Upon completing the conference and signing these documents, press the submit button to send each form. At this point, the student and CI discuss the “APTA Physical Therapy Student Evaluation: Clinical Experience and Clinical Instruction” form which is completed by the student on-line and printed. In addition to the student signing the form, the CI signs the form indicating he/she has reviewed the information with the student.
**IMPORTANT: The CI and student should electronically sign both evaluation forms. The CI/student must personally enter his/her own name and date after the evaluation conference for this to be considered a valid electronic signature.** What is the Procedure for the Evaluation Conference? After the student and CI complete the evaluation forms individually on-line, they SHOULD NOT click the “Submit Evaluation” button. Simply close the browser window and responses will be automatically saved. To access saved responses for the CI/student conference, click on the link provided in the email invitation. Please hold the CI/student evaluation conference before submitting your responses and then return to submit the form electronically after the conference. The evaluation conference should be held in a private area with a computer. The CI and student should review their evaluations simultaneously. Optimally, the student would bring a laptop to the clinic so that each evaluation could be brought up on a separate computer, allowing the CI and student to scroll down through sections of the form at the same time. A second option would be locating a computer lab or private office with two computers. Finally, it is possible to open two browser windows on one computer by having:
the CI click on the link provided in the email invitation and once the form is open, minimize the browser window;
the student can then open a second browser window (i.e. Internet Explorer, Netscape, Mozilla etc.) and access his/her email to click on the link provided in the email invitation; and
the CI and student can then “maximize and minimize” each browser window to see the two evaluation documents.

COMPETENCIES AND CRITERIA Short-Term Clinical Competencies
94
Conversely, you may open and review one document at a time if you prefer. Differences in responses between the CI’s form and the student’s self-assessment are discussed with both persons offering examples to substantiate the chosen response. If agreement is not reached, responses on the forms should remain and a comment entered. At the end of the evaluation conference, the CI and student should sign both the CI evaluation and the student self-assessment electronically. (Typing his/her name in the space provided on the "Signatures" page is considered to be a signature. The CI/student must each personally enter his or her own name and date after the evaluation conference for this to be considered a valid electronic signature.) Upon completing the conference and signing these documents, press the submit button to send each form. This should be done for the evaluation completed by the CI, as well as the evaluation completed by the student. Printed copies of these forms do not need to be provided to the Emory University, Division of Physical Therapy. If the affiliating facility requires a printed copy of this evaluation, you will have the option to download and print or save a PDF of your completed evaluation after you click the submit evaluation button, which is located on the last page of the evaluation form. At this point, the student and CI can discuss the APTA Physical Therapy Student Evaluation: Clinical Experience and Clinical Instruction form which is also completed on-line, printed, and signed by the student. The CI is asked to sign this form indicating he/she has reviewed the information contained in the evaluation of the clinical education experience.
What Forms Does the Student Need to Return to Emory University, Division of Physical Therapy? Clinical Education Evaluation: Online submission of both the clinical instructor’s and student’s versions. Online submission should be completed the last day of the clinical affiliation. APTA Physical Therapy Student Evaluation - Clinical Experience and Clinical Instruction form: Fill out the entire form on-line (including the clinical instructor’s information on the first page), print, and submit on-line. Review the printed form with your clinical instructor during the final evaluation meeting. Both the student and the clinical instructor, sign the form. The hard copy of the APTA form is due on the Monday immediately following the end of the two-week clinical block, by the close of business. Hand deliver to Suite 312, 1462 Clifton Road. Clinical Site Orientation Checklist: The orientation checklist is due on the Monday immediately following the end of the two-week clinical block, by the close of business. Hand deliver to Suite 312, 1462 Clifton Road. Please click the "Next Page" button below to begin the evaluation.

COMPETENCIES AND CRITERIA Short-Term Clinical Competencies
95
Please complete the following:
*STUDENT
*PRIMARY CLINICAL INSTRUCTOR
SECONDARY CLINICAL INSTRUCTOR (Optional)
*FACILITY
*DATE: FINAL (mm/dd/yyyy)
*COMPLETED BY
PROVISION OF PATIENT CARE Please use the following scale to score the student: 4 = Demonstrates Competency: Student performs all criteria for the item 80-100% of the time 3 = Developing Competency: Student performs all criteria for the item 50-79% of the time 2 = Beginning to show competency- Student performs all criteria for the item 26 -49% of the time 1 = Rarely meets competency- Student performs all criteria for the item 0-25% of the time N/A not applicable Click the highlighted Item Below to View the Criteria. Given a client, the student was able to:
Provision of Patient Care
*16. Adhere to safety in provision of patient care. 4☐ 3☐ 2☐ 1☐ N/A☐
COMMENTS:

COMPETENCIES AND CRITERIA Short-Term Clinical Competencies
96
ADMINISTRATION Please use the following scale to score the student: 4 = Demonstrates Competency: Student performs all criteria for the item 80-100% of the time 3 = Developing Competency: Student performs all criteria for the item 50-79% of the time 2 = Beginning to show competency- Student performs all criteria for the item 26 -49% of the time 1 = Rarely meets competency- Student performs all criteria for the item 0-25% of the time N/A not applicable Click the highlighted Item Below to View the Criteria. In any and all circumstances during the clinical education experience, the student was able to:
COMMENTS:
Administrative Process
*40. Demonstrate professional behavior. 4☐ 3☐ 2☐ 1☐ N/A☐

COMPETENCIES AND CRITERIA Short-Term Clinical Competencies
97
PROVISION OF PATIENT CARE Please use the following scale to score the student: 4 = Demonstrates Competency: Student performs all criteria for the item 80-100% of the time 3 = Developing Competency: Student performs all criteria for the item 50-79% of the time 2 = Beginning to show competency- Student performs all criteria for the item 26 -49% of the time 1 = Rarely meets competency- Student performs all criteria for the item 0-25% of the time N/A not applicable Click the highlighted Item Below to View the Criteria. Given a client, the student was able to:
Provision of Patient Care *1. Identify symptoms and coexisting conditions of the client. 4☐ 3☐ 2☐ 1☐ N/A☐ *2. Differentiate symptoms and impairments presented from symptoms and impairments to be assessed.
4☐ 3☐ 2☐ 1☐ N/A☐
*3a. Identify onset of symptoms. 4☐ 3☐ 2☐ 1☐ N/A☐ *3b. Identify the relationship of symptoms to other examination findings.
4☐ 3☐ 2☐ 1☐ N/A☐
*4. Determine the priority of conditions to be assessed. 4☐ 3☐ 2☐ 1☐ N/A☐ *5. Identify and determine the rationale for procedures to examine the client's impairments or conditions.
4☐ 3☐ 2☐ 1☐ N/A☐
*6. Prepare to execute the examination procedure. 4☐ 3☐ 2☐ 1☐ N/A☐

COMPETENCIES AND CRITERIA Short-Term Clinical Competencies
98
PROVISION OF PATIENT CARE Please use the following scale to score the student: 4 = Demonstrates Competency: Student performs all criteria for the item 80-100% of the time 3 = Developing Competency: Student performs all criteria for the item 50-79% of the time 2 = Beginning to show competency- Student performs all criteria for the item 26 -49% of the time 1 = Rarely meets competency- Student performs all criteria for the item 0-25% of the time N/A not applicable Click the highlighted Item Below to View the Criteria. 7. Given a client, the student was able to conduct the examination according to the criteria sheet for the specific procedure/tests listed below:
Provision of Patient Care *7a. Gross Evaluation 4☐ 3☐ 2☐ 1☐ N/A☐ *7b.Vital Signs 4☐ 3☐ 2☐ 1☐ N/A☐ *7c. Visual Inspection 4☐ 3☐ 2☐ 1☐ N/A☐ *7d. Special Tests 4☐ 3☐ 2☐ 1☐ N/A☐ *7e. Palpation 4☐ 3☐ 2☐ 1☐ N/A☐ *7 f. Posture Evaluation 4☐ 3☐ 2☐ 1☐ N/A☐ *7g.Goniometry 4☐ 3☐ 2☐ 1☐ N/A☐ *7h. Manual Muscle Testing 4☐ 3☐ 2☐ 1☐ N/A☐ *7i. Orthopedic Evaluation: Peripheral Joints 4☐ 3☐ 2☐ 1☐ N/A☐ *7j. Limb Measurements 4☐ 3☐ 2☐ 1☐ N/A☐ *7k. Measurement of Ambulation Aids 4☐ 3☐ 2☐ 1☐ N/A☐ *7l. Amputee Evaluation 4☐ 3☐ 2☐ 1☐ N/A☐ *7m. Prosthetic Evaluation 4☐ 3☐ 2☐ 1☐ N/A☐ *7n. Gait Analysis 4☐ 3☐ 2☐ 1☐ N/A☐ *7o. Sensory Evaluation 4☐ 3☐ 2☐ 1☐ N/A☐ *7p. Functional Evaluation 4☐ 3☐ 2☐ 1☐ N/A☐ *7q. Other (list below if applicable) 4☐ 3☐ 2☐ 1☐ N/A☐ *7r. Other (list below if applicable) 4☐ 3☐ 2☐ 1☐ N/A☐ *7s. Other (list below if applicable) 4☐ 3☐ 2☐ 1☐ N/A☐ *7t. Other (list below if applicable) 4☐ 3☐ 2☐ 1☐ N/A☐ *7u. Other (list below if applicable) 4☐ 3☐ 2☐ 1☐ N/A☐ *7v. Other (list below if applicable) 4☐ 3☐ 2☐ 1☐ N/A☐ *7w. Other (list below if applicable) 4☐ 3☐ 2☐ 1☐ N/A☐ *7x. Other (list below if applicable) 4☐ 3☐ 2☐ 1☐ N/A☐ *7y. Other (list below if applicable) 4☐ 3☐ 2☐ 1☐ N/A☐ *7z. Other (list below if applicable) 4☐ 3☐ 2☐ 1☐ N/A☐

COMPETENCIES AND CRITERIA Short-Term Clinical Competencies
99
If 7q. "other" is applicable, list the procedure/test below.
If 7r. "other" is applicable, list the procedure/test below.
If 7s. "other" is applicable, list the procedure/test below.
If 7t. "other" is applicable, list the procedure/test below.
If 7u. "other" is applicable, list the procedure/test below.
If 7v. "other" is applicable, list the procedure/test below.
If 7w. "other" is applicable, list the procedure/test below.
If 7x. "other" is applicable, list the procedure/test below.
If 7y. "other" is applicable, list the procedure/test below.
If 7z. "other" is applicable, list the procedure/test below.

COMPETENCIES AND CRITERIA Short-Term Clinical Competencies
100
PROVISION OF PATIENT CARE Please use the following scale to score the student: 4 = Demonstrates Competency: Student performs all criteria for the item 80-100% of the time 3 = Developing Competency: Student performs all criteria for the item 50-79% of the time 2 = Beginning to show competency- Student performs all criteria for the item 26 -49% of the time 1 = Rarely meets competency- Student performs all criteria for the item 0-25% of the time N/A not applicable Click the highlighted Item Below to View the Criteria. Given a client, the student was able to:
Provision of Patient Care
*8. Evaluate examination findings. 4☐ 3☐ 2☐ 1☐ N/A☐ *9. Establish a physical therapy diagnosis. 4☐ 3☐ 2☐ 1☐ N/A☐ *10. Determine the prognosis. 4☐ 3☐ 2☐ 1☐ N/A☐ *11. Establish intervention goals. 4☐ 3☐ 2☐ 1☐ N/A☐ *12. Determine an intervention plan with rationale.
4☐ 3☐ 2☐ 1☐ N/A☐

COMPETENCIES AND CRITERIA Short-Term Clinical Competencies
101
PROVISION OF PATIENT CARE Please use the following scale to score the student: 4 = Demonstrates Competency: Student performs all criteria for the item 80-100% of the time 3 = Developing Competency: Student performs all criteria for the item 50-79% of the time 2 = Beginning to show competency- Student performs all criteria for the item 26 -49% of the time 1 = Rarely meets competency- Student performs all criteria for the item 0-25% of the time N/A not applicable Click the highlighted Item Below to View the Criteria. 13. Given a client, the student was able to administer the intervention according to the criteria sheet or evidence-based method for the specific procedures listed below.
Provision of Patient Care *13a. Range of Motion 4☐ 3☐ 2☐ 1☐ N/A☐ *13b. Pre-operative Instruction 4☐ 3☐ 2☐ 1☐ N/A☐ *13c. Massage 4☐ 3☐ 2☐ 1☐ N/A☐ *13d. Soft Tissue Mobilization 4☐ 3☐ 2☐ 1☐ N/A☐ *13e. Joint Mobilization 4☐ 3☐ 2☐ 1☐ N/A☐ *13f. Manipulation 4☐ 3☐ 2☐ 1☐ N/A☐ *13g. Iontophoresis with Phoresor Stimulator 4☐ 3☐ 2☐ 1☐ N/A☐ *13h. High-Voltage Pulsed Stimulation 4☐ 3☐ 2☐ 1☐ N/A☐ *13i. Neuromuscular Functional Electrical Stimulation 4☐ 3☐ 2☐ 1☐ N/A☐ *13j. Moist Heat Pack 4☐ 3☐ 2☐ 1☐ N/A☐ *13k. Intermittent Compression Pump (Jobst) 4☐ 3☐ 2☐ 1☐ N/A☐ *13l. T.E.N.S. 4☐ 3☐ 2☐ 1☐ N/A☐ *13m.Ultrasound 4☐ 3☐ 2☐ 1☐ N/A☐ *13n. Medical Diathermy 4☐ 3☐ 2☐ 1☐ N/A☐ *13o. Application of Cold 4☐ 3☐ 2☐ 1☐ N/A☐ *13p.Ambulation Training 4☐ 3☐ 2☐ 1☐ N/A☐ *13q. Paraffin 4☐ 3☐ 2☐ 1☐ N/A☐ *13r. Cervical Traction 4☐ 3☐ 2☐ 1☐ N/A☐ *13s. Lumbar Traction 4☐ 3☐ 2☐ 1☐ N/A☐ *13t. Proprioceptive Neuromuscular Facilitation 4☐ 3☐ 2☐ 1☐ N/A☐ *13u. Selection and Teaching of Exercise 4☐ 3☐ 2☐ 1☐ N/A☐ *13v. Treatment of Functional Limitations 4☐ 3☐ 2☐ 1☐ N/A☐ *13w. Other (list below if applicable) 4☐ 3☐ 2☐ 1☐ N/A☐ *13x. Other (list below if applicable) 4☐ 3☐ 2☐ 1☐ N/A☐ *13y. Other (list below if applicable) 4☐ 3☐ 2☐ 1☐ N/A☐
If 13w. "other" is applicable, list the procedure/test below.
If 13x. "other" is applicable, list the procedure/test below.
If 13y. "other" is applicable, list the procedure/test below.

COMPETENCIES AND CRITERIA Short-Term Clinical Competencies
102
PROVISION OF PATIENT CARE Note: Question #16 is missing below because you have already completed that question above. Please use the following scale to score the student: 4 = Demonstrates Competency: Student performs all criteria for the item 80-100% of the time 3 = Developing Competency: Student performs all criteria for the item 50-79% of the time 2 = Beginning to show competency- Student performs all criteria for the item 26 -49% of the time 1 = Rarely meets competency- Student performs all criteria for the item 0-25% of the time N/A not applicable Click the highlighted Item Below to View the Criteria. Given a client, the student was able to:
Provision of Patient Care *14. Assess the effects of the intervention. 4☐ 3☐ 2☐ 1☐ N/A☐ *15. Modify the intervention and/or goals as indicated. 4☐ 3☐ 2☐ 1☐ N/A☐ *17a. Record initial notes concisely and accurately in appropriate records.
4☐ 3☐ 2☐ 1☐ N/A☐
17b. Record progress notes concisely and accurately in appropriate records.
4☐ 3☐ 2☐ 1☐ N/A☐
17c. Record discharge notes concisely and accurately in appropriate records.
4☐ 3☐ 2☐ 1☐ N/A☐
*17d. Record intervention(s) given concisely and accurately in appropriate records.
4☐ 3☐ 2☐ 1☐ N/A☐
Comments:

COMPETENCIES AND CRITERIA Short-Term Clinical Competencies
103
INTERPERSONAL COMMUNICATION Please use the following scale to score the student: 4 = Demonstrates Competency: Student performs all criteria for the item 80-100% of the time 3 = Developing Competency: Student performs all criteria for the item 50-79% of the time 2 = Beginning to show competency- Student performs all criteria for the item 26 -49% of the time 1 = Rarely meets competency- Student performs all criteria for the item 0-25% of the time N/A not applicable Click the highlighted Item Below to View the Criteria. In any and all interactions during the clinical education experience, the student was able to:
Interpersonal Skills
*18. Identify cognitive needs and resources of other person(s). 4☐ 3☐ 2☐ 1☐ N/A☐ *19. Identify emotional needs and resources of other person(s).
4☐ 3☐ 2☐ 1☐ N/A☐
*20. Identify cognitive needs and resources of self. 4☐ 3☐ 2☐ 1☐ N/A☐ *21. Identify emotional needs and resources of self. 4☐ 3☐ 2☐ 1☐ N/A☐ 22. Identify roles of relevant persons. 4☐ 3☐ 2☐ 1☐ N/A☐ *23 Respond to others in a way that fosters a positive change. 4☐ 3☐ 2☐ 1☐ N/A☐ *24. Refer client and relevant others to another person if indicated.
4☐ 3☐ 2☐ 1☐ N/A☐
*25. Exhibit caring for the people with whom he/she is involved.
4☐ 3☐ 2☐ 1☐ N/A☐
*26. Evaluate the effect of his/her response on the needs of the other person(s) and self.
4☐ 3☐ 2☐ 1☐ N/A☐
*27. Modify his/her response to the needs of relevant others as indicated.
4☐ 3☐ 2☐ 1☐ N/A☐
Comments:

COMPETENCIES AND CRITERIA Short-Term Clinical Competencies
104
TEACHING-LEARNING Please use the following scale to score the student: 4 = Demonstrates Competency: Student performs all criteria for the item 80-100% of the time 3 = Developing Competency: Student performs all criteria for the item 50-79% of the time 2 = Beginning to show competency- Student performs all criteria for the item 26 -49% of the time 1 = Rarely meets competency- Student performs all criteria for the item 0-25% of the time N/A not applicable Click the highlighted Item Below to View the Criteria. Given a client or other opportunities to plan, implement and evaluate the teaching learning process, the student was able to:
Teaching-Learning Process *28. Identify the needs of the learner/client. 4☐ 3☐ 2☐ 1☐ N/A☐ *29. Identify an appropriate level of learning or skill to be accomplished in the learning experience.
4☐ 3☐ 2☐ 1☐ N/A☐
*30. State the behavior to be learned by the client/learner. 4☐ 3☐ 2☐ 1☐ N/A☐ *31. Make certain the learner/client understands the purpose (i.e., why they are learning what they are learning).
4☐ 3☐ 2☐ 1☐ N/A☐
*32. Explain what is to be learned. 4☐ 3☐ 2☐ 1☐ N/A☐ *33. Demonstrate to the learner/client what is to be learned. 4☐ 3☐ 2☐ 1☐ N/A☐ *34. Provide an opportunity for the learner/client to practice the behavior.
4☐ 3☐ 2☐ 1☐ N/A☐
*35. Give the learner/client feedback on performance of the desired behavior.
4☐ 3☐ 2☐ 1☐ N/A☐
*36. Give some examples of use of the behavior in the client's everyday life.
4☐ 3☐ 2☐ 1☐ N/A☐
*37. Solicit some examples from the client of use of the behavior in his/her everyday life.
4☐ 3☐ 2☐ 1☐ N/A☐
*38. Determine that the learner/client has learned what is being taught.
4☐ 3☐ 2☐ 1☐ N/A☐
Comments:

COMPETENCIES AND CRITERIA Short-Term Clinical Competencies
105
ADMINISTRATION Note: Question #40 is missing below because you have already completed that question above.
Please use the following scale to score the student: 4 = Demonstrates Competency: Student performs all criteria for the item 80-100% of the time 3 = Developing Competency: Student performs all criteria for the item 50-79% of the time 2 = Beginning to show competency- Student performs all criteria for the item 26 -49% of the time 1 = Rarely meets competency- Student performs all criteria for the item 0-25% of the time N/A not applicable Click the highlighted Item Below to View the Criteria.
The student was able to demonstrate competency in the administrative process according to the objectives and criteria below:
Administrative Process *39. Identify the administrative structure to provide physical therapy services.
4☐ 3☐ 2☐ 1☐ N/A☐
*41. Identify the overall goals of the physical therapy services provided.
4☐ 3☐ 2☐ 1☐ N/A☐
Comments:

COMPETENCIES AND CRITERIA Short-Term Clinical Competencies
106
Please provide the following dates regarding student attendance:
Date(s) absent: (mm/dd/yyyy)
Date(s) made-up: (mm/dd/yyyy)
STUDENT:
*Name: *Date: (mm/dd/yyyy)
PRIMARY CLINICAL SUPERVISOR:
*Name:
*Date: (mm/dd/yyyy)
*Clinical Specialty Certification (cite the
specific certification or enter None):
Date of Clinical Specialty Certification: (mm/dd/yyyy)
*APTA Credentialed Clinical Instructor (Primary CI): ☐ Yes
☐ No
SECONDARY CLINICAL SUPERVISOR (Optional):
Name:
Date: (mm/dd/yyyy)
Clinical Specialty Certification (cite the
specific certification or enter None):
Date of Clinical Specialty Certification: (mm/dd/yyyy)
APTA Credentialed Clinical Instructor (Secondary CI):
☐ Yes
☐ No

COMPETENCIES AND CRITERIA Short-Term Clinical Competencies
107
3. How many minutes did it take you to complete the evaluation?
4. Did you complete the evaluation at one sitting, or did you start the evaluation, stop, and complete it at a
later time? ☐ I completed the evaluation at one sitting
☐ I started the evaluation, stopped, and completed at a later time
3. Please rate your agreement with the following: Strongly Disagree Disagree Agree Strongly Agree
a. Based on the instructions provided, I understand how to score the Emory online clinical education evaluation of student performance.
☐ ☐ ☐ ☐
b. The process used to complete the Emory online clinical education evaluation was simple.
☐ ☐ ☐ ☐
c. It was convenient for me to complete the Emory clinical education evaluation online.
☐ ☐ ☐ ☐
d. I am familiar with the objectives and expectations of the Emory PT program for this experience.
☐ ☐ ☐ ☐
e. I understand how to use Emory criteria to rate student performance.
☐ ☐ ☐ ☐
4. If you disagreed or strongly disagreed with any of the above, please reference the item number and provide specific details.
5. Please provide any additional comments regarding your experience completing the online evaluation.

COMPETENCIES AND CRITERIA Short-Term Clinical Competencies
108
You have completed the online evaluation of student performance.
WARNING!
DO NOT CLICK the "Submit Evaluation" button until after you have the CI/student conference. Please note that your responses are automatically saved when you exit the form. In order to access your saved evaluation form for the CI/student discussion, please click on the link provided in the email
invitation you received. FINAL STEP FOR SUBMISSION After completing the CI/student conference, please click the "Submit
Evaluation" button below to submit your final responses. After clicking the “Submit Evaluation” button, you will have the option to download and print a PDF of your responses. A link (Download PDF) will be available on the upper left side of the next page you reach after clicking the “Submit Evaluation” button. Whether or not you decide to download a PDF of your evaluation, you must scroll to the bottom of the page and click the “Submit Evaluation” button a second time. This is
necessary to record your responses and exit the form.
Thank you for completing the online evaluation!
Note: If you need to stop and complete the survey later, your responses on all previous pages will be automatically saved when you exit the evaluation. To save any responses on the
current page, please click the "Save and Continue" button below before you exit the evaluation. When you are ready to complete the survey, simply click on the link in the email invitation you
received and you will be able to resume where you left off or at the beginning if you prefer.

COMPETENCIES AND CRITERIA Short-Term Clinical Competencies
109
CLINICAL EDUCATION / SHORT-TERM ADULT NEUROREHABILITATION/PEDIATRIC REHABILITATION
NEUROREHABILITATION CLINICAL EDUCATION EVALUATION
DIVISION OF PHYSICAL THERAPY EMORY UNIVERSITY
CLINICAL SCIENCE
ADULT NEUROREHABILITATION/PEDIATRIC REHABILITATION SHORT-TERM CLINICAL EDUCATION EXPERIENCE
Instructions Welcome to the on-line “Clinical Education Evaluation” of student performance for the Adult Neurorehabilitation/Pediatric Rehabilitation short term clinical education experience. The online form is to be used in conjunction with competency documents provided by the clinical coordinator, as well as criteria sheets found in the Emory Physical Therapy Entry Level Competencies and Criteria manual available at your facility. For your convenience, you can access the competencies online. To view a competency, click on the title you wish to review: Provision of Patient Care, Interpersonal Communication, the Teaching-Learning Process, or Administration. Additionally, the criteria for each individual item within a competency can be accessed by clicking on the highlighted item in the evaluation form. A pop-up window will open with a description of the criteria. After beginning the evaluation you can exit at any time, for any reason, and your responses will be automatically saved as long as you do not click the “Submit Evaluation” button. You may re-enter the evaluation to view or make changes to your responses as many times as necessary using the link provided in the email invitation, as long as you have not submitted the form. When you re-enter the document, you will be given the option to resume where you left off or start at the beginning. Please hold the evaluation conference with your student before submitting the evaluation form. If the affiliating facility requires a printed copy of this evaluation, you will have the option to download and print or save a PDF of your completed evaluation after you click the "Submit Evaluation" button, which is located on the last page of the evaluation form.
Division of Physical Therapy
Emory University

COMPETENCIES AND CRITERIA Short-Term Clinical Competencies
110
Course Objectives Items on the form are designed to measure the following general objectives during this clinical experience.
Given adult patients with neurologic problems or pediatric patients with limited comorbidities, the student will use the problem-solving process to assess patients and establish a plan of care, in accordance with Emory’s criteria described in the Provision of Patient Care criteria sheet.
The student will use the interpersonal communication and teaching-learning processes during interactions with patients, healthcare providers, and staff in accordance with Emory’s criteria described in the Interpersonal Communications and Teaching-Learning criteria sheets.
The student will demonstrate professional behavior in accordance with Emory’s criteria described in the Administration criteria sheet.
The student will identify the administrative structure and goals of the physical therapy department as described in the Administration criteria sheet.
Feedback Daily feedback: It is expected that the clinical instructor (CI) provide the student feedback, present suggestions, and frequently set/assess educational goals. Periodic feedback: A thorough review of student performance (utilizing the evaluation form as a guide) is helpful at the end of the first week of the two-week block. Who Completes the Final Short Term Evaluation Form? The CI and student individually complete their own version of the evaluation form online. If more than one CI provided supervision during the affiliation the therapist who had primary responsibility must be designated as “primary CI.” The primary CI will collect and collate data from all supervising CIs involved during the appropriate time period. The primary CI will input the ratings and comments into the online evaluation form and hold the evaluation conference with the student. When are the Evaluations completed? The evaluation is completed at the end of the affiliation. The final day of the two-week block is the only time a formal written evaluation by the CI and student should be performed. The evaluation is only based on the last week of the affiliation. How is the On-Line Clinical Education Evaluation Form Completed? The form is divided into 4 sections/competencies: provision of care, interpersonal communication, teaching-learning, and administration. Observable behaviors to be graded are listed for each competency, and a comments' section is provided. Each item evaluated will be scored as follows: 4 = Demonstrates Competency: Student performs all criteria for the item 80-100% of the time 3 = Developing Competency: Student performs all criteria for the item 50-79% of the time 2 = Beginning Competency: Student performs all criteria for the item 26 -49% of the time 1 = Rarely Competent: Student performs all criteria for the item 0-25% of the time N/A = Not applicable: Student did not have an opportunity to perform or did not have a sufficient number of opportunities to be evaluated (usually < 3) Scoring Example: #12: “Determine an intervention plan with rationale”: If the student correctly demonstrated this behavior according to criteria 80% of the time during the second week (8 times out of 10 or better), the appropriate response is “4”. If less than 80%, please estimate the percentage of time the student demonstrated a behavior according to criteria and select that scoring level. If the CI did not have an opportunity to observe the student or there was not sufficient opportunity, Not Applicable “N/A” should be selected. Two items are pulled out of sequence from their respective competencies and graded first due to their importance in clinical care. The first is #16: “Adhere to safety in provision of patient care”, and the second is #40: “Demonstrate professional behavior.” We expect the student will earn a “4 – Demonstrates Competency” for both of these items, and be at 100%. If the student is not earning a “4”, or is earning a “4” but demonstrating “red flags”, please contact one of the Directors of Clinical Education immediately (Patricia Bridges – 404-712-4132 or Tami Phillips – 404-727-1350). A “red flag” for either item may result in dismissal from the affiliation and/or remediation.

COMPETENCIES AND CRITERIA Short-Term Clinical Competencies
111
Please utilize the “Comments” boxes to:
provide constructive feedback, examples and suggestions for items requiring further practice
provide information about items marked N/A
provide positive feedback, examples, and suggestions What is the Procedure for the Evaluation Conference? After the student and CI complete the evaluation forms individually online, they SHOULD NOT click the “Submit Evaluation” button. Simply close the browser window and responses will be automatically saved. To access saved responses for the CI/student conference, click on the link provided in each individual’s email invitation. The CI and student should review their individual, completed evaluation forms in the conference. Differences in responses are discussed with both persons offering examples to substantiate the chosen response. If agreement is not reached, the responses on each form should remain and written comments made. At the end of the evaluation, both evaluation forms are signed electronically by the student and the clinical instructor. Clinical Instructors please indicate whether you have a clinical specialty certification and specify whether you are an APTA credentialed clinical instructor. If the affiliating facility requires a printed copy of this evaluation, you will have the option to download and print or save a PDF of your completed evaluation after you click the “Submit Evaluation” button, which is located on the last page of the evaluation form. Emory does not require a printed copy. Upon completing the conference and signing these documents, press the submit button to send each form. At this point, the student and CI discuss the “APTA Physical Therapy Student Evaluation: Clinical Experience and Clinical Instruction” form which is completed by the student on-line and printed. In addition to the student signing the form, the CI signs the form indicating he/she has reviewed the information with the student. **IMPORTANT: The CI and student should electronically sign both evaluation forms. The CI/student
must personally enter his/her own name and date after the evaluation conference for this to be considered a valid electronic signature.** What is the Procedure for the Evaluation Conference? After the student and CI complete the evaluation forms individually on-line, they SHOULD NOT click the “Submit Evaluation” button. Simply close the browser window and responses will be automatically saved. To access saved responses for the CI/student conference, click on the link provided in the email invitation. Please hold the CI/student evaluation conference before submitting your responses and then return to submit the form electronically after the conference. The evaluation conference should be held in a private area with a computer. The CI and student should review their evaluations simultaneously. Optimally, the student would bring a laptop to the clinic so that each evaluation could be brought up on a separate computer, allowing the CI and student to scroll down through sections of the form at the same time. A second option would be locating a computer lab or private office with two computers. Finally, it is possible to open two browser windows on one computer by having:
the CI click on the link provided in the email invitation and once the form is open, minimize the browser window;
the student can then open a second browser window (i.e. Internet Explorer, Netscape, Mozilla etc.) and access his/her email to click on the link provided in the email invitation; and
the CI and student can then “maximize and minimize” each browser window to see the two evaluation documents.
Conversely, you may open and review one document at a time if you prefer. Differences in responses between the CI’s form and the student’s self-assessment are discussed with both persons offering examples to substantiate the chosen response. If agreement is not reached, responses on the forms should remain and a comment entered.

COMPETENCIES AND CRITERIA Short-Term Clinical Competencies
112
At the end of the evaluation conference, the CI and student should sign both the CI evaluation and the student self-assessment electronically. (Typing his/her name in the space provided on the "Signatures" page is considered to be a signature. The CI/student must each personally enter his or her own name and date after the evaluation conference for this to be considered a valid electronic signature.) Upon completing the conference and signing these documents, press the submit button to send each form. This should be done for the evaluation completed by the CI, as well as the evaluation completed by the student. Printed copies of these forms do not need to be provided to the Emory University, Division of Physical Therapy. If the affiliating facility requires a printed copy of this evaluation, you will have the option to download and print or save a PDF of your completed evaluation after you click the submit evaluation button, which is located on the last page of the evaluation. At this point, the student and CI can discuss the APTA Physical Therapy Student Evaluation: Clinical Experience and Clinical Instruction form which is also completed on-line, printed, and signed by the student. The CI is asked to sign this form indicating he/she has reviewed the information contained in the evaluation of the clinical education experience. What Forms Does the Student Need to Return to Emory University, Division of Physical Therapy? Clinical Education Evaluation: Online submission of both the clinical instructor’s and student’s versions. Online submission should be completed the last day of the clinical affiliation. APTA Physical Therapy Student Evaluation - Clinical Experience and Clinical Instruction form: Fill out the entire form on-line (including the clinical instructor’s information on the first page), print, and submit on-line. Review the printed form with your clinical instructor during the final evaluation meeting. Both the student and the clinical instructor, sign the form. The hard copy of the APTA form is due on the Monday immediately following the end of the two-week clinical block, by the close of business. Hand deliver to Suite 312, 1462 Clifton Road.
Clinical Site Orientation Checklist: The orientation checklist is due on the Monday immediately following the end of the two-week clinical block, by the close of business. Hand deliver to Suite 312, 1462 Clifton Road. Please click the "Next Page" button below to begin the evaluation.

COMPETENCIES AND CRITERIA Short-Term Clinical Competencies
113
Please complete the following:
*STUDENT
*PRIMARY CLINICAL INSTRUCTOR
SECONDARY CLINICAL INSTRUCTOR (Optional)
*FACILITY
*DATE: FINAL (mm/dd/yyyy)
*COMPLETED BY
PROVISION OF PATIENT CARE Please use the following scale to score the student: 4 = Demonstrates Competency: Student performs all criteria for the item 80-100% of the time 3 = Developing Competency: Student performs all criteria for the item 50-79% of the time 2 = Beginning to show competency- Student performs all criteria for the item 26 -49% of the time 1 = Rarely meets competency- Student performs all criteria for the item 0-25% of the time N/A not applicable Click the highlighted Item Below to View the Criteria. Given a client, the student was able to:
Provision of Patient Care
*16. Adhere to safety in provision of patient care. 4☐ 3☐ 2☐ 1☐ N/A☐
COMMENTS:

COMPETENCIES AND CRITERIA Short-Term Clinical Competencies
114
ADMINISTRATION Please use the following scale to score the student: 4 = Demonstrates Competency: Student performs all criteria for the item 80-100% of the time 3 = Developing Competency: Student performs all criteria for the item 50-79% of the time 2 = Beginning to show competency- Student performs all criteria for the item 26 -49% of the time 1 = Rarely meets competency- Student performs all criteria for the item 0-25% of the time N/A not applicable Click the highlighted Item Below to View the Criteria. In any and all circumstances during the clinical education experience, the student was able to:
COMMENTS:
Administrative Process
*40. Demonstrate professional behavior. 4☐ 3☐ 2☐ 1☐ N/A☐

COMPETENCIES AND CRITERIA Short-Term Clinical Competencies
115
PROVISION OF PATIENT CARE Please use the following scale to score the student: 4 = Demonstrates Competency: Student performs all criteria for the item 80-100% of the time 3 = Developing Competency: Student performs all criteria for the item 50-79% of the time 2 = Beginning to show competency- Student performs all criteria for the item 26 -49% of the time 1 = Rarely meets competency- Student performs all criteria for the item 0-25% of the time N/A not applicable Click the highlighted Item Below to View the Criteria. Given a client, the student was able to:
Provision of Patient Care *1. Identify symptoms and coexisting conditions of the client. 4☐ 3☐ 2☐ 1☐ N/A☐ *2. Differentiate symptoms and impairments presented from symptoms and impairments to be assessed.
4☐ 3☐ 2☐ 1☐ N/A☐
*3a. Identify onset of symptoms. 4☐ 3☐ 2☐ 1☐ N/A☐ *3b. Identify the relationship of symptoms to other examination findings.
4☐ 3☐ 2☐ 1☐ N/A☐
*4. Determine the priority of conditions to be assessed. 4☐ 3☐ 2☐ 1☐ N/A☐ *5. Identify and determine the rationale for procedures to examine the client's impairments or conditions.
4☐ 3☐ 2☐ 1☐ N/A☐
*6. Prepare to execute the examination procedure. 4☐ 3☐ 2☐ 1☐ N/A☐

COMPETENCIES AND CRITERIA Short-Term Clinical Competencies
116
PROVISION OF PATIENT CARE Please use the following scale to score the student: 4 = Demonstrates Competency: Student performs all criteria for the item 80-100% of the time 3 = Developing Competency: Student performs all criteria for the item 50-79% of the time 2 = Beginning to show competency- Student performs all criteria for the item 26 -49% of the time 1 = Rarely meets competency- Student performs all criteria for the item 0-25% of the time N/A not applicable Click the highlighted Item Below to View the Criteria. 7. Given a client, the student was able to conduct the examination according to the criteria sheet for the specific procedure/tests listed below:
Provision of Patient Care *7a. gross evaluation 4☐ 3☐ 2☐ 1☐ N/A☐ *7b. evaluation of temperature 4☐ 3☐ 2☐ 1☐ N/A☐ *7c. evaluation of blood pressure 4☐ 3☐ 2☐ 1☐ N/A☐ *7d. evaluation of ventilation 4☐ 3☐ 2☐ 1☐ N/A☐ *7e. evaluation of pulse rate and peripheral pulses 4☐ 3☐ 2☐ 1☐ N/A☐ *7 f. visual inspection 4☐ 3☐ 2☐ 1☐ N/A☐ *7g. special tests 4☐ 3☐ 2☐ 1☐ N/A☐ *7h. Cognitive Assessment 4☐ 3☐ 2☐ 1☐ N/A☐ *7i. Screening for CNS Dysfunction 4☐ 3☐ 2☐ 1☐ N/A☐ *7j. Cranial Nerve Assessment 4☐ 3☐ 2☐ 1☐ N/A☐ *7k. Sensory Assessment 4☐ 3☐ 2☐ 1☐ N/A☐ *7l. Evaluation of Functional Limitations 4☐ 3☐ 2☐ 1☐ N/A☐ *7m. Balance and Fall Risk 4☐ 3☐ 2☐ 1☐ N/A☐ *7n. Gait Analysis 4☐ 3☐ 2☐ 1☐ N/A☐ *7o. Perceptual Assessment 4☐ 3☐ 2☐ 1☐ N/A☐ *7p. Task Analysis 4☐ 3☐ 2☐ 1☐ N/A☐ *7q. Other (list below if applicable) 4☐ 3☐ 2☐ 1☐ N/A☐ *7r. Other (list below if applicable) 4☐ 3☐ 2☐ 1☐ N/A☐ *7s. Other (list below if applicable) 4☐ 3☐ 2☐ 1☐ N/A☐ *7t. Other (list below if applicable) 4☐ 3☐ 2☐ 1☐ N/A☐ *7u. Other (list below if applicable) 4☐ 3☐ 2☐ 1☐ N/A☐ *7v. Other (list below if applicable) 4☐ 3☐ 2☐ 1☐ N/A☐ *7w. Other (list below if applicable) 4☐ 3☐ 2☐ 1☐ N/A☐ *7x. Other (list below if applicable) 4☐ 3☐ 2☐ 1☐ N/A☐ *7y. Other (list below if applicable) 4☐ 3☐ 2☐ 1☐ N/A☐ *7z. Other (list below if applicable) 4☐ 3☐ 2☐ 1☐ N/A☐

COMPETENCIES AND CRITERIA Short-Term Clinical Competencies
117
If 7q. "other" is applicable, list the procedure/test below.
If 7r. "other" is applicable, list the procedure/test below.
If 7s. "other" is applicable, list the procedure/test below.
If 7t. "other" is applicable, list the procedure/test below.
If 7u. "other" is applicable, list the procedure/test below.
If 7v. "other" is applicable, list the procedure/test below.
If 7w. "other" is applicable, list the procedure/test below.
If 7x. "other" is applicable, list the procedure/test below.
If 7y. "other" is applicable, list the procedure/test below.
If 7z. "other" is applicable, list the procedure/test below.

COMPETENCIES AND CRITERIA Short-Term Clinical Competencies
118
PROVISION OF PATIENT CARE Please use the following scale to score the student: 4 = Demonstrates Competency: Student performs all criteria for the item 80-100% of the time 3 = Developing Competency: Student performs all criteria for the item 50-79% of the time 2 = Beginning to show competency- Student performs all criteria for the item 26 -49% of the time 1 = Rarely meets competency- Student performs all criteria for the item 0-25% of the time N/A not applicable Click the highlighted Item Below to View the Criteria. Given a client, the student was able to:
Provision of Patient Care
*8. Evaluate examination findings. 4☐ 3☐ 2☐ 1☐ N/A☐ *9. Establish a physical therapy diagnosis. 4☐ 3☐ 2☐ 1☐ N/A☐ *10. Determine the prognosis. 4☐ 3☐ 2☐ 1☐ N/A☐ *11. Establish intervention goals. 4☐ 3☐ 2☐ 1☐ N/A☐ *12. Determine an intervention plan with rationale. 4☐ 3☐ 2☐ 1☐ N/A☐

COMPETENCIES AND CRITERIA Short-Term Clinical Competencies
119
PROVISION OF PATIENT CARE Please use the following scale to score the student: 4 = Demonstrates Competency: Student performs all criteria for the item 80-100% of the time 3 = Developing Competency: Student performs all criteria for the item 50-79% of the time 2 = Beginning to show competency- Student performs all criteria for the item 26 -49% of the time 1 = Rarely meets competency- Student performs all criteria for the item 0-25% of the time N/A not applicable Click the highlighted Item Below to View the Criteria. 13. Given a client, the student was able to administer the intervention according to the criteria sheet or evidence-based method for the specific procedures listed below.
Provision of Patient Care
*13a. Bed Mobility 4☐ 3☐ 2☐ 1☐ N/A☐ *13b. Transfers 4☐ 3☐ 2☐ 1☐ N/A☐ *13c. Balance training 4☐ 3☐ 2☐ 1☐ N/A☐ *13d. Ambulation training 4☐ 3☐ 2☐ 1☐ N/A☐ *13e. Treatment of functional limitations 4☐ 3☐ 2☐ 1☐ N/A☐ *13f. Range of Motion 4☐ 3☐ 2☐ 1☐ N/A☐ *13g. Constraint-induced Movement Therapy
4☐ 3☐ 2☐ 1☐ N/A☐
*13h. PNF 4☐ 3☐ 2☐ 1☐ N/A☐ *13i. Structuring Treatment Sessions 4☐ 3☐ 2☐ 1☐ N/A☐ *13j. Other (list below if applicable) 4☐ 3☐ 2☐ 1☐ N/A☐ *13k. Other (list below if applicable) 4☐ 3☐ 2☐ 1☐ N/A☐ *13l. Other (list below if applicable) 4☐ 3☐ 2☐ 1☐ N/A☐ *13m. Other (list below if applicable)
4☐ 3☐ 2☐ 1☐ N/A☐ *13n. Other (list below if applicable) 4☐ 3☐ 2☐ 1☐ N/A☐ *13o. Other (list below if applicable) 4☐ 3☐ 2☐ 1☐ N/A☐ *13p. Other (list below if applicable) 4☐ 3☐ 2☐ 1☐ N/A☐ *13q. Other (list below if applicable) 4☐ 3☐ 2☐ 1☐ N/A☐ *13r. Other (list below if applicable) 4☐ 3☐ 2☐ 1☐ N/A☐ *13s. Other (list below if applicable) 4☐ 3☐ 2☐ 1☐ N/A☐
If 13j. "other" is applicable, list the procedure/test below.
If 13k. "other" is applicable, list the procedure/test below.
If 13l. “other” is applicable, list the procedure/test below.

COMPETENCIES AND CRITERIA Short-Term Clinical Competencies
120
If 13m. “other” is applicable, list the procedure/test below.
If 13n. “other” is applicable, list the procedure/test below.
If 13o. “other” is applicable, list the procedure/test below.
If 13p. “other” is applicable, list the procedure/test below.
If 13q. “other” is applicable, list the procedure/test below.
If 13r. “other” is applicable, list the procedure/test below.
If 13s. “other” is applicable, list the procedure/test below.

COMPETENCIES AND CRITERIA Short-Term Clinical Competencies
121
PROVISION OF PATIENT CARE Note: Question #16 is missing below because you have already completed that question above. Please use the following scale to score the student: 4 = Demonstrates Competency: Student performs all criteria for the item 80-100% of the time 3 = Developing Competency: Student performs all criteria for the item 50-79% of the time 2 = Beginning to show competency- Student performs all criteria for the item 26 -49% of the time 1 = Rarely meets competency- Student performs all criteria for the item 0-25% of the time N/A not applicable Click the highlighted Item Below to View the Criteria. Given a client, the student was able to:
Provision of Patient Care *14. Assess the effects of the intervention. 4☐ 3☐ 2☐ 1☐ N/A☐ *15. Modify the intervention and/or goals as indicated. 4☐ 3☐ 2☐ 1☐ N/A☐ *17a. Record initial notes concisely and accurately in appropriate records.
4☐ 3☐ 2☐ 1☐ N/A☐
17b. Record progress notes concisely and accurately in appropriate records.
4☐ 3☐ 2☐ 1☐ N/A☐
17c. Record discharge notes concisely and accurately in appropriate records.
4☐ 3☐ 2☐ 1☐ N/A☐
*17d. Record intervention(s) given concisely and accurately in appropriate records.
4☐ 3☐ 2☐ 1☐ N/A☐
Comments:

COMPETENCIES AND CRITERIA Short-Term Clinical Competencies
122
INTERPERSONAL COMMUNICATION Please use the following scale to score the student: 4 = Demonstrates Competency: Student performs all criteria for the item 80-100% of the time 3 = Developing Competency: Student performs all criteria for the item 50-79% of the time 2 = Beginning to show competency- Student performs all criteria for the item 26 -49% of the time 1 = Rarely meets competency- Student performs all criteria for the item 0-25% of the time N/A not applicable Click the highlighted Item Below to View the Criteria. In any and all interactions during the clinical education experience, the student was able to:
Interpersonal Skills
*18. Identify cognitive needs and resources of other person(s). 4☐ 3☐ 2☐ 1☐ N/A☐ *19. Identify emotional needs and resources of other person(s). 4☐ 3☐ 2☐ 1☐ N/A☐ *20. Identify cognitive needs and resources of self. 4☐ 3☐ 2☐ 1☐ N/A☐ *21. Identify emotional needs and resources of self. 4☐ 3☐ 2☐ 1☐ N/A☐ 22. Identify roles of relevant persons. 4☐ 3☐ 2☐ 1☐ N/A☐ *23 Respond to others in a way that fosters a positive change. 4☐ 3☐ 2☐ 1☐ N/A☐ *24. Refer client and relevant others to another person if indicated. 4☐ 3☐ 2☐ 1☐ N/A☐ *25. Exhibit caring for the people with whom he/she is involved. 4☐ 3☐ 2☐ 1☐ N/A☐ *26. Evaluate the effect of his/her response on the needs of the other person(s) and self.
4☐ 3☐ 2☐ 1☐ N/A☐
*27. Modify his/her response to the needs of relevant others as indicated.
4☐ 3☐ 2☐ 1☐ N/A☐
Comments:

COMPETENCIES AND CRITERIA Short-Term Clinical Competencies
123
TEACHING-LEARNING Please use the following scale to score the student: 4 = Demonstrates Competency: Student performs all criteria for the item 80-100% of the time 3 = Developing Competency: Student performs all criteria for the item 50-79% of the time 2 = Beginning to show competency- Student performs all criteria for the item 26 -49% of the time 1 = Rarely meets competency- Student performs all criteria for the item 0-25% of the time N/A not applicable Click the highlighted Item Below to View the Criteria. Given a client or other opportunities to plan, implement and evaluate the teaching learning process, the student was able to:
Teaching-Learning Process *28. Identify the needs of the learner/client. 4☐ 3☐ 2☐ 1☐ N/A☐ *29. Identify an appropriate level of learning or skill to be accomplished in the learning experience.
4☐ 3☐ 2☐ 1☐ N/A☐
*30. State the behavior to be learned by the client/learner. 4☐ 3☐ 2☐ 1☐ N/A☐ *31. Make certain the learner/client understands the purpose (i.e., why they are learning what they are learning).
4☐ 3☐ 2☐ 1☐ N/A☐
*32. Explain what is to be learned. 4☐ 3☐ 2☐ 1☐ N/A☐ *33. Demonstrate to the learner/client what is to be learned. 4☐ 3☐ 2☐ 1☐ N/A☐ *34. Provide an opportunity for the learner/client to practice the behavior.
4☐ 3☐ 2☐ 1☐ N/A☐
*35. Give the learner/client feedback on performance of the desired behavior.
4☐ 3☐ 2☐ 1☐ N/A☐
*36. Give some examples of use of the behavior in the client's everyday life.
4☐ 3☐ 2☐ 1☐ N/A☐
*37. Solicit some examples from the client of use of the behavior in his/her everyday life.
4☐ 3☐ 2☐ 1☐ N/A☐
*38. Determine that the learner/client has learned what is being taught.
4☐ 3☐ 2☐ 1☐ N/A☐
Comments:

COMPETENCIES AND CRITERIA Short-Term Clinical Competencies
124
ADMINISTRATION Note: Question #40 is missing below because you have already completed that question above.
Please use the following scale to score the student: 4 = Demonstrates Competency: Student performs all criteria for the item 80-100% of the time 3 = Developing Competency: Student performs all criteria for the item 50-79% of the time 2 = Beginning to show competency- Student performs all criteria for the item 26 -49% of the time 1 = Rarely meets competency- Student performs all criteria for the item 0-25% of the time N/A not applicable Click the highlighted Item Below to View the Criteria.
The student was able to demonstrate competency in the administrative process according to the objectives and criteria below:
Administrative Process *39. Identify the administrative structure to provide physical therapy services.
4☐ 3☐ 2☐ 1☐ N/A☐
*41. Identify the overall goals of the physical therapy services provided.
4☐ 3☐ 2☐ 1☐ N/A☐
Comments:
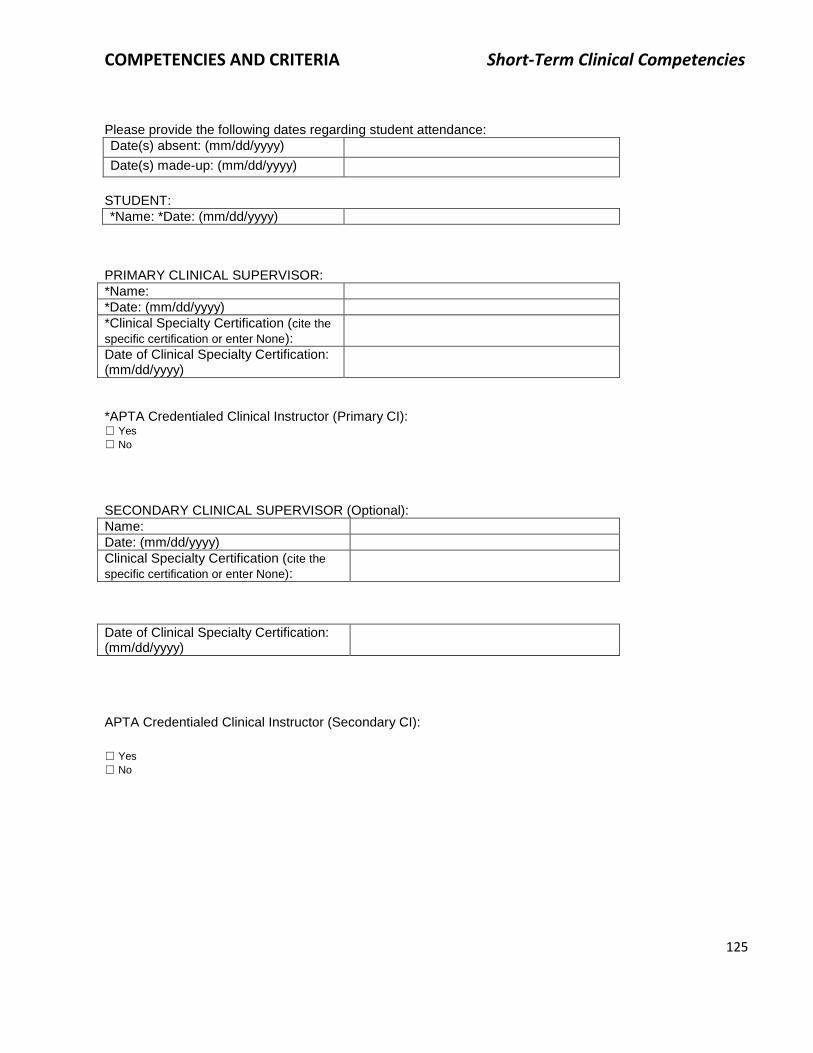
COMPETENCIES AND CRITERIA Short-Term Clinical Competencies
125
Please provide the following dates regarding student attendance:
Date(s) absent: (mm/dd/yyyy)
Date(s) made-up: (mm/dd/yyyy)
STUDENT:
*Name: *Date: (mm/dd/yyyy)
PRIMARY CLINICAL SUPERVISOR:
*Name:
*Date: (mm/dd/yyyy)
*Clinical Specialty Certification (cite the
specific certification or enter None):
Date of Clinical Specialty Certification: (mm/dd/yyyy)
*APTA Credentialed Clinical Instructor (Primary CI): ☐ Yes
☐ No
SECONDARY CLINICAL SUPERVISOR (Optional):
Name:
Date: (mm/dd/yyyy)
Clinical Specialty Certification (cite the
specific certification or enter None):
Date of Clinical Specialty Certification: (mm/dd/yyyy)
APTA Credentialed Clinical Instructor (Secondary CI):
☐ Yes
☐ No

COMPETENCIES AND CRITERIA Short-Term Clinical Competencies
126
5. How many minutes did it take you to complete the evaluation?
6. Did you complete the evaluation at one sitting, or did you start the evaluation, stop, and complete it at a later time?
☐ I completed the evaluation at one sitting
☐ I started the evaluation, stopped, and completed at a later time
3. Please rate your agreement with the following: Strongly Disagree Disagree Agree Strongly Agree
a. Based on the instructions provided, I understand how to score the Emory online clinical education evaluation of student performance.
☐ ☐ ☐ ☐
b. The process used to complete the Emory online clinical education evaluation was simple.
☐ ☐ ☐ ☐
c. It was convenient for me to complete the Emory clinical education evaluation online.
☐ ☐ ☐ ☐
d. I am familiar with the objectives and expectations of the Emory PT program for this experience.
☐ ☐ ☐ ☐
e. I understand how to use Emory criteria to rate student performance.
☐ ☐ ☐ ☐
4. If you disagreed or strongly disagreed with any of the above, please reference the item number and provide specific details.
5. Please provide any additional comments regarding your experience completing the online evaluation.

COMPETENCIES AND CRITERIA Short-Term Clinical Competencies
127
You have completed the online evaluation of student performance.
WARNING!
DO NOT CLICK the "Submit Evaluation" button until after you have the CI/student conference. Please note that your responses are automatically saved when you exit the form. In order to access your saved evaluation form for the CI/student discussion, please click on the link provided in the email
invitation you received. FINAL STEP FOR SUBMISSION After completing the CI/student conference, please click the "Submit
Evaluation" button below to submit your final responses. After clicking the “Submit Evaluation” button, you will have the option to download and print a PDF of your responses. A link (Download PDF) will be available on the upper left side of the next page you reach after clicking the “Submit Evaluation” button. Whether or not you decide to download a PDF of your evaluation, you must scroll to the bottom of the page and click the “Submit Evaluation” button a second time. This is
necessary to record your responses and exit the form.
Thank you for completing the online evaluation!
Note: If you need to stop and complete the survey later, your responses on all previous pages will be automatically saved when you exit the evaluation. To save any responses on the
current page, please click the "Save and Continue" button below before you exit the evaluation. When you are ready to complete the survey, simply click on the link in the email invitation you
received and you will be able to resume where you left off or at the beginning if you prefer.

COMPETENCIES AND CRITERIA Fundamentals of Clinical
Measurement -DPT 710
128
CRITERIA SHEET DRAPING
1. Pre-Planning for Procedure:
A. Identify the priority symptoms, signs, and/or conditions, which make the procedure applicable:
(1) If any sign, symptom, or condition requires exposure of body part(s) for evaluation or treatment
(2) If maintenance of warmth of untreated body parts is indicated
(3) If protection of client's hair or any clothing not removed is indicated
(4) Whenever the client's modesty or dignity might be compromised
B. Identify the rationale for choice of procedure:
(1) Safety:
(a) Client: Prevent unnecessary exposure.
(b) Area: N/A
(c) PT: Provide visual access to body parts, thus preventing injury or oversight; prevent exposure to areas of infection, if applicable.
(2) Economics:
(a) Cost of laundry/linen
(3) Condition of client:
(a) Requiring any examination and/or treatment
(4) Duration of procedure:
(a) Length of examination and/or treatment
(5) Alternative treatments:
(a) In case of burns or severe open wounds draping may be modified or not used
(b) Use of hospital clothing or swim wear may be used
(6) Application of procedure to short or long term goals:
(a) Allows PT to have visual access of body part to be evaluated or treated in order to assess degree of change
2. Preparation of Physical Therapist:
Division of Physical Therapy
Emory University

COMPETENCIES AND CRITERIA Fundamentals of Clinical
Measurement -DPT 710
129
A. Review the draping procedure as needed.
B. Read medical record.
C. Select the area to be draped in accordance with the examination or therapeutic measure to be performed.
D. Interview client:
(1) Ascertain clothing being worn.
(2) Ascertain the comfort of the client related to the environmental temperature.
E. Select and collect correct equipment and materials:
(1) Linen
(2) Hospital clothing
(3) Other equipment for performance of examination or therapeutic measure
F. Prepare the environment and equipment/materials:
(1) Pre-treatment preparation:
(a) Position linens and pillows, if applicable.
(b) Close curtain/door.
(2) Safety of equipment:
(a) Materials should be clean.
3. Execute the Procedure:
A. Follow the Teaching-Learning Process and Interpersonal Relationships Criteria to explain and demonstrate the procedure to the client.
B. Sequential steps of the procedure:
(1) Draping sequence when prone position is necessary for selected examination/treatment:
(a) Exposure of one or both limbs on the same side:
1) Client is positioned adhering to criteria for positioning.
2) Drape is placed over all areas except the limb or limbs to be treated.
3) Lower limb: Drape is pulled between thighs under the limb to be exposed and encircles the hip.
4) Upper limb: Drape is pulled over lateral rib cage, under axilla, and tucked under anterior surface of joint.
(b) Exposure of both upper or both lower limbs:
1) Lower limbs: Drape is pulled between thighs and encircles the hip, moving toward lateral and anterior surfaces of hips; this forms a diaper type of drape.
2) Upper limbs: Drape is placed around thorax and tucked around both lateral sides of the thorax just inferior to the axilla and is tucked under the rib cage.

COMPETENCIES AND CRITERIA Fundamentals of Clinical
Measurement -DPT 710
130
(c) Exposure of neck, shoulders, and upper thorax:
1) Client is positioned adhering to criteria for bed positioning.
2) Drape is placed over back and legs; it is then folded downward as far as necessary to expose the area adequately for treatment.
3) If the patient's arms are abducted, then towels should be placed parallel to the lateral rib cage just inferior to the axilla.
(d) Exposure of lumbar area:
1) Client is positioned adhering to criteria for bed positioning.
2) Client is draped over the upper back and shoulders down to the level of the inferior angles of scapulae.
3) Drape is placed over the lower limbs and up to the level of the gluteal crease.
4) If lumbar area and one entire hip is to be exposed, then drape is applied as stated but is pulled between the thighs and pulled under and around the limb in order to leave the hip exposed.
(e) Exposure of total back:
1) Client is positioned adhering to criteria for bed positioning.
2) Drape covers lower limbs up to level of gluteal folds.
3) Drape should extend along the sides of the rib cage to a point just inferior to the axillae.
(f) Exposure of buttocks:
1) Client is positioned adhering to criteria for bed positioning.
2) Drape is placed over back down to lumbar area.
3) One end of the drape is placed over the buttocks; the other end is pulled between the thighs and around to the anterior surface of the legs (diaper type arrangement); next, the drape over the buttocks is folded to expose buttocks but leaving gluteal cleft covered.
(2) Draping sequence when supine position is necessary for selected examination and/or treatment:
(a) Exposure of one or both limbs on the same side:
1) Client is positioned adhering to criteria for bed positioning.
2) Drape is placed over the entire body.
3) Upper limb: Pull drape around rib cage just inferior to the axilla and tuck under back on both sides of rib cage.
4) Lower limb: Pull one side of drape under the limb to be exposed and encircle the hip.
(b) Exposure of both upper or lower limbs:
1) Client positioned adhering to criteria for bed positioning.
2) Drape is applied leaving limbs to be exposed uncovered.

COMPETENCIES AND CRITERIA Fundamentals of Clinical
Measurement -DPT 710
131
3) Cover all areas not being treated; tuck drape under both sides of rib cage.
(c) Exposure of shoulders:
1) Client is positioned adhering to criteria for bed positioning.
2) Drape over entire body leaving upper limbs and head uncovered; tuck drape around rib cage just inferior to the axillae.
(d) Exposure of rib cage (if needed for observation of breathing, breathing exercises, observation of abdominal muscle action, or trunk strengthening):
1) Client positioned adhering to criteria for bed positioning.
2) Drape all areas of trunk above and below the area to be exposed, including the extremities.
(3) Draping sequence when side-lying position is necessary for selected examination and/or treatment:
(a) Exposure of one or both limbs on the same side:
1) Client is positioned adhering to criteria for bed positioning.
2) Drape is placed over all areas except the limb or limbs to be treated.
3) Lower limb: Drape is pulled between thighs under the limb to be exposed and encircles the hip.
4) Upper limb: Drape is pulled over lateral rib cage, under axilla and tucked under rib cage.
(b) Exposure of neck, shoulder, and upper thorax:
1) Client is positioned adhering to criteria for bed positioning.
2) Drape is placed over body covering area from shoulder to feet.
3) Drape is folded caudally as far as necessary to expose the area.
4) Drape is tucked around thorax just inferior to axillae in line with the inferior eagle of the scapulae.
(c) Exposure of lumbar area:
1) Client is positioned adhering to criteria for bed positioning.
2) Client is draped over the upper back and shoulders down to the level of the inferior angles of scapulae.
3) Drape is placed over the lower limbs and up to the level of the gluteal crease.
4) If the lumbar area and one entire hip is to be exposed, then drape is applied as stated, but is pulled between the thighs and pulled under and around the limb in order to leave the hip exposed.
(d) Exposure of total back:
1) Client is positioned adhering to the criteria for bed positioning.
2) Drape covers lower limbs up to the level of the gluteals and 2nd sacral vertebra.
3) Drape or gown should cover the anterior trunk.

COMPETENCIES AND CRITERIA Fundamentals of Clinical
Measurement -DPT 710
132
(e) Exposure of buttocks:
1) Client is positioned adhering to the criteria for bed positioning.
2) Drape is placed over lower limbs and trunk.
3) Drape is folded back at level of buttocks.
4) An additional towel drape may be needed to cover gluteal cleft.
(4) Draping sequence when sitting position is necessary for examination and/or treatment:
(a) Exposure of neck, shoulders, and upper back:
1) Client is positioned sitting on mat, table, bed, or chair.
2) Drape is placed around thorax just inferior to the axillae and secured firmly.
3) If patient's lower limbs are not covered with clothing, then a drape should be used to avoid chilling of legs and feet. If a patient is a male, it may not be necessary to encircle the thorax; however, a drape should cover the untreated area of the posterior trunk.
(b) Exposure of lower limbs:
1) Client is positioned sitting on the mat, table, bed, or a chair.
2) Upper body is covered by clothing, hospital gown, or other appropriate drape.
3) Drape is placed over lap, brought between the legs, diaper style, and tucked under buttocks (encircling hips).
4) One or both limbs may be exposed.
C. Implement changes in procedure based upon:
(1) Client's response
(2) client's modesty
(3) patient's warmth or discomfort
(4) area needing exposure more extensive than initially anticipated
(5) achievement of examination or treatment goal
D. Record results : N/A
E. Clean the area.
F. Dispose of linens appropriately

COMPETENCIES AND CRITERIA Fundamentals of Clinical
Measurement -DPT 710
133
CRITERIA SHEET PALPATION
1. Pre-Planning for Procedure:
A. Identify the priority signs, symptoms, and conditions which make the procedure applicable:
(1) Pain
(2) Weakness or paralysis
(3) Hypo-mobility/Hype-mobility of joints
B. Identify rationale for choice of procedure:
(1) Safety:
(a) Palpation may be used in the presence of diminished or absent sensation in order to ascertain when soft tissues (e.g. muscle, tendon, nerves) are under maximum passive tension
(b) Palpation must be utilized with varying degrees of force depending upon the goal of the palpation
(c) Palpation may be firm for identification of painful tissue
(d) Palpation may be gentle when used to ascertain contractions of weak muscles or avoiding elicitation of pain
(2) Economics:
(a) P.T. time
(3) Condition of client:
(a) Can be used with alert clients
(b) Can be used with disoriented clients to identify pain levels
(4) Duration of treatment:
(a) Used throughout manual muscle testing
(b) Used as consistent part of orthopaedic examination of spine and limbs
(c) Used as consistent part of pain evaluation
(d) Used consistently to verify surface anatomy of bony landmarks
(5) Generate other possible alternative treatments:
Division of Physical Therapy
Emory University

COMPETENCIES AND CRITERIA Fundamentals of Clinical
Measurement -DPT 710
134
(a) For muscle contractions use electrical testing and EMG
(b) For painful trigger points use medco-sonalator
(c) For identification of landmarks – there is no alternative
2. Application of procedure to short and long term goals:
A. STG: Identification of the status of specific tissues involved in pathological problems
B. LTG: Identification of a change in status of the tissue being palpated
3. Preparation of Physical Therapist:
A. Review procedure as necessary:
(1) General criteria for the physical therapist:
(a) Identification and interpretation of information gathered by palpation occurs through the development of sensitivity in the therapist's fingers; therefore, it is necessary that:
1) Your muscles should be relaxed so your joints are resting in mid-position.
2) Your joints should be gently fixed so that they do not move actively during the procedure.
3) If movement of the palpating finger or fingers is necessary it should occur in the more proximal joints of the limb or through weight shifts occurring in the trunk.
4) Keep movements of your distal joints of the palpating finger to a minimum so that you are better able to perceive what you are palpating instead of your joint movements.
(2) Due to constant use the palmar surface of the index finger, you may have thickened skin. Use of the lateral/medial border of index finger or use of thumb, middle, or ring finger may be preferable.
(3) For small joint lines you may wish to use only the lateral or medial edge of the palmar surface of the finger.
B. Read medical record:
(1) Review previous evaluations in which palpation was a part.
(2) Determine structures to be palpated and the goal for the palpation.
C. Interview client:
(1) Interview content depends upon the evaluation procedure of which palpation is a part.
D. Select and collect equipment:
(1) Linens
(2) Clothing for client
E. Secure the environment:
(1) Set up treatment area.

COMPETENCIES AND CRITERIA Fundamentals of Clinical
Measurement -DPT 710
135
4. Execute the Procedure:
A. Follow the IPR and Teaching-Learning Processes to establish rapport and explain the procedure. Demonstrate the type of palpation which will be employed.
B. Sequential steps of procedure:
(1) Palpation of muscle contractions:
(a) Utilization:
1) To determine that the specific muscle being tested in the "Manual Muscle Test” (MMT) is contracting
2) To assign a grade of Trace
3) To determine if other muscles are substituting for the muscle being tested
(b) Position of client:
1) Determined by the specific MMT
(c) Position of the palpating hand:
1) Fingers are placed parallel to the skin surface in a line perpendicular to the direction of the muscle fibers or over tendon of the muscle
(d) Amount of pressure:
1) Gentle enough to cause only a 3-5 millimeter indentation of the surface
2) This criterion is of particular importance if the muscle being graded is below a grade of Poor (P) since too firm pressure can obliterate the contraction
(2) Palpation of bony landmarks and joint lines:
(a) Utilization:
1) To determine the specific location of the anatomical structure, and to develop the tactile sensitivity
2) To recognize the normal limits of size, density, and alignment of the anatomical structures in order to perform examination procedures which assess the status of the function of anatomical structures
(b) Position of the client:
1) Relaxed with body or parts to be palpated supported to insure muscles will be relaxed
(c) Position of therapist:
1) Joints and body position relaxed to insure decreased stress in muscles
2) Position of palpating hand:
(a) First, place finger/fingers/hand in total contact with the structure to be palpated. This requires the contact to be parallel to the surface of the skin directly over the structure.

COMPETENCIES AND CRITERIA Fundamentals of Clinical
Measurement -DPT 710
136
(b) Second, relax your hand so that it remains still and apply a maintained light pressure until your hand stops sinking into the soft tissue.
(c) Third, move the skin over the landmark or joint line by initiating your movement through your proximal joints (See II A.1). If the structure appears obscure to your touch you may be pressing too firmly.
(d) Release your pressure slightly and repeat the second and third steps described previously.
(d) Amount of pressure – (see c) As you become more skilled the amount of pressure exerted will become less and you will feel more definitive information with your fingers.
(3) Palpation of passive movement of joints (physiologic):
(a) Utilization:
1) Provides information on the normal limits of joint motion; prepares the physical therapist to evaluate abnormal joint movement and identify the structures presenting normal ranges of movement
2) Used as one criterion for MMT and goniometric measurement
3) Prepares the physical therapist to establish treatment programs to prevent loss of joint motion or restore normal movement to joints
(b) Position of the client:
1) Any body position can be utilized as long as client is able to relax and allow full passive movement to occur.
2) There should be contraction of muscles controlling the joint to be examined.
3) The supine position will be used since this is the position used in the criteria sheet for range of motion exercises.
(c) Position of therapist and palpating hand(s):
1) Follow the description in the criteria sheet for range of motion for hand placement for each exercise.
2) Your grip must make the client confident. Use total contact of your hands, with a gentle but firm grip. This is accomplished by a three step process:
(a) First, lay your hand on the part to be held, just contact the skin, and relax your hand with as much of your hand contact as possible. (your hand must be PERFECTLY STILL before proceeding on to the next step)
(b) Second, apply and maintain a light pressure until your hand stops sinking into the soft tissues; this will result in a firm grip of the subject's bones. This, in turn, will make him feel secure. (It may take two or three seconds for this to happen; the more soft tissue between you and the bone, the longer it will take. Try this three-step grip on someone else, use a watch, and see how long 3 seconds lasts.
(c) Third, only after your hand has stopped sinking completely can you begin any movement palpation.

COMPETENCIES AND CRITERIA Fundamentals of Clinical
Measurement -DPT 710
137
3) When a normal joint is passively moved through its range of motion:
(a) No resistance is felt through most of the range
(b) Slight resistance will be felt toward the end of the range
(c) Resistance to movement increases until passive movement stops
4) Cessation of passive movement which comes at the end of normal range is defined as end-feel (i.e. what you feel as the joint motion ends).
5) Tissues responsible for end feels are:
(a) Soft tissue approximation (e.g. knee flexion)
(b) Muscular (elastic resistance) (e.g. flex hip with knee extended)
(c) Ligamentous (firm arrest of movement with no give) (e.g. abduction of leg with thigh stabilized)
(d) Cartilaginous (sudden stop) (e.g. extension of knee)
(e) Capsular (firm arrest of movement with slight give) (e.g. hyperextension of elbow)
6) In order to establish the end range of each joint:
(a) Stabilize proximal to the joint.
(b) Slowly and gently move part toward the end of range until the motion stops.
(c) Identify the tissue(s) which stop motion and create the end feel.
(d) Amount of pressure – sufficient to reach the end range without causing pain
(4) Palpation of deep structures (e.g. muscles, nerves, bursae, tendons, and vessels) follows the same procedures as listed for palpation of bony landmarks and joint lines (B.2. a-d).
C. Implement changes in procedures:
(1) Modify amount of pressure used with palpation based on verbal feedback from client.
(2) Monitor pain levels during palpation.
D. Record results:
(1) In SOAP format
(2) On specific area of evaluation form
E. Clean up area:
(1) Return any supplies.
(2) Assist with final disposition of client.
(3)

COMPETENCIES AND CRITERIA Fundamentals of Clinical
Measurement -DPT 710
138
CRITERIA SHEET Range of Motion Exercises in Cardinal and Diagonal Planes
1. Pre-Planning for the Procedure: A. Identify the priority signs, symptoms, and conditions which make the procedure applicable:
(1) Contractures (2) Hyper-tonicity/Hypo-tonicity (3) Hyper-mobility/Hypo-mobility (4) Diseases or disorders resulting in primary weakness, paresis, or paralysis of muscles (5) Systemic diseases or disorders which require a period of physical quiescence or forced immobility
thus resulting in disuse, muscle weakness, and decreased joint and muscle flexibility B. Identify rationale for choice of procedure:
(1) Safety: (a) Avoid excessive, abnormal movements of joints during exercise. (b) Avoid gripping with fingers; use a flat handed lumbrical grip (MP joints flexed and IP
joints extended). (c) Avoid forced motion; observe reactions carefully for presence of pain. (d) Question the client during and post treatment to identify existing pain patterns. (e) If client is unable to communicate observe:
1) Visible signs of discomfort in facial expressions 2) Physical signs of discomfort such as muscle splinting or withdrawing of body part
(2) Economics: (a) Space (b) P.T. time
(3) Condition of client: (a) Can be used with any client by varying the duration, intensity, and frequency (b) Must identify amount of client assistance and modify procedure accordingly
(4) Duration of treatment: (a) May be repeated several times daily (b) Increasing time of performance may be used to evaluate client status
(5) Generate other possible alternative treatments: (a) Use of various exercise equipment by client (e.g. passive, mobilizer, active resistive, and
assistive exercise devices) (b) Positioning program changed frequently throughout day (c) Use of functional and/or developmental activities or positions
(6) Application of procedure to short or long term goals: (a) STG: Improve or increase available motion; Improve or increase nutritional status
Division of Physical Therapy
Emory University

COMPETENCIES AND CRITERIA Fundamentals of Clinical
Measurement -DPT 710
139
(b) LTG: Retention of increased range of motion and therefore improved functional ability
2. Preparation of the Physical Therapist: A. Review procedure as necessary. B. Read medical record:
(1) Review any evaluations of range of motion available. (2) Determine specific areas needing treatment.
C. Interview client: (1) Are there specific activities or movements you wish to perform which you are unable to perform? (2) If yes, how long have you been unable to perform these activities/movements? (3) What prevents you from performing these activities or movements?
D. Select and collect correct equipment: (1) Linens (2) Clothing for client (3) Goniometer (4) Sphygmomanometer/Stethoscope
E. Secure the environment: (1) Set up treatment area. (2) Expose and drape client (see Criteria for Draping).
3. Execute the procedure: A. Follow the IPR criteria to establish rapport with client; follow the Teaching – Learning Criteria
to explain the procedure. B. Sequential steps of procedure:
(1) Identify proper joint stabilization: (a) Client's body must be stabilized for all joints proximal to the joint being treated:
1) Stabilization may be provided by the supporting surface of a plinth. 2) Stabilization may be provided by the supporting surface of a chair. 3) Stabilization may be provided by the position of patient, position and/or hand placement
of the Physical Therapist, or a combination of these factors. (b) Support of the extremity distal to the joint being treated unless specific hand
holds are indicated in the technique. (c) Perform the range of motion adhering to the specific instructions for each
movement. (2) Specific criteria for cardinal plane movements (supine position):
(a) Hip and knee joints: 1) Hip flexion with knee flexion:
(a) Place one hand on posterior thigh just proximal to knee; other hand on posterior leg just proximal to ankle.
(b) Bend the knee toward chest using pressure against thigh. (c) Lower leg and extend hip and knee. (d) As the limb is moved toward the end range of flexion, it may be necessary to
support the limb with one hand and use the hand closest to ankle to reach across and stabilize the other limb, keeping it flat on the bed.
(e) Place your hand on the opposite distal femur to prevent hip and pelvis movement into flexion and posterior pelvic tilt; this movement could substitute for hip flexion on the side you are moving.
2) Extension of hip and knee:

COMPETENCIES AND CRITERIA Fundamentals of Clinical
Measurement -DPT 710
140
(a) Return from flexion, support posterior aspect of knee to prevent hyperextension.
3) Flexion of hip with knee extended (straight leg raising): (a) Hand position is same as for flexion with knee flexion. (b) Position of proximal hand should enable therapist to palpate
hamstrings during the movement. (c) Keeping the knee extended, lift limb into hip flexion; be cognizant of
the increasing muscle tension in hamstrings. (d) When surface tension is felt, return to starting position.
4) Hip hyperextension with knee flexion: (a) Limb is moved to side of bed below bed level by flexing the knee. (b) The other limb may be stabilized in hip and knee flexion with foot supported on
the bed; this will assist pelvic stability and prevent increase in lumbar lordosis. (c) Hip is lowered into 5˚ - 10˚ degrees of hyperextension. (d) Gently flex the knee keeping hip extended. (e) Palpate the anterior surface of thigh to note tension in muscles. (f) When tension is felt, return to starting position.
5) Hip abduction with knee extended: (a) Hand placement is the same as for flexion. (b) Move limb away from mid line of body; pressure on medial thigh proximal to knee. (c) Keep limb in a neutral position with patella pointing upward. (d) It may be necessary to stabilize the opposite limb and pelvis; this may be done by
positioning this limb in slight abduction prior to performing the exercise. 6) Adduction:
(a) Return from abduction. 7) External rotation with hip and knee extended:
(a) Place hands on antero-medial thigh and leg just proximal to knee and ankle joints respectively.
(b) Keeping the knee straight, roll the entire limb outward with the pressure applied above the knee.
(c) Avoid flexion and abduction of hip. 8) Internal rotation with hip and knee extended:
(a) Place hands on postero-lateral surfaces of thigh and leg just proximal to knee and ankle joints respectively.
(b) Keeping the knee straight, roll the entire limb inward with the pressure applied above the knee.
(c) **Hip rotation may be performed with the hip and knee flexed to 90°; however, extreme caution should be used due to the leverage that the therapist has with the limb in this position. There are also pathological conditions for which this position would be contraindicated.
(b) Ankle joint: 9) Dorsiflexion:
(a) Support foot with heel vesting in palm; grasp heel with fingers and thumb.
(b) Place your forearm on lateral border of foot.

COMPETENCIES AND CRITERIA Fundamentals of Clinical
Measurement -DPT 710
141
(c) Other hand stabilizes knee and proximal tibia. (d) Pull heel inferiorly (away from hip and knee). (e) Keep traction in heel and push foot up toward anterior. (f) This exercise should be performed:
1. With the knee extended (gastrocnemius) 2. With the knee flexed (soleus)
10) Plantarflexion: (a) Keep knee flat on table. (b) Pull down on dorsum of foot.
11) Eversion: (a) Grasp foot with hand, palm of hand holds sole of foot. (b) Support ankle with the other hand on the anterior talus. (c) Pull lateral border of foot up and out.
12) Inversion: (a) Maintain same grasp as for eversion. (b) Support ankle with other hand. (c) Push medial border of foot up and in.
13) Calcaneus: (a) Grasp heel with palms on lateral and medial sides. (b) Gently move calcaneus in a medial and lateral direction.
(c) Metatarsals: 9) Stabilize anterior ankle at level of tarsals.
10) Grasp first metatarsal on superior and inferior aspect and glide bone in an anterior and posterior direction.
11) Repeat on 3rd, 4th, and 5th metatarsals.
12) Stabilize the proximal aspect of metatarsals by grasping dorsal and plantar surface of foot, and move each metatarsal from its distal end; movement is a small anterior – posterior gliding.
(d) Joints of the toes:
9) Except for the great toe, individual joints of the toes are seldom given range.
10) If the toes are in a flexed position, they should be gradually moved to a neutral or extended position.
11) To flex and extend the great toe, stabilize the first metatarsal and move the proximal phalanx. Then, stabilize the proximal phalanx and move the distal one.
12) Lateral 4 toes – Stabilize metatarsals and gently move toes into extension and flexion.
13) Abduction – Stabilize metatarsals; grasp toes on dorsal and plantar surface.
(a) Move 1st and 2nd toes toward the medial border of the foot.
(b) Move 2nd and 3rd, 4th and 5th toes toward the lateral border of the foot.
14) Adduction – Use same hand position as for abduction.
(a) Move the 1st toe toward the midline of the foot.

COMPETENCIES AND CRITERIA Fundamentals of Clinical
Measurement -DPT 710
142
(b) Move the 3rd, 4th and 5th toes toward the midline of the foot. (e) Scapula:
9) Before performing R.O.M. for a client's shoulder joint, you will want to know the amount of movement available at the scapula-thoracic joint. This is examined more specifically with the client prone.
10) However, it is not necessary to turn a client over for this purpose only. It is possible to lift the client's trunk, place one hand on the vertebral border and the inferior angle of the scapula and gently move one scapula into slight upward rotation, abduction, and elevation.
11) These scapular motions are required for shoulder abduction and flexion. (f) Shoulder Joint:
9) Forward Flexion: (a) Grasp client's wrist/hand with your distal hand and place other hand proximal to elbow. (b) Keep client's arm in neutral rotation. (c) Raise arm overhead (do not exert force on client's forearm). (d) It is useful to change hands as the arm approaches 90°. The proximal hand supports the
arm while the distal hand notes scapular movement on the axillary border. 10) Extension: This can be performed supine, with client's arm over the edge of the plinth or
in the prone position. (a) Place one hand on anterior acromion to prevent scapular protraction. (b) Place other hand on distal humerus and extend arm.
11) Abduction: (a) Grasp humerus on posterior surface just above elbow joint. Allow client's forearm to
rest on your forearm. Client's elbow is bent. (b) Place your other hand on the superior aspect of the client's shoulder. (c) Bring client's humerus to 90° of abduction. (d) At 90°, allow client's shoulder to go into full external rotation. It may be most
convenient for you to change your hand placement at this time. (e) The hand which stabilized the scapula now supports the humerus. (f) The other hand is placed on the axillary border of the scapula to note appropriate
movement during the last half of the range. 12) Adduction:
(a) Grasp the client's arm as for abduction. (b) Return to resting/neutral position from abduction.
13) Horizontal abduction and adduction: (a) Repeat abduction range to 90°. (b) Flex elbow, place distal hand on lateral forearm and proximal hand on posterior
upper arm, and move arm across chest until elbow is in midline. (adduction) (c) Return to starting position. (d) Move arm posteriorly. (abduction)
14) External Rotation: (a) Place shoulder in 90° abduction and elbow at 90° flexion. (b) Support the elbow with one hand and the wrist with the other hand. (c) Rotate the forearm backwards, moving the dorsum of hand toward the table. Apply
pressure at distal humerus if possible. If not, apply pressure at proximal ulna/radius. 15) Internal Rotation:
(a) Shoulder and elbow placed at 90°.

COMPETENCIES AND CRITERIA Fundamentals of Clinical
Measurement -DPT 710
143
(b) Place client’s elbow and proximal forearm on the anterior shoulder and PT’s hand supports client's elbow on the posterior aspect.
(c) The other hand supports forearm and client's hand. (d) Rotate forearm forward toward 70°. Then, allow protraction of the shoulder for the
last 30° until the palm of the hand touches the table. (g) Elbow Joint:
9) Flexion: (a) One hand stabilizes the humerus. The other grasps the distal radius/ulna. (b) Bring the palm of the hand toward the shoulder keeping the forearm in supination. (c) Repeat with the forearm in pronation.
10) Extension: (a) Humerus is stabilized against supporting surface. (b) One hand stabilizes anterior shoulder to prevent protraction, other grasps anterior,
distal radius/ulna. (c) Straighten elbow with forearm in supination. (d) Observe angle of carry for the elbow joint; it is more marked in women. (e) Repeat with forearm in pronation.
11) Supination and Pronation: (a) Supination and pronation should be done with elbow extended or elbow flexed to 90°. (b) Thumb pointing to the ceiling in the neutral position. (c) You may support humerus with one hand and grasp distal forearm with other hand or (d) You may stabilize humerus against the plinth, and place the base of your palms on volar
and dorsal surfaces of client's forearm. (e) Supination brings client's palm up and pronation takes client's palm down to face plinth.
(h) Wrist Joints: 9) Flexion:
(a) Humerus is stabilized against plinth. (b) One hand stabilizes forearm, and the other hand grasps hand across metacarpals. (c) Move palm of hand toward forearm.
10) Extension: (a) Same procedure as above, but dorsum of hand is moved toward forearm.
11) Radial and ulnar deviation: (a) Same procedure as above, but hand is moved medially and laterally. (b) No flexion or extension takes place.
(i) Finger Joints: R.O.M. for the fingers is performed with the forearm stabilized in a neutral position, on a firm surface, and with the wrist maintained in a neutral position.
9) MP Joints: (a) One hand stabilizes the wrist/metacarpals. The other hand holds the proximal phalanx.
1. Extension – Move proximal phalanx toward dorsum of hand. 2. Flexion – Move toward palm of hand. 3. Abduction – Index and third finger move toward thumb; 3rd, 4th, and 5th fingers
move toward ulnar side of hand. 4. Adduction – Index finger moves toward midline of hand; 4th and 5th fingers move
toward midline of hand. 5. Rotation – Stabilize metacarpal, grasp proximal phalanx, and gently rotate phalanx
at MCP joint; repeat on all MCP joints.

COMPETENCIES AND CRITERIA Fundamentals of Clinical
Measurement -DPT 710
144
10) Proximal IP Joints: (a) One hand grasps proximal phalanx while also stabilizing MP joints, wrist joint is in
neutral, other hand grasps middle phalanx: 1. Flexion – Move middle phalanx toward palm of hand. 2. Extension – Move middle phalanx back to starting position.
11) Distal IP Joints: (a) One hand grasps middle phalanx while also stabilizing proximal IP, MP, and wrist joints,
other hand grasps distal phalanx: 1. Flexion – Move distal phalanx toward palm of hand. 2. Extension – Move distal phalanx back to starting position.
(j) Thumb Joints – The position used for these motions is forearm and hand resting on ulnar border.
9) Carpal-metacarpal joint: (a) One hand stabilizes wrist and joint in neutral position; other hand grasps 1st metacarpal:
1. Flexion – Move metacarpal across palm in plane parallel to palm. 2. Extension – Move metacarpal across from palm, still in same plane as the palm. 3. Abduction – Move metacarpal away from palm in a plane perpendicular to the
palm. 4. Adduction – Move metacarpal from abducted position to a position beside the
second metacarpal. 5. Opposition – Stabilize carpal and grasp dorsal and volar surface of metacarpal, turn
metacarpal inward and outward. 10) MP Joint:
(a) One hand grasps metacarpal and also stabilizes MCP and wrist joints in neutral positions, other hand grasps proximal phalanx: 1. Flexion – Move proximal phalanx toward palm. 2. Extension – Move proximal phalanx back to neutral position, and for some people,
beyond neutral toward dorsum of hand. 11) IP Joint:
(a) One hand grasps proximal phalanx and also stabilizes MP, MCP, and wrist joints in neutral position, other hand grasps distal phalanx: 1. Flexion – Move distal phalanx toward palm. 2. Extension – Move distal phalanx back to neutral position, and for some people,
beyond neutral toward the dorsum of the hand. (3) Diagonal Planes (PNF extremity patterns):
(b) Therapeutic measure (does not have to be applied in any particular sequence; only by preference):
9) Upper extremity - Exercise #1 (description is for right limb, reverse for left side): (a) Starting position:
1. Place the shoulder in extension, adduction, and internal rotation. 2. Place the elbow in extension, and place the forearm in pronation. 3. Place the wrist in flexion. 4. Place the fingers in flexion.
(b) The therapist grasps the dorsum of the hand with the left hand, and the right hand supports the arm just proximal to the elbow joints.
(c) Move the extremity into a position of:
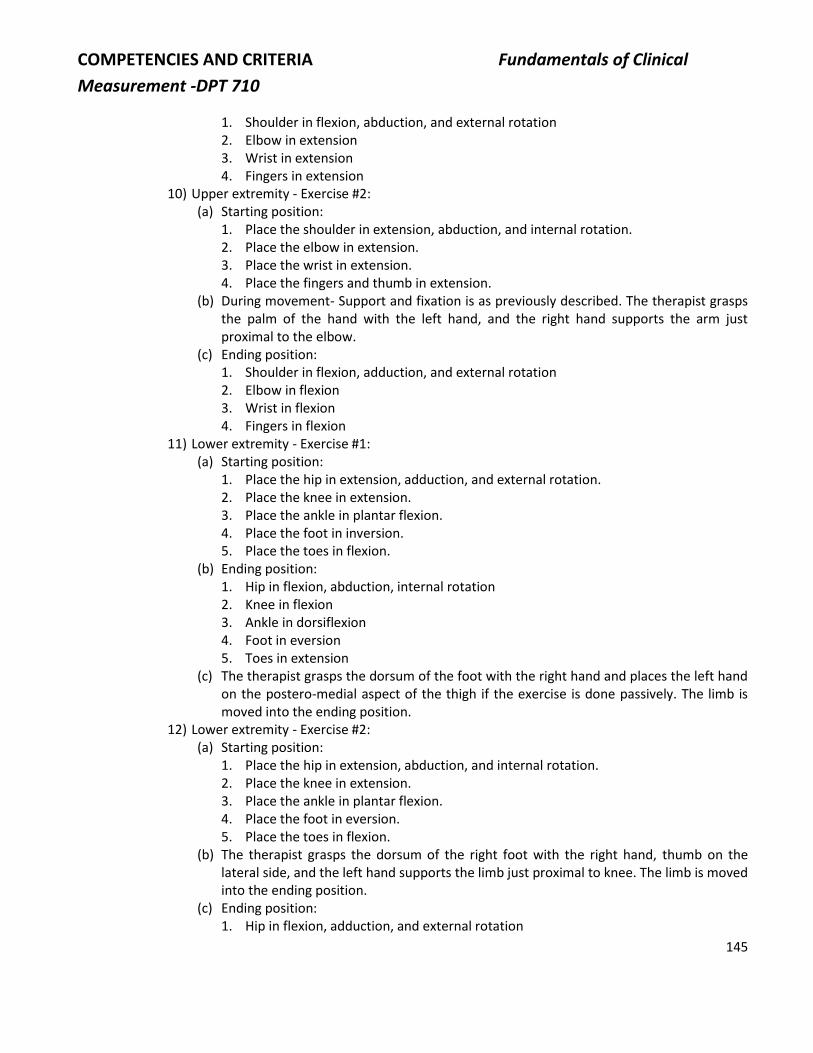
COMPETENCIES AND CRITERIA Fundamentals of Clinical
Measurement -DPT 710
145
1. Shoulder in flexion, abduction, and external rotation 2. Elbow in extension 3. Wrist in extension 4. Fingers in extension
10) Upper extremity - Exercise #2: (a) Starting position:
1. Place the shoulder in extension, abduction, and internal rotation. 2. Place the elbow in extension. 3. Place the wrist in extension. 4. Place the fingers and thumb in extension.
(b) During movement- Support and fixation is as previously described. The therapist grasps the palm of the hand with the left hand, and the right hand supports the arm just proximal to the elbow.
(c) Ending position: 1. Shoulder in flexion, adduction, and external rotation 2. Elbow in flexion 3. Wrist in flexion 4. Fingers in flexion
11) Lower extremity - Exercise #1: (a) Starting position:
1. Place the hip in extension, adduction, and external rotation. 2. Place the knee in extension. 3. Place the ankle in plantar flexion. 4. Place the foot in inversion. 5. Place the toes in flexion.
(b) Ending position: 1. Hip in flexion, abduction, internal rotation 2. Knee in flexion 3. Ankle in dorsiflexion 4. Foot in eversion 5. Toes in extension
(c) The therapist grasps the dorsum of the foot with the right hand and places the left hand on the postero-medial aspect of the thigh if the exercise is done passively. The limb is moved into the ending position.
12) Lower extremity - Exercise #2: (a) Starting position:
1. Place the hip in extension, abduction, and internal rotation. 2. Place the knee in extension. 3. Place the ankle in plantar flexion. 4. Place the foot in eversion. 5. Place the toes in flexion.
(b) The therapist grasps the dorsum of the right foot with the right hand, thumb on the lateral side, and the left hand supports the limb just proximal to knee. The limb is moved into the ending position.
(c) Ending position: 1. Hip in flexion, adduction, and external rotation

COMPETENCIES AND CRITERIA Fundamentals of Clinical
Measurement -DPT 710
146
2. Knee in flexion 3. Ankle in dorsiflexion 4. Foot in inversion 5. Toes in extension
13) Terminate treatment: (a) Notify the client that the treatment is complete. (b) Instruct the client in any activities, movements, or positions to utilize or avoid. (c) Position client in a position which is appropriate for other treatments if indicated. If
no other treatment is indicated, leave client in the position commensurate with client's daily activities.
C. Implement changes in procedure: (2) Utilize newly acquired range in specific activities or daily living (3) Increase/decrease frequency, duration, and intensity
D. Record results in the SOAP format: (2) O:
(b) Pre and post range of motion (c) Effect on vital signs, orientation
(3) A: (b) Assess the possibility of achievement or non-achievement of stated goals and include rationale
for assessment (4) P:
(b) Recommendation for further examination or treatment; upgrade goals and include plan for goal achievement
E. Clean up area: (2) Return equipment. (3) Assist with final disposition of client.

COMPETENCIES AND CRITERIA Fundamentals of Clinical
Measurement -DPT 710
147
CRITERIA SHEET GONIOMETRY
The examination of joint motion, goniometry, assesses the physiological motion available at a single joint, or the sum total of motion occurring at several joints. Each measurement is performed following a set procedure and specific criteria.
1. Pre-Planning for the Procedure:
A. Identify the priority signs, symptoms, and conditions which make the procedure applicable:
(1) Presence of joint contractures and/or deformities
(2) Decreased joint mobility secondary to disease or injury
(3) History of disease state known to disrupt joint structure and function (e.g. rheumatoid arthritis, hemophilia)
(4) Prolonged immobilization secondary to injury, disease state
B. Considerations for choice of the procedure:
(1) Safety:
(a) Client must be medically cleared to perform both passive range of motion (PROM) and active range of motion (AROM).
(b) Client's joints must be carefully moved through available range.
(c) Monitor client's level of pain throughout the procedure.
(2) Motion measured:
(a) Passive and active joint motion should be measured when possible. In goniometry, passive movements are always measured.
1) Passive range measurement provides you with assessment of the actual joint range or the amount of movement possible in the joint.
2) Active range measurement provides you with assessment of functional range, that is, the amount of movement the client can perform.
(b) Assess the least involved side first for comparison with the most involved side.
(3) Reliability and Validity:
(a) When measuring, try to rule out as many of the factors as possible that decrease reliability and
Division of Physical Therapy
Emory University

COMPETENCIES AND CRITERIA Fundamentals of Clinical
Measurement -DPT 710
148
validity.
(b) Reliability of measurements can be improved by such controls as measuring consistently before or after treatment, duplicating positions used, and measuring at the same time of day.
(4) Economics:
(a) Physical therapist's time
(5) Duration of Procedure:
(a) Variable; dependent upon number of joints measured, client's level of pain, and therapist's time
(6) Generate Other Possible Alternative Procedures:
(a) Linear measurements (e.g. fingertip to distal palmar crease)
(b) Gross assessment
C. Application of Procedure to Short and Long-term Goals:
(1) Identify joint restrictions which may hamper client's functional ability and independence.
(2) Develop exercise program to maintain/increase joint range and, thereby, increase client's function.
(3) Plot client's progress; establish highest independent functional level of the client.
2. Preparation of the Physical Therapist:
A. Review the procedure, if necessary.
B. Read client's medical record:
(1) Obtain medical history, precautions for treatment, etc.
(2) Determine joints to be measured, based on the area and extent of injury and/or dysfunction.
C. Determine goniometric measurements which may be performed in each test position (e.g. sitting, supine).
D. Interview the client:
(1) Ask questions identifying information not available in the medical record.
(2) Ask questions concerning client's present functional level (e.g. methods of performing ADL's and/or ambulation).
(3) Ask questions regarding area and behavior of pain.
(4) Ask questions regarding client's perception of procedure to be performed.
(5) Ask questions regarding client's identification of goals.
E. Select and Collect Correct Equipment: (1) Stethoscope and sphygmomanometer (2) Goniometer (3) Goniometry forms and pencils (4) Gown and necessary linens (5) Skin pencil

COMPETENCIES AND CRITERIA Fundamentals of Clinical
Measurement -DPT 710
149
F. Secure the Environment:
(1) Separate cubicle or mat table with pull around curtains, if possible.
3. Execution of the Procedure:
A. Follow the IPR and Teaching-Learning Criteria to establish rapport and explain the procedure to the client.
B. Sequential Steps of the Procedure:
(1) Determine the joints and the sequence of motion to be measured which will be time and energy efficient based upon:
(a) Medical record
(b) Client interview
(c) Gross evaluation of joint motion
(2) Position the client, as defined in the syllabus, for each motion being measured, allowing for:
(a) Freedom of joint motion
(b) Comfort of the client (i.e. perform as many measurements as possible in a given position before changing the client's position)
(3) Drape the client so as to expose the area around the joint being measured in a way which allows:
(a) Observation of the motion being measured and the related motions (normal or compensatory)
(b) Freedom of motion
(c) Preservation of client's modesty
(4) Explain the procedure involved to the client. (No participation of the client at this point) Explanation given to the client will depend on whether the motion measured is passive or active motion. From this point on, if there is a difference in the procedure, based on passive versus active measurements, the difference is identified.
(a) PASSIVE MOTION
1) Explain that the motion to be measured is the passive motion possible at each joint. The client is to relax and allow the movement to be completed by the evaluator.
2) Identify the general steps involved with specific instructions appropriate to each joint.
3) Explain to the client that you will be instructing and stabilizing the client throughout the procedure to avoid substituting.
(b) ACTIVE MOTION
1) Explain that the motion to be measured is the motion available when the client actively performs the movement.
2) Identify the general steps involved with specific instructions appropriate to each joint.
3) Explain to the client that you will be instructing and stabilizing the client throughout the

COMPETENCIES AND CRITERIA Fundamentals of Clinical
Measurement -DPT 710
150
procedure to avoid substitutions.
4) Identify that the client is to complete as much of the range that he/she is capable of completing with each repetition.
5) Explain that the client is to relax between repetitions.
(5) Move the client's joint to be measured through passive range sufficiently to:
(a) Locate the functional axis of motion
(b) Mark bony landmarks with skin pencil
(c) Demonstrate desired motion to client
(d) Work the joint through the initial stiffness
(6) Perform the desired movement:
(a) Passive motion
1) Move the part passively through the desired range.
2) Insure that the motion is in the correct plane.
3) Stabilize to insure the motion is occurring at the joint being measured.
4) Determine that the passive end range is accomplished:
(a) The end range sought will be determined by the individual client situation.
(b) The end range may be reached at the time the client complains of pain or when resistance to movement is felt by the therapist.
(c) It is essential that the same determination for end range be made for each measurement.
(b) Active Motion
1) Request the client to actively perform the desired motion.
2) Stabilize and instruct the client as needed to insure the motion is:
(a) In the correct plane
(b) Occurring at the joint being measured
3) Determine that the active end range is accomplished:
(a) The end range sought will be determined by the individual client situation.
(b) The end range may be determined by the client's level of pain or when resistance to movement is felt by the client.
(c) It is essential to instruct and determine from the client that the same determination for end range be made for each movement.
(7) Position the goniometer as defined in the syllabus for each motion being measured:
(a) Place the stationary arm mid-line, parallel to, or perpendicular with, the longitudinal axis of the non-moving segment. The stationary arm is the one with the protractor and may be heavier

COMPETENCIES AND CRITERIA Fundamentals of Clinical
Measurement -DPT 710
151
than the moveable arm. Stabilization of this arm assists in increasing accuracy.
(b) Place the moving arm either parallel to, or in line with, the longitudinal axis of the moving segment. The moving arm is the one with the arrow type point or line.
(c) The goniometer axis is placed as near to the axis of motion as possible. (The point at which the two arms of the goniometer intersect will correspond to the axis of motion, even though this point may not correspond directly with the anatomical joint axis.)
(d) Maintain the goniometer slightly away from, or in light contact with, the body parts.
(e) Hold the goniometer firmly with your thumb and index finger to prevent slipping of the arms. Do not grasp the arms with your hands restricting your view of the alignment of the arms.
(f) Maintain the goniometer at eye level during alignment and sight along as great a distance as possible.
(g) Do not attempt to keep the goniometer centered over the joint axis during the execution of the motion because the axis may change. Correct alignment of the moving and stationary arms must be exact at completion of the range.
(8) Perform a minimum of three repetitions of each measurement, excluding the demonstration:
(a) Record each measurement.
(b) If a discrepancy of greater than 5° motion exists between measurements, in neck, trunk, shoulders, and hips, and 3° motion in remaining distal joints, allow client to rest and then repeat entire procedure.
(9) Determine and record available joint motion based upon average of the three measurements:
(a) Record degrees of motion indicating whether measurements were determined actively (AROM) or passively (PROM).
(b) Record presence of joint pain next to the goniometric measurements.
(c) Note any modifications used in test performance.
C. Implement changes in procedure based upon changes in clients:
(1) Pain
(2) Voluntary motion
(3) Endurance
(4) Tolerance to different positions
D. Record results in client's medical record, utilizing SOAP format or other approved format (e.g. utilize goniometry form which can be added to client's chart).
E. Interpret results of examination procedure:
(1) Discuss factors related to reliability and validity which could influence the results.
(2) Identify/interpret discrepancies between active range of motion and passive range of motion.
(3) Identify patterns of involvement noting associated limitations of range and areas of the body.

COMPETENCIES AND CRITERIA Fundamentals of Clinical
Measurement -DPT 710
152
(4) Identify substitution motions which facilitate function.
(5) Determine functional limitations.
(6) Identify an appropriate treatment program, including:
(a) Objectives or goals
(b) Principles related to goniometry and other examination findings which should be incorporated
(c) Specific treatment program incorporating a and b above
F. Clean up area.

COMPETENCIES AND CRITERIA Fundamentals of Clinical
Measurement -DPT 710
153
COMPETENCIES AND CRITERIA Fundamentals of Clinical
Measurement -DPT 710
154
CRITERIA SHEET STANDARD PROCEDURE FOR GONIOMETRY
TRUNK (THORACIC & LUMBAR)
LUMBAR SPINE FLEXION (6 cm)
Position: Standing with trunk upright, place one mark on the skin overlying the sacrum midway between the
PSISs and one mark on the spine 15 cm superior to the first mark. The zero end of the tape measure
is held on the superior mark. As the subject slowly performs trunk flexion with the hands
approximating the toes, the inferior portion of the tape measure is permitted to "travel" up the
spine as the movement occurs. Note the cm reading at the inferior mark at end range flexion. To
record the movement, subtract 15 cm from the end range reading.
LUMBAR SPINE EXTENSION (2 cm)
Position: Standing with trunk upright, place one mark on the skin overlying the sacrum midway between the
PSISs and one mark on the spine 15 cm superior to the first mark. The zero end of the tape measure
is held on the superior mark. With hands on hips, the subject slowly performs trunk extension. Keep
the tape measure in contact with the spine while allowing the inferior end of the tape measure to
"travel.”
Reference: Williams R, Binkley J, Bloch R, Goldsmith CH, Minuk R (1993). Reliability of the modified-modified
Schober and double inclinometer methods for measuring lumbar flexion and extension. Physical
Therapy 73(1):26-37.
Division of Physical Therapy
Emory University

COMPETENCIES AND CRITERIA Fundamentals of Clinical
Measurement -DPT 710
155
THORACIC AND LUMBAR ROTATION
Position: Place a mark on the skin overlying the sacrum midway between the PSISs. Subject sits at the end of
a plinth, hold the zero end of the tape measure over the jugular notch and wrap the tape measure
under the axilla (on the side opposite to the rotation) and measure the distance to the mark on the
sacrum. Ask the subject to turn the head and trunk and allow that inferior end of the tape measure
to "travel.” Subtract the starting distance from the ending distance to record the movement. Repeat
to the other side.
Reference: Hertling D and Kessler, RM (1996). Management of Common Musculoskeletal Disorders, 3rd Ed.
Lippincott: Philadelphia.

COMPETENCIES AND CRITERIA Fundamentals of Clinical
Measurement -DPT 710
156
THORACIC AND LUMBAR LATERAL FLEXION (6 cm)
Position: Standing with trunk upright, place a mark on the highest point of the iliac crest, on the midline of
the trunk, and place a second mark 20 cm superior to the first mark. Hold the zero end of the tape
measure at the superior mark and allow the tape measure to "travel" as the subject laterally flexes
approximating the hand toward the knee. Subtract 20 cm from the ending distance to record the
movement. Repeat on the other side.
Reference: Merritt, JL, McLean TJ, Erickson RP, Offord KP (1986). Measurement of trunk flexibility in normal
subjects: Reproducibility of three clinical methods. Mayo Clinic Proceedings 61: 192-197.

COMPETENCIES AND CRITERIA Fundamentals of Clinical
Measurement -DPT 710
157
NECK (CERVICAL)
CERVICAL FLEXION / EXTENSION (0˚-65˚)
Position: Sitting with back supported, head in neutral position, eyes forward; subject holds a tongue
depressor blade between the molars of one side of the jaw
Stationary Arm: Horizontal to the floor, pointing posteriorly
Moving Arm: Aligned with the tongue blade; subject is to flex head and neck as far as possible,
approximating the chin to the chest. This measurement will incorporate within it the
movement of atlanto-occipital joint during flexion and extension.
LATERAL FLEXION (0˚-40˚)
Position: Sitting with back supported, head neutral, and eyes forward, subject attempts to move ear
to shoulder
Stationary Arm: Aligned with the tips of the thoracic spinous processes
Moving Arm: Aligned with the external occipital protuberance

COMPETENCIES AND CRITERIA Fundamentals of Clinical
Measurement -DPT 710
158
CERVICAL ROTATION (0˚-45˚)
Position: Sitting with back supported, head neutral, and eyes forward
Stationary Arm: Above the head and aligned with the approximate center of the cranium and the center of
the acromion process (i.e. the center of the shoulder) on the side opposite where
movement will occur
Moving Arm: Aligned with the midline of the nose

COMPETENCIES AND CRITERIA Fundamentals of Clinical
Measurement -DPT 710
159
HIP JOINT
FLEXION (0˚-120°) See Diagram 1a
Position: Supine; leg not being tested is extended to help stabilize the pelvis; flex hip and knee of test
leg
Stationary Arm: Parallel to midline of trunk
Moving Arm: Along lateral midline of femur toward center of lateral epicondyle
EXTENSION & HYPEREXTENSION (0˚-20°) See Diagram 1b
Position: Supine, near edge of table so test leg can be placed off the edge of table, knee extended; leg
not being tested is flexed to help stabilize the pelvis
Stationary Arm: Same as flexion
Moving Arm: Same as flexion
* Alternate Method: Test hip extension in Thomas or Modified Thomas Position; preferred method in presence
of hip flexor tightness
ABDUCTION (0˚-45°) See Diagram 3
Position: Supine with hips and knees extended and legs abducted
Stationary Arm: Aligned horizontally with the two anterior superior iliac spines
Moving Arm: Along anterior midline of femur toward center of patella
ADDUCTION (0˚-15°) See Diagram 4
Position: Supine; leg not being tested is abducted out of the way; hip neutral and knee extended on
test leg

COMPETENCIES AND CRITERIA Fundamentals of Clinical
Measurement -DPT 710
160
Stationary Arm: Same as Abduction
Moving Ann: Same as Abduction
INTERNAL & EXTERNAL ROTATION (0˚-45°) See Diagrams 5 and 6
Position: Supine with test leg in hip extension and knee flexed approximately 90° over edge of table;
leg not being tested is flexed at the hip and knee with foot resting on the table edge
Stationary Arm: Parallel with table
Moving Arm: Along crest of tibia; aligned midway between malleoli
* Alternate method: If you have a goniometer whose arms can be loosened, then hold the arm with the
protractor, letting the other arm hang vertically toward floor. Next, move the arm with
the protractor in line with tibial crest and read the angle between the vertical arm and the
tibial crest.
NOTE: Hip rotation range measured with the hip extended is usually not comparable to the range found
when the hip is flexed. This is due to the location of the attachments of the ligamentous structures. As
a general rule, internal rotation tends to be less free when the hip is extended.

COMPETENCIES AND CRITERIA Fundamentals of Clinical
Measurement -DPT 710
161
DIAGRAMS
Diagram 1b
HIP EXTENSION
Leg off side of table
Diagram 1a
HIP FLEXION
Keep opposite leg extended

COMPETENCIES AND CRITERIA Fundamentals of Clinical
Measurement -DPT 710
162
Diagram 2
STRAIGHT LEG RAISING TEST
(To test the flexibility of the hamstring group)

COMPETENCIES AND CRITERIA Fundamentals of Clinical
Measurement -DPT 710
163
DIAGRAMS CONT.
Diagram 3
HIP ABDUCTION

COMPETENCIES AND CRITERIA Fundamentals of Clinical
Measurement -DPT 710
164
Diagram 4
HIP ADDUCTION

COMPETENCIES AND CRITERIA Fundamentals of Clinical
Measurement -DPT 710
165
DIAGRAMS CONT.
Diagram 6
HIP EXTERNAL ROTATION
Diagram 5
HIP INTERNAL ROTATION

COMPETENCIES AND CRITERIA Fundamentals of Clinical
Measurement -DPT 710
166
KNEE JOINT
FLEXION (0˚-130°)
Position: Supine with hip flexed approximately 90°; leg is allowed to fully flex at the knee
Stationary Arm: Along the midline of the lateral aspect of the femoral shaft, in line with the greater
trochanter
Moving Arm: Along the lateral aspect of the fibular shaft, in line with the lateral malleolus
*Alternate Method: Prone lying to check flexibility of rectus femoris
EXTENSION (130˚-0°)
Position: Prone
Stationary Arm: Same as with flexion of the knee
Moving Arm: Same as with flexion of the knee
*Alternate Method: Supine with the hip maintained as much toward 0° of extension as possible
GENU VALGUM/VARUM (0˚-15˚)
Position: Supine with hip and knee extended
Stationary Arm: Along the midline of the anterior aspect of the femoral shaft
Moving Arm: Along the midline of the anterior aspect of the tibial shaft, or midline of lower leg

COMPETENCIES AND CRITERIA Fundamentals of Clinical
Measurement -DPT 710
167
ANKLE / FOOT JOINTS
NOTE: Primary motions of dorsiflexion and plantarflexion occur in the crural joint. Ankle joint measurements
are taken with the joint in the "neutral" position, in which the foot forms a right angle with the leg.
This position is by convention 0°.
DORSIFLEXION (0˚-20°)
Position: Supine or sitting with the knee flexed and the foot unsupported or prone with knee
flexed to 90°
Stationary Arm: Along the lateral aspect of the fibular shaft (i.e. between the head of the fibula and the
lateral malleolus)
Moving Arm: Along the lateral midline of calcaneus or the lateral aspect of the 5th metatarsal
NOTE: Measurements are made with knee bent to eliminate tension on the gastrocnemius. It is best to
include dorsiflexion measurements with the knee flexed and with the knee extended. The former
measures joint motion and the latter measures flexibility of the gastrocnemius.
PLANTAR FLEXION (0˚-45°)
Position: Same as for dorsiflexion; movement is made away from the "neutral" position in the
direction opposite of that of dorsiflexion
Stationary Arm: Same as for dorsiflexion
Moving Arm: Same as for dorsiflexion

COMPETENCIES AND CRITERIA Fundamentals of Clinical
Measurement -DPT 710
168
FOREFOOT INVERSION/EVERSION (0˚-30°)/(0˚-20°)
Position: Supine with knee extended and heel over the edge of the table
Stationary Arm: Along the midline of the anterior aspect of the tibial shaft; stabilize the calcaneus to
prevent the hindfoot from moving
Moving Arm: Along the 2nd metatarsal (i.e. midline of foot)
HINDFOOT INVERSION/EVERSION
Position: Prone with knee extended and foot over the edge of the table
Stationary Arm: Along the midline of calf
Moving Arm: Along the midline of the calcaneus
FIRST MTP HYPEREXTENSION (0°-90°)
Position: Supine
Stationary Arm: Medal aspect 1st metacarpal
Moving Arm: Medal aspect proximal phalanx

COMPETENCIES AND CRITERIA Fundamentals of Clinical
Measurement -DPT 710
169
DIAGRAMS

COMPETENCIES AND CRITERIA Fundamentals of Clinical
Measurement -DPT 710
170
SHOULDER JOINT
FLEXION (0˚-180°)
Position: Supine with arm at side and thumb pointed toward ceiling, pillow under knees or
patient's hips and knees flexed with feet on the table
Stationary Arm: Parallel to midline of trunk
Moving Arm: Along midline of humerus, in line with lateral epicondyle
EXTENSION (0˚-45°)
Position: Supine toward edge of bed so arm can move toward the floor; elbow flexed to 90°,
without abducting humerus
Stationary Arm: Parallel to midline of trunk
Moving Arm: Along midline of humerus in line with lateral epicondyle
* Alternate Method: Prone lying with shoulder in neutral rotation and elbow extended
ABDUCTION (0˚-180°)
Position: Supine with arm at side, palm toward ceiling with thumb leading motion
Stationary Arm: Parallel to midline of sternum
Moving Arm: Along midline of humerus in line with medical epicondyle
ROTATION (0˚-90°)
Position: Supine or prone, shoulder supported in 90° abduction, forearm neutral and
perpendicular to table, elbow flexed to 90° (this is considered the 0° position)
Stationary Arm: Parallel to table top, or allow the lighter arm to hang vertically (i.e. perpendicular to
floor)
COMPETENCIES AND CRITERIA Fundamentals of Clinical
Measurement -DPT 710
171
Moving Arm: In line with ulna toward ulnar styloid process
ELBOW JOINT
FLEXION (0˚-150°)
Position: Supine or sitting with arm parallel to the lateral midline of the body, forearm supinated
Stationary Arm: Lateral midline of the humerus toward acromion
Moving Arm: Lateral midline of radius toward styloid process
EXTENSION (150˚-0°)
Position: Same as for flexion; return from flexion
Stationary Arm: Same as flexion
Moving Arm: Same as flexion
FOREARM
PRONATION (0˚-80°)
Position: Supine or sitting, elbow flexed to 90°, arm held close to side of the body, forearm in
mid-position (i.e. so that the thumb may be pointed up)
Stationary Arm: Held vertically on lateral side of forearm and parallel to long axis of the humerus
Moving Arm: Across the dorsum of the wrist at the level of the styloid processes
SUPINATION (0˚-80°)

COMPETENCIES AND CRITERIA Fundamentals of Clinical
Measurement-DPT 710
172
Position: Same as for pronation
Stationary Arm: Held vertically on the medial side of forearm and parallel to long axis of the humerus
Moving Arm: Across the volar aspect of the wrist at the level of the styloid processes
WRIST JOINT
FLEXION (0˚-80°)
Position: Supine or sitting, shoulder flexed or abducted to 90°, elbow flexed to 90°; the forearm
should be vertical in a mid-position between supination and pronation and the fingers
should be relaxed
Stationary Arm: Along ulna toward center of olecranon process
Moving Arm: Along ulnar border of the 5th metacarpal
NOTE: Do not allow ulnar flexion of the wrist.
EXTENSION (0˚-70°)
Position: Same as for wrist flexion
Stationary Arm: Same as for wrist flexion
Moving Arm: Same as for wrist flexion
NOTE: Flexion and extension can be measured on the radial or ulnar sides of the hand, but the measurements
of the two sides will vary due to the anatomical structure of the wrist and the cupping of the hand on
the 5th finger side. If measured on the radial side, use the 2nd metacarpal for the distal landmark.
RADIAL DEVIATION (ABDUCTION)/ULNAR DEVIATION (ADDUCTION) (0˚-20°/0˚-30°)
Position: Supine or sitting, elbow flexed; forearm pronated and resting on the table
Stationary Arm: Along the midline of the dorsal surface of the forearm

COMPETENCIES AND CRITERIA Fundamentals of Clinical
Measurement-DPT 710
173
Moving Arm: Along the midline of the dorsal surface of the third metacarpal
NOTE: Avoid flexion or extension of the wrist or pronation and supination of the forearm.
Do not use the phalanx for a point of reference.
METACARPOPHALANGEAL JOINTS OF FINGERS
FLEXION (0˚-90°)
Position: Supine or sitting, elbow flexed, forearm neutral, and wrist in neutral (0°)
Stationary Arm: Along the midline of the dorsal surface of the metacarpal of the joint to be measured
Moving Arm: Along the midline of the dorsal surface of the proximal phalanx
* Alternate Method: Take a ruler measurement from the tip of each finger to the distal carpal crease. This is
the preferred method in the presence of edema or bony joint changes.
EXTENSION (0˚-45°)
Position: Supine or sitting, elbow flexed and wrist neutral (0°)
Stationary Arm: Along the radial or palmar side of the 2nd metacarpal, ulnar or palmar side of 5th
metacarpal, or on the palmar surface of the 3rd or 4th metacarpals
Moving Arm: Same position as stationary arm except on adjoining proximal phalanges
ABDUCTION (0˚-20°)
Position: Sitting or supine, forearm and hand supported, forearm pronated, and wrist in neutral
Stationary Arm: Along the dorsal midline of the metacarpal of the joint being measured
Moving Arm: Along the dorsal midline of the proximal phalanx of the joint being measured

COMPETENCIES AND CRITERIA Fundamentals of Clinical
Measurement-DPT 710
174
INTERPHALANGEAL JOINTS OF FINGERS
FLEXION (0˚-90°)
Position: Sitting or supine, forearm supported and wrist in neutral
Stationary Arm: Dorsal midline of the more proximal phalanx of the joint being measured
Moving Arm: Dorsal midline of the more distal phalanx of the joint being measured
*Alternate method: Take a ruler measurement from the tip of each finger to the distal palmar crease. This is
the preferred method in the presence of edema or bony joint changes.
EXTENSION
Position: Same as for flexion; return from flexion
Stationary Arm: Same as for flexion
Moving Arm: Same as for flexion
THUMB METACARPOPHALANGEAL AND INTERPHALANGEAL JOINTS
THUMB FLEXION (0˚-60˚ to 90°) M.P. joint; (0˚-90°) I.P. joint
Position: Forearm and hand supported on a firm surface with forearm in full supination
Stationary Arm: M.P. Joint- parallel to midline of metacarpal; I.P. Joint- parallel to midline of proximal
phalanx
Moving Arm: M.P. Joint- parallel to midline of proximal phalanx; I.P. Joint- parallel to midline of distal
phalanx
* Alternate Method: If using finger or half circle goniometer:

COMPETENCIES AND CRITERIA Fundamentals of Clinical
Measurement-DPT 710
175
Position: Forearm and hand supported on ulnar border, thumb in approximation with second
phalange
Stationary Arm: M.P. Joint - midline of metacarpal on dorsal surface; I.P. Joint - midline of proximal
phalanx on dorsal surface
Moving Arm: M.P. Joint - midline of proximal phalanx on dorsal surface; I.P. Joint - midline of distal
phalanx on dorsal surface
THUMB EXTENSION (90° to 60°- 0°)
Position: Same as for flexion; return from flexion
Stationary Arm: Same as for flexion
Moving Arm: Same as for flexion

COMPETENCIES AND CRITERIA Fundamentals of Clinical
Measurement-DPT 710
176
THUMB CARPOMETACARPAL JOINT
ABDUCTION (0˚-40°)
Position: Forearm and hand supported on ulnar border, thumb in approximation with second
phalange; in this starting position, the goniometer will indicate 15˚-20° and this is
recorded as 0°
Stationary Arm: Midline of radial side of 2nd metacarpal
Moving Arm: Midline of dorsal surface of 1st metacarpal
ADDUCTION (40˚-0°)
Position: Same as for abduction; return from abduction to 0°
Stationary Arm: Same as for abduction
Moving Arm: Same as for abduction
OPPOSITION: Take a ruler or tape measurement measure from the tip of thumb to head of 5th metacarpal.

COMPETENCIES AND CRITERIA Fundamentals of Clinical
Measurement -DPT 710
177
INFORMATION SHEET MANUAL MUSCLE TESTING
General Information and Guidelines for Muscle Testing The examination procedure of manual muscle testing is a series of predetermined techniques which assess a
person's ability to develop voluntary tension within a part of a muscle, the whole muscle, or a group of muscles under a specific set of criteria. Muscle testing is applied to individual muscles whenever possible, however, the overlapping, interdependency of muscle action sometimes prevents this. Through competent knowledge of the anatomy and kinesiology of the neuromusculoskeletal systems and the procedures of muscle testing, the therapist can learn to differentiate the action, and by utilization of a specific position which places the test muscle in its most favorable position to perform its' motion, the relative effectiveness of other muscles performing the motion may be reduced.
1. The criteria established for manual muscle testing are: A. Each test is performed in the specific manner described in the manual. This includes:
(1) Correct position of the subject/client, the part to be tested and the therapist's own body and hands (2) Correct stabilization: adhering to strict rules of stabilization is to prevent substitute movements by -
(a) Limiting unwanted movements of adjoining body parts, in order that the test muscle acts to achieve only the desired movement
(b) Insuring that the correct position of the part to be tested is maintained in order to prevent deviations of the test movement from occurring out of the correct plane of movement
(3) Correct support of the part to be tested B. Prior to performing any muscle test, the available joint range must be assessed passively. If the client
can move actively, it is permissible to have the client perform the motion to assess active joint range. Assessment of active joint range is not a substitute for passive assessment performed by the therapist.
C. Regardless of grade assigned, all muscles (belly or tendon) must be manually palpated. Palpation provides the therapist with information regarding motion substitutes by muscles not being tested. The palpation points are listed in the manual for each test.
D. Each motion should be performed a set number of times. Consistency throughout the test should occur. Three contractions are suggested as the number used. The criterion for the number of contractions must be decided upon by all members of a department and adhered to in order to maintain as much inter-rater reliability as possible.
E. All clothing must be removed from the part to be tested in order that careful visual observation and manual palpation can be performed consistently and accurately.
F. Accurate knowledge of the grading key is necessary in order to document the result of the test. G. If any criterion is altered, the alteration must be documented in writing on the client's record.
2. Basic considerations during test administration:
Division of Physical Therapy
Emory University

COMPETENCIES AND CRITERIA Fundamentals of Clinical
Measurement -DPT 710
178
A. Explain briefly and demonstrate the motion to the client. Make certain the client can see and hear your
instructions. B. Avoid frequent position change. Complete all tests which can be performed in one position before
requesting that the client change positions. C. If only one side of the client is involved, always compare with the uninvolved side. The comparison is of
particular importance when testing muscles from Fair plus (F +) to Normal (N). D. When movement takes place in a plane perpendicular to the force of gravity (i.e. the horizontal or
transverse planes) gravity's effect (as resistance) on the moving part is lessened and movement is achieved with less effort. Movement occurring perpendicular to the force of gravity is usually expressed as movement in the gravity-eliminated position during which friction should be reduced as much as possible. Reduction of friction is best accomplished by using a powder board. If a powder board is not available, use a slippery surface or support the part with your hand.
E. Movement that takes place in a plane parallel to the force of gravity and directly against the force of gravity is expressed as anti-gravity or against gravity.
F. Strive to perform tests on several muscles before recording the grades. Practice remembering several grades at a time, and then record these grades.
G. During the testing, the therapist should stand or sit in close approximation to the client to afford support and stabilization while maintaining proper body mechanics.
3. Advantages and uses of the manual muscle test: A. Advantages:
(1) Test may be performed in any environment. (2) Little external equipment is necessary. (3) Knowledge of the muscle test is widespread; the muscle test is, therefore, an accepted clinical tool
used by numerous medical specialties. B. Uses:
(1) To assist in definitive diagnosis (2) To assist in recording the increase or decrease in function during a disease process (3) To assess the effectiveness of a specific therapeutic technique (4) To establish a baseline performance of muscle function so realistic remedial exercise programs can
be planned (5) To assist in selection of equipment for a client (6) To assist in assessing the effectiveness of a medical or surgical procedure through serial muscle tests
4. Disadvantages and contraindications: A. Disadvantages:
(1) Requires specific knowledge of the test as well as manual skill to perform the test, therefore, delegation of the task to an untrained individual is not possible
(2) Requires voluntary cooperation and conscious control by the client (3) Not useful for all diagnoses (4) Not useful in presence of pain
B. Contraindications for use: (1) In persons with hypertonic muscle (i.e. spasticity or rigidity) (2) In persons that demonstrate acute pain with isotonic and isometric muscle contraction (i.e. soft
tissue trauma or joint diseases) (3) In persons displaying inability to control muscle contractions (4) In persons whose level of cognition prevents understanding the instructions

COMPETENCIES AND CRITERIA Fundamentals of Clinical
Measurement -DPT 710
179
(5) In persons at risk for pathological fractures
5. Grading System: A. Several grading systems are used throughout the country. Examples of these systems are numerical (0-
5) and a percentage system (0% through 100%). B. The grading system to be used in your program will be based on the ability of a muscle or muscle group
to withstand manual resistance, to move through a predetermined arc of motion against gravity (AG) or gravity eliminated (GE), and the ability of the muscle to demonstrate contractile properties judged by palpation.
C. This system may be summarized as follows:
GRADES DEFINITION
Normal (N)
5/5
Subject moves the test part through complete predetermined arc of motion against
gravity and withstands maximum amount of resistance* a specified number of times
without showing fatigue.
Good (G)
4/5
Same as normal except as maximum resistance is applied the muscle or muscle
group "gives" slightly allowing the part to be pulled several degrees into the
opposite direction.
Good Plus is used in some facilities as an increment between Good and Normal. The
definition would be identical to good except the amount of "give" would be
subjectively less.
Fair Plus (F+)
3+/5
Subject can move the test part through the complete arc of motion against gravity,
and can withstand minimal resistance. When resistance is applied an eccentric
contraction occurs in the test muscle.
Fair (F)
3/5
Subject can move the test part through the complete arc of motion against gravity,
but cannot withstand any external resistance.
Fair Minus(F -)
3-/5
Subject can move over one-half, but less than the complete arc of motion against
gravity.

COMPETENCIES AND CRITERIA Fundamentals of Clinical
Measurement -DPT 710
180
Poor Plus(P+)
2+/5**
Subject can move approximately 1/3 to 1/2 of the complete arc of motion against
gravity.
Poor(P)
2/5
Subject can move through the complete arc of motion gravity eliminated (GE).
Poor Minus (P-)
2-/5
Subject can move through a partial arc of motion gravity eliminated.
Trace (T)
1/5
Muscle demonstrates contractile properties judged by palpation. No motion occurs.
Zero (0)
0/5
Muscle demonstrates no contractile properties as judged by palpation.
*maximum resistance must consider age and sex
**poor plus start- less than 1/3
(1) Range Grade/Strength Grade: Muscle spasms, contracture, or other factors may limit range of
motion, even though muscle strength is Fair Plus or better within the available range. For that
reason, both a range grade of P+ or F- and a strength grade are assigned. For example, F-/G means
the patient moved one-half to approximate completion of range of motion against gravity with slight
"give" occurring as resistance is applied.
(2) Each grade is based on three repetitions with the lowest of the three grades being the assigned
grade.
D. Clarification of resistance:
(1) Resistance is given manually in the form of a break test. That is, pressure is applied in a direction
opposite the movement in an attempt to cause the test muscle to break its contraction or to "give.”
(2) The object of the resistance is to test the ability of the muscle to hold its tension. In many instances
the examiner may, through positioning or physical abilities, have a decided advantage over the
muscle. Care must be taken not to force the muscle to yield its hold in a manner causing tissue
tearing.
(3) Resistance is applied slowly, building up pressure against the part that is moved by the muscle.
(4) The command to the subject is "hold.” Actually, the subject is performing an isometric contraction
or holding contraction.
(5) When applying resistance one must give consideration to age and sex:
COMPETENCIES AND CRITERIA Fundamentals of Clinical
Measurement -DPT 710
181
(a) Strength usually increases gradually over approximately 20 years, remains at a peak for 10 or 15
years, and then gradually decreases as age increases.
(b) When testing children, one should be aware of specific groups of muscles which are normally
weak during growth and development. A useful clue is to be familiar with the motor skill
abilities at various ages. These abilities will give the examiner an idea of the muscle groups
which can function maximally.
(c) In the case of infants, manual muscle testing is tone, utilizing reflexes and reactions which cause
body parts to move and muscles to contract. The key is usually reduced to the increments of
present and absent as observed and palpated by the examiners. In the case of toddlers and pre-
school children, the muscle test is usually a combination of observing gross motor activities and
using the adult test, whenever possible. Once children are able to follow demonstration and
verbal instructions, the adult test is applied.
(6) When giving resistance one should consider the length-tension relationship and the change in
rotation component of muscle force related to joint position.
6. Gross Muscle Testing of the Human Body:
A. The utilization of gross muscle testing, as an initial screening tool for strength, is widely used in physical
therapy. The meaning of gross muscle test may vary from person to person or between facilities. The
gross muscle test is a routine procedure to be used prior to any activity when the general strength is
unknown.
B. One may also find the use of such a screening test economical from the standpoint of the client’s and
therapist's time, as well as a means of conserving the client's energy. Examples of types of gross tests:
(1) Place the part in a position with no consideration for gravity and apply resistance
(2) Apply resistance in a way to test a combination of movements at one time, such as shoulder flexors,
abductors, and external rotators
C. In both of these examples, the therapist is looking for areas of weakness which appear to be below the
muscle test grade of Good. If such weaknesses appear then performance of specific muscle tests on the
muscle groups which appear to have grades below Good is indicated. The gross muscle test can also be
useful to judge strength and asymmetry of right and left sides by testing the sides simultaneously.
D. This technique is most easily applied to the limbs. The gross muscle test can be performed in a variety of
positions, but sitting, supine, and standing are the usual choices. Observation of the client's
performance during daily activities is another method of assessing the gross functional strength of
muscle groups. Examples of activities are shaking hands, rising from supine to sitting, rising from sitting
to standing, and ambulation.
E. In summary, the gross muscle test may be performed on clients displaying generalized weakness and
clients whose energy and time should be conserved. The objectives to be achieved by use of this
screening tool would be to:
(1) Assess general strength prior to performing activities such as transfers or standing

COMPETENCIES AND CRITERIA Fundamentals of Clinical
Measurement -DPT 710
182
(2) Enable the therapist to assess body areas in need of definitive testing
(3) Enable the therapist to assess asymmetrical patterns of weakness by comparing right and left sides
(4) Enable the therapist to test combination movements which are an integral part of normal activities
F. The gross muscle test does not consistently consider body position, effect of gravity, or specific muscles,
but may give consideration to any or all of these criteria during the test. Whenever possible give
resistance in an against gravity position.

COMPETENCIES AND CRITERIA Fundamentals of Clinical
Measurement -DPT 710
183
CRITERIA SHEET MANUAL MUSCLE TESTING
1. Pre-Planning for the Procedure: A. Identify the priority signs, symptoms, and conditions which make the procedure applicable:
(1) Documented muscle weakness, nerve injury, or neurological disorder (2) Loss of voluntary motion secondary to traumatic injury or disease process (3) Client's perception of strength deficit
B. Identify the rationale for choice of the procedure:
(1) Safety: (a) Client must be medically stable (cleared for position change). (b) Care must be taken when testing muscles in areas adjacent to open wounds, bums, etc. and in
clients with cardiac/respiratory disorders, vital signs must be monitored throughout the course of treatment.
(c) Manual muscle testing is contraindicated in presence of extreme pain, active muscle degeneration, and fracture sites.
(2) Economics: (a) Physical therapist's time; increased treatment cost for patient session
(3) Condition of Client: (a) Any client known to have suspected or documented muscle weakness secondary to disease or
injury (b) Any client found to have specific weakness during gross evaluation
(4) Duration of Procedure: (a) Variable and is dependent upon number of muscles to be tested, client's endurance, and
therapist's time (5) Generate Other Possible Alternative Procedures:
(a) Isometric muscle testing (difficult to grade strength of contraction) or serial gross muscle screens may be performed in presence of pain or decreased voluntary motion.
(b) Quantitative muscle testing (e.g. dynamometer, strain gauge, isokinetic equipment) (6) Relationship of Procedure to Short and Long-Term Goals:
(a) Identify muscle weaknesses, which may hamper functional ability and independence. (b) Develop exercise program to increase/maintain muscle strength and improve client's function;
plot client's progress. (c) Establish highest independent functional level of the client.
2. Preparation of the Physical Therapist: A. Review the procedure, as necessary. B. Read client's medical record:
(1) Obtain medical history, precautions, etc.
Division of Physical Therapy
Emory University

COMPETENCIES AND CRITERIA Fundamentals of Clinical
Measurement -DPT 710
184
(2) Predict muscles to be tested based on the area and extent of injury and/or dysfunction. C. Interview the client:
(1) Ask questions identifying information not available in the medical record. (2) Ask questions concerning present functional level (e.g. methods of performing ADL's and/or
ambulation). (3) Ask questions regarding area and behavior of pain. (4) Ask questions regarding client's perception of procedure to be performed. (5) Ask questions regarding client's identification of goals.
D. Determine muscle tests which may be performed in each testing position (e.g. supine, prone). E. Select and collect correct equipment:
(1) Stethoscope and sphygmomanometer (2) Muscle testing forms and pencils (3) Goniometer (4) Powder board (5) Gown and necessary linens
F. Secure the environment: (1) Separate cubicle or mat table with pull around curtains if possible.
3. Execution of the Procedure: A. Follow the IPR and Teaching-Learning Criteria to establish rapport and explain procedure to the client. B. Sequential steps of the procedure:
(1) Determine the test sequence which will be time and energy efficient, based upon: (a) Medical record (b) Client interview (c) Gross evaluation of muscle strength
(2) Position the client, as defined in the syllabus, for each muscle to be tested, including: (a) Use of against gravity (AG) or gravity eliminated (GE) positions (b) Use of powder board, if indicated (c) Consideration of client's comfort
(3) Drape the client so as to expose the area around the muscle to be tested in a way which allows: (a) Observation of muscle being tested and the muscles which may substitute for motion being
performed (b) Freedom of motion (c) Preservation of client's modesty
(4) Determine client's available range of motion: (a) Being tested through available range; passively move joint related to muscle and record range (b) Select standard or alternate grading system (Range Grade/Strength Grade) based upon results
of the range of motion check. (5) Explain the procedure to the client:
(a) Verbally explain the specific steps in the procedure and the client's role. (b) Demonstrate the muscle action to the client on the client. (c) Explain that you will be giving the following commands:
1) Perform the motion. 2) Hold in the end range position before therapist applies resistance. 3) Relax between repetitions. 4) Identify that you will be palpating specific areas.
(d) Explain the necessity of stabilization.

COMPETENCIES AND CRITERIA Fundamentals of Clinical
Measurement -DPT 710
185
(e) Assess understanding and ability to respond. (6) Stabilize the area proximal to muscle being tested, as identified in syllabus; be sure to:
(a) Provide effective stabilization. (b) Maintain stabilization throughout the motion and application of resistance. (c) Provide stabilization by using a firm, flat hand, thereby, avoiding pressure points and client
discomfort. (d) Avoid pressure directly over joints.
(7) Palpate each muscle tested and related muscles if substitution is suspected: (a) Palpate area over the belly of the muscle which covers a representative sample of where the
muscle's length and width begin. (b) Palpate with muscle at rest and continue palpation throughout performance of motion. (c) Palpate with finger pads using gentle, but firm and continued touch.
(8) Have the client perform three consecutive repetitions of the test motion before assigning a muscle grade.
(9) Apply resistance at the end of range, unless otherwise specified in the syllabus. After command to hold ("hold, don't let me move you"): (a) Apply resistance gradually allowing client time to meet your resistance. (b) Release resistance gradually. (c) Apply resistance in the direction opposite to the test motion. (d) Apply resistance with a flat hand so as to avoid pressure points and avoid discomfort to the
client. (e) Use your voice to facilitate client's muscle contraction. (f) Avoid pressure over joint.
(10) Assign grade to each muscle based upon the lowest grade for the three repetitions: (a) Record muscle or action and grade. (b) Note any modifications used in test performance (e.g. change in position of client, limb, or
joint). C. Implement changes in procedure based upon client's response:
(1) Use of standard versus alternate grading system based upon changes in client's range of motion (2) Client's endurance and/or pain
D. Record results in client's medical record utilizing SOAP format or other approved format (e.g. MMT form which can then be added to the chart).
E. Interpret results of examination procedure:
(1) Discuss factors related to reliability and validity. (2) Identify patterns of nerve and muscle involvement, including the extent and level of involvement. (3) Identify substitution patterns which facilitate function. (4) Determine functional limitations. (5) Identify an appropriate treatment program, including:
(a) Objectives or goals (b) Principles related to muscle testing which should be incorporated (c) Specific treatment program incorporating (a) and (b) above
F. Clean up area.

COMPETENCIES AND CRITERIA Fundamentals of Clinical
Measurement -DPT 710
186
CRITERIA SHEET STANDARD PROCEDURE FOR MANUAL MUSCLE TESTING
HEAD AND NECK
CERVICAL EXTENSION
Upper trapezius, iliocostalis cervicis, longissimus capitis, longissimus cervicis, spinalis cervicis, spinalis capitis,
splenius capitis, splenius cervicis, semispinalis cervicis, semispinalis capitis, multifidus
Position: GE: (O to 2) Side lying with head supported on powder board
AG: (2+ to 5) Prone with pillow under chest, head and neck in neutral
Movement: Cervical extension through the full range of movement
Stabilization: Upper part of back
Resistance: Applied to occiput and directed straight down
Palpation: The erector spinae and trapezii may be found on either side of spinous processes in cervical area
Substitutions: Watch for deviation left or right which may indicate that one side is stronger than the other
FLEXION OF ATLANTO-OCCIPITAL AND CERVICAL VERTEBRAL JOINTS
1) Rectus capitis anterior, longus capitis: Atlanto-occipital flexion
2) Longus colli, sternocleidomastoid: Cervical flexion
Position: GE: (O to 2) Side lying with head supported on powder board; head and neck in neutral
position of flexion and extension
AG: (2+ to 5) Supine position, head in neutral position
Division of Physical Therapy
Emory University

COMPETENCIES AND CRITERIA Fundamentals of Clinical
Measurement -DPT 710
187
Movement: Head and neck flexion; the chin is tucked and neck flexes moving chin toward sternal notch
Stabilization: Across upper rib cage
Resistance: Support chin and press against forehead in the direction of extension
Palpation: On bellies of sternocleidomastoid, on either side of the supra-sternal notch
Substitutions: 1. Only the head flexors may be working
2. Platysma

COMPETENCIES AND CRITERIA Fundamentals of Clinical
Measurement -DPT 710
188
FLEXION AND ROTATION OF NECK
Sternocleidomastoid
Position: GE: (0 to 2) Sitting with head in neutral position; rotate head to each side
AG: (2+ to 5) Supine; Sternal head - head rotated 90°, lift ear toward ceiling;
Clavicular head- head rotated 45°, lift ear toward shoulder
Stabilization: Upper rib cage
Resistance: Applied to side of head toward extension
Palpation: Belly of individual sternocleidomastoid
Substitutions: 1. One head of the sternocleidomastoid muscle may substitute for the other. Palpate to
determine functioning of both heads.
2. In GE position gravity may flex the neck while the small rotators in the posterior neck region
may rotate the neck.
INFANT TEST
Sternocleidomastoid
Newborn to 4 weeks – 8 weeks:
Stimulus - light stroke on cheek or at corner of mouth
Response - turns head to same side
4 - 8 weeks to 6 or 7 months:
Early: Stimulus - turn head to side
Response - turns head to mid-position
Late: Stimulus - pull to sitting
Response - lifts head through range
6 or 7 months to 3 - 5 years:
Stimulus - hold supine in space
Response - head rises to normal position
FACE - Musculature of the face will be tested according to procedures listed in Daniels and Worthingham.

COMPETENCIES AND CRITERIA Fundamentals of Clinical
Measurement -DPT 710
189
TRUNK
TRUNK FLEXION
1. Upper rectus abdominis, obliquus externus abdominis, and obliquus internus abdominis
Position: Supine
Movement: GE: (0 to 2) Depression of lower portion of thorax
AG: (2+ to 5) Partial sit-up; flexion of thoracic and lumbar vertebrae
Stabilization: Legs
Resistance: No external resistance is given; resistance is determined by position of arms
Grading: 0 No contraction is palpated
1 Contraction without depression of thorax
2- Contraction with partial depression thorax
2 Contraction with full depression of thorax
2+ Arms at side; trunk begins motion against gravity
3- Arms at sides; spines of scapulae clear table
3 Arms at sides; inferior angles of scapulae clear table
3+ Arms held straight in front of subject; inferior angles of scapulae clear table
4 Arms crossed on chest; inferior angles of scapulae clear table
5 Hands placed behind head with elbows pointing outward; inferior angles of scapulae clear
table
Palpation: Rectus- just below xiphoid process of sternum
Obliquus externus- just below costal angle
Obliquus internus- medial to ASIS

COMPETENCIES AND CRITERIA Fundamentals of Clinical
Measurement -DPT 710
190
Substitutions: 1) Client may jerk up- to prevent this, sit up slowly
2) For grades 2+ to 3 client may push up with arms
3) For grades 2-3 client may breathe deeply
4) Oblique abdominals working together can produce straight trunk flexion. Determine
presence of rectus with palpation.
5) Watch for deviation of umbilicus to one side, which indicates greater strength to that side.
ROTATION WITH FLEXION
1. Obliquus externus abdominis
2. Obliquus internus abdominis
Position: GE : (0 tp 3) Sitting with arms at sides
Movement: Stabilize pelvis; client rotates trunk
Grading: 2- Partial rotation
2 Full rotation
*Alternate
Method:
Alternate position for clients who cannot sit: Supine with hips and knees flexed, feet
flat on table; watch for depression of lower portion of rib cage and elevation of pelvis as
client tries to rotate and flex trunk
Position: AG: (P+ to N) Supine, legs straight, arms folded behind neck
Movement: Client attempts to do a diagonal sit-up
Grading: 2+ Elevation of ½ of opposite scapula, arms relaxed
3 Inferior angle of opposite scapula clears table, arms relaxed
3+ Arms straight in front, opposite scapula clears table and part of scapula on side toward
which person is reaching comes off table
4 Arms crossed on chest, opposite scapula clears table and part of scapula on side toward
which person is reaching comes off table
N Hands placed behind head with arms horizontally abducted, both scapulae clear table

COMPETENCIES AND CRITERIA Fundamentals of Clinical
Measurement -DPT 710
191
Stabilization: Legs
Resistance: Determined by position of the arms; no external resistance is applied
Palpation: Obliquus Externus Abdominis may be palpated just inferior to the costal angle. Obliquus
Internus Abdominis is palpated in the lower quadrant of the abdomen medial to ASIS.
Substitutions: 1) In GE sitting position the deep rotators of the back may rotate trunk. Palpate to
determine functioning of the obliques.
2) In AG position client may try to jerk up. Movement should be done slowly.

COMPETENCIES AND CRITERIA Fundamentals of Clinical
Measurement -DPT 710
192
LATERAL FLEXION
1. Obliquus Externus and Internus Abdominii (on same side)
Position: GE: (0 to 2) Supine; arms folded across chest
AG: (2+ to 5) Side lying with legs extended, bottom arm folded across chest, and top arm
reaching toward knee on same side
Movement: Client attempts to bring shoulder toward hip on same side
Stabilization: Hips and legs
Resistance: Weight of body and number of repetitions determine the resistance
Grading: 2+ Beginning of motion to ½ range
3- ½ range to almost full range
3 1 repetition
4 3 repetitions
5 5 repetitions
Palpation: Between lateral aspect of rib cage and crest of ilium
Substitutions: 1) In GE position the latissimus dorsi may perform the motion.
2) In AG position the client may push himself up by using his arms.
3) The back extensors working unilaterally may laterally flex the trunk. Determine this
by palpation and by being certain that the ribs are depressed not flaring as the
motion occurs.

COMPETENCIES AND CRITERIA Fundamentals of Clinical
Measurement -DPT 710
193
HIP-HIKING
1. Quadratus lumborum
Position: GE: (0 to 2) Supine; arms folded across chest
AG: (2+ to 5) Standing on a block or stool with test leg hanging free
Movement: Subject hikes hip/elevates pelvis on test side
Stabilization: Trunk on opposite side
Resistance: Applied to the iliac crest in a downward direction
Substitutions: Lateral flexion of trunk to opposite side may give the appearance of hip hiking.
Prevent this by stabilizing the trunk on opposite side.

COMPETENCIES AND CRITERIA Fundamentals of Clinical
Measurement -DPT 710
194
TRUNK EXTENSION
1. Thoracic erector spinae
Position: GE: (O to2) Sitting with back slightly "rounded" and relaxed.; stabilize lumbar area with
hand or back of chair
AG: (2+ to 5) Prone with pillows under abdomen, arms resting on buttocks
Movement: Subject extends the thoracic portion of the spine
Stabilization: Pelvis and lumbar spine
Resistance: Applied to the upper portion of thoracic spine
Palpation: Parallel to spinous processes in thoracic area
Substitutions: 1) Cervical and lumbar extensors may contract. Detect this by making sure the thoracic
spine is extending and by palpating.
2) Client may push off from the table with an anterior thrust of the shoulders. To
prevent this, keep scapulae in adduction and arms off the table by resting them across
client's buttocks.
3) To insure contraction of extensors and not scapula adductors, have client relax
shoulders at completion of test.
2. Lumbar erector spinae
Position: GE: (O to 2+) Sitting
AG: (2+ to 5) Prone with pillows under hips and hands across buttocks
Movement: Client arches low back, anterior tilt of pelvis
Stabilization: Pelvis and thighs
Resistance: Applied to lower portion of thoracic spine
Substitutions: Thoracic erector spinae or hip extensors may contract. Be sure extension is occurring at
the lumbar spine and palpate to detect this substitution.
*Alternate
Method:
For thoracic and lumbar erector spinae (GE plane): Client supine; client arches back in
thoracic and lumbar regions

COMPETENCIES AND CRITERIA Fundamentals of Clinical
Measurement -DPT 710
195
INFANT TEST
Erector Spinae
Newborn to 4 weeks - 8 weeks:
Stimulus - prone, face down
Response - frees face by turning head, produces slight contraction in muscles
4 - 8 weeks to 6 or 7 months:
Early: Stimulus - hold prone in space
Response - lifts head and contracts back extensors
Late: Stimulus - pull to sitting
Response - lifts head through range
6 or 7 months to 3 - 5 years:
Same as above
Stimulus - prone in space, supported under thorax, head extended
Response - spine and legs extend

COMPETENCIES AND CRITERIA Fundamentals of Clinical
Measurement -DPT 710
196
HIP
HIP FLEXION
1. Iliacus
2. Psoas major
3. Rectus Femoris
Position: GE: (O to 2) Subject is side lying with the test limb supported on a powder board or by
therapist, hip is in 0° extension, and knee is flexed 90°
AG: (2+ to 5) Subject is sitting, hips and knees flexed to 90°, hands holding onto edge of
table to stabilize trunk and pelvis
Movement: Subject flexes hip
Stabilization: Therapist stabilizes ipsilateral pelvis. Patient stabilizes trunk/pelvis by holding onto the
edge of the table.
Resistance: Applied above knee on distal femur toward extension
Palpations: Iliacus- difficult due to location and flat shape
Psoas Major- patient must relax abdominals and the muscle may be felt deep in the
abdominal cavity as hip flexion is attempted
Rectus femoris- may be felt between the proximal attachments of the Tensor fascia
latae and Sartorius
Substitutions: 1) Sartorius- hip will abduct and externally rotate as it flexes
2) Tensor fascia latae- hip will abduct and internally rotate as it flexes
3) One of the muscles may not be functioning. Palpate to determine functioning of each
muscle.
4) Pelvic movement caused by abdominals

COMPETENCIES AND CRITERIA Fundamentals of Clinical
Measurement -DPT 710
197
COMBINATION OF FLEXION, ABDUCTION, AND EXTERNAL ROTATION
1. Sartorius
Position: GE: (0 to 2) Supine position with heel of test limb resting on opposite ankle
AG: (2+ to 5) Sitting with hip and knee flexed to 90˚ and pelvis stabilized; subject brings
plantar surface of heel to opposite knee
Movement: Smooth hip flexion, abduction, and external rotation; subject slides heel along leg
toward knee
Stabilization: Subject holds onto table with hands to keep trunk erect
Resistance: Place one hand on lateral aspect of thigh just proximal to knee and the other hand on
medial side of ankle just proximal to the medial malleolus. Resist into extension,
adduction, and neutral rotation.
Substitutions: 1) Iliopsoas and Rectus femoris- will produce straight hip flexion without abduction or
lateral rotation
2) Tensor fascia latae- will produce hip flexion and abduction with medial rather than
lateral rotation
INFANT TEST
Iliopsoas, Sartorius, Rectus Femoris
Newborn to 4 weeks - 8 weeks:
Stimulus - infant supported on trunk, held in position for walking
Response - reflex stepping
Stimulus - tickle or pin prick to sole
Response - flexion of limb
Stimulus - turn head to opposite side
Response - increase of flexor tone, possibly with some movement

COMPETENCIES AND CRITERIA Fundamentals of Clinical
Measurement -DPT 710
198
4 - 8 weeks to 6 or 7 months:
Early: Stimulus - tickle or pin prick to sole
Response - flexion of limb
Stimulus - turn head to opposite side
Response - increase of flexor tone, possibly with some movement
Late: Stimulus - prone, arms over head, legs extended, lift hip
Response - hip flexion
6 or 7 months to 12 or 13 months:
Early: Same as Late above
Late: Stimulus - supine in extension, rotate head
Response - segmental rotation of body with flexion of hip
12 or 13 months to 3 - 5 years:
Early: Same as Late above
Stimulus - standing
Response- flexes through range
Late: Same as Late above
Stimulus - motivate to step on stool or stair
Response - flexes through most of range

COMPETENCIES AND CRITERIA Fundamentals of Clinical
Measurement -DPT 710
199
HIP EXTENSION
1) Gluteus Maximus
Position: GE: (0 to2) Side lying test limb supported on powder board, hip flexed 90°, knee flexed 90°
*Alternate
Method:
GE: Side lying with test limb resting on table, hip and knee positioned as above, opposite
limb supported
Position: AG: (2+ to 5) Prone with sufficient pillow support to decrease lumbar curve, knee flexed 90°
*Alternate
Method:
AG: Have subject lean forward over edge of table, hips flexed as close to 90° as possible,
feet supported on floor; knee on test leg flexed to 90˚ (Good position in presence of
tight hip flexors) (If this position is used, record in notes accordingly)
Movement: Subject extends hip to 0° extension. If you are in doubt that the gluteus maximus is
present, trace contractions may be elicited by requesting the subject to lift head and
shoulders or squeeze buttocks together.
Stabilization: Hold ipsilateral pelvis firmly to prevent lumbar hyperextension; maintain knee flexion
Resistance: Just proximal to knee on posterior aspect of thigh toward flexion
Palpations: Posterior aspect of ilium
Substitutions: 1) Hamstrings
2) Lumbar extensors may tilt pelvis
3) Imbalance in strength of hip abductors/adductors may cause rotation with extension.
This should not be considered a fault of gluteus maximus and requires no down grading.
INFANT TEST
Gluteus Maximus, Hamstrings
Newborn to 4 weeks - 8 weeks:
Stimulus - prone, knees and hips flexed under abdomen
Response - will extricate legs from under body
Stimulus - supine, loud clap of hands or slap on bed
Response - total extension
Stimulus - tickle or pin prick to sole of opposite foot

COMPETENCIES AND CRITERIA Fundamentals of Clinical
Measurement -DPT 710
200
Response - extension of limb
Stimulus - turn head to same side
Response - increase of extensor tone
4 - 8 weeks to 6 or 7 months:
Early: Stimulus - prone, knee and hips flexed under abdomen
Response - will extricate legs from under body
Stimulus - prone over examiner's knees, head flexed
Response - hip extension
Late: Stimulus - prone in space; support under thorax, head extended
Response - hip extension
6 or 7 months to 12 or 13 months:
Same as Late above
12 or 13 months to 3-5 years:
Early: same as Late above
Late: Stimulus - on hands and knees, tilt to one side
Response - extension, abduction on raised side
HIP ABDUCTION
1. Gluteus Medius
Position: GE: (O to 2) Supine with hip and knee in anatomical position
AG: (2+ to 5) Side lying with lower hip and knee flexed to 90°; test leg rests on table
posterior to other leg, hip is in neutral position, and knee extended; therapist faces
subject's back near the hip area
Movement: Abduction of hip with no flexion or rotation

COMPETENCIES AND CRITERIA Fundamentals of Clinical
Measurement -DPT 710
201
Stabilization: GE: Pelvis must be held down to prevent lateral tilting and use the superior aspect of the
iliac crest.
AG: Pelvis must be stabilized to prevent rolling and lateral tilt.
Resistance: On lateral aspect of thigh just proximal to knee, toward adduction
Palpation: Lateral aspect between iliac crest and greater trochanter
Substitutions: 1) Quadratus lumborum and lateral abdominals may hike the hip, giving the appearance
of abduction. Prevent this by stabilizing the pelvis.
2) Tensor fascia latae- patient rolls slightly onto his back, which puts the tensor fascia
latae in a more favorable position to abduct. Prevent this by stabilizing the pelvis
perpendicular to table.
2. Tensor Fascia Latae
Position: GE: (0 to 2) Semi-sitting with hips flexed approximately 30˚-45˚, knees extended, test limb
on powder board
AG: (2+ to 5) Side lying with lower leg flexed at hip and knee for balance, test leg resting in
front of other leg with hip flexed 30˚-45°; pelvis is rolled posteriorly to prevent the
iliotibial band from riding over the head of the femur
Movement: Abduction of hip with hip maintained in flexion and internal rotation
Stabilization: Prevent rolling movement of pelvis and trunk
Resistance: Lateral aspect of thigh just proximal to knee joint toward adduction
Palpation: Just lateral to anterior superior iliac spine (ASIS) and sartorius tendon
Substitutions: 1) Gluteus medius- prevent this by stabilizing pelvis as described above and by not
allowing patient to extend hip
2) Hip flexors- produce only flexion, not flexion and abduction

COMPETENCIES AND CRITERIA Fundamentals of Clinical
Measurement -DPT 710
202
INFANT TEST
Gluteus medius, tensor fascia latae
Newborn to 4 weeks - 8 weeks:
Stimulus - side lying, drop abducted leg
Response - may attempt momentary deceleration of dropping leg
4 - 8 weeks to 6 or 7 months:
Same as above
Stimulus - supine, turn head
Response - body follows and may be accompanied by some abductor contraction
6 or 7 months to 12 or 13 months:
Early: Stimulus - supine in extension, turn head
Response - body rotates segmentally, possibly with some abduction
Late: Same as Early above
Stimulus - on hands and knees, tilt to one side
Response - abduction, extension on raised side, increase in tone on low side
Stimulus - supported by hands while standing
Response - cruising
12 or 13 months to 3 - 5 years:
Early: Same as Late above
Late: Stimulus - knee standing, pull or tilt to one side
Response - abduction on raised side, increase in tone on low side

COMPETENCIES AND CRITERIA Fundamentals of Clinical
Measurement -DPT 710
203
HIP ADDUCTION
1. Adductor longus
2. Adductor magnus
3. Adductor brevis
4. Gracilis
5. Pectineus
Position: GE: (O to 2) Supine with lower limbs abducted 25° bilaterally, test limb on powder board
AG: (2+ to 5) Side lying with test limb resting on table and top limb supported in abduction
Movement: Adduction of test limb toward other limb
Stabilization: Pelvis is prevented from tilting or rolling and top limb is held in abduction. Subject
steadies self with hands on table surface.
Resistance: On medial aspect of thigh just proximal to knee toward abduction
Palpation: Adductors palpated as a group on medial aspect of thigh
Adductor longus- tendon may be felt on antero-medial aspect of thigh
Gracilis- palpate just proximal to knee, medial to tendon of semitendinosus
Pectineus- difficult; flex, adduct, and externally rotate hip and muscle may be found just
lateral to adductor longus tendon
Substitutions: 1) Hamstrings- adduction is accompanied by external rotation
2) Elevating the pelvis on test side and/or flexing trunk to opposite side may give the
appearance of hip adduction.
3) Int/Ext rotators- prevent by having patient do straight adduction without rotation

COMPETENCIES AND CRITERIA Fundamentals of Clinical
Measurement -DPT 710
204
INFANT TEST
Adductors, Medial rotators
Newborn to 4 weeks - 8 weeks:
Stimulus - tickle or pin prick to sole of opposite foot
Response - extension, adduction, medial rotation of limb
Stimulus - supine, loud clap of hands or slap on bed
Response - total extension with adduction, medial rotation of limbs
4 - 8 weeks to 6 or 7 months:
Early: Stimulus - tickle or pin prick to sole of opposite foot
Responses - extension, adduction, medial rotation of limb
Late: Stimulus - prone in space, support under thorax, raise head
Responses - may adduct and medially rotate during hip extension
6 or 7 months to 3 - 5 years:
Early: Same as Late above
Late: Same as Late above
Stimulus - side lying, hips over table
Response - prevents abduction and lateral rotation
HIP EXTERNAL ROTATION
1. Gluteus Maximus: listed previously as a hip extensor
2. Six small External Rotators:
Obturator Externus
Obturator Internus
Gemellus Superior
Gemellus Inferior
Quadratus Femoris

COMPETENCIES AND CRITERIA Fundamentals of Clinical
Measurement -DPT 710
205
Piriformis
Position: GE: (0 to 2) Standing with test limb in hip and knee extension and hip internally rotated,
weight is borne on opposite limb; Supine- limb position the same as for standing test
AG: (2+ to 5) Supine with knee of test limb flexed over end of table, opposite hip and knee
flexed with foot resting on the table; Sitting with leg over edge of table
Movement: GE: Subject must externally rotate hip so that knee moves beyond the neutral position
AG: Foot and leg must move medially as hip rotates externally
Stabilization: Place hand on lateral side of thigh, just proximal to knee to apply counter pressure
during resistance
Resistance: On medial aspect of ankle toward neutral rotation
Palpation: Gluteus maximus on buttocks; other muscles are too deep to palpate
Substitutions: 1) Patient may elevate buttocks on opposite side giving appearance of lateral rotation
2) Patient may invert foot, flex knee, or adduct hip giving appearance of lateral rotation
3) In GE position patient may laterally rotate stance leg giving the appearance of lateral
rotation of the test leg.
HIP INTERNAL ROTATION
1. Gluteus Minimus
2. Gluteus Medius (anterior fibers): previously listed as hip abductor
3. Tensor Fascia Latae: assists more when hip is flexed than with extended hip
4. Adductor group: assists more when hip is extended than flexed
Position: GE: (O to 2) Same as for external rotation test except hip is placed in external rotation
AG: (2+ to 5) Same as external rotation test
Movement: GE: Subject must internally rotate hip so that knee moves beyond the neutral position
AG: Foot and leg must move laterally as hip rotates internally
Stabilization: Place hand on lateral side of thigh just proximal to knee, apply counter pressure during
resistance

COMPETENCIES AND CRITERIA Fundamentals of Clinical
Measurement -DPT 710
206
Resistance: On lateral aspect of ankle toward neutral rotation
Palpation: Gluteus minimus cannot be palpated; palpation of gluteus medius/tensor fascia latae
listed previously
Substitutions: 1) Patient may elevate buttocks on side of test leg giving appearance of medial rotation
2) Patient may evert foot, flex knee, or adduct hip giving appearance of medial rotation
3) In GE position patient may medially rotate stance leg giving the appearance of lateral
rotation of test leg.
KNEE
KNEE FLEXION
1. Biceps Femoris
2. Semitendinosus
3. Semimembranosus
4. Popliteus
5. Plantaris
6. Gracilis: listed with hip
7. Sartorius: listed with hip
8. Gastrocnemius: listed with ankle
Position: GE: (O to 2) Side lying with test limb resting on a powder board, hip neutral and knee flexed
5° to 10°; opposite limb flexed at hip and knee
*Alternate
Method:
Side lying with test limb on table, hip neutral, knee flexed to 5°-10°; other limb
supported
AG: (2+ to 5) Prone; hip neutral and knee flexed to 5°- 10°
Movement: Knee flexion to 90°
Stabilization: Posterior aspect of buttocks on test side; prevent hip flexion
Resistance: With the knee in 90° flexion, resistance is applied to posterior leg just proximal to ankle
COMPETENCIES AND CRITERIA Fundamentals of Clinical
Measurement -DPT 710
207
toward extension. To differentiate asymmetrical weakness of medial and lateral
hamstrings, place the tibia in medial tibial rotation and knee flexion to test the
semitendinosus and semimembranosus. Resistance should be toward knee extension
and external rotation of tibia. For biceps femoris, place the tibia in external rotation
with knee flexion. Resistance should be toward extension and internal rotation of tibia.
Palpation: Biceps femoris (long head)- postero-Iateral side of thigh just proximal to knee
Semimembranosus- postero-medial side of thigh just proximal to knee; it may be felt on
either side of the more prominent semitendinosus tendon
Substitutions: 1) Gastrocnemius, gracilis, sartorius- to determine substitutions by these muscles
prevent undesired movements and palpate
2) In GE position patient may flex hips causing passive flexion of the knee
3) One or more of the hamstrings may not be functioning. Determine function of each
by palpation.
INFANT TEST
Hamstrings
Newborn to 4 weeks - 8 weeks:
4 - 8 weeks to 3 - 5 months:
See Gluteus Maximus and Hamstring- hip extension section
Stimulus: prone over examiner’s knees, head extended
Response: knee flexion
KNEE EXTENSION
1. Vastus Medialis
2. Vastus Lateralis
3. Vastus Intermedius

COMPETENCIES AND CRITERIA Fundamentals of Clinical
Measurement -DPT 710
208
4. Rectus Femoris
Position: GE: (O0to 2) Side lying with test limb supported on powder board or supported by therapist,
hip flexed to 45° and knee flexed to 90°
AG: (2+ to 5) Sitting with hips in approximately 45° of flexion, arms slightly posterior to sides
of body for support, knees flexed to 90°; place a small pad under the distal femur to
neutralize anterior bowing of the femur
Movement: Extension
Stabilization: Anterior aspect of hip to prevent hip extension
Resistance: Applied proximal to ankle with knee in 10° of flexion toward flexion
Palpation: Vastus medialis and lateralis- on corresponding sides of thigh just proximal to the knee
Vastus intermedius- cannot be palpated
Rectus femoris- felt between tensor fascia latae and sartorius at proximal attachments
Common quadriceps femoris tendon- palpated at the base of the patella
Substitutions: 1) In GE position patient may extend hip causing passive extension of the knee.
2) Patient may quickly flex knee then relax giving appearance of knee extension
3) One or more parts of the quadriceps may not be functioning. Determine by palpation
that each is functioning.
INFANT TEST
Quadriceps
Newborn to 4 weeks - 8 weeks:
Stimulus - supine, loud clap of hands or slap on bed
Response - total extension
Stimulus - prone, knees and hips flexed under abdomen
Response - will extricate legs from under body
Stimulus - tickle or pin prick to sole of opposite foot
Responses - extension of limb

COMPETENCIES AND CRITERIA Fundamentals of Clinical
Measurement -DPT 710
209
Stimulus - turn head to same side
Response - increase in extensor tone
4 - 8 weeks to 6 or 7 months:
Early: Stimulus - supine, loud clap of hands or slap on bed
Response - total extension
Stimulus - supine, quickly attempt to flex knee
Response - maintenance of knee extension
Late: Stimulus - supine, loud clap of hands or slap on bed
Response - total extension
Stimulus - hold in standing position
Response - bounces up and down with knee extension, support weight momentarily
6 or 7 months to 12 or 13 months:
Early: Same as Late above
Late: Stimulus - pull to standing from kneeling
Response - places one foot ahead and pulls self up, contraction of quadriceps
12 or 13 months to 3 - 5 years:
Early: Same as Late above
Late: Stimulus - squat position, motivate to stand
Response - raises weight by extending knee and hip
Stimulus - motivate to step on stool or stair
Response - raises weight by knee extension on one leg

COMPETENCIES AND CRITERIA Fundamentals of Clinical
Measurement -DPT 710
210
ANKLE
PLANTARFLEXION
1. Gastrocnemius
2. Soleus
Position: GE: (0 to2) Prone
Non-weight bearing test:
Position: AG: (P+ to G) Non-weight bearing test- Gastrocnemius: prone with knee extended and foot
hanging over the table edge; Soleus: same as gastrocnemius test except knee is flexed
to 90°
Movement: Plantar flexion of ankle
Stabilization: Lower leg on posterior aspect
Resistance: Grasp calcaneus and apply pressure in a downward direction
Palpation: Gastrocnemius- lateral head on postero-Iateral aspect of proximal calf; medial head on
postero-medial aspect of medial calf
Soleus- may be palpated on either side of gastrocnemius in middle 1/3 of calf; common
tendon may be felt as it attaches to posterior aspect of calcaneus
Grading:
2+ Completes full range of motion and withstands maximum resistance; able to clear
heel/complete partical range of motion during a single leg heel raise
Weight bearing test:
Position: AG: (P+ to N) Stand on test leg with knee extended, other foot off the floor; hands may be
used to balance but no weight is borne on hands
Movement: Rise up on toes, lifting heel from floor
Resistance: Body weight - grade is determined by number of repetitions
Grading: 2+ Less than ½ range
3 1 repetition with full range of motion
G –2-9 repetitions
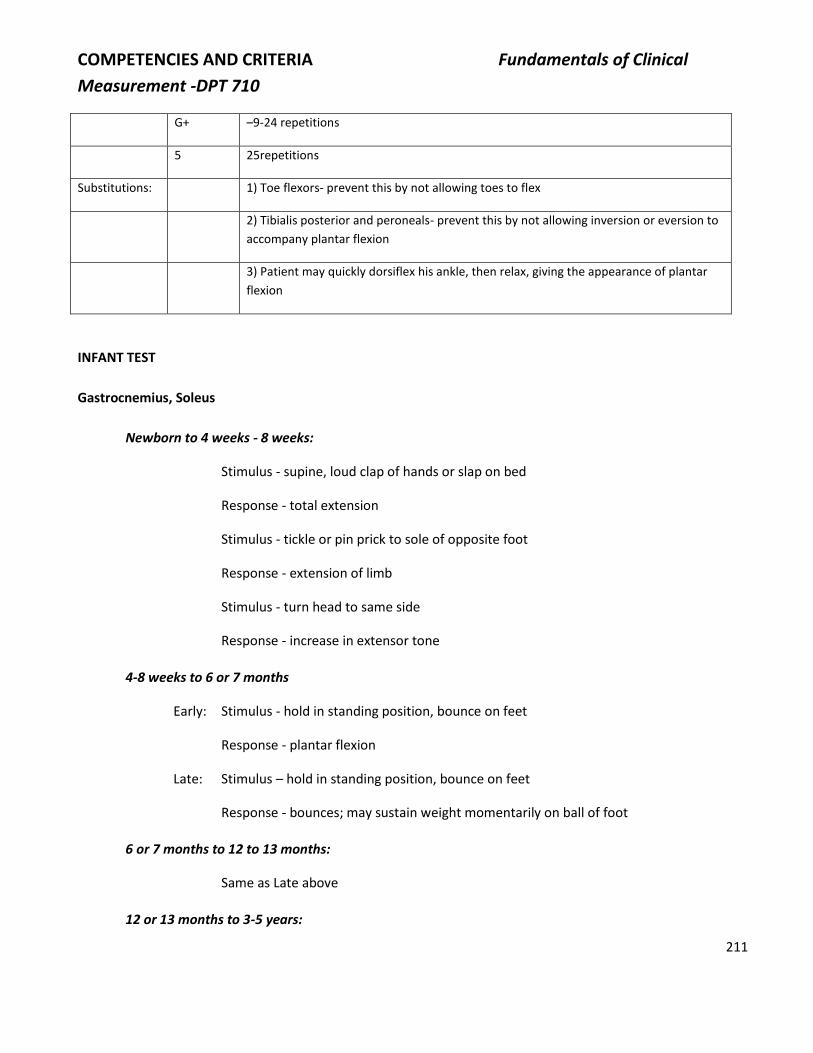
COMPETENCIES AND CRITERIA Fundamentals of Clinical
Measurement -DPT 710
211
G+ –9-24 repetitions
5 25repetitions
Substitutions: 1) Toe flexors- prevent this by not allowing toes to flex
2) Tibialis posterior and peroneals- prevent this by not allowing inversion or eversion to
accompany plantar flexion
3) Patient may quickly dorsiflex his ankle, then relax, giving the appearance of plantar
flexion
INFANT TEST
Gastrocnemius, Soleus
Newborn to 4 weeks - 8 weeks:
Stimulus - supine, loud clap of hands or slap on bed
Response - total extension
Stimulus - tickle or pin prick to sole of opposite foot
Response - extension of limb
Stimulus - turn head to same side
Response - increase in extensor tone
4-8 weeks to 6 or 7 months
Early: Stimulus - hold in standing position, bounce on feet
Response - plantar flexion
Late: Stimulus – hold in standing position, bounce on feet
Response - bounces; may sustain weight momentarily on ball of foot
6 or 7 months to 12 to 13 months:
Same as Late above
12 or 13 months to 3-5 years:

COMPETENCIES AND CRITERIA Fundamentals of Clinical
Measurement -DPT 710
212
Early: Same as Late above
Late: Stimulus - standing, rock forward
Response - plantar flexes
Stimulus - present object high above head
Response - reaches and raises on toe
DORSIFLEXION AND INVERSION
Tibialis anterior
Position: GE: (0-2) May be tested in sitting with test limb externally rotated and resting on anterior
surface of opposite limb; supine position or side lying may also be used. Grade 2 is
partial range of motion.
AG: (2+-5) Sitting, hip and knee flexed to 90°
Movement: Keeping the toes flexed the foot is brought into a dorsiflexion and inversion
combination
Stabilization: Tibia just proximal to ankle joint
Resistance: Applied to medial-dorsal aspect of foot toward plantar flexion and eversion
Palpation: Muscle belly may be felt inferior to patella just lateral to tibial crest; the tendon may be
felt on antero-medial aspect of ankle in front of the medial malleolus
Substitutions: 1) Extensor hallucis longus- to prevent this keep great toe flexed (tendon is easily
mistaken for the tendon of the tibialis anterior)
2) Extensor digitorum longus will dorsiflex and evert; prevent this by keeping toes flexed
3) Tibialis posterior - will invert without dorsiflexion
4) Tibialis posterior and extensor hallucis longus working together will produce
dorsiflexion and inversion
5) Patient may quickly plantar flex ankle then relax, giving appearance of dorsiflexion

COMPETENCIES AND CRITERIA Fundamentals of Clinical
Measurement -DPT 710
213
INFANT TEST
Tibialis anterior
Newborn to 4 weeks - 8 weeks:
Stimulus - tickle or pin prick to sole of foot
Response - flexion of limb
Stimulus - infant supported by trunk, held in position for walking
Response - reflex stepping
4-8 weeks to 6 or 7 months:
Stimulus - tickle or pin prick to sole of foot
Response - dorsiflexion of foot
6 or 7 months to 12 or 13 months:
Early: Same as above
Late: Stimulus - pull to standing from kneeling
Response - places one foot ahead, using dorsiflexion
12 or 13 months to 3-5 years:
Early: Same as Late above
Late: Stimulus - motivate to step on stool or stair
Response - dorsiflexes foot as it is being placed on stool
Stimulus - standing, held under axilla, tilt backwards
Response - dorsiflexion
INVERSION FROM PLANTARFLEXION
Tibialis posterior
Position: GE: (0to2) Supine or sitting with ankle in 45° of plantar flexion: partial ROM for Gr 2

COMPETENCIES AND CRITERIA Fundamentals of Clinical
Measurement -DPT 710
214
AG: (2+ to 5) sittingwith leg supported and ankle in 45° of plantar flexion
Movement: Inversion
Stabilization: Tibia, proximal to ankle
Resistance: Applied to medial border of foot toward eversion
Palpation: Tendon may be felt behind the medial malleolus.
Substitutions: 1) Tibialis anterior- will dorsiflex as it inverts
2) Long toe flexors- to prevent this, keep toes relaxed
3) Gastrocnemius/Soleus- will produce too much plantar flexion
4) Patient may quickly evert his foot then relax, giving the appearance of inversion
INFANT TEST
Tibialis Posterior
Newborn to 4 weeks - 8 weeks:
Stimulus - supine, loud clap of hands or slap on bed
Response - total extension with contraction of posterior tibialis
Stimulus - tickle or pin prick to sole of opposite foot
Response - extension of limb with inversion and plantar flexion
Stimulus - turn head to same side
Response - increase in extensor tone, including posterior tibialis
4 - 8 weeks to 6 or 7 months
Stimulus - supine, loud clap of hands or slap on bed
Response - total extension with contraction of posterior tibialis
EVERSION FROM PLANTARFLEXION
1. Peroneus longus
2. Peroneus brevis

COMPETENCIES AND CRITERIA Fundamentals of Clinical
Measurement -DPT 710
215
Position: GE: (0-2) Sitting or supine with ankle in 45° of plantar flexion. Partial ROM for Gr 2
AG: (2+-5) as above
Movement: Eversion
Stabilization: Tibia, proximal to ankle
Resistance: On lateral border of foot moving into inversion
Palpation: Peroneus longus- may be felt just below the head of the fibula on lateral aspect of leg;
posterior to the peroneus brevis in distal portion of the leg
Peroneus brevis- most prominent in the distal aspect of the leg; can be traced at its
attachment on 5th metatarsal
Substitutions: 1) Extensor digitorum longus and peroneus tertius- foot will dorsiflex as it everts
2) Gastrocnemius and soleus- foot will plantar flex more than it everts
3) One of peroneals may not be functioning; palpate to determine both are functioning
4) Patient may quickly invert foot then relax, giving appearance of eversion
INFANT TEST
Peroneals
Newborn to 6 or 7 months:
Stimulus - stroke along lateral border, plantar surface of foot
Response - may evert foot
6 or 7 months to 12 or 13 months:
Stimulus - prone on tilt board, tilt the board
Response - eversion on raised side
12 or 13 months to 3-5 years:
Stimulus - stroke along lateral border, plantar surface of foot
Response - may evert foot
Stimulus - on hands and knees, tilt to one side

COMPETENCIES AND CRITERIA Fundamentals of Clinical
Measurement -DPT 710
216
Response - eversion on raised side
TOES
Due to the difficulty in isolating toe movements, strength of the muscles which move the metatarsophalangeal
(MP), proximal interphalangeal (PIP) and distal interphalangeal (DIP) joints of toes 2 through 5 will be tested
together. The location of the resistance will aid in differentiation. Abduction and adduction of toes will also be
tested together.
Flexion and extension of the MP, PIP, and DIP joints of the great toe will be tested separately.
Because the toe lever lengths are quite short, the exact AG positioning will be replaced by the general positions
of supine, side lying, or sitting. It is felt that these changes are justified, since the effect of gravity is negligible.
FLEXION OF MP AND IP JOINTS OF TOES 2 THROUGH 5
1) Flexor digitorum longus (FDL)
2) Flexor digitorum brevis (FDB)
3) Lumbricales (L)
4) Interossei (I)
Position: Supine, side lying, or sitting; leg and foot supported
Movement: Flexion of MP and IP joints of lateral four toes
Stabilization: Metatarsals
Resistance: For L and I- give pressure on plantar surface of proximal phalanges
For FDB- give pressure on plantar surface of middle phalanges
For FDL- give pressure on plantar surface of distal phalanges.

COMPETENCIES AND CRITERIA Fundamentals of Clinical
Measurement -DPT 710
217
Palpation: L and I-·no palpation
FDB- palpate the tendons on the plantar surface of the middle phalanges
FDL- palpate on medial aspect between the middle and lower thirds of the leg
Substitutions: Quick extension followed by relaxation gives appearance of active contraction
FLEXION OF MP AND IP JOINTS OF THE GREAT TOE
1) Flexor hallucis brevis (FHB)
2) Flexor hallucis longus (FHL)
Position: GE: (0 to 5) Supine, side lying, or sitting; leg and foot supported
Movement: 1) Flexion of MP joint
2) Flexion of IP joint
Stabilization: 1) Grasp first metatarsal on dorsal and plantar surface
2) Grasp MTP joint on dorsal and plantar surface
Resistance: 1) On plantar surface of proximal phalanx
2) On plantar surface of distal phalanx
Palpation: 1) & 2) On plantar surface of proximal and distal phalanges respectively
Substitutions: 1) FHL can substitute for FHB
2) Quick extension followed by relaxation
INFANT TEST
Peroneals
Newborn to 6 or 7 months:
Stimulus - stroke along lateral border, plantar surface of foot
Response - may evert foot

COMPETENCIES AND CRITERIA Fundamentals of Clinical
Measurement -DPT 710
218
6 or 7 months to 12 or 13 months:
Stimulus - prone on tilt board, tilt the board
Response - eversion on raised side
12 or 13 months to 3-5 years:
Stimulus - stroke along lateral border, plantar surface of foot
Response - may evert foot
Stimulus - hands and knees, tilt to one side
Response - eversion on raised side
EXTENSION OF MTP AND II- JOINTS 2 THROUGH 5
1) Extensor digitorum longus (EDL)
2) Extensor digitorum brevis (EDB)
Position: GE: (0to 2) Supine, side lying, or sitting with hips flexed to 90° and knees extended
AG: (2+ to 5) Sitting with hip and knee flexed to 90° (90°/90°)
Movement: Extension of MTP, PIP, and DIP joints of toes 2 through 5
Stabilization: 1) Grasp the foot with your fingers on plantar surface and thumb over dorsal surface of
metatarsals. The foot needs to be stabilized in a neutral position between dorsiflexion
and plantar flexion (plantar flexion of the ankle will put tension on the long extensor
and dorsi flexion will relax the long extensor).
2) Keep MTP joints in neutral as extension of DIP occurs.
Resistance: 1) EDL- may be resisted with pressure over distal phalanges into the flexion direction
2) EDB- may be resisted with pressure over the proximal phalanges into flexion direction
Palpation: 1) EDL- may be felt at tendinous insertions into extensor expansion on dorsum of foot
2) EDB- may be felt on antero-lateral aspect of foot just inferior to lateral malleolus
Substitutions: 1) Either EDB or EDL may act separately and palpation will differentiate. Toes may
deviate laterally when only EDB is functioning.
2) Plantar flexion will stretch extensor tendons and extend toes through passive

COMPETENCIES AND CRITERIA Fundamentals of Clinical
Measurement -DPT 710
219
insufficiency.
3) Flexion followed by relaxation
EXTENSION OF MTP AND IP JOINTS OF THE GREAT TOE
1) Medial division of extensor digitorum brevis (sometimes called extensor hallucis brevis) (EHB)
2) Extensor hallucis longus (EHL)
Position: GE: (0 to 2) Supine, side lying, or sitting with hips flexed to 90° and knees extended
AG: (2+ to 5) Sitting with hip and knee flexed to 90° (90°/90°)
Movement: 1) Extension of MTP joint
2) Extension of IP joints and assists with extension of MTP
Stabilization: Grip dorsal and plantar surface of 1st metatarsal stabilizing the foot in neutral position
(plantar flexion of the ankle will put tension on the long extensor muscle, and
dorsiflexion will relax the long extensor)
Resistance: Pressure on dorsal surface of base of proximal phalanx of great toe
Palpation: 1) EHB may be felt on dorsal surface at base of proximal phalanx of great toe
2) EHL may be felt on dorsal surface at base of distal phalanx of great toe
Substitutions: 1) Plantarflexion may extend the toe
2) Rebound from flexion may appear as extension
3) If EHB is functioning and the EHL is not, the distal phalanx will not extend.
4) EHL may substitute for EHB since EHL crosses all joints of great toe.
ABDUCTION OF MTP JOINTS OF TOES
1) Abductor hallucis (AH)
2) Abductor digiti minimi (ADM)
3) Dorsal interossei

COMPETENCIES AND CRITERIA Fundamentals of Clinical
Measurement -DPT 710
220
Position: GE and AG: (O to 5) Supine or sitting with foot supported, ankle in neutral (0°)
Movement: Attempt to separate the toes
Stabilization: Ankle in neutral (0°); grasp foot from lateral side holding the metatarsals
Resistance: Push toes into adduction
Palpation: AH may be found on postero-medial border of foot from the proximal phalanx of great
toe to the calcaneus
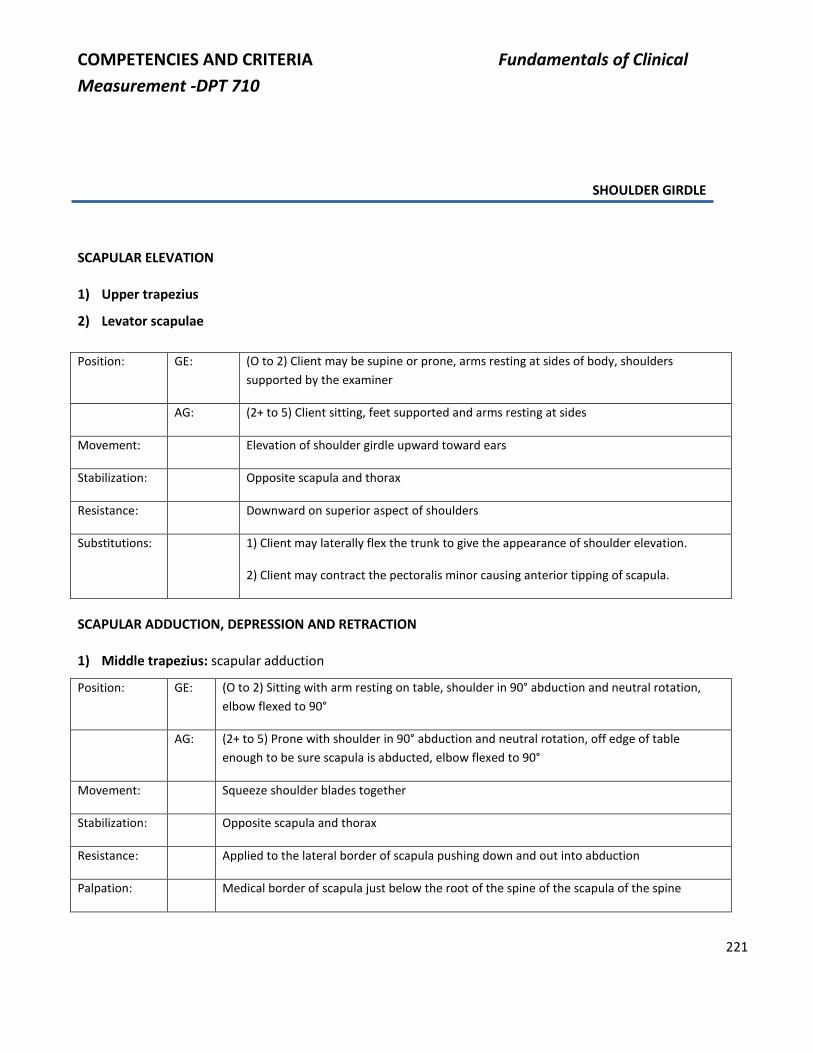
COMPETENCIES AND CRITERIA Fundamentals of Clinical
Measurement -DPT 710
221
SHOULDER GIRDLE
SCAPULAR ELEVATION
1) Upper trapezius
2) Levator scapulae
Position: GE: (O to 2) Client may be supine or prone, arms resting at sides of body, shoulders
supported by the examiner
AG: (2+ to 5) Client sitting, feet supported and arms resting at sides
Movement: Elevation of shoulder girdle upward toward ears
Stabilization: Opposite scapula and thorax
Resistance: Downward on superior aspect of shoulders
Substitutions: 1) Client may laterally flex the trunk to give the appearance of shoulder elevation.
2) Client may contract the pectoralis minor causing anterior tipping of scapula.
SCAPULAR ADDUCTION, DEPRESSION AND RETRACTION
1) Middle trapezius: scapular adduction
Position: GE: (O to 2) Sitting with arm resting on table, shoulder in 90° abduction and neutral rotation,
elbow flexed to 90°
AG: (2+ to 5) Prone with shoulder in 90° abduction and neutral rotation, off edge of table
enough to be sure scapula is abducted, elbow flexed to 90°
Movement: Squeeze shoulder blades together
Stabilization: Opposite scapula and thorax
Resistance: Applied to the lateral border of scapula pushing down and out into abduction
Palpation: Medical border of scapula just below the root of the spine of the scapula of the spine

COMPETENCIES AND CRITERIA Fundamentals of Clinical
Measurement -DPT 710
222
Substitutions: 1) In GE position subject may twist the trunk, thus giving the appearance of scapula
adduction. Prevent this by stabilizing the trunk.
2) Posterior deltoid- subject will horizontally abduct shoulder without adducting scapula
3) Rhomboid - diagonally upward adduction of the scapula; do not let subject internally
rotate shoulder because this puts rhomboids at an advantage
4) Lower trapezius- scapula depression and adduction
5) Rhomboids and lower trapezius together- straight adduction; determine this by palpation
2) Lower trapezius: scapular depression and adduction
Position: GE and AG O to 2 and AG: 2+ to 5. Prone with humerus in 1350 of abduction and head rotated to
opposite side.
Movement: Subject lifts arm off table. For grades O-P, subject is unable to lift arm: grade on the
amount of scapular movement and firmness of muscle contraction.
For grades of 2+ to 3: subject lifts arm and grade is based on scapular movement. If
deltoid is weak, P.T. supports arm and shoulder.
For grades 2+ to 5: apply resistance to scapula after subject lifts arm off table.
Stabilization: Opposite thorax.
Resistance: Applied to posterior aspect of the scapula in an upward and outward direction.
Palpations: At base of spine of scapula fibers run inferior and medially to spinous processes.
Substitutions: Rhomboids and other parts of trapezius.
3) Rhomboids: scapular adduction and downward rotation
Position: GE: (0 to 2) Sitting with dorsum of hand on buttocks
AG: (2+ to 5) Prone with hand on buttocks
Movement: Subject adducts scapula by moving the arm away from the back while maintaining the hand
over buttocks; elbow remains slightly flexed
Stabilization: Thorax on opposite side

COMPETENCIES AND CRITERIA Fundamentals of Clinical
Measurement -DPT 710
223
Resistance: Applied to vertebral border of scapula, pushing into abduction and upward rotation
Palpation: On vertebral border of scapula- fibers run in oblique direction toward spinous process
Substitutions: 1) Wrist extensors- by pressing hand against buttocks, subject may lift arm
2) Middle trapezius- adducts scapula with no rotation
3) Latissimus dorsi- adducts and extends arm with no effect on scapula
4) Posterior deltoid - humerus horizontally abducts; no scapular movement
SCAPULAR PROTRACTION, UPWARD ROTATION, ABDUCTION
1) Serratus anterior
Position: GE: (0 to 2) Sitting with arm resting on table, shoulder in 90° flexion, and elbow straight; stabilize
thorax to prevent anterior displacement of sternum
AG: (2+ to 5) Supine with shoulder flexed to 90° and elbow fully flexed
Movement: Push arm forward; scapula abducts
Stabilization: Thorax on opposite side
Resistance: To axillary border of scapula; support arm in test position as resistance is applied
Palpation: None
Muscle may be palpated in some subjects in the interdigitations on lateral rib cage between
the external obliques and the latissimus dorsi.
Substitutions: In GE position subject may move trunk forward, pushing arm with it.
NOTE: During elevation of the humerus to 90°, the serratus is not functional if the vertebral border
of scapula flares from chest wall.
INFANT TEST
Trapezius, Rhomboids, Serratus, Pectoralis Minor
Newborn to 4 weeks - 8 weeks:
Stimulus - pull gently while infant is grasping finger
Response - contraction of muscles

COMPETENCIES AND CRITERIA Fundamentals of Clinical
Measurement -DPT 710
224
Stimulus - crying
Response - contraction of muscles
Stimulus - loud claps of hands or slap on bed
Response - contraction of muscles during total extension
4 - 8 weeks to 6 or 7 months:
Early: Stimulus - crying
Response - contraction of muscles
Stimulus - loud claps of hands or slap on bed
Response - contraction of muscles during total extension
Late: Stimulus - prone, propped on arms, shift weight to one arm
Response - supports weight on one arm
6 or 7 months to 12 - 13 months:
Stimulus - show toy
Response - reaches for toy (prone for lower trapezius, sitting for upper trapezius and
serratus)
12 or 13 months to 3 to 5 years:
Stimulus - on hands and knees, tilt to one side
Response - abduction and extension of raised arm, increase in tone in low arm
HUMERAL FLEXION
1) Anterior deltoid
2) Coracobrachialis
3) Pectoralis major (clavicular head) - tested in horizontal adduction position

COMPETENCIES AND CRITERIA Fundamentals of Clinical
Measurement -DPT 710
225
Position: GE: (0 to 2) Side lying with arm on powder board, shoulder in neutral rotation, elbow flexed to
90° or supported
AG: (2+ to 5) Sitting with shoulder in slight abduction and internal rotation and elbow flexed to
90°
Movement: Flex shoulder to 90°
Stabilization: Top of opposite shoulder if trunk flexed laterally to side of the test; top of same shoulder if
shoulder elevated
Resistance: Applied immediately, proximal to elbow pushing straight down
Palpation: 1) Anterior Deltoid- just inferior to lateral of clavicle
2) Coracobrachialis- just inferior to coracoid process
Substitutions: 1) Biceps brachii- prevent this by not allowing subject to laterally rotate shoulder
2) Subject may elevate shoulder and lean backward to give the appearance of some
shoulder flexion.
3) One or two of the shoulder flexors may not be functioning. Determine this by palpation.
4) Subject may quickly extend shoulder, then relax thus giving the appearance of shoulder
flexion.
HUMERAL EXTENSION
1) Latissimus dorsi
2) Teres major
Position: GE (0 to 2) Side lying with arm on powder board, shoulder in neutral rotation, and elbow flexed
AG (2+ to 5) Prone lying with arm medially rotated and palm toward ceiling
Movement: Extends shoulder through the range
Stabilization: Scapula
Resistance: Proximal to elbow
Palpation: 1) Teres major- may be palpated on the lower border of the scapula
2) Latissimus dorsi- may be palpated just distal to teres major

COMPETENCIES AND CRITERIA Fundamentals of Clinical
Measurement -DPT 710
226
Substitutions: Subject may tip scapula forward in an effort to complete range of motion.
HUMERAL ABDUCTION
1) Middle deltoid (test muscle)
2) Anterior deltoid (given previously)
3) Posterior deltoid (tested as horizontal abductor)
4) Supraspinatus (in scaption 0° -30°) - AG position is sitting with neutral rotation
Palpate: Just superior to spine scapula
Resist: Distal humerus
NOTE: 2, 3, and 4 are active during this motion and, therefore, are listed. Palpate for the presence or absence of
these muscles.
1) Test for Middle Deltoid
Position: GE: (0 to 2) Supine with arm on powder board, shoulder in neutral rotation, elbow flexed to 90°
AG: (2+ to 5) Sitting with shoulder in neutral rotation and elbow flexed to 90°
Movement: Abduct shoulder to 90°
Stabilization: Palpate just superior to spine of scapula. Stabilize contralateral scapula.
Resistance: Applied immediately proximal to elbow pushing straight down
Palpation: Just below acromion on lateral aspect of shoulder
Substitutions: 1) Biceps brachii- prevent this by not letting subject laterally rotate shoulder
2) Subject may elevate shoulder and lean to opposite side, thus giving the appearance of
some shoulder abduction.
3) Some of the shoulder abductors may not be functioning. Determine this by palpation.
4) Serratus anterior- may elevate acromion, thus giving the appearance of shoulder
abduction.

COMPETENCIES AND CRITERIA Fundamentals of Clinical
Measurement -DPT 710
227
INFANT TEST
Anterior Deltoid, Middle Deltoid
Newborn to 4 weeks - 8 weeks:
Stimulus - supine, loud clap of hands or slap on bed
Response - total extension, followed by flexion
4 - 8 weeks to 6 or 7 months:
Early: Stimulus - prone, propped on arms, shift weight to one arm
Response - supports weight and begins to extend arm over head
Late: Stimulus - sitting supported, present object
Response - reaches for object
Stimulus - hold in front of mirror
Response - reaches for image
6 or 7 months to 3 - 5 years:
Stimulus - sitting, supported, present object
Response - reaches, for object
Stimulus - sitting, tilt or pull to one side
Response - abduction

COMPETENCIES AND CRITERIA Fundamentals of Clinical
Measurement -DPT 710
228
HORIZONTAL ADDUCTION, FLEXION, AND INTERNAL ROTATION
1) Pectoralis Major
A. Position for Sternal and Clavicular Heads
Position: GE: (0 to 2) Sitting with arm on powder board or table, shoulder abducted to 90°, neutral
rotation, elbow flexed to 90°
Movement: Horizontal adduction- move arm forward
Stabilization: Opposite shoulder and trunk as needed
Position: AG: (2+ to 5) Supine with shoulder abducted to 90°, neutral rotation, elbow flexed to 90°
Movement: Horizontal adduction
Stabilization: Opposite shoulder and trunk as needed
Resistance: Applied immediately proximal to elbow pulling back in horizontal abduction
B. Position for Clavicular Head
Position: AG: (2+ to 5) Supine, humerus in about 45˚ of abduction, elbow flexed to 90°
Movement: Adduction and flexion of humerus
Stabilization: Trunk
Resistance: Distal end of humerus toward abduction and extension
Palpation: Just below medial border of clavicle

COMPETENCIES AND CRITERIA Fundamentals of Clinical
Measurement -DPT 710
229
C. Position for Sternal Head
Position: AG: (2+ to 5) Supine with shoulder in 135˚ of abduction, elbow flexed to 90°
Movement: Subject approaches 45° of motion in direction of horizontal adduction and extension; subject
moves hand toward opposite hip
Stabilization: Lower portion of thorax and anterior aspect of hip on opposite side for counter pressure
Resistance: Applied immediately proximal to elbow pulling back into abduction and flexion
Palpation: Just lateral to sternum at level of ribs 2 and 3
Substitutions: Trunk movement attempting to move humerus
HORIZONTAL ABDUCTION
1) Posterior deltoid
Position: GE: (0 to 2) Sitting with arm on powder board or table; shoulder in neutral rotation, 90° of
shoulder flexion, elbow flexed to 90°
AG: (2+ to 5) Prone with shoulder in neutral rotation, in 90° flexion over edge of table; adduction
with elbow flexed to 90°, forearm in neutral position
Movement: GE: Bring elbow backward
AG: Lift elbow toward ceiling
Stabilization: Scapula on same side
Resistance: Applied immediately proximal to elbow pushing straight down
Palpation: Just below spine of scapula
Substitutions: 1) Adducting the scapula without horizontally abducting the shoulder
2) In GE position, twisting the trunk and throwing arm backward, thus giving the appearance
of horizontal abduction; prevent this by stabilizing the trunk

COMPETENCIES AND CRITERIA Fundamentals of Clinical
Measurement -DPT 710
230
INFANT TEST
Posterior Deltoid
Newborn to 4 - 8 weeks:
Stimulus - prone, arms and legs flexed under body
Response - infant will attempt to extricate limbs from under body
4 - 8 weeks to 6 or 7 months:
Stimulus - prone
Response - will try to prop on arms
6 to 7 months to 3 - 5 years:
Stimulus - prone on tilt board, tilt board
Response - horizontal abduction on high side
EXTERNAL ROTATORS
1) Infraspinatus
2) Teres minor
3) Supraspinatus
Position for 1, 2, and 3 above-
Position: *GE: (0 to 2) Subject may be prone with shoulder flexed off table in neutral rotation with arm
hanging down; or sitting, leaning slightly forward, shoulder in neutral rotation with arm
hanging down
AG: (2+ to 5) Subject is prone, forearm and hand over the edge of the table, shoulder abducted
90° in neutral rotation, elbow flexed to 90°
Movement: External rotation of humerus
Stabilization: Posterior scapula on same side
Resistance: Just proximal to wrist on extensor surface of forearm

COMPETENCIES AND CRITERIA Fundamentals of Clinical
Measurement -DPT 710
231
Palpation: Infraspinatus may be felt below spine of scapula; supraspinatus above. Teres minor is
sometimes difficult to distinguish from infraspinatus.
*For lower grades an alternate test would be a stretch range. Place shoulder in complete internal rotation, support
arm, and grade according to how far through range the muscle contracts. Use a standard key.
Substitutions: 1) One or more of the muscles may not be functioning. Determine this by palpation.
2) The subject may medially rotate shoulder then relax giving appearance of lateral rotation
3) Posterior deltoid will also hyperextend shoulder.
INTERNAL ROTATORS
1) Subscapularis
2) Teres major
3) Pectoralis major and Latissimus dorsi- also function in internal rotation; however, they are not specifically
tested in this position
Position: GE: (0 to 2) Subject may be prone with shoulder flexed off table in neutral rotation, arm hanging
down; or sitting, leaning slightly forward, shoulder in neutral rotation, arm hanging down
AG: (2+ to 5) Subject is prone, forearm and hand over the edge of the table, shoulder abducted
90° in neutral rotation, elbow flexed to 90°
Movement: Internal rotation of humerus
Stabilization: Posterior scapula on same side
Resistance: Just proximal to wrist on flexor surface
Palpation: Teres major- may be palpated along axillary border of scapula
Latissimus dorsi- on lateral-posterior ribs immediately below Teres major
Pectoralis major- see horizontal adduction
Subscapularis- with arm hanging toward floor (GE position) this muscle may be palpated
deep in axilla toward costal surface as internal rotation is performed

COMPETENCIES AND CRITERIA Fundamentals of Clinical
Measurement -DPT 710
232
INFANT TEST
Latissimus dorsi
Newborn to 4 weeks - 8 weeks:
Stimulus - pull gently while infant is grasping finger
Response - contraction of muscle while pulling limb toward body
Stimulus - crying
Response - contraction of muscle
4 - 8 weeks to 6 or 7 months:
Stimulus - crying
Response - contraction of muscle
6 or 7 months to 12 or 13 months:
Early: Stimulus - crying
Response - contraction of muscle
Stimulus - sitting, gently push backwards
Response - catches self with arms with contraction of muscle
Stimulus - present object
Response - will pull object toward body
1. Adductors and medial rotators
Newborn to 4 weeks - 8 weeks:
Stimulus - pull gently while infant is grasping finger
Response - contraction of muscles while pulling limb toward body
4-8 weeks to 3-5 years:
Stimulus - present object
Response - will pull object toward body

COMPETENCIES AND CRITERIA Fundamentals of Clinical
Measurement -DPT 710
233
ELBOW
ELBOW FLEXION
1) Biceps brachii
2) Brachialis
3) Brachioradialis
Position: GE: (0 to 2) Sitting with arm supported in 90° abduction or flexion, shoulder in neutral rotation,
forearm supinated, elbow extended
AG: (2+ to 5) Sitting, arm at side, forearm supinated, elbow extended
Movement: Flex elbow to 90° if AG and through full range if GE
Stabilization: Proximal humerus
1) Biceps (forearm supinated)
Palpation: Either the muscle belly or the Biceps tendon as it passes over the elbow, just medial to
brachioradialis
2) Brachialis (forearm pronated)
Palpation: Distal arm, medial to, and deep to biceps tendon
3) Brachioradialis (forearm neutral)
Palpation: At the bend in the elbow just lateral to the biceps tendons
Resistance: Applied immediately proximal to the wrist
Substitutions: 1) The client may extend his shoulder causing passive flexion of the elbow.
2) The client may quickly extend his elbow then relax, giving appearance of elbow flexion
3) One or more of the elbow flexors may not be functioning.
4) Pronator teres
5) Wrist flexors or extensors

COMPETENCIES AND CRITERIA Fundamentals of Clinical
Measurement -DPT 710
234
INFANT TEST
Elbow flexors
Newborn to 4 weeks - 8 weeks:
Stimulus - pull gently while infant is grasping finger
Response - attempts to adduct shoulder and flex elbow
Stimulus - turn head toward opposite side
Response - increase in flexor tone possible with some movement
4 - 8 weeks to 6 or 7 months:
Early: Stimulus - turn head to opposite side as if to begin rolling over
Response - elbow flexion
Late: Stimulus - present object
Response - grasps object and brings toward mouth or into flexion for examination
6 or 7 months to 3 - 5 years:
Same as Late above

COMPETENCIES AND CRITERIA Fundamentals of Clinical
Measurement -DPT 710
235
ELBOW EXTENSION
1) Triceps
Position: GE: (0 to 2) Sitting with arm supported in 90° abduction or flexion, shoulder in neutral rotation,
elbow fully flexed, forearm neutral
AG: (2+ to 5) Prone with forearm and hand over the edge of the table, shoulder in 90° abduction,
elbow flexed to 90°, forearm neutral or supine with shoulder flexed to 90° and elbow fully
flexed, forearm neutral
*Alternate
Method:
1) Client supine- humerus is at 90° flexion with hand resting on the opposite shoulder and
forearm is in supination
2) Client supine-humerus is at 90° flexion with the hand resting on the same shoulder and
the forearm is in supination
Therapist stabilizes the humerus in 90° flexion and supports the forearm and hand.
Movement: Extend elbow through range of motion
Stabilization: Humerus
Resistance: Applied immediately proximal to the wrist; never give resistance to "locked elbow" - give
resistance with elbow in slight flexion
Palpation: Just above the olecranon process
Substitutions: 1) Anconeus- determine this by palpation
2) The client may flex his shoulder causing passive extension of his elbow.
3) The client may quickly flex his elbow then relax giving the appearance of elbow extension.
4) Wrist extensors

COMPETENCIES AND CRITERIA Fundamentals of Clinical
Measurement -DPT 710
236
INFANT TEST
Triceps
Newborn to 4 weeks - 8 weeks:
Stimulus - supine, loud clap of hands or slap on bed
Response - total extension with elbow extension
Stimulus - turn head toward same side
Response - increase of extensor tone, possibly with some movement
4 - 8 weeks to 6 or 7 months:
Early: Stimulus - prone, propped on arms
Response - reaches over head or begins to push up on hands
Stimulus - prone prop on arms
Response - pushes up and rolls over
Late: Stimulus - sitting
Response - hold weight of upper trunk on arms
6 or 7 months to 3 - 5 months:
Stimulus - prone, limbs flexed, head down
Response - extends elbows and takes weight on arm

COMPETENCIES AND CRITERIA Fundamentals of Clinical
Measurement -DPT 710
237
FOREARM
PRONATION
1) Pronator teres
2) Pronator quadratus
Position: GE: (0-2) Sitting with shoulder supported in 90° flexion, elbow flexed to 90° and forearm
perpendicular to table in supination; or supine with elbow flexed to 90° forearm in
supination; or prone with shoulder supported in 90° abduction and elbow flexed to 90°
AG: (2+ to 5) Sitting with humerus at side, elbow flexed 90°, forearm supinated and supported
by examiner
Movement: GE: From full supination to full pronation
AG: From full supination to neutral
Stabilization: Humerus- keep elbow in at side
Resistance: Applied immediately proximal to wrist
Palpation: 1. Ulnar side, proximal forearm; runs oblique, medial to lateral
2. Pronator quadratus cannot be palpated.
Substitutions: 1. Client may laterally flex trunk to opposite side, abduct and internally rotate shoulder, thus
giving the appearance of pronation
2. If the pronator teres is weak or not functioning, the client can pronate with pronator
quadratus. Determine this by palpation.
3. Brachioradialis pronates from full supination to neutral.
4. Wrist flexors
SUPINATION
1) Supinator brevis
2) Biceps brachii
Position: GE: (0 to 2) Sitting with shoulder supported in 90° flexion, elbow flexed 90°, and forearm
perpendicular to table in pronation; or supine with elbow flexed 90°, forearm in pronation;
or prone with shoulder supported in 90° abduction and elbow flexed to 90°
AG: (2+ to 5) Sitting with humerus at side, elbow flexed 90°, forearm pronated

COMPETENCIES AND CRITERIA Fundamentals of Clinical
Measurement -DPT 710
238
Movement: GE: From full pronation to full supination
AG: From full pronation to neutral
Stabilization: Humerus- keep elbow at side
Resistance: Applied immediately proximal to the wrist
Palpation: 1. Radial, proximal forearm (supinator)
2. Biceps tendon (biceps)
Substitutions: 1. The client may laterally flex trunk towards same side and adduct shoulder thus giving the
appearance of supination.
2. One of the supinators may not be functioning, but the client can supinate with the other.
Determine this by palpation.
3. Brachioradialis supinates from full pronation to neutral.
4. Shoulder external rotators
5. Wrist extensors
INFANT TEST
Newborn to 4 weeks - 8 weeks:
Stimulus - pull gently while infant is grasping finger, change direction of pull
Response - contraction of muscles according to the direction of pull
4 - 8 weeks to 3 - 5 years:
Early: Same as above
Late: Stimulus - object in hand
Response - turns object with control by muscles

COMPETENCIES AND CRITERIA Fundamentals of Clinical
Measurement -DPT 710
239
WRIST
WRIST FLEXION
1) Flexor carpi radialis (FCR)
2) Palmaris longus (PL)
3) Flexor carpi ulnaris (FCU)
Position: GE: (0 to 2) Sitting or lying, elbow in slight flexion, ulnar border of hand resting on flat surface
AG: (2+ to 5) Sitting or lying, elbow in slight flexion, dorsal surface of hand resting on flat surface
Movement: Straight flexion of the wrist, if testing all 3 muscles together
If testing individual muscles you would test following movements-
1) Straight flexion (FCR or PL)
2) Flexion with ulnar deviation (FCU)- if testing GE, a position different to one
identified above would be needed
Stabilization: Forearm
Resistance: Applied to palm of hand when testing straight flexion; Flexor carpi ulnaris- applied to base of
5th metacarpal bone in the direction of extension and radial deviation
Palpation: 1) In line with second metacarpal
2) In midline at bend of wrist
3) At the bend in the wrist and in line with the base of the fifth metacarpal (To locate the
muscle have the client abduct the little finger and FCU will stand out)
Substitutions: 1. The flexor carpi radialis or ulnaris may not be functioning. Determine this by palpation
and by watching for radial or ulnar deviation during wrist flexion.
2. The patient may extend wrist then relax giving the appearance of wrist flexion.
3. Finger flexor- to prevent this, keep fingers relaxed

COMPETENCIES AND CRITERIA Fundamentals of Clinical
Measurement -DPT 710
240
WRIST EXTENSION
1. Extensor carpi radialis longus (ECRL)
2. Extensor carpi radialis brevis (ECRB)
3. Extensor carpi ulnaris (ECU)
Position: GE: (0 to 2) Sitting or lying, elbow slightly flexed, hand resting on ulnar border on table
AG: (2+ to 5) Sitting or lying, elbow slightly flexed, hand resting on volar surface on table
Movement: Straight extension of the wrist, if testing all 3 muscles together
Testing individual muscles you would test the following movements-
1) Extension with radial deviation (ECRL)
2) Straight extension (ECRB)
3) Extension with ulnar deviation (ECU)
If testing ECRL or ECU GE, a position different to the one identified above would be needed.
Stabilization: Forearm
Resistance: Dorsum of hand when testing straight extension
Extensor carpi radialis longus- dorsal surface of second and third metacarpal bones in
direction of flexion and ulnar deviation
Extensor carpi ulnaris- dorsal surface of fifth metacarpal towards flexion and radial deviation
Palpation: 1) Near tendon of Extensor pollicis longus in line with second metacarpal
2) Radial side at base of third metacarpal
3) In line with fifth metacarpal, just distal to ulnar styloid
Substitutions: 1) One or two wrist extensors may not be functioning, but can still extend the wrist.
Determine this by palpation and by watching for radial/ulnar deviation during extension.
2) The patient may flex wrist extensors then relax, giving the appearance of wrist extension.
3) Extensor digitorum communis- keep fingers relaxed to prevent this

COMPETENCIES AND CRITERIA Basic Measurement Skills-DPT 710
241
FINGERS
FLEXION OF METACARPOPHALANGEAL JOINTS (MCP)
1) Lumbricales
2) Interossei
Position: GE: (0 to 2) Hand and forearm resting on table, forearm and wrist in neutral position, MCP, IP,
and DIP joints extended
AG: (2+ to 5) Same position, except forearm supinated with palm up
Movement: MCP joints flex as PIP and DIP joints remain extended
Stabilization: Wrist and metacarpals
Resistance: Palmar surface proximal phalanges; apply resistance to each finger separately
Substitutions: 1) Flexor digitorum superficialis
2) Flexor digitorum profundus
3) Flexor digiti quinti brevis
FLEXION OF PROXIMAL INTERPHALANGEAL JOINTS
1) Flexor digitorum superficialis
Position: GE: (0 to 2) Hand and forearm resting on table, forearm and wrist in neutral position
AG: (2+ to 5) Same position, except forearm supinated
Movement: Flexion of proximal interphalangeal joint
Stabilization: Proximal phalanx of finger tested; other fingers held in extension; stabilize palm
Resistance: Volar surface middle phalanx
Palpation: Just proximal to PIP joint of each digit
*The two flexor tendons cannot be distinguished from one another at this point.
Substitutions: 1) Flexor digitorum profundus
2) Relaxation of extension of PIP joint may appear as flexion

COMPETENCIES AND CRITERIA Basic Measurement Skills-DPT 710
242
FLEXION OF DISTAL INTERPHALANGEAL JOINTS
1) Flexor digitorum profundus
Position: GE: (0 to 2) Hand and forearm resting on table, forearm and wrist in neutral position
AG: (2+ to 5) Same position, except forearm supinated
Movement: Flexion of distal interphalangeal joints
Stabilization: Middle phalanx and proximal interphalangeal joint
Resistance: Volar surface of distal phalanx
Palpation: Just proximal to DIP joint of each digit
Substitutions: 1) Relaxation after hyperextension gives the impression of active motion
EXTENSION OF MCP JOINTS
1) Extensor digitorum communis
2) Extensor indicis proprius
3) Extensor digiti minimi
Position: GE: (0 to 2) Forearm, wrist, and hand supported in neutral position, fingers flexed
AG: (2+ to 5) Forearm, wrist, and hand supported with forearm pronated and fingers flexed
Movement: Extension of MCP joints with PIP and DIP joints in flexion
Stabilization: Keep wrist in neutral position, stabilize metacarpals
Resistance: Dorsal surface of proximal phalanges; resist each finger separately; look for springing motion
Palpation: Tendons may be felt on dorsum of MCP joints
Substitutions: 1) The patient may quickly flex his MP joints then relax giving the appearance of extension.
2) If the extensor digitorum is not functioning, but the other two are, the patient will be able
to extend index and little fingers, but not the middle and ring fingers. Determine functioning
of all muscles by palpation.

COMPETENCIES AND CRITERIA Basic Measurement Skills-DPT 710
243
FINGER ABDUCTION
1) Dorsi interossei
2) Abductor digiti minimi
Position: GE: (0 to 2) Hand resting on palmar surface on table with wrist in neutral position
AG: (2+ to 5) Hand resting on ulnar or radial border according to muscle tested to achieve AG
position, wrist and fingers neutral
Movement: Move index, ring, and little fingers away from middle finger, middle finger moves toward
index and ring fingers
Stabilization: Metacarpals and wrist
Resistance: Applied to the side of the distal end of the proximal phalanx toward adduction
Palpation: First dorsal interosseus- radial side of the shaft of the second metacarpal
Second, third, & fourth dorsal interossei- palpate tendons at head of respective metacarpal
Substitutions: 1) Extensor digitorum- when MP joints hyperextend they also abduct; prevent this by not
letting patient hyperextend MP joints
2) Wrist flexors- put extensor tendons on stretch and produce abduction by tendon action-
don't allow patient to press down on table with palm
FINGER ADDUCTION
1) Palmar interossei
Position: GE: (0 to 2) Hand resting on palmar surface on table with wrist and fingers in neutral position
AG: (2+ to 5) Hand resting on ulnar or radial border according to muscle tested to achieve AG
position, wrist and fingers in neutral
Movement: Adduction of index finger toward middle finger
Adduction of ring and little finger toward middle finger
Stabilization: MP and IP joints of finger in extension
Resistance: With your thumb and index finger grasp the proximal phalanx on the dorsal and volar
surfaces and apply resistance in:
1) Radial direction for the second finger

COMPETENCIES AND CRITERIA Basic Measurement Skills-DPT 710
244
2) Ulnar direction for the fourth and fifth fingers
Palpation: In the area of the articulation between the metacarpal and proximal phalanx
1st- ulnar side, second metacarpal
2nd- radial side, fourth metacarpal
3rd- radial side, fifth metacarpal
Substitutions: Finger flexors and extensors
INFANT TEST
Extensor digitorum, Extensor pollicis, Abductor digiti minimi, and Interossei
Newborn to 4 weeks - 8 weeks:
Stimulus - light stroke on lateral border, dorsum of hand
Response - may extend and abduct all digits
Stimulus - turn head toward side
Response - increase of extensor tone may cause muscle response
4 - 8 weeks to 6 or 7 months:
Early: Stimulus - prone, arm over head, propped on arms
Response - scratches surface
Late: Stimulus - prone
Response - props on hands, sometimes extends fingers, reaches for object with fingers extended
6 or 7 months to 12 or 13 months:
Stimulus - hip flexed, head suspended toward floor
Response - tends digits with elbow extension

COMPETENCIES AND CRITERIA Basic Measurement Skills-DPT 710
245
12 or 13 months to 3 - 5 years:
Same as above
Stimulus - request infant's toy
Response - release of toy
Finger flexors and Flexor pollicis
Newborn to 4 weeks - 8 weeks:
Stimulus - place a finger in infant's palm or lightly stroke ulnar border of palm
Response - grasps finger
4 - 8 weeks to 6 or 7 months:
Early: Stimulus - prone, arm overhead, propped on arms
Reponses - scratches surface
Late: Stimulus - present object
Response - grasps object
6 or 7 months to 3 - 5 years:
Same as Late above

COMPETENCIES AND CRITERIA Basic Measurement Skills-DPT 710
246
THUMB
FLEXION OF MCP JOINT OF THUMB
1) Flexor pollicis brevis
Position: GE: (0 to 2) Hand supported, palm up, forearm supported
AG: (2+ to 5) Hand resting on radial border (if you do not feel you can stabilize adequately in this
position use the GE position and record accordingly)
Movement: Flexion of proximal phalanx of thumb
Stabilization: Hold first metacarpal in abduction and the IP joint in extension
Resistance: Toward extension of MCP joint, applied on proximal phalanx
Palpation: Over palmar surface of first metacarpal (medial to abductor pollicis brevis)
Can also be located by first finding the tendon of the flexor pollicis longus as it passes across
the first metacarpal; palpate on each side of this tendon for the flexor pollicis brevis
Substitutions: 1) Flexor pollicis longus
2) Oblique head of adductor pollicis
FLEXION OF IP JOINT OF THUMB
1) Flexor pollicis longus
Position: GE: (0 to 2) Same as flexor pollicis brevis
AG: (2+ to 5) Same as flexor pollicis brevis
Movement: Flexion of IP joint of thumb
Stabilization: Hold first metacarpal in abduction and MCP joint in extension
Resistance: Toward extension of IP joint, applied on distal phalanx
Palpation: The tendon as it crosses the base of the proximal phalanx

COMPETENCIES AND CRITERIA Basic Measurement Skills-DPT 710
247
THUMB ADDUCTION
1) Abductor pollicis brevis
Position: GE: (0 to 2) Hand resting on ulnar border, wrist neutral, thumb adducted against the volar
aspect of the index finger
AG: (2+ to 5) Forearm supinated, wrist neutral, thumb adducted
Movement: Abduction of thumb 90° from palm
Stabilization: Support the hand and stabilize the MP and IP joints of the thumb in extension
Resistance: Applied to proximal phalanx toward adduction
Palpation: On thenar eminence just lateral to flexor pollicis brevis over scaphoid tubercle
Substitutions: 1) Abductor pollicis longus- abducts thumb to radial side of hand
2) Opponens pollicis- tends to rotate also
2) Abductor pollicis longus
Position: GE: (0 to 2) Hand resting on ulnar border, wrist neutral, thumb adducted against the volar
aspect of the index finger
AG: (2+ to 5 N) Forearm supinated, wrist neutral, thumb adducted
Movement: Thumb abducts in a radial direction on a diagonal plane between extension and abduction
Stabilization: Support hand; stabilize first metacarpal and keep MP and IP joints of thumb in extension
Resistance: Applied to distal end of first metacarpal toward adduction
Palpation: Base of 1st metacarpal just medial to extensor pollicis brevis (hand resting on ulnar border)
Substitutions: 1) Abductor pollicis brevis- lifts metacarpal toward midline of hand
2) Extensor pollicis longus and brevis- may extend and also contribute to abduction of first
metacarpal; differentiate by palpation
3) Hyperextension of IP joint followed by relaxation gives impression of active motion

COMPETENCIES AND CRITERIA Basic Measurement Skills-DPT 710
248
EXTENSION OF MCP JOINT OF THUMB
1) Extensor pollicis brevis
Position: GE: (0 to 2 P) Hand supported, palm up
AG: (2+ to 5) Hand resting on ulnar border
Movement: Extension of MCP joint of thumb
Stabilization: Support the hand and 1) sandwich the IP joint of the thumb in extension and stabilize the
first metacarpal or 2) stabilize the first metacarpal and keep the IP joint in flexion
Resistance: Toward MCP flexion, applied on dorsal surface of proximal phalanx
Palpation: Inside border of the anatomical snuffbox (with hand resting on ulnar border), just lateral to
the tendon of the abductor pollicis longus
Substitutions: Extensor pollicis longus
EXTENSION OF IP JOINT OF THUMB
1) Extensor pollicis longus
Position: GE: (0 to 2) Hand supported, palm up
AG: (2+ to 5) Hand resting on ulnar border
Movement: Extension of IP joint of thumb
Stabilization: Support hand and stabilize first metacarpal and MCP joint of the thumb in extension
Resistance: Toward IP flexion, applied on dorsal surface of distal phalanx
Palpation: Outside border of the anatomical snuffbox (with hand resting on ulnar border)
Substitutions: Relaxation after strong flexion gives impression of active motion
THUMB ADDUCTION
1) Adductor pollicis
Position: GE: (0 to 2) Hand resting on ulnar border, wrist neutral, thumb abducted from palm
AG: (2+ to 5) Forearm in pronation, wrist in neutral, and thumb abducted from palm and over

COMPETENCIES AND CRITERIA Basic Measurement Skills-DPT 710
249
edge of table
Movement: Adduction of thumb
Stabilization: Dorsum of hand- metacarpals
Resistance: Applied to proximal phalanx toward abduction
Palpation: Between first and second metacarpal (in web space)
Substitutions: 1) Flexor pollicis brevis- palpate to differentiate
2) Flexor pollicis longus- IP joint flexes also
OPPOSITION
1) Opponens pollicis
2) Abductor pollicis brevis
Position: GE/AG: (0 to 2) Hand resting on dorsal surface
Movement: Roll 1st metacarpal head toward ulnar side of hand keeping tip of thumb against base of
index finger
Stabilization: Support hand, stabilize wrist, stabilize IP joint of thumb in flexion & rest it on index finger
Resistance: Toward de-rotation of the first metacarpal
Palpation: Radial side of shaft of the first metacarpal; lateral to flexor pollicis brevis
Substitutions: If the opponens pollicis is not functioning the abductor pollicis brevis can abduct the thumb
without rotation. Palpate to be sure both muscles are functioning.

COMPETENCIES AND CRITERIA Introduction to Interventions-DPT 740
250
CRITERIA SHEET SELECTION AND TEACHING OF EXERCISE
1. Pre-Planning for Procedure: A. Identify the priority signs, symptoms, and conditions which make the procedure applicable:
(1) Weakness of muscles (2) Tightness of muscles (3) Pain of musculoskeletal system (4) Decreased endurance (5) De-conditioning
B. Identify the rationale for choice of procedure: (1) Safety: Monitor vital signs to assess the change caused by activity and to allow gradual upgrading of
activity; monitor pain and fatigue levels. During use of resistive equipment, client must be observed to avoid injury.
(2) Economics: PT time (3) Condition of client:
(a) Client should be alert when using exercise equipment. (4) Duration of treatment: Condition of client will influence choice of type, intensity, and duration of
treatment. (5) Generate other possible alternative treatments:
(a) Ambulation (b) Functional activity
(6) Application of procedure to short and long term goals: (a) STG: To improve strength and flexibility; to decrease pain (b) LTG: To achieve functional independence, to maintain appropriate flexibility, to achieve pain-
free movement during work and recreational activities
2. Preparation of Physical Therapist: A. Review procedure as necessary. B. Review medical record.
(1) Review results of other P.T. evaluations. (2) Select the muscles or muscle groups which require exercise. (3) Select types of exercises indicated by the evaluation results and how each will be performed.
Include: (a) Position of client and position of the part to be exercised (b) Use of equipment vs. no equipment (c) Sequence of the exercises and frequency of each exercise considering the client's endurance
and medical status C. Interview the client.
(1) Ask questions related to the effects of previous treatments. (2) Seek the client's goals related to the exercises.
Division of Physical Therapy
Emory University

COMPETENCIES AND CRITERIA Introduction to Interventions-DPT 740
251
(3) Ask about other similar activities the client may be using currently. D. Determine position sequence for order of exercise. E. Select and collect correct equipment:
(1) Linens (2) Exercise equipment, if used (3) Timing or rhythm monitoring devices
F. Secure the environment.
3. Execute the Procedure: A. Follow the Interpersonal Relations and Teaching-Learning Criteria to establish rapport and explain the
procedure to the client. B. Sequential steps of the procedure:
(1) Record vital signs. (2) Position the client as indicated by type of exercise program to be performed. (3) Perform technique adhering to:
(a) Safety precautions to protect the client and therapist: 1) Therapist is positioned in a manner which allows guarding and/or spotting as necessary 2) Therapist utilizes appropriate body mechanics 3) Therapist uses appropriate equipment to insure safety 4) Monitor responses and vital signs
(b) Criteria for operation of resistive exercise equipment (if used) including: 1) Ability to set up the equipment for any technique in 5 minutes 2) Ability to operate the equipment demonstrating knowledge of the parts and their uses
(Reference: Equipment operating manual or department procedure) 3) Ability to position the client in the equipment with efficiency (time and energy)
demonstrating knowledge of a planned sequence and manual control of the client and the equipment
(c) Criteria for handling clients during exercises performed without apparatus including: 1) Support and control of the client and/or the part being exercised 2) Ability to provide manual assistance and/or resistance with hands placed on correct area in
order to provide direction of movement and evaluate the effort of the client C. Implement changes in procedure based upon:
(1) Response of client: vital signs, increase in pain, decrease in ability to perform (2) Response of client toward achievement of STG and LTG
D. Record results in SOAP or other approved format. (1) 0:
(a) Record response of vital signs during pre and post exercise. (b) Record type, frequency, and resistance (if used). (c) Record muscle groups included in program.
E. Interpret results of procedure. F. Prepare client for dismissal. G. Clean up area.

COMPETENCIES AND CRITERIA Introduction to Interventions-DPT 740
252
CRITERIA SHEET EXAMINATION OF THE SENSORY SYSTEM
Introduction
To perform a complete sensory examination, touch, pain, temperature, position sense, vibration sense, and a variety of discriminatory modalities are tested. You should determine: 1) the elements of sensation affected (qualitative), 2) the degree of impairment (quantitative), and 3) the areas of sensory loss distribution. Information relative to degree and distribution are necessary to determine the nature of the dysfunction involved (peripheral nerve or nerve root distribution, complete spinal sensory level, hemi-anesthesia, dissociated sensory syndrome, etc.). Determine whether sensation is appreciated over the affected part, or the whole body, if indicated. Compare the equality of sensation on both sides of the body, throughout one side of the body, and throughout a limb.
1. Pre-Planning for Procedure:
A. Identify priority signs, symptoms, and conditions which make the procedure applicable:
(1) Upper motor neuron lesion
(2) Lower motor neuron lesion
(3) Thalamic lesions
B. Identify rationale for choice of procedure:
(1) Safety:
(a) To assess the extent to which deficient sensation may affect safety during performance of functional and ADL activities
(b) Substitute temperature test for pain test when dealing with clients manifesting nutritional deficits related to poor healing processes
(2) Economics:
(a) Cost of materials (see – 2. D.), and therapist's time
(3) Condition of the client:
(a) Known or suspected sensory deficit
(b) Must be able to respond with accuracy
(4) Duration of the procedure:
1) Perform within context of general neurologic evaluation.
2) The procedure should not be lengthy (as fatigue sets in, replies become increasingly
Division of Physical Therapy
Emory University

COMPETENCIES AND CRITERIA Introduction to Interventions-DPT 740
253
inaccurate).
3) If sensory changes are found, you may want to repeat the sensory evaluation separately.
(5) Alternative procedures: N/A
(6) Application to short and long term goals:
(a) Identify the elements of sensation affected.
(b) Identify the degree of impairment.
(c) Identify areas of sensory loss.
(d) Identify nature of the dysfunction causing alteration in perception of sensation.
(e) Assess progress toward recovery.
2. Preparation of Physical Therapist:
A. Review the procedure as necessary.
B. Review the medical record.
C. Interview the client.
(1) Have you noticed any difficulty with your ability to feel? Do you have trouble telling where your arms and legs are?
(2) Is the loss greater on one side than the other?
(3) Is the loss greater in the arm or the leg, or do they feel the same?
(4) Is the loss greater distally or proximally, or is the loss the same throughout the limb? (use lay terms)
(5) Is the loss greater anterior, posterior, medial, or lateral? (use lay terms)
(6) Is the loss in a dermatomal pattern? (use lay terms)
D. Select and collect equipment:
(1) Cotton or camel's hair brush
(2) Disposable pin
(3) Test tubes
(4) C-128 tuning fork
(5) Calibrated compass
(6) Small objects: commonly used objects are nickel, dime, quarter, key, pencil, penknife
(7) Linens
E. Secure the environment/equipment/materials:
(1) Pre-treatment preparation:
(a) Fill test tubes – one with ice water, one with hot water
(b) Prepare the area with linens.

COMPETENCIES AND CRITERIA Introduction to Interventions-DPT 740
254
3. Execute the Procedure:
A. Follow the Interpersonal Relations and Teaching-Learning Criteria to establish rapport and explain the procedure to the client.
B. Sequential steps of the procedure:
(1) Tests of primary sensation – superficial sensation. Follow a systematic pattern, e.g. distal to proximal, proximal to distal, flexor side, extensor side.
(a) The various forms of sensibility should be tested over the whole surface of the body, making sure all segments of the spinal cord and all cranial nerves are covered, dependent upon diagnosis. Testing should occur distal to proximal so sensory levels and sensory loss in the distribution of roots and peripheral spinal nerves may be determined, and should include and compare all surfaces. 1) Touch sensation – This is tested by means of a cotton wisp, camel's hair brush, or by the
examiner's finger. With eyes closed, cotton is touched over various parts of the body. Client says "yes" whenever light touch is felt. Client may also identify where touch is felt (tactile localization) testing discriminatory function.
2) Pain sensation – This is tested using a common pin or safety pin. Pin held lightly by the shaft between thumb and index finger to ensure equal pressure over all areas tested. With eyes closed, the client reports whether the stimulus is sharp or dull, as the head and point of the pin are irregularly applied over various parts of the body. (Superficial pressure is also tested by use of the head of the pin). In uncooperative or unresponsive patients, look for a withdrawal response or a facial grimace in response to painful stimuli.
3) Temperature sensation – This is tested with two large dry test tubes, one with hot water and one with cold water. The client, with eyes closed, is asked to identify whether the stimulus is hot or cold as applied over various parts of the body.
(b) Varying stimuli in a random manner is important, being careful not to alternate opposite stimuli. Vary the rhythm to make tests as objective as possible.
(2) Tests of primary sensation – deep sensation:
(a) Vibration sense – This is tested with a C-128 tuning fork. Demonstration to the client occurs over the sternum, as vibration sense is seldom lost in this area. Set the tuning fork in active vibration and apply over the elbow, wrist, tibia, malleoli. To make the test objective, occasionally grasp the prongs of the fork to interrupt the stimulus, and ask the client to report when the vibration is felt and when it stops. If vibration sense is impaired, the examiner will still feel the vibration in his hand after the client ceases to appreciate the sensation. Always apply the base of the fork firmly to the bony prominences.
1) To quantify: Ask the client for how long he feels the vibration over the back of the wrist or tibia (average time for the back of the wrist is 15-20 seconds; over the tibia is 7-10 seconds).
2) Vibration sense is more commonly disturbed in the lower extremities. In clients over 50 years of age vibration sense is often impaired normally; therefore, the test is of little value in older individuals.
(b) Joint position sense – This is often tested using the big toe in the lower extremity and the index finger in the upper extremity, with the eyes closed. Digits are grasped on the lateral surfaces and moved gently up and down. The client identifies the position of the digit. Do

COMPETENCIES AND CRITERIA Introduction to Interventions-DPT 740
255
not provide additional sensory input for the client by allowing the digit to rub against the adjoining skin. Do not place the digits in extremes of flexion or extension during the test. Recognition of initiation of movement may also be evaluated. (Normally, clients should be able to identify movements as small as 1 or 2 mm in a joint).
1) If during the above test the position sense is found to be decreased or absent, you may proceed proximally to test additional joints in the body. Proximal joints may be tested in a manner similar to the above, or an entire limb may be tested as described within the Brunnstrom approach to management of adult clients with hemiplegia.
UPPER LIMB, SENSORY ASSESSMENT
Passive Motion Sense – The therapist supports the patient's involved arm under the forearm, holding the elbow flexed and the wrist moderately extended. This should be done in such a manner that no change of grip is required when the various joint positions are changed. The therapist may use one of two methods of arm support. If he is able to adequately support the patent's upper limb with one hand, he has the other available for palpating, guarding, etc. However, if the examiner feels that he is unable to maintain adequate support of the limb while performing passive movement of the various joints, he may choose to use both hands. Each time the arm position is changed, the client indicates his recognition of the change by placing his uninvolved arm in a position identical with that of the affected limb. The test is performed with the client blindfolded, but to ascertain that he understands what is required of him, the procedure is first carried out without blindfolding.
This preliminary trial also serves the purpose of acquainting the examiner with spasticity and/or joint ranges where pain is encountered. Passive motions are to be performed slowly, avoiding pain and elicitation of spasticity as much as possible. Several shoulder movements, including rotation, are tested. The elbow movements of flexion and extension may be tested in different shoulder positions. Pronation and supination movements should be alternated with wrist flexion and extension movements, since it has been frequently observed that hemiplegic clients often confuse the two types of motion. Motions at the various joints should be randomly mixed, and repeated at least twice to rule out the possibility of chance guessing. It might be helpful to the examiner to practice this test with a few normal subjects to determine the normal response. Characteristically there is a certain amount of hesitation for some joint motions, and a normal range of error (under or overshoot). The client's response should therefore be compared with the actual normal response, rather than what the normal response might be anticipated to be.
The client is seated with his forearm pronated, resting on a firm pillow on his lap. The hands and fingers should protrude over the edge of the pillow. The technique to be followed is the same as that previously described in testing passive motion sense in the upper limb. For standardization purposes only flexion and extension are to be considered. For evaluation of the wrist motions the examiner should grip the client's involved hand in the region of the second and fifth metacarpophalangeal joints, such that he is not in direct contact with the palm or dorsum of the hand. The fingers should be tested individually. The therapist grasps the distal portion of the finger and slowly moves the digit into extension or flexion. The client is to verbalize the direction in which the finger was moved, or if unable to express himself verbally, duplicate the motion with his unaffected hand. To test thumb motions, the examiner should position the hand in mid-position (resting on the ulnar border). The client is to indicate extension ("up") or flexion ("down"). LOWER LIMB, SENSORY ASSESSMENT
Passive Motion Sense – This test is to be administrated with the client in a supine position in a similar manner to passive motion sense in the upper extremity. However, since it is extremely difficult to duplicate
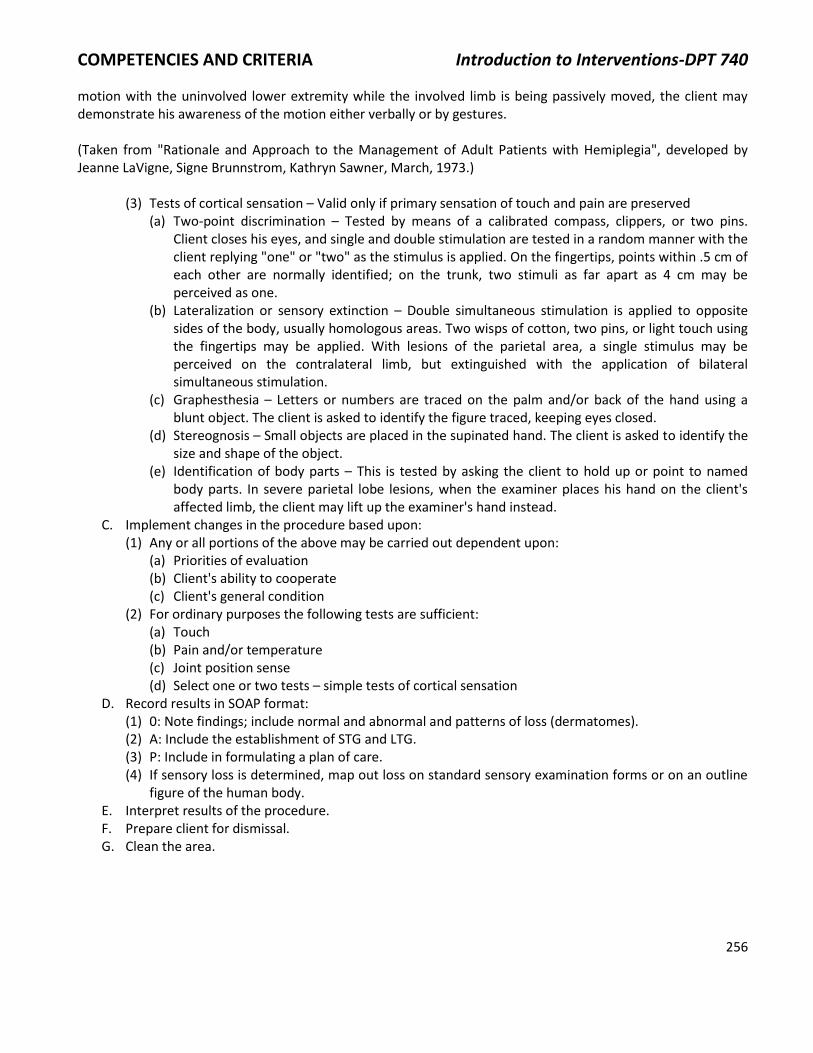
COMPETENCIES AND CRITERIA Introduction to Interventions-DPT 740
256
motion with the uninvolved lower extremity while the involved limb is being passively moved, the client may demonstrate his awareness of the motion either verbally or by gestures. (Taken from "Rationale and Approach to the Management of Adult Patients with Hemiplegia", developed by Jeanne LaVigne, Signe Brunnstrom, Kathryn Sawner, March, 1973.)
(3) Tests of cortical sensation – Valid only if primary sensation of touch and pain are preserved (a) Two-point discrimination – Tested by means of a calibrated compass, clippers, or two pins.
Client closes his eyes, and single and double stimulation are tested in a random manner with the client replying "one" or "two" as the stimulus is applied. On the fingertips, points within .5 cm of each other are normally identified; on the trunk, two stimuli as far apart as 4 cm may be perceived as one.
(b) Lateralization or sensory extinction – Double simultaneous stimulation is applied to opposite sides of the body, usually homologous areas. Two wisps of cotton, two pins, or light touch using the fingertips may be applied. With lesions of the parietal area, a single stimulus may be perceived on the contralateral limb, but extinguished with the application of bilateral simultaneous stimulation.
(c) Graphesthesia – Letters or numbers are traced on the palm and/or back of the hand using a blunt object. The client is asked to identify the figure traced, keeping eyes closed.
(d) Stereognosis – Small objects are placed in the supinated hand. The client is asked to identify the size and shape of the object.
(e) Identification of body parts – This is tested by asking the client to hold up or point to named body parts. In severe parietal lobe lesions, when the examiner places his hand on the client's affected limb, the client may lift up the examiner's hand instead.
C. Implement changes in the procedure based upon: (1) Any or all portions of the above may be carried out dependent upon:
(a) Priorities of evaluation (b) Client's ability to cooperate (c) Client's general condition
(2) For ordinary purposes the following tests are sufficient: (a) Touch (b) Pain and/or temperature (c) Joint position sense (d) Select one or two tests – simple tests of cortical sensation
D. Record results in SOAP format: (1) 0: Note findings; include normal and abnormal and patterns of loss (dermatomes). (2) A: Include the establishment of STG and LTG. (3) P: Include in formulating a plan of care. (4) If sensory loss is determined, map out loss on standard sensory examination forms or on an outline
figure of the human body. E. Interpret results of the procedure. F. Prepare client for dismissal. G. Clean the area.

COMPETENCIES AND CRITERIA Introduction to Interventions-DPT 740
257
CRITERIA SHEET SUPERFICIAL HEAT: INFRARED AND MOIST HEAT PACKS
1. Pre-Planning for Procedure: A. Identify the priority signs, symptoms, and condition which make the procedure applicable:
(1) Increased pain of probable muscular or joint origin (2) Increased muscle tension causing:
(a) Decreased range of joint motion (b) Possible splinting or adjoining muscles
B. Identify the rationale for choice of procedure: (1) Safety:
(a) Avoid use in presence of absent sensation and occlusive disease. (b) Avoid direct heat over bony prominences and/or over immature scars. (c) Use extra toweling with elderly or thin clients.
(2) Economics: (a) P.T. time, indirect costs of equipment, maintenance, energy, laundry
(3) Condition of client: (a) Known or suspected soft tissue trauma
(4) Duration of the treatment: (a) Dependent on client's tolerance to heat (b) Length of time necessary to decrease signs and symptoms
(5) Generate other alternative treatments: (a) Hydrotherapy (hot or cold) (b) Cold applications (c) Massage (d) Graded movement
(6) Application of procedure to short and long term goals: (a) STGs: decreased pain, increased movement, decreased splinting, decreased muscle tension (b) LTG: full painless movement
2. Preparation of Physical Therapist: A. Review procedure as necessary. B. Review medical record. C. Interview client.
(1) Ask questions to identify the area of pain or tightness. (2) Ask questions to identify any reactions to heat during prior treatments. (3) Ask questions to identify the level of sensation of part to be heated.
D. Determine treatment sequence and positioning. E. Select and collect correct equipment:
(1) For use with infrared and moist heat packs: (a) Linens, pillows, cotton or gauze, pack covers
Division of Physical Therapy
Emory University

COMPETENCIES AND CRITERIA Introduction to Interventions-DPT 740
258
(b) Timer and call bell (c) Appropriate clothing (gown, shorts, etc.)
(2) Infrared: (a) Choose lamp type: luminous, non-luminous (b) Choose size sufficient to heat the area to be treated
(3) Moist heat packs: (a) Choose cervical pack for neck, or "wrap around" heat such as feet, ankles, elbows, wrists, and
knees (b) Choose number of packs to cover area needed balanced with the total weight of the pack
F. Prepare the environment/equipment/materials: (1) Infrared:
(a) Preheat non-luminous generators. (b) Have towels available. (c) Room should be warm (d) Set up treatment area
(2) Moist heat packs: (a) Check temperature of unit (140° -160° F). (b) Remove the pack from unit by loops. Make sure pack has been adequately heated after previous
use. (c) Check for leaking pack. (d) Wrap pack in commercial cover or turkish towels. (e) Recommend using 6-8 layers of towel between pack and skin. Additional layers are necessary
when the client lies on top of the pack. A commercial cover is equal to 6 layers of toweling. (f) A towel should be wrapped around the cover to prevent direct contact with the client and to
provide for repeated use of the cover. (g) Temperature of room should be at least 76°F to prevent chilling.
3. Execute the Procedure: A. Follow the Interpersonal Relations and Teaching-Learning Criteria to establish rapport and explain the
procedure to the client. B. Sequential steps of the procedure:
(1) Infrared: (a) Place client in comfortable position, properly draped, with the treatment area exposed. Client
should be relaxed. (b) Protect client's eyes, ears, lips, and tip of nose as indicated:
1) Goggles over eyes 2) Moist cotton pads over eyes, lips, and tip of nose 3) Towel over ear when side of face is being treated 4) Drape luminous lamps to prevent glare
(c) Elevate part if edema is present (angle lamp). (d) Braces and bi-valved casts should be removed during treatment (maintain position of extremity
if indicated). (e) Explain purpose and procedure to client. (f) Instruct client to notify therapist if heat is too hot (sensation of burning, pain, or discomfort). (g) Position lamp:
1) Position infrared unit opposite to the center of area being treated, so that the rays strike the skin at right angles.
2) Distance lamp between 24-36 inches. Begin at 30 inches or use "comfortable sensation of

COMPETENCIES AND CRITERIA Introduction to Interventions-DPT 740
259
warmth" as a guide. Client's tolerance to heat is eventual guide. (h) Set timer for 20 minutes. (i) Give client call bell. (j) Interim Evaluation:
1) Adjust distance of lamp or add layers of dry towels as indicated as treatment progresses. 2) If perspiration begins to decrease, stop treatment, since client cannot tolerate the heat. 3) Too much heat is also indicated by a mottled coloring. Adjust as above.
(k) At the completion of the treatment: 1) Turn off lamps. 2) Inspect part. 3) Indicate treatment has ended. 4) Solicit client's overall response.
(2) Moist heat packs: (a) Instruct the client in rationale for use and application. (b) Expose all parts of body to be treated, remove all clothing around part to be treated, particularly
underwear, and thoroughly examine part to be treated. (c) Drape client appropriately. (d) Position client comfortably. (e) Avoid drafts and chilling client. (f) Instruct patient to notify therapist if pack becomes too hot or uncomfortable; heat should be
"comfortably warm". (g) Apply pack with appropriate side toward client. (h) Make sure toweling is wrinkle-free to avoid pockets of heat. (i) Secure pack adequately to prevent slippage. (j) Set timer for 20-30 minutes and give client call bell. (k) Perform Interim Check:
1) Elicit client's verbal response as to adequacy of heat – too much, too little 2) Check skin – If mottled add more toweling; if skin is cool remove some toweling. 3) Check for heat sensitivity:
(a) Shallow, gasping breath (b) Perspiration (c) Weak and rapid pulse (d) Facial pallor (e) Drop in blood pressure (f) Nausea, dizziness
4) Check for chilling: (a) Shivering (b) Undue pallor (c) Gooseflesh (d) Cyanosis
(l) Terminate treatment: 1) Remove pack after treatment. Cover heated part with toweling to prevent rapid heat loss,
return unit to hot pack, and check client's skin for any untoward signs. 2) Solicit response to treatment from client. 3) Close interview with client.
C. Implement changes in procedure based upon: (1) Response of client to intensity of heat

COMPETENCIES AND CRITERIA Introduction to Interventions-DPT 740
260
(2) Response of client toward achievement of STG and LTG listed in 1.B.6. D. Record results in SOAP format or other approved format. E. Interpret results. F. Prepare client for dismissal. G. Clean the area.

COMPETENCIES AND CRITERIA Introduction to Interventions-DPT 740
261
CRITERIA SHEET SUPERFICIAL HEAT – PARAFFIN
1. Pre-Planning for Procedure:
A. Identify the priority signs, symptoms, and conditions which make the procedure applicable: (1) Increased pain of probable muscular origin (2) Increased muscle tension causing:
(a) Decreased range of joint motion (b) Possible splinting of adjoining muscles
B. Identify rationale for choice of procedure: (1) Safety:
(a) Avoid use in presence of absent sensation and occlusive disease. (b) Avoid application over open skin areas and/or over immature scars.
(2) Economics: (a) P.T. time, indirect costs of equipment maintenance, energy, laundry, paraffin
(3) Condition of client: (a) Known or suspected soft tissue trauma, joint disease
(4) Duration of treatment:
(a) Dependent on client's tolerance to heat (b) Length of time necessary to decrease signs and symptoms
(5) Generate other alternative treatments:
(a) Hydrotherapy (hot or cold) (b) Cold applications (c) Massage (d) Graded movement (e) Hot packs; infrared lamp
(6) Application of procedure to short and long-term goals: (a) STG: Decreased pain, increased movement, decreased splinting, decreased muscle tension (b) LTG: Full painless movement
2. Preparation of Physical Therapist: A. Review procedure as necessary. B. Review medical record. C. Interview client.
(1) Ask questions to identify the area of pain or tightness. (2) Ask questions to identify any reactions to heat during prior treatments. (3) Ask questions to identify the level of sensation of part to be heated.
Division of Physical Therapy
Emory University

COMPETENCIES AND CRITERIA Introduction to Interventions-DPT 740
262
D. Determine positioning for client. E. Select and collect correct equipment:
(1) Plastic wrap (2) Towels (3) Timer (4) Rubber bands
F. Prepare the environment and equipment/materials:
(1) Check temperature of wax:
(a) If it is between 125°-130° F, proceed. (b) If it is over 130° F, remove cover and wait until temperature drops. (c) If it is below 125° F, return cover and wait until the temperature rises. If bath has a timer
mechanism for adjusting temperature, activate the clock for the number of minutes necessary to raise the temperature the desired amount. Bath temperature rises 1° F/minute.
(2) Set up treatment area.
3. Execute the Procedure:
A. Follow the Interpersonal Relations and Teaching-Learning Criteria to establish rapport and explain the procedure to the client.
B. Sequential steps of the procedure:
(1) Instruct client to remove jewelry and to wash part with soap and water and dry thoroughly. Water remaining on the skin can be heated by the paraffin and cause burns.
(2) Instruct client in following precautions: (a) Level – Dip hand above wrist or ankle; following dips should go no higher than the first dip. (b) Speed of dip – First dip is rapid; other dips are smooth and can be slower. (c) Immobilization – Do not move hand after first dip; hand should be positioned with fingers
separated and with the fingers and wrist in a comfortable position. (d) If hot spots develop or if wax is uncomfortably hot, client should notify the therapist.
(3) Dip part to appropriate level and remove:
(a) First dip should be rapid. (b) Guide part to assure proper level of immersion and prevent splash.
(4) Allow sufficient time between dips to permit wax to solidify. The wax changes from shiny to dull. The first application is important: allow the first coat to dry thoroughly before additional coats are applied.
(5) Continue dipping until part is well covered by wax glove (6-8 times). (6) Wrap the dipped part in plastic or waxed paper and then in a heavy towel. (7) Secure towel with rubber bands. (8) Position part treated in a comfortable manner, avoiding dependency. (9) Allow hands (or feet) to remain wrapped 15 -20 minutes. (10) Remove wax at end of treatment.
(a) Run forefinger down glove and peel wax off. Rinse and dry wax. (b) Return wax to bath.
C. Implement changes in procedure based upon: (1) Response to heat (2) Goals

COMPETENCIES AND CRITERIA Introduction to Interventions-DPT 740
263
D. Record results in SOAP format or other appropriate forms. E. Interpret results of treatment. F. Prepare client for dismissal. G. Clean up area.

COMPETENCIES AND CRITERIA Introduction to Interventions-DPT 740
264
CRITERIA SHEET APPLICATION OF COLD
1. Pre-Planning for Procedure: A. Identify the priority signs, symptoms, and conditions which make the procedure applicable:
(1) Increased pain of probable muscular origin (2) Increased muscle tension causing:
(a) Decreased range of joint motion (b) Possible splinting of adjoining muscles
(3) Immediate onset of pain resulting from trauma due to overstretching of muscles, ligaments, etc. (4) Decreased ability of muscle to perform a voluntary contraction due to inhibition
B. Identify the rationale for choice of procedure: (1) Safety:
(a) Avoid use in presence of absent sensation or occlusive disease. (b) Check client for cold hypersensitivity prior to application. (c) Monitor serial vital signs if full or partial body immersion is used. (d) P.T. should wear gloves to protect hands if handling ice for prolonged periods of time (several
hours). (2) Economics:
(a) Physical therapist time; initial cost of ice machine or cold-pack machine; ice is inexpensive (3) Condition of client:
(a) Known soft tissue trauma, known or suspected immediate injury to soft tissue or joint (4) Duration of treatment – length of time necessary to decrease signs and symptoms:
(a) Ice towels: each application for approximately two (2) minutes, repeated from 5-10 times; towels reapplied every three (3) minutes; two (2) minutes on with one minute to change towels)
(b) Ice massage: continuous application until hyperemia of affected area occurs (5-15 minutes, depending on size of area treated)
(c) Refrigerant spray: apply until sign of frost (usually 5-10 seconds), apply friction massage and reapply refrigerant spray; alternate spray and massage for 5-15 minutes
(d) Crushed ice packs or commercial cold pack: static application for 5-20 minutes (e) Cool water (whirlpool, tank, etc.) immersion of limb, lower trunk and legs or full immersion:
1) Time varies from 5-10 minutes for body parts to 1-5 minutes for initial full immersion, progressing up to 15-20 minutes and 5-10 minutes for body parts and full immersion, respectively
(f) Brief ice: 3-5 second application by stroking (5) Generate other possible alternative treatments:
(a) Heat (b) Massage (c) Graded movement (d) Electrical stimulation for relief of pain and prevention or relief of edema
Division of Physical Therapy
Emory University

COMPETENCIES AND CRITERIA Introduction to Interventions-DPT 740
265
(6) Application of procedure to short and long term goals: (a) STGs: Decrease pain, increase movement, prevent edema (b) LTGs: Full painless movement, increase ability to contract muscles voluntarily
2. Preparation of Physical Therapist: A. Review the procedure as necessary. B. Review the medical record. C. Interview the client:
(1) Ask questions to identify the area and behavior of pain. (2) Ask questions to identify previous reactions to cold. (3) Ask questions to identify level of sensation.
D. Determine treatment position. E. Select and collect correct equipment:
(1) Towels, linens (2) Timers (3) Clothing for client (4) Ice pack, refrigerant spray, ice for massage or brief stroking
F. Secure the environment: (1) Prepare type of ice to be used. (2) Set up treatment area for type of treatment to be performed. (3) Room temperature should be in a range to insure general comfort and prevent chilling.
3. Execute the Procedure: A. Follow the Interpersonal Relations and Teaching-Learning Criteria to establish rapport with client. B. Sequential steps of procedure:
(1) Position and drape client appropriately for the area to be treated. (a) If using refrigerant spray, care must be taken to protect client's face and nose from fumes and
assure adequate ventilation. (b) If using ice massage or brief stroking, position a towel to absorb drips so that cold water does
not run onto areas not to be treated. (2) Palpate to locate areas of tenderness or extent areas to be treated or perform other pre-treatment
evaluations deemed necessary. (3) Application:
(a) Ice packs: Using a damp towel, form a pack of crushed ice large enough to cover the part to be treated. 1) Protect linens and pillows with plastic. 2) Place a towel over the plastic to absorb water as ice melts. 3) Place pack in contact with body part making certain entire muscle area is covered. 4) Cover client with sheet to prevent chilling. 5) Set timer. 6) Recheck every 2-5 minutes for reaction. 7) When area becomes numbed and has a local hyperemia, pack can be removed and
remainder of treatment performed. (b) Commercial cold pack: Pack may be applied in the plastic cover. Prior to application, place a
damp towel over the part. Follow Steps 3-7 in section a. on ice packs. (c) Ice massage:
1) Protect linens and pillows with plastic.

COMPETENCIES AND CRITERIA Introduction to Interventions-DPT 740
266
2) Place towel under part to be treated to absorb water as ice melts. 3) Remove ice from container. Wrap washcloth around ice to protect hand. 4) Apply ice to skin in short overlapping strokes or circular movements, depending upon the
shape of the area treated. (Long strokes for muscle bellies, circular strokes for irregular surfaces.)
5) Watch for consistently reddened areas and re-inform the client of the basic sensation of cool, cold, burning sensation, and numbness.
6) When redness and numbness occurs, terminate massage and complete the remainder of the treatment.
(d) Refrigerant spray: 1) Apply spray in slow sweeping motions. (8-10 inches from surface) 2) Watch for signs of frost. At first sign of frost, cease spraying. 3) Apply frictional massage until part is warmed. 4) Reapply spray and continue alternating spray and massage. 5) Instruct client to report any problem with fumes, any dizziness, or nausea. 6) When pain or spasm have decreased, stop treatment and follow with other treatment such
as active motion of the part. (e) Ice towels: Mix crushed ice with water, forming a slough mixture.
1) Soak two towels in the mixture. Wring out one towel and place directly over the affected area.
2) Leave towel in place for 1-2 minutes. 3) Remove towel and replace it in the ice; wring out other towel and apply it to the client. 4) Continue to reapply towels. 5) Exercise can be performed during or after ice towels. 6) Terminate treatment when positive change in symptoms noted.
(f) Brief ice: Select muscle group to be facilitated. 1) Apply 2-5 brisk strokes with the ice cube over the muscle belly; wipe off water. 2) Repeat several times attempting to elicit a voluntary contraction between applications. 3) If muscle activity to be facilitated is for holding a part stable:
(a) Place part in desired position. (b) Ice 3-5 seconds over the muscle belly requesting the client to hold the part stable. (c) Apply manual pressure to test the holding capacity of muscle. (d) Repeat as necessary.
C. Implement changes in procedure based upon:
(1) Increase in symptoms (2) Client intolerance
D. Record results in client's record using SOAP or other appropriate format. (1) Pre and post-treatment measurements of ROM, edema, and increased degrees of active motion (2) Interpret results of procedure
4. Prepare client for dismissal or exercise.
5. Clean the area.

COMPETENCIES AND CRITERIA Introduction to Interventions-DPT 740
267
CRITERIA SHEET ULTRASOUND
1. Pre-Planning for Procedure: A. Identify the impairments and conditions which make the procedure applicable:
(1) Pain (2) Wounds or tissue damage (3) Decreased range of motion or tissue extensibility (4) Inflammation (5) Muscle spasm
B. Identify the rationale for choice of procedure: (1) Safety – Major contraindications for the use of ultrasound include application over:
(a) Eyes, ears, ovaries or testes, brain, spinal cord, lower cervical sympathetic ganglia, or open epiphyseal plates
(b) Pregnant uterus (c) Ischemic areas (d) Neoplasm (e) Active bacterial infection or bleeding (f) Insensitive area (g) Cognitive or other impairment that would render client incompetent or unreliable in their ability
to identify sensory changes (e.g. heating) during treatment (h) Ultrasound should be applied with caution over bony prominences and metal implants,
particularly superficial metal implants. (2) Economics:
(a) Devices are expensive to purchase. (b) Operating costs are low. (c) Considerable (5-15 minutes) therapist time is involved with the application of each treatment.
(3) Condition of client: (a) Cooperative and communicative (b) Presenting with impairments amenable to intervention with ultrasound (c) Does not present with any of the above contraindications
(4) Duration of treatment – 5-15 minutes depending on the size of area to be treated (5) Possible alternative treatments:
(a) Diathermy – thermal effects (b) Hot packs – thermal effects (c) Infrared – thermal effects (d) Massage – mechanical effects (e) Transcutaneous electrical nerve stimulation – analgesic effects (f) High-Volt Pulsed Electrical Stimulation – analgesic effects (g) Functional Electrical Stimulation – mechanical effects
Division of Physical Therapy
Emory University

COMPETENCIES AND CRITERIA Introduction to Interventions-DPT 740
268
(h) Low-Level Laser Therapy – non-thermal effects (6) Application of procedure to short and long-term goals:
(a) STGs: Decrease pain, increase range of motion, reduce muscle spasm, (b) LTG: Improved function
2. Preparation of Physical Therapist: A. Review procedure as necessary. B. Review medical record. C. Interview client – Leading questions which you should include are:
(1) Exactly where does it hurt? What kind of pain is it? Dull? Sharp? Etc. (2) Do you have any problems with your circulation? Does your (body part to be treated) ever feel
cold/numb/fall asleep/turn blue? (3) Do you have any problems with your sensation? (4) Do you have any significant medical problem which you think I should know about? (5) Do you have any metal implants in your (body part to be treated)? (6) If the intervention is to be administered near the uterus of a female client:
(a) Is there any chance that you may be pregnant? D. Determine treatment sequence and position. E. Select and collect correct equipment:
(1) Equipment for testing skin sensation: cotton swab, pin, warm/cold test tubes (2) Towel (3) Coupling agent/water bath (4) Ultrasound machine (5) Pillows and sheets for positioning and draping (6) Hospital gown
F. Secure the environment: (1) Pre-treatment preparation:
(a) Be sure all controls are off and at zero before plugging in the machine. (b) Plug in and position machine.
(2) Safety of equipment: (a) Check for broken or frayed cables. (b) Check for current certification of inspection. (c) Clean transducer face with alcohol.
3. Execute the Procedure: A. Follow the Interpersonal Relations and Teaching-Learning Criteria to establish rapport with client. B. Sequential steps of procedure:
(1) Explain purpose and procedure of intervention to client. (2) Have client remove all clothing and jewelry from area to be treated. Position and drape client
appropriately. (3) Examine part to be treated. Check skin for scars. Check for any signs of compromised circulation. (4) Perform a superficial (i.e. skin) sensory examination. (5) Consider the following to determine most effective method of administration of ultrasound:
(a) Size and location of total area to be treated (b) Shape/contour of total area to be treated (c) Depth of tissue to be treated (d) Desired effect of treatment (e.g. thermal, mechanical) (e) Client comfort and safety
(6) Determine parameters for administration of ultrasound:

COMPETENCIES AND CRITERIA Introduction to Interventions-DPT 740
269
(a) Technique to be used (i.e. pulsed or continuous) (b) Coupling agent or medium to be used (e.g. cream, gel, oil, water bath) (c) Dosage – including duration, intensity and frequency (d) Sectioning of total area to be treated; If a large area, section into smaller units of treatment (e) Position of client during treatment (f) Explain that ultrasound should elicit only gentle warmth (if continuous) or no sensation at all
(pulsed) and that any feeling of heat or discomfort must be reported to you immediately. (7) Administrate ultrasound treatment:
(a) Liberally apply the coupling agent (room temperature or warmed). (b) Warm transducer in hand. (c) Position transducer for treatment.
1) Transducer should be perpendicular to the area treated. 2) Firm downward pressure should be applied to the transducer.
(d) Begin stroking with dominant hand. (e) Adjust intensity to desired level on the average intensity scale with non-dominant hand. (f) Continue stroking at a rate of about 4 cm per second with each stroke covering half the area of
the former stroke. (g) Be sure that a 90° angle and firm pressure with total contact and continual movement is
maintained during the entire treatment. If pain occurs the problem may be: 1) Intensity too high/too low 2) Contact has not been maintained 3) Movement has not been continuous 4) Client may be particularly sensitive to ultrasound
(h) Ask the client: 1) Is it getting warm? 2) Is it any more than just warm? 3) Do you feel any pain or discomfort?
(8) Evaluate the above and adjust appropriately. If the pain continues, discontinue treatment. (a) When the unit "clicks" the power to the applicator head shuts off. (b) Turn the intensity control down to ZERO if it does not automatically go to zero.
(9) To terminate the intervention: (a) Solicit the client's overall response to the measure. (b) Indicate that the treatment has ended. (c) Turn the machine off. (d) Unplug the cord. (e) Move the machine from the immediate care area. (f) Prepare the client to leave:
1) Remove the coupling agent. 2) Dry the area. 3) Instruct (assist) the client to dress.
(g) Close the interview. C. Implement changes in procedure based upon:
(1) Response of the client as noted in #15 above. (2) Achievement of short and long term goals listed in B.6.
D. Record results in SOAP or other appropriate format. Be sure to include subjective as well as objective responses to treatment including: (1) Vital signs – pre and post treatment

COMPETENCIES AND CRITERIA Introduction to Interventions-DPT 740
270
(2) Skin appearance – pre and post treatment (3) Subjective response to treatment (4) Objective changes in range of motion or muscle spasm (5) Documentation of specific treatment administered technique, dosage, positioning, area treated
E. Interpret results of procedure.
References Michlovitz, SL, Nolan TP (Eds). Modalities for Therapeutic Intervention, 4th Ed. Chapter 5; Chapter 8, pp 141-148; 152-162.

COMPETENCIES AND CRITERIA Introduction to Interventions-DPT 740
271
CRITERIA SHEET MEDICAL DIATHERMY
1. Pre-Planning for Procedure: A. Identify the priority impairments and conditions which make the procedure applicable – medical
diathermy is indicated whenever deep or superficial tissue heating is desirable, provided no contraindications to use exist. This would include deep or superficial tissue heating for the treatment of: (1) Pain (2) Decreased mobility – sub-acute trauma (3) Inflammation – sub-acute or chronic
B. Identify the rationale for choice of procedure: (1) Safety – major contraindications for the use of medical diathermy include:
(a) Possibility of hemorrhage (b) Vascular disease – thrombophlebitis and occlusive arterial disease (c) Pregnancy (d) Menstruation (e) Decreased or lack of skin sensibility (f) Metal implants – shrapnel, pacemaker, intrauterine device, pins, nails, artificial joint
replacement, etc. (g) Questionable mental status, reliability of client – unconscious patients, small children, mentally
impaired adults (h) Hypersensitive skin (e.g. following x-ray treatments) (i) Cancer or tuberculosis (j) Cardiac pacemaker (k) Wet dressings or cast
(2) Economics: (a) Devices are expensive to purchase (b) Operating costs are low (c) Relatively little therapist time required once treatment regimen established
(3) Condition of patient – Patient must be: (a) Cooperative and communicative (b) Presenting with impairments amenable to tissue heating (c) Able to maintain an appropriate position for duration of treatment (without appreciable
movement) (d) Does not present with any of the above contraindications
(4) Duration of treatment: 10-30 minutes (5) Possible alternative treatments:
(a) Ultrasound (b) Hot packs (c) Infrared
Division of Physical Therapy
Emory University

COMPETENCIES AND CRITERIA Introduction to Interventions-DPT 740
272
(d) Massage (e) Any other superficial or deep heating modalities
(6) Application of procedure to short and long term goals: (a) STGs: Decrease pain, increase range of motion (b) LTG: Independent pain free movement
2. Preparation of Physical Therapist: A. Review the procedure as necessary. B. Review the medical record. C. Interview the client.
(1) Exactly where does it hurt? (2) Do you have any metal implants? Have you ever had surgery? (3) Do you have any problems with your circulation? Does your (body part to be treated) ever feel
cold/numb/turn blue? (4) Do you have any problems with your sensation? (5) If a female patient:
(a) Is there any chance that you may be pregnant? (b) Do you have an intrauterine device (IUD) in place? (c) Are you menstruating?
D. Determine treatment sequence and position. E. Select and collect correct equipment:
(1) Paraphernalia for testing skin sensation: cotton swab, pin, warm/cold test tubes (2) Turkish towel (3) Diathermy machine including any appropriate emitters, condensers, or cables (4) Appropriate treatment area – quiet room, wooden chair or table (5) Timer with bell (6) Call button or bell (7) Pillows and sheets for positioning and draping (8) Hospital gown
F. Secure the environment: (1) Pre-treatment preparation:
(a) Connect applicators to the machine. (b) Be sure all controls are off and at zero before plugging in the machine. (c) Plug in and position machine. (d) Allow machine to warm up if necessary. (e) Make sure leads are not in contact with one another or with metallic parts of unit or treatment
table (SWD only). (2) Safety of equipment:
(a) Check plugs and cables. (b) Check for current certification of inspection.
3. Execute the Procedure:
A. Follow the Interpersonal Relations and Teaching-Learning Criteria to establish rapport with client.
B. Sequential steps of procedure:
(1) Explain purpose and procedure of intervention to client.
(2) Instruct client to remove all metal objects, including rings, jewelry, hearing aids, and watches.
(a) Explain that these pieces of metal in a diathermy field become very hot and may be damaged or

COMPETENCIES AND CRITERIA Introduction to Interventions-DPT 740
273
cause burns.
(3) Remove all clothing from area to be treated and drape client appropriately.
(4) Examine part to be treated, and check skin for scars or burns.
(5) Perform a superficial (i.e. skin) sensory examination.
(6) Determine most effective method of application, considering:
(a) Size of area to be treated
(b) Sharp/contour of area to be treated
(c) Depth of tissue to be heated
(d) Client comfort and safety
(7) Include determination of:
(a) Type of diathermy to be used (i.e. SWD)
(b) Type and size of electrodes to be used (i.e. space plate, condenser pads, contour drum cables, emitters, etc.)
(c) Spacing and positioning of electrodes
(d) Explain that diathermy should elicit only comfortable warmth, not heat.
(e) Instruct client to report if he feels too warm, not warm, or if he has "hot spots".
(f) Drape and position client properly.
(g) Instruct client that he must not change position; assure client's comfort (i.e. no exposure to drafts, relaxed posture).
(h) Give client call bell to summon help if necessary.
(i) Place proper numbers of toweling between client and electrodes.
(j) Place applicator properly in relation to patient to achieve desired heating. Avoid having leads touching one another or table.
(k) Set timer for desired duration of treatment (20-30 minutes). (l) Tune the machine (if necessary) – Set output control at low setting, and adjust tuning control
until a maximal reading is reached on the resonance indicator meter. (m) Gradually increase output until client reports a feeling of comfortable warmth. (n) Periodically re-check client, ask if heat is comfortable and even, and check tuning. Inspect skin
after approximately 10 minutes or if patient complains of uneven heat or undue warmth. 1) If skin is bright pink or a white patch surrounded by a reddened area of inflammation,
immediately terminate treatment. 2) If skin is not pink and client does not feel warmth, increase output, remove a layer of
toweling, or recheck set up. 3) If client is uncomfortable and needs to be repositioned, return output and tuning controls to
ZERO and reposition client, then retune machine. 4) If skin has been inspected and is not pink, retune machine.
(o) To terminate treatment: 1) Return all controls to off or ZERO.

COMPETENCIES AND CRITERIA Introduction to Interventions-DPT 740
274
2) Elicit client's response. 3) Check parts treated.
C. Implement changes in procedure based upon: (1) Response of the patient:
(a) Skin color or sensory changes – modify as identified in B.7.n. (b) If patient reports fatigue, nausea, dizziness – terminate treatment (c) Any marked changes in vital signs – terminate treatment
(2) Achievement of short and long term goals listed in 1.B.6. D. Record results in SOAP format or other approved format. Be sure to include subjective as well as
objective responses to treatment, including: (1) Vital signs – pre and post treatment (2) Skin appearance – pre and post treatment (3) Subjective response to treatment (4) Objective changes in mobility or performance (5) Documentation of specific treatment administered equipment, dosage, positioning, area treated
E. Interpret results of treatment. F. Prepare client for dismissal. G. Clean up area.

COMPETENCIES AND CRITERIA Introduction to Interventions-DPT 740
275
CRITERIA SHEET CERVICAL AND LUMBAR TRACTION; MOTORIZED AND STATIC
1. Pre-Planning for Procedure: A. Identify the priority signs, symptoms, and conditions which make the procedure applicable:
(1) Pain (2) Muscle tension (3) Decreased movement (4) Radicular pain
B. Identify the rationale for choice of procedure: (1) Safety:
(a) Improper alignment of the apparatus and improper fitting of halters, belts, etc. may exacerbate the client's symptoms.
(b) Incorrect time sequences for motorized traction and/or intensity and duration of motorized and static traction may exacerbate the client's symptoms.
(2) Economics: (a) Initial cost of equipment is a major investment. (b) Operating costs are negligible.
(3) Condition of client: (a) Client should be conscious in order to provide feedback related to symptomatic relief. (b) Client must be able to tolerate pressure on the skin.
(4) Duration of treatment: (a) Duration is dependent upon the STG's and symptomatic response.
(5) Generate other possible alternative treatments. (a) N/A
(6) Application of procedure to short and long term goals: (a) STGs: Relief of pain, muscle tension, increased movement (b) LTGs: Increased functional use of body part
2. Preparation of Physical Therapist: A. Review the procedure as necessary. B. Review the medical record.
(1) From the medical record information: (a) Select the method of traction and expected treatment goals. (b) Select the angle of application and length of time of application based upon the projected
treatment goals and area of joint or muscle involvement. (c) Select the position to be used based upon client's medical condition and projected treatment
goals. C. Interview the client:
(1) Have you ever used any type of traction or pulling device on your neck, back, leg, etc? (2) If yes, how did it feel?
Division of Physical Therapy
Emory University

COMPETENCIES AND CRITERIA Introduction to Interventions-DPT 740
276
(3) Ask pertinent questions included in Evaluation for Area and Behavior of Pain.
D. Determine treatment sequence and positioning. E. Select and collect correct equipment:
(1) Linens and clothing for client (2) Collect appropriate halters, belts, ropes, etc. for the type of traction to be used
F. Secure the environment: (1) Check all cables, belts and halters for safety. All buckles, snaps, "D" rings, and attachments should
be functioning and firmly attached to the appropriate part of the equipment. (2) Check the operation of the machine, pulley, etc. (3) If cervical traction, remove client's dentures, glasses, and earrings, and avoid creases in halter.
3. Execute the Procedure: A. Follow the Interpersonal Relations and Teaching-Learning Criteria to establish rapport with client. B. Sequential steps of procedure:
(1) Position and drape the client according to the area to be treated, following the criteria for Positioning and Draping.
(2) Examine part to be treated. (3) Assist client in donning the traction apparatus directly over skin or light gown.
C. LUMBAR TRACTION: (1) Thoracic belt:
(a) With client standing, place the inside toward the body. If client is unable to stand, position belt on traction table and slide client over on top of belt.
(b) "D" rings should be at the top of the shoulders. (c) Center seam should be directly over the center of the back. (d) Attach strap around client just inferior to rib cage to prevent slipping of thoracic belt. (e) The attachment webbing should be anchored with the buckle or other connecting mechanism. (f) Test the tightness off the belt by pulling tip of the thoracic straps.
(2) Pelvic belt: (a) The top of the belt should come about 1" above the crest of the ilium. (b) Tighten the upper strap first and as firmly as possible. (c) Tighten the other two straps. (d) Make certain the traction strap is directly down the center and in line with the spine.
D. CERVICAL TRACTION: (1) Cervical halter:
(a) Have client lie supine with base of occiput at the bottom of head halter. Place a small towel over the halter to keep it free from hair and body oil.
(b) Bring chin strap over chin; keep it up on tip of chin. (c) Place a tissue between chin and halter. (d) Tighten straps evenly, snug but not tight. (e) If using Saunders halter, adjust width of halter to fit the occiput and apply strap to forehead. (f) Adjust table height to appropriate degree of neck flexion/extension to provide pull at involved
area of cervical spine. (2) Operation of the equipment:
(a) Connect the traction straps to the appropriate place on the traction machine and turn on the power switch.
(b) Manually pull on rope to check alignment. Set poundage to be used; set the timing of the pull and rest cycles.

COMPETENCIES AND CRITERIA Introduction to Interventions-DPT 740
277
(c) Set timer clock for desired length of treatment. This activates the traction machine. 1) Guidelines for selecting rest and hold cycles and initial poundage:
(a) Acute cervical problems: 8-15 pounds depending upon the amount of muscle tension and size of client's head. Start with poundage less than head weight initially. Gradually increase until weight of the head is reached. Stabilize poundage for one or two treatments until effects can be evaluated. Based upon effects, increase or decrease poundage. If the objective is relaxation, select cycle of 8-10 seconds followed by a rest cycle sufficient in length to allow for relaxation to occur. The criteria are client response and physical therapist's observation.
(b) Sub-acute cervical problems: 10-18 pounds depending on size of client (head is 100 of total body weight). If client is presenting with signs/symptoms of numbness and/or tingling in some area of upper limb, poundage should be gradually increased until a reduction in symptoms results. Next decrease poundage back 4-5 pounds for initial treatment. Evaluate the results the following day. Gradually increase poundage during subsequent 2 treatments until consistent reduction of symptoms is noted. Start with a longer hold than rest if symptoms reoccur during rest cycle; otherwise, equalize cycles.
(c) Acute lumbar problems: Calculate ¼ of client's body weight and reduce by 10-15 pounds. Follow the weight, rest, and hold guidelines in section C.1.a. Objective: to place a gentle prolonged stretch on the muscles in a temporarily shortened state to induce relaxation.
(d) Sub-acute lumbar problems: Calculate ¼ of client's body weight and apply the poundage. Client should feel a gentle stretch to pelvis. Gradually increase poundage until stretch is felt. Evaluate response of client prior to next treatment (pain, flexibility, etc). Increase traction 5-10 pounds each treatment until approximately 30-40 pounds has been added. If client presents with specific signs/symptoms of numbness, tingling, etc. increase poundage until a decrease in signs/symptoms is noted. The rest cycle will be 5-8 seconds while the hold is lengthened to 10-14 seconds.
(d) Motorized Lumbar Traction: 1) Unit is equipped with knob or lever to separate the table. In order to remove remainder of
slack, do not pull knob or level to separate table on first cycle of machine. Pull knob to separate table after the cycle has returned to rest. The table should not separate more than 2 or 3 in. If the table separates more than 5 or 6 inches this shows that the slack was not taken up. Readjustment may be necessary.
2) Recheck alignment of traction rope making certain it is centered. Observe the initial pull and rest cycles in order to check accuracy of application angle and client comfort.
(e) Motorized Cervical Traction: 1) Set timer to desired length of treatment. 2) Turn adjustment for weight of pull until machine begins to pull. Be sure angle of pull is
comfortable and alignment is correct before raising weight of pull to treatment level. Determine proper weight by client comfort and goals of treatment.
(3) Termination of the traction: (a) Lumbar Traction:
1) Place one hand on spreader bar and apply tension toward the machine to absorb the jerk when cable tension is released.
2) Return poundage dial to cord release. 3) Disconnect traction cable. 4) Return table to locked position. Check to make sure it is locked.

COMPETENCIES AND CRITERIA Introduction to Interventions-DPT 740
278
5) Disconnect harness hooks and remove pelvic and thoracic belts. (b) Cervical Traction:
1) Place one hand on spreader bar to absorb release of tension on cable. 2) Return poundage dial to cord release. 3) Remove D rings of halter from spreader bar. 4) Remove halter from client.
E. Implement changes in procedure based upon: (1) Response of the client:
(a) Decrease pain/increase pain (b) Decrease muscle spasm/increase muscle spasm (c) Decrease numbness and tingling/increase numbness and tingling
(2) Achievement of stated goals F. Record in SOAP or other approved format
(1) 0: State parameters of treatment and objective change noted on re-evaluation. (2) A: Assess effects based upon increased function. (3) P: State continuation or change in procedure planned.
F. Interpret results of procedure. G. Prepare client for dismissal. H. Clean up area.

COMPETENCIES AND CRITERIA Introduction to Interventions-DPT 740
279
CRITERIA SHEET TRANCUTANEOUS ELECTRICAL NERVE STIMULATION (TENS)
1. Pre-Planning for Procedure: A. Identify the priority signs, symptoms, and conditions which make the procedure applicable:
(1) Pain B. Identify the rationale for choice of procedure:
(1) Safety – Major contraindications for the use of TENS include: (a) Presence of cardiac pacemakers (b) Treatment over carotid sinus (c) Pregnancy (effects of TENS on developing fetus have not been determined)
*Note – TENS has proven to be a safe non-invasive technique for the treatment of pain. The use of TENS helps to reduce or avoid many often unwanted side effects associated with pain medication. TENS application does occasionally provide an adverse skin reaction which can generally be corrected by using a protective skin barrier. Use re-usable electrodes rather than single use electrodes.
(2) Economics: (a) Units may be rented initially by client then purchased if long-term home use is required. (b) Significant amounts of therapist time are required for appropriate client evaluation, treatment,
and education in the use of TENS. (3) Condition of client:
(a) Client with both acute and chronic pain may be treated with TENS. (4) Duration of treatment:
(a) Variable – see 3 – Execution of procedure (5) Generate alternative treatments:
(a) High voltage galvanic stimulation (b) Medical galvanism (c) Medical diathermy (d) Ultrasound (e) Hot pack (f) Whirlpool (g) Massage (h) Infra-red
(6) Application of procedure to short and long term goals: (a) STG: Decreased report of pain, decreased use of pain medications, increased activity (b) LTG: Permanent relief or reduction in pain, decreased use of pain medications, increased activity
(recreational and vocational)
Division of Physical Therapy
Emory University

COMPETENCIES AND CRITERIA Introduction to Interventions-DPT 740
280
2. Preparation of Physical Therapist: A. Review procedure as necessary. B. Review medical record. C. Interview client.
(1) Obtain a history of the client's past medical problems, including presence of coronary disease or pacemaker.
(2) Perform pain evaluation as outlined in criteria sheet for Areas and Behavior of Pain. (3) If a female client, determine if there is any chance that she may be pregnant.
D. Determine assessment/treatment sequence and positioning. E. Select and collect correct equipment:
(1) TENS unit with charged battery (2) 2 leads (3) 4 electrodes (4) Conditioning gel (if carbon electrodes) (5) Cotton (6) Alcohol (7) Appropriate recording forms, dermatome charts (8) Pencil (9) Linens (10) Gown (11) Towels
F. Secure the environment:
(1) Pre-treatment preparation: (a) Obtain a private, warm, quiet, relaxing area in which to examine and treat the client.
(2) Safety of equipment: (a) Check for frayed or broken wires.
3. Execute the Procedure: A. Follow the Interpersonal Relations and Teaching-Learning Criteria to establish rapport with client. B. Sequential steps of procedure:
(1) Explain to the client that: (a) TENS is electrical energy that has been shown to be effective in the relief of some types of pain. (b) Often, several treatments over a period of days are necessary to determine the position of
electrode placement that will result in maximum pain relief for an individual. (c) Some people derive relief from a single 30-45 minutes treatment, while others need to wear the
TENS unit 12 or more hours/day for several weeks in order to derive maximum benefit from the treatment.
(2) Instruct the client that his active participation and cooperation in this type of treatment is most important for the success of the treatment; and that, following the initial treatment he may be instructed in the application of electrodes and use of the TENS unit so that he may use it independently at home.
(3) Inform the client that once the unit is turned on, he may feel a mild warmth or tingling sensation under the electrodes. The sensation may diminish or disappear if the client gets used to (accommodates to) it, at which time the intensity may be increased.
(4) Elicit the client's feelings; answer questions. (5) Position the patient comfortably and drape appropriately.
C. Treatment Procedure – Please note that TENS units may vary slightly and it is suggested that the

COMPETENCIES AND CRITERIA Introduction to Interventions-DPT 740
281
therapist consult the operator's manual for the unit being used before applying this technique to a patient.
(1) Determine the location of electrode placement according to the client's description of pain. (a) Along a painful dermatome; on or proximal to the site of pain (b) Paravertebrally near or proximal to the painful nerve root (c) On either side of a painful joint
(2) Clean the skin area with alcohol; dry completely. (3) Connect the electrodes to the leads. Carbon electrodes – Apply a small amount of gel to each
electrode; set the electrode in place on the skin and tape securely. Reusable - Follow directions on package.
(4) Make sure all control dials on the unit are set at zero. (5) Connect the leads to the unit. (6) Instruct the client to let you know when he feels a definite but not uncomfortable tingling or buzzing
under the electrodes. Instruct the client to inform you if he feels discomfort at or a burning sensation under the electrodes at any time during the treatment. EMPHASIZE THIS COMMUNICATION EFFORT.
(7) Turn the intensity knob on slowly. Increase the voltage until the client reports that he perceives a tingling sensation under the electrodes.
(8) Adjust the parameters (rate, width, modulation). (9) Leave the settings and ask the client to let you know if the sensation diminishes or disappears. Some
clients will not accommodate to this sensory input and are able to tolerate it at comfortable levels. If a client reports burning or uncomfortable feeling secondary to the application of TENS, turn the unit off, remove the electrodes, inspect the skin area for pathological changes (burns, allergic reaction to tape, jelly, and electrode). If pathological signs are noted, the electrodes must be reapplied to location in order for treatment to be resumed.
(10) Allow the client to relax or engage in physical exercise/activity/rehab program with the electrodes in place and the unit on for about 30-45 minutes.
(11) Record the electrode placement on the dermatome charts; record the voltage, parameters and duration on appropriate forms.
D. Termination of Treatment:
(1) Turn all dials to zero. (2) Remove electrodes; cleanse and inspect skin for irritation, burns, and allergic reactions. (3) Elicit the client's feelings regarding the treatment, any change in his pain state, and types of
sensations experienced during the treatment. Repeat appropriate components of procedure for Areas and Behavior of Pain.
(4) If the client is an inpatient and receiving a 30 minute treatment, have the client return to his room. If the client is an outpatient or an inpatient who will be responsible for conducting his own treatment at regular intervals, instruct the client and a family member in the application of electrodes, setting of voltage, rate and width controls, care of the unit, charging of batteries (follow instructions in operator's manual for that particular unit), and the following safety precautions: (a) If wearing the unit 24 hours/day, check the skin under the electrodes 3 times a day for the first
several days. (b) Discontinue use of the unit if skin irritation is noted secondary to treatment and consult a
physical therapist or physician. (c) The client may engage in most activities while wearing the unit. He should not swim, shower, or
engage in rough sports while wearing the unit.

COMPETENCIES AND CRITERIA Introduction to Interventions-DPT 740
282
(d) Turn off all controls on the unit before removing electrodes. (e) Remove the unit at least one hour/day to engage in personal hygiene and to assess the level of
pain perceived without the unit. (5) Have the client keep a daily log of his use of the TENS apparatus and his perception of pain during
this time. (6) If the client is an inpatient, check or have the nursing staff check the skin under the electrodes 3
times a day for the first several days of round-the-clock treatment. (7) If the client is an outpatient, have him return once or twice a week for the first several weeks to
assess the benefit of the treatment. Different electrode placement and changes in voltage may result in greater pain relief.
(8) As the pain becomes controlled, attempt to wean the client off the device by decreasing the duration of treatment time.
*Note – Complete, comprehensive instruction of the client, family, and nursing staff is imperative if TENS is to be used to its maximum potential for pain relief. Units may be rented initially, and then they can be purchased by clients requiring long-term home programs.
*Note – TENS should be used in conjunction with an exercise or increasing activity program on both inpatient and outpatient basis. Concepts of behavior modification to alter pain behavior may be incorporated into a treatment program.
E. Implement changes in procedure based upon: (1) Response of the client:
(a) See above procedure with regard to skin irritation, burns, or inadequate improvement. (b) Inability of client to cooperate – example: immediate post-operative treatment
(2) Achievement of short and long-term goals – See procedure #24 F. Record results in SOAP format or other appropriate forms.
(1) Record pre- and post-treatment subjective assessments of pain. (2) Record pre- and post-treatment objective measurements of pain. (3) Record the pre- and post- treatment condition of skin in area treated. (4) Record treatment administered and instructions given to client. (5) Record assessment of client response/effectiveness of treatment. (6) Outline plan of action for further TENS treatments.
G. Interpret results of procedure. H. Prepare client for dismissal. I. Clean up area.

COMPETENCIES AND CRITERIA Introduction to Interventions-DPT 740
283
CRITERIA SHEET IONTOPHORESIS WITH THE PHORESOR STIMULATOR
1. Pre-Planning for Procedure: A. Identify the priority signs, symptoms, and conditions which make the procedure applicable:
(1) Inflammation (2) Pain (3) Myofascial trigger points
B. Identify rationale for choice of procedure: (1) Safety:
(a) Major contraindications include: allergic reactions or sensitivity to drugs applied, pacemaker, damaged or denuded skin, recent scar tissue, application to the temporal, orbital regions and thoracic areas
(b) After the electrode is filled with medications, remove air bubbles to prevent skin burns (c) Begin treatment with intensity set at zero, increase the intensity slowly (approximately .10
milliamperes every 2-3 seconds), and do not increase the intensity above 4.0 milliamperes (2) Economics:
(a) Initial cost of the Phoresor or other DC unit, then the cost of the medication and electrode for each patient
(b) Therapist time required for patient evaluation, treatment planning, equipment set up, and re-evaluation post treatment
(3) Condition of the client: (a) Client with acute inflammation such as tendonitis or bursitis (b) Client with acute pain from the above conditions (c) Client with active myofascial trigger point
(4) Duration of treatment: (a) Dependent on the medications used; Lidocaine and Dexamethasone, 20 minutes; lidocaine only,
10 minutes (5) Generate alternative treatments:
(a) High voltage galvanic stimulation (b) TENS (c) Cold
(6) Application of procedure to short and long term goals: (a) STGs:
1) Decrease report of pain or amount of pain medication by a specified amount, within a specified time frame.
2) Increase pain free range of motion by a specified amount, within a specified time frame. 3) Decrease swelling by a specified amount, within a specified time frame.
(b) LTG: 1) Return to prior functional level within a specified time frame.
Division of Physical Therapy
Emory University

COMPETENCIES AND CRITERIA Introduction to Interventions-DPT 740
284
2. Preparation of Physical Therapist: A. Review the procedure as necessary. B. Review the medical record if available. C. Interview the client:
(1) Obtain a history of the client including medications taken, allergies, and history of course of present illness.
(2) Perform evaluation. D. Determine treatment sequence and related positioning. E. Select and collect correct equipment:
(1) Phoresor unit with charged battery (2) Medication and 5cc syringe (3) Phoresor electrodes (4) Cotton and alcohol (5) Linen and towels
F. Secure the environment: (1) Pre-treatment preparation:
(a) Obtain a private area in which to examine the patient. (2) Safety of equipment:
(a) Check for frayed or broken wires.
3. Execute the Procedure: A. Follow the Interpersonal Relations and Teaching-Learning Criteria to establish rapport with the client. B. Sequential steps of the procedure:
(1) Have client remove clothing on or near the area to be treated. (2) Position and drape client comfortably. (3) Explain to the client it is normal to feel sensations of warmth and tingling, but if the sensations are
unbearable you need to be informed. (4) Examine the skin and cleanse with alcohol. (5) Place the active electrode over the trigger point or inflamed tissue. (6) Secure the dispersive electrode at least 4 finger widths from the active electrode. (7) Fill the syringe with either 3cc of lidocaine or 2cc lidocaine and 2cc dexamethasone depending on
the desired effects. (8) Inject medication into the active electrode at portal site. (9) Check the electrode for air bubbles, and remove the air bubbles through the portal site. (10) Set the time for 10 minutes for lidocaine only and 20 minutes for lidocaine and dexamethasone. (11) Slowly turn up the intensity (approximately 1 milliampere every 2-3 seconds) to 4 milliamperes. (12) If the client is unable to tolerate 4 milliamperes, maintain the intensity at the highest tolerable level
then re-check in 2-3 minutes to see if the full intensity can be tolerated. (13) Provide the client with a bell or some other means of contacting you. (14) Re-check the client mid-way through the treatment. (15) When the timer goes off, turn the intensity to zero, remove the electrodes and inspect the skin. (16) Re-assess the condition.
C. Implement changes in procedures based upon: (1) Response of client:
(a) Skin irritation (2) Achievement of short and long term goals
D. Record results in SOAP format or other appropriate forms:

COMPETENCIES AND CRITERIA Introduction to Interventions-DPT 740
285
(1) Record pre- and post-treatment subjective assessment. (2) Record all pre- and post-treatment objective measurements. (3) Record specific parameters of treatment administered (e.g. position, intensity, duration). (4) Record client's response to treatment. (5) Outline/modify treatment plan of initial evaluation.
E. Interpret results. F. Prepare client for dismissal. G. Clean up area.
(1) Return equipment. (2) Remove used linens.
References: Kahn J: Principles and Practice of Electrotherapy. Churchill Livingstone, NY, 1987. Cummings J: Iontophoresis in Nelson and Currier (Eds) Clinical Electrotherapy. Appleton and Lagne, Conn., 1987. Phoresor Model PM 600 Instruction Guide. Motion Control, Inc. 1290 West 2320 South, Suite A, Salt Lake City, Utah 84119.

COMPETENCIES AND CRITERIA Introduction to Interventions-DPT 740
286
CRITERIA SHEET HIGH-VOLTAGE PULSED STIMULATION (HVPS)
1. Pre-Planning for Procedure: A. Identify the priority signs, symptoms, and conditions which make the procedure applicable:
(1) Open wounds (2) Inflammation (3) Edema (4) Pain (5) Disuse atrophy (small muscles) (6) Decreased circulation (7) Loss of motor control (small muscles) (8) Decreased ROM (small muscles) (9) Protective muscle spasms
B. Identify the rationale for choice of procedure: (1) Safety:
(a) Contraindications – patients with cardiac pacemakers, over the carotid sinus area, over a pregnant uterus, over or near cancerous malignancy, trans-cerebrally
(b) Begin treatment with intensity set at zero, and avoid any sudden increases in intensity. (c) Avoid exposing the client directly to house current.
(2) Economics: (a) Variation in cost of equipment due to varying parameters (b) Inexpensive to operate (c) Therapist time – varies, but generally for patient assessment, treatment planning, set up,
reassessment, and documentation (d) Treatment duration and frequency is often increased initially, depending on goals.
(3) Condition of client: (a) Various orthopedic and neurologic, acute and chronic conditions are appropriate, but muscles
must be innervated for muscle stimulation. (b) Tissue damage (ulceration/pressure ulcer) from chronic venous stasis, peripheral arterial
insufficiency, diabetes mellitus, spinal cord injury, pressure, post-surgical wounds, friction and burns
(c) Edema/effusion from traumatic procedures, inflammation of joints/soft tissue (e.g. bursitis, tendonitis, rheumatoid arthritis), hemophilic joints, acute hematomas and various hand and foot injuries/surgeries
(d) Pain, both acute and chronic, from trauma, inflammation, surgery, tissue degeneration or impaired circulation (e.g. cervical or lumbar pain, TMJ dysfunction, cancer, arthritis, sprains, debridement, and phantom limb)
(e) Impaired joint mobility – shortening of connective tissue, shortening of muscles, joint pain/swelling, and protective muscle spasm
Division of Physical Therapy
Emory University

COMPETENCIES AND CRITERIA Introduction to Interventions-DPT 740
287
(f) Disuse atrophy/muscle re-education – from trauma, prolonged immobilization, joint degeneration, chronic inflammatory joint conditions, and CNS lesions
(4) Duration of treatment: Variable, see III. Execution of Procedure (5) Generative alternative treatments:
(a) Tissue damage: heat, cold, whirlpool, irradiation, interferential, NMES, debridement (b) Edema/effusion: pressure garment, intermittent air pump, air splints, positioning, massage,
active exercise, NMES, interferential stimulation, cold, heat (c) Pain: TENS, heat, cold, active exercise, interferential stimulation (d) Impaired joint mobility: PROM, heat, cold, LAMES, interferential, edema and pain treatment
listed above (e) Disuse atrophy: biofeedback, interferential, active exercise, NMES
(6) Application of procedure to STG and LTG (LTG and discharge goals are same here): (a) Tissue damage:
1) STG: decrease (by specified amount) the wound measurements, (concentric circles or depth), undermining, drainage or microorganism within a specified time frame/number of treatments
2) LTG: regain functional use of body part (e.g. full weight bearing, independent ambulation in home)
(b) Edema/effusion: 1) STG: decrease (specific amount) the volumetric displacement or circumferential
measurement of the body part within a specified time frame/number of treatments 2) LTG: regain functional use of body part involved (e.g. independent in self care activities
requiring use of the right hand) (c) Pain:
1) STG: decrease (specific amount) the patient's score on pain index or the amount of pain medication asked for within a specific time frame
2) LTG: regain functional use of body part involved (e.g. independent ambulation without assistive devices on all surfaces)
(d) Impaired joint mobility: 1) STG: increase (specific amount AROM at the right glenohumeral joint within a specific time
frame 2) LTG: independent in all self care activities requiring the use of the right shoulder
(e) Disuse atrophy: 1) STG: increase (specific amount) the manual muscle grade of the right quadriceps within a
specific time frame. 2) LTG: independent in ascending and descending stairs
2. Preparation of Physical Therapist: A. Review the procedure as necessary. B. Review the medical record. C. Interview client.
(1) Obtain a history of client's medical problems including presence of coronary disease or pacemaker, description of present symptoms (motor and sensory), and any relevant information related to the client's injury and recovery.
(2) If a female client, determine if there is any chance that she may be pregnant. D. Determine assessment/treatment sequence,

COMPETENCIES AND CRITERIA Introduction to Interventions-DPT 740
288
E. Select and collect correct equipment: (1) Current source (2) Electrodes and leads (3) Straps to secure electrodes (4) Coupling agent – H20 or gel (5) Rubber or plastic mat (6) Towels, linens, gown
F. Secure the environment: (1) Pre-treatment preparation:
(a) Secure a private, quiet area to examine and treat client. (b) Soak the electrode in warm water. (c) Turn all dials to zero. (d) Allow machine to warm up. (e) Attach the leads to the electrodes and the machine.
(2) Safety of equipment: (a) Check for frayed or broken wire. (b) Check for current certification of inspection of equipment. (c) Check to see that client is not touching the current course, water or gas pipe, or a wet floor.
3. Execute the Procedure: A. Follow the Interpersonal Relations and Teaching-Learning Criteria to establish rapport with client. B. Sequential steps of procedure:
(1) Have client remove all metal and clothing on or near the area to be treated. (2) Position client and drape as necessary. (3) Explain the treatment to the client in understandable terms:
(a) Describe the sensations he will experience. (b) Instruct the client to report any localized discomfort. (c) Instruct the client not to move or touch any of the equipment during treatment.
(4) Place plastic or rubber mat under area to be treated if necessary. Put the towel between the mat and the client.
(5) Inspect the skin area to be treated. If any abrasions are in the area, cover them with adhesive tape. (6) Assess skin sensation. (7) Select appropriate electrodes. (8) Apply electrode over appropriate skin locations. (9) Secure the electrode to the patient. (10) Gradually increase intensity to achieve a desired response/muscle contraction. Do not exceed the
clients' tolerance. As skin resistance decreases, the current will flow readily. (11) Note sensation reported by the client. (12) Gradually decrease intensity to zero. (13) Remove electrodes. (14) Clean and inspect the skin. (15) If client complains of itching or burning, apply cream. (16) Instruct the client to dress. (17) Close the interview.
C. Implement changes in procedure based upon: (1) Response of the client:
(a) Report of discomfort under electrodes – electrode contacts should be checked and/or stimulating parameter modified (placement, size and position of electrodes and/or wave form,
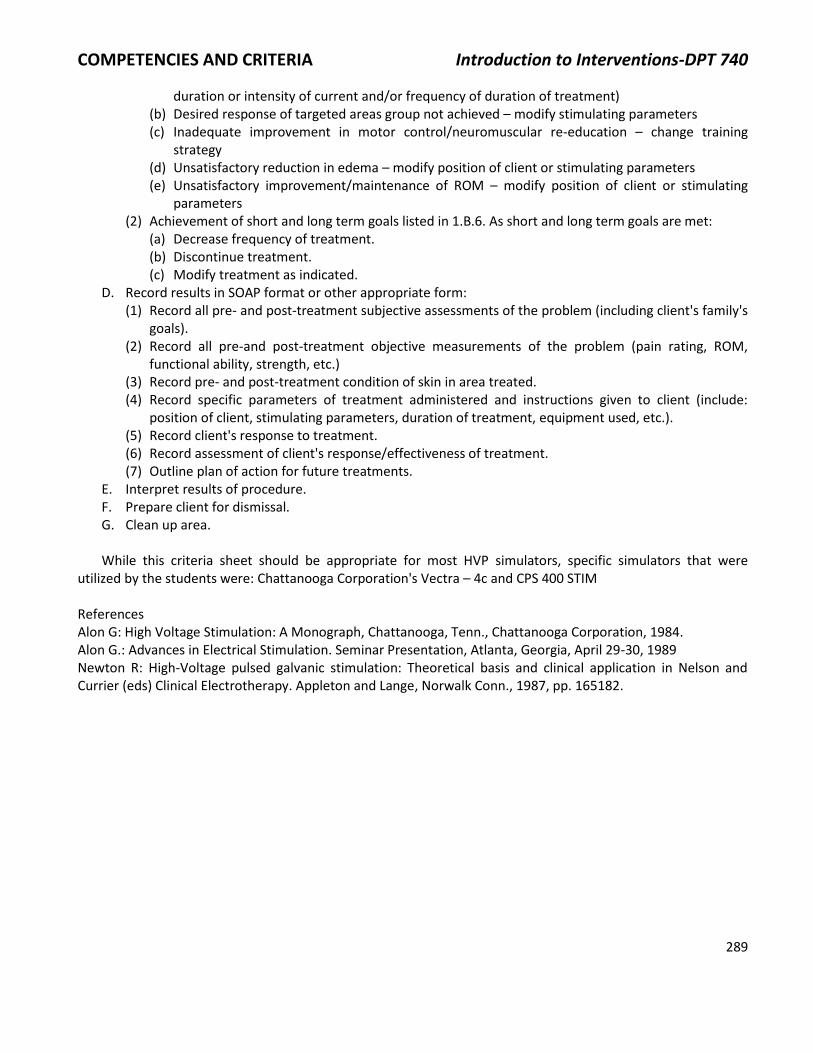
COMPETENCIES AND CRITERIA Introduction to Interventions-DPT 740
289
duration or intensity of current and/or frequency of duration of treatment) (b) Desired response of targeted areas group not achieved – modify stimulating parameters (c) Inadequate improvement in motor control/neuromuscular re-education – change training
strategy (d) Unsatisfactory reduction in edema – modify position of client or stimulating parameters (e) Unsatisfactory improvement/maintenance of ROM – modify position of client or stimulating
parameters (2) Achievement of short and long term goals listed in 1.B.6. As short and long term goals are met:
(a) Decrease frequency of treatment. (b) Discontinue treatment. (c) Modify treatment as indicated.
D. Record results in SOAP format or other appropriate form: (1) Record all pre- and post-treatment subjective assessments of the problem (including client's family's
goals). (2) Record all pre-and post-treatment objective measurements of the problem (pain rating, ROM,
functional ability, strength, etc.) (3) Record pre- and post-treatment condition of skin in area treated. (4) Record specific parameters of treatment administered and instructions given to client (include:
position of client, stimulating parameters, duration of treatment, equipment used, etc.). (5) Record client's response to treatment. (6) Record assessment of client's response/effectiveness of treatment. (7) Outline plan of action for future treatments.
E. Interpret results of procedure. F. Prepare client for dismissal. G. Clean up area. While this criteria sheet should be appropriate for most HVP simulators, specific simulators that were
utilized by the students were: Chattanooga Corporation's Vectra – 4c and CPS 400 STIM
References Alon G: High Voltage Stimulation: A Monograph, Chattanooga, Tenn., Chattanooga Corporation, 1984. Alon G.: Advances in Electrical Stimulation. Seminar Presentation, Atlanta, Georgia, April 29-30, 1989 Newton R: High-Voltage pulsed galvanic stimulation: Theoretical basis and clinical application in Nelson and Currier (eds) Clinical Electrotherapy. Appleton and Lange, Norwalk Conn., 1987, pp. 165182.

COMPETENCIES AND CRITERIA Introduction to Interventions-DPT 740
290
CRITERIA SHEET NEUROMUSCULAR FUNCTIONAL ELECTRICAL STIMULATION (NFES)
1. Pre-Planning for Procedure: A. Identify the priority signs, symptoms, and conditions which make the procedure applicable:
(1) Disuse atrophy (innervated) during immobilization (2) Muscle flaccidity due to loss of motor control (3) Edema (4) Loss of ROM (5) Need for orthotic device (6) Loss of muscle endurance (7) Spasticity
B. Identify the rationale for choice of procedure: (1) Safety – Major contraindications for the use of NFES includes:
(a) Demand pacemakers; arrhythmia or cardiac conduction disturbance (b) Unreliable in use of unit or maintenance (c) Avoid electrode placement over open wound or scar (d) Presence of active hemorrhage (e) Patients with phlebitis (f) At spontaneous fracture site (g) Increased sensitivity to electrodes, gel, or tape (h) Avoid jamming of a joint (i) De-nervated muscles
(2) Economics: (a) Units may be rented or purchased if needed for long term. (b) Significant amount of therapist time is required for appropriate client evaluation, treatment,
and education in the use of NFES. (3) Condition of client – Various orthopedic and neurologic acute and chronic conditions but muscles
must be innervated: (a) Arthroscopy/arthrotomy (ligament repair/reconstruction, patella realignment surgeries, muscle
transfers, lateral retinacular releases, meniscectomies, synovectomies (b) Limb fractures (c) Joint replacement (d) Arthritis (e) Ligamentous sprains (f) Patello-femoral malalignment, chondromalacia patella, subluxing or dislocating patella (g) Shoulder subluxation (h) Potential return of motor control
(4) Duration of the treatment: (a) Variable – see 3: Execution of Procedure
Division of Physical Therapy
Emory University

COMPETENCIES AND CRITERIA Introduction to Interventions-DPT 740
291
(5) Generate alternative treatments: (a) Disuse atrophy and flaccidity – biofeedback, therapeutic exercise, interferential, HVGS (b) Edema – pressure garment, intermittent air pump, air splints, positioning, massage, active
exercise, HVGS, interferential stimulation, heat, cold (c) Loss of AROM, PROM – CPM, HVGS, interferential
(6) Application of procedure to STG and LTG (LTG and Discharge goals are same here): (a) Disuse atrophy, flaccidity
1) STGs: increase muscle endurance, decrease need for orthotic device, increase frequency or intensity of voluntary muscle contraction (specific measure and time frame) for all goals
2) LTG: regain functional use of body part (e.g. independent ambulation 200 yards without orthotic device)
(b) Edema: 1) STG: decrease (specified) amount of edema within specific time frame 2) LTG: regain functional of body part involved
(c) Loss of ROM: 1) STG: increase (specific amount) passive and active ROM within specific time/number of
treatments 2) LTG: regain function of body part involved
2. Preparation of Physical Therapist: A. Review procedure as necessary. B. Review medical record. C. Interview client.
(1) Obtain a history of the client's medical problems including presence of coronary disease or pacemaker, description of present symptoms (motor and sensory), and any relevant information related to the clients' injury and recovery.
D. Determine assessment and treatment sequence and related position, e.g. supine, with involved knee supported at 30°.
E. Select and collect correct equipment: (1) Current source (2) Electrodes and leads (3) Tape to secure electrodes, when required (4) Coupling agent – gel, when necessary
F. Secure the environment: (1) Safety of equipment:
(a) Check for frayed or broken leads. (b) Intensity control should be set on 0.
3. Execute the Procedure: A. Follow the Interpersonal Relations and Teaching-Learning Criteria to establish rapport with client. B. Sequential steps of procedure:
(1) Have client remove all metal and clothing on or near the area to be treated. (2) Position the client and expose area to be treated. (3) Explain the treatment to the client in understandable terms.
(a) Describe the sensations he will experience. (b) Instruct the client to report other sensations experienced.
(4) Inspect the skin area to be treated. If abrasions are in the area, cover them with adhesive tape. (5) Assess skin sensation. (6) Select appropriate electrodes.

COMPETENCIES AND CRITERIA Introduction to Interventions-DPT 740
292
(7) Apply electrodes over appropriate skin locations and secure. (8) Set the dial at the desired setting for the rise and fall, rate, duty cycle, reciprocal/synchronous, and
treatment time. (9) Gradually increase intensity to achieve a desired muscle contraction. Do not exceed the client's
tolerance. As skin resistance decreases, the current will flow readily. (10) Note sensation reported by the client. (11) At end of treatment time slowly decrease intensity to zero. (12) Remove electrodes. (13) Clean and inspect the skin. (14) If client complains of itching or burning, apply cream.
C. Implement changes in procedure based upon: (1) Response of the client:
(a) Report of discomfort under electrodes – electrode contacts should be checked and/or stimulating parameter modified (placement, size and position of electrodes; and/or rise/fall, duty cycle, output and rate or intensity of current and/or frequency or duration of treatment)
(b) Desired contraction of targeted muscle/muscle group not achieved – modify stimulating parameters
(c) Inadequate improvement in motor control/neuromuscular re-education – change training strategy
(d) Unsatisfactory reduction in edema – modify position of client or stimulating parameters (e) Unsatisfactory improvement/maintenance of ROM – modify position of client or stimulating
parameters (2) Achievement of short and long term goals listed in 1.B.6. As short and long term goals are met:
(a) Decrease frequency of treatment (b) Modify treatment as indicated (c) Discontinue treatment
D. Record results in SOAP format or other appropriate form: (1) Record all pre- and post-treatment subjective assessments of the problem. (2) Record all pre- and post-treatment objective measurements of the problem (circumference or
volumetric limb measurements, ROM, functional ability, strength, etc.). (3) Record pre- and post-treatment condition of skin in area treated. (4) Record specific parameters of treatment administered and instructions given to client (include:
position of client, stimulating parameters, duration of treatment, equipment used, etc.). (5) Record client's response to treatment. (6) Outline plan of action for future treatments.
E. Interpret results of procedure. F. Prepare client for dismissal. G. Clean up area.
*Note – While this criteria sheet should be appropriate for most battery operated neuromuscular stimulators, specific stimulators that were utilized by the students were: HiVolt and Chattanooga's corporation's Vecta -4c and CPS ST1M and Empis 300 PV NEMS / Hi Volt.
Reference: Benton L, Baker L, Bowman B., Walters R: Functional Electrical Stimulation: A Practical Guide, Rancho Los 'Amigos Rehabilitation Engineering Center, Downey. Calif, 2nd edition, 1981.

COMPETENCIES AND CRITERIA Introduction to Interventions-DPT 740
293
Baker L, Parker K, Sanderson 0: Neuromuscular electrical stimulation for the head injured patient. Physical Therapy 63: 25-32, 1988. Baker L, Parker K: Neuromuscular electrical stimulation of the muscles surrounding the shoulder. Physical Therapy 66: 1930-1937. Baker L. Clinical uses of neuromuscular electrical stimulation in Nelson and Currier (Eds) Clinical Electrotherapy. Apelton and Lange, Norwalk Conn, 1987, pp. 115-140.

COMPETENCIES AND CRITERIA Introduction to Interventions-DPT 740
294
CRITERIA SHEET ELECTRICAL STIMULATION (HIGH/LOW VOLT D. C., FARADIC & SINUSOIDAL A.C.)
1. Pre-Planning for Procedure: A. Identify the priority signs, symptoms, and conditions which make the procedure applicable:
(1) Pain (2) Inflammation (3) Decreased mobility (4) Edema (5) Contractures (6) Muscle atrophy (7) Paresis (8) Open wounds
B. Identify the rationale for choice of procedure: (1) Safety:
(a) Major contraindications for treatment with electrical stimulation are the presence of a cardiac pacemaker and pregnancy. Care must be taken during the treatment to avoid shocking the client. The therapist must avoid any sudden increases in the intensity of the applied stimulus as well as exposing the client directly to house current through the use of faulty equipment.
(2) Economics: (a) There is a wide variation in cost of equipment. (b) Equipment is inexpensive to operate. (c) Therapist time varies with each treatment. (d) Frequent treatment is often required to achieve/maintain goals of treatment.
(3) Condition of client: (a) For muscle re-education, muscle must be innervated. (b) For reduction of edema, preventing contractures, or retarding atrophy, the muscles treated do
not need to be innervated. (4) Duration of treatment:
(a) Duration will vary with the number of muscles being stimulated and the goals of treatment. (5) Generate other possible treatments:
(a) Pain – SWD, MWD, US, hot pack, infrared, ice, graded movement (b) Inflammation – ice, SWD, MWD (c) Deceased mobility:
1) Decrease edema – pressure garment/pump, positioning, active exercise, massage 2) Prevent contractures – ROM exercises, splints, positioning, graded movements 3) Delay atrophy – active exercise (disuse atrophy only) 4) Promote muscle re-education biofeedback, therapeutic exercises
(6) Application of procedure to short (STG) and long term goals (LTG): (a) Pain:
Division of Physical Therapy
Emory University

COMPETENCIES AND CRITERIA Introduction to Interventions-DPT 740
295
1) STGs: Decreased report of pain, decreased intake of pain medication, increased activity 2) LTGs: Permanent relief or reduction in pain, decreased pain medication use, increased
activity (recreational and vocational) (b) Inflammation:
1) STGs: Increase nutrition circulation to area to be treated, decrease edema 2) LTGs: Promote post-trauma tissue healing and re-growth
(c) Decreased mobility: 1) Edema:
(a) STG: Decreased edema (b) LTG: Improve nutrition and healing of body part being treated
2) Contractures: (a) STG: Prevent contractures and improve ROM (b) LTG: Maintain functional ROM, improve function
3) Muscle atrophy: (a) STG: Retard muscle atrophy, maintain muscle in viable state to permit re-innervation (b) LTG: Functional recovery/re-innervation of muscle(s) being treated
4) Muscle re-education: (a) STG: Improved voluntary movement/control (b) LTG: Improved functional movement of body part treated
2. Preparation of Physical Therapist: A. Review the procedure as necessary. B. Review the medical record. C. Interview the client.
(1) Obtain a history of the client's medical problems including presence of coronary disease or pacemaker, description of present symptoms (motor and sensory), and any relevant information related to the client's injury and recovery.
(2) If a female client, determine if there is any chance that she may be pregnant. D. Determine assessment and treatment sequence and positioning. E. Select and collect correct equipment:
(1) Current source (2) Electrodes and leads (3) Straps to secure electrodes (4) Coupling agent – H2O or gel (5) Rubber or plastic mat (6) Towels, linens, patient gown
F. Secure the environment: (1) Pre-treatment preparation:
(a) Secure a private, quiet area to examine and treat client. (b) Soak the electrode in warm water. (c) Turn all dials to zero. (d) Allow machine to warm up. (e) Attach the leads to the electrodes and the machine.
(2) Safety of equipment: (a) Check for frayed or broken wire. (b) Check for current certification of inspection of equipment. (c) Check to see that client is not touching the current source, water or gas pipe, or a wet floor.

COMPETENCIES AND CRITERIA Introduction to Interventions-DPT 740
296
3. Execute the Procedure: A. Follow the Interpersonal Relations and Teaching-Learning Criteria to establish rapport with client. B. Sequential steps of procedure:
(1) Have client remove all metal and clothing on or near the area to be treated. (2) Position the client and drape as necessary. (3) Explain the treatment to the client in understandable terms.
(a) Describe the sensations he will experience. (b) Instruct the client to report any localized discomfort. (c) Instruct the client not to move or touch any of the equipment during treatment.
(4) Place plastic or rubber mat under area to be treated if necessary. Put the towel between the mat and the client.
(5) Inspect the skin area to be treated. If any abrasions are in the area, cover them with adhesive tape. (6) Assess skin sensation. (7) Select appropriate electrodes. (8) Apply and secure electrode over appropriate skin locations. (9) Set the parameters at the desired settings for the type of current, pulse, and surge. (10) Gradually increase intensity to achieve a desired muscle contraction. Do not exceed the client's
tolerance. As skin resistance decreases, the current will flow readily. (11) Note sensation reported by the client. (12) At end of treatment period, slowly decrease intensity to zero, reduce pulse rate and surge, and turn
off switch. (13) Remove electrodes. (14) Dry and inspect the skin. (15) If client complains of itching or burning, apply cream.
C. Implement changes in procedure based upon: (1) Response of the client:
(a) Report of discomfort under electrodes – electrode contacts should be checked and/or stimulating parameters modified (placement, size and position of electrodes; and/or wave form, duration or intensity of current; and/or frequency or duration of treatment)
(b) Desired contraction of targeted muscle/muscle group not achieved – modify stimulating parameters
(c) Inadequate improvement in motor control/neuromuscular re-education – change training strategy
(d) Unsatisfactory reduction in edema – modify position of client or stimulating parameters (e) Unsatisfactory improvement/maintenance of ROM – modify position of client or stimulating
parameters (2) Achievement of short and long term goals listed in 1.B.6. As short and long term goals are met:
(a) Decrease frequency of treatment (b) Modify treatment as indicated (c) Discontinue treatment
D. Record results in SOAP format or other appropriate form. (1) Record all pre- and post-treatment subjective assessments of the problem. (2) Record all pre- and post-treatment objective measurements of the problem (pain rating, ROM,
functional ability, strength, etc.). (3) Record pre- and post-treatment condition of skin in area treated. (4) Record specific parameters of treatment administered and instructions given to client (include:
position of client, stimulating parameters, duration of treatment, equipment used, etc.).

COMPETENCIES AND CRITERIA Introduction to Interventions-DPT 740
297
(5) Record client's response to treatment. (6) Record assessment of client's response/effectiveness of treatment. (7) Outline plan of action for future treatment.
E. Interpret results of procedure. F. Prepare client for dismissal. G. Clean up area.
* Though TENS falls under the heading of electrical stimulation, due to the specificity and sophistication of the treatment and equipment, a separate criteria sheet has been developed.

COMPETENCIES AND CRITERIA Introduction to Interventions-DPT 740
298
INFORMATION SHEET ULTRAVIOLET
Description of Modality
Ultraviolet is a modality that emits very short electromagnetic rays as a consequence of heating. Length of
ray is 190-390 mm. Penetration is 0.1-1.1 mm. Mercury is vaporized in a quartz container by intense heat.
Production of Ultraviolet Rays
Ultraviolet rays are created in a burner in the reflector part of the machine. The burner consists of an airless
quartz tube containing a small amount of liquid mercury as well as argon gas. Electrodes are located at both
ends of this quartz tube. When the switch is turned on, current is passing along each of these electrodes
creating a potential difference. Because the current cannot flow until the argon gas has been ionized, the starter
switch must be activated. Activation of this switch hastens the argon ionization. When the argon is sufficiently
ionized, current begins to flow. The flow of current is reflected by the appearance of a greenish blue light. The
current flowing through the tube causes increased ionization. As ionization proceeds the positively-charged ions
move toward the cathode (negative electrode); the negatively charged, toward the anode (positive electrode).
This ionic movement causes the particles to collide, liberating electrons that migrate toward the anode. From
the anode the electrons travel to the cathode where the ion and electron reunite. This reunification neutralizes
the gas. As a consequence of the neutralization, energy is liberated in the form of electromagnetic light wave.
Quantity of Ultraviolet absorption when the waves encounter a new medium they are subject to refraction,
reflection, and absorption. The proportion of waves reflected, refracted, or absorbed depends on the medium
encountered, the wavelength, and the angle at which the rays strike the surface. To have a physiologic effect,
waves must be absorbed (Law of Gratthus). Waves are maximally absorbed when they strike the new medium at
a 90° angle. Absorption is maximal because the proportion of rays absorbed varies directly with the magnitude
of the cosine of the angle of incidence (Cosine Law). At a ninety degree angle the cosine is maximal and so also is
the absorption.
Intensity of the Ultraviolet
The intensity of rays striking the surface varies inversely with the square of the distance from the source of
the rays.
I=L/d2 Therefore, the further the distance, the less the intensity.
Division of Physical Therapy
Emory University

COMPETENCIES AND CRITERIA Introduction to Interventions-DPT 740
299
Unique Thermal Effects
1. Ultraviolet irradiation causes desquamation of the superficial epidermis.
2. The consequence of desquamation is epidermal thickening. The interaction of these two phenomena
necessitates stronger doses of irradiation to repeat a constant reaction.
3. Ultraviolet irradiation results in pigmentation, a consequence of the conversion of tryosine to melanin.
4. Very short ultraviolet rays (2900° A) are abiotic (i.e. lethal to surface bacteria).
5. Ultraviolet irradiation of an extensive area with rays of 2700 to 3100° A results in the formation of vitamin D,
which promotes the absorption of calcium and phosphorous from the intestine. Extensive irradiation with
waves of 2900° A lowers the threshold of reticuloendothelial cells, which indirectly increases the resistance
to superficial bacterial invasion. This effect is referred to as the esaphylactic effect.
Precautions
Certain substances and procedures may increase a client's sensitivity to ultraviolet and result in an
unexpectedly severe reaction to the dose. Sensitizers include:
1. Coal tar ointment application
2. Infra red irradiation preceding ultraviolet
3. Foods: strawberries, eggs, lobster
Other precautions include:
1. Conjunctivitis – latent photophobia and tearing: avoid by wearing protective glasses
2. Overdose – manifested by the systematic symptoms of headache, vomiting, and fever in conjunction with
the sign of red, tender, and/or blistered skin
3. Electric shock – may occur if the client touches the generator when circuit is not complete
4. Burns – may occur if the client/therapist touches the hot areas of the burner

COMPETENCIES AND CRITERIA Introduction to Interventions-DPT 740
300
5. Chill – may occur if the client is exposed to a draft
6. New skin or scars of genitalia – these areas must be protected against irradiation by draping or toweling to
protect against overdose
7. Application to clients with impaired cognitive processes: Children, elderly, psychotic, or mentally challenged
clients require special management, e.g., another person to ensure that they will not move during the
treatment
Contraindications
1. Extremely sensitive skin/photosensitive people/existing sunburn
2. Previous adverse systemic effects from ultraviolet irradiations: headache, nausea, vomiting, and fever
3. Drug therapy: gold; sulphur, insulin, thyroid extract, quinine, analine dyes, tetracycline, and greensoap
4. Con-commitant diseases: Acute pulmonary tuberculosis, acute exema, acute dermatitis, renal or hepatic
insufficiency, diabetes, advanced heart disease, arteriosclerosis
5. Fever of any origin
6. Recent x-ray therapy in same area
Calculation of Dosage
Dosage is determined by the magnitude of the erythemal reaction desired.
1. Initial dosage: Determine the erythemal reaction desired initially. A minimal erythemal dosage is usually the
dosage of choice.
A. Sub-erythemal – no visible reaction in 4-8 hours (S.E.D.)
B. Erythema – slightly red; 4-8 hours; fades in 24 hours (M.E.D.); no peeling, may itch
C. 1° erythema – moderately red; still evident at 24 hours, slight peeling, some itching and burning; similar
to sunburn
D. 2° erythema – red and edematous with marked peeling of epidermis; fades in 2 to 3 days
E. 3° erythema – blisters appear after 2 hours; fades after one week

COMPETENCIES AND CRITERIA Introduction to Interventions-DPT 740
301
2. Changes/adjustments in dosage:
A. Repeat an erythemal reaction: Determine the dosage required to repeat the erythemal reaction initially
desired (only after the reaction has faded):
(1) Repeat a minimal erythemal dose degree erythema 125% of sub-erythemal dosage.
(2) Repeat at 1st degree erythema 150% of M.E.D.
(3) Repeat a 2nd degree erythema 175% of M.E.D.
(4) Repeat a 3rd degree erythema 200% of M.E.D.
B. Peeling/change in treatment regularity: With the onset of peeling dosage should return to initial dosage.
After a two-day lapse in treatment, the most recent dose should be repeated.
C. Adjustment of distance: By reducing the distance from the lamp source, treatment time may be
decreased. This is desirable in long standing treatment.
New dose = old dose x new distance2 = 15 X 20”2
30"2
x = 15 seconds x 400
900
=6.6 seconds
Frequency of Irradiation
First-degree erythemal reactions are usually administered every other day. This schedule permits the
reaction to fade and avoids possible overdose.
1. Biotic Irradiation – Technique of exposure:

COMPETENCIES AND CRITERIA Introduction to Interventions-DPT 740
302
A. Boundaries of Exposure:
Once all lesions have been identified, the pattern of irradiation should be planned. If lesions are diffuse
or spread out, as many as six exposures may be required to give optimum benefit. To prevent overdose,
anatomic landmarks are used to define the boundaries of each area exposed.
Four Exposure Technique (usually for Psoriasis):
(1) Supine: Dual exposure:
(a) First exposure: This exposure extends from the head to anterior superior iliac spines/umbilicus.
In this position, the arms are internally rotated and the hands are pronated by the side of the
client. In this “exposure” the eyes are covered by damp cotton to avoid conjunctivitis, and, in
women, the nipples are covered in a similar manner.
(b) Second exposure: The previously exposed area is covered to the ASIS or umbilicus and the
unexposed section of the body is uncovered and subsequently irradiated.
(2) Prone:
(a) First exposure: Extends from the head to the iliac crests. The arms are positioned externally,
rotated, and supinated.
(b) Second exposure: The previously exposed area is covered to the boundary described and the
lower half of the body subsequently is exposed.
2. Abiotic Irradiation – This type of irradiation is used for its lethal effects on bacteria in the treatment of
wounds, particularly decubitis:
A. Types of lamps – “Spot Quartz":
(1) Air cooled mercury vapor lamp
(2) Kromayer lamp
B. Preparation of equipment:
(1) These lamps usually require a five-minute warm up prior to application. The client is physically
prepared for this type of irradiation by using aseptic technique in cleansing the lesion with soap and
water. (Crust should be removed, scabs should stay). The skin is then dried. The skin around the
wound is protected by sterile gauze and often further protected by covering the unexposed area

COMPETENCIES AND CRITERIA Introduction to Interventions-DPT 740
303
with a thick sheet of paper. This paper has a hole in the center, which allows for lesion exposure.
The part is then comfortably positioned. The eyes are protected with goggles and the client is
emotionally prepared to expect an erythemal reaction.
(2) The Kromayer lamp is then centered directly over the lesion, about 1 – 1 ½ inches above it and
perpendicular to the lesion. The dosage is determined by the M.E.D.
3. Method for Acne:
A. Usually one exposure, taking precaution to protect the eyes and nose from overdose. Drape as
appropriate, usually at the axilla.
B. Increase by ½ M.E.D. to 1 M.E.D. to produce peeling. Method of increasing dosage depends on
frequency of treatment.
Maintenance of Equipment:
1. Never touch or jar the burner.
2. Clean lamp once a week with soft cloth and ethyl alcohol.
Watkins: A manual of electrotherapy. Phila., Lea and Febiger, 1965.

COMPETENCIES AND CRITERIA Introduction to Interventions-DPT 740
304
CRITERIA SHEET NERVE CONDUCTION
1. Pre-Planning for Procedure: A. Identify the priority signs, symptoms, and conditions which make the procedure applicable:
(1) Pain (2) Hyperesthesia (3) Paresthesia (4) Weakness (5) Localization of peripheral nerve injuries (6) Suspect demyelination
B. Identify the rationale for choice of procedure:
(1) Safety: (a) Care should be taken to avoid evoking pain from pressure with the metal contacts used to
deliver the current. (2) Economics:
(a) Cost/availability of equipment (b) Therapist time
(3) Condition of patient: (a) Client needs only to remain still during the procedure.
(4) Duration of procedure: (a) 30-45 minutes
(5) Other possible alternative procedures: (a) Electromyogram (EMG) (b) Strength-duration curve (c) Galvanic twitch-tetanus ratio (d) Reaction of degeneration test (e) Manual muscle testing
(6) Application of procedure to short and long term goals: (a) Evaluate medical and surgical management of the client (b) Therapeutic goals (c) To evaluate the progression or regression of a disease or injury
2. Preparation of Physical Therapist: A. Review the procedure as necessary. B. Review the medical record. C. Interview the client.
(1) Obtain any additional information that you think may be relevant in helping you to localize the lesion. Needed information may include the distribution, extent, progression, duration, and/or nature of the client's problem.
Division of Physical Therapy
Emory University

COMPETENCIES AND CRITERIA Introduction to Interventions-DPT 740
305
D. Determine assessment/treatment sequence and related positioning, etc. E. Select and collect correct equipment:
(1) Appropriate materials for positioning and draping including plinth, gowns, towels, pillows, sheets, etc.
(2) NCV recording system (these systems are commercially available and used for both electromyography and NCV measurements)
(3) Conducting gel or paste (4) Alcohol wipes or gauze and alcohol (5) Film (if camera is available)
F. Secure the environment: (1) Pre-treatment preparation:
(a) Turn on equipment. (b) Switch to "Cond. time" mode on stimulation panel. (c) Be certain stimulator intensity is turned down to 0. (d) Select pulse duration "0.1 msec" (probably most appropriate). (e) Select rate of stimulation at l/sec. (f) Select polarity to normal. (g) Be certain stimulator is turned on at the panel. (h) Select sweep speed, probably “10msec/div", though slower sweep may be indicated if
conduction is severely delayed. (i) Position CRO (EMG Screen) tracing in the upper of the screen. Use "position" control knob. (j) If recording system has a camera, adjust the camera into proper position and plug into
synchronizing "jack". (k) Be sure 60 cycle filter is "on". (l) Position the EMG recording plug in unit "on the movable arm". (m) Be certain there is sufficient film in the camera (if available) for all recordings to be taken.
(2) Safety of equipment: (a) Check for frayed or broken wires or plugs. (b) Check for current inspection sticker.
3. Execute the Procedure: A. Follow the Interpersonal Relations and Teaching-Learning Criteria to establish rapport with client. B. Sequential steps of procedure:
(1) Explain the procedure to the client. (a) Indicate the feeling that the client will have when stimulated (i.e. "a pulsing, tingling sensation");
use "impulse" rather than "shock". (b) Position the client and ensure proper draping and comfort. (c) Clean the areas to be tested with alcohol. (d) Apply electrode paste to each recording electrode. (e) Place the recording electrodes over the muscle belly or nerve to be sampled. Attach the ground
electrode in the vicinity of the recording electrodes in any area where good skin contact can be made.
(f) Insert lead from ground recording and ground electrodes into appropriate jack on movable arm. (g) Apply electrode paste to the stimulator tips. (h) Determine cathode (-) and anode (+) of the stimulator; use the cathode for reference point in
stimulating. (i) Finally, assure the client and yourself as to emotional status, and tell the client the procedure
may be terminated if so desired.

COMPETENCIES AND CRITERIA Introduction to Interventions-DPT 740
306
(2) Carry out Procedure (Example below is for median nerve NCV): (a) Attach recording electrodes (with electrode paste applied) to the muscle belly of the thenar
eminence (at approximately motor-point; see motor point chart). (b) Be certain electrodes are secured snugly with tape. (c) Attach ground electrode to the dorsum of the hand with rubber strapping, again be certain the
electrode fits snugly. (d) Determine points of stimulation at elbow and wrist.
1) Elbow – The median nerve lies medial to the brachial artery in the cubital fossa. Brachial artery is just medial to the biceps tendon.
2) Wrist – The median nerve lies deep to the palmaris longus; therefore, use this muscle as a landmark.
(e) Lights will have to be dimmed with an area light only on the client so that the EMG screen can be photographed.
(f) Apply cathode of stimulator distally and anode proximally along the median nerve at the elbow. Use electrode paste and apply firm pressure.
(g) Turn up intensity of stimulator until it is felt by client and a potential is seen on the EMG screen. Move stimulator slightly both medial-lateral and proximal-distal until maximum potential is seen on the screen. Let the client get used to the feeling. If the potential is satisfactory and not uncomfortable for the client, quickly turn up the intensity to a supra-maximal value. Take a picture. Turn the intensity down to zero. Remove the stimulator, and mark the cathode stimulation point.
(h) If the impulse is too painful for the client and/or a proper recording is not obtained, you can change the position of the ground electrode and/or move the stimulator slightly to a site that is more comfortable and gives a better record. When you move the electrode you must clean the area with alcohol before applying it again. Note: In taking a picture this can be done by the examiner using a shutter-release cable or it can be done by an auxiliary person.
(i) After positioning the EMG tracing further down on the screen so the two records do not overlap. Repeat steps f. and g. at the wrist.
(j) Remove the picture from the camera and pull off the backing according to specific instructions for that camera.
(k) Measure conduction distance in cm. from elbow cathode stimulating point to wrist cathode stimulating point, and mark them on the back of the photo.
(l) Using calipers or draftsmen's dividers, determine the latencies or the two potentials referring to calibration markings on the photograph.
(m) Mark the latencies on the back of the photo and calculate NCV. (n) Determine if it is appropriate to repeat the procedure for other nerves.
*Note – The palmaris longus muscle is absent in a certain percentage of the population. If this muscle is absent, use the midpoint of volar surface of wrist between radial and ulnar styloids.
(3) Termination of Procedure: (a) Tell the client the procedure is concluded. (b) Remove electrodes and clean areas. (c) Turn off the equipment. (d) Inquire into the feelings of client and answer questions appropriately using professional
discretion in answering. (e) Dismiss the client.

COMPETENCIES AND CRITERIA Introduction to Interventions-DPT 740
307
(f) Clean electrodes with cotton or gauze and store in safe place. (g) Return equipment to specified place.
C. Implement changes in procedure based upon: (1) Response of the client:
(a) If unable to record compound muscle action potential on screen: 1) Use slower sweep speed 2) Use longer pulse duration 3) Modify recording and/or stimulating sites (improve skin preparation or change sites)
(b) If client is unable to tolerate supra-maximal stimulation: 1) Modify recording and/or stimulating sites (improve skin preparation or change sites) 2) Help client to identify and allay fear or anxiety
D. Record results in SOAP format or other appropriate forms. (1) Record both observed and "normal" NCV measurements in client's medical record. (2) Record the client's response to the procedure.
E. Interpret results of procedure. F. Prepare client for dismissal. G. Clean the area.
COMPETENCIES AND CRITERIA Introduction to Interventions-DPT 740
308
CRITERIA SHEET RELAXATION TECHNIQUES (PNF)
1. Pre-Planning for Procedure: A. Identify the priority signs, symptoms, and conditions which make the procedure applicable:
(1) Adaptive shortening of muscle (2) When client has ability to perform voluntary contractions
B. Identify the rationale for choice of procedure:
(1) Safety: (a) If performed in presence of diminished or absent sensation, manual palpation must be used to
judge starting position. (b) Caution should be taken not to increase available muscle length beyond pain tolerance of client
in order to avoid muscle soreness and splinting. (2) Economics:
(a) Inexpensive (3) Condition of patient:
(a) Patient must have some degree of voluntary control of muscles. (b) Patient must be able to understand simple commands and carry out simple procedures such as
"push down". (c) This can be used in presence of pain and diminished sensation.
(4) Duration of treatment: (a) Relaxation technique may be repeated several times until therapist feels a plateau has been
reached. An increase of 10°-15° is reasonable for one treatment. (b) The newly acquired range should be utilized in a functional activity. (c) Relaxation techniques should be sequenced with other treatment.
(5) Generate other possible alternative treatments: (a) Passive exercise
(6) Application of procedure to short and long term goals: (a) STG: Immediate relaxation of muscle with increased range (b) LTG: Retention of improved range of motion through retention of increased muscle length
2. Preparation of Physical Therapist: A. Review procedure as necessary. B. Review medical record.
(1) Review any evaluation so ranges which are available are familiar. (a) Locate point in the range of motion were limitation occurs. (b) Locate specific muscle groups involved. (c) Determine the appropriate patterns of motion to use for lengthening the muscle groups
involved. 1) Consider all of the actions of the muscles limiting movement to decide which pattern(s)
Division of Physical Therapy
Emory University

COMPETENCIES AND CRITERIA Introduction to Interventions-DPT 740
309
would be appropriate. 2) Consider their anatomical attachment(s) to decide how many patterns would be needed to
achieve maximum lengthening. (d) Determine the appropriate relaxation technique to employ.
C. Interview the client.
(1) Are there any activities you wish to perform which you are unable to perform? Why? (2) If yes, how long has it been since you were able to perform the activities? (3) What initially made you unable to perform these activities?
D. Determine treatment sequence and related positions. E. Select and collect correct equipment.
(1) Linens (2) Clothing for client (3) Goniometer
F. Secure the environment. (1) Set up treatment area
3. Execute the Procedure: A. Follow the interpersonal relations criteria to establish rapport with client. Include verbal cues, correct
manual contacts, all movements, and type of muscle contractions in demonstration. B. Sequential steps of procedure:
(1) Position client to achieve all necessary movement at all joints. (a) Hold-relax:
1) Move client's body to a point where limitation of motion occurs: (a) Include all three movement components at proximal pivot. (b) Include all correct positions for intermediate and distal pivots.
2) Using the command to hold, have the client perform an isometric contraction of the antagonistic pattern.
3) Request voluntary relaxation and allow time for it to occur. 4) Move the part (either passively or actively) into the agonistic pattern including all three
movement components of proximal pivot and control of intermediate and distal pivot. 5) Repeat 1-4 several times until a plateau is reached.
(b) Contract-relax: 1) Same as a.1. 2) Using the commands to push, pull, lift, etc. have the client perform the antagonistic pattern
allowing isotonic movement in rotation component and isometric contraction of all other movement components.
3) Request voluntary relaxation and allow time for it to occur. 4) Move the part (either passively or actively) into the agonistic pattern including all three
movement components of proximal pivot and control of intermediate and distal pivot. 5) Repeat 1-4 several times.
C. Implement changes in procedure. (1) Relaxation technique may be repeated several times until therapist feels a plateau has been
reached. An increase of 10°-15° is reasonable for one treatment. (2) The newly acquired range should be utilized in a functional activity. (3) Relaxation techniques should be sequenced with other treatment.
D. Record results in SOAP or other approved format. E. Interpret results of procedure.

COMPETENCIES AND CRITERIA Introduction to Interventions-DPT 740
310
F. Prepare client for dismissal. G. Clean up area.

COMPETENCIES AND CRITERIA Introduction to Interventions-DPT 740
311
INFORMATION SHEET PNF TREATMENT PROCEDURES Introduction: PNF procedures can be applied to clients with any given diagnosis as a treatment for
impairment. These procedures include relaxation, mobility, strength, stability, controlled mobility, and skill
techniques.
1. Relaxation Techniques: A. Hold-Relax:
(1) Refer to the Relaxation Techniques Criteria Sheet from Musculoskeletal Complex. B. Contract-Relax:
(1) Refer to the Relaxation Techniques Criteria Sheet from Musculoskeletal Complex. C. Rhythmic Stabilization:
(1) Indications: (a) Agonistic pattern weakness (b) Splinting due to pain (c) Inability to stabilize
(2) Precautions: (a) Don't allow client to Valsalva
(3) Procedure: (a) Move client's body to the desired point in the range of motion, including all components of the
pivot at which stability is desired. (b) Using the command "hold", have the client perform an isometric contraction of the agonistic
pattern building gradually until maximal resistance is achieved. (c) Without breaking the hold of the agonistic pattern, have the client perform an isometric
contraction of the antagonistic pattern, again building gradually until maximal resistance is achieved.
(d) Repeat steps a-c two or three times. (e) Using the command "relax", have the client relax both agonistic and antagonistic muscle groups. (f) Rhythmic stabilization may be repeated at different points of the range of the agonistic pattern
to obtain the desired response. D. Rhythmic Initiation:
(1) Indications: (a) Rigidity (b) Spasticity (c) Weakness
(2) Procedure: (a) Using the command "relax and let me move you", move the limb first through the available
range of the agonistic pattern, and then return the limb through the antagonistic pattern. (b) When relaxation is achieved, using the command "now help me move you", have the client
Division of Physical Therapy
Emory University

COMPETENCIES AND CRITERIA Introduction to Interventions-DPT 740
312
assist the movement for three repetitions. (c) Using the command "push" or "pull" as appropriate, superimpose resistance upon the
movement, gradually increasing the resistance with the increase in the client's response. Repeat for three repetitions.
(d) Have the client move the limb actively through the agonistic and antagonistic patterns independently.
E. Rhythmical Rotation: (1) Indications:
(a) Decreased mobility (2) Procedure:
(a) Have the client relax. (b) Move the limb slowly through the available range of the desired pattern, while simultaneously
rotating and de-rotating the body part around its axis. (c) Repeat the procedure two or three times.
F. Slow Reversal Hold Relax: (1) Indications:
(a) Decreased mobility (2) Procedure:
(a) Move the limb to the point of limitation in the range of the agonistic pattern. (b) Have the client perform an isotonic contraction of the antagonistic pattern against maximal
resistance, allowing motion to occur only in the rotary component of the pattern. (c) Using the command "hold", have the client perform an isometric contraction of all components
of the antagonistic pattern (including the rotary component) against maximal resistance. (d) Using the command "relax", support the client's limb and allow relaxation to occur. (e) Using the appropriate commands, have the client perform an isotonic contraction of the
agonistic pattern against maximal resistance, throughout the available range.
2. Mobility Techniques: A. Hold Relax Active Motion:
(1) Indication: (a) Inability to initiate movement
(2) Procedure: (a) Passively move the client's limb through the desired pattern to the shortened range. (b) Using the command "hold", have the client perform an isometric contraction of the desired
pattern, gradually building up to maximal resistance. (c) Using the command "relax", have the client relax. (d) When relaxation occurs, quickly move the client's body part through the desired pattern to the
lengthened range of the pattern. (e) Apply a quick stretch, and using appropriate commands, have the client perform an isotonic
contraction of the desired pattern, returning to the shortened range. (f) The entire procedure may be repeated. (g) The isotonic contraction from the lengthened to the shortened range of the pattern may be
active, active assisted, or resisted. B. Slow Reversal:
(1) Indication: (a) Decreased mobility of agonistic pattern (b) Weakness of agonist (c) Decreased coordination

COMPETENCIES AND CRITERIA Introduction to Interventions-DPT 740
313
(2) Procedure: (a) Move the client's limb to the lengthened range of the agonistic pattern. (b) Using the proper manual contacts and verbal cues, have the client perform an isotonic
contraction of the agonistic pattern against maximal resistance, to the weak point in the range of motion.
(c) Switch manual contacts to the antagonistic pattern and have the client perform an isotonic contraction of the antagonistic pattern against maximal resistance.
(d) Again switch manual contacts to the agonistic pattern and have the client move through as much of the range of the pattern as possible.
(e) The procedure may be repeated two or three times. (f) If an increase in the range of the agonistic pattern fails to occur by the sequence described, the
procedure may begin in the lengthened range of initiation of the antagonistic pattern. C. Quick Reversal:
(1) Indications: (a) Inability to initiate movement
(2) Procedure: (a) Have the client relax. (b) Move the client's limb to the shortened range of the agonistic pattern. (c) Quickly move the client's limb to the shortened range of the agonistic pattern. (d) Again move the client's limb to the shortened range of the agonistic pattern and using the
command "hold", have the client perform an isometric contraction of the agonistic pattern. (e) Again have the client relax. (f) The procedure can be repeated.
3. Strength Techniques: A. Slow Reversal Hold:
(1) Indications: (a) Weakness (b) Inability to stabilize (c) Decreased coordination
(2) Procedures: (a) Move the limb to the lengthened range of the agonistic pattern. (b) Using the proper manual contacts and verbal cues, have the client perform an isotonic
contraction of the agonistic pattern against maximal resistance to the desired point in the range. (c) Using the command "hold", have the client perform an isometric contraction of the agonistic
pattern against maximal resistance. (d) Switch manual contacts to the antagonistic pattern and have the client perform an isotonic
contraction of the antagonistic pattern against maximal resistance to the desired point in the range.
(e) Using the command "hold", have the client perform an isometric contraction of the antagonistic pattern against maximal resistance.
(f) The procedure may be repeated two of three times, through increments or decrements of range of motion and with a gradual increase in resistance each repetition.
(g) The procedure may begin in the lengthened range of initiation of the antagonistic pattern. (h) Repeated contractions may be performed during the isotonic contraction of the agonistic or
antagonistic pattern.

COMPETENCIES AND CRITERIA Introduction to Interventions-DPT 740
314
B. Repeated Contractions: (1) Indications:
(a) Weakness (b) Decreased endurance
(2) Procedures: (a) Move the limb to the lengthened range of initiation of the agonistic pattern. (b) Using the proper manual contacts and verbal cues, have the client perform the sequence of
procedures described for the slow reversal technique. (c) As the client performs the isotonic contraction of the agonistic pattern, apply repeated quick
stretches to the desired components of the pattern, using the command "now push" or "now pull".
(d) Have the client continue to perform the isotonic contraction of the agonistic pattern following each quick stretch.
(e) Switch manual contacts and have the client perform an isotonic contraction of the antagonistic pattern as described for the slow reversal technique.
(f) The procedure may be repeated two or three times. (g) An isometric contraction of the agonistic pattern may be performed at the weak point in the
pattern prior to the performance of the repeated contractions. (h) Repeated contractions may be performed during the isotonic contraction of the antagonistic
pattern. (i) One specific component of the pattern may be emphasized.
C. Timing for Emphasis: (1) Indications:
(a) Weakness in a specific component of a pattern (b) Decreased coordination due to weakness
(2) Procedures: This Technique can be performed one of two ways: (a) Isometric contraction, strong components:
1) Have the client attempt to perform an isotonic contraction of the agonistic pattern, using the proper manual contacts and verbal cues.
2) Allow little or no motion to occur in the stronger components of the pattern (isometric contraction).
3) Allow motion to occur in the weaker component of the pattern against maximal resistance (isotonic contraction).
(b) Isometric build up, weak components: 1) Have the client perform an isotonic contraction of the agonistic pattern against maximal
resistance to the strongest point in the range. 2) Using the command "hold", have the client perform an isometric contraction of the
agonistic pattern at the strong point in the pattern. 3) Using the command "now push" or "now pull”, have the client perform an isotonic
contraction of the weak component of the pattern. D. Resisted Progression:
(1) Indications: (a) Weakness (b) Decreased endurance
(2) Procedures: (a) Have the client perform a progression of locomotion in a forward, backward, or diagonal
direction against maximal resistance.

COMPETENCIES AND CRITERIA Introduction to Interventions-DPT 740
315
(b) Use manual contacts appropriate for the desired activity and the direction of the progression.
4. Stability Techniques: A. Slow Reversal Hold through Decrements of Range:
(1) Indications: (a) Same as slow reversal hold
(2) Procedures: (a) Have the client perform the sequence of procedures in the manner described for the Slow
Reversal Hold technique. (b) With each successive reversal of the agonistic and antagonistic patterns, have the client
gradually move through smaller ranges of the patterns. B. Rhythmic Stabilization:
(1) Refer to Relaxation Techniques. C. Alternating Isometrics:
(1) Indications: (a) Agonistic pattern weakness (b) Splinting due to pain (c) Inability to stabilize
(2) Procedures: (a) Move the client's limb to the desired range of initiation of the pattern. (b) Using the command "hold", have the client perform an isometric contraction of the agonistic
pattern except the rotary component, against maximal resistance. (c) Using the command "hold", have the client perform an isometric contraction of the antagonistic
pattern except the rotary component, against maximal resistance. (d) The procedure can be repeated, gradually increasing the resistance with each reversal over the
entire sequence of repetitions.
5. Controlled Mobility Techniques: A. Slow Reversal:
(1) Refer to Mobility Techniques. B. Slow Reversal Hold:
(1) Refer to Strength Techniques. C. Slow Reversal Hold through Increments of Range:
(1) Indications: (a) Weakness (b) Inability to stabilize (c) Decreased coordination
(2) Procedures: (a) Have the client perform the sequence of procedures in the manner described for the Slow
Reversal Hold (refer to Strength Techniques). (b) With each successive reversal of the agonistic and antagonistic patterns, have the client
gradually move through larger ranges of the patterns.
6. Skill Techniques: A. Slow Reversal:
(1) Refer to Mobility Techniques.

COMPETENCIES AND CRITERIA Introduction to Interventions-DPT 740
316
B. Agonistic Reversal: (1) Indications:
(a) Spasticity (b) Weakness
(2) Procedures: (a) Move the client's limb to the lengthened range of the desired pattern. (b) Using the proper manual contacts and verbal cues, have the client perform a concentric isotonic
contraction of the desired pattern to the shortened range of the pattern. (c) Using the command "make it hard for me to move you", have the client perform an eccentric
contraction of the desired pattern returning to the lengthened range of the pattern. (d) The procedure may be repeated two or three times.
C. Normal Timing: (1) Indications:
(a) Decreased coordination (2) Procedures:
(a) Move the client's limb to the lengthened range of the desired pattern. (b) Using the proper manual contacts and verbal cues, have the client perform an isotonic
contraction of the desired pattern from distal to proximal against maximal resistance. (c) At the point in the range of the pattern that a component of the pattern fails to respond, have
the client perform an isometric contraction of the pattern until the weak component responds. (d) The technique may be repeated two or three times.
7. Elements: A. Manual Contacts:
(1) Manual contacts are specific hand placements used to facilitate a desired response. (2) During the performance of a technique, the therapist places hands firmly on the skin surface over
the appropriate underlying structures to facilitate the muscles involved in the desired pattern. B. Stretch:
(1) Stretch Stimulus: The therapist places the client's limb in the lengthened range of the pattern, the optimal position to develop tension in the muscles of the desired pattern.
(2) Quick Stretch: Using appropriate manual contacts for the desired pattern, the therapist performs a brief, quick movement through a small range of motion, stretching the muscles of the desired pattern.
C. Traction: (1) During the performance of a technique, using the appropriate manual contacts for the desired
pattern, the therapist manually distracts the joint surfaces as the client performs an isotonic or isometric contraction of the pattern.
(2) Traction is used to facilitate flexion and mobility. D. Approximation:
(1) During the performance of a technique, using the appropriate manual contacts for the desired pattern, the therapist suddenly compresses the joint surfaces as the client performs an isotonic or isometric contraction of the pattern.
(2) Approximation is used to facilitate extension and stability. E. Maximal Resistance:
(1) During the performance of an isotonic contraction of the desired pattern, the therapist provides the greatest amount of force against which the client is able to perform the complete range of the pattern.

COMPETENCIES AND CRITERIA Introduction to Interventions-DPT 740
317
F. Verbal Communication:
(1) Instructions: (a) Prior to the performance of a technique, the therapist explains and demonstrates the procedure
to be performed. (2) Commands:
(a) During the actual performance of a technique, the therapist provides brief, properly timed verbal cues to guide the client through the procedure.

COMPETENCIES AND CRITERIA General Medical Conditions-DPT 755
318
CRITERIA SHEET GROSS EVALUATION
Introduction
This procedure should be performed gross on every patient at the initial visit. No more than fifteen minutes should be required to perform the evaluation. The purpose of the gross evaluation is to provide the therapist with an overview of the patient and help to prioritize those areas requiring in-depth examination. The gross evaluation has no specific sequence (3 B). The order is predicated upon whether the patient is on bedrest, ambulatory, or sitting in a wheelchair. The therapist should predetermine a logical sequence of steps based on the individuality of each client. The following is a logical sequence in which the evaluation may be executed.
1. Pre-Planning for Procedure:
A. Identify the priority signs and symptoms which make the procedure applicable:
(1) Presentation of any client
(2) Limited motion
(3) Weakness
(4) Critically ill
(5) Recent surgery
(6) Homeostatic failure
B. Identify rationale for choice of procedure:
(1) Initial/overview assessment of clinical problems
2. Preparation of the Physical Therapist:
A. Review procedure as necessary.
B. Review medical record.
C. Interview client:
(1) Introduce self, profession, purpose of your visit.
(2) Determine ability to hear and see.
(3) Determine orientation to place, time, and person.
(4) Determine prior functional level.
(5) Determine problems that the patient views as limiting him/her.
D. Determine assessment sequence and related positioning.
E. Select and collect correct equipment:
(1) Safety belt
(2) Draping material
(3) Wheelchair
(4) Mat table, bed, plinth
(5) Sphygmomanometer and stethoscope
Division of Physical Therapy
Emory University

COMPETENCIES AND CRITERIA General Medical Conditions-DPT 755
319
(6) Thermometer
(7) Sharp object
(8) Cotton balls
F. Prepare the environment:
(1) Avoid areas with excessive noise.
(2) Schedule a time that is optimal for the patient – avoiding fatigue.
(3) Check safety of all equipment.
3. Execute the Procedure:
A. Use the Teaching-Learning and Interpersonal Relationships criteria to establish rapport and explain and
demonstrate the procedure to patient.
B. Sequential steps of procedure:
(1) Take vital signs:
(a) See individual criteria sheets for temperature, blood pressure, respiration, and pulse rate.
(2) Perform a Visual Inspection:
(a) See individual criteria sheet for visual inspection.
(3) Assess associated handicaps:
(a) Vision – Take an object (pencil or name tag) and have the patient track; does patient track the
object to left, right, up, and down?
(b) Hearing – Rub your index finger and thumb together near patient's ear; try one ear, then the
other, and then test both together.
(c) Cognition/affect – What is the patient's mood?
(d) Communication – Does the patient understand? Does the patient respond appropriately? Does
the patient verbalize clearly or is speech slurred? Is speech absent?
(4) Evaluate Gross ROM:
(a) Determine differences between right and left side.
(b) Determine differences between upper and lower extremity.
(c) One or two repetitions is adequate.
(d) Proceed proximal to distal:
1) Assess shoulder flexion and abduction.
2) Assess elbow flexion and extension.
3) Assess wrist flexion and extension.
4) Assess patient's ability to make a fist and extend fingers.
5) Assess hip flexion and extension.
6) Assess knee extension.
7) Assess dorsiflexion.
(e) Note if range is performed actively or passively.
(f) Assess the quality of the movement:
1) Is increased resistance to movement present?

COMPETENCIES AND CRITERIA General Medical Conditions-DPT 755
320
2) Does resistance change with speed of movement?
3) Is a tremor present?
(g) Note end range of motion – What limits it, is there pain, bony end range, or soft end range?
(h) Note is limb feels abnormally heavy.
(i) Determine need for specific goniometric measurements immediately or on a subsequent visit.
(5) Evaluate Gross Muscle Strength:
(a) This is functional strength needed for transfers – Not performed in specific muscle testing
position, performed bilaterally and only those muscles essential for function are tested
(b) One or two repetitions are adequate.
(c) Apply resistance at the end of the range as per MMT criteria, unless specified otherwise.
(d) Test upper extremity in sitting position and lower extremity in supine or sitting:
1) Shoulder depressors – Have patient place hands on mat table, bed, or arms of chair and
have patient attempt to lift him/her self up.
2) Triceps - Straighten patient's elbow and resistance is given toward flexion.
3) Assess shoulder flexion at 90°- Patient may have to put arms around therapist for assisted
transfer.
4) Quadriceps – With patient sitting, have patient extend knee and give resistance over distal
tibia and stabilize with arm under distal thigh.
5) Hip extensors – Have patient elevate buttocks off bed or mat table by using feet to push on
bed.
6) Check dorsiflexors if ambulation is required; have patient "pull toes towards nose" and resist
on dorsum of foot toward plantar flexion.
7) Determine muscle groups which may require specific MMT immediately or on subsequent
visits.
(6) Assess trunk stability in sitting:
(a) If patient is in chair, slide forward away from back rest - Does patient list to the left or right?
(b) If patient is in bed, have them sit on the edge of the bed and determine if the patient can
maintain balance. If the patient can maintain balance, gently push to the left and right, forward
and back. Can the patient regain balance? Does the patient have protective responses?
(7) Assess functional ability:
(a) Assess bed mobility. Note ability to perform the following activities and amount of assistance
required:
1) Scooting up and down in bed
2) Rolling side to side
3) Supine to sitting or side-lying to sitting
4) Sitting to supine
(b) Assess transfer ability. What level of assistance including verbal cuing does the patient require?
(c) Assess gait:

COMPETENCIES AND CRITERIA General Medical Conditions-DPT 755
321
1) Determine assistance required for sit to stand.
2) Determine static standing balance.
3) Can the patient march in place? Can the patient step forward and back?
4) Examine gait. Observe from the anterior, lateral, and posterior aspect of the patient.
Proceed in a cephalocaudal direction:
(a) Note head placement.
(b) Note shoulder position.
(c) Note trunk list/lateral bend.
(d) Note if step length is unequal (look and listen for this).
(e) Note if steps are in line of progression.
(f) Note foot placement.
(g) Note circumduction.
(h) Note base of support.
(8) Assess sensation:
(a) Prioritize sensory sequence according to patient diagnosis and therapeutic goal.
(b) Use the Teaching-Learning and Interpersonal Relationships Criteria to establish rapport and explain and demonstrate the procedure to patient (e.g. demonstrate using visual clues, ascertain that client understands his role in the procedure).
(c) Work proximal to distal, distal to proximal, or cephalo-caudally – determined by 8.a.
(d) Compare sides.
(e) Compare flexor and extensor surfaces following a dermatome level.
(f) Can patient perceive presence and location of light touch (use cotton ball).
(g) Can patient perceive presence and location of pressure (eraser end of pencil, fingertip).
(h) Can patient perceive presence and location of sharp versus dull, or hot versus cold (use pin-prick, test tubes with hot and cold water).
(i) Assess joint proprioception:
1) Assess one motion for each joint.
2) Demonstrate the motion and make certain patient can give the response requested.
3) Grasp the limb on sides of joint; once the test has started do not change your grasp.
4) Move the joint passively in all directions, then stop at one of the extremes of range.
5) Ask the patient to identify the position of the joint.
6) NOTE: For specific diagnoses additional proprioception tests may be added.
C. Implement changes in procedure:
(1) Perform only essential steps if patient's tolerance is limited for any reason.
(2) When dysfunction or limitation is noted in any of the items (B. 1-8), the therapist must perform a specific examination (i.e. goniometric measurements, specific manual muscle test).
D. Record results.
E. Clean the area.

COMPETENCIES AND CRITERIA General Medical Conditions – DPT 755
322
INFORMATION SHEET BED MOBILITY
General Instructions:
1. Identify areas requiring mandatory positioning.
2. Identify the position(s) of choice.
3. Evaluate the need for staff assistance.
4. Evaluate present equipment.
5. Identify equipment needs.
6. Identify client's perceptual needs.
7. Identify safety requirements: restraints, rails, tubes, and lines.
Utilization of proper body mechanics and techniques in assisting patient movement is essential for both
safety and efficiency of the maneuver. Proper body mechanics includes:
1. Keep spine straight.
2. Bend at the hips and knees.
3. Maintain a wide base of support.
4. Lean toward direction of movement.
5. Transfer body weight from one foot to the other, in the direction of patient movement.
6. Use hi-lo bed to place patient at a height which allows use of proper body mechanics and assures safety.
7. Move patient close to you, and avoid leaning and stretching.
Remember you are responsible for the safety and energy conservation of both yourself and the client.
Division of Physical Therapy
Emory University

COMPETENCIES AND CRITERIA General Medical Conditions – DPT 755
323
CRITERIA SHEET BED MOBILITY
1. Pre-planning for Procedure: A. Identify priority signs and symptoms and conditions which make the procedure applicable:
(1) Decreased strength (2) Decreased mobility (for any reason) (3) Pain (4) Cardiopulmonary dysfunction
B. Identify the rationale for choice of procedure: (1) Safety:
(a) Catheter tubing (i.e. urinary, I.V., drainage bag, ventilation, oxygen) (b) Side rails raised or lowered as appropriate (c) Restraints necessary
(2) Condition of client: (a) Cause, nature, and primary site of cardiopulmonary dysfunction
1) Maintain head of bed elevated in patients with orthopnea. (b) Cause, site, and nature of restriction of mobility or strength (c) Consider altered state of consciousness (d) Cause, nature and site of pain, wound, incision
(3) Duration of therapy: (a) Consider energy expenditure requirements and restrictions
(4) Generate other possible mechanisms: (a) None
(5) Application of procedure to short and long term goals: (a) STG- prevent contractures (b) LTG- independent mobility, prevent decubiti
2. Preparation of Physical Therapist: A. Review procedure as necessary. B. Review medical record. C. Interview client:
(1) Are you able to move around in the bed, e.g. rollover? (2) How do you rollover? (3) Can you roll onto your stomach? (4) Can you bend your knees up and push with your feet?
D. Select and collect correct equipment: (1) Draw sheet
E. Prepare the environment and equipment/materials: (1) Pre-treatment preparation:
Division of Physical Therapy
Emory University

COMPETENCIES AND CRITERIA General Medical Conditions – DPT 755
324
(a) Place draw sheet beneath patient. (b) Roll sheet lengthwise. (c) Wedge sheet roll beneath one side of patient, leaving one foot of sheet free; push and roll sheet
beneath client. (d) From opposite side of bed retrieve remaining sheet and pull through.
(2) Safety of equipment: (a) Check stability of side rails. (b) Check security and height of trapeze. (c) Secure hospital bed brakes.
3. Execute the Procedure: A. Follow the Teaching-Learning and Interpersonal Relationships Criteria to establish rapport with the
client and explain and demonstrate procedure. B. Sequential steps of procedure:
(1) Position from supine to prone: (a) Raise bed to comfortable height for you. (b) Remove all supports and inspect all "suspect areas". (c) Lower side rail closer to you. (d) Place one arm under client's upper trunk and one under his buttocks or use the draw sheet to
move the client in the bed toward you. If the client is able to assist you using the handrail, leave the handrail up for the client to pull toward the handrail. With the client's knees flexed and feet flat on bed, the client may be able to lift his buttocks assisting the therapist in moving himself to the side.
(e) Instruct and assist client as necessary to flex his hip and knee of the side closer to you. (f) Place pillow between client's knees if necessary to protect skin over bony prominences. (g) Raise side rails closer to you and move to opposite side of bed. (h) Lower side rail closer to you. (i) Grasp client’s far shoulder and hip. (j) Roll client toward you onto his side. If client is not able to move his arm from under him
posteriorly, you can position the extremity posteriorly with one hand while maintaining support of him with the other hand.
(k) Continue rolling client from his side onto his stomach. (l) Position client as described in the information sheet for bed positioning for the prone
position. (m) Raise bedrail.
(2) Moving from prone to supine - Same procedure as above with the following exceptions (see position from supine to prone): (a) The upper extremity that the client is lying on will need to be moved from under him anteriorly,
if possible, or posteriorly if range of motion is restricted. (b) Place one arm under client's upper trunk and one under his hips. The client will not be able to
assist you by flexing his knees. (c) Client will not flex his hip and knee before rolling over. (d) Position client as described in the information sheet for bed positioning for the supine position.
(3) Client supine or prone - To move a client closer to the side of the bed using a draw sheet: (a) Raise bed to comfortable height. (b) Lower side rail closer to you. (c) Place one hand toward the top to the draw sheet and the other hand toward the bottom. (d) Pull the sheet toward you, and check client's positioning and modify as necessary.

COMPETENCIES AND CRITERIA General Medical Conditions – DPT 755
325
(e) Raise side rail. (4) Client supine or prone - To move a client toward the head or foot of the bed - 2 people using a
draw sheet: (a) Raise bed to comfortable height with bed flat if safe for patient. (b) Individuals stand on opposite sides of the bed. (c) Lower side rail closer to you. (d) Each grasps the draw sheet one hand toward the top and one hand toward the bottom of the
draw sheet. (e) When both individuals are ready one signals and both lift the client sufficiently to slide him in
the desired direction. Check client's positioning and modify as necessary. (f) Raise side rails
(5) Client supine - To move a client toward the head of the bed - no draw sheet: (a) Raise bed to comfortable height with bed flat if safe for patient. (b) Lower side rails closer to you. (c) Instruct and assist client as necessary to flex hips and knees with feet on bed. (d) Place one arm under client's shoulders/upper trunk and one arm under his buttocks. (e) If client is able, have him lift his buttocks and push up in the bed with his legs as you lift his
buttocks sufficiently to slide him toward the head of the bed. (f) Raise side rail.
C. Implement changes in procedure based upon: (1) Response of the patient:
(a) Vital signs (b) Comfort/pain (c) Endurance
(2) Patient's changing status D. Record results in SOAP format
(1) 0: Type of procedure utilized, amount of assistance rendered by therapist and patient, observed patient reaction, use of draw sheet, ancillary personnel
(2) A: e.g., patient mobility limited by bilateral decreased hip flexion E. Clean area.

COMPETENCIES AND CRITERIA General Medical Conditions – DPT 755
326
CRITERIA SHEET BED POSITIONING
Physiologic Basis
Positioning programs are primarily used to prevent/correct deformity arising from inactivity. The two major types of deformity that may occur are contractures and decubitus ulcers.
Decubitus ulcers generally develop in two stages. In the first stage the skin overlying a bony prominence is compressed. The compression causes ischemia. Repeated frictional forces to this ischemic area results in skin erosion (sheet burn). In the second stage, the continued pressure and ischemia result in necrosis. The most common sites for decubitus ulcers are: the vertebral spines, the elbow, the iliac crests, the sacrum, the greater trochanter (of the femur), the heel, and the base of the fifth metatarsal.
Contractures generally develop when a body segment is held in a constant posture. As a result of the constant posture, the muscles surrounding the joint adapt to the new length, shortening or strengthening on one side, lengthening or weakening on the other. During periods of prolonged bed rest contractures frequently develop. The most common type of contractures are: adduction and internal rotation contractures of the shoulder, flexion and external rotation contractures of the hip, flexion contractures of the knees and plantar flexion contractures of the ankle.
Bed positioning programs change the relationships of the body parts every two hours during the day. That is, the weight-bearing areas and muscle lengths are varied with a frequency adequate to prevent deformity.
1. Equipment; the following equipment is necessary for adequate bed positioning:
A. High-low bed
B. Bed board- 3/4 inch plywood amenable to "gatching"
C. Firm mattress
D. Fleece boots- with plastic horizontal and vertical bar high top tennis shoes
E. Side rails
Division of Physical Therapy
Emory University

COMPETENCIES AND CRITERIA General Medical Conditions – DPT 755
327
F. Overhead trapeze
G. Trochanter rolls (2)
H. Shoulder rolls (2)
I. Heel rolls (2) (where footboard is unavailable or unnecessary)
J. Hand rolls (2)
K. Egg crate mattress
L. Air mattress
M. Sheepskin
N. Foam pads
Program
Generally the position of the client should be changed every two hours during the day. The positions used include the supine, prone, and both side-lying positions. As a rule, unconscious clients should not be placed in the supine posture.
1. Supine:
A. Lower extremities:
(1) The hips are placed in neutral position. Trochanter rolls are used to prevent external rotation in weak areas. The knees are completely extended. The entire plantar surfaces of the feet are in firm contact with a foot board or resting dorsiflexion splint. Bed cradle may be used to prevent pressure of sheets on extremities.
B. Lower extremities:
(1) Alternate positions of lower extremities-
(a) Pillow(s) under knees or stool with pillow on top under knees for protection and comfort of low back. The stool might be necessary for clients with low back pain or a history of low back problems.
C. Upper extremities:
(1) The shoulder is generally to 90 degrees and is periodically positioned between full external and full internal rotation.
(2) The elbow is generally abducted and positioned between 90 degrees flexion and full extension.
(3) The wrist is generally maintained in slight extension. The metacarpals are in 90 degree flexion and fingers in slight flexion. The thumbs are in abduction and opposition. This position is maintained by use of handroll.
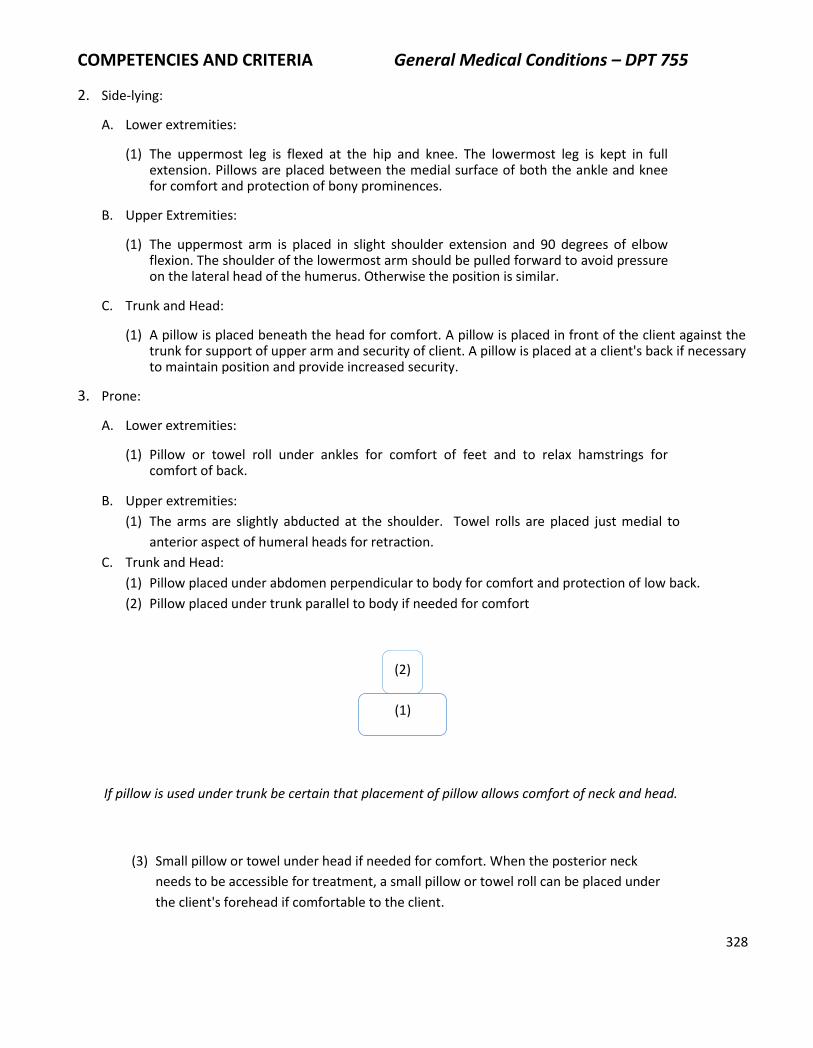
COMPETENCIES AND CRITERIA General Medical Conditions – DPT 755
328
2. Side-lying:
A. Lower extremities:
(1) The uppermost leg is flexed at the hip and knee. The lowermost leg is kept in full extension. Pillows are placed between the medial surface of both the ankle and knee for comfort and protection of bony prominences.
B. Upper Extremities:
(1) The uppermost arm is placed in slight shoulder extension and 90 degrees of elbow flexion. The shoulder of the lowermost arm should be pulled forward to avoid pressure on the lateral head of the humerus. Otherwise the position is similar.
C. Trunk and Head:
(1) A pillow is placed beneath the head for comfort. A pillow is placed in front of the client against the trunk for support of upper arm and security of client. A pillow is placed at a client's back if necessary to maintain position and provide increased security.
3. Prone:
A. Lower extremities:
(1) Pillow or towel roll under ankles for comfort of feet and to relax hamstrings for comfort of back.
B. Upper extremities:
(1) The arms are slightly abducted at the shoulder. Towel rolls are placed just medial to
anterior aspect of humeral heads for retraction.
C. Trunk and Head:
(1) Pillow placed under abdomen perpendicular to body for comfort and protection of low back.
(2) Pillow placed under trunk parallel to body if needed for comfort
If pillow is used under trunk be certain that placement of pillow allows comfort of neck and head.
(3) Small pillow or towel under head if needed for comfort. When the posterior neck
needs to be accessible for treatment, a small pillow or towel roll can be placed under
the client's forehead if comfortable to the client.
(2)
(1)

COMPETENCIES AND CRITERIA General Medical Conditions – DPT 755
329
4. Sitting:
A. Lower extremities:
(1) Feet should be firmly on the floor or resting on the foot rests of a wheelchair. Knees
should be slightly bent, with popliteal fossa clear of the front edge of seat.
B. Upper extremities:
(1) Upper extremities supported with elbows at 45° and humerus in closed pack position.
C. Head and neck:
(1) Pillow might be necessary at the client's back for comfort.
(2) Pillow(s) are placed in client's lap for support of client's upper extremities if necessary for comfort.
(3) Stool placed under feet if necessary for comfort and protection of low back.
(4) If client's posterior neck and upper back need to be accessible, client can lean forward over the
plinth.
(a) Pillows can be used to support client's upper trunk and head. Upper extremities can be
supported by placing them on the plinth or on the pillows. Client's head is positioned on the
pillows for comfort and when necessary positioned to allow accessibility of the posterior neck.
Some clients may prefer a towel roll or folded towel under their forehead or head instead of
pillows.
Frequency of Turning
A full position change is recommended every two hours. With each change, the skin should be evaluated
and treated as indicated.
Contraindications
Postural changes are generally contraindicated when a client is being managed with skeletal traction or
balanced suspension.

COMPETENCIES AND CRITERIA General Medical Conditions – DPT 755
330
Precautions
Further consultation is necessary before beginning a postural change in the following conditions:
1. Critically ill
2. Tracheotomy
3. Cardiorespiratory problems
4. Recent vascular surgery
5. IVs or tubes in place
6. Recent surgery - neurologic or orthopedic
7. Recent nasogastric feeding
8. Hiatal hernia

COMPETENCIES AND CRITERIA General Medical Conditions – DPT 755
331
INFORMATION SHEET TRANSFERS
1. Indications for selection of type of transfer:
A. Select appropriate transfer procedure based on:
(1) Extent and nature of client's disability (2) Ability of client to cooperate (3) Size of client
2. Types of transfers:
A. Pivot transfer: (1) Client is able to assist by using one or both lower extremities and one or both upper extremities.
B. Assisted transfer: (1) Client may assist by using lower extremities and upper extremities minimally, but can be used
for client who is not able to assist in transfer. C. Sliding board:
(1) Client is able to assist by using upper extremities sufficiently enough to maneuver his body onto the board and slide to the bed or chair.
(2) Client does not have sufficient strength in lower extremities to do a pivot transfer. D. Independent transfer:
(1) Client is able to safely perform a pivot or sliding board transfer without assistance or verbal cuing.
E. Two-person lift: (1) Client is unable to assist with the transfer.
F. Three-person lift: (1) Client is unable to assist with the transfer.
Division of Physical Therapy
Emory University

COMPETENCIES AND CRITERIA General Medical Conditions – DPT 755
332
CRITERIA SHEET TRANSFERS
1. Pre-planning for Procedure:
A. Identify priority signs, symptoms, or conditions which make the procedure applicable:
(1) Decreased strength
(2) Decreased mobility
(3) Altered state of consciousness
(4) Postural hypotension
(5) Decreased balance
(6) Pain
B. Identify rationale for choice of transfer:
(1) Safety:
(a) Prevent skin friction/bruising of extremity
(b) Protect involved areas, e.g. wounds, non-weight bearing limbs
(c) Provide adequate support to patients with postural hypotension or decreased balance, strength and ROM
(2) Economics:
(a) Number of people available
(b) Availability and type of equipment
(c) Resources required of physical therapist
(3) Condition of client, considering:
(a) Visual deficits
(b) Altered mental status
(c) Client's pain and dysfunction
(d) Client's size (weight and height)
(e) Apparatus attached to client, e.g. I.V. lines, urinary catheter, post-operative incision drains
(4) Generate other possible alternative treatments:
(a) Hoyer lift
Division of Physical Therapy
Emory University

COMPETENCIES AND CRITERIA General Medical Conditions – DPT 755
333
(5) Application of transfer to short and long term goals
(a) STG: Client instructed in transfers
(b) LTG: Safe transfer with highest level of independence using appropriate equipment
2. Preparation of the Physical Therapist:
A. Review the procedure as necessary.
B. Review the medical record noting any precautions.
C. Interview the client:
(1) When did you last sit up?
(2) Do you need help to the chair? To the bathroom?
D. Perform a gross evaluation of the client per criteria sheet.
E. Select and collect equipment:
(1) Safety/gait belt
(2) Non-skid footwear
(3) Sliding board
(4) Wheelchair with brakes, removable or swing-away leg rests
(5) UE sling/support (if necessary)
(6) Adequate ancillary personnel
(7) Appropriate draping material
F. Prepare the environment and equipment/materials:
(1) Pre-treatment preparation:
(a) Find an atmosphere that is free from distraction, if possible.
(b) Instruct/assist client with donning his robe, non-skid footwear, and support garments (ace bandage, brace, corset, or sling) as necessary.
(c) Prepare ancillary personnel, e.g. instruct them in the procedure.
1) Instruct in responsibilities and sequence of events.
(2) Safety of equipment:
(a) Check condition of belt, looking for fraying.
(b) Check buckles on belt.
(c) Insure dry, non-skid floor.
(d) Reposition external apparatus, e.g. catheter tubing, to prevent dislodging and ensure adequate slack/security.
(e) Check brakes and movable parts of wheelchair and secure chair or hospital bed.
3. Execute the Procedure:

COMPETENCIES AND CRITERIA General Medical Conditions – DPT 755
334
A. Follow the Teaching-Learning and Interpersonal Relations Criteria to establish rapport and inform patient about procedure, i.e. explain, demonstrate, determine patient understands, practice, and give feedback.
B. Sequential steps of procedure:
(1) Pivot transfer I (bed-chair) – minimal to moderate assist:
(a) Position the wheelchair next to the client's strong side when he is sitting. Place the chair at an approximate 20˚ – 30° angle with the bed.
(b) Lock the chair securely or place appropriate wedge blocks behind the back wheels.
(c) Raise footrests or remove, if possible.
(d) Remove arm rests on the side of the wheelchair nearest the client, if removable.
(e) Assist client in rolling on his side toward you. Slide one arm under the client's shoulders and lift as you place the other hand behind his knees and assist his legs off the bed.
OR
If client is unable to roll, move him near the edge of the bed toward you, and move his feet over the edge of the bed. Slide one arm under the client's shoulders and lift as you continue to pull his legs toward you and off the bed.
(f) Support client in the sitting position until he gains his balance and is without complaints of lightheadedness.
(g) Put gait belt on patient.
(h) Assist client in sliding to the edge of the bed until both feet are on the floor.
(i) Pull the wheelchair up until the client's feet are between the footrests. Maintain support of the client as needed by keeping one hand on client's weaker shoulder or on gait belt.
(j) Position feet so that foot (the strongest lower extremity) closest to the wheelchair is pulled back and centered under the body.
(k) Instruct the client to assist when he begins to stand by pushing down into the bed with his stronger hand and lifting his weight by straightening his stronger leg as the trunk inclines forward.
(l) Place inside of your heel in front of client's weaker foot to prevent the client's foot from slipping.
(m) Bend your hips and knees until your knee is slightly touching the client's weaker knee.
(n) Place your arm under the client's strong arm and support upper trunk while placing other hand under client's buttocks or both hands on gait belt.
(o) Have client stand and assist him in standing, pulling his hips forward while stabilizing his knee with your knee.
(p) Balance client in upright position before instructing him to turn to sit in chair.
(q) Instruct client to assist when he sits by keeping his head and trunk forward and lowering himself slowly into the chair, using his strong arm and leg.

COMPETENCIES AND CRITERIA General Medical Conditions – DPT 755
335
(r) Ask client to begin pivoting toward the chair and reaching for the outside armrest while you assist him in this motion, stabilizing his weaker knee and foot.
(s) Have client sit, reminding him to keep his head and trunk forward and to sit slowly. Assist him in keeping his trunk forward and lower him slowly, bending your hips and knees.
(t) Instruct and assist client as necessary to slide back in the wheelchair, lower the foot rests, and put his feet on the foot rests.
(2) Pivot Transfer II (bed-chair) – moderate to max assist:
(a) Position wheelchair and bring client to sitting position on edge of bed with feet touching the floor as for pivot transfer I.
(b) Support client as necessary as he sits on the edge of the bed. Maintain the position of the wheelchair with the bed, but pull the wheelchair or have someone pull the wheelchair up until the client's feet are between the footrests.
(c) Bend your hips and knees, block client's feet with insides of your heels and his knees with your knees, and reach under his buttocks with both hands.
(d) Instruct client that you will rock forward and back three times and on the third forward rock you will straighten your body while pulling his hips forward and forcing his knees back.
(e) When client is standing, pivot him a quarter turn, and lower him to chair by reversing the procedure for standing.
(f) Place client's feet on footrests, and check that his buttocks are against the backrest and that he is not leaning to one side.
(g) If client is leaning back or to one side, go behind the wheelchair, place both of your arms under the client's arm, grasp his wrists, and cross his arms on his chest.
(h) Holding the arms, lift client's trunk to pull his hips back into the wheelchair. Instruct client to push on the footrests at the same time if he is able.
(3) Sliding Board Transfer (bed-chair) – non-weight bearing, minimal or no lower extremity strength:
(a) Position wheelchair close to bed on the client's stronger side.
(b) Lock wheelchair securely.
(c) Remove inside armrest closest to bed.
(d) Remove footrests.
(e) Assist client as needed (technique described in pivot transfer) to come to sitting position on edge of bed with feet touching floor. If client needs assistance in sitting up, the chair can be positioned to allow space to you to be next to the bed to assist client. The wheelchair can then be positioned close to the bed after the client is sitting. Maintain support to the client as necessary while he is sitting and attempting this transfer.
(f) Work one end of sliding board under client's hips and the other end in the chair by leaning patient to the side.

COMPETENCIES AND CRITERIA General Medical Conditions – DPT 755
336
(g) Instruct client to maneuver himself onto and across the sliding board by pushing down into the bed with his hands as possible, shifting his weight from his hip nearest the chair onto the opposite hip.
(h) Assist client as necessary and guard him to prevent loss of balance throughout the procedure.
(i) As client gets closer to the wheelchair, he may be able to use the far armrest or handle at the top of the backrest to pull himself toward the wheelchair.
(j) Caution client to be aware of his body placement to prevent scraping the wheel as he passes over it.
(k) When client is in the chair, remove sliding board by patient leaning to one side. Replace armrest and place his feet on the footrests.
(l) Check to see if client's position in the wheelchair is comfortable. Check that the position of the buttocks is against the backrest and that his weight is distributed equally in the chair. Modify as necessary, using the procedure described in the pivot Transfer II.
(4) Depression transfer:
(a) Same procedure used as with sliding board transfer except client will need no assistance. To transfer into the wheelchair the client may or may not use a sliding board. Caution must be taken when a sliding board is not used to prevent client's bumping or scraping his hip when transferring across the wheel or arm of a wheelchair. The client will need to push down with his arms to lift his weight sufficiently to clear the wheel when crossing.
(5) Two Person Lift (chair – bed or tilt table):
(a) Position wheelchair close to and parallel with the bed; back of wheelchair at the head of the tilt table. Wheelchair should be placed a distance between the head and foot of the bed to facilitate proper positioning of client on the bed when the transfer is complete.
(b) Lock wheelchair and bed securely. If the bed has no locks, secure it using additional personnel and/or positioning it against a wall.
(c) Remove inside armrest. Remove leg rests if possible. If leg rests do not detach, raise foot rests.
(d) One individual stands behind the wheelchair, reaches under the client's arms, grasps his wrists and crosses client's arm on chest.
(e) The other individual stands in front of the wheelchair at a slight angle with the bed, facing the bed and the client. If the leg rests are not detachable, position feet between the outside leg rest and the bed in such a way as to prevent interference from them during the transfer. Place arms under client’s legs, generally in the area of mid-thigh and mid-calf as is comfortable and provides maximum support to client's lower extremities.
(f) Identify one individual to do steps g. and h.
(g) Determine all involved are ready to begin the transfer.
(h) Give signal to begin transfer.
(i) Both individuals lift client up and over to the tilt table, lowering him gently.

COMPETENCIES AND CRITERIA General Medical Conditions – DPT 755
337
(j) Secure client as necessary for safety and comfort.
(k) Check positioning of client and modify as necessary. To transfer a client from the bed to a wheelchair, the client is positioned and supported in a semi-sitting position on the bed and the reverse procedure is followed.
(6) Three Man Lift (stretcher – tilt table or bed):
(a) Place sheet on stretcher under client. Position stretcher against and parallel with tilt table. Head of client should be at head of tilt table.
(b) Lock stretcher and tilt table securely or secure both by assistance of personnel.
(c) One individual stands next to the side of the stretcher at client's hips. Grasp the sheet in a way to provide support to client's mid-trunk.
(d) Second individual stands next to the far side of the tilt table in a position to give support to the client's head, neck, and upper trunk. Grasp the sheet in a way to provide support to the areas listed. (Support needed in these areas will vary among clients and should be given as much as is required by each individual client)
(e) Third individual stands next to the far side of the tilt table in a position to give support to lower extremities and feet. Grasp the sheet in a way to provide support to the areas listed. Prevent client's feet from bumping and scraping footboard during transfer.
(f) Identify one individual to do steps g. and h.
(g) Determine all involved are ready to begin transfer and give signal to begin transfer.
(h) All individuals support the body parts for which each is responsible with the sheet and slide the client onto the tilt table.
OR
(a) Position the stretcher close to the tilt table, allowing space between the stretcher and tilt table for the individuals performing the transfer to stand and turn after lifting the client. The stretcher should be positioned somewhat parallel with the client's head toward the foot of the tilt table.
(b) Lock stretcher and tilt table securely or secure either as necessary by additional personnel or positioning using a wall for support.
(c) All three individuals stand between the stretcher and the tilt table facing the client.
(d) One individual stands next to the stretcher at client's head and shoulders. Position one arm to support client's head and neck and the other arm to support upper trunk.
(e) Second individual stands next to the stretcher midway between client's hips and feet. Position arms under client to support his mid-trunk.
(f) Third individual stands next to the stretcher midway between client's hip and feet. Position arms under client to support his lower extremities and feet.
(g) Identify one individual to do steps h., i., and j.
(h) Have all individuals roll the client in one motion toward them on the stretcher to facilitate lifting and transferring client to table.

COMPETENCIES AND CRITERIA General Medical Conditions – DPT 755
338
(i) Determine all involved are ready to begin the transfer.
(j) Give signal to begin transfer.
(k) Lift client from stretcher, pivot around to position client on tilt table, and gently lower him to table.
(l) Secure client as necessary for safety and comfort.
(m) Check positioning of client and modify as necessary.
C. Implement changes in procedure based on:
(1) Response of the patient:
(a) Vital signs
(b) Fatigue level
(2) Achievement of short and long term goals listed in 3.B
D. Record results in SOAP format:
(1) 0: Indicate type of transfer performed successfully, amount of therapist assistance required, observed client reaction, and equipment/personnel utilized.
(2) A: Decreased muscle strength prevents patient from achieving independence in transfer activities.
F. Clean the area.

COMPETENCIES AND CRITERIA General Medical Conditions – DPT 755
339
INFORMATION SHEET STERILE TECHNIQUE
Definitions:
Sterile – free from any living microorganism
Clean – free from all pathogenic organisms
1. Ways of Sterilization:
A. Autoclave:
(1) Steam under pressure
B. Boiling:
(1) 20 minutes
C. Chemicals:
(1) Zephiran solution
(2) Alcohol 702
(3) Betadine
(4) Hydrogen peroxide
D. Oven
E. Presto Cooker:
Everything that comes in contact with a wound should be sterilized by steam under pressure (autoclaved) if this method is available. The fairly prevalent organisms that cause wound infections of gas-gangrene and tetanus are spore forming and to kill these spores it is necessary to employ temperatures above that of boiling water. However, boiling water over a long period of time is probably the best substitute for steam under pressure (must be boiled at least 20 minutes for complete effectiveness). Equipment that would be destroyed by boiling or autoclaving is soaked for adequate periods of time in chemical solutions.
2. Maintaining a “Clean” Environment:
One or more of the following procedures should be carried out when a patient is being treated for an infectious disease. The necessary measures are selected with regard to the character of the infection, whether respiratory (i.e. tuberculosis, pneumonia, strep) or gastrointestinal (dysentery, typhoid, etc).
Division of Physical Therapy
Emory University

COMPETENCIES AND CRITERIA General Medical Conditions – DPT 755
340
The patient should be placed in a private room. Anyone entering the patient's room must wear a gown, cap, and mask. If the nasopharyngeal discharges are infectious the patient should wear a mask. Caps and masks should be worn only once and not more than 2 hours.
Care must be taken to avoid contaminating a "clean" area with anything that has been in the vicinity of the infected patient. Rubber gloves are worn, where indicated. Soiled linens are kept in closed, labeled containers and later sterilized by boiling.
When the isolation period is terminated the bed, chairs, table, and other washable furnishings should be cleaned with hot soapy water, and the entire room aired for several hours. The mattress and pillows should be exposed to ultraviolet for minimum of 6 hours.
3. Handling of Equipment and Supplies used in Dressings:
Clean wounds (not infected) are dressed by the application of eight or more layers of sterile gauze, folded into suitable shapes and sizes. The dressing is held in place by adhesive tape, bandages, or binder.
Infected wounds may have either dry or wet dressings. When the wound is dressed, it is cleaned with sterile gauze sponge saturated with a saline solution or a mild antiseptic solution. Wet dressings are made of many layers of gauze plus a pad of cellucotton covered with gauze. Over this dressing a protector of rubber tissue, rubberized silk, cellulose film or moisture proof paper is used to keep the bed clothing dry and dressing sterile.

COMPETENCIES AND CRITERIA General Medical Conditions – DPT 755
341
PROCEDURE AND CRITERIA SHEET STERILE TECHNIQUE
1. Pre-Planning for Procedure:
A. Identify the priority signs and symptoms which make the procedure applicable:
(1) Extremely low white blood cell count
(2) Respiratory, enteric infection
(3) Wound infection
(4) Burns
B. Identify rationale for choice of procedure:
(1) Safety:
(a) Of therapist
(b) Of patient
2. Preparation of the Physical Therapist:
A. Review the procedure as necessary.
B. Review the medical record to determine which isolation technique is required.
C. Select and collect the correct equipment:
(1) Mask
(2) Gown
(3) Gloves
(4) Shoe covers (if necessary)
(5) The following are required for dressing changes of wound:
(a) Sterile towel
(b) Sterile instruments
(c) Sterile gauze
(d) Antiseptic solution
(e) Adhesive tape
(f) Sterile gloves
(6) All other items, such as blood pressure cuffs and thermometers, should be kept in patient's
room to avoid contamination.
(7) Other equipment necessary for executing specific procedures should be obtained.
Division of Physical Therapy
Emory University

COMPETENCIES AND CRITERIA General Medical Conditions – DPT 755
342
3. Execute the Procedure:
A. Sequential steps of procedure:
(1) Wash hands.
(2) If shoe covers necessary, put them on first.
(3) Holding cap on inside, place cap on head, and tuck all hair in.
(4) Hold the gown on the inside with the neckband upright.
(5) Slip arms into sleeves of gown.
(6) Don gloves – see attached – and secure gloves over the cuffs of the gown.
(7) Secure the collar and waistband strings of the gown.
(8) Put on mask with top string above ears and bottom string around neck.
(9) When treatment is done, hampers and waste containers should be available inside for disposing
of gowns, gloves, and masks before leaving the room.
(10) Take the gown off first, wrapping it inside out.
(11) Remove gloves, pulling off from the cuff and turning them inside out as they come off.
(12) Remove mask.
(13) Wound precautions may mean that you need only wear protection if you are handling
or changing the dressings; if you are not sure, ask the nurse.
(14) Wash hands and scrub fingernails.
B. Radiation precautions (as in a patient who has had brain scan or liver scan):
(1) These are indicated by a sign on the door, on the chart, or on the foot of the bed.
(2) If you are pregnant or there is any possibility that you might be pregnant, DO NOT come into
contact with patient.
(3) Do not handle patient or bed linen unless wearing gown, gloves, and mask.
(4) Sweat is also an excretory mechanism for radioactive isotopes. This is especially important to
P.T. if you are having the patient exercise.
(5) Do not get the radiated area wet.
C. Tuberculosis precautions (only if patient is "active" and has not received at least one week's dosage
of medication):
(1) Gown, mask, gloves, and cap should be worn, as in 3. A.
(2) When leaving unit:
(a) Remove gloves and wash your hands thoroughly.
(b) Untie and remove gown (turning gown inside out).
(c) Remove cap.
(d) Untie and remove mask (handle only by strings).
(e) Wash hands thoroughly again immediately after leaving the room.
D. Reverse isolation:
(1) This is indicated by a sign on the door.
(2) Put on gown, mask, cap, boots, and gloves before entering room, using technique in 3. A.
(3) Remove gown, etc. after leaving the room.

COMPETENCIES AND CRITERIA General Medical Conditions – DPT 755
343
E. To change dressing (therapist preparation):
(1) Secure necessary materials. Considerations:
(a) Sterile towel
(b) Sterile instruments
(c) Sterile gauze
(d) Antiseptic solution
(e) Adhesive tape
(f) Sterile gloves
(2) Wash hands.
(3) Drape client, exposing only the area to be dressed.
(4) Remove bandages or binder and loosen adhesive straps.
(5) Unwrap and place sterile towel (doubled) near involved part, touching only the areas that will
not be in contact with the sterile materials.
(6) Unwrap and place the sterile instruments and gauze on the sterile towel. Methods:
(a) Empty sterile package, without touching inside the package and without the package
touching the towel, onto the sterile towel.
(b) Open sterile package and place the material on the sterile towel using a sterile forceps.
(7) Remove soiled dressing using sterile forceps or sterile gloves.
(8) Dispose of soiled dressings.
(9) Discard unsterile forceps or gloves.
(10) Wash hands.
(11) Clean wound with sterile gauze, if necessary, using sterile forceps or sterile gloves.
(12) Dispose of cleaning gauze and discard unsterile forceps and gloves.
(13) Wash hands.
(14) Place sterile gauze on wound using sterile forceps or sterile gloves until area is sufficiently
covered.
(15) Place final dressing on wound, using abdominal pad if necessary, with sterile forceps or sterile
gloves.
(16) Discard forceps or remove gloves and fasten dressing with adhesive tape.
(17) Secure dressing in place with additional tape, sling, bandage, or binder.
F. Method of gloving:
(1) Un-wrap the sterile gloves.
(2) Unseal the package, fold the upper corner back, and open it away from the package.
(3) Unfold the remainder of the package by always grasping the outside part of the wrapper,
exposing the contents of the package.

COMPETENCIES AND CRITERIA General Medical Conditions – DPT 755
344
(4) After the package is opened, grasp the glove for the right hand by the turned down cuff with the
left hand and slip the right hand into the glove.
(5) Place the right hand, now gloved, beneath the cuff of the left glove so that the left hand may be
placed in the glove.
(6) With the right hand beneath the cuff of the left glove and the left hand in the glove, the left cuff
can now be unfolded.
(7) Place the left hand, now gloved, beneath the cuff of the right glove and unfold it.

COMPETENCIES AND CRITERIA General Medical Conditions – DPT 755
345

COMPETENCIES AND CRITERIA General Medical Conditions – DPT 755
346
CRITERIA SHEET VISUAL INSPECTION
1. Pre-Planning for Procedure:
A. See gross evaluation.
2. Preparation of Physical Therapist:
A. Review the procedure as necessary.
B. Review the medical record.
C. Interview the client:
(1) Introduce self, profession, and purpose of visit.
(2) Why are you in the hospital?
(3) What activities are you unable to perform?
(4) What do you think limits those activities?
D. Select and collect the correct equipment:
(1) None necessary – If you have difficulty remembering all the data, a pad and pencil may be
necessary to record findings.
3. Execute the Procedure: General –
A. Follow the Teaching/Learning and Interpersonal Relationships Criteria to establish rapport.
B. Proceed in an orderly fashion, many variations are possible, but sequence should be orderly and
avoid undue stress on patient or inordinate amount of therapist's time.
C. Proceed from a general overview to specific.
D. Proceed in a cephalocaudal, proximal to distal manner.
E. Expose all areas to be observed and drape patient appropriately.
F. General survey:
(1) Watch patient as he walks into department, sits in a wheelchair, or lies in bed. Grossly observe
for signs of distress, facial expressions of pain, splinting of parts, skin color, stature, weight,
posture, motor activity, gait, dress, grooming, personal hygiene, manner, mood, odors, and
relationship to surroundings, speech, and state of awareness.
G. Specific survey:
(1) Head:
(a) Note head size:
1) Normocephalic
2) Microcephalic – small head
3) Hydrocephalic – large head
(b) Observe evidence of trauma:
Division of Physical Therapy
Emory University
COMPETENCIES AND CRITERIA General Medical Conditions – DPT 755
347
1) Atraumatic
2) Specific observation
(c) Note skin color of face:
1) Pale – may be anemic
2) Yellow – may be jaundiced
3) Ruddy – may have elevated temperature, polycythemia, exposure to ultraviolet
4) Dusky – indicates anoxia
(d) Varices on cheeks – may indicate alcohol abuse
(2) Eyes:
(a) Have patient track an object with their eyes:
1) Extra-oculomotion intact (EOMI)
2) Extra-ocular motion limited (EOML)
(b) Have patient close eyes, and observe pupils when patient opens eyes. Pupils should
constrict, and constrict evenly.
1) PERLA – pupils equal and respond to light accommodation
2) Doll's eyes – pupils remain fixed and dilated, indicative of hypoxia
3) Pinpoint – pupils remain fixed and constricted, indicative of decreased neurological
function
(c) Observe for Xanthelasma – small, flat, yellow lipid deposit on upper or lower eyelid;
associated with hyperlipidemia or premature heart disease
(d) Corneal Arcus – a grayish white ring at the junction of the cornea and sclera caused by lipid
deposits (common in the elderly and in Blacks); associated with hyperlipidemia
(e) Cataracts – an opacity of the crystalline eye lens, sometimes with a bluish tint
(f) Jaundice – most easily detected in the sclera because related to increased destruction of red
blood cells (RBC's) and may be caused by liver congestion as in hepatitis, gall bladder
disease, or common bile duct obstruction
(g) Observe for strabismus and nystagmus, rapid to and fro movement of eyes
(h) Observe for exopthalmous – sign of hyperthyroidism; outward bulging of entire orbit
(i) Does subject wear glasses or contact lenses? Why?
(j) Look for redness of eyes
(k) Ask about pain, double vision
(3) Ears:
(a) Observe for:
1) Evidence of trauma
2) Evidence of frostbite, anoxia, cyanosis
3) Discharge
(b) Ask patient about tinnitus (ringing of the ears), earache, infections, and hearing aids.
(4) Nose:
(a) Observe for:
1) Nasal flaring

COMPETENCIES AND CRITERIA General Medical Conditions – DPT 755
348
2) Deviated septum
3) Evidence of trauma
4) Epistaxis
(b) Ask patient about:
1) Sinus trouble
2) Nasal stuffiness
3) Hay fever
(5) Mouth and Throat:
(a) Observe for:
1) Dental hygiene
2) Condition of gums and lips
3) Halitosis
(a) Ketosis (sweet-sour smell that may occur in diabetes)
(b) Alcohol on Breath (AOB)
4) Dentures
5) Trauma
6) Herpes Zoster lesions (fever blisters)
7) Condition of mucous membranes
8) Color and papillation of tongue – should be pink, moist, and well papillated
(a) Black – dehydration
(b) White – fungal lesion
(c) Bluish – cyanosis, anemia, respiratory distress
9) Listen for hoarseness
10) Have patient stick tongue out – should be midline
(6) Skin:
(a) Observe for turgor:
1) Decreased turgor indicates dehydration
2) Edema
(b) Color:
1) Pallor – may be evident in any patient with chronic disease
2) Flushed – may be feverish; may be polycythemia
3) Jaundice – hepatitis, gall bladder disease
4) Cyanotic – anemia, congestive heart failure, respiratory distress
(a) Color of fingernail beds is more reliable than skin color in estimating anemia.
(b) It is common practice to inspect the palms of the hands for pallor. As the
hemoglobin level drops, the palms become pale.
(c) Presence of cyanosis is dependent upon the absolute amount of un-oxygenated
hemoglobin and not on the ratio of oxygenated to un-oxygenated hemoglobin.
Therefore, it may be impossible for the anoxic patient to be cyanotic (not enough
hemoglobin). Conversely a patient with polycythemia may appear cyanotic even
though the oxygen content of the blood is perfectly normal.

COMPETENCIES AND CRITERIA General Medical Conditions – DPT 755
349
1. Cyanosis is classified as peripheral, and it occurs because of slowed circulation
through peripheral vascular beds which allows the capillaries to give up more
than normal amounts of oxygen. The most frequent cause is cold and nervous
tension; also low cardiac output. The feet and hands have a bluish tinge.
2. Central cyanosis results from low arterial oxygen saturation seen in congenital
heart disease and emphysema. The face and mucous membranes are blue.
(c) Scars, bruises
(d) Rash, redness
(e) Dryness – dehydration, psoriasis
(f) Shiny and lack of hair may indicate peripheral vascular disease (PVD)
(7) Observe for total body build:
(a) Well-developed
(b) Well-nourished
(c) Cachectic
(d) Anorexic
(e) Obese
(f) Excessive sweating
(8) Neck:
(a) Observe for:
1) Jugular or neck vein distention (JVD, NVD) obvious – Jugular distension in a person lying
45° or higher suggests a high venous pressure which may be caused by congestive heart
failure, corpulmonale, or vena cava obstruction.
(a) Locate the Angle of Louis (visible angularity on the anterior chest wall where the
manubrium joins the sternum)
(b) Observe the veins on the dorsum of the patient's hands with his arms dependent
and with him sitting or lying at 30˚ or greater
(c) One arm is gradually and passively elevated
(d) Note the point at which the hand veins collapse. Interpretation:
1. Venous pressure is increased if the veins do not collapse when the hand is
raised to the Angle of Louis.
(b) Examine veins on both sides of the neck for aneurysm.
(c) Assess accessory muscle use which is indicative of respiratory distress.
(d) Determine if ROM is full.
(e) Note presence of goiter which is seen in thyroid disease.
(f) Note the presence of lymphadenopathy (swollen glands).
(9) Thorax:
(a) Observe topographic anatomy:
1) Anterior chest:
(a) Mid-sternal line (MSL)
(b) Mid-clavicular line (MCL)
2) Lateral chest:

COMPETENCIES AND CRITERIA General Medical Conditions – DPT 755
350
(a) Anterior axillary line (AAL)
(b) Mid-axillary line (MAL)
(c) Posterior axillary line (PAL)
3) Back:
(a) Mid-spinal line
(b) Scapular line (any abnormality should be described as being so many centimeters
medial or lateral to the reference line and in a specific intercostal space)
(b) Determine thoracic symmetry:
1) The two halves of the thorax should be symmetrical.
(a) Note trauma scars, orthopedic or musculoskeletal problems (kyphosis, pectus
excavatum, pigeon breast)
(b) The anterior-posterior diameter (AP) of the thorax should be definitely less than the
transverse diameter. (In persons with emphysema the lungs become hyper-inflated
and A-P diameter increases)
(c) Normally the ribs are situated at a 45° angle in relation to the spine, but in persons
with emphysema the ribs are more horizontal
(c) Assess respiration – observe rate, depth, symmetry, and pattern of respiration:
1) Patients with multiple rib fractures or a sternal fracture may develop a flail chest in
which a portion of the chest wall loses continuity with the rest of the rib cage and
moves in an opposite direction during respiration. With inspiration, when the thorax is
expanding, the flair portion sinks in; on expiration, the flail portion bulges.
(d) Observe for spinal abnormalities:
1) Scoliosis
2) Kyphosis
3) Spondylolisthesis
(e) Find the Point of Maximal Impulse (PMI):
1) The movements of the heart against the chest wall and a rhythmic sharply localized
thrust may be visualized, normally located in the mid-clavicular line in the fifth
intercostal space. (PMI, MCL, 5th 1CS)
(f) Note cough, sputum production, hemoptysis, and/or wheezing.
(10) Abdomen:
(a) Check for scars, trauma
(b) Ascites (massive edema)
(c) Obesity
(d) Abdominal distention (constipation, urinary retention)
(e) Note difficulties with swallowing
(f) Ask patient about appetite, heartburn, nausea, vomiting, diarrhea, hemorrhoids
(g)
(11) Extremities:
(a) Clubbing – This is a sign associated with cardiopulmonary disease. There is diffuse
enlargement of the terminal phalanges of the fingers and toes. It is thought to come from

COMPETENCIES AND CRITERIA General Medical Conditions – DPT 755
351
tissue hypoxia and increased blood flow to the extremities out of proportion to the needs of
the tissues. This increased blood flow produces forced feeding and accelerated tissue
growth. Clubbing usually occurs in the thumb and index finger.
1) Execution:
(a) Only truly seen in profile
(b) View the finger from the side
1. Normal – An obtuse angle of about 160° is present between the base of the nail
and skin next to the cuticle. This “base angle” is clearly seen in the normal
thumb.
2. In clubbing, the base angle is obliterated and becomes 180° or more.
(b) Heberden's nodes – These are firm fibrous nodules about the terminal interphalangeal joints
with mushrooming of the terminal phalanges (characteristic of osteoarthritis).
(c) Bony disfigurement and displacement of MP's and PIP's is usually indicative of rheumatoid
arthritis (R.A.).
(d) Tophi-fibrous node generally found in articulation of great toe; usually painful; is indicative
of gout.
(e) Edema – Usually occurs in dependent parts of the body and shifts from legs to sacrum when
patient goes from sitting to supine. Morning edema is more worrisome than evening edema.
1) Edema may be localized or generalized (anasarca).
2) Unilateral edema suggests local disease recognized as puffiness or swelling of the area.
3) Characterized as 1+ to 4+. 1+ is called trace; 4+ is called "pitting edema”. The area is
pressed for a few seconds with the therapist's thumb. If persistence of the indentation
remains; this is pitting edema. Large amounts of fluid may accumulate in the tissue
spaces before swelling can be detected. A weight gain of 10 pounds can occur before
pitting edema results.
(f) Varicose veins
H. Record all observations:
(1) 0: Include normal as well as abnormal findings.
(2) A: Patient with evidence of atherosclerosis as determined by shiny, friable skin on LEs, absence
of pulse in dorsalis pedis and posterior tibialis, and increased jugular vein distention.
(3) P: Avoid intense heat, cold, and exercise in patient with suspected atherosclerotic changes.

COMPETENCIES AND CRITERIA General Medical Conditions – DPT 755
352
CRITERIA SHEET EVALUATION OF TEMPERATURE
1. Pre-Planning for Procedure:
A. Identify the priority signs and symptoms which make the procedure applicable:
(1) Perspiration
(2) Piloreceptor response - "goose bumps"
(3) Shaking chills (rigor)
(4) Tachycardia/tachypnea
(5) Change in skin temperature or color
B. Identify the rationale for choice of procedure:
(1) Safety:
(a) A rectal thermometer should not be used after rectal surgery, in patients with myocardial
infarction (initiates a vagal response), in clients with internal hemorrhoids, or in clients with
rectal polyps.
(b) An oral thermometer may be too inaccurate following surgery.
(c) Oral thermometers should not be used after oral surgery or in clients who are intubated.
(d) An axillary temperature may be taken if oral or rectal not permissible, but this is the most
inaccurate of 3 methods.
(2) Condition of the client:
(a) Recent intake of hot or cold food or beverages may give false reading with oral
thermometer
(b) Client's ability to keep oral thermometer under the tongue
(c) Recent intake of aspirin
(3) Generate other possible alternative treatments.
(4) Application of procedure to Short and Long Term Goals:
(a) An elevated temperature increases the basal metabolic response with a subsequent
increase in heart and respiratory rates. Activity may compromise the patient's reserve.
2. Preparation of the Physical Therapist:
A. Review the procedure as necessary.
B. Review the medical record.
C. Interview the client:
(1) Have you had any shaking, chills, or severe sweating?
(2) What have you eaten or drunk in the past 20 minutes?
(3) Have you had any aspirin within the past 2 hours?
Division of Physical Therapy
Emory University

COMPETENCIES AND CRITERIA General Medical Conditions – DPT 755
353
D. Select and collect the correct equipment:
(1) Secure the appropriate thermometer based on need for accuracy and client's medical condition.
E. Prepare the environment and equipment/materials:
(1) Shake mercury thermometer down; insure operational status of digital thermometer.
3. Execute the Procedure:
A. Use the Teaching-Learning and Interpersonal Relationships criteria to establish rapport and explain
and demonstrate the procedure.
B. Sequential steps or procedure:
(1) Oral:
(a) Client may be in any position; place thermometer in sublingual position. Have client keep
mouth closed, do not allow client to "bite” on thermometer. Retain for 3 minutes or until
digital thermometer beeps.
(2) Rectal:
(a) Have client side-lying in knees to chest position. Lubricate thermometer, spread buttocks
apart, locate the anus, insert thermometer gently. Retain for 3 minutes (mercury
thermometer).
(3) Axillary:
(a) Client may be sitting or supine; place thermometer in axillary fold. Closely appropriate arm
to thorax. Retain for 5 minutes.
(4) Skin:
(a) With palmar aspect of hand, determine warmth of affected part; compare to other
extremity.
(5) Remove thermometer.
(6) Wipe the thermometer clean.
(7) Do not handle bulb end.
(8) Read the thermometer.
C. Implement change in procedure based upon:
(1) Patient’s ability to cooperate
(2) Accuracy of findings
D. Record results in SOAP format:
(1) 0:
(a) Identify site of temperature reading
(b) Identify type of thermometer
(c) Record temperature in degrees
(2) A:
(a) Hyperthermia/febrile - temperature above 99.6°
(b) Hypothermia - temperature below 97°
(c) Afebrile - temperature at 98.6°
(3) P:
(a) Modify treatment accordingly.

COMPETENCIES AND CRITERIA General Medical Conditions – DPT 755
354
CRITERIA SHEET EVALUATION OF BLOOD PRESSURE
1. Pre-Planning for Procedure:
A. Identify the priority signs and symptoms which make the procedure applicable:
(1) Prolonged bed rest
(2) History of hypertension, diabetes mellitus, atherosclerosis
(3) History of fainting or postural hypotension
(4) Dizziness, lightheadedness, headaches
B. Identify the rationale for choice of procedure:
(1) Safety:
(a) Never measure blood pressure on an extremity where there is an indwelling arterial/venous
catheter.
(b) Never measure blood pressure on an extremity where there is an arteriovenous fistula. (as
used in hemodialysis)
(c) Never measure blood pressure in the arm on the same side as a mastectomy.
(d) Never measure blood pressure in an extremity immediately after an arterial line has been
removed.
(e) Avoid areas of marked edema, thromboemboli, or phlebitis.
(f) It is permissible to measure blood pressure in the extremity where a heparin lock is in place.
(2) Condition of the client:
(a) Determine level of activity prior to the blood pressure measurement.
(b) Determine medication, such as anti-hypertensives, aldomet, Inderal, birth control pills,
and/or nitroglycerine preparations.
(c) Determine recent intake of fluids.
(d) Determine recent hemorrhage, blood volume depletion, and/or diuretic therapy.
(3) Generate other possible alternative mechanisms:
(a) None, unless client is monitored by an in dwelling arterial catheter with digital readout.
2. Preparation of the Physical Therapist:
A. Review the procedure as necessary.
B. Review the medical record.
C. Interview the client:
(1) Have you ever been told you have high blood pressure?
(2) Do you ever get dizzy or lightheaded when you get up quickly?
Division of Physical Therapy
Emory University

COMPETENCIES AND CRITERIA General Medical Conditions – DPT 755
355
(3) Do you ever get severe headaches?
D. Select and collect correct equipment:
(1) Sphygmomanometer
(2) Cuff
(a) Identify the size of cuff required.
1) Adult arm – 13 cm wide
2) Adult leg – 15 cm wide
3) Child – should cover 2/3 of brachium
(3) Stethoscope
E. Prepare the environment and equipment/materials:
(1) Evaluate the reliability of sphygmomanometer.
3. Execute the Procedure:
A. Follow the Teaching-Learning and Interpersonal Relations Criteria to establish rapport and explain
and demonstrate the procedure.
B. Sequential steps of treatment:
(1) Position client - may be sitting, supine, or standing
(a) Readings may be done twice - supine to sitting, or sitting to standing, to determine effects of
postural changes
(2) Identify extremity to be used for measurement.
(3) Remove clothing from extremity. Do not roll up sleeve or pant leg.
(4) Place the inferior border of the pneumatic cuff one inch above the antecubital fossa, or one inch
above the popliteal fossa.
(5) Wrap the cuff around the arm or leg.
(6) Palpate the brachial artery and place arm, with elbow straight, at the level of the heart.
(7) Place the diaphragm of the stethoscope over the point of maximal impulse pulsation of the
brachial or popliteal artery.
(8) Position the ear pieces of the stethoscope in place.
(9) Assess your ability to read the manometer.
(10) Rapidly inflate the cuff to between 180-200 mmHg.
(11) Deflate the cuff at a rate of about 2 mmHg per second.
(12) Note the level at which the pulse sound is first detected to occur regularly; this is the systolic
pressure.
(13) Continue to deflate the cuff at a rate of about 2 mmHg per auscultated pulse beat.
(14) Note the level at which the pulse disappears; this is the diastolic pressure.
(15) Rapidly complete deflation to 0 mmHg.
(16) If multiple readings will be taken, leave cuff in situ; if no more readings will be taken, remove
cuff.
(17) Use arm with higher reading for record and subsequent readings.
C. Implement changes in procedures based upon the response of the client.
(1) Alternate means of blood pressure evaluation:
(a) In clients who are extremely hypotensive, or in shock, an audible systolic pulse cannot

COMPETENCIES AND CRITERIA General Medical Conditions – DPT 755
356
always be determined. Systolic pulse is determined by palpation. This is called a “palpable”
blood pressure.
(2) To execute this procedure follow steps 1-4 in 3B, then:
(a) Palpate the radial pulse.
(b) Increase the cuff pressure until the radial pulse disappears.
(c) Deflate the cuff slowly (2 mmHg/sec) until the radial pulse reappears and note this value;
this is the approximate systolic pressure.
(d) Diastolic pressure is usually too weak to palpate.
(e) Deflate quickly to 0 mmHg.
(3) This palpable means may be used prior to auscultation to ascertain maximal systolic cuff
pressure. Cuff should be inflated approximately 20 mmHg above palpable systolic measurement.
This method may be used to assess the reliability of your auscultatory finding.
D. Record the results in SOAP format:
(1) O:
(a) Record the position of the patient and the extremity in which the measurement was taken.
(b) Record the measurement and indicate if the measurement was taken by palpable or
auscultatory method.
(2) A:
(a) Normal (18 years old or older) - systolic <130 mmHg, diastolic <85 mmHg
(b) High normal systolic - 130-139 mmHg, diastolic 85-89 mmHg
(c) Hypertension (stages 1-4) - systolic >130 mmHg, diastolic >89 mmHg
(d) Hypotension - blood pressure less than 90/60
(e) Poor inotropic response - There should be a corresponding increase in blood pressure for
each increase in work load. Clients who are unable to maintain their blood pressure
response indicate a poor cardiac tone and an inability of the ventricle to generate a forceful
contraction.
(3) P:
(a) Modify treatment accordingly, and notify appropriate personnel where indicated.
E. Clean the area.

COMPETENCIES AND CRITERIA General Medical Conditions – DPT 755
357
CRITERIA SHEET EVALUATION OF VENTILATION
1. Pre-Planning for Procedure:
A. Identify the priority signs, symptoms, and conditions which make the procedure applicable:
(1) Exercise
(2) Cardiac or pulmonary disease
(3) Neuromuscular disorders
(4) Musculoskeletal disorders
(5) Cyanosis
(6) Lightheadedness
(7) Dizziness
(8) Yawning
(9) Lethargy
(10) Gasping, panting
(11) Diaphoresis
(12) Flushed face
B. Identify the rationale for choice of procedure:
(1) Safety and condition of patient:
(a) Determine patient's baseline, and determine patient's ability to perform activity.
(b) Ascertain patient's distress level.
(2) Alternate mechanisms:
(a) None available unless patient is on a respiratory monitoring device with digital read-out
(3) Application to short and long term goals:
(a) Necessity of breathing exercises to decrease tachypnea
(b) Determine necessity of providing long rest periods between bouts of activity
2. Preparation of the Physical Therapist:
A. Review the procedure as necessary.
B. Review the medical record.
C. Interview the client:
(1) Do you feel short of breath?
(2) What kinds of activity make you breathless?
(3) How long does it usually take for you to regain your breath?
D. Select and collect the correct equipment:
(1) Watch with second hand.
Division of Physical Therapy
Emory University

COMPETENCIES AND CRITERIA General Medical Conditions – DPT 755
358
E. Prepare the environment and equipment/materials:
(1) Pre-treatment preparation:
(a) None necessary
(b) Generally, respirations are counted after the patient's pulse is taken, with the patient in the
same position.
3. Execute the Procedure:
A. Do not inform the patient of what you are doing. Observation of the respiratory rate should not be
evident to the patient. If this occurs, the individual will be conscious of his breathing and normal
rate and rhythm will be lost.
B. Sequential steps of procedure:
(1) Position patient for comfort and ease of respiration:
(a) May be sitting, standing, or supine
(2) Locate the proper site for evaluation and determine ability to detect respiratory movement:
(a) Diaphragmatic in males
(b) Costal in females
(3) Count the respirations while your fingers are in position to take the pulse.
(4) Count the respirations per minute - this is the rate:
(a) You may count the number of respirations in 15 seconds and multiply by 4 if the rhythm is
regular.
(5) Determine regularity of respiration - this is the rhythm:
(a) Is it smooth with even timing between breaths?
(b) Is it irregular with apneic pauses followed by large gasps?
(c) Note yawning, sighing, gasping, and/or panting.
(6) Determine the inhalation to exhalation rate:
(a) Count the number of seconds the patient breathes in.
(b) Count the number of seconds the patient breathes out.
(7) Determine ease of respiration:
(a) Labored - nasal flaring, use of levator scapula, sternocleidomastoid muscles, and intercostals
(b) Normal - diaphragmatic, abdominal movement only
C. Implement changes in procedure based upon:
(1) Response of the patient:
(a) Observation of the respiratory rate should not be evident to the patient.
(b) If reliability is affected, repeat measurement.
D. Record results in SOAP format:
(1) O:
(a) Rate – # of respirations/minute
(b) Rhythm – regular/irregular; note gasps, yawning, sighing
(c) I:E ratio
(d) Ease of respiration – note use of accessory muscles
(2) A:

COMPETENCIES AND CRITERIA General Medical Conditions – DPT 755
359
(a) Tachypnea/hyperventilation – respirations greater than 20 times per minute
(b) Bradypnea/hypoventilation – respirations less than 16 per minute
(c) Normal – 16-24 per minute
(d) Pediatrics – have increased respiratory rates
(e) Rhythm is irregular in Cheyne-Stokes – Intermittent period of apnea and gasping
(f) Ratios:
1) Normal 1:3
2) Prolonged inspiration 2:1
3) Prolonged expiration 1:4
(3) P:
(a) Modify the patient’s treatment accordingly.
(b) Notify appropriate personnel where indicated:
1) Sudden or marked change in status

COMPETENCIES AND CRITERIA General Medical Conditions – DPT 755
360
CRITERIA SHEET PULSE RATE AND EVALUATION OF PERIPHERAL PULSES
1. Pre-Planning for Procedure: A. Identify the priority signs, symptoms, and conditions which make the procedure applicable:
(1) Prolonged bed rest (2) Exertion (3) Cardiopulmonary disorders (4) Lightheadedness, dizziness (5) Palpitations
B. Identify rationale for choice of procedure: (1) Safety:
(a) Determine patient's ability to perform evaluative or therapeutic procedures. (2) Condition of Patient:
(a) Recent ingestion of coffee, tea, alcohol, heavy meal (b) Recent cigarette/cigar use (c) Weakness, lethargy, syncope (d) Shortness of breath (e) Chest pain (f) Diaphoresis (g) Anemia, fever, hemorrhage, hyper/hypothyroidism, increased intracranial pressure,
jaundice (h) Recent exercise (i) Medications (inderal, digitalis, valium) (j) Anxiety
(3) Duration of treatment: (a) Determine necessity of prolonged rest periods between bouts of exertion.
(4) Generate alternate mechanisms: (a) None – unless patient is monitored on telemetry or has continuous ECG read-out
(5) Application of procedure to short and long term goals: (a) Increase cardiac efficiency (b) Increase exercise tolerance
2. Preparation of Physical Therapist: A. Review of the procedure as necessary. B. Review the medical record. C. Interview the patient:
(1) Do you ever get palpitations? (2) Have you recently had anything to eat or drink (coffee, tea, cola) or had a cigarette? (3) Does your heart ever "skip a beat"? (4) Do you take any heart medications?
Division of Physical Therapy
Emory University

COMPETENCIES AND CRITERIA General Medical Conditions – DPT 755
361
D. Select and collect the correct equipment:
(1) Watch with second hand
3. Execute the Procedure: A. Follow the Teaching-Learning and Interpersonal Relationships Criteria to establish rapport and
explain and demonstrate the procedure. B. Sequential steps for procedure:
(1) Identify the appropriate site for pulse taking. (a) Generally, choose radial pulse for accessibility. (b) Choose femoral or popliteal pulse with peripheral vascular disease.
1) Start distal if pulse is present and all extremity pulses intact. If distal pulse not present, progress in caudo-cephalic direction.
(c) Check carotid pulse to assess consciousness. (d) Check temporal pulse if radial pulse is inaccessible (forearm in cast or bandaged).
(2) Position client comfortably and for accessibility. (3) For lower extremity, remove clothing, socks, and stockings, and drape appropriately. (4) Locate arterial pulses. These can be palpated at any point where the arteries lie near the surface
of the body and where they can be compressed against a firm, usually bony, surface. (a) Radial pulse – locate the artery at the radial and volar aspect of the wrist, compress gently
against distal end of radius with first 3 fingers (b) Brachial pulse – artery is just medial to the biceps tendon, above the elbow (c) Femoral artery – located between the anterior iliac spine and symphysis pubis; press deeply
(the use of two hands, one on top of the other, may facilitate the examination, especially in obese patients)
(d) Popliteal pulse – patient’s knee should be slightly flexed, press the fingertips of both hands into the popliteal fossa slightly lateral to the midline; this pulse is difficult to find
(e) Dorsalis pedis pulse – use three fingers on the dorsum of foot, not ankle; over the lateral to extensor tendon of great toe
(f) Posterior tibial – curve your fingers behind and slightly below the medial malleolus of ankle (g) Carotid – locate Adams apple, move fingers about one inch laterally; this pulse is easier to
find with patient's neck in extension (h) Temporal – place index and middle finger laterally and superior to the orbit of the eye
(5) Do not use your thumb. (6) Determine rate:
(a) Count the number of pulses per minute. (b) Count the number of pulses in 15 seconds and multiply by 4. This method can only be used if
pulse rate is regular. (c) If pulse if irregular, take pulse for a full minute.
(7) Determine rhythm: (a) Smooth – Even beats with predictable intervals (b) Irregular – E.g. 3 beats, no beat, 3 beats, no beat; irregular intervals but with predictable
pattern (c) Irregularly, irregular – Chaotic rhythm with no discernible pattern
(8) Note depth: (a) Absent – No pulse palpable (b) Diminished – Weak but palpable

COMPETENCIES AND CRITERIA General Medical Conditions – DPT 755
362
(c) Normal – Of normal intensity (d) Jack-hammer/water-hammer – Bounding pulse (e) Thready – Rapid, feeble pulse; difficult to discern pulses
C. Implement changes in procedure as necessary. D. Record results in SOAP format:
(1) S: (a) "My heart feels like it's going to jump out of my chest."
(2) 0: (a) Record rate, presence, rhythm, and depth of pulses. (b) Record position of patient. (c) Record comparison between right and left extremities. (d) Record changes with activity. (e) Record length of time to return to normal after activity.
(3) A: (a) Tachycardia – Pulse rate greater than 100 beats per minute (b) Bradycardia – Pulse rate less than 60 beats per minute (c) Normal – 60 to 100 beats per minute (d) Pediatrics – Have increased rates, women have higher rate than men
(4) P: (a) Modify treatment accordingly. (b) Notify appropriate personnel when indicated.

COMPETENCIES AND CRITERIA General Medical Conditions – DPT 755
363
CRITERIA SHEET SENSORY ASSESSMENT
Introduction: Disturbances of the sensory system pose significant functional implications for patients with
neurological deficits. Screening and evaluation for sensory impairments is necessary prior to treatment
planning.
1. Pre-Planning for Procedure:
A. Identify the priority signs and symptoms which make the procedure applicable:
(1) CNS or PNS diagnosis
(2) Lack of attention to the environment
(3) Lack of attention to the evaluator
(4) Difficulty generating a motor copy after physical demonstration by the therapist
(5) Neglect or lack of awareness of a limb
(6) Difficulty with balance or increased frequency of falls
B. Identify the rationale for choice of procedure:
(1) Safety:
(a) Burn and wound hypersensitivity
(b) Fall prevention
(2) Condition of the client:
(a) Trust for therapist
(b) Positioning limitations
(c) Ability to understand directions for testing
(d) Attention span
(e) Expressive communication abilities
(3) Generate other possible alternative treatments.
(4) Application of procedure to short and long term goals:
(a) Impaired sensation will reduce information received regarding position in space, vibration,
temperature, touch, sight and sound, which will interfere with safety, function, and learning.
Division of Physical Therapy
Emory University

COMPETENCIES AND CRITERIA General Medical Conditions – DPT 755
364
2. Preparation of the Physical Therapist:
A. Review the procedure as necessary.
B. Review the medical record.
C. Interview the client:
(1) Identify reports of dysesthesia or paresthesia.
(2) Indentify reports of falls.
D. Select and collect the correct equipment:
(1) Penlight
(2) Cotton ball or light brush
(3) Safety pin, paper clip, or name tag
(4) Tuning fork
(5) Test tubes of warm and cool water
E. Prepare the environment and equipment/materials.
3. Execute the Procedure:
A. Use the Teaching-Learning and Interpersonal Relationships Criteria to establish rapport and explain
and demonstrate the procedure.
B. Sequential steps of procedure:
(1) Vision:
(a) Eye opening:
1) Test in optimal environmental conditions.
2) Observe and report presence/absence and duration of eye opening.
3) Observe and report effect of environmental conditions. Consider:
(a) Light level
(b) Sound level
(c) Presence or absence of simultaneous challenges to motor control
(d) Presence or absence of simultaneous tactile, proprioceptive, or
vestibular stimulation
(e) Requirements for social interaction
(f) Characteristics of the visual stimulus
(b) Pupils:
1) Observe for inequality of dilation.
2) Observe for appropriate dilation relative environmental illumination.
3) Observe for inequality of reactivity to penlight stimulation.
(c) Determine if client has corrective lenses:
1) Test/treat wearing glasses.
2) Clean lenses if needed before further testing.
(d) Eye contact:
1) Observe and report ability to attain and sustain eye contact with another person.
2) Observe and report ability to break eye contact with another person.
(e) Visual acuity:
1) Close distances (read newspaper, point to picture, or note attention to small objects)

COMPETENCIES AND CRITERIA General Medical Conditions – DPT 755
365
2) Far distances (read wall clock or observe for visual tracking of a moving person or object
at near and far distances)
3) Far distances without movement cues (locate static object or person on request by
scanning the room)
4) Older clients and those with suspected low vision should be observed negotiating a
room at low light levels.
(f) Peripheral vision/visual field cuts:
1) If possible, obtain assistant. (if not, examiner is positioned behind client)
2) Position client in secure upright posture with head in midline and explain procedure.
3) Client is instructed to look straight ahead.
4) Assistant slowly moves object or index finger from behind the client into each quadrant
of the visual field. Note position of awareness and any asymmetries.
(2) Visual motor control:
(a) Visual pursuits:
1) Modify the environment to support optimal responses.
2) Choice of stimulus:
(a) Human face in appropriate orientation to client's face (neonates and clients in early
stages of recovery form brain injury)
(b) Objects with high contrast to the visual ground
(c) Noiseless object (examiner may choose to obtain attention with a noise maker)
3) Choose an appropriate distance and movement speed of stimulus.
4) Order test trials for young children in the developmental sequence of acquisition of
visual pursuits. (horizontal then vertical)
5) Observe and report difficulty crossing the midline.
6) Test for convergence to an approaching stimulus.
7) Observe for presence or absence of counter rolling of the eyes with lateral head tilt.
8) Test for vestibular ocular reflex.
(b) Test for strabismus:
1) Observe the position of the corneal light reflex in each eye.
2) Test for strabismus/amblyopia using the "cover test".
(c) Observe and describe nystagmus, if present.
(3) Hearing:
(a) Determine if the client hears/understands your speech.
(b) Determine if the client has hearing aids (screen with aids in place and turned on).
(c) Determine if the client hears paper crackling positioned close to her/his ear.
(d) Determine if the client turns head toward novel environmental sounds.
(e) Determine if the client startles to loud noises or appears overly sensitive to sound.
(4) Light touch:
(a) Instruct client in the procedure, providing a trial prior to proceeding.
(b) Instruct client not to guess if uncertain.
(c) Occlude vision and expose skin.

COMPETENCIES AND CRITERIA General Medical Conditions – DPT 755
366
(d) Touch client's skin with cotton ball or light brush.
(e) To assess gross touch sensation, have client tell you when he/she felt the touch; to assess
touch localization, have client tell you where he/she felt the touch.
(f) Randomize stimuli among right, left, UE, LE, trunk, and face to prevent prediction by client.
(g) Avoid summation of impulses. Don’t apply consecutive stimuli too close or in rapid
succession.
(h) Be aware of general pattern of deficit: right/left, proximal/distal, peripheral/axial, or
dermatome pattern.
(5) Pin prick:
(a) Instruct client in the procedures, providing a trial prior to proceeding.
(b) Instruct client not to guess if uncertain.
(c) Occlude vision and expose skin.
(d) Touch client's skin with the pin or dull side of a safety pin or nametag.
(e) Have client tell you whether he/she felt sharp or dull sensation.
(f) Randomize the stimuli among right, left, UE, LE, and trunk to prevent prediction by client.
(g) Do not apply consecutive stimuli close to each other or in rapid succession to avoid
summation of impulses.
(h) Be aware of general pattern of deficit: right/left, proximal/distal, peripheral/axial, or
dermatome pattern.
(6) Pressure:
(a) Instruct client in the procedures, providing a trial prior to proceeding.
(b) Instruct client not to guess if uncertain.
(c) Occlude vision and expose skin.
(d) Apply firm pressure to client's skin with your thumb.
(e) Have client tell you when he/she feels pressure.
(f) Randomize stimuli among right, left, UE, LE, trunk, and face to prevent prediction by client.
(g) Do not apply consecutive stimuli close to each other or in rapid succession to avoid
summation of impulses.
(h) Be aware of general pattern of deficit: right/left, proximal/distal, peripheral/axial, or
dermatome pattern.
(7) Proprioception:
(a) Instruct client in the procedures, providing a trial prior to proceeding.
(b) Instruct client not to guess if uncertain.
(c) Occlude vision.
(d) Position client in a neutral posture so that movement of the limb will not be detected by
rubbing on the supporting surface.
(e) Hold client's limb distal to the joint being tested with your fingers on the lateral aspect.
(f) Move the reference limb from the resting position to a static posture, first in a single plane,
progressing to multiple planes of motion.
(g) Ask the client to replicate the position with the other limb or to describe it verbally.
(h) Return the client to resting posture between stimuli for reference to neutral.

COMPETENCIES AND CRITERIA General Medical Conditions – DPT 755
367
(i) Be aware of general pattern of deficit: right/left or proximal/distal.
(8) Kinesthesia:
(a) Instruct client in the procedures, providing a trial prior to proceeding.
(b) Instruct client not to guess if uncertain.
(c) Occlude vision.
(d) Position client in a neutral posture so that movement of the limb will not be detected by
rubbing on the supporting surface.
(e) Hold client's limb distal to the joint being tested with your fingers on the lateral aspect.
(f) Slowly move the testing joint from the resting position in a single plane of motion.
(g) Ask the client which direction you are moving the joint while the motion is occurring.
(h) Return the client to resting posture between stimuli for reference to neutral.
(i) Be aware of general pattern of deficit: right/left or proximal/distal.
(9) Vibration:
(a) Instruct client in the procedures, providing a trial prior to proceeding.
(b) Instruct client not to guess if uncertain.
(c) Occlude vision and expose skin.
(d) Tap tuning fork and apply the stem to a bony prominence (elbow, knee, styloid, malleolus).
(e) Ask the client whether the tuning fork is vibrating or not.
(f) Be aware of general pattern of deficit: right/left or proximal/distal.
(10) Temperature:
(a) Instruct client in the procedures, providing a trial prior to proceeding.
(b) Instruct client not to guess if uncertain.
(c) Occlude vision and expose skin.
(d) Apply vial of either warm (104-113 degree) or cool (41-50 degree) water to the client’s skin.
(e) Ask the client whether the test tube is cool or warm.
(f) Be aware of general pattern of deficit: right/left or proximal/distal.
C. Implement change in procedure based on:
(1) Patient's ability to cooperate
(2) Accuracy of findings
(3) Contamination by cognitive or communicative deficits
D. Record results in SOAP format:
(1) Subjective (S):
(a) Report hypo or hypersensitivity
(b) Clients symptoms or behaviors (agitation)
(2) Objective (O):
(a) Include sensation tested
(b) Percentage of correct responses

COMPETENCIES AND CRITERIA General Medical Conditions – DPT 755
368
(c) Patterns of deficit
(d) Sensations not tested
(3) Assessment (A):
(a) Ascertain and report whether/which pathway or receptor is impaired
(b) Any limitation to collection of valid data (cognitive or communicative deficits)
(c) Relationships between deficits and activity limitations or safety
(4) Plan (P):
(a) Implement plan to train or compensate for identified deficits
(b) Implement necessary referrals
E. Prepare client for dismissal.
F. Clean up area.

COMPETENCIES AND CRITERIA General Medical Conditions – DPT 755
369
PROCEDURE AND CRITERIA SHEET EVALUATION AND TREATMENT OF FUNCTIONAL LIMITATIONS
1. Pre-Planning for Procedure: A. Identify symptoms and co-existing problems of the client. (see Criteria for the
Evaluation and Treatment of Clients) B. Identify problems that could compromise the client's medical safety during functional
assessment, and adapt plans for assessment to insure client safety. C. Identify the reason for referral. D. Identify the client's level of function prior to this injury/illness. E. Determine the characteristics and demands of the environments in which the client must
function with safety and efficiency. F. Determine the domains of life to be addressed in assessment. (self care, play, educational,
family role, vocational, sports performance, leisure) G. Determine the purpose(s) and rationale for evaluation of competencies and limitations in
functional use of movement, including: (1) Immediate needs to insure the client's safety by identifying the client's level of independence
and/or requirements for caretaker assistance/equipment to other individuals involved in the client's care
(2) Identification of client/caretaker resources, needs, and priorities in all relevant environments (3) Verification of need for physical therapy services (4) Determination of an appropriate treatment plan and goals (5) Documentation of functional outcomes of physical therapy
2. Preparation of Physical Therapist: A. Identify relevant standards or requirements for documentation, including:
(1) Standards of Practice for Physical Therapy (American Physical Therapy Association) (2) Documentation standards of the facility (probable source: Procedure Manual for the Physical
Therapy Department) (3) Special requirements of the source of reimbursement for services (workman's compensation,
school regulations, Medical Assistance, Medicare, etc.) (4) Special requirements imposed by participation of the physical therapy service in a database
B. Determine the time constraints for functional assessment. C. Determine the priority order of functional tasks and environments to be assessed based on:
(1) Client medical safety (2) Client comfort (3) Medical treatment priorities (4) Information being sought from another source through referral initiation (5) Client's functional, physiologic, emotional, social, and vocational needs (6) Client age (7) Financial and other required resources
Division of Physical Therapy
Emory University

COMPETENCIES AND CRITERIA General Medical Conditions – DPT 755
370
D. Locate and review special forms or standardized tests currently available for use. (1) Review manuals of available tests of functional movement and determine suitability of test
for use in assessment of a client by comparing tests in these areas: (a) Purpose (b) Domains of function assessed (c) Individual items assessed in each domain (d) Age range (appropriate population) (e) Reliability (f) Validity (g) Time required to complete (h) Training required of examiner (i) Scoring requirements:
1) Best performance vs. single trial score 2) Scored by caretaker/client interview 3) Self-scored by client/caretaker 4) Time limitations on task completion
(j) Scaling of scores: 1) Credit for partial performance scales 2) Caregiver assistance scales 3) Separate scaling for use of equipment (walkers, orthotics, sliding boards, hydraulic bath
lifts, etc.) (k) Time required to score (l) Cost and quality of materials (m) Ease of interpretation of results by other professionals (n) Ability of the instrument to document progress in relevant areas of function (o) Conversion capabilities to computer assisted database management
(2) If a standardized test is to be used, prior to the client's physical therapy session, review the scaling of scores for all items to be tested and obtain forms.
(3) If a standardized test is to be used, identify any tasks to be tested not included in the test. (4) If available standardized tests do not meet the assessment needs of the client or caretakers,
then list tasks that need to be assessed and review caregiver assistance scales and performance labels in criteria sheet.
(5) Determine the environment(s) for testing. (a) Natural environments are usually preferable. (b) Identify characteristics of the test environment. (c) Modify the test environment as needed:
1) Can surfaces in the home environment be duplicated? (a) Examples: low easy chairs, soft bed edges, grass, curbs
2) Can levels of illumination match those at home? 3) Can screens be used if distractions are problematic? 4) Can crowded hallways be found?
(6) Determine the time for testing, considering: (a) Motivation (b) Fatigue (avoid excessive trials during testing) (c) Testing at natural times of day examples:
1) Bed to wheelchair transfers first thing in morning (is morning stiffness a problem?), in room before transport to PT, during transfer to and from mat for exercise, or when

COMPETENCIES AND CRITERIA General Medical Conditions – DPT 755
371
returning to room to rest 2) Observe drinking when thirsty 3) Feeding at mealtimes 4) Toileting when required 5) Car transfers when preparing to leave rehab center
(7) Obtain all equipment necessary for testing and check for safety. (8) Anticipate needs for physical assistance and schedule personnel to assist the therapist if
necessary.
3. Execute the Procedure: A. Observe client/caretaker performance of functional tasks:
(1) Conduct testing in order of priority. (2) Observe client for signs of stress/fatigue. (3) Guard client's safety at all times during testing. (4) Allow client/caretaker to demonstrate their own method to accomplish a task before suggesting
a method. ("Show me how you sit up in bed.") (a) If method of execution is aberrant, note compensations and problem solving strategies
employed by the client or caretaker to accomplish task. 1) Are these strategies safe and efficient? 2) Generate a list of possible impairments that could require the
observed compensations. (b) If not testing at home, inquire if method demonstrated is the one used at home. (c) If not testing at home, inquire if adaptive equipment is used at home. (d) If not testing at home, inquire if task was easier or harder to perform with hospital/clinic
equipment. (5) Observe performance relative to the following parameters:
(a) Assistive devices used or needed (b) Environmental adaptations required (c) Missing components of task or components requiring physical assistance (d) Time required to complete task (e) Symptoms (pain, shortness of breath, O2 desaturations, or fatigue) during or after task (f) Limitations on the client's ability to perform other necessary daily tasks due to time or effort
involved in task (g) Caregiver requirements; example(s):
1) Client can transfer from W/C to bed using sliding board if assisted with positioning of sliding board, feet, and footrests (implies caregiver can leave room after assisting with initial steps of task).
2) When seated in wheelchair, client can retrieve a small object from the floor, but must use both arms to push back up to an erect sitting position from a forward bent position (describes deviation from normal postural control; implies cannot lift large object from floor).
(6) Terminate assessment before client is overly fatigued. (7) Ask client/caretaker if performance during testing was typical.
B. If a standardized assessment is used: (1) Date the test form. (2) Follow standard test procedures. (note any necessary modifications on the form) (3) Score the test completely and accurately. (4) Append a copy of the test form to the record.

COMPETENCIES AND CRITERIA General Medical Conditions – DPT 755
372
(5) Supplement standardized test with additional tasks as necessary. C. Record clinically relevant competencies in functional movements in the objective section of the
record. Example(s): (1) Objective (O): Functional Motor Skills or ADLs:
(a) Independent (I) in bed mobility including rise to sit at edge of bed (b) Dynamic sitting balance at edge of bed adequate for lower extremity dressing/ADL/transfers (c) (I) sit to stand from bed to and from bedside chair (d) (I) stand to sit with right arm on armrest required to slow descent (e) Can reach above shoulder level to retrieve soup cans from kitchen shelves with left arm (no
pain) (f) Can play 1-1.5 hour singles tennis match without knee pain
D. Discuss the client's present functional limitations with client/caregiver and/or other team members and establish the priority order of desired functional outcomes of treatment (i.e. discharge goals/long term goals) based upon: (1) Priority of client and caregiver's needs, including:
(a) Needs for safety in current and future environments (b) Client’s personal and vocational goals
(2) Client motivation and opportunity for success (3) Client and caregiver's ability to participate in the treatment (4) Diagnosed medical problem and related signs and symptoms, including current impairments,
medical status, stage of disease, progression, and duration (5) Prior, current, or planned medical treatments, including anticipated side effects of any medical
treatments (6) Assessment of time/financial restraints (7) Determination of equipment, materials, and personnel resources necessary (8) Identification of financial considerations (9) Assessment of resources available to client/caretaker
E. Record in the physical therapy record the agreed upon short and long term functional outcomes of treatment including: (1) Who will perform the task (client or caretaker) (2) What task will be performed (3) Under what conditions:
(a) Environment (b) Equipment (c) Components requiring assistance or level of assistance (d) Efficiency (time required, how well must the task be done) (e) Endurance
(4) Target dates for achievement (5) Target dates for re-evaluation
F. Record and date on standardized form or chart the present level of performance in all functional tasks targeted as goals in a clear, brief, measurable statement, including: (1) Who performed the task (client or caretaker) (2) What task was performed (3) Under what conditions:
(a) Environment (b) Equipment (c) Level of assistance:

COMPETENCIES AND CRITERIA General Medical Conditions – DPT 755
373
1) Number of helpers required 2) Amount/type of help:
(a) Contact guarding required - caregiver must keep hands on patient, high probability of patient requiring assistance
(b) Assistance required - patient completes part of task (describe) without assistance 1. Minimal – completes 75% or more of the task 2. Moderate – completes 50% or more of the task 3. Maximal – completes 25% or more of the task 4. Initiates – completes first 10% of task 5. Cooperates – cooperates with caregiver though dependent; patient instructs
novel caregivers in steps of procedure 6. Dependent – 0-10% of task
(c) Physical guidance (include component of the task) (d) Physical prompt or cue (touching the client as a reminder or to
increase awareness of a body part) (e) Verbal prompts (include component of the task) – patient can perform
physical components of task but requires instruction (f) Independent – performs skill safely with no supervisor
present and no assistance with environmental set up (i.e. no supervision required)
(d) Time required to complete task if relevant (e) Efficiency (f) Endurance; example(s) :
1) Objective (O): Function (ambulation): (a) Mrs. Snyder can rise from her bedside chair or bed in her hospital room using upper
extremities for push off and walk to the bathroom with quad cane in (L) hand and (R) AFO. Mrs. Snyder can perform all tasks associated with toileting independently, requires raised toilet seat and left sidewall mounted wall railing. Precaution: Mrs. Snyder requires (R) AFO for ankle/knee stability at all times when walking. Mrs. Snyder is dependent in donning her brace and shoe.
(b) Patient walks up one flight of stairs with left hand railing with assist from one person to carry her cane.
(c) Patient requires skilled physical assistance x2 and extensive verbal prompting to descend steps with left hand railing.
G. Analyze each task targeted as a functional outcome of therapy. (1) Identify the sequence of movements required to perform the task safely and efficiently. (2) Identify steps in the sequences which are difficult for the client. (3) Generate a list of possible impairments (include perceptual deficits) that could lead to difficulty
with the problematic movement components. (4) Select and perform tests to determine the presence or absence of all possible impairments
related to the functional limitation. (5) Identify impairments to be addressed in treatment (poor balance, loss of extensibility in specific
joint movements, deficient eccentric control in the quadriceps, inadequate activation of the hip extensors in single limb stance) that are, or may be, related to deficient performance.
(6) Identify impairments related to function which are not amenable to treatment and will require compensatory strategies, including assistive devices.
(7) Identify steps to achievement of the task that begin at the present level of mastery and progress

COMPETENCIES AND CRITERIA General Medical Conditions – DPT 755
374
toward independence. (these may be your short term goals or subsets of your short term goals) H. Implement a physical therapy treatment program to address impairments related to
functional limitations and allow for practice within the context of the functional tasks targeted in short and long term goals. (see Structuring the Treatment Session)
I. Continuously evaluate the effects of the treatment plan with particular attention to maintaining client motivation by choosing challenges, tasks, environments, and activities that will allow a true perception of increasing mastery through success.
J. Modify the treatment program and/or goals, as indicated based on: (1) Client's medical safety (2) Client's comfort (3) Client's ability to provide required assistance (4) Effect on symptoms, impairment, ability/disability, and/or handicap (5) Required client resources (6) Current and future treatment priorities
K. Record concisely and accurately in appropriate records (according to the criteria sheet on "Documentation"): (1) Subjective results (2) Objective results (3) Assessment (4) Plan (5) Treatment given
L. On or before pre-determined re-evaluation date, meet with client/family and other team members to discuss progress toward goals and re-evaluate the program.
M. Prepare the client for discharge, including: (1) Environmental assessment of home or vocation setting if necessary (include transportation
needs) (2) Ordering of all necessary equipment in time for discharge (3) Instructing the caregiver and re-demonstrating the procedures (4) Teaching the client who requires assistance to instruct a novel caretaker (5) Writing a discharge note with functional outcomes of therapy

COMPETENCIES AND CRITERIA General Medical Conditions – DPT 755
375
CRITERIA SHEET TILT TABLE
1. Pre-Planning for Procedure: A. Identify the priority signs, symptoms, and conditions which make the procedure
applicable: (1) Prolonged bedrest (2) Immobility of hips and/or knees (3) Severe weakness (4) Paraparesis, paraplegia (5) Non-weight bearing on one lower extremity
B. Identify the rationale for choice of procedure: (1) Safety:
(a) Patients may have body demineralization. Caution in transfer is necessary to prevent pathologic fractures.
(b) Patients may have markedly unstable blood pressure and severe tachycardia. (c) Patients may need lower extremities wrapped with elastic bandage or elastic stockings to
assist venous return when there is loss of the muscular pump. (d) Corset or abdominal binder indicated if patient is lacking trunk stability or is nauseous.
(2) Economics: (a) A tilt table is an easy piece of equipment to use. (b) It requires a moderate amount of therapist's time to initially establish patient's reactions
and vital sign parameters. (c) It allows for conservative progress from bedrest to upright.
(3) Condition of Patient: (a) Increases renal and cardiovascular physiology (b) Increases endurance (c) Re-accommodates client to the upright position
(4) Duration of treatment: (a) Elevation of table should occur slowly and at a rate tolerable to client. (b) Maintain client in elevated position as long as tolerable and vital signs permit.
(5) Generate other possible alternatives: (a) Bring to stand without sitting (b) Progress directly to parallel bars (c) Circo-electric bed
(6) Application of procedure to short and long term goals: (a) STG: Decrease postural hypotension; increase calcium metabolism (b) LTG: Independent in upright activities; prevent renal calculi
2. Preparation of the Physical Therapist: A. Review the procedure as necessary.
Division of Physical Therapy
Emory University

COMPETENCIES AND CRITERIA General Medical Conditions – DPT 755
376
B. Review the medical record. C. Interview the client:
(1) How long have you been in bed? (2) Have you been out of bed and in a chair? (3) Do you get dizzy when you sit up?
D. Select and collect the correct equipment: (1) Ace bandages or elastic stockings (2) Corset if client has no trunk stability (3) Obtain table and make sure straps and footboard are with table (4) Standing block if non weight bearing on one leg (5) Crutches for exercise or to relieve weight bearing (6) Weights or other equipment for exercise (ball) (7) Sheets (8) Sphygmomanometer (9) Stethoscope (10) Watch with sweep hand
E. Prepare the environment and equipment/materials: (1) Check brakes on tilt table. (2) Check straps, looking for fraying and examining buckles. (3) Check stability of standing block.
3. Execute the Procedure: A. Using the Teaching-Learning and Interpersonal Relations Criteria to establish rapport and explain
and demonstrate to the client. (1) Place sheet on tilt table. (2) Transfer client onto tilt table. (3) If client does not have elastic stockings, apply a spiral wrap to legs from toes to groin (unless leg
is in cast, or in brace or otherwise unable to be wrapped). (4) Position client comfortably with feet against footboard.
(a) If client is non-weight bearing on one extremity, standing block goes beneath unaffected extremity. Pad block if necessary with towel.
(5) Apply corset if client lacks trunk stability or nausea and dizziness is anticipated. (6) Fasten straps securely across knees, pelvis, and chest. (7) Check the client's pulse and blood pressure. (8) Leave blood pressure cuff in situ since multiple readings will ensue, and some may be taken very
rapidly. (9) Electric tilt table should be plugged in. (10) Elevate tilt table to 15°-20°. (11) Visually inspect client for paleness of the face, cyanosis, intense rubor of toes, or perspiration. (12) Check blood pressure and pulse. (13) Lower client immediately if a sharp drop in systolic blood pressure (greater than 20 mmHg or
below 90 mmHg) occurs with a rapid elevation in pulse rate above 110. Lower client if he becomes nauseated, dizzy, extremely pale, feet appear blue, or pulse rate remains above 110.
(14) If client remains comfortable at a low elevation, angle increases should be made after 2 to 3 minute intervals until client is fully upright (approximately 80°). Repeat blood pressure and pulse measurements after every change in position. Use criteria listed in #13 for termination, as necessary.
(15) After client develops standing tolerance numerous vital sign measurements are not necessary.

COMPETENCIES AND CRITERIA General Medical Conditions – DPT 755
377
(16) While client is on the tilt table he may need to be engaged in conversation to distract attention from the situation.
(17) Client may be given exercises for the upper extremities using Velcro weights or dumbbells. Balancing exercises may be done by ball toss or client can perform trunk bends laterally and forward.
(18) Clients should be instructed in quad sets when necessary. Loosen knee strap to permit easier movement.
(19) If client tolerates the upright position, terminate treatment in 20 to 30 minutes. (20) Lower the table slowly. (21) Remove straps and ace bandages. (22) Transfer client back to wheelchair/stretcher.
B. Implement changes in procedure based upon: (1) Response of patient:
(a) Vital signs (b) Fatigue (c) Dizziness (d) Nausea (e) Pain
(2) Achievement of short and long term goals: (a) Patient becomes able to tolerate upright activities without postural hypotension.
C. Record results in SOAP format: (1) 0:
(a) Record maximum angle of elevation client achieved and length of time at that angle. (b) Record blood pressure and pulse rate response at rest and after elevation. (c) Record visual inspection, including pale, cyanotic, or intense rubor. (d) Record client's response to treatment, including nausea, vomiting, etc. (e) Record exercises given, if any.
(2) A: Client's tolerance to upright position is improving, good, poor, etc.
D. Clean area. (1) Replace tilt table with straps in appropriate place. (2) Replace stethoscope and blood pressure apparatus to
appropriate place. (3) Wipe surface of table, as indicated.

COMPETENCIES AND CRITERIA General Medical Conditions – DPT 755
378
INFORMATION SHEET MASSAGE
1. Definition: A. Massage is the term used to designate certain manipulations of the soft tissues of the body; these
manipulations are most effectively performed by the hands and are carried out with the purpose of producing effects on the nervous and muscular systems, and on the local and general circulation of blood and lymph.
2. Terminology: A. Effleurage – These are the long gliding strokes of the hands, performed slowly and rhythmically.
(1) Superficial – light pressure; has effects through reflex means; has three purposes: (a) Used to initiate and end massage
(b) Enables therapist to relax patient initially and allows him or her to become accustomed to
the touch of the therapist's hands as well as to evaluate areas of tenderness
(c) Distributes lubricant
(2) Deep – deeper pressure applied with enough pressure used to empty venous or lymph channels; has two purposes: (a) Provides passive stretch to specific muscles or muscle groups
(b) Readies patient for more vigorous techniques
B. Petrissage – This is also known as kneading; a wringing movement in which muscles are picked up or lifted away from bony attachments and "rolled, squeezed or wrung"; has the following purposes: (1) Rids muscle or muscles of waste products produced with excessive or abnormal activity
(2) Assists with venous and lymph flow
(3) Mobilizes adhesions
C. Friction – This is a deep circular rolling movement employed in treatment around bony prominences or joints; technique: fingers or thumb remain stationary on one point on the skin and the skin is rolled over underlying tissues; little or no lubricant is used; primary purpose is to loosen adhesions or superficial scars
D. Tapotement – This is a percussion movement; series of brisk blows, following each other in a rapid alternating fashion; tapping, slapping, hacking, clapping; used for stimulation
3. Basic Principles: A. General Sequence:
(1) Superficial effleurage (stroking) (2) Deep effleurage
(3) Kneading
(4) As indicated: friction, tapotement
(5) Deep effleurage (stroking)
Division of Physical Therapy
Emory University

COMPETENCIES AND CRITERIA General Medical Conditions – DPT 755
379
(6) Superficial effleurage (stroking)
B. Specific Progression:
(1) Follow venous return:
(a) Extremities: "Uncork the bottle" and move proximal fluid before distal
(b) Back, neck: stroke motion is distal to proximal; caudocephalad
(2) Return stroke: always light so as not to counteract effects of previous stroke C. Application of strokes is determined by:
(1) Direction: parallel or perpendicular to fibers
(2) Depth (pressure): dependent upon the condition, start light and increase depth
(3) Rate: even and varies from slow (7"/sec), for sedation, to fast for stimulation effect
(4) Rhythm: transition from one stroke to another should be smooth
4. Specific Massage Procedures for Individual Body Parts: A. Full back (Diagram 1):
(1) Follow the procedure outlined in general procedure sheet.
(2) Patient preparation:
(a) Position: may use prone or semi-prone
1) Support under the abdomen to flatten the lumbar spine
2) Support under upper chest and shoulders
3) Head in neutral rotation and slight flexion
4) Support under ankles
5) If semi-prone is used, care must be taken to relieve pressure on greater trochanter of
femur and greater tuberosity of humerus. Head is in neutral rotation and slight flexion,
supported in the mid-line of the trunk. Top leg is supported in neutral adduction and
both hips and knees flexed to flatten the lumbar spine.
(b) Draping: All clothing should be removed from the area to be treated. Female patients should
use a gown.
1) Tuck towel into the waistband of undergarment and pull down to expose buttocks.
2) Locate greater trochanter and crest of ilium. Pull drape with undergarment to a point
between these land marks
3) Drape sheet over buttocks and legs.
4) On female patients use the sides of the gown to cover the lateral rib cage.
(c) Pre-treatment evaluation: Records areas of edema, pain, tightness, etc.
(3) Technique: The following sequence is to assist you in developing a pattern. Your position is
standing at the level of the patient's waist, facing the patient's head, your inside leg back and
your outside leg forward.
(a) Starting at the buttocks, place hands perpendicular to the gluteus medius, finger tips lying
between the trochanter and the crest. Pull hands together toward the midline of the back
and proceed up the back using an open V hand position. The thumbs are resting on either
side of the spinous processes.
(b) Progress as follows: (see illustration) Buttocks – up back to mastoid processes – out over
trapezius – over acromio-clavicular joints – back down the side of the lateral rib cage to the

COMPETENCIES AND CRITERIA General Medical Conditions – DPT 755
380
starting position
(c) After several deep effleurage strokes, start two-handed petrissage at the buttock area. Use
a counter-clockwise direction. Continue for two or three sweeps (up and back) on each side
of the back. As you reach the buttocks area for the last time, change back to effleurage for
several more strokes.
(d) As you again get to the buttocks area, change to palmar friction. Perform this over total back
and shoulder area. Move into finger thumb petrissage over entire back and then change to
effleurage
(e) End this series of effleurage strokes with the trapezius stroke, and move directly into finger-
thumb petrissage in the neck area.
(f) Perform circular stroking, friction, and petrissage in the neck area. Try to tell the difference
in the feel of these three strokes. You should be using the fingers and thumb of one hand or
fingers and thumbs of both hands in combination for these strokes.
(g) Move back into deep effleurage and gradually decrease pressure until you are performing
superficial effleurage. End with this stroke.
(h) Place alcohol on towel and clean area using firm strokes.
B. Neck and upper back (Diagram 2):
(1) Follow the procedure outlined in the general procedures.
(2) Patient preparation:
(a) Position: Patient can be sitting, supine, prone or semi-prone. Prone and semi-prone
positions are described with full back. Sitting: Position the patient in sitting, leaning over the
table edge. Support anterior chest and forehead on a pillow. Same positioning used in
applying heat to the posterior neck.
(b) Draping: Expose the neck and upper back with the inferior border of drape at the level of
thoracic 12.
(c) Pre-treatment evaluation: Record areas of edema, tightness, pain, spasm, etc.
(3) Technique: The following is an example of a sequence of strokes to assist you to develop a
pattern:
(a) Start effleurage at the mastoid processes:
1) Fingers are perpendicular to muscle fibers.
2) Pull hands down the lateral side of the neck.
3) Pull hands in an oblique direction toward the midline of the back following the lateral
border of the trapezius muscle.
4) Now stroke upward with an open "V" back to the starting position.
5) Ask your client to comment on the depth of your pressure.
(b) Two-handed petrissage is usually started at the lower border of the trapezius muscle. This is
a position that allows easy transition without losing contact or breaking rhythm. Remember
that the top hand is the stabilizing one and the other hand does the main job of providing
pressure.
1) Place both hands on the subject with the fingers pointing towards the spine.
2) As the bottom hand makes a circle away from the spine it pushes up and passes under

COMPETENCIES AND CRITERIA General Medical Conditions – DPT 755
381
the top hand.
3) As the hands pass, the bottom hand is moving toward the spine and the top hand is
moving away from the spine.
(c) Three count stroke for trapezius (Diagram 3):
1) The first part of the stroke starts at the origin of the lower trapezius and moves to the insertion. As the first stroke concludes, the second stroke starts at the origin of upper trapezius and concludes at its insertion.
(d) Perform each stroke several times. (e) End the massage with effleurage moving back from deep stroking to superficial stroking.
C. Facial area: (1) Follow the procedure outlined in the general procedures.
(2) Patient preparation:
(a) Position: Supine with supports under head and knees
(b) Draping: Protect the patient's hair
(c) Pre-treatment evaluation: Record areas of pain, edema, tightness of skin of face and neck
(3) Technique: Suggested sequence for treatment:
(a) Start at the chin and stroke upward to temple area several times. Try to cover the major
portion of the jaws and cheeks.
(b) At end of last stroke place thumbs at midline of forehead. Stroke out to temple several
times then stroke supra and infra orbital ridges.
(c) Use circular stroking with fingertips or thumb over the same area. (d) Finish with stroking the entire face. (e) Friction strokes may be incorporated to stretch or loosen adhesions in the facial area.
1) Finger tip – like violin players change areas every 1/4 minute
2) Friendly pinch to pull tissue out
3) For lip area: Place one finger inside lip and the other outside lip. (wearing gloves)
(a) Do rubbing motion
(b) Pull lip out against tightness
4) Mouth: Insert one finger from both hands and gently pull mouth open using circular
motions.
5) Ask your client to comment on the depth of your pressure.
(4) Examples of specific uses for facial massage: (a) Sedative – This technique may be included as part of treatment for person with a neck injury
(not fracture) having pain in forehead and around eyes due to nerve root pressure or protective spasm. Include upper neck and acromio-clavicular joint. Stroke upward to jaw and return. Alternate petrissage to upper trapezius. Use hands simultaneously. Alternate this with stroking. Fingers should reach to supraspinatus area.
(b) Relaxation: In the case of unilateral paralysis, the unaffected side is over contracted and
needs techniques to enhance relaxation.
(c) This technique can be used for facilitation and increased sensory stimulation. In the case of
paralysis, manual pressure applied to the affected part provides an increase in stimulation
of nerve endings in muscles. Friction will help prevent the formation of inelastic fibrous
tissue and adhesions in the paralyzed muscles.

COMPETENCIES AND CRITERIA General Medical Conditions – DPT 755
382
(d) Local ischemic pain may be decreased as manual pressure causes a redistribution of blood
and O2 to the area.
(e) This technique can be use for stretching to loosen adhesions or scar tissue.
D. Upper Limb: (1) Follow the procedure outlined in general procedures.
(2) Patient preparation:
(a) Position: Position the patient so that the limb is placed in an elevated position to assist in
venous drainage by utilizing gravity.
(b) Draping: Expose the entire limb including the proximal attachments of deltoid muscle. All
other areas would be draped.
(c) Pre-treatment evaluation: Record areas of pain, edema, tightness, etc. (3) Technique – Start with superficial stroking to the entire limb. Alternate hands so that one hand
is always stabilizing and the joints will not be jammed. (a) Start deep stroking and proceed in the following manner
1) Elbow – shoulder – over acromio-clavicular joint
2) Progress downward covering more area with each stroke
3) Deep stroking following the muscle groups as demonstrated in class – example: flexors
vs. extensors. Palpate for the inter-muscular divisions so that a group can be outlined.
(b) Use one-handed petrissage in the same area listed in #2.
(c) Perform circular stroking using fingers and thumb simultaneously from elbow – deltoid. Pay
special attention to the deltoid insertion. Following with stroking the entire arm several
times and then move to the hand area.
(d) Perform thumb stroking and friction around all upper limb joints in web spaces and over
palm. End with stroking of hand – forearm slightly above elbow. The final strokes should
include the epicondyle of humerus, the common origin of flexors and extensors.
(e) The entire limb would be treated in cases of dependent edema, caused by inability to move.
(little or no muscle contraction)
1) Major objective: Move fluid out of tissues back into the general circulatory system.
(f) Amputation sites may be treated post-amputation after sutures are removed.
1) Major objectives: Prevent pooling in distal ends of stump, keep skin of stump loose,
especially in scar area, and desensitize the area prior to receiving prosthesis.
(g) Specific areas may be treated with friction for loosening scar or preventing skin tightness
over bone or soft tissue.
(h) Contraindications:
1) Where emboli are suspected
2) Directly over unhealed fractures unless fixed with metal implantation
3) In presence of inflammation of veins
4) Where infection could be spread through the circulation
5) Known ischemic disease
E. Lower Limb:
(1) Follow the procedures outlined in the general procedures.
(2) Patient preparation:

COMPETENCIES AND CRITERIA General Medical Conditions – DPT 755
383
(a) Position: Treatment may be done with the patient in supine, prone, or side-lying.
(b) Drape the patient using the procedure to expose one lower limb given in patient
management section of General Medicine complex.
(3) Technique:
(a) Superficial effleurage:
1) Place the medium on your hands and perform several strokes of superficial effleurage.
2) Start the stroke at the knee and stroke from knee to hip area.
3) Gradually extend area with each stroke until entire limb is being covered by the stroke.
(b) Deep effleurage:
1) Gradually deepen the pressure of the effleurage performing 6-8 strokes.
2) Cover the entire limb from foot to hip each time.
(c) Petrissage:
1) Divide the thigh into anterior, lateral posterior, and medial posterior sections.
2) Begin effleurage to the anterior section, then finger or palmar petrissage to one hand
petrissage ending with effleurage.
3) Repeat (b.) on the lateral posterior section.
4) Begin effleurage on the medial posterior section. Then proceed to two hand petrissage,
ending with effleurage.
5) Finger effleurage lateral and medial aspects of knee.
(d) Friction:
1) Cross fiber friction can be utilized in any specific area in which you note tension in
muscular tissue, tightness of ligaments, or adherent skin.
(e) Contraindications:
1) Suspected emboli
2) Directly over new fractures without internal fixation
3) In presence of inflammation of veins
4) Superficial infections in area
Beard. and Wood: Massage: Principles and Techniques. Phila., W.B. Saunders, 1964.

COMPETENCIES AND CRITERIA General Medical Conditions – DPT 755
384

COMPETENCIES AND CRITERIA General Medical Conditions – DPT 755
385

COMPETENCIES AND CRITERIA General Medical Conditions – DPT 755
386

COMPETENCIES AND CRITERIA General Medical Conditions – DPT 755
387
CRITERIA SHEET MASSAGE
1. Pre-Planning for the Procedure: A. Identify the priority signs, symptoms, and conditions which make the procedure applicable
(indications): (1) Pain (2) Headaches (3) Muscle guarding (4) Lymphedema (5) Muscle fatigue (6) Adhesions (7) Decreased ROM due to edema or muscle guarding
B. Identify rationale for choice of procedure: (1) Safety (contraindications and precautions):
(a) Acute thrombophlebitis (b) Recent embolic phenomenon (c) Acute infection in affected area (d) IV in extremity (e) Non-union fracture (f) De-compensated cardiac conditions (g) Severe edema (h) Cancer – radiation or chemotherapy (i) Fragile skin
(2) Economics: Massage requires 1:1 patient-therapist time, but minimal equipment. Procedure time can also be used to educate patient.
(3) Condition of patient – skin condition should be: (a) Flexible (b) Free of abrasions, blisters, dermatitis, etc. (c) Without intense rubor, e.g. not sunburned
(4) Duration of procedure: (a) Less pressure, shorter duration on first visit (b) Treatment time depends on size of area and patient tolerance
(5) Generate other possible alternative treatments: (a) Therapeutic pool (b) Stretching (c) Ultrasound (d) Electrical stimulation (e) Relaxation techniques
(6) Application of procedure to short and long term goals:
Division of Physical Therapy
Emory University

COMPETENCIES AND CRITERIA General Medical Conditions – DPT 755
388
(a) Long term goals: 1) Independent in functional activities 2) Function pain free or with tolerable pain
(b) Short term goals: 1) Increase mobility 2) Decrease edema 3) Increase circulation 4) Relaxation 5) Decrease pain
2. Preparation of the Physical Therapist: A. Review the procedure as necessary. B. Review the medical record. C. Interview client:
(1) Identify area of pain. (2) Identify activities or positions that increase or decrease the pain. (3) Inquire as to allergies to scents or other ingredients in chosen lubricant.
D. Determine treatment sequence and patient positioning. E. Select and collect equipment:
(1) Linens (2) Alcohol (3) Hair bands/shower cap (4) Lubricant (none, talc, oil, lotion, US gel)
F. Secure the environment: (1) Room should be quiet, warm, and conducive to relaxing. (2) Cover plinth with sheet. (3) Talcum powder is not used on patients with lung disease. (4) Use electric hi-lo plinth if available to protect therapist's back and joints through use of proper
body mechanics.
3. Execute the Procedure: A. Follow the Teaching-Learning process and Interpersonal Relations Criteria to establish rapport
with the client and explain and demonstrate the procedure. B. Sequential steps of the procedure:
(1) Wash and warm hands. Remove watch and jewelry. (2) Identify extent of area to be treated. (3) Instruct or assist the patient with changing to gown. (4) Drape and position the patient to protect modesty and expose treatment area. (5) Use pillows and towel rolls to support patient in position of comfort. (6) Apply lubricant to hands and then on to the patient. (7) Spread lubricant over area using superficial effleurage strokes. (8) See Information Sheet for performance and sequence of strokes to specific area. (9) Inform patient when treatment is about to end. (10) Clean the lubricant from the patient; clean again with alcohol on towel to remove remaining oil. (11) Lower plinth or bed and assist patient up as necessary. (12) Wash hands.
C. Implement changes in procedure based upon: (1) Response of the patient:
(a) Vital signs, fatigue

COMPETENCIES AND CRITERIA General Medical Conditions – DPT 755
389
(b) Increased muscle guarding (2) Verbal feedback from patient:
(a) Increased pain (b) Position uncomfortable
D. Record results in SOAP format:
(1) 0: (a) Include: area treated, position, techniques
(2) A: (a) Assess effectiveness of massage toward reaching goals
E. Clean the area.

COMPETENCIES AND CRITERIA General Medical Conditions – DPT 755
390
CRITERIA SHEET USE OF PERSONAL PROTECTIVE EQUIPMENT (PPE)
1. Pre-Planning for Procedure: A. Identify the priority signs and symptoms which make the procedure applicable:
(1) Extremely low white blood cell count
(2) Respiratory, enteric infection
(3) Wound infection
(4) Burns
B. Identify rationale for choice of procedure: (1) Safety:
(a) Of patient
(b) Of therapist
2. Preparation of Physical Therapist: A. Review the procedure as necessary. B. Review the medical record.
(1) Determine PPE required.
(2) Determine need for clean versus sterile items.
C. Select and collect correct PPE: (1) Mask, gown, gloves
(2) Materials for dressing change
3. Execute the Procedure: A. Sequential steps of procedure:
(1) Wash hands and scrub nails.
(2) Hold the gown on the inside, neckband upright.
(3) Slip arms into sleeves of gown.
(4) Secure the collar and waistband strings of the gown.
(5) Put on mask if needed.
(6) Don gloves using good technique (or sterile technique) and secure over the cuffs of the gown.
(7) Upon completing treatment remove PPE and dispose of properly.
(8) As you remove gloves and gown, turn them inside out.
(9) Wash hands again.
B. Radiation precautions: (1) These will be indicated by a sign on the door or on chart.
(2) If you are pregnant or there is a possibility that you are pregnant, do not come into contact with
patient.
Division of Physical Therapy
Emory University

COMPETENCIES AND CRITERIA General Medical Conditions – DPT 755
391
(3) Handle patient and bed linen only when wearing PPE.
(4) Sweat is an excretory mechanism for radioactive isotopes so take appropriate precautions.
C. Tuberculosis precautions (only if patient is "active" and has not received at least one week dosage of medication): (1) As always, wash hands thoroughly before and after.
(2) Wear mask.
D. Reverse isolation:
(1) This will be indicated by sign on door.
(2) Follow posted directions.

COMPETENCIES AND CRITERIA General Medical Conditions – DPT 755
392
CRITERIA SHEET WOUND CARE / DRESSING CHANGES
1. Pre-Planning for Procedure: A. Identify priority signs and symptoms which make the procedure applicable:
(1) Open wound (2) Stage 1 pressure ulcer (remains red when pressure removed)
2. Preparation of Physical Therapist: A. Review the procedure as necessary.
(1) Determine PPE needed.
(2) Determine need for clean or sterile technique.
(3) Determine need for clean or sterile dressings and instruments.
B. Review the medical record: (1) Lab values
(2) Infection present?
(3) Medical problems
(4) Orientation
(5) Functional level
(6) Wound area, pulses/blood supply to area
C. Interview the client: (1) Ask about information not available in medical record.
(2) Determine current functional level.
(3) Determine area and behavior of pain/problem.
(4) Determine client's understanding of procedure to follow.
(5) Identify client's goals.
D. Determine assessment/treatment sequence and position. E. Select and collect equipment:
(1) Materials for debridement and dressing change
(2) Equipment for monitoring client's safety (e.g. stethoscope and sphygmomanometer)
(3) Appropriate PPE
(4) Towels, linens for draping
F. Secure the environment (client room, whirlpool area).
Division of Physical Therapy
Emory University

COMPETENCIES AND CRITERIA General Medical Conditions – DPT 755
393
3. Execute the Procedure: A. Follow the Interpersonal Relations and Teaching-Learning Criteria to establish rapport, and explain
the procedure to the client. B. Sequential steps of procedure:
(1) Wash hands thoroughly.
(2) Evaluate client as appropriate according to Gross Evaluation Criteria.
(3) Evaluate wound:
(a) Don gloves, remove dressings, and dispose of them properly.
(b) Inspect wound for color, drainage, pain, size, location, and stage.
(c) Clean and debride as appropriate using clean or sterile technique (follow Hydrotherapy
Criteria if used).
(d) Discard gloves, wash hands, and don clean gloves.
(e) Apply appropriate dressing given stage of healing and amount of drainage and considering
patient needs/preferences.
C. Implement changes in procedure based upon client's response and findings.
(1) Consult with physician if distal pulses or infection suspected.
(2) Modify treatment/treatment location to accommodate client fatigue, vital signs, etc.
D. Record results in SOAP or other approved format.
E. Interpret results of procedure.
F. Prepare client for dismissal.
(1) Instruct client in any wound care that he/she can be responsible for (e.g. remoisten dressings,
change dressings).
(2) Instruct client in activities affecting wound (e.g. decreased weight-bearing, elevating limb).
G. Clean up area.
(1) Dispose of infectious material appropriately.
(2) Clean work surfaces and instruments with approved sterilizing agents.

COMPETENCIES AND CRITERIA General Medical Conditions-DPT 755
394
CRITERIA SHEET SEQUENTIAL AND INTERMITTENT COMPRESSION PUMP (JOBST)
1. Pre-Planning for Procedure:
A. Identify the priority signs, symptoms, and conditions which make the procedure applicable: (1) Edema
B. Identify the rationale for choice of procedure: (1) Safety – Contraindicated with:
(a) Phlebitis or recent embolic phenomenon, uncompensated heart failure, or recent CVA
(b) Infection in affected extremity within the last six weeks
(c) Severe hypertension
(d) Superior vena cava syndrome
(e) Open wounds on involved extremity
(2) Economics: (a) For massive edema patient should receive continuous treatment. Rental of equipment to
patient may be necessary either through the hospital or a local vendor. (3) Condition of the patient:
(a) Any patient with heart disease, particularly signs of congestive heart failure, should be observed carefully for ill effects during treatment. Patients with uncompensated heart failure should not receive treatment.
(4) Duration of treatment: (a) Treatments should last at least two hours.
(b) To be most effective, patient should have apparatus at home or at bedside for continuous
pumping.
(5) Generate other alternative mechanisms: (a) Ace bandaging/elastic hose with elevation (b) Compression garments
(6) Application of procedure to short and long term goals: (a) STG: Decrease lymphedema (b) LTG: Prevent fibrous scarring
2. Preparation of the Physical Therapist: A. Review the procedure as necessary. B. Review the medical record. C. Interview the client:
(1) Does the swelling decrease your function? What activities are affected?
(2) When is the swelling most severe? What activities decrease the swelling?
Division of Physical Therapy
Emory University

COMPETENCIES AND CRITERIA General Medical Conditions-DPT 755
395
D. Select and collect the correct equipment: (1) Compression units and sleeve or boot (2) Materials for draping
(3) Stethoscope and sphygmomanometer
(4) Materials for positioning, pillows, IV pole, extremity support
(5) Stockinette
(6) JOBST measuring tape or tape measure
(7) Cellophane tape (8) Bandage scissors (9) Timer
(10) Call bell
E. Prepare the environment and equipment/materials: (1) Check the plug on the machine.
(2) Position the machine near the client.
(3) Position the machine on a tabletop.
(4) Check the functioning of the machine, e.g. it turns on.
3. Execute the Procedure: A. Follow the Teaching-Learning and Interpersonal Relations Criteria to establish rapport with the client
and to explain and demonstrate the procedure. B. Sequential steps of the procedure:
(1) Instruct/assist the client in removal of clothing from the affected part.
(2) Take circumferential measurements of the involved extremity and record the site of the
measurement.
(3) Place stockinette over the extremity to be treated.
(4) Take blood pressure measurement in the unaffected extremity.
(5) Connect the pneumatic appliance to the black air tube on the machine.
(6) Plug the machine in.
(7) Set the "off” timer to zero and switch the machine on, allowing the sleeve to inflate fully.
(8) When the maximum pressure is reached adjust the pressure control valve to the desired setting, (40
– 60 mmHg for arm; 60 – 80 mmHg for leg) but not more than 100 mmHg below the client's diastolic
blood pressure.
(9) Lock the pressure valve in place to avoid setting from accidentally being changed.
(10) Switch the machine off, and allow the sleeve to deflate completely.
(11) Put the sleeve or boot on the client and check for comfort.
(12) Place the client on the bed/plinth supine, head flat, with the extremity elevated as much as possible.
(13) Set the "off" and "on" timers to desired setting at a 1:3 ratio (e.g. 20 seconds off, 60 seconds on or
30 seconds off and 90 seconds on are recommended).
(14) Switch the machine on and check that the preset pressure is reached. Make adjustments as
necessary. Instruct the client to rhythmically contract and relax the muscles in the affected
extremity during the "off" cycle throughout the treatment.

COMPETENCIES AND CRITERIA General Medical Conditions-DPT 755
396
(15) Instruct the client to rhythmically contract and relax the muscles in the affected extremity during
the “off” cycle throughout the treatment.
(16) Set the timer for the treatment period.
(17) Remind the client of the precautions and expected sensations.
(18) Give the client a call bell.
(19) Periodically check the blood pressure, especially on the first treatment or if the client has a
cardiovascular problem.
(20) At termination of the treatment, turn off the machine, and deflate and remove the pneumatic
appliance and stockinette.
(21) Measure the circumference of the extremity at the same sites as previously measured.
(22) If measurement for elastic support garment is necessary, measurements are taken at this time.
(23) Apply the ace wrap, and stretch stockinette or elastic support to the extremity.
C. Implement changes in the procedure based upon:
(1) Response of the client:
(a) Change in vital signs
(b) Increased discomfort
(c) Fatigue
(2) Achievement of short and long term goals:
(a) Short term goal – decrease edema to facilitate increased mobility
D. Record results in SOAP format:
(1) S:
(2) 0:
(a) Record pre and post treatment circumferential measurements.
(b) Record site of measurements.
(c) Record length of "on" and "off" time.
(d) Record maximum pressure and blood pressure responses.
(e) Record any untoward effects.
(f) Record pre and post treatment visual inspection results.
(3) A:
(a) Intermittent compression pump is effective, ineffective, etc.
(4) P:
E. Clean the area.
(1) Unplug the machine.
(2) Fold pneumatic appliance neatly.
(3) Replace all the materials in the appropriate location.

COMPETENCIES AND CRITERIA General Medical Conditions-DPT 755
397
CRITERIA SHEET MEASUREMENT OF EQUIPMENT
1. Equipment used for Ambulation:
A. General types:
(1) Crutches – standard underarm, Canadian, forearm triceps, ortho wooden standard, trough forearm,
platform
(2) Canes – wooden, aluminum, 4 legged-quad, (ortho and functional grips)
(3) Walkers – pick-up or standard, rolling, forearm rolling
(4) Special equipment – parallel bars, suspension assist
B. Crutches:
(1) Types and measurement:
(a) General precautions and guidelines:
1) Client should be measured for crutches while wearing the shoes used when walking.
2) Crutch measurement should include length with tips in place and also axillary pads if used.
(a) Tips add 1/2" to 3/4" to overall length and are always used.
(b) Axillary pads add approximately to overall length. They are not always part of standard
crutch equipment.
(b) Axillary: These crutches fit under the arm below axilla. The length and handgrip position are
adjustable. The length is measured from 2" below axilla to approximately 6" to the side and in
front of the foot. The handgrip should allow a 30° bend at the elbow.
1) If the client is able to stand in parallel bars:
(a) Adjust the height of the parallel bars so that when weight is borne on the hands and the
shoulders are kept depressed the elbows remain flexed 30°.
(b) Assist the client to stand and have the client support and balance using the parallel bars.
The client should have on shoes if possible.
(c) Measure from 2" below the axillary fold to a point on the floor 6" in front and 2" to the
side of the client's foot or shoe.
(d) Have the client sit down.
(e) Adjust the crutches:
1. Remove the thumbscrews from the bolts.
2. Remove the bolts.
3. Move the center leg of the crutch until the crutch length from axillary support to the
rubber crutch tip is the same as your previous measurement.
4. Replace the bolts in the crutches and have the client stand up. Test the crutch
Division of Physical Therapy
Emory University

COMPETENCIES AND CRITERIA General Medical Conditions-DPT 755
398
length by having the client hold the crutches under the arms.
5. Adjust the handgrips to allow a 30° elbow bend or match the height of the parallel
bars.
6. When the length is correct, replace the thumbscrews on the bolts and tighten
securely.
(f) Have the client stand and push on the crutch handgrips keeping the shoulders down.
Check the space between axilla and top of crutch.
1. There should be approximately 2 inches between the axilla and crutch top.
(g) After this last check, make any additional corrections in length or height of crutches.
2) If the client is unable to stand:
(a) With foot at right angle to the bed, make a mark on sheet 6” to the side of the foot.
(b) Make sure the mark is level with sole when the foot is in the position of standing.
(c) Measure from 2” below the axilla to the point 6” to the side of the foot.
(d) The hand grips can then be measured by:
1. Have the client make a fist and hyperextend the wrist.
2. Place crutch under arm, 2” below axilla.
3. Bend elbow to 30°.
4. Place handgrip at the point indicated by the client’s fist.
3) Alternate method:
(a) Take the client's height.
(b) Subtract 16".
(c) Adjust crutches to the calculated length.
(d) Stand client and make length adjustments as necessary.
(e) Adjust hand grips as given in other method.
(c) Forearm Crutches (Lofstrand or Canadian): These fit the forearm by means of a cuff. The length
from the handgrip to the floor should allow a 30° bend in the elbow when the crutches rest 2" to
the side and 6" in front of the feet.
1) If the client is able to stand:
(a) Measure the point 2" to the side and 6" in front of the toe of shoe.
(b) Have client make a fist with wrist in 20-30° hyperextension and elbow flexed to
approximately 30°.
(c) Measure from the fist to the mark to attain the height of the handgrip.
(d) Measure from the fist to 1" below the cubital fossa for the cuff height.
2) If the client is unable to stand:
(a) With the fist clenched and elbow flexed 30°, adjust forearm cuff so that it falls 1"-2"
below cubital fossa.
(b) Mark a point 6" to the side of the foot with ankle held at a right angle.
(c) Adjust the crutch length to match that point.
3) Adjustments:
(a) Slipping spring locking pin
(b) Friction twist lock

COMPETENCIES AND CRITERIA General Medical Conditions-DPT 755
399
(d) Through forearm and forearm platform, weight bearing is on forearms instead of hand and
wrists. The length should allow for a 90° bend in the elbow when the crutches rest 2" to the side
and 6" in front of the foot. The handgrip should be adjusted to provide a comfortable grip when
the forearm is resting in the trough or platform. A safety strap may be used to give added
stability. (Adjustments are similar to axillary and forearm crutch)
(2) Considerations for safety:
(a) Always use safety rubber tips that provide a concave surface to contact the floor.
(b) Check tips for lint, etc. to prevent slipping.
(c) Select the type of crutch according to the client's physical condition, walking requirements, and
ability to balance.
(d) Do not allow client to use crutches unsupervised unless has demonstrated ability to do so.
(3) Crutches need to be checked for correct height adjustment for the next several days as the
walking posture will improve and the client will stand taller.
C. Canes:
(1) Types:
(a) Standard: Available in a variety of shapes and materials
(b) Tripod: Same as standard but has three points of floor contact
(c) Quadruped: Has four points of floor contact; may have a shovel handle grip or standard grip
(2) Measurements:
(a) Adjust to same elbow angle (30°) as for crutches
(b) Aluminum adjustable cane:
1) Slipping spring locking pin
2) Friction twist lock
3) Set screw
(c) Wood canes – To cut, measure amount needed to be cut off with rubber tip on cane. Then,
remove tip and cut measured length.
D. Walkers:
(1) Types:
(a) Standard: A rigid four-legged frame opens on one side. These are adjusted to the same elbow
angle as crutches. Each leg has a rubber safety tip or glider tip if walker is to be pushed forward
rather than lifted forward.
(b) Reciprocal: These are the same as the standard except each side may be moved forward
independent of the other.
(c) Rolling: These are similar to the standard except each leg has a caster. Usually it has a portable
seat so the patient may walk or sit and propel walker with feet, or may be a standard with just
front wheel attachment.
(d) Forearm trough attachments on walkers: Weight-bearing is on forearm instead of wrist.
(2) Measurements:
(a) Adjust to same elbow angle (30°) as for crutches
(b) Adjustable walkers:
1) Slipping spring locking pin

COMPETENCIES AND CRITERIA General Medical Conditions-DPT 755
400
2) Friction twist lock
3) Set screw

COMPETENCIES AND CRITERIA General Medical Conditions-DPT 755
401
INFORMATION SHEET AMBULATION TRAINING: GAIT PATTERNS
A. Objectives: The physical therapist is responsible for the initial training of ambulation patterns to their
clients and the subsequent upgrading of the techniques as the status of the locomotion ability changes.
The latter of these responsibilities appears to be the more difficult to accomplish since the client's
physical problems and abilities vary in each case.
(1) To enable the client to get from one place to another by means of walker:
(a) Independent ambulation
(b) With aid of equipment (assistive device):
1) Crutches (with or without brace)
2) Cane
3) Walker
4) Chair
(2) To enable the client to walk safely and efficiently with a minimum amount of equipment and/or
assistance
(3) To give the client physiological and psychological benefits
(4) To increase client's endurance
(5) To develop as normal a gait as possible
B. Types of Gait:
(1) Four point alternate crutch gait:
(a) Starting position:
1) Standing, feet apart, crutches slightly ahead and to the side, with weight distributed evenly
between the feet and crutches
(b) Procedure:
1) Sway to the right taking weight onto the right crutch and freeing the left crutch. Lift the left
crutch and place it a short distance ahead. Sway to the left, raise the right foot, and place it
ahead opposite left crutch. Repeat for moving the right crutch, then the left foot.
2) Left crutch - right foot - right crutch - left foot
(2) Two point alternate crutch gait:
(a) Starting position:
1) Standing, feet apart, crutches slightly ahead and to the side, with weight distributed evenly
between feet and crutches
(b) Procedure:
1) This involves placing one crutch and the opposite foot down on the floor simultaneously,
Division of Physical Therapy
Emory University

COMPETENCIES AND CRITERIA General Medical Conditions-DPT 755
402
then the other crutch and the other foot.
2) Right crutch and left foot simultaneously, left crutch and right foot simultaneously
(3) Three point crutch gait:
(a) Starting position:
1) Standing, feet apart, crutches slightly ahead and to the side, with weight distributed evenly
between the two crutches and stronger limb
(b) Procedure:
1) The two crutches and the weaker limb are placed forward on the floor simultaneously, and
then the stronger limb is placed forward.
2) Repeat sequence.
(4) Modifications:
(a) Three point non-weight-bearing gait:
1) Starting position:
(a) Standing erect with the weight evenly distributed between crutches
2) Procedure:
(a) Client places both crutches in front of body simultaneously lifting body weight; swing
body through crutches until foot contacts floor.
(b) Repeat sequence.
(5) Swing-to-crutch gait:
(a) Starting position:
1) Standing erect with weight distributed evenly between feet and crutches
(b) Procedure:
1) The client places the two crutches simultaneously in front of the body, bearing down on the
crutches and lifting the body so that it moves up to the crutches.
2) Move both crutches forward, lift and swing body up to the crutches.
(6) Swing-through crutch gait:
(a) Starting position:
1) Standing erect with weight distributed evenly between the feet and crutches
(b) Procedure:
1) The client lifts himself by pressing down on crutches, and swings body ahead of them. The
crutches are then placed in front of the feet simultaneously and the gait is continued.
2) Both crutches – lift and swing body beyond crutches
(7) Method of using one cane:
(a) Starting position:
1) Standing erect with cane in the hand opposite the involved extremity; the elbow should be
slightly flexed (15-30°)
(b) Procedure:
1) The cane is moved forward with the involved limb followed by forward movement of the
uninvolved limb.

COMPETENCIES AND CRITERIA General Medical Conditions-DPT 755
403
2) Repeat sequence.
(8) Methods of using walker:
(a) Starting position:
1) Standing erect with weight evenly distributed between feet and walker
(b) Procedure:
1) The walker is moved forward and client utilizes:
(a) PWB gait
(b) NWB gait
(c) Walk to gait
(d) Swing to gait
2) With a reciprocal walker the client may utilize a:
(a) 2 point gait
(b) 4 point gait
(9) Types of gait patterns and equipment:
(a) Crutches – 3 point NWB, 3 point partial WB, 4 point, 2 point, 1 crutch, swing to, swing through
(b) Reciprocal walker – 4 point, 2 point
(c) Stationary walker – 3 point NWB, 3 point partial, swing to
(d) Canes – 2 point or 4 point gait
C. Logical gait sequence progressions:
(1) Routine sequence – used for clients with or without equipment:
(a) Start in parallel bars, and adjust bars to allow approximately 30° elbow bend.
(b) You demonstrate pattern to be taught.
(c) Client performs pattern with your assistance.
(d) Client performs pattern without your assistance.
(e) Correct errors if necessary.
(f) Have client repeat the pattern.
(g) Progress to next highest level of independence as suggested in the following outline.
(2) Initial pattern: 3 point non-weight bearing using crutches or 4 point standard walker:
(a) Progression:
1) 3 point NWB
2) 3 point partial
3) 4 point or 2 point
4) 1 cane
5) Independent
(3) Initial pattern: 3 point partial weight bearing on crutches or walker:
(a) Progression 1:
1) 3 point partial
2) 4 point or 2 point
3) 1 cane
4) Independent
(b) Progression 2:

COMPETENCIES AND CRITERIA General Medical Conditions-DPT 755
404
1) 3 point partial
2) 1 cane
3) Independent
(4) Initial pattern: 4 point crutches or reciprocal walker:
(a) Progression 1:
1) 4 point
2) 2 point
3) 2 canes
4) 1 cane
5) Independent
(b) Progression 2:
1) 4 point
2) 2 canes
3) Independent
(5) Initial pattern: partial weight bearing using 1 cane only:
(a) Progression:
1) Cane
2) Independent
D. Ascending Stairs/Curb:
(1) Crutch Methods:
(a) The client should be taught two methods of ascending and descending stairs:
1) Using one crutch and a handrail (the preferable method)
2) Using two crutches (less safe, but necessary when there is no railing available, as on a curb)
3) If there are two railings, the client should use the railing on the side of the weaker or
affected lower extremity, holding both crutches under the same arm.
(b) Gait pattern:
1) Non-weight bearing (unilateral):
(a) Push on crutch and rail and lift uninvolved leg to first step.
(b) Advance hand on railing and lift crutch to first step.
(c) NOTE: If client has a long leg cast, it must be held behind the client.
2) Partial or full weight bearing:
(a) Push on crutch and rail and lift uninvolved leg to first step (minimal weight acceptable
on involved extremity).
(b) Advance hand on the railing and lift the crutch to the first step.
(c) Lift involved or weaker leg to the first step.
(2) Cane Methods:
(a) As in the crutch method, a railing should be used when available and on the appropriate side
(opposite the affected leg); the cane is hooked over the involved arm or on client’s belt.
(b) Gait pattern:
1) Using railing:
(a) Grasp railing with uninvolved hand about four inches forward.

COMPETENCIES AND CRITERIA General Medical Conditions-DPT 755
405
(b) Shift weight to involved leg, supporting self with hand on rail.
(c) Step up with uninvolved leg.
(d) Lift involved leg to same step.
2) Using cane:
(a) Shift weight to involved leg and cane.
(b) Step up with uninvolved leg.
(c) Lift affected leg to same step.
(d) Lift cane to same step.
(3) Paraplegic method:
(a) Paraplegics can usually only ascend stairs backward. If handrail is available, the client should use
one crutch and the rail.
(b) Gait pattern:
1) Client stands with back to stairs, very close to steps.
2) Client quickly extends his trunk, and then forcefully jackknifes, lifting his lower extremities
to the first step.
3) Client raises crutch to the first step, then advances arm on rail.
4) "Para-stance" is assumed immediately.
NOTE: This is a very difficult task, usually only managed by the young, athletic, low spinal level client.

COMPETENCIES AND CRITERIA General Medical Conditions-DPT 755
406
INFORMATION SHEET AMBULATION TRAINING: SIT TO STAND/STAND TO SIT
1. Rising from wheelchair for ambulation with assistive devices/moving patient from the chair to the
erect position:
A. Method used by those with sufficient voluntary movement in the lower limbs to perform
straightening of hips and knees with the aid of crutches (No appliances):
(1) Client from the chair:
(a) Position of client after the chair is secured:
1) Sit forward front of chair.
2) Involved limb placed forward and slightly to side.
3) Place both crutches on side of weak limb; grasp both hand pieces using one hand.
4) Place crutches far enough to side to give wide base of support.
5) Place other hand on armrest of chair.
(b) Position of therapist:
1) Stand close to client on side of weak limb or face the client.
2) If client needs assistance to stand, stand facing client, hips and knees flexed and one foot
forward.
3) Place hand on rib cage and assist him to standing.
4) If client needs no assistance to stand, be prepared to aid him in case he loses balance.
(c) Procedure:
1) Client leans forward from hips, pushes down on hands and feet, straightens knees, and hips,
raising body to erect position.
2) If assistance is needed, refer to Basic Transfers.
3) After client is standing, he reaches across and grasps outer crutch with hand, placing it
under the arm.
4) Client then rotates remaining crutch inward and places it under arm.
5) Holding crutch under arm, client releases hand piece and grasps it in proper manner.
6) Alternate method for second crutch: Lean crutch against chest, reach around crutch and
grasp hand piece, and place crutch under arm.
B. Procedure for client who is non-weight bearing on one lower limb:
(1) If the patient can only bear weight on one limb:
(a) Teach client to assume standing from the wheelchair by having the client push down on
the chair arms as he leans toward you and extends the hips. You should keep one hand
under the non-weight bearing limb and steady the client as the hips and knees extend.
Division of Physical Therapy
Emory University

COMPETENCIES AND CRITERIA General Medical Conditions-DPT 755
407
(b) Teach client to balance on one limb; holding onto bars, the client shifts weight in all directions
and gradually gains balance so that momentarily one limb standing is achieved without holding.
(c) Teach client to lift body weight by pushing on parallel bars; the action of the shoulders should
be one of scapular adduction and depression.
(d) You demonstrate the pattern.
(e) Assist client to perform pattern.
(f) Have client perform pattern under your close supervision.
(g) Correct any errors and have client repeat the pattern.
(2) If the client can bear full weight on one limb and partial on the other:
(a) Teach client to come to standing as in 1.a.
(b) Rule of thumb for the partial weight-bearing limb:
1) Know the client's body weight.
2) The physician can relate the amount of weight bearing desired - The least amount is simply a
"toe touch;” beyond the "toe touch," the client is usually allowed to bear a percentage of
the total body weight. Calculate desired weight bearing percentage X total weight bearing =
number of pounds of foot pressure.
3) Stand client on the sound limb; allow hands to be used for balance. The client then should
practice pressing the affected foot on the scale until the correct amount of pressure is
reached. The purpose is to assist the client in learning how the correct amount of pressure
feels against the foot.
C. Procedure for assuming standing with knees retained in extension by braces, splints, casts, or ankylosis:
(1) Place one crutch on each handle of back of wheelchair.
(2) Move to right side of chair.
(3) Cross left leg over right leg, making sure not to bump the legs.
(4) Place right hand on the rear of the seat of the wheelchair and the left hand on the right armrest.
(5) Twist body and lift self into jackknife position, facing the chair.
(6) Place right hand on left armrest.
(7) Reposition feet for maximum balance.
(8) Balance with one arm on armrest and reach for crutch with the other.
(9) Position crutch securely under the arm.
(10) With other hand reach for remaining crutch, keeping weight forward on crutch.
(11) Keep weight forward on crutches and back away from chair.
(12) Assume weight on feet and crutches, hips slightly ahead of feet, with shoulders back, head erect.
D. Return to Sitting from Ambulation with Assistive Devices:
(1) For the client who bears weight bilaterally:
(a) Position of client:
1) Back toward chair
2) Back of legs touching chair
(b) Position of therapist – standing in front or to weak side
(c) Procedures:
1) Remove hand from crutch on side of weaker limb (adduct arm to hold crutch against body).

COMPETENCIES AND CRITERIA General Medical Conditions-DPT 755
408
2) Rotate arm inward, grasping hand piece (back of hand is toward body).
3) Rotate crutch outward from under the arm.
4) Leaning on the one crutch, remove remaining crutch from under arm and place it with other
crutch.
5) Place free hand on armrest.
6) Keeping trunk erect, incline slightly forward from hips, flex hips/knees, and lower self to the
chair.
7) If client needs assistance sitting, hold him by the waist and gently lower him to chair.
(2) For the client who bears weight unilaterally:
(a) Approach the chair getting very close to avoid excessive "backing up".
(b) Turn slowly using short steps in the normal crutch gait sequence.
(c) Back up to the chair by pushing down on handgrips, then hopping backward on uninvolved
lower extremity.
(d) Balance on the uninvolved lower extremity and release handgrip on uninvolved side; pronate
arm and grasp handgrip, freeing crutch from under the arm.
(e) Maintain handgrip on crutch on involved side, but remove it from under arm.
(f) Supporting self with crutches in one hand and weight on uninvolved lower extremity, reach back
to armrest with free hand.
(g) Position involved lower extremity forward, with heel resting on floor.
(h) Lower self gently into chair.
(i) Place crutches on back handle of chair.
(j) Place feet on footrests.
(3) For the client who bears weight bilaterally with knees locked in extension:
(a) Approach chair.
(b) Balancing on one crutch, place other crutch on the back handle of the chair; now, place hand on
armrest.
(c) Balancing on this armrest, place other crutch on back handle of the chair.
(d) Place this hand on the armrest.
(e) Move right hand to the seat of the wheelchair.
(f) Twist to the right, sitting on the edge of the seat.
(g) Push down on armrests to push body back into the chair.
(h) Unlock knee joints.
(i) Place feet on footrests.

COMPETENCIES AND CRITERIA General Medical Conditions-DPT 755
409
CRITERIA SHEET AMBULATION TRAINING
1. Pre-Planning for procedure:
A. Identify the priority signs, symptoms, and conditions, which make the procedure applicable:
(1) Decreased strength, range of motion, and sensation in lower limbs
(2) Presence of pain
(3) Observed deviation(s) in ambulation pattern
(4) Cardiopulmonary dysfunction
B. Identify the rationale for choice of procedure:
(1) Safety:
(a) To enable client to perform functional ambulation with the highest degree of safety possible
(b) To instruct client in the safe use of ambulation assists if such assists are needed
(2) Economics:
(a) Physical therapist's time
(b) Cost of ambulation assists
(3) Condition of client:
(a) Client unable to ambulate independently for any reason.
(b) Client unable to ambulate with assistive devices.
(4) Duration of treatment:
(a) Determine the client's endurance time for specific activities.
(b) Duration is based on client's response to the activity.
(5) Generate other possible alternative treatments:
(a) Kinetron – to develop reciprocal weight bearing pattern
(b) Treadmill – to develop reciprocal weight bearing pattern with increasing physical difficulty
(6) Application of procedure to short and long term goal:
(a) STG – Activate a plan of training which decreases the gait abnormalities.
(b) LTG – Establish the highest level of ambulation possible considering the medical, physical, emotional, and cognitive condition of the client.
Division of Physical Therapy
Emory University

COMPETENCIES AND CRITERIA General Medical Conditions-DPT 755
410
2. Preparation of the Physical Therapist:
A. Review procedure as necessary.
B. Review medical record.
C. Interview client:
(1) What type of ambulation would you wish to perform?
(2) Do you have stairs at your home or office? If so, how many?
(3) How far would you like to walk at any one time?
(4) What do you think is the greatest barrier to your ability to walk?
D. Select and collect correct equipment:
(1) Safety belt
(2) Assistive devices
(3) Sphygmomanometer/stethoscope
(4) Shoes
(5) Ammonia inhalants
E. Secure the environment:
(1) Pretreatment preparation:
(a) Clear obstacles from walking area.
(b) Adjust parallel bars or assistive devices.
3. Execute the procedure:
A. Use the Teaching-Learning and Interpersonal Relationships Criteria to establish rapport:
(1) Explain and demonstrate the procedure to the patient.
B. Sequential steps of procedure:
(1) Remove any client restraints or unnecessary supports.
(2) Secure walking belt firmly.
(3) Request or assist the client to protect his feet with shoes or slippers.
(4) Transfer the client to parallel bars for practical assessment of ambulation aid and gait pattern previously selected.
(5) Prepare wheelchair or stretcher for safety when the client stands.
(6) Guard client according to principles of safety.
(7) Assist the client in rising to standing position (See Information sheet for rising from wheelchair for ambulation with assistive devices).
(8) Assist client in executing previously selected gait pattern within the parallel bars (see information sheet).

COMPETENCIES AND CRITERIA General Medical Conditions-DPT 755
411
(9) Evaluate the appropriateness of the gait pattern and ambulation aid tentatively selected.
(10) Make the necessary additional modifications and adaptations.
(11) Progress the level of difficulty toward the required level of proficiency according to the most recent gross evaluation.
C. Implement changes in procedure based upon client response:
(1) Methods:
(a) Ambulate outside the parallel bars.
(b) Increase the distance ambulated.
(c) Decrease the quantity of assistance required by personnel.
(d) Decrease the base of support offered by the ambulation aid.
(e) Increase the complexity of the terrain.
(f) Increase the incline or height of ramps, curbs, and stairs first with, then without, handrails.
(2) Achievement of STG and LTG in 1.B.6.
D. Record results in SOAP format.
E. Clean the areas.

COMPETENCIES AND CRITERIA General Medical Conditions-DPT 755
412
CRITERIA SHEET ASSESSMENT OF CLAUDICATION TIME OF THE LOWER EXTREMITIES
1. Pre-Planning for Procedure: A. Identify the priority signs, symptoms, and conditions, which make the procedure applicable:
(1) Cramps during ambulation (2) Shin splints (3) History of atherosclerosis, diabetes (4) Signs of gangrene
B. Identify the rationale for choice of procedure: (1) Safety:
(a) Identify any cardiopulmonary disease that may preclude heavy/prolonged exercise. (b) Determine the need for pre-exercise medication (i.e. nitroglycerin, isordil).
(2) Economics: (a) Evaluation does not require expensive or sophisticated equipment. (b) Evaluation requires moderate amount of therapist's time.
(3) Condition of the patient: (a) Myovascular drugs/pain medications may affect the reliability of the evaluation. (b) Recent alcohol consumption may affect the reliability of the evaluation. (c) Recent surgery may affect the reliability of the evaluation. (d) Patient must be able to ambulate. (e) Ability of patient to cooperate and communicate.
(4) Duration of treatment (5) General alternative evaluation procedures:
(a) Doppler (b) Superficial circulatory assessment (c) Palpation of peripheral pulse
(6) Application of procedure to short and long term goals: (a) To establish a baseline through which the effectiveness of the therapeutic regimen may be
assessed (b) To re-evaluate a client to assess the progress of the disease (c) To assess the severity of the disease
2. Preparation of the Physical Therapist: A. Review procedure as necessary. B. Review the medical record. C. Interview the client:
(1) How far can you generally walk? (2) What makes you stop walking? (3) What medications are you on? (4) Have you recently had any alcohol or coffee? Are you sure?
Division of Physical Therapy
Emory University

COMPETENCIES AND CRITERIA General Medical Conditions-DPT 755
413
D. Select and collect the correct equipment: (1) Metronome (2) Stopwatch/sweep hand (stop watch preferred) (3) Draping materials
E. Prepare the environment and equipment/materials: (1) Schedule evaluation time when free access to an unobstructed corridor is available for undisturbed
ambulation. (2) Evaluate operational status of metronome and stopwatch.
3. Execute the procedure: A. Follow the Teaching-Learning and Interpersonal Relations Criteria to establish rapport with the patient
and explain and demonstrate the procedure: (1) Explain that muscle cramping is expected to occur during the evaluation. (2) Explain to the client that s/he should notify you immediately when the cramps first occur. (3) Explain to the client that s/he should continue to walk as long as possible despite the cramps.
B. Sequential steps of procedure: (1) Expose the lower extremities. (2) Inspect the skin for trophic changes, sensation, and bruises. (3) Set the metronome to 100 beats/minute. (4) Demonstrate the activity to the client, ambulating in time with the metronome at 100 steps/minute. (5) Remind the patient of the importance of notifying the examiner of the initial cramping sensation
and need to continue as long as possible. (6) Start the metronome. (7) Start the stopwatch. (8) Note the time when the patient first identifies the pain. This is the "claudication time". (9) Continue timing until the "break" is reached, and the patient is unable to walk any longer. This is the
"absolute walking time". (10) Reset the stopwatch and immediately restart timing; time until the pain disappears. (11) Keep patient in standing posture until pain disappears to continue flow to feet; doesn't occlude
vessels when standing. C. Implement change in therapeutic measures based upon:
(1) Response of the patient: (a) Vital signs (b) Claudication time – dull, aching
(2) Achievement of long and short term goals D. Record results in SOAP format:
(1) O: Include – (a) Claudication time (b) Absolute walking time (c) Pain disappearance time
(2) A: (a) Increase or decrease in severity of disease; efficacy of treatment procedures; implementation
(3) P: (a) Continuation and discontinuation of Buerger's exercise, thermal modalities
E. Clear the area: (1) Replace metronome and stopwatch. (2) Dispose of soiled linen.

COMPETENCIES AND CRITERIA General Medical Conditions-DPT 755
414
CRITERIA SHEET BUERGER'S EXERCISES
1. Pre-Planning for Procedure:
A. Identify the priority signs and symptoms which make the procedure applicable (aid in developing arterial
collateral circulation):
(1) Intermittent claudication
(2) Atherosclerosis
(3) History of diabetes
(4) Trophic changes of the skin
B. Identify rationale for choice of procedure:
(1) Safety:
(a) Client must have good balance and fair tolerance. Procedure involves many position
changes.
(2) Economics:
(a) Patient can easily be instructed to perform these activities at home.
(3) Condition of patient:
(a) Patient must have intact sensorium.
(4) Generate other possible alternative mechanisms:
(a) None available
(5) Application of procedure to short and long term goal:
(a) STG – Improve local circulation
(b) LTG – Pain-free ambulation
2. Preparation of Physical Therapist:
A. Review procedures as necessary.
B. Review medical record.
C. Interview client:
(1) Do you get pain in your legs?
(2) What brings it on? What relieves it?
(3) Does the pain ever wake you from sleep?
D. Select and collect the correct equipment:
(1) Chair
(2) Plinth/bell
(3) Draping material
(4) Timer or clock or stopwatch or wristwatch
Division of Physical Therapy
Emory University

COMPETENCIES AND CRITERIA General Medical Conditions-DPT 755
415
(5) Pillows
E. Prepare the environment and equipment/materials:
(1) Attempt to find a place that has a comfortable room temperature, without excessive draft.
(2) Place chair padded with pillow upside down on edge of bed.
3. Execute the Procedure:
A. Follow the Teaching-Learning and Interpersonal Relations Criteria to establish rapport with the client
and explain and demonstrate the procedure.
B. Sequential steps of the procedure:
(1) Have patient remove all clothing from lower extremities.
(2) Have patient lie on his back, elevating legs and resting them on the chair until they blanch. (may
take 30 seconds to 3 minutes)
(3) Patient may do ankle circles to decrease time or pump feet.
(4) As soon as legs pale, have patient sit up with legs hanging over edge of bed. Ideally the feet should
not touch the floor. Have patient sit on pillows if bed is not high enough.
(5) Have patient remain dangling for approximately one minute more than it takes for rubor to develop.
(this may take from 3 to 5 minutes)
(6) Have patient return to supine and rest.
(7) Repeat cycle to patient's tolerance.
C. Implement changes in procedure based upon:
(1) Response of patient:
(a) Vital signs
(b) Postural hypotension
(c) Increased pain
(d) Fatigue level
(2) Achievement of short and long term goals
D. Record results in SOAP format:
(1) 0:
(a) Note patient’s ability to perform activity.
(b) Note duration of time of blanching and rubor.
(c) Note visual appearance of extremities.
(2) A:
(a) Buerger's exercises effective/ineffective
(3) P:
(a) According to O and A
(b) Increased pain – discontinue
(c) Same or decreased pain – continue
E. Clean up area.

COMPETENCIES AND CRITERIA General Medical Conditions-DPT 755
416
PROCEDURE AND CRITERIA SHEET DOCUMENTATION-INITIAL EVALUATION
1. Pre-Planning for Procedure:
A. Identify symptoms and co-existing problems of the client (see Criteria for the Evaluation and
Treatment of Clients).
B. Conduct the examination according to the criteria sheet for the specific procedures/tests.
C. Interpret the examination findings.
D. Establish the movement problems, dysfunctions (impairment, functional limitation, disability) or
diagnosis:
(1) That accounts for all pertinent signs and symptoms
(2) Toward which treatment and treatment goals are directed
E. Establish treatment goals with rational.
F. Determine a treatment plan with rationale.
2. Preparation of Physical Therapist:
A. Verify admission data, including:
(1) Is the client a referral or a walk-in?
(2) If a referral, what are the name, address, and phone number of the referral source?
(3) If required by state law, is the written physician consultation included in the record with appropriate
signature and date?
(4) If the written consultation is required but not included, proceed in compliance with state law, and
always:
(a) Verify verbal referrals by phone or written contact.
(b) Document date of any phone contact and person contacted.
(c) Document plan for obtaining written prescription as required by state law.
B. Identify relevant standards of requirements for documentation, including:
(1) Standard of Practice for Physical Therapy (American Physical Therapy Association)
(2) Documentation standards of the facility (probable source: Procedure Manual for the Physical
Therapy Department)
(3) Special requirements of the source of reimbursement for services (Medicare, Medical Assistance, or
private insurer)
C. Obtain informed consent of the client or the client's representative for evaluation and/or
implementation of the plan of care.
D. Determine the reliability and validity of data to be reported in the evaluation.
Division of Physical Therapy
Emory University

COMPETENCIES AND CRITERIA General Medical Conditions-DPT 755
417
3. Execute the Procedure:
A. Record concisely and accurately in appropriate records:
(1) Date and title of report (i.e. Physical Therapy Initial Evaluation; in acute care settings also
indicate time of day)
(2) History (Hx: PMP): History of the present medical problem for which the client was referred to
physical therapy, including:
(a) Onset of symptoms
(b) Progression or stage (i.e. acute, intermittent, improving)
(c) Medical diagnoses and results of medical tests
(d) Previous or ongoing treatment
(e) Admission and referral information, including – source of referral, primary physician, specific
referral diagnosis, medical orders and specific precautions for physical therapy, overall medical
plan for the client, and relationship of physical therapy to the overall medical plan for the
problem
(3) Subjective results of the evaluation (S):
(a) Information reported by the client (or a designated family member) that is pertinent to the
management of the case or the client's present condition
(b) Includes the following if the patient or family member tells the therapist - history, lifestyle or
home situation, emotions or attitudes, goals, complaints, response to treatment
(4) Objective results of the evaluation (O):
(a) Past Medical History (PMHx) – Results of review of the medical database for pertinent past
medical history (previous surgery, trauma, coexisting conditions, etc.)
(b) Complete results of the therapist's objective measurements or observations (example - Active
ROM)
(c) Includes observable, testable, baseline data against which progress may be reliably measured in
subsequent progress reports
(5) Assessment (A):
(a) Problem List – List of the physical therapy problems in order of priority (disabilities, functional
limitations, or impairments to be addressed in therapy should be described, not the medical
diagnosis)
(b) Long-term goals (LTGs) – Time-related list of the predicted or desired functional outcomes of
physical therapy:
1) Goals are related to the specific needs and problems of the patient.
2) Goals must be reasonable, observable, and testable.
3) Expected date of achievement for LTG is dependent upon setting. (hospital-based LTGs
may be for discharge to home, school-based LTGs maybe for the school year, out-patient
adult settings maybe for the completion of physical therapy)
(c) Short term goals (STGs) – Intermediate steps or outcomes necessary to achieve long-term goals
with target dates:
1) Goals are related to the specific needs and problems of the patient.
2) Goals must be reasonable, observable, and testable.

COMPETENCIES AND CRITERIA General Medical Conditions-DPT 755
418
3) Time to predicted achievement for STG is dependent upon setting.
4) STGs should guide immediate treatment plan.
(d) PT Impression:
1) Correlations between the S,O,A,& P parts of the note that might not be obvious to all parties
reading the note
2) Inconsistencies between pt's complaints and objective findings (i.e. walks in PT but not at
home)
3) Justification for the goals or treatment plan
4) Comments on rehab potential
5) Identification of missing information and reasoning for information not obtained
6) Discussion of further testing or services needed
(6) Plan (P) (Physical Therapy Treatment Plan):
(a) Proposed frequency, duration, and location of treatment
(b) Treatment the client will receive
(c) Plans for further assessment or reassessment
(d) Plans for discharge
(e) Plans for client and family education
(f) Plans to obtain equipment for the client
(g) Referrals to other services
(h) Plans to consult with physician regarding further treatment
(7) Sign your name, title, and department
Addendum:
Students shall sign their full names (no initials) followed by SPT. All notes written in the chart must be counter-
signed by a registered physical therapist.

COMPETENCIES AND CRITERIA General Medical Conditions-DPT 755
419
PROCEDURE AND CRITERIA SHEET DOCUMENTATION-PROGRESS NOTES
1. Pre-Planning for Procedure:
A. Identify the problem(s) currently under evaluation and/or treatment.
B. Identify the written short and long term goals from the most current physical therapy treatment plan.
C. Identify differences between the client's present physical status or performance of targeted functional
motor skills and status at initial evaluation and/or last progress report.
D. Recall relevant subjective comments of the patient.
E. Identify current objective data relevant to each problem/goal.
F. Analyze the reliability and validity of evaluation and treatment.
G. Determine your professional analysis of the problem.
H. Synthesize a plan for further action if required.
I. Identify the rationale for choice of procedures.
2. Preparation of Physical Therapist:
A. Identify the type of note required.
B. Review the procedure, as necessary.
C. Identify the departmental standards for frequency of documentation and any special requirements or
mandates.
D. Read the current medical record.
3. Execute the Procedure:
A. Identify the progress note section of client's medical record.
B. Record the day/month and year when the note is being written.
C. Identify the type of note. (i.e. Physical Therapy Progress Note)
D. Concisely and accurately record:
(1) (S): Subjective information:
(a) Client/family member's relevant subjective comments
(b) Subjective reactions to treatment/progress
(2) (O): Objective information:
(a) Any new or different objective data (see criteria for Initial Evaluation)
(b) Tx: treatment given to the client includes – specific exercises/functional skills taught to the
patient, level of independence in performing exercises/functional tasks, number of repetitions
tolerated, positions used, modifications necessary
(3) (A): Assessment:
(a) Record concisely your assessment of the client's progress relative to each problem or targeted
Division of Physical Therapy
Emory University

COMPETENCIES AND CRITERIA General Medical Conditions-DPT 755
420
functional outcome.
(b) Explain rationale for choice of treatment measures.
(c) Identify and describe the client's current status or progress for each problem under treatment.
(4) (P): Physical Therapy Treatment Plan:
(a) Briefly describe plans for future action. (i.e. any modifications in present program)
(5) Sign your full name, title, and department at end of note.

COMPETENCIES AND CRITERIA General Medical Conditions-DPT 755
421
INFORMATION SHEET HYDROTHERAPY AND HYDROKINETICS
1. Definition:
A. Hydrotherapy is a water treatment sometimes combined with mechanical agitation as an added
stimulus. It combines the mechanisms/effects of conductive heating, cooling, and gentle massage.
2. Equipment:
A. Tanks:
(1) The tanks usually used in physical therapy departments are made of stainless steel. The tanks come
in several sizes and may be stationary or mobile units.
(a) The most common is the 40 to 60 gallon tank which can be used for the lower extremities, the
upper extremities, and/or the hips.
(b) The small 18 - 25 gallon tank is usually used for the arms and hands.
(c) The so called LOBOY, designed for seating the patient inside with his legs extended, has a
capacity ranging from 70 to 90 gallons.
(d) The 425 - gallon tank, or Hubbard Tank, is keyhole shaped to allow for underwater exercises. It is
8 feet 10 inches long x 6 feet 6 inches wide x 34 inches high.
B. Chairs or stools for use with whirlpools should be adjustable in height and preferably equipped with low
back supports. Sit-in whirlpools come equipped with stainless steel seats, which may be adjusted to
different heights.
C. Walking Tank:
(1) Some Hubbard tanks contain a walking tank which is beneath the center section. The bottom of the
tub can be removed to give access to this space, which is equipped with parallel bars for underwater
ambulation.
D. Pool Therapy:
(1) Pools are usually equipped with underwater plinths and parallel bars for administering underwater
exercises and ambulation training. The physical therapist administers the treatment in the pool.
Clients and therapists should take showers before and after pool treatments. Clients on stretchers
are bathed and transferred into the pool with a hoist similar to the Hubbard tank hoist. Pool
sanitation is usually taken care of through chlorination and constant in-flow, as in swimming pools.
Therapeutic pools often allow early ambulation. The buoyancy of the water makes movement
easier. The pool allows both assistance and resistance to motion. It has the advantages of full body
immersion and a more generalized stimulus with a resultant generalized response.
Division of Physical Therapy
Emory University

COMPETENCIES AND CRITERIA General Medical Conditions-DPT 755
422
E. Electric turbine ejector: The turbines are electric motors with 1/4 to 1/2 horsepower which drive a
propeller mounted on a long shaft which is immersed in the water. The turbine agitates the water by
producing an underwater jet of air and water. Air is taken into the turbines through openings located on
the motor. Two openings are located at the bottom of the turbine, one to suction water into the turbine
from the tank and one for the water and air to be blown back into the tank.
(1) Precautions:
(a) The turbine must be grounded.
(b) The line cord plug should be secure.
(c) Do not turn on the turbine unless the suction and discharge holes are well-covered with water.
(d) Never cover the air intakes on the motor.
(e) The water must be free of debris.
(2) Adjustments:
(a) The direction of the air stream can be raised, lowered, or rotated to the side.
(b) Pressure of the water stream may be regulated.
(c) The amount of air mixed with the water stream may be regulated.
(d) An electric heater is available with some tanks to prevent decrease in water temperature.
(heater guard should be used when treating lower extremities)
F. Dial thermometer: These provide easy reading of water temperature. The thermometer will be damaged
if water temperature exceeds 160° when the tank is being filled.
G. Electric drain pump: Some tanks are equipped with a quick emptying electric pump, attached to the
bottom of the tank, which drains the water rapidly. A valve located under the tank base will permit
complete draining of any residue water remaining in the pump system.
(1) Precaution: Gauze, Band-Aids, dressings, and other foreign material should be removed manually to
prevent damage of the pump.
H. Hoist and Stretcher - Mechanical systems for transferring the patient into and out of the tank: The
stretcher attaches to the hoist by four cables. The overhead hoist, moveable on a ceiling beam, allows
raising, lowering, and moving the stretcher toward or away from the tank.
I. Mixing Valve:
(1) The tanks are usually filled by a mixing valve which lets water in at regulated temperatures.
(a) The Skin:
1) The skin is the organ of the body which is of main concern in water application since it is
between the body and the environment.
2) Located throughout the entire surface of the skin are the sensory receptors for heat, cold,
pressure, pain, and itching. These receptors form part of the important link in the stimulus -
response mechanism so necessary for the effects of many physical therapy applications or
treatments.
3. Hydrotherapy is a thermal procedure. Therefore, its effect is achieved mainly by the change in temperature
it conveys to the body surface.
A. Skin surfaces, except for the axilla, generally have a temperature of 92°F. The normal body temperature
will range from 97.2°F to 99.5°F. The temperature regulating mechanisms of the body tend to keep it in
that range. If water temperature above 92°F is applied to the body surface, heat will be absorbed by the

COMPETENCIES AND CRITERIA General Medical Conditions-DPT 755
423
body. The receptors in the skin will absorb the heat and convey temperature change information
through the peripheral nerves to the central nervous system. The response will consist of the following
effects:
(1) Physiological Effects:
(a) General Body Heating Effects:
1) Increases in core temperature if trunk and all extremities immersed in water at 102° F (Body
cannot dissipate heat due to total body immersion)
2) Increase in skin temperature (conduction)
3) Increased metabolic rate
4) Increased pulse rate (10 beats per minute for each degree Fahrenheit increase in body
temperature)
5) Increased respiration rate (4 breaths per minute for each degree Fahrenheit increase)
6) Vasodilation of the peripheral vessels:
(a) Hyperemia
(b) Increase of circulatory flow
(c) Rise in blood volume
(d) Vasoconstriction of the central vessels
7) Increased perspiration
8) Increased number of leukocytes in the blood leading to increased phagocytosis
9) Increased permeability of the cell membrane
10) Momentary rise in blood pressure
11) Increased circulatory flow:
(a) Increase of heat elimination from area heat is being applied to
(b) Regression of inflammatory processes and diminution of edema and effusions
(b) Local Heating Effects:
1) Increased blood flow
2) Increased local tissue metabolism
3) Increased leukocytes in heated area
4) Removal of transudates and exudates
5) Local analgesia
6) Local muscle relaxation - decreased muscle spasm
7) Mottled erythema
(2) General Effects:
(a) Cleansing of skin surface and debridement
(b) Mechanical stimulation by agitation of water
(c) Softens scar tissue and breaks down old adhesions
(d) Increase of lymphatic circulation
(e) Increase of oxygen consumption (increase of metabolism; increased rate of respiration but
breathing more shallow)
(f) Change in the pH of urine, blood, and sweat to the alkaline side (secondary to increase of
metabolism)

COMPETENCIES AND CRITERIA General Medical Conditions-DPT 755
424
(g) Sedation of body tissues - sedative effect upon irritative conditions of sensory motor nerves;
increased muscle tone from short hot treatment, diminished muscle excitability from prolonged
hot treatment
(h) Analgesia - relieves pain (sedative effect); ischemia is the cause of pain
(i) Anorexia - decreased circulation to stomach
(j) Regression of inflammatory processes and diminution of edema and effusions
4. Properties and other effects of water utilized therapeutically:
A. High density – reduces effects of gravity – buoyancy
B. Viscosity – permits water to conform to surface
C. Cleansing and massaging
D. Good solvent
E. Skin softening
5. Temperature Ranges for Hydrotherapy Procedures:
COLD < 65° F 18.3° C
COOL 65 – 75° F 18.3 – 23.9° C
TEPID 75 – 92° F 23.9 – 33.3° C
NEUTRAL 92 – 97° F 33.3 – 36.1° C
WARM-HOT 98 – 104° F 36.7 – 40° C
VERY HOT > 104° F > 40° C
Upper safe temperature limits 110-115 degrees F
A. NOTE:
(1) Conversions from Centigrade to Fahrenheit – multiply (C˚) by 9 divide by 5 and then add 32; result
equals degrees F
(2) Conversions from Fahrenheit to Centigrade – subtract 32° from (F˚), multiply result by 5, and divide
the product by 9; result equals degrees Centigrade

COMPETENCIES AND CRITERIA General Medical Conditions-DPT 755
425
B. Suggested Temperatures determined by part treated and treatment objectives:
Arm whirlpool 108° – 112° F
Leg whirlpool 106° – 110° F
Half bath in LOWBOY 101° – 103° F
Hubbard Tank < 100° F
(1) Advantages:
(a) Heat is applied to all surfaces of immersed area
(b) Buoyancy of water permits exercise during treatment
(c) Cleansing action provided through the mechanical effects of water in motion
(d) Temperature of water easily controlled
(e) Bandage removal facilitated by soaking bandages before turning on the turbine
(2) Disadvantages:
(a) Client transfer into and out of the tank is at times difficult
(b) Clients preparation for the treatment is more involved
(c) Clients cannot be left unattended while in the Hubbard Tank
(d) Clients are fearful at times of being transferred into the tank and remaining there for treatment
(e) Heat provided is only superficial
(f) Equipment cleaning is extensive
(g) Cross contamination is an ever present possibility
6. General Practice in Administering Hydrotherapy:
A. Read the patients chart for pertinent information including the physician's order.
B. Explain the treatment to your patient - include length of time and what procedures will follow.
C. Instruct and assist the patient as needed to remove the necessary clothing, put on the appropriate
treatment apparel, and assume the proper position that is safe and comfortable.
D. Protect the patient against cold environment during and following application of treatment.
E. Inspect the area to be treated for sensation and skin conditions.
F. Instruct the patient in the use of the call system if the procedure is such that the therapist does not
remain with the patient throughout the treatment period.
G. Where indicated, instruct the patient to move the part during treatment.
H. The tank is filled with water to the desired starting temperature. To be safe ALWAYS TEST THE WATER
WITH YOUR HAND.
I. Avoid pressure of extremities on the side of the tank.
Watch for the following adverse effects:
(1) Dizziness
(2) Weakness increases
(3) Pain increases
(4) Nausea
(5) Edema increases

COMPETENCIES AND CRITERIA General Medical Conditions-DPT 755
426
(6) Shallow, gasping breath
(7) Weak and rapid or fluttering pulse
(8) Profuse sweating
(9) Cyanosis
(10) Drop in blood pressure
J. At the end of the treatment, dry the patient thoroughly and inspect the part.
K. Terminate treatment – Determine client's overall response.
L. Record results appropriately – Include equipment used, patient positioning, special precautions, and
length of treatment, patient response, and observations.
M. Attend to aftercare of the equipment and treatment area.
7. Indications:
A. Sprains and strains after the first 36 hours
B. Poorly healing or infected areas – relief of pain, improvement of circulation
C. Post-operative orthopedic procedures - upon removal of cast to soften dead skin, reduce stiffness and
edema, improve circulation
D. Arthritis, neuritis, tendonitis, tendon transplants
E. Decubitus ulcers and wounds – drainage of sinuses and removal of necrotic tissue
F. Burns
G. Chronic inflammatory conditions, arthritis, tenosynovitis, bursitis
H. Neurologic conditions, Guillain-Barre, polio, muscular dystrophy
I. In preparation for, or in conjunction with, other treatments
8. Contraindications:
A. Peripheral vasoconstriction and subsequent peripheral stasis and anoxia
B. Lowered leukocyte response and impaired phagocytic capabilities of tissue cells
C. Cardiac decompensation and coronary heart disease
D. Acute infections and febrile diseases
E. Bowel and/or bladder incontinence
9. Periodic Care of Equipment:
A. Turbines should be checked, cleaned, and oiled periodically by trained personnel.
B. Whirlpool thermometer should be checked for accuracy frequently, and any discrepancies are
indications for overhaul by trained personnel.
C. Thermostatic water mixing valve should be checked for accuracy.
D. Procedure should be established for checking the effectiveness of the antiseptic technique used to
prevent cross contamination by periodic culturing of the tank and turbine.
E. The hoist and stretcher for the Hubbard tank and/or pool should be maximum load tested on a regular
basis.
F. Lab cultures should be taken once a month or more often if having contamination problems.
G. Methods of Cleaning:
(1) Cleaning the inside of the turbine and tube:
(a) Immerse total surface of turbine, which was in contact with the water during the treatment, in a
bucket of water containing Clorox, Betadyne, prepadyne, or wescodyne solution.

COMPETENCIES AND CRITERIA General Medical Conditions-DPT 755
427
(b) Turn on turbine (make certain that suction and discharge openings on the turbine are well-
covered with water) and leave on from one to three minutes.
(c) Turn off turbine, remove bucket, and empty.
(d) Refill water bucket with hot water and, as before, immerse turbine in bucket.
(e) Turn on turbine and leave on from one to three minutes.
(f) Turn off turbine; remove bucket, and empty water.
(2) Cleaning the tanks and turbines:
(a) Fill tank sufficiently to cover the total surface and the turbines.
(b) Add appropriate antiseptic. Turn on turbine and leave on while tank is being scoured.
(c) Turn turbine off and drain tank.
(d) Refill the tank as described in (a) above.
(e) Turn on turbine and leave on during the time the tank is being rinsed.
(f) Turn turbine off and drain tank.

COMPETENCIES AND CRITERIA General Medical Conditions-DPT 755
428
INFORMATION SHEET HUBBARD TANK
1. Physiological Effects:
A. Effects are the same, with a few exceptions, as with whirlpool, but increased as more of the body
surface is immersed.
B. Exceptions:
(1) Perspiration is more limited as more of the body surface is immersed. Heat elimination is not as
great as with whirlpool, as more body surface is immersed.
2. Equipment:
A. Tank:
(1) Hubbard tanks have a capacity of 425 gallons.
(2) The tank is constructed from heavy gauge stainless steel. To aid the therapist in working with the
patient, the tank is elevated to a suitable height and is keyhole shaped.
(3) The shape also allows lateral motion of the client's extremities.
B. Electric turbine ejectors: These agitate the water by producing an underwater jet of air and water.
Usually more than one turbine is available.
(1) Precautions:
(a) Turbine must be grounded.
(b) The line cord plug should be secure.
(c) Do not turn on the turbine unless the suction and discharge holes are well covered with water.
(d) Never cover the air intakes on the motor.
(e) Water must be free of debris.
(2) Adjustments:
(a) Direction of air stream can be raised, lowered, or rotated to the side.
(b) Pressure of the water stream may be regulated.
(c) The amount of air mixed with the water stream may be regulated.
C. Dial thermometer: This provides easy reading of the water temperature. The thermometer will be
damaged if the water temperature exceeds 160°F when the tank is being filled.
D. Thermostatic water mixing value: This allows mixing of the water between 65° to 120° F.
E. Inlet and drain: This is the means of filling and emptying tank.
F. Head support: This is an adjustable attachment located at one end of the tank for support by use of a
canvas sling headrest or for support of a stretcher if used for transferring the client into the tank.
Division of Physical Therapy
Emory University

COMPETENCIES AND CRITERIA General Medical Conditions-DPT 755
429
3. Additional Equipment Frequently Used:
A. Electric overhead hoist and stretcher: This is a mechanical system for transferring the patient into and
out of the tank. The stretcher is attached to the hoist by 4 cables. The overhead hoist, moveable on
ceiling beam, provides raising, lowering, and moving of the stretcher toward or away from tank.
4. Periodic Care of Equipment:
A. This is the same as for the whirlpool.
(1) Additional: Thermostatic water mixing valve should be checked for accuracy frequently and any
discrepancies are indication for overhaul by trained personnel.
5. Considerations of Treatment:
A. Select amount and type of antiseptic substance to be added to water for treatment if such substance is
indicated.
(1) Considerations: These are the same as for a whirlpool.
B. Select appropriate water temperature - general range from 90° – 100°F (P.M.& R-Krusen)
(1) Considerations:
(a) Purpose of treatment:
1) Exercise - 92° – 95° F (Therapeutic Exercise - Licht)
2) Relaxation 98° – 100° F (Therapeutic Exercise - Licht)
3) Cleaning and relief of pain - 95° – 100° F
(b) Presenting symptoms:
1) Circulatory or sensory impairment - 90° – 98° F
2) Body burns – 98° F
3) Client's age
4) Geriatric client – less than 100° F
C. Select duration of treatment:
(1) Considerations: These are the same as for a whirlpool.
6. Walking Tank:
A. Some Hubbard tanks contain a walking tank, which is beneath the center section. The bottom of the tub
can be removed to give access to this space, which is equipped with parallel bars for underwater
ambulation.
7. Pool Therapy:
A. Pools are usually equipped with underwater plinths and parallel bars for administering underwater
exercise and ambulation training. The physical therapist administers the treatment in the pool. Clients
and therapists should take showers before and after pool treatments. Clients on stretchers are bathed
and transferred into the pool with a hoist similar to the Hubbard tank hoist. Pool sanitation is usually
taken care of through chlorination and constant in-flow, as in swimming pools.
B. Advantages:
(1) Same as for whirlpool with the following additional advantages:
(a) The size and shape of the tank allows more and greater ranges of motion during exercise than is
allowed in the conventional whirlpool.
(b) The shape and height of the tank provides easy access to the client for the therapist.

COMPETENCIES AND CRITERIA General Medical Conditions-DPT 755
430
(c) The presence of more than one turbine provides more cleaning action than is provided by the
conventional whirlpool.
C. Disadvantages:
(1) Same as for whirlpool, but more extreme due to the size of the tank and the body surface of the
client covered during treatment.
D. Precautions:
(1) The temperature of the water should be stabilized before the client enters the tank.
(2) Clients with impaired sensation or circulation should be checked more closely and more frequently.
(3) Clients should not be left unattended.
(4) Care should be taken in cleaning of equipment when treating clients with wounds to prevent cross
contamination.
(5) Substances, such as silver nitrate for treatment of burns, should be used discriminately as they can
cause excessive bubbles.
(6) Clients might experience the following adverse side effects:
(a) Dizziness
(b) Weakness increases
(c) Pain increases
(d) Nausea
(e) Edema increases
(7) Clients with considerable fear or weakness might need physical support while in the tank. A sheet
can be placed around client's chest, under his arms and tied to vertical upright portion of headrest.
(8) Never put a cardiac or respiratory patient into the tank.
Note:
For burn patients and those patients with open wounds, an isotonic saline solution is used and detergent is
added. An isotonic saline solution = .9% NaCl, 9 gr/liter or .7Ib. NaCl with 10 gallons of water and .05% KCl or .5
grs/liter or .04 Ibs with 10 gallons of H20. To prevent over sudsing, Dow-Corning Anti-foam AF is used.
Addendum:
Evidence now indicates that there is lower surface bacterial count if the area of infection or burn is sprayed with
a hose at 6 inches for 30 seconds at 100°. This procedure may have to be altered if it is too painful for the
patient.

COMPETENCIES AND CRITERIA General Medical Conditions-DPT 755
431
CRITERIA SHEET HUBBARD TANK
1. Pre-Planning for Procedure:
A. Identify the priority signs, symptoms, and conditions which make the procedure applicable:
(1) Decreased mobility
(2) Increased weakness
(3) Pain
(4) Open wound
B. Identify the rationale for choice of procedure:
(1) Safety:
(a) Turbine is grounded.
(b) Line cord is secure.
(c) Tank has been cleaned as necessary.
(d) Protect casting material, if present, from moisture.
(2) Economics:
(a) The whirlpool is costly because it requires much hot water, antiseptic, time to fill and clean, and
increased linens.
(3) Condition of patient:
(a) Determine if client is allergic to iodine preparations if Betadyne or Prepadyne is to be used.
(b) Areas involved should be totally submerged in water.
(c) Avoid pressure of extremities on side of whirlpool.
(d) Tank should be large enough but not too large to minimize water consumption and fear of
patient.
(e) Client's circulatory integrity:
1) If client has PVD, avoid extremes of temperature.
2) Client's upper or lower extremities should not be left in a dependent position.
3) The presence of thrombophlebitis is considered a contraindication by some.
(4) Duration of treatment:
(a) Children, geriatrics, new skin grafts – 10 to 15 minutes
(b) Adults, cleansing of wound, debridement – 20 minutes
(5) Generate other possible alternative treatments:
(a) Hot packs
(b) Paraffin
(c) Ultraviolet
Division of Physical Therapy
Emory University

COMPETENCIES AND CRITERIA General Medical Conditions-DPT 755
432
(d) Therapeutic pool
(6) Application of procedure to short and long term goals:
(a) STG:
1) Cleanse and debride affected part.
2) Increase mobility.
(b) LTG:
1) Promote healing.
2) Gain independence in ambulation.
2. Preparation of Physical Therapist:
A. Review the procedure sheet as necessary.
B. Review the medical record.
C. Interview the client:
(1) Are you afraid of water?
(2) Do you have pain? Where? What relieves it?
(3) What activities are you unable to perform?
(4) Are you allergic to iodine, preparations with iodine, or any kind of soap?
D. Select and collect the correct equipment:
(1) Towels/bath sheet
(2) Tank pillow
(3) Sheets
(4) Sterile towels, sheets, and blankets if necessary in burns and open wounds
(5) Clothing to be worn by the client
(6) Timer
(7) Shower cap
(8) Stretcher for Hubbard Tank
(9) Headrest in place and secure
(10) Clothing for redressing client
(11) Topical medication as indicated
(12) Antiseptic solution
(13) Supportive personnel if necessary
E. Prepare the environment and equipment/materials:
(1) Make sure room is warm and free from drafts.
(2) Check to see that:
(a) Turbines are grounded
(b) Line cord plug is secure
(c) Tank and stretcher cleaned appropriately
(d) Hoist is operating safely and efficiently
(e) Hoist cables are not frayed or twisted
(f) Hoist cables are working properly
(g) "D" rings on stretcher are safe
(h) Stretcher is securely attached to the frame

COMPETENCIES AND CRITERIA General Medical Conditions-DPT 755
433
(i) Water temperature is correct
(3) Fill the tank 2/3 full
(4) Place the stretcher on a litter
(5) Cover stretcher with sheet
3. Execute the procedure:
A. Follow the Teaching-Learning and Interpersonal Relations Criteria sheets to establish rapport and
explain and demonstrate the procedure to the client.
B. Sequential steps of procedure:
(1) Instruct/assist client to remove jewelry.
(2) Instruct and assist, as necessary, the client to remove clothing and apply clothing to be worn during
the treatment, draping as necessary.
(3) Remove any bandages present. If bandages are adhered, they can be soaked, facilitating removal,
while the client is in the water. Before the turbine is turned on, remove the bandages from the areas
or from the water. (Wear sterile gloves and use universal precautions for removal of bandages)
(4) Secure litter and transfer client to stretcher using method previously determined. Client should be
centered on the stretcher more toward the foot. (This is important if cables are even in length. If
cables are uneven, balance of the stretcher can be maintained by connecting shortest cables toward
client's head.)
(5) Check to be sure client's arms and hands are completely on the stretcher.
(6) Pad any pressure points (heels and elbows) with towels if they are tender and/or resting on the
frame.
(7) Support client's head with a tank pillow or towels if necessary.
(8) Center the litter under the overhead hoist and cables.
(9) Lower the crossbar sufficiently to allow the cables to reach each corner of the stretcher.
(10) Connect the foot cables to the stretcher first, then the head cables.
(a) Cables should not be twisted or crossed.
(b) Open ends of the cable hooks should be directed outward.
(11) Raise the crossbar only enough to tighten the cables.
(12) Recheck to be sure the snap locks are securely locked on the ends of the stretcher rings.
(13) Instruct client, as necessary, that he/she is about to be lifted up and over into the water.
(14) Raise the stretcher to a height sufficient to allow the client's hips to clear the tank.
(15) Move the hoist along the track to the desired position.
(16) Lower the client into the water.
(17) Lower the crossbar to allow removal of the cables.
(18) Adjust headrest for comfort.
(19) Remove the cables, holding on to the cables to avoid hitting the client. (The cables may be left
attached to the stretcher to provide more security for the client, if necessary.)
(20) Hold onto the cables, raise the crossbar, and move the hoist out of the client's way.
(21) Leave the stretcher in place under the client. The stretcher may need to be removed if it prevents
exposure of the client's back to the water or if the client needs to be turned in the water.
(22) Remind the client of precautions and his/her role in reporting his/her reaction to the treatment.

COMPETENCIES AND CRITERIA General Medical Conditions-DPT 755
434
(23) Turn on turbines and, if necessary, readjust the height, direction, and pressure of the air streams to
provide the appropriate effects.
(24) Set the timer to the previously selected duration.
(25) Remain or have staff personnel remain in the area throughout the treatment, attending to client as
necessary,
(26) Observe the client periodically for adverse side effects such as flushed skin, circumoral pallor,
excessive perspiration headache, and pulse rate exceeding 115.
(27) Have patient exercise and move appropriate parts.
(28) Position litter next to the tank under the overhead hoist.
(29) Turn off the turbines.
(30) Place stretcher under the client if it was removed. (Be sure the client is more toward the foot end of
the stretcher.)
(31) Return hoist to center position over the client.
(32) Lower the crossbars sufficiently to allow the cables to reach each corner of the stretcher.
(a) The shortest cables should be toward the client's head.
(b) The cables should not be twisted or crossed.
(c) The open ends of the cable hooks should be directed outward.
(33) Attach the foot cables, then the head cables.
(34) Raise the crossbar only enough to tighten the cables.
(35) Recheck to be sure all cables are secure.
(36) Instruct the client that he/she is about to be lifted out of the water and onto the litter.
(37) Raise the client sufficiently to clear the stretcher from the water.
(38) Instruct the client as necessary and tilt the stretcher slightly downward at the foot to allow the
excess water to drain.
(39) Cover the client with a bath blanket, sheet, or towels, and remove the client's wet clothing.
(40) Raise the stretcher high enough to allow the client's hips to clear the edge of the tank.
(41) Move the stretcher over the litter.
(42) Check to be sure the client's arms and hands are on the stretcher.
(43) Lower the stretcher onto the litter.
(44) Lower the crossbar sufficiently to loosen the cables.
(45) Remove and hold onto the cables.
(46) Raise the crossbar and move the hoist out of the way.
(47) Move the client on the litter to the desired area for redressing and bandaging, if indicated.
(48) Transfer client from litter to stretcher.
(49) Instruct/assist client as necessary in drying thoroughly, keeping him/her as warm as possible.
(50) Apply topical medication and sterile bandages as indicated.
(51) Instruct and assist client as necessary in redressing.
C. Implement changes in procedure based upon:
(1) Response of patient:
(a) Change in vital signs – patient became hypotensive or developed tachycardia or tachypnea
(b) Patient suffered increased weakness or fatigue

COMPETENCIES AND CRITERIA General Medical Conditions-DPT 755
435
(2) Achievement of short and long term goals
D. Record the results in SOAP format:
(1) 0:
(a) Record visual inspection of part prior to treatment.
(b) Record type of whirlpool used, duration of treatment, and antiseptic, if any.
(c) Record amount of assistance patient required in transfers.
(d) Record activities performed in whirlpool.
(e) Record any immediate effects, including change of vital signs, appearance of patient,
appearance of part, increased fatigue, pain, nausea, or vomiting.
E. Clean up tank and area:
(1) Wipe inside of treatment tub with Betadyne.
(2) Immerse entire surface in water.
(3) Drain the tank.
(4) Scrub the inside of the tank with brush and Betadyne, paying special attention to seams, drains,
turbines, seats, head rest, and frame.
(5) Rinse the tank.
(6) Dry the tank.
The hoist stretcher, headrest, and cable hooks can be cleaned by putting them inside the tank while the tank
is being cleaned. All this equipment can be cleaned with a brush using the appropriate antiseptic solution and
rinsed at the time the tank is being rinsed. As with the whirlpool, a procedure must be established for periodic
culturing of the tank, inside the turbine tube, and the equipment used to maintain the desired antiseptic effect.
In some institutions they use "Bodi Gard" plastic liners for the Hubbard tanks and whirlpools when treating
burns and patients with large wound infections. The liner is disposed of at the end of treatment, which cuts
down on contamination problems.

COMPETENCIES AND CRITERIA General Medical Conditions-DPT 755
436
INFORMATION SHEET WHIRLPOOL
1. Indications and Considerations for Selection of Appropriate Water Temperature:
A. Size of treatment area:
(1) Upper extremities – 98°-110°F (Krusen – 105˚F)
(2) Lower extremities – 98°-104°F (Krusen – 100°-102°F)
(3) Trunk and extremities – 93°-102°F (Krusen - 90°-100°F)
B. Presenting symptoms:
(1) Circulatory or sensory impairment:
(a) Upper and lower extremities – 90°-98°F
(b) Trunk and lower extremities – 90°-98°F
(2) Burns – 98°F
C. Client's age:
(1) Very young – 98°F
(2) Geriatric – less than 100°F
2. Considerations for Selection of Duration of Treatment:
A. Effective duration – 20 to 30 minutes
B. Effective duration for clients with recent skin grafts, less than one week (varies depending on referring
physician) – usually 10 minutes
3. Consideration for Selection of Size of Whirlpool:
A. Areas involved must be totally submerged in water.
B. There must be adequate room for patient to exercise part, if necessary.
C. Pressure of extremity on side of tank is avoided.
D. Tank is large enough but not too large, to avoid excess water consumption.
E. Size of patient is considered.
F. Ability of patient to get in and out of whirlpool is considered. If client has weakness and immobility, a
Hubbard Tank with Hoyer hoist may be necessary, even though part involved is small.
G. Patient's fear is considered.
H. Therapist accessibility to part is considered.
4. Consideration for Selection of Antiseptic Substance:
A. This is necessary if client has open wound.
B. Prepadyne, Betadyne, Wescodyne:
(1) All are iodine derivatives. Make sure client is not allergic to iodine preparations.
(2) Betadyne causes excessive suds; add Dial soap (bar) to decreased suds, if necessary.
Division of Physical Therapy
Emory University

COMPETENCIES AND CRITERIA General Medical Conditions-DPT 755
437
(3) Most solutions stain clothing, Physical Therapist's and patient's.
C. Hyperchlorite:
(1) HCL
(2) Clorox:
(a) Use liquid preparation if possible, powders crystallize.
(b) Patient must be rinsed off after whirlpool is finished to prevent itching.
D. Other:
(1) Substance and amount selected should be known to have the most antiseptic effect with the
bacteria present.
(2) Addition of salt is sometimes indicated to approximate a saline solution, particularly with patients
with large areas of open wounds and/or electrolyte imbalance.
Krusen, Kottke, Elwood: Handbook of Physical Medicine and Rehabilitation. Phila., W.E. Saunders and Co., 1965.

COMPETENCIES AND CRITERIA General Medical Conditions-DPT 755
438
CRITERIA SHEET WHIRLPOOL
1. Pre-Planning for Procedure:
A. Identify the priority signs, symptoms, and conditions which make the procedure applicable:
(1) Decreased mobility
(2) Decreased strength
(3) Pain
(4) Open wound with or without infection
B. Identify the rationale for choice of procedure:
(1) Safety:
(a) Turbine is grounded.
(b) Line cord is secure.
(c) Tank has been cleaned as necessary.
(d) Protect casting material, if present, from moisture.
(2) Economics:
(a) Whirlpool is costly as it requires much hot water, antiseptic, time to fill and clean, and increased
linens.
(3) Condition of patient:
(a) Determine if allergic to iodine preparations if Betadyne or Prepadyne used.
(b) Areas involved should be totally submerged in water.
(c) Avoid pressure of extremities on side of whirlpool.
(d) Tank should be large enough but not too large to minimize water consumption and fear of
patient.
(e) Client's circulatory integrity:
1) If client has PVD, avoid extremes of temperature.
2) Client's upper or lower extremities should not be left in a dependent position.
3) Presence of thrombophlebitis is considered a contraindication by some.
(4) Duration of treatment:
(a) Children, geriatrics, new skin grafts – 10 to 15 minutes
(b) Adults, cleansing of wound, debridement – 20 minutes
(5) Generate other possible alternative treatments:
(a) Hot packs
(b) Paraffin
(c) Ultraviolet
Division of Physical Therapy
Emory University

COMPETENCIES AND CRITERIA General Medical Conditions-DPT 755
439
(d) Hubbard tank/therapeutic pool
(6) Application of procedure to short and long term goals:
(a) STGs:
1) Cleanse and debride affected part.
2) Increase mobility.
(b) LTGs:
1) Promote healing.
2) Gain independence in ambulation.
2. Preparation of Physical Therapist:
A. Review the procedure as necessary.
B. Review the medical record.
C. Interview the client:
(1) Are you afraid of water?
(2) Do you have pain? Where? When? What relieves it?
(3) What activities are you unable to perform?
(4) Are you allergic to iodine, preparations with iodine, or any kind of soap?
D. Select and collect the correct equipment:
(1) Towels/bath sheet, pins
(2) Antiseptic, if necessary
(3) Timer
(4) Drinking water
(5) Stools, chair, or whirlpool seat
(6) Gown, bathing suits (or clothing to be worn by client)
(7) Mechanical lifts
(8) Personnel for transfers, if appropriate
E. Prepare the environment and equipment/materials:
(1) Make sure hydrotherapy area is warm and free from drafts.
(2) Made sure turbine is grounded.
(3) Make sure line cord plug is secure.
(4) Make sure tank has been cleaned appropriately.
(5) Make sure no water is on the floor.
(6) Determine safety or security of stool, chair, or whirlpool seat selected.
3. Execute the procedure:
A. Follow the Teaching-Learning and Interpersonal Relations Criteria to establish rapport, and explain and
demonstrate the procedure to the patient.
B. Sequential steps of procedure:
(1) Make sure the water temperature is accurate.
(2) Close the drain valve.
(3) Fill the tank:
(a) High enough to provide adequate coverage
(b) Without danger of overflow of water during agitation of turbines

COMPETENCIES AND CRITERIA General Medical Conditions-DPT 755
440
(4) Instruct/assist the client to remove clothing from areas to be treated and apply clothing to be worn
during the treatment.
(a) Do not roll sleeve or trouser up, if they constrict the part (i.e. remove the clothing).
(5) Remove jewelry from areas to be immersed.
(6) Remove bandages, band-aids, and gauze from area to be treated.
(a) Bandages that are adhered can be soaked in the water, but must be removed before turning
agitator/turbine on.
(7) Re-check water temperature.
(8) Assess turbine – Make sure air intakes are not covered and that the suction and discharge holes are
adequately covered with water.
(9) Assist client to position part in tank.
(10) Soak off and remove adhered dressings.
(11) Add antiseptic solution if necessary.
(12) Turn on agitator.
(13) Select and regulate turbine ejector to provide appropriate height, direction, and pressure of
airstream.
(14) Remind client of side effects or precautions.
(15) Set timer for 20 minutes (or duration of treatment).
(16) Provide client with call bell.
(17) Instruct in exercises, if appropriate.
(18) Recheck at 5 minute intervals – Offer patient water to prevent dehydration from insensible water
loss. Client should be attended for duration of treatment.
(19) After 20 minutes turn off turbines.
(20) Instruct/assist client to remove part from the tank.
(21) Inspect and dry the affected part, if exposed.
(22) Apply topical medication, sterile dressings, etc., as indicated.
(23) Instruct/assist client in removing clothing worn during treatment.
(24) Instruct/assist client to redress.
(25) Drain the whirlpool.
C. Implement changes in procedure based upon:
(1) Client's response:
(a) Change in vital signs – patient became hypotensive or developed tachycardia or tachypnea
(b) Patient suffered increased weakness or fatigue
(2) Achievement of short and long term goals
D. Record in SOAP format:
(1) 0:
(a) Record visual inspection of part prior to treatment.
(b) Record type of whirlpool used, duration of treatment, and antiseptic used, if any.
(c) Record amount of assistance patient required in transfers.
(d) Record activities performed in whirlpool.
(e) Record any immediate effects, including change of vital signs, appearance of patient,

COMPETENCIES AND CRITERIA General Medical Conditions-DPT 755
441
appearance of part, increased fatigue, pain, nausea, and/or vomiting.
E. Clean up area and whirlpool:
(1) Wipe inside of treatment tub with Betadyne.
(2) Immerse entire surface in water.
(3) Drain whirlpool.
(4) Scrub inside of tank with brush and betadyne, paying special attention to seams, drains, turbines,
seats, head rest, and frame.
(5) Rinse whirlpool.
(6) Dry whirlpool.

COMPETENCIES AND CRITERIA General Medical Conditions-DPT 755
442
INFORMATION SHEET BANDAGING
1. Purposes:
A. To hold dressings and splints in place
B. To apply pressure (prevent edema, stump shrinkage, and shaping)
C. To immobilize a part (restrict or limit motion)
D. To support a dependent or injured part
E. To protect an injured area
F. To check hemorrhage
2. General Rules of Bandaging:
A. Bandages should be applied securely but not so tightly that they restrict circulation.
B. In bandaging an extremity, a small portion of the distal extremity should be left uncovered so that any
change in circulation can be observed. Any bandages, which leave a large portion of the distal part of
one extremity exposed, can cause swelling.
C. In applying a bandage which surrounds or covers the chest, care must be taken not to interfere with
respiration (looser at the top of the chest).
D. In applying a bandage, care should be taken that skin surfaces do not come in contact with each other.
When two fingers are bandaged together or an arm is bandaged across the chest, all areas where two
skin surfaces meet should be protected by some material such as gauze or sheet wadding.
E. In applying bandages, bony prominences must be protected. Felt padding, sheet wadding, or cotton
should be placed around the bony prominence, not directly over it.
F. Care should be exercised when bandages cover areas where blood vessels or nerves are superficial.
Division of Physical Therapy
Emory University

COMPETENCIES AND CRITERIA General Medical Conditions-DPT 755
443
G. There is no rigid rule as to the specific type of bandage that should be used. This depends on the area,
the size of the individual, and the purpose for which the bandage is applied.
H. Bandages should be applied smoothly to insure even pressure.
3. Materials Used In Bandages:
A. Cotton:
(1) Absorbent cotton – absorbs fluids
(a) Uses- cleansing, application of medications, padding for splints
(2) Nonabsorbent cotton – fluid repellent
(a) Uses- backing material for dressings which are applied over draining wounds
(3) Sheet wadding or cotton wadding – nonabsorbent cotton prepared in sheets, cut and rolled into
bandages of various widths
(a) Uses- compression bandages, padding of splints, protective covering where skin surfaces come
into contact under adhesive dressings
B. Cellucotton or cellulose – soft texture and is capable of absorbing fluids
(1) Uses – padding electrodes in electrotherapy, substitute for cotton in gauze-covered dressings
C. Gauze – most widely used of all surgical dressing materials; it is a light, cool, and loosely-woven
absorbent material
(1) Sponges – pieces of gauze folded to various sizes and thickness
(a) Uses – to cover and protect wounds, to absorb blood and other fluids during operations, to give
pressure in the control of hemorrhage
(2) Combines – a layer of absorbent cotton backed by a layer of non-absorbent cotton and enclosed in
gauze (The side with the absorbent cotton or cellucotton is applied next to the wound)
(a) Uses – to cover and protect operative site and draining wounds
(3) Cling – adheres to itself
D. Muslin – tightly-woven, unbleached cotton
(1) Uses – employed where support and pressure rather than elasticity are needed, triangular and
cravat bandages, slings, maintenance of traction in the application of various emergency splints

COMPETENCIES AND CRITERIA General Medical Conditions-DPT 755
444
E. Flannel – soft, pliable, resistant woolen material; maintains the temperature of a part and absorbs fluid
(1) Uses – employed where protection and softness are desired
F. Stockinette– unbleached, non-absorbent, and highly stretchable tubular cotton
(1) Uses – slipped over the arm, leg, or body before application of a cast or jobst compression sleeve
during treatment
G. Elastic bandages – long-fiber cotton threads are specially woven to make the bandage so elastic that it
may be stretched to almost twice its length
(1) Uses – to exert even pressure over an area, to provide support
H. Adhesive – prepared by spreading a mixture of zinc oxide, waxes, resins, and rubber onto one surface of
a firm cloth; when applied to a surface, this material has the ability to adhere firmly
(1) Uses – to provide pressure or support, to hold dressings in place, to give traction
(2) Elastic adhesive bandages – adhesive mixture placed on one surface of an elastic bandage
(a) Uses – to maintain an even exertion of pressure over a relatively long period of time
(3) Moleskin adhesive – adhesive mixture is placed on one surface of a very strong cotton material
(a) Uses- to give traction, to prevent irritation from rubbing
I. Felt – unwoven fabric made of wool or wool and hair
(1) Uses – padding in splints and casts
J. Rubber – made of rubber in various lengths and widths
(1) Uses – to hold electrodes in place in electrotherapy, to restrict circulation to a part
4. Basic Turns of Bandaging:
A. A basic turn represents a single encirclement of a part by the bandage with a return to the starting point
or to a point on a line with that part.
B. All turns are begun by applying the external surface of the roller to the part to be bandaged.
(1) Geometric Configuration of the body:
(a) Six Cylinders:
1) Neck
2) Thorax
3) Abdomen

COMPETENCIES AND CRITERIA General Medical Conditions-DPT 755
445
4) Wrist
5) Fingers
6) Lower leg (above ankle)
(b) Five Cones:
1) Arms
2) Forearms
3) Thighs
4) Legs
5) Feet Cylinder
(c) Four Ovoids:
1) Head
2) Finger tips
3) Toe tips
4) Amputation stumps

COMPETENCIES AND CRITERIA General Medical Conditions-DPT 755
446
C. Five Basic Turns – one or a combination of turns may be used to prepare any type of bandage on the
body:
(1) Circular Turns – the area covered by the bandage is equal in width to the width of the roll of
bandage; used for bandaging a cylinder shaped part and for anchoring a bandage initially:
(a) Directions for Circular Turns:
1) Hold the roller bandage in the right hand.
2) Lay the free edge of the bandage against the body surface to be bandaged, holding it in
place with the left thumb. The external surface of the roller is applied to the part.
3) Carry the roller to the right with the right hand, making a clockwise turn.
4) Posteriorly transfer the roller to the left hand, with the right hand hold the beginning of
the turn in place.
5) Carry the roller forward with left hand exactly covering the initial turn of the bandage.
6) The second circular turn is an exact duplication of the first.
(2) Spiral Turns – the area covered by the bandage is larger than the width of the bandage, there is
only a partial overlap of the preceding turns; used for bandaging cylinder and cone shaped
parts:
(a) Directions for Spiral Turns:
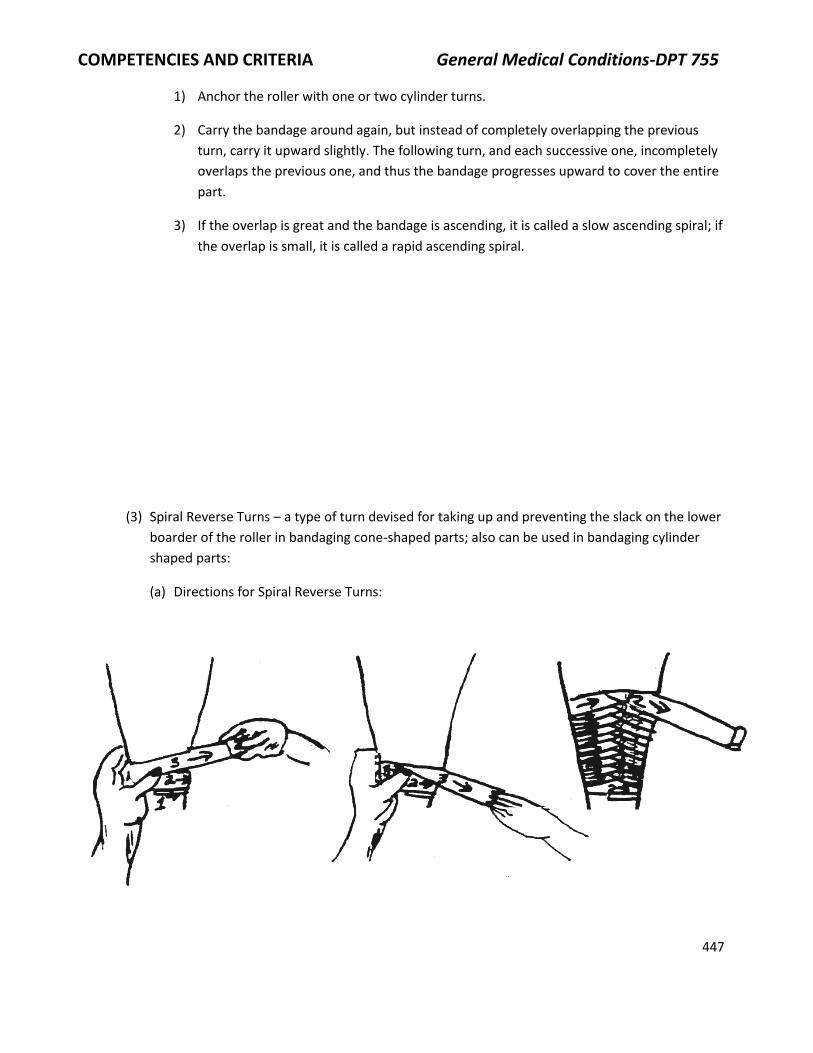
COMPETENCIES AND CRITERIA General Medical Conditions-DPT 755
447
1) Anchor the roller with one or two cylinder turns.
2) Carry the bandage around again, but instead of completely overlapping the previous
turn, carry it upward slightly. The following turn, and each successive one, incompletely
overlaps the previous one, and thus the bandage progresses upward to cover the entire
part.
3) If the overlap is great and the bandage is ascending, it is called a slow ascending spiral; if
the overlap is small, it is called a rapid ascending spiral.
(3) Spiral Reverse Turns – a type of turn devised for taking up and preventing the slack on the lower
boarder of the roller in bandaging cone-shaped parts; also can be used in bandaging cylinder
shaped parts:
(a) Directions for Spiral Reverse Turns:
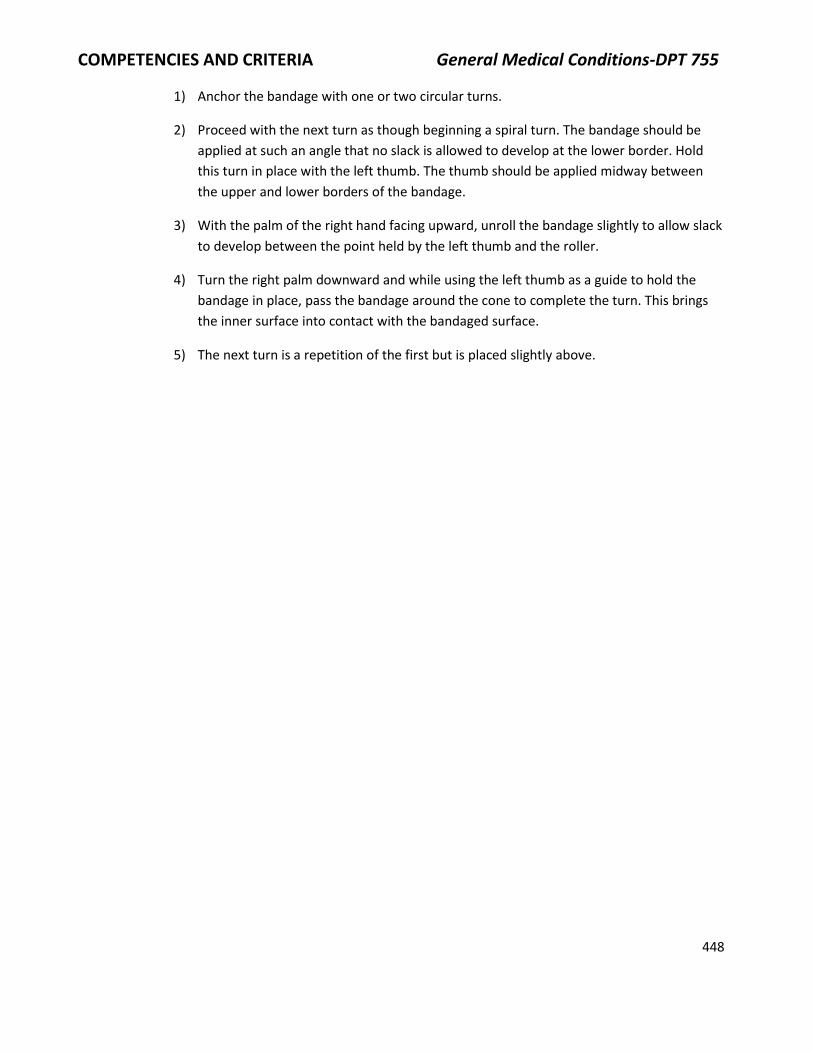
COMPETENCIES AND CRITERIA General Medical Conditions-DPT 755
448
1) Anchor the bandage with one or two circular turns.
2) Proceed with the next turn as though beginning a spiral turn. The bandage should be
applied at such an angle that no slack is allowed to develop at the lower border. Hold
this turn in place with the left thumb. The thumb should be applied midway between
the upper and lower borders of the bandage.
3) With the palm of the right hand facing upward, unroll the bandage slightly to allow slack
to develop between the point held by the left thumb and the roller.
4) Turn the right palm downward and while using the left thumb as a guide to hold the
bandage in place, pass the bandage around the cone to complete the turn. This brings
the inner surface into contact with the bandaged surface.
5) The next turn is a repetition of the first but is placed slightly above.

COMPETENCIES AND CRITERIA General Medical Conditions-DPT 755
449
(4) Recurrent Turns – The bandage is passed over the tip of the ovoid and fixed at one point on the
opposite side of the figure. It is then reflected on itself so that it either exactly retraces its
original course or slightly diverges from the point at which it is fixed. Recurrent turns are
combined with circular turns in bandaging an ovoid shaped part.
(a) Directions for Recurrent Turns:
1) Fix the bandage in place with one or two circular turns around the widest part of the
ovoid.
2) Fix the bandage at the center of the circular turn and pass the bandage over the center
of the tip of the ovoid. Continue downward until the circular turn is reached on the
opposite side of the ovoid.
3) Fix the bandage in place on the opposite side and bring the bandage back to the original
point, only partially overlapping the first turn.
4) The next recurrent turn is similar to the first except each successive turn only partly
overlaps the previous ones. In doing the recurrent turns, if one turn passes to the left of
the midline the next should pass to the right of the midline and thus alternate. In this
manner, the turns diverge from the center of the ovoid eventually covering the entire
surface.
COMPETENCIES AND CRITERIA General Medical Conditions-DPT 755
450
(5) Figure of Eight Turns – These turns take the form of the figure 8 consisting of two loops and one
point of crossing; subject to many variations and adapts itself readily to a number of different
purposes:
(a) Directions for Figure of Eight Turns:
1) The bandage proceeds upward and encircles the part. It is then brought downward to
cross the initial layer of bandages at an oblique angle. It is then continued around the
part and returned to the starting point.
2) The turns may ascend to form ascending figure of eights.
3) The turns may descend to form descending figure of eights. The turns proceed
downward each turn only partly overlapping and lying lower than the previous one.
4) The turns may diverge from a central point to form the divergent or eccentric figure of
eight.
5) The turns may converge toward a central point to form the concentric figure of eight.
6) Figure of eight turns may be used for bandaging:
(a) Joints – the elbow, the knee, the wrist, and the ankle
(b) Junctions of the extremities with the trunk- the shoulder and the hip
(c) Special junctions of a narrow and a wider part- thumb and wrist
(d) Cone-shaped parts – as a substitute for spiral reverse turns
7) Spica Bandages – Figure of Eight bandages in which one loop is of greater circumference
than the other and in which the points of crossing of succeeding turns form sharp or
steep angles

COMPETENCIES AND CRITERIA General Medical Conditions-DPT 755
451
5. Starting a Bandage:
A. Application of 2-3 circular turns to a cylinder-shaped part (this is the most commonly-used method)
B. Oblique fixation in which the initial end of the bandage is obliquely crossed by the first turn (often
used in doing Figure of Eight turns)
C. Adhesive tape fixation – a strip of tape about three inches long and one inch wide is applied partly
upon the bandage and partly upon the skin to fix the bandage
6. Terminating a Bandage:
A. Methods:
(1) Secure with use of:
(a) Adhesive tape
(b) Safety pins
(c) Clips
(2) Secure by pulling the last turn of the bandage slightly tighter than usual and tucking the end
under the upper border of the previous turn. (Not as effective as securing the bandage with one
of the methods listed above)
COMPETENCIES AND CRITERIA General Medical Conditions-DPT 755
452
CRITERIA SHEET BANDAGES FOR THE UPPER EXTREMITY
1. Bandage for wrist:
A. Since the wrist is a cylinder, it is usually bandaged with simple circular turns. One or more spiral
turns may be applied when necessary to cover an area slightly wider than the width of the bandage.
2. Bandage for the palm and dorsum of the hand:
A. The ideal bandage for either the palm or the dorsum of the hand is the figure-of-eight bandage with
the points of crossing over either the palm or dorsum as desired. Use a two-inch bandage.
Division of Physical Therapy
Emory University

COMPETENCIES AND CRITERIA General Medical Conditions-DPT 755
453
(1) Apply trio circular turns around the wrist terminating at the back of the wrist if dorsum is to be
bandaged.
(2) Carry the roller across the back of the hand, around the palm, back across the dorsum, and
return to the wrist completing the first figure-of-eight.
(3) Repeat with as many figure-of-eight turns as necessary to cover adequately the dorsum or the
palm.
(4) Terminate with one or two circular turns around the wrist.
3. Bandage for the forearm: Since it is cone-shaped, spiral reverse turns are used.

COMPETENCIES AND CRITERIA General Medical Conditions-DPT 755
454
4. Bandages for the elbow:
A. If the elbow is bandaged in a straight position, a simple figure-of-eight with the turns crossing in
front is used. Since nerves and blood vessels are superficial in the front of the elbow, pressure
should not be great.
B. With the elbow bent, the following modification of a figure-of-eight is used:
(1) Apply one or two circular and spiral turns to the upper forearm to anchor the bandage.
(2) Apply a circular turn around the point of the elbow.
(3) Start the first figure-of-eight turn by a loop around the upper forearm. This turn should overlap
the lower border of the circular turn around the point of the elbow.
(4) Apply the second loop of the figure-of-eight turn around the lower arm. This turn should overlap
the upper border of the circular turn around the elbow. Thus, the first figure-of-eight turn serves
to fix the circular turn, which covers the point of the elbow.
(5) Continue the figure-of-eight turns applying these alternately below and above the elbow.
(6) Complete with one or two circular turns around the lower arm.
5. Bandage for the arm: Since it is cone-shaped, spiral reverse turns are used.

COMPETENCIES AND CRITERIA General Medical Conditions-DPT 755
455
6. Bandage for the shoulder: Shoulder Spica- consists of a series of figure-of-eight turns with loops around
the upper arm and chest with points of crossing over the affected shoulder:
A. Apply two or three circular and ascending spiral or spiral reverse turns (depending on type of
bandage used) over the middle of the arm on the affected side to anchor the bandage.
B. Carry the bandage across the upper aspect of the back, under the opposite axilla, and back across
the upper anterior chest to the upper part of the bandage on the arm. This completes the first loop
of the figure-of-eight turn.
C. Carry the roller around the arm, ascending at the same time. This completes the second loop of the
figure-of-eight.
D. Continue applying turns around the chest and arm in an ascending fashion until the entire shoulder
is covered.
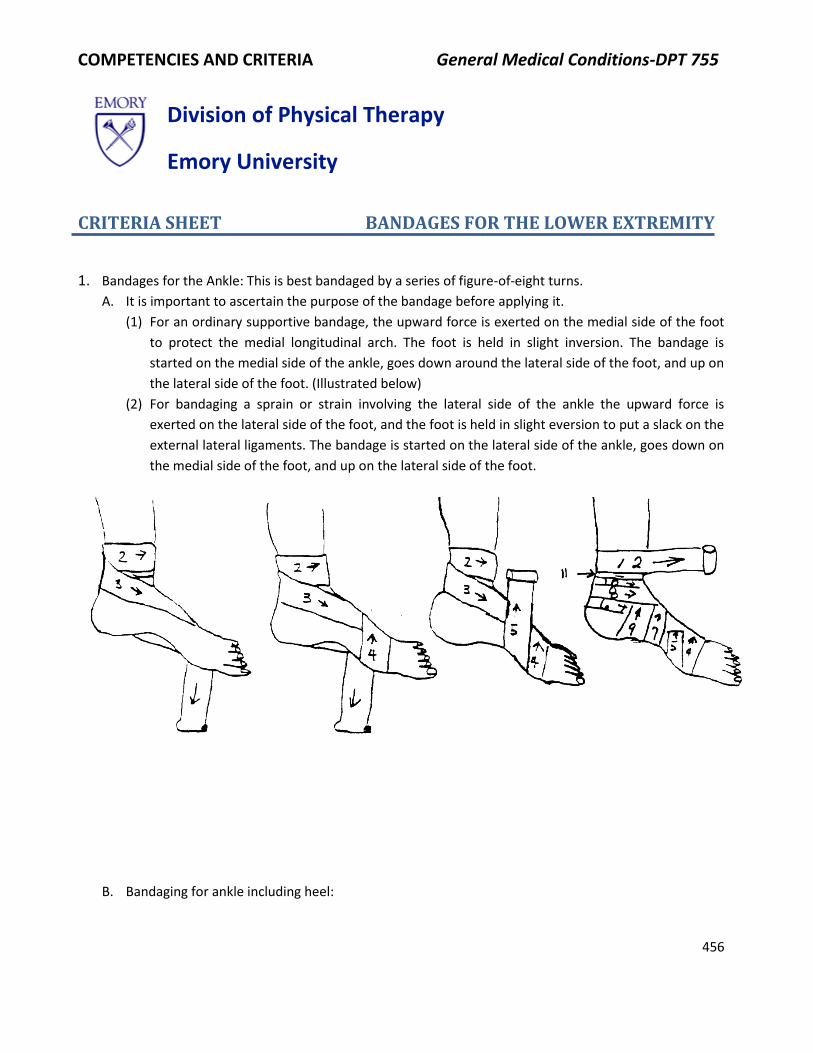
COMPETENCIES AND CRITERIA General Medical Conditions-DPT 755
456
CRITERIA SHEET BANDAGES FOR THE LOWER EXTREMITY
1. Bandages for the Ankle: This is best bandaged by a series of figure-of-eight turns.
A. It is important to ascertain the purpose of the bandage before applying it.
(1) For an ordinary supportive bandage, the upward force is exerted on the medial side of the foot
to protect the medial longitudinal arch. The foot is held in slight inversion. The bandage is
started on the medial side of the ankle, goes down around the lateral side of the foot, and up on
the lateral side of the foot. (Illustrated below)
(2) For bandaging a sprain or strain involving the lateral side of the ankle the upward force is
exerted on the lateral side of the foot, and the foot is held in slight eversion to put a slack on the
external lateral ligaments. The bandage is started on the lateral side of the ankle, goes down on
the medial side of the foot, and up on the lateral side of the foot.
B. Bandaging for ankle including heel:
Division of Physical Therapy
Emory University

COMPETENCIES AND CRITERIA General Medical Conditions-DPT 755
457
2. Bandaging the Toes: These are bandaged the same as the fingers. The bandage is anchored around the
ankle and recurrent and spiral (or spiral reverse) turns are used.
3. Bandage for the leg: consists of spiral or spiral reverse turns depending on the type of material being
used
4. Bandages for the Knee:
A. Since the knee is a weight bearing structure it is again important to ascertain exactly the purpose of
the bandage before applying it.
(1) For an ordinary supportive bandage, a figure-of-eight is applied with the crosses on the medial
side. The tibial collateral ligament is placed posteriorly on this side of the joint, and anatomically
the medial side of the knee is relatively weak and normally receives a great amount of the
weight bearing stress. This is even more evident when the foot is pronated. (Illustrated below)
(2) If the bandage is to prevent hyperextension, the figure-of-eight lures should be crossed on the
back of the knee.
(3) Ordinarily the whole knee joint is bandaged, but sometimes the patella is left free in the front
for easy motion with an eccentric figure-of-eight being used.
(4) Sometimes a bandage is applied to the bent knee. (Illustrated below)

COMPETENCIES AND CRITERIA General Medical Conditions-DPT 755
458
5. Bandaging the thigh: The thigh is a cone and is bandaged with spiral reverse turns.
6. Bandaging the Hip: Hip spica bandage- bandaged with a series of figure-of-eight turns with loops around
the thigh and abdomen

COMPETENCIES AND CRITERIA General Medical Conditions-DPT 755
459
A. Ordinarily a supportive bandage for the hip is arranged so that the point of crossing of the figure-of-
eight turns is on the lateral side of the hip, directly opposite the hip joint. This tends to prevent
lateral motion at the joint.
(1) It is particularly important when bandaging an above-knee amputation stump to have the point
crossing on the lateral side of the joint to prevent flexion contractures of the hip.

COMPETENCIES AND CRITERIA General Medical Conditions-DPT 755
460
CRITERIA SHEET ACE BANDAGING
1. Pre-Planning for Procedure:
A. Identify the priority signs, symptoms, and conditions, which make the procedure applicable:
(1) Lymphedema
(2) Assist venous return
(3) Dynamic vascular support
(4) Musculoskeletal support
B. Identify the rationale for choice of procedure:
(1) Safety:
(a) Make sure wrap is wrinkle-free.
(b) Elastic wraps should be rewrapped every 4 to 6 hours to allow the skin to be exposed to the
air and to permit depressions caused by the elastic bandages to reduce.
(c) Does not allow easy access to part treated.
(d) Bandage should be secure but not tight.
(2) Economics:
(a) Choose size and number of bandages necessary to allow sufficient coverage but avoid
overwrapping:
1) Determine extent of area to be wrapped.
2) Determine width and number of bandages needed by size of affected part.
(3) Condition of client:
(a) Observe the part to be treated.
(b) Note warning signs of impending problems:
1) Severe redness
2) Cyanosis
3) Echymosis
4) Swelling
5) Necrosis
(c) Use sterile technique, if appropriate.
(4) Generate alternatives for treatment:
(a) Intermittent compression pump (Jobst); elastic garments
(5) Application of procedure to short and long term goals:
(a) Short term goals – Decrease edema.
(b) Long term goals – Decrease pain and increase mobility.
Division of Physical Therapy
Emory University

COMPETENCIES AND CRITERIA General Medical Conditions-DPT 755
461
2. Preparation of the Physical Therapist:
A. Review procedure as necessary.
B. Review medical record.
C. Interview client:
(1) Do you ever have swelling? When is the swelling worst? What activities aggravate the swelling?
What time of the day is the swelling usually the worst?
(2) What activities are limited by the swelling?
D. Select and collect the correct equipment:
(1) Ace bandages
(2) Fasteners
(3) Obtain draping material
(4) Gauze, if needed to dress skin under wrap
E. Prepare the environment and equipment/materials:
(1) Roll up the bandages, if unrolled
3. Execute the procedure:
A. Follow the Teaching-Learning and Interpersonal Relationships Criteria to establish rapport and
explain and demonstrate the procedure to the client.
B. Sequential steps of the procedure:
(1) Expose the extremity to be wrapped and position the client in a comfortable position.
(2) Lower extremity – to decrease edema or prevention of phlebitis:
(a) Begin wrap on upper surface of the toes and proceed to the outer side:
1) Cross the dorsum of the foot, but leave the toes uncovered.
(b) Anchor wrap by wrapping twice.
(c) Use spiral turns to include the heel. (Use a minimum amount of bandage on the foot if a
shoe is to be worn.)
(d) Continue to wrap the calf with spiral turns to overlap about one-half the width of the
previous layer.
(e) Continue with figure-of-eight wraps over the knee.
(f) Use a spiral wrap to the groin area and fasten with bandage with clips, safety pins, or tape.
Do not place fasteners at the back of the leg or over bony prominences.
(3) Upper extremity – for edema reduction or prevention:
(a) Begin wrap on the back of the hand and proceed to the outer side. Leave fingers uncovered.
(b) Anchor wrap by wrapping twice around the hand.
(c) Use spiral turns to include base of thumb/wrist, but leave the thumb exposed from MP joint
out.
(d) Continue wrap with spiral turns to overlap about one-half the width of the previous layer.
(e) End wrap at the axilla and fasten with bandage clips, safety pins, or tape.
(4) Single joint – for support:
(a) Begin wrap well below affected area. Anchor with a couple of wraps around the extremity.
(b) Use figure-of-eight wrap over affected area by bringing wrap up and across affected joint,

COMPETENCIES AND CRITERIA General Medical Conditions-DPT 755
462
around and behind joint, and down across the joint in the opposite direction.
(c) Continue figure-of-eight wrap with turns overlapping about one-half the width of the
previous layer until the joint is entirely wrapped.
(d) Anchor with a couple of wraps around the extremity, above the affected joint. Fasten with
bandages, clips, etc.
(5) Below Knee Stump:
(a) Begin wrap on outside of the stump, just below the knee. Unroll bandage down the side of
the stump, over the end, and around the back of the stump near the end. Pull a little tight.
(b) Continue around to the front of the stump and unroll the bandage up to the inside, just
below the knee.
(c) Take bandage around back of stump to start again at the top and outside.
(d) Continue wrap partly covering the previous layer each time around.
(e) Begin wrap with second bandage exactly as before for 1 1/2 wraps.
(f) Then, take the bandage around behind the knee and up over the knee from outside to
inside, circle behind knee, and continue wrapping as before until the entire bandage is used.
(g) Fasten bandage – Never fasten over the end of the stump or behind the leg because of
possible pressure points.
(6) Below elbow stump (same procedure as below the knee)
(7) Above knee stump (may be wrapped with the same procedure as below knee with spica wrap
around the waist)
(a) Alternate:
1) Bandaging begins on the front surface of the stump just below the hip crease, the
patient anchoring end with his thumb. The bandage then goes over the end of the
stump and up the back of the thigh to the buttock fold where it is held by the fingers of
the patient.
2) The above is repeated twice. The second turn covers the end of the stump on the inner
side and the third turn covers the outer end of the stump.
3) As the third turn ends on the back side of the thigh, a turn is made and the bandage is
brought around the outside of the stump toward the front, and then around the stump.
This anchors the bandage. Repeat the circular turns twice.
4) Bring the bandage upward from the outer side of the stump across the hip joint, around
the hip bones (below the waistline), then across in front of the hip joint and around the
stump to form a figure eight. Repeat once again.
5) The bandaging is finished by one or more turns around the stump, fastening the end of
the bandage with the clips. Secure the other ends with safety pins through all the
thickness of the bandage - one in front of the hip joint, one in back of the hip joint, and
one at the side.
(8) Interim Evaluation:
(a) If elastic wrap becomes loose, it needs to be removed and rewrapped.
(b) If extremity becomes painful or if fingers or toes feel cold, wrap is too tight and needs to be
removed and wrapped with less tension.

COMPETENCIES AND CRITERIA General Medical Conditions-DPT 755
463
C. Implement changes in procedure based upon response of patient:
(1) See 8 above
D. Record results in SOAP format.
(1) S:
(2) 0:
(a) Record results of visual inspection of stump
(3) A:
(a) Record pre and post bandage circumferential measurements
(4) P:
E. Clean the area.

COMPETENCIES AND CRITERIA General Medical Conditions-DPT 755
464
ASSESSMENT OF THE UPPER EXTREMITY ARTERIAL CIRUCLATION: THE COMPRESSION TEST OF ALLEN
1. Pre-Planning for Procedure:
A. Identify the priority signs and symptoms which make the procedure applicable:
(1) Raynaud's disease
(2) Arteriosclerotic disease
(3) Diabetes mellitus
(4) Recent arterial line
B. Identify rationale for choice of procedure:
(1) Safety:
(a) Determine efficacy of thermal modalities
(2) Generate other possible alternative mechanisms:
(a) Doppler
(b) Peripheral pulse
(c) Evaluation of peripheral circulation
(d) Cold-pressor test
(e) Gibbons-Landes test
(3) Application of procedure to short and long term goals:
(a) Determine safety of thermal modalities and exercises.
2. Preparation of Physical Therapist:
A. Review the procedure as necessary.
B. Review the medical record.
C. Interview the client:
(1) Describe what happens to your hands in the cold?
(2) Do you smoke?
(3) Do you have a history of diabetes?
D. Determine assessment position.
E. Select and collect correct equipment:
(1) Stopwatch, watch with sweep hand.
F. Prepare the environment and equipment/materials:
(1) Test should be performed in an area with adequate lighting and without extremes in
temperature.
Division of Physical Therapy
Emory University

COMPETENCIES AND CRITERIA General Medical Conditions-DPT 755
465
3. Execute the procedure:
A. Follow the Teaching-Learning and Interpersonal Relations Criteria to establish rapport and explain
and demonstrate the procedure.
B. Sequential steps of procedure:
(1) Locate the radial artery.
(2) Compress radial artery firmly and maintain compression on radial artery.
(3) Patient makes a tight first, squeezing all the blood out of the hand; hand should blanch.
(4) Patient opens hand, therapist maintains compression.
(5) Therapist starts stopwatch.
(6) Stops stopwatch when rubor returns.
(7) Repeat steps using ulnar artery.
(8) Compare right and left sides.
C. Record results in SOAP format.
(1) A:
(a) Normal – Color returns within 3 seconds
(b) Abnormal – Greater than 3 seconds – Indicates occlusion of ulnar artery, or ulnar side of
palmar arch (or radial artery occlusion if ulnar compressed)

COMPETENCIES AND CRITERIA General Medical Conditions-DPT 755
466
CRITERIA SHEET SEQUENCE OF STEPS IN CLINICAL ASSESSMENT OF CARDIOPULMONARY PATIENT
Identify primary manifestations and complaints (through the chart and/or interviewing the patient).
A. Symptoms: (1) Excessive nasal secretions:
(a) Indicative of upper respiratory infection (URI)
(b) Indicative of allergy
(2) Cough – establish onset, duration and quality of cough:
(a) Chronic or acute
(b) Morning or evening
(3) Expectorations of sputum – establish source, quantity, quality, and occasion
(a) Color:
1) White may indicate irritation.
2) Yellow may indicate infection.
3) Green (due to presence of verdoperoxidase liberated from polymorphonuclear
leukocytes) is indicative of stagnant pus in dilated bronchi, a lung abscess, or an infected
sinus.
4) Rusty may be indicative of pneumonia.
5) "Currant jelly" may be indicative of pulmonary embolus or neoplasm.
6) Pink may be indicative of pulmonary edema.
7) It may be bloody.
8) Black may be indicative of old blood, aspergillosis, or soot.
(b) Consistency:
1) Mucoid, tenacious, or sticky
2) Frothy – common with congestive heart failure
3) Gelatinous – common with neoplasm
(c) Hemoptysis (expectoration of blood) is normal in pneumococcal pneumonia. It will appear
streaky with occasional specks of blood.
1) Bright red blood (BRB) may be a result of the rupture of vessels.
2) This may be the manifestation of pulmonary TB and CA.
(d) Odor:
1) None
2) Foul smelling – could be indicative of gross, generally anaerobic infection
(4) Determine Respiratory Rate and the ratio of the time of inspiration to expiration, I:E ratio.
Normally expiration is twice as long as inspiration. Therefore, the I:E ratio is normally 1:2.
(5) Breathlessness or dyspnea – awareness of difficulty in breathing
Division of Physical Therapy
Emory University

COMPETENCIES AND CRITERIA General Medical Conditions-DPT 755
467
(a) Moderate exertion – running short distance, climbing one flight of stairs
(b) Mild exertion – walking short distance on level surface, ordinary pace
(c) Minimal exertion – breathlessness while talking, shaving, washing
(d) Breathlessness at rest
(e) Breathlessness while lying down – orthopnea
(6) Use of accessory muscles of respiration – Normally inspiration is a dynamic act accomplished
primarily by the diaphragm and expiration is passive.
(a) Use of the accessory muscles indicates increased work of breathing.
(7) Chest pain – Identify the source.
(a) Dermatomes – circumferential, not tender to palpation
(b) Skin
(c) Ribs and cartilages – localized tenderness, reproducible when area is compressed; a fracture
well localized and may produce crepitation with respiratory movement
(d) Nerves – burning pain, not tender to palpation
(e) Muscles – aggravated by respiration
(f) Pleura – characterized as sharply localized, superficial, knife-like or "catching"; aggravated
by respiratory movement
(g) Lung parenchyma – Note: there are no pain fibers in the lung parenchyma
(h) Heart – characterized as dull, crushing tight, in the mid-sternal area, often with radiation to
jaw, either arm, or back
B. Signs:
(1) Movement – look for symmetry and note areas of diminished thoracic movement; note
kyphosis, scoliosis
(2) Cyanosis/pallor/flushed
(3) Sweating
(4) Anorexia, weight loss
(5) Weakness
(6) Fatigue
(7) Clubbing of digits
(8) Neurological signs – agitation, disorientation, combativeness
2. Interview the Patient:
A. Obtain personal and family history.
3. Palpation:
A. Palpate the trachea and see if it is in midline.
4. Percussion – see procedure sheet.
5. Auscultation – see procedure sheet.
6. Review Radiological Exams:
A. Chest x-ray
B. Fluoroscopy
C. Bronchography
7. Review Laboratory Assessment:

COMPETENCIES AND CRITERIA General Medical Conditions-DPT 755
468
A. Sputum cytology
B. Sputum culture and sensitivity
C. Pleural fluid, if any
D. Biopsy reports
E. Diagnostic skin tests:
(1) PPD - (I.A.) – purified, protein, derivative; a positive test (+) indicates patient has been
previously infected with TB or has been exposed to the disease but is not necessarily infective
(2) A negative test indicates no previous exposure to the disease
F. Biomechanical Studies:
(1) Acid phosphotase:
(a) N = Female – .13 – .63, Male – .01 – .56
(b) Elevated in patients with cancer
(2) Albumen:
(a) Decreases in renal disease, hepatic damage, chronic infections, malabsorption syndrome,
and burns
(3) Alkaline phosphatase: N = 2.0 – 4.5 m.
(a) Increases in diseases of the liver, pancreas, lung, and bone
(4) Bilirubin: N = .4mg/100
(a) Increases in liver disease (i.e. hepatitis)
(5) Blood, urea, nitrogen (BUN): N = 8 – 25mg/100 ml
(a) Increases in renal disease and neoplasms, shock, dehydration, GI bleeds, infections, and
diabetes mellitus
(b) Decreases in liver disease, pregnancy, and malnutrition
(6) Ca+: N = 8. 5 – 10. 5 mg/100/ml
(a) Increases in hyperparathyroidism, bone metastasis, multiple myeloma, prolonged
immobilizations, and leukemia (coma occurs level 13 mg/100)
(b) Decreases in hypoparathyroidism, renal failure, and osteomalacia (<7 mg/100 is life
threatening)
(7) Cholesterol: 150 – 200 mg/100 mg; > .250 is abnormal
(a) Increases in primary lipid disorder, nephritic syndrome, hypothyroidism, pancreatitis,
diabetes mellitus, and obstructive jaundice
(b) Decreases in hyperparathyroidism, malabsorption syndrome, and malnutrition
(8) CPK Creatinine Phosphokinase: N = 5 – 35 mu/ml
(a) Decreases in injury to heart or skeletal muscle, muscular dystrophy, and cerebral infarction
(9) Glucose: N = 70 – 100 mg/100
(a) Increases with diabetes mellitus, adrenal thyroid, and pituitary hyperactivity
(b) Decreases in insulin shock, pancreatic tumor liver disease, adrenal pituitary, and thyroid
hyperactivity
(10) Hepatitis Associated Antigen (HAA):
(a) Positive in patients with serum hepatitis, immune-suppressed patients, Down's syndrome,
and with lymphoma

COMPETENCIES AND CRITERIA General Medical Conditions-DPT 755
469
(11) Lactic dehydrogenase (LDH): N = 60 – 120 u/ml
(a) Increases in myocardial infarction, muscular dystrophy, hemolysis, liver necrosis, pulmonary
infarct, pernicious anemia, renal infarction, and malignancy
(12) Potassium (K+): N = 3.5 – 5.0 meq/L
(a) Increases in uncontrolled diabetes, acute and chronic renal disease, respiratory distress
syndrome in newborns, renal insufficiency, following trauma, with diuretics, vomiting, and
diarrhea
(b) Serum K+, 3 meq, or 6.5 meq causes cardiotoxicity
(13) Serum Glutamic Oxaloacetic Transaminase (SGOT): N = 10 – 4 u/ml
(a) Increases in myocardial infarct or disease of heart muscle (bacterial endocarditis, thematic,
viral, metabolic disease of the heart), liver disease, kidney damage, cirrhoses, infectious
mononucleosis, muscular dystrophy, and muscle trauma including gangrene
(14) Sodium (Na+):
(a) Increases in dehydration, uremia, aldosteronism, and diuretics
(b) Decreases with use of diuretics, inappropriate ADH secretion, diarrhea, untreated diabetes,
excessive sweating, and adrenal insufficiency
(15) Triglycerides: N = 40 – 150 mg/100 ml
(a) Increase with coronary artery disease, diabetes mellitus, nephrotic syndrome,
hypothyroidism, and hepatic disease
(16) Uric Acid:
(a) Increases in gout, polycythemia vera, leukemia, renal disease, oligouric agents, and
allopurinol
G. Hematology:
(1) Complete blood count (CBC):
(a) Hemoglobin (Hb):
1) Male – 13 – 16 gm/100 ml
2) Female – 12 – 15 gm/100 ml
(b) Hematocrit (HCt):
1) Male – 42 – 500
2) Female – 40 – 480
(c) White blood count (WBC): 4,800 – 10,800/cumm
(d) WBC differential
(e) Platelets: 200,000 – 400,000
(2) Erythrocyte Sedimentation Rate (ESR):
(a) N = 0 – 12 in males, 0 – 20 in females
(b) Increases in infection, inflammatory disease, and malignancy
(c) Useful in evaluating rheumatoid arthritis
8. Assess findings in view of case history and patient’s presenting signs and symptoms.
9. Modify treatment is necessary. Cherniak and Cherniak: Respiration in Health and Disease, 2nd Ed. Phila., W.B. Saunders, 1972.

COMPETENCIES AND CRITERIA General Medical Conditions-DPT 755
470
CRITERIA SHEET SURFACE MARKINGS
1. Bony Landmarks:
A. Anterior:
(1) Clavicle
(2) Ribs – 12 pairs
(3) Sternum – 3 parts:
(a) Body
(b) Xiphoid:
(a) Distal portion of sternum
(b) Forms subcostal/infrasternal angle with anterior margin of lower ribs; normal is
about 90°
(c) Forms costal margin with costal cartilages of ribs 7, 8, 9, and 10 and ends of 11, 12
(c) Manubrium:
1) Suprasternal/Jugular Notch:
(a) Superior border of manubrium
(b) Corresponds posteriorly to level of T-2
(c) Used in palpation of trachea
2) Sternal Angle/Angle of Louis:
(a) Located about 5 cm below jugular notch
(b) Marks junction between manubrium and sternal body
(c) Palpable
(d) Marks sternocostal junction of 2nd rib; able to locate other ribs and/or interspaces
(e) Marks bifurcation of trachea
(f) Marks upper border of atria of heart; used to determine venous distention
(4) Larynx:
(a) C3 – C6
(5) Trachea:
(a) C6 to sternal angle anteriorly
(b) C6 to T5 posteriorly
B. Posterior:
(1) Scapula
(2) C-7:
(a) Most prominent spinous process/vertebra preeminence
Division of Physical Therapy
Emory University

COMPETENCIES AND CRITERIA General Medical Conditions-DPT 755
471
(b) Aids in location of thoracic vertebrae
(c) Highest point of lung tissue posteriorly
(3) T-10 – lowest point of lung tissue posteriorly
2. Topographical Lines:
A. Anterior:
(1) Mid-sternal:
(a) Located midline of sternum, from suprasternal notch to xiphoid
(2) Mid-clavicular:
(a) Parallel to midsternal
(b) Located midway between tip of acromion and sternal attachment bump
(c) Extends distally to costal margin
B. Lateral:
(1) Anterior axillary line:
(a) Continuation of anterior axillary fold
(b) Runs downward along antero-Iateral alignment of the chest wall
(c) Begins at insertion of pectoralis major muscle
(2) Posterior axillary line:
(a) Continuation of posterior fold
(b) Follows along postero-lateral chest wall
(c) Begins at insertion of latissimus dorsi muscle
(3) Mid-axillary line:
(a) Halfway between anterior and posterior axillary line
(b) Runs down lateral wall, beginning at apex of axilla
(c) When patient recumbent, mid-axillary line lies in same plane as right atrium
(d) Used to measure Central Venous Pressure (CVP)
(4) NOTE: For correct evaluation of these lines, arms cannot be abduction >90° from lateral chest
C. Posterior:
(1) Vertebral/Mid-Spinal:
(a) Runs downward along spinous processes of vertebrae
(2) Mid-scapular/Scapular:
(a) Runs parallel to spine, bisects inferior angle of scapula
(3) NOTE: Must be evaluated with patient erect, arms at sides; also scapular mobility must be
demonstrated
3. Significant/Function of Landmarks:
A. Landmarks aid in the communication of exact position of disorders.
B. Landmarks aid in the location of deeper anatomical structures within thorax.
(1) Diaphragm:
(a) Right Dome:
1) Level of 4th interspace/5th rib at mid-clavicular line
(b) Liver:
1) Beneath right diaphragm extending to costal margin

COMPETENCIES AND CRITERIA General Medical Conditions-DPT 755
472
(c) Left Dome:
1) About 1" (2.5 cm) lower than right, level of 5th interspace/6th rib at mid-clavicular line
2) Beneath the left diaphragm – stomach, splenic flexure of colon, left kidney
(2) Cardiac:
(a) Apical pulse apex beat:
1) Location of apex of left ventricle
2) At approximate level of 5th interspace about 8cm lateral to left of mid-sternal line
(b) Left Border:
1) Formed by left ventricle and left atrium
2) Upwards from apex to level of 2nd costal cartilage, 2.5 cm from left sternal border
(c) Right Border:
1) Formed by right atria
2) Runs between costal cartilages 3 – 6, about ½ to 1 inch lateral of right sternal border
(d) Superior Border:
1) Formed by right and left atria; marked by horizontal line at level of 3rd sternochondrial
attachment
(e) Inferior Border: (DIAPHRAGMATIC)
1) Formed primarily by right ventricle, but partly by left ventricle
2) Marked by line between right and left borders, sloping slightly downward and passing to
the left at xiphoid – sternal junction
(3) Lungs:
(a) Markings:
1) Apices:
(a) Extend above clavicles about 2.5 cm in mid-clavicular line
2) Anterior Border – Right Lung:
(a) Line, beginning at sterno-clavicular joint drawn to center of sternal angle, then
travels downward as far as xiphoid-sternal joint; markings for right pleural space are
similar
3) Left Pleural Space:
(a) As with right, line drawn from sterno-clavicular joint to sternal angle, as far as 4th
costal cartilage where now turns left to left sternal border and then proceeds down
to 7th costal cartilage
4) Left Lung:
(a) Position is slightly inside pleura until 4th costal cartilage where it turns laterally for
about 3cm (CARDIAC NOTCH), then again turns downward and ends at 6th costal
cartilage about 2.5cm from left sternal border
5) Inferior Borders of Lungs and Pleura:
(a) Correspond anteriorly and laterally, beginning at lower end of anterior costal
margin, crossing 6th rib at mid-clavicular line, 8th rib at mid-axillary line
(b) However, posteriorly, the inferior border of the lungs crosses the 10th rib at the
mid-scapular line and ends at level of T-10 about 2.5 cm lateral of spine

COMPETENCIES AND CRITERIA General Medical Conditions-DPT 755
473
(c) Inferior border of pleura crosses 12th rib at mid-scapular line and ends 2.5 cm
lateral of T-12.
(b) Fissures:
1) Oblique/Long:
(a) Separates upper lobes from lower
(b) Begins at level of T4 (other sources: T2, T3) posterior, curves downward, crossing
4th rib at mid-axillary line and ends anteriorly at inferior border of 6th costal
cartilage, midway between mid-sternal and mid-clavicular lines
1. NOTE: If stand/sit erect with hands behind neck, position of scapulae is such
that vertebral border corresponds to posterior aspect of long fissure
2) Transverse/Horizontal:
(a) Separates right middle lobe from right upper lobe
(b) Begins at long fissure at mid-axillary line, level of 5th rib and travels anteriorly to the
3rd/4th intercostal space
4. Bronchopulmonary Segments:
A. Upper Lobes:
(1) Anterior segment:
(a) Underlies the upper anterior chest between the clavicles and the transverse fissure (4th rib)
(2) Anterior apical segment:
(a) Occupies area of the lung above the clavicle anteriorly
(3) Posterior apical segment:
(a) Lies posteriorly in area above the clavicle
B. Middle Lobes:
(1) Right medial segment:
(a) Situated anteriorly between transverse and oblique fissure
(2) Right lateral segment:
(a) Anterior portion of axilla
(3) Lingula:
(a) Superior – upper anterior chest wall
(b) Inferior – lower anterior chest wall
C. Lower Lobe:
(1) Superior –
(a) Just below angle of scapula
(b) Corresponds to T-7
(2) Anterior basal segment
(3) Medial basal segment
(4) Posterior basal segment
(5) Lateral basal segment

COMPETENCIES AND CRITERIA General Medical Conditions-DPT 755
474
Addendum:
Chest increases in size in three dimensions: A-P, transverse, and longitudinal.
A-P: "Bucket Handle" scalenes lift first rib. External intercostals raise 2nd – 7th ribs upward and forward.
Rotation occurs about the sterno-vertebral joint.
Transverse: "Pump Handle" 5th and 6th ribs have a greater radius of curvature, while the 7th – 10th ribs are
sharply curved. External intercostals pull and increase transverse diameter. Rotation occurs about the costo-
vertebral joint. Transverse diameter is also increased by pull of diaphragm.
Longitudinal: The principle action is contraction of diaphragm muscle which pulls the central portion down.

COMPETENCIES AND CRITERIA General Medical Conditions-DPT 755
475
CRITERIA SHEET PULMONARY EVALUATION
1. Pre-Planning for Procedure:
A. Identify the priority signs, symptoms, and conditions which make the procedure applicable:
(1) Breathlessness
(2) Accessory muscle use
(3) Clubbing of the digits
(4) Cough
B. Identify the rationale for choice of procedure:
(1) Safety:
(a) Determine safety of ensuing bronchial drainage.
(2) Condition of Patient:
(a) Kyphoscoliosis
(b) Post-operative
(c) Occupational Exposure – chemical, asbestos, dust, mining
(d) Smoker
(e) Ability to concentrate
(3) Duration of treatment:
(a) Until complete or until patient's tolerance makes stopping necessary
(4) Generate other possible alternative measures:
(a) History, radiologic, and laboratory findings
(5) Application of procedure to long and short term goals:
(a) Assess efficacy of treatments (i.e. necessity of percussion or vibration, relaxation exercises,
contraindications to head down position)
2. Preparation of the Physical Therapist:
A. Review the procedure as necessary.
(1) Review surface anatomy of the chest as it relates to underlying structure.
B. Review the medical record.
(1) Specifically identify results of physical examination, chest x-ray, arterial blood gases, pulmonary
function tests, social and occupational history, and habits of the client.
C. Interview the client:
(1) Do you have difficulty breathing? When?
(2) What do you do to alleviate shortness of breath?
(3) Do you, or have you ever smoked? What kind of work do you (did you) do?
Division of Physical Therapy
Emory University

COMPETENCIES AND CRITERIA General Medical Conditions-DPT 755
476
D. Determine assessment sequence and related positioning.
E. Select and collect the proper equipment:
(1) Stethoscope
(2) Tape measure
(3) Spirometer
(4) Watch with second hand
(5) Gown
F. Prepare the environment and equipment/materials:
(1) Pre-treatment preparation:
(a) Position client in comfortable sitting position which permits forward bending without undue
tension on hamstring muscles, preferably with the legs over side of bed and feet supported.
(b) Gently tap diaphragm of stethoscope to assure adequate transmission of sound.
(c) Evaluate function and reliability/calibrations of spirometer.
3. Execute the Procedure:
A. Follow the Teaching-Learning and Interpersonal Relationships Criteria to establish rapport and
explain and demonstrate procedure to the client.
B. Sequential steps of procedure:
(1) Observation:
(a) Open hospital gown to visualize neck and abdominal musculature and observe accessory
muscle use, including nasal flaring.
(b) Identify any areas of present or previous trauma, scar, bruises, and/or hemorrhage.
(c) Examine the thorax to determine if there are structural deformities (i.e. kyphosis, scoliosis,
pectus excavatum).
(d) Observe for signs of chronic disease (i.e. clubbing of the digits, increased A-P diameter,
observe to see if the angle of ribs 2-7 are more horizontal than normal).
(e) Observe for signs of systemic involvement (i.e. cyanosis (inside mouth), flushing,
neurological symptoms, oliguria).
(f) Assess the respiratory rate (see procedure sheet).
(g) Assess the inspiratory to expiratory ratio.
(2) Interview the client:
(a) Instruct the client to identify his state/severity of dyspnea:
1) Rest – patient is supine and is unable to breathe and vocalize simultaneously
2) Mild exertion – performing ADL activities
3) Moderate exertion – walking at normal cadence on level surface
4) Severe exertion – running or climbing stairs
(b) Identify the condition of onset of breathlessness:
1) Sleep (nocturnal dyspnea)
2) Paroxysmal
3) Supine position (orthopnea)
4) Activity
COMPETENCIES AND CRITERIA General Medical Conditions-DPT 755
477
(c) Identify if patient has been exposed to occupational hazards (coal, beryllium, asbestos, talc,
flour) or has traveled recently (fungal infections).
(d) Ask patient if he has had recent unexplained weight loss or if he suffers from night sweats.
(e) Ask patient about smoking history and ascertain number of pack years.
(f) Ask patient to cough and evaluate cough as dry or productive, effective or ineffective.
(g) Ask patient about sputum production:
1) Time of day and precipitating factors
2) Source
3) Consistency
4) Color
5) Odor
(h) Ask patient to describe pain.
(3) Palpation:
(a) Measurement of chest excursion:
1) Have client assume seated position.
2) Place tape measure around the chest at the level of the xiphoid.
3) Instruct client to exhale maximally. Record circumference.
4) Instruct client to inhale maximally. Hold tape firmly but allow expansion of the tape to
accompany chest wall movement. Record the circumference.
5) The difference in the two measurements is the chest excursion.
6) Repeat the procedure at the level of the 10th rib.
(b) Assessment of tracheal position in an upright position with neck slightly flexed to relax
sternocleidomastoid and with chin in midline:
1) Insert tip of index finger into the neck at level of supra-sternal notch, rotate finger to
left and right, and cartilaginous tissue should be sensed on both sides. If soft tissue is
encountered, this is a sign of tracheal deviation or mediastinal shift.
(c) Palpate respiratory excursions:
1) Have patient sitting upright, bent forward slightly at the waist, and stand behind the
patient. The therapist places the thumb of each hand paravertebrally and equidistant
from the spinal column with fingers stretched out to approximately the four lowest
intercostal spaces.
2) Pull the patient's skin taut.
3) Have patient inhale maximally, allowing hands to accompany the respiratory movement.
4) Observe if therapist’s thumbs are still equidistant apart. Record findings.
5) This should be done over the entire posterior and anterior aspect.
(d) Palpate lateral costal expansion.
1) Again with patient sitting, facing patient, therapist places palms of each hand on the
mid-axillary line at the level of the 8th – 10th rib.
2) Patient is requested to maximally inhale.
3) Observe for symmetrical and strong lateral respiratory excursion.
(e) Palpate diaphragmatic movement:

COMPETENCIES AND CRITERIA General Medical Conditions-DPT 755
478
1) With the patient sitting comfortably, therapist places palm of hand horizontally beneath
the xiphoid.
2) Patient is requested to maximally inhale.
3) Therapist palpates for muscle tension. Note an alternate method is to have patient
"sniff". This causes a "quick stretch" to be placed on the diaphragm and affords easier
means of palpation.
4) Therapist should observe for smooth symmetrical movement. Make note of any sign of
hemi-diaphragm paresis.
(4) Percussion – see procedure sheet.
(5) Auscultation – see procedure sheet.
C. Implement changes in procedure based upon:
(1) Response of the patient:
(a) Change in vital signs
(b) Fatigue
(2) Achievement of short and long term goals
D. Record results in SOAP format:
(1) Record visual inspection findings, severity of dyspnea, activity level, occupational status, color,
time and amount of sputum production, chest excursion, tracheal deviation, respiratory
excursion, percussion, and auscultation findings.
(2) Attempt to identify a commonality as the most likely cause of findings.
E. Interpret the results of the procedure.

COMPETENCIES AND CRITERIA General Medical Conditions-DPT 755
479
INFORMATION SHEET PERCUSSION OF THE CHEST
The pitch of the sound produced during percussion is determined by the ratio of air-containing
tissue to solid tissue in the area directly beneath the percussion finger. Well-aerated lung parenchyma
produces a low-pitched resonant sound which is similar to that of a muffled drum. A sound that is
higher in pitch, with a dull to flat note, implies that the amount of solid tissue beneath the percussion
finger is increased because of atelectasis, fibrosis, or consolidation of fluids in the pleural space.
Percussion of the chest produces vibrations of the chest wall and the underlying lung parenchyma.
These vibrations penetrate medially into the thoracic cavity and also radiate laterally over the chest
wall. The heavier the percussion stroke, the deeper the penetration and lateral radiation of these
vibrations. So, ultimately the whole thoracic cavity can be made to vibrate.
The pitch of the sound produced by percussion enables the examiner to determine the ratio
between air-containing tissue and solid tissue that exists in the area underlying the percussing finger.
Percussion over normal air-containing tissue produces slow vibrations so that the resultant sound has a
low pitch and relatively long duration. Percussion over an area in which the ratio of air-containing tissue
is increased produces a sound with a lower than normal pitch. Since the normal chest is approximately
one inch thick, the vibrations produced by light percussion will only penetrate a short distance. If there
is obesity or if the thickness of the musculature of the chest wall is increased, the note will be flat.
Percussion over a lesion which is deep within the lung will not result in abnormal sounds.
Percussion Note Intensity Pitch Duration
Flatness Soft High Short
Dullness Medium Medium Medium
Resonance Loud Low Long
Hyperresonance Very Loud Lower Longer
Tympany Loud Musical Timer
Flat = sound of percussing thigh
Division of Physical Therapy
Emory University

COMPETENCIES AND CRITERIA General Medical Conditions-DPT 755
480
Dull = sound of percussing liver
Resonant = sound over normal lung
Hyperresonant = sound heard in emphyematic lung
Tympanic = air in bubble – gastric, puffed cheek

COMPETENCIES AND CRITERIA General Medical Conditions-DPT 755
481
CRITERIA SHEET PERCUSSION OF THE CHEST
1. Pre-Planning for Procedure:
A. Identify the priority signs, symptoms, or conditions which make the procedure applicable:
(1) Cardiopulmonary dysfunction
B. Identify the rationale for choice of procedure:
(1) Condition of client:
(a) Presence of fluid, air, tumor, or organomegaly
(2) Generate other possible alternatives:
(a) Reflex hammer used as plexor
(3) Application of procedure to short and long term goals:
(a) Assessment of effectiveness of treatment procedures
(b) Achieve pulmonary hygiene to increase endurance
2. Preparation of Physical Therapist:
A. Review the procedure as necessary.
B. Review the medical record.
C. Interview client:
(1) Do you have any chest pain? Where?
(2) What activities aggravate it; what alleviates it?
D. Determine assessment sequence and positioning.
E. Select and collect equipment – no equipment necessary; reflex hammer if necessary
F. Prepare the environment:
(1) Pre-treatment preparation:
(a) Drape and position appropriately
(b) Warm hands
3. Execute the Procedure:
A. Follow the Teaching-Learning and Interpersonal Relationships Criteria to establish rapport with
client and explain and demonstrate the procedure.
B. Sequential steps of procedure:
(1) With patient sitting, place the pleximeter finger in a horizontal position so that it is parallel with
the plane of the diaphragm.
(2) If right-handed, use the third finger of the left hand. (pleximeter)
(3) The terminal phalanx of the finger is applied to the patient's chest wall with very little pressure.
(4) The rest of the finger and remaining fingers are raised slightly (so that the percussion note is not
Division of Physical Therapy
Emory University

COMPETENCIES AND CRITERIA General Medical Conditions-DPT 755
482
damped).
(5) Using the wrist as a fulcrum, with the elbows fixed in a semi-flexed position, the plexor finger is
brought down sharply at a right angle to tap the terminal phalanx of the pleximeter finger in a
rapid staccato motion.
(6) The blows should be short, sharp, and light, with instantaneous recoil of the finger (if the recoil
is slow, the sound may be damped).
(7) The pleximeter finger is moved slowly and continuously from the apex down to the base,
anteriorly to the axilla, and posteriorly with the plexor continuously tapping rapidly and lightly.
(8) A continuous sound having the same pitch throughout will result if the underlying lung is
normal, and a change in pitch will be obvious.
(9) Move the pleximeter downward from the lower lobe of the lung until the abrupt, flat note
produced by the solid intra-abdominal contents is reached, indicating the position of the
diaphragm.

COMPETENCIES AND CRITERIA General Medical Conditions-DPT 755
483
INFORMATION SHEET LUNG AUSCULTATION
Auscultation = the method of listening to breath sounds through a stethoscope to detect changes
1. Breath Sounds – The breath sounds heard over the chest wall during auscultation differ considerably
both in quality and intensity from those actually produced by the turbulence created by the movement
of air within the tracheobronchial tree.
A. Vesicular Breath Sounds – These are heard over normal lung parenchyma. Inspiratory sound is easily
heard, but the expiratory sound is fainter and is approximately 1/3 the length of the inspiratory.
Note vesicular breath sounds are heard normally everywhere, except at the apex of the right lung,
where the bronchi are closer to the chest wall and are covered by a smaller amount of lung tissue.
Here, the breath sound is broncho-vesicular.
B. Broncho-vesicular breath sound – These always imply that some of the alveoli in the underlying area
of the lung are normal. The expiratory note increases in intensity and pitch and progressively
lengthens until it is as long as inspiration. Then, the inspiratory sound increases in pitch and intensity
until it equals that of the expiratory sound. As long as the end of the inspiratory sound blends with
the beginning of the expiratory sound, the breath sound is broncho-vesicular.
C. Bronchial breath sound – There is a gap between the end of inspiration and the beginning of
expiration. The sound is high-pitched and loud, inspiration and expiration being equally affected
with respect to pitch, intensity, and duration, and is identical to that normally heard during
auscultation over the trachea. This breath sound is heard over an area of consolidation, provided
that it is in close opposition to a patent bronchus.
2. Adventitious Sounds – Certain sounds produced by pathological processes within the lungs and the
tracheobronchial tree are called adventitious sounds. These are never heard over healthy lung tissue.
Their presence indicates that a pathological process has developed in the underlying lung or pleura.
A. Rhonchus – This is a musical sound produced within the lumen of the tracheobronchial tree.
Whenever a portion of the tracheobronchial tree becomes narrowed, the resistance to airflow
increases and turbulence and eddy formation may develop. The bronchi normally become
shortened during expiration, consequently rhonchi are usually more pronounced during expiration.
A rhonchus heard only during expiration implies that the wall of the affected bronchus is still flexible
and capable of widening and lengthening during inspiration. A rhonchus that is heard during both
expiration and inspiration suggests that the lumen of the affected bronchus is narrowed during both
the inspiratory and expiratory phases of respiration. The pitch of a rhonchus provides a clue as to its
site of origin, and it is generally felt that high-pitched rhonchi originate in small bronchi and
bronchioles and low-pitched rhonchi in large bronchi.
Division of Physical Therapy
Emory University
COMPETENCIES AND CRITERIA General Medical Conditions-DPT 755
484
B. Rale – A rale is a short, interrupted, nonmusical, explosive, or bubbling sound which is most readily
heard during inspiration. Rales are classified into three types depending both on their pitch and on
the phase of inspiration in which they predominate. They sound like rubbing your hair together
between your fingers.
(1) Course Rales - occur in larger or medium sized bronchi, and are produced during the initial part
of inspiration
(2) Medium Rales – smaller bronchi are involved, and these occur in the middle phase of inspiration
(3) Fine Rales – in terminal bronchioles (occurs in pulmonary congestion, and occur during the last
part of inspiration
(4) Cardiac Rales – bilateral involvement, both lung fields with rales that disappear above fluid level
C. Pleural Rub – A pleural rub is a loud, dry, creaking, coarse leathery sound. It is diagnostic of pleural
irritation; it is produced by the rubbing of the inflamed surfaces of the two pleural surfaces against
one another during respiration and is therefore present predominately during the latter part of
inspiration and the early part of expiration. Since the greatest movement of the lungs, and therefore
the greatest excursion of the pleural surfaces, occurs over the lower lobes, friction rubs are most
frequently detected over the lower areas of the chest wall.
3. Spoken Sound Auscultation: When a person speaks in a normal tone, the sound heard on auscultation of
the normal lung is soft and muffled. The words themselves are not distinct. Pathological conditions in
the chest cause alterations in the sound transmitted.
A. Bronchophony – This is a term used to indicate an increased clarity and loudness of words. This
sound is normally heard when listening over a large bronchus. When consolidation or compression
of lung tissue exists, bronchophony is heard. In these conditions, the loss of some of the sound-
damping quality of the alveoli produces the increased clarity and loudness of words.
B. Whispered Pectoriloquy – Normally, whispered speech is damped and inaudible except over the
trachea and main-stem bronchi, where it is heard more clearly, but still indistinctly. With
consolidation and compression of lung tissue, this sound is clear with definite recognition of words.
Even small amounts of consolidation produce a clear though still faint sound. This change occurs
before bronchophony.
C. Egophony – Normally, when the patient says the letter "E", the sound on auscultation is an "E". In
consolidation or compression of lung tissue, when the "E" is pronounced, the sound on auscultation
is nasal and beating in quality as in "A".
D. Fremitus – When the patient says "99", the sound is muffled in the normal lung. In consolidation,
and over the right upper lobe, the lung parenchyma fremitus increases in intensity. Vocal fremitus
markedly decreases in intensity when fluid or air is in the pleural space, and the sound is almost
inaudible.
Cherniak and Cherniak: Respiration in Health and Disease. Phila. ,W. B. Saunders, 1972.

COMPETENCIES AND CRITERIA General Medical Conditions-DPT 755
485
CRITERIA SHEET LUNG AUSCULTATION
1. Pre-Planning for Procedure:
A. Identify the priority signs, symptoms, and conditions which make the procedure applicable:
(1) Cardiopulmonary dysfunction
B. Identify the rationale for choice of procedure:
(1) Safety:
(a) Make sure the patient doesn't hyperventilate.
(b) Do not over fatigue the patient.
(2) Condition of patient: must be alert, cooperative
(3) Generate other possible alternative treatments:
(a) Chest x-ray
(b) Fluoroscopy
(c) Percussion
(4) Application to short and long term goals: Evaluate the safety of bronchial drainage, evaluate the
effectiveness of bronchial drainage, and evaluate breathing exercises.
2. Preparation of the Physical Therapist:
A. Review the procedure as necessary.
B. Review the medical record.
C. Interview Client:
(1) Are you having difficulty breathing?
(2) Do you have pain? When? Where?
(3) What activities are limited?
D. Determine the assessment sequence and related positioning.
E. Select and collect the correct equipment.
F. Prepare the environment and equipment/materials:
(1) Turn off radios and televisions and a find quiet atmosphere to insure reliability of findings.
3. Execute the Procedure:
A. Follow the Teaching-Learning and Interpersonal Relationships criteria to establish rapport and
explain and demonstrate the procedure to patient.
B. Sequential steps of procedure:
(1) Clean bell with an alcohol wipe, and then warm with hands.
(2) Position client comfortably in upright position.
(3) Remove all garments covering chest.
Division of Physical Therapy
Emory University

COMPETENCIES AND CRITERIA General Medical Conditions-DPT 755
486
(4) Identify bony landmarks that indicate underlying lung anatomy.
(5) Place stethoscope in ears with elbows of earpieces pointing forward.
(6) Turn bowl of stethoscope so that diaphragm is open. Check this by gently tapping diaphragm
with finger and listening for adequate transmission of sound.
(7) Have patient take deep full breaths through an open mouth.
(8) Start at apices posteriorly and proceed to lower lobes listening first on one side, then the other.
(9) Listen on the right side at the axillary line for right middle lobe sounds.
(10) Listening anteriorly, again proceeding from apices to bases, comparing right and left sides.
(11) Assess whispered pectoriloquy:
(a) Place stethoscope over given lobe.
(b) Have patient whisper the words “one, two, three". (See 3 B. on Auscultation Information
Sheet)
(12) Assess egophony:
(a) While therapist is listening with stethoscope over given lobe, have patient say the letter "E".
(See 3 C. on Auscultation Information Sheet)
(13) Assess fremitus:
(a) While therapist is listening with stethoscope over a given lobe have patient say "99". (See 3
D. on Auscultation Information Sheet)
(14) Replace garments.
C. Implement changes in procedure based upon:
(1) Response of the patient:
(a) Vital signs
(b) Fatigue level
D. Record results in SOAP format:
(1) 0:
(a) Record site and sound appreciated.
(b) Whispered pectoriloquy:
1) Sounds damped and inaudible = normal
2) Sounds transmitted with clarity = consolidated
(c) Egophony:
1) E is heard as "E" = normal
2) E is heard as “A” = consolidation
(d) Fremitus:
1) “99” is muffled = normal
2) “99” heard clearly = consolidated
3) “99” diminished, inaudible = air or fluid in pleural space
(e) Rales:
1) Cardiac or pulmonary congestion
(f) Rhonchi:
1) Airway obstruction
E. Interpret the results of the procedure.

COMPETENCIES AND CRITERIA General Medical Conditions-DPT 755
487
INFORMATION SHEET BRONCHIAL DRAINAGE
Purpose
Bronchial drainage is a procedure used to assist with the drainage of secretions from specific areas of
the lungs by means of gravity. The positions are based on the anatomy of the bronchial tree.
Symptoms
Bronchial drainage is generally advocated when the client complains of shortness of breath and/or
productive cough. Bronchial drainage may be further indicated when the chest evaluation reveals
adventitious sounds on auscultation, profuse or thick sputum by observation, and/or cough inadequate to
clear secretions.
Sequencing and Duration
When more than one broncho-pulmonary segment is affected, drainage should proceed in a
cephalocaudal direction. Each position is maintained for 20 minutes, or to the patient's tolerance.
Adjuncts
To increase the effectiveness of bronchial drainage, respiratory therapy techniques may be employed.
Where sputum is thick or tenacious, previous humidification may increase the effectiveness of drainage by
thinning the secretions. Where breath sounds are characterized by diffuse inspiratory and/or expiratory
rhonchi, drainage may be enhanced by the previous administration of bronchodilators (i.e., aminophylline,
vaponephrine, terbutaline) or by a mucolytic agent such as respaire (Mucomyst). Where breathlessness is
severe, simultaneous administration of aerosol may enable the client to regulate drainage by decreasing the
work of breathing. When atelectasis is the primary problem, as after cardiothoracic surgery, an incentive
spirometer may be advocated.
Physical measures are also available to increase the effectiveness of bronchial drainage. These measures
are the manual techniques: percussion, shaking, and/or vibration as well as localized breathing exercises.
When percussion, shaking, and/or vibration are used with drainage, the duration of the drainage posture
may be shortened from 10-15 minutes per segment to 1-5 minutes per segment.
Percussion, shaking, and/or vibration are used to loosen adherent secretions from the bronchial wall.
These procedures are administered once the client has been placed in the proper drainage position.
Division of Physical Therapy
Emory University

COMPETENCIES AND CRITERIA General Medical Conditions-DPT 755
488
Percussion precedes vibration and shaking and is usually used when secretions are particularly thick and/or
tenacious.
Percussion consists of the administration of rhythmic blows of the upper hands for several minutes over
the chest wall overlying the affected segment.
Vibration is the fine, tremorous motion applied to the chest wall overlying the affected segment.
Vibrations are applied in expiration only. Vibrations should be applied with care over rib fractures and are
generally avoided over areas of recent skin grafts. Shaking is an additional method to vibration. This
procedure is performed during expiration and consists of a manual compression of the chest wall in a rapid
down and inward motion.
Localized or segmental breathing exercises are also advocated during postural drainage.
Indication for Bronchial Drainage
Generally, bronchial drainage is advocated for the obstructive diseases, chronic bronchitis,
bronchiectasis, cystic fibrosis, emphysema, and asthma. Bronchial drainage has also been used in the
treatment of such restrictive diseases as pneumonia, atelectasis, and respiratory muscle weakness.
Contraindications for Bronchial Drainage
Generally, bronchial drainage is contraindicated immediately after meals. In addition, the head down
postures are contraindicated where increased cardiovascular load, increased intracranial fluid pressure (or
edema), nausea, or increased work of breathing are undesirable or dangerous. Time of last meal or tube
feeding should be at least one hour prior to treatment.
Modified Bronchial Drainage - Some patients cannot tolerate lying flat or being tipped without becoming
dyspneic. If the patient will become distressed by the traditional drainage position, it is better to modify the
position to the patient's comfort, than to compromise his condition. Simply have the patient lie as flat as he
can tolerate, for short periods of time. Percussion, shaking, and vibration may be given as usual.
Percussion is contraindicated in a patient with recent fractures, prolonged steroid therapy, osteoporosis,
receiving radiation therapy, low platelet count, and with patient discomfort. When performed vigorously,
shaking may also be contraindicated in the above conditions.

COMPETENCIES AND CRITERIA General Medical Conditions-DPT 755
489
CRITERIA SHEET BRONCHIAL DRAINAGE
1. Pre-Planning for Procedure:
A. Identify the priority signs, symptoms, or conditions which make the procedure applicable:
(1) Adventitious sounds
(2) Abnormal spoken sounds
(3) Productive cough
2. Identify the Rationale for Choice of Procedure:
A. Safety:
(1) Prevention of aspiration
(2) Prevention of superimposed infection in patient with chronic obstructive lung disease
B. Economics:
(1) No equipment is required. Patient and family may be instructed on how to provide therapy.
C. Condition of patient (see Information Sheet for contraindications):
(1) Low platelet count
(2) Upper G.I. bleed
(3) Increased intracranial pressure
(4) Recent ingestion of meal
(5) Orthopnea
D. Duration of treatment:
(1) Drainage position for specified broncho-pulmonary segment should be maintained for a
minimum of 15-20 minutes prior to initiation of manual techniques.
(2) Percussion should be performed for a minimum of 2-5 minutes. Vibration and/or shaking follow
percussion and are performed for 6 repetitions.
(3) The patient rests, and the sequence is repeated as needed.
E. Generate other possible alternative treatments:
(1) Mechanical percussors and vibrators
(2) Tilt table
F. Application of procedure to short and long term goals:
(a) STG – Maintain patent airway.
(b) LTG – Become independent in pulmonary hygiene.
Division of Physical Therapy
Emory University

COMPETENCIES AND CRITERIA General Medical Conditions-DPT 755
490
3. Preparation of Physical Therapist:
A. Review procedure as necessary.
B. Review medical record.
C. Interview client:
(1) When did you last eat?
(2) How productive has your cough been today?
(3) Do you become dizzy or short of breath when the head of the bed is tipped downward?
D. Determine assessment and treatment sequence for positioning.
E. Select and collect correct equipment:
(1) Tissues
(2) Sputum cup/emesis basin
(3) Pillows
(4) Towel
F. Prepare the environment and equipment/materials:
(1) Pre-treatment preparation:
(a) Consult with respiratory therapist, if appropriate, to select most advantageous treatment
time.
(b) Have patient use a humidification mask.
(c) Identify the most appropriate therapeutic procedure(s) to facilitate clearance.
(d) Identify the lobe(s) or segment(s) of lung(s) requiring assisted clearance.
(e) Expose the thoracic cage and observe for bruises and scars. Identify existence and site of
catheters or tubes and intravenous lines and assure their free flow (patency).
(2) Safety of equipment – tilt table:
(a) Check plugs, if present.
(b) Check brakes.
4. Execute the Procedure:
A. Follow the Teaching-Learning and Interpersonal Relationships Criteria to establish rapport and
explain and demonstrate the procedure to the patient.
B. Sequential steps of procedure:
(1) Position the patient for drainage of the involved broncho-pulmonary segment.
(2) Standard drainage positions for all segments below:
(a) Upper lobes:
1) Apical segment: (posterior)
(a) Seat client comfortably with arms relaxed at shoulder level (prop them on bedside
table or with pillows). Have client lean forward at 45° angle.
(b) Percuss over the posterior aspect of the thorax in the area superior to the spine of
the scapula, if indicated. (one hand is usually adequate)
2) Apical segment: (anterior)
(a) Position client as in (1) (a), but have client lean backwards at 45° angle. Percuss over
supraclavicular area, if indicated. (one hand is usually adequate)
3) Anterior segments:

COMPETENCIES AND CRITERIA General Medical Conditions-DPT 755
491
(a) Position client supine with the bed flat.
(b) Place a pillow under both knees and each arm.
(c) Percuss over the area between the clavicle and nipple, if indicated.
4) Posterior segments:
(a) Left lung:
1. Position client 1/4 from prone, left side up.
2. Place pillow under left arm and head.
3. Elevate head of bed 30°.
(b) Right lung:
1. Position client 1/4 from prone, right side up.
2. Place pillow under right arm and head.
3. Bed is in neutral position.
5) Lingula segment: (left only)
(a) Place pillow horizontally on the right side of client's 10th rib.
(b) Turn client to the right, over pillow, into a position from prone, left side upper most.
(c) Elevate the foot of the bed 14".
(d) Percuss in mid-axillary line immediately distal to the axilla, if indicated.
(b) Middle lobes: (right only)
1) Place pillow longitudinally on the left side of the client's 10th rib.
2) Turn client to the left until he is turned from supine. Place pillow behind back to
maintain position.
3) Elevate the foot of the bed 12-14".
4) Percuss on anterior axillary line at the 4th thoracic rib, if indicated.
(c) Lower Lobes:
1) Superior segments:
(a) Place pillow horizontally at the level of the anterior superior iliac spine.
(b) Turn client prone onto pillow. (pillow should prevent increased lumbar lordosis)
(c) Bed position is neutral.
(d) Percuss beneath inferior angle of scapula, if indicated.
2) Medial Basal Segments: (left only)
(a) Place pillow horizontally at the level of the client's 10th rib.
(b) Turn client over the pillow until he assumes a right side-lying position.
(c) Elevate the foot of the bed 18-20".
(d) Percuss in posterior axillary line at level of 7th thoracic rib, if indicated.
3) Anterior Basal Segments:
(a) Turn client supine.
(b) Support the head and knees with pillows.
(c) Elevate the foot of the bed 18-20".
(d) Percuss in area just distal to the nipple line, if indicated.
4) Posterior Basal Segments:
(a) Place two pillows horizontally at the level of the 10th rib.

COMPETENCIES AND CRITERIA General Medical Conditions-DPT 755
492
(b) Turn client prone onto pillows.
(c) Elevate the foot of the bed 18-20".
(d) Percuss over area of 8-10th thoracic rib in the mid-scapular line, if indicated.
5) Lateral Basal Segment: (Right)
(a) Place pillow under the hips.
(b) Patient is lying on opposite side.
(c) Foot of bed is raised 18-20".
(d) Percuss over mid-axillary line in area of 8th-10th thoracic rib, if indicated.
(3) Prepare to percuss, if appropriate:
(a) Inform the client of the purpose and nature of the procedure.
(b) Instruct the client to breathe normally in through his nose and out through his mouth with
pursed lips while you are percussing.
(c) Identify the landmarks demarcating the affected segment.
(d) Cover the area with at least one towel if patient is cachectic.
(e) Cup both your hands.
(f) Rhythmically strike the identified area of the chest with gentle alternating blows of the right
and left cupped hands for one minute. (Confine your movement to the wrists)
Note: There has been much recent controversy about percussion in patients with cancer and pulmonary
emboli. In the former, there is no contraindication unless the patient has been receiving radiation
therapy or has known lytic lesions. Treatment will be dictated by the more life threatening of the disease
entities. (pneumonia vs. cancer) In pulmonary emboli, do not treat if process is ongoing (i.e. multiple
periodic episodes). There is no contraindication to percussion once the embolus is lodged.
(4) Following percussion, vibrate, if appropriate:
(a) Instruct the client to inhale through his nose.
(b) Position your hands so that the fingers of your non-dominant hand follow the patient's ribs.
(c) Place your dominant hand over your non-dominant one, with elbows slightly bent.
(d) Have client exhale.
(e) As client exhales, gently, but firmly vibrate (isometrically contract the brachioradialis). Keep
entire hand in contact with client's thorax and maintain even pressure.
(f) Repeat 3 to 6 times.
(5) Sit patient up to cough as necessary. Splint as necessary.
C. Implement changes in procedure based upon:
(1) Response of the patient:
(a) Vital signs change
(b) Fatigue
(c) Patient becomes cyanotic
(2) Achievement of short and long term goals

COMPETENCIES AND CRITERIA General Medical Conditions-DPT 755
493
D. Record results in SOAP format
(1) 0:
(a) Record position of patient, where percussed, vibrated, patient reaction, patient response
(b) Sputum production: consistency, color, and odor
(c) Pre and post treatment auscultation findings
(2) A:
(a) Secretions mobilizing or consolidated
(3) P:
(a) Continue or discontinue
E. Interpret results of procedure.
F. Prepare client for dismissal.
G. Clean the area.

COMPETENCIES AND CRITERIA General Medical Conditions-DPT 755
494
INFORMATION SHEET DIAPHRAGMATIC BREATHING PATTERN
To be effective, movement of the abdominal muscles must be coordinated with lower thoracic expansion during inspiration, contraction during expiration. Outward movement or protrusion of the abdominal wall muscles is associated with diaphragmatic descent during inspiration. Inward movement toward the spine is associated with elevation of the diaphragm during expiration because of the upward pressure of abdominal viscera.
It is best to begin with the patient comfortably supported and relaxed, lying in the supine position with the neck and shoulder girdle musculature relaxed and emphasis placed on lower thoracic movement.
Inhalation through the nose with filling of the lower chest and outward movement of the abdominal wall is followed by slower exhalation through pursed lips (ratio 1:2 or 1:3). The lower thorax and the abdomen should be actively contracted. Upper thoracic movement should be minimal.
Having the patient place one of his hands on his upper chest and the other on his abdomen will give him the feel of the rhythm and movement. Also moderate inward and upper pressure with the palms on the mid-abdomen may be useful. The use of a towel, belt, or strip of cloth wrapped around the lower chest and pulled tightly across the front during expiration and released during inspiration will help. The use of coins or keys below the first rib, on either side may be used as reinforcement to prevent apical movement.
Placing the patient in a Trendelenburg, or head down position, and the use of weighted bags or pads on the abdomen may be used as adjuncts. In the head down position, the viscera elevate the diaphragm so that it may then contract through a larger descent during inspiration. Weights on the abdomen may strengthen the abdominal muscles and diaphragm.
After the basic maneuver is mastered, the patient should practice the breathing maneuvers in the sitting and standing positions. Eventually the patient should be encouraged to coordinate the breathing pattern with physical activities such as walking, stooping, or lifting. While walking the patient should take one or two steps with inspiration and 3 or 4 steps with expiration (paced breathing).
Limitations to exercise in the pulmonary patient are related to reduced ventilatory capacity, reduction in alveolar surface available for transfer of oxygen, and circulatory restriction in the pulmonary vascular bed. Hypoxemia will accentuate the latter and oxygen should be administered during exercise if the arterial oxygen tension decreases below 60 mmHg. With oxygen the patient with advanced disease can increase his exercise capacity considerably; its use rarely causes a problem with increased CO2 tension in the stable patient with mild hypercapnia. Before the patient with advanced or moderate disease is placed on an exercise program, blood gases should be measured. Patients with active infection or heart failure should not be stressed.
Division of Physical Therapy
Emory University

COMPETENCIES AND CRITERIA General Medical Conditions-DPT 755
495
INFORMATION SHEET PURSED LIP BREATHING
Physiologic Basis
Pursed lips breathing (PLB) is a breathing exercise commonly employed to prolong the duration of
expiration. The breathing pattern (often spontaneously developed by obstructed clients) has little
physiologic basis. Theorists hold that pursed lips breathing slows expiration and promotes lung emptying.
Some (Egan, 1973; Thomas et aI, 1966) contend that the pursing of lips causes added resistance to the
egress of air from the mouth. This resistance then creates a back pressure in the small airways sufficient to
prevent collapse in unstable airways. In this way, pursed lip breathing might attenuate the work of breathing
and/or decrease dyspnea.
Methods
The literature essentially describes one method of PLB. This method consists only of requiring the client
to purse his lips (as if blowing out a candle) during the expiration phase of a normal ventilatory cycle. Some
advocate that while breathing through pursed lips, expiration should be emphasized or forced. Others hold
that forcing the expiration merely creates added airway obstruction by increasing the intrathoracic pressure
above intra-luminal pressure.
Indications
Pursed lips breathing is generally advocated in all obstructive diseases: asthma, emphysema, chronic
bronchitis, cystic fibrosis, and bronchiectasis. Some advocate PLB to relieve dyspnea of any reason.
Contraindications
There are no known contraindications for PLB. However, if dyspnea worsens, the treatment should be
discontinued in favor of more definitive therapy.
Division of Physical Therapy
Emory University

COMPETENCIES AND CRITERIA General Medical Conditions-DPT 755
496
CRITERIA SHEET PURSED LIP BREATHING
1. Pre-Planning for Procedure:
A. Identify the priority signs and symptoms which make the procedure applicable:
(1) Dyspnea
(2) Energy Conservation
B. Identify the rationale for choice of procedure:
(1) Safety:
(a) Pursed lip breathing may evoke forced expiration, an undesirable pattern of breathing in an obstructed patient. (Gaskell, D.V. and Webber, B.A.)
(2) Condition of patient:
(a) Patient must be alert and cooperative.
(3) Duration of treatment:
(a) To patient's tolerance
(4) Alternative treatment:
(a) IPPB, Incentive Spirometry
(5) Application of procedure to short and long term goals:
(a) Short term: alleviate dyspnea
(b) Long term: independent in ADL
2. Preparation of the Physical Therapist:
A. Review the procedure as necessary.
B. Review the medical record.
C. Interview the client:
(1) Do you ever get short of breath?
(2) How do you get relief?
(3) What activities worsen it?
(4) In what activities are you limited?
D. Determine treatment position.
Division of Physical Therapy
Emory University

COMPETENCIES AND CRITERIA General Medical Conditions-DPT 755
497
E. Select and collect correct equipment:
(1) None necessary
F. Prepare the environment and equipment/materials:
(1) Choose a relaxed atmosphere, such as a quiet room.
(2) Instruct the client in routine of relaxation exercises if he/she is anxious or tense.
(3) Identify position in which patient's breathing will be comfortable. Usually sitting forward, leaning is a good position.
3. Execute the Procedure:
A. Follow the Teaching-Learning and Interpersonal Relationships Criteria to establish rapport and explain and demonstrate the procedure to patient.
B. Sequential steps of procedure:
(1) Position patient in the posture planned and determine if position is comfortable for the patient.
(2) Demonstrate the breathing pattern to the client. This pattern consists of slow, relaxed inhalation through the nose followed by a passive exhalation through pursed lips. The exhalation phase is stopped when a wheeze is detected.
(3) Demonstrate how abdominal muscle activity can be detected.
(4) Supervise the client in practicing the exercise offering feedback as appropriate.
(5) Continue to supervise the activity and ask the client to evaluate his/her own performance.
(6) When performance is accurate, indicate that the exercise is complete.
(7) Review with the client when pursed lip breathing might be helpful, providing examples as necessary, including paced breathing.
(a) If patient is ambulatory, instruct patient in use of pursed lip breathing in a "paced" rhythmic fashion.
(b) Find a cleared, uncluttered hallway.
(c) Have patient inhale through the nose for 2 steps and exhale through pursed lips for 4 steps. (number of steps may be adjusted individually but I:E ration should be at least 1:2)
(d) Have patient practice until patient is comfortable with activity on level surface.
(e) Have patient practice paced pursed lip breathing ascending and descending stairs, when appropriate.
(8) Terminate session when the client is able to perform pursed lip breathing independently.
C. Implement changes in procedure based upon:
(1) Response of the patient:
(a) Vital signs
(b) Fatigue level – to patient's tolerance
(2) Achievement of short and long term goals:

COMPETENCIES AND CRITERIA General Medical Conditions-DPT 755
498
(a) Alleviation of dyspnea
(b) Independent in ADL
D. Record results in SOAP format:
(1) 0: Include respiratory rate before and after session, position chosen, and functional activities practiced.
(2) A: Relaxation exercise alleviated dyspnea.
(3) P: Continue treatment.
E. Interpret results of the procedure.

COMPETENCIES AND CRITERIA General Medical Conditions-DPT 755
499
CRITERIA SHEET BREATHING EXERCISES
1. Pre-Planning for Procedure:
A. Identify the priority signs, symptoms, and conditions which make the procedure applicable:
(1) Decrease breath sounds
(2) Splinting secondary to pain
(3) Muscle weakness
(4) Immobility
B. Identify the rationale for choice of procedure
(1) Economics – no equipment other than therapist's hands
(2) Condition of patient:
(a) Tenderness over surgical incision
(3) Duration of treatment – to patient's tolerance; no more than 5 consecutive deep breaths without a rest period
(4) Generate other possible alternative treatments
(a) Incentive Spirometry
(5) Application of procedure to short and long term goals:
(a) Short term goal – improve alveolar ventilation
(b) Long term goal – return to normal or optimal tidal volume
2. Preparation of Physical Therapist:
A. Review procedure as necessary.
B. Review medical record.
C. Interview client:
(1) Do you have pain when you take a deep breath?
(2) Show me where the pain is.
(3) Do you have difficulty taking a deep breath? Why?
(4) Do you get short of breath?
D. Determine treatment sequence and positioning.
Division of Physical Therapy
Emory University

COMPETENCIES AND CRITERIA General Medical Conditions-DPT 755
500
E. Select and collect equipment.
F. Prepare the environment and equipment/materials:
(1) Pre-treatment preparation:
(a) Identify position which is the most comfortable and advantageous for involved lobe or lung field.
(b) Review surface anatomy to identify area(s) for hand placement:
1) Chest wall overlying particular lobe or lung field (localized breathing exercises)
2) Mid rectus area
(c) Have patient medicated prior to treatment for pain, as needed.
(2) Safety of equipment:
(a) Allow chest tubes, if present, to have adequate slack.
3. Execute the Procedure:
A. Follow the Teaching-Learning and Interpersonal Relationships Criteria to establish rapport and explain and demonstrate the procedure to the patient.
B. Sequential steps of procedure:
(1) Instruct or position patient comfortably:
(a) Seated posture with knees in slight flexion and arms at sides, palms up, supported by pillows
(b) Head of bed elevated 45°, place pillow under patient's knees or alternatively "gatch" the bed at the knees
(c) Standard or modified drainage positions (see Procedure Sheet)
(2) Place hand on chest wall or abdomen as previously identified in II.E.l.b.
(3) Apply firm pressure to that area at the end of the client's expiratory maneuver.
(4) Instruct client to inspire deeply through the nose and expire passively through the mouth on command. (If using a humidifier/nebulizer, client should be instructed to inspire through mouth)
(5) Instruct the client to inspire deeply through the nose, attempting to direct the air toward your hand. ("Breathe into my hand")
(6) Reduce hand pressure as client inspires. (At end inspiration, the instructor's hand should be applying no pressure on the chest)
(7) Instruct the client to hold the breath for two or three seconds at the completion of inspiration.
(8) Increase hand pressure as client exhales, so that maximum pressure is at end of expiration.
(9) Progress the exercise by instructing the client to use his own hands.
(10) Repeat sequence in erect sitting position.
(11) Repeat sequence in standing position.
(12) Terminate treatment.
C. Implement changes in procedure based upon:

COMPETENCIES AND CRITERIA General Medical Conditions-DPT 755
501
(1) Response of the client:
(a) Determined by client's tolerance level
(2) Achievement of short and long term goals listed
(a) Short term goal – improvement in alveolar ventilation
(b) Long term goal – normal or optimal tidal volume
D. Record results in SOAP format or other approved format.
(1) Include:
(a) Physical examination findings before and after session
(b) Description of breathing exercises and other modalities employed
(c) Any modifications made in treatment
E. Interpret results of procedure.
F. Prepare client for dismissal.
G. Clean up area.

COMPETENCIES AND CRITERIA General Medical Conditions-DPT 755
502
CRITERIA SHEET PRE-OPERATIVE INSTRUCTIONS
1. Pre-Planning for the Procedure:
A. Identify the priority signs, symptoms, or conditions which make the procedure applicable:
(1) Thoracic surgery
(2) Abdominal surgery
(3) Head/neck surgery
B. Identify the rationale for the choice of the procedure:
(1) Safety – precautions outlined in preoperative instruction regarding:
(a) Cough techniques
(b) Bed mobility techniques
(c) Increased stress may produce angina
(2) Economics:
(a) Nature of the pre-operative instruction is prevention of post-surgical pulmonary complications which would necessitate additional medical treatment
(3) Condition of the client – consider:
(a) Smoking history
(b) Past medical history
(c) Client's cognitive ability
(d) Present medical stability (i.e. vital signs, monitors)
(4) Generate other possible alternative treatments:
(a) Group instruction
(b) Family member instruction if the patient is unresponsive or unstable
(5) Application of the procedure to the short and long term goals:
(a) Short term goal: client's knowledge of postoperative pulmonary techniques
(b) Long term goal: independent pulmonary management post surgically
Division of Physical Therapy
Emory University

COMPETENCIES AND CRITERIA General Medical Conditions-DPT 755
503
2. Preparation of the Physical Therapist:
A. Review the procedure as necessary.
B. Read the medical record.
C. Interview the client:
(1) Do you know what kind of surgery you are going to have?
(2) When is your surgery scheduled?
(3) Have you ever had any lung or breathing problems?
(4) Do you or have you ever smoked? About how much? For how long?
D. Determine assessment/treatment sequence and positioning.
E. Select and collect equipment:
(1) Stethoscope
(2) Tape measure
(3) Goniometer
(4) Towel, pillow
(5) Kleenex or sputum cup
F. Prepare the environment and equipment/materials:
(1) Have family members present, if possible
(2) Choose a non-distracting environment
3. Execute the Procedure:
A. Follow the Teaching-Learning and Interpersonal Relationships Criteria to establish rapport and explain and demonstrate the procedure to patient.
B. Sequential steps of the procedure:
(1) Inform the client that the purpose of the meeting is to make the client aware of the risks of pulmonary complications, and inform the client how cardiopulmonary physical therapy can reduce the risk of pulmonary complications.
(2) Review with the client those individual factors that may predispose him/her to pulmonary complications.
(3) Review the additional general factors that predispose patients to pulmonary complications, e.g., incision, anesthesia, pain, and medication.
(4) Demonstrate where the incision will be and explain that some incisional pain on or after moving, deep breathing, or coughing will occur despite administration of analgesics.
(5) Instruct the client to assume a supine position (or the expected post-operative posture).
(6) Explain the client's role in the treatment:
(a) To cooperate with the therapist as much as possible

COMPETENCIES AND CRITERIA General Medical Conditions-DPT 755
504
(b) To accept responsibility for the program when the therapist is not present
(7) Demonstrate and practice log rolling to assume a side-lying posture (or the posture to be assumed when treatment begins).
(8) Demonstrate and practice post-operative pattern of breathing to be employed during auscultation and aerosol therapy.
(9) Demonstrate and practice relaxation exercises.
(10) Demonstrate and practice breathing exercises, e.g. diaphragmatic breathing and pursed lip breathing.
(11) Demonstrate modified drainage and manual techniques.
(12) Demonstrate and practice proper cough (sequence involves a deep breath, breath hold, abdominal, glottal, and intercostal compression, and two coughs per breath) and splinting techniques (pillow "bear hug" for postero-lateral thoracotomy, anterior pillow compression for anterior midline incisions), huffing, and accentuating "H" sounds.
(13) Instruct and demonstrate to the client turning to the other side while you simultaneously evaluate his/her log rolling ability.
(14) Request the client to use breathing pattern appropriate for auscultation (you evaluate his/her performance).
(15) Request the client to execute breathing exercises as previously taught (you evaluate his/her learning).
(16) Request the client to demonstrate proper cough and splinting techniques while you evaluate the performance.
(17) Instruct the client to assume the supine posture.
(18) Demonstrate how you will assist the client to assume a sitting position.
(19) Demonstrate and practice foot-circling activities (ten clockwise and ten counterclockwise with both ankles every hour).
(20) Demonstrate and evaluate any shoulder mobility exercises that will be utilized in the immediate post-operative period (for postero-lateral thoracotomy).
(21) Practice coughing and splinting in seated position.
(22) Ask the client if he/she has any questions/problems. If so, provide the necessary explanation.
(23) Terminate the treatment.
Reference: Bendixen, H.H. et al. Respiratory Care, St. Louis: C.V. Mosby, 1965
C. Implement the changes in the procedure based upon:
(1) Patient response:
(a) Vital signs

COMPETENCIES AND CRITERIA General Medical Conditions-DPT 755
505
(b) Fatigue level
(c) Attention span/altered mental status
(d) Age
D. Record results in SOAP format or other approved format:
(1) Include:
(a) Pre-operative vital signs and pertinent lab data
(b) Auscultation, percussion, palpation findings
(c) Other physical exam findings
(d) Identify specific instruction given
(e) Patient response to session
E. Interpret results of procedure.
F. Prepare client for dismissal.
G. Clean the area.

COMPETENCIES AND CRITERIA General Medical Conditions-DPT 755
506
INFORMATION SHEET ENERGY CONSERVATION
1. BED MOBILITY
A. Rolling supine to side: Have patient perform three steps – bend knees so that he/she can push off to start the roll, then inhale deeply, then exhale as he/she rolls over to side-lying.
B. Supine to sitting: Have patient inhale deeply while supine then exhale as he/she does a "sit-up”; do not hold breath.
C. Supine to sitting: Roll to side-lying as in A. above; while on side, inhale deeply then exhale as he/she pushes with arms sideways to sit.
D. Reaching: Suggest that when patient needs to reach above head or to the side, inhale deeply; when reaching downward, exhale.
E. Use of side-rails: Avoid pulling with arms if patient has cardiopulmonary problems.
2. SITTING AT REST
A. Avoid propping or pushing with your elbows or hands on the arms of the chair; elbows bent, sit with hands supine in lap.
B. Concentrate on relaxation of the hands, forearm, and shoulder muscles. Suggest a darkened room, reclining chair, soft music, closing eyes, and quiet atmosphere.
3. SIT TO STAND – MOBILITY
A. Scoot to the edge of the chair first so that less energy is spent controlling trunk motion during the actual maneuver.
B. Do not hold breath during maneuver.
C. Exhale in preparation, then inhale as he/she stands. Use leg muscles mostly and assist with arms to push only slightly.
D. Rocking to provide some momentum may be helpful, exhale as rocking forward, inhale as rocking backward.
E. Exhale as he/she sits.
4. DRESSING
Division of Physical Therapy
Emory University

COMPETENCIES AND CRITERIA General Medical Conditions-DPT 755
507
A. Bring all clothing to the bed or chair that he/she will need to dress and avoid extra trips around the room.
B. Dress top and dress bottom to knees first while sitting, then stand to pull clothing up over hips.
C. To put shoes on, lift leg, cross foot over opposite knee, and exhale as he/she bends forward; inhale as he/she straightens up.
D. Allow plenty of time for dressing and ADL so as to avoid rushing. Dress slowly.
5. STAIR CLIMBING
A. Go up several steps, then rest; don't try all the steps at once.
B. Synchronize breathing with number of stairs; for example, inhale for one step, exhale for two steps, then rest. Repeat or alter according to individual breathing rates. Have patient do pursed lip breathing. (see PLB criteria sheet)
C. While resting between steps, lean on railing or wall to maintain or recover breathing rate. Lean shoulders or even the head to maximize rest.
D. Avoid pulling on the railing.
6. HOUSEWORK
A. Move all objects used frequently to low levels so that reaching is minimized. This includes dishes, objects on shelves, and plants for watering.
B. Clean small sections of a room at a time.
C. Use equipment on rollers whenever possible.
D. In the kitchen, move dishes to lower heights, and use a rolling cart or tray instead of carrying things in arms.
E. When making bed, inhale, then bend forward and exhale while lifting mattress.

COMPETENCIES AND CRITERIA General Medical Conditions-DPT 755
508
INFORMATION SHEET CONDITIONING EXERCISE PROGRAMS
PHYSIOLOGIC BASIS
All individuals have an approximately equal number of muscle fibers. The hypertrophic or atrophic states are a result of different sizes of muscle fibers. Large muscle fibers contain greater amounts of contractile proteins and smaller fibers contain lesser amounts of contractile proteins. (i.e. actin and myosin)
Circulatory changes in combination with exercise provide the mechanism for increasing muscle function. These circulatory changes during exercise are as follows:
1. Increased volume of blood to exercising muscle(s)
2. Increased flow of blood to exercising muscle(s)
3. Local vasodilatation in muscle(s) to increase O2 uptake
4. Opening of collateral vessels
5. Decreased venous return to the heart
6. Increased heart rate to provide adequate cardiac output despite decreased venous return; cardiac output may increase 5-7 times the normal
7. Build up of body heat, CO2, and a drop in pH leads to increased respiratory rate
8. Decreased flow to other organs (stomach, kidney) to preserve circulation to brain, heart, exercising muscles
9. Increased flow delivers necessary O2 for aerobic metabolism and nutrients for building muscle proteins
10. Increased amounts of contractile proteins yield larger muscle fibers, thus, muscle size
11. Muscle pump action is enhanced by increased force of contraction
O2 debt occurs when large amounts of O2 are required and anaerobic metabolism is present. For all anaerobic work done, the O2 required during an equivalent amount of aerobic work is quantified as if all metabolism were all aerobic. In other words, the amount of O2 that would have been utilized had all metabolism been aerobic is termed O2 debt. O2 debt is indicative of O2 consumed during recovery after exercise to remove or convert anaerobic products. In athletes this amount is usually 20-30 liters of O2.
VO2 is the best indicator of exercise capacity and at rest is normally 2-5 L/min. This value indicates maximum O2 uptake at the tissue level. Factors influencing VO2 are cardiac output, muscle size, local blood flow to the tissue, O2 delivered to the tissues, arterial capillary integrity to allow gas diffusion, oxygen carrying capacity of the blood, and ventilatory capacity.
A Valsalva maneuver during exercise has the potential to be extremely dangerous because of its
Division of Physical Therapy
Emory University

COMPETENCIES AND CRITERIA General Medical Conditions-DPT 755
509
compromising effect on cardiac output. A forced expiration against a closed glottis creates increased intrathoracic pressure, thus increases venous damping above and below the thorax. The result is a series of "empty beats" with an extremely low cardiac output and drop in B.P. This is followed by a compensatory rise in heart rate. Upon release of the Valsalva maneuver a rapid influx of blood occurs which markedly slows the heart rate and increases stroke volume.
PURPOSE
The purpose of monitored exercise programs is to provide the clinician with a means to regulate stress at a safe level, one that will allow an increase in a patient's functional capacity. The limits of each individual are independent and unknown by standard measures; limits are dependent upon one's ability to maintain cardiac output during activity.
EFFECTS
The two most important long-term effects of exercise in patients with chronic diseases are:
1. Lowered resting heart rate by as much as 10% to a given work load
2. Increased V02, maximum O2 uptake, at the tissue level
The physiologic effects of a low flow O2 supply in conditioning programs, especially with patients with COPD, are the basis of the primary goals:
1. To watch the alveolar ventilation with blood perfusion (i.e. V/Q ratio)
2. To minimize hypoxia during exercise
The resting heart rate is easier to measure clinically and may indicate potential reserve capacity for exercise. In normal individuals, the heart rate rises during exercise. If resting heart rate begins at a high level, there is less of a margin for exercise reserve capacity. Each individual has a maximum heart rate that he can achieve. The maximum is age-related. To calculate: MAPHR = 220 - age in years of patient.
PLANNING
In planning a conditioning program for a patient with chronic disease, consider:
1. Choosing the best time for the patient
2. Limiting session by either duration or intensity of activity - An increase in duration may be implemented by increasing the frequency of each activity or lengthening the time in general for the overall session. Increasing the intensity refers to the addition of resistance to an activity.
3. Utilizing simple exercises or activities
4. Preserving or maintaining present function
5. Providing progression and/or adapt to meet a new or changed condition
6. Constantly evaluating subjective and objective measurements of heart rate, blood pressure, respiratory rate, the symptoms of decreased cardiac output, ischemia, or cardiac failure
7. Watch patient for signs of confusion, disorientation, diaphoresis, cyanosis, nausea, angina

COMPETENCIES AND CRITERIA General Medical Conditions-DPT 755
510
8. Inclusion of patient and patient's family in a patient education program
9. Energy conservation tips
TYPES OF EXERCISE PROGRAMS
1. Negative work – decelerative actions; for example, bicycling downhill, walking down stairs
2. Conditioning exercises – to strengthen, increase speed or mobility, or to promote circulatory changes; must incorporate intensity, duration, frequency
3. Interval training – incorporates short bouts of exercise and rest intervals; results in little lactic acid build-up and no O2 debt, providing the activity is slow and rhythmic without spurts or bursts of energy
All patients, but particularly those with COPD, should coordinate exercises with breathing patterns. Inspiration may be coupled with UE flexion or abduction or external rotation. Expiration may be coupled with UE motions of extension, internal rotation, and adduction as well as LE flexion exercises.
e.g.) When instructing a patient in a knee-to-chest exercise, suggest that he/she breathe out when flexing the LE; likewise, inhale when returning to original position.
Lengthy inactivity results in muscle atrophy, weakness, and hyperventilation with tachypnea and dyspnea on exertion. Conditioning programs should be directed toward the following physiological goals:
1. Increased exercise tolerance
2. Decreased heart and respiratory rates and decreased minute volume for given exercise load
3. A more rapid return of these parameters to pre-exercise levels at cessation of activity
4. Decreased oxygen debt, lactic acid levels, and cardiac output
To achieve true conditioning, repeated stress must be imposed on the cardio-respiratory and muscular systems. In the presence of respiratory disease these stresses will be at a lower level and are limited by dyspnea and fatigue. Also the patient's EKG and ABG's should be monitored. O2 should be administered for any patient with O2 tension below 60 mmHg or who has mild pulmonary hypertension.
Exercises are of two general types:
1. Calisthenics - to strengthen specific muscle groups - not aimed at respiratory muscle but to increase general strength
2. Conditioning exercises - to increase endurance or tolerance - measured level walking, treadmill, stair climbing, and stationary bicycle
Controlled breathing should be utilized during all forms of exercise.
Simple measures of improvement are changes in pulse rate, respiratory rate, distance walked at a constant speed, time spent walking a known distance, calculated work in a dept. test, duration of post-exercise dyspnea, and the rate of return of pulse and respiratory rate to resting levels. More complex measurements might include minute volume, respiratory quotient, oxygen consumption, and lactic acid

COMPETENCIES AND CRITERIA General Medical Conditions-DPT 755
511
levels.
Because repetition and mild stress are necessary to bring about improvement, a program of daily routine exercises should be given. Training should be stressful but sub-maximal - fatigue and exhaustion should be avoided by providing adequate rest periods.
Maximum improvement occurs within 3 to 6 weeks and additional effort is used to maintain improvement on a permanent basis. Maintenance of this improvement in exercise tolerance cannot be achieved without persistence. Improvement in exercise tolerance may be maintained over a period of time in spite of an increase in respiratory function impairment.
Source: Cherniak and Cherniak: Respiration in Health and Disease. 2nd Edition. Phila., W.B. Saunders, 1972.

COMPETENCIES AND CRITERIA General Medical Conditions-DPT 755
512
CRITERIA SHEET GAIT ANALYSIS
1. Pre-Planning for Procedure:
A. Identify priority impairments and conditions which make the procedure applicable:
(1) Decreased strength, range of motion, and sensation in lower limbs
(2) Presence of pain
(3) Observed gait deviation(s) or pattern
(4) Cardiopulmonary dysfunction
(5) Amputation
(6) CNS insult
B. Identify the rationale for choice of procedure:
(1) Safety:
(a) To establish the highest independent ambulatory level of the client
(b) To provide medical personnel, client, and client's family with information regarding client's
ambulation abilities to ensure safe ambulation practices
(2) Economics:
(a) Physical therapist's time
(3) Condition of client:
(a) Known or suspected nerve and/or muscle dysfunction
(b) Known or suspected joint dysfunction
(c) Known or suspected CNS dysfunction
(4) Duration of gait analysis – dependent upon client's response to the ambulation activity
(5) Generate other possible alternative gait analysis procedures
(6) Application of procedure to short and long term goals:
(a) STG: To establish intervention(s) to lessen gait deviations
(b) LTG: To provide serial evaluations of progress in order to implement necessary change in
intervention(s)
2. Preparation of Physical Therapist:
A. Review the procedure as necessary.
B. Review the medical record.
C. Interview the client.
(1) Describe your method of walking at this time and the distance you are able to walk.
(2) If the client is walking, describe any problems you have during walking and/or after walking.
(3) If client is not walking:
Division of Physical Therapy
Emory University

COMPETENCIES AND CRITERIA General Medical Conditions-DPT 755
513
(a) How long has it been since you have walked outside your home? Inside your home?
(b) Did you or have you ever used devices such as braces, canes, crutches, or walkers to assist in
walking?
(c) What caused you to stop walking?
D. Determine assessment sequence (i.e. anterior, posterior, lateral views).
E. Select and collect correct equipment:
(1) Obtain clothing or drapes which allow visual observation of lower limbs.
(2) Reserve area for ambulation – parallel bars
(3) Collect other ambulation equipment as indicated by condition of client – training brace, assistive
devices for ambulation
(4) Collect any special equipment necessary for specific types of analysis –
(a) Stop watch for timed ambulation
(b) Distance markers
(c) Pressure sensitive paper for stride length and width analysis
F. Secure the environment:
(1) Adjust parallel bars and check stability of parallel bars.
(2) Clear walking area.
(3) Place a chair at the opposite end of the parallel bars.
(4) Place any special material on walking surface and secure the material.
3. Execute the Procedure:
A. Follow the Interpersonal Relations and Teaching-Learning Criteria to establish rapport and explain
the procedure to the client.
B. Sequential steps of the procedure:
(1) If the client is in a wheelchair:
(a) Position client at the end of the parallel bars.
(b) Secure the brakes and lift or remove the footrests.
(c) Secure the gait belt around client's waist.
(d) Perform gross muscle test of triceps, hip extensors, and knee extensors.
(e) Based on the above, determine the amount of assistance necessary for the client to achieve
standing.
(f) Have client stand to demonstrate weight shifts in all directions and momentary balance
without hand support.
(g) Have client demonstrate the ambulation pattern; P.T. performs contact guarding using gait
belt during the first several steps to assess level of independent ambulation that is possible.
If client requires continuous contact guarding, an additional person should assist with the
evaluation so that you are free to observe.
1) Have client walk directly away from you and directly back toward you. Starting at the
feet, look for:
(a) Excessively pronated or supinated feet (excessive eversion or inversion of the STJ)
(b) Relative stance time on each side
(c) Excessive toeing in or out – especially if unilateral

COMPETENCIES AND CRITERIA General Medical Conditions-DPT 755
514
(d) Medial or lateral whipping of foot
(e) Wide based gait
(f) Circumduction
(g) Scissoring – excessive adduction
(h) Compensated Trendelenburg (lateral bending over weight bearing leg)
(i) Trendelenburg (hip drop on opposite side with weight bearing)
(j) Hip hiking
(k) Inadequate, excessive, or inappropriate arm motions
(l) Signs of increased or decreased tone in specific muscle groups
2) Have client walk so that you have a side view. Starting at the feet, look for:
(a) Step length – equal or unequal
(b) Foot slap at heel strike, high steppage gait, or toe down first
(c) Lack of push off from toes – flat-footed gait
(d) Short shuffling steps
(e) Hyperextension of knee on weight bearing
(f) Inadequate flexion of hip or knee or excessive plantarflexion of ankle during swing
through
(g) Inadequate extension of hip and knee or excessive ankle plantarflexion during
stance
(h) Vaulting over weight bearing leg
(i) Excessive forward or backward trunk bending
3) After identification of the gait deviations and abnormal gait parameters, categorize the
major cause(s) for each defect in the stance and swing phases:
(a) Specific areas of pain
(b) Weakness, tightness
(c) Loss or diminished sensation
4) If the client demonstrates the need for an assistive device such as a cane, crutches,
walker, etc. proceed to:
(a) Adjustment of the equipment: See MEASUREMENT OF EQUIPMENT
(b) Teaching the client to use the equipment
5) If ability of the client to perform level ambulation is assessed as independent, proceed
with analysis of specific activities such as inclines, curbs, stairs, and uneven terrain. (See
Information Sheet for specific activity)
(2) If client is on a tilt table and has stability in the upright position:
(a) Position the tilt table at one end of the parallel bars.
(b) Secure the caster locks.
(c) Adjust the height of the parallel bars and instruct the client to support self by holding on to
the parallel bars.
(d) Secure gait belt around client’s waist.
(e) Loosen the straps securing the trunk and knees.
(f) Instruct the client to shift body weight in a sideward direction, to "mark time" and

COMPETENCIES AND CRITERIA General Medical Conditions-DPT 755
515
demonstrate momentary balance without hand support, if possible.
(g) 1, 2, 3: Repeat sequence from B.1, g. 1, 2, 3, 4, 5
C. Implement changes in the examination procedure based upon:
(1) Response of the client:
(a) Vital signs
(b) Fatigue
(c) Pain
(d) Inability to perform
(2) Achievement of stated goals
D. Record results in SOAP format or other appropriate form used for the examination procedure.
E. Interpret the results.
F. Prepare client for dismissal.
G. Clean up area.
References
Dutton M. Orthopaedic Examination, Evaluation, Intervention. Chapter 13, pp 373-410, McGraw Hill, NY,
2004.

COMPETENCIES AND CRITERIA General Medical Conditions-DPT 755
516
CRITERIA SHEET EVALUATION OF THE CLIENT WITH AMPUTATION
1. Pre-Planning for Procedure:
A. Identify the priority signs, symptoms, and conditions which make the procedure applicable:
(1) Congenital limb deficiencies
(2) Traumatic loss or surgical removal of any limb
B. Identify the rationale for choice of procedure:
(1) Safety:
(a) Client must be medically stable
(2) Economics:
(a) Physical Therapist time
(3) Condition of client:
(a) Manual muscle testing is not used until 6 weeks post-surgery. If client has had additional
vascular surgery, extremes of motion of remaining joints would be delayed until medically
cleared for movement and positioning which allow partial dependency.
(4) Duration of treatment:
(a) 30-45 minutes depending upon medical precautions
(5) Generate other possible alternative treatments: N/A
(6) Application of procedure to short and long term goals:
(a) STGs: Establish baseline joint range, strength, girth of affected limb and remaining body
parts as basis for treatment intervention
(b) LTGs: Serial evaluations to determine time frame for post-surgical and pre-prosthetic
activities
2. Preparation of Physical Therapist:
A. Review the procedure as necessary.
B. Review the medical record.
C. Interview the client.
(1) Ask questions regarding identification of major goals.
(2) Ask questions identifying information not available in record.
(3) Ask questions covering area and behavior of pain.
D. Determine assessment sequence and related positioning.
E. Select and collect correct equipment:
(1) Goniometer, tape measure
(2) Recording forms
Division of Physical Therapy
Emory University

COMPETENCIES AND CRITERIA General Medical Conditions-DPT 755
517
(3) Linens, pillows, appropriate clothing
(4) Equipment for sensory test
F. Secure the environment:
(1) Set up treatment area.
3. Execute the Procedure:
A. Follow the Interpersonal Relations and Teaching-Learning Criteria to establish rapport and explain
the procedure to the client.
B. Sequential steps of procedure:
(1) Drape client according to Criteria for Draping.
(2) Perform a sensory evaluation for hot/cold, deep pressure, and light touch. Priority areas:
uninvolved foot (plantar surface), ischial area, and stump. If client's disability is 2° to PVD, check
hands also.
(3) Check active joint range of all remaining joints; starting with uninvolved and progressing to
amputation site.
(4) If active range is limited in any area, assess the motion passively.
(5) Measure with a goniometer any areas noted to have tightness.
(6) Measure girth of remaining affected limb following Criteria for Circumferential Measures for
Amputation.
(7) Determine strength in general of upper and lower extremities. Priority areas: hip extensors, hip
abductors, knee extensors, ankle plantar and dorsi flexors, elbow extensors, shoulder girdle and
volar surface of hands
(8) Determine condition of remaining lower extremity: loss of digits, friable skin, temperature, rigid,
brittle nails, hairlessness, and skin color
(9) Evaluate stump: state of healing, condition of scar, shape, temperature, color
(10) Determine functional level: bed mobility, sitting, transfer, wheelchair independence, standing,
gait with equipment
(11) Measure for ambulation aid.
C. Implement changes in procedure based upon:
(1) Response of client:
(a) Vital signs
(b) Fatigue
(c) Pain
(2) Achievement of goals
D. Record in SOAP format or other approved format.
(1) 0: Range of motion, strength, girth measures, sensory findings, highest functional level achieved
(2) A: How findings affect achievement of goals
(3) P: Therapeutic program, education, equipment needs
E. Prepare client for dismissal.
F. Clean up area.
(1) Return equipment.
(2) Assist with final disposition of client.

COMPETENCIES AND CRITERIA General Medical Conditions-DPT 755
518
CRITERIA SHEET PROSTHETIC EVAL: BENCH ALIGNMENT WORKMANSHIP, DON/DOFF, ALIGNMENT
1. Pre-Planning for Procedure:
A. Identify the priority signs, symptoms, and conditions which make the procedure applicable:
(1) Receipt of a new prosthesis following any problem/disease resulting in amputation of any limb
(2) Surgical revision of an existing amputation resulting in necessary prosthetic revision
(3) Mal-fitting prosthesis necessitating revision of existing prosthesis
B. Identify the rationale or the choice of the procedure:
(1) Safety:
(a) Client must be medically stable.
(b) Client's residual limb must be healed sufficiently for fitting.
(c) Client’s residual limb must be monitored for changes in color and/or edema during
treatment.
(d) In clients with cardiac conditions and/or vascular insufficiency, vital signs must be monitored
throughout course of the treatment.
(2) Economics:
(a) Physical therapists' time
(b) Availability of evaluation equipment
(3) Condition of client:
(a) Any client having an amputation of a limb and having been fitted with prosthesis may be
evaluated. Specific evaluation of the residual limb should be carried out prior to, during, and
following prosthetic checkout.
(4) Duration of treatment:
(a) Variable – dependent upon client endurance, skin tolerance of residual limb, and condition
of the sound limb
(5) Generate other possible alternative treatments: Not applicable
(6) Application of procedure to short and long-term goals:
(a) STG: Identify any problems which may hinder ambulation with prosthesis. Determine
consistency of finished prosthesis with prosthetic prescription.
(b) LTG: Establish highest independent ambulatory level of the client. Establish highest
independent functional level of the client.
Division of Physical Therapy
Emory University

COMPETENCIES AND CRITERIA General Medical Conditions-DPT 755
519
2. Preparation of Physical Therapist:
A. Review the procedure as necessary.
B. Review the medical record.
C. Interview the client.
(1) Ask questions identifying information not available in medical record.
(2) Ask questions concerning present method of residual limb care, exercise, and ambulation.
(3) Ask questions regarding identification of major goals.
(4) Ask questions covering area and behavior of pain.
D. Determine assessment/treatment sequence and related positioning. Items to be considered in the
evaluation include:
(1) Bench alignment
(2) Workmanship
(3) Client's ability to don and doff prostheses
(4) Static alignment
(5) Dynamic alignment
E. Select and collect correct equipment:
(1) Goniometer, tape measure, calipers, devil level, and mirror
(2) Small ball of therapist wrapped in cellophane
(3) Skin marking pencils
(4) Client's prosthesis, liner, socks, etc.
(5) Recording forms
(6) Reserve parallel bars
F. Secure the environment:
(1) Adjust parallel bars, and check stability of parallel bars,
(2) Place chair at opposite end of parallel bars.
3. Execute the Procedure:
A. Follow the Interpersonal Relations and Teaching-Learning Criteria to establish rapport and explain
the procedure to the client.
B. Sequential steps of procedure for specific prostheses:
(1) Bench alignment – Purpose: Determine the geometric relationship between the socket, shank,
and foot.
(a) Below-knee prostheses:
1) Place the prosthesis in an upright position, normal standing position, on a flat surface.
You may need to secure the assistance of an additional person to support the prosthesis
in an upright position.
2) Locate the midpoint of the posterior brim of the prosthesis. Mark midpoint with pencil.
Locate the center of the heel.
3) Drop plumb line vertically from the midpoint on the posterior brim.
(a) Plumb line should fall ½ inch lateral to the center of the heel.
4) Locate the midpoint of the lateral aspect of the socket. Mark midpoint with pencil.
5) Drop plumb line vertically from the midpoint of the lateral aspect of the socket.

COMPETENCIES AND CRITERIA General Medical Conditions-DPT 755
520
(a) Plumb line should fall slightly anterior to the breast of the heel of the shoe.
6) Place the devil level in the socket. Read the angle of socket flexion when the fluid level
keeps the pointer at zero.
(a) Socket should be set in approximately 5˚-7° of initial socket flexion.
(b) If the client has a knee flexion contracture, the socket should be set in initial socket
flexion equal to flexion contracture of the client's residual limb.
(b) Above-knee prostheses:
1) Place the prosthesis in an upright position, with the prosthetic shoe flat on the floor. An
additional person is required to maintain the socket in extension and the prosthesis in
the upright position.
2) Locate the center of the greater trochanter on the prosthesis by measuring in 2" from
the posterior wall on horizontal line parallel to floor at level of posterior brim.
3) Drop a plumb line vertically from the center of the greater trochanter to the ankle.
(a) In the majority of cases, the knee axis should fall directly on the vertical line
connecting the greater trochanter and the ankle.
(b) If the knee axis is posterior to the vertical line connecting the greater trochanter and
the ankle, the client has increased knee stability.
(c) If the knee axis is anterior to the vertical line connecting the greater trochanter and
the ankle, the client has compromised knee stability and increased mobility.
4) Locate the knee bolt. Place index fingers on either end of the knee bolt and visualize a
line connecting both ends of the bolt.
(a) Knee bolt should be horizontal.
(b) Knee bolt should be perpendicular to the line of progression.
5) Locate the point where the ischial tuberosity contacts the ischial seat by measuring in
1/2" from the inner surface of the posterior brim and ¼ to 1" in from the inner surface
of the medial wall.
6) Drop a plumb line from the contact point of the ischial tuberosity.
(a) The center of the heel should be directly on or slightly lateral to vertical plumb line.
7) Place the devil level in the socket. Read the angle of socket flexion when the fluid
bubble is in the center of the level.
(a) Socket should be set in at least 5˚-7° of initial socket flexion.
(b) If the client has a hip flexion contracture, the socket should be set in the degree of
flexion exhibited by the client, plus the 5˚-7° of initial socket flexion.
(c) Cosmesis limits the degree of initial socket flexion which is set in an above knee
socket. A general rule of thumb – a hip flexion contracture of 20˚-25° may be
accommodated in an above knee socket without severely compromising cosmesis.
(2) Workmanship – Purpose: Determine the adequacy of fabrication of the prosthesis.
(a) Below-knee prostheses:
1) Plastic laminate:
(a) Plastic laminate should be uniform in color with no non-resin impregnated areas.
(b) The color of plastic laminate should be similar to color of the client's sound limb.

COMPETENCIES AND CRITERIA General Medical Conditions-DPT 755
521
2) Shape and contour:
(a) Prosthetic limb should appear similar to the sound limb in both shape and contour.
3) Socket and suspension:
(a) Socket should be smooth and free from any rough areas.
(b) Rivets and fastening should be neat and secure.
(c) For thigh corset, joint covers should be placed over the mechanical joints to prevent
damage to client's clothing.
(d) Leather work should be neat.
(b) Above-knee prostheses:
1) Plastic laminate:
(a) Same as for below-knee prosthesis
2) Shape and contour:
(a) Same as for below knee prosthesis
(b) If client is prescribed with an endoskeletal (modular) unit, the foam covering should
resemble the shape and contour of the sound limb.
(c) Additional elastic stocking may need to be added to shape form to proper contours.
3) Socket and suspension:
(a) Socket interior should be smooth and free from any rough areas.
(b) The interior of a wooden socket should be coated with a sealing agent during
fabrication. Presence of a sealant prevents perspiration from penetrating the wood
and raising the grain or causing rough spots.
(c) Socket brim should be adequately flared to provide comfort for client and allow
proper pressure or weight bearing.
(d) Leather work should be firmly attached and neatly stitched.
(e) Rivets and fastenings should be neat and secure.
4) Component Parts:
(a) The prosthetic foot should fit in the shoe snugly, but not too tightly to prevent client
from changing shoes.
(b) The hip, knee, and ankle joints should operate easily, without excessive play.
(c) Mechanical controls, extension aids, locks, etc. function properly and can be easily
adjusted according to needs of the client.
(d) Sufficient clearance should exist between the proximal portion of the shank and the
knee unit to prevent rubbing between component parts, as the knee flexes and
extends. Clearance should not be too great, or the client's clothing may get caught
as the knee unit flexes and extends.
(e) Sufficient clearance should also exist at the ankle articulation.
(3) Donning/Doffing the Prosthesis – Purpose: Assess the client’s ability to put on and remove
prosthesis.
(a) Below-Knee prostheses – PTB with supra-condylar cuff, supra-condylar wedge or thigh
corset:
1) Client should be seated in a chair.

COMPETENCIES AND CRITERIA General Medical Conditions-DPT 755
522
2) Apply stump socks in adequate number to produce proper fit and suspension.
(a) Cotton socks applied prior to wool socks promote absorption of perspiration;
marking from cotton socks may also be used to indicate weight-bearing on residual
limb.
(b) Thin nylon sock, if worn by the client, is always applied first.
(c) Smooth socks to avoid skin problems.
(d) Rotate seams on stump sock, during application, to avoid increased pressure over
seams.
3) Secure liner in prosthesis.
4) Insert residual limb into prosthesis.
(a) Care needs to be taken to ascertain that the tibial angle of the client's residual limb
is the same as the angle of the prosthetic socket.
5) Client stands, permitting residual limb to settle in socket, and fastens the suspension
(cuff or corset).
(a) Medial wedge may be inserted either with the client in a seated or sitting position
(PTB with supra-condylar wedge).
6) Client removes prosthesis by unfastening suspension and lifting residual limb from
socket. Client then removes stump socks and checks skin condition of residual limb.
7) PTB with SC/SP suspension:
(a) Follow steps 1 and 2 listed above.
(b) Apply liner to residual limb.
(c) Thrust residual limb and liner into socket.
(d) Stand to position residual limb in socket.
(e) Client removes prosthesis by forcefully flexing the knee on prosthetic side and
removing residual limb from socket.
(b) Above-Knee Prostheses – Conventional A-K Prosthesis with Silisean Bandage or Pelvic Belt:
1) Apply stump sock.
(a) Criteria same as noted for below knee prosthesis.
2) Insert residual limb into socket.
(a) Socket should be slightly externally rotated to allow for ease of application.
3) Stand to reposition residual limb in socket.
4) Secure suspension.
5) Client removes prosthesis by loosening suspension and lifting residual limb out of
socket.
6) Client must un-weight the prosthetic limb in order to remove prosthesis.
(c) Above-Knee Prostheses – A-K Prosthesis with Suction Suspension:
1) Client may either stand or sit.
2) Apply elastic bandage or cotton stockinette to the residual limb.
(a) Bandage must be applied to the level of the inguinal ligament.
(b) There should be a snug fit of cotton stockinette without wrinkles.
(c) End of bandage or stockinette should be left loose at distal end of residual limb.

COMPETENCIES AND CRITERIA General Medical Conditions-DPT 755
523
3) Unscrew valve and place loose end of bandage or stockinette through valve hole.
4) Insert residual limb into socket.
5) Client stands and places prosthetic foot slightly ahead of sound foot.
(a) Prosthetic heel should be in line with the toe of the sound extremity.
6) Client then places hand, on amputated side, on the socket just above the knee.
(a) Sufficient pressure should be applied to keep the prosthetic knee in extension and
prevent buckling.
7) With the opposite hand, the client pulls the distal end of the bandage or stockinette
until it is taut.
8) Client locates the adductor longus tendon and rotates the socket or limb as necessary to
place tendon in channel.
(a) Forceful adduction of the residual limb against resistance will help client to locate
the adductor tendon.
(b) Correct position of the adductor tendon will place the ischial tuberosity in the
correct position on the posterior brim.
9) Client then performs a pumping action by slightly flexing and extending the sound limb.
As the client is performing the pumping action with the sound limb, he is also exerting a
downward pull on the bandage or sock.
(a) Pumping action must be stopped each time a new grip is taken on the pull sock.
(b) Pumping may be resumed when a downward pull is reapplied to the bandage or
sock.
10) Adjust skin tension around the brim of the socket.
11) Replace the valve.
12) Client removes prosthesis by removing valve and lifting residual limb from socket.
(4) Static Alignment – Purpose: Determine the fit and comfort of the socket, length of prosthesis,
and adequacy of alignment relationships.
(a) Below-Knee prosthesis. With client in a standing position, note the following:
1) Level of the pelvis:
(a) Client must bear weight equally on both feet.
(b) Palpate the anterior superior iliac spines.
(c) Line connecting the ASIS's should be parallel to the floor.
(d) May also palpate the posterior superior iliac spines.
(e) Line connecting the PSIS's should be parallel to the floor.
(f) If the pelvis does not appear level, check the client's weight bearing status on the
prosthetic side, the length of prosthesis versus length of sound limb, and the
attitude of the hip and knee on prosthetic side.
2) Check comfort of the client:
(a) Client should be comfortable with the midlines of the heels not more than 6 inches
apart.
(b) Amount of pressure borne on the residual limb should be tolerable.
(c) Client should not feel pressure on the shaft of the residual tibia.

COMPETENCIES AND CRITERIA General Medical Conditions-DPT 755
524
(d) Client should not feel pressure on the head or distal end of residual fibula.
3) Stability of knee of residual limb during weight-bearing:
(a) Client should be able to maintain knee stability with little muscular effort. Check by
exerting a quick anterior force in the area of the popliteal fossa.
4) Antero-posterior alignment of the prosthesis:
(a) Place a piece of paper under the anterior portion of the client's heel. Attempt to pull
paper posteriorly.
(b) Place a piece of paper under the ball of the sole of the client's foot. Attempt to pull
paper anteriorly.
(c) Client must bear weight on the prosthetic limb during this test.
(d) If the prosthetic foot is aligned correctly on the socket, the prosthetic heel will be
flat on the floor and you will be unable to pull paper from underneath either the
heel or ball of the foot.
5) Medio-lateral alignment of the prosthesis:
(a) Follow same procedure as in step 4, except alternately place the paper under the
medial and lateral border of the foot, and pull paper either medially or laterally.
(b) With correct medio-lateral alignment, the medial and lateral borders of the foot
should contact the floor evenly.
(c) Examine the medial and lateral brims of the socket to see that there is no gap
between the socket and the residual limb.
(d) Lateral gaping indicates outset shank/foot assembly on socket.
(e) Medial gaping indicates inset shank/foot assembly on socket.
6) Anterior Trim Line:
(a) Adequate height of anterior trim line for standard PTB socket is mid-patella.
(b) For supra-condylar/supra-patellar suspension, the trim line extends above the
superior border of the patella.
(c) For conventional B-K prostheses, the anterior trim line is at the level of the patella
tendon.
7) Height of medial and lateral walls:
(a) For standard PTB prosthesis, the medial and lateral walls extend to the level of the
epicondyles. Prosthetic walls (medial and lateral) should contact the epicondyles for
maximum stability.
(b) With supra-condylar and supra-patellar suspension, the medial and lateral walls
extend above the epicondyles. The wedge (supra-condylar suspension) should cover
the medial epicondyle for maximum stability.
8) Pistoning:
(a) Mark the client’s stump sock at the level of the posterior brim of the socket.
(b) Ask the client to hike his hip or elevate pelvis on the amputated side without flexing
knee.
(c) Prosthesis should not drop (slip) more than ¼ inch as the client performs this
activity.

COMPETENCIES AND CRITERIA General Medical Conditions-DPT 755
525
(d) Pistoning may result from:
1. Inadequate suspension
2. Improper contouring/contact of the medial and/or lateral walls or uprights
3. Improper placement of the medial wedge
4. Too large a socket
9) Contact residual limb and distal end of socket:
(a) Wrap a small ball of clay (approximately size of a pea) in a piece of cellophane.
(b) Place clay ball in distal end of socket.
(c) Ask amputee to don prosthesis and then assume an upright position, placing equal
weight on sound foot and prosthetic foot.
(d) Remove prosthesis and note the shape of the clay ball.
(e) If clay ball appears flattened, the client's residual limb is in contact with distal end.
Contact with distal end helps to control edema and prevent skin disorders.
(f) If clay ball does not appear flattened, client's residual limb is not in contact with
distal end.
10) Suspension:
(a) Suspension tabs for the supra-condylar cuff should be located at the level of the
knee joint and slightly behind the midpoint of the lateral wall of the socket.
(b) Thigh corset should fit closely above the patella and the epicondyles to provide
adequate suspension of the residual limb.
(c) Proximal border of the thigh corset should extend to approximately 2 inches below
the perineum.
(d) Thigh corsets prescribed to provide a high proportion of the weight-bearing should
extend to the ischial tuberosity.
(e) Thigh corsets prescribed for antero-posterior or medio-lateral stability, the corset
may be approximately 7 inches in height.
(b) Below-Knee prosthesis – With the client in a sitting position, note the following:
1) Comfort of the client:
(a) Client should not feel discomfort (pain or burning) in the popliteal area while sitting.
(b) Check to see if sole of the shoe remains flat on the floor while the client is sitting.
2) Flaring of the posterior trim line:
(a) Palpate the hamstring tendons and note the relationship between the hamstring
tendon and the hamstring channel in the socket.
(b) Adequate flaring of posterior trim line will assure comfort and prevent displacement
of the residual limb in the socket.
(c) Tissue rolls in the posterior aspect of the socket should be minimal. Client should be
able to flex residual limb to 90°.
3) Anterior gaping of the socket:
(a) Place the sole of the client's prosthetic foot flat on the floor.
(b) Measure the distance between patella and the interior aspect of the socket.
(c) Anterior gap of less than ¾ inch is acceptable.

COMPETENCIES AND CRITERIA General Medical Conditions-DPT 755
526
4) Suspension:
(a) Cuff suspension should maintain good position with 0° to 65° of knee flexion in
sitting. Suspension should loosen with knee flexion between 65° and 90°.
(c) Below-Knee prosthesis – With prosthesis off the client:
1) Condition of residual limb:
(a) Client's residual limb should be free of excessive perspiration, discoloration, or
abrasions.
(b) Redness should disappear in approximately 10 minutes. Red area which does not
blanche with light pressure is probably receiving too much pressure.
2) Areas of weight-bearing:
(a) Note the imprint from stump socks on the residual limb. Residual limb should be
marked evenly.
(b) For PTB prosthesis, areas of weight-bearing should be patellar tendon, medial tibial
flare, latero-distal and posterior-proximal aspect of the residual limb.
(c) For prosthesis with supra-condylar suspension, weight-bearing areas are same as
PTB. Redness may be noted above medial epicondyle due to pressure from the
wedge.
3) Height of posterior wall:
(a) Note height of the posterior wall by visual inspection of the prosthesis.
(b) A high posterior brim minimizes skin rolls, stabilizes residual limb in socket and
provides an anteriorly directed force to maintain weight-bearing on patella bridge.
(c) With corset suspension, the posterior wall may be slightly lower, as the posterior
portion of the corset provides additional support.
(d) Limit for maximum height of the posterior wall is dependent on the client's ability to
sit and kneel comfortably.
(d) Above-Knee Prosthesis – With the client in a standing position, note the following:
1) Level of the pelvis:
(a) Residual limb must be properly inserted into socket.
(b) Client must bear weight equally on both feet.
(c) Palpate the anterior superior iliac spines.
(d) Line connecting the ASIS's should be parallel to the floor.
(e) If the pelvis does not appear level, check the client's weight-bearing status on the
prosthetic side, length of the prosthesis versus length of contralateral limb, attitude
of the hip on the prosthetic side, and attitude of hip, knee, and ankle on the sound
side.
(f) May also determine level of the pelvis by palpating the PSIS's and determining if line
connecting PSIS's is parallel to the floor.
2) Comfort of the client:
(a) Client should be comfortable with midlines of the heels not more than 6 inches
apart.
(b) Check to see that the adductor tendon is properly located in the adductor channel

COMPETENCIES AND CRITERIA General Medical Conditions-DPT 755
527
by palpating the tendon and asking the client to adduct his residual limb against
resistance.
(c) Check the position of the ischial tuberosity on the ischial seat by asking the client to
bend forward and un-weight the prosthesis. The therapist stands behind the client,
and locates (probes for) the ischial tuberosity with his/her index finger. Once the
ischial tuberosity is located, the therapist asks the client to return to the upright
position, bear weight on the prosthesis, and relax the musculature of the residual
limb. The therapist's finger should be squeezed between the tuberosity and the
ischial seat.
(d) Check to see that the client is free from vertical pressure in the area of the
perineum. This may be determined by questioning the client, visual inspection of
the area, or asking the client to cross his prosthesis over sound leg.
3) Stability of the prosthetic knee during weight-bearing:
(a) Client should be able to maintain knee stability without using excessive effort in
pressing backward with the residual limb. Check by striking the back of the
prosthetic knee with moderate force. Prosthetic knee should give slightly, but return
immediately to full extension.
(b) May also determine stability of the prosthetic knee by noting the position of the
knee bolt in relation to the TKA line. Anterior knee bolt compromises stability;
posterior knee bolt enhances stability.
(c) Note: When checking prosthetic knee stability, be sure the client is standing near
parallel bars or other support.
4) Angle of posterior brim:
(a) During weight-bearing, the brim of the posterior socket wall should be parallel to
the ground.
(b) If brim is not parallel to ground, note the degree of angulation that brim deviates
from horizontal. Deviation of greater than 5° horizontal may cause poor distribution
of weight-bearing between the ischium and gluteal muscles.
5) Location of valve (total contact socket):
(a) Preferred location for valve is the antero-medial aspect of the prosthesis. Valve
should be vertically inclined.
(b) When the valve is removed, the tissues of the residual limb should protrude slightly
into the valve hole. Firmness of tissues, protruding into valve, should be similar to
firmness of the thenar eminence.
6) Suspension:
(a) Pelvic band should fit the contours of the pelvis. If residual limb is short, the metal
band should extend anteriorly approximately 1 inch medial to the ASIS and
posteriorly to within ¼ to 1 inch lateral to the PSIS. With a longer residual limb, the
band may be shorter posteriorly, but not anteriorly.
(b) Pelvic band should pass between the iliac crest and the greater trochanter. The
band should not exert pressure on the ASIS.

COMPETENCIES AND CRITERIA General Medical Conditions-DPT 755
528
(c) Pelvic joint should be located slightly ahead and slightly above the greater
trochanter, (approximately ½ inch in each direction). Pelvic joint should also be
parallel to line of progression.
(d) Silesian bandage – The lateral attachment should be located ¼ inch above and ¼
inch posterior to the greater trochanter the anterior attachment is located at the
intersection of a vertical line which bisects the anterior aspect of the socket and a
horizontal line at the level of the ischial seat.
(e) Above-Knee Prosthesis – With the client in a sitting position, note the following:
1) Comfort of the client:
(a) Client should not feel any discomfort (burning) in the hamstring region with sitting.
2) Relationship of the socket to the residual limb:
(a) The socket should remain securely on the residual limb while the client is seated. To
check, ask the client to bend forward and touch shoe on prosthetic side. Look to see
if socket remains on the residual limb.
3) Alignment of the shank:
(a) The shank of the prosthesis should be vertical to the floor when the client sits in a
chair with his feet flat on the floor.
(b) If faulty alignment is noted, question the client and palpate for uncomfortable
pressure, especially in the region of the adductor's femoral triangle and gluteal
crease.
4) Location of knee bolt:
(a) The center of the knee bolt should be ½ to ¾ inch above the level of the medial
tibial plateau.
(b) If the knee bolt is elevated, the prosthetic knee is higher than the sound knee.
(c) If the knee bolt is too low, the prosthetic knee will extend ahead of the sound knee.
5) Noise due to air escape with position change:
(a) After the client has been sitting for a few minutes, ask the client to rapidly assume a
standing position.
(b) No noise due to air escape should be emitted with position change.
(c) If air noise is present, check the fit of the lateral and anterior walls.
(f) Above-Knee Prosthesis – With the prosthesis off the client, note the following:
1) Condition of residual limb:
(a) Client's residual limb should be free of excessive perspiration, discoloration, or
abrasions.
(b) Redness should disappear within 10 minutes following removal of the prosthesis.
(c) Check for edema in the distal aspect of the residual limb, especially if the client
complained of distal tightness which increased during the checkout procedure.
2) Height of anterior and lateral walls:
(a) Measure the difference in height between the posterior and anterior walls and the
posterior and lateral walls.
(b) The anterior and lateral walls should be approximately 2 inches higher than the

COMPETENCIES AND CRITERIA General Medical Conditions-DPT 755
529
posterior wall.
(c) The anterior wall is too high if it contacts the ASIS when the client is sitting.
3) Position of the thigh piece when prosthesis placed in a kneeling position:
(a) Place the prosthesis in a kneeling position and flex the knee as far as possible,
noting the position of the shank.
(b) The thigh piece should at least be able to be brought to the vertical position.
Preferably, the thigh piece should be able to assume a position of backward
inclination.
(c) Without backward inclination of the thigh piece in kneeling, the client will feel as if
he is being forced forward when he kneels.
C. Implement changes in procedure based upon client's response.
D. Record results in client record.
E. Interpret results of procedure.
F. Prepare client for dismissal.
G. Clean up area.

COMPETENCIES AND CRITERIA Musculoskeletal Rehabilitation-DPT 800
530
CRITERIA SHEET POSTURE EVALUATION
1. Pre-Planning for Procedure:
A. Identify the priority signs, symptoms, and impairments which make the procedure applicable:
(1) Persistent body segment malalignment (any body part)
(2) Muscle weakness and/or imbalance
(3) Decreased joint mobility
(4) Pain
(5) Neuromusculoskeletal problems which could cause 1-4
B. Identify the rationale for choice of procedure:
(1) Safety:
(a) Client must be able to perform static standing. If necessary an assistant can provide stability.
(2) Economics:
(a) Physical therapy time; forms
(3) Condition of client:
(a) Known or suspected limb length discrepancy
(b) Known or suspected spinal deformity
(c) Known or suspected joint disease
(d) Known or suspected muscle or nerve damage
(4) Duration of treatment:
(a) Dependent upon the client's response to the evaluation
(5) Generate other possible alternative treatments:
(a) Muscle test, goniometry, and sitting posture (if client unable to stand)
(6) Application of procedure to short and long term goals:
(a) STG: To identify the cause(s) for client's problems
(b) LTG: Using the evaluation results, establish a treatment regimen which decreases or
eliminates the client's symptoms
2. Preparation of the Physical Therapist:
A. Review the procedure as necessary.
B. Review the medical record.
C. Interview the client.
(1) How would you describe your posture?
(2) Are there any activities at home or work which you are unable to perform?
(3) If yes, what keeps you from performing the activities?
Division of Physical Therapy
Emory University

COMPETENCIES AND CRITERIA Musculoskeletal Rehabilitation-DPT 800
531
(4) Do you know of any specific problems you have with your muscles, bones, or joints?
D. Determine assessment sequence.
(1) Sitting, standing, supine
(2) Anterior, posterior, lateral views
E. Select and collect correct equipment:
(1) Plumb line
(2) Linear measures (tape and ruler)
(3) Goniometer
(4) Appropriate clothing to allow exposure of spine, acromion, greater trochanter, and malleoli
(5) Mirror
(6) Skin pencil
(7) Protractor and caliper
(8) Set of blocks of known height
F. Secure the environment:
(1) Set up treatment area.
(2) Hang plumb line.
3. Execute the Procedure:
A. Follow the Interpersonal Relations and Teaching-Learning Criteria to establish rapport with client.
B. Sequential steps of procedure:
(1) Following the recording sheet sequence:
(a) Perform the plumb line evaluation – Observe the relationship of the body as a whole
relative to the plumb line and record under the heading Plumb line. It should be noted from
the left and right sides to detect positional faults. Descriptions such as the following should
be used in recording findings: "Body anterior from ankles up,” Pelvis and head anterior,”
and/or "Good except for lordosis."
1) Posterior view: Mark the C7 spinous process, PSIS's and S2 level at the median sacral
ridge. Stand client with back toward the plumb line using C7 and S2 as reference points.
Record the deviations of body segments occurring on either side of the plumb line.
2) Lateral view: Mark lateral malleolus, posterior border of patella, center of greater
trochanter, center of acromion and ear lobe. Stand client, side toward the plumb line,
with the line near as many of the reference points as possible. Mark deviations of body
segments anterior or posterior to the reference points.
(b) Perform segmental alignment – Segmental alignment faults may be noted with or without a
plumb line. Indicate presence of fault by marking X in space provided. If no fault is present,
check (√) the space. Indicate right or left with R or L.
(c) Perform the circumferential and limb length measurements according to the Criteria for
Measurement of Limb Circumference, Segmental Length, and Sitting Pelvic Height.
(d) Perform the muscle flexibility tests:
1) Tensor Fasciae Latae (TFL):
(a) Position of subject – side-lying with test leg side up, bottom leg in mid range of hip
and knee flexion, support head and neck with pillow for comfort

COMPETENCIES AND CRITERIA Musculoskeletal Rehabilitation-DPT 800
532
(b) With the test knee flexed 60° to 90°, the hip is positioned in flexion, abduction, and
internal rotation.
(c) Gradually move the hip into extension and external rotation. While maintaining the
hip in extension and external rotation, move the hip into adduction.
(d) Stabilize the pelvis to prevent lateral tilt.
(e) Tightness is indicated by the inability of the leg to adduct and also by the presence
of an indentation on lateral aspect of the test thigh in the area of the iliotibial fascial
band.
2) All other muscle groups are evaluated by the procedures in the Goniometry Syllabus.
C. Implement changes in procedure based upon:
(1) Findings of the evaluation which may indicate need for additional specific evaluations to be
performed.
D. Record results using specific format used or SOAP format in the medical record.
E. Interpret results.
F. Prepare client for dismissal.
G. Clean up area.
(1) Return equipment.
(2) Assist with final disposition of client.
H. Example of Postural Evaluation Handout:
(1) Example of Postural Evaluation Record (Adapted from Kendall, F et al. Muscle Testing and
function with Posture and Pain, 2005, Lippincott Williams, and Wilkins)
(a) SCOLIOSIS (Name according to convexity of curve):
(b) USE CRITERIA SHEET FOR MEASUREMENT OF LIMB CIRCUMFERENCE, SEGMENTAL LENGTH,
AND SITTING PELVIC HEIGHT.
1) LIMB LENGTH AND CIRCUMFERENTIAL MEASUREMENTS:
Right Left
A. Leg Length ASIS to Med. Mal.
Umbil to Med. Mal.
B. Arm Length Lat tip of Acrom. To Olec.
Olec. to Ulnar Styloid
(MAY ALSO USE JOINT LINE AT END OF LAT. EPICONYLE)
2) CIRCUMFERENTIAL MEASUREMENTS
(a) Indicate the bony or skin landmark used, distance used, and the resulting
circumference.

COMPETENCIES AND CRITERIA Musculoskeletal Rehabilitation-DPT 800
533
(b) Check mid-arm, mid-forearm, mid-thigh, and mid-calf.
(c) If measuring for limb edema, circumferential measurements must be made every 5-
10 cm depending upon the limp length.
(d) If measuring stumps of amputees use 5 cm between measurements.
3) MUSCULAR FLEXIBILITY (Record PROM in degrees)
Muscular Flexibility Right Left
TFL Tightness (X if tight)
Hip Flexion
Hip Extension
(SLR) Hip Flexion with Knee Ext.
Knee Flexion with Hip Ext
Ankle DF with Knee Flexed
Ankle DF with Knee Ext.

COMPETENCIES AND CRITERIA Musculoskeletal Rehabilitation-DPT 800
534
CRITERIA SHEET CIRCUMFERENCE, SEGMENTAL LENGTH, AND SITTING PELVIC HEIGHT
1. Pre-Planning for Procedure: A. Identify the priority signs, symptoms, and conditions which make the procedure applicable:
(1) Visible asymmetry in limbs and/or trunk during static and/or dynamic activities (2) Muscle dysfunction which may impede bony growth in a child
B. Identify the rationale for choice of procedure: (1) Safety: Not applicable (2) Economics: PT time (3) Condition of client: This can be performed on any client regardless of condition. Exception:
Measuring sitting pelvic height would require that client be able to maintain a sitting position at least momentarily.
(4) Duration of treatment: Length of time to collect measures (5) Generate other alternative treatments: Not applicable (6) Application of procedure to short and long term goals:
(a) STGs: To establish the baseline measures for children; To establish the baseline measures for adults who may display a change in physical configuration due to disease or pathology
(b) LTGs: To predict possible progressive deformity; To assist in planning for management such as bracing, modifications of shoes, surgery, etc.
2. Preparation of Physical Therapist: A. Review the procedure as necessary. B. Review the medical record. C. Interview the client:
(1) Ask questions to ascertain if similar measurements have been made previously. (2) If "yes", then ascertain the reason.
D. Determine assessment sequence and related positioning. E. Select and collect correct equipment:
(1) Ruler, tape, marking pen (2) Appropriate clothing, drapes, etc.
F. Secure the environment: (1) Set up treatment area.
3. Execute the Procedure: A. Follow the Interpersonal Relations and Teaching-Learning Criteria to establish rapport and explain
the procedure to the client. B. Sequential steps of the procedure:
(1) Circumferential measures: (a) Choose a landmark appropriate to the limb being measured, (i.e. select a distal landmark)
which will remain constant (e.g. level of wrist crease, superior border of patella or inferior
Division of Physical Therapy
Emory University

COMPETENCIES AND CRITERIA Musculoskeletal Rehabilitation-DPT 800
535
border of greater trochanter). (b) Measure from the landmark and place a mark every 2-4 inches. (c) Place the tape around the limb at the level of each mark. Pull the tape snug but do not cause
tissue to bulge around the tape. (d) Measure exactly the same way each time. (e) Record the objective findings. Measure unaffected limb for comparison using the same
landmarks and intervals. (2) Limb length measurement:
(a) Position the patient supine. (b) Choose and mark the appropriate landmarks.
1) Upper limbs: lateral tip of acromion to tip of olecranon; from tip of olecranon to ulnar styloid; measure both limbs
2) Lower limbs: ASIS to medial malleolus; measure both limbs (c) Measure the distance between the landmarks.
1) Special precautions for lower limbs: (a) Level the iliac crests. (b) Keep both lower limbs in identical position with regard to rotation and abduction of
hips by placing heels together and allowing limbs to roll into normal external rotation.
2) Avoid moving the skin over the bony landmark during measurements. (3) Sitting Pelvic Height:
(a) Position patient sitting on a firm surface with feet supported. (b) Draping should allow visual inspection of iliac crests from posterior. (c) Locate highest point on each crest and place a rigid ruler in a vertical position parallel to
lateral side of hip. Measure from crest to supporting surface. (d) Record pelvic height in inches or centimeters.
C. Implement changes in procedure based upon: (1) Ability of client to hold position (2) Ability of client to remain still
D. Record results in client's record using SOAP or other approved format. (1) Record each measure. (2) Record landmarks used.
E. Interpret results of procedure. F. Prepare client for dismissal. G. Clean up the area.

COMPETENCIES AND CRITERIA Musculoskeletal Rehabilitation-DPT 800
536
CRITERIA SHEET SOFT TISSUE MOBILIZATION
1. Pre-Planning for Procedure:
A. Identify the priority signs, symptoms, conditions which make the procedure applicable:
(1) Pain
(2) Adhesions
(3) Muscle guarding/trigger points
(4) Limited joint range of motion
(5) Limited accessory motion
B. Identify rationale for choice of procedures:
(1) Safety: Do not use if any of the following conditions are present:
(a) Acute thrombophlebitis
(b) Recent embolic phenomenon
(c) Active infectious process in affected extremity or area
(d) IV in extremity
(e) Non-union fracture
(f) Open wound
C. Economics:
(1) Soft tissue mobilization requires 1:1 therapist-patient contact but equipment is minimal.
D. Condition of patient:
(1) Known or suspected soft tissue restrictions
(2) Known or suspected joint dysfunction
(3) Skin condition should be free of abrasions, e.g. blisters, skin eruptions, dermatitis, etc.
E. Duration of treatment:
(1) Length of time depends on area treated, variable from 10 -30 minutes.
F. Generate other possible alternative treatments:
(1) Massage
(2) Whirlpool
(3) Passive stretching exercises
G. Application of the procedure to short and long term goals:
(1) STGs:
(a) Decrease, by a specified amount, the patients' pain rating within a specific time frame.
(b) Increase, by a specific amount, soft tissue mobility within a specific time frame.
(c) Increase, by a specified amount, active range of motion of a joint within a specific time
Division of Physical Therapy
Emory University

COMPETENCIES AND CRITERIA Musculoskeletal Rehabilitation-DPT 800
537
frame.
(2) LTGs:
(a) Patient should be independent in whatever functional activity in which the patient was
limited, within a specific time frame.
2. Preparation of Physical Therapist:
A. Review procedure as necessary.
B. Review medical record.
C. Interview patient.
(1) Obtain a medical history with specific interest regarding acute thrombophlebitis, recent
embolus, acute infections, and fractures.
(2) Identify the location, nature, intensity, and duration of pain.
(3) Identify activities and/or movements that increase and decrease the pain.
(4) Identify limitations in functional activities.
D. Determine assessment and treatment sequence to minimize discomfort.
E. Select and collect equipment:
(1) Lubricant
(2) Linen – sheets, towels, pillows, gown
F. Prepare the environment.
(1) Pre-treatment preparation:
(a) Room should be quiet and warm.
(b) Hi-Lo table preferable, with height adjusted low enough for the therapist to maintain
extended elbows.
(c) Cover table with a sheet.
(2) Safety of equipment:
(a) Non-slick lubricant, such as beeswax or Fascia Free™, should be used.
1) Make sure patient is not allergic to lubricant.
(b) Fingernails no longer than tips of fingers to avoid scratching patient.
3. Execute the Procedure:
A. Follow the Teaching-Learning process and Interpersonal Relations Criteria to establish rapport with
the client and explain the procedure.
B. Sequential steps of the procedure:
(1) Wash and warm hands and remove jewelry.
(2) Identify extent of area to be treated.
(3) Provide and instruct in gown and draping.
(4) Position the patient for maximum relaxation, comfort, and access to the area.
(5) Apply the lubricant to your hands (optional).
(6) Therapist maintains position close to the patient providing for therapist comfort and relaxation.
(7) Assess mobility restrictions in the tissue layers according to depth, direction, and location and
according to the criteria presented in class.
(8) Treat the superficial layers before the deep layers.
(9) Clear the soft tissue restrictions around bony landmarks.

COMPETENCIES AND CRITERIA Musculoskeletal Rehabilitation-DPT 800
538
(10) Hand contact at beginning of treatment is parallel to skin; later in treatment hand contact can
become more perpendicular to reach deeper tissue layers.
(11) Rate of force is consistent with desired effects. Force should be slow enough to not produce
reflex muscle guarding.
(12) Direction of strokes is consistent with technique chosen and muscle fiber direction.
(13) Clean the lubricant off client with an alcohol towel if needed.
C. Implement changes in procedure based upon:
(1) Response of the client:
(a) Vital signs
(b) Muscle guarding
(2) Verbal feedback of the client:
(a) Increased pain
(b) Uncomfortable positioning
D. Record results in SOAP format. Under assessment (A) be sure to include effects of massage.
E. Interpret results of procedure.
F. Prepare client for dismissal.
G. Clean the area.
References:
Maria Ebner: Connective Tissue Manipulations, Krieger Publishing Co., Inc., Malabar, Florida 1985.
Greg Johnson and Vicki Saliba: Functional Orthopaedics I, Course notes.

COMPETENCIES AND CRITERIA Musculoskeletal Rehabilitation-DPT 800
539
CRITERIA SHEET MUSCULOSEKELETAL EVALUATION: PERIPHERAL JOINTS
1. Pre-Planning for Procedure:
A. Identify priority signs, symptoms, and conditions which make the procedure applicable:
(1) Increased pain
(2) Decreased or increased mobility of point
(3) Decreased muscle performance
(4) Decreased function
B. Identify the rationale for choice of procedure:
(1) Safety: N/A
(2) Economics: physical therapist's time
(3) Condition of client:
(a) Known or suspected soft tissue trauma
(b) Joint impairments and joint inflammation
(c) Conditions which may cause a transient immobility such as CNS disorders, post surgical
immobilization of joints, etc.
(4) Duration of treatment – dependent upon client's response to the evaluation:
(a) If all parts of the evaluation cause an increase in pain, evaluation may need to be
terminated.
(5) Generate other possible alternative treatments: None
(6) Application of procedure to short and long term goals:
(a) STG: to identify the causes of the client's problem
(b) LTG: using the evaluation results, establish a treatment regimen which decreases or
eliminates the client's symptoms
2. History and Systems Review:
A. Review the procedure as necessary.
B. Review the medical record (if available).
C. General Health Checklist (Boissonnault, G. Primary Care for the Physical Therapist. Examination and
Triage. 2005, Elsevier and Saunders):
(1) Fatigue
(2) Malaise
(3) Fever/chills/sweat
(4) Nausea/vomiting
(5) Dizziness/lightheadedness
Division of Physical Therapy
Emory University

COMPETENCIES AND CRITERIA Musculoskeletal Rehabilitation-DPT 800
540
(6) Paresthesia/numbness
(7) Weakness
(8) Change in mentation
D. With the presence of "red flags", make appropriate consultation and/or continue with specific
systems screening.
E. History:
(1) What treatments are you using currently?
(2) Have you had previous physical therapy for this or another problem?
(3) What functional problems are you currently having difficulty with (option is to use functional
outcome measure)?
(4) What are your goals for physical therapy?
F. Tests and Measures
G. Examination:
(1) Determine assessment sequence and related positioning to minimize discomfort and position
changes.
(2) Select and collect equipment:
(a) Sphygmomanometer, stethoscope
(b) Sensory testing equipment: sharp, dull, hot, cold
(c) Recording form(s)
(3) Secure the environment:
(a) Position equipment.
(b) Prepare area with linens.
3. Tests and Measures
A. Follow the Interpersonal Relations and Teaching-Learning Criteria to establish rapport and explain
the procedure to the client.
B. Sequential steps of procedure:
(1) Scanning/Screening if indicated by History
(2) Observation of client:
(a) Sitting posture
(b) Rising from chair
(c) Gait
(d) Undressing
(e) Getting onto table or sitting down in chair; look at facial expressions, substitution, local
positioning, positional guarding during above activities
(3) Posture and Alignment
(4) Objective testing of involved and related parts:
(a) Active physiologic movements: Get P1 P2 pain arc and assess normal synergy
(b) Passive physiologic movement:
1) Assess end-feel and range.
2) Compare 1 and 2 joint muscle limitation.
3) Assess "capsular pattern".

COMPETENCIES AND CRITERIA Musculoskeletal Rehabilitation-DPT 800
541
(c) Passive accessory movements: Use predetermined movements for each specific joint.
1) Movements may include anterior-posterior glide, inferior glide, lateral distraction,
posterior-anterior glide, lateral and medial glide, and/or rotation.
2) Rules during movements:
(a) Client's position must ensure relaxation.
(b) PT's position must ensure relaxation.
(c) There must be stabilization of the part.
(d) Hand position: Hands are as close together as possible with the part of the
stabilizing hand parallel to that part of the other hand which will perform the
movement.
(e) Joint surfaces should be maintained parallel during the gliding movements and
perpendicular during traction (distraction) and compression movements.
(f) Movements are performed with the joint in the loose packed position.
(d) Resisted isometrics – Assess contractile units for pain location and gross neurological
involvement.
1) Specific position for each muscle group of each joint.
2) General rule – Place muscle group into mid-range.
(a) Position the joint.
(b) Position the PT's hands.
(c) Request an isometric contraction. Vary the amount of the resistance depending
upon the severity of the pain the client is experiencing.
(d) Prevent joint movement from occurring by setting your hand positions prior to the
isometric contraction.
(e) This is not reliable for "trigger points".
(f) This is not reliable for hot/severe joints or joints with a high degree of irritability and
displaying signs of inflammation.
(e) Muscle Performance Tests
(f) Special Tests
(g) Palpation of movement and deep structures:
1) Perform deep palpation and identification of muscles, bursae, tendons, nerves, and
vessels.
2) Correlate tenderness in structures with pain and dysfunction. See Information on
Palpation of Movement and "End-feel".
C. Implement changes in procedure based upon:
(1) Response of the patient:
(a) Duration of treatment
(b) Fatigue level
(c) Significant increase in pain
D. Record results on SOAP format or other type of appropriate evaluation form such as a body chart or
pain graph.
COMPETENCIES AND CRITERIA Musculoskeletal Rehabilitation-DPT 800
542
E. Interpret results of procedure.
F. Prepare client for dismissal.
G. Clean up area.
(1) Return equipment.
(2) Assist with final disposition of client.
4. Evaluation
A. Physical Therapy Diagnosis:
(1) Stage of healing
(2) Clinical Reactivity
(3) Impairments in priority order
(4) Functional loses in priority order
(5) Current Disabilities
(6) Short term goals related to priority impairments
(7) Long term goals related to priority functional losses
(8) Prognosis

COMPETENCIES AND CRITERIA Musculoskeletal Rehabilitation-DPT 800
543
INFORMATION SHEET JOINT MOBILIZATION
Joint mobilization – Passive joint movements (arthrokinematics) applied to a joint for the purpose of
restoring normal joint movement (osteokinematics) or reducing pain.
1. Classification of mobilization techniques:
A. Oscillations (articulations) – Rhythmic movement of small or large amplitude applied anywhere in
the range of motion
B. Distractions (articulations) – Separation of joint surfaces without injury or dislocation of the parts
C. Thrusts/manipulations – Quick, high velocity, short amplitude movements applied at the end of the
available accessory range of motion
D. Further classification such as direct/indirect, contact/noncontact, etc. may be used for mobilization
techniques in the spine.
2. Proposed effects of joint mobilization:
A. Mechanical:
(1) Free adhesions
(2) Stimulate the production of GAO's in the joint capsule, ligaments, and myofascial tissues
(3) Release impinged material
B. Neurophysiologic:
(1) Stimulation of type I and II mechanoreceptors
(2) Homonymous muscle relaxation through increased GTO activity and/or decreased gamma
discharge
3. Grading of mobilizations:
A. The mobilization technique imparted may be described in terms of amplitude and the point in the
accessory range at which the technique is initiated.
(1) Grade I – A small amplitude movement applied at the beginning of the accessory range
(2) Grade II – A large amplitude movement applied at the beginning of the accessory range to mid-
range
(3) Grade III – A large amplitude movement applied at the middle of the accessory range to end-
range
(4) Grade IV – A small amplitude movement applied at the end of the accessory range
(5) Grade V – A small amplitude, quick thrust movement to apply movement just beyond pathologic
end range
(a) Grade V joint mobilization is appropriate when:
1) Low tissue reactivity
Division of Physical Therapy
Emory University

COMPETENCIES AND CRITERIA Musculoskeletal Rehabilitation-DPT 800
544
2) Chronic condition
3) No neighboring hypermobility
4) Joint blocked
References:
Maitland, G.D.: Peripheral Manipulation. Butterworth.
Mennell, J.: Joint Pain. Little-Brown, Boston, 1964.
Kessler, R. and Hertling, D.: Management of Common Musculoskeletal Disorders. Harper and Row,
Philadelphia, PA, 1983.

COMPETENCIES AND CRITERIA Musculoskeletal Rehabilitation-DPT 800
545
CRITERIA SHEET JOINT MOBILIZATION
1. Pre-Planning for Procedure:
A. Identify the priority signs, symptoms, and conditions which make the procedure applicable:
(1) Joint pain
(2) Decreased joint range of motion
(3) Decreased joint accessory motion
(4) Adhesions
(5) Decreased soft tissue extensibility
(6) Muscle guarding
(7) Altered positional relationships
B. Identify the rationale for choice of procedures:
(1) Safety – Avoid use if any of the following conditions are present:
(a) Compromised ligamentous integrity
(b) Inadequate bony healing
(c) Bacterial infection in the affected extremity or area
(d) Active inflammatory arthritis
(e) Malignancy involving joint structures
(f) Cauda Equina signs for lumbar spine mobilization
(g) Vertebro-basilar insufficiency for cervical spine mobilization
(h) Joint ankylosis
(2) Be careful if any of the following precautions are present:
(a) Joint effusion
(b) RA
(c) Metabolic bone disorders (e.g. osteoporosis, T.B.)
(d) Joint hypermobility
(e) Joint not ossified (18-24 months)
(f) Tissue block (bony block or internal derangement)
(g) At limit of expected range of prosthesis for total joint arthroplasties
(h) Pregnancy, especially last trimester and first 2-3 months post-natal, especially lumbar spine
or pelvic regions
(i) Spinal cord involvement (for spine mobilization)
(j) Spondylolisthesis (for lumbar spine mobilization)
(k) Severe radiculopathy
Division of Physical Therapy
Emory University

COMPETENCIES AND CRITERIA Musculoskeletal Rehabilitation-DPT 800
546
(3) Economics: Joint mobilization requires 1:1 therapist – patient contact but equipment is minimal
(4) Condition of the patient:
(a) Known or suspected joint dysfunction or joint disease
(5) Duration of treatment:
(a) Dependent upon length of time necessary to change signs or symptoms
(b) Variable from 5 to 20 minutes
(6) Generate other possible alternative treatments:
(a) Passive range of motion (gross osteokinetic movements)
(b) Active range of motion
(c) Self-mobilization techniques
(7) Application of the procedure to short and long term goals:
(a) STGs:
1) Increase (by a specified amount) the active and passive range of motion of a specific
joint (within a specified time frame)
2) Decrease (by a specified amount) the patient's pain rating (within a specified time
frame)
(b) LTGs:
1) Independence with the functional activity(ies) in which the patient is limited (within a
specified time frame)
2. Preparation of Physical Therapist:
A. Review the procedure as necessary.
B. Review the medical record.
C. Interview the patient.
(1) Obtain a medical history with specific interest regarding status of fractures, bone pathology, and
bacterial infection.
(2) Identify the area of limited mobility.
(3) Identify if pain is present; and if so, identify the location, nature, intensity, and duration of pain.
(4) Identify limitations in functional activities.
D. Determine assessment and treatment positioning and sequence to minimize discomfort and
position changes.
E. Select and collect equipment:
(1) Linen
F. Prepare the environment:
(1) Plinth or chair adequate for secure patient positioning and access to the involved joint(s)
3. Execute the Procedure:
A. Follow the Teaching-Learning Process and Interpersonal Relations Criteria to establish rapport with
the client and explain the procedure.
B. Sequential steps of the procedure:
(1) Identify the painful motions or motions to be restored, the mobilization techniques to be used,
and the grade of mobilization to be used.
(2) Provide and instruct in gown and draping.

COMPETENCIES AND CRITERIA Musculoskeletal Rehabilitation-DPT 800
547
(3) Position the patient for relaxation, stabilization, and access to the area.
(4) Position yourself with good body mechanics with maximum leverage.
(5) Place your hands near the joint surfaces.
(6) Ensure adequate stabilization of the segment.
(7) Mobilize in the chosen direction with a force and amplitude consistent with the grade of
mobilization chosen.
C. Implement changes in procedure based upon:
(1) Response of the patient:
(a) Change in ROM
(b) Muscle guarding
(c) Pain
(d) Goals
D. Record results in SOAP format or other appropriate forms:
(1) 0: Specific mobilization techniques used including the grade and ROM measurements
(2) A: The effect of the treatment (i.e. increased ROM, decreased pain, etc)
E. Interpret the results of procedure.
F. Prepare client for dismissal.
G. Clean up area.
References
Kisner C & Colby LA. Therapeutic Exercise: Foundations and Techniques, 5th Ed. Chapter 5. F.A. Davis,
Philadelphia, PA, 2007.

COMPETENCIES AND CRITERIA Musculoskeletal Rehabilitation-DPT 800
548
CRITERIA SHEET JOINT MANIPULATION
1. Pre-Planning for Procedure:
A. Identify priority signs, symptoms, and conditions that would support the use of joint manipulation based on current clinical prediction guidelines:
(1) Decreased Joint ROM
(2) Pain
(3) Muscle Contracture
(4) Shortened Ligament(s)
(5) Tightened Joint Capsule or Joint Adhesions
(6) Asymmetrical Movement
(7) Joint Misalignment or Improper Kinematics
(8) Hypertonic Muscle(s)
(9) Joint Dislocation or Subluxation
(10) Joint Hypomobility
B. Identify rationale for choice of procedure:
(1) Safety:
(a) Assess the extent to which physical signs/symptoms or past medical history interfere with ability to perform functional activities safely.
1) Absolute Contraindications:
(a) Malignancy
(b) Rheumatoid collagen necrosis
(c) Acute or sub-acute fracture
(d) Joint ankylosis
(e) Active inflammatory or infective arthritis
(f) Vertebro-basilar insufficiency
(g) Ligament rupture
(h) Cauda Equina
Division of Physical Therapy
Emory University

COMPETENCIES AND CRITERIA Musculoskeletal Rehabilitation-DPT 800
549
(i) Osteomyelitis
2) Relative Contraindications:
(a) RA
(b) Spinal Cord Involvement
(c) Metabolic bone disorder
(d) Osteoporosis
(e) Joint not yet ossified
(f) Tissue block
(g) Pregnancy
(h) Hypermobility
(i) History of malignancy
(j) Herniated disks
(k) Dizziness
(l) Spondylolisthesis
(m) Congenital bone deformities
(n) Tuberculosis
(o) Radiating Nerve Symptoms past the knee
(2) Condition of the client:
(a) Procedure should be appropriately modified according to client's medical, physical, and mental status.
(3) Economics:
(a) Physical therapist's time
(b) Minimal equipment/material expense
(4) Duration of procedure:
(a) Dependent upon the joint and patient status
(b) 2-3 minutes
(5) Alternative procedures:
(a) Joint Mobilization
(b) PROM exercises
(c) Self mobilization or AROM exercises
(d) PNF
(e) Myofascial Release or Massage
(f) Mechanical Traction

COMPETENCIES AND CRITERIA Musculoskeletal Rehabilitation-DPT 800
550
(6) Application to short and long-term goals:
(a) To document observed signs and symptoms
(b) To determine client's status relative to diagnosis
(c) To provide a plan of action which may include a referral, PT evaluation, or PT intervention
2. Preparation of Physical Therapist:
A. Review the procedures as necessary.
B. Review the medical record or medical history form.
(1) Check for any contraindications (see B.1.a).
(2) Check for recent traumas or surgeries.
(3) Determine any other co-morbidities.
C. Perform visual inspection of client.
(1) Limb and trunk posture/position
(2) Muscle tone or spasticity
(3) Assess gait if applicable
D. Interview the client; history and assessment of:
(1) Identify onset and progression of signs/symptoms.
(2) Identify nature and location of the symptoms.
(3) Obtain history of any medical intervention (including surgical and pharmacological) and testing.
(4) Determine desired goals of patient/caregiver.
(5) Obtain verbal consent from patient.
E. Analyze the information obtained and ask further questions.
F. Select and collect equipment:
(1) Linens/Towels
(2) Stools/High-Low Table
(3) Pillows
(4) Belt (can use for hip manipulation)
G. Prepare the environment/equipment/materials.
3. Execute the Procedure:
A. Follow the Interpersonal Relations and Teaching-Learning Criteria to establish rapport and explain the procedure to the client.
B. Sequential steps of procedure:
(1) Ensure patient is relaxed and in proper position on a high-low/adjustable table.

COMPETENCIES AND CRITERIA Musculoskeletal Rehabilitation-DPT 800
551
(2) PT must also be relaxed.
(3) Generally, want hands close to joint surfaces.
(4) Want one segment stabilized while apply specific force to an adjacent segment.
(5) Determine the grade of oscillation (see Joint Mobilization Information sheet).
(6) Determine joint to be mobilized.
(a) Upper Extremity:
1) Shoulder:
(a) Glenohumeral Joint:
1. Loose pack position – 55-70° Abduction, 30° horizontal adduction, and neutral rotation
2. Inferior Glide:
a. Patient supine
b. Approach arm superiorly and contact superior aspect of proximal humerus to impart an inferior glide
3. Posterior Glide:
a. Patient supine
b. Approach arm inferiorly and support it while contacting the anterior aspect of the proximal humerus to impart a posterior glide
c. May need to put a towel roll behind scapula
4. Anterior Glide:
a. Patient is prone with arm hanging of the edge of the table
b. Place a pad supporting the coracoid process; this provides some stabilization of the scapula
c. Stand and face the medial side of the upper arm
d. Support the elbow against your body with your left hand, maintaining the arm in adduction and neutral rotation
e. The mobilization hand is placed over the posterior aspect of the proximal humerus to apply an anterior glide
2) Elbow:
(a) Humeroulnar/Humeroradial:
1. Inferior Glide (Increase Flexion):
a. Patient supine with arm to side
b. Elbow in 70-90° of flexion
c. Stabilize distal humerus and mobilize proximal ulna to apply an inferior glide
2. Inferior Glide (Increase Extension):

COMPETENCIES AND CRITERIA Musculoskeletal Rehabilitation-DPT 800
552
a. Patient supine with arm at side
b. Elbow at or near end range extension with forearm neutral
c. Stabilize distal humerus and mobilize at distal ulna to apply an inferior glide
3. Inferior Glide of Radius on Ulna (Increases Extension):
a. Patient supine with arm at side
b. Elbow in flexion, forearm neutral
c. Stabilize distal humerus and mobilize distal radius to apply an inferior glide
4. Medial Glide (Increases joint play of forearm abduction needed for elbow extension):
a. Patient supine with arm at side
b. Forearm supinated, elbow at or near end range extension
c. Stabilize proximal forearm and mobilize distal humerus to apply a medial glide
(b) Radio-ulnar:
1. Dorsal-Ventral Glide of Radial Head (Increases Pronation/Supination):
a. Patient supine
b. Elbow flexion with forearm supinated
c. Stabilize distal humerus using the table and mobilize the radial head with thumbs or thenar eminence to apply a PA/AP or dorsal/ventral glides
2. Dorsal-Ventral Glide of Distal Radiounlar Joint (Increases Pronation/Supination):
a. Patient sitting or supine
b. Elbow flexed with wrist neutral
c. Stabilize distal radius or ulna while mobilizing distal radius or ulna with thumbs or thenar eminences to apply a PA/AP or dorsal/ventral glides
3) Wrist and Hand:
(a) Radio-carpal:
1. Dorsal/Volar Glide (Volar increases extension and Dorsal increases flexion):
a. Patient sitting with forearm supported
b. Forearm pronated
c. Stabilize distal forearm while mobilizing proximal row of carpals to apply a PA/AP or dorsal/ventral glides
(b) Mid-carpal:
1. Dorsal/Volar Glide (Volar increases extension and Dorsal increases flexion):
a. Patient sitting with forearm sitting

COMPETENCIES AND CRITERIA Musculoskeletal Rehabilitation-DPT 800
553
b. Forearm pronated
c. Stabilize proximal row of carpals and mobilize distal row of carpals to apply a PA/AP or dorsal/ventral glides
(c) Trapezio-metacarpal:
1. Distraction and Dorsal/Volar Glide (Dorsal increases abduction and Volar increases adduction):
a. Patient sitting with forearm supported
b. Forearm neutral, carpo-metacarpal(CMC) joint neutral
c. Stabilize the trapezium and mobilize the 1st metacarpal to apply a PA/AP or dorsal/ventral glides
(d) Scaphoid on Radius:
1. Palmar Glide (increases extension):
a. Patient sitting with forearm supported
b. Forearm pronated
c. Mobilize scaphoid in volar direction
(e) Inter-metacarpal:
1. Dorsal/Palmar Glide (Dorsal/Volar increases cupping of palm to allow opposition and gripping):
a. Patient sitting with forearm or humerus supported
b. Wrist neutral
c. Stabilize adjacent metacarpal and mobilize desired metacarpal in dorsal/ventral directions
(f) Metacarpophalangeal (MCP):
1. Distraction/Palmar/Dorsal (Palmar increases flexion; Dorsal increases extension):
a. Patient sitting with forearm and wrist supported
b. Wrist neutral
c. Stabilize the metacarpal and mobilize the proximal phalanx to apply a distraction, palmar or dorsal glide
(g) Proximal Interphalangeal and Distal Interphalangeal:
1. Distraction/Palmar/Dorsal (Palmar increases flexion; Dorsal increases extension)
a. Patient sitting with forearm and wrist supported
b. Wrist and MCP neutral
c. Stabilize proximal/middle phalanx while mobilizing the middle/distal phalanx and apply a distractive/palmar/dorsal force

COMPETENCIES AND CRITERIA Musculoskeletal Rehabilitation-DPT 800
554
(b) Lower Extremity:
1) Hip:
(a) Distraction (Increases flexion and abduction):
1. Patient supine
2. LE in loose-packed position (30° flexion, 30° abduction, slight ER)
3. Hold LE just proximal to malleoli and lean body back to use body weight to perform inferior glides/oscillations
(b) Inferior Glide (Increases flexion):
1. Patient supine
2. Hip and knee flexed to 90°
3. Mobilize femur to apply an inferior glide either with a belt (wrapped around patient’s femur and your hips) or with hands
(c) Posterior Glide (Increases IR):
1. Patient supine
2. LE in loose-packed position
3. Stabilize with hand or leg the posterior mid-distal femur to apply a posterior glide to proximal femur
(d) Medial Glide (Increases Abduction):
1. Patient side lying
2. Hip abducted
3. Stabilize distal femur with hand and mobilize at proximal femur to apply a medial force
2) Knee:
(a) Patello-femoral (Restore Knee joint play):
1. Superior/Inferior & Medial/Lateral:
a. Patient supine
b. Knee fully extended
c. Use thumbs to mobilize patella in desired direction and avoid compression
(b) Femorotibial:
1. Distraction (Restore Knee joint play):
a. Patient prone
b. Knee flexed to about 90° with towel placed on leg for comfort
c. Stabilize femur with elbow (on towel) and mobilize the tibia to apply an inferior force using hands pull up the lower leg

COMPETENCIES AND CRITERIA Musculoskeletal Rehabilitation-DPT 800
555
2. Posterior Glide (Increase Flexion):
a. Patient supine
b. Place bolster or towel under knee to help stabilize and place knee in slight flexion
c. Stabilize distal femur and mobilize proximal tibia to apply a posterior glide
3. Anterior Glide (Increase Extension):
a. Patient supine
b. Place bolster or bend knee to around 90° of flexion
c. Stabilize distal LE by sitting on the patient’s foot and mobilize with fingers on the posterior side of the proximal calf with both hands and thumbs on the anterior surface of the tibia to provide an anterior glide
4. Posterior Glide (Increases Flexion):
a. Patient supine
b. Place bolster or towel just distal to knee to help stabilize and place knee in slight flexion
c. Stabilize proximal tibia and mobilize distal femur to apply a posterior glide
(c) Tibiofibular:
1. Superior/Inferior Glide & Anteriolateral/Posteriomedial Glide:
a. Patient supine
b. Knee bent to about 90°
c. Stabilize the tibia with hand or by sitting on the patient’s foot and mobilize the fibular head superiorly/inferiorly or anteriolaterally/posteriomedially
3) Ankle:
(a) Talocrural:
1. Distraction:
a. Patient supine
b. Loose-packed position in slight plantarflexion
c. Mobilize talus and calcaneus by gripping just below the malleoli and applying an inferior force by leaning back
2. Anterior/Posterior Glides (Anterior increases PF and Posterior increases DF):
a. Patient supine
b. Loose-packed position in slight plantarflexion
c. Stabilize distal tibia/talus and mobilize desired segment by applying a anterior/posterior glide
3. Eversion/Inversion Glides

COMPETENCIES AND CRITERIA Musculoskeletal Rehabilitation-DPT 800
556
a. Patient supine
b. End of inversion/eversion range
c. Stabilize tibia and mobilize the calcaneus apply an inversion/eversion
(b) 1st Metatarsophalangeal:
1. Distraction & Dorsal/Plantar Glides (Dorsal increases flexion; Plantar increases extension):
a. Patient supine
b. Loose-packed position in slight extension
c. Stabilize 1st metatarsal and mobilize proximal phalanx of great toe to apply a distraction, dorsal, or plantar glide
(c) Thoracic spine:
1) Patient Supine:
(a) Patient is supine with their arms crossed in an over or undercrossing position while firmly gripping their own thoracic region with their hands.
(b) Therapist stands to one side of the patient (opposite the side to be treated) and using the arm furthest from the targeted side, the clinician gently pulls with patient into side-lying.
(c) Leaning over the patient, the clinician places their hand behind the patient’s back just caudal to the targeted segment and uses a pistol grip.
(d) The patient is then scooped into flexion and gently extended to the level of the restriction, keeping the patients spine in a relatively flexed position.
(e) The thrust should be from the chest of the clinician through the shaft of the humerus.
(f) Reassess pain and range of motion.
2) Patient Sitting; Rotational Manipulation:
(a) Patient is seated and straddling the plinth. Have the patient cross their arms with the arms position at 90° of elevation.
(b) Clinician places a pillow on top of patient’s shoulders and has the patient's arms rest on top of the pillow.
(c) Clinician stands to one side of the patient (to the side that the patient is rotating toward).
(d) Clinician reaches under the patient's opposite axilla and grasps the contralateral scapula.
(e) Clinician uses their right pisiform to contact the right transverse process of T12 (if patient is rotating to the left) and induces left spinal rotation with their left arm and body.

COMPETENCIES AND CRITERIA Musculoskeletal Rehabilitation-DPT 800
557
(f) Clinician engages the restrictive barrier and applies a low velocity, high amplitude thrust into left rotation.
(g) Re-asses pain and active motion.
(d) Lumbosacral Region:
1) Sacral:
(a) Patient is supine. The patient’s pelvis is translated toward the therapist’s side of the table.
(b) The therapist maximally side bends the patients lower extremity and trunk away.
(c) The therapist then induces a rotation (toward the clinician’s side of the table).
(d) The therapist places his/her caudal hand, using a broad contact, over the ASIS (over the ASIS furthest from the clinician).
(e) Once the ASIS starts to elevate, and a firm barrier is reached, a posterior and inferior thrust is delivered through the ASIS in an anterior to posterior direction.
2) Lumbar Spine – General neutral gapping mobilization:
(a) Patient: Place the patient in side lying with the painful side up.
(b) Clinician: Flex the patient's top leg until you palpate motion at the desired segment/inter space; place the patient’s foot in the popliteal space.
(c) Grasp the lowermost arm and shoulder and induce rotation and side bending until you palpate motion at the appropriate segmental level/inter space.
(d) Place your thumb on lateral/uppermost aspect of the spinous process and position the patient’s arms around the therapist’s cranial hand.
(e) While maintaining the setup, logroll the patient towards you.
(f) The therapist should use the caudal arm to induce a high velocity, low amplitude force in an anterior direction.
(g) Re-assess pain and active motion.
C. Implement changes in the examination procedure based upon:
(1) Response of the client:
(a) Pain
(2) Achievement of stated goals
D. Record results in SOAP format or other appropriate form used for the examination procedure.
E. Interpret results and reassess patient’s pain level and active range of motion.
F. Clean up area

COMPETENCIES AND CRITERIA Kinesiology and Biomechanics-DPT 715
558
CRITERIA SHEET NEUROREHABILITATION COMPLEX PHILOSOPHY
Course Philosophy The Neurorehabilitation Complex will apply the dynamical systems model of motor control to the
recognition of clinical signs and symptoms, evaluation and assessment of those signs, and related treatment interventions.
Students will identify and assess clinical signs presented by clients with neurologic deficits. Neurologic
deficits will be studied across the life span beginning with pediatric clients and progressing to disorders normally encountered later in life. Based on the findings of the evaluation, students will determine missing or limited functions contributing to the client's abnormal movement and select a treatment intervention based on these findings.
Signs and symptoms of movement disorders following neurological damage will be analyzed as biomechanical, behavioral, or motor control problems. Functional prognosis and limitations of an individual client will be used as a basis for determining treatment.
Skilled execution of functional tasks (breathing, eating, ability to reach, roll, sit, stand, ambulate, dress, and propel a wheelchair) requires the interaction and adaptation of related functions and practice. Those functions include but are not limited to: attention, motivation, vision, perception, proprioception, social and emotional status, musculoskeletal status, age, and balance.
Treatment interventions will be related to primary functional problems for the individual client. Treatment plans will be implemented based on an eclectic, functional approach to the client, rather than application of specific techniques.
Many assessments and treatment interventions presented in previous complexes will be applied to clients with neurologic deficits. Principles of cardiopulmonary considerations, posture and gait analysis, joint mobility, and application of modalities are some topics which will be revisited with new considerations and indications.
Division of Physical Therapy
Emory University

COMPETENCIES AND CRITERIA Kinesiology and Biomechanics-DPT 715
559
PROCEDURE AND CRITERIA SHEET GENERAL SCREENING FOR CNS DYSFUNCTION
Introduction
The following procedure represents/describes tests which are included in a neurologic screening.
Although the sequence of events is intended to represent a logical progression, the therapist should
predetermine logical sequence of steps based on the individuality of the client (include consideration of
client's medical status and presentation of signs/symptoms). This procedure should be used to screen any
client presenting to the therapist to determine whether further neurologic evaluation is appropriate, and to
determine possible anatomic regions presenting deficits.
1. Pre-Planning for Procedure:
A. Identify priority signs, symptoms, and conditions which make the procedure applicable:
(1) Any known or suspected neurologic deficit
(2) Change in mental status or behavior
(3) Altered motor control
(4) Postural deviations
(5) Abnormal movements (tremors, clonus, athetosis)
(6) Altered reflexes and reactions
(7) Altered sensation
(8) Perceptual deficits
(9) Impaired vital functions (swallowing, breathing)
B. Identify rationale for choice of procedure:
(1) Safety:
(a) Assess the extent to which altered mentation of physical signs/symptoms interfere with
ability to perform functional activities safely.
(b) Monitor vitals.
(c) Use a safety belt where/when appropriate.
(2) Condition of the client:
(a) Client may or may not be medically stable.
(b) Procedure should be appropriately modified according to client's medical, physical, and
mental status.
(3) Economics:
(a) Physical therapist's time and minimal equipment/material expense
Division of Physical Therapy
Emory University

COMPETENCIES AND CRITERIA Kinesiology and Biomechanics-DPT 715
560
(4) Duration of procedure:
(a) Dependent upon client’s medical status and ability to participate in test items
(5) Alternative procedures: N/A
(6) Application to short and long-term goals:
(a) To document observed CNS signs and symptoms
(b) To determine client's status relative to diagnosis
(c) To provide a plan of action which may include a referral, PT evaluation, or PT intervention
2. Preparation of the Physical Therapist:
A. Review procedures as necessary.
B. Review the medical record or medical history form.
C. Perform visual inspection of client:
(1) Awareness of hygiene
(2) Limb and trunk posture
D. Interview the client; history and assessment of:
(1) Changes in behavior or mentation
(2) Changes in bowel and bladder function
(3) Impaired subjective account of sensory awareness
(4) Changes in number of falls/periods of dizziness
(5) Impaired motor function in daily tasks
(6) Identify onset and progression of signs/symptoms
(7) Identify nature of the symptoms
(8) History of any medical intervention (including surgical and pharmacological) and testing
E. Analyze the information obtained and:
(1) Ask further questions.
(2) Select screening test.
F. Select and collect equipment:
(1) Linens
(2) Safety belt
(3) Equipment for vitals
(4) Goniometer
(5) Reflex hammer
(6) Equipment for sensory tests
G. Prepare the environment/equipment/materials.
3. Execute the Procedure:
A. Follow the IPR and Teaching-Learning Criteria to establish rapport and explain the procedure.
B. Sequential steps of the procedure (vital signs and visual inspection are an assumed inherent part of
every evaluation):
(1) Assess general cognitive status of the client (evaluated within context of interview with client):
(a) Note level of consciousness, awareness of environment, attention span, memory, affect,
logical thought
(b) In the event deficits are noted, perform cognitive assessment.

COMPETENCIES AND CRITERIA Kinesiology and Biomechanics-DPT 715
561
(2) Cranial Nerve Assessment:
(a) Olfactory (I):
1) “Have you noticed any changes in your ability to detect odors or has the taste of food
changed?” (in particular: coffee, orange, vanilla)
(b) Optic (II):
1) Visual acuity:
(a) Have client read newspaper, read clock, etc. (allow client to wear glasses)
2) Visual fields (gross):
(a) May be tested with examiner sitting in front of client and client looking straight
ahead at examiner's nose.
(b) May be better performed standing behind client:
1. Client looks straight ahead, and examiner brings finger from behind the field of
vision into field of vision, asking the client to indicate when the finger is first
seen.
(c) Check peripherally and superiorly; stimuli should be exposed singularly and
simultaneously.
(c) Oculomotor (oculomotor, trochlear, abducens: III, IV, VI):
1) Observe pupillary responses.
2) Check conjugate eye movements as the client looks side to side, up and down.
(a) Client looks at a finger approaching the nose as examiner checks convergence.
3) Note presence of nystagmus.
(d) Trigeminal (V):
1) Motor portion:
(a) Client is asked to clench teeth; examiner feels masseter and temporal muscles to
assess force of contraction and bulk.
(b) Pterygoids are tested by asking the client to press the jaw laterally against the
examiner's finger with the mouth partially open (deviations of the jaw with mouth
opening indicate masseter weakness on the side of the deviation).
2) Sensory portion:
(a) Corneal reflex not generally tested.
(b) Facial sensation assessed over entire face, including the anterior half of the scalp
(see criteria sheet for examination of the sensory system).
(e) Facial (VII):
1) Examined simply by asking the client to perform various facial expressions (wrinkle
forehead, frown, close eyes tightly, open mouth, retract mouth, whistle, screw up nose,
puff out cheeks, etc).
2) Taste in the anterior two thirds of the tongue not generally tested; it may be tested in
cases of known peripheral facial paralysis.
(f) Auditory (VIII):
1) Not generally formally tested.
2) Note client’s ability to hear the spoken word (cochlear portion).
COMPETENCIES AND CRITERIA Kinesiology and Biomechanics-DPT 715
562
(g) Glossopharyngeal (IX):
1) Not generally assessed; it supplies pharynx and posterior 1/3 of the tongue with taste
fibers.
(h) Vagus (Xl):
1) May have occasion to assess gag reflex by touching back of the pharynx with a throat
stick.
2) Normally leads to contraction of the palatal muscles.
3) Vegetative functions of the vagus nerve (pulse, respiration, etc.) assessed during vitals.
4) Vocal musculature not formally tested, but note hoarseness, aphonia, etc.
(i) Spinal Accessory (XI):
1) Perform manual muscle test for trapezius and sternocleidomastoid muscles according to
criteria for MMT.
(j) Hypoglossal (XII):
1) Client is asked to protrude tongue (Note deviation from midline, atrophy, or involuntary
movements of the tongue).
**Note: If any deficits are noted, a further assessment of the system (olfactory, visual, motor) by the
PT, or a referral to the appropriate medical specialist is indicated.
(3) Assess Active R.O.M.
(a) Ask client to perform active motion in limbs and planes of movement indicated by signs and
symptoms.
(b) Use a systematic approach designed to reveal asymmetries and provide structure for
completeness and efficiency.
(c) Minimize stress on client, including unnecessary changes in position and repetitions.
**Note: If any deficits are noted, a further assessment using passive ROM and Manual Muscle Testing
are indicated (Refer to specific Criteria Sheets).
(4) Assess Resistance to Passive Joint Motion:
(a) Place client in a comfortable sitting or supine (report which is used) position with the head
in midline position.
(b) Hold the client’s upper extremity by the wrist and elbow at the joint (avoiding contact with
muscle bellies).
(c) Instruct the client to relax, allowing you to move the limb passively.
(d) Passively move the joint through full excursion several times, varying the speed.
(e) If resistance changes, note the position in the range where it occurs.
(f) Note quality and quantity of resistance:
1) Cogwheel rigidity
2) Lead pipe rigidity

COMPETENCIES AND CRITERIA Kinesiology and Biomechanics-DPT 715
563
3) Clasp knife
4) Clonus
5) Flaccidity
6) Joint laxity (i.e. recurvatum at elbow or knee, scapular winging)
(g) Note any asymmetrical findings.
(h) Record the neurobehavioral state at the time of testing and any alterations due to testing.
(i) Repeat the procedure for the lower extremity:
1) Place your hands on the ankle and knee joints (avoiding contact with muscle bellies),
moving the leg through full range of flexion and extension.
2) Place your hands on the heel and first and fifth metatarsals (avoiding contact with
muscle bellies), moving the ankle through full range of dorsiflexion and plantarflexion.
(5) Assess Sensation: Refer to specific Criteria Sheet.
(6) Assess Perception: Refer to specific Criteria Sheet.
(7) Assess Strength: Refer to specific Criteria Sheets for Manual Muscle Testing and/or Gross
Evaluation.
**Note: MMT may not be appropriate for some clients who present with neuralgic problems, but is very
useful for others. Isokinetic testing is another useful tool in the evaluation of strength in clients with
neuralgic deficits.
(8) Assess Coordination:
(a) Test for upper extremity coordination:
1) Finger-nose: With eyes open, and then closed, ask client to bring the tip of the index
finger to the tip of the nose.
(a) Positive test: jerky or wandering movement, consistently missed target, discrepancy
between eyes open and closed
2) Finger-finger: With his or her eyes open, ask client to point to examiner's index finger
with his or her own index finger in rapid succession as examiner changes position of the
target.
(a) Positive test: jerky or wandering movement, past pointing, deliberate movement
3) Adiadochokinesia: Ask client to rapidly and alternately pronate and supinate the
forearms with arms extended.
(a) Positive test: uneven, jerky movements with changing amplitude
4) Finger opposition: Ask client to rapidly oppose thumb to pad of each finger on the same
hand.
(a) Positive test: uneven, jerky, slow movements
(b) Tests for lower extremity coordination:
1) Heel-knee: In the supine position, client places the heel of one foot on the opposite
knee then moves it down along the tibia.
(a) Positive test: movement is uneven, jerky, inaccurate

COMPETENCIES AND CRITERIA Kinesiology and Biomechanics-DPT 715
564
2) Adiadochokinesia: While supine, client performs rapid flexion and extension of the knee.
(a) Positive test: uneven, jerky, slow movements
(9) Assess Deep Tendon Reflexes:
(a) Biceps:
1) Hold the client's elbow with his or her forearm resting on that of the examiner.
2) Instruct the client to rest passively.
3) Palpate the biceps tendon.
4) Place your thumb lightly on the biceps tendon and briskly tap your thumb with a reflex
hammer.
(b) Brachioradialis:
1) Support the client's forearm in yours with the client's forearm in neutral
supination/pronation position.
2) Briskly tap the brachioradialis tendon by tapping the lower third of the radius.
(c) Triceps:
1) Support the client's elbow with his or her forearm in the horizontal plane.
2) Briskly tap the tendon of short head of the triceps at its insertion.
(d) Patellar:
1) Test the client in sitting position with knee flexion at 90 degrees and foot clearing the
floor (the examiner may need to support the limb from under the knee).
2) Briskly strike the patellar tendon with the reflex hammer.
(e) Achilles:
1) Test the client in prone position if possible with the knee flexed and foot slightly
dorsiflexed.
2) Briskly strike the Achilles tendon with the reflex hammer.
(10) Assess Static and Dynamic balance:
(a) Sitting:
1) Determine whether and for how long client can maintain position without losing
balance.
2) Determine whether and how far the client can reach forward and laterally without
losing balance.
(b) Standing:
1) Determine whether and for how long client can maintain position without losing
balance.
2) Determine whether and for how long client can maintain standing on one leg without
losing balance.
3) Determine whether and for how long client can maintain position 1 and 2 with eyes
closed without losing balance.
4) Determine whether and how far client can reach forward and laterally without losing
balance.

COMPETENCIES AND CRITERIA Kinesiology and Biomechanics-DPT 715
565
C. Implement changes in procedure:
(1) Any or all portions of the above may be carried out dependent upon:
(a) Evaluation priorities
(b) Client's condition
(c) Client's ability to assume/perform test items and positions
D. Record results in SOAP format of other appropriate forms
(1) 0: Note findings, normal and abnormal.
(2) A: Indicate whether findings are consistent with diagnosis.
(3) P: Formulate a plan of care, including referring to another health professional, completing a
thorough PT evaluation, and/or discharging client from PT.
E. Clean the area.

COMPETENCIES AND CRITERIA Kinesiology and Biomechanics-DPT 715
566
CRITERIA SHEET FUNCTIONAL EVALUATION
1. Pre-Planning for Procedure: A. Identify the priority signs, symptoms, and conditions which make the procedure applicable:
(1) Decreased function secondary to injury (2) Decreased function secondary to disease
B. Identify the rationale for choice of procedure: (1) Safety:
(a) Coordinate medical precautions with type of function being evaluated. (b) Monitor serial vital signs in presence of cardio-respiratory problems or severe de-
conditioning. (2) Economics:
(a) PT time, space (3) Condition of client:
(a) Known or suspected disease or disorder which limits the client's ability to perform activities necessary to function in desired environment
(4) Duration of treatment: (a) Client's tolerance (b) Number of activities tested
(5) Generate other possible alternative procedures (a) MMT (b) Goniometry (c) Sensory evaluation
(6) Application of procedure to short and long term goals: (a) STG: To establish a baseline activity level in order to establish immediate treatment
intervention (b) LTG: Ongoing upgrading of activities identified in order to achieve highest functional level
2. Preparation of Physical Therapist: A. Review the procedure as necessary. B. Review the medical record. C. Interview the client.
(1) Ask questions related to history of functional level. (2) Ask questions related to client's perception of existing functional level. (3) Ask questions to ascertain client's goals. (4) Ask questions to ascertain what problems appear to be causing limitation in function.
D. Determine assessment and position sequence. E. Select and collect correct equipment:
(1) Evaluation forms (2) Available mat, chair, parallel bars
Division of Physical Therapy
Emory University

COMPETENCIES AND CRITERIA Kinesiology and Biomechanics-DPT 715
567
(3) Linens, pillows as necessary (4) Appropriate clothing for client
F. Secure the environment:
(1) Set up treatment area.
3. Execute the Procedure: A. Follow the Interpersonal Relations and Teaching-Learning Criteria to establish rapport with client. B. Sequential steps of procedure:
(1) Decide upon the testing sequence. (a) Consider the comfort of the client (i.e. perform as many tests as possible in a given position
before changing the client's position). (2) Instruct the client in the specific test. Demonstrate task, generally. Avoid exact demonstration
since the objective is to observe the client's usual performance rather than behavior modeled after your demonstration.
(3) Continue to proceed through the evaluation until the highest possible level is reached. (4) If appropriate, sample performance of higher levels providing assistance as necessary. (5) Document the assistance provided. (6) Provide sufficient guarding to make performance safe. (7) Grade each task.
(a) Assign the correct grade for the level of independence. (b) Describe briefly the quality of the task performance. (c) Record the appropriate grade in the correct place on the form.
C. Implement changes in procedure based upon response of client. D. Record results in SOAP format or other appropriate forms.
(1) O: Refer to recording form or summarize findings. Assess the task performances as being functional or non-functional and record appropriately.
E. Interpret results. (1) A: Discuss factors related to reliability and validity which could influence the results of the test.
Identify physical limitations, such as limited range, muscle weakness, or spasticity, which may affect the quality of performance.
(2) P: Identify the appropriate treatment program, including: (a) Objectives (b) Specific treatment program
F. Prepare client for dismissal. G. Clean up area.

COMPETENCIES AND CRITERIA Kinesiology and Biomechanics-DPT 715
568
INFORMATION SHEET ACTIVITIES OF DAILY LIVING
The evaluation of Activities of Daily Living has been designed to allow for rapid but complete evaluation of important functional activities. The activities are listed in the left column and have been grouped, in most instances, from easy to difficult within a general category, such as bed activities.
The second column provides the place to record the level of independence the patient exhibited when performing each activity. The levels are defined as follows:
I Independent The patient can perform the activity independently; that is without verbal or
physical assistance.
S Supervised The patient can perform the activity but requires verbal instruction or
guarding without physical assistance.
A Moderate Assistance The patient can perform the activity when given assistance by one person (the
patient is doing most of the work).
M Maximal Assistance The therapist is doing most of the work, but the patient is providing some
assistance.
Note: It is especially important to distinguish between moderate assistance and maximal assistance when considering placement of the patient.
U Unable to Assist The patient is unable to assist or is dependent and, consequently, the activity must
be performed totally by the therapist.
X Not tested
In certain instances, this may be the only information required, and the rest of the columns would then be left empty, e.g. if the evaluation is to provide justification for continuance of treatment. The remaining three columns provide more information concerning the quality of performance and become significant when planning treatment or assessing progress and should be used accordingly.
The third column provides an opportunity for the evaluator to assess the level of function of the patient. This may appear to be an unnecessary column, but it is not. For example, the quadriplegic patient may be
Division of Physical Therapy
Emory University

COMPETENCIES AND CRITERIA Kinesiology and Biomechanics-DPT 715
569
able to transfer from bed to wheelchair independently but, if it takes 20 minutes, he may not be willing to expand the energy to perform the transfer. Essentially, then, his transfer is non-functional and should be noted as such.
The fourth column provides a place to describe briefly the quality of performance. Appropriate responses may be slow, uncoordinated, lacking balance, unsafe, abnormal sequence, efficient, normal, etc. (It is important to describe the activities which are less independent than those which are performed well). Factors which may be limiting the performance should be noted. Examples of appropriate responses are pain, spasticity, muscular weakness, and limited range of motion or dizziness. These descriptions provide the therapist with information which will be valuable when planning a treatment program.
The check-off list of assistive devices provided enables the evaluator to quickly identify those devices used by the patient in performing functional activities as well as the type of gait used.
An example form follows.

COMPETENCIES AND CRITERIA Kinesiology and Biomechanics-DPT 715
570
ACTIVITIES OF DAILY LIVING: INFORMATION SHEET
EVALUATION OF ACTIVITIES OF DAILY LIVING
NAME: ________________________________________________ DATE: ____________________ DIAGNOSIS: __________________________________________________________________________ PRECAUTIONS: ________________________________________________________________________ Key:
I = Patient can perform activity independently S = Patient requires supervision A= Patient requires moderate assistance D = Patient is dependent and unable to assist F = Functional N = Non-functional X = Not tested
Activity Level of Independence Functional
Non-Functional
Factors Limiting
Function
BED ACTIVITIES:
1. Moving to left
2. Moving to right
3. Rolling to left
4. Rolling to right
5. Sit up
Sitting Activities:
6. Balance sitting (legs extended)
7. Balance sitting (legs flexed over edges)
Transfer Activities:
8. From bed to chair
9. From chair to bed
10. From w/c to toilet
11. From toilet to w/c
12. W/c to tub/shower
13. Tub shower to w/c
Wheelchair Activities:
14. Propel 200 ft. on level surface
15. Ascend ramp
16. Descend ramp
17. Ascend curb
18. Descend curb

COMPETENCIES AND CRITERIA Kinesiology and Biomechanics-DPT 715
571
Ambulation Activities:
19. Stand up from chair
20. Stand up from bed
21. Ambulate 100 ft.
22. Sit down on chair
23. Sit down on bend
24. Ascend flight of stairs with rail
25. Descend flight of stairs with rail
26. Descend flight of stairs without rail
27. Descend flight of stairs without rail
28. Down to floor
29. Up from floor
Traveling Activities
30. Get into car
31. Get out of car
32. Put w/c in car
33. Get w/c out of car
34. Drive car
Assistive devices Used by the Patient
Check the appropriate boxes:
Wheelchair: Type of Gait
1. Caster Lock 1. Swing to
1. Pneumatic tires 2. Swing through
2. Cushioned seat 3. 4-point
3. Seat board 4. 3-point full weight bearing
4. Back board 5. 3-point partial weight bearing
5. Reclining back
6. Removable footrests
7. Desk arms
8. Brake extension
9. Motorized
Left Right
Braces:
1. Short leg
2. Long leg

COMPETENCIES AND CRITERIA Kinesiology and Biomechanics-DPT 715
572
3. Pelvic band
4. Knight spinal
5. Other (specify):_____________
Ambulation Device:
1. Cane
2. Walker
3. Crutches (specify type):_________________
Sling:

COMPETENCIES AND CRITERIA Kinesiology and Biomechanics-DPT 715
573
CRITERIA SHEET STRUCTURING TREATMENT SESSIONS
Introduction
Therapeutic interventions include retraining of functional mobility patterns, family and professional
training sessions, and application of exercise and modalities. The manner in which the therapist structures
treatment sessions will influence the benefit of the program. Structuring the treatment session includes
preparing the environment, scheduling practice, providing feedback, and level of assistance.
1. Pre-Planning for Procedure:
A. Identify the priority signs and symptoms which make the procedure applicable:
(1) Cognitive assessment
(2) Sensory assessment
B. Identify the rationale for choice of procedure:
(1) Safety
(2) Condition of the client:
(a) Cognitive (memory, attention) deficits
(b) Communicative limitations
(c) Interests and goals
(d) Learning stage of client
(3) Generate other possible alternative treatments.
(4) Application of procedure to short and long term goals:
(a) Environments providing motivation and challenge without overwhelming or boring the
client will affect participation and progression toward goals.
(b) Practice schedules favoring performance rather than learning will interfere with the client's
retention and transfer of skill to functional situations.
(c) Feedback schedules favoring performance rather than learning will interfere with the
client's retention and transfer of skill to functional situations.
(d) Client will be able to perform__________ (skill or task) with __________ (physical or verbal
assist) and _________ (type and amount of feedback) in _________ (type of environment)
in __________ (time frame).
2. Preparation of the Physical Therapist:
A. Review procedure as necessary.
Division of Physical Therapy
Emory University

COMPETENCIES AND CRITERIA Kinesiology and Biomechanics-DPT 715
574
B. Review medical record:
(1) Cardiopulmonary endurance precautions
(2) Musculoskeletal precautions
(3) Cognitive limitations
C. Interview client:
(1) Cognitive (attention, memory) limitations
(2) Communication deficits
D. Select and collect the correct equipment.
E. Prepare the environment and equipment/materials:
(1) Plan treatment in a quiet, secluded area if client is expected to be introduced to a new task.
(2) Plan treatment in a quiet, secluded area if client presents with attention deficits.
(3) Identify a safe but active environment if client is expected to perform previously learned skill in
a more challenging environment.
(4) Identify a novel environment to promote transfer of a previously learned skill.
3. Execute the Procedure:
A. Use the Teaching-Learning and Interpersonal Relationships criteria to establish rapport and explain
and demonstrate the procedure.
B. Sequential steps of procedure:
(1) Environment:
(a) Internal environment:
1) Provide appropriate lighting, voice tone, voice volume, and conversation topics to
optimize client's level of arousal.
2) Select appropriate task requirements to motivate and challenge client.
3) Offer choices to client to maintain an internal locus of control.
4) Introduce new tasks with an explanation of the importance and relevance to improve
client motivation.
5) Introduce new tasks with an analysis of the similarities and differences with former
tasks to prevent client from experiencing a fear of failing and to augment new learning.
(b) External environment:
1) Closed environment:
(a) Begin new tasks in a static environment where the client determines spatial and
temporal variables.
(b) Examples of closed environments include: picking up an object, walking in a quiet
hallway, and climbing stairs.
2) Open environment:
(a) Progress to dynamic environments where the client must analyze the spatial and
temporal demands prior to executing movement.
(b) Examples of open environments include: catching an object, walking in a busy
cafeteria, and addressing an escalator.
(2) Practice:
(a) Random practice:

COMPETENCIES AND CRITERIA Kinesiology and Biomechanics-DPT 715
575
1) Practice different activities and exercises in unpredictable order rather than performing
one activity solely before proceeding to the next.
2) Work on several treatment goals in the same session rather than addressing one goal
for the session.
(b) Variable practice:
1) Practice the same activity in variety of instances rather than in same environment each
trial.
2) Alter the environmental constraints demanded of the client.
(3) Feedback:
(a) Feedback Modality:
1) Provide info to client regarding success of action in modality most useful to individual.
2) Use demonstration if client is hard of hearing, speaks a foreign language, or has aphasia.
3) Use verbal feedback if the client has perceptual or sensory deficits.
4) Select appropriate rewards according to client's age and interests as indicated.
(b) Feedback Frequency:
1) Provide feedback after a time delay following the action.
(a) During the delay, ask client to evaluate the success of the activity and to identify
missing movement components.
(b) Reduce delay time and cognitive demands according to client's age, attention, and
memory.
2) Provide feedback in summary format rather than offering information following each
action.
(a) Alter number of actions provided as a summary according to client's
attention/memory.
(c) Level of Assistance:
1) Fade amount of physical assistance required by client's functional ability within and
between treatment sessions.
2) Fade amount of verbal assistance required by client's cognitive ability within and
between treatment sessions.
3) Fade amount of assistance required by caregiver according to current ability.
4) Vary type of equipment used during functional training according to performance.
C. Implement change in procedure based on:
(1) Client's ability to attend to session
(2) Client's retention and transfer of skill learning
D. Record results in SOAP format
(1) S: Report client's interpretation of success or frustration.
(2) O: Include environment, practice schedule, feedback schedule, and level of assistance used,
client's initial level of skill, and current level of ability.
(3) A: Ascertain whether/which environment, practice schedule, feedback schedule, and level of
assistance promoted learning as identified as retention/transfer of skill to novel/delayed
situation.

COMPETENCIES AND CRITERIA Kinesiology and Biomechanics-DPT 715
576
(4) P: Implement plan to continue or alter environment, practice schedule, feedback schedule, and
level of assistance or compensate for deficits.
E. Prepare client for dismissal.
F. Clean up area.

COMPETENCIES AND CRITERIA Kinesiology and Biomechanics-DPT 715
577
CRITERIA SHEET PERCEPTUAL ASSESSMENT
Introduction
The presence of perceptual dysfunction will interfere with the client's ability to carry out functional
activities. Screening and evaluation for perceptual impairments is necessary prior to treatment planning.
1. Pre-Planning for Procedure:
A. Identify the priority signs and symptoms which make the procedure applicable:
(1) CNS diagnosis
(2) Lack of attention to the environment
(3) Lack of attention to the evaluator
(4) Lack of attention to own body parts
B. Identify the rationale for choice of procedure:
(1) Safety:
(a) Injury susceptibility related to inattention
(2) Condition of the client:
(a) Trust for therapist
(b) Cognitive deficits
(3) Generate other possible alternative treatments.
(4) Application of procedure to short and long term goals:
(a) Impaired perception will reduce awareness of body in space and objects in space which will
interfere with safety, function, and learning.
2. Preparation of the Physical Therapist:
A. Review procedure as necessary.
B. Review medical record.
C. Interview client:
(1) Reports of injury or inattention
D. Select and collect the correct equipment:
(1) Paper and pen
(2) Common objects (pen, penny, key, paper clip)
(3) Pictures of family members or famous people
E. Prepare the environment and equipment/materials.
Division of Physical Therapy
Emory University

COMPETENCIES AND CRITERIA Kinesiology and Biomechanics-DPT 715
578
3. Execute the Procedure:
A. Use the Teaching-Learning and Interpersonal Relationships Criteria to establish rapport and explain
and demonstrate the procedure.
B. Sequential steps of procedure:
(1) Stereognosia:
(a) Instruct client in the procedure, providing a trial prior to proceeding.
(b) Instruct client not to guess if uncertain.
(c) Occlude vision.
(d) Place a common object in the client's hand.
(e) Ask the client to identify the object.
(2) Somatognosia:
(a) Instruct client in the procedures, providing a trial prior to proceeding.
(b) Instruct client not to guess if uncertain.
(c) Name a body part.
(d) Ask the client to point to the named body part on him/herself or the therapist.
(e) Do not differentiate right from left.
(f) Ask the client questions regarding the relationship between body parts. (Are your knees
below your belly? What is on your head, hair or feet?)
(3) Right/Left Discrimination:
(a) Instruct client in the procedures, providing a trial prior to proceeding.
(b) Instruct client not to guess if uncertain.
(c) Name a body part, differentiating right from left.
(d) Ask the client to point to the named body part on him/herself or the therapist.
(e) Ask the client to turn right or left out the doorway or to place an object to the right or left of
another.
(4) Unilateral Neglect:
(a) Instruct client in the procedures, providing a trial prior to proceeding.
(b) Present the client with several different papers with horizontal lines drawn on them.
(c) Ask the client to draw a line through the center of each line individually.
(d) Ask the client to draw or copy a picture of a person, house, or clock.
(e) Present the client with a paper with a line of letters in random order.
(f) Ask the client to draw a line through every letter on each line.
(g) Note client's ability to attend to both sides of the presented material.
(5) Homonymous Hemianopsia:
(a) Instruct client in the procedures, providing a trial prior to proceeding.
(b) Instruct client not to guess if uncertain.
(c) Instruct the client to maintain eye gaze directly in front of him/her, or to look into your eyes.
(d) Slowly move a pen from one side to the other side of the client's field of vision.
(e) Ask the client to tell you when and where he/she sees the pen.
(f) Note the pattern of visual awareness.

COMPETENCIES AND CRITERIA Kinesiology and Biomechanics-DPT 715
579
(6) Tracking:
(a) Instruct client in the procedures, providing a trial prior to proceeding.
(b) Instruct client to maintain his/her head in a fixed position facing straight ahead.
(c) Ask the client to follow a pen from one side to the other while maintaining head posture.
(7) Figure Ground:
(a) Instruct client in the procedures, providing a trial prior to proceeding.
(b) Instruct client not to guess if uncertain.
(c) Place a white sheet over a table or mat.
(d) Arrange a white towel and other common objects on the sheet (pen, paper clip, nickel,
tape).
(e) Ask the client to identify each object in front of him/her.
(8) Position in space:
(a) Instruct client in the procedures, providing a trial prior to proceeding.
(b) Instruct client not to guess if uncertain.
(c) Place several common objects on a table (toothbrush, cup, bottle of lotion).
(d) Ask the client to move one object in relation to another (place the toothbrush into the cup,
the cup on the table, the cup next to the bottle).
(9) Facial Agnosia:
(a) Instruct client in the procedures, providing a trial prior to proceeding.
(b) Instruct client not to guess if uncertain.
(c) Present the client with a picture of a family member or a famous personality.
(d) Ask the client to identify the individual.
(10) Depth Perception:
(a) Instruct client in the procedures, providing a trial prior to proceeding.
(b) Instruct client not to guess if uncertain.
(c) Instruct client to look straight ahead.
(d) Hold two different color pens at different distances in front of the client's eyes.
(e) Ask the client to tell you which of the two pens is closer to him/her.
(f) Perform the test using various distances, randomizing which pen color is closer to the client.
(11) Apraxia:
(a) Instruct client in the procedures, providing a trial prior to proceeding.
(b) The therapist sits directly opposite the client.
(c) The therapist performs a series of different limb movements (wave, brush hair, touch
shoulder).
(d) Ask the client to imitate the posture.
C. Implement change in procedure based on:
(1) Patient's ability to cooperate
(2) Accuracy of findings
(3) Contamination by cognitive or communicative deficits
D. Record results in SOAP format:
(1) S (Subjective): Report agitation or inattention.

COMPETENCIES AND CRITERIA Kinesiology and Biomechanics-DPT 715
580
(2) O (Objective): Include perception tested, percentage of correct responses, and patterns of
deficit.
(3) A (Assessment): Ascertain and report whether/which cortical structure is impaired and any
limitation to collection of valid data (cognitive or communicative deficits).
(4) P (Plan): Implement plan to train or compensate for deficits.
E. Prepare client for dismissal.
F. Clean up area.

COMPETENCIES AND CRITERIA Kinesiology and Biomechanics-DPT 715
581
INFORMATION SHEET BRUNNSTROM STAGES
Introduction
Signe Brunnstrom devised a mechanism to describe the normal recovery of motor function that occurs
following cerebral vascular accidents. Brunnstrom identified six stages based on resting posture and active
movement. Health professionals use the descriptions to communicate with each other when referring to the
level of impairment experienced by the client. The Fugl-Meyer evaluation uses the Brunnstrom stages as a
basis for assessing motor return. Practitioners need to be familiar with the descriptors to be able to
communicate effectively with other professionals.
1. Upper Extremity:
A. Recovery Stage 1:
(1) Limb is flaccid.
(2) No voluntary motor activity is present.
(3) Associated reactions cannot be elicited. Associated reactions may appear in the involved limb as
either a generalized muscular tension without joint movement or as varying degrees of joint
movement. For the purpose of standardization, resisted elbow extension ("push"), then resisted
elbow flexion ("pull") on the less involved side are the only two movements to be used to evoke
associated reactions. Since the effect is cumulative, three successive attempts are made using
the "push" motion, followed by three successive attempts using the "pull" motion with a short
rest occurring in between the two motions. The client's effort must be maximal.
B. Recovery Stage 2:
(1) Resistance to passive stretch begins to develop.
(2) Minimal voluntary motion may be present.
(3) Associated reactions may be elicited.
C. Recovery Stage 3:
(1) Resistance to passive stretch is more marked.
(2) Basic abnormal movement synergies may be performed voluntarily within a limited range. Since
flexion movements predominate in the upper extremity, an attempt should be made to test the
extension components first, followed by a rest period prior to asking clients to move within
flexion movements.
(a) Ask the client to sit erect in a chair with a solid back support, with hands resting on his or
Division of Physical Therapy
Emory University

COMPETENCIES AND CRITERIA Kinesiology and Biomechanics-DPT 715
582
her lap with neutral forearm pronation/supination. Then ask the client to reach forward and
downward to between the "knees without incorporating trunk motion”. If the client is
exhibiting movement within an abnormal extension synergy, he or she is able to perform
the motion without difficulty. The extension synergy is composed of scapular protraction,
shoulder adduction, and internal rotation, elbow extension, and forearm pronation.
(b) Ask the client to reach up from the starting position to "scratch behind your ear". A full
flexion synergy is demonstrated if he or she is able to touch behind the ipsilateral ear with
the involved limb. The flexion synergy is composed of scapular retraction and elevation,
shoulder flexion, external rotation, and abduction, elbow flexion, and forearm supination.
D. Recovery Stage 4:
(1) Resistance to passive movement is present, but begins to decline.
(2) Movements that deviate from the basic abnormal synergies can be accomplished volitionally.
(a) Client is able to pull his or her arm backward until the dorsal surface of the hand touches the
sacral region. This movement incorporates shoulder hyperextension and internal rotation,
elbow flexion, and forearm pronation.
(b) Client is able to raise the arm forward on the sagittal plane to 90 degrees of shoulder flexion
while maintaining full elbow extension.
(c) Client is able to perform alternating forearm pronation and supination while keeping the
elbow at 90 degrees of flexion, held into the trunk.
E. Recovery Stage 5:
(1) Resistance to passive movement continues to decrease.
(2) The client becomes more adept at performing normal movement patterns as volitional
movement is less dominated by abnormal synergies.
(a) Client is able to perform 90 degrees of shoulder abduction while maintaining elbow
extension and forearm pronation.
(b) Client is able to perform alternating forearm pronation and supination while maintaining the
shoulder in 90 degrees of abduction and the elbow in full extension.
(c) Client is able to perform scapular protraction (activating the serratus anterior) while
maintaining the shoulder in 90 degrees of flexion.
F. Recovery Stage 6:
(1) No resistance to passive movement is noted.
(2) Muscle actions in normal movement patterns can be performed freely.
G. Recovery Stage 7:
(1) Movement is normal motor function.
2. Lower Extremity:
A. Recovery Stage 1:
(1) Limb is flaccid.
(2) No voluntary motor activity is present.
(3) Associated reactions cannot be elicited when the client lies supine. Associated reactions are
elicited in the lower extremity by resisting plantarflexion and dorsiflexion of the less involved
ankle. Because the lower extremity is usually dominated by an abnormal extension synergy

COMPETENCIES AND CRITERIA Kinesiology and Biomechanics-DPT 715
583
pattern, an attempt should be made to elicit a flexor reaction first.
B. Recovery Stage 2:
(1) Resistance to passive stretch begins to develop.
(2) Minimal voluntary movement may be present.
(3) Associated reactions may be elicited.
C. Recovery Stage 3:
(1) Resistance to passive stretch is more marked.
(2) Basic abnormal movement synergies may be performed voluntarily within a limited range.
(a) Ask the client to lie supine and attempt to bring his or her knee toward the chest.
Components of abnormal flexion synergy are hip flexion, external rotation, and abduction,
knee flexion, and ankle dorsiflexion.
(b) Abnormal extension synergy is elicited with the client in side-lying with the lower extremity
passively placed in hip and knee flexion. The client is then asked to extend the limb.
Components of abnormal extension synergy are hip extension, internal rotation, and
adduction, knee extension, and ankle plantarflexion.
D. Recovery Stage 4:
(1) Resistance to passive stretch is present but begins to decline.
(2) Movements that deviate from the basic abnormal synergies can be accomplished volitionally.
(a) While in the supine position, the client is able to perform hip abduction while maintaining
hip and knee extension.
(b) While sitting, the client is able to perform each hip, knee, and ankle flexion past 90 degrees
individually without movement at the other two joints.
E. Recovery Stage 5:
(1) Resistance to passive stretch continues to decrease.
(2) The client becomes more adept at performing normal movement patterns as volitional
movement is less dominated by abnormal synergies.
(a) While sitting, the client is able to perform alternating ankle dorsiflexion and plantarflexion
while maintaining knee extension with his or her heel off the floor.
(b) While standing with upper extremity support, the client is able to flex the knee without
simultaneously flexing the hip.
F. Recovery Stage 6:
(1) No resistance to passive movement is noted.
(2) Muscle actions in normal movement patterns can be performed freely.
G. Recovery Stage 7:
(1) Movement is normal motor function.

COMPETENCIES AND CRITERIA Kinesiology and Biomechanics-DPT 715
584
CRITERIA SHEET ROLLING IN BED
Introduction
Rolling in bed is an important function for people of all ages. Following a neurological deficit, clients are
unable to perform this activity because of impairments in strength, balance, range, perception, cognition,
and/or sensation. Assessment of neurologic and functional status is indicated for every client with
neurologic deficit. Evaluation of rolling in bed is a critical portion of the complete neurologic evaluation.
1. Pre-Planning for Procedure:
A. Identify the priority signs and symptoms which make the procedure applicable:
(1) Client is unable to roll to the side from supine.
(2) Client is missing any combination of the following key events:
(a) Neck rotation and lateral flexion in the direction of the movement
(b) Scapular protraction with shoulder flexion to reach to the rolling side
(c) Shoulder flexion, abduction, and internal rotation on the side being rolled onto
(d) Hip external rotation on the side being rolled onto
(e) Hip flexion and abduction with posterior pelvic tilt to bring body weight forward to roll to
side
(f) Alternate to step e. to place LE into hip/knee flexion to push from bed to provide force to
roll
(3) Client is presenting with any of the following dysfunctional movements:
(a) Overcompensating by pulling with the stronger limb
(b) Neglecting the weaker limb, either rolling onto it or performing rolling without including its
progression
(c) Forward neck flexion without movement at trunk or limbs
(d) Pushing with neck or upper trunk extension
(e) Scapular retraction on the weaker limb
(4) Integrate all elements of the neurologic evaluation:
(a) Determine the primary and secondary deviations presented in the client's movement.
(b) Analyze whether treatment is indicated.
(c) Determine whether client is safe in executing the movement.
(d) Determine whether client is energy efficient in executing the movement.
Division of Physical Therapy
Emory University

COMPETENCIES AND CRITERIA Kinesiology and Biomechanics-DPT 715
585
(e) Determine whether client is able to execute the movement.
B. Identify the rationale for choice of procedure:
(1) Safety:
(a) Perceptual deficits preventing an awareness of the borders of the bed
(b) Protection of a subluxed glenohumeral joint
(2) Condition of the client:
(a) Trust for therapist
(b) Positioning limitations
(c) Postural or skeletal deformities
(3) Generate other possible alternative treatments.
(4) Application of procedure to short and long term goals:
(a) Inability to roll to the side from supine will interfere with safety, function, skin condition,
and mobility.
(b) Client will be able to roll toward the _________ side with _________ assistance for
________ component and __________ verbal cuing in __________ sessions.
2. Preparation of the Physical Therapist:
A. Review procedure as necessary.
B. Review medical record:
(1) Weight bearing or positioning precautions
(2) Perceptual deficits
(3) Musculoskeletal condition
(4) Sensory loss
(5) Vestibular dysfunction
C. Interview client:
(1) Determine current functional level.
(2) Identify any painful areas.
D. Select and collect the correct equipment.
E. Prepare the environment and equipment/materials:
(1) Remove side rails if applicable.
(2) Remove obstructive objects.
3. Execute the Procedure:
A. Use the Teaching-Learning and Interpersonal Relationships Criteria to establish rapport and explain
and demonstrate the procedure.
B. Sequential steps of procedure:
(1) Instruct client in the procedure, providing a demonstration.
(2) Present information according to client's cognitive ability.
(3) Provide hands on assist to promote proper position as indicated by client's natural pattern and
deficits.
(a) Provide a physical or verbal reminder to rotate the neck and to laterally flex upward.
(b) Provide a physical or verbal reminder to place weak UE into abduction to prevent rolling
onto it, or to place it onto the client's belly if the limb is flaccid.

COMPETENCIES AND CRITERIA Kinesiology and Biomechanics-DPT 715
586
(c) Hands on scapula of reaching UE to provide assist in bringing upper body weight forward.
(d) Provide physical or verbal assist to assure the hip is externally rotated on the side to which
rolling will occur.
(e) Provide physical or verbal assist at the pelvis to encourage bringing the LE across to roll.
(f) Alternate to e. is to provide physical or verbal assist to bring the LE into flexion and to push
from bed surface to perform the roll.
(g) Tapping of the gluteus medius to encourage step e.
(h) Tapping of the gluteus maximus to encourage step f.
(i) Use of PNF chopping pattern with UE combination and manual contacts at UE and head to
encourage rolling.
(4) Perform therapeutic interventions as indicated to resolve deficits interfering with transition:
(a) Stretch any tightness.
(b) Implement positioning, splinting, or seating protocol.
(c) Train to compensate or correct sensory or perceptual deficits.
(d) Strengthen any missing components of normal movement as indicated.
1) Practice PNF chopping pattern with UE combination and manual contacts at UE and
head against maximal resistance to strengthen rolling pattern.
2) Ask client to perform scapular protraction against the therapist's resistance while in
supine or side-lying to strengthen pectoral muscles.
3) Practice shoulder abduction with the humerus resting on the mat to strengthen the
middle deltoid, enabling the client to move the limb prior to rolling to that side.
4) Perform isometric and isotonic hip extension exercises while supine to strengthen
gluteus maximus to enable the client to push that LE into the bed to perform rolling.
5) Perform isotonic hip flexion exercises to strengthen rectus femoris, enabling the client
to be able to bring the limb forward to perform rolling.
6) Practice the act of rolling in its entirety.
(5) Instruct staff and family members in proper procedure as indicated.
C. Implement change in procedure based on:
(1) Patient's ability to follow instruction
(2) Success of intervention
D. Record results in SOAP format:
(1) S: Report client's interpretation.
(2) O: Include client's uncorrected pattern, amount of physical and verbal assist required to perform
transition, and therapist's physical hand placement used to perform transition.
(3) A: Ascertain and report whether any physical, cognitive, or communicative limitation interferes
with movement.
(4) P: Outline plan to train or compensate for deficits.
E. Prepare client for dismissal.
F. Clean up area.

COMPETENCIES AND CRITERIA Kinesiology and Biomechanics-DPT 715
587
INFORMATION SHEET TRANSITION TO SHORT SIT
Introduction
Coming to a sitting position is an important function for people of all ages. Following a neurological
deficit, clients are unable to achieve sitting because of impairments in strength, balance, range, perception,
cognition, and/or sensation. Assessment of neurologic and functional status is indicated for every client with
neurologic deficits. Evaluation of transition to sit is a critical portion of the complete neurologic evaluation.
1. Pre-Planning for Procedure: A. Identify the priority signs and symptoms which make the procedure applicable:
(1) Client is unable to achieve sitting position from a side-lying position. (2) Client is missing any combination of the following key events:
(a) Neck lateral flexion on the up side (b) Trunk lateral flexion on the up side (c) Shoulder abduction on the down side (d) Shoulder flexion and abduction on the up side (e) Scapular protraction on the up side (f) Elbow extension on the down side (g) Bilateral hip flexion and abduction (h) Bilateral knee extension to bring legs off the bed (i) Elongation of the trunk on the down side
(3) Client is presenting with any of the following dysfunctional movements: (a) Overcompensating by pulling with the stronger limb (b) Neglecting the weaker limb (c) Forward neck flexion (d) Pushing with neck or upper trunk extension (e) Shortening of the trunk on the down side (f) Scapular retraction on the weaker limb
(4) Integrate all elements of the neurologic evaluation: (a) Determine the primary and secondary deviations presented in the client's movement. (b) Analyze whether treatment is indicated. (c) Determine whether client is safe in executing the movement. (d) Determine whether client is energy efficient when executing the movement. (e) Determine whether client is able to execute the movement.
Division of Physical Therapy
Emory University

COMPETENCIES AND CRITERIA Kinesiology and Biomechanics-DPT 715
588
B. Identify the rationale for choice of procedure: (1) Safety:
(a) Perceptual deficits preventing an awareness of the borders of the bed (2) Condition of the client:
(a) Trust for therapist (b) Positioning limitations (c) Postural or skeletal deformities
(3) Generate other possible alternative treatments. (4) Application of procedure to short and long term goals:
(a) Inability to assume sitting position will interfere with safety, function, and interpersonal relationships.
(b) Client will be able to transition to sit with ________ assistance for _________ component and _______ verbal cuing in _______ sessions.
2. Preparation of the Physical Therapist: A. Review procedure as necessary. B. Review medical record:
(1) Weight bearing precautions (2) Elevated intracranial pressure (3) Perceptual deficits (4) Vestibular dysfunction (5) Dystonia
C. Interview client: (1) Determine current functional level. (2) Identify any painful areas.
D. Select and collect the correct equipment. E. Prepare the environment and equipment/materials:
(1) Remove side rails if applicable. (2) Remove obstructive objects.
3. Execute the Procedure: A. Use the Teaching-Learning and Interpersonal Relationships Criteria to establish rapport and explain
and demonstrate the procedure B. Sequential steps of procedure:
(1) Instruct client in the procedure, providing a demonstration. (2) Present information according to client's cognitive ability. (3) Provide hands on assist to promote proper position as indicated by client's natural pattern and
deficits: (a) Hand on up side shoulder to laterally flex the neck toward the up side (b) Hands on the up side shoulder and/or pelvic girdles to shorten the trunk (c) Place client's hands in an open position on the bed to accept weight (d) Hand on inferior angle of the scapula to protract weaker side (e) Assist LE's into flexion and off the side of the bed when appropriate (f) Hand on lower side trunk under the axilla to elongate the weight bearing side (g) Hand on lower side humerus to achieve shoulder abduction (h) Hand on lower side humerus to achieve elbow extension
(4) Perform therapeutic interventions as indicated to resolve deficits interfering with transition: (a) Stretch any tightness. (b) Implement positioning, splinting, or seating protocol.

COMPETENCIES AND CRITERIA Kinesiology and Biomechanics-DPT 715
589
(c) Train to compensate or correct sensory or perceptual deficits. (d) Strengthen any missing components of normal movement as indicated:
1) Ask client to perform lateral neck flexion lifting head from pillow while in side-lying position.
2) Ask client to lift head and shoulder from pillow using elbow extension of the down arm while in side-lying position.
3) Ask client to initiate bilateral hip flexion to bring LE's off the edge of the bed. 4) Ask client to initiate bilateral knee extension to complete the task of bringing LE's off the
edge of the bed. (5) Instruct staff and family members in proper procedure as indicated.
C. Implement change in procedure based on: (1) Patient's ability to follow instruction (2) Success of intervention
D. Record results in SOAP format: (1) S: Report client's interpretation. (2) O: Include client's uncorrected pattern, amount of physical and verbal assist required to perform
transition, therapist's physical hand placement used to perform transition. (3) A: Ascertain whether any physical, cognitive, or communicative limitation interferes with
movement. (4) P: Implement plan to train or compensate for deficits.
E. Prepare client for dismissal. F. Clean up area.

COMPETENCIES AND CRITERIA Kinesiology and Biomechanics-DPT 715
590
INFORMATION SHEET TRANSITION TO STAND
Introduction
Coming to a standing position is an important function for people of all ages. Following a neurological
deficit, clients are unable to achieve standing because of impairments in strength, balance, range, perception, cognition, and or sensation. Assessment of neurologic and functional status is indicated for every client with neurologic deficits. Evaluation of transition to stand is a critical portion of the complete neurologic evaluation.
1. Pre-Planning for Procedure: A. Identify the priority signs and symptoms which make the procedure applicable:
(1) Client is unable to achieve standing position from a sitting position. (2) Client is missing any combination of the following key events:
(a) Scooting toward the edge of the chair (b) Bilateral knee flexion to greater than 90 degrees (c) Bilateral heel contact directly with the floor (d) Forward trunk flexion with anterior pelvic tilt and hip flexion bringing weight symmetrically
over the forefeet (e) Shoulders aligned directly over the knees (f) Symmetrical transfer of center of mass forward and upward (g) Trunk, hip, and knee extension for final alignment
(3) Client is presenting with any of the following dysfunctional movements: (a) Pushing asymmetrically from support surface with the stronger limb (b) Using extension of the weaker LE to push toward the stronger side (c) Using upper trunk extension to push center of mass backward (d) Using neck or upper trunk flexion to bring center of mass forward rather than hip flexion (e) Equinovarus positioning of the foot
(4) Integrate all elements of the neurologic evaluation: (a) Determine the primary and secondary deviations presented in the client's movement. (b) Analyze whether treatment is indicated. (c) Determine whether client is safe in executing the movement. (d) Determine whether client is energy efficient in executing the movement. (e) Determine whether client is able to execute the movement.
B. Identify the rationale for choice of procedure:
(1) Safety: (a) Perceptual deficits preventing an awareness of position of body in space (b) Position of foot may predispose client to ankle sprain (c) Locking wheelchair brakes if indicated
Division of Physical Therapy
Emory University
COMPETENCIES AND CRITERIA Kinesiology and Biomechanics-DPT 715
591
(d) Support of UE if glenohumeral subluxation is a possibility (e) Proper body mechanics must be used by the therapist
(2) Condition of the client: (a) Trust for therapist (b) Weight bearing precautions (c) Postural or skeletal deformities
(3) Generate other possible alternative treatments. (4) Application of procedure to short and long term goals:
(a) Inability to assume standing position will interfere with safety, function, and mobility. (b) Client will be able to assume standing from sitting in surface with assistance for component
and verbal cuing in sessions.
2. Preparation of Physical Therapist: A. Review procedure as necessary. B. Review medical record:
(1) Weight bearing precautions (2) Musculoskeletal deformities (3) Perceptual deficits (4) Orthostatic hypotension (5) Vestibular dysfunction
C. Interview client: (1) Determine current functional level. (2) Identify any painful areas.
D. Select and collect the correct equipment. E. Prepare the environment and equipment/materials:
(1) Prepare wheelchair if applicable. (2) Apply orthotic device if applicable. (3) Apply gait belt if indicated.
3. Execute the Procedure: A. Use the Teaching-Learning and Interpersonal Relationships Criteria to establish rapport and explain
and demonstrate the procedure. B. Sequential steps of procedure:
(1) Instruct client in the procedure, providing a demonstration. (2) Present information according to client's cognitive ability. (3) Provide hands on assist to promote proper position as indicated by client's natural pattern and
deficits. (a) Achieve forward scooting to prevent contact of femurs with seat surface. (b) Physically place both LE's into flexed position. (c) Prevent client's hands from pushing asymmetrically from seat surface. (d) Hands on pelvis to provide an anterior pelvic tilt and forward displacement of center of
mass. (e) Hand at the sternum and clavicles to prevent forward flexion of the upper trunk. (f) Hand on the dorsal surface of the weaker foot and/or use of an orthotic to provide contact
of the calcaneus with the ground. (g) Hand on the superior aspect of the knee to encourage rear foot contact with the ground and
forward weight shift by providing pressure through the tibia to the calcaneus. (h) Hands at trunk to assist client with symmetrical upward displacement of center of mass. (i) Hands at trunk, sternum, and/or femur to provide trunk, hip, and knee extension to

COMPETENCIES AND CRITERIA Kinesiology and Biomechanics-DPT 715
592
complete standing alignment without hyper extension of the knee or pelvic retraction. (4) Perform therapeutic interventions as indicated to resolve deficits interfering with transition:
(a) Stretch any tightness. (b) Implement positioning, splinting, orthotic, or seating protocol. (c) Train to compensate or correct sensory or perceptual deficits. (d) Strengthen any missing components of normal movement as indicated.
1) Ask client to perform anterior pelvic tilt in sitting position. 2) Ask client to perform knee flexion with weaker limb, sliding the foot across the ground. 3) Practice forward displacement of center of mass over client's feet maintaining anterior
pelvic tilt and preventing forward flexion of the upper trunk. 4) Provide support in front of client if necessary to provide supportive, safe practice
environment. 5) Perform activities such as throwing and bowling to encourage forward displacement of
center of mass. 6) Practice upward displacement of center of mass, raising the buttocks from the seat
surface. 7) Ask client to perform hip and/or knee extension in standing without substituting pelvic
or trunk motion. 8) Practice entire transition of sit to stand in its entirety.
(5) Instruct staff and family members in proper procedure as indicated. C. Implement change in procedure based on:
(1) Patient's ability to follow instruction (2) Success of intervention
D. Record results in SOAP format: (1) S (Subjective): Report client's interpretation. (2) O (Objective): Include client's uncorrected pattern, amount of physical and verbal assist required
to perform transition, therapist's physical hand placement used to perform transition. (3) A (Assessment): Ascertain whether any physical, cognitive, or communicative limitation
interferes with movement. (4) P (Plan): Implement plan to train or compensate for deficits.
E. Prepare client for dismissal. F. Clean up area.
Copyright © 2022 FDOKUMEN