comandos basicos de linux
12
UNJFSC Ing. de Sistemas Ing. Carlos Márquez Álvarez 1 COMANDOS BASICOS DE LINUX Archivos , Directorios y Enlaces - Archivo -rw-r—r-- 1 root root 290 feb 26 2009 quotatab (Archivo) d Directorios drwxr-xr-x 3 root root 4096 ene 14 20:29 racoon (Directorio) l Enlace lrwxrwxrwx 1 root root 7 ene 14 20:28 rc -> rc.d/rc (Enlace) Creando Archivos desde cat. cat --- Muestra el contenido de un archivo cat [nombre del archivo] cat /etc/hosts [root@localhost etc]# cat /etc/hosts # Do not remove the following line, or various programs # that require network functionality will fail. 127.0.0.1 localhost.localdomain localhost ::1 localhost6.localdomain6 localhost6 Generando un texto: Editor de textos: cat > [ruta y nombre del archivo] Ejemplo: cat > /root/texto1.txt [root@localhost etc]# cat > /root/texto1.txt LINUX ADMINISTRACION HORARIO: LU - MI - VI 7 -10 Pulsar ctr + d (guarda y sale) [1]+ Stopped cat > /root/texto1.txt [root@localhost etc]# ls /root anaconda-ks.cfg Desktop install.log install.log.syslog texto1.txt
Transcript of comandos basicos de linux

UNJFSC Ing. de Sistemas
Ing. Carlos Márquez Álvarez 1
CCOOMMAANNDDOOSS BBAASSIICCOOSS DDEE LLIINNUUXX
Archivos , Directorios y Enlaces
- Archivo
-rw-r—r-- 1 root root 290 feb 26 2009 quotatab (Archivo)
d Directorios
drwxr-xr-x 3 root root 4096 ene 14 20:29 racoon
(Directorio)
l Enlace
lrwxrwxrwx 1 root root 7 ene 14 20:28 rc -> rc.d/rc
(Enlace)
Creando Archivos desde cat. cat --- Muestra el contenido de un archivo
cat [nombre del archivo]
cat /etc/hosts
[root@localhost etc]# cat /etc/hosts
# Do not remove the following line, or various programs
# that require network functionality will fail. 127.0.0.1 localhost.localdomain localhost ::1
localhost6.localdomain6 localhost6 Generando un texto:
Editor de textos:
cat > [ruta y nombre del archivo]
Ejemplo:
cat > /root/texto1.txt
[root@localhost etc]# cat > /root/texto1.txt
LINUX ADMINISTRACION
HORARIO: LU - MI - VI 7 -10
Pulsar ctr + d (guarda y sale)
[1]+ Stopped cat > /root/texto1.txt
[root@localhost etc]# ls /root
anaconda-ks.cfg Desktop install.log install.log.syslog texto1.txt

UNJFSC Ing. de Sistemas
Ing. Carlos Márquez Álvarez 2
Ejercicio:
Crear texto2.txt dentro del directorio root.
Contenido: Nombres y apellidos.
MANEJO DE ARCHIVOS.
Identificar los tipos de FICHEROS.
file [nombre del fichero]
Ejemplo:
file /etc/hosts
[root@localhost ~]# file /etc/hosts
/etc/hosts: ASCII English text
[root@localhost ~]# file /etc/
/etc/: directory
HEAD
MUESTRA LAS 10 PRIMERAS LINEAS DE UNA RCHIVO
head [NOMBRE DEL ARCHIVO]
EJMPLO:
head /etc/passwd
[root@localhost ~]# head /etc/passwd
root:x:0:0:root:/root:/bin/bash
bin:x:1:1:bin:/bin:/sbin/nologin
daemon:x:2:2:daemon:/sbin:/sbin/nologin
adm:x:3:4:adm:/var/adm:/sbin/nologin
lp:x:4:7:lp:/var/spool/lpd:/sbin/nologin
sync:x:5:0:sync:/sbin:/bin/sync
shutdown:x:6:0:shutdown:/sbin:/sbin/shutdown
halt:x:7:0:halt:/sbin:/sbin/halt
mail:x:8:12:mail:/var/spool/mail:/sbin/nologin
news:x:9:13:news:/etc/news:
Nota:
Passwd --- contiene las cuentas de los usuarios. (NOMBres, contraseña, rutas del home directory,
burn shell)
PARA ESPECIFICAR EL NUMERO DE LINEAS A MOSTRAR
UNJFSC Ing. de Sistemas
Ing. Carlos Márquez Álvarez 3
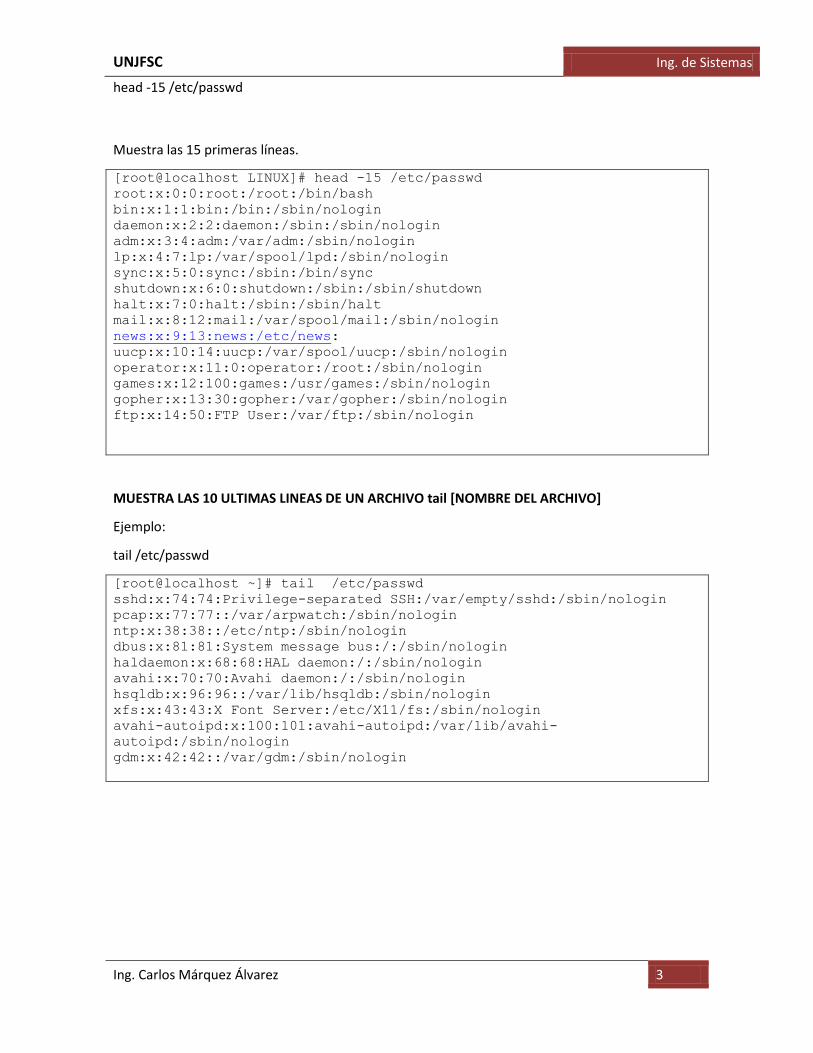
head -15 /etc/passwd
Muestra las 15 primeras líneas.
[root@localhost LINUX]# head -15 /etc/passwd
root:x:0:0:root:/root:/bin/bash
bin:x:1:1:bin:/bin:/sbin/nologin
daemon:x:2:2:daemon:/sbin:/sbin/nologin
adm:x:3:4:adm:/var/adm:/sbin/nologin
lp:x:4:7:lp:/var/spool/lpd:/sbin/nologin
sync:x:5:0:sync:/sbin:/bin/sync
shutdown:x:6:0:shutdown:/sbin:/sbin/shutdown
halt:x:7:0:halt:/sbin:/sbin/halt
mail:x:8:12:mail:/var/spool/mail:/sbin/nologin
news:x:9:13:news:/etc/news:
uucp:x:10:14:uucp:/var/spool/uucp:/sbin/nologin
operator:x:11:0:operator:/root:/sbin/nologin
games:x:12:100:games:/usr/games:/sbin/nologin
gopher:x:13:30:gopher:/var/gopher:/sbin/nologin
ftp:x:14:50:FTP User:/var/ftp:/sbin/nologin
MUESTRA LAS 10 ULTIMAS LINEAS DE UN ARCHIVO tail [NOMBRE DEL ARCHIVO]
Ejemplo:
tail /etc/passwd
[root@localhost ~]# tail /etc/passwd
sshd:x:74:74:Privilege-separated SSH:/var/empty/sshd:/sbin/nologin
pcap:x:77:77::/var/arpwatch:/sbin/nologin
ntp:x:38:38::/etc/ntp:/sbin/nologin
dbus:x:81:81:System message bus:/:/sbin/nologin
haldaemon:x:68:68:HAL daemon:/:/sbin/nologin
avahi:x:70:70:Avahi daemon:/:/sbin/nologin
hsqldb:x:96:96::/var/lib/hsqldb:/sbin/nologin
xfs:x:43:43:X Font Server:/etc/X11/fs:/sbin/nologin
avahi-autoipd:x:100:101:avahi-autoipd:/var/lib/avahi-
autoipd:/sbin/nologin
gdm:x:42:42::/var/gdm:/sbin/nologin

UNJFSC Ing. de Sistemas
Ing. Carlos Márquez Álvarez 4
PARA ESPECIFICAR EL NUMERO DE LINEAS A MOSTRAR
tail -4 /etc/passwd
[root@localhost LINUX]# tail -4 /etc/passwd
hsqldb:x:96:96::/var/lib/hsqldb:/sbin/nologin
xfs:x:43:43:X Font Server:/etc/X11/fs:/sbin/nologin
avahi-autoipd:x:100:101:avahi-autoipd:/var/lib/avahi-
autoipd:/sbin/nologin
gdm:x:42:42::/var/gdm:/sbin/nologin
Muestra las 4 últimas líneas.
Ejercicio :
El archivo /var/log/messages es un log de sistema ( Registra algunos sucesos de sistema)
Mostrar.
tail -F /var/log/messages
F Mantiene al archivo messages actualizado. Cualquier reporte generado durante la
visualizacion del archivo aparecerá en tiempo real.
Ejercicio:
Mostrar de las 15 primeras las 10 últimas del archivo passwd.
head -15 /etc/passwd | tail -10
[root@localhost ~]# head -15 /etc/passwd | tail
sync:x:5:0:sync:/sbin:/bin/sync
shutdown:x:6:0:shutdown:/sbin:/sbin/shutdown
halt:x:7:0:halt:/sbin:/sbin/halt
mail:x:8:12:mail:/var/spool/mail:/sbin/nologin
news:x:9:13:news:/etc/news:
uucp:x:10:14:uucp:/var/spool/uucp:/sbin/nologin
operator:x:11:0:operator:/root:/sbin/nologin
games:x:12:100:games:/usr/games:/sbin/nologin
gopher:x:13:30:gopher:/var/gopher:/sbin/nologin
ftp:x:14:50:FTP User:/var/ftp:/sbin/nologin
Generar un archivo de texto: diraiz.txt cuyo contenido es el listado del directorio raiz.
ll / > /root/diraiz.txt
UNJFSC Ing. de Sistemas
Ing. Carlos Márquez Álvarez 5
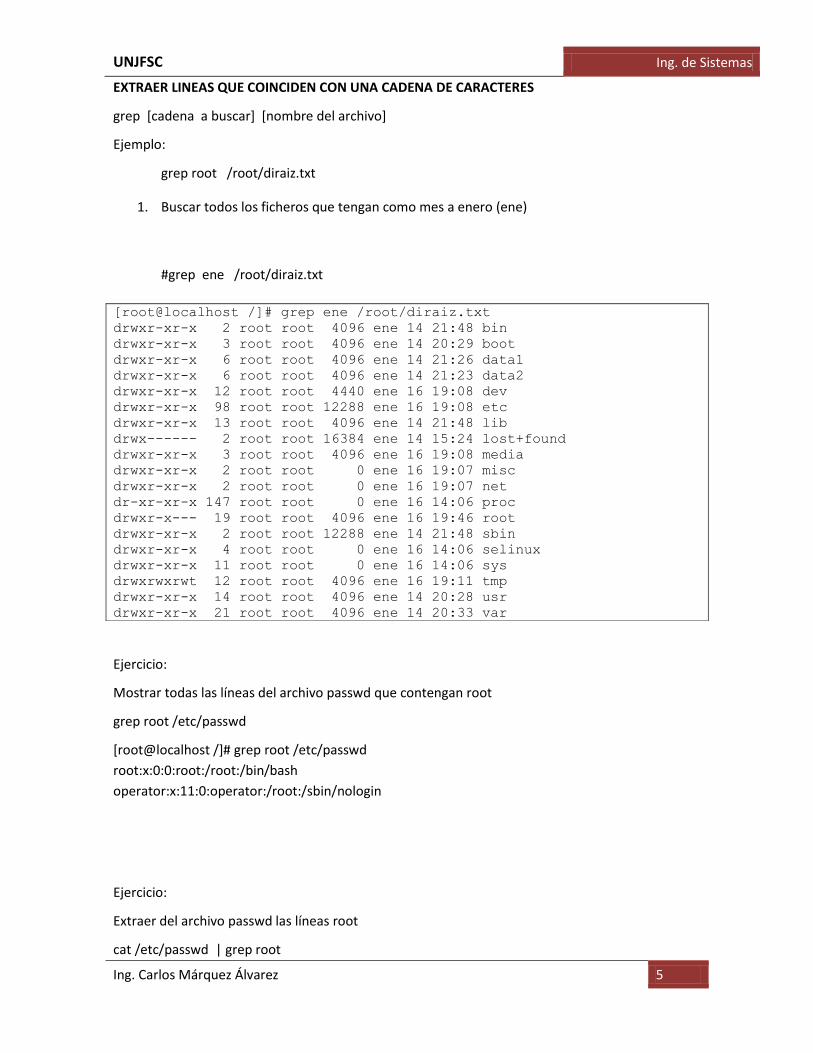
EXTRAER LINEAS QUE COINCIDEN CON UNA CADENA DE CARACTERES
grep [cadena a buscar] [nombre del archivo]
Ejemplo:
grep root /root/diraiz.txt
1. Buscar todos los ficheros que tengan como mes a enero (ene)
#grep ene /root/diraiz.txt
Ejercicio:
Mostrar todas las líneas del archivo passwd que contengan root
grep root /etc/passwd
[root@localhost /]# grep root /etc/passwd
root:x:0:0:root:/root:/bin/bash
operator:x:11:0:operator:/root:/sbin/nologin
Ejercicio:
Extraer del archivo passwd las líneas root
cat /etc/passwd | grep root
[root@localhost /]# grep ene /root/diraiz.txt
drwxr-xr-x 2 root root 4096 ene 14 21:48 bin
drwxr-xr-x 3 root root 4096 ene 14 20:29 boot
drwxr-xr-x 6 root root 4096 ene 14 21:26 data1
drwxr-xr-x 6 root root 4096 ene 14 21:23 data2
drwxr-xr-x 12 root root 4440 ene 16 19:08 dev
drwxr-xr-x 98 root root 12288 ene 16 19:08 etc
drwxr-xr-x 13 root root 4096 ene 14 21:48 lib
drwx------ 2 root root 16384 ene 14 15:24 lost+found
drwxr-xr-x 3 root root 4096 ene 16 19:08 media
drwxr-xr-x 2 root root 0 ene 16 19:07 misc
drwxr-xr-x 2 root root 0 ene 16 19:07 net
dr-xr-xr-x 147 root root 0 ene 16 14:06 proc
drwxr-x--- 19 root root 4096 ene 16 19:46 root
drwxr-xr-x 2 root root 12288 ene 14 21:48 sbin
drwxr-xr-x 4 root root 0 ene 16 14:06 selinux
drwxr-xr-x 11 root root 0 ene 16 14:06 sys
drwxrwxrwt 12 root root 4096 ene 16 19:11 tmp
drwxr-xr-x 14 root root 4096 ene 14 20:28 usr
drwxr-xr-x 21 root root 4096 ene 14 20:33 var

UNJFSC Ing. de Sistemas
Ing. Carlos Márquez Álvarez 6
[root@localhost /]# cat /etc/passwd | grep root
root:x:0:0:root:/root:/bin/bash
operator:x:11:0:operator:/root:/sbin/nologin
Ejercicio:
Mostrar a todas las líneas cuya número de inodo sea 1009857
ls / -li
1009857 drwxr-xr-x 3 root root 4096 ene 14 20:29 boot
[root@localhost LINUX]# ls / -lia | grep 1009857
1009857 drwxr-xr-x 3 root root 4096 ene 14 20:29 boot
ADMINISTRACION DE USUARIO Y GRUPOS.
USUARIOS.
Tiene acceso al servidor.
Ejemplo:
root
Los usuario tienen nombre y número que los identifica.
Ejemplo root --- UID:0 (Numero de identificación de usuario)
Para cualquier usuario creado por el administrador el sistema le asignara un correlativo iniciando
desde 500
Ejemplo:
user1 ---UID- 500
user2 ---UID ---501
user3 -----UID- 502
LOS GRUPOS.
El grupo reune a los usuarios con ciertos derechos comunes.
Los grupos tiene un numero que los identifica: GID.
Ejemplo:
La empresa: sistemas SAC. , tiene las siguientes áreas de trabajo:
UNJFSC Ing. de Sistemas
Ing. Carlos Márquez Álvarez 7
Area:
gerencia: gerente1
contabilidad : contador1 , contador 2
ventas: vendedor1 vendedor2
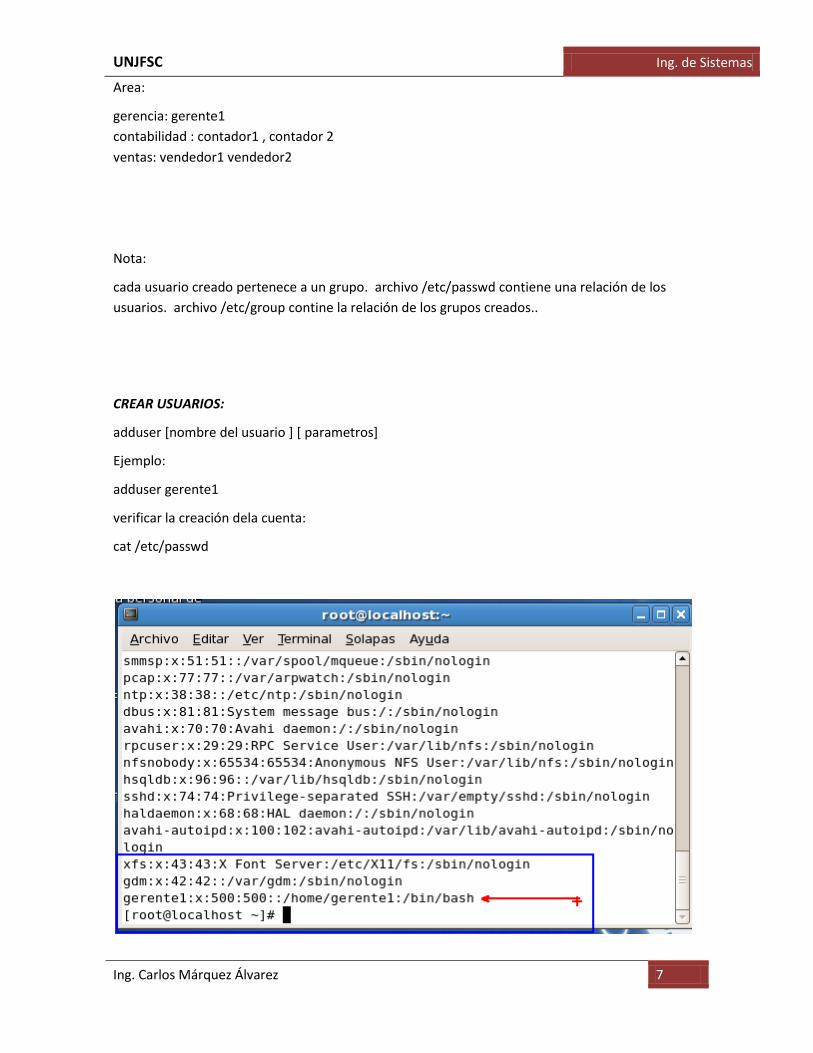
Nota:
cada usuario creado pertenece a un grupo. archivo /etc/passwd contiene una relación de los
usuarios. archivo /etc/group contine la relación de los grupos creados..
CREAR USUARIOS:
adduser [nombre del usuario ] [ parametros]
Ejemplo:
adduser gerente1
verificar la creación dela cuenta:
cat /etc/passwd

UNJFSC Ing. de Sistemas
Ing. Carlos Márquez Álvarez 8
NOTA:
LA APLICACION DE LA REGLA NOMBRE APELLIDO.
El nombre de usuario tiene le primer caraacter del nombre y el resto su apellido.
Ejemplo:
Juan Perez -----------------> jperez
Crear el usuario:
SUNOmbre SUApellido. -------
[root@localhost LINUX]# adduser gerente1
Passwd gerente1
[root@localhost LINUX]# adduser cmarquez
[root@localhost LINUX]# adduser jperez
¿Cuál es el grupo de pertenencia?
Cada usuario pertenece a su propio grupo.
jperez pertenece al grupo jperez
Verificar:
tail /etc/passwd
gerente1 : x : 500 :500 ::/home/gerente1
:/bin/bash
Nombre del usuario Contr. Encrip. UID: GID: Home directory: Shell del usuario.
UID : NÚMERO DE IDENTIFICACION DEL USUARIO GID NÚMERO DE IDENTIFICACION DEL GRUPO.

UNJFSC Ing. de Sistemas
Ing. Carlos Márquez Álvarez 9
CREA GRUPOS
groupadd [nombre del grupo]
Ejemplo:
groupadd gerencia
Verificar :
[root@localhost LINUX]# tail /etc/group
haldaemon:x:68:
avahi:x:70:
hsqldb:x:96:
xfs:x:43:
avahi-autoipd:x:101:
gdm:x:42:
gerente1:x:500:
cmarquez:x:501:
jperez:x:502:
gerencia:x:503:
NOTA:
1.-CADA USUARIO CREADO TENDRA UN DIRECTRIO PERSONAL (HOME DIRECTORY) DENTRO DE
home
[root@localhost LINUX]# ll /home
total 24
drwx------ 3 gerente1 gerente1 4096 ene 16 20:30 gerente1
drwx------ 3 jperez jperez 4096 ene 16 20:31 jperez
drwx------ 3 cmarquez cmarquez 4096 ene 16 20:30 cmarquez
2. LOS USUARIOS SON PROPIETARIOS DE SU HOME DIRECTORY.
usuario es dueño del directorio gerente1-------
d rwx------ 3 gerente1 gerente1 4096 ene 16 20:30 gerente1
[Permisos ] [Num de enlac] [NOmb prpietario] [nomb. grupo] [tamanño] [fecha y hora] [nombre
del fichero]
DAR PERTENENCIA DE UN USUARIO A UN GRUPO

UNJFSC Ing. de Sistemas
Ing. Carlos Márquez Álvarez 10
Durante la creación del usuario:
adduser -g [Nombre del grupo] [ nombre del usuario]
Ejemplo:
adduser -g contabilidad contador1
COntador1 pertenece al grupo contabilidad.
[root@localhost LINUX]# tail /etc/passwd
colocar resultado del archivo
Crear:
gerencia: gerente1
contabilidad : contador1 , contador2, gerente1
ventas: vendedor1 vendedor2,gerente1
CAMBIAR DE GRUPO A UN USUARIO:
usermod -g [nombre del grupo] [nombre del dusuario]
Ejemplo:
usermod -g gerencia gerente1
Para dar pertenencia de un usuario a más de un grupo:
usermod -G nombregrupo1,nombregrupo2,nombrehrupo3 [nombre usuario]
ejemplo:
usermod -G gerencia,contabilidad,ventas gerente1
mostrar una relación de los usuarios creados por el administrador:
cat /etc/passwd | grep 50
[root@localhost LINUX]# cat /etc/passwd | grep 50
ftp:x:14:50:FTP User:/var/ftp:/sbin/nologin
gerente1:x:500:500::/home/gerente1:/bin/bash
jyupanqui:x:501:501::/home/jyupanqui:/bin/bash
jperez:x:502:502::/home/jperez:/bin/bash

UNJFSC Ing. de Sistemas
Ing. Carlos Márquez Álvarez 11
contador1:x:503:504::/home/contador1:/bin/bash
CAMBIA DE PROPIETARIO A UN FICHERO.
chown [nombre del propietario] [nombre del fichero]
[root@localhost ~]# ls -l
total 80
rw------- 1 root root 1086 ene 14 20:35 anaconda-ks.cfg drwxr-xr-x 2 root root 4096 ene 14
22:00 Desktop
rw-r—r-- 1 root root 1137 ene 16 19:46 diraiz.txt
rw-r—r-- 1 root root 30642 ene 14 20:35 install.log
rw-r—r-- 1 root root 4386 ene 14 20:33 install.log.syslog
rw-r—r-- 1 root root 51 ene 14 21:42 texto1.txt
[root@localhost ~]# chown gerente1 texto1.txt
[root@localhost ~]# ls -l
total 80
rw------- 1 root root 1086 ene 14 20:35 anaconda-ks.cfg drwxr-xr-x 2 root root 4096
ene 14 22:00 Desktop
rw-r—r-- 1 root root 1137 ene 16 19:46 diraiz.txt
rw-r—r-- 1 root root 30642 ene 14 20:35 install.log
rw-r—r-- 1 root root 4386 ene 14 20:33 install.log.syslog
rw-r—r-- 1 gerente1 root 51 ene 14 21:42 texto1.txt
Practica:
Crear el archivo texto1.txt en root el cual contendrá el listado del directorio raíz
#ls –l > /root/texto1.txt
CAMBIA DE GRUPO A UN FICHERO
chgrp [nombre del grupo] [nombre del fichero]
Ejemplo:
Listado Actual del directorio

UNJFSC Ing. de Sistemas
Ing. Carlos Márquez Álvarez 12
drwxr-xr-x 3 root root 4096 ene 14 20:29 boot
drwxr-xr-x 2 root root 4096 ene 16 21:42 data
drwxr-xr-x 6 root root 4096 ene 14 21:26 data1
Aplicamos
chgrp gerencia /data
Listado después del cambio
drwxr-xr-x 3 root root 4096 ene 14 20:29 boot
drwxr-xr-x 2 root gerencia 4096 ene 16 21:42 data
drwxr-xr-x 6 root root 4096 ene 14 21:26 data1