
CLIMBER 9.18 - Grillo SpA
48
02450-14 CLIMBER 9.18 OPERATOR'S MANUAL MANUALE DELL'OPERATORE MANUAL DE INSTRUCCIONES
-
Upload
khangminh22 -
Category
Documents
-
view
1 -
download
0
Transcript of CLIMBER 9.18 - Grillo SpA

024
50-1
4
CLIMBER 9.18OPERATOR'S MANUALMANUALE DELL'OPERATOREMANUAL DE INSTRUCCIONES

SUMMARY
Safety rulesInstructions :
Warnings 5Identification and servicing 6Technical specifications 7Putting the machine into service 8Instructions for use 8Maintenance and lubrication 10
Illustrations 38EC Declaration of conformity - Noise and vibrations levels 45
INDICE
Norme antinfortunisticheIstruzioni :
Avvertenze 16Identificazione e assistenza 17Caratteristiche tecniche 18Messa in opera della macchina 19Istruzioni d’uso 19Manutenzione e lubrificazione 21
Figure 38Certificato di conformità CE - Rumorosità e livelli di vibrazione 45
ÍNDICE
Normas de seguridadInstrucciones:
Advertencias 27Identificación y asistencia 29Características técnicas 29Puesta en servicio de la máquina 30Instrucciones de uso 30Mantenimiento y lubricación 32
Ìndice de ilustraciones 38Certificado de conformidad CE - Niveles de ruido y vibración 45
- i -

SAFETY SYMBOLS - SIMBOLOGIA PER LA SICUREZZA - SYMBOLOGIE POUR LA SECURITE –SICHERHEITSSYMBOLE- SIMBOLOGÍA DE SEGURIDAD
OPEN MANUAL- means that you must read the operator's manual very carefully.
MANUALE APERTO - significa che dovete leggere attentamente il manuale di uso e manutenzione.
MANUEL OUVERT – signifie qu'il faut lire avec attention le présent manuel.
OFFENES HANDBUCH – bedeutet, dass Sie die Gebrauchs- und Wartungsanleitung aufmerksam durchlesen müssen.
MANUAL ABIERTO – es decir que hay que leer muy atentamente el manual del operador.
CAUTION! - means that you have to pay particular attention to the operation you have to carry out, in particular if there is theindication “DANGER”.
ATTENZIONE! - significa che dovete porre particolare attenzione all’operazione che dovete effettuare, in particolare se vi è anchel’indicazione di “Pericolo”.
ATTENTION! - signifie qu'il faut faire particulière attention dans l'opération que vous allez faire, en particulier s'il y a aussil'indication “DANGER”.
VORSICHT! - bedeutet, dass Sie besondere Aufmerksamkeit beim Durchführen des Vorgangs haben müssen, insbesondere wennauch der Hinweis “GEFAHR” aufgeführt ist.
ATENCIÓN! - es decir que hay que poner mayor atención en la operación a ejecutar si, en particular cuando hay también laindicación “Peligro”.
INTERDICTION, YOU MUST NOT DO THAT! - means that it is absolutely forbidden to carry out the operations reported under thissymbol because they could lead to mortal danger.
DIVIETO, NON FARE! - significa che non dovete assolutamente fare le operazioni riportate sotto questo simbolo, potrebbecomportare un pericolo mortale.
INTERDICTION, NE PAS FAIRE! - signifie qu'il est absolument interdit d' effectuer les opérations reportées sous cette indication,car elles pourraient conduire au danger de mort.
VERBOT, strengstens untersagt! - bedeutet, dass der Vorgang unter diesem Symbol absolut nicht durchgeführt werden darf, da erzur einer lebensgefährlichen Situation führen könnte.
PROHIBICIÓN, NO LO HAGAN! - es decir que no hay que hacer absolutamente las operaciones bajo este símbolo, podríacomportar un peligro mortal.
NOTE, you have to pay particular attention to the note put next to this symbol
NOTA, dovete porre particolare attenzione alla nota posta accanto a questo simbolo.
NOTE, il faut faire attention particulière à la note mise à côté de ce symbole.
ANMERKUNG, besondere Aufmerksamkeit muss auf die Anmerkungen neben diesem Symbol gelenkt werden.
NOTA, hay que poner atención particular en la nota puesta a lado de este símbolo.
You must not repair nor lubricate the machine with moving parts or with the engine put on.
Non riparare o lubrificare la macchina con organi in movimento o motore acceso
Ne pas réparer ou lubrifier la machine avec des parties en mouvement ou à moteur en marche.
Niemals bei bewegenden Objekten oder bei laufendem Motor Reparationen oder Einschmierungen durchführen.
No reparar ni lubrificar la máquina con órganos en movimiento o motor en marcha.
You must not smoke, light matches or lift flames, trigger frames nor cause sparks.
Vietato fumare, accendere fiammiferi o fiamme, lasciare fiamme libere o creare scintille.
Il est interdit de fumer, allumer des allumettes ou du feu, laisser des flammes libres ou de causer des étincelles.
Es ist untersagt zu Rauchen, Streichhölzer oder Feuer anzuzünden, Flammen auslösen oder Funken verursachen.
Prohibido fumar, encender cerillas o fuego, dejar llamas o crear chispas.
Use personal protective equipement
Utilizzare mezzi di protezione individuali
Utilisez l'équipement de protection individuelle
Individuelle Schutzausrüstung benutzen
Utilizar dispositivo de proteccion individual

GENERAL SECURITY RULES
NORME DI CARATTERE GENERALE SULLA SICUREZZA
SICHERHEITSHINWEISE
RÈGLES GÉNÉRALES DE SÉCURITÉ
NORMAS DE CARÁCTER GENERAL SOBRE LA SEGURIDAD
NORMAS DE CARÁCTER GENERAL ACERCA DA SEGURANÇAPay attention to symbol DANGER! It points out all most dangerous operations according to the situation. All safety rules are important and therefore must be strictlyobserved. Always keep this handbook within the reach, read it carefully and learn how to use the equipment in a safe way. Let nobody, not provided with necessaryinformation, work with the equipment.
Fare attenzione al simbolo PERICOLO! Esso indica la presenza delle principali situazioni di pericolo. Tutte le norme antinfortunistiche contente sono importanti evanno rispettate. Tenere sempre questo manuale a portata di mano, leggerlo attentamente ed imparare ad usare l’attrezzatura in modo sicuro. Non permettere chequalcuno operi con questa attrezzatura senza aver ricevuto istruzioni esaurienti.
Attention au symbole DANGER! Il indique la présence des principales situations de danger. Toutes les normes contenues pour la prévention des accidents sontimportantes et doivent être respectées scrupuleusement. Garder toujours ce manuel à la portée de la main, le lire attentivement et apprendre à utiliser ce matérielen toute sécurité. Ne pas permettre que d’autres personnes utilisent ce matériel sans avoir reçus des instructions exhaustives.
Achtung - die mit dem Symbol GEFAHR! gekennzeichneten Hinweise weisen auf potentielle Gefahrensituationen hin. Alle sicherheitsrelevanten Hinweise in diesemHandbuch sind sehr wichtig und müssen unbedingt befolgt werden. Bewahren Sie dieses Handbuch stets griffbereit auf, lesen Sie es aufmerksam durch, und lernenSie, die Maschine und die gesamte Ausrüstung sicher zu benutzen. Die Maschine darf nur von Personen benutzt werden, die vorher entsprechend unterwiesenwurden.
Preste atención al símbolo ¡PELIGRO! Indica la presencia de situaciones importantes de peligro. Todas las normas de prevención de accidentes detalladas sonimportantes y deben respetarse estrictamente. Conserve este manual al alcance de la mano, léalo atentamente y aprenda a utilizar el equipamiento de modoseguro. No permita que otras personas operen con este equipamiento sin haber recibido instrucciones exhaustivas.
Take special care not to touch hot parts of the engine.
Prestate particolare attenzione a non entrare in contatto con parti surriscaldate del motore.
Veiller tout particulièrement à ne pas toucher des éléments surchauffés du moteur.
Achtung – keine heißen Motorteile berühren!
No tocar partes recalentadas del motor.
Tome muito cuidado para não entrar em contacto com as partes aquecidas do motor.
Engine exhaust fumes can cause sickness or death. If it is necessary to run anengine in an enclosed area, use an exhaust pipe extension to remove thefumes. Always try to work in a well ventilated area.
I gas di scarico possono causare malanni o morte. Se è necessario mettere inmoto un motore in uno spazio chiuso, usare una prolunga tubo di scarico per faruscire il fumo. Lavorare in una zona ben ventilata.
L’exhalation des gaz d’échappement peut être cause d’intoxication ou de mort.S’il est vraiment nécessaire d’allumer le moteur à l’intérieur, appliquer au tuyaud’échappement un autre tuyau extensible pour permettre la sortie des gaz. Il esttoujours mieux de travailler en plein air.
Auspuffgase können Übelkeit oder Tod verursachen. Wenn es notwendig ist,einen Motor in einem geschlossenen Raum laufen zu lassen, benützen Sie eineVerlängerung, um das Auspuffgas abzuleiten. Versuchen Sie immer in einemgut belüfteten Raum zu arbeiten.
Los gases de escape pueden provocar enfermedades o muerte. De tener queponer en marcha un motor en un espacio cerrado, usar una prolongación deltubo de escape para que salga el humo. Trabajar en una zona bien ventilada.
Os gases de escape podem causar danos ou morte. Caso seja necessáriofazer com que o motor funcione num espaço fechado, utilize uma extensãopara o tubo de escape que os fumos sejam expulso para o exterior. Trabalhenuma área bem ventilada.
Caution! Never touch moving pulleys or belts. They can be very dangerous.Never do maintenance with engine running.
Attenzione! Non toccare mai pulegge o cinghie in movimento, creano gravidanni alla persona. Non fare manutenzione col motore in moto.
Attention! Ne jamais toucher ni poulies ni courroies en mouvement, ellespeuvent provoquer des accidents aux personnes. Ne pas faire l’entretien quandle moteur est en marche.
Vorsicht! Nie laufende Riemenscheiben oder Treibriemen anfassen, da esgefährlich ist. Nie bei laufendem Motor Instandhaltung machen.
¡Atención! No tocar jamás poleas o correas en movimiento, porque puedencrear graves daños a la persona. No efectuar el mantenimiento con el motor enmarcha.
Atenção! Nunca toque nas polias ou correias em movimento devido ao altorisco de ferimentos. Nunca faça a manutenção da máquina com o motor ligado.
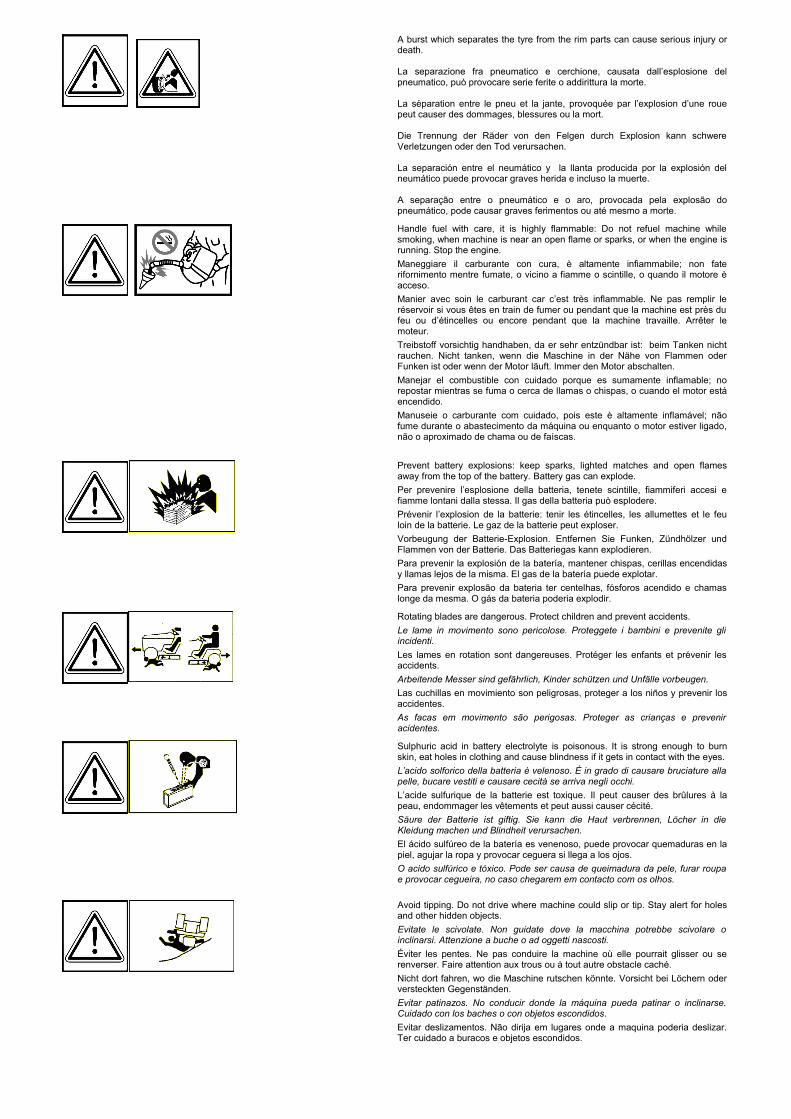
A burst which separates the tyre from the rim parts can cause serious injury ordeath.
La separazione fra pneumatico e cerchione, causata dall’esplosione delpneumatico, può provocare serie ferite o addirittura la morte.
La séparation entre le pneu et la jante, provoquée par l’explosion d’une rouepeut causer des dommages, blessures ou la mort.
Die Trennung der Räder von den Felgen durch Explosion kann schwereVerletzungen oder den Tod verursachen.
La separación entre el neumático y la llanta producida por la explosión delneumático puede provocar graves herida e incluso la muerte.
A separação entre o pneumático e o aro, provocada pela explosão dopneumático, pode causar graves ferimentos ou até mesmo a morte.
Handle fuel with care, it is highly flammable: Do not refuel machine whilesmoking, when machine is near an open flame or sparks, or when the engine isrunning. Stop the engine.
Maneggiare il carburante con cura, è altamente infiammabile; non faterifornimento mentre fumate, o vicino a fiamme o scintille, o quando il motore èacceso.
Manier avec soin le carburant car c’est très inflammable. Ne pas remplir leréservoir si vous êtes en train de fumer ou pendant que la machine est près dufeu ou d’étincelles ou encore pendant que la machine travaille. Arrêter lemoteur.
Treibstoff vorsichtig handhaben, da er sehr entzündbar ist: beim Tanken nichtrauchen. Nicht tanken, wenn die Maschine in der Nähe von Flammen oderFunken ist oder wenn der Motor läuft. Immer den Motor abschalten.
Manejar el combustible con cuidado porque es sumamente inflamable; norepostar mientras se fuma o cerca de llamas o chispas, o cuando el motor estáencendido.
Manuseie o carburante com cuidado, pois este è altamente inflamável; nãofume durante o abastecimento da máquina ou enquanto o motor estiver ligado,não o aproximado de chama ou de faíscas.
Prevent battery explosions: keep sparks, lighted matches and open flamesaway from the top of the battery. Battery gas can explode.
Per prevenire l’esplosione della batteria, tenete scintille, fiammiferi accesi efiamme lontani dalla stessa. Il gas della batteria può esplodere.
Prévenir l’explosion de la batterie: tenir les étincelles, les allumettes et le feuloin de la batterie. Le gaz de la batterie peut exploser.
Vorbeugung der Batterie-Explosion. Entfernen Sie Funken, Zündhölzer undFlammen von der Batterie. Das Batteriegas kann explodieren.
Para prevenir la explosión de la batería, mantener chispas, cerillas encendidasy llamas lejos de la misma. El gas de la batería puede explotar.
Para prevenir explosão da bateria ter centelhas, fósforos acendido e chamaslonge da mesma. O gás da bateria poderia explodir.
Rotating blades are dangerous. Protect children and prevent accidents.
Le lame in movimento sono pericolose. Proteggete i bambini e prevenite gliincidenti.
Les lames en rotation sont dangereuses. Protéger les enfants et prévenir lesaccidents.
Arbeitende Messer sind gefährlich, Kinder schützen und Unfälle vorbeugen.
Las cuchillas en movimiento son peligrosas, proteger a los niños y prevenir losaccidentes.
As facas em movimento são perigosas. Proteger as crianças e preveniracidentes.
Sulphuric acid in battery electrolyte is poisonous. It is strong enough to burnskin, eat holes in clothing and cause blindness if it gets in contact with the eyes.
L’acido solforico della batteria è velenoso. È in grado di causare bruciature allapelle, bucare vestiti e causare cecità se arriva negli occhi.
L’acide sulfurique de la batterie est toxique. Il peut causer des brûlures à lapeau, endommager les vêtements et peut aussi causer cécité.
Säure der Batterie ist giftig. Sie kann die Haut verbrennen, Löcher in dieKleidung machen und Blindheit verursachen.
El ácido sulfúreo de la batería es venenoso, puede provocar quemaduras en lapiel, agujar la ropa y provocar ceguera si llega a los ojos.
O acido sulfúrico e tóxico. Pode ser causa de queimadura da pele, furar roupae provocar cegueira, no caso chegarem em contacto com os olhos.
Avoid tipping. Do not drive where machine could slip or tip. Stay alert for holesand other hidden objects.
Evitate le scivolate. Non guidate dove la macchina potrebbe scivolare oinclinarsi. Attenzione a buche o ad oggetti nascosti.
Éviter les pentes. Ne pas conduire la machine où elle pourrait glisser ou serenverser. Faire attention aux trous ou à tout autre obstacle caché.
Nicht dort fahren, wo die Maschine rutschen könnte. Vorsicht bei Löchern oderversteckten Gegenständen.
Evitar patinazos. No conducir donde la máquina pueda patinar o inclinarse.Cuidado con los baches o con objetos escondidos.
Evitar deslizamentos. Não dirija em lugares onde a maquina poderia deslizar.Ter cuidado a buracos e objetos escondidos.

DANGER! Machine roll-over: Do not use this machine on slopes greater than17° (30%).
PERICOLO! Ribaltamento della macchina. Non usare questa macchina supendii superiori ai 17° (30%).
DANGER! Renversement de la machine. Ne pas utiliser cette machine sur despentes supérieures à 17° (30%).
GEFAHR! Umstürzen der Maschine. Die Maschine nicht an Hängen mit einer Neigungüber 17° (30%) einsetzen.
¡PELIGRO! Volcado de la máquina. No utilizar esta máquina en pendientessuperiores a 17° (30%).
PERIGO! Revirado da máquina. Não use essa máquina em inclinações alémde 17° (30%).
DANGER! READ THE INSTRUCTION MANUAL. KEEP SAFETY DISTANCES.
PERICOLO! LEGGERE IL MANUALE D’ISTRUZIONE. TENERE LONTANO LEPERSONE.
DANGER! LIRE LE MANUEL D’INSTRUCTIONS. RESPECTER LES DISTANCES DE SÉCURITÉ
GEFAHR! DIE GEBRAUCHS ANLEITUNG DURCHLESEN. NICHT IN DER NÄHE VON ANDEREN PERSONEN MÄHEN.
PELIGRO! LEER LAS INSTRUCCIONES. MANTENER ALEJADAS LAS PERSONAS.
PERIGO! LER O MANUAL DE INSTRUÇÕES. MANTER AS PESSOAS AFASTADAS.
Before using the machine, it is mandatory to put on the appropriate individual safety devices: body protection, protection gloves, security shoes, ear protection.
Prima di utilizzare la macchina, è obbligatorio indossare gli appositi dispositivi disicurezza individuali: protezione del corpo, guanti di protezione, calzature di sicurezza, protezione dell’udito.
Avant d’utiliser la machine, il est obligatoire de mettre les dispositifs individuels de sécurité appropriés: protection du corps, gants de protection, chaussures de sécurité, protection de l’ouïe.
Vor dem Gebrauch der Maschine ist es vorgeschrieben, die geeignete persönlichen Schutzkleidung anzuziehen: Körperschutz, Schutzhandschuhe, Sicherheitsschuhe, Gehörschutz.
Antes de utilizar la máquina es obligatorio ponerse los dispositivos individuales de seguridad apropiados: protección del cuerpo, guantes de protección, calzado de seguridad, protección del oído.

ALTEZZA DI TAGLIOCUTTING HEIGHT
HAUTEUR DE COUPESCHNITTHÖHE
ALTURA DE CORTE
STOPSTOP
ARRÊTE
STOPPARAD
O
MARCIA AVANTIFORWARD GEARMARCHE AVANT
VORWÄRTSFAHRT
DELANTE
LENTASLOWLENT
LANGSAMLENTAMENTE
VELOCEFAST
RAPIDESCHNELL
VELOZ
LENTASLOWLENT
LANGSAMLENTAMENTE
VELOCEFAST
RAPIDESCHNELL
VELOZ
RETROMARCIAREVERSE GEAR
MARCHE ARRIÈRERÜCKWÄRTSFAHRTMARCHA INVERTIDA
INSERIMENTO PTOPTO ENGAGEMENT
CONNECTION PRISE DE FORCEZAPFWELLE EINSCHALTUNGCONEXIÓN TOMA DE FUERZA
4
PERICOLODANGERDANGEREUXVORSICHTPELIGRO
ARRESTO LAMABLADE DISENGAG.ARRETE DE LAME
MESSERABSCHALTUNGDESCONNECTION
DE CUCHILLA
INSERIMENTO LAMABLADE ENGAGEMENT
CONNECTION DE LA LAMEMESSERANSCHALTUNGCONEXIÓN DE CUCHILLA
DIFFERENTIAL LOCKBLOCC. DIFFERENZIALEBLOCAGE DIFERENTIELDIFFERENTIALSPERREBLOQUEO DIFERENCIAL
FRENOBRAKEFREIN
BREMSEFRENO
CAUTION, DANGER!ATTENZIONE, PERICOLO!ATTENTION, DANGER!VORSICHT, GEFAHR!¡ATENCION, PELIGRO!
AVVIAMENTO A FREDDOCHOKE STARTDEMARRAGE A FROIDKALTSTARTARRANQUE EN FRIO
ACCELERATORETHROTTLE
ACCELERATEURAKZELERATORACELERATOR
ARRESTO LAMABLADE DISENGAG.ARRETE DE LAME
MESSERABSCHALTUNGDESCONNECTION
DE CUCHILLA

Climber 9.18/ Translation of the original instructions
HYDROSTATIC GRASS CUTTER
GRILLO CLIMBER 9.18Dear Customer,Thank you for choosing our product. We hope that this new tractor mower will perfectly meet yourrequirements. For best use and maintenance over time, please carefully read and follow the instructionsgiven in this manual. This will enable you to get top results from your mower and will prevent avoidableexpense. Please look after this manual which should always be kept with the machine.
GENERAL DESCRIPTION AND INTENDED USE
The Grillo machine Climber 9.18 is a ride-on grass-cutter with operator on board, designed for the cut of grass, on slopes also.
WARNING! Before starting the engine, read this manual carefully. Thefollowing warnings are very important in ensuring safety!
WARNINGS
Caution is the best tool for accident prevention.You are urged to read the following instructions for use of the grass-cutter before starting work. Incorrect use of the mower and its equipment may cause damage. To reduce this risk, follow theprecautions given below: 1) Read the whole of this before turning on and using the grass-cutter, before starting any work at all. 2) Pay particular attention to the warnings and safety labels set out around the grass-cutter. 3) Before allowing others to use the grass-cutter, inform them of the safety rules and carefully instruct
them on how to use the machine. 4) Before starting work, put on suitable working clothes, gloves, strong shoes and protective
glasses. 5) Wear special acoustic protections (ear-caps) during work. 6) Before turning on the machine, make sure there are no persons around it; especially children
(minimum distance 15 metres). 7) Before driving the machine in reverse, make sure there are no persons or obstacle in the way. 8) Check the condition of the ground before mowing. Make sure that there are no stones, sticks, or
other objects, which could be run over and become a danger when projected. 9) If any impact with a foreign object occurs, disengage the blade, turn off the engine, remove the
ignition key and examine the lawnmower. If the machine vibrates, have it repaired. 10) Before getting off the mower, turn off the engine, turn off the PTO, remove the ignition key and lower
the cutting deck in the lowest position.11) Always drive slowly along uneven paths. 12) Keep the speed down when driving down slopes. 13) Always turn slowly when driving downhill. 14) The user is always liable for any damage caused to third parties. 15) Deformed or damaged blades must always be replaced , never just repaired.16) Always use original GRILLO spare parts and accessories. 17) Only work in sunlight or under effective artificial lighting.18) Only store fuel in suitable containers designed for the purpose. 19) Be very careful when working close to a road. 20) Allow the engine to cool before putting the machine away in a closed environment. 21) Do not operate the machine when tired or after drinking alcohol.22) Do not allow any fuel spillage and after filling the tank wipe away any spilled fuel before starting the
engine. 23) Do not tamper with the safety devices or disable them. 24) Do not change the engine settings, especially the maximum number of revs. 25) Do not rest heavy loads on the seat, the starter safety device could become disengaged.
5

Climber 9.18/ Translation of the original instructions
26) Never attempt any adjustments or cleaning with the engine running. 27) Never allow anyone to check the machine while you are seated at the controls with the engine
running.
IMPROPER USE TO BE AVOIDED28) Do not allow passengers to ride on the machine.29) Do not allow under-age children to operate it; use is prohibited to children under 16 years old. 30) Do not operate the grass-cutter near to ditches or verges which could collapse under the weight of
the machine, especially when the surface is loose or wet. 31) Replace worn or damaged exhausts.
FURTHER SAFETY ADVICEThe above mentioned warnings could not be enough to avoid any risk, if the operator does not use thepresent grass-cutter correctly. Therefore, for your safety we give you following advices:32) The mower blade is very dangerous when rotating, never put hands or feet underneath the
mower deck. 33) Do not drive in reverse at high speed. 34) It is dangerous to operate the steering wheel abruptly with the engine at full power. 35) Fill the tank with fuel before starting the engine. Only refuel outdoors, always turn off the engine,
keep away from sparks or naked flames, do not smoke! Always replace the cap on the fuel tank andthose on fuel containers properly.
36) If the fuel tank has to be emptied, only do so outdoors. 37) Do not operate the grass-cutter over gravel which could become sucked up and drawn into the
blade, becoming very dangerous. 38) If you have children, hide the ignition key after using the machine. 39) CAUTION: to avoid the risk of fire, keep the engine compartment, exhaust, discharge outlets,
battery, tank area and fuel pipes free from grass, leaves, dirt etc. 40) Do not store the machine inside any building where the engine fumes can reach naked flames,
sparks or bare electrical wires
Remove the mower deck, turn off the engine and disconnect the spark plugs:a) before cleaning obstructed points.b) before checking or repairing the lawnmower.c) when the machine hits a foreign body (check the mower deck to see if it is damaged). d) if abnormal vibration occurs, stop and inspect the machine. Contact the nearest authorizedservice centre if you need help.
IDENTIFICATION AND SERVICINGIDENTIFICATION
The Grillo CLIMBER 9.18 has a label under theinstrument panel indicating the machine’s serialnumber.
TECHNICAL ASSISTANCEThis manual provides instructions for use and basic maintenance of the mower by the user. Foroperations that are not described in this manual, contact your Area Dealer.
SPARE PARTSOnly use original spare parts. These are the only parts that ensure safety and interchangeability. Alwaysquote the machine’s serial number and the code number of the part to be replaced when ordering spareparts. For engine parts, follow the indications given in the specific manual.
6

Climber 9.18/ Translation of the original instructions
WARRANTYThe guarantee is given in compliance with the current law. The dealer will have to give the client a copyof the registration card of the machine, which they will print up from the Grillo website. For the engine the guarantee of the relative manufacturers apply.
RECOMMENDED LIST OF SPARE PARTS 2 x mowing blades2 x blade screws2 x blade screw nuts1 x set of belts1 x air filter for engine1 x oil filter for engine
TECHNICAL SPECIFICATIONS
MOTOR: B&S INTEK 7180, 15,2 HP (@ 3300 r.p.m.) 656 cm³ OHV twin-cylinder petrol engine.
STARTER: electric with 12V battery.
FUEL TANK: 13 Litres – EMERGENCY SUPPLY: 3 litres.
GEARBOX: hydrostatic transmission with reduction gear and differential.
DIFFERENTIAL LOCK: with pedal engagement.
INTERNAL STEERING RADIUS: 380 mm (±14.9’’).
CLUTCH: electromagnetic with P.T.O and with blade brake.
SPEED: continuously variable from 0 to 9 km/h + reverse speed from 0 to 6 km/h.
TYRES: TRACTOR front 13×5.00-6 puncture-proof treated; rear: 17×8.00-8.
SEAT: sprung and adjustable super-comfort seat with armrests and roll-bar.
BRAKES: front service brakes with pedal engagement; rear parking brake with lever engagement.
CUTTING DECK: rear/side discharge.
CUTTING SYSTEM: rotating with 1 blade.
CUTTING WIDTH: 910 mm (±36’’).
CUTTING HEIGHT: from 30 mm to 90 mm (from ±1.2’’ to ±3.5’’) with 4 different cutting positions and 1
transfer position.
HOURLY CUTTING CAPACITY: approx. 7200 m2/h (±1.7 acres per hour).
STANDARD FEATURES: tow bar.
ATTACHMENTS: turf wheels set, 110 cm (±43’’) Quick Shift cutting deck with mulching, rear discharge
and electrical cutting height adjustment, mulching kit for 91 cm (±36’’) cutting deck, 125 cm (±49’’)
orientable snow blade, snow chains for rear wheels.
WEIGHT: 293 kg
SIZE: Length: 1800 mm (±71’’) Width: 990 mm (±38.9’’) Height: 1070 mm (±42.1)
7

Climber 9.18/ Translation of the original instructions
PUTTING THE MACHINE INTO SERVICE
1) Check that the machine has not been damaged in transit. 2) Check the oil levels of the engine, hydrostatic transmission and final drive.3) Check the tyre pressure: 1 BAR front wheels 13×50/6 1.5 BAR rear wheels 17×8.00-8 4) Check the battery voltage; it must be at least 12,5 Volts. Charge if necessary. IMPORTANT!!! During assembly take care not to reverse the polarity of the battery.
BATTERY – CAUTION!The gases released by the battery are explosive, keep it away from naked lights or sparks. Check theliquid level periodically and keep the terminals lubricated with Vaseline grease.
RUNNING IN – CAUTION!!Change the engine oil and filter after the first 20 working hours. Check that there are no oil leaks or slackscrews, especially those which fix the blade, the steering and the wheels. Adjust the tension of thehydrostatic transmission belts (fig. 16).
INSTRUCTIONS FOR USE
BEFORE STARTING UP THE ENGINEBefore starting up the engine, always check that:– the engine oil level is correct (fig. 4) the oil in the hydraulic engine is at the correct level (fig. 3) the forward level is in the idle position (fig. 1B, no. 2) the engine cooling intake grilles are clean (fig. 5)– air filter is clean (fig. 6). – the mowing deck is clean– the hydraulic motor fins are clean (fig. 7)– the blades are sharp and firmly fastened in place– the screw in the centre of the blade hub is safety tightened (fig. 1C, no.3)Fill the fuel tank using a funnel with very fine filter (fig. 1A, no. 4).
STARTING UP THE ENGINE– Push the throttle half way in (fig. 1B, no.5)
– If the engine is cold, use the choke (fig. 1B, no.6). Turn the ignition key on the dashboard (fig. 1, no.7).
Once the engine has started, turn off the choke and wait for a few minutes to allow the engine to warmup.
To switch off the engine put the ignition key in the STOP position (fig. 1, no. 7).
N.B. When moving the mower from one place to another, you are advised to keep the cutting deck at themaximum height setting.
STARTING WORK– Choose the desired cutting height by means of the lever 8 (fig. 1D). Suitably accelerate the engine and
engage the PTO lever (fig. 1, no. 1). Gently operate the forward travel lever (fig. 1B, no. 2) and startwork. To stop, return the forward lever to the stop position.
– The lever (fig. 1B, no. 2) is also used to reverse. When it is moved back, the machine movesbackwards; always operate it gently.
8

Climber 9.18/ Translation of the original instructions
FRONT BRAKEThe front brake (fig. 23, no. 1) must be used only as emergency brake, sloping down to avoid themachine sliding. (When it is used with the differential lock, it makes the machine steadier on slopes). Theforward travel lever is normally used to decelerate and to brake.
PARKING BRAKETo engage the parking brake, please press the lever upwards and lock it to the proper seal retainer (fig.23, no. 2); in this position, if the forward travel lever is engaged, an acoustic signal warns that theparking brake is engaged. To adjust the parking brake, use the castellated nut (fig. 22).
CUTTING POSITIONSThe cutting position is adjusted using the lever (fig. 1D, no. 8).The deck can be set in 4 different cutting positions from 30 to 90 mm and one travel position in which theblade disengages automatically (fig. 1D). In case of uneven ground, humps or dips, the deck should be kept in the highest cutting position toprevent knocks by the blade.
SLOPING GROUNDIf possible, steep slopes must be mown in the up/down direction, taking great care when turning that thewheels upstream do not strike obstacles (stones, branches, roots, etc.) which might cause the machineto overturn, or lead to loss of control.Assess the conditions and take care if the ground and grass are damp since the machine mightslip. Downhill, set off at low speed and do not pass over dry or cut grass since the wheels lose grip;
INTERVENTION OF SAFETY DEVICESRemember that the engine will stop whenever:– The operator gets up from the seat.
The engine will not start up if:– The blade is engaged.– Nobody is sitting in the driver’s seat.– If the cutting deck isn’t at the highest setting.
HOURMETERThe machine is equipped with the new hour meter. This hour meter has three different functions:1) It always shows the no. of hours worked, even when the key is not inserted.2) It displays the no. of hours to the next engine oil change (OIL CHANGE IN...HS). The first oil changemustbe carried out after the first 20 working hours than every 100 working hours. The indicator “OILCHANGE”flashes automatically when it is necessary to change the oil.3) It displays the no. of hours to the next lubrication (LUBE IN...HS). Lubrication must be carried outevery50 working hours. The indicator “LUBE” flashes automatically when lubrication must be carried out.By pushing the white button you can choose the function to be displayed on the hour meter.
USEFUL RULES FOR EFFICIENT USE1) Never strain the engine: when fumes are emitted from the exhaust it means that it is being strained.Slow down.2) Do not leave the machine out in the rain.3) Frequently sharpen the mower blades: the cut will be better and the engine will not be strained asmuch.4) Check the land before mowing to make sure that there are no stones, sticks or foreign bodies.5) Keep the engine at peak r.p.m. during mowing, adjust the speed according to the height of the grass.6) Keep the grilles above the engine and the cooling fins of the hydraulic motor (fig. 5 - 7) clean.
99

Climber 9.18/ Translation of the original instructions
MAINTENANCE AND LUBRICATION
CAUTION! - Disconnect the plugs before performing any cleaning, maintenance or repair operation. Alwayswear suitable clothing and working gloves. - When the machine or part of it is lifted to carry out maintenance operations, always rememberto use suitable fixing tools such as holders and safety locks. - When carrying out maintenance operations and/or when the machine is tilted without safetylocks or supports, never leave it unguarded in places where inexperienced people and childrencould have easy access to it. - Protect the environment: carefully dispose of used oils, petrol and any other pollutant product! - Effective maintenance and correct lubrication help to keep the machine fully efficient.
ENGINE
For the lubrication intervals, follow the instructions provided in the engine handbook; the oil must in anycase be changed after the first 20 working hours, using AGIP SAE 30 engine oil. To remove the oilremove the tap and connect a rubber hose long enough to drain the oil into a container outside themachine (fig. 20B). Change the oil filter (fig. 10).
FINAL DRIVE GEARBOXCheck the oil level every 100 hours by unscrewing the cap (fig. 11, ref. A); if necessary top up with80W90 (API GL-5) gearbox oil. To drain the oil unscrew the cap (fig. 11, ref. B). Change the oil every1000 hours. Quantity 1,9 lt (fill through the tap fig. 11A).
HYDRAULIC MOTOR
Check the level in the expansion tank when the motor is cold. It should come up to the level notch (fig. 3). If necessary, add AGIP SAE 15W50 or 20W50m oil. Change the oil every 200 working hours. To drainthe oil, unscrew the cap (fig. 4); pour into the tank. Keep the fins and coil of the hydraulic motor (fig. 3A and 7) thoroughly cleaned. Quantity 1 litre.
AIR FILTERCheck the air filter every 4 hours, or more frequently if working in a very dusty environment (fig. 6).Check the air intake grid for engine cooling (fig. 5). The external and internal grids must always be keptclean to avoid blocking the air flow needed for the engine cooling.Keep the engine compartment, the hydrostatic transmission and the intake grid clean.
CHECKING THE BLADES AND DECKA blunt blade tears the grass, leaving it unattractive. The cutting edges of both blades must besharpened. To remove a blade, take hold of it firmly, wearing work gloves, and unscrew the centralscrew, remembering that the screw has a right-hand thread (fig. 1C, no. 3). Sharpen both cutting edgesusing a medium-grain grinding wheel and check that the blade is balanced by standing it on a round barinserted in the central hole. Fit the two cutting blades following the diagram (fig. 13).
CAUTION!Tighten the fixing screw (fig. 1C, no. 3) firmly. Always replace damaged or crooked blades; never attemptto repair them! When fitting, always follow the diagram (fig. 10). ALWAYS USE ORIGINAL BLADES! Ifthey are worn they can be turned round since they have two cutting edges.
910 mm CUTTING DECKADJUSTING THE CUTTING DECKLevelness of the cutting deck is essential in order to obtain an evenly mown lawn.Park the mower on a flat surface and check that the tyre pressure is correct. Adjust the right and the leftadjustment devices so that the edge of the cutting deck is at the same distance from the floor, 30 mm, onboth sides (with the operator sitting on board – fig. 14 – 14A). If you are unable to level off the deck,contact an Authorised After-Sales Service Centre.
10

Climber 9.18/ Translation of the original instructions
ENGINE – BLADE BELT 910 mm CUTTING DECKThe engine – blade belt is self-adjusting. Therefore no adjustment is required. Simply check the springtension (fig. 15). If the belt becomes twisted or comes off, check the parameters below, keeping thecutting deck in the highest position (“travel” position):1) 170 mm from the edge of the deck to the ground (fig. 24).2) 170 mm from the rear edge of the deck to the ground (fig. 24).3) Adjust the registers (fig. 14 – 14A). 4) Take care when positioning the belt guides; move them towards the belt, checking the cutting deck atthe various height settings (fig. 12, ref. A). Check that during operation the belt I always in the centre ofthe stretcher (fig. 15, ref. A). The stretcher has to stick about 5/8 mm out of the frame (fig. 25).
110 MP CUTTING DECKThis cutting deck with 3 blades has a cutting width of 1100 mm. It has two functions: rear discharge andmulching. If you want to change from rear discharge function to mulching function you simply have touse the lever. It is namely not necessary to change the blades (fig. 26 – 27). The cutting height can beadjusted electrically using the button on the dashboard (fig. 36).
MAINTAINANCE 110MP CUTTING DECKTo ensure the deck belt works properly and to have a uniform cut, please follow these instructions:– put the cutting deck in its lowest position.– adjust the front arms fig. 34 in order to set the front part of the cutting deck at 35 mm from the ground(fig. 28): you have to measure the point A as indicated (fig. 29).– regulate the adjusting device (fig. 35) in order to set the rear part of the cutting deck at 35 mm from theground (fig. 30): you have to measure the point B as indicated (fig. 29).To check the cutting deck belt you have to unscrew the knob D in fig. 31 and remove the two protections.If you see that the length of the belt has changed, resulting in malfunctioning, you can regulate the belt tension using the adjusting screw (fig. 32). If you want to replace the belt, please follow the fig. 33 to re-assemble it. The spring has to be adjusted at 86 mm and it is indicated by the red arrow (fig. 32B). The stretcher has to be lubricated every 50 working hours (fig. 32/C).
ENGINE – HYDROSTATIC TRANSMISSION BELTWhenever there is a change in belt length (causing therefore its malfunctioning), the tension can beregulated by means of the adjustment device (fig. 16). Take care not to compress the spring beneath theunit completely; belts must be neither too tight nor slack. The spring must be kept set at 44 mm and it isindicated by the red arrow (fig. 16)
BLADE ROTATIONRotation is started and stopped using the switch (no. 1, fig. 1). When rotation is engaged, the enginemust be running at medium r.p.m (see throttle sticker) and the machine must not be in the grass forcutting. Never start the blades with the engine at maximum r.p.m. The machine is equipped with anelectromagnetic clutch which also brakes the blade during disengagement. The blades are alsodisengaged automatically when the cutting height adjuster lever is moved to the highest position. Alwayswork at maximum rpm.
CHANGING THE BELTSThe movement is transmitted from the motor to the hydraulic transmission and to the blades by means oftwo v-belts. Replace the belts as soon as they show signs of wear!Their replacement and subsequent adjustment are fairly complex procedures and must be carried out byan Authorised After-Sales Service Centre. For the cutting deck – engine belt, the belt guides of the deckpulley have to be removed; release the belt stretcher spring (fig. 15, ref. B). For the two transmission andhydraulic engine belts proceeds as follows: -remove the rear and top grids-undo the belt stretcher nut (fig. 16). ALWAYS USE ORIGINAL BELTS!
11

Climber 9.18/ Translation of the original instructions
TRACTION RELEASE LEVERThe traction release device is located behind the seat; if the machine breaks down, to allow it to betowed or moved by hand, move the lever outward (fig. 20A). In the position shown (fig. 20B) the machineis in working condition. Check that during working the hydraulic engine piston does not remain presseddown; if necessary, adjust the nut (fig. 21).
DIFFERENTIAL LOCK ADJUSTMENTThe differential lock has to be activated when the pedal is half way of its travel (fig. 8). To adjust theactivation point of the differential lock use the screw (fig. 9).
MAINTENANCE SUMMARY TABLEPROCEDURE EVERY 8
HOURSAFTER
20HOURS
EVERY50
HOURS
EVERY100
HOURS
ONCE A YEAROR EVERY200 HOURS
Engine oilcheck the level ●
change ● ●
Air filtercheck ●
replace ٭
Spark plugcheck/adjust ●
replace ●
Hydraulic engine oil
check the level ● ●
replace ●
Check that the engine intake grid is clean ●
Check that the hydraulic engine cooling fins are clean ●
Final drive gearbox oil
check the level ● ●
replace ٭
Check that blades are well-sharpenedand well-fixed
●
Lubricate with grease● ●
● recommended procedureprocedure to be carried out if necessary ٭
12

Climber 9.18/ Translation of the original instructions
LUBRICATION POINTS WITH GREASE
TROUBLESHOOTING
PROBLEM
CAUSE REMEDY
Dashboard OFF with key in “AVV.” (ON) pos.
Battery not supplying power – Check connecting cables
– Check electrolyte level
– Recharge battery
– Change the fuse
Dashboard ON, but starter motor does not turn over with key in “AVV” (ON) pos.
– Battery not supplying enough power – Recharge battery
– Start-up go-ahead not given – Travel lever in stop position
– Disengage blades
– Sit in the driver’s seat
Difficult starting or irregular running of engine
– Carburettor problems – Clean or change the air filter
– Adjust the carburettor (follow engine manualinstructions)
– Deposits or dirt in fuel – Empty the tank and use fresh petrol
– Check and change the petrol filter if necessary
Starter motor turns over but engine does not start
– No petrol flow – Check that the choke has been activated (ifengine is cold)
– Check petrol level in tank 13

Climber 9.18/ Translation of the original instructions
– Check wiring of carburettor opening control
– Check petrol filter (and change if necessary)
– Check that the vent on the tank cap is notblocked
– Fault in ignition system – Check that the caps of the spark plugs arecorrectly fastened
– Check that the electrodes are clean and at thecorrect distance apart.
Drop in engine performance during cutting
Speed too high for cutting height – Reduce speed
When the blades are engaged the engine cuts out
- Go ahead not given for blade engaging - Check the blade-engaging microswitch- Sit in the driver's seat
Uneven cutting
– Cutting deck not parallel to ground – Check tyre pressure
– Level off the deck– Blades fault – Check that the blades are correctly mounted
– Sharpen or change the blades
– Adjust the tension of the cutting deck engine belt
Vibrations during operation
– Blades unbalanced – Balance blades or replace if damaged
– Fastenings are loose – Check and fasten the blade fixing screws as well as the fixing screws of the engine
and chassis.
Incorrect P.T.O. engagement
– Check the battery voltage, it must be at least12,5 volts
– Check the levelness of the blade brake and the electromagnetic clutch, 0,3 mm
– When PTO button is pressed, the blade does not engage
14

Climber 9.18/ Translation of the original instructions
ELECTRICAL SYSTEMThe electrical system is protected by a fuse which cuts out the entire electrical system if blown. Afterfinding and repairing the fault, replace the fuse with another of the same rating. Never replace thefuse with one of a different rating. The electrical system fuses are underneath the tank (fig. 19). If theproblems persist after all the procedures described above have been carried out, contact the AuthorisedAfter-Sales Service Centre. Never attempt to make difficult repairs unless you have the necessaryequipment and technical expertise.
IMPORTANT!– Take care not to reverse the battery polarity.– Never operate the mower without the battery, since it is equipped with a charge regulator.– Take care not to cause short-circuits.
THE MACHINE DOES NOT REMAIN IN NEUTRALAdjust the zero turn device by tightening or loosening it (fig. 17).to adjust the forward and reverse travel speeds, use the screws (fig. 18).
ENDING WORKAfter mowing, disengage the blades and drive back to base with the cutting deck in the highest position.To stop, move the travel lever to the STOP position (fig. 1B, no. 2), set the throttle lever on the minimumr.p.m., switch off the engine by turning the key in the STOP position (fig. 1, no.7) and lower the deck tothe lowest position. Engage the parking brake (fig. 23, no. 2).
CLEANINGClean the outside of the mower after each use.
STORAGE AND PROLONGED PERIODS OF DISUSEStore the mower in a dry place, away from atmospheric agents, and preferably cover with a sheet. If themower is not going to be used for a long period (over 1 month), disconnect the red battery cable andfollow the instructions given in the engine manual. Also lubricate all of the articulated joints. Regularlycheck that the battery voltage does not drop below 12 volts. If it does, recharge the battery. If themachine is to be out of use for more than 30 days (models with petrol engine), drain the fuel from theengine to prevent sticky deposits from forming in the fuel intake system or in vital parts of carburettor. Toavoid this procedure, it is possible to save fuel in storage up to 12 months by using an appropriate fuelstabilizer. Add the such additive to the fuel in the tank or in the fuel container. Run the engine for a whileto let the stabilizer get into the fuel system. Caution: if the engine is fed with petrol containing alcohol,drain the fuel tank and run the engine until there is no fuel left.
TRANSPORTING THE MACHINEIf the machine has to be transported on a lorry or a trailer, fasten it to the vehicle using ropes or cables.
15

Climber 9.18/Original instructions- Istruzioni originali- Original-Anleitungen- Instrucciones originales
TRINCIAERBA IDROSTATICO
GRILLO CLIMBER 9.18 Gentile Cliente,nel ringraziarla per la fiducia e la preferenza accordata al nostro Grillo CLIMBER, confidiamo che l’uso diquesta sua nuova macchina risponda pienamente alle sue esigenze. Per l’impiego ottimale e per la suamanutenzione nel tempo, la preghiamo di leggere attentamente e seguire scrupolosamente le indicazionidi questo libretto; ciò le consentirà di ottenere i massimi risultati e salvaguardare la sua spesa. Lapreghiamo di conservare questo libretto, che dovrà sempre accompagnare la macchina.
DESCRIZIONE GENERALE E USO PREVISTOLa macchina Grillo Climber 9.18 è un trinciaerba con operatore a bordo, progettato per il taglio dell'erba,anche in pendenza.
ATTENZIONE! Leggere attentamente prima di avviare il motore.Le seguenti avvertenze sono importanti per l’incolumità dell’operatore!
AVVERTENZELa prudenza è l’arma principale nella prevenzione degli incidenti!La preghiamo vivamente di leggere con attenzione le seguenti avvertenze nell’uso del trinciaerba, primaancora di iniziare il lavoro. L’uso improprio del trinciaerba e il suo equipaggiamento possono risultarepericolosi; per ridurre queste possibilità osservare le precauzioni necessarie di seguito riportate: 1) Leggere questo manuale interamente, prima di accendere e mettere in movimento il trinciaerba. 2) Dare particolare attenzione alle ammonizioni e alle etichette di sicurezza attorno al trinciaerba. 3) La rotazione della lama del trinciaerba è altamente pericolosa, non mettere mai le mani o i piedi sotto al piatto rasaerba. 4) Prima di fare lavorare con la macchina altre persone bisogna metterle al corrente delle norme di
sicurezza e di come si usa. 5) Prima d'iniziare il lavoro, verificare che non ci siano persone attorno, specialmente bambini
(osservare una distanza minima di 15 metri). 6) Prima di partire con la macchina a marcia indietro controllare che non ci siano persone od ostacoli. 7) Prima di iniziare il lavoro, indossare indumenti appropriati da lavoro, guanti, scarponi,
occhiali. 8) Indossare appropriate protezioni acustiche (cuffie). 9) Controllare il terreno prima di procedere alla rasatura, che non vi siano sassi, bastoni o corpi
estranei, che potrebbero essere scagliati lontano, e quindi molto pericolosi. 9) Se si urta un corpo estraneo, disinnestare la lama, fermare il motore, togliere la chiave di
avviamento e ispezionare il trinciaerba; se la macchina vibra, farla riparare. 10) Prima di scendere dal trinciaerba, spegnere il motore, disinserire la PTO, rimuovere la chiave
d'avviamento e abbassare il piatto tosaerba nella posizione più bassa. 11) Sui viali sconnessi viaggiare a bassa velocità.12) Sulle pendenze, in discesa moderare la velocità13) In discesa, curvare sempre lentamente. 14) L'utilizzatore è sempre responsabile dei danni arrecati a terzi.15) I coltelli deformati o danneggiati devono essere sempre sostituiti, mai riparati. 16) Usare sempre ricambi ed accessori originali GRILLO. 17) Lavorare solo con la luce del sole o con buona luce artificiale. 18) Immagazzinare il carburante in contenitori specificatamente costruiti per questo scopo.19) Fare attenzione quando si lavora vicino ad una strada.20) Far raffreddare il motore prima di mettere la macchina in locali chiusi. 21) Non usare la macchina quando si è affaticati e non bere alcolici. 22) Evitare fuoriuscite di combustibile e dopo aver riempito il serbatoio pulire ogni fuoriuscita sulla
macchina prima di avviare il motore. 23) Non manomettere o disattivare i dispositivi di sicurezza. 24) Non cambiare le regolazioni del motore, in modo particolare il numero di giri max. 25) Non appoggiare pesi sul sedile, si potrebbe disattivare il dispositivo di sicurezza dell'avviamento.26) Non fare nessun tipo di regolazione o pulizia col motore in moto.
16

Climber 9.18/Original instructions- Istruzioni originali- Original-Anleitungen- Instrucciones originales
27) Non fare controllare la macchina da nessuno mentre siete seduti alla guida col motore in moto.
USI IMPROPRI DA EVITARE28) Non permettere passeggeri sulla macchina.29) Non fare lavorare ragazzi troppo giovani; vietato l'uso ai minori di 16 anni.30) Non operare col trinciaerba vicino a fossati o banchine che si possono rompere sotto il peso della
macchina, specialmente quando la superficie è staccata o bagnata. 31) Sostituire le marmitte danneggiate o usurate.
ULTERIORI ACCORGIMENTI PER LA SICUREZZALe avvertenze sopra riportate potrebbero non essere sufficienti ad evitare ogni rischio, nel caso in cuil'operatore non si attenesse all'uso appropriato della presente macchina trinciaerba. Pertanto, permaggiore prudenza specifichiamo quanto segue.32) La rotazione della lama del trinciaerba è molto pericolosa, non mettere mai le mani o i piedi sotto al
piatto rasaerba. 33) Non fare retromarcia col motore accelerato. 34) E' pericoloso azionare il volante di guida bruscamente, col motore a massimo regime. 35) Prima di avviare il motore riempire il serbatoio di carburante. Fare rifornimento di combustibile solo
all'aperto, spegnere sempre il motore, stare lontano da scintille o fiamme, non fumare!Riposizionare in modo sicuro il tappo del serbatoio e dei contenitori di carburante.
36) Se dovete svuotare il serbatoio carburante, eseguire l'operazione all'aperto. 37) Non lavorare col trinciaerba sopra alla ghiaia che viene aspirata e centrifugata dalla lama,
risultando molto pericolosa. 38) Se avete dei bambini, quando non usate la macchina, nascondete la chiave d'avviamento. 39) ATTENZIONE: per ridurre il pericolo d'incendio mantenere il vano motore, la marmitta, i collettori
di scarico, la batteria, la zona serbatoio e conduttura carburante liberi da erba, foglie, polvere ecc. 40) Non immagazzinare la macchina dentro un edificio dove i vapori del carburante possono arrivare a
fiamme, scintille o fili elettrici scoperti.
Disinnestare la trasmissione del piatto di taglio, spegnere il motore e disinserire le candele:a) prima di pulire i punti ostruitib) prima di controllare o riparare il trinciaerba.c) dopo aver urtato un corpo estraneo (ispezionare l'organo di taglio per verificare che non siadanneggiato). d) se la macchina comincia a vibrare in modo anomalo, effettuare immediatamente un controllogenerale per individuare la ragione che provoca questa anomalia: se necessario richiederel'intervento di un professionista.
IDENTIFICAZIONE E ASSISTENZAIDENTIFICAZIONE
Il Grillo CLIMBER 9.18 è fornito di una targhetta, posta sottoal cruscotto, con il numero della macchina.
SERVIZIO ASSISTENZAQuesto manuale fornisce le indicazioni per l’uso del trinciaerba e per una corretta manutenzione di base,eseguibile dall’utilizzatore. Per gli interventi non descritti in questo libretto, interpellare il Rivenditore diZona.
RICAMBISi raccomanda di impiegare esclusivamente ricambi originali, gli unici che offrono caratteristiche disicurezza e intercambiabilità. Ogni richiesta deve essere corredata del numero di matricola dellamacchina e il numero di codice del pezzo da sostituire. Per i ricambi del motore, attenersi a quantoindicato nel libretto specifico.
17

Climber 9.18/Original instructions- Istruzioni originali- Original-Anleitungen- Instrucciones originales
GARANZIALa garanzia è fornita nei modi e nei limiti indicati dalla legge vigente. Il rivenditore dovràobbligatoriamente consegnare il certificato di garanzia della macchina al cliente finale, stampando unacopia della registrazione dal sito Grillo. Per quanto riguarda il motore, valgono le condizioni previste dai rispettivi Produttori.
RICAMBI CHE SI CONSIGLIANO DI TENERE DI SCORTAN. 2 lamette N. 2 viti lameN. 2 dadi viti lameN. 1 serie di cinghieN. 1 filtro aria motoreN. 1 filtro olio motore
CARATTERISTICHE TECNICHE
MOTORE: BRIGGS&STRATTON INTEK 7180 OHV 15,2 HP 656 cm³, bicilindrico a benzina.
AVVIAMENTO: elettrico con batteria 12V.
SERBATOIO: 13 litri - RISERVA: 3 litri
CAMBIO: trasmissione idrostatica con riduttore e differenziale.
BLOCCAGGIO DIFFERENZIALE: azionato tramite pedale.
RAGGIO INTERNO DI STERZATA: 38 cm
FRIZIONE: elettromagnetica per P.T.O con freno lama.
VELOCITÀ: da 0 a 9 km/h con variazione continua + RM da 0 a 6 km/h
PNEUMATICI TRACTOR anteriori: 13 x 5.00 – 6 con trattamento antiforo; posteriori: 17 x 8.00 – 8
SEDILE: super comfort, molleggiato e regolabile con braccioli e arco di sicurezza.
FRENI: di servizio sulle ruote anteriori con comando a pedale – di stazionamento sulle ruote posteriori
con comando a leva.
PIATTO DI TAGLIO: a scarico laterale / posteriore.
SISTEMA DI TAGLIO: rotativo a 1 lama
LARGHEZZA DI TAGLIO: 910 mm
ALTEZZA DI TAGLIO: da 30 a 90 mm con 4 diverse posizioni di taglio e 1 di trasferimento.
RESA: 7.200 m²/h (indicativa)
DI SERIE: tiro traino.
ACCESSORI: set ruote Garden, piatto MP da 110 cm (scarico posteriore – mulching) con leva Quick
Shif e regolazione altezza di taglio elettrica, kit mulching per piatto da 91 cm, lama orientabile da 125
cm, catene da neve per ruote posteriori.
DIMENSIONI: Lunghezza 1.800 mm – Larghezza 990 mm – Altezza 1.070 mm
PESO: 293 kg
18

Climber 9.18/Original instructions- Istruzioni originali- Original-Anleitungen- Instrucciones originales
MESSA IN OPERA DELLA MACCHINA
1) Controllare l’integrità della macchina, che non abbia subito danni durante il trasporto.2) Verificare i livelli olio, motore, trasmissione idrostatica, riduttore ruote.
3) 3) Verificare la pressione dei pneumatici:1 BAR ruote anteriori 13 x 5.00-61,5 BAR ruote posteriori 17 x 8.00-8.
4) Controllare il voltaggio della batteria, non deve risultare inferiore al valore di 12,5 volt,eventualmente provvedere alla ricarica. IMPORTANTE! Durante il montaggio evitare di invertire le polarità della batteria.
BATTERIA - ATTENZIONEI gas sprigionati dalla batteria sono esplosivi, tenetela lontano da fiamme o scintille. Controllateperiodicamente il livello del liquido e tenete lubrificati con grasso di vaselina i morsetti.
RODAGGIO - ATTENZIONE!!Sostituire l’olio motore dopo le prime 20 ore di funzionamento unitamente al filtro. Controllare che non visiano perdite d’olio o viti lente, in particolare quelle di fissaggio della lama, dello sterzo e delle ruote.Registrare la tensione delle cinghie trasmissione idrostatica (fig. 16).
ISTRUZIONI D'USO
PRIMA DI AVVIARE IL MOTOREPrima di avviare il motore controllare sempre:– che l'olio nel motore sia a livello (fig. 2) che l’olio del motore idraulico sia a livello (fig. 3); che la leva avanzamento sia in posizione di folle (fig. 1B, n.2)– che le griglie di aspirazione per il raffreddamento del motore siano pulite (fig. 5):– che il filtro aria sia ben pulito (fig. 6);– che il piatto tosaerba sia ben pulito;– che le alette del motore idraulico siano pulite (fig. 7);– che le lame siano ben affilate e saldamente fissate;– che la vite centrale mozzo lama sia ben serrata (fig. 1C n. 3).
Riempire il serbatoio di carburante servendosi di un imbuto munito di un filtro molto fine (fig. 1A, n. 4).
AVVIAMENTO DEL MOTORE – Spingere fino a metà corsa il manettino acceleratore (fig. 1B, n. 5)– Se il motore è freddo azionare il dispositivo di starter (fig. 1B, n. 6). Ruotare la chiave di avviamento
posta sul cruscotto (fig. 1, n. 7).– Una volta avviato il motore disinserire lo starter, aspettare qualche minuto per riscaldare il motore.– Per spegnere il motore portare la chiave nella posizione STOP (fig. 1, n. 7). Nota: durante i trasferimenti è bene che il piatto di taglio sia in posizione di massima altezza.
INIZIO DEL LAVORO– Scegliere l’altezza di taglio agendo sulla leva (fig. 1D, n. 8), accelerare opportunamente il motore,
innestare la PTO (fig. 1, n.1). Azionare dolcemente la leva avanzamento (fig. 1B, n. 2) ed iniziare illavoro. Per fermarsi riportare la leva avanzamento in posizione stop.
– La leva (fig. 1B, n. 2) serve anche per la retromarcia, spostandola indietro la macchina retrocede - azionarla dolcemente.
FRENO ANTERIOREIl freno anteriore (fig. 23 n. 1) va utilizzato unicamente come freno di emergenza in discesa per non farescivolare la macchina. Utilizzato in combinazione con il bloccaggio differenziale, rende la macchinamolto stabile in discesa. In condizioni normali, per rallentare e frenare, utilizzare solo la leva diavanzamento.
1719

Climber 9.18/Original instructions- Istruzioni originali- Original-Anleitungen- Instrucciones originales
FRENO DI STAZIONAMENTOIl freno di stazionamento si inserisce spingendo la leva verso l'alto e agganciandola all'apposito fermo(fig. 23, n.2); in questa posizione, nel caso si inserisca l'avanzamento, un segnalatore acustico avverteche il freno di parcheggio è inserito. Per registrare il freno di stazionamento, agire sul dado a corona (fig.22).
POSIZIONI DI TAGLIOPer regolare l’altezza di taglio si agisce sulla leva (fig. 1D, n. 8). Il piatto può essere posizionato in 4diverse posizioni di taglio da 30 a 90 mm ed una posizione di trasferimento nella quale la lama sidisinnesta automaticamente (fig. 1D). In presenza di terreno accidentato, cunette o dossi, è convenienteoperare con il piatto nella posizione di taglio più alta onde evitare urti da parte della lama.
TERRENI IN PENDENZAI terreni ripidi devono essere percorsi possibilmente nel senso salita/discesa, facendo molta attenzionenei cambi di direzione, che le ruote a monte non incontrino ostacoli (sassi, rami, radici, ecc.) chepotrebbero causare il ribaltamento o la perdita di controllo della macchina. Se le ruote motrici tendono aslittare, utilizzare il bloccaggio differenziale (fig. 8). Premendo si inserisce, abbandonando il pedale sidisinnesta automaticamente. Valutare pertanto le varie situazioni e prestare attenzione in presenza diterreno umido e erba bagnata in quanto la macchina potrebbe scivolare. In discesa partire a bassavelocità ed evitare di calpestare erba secca o tagliata in quanto le ruote perdono aderenza.
INTERVENTI DEI DISPOSITIVI DI SICUREZZARicordare sempre che il motore si ferma ogni volta che:– L’operatore si alza dal sedile.Inoltre il motore non si avvia se:– La lama è innestata.– Se non si è seduti al posto di guida.– Se il piatto non è nella posizione più alta di trasferimento.
STRUMENTO CONTAORELa macchina è dotata del nuovo contaore. Questo strumento espleta tre funzioni:1) Mostra il totale delle ore lavorate (sempre visibile sul display anche a chiave disinserita).2) Mostra le ore mancanti al cambio dell'olio motore (OIL CHANGE IN...HS). Il primo cambio dell'oliomotoredeve avvenire dopo le prime 20 ore di lavoro, i cambi olio motore successivi devono avvenire ogni 100ore dilavoro. La scritta “OIL CHANGE” lampeggia automaticamente sul display quando occorre effettuare ilcambio dell'olio motore.3) Mostra le ore mancanti all'ingrassaggio (LUBE IN...HS). Gli ingrassaggi devono essere eseguiti ogni50ore di lavoro. “LUBE” lampeggia automaticamente sul display quando occorre ingrassare la macchina.Premendo il pulsante bianco del contaore si possono visualizzare a scelta le funzioni sopra indicate.
REGOLE UTILI PER IL BUON USO1) Non forzare mai il motore: quando fuma dallo scarico, è sotto sforzo; bisogna rallentare.2) Non tenere la macchina sotto la pioggia.3) Affilare frequentemente le lame; il taglio sarà migliore e il motore forzerà di meno. 4) Controllare il terreno prima di procedere alla rasatura che non vi siano sassi, bastoni o corpi
estranei.5) Durante la rasatura tenere il motore a massimo regime, regolare la velocità in base all’altezza
dell’erba.6) Mantenere pulite le griglie sopra al motore e le alette di raffreddamento del motore idraulico (fig. 5 e
fig. 7).
20

Climber 9.18/Original instructions- Istruzioni originali- Original-Anleitungen- Instrucciones originales
MANUTENZIONE E LUBRIFICAZIONE
ATTENZIONE! - Scollegare le candele prima di iniziare qualsiasi intervento di pulizia, manutenzione oriparazione. Indossare indumenti adeguati e guanti da lavoro. - Qualora si sollevi la macchina o parte di essa, usare sempre strumenti idonei quali supporti ofermi di sicurezza. - Non lasciare la macchina in manutenzione, priva di sicurezze o sollevata, in luoghi accessibilia persone inesperte, specialmente bambini. - Non disperdere mai nell’ambiente olii esausti, benzina, gasolio ogni altro prodottoinquinante! - Un’efficiente manutenzione e una corretta lubrificazione contribuiscono a mantenere lamacchina in perfetta efficienza.
MOTORE
Per gli intervalli di lubrificazione seguire le norme contenute nel libretto del motore; comunque èindispensabile sostituire l’olio dopo le prime 20 ore di lavoro, utilizzando olio motore SAE 30. Pertogliere l'olio svitare il tappo (fig. 20B) e inserire un tubo in gomma sufficientemente lungo per scaricarel'olio in un recipiente all'esterno della macchina. Sostituire il filtro olio (fig. 10).
RIDUTTORE RUOTEControllare il livello olio ogni 100 ore svitando il tappo (fig. 11, rif. A); se occorre aggiungere olio percambio 80W90 (API GL-5). Per togliere l'olio svitare il tappo (fig. 11, rif, B), sostituirlo ogni 1000 ore.Quantità lt. 1,9 (inserire l'olio dal tappo fig. 11, rif. A).
MOTORE IDRAULICO
Controllare il livello nella vaschetta di espansione con motore freddo, deve arrivare nella tacca di livello(fig. 3); se occorre aggiungere olio motore 15W50 oppure 20W50. Sostituire l'olio ogni 200 ore di lavoro.Per togliere l'olio svitare il tappo (fig. 4); inserirlo dalla vaschetta. Mantenere ben pulite le alette e laserpentina del motore idraulico (fig. 3A - fig. 7). Quantità lt. 1.
FILTRO ARIAControllare il filtro aria ogni 4 ore od anche più frequentemente se l’ambiente è molto polveroso (fig. 6).Controllare la griglia a rete di aspirazione del raffreddamento del motore (fig. 5). Per non pregiudicare ilpassaggio dell'aria che serve a raffreddare il motore bisogna tenere sempre pulite le griglie esterne edinterne. Mantenere ben pulito il vano motore, la trasmissione idrostatica, la griglia di aspirazione.
CONTROLLO LAME E PIATTOUna lama non affilata strappa l’erba, conferendogli un brutto aspetto; é necessario che l’affilatura siasempre eseguita sui taglienti delle due lame. Per smontare una lama, afferrarla saldamente, utilizzandoguanti da lavoro e svitare la vite centrale, attenzione la vite è destra (fig. 1C, n. 3). Affilare entrambi itaglienti per mezzo di una mola a grana media e verificare l’equilibratura della lama sorreggendola conun tondo infilato nel foro centrale. Per le due lame di taglio eseguire il montaggio seguendo lo schema(fig. 13).
ATTENZIONE!Serrare bene a fondo la vite di fissaggio (fig. 1C, n. 3). Sostituire sempre i coltelli danneggiati o storti;non tentare mai di ripararli! Per il montaggio seguire lo schema (fig. 13). USARE SEMPRE COLTELLIORIGINALI! Se risultano usurati si possono girare in quanto sono dotati di doppio tagliente.
PIATTO DI TAGLIO 910 mmREGOLAZIONE PIATTO DI TAGLIOUna buona planarità del piatto è essenziale per ottenere un prato uniformemente rasato. Posto ilrasaerba su una superficie piana e verificata la corretta pressione dei pneumatici, agire sui registri didestra e di sinistra fino a portare il bordo del piatto alla stessa distanza del pavimento, 30 mm sia da unlato che dall'altro (con l'operatore seduto) (fig. 14 – 14A). Nel caso non si riuscisse ad ottenere un buon parallelismo, consultare un Centro di AssistenzaAutorizzato.
21

Climber 9.18/Original instructions- Istruzioni originali- Original-Anleitungen- Instrucciones originales
CINGHIA MOTORE – LAMA PIATTO 910 mmLa cinghia motore – lama piatto è autoregolante, non ha bisogno di nessuna regolazione: bastacontrollare la tensione della molla (fig. 15). Se si verifica l'attorcigliamento o la fuoriuscita della cinghiacontrollare le seguenti misure, tenendo il piatto nella posizione più alta (posizione di trasferimento).
1) Dal bordo anteriore del piatto al terreno 170 mm (fig. 24).2) Dal bordo posteriore del piatto al terreno 170 mm (fig. 24).3) Agire sui registri (fig. 14 – 14A).4) Attenzione, quando si posizionano i guidacinghia occorre avvicinarli alla cinghia controllando il
piatto nelle varie altezze (fig. 12, rif. A). Verificare che la cinghia lavori sempre la centro deltenditore (fig. 15, rif. A). Il tenditore deve sporgere di 5/8 mm rispetto al telaio, come illustrato infig. 25.
PIATTO DI TAGLIO 110 MPQuesto piatto di taglio a 3 lame ha una larghezza di taglio di 1100 mm ed incorpora due funzioni: scaricoposteriore e mulching. Per passare dalla funzione scarico posteriore a quella di mulching è sufficienteutilizzare la leva e non è pertanto necessario cambiare le lame (fig. 26 – 27). La regolazione dell'altezzadi taglio avviene elettricamente attraverso pulsante sul cruscotto (fig. 36).
MANUTENZIONE PIATTO 110 MPPer il buon funzionamento della cinghia piatto e un taglio uniforme:-portare il piatto nella posizione più bassa.-agire sui bracci anteriori (fig. 34) per portar la parte anteriore del piatto a 35 mm da terra (fig. 28): lamisura va effettuata nel punto indicato (fig. 29, rif. A).-agire sui dispositivi di regolazione (fig. 35) per portare la parte posteriore del piatto a 35 mm da terra(fig. 30): la misura va effettuata nel punto indicato (fig. 29, rif. B).Per verificare la cinghia piatto, occorre svitare la vite (fig. 31, rif. D) e sfilare le due protezioni. Qualora siriscontrasse una variazione in lunghezza della cinghia e conseguente malfunzionamento, è possibileregolare la tensione agendo sul registro (fig. 32). Qualora si proceda alla sostituzione della cinghia, per ilrimontaggio seguire lo schema illustrato in fig. 33. La molla va mantenuta regolata a 86 mm ed è indicatadalla freccia rossa (fig. 32, rif. B). Il tenditore va lubrificato ogni 50 ore (fig. 32, rif. C).
CINGHIE MOTORE – TRASMISSIONE IDROSTATICAQualora si riscontrasse una variazione in lunghezza della cinghia e conseguente malfunzionamento, èpossibile regolare la tensione agendo sul registro (fig. 16). Attenzione: non comprimere completamentela molla sotto al dado, le cinghie non devono essere né troppo tese, né lente. La molla va mantenutaregolata a 44 mm ed è indicata dalla freccia rossa (fig. 16).
ROTAZIONE LAMAPer innestare e disinnestare la rotazione della lama si agisce sul pulsante n. 1, fig.1. Durante l'innesto ilmotore deve essere a metà regime (vedi indicazione sull'adesivo acceleratore) e la macchina deveessere al di fuori dell'erba da tagliare. Non inserire le lame con motore a massimo regime. La macchinaè dotata di frizione elettromagnetica che funziona anche da freno lama durante il disinnesto. Il disinnestoavviene anche automaticamente nella posizione più alta della leva regolazione altezza di taglio.Lavorare sempre con il motore a massimo regime.
SOSTITUZIONE CINGHIELa trasmissione del movimento del motore alla trasmissione idraulica e dal motore alle lame è ottenutaper mezzo di due cinghie trapezoidali. Sostituire le cinghie non appena manifestano segni di usura! La loro sostituzione e successive regolazioni sono abbastanza complesse ed è indispensabile venganoaffidate ad un Centro Assistenza Autorizzato. Per la cinghia motore piatto di taglio, occorre smontare iguida-cinghia della puleggia piatto e sganciare la molla tendicinghia (fig. 15, rif. B). Per le due cinghiemotore rinvio e rinvio motore idraulico, procedere come segue:1) togliere la griglia posteriore e superiore2) allentare il dado tendicinghia (fig. 16)USARE SEMPRE CINGHIE ORIGINALI!
22
Climber 9.18/Original instructions- Istruzioni originali- Original-Anleitungen- Instrucciones originales
DISPOSITIVO DI SBLOCCO DELLA TRAZIONEIl dispositivo di sblocco della trazione è posizionato dietro al sedile. Se si verificasse un’avaria allamacchina, per poterla trainare o spostare a mano posizionare la levetta verso l'esterno (fig. 20, pos. A).Nella posizione (fig. 20, pos. B) la macchina è in lavoro. Verificare che il pistoncino del motore idraulicodurante il lavoro non rimanga premuto, eventualmente registrare il dado (fig. 21).
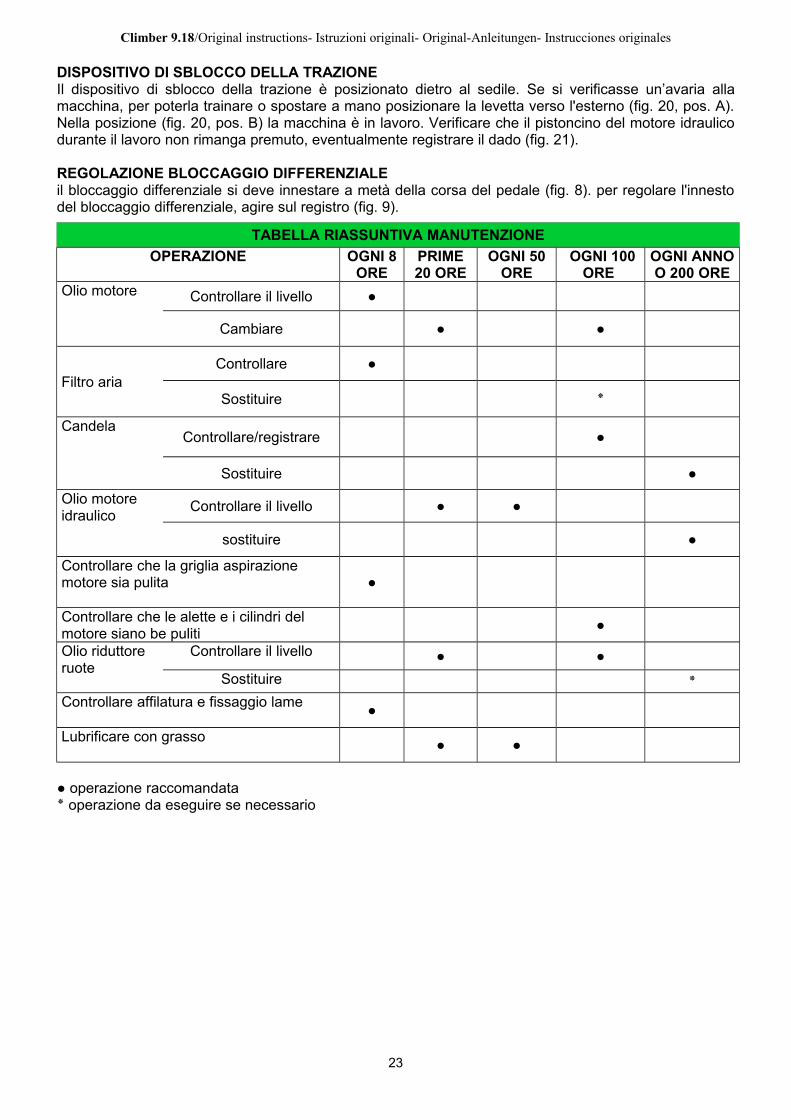
REGOLAZIONE BLOCCAGGIO DIFFERENZIALEil bloccaggio differenziale si deve innestare a metà della corsa del pedale (fig. 8). per regolare l'innestodel bloccaggio differenziale, agire sul registro (fig. 9).
TABELLA RIASSUNTIVA MANUTENZIONE
OPERAZIONE OGNI 8ORE
PRIME20 ORE
OGNI 50ORE
OGNI 100ORE
OGNI ANNOO 200 ORE
Olio motore Controllare il livello ●
Cambiare ● ●
Filtro ariaControllare ●
Sostituire ٭
CandelaControllare/registrare ●
Sostituire ●
Olio motore idraulico
Controllare il livello ● ●
sostituire ●
Controllare che la griglia aspirazione motore sia pulita ●
Controllare che le alette e i cilindri del motore siano be puliti
●
Olio riduttore ruote
Controllare il livello ● ●
Sostituire ٭Controllare affilatura e fissaggio lame
●
Lubrificare con grasso● ●
● operazione raccomandataoperazione da eseguire se necessario ٭
23
Climber 9.18/Original instructions- Istruzioni originali- Original-Anleitungen- Instrucciones originales
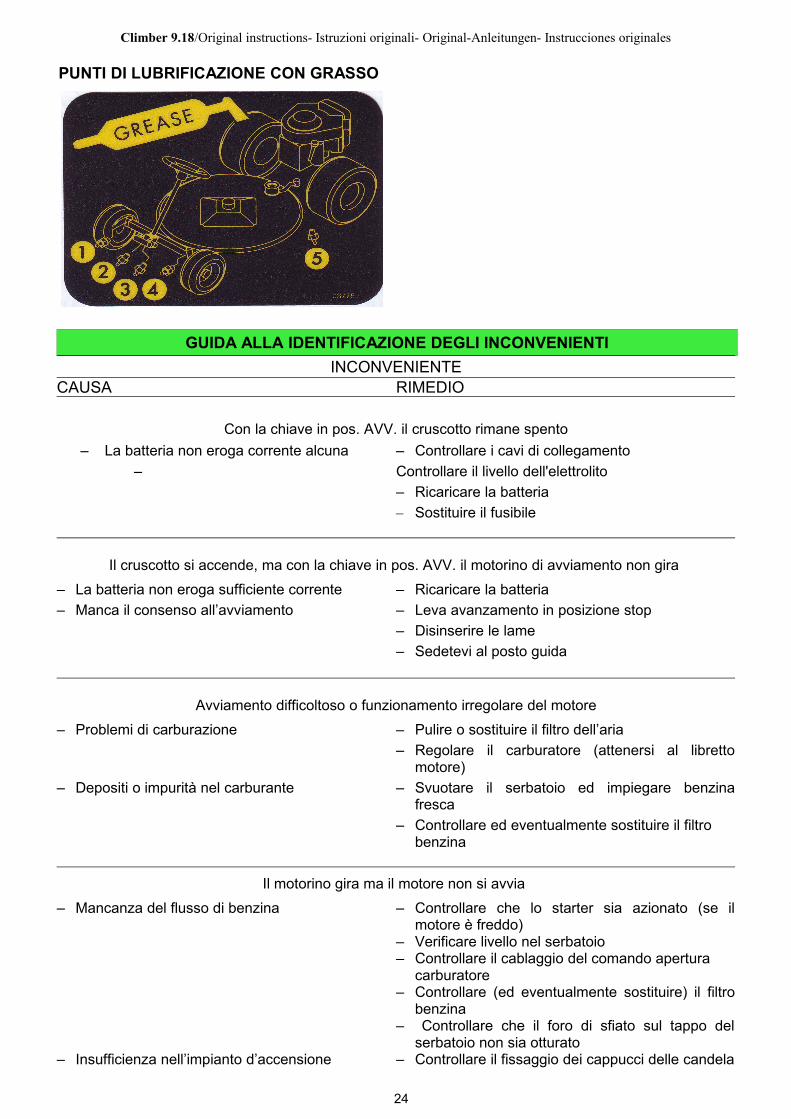
PUNTI DI LUBRIFICAZIONE CON GRASSO
GUIDA ALLA IDENTIFICAZIONE DEGLI INCONVENIENTI
INCONVENIENTECAUSA RIMEDIO
Con la chiave in pos. AVV. il cruscotto rimane spento
La batteria non eroga corrente alcuna – Controllare i cavi di collegamento
– Controllare il livello dell'elettrolito
– Ricaricare la batteria
– Sostituire il fusibile
Il cruscotto si accende, ma con la chiave in pos. AVV. il motorino di avviamento non gira
– La batteria non eroga sufficiente corrente – Ricaricare la batteria
– Manca il consenso all’avviamento – Leva avanzamento in posizione stop
– Disinserire le lame
– Sedetevi al posto guida
Avviamento difficoltoso o funzionamento irregolare del motore
– Problemi di carburazione – Pulire o sostituire il filtro dell’aria
– Regolare il carburatore (attenersi al librettomotore)
– Depositi o impurità nel carburante – Svuotare il serbatoio ed impiegare benzinafresca
– Controllare ed eventualmente sostituire il filtrobenzina
Il motorino gira ma il motore non si avvia
– Mancanza del flusso di benzina – Controllare che lo starter sia azionato (se ilmotore è freddo)
– Verificare livello nel serbatoio– Controllare il cablaggio del comando apertura
carburatore– Controllare (ed eventualmente sostituire) il filtro
benzina– Controllare che il foro di sfiato sul tappo del
serbatoio non sia otturato– Insufficienza nell’impianto d’accensione – Controllare il fissaggio dei cappucci delle candela
24

Climber 9.18/Original instructions- Istruzioni originali- Original-Anleitungen- Instrucciones originales
– Verificare la pulizia e la corretta distanza fra glielettrodi
Calo di rendimento del motore durante il taglio
– Velocità di avanzamento elevata in – Diminuire la velocitàrapporto all’altezza di taglio
Taglio irregolare
– Piatto di taglio non parallelo al terreno – Controllare la pressione dei pneumatici– Ripristinare il parallelismo del piatto
– Inefficienza della lama – Controllare il corretto montaggio della lama– Affilare o sostituire le lame– Regolare la tensione della cinghia motore piatto
Vibrazioni durante il funzionamento
– Lame squilibrate – Equilibrare o sostituire le lame se danneggiate– Fissaggi allentati – Verificare e serrare le viti di fissaggio delle lame,
del motore e del telaio
Inserimento PTO irregolare
– Premendo il pulsante PTO – Verificare il voltaggio della batteria, non deve la lama non si inserisce essere inferiore a 12, 5 volt – Regolare la planarità freno lama frizione elettromagnetica a 0,3mm
IMPIANTO ELETTRICOL’impianto elettrico è protetto da un fusibile che, se interrotto, provoca la totale inefficacia di tuttol’impianto elettrico. Ricercato e riparato il guasto, sostituire il fusibile avariato con uno di ugualeportata. Non sostituire mai il fusibile con uno di portata diversa. I fusibili dell’impianto elettrico sitrovano sotto al serbatoio (fig. 19). Se gli inconvenienti perdurano dopo aver eseguito le operazionisopra descritte, contattare il Centro Assistenza Autorizzato. Non tentare mai di effettuare riparazioniimpegnative senza avere i mezzi e le cognizioni tecniche necessarie.
IMPORTANTE!- Evitare di invertire la polarità della batteria.- Non far funzionare il rasaerba senza la batteria, essendo dotato di un regolatore di carica.- Fare attenzione a non causare corto circuiti.
LA MACCHINA NON STA IN FOLLERegistrare allentando o stringendo il dispositivo di ritorno a zero (fig. 17).Per registrare la velocità in marcia avanti e in RM agire sulle viti (fig. 18).
FINE LAVOROTerminata la rasatura, disinnestare le lame, ed effettuare il percorso di ritorno con il piatto di taglio inposizione di massima altezza. Per fermarsi mettere la leva avanzamento in posizione STOP (fig. 1B, n.2), portare il manettino acceleratore al minimo, spegnere il motore ruotando la chiave nella posizione diSTOP (fig. 1, n. 7), abbassare il piatto nella posizione più bassa, inserire il freno di stazionamento (fig.23, n. 2).
25

Climber 9.18/Original instructions- Istruzioni originali- Original-Anleitungen- Instrucciones originales
PULIZIADopo ogni utilizzo, ripulire l’esterno del rasaerba.
RIMESSAGGIO E INATTIVITÀ PROLUNGATA Riporre la macchina in un ambiente asciutto, al riparo dalle intemperie e, possibilmente, ricoprirla con untelo. Se si prevede un prolungato periodo di inattività (superiore a 1 mese), provvedere a scollegare ilcavo rosso della batteria (fig. 23) e seguire le indicazioni contenute nel libretto di istruzioni del motore;lubrificare inoltre tutte le articolazioni. Controllare periodicamente che il voltaggio della batteria nonscenda sotto il valore di 12 Volt e in tal caso provvedere alla ricarica. Se la macchina non viene utilizzataper più di 30 giorni (motori a benzina) occorre svuotare del carburante il motore onde prevenire laformazione di depositi gommosi nel sistema di alimentazione o in parti vitali del carburatore. Nel caso sivolesse evitare questa operazione, è possibile prolungare la conservazione del carburante inrimessaggio fino a 12 mesi aggiungendo uno stabilizzante per benzina adatto allo scopo. Miscelarel'additivo al carburante nel serbatoio o nel recipiente del carburante. Accendere il motore per farcircolare l'additivo nel sistema di alimentazione. Nota: se il motore utilizza benzina contenente alcol,svuotare il serbatoio facendo funzionare il motore fino ad esaurire il carburante.
AVVERTENZE PER IL TRASPORTOSe la macchina viene trasportata a bordo di un camion o un rimorchio, assicurarla al mezzo di trasportomediante funi o cavi.
26

Climber 9.18/ Traduccion Instrucciones originales
DESBROZADORA HIDROSTATICA
GRILLO CLIMBER 9.18Estimado cliente,la agradecemos por la confianza y la preferencia que ha mostrado por nuestro GRILLO CLIMBER 9.18 yconfiamos que el uso de su nueva máquina responda plenamente a sus exigencias. Para un empleoóptimo y un perfecto mantenimiento, le rogamos lea atentamente las indicaciones de este manual yprocure seguirlas escrupulosamente, ello le permitirá obtener los máximos resultados y salvaguardar sucompra. Le rogamos conserve siempre este manual, que debe acompañar la máquina.
DESCRIPCIÓN GENERAL Y USO PREVISTOEl Climber 9.18 es una desbrozadora con asiento, construido para cortar la hierba, en terrenospendientes también.
¡ATENCIÓN! Antes de arrancar el motor leer atentamente.¡Las siguientes advertencias son importantes para su integridad física!
NORMAS DE PREVENCIÓN DE ACCIDENTES
¡La prudencia es el arma principal en la prevención de cualquier accidente!Le rogamos lea con atención las siguientes advertencias antes de iniciar el trabajo con la cortadora decésped. El uso inadecuado de la máquina y de su equipamiento puede resultar dañoso; para reducir lasposibilidades de riesgo, es necesario tomar las precauciones necesarias que a continuación seenumeran:1) Leer todo el manual, antes de encender y poner en funcionamiento la cortadora de césped.2) Prestar especial atención a las prohibiciones y a los adhesivos de seguridad colocados en lamáquina.3) La rotación de la cuchilla de la cortadora de césped es sumamente peligrosa, nunca poner lasmanos o los pies debajo del plato de corte.4) Antes de permitir que otras personas trabajen con la máquina, es preciso ponerlas al corriente de lasnormas de seguridad y de cómo se usa la misma.5) Antes de encender la máquina, controlar que no hayan personas alrededor de la misma,especialmente niños (distancia mínima de 15 metros). 6) Antes de retroceder con la máquina en funcionamiento, controlar que no hayan personas uobstáculos.7) Antes de iniciar el trabajo, ponerse una indumentaria apropiada: guantes, botas, gafas deprotección.8) Durante el trabajo, póngase adecuados medios de protección acústica (cascos).9) Controlar el terreno antes de proceder a cortar el césped, removiendo las piedras, palos o cuerposextraños que puedan ser arrojados lejos y resultar de ese modo sumamente peligrosos.10) Si se choca contra un cuerpo extraño, desembragar la cuchilla, parar el motor, desconectar lasbujías, quitar la llave de arranque e inspeccionar la cortadora.11) Antes de encender la cortadora de césped, apagar el motor, desconectar la PTO (toma de fuerza),extraer la llave de encendido y bajar el plato de corte en la posición más baja.12) En senderos secundarios, viajar a baja velocidad.13) Si el terreno es muy inclinado, moderar la velocidad durante el descenso.14) En las bajadas, curvar siempre de manera muy lenta.15) El usuario siempre es responsable de los daños originados a terceros.16) Las cuchillas deformadas o dañadas siempre deben ser sustituidas, no reparadas.17) Usar siempre recambios originales Grillo.18) Cortar sólo a la luz del sol o con buena iluminación artificial.19) Almacenar el combustible en recipientes fabricados específicamente con dicha finalidad. 20) Prestar atención cuando se trabaje en proximidad de una carretera.21) Dejar enfriar el motor antes de guardar la máquina en ambientes cerrados.22) No utilizar la máquina en caso de estar cansado y no hacer uso de bebidas alcohólicas.23) Evitar las pérdidas de combustible y, tras haber llenado el tanque, limpiar los residuos que quedensobre la máquina antes de poner en marcha la misma.
27
Climber 9.18/ Traduccion Instrucciones originales
24) No manipular ni desactivar los dispositivos de seguridad.25) No modificar las regulaciones del motor, especialmente la cantidad máxima de revoluciones.26) No ponga pesos sobre el asiento, el dispositivo de seguridad de arranque podría desactivarse.27) No hacer algún tipo de regulación o limpieza con el motor en marcha.28) No hacer controlar la máquina por otras personas mientras esté conduciendo con el motor enmarcha.
EVITAR LOS USOS INCORRECTOS29) No llevar pasajeros. 30) No deje trabajar a muchachos demasiado jóvenes: se prohíbe el uso a los menores de 16 años. 31) No trabajar con la cortadora de césped cerca de fosos o banquinas que puedan ceder bajo el pesode la máquina, especialmente cuando la superficie se presenta movediza o mojada.32) Sustituir el silenciador de escape cuando el mismo esté gastado o dañado.
MEDIDAS PREVENTIVAS COMPLEMENTARIAS Las advertencias citadas arribas podrían no ser suficientes al fin de evitar cualquier riesgo, en el casode que el operador no respete el uso apropiado de la máquina cortacésped. Por eso, añadimos lasmedidas preventivas de seguridad que se dan a continuación.33) La rotación de la cuchilla de la cortadora de césped es sumamente peligrosa, nunca poner lasmanos o los pies debajo del plato de corte.34) No hacer marcha atrás con el motor acelerado. 35) Es peligroso accionar el volante de manera brusca.36) Antes de arrancar, reposte de combustible el tanque. Haga el abastecimiento sólo al aire libre,apague siempre el motor, manténgase alejado de chispas o llamas, ¡no fume! Cierre bien el tapón deldepósito y de los contenedores de carburante.37) Si fuera necesario vaciar el tanque de combustible, efectuar la operación al aire libre.38) No trabajar con la cortadora de césped sobre la grava, dado que la misma es aspirada ycentrifugada por la cuchilla, resultando sumamente peligrosa.39) Esconder las llaves donde los niños no pueden encontrarlas. 40) ATENCIÓN: Para reducir el peligro de incendio, mantener el alojamiento motor, el silenciador delescape, los tubos de escape, la batería, la zona del tanque y los conductos de combustible limpios decésped, hojas, polvo, etc.41) No almacenar la máquina dentro de un edificio donde los vapores del combustible puedan entrar encontacto con llamas, chispas o cables de electricidad descubiertos.
Desinsertar la transmisión del plato de corte, apagar el motor y desconectar las bujías:a) antes de limpiar los puntos obstruidos. b) antes de controlar o reparar la desbrozadora.c) en caso de choque contra un cuerpo extraño (inspeccionar el órgano de corte para comprobarque no haya daños). d) si la máquina empieza a vibrar de manera anómala, efectuar en seguida un control general para individuar el origen de la anomalía: si necesario, contacte a un profesional.
28

Climber 9.18/ Traduccion Instrucciones originales
IDENTIFICACIÒN Y ASISTENCIA
IDENTIFICAZIONE
La desbrozadora CL9.18 está dotada de una placa deidentificación con el número de bastidor de máquinasituada debajo de tablero de control.
SERVICIO ASISTENCIAEste manual ofrece las indicaciones para el uso de la cortadora de césped y para un buenmantenimiento básico, posible de ser efectuado por el usuario. Para obtener información acerca de lasintervenciones no descritas en este manual, se ruega ponerse en contacto con el Revendedor local.
REPUESTOSSe recomienda utilizar exclusivamente repuestos originales, los únicos que ofrecen características deseguridad y posibilidad de intercambio. Cada pedido debe ser acompañado por el número de bastidorde la máquina y la referencia de la pieza a sustituir. Para los repuestos del motor, atenerse a lasindicaciones del manual correspondiente.
GARANTÍALa garantía es ofrecida en los modos y dentro de los límites previstos por la ley en vigor. El revendedortiene que entregar el certificado de garantía de la máquina al cliente final, imprimiendo una copia de laregistración del sitio Internet Grillo. Por lo que respecta el motor, valen las condiciones previstas por losrespectivos fabricantes.
REPUESTOS QUE SE RECOMIENDA TENERN. 2 cuchillasN. 2 tornillos cuchillasN. 2 tuercas tornillos cuchillasN. 1 serie correasN. 1 filtro aire motorN. 1 filtro aceite motor
CARACTERÍSTICAS TÉCNICAS
MOTOR: B&S 7180 INTEK OHV 15,2HP a 3300 rpm, 656 cm³, de dos cilíndros, gasolina.
ARRANQUE: eléctrico con batería 12V.
CAPACIDAD DEPÓSITO CARBURANTE: 13 litros – RESERVA: 3 litros
CAMBIO: transmisión hidrostática con reductor y diferencial.
BLOQUEO DIFERENCIAL: mediante pedal.
RADIO DE GIRO INTERIOR: 380 mm.
EMBRAGUE: por P.T.O. y electromagnética, con freno cuchilla.
VELOCIDAD: de 0 a 9 Km/h con variación continúa y marcha atrás de 0 a 6 Km/h.
NEUMÁTICOS delanteros TRACTOR: 13x5.00 – 6 con tratamiento anti-pinchazo; traseros TRACTOR:
17 x 8.00-8.
ASIENTO: superconfort, amortiguado y regulable, con apoyabrazos y roll-bar.
FRENOS: de servicio en las ruedas delanteras con mando a pedal – de estacionamiento en las ruedas
traseras con mando a palanca.
PLATO DE CORTE: con descarga lateral / trasera.
TIPO DE CORTE: 1 cuchilla rotativa.
29

Climber 9.18/ Traduccion Instrucciones originales
ANCHO DE CORTE: 910 mm.
ALTURA DE CORTE: de 30 mm a 90 mm con 4 posiciones de corte y 1 posición de traslado.
CAPACIDAD HORARIA: 7.200 m2/h (aproxim.).
DE SERIE: gancho de tiro.
ACCESORIOS: juego ruedas para césped, kit plato MP de 110 cm con palanca QUICK SHIFT
(descarga posterior + mulching) y regulación eléctrica de la altura del plato de corte, kit mulching para
plato cm 91, cadenas para ruedas, pala frontal orientable 125 cm
PESO: 293 kg
DIMENSIONES: Largo: 1.800 mm - Ancho: 990 mm - Alto: 1.070 mm
PUESTA EN MARCHA DE LA MÁQUINA
1) Controlar la integridad de la máquina , que no haya sufrido daños durante el transporte. 2) Controlar los niveles de aceite, aceite motor, transmisión hidrostática, reductor ruedas.
3) 3) Controlar la presión de los neumáticos: 1 BAR ruedas delanteras 13 x 50/61,5 BAR ruedas traseras 17 x 8.00-8 y 18 x 8.50-8
4) Controlar el voltaje de la batería, que no debe resultar inferior a los 12,5 voltios, eventualmenteproceder a la recarga de la misma. ¡IMPORTANTE! Durante el montaje, evitar la inversión de los polos de la batería.
BATERÍA - ¡ATENCIÓN!Los vapores emitidos por la batería son explosivos, por ello es necesario mantenerla lejos de llamas ochispas. Controlar periódicamente el nivel del líquido y mantener los bornes engrasados con vaselina.
RODAJE - ¡ATENCIÓN! Sustituir el aceite motor y el filtro tras las primeras 20 horas de funcionamiento. Controlar que no seproduzcan pérdidas de aceite y que no se aflojen los tornillos, especialmente los que fijan la cuchilla decorte, el volante y las ruedas. Regular la tensión de las correas de transmisión hidrostática (fig. 16).
INSTRUCCIONES DE USO
Antes de poner en marcha el motor, controlar siempre que:– el aceite del motor esté a nivel (fig. 2);– el aceite del motor hidráulico esté a nivel (fig. 3);– la palanca de avance esté en punto muerto (fig.1/B n. 2);– las rejillas de aspiración para la refrigeración del motor estén limpias (fig. 5);– el filtro de aire esté bien limpio (fig. 6);– el plato de corte esté bien limpio;– las aletas del motor hidráulico estén limpias (fig. 7);– las cuchillas estén bien afiladas y fuertemente aseguradas;– el tornillo central del cubo de la cuchilla esté bien ajustado (fig. 1/C n. 3);Llenar el tanque de combustible sirviéndose de un embudo dotado de un filtro muy fino (fig. 1/A n. 4).
PUESTA EN MARCHA DEL MOTOR– Empujar la manecilla del acelerador hasta la mitad de su recorrido (fig. 1/B n. 5).– Si el motor está frío, accionar el stárter (fig. 1/B n. 6). Girar la llave de puesta en marcha colocada enel salpicadero (fig. 1 n. 7).– Una vez en marcha el motor, desconectar el stárter y esperar algunos minutos para calentar el motor.– Para apagar el motor girar la llave de arranque en la posición de STOP (fig. 1, n. 7)Nota: Durante los desplazamientos, es oportuno que el plato de corte se encuentre a la máxima altura.
30

Climber 9.18/ Traduccion Instrucciones originales
INICIO DEL TRABAJO– Seleccionar la altura de corte mediante la palanca (fig. 1/D n. 8), acelerar el motor cuanto seanecesario y embragar la PTO (toma de fuerza) (fig. 1 n. 1). Accionar moderadamente la palanca deavance (fig. 1/B n. 2) e iniciar el trabajo. Para detenerse, llevar la palanca de avance nuevamente a laposición de Stop.– La palanca (fig. 1/B n. 2) también sirve para la marcha atrás; moviéndola hacia atrás la máquinaretrocede. Se recomienda accionarla moderadamente.
FRENO DELANTEROEl freno delantero (fig. 23 n. 1) debe ser utilizado únicamente en condiciones de emergencia, para evitarel deslizamiento de la máquina en fuertes bajadas. (Se recomienda, para mejor estabilidad, de utilizarloen conjunto con el bloqueo diferencial de las ruedas traseras). En condiciones normales, para frenarutilizar la palanca de mando de la trasmisión hidrostática.
FRENO DE ESTACIONAMIENTOAccionar el freno empujando la palanca hacia arriba hasta que se enganche en el tornillo (fig. 23 n. 2).En esta posición, al accionar la palanca de avance, un señalador acústico avisa de que el freno estáaccionado. Para ajustar el freno de estacionamiento, regular la tuerca almenada (fig. 22).
POSICIONES DE CORTEPara regular la altura de corte se utiliza la palanca de la fig. 1/D n. 8. El plato puede ser colocado encuatro posiciones de corte diferentes (de 30 a 90 mm) y en una posición de traslado, donde la cuchillase desembraga automáticamente (Fig. 1/D). En presencia de terreno accidentado, cunetas o badenes,es oportuno trabajar con el plato en la posición de corte más alta para evitar choques por parte de lacuchilla.
TERRENOS INCLINADOSLos terrenos escarpados deben ser recorridos posiblemente en el sentido de subida y bajada, prestandosuma atención en que las ruedas no encuentren obstáculos (piedras, ramas, raíces, etc.) en loscambios de dirección, dado que se podría producir el vuelco o la pérdida de control de la máquina. Silas ruedas motrices tienden a resbalar, utilizar el bloqueo diferencial (fig. 8), que se activa presionandoel pedal y se desactiva automáticamente cuando se lo suelta. Por lo tanto, evaluar las diferentessituaciones y prestar atención en presencia de terreno húmedo y césped mojado, dado que lamáquina podría resbalar. En descenso, partir a baja velocidad y evitar pisar césped seco o cortado,dado que en dichas condiciones las ruedas pierden adherencia.
INTERVENCIÓN DE LOS DISPOSITIVOS DE SEGURIDADRecordar siempre que el motor se para automáticamente cada vez que:– El operador se levanta del asiento.Además, el motor no se pone en marcha si:– La cuchilla está embragada.– Si el operador no está sentado en el puesto de conducción.– Si el plato no se encuentra en la posición superior de traslado.
CONTADOR HORARIOLa máquina está equipada con un nuevo contador horario. Este dispositivo ofrece 3 funciones:1) Muestra el número de las horas trabajadas (siempre visible, incluso si la llave no está insertada).2) Muestra las horas que faltan al cambio del aceite motor (OIL CHANGE IN ...HS). Es indispensablesustituir el aceite tras las primeras 20 horas de trabajo y sucesivamente cada 100 horas de trabajo. Elmensaje “ OIL CHANGE” parpadea automáticamente en la pantalla cuando es necesario efectuar lasustitución del aceite motor.3) Muestra las horas que faltan a la lubricación con grasa (LUBE IN...HS). La lubricación con grasa esnecesaria cada 50 horas de trabajo. “LUBE” parpadea automáticamente en la pantalla cuando esnecesarioengrasar la máquina.Estas tres funciones se pueden escoger presionando el botón blanco del contador horario.
31

Climber 9.18/ Traduccion Instrucciones originales
REGLAS ÚTILES DE BUEN USO1) Nunca forzar el motor; cuando sale humo por el escape significa que la máquina se está esforzando,entonces es necesario desacelerar.2) No tener la máquina bajo la lluvia.3) Afilar las cuchillas frecuentemente; el corte será mejor y el motor se esforzará mucho menos.4) Controlar el terreno antes de proceder al corte del césped; eliminar las piedras, los palos y loscuerpos extraños.5) Durante el corte, mantener el motor en régimen máximo, regular la velocidad en base a la altura delcésped.6) Mantener limpias las rejillas situadas sobre el motor y las aletas de enfriamiento del motorhidráulico (fig. 5 - fig. 7).
MANTENIMIENTO Y LUBRICACIÓN
¡ATENCIÓN!- Desconectar las bujías antes de iniciar cualquier operación de limpieza, mantenimiento oreparación. Llevar indumentaria apropiada y guantes de trabajo.- Si fuera necesario levantar la máquina o parte de esa, utilizar siempre herramienta adecuadacomo soportes o ganchos de seguridad.- No dejar la máquina en mantenimiento, sin dispositivos de seguridad o levantada en lugaresaccesibles a personas inexpertas, especialmente niños.- Nunca desechar en el medio ambiente el aceite usado, la gasolina o cualquier otro productocontaminante. - Un mantenimiento eficaz y una correcta lubricación contribuyen a mantener la máquina enperfectas condiciones.
MOTORPara las operaciones de lubricación, seguir las normas incluidas en el manual del motor; de todosmodos, es indispensable sustituir el aceite tras las primeras 20 horas de trabajo utilizando aceitemotor AGIP SAE 30. Para vaciar desenroscar el tapon y colocar en el grifo (fig. 20/B) un tubo de gomalo suficientemente largo como para descargar el aceite en un recipiente ubicado fuera de la máquina.Luego sustituir el filtro aceite (fig. 10).
REDUCTOR DE RUEDASControlar el nivel de aceite cada 100 horas destornillando el tapón (A, fig. 11); de ser necesario rellenarcon aceite para cambio 80 W 90 (API GL-5). Para quitar aceite destornillar el tapón (B, fig. 11),cambiarlo cada 1000 horas. Cantidad l 1,9 (echar el aceite por el tapón fig. 11/A).
MOTOR HIDRÁULICOCon el motor frío, controlar el nivel en la cámara de expansión, que debe llegar a la marca de nivel (fig.3); si es necesario, agregar aceite AGIP SAE 15W50 u 20W50. Sustituir el aceite cada 200 horas detrabajo. Para quitar el aceite, desenroscar la tapa (fig.4); luego introducir el aceite nuevo en la cámara.Mantener bien limpias las aletas y el serpentín del motor hidráulico (fig. 3/A y fig. 7). Cantidad 1 litro.
FILTRO DE AIREControlar el filtro de aire cada 4 horas de trabajo o aún más frecuentemente si el ambiente es muypolvoriento (fig. 6). Controlar la rejilla de aspiración de la refrigeración del motor (fig. 5). Para noperjudicar el paso del aire que sirve para refrigerar el motor, es necesario mantener limpias tanto lasrejillas exteriores como las interiores (fig. 5). Mantener bien limpio el alojamiento del motor, latransmisión hidrostática y la rejilla de aspiración.
CONTROL CUCHILLAS Y PLATO DE CORTEUna cuchilla desafilada arranca el césped, dándole un aspecto desagradable. Es necesario que elafilado sea realizado siempre en los filos de las dos cuchillas. Para desmontar una cuchilla, aferrarlafuertemente, utilizando guantes de trabajo, y destornillar el tornillo central considerando que el mismogira a derechas (fig. 1/C n. 3); afilar ambos filos mediante una muela de grano mediano y controlar elequilibrado de la cuchilla sosteniéndola con una barra introducida en el orificio central.Efectuar el montaje de ambas cuchillas (fig. 13).
32

Climber 9.18/ Traduccion Instrucciones originales
¡ATENCIÓN!Ajustar a fondo el tornillo de fijación (fig. 1/C n. 3). Sustituir siempre las cuchillas dañadas o torcidas,¡nunca tratar de repararlas! Para el montaje, seguir el esquema de la fig. 13. ¡USAR SIEMPRECUCHILLAS ORIGINALES! Si las mismas resultan desgastadas pueden ser dadas vuelta, dado queconstan de doble filo.
PLATO DE CORTE 910 mm REGULACIÓN PLATO DE CORTEUna buena planeidad del plato es esencial para obtener un corte de césped uniforme. Colocar lacortadora sobre una superficie plana, controlar la correcta presión de los neumáticos, y luego servirsede los reguladores derechos e izquierdos hasta llevar el borde del plato a la misma distancia al suelo, 30mm, tanto de un lado como del otro, con el operador sentado (fig. 14 – 14/A). En caso de no lograr unperfecto paralelismo, se ruega consultar un Centro de Asistencia Autorizado.
CORREA MOTOR - CUCHILLA PLATO 910 mmLa correa motor - cuchilla consta de regulación automática, por lo tanto no tiene necesidad de algunaregulación; es suficiente controlar la tensión del resorte (fig. 15). Si se produce el enroscamiento o lasalida de la correa, controlar las siguientes medidas teniendo el plato en la posición superior detraslado:1) Distancia del borde delantero del plato al suelo: 170 mm (fig. 24).2) Distancia del borde trasero del plato al suelo: 170 mm (fig. 24).3) Servirse de los registros (fig. 14 - 14/A).4) Atención cuando se posicionan los desplazadores de correa, hay que acercarlos controlando el platoen las diferentes alturas (A, fig. 12). Controlar que la correa trabaje siempre en el centro del tensor (A,fig. 15). El tensor debe sobresalir de 5/8 mm con respecto al bastidor (fig. 25).
PLATO DE CORTE 110 MPEste plato de corte, de tres cuchillas y tiene un ancho de corte de 1.100 mm, e incluye dos funciones:descarga trasera y mulching. Para pasar de la función descarga trasera a la función mulching essuficiente actuar por medio de la palanca y no es necesario cambiar las cuchillas (fig. 26 y 27). Laregulación de la altura de corte es eléctrica, por medio de un pulsador colocado sobre el salpicadero(fig. 36).
MANTENIMIENTO PLATO 110 MPPara mantener el correcto funcionamiento de la correa plato de corte y para asegurar un corteuniforme:- Llevar el plato a la posición más baja.- Utilizando los puntos de ajuste en los brazos delanteros (Fig. 34), llevar la parte delantera del plato auna distancia de 35 mm al suelo (Fig. 28): la medida se efectúa en el punto indicado en Fig. 29 (A).- Utilizando los puntos de ajuste Fig. 35 , llevar la parte trasera del plato a una distancia de 35 mm alsuelo (Fig. 30): la medida se efectúa en el punto indicado en Fig. 29 (B). Para controlar la correa delplato, es necesario destornillar el pomo Fig. 31 (D) y quitar las dos protecciones. Si se verifica unavariación de la correa en longitud con consecuente mal funcionamiento, es posible ajustar la tensión pormedio del dispositivo correspondiente (Fig. 32). Si es necesario cambiar la correa, para montarla seguirel esquema ilustrado en Fig. 33. El muelle debe mantenerse ajustado a 86 mm y es indicado por laflecha roja (fig. 32 ref. B). El tensor tiene que ser lubricado cada 50 horas (Fig. 32 ref. C).
CORREA MOTOR - TRANSMISIÓN HIDROSTÁTICASi se detecta una variación de longitud de la correa y el consiguiente mal funcionamiento, es posibleregular la tensión mediante el regulador de la fig. 16. Prestar atención en no comprimir completamenteel resorte situado debajo de la tuerca; las correas no tienen que estar demasiado tensas ni demasiadoflojas. El resorte debe mantenerse regulado en 44 mm y es indicado por la flecha roja (fig. 16).
ROTACIÓN CUCHILLAPara embragar y desembragar la rotación de la cuchilla, se utiliza el pulsador de la fig. 1 n. 1. Durante elembrague, el motor debe estar a régimen medio (véase la indicación en el adhesivo del acelerador) y lamáquina no debe estar sobre el césped para cortar. No activar las cuchillas con el motor en régimenmáximo. La máquina está dotada de embrague electromagnético, que funciona también como freno delas cuchillas durante el desembrague. El desembrague se produce también de manera automática en la
33

Climber 9.18/ Traduccion Instrucciones originales
posición superior de la palanca de regulación de la altura de corte. Trabajar con el motor a régimenmáximo.
SUSTITUCIÓN CORREASLa transmisión del movimiento del motor a la transmisión hidráulica y a las cuchillas se obtiene mediantedos correas trapezoidales. ¡Sustituir las correas en cuanto se detecten signos de desgaste! Susustitución y las regulaciones sucesivas son bastante complejas y es indispensable que sean realizadaspor un Centro Asistencia Autorizado. Para la correa del motor del plato de corte, es necesariodesmontar los desplazadores de la correa de la polea del plato, y luego desenganchar el resorte tensorde correa como en la fig. 15, B. Para las dos correas motor-transmisión y transmisión-motor hidráulico,proceder de la siguiente manera: 1) Quitar las rejillas trasera y superior. 2) Aflojar la tuerca tensora decorrea (Fig. 16). ¡USAR SIEMPRE CORREAS ORIGINALES!
DISPOSITIVO DE DESBLOQUEO DE LA TRACCIÓNEl dispositivo de desbloqueo de la tracción está posicionado detrás del asiento, si se verificase unaavería en la máquina, para poder remolcarla o desplazarla a mano posicionar la palanca hacia elexterior (fig. 20/A). En la posición indicada en la fig. 20/B la máquina está en trabajo. Controlar que elpistoncillo del motor hidráulico durante el trabajo no permanezca presionado, de ser necesario registrarla tuerca (fig. 21).
REGULACIÓN BLOQUEO DIFERENCIALEl bloqueo diferencial tiene que activarse cuando el pedal se encuentra en el medio de su recorrido (fig.8). Para ajustar el punto de activación del bloqueo diferencial, utilizar el dispositivo correspondiente (fig.9).
TABLA RECAPITULATIVA DE MANTENIMIENTOINTERVENTOS CADA 8
HORASPRIMERAS20 HORAS
CADA50
HORAS
CADA100
HORAS
CADA AÑOO CADA 200
HORASAceite motor Controlar el nivel ●
Sustituir ● ●
Filtro aireControlar ●
Sustituir ٭
BujíaControlar/registrar ●
Sustituir ●
Aceite motor hidráulico
Controlar el nivel ● ●
Sustituir ●
Controlen que la rejilla de aspiración motor sea limpia
●
Controlen que las aletas del motor hidráulico sean limpias
●
Aceite caja decambios
Controlar el nivel ● ●
Sustituir ٭Controlar afilado y fijación cuchillas
●
Lubricar con grasa● ●
● intervención recomendadaintervenir si necesario ٭
34

Climber 9.18/ Traduccion Instrucciones originales
PUNTOS DE LUBRICACION CON GRASA
GUÍA A LA IDENTIFICACIÓN DE LOS INCONVENIENTES
INCONVENIENTECAUSA SOLUCIÓN
Con la llave en posición “AVV” (MARCHA) el salpicadero queda apagado
La batería no suministra alguna corriente – Controlar los cables de conexión
– Controlar el nivel del electrólito
– Recargar la batería
– Sustituir el fusible
El salpicadero se enciende, per con llave en posición “AVV” (MARCHA) el motor de arranque no gira
– La batería no suministra suficiente corriente – Recargar la batería
– Falta el asenso a la puesta en marcha – Palanca de avance en posición Stop
– Desactivar las cuchillas
– Sentarse en el puesto de conducción
Puesta en marcha dificultosa o funcionamiento irregular del motor
– Problemas de carburación – Limpiar o sustituir el filtro del aire
– Regular el carburador (referirse al manual delmotor)
– Depósitos o impurezas en el combustible – Vaciar el tanque y cargar combustible nuevo
– Controlar y sustituir el filtro combustible
El motor de arranque gira pero el motor principal no arranca
– Falta de flujo de combustible – Controlar que el stárter esté accionado (si elmotor está frío)
– Controlar el nivel del tanque– Controlar los cables del mando apertura carburador– Controlar y eventualmente sustituir el filtro de combustible – Controlar que el orificio de ventilación en la tapa
del tanque no esté obstruido.
35

Climber 9.18/ Traduccion Instrucciones originales
– Insuficiencia en el equipo de encendido – Controlar la fijación de los capuchones de lasbujías.
– Controlar que los electrodos estén limpios y auna distancia correcta.
Reducción del rendimiento del motor durante el corte
– Velocidad de avance elevada en relación – Disminuir la velocidada la altura de corte
Corte irregular
– Plato de corte no paralelo al terreno – Controlar la presión de los neumáticos– Restablecer el paralelismo del plato
– Cuchilla ineficaz – Controlar que la cuchilla esté montada correctamente
– Afilar o sustituir las cuchillas– Regular la tensión de la correa del motor plato
Vibraciones durante el funcionamiento
– Cuchillas desequilibradas – Equilibrar las cuchillas o sustituirlas si están dañadas
– Fijaciones flojas – Controlar y ajustar los tornillos de fijación de las cuchillas, los del motor y los del chasis
Activación toma de fuerza irregular
– Presionando el botón toma de fuerza – Controlar el voltaje de la batería, no debe ser la cuchilla no se activa inferior a 12, 5 V – Regular el plano del freno cuchilla embrague electromagnético 0,3 mm
INSTALACIÓN ELÉCTRICALa instalación eléctrica está protegida por un fusible que, cuando se interrumpe, provoca la completaineficacia de la misma. Una vez detectada y reparada la avería, sustituir el fusible averiado por otro dela misma capacidad. Nunca sustituir el fusible por otro de capacidad diferente. Los fusibles de lainstalación eléctrica se encuentran debajo del tanque (fig. 19). Si los inconvenientes perduran tras haberefectuado las operaciones descritas, ponerse en contacto con el Centro de Asistencia Autorizado.Nunca tratar de efectuar reparaciones importantes sin contar con los medios y los conocimientostécnicos necesarios.
¡IMPORTANTE!– Evitar la inversión de los polos de la batería.– No hacer funcionar la cortadora de césped sin la batería, dado que está dotada de un regulador decarga.– Prestar atención en no causar cortocircuitos.
SI LA MÁQUINA NO SE MANTIENE EN PUNTO MUERTORegular el dispositivo de retorno a cero ajustándolo o aflojándolo (fig. 17).Para regular la velocidad de avance y retroceso, utilizar los tornillos (fig. 18).
36

Climber 9.18/ Traduccion Instrucciones originales
FIN DEL TRABAJOUna vez terminado el corte del césped, desembragar las cuchillas y efectuar el trayecto de retorno conel plato de corte en posición de máxima altura. Para detenerse, colocar la palanca de avance enposición STOP (fig. 1/B Nº 2), llevar la manecilla del acelerador a la posición de mínimo, apagar elmotor girando la llave en posición STOP (fig. 1 Nº 7) y bajar el plato a la posición más baja, activar elfreno de estacionamiento (fig. 23 N° 2).
LIMPIEZALimpiar la parte exterior de la cortadora de césped después de cada uso.
ALMACENAMIENTO E INACTIVIDAD PROLONGADAGuardar la máquina en un ambiente seco, al reparo de la intemperie, cubriéndola si es posible con unalona. Si se prevé un prolongado período de inactividad (superior a 1 mes), desconectar el cable rojo dela batería y seguir las instrucciones del manual del motor; lubricar además todas las articulaciones.Controlar periódicamente que el voltaje de la batería no descienda por debajo de los 12,5 voltios, encuyo caso es necesario recargarla. Si se prevé un periodo prolongado de inactividad (superior a unmes), es necesario vaciar el motor del combustible para prevenir la formación de depósitos gomosos enel sistema de alimentación o en partes vitales del carburador. Si se quiere evitar esta operación, esposible prolongar la conservación del combustible en almacenamiento hasta 12 meses añadiendo eladitivo estabilizante para gasolina Mezcle el aditivo al carburante en el depósito o en el recipiente delcarburante. Ponga en marcha el motor por un tiempo para hacer circular el aditivo en el sistema dealimentación. Nota: si el motor lleva gasolina con alcohol, vacíe el depósito haciendo funcionar el motorhasta que se vacíe por completo.
ADVERTENCIAS POR EL TRANSPORTESi la máquina es transportada con un camión o un remolque, amárrela al medio de transporte concables o cadenas.
37

Fig. 1A
Fig. 1BFig. 1C
Fig 1D
Fig. 2
2
5
8
1
7
Fig. 1
4
6
38

Fig. 3Fig. 3A
Fig. 4
Fig. 5
Fig. 6 Fig. 7
Fig. 8Fig. 9
OIL LEVELLIVELLO OLIO
39

Fig. 10 Fig. 11
Fig. 11A Fig. 12
Fig. 13 Fig. 14
Fig. 14A Fig. 15
A A
B A
B
A
OIL LEVELLIVELLO OLIO
40

Fig. 16 Fig. 17
Fig. 18Fig. 19
Fig. 20A
Fig. 20B
Fig. 21 Fig. 22
OILOLIO
44 mm
41
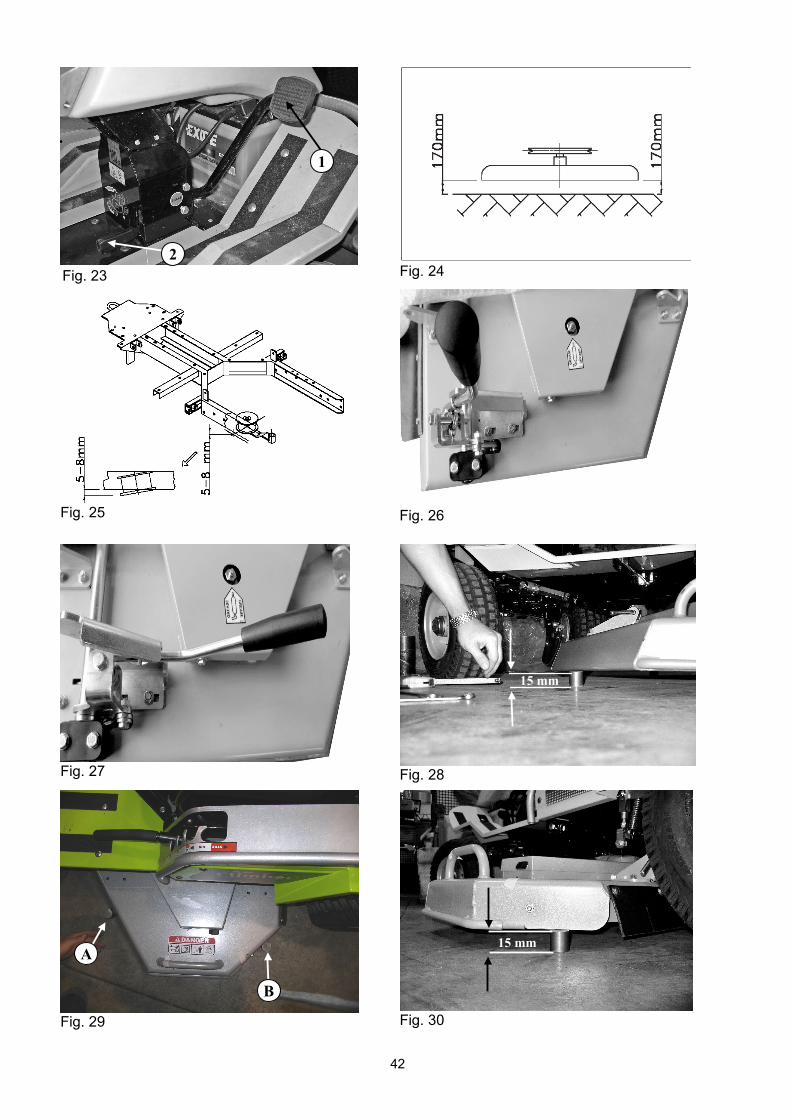
Fig. 23 Fig. 24
Fig. 25 Fig. 26
Fig. 27 Fig. 28
Fig. 29 Fig. 30
2
1
Fig. 23
15 mm
B
A15 mm
42

Fig. 31 Fig. 32
Fig. 33 Fig. 34
Fig. 35Fig. 36
86 mm
D
43

WARNING! This arrow shows the hook-up points for lifting the machine.ATTENZIONE! Le frecce indicano i punti di aggancio per il sollevamento della macchina.ATTENTION! Cette flèche indique les points d’accrochage pour le levage de la machine.ACHTUNG! Mit dieser Pfeil sind die Punkte zum Anheben der Maschine gekennzeichnet.ATENCIÓN! Las flechas indican los puntos de enganche para el levantamiento de la maquina.
TRANSPORTINGIf the machine is transported on a truck or trailer, lower the cutting deck, engage the parking brake andfasten the machine securely with ropes, cables or chains to the hauling device.TRASPORTOSe la macchina viene trasportata con un camion o un rimorchio, abbassare il piatto di taglio, inserire ilfreno di stazionamento ed assicurarla adeguatamente al mezzo di trasporto mediante funi, cavi ocatene.TRANSPORTSi la machine doit être transportée sur un camion ou une remorque, abaisser le plateau de coupe, serrerle frein à main et la fixer solidement sur l’engin de transport avec des cordes, des câbles ou deschaînes.TRANSPORTWenn die Maschine auf einem Lastwagen oder einem Anhänger transportiert wird, ist das Mähdeck zusenken, die Feststellbremse anzuziehen und die Maschine mit Seilen, Tauen oder Ketten auf demTransportmittel sicher zu befestigen.TRANSPORTESi la máquina se transporta con un camión o con un remolque, bajar el plato de corte, inserir el freno deestacionamiento y asegurarla adecuadamente al medio de transporte mediante sogas, cables ocadenas.
1800 mm 990 mm 1070 mm
44

Grillo S.p.A.47521 CESENA (ITALY) – Via Cervese 1701Tel: +39 0547 633111Fax: +39 0547 632011Website: www.grillospa.it E-mail: [email protected]
GRILLO DEUTSCHLAND GmbHPilsener Strasse, 9 - D-86199 AugsburgTel: + 49 082126879910Faxnr.: + 49 01733132860Webseite: www.grillodeutschland.de E-Mail: [email protected]
Grillo Agrigarden LTDDove fields Uttoexeter - ST148HU StaffordshireTel: + 44 01889569149Fax no.: + 44 01889592666Website: www.grilloagrigarden.co.uk E-mail: [email protected]
S.p.A.