Client Portal and Taskfire User Guide - WheelHouse Solutions
106
Client Portal and Taskfire User Guide Updated 9/6/2016 © 2015 Autotask Corporation
-
Upload
khangminh22 -
Category
Documents
-
view
4 -
download
0
Transcript of Client Portal and Taskfire User Guide - WheelHouse Solutions

Client Portal and TaskfireUser Guide
Updated 9/6/2016
© 2015 AutotaskCorporation
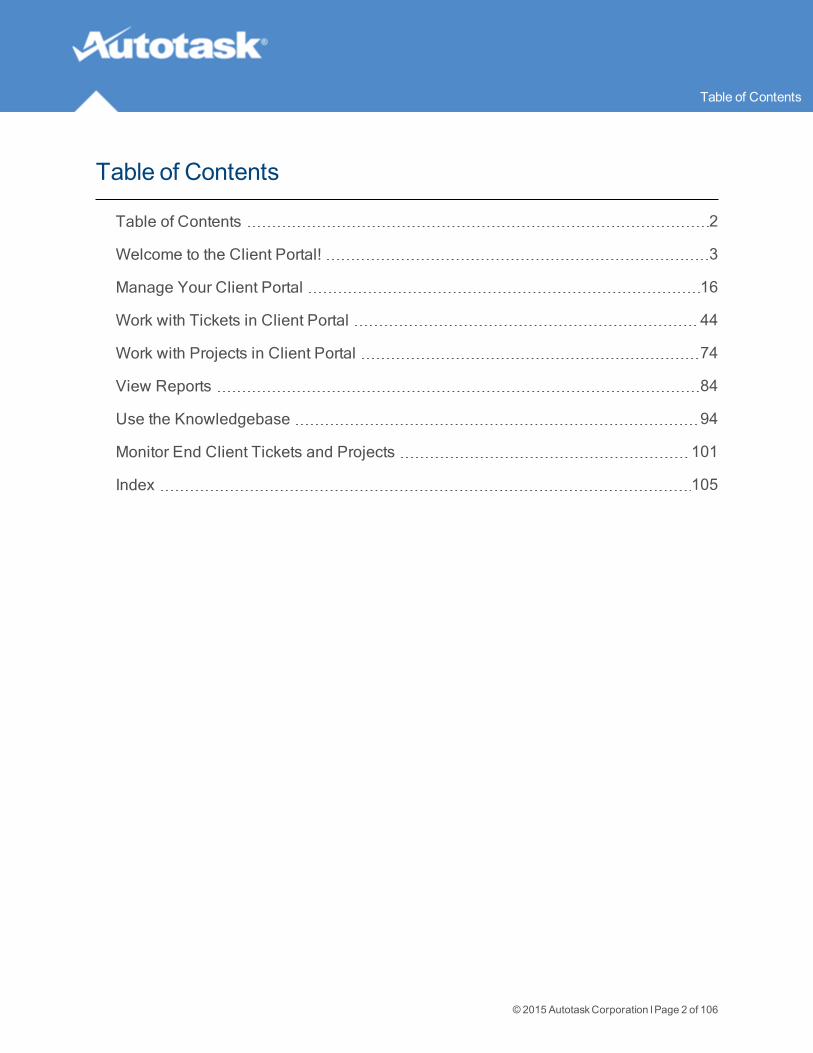
Table of Contents
Table of Contents 2
Welcome to the Client Portal! 3
Manage Your Client Portal 16
Work with Tickets in Client Portal 44
Work with Projects in Client Portal 74
View Reports 84
Use the Knowledgebase 94
Monitor End Client Tickets and Projects 101
Index 105
Table of Contents
© 2015 AutotaskCorporation lPage 2 of 106
Welcome to the Client Portal!Our Client Portal is a secure web site that gives you access to your company's records in our Autotask data-base.
The level of access for each user is controlled by the security level assigned to them. There are two kinds ofsecurity levels: Standard Client Portal, and Taskfire.
What you can do with a standard Client Portal security level
The standard Client Portal lets you create tickets (a.k. a. "Service Requests") andmonitor tickets and pro-jects. Depending on your security level, you can:
l Submit tickets directly into our ticketing system
l Monitor the progress of previously submitted tickets and projects and review our staff's notes and timeentries
l Add notes and attachments of your own
l Grant approvals for proposed work online
l Run reports
l View invoices
l If you are a company we bill for work done for another company (the "End Client"), you can review thework we did for the end client. You can findmore on that in the topic "Monitor End Client Tickets andProjects" on page 101.
What you can do with a Taskfire security level
Taskfire is an extension of the standard Client Portal. You get all the standard features plus your own internalhelp desk. This is a great solution for customers who have their own IT resources, but do not have the capa-city to deal with everything. Taskfire is perfect for coordinating the work between your company and ours, andeven your headquarters and subsidiaries. You can:
l Create tickets and assign them to your internal resources
l Have your internal resources track their work
l Escalate tickets to us manually, and configure auto-escalation rules based on issue types, time of dayand out of office settings
l Share work between your company's locations
© 2016AutotaskCorporation lPage 3 of 106
l Add other vendors to you client portal. This lets you keep track of tickets for maintenance crews, utilitycompanies, Internet service providers and others.
You can assign Taskfire licenses to your IT staff, and standard Client Portal licenses to everyone else. Formore information about security levels, refer to "Security Level Permissions " on page 7.
Getting started
All users should watchUsing Client Portal (available in English only)
Taskfire users should also watchUsing Taskfire (available in English only)
l The first time you log in you should "Edit Your Profile" on page 4 and "Change Your Password" on page6.
l The Client Portal is a Cloud-based application delivered in your browser. If things don't work asdescribed in this Help file, youmay want to "Configure Your Browser Settings" on page 7.
l If you don't have access to all the features you need, check with your Client Portal manager about the"Security Level Permissions " on page 7. You can check your current level and permissions on the EditProfile page.
l To get an overview of the navigation, refer to "Navigate the Client Portal" on page 9.
l To dive right in, click "Create a Ticket" on page 45 on the landing page and see how easy it is!
l Everything else is covered in this online Help system. If you are on a page that displays a questionmark in the top right corner, you can click it to get context-sensitive help for that topic.
Edit Your Profile
All users
On any Client Portal page, click Edit Profile
All users can view and edit their Client Portal user profile and view the permissions included with theirassigned security level.
1. Click theEdit Profile link at the top of the Client Portal to open the User Profile window.
© 2016AutotaskCorporation lPage 4 of 106

© 2016AutotaskCorporation lPage 5 of 106

2. Review and edit your profile information. Note that fields with a red asterisk are required.
3. Scroll down to view your security level permissions.
4. Click Save and Close.
Change Your Password
All Users
On any Client Portal page, click Change Password
To change your password:
© 2016AutotaskCorporation lPage 6 of 106
1. Click theChange Password link at the top of the Client Portal to access the Change Password win-dow.
2. Type your current password.
3. Type a new password.
Passwords must be between 5 and 50 alphanumeric characters. Spaces and single quotesare not allowed.
4. Type your new password again to confirm.
5. Click Save and Close.
Configure Your Browser Settings
All users
Please refer to the online version of this help file.
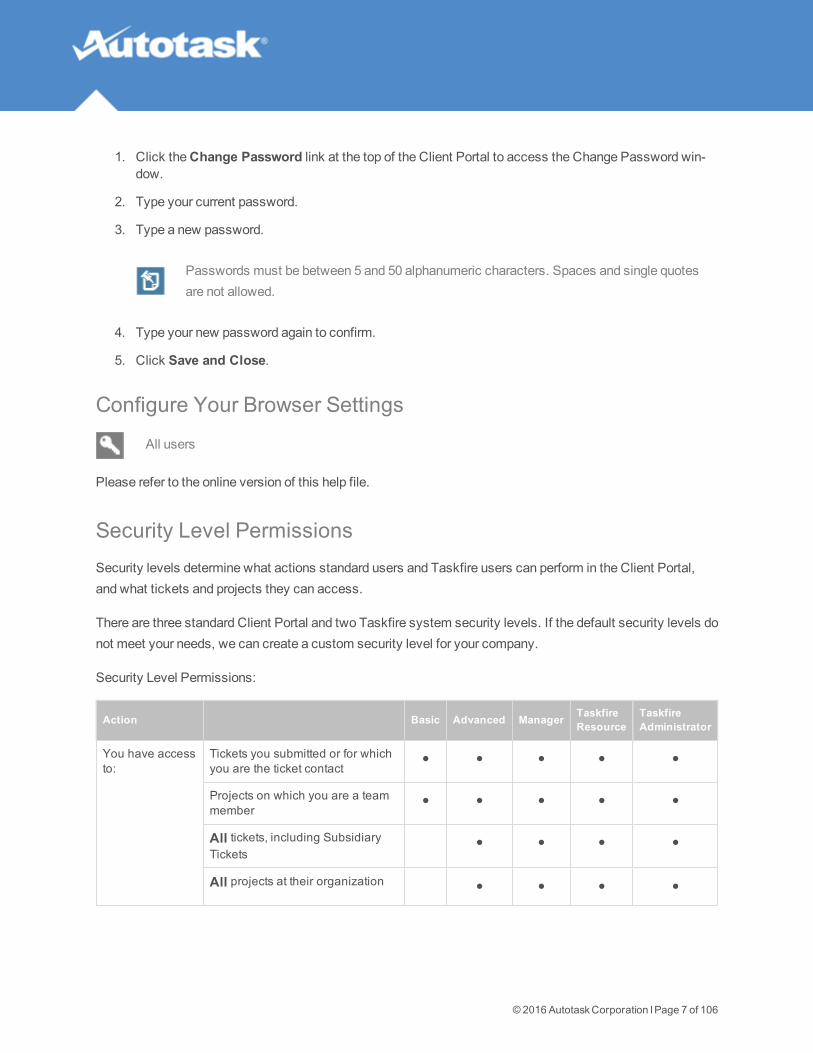
Security Level PermissionsSecurity levels determine what actions standard users and Taskfire users can perform in the Client Portal,and what tickets and projects they can access.
There are three standard Client Portal and two Taskfire system security levels. If the default security levels donot meet your needs, we can create a custom security level for your company.
Security Level Permissions:
Action Basic Advanced Manager TaskfireResource
TaskfireAdministrator
You have accessto:
Tickets you submitted or for whichyou are the ticket contact • • • • •Projects on which you are a teammember • • • • •All tickets, including SubsidiaryTickets
• • • •
All projects at their organization • • • •
© 2016AutotaskCorporation lPage 7 of 106

Action Basic Advanced Manager TaskfireResource
TaskfireAdministrator
Tickets Dataactions permitted
Create new Tickets (ServiceRequests), and add Notes andAttachments
• • • • •
Can view Service Provider Priority • •Can set Service Provider Priorityon ticket creation. • • • • •
Project actionspermitted
View project schedule • • • • •Email members of the project team • • • • •View /add project notes • • • • •View project attachments • • • • •View project calendar items • • • • •View project tasks you areassigned to • • • • •Add issues • • • • •View project charges • • •View estimated hours • • •
Profile View/edit your own profile • • • • •
© 2016AutotaskCorporation lPage 8 of 106

Action Basic Advanced Manager TaskfireResource
TaskfireAdministrator
Portal Admin Create and manage Client PortalUsers • • •Create and manage Queues •Create and manage Request TypePreferences •Create and manage Vendors •Create and manage Out of OfficeSettings •Create and manage Scheduled OffHours •
Knowledgebase Access Knowledgebase (if Know-ledgebase is turned on for yourcompany).Only articles marked "public" canbe seen by a client user.
• • • • •
Reports View Invoice and Block HourReports • •
Navigate the Client Portal
All users
Logging in
Log in using the URL, User Name and Password you received in yourWelcome email.
© 2016AutotaskCorporation lPage 9 of 106

You can choose to have the portal store your log-in credentials for future visits.
l Select Remember My User Name to have Client Portal automatically populate this field when youaccess the log-in page. You will have to specify your password.
l Select Keep Me Logged-in on this Computer to have Client Portal automatically populate bothfields when you access the log-in page. You just click LOGIN.
The Landing page
When you log in to the Client Portal your first stop is your Landing Page, with buttons for some of themostfrequent actions. Just click an option to go! If you want to hide this landing page, select the check mark at thebottom of the page.
© 2016AutotaskCorporation lPage 10 of 106

Tickets
All open tickets you submitted or are a contact or resource on appear on theMy Tickets page. Here, you canreview our progress on the issue, and view any notes or attachments we have added, and add your own notesand attachments.
© 2016AutotaskCorporation lPage 11 of 106

You can find other tickets using the pre-configured ticket filters on the Tickets drop-downmenu and sub-nav-igation bar. Access to the Open Tickets selection is controlled by your Security Level.
You can also search for tickets by keyword or ticket number using the Ticket Search.
If the ChangeManagement feature is enabled, you will see an additional button,My Change Approvals.Click this button to view a list of all tickets awaiting your approval or that you have approved or rejected. It willnot display tickets whose Service Provider Status is Complete.
If your company is listed on any of our contracts as the "Company to bill", you will see an additional option,End Client Tickets. Click this button to view a list of all tickets where your company is the Company to bill.For additional information, see "End Client Tickets" on page 101.
Projects
The Project tab provides access to project information, including tasks and issues, teammembers, sched-ules, notes, estimated hours, the project calendar, and project charges (if your Security Level allows this).
© 2016AutotaskCorporation lPage 12 of 106
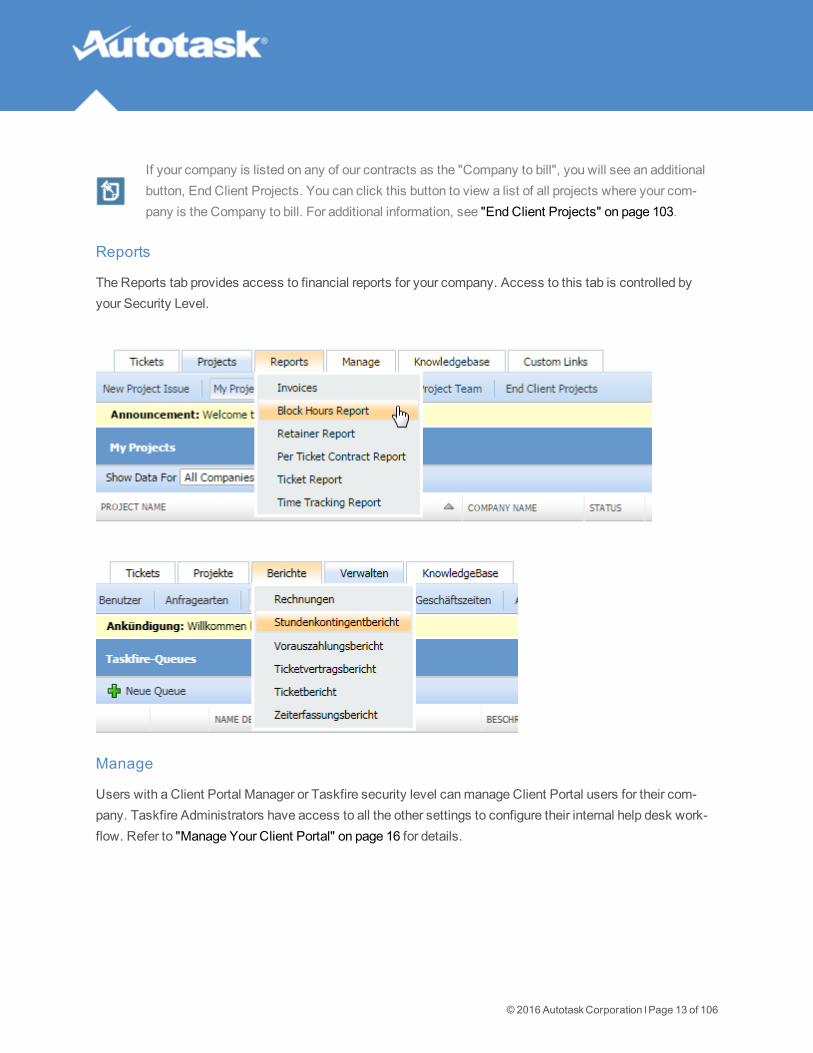
If your company is listed on any of our contracts as the "Company to bill", you will see an additionalbutton, End Client Projects. You can click this button to view a list of all projects where your com-pany is the Company to bill. For additional information, see "End Client Projects" on page 103.
Reports
The Reports tab provides access to financial reports for your company. Access to this tab is controlled byyour Security Level.
Manage
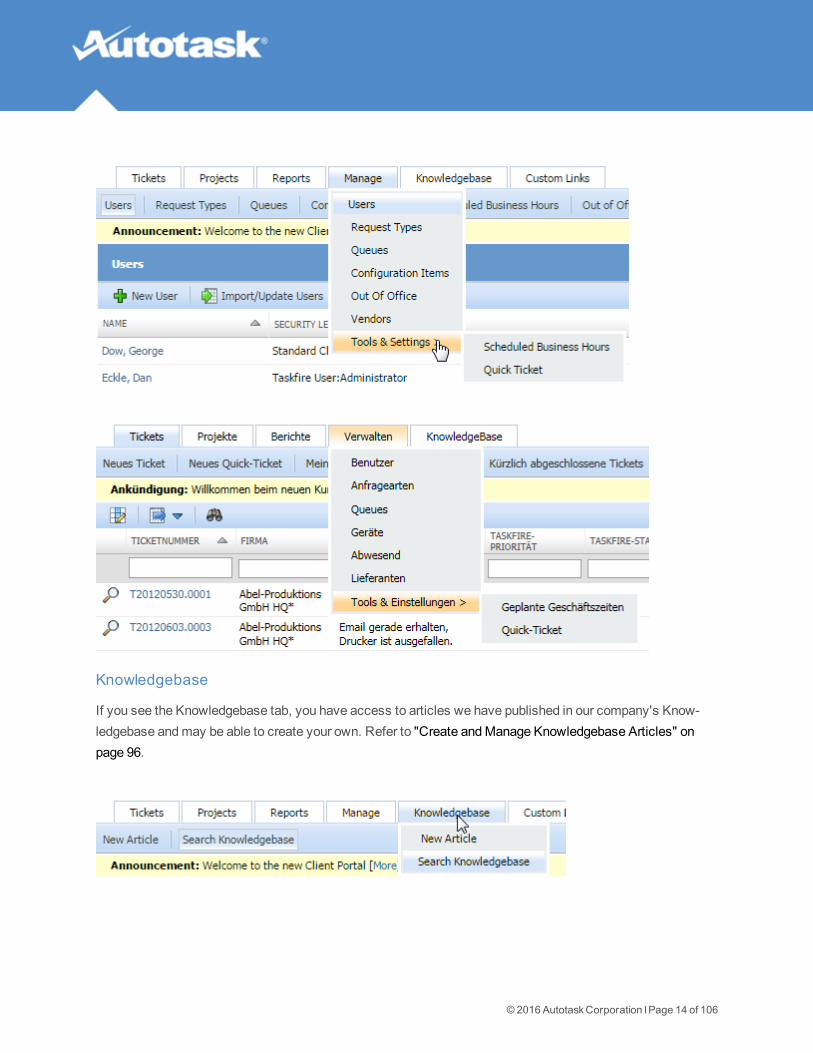
Users with a Client Portal Manager or Taskfire security level canmanage Client Portal users for their com-pany. Taskfire Administrators have access to all the other settings to configure their internal help desk work-flow. Refer to "Manage Your Client Portal" on page 16 for details.
© 2016AutotaskCorporation lPage 13 of 106
Knowledgebase
If you see the Knowledgebase tab, you have access to articles we have published in our company's Know-ledgebase andmay be able to create your own. Refer to "Create andManage Knowledgebase Articles" onpage 96.
© 2016AutotaskCorporation lPage 14 of 106

Custom Links
The Custom Links tab provides a drop-downmenu for helpful links that we have provided:
Announcement (news item)
Within the Client Portal, you will notice the Announcement headline in the bar below the tabs and sub-nav-igation bar. This links to information from us, such as system outage notices or other important informationthat we want you to know. Click the [More] link to view the full announcement.
If the ChangeManagement feature is enabled and there are change requests awaiting yourapproval, a second banner will appear, indicating how many change requests require your approval.Click the View link to see a list.
© 2016AutotaskCorporation lPage 15 of 106

Manage Your Client PortalClient Portal Manager, Taskfire Resource or Taskfire Administrator to create andmanage users,Taskfire Administrator for all other configuration settings
Configuration tasks for standard Client Portal ManagersIf your company will not be using the Taskfire internal help desk, you will only need tomake sure that thepeople in your company who will be accessing Client Portal have a user account with the right security level.
Refer to "Manage Client Portal Users" on page 17.
Configuration tasks for Taskfire AdministratorsIf you will bemanaging your internal help desk using Taskfire, you will need to configure the Client Portal tosupport the shared ticket workflow that we have agreed upon. You will also need to let us know which userswill be assigned Taskfire security levels, and who will be the Taskfire Administrator who will configure the Cli-ent Portal for Taskfire.
You cannot assign Taskfire security levels yourself. Youmust contact us to assign them for you.
Refer to the following topics:
l "Manage Client Portal Users" on page 17
l "Manage Request Types" on page 22
l "Manage Ticket Queues" on page 26
l "Enable and Configure Quick Tickets" on page 29
l "Define Scheduled Business Hours" on page 31
l "TheOut of Office Setting" on page 32
l "Add Vendors" on page 33
If you will be sharing ticket work with contacts at other locations (a parent/subsidiary set up in Autotask isrequired), refer to "Set UpWork Sharing Between Locations" on page 41 for an overview and recommendedsteps for configuration.
© 2016AutotaskCorporation lPage 16 of 106

Manage Client Portal Users
Client Portal Managers, Taskfire Resources and Taskfire Administrators and some custom securitylevels
Landing Page > Manage > Users
If you have access to theManage > Users feature, you can create Client Portal user accounts for people atyour company andmanage their profile information, including user names and passwords. The users you addwill appear as contacts for your company in our database.
You are not able to create new Taskfire users. You can create a user record for them and assign
them a standard Client Portal security level, but we will need to assign them the Taskfire security
level. Also note that if you havemultiple locations, a Taskfire resource that will be working on tick-
ets for other locations must be added to the Parent Company (see "Set UpWork Sharing BetweenLocations" on page 41).
How to...Add a newClient Portal user
1. On theManage tab, select Users. TheManage Users page opens, displaying the contacts from yourcompany.
2. Click New User. The New Contact page opens.
3. Enter general information for the new contact.
4. Click theClient Portal tab.
5. Select theActivate Client Portal check box. The page becomes active:
© 2016AutotaskCorporation lPage 17 of 106

© 2016AutotaskCorporation lPage 18 of 106

Populate the following fields:
Field Definition
UserName
Enter a user name. You may want to use email addresses as a standard for User Names.
SecurityLevel
Select one of the Standard Client Portal Security Levels (Basic, Advanced, or Manager). Tosee the specific permissions for each, place your mouse over the Security Level, or referto"Security Level Permissions " on page 7. To upgrade the user to a Taskfire security level,contact us.
We can create Custom Security Levels for you that will appear in the Custom
Security Level section. Contact us if you need a specific combination of per-
missions for your users.
FormattingOptions
Select the Date, Time, and Number Format for this user.
6. Click Save and Close.
Import or update many users at once
© 2016AutotaskCorporation lPage 19 of 106

1. On theManage tab, select Users. TheManage Users page opens, displaying the contacts from yourcompany.
2. Click Import/Update Users button. The Import/Update Users page opens:
3. Click Download Import Template, complete it, and save it.
4. Click Browse orChoose File to locate your template.
5. If you have subsidiaries, youmay select whether to upload/update users into your own companyrecord, or a subsidiary.
6. Use the radio buttons to select your import/update preferences.
© 2016AutotaskCorporation lPage 20 of 106

7. Click Import.
8. You will be notified via email when your import/update is complete.
If you wish to see your import/update history, click the Import History button, or on the linkprovided in the popup that appears when you have submitted your import/update file.
View the Import/Update History
1. On theManage tab, select Users.
2. Click the Import History button. The Import History page displays:
Any failed imports/updates will be noted in the Status column.
3. Click theView Exceptions link to see details on the cause of the failure.
Change a user's security level
To change a user's Security Level:
1. Click Manage > Users.
2. Find the user on the list of Client Portal users.
3. Click the user name to open the Contact page.
4. Select a new Standard Client Portal Security Level for the user (Basic, Advanced, or Manager) orselect a Custom Security Level that we have added for your company. Refer to "Security Level Per-missions " on page 7 for more information on Security Levels.
We control which standard security levels (Basic, Advanced, or Manager) you can assignwhen you create or edit a user in the Client Portal. Security levels that are not enabled willappear grayed out on theContact > Client Portal tab.Taskfire security levels can only be assigned by us, your service provider.
© 2016AutotaskCorporation lPage 21 of 106
5. Click Save and Close.
Reset a user's password
When users forget their password, you can automatically send them a new password with one click.
1. On theManage tab, select Users. This will open theManage Users page.
2. Find the user whose password you need to reset. Click their name to open the Contact page.
3. Click theClient Portal tab.
4. Click Reset Password/Notify User at the bottom of the page.
5. The user's password is reset with a system-generated password, and an email with the new passwordis sent to them. The user can then change this password on his or her profile page.
Manage Request Types
Taskfire Administrator
Manage > Request Types
A request type is a template that you create tomake it easy for users to report issues, and for you to gather allthe information you need from them, using pre-configured "follow-up questions."
The request type determines:
l The internal queue the ticket will be placed into and optionally, the internal resource that will beassigned
l The vendor to whom the ticket is auto-transferred
l When the ticket is auto-transferred, and if the Out of Office setting will impact it
l Whether the ticket will be shared with IT-colleagues at your subsidiaries
We have set up aGeneral Request type for you. You will not be able to delete this queue, but you can assign aTaskfire queue and resource, and define auto-escalation rules andOut or Office settings. If you are not goingto use it, you can inactivate it.
How to...Create or edit a request type
1. Go toManage> Request Types.
© 2016AutotaskCorporation lPage 22 of 106

2. To create a new Request Type, click New Request Type.
To edit an existing Request Type, click the pencil icon.
© 2016AutotaskCorporation lPage 23 of 106

Field Description
Request TypeName
Enter a name that makes it clear when the request type should be used.
Active Select this check box to make the Request Type available to users.
Shared with Sub-sidiaries
Check to make this request type available to your subsidiaries.
TheShared with Subsidiaries check box only appears if your com-pany has multiple locations with Taskfire users and you are an admin-istrator at the parent location. Refer to "Set UpWork Sharing BetweenLocations" on page 41 for more information.
© 2016AutotaskCorporation lPage 24 of 106

Field Description
Configuration ItemThis field is read-only for request types created by your service pro-vider, but can be edited for request types created by you.
Click the dropdown to select an option:•Not visible.When this option is selected, the Configuration Item field is not dis-played on the New/Edit Ticket page, and a configuration item is not required.• Visible but optional. The Configuration Item field is displayed on the New/EditTicket page, but not required to submit a ticket.• Visible and required. The Configuration Item field is displayed on the New/EditTicket page, and required to submit a ticket.
Follow-up Ques-tions
Follow-up questions will appear on the New Ticket page. They prompt the user toenter all required information when they submit a ticket with this request type, andreduce the need for follow-up phone calls to get clarification. You can add up to 5 fol-low-up questions.• Click the green plus sign to add a new follow-up question. Enter the question,and select either a single-line or multi-line text box for the answer.• Click the pencil icon to edit or the red X symbol to delete an existing question.
When this requestgoes to internalhelp desk, whoreceives it?
Select the Taskfire queue that this type of issue should go to and the Taskfireresource who should be assigned (if any).
When this requesttype is Auto-Trans-ferred whoreceives it?
Select the external vendor who will receive the ticket when it transfers automatically,either all the time, when your company is closed, or when Out of Office it turned on,depending on your auto-transfer settings.
Auto-EscalationRules
Select when this type of issue should automatically transfer to us or to the selectedvendor. Options include:• Never: Select this option if this type of issue should never automatically transfer tous or to a vendor, although you can still manually transfer the ticket if necessary.• Always: Select this option to always transfer this type of issue to us or a vendor.• Outside of Scheduled Business Hours: Select this option if you would like to auto-matically transfer this type of issue only when your office is closed. This setting isbased on the Business Hours you entered in Manage > Business Hours. Click thepencil icon to edit your business hours.
When a request type is set up to auto-escalate, the auto-escalationwill use the parent business hours for the range of hours (for example,8 AM to 5 PM), but will convert the time to the subsidiary location'stime zone.
© 2016AutotaskCorporation lPage 25 of 106
Field Description
Out of Office Select this check box to enable Out of Office for this type of issue. When you turn onOut of Office for the Client Portal (Manage > Out of Office), this type of issue willtemporarily transfer to us or the selected vendor.
If a parent location is set to "out of office," all tickets that use a shared
request type will be temporarily transferred according to the out of
office settings specified in the request type.
3. Click Save and Close to finish.
Delete a request type
Request types you have created yourself can be deleted, as long as they have not been used with any tickets.If they have been used, you will be able to inactivate them.
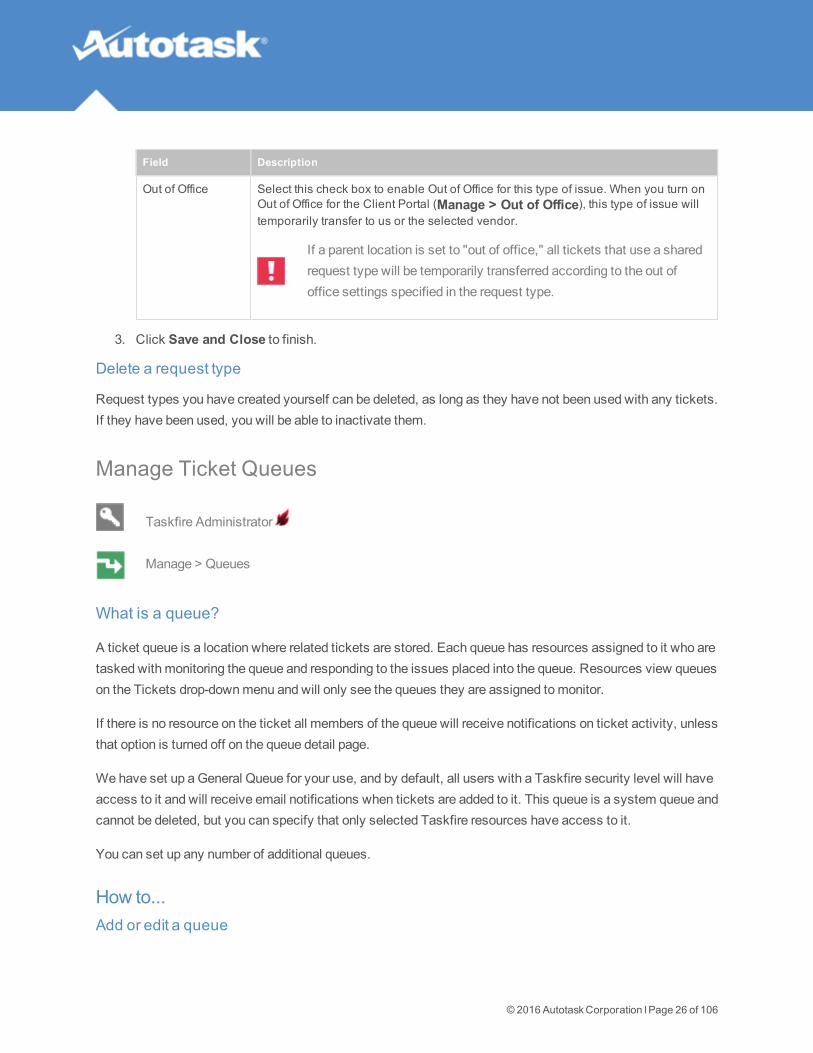
Manage Ticket Queues
Taskfire Administrator
Manage > Queues
What is a queue?
A ticket queue is a location where related tickets are stored. Each queue has resources assigned to it who aretasked with monitoring the queue and responding to the issues placed into the queue. Resources view queueson the Tickets drop-downmenu and will only see the queues they are assigned tomonitor.
If there is no resource on the ticket all members of the queue will receive notifications on ticket activity, unlessthat option is turned off on the queue detail page.
We have set up aGeneral Queue for your use, and by default, all users with a Taskfire security level will haveaccess to it and will receive email notifications when tickets are added to it. This queue is a system queue andcannot be deleted, but you can specify that only selected Taskfire resources have access to it.
You can set up any number of additional queues.
How to...Add or edit a queue
© 2016AutotaskCorporation lPage 26 of 106

1. On Taskfire Queues page, click New Queue. To edit an existing queue, click the pencil icon.
The Taskfire Queue page opens:
© 2016AutotaskCorporation lPage 27 of 106
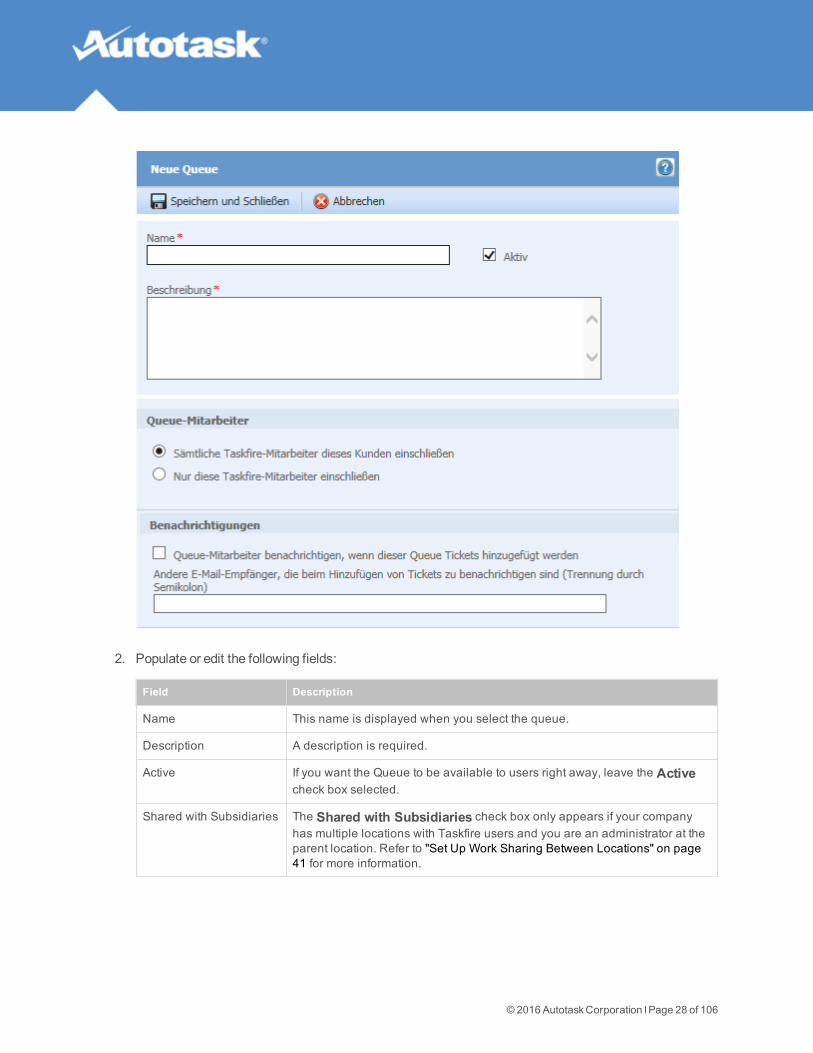
2. Populate or edit the following fields:
Field Description
Name This name is displayed when you select the queue.
Description A description is required.
Active If you want the Queue to be available to users right away, leave the Activecheck box selected.
Shared with Subsidiaries The Shared with Subsidiaries check box only appears if your companyhas multiple locations with Taskfire users and you are an administrator at theparent location. Refer to "Set Up Work Sharing Between Locations" on page41 for more information.
© 2016AutotaskCorporation lPage 28 of 106
Field Description
Include all TaskfireResources for this Client/ Include only theseTaskfire Resources
Determines the users who are assigned to monitor the queue.
Notifications Select the Notify queue resource(s) when tickets are added to thisqueue check box if you would like Queue resources to receive an emailwhen tickets are added to the Queue, and enter any additional notificationrecipients.
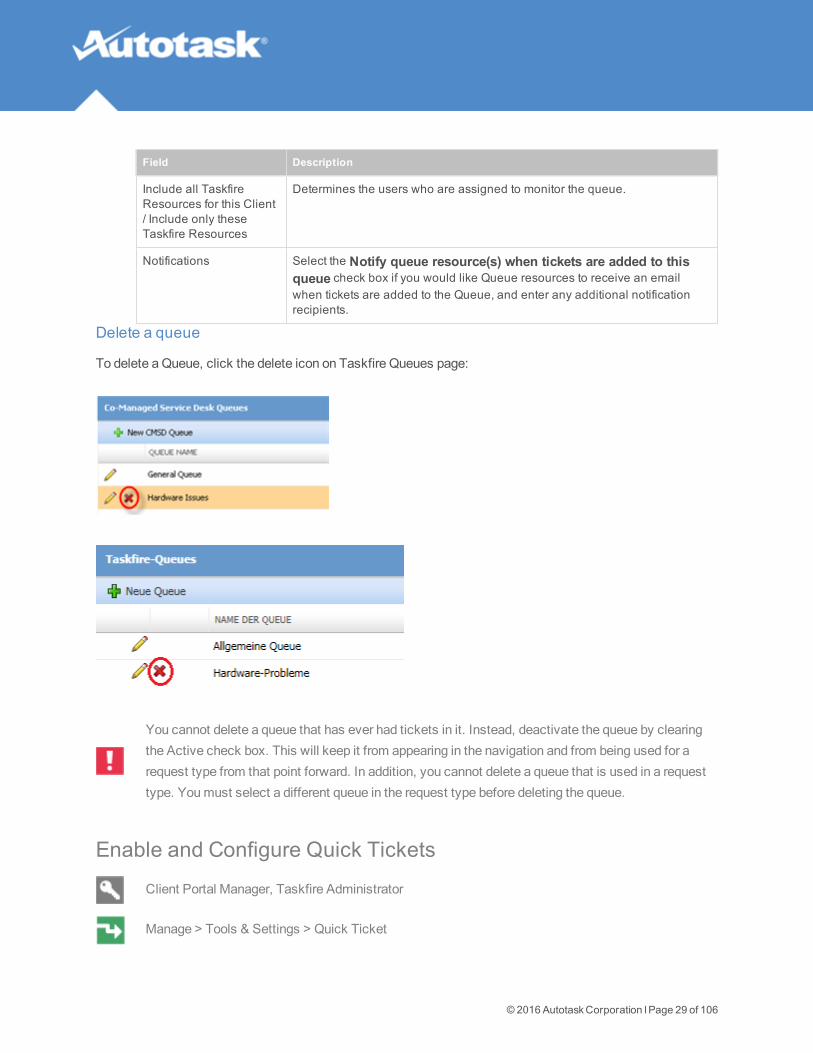
Delete a queue
To delete a Queue, click the delete icon on Taskfire Queues page:
You cannot delete a queue that has ever had tickets in it. Instead, deactivate the queue by clearing
the Active check box. This will keep it from appearing in the navigation and from being used for a
request type from that point forward. In addition, you cannot delete a queue that is used in a request
type. Youmust select a different queue in the request type before deleting the queue.
Enable and Configure Quick Tickets
Client Portal Manager, Taskfire Administrator
Manage > Tools & Settings > Quick Ticket
© 2016AutotaskCorporation lPage 29 of 106
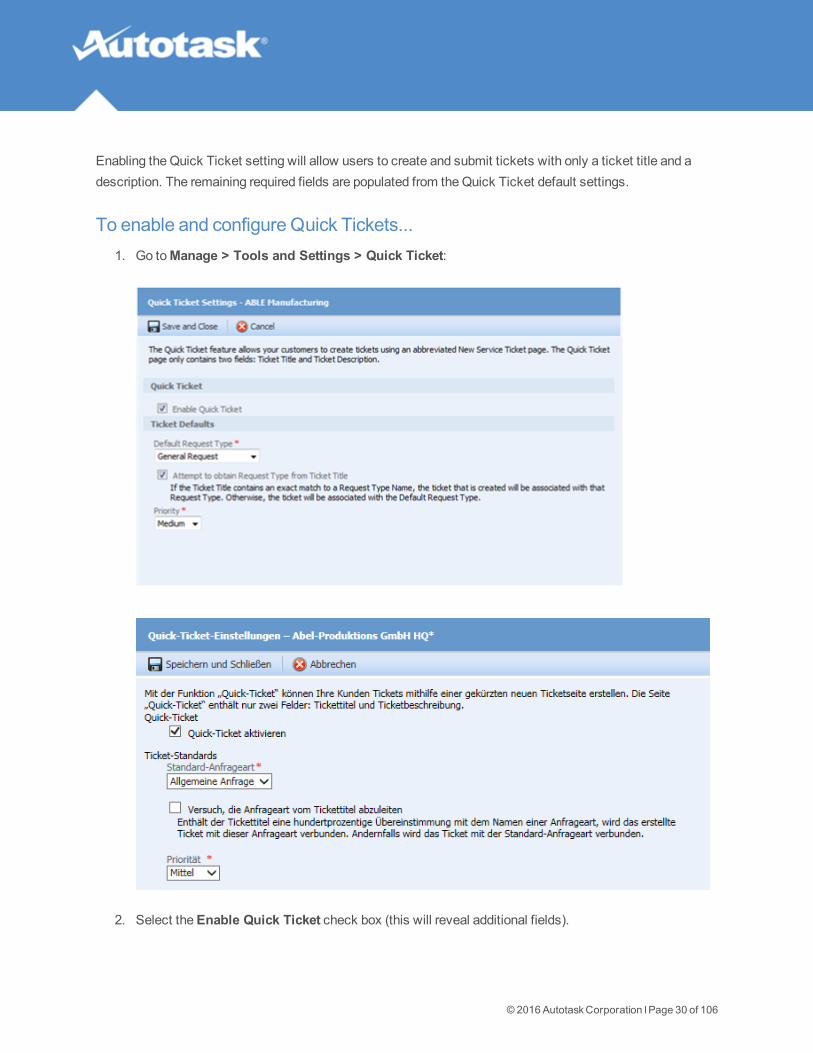
Enabling the Quick Ticket setting will allow users to create and submit tickets with only a ticket title and adescription. The remaining required fields are populated from theQuick Ticket default settings.
To enable and configure Quick Tickets...1. Go toManage > Tools and Settings > Quick Ticket:
2. Select theEnable Quick Ticket check box (this will reveal additional fields).
© 2016AutotaskCorporation lPage 30 of 106

Field Description
DefaultRequest Type
By default, all Quick Tickets will be assigned the default request type you select here.
Attempt toobtainRequest Typefrom TicketTitle
If the Ticket Title contains an exact match to a Request Type Name, the ticket that is cre-ated will be associated with that Request Type. Otherwise, the ticket will be associatedwith the Default Request Type.
If you select a Request Type for your Quick Tickets that requires users to
select a configuration item, they will be unable to do so when creating a
Quick Ticket. When the ticket is edited later, youmust first select a con-
figuration item to able to save it again.
Priority By default, all Quick Tickets will be assigned the default priority you select here.
3. Click Save and Close.
Your users will be able to access it from the Landing Page and the Tickets drop-down and sub-navigationmenus.
Define Scheduled Business Hours
Taskfire Administrator
Manage > Tools & Settings > Scheduled Business Hours
The Scheduled Business Hours setting lets the Client Portal know when internal resources are available andwhen your office is closed. They are used to determine when tickets should be automatically escalated to usor another service provider.
How to...Add business hours
1. Navigate toManage > Tools & Settings > Scheduled Business Hours.
2. In theScheduled Business Hours section, enter the start and end times for your normal businessday, when internal IT resources will be available.
3. In the Time Zone section, enter the time zone to use when a ticket is auto-transferred, and a requesttype is set to transfer "Outside of Scheduled Business Hours".
4. Click Save and Close.
© 2016AutotaskCorporation lPage 31 of 106

Automatically transfer tickets outside scheduled business hours
For information on how to auto-transfer tickets to us or another vendor, refer to "Manage Request Types" onpage 22.
If your company has multiple locations with Taskfire users and you share work between those loc-ations, certain rules apply when the business hours are different for one or more location. Refer to"Set UpWork Sharing Between Locations" on page 41 for more information.
The Out of Office Setting
Taskfire Administrator
Manage > Out Of Office
When theOut of Office setting is on, tickets with service request types that are configured for it are auto-matically transferred to us (or another vendor). This allows us to serve as a backup to your internal IT staff.The setting can be used whether you are out of the office for a couple of hours, or whether you are on vacation.
How to...Turn Out of Office on or off
l To turn Out of Office on, go toManage > Out of Office and click Set to "out of office":
© 2016AutotaskCorporation lPage 32 of 106

Below the buttons, you will see a list of Request Types, who they were created by (your company orours), whether they are shared with your subsidiaries, and whether they are enabled for Out of Office.
l When you return to the office, click I am in the office to return to your standard Taskfire ticket work-flow.
Configure request types for Out of Office
Tickets are auto-transferred to an external service provider based on their request type. Refer to "ManageRequest Types" on page 22.
Add Vendors
Taskfire Administrator
Manage > Vendors
Even though we are the service provider that makes this Client Portal available to you, we are not the onlyvendor you can use it with. If you set up other vendors you work with on a regular basis, such as utilities, thecable company, or your landlord, you can create tickets for issues they are involved with, and use email toescalate them if necessary.
This will allow you to track all your internal help desk issues in one place.
© 2016AutotaskCorporation lPage 33 of 106

Best Practice: Add a separate Request Type for each vendor you set up. Refer to "Manage RequestTypes" on page 22.
How to...Add a vendor
1. Go toManage > Vendors.
2. Enter the information for your vendor. The email address you enter will be the one that is used whenyou transfer a ticket to the vendor.
3. To share this vendor with your subsidiaries, check Shared with Subsidiaries.
4. Click Save and Close.
Transfer a ticket to a vendor
You can transfer a ticket manually, or you can set up auto-escalation settings to automatically transfer certainissues to the vendor. For more information, refer to:
"Transfer a Ticket to a Service Provider" on page 72
"Manage Request Types" on page 22
Manage Configuration Items (Devices, Assets)
By default, all users can add and edit configuration items, but this setting can bemodified.
Manage > Configuration Items
"Configurations items" are hardware or software items (such as laptops, printers, and software applications)that we track and support for you. They alsomight be called "devices", "installed assets" or "installedproducts," depending on how your Client Portal is set up.
In this article, we will use the term "configuration item."
When you acquire a new configuration item (such as a desktop computer), you can add it through the ClientPortal so that we're aware of its details. This will enable us tomore effectively support you if you have prob-lems with it. Refer to "Add and Edit Configuration Items" on page 37.
In addition, maintaining an up-to-date list of these items will help you better track your own technology assets.
© 2016AutotaskCorporation lPage 34 of 106

How to...Search and sort the configuration items list
1. From theManage tabmenu, select Configuration Items or click theManage tab and click Con-figuration Items.
The Configuration Items page will display:
© 2016AutotaskCorporation lPage 35 of 106

2. To search by any of the columns, type your criteria in the field below the column header and pressEnter. The list will update.
3. To sort by any column in ascending order, click the column header. To sort in descending order, clickthe column header again.
4. For more search criteria, click Advanced Filter, then select your criteria and click Apply Filter.
Export the configuration item list
1. On theConfiguration Items list, click Export and select a format.
2. Your exported file will open in a new window.
Delete configuration items
1. On theConfiguration Items list, locate the configuration item you want to delete.
2. Click theDelete icon.
3. Confirm the deletion.
You will not be able to delete a Configuration Item if it is associated with one or more ticketsand/or subscriptions.
© 2016AutotaskCorporation lPage 36 of 106
Add and Edit Configuration Items
By default, all users can add and edit configuration items, but this setting can bemodified
Manage > Configuration Items
Depending on how your Client Portal is set up, they may also be called "Installed Assets" or"Devices." In this article, we will use the term "Configuration Item."
How to...
Add configuration items
1. From theManage tabmenu, select Configuration Items or click theManage tab and select Con-figuration Items.
The Configuration Items page will display.
2. Click New Configuration Item.
The New Configuration Item page will display.
© 2016AutotaskCorporation lPage 37 of 106

© 2016AutotaskCorporation lPage 38 of 106

3. Complete the appropriate fields.
Field Definition
Save and Close Saves the item and closes the page.
Save and CreateNew
Saves the article but keeps the page open.
Company This field will only be displayed if you have subsidiaries. If you do, you may selectthe subsidiary with which the item is associated.
Product/Device Select the product or device associated with the item.
© 2016AutotaskCorporation lPage 39 of 106

Field Definition
Active Select this check box if the item is active.
Installed On Enter the installation date or use the date selector.
Warranty Expir-ation
Enter the date on which the product warranty expires or use the date selector.
Serial Number Enter the product serial number. This is an alpha-numeric field. Your entry does nothave to be unique.
Reference Num-ber
Enter the product reference number. Your entry does not have to be unique.
Reference Name Enter the product reference name. Your entry does not have to be unique.
Contact The default value is the user currently logged on. You may select a different contactfor this item. Depending on your security permissions, you may be able to add a newcontact by click on the + icon.
Location Enter the location of the item.
Notes Enter any notes concerning the item.
4. Click Save and Close.
Edit configuration items
1. From theManage tabmenu, select Configuration Items or click theManage tab and then click Con-figuration Items.
The Configuration Items page will display.
2. Locate the item you wish to edit and click the pencil icon.
TheEdit Configuration Item page will display.
3. Edit any of the fields described above.
4. Click Save and Close.
ViewConfiguration Items Associated with a User
Security levels that have this setting enabled.
For more information on configuration items, see "Manage Configuration Items (Devices, Assets)" on page34.
To view the configuration items (installed products, installed assets) associated with a user:
© 2016AutotaskCorporation lPage 40 of 106
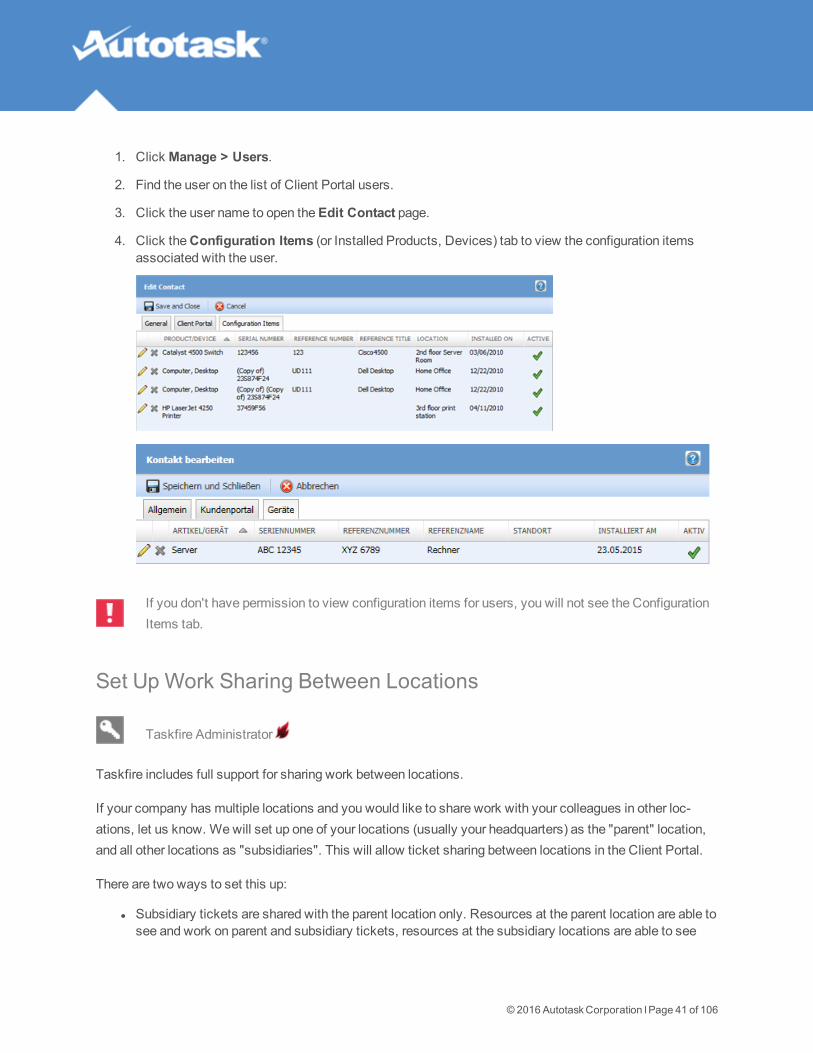
1. Click Manage > Users.
2. Find the user on the list of Client Portal users.
3. Click the user name to open theEdit Contact page.
4. Click theConfiguration Items (or Installed Products, Devices) tab to view the configuration itemsassociated with the user.
If you don't have permission to view configuration items for users, you will not see the Configuration
Items tab.
Set Up Work Sharing Between Locations
Taskfire Administrator
Taskfire includes full support for sharing work between locations.
If your company has multiple locations and you would like to share work with your colleagues in other loc-ations, let us know. Wewill set up one of your locations (usually your headquarters) as the "parent" location,and all other locations as "subsidiaries". This will allow ticket sharing between locations in the Client Portal.
There are two ways to set this up:
l Subsidiary tickets are shared with the parent location only. Resources at the parent location are able tosee and work on parent and subsidiary tickets, resources at the subsidiary locations are able to see
© 2016AutotaskCorporation lPage 41 of 106

and work on tickets for the subsidiary only. See "Share subsidiary tickets with the parent location" onpage 42.
l You can also allow resources at subsidiary locations to see and work on parent and "sibling" (other sub-sidiary location) tickets. See "Share all parent and "sibling" location tickets" on page 43.
How to...Share subsidiary tickets with the parent location
This kind of sharingmust be set up by the Taskfire Administrator at the parent location. The Taskfire Admin-istrator sets up all shared request types, queues and vendors.
Set up resources
Resources associated with the parent location will be able to see and work on tickets from any location,resources associated with a subsidiary location will only see and work on tickets for that location.
l Regardless of their physical location, add resources who need to work on tickets frommore than onelocation to the parent location.
Share request types, queues and vendors
1. Go toManage > Request Types (Queues, Vendors) and open the request type (queue, vendor) youwish to share.
2. Select theShared with Subsidiaries check box.
After you select this check box and save, the shared request type (queue, vendor) will appear on the requesttype drop-down list when a user at any location is creating a new ticket, and also appear on theManage >Request Type Preferences page with a check mark in theShared column to indicate its shared status.
About request types created by the solution provider
Any service request templates we (the solution provider) have created will appear in Taskfire for the parentand all subsidiary locations. The template will even have the same name. Some changes can bemade by loc-ations, such as assigning a resource and adding auto-escalation rules.
As long at the template remains unshared the changes remain internal to that location. If, however, the parentshares the service request template at any point, all subsidiary location-specific changes are lost and the par-ent-shared version replaces the subsidiary version. Conversely, if the template is unshared, all subsidiary loc-ation-specific changes are reinstated.
© 2016AutotaskCorporation lPage 42 of 106

Shared queues will appear on the Tickets menu for all parent and subsidiary resources that have been addedto the queue (Taskfire resources at the subsidiary will only see their location's tickets and not those of otherlocations or of the parent), and send notifications to resources when a ticket for their location has been addedto the queue.
Vendors will be available for selection when a resource at a subsidiary or parent location transfers a ticket.
The only time you will want an unshared request type (queue, vendor) would be if the location will
handle specialized work internally that will never go outside that location.
Share all parent and "sibling" location tickets
This type of sharing allows subsidiary resources to see and work on parent and sibling location tickets.
It must be enabled by us, your service provider. It is not necessary to share request types, queues, orvendors, but youmust indicate if tickets are to be displayed for Taskfire security levels only, or both standardClient Portal and Taskfire security levels.
Sever a parent/subsidiary relationship
If at some point the parent/subsidiary relationship in Autotask is severed, all sharing settings at subsidiary loc-ations are removed. If at any time the relationship is reinstated, all sharing settings will also be reinstated.
© 2016AutotaskCorporation lPage 43 of 106

Work with Tickets in Client PortalAll Client Portal users can create tickets and view tickets they are the ticket contact or the assignedclient contact for. Other permissions depend on the security level.
Tickets > My Tickets
When you have an issue to report to us, you can submit a ticket through the Client Portal. The ticket will go dir-ectly into one of our IT management queues, where it will be immediately prioritized and assigned.
What is a ticket?A ticket is the electronic record of an issue you want us to deal with. You create one to report bugs, requesttechnical support, or submit feature suggestions.
Most tickets will be regular service requests (reset password, upgradeWindows...), but wemayalso categorize a ticket as an incident ticket (something's not working...), problem ticket or changerequest ticket. This designation will appear on the upper right corner of the ticket page. Refer to"About Change Requests, Incidents and Problems" on page 50.
The ticket initially includes only the information you enter - a title, a description of the issue, the priority,answers to any follow-up questions, and your contact information. After we receive the ticket, assign it, andbegin to work on it, the ticket will include additional information, such as the resource assigned, hours worked,and notes that have been added. How much of this you can see will depend on our global ticket settings andyour security level. But you will be able to track what is happening, add attachments, and enter notes of yourown.
What you can do with tickets...If you are a user with a standard Client Portal security level
Depending on your security level, you can:
l Submit tickets directly into our ticketing system. Refer to "Create a Ticket" on page 45.
l Search for existing tickets. Refer to "Find a Ticket Using Ticket Grids" on page 54.
l Monitor the progress of previously submitted tickets and review our staff's notes and time entries."View a Ticket" on page 56
© 2016AutotaskCorporation lPage 44 of 106

l Add notes and attachments of your own. Refer to "Add a Ticket Note" on page 61 and "Add Attach-ments" on page 63.
l Grant approvals for proposed work online. Refer to "About Change Requests, Incidents and Problems"on page 50.
l If you are a company we bill for work done for another company (the "End Client"), you can review thework we did for the end client. You can findmore on that in the topic "Monitor End Client Tickets andProjects" on page 101.
If you are a user with a Taskfire security level
Users with a Taskfire license can run their own internal help desk in the Client Portal. In addition to the fea-tures available to standard security levels, they can:
Edit tickets once they are created. Refer to "Edit a Ticket" on page 65.
Work on internal tickets themselves. Refer to "Track Internal Time on a Ticket" on page 69.
Escalate tickets that go beyond the capacity of the internal help desk to us or another service provider. Referto "Transfer a Ticket to a Service Provider" on page 72.
Create a Ticket
All users
Tickets > New Ticket
For a detailed description of tickets, see "Work with Tickets in Client Portal" on page 44.
How to...Create a standard ticket
1. Click theCreate a Ticket button on the Landing Page, or click the Tickets tab and select New Ticket.
© 2016AutotaskCorporation lPage 45 of 106

© 2016AutotaskCorporation lPage 46 of 106

2. Complete the following fields:
Field Description
Account Defaults to the location of the logged-in user. If you have set up work sharingbetween locations, you can select a different location.
Request Type Select a the most appropriate request type. When you make your selection, thepage may refresh and request type-specific follow-up questions may be displayed.Please enter as much information as possible. This will help us assign the right tech-nicians to you service request and will speed up the resolution.
Picking the right request type is crucial. Request types determine if
the ticket is sent to us, your service provider, or, if you have licensed
the Taskfire internal help desk, is assigned to an internal queue.
© 2016AutotaskCorporation lPage 47 of 106

Priority If you see the Priority field, select a priority for the issue. Options include Critical,High, Medium, and Low. You will only see this field if your Client Portal SecurityLevel allows you to set the Ticket Priority. Otherwise, the Priority is determined bysettings in Autotask. Taskfire users will always see the Priority field because it rep-resents the Taskfire Priority, not the ticket priority.
Internal Resource Select an internal resource if this ticket will be worked on by internal staff.The internal ticket resource is the person at your company who is assigned to workon the ticket. The internal resource automatically receives all notifications asso-ciated with the ticket, including status changes, and any updates we make on trans-ferred tickets, including notes and actions. The ticket will appear on their My Ticketspage in Client Portal.
Ticket Title Type a title for your ticket. Make this title as clear as possible to communicate yourissue.
Description Type a description of the issue. Include as much detail as you can, including whatthe problem is, how to replicate the issue (if applicable), and any other importantdetails.
Self-Help Appears only if Knowledgebase is enabled for your company. Click the Self-Helpbutton to access articles in the Knowledgebase that relate to the ticket you are cre-ating and which might help you solve your issue. See "Use the Knowledgebase" onpage 94 for more information.
Contact Information
Ticket Contact Defaults to your name, but you can select a different contact. This is the person thatwe will contact if we need additional information. The contact's email address andphone number will be displayed, but cannot be edited.
Configuration Item (may not be displayed for all Request Types)
Show All/ Asso-ciated With
Select the Show All radio button to select from all configuration items installed foryour company. SelectAssociated with to filter the configuration item list by itemsassociated with the ticket contact.
Configuration Item Select the configuration item this ticket is related to by clicking the configuration itemselector icon, or typing the name of the configuration item into the field. The con-figuration item list only contains products we have added for your company. Con-figuration items on the drop-down list appear in the following format:[Configuration Item Name| [Serial Number] | [Reference Number] | [ReferenceName].
For certain request types, selecting a configuration itemmay berequired.
Follow-up Questions
Follow-up Ques-tions
Answer any follow-up questions that appear. Not all request types will have ques-tions. These are used to help us gather important information from you up front, sowe can begin working on the issue as quickly as possible.
© 2016AutotaskCorporation lPage 48 of 106
Additional Information
Additional Inform-ation
Any ticket user-defined Fields (UDFs) that have been added and set to display in theClient Portal will appear in this section.
3. Click Savewhen you are finished.
The ticket is now submitted. You can check the status of your ticket any time through the portal, using theMyTickets, Open Tickets, or Find Tickets search options. Refer to "Find a Ticket Using Ticket Grids" on page 54for more information.
Create a Quick Ticket
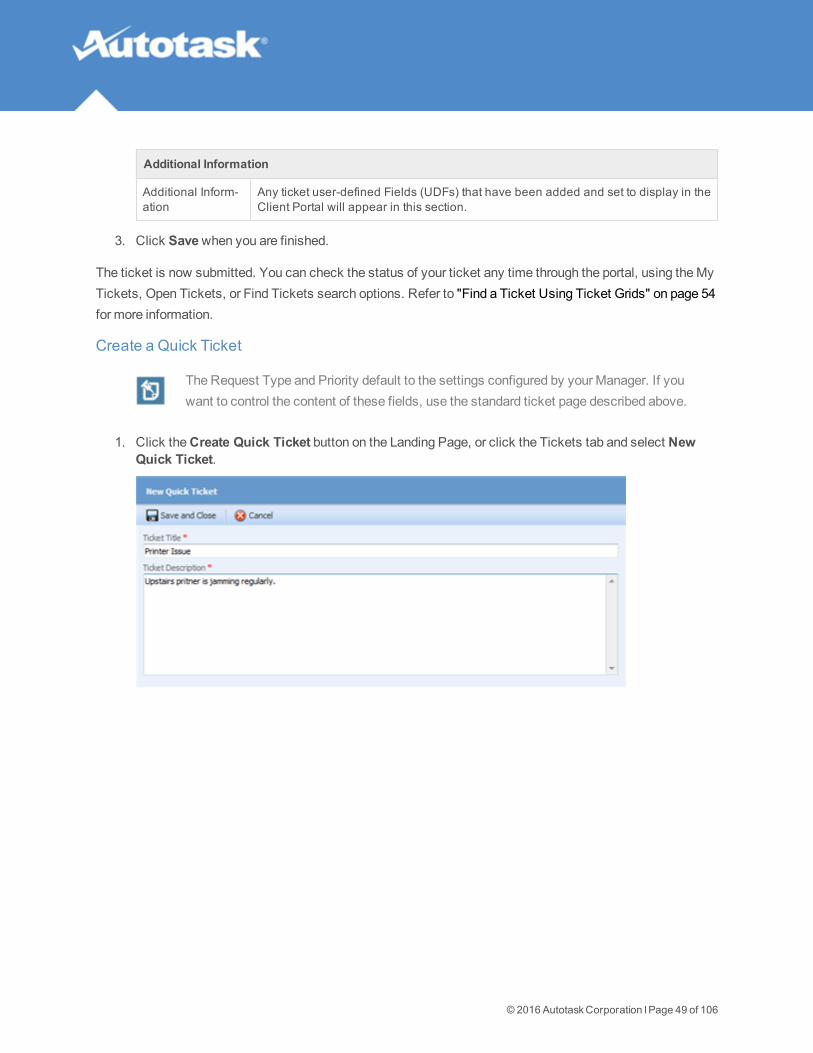
The Request Type and Priority default to the settings configured by your Manager. If youwant to control the content of these fields, use the standard ticket page described above.
1. Click theCreate Quick Ticket button on the Landing Page, or click the Tickets tab and select NewQuick Ticket.
© 2016AutotaskCorporation lPage 49 of 106

2. Complete the following fields:
Field Description
Title Type a title for your ticket. Make this title as clear as possible to communicate your issue.
Description Type a description of the issue. Include as much detail as you can, including what the prob-lem is, how to replicate the issue (if applicable), and any other important details.
3. Click Save and Close.
About Change Requests, Incidents and Problems
In Autotask, the parent application to your Client Portal (and the one we use tomanage our business), thereare several types of tickets we can create.
l The first is an ordinary Service Request. A ticket that asks us to upgrade your SnagIT license to ver-sion 12 would be a Service Request.
l The second is called an Incident, a type of ticket where something is not working as expected. It couldbe a standalone issue, like when a printer is not working. When the printer is fixed, the issue isresolved and your service request is completed.
l Sometimes, however, an issue is part of a larger unknown problem. And sometimes a group of ticketsall have the same root cause. These issues are Incidents, and the cause of these incidents is theProblem.
More about incidents and problems
Our goal is to restore normal IT service operations as quickly as possible to minimize theadverse impact on your business operations. Associating incidents with a problem can help usdo that by allowing us to track, manage, and resolve all related incidents together instead of
© 2016AutotaskCorporation lPage 50 of 106

handling each one separately.
If one of your tickets is associated with either problem tickets or incident tickets, you'll see cor-responding sections on the Ticket Detail view. These sections will list any problems or incid-ents associated with the base ticket. Just click the problem or incident ticket number to openthe associated ticket.
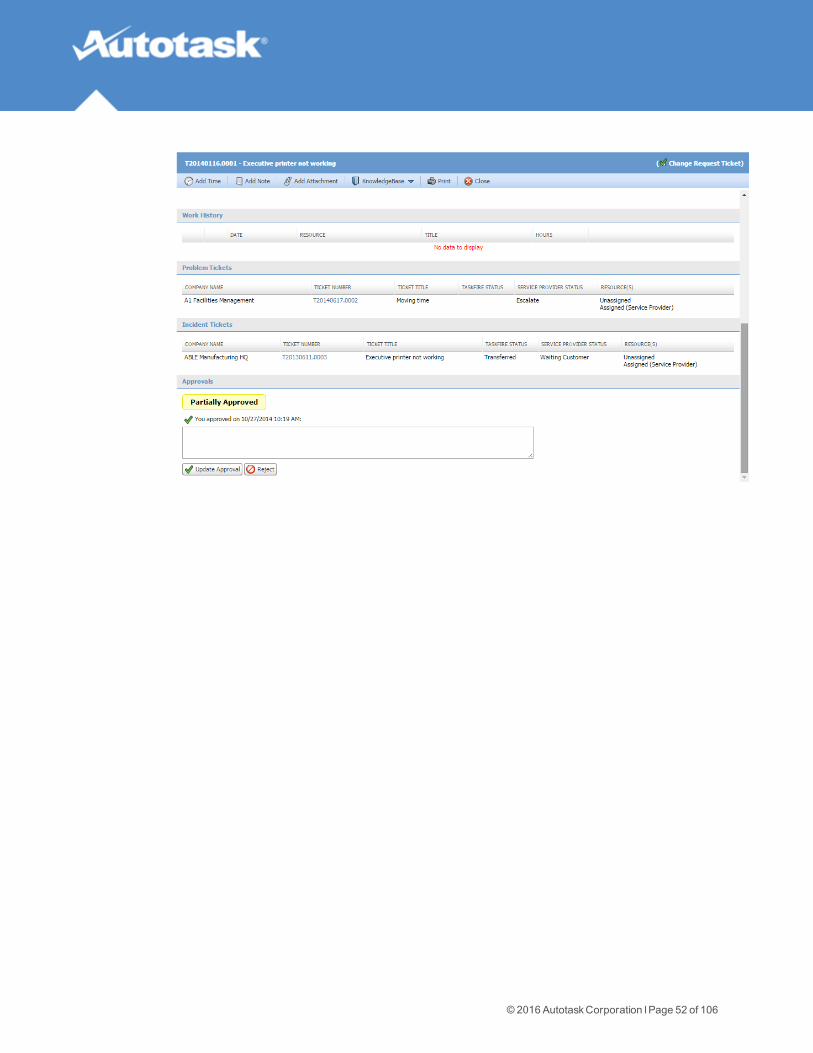
l The last type of ticket is aChange Request.
More about change request tickets
The objective of changemanagement is to control and enable beneficial changes with minimumdisruption to your business. In order to support that objective, formal approvals by one or sev-eral people are required. Wemay even assign change approvals to you, so you can approve orreject a change that will impact your business operations.
There are several differences between regular tickets and Change Request tickets:
l Change Request tickets have their own grid under the Tickets > My ChangeApprovals, where all tickets that you have approved or need to approve are listed. A flagwill let you know if there are change requests waiting your approval.
l On the ticket title bar, the ticket is identified as a Change Request Ticket
© 2016AutotaskCorporation lPage 51 of 106
© 2016AutotaskCorporation lPage 52 of 106
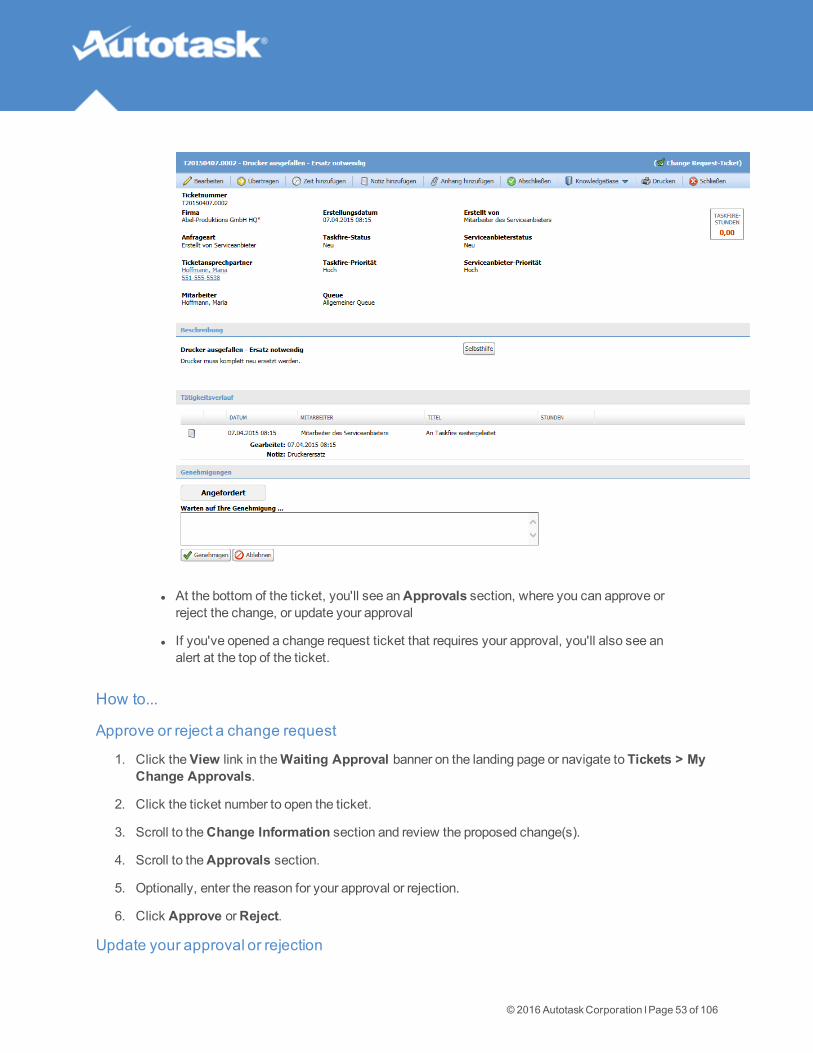
l At the bottom of the ticket, you'll see anApprovals section, where you can approve orreject the change, or update your approval
l If you've opened a change request ticket that requires your approval, you'll also see analert at the top of the ticket.
How to...
Approve or reject a change request
1. Click theView link in theWaiting Approval banner on the landing page or navigate to Tickets > MyChange Approvals.
2. Click the ticket number to open the ticket.
3. Scroll to theChange Information section and review the proposed change(s).
4. Scroll to theApprovals section.
5. Optionally, enter the reason for your approval or rejection.
6. Click Approve orReject.
Update your approval or rejection
© 2016AutotaskCorporation lPage 53 of 106

You can change your mind about a previous approval or rejection.
1. Open the ticket and scroll to theApprovals section.
2. Enter the reason for changing your approval or rejection.
3. Click theUpdate Approval orUpdate Rejection button.
Find a Ticket Using Ticket Grids
All users can see the tickets they submitted, and Taskfire users can see the queues they are amem-ber of. Permission to see all tickets is governed by your security level.
Tickets Menu
When you click on the Tickets tab, amenu of options lets you choose from several grids that filter your com-pany's tickets in different ways. The options you will see will depend on your security level.
MenuOption Description
Standard Client Portal Secur-ity Levels
Standard Taskfire SecurityLevels
Basic Advanced Manager Resource Administrator
My Tickets Tickets where the user is theTicket Contact
Yes Yes Yes Yes Yes
Open Tick-ets
Incomplete tickets, including recur-ring tickets due within 30 daysand tickets at subsidiary locations.
No All All All All
RecentlyCompletedTickets
Tickets completed within the last 7days.
Mine All All All All
MyChangeApprovals
Tickets that require your approval.Refer to "About ChangeRequests, Incidents and Prob-lems" on page 50
Mine All All All All
TicketSearch
All tickets regardless of status. Mine All All All All
Queues All tickets assigned to the queue.Refer to "Manage Ticket Queues"on page 26.
No No No Queuesthey areassignedto
All
End ClientTickets
Tickets for which your company isthe Company to bill. See "MonitorEnd Client Tickets and Projects"on page 101.
No Yes Yes Yes Yes
© 2016AutotaskCorporation lPage 54 of 106

The grids in which tickets are displayed are very flexible. You can add, remove, reorder, sort, and filter oncolumns. The Advanced Filter provides detailed search criteria for locating specific tickets.
Whether or not you can display the Service Provider Priority column depends on your Client Portal
security level settings.
How to...Add, remove and reorder columns
1. Click theColumn Chooser icon. A window that displays available and selected columns will open.
To add an available column, select it and click the right arrow. It will be added to theSelected list.
To remove a column, select it and click the left arrow. It will be added to theAvailable list.
To reorder the columns, highlight a selected column and click the up or down arrow.
2. Click Save and Close.
Outside of the column chooser, you can also click on a column header and drag the columnto a new location.
The Priority column (for Taskfire users, Service Provider Priority) is only available to userswith security level permission to view Priority.
Export the columns displayed in the grid
1. Place your mouse over theExport icon at the top of the list and select the type of export you'd like(CSV, Excel, or PDF).
If you plan to print the report, select the .PDF format.
2. The ticket report opens in a new window.
Sort on a column header
1. Click a column header to sort it in ascending order.
2. Click again to sort in descending order.
Filter on column headersl Enter your filter criteria directly in the field below the column header. The filter will be applied shortly
© 2016AutotaskCorporation lPage 55 of 106

after you stop typing.
You can search by multiple columns at once. For example, once you search by companyname Acme, you can then search the Acme company tickets by another filter.
Use advanced filtering
1. Click theAdvanced Filter icon on any ticket grid.
2. For each column you wish to filter on, select a filter type (if necessary), an operator, and the values.
3. Click Apply Filter. This will return you to the ticket grid, with your new filter applied.
4. Tomodify the filter, click theEdit link at the top of the grid.
5. To clear the filter, click theClear link.
Open a ticket
Click on themagnifying glass icon to open a ticket in a new window.
View a Ticket
All users can at least open tickets they are the ticket contact for
On any ticket grid, click themagnifying glass on a ticket row
All Client Portal users can view tickets they are the ticket contact for. The ticket page they see, however,depends on the security level assigned to them.
The ticket view for users with standard Client Portal security levels
Users with a standard Client Portal security license see a ticket view that reflects the fact that they can followthe ticket in the Client Portal, add a note or an attachment, consult the Knowledgebase if it is enabled, andprint the ticket. All ticket fields are read-only.
Your Security Level permissions determine whether or not you will see the ticket Priority field. Bydefault, users with a standard Client Portal security license do not see the field. That permission canbe changed with a custom security level.
If you are a Client Portal user without access to Taskfire, and co-workers are Taskfire users, thoseco-workers will see a Taskfire Priority that does not display for non-Taskfire users.
© 2016AutotaskCorporation lPage 56 of 106

© 2016AutotaskCorporation lPage 57 of 106
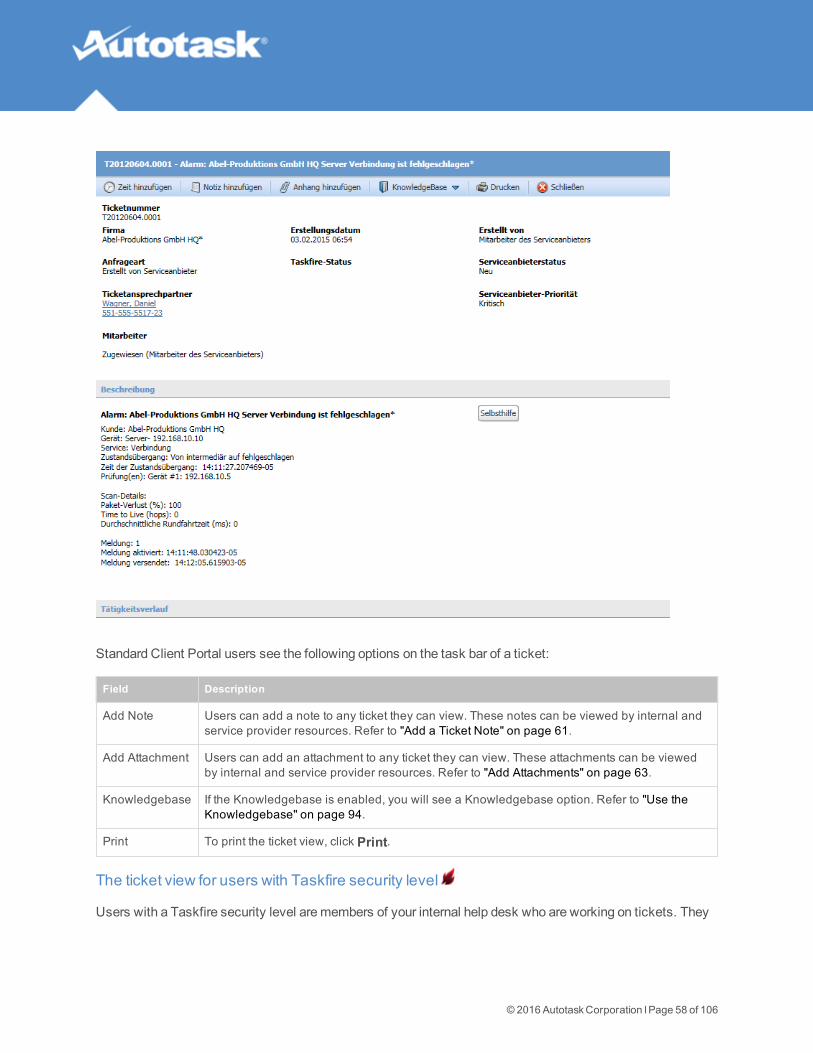
Standard Client Portal users see the following options on the task bar of a ticket:
Field Description
Add Note Users can add a note to any ticket they can view. These notes can be viewed by internal andservice provider resources. Refer to "Add a Ticket Note" on page 61.
Add Attachment Users can add an attachment to any ticket they can view. These attachments can be viewedby internal and service provider resources. Refer to "Add Attachments" on page 63.
Knowledgebase If the Knowledgebase is enabled, you will see a Knowledgebase option. Refer to "Use theKnowledgebase" on page 94.
Print To print the ticket view, click Print.
The ticket view for users with Taskfire security level
Users with a Taskfire security level aremembers of your internal help desk who are working on tickets. They
© 2016AutotaskCorporation lPage 58 of 106

might escalate some tickets to us, but for the tickets they work themselves, they needmuch the same func-tionality we have in Autotask.
Your Client Portal security level permissions determine whether or not you will see the Service Pro-vider Priority field. By default, users with a standard Taskfire security license do see the Service Pro-vider Priority. That permissions can be changed with a custom security level.
Taskfire users see the following additional options on the task bar of a ticket:
© 2016AutotaskCorporation lPage 59 of 106

Option Description
Edit Taskfire users can put the ticket into Edit mode and modify a number of fields. Refer to "Edit a Ticket"on page 65.
Transfer Tickets that were initially created as internal tickets can be manually transferred to a service provider.Refer to "Transfer a Ticket to a Service Provider" on page 72.
Add Time Taskfire users are able to track their time on all tickets, internal or transferred. Refer to "Track InternalTime on a Ticket" on page 69.
Resource time can be reported on using "The Time Tracking Report" on page 91.
Complete Taskfire resources can complete tickets. This updates the Taskfire Status to complete. Taskfire Statusis separate from the Service Provider Status, which is independently set by the service provider.
Delete Taskfire users can delete Internal tickets, even if work has been performed on them. However, ticketsthat were transferred to a vendor cannot be deleted, and the Delete option is not displayed for trans-ferred tickets.
Taskfire fields and functions will not appear on a ticket that was created before Taskfire was turned
on for your company. To get this functionality, youmust re-create the ticket.
© 2016AutotaskCorporation lPage 60 of 106

Add a Ticket Note
All users with access to the ticket
Ticket notes are used to track information, update the status, and communicate with internal and externalticket resources. All notes support email notification, which allows you to send the text of the note to selectedindividuals.
To add a ticket note...1. Find the ticket to which you would like to add a note and open it.
2. On the Ticket View page, click Add Note. The Note page opens.
© 2016AutotaskCorporation lPage 61 of 106
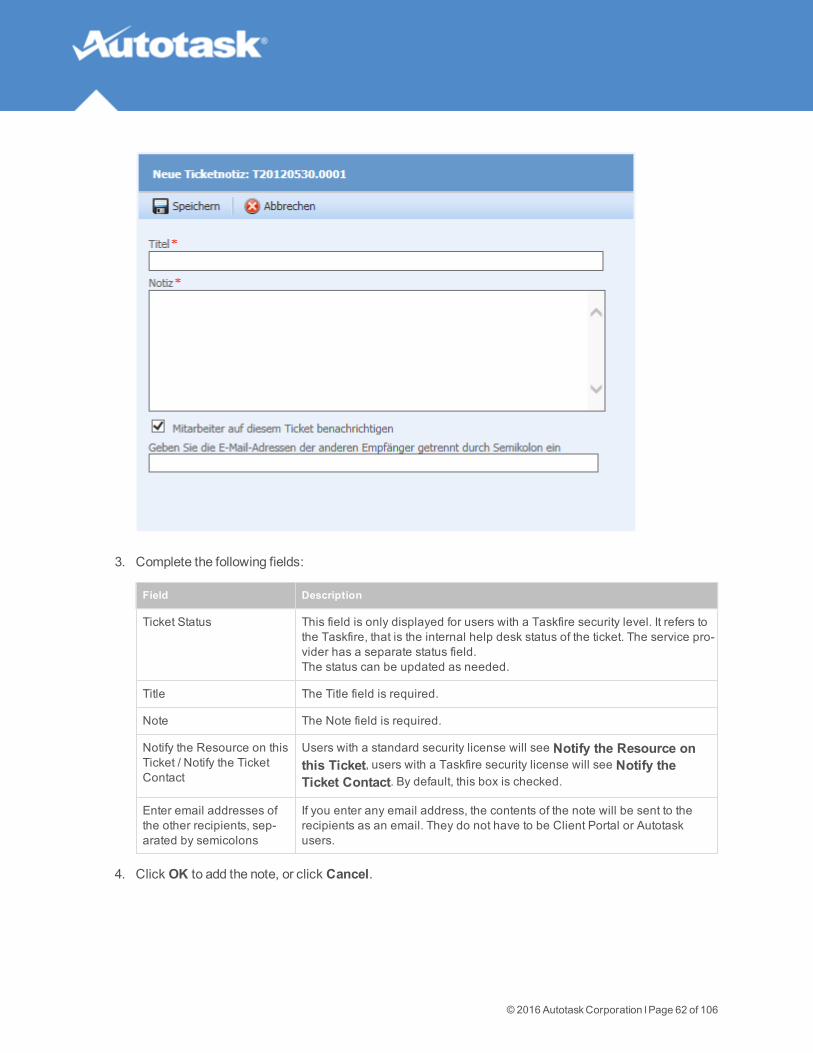
3. Complete the following fields:
Field Description
Ticket Status This field is only displayed for users with a Taskfire security level. It refers tothe Taskfire, that is the internal help desk status of the ticket. The service pro-vider has a separate status field.The status can be updated as needed.
Title The Title field is required.
Note The Note field is required.
Notify the Resource on thisTicket / Notify the TicketContact
Users with a standard security license will see Notify the Resource onthis Ticket, users with a Taskfire security license will see Notify theTicket Contact. By default, this box is checked.
Enter email addresses ofthe other recipients, sep-arated by semicolons
If you enter any email address, the contents of the note will be sent to therecipients as an email. They do not have to be Client Portal or Autotaskusers.
4. Click OK to add the note, or click Cancel.
© 2016AutotaskCorporation lPage 62 of 106

Any resource on the ticket (at your company or ours) will automatically be notified via email. If youselected theNotify the ticket contact option, that person will also be notified via email that the notewas added.
Add Attachments
All users with access to the ticket, project or Knowledgebase article
An attachment is a file that is linked to a ticket, project or Knowledgebase article, such as a screen shot of anerror message or aWord document that provides background information.
Supported File Types and Size
The file size for uploaded attachments is limited to 10 MB. Autotask will not accept the following file formats:ade, adp, app, asp, aspx, bas, bat, cer, chm, class, cmd, cnt, com, cpl, crt, csh, cshtml, der, exe, fon, fxp,gadget, hlp, hpj, hta, inf, ini, ins, isp, its, iw, js, jse, ksh, lnk, mad, maf, mag, mam, maq, mar, mas, mat, mau,mav, maw, mda, mde, mdt, mdw, mdz, msc, msh, msh1, msh1xml, msh2, msh2xml, mshxml, msi, msp,mst, ops, osd, pcd, php, pif, plg, prf, prg, ps1, ps1xml, ps2, ps2xml, psc1, psc2, pst, reg, scf, scr, sct, shb,shs, tmp, url, vb, vbe, vbp, vbs, vsmacros, vsw, ws, wsc, wsf, wsh, xnk.
To add an attachment...
Youmust first save the parent entity (ticket, project or knowledgebase article). Then you can add an
attachment.
1. Click Add Attachment. The New Ticket / Project / Knowledgebase Attachment page will display.
© 2016AutotaskCorporation lPage 63 of 106

2. Enter aName for your attachment.
3. Click Browse or Choose File to locate and select your attachment.
4. Click Attach File. It will appear on the list at the bottom of the page.
5. To create additional attachments for this item, repeat steps 2 - 4.
© 2016AutotaskCorporation lPage 64 of 106

To remove an attachment, click theDelete icon next to it in the list.
6. When you have added all attachments, click Save & Close.
The files will be uploaded and can be accessed by everyone with access to the ticket.
Edit a Ticket
Users with a Taskfire security level can edit tickets that are being worked on by your internal help
desk
On any ticket grid, click themagnifying glass on a ticket row to open the ticket, then click the Editicon
When you create a ticket and assign it to your internal help desk, a number of fields remain editable as longas:
l You have a Taskfire security level
l The ticket status is not equal to Complete
l The ticket was created after Taskfire was enabled for your Client Portal
Refer to "Find a Ticket Using Ticket Grids" on page 54 for information on how to search for a ticket.
How to...Edit a ticket
1. Click thePencil icon at the top of the ticket preview page or window.
The ticket opens in edit mode. The fields you can change are active for editing. The fields you cannotedit, such as the transferred status and priority, are not active for editing:
© 2016AutotaskCorporation lPage 65 of 106

© 2016AutotaskCorporation lPage 66 of 106

2. Make the required changes. You can edit the following fields:
Field Description
Resource(s) You can change the internal resource assigned to the ticket.Click the dropdown and select any resource with a Taskfire security level.
TicketContact
This is the person that we will contact if we need additional information.
© 2016AutotaskCorporation lPage 67 of 106

Field Description
TaskfireStatus
The Taskfire Status is assigned by your company. Initially, it is populated by the RequestType, but you can change it in Edit mode. The following statuses are available:New: Use for a brand new ticket.In Progress: Use for a ticket that is currently being worked on internally at your com-pany.On Hold: Use for a ticket that has been placed on hold.Transferred: Use for a ticket that has been transferred to us or another party to work on.Transfer Complete: Use to indicate that the party the ticket was transferred to (either usor another vendor) has completed work on the ticket and it is now back in your court.Complete: Use to indicate that the resource at your company has completed work on theticket.
When you set a ticket's status to complete and save it, you will no longer
be able to edit it. If this ticket has gone back and forth between you and us,
youmay also want to add a note stating you have completed work on it so
wewill know to complete our version of the ticket.
Any tickets that were created before you enabled Taskfire will appear witha Taskfire Status of "Transferred."
Taskfire Pri-ority
The Taskfire priority is assigned by your company. Initially, it is populated by the requesttype, but you can change it in edit mode.
Queue A ticket queue is a location where related tickets are stored. Each queue has resourcesassigned to it who are tasked with monitoring the queue and responding to the issuesplaced into the queue. Resources view queues on the Tickets drop-down menu and willonly see the queues they are assigned to monitor.If there is no resource on the ticket all members of the queue will receive notifications onticket activity, unless that option is turned off on the queue detail page. See "ManageTicket Queues" on page 26 for details.Select a different queue from the Queue drop-down list. Note that this can change theresources who will be able to see the ticket.
ConfigurationItem
When you edit the ticket, you can also select a different configuration item from thedrop-down list. Configuration items on the drop-down list appear in the followingformat: [Configuration Item Name| [Serial Number] | [Reference Number] | [Refer-ence Name]. This helps you easily differentiate between configuration items thathave the same name.
3. Click Save.
© 2016AutotaskCorporation lPage 68 of 106

Track Internal Time on a Ticket
Users with a Taskfire security level can enter time on tickets that are being worked on by your
internal help desk
On any ticket grid, click themagnifying glass on a ticket row to open the ticket, then click Add Time
Time entries are used to track the time you've spent working on a ticket and to record the type of work you'veperformed. Users with access to all your company's tickets can run a Time Tracking Report that summarizesinternal work by Company, Configuration Item, Request Type, Resource or Queue. Refer to "The Time Track-ing Report" on page 91.
To add a ticket time entry...1. Find the ticket to which you want to add time and open it.
2. On the Ticket View page, click Add Time to open the Time Entry window.
© 2016AutotaskCorporation lPage 69 of 106

© 2016AutotaskCorporation lPage 70 of 106

3. Populate the following fields:
Field Description
Resource Taskfire Administrators can change the name of the resource and add time on another user'sbehalf.
Status Select the appropriate ticket status
© 2016AutotaskCorporation lPage 71 of 106

Field Description
Date andTimefields
The date defaults to the current date, and both Start and End Date to the current time. You canchange either field, or enter the hours and minutes worked. In that case, the Start Time is recal-culated.
Note The text entered into the Note field is visible to all users with access to the ticket.
InternalNote
Before you enter an Internal Note, use the radio buttons to indicate whether or not you'd likethe note to be visible to your Service Provider.
Notify Select or enter the recipients of an email that contains the text of the note.
4. Click Save and Close.
Transfer a Ticket to a Service Provider
Taskfire security levels only
Open the ticket you want to transfer from one of the ticket grids
There are times when youmight need tomanually transfer a ticket to us or another service provider for assist-ance.
Let's say you usually handle printer issues in-house and we handle server issues. You have a printerissue that turns out to be a network connection problem. You can transfer the ticket to us, we willcomplete our portion of the work, and then send the ticket back to you to finish work on your end.
You are also able to transfer the ticket to another vendor. Youmight want to use this feature to track internalservice needs beyond IT, such as your electrician, plumber, or janitorial service.
You can configure Request Types so that certain tickets are automatically transferred (or escalated)to us. See "Manage Request Types" on page 22.
Tomanually transfer a ticket...1. In themenu bar of the Ticket View, click Transfer. The Transfer Ticket window opens:
© 2016AutotaskCorporation lPage 72 of 106

2. Populate the following fields:
Field Description
Radio but-ton: Whowould youlike totransferthis ticketto?
The radio button defaults to our company name.If you select this option, the ticket will appear in the appropriate queue in our databasewhere we will see it and schedule work on it. A new external status: Transferred Statusand external priority: Transferred Prioritywill appear. We may ask you a question via sys-tem note. If we do, you'll be notified. Or, we may complete the ticket, in which case yourinternal Status will be updated to Transfer Complete, and you'll be notified that our workon the ticket is finished.
If you select To this vendor via email: a snapshot of the ticket is taken and is pasted intoan email, which is sent to the vendor. A new external ticket status Transferred to thisVendor appears with the name of the vendor (click the name to view the contact inform-ation). You will still need to track and update the ticket in Client Portal.
Vendorselectiondropdown
This field is only enabled when To this vendor via email:is selected. Select anothervendor from the dropdown.
Note Enter text describing the issue and why you are transferring the ticket.
3. Click OK.
© 2016AutotaskCorporation lPage 73 of 106

Work with Projects in Client PortalTo view projects in the Client Portal, your security level must include Projects access or youmustbe a client teammember on the project
Projects > My Projects
A project is a carefully planned set of steps required tomeet a specific business objective. Whether it is clientfacing or internal, short or long term, a project will likely include the following elements: a schedule withphases, assigned tasks with set deadlines, a project team, a budget, and reports to monitor progress.Autotask projects provide all of these elements.
How are projects different from tickets?l Projects are proactive and planned. Tickets are often created in response to a customer issue.
l Projects consist of a number of possibly interdependent phases and tasks. Tickets are stand-alone, ora series of identical instances of the same assignment.
Client Portal users can follow and work with us on projects we have set up for your company.
If your company is the Company to bill for another customer, you can view details for projects andtickets for which you are being billed. To access a list of the projects for which you are the Companyto bill, select End Client Projects from theProjects tab right-click menu. Refer to "Monitor End Cli-ent Tickets and Projects" on page 101.
To open a project, click the project name on theProjects > My Projects list.
Working with a project
Formore information on available project functions, see:
"View a Project" on page 74
"Work with Your Open Tasks" on page 82
View a Project
To view projects in the Client Portal, your security level must include Projects access or youmustbe a client teammember on the project
Projects > My Projects > click on a project
© 2016AutotaskCorporation lPage 74 of 106

Projects open to the Project Summary page. On the left, you'll see the project menu. Clicking on the links willopen pages that display information about the project.
About...The Summary page
On the Summary page, you'll get a high-level project overview.
© 2016AutotaskCorporation lPage 75 of 106
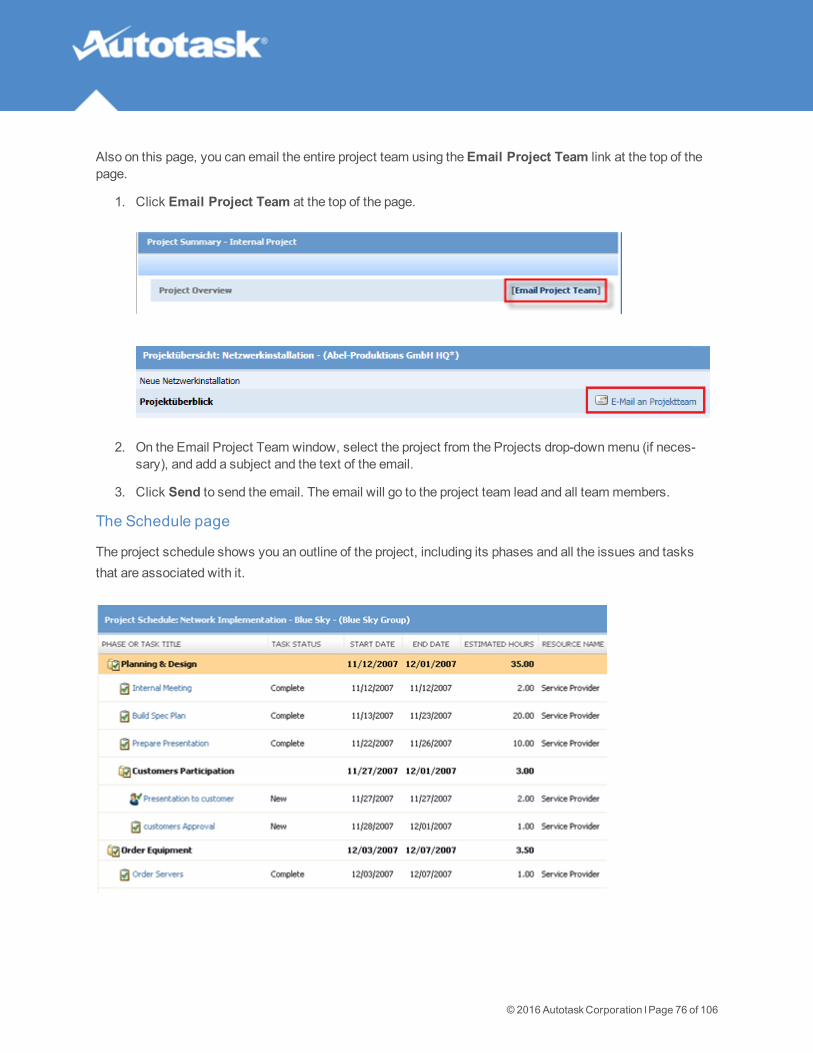
Also on this page, you can email the entire project team using theEmail Project Team link at the top of thepage.
1. Click Email Project Team at the top of the page.
2. On the Email Project Team window, select the project from the Projects drop-downmenu (if neces-sary), and add a subject and the text of the email.
3. Click Send to send the email. The email will go to the project team lead and all teammembers.
The Schedule page
The project schedule shows you an outline of the project, including its phases and all the issues and tasksthat are associated with it.
© 2016AutotaskCorporation lPage 76 of 106

You can click on a task title to view the details, and to add notes or attachments to the task. Refer to "Workwith Your Open Tasks" on page 82.
The Calendar page
The project calendar lists events that our project teammembers have added to the project. This could includemeetings, webinars, days off, etc.
© 2016AutotaskCorporation lPage 77 of 106

Only our staff members can add events to the projects calendar, and this calendar does not integ-rate with other calendars.
To print the details of a particular event:
1. Click the event you would like to print. The details will display in the bottom frame of the page.
2. Click Print.
The Notes page
Project notes are used to communicate status, progress, and other issues with project teammembers. Theykeep all communications in one convenient place that all teammembers can access. You will also be able toopen any attachments that we have added to a note, but you will not be able to add your own attachmentsthrough Client Portal.
Find the note you would like to view and click to open it. The note opens in the preview pane at the bottom ofthe page, where you can view or print it.
To add a project note:
1. On theProject Notes page, click New Project Note at the top of the page top open the New ProjectNote window:
© 2016AutotaskCorporation lPage 78 of 106

© 2016AutotaskCorporation lPage 79 of 106

2. Enter a subject and the text of the note.
3. To notify all active project teammembers, select the notification check box.
4. Click Save and Close.
The Project Issues page
A project issue is a task or problem that arises after the original project schedule is developed. When you addan issue through the Client Portal, it will appear in the project schedule as well as on the Issues page. You canopen it from either location.
To add a project issue:
1. Click New Project Issue
or
Select New Project Issue from the Projects menu.
2. The New Project Issue window opens:
© 2016AutotaskCorporation lPage 80 of 106

3. Select the Project Name, if you did not first open the project.
4. Enter a Title andDetails.
5. Click Save and Close.
The issue appears on the Project Issue page as well as in the project schedule. Note that in the sched-ule, it will appear at the top of the task list and will be at the project level (not as part of a project phase).
The project lead is assigned as the resource and all active teammembers receive an email notificationwith details about the new issue. In addition, the issue will also show up on the Project Manager’sDashboard.
The Charges page
Client Portal Manager or Taskfire security level
Project charges track project-related charges for items other than labor. Youmay be billed for these chargesas part of your project billing. Examples of project charges are hardware and software charges, and incid-entals such as delivery charges. Change orders for project tasks will also appear on the Charges View.
© 2016AutotaskCorporation lPage 81 of 106
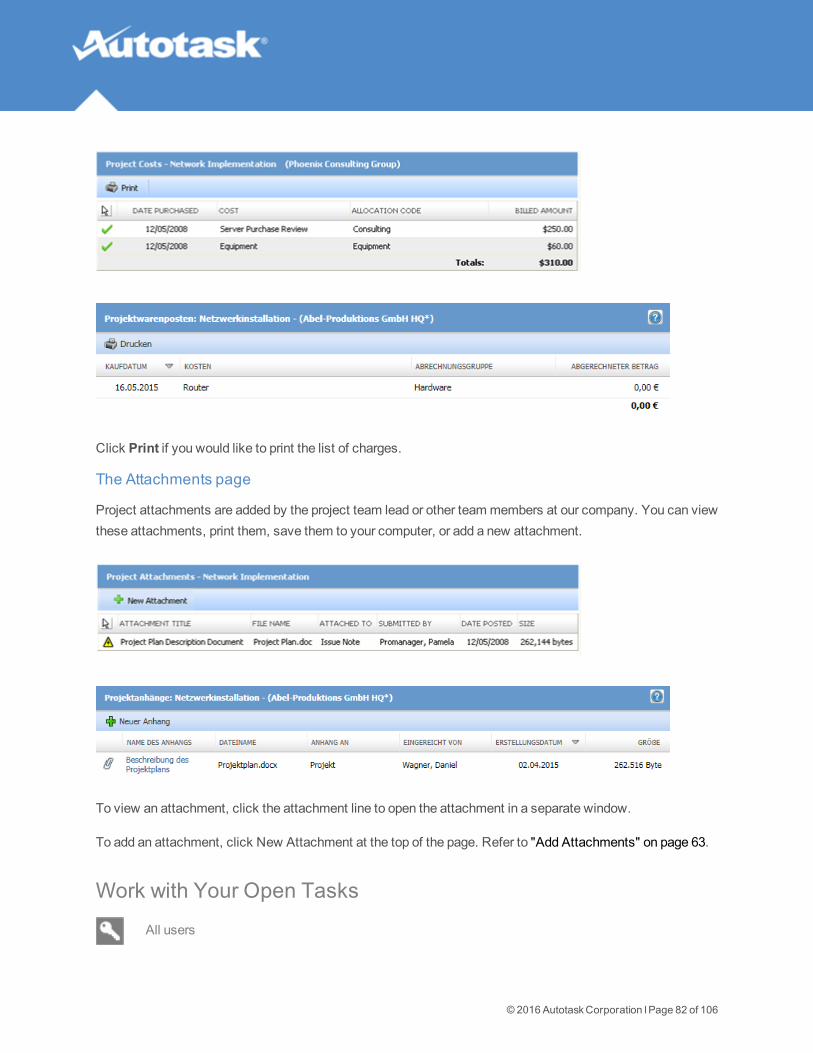
Click Print if you would like to print the list of charges.
The Attachments page
Project attachments are added by the project team lead or other teammembers at our company. You can viewthese attachments, print them, save them to your computer, or add a new attachment.
To view an attachment, click the attachment line to open the attachment in a separate window.
To add an attachment, click New Attachment at the top of the page. Refer to "Add Attachments" on page 63.
Work with Your Open Tasks
All users
© 2016AutotaskCorporation lPage 82 of 106

Projects > My Open Tasks, or click on a task in the project schedule
The core element of a project is the project schedule. It contains the tasks that are the specific work assign-ments for our staff.
The project schedule also contains any issues that were added to the project either by our staff or by you,through the Client Portal. They also appear on the Issues page of the project. Refer to "The Project Issuespage" on page 80.
Tasks can be tracked at the project level, or inside of a phase or a sub-phase. Phases and sub-phases help usto organize the project, much like folders inWindows Explorer help you to organize documents.
When you add an issue to a project, it appears on the schedule at the project level (not within aphase or sub-phase).
What tasks appear in MyOpen Tasks?
Whenwe add a task to the project schedule, we can name a specific user at your company as the "contact"and check a setting that allows that user to complete the task. Such tasks, and all tasks that have a status ofWaiting Customerwill appear on theMy Open Tasks page.
On this page, you can do the following:
Icon Description
OpenTaskDetails
Click the task name to open it. The Task or Issue Details window opens in List View, displaying adescription of the task and all task notes, time entries and attachments. You will be able to add anote of your own, and if the task is so configured, complete the task.Tasks that you can complete are typically tasks that describe steps that require your approval.You can also print the task from this view.
Respondto thisTask viaEmail
Click the email icon on a task row. Your default email client will open, with our support emailaddress already populated.
Enter aTask Note
Click the Note icon on to open the New Task Note window and enter a Subject and a Message.
Completethis Task
Some tasks are configured by us in such a way that you, the customer, can complete them.
An example of a task that youmight be able to complete would be "Approve ProjectBudget", or "Final Project Approval".
Click the green check mark to complete the task.
© 2016AutotaskCorporation lPage 83 of 106

ViewReportsVaries
Reports
In the Client Portal, you can run the following reports:
l Invoices Report: View invoices for your company for a specific date range, or find invoices with a spe-cific invoice number or range of numbers. Refer to "Invoices Report" on page 84.
l Block Hours Report: View information on block contract usage and remaining hours. Refer to "BlockHours Report" on page 86.
l Retainer Report: View information on retainer contract usage and remaining dollars. Refer to "TheRetainer Report" on page 87.
l Per Ticket Contract Report: Tickets remaining and current tickets remaining, grouped by companyand contract. Refer to "Per Ticket Contract Report" on page 88.
l Ticket Report: View a detailed ticket report with a variety of sorting options. Refer to "The TicketReport" on page 89.
l Time Tracking Report: View information on time entered on tickets by Taskfire users. Refer to "TheTime Tracking Report" on page 91.
Invoices Report
Client Portal Manager or Taskfire Administrator security level
Reports > Invoices
View your company's invoices from us through Client Portal using the Invoices report on the Reports tab.
To run the Invoice report...1. Hover over the Reports tab and select Invoices from the drop-downmenu. The Invoices page opens.
2. Select the report criteria in the left pane. By default, the date range is for the last 7 days. You can alsofilter by project and invoice number.
3. Click Show Criteria on Report to display the report criteria at the top of the report.
4. Click Generate. A list of invoices meeting your criteria displays.
© 2016AutotaskCorporation lPage 84 of 106
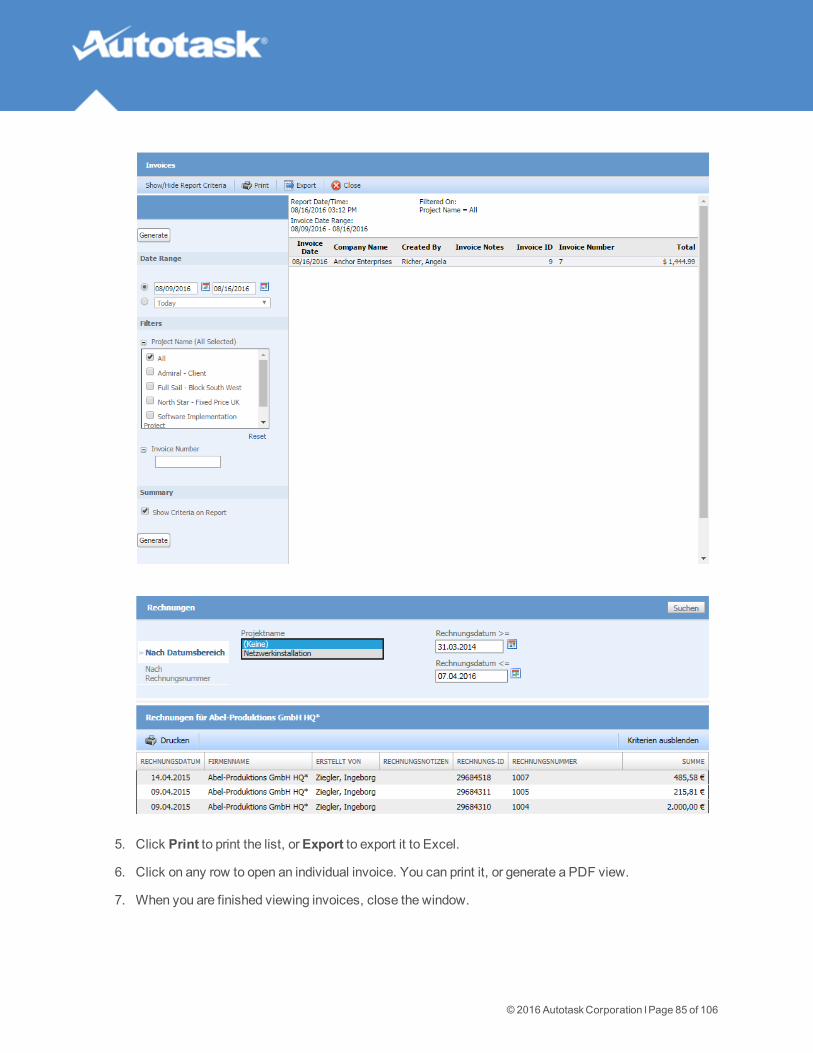
5. Click Print to print the list, orExport to export it to Excel.
6. Click on any row to open an individual invoice. You can print it, or generate a PDF view.
7. When you are finished viewing invoices, close the window.
© 2016AutotaskCorporation lPage 85 of 106

Block Hours Report
Client Portal Manager or Taskfire Administrator security level
Reports > Block Hour Report
View your prepaid labor through Client Portal using the Block Hours report on the Reports tab. You will haveaccess to the Reports tab only if you have a Security Level of Manager or a custom Security Level that allowsaccess to this report.
To run the Block Hours report...1. Click the Reports tab and select Block Hours Report from the drop-downmenu. The Block Report
page opens.
2. Enter a date range for the report and narrow the results by contract, type of purchase, and/or project.
3. Click Show Criteria on Report to display the report criteria at the top of the report.
4. Click Generate. The report opens in the right frame.
The following sections of data are available for prepaid labor:
© 2016AutotaskCorporation lPage 86 of 106

l Block Purchases of [# of hours on [date]] : This section details the task or ticket work that wasapplied towards your block hour purchase.
l Non-Block Deductions: This section details the task or ticket work that was not applied towards anyprepaid labor agreement and any adjustments made to this labor after it was billed.
l Contract To-Date Totals: Active and Paid Blocks Only: This section provides totals for the activeblocks and non-block deductions used and what the resulting and block balances are.
This section provides totals for ALL labor and is not filtered by the report criteria you enteredwhen running the report.
The Retainer Report
Client Portal Manager or Taskfire Administrator security level
Reports > Retainer Report
View your prepaid dollars through Client Portal using the Retainer report on the Reports tab.
To run the Retainer report...1. Click the Reports tab and select Retainer Report from the drop-downmenu. The Retainer Report
page opens.
2. Enter a date range for the report and narrow the results by contract, type of purchase, and/or project.
3. Click Show Criteria on Report to display the report criteria at the top of the report.
4. Click Generate. The report opens in the right frame.
The following sections of data are available for prepaid labor:
© 2016AutotaskCorporation lPage 87 of 106

l Retainer Purchases of [amount]on [date]: This section details the task or ticket work that wasapplied towards your block hour purchase.
l Non-Retainer Deductions: This section details the task or ticket work that was not applied towardsany prepaid labor agreement and any adjustments made to this labor after it was billed.
l Contract To-Date Totals: Active and Paid Retainer Purchases Only: This section provides totalsfor the active retainer and non-retainer deductions used and what the resulting retainer balances are.
This section provides totals for ALL labor and is not filtered by the report criteria you enteredwhen running the report.
Per Ticket Contract Report
Client Portal Manager or Taskfire Administrator security level
Reports > Per Ticket Contract Report
© 2016AutotaskCorporation lPage 88 of 106

View your prepaid labor through Client Portal using the Per Ticket Contract report on the Reports tab.
To run the Per Ticket Contract report...1. Click the Reports tab and select Per Ticket Contract Report from the drop-downmenu. The Report
Criteria frame opens.
2. Enter a date range for the report and narrow the results by contract status.
3. Click Generate. The report opens in the right frame.
The following sections of data are available for prepaid labor:
l Contract: [Contract Name] [contract date range]: This header row details the contract informationincluding number of Tickets Used on the Contract as well as the Current Tickets Remaining.
l [#]Tickets [ticket purchase date range]: This section details the completed tickets that consumed anincident including its Create Date, Created By, Complete Date, and Hours Worked. The ticket can beaccessed by clicking on the Ticket Number from within the report.
The Ticket Report
Any user who can see all tickets for their company can access this report.
Reports > Ticket Report
© 2016AutotaskCorporation lPage 89 of 106

To run the Ticket report...1. Click the Reports tab and select Ticket Report from the drop-downmenu. The Report Criteria frame
opens.
2. Select yourSort By, Date Range, Filters, andColumns.
The Priority column (non-Taskfire clients) or Service Provider Priority column (Taskfire clients) areavailable only when your security level includes permission to view the service provider priority.
3. Click Generate. The report opens in a new window.
© 2016AutotaskCorporation lPage 90 of 106

The Ticket Report does not include Ticket Notes.
The Time Tracking Report
Any user who can see all tickets for their company can access this report.
Reports > Time Tracking
To run the Time Tracking report...1. Click the Reports tab and select Ticket Report from the drop-downmenu. The Report Criteria frame
opens.
2. Select yourGroup By, Date Range, Filters, andColumns criteria.
3. Click Generate. The report opens in a new window.
© 2016AutotaskCorporation lPage 91 of 106

© 2016AutotaskCorporation lPage 92 of 106

© 2016AutotaskCorporation lPage 93 of 106

Use the KnowledgebaseIf the Knowledgebase is enabled for your Client Portal, all users can search it
Knowledgebase > Search Knowledgebase or Ticket View > Self Help
The fastest way to resolvemany issues is when you find the answer you are looking for in the Know-ledgebase.
If the Knowledgebase feature is enabled for your company, all Client Portal users in your organization will beable to search all articles in the Knowledgebase that are either marked public or that were published spe-cifically to your company.
Users with a Taskfire security level can create andmanage Knowledgebase articles for their organ-ization. Refer to "Create andManage Knowledgebase Articles" on page 96.
You can access the Knowledgebase in two ways.
How to...Get self help on a ticket
1. When you create a new ticket or view an existing ticket, click Self Help.
The Knowledgebase search page opens, with the title of the ticket automatically entered as the searchterm and the search already executed.
© 2016AutotaskCorporation lPage 94 of 106

2. Optionally, you can change the search term and narrow the search by selecting a sub-category in theCategory field.
3. Click Search again.
Search the Knowledgebase
1. Click theKnowledgebase tab in the Client Portal and select Search Knowledgebase.
2. Enter search terms in theSearch box. Use quotes around words to find an exact phrase. Otherwise,the search will find any of the words you enter in the Search box. It will also find any variations thatbegin with the word.
3. To narrow your search, select a category from theCategorymenu. The search will return articles in theselected category only.
4. Click Search. All text and fields in Knowledgebase articles are searched.
© 2016AutotaskCorporation lPage 95 of 106
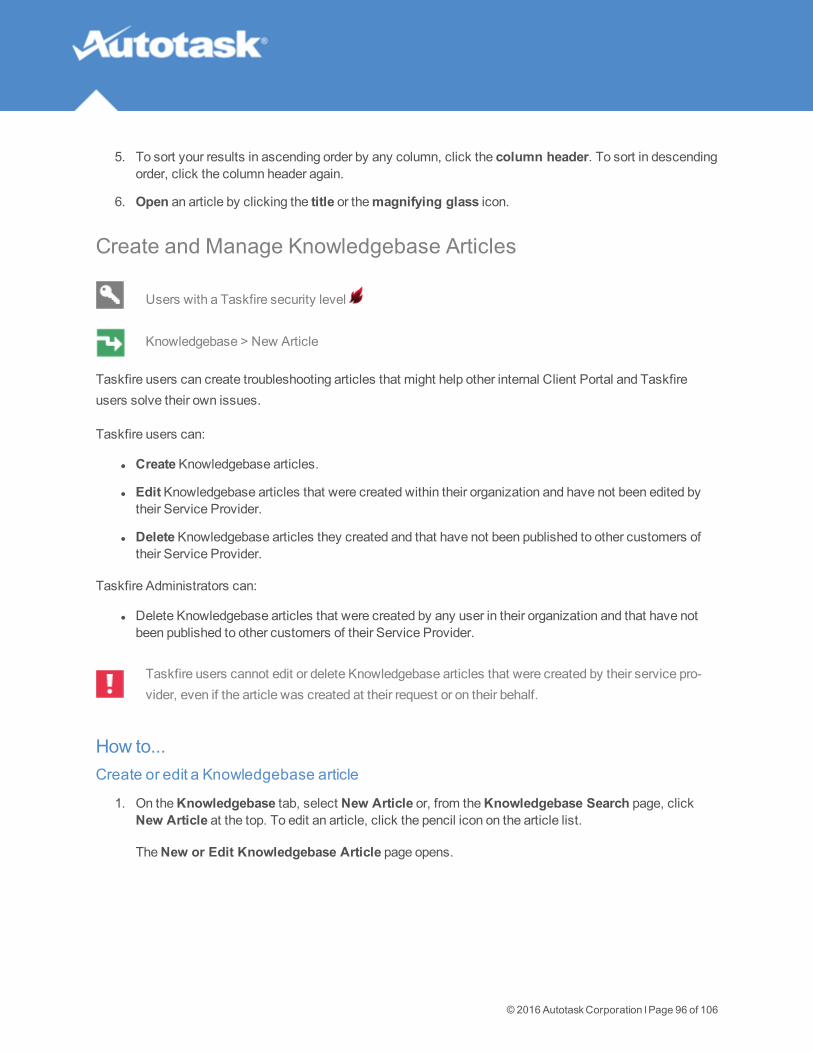
5. To sort your results in ascending order by any column, click the column header. To sort in descendingorder, click the column header again.
6. Open an article by clicking the title or themagnifying glass icon.
Create and Manage Knowledgebase Articles
Users with a Taskfire security level
Knowledgebase > New Article
Taskfire users can create troubleshooting articles that might help other internal Client Portal and Taskfireusers solve their own issues.
Taskfire users can:
l CreateKnowledgebase articles.
l EditKnowledgebase articles that were created within their organization and have not been edited bytheir Service Provider.
l DeleteKnowledgebase articles they created and that have not been published to other customers oftheir Service Provider.
Taskfire Administrators can:
l Delete Knowledgebase articles that were created by any user in their organization and that have notbeen published to other customers of their Service Provider.
Taskfire users cannot edit or delete Knowledgebase articles that were created by their service pro-
vider, even if the article was created at their request or on their behalf.
How to...Create or edit a Knowledgebase article
1. On theKnowledgebase tab, select New Article or, from theKnowledgebase Search page, clickNew Article at the top. To edit an article, click the pencil icon on the article list.
TheNew or Edit Knowledgebase Article page opens.
© 2016AutotaskCorporation lPage 96 of 106

© 2016AutotaskCorporation lPage 97 of 106

2. Enter information as follows:
Field Definition
Add Attachment Click to open the Add Attachment dialog. If the article hasn't been saved, you willbe prompted to save it. For details on adding an attachment, refer to "Add Attach-ments" on page 63.
Title Enter a descriptive title for the article. The title is required but does not have to beunique.
Category Select the "category > subcategory..." with which you'd like to classify the article.
Keywords Enter keywords for this article. Keyword is one of the fields searched in a Know-ledgebase Search.
Keyword search is a single word search. Separatemultiple keywordswith a comma. If you want to use a two-word phrase as a keyword,do not use spaces between the words. For example, if you want touse "hard drive" as a keyword, enter "harddrive" into the field.
Error Code You can enter an error code for this article. Error code is one of the fields searchedin a Knowledgebase Search.
Detail Enter the body of your article into the Detail field using the WYSIWYG editor. Theicons and tools in the editor are similar to Microsoft Word tools and icons.
The defaultDesign view (selected below the text field) allows you to write andformat your own content directly in the text field or paste formatted text from anotherdocument. You can click the picture icon to insert an image.
SelectHTML below the text field to view or edit the HTML markup or enter text andHTML markup directly. Alternately, use an external HTML editor and cut and pasteHTML content into the HTML view of the text field.
Select the Preview option to see how your article will appear to Knowledgebaseusers.
Associate Ticket Click this link to open the Select Ticket page. See "Associate tickets with a Know-ledgebase article" on page 98, below.
3. Click Save and Close.
Associate tickets with a Knowledgebase article
1. On theNew Knowledgebase Article page, select Associate Ticket.
2. TheSelect Ticket page opens:
© 2016AutotaskCorporation lPage 98 of 106
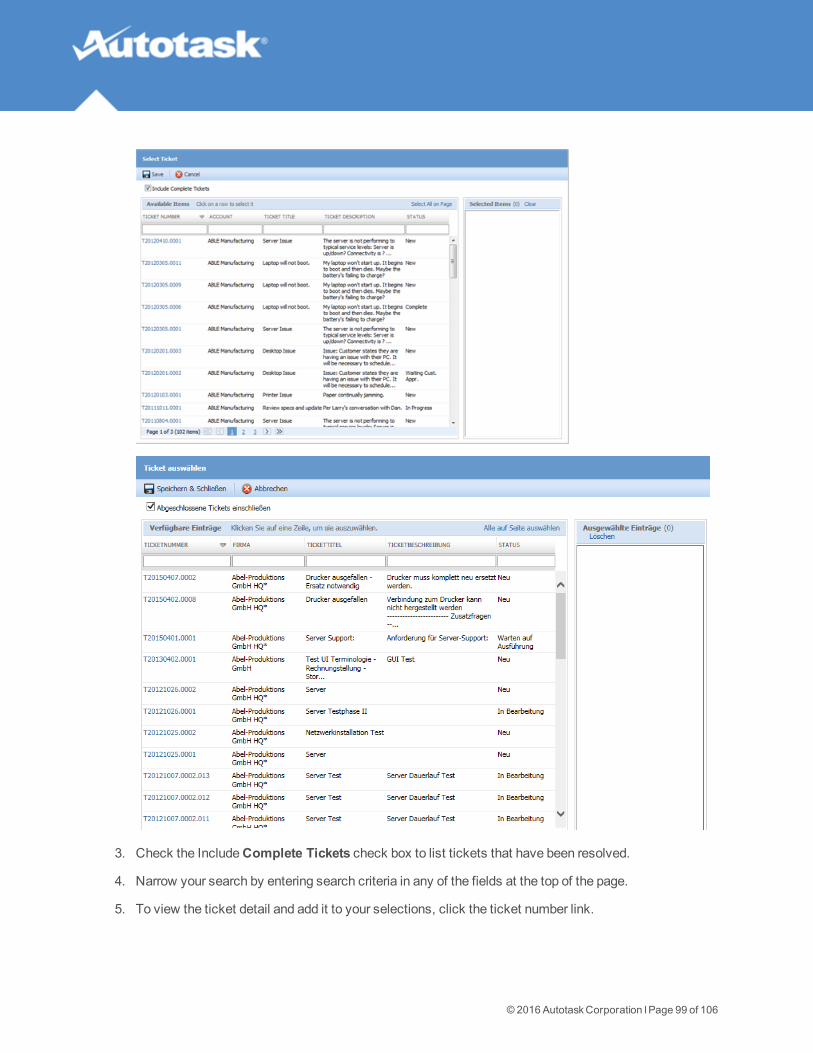
3. Check the IncludeComplete Tickets check box to list tickets that have been resolved.
4. Narrow your search by entering search criteria in any of the fields at the top of the page.
5. To view the ticket detail and add it to your selections, click the ticket number link.
© 2016AutotaskCorporation lPage 99 of 106
6. Select an individual ticket by clicking on it, or select all displayed tickets by clicking theSelect All onPage link. Your selections will appear in the list on the left. To remove all selected tickets from that list,click theClear link.
7. Click Save & Close to save your selections and return to the Knowledgebase Article page.
Delete a Knowledgebase article
1. Locate the article you wish to delete. See "Use the Knowledgebase" on page 94 for more information.
2. Either click theDelete icon and confirm the deletion OR open the article and click theDelete button.
3. Confirm the deletion.
Youmay not delete articles that we, your service provider, have created for you.
© 2016AutotaskCorporation lPage 100 of 106

Monitor End Client Tickets and ProjectsClient Portal users at Autotask customers that have been selected as "Company to bill" on one ormore contracts
Tickets > End Client Tickets
Projects > End Client Projects
If your company is a customer or partner of our company, and we are billing you for work we did for one of yourcustomers (the end client, whom you will bill directly), you can use your Client Portal to view tickets and pro-jects that contain billing items we are billing to you. This allows you to track the work we are doing for your cus-tomer.
End client tickets and projects are not mixed in with the tickets and projects we do for your company. They areaccessed from separate pages that display only tickets or projects that include work done for another com-pany where your company is the designated Company to bill. The Ticket Search will not return any end clienttickets, and no end client data will appear in reports. You do however have access to the Knowledgebase fromend client tickets.
For more information, refer to:
l "End Client Tickets" on page 101
l "End Client Projects" on page 103
End Client Tickets
Client Portal users at Autotask customers that have been selected as "Company to bill" on one ormore contracts
Tickets > End Client Tickets
The End Client Tickets page displays a list of all tickets for which your company is the designated "Companyto bill." It allows you to view information about tickets where we do work for one of your clients, but invoicesare sent to your company. The page is only available to Client Portal users from Autotask customers thathave been selected as "Company to bill" on one or more contracts.
Tickets appear on this page if:
© 2016AutotaskCorporation lPage 101 of 106

l The ticket is associated with a contract where your company is the "Company to bill"
l One ormore time entries on the ticket are associated with a contract where your company is the "Com-pany to bill"
The End Client Tickets list displays general information about each ticket.
l All dates and times on the list display in your company's time zone. Dates without times display inEastern Standard time.
l End client ticket information is read-only. You cannot add or edit notes or attachments. You can printany list that displays a Print button. You can click the ticket contact name to email the contact. Anemail message form opens in your default email application.
On this page, you can do the following:
Option Description
Export Click the Export button to export the contents of the ticket list to CSV, Excel, or PDF.
IncludeCompletedTickets
By default, the list does not display tickets with a status of Complete. To display tickets with a Com-plete status, click to select this check box.
To hide completed tickets, click to clear the check box.
Column Fil-ters
A column filter appears at the top of each column below the column heading. You can search byany column. Simply begin to type the first few characters of the data you are searching for in theappropriate column filter. The search will begin shortly after you stop typing, allowing you to enteras few or as many characters as you wish. The more characters you enter, the more precise thesearch.
For example, to filter by client, begin to type the client name in the client filter field. All filters exceptfor the date filters are "starts with" filters. That is, if you type A, the list will include all clients withnames that start with A; if you type Acme, the list will include only clients with Acme as the first wordin the name.
For date fields, you must enter a complete date or select a date from the date picker. The date filtersreturn only exact matches.
You can search by multiple columns at once. For example, once you search by client name Acme,you can then search the Acme client tickets by another filter.
TicketNumberlink
Click the ticket number to open the ticket detail page in another window.The ticket detail displays general ticket information including the company name, create date,status, ticket contact, the internal resource (if assigned) and the due date. You can also see thedescription and a work history including attachments. The Work History displays only informationrelated to the ticket items for which your company can be billed. Hours worked are not displayeduntil we approve and post the time entry.For additional information on the ticket detail window, refer to "View a Ticket" on page 56.
© 2016AutotaskCorporation lPage 102 of 106
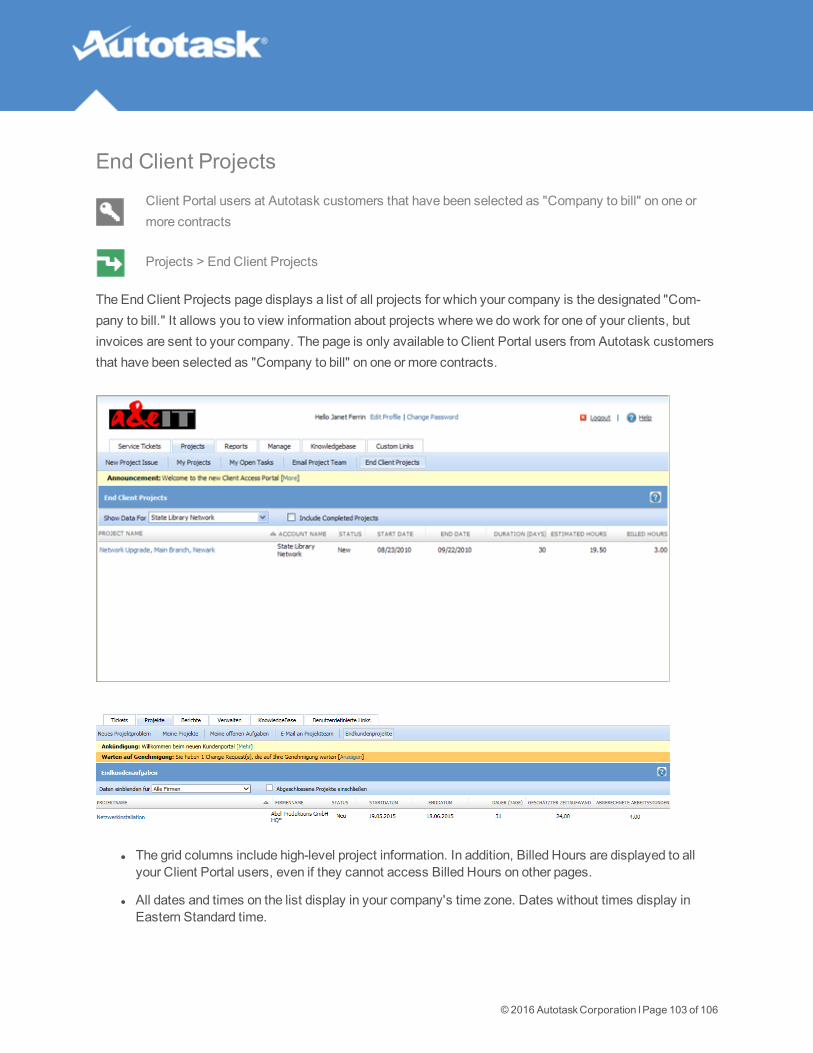
End Client Projects
Client Portal users at Autotask customers that have been selected as "Company to bill" on one ormore contracts
Projects > End Client Projects
The End Client Projects page displays a list of all projects for which your company is the designated "Com-pany to bill." It allows you to view information about projects where we do work for one of your clients, butinvoices are sent to your company. The page is only available to Client Portal users from Autotask customersthat have been selected as "Company to bill" on one or more contracts.
l The grid columns include high-level project information. In addition, Billed Hours are displayed to allyour Client Portal users, even if they cannot access Billed Hours on other pages.
l All dates and times on the list display in your company's time zone. Dates without times display inEastern Standard time.
© 2016AutotaskCorporation lPage 103 of 106

l End client project information is read-only. You cannot add or edit notes, attachments, or issues. Youcan print any list that displays a Print button. You can email all project teammembers, but only fromthe Project Summary page.
On this page, you can do the following:
Option Description
Show Datafor
By default, the list displays all clients which have projects that designate your company as the Com-pany to bill. Click the dropdown to select a specific client. Only clients who have projects with con-tracts where you are the Company to bill appear on the list.
IncludeCompletedProjects
Click this check box to include projects with a status of Complete.
View a Pro-ject
Click on a project to open it. The features available on the Project Summary page will vary depend-ing on your assigned Client Portal security level, and the content is limited to items associated withtasks and charges for which your company is the Company to bill. For an overview of project pages,refer to "View a Project" on page 74.
© 2016AutotaskCorporation lPage 104 of 106

Index: add asset – project schedule
Index
add asset 37
add attachment 63
add configuration item 37
add device 37
add Knowledgebase article 96
add ticket note 61
add vendors 33
announcement 15
asset 34
block hours report 86
business hours 31
ChangeManagement 50
change password 6
change request 50
change security level 21
Client Portal overview 3
configuration item 34
configure 13, 16
configure browser settings 7
create quick ticket 45
create ticket 45
custom links 15
delete Knowledgebase article 96
device 34
edit Knowledgebase article 96
edit ticket 65
edit your profile 4
enter time on ticket 69
find ticket 54
follow-up questions 48
incident ticket 50
invoices report 84
knowledgebase 14
landing page 10
log In 9
manage 13, 16
manage queues 26
manage request type 22
manage users 17
navigation 9
out of office on/off 26, 32
parent subsidiary 41
per ticket contract report 88
priority 48
problem ticket 50
project attachments 82
project calendar 77
project charges 81
project issues 80
project menu 12
project schedule 76
© 2016AutotaskCorporation lPage 105 of 106

Index: project summary – view your security level
project summary 75
project tasks 82
projects (overview) 74
quick ticket settings 29
reports 13
reports (overview) 84
request type 47
retainer report 87
search Knowledgebase 94
security level permissions 7
self help 94
service backup 32
share work between loactions 41
ticket grid 54
ticket report 89
ticket view 56
tickets (overview) 44
tickets menu 11
time tracking report 91
transfer ticket to service provider 72
view configuration item associated with user 40
view end client projects 101, 103
view end client tickets 101
view your security level 4
© 2016AutotaskCorporation lPage 106 of 106