Chemical Reactions - Fc.Hermon.Net
128
Chemical Reactions THIRD EDITION REDESIGNED FOR THE NGSS ISSUES AND PHYSICAL SCIENCE
-
Upload
khangminh22 -
Category
Documents
-
view
1 -
download
0
Transcript of Chemical Reactions - Fc.Hermon.Net

Chemical Reactions
T H I R D E D I T I O N
R E D E S I G N E D F O R T H E N G S S
ISSUES AND PHYSICAL SCIENCE


Chemical Reactions
THE LAWRENCE HALL OF SCIENCE UNIVERSIT Y OF CALIFORNIA, BERKELEY
T H I R D E D I T I O N
R E D E S I G N E D F O R T H E N G S S
ISSUES AND PHYSICAL SCIENCE

Published by
17 Colt CourtRonkonkoma NY 11779 Website: www.lab-aids.com
This book is part of SEPUP’s Issues and Science course sequence. For more information about this sequence, see the SEPUP and Lab-Aids websites.
ISSUES AND EARTH SCIENCE
ISSUES AND LIFE SCIENCE
ISSUES AND PHYSICAL SCIENCE
Additional SEPUP instructional materials include SEPUP Modules: Grades 6–12 Science and Sustainability: Course for Grades 9–12 Science and Global Issues: Biology: Course for High School Biology
This material is based in part upon work supported by the National Science Foundation under Grants 9554163 and 0099265. Any opinions, findings, and conclusions or recommendations expressed in this material are those of the authors and do not necessarily reflect the views of the National Science Foundation.
For photo and illustration credits, see page 115, which constitutes an extension of this copyright page.
The preferred citation format for this book is SEPUP. (2018). Issues and Physical Science: Chemical Reactions. Lawrence Hall of Science, University of California at Berkeley. Ronkonkoma, NY: Lab-Aids, Inc.
Third Edition
Q2 3 4 5 6 7 8 9 22 21 20 19 18
© 2018 The Regents of the University of California
978-1-63093-487-3 v2
SEPUP Lawrence Hall of ScienceUniversity of California at BerkeleyBerkeley CA 94720-5200
email: [email protected]: www.sepuplhs.org

v
A Letter to Issues and Physical Science Students
As you examine the activities in this book, you may wonder, “Why does this book
look so different from other science books I’ve seen?” The reason is simple: it is a
different kind of science program, and only some of what you will learn can be
seen by leafing through this book!
Issues and Physical Science uses several kinds of activities to teach science. As
you conduct these activities, you will engage in the same practices used by
scientists to understand the natural world and by engineers to solve problems.
For example, you will plan and carry out an experiment to investigate how
water and sand heat up differently. You will analyze and interpret data on ocean
temperatures and worldwide winds. And you will examine evidence for links
between climate change, global warming, and human activity. A combination of
laboratories, investigations, readings, models, scientific debates, role plays, and
projects will help you develop your understanding of science and the relevance
of earth science to your interests.
You will find that important scientific ideas come up again and again in different
activities throughout the program. You will be expected to do more than just
memorize these concepts: you will be asked to develop explanations and apply
them to solve problems. In particular, you will improve your decision-making
skills by using evidence to weigh outcomes and to decide what you think should
be done about the scientific issues facing our society.
How do we know that this is a good way for you to learn? In general, research on
science education supports it. In particular, many of the activities in this book were
tested by hundreds of students and their teachers, and then modified on the basis
of their feedback. New activities are based on what we learned in classrooms using
the materials and on new research on science learning. In a sense, this entire book
is the result of an investigation: we had people test our ideas, we interpreted the
results, and we then revised our ideas! We believe the result will show you that
learning more about science is important, enjoyable, and relevant to your life.
SEPUP Staff

vi
ISSUES & PHYSICAL SCIENCE THIRD EDITION
Director: Barbara Nagle
Co-Director: John Howarth
Coordinator: Janet Bellantoni
AUTHORS
Barbara Nagle, Tiffani Quan, Maia Binding
CONTENT AND SCIENTIFIC REVIEW
Dr. Courtney J. Hastings, Assistant Professor of Chemistry, Loyola University Maryland, Baltimore, Maryland
PRODUCTION
Coordination, Design, Photo Research, Composition: Seventeenth Street Studios
Production Coordinator for Lab-Aids: Hethyr Tregerman
Editing: Kerry Ouellet

vii
FIELD TEST CENTERS
Issues and Physical Science is a revision of Issues, Evidence, and You (IEY). We are extremely grateful to the center directors and teachers who taught the original and revised program. These teachers and their students contributed significantly to improving the course. Since then, Issues and Physical Science has been used in many classrooms across the United States. This third edition is based on what we have learned from teachers and students in those classrooms. It also includes new data and information, so the issues included in the course remain fresh and up-to-date.
i e y c e n t e r s
Alaska: Donna York (Director), Kim Bunselmeyer, Linda Churchill, James Cunningham, Patty Dietderich, Lori Gilliam, Gina Ireland-Kelly, Mary Klopfer, Jim Petrash, Amy Spargo
California-San Bernardino County: Dr. Herbert Brunkhorst (Director), William Cross, Alan Jolliff, Kimberly Michael, Chuck Schindler
California-San Diego County: Mike Reeske and Marilyn Stevens (Co-Directors), Pete Brehm, Donna Markey, Susan Mills, Barney Preston, Samantha Swann
California-San Francisco Area: Stephen Rutherford (Director), Michael Delnista, Cindy Donley, Judith Donovan, Roger Hansen, Judi Hazen, Catherine Heck, Mary Beth Hodge, Mary Hoglund, Mary Pat Horn, Paul Hynds, Margaret Kennedy, Carol Mortensen, Bob Rosenfeld, Jan Vespi
Colorado: John E. Sepich (Director), Mary Ann Hart, Lisa Joss, Geree Pepping-Dremel, Tracy Schuster, Dan Stebbins, Terry Strahm
Connecticut: Dave Lopath (Director), Harald Bender, Laura Boehm, Antonella Bona-Gallo, Joseph Bosco, Timothy Dillon, Victoria Duers, Valerie Hoye, Bob Segal, Stephen Weinberg
Kentucky-Lexington Area: Dr. Stephen Henderson and Susie Nally (Co-Directors), Stephen Dilly, Ralph McKee II, Barry Welty, Laura Wright
Kentucky-Louisville Area: Ken Rosenbaum (Director), Ella Barrickman, Pamela T. Boykin, Bernis Crawford, Cynthia Detwiler, Denise Finley, Ellen Skomsky
Louisiana: Dr. Shiela Pirkle (Director), Kathy McWaters, Lori Ann Otts, Robert Pfrimmer, Eileen Shieber, Mary Ann Smith, Allen (Bob) Toups, Dorothy Trusclair
Michigan: Phillip Larsen, Dawn Pickard and Peter Vunovich (Co-Directors), Ann Aho, Carolyn Delia, Connie Duncan, Kathy Grosso, Stanley Guzy, Kevin Kruger, Tommy Ragonese
New York City: Arthur Camins (Director), Eddie Bennett, Steve Chambers, Sheila Cooper, Sally Dyson
North Carolina: Dr. Stan Hill and Dick Shaw (Co-Directors), Kevin Barnard, Ellen Dorsett, Cameron Holbrook, Anne M. Little
Oklahoma: Shelley Fisher (Director), Jill Anderson, Nancy Bauman, Larry Joe Bradford, Mike Bynum, James Granger, Brian Lomenick, Belva Nichols, Linda Sherrill, Keith Symcox, David Watson
Pennsylvania: Dr. John Agar (Director), Charles Brendley, Gregory France, John Frederick, Alana Gazetski, Gill Godwin
Washington, D.C.: Frances Brock and Alma Miller (Co-Directors), Vasanti Alsi, Yvonne Brannum, Walter Bryant, Shirley DeLaney, Sandra Jenkins, Joe Price, John Spearman
Western New York: Dr. Robert Horvat and Dr. Joyce Swartney (Co-Directors), Rich Bleyle, Kathaleen Burke, Al Crato, Richard Duquin, Lillian Gondree, Ray Greene, Richard Leggio, David McClatchey, James Morgan, Susan Wade

viii
r e v i s i o n c e n t e r s
Buffalo, New York: Kathaleen Burke (Director), Robert Baxter, Robert Tyrell
Charleston County, South Carolina: Rodney Moore (Director), Deborah Bellflower, Liz Milliken, Donna Ouzts, Gail Wallace
Lemon Grove, California: Samantha Swann (Director), Lyn Ann Boulette, Amber Lunde
Vista, California: Donna Markey (Director)
Winston-Salem/Forsyth County, North Carolina: Jim Bott (Director), Kathy Boyer, Jason Felten, Bill Martin
n g s s r e v i s i o n c e n t e r s
Chicago, Illinois: Misty Richmond (Coordinator), Katherine McIntyre, Francis Panion, Rozy Patel, Thomas Vlajkov

ix
1 i n v e s t i g at i o n
Producing Circuit Boards 3
2 l a b o r at o r y
Evidence of Chemical Change 11
3 r e a d i n g
Physical Changes and Chemical Reactions 17
4 m o d e l i n g
Chemical Reactions at the Molecular Scale 25
5 ta l k i n g i t o v e r
Physical or Chemical Change? 31
6 l a b o r at o r y
Comparing the Masses of Reactants and Products 35
7 m o d e l i n g
Explaining Conservation of Mass 39
8 i n v e s t i g at i o n
Chemical Batteries 43
9 l a b o r at o r y
Thermal Energy and Reactions 49
10 d e s i g n
Developing a Prototype 53
11 d e s i g n
Refining the Design 57
12 l a b o r at o r y
Recovering Copper 61
13 l a b o r at o r y
Another Approach to Recovering Copper 65
Unit Summary 71Appendices 73Glossary 107Index 111Credits 115
ContentsChemical Reactions


Chemical Reactions

Janice and her father walked into the cell phone store. It was time to buy new phones. As they headed for the long row of the latest models, Janice
noticed a sign: “Turn in your old phone and get 10% off a new phone!”
“Wow!” She thought, “I have my old phone, so I can turn it in. That’s an easy 10% discount!”
Just then the salesperson came by. Janice asked, “Why do you give a discount if I turn in my old phone?”
“The companies save money by recovering and reusing the materials from old phones to make new phones,” replied the salesperson. “For example, there are metals like copper, silver, gold, and platinum in a cell phone. Although there isn’t much in one phone, more than 2 billion people have smartphones! Recycling saves those metals and also reduces waste from the reactions used to purify the metals.”
“What do all those metals in my phone do?” asked Janice.
The salesperson responded, “There are metals in the battery. Chemical reactions in the battery provide energy for the phone. Metals are also part of the electronics that make your cell phone smart!”
“I heard that the new cell phone batteries are better than the old ones. Right now my phone gets really hot sometimes. My dad says it’s probably the battery heating up.”
“Yup,” said the salesperson. “Engineers are constantly designing improve-ments to every part of a cell phone, including the batteries, to make them work better for the customer and be better for the environment. Let me show you our new models.”
• • •
Chemicals and chemical reactions are used to make and power many products, including the batteries and circuits in electronics. The reactions used to purify metals and produce cell phone parts, such as circuit boards, provide useful products, but they also create waste. How do these chemical reactions work? In this unit, you will analyze and interpret data to determine whether chemical reactions have taken place. You will develop models to describe what happens during a chemical reaction at the molecular scale and use your models to explain your observations of reactions in open and closed systems. You will also apply what you learn about energy and matter in chemical reactions to design, test, and modify a product and to develop methods to clean up chemical waste.

REACTIONS 3
1 Producing Circuit Boardsi n v e s t i g at i o n
Chemical processes are used to make many of the products you use every day. These products include the food you eat, the clothing
you wear, and electronic devices such as computers, cell phones, and televisions.
One essential part of a computer and many other electronic devices is a circuit board. A circuit board is a thin board with copper lines on the surface. It works like a wiring system to transfer electricity to the electronic parts of a computer or other device. The copper lines form paths for the flow of electricity. A chemical process called etching is used to create the copper paths on the circuit board. In this activity, you will find out how etching works by etching your own circuit board.
GUIDING QUESTION How are chemical processes used to produce circuit boards?
The large circuit board (left) holds many smaller circuit boards, one of which is magnified on the right.

ACTIVITY 1 PRODUCING CIRCUIT BOARDS
4 REACTIONS
MATERIALSFor each group of four students
1 piece of copper-coated plastic
1 felt-tip permanent marker
1 piece of steel wool
1 battery harness with light bulb
1 9-volt alkaline battery
For each pair of students
1 piece of paper
For each student
1 Student Sheet 1.1, “Three-level Reading Guide: Etching Circuit Boards”
1 pair of chemical splash goggles
SAFETYWear chemical splash goggles at all times during this lab investiga-tion. Do not allow solutions to touch your skin or clothing. Clean up any spills immediately. If accidental contact occurs, inform your teacher and rinse exposed areas. Wash your hands thoroughly with soap and water after you finish the activity.
PROCEDUREPart A: Designing and Etching a Circuit Board
1. Listen carefully as your teacher describes how a circuit board works.
2. Plan your circuit board design.
a. Outline the shape of the copper-coated plastic on a piece of paper.
b. Discuss with your partner how you will design your circuit. It should be a pattern that will conduct electricity (allow electricity to flow) from one end of the board to the other.
c. Using a pencil, sketch your design on the paper, making sure to use thick lines.
d. Share your design with the other pair in your group. Decide which design will be etched on the piece of copper-coated plastic.

PRODUCING CIRCUIT BOARDS ACTIVITY 1
REACTIONS 5
3. Prepare your circuit board for etching.
a. Select someone in your group to clean the surface of the copper-coated plastic piece by rubbing the copper-coated side with steel wool. Cleaning will remove surface dirt and other impurities that might interfere with the etching process. Once you clean it, be careful not to touch the copper surface with your fingers. Oil from your fingers will interfere with the etching process.
b. Use the marker to draw your design on the copper-coated side of the circuit board and to write your initials on the plastic side. Be sure to make thick lines with the marker.
c. Let the ink dry for 1 minute (min).
d. Re-trace your design and your initials, and again let the ink dry for 1 min.
4. Begin the etching process.
a. First, make a table in your science notebook to record the properties of the copper on the circuit board and the copper chloride etching solution before and after you place the board in the solution for etching.1
b. Look at the circuit board and the copper chloride etching solution. Record your observations in the table in your science notebook.
c. Your teacher will place your circuit board in the tray. It will soak there overnight.
Part B: Examining the Circuit Board
5. Observe the used copper chloride after the etching process has completed. Describe your observations in your science notebook.
6. Obtain your circuit board from your teacher after it has been rinsed off with water.
7. Rub your circuit board with steel wool to remove any remaining ink.
8. Examine your circuit board, and then test it with the battery-and-light-bulb circuit. Record the results of your test.
1 SELTSN1

ACTIVITY 1 PRODUCING CIRCUIT BOARDS
6 REACTIONS
Part C: Reading
Refer to Student Sheet 1.1, “Three-level Reading Guide: Etching Circuit Boards,” to guide you as you complete the following reading. Be sure to pay attention to the illustrations and relate them to the text and your experience producing a circuit board.234
MAKE PRODUCTS, MAKE WASTEMaking Everyday Products
People buy and use products every day. These products include items we consume and dispose of right away. But we also buy products that serve us for longer periods of time, like sneakers, cell phones, or computers. What happens before you buy a product? It has to be made from materials, and those materials have to come from somewhere. The process of making the product often produces waste.
Take, for example, a computer. To manufacture a computer, the parts must be made first. To make the parts, raw or recycled materials must be obtained. As you saw in the investigation, copper is one of the raw materials that end up in a circuit board. Mining companies dig out copper-containing rocks, called copper ore, from deposits in the earth. Refining companies then physically crush the rock. Next they use chemicals to remove the copper from the ore. The copper is purified and then sold to companies that use the copper to make products.
2 ELRS6813 SELTTL14 ELRS689
Copper-containing rock can be mined from open pit mines (left) on Earth’s surface or from tunnel mines (right) that are blasted into Earth’s surface.

PRODUCING CIRCUIT BOARDS ACTIVITY 1
REACTIONS 7
Making Circuit Boards
To make your circuit board, you used a process very similar to that used in the circuit board industry. This process is based on the chemical characteristics of copper. A chemical process etches a copper circuit on a piece of plastic. To etch a copper circuit board means to use a corrosive solution to create a circuit for the flow of electricity. The corrosive solution removes any unwanted copper. The copper that is protected from the etching solution (in your investigation, the copper below the permanent marker) is left on the board and creates a metal path. The metal path of a circuit board determines how elec-tricity flows throughout the computer. This process removes much of the copper on the board, leaving it in the etching solution.
Making Waste
Each step in the process from raw materials to finished circuit board creates some form of waste. After ore containing copper is mined, the copper must be extracted from the ore. However, more than 98% of the ore does not contain any copper, so a lot of waste remains in the ore, as well as in the chemicals used to remove the copper.
As you observed in this activity, after a circuit board is etched, the used etching solution and rinse water contain copper in a different form than you began with. Other steps in the computer manufacturing process create yet more wastes that have copper in them. Solutions
Hot liquid metal copper is poured into molds where it will cool (left). A technician works with a machine that etches copper circuit boards (right).

ACTIVITY 1 PRODUCING CIRCUIT BOARDS
8 REACTIONS
containing copper above a certain level are considered toxic. The U. S. Environmental Protection Agency (EPA) reports on yearly releases of chemicals. In 2015, they reported that copper made up about 5% of all the toxic chemicals released into the environment. That’s about 76,000 metric tons of copper.
Copper Isn’t Always Bad
The human body needs small amounts of copper and other metals to function properly. That is why they are often among the ingredi-ents of vitamin and mineral supplements. The U.S. Food and Drug Administration (FDA) recommends adults get about 2 milligrams (mg) of copper each day. But in much larger amounts, copper and other metals can be toxic. High levels of copper in drinking water can cause
Mining and manufacturing copper-containing substances can result in waterways that are polluted with copper waste.

PRODUCING CIRCUIT BOARDS ACTIVITY 1
REACTIONS 9
vomiting, diarrhea, stomach cramps, and nausea. Eating or drinking even higher amounts of copper can cause liver and kidney damage. Inhaling copper dust over long periods of time can cause dizziness, headaches, diarrhea, and irritation of the nose, mouth, and eyes. Since high levels of copper can be toxic, proper disposal is crucial.
Today, the United States has laws that prevent companies and indi-viduals from dumping toxic waste directly into the soil, water, and sewer systems. This helps keep the environment cleaner and safer. But manufacturing products that people want, like circuit boards, still produces toxic waste. Figuring out how to handle this waste in ways that will not harm the environment is a problem scientists and engineers face every day. It often costs companies a great deal of money to dispose of toxic waste safely. But, even though some chemical processes produce wastes, other chemical processes have been designed to clean up wastes.
ANALYSIS 1. Describe the changes that occurred to the properties of the
following during the etching process:56
a. your circuit board
b. the copper chloride etching solution
2. Evidence is factual information or data that support or refute a claim. How does your answer to item 1 provide evidence about whether the starting and final substances change during the etching process?78
3. The etching process produced waste etching solution.
a. What do you think should be done with this waste?
b. A trade-off is an exchange of one outcome for another—giving up something that is a benefit or advantage in exchange for something that may be more desirable. What is one trade-off of your suggestion in 3a?
4. Etching circuit boards creates large amounts of copper-containing toxic waste. What ways can you think of to reduce the amount of copper-containing waste produced?
5 NGPS1A26 NGSPAD17 NGPS1B18 NGSPNS1


REACTIONS 11
2 Evidence of Chemical Changel a b o r at o r y
In the previous activity, you used a chemical process to etch a circuit board. You observed several changes: both the disappearance of the
visible copper coating on the circuit board and a change in the color of the etching solution. A chemical change occurs when substances interact to form new substances. This process is also called a chemical reaction. In this activity, you will observe five combinations of chem-icals. For each combination, you will make observations to determine whether there is evidence that a chemical change has taken place. You will look for evidence that the new substances are different from those combined at the start.
GUIDING QUESTION How can you tell if a chemical change has occurred?
The appearance of a red solid indicates that a new substance has formed. This substance formed from a reaction between the colorless liquid in the test tube and the yellow liquid added from the dropper.

ACTIVITY 2 EVIDENCE OF CHEMICAL CHANGE
12 REACTIONS
MATERIALSFor each group of four students
1 sealable plastic bag (1-quart)
1 container of sodium bicarbonate
1 container of calcium chloride
1 dropper bottle of phenol red solution
1 graduated cylinder (50-mL)
2 scoops (5-cc)
1 bottle of limewater
1 straw
For each pair of students
1 SEPUP tray
1/8 effervescent tablet
1 dropper bottle of water
1 dropper bottle of iron chloride
1 dropper bottle of sodium carbonate
water
For each student
1 pair of chemical splash goggles
1 Student Sheet 2.1, “Chemical Change Observations”
1 Student Sheet 2.2, “Periodic Table of Elements”
1 Student Sheet 2.3, “Comparing Substances Before and After a Chemical Change”
SAFETYWear chemical splash goggles during this lab. In this activity, you will be working with chemicals and glass equipment. Be sure to follow all laboratory safety rules. Use only the amounts of chemicals listed in the procedure. The chemicals used in this activity cause skin irrita-tion and damage clothing. Thoroughly rinse any area that comes into direct contact with laboratory chemicals. If you accidentally touch the chemicals, inform you teacher and rinse exposed areas thor-oughly. If you break any glass or spill any liquid or chemical, inform your teacher. Wash your hands thoroughly with soap and water after you finish the activity.
PROCEDURE 1. In this activity, you will mix chemicals and look for evidence of
a chemical change. How do you think you will know whether a chemical change happened? Discuss with your group what obser-vations might be evidence of a chemical change. Be prepared to share your ideas with the class.9101112
9 ELRS68310 NGSPPI311 NGPS1A212 SELTRS1

EVIDENCE OF CHEMICAL CHANGE ACTIVITY 2
REACTIONS 13
2. Review the science classroom safety guidelines and the locations of safety equipment as directed by your teacher.
3. Your teacher will demonstrate what happens when a candle is burned.
a. Observe the candle before and after your teacher lights it. Write down your observations of the properties of the candle in the data table on Student Sheet 2.1, “Chemical Change Observations.”
b. In the last column of Student Sheet 2.1, make note of any evidence suggesting that the substances in the candle and the air are changing.13
4. You will look at four more reactions in Procedure Steps 4–8. In this Procedure Step, investigate the interaction of carbon dioxide and limewater.
a. Working with your group of four, use the graduated cylinder to measure about 6 milliliters (mL) of limewater into Cup A of a SEPUP tray. Record your observations of properties of the solution.
b. Insert the clean straw into the solution. Select one member of your group to blow bubbles, lightly and steadily, into the straw. Do not drink the solution or draw it up into the straw. Continue blowing bubbles through the straw for about 1 min.
c. Write down your observations on Student Sheet 2.1. Make note of any evidence suggesting that the substances in the Cup A are changing.
5. Investigate the interaction of an effervescent tablet with water.
a. With your partner, use the graduated cylinder to measure about 6 mL of water into Cup C of a SEPUP tray.
b. Write down your observations of the properties of the water and the piece of effervescent tablet on Student Sheet 2.1.
c. Drop the 1/8 piece of effervescent tablet into the water.
d. Write down your observations on Student Sheet 2.1. Make note of any evidence suggesting that the substances in the tray are changing.
13 NGCCPA3

ACTIVITY 2 EVIDENCE OF CHEMICAL CHANGE
14 REACTIONS
6. Investigate the interaction of iron chloride and sodium carbonate solutions.
a. With your partner, place 5 drops of iron chloride solution in Cup 1 of a SEPUP tray. Observe the solution, and record your observations.
b. Observe the sodium carbonate solution in the dropper bottle, and record your observations.
c. Add 5 drops of sodium carbonate solution to Cup 1.
d. Record your observations on Student Sheet 2.1. Make note of any evidence suggesting that the substances in the tray are changing.
7. Follow your teacher’s instructions for disposing of the chemicals and for cleaning the SEPUP tray.
8. Investigate the interaction of calcium chloride, sodium bicar-bonate, and phenol red.
a. In your group of four, measure 2 level 5-cc scoops of calcium chloride, and place it in a 1-quart sealable bag. Record your observations of the calcium chloride on Student Sheet 2.1.
b. Measure 1 level 5-cc scoop of sodium bicarbonate, and place it in the bag. Record your observations of the sodium bicar-bonate on Student Sheet 2.1.
c. Measure 10 mL of the phenol red solution with the gradu-ated cylinder. Record your observations of the phenol red on Student Sheet 2.1.
d. Seal the plastic bag about halfway, and squeeze out as much air as possible. While one student holds the bag, another should carefully pour the phenol red into the opening. Then tightly seal the bag.
e. Mix the contents by squeezing the outside of the bag. Allow all group members to feel the outside of the bag. Record your observations on Student Sheet 2.1. Make note of any evidence suggesting that the substances in the bag are changing.
9. Follow your teacher’s directions for disposal of all chemicals and for returning and cleaning the equipment so that it can be reused.

EVIDENCE OF CHEMICAL CHANGE ACTIVITY 2
REACTIONS 15
10. Use Student Sheet 2.2, “Periodic Table of the Elements,” to compare the elements present before and after mixing the chemicals.14
a. On Student Sheet 2.3, “Comparing Substances Before and After a Chemical Change,” record the elements that you started with in the “Elements in Substances” column in the “Starting Substances” section. The first row is filled in for you as an example. Note that a new element starts every time there is a new capital letter.
b. Do the same thing for the “Elements in Substances” column in the “Final Substances” section.
ANALYSIS 1. Using your data on Student Sheet 2.1, answer the following:15
a. Which observations provided evidence that chemical changes were taking place?16
b. Which observations indicated a change in one or more starting substances?
c. Which observations indicated the production of new substances?
2. Explain what happens to elements and compounds during a chemical reaction.1718
14 NGPS1B115 NGPS1B116 NGPS1B317 NGPS1B118 NGCCPA3
As zinc reacts with hydrochloric acid, it produces the hydrogen gas that fills the balloons.

ACTIVITY 2 EVIDENCE OF CHEMICAL CHANGE
16 REACTIONS
3. A student decides to do an experiment to see if aluminum metal will react with a solution of copper chloride dissolved in water. He pours the copper chloride (a blue liquid) into a beaker containing a piece of aluminum foil (a shiny silver-colored solid). He observes that
• the beaker becomes warm, but not too hot to touch.
• the liquid bubbles.
• the liquid becomes grayish in color.
• the shiny solid aluminum seems to disappear.
• fine reddish-brown solid particles form.
a. Prepare a data table to compare the substances before and after the investigation.
b. Analyze and interpret the data in the table to answer the following questions: 192021
• Did a chemical change occur?
• What is the evidence for your answer?
19 NGSPAD120 NGSPNS121 SEASAD1

REACTIONS 17
3 Physical Changes and Chemical Reactionsr e a d i n g
You have observed the signs that may provide evidence of new substances being formed during a chemical change. But some-
times some of these signs can be evidence of a physical change. In a physical change, no new substance is formed.
In this activity, you will learn about more examples of chemical changes and how physical changes differ from chemical changes. This will help you figure out whether the changes you observe are chemical or physical.
GUIDING QUESTION What is the difference between a physical and a chemical change?
A piece of chalk was added to acid. Is the chalk reacting chemically with the acid, or just dissolving?

ACTIVITY 3 PHYSICAL CHANGES AND CHEMICAL REACTIONS
18 REACTIONS
MATERIALSFor each student
1 Student Sheet 3.1, “Anticipation Guide: Physical and Chemical Changes”
PROCEDURE 1. Fill in the “Before” column of Student Sheet 3.1, “Anticipation
Guide: Physical and Chemical Changes,” to prepare you for the following reading. 22
2. Follow your teacher’s instructions for how to use the Stop to Think questions.23
3. Complete the reading. Be sure to pay attention to the illustrations and relate them to the text. 2425262728
READINGPhysical Change
In a physical change, the observable form of a substance changes, but it remains the same substance with the same properties. For example, if you were to take some sugar and grind it into a fine powder, it would be powdered sugar. You could tell that it was still sugar by comparing its properties before and after grinding. Its solubility would not change: it would still dissolve if you mixed it with water. Although tasting is not a safe property to test in the lab, you probably already know that both regular sugar and powdered sugar have the sweet taste of sugar. Another example of a physical change is cutting or shaving a piece of wood. The cut pieces and the wood shavings would still be the same substance. They would have the same color, hardness, density, and ability to burn in air.29
22 SELTAG123 SELTST124 ELRS68125 NGSPOE126 ELRS68727 ELRS68428 ELWH689
29 NGPS1A2
All of the forms of sugar shown, including powdered sugar, table sugar, and rock sugar candy, are the same chemical substance.
PHYSICAL CHANGES AND CHEMICAL REACTIONS ACTIVITY 3
REACTIONS 19
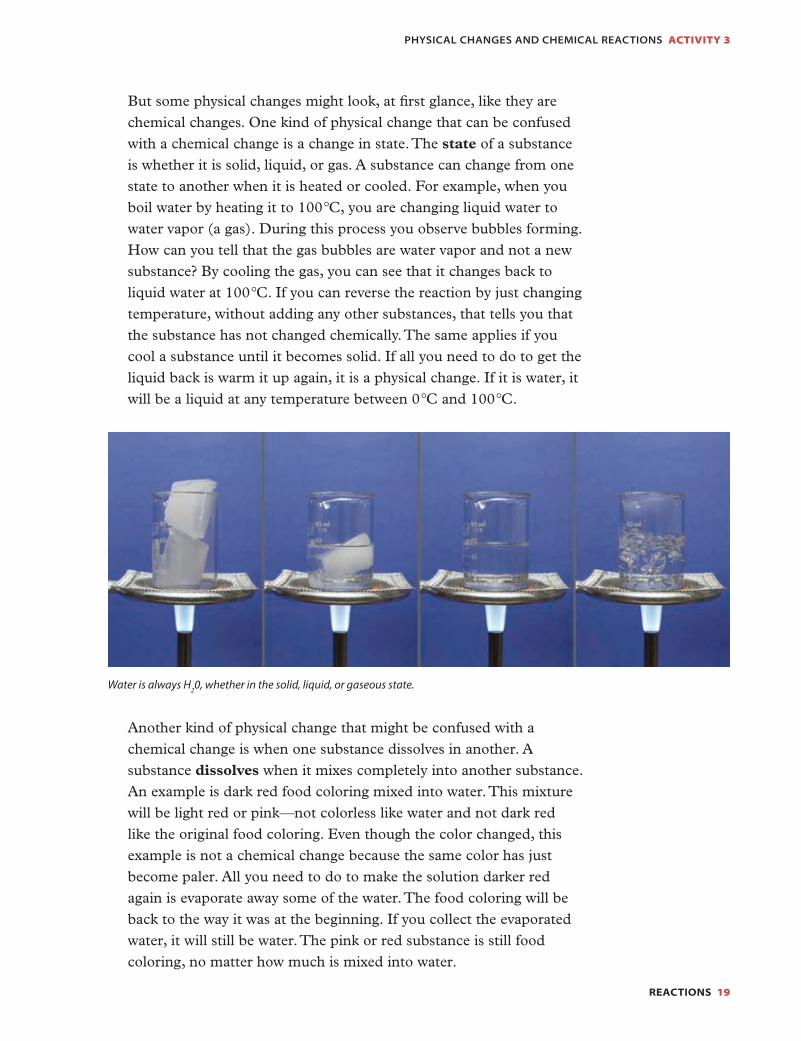
But some physical changes might look, at first glance, like they are chemical changes. One kind of physical change that can be confused with a chemical change is a change in state. The state of a substance is whether it is solid, liquid, or gas. A substance can change from one state to another when it is heated or cooled. For example, when you boil water by heating it to 100°C, you are changing liquid water to water vapor (a gas). During this process you observe bubbles forming. How can you tell that the gas bubbles are water vapor and not a new substance? By cooling the gas, you can see that it changes back to liquid water at 100°C. If you can reverse the reaction by just changing temperature, without adding any other substances, that tells you that the substance has not changed chemically. The same applies if you cool a substance until it becomes solid. If all you need to do to get the liquid back is warm it up again, it is a physical change. If it is water, it will be a liquid at any temperature between 0°C and 100°C.
Another kind of physical change that might be confused with a chemical change is when one substance dissolves in another. A substance dissolves when it mixes completely into another substance. An example is dark red food coloring mixed into water. This mixture will be light red or pink—not colorless like water and not dark red like the original food coloring. Even though the color changed, this example is not a chemical change because the same color has just become paler. All you need to do to make the solution darker red again is evaporate away some of the water. The food coloring will be back to the way it was at the beginning. If you collect the evaporated water, it will still be water. The pink or red substance is still food coloring, no matter how much is mixed into water.
Water is always H20, whether in the solid, liquid, or gaseous state.

ACTIVITY 3 PHYSICAL CHANGES AND CHEMICAL REACTIONS
20 REACTIONS
But what about when you add a solid substance, like sugar, to water and it seems to disappear into the water? The key to deciding whether this is a physical or chemical change is whether the sugar is still there or has changed into another substance with different properties. You likely know that if you were to taste the water, the sugary taste would still be there. You might also know that if you let the water evaporate, solid sugar crystals would reappear. So dissolving sugar is a physical change, not a chemical change. The sugar is still there—it has just dissolved and mixed with the water.
STOP TO THINK 1
Give three examples of physical changes, and explain how to tell that these changes are physical rather than chemical.
Chemical Change
In a chemical change, or chemical reaction, the atoms in the starting substances recombine to produce new substances. The properties of the starting substances are different from the properties of the new substances. This means that you cannot reverse the process and get the original substances back just by changing the temperature or evaporating water from a solution. In the last activity, you observed changes in properties that may be evidence that new substances had formed. If the starting substances form new substances, this would mean a chemical reaction had taken place. The changes that may indicate a chemical reaction took place include3031
• the production of a gas at a temperature below the boiling temperature.
30 NGPS1A231 NGPS1B1
This blue food coloring (left) has mixed with water, but it has not changed its properties.
This sugar (right) was dissolved in water. It is crystallizing to form rock candy. Both dissolving and crystallizing are physical changes.

PHYSICAL CHANGES AND CHEMICAL REACTIONS ACTIVITY 3
REACTIONS 21
• the production of a solid when two liquids are mixed at a tempera-ture well above the freezing temperature. A solid produced in this way is called a precipitate.
• the disappearance of a solid, unless it is just dissolving in a liquid and can be recovered by evaporating the liquid.
• a color change, unless it is just becoming paler because the substance is mixing into water.
• the release or absorption of energy as a result of mixing, but not heating or cooling, substances.32
• any other observable or measurable change in the properties of the substances, such as a change in odor, density, or solubility.
STOP TO THINK 2
A student mixes a dark green solution with water, and the result is pale green. Is this
likely a chemical change or not? Explain.33
Comparing Physical and Chemical Changes at the Molecular Scale
The diagram below shows a model of the changes at the molecular scale when a substance changes state. As you can see, the molecules remain the same—all that changes is their movement and interaction, and sometimes the amount of space between the particles.
32 NGPS1B333 ELWH689
Water molecules in the solid (left), liquid (middle), and gaseous (right) state.
LabAids SEPUP IAPS Reactions 3eFigure: Reactions 3e SB 3.6 MyriadPro Reg 9.5/11
= vibration or movement

ACTIVITY 3 PHYSICAL CHANGES AND CHEMICAL REACTIONS
22 REACTIONS
The next diagram shows a model of a substance, such as sugar, dissolving in water. Again, the sugar and water molecules are unchanged. They have just mixed together.
But in a chemical change, the atoms in the starting substances recom-bine in new ways to cause completely different structures in the new substances produced. The patterns of changes in the combinations of atoms explain the observed changes in properties after a reaction. A simple diagram of a chemical change follows:3435
STOP TO THINK 3
A student mixes some water at room temperature (20°C) with a white powder also at room temperature. The white powder disappears into the water, and bubbles form. The solution warms up to 30°C. Is this likely a physical or a chemical change? Explain
your answer.36
34 NGPS1B135 NGCCPA336 ELWH689
LabAids SEPUP IAPS BME 3eFigure: Materials3e SB 3.8MyriadPro Reg 9.5/11
OO OO CC �
LabAids SEPUP IAPS Reactions 3eFigure: Reactions 3e SB 3.7 MyriadPro Reg 9.5/11
(molecules are not to scale)
water water � sugar
water molecule sugar molecule

PHYSICAL CHANGES AND CHEMICAL REACTIONS ACTIVITY 3
REACTIONS 23
ANALYSIS 1. Complete the After column of Student Sheet 3.1.3738
2. Your teacher takes a candle and cuts some wax from the bottom of it. She puts the bit of wax in a beaker and places it on a hot plate. Eventually, the wax melts and becomes liquid. Do you think this is a physical or a chemical change? Explain.39
3. Your teacher lights a small candle and allows it to burn. At first, the candle wax melts, but then it seems to burn away and disap-pear. The candle also gives off smoke, heat, and light. Is this a physical or chemical change? Explain.40
4. A student mixes some soap with water and then blows through a straw into the solution. Bubbles form. Do you think a chemical change has taken place? Explain.41
37 NGPS1A238 SELTAG139 NGSPAD140 NGPS1B341 SEASAD1


REACTIONS 25
4 Chemical Reactions at the Molecular Scalem o d e l i n g
In the last three activities, you investigated several chemical reactions. Each reaction produced new substances with different
properties from the starting substances. In all of these reactions, the building-block elements of the substances after the reaction are the same as the building-block elements of the substances before the reaction. In this activity, you will look more closely at what happens to atoms of elements during a chemical reaction. To do this, it will help you to know how scientists represent the substances in a chem-ical reaction. 4243
Scientists write chemical equations to represent the substances in a chemical reaction. They list the starting substances, called reactants, on the left. They list the final substances, called products, on the right. They place an arrow between them to show that a reaction occurs.
reactant(s) product(s)
42 NGPS1B143 NGCCSP2
The sugar in this burning marshmallow is reacting with oxygen in the air.

ACTIVITY 4 CHEMICAL REACTIONS AT THE MOLECULAR SCALE
26 REACTIONS
The reactants and products can be described with words or with chemical formulas. The word equation below is read as “sugar plus oxygen produces carbon dioxide plus water” or “sugar plus oxygen yields carbon dioxide plus water.”
sugar + oxygen carbon dioxide + water
In this activity, you will use models and chemical equations to explore several reactions at the molecular scale.
GUIDING QUESTION What happens to atoms and molecules during a chemical reaction?
MATERIALSFor each pair of students
1 molecular model set containing
32 white “atoms”
18 black “atoms”
14 red “atoms”
4 blue “atoms”
54 white “bonds”
colored pencils
PROCEDURE 1. Review the elements in the table below. These seven elements
occur as molecules with 2 atoms. For this reason, they are called diatomic elements, “di-” meaning two.
Diatomic Elements
ELEMENT NAME FORMULA
Bromine Br2
Chlorine Cl2
Fluorine F2
Hydrogen H2
Iodine I2
Nitrogen N2
Oxygen O2

CHEMICAL REACTIONS AT THE MOLECULAR SCALE ACTIVITY 4
REACTIONS 27
2. Model the reaction of hydrogen and oxygen to produce water.4445
a. Build two hydrogen molecules and one oxygen molecule. These are your reactants. Use the white bonds (tubes) to make the connections that represent chemical bonds between the atoms. See below for the colors to use for each kind of atom.
Model Parts
COLOR ELEMENT SYMBOL
Hydrogen H
Carbon C
Oxygen O
Nitrogen N
b. Draw a labeled diagram of the reactants, like the one below, in your science notebook. Be sure to leave space to the right to draw your products when you get to Step 2d. 46
reactant(s) product(s)
c. The hydrogen and oxygen react! Take apart your hydrogen and oxygen molecules, and make as many water molecules as you can using the atoms from your hydrogen and oxygen models. Water has 2 hydrogen atoms and 1 oxygen atom.
d. Complete your labeled diagram of this reaction in your science notebook.
e. Discuss with your partner which of the following chemical equations you think best describes the reaction you just modeled. Record the equation you chose beneath your labeled diagram, and be prepared to explain your answer.4748
i. H2 + O2 H2O
ii. 2 H2 + O2 H2O
iii. 2 H2 + O2 2 H2O
iv. H2 + 2 O2 2 H2O
44 NGSPDM245 ELRS68346 SELTSN147 NGPS1B248 NGCCEM1
3842 LabAids SEPUP T-8-3 Chemistry of Materials SBFigure: T-8-3 Fig11_02MyriadPro
H
H
H2
H
H
H2 O2
+O
O

ACTIVITY 4 CHEMICAL REACTIONS AT THE MOLECULAR SCALE
28 REACTIONS
3. You just chose the balanced equation for the reaction of hydrogen and oxygen to produce water. In a balanced equation, the type and number of each atom in the reactants equal the type and number of atoms in the products. Now use the molecular models to complete the following equation for the reaction of hydrogen and nitrogen to produce ammonia, according to the following reaction:
hydrogen + nitrogen ammonia
3 H2 + N2 ___ NH3
a. Begin by making the reactants and drawing and labeling them in your science notebook.
b. Take apart the reactants, and make as many ammonia molecules as possible.
c. Complete your labeled drawing.
d. Copy and complete the chemical equation above.
4. Methane is the gas used in most gas stoves. Its formula is CH4. Methane burns in oxygen to produce carbon dioxide and water. Your goal is to use the models to complete this reaction:
methane + oxygen carbon dioxide + water
CH4 + O2 CO2 + H2O
a. From the models, figure out how many molecules of oxygen (O2) it will take to completely convert one molecule of methane to carbon dioxide and water.
b. Make a labeled diagram of your reactants and products, and record the equation that describes your model in your science notebook.

CHEMICAL REACTIONS AT THE MOLECULAR SCALE ACTIVITY 4
REACTIONS 29
ANALYSIS 1. A quantity is conserved if it is held constant, or does not
change.4950
a. Are atoms conserved during a chemical reaction? In other words, are the same kinds and numbers of atoms present in the reactants as in the products? Support your answer with a diagram using evidence from the modeling activity.5152
b. Are molecules conserved during a chemical reaction? Refer to the diagram you used for 1a to support your answer.
2. Which one of the equations below is most likely correct? Explain your answer.
a. Fe + Cl2 FeCl3b. Fe + 3 Cl2 FeCl3c. 2 Fe + 3 Cl2 2 FeCl3d. 3 Fe + 2 Cl2 2 FeCl3
49 NGPS1B250 SEASMD151 NGSPDM252 NGCCEM1


REACTIONS 31
ta l k i n g i t o v e r
You have observed the signs of new substances being formed during a chemical change. You have also learned about physical
changes, where no new substances are formed.
In this activity, you will read six scenarios describing a change in matter. You and your group will decide whether the change is a physical change or a chemical change.
GUIDING QUESTIONIs the change observed a physical change or a chemical change (reaction)?
5 Physical or Chemical Change?
a b c d
e f g h
After you complete this activity, you will be able to explain which of these photos show chemical changes.

ACTIVITY 5 PHYSICAL OR CHEMICAL CHANGE?
32 REACTIONS
MATERIALSFor each student
1 Student Sheet 5.1, “Comparing Evidence of Physical and Chemical Change”
1 Student Sheet 5.2, “Analyzing Changes”
PROCEDURE 1. Follow your teacher’s instructions for completing Student Sheet
5.1, “Comparing Evidence of Physical and Chemical Change.”
2. Read the first scenario that follows the Procedure. Discuss whether the change is physical or chemical. Use the information in the table on Student Sheet 5.1 and the evidence in the scenario to make your decision. Your group should come to agreement. Record your conclusion in the first table on Student Sheet 5.2, “Analyzing Changes.”53545556
• Listen to and consider the explanations and ideas of other members of your group.
• If you disagree about a scenario with others in your group, explain to the rest of the group why you disagree.
3. Repeat Step 2 with each of the remaining five scenarios. Be prepared to share your group’s reasoning with the class.
4. Record on the class data table your group’s decisions about whether the change in each scenario is physical or chemical. Be prepared to explain your reasoning for any scenarios where there is disagreement in the class.
5. As a class, discuss and try to reach agreement about which scenarios describe physical change and which describe chemical change. Remember to use evidence to support your ideas.
53 NGPS1A254 NGSPAD155 ELRS68156 ELSL081

PHYSICAL OR CHEMICAL CHANGE? ACTIVITY 5
REACTIONS 33
57
ANALYSIS 1. Identify each of the following as a physical change or a chemical
reaction. Explain each of your conclusions.585960
a. An open bottle of perfume evaporates, and the perfume can be smelled throughout the room.
b. A blue solid is mixed into water. The solid disappears and the water becomes pale blue.
c. A shiny, gray iron nail falls into a bucket of water. A few days later, the surface of the nail is covered in a dull, crusty, reddish-brown solid.
57 NGPS1B358 NGPS1B159 NGSPNS160 NGCCPA3
1. A person digests a cracker.
A cracker is made mostly of starch. Starch is a compound made of long chains of sugars that contain carbon, oxygen, and hydrogen atoms. Substances in your digestive system break the starch down into sugars. Eventually, the cells in your body break the sugars down into carbon dioxide gas and liquid water. As the sugars break down, energy is released. Your body uses the energy to move, stay warm, and perform other functions.
2. A drink is made from powdered drink mix.
A powder containing sugar, fruit flavoring, and red food coloring is mixed with water. The mixture is stirred, and the solids disappear. The mixture becomes a red fruit-flavored liquid. If a drop of the liquid is left in a warm place, the water will evaporate, leaving behind a red fruit-flavored, sugary powder.
3. Epoxy glue is mixed and hardens.
Two substances are mixed to create a hard, strong glue. One of the original
substances is a clear, colorless, sticky liquid made of carbon, hydrogen, and oxygen. The other is a clear, colorless, sticky liquid made of carbon, hydrogen, and nitrogen. When they are mixed, they become warm and harden to form a clear, colorless, solid substance.
4. A car burns gasoline.
Octane is a liquid and one of the ingredi-ents in gasoline. Octane is a compound made of carbon and hydrogen. When octane burns it interacts with oxygen from the air. This produces carbon dioxide and water.
5. Ozone forms.
Ultraviolet light interacts with oxygen in the atmosphere to form ozone. Oxygen is a colorless and odorless gas. Ozone is a toxic, pale blue gas with an odor.
6. A puddle evaporates.
A muddy puddle is heated by the sun. The water turns into water vapor, leaving behind a hard clump of mud.
Scenarios of Physical or Chemical Change

ACTIVITY 5 PHYSICAL OR CHEMICAL CHANGE?
34 REACTIONS
d. A battery contains the metal zinc and several compounds. The interaction of chemicals in the battery provides electrical energy to a portable radio.61
2. Review the photos on the first page of this activity. Which show a chemical change? Explain.
3. A student begins with Substance A, which is a white solid. The solid is in the form of hard pebble-like chips. The chips do not dissolve in water. They have a density of 2.71 grams per cubic centimeter (g/cm3). 626364
The student mixes Substance A with hydrochloric acid. The mixture bubbles, and the white solid disappears. The student allows all the liquid to evaporate and is left with Substance B. Substance B is a solid white powder. It has a density of 2.15 g/cm3. Substance B dissolves in water. Substance B does not bubble if mixed with hydrochloric acid.
a. Prepare a data table to show the properties of Substances A and B.
b. Did a chemical reaction take place when Substance A was mixed with hydrochloric acid? Explain your answer based on your analysis of the data collected about Substances A and B.
c. Explain what happened to Substance A and hydrochloric acid at the atomic/molecular level. Your response can be a general description; it does not need to include molecular formulas or drawings.
4. Explain how the patterns of differences between a physical and chemical change are explained by changes at the scale of atoms and molecules.65
61 NGPS1B362 NGPEP1263 NGSPAD164 SEASAD165 NGCCPA3
REACTIONS 35
6 Comparing the Masses
of Reactants and Productsl a b o r at o r y
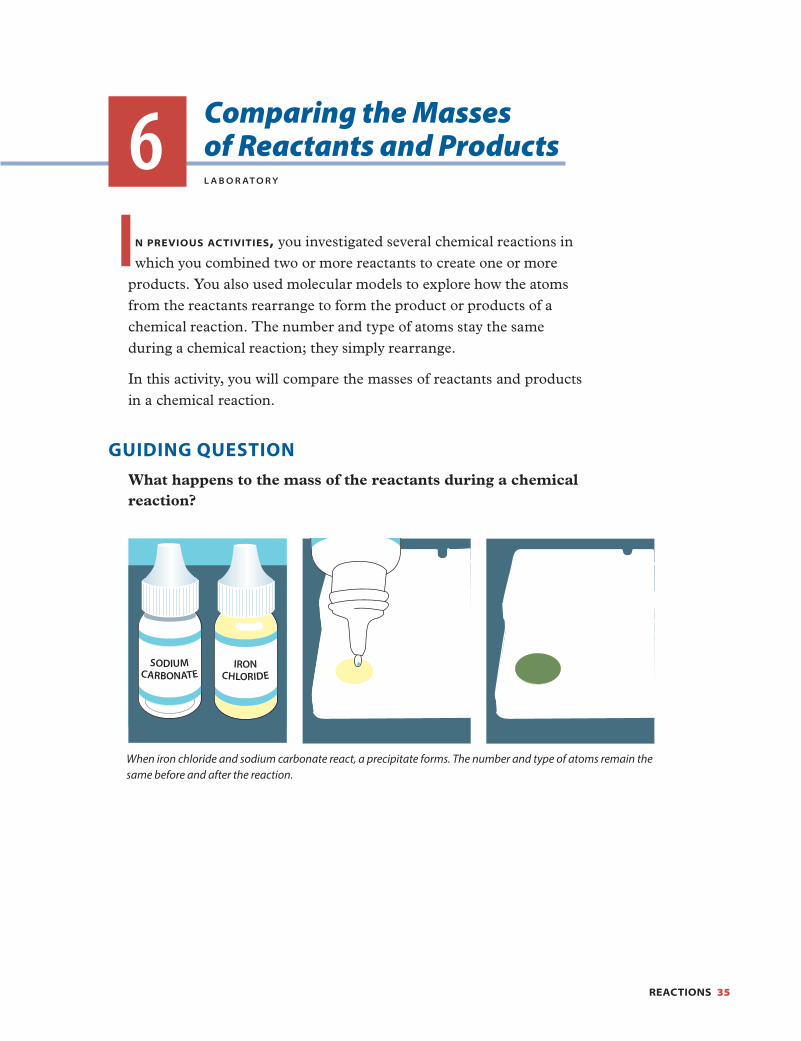
In previous activities, you investigated several chemical reactions in which you combined two or more reactants to create one or more
products. You also used molecular models to explore how the atoms from the reactants rearrange to form the product or products of a chemical reaction. The number and type of atoms stay the same during a chemical reaction; they simply rearrange.66
In this activity, you will compare the masses of reactants and products in a chemical reaction.
GUIDING QUESTION What happens to the mass of the reactants during a chemical reaction?
66 NGPS1B1
LabAids SEPUP IAPS BME 3eFigure: Materials3e SB 6.1abcMyriadPro Reg 9.5/11
CARBONATESODIUM
CHLORIDEIRON
When iron chloride and sodium carbonate react, a precipitate forms. The number and type of atoms remain the same before and after the reaction.

ACTIVITY 6 COMPARING THE MASSES OF REACTANTS AND PRODUCTS
36 REACTIONS
MATERIALSFor each pair of students
1 dropper bottle of calcium chloride
1 dropper bottle of sodium carbonate
2 graduated cups (30 mL)
1 stir stick
1 electronic balance
paper towels
For each student
1 pair of chemical splash goggles
SAFETYWear chemical splash goggles at all times during this lab. Do not allow solutions to touch your skin or clothing. Clean up any spills immediately. If accidental contact occurs, inform your teacher and rinse exposed areas thoroughly. Wash your hands thoroughly with soap and water after you finish the activity.
PROCEDURE 1. Your teacher will set up a demonstration of a chemical reaction. 67
a. Observe the reaction.
b. Record in your science notebook your prediction of how the mass after the reaction compares with the mass before the reaction: will it increase, decrease, or stay the same?
2. Follow the remaining steps to gather data about the total mass before and after for a different chemical reaction that you and your partner will investigate. Create a data table in your science notebook to collect data on the chemical reaction.
3. Use one graduated cup to measure 5 mL of calcium chloride.
4. Use a second graduated cup to measure 5 mL of sodium carbonate.
5. Place the graduated cup with the calcium chloride, the graduated cup with the sodium carbonate, and a stir stick on the electronic balance. Don’t forget to zero the balance before you start!
6. Record the total mass in your data table.
67 SELTSN1

COMPARING THE MASSES OF REACTANTS AND PRODUCTS ACTIVITY 6
REACTIONS 37
7. Pour the calcium chloride into the graduated cup with the sodium carbonate. Use the stir stick to stir the solution in the graduated cup. Leave the stir stick propped on the side of the graduated cup.
8. Return the empty graduated cup, stir stick, and graduated cup with your products to the electronic balance, and record the total mass in your data table.
ANALYSIS 1. Based on this activity, how would you answer the Guiding
Question? Explain the evidence for your answer. 68697071
2. Below is a data table from an experiment in which an effervescent tablet is added to a test tube of water, producing a solution that fizzes and releases gas bubbles. The total mass of the substances and the test tube were recorded before and after the tablet was added to the test tube of water. If matter is always conserved, how do you explain these results?7273
Experimental Results
MATERIALS USEDMASS BEFORE REACTION
MASS AFTER REACTION
test tube + effervescent tablet + 10 mL water
36.55g 35.95g
3. Using what you now know about the mass during a chemical reaction, how would you respond if a company said it had devel-oped a way to make hazardous materials and wastes “disappear”?
68 NGPS1B269 NGSPNS470 NGCCEM171 NGCCSP272 NGSPAD173 NGCCSP2


REACTIONS 39
m o d e l i n g
In the last activity, you observed that the total mass of the products of a chemical reaction equals the total mass of the reactants. This is
called the conservation of mass, which means that no mass is gained or lost in a chemical reaction. Conservation of mass occurs in all chemical reactions. Conservation of mass is so important to an under-standing of chemistry that scientists call it the law of conservation of mass, or the mass conservation principle. This law states that in a closed system, the total mass will remain constant. In other words, matter cannot be created or destroyed in a chemical reaction. A closed system is one in which the reactants and products cannot move into or out of the system. (Imagine a test tube with a stopper in it.) An open system allows the movement of reactants or products into and out of the system. (Now the test tube’s stopper has been removed, and reac-tants and products can escape or be added to the system. For example, if one or more reactants or products are gases that can enter or leave the test tube, the system will be open. But if all the reactants and products are liquids and solids, and remain in the container, the system can still be considered to be closed.)747576
In this activity, you will use molecular models and chemical equations to explain at the molecular level why mass is conserved, and why scientists and engineers can’t just make the copper from electronics production “go away.”
GUIDING QUESTION Why is mass always conserved in chemical reactions?
74 NGPS1B175 NGPS1B276 NGSPNS4
7 Explaining Conservation of Mass
LabAids SEPUP IAPS BME 3eFigure: Materials3e SB 7.1MyriadPro Reg 9.5/11
H
H
H2
H
H
H2 O2
O
O�
According to the law of conservation of mass, when hydrogen and oxygen react to form water, the number of hydrogen and oxygen atoms must remain the same.

ACTIVITY 7 EXPLAINING CONSERVATION OF MASS
40 REACTIONS
MATERIALSFor each pair of students
1 molecular model set containing
32 white “atoms”
18 black “atoms”
14 red “atoms”
4 blue “atoms”
54 white “bonds”
colored pencils
PROCEDURE77787980
1. Review the elements and the masses of their atoms in the table below.
Atomic Mass of Elements
ELEMENTCHEMICAL SYMBOL
ATOMIC MASS (ATOMIC MASS UNITS – AMU)
Carbon C 12
Hydrogen H 1
Nitrogen N 14
Oxygen O 16
2. Model the reaction of hydrogen and oxygen to produce water using the equation below.
Hint: You did this in the activity “Chemical Reactions at the Molecular Scale.”
2 H2 + O2 2 H2O
See below for the colors to use for each kind of atom.
Model Parts
COLOR ELEMENT SYMBOL
Hydrogen H
Carbon C
Oxygen O
Nitrogen N
77 NGPS1B178 NGPS1B279 NGSPDM280 NGCCSP2

EXPLAINING CONSERVATION OF MASS ACTIVITY 7
REACTIONS 41
3. Use the model of the reaction and the table of masses above to answer the following in your science notebook:81
a. What is the total mass of the reactants?
b. What is the total mass of the products?
c. Explain how this reaction demonstrates the conservation of mass.
4. Repeat Steps 2 and 3 for the following equations:
a. 3 H2 + N2 2 NH3
b. CH4 + 2 O2 CO2 + 2 H2O
ANALYSIS 1. Use the reaction H2 + Cl2 2 HCl to respond to the items
below:
a. Draw a labeled diagram to explain how the law of conservation of mass applies to the reaction. In your diagram, be sure to show the individual atoms in the reactants and the products. Do not use the atomic masses of the individual atoms or molecules in your response.
b. Use your diagram to explain how the law of conservation of mass applies to all chemical reactions.82838485
2. A chemical reaction occurs in a test tube. The mass of the reactants and test tube is 23 g before the reaction occurs. During the reaction, a gas is formed and the reaction bubbles vigorously. The gas escapes into the air. After the reaction, the mass of the products and test tube is 22 g.
a. What evidence do you have that a chemical reaction has occurred?
b. Does the law of conservation of mass apply to this reaction? Explain your reasoning.868788
3. In the activity “Producing Circuit Boards,” you used a solution to etch copper. Based on what you have learned in this and previous activities, explain what happened to the copper that was removed from the copper-coated plastic. Use the law of conservation of mass to explain your reasoning.
81 SELTSN182 NGSPDM283 NGCCEM184 NGPEP1585 SEASMD186 NGSPNS487 NGCCEM188 NGSPEA1


REACTIONS 43
8 Chemical Batteriesi n v e s t i g at i o n
So far, you have been learning how chemical reactions can be used to make new substances or products. During a chemical reaction,
the atoms in each substance are rearranged to form new substances. You have observed that some chemical reactions also release energy as heat or light. Scientists and engineers are able to use some of these energy-releasing reactions to obtain useful energy. In this activity, you will design a chemical battery to investigate how energy from chemical reactions can be transformed into electrical energy.8990
First, you will build a chemical battery prototype. A prototype is an early model of a product being designed. A prototype provides a way for new ideas to be tested, evaluated, and then used to improve a design. Like an engineer, you will test your prototype to see how well it works. If you imagine a battery, it is likely a cylindrical or rect-angular object, like the ones pictured below. You cannot see inside of these batteries. The prototype you will make will use substitute mate-rials that will allow you to see how the parts are interacting. Based on how the prototype functions, you will generate ideas for how to further test, evaluate, and improve your design.
89 NGCCEM390 NGPS1B3
Chemical reactions occur inside these batteries to release electricity.

ACTIVITY 8 CHEMICAL BATTERIES
44 REACTIONS
GUIDING QUESTION How can we improve the design of a chemical battery?
MATERIALSFor each group of four students
1 dropper bottle of 3% hydrogen peroxide solution
1 small piece of sandpaper
For each pair of students
1 SEPUP wet cell chamber
1 strip of copper
1 strip of iron
1 strip of magnesium
1 strip of zinc
5 packages of table salt
1 plastic spoon
1 graduated cylinder (50-mL)
2 wire leads: 1 red and 1 black, with clips
1 plastic cup (9-ounce)
1 electric motor
masking tape
paper towels
For each student
1 pair of chemical splash goggles
1 Student Sheet 8.1, “Chemical Battery Designs”
SAFETYWear chemical splash goggles at all times during this lab. Do not allow the solutions to touch your skin or clothing. Clean up any spills immediately. If accidental contact occurs, inform your teacher and rinse exposed areas. Be sure to wash your hands thoroughly with soap and water after you finish the activity.
PROCEDUREPart A: Build and Test a Chemical Battery Prototype
1. Prepare the battery’s electrolyte—the liquid that will conduct the electricity released by the battery.91
a. Use the graduated cylinder to put 25 mL of water into the plastic cup.
b. Add 5 packages of table salt.91 ELRS683

CHEMICAL BATTERIES ACTIVITY 8
REACTIONS 45
c. Add 25 drops of hydrogen peroxide.
d. Stir until all of the salt is dissolved.
e. Carefully pour the mixture into the SEPUP wet cell.
2. Attach a small piece of masking tape to the motor shaft to make a flag. This will allow you to see when the spindle on the motor is turning.
3. Clip one wire lead onto the zinc strip and another wire lead onto the magnesium strip. Clip the other ends to the motor.
4. Lower the zinc and magnesium strips into the second and fifth slots of the SEPUP wet cell as shown below. There should be a small amount of metal sticking out of the cells.
5. Observe the motor spinning.
Hint: If the motor doesn’t spin, try giving the flag a small push with your finger to start it. If it still does not spin, let your teacher know.
6. Once the motor spins, disconnect the wire leads from the metal strips. Remove the two metal pieces. Dry them, and then shine them with a piece of sandpaper. It is extremely important to completely dry the metals on a paper towel and clean both sides with the sandpaper!
LabAids SEPUP IAPS Reactions 3eFigure: Reactions 3e SB 8.2 MyriadPro Reg 9.5/11

ACTIVITY 8 CHEMICAL BATTERIES
46 REACTIONS
Part B: Optimizing the Battery Design
7. In Part A, you built an initial prototype of a chemical battery. You saw how two metals—zinc and magnesium—along with the electrolyte transformed chemical energy into electrical energy. Now you and your partner will brainstorm, design, build, and test battery designs to make a better battery. Your new design must meet the following design criteria (minimum requirements for how the design must function; singular criterion) and constraints (something that limits or restricts the design, such as the availability of particular materials or limits on the size or final cost of the design).
Design Criteria
The design must
• be able to make the motor spindle turn as fast as possible.
• power the motor for at least 5 min.
Design Constraints
The design is limited by
• using only the materials provided.
• using the original electrolyte solution prepared in Part A.
8. With your partner, discuss different ways that you could modify the original chemical battery design to meet the criteria within the constraints above.
Hint: For each idea, limit your modifications to one change at a time.
9. On Student Sheet 8.1, “Chemical Battery Designs,” draw and label diagrams of your designs. If you are adjusting the volume of electrolyte in the wet cell or the amount of metal submerged, be sure to indicate specific measurements on your drawings.92
10. Build prototypes to test your designs. Be sure to make and record your observations on your Student Sheet.93
11. Discuss with the other pair in your group which of your designs best met the design criteria and constraints. As a group, determine if a better design could be made from combining parts of the prototypes already built and tested.9495
92 NGSPCE393 NGED1B194 NGED1C195 NGED1B3
CHEMICAL BATTERIES ACTIVITY 8
REACTIONS 47
ANALYSIS 1. Did a chemical change take place in your wet cell? Use evidence
from your investigation to support your answer.
2. Which of your design ideas
a. made the motor spin the fastest?
b. made the motor spin the slowest?
3. Why do you think the motor spun the fastest in the design you described in Analysis item 2a?
4. When designing your prototypes, you made one modification at a time. Based on the designs from all of your classmates, which types of modifications most improved the chemical battery’s performance?9697
96 NGED1C197 NGED1B3


REACTIONS 49
l a b o r at o r y
In the last activity, you designed chemical battery prototypes that transformed chemical energy into electrical energy. Chemical
reactions can also result in a release or absorption of thermal energy, which can be observed as a change in temperature. Thermal energy is the energy of the motion of the particles in a substance. In this activity, you will explore two reactions that result in measurable changes in thermal energy.9899100101
GUIDING QUESTION What does thermal energy have to do with chemical reactions?
98 NGPS3A499 NGPS1B1100 NGCCEM3101 NGPS1B3
9 Thermal Energy and Reactions
When glycerin reacts with potassium permanganate, the temperature increases, white smoke appears, and glycerin bursts into flames.

ACTIVITY 9 THERMAL ENERGY AND REACTIONS
50 REACTIONS
MATERIALSFor each group of four students
2 graduated cylinders (50-mL)
1 container of sodium bicarbonate
1 bottle of 5% acetic acid
1 container of iron filings
1 container of calcium chloride
3 scoops (5-cc)
water
For each pair of students
2 plastic cups (9-ounce)
1 thermometer
For each student
1 pair of chemical splash goggles
SAFETYWear chemical splash goggles at all times during this lab. Do not allow the solutions to touch your skin or clothing. Clean up any spills immediately. If accidental contact occurs, inform your teacher and rinse exposed areas. Wash your hands thoroughly with soap and water after you finish the activity.
PROCEDURE 1. In your group of four, one pair should start with Step 2 to
complete Reaction 1 while the other pair starts with Step 3 to complete Reaction 2. After completing your first reaction, you will complete the other reaction. 102
2. Follow these steps to complete Reaction 1:
a. Use a graduated cylinder to measure 20 mL of acetic acid, and place it in a plastic cup.
b. Place the thermometer inside the plastic cup, and record the starting temperature in your science notebook.103
c. Carefully add 1 scoop (5 cc) of sodium bicarbonate to the plastic cup. While securely holding the cup, use the thermom-eter to gently mix the reactants. Make sure to hold the cup near the top to avoid changing the temperature of the contents with your hands.
102 ELRS683103 SELTSN1

THERMAL ENERGY AND REACTIONS ACTIVITY 9
REACTIONS 51
d. Make observations as the reactions occurs. When the tempera-ture reading on the thermometer stops changing, record the final temperature in your science notebook.
e. Follow your teacher’s instructions for cleaning up after this part of the activity.
3. Follow these steps to complete Reaction 2:
a. Use a clean graduated cylinder to measure 20 mL of water, and place the water in a clean plastic cup.
b. Place the thermometer inside the plastic cup, and record the starting temperature in your science notebook.
c. Using a new 5-cc scoop, add 1 scoop of iron filings to the plastic cup.
d. Using a new 5-cc scoop, add 1 scoop of calcium chloride to the plastic cup. While securely holding the cup, use the thermom-eter to gently mix the reactants. Make sure to hold the cup near the top to avoid changing the temperature of the contents with your hands.
e. Make observations as the reaction occurs. When the tempera-ture reading on the thermometer stops changing, record the final temperature in your science notebook. This may take up to 1 min.
f. Follow your teacher’s instructions for cleaning up after this part of the activity.
4. Discuss your results with the other pair of students in your group. Did you make similar observations and record similar temperature changes? Which reaction released thermal energy? Which reaction absorbed thermal energy?

ACTIVITY 9 THERMAL ENERGY AND REACTIONS
52 REACTIONS
ANALYSIS 1. Look at the data in the following table, which shows the
temperature of the reactants and products of different chemical reactions.104105106
REACTIONTEMPERATURE OF REACTANTS
TEMPERATURE OF PRODUCTS
A 23°C 23°C
B 23°C 50°C
C 23°C 3°C
a. An endothermic reaction is a reaction that absorbs energy from the environment. Energy is absorbed when it takes more energy to break apart the reactants than is released when the products form. Which reaction in the table is endothermic? How do you know?
b. Which reaction from the Procedure was endothermic? Use evidence from the laboratory to support your answer.
c. An exothermic reaction is a reaction that releases energy into the environment. Energy is released when the amount of energy absorbed to take apart the reactants is less than the energy released when the products form. Which reaction in the table is exothermic? How do you know?
d. Which reaction from the Procedure was exothermic? Use evidence from the laboratory to support your answer.
2. If the temperature does not change during a chemical reaction, what does this tell you about the energy needed to break apart the reactants and form the products?107
104 NGSPAD1105 NGPS1B3106 SEASAD1107 NGCCEM3

REACTIONS 53
10 Developing a Prototyped e s i g n
Someone who uses science and tools to build a product that solves a practical problem is called an engineer. In the “Chemical
Batteries” activity when you designed and tested prototypes of batteries, you were doing the work of an engineer. In the following activities, you and your classmates are going to be engineers who design, build, test, and refine a product to keep your hands warm when it is cold outside. You will use the exothermic iron reaction you have been investigating as part of your design.108
GUIDING QUESTION How do engineers design and test a prototype hand warmer?
108 NGSPCE3
What kinds of products would help you keep warm on a cold day?

ACTIVITY 10 DEVELOPING A PROTOTYPE
54 REACTIONS
MATERIALSFor each group of four students
1 container of iron filings
1 container of calcium chloride
1 container of pre-swelled absorbent beads
1 sealable plastic bag
1 graduated cup (30-mL)
1 scoop (30-cc)
3 scoops (5-cc)
water
1 thermometer
timer or clock
1 tray
paper towels
For each student
1 pair of chemical splash goggles
1 Student Sheet 10.1, “Hand Warmer Designs”
SAFETYWear chemical splash goggles at all times during this lab. Do not allow the solutions to touch your skin or clothing. Clean up any spills immediately. If accidental contact occurs, inform your teacher and rinse exposed areas. Keep all materials on the tray to catch any acci-dental spills. Wash your hands thoroughly with soap and water after you finish the activity.
PROCEDUREPart A: Define the Problem
1. Watch your teacher’s demonstration of a hand warmer prototype.
2. Read the following criteria and constraints for the hand warmer. As a class, clarify or add any relevant criteria or constraints to the design challenge.
Design Criteria
The design must
• be contained within a sealable bag.
• use an exothermic reaction containing iron.109
• reach and maintain a temperature of 35–45ºC for at least 5 min.
109 NGPS1B3

DEVELOPING A PROTOTYPE ACTIVITY 10
REACTIONS 55
Design Constraints
The design is limited by
• using only the materials provided.
• using no more than 15 cc of iron filings and 15 cc of calcium chloride.
Part B: Brainstorm Designs
3. Review all of the available materials with your partner.
4. Discuss different ways that you can use the available materials to design an improved prototype that could meet the criteria and constraints. Come up with as many ideas as possible. Remember to only modify one variable at a time.
5. On Student Sheet 10.1, “Hand Warmer Designs,” draw and label diagrams of your designs. At this point, you should indicate how much of each material you will use to build the prototype. You should also indicate the specific modification of the original design shown by your teacher.
Part C: Build and Test Your Design110
6. With the other pair in your group, discuss all of your design ideas. Choose the one design that you would like to build that you think will best meet the criteria within the given constraints.
7. As a group, build and test a prototype of your chosen design. Be sure to make and record your observations on your Student Sheet. Don’t forget to measure the temperature change using the thermometer. Keep the thermometer on the outside of the hand warmer—do not put it inside the sealable bag! Remember, the hand warmer is supposed to maintain a temperature of 35–45ºC for at least 5 min.
Part D: Evaluate Your Design111112
8. Compare and contrast your initial design and test results of your prototype with another group of students in your class.
9. Discuss which of your prototypes best meets the design criteria and constraints. As a larger group, determine if a better design could be made from combining parts of your designs.113
110 NGED1B1111 NGED1C1112 NGSPAD1113 NGED1B3

ACTIVITY 10 DEVELOPING A PROTOTYPE
56 REACTIONS
10. As a class, identify characteristics of everyone’s designs that contributed to the function of your hand warmers. Also, identify characteristics of the designs that might have decreased the function of your hand warmers.
ANALYSIS 1. Did your prototype meet the criteria for the hand warmer? If not,
what criteria did your design fail to meet?
2. How could you improve your design? Is there a feature of another design or a material that you did not use that you would like to include? Why or why not?114
3. When you combine the reactants provided in this activity, the reaction begins almost instantly. How do you think you could make the reaction start when you want it to?
4. The reaction in your hand warmer releases thermal energy, which increases the temperature of the warmer.115116
a. Why does the warmer not stay warm forever?
b. Where does the released energy from the reaction in the hand warmer go?
114 NGED1C2115 NGPS3A4116 NGCCEM3

REACTIONS 57
11 Refining the Designd e s i g n
When developing solutions to problems, engineers engage in the engineering design process—a series of steps that
engineers follow to come up with a solution to a problem. In this process, many steps are repeated and sometimes in various orders because prototypes often need to be tested, redesigned, and retested many times until the engineers find the best solution. A diagram of a common design process is shown below. In the “Developing a Prototype” activity, you and your partner designed, built, tested, evaluated, and redesigned a hand warmer. In this activity, you will continue to redesign, build, test, and evaluate your hand warmer.117118
GUIDING QUESTION How can the hand warmer design prototypes be redesigned and improved?
117 NGED1B1118 NGED1C2
LabAids SEPUP IAPS BME 3eFigure: BME3e SB 5_1MyriadPro Reg 9.5/11
Identify the problem
Brainstorm solutions
Design
Build
Test and evaluateRedesign
Share solution
Engineering Design Process

ACTIVITY 11 REFINING THE DESIGN
58 REACTIONS
MATERIALSFor each group of four students
1 container of iron filings
1 container of calcium chloride
1 container of pre-swelled absorbent beads
sealable plastic bags (small, medium, and large)
1 graduated cup (30-mL)
1 scoop (30-cc)
3 scoops (5-cc)
water
1 thermometer
timer or clock
1 tray
paper towels
For each student
pair of chemical splash goggles
1 Student Sheet 11.1, “Evaluation of Hand Warmer Design”
SAFETYWear chemical splash goggles at all times during this lab. Do not allow the solutions to touch your skin or clothing. Clean up any spills immediately. If accidental contact occurs, inform your teacher and rinse exposed areas. Keep all materials on the tray to catch any acci-dental spills. Wash your hands thoroughly with soap and water after you finish the activity.
PROCEDUREPart A: Redefine the Problem and Brainstorm Designs
1. Read the following criteria and constraints for the hand warmer. As a class, clarify or add any relevant criteria or constraints to the design challenge. 119
Note: There is an additional criterion that your hand warmer needs to meet in this activity.
Design Criteria
The design must
• be contained within a sealable bag.
• use an exothermic reaction containing iron.120
119 NGSPCE3120 NGPS1B3
REFINING THE DESIGN ACTIVITY 11
REACTIONS 59
• reach and maintain a temperature of 35–45ºC for at least 5 min.
• allow the user to activate the hand warmer when needed.
Design Constraints
The design is limited by
• using only the materials provided.
• using no more than 15 cc of iron filings and 15 cc calcium chloride.
2. Review all of the available materials with your partner.
3. Discuss different ways that you can use the available materials to design an improved prototype that could meet the criteria and constraints. Come up with as many ideas as possible.
Hint: You do not need to use all of the materials in your design.
4. In your science notebook, draw and label diagrams of your designs. Be sure to include information about how much of each material you will use in each design.
Part B: Build, Test, and Evaluate Your Design
5. With your group, discuss the different designs. Choose the one design you think will best meet the criteria and constraints.
6. Build your chosen prototype. Do not activate your hand warmer.
7. Compare and contrast your designs and built prototype with another group of students in your class. Record your observations, including similarities and differences, in your science notebook.
8. Explain how to activate your hand warmer to the other group of students.
9. Activate their hand warmer while they activate your hand warmer. Use the thermometer to record the temperature change. Remember, the hand warmer is supposed to be 35–45ºC for at least 5 min. Record any observations and results on Student Sheet 11.1, “Evaluation of Hand Warmer Design.” You and your group will complete this Student Sheet as an evaluation of the other group’s hand warmer.121122
10. Exchange completed Student Sheets with the other group of students after you finish your evaluation of each other’s hand warmers.
121 NGED1B1122 NGED1B2

ACTIVITY 11 REFINING THE DESIGN
60 REACTIONS
11. Discuss which of your prototypes best met the design criteria within the given constraints. As a larger group, determine if a better design could be made from combining parts of the prototypes.123124125
ANALYSIS 1. How did you modify your hand warmer design to allow you to
control when the reaction started? Why did you make this design choice?
2. Based on the testing of your hand warmer and seeing your class-mates’ designs, how might you further modify your design? 126
3. Draw a labeled diagram of your final hand warmer design. Be sure to label all of the materials, the quantities of each, and their sizes. Use your diagram to explain 127128129
• the design criteria and constraints.
• the chemical process used to solve the problem.
• the movement of thermal energy when your hand warmer is activated.130131
• how and why your design changed throughout the engineering design process.
• how your design choices helped you meet the criteria and constraints.
4. Reflection: For what purpose might you design a product that uses an endothermic reaction?
123 NGSPAD1124 NGED1C1125 NGED1B3126 NGED1C2127 NGPEP16128 NGPS1B1129 SEASEN1130 NGPS3A4131 NGCCEM3

REACTIONS 61
12 Recovering Copperl a b o r at o r y
In the first activity of this unit, the reaction you used to produce circuit boards also produced waste. Deciding how to handle waste
produced from manufacturing is challenging. In some cases, the waste is toxic. In other cases, the waste contains valuable materials that can be reclaimed and then reused. To reclaim metal means to get it back so it can be used again. Reclaiming metal from waste reduces the amount of new metal needed for manufacturing.
One way to reclaim copper from used copper chloride is to combine the waste with a substance that precipitates the copper. Some methods produce copper metal; other methods produce solid copper compounds that do not dissolve in water. The copper precipitates because of a chemical reaction. Reclaiming the copper can be a useful way to deal with waste. It reduces the amount of toxic waste discarded and provides copper that can be used again to make new products.
Chemists have found that certain other metals are effective in removing copper from waste products. In this activity, you will test three metals to find out which one is best at reclaiming copper from waste.
Mixing two chemicals (left) results in a chemical reaction that creates an orange precipitate. Test tubes (right) hold the results of several metal precipitation reactions.

ACTIVITY 12 RECOVERING COPPER
62 REACTIONS
GUIDING QUESTION Which metal is best at reclaiming copper from the used copper chloride solution?
MATERIALSFor each group of four students
1 dropper bottle of used copper chloride solution from the “Producing Circuit Boards” activity
1 dropper bottle of 5% ammonia solution
1 cup of water
For each pair of students
1 SEPUP tray
1 aluminum washer
1 iron washer
1 zinc washer
1 plastic spoon
1 dropper
1 pair of forceps
paper towels
For each student
1 pair of chemical splash goggles
1 Student Sheet 12.1, “Reclaiming Copper from Waste”
SAFETYWear chemical splash goggles at all times during this lab. Do not allow solutions to touch your skin or clothing. Clean up any spills immediately. If accidental contact occurs, inform your teacher and rinse exposed areas thoroughly. Wash your hands thoroughly with soap and water after you finish the activity.
PROCEDURE132133
1. With your partner, carefully examine each of the three metal washers: aluminum, iron, and zinc. Record your observations on Student Sheet 12.1, “Reclaiming Copper from Waste.” 134
2. Add 10 drops of used copper chloride solution to Cups 1–4 of the SEPUP tray.
3. Using forceps, place the aluminum washer in Cup 1, the iron washer in Cup 2, and the zinc washer in Cup 3. Cup 4 will serve as a control for comparison purposes.
132 NGSPPI3133 NGPS1A2134 NGPEP12

RECOVERING COPPER ACTIVITY 12
REACTIONS 63
4. Observe the reaction in each cup for 5–10 min. Record your observations of each reaction on Student Sheet 12.1. Be sure to include a comparison of the results obtained with each of the different metals.
5. Using the plastic spoon, remove all of the solid pieces of metal from the cups (leaving as much liquid in the cups as you can), and place them on a paper towel. Clean the spoon with a paper towel after you remove each piece.
6. On your Student Sheet, record your final observations of each metal.
7. Record your observations of the solutions left in each cup.
8. Using a dropper, put 5 drops of each of the solutions into a clean cup in the SEPUP tray. Do this by transferring 5 drops from Cup 1 to Cup 6, from Cup 2 to Cup 7, from Cup 3 to Cup 8, and from Cup 4 to Cup 9. Be sure to clean the dropper with water after each transfer so the solutions do not mix.
9. Test for copper in each solution by adding 2 drops of ammonia solution to Cups 6–9. If copper is present in the solution, a deep blue color or a blue-green precipitate will form.
10. Record your observations of the ammonia test on your Student Sheet. Dispose of the metals and solutions in your SEPUP tray as directed by your teacher.
EXTENSIONWhat other metals can precipitate copper from the used copper chloride solution? Design an experiment to find out. After your teacher approves your investigation, conduct the experiment, and present the results to the class.
ANALYSIS 1. Explain the purpose of including Cup 4 and Cup 9 in your
investigation.
2. Explain, using evidence from this investigation, which metal seemed to work best at removing the copper from solution. 135136137
135 NGPS1B2136 NGSPAD1137 NGCCPA3
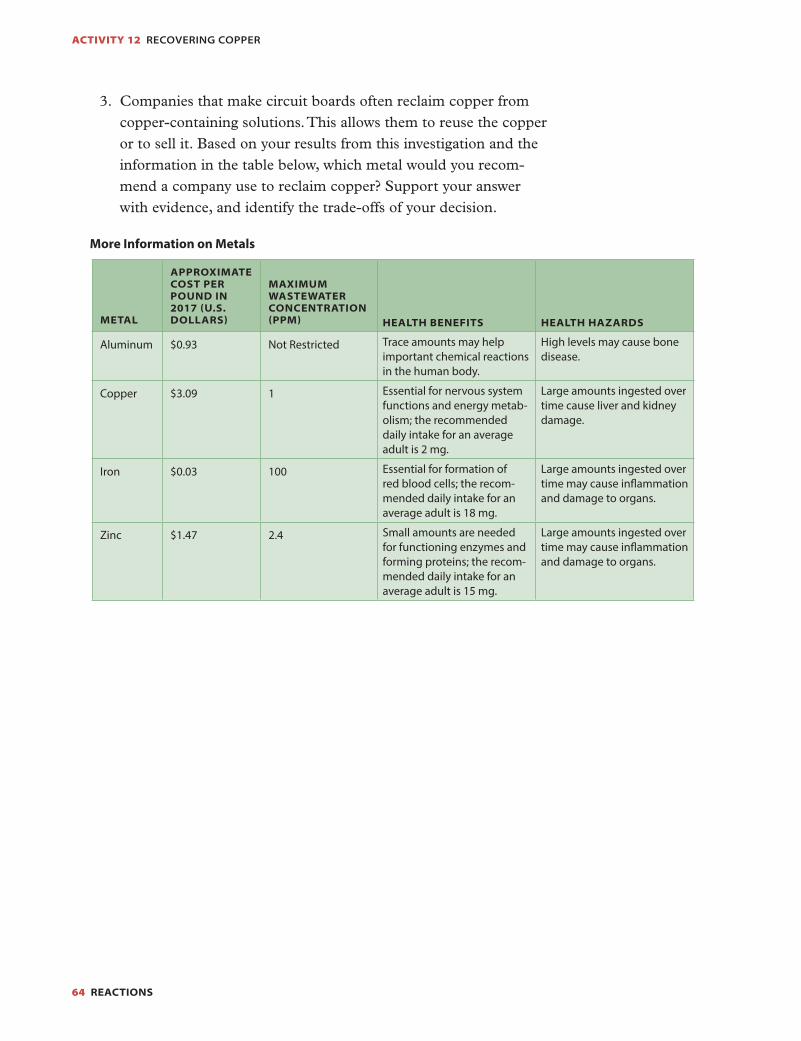
ACTIVITY 12 RECOVERING COPPER
64 REACTIONS
3. Companies that make circuit boards often reclaim copper from copper-containing solutions. This allows them to reuse the copper or to sell it. Based on your results from this investigation and the information in the table below, which metal would you recom-mend a company use to reclaim copper? Support your answer with evidence, and identify the trade-offs of your decision.138139140
More Information on Metals
METAL
APPROXIMATE COST PER POUND IN 2017 (U.S. DOLLARS)
MAXIMUM WASTEWATER CONCENTRATION (PPM) HEALTH BENEFITS HEALTH HAZARDS
Aluminum $0.93 Not Restricted Trace amounts may help important chemical reactions in the human body.
High levels may cause bone disease.
Copper $3.09 1 Essential for nervous system functions and energy metab-olism; the recommended daily intake for an average adult is 2 mg.
Large amounts ingested over time cause liver and kidney damage.
Iron $0.03 100 Essential for formation of red blood cells; the recom-mended daily intake for an average adult is 18 mg.
Large amounts ingested over time may cause inflammation and damage to organs.
Zinc $1.47 2.4 Small amounts are needed for functioning enzymes and forming proteins; the recom-mended daily intake for an average adult is 15 mg.
Large amounts ingested over time may cause inflammation and damage to organs.
138 NGSPEA1139 SEASET1140 ELWH681

REACTIONS 65
13 Another Approach to Recovering Copperl a b o r at o r y
In the previous activity, you conducted chemical reactions with solid metals to precipitate copper metal from the used copper chloride
solution. The brownish-orange substance that formed was solid copper. Reclaiming copper from waste solutions has two advantages. First, it reduces the volume of toxic copper compounds that are thrown away because copper is replaced in solution with another less toxic metal. Second, copper is a valuable metal that can be reused or sold.
Solid metals are not the only reactants that precipitate copper. Solutions of certain compounds can also form copper precipitates when they react with the used copper chloride solution. As you work to determine the best way to treat the waste from circuit board manu-facturing, you will evaluate two more chemical reactions that reclaim copper from the used copper chloride solution.
A goldsmith sorts printed computer circuit boards to reclaim the precious metal before the boards are recycled.

ACTIVITY 13 ANOTHER APPROACH TO RECOVERING COPPER
66 REACTIONS
GUIDING QUESTION What is the best option for reclaiming copper metal from the used copper chloride solution?
MATERIALSFor each group of four students
1 dropper bottle of used copper chloride solution from the “Producing Circuit Boards” activity
1 dropper bottle of sodium carbonate solution
1 dropper bottle of sodium hydrogen phosphate solution
1 dropper bottle of 5% ammonia solution
1 dropper bottle of water
1 cup of water
For each pair of students
1 SEPUP tray
1 SEPUP funnel
2 pieces of filter paper
1 dropper
1 stir stick
1 pair of forceps
For each student
1 pair of chemical splash goggles
1 Student Sheet 13.1, “Using Filtration to Reclaim Copper from Waste”
answer to Analysis item 3 from the “Producing Circuit Boards” activity
SAFETYWear chemical splash goggles at all times during this lab. Do not allow solutions to touch your skin or clothing. Clean up any spills immediately. If accidental contact occurs, inform your teacher and rinse exposed areas thoroughly. Wash your hands thoroughly with soap and water after you finish the activity.
PROCEDURE141
Part A: Precipitation of Metals
1. Add 15 drops of used copper chloride solution to Cups 1, 2, and 3 of the SEPUP tray.
2. Add 20 drops of sodium carbonate solution to Cup 1, and stir. Rinse the stir stick.
3. Add 20 drops of sodium phosphate solution to Cup 2, and stir.141 NGSPPI3
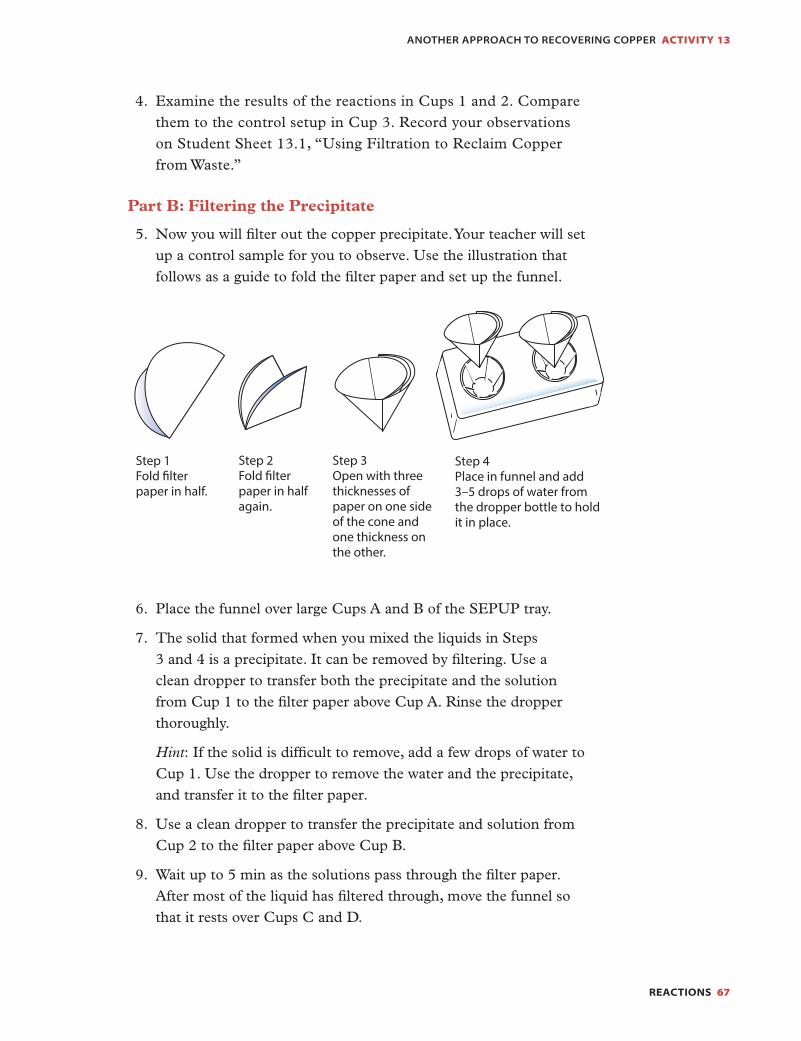
ANOTHER APPROACH TO RECOVERING COPPER ACTIVITY 13
REACTIONS 67
4. Examine the results of the reactions in Cups 1 and 2. Compare them to the control setup in Cup 3. Record your observations on Student Sheet 13.1, “Using Filtration to Reclaim Copper from Waste.”
Part B: Filtering the Precipitate
5. Now you will filter out the copper precipitate. Your teacher will set up a control sample for you to observe. Use the illustration that follows as a guide to fold the filter paper and set up the funnel.
6. Place the funnel over large Cups A and B of the SEPUP tray.
7. The solid that formed when you mixed the liquids in Steps 3 and 4 is a precipitate. It can be removed by filtering. Use a clean dropper to transfer both the precipitate and the solution from Cup 1 to the filter paper above Cup A. Rinse the dropper thoroughly.
Hint: If the solid is difficult to remove, add a few drops of water to Cup 1. Use the dropper to remove the water and the precipitate, and transfer it to the filter paper.
8. Use a clean dropper to transfer the precipitate and solution from Cup 2 to the filter paper above Cup B.
9. Wait up to 5 min as the solutions pass through the filter paper. After most of the liquid has filtered through, move the funnel so that it rests over Cups C and D.
Step 1Fold filter paper in half.
Step 2Fold filter paper in half again.
Step 3Open with three thicknesses of paper on one side of the cone and one thickness on the other.
Step 4Place in funnel and add 3–5 drops of water from the dropper bottle to hold it in place.
2461 LabAids SEPUP IAPS SBFigure: PhysSB B 28.02

ACTIVITY 13 ANOTHER APPROACH TO RECOVERING COPPER
68 REACTIONS
10. Use forceps to gently pick up the filter paper in Cups A and B, and inspect the precipitate. Record your observations of the precipitate on your Student Sheet.
11. The filtered liquids left in Cups A and B are now called the filtrates. On your Student Sheet, record your observations of the filtrates.
12. Add 5 drops of ammonia to Cups A and B, and stir, making sure to clean the stir stick between stirring each cup. Record your observations and the results of the ammonia test on your Student Sheet. Be sure to include your observations of your teacher’s demonstration of the control setup as well.
13. Dispose of the filter papers and solutions in your SEPUP tray as directed by your teacher.
ANALYSIS 1. Which solution was most effective at removing copper from the
used copper chloride solution—sodium carbonate or sodium hydrogen phosphate? Explain your evidence.142143144145
2. The table “Summary of Precipitation Reactions” that follows shows information about each of the substances you used to precipitate copper. Based on your answer to Analysis item 1, your results from this and the previous activity, and the information in the table, which precipitation reaction would you recommend a company use to reclaim copper?
Be sure to support your answer with evidence and discuss the trade-offs.146147148149
142 NGPS1A2143 NGPS1B1144 NGSPAD1145 NGCCPA3146 NGSPAD1147 NGSPEA1148 SEASET1149 ELWH681

ANOTHER APPROACH TO RECOVERING COPPER ACTIVITY 13
REACTIONS 69
Summary of Precipitation Reactions
METAL
APPROXIMATE COST PER POUND (U.S. DOLLARS IN 2017)
WHAT ARE THE PRODUCTS OF THE REACTION?
WHAT CAN BE DONE WITH THESE PRODUCTS?
Aluminum $0.93 CopperAluminum chloride
Reuse copperEasy disposal of aluminum chloride through release into environment
Iron $0.03 CopperIron chloride
Reuse copperRestricted disposal of iron chloride—must be treated, stored, or diluted
Zinc $1.47 CopperZinc chloride
Reuse copperHighly restricted disposal of zinc chloride—must be treated or stored
Sodium carbonate
$0.10 Copper carbonateDissolved salt
Reuse copper carbonateEasy disposal of dissolved salt through release into environment
Sodium phosphate
$0.27 Copper phosphateDissolved salt
Reuse copper phosphateEasy disposal of dissolved salt through release into environment
3. Reflection: Look back at your answer to Analysis item 3 from the first activity, “Producing Circuit Boards.” Now that you’ve completed the unit, has your idea of what to do with the waste changed? Explain.


REACTIONS 71
Chemical Reactionsu n i t s u m m a r y
Products and Waste from Chemical Reactions
Scientists and engineers use chemical reactions to make a variety of products. For example, chemical reactions are used to purify metals from their ores and to produce the circuit boards used in electronics. Chemical reactions are also used in batteries, automobile engines, chemical hand warmers, and other devices to provide usable energy. These chemical reactions sometimes produce wastes. Cleaning up these wastes sometimes requires using additional chemical reactions.
Evidence of Chemical Reactions
Every substance has characteristic properties that can be used to identify that substance. When some substances are combined, they undergo a chemical reaction, or chemical change, that forms a new substance. The appearance of a new substance with new properties provides evidence of a chemical reaction. Some of the signs that provide evidence that new substances have formed due to a chemical reaction are bubbling or fizzing, formation of a precipitate, and color change. The absorption or release of energy when substances are mixed is also a sign of a chemical reaction. Chemical changes are differentiated from physical changes by the fact that physical changes do not produce new substances. Physical changes include changes in state, such as the change from solid to liquid or liquid to gas, and the process of dissolving.
Rearrangement of Atoms in Chemical Reactions
Chemical changes at a scale you can observe are caused by changes at the scale of atoms and molecules. During a chemical reaction, atoms regroup into different molecules. These changes in structure cause changes in properties that you can observe or measure. In contrast, physical changes affect the distances and interactions between atoms and molecules, or how they mix with other atoms and molecules, but they do not change how the atoms are grouped into molecules.

UNIT SUMMARY
72 REACTIONS
Conservation of Atoms and Mass in Chemical Reactions
Atoms are conserved in a chemical reaction. Although atoms rear-range into new molecules, the total number and kinds of atoms in the products are the same as the number and kinds of atoms in the reactants. Since each kind of atom has a characteristic mass, the total mass before and after the reaction remains constant. This is called the law of conservation of mass, which states that mass is neither created nor destroyed in a chemical reaction.
Engineering Design
Chemical engineers design products that use chemical processes to solve a variety of problems. Like all engineers, chemical engineers use a systematic approach called the engineering design cycle to design, build, test, and improve engineering solutions.
Essential Scientific Terms
atom
chemical change
chemical reaction
compound
conserved, conservation
constraint
criteria, criterion
element
engineer
engineering design process
law of conservation of mass
mass
molecule
physical change
precipitate
product
prototype
reactant
thermal energy

REACTIONS 73
THE NATURE OF SCIENCE AND ENGINEERING
If someone asked you the question, “What is science?” how would you answer?
You might reply that it is knowledge of such subjects as Biology, Chemistry, Earth Science, and Physics. That would be only partly correct. Although science is certainly related to the accumulation and advancement of knowledge, it is much more than that. Science is a way of exploring and understanding the natural world.
According to the American Association for the Advancement of Science (AAAS), two of the most fundamental aspects of science are that the world is understandable and that scientific ideas are subject to change.
Scientists believe that the world is understandable because things happen in consistent patterns that we can eventually understand through careful study. Observations must be made and data collected for us to discover the patterns that exist in the universe. At times scientists have to invent the instruments that allow them to collect this data. Eventually, they develop theories to explain the observa-tions and patterns. The principles on which a theory is based apply throughout the universe.
When new knowledge becomes available, it is sometimes necessary to change theories. This most often means making small adjustments, but on rare occasions it means completely revising a theory. Although scientists can never be 100% certain about a theory, as knowledge about the universe becomes more sophisticated most theories become more refined and more widely accepted. You will see examples of this process as you study the history of scientists’ understanding of such topics as elements and the periodic table, the cellular basis of life, genetics, plate tectonics, the solar system, and the universe in this middle school science program.
Science and EngineeringAa p p e n d i x

APPENDIX A
74 REACTIONS
While the main goal of science is to understand phenomena, the main goal of engineering is to solve problems. Like science, engineering involves both knowledge and a set of practices common across a range of engineering problems. Just as scientists start by asking questions, engineers start by defining problems. Just as scientists search for expla-nations for phenomena, engineers search for solutions to problems.
Science and engineering often build on each other. For example, scientists use instruments developed by engineers to study the natural world. And engineers use scientific principles when designing solu-tions to problems.
Scientific Inquiry
Inquiry is at the heart of science, and an important component of inquiry is scientific investigation, including experimentation. Although scientists do not necessarily follow a series of fixed steps when con-ducting investigations, they share common understandings about the characteristics of a scientifically valid investigation. For example, scientists obtain evidence from observations and measurements. They repeat and confirm obser va tions and ask other scientists to review their results. It is important for scientists to avoid bias in designing, conducting, and reporting their investigations and to have other unbi-ased scientists duplicate their results. Some types of investigations allow scientists to set up controls and vary just one condition at a time. They formulate and test hypotheses, sometimes collecting data that lead them to develop theories.
When scientists develop theories they are constructing models and explanations of the patterns and relationships they observe in natural phenomena. These explanations must be logically consistent with the evidence they have gathered and with evidence other scientists have gathered. Hypotheses and theories allow scientists to make predictions. If testing turns out to not support a prediction, scientists may have to look at revising the hypothesis or theory on which the prediction was based.
Engineering Design
An engineer uses science and technology to build a product or design a process that solves a problem or makes the world better. Engineering design refers to the process engineers use to design, test, and improve solutions to problems. Like scientists, engineers design investigations to test their ideas, use mathematics, analyze their data, and develop models.

APPENDIX A
REACTIONS 75
Since most solutions in the real world are not perfect, engineers work to develop the best solutions they can, while balancing such factors as the function, cost, safety, and usability of their solutions. The factors engineers identify as important for solutions to a problem are called criteria and constraints. Most engineering solutions have one or more trade-offs—desired features that must be given up in order to gain other more desirable features.
Science as a Human Endeavor
Science and engineering are human activities. People from all over the world engage in science and engineering and use scientific information and technological solutions. The types of questions a scientist asks and the types of problems an engineer tries to solve are influenced by what they think is important. And what they think is important to investigate often depends on their background, experiences, and perspective. This is why it is essential for all types of people to become scientists and engineers—to be sure science and engineering respond to their interests and needs and to be sure that there are diverse ideas to enrich explanations and arguments. Participation by a wide variety of people in science and engineering will lead to greater and swifter progress toward understanding how the natural world works and solving problems facing individuals, communities, and the environment.
Visit the SEPUP Third Edition page for each unit of the SEPUP website at www.sepuplhs.org/middle/third-edition to learn more about the interests and accomplishments of diverse scientists and engineers. Each unit highlights examples of people from varied backgrounds in careers that contribute to and depend on the advancement of science and technology.
ReferencesAmerican Association for the Advancement of Science (AAAS). (1990). Project 2061: Science for all Americans. New York: Oxford University Press.
National Research Council. (2012). A Framework for K–12 Science Education: Practices, Crosscutting Concepts, and Core Ideas. Committee on a Conceptual Framework for New K–12 Science Education Standards. Board on Science Education, Division of Behavioral and Social Sciences and Education. Washington, DC: The National Academies Press.

APPENDIX A
76 REACTIONS
Science SafetyBSCIENCE SAFETY GUIDELINES
You are responsible for your own safety and for the safety of others. Be sure you understand the following guidelines and follow your
teacher’s instructions for all laboratory and field activities.
Before the Investigation
• Listen carefully to your teacher’s instructions, and follow any steps recommended when preparing for the activity.
• Know the location and proper use of emergency safety equip-ment, such as the safety eye-and-face wash, fire blanket, and fire extinguisher.
• Know the location of exits and the procedures for an emergency.
• Dress appropriately for lab work. Tie back long hair and avoid wearing dangling or bulky jewelry or clothing. Do not wear open-toed shoes. Avoid wearing synthetic fingernails—they are a fire hazard and can tear protective gloves.
• Tell your teacher if you wear contact lenses, have allergies to latex, food, or other items, or have any medical condition that may affect your ability to perform the lab safely.
• Make sure the worksurface and floor in your work area are clear of books, backpacks, purses, or other unnecessary materials.
• Ask questions if you do not understand the procedure or safety recommendations for an activity.
• Review, understand, and sign the Safety Agreement, and obtain the signature of a parent or guardian.
a p p e n d i x

APPENDIX B
REACTIONS 77
During the Investigation
• Carefully read and follow the activity procedure and safety recommendations.
• Follow any additional written and spoken instructions provided by your teacher.
• Use only those activities and materials approved by your teacher and needed for the investigation.
• Don’t eat, drink, chew gum, or apply cosmetics in the lab area.
• Wear personal protective equipment (chemical splash goggles, lab aprons, and protective gloves) appropriate for the activity.
• Do not wear contact lenses when using chemicals. If your doctor says you must wear them, notify your teacher before conducting any activity that uses chemicals.
• Read all labels on chemicals, and be sure you are using the correct chemical.
• Keep chemical containers closed when not in use.
• Do not touch, taste, or smell any chemical unless you are instructed to do so by your teacher.
• Mix chemicals only as directed.
• Use caution when working with hot plates, hot liquids, electrical equipment, and glassware.
• Follow all directions when working with live organisms or micro-bial cultures.
• Be mature and cautious, and don’t engage in horseplay.
• Report any unsafe situations, accidents, or chemical spills to your teacher immediately.
• If you spill chemicals on your skin, wash it for 15 minutes with large amounts of water. Remove any contaminated clothing and continue to rinse. Ask your teacher if you should take other steps, including seeking medical attention.
• Respect and take care of all equipment.

APPENDIX B
78 REACTIONS
After the Investigation
• Dispose of all chemical and biological materials as instructed by your teacher.
• Clean up your work area, replace bottle caps securely, and follow any special instructions.
• Return equipment to its proper location.
• Wash your hands with soap and warm water for at least 20 seconds after any laboratory activity, even if you wore protective gloves.
Your teacher will give you an agreement similar to the one below to sign.
Science Safety Agreement
S T U D E N T
I, _________________________, have read the attached Science Safety Guidelines for students and have discussed them in my classroom. I understand my responsibilities for maintaining safety in the science classroom. I agree to follow these guidelines and any additional rules provided by the school district or my teacher.
Student Signature________________________________________________________________________
Date_____________________
PA R E N T O R G UA R D I A N
Please review with your student the attached Science Safety Guidelines, which include the safety responsibilities and expectations for all students. It is important that all students follow these guidelines in order to protect themselves, their class-mates, and their teachers from accidents. Please contact the school if you have any questions about these guidelines.
I, _________________________, have read the attached guidelines and discussed them with my child. I understand that my student is responsible for following these guidelines and any additional instructions at all times.
Parent or Guardian Signature_____________________________________________________________
Date_____________________

APPENDIX A
REACTIONS 79
Th e fo llow i n g pag e s include instructional sheets that you can use to review important science skills:
• Reading a Graduated Cylinder
• Using a Dropper Bottle
• Bar Graphing Checklist
• Scatterplot and Line Graphing Checklist
• Interpreting Graphs
• Elements of Good Experimental Design
• Using Microscopes
Science SkillsCa p p e n d i x

APPENDIX C
80 REACTIONS
READING A GRADUATED CYLINDER A graduated cylinder measures the volume of a liquid, usually in milliliters (mL). To measure correctly with a graduated cylinder:
1. Determine what measurement each unmarked line on the gradu-ated cylinder represents.
2. Set the graduated cylinder on a flat surface and pour in the liquid to be measured.
3. Bring your eyes to the level of the fluid’s surface. (You will need to bend down!)
4. Read the graduated cylinder at the lowest point of the liquid’s curve (called the meniscus).
5. If the curve falls between marks, estimate the volume to the closest milliliter.
The example below shows a plastic graduated cylinder that contains 42 mL of liquid.
50
40

APPENDIX C
REACTIONS 81
USING A DROPPER BOTTLE
Incorrect
Holding the dropper bottle at an angle creates drops that vary in size.
Correct
Holding the dropper bottle vertically creates drops that are more consistent in size.

APPENDIX C
82 REACTIONS
BAR GRAPHING CHECKLISTSample Graph
Follow the instructions below to make a sample bar graph.
Start with a table of data. This table represents the amount of Chemical A that the Acme Company used each year from 2011 to 2015.
Determine whether a bar graph is the best way to represent the data.
If so, draw the axes. Label them with the names and units of the data.
Decide on a scale for each axis. Be sure there is enough space for all the data and that it’s not too crowded.
Mark intervals on the graph, and label them clearly.
Year Chemical Aused (kg)
2011
2013
2014
2012
2015
100
110
80
90
105
Year
Chem
ical A
(kg)
Year axis: 1 block = 1 year
Chemical A axis: 1 block = 20 kilograms
Year
Chem
ical A
(kg)
120
0
40
20
60
80
100
2012
2011
2013
2014
2015

APPENDIX C
REACTIONS 83
BAR GRAPHING CHECKLIST (continued)
Plot your data on the graph.
Fill in the bars.
Title your graph. The title should describe what the graph shows.
Year
Chem
ical A
(kg)
120
0
40
20
60
80
100
2012
2011
2013
2014
2015
Year
Chem
ical A
(kg)
120
0
40
20
60
80
100
2012
2011
2013
2014
2015
Year
Chem
ical A
(kg)
120
0
40
20
60
80
100
2012
2011
2013
2014
2015
Amount of Chemical A used 2011–2015
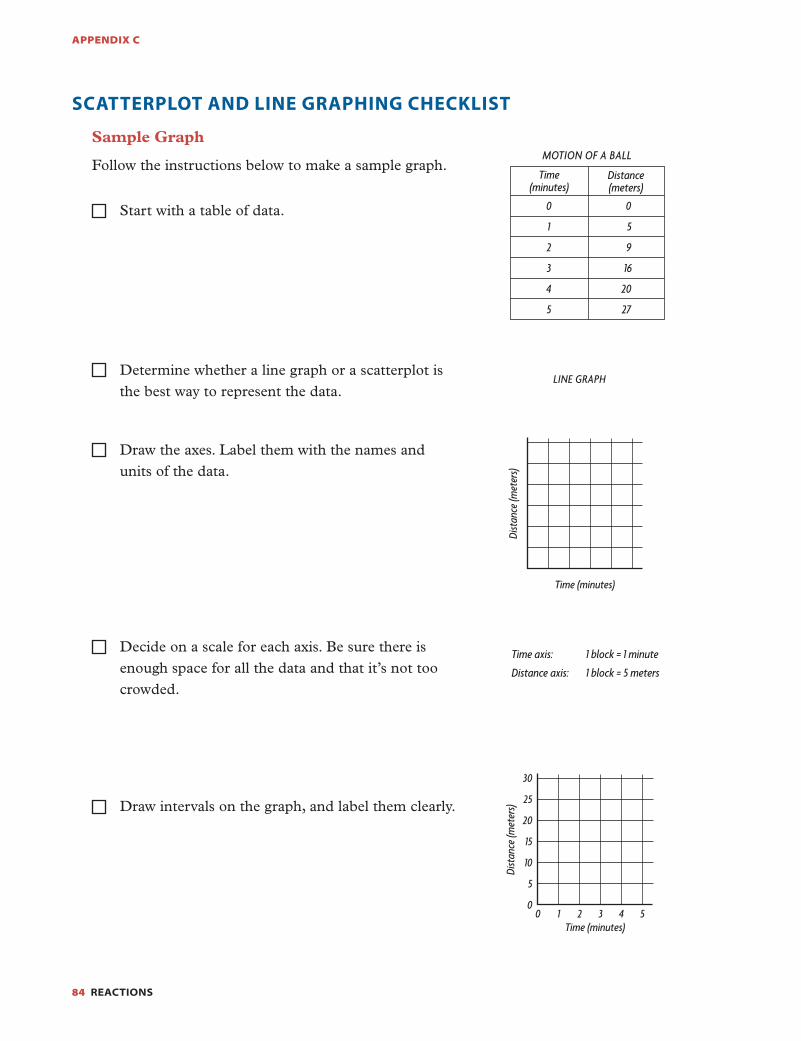
APPENDIX C
84 REACTIONS
Sample Graph
Follow the instructions below to make a sample graph.
Start with a table of data.
Determine whether a line graph or a scatterplot is the best way to represent the data.
Draw the axes. Label them with the names and units of the data.
Decide on a scale for each axis. Be sure there is enough space for all the data and that it’s not too crowded.
Draw intervals on the graph, and label them clearly.
SCATTERPLOT AND LINE GRAPHING CHECKLIST
Time(minutes)
Distance(meters)
0
2
3
1
4
0
9
5
16
20
5 27
MOTION OF A BALL
LINE GRAPH
Time (minutes)
Dist
ance
(met
ers)
Time axis: 1 block = 1 minute
Distance axis: 1 block = 5 meters
Time (minutes)
Dist
ance
(met
ers)
30
0
10
5
15
20
25
0 3 421 5

APPENDIX C
REACTIONS 85
SCATTERPLOT AND LINE GRAPHING CHECKLIST (continued)
Plot your data on the graph.
For a scatterplot, leave the points unconnected.
For a line graph, draw a smooth line or curve that follows the pattern indicated by the position of the points.
Title your graph. The title should describe what the graph shows.
If more than one data set has been plotted, include a key.
Time (minutes)
Dist
ance
(met
ers)
30
0
10
5
15
20
25
0 3 421 5
Time (minutes)Di
stan
ce (m
eter
s)
30
0
10
5
15
20
25
0 3 421 5
Time (minutes)
Dist
ance
(met
ers)
30
0
10
5
15
20
25
0 3 421 5
BALL ROLLING DISTANCE
= large ball
= small ball

APPENDIX C
86 REACTIONS
There is a pattern. There is no pattern.
Is there a relationship?
Relationship
What is the general trend of the data?
IAPS 3e WavesFig. SB App_C 1 MyriadPro Reg 9.5/11
No relationship
Positive: as x increases, y increases
Linear: as x increases, y consistently increases (sometimes called “direct”)
Nonlinear: as x increases, y increases at a changing rate
Linear: as x increases, y consistently decreases
Nonlinear: as x increases, y decreases at a changing rate (sometimes called “inverse”)
Cyclical: as x increases, y repetitively increases and decreases
Negative: as x increases, y decreases
INTERPRETING GRAPHS
Determine the path that describes the data.

APPENDIX C
REACTIONS 87
INTERPRETING GRAPHS (continued)
Define the components of the graph.
Things you can say:
“The title of the graph is . . .”
“The independent variable in this graph is . . .”
“The dependent variable in this graph is . . .”
“_________ is measured in __________________”
Create a description of what the graph reveals.
Things you can say:
“This graph shows that . . .”
“As the _________ increases, the . . .”
“The ______ has the highest . . .”
“_________ is different from ___________ because . . .”
“The__________ peaked at . . .”
“The rate of _______ increased from . . .”
Describe how the graph relates to the topic.
Things you can say:
“This graph is important to understanding ________because . . .”
“This graph supports the claim that _____________ because . . .”
“This graph refutes the claim that _____________ because . . .”

APPENDIX C
88 REACTIONS
ELEMENTS OF GOOD EXPERIMENTAL DESIGN
An experiment that is well designed
• builds on previous research.
• is based on a question, observation, or hypothesis.
• describes all steps in a procedure clearly and completely.
• includes a control for comparison.
• keeps all variables—except the one being tested—the same.
• describes all data to be collected.
• includes precise measurements and all records of data collected during experiment.
• may require multiple trials.
• can be reproduced by other investigators.
• respects human and animal subjects.
Note: Elements may vary depending on the problem being studied.

APPENDIX C
REACTIONS 89
Focusing a Microscope
Be sure that your microscope is set on the lowest power before placing your slide onto the microscope stage. Place the slide on the microscope stage. Center the slide so that the sample is directly over the light opening, and adjust the microscope settings as necessary. If the microscope has stage clips, secure the slide in position so that it does not move.
• Observe the sample. Focus first with the coarse-focus knob, and then adjust the fine-focus knob.
• After switching to a higher power magnification, be careful to adjust the focus with the fine-focus knob only.
• Return to low power before removing the slide from the microscope stage.
Safety
Always carry a microscope properly with both hands—one hand underneath and one holding the microscope arm. When you are working with live organisms, be sure to wash your hands thoroughly after you finish the laboratory.
USING MICROSCOPES
3377 SEPUP SGI Cell SBFigure: 3377CellSB 02_01Mryriad Pro 9/9
eyepiece
objectives
coarse focus knob
�ne focus knob
light source
diaphragm
stage clips
stage

APPENDIX C
90 REACTIONS
Some Tips for Better Drawings
• Use a sharp pencil and have a good eraser available.
• Try to relax your eyes when looking through the eyepiece. You can cover one eye or learn to look with both eyes open. Try not to squint.
• Look through your microscope at the same time as you do your drawing. Look through the microscope more than you look at your paper.
• Don’t draw every small thing on your slide. Just concentrate on one or two of the most common or interesting things.
• You can draw things larger than you actually see them. This helps you show all of the details you see.
• Keep written words outside the circle.
• Use a ruler to draw the lines for your labels. Keep lines parallel—do not cross one line over another.
• Remember to record the level of magnifi cation next to your drawing.
3377 SEPUP SGI Cell SBFigure: 3377CellSB 03_01
Spirogyra (algae) x 400
chloroplast
cell wall

APPENDIX A
REACTIONS 91
Measurements that appear in this program are expressed in metric units from the International System of Units, otherwise known
as SI units (from Système Internationale d’Unités), which was estab-lished by international agreement. Virtually all countries in the world mandate use of the metric system exclusively. The United States does not use the metric system for many measurements, although it has been the standard for the scientific community in the United States for more than 200 years. A U.S. government effort to convert from the United States customary system to metric measurements in all realms of life has yet to extend far beyond governmental agencies, the military, and some industries.
The reason that many countries have replaced their traditional measurement systems with the metric system is its ease of use and to improve international trade. There are far fewer units to understand in comparison to the system commonly used in the United States. The metric system has only one base unit for each quantity and larger or smaller units are expressed by adding a prefix. The table below shows the base units in the International System of Units.
QUanTiTY BaSe UniT
Length meter (m)
Mass kilogram (kg)
Time second (s)
Temperature kelvin (K)
Electric current ampere (A)
Luminous intensity candela (cd)
Mole mole (mol)
The International System of UnitsDa p p e n d i x

APPENDIX D
92 REACTIONS
Other international units appearing in SEPUP’s Issues and Science units are shown in the table below:
QUanTiTY UniT COMMOn exaMpLe
Temperature Celsius (°C) Room temperature is about 20° Celsius
Volume liter (L) A large soda bottle contains 2 liters.
Mass gram (g)A dollar bill has the mass of about 1 gram.
Wavelength nanometer (nm)Visible light is in the range of 400 to 780 nanometers
The International System’s prefixes change the magnitude of the units by factors of 1,000. Prefixes indicate which multiple of a thousand is applied. For example, the prefix kilo- means 1,000. Therefore, a kilometer is 1,000 meters and a kilogram is 1,000 grams. To convert a quantity from one unit to another in the metric system, the quantity needs only to be multiplied or divided by multiples of 1,000. The chart below shows the prefixes for the metric system in relation to the base units. Note: Although it is not a multiple of 1,000 the prefix centi- is commonly used, for example, in the unit centimeter. Centi- represents a factor of one 100th.
MeTRiC pReFix FaCTOR FaCTOR (nUMeRiCaL)
giga (G) one billion 1,000,000,000
mega (M) one million 1,000,000
kilo (k) one thousand 1,000
[UNIT] one 1
milli (m) one one-thousandth 1/1,000
micro (μ) one one-millionth 1/1,000,000
nano (n) one one-billionth 1/1,000,000,000

APPENDIX A
REACTIONS 93
The following pages include instructional sheets and templates for some of the literacy strategies that are used throughout this book.
Use them for reference or to copy into your science notebook.
• Oral Presentations
• Reading Scientific Procedures
• Keeping a Science Notebook
• Writing a Formal Investigation Report
• Constructing a Concept Map
• Developing Communication Skills
Literacy StrategiesEa p p e n d i x

APPENDIX E
94 REACTIONS
ORAL PRESENTATIONS• Your presentation time is short. Focus your presentation on the
most important ideas you need to communicate.
• Communicate clearly by planning your words in advance. When speaking, talk slowly and loudly, and look at your audience.
• Group members should ask for and give each other support if they need help expressing a key word or concept.
• Include graphs and maps when possible. Make sure the type or handwriting and the images are large enough for everyone in the audience to see them.
• While you have your own opinions on a topic, it is important that you present unbiased and complete information. Your audience can then make their own conclusions.
• All the members of a group must participate.
• Since any group member may be asked to answer questions from the class, all group members should fully understand the presentation.
• In a group presentation, you could all play the role of different experts when presenting your information. The class would represent the community members who might be making a decision on the issue.

APPENDIX E
REACTIONS 95
READING SCIENTIFIC PROCEDURESThe purpose of reading a scientific procedure is to find out exactly what to do, when to do it and with what materials, in order to complete all the steps of an investigation.
If you read a step and are not sure what to do, try these strategies:
• Re-read the previous step.
• Re-read the step that confuses you. Sometimes re-reading clarifies the information.
• Ask your partner if he or she understands what the step says to do.
• Ask your partner if there are words you don’t understand.
• Ask your partner to explain what the step says to do.
• Ask your partner to read the step aloud as you listen and try to do what your partner is describing.
• Re-read the purpose (Guiding Question) of the investigation.
• Try to say the purpose of the step out loud in your own words.
• Look at the clues in the pictures of the activity.
• Peek at other groups and listen to see if they are doing the step that confuses you.
• Tell your teacher exactly what you are confused about and why it doesn’t make sense.

APPENDIX E
96 REACTIONS
KEEPING A SCIENCE NOTEBOOK• Write in blue or black ink.
• Cross out mistakes or changes with a single line. Do not erase or use correction fluid.
• Write neatly.
• Record the date of each entry.
• For each new investigation, write down the following:
Title:
Purpose:Re-write the Guiding Question in your own words. Hint: What are you going to do? Why are you going to do it?
Materials:Place a “√” here after you have collected the necessary materials.
Procedure:Write down whether you understand the procedure.
Data:Record observations, measurements, and other lab work.Include data tables, charts, diagrams, and/or graphs when needed.Be sure to label your work clearly.
• Sometimes, you may want to do the following:
Make inferences or draw conclusions based on the data.I think my results mean . . .I think that this happened because . . .
Reflect on how the activity worked in your group.This is what went well . . This is what did not go well . . .If I could do this activity again, I would . . .
Think about what questions you still have.I wonder if . . .I’m not sure about . . .
Keep track of new vocabulary and ideas.A key word I learned is . . .I would like to find out what happens when . . .One interesting thing to do would be to . . .

APPENDIX E
REACTIONS 97
KEEPING A SCIENCE NOTEBOOK (continued)The following is a guide to help you conduct investigations. However, depending on the investigation, you may not always use all of steps below or use them in the same order each time.
Title: Choose a title that describes the investigation.
Purpose: What am I looking for? Write what you are trying to find out in the form of a question.
Background: What do I know about the topic? Write a summary of background information you have on the topic that led to the purpose for the investigation.
Hypothesis: Write a statement about what you predict you will see as data in the experiment to answer the question in the “Purpose” and why you are making that prediction.
Experimental Design: How will you answer the question?Describe the methods you will use (what you will do) to answer the question. Use short numbered steps that are easy to follow in the lab.Make a list of the materials you will use to answer the question.Outline the variables:
• Independent variable (what is being changed) • Dependent variable (what is being measured) • Control (what will be used as baseline comparison)
Data: What did you find?Record observations and measurements. Use a data table where appropriate to organize the data. Don’t forget to include proper units and clear labels.
At the end of your investigation, do the following:
Make inferences or draw conclusions about the data:I think my results mean . . .I think this happened because . . .
Think about any errors that occurred during the investigation:What did not go as planned?What steps were hard to follow while doing the investigation and why?
Think about questions you still have that could lead to new investigations:I wonder if . . .I’m not sure about . . .
Keep track of new vocabulary and new ideas that could lead to new investigations
I would like to find out what happens when . . .One interesting thing to do would be to . . .
Reflect on how the activity worked in your groupThis is what went well . . . This is what did not go well . . .If I could do this investigation again, I would . . .

APPENDIX E
98 REACTIONS
WRITING A FORMAL INVESTIGATION REPORT Use the information from your science notebook to write a formal report on the investigation you performed.
Title:Choose a title that describes the investigation.
Abstract: What were you looking for in this investigation, and what did you find?
Write a paragraph that summarizes what you already knew about the topic, your purpose, your hypothesis, and your results and conclusions.
Experimental Design:Describe the materials and investigational methods you used to answer the question.State what variables you worked with and any controls.
Data: What did you find?Report observations and measurements. Include an organized data table if appropriate to help someone reviewing your report to easily see the results.Don’t forget to use proper units of measurement and write clear labels for your table columns.
Data Analysis: Represent the data in a way that can be easily interpreted.
Use graphs, diagrams, or charts where appropriate to help a reviewer interpret your data.
Conclusion: What do the data mean?Summarize the data.Discuss your conclusion based on the accuracy of your hypothesis and the data you collected.Discuss any errors that occurred that may have interfered with the results.Describe any changes that need to be made the next time the investigation is performed.Describe any new questions to be investigated based on the results of this investigation.
APPENDIX E
REACTIONS 99
CONSTRUCTING A CONCEPT MAP 1. Work with your group to create a list of 15–20 words related to
the topic.
2. If you are uncertain of the meaning of a word, look it up in the book or your notes or discuss it with your group.
3. Discuss with your group how all of the words on your list are related, and sort your list of words into three to five categories based on these relationships.
Remember to listen to and consider the ideas of other members of your group. If you disagree with others in your group, explain to the rest of the group why you disagree.
4. Identify words that can be used to describe each category.
5. Work with your group to create a concept map on this topic. Follow these steps:
a. Write the topic in the center of your paper, and circle it.
b. Place the words describing each category around the topic. Circle each word.
c. Draw a line between the topic and each category. On each line, explain the relationship between the topic and the category.
d. Repeat Steps 5b and 5c as you continue to add all of the words on your list to your concept map.
e. Add lines to connect other related words. Explain the relationship between the words on the line.
6. View the concept maps of other groups. As you look at their concept maps, observe similarities and differences between their maps and yours. Discuss your observations with your group members.
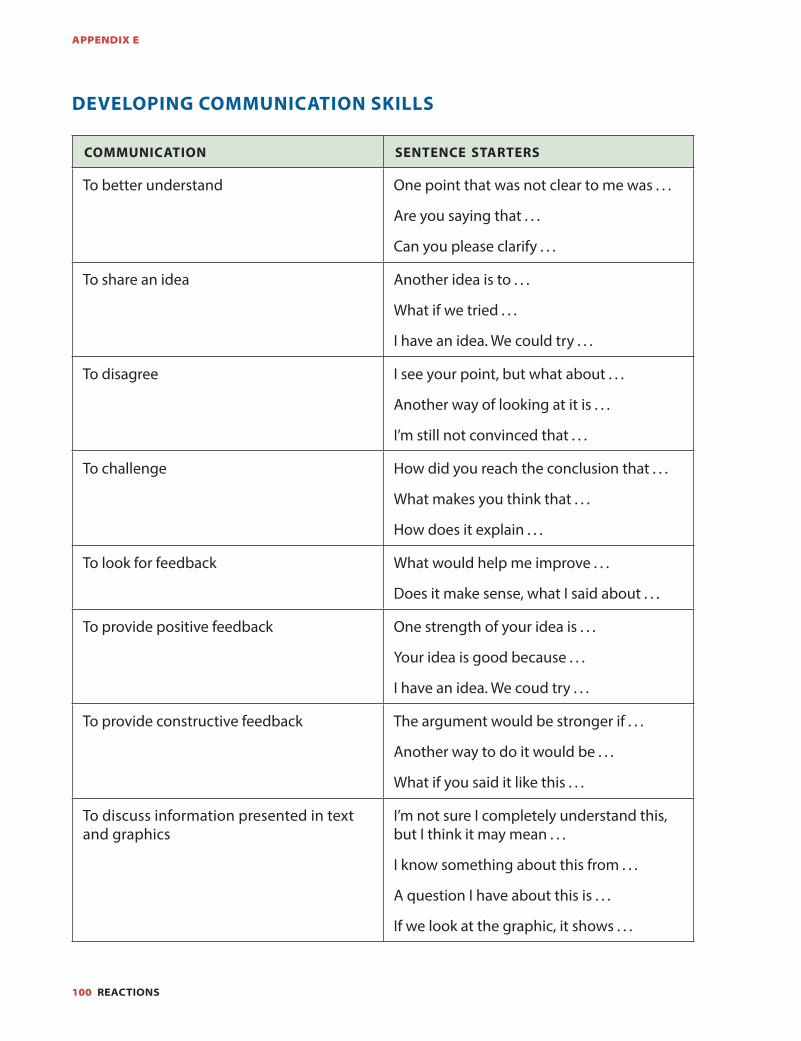
APPENDIX E
100 REACTIONS
DEVELOPING COMMUNICATION SKILLS
communication sentence starters
To better understand One point that was not clear to me was . . .
Are you saying that . . .
Can you please clarify . . .
To share an idea Another idea is to . . .
What if we tried . . .
I have an idea. We could try . . .
To disagree I see your point, but what about . . .
Another way of looking at it is . . .
I’m still not convinced that . . .
To challenge How did you reach the conclusion that . . .
What makes you think that . . .
How does it explain . . .
To look for feedback What would help me improve . . .
Does it make sense, what I said about . . .
To provide positive feedback One strength of your idea is . . .
Your idea is good because . . .
I have an idea. We coud try . . .
To provide constructive feedback The argument would be stronger if . . .
Another way to do it would be . . .
What if you said it like this . . .
To discuss information presented in text and graphics
I’m not sure I completely understand this, but I think it may mean . . .
I know something about this from . . .
A question I have about this is . . .
If we look at the graphic, it shows . . .

Imagine yourself reading a magazine. A feature article summarizes recent studies on the effectiveness of vitamin supplements and
concludes that taking vitamin pills and liquids is a waste of money. A few pages later, an advertisement from a vitamin company claims that one of its products will protect you from all sorts of diseases. Such wide differences in claims that you will see in the popular media are common, but how can you tell which one is correct? “Media literacy” is the term that encompasses the skills we need to develop to effectively analyze and evaluate the barrage of information we encounter every day. Media literacy also includes the ability to use various media to create and communicate our own messages.
A strong background in the process of science helps you build two important skills of media literacy: being able to identify valid and adequate evidence behind a claim and evaluating if the claim is a logical conclusion based on the evidence. The skills share much in common with the process of scientific inquiry, in which you learn to seek out information, assess the information, and come to a conclusion based on your findings.
Evaluating Media Messages
A “media message” is an electronic, digital, print, audible, or artistic visual message created to transmit information. Media messages can include newspaper articles, political advertisements, speeches, artwork, or even billboards. The following are some of the kinds of questions you might ask as you learn to critically analyze and evaluate messages from various kinds of media. On the next page are three examples of media messages, all related to a common theme. Use these three examples to analyze and evaluate the messages.
Media LiteracyF
REACTIONS 101
a p p e n d i x
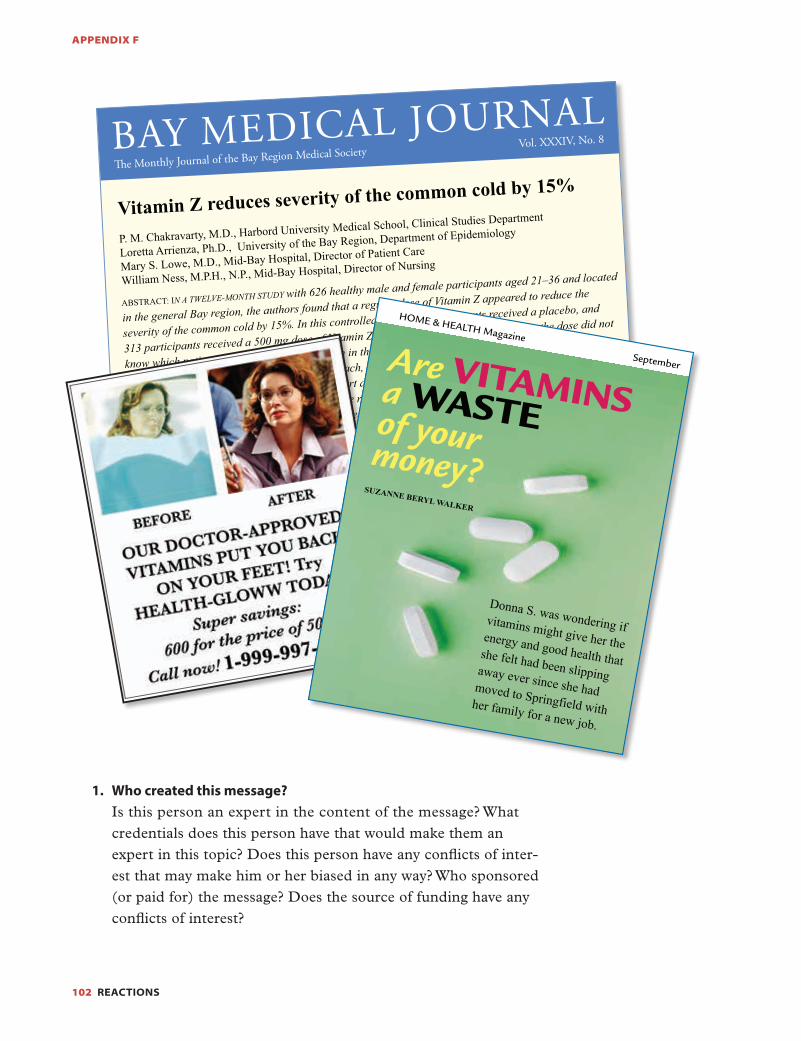
APPENDIX F
102 REACTIONS
1. Who created this message? Is this person an expert in the content of the message? What credentials does this person have that would make them an expert in this topic? Does this person have any conflicts of inter-est that may make him or her biased in any way? Who sponsored (or paid for) the message? Does the source of funding have any conflicts of interest?
BAY MEDICAL JOURNAL�e Monthly Journal of the Bay Region Medical Society Vol. XXXIV, No. 8
Vitamin Z reduces severity of the common cold by 15%
P. M. Chakravarty, M.D., Harbord University Medical School, Clinical Studies Department
Loretta Arrienza, Ph.D., University of the Bay Region, Department of Epidemiology
Mary S. Lowe, M.D., Mid-Bay Hospital, Director of Patient Care
William Ness, M.P.H., N.P., Mid-Bay Hospital, Director of Nursing
ABSTRACT: IN A TWELVE-MONTH STUDY with 626 healthy male and female participants aged 21–36 and located
in the general Bay region, the authors found that a regular dose of Vitamin Z appeared to reduce the
severity of the common cold by 15%. In this controlled study, 313 participants received a placebo, and
313 participants received a 500 mg dose of Vitamin Z daily. The clinicians administering the dose did not
know which patients were receiving the vitamin in this double-blind study. Over the twelve months, the
participants averaged .9 incidences of illness each, defined as appearing to be rhinoviruses with general
cold symptoms. Patients were asked to self-report about the severity, type, and duration of symptoms,
using an assessment form. On the average, those receiving Vitamin Z reported less severe symptoms and
shorter duration, by about 15%. The effects varied somewhat based upon the types of patients and the
number of illnesses they experienced. Participants were requested not to use any other cold remedies or
symptom relief during the occurrence, although compliance with this request was only 65%. Data analysis
and graphs are provided, showing the aggregated results, and including estimations of likely margins of
error.
Are VITAMINS a WASTE of your money?
HOME & HEALTH Magazine
September
Donna S. was wondering if vitamins might give her the energy and good health that she felt had been slipping away ever since she had moved to Springfield with her family for a new job.
SUZANNE BERYL WALKER

APPENDIX F
REACTIONS 103
2. What creative techniques in the message attract a person’s attention?Are there any sensational or emotional words, images, or sounds that grab the viewer’s attention? Do any of these words, images, or sounds try to stir up emotions and influence the viewer’s ideas?
3. Does the message cite or mention appropriate sources of factual information?Does the author cite first-person sources when reporting facts? Are the author’s sources from credible organizations?
4. Does the presented evidence completely support the claim? Might there be other information that could support or discredit the message? Does the author make logical inferences and conclu-sions from the evidence presented in the article?
5. Who is the target audience of this message?How is this message directed at this particular audience?
6. Is the message promoting certain values, lifestyles, positions, or ideas either directly or indirectly?Are there any positions or ideas that are being promoted that are not explicit in the message?
Evaluating Internet Sources
Imagine that you want to search the Internet to find out about the effectiveness of vitamin supplements so that you can come to your own conclusion. When you are searching for information online, a search engine is searching from over one trillion websites.1 Determining which websites and sources of information are reliable and which are biased is difficult. To make an informed decision about this topic, you will need to identify accurate and unbiased websites. Below is a suggested list of questions that will help you determine if a particular website is an accurate and unbiased source of information.
1. Are the authors’ names, contact information, and credentials clearly labeled on the website?Accurate websites will usually contain information from knowl-edgeable authors who have their names, credentials, and contact information clearly labeled on the website. Some websites are managed by a collection of people or an organization, and infor-mation on the exact author may not be clearly stated. However,
1. Alpert, Jesse & Hajaj, Nissan. (July 25, 2008). We knew the Web was big. . . . The Official Google Blog. Retrieved August 2010 from http://googleblog.blogspot.om /2008/07/we-knew-web-was-big.html.
APPENDIX F
104 REACTIONS
these organizations should state the names, contact information, and credentials somewhere on their website of the people who represent the organization.
2. Is the information and the website up to date?Some information that you may be seeking needs to be current. For example, if you were looking for the number of cars in the United States, you would want the most recent data. A study conducted in 1982 would not be helpful in this case. When seeking information that needs to be current, determine if the date the article or infor-mation was written is clearly indicated on the website so you can be sure you are accessing the most recent infor mation. Credible websites will usually indicate the date the article or information was created or last updated. Also, the person or organization maintaining the website should be regularly updating the website, so that the majority of links to other websites work.
3. Are sources of information clearly cited?When factual information is stated in a website, is the source clearly cited so you can refer back to it?
4. Are there links to more resources on this topic?Authoritative websites will often provide links to further information from other sources that support their claim. Authors of websites that contain information that is biased or inaccurate usually do not provide additional information that supports their claims.
5. What are other people saying about the author or the organization that produced this information?If you come across information from an author or organization that you are unfamiliar with, perform a search for other informa-tion about the author or organization. What are experts writing about the author’s or organization’s other work?
6. Why is this website on the Internet?Was this information put on the Internet to inform or to persuade people? Is the author selling something? What is the author’s moti-vation for providing this information?
Further ResourcesThier, M., & Daviss, B. (2002). The new science literacy. Portsmouth, NH: Heinemann.
Center for Media Literacy. http://www.medialit.org.
PBS Teachers. Media literacy. http://www.pbs.org/teachers/media_lit.

Crosscutting ConceptsG
REACTIONS 105
a p p e n d i x
patterns A pattern is a set of repeating things or events. Scientists observe patterns in their data. Patterns lead to questions about relationships and ideas about what causes these relationships.
cause and effect Events have causes. If “A” causes “B” to happen, they have a cause-and-effect relationship. A major activity of science is to explain how this happens. Sometime the causes are simple and sometimes they are complex. Sometimes both A and B occur, but one does not cause the other.
scale, proportion, and quantity
Scientific phenomena occur at various scales of size, time, and energy. Phenomena observed at one scale may not be observable at another scale. Scientists use proportional relationships to compare measurements of objects and events. They often use mathematical expressions and equations to represent these relationships.
system and system models
A system is a group of interacting objects or processes. Describing a system, including its components, interactions and boundaries, and making models of that system helps scientists and engineers understand phenomena and test ideas.
energy and matter Tracking changes of energy and matter into, out of, and within systems helps scientists understand the systems’ possibilities and limitations. Many cause and effect relationships result from changes of energy and matter.
structure and function
The structure (shape, composition, construction) of an object or living thing determines many of its properties and functions (what the structure can do).
stability and change For natural and built systems alike, conditions are sometimes stable (the same or within a range), and sometimes they change. Scientists study what conditions lead to either stability or change.
Patterns
A ➞ B Cause and Effect
Scale, Proportion, and Quantity
Energy and Matter
Structure and Function
Stability and Change
Sysytem and System Models
y
x
O
H H
Patterns
A ➞ B Cause and Effect
Scale, Proportion, and Quantity
Energy and Matter
Structure and Function
Stability and Change
Sysytem and System Models
y
x
O
H H
Patterns
A ➞ B Cause and Effect
Scale, Proportion, and Quantity
Energy and Matter
Structure and Function
Stability and Change
Sysytem and System Models
y
x
O
H H
Patterns
A ➞ B Cause and Effect
Scale, Proportion, and Quantity
Energy and Matter
Structure and Function
Stability and Change
Sysytem and System Models
y
x
O
H H
Patterns
A ➞ B Cause and Effect
Scale, Proportion, and Quantity
Energy and Matter
Structure and Function
Stability and Change
Sysytem and System Models
y
x
O
H H
Patterns
A ➞ B Cause and Effect
Scale, Proportion, and Quantity
Energy and Matter
Structure and Function
Stability and Change
Sysytem and System Models
y
x
O
H H
Patterns
A ➞ B Cause and Effect
Scale, Proportion, and Quantity
Energy and Matter
Structure and Function
Stability and Change
Sysytem and System Models
y
x
O
H H


APPENDIX A
REACTIONS 107
Glossary
advantage A property that in your opinion is favorable.
analysis (of experimental results) Making connections between the results of an experiment and the idea or question being investigated.
atom The basic building block of matter.
benefit An advantage, profit, or gain.
bond See chemical bond.
chemical bond An electrical attraction between atoms.
chemical change A process during which a substance or substances change into one or more new substances as a result of a change in the arrangements of atoms in mole-cules. Also called a chemical reaction.
chemical equation A symbolic represen-tation of the reactants and products in a chemical reaction.
chemical property Describes how a material reacts with another substance (e.g., reactivity with acid). See property.
chemical reaction A process during which a substance or substances change into one or more new substances as a result of a change in the arrangements of atoms in mole-cules. Also called a chemical change.
circuit A path along which electrical energy can transfer.
circuit board A thin plate that electrically connects computer chips and other electronic components. The connecting pathways are etched in copper and laminated onto a noncon-ductive material. See also etch.
closed system A system that does not allow matter or energy to enter or escape.
compound A substance made from more than one element joined by a chemical bond.
conserved Saved; neither gained nor lost.
conservation of mass The principle (or scientific law) that mass is neither created nor destroyed during a chemical reaction. See law of conser-vation of mass.
constraint In engineering design, some-thing that limits the solution to a problem.
criteria In engineering design, the goals and the desired features of the solution. Plural of criterion. See criterion.
criterion A minimum requirement for how the design must function. See criteria.
data Information gathered from an experiment or observations.
density Mass of a substance per unit of volume.

GLOSSARY
108 REACTIONS
diatomic element An element composed of molecules that contain 2 atoms of the element. The seven diatomic elements are hydrogen, nitrogen, oxygen, fluorine, chlorine, iodine, and bromine.
disadvantage A property that in your opinion is not favorable.
dissolve To mix into another substance at the scale of individual particles (atoms or molecules).
endothermic A process that absorbs energy.
element The simplest pure substances, made of just one type of atom.
energy The ability to cause objects to change, move, or work.
energy transfer The movement of energy from one object to another.
engineer Someone who uses science and tools to build a product that solves a practical problem.
engineering design process A series of steps that engineers follow to come up with a solution to a problem.
etch A chemical process that cuts into a solid surface.
evidence Information that supports or refutes a claim.
exothermic A process that releases energy.
filtrate Liquid obtained by filtering a mixture of solids and liquids.
gas A state of matter with no fixed shape. A gas will expand to fill the space available. The particles in gas tend to have a lot of movement and not stay grouped together.
law of conservation of mass The scien-tific principle that mass is neither created nor destroyed during a chemical reaction.
life cycle (in physical science) The phases in the existence of a product, including what is needed to make the product, how it will be made, and what will happen to the product when it is no longer being used.
liquid A state of matter with a specific volume but not a specific shape. Liquid particles tend to stay together and move less than gas particles but more than solid particles.
liter (L) A unit of volume in the metric system; 1 L is equal to 1,000 milliliters (mL); 1 mL is equal to 1 cubic centi-meter (cm3).
mass The amount of matter in an object.
material A type of solid matter used to make things.
matter The stuff that makes up all living and nonliving objects.
meter (m) A unit of length in the metric system; 1 m is equal to 100 centime-ters (cm) or 1,000 millimeters (mm).
metric system The worldwide measuring system used by scientists. Also known as the International System of Units (SI).
model Any representation of a system (or its components) used to help one understand and communicate how it works.
molecule Two or more atoms held together by chemical bonds.
observation Any description or measurement gathered by the senses or instruments.
open system A system that allows matter or energy to enter or escape.
particle Small structures that make up all matter. See matter.
pattern Something that happens in a repeated and predictable way.

GLOSSARY
REACTIONS 109
physical change A change that occurs when the spacing or interactions between particles in a substance change or the particles mix with other particles. The particles them-selves do not change because there are no changes in the arrangement of atoms in the molecules of the substances.
physical property A property that can be identified, observed, or measured and does not rely on testing if the material reacts with another substance (e.g., color). See property.
product (in chemistry) A chemical substance that is by the reactants; that is, the final substances present at the end of the reaction.
property Particular characteristics of a material such as the material’s density, melting point, or color. A change in volume of the material does not change its properties.
precipitate, precipitation (in chemistry) An insoluble solid formed when two liquid solutions are mixed, or to form an insoluble solid when two liquid solutions are mixed.
prototype An early sample of a product that provides information about how the device or system works.
reclaim To retrieve waste material so it can be used again.
reclamation The process of reclaiming waste material for reuse.
reactant A chemical substance that enters into a reaction; the original substances present before a reaction takes place.
reactivity The tendency for a substance to react or combine chemically with other substances.
scale The ratio of the size of a real object and a model, map, diagram, or other representation of the object. Can also be used to refer to the general size of objects being referred to (i.e., atomic/molecular scale).
science The systematic study of the natural world.
scientific method A set of processes used when conducting investiga-tions. These generally involve making observations, collecting and analyzing data, and drawing conclu-sions, especially when testing scientific hypotheses.
scientific model See model.
scientist Someone who pursues under-standing of the natural world by using evidence to answer questions.
simulation The imitation of a real-world process or system over time.
solid A state of matter with a relatively fixed volume and shape. Solid parti-cles tend to stay close together and not move very much.
solubility The ability of a substance to dissolve in another substance.
state The physical form of matter—solid, liquid, or gas.
structure The parts of an object or system, including what they are made of, their shapes, and their arrange-ment. The type and arrangement of atoms and/or molecules that make up a substance.
technology Any product or process made by engineers and scientists.
temperature A measure of the average kinetic energy of a sample due to molecular motion, often using the Fahrenheit (°F) or Celsius (°C) scale.

GLOSSARY
110 REACTIONS
thermal energy The total energy of motion of the particles in a sample of a substance.
trade-off A desirable outcome given up to gain another desirable outcome.
volume The amount of space that an object or substance occupies.
weight The vertical force exerted by a mass as a result of gravity.

APPENDIX A
REACTIONS 111
AAAAS (American Association for the
Advancement of Science), 73advantage, 107analysis, 107atoms
definition, 107diatomic elements, 26, 26, 108rearrangement by chemical change,
71
Bbar graphing, required skills, 82–83batteries. See chemical batteries.benefit, 107bond. See chemical bond.
Ccause and effect, 105chemical batteries, 43, 43–47chemical bond, 107chemical change. See also chemical
reactions.conservation of mass, 72definition, 11, 107evidence of, 71identifying, 11, 11–16law of conservation of mass, 72precipitates, 21rearrangement of atoms, 71reversing, 21solids produced by. See precipitates.
chemical equations, 25, 107chemical property, 107
chemical reactions. See also chemical change.conserved elements, 26definition, 11, 107diatomic elements, 26, 26endothermic reactions, 52exothermic reactions, 52at the molecular scale, 25, 25–29products, 25, 71reactants, 25, 35–37and thermal energy, 49, 49–52vs. physical change, 17, 17–23, 20, 22,
31waste, 71
circuit, 107circuit boards
copper used in, 6–9definition, 3, 107etching, 3–9, 7, 7illustration, 3producing, 3–9waste products, 6–9
closed systems, 39, 107communication skills, 100compound, 107concept maps, 99conservation of mass, 72. See also law of
conservation of mass.closed systems, 39definition, 39, 107open systems, 39reasons for, 39–41
conserved, 26, 107constraint, 46, 107copper
in circuit boards, 6–9as environmental hazard, 7–9precipitating, 61–64reclaiming, 61–69, 65
Index
Bold page number indicates a definition. Italic page number indicates an illustration.
INDEX
112 REACTIONS
copper mines, 6, 8copper ore, 6criteria, 46, 107criterion, 46, 107
Ddata, 107density, 107diatomic elements, 26, 26, 108disadvantage, 108dissolve, 20, 108drawing microscopic views, 90, 90dropper bottle, proper use of, 81
Eecosystems, 105element, 108endothermic reactions, 52, 108energy
definition, 108tracking, 105
energy transfer, 108engineering design process, 57–60, 72,
108engineers
definition, 53, 108role in engineering design, 74–75
environmental problems, designing solutions toelements of good design, 88role of engineers, 74–75
etch, 108etching circuit boards, 3–9, 7, 7evidence, 9, 108exothermic reactions, 52, 108
Ffiltrates, 68, 108focusing a microscope, 89formal investigation reports, writing, 98function, 105
Ggas, 108graduated cylinder, reading, 80graphs
bar graphs, 82–83interpreting, 86–87line graphs, 84–85scatterplots, 84–85
IInternational System of Units (SI), 80Internet sources, evaluating, 103–104interpreting graphs, 86–87
Llaw of conservation of mass, 39, 72, 108.
See also conservation of mass.life cycle, 108line graphs, 84–85liquid
definition, 108measuring the volume of, 80
liter (L), 108literacy strategies
communication skills, 100concept maps, 99Internet sources, evaluating, 103–104keeping a notebook, 96–97media messages, evaluating, 101–
103, 102oral presentations, 94reading scientific procedures, 95writing a formal investigation report,
98
Mmarshmallows roasting, 25mass, changes during chemical reactions,
35–37. See also conservation of mass.material, 108matter
definition, 108tracking, 105
measuring the volume of a liquid, 80media literacy, 101–103, 102

REACTIONS 113
INDEX
meter (m), 108metric system
base units, 91–92definition, 108prefixes, 92SI (International System of Units),
91–92microscopes
drawing microscopic views, 90, 90focusing, 89parts of, 89safety guidelines, 89–90
model, 108modeling, 105molecule, 108
Nnotebooks, keeping, 96–97
Oobservation, 108open systems, 39oral presentations, 94
Pparticle, 108patterns, 105, 108physical change
definition, 109dissolving, 20vs. chemical reactions, 17, 17–23, 20,
22, 31, 31–34physical property, 109precipitates, 21, 109precipitating copper, 61–64precipitation, 109prefixes, metric system, 92products of chemical reactions
changes in mass, 35–37definition, 25, 109
property, 109proportional relationships, 105prototypes
definition, 43, 109developing and testing, 53, 53–56engineering design process, 57–60refining the design, 57–60
Qquantity, 105
Rreactants in chemical reactions
changes in mass, 35–37definition, 25, 109
reactivity, 109reading
a graduated cylinder, 80scientific procedures, 95
reclaimingcopper, 61–69, 65definition, 109
reclamation, 109reports
communication skills, 100concept maps, 99formal investigation, 98keeping a notebook, 96–97oral presentations, 94
Ssafety agreement form, 78safety guidelines
carrying microscopes, 89–90general, 76–78
scale, 105, 109scatterplots, 84–85science
definition, 109nature of, 73–75
science skillsbar graphing, 82–83communication, 100concept maps, 99good experimental design, 88interpreting graphs, 86–87keeping a notebook, 96–97line graphs, 84–85measuring the volume of a liquid, 80oral presentations, 94reading a graduated cylinder, 80reading scientific procedures, 95scatterplots, 84–85using a dropper bottle, 81writing a formal investigation report,
98

INDEX
114 REACTIONS
scientific inquiry, 74scientific method, 109scientific model. See model.scientific procedures, reading, 95scientist, 109SI (International System of Units), 80simulation, 109solid, 109solubility, 109state of a substance, 18, 19, 109structure, 105, 109system, 105system models, 105
Ttechnology, 109temperature, 109thermal energy, definition, 49, 110thermal energy and reactions
description, 49, 49–52endothermic reactions, 52exothermic reactions, 52
trade-off, 9, 110
Vvolume, 110
Wwaste products from etching circuit
boards, 6–9weight, 110writing a formal investigation report, 98

APPENDIX A
REACTIONS 115
Credits
Abbreviations: t (top), m (middle), b (bottom), l (left), r (right), c (center)
All illustrations by Seventeenth Street Studios
Front cover photo and unit opener: Tom McHugh / Photo Researchers, Inc.
Page 3 l: Maximiliam Stock/Photo Researchers, Inc.; r: Maximiliam Stock/Photo Researchers, Inc.; Page 6 l: Spencer Musick, r: Peter Bowater/Photo Researchers, Inc.; Page 7 l: Per-Anders Pettersson/Getty Images, r: © Ed Young/ Corbis; Page 8: © Lowell Georgia/Corbis; Page 11: Charles D. Winters/Science Source; Page 15: Charles D. Winters/Science Source; Page 17: Turtle Rock Scientific/Science Source; Page 18: Maximilian Stock Ltd/Science Source; Page 19: GIPhotoStock/Science Source; Page 20 l: GIPhotoStock/Science Source, r: Ted Kinsman/Science Source; Page 25: Digirebelle®; Page 31 tl, bl: GIPhotoStock/Science Source; tcl: Gusto Productions/Science Source; tcr: Charles D. Winters/Science Source; tr, br: Andrew Lambert Photography/Science Source; bcl: Science Source; bcr: © Stuart Westmorland/Science Faction/Corbis; Page 43: Stockbyte/Getty Images; Page 49: Charles D. Winters/Science Source; Page 53: RDanailova/Shutterstock; Page 61 l: David Taylor/Photo Researchers, Inc., r: Andrew Lambert Photography/Photo Researchers, Inc.; Page 65: © Philippe Eranian/ Corbis