Check out user manuals - PowerHouse Hub
172
-
Upload
khangminh22 -
Category
Documents
-
view
0 -
download
0
Transcript of Check out user manuals - PowerHouse Hub


PowerHouse Talent Admin Guide 7.1 www.powerhousehub.com
2 | Page
Mediasphere Holdings Pty Ltd Copyright © 2020 [email protected]
Contents
PowerHouse Hub Admin Guide ............................................................................................................................................................................ 5
The Administration Portal ........................................................................................................................................................................................ 5
Settings ........................................................................................................................................................................................................................... 7
Email ................................................................................................................................................................................................................................ 8
Includes .......................................................................................................................................................................................................................... 9
Styling ........................................................................................................................................................................................................................... 10
CPD ................................................................................................................................................................................................................................ 11
CPD Settings ............................................................................................................................................................................................................... 12
Enabling CPD for Manager and Learner Users .............................................................................................................................................. 15
Notes ............................................................................................................................................................................................................................. 16
Licensing ...................................................................................................................................................................................................................... 17
Payments ...................................................................................................................................................................................................................... 17
Site .................................................................................................................................................................................................................................. 19
System ........................................................................................................................................................................................................................... 20
Integrations ................................................................................................................................................................................................................. 22
Menus ........................................................................................................................................................................................................................... 23
Messenger ................................................................................................................................................................................................................... 24
Modules ........................................................................................................................................................................................................................ 25
Developer Tools ........................................................................................................................................................................................................ 25
About ............................................................................................................................................................................................................................. 26
PowerHouse Hub Talent Modules ..................................................................................................................................................................... 27
User Accounts ............................................................................................................................................................................................................ 29

PowerHouse Talent Admin Guide 7.1 www.powerhousehub.com
3 | Page
Mediasphere Holdings Pty Ltd Copyright © 2020 [email protected]
Profile Summary ........................................................................................................................................................................................................ 32
Admin Permissions ................................................................................................................................................................................................... 34
Import Users ............................................................................................................................................................................................................... 35
Export Users ................................................................................................................................................................................................................ 36
User Fields ................................................................................................................................................................................................................... 37
User Forms .................................................................................................................................................................................................................. 39
Buy More Users ......................................................................................................................................................................................................... 41
Certificate Manager ................................................................................................................................................................................................. 42
Group Management ................................................................................................................................................................................................ 46
Events ............................................................................................................................................................................................................................ 48
Webinar Manager ..................................................................................................................................................................................................... 59
Dashboard Surveys .................................................................................................................................................................................................. 66
Premium Surveys ...................................................................................................................................................................................................... 72
Job Alerts Manager .................................................................................................................................................................................................. 81
Dashboard Banner .................................................................................................................................................................................................... 86
News Editor ................................................................................................................................................................................................................. 89
Links ............................................................................................................................................................................................................................... 93
Document Library ..................................................................................................................................................................................................... 95
User Uploads .............................................................................................................................................................................................................. 99
Content Publisher .................................................................................................................................................................................................. 103
Marking Assessments ........................................................................................................................................................................................... 142
Learning Plan Manager ....................................................................................................................................................................................... 144
Onboarding Manager .......................................................................................................................................................................................... 148
WorkPro .................................................................................................................................................................................................................... 152
Course Catalogue .................................................................................................................................................................................................. 152

PowerHouse Talent Admin Guide 7.1 www.powerhousehub.com
4 | Page
Mediasphere Holdings Pty Ltd Copyright © 2020 [email protected]
Training Records .................................................................................................................................................................................................... 157
Reports ...................................................................................................................................................................................................................... 158
Scheduled Tasks ..................................................................................................................................................................................................... 162
Web Content Editor .............................................................................................................................................................................................. 164
Technical Support .................................................................................................................................................................................................. 172
PowerHouse Talent Admin Guide 7.1 www.powerhousehub.com
5 | Page
Mediasphere Holdings Pty Ltd Copyright © 2020 [email protected]
PowerHouse Hub Admin Guide
Introduction
PowerHouse Hub is a complete online training solution with several features that make creating and maintaining your online courses and online induction program simple.
This part of the PowerHouse Hub manual is intended to take you through the process of setting up your PowerHouse training portal so your learners can have full accessibility to your organisation’s training materials and assets. By the end of this manual, as the Administrator, you will be able to confidently navigate through the portal and successfully:
• create intuitive Learning Programs, courses, and assessments • produce reports based on compliance and learning progress • create events and webinars • upload various documentation for users to access • add various user types • group users together and control the courses accessed by the group • produce highly customised certificates • generate compliance and progress reports • create Dashboard and Premium Surveys • create courses to the Course Catalogue module, ready for the learner’s purchase • create various pieces of news; and • add a specific colour scheme, background images and company logos
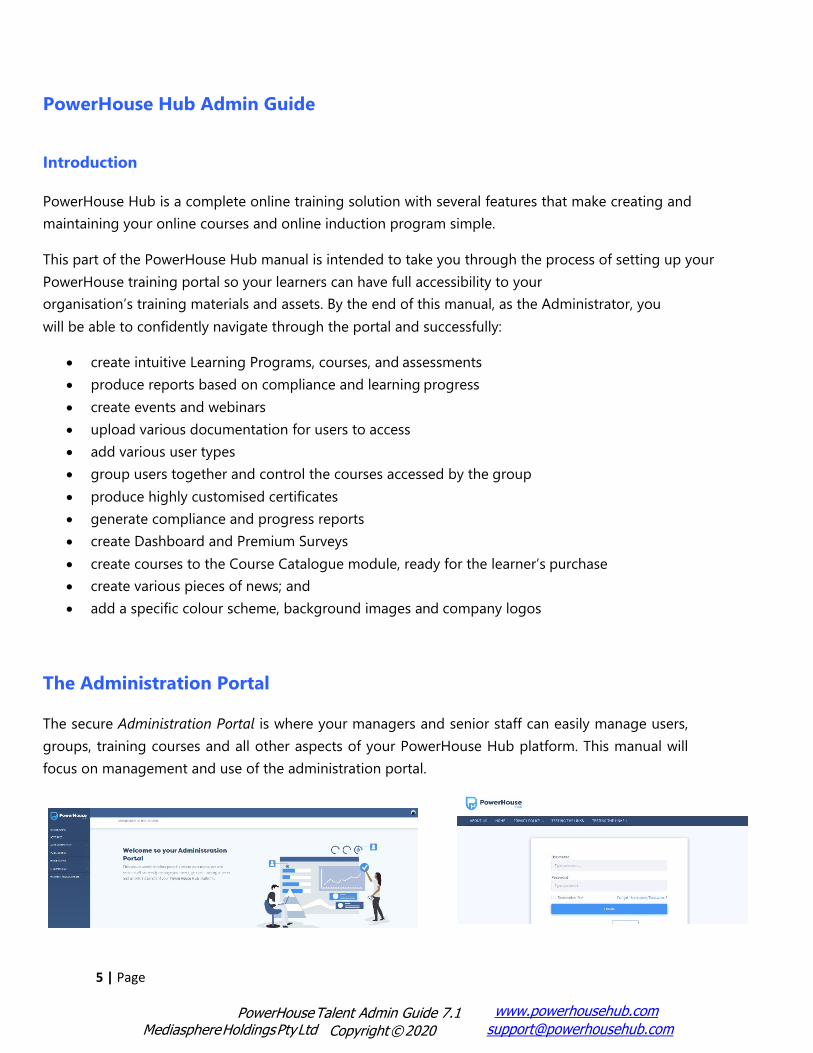
The Administration Portal
The secure Administration Portal is where your managers and senior staff can easily manage users, groups, training courses and all other aspects of your PowerHouse Hub platform. This manual will focus on management and use of the administration portal.

PowerHouse Talent Admin Guide 7.1 www.powerhousehub.com
6 | Page
Mediasphere Holdings Pty Ltd Copyright © 2020 [email protected]
The web address of the administration portal is the same as for the user portal.
1. Enter your username and password 2. Select the Login button
To access the remaining modules within the platform, click the menu items within the left-hand side menu. As you click each tab, it will display all the modules relating to that heading in a dropdown menu.
The headings displayed within the menu include:
Dashboard
As mentioned above, this is the default screen upon logging in to the portal. The Dashboard is where recent activity and new registrations is displayed.
Settings
This module is related to the pages of the learner portal. In this module you can adjust the Google Analytics settings, the email addresses that are used on the site, and enable or disable the available modules. Settings such as CPD and re-induction can also be adjusted here.
Administration
This is where administrative duties will be carried out. This includes anything from creating accounts and generating reports to creating CPD Categories.

PowerHouse Talent Admin Guide 7.1 www.powerhousehub.com
7 | Page
Mediasphere Holdings Pty Ltd Copyright © 2020 [email protected]
Publishing
This module is used to create news, documents, webinars, events, and courses and manage existing courses. The Content Publisher will be looked at in more detail on pages 36-94 of the manual.
Workflows
This module allows you to enhance your learner’s skills by having them complete Learning Programs.
Website Management
Create and structure web content in this module. Banners can be uploaded here. This module can also be used to sell your online courses and provide discounts coupons to your learners.
Settings
The settings module allows administrators to adjust the Google Analytics, email addresses, tax settings and functions, such as Continued Professional Development. Click on Settings in the left-hand menu.
This will open the Platform Settings page, where you will see the settings icons displayed like so:

PowerHouse Talent Admin Guide 7.1 www.powerhousehub.com
8 | Page
Mediasphere Holdings Pty Ltd Copyright © 2020 [email protected]
Select the Email thumbnail displayed on the Platform Settings page. Updating your company email is done through this setting. To update these details, complete the following:
Admin Email Address: this is the email address used as ‘sender’ for every email generated from the site.
Re-Route All Emails: this will force all sent emails to the Admin Email Address specified above. This feature is used for site testing.
Admin Name: this is the name accompanying the email address used as ‘sender’ for every email generated from the site.

PowerHouse Talent Admin Guide 7.1 www.powerhousehub.com
9 | Page
Mediasphere Holdings Pty Ltd Copyright © 2020 [email protected]
Contact Email Address: this is the email address used as ‘recipient’ for every enquiry submitted through the Help/Contact Us form.
Once you have finished filling in all the relevant fields, click the Save button.
Includes
The settings displayed within the Includes page are for advanced users only. You can add links to CSS stylesheets and JavaScript files to customise fonts and provide additional functionality.
Additionally, you can add Google Analytics scripts to each script textbox. Google Analytics enable you to track individual page visits from users, including their operating system and the browser used. Google Analytics processes this data and obtains information that is beneficial to site owners.

PowerHouse Talent Admin Guide 7.1 www.powerhousehub.com
10 | Page
Mediasphere Holdings Pty Ltd Copyright © 2020 [email protected]
1. Once you have completed script text in all relevant textboxes, press Save.
Styling
This is where you can change the look of your site.
Each image upload section with have three buttons, which allow you to view the current image, change the current image, and reset the current image.
1. To update the current image(s), press the Change button, and select the correct image from your files.

PowerHouse Talent Admin Guide 7.1 www.powerhousehub.com
11 | Page
Mediasphere Holdings Pty Ltd Copyright © 2020 [email protected]
2. Once you have made these changes, click Save.
CPD
Continuing Professional Development also known as CPD, can allow you to track your users progress whilst they work through certain courses, events and webinars that allow them to obtain CPD upon completion. To begin creating CPD, on the left-hand menu select Settings and this will allow you to select the CPD module.
1. Select the CPD button at the top of the page. 2. To enable CPD slide the toggle button to ON 3. Select Save 4. After selecting save, below there should be a CPD Category section as shown below.
5. In Category Title name the CPD category you would like your users to be assigned to, then select Add Category.
6. After creating all categories for users, select Group Management under Administration on the left-hand menu.
7. Select user group you want to assign CPD value to by selecting the three dots next to the user group under Actions.
8. Then select Edit CPD Group from the drop-down menu.
**Note: Please assign users to 1 parent group to inherit the CPD settings associated to that group. If you wish to change the users CPD group, please select User Accounts under the Administration tab.
1. Select the user account you wish to change. 2. Select the Assigned Groups button. 3. In Assigned CPD Group, the dropdown menu will show other CPD groups you can assign the user to.

PowerHouse Talent Admin Guide 7.1 www.powerhousehub.com
12 | Page
Mediasphere Holdings Pty Ltd Copyright © 2020 [email protected]
CPD Settings
After selecting Edit CPD Group through Group Management, you will now be able to enable the group CPD and edit how many points you would like to allocate for the selected group.
1. Select the enable CPD group check box. 2. Under Display Text you can show what type of CPD points will be credited to the learner. There are 3
options already in place Credits, Points and Hours. You can also edit the CPD type in the field that you wish to use. You can assign different CPD value to different groups.
3. You are then able to allocate how much 1 hour will equal to 1 CPD value.
Show Conversion Tooltip: allows learners to see the conversion of CPD they have retrieved and the hours conversion. This feature is optional. Minimum Hours Required: Is how many hours the group will need to complete. Limit Start Date: Is the start date for the user to start completing CPD. Limit Date End: Is the end date for the when the user is required to complete the minimum requirements to gain their CPD accreditation. Days added after limit date reached: Is the period of time their renewal date is due ie. If 1 year you would enter 365 days.

PowerHouse Talent Admin Guide 7.1 www.powerhousehub.com
13 | Page
Mediasphere Holdings Pty Ltd Copyright © 2020 [email protected]
CPD Certificate Here you can allocate a certificate for when learners have completed their CPD.
1. From the dropdown select which certificate you would like to assign the group to receive.
Note: You can modify certificates under Certificate Manager in Administration tab. CPD Category In CPD Category you can now create categories that will allocate CPD points to and the minimum hours the learner needs to achieve to complete the category. The categories shown are dynamically pulled through from the CPD settings in Settings.
1. Select the Assign checkbox to enable minimum hours. 2. Under minimum hours input how many hours the learner will need to obtain for that category within the
time allocated. 3. Ensure that you have assigned the correct categories to each group.
Note: If CPD is not assigned minimum hour’s, the CPD Category will become optional for users to complete as opposed to mandatory. Assigning CPD for Webinars, Events and Courses You are now able to assign CPD for webinars events and course for users to retrieve points for attending events and webinars or completing courses. Webinars To begin assigning CPD to webinars, select Webinar Manager in the Publishing tab.
1. You can add CPD by creating a new webinar by selecting Add Webinar button and then select CPD Category.

PowerHouse Talent Admin Guide 7.1 www.powerhousehub.com
14 | Page
Mediasphere Holdings Pty Ltd Copyright © 2020 [email protected]
2. If you have a webinar to add CPD to, select the webinar you want to add CPD to and select the first edit icon next the name of the webinar.
3. Select CPD Category at the top of the section. 4. Now input the value of CPD in the first section and the table below will calculate the CPD value to each
group. 5. Select the CPD categories you wish to assign the webinar to. 6. Select Save.
Events To begin assigning CPD to events, select Events in the Publishing tab.
1. You can add CPD by creating a new event by selecting Add Event button and then select CPD Category.
2. If you have an event to add CPD to, Select the Event, you want to add CPD to and select the first icon next the name of the webinar.
3. Select CPD Category at the top of the module. 4. Now input the value of CPD in the first section and the table below will calculate the CPD value to each
group. 5. Select the CPD categories you wish to assign the webinar to. 6. Select Save.
Courses/SCORM Course To begin assigning CPD to courses, select Content Publisher in the Publishing tab.
1. You can add CPD by creating a new course by selecting Add Course button and then select CPD Category.
2. To add CPD to a course pre-made in Content Publisher select the tool icon 3. Scroll down to the Assign CPD Hours and Categories. 4. Now input the value of CPD in the first section and the table below will calculate the CPD value to each
group. 5. Select the CPD categories you wish to assign the webinar to. 6. Select Save.

PowerHouse Talent Admin Guide 7.1 www.powerhousehub.com
15 | Page
Mediasphere Holdings Pty Ltd Copyright © 2020 [email protected]
Enabling CPD for Manager and Learner Users To ensure that Managers and Learner accounts are enabled they will be able to see the CPD Overview which shows what has been completed and how much CPD is remaining including the dates.
1. Select Settings on the left-hand side menu. 2. Select System from the top menu bar. 3. Through Global Manager Settings you can enable the Allow managers to view Learners CPD Overview
by using the toggle button.
4. If you scroll down to the learner dashboard settings you can enable Show CPD Overview, this will
learners to see their CPD progress on their dashboard.
5. Select Save.

PowerHouse Talent Admin Guide 7.1 www.powerhousehub.com
16 | Page
Mediasphere Holdings Pty Ltd Copyright © 2020 [email protected]
Notes Administration users can leave notes under User Accounts for other admin users to view. This feature will allow admin users to leave notes about the learner under their profile to either keep track or notes for other admin accounts to view and update.
1. Select User Accounts in the Administration tab. 2. Under the actions tab select Edit User. 3. Then select the Notes button. 4. In the text box under Write A New Note you can add text, images, or a link for admin users to see.
5. Under User Notes that is a history of notes left from other administration users you can also delete the
note in the action’s dropdown on the right-hand side.
6. To resolve a note, select the Actions dropdown on the note, and select Mark as Resolved.
7. You can also select the Show Resolved or Show Active button to see any archived notes that have been resolved from other admin users.

PowerHouse Talent Admin Guide 7.1 www.powerhousehub.com
17 | Page
Mediasphere Holdings Pty Ltd Copyright © 2020 [email protected]
Licensing
This is where the number of learners created for this site can be adjusted. This page provides an overview of learner totals and allows you to order more where required.
Payments
This is where the tax settings used on the site will be updated and you are also able to configure PayPal through this feature. There are three sections requiring data, this includes:
• Business Number • Business Number Label – Appears on all invoices • Currency Symbol • Payment Currency • Include Tax on Purchases • Tax Text • Tax Percentage

PowerHouse Talent Admin Guide 7.1 www.powerhousehub.com
18 | Page
Mediasphere Holdings Pty Ltd Copyright © 2020 [email protected]
PayPal Before you can integrate a PayPal, you must set up your development environment to get OAuth 2.0 client ID and secret credentials for the sandbox and live environments.
Stripe Payment Gateway You can now set up Stripe as your payment gateway for users to purchases items. Please follow instructions on Payments module.
Payment Gateways To make sure you have the correct payment gateway set up, at the top of the integrations will show what has been enabled.

PowerHouse Talent Admin Guide 7.1 www.powerhousehub.com
19 | Page
Mediasphere Holdings Pty Ltd Copyright © 2020 [email protected]
Site
This is where the settings for site related information are controlled.
Site Details
Customise your site’s basic details and activate maintenance mode.
Location Details
Updating your company address is done through this section. Fill out the required fields, and click Save.

PowerHouse Talent Admin Guide 7.1 www.powerhousehub.com
20 | Page
Mediasphere Holdings Pty Ltd Copyright © 2020 [email protected]
System
This is where the settings for the system are updated, from the top select which area you would like to configure. Sections include:
Display Homepage Template
Here you can change the home page template by using the drop-down menu on how the login page will look.
User Forms
You can enable and modify the user forms that are created and shown in the front end.
User Labels
In this section you can modify the labels that represent each user type. When this is changed note that this will appear throughout the platform. Please note that the label only allows 15-character limit.
Course Settings Enable or disable the function for users to be able to export courses to PDF. Onboarding Settings This allows you to enable Onboarding Workflows for users. You can choose to show the Onboarding Workflow on login or allow users to access modules if they have not completed assigned workflows.
Training Record This feature allows you to enable the Reflective Journal to feature for learner users to complete when they have accomplished CPD courses. Registration Registration Forms In this section you can enable which registrations forms can be viewed on the front-end of the website. Registration Induction In each panel content for learner, contractor and business you can modify the text for each registration for the user.
Security
XSS Security This setting allows you to enable or disable the Content Security Policy. Simply select the slider icon to do so.
PowerHouse Talent Admin Guide 7.1 www.powerhousehub.com
21 | Page
Mediasphere Holdings Pty Ltd Copyright © 2020 [email protected]
Lockouts This allows you to set lockout restrictions. To set a lockout, select the amount of maximum incorrect attempts. If you want infinite attempts, type zero in this field. Once you have done this, set the duration you wish to lock your learners out for. Password Options This allows you to add password restrictions for your site. To set specific password requirements, enter the minimum and maximum characters and select if you’d like to require an uppercase letter, number or special character. Global Manager Settings The following allows settings for all manager users. You can enable managers to add new learner accounts, allow managers to update a user’s Workforce Wallet information and allow managers to upload files and add expiry dates.
Copyright Protection
This section allows you to control whether right clicking is available on course materials. Once you have finished populating the relevant data, click Save. Dashboard Learner Dashboard This section allows you to adjust how the learner dashboard displays. Here you can show profile blocks, activity reports, risks and capabilities and alerts. The learner’s compliance block can also be selected. E-Commerce Alternative Login Page In this section you can configure where the login panel is positioned on the front end of your page when eCommerce is enabled. Frontend Catalogue By enabling this setting, you are allowing your users to purchase events from the learner portal. You can also select how many courses, events, and webinars you can showcase in the front end of your homepage.
Miscellaneous Portal Link Link to another PowerHouse Hub portal. To link an account, you must have users with matching usernames

PowerHouse Talent Admin Guide 7.1 www.powerhousehub.com
22 | Page
Mediasphere Holdings Pty Ltd Copyright © 2020 [email protected]
and emails.
LDAP Integration This section allows you to enable or disable the LDAP Integration. Select the slider icon to do so. Integrations
Integrations are a way of allowing additional functionality throughout the product. You can enable/disable and control the configurations for your installed integrations here.
Select the Install button to begin the installation process.

PowerHouse Talent Admin Guide 7.1 www.powerhousehub.com
23 | Page
Mediasphere Holdings Pty Ltd Copyright © 2020 [email protected]
Menus
The Menu Manager allows you to reorder or rename menu items on then landing page for all user types.
1. Select a user type from the top-right menu. 2. Select the pen icon and rename the menu title. 3. Select Save.
Where this is a star next to a menu title this means when changed to a different name this will be applied to all paged within the user portal. This feature is only available for learner accounts.
1. To change a starred title, select the pen icon next to a star menu item.

PowerHouse Talent Admin Guide 7.1 www.powerhousehub.com
24 | Page
Mediasphere Holdings Pty Ltd Copyright © 2020 [email protected]
2. You can choose options to create a singular and plural name as the menu title. Please type your desired new menu title name. Example: Singular – Unit and Plural – Units as shown below.
3. If you would like to use the plural as the menu title, select yes to enable this feature.
4. Select Save.
Messenger
Messenger settings allow you to control on user’s ability to message other users, you can control for learner and manager users.

PowerHouse Talent Admin Guide 7.1 www.powerhousehub.com
25 | Page
Mediasphere Holdings Pty Ltd Copyright © 2020 [email protected]
Modules
Each site is designed and set up per instructions from management at your company. The modules which were deemed appropriate for use by your company were selected. This selection cannot be changed by users.
If you wish to add or remove modules from your product, please contact Powerhouse Hub. This is also the case with the Menu Manager page. On this page you can enable or disable the available tabs inside the left-hand menu on the portal. If you wish to enable or disable modules within your platform, please contact Powerhouse Hub.
Developer Tools
If you wish to add and create test users to the platform you can use this feature to automatically generate test users and assign them to groups.

PowerHouse Talent Admin Guide 7.1 www.powerhousehub.com
26 | Page
Mediasphere Holdings Pty Ltd Copyright © 2020 [email protected]
About
This is where administrators can view details about their platform, such as the Current Version and Latest Version. If there is a new version of the platform they can upgrade to, the version number will display under Latest Version.

PowerHouse Talent Admin Guide 7.1 www.powerhousehub.com
27 | Page
Mediasphere Holdings Pty Ltd Copyright © 2020 [email protected]
PowerHouse Hub Talent Modules
Now that we have covered the settings for your online training platform, it’s time to take you through all PowerHouse modules you will be using to help manage your staff compliance. The modules will be discussed in the following order:
• User Accounts • Certificate Manager • Group Management • Events • Webinar Manager • Dashboard Surveys • Premium Surveys • News Editor • Links • Document Library • User Uploads • Content Publisher • Marking Assessments • Learning Plan Manager • Onboarding Manager • Course Catalogue • Training Records • Reports • Scheduled Tasks • Web Content Editor

PowerHouse Talent Admin Guide 7.1 www.powerhousehub.com
28 | Page
Mediasphere Holdings Pty Ltd Copyright © 2020 [email protected]
NOTE: for all modules to display on the learner dashboard, all modules must be enabled through Modules. You can enable all dashboard modules through System, in the Settings module. Once you have
clicked the System icon, you will be taken to the Systems Settings page.

PowerHouse Talent Admin Guide 7.1 www.powerhousehub.com
29 | Page
Mediasphere Holdings Pty Ltd Copyright © 2020 [email protected]
User Accounts
This feature allows you to create various user access levels. You have the option to create learners, managers, businesses, and administrator accounts.
Add User Account
1. To create a new user account, select the Add User icon inside the User Accounts module.
Account Details
2. Select the User Type. For this demonstration, Learner will be selected. 3. Choose the Status of the learner. 4. Enter the required CPD Credits.

PowerHouse Talent Admin Guide 7.1 www.powerhousehub.com
30 | Page
Mediasphere Holdings Pty Ltd Copyright © 2020 [email protected]
Personal Details
5. Provide basic personal details for your learner, such as their full name, role, address, email and mobile number.
NOTE: ensure you provide the email of the user, as this is a mandatory field.
Associate to Business
If your learner is a contractor for a business, you must associate them with that business. This will allow the Business to track and monitor the learner’s progress.
Link to other user accounts
6. Link your learner account to other user accounts. Do this by selecting the dropdown
menu for each account you wish to link the learner account to.
NOTE: As you would have already linked your learner to a business account, the only account you will need to link to is a Manager account.

PowerHouse Talent Admin Guide 7.1 www.powerhousehub.com
31 | Page
Mediasphere Holdings Pty Ltd Copyright © 2020 [email protected]
Login details
7. Provide basic login details for your learner.
NOTE: ensure you complete this section as this is a required field.
Assign to groups
Assign the learner to groups. By doing this, you are allowing the learner accessibility to all course materials, events, webinars and documents assigned to those groups.
8. Choose the relevant group(s) by selecting the checkboxes.
Welcome email
Select this checkbox to send this learner a welcome email with login credentials etc.
9. Once you have completed this form, press Save.

PowerHouse Talent Admin Guide 7.1 www.powerhousehub.com
32 | Page
Mediasphere Holdings Pty Ltd Copyright © 2020 [email protected]
Profile Summary
Under User Accounts, you can view a user’s details by clicking on their name inside the Users List table.
This will present you with the user’s Profile Summary, where you can view and edit their key details, view and assign groups, view activity completion status, and login as the user.
Edit details
1. To edit the user’s details, click Edit Details. 2. Update the required information. 3. When finished, click Save at the very bottom of the page.

PowerHouse Talent Admin Guide 7.1 www.powerhousehub.com
33 | Page
Mediasphere Holdings Pty Ltd Copyright © 2020 [email protected]
Assigned groups
1. To assign your user to groups, click Assigned Groups within the Profile
Summary. 2. Select the relevant groups/subgroups you wish to assign or unassign to the user. By
assigning groups to your user account, you are giving the user access to all courses, news, webinars, documentation and events within that group.
NOTE: The Group Management module will be spoken about in detail on page 31-32
3. When finished, press Save.
PowerHouse Talent Admin Guide 7.1 www.powerhousehub.com
34 | Page
Mediasphere Holdings Pty Ltd Copyright © 2020 [email protected]
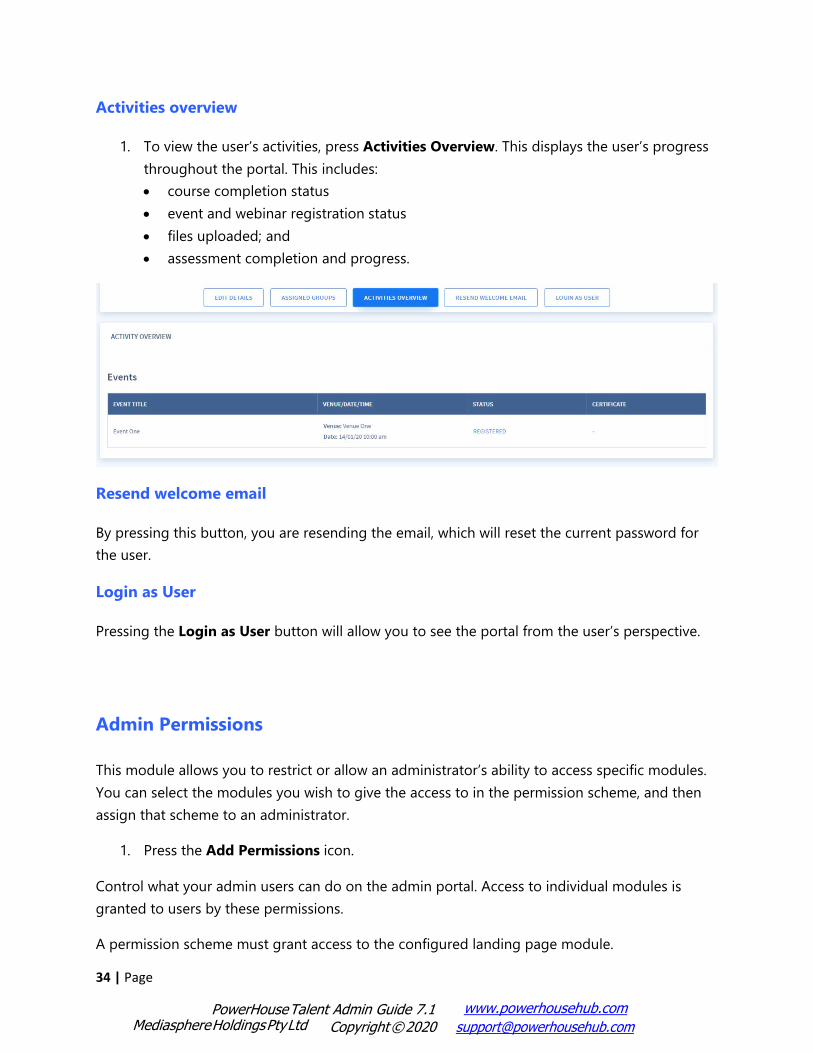
Activities overview
1. To view the user’s activities, press Activities Overview. This displays the user’s progress throughout the portal. This includes: • course completion status • event and webinar registration status • files uploaded; and • assessment completion and progress.
Resend welcome email
By pressing this button, you are resending the email, which will reset the current password for the user.
Login as User
Pressing the Login as User button will allow you to see the portal from the user’s perspective.
Admin Permissions
This module allows you to restrict or allow an administrator’s ability to access specific modules. You can select the modules you wish to give the access to in the permission scheme, and then assign that scheme to an administrator.
1. Press the Add Permissions icon.
Control what your admin users can do on the admin portal. Access to individual modules is granted to users by these permissions.
A permission scheme must grant access to the configured landing page module.
PowerHouse Talent Admin Guide 7.1 www.powerhousehub.com
35 | Page
Mediasphere Holdings Pty Ltd Copyright © 2020 [email protected]
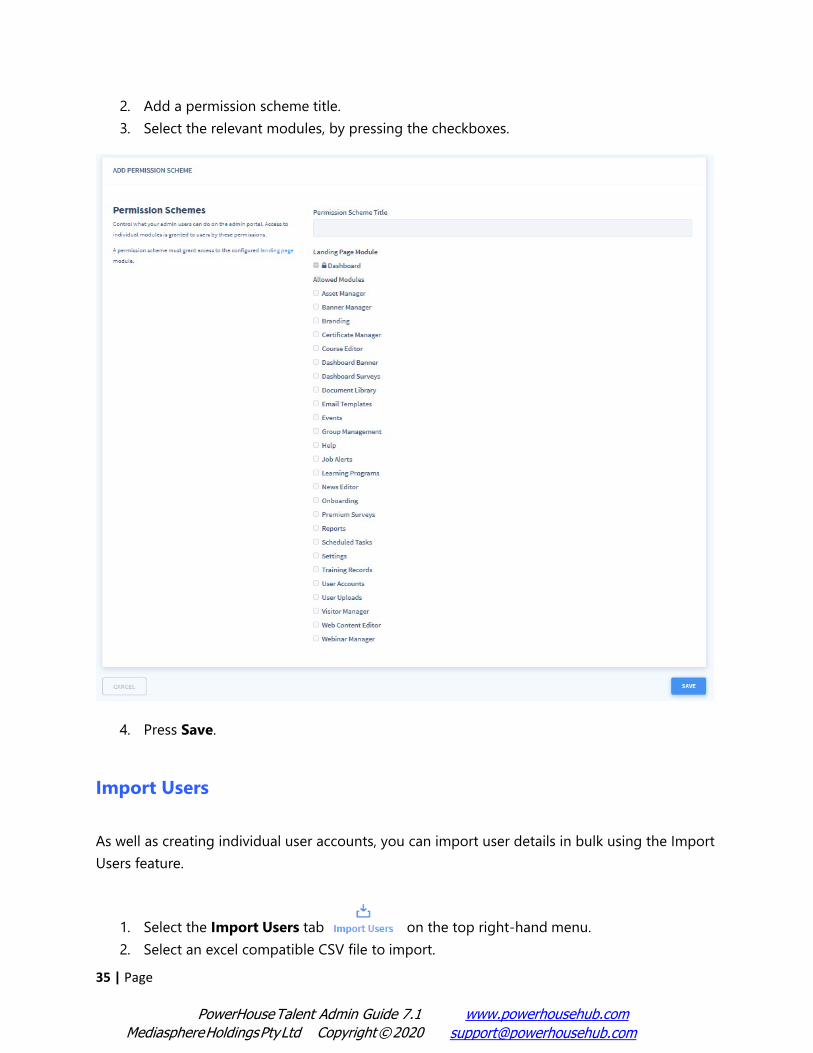
2. Add a permission scheme title. 3. Select the relevant modules, by pressing the checkboxes.
4. Press Save.
Import Users
As well as creating individual user accounts, you can import user details in bulk using the Import Users feature.
1. Select the Import Users tab on the top right-hand menu. 2. Select an excel compatible CSV file to import.

PowerHouse Talent Admin Guide 7.1 www.powerhousehub.com
36 | Page
Mediasphere Holdings Pty Ltd Copyright © 2020 [email protected]
NOTE: This module uses a CSV file to add user details to the database. A sample CSV file is provided on the Import Users page
3. To import user information using a CSV file, download the sample CSV file by clicking on Download Sample CSV. This Excel sheet will demonstrate the information and format that you will need to follow to make a new CSV file.
NOTE: for the CSV file to import correctly, anywhere that your data has a comma, you will need to replace it with ,. For example, if your data is: 21 John Street, Carindale, the CSV file should be: 21 John Street,Carindale. When the information is imported the , will be converted back into a comma.
1. Once you have completed creating the CSV file, save the file and make sure that the file
extension is .CSV.
2. On the Import Users page, select on the Choose File button, navigate to the location of your CSV file and select it. The details of the users listed in the CSV file will appear on the screen.
3. Select the Blank Password Handling. You can specify a password for each user within the
CSV file.
4. Once you have completed the relevant fields, press Validate & Import.
5. Once the users have been imported, you can assign them to groups using the Group Management module.
6. Once the users have been assigned to a group, use the Export Users feature in the User
Accounts module to export the details of the users.
Export Users
1. Select the relevant user type(s) and group(s).

PowerHouse Talent Admin Guide 7.1 www.powerhousehub.com
37 | Page
Mediasphere Holdings Pty Ltd Copyright © 2020 [email protected]
A spreadsheet will be generated for you, containing all users that have matched the selected criteria.
2. Press Save.
NOTE: no users will be deleted during the exporting process.
User Fields User fields are used to create fields for a user form, this feature allows administrators to create custom fields for users that can display in registration forms, reports and user profiles. Forms allows you to obtain information needed for different types of users. To begin select User Accounts in the Administration module.
1. Select User Fields in the top menu panel. You will be able to see a list of all custom user fields
created and you can edit them by selecting under Actions the three dots.
2. Select Add Field 3. Select the Type dropdown to give the user field a value and give the custom field a Title.
• Text – allows text to be an input. This user field type can be unique.

PowerHouse Talent Admin Guide 7.1 www.powerhousehub.com
38 | Page
Mediasphere Holdings Pty Ltd Copyright © 2020 [email protected]
• Text Area – field allows users to enter a paragraph response. • Number – field will require a numerical value. • Dropdown – allows values to be selected. • Email – will require an email address. • Checkbox – allows users to select the checkbox. • Radio – allows users to select a value. • Date picker – allows a date to be used. You are also able to configure this field for the user to select only
future dates.
Under Display & Permission Settings, this section allows you to specify where you would like the fields to appear.
1. Toggle Yes for Show in reports if you would like the fields to be included in reports that are created. 2. Toggle Yes for Show in user profiles if you would like learners to complete the user fields under Edit Profile
where they can complete these manually. 3. Select Create
Once you create custom fields for a user types, they will automatically become a field for the user type allocated to complete when creating a new user or existing users.
SAML Integration Using the SAML Integration, you can specify claims that you would like to sync with the users account. This would be useful for keeping information up to date across the two platforms in instances where a family name or email address changes.
1. To begin through Settings, select Integrations. 2. Select SAML 2.0 Single Sign on and select install.

PowerHouse Talent Admin Guide 7.1 www.powerhousehub.com
39 | Page
Mediasphere Holdings Pty Ltd Copyright © 2020 [email protected]
3. Under User Field Synchronisation, under User Fields use the drop down to select the custom fields list to assign for the claim binding.
4. Select Add Attribute if you would like to assign more fields for claim bindings for users.
5. Select Save.
User Forms After User Fields are created, you can now build a custom form for your users to fill out. There are 3 Active forms to create for learners, contractors, and business users. This page will show if there are current forms allocated each type of user. If the user says, ‘Default Form’, this means there has been no configured forms for this user. To begin creating a form, select User Forms at the top of the menu.
1. Select the Add Form button to create a new form. 2. In Form Description please ensure all mandatory fields correctly filled.
3. If you would like users to have a passphrase to create an account under Publicity, ensure you select “A
passphrase is required to register”. Then input the registration passphrase the user will need to obtain to create an account.

PowerHouse Talent Admin Guide 7.1 www.powerhousehub.com
40 | Page
Mediasphere Holdings Pty Ltd Copyright © 2020 [email protected]
4. In Group Assignments select the group you would like the user to be allocated to. Note: that businesses will automatically be assigned to a system generated business group and contractors will automatically be assigned to those groups that they link to, however you can select additional groups to assign these users to as well.
The Form Builder allows you to configure fields for the registration form. You are also able to add standard and customer fields that have been created through user fields.
1. To add a standard field, select the Add Standard Field button. These fields have been automatically created.
2. To add a custom field, select the Add Customer Field button. These fields have been created through User Fields.
3. To delete a field, select the trash icon and to edit a field select the pen icon. 4. Select the Create button to save the form.
If you have multiple form types, you can unpublish and choose another form to be assigned as published.

PowerHouse Talent Admin Guide 7.1 www.powerhousehub.com
41 | Page
Mediasphere Holdings Pty Ltd Copyright © 2020 [email protected]
Buy More Users
1. Once you have selected the Buy More Users tab, you will be taken to a form that will send your request for more users to Powerhouse Hub.
2. Fill in all relevant details and click Send

Mediasphere Holdings Pty Ltd Copyright © 2020 [email protected] PowerHouse Talent Admin Guide 7.1 www.powerhousehub.com
42 | Page
Certificate Manager
The Certificate Manager allows you to create your own custom certificates. These can then be assigned to courses, events, and webinars.
1. On the left-hand side menu, click the Administration dropdown tab and select the
Certificate Manager module. This will bring you to the List Certificates page.
This is where you can design your own certificates for learners to unlock upon completion of courses, events and webinars.
2. Select the Add Certificate icon.

Mediasphere Holdings Pty Ltd Copyright © 2020 [email protected] PowerHouse Talent Admin Guide 7.1 www.powerhousehub.com
43 | Page
3. Add the certificate title. 4. Choose the background image.
NOTE: it’s important to remember that you must choose a valid image file (either jpg. or .png) with the appropriate dimensions (2480w x 3508h).
5. Inside the Content* field, alter the highlighted text to suit the details of your certificate.

Mediasphere Holdings Pty Ltd Copyright © 2020 [email protected] PowerHouse Talent Admin Guide 7.1 www.powerhousehub.com
44 | Page
NOTE: when creating your certificate, you can also change the hexcodes on each text piece on the certificate. You can change these to suit your company’s colour palette.

Mediasphere Holdings Pty Ltd Copyright © 2020 [email protected] PowerHouse Talent Admin Guide 7.1 www.powerhousehub.com
45 | Page

PowerHouse Talent Admin Guide 7. 1 www.powerhousehub.com
46 | Page
Mediasphere Holdings Pty Ltd Copyright © 2020 [email protected]
6. Once this is done, select the Save button on the bottom of the page.
Once you have pressed Save, you’ll be taken back to the List Certificates page.
There are three icons underneath the Actions heading, inside the Certificates table. These include, and enable you to:
• Download the certificate
• Edit the certificate • Delete the certificate
NOTE: On pages 34, 43 and 84 we mention how you can add this certificate to your learner’s events, webinars, and courses.
Group Management
The Group Management module allows you, the Administrator, to add your users to hierarchical groups along with multiple group managers. Within each group, all users are given access to the same courses, news, events, and course catalogue items.
1. To begin, select the Group Management tab, underneath the Administration dropdown,
on the left-hand side menu.
2. Select the Add Group button. This will take you to the Add Group page, where you can create the group details.

PowerHouse Talent Admin Guide 7. 1 www.powerhousehub.com
47 | Page
Mediasphere Holdings Pty Ltd Copyright © 2020 [email protected]
3. Enter a group name.
4. Add a short description of the group, if required.
NOTE: The Group Key will automatically populate.
5. Press Save. Group Limits
You can now set up group limits to make sure manager users are setting up new users within a certain limit.
1. Enable Group Limit by selecting ON from the toggle button 2. Under Learner Limit select the number manager users can add into the platform. 3. Select Save.

PowerHouse Talent Admin Guide 7. 1 www.powerhousehub.com
48 | Page
Mediasphere Holdings Pty Ltd Copyright © 2020 [email protected]
Events
Events is a comprehensive module that gives you the ability to add face-to-face training events to your learner’s portal.
1. To begin populating events, underneath the Publishing tab, select the Events module.
This will bring you to the Event Listing page. From here, you are able to view current and past events, add event categories, venues and presenters for your events.
Before we add a new event, we’ll need to create a new category, venue and presenter for the event.
Creating event categories
1. Begin by selecting the Categories button, in the top right-hand menu.

PowerHouse Talent Admin Guide 7. 1 www.powerhousehub.com
49 | Page
Mediasphere Holdings Pty Ltd Copyright © 2020 [email protected]
2. Select the Add Category button. 3. Add the name and a short description of your event.
4. Press Save.
Creating event venues
Next, we will be adding a new venue for your event.
1. Select the Venues button in the top-right hand corner of the page.
2. Press the Add Venue button. 3. Enter the venue details, such as the name and address of the venue.

PowerHouse Talent Admin Guide 7. 1 www.powerhousehub.com
50 | Page
Mediasphere Holdings Pty Ltd Copyright © 2020 [email protected]
4. Once you have filled out the details of the venue, press Save.
Lastly, we will be adding the details of the presenter of the event.
Creating event presenters
1. Select the Presenters button in the top-right hand corner of the page.
2. Press the Add Presenters button. 3. Enter the event presenter details. 4. Once you have done this, press Save.
Creating an event – settings
Now that you have populated all the details for your event, it’s time to begin creating it.
1. Go back to the Event Listing page and select the Add Event button. 2. Create a new event by adding the event title and the unique identifier (if required). 3. Set the event’s Status to Active using the dropdown. 4. Select the Event Category created earlier, by using the dropdown.

PowerHouse Talent Admin Guide 7. 1 www.powerhousehub.com
51 | Page
Mediasphere Holdings Pty Ltd Copyright © 2020 [email protected]
5. Once you have filled out the details of the venue, press Save.
Lastly, we will be adding the details of the presenter of the event.
Creating event presenters
5. Select the Presenters button in the top-right hand corner of the page.
6. Press the Add Presenters button. 7. Enter the event presenter details. 8. Once you have done this, press Save.
Creating an event – settings
Now that you have populated all the details for your event, it’s time to begin creating it.
5. Go back to the Event Listing page and select the Add Event button. 6. Create a new event by adding the event title and the unique identifier (if required). 7. Set the event’s Status to Active using the dropdown. 8. Select the Event Category created earlier, by using the dropdown.

PowerHouse Talent Admin Guide 7. 1 www.powerhousehub.com
52 | Page
Mediasphere Holdings Pty Ltd Copyright © 2020 [email protected]
NOTE: To ensure your new event appears on the login page, tick the Show on Frontend option. This will only work if your portal has an eCommerce login page. This was discussed on page18.
9. Select the certificate learners will receive after attending the event. This is where the certificate created on pages 28-31 comes in handy.
10. Upload a thumbnail image for your event, by selecting Choose file.
NOTE: The thumbnail image should not exceed 500 pixels wide and 500 pixels high. If the image uploaded has other dimensions, it will be resized and stretched accordingly.
11. Under Registration Cost, you can set a price for your event or make it free. To make it free, select This event is FREE. This information will be displayed on the event thumbnail. It will automate a programming loop to bypass your e-Commerce gateway and allow your learners to register automatically to the event.
12. To set a cost, select This event has a COST, and add a price for a Single Registration.
Add Group Price Add a group price will allow users in a certain group to pay a different price to other users. An example of using can be giving a different price for a member and non-member of your company.
1. Select Add Group Price button. 2. Select the Group you would like to allocate a different price to. 3. Allocate the price amount. 4. Select Save
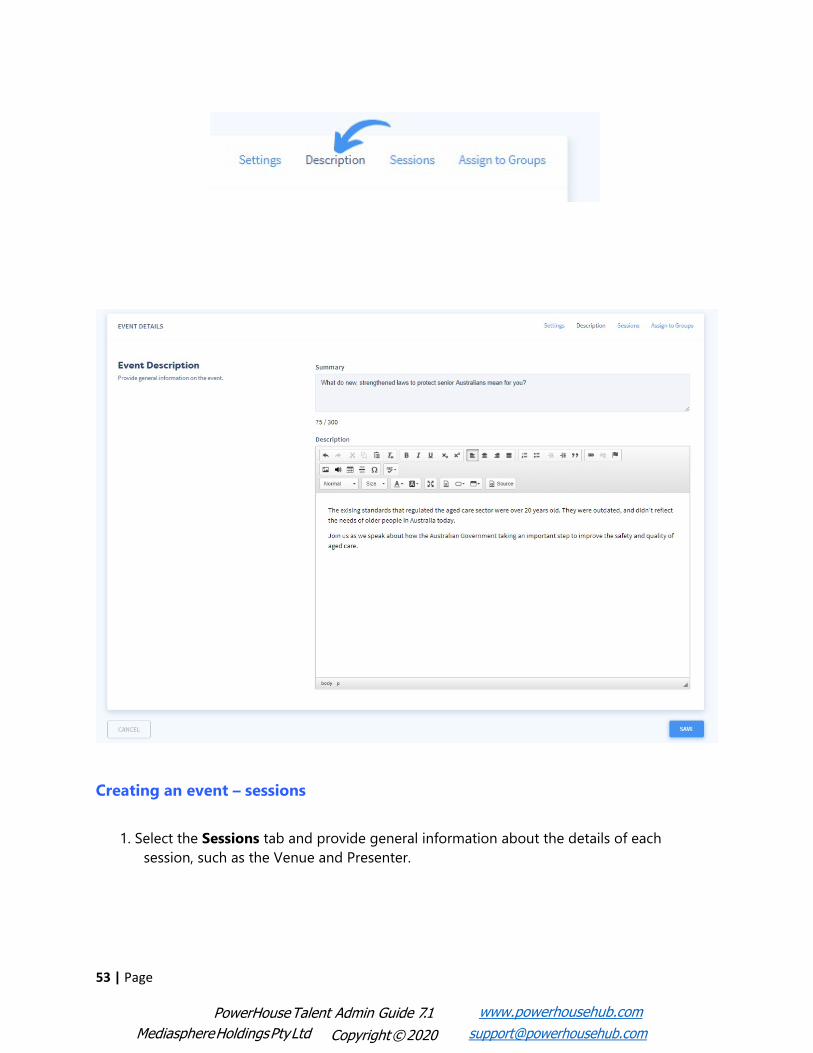
Creating an event – description
1. Once you have finished populating the basic information for your event, select the
Description tab, and provide a general summary and description for your event.
PowerHouse Talent Admin Guide 7. 1 www.powerhousehub.com
53 | Page
Mediasphere Holdings Pty Ltd Copyright © 2020 [email protected]
Creating an event – sessions
1. Select the Sessions tab and provide general information about the details of each session, such as the Venue and Presenter.

PowerHouse Talent Admin Guide 7. 1 www.powerhousehub.com
54 | Page
Mediasphere Holdings Pty Ltd Copyright © 2020 [email protected]
NOTE: Each session can be edited independently and can occur on multiple dates at several venues. Simply
select the Add Session button to add another session to your event.
Creating an event – assign to groups
1. Select the Assign to Groups tab and assign your event to any of the groups displayed. This will show the event on ‘Recommended for you’ for your user(s).

PowerHouse Talent Admin Guide 7. 1 www.powerhousehub.com
55 | Page
Mediasphere Holdings Pty Ltd Copyright © 2020 [email protected]

PowerHouse Talent Admin Guide 7. 1 www.powerhousehub.com
56 | Page
Mediasphere Holdings Pty Ltd Copyright © 2020 [email protected]
2. Once you have navigated through the tabs and filled in the required details, press the Save button.
Editing your event
Once you have provided the required information and saved your event, you will be taken back to the Event Listing page. You will be able to see your newly created event on the list.
Underneath the Actions heading there are 5 icons (shown above and below) which will give you the ability to:
• edit your event • download registration details
• view the event’s payment data • mark the attendance of users; and • delete the event
1. To edit your event, select the edit icon. This will take you back to the Event Details page.
You will notice that there are two new tabs within the Event Details. Custom Fields and Waiting List.

PowerHouse Talent Admin Guide 7. 1 www.powerhousehub.com
57 | Page
Mediasphere Holdings Pty Ltd Copyright © 2020 [email protected]
Editing your event – custom fields
Custom fields allow you to ask the users questions regarding the event. If the user answers the questions incorrectly, they will be automatically blocked from registering.
1. Select the Custom fields tab and enter all the required information.
2. To add another field, select the Add Field button.
3. Once you have finished editing the details of your event, remember to press the Save
button, as this will not automatically save

PowerHouse Talent Admin Guide 7. 1 www.powerhousehub.com
58 | Page
Mediasphere Holdings Pty Ltd Copyright © 2020 [email protected]
Editing your event – waiting list
The Waiting List is used when an event has reached its maxed number of attendees. Once the maximum number of attendees has been reached, users are given the opportunity to be a part of the waiting list.
As you can see in the image below, a user has tried to register for the event; however, the maximum attendees have been reached.
This image is an example of the user’s point of view. The user is trying to apply for a fully booked event.
The user must select APPLY FOR WAITING LIST and submit their request to be added to the waiting list. This will notify them once space in that session becomes available.
After the user has registered for the waiting list, you will see that their information has been added to the table.
As you may remember from earlier when populating session times for the event, as an Administrator, you have the capability to alter the maximum attendees per session.

PowerHouse Talent Admin Guide 7. 1 www.powerhousehub.com
59 | Page
Mediasphere Holdings Pty Ltd Copyright © 2020 [email protected]
1. Select the Sessions tab
2. Alter the Max Attendees so the user(s) within the waiting list can 3. Once you have done this, press Save 4. Select the Waiting List tab and press the Add Attendee button, displayed underneath
the actions tab. This will automatically register the user for the event.
This image is an example of the user’s point of view. The user is registered for the event.
Webinar Manager
The Webinar Manager integrates with the API from the GoToMeeting application. You will need to license GoToMeeting independently and add your access codes into the Webinar Settings tab.
1. Inside the Publishing dropdown on the left-hand side menu, select the Webinar Manager

PowerHouse Talent Admin Guide 7. 1 www.powerhousehub.com
60 | Page
Mediasphere Holdings Pty Ltd Copyright © 2020 [email protected]
module.
NOTE: if you are yet to create webinars on your portal, you will be welcomed with the page below:
Creating webinar categories
Before we add a new webinar, we’ll be creating a new category for the webinar to be listed under.
1. Begin by selecting the Categories button, in the top right-hand menu.
5. Select the Add Category button. 6. Add the name and a short description of your category.
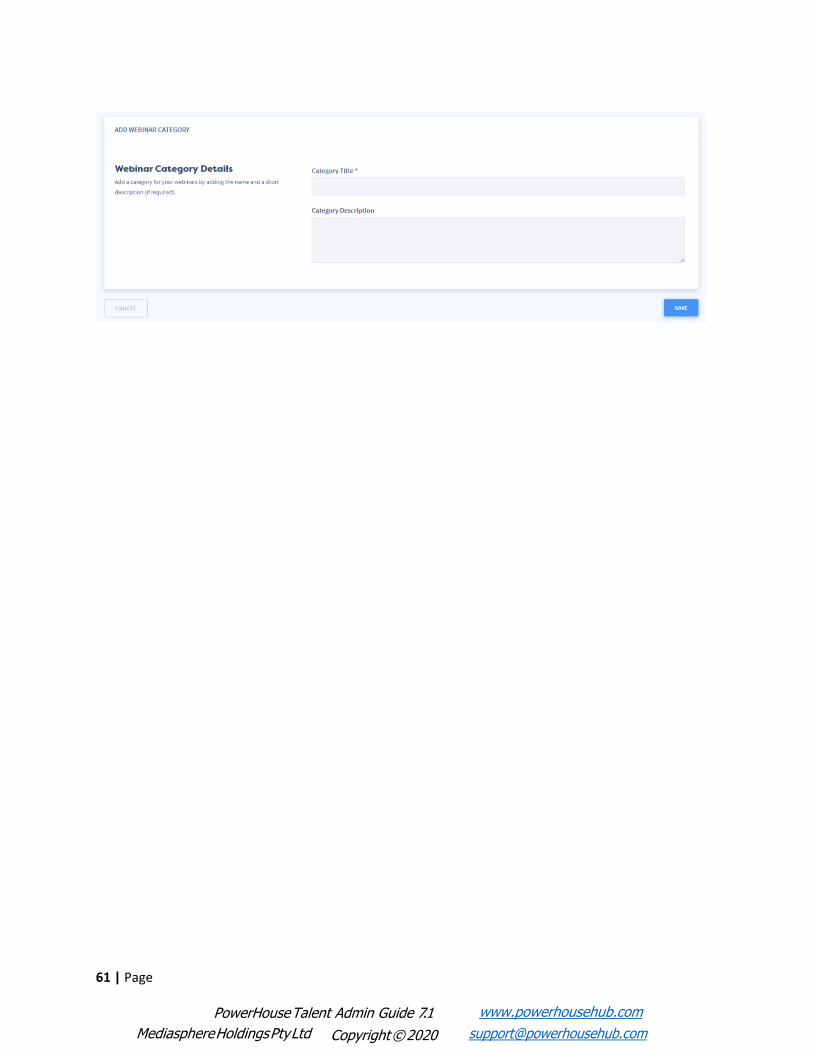
PowerHouse Talent Admin Guide 7. 1 www.powerhousehub.com
61 | Page
Mediasphere Holdings Pty Ltd Copyright © 2020 [email protected]

PowerHouse Talent Admin Guide 7. 1 www.powerhousehub.com
62 | Page
Mediasphere Holdings Pty Ltd Copyright © 2020 [email protected]
7. Press Save and select the Webinars tab to be taken back to the webinar listings.
Add Webinar
1. To add a new webinar to your training portal, select the Add Webinar button displayed on the Webinar page.
This will take you to the Add Webinar page. As you can see, there are three tabs requiring information. These tabs include Settings, Description and Assign to Groups.
Add Webinar – Settings
2. Firstly, on the Settings tab, within the General Information heading, you must enter the
details for the following:
• Title of your Webinar • Host contact information
• Webinar Unique Identifier • Start and finish dates and times
3. In the Webinar Settings section, you must select the following from the relevant
dropdown menus:

PowerHouse Talent Admin Guide 7. 1 www.powerhousehub.com
63 | Page
Mediasphere Holdings Pty Ltd Copyright © 2020 [email protected]
• Certificate for the webinar • Webinar category
• Webinar status
4. Within the Date & Time section, provide basic information on the date and duration of the webinar, using the pop-up calendar, and manually entering the time.
5. Next, inside the Thumbnail section, upload an image that will be added as the thumbnail of the webinar. You can do this by selecting the Choose file button.
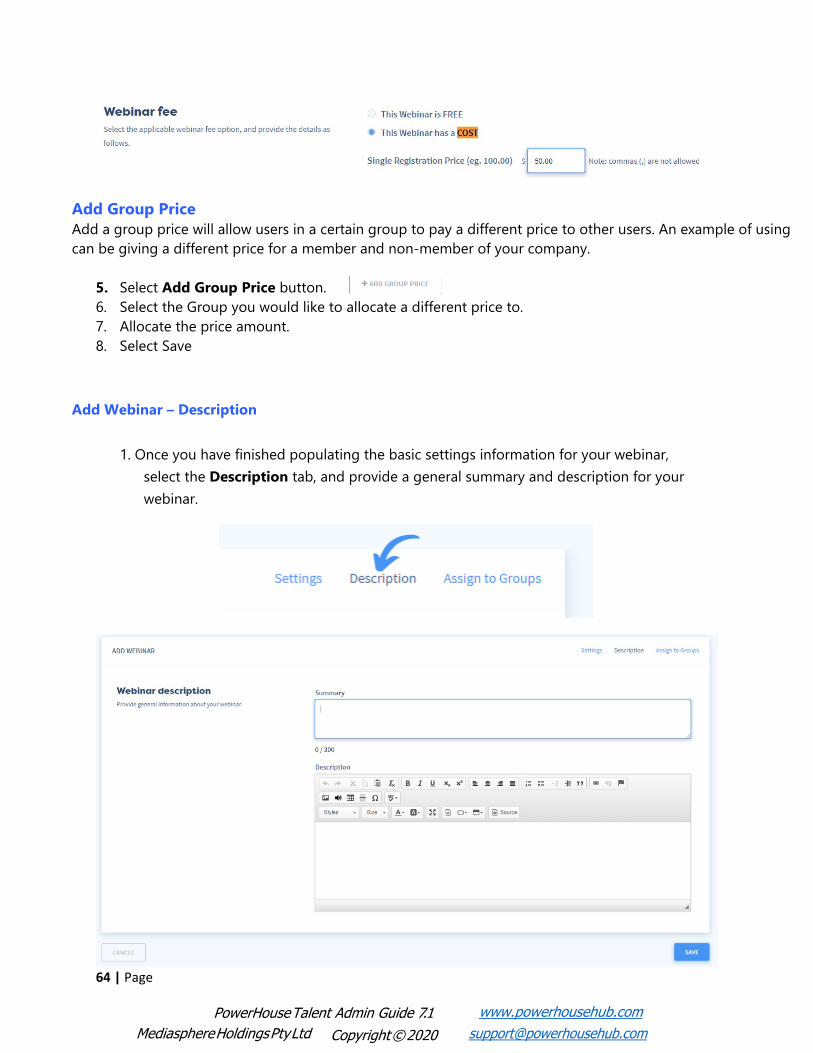
6. To add costs to your webinar, select the applicable webinar fee option, and provide the
details as follows.
PowerHouse Talent Admin Guide 7. 1 www.powerhousehub.com
64 | Page
Mediasphere Holdings Pty Ltd Copyright © 2020 [email protected]
Add Group Price Add a group price will allow users in a certain group to pay a different price to other users. An example of using can be giving a different price for a member and non-member of your company.
5. Select Add Group Price button. 6. Select the Group you would like to allocate a different price to. 7. Allocate the price amount. 8. Select Save
Add Webinar – Description
1. Once you have finished populating the basic settings information for your webinar, select the Description tab, and provide a general summary and description for your webinar.

PowerHouse Talent Admin Guide 7. 1 www.powerhousehub.com
65 | Page
Mediasphere Holdings Pty Ltd Copyright © 2020 [email protected]
Add Webinar – Assign to Groups
1. Select the Assign to Groups tab and assign your event to any of the groups displayed.
This will show the event on ‘Recommended for you’ for your user(s).
2. Once you have navigated through the tabs and filled in the required details, press the Save button. This will take you back to the Webinars page, where you will see your new Webinar(s) displayed.

PowerHouse Talent Admin Guide 7. 1 www.powerhousehub.com
66 | Page
Mediasphere Holdings Pty Ltd Copyright © 2020 [email protected]
As you can see, the webinar welcome text and illustration have disappeared, and now displays the Webinar page list.
From the list of all your webinars, you can:
• view a list of all webinars currently listed on the site. These show the start date, end date and the webinar status
• select Start Meeting to start the webinar at the scheduled time; and • view the access code for the webinar
Underneath the Actions tab there are also 4 icons, which allow you to do the following:
• Edit your webinar • Mark user attendance
• Download attendee list; and • Delete your webinar
Dashboard Surveys
Polls and Quizzes can be created on the dashboard using Dashboard Surveys. Polls are excellent for discerning popular opinion among users. Quizzes can be used as a question of the day or a quick quiz to keep users refreshed and prepared.

PowerHouse Talent Admin Guide 7. 1 www.powerhousehub.com
67 | Page
Mediasphere Holdings Pty Ltd Copyright © 2020 [email protected]
1. To add a Poll or Survey, press the Add Dashboard Survey button.
2. Select whether you would like to add a Poll or Quiz. Once you have populated some Polls and Surveys, your page will begin to look like this:
The three icons beside the title will allow you to edit/create, change the settings and delete your Poll/Quiz.
3. Click the Settings icon to alter the Poll/Quiz Settings.
This will bring you to the Settings page. This is where you will edit the Poll/Quiz details. Such as the:
• Title • Question Order • Status; and

PowerHouse Talent Admin Guide 7. 1 www.powerhousehub.com
68 | Page
Mediasphere Holdings Pty Ltd Copyright © 2020 [email protected]
• Groups the Poll/Quiz is assigned to.
4. Once you have completed the Poll/Survey settings, press Save. As you can see, the Poll and Quiz titles have now changed.
5. To start populating question types within your Poll/Quiz, select the Edit icon. This
will open the Questions Editor.

PowerHouse Talent Admin Guide 7. 1 www.powerhousehub.com
69 | Page
Mediasphere Holdings Pty Ltd Copyright © 2020 [email protected]
Within the Questions Editor, there are three icons. These include:
• Add True or False Question
• Add Multiple Choice Question • Add Short Answer Question
You can select the same option, or various options as many times as you’d like; however, we do suggest keeping the amount to four questions per Poll/Quiz. Polls/Quizzes are intended to provide your learners with quick mental checks or voting opportunities, rather than challenging them academically.
NOTE: Polls only have True or False and Multiple Choice options within the Questions Editor.
6. Select any option to begin populating questions for your Poll/Quiz.
Once you have selected an option, the Questions Editor will unfold text fields, where you can alter the content for your question(s). Let’s take True or False, for example:
True or False

PowerHouse Talent Admin Guide 7. 1 www.powerhousehub.com
70 | Page
Mediasphere Holdings Pty Ltd Copyright © 2020 [email protected]
1. Select the Edit icon, on your True or False question type. 2. Type your question inside the Question field.
3. Select whether the question should be marked as true or false. 4. Press Save.
Multiple Choice
1. To start populating multiple choice question types, select the Add Multiple Choice
Question icon on the Questions Editor.
2. Select the Edit icon on your new Multiple-Choice question to open up the text fields.
3. Type your question into the question field. 4. Inside the answers field, type your responses. After typing each answer, press ‘enter’ on
your keyboard, and type the next response. It should look something like this:

PowerHouse Talent Admin Guide 7. 1 www.powerhousehub.com
71 | Page
Mediasphere Holdings Pty Ltd Copyright © 2020 [email protected]
NOTE: as you begin to populate your answer responses, your answers will appear below, where you can select the correct answer(s).
5. Once you have finished selecting the correct answer(s), press Save.
Short Answer
1. To start populating short answer question types, select the Add Short Answer Question
icon on the Questions Editor.
2. Select the Edit icon on your new Short Answer question to open the text fields. 3. Type your question into the question field. 4. Inside the answers field, type the Model Response. This is where you, the administrator,
can write what the answer should be. The answer the learner provides will then be marked against the Model Response. Once done, it should look something like this:
5. Once done, press Save

PowerHouse Talent Admin Guide 7. 1 www.powerhousehub.com
72 | Page
Mediasphere Holdings Pty Ltd Copyright © 2020 [email protected]
Premium Surveys
The Premium Surveys module is used to calculate overall employee satisfaction levels, create employee risk profiles and recognise workplace hazards.
1. To get started, select the Premium Surveys module underneath the Publishing tab on the left-hand menu.
As you can see, there are pre-existing surveys with the Premium Surveys page table.
2. To begin editing a premium survey, select the Settings icon on any of the pre-
existing surveys. This will bring you to the Survey Details page, where you can provide basic information about the survey.
NOTE: the first option, Employee Satisfaction, will be selected for this manual demonstration.

PowerHouse Talent Admin Guide 7. 1 www.powerhousehub.com
73 | Page
Mediasphere Holdings Pty Ltd Copyright © 2020 [email protected]
3. Add the Survey Title. 4. Select the Survey Status that relates to your survey; Published or Draft, by pressing the
dropdown menu.
5. Choose a Main Image for your survey, by pressing the Choose File button, and selecting the appropriate image.
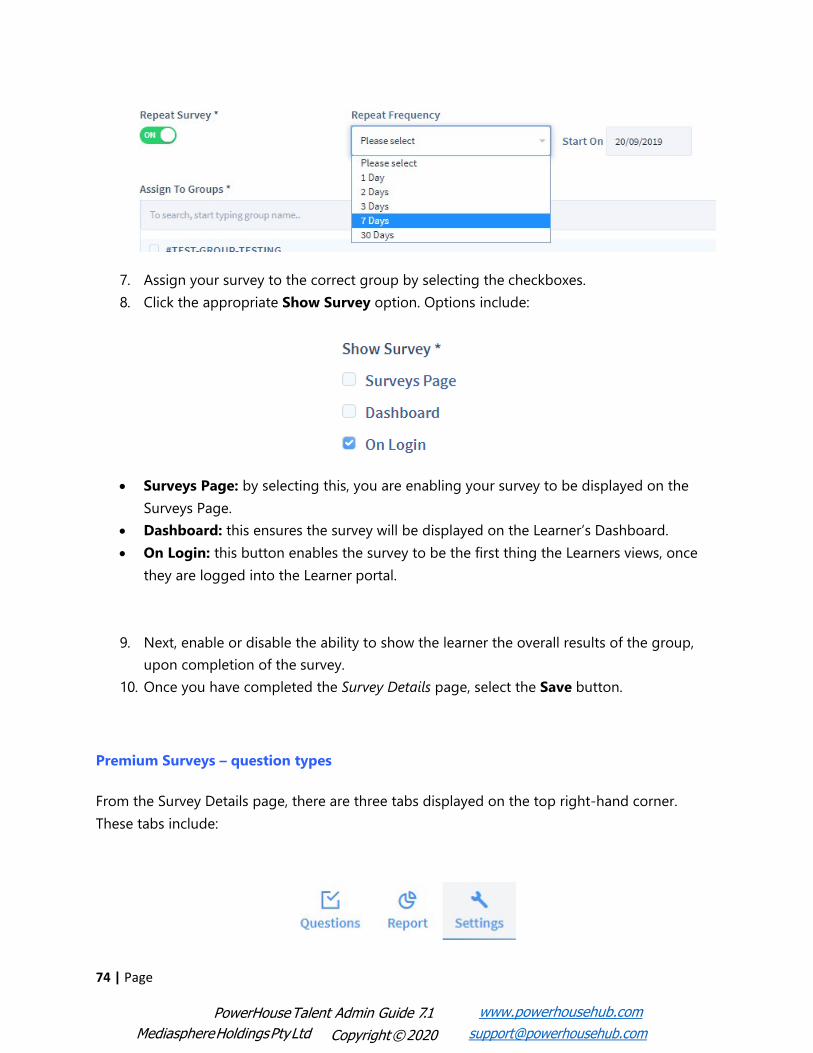
6. Enable or disable the Repeat Survey functionality, by clicking on the slider icon. This is where you are able to select the Repeat Frequency and the start date of the scheduled survey.
PowerHouse Talent Admin Guide 7. 1 www.powerhousehub.com
74 | Page
Mediasphere Holdings Pty Ltd Copyright © 2020 [email protected]
7. Assign your survey to the correct group by selecting the checkboxes. 8. Click the appropriate Show Survey option. Options include:
• Surveys Page: by selecting this, you are enabling your survey to be displayed on the
Surveys Page. • Dashboard: this ensures the survey will be displayed on the Learner’s Dashboard. • On Login: this button enables the survey to be the first thing the Learners views, once
they are logged into the Learner portal.
9. Next, enable or disable the ability to show the learner the overall results of the group, upon completion of the survey.
10. Once you have completed the Survey Details page, select the Save button.
Premium Surveys – question types
From the Survey Details page, there are three tabs displayed on the top right-hand corner. These tabs include:
PowerHouse Talent Admin Guide 7. 1 www.powerhousehub.com
75 | Page
Mediasphere Holdings Pty Ltd Copyright © 2020 [email protected]
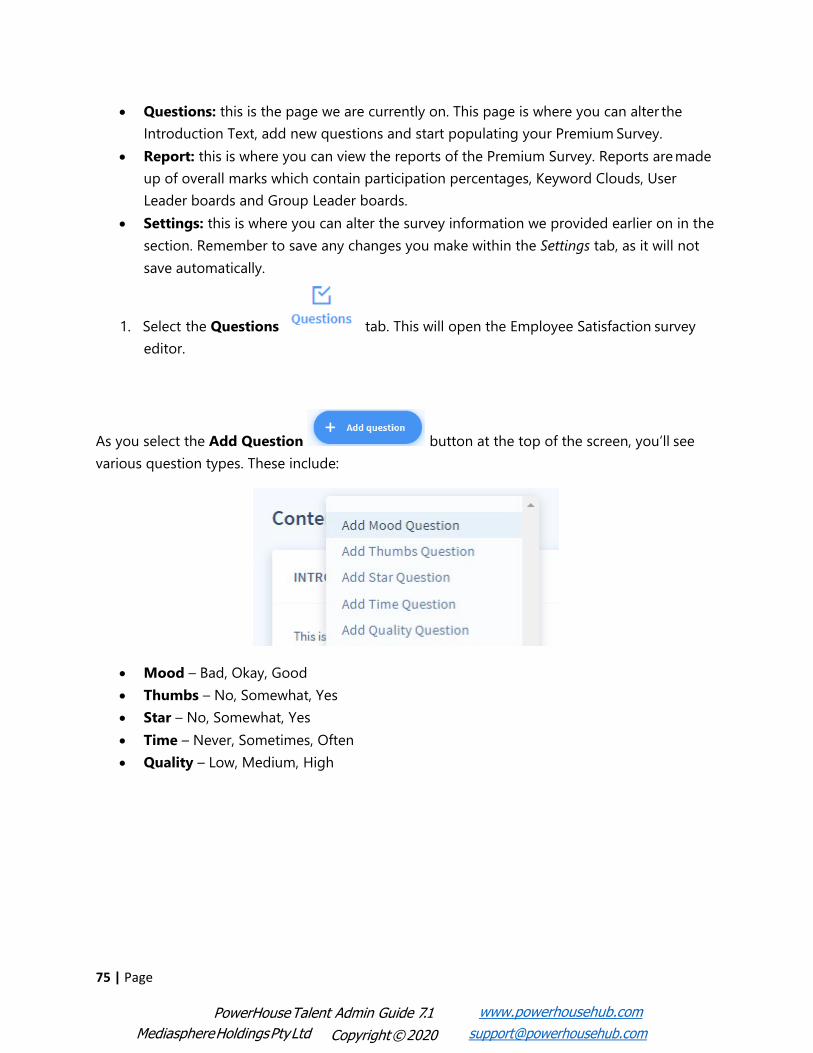
• Questions: this is the page we are currently on. This page is where you can alter the Introduction Text, add new questions and start populating your Premium Survey.
• Report: this is where you can view the reports of the Premium Survey. Reports are made up of overall marks which contain participation percentages, Keyword Clouds, User Leader boards and Group Leader boards.
• Settings: this is where you can alter the survey information we provided earlier on in the section. Remember to save any changes you make within the Settings tab, as it will not save automatically.
1. Select the Questions tab. This will open the Employee Satisfaction survey
editor.
As you select the Add Question button at the top of the screen, you’ll see various question types. These include:
• Mood – Bad, Okay, Good • Thumbs – No, Somewhat, Yes • Star – No, Somewhat, Yes
• Time – Never, Sometimes, Often • Quality – Low, Medium, High

PowerHouse Talent Admin Guide 7. 1 www.powerhousehub.com
76 | Page
Mediasphere Holdings Pty Ltd Copyright © 2020 [email protected]
o Mood
Example of the Learner’s (front-end) view of the Mood Survey question.
o Thumbs
o Star
Example of the Learner’s (front-end) view of the Thumbs Survey question.
Example of the Learner’s (front-end) view of the Star Survey question.

PowerHouse Talent Admin Guide 7. 1 www.powerhousehub.com
77 | Page
Mediasphere Holdings Pty Ltd Copyright © 2020 [email protected]
o Time
Example of the Learner’s (front-end) view of the Time Survey question.
o Quality
Example of the Learner’s (front-end) view of the Quality Survey question.
PowerHouse Talent Admin Guide 7. 1 www.powerhousehub.com
78 | Page
Mediasphere Holdings Pty Ltd Copyright © 2020 [email protected]
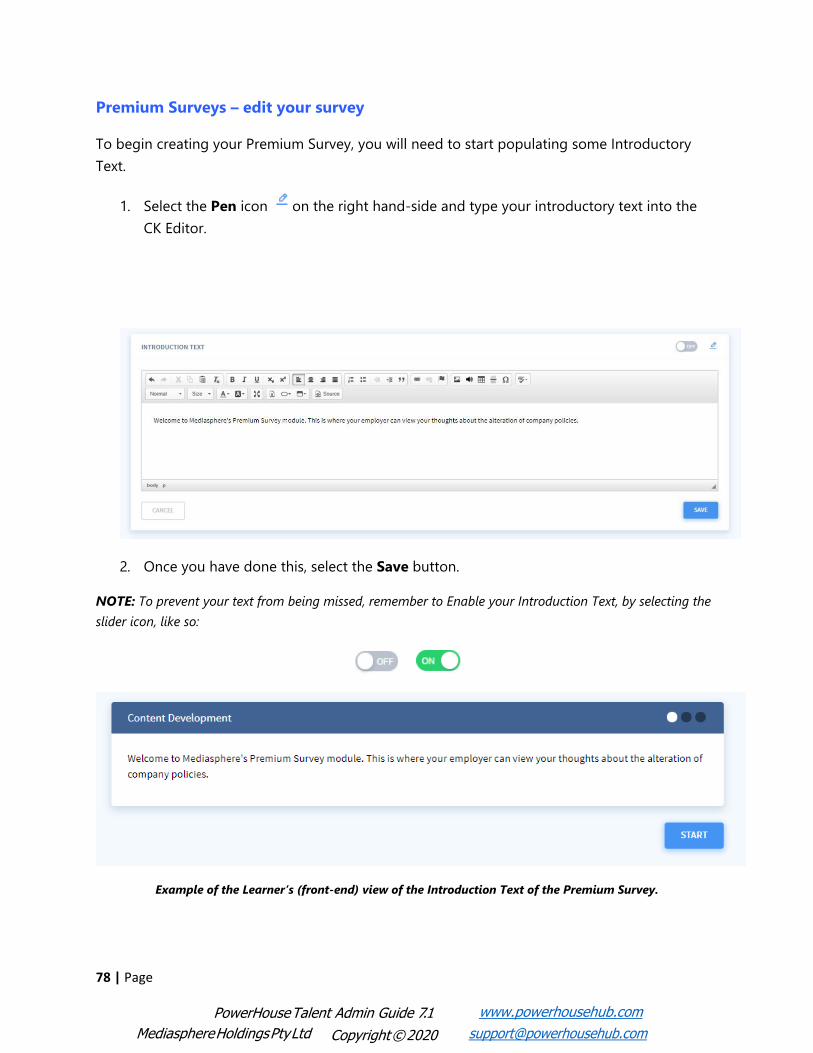
Premium Surveys – edit your survey
To begin creating your Premium Survey, you will need to start populating some Introductory Text.
1. Select the Pen icon on the right hand-side and type your introductory text into the
CK Editor.
2. Once you have done this, select the Save button.
NOTE: To prevent your text from being missed, remember to Enable your Introduction Text, by selecting the slider icon, like so:
Example of the Learner’s (front-end) view of the Introduction Text of the Premium Survey.

PowerHouse Talent Admin Guide 7. 1 www.powerhousehub.com
79 | Page
Mediasphere Holdings Pty Ltd Copyright © 2020 [email protected]
3. Select the Add question icon
This will display the question list, shown below.
4. Select the Pen icon on one of the survey options you have selected. 5. Type your question within the text box. E.g. How do you feel about the recent changes to
the company policies? (Potential answers: Bad, Okay, Good).
Example of the Learner’s (front-end) view of the Mood Survey question.

PowerHouse Talent Admin Guide 7. 1 www.powerhousehub.com
80 | Page
Mediasphere Holdings Pty Ltd Copyright © 2020 [email protected]
6. Inside the answer panel, insert the follow up question for each potential answer. E.g. If the employee were to answer with Bad, the follow up question could be:
‘Oh no, ‘Bad’? Please tell us why!’
Example of the Learner’s (front-end) view of the Mood Survey follow up question.
NOTE: Not all question types are the same. So, you may have to be a little creative with your questions, in
order for them to match the survey type. For instance, the Time survey type would not require the same answers as the Mood survey type. The below image will display how confusing this will be to your Learners.

PowerHouse Talent Admin Guide 7. 1 www.powerhousehub.com
81 | Page
Mediasphere Holdings Pty Ltd Copyright © 2020 [email protected]
Example of the Learner’s (front-end) view of the unsuitable Survey responses.
7. Once you have populated all question types with questions, and follow-up responses, press Save.
Job Alerts Manager
This is where you, the administrator, can advertise jobs available within the company. Once you have posted the details of a vacant position, your staff can view the job post and apply for the position.
To begin adding job posts, underneath the Publish tab on the left-hand menu select the Job Alerts Manager module. This will bring you to the List Jobs page.
Firstly, you’re going to create a category for your Job Post, this will help keep your job postings organised.
PowerHouse Talent Admin Guide 7. 1 www.powerhousehub.com
82 | Page
Mediasphere Holdings Pty Ltd Copyright © 2020 [email protected]
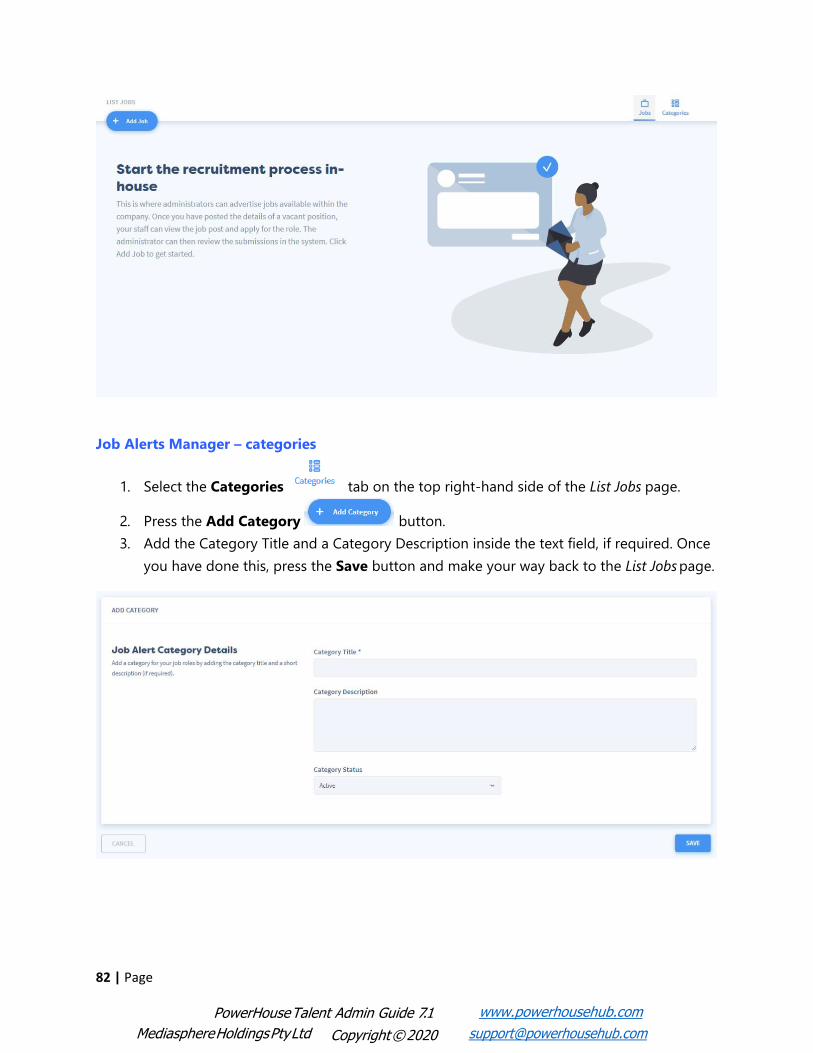
Job Alerts Manager – categories
1. Select the Categories tab on the top right-hand side of the List Jobs page.
2. Press the Add Category button. 3. Add the Category Title and a Category Description inside the text field, if required. Once
you have done this, press the Save button and make your way back to the List Jobs page.
PowerHouse Talent Admin Guide 7. 1 www.powerhousehub.com
83 | Page
Mediasphere Holdings Pty Ltd Copyright © 2020 [email protected]
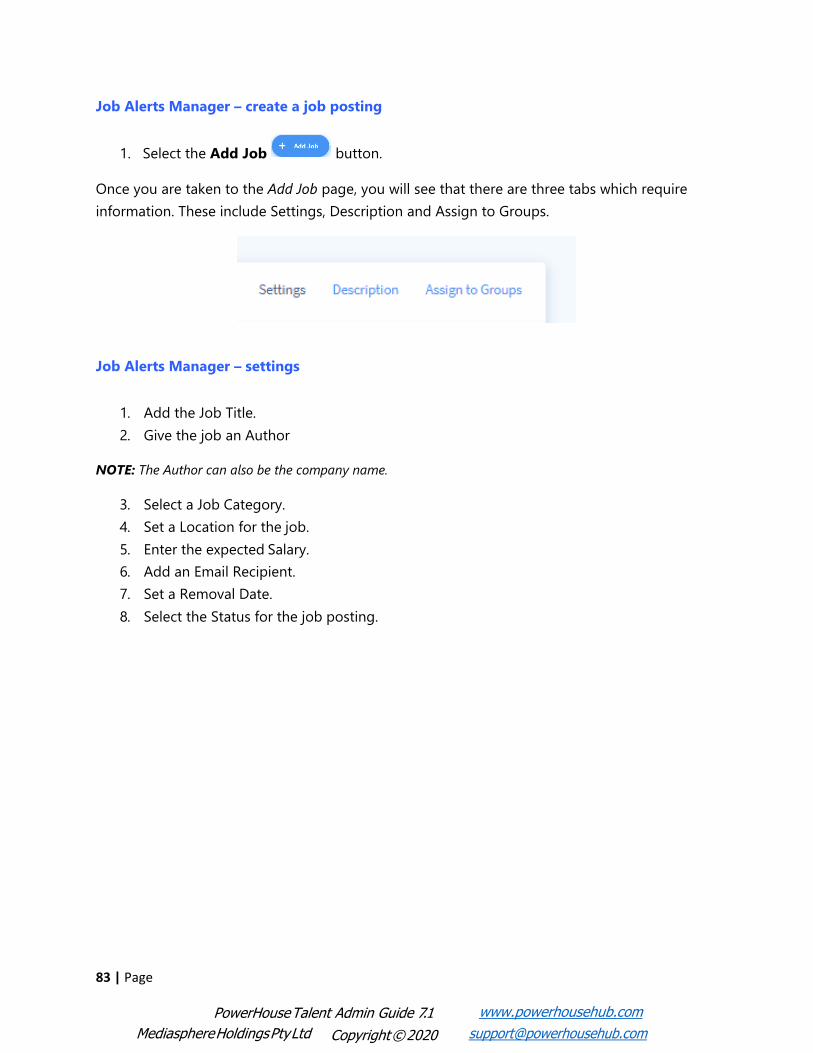
Job Alerts Manager – create a job posting
1. Select the Add Job button.
Once you are taken to the Add Job page, you will see that there are three tabs which require information. These include Settings, Description and Assign to Groups.
Job Alerts Manager – settings
1. Add the Job Title. 2. Give the job an Author
NOTE: The Author can also be the company name.
3. Select a Job Category. 4. Set a Location for the job. 5. Enter the expected Salary. 6. Add an Email Recipient. 7. Set a Removal Date. 8. Select the Status for the job posting.

PowerHouse Talent Admin Guide 7. 1 www.powerhousehub.com
84 | Page
Mediasphere Holdings Pty Ltd Copyright © 2020 [email protected]
9. Once you have done this, select the Description tab.
Job Alerts Manager – description
Provide information on the job description. This is where you can outline the key responsibilities of the position.
10. Provide the Job Summary. 11. Enter the Job Description.
Once you have done this, select the Assign to Groups tab.

PowerHouse Talent Admin Guide 7. 1 www.powerhousehub.com
85 | Page
Mediasphere Holdings Pty Ltd Copyright © 2020 [email protected]
Job Alerts Manager – assign to groups
Assign this job to a group. By doing this, you are allowing the users within that group to view the job on their learning portal.
12. Assign the job to any of the groups, by selecting the checkboxes.
13. Once you have filled all tabs with important information about the vacant position, press Save. This will take you to the List Jobs page, where you will see your list of jobs beginning to form.

PowerHouse Talent Admin Guide 7. 1 www.powerhousehub.com
86 | Page
Mediasphere Holdings Pty Ltd Copyright © 2020 [email protected]
Dashboard Banner
Create dashboard banners that feature courses, news items or external links.
This image is a visual representation of how the Dashboard Banner will display on the learner dashboard.
1. Begin creating your dashboard images by selecting the Dashboard Banner module, underneath the administration tab on the left-hand menu. This will bring you to the Learner Dashboard Image Carousel page.

PowerHouse Talent Admin Guide 7. 1 www.powerhousehub.com
87 | Page
Mediasphere Holdings Pty Ltd Copyright © 2020 [email protected]
2. Select the Add Image button.
This will bring you to the Add Image page, where you can start creating your Dashboard Banner Image.
Dashboard Banner Image
Add an image and details to display on the learner dashboard.
3. Add the Image Title. 4. Insert the correct Image File.
NOTE: Do not exceed 1400x420 pixels.
5. Enter an Image Caption.

PowerHouse Talent Admin Guide 7. 1 www.powerhousehub.com
88 | Page
Mediasphere Holdings Pty Ltd Copyright © 2020 [email protected]
Add a Link to the Image
Add a link to the learner dashboard. This allows the learner to click on the dashboard banner and be taken to a related link. You can select whether you would like the image to be linked to:
• a course • a news item; or • an external link.
Assign to Groups
Assign this banner image to a group. By doing this, you are allowing all users within those groups to view the banner on their learner dashboard.
NOTE: If you have chosen to link your banner to a news item or course, ensure you have assigned the banner to the groups that display that certain item.

PowerHouse Talent Admin Guide 7. 1 www.powerhousehub.com
89 | Page
Mediasphere Holdings Pty Ltd Copyright © 2020 [email protected]
News Editor
The News Editor module allows you to publish news stories to the learner Dashboard.
1. Inside the Publishing tab, on the left-hand side menu, select the News Editor module. This will bring you to the List News page.
News Category
1. To add a News Category, press the Categories button on the top right-
hand menu, and select Add Category .

PowerHouse Talent Admin Guide 7. 1 www.powerhousehub.com
90 | Page
Mediasphere Holdings Pty Ltd Copyright © 2020 [email protected]
1. Fill in the category name. 2. Provide a brief category description. 3. Once you’re finished adding the required information, press Save.
This will create the List Categories page, where you will see your categories begin to populate.
Within the Category List, there are three icons underneath the Actions column. These include:
• Edit this category • Assign news to this category
• Delete this category
4. Select the News tab on the top right-hand corner. This will bring you back to
the List News page, where you can start populating your news articles.
Add News
1. To get started, press the Add News button at the top of the page.
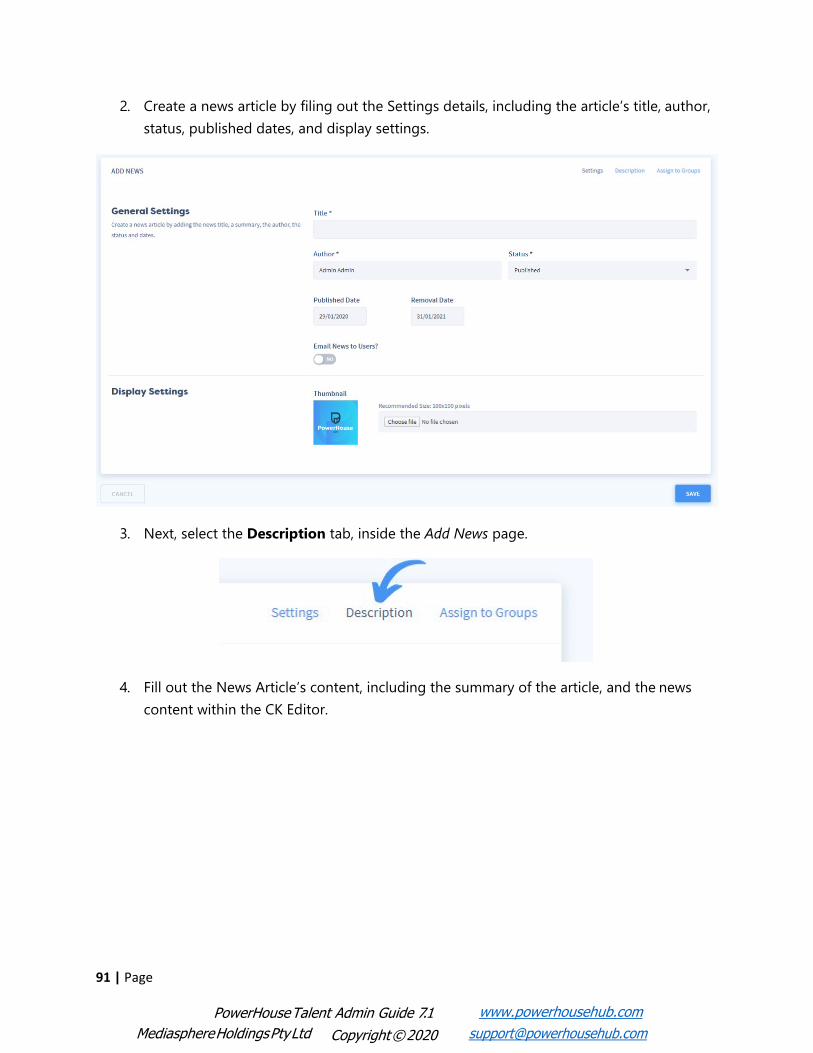
PowerHouse Talent Admin Guide 7. 1 www.powerhousehub.com
91 | Page
Mediasphere Holdings Pty Ltd Copyright © 2020 [email protected]
2. Create a news article by filing out the Settings details, including the article’s title, author, status, published dates, and display settings.
3. Next, select the Description tab, inside the Add News page.
4. Fill out the News Article’s content, including the summary of the article, and the news content within the CK Editor.

PowerHouse Talent Admin Guide 7. 1 www.powerhousehub.com
92 | Page
Mediasphere Holdings Pty Ltd Copyright © 2020 [email protected]
5. Next, move onto the Assign to Groups tab and select the groups you wish to view the News Article.

PowerHouse Talent Admin Guide 7. 1 www.powerhousehub.com
93 | Page
Mediasphere Holdings Pty Ltd Copyright © 2020 [email protected]
6. Once you’re done, press Save.
As you start to populate more News Articles, the News List is created:
Edit News
1. To edit an existing news item, select the Edit icon inside the Actions column. 2. Once you have finished editing your news article, remember to press the Save button to
save your changes.
Links
This module allows you to add website links and assign those links to a specific group. The learners within those groups will then be able to access those links through their learning portal.
1. Inside the News Editor module, select the Links tab on the top right-hand menu. You will be taken to the following page:

PowerHouse Talent Admin Guide 7. 1 www.powerhousehub.com
94 | Page
Mediasphere Holdings Pty Ltd Copyright © 2020 [email protected]
2. Select the Add Link button. You will be taken to the Link Details page, where you will be able to provide basic link information.
3. Add the Link Title. 4. Provide the full URL into the Link URL text field.
5. Provide the author’s name. 6. Confirm the Status of the link.
7. Set the link Publish Date, and link Removal Date.
8. Assign the link to the relevant group.

PowerHouse Talent Admin Guide 7. 1 www.powerhousehub.com
95 | Page
Mediasphere Holdings Pty Ltd Copyright © 2020 [email protected]
9. Once you have populated all required information for your Link, press Save.
Document Library
The Document Library allows you to categorise documents for your users to access from their learning portal.
1. Underneath the Publishing tab inside the left-hand menu, select Document Library to be taken to the Documents page. This is where you can create, edit, download and delete documents.
Before you start creating documents, you must first create some categories. This will help organise the filing system.

PowerHouse Talent Admin Guide 7. 1 www.powerhousehub.com
96 | Page
Mediasphere Holdings Pty Ltd Copyright © 2020 [email protected]
Document Library – creating a category
1. Press the Categories button displayed on the top left hand-side menu. This will take you to the Categories page
2. Select the Add Category button. 3. Add a Category Name and Category Description. 4. Once you have done this, press Save
Once you begin to populate your categories, this will create the categories list on the Categories page.

PowerHouse Talent Admin Guide 7. 1 www.powerhousehub.com
97 | Page
Mediasphere Holdings Pty Ltd Copyright © 2020 [email protected]
5. To start populating Documents, select the Documents tab on the top right-hand side menu. This will take you back to the Documents page.
Document Library – creating a document
1. To begin creating your document, select the Add Document button. 2. Add a document name. 3. Upload the appropriate file. 4. Provide a document description. 5. Select the applicable category.
NOTE: Press and hold the CTRL button to select multiple categories.
6. Add a publish and removal date for your document, by selecting the textboxes and clicking the correct dates.

PowerHouse Talent Admin Guide 7. 1 www.powerhousehub.com
98 | Page
Mediasphere Holdings Pty Ltd Copyright © 2020 [email protected]
7. Assign the document to the relevant group(s). This document will show on the learner dashboard for users in the selected group(s).
8. Once you have finished importing all relevant information for your document(s), press
Save.
As you begin to populate your documents, this will create the documents list, on the Documents page.
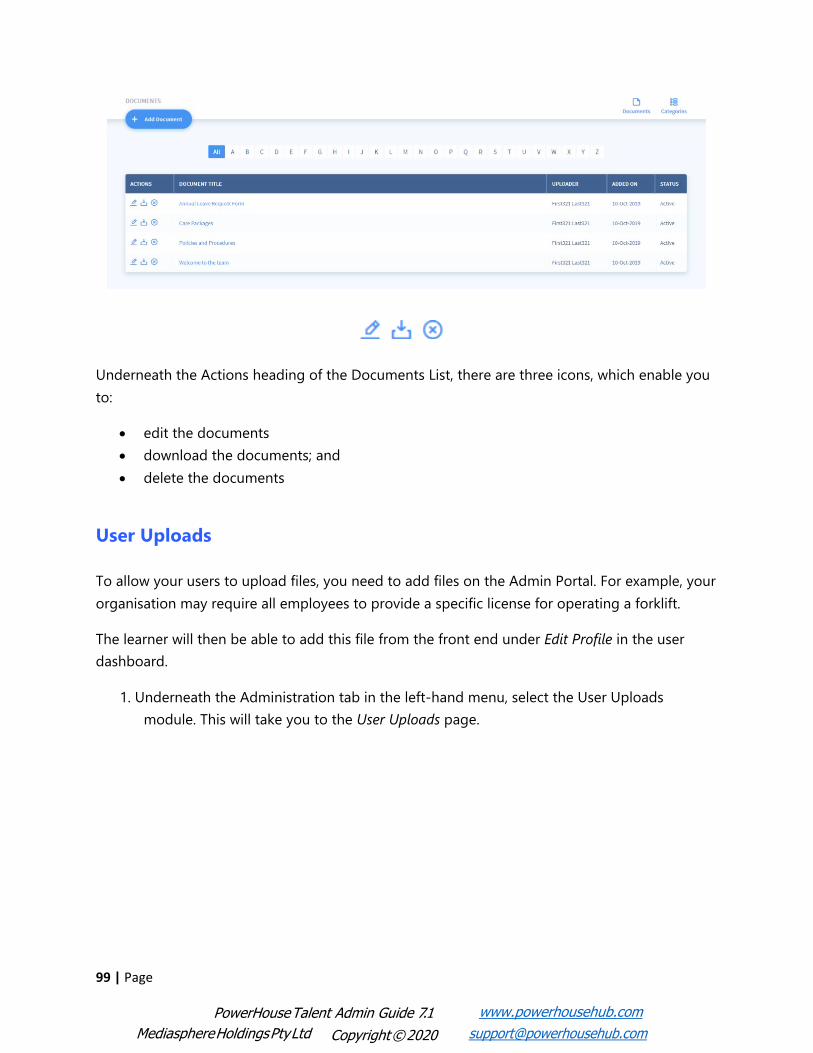
PowerHouse Talent Admin Guide 7. 1 www.powerhousehub.com
99 | Page
Mediasphere Holdings Pty Ltd Copyright © 2020 [email protected]
Underneath the Actions heading of the Documents List, there are three icons, which enable you to:
• edit the documents • download the documents; and
• delete the documents
User Uploads
To allow your users to upload files, you need to add files on the Admin Portal. For example, your organisation may require all employees to provide a specific license for operating a forklift.
The learner will then be able to add this file from the front end under Edit Profile in the user dashboard.
1. Underneath the Administration tab in the left-hand menu, select the User Uploads module. This will take you to the User Uploads page.

PowerHouse Talent Admin Guide 7. 1 www.powerhousehub.com
100 | Page
Mediasphere Holdings Pty Ltd Copyright © 2020 [email protected]
Before we begin populating user uploads, we must first create a category for the file to go into.
User Uploads – creating categories
1. Select the Categories tab.
2. Press the Add Category button displayed at the top of the Registration Categories page.
3. Provide the basic information such as Category Name and Status.
4. Press Save once you have done this
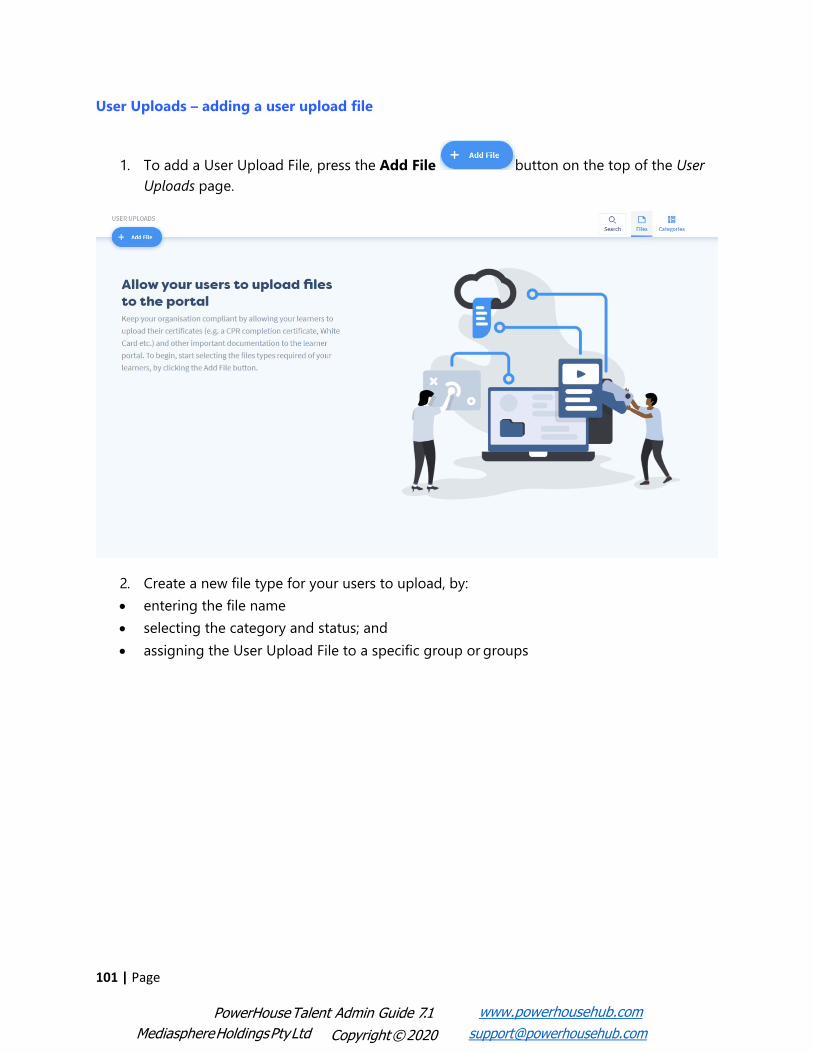
PowerHouse Talent Admin Guide 7. 1 www.powerhousehub.com
101 | Page
Mediasphere Holdings Pty Ltd Copyright © 2020 [email protected]
User Uploads – adding a user upload file
1. To add a User Upload File, press the Add File button on the top of the User Uploads page.
2. Create a new file type for your users to upload, by: • entering the file name • selecting the category and status; and
• assigning the User Upload File to a specific group or groups

PowerHouse Talent Admin Guide 7. 1 www.powerhousehub.com
102 | Page
Mediasphere Holdings Pty Ltd Copyright © 2020 [email protected]
3. Once you have finished, press Save.
Now that the user file has been added to the user’s portal, the Personal File Uploads section of their My Details page, should look something like this:
This is the frontend view of a user uploading a personal file to their portal. Compliance and Credentials – uploading files for onboarding workflows The Compliance and Credentials tabs allow you to create documents that need to be uploaded when a user is completing an onboarding workflow. The files can be sorted into both categories depending on the type of file such as for compliance this type of file could be a Blue Card and for credentials this type of file could be Drivers License.
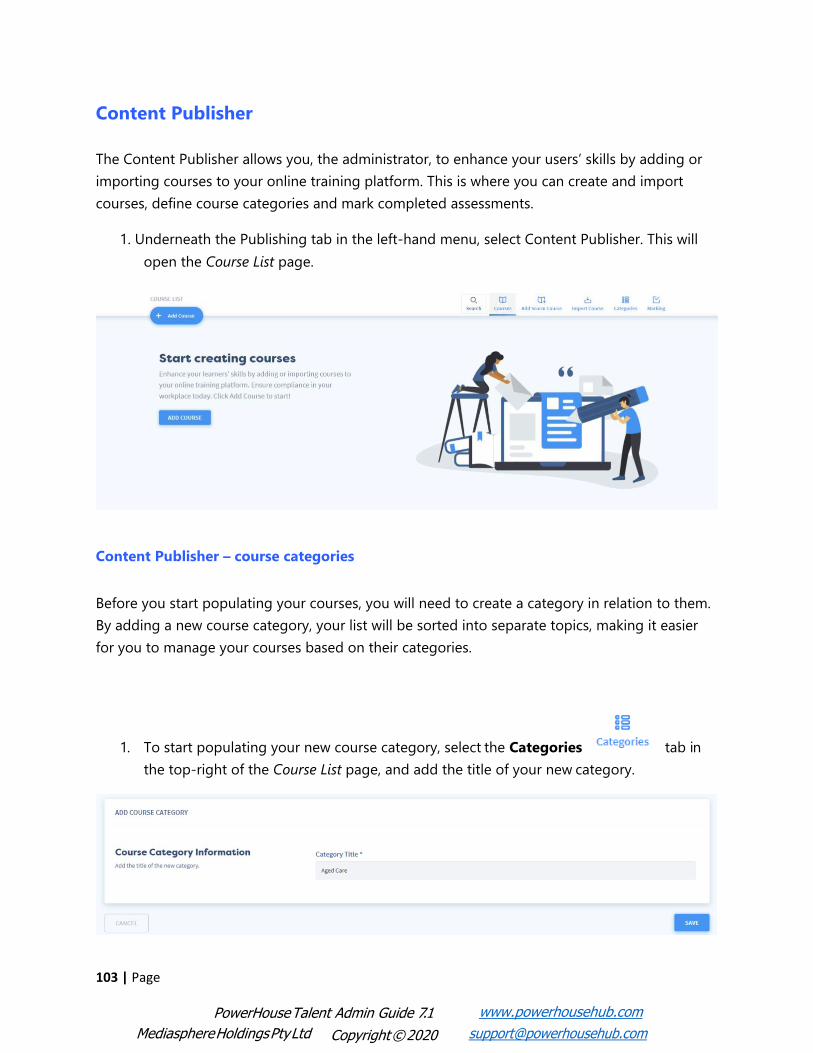
PowerHouse Talent Admin Guide 7. 1 www.powerhousehub.com
103 | Page
Mediasphere Holdings Pty Ltd Copyright © 2020 [email protected]
Content Publisher
The Content Publisher allows you, the administrator, to enhance your users’ skills by adding or importing courses to your online training platform. This is where you can create and import courses, define course categories and mark completed assessments.
1. Underneath the Publishing tab in the left-hand menu, select Content Publisher. This will open the Course List page.
Content Publisher – course categories
Before you start populating your courses, you will need to create a category in relation to them. By adding a new course category, your list will be sorted into separate topics, making it easier for you to manage your courses based on their categories.
1. To start populating your new course category, select the Categories tab in the top-right of the Course List page, and add the title of your new category.

PowerHouse Talent Admin Guide 7. 1 www.powerhousehub.com
104 | Page
Mediasphere Holdings Pty Ltd Copyright © 2020 [email protected]
2. Once you have done this, press Save.
Now that we have the course category sorted, it’s time to start creating some courses.
Creating a Course
1. To start populating engaging content for your users, press the Add Course button displayed on top of the Course List page.
This will bring you to the Add Course page, where you will need to provide basic information about your course.

PowerHouse Talent Admin Guide 7. 1 www.powerhousehub.com
105 | Page
Mediasphere Holdings Pty Ltd Copyright © 2020 [email protected]
1. To start creating your course, you will need to:
• Add the course title • Enter the course unique identifier • By selecting the dropdown menus, choose your course’ pass rate, certificate (as
mentioned on page 31, this is where creating your certificate prior to building your courses, webinars and events comes in handy), course category(s) and status; and
• Assign your course to a mandatory group. By doing this, you are allowing the users within that group to view the course on their portal.
• Training time allows you to allocate how long the course should take to be completed. (This is optional)
• Course expiration allows you to enable after the course has been assigned if there is an expiry for the learner to complete the course.
• Re-induction allows learner users to re-complete the course if needed after a certain period, e.g a course must be completed annually.
NOTE: you can assign to multiple course categories.
2. Once you have done this, press Save.
As you are taken back to the Course List page, you will notice your new course will be displayed at the top of the course list.
Course Icons
In the Course Title bar, there are a range of icons. These icons include:
• Edit Course: This icon opens the Course Editor and allows you to edit the sections and pages within the selected course.
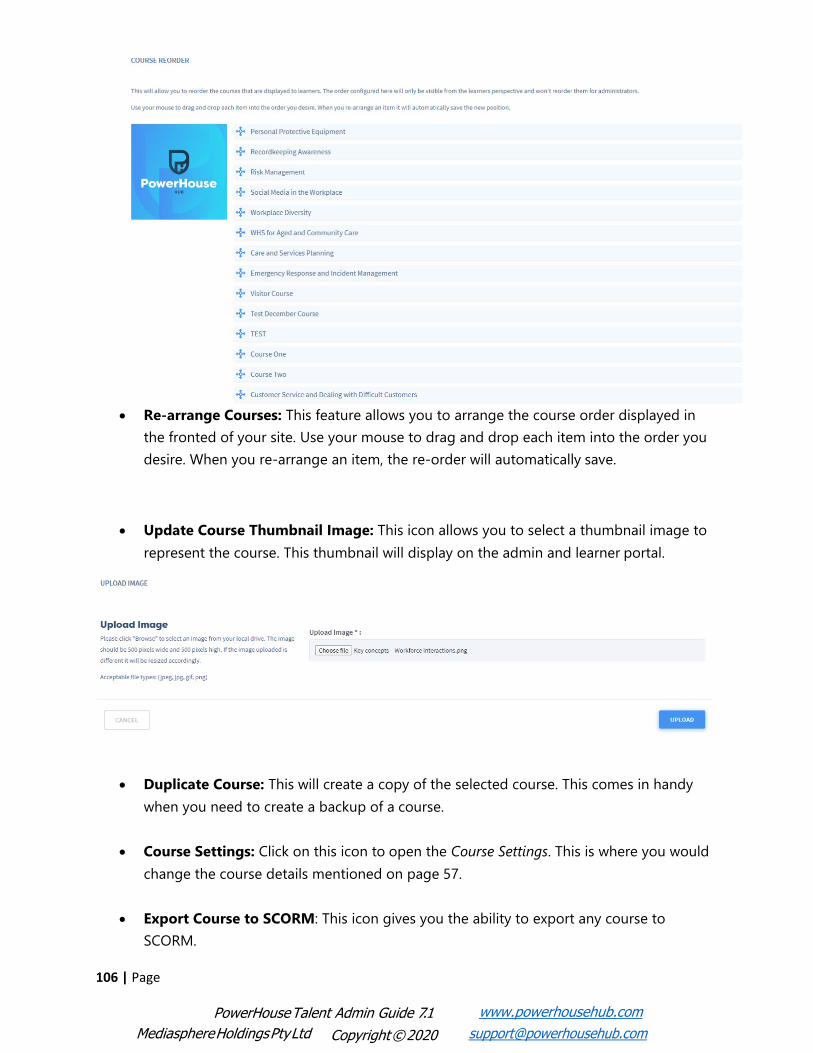
PowerHouse Talent Admin Guide 7. 1 www.powerhousehub.com
106 | Page
Mediasphere Holdings Pty Ltd Copyright © 2020 [email protected]
• Re-arrange Courses: This feature allows you to arrange the course order displayed in the fronted of your site. Use your mouse to drag and drop each item into the order you desire. When you re-arrange an item, the re-order will automatically save.
• Update Course Thumbnail Image: This icon allows you to select a thumbnail image to represent the course. This thumbnail will display on the admin and learner portal.
• Duplicate Course: This will create a copy of the selected course. This comes in handy when you need to create a backup of a course.
• Course Settings: Click on this icon to open the Course Settings. This is where you would
change the course details mentioned on page 57.
• Export Course to SCORM: This icon gives you the ability to export any course to SCORM.

PowerHouse Talent Admin Guide 7. 1 www.powerhousehub.com
107 | Page
Mediasphere Holdings Pty Ltd Copyright © 2020 [email protected]
• Export Course: This icon gives you the ability to export any course.
• Export Course to PDF: This icon gives you the ability to export any course to PDF.
• Import Course Content: This icon allows you to import additional course content to a pre-existing course.
• Archive Course: Click on this icon to archive your course. To delete a course, you must
archive it first. You can delete a course any time by clicking on the Archive Course icon. This course will then show under archived courses. To find it, click the Search on the Status dropdown menu select Archived, then Search.
To permanently delete the course, click on the Permanently Delete Course icon. If
you wish to restore an archived course, click on the Restore icon. The course will then show up under the status dropdown menu as Active.
• Click to edit: This icon allows you to edit the title of the course. Simply click the Click to
edit icon displayed on the right-hand side of the course title, make your changes
and press the save icon.
Add SCORM Course
Our platform allows the import of SCORM with pass or fail reporting capabilities. There are two options for exporting SCORM. These files can either be added to the page, which allows for the addition of other course pages, or as a course, which will have the file sitting by itself. Should

PowerHouse Talent Admin Guide 7. 1 www.powerhousehub.com
108 | Page
Mediasphere Holdings Pty Ltd Copyright © 2020 [email protected]
you wish to have more detailed reports, it is recommended to use our platform to build your assessments.
1. To start populating your SCORM courses, select the Add Scorm Course tab displayed at the top of the page.
This will bring you to the Add Course page, where you will need to provide basic information for your new SCORM course.
2. To start creating your course, you will need to: • add the course title
• enter the course unique identifier

PowerHouse Talent Admin Guide 7. 1 www.powerhousehub.com
109 | Page
Mediasphere Holdings Pty Ltd Copyright © 2020 [email protected]
• upload the SCORM object.
NOTE: ensure the file is zipped before uploading.
• select the correct SCORM Version
• assign a certificate • assign a category to your SCORM course • choose your course’ status; and
• assign your course to a group. By doing this, you are allowing the learners within that group to view the course on their portal.
3. Select Save once you have done this.
Once you have saved the information provided, your SCORM course will display within the Course List page.
NOTE: The only changes that can be made to this course are changes to the SCORM file. If you would like to add assessments, this must be done by adding the SCORM file to the page. We recommend for SCORM to be added to the page rather than added as a course as this allows for assessments to be built on our platform. Adding SCORM as a course will only mark pass or fail for assessments within the SCORM.
Import Course
Content Publisher also has the option to import an existing course.
1. Select the Import Course icon. This will take you to the Import Course(s) page.

PowerHouse Talent Admin Guide 7. 1 www.powerhousehub.com
110 | Page
Mediasphere Holdings Pty Ltd Copyright © 2020 [email protected]
2. Click the Choose File button and select the course you wish to upload from your computer.
NOTE: The types of courses that can be uploaded are SCORM and .json file types.
3. You can also start importing your courses by drag and dropping them into the Import
field.
Once you have selected the appropriate course, click the Import All button to import it. The uploaded course can then be found at the top of the Courses List page.

PowerHouse Talent Admin Guide 7. 1 www.powerhousehub.com
111 | Page
Mediasphere Holdings Pty Ltd Copyright © 2020 [email protected]
You can upload multiple course files at once using either the Choose File or drag and drop method.
Assign Certificate to Import Course Upload While importing courses through content publisher, you can now add certificates uploaded through Certificate Manager before importing the course.
1. After importing course, under Assign Certificate, select the desired certificate you wish to automatically be designated.
2. Select Import All.

PowerHouse Talent Admin Guide 7. 1 www.powerhousehub.com
112 | Page
Mediasphere Holdings Pty Ltd Copyright © 2020 [email protected]
Course Skeleton
To start creating the skeleton of your course, select the Edit Course icon within your course title bar.
This will open the Edit Course page.

PowerHouse Talent Admin Guide 7. 1 www.powerhousehub.com
113 | Page
Mediasphere Holdings Pty Ltd Copyright © 2020 [email protected]
As you can see, there will be a range of icons. These icons include:
• Add Page: select this icon to add new pages to your course
• Add Section: selection this icon to add new sections to your course • Add Practice Test: select this icon to add a test before your course commences • Add Test: select this icon to add a test to the end of your course
• Add Scenario: select this icon to add a scenario to your course • Add Survey: select this icon to add a survey to the end of your course
Each section features a range of icons on the left-hand side of the title.
These icons include:
• Re-arrange Items: select this icon to rearrange the order of sections within the course. These can be drag and dropped.
• Add Section Page: select this icon to add a page to the section you are currently editing.
• Add Section Practice Test: select this icon to insert a formative practice test to your section.
• Add Section Test: select this icon to insert a summative assessment to your section. • Add Section Scenario: select this icon to add a scenario to your section. • Add Section Survey: select this icon to insert a survey to your section. • Delete Section: select this icon to remove the section from your course. • Click to edit: select this icon to edit the title your section. Remember to press the Save
icon once you have done this.
Select any of these options to develop your comprehensive course skeleton.
As you start populating sections and pages within those sections, you’ll start to see your course skeleton forming:

PowerHouse Talent Admin Guide 7. 1 www.powerhousehub.com
114 | Page
Mediasphere Holdings Pty Ltd Copyright © 2020 [email protected]
As you can see, the course pages also display a range of icons. These include:
• Edit this page: select this icon to edit the course page. • Re-arrange Items: select this icon to rearrange the order of pages within the section.
These can be drag and dropped. • Move this page: select this icon to move the current page into a new course section.
• Duplicate this page: select this icon to duplicate the course page. • Preview this page: select this icon to preview the course page. • Import SCORM to this page: select this icon to import a SCORM to the selected page. • Delete this page: select this icon to remove the page from your course.

PowerHouse Talent Admin Guide 7. 1 www.powerhousehub.com
115 | Page
Mediasphere Holdings Pty Ltd Copyright © 2020 [email protected]
• Click to edit: select this icon to edit the title of your page. Remember to press the Save icon once you have done this.
Editing Course Pages
Now that you have your course skeleton, it’s time to start importing text, images and templates to help create an engaging and vibrant course. To do this, select the Edit this page icon, on any of the pages within the course skeleton. This will open up a blank page, where you will see PowerHouse Hub’s inbuilt content editor, referred to as the CK Editor. You will use this to add content to all the pages of the course.
The CK Editor has a variety of templates, font styles, colours and formatting options for you to choose from when creating content for a course. Simply hover over the symbols and click to use them.
From left to right, the icons include:
• Undo: select this icon to undo any mistakes you make. • Redo: select this icon to redo mistakes that you have undone. • Cut: select this icon to cut any items.
• Copy: select this icon to copy an item you wish to duplicate. Select the Paste icon to display the duplicated item.
• Paste: select this icon to paste an item you have cut. • Remove format: select this icon to remove any formatting the text may have.
• Bold: select this icon to make text become bold. Highlight the text you wish to bolden and select the Bold icon.
• Italic: select this icon to make your text become italicised. • Underline: select this icon to underline your text. • Subscript: select this icon to script your text. Highlight the text and select the Subscript
icon.

PowerHouse Talent Admin Guide 7. 1 www.powerhousehub.com
116 | Page
Mediasphere Holdings Pty Ltd Copyright © 2020 [email protected]
• Superscript: select this icon to script your text. Highlight the text and select the
Superscript icon.
From left to right, select the above icons to:
• left align
• centre • right align; and • justify your text
Highlight the text that requires alignment and select the alignment you wish to apply to the text.
• Insert/Remove Numbered List: select this icon to populate or remove a numbered list. Highlight the text you wish to add or remove a numbered list to/form, and select the
Insert/Remove Numbered List icon.
• Insert/Remove Bulleted List: select this icon to populate or remove a bullet-point list., Highlight the text you wish to add or remove a Bulleted list to/from, and select the
Insert/Remove Bulleted List icon. • Indenting: select this icon to alter the numbered and bullet-point lists. Use the Increase
Indent icon to bring the bullet point closer to the middle of the page. You can continue clicking this button until you are happy with the alignment of the bullet point.
Clicking the Decrease Indent icon will move the bullet point back the other way.

PowerHouse Talent Admin Guide 7. 1 www.powerhousehub.com
117 | Page
Mediasphere Holdings Pty Ltd Copyright © 2020 [email protected]
• Block Quote: select this icon to create a block quote textbox to the page. From here, you will be able to add text to the quoted textbox; or, you could highlight existing text
and select the Block Quote icon to make your ordinary text standout.
• Link: select this icon to help gain easy access to websites and documents. Highlight the
text you wish to be linked to a website or document, then select the Link icon. Once you have done this, the Link pop-up will appear, where you can insert the URL and window details. Select the OK button once you have entered the required details.

PowerHouse Talent Admin Guide 7. 1 www.powerhousehub.com
118 | Page
Mediasphere Holdings Pty Ltd Copyright © 2020 [email protected]
• Unlink: select this icon to remove the link. Highlight the text and select the Unlink icon.
• Anchor: select this icon to insert an anchor on your page. Once you have selected the
Anchor icon, this will open the Anchor Properties pop-up, where you will type the name of your anchor. This will display a red flag next to your text, which is only visible from the administration portal.

PowerHouse Talent Admin Guide 7. 1 www.powerhousehub.com
119 | Page
Mediasphere Holdings Pty Ltd Copyright © 2020 [email protected]
• Image: select this icon to add an image onto your page. Once you have selected the
Image icon, the Image Properties pop-up will appear. Once you have chosen your image file from the Asset Manager, choose the Width, Height and the desired alignment of the image. Click OK to add your image to the page.
• Insert HTML5 Audio: select this icon to add audio to your page. This will display the HTML5 Audio pop-up. This is where you can add an online sound file. To do so, paste or type the sound URL into the URL text field. Choose your desired alignment at the bottom and click OK to add it to the page. A sound file can also be added from the platform.
1. In the HTML5 Audio pop-up, press Browse Server. 2. Hover over the required audio file and select Insert. 3. Provide any basic information needed to the HTML5 Audio pop-up. Once you have done
this, press OK.

PowerHouse Talent Admin Guide 7. 1 www.powerhousehub.com
120 | Page
Mediasphere Holdings Pty Ltd Copyright © 2020 [email protected]

PowerHouse Talent Admin Guide 7. 1 www.powerhousehub.com
121 | Page
Mediasphere Holdings Pty Ltd Copyright © 2020 [email protected]
• Table: select this icon to create an organised way of breaking up the content of a page with the use of Tables.
• Insert Horizontal Line: select this icon to insert a horizontal line to your page. • Insert Special Character: select this icon to insert a special character within your text.

PowerHouse Talent Admin Guide 7. 1 www.powerhousehub.com
122 | Page
Mediasphere Holdings Pty Ltd Copyright © 2020 [email protected]
Spell Checker: select this icon to check your spelling.
• Formatting Styles: select this icon to choose the style of your text. Simply select the
Formatting Styles icon and select the relevant style of your text. You can select from:

PowerHouse Talent Admin Guide 7.1 www.powerhousehub.com
123 | Page
Mediasphere Holdings Pty Ltd Copyright © 2020 [email protected]
o Block Styles – Heading1, Heading2, Heading3, Heading4, Heading5 and custom box options; or
o Inline Styles – Cited work and “Inline Quotation”.
• Font Size: select this icon to alter your text size. Either select your option before you
begin typing or highlight pre-existing text, select the Font Size icon and choose the best option for your page.
• Text Colour: select this icon to change the colour of your text. • Background colour: select this icon to change the background colour of your text. This
will display as highlighted text.
NOTE: It’s best to stick with a light background colour and a dark text colour, like so:
Templates, Wells and Panels
Templates, wells and panels are a great way to enhance your ordinary text pages.
Ensure you use a bright colour for your text background.

PowerHouse Talent Admin Guide 7.1 www.powerhousehub.com
124 | Page
Mediasphere Holdings Pty Ltd Copyright © 2020 [email protected]
Templates
By selecting the Templates icon, you have access to all pre-created options, such as:
• Full Width Image Page
• Full-Width Video Page

PowerHouse Talent Admin Guide 7.1 www.powerhousehub.com
125 | Page
Mediasphere Holdings Pty Ltd Copyright © 2020 [email protected]
• Columns
• Accordions; and

PowerHouse Talent Admin Guide 7.1 www.powerhousehub.com
126 | Page
Mediasphere Holdings Pty Ltd Copyright © 2020 [email protected]
• Columns
• Accordions; and

PowerHouse Talent Admin Guide 7.1 www.powerhousehub.com
127 | Page
Mediasphere Holdings Pty Ltd Copyright © 2020 [email protected]
• Tabbed Sliders
Simply select an option and fill in the Template with text and/or images.

PowerHouse Talent Admin Guide 7.1 www.powerhousehub.com
128 | Page
Mediasphere Holdings Pty Ltd Copyright © 2020 [email protected]
Wells
Wells are a great way to uplift your ordinary text pages.
Selecting this will display a Wells drop-down tab. Options include:
• default well • grey well • gold well • red well • green well • blue well • purple well
Select an option and fill in the Well with text.

PowerHouse Talent Admin Guide 7.1 www.powerhousehub.com
129 | Page
Mediasphere Holdings Pty Ltd Copyright © 2020 [email protected]
Panels
The Panels icon displays a drop-down tab with options for panels. Options include:
• “Default” panel • “Activity” panel • “Key Point” panel • “More Info” panel • “Hot Tip” panel • “For Example” panel
Select an option and fill in the Panel with text.

PowerHouse Talent Admin Guide 7.1 www.powerhousehub.com
130 | Page
Mediasphere Holdings Pty Ltd Copyright © 2020 [email protected]
Source Code
By selecting the Source icon you can view any templates, stand-alone text, images or videos through code. Here you can alter any unnecessary text, spaces or image alignments.
Embedding an Image
1. To get a full-screen image in your course page, select the Image icon and click
Browse Server. This will open the Asset Manager, home for all images uploaded to the platform.
NOTE: If you’re wanting to upload a new image from your computer, at the top of the page select Upload File, then click Choose File. Locate your chosen image, then select the Upload button.
2. Once you have located your chosen image, hover over its thumbnail, and select the
green Insert button.

PowerHouse Talent Admin Guide 7.1 www.powerhousehub.com
131 | Page
Mediasphere Holdings Pty Ltd Copyright © 2020 [email protected]
You will be taken to the Image Properties window. From here, you will be able to fill in the relevant fields, such as the Alternative Text, Width, Height and the alignment of the image.
NOTE: Ensure you copy the image’s URL address. You will need this to embed the image.
3. Press the green OK button when finished.
4. Select the image.
5. While you have the image selected, press the Link icon. 6. Paste the image’s link into the URL field.

PowerHouse Talent Admin Guide 7.1 www.powerhousehub.com
132 | Page
Mediasphere Holdings Pty Ltd Copyright © 2020 [email protected]
7. Once you have copied the link into the link URL, select the Target tab inside the Link
pop-up. This will bring you to the Target dropdown menu.
8. Select the New Window (_blank) option and press OK.
The image has now been embedded.

PowerHouse Talent Admin Guide 7.1 www.powerhousehub.com
133 | Page
Mediasphere Holdings Pty Ltd Copyright © 2020 [email protected]
Embedding Vimeo Videos
1. In the CK Editor, select the Templates icon and select the Full-Width Video option.
2. Once you have accessed Vimeo and found your chosen video, select the More Actions
icon and select the Embed option.
This will take you to the Embed page of the video.

PowerHouse Talent Admin Guide 7.1 www.powerhousehub.com
134 | Page
Mediasphere Holdings Pty Ltd Copyright © 2020 [email protected]
3. Select the Embed Code button on the top right-hand side of the page.
4. Copy the HTML code between the quotation marks (“”) and navigate your way back to the course page.

PowerHouse Talent Admin Guide 7.1
www.powerhousehub.com
135 | Page
Mediasphere Holdings Pty Ltd Copyright © 2020 [email protected]
Now it’s time to paste the video code into the Full-Width Video code.
5. Select the Source Code icon. 6. Replace the pre-existing code between the quotation marks with the embedded video
code.
Embedding YouTube Videos
1. Once you have accessed YouTube and found your chosen video, select the Share
icon and select the Embed option.

PowerHouse Talent Admin Guide 7.1
www.powerhousehub.com
136 | Page
Mediasphere Holdings Pty Ltd Copyright © 2020 [email protected]
7. Copy the HTML code between the quotation marks (“”) and navigate your way back to the course page.

PowerHouse Talent Admin Guide 7.1
www.powerhousehub.com
137 | Page
Mediasphere Holdings Pty Ltd Copyright © 2020 [email protected]
Now it’s time to paste the video code into the Full-Width Video code.
2. Select the Source Code icon. 3. Replace the pre-existing code between the quotation marks with the embedded video
code.
Adding a Test
1. To add a section test, select the Add Section Test icon within the section tab.
2. To begin editing the Section Test, select the Edit icon on the test title bar. This will
take you to the Assessment Editor.

PowerHouse Talent Admin Guide 7.1
www.powerhousehub.com
138 | Page
Mediasphere Holdings Pty Ltd Copyright © 2020 [email protected]
3. As the assessment editor provides the option for you to add
introduction and summary
text, enable the text fields, select the Edit Content icon, and add content to the introductory and summary fields.
4. Once you have added your introductory and summary content, press Save.
Questions Editor
The platform features a range of questions that you can add to the Questions Editor. Question types include:
• True or False (previously mentioned on page 46) • Multiple Choice (previously mentioned on page 46) • Short Answer (previously mentioned on page 47) • Re-order
1. To start creating your assessment questions, select either one of these four question type icons. For this demonstration, the Re-order question type will be selected.

PowerHouse Talent Admin Guide 7.1
www.powerhousehub.com
139 | Page
Mediasphere Holdings Pty Ltd Copyright © 2020 [email protected]
2. Select the Edit Question icon. 3. Enter your question in the text field. 4. Type your answers into the Answers text field.
NOTE: ensure you write your answers in the correct order, as they will be randomised when shown to the learner.
5. Select the Require an Answer radio button, displayed on the right side of the question
type. This will ensure the learners must provide the correct response.
6. Once you have finished populating all your content for your question types, ensure you select the Save button, as your work will not be automatically saved.

PowerHouse Talent Admin Guide 7.1
www.powerhousehub.com
140 | Page
Mediasphere Holdings Pty Ltd Copyright © 2020 [email protected]
Introduction to Scenario Branching
Scenarios are a great way to test your learners in a more engaging way than the typical true or false questions. Through the Scenario module, the learners are able to resolve workplace issues or defuse an emergency situation, based on the pathway options created for them.
1. To add a Scenario to your course, select the Add Scenario icon from the row of icons on the Edit Course page. You can also add a scenario within your section, by
clicking the Add Section Scenario icon.
2. Once you have taken the necessary steps to change the title of your new scenario, select
the Edit this Scenario icon, which will open to the Edit Scenario page. This is where you can include introduction text and start creating your scenario pathway.
It’s time to edit your initial path. The initial path is also known as the decision path.
3. Enter the title of your pathway. 4. As scenario builds are all about storytelling, inside the text field, write a descriptive
introduction of what has happened to create an issue. E.g.:
You are heading to the breakroom to have your lunch, and you see some smoke trailing out of the break room and into the hallway. As you move closer to the breakdown, you see that the stove has
been covered with a tea-towel, resulting in a small fire.
What do you do?

PowerHouse Talent Admin Guide 7.1
www.powerhousehub.com
141 | Page
Mediasphere Holdings Pty Ltd Copyright © 2020 [email protected]
Once you have a short description, you can start to form the pathway you want your learners to take.
5. Select the Add New Decision icon to create your responses for the initial question, highlighted in bold above.
6. Edit the title of the new decision by selecting the Edit icon. 7. As the initial question is asking ‘What do you do?’ this is where you will need to answer
that question, with various responses for the learners to choose from. E.g.
• First decision: Shout 'Fire! Fire! Fire!' and sound the alarm to alert others in the building.
• Second decision: Remain calm. If it is safe to do so, turn the stove top off and place a fire blanket over the small fire.
• Third decision: Leave the fire as it isn’t that big and find someone to help you extinguish it.
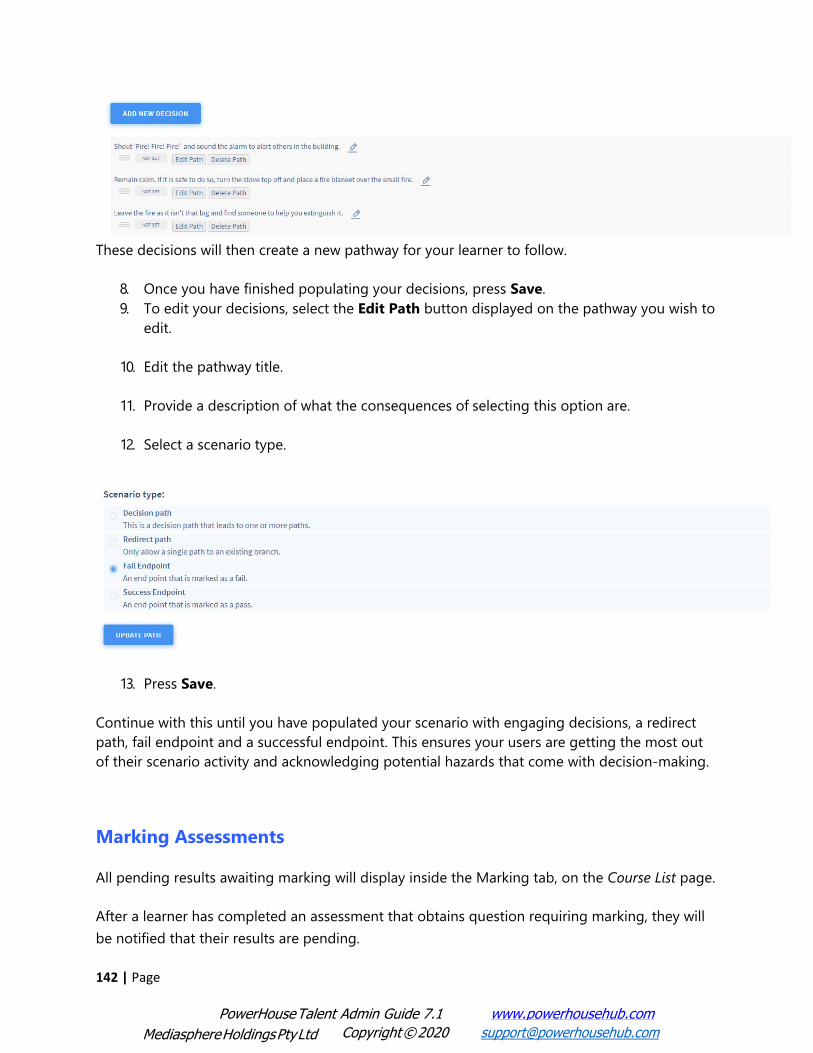
PowerHouse Talent Admin Guide 7.1
www.powerhousehub.com
142 | Page
Mediasphere Holdings Pty Ltd Copyright © 2020 [email protected]
These decisions will then create a new pathway for your learner to follow.
8. Once you have finished populating your decisions, press Save. 9. To edit your decisions, select the Edit Path button displayed on the pathway you wish to
edit.
10. Edit the pathway title.
11. Provide a description of what the consequences of selecting this option are.
12. Select a scenario type.
13. Press Save.
Continue with this until you have populated your scenario with engaging decisions, a redirect path, fail endpoint and a successful endpoint. This ensures your users are getting the most out of their scenario activity and acknowledging potential hazards that come with decision-making.
Marking Assessments
All pending results awaiting marking will display inside the Marking tab, on the Course List page.
After a learner has completed an assessment that obtains question requiring marking, they will be notified that their results are pending.

PowerHouse Talent Admin Guide 7.1
www.powerhousehub.com
143 | Page
Mediasphere Holdings Pty Ltd Copyright © 2020 [email protected]
NOTE: results will only be pending if the assessment(s) include re-order or short answer question types.
1. To mark assessments, on the Course List page, select the Marking tab, displayed within the top right-hand menu. This will bring you to the Marking Assessment page.
2. Click the Pen icon underneath the Mark column of the question you would like
to mark.
3. Inside the dropdown menu, select a value for the user’s answer. Select Correct if the answer is correct. Select Incorrect if the answer is not correct.

PowerHouse Talent Admin Guide 7.1
www.powerhousehub.com
144 | Page
Mediasphere Holdings Pty Ltd Copyright © 2020 [email protected]
4. When finished, click Save. 5. If you would like the user to be notified when the course is marked, click the Send
notification to user checkbox.
Learning Plan Manager
To group several courses into one program, a learning program should be created. Learning programs grant you the ability to condense several courses into one program.
To access your learning programs, click Learning Program Manager on the left-hand side menu, under the Workflows tab.
Add Program
1. Select the Add Program button at the top of the page. 2. Provide a Program Title.

PowerHouse Talent Admin Guide 7.1
www.powerhousehub.com
145 | Page
Mediasphere Holdings Pty Ltd Copyright © 2020 [email protected]
3. By selecting the dropdown menu, assign a Recommended Timeframe for the program to be completed in.
4. Assign a Certificate to the Learning Program.
5. Click Choose File under the Main Image section to select an image for the program’s thumbnail.
6. Enable or disable prerequisites by selecting the Radio button.

PowerHouse Talent Admin Guide 7.1
www.powerhousehub.com
146 | Page
Mediasphere Holdings Pty Ltd Copyright © 2020 [email protected]
1. Provide a summary of 300 words or less, inside the Summary text field.
2. Write a short description of your Learning Program. This is what will be displayed to learners within the thumbnail of the Learning Program. This is typically 75-150 words.
3. When you have finished, select the Save button.
Once you have saved your Learning Program, you will be taken back to the List Programs page, where you will start to see your Learning Program list grow.

PowerHouse Talent Admin Guide 7.1
www.powerhousehub.com
147 | Page
Mediasphere Holdings Pty Ltd Copyright © 2020 [email protected]
Edit program
1. Click the Edit icon displayed underneath the Actions tab on the List
Programs page. This will open the Learning Program Details page. As you can see there are additional tabs that require information. These include:
• Assign courses • Assign to groups
2. Select the courses that will be assigned to this Learning Program.
3. Assign this Learning Program to a group. By doing this, you are allowing the
users within that group to view the Learning Program on their learning portal.

PowerHouse Talent Admin Guide 7.1
www.powerhousehub.com
148 | Page
Mediasphere Holdings Pty Ltd Copyright © 2020 [email protected]
1. Press Save
Onboarding Manager The Onboarding Manager feature allows you create workflows and welcome emails for your new hires. To begin creating your Onboarding Workflow, inside the Publishing dropdown, select the Onboarding Manager module on the left-hand menu. This will bring you to the Onboarding page.
1. Select the Add Workflow button at the top of the page. 2. Provide the basic information, such as title of your Onboarding Workflow, Description, Status and whether
if this Workflow is a brand new one or you can also duplicate an existing Workflow. 3. Select the Save button.

PowerHouse Talent Admin Guide 7.1
www.powerhousehub.com
149 | Page
Mediasphere Holdings Pty Ltd Copyright © 2020 [email protected]
Adding Workflow Items This will bring you to the Onboarding Content page where you can now create and add items to the Onboarding Workflow under Content.
4. Now select the Add button next to Tasks. This is where you can select the type of item you would like to add to your workflow. Options are:
• Content page: this is a static page that displays content to the learner. • Personal Information: A form for the learner to enter their personal details. The fields in this task
can be mandatory or not using the toggle button. • File Upload: Digital form that allows you to request credentials and compliances to be uploaded.
(Note: Please ensure under User Uploads, you have created file’s under Credential or Compliance). • Induction Courses: This allows you to assign mandatory courses to the workflow.
5. Provide general information needed for each content and then select Save. 6. You can also edit the Title of the item using the icon then select the save button. 7. At the top right-hand corner there is an Actions button, the Action button allows you to either Duplicate
the workflow item or Delete it. 8. Once all the content has been created for the workflow, you are now able to select the Re-order button,
to change the lists of contents in the workflow. 9. As you start to create your contents for the workflow it should start to look like this

PowerHouse Talent Admin Guide 7.1
www.powerhousehub.com
150 | Page
Mediasphere Holdings Pty Ltd Copyright © 2020 [email protected]
Edit Onboarding Workflow Settings The Edit Onboarding Workflow Settings is where you can edit the Title, add a thumbnail and adding a Description. You can also assign time frames of when the Workflow needs to be completed and set completion reminders and assign completion certificates and overdue manager alerts.
1. In Workflow description, you can edit the Title and Description and Upload a picture for the Thumbnail.
2. In Timeframe and Reminders make sure you enable the Toggle button to activate this setting. 3. In General Settings you can activate the Status to be visible to users using the dropdown and
can assign a Certificate through the Certificate Manager. You are also able to activate the ‘Send Overdue Manager alerts’ also by using the toggle button on the right to Yes.
Assign Users Onboarding Workflow Settings
In this section of Assign, we are now able to assign users to complete the workflow we have just created.
1. Under Assign Workflow to Groups, select the groups of users you would like to assign the workflow to.

PowerHouse Talent Admin Guide 7.1
www.powerhousehub.com
151 | Page
Mediasphere Holdings Pty Ltd Copyright © 2020 [email protected]
2. Transfer after Completion allows you to assign users to groups upon successful completion of the workflow. This allows users to become a part of the group that has successfully completed all items in the
workflow.
NOTE: Once you have assigned users to this workflow, some sections will no longer be editable. Please check all items in the workflow are correct. Onboarding Settings In this section after onboarding workflow's have been created, you can then go to Settings, and in System you should be able to see an Onboarding Settings section, this will allow you to enable the workflow for users and managers.
1. Select Settings from the left-hand menu, and then select System. 2. You should now be able to see the Onboarding Settings module.
3. You should be able to enable two options of ‘Show Onboarding Workflow on login if not completed’ and ‘Allow users to access other modules if they haven’t completed their assigned workflows’.
4. Select the toggle button to the right to activate these settings.
WorkPro Settings WorkPro is a feature that allows you to assign users to complete a Police Check and/or Visa Check. This will automatically assign users to complete a Police Check through the workflow this is activated through. After users are assigned to groups this feature will pop in the top menu. NOTE: Please ensure you have enabled the WorkPro through the Integration module in Settings.

PowerHouse Talent Admin Guide 7.1
www.powerhousehub.com
152 | Page
Mediasphere Holdings Pty Ltd Copyright © 2020 [email protected]
You should be able to see the user fields:
• User # • Checkbox – Allows you update only selected user. • First Name. • Last Name • Email • Employment Type • Employments Role • Company Industry • Employment State • Contact with Vulnerable Groups
This will allow you assign certain users the WorkPro check.
WorkPro
The WorkPro module allows you to manage the workflows created through Onboarding Manager. You will be able to view the status of both Work Rights and the Police Checks assigned to users.
1. Inside the Administration tab dropdown, select WorkPro. 2. The first page should allow you to see all users that have been assigned the Work Rights check. 3. To view Police Checks, select the Police Checks button next to Work Rights.
Course Catalogue
The Course Catalogue allows you to add and sell courses via the Buy Courses module on the learner portal.
1. Inside the E-Commerce module tab, select the Course Catalogue module. This will take you to the Cart Items page.
Once you start populating your course catalogue items, this page will list all available courses for purchase on the platform.

PowerHouse Talent Admin Guide 7.1
www.powerhousehub.com
153 | Page
Mediasphere Holdings Pty Ltd Copyright © 2020 [email protected]
Add Course Catalogue Item
To add a course catalogue item, select the Add Item icon displayed at the top of the page. This will bring you to the Cart Item Details page. This is where you can enter details of the course catalogue item.
1. Provide your Cart Item with a title. 2. Select the appropriate Course Catalogue Status. 3. Select whether you would like your Cart Item to display on the Login screen

PowerHouse Talent Admin Guide 7.1
www.powerhousehub.com
154 | Page
Mediasphere Holdings Pty Ltd Copyright © 2020 [email protected]
1. Select the appropriate Cart Cost by selecting This item is FREE or selecting This item has a COST. If the course catalogue item has a cost, select this option and fill out the details as required.
2. Under the Description tab, add a short summary and description for your course catalogue item.
3. Under the Video/Images tab, upload resources to help with the promotion of your course catalogue item. Provide the URL to an embedded version of an externally hosted video, and upload images as required.
Add Group Price Add a group price will allow users in a certain group to pay a different price to other users. An example of using can be giving a different price for a member and non-member of your company.
1. Select Add Group Price button. 2. Select the Group you would like to allocate a different price to. 3. Allocate the price amount. 4. Select Save

PowerHouse Talent Admin Guide 7.1
www.powerhousehub.com
155 | Page
Mediasphere Holdings Pty Ltd Copyright © 2020 [email protected]
1. Under the Assign Courses tab, select all courses to be assigned to this course catalogue
item.
2. Under the Recommended tab, assign the course catalogue item to any of the groups
displayed. This will show the course catalogue item on ‘Recommended for you’ for the Learner/s.

PowerHouse Talent Admin Guide 7.1
www.powerhousehub.com
156 | Page
Mediasphere Holdings Pty Ltd Copyright © 2020 [email protected]
3. Once you have done this, save your changes by selecting the Save button at the bottom right-hand corner of the page.
Discount Coupons
Select the Discounts tab on the top right-hand menu to add a discount coupon. This allows your learners to receive discounts on course catalogue items.
1. Add a Code for your coupon. 2. Add a percentage discount. 3. Add an expiry date. 4. Select Add Coupon to store the code. Share the code as part of your marketing
initiatives.

PowerHouse Talent Admin Guide 7.1
www.powerhousehub.com
157 | Page
Mediasphere Holdings Pty Ltd Copyright © 2020 [email protected]
Training Records
This feature allows administrators to have a comprehensive insight into all users’ internal and external training activities.
Once the learner has completed a course or imported external training records, the administrator can view the internal training records and accept or decline external training records.
Search for a training record by selecting the Search button and entering the filter details.
1. To search for a specific Training Record, click the Search tab on the top of the Training Records page.

PowerHouse Talent Admin Guide 7.1
www.powerhousehub.com
158 | Page
Mediasphere Holdings Pty Ltd Copyright © 2020 [email protected]
2. Enter the details of the activity you would like to search.
3. This includes the activity completion date, the user’s full name, email, the relevant CPD
Profile and the approval status.
4. When you have finished, click the Search button.
Reports Once your learners have begun to submit results, you will be able to view their results in a meaningful way. To do this, PowerHouse Hub offers various inbuilt reports that interrogate the database of results to provide a range of information.
These reports are:
COURSE/ASSESSMENT REPORTS
• Generate a report on users who have submitted and have passed or failed (courses with assessments only) from a certain date to another date
• Generate a report on users who have been created that have not submitted (courses with assessments only)
• Generate a report on users who have submitted a survey from a certain date to another date
• Generate a report on users who have attempted an assessment from a certain date to another date and failed
• Generate a report on users who have not yet completed a course (with or without assessments)
• Generate a report on users who have submitted results for a SCORM object from a certain date to another date
• Generate a report on users who have completed a Scenario which shows the traversal path from a certain date to another date
• Generate a report on users who have passed or failed a course (with or without assessments) from a certain date to another date
• Generate a report on the cumulative training time by users who have passed courses from a certain date to another date.
DASHBOARD SURVEY REPORTS
• Generate a report on users who have submitted results for a Dashboard Survey from a
certain date to another date.

PowerHouse Talent Admin Guide 7.1
www.powerhousehub.com
159 | Page
Mediasphere Holdings Pty Ltd Copyright © 2020 [email protected]
DOCUMENTS REPORTS
• Generate a report on users who have downloaded documents from the Document Library
EVENT REPORTS
• Generate a report on users who have registered for events • Generate a report on users who have registered for and attended events • Generate a report on users who have registered for and failed to attend events
LEARNING PROGRAM REPORTS • Generate a report on users who have Started, Completed, or Not Started a Learning Program from
a certain date to another date.
ONBOARDING REPORTS
• Generate a report on users who have been assigned to Onboarding Workflows from a certain date to another date
PREMIUM SURVEYS REPORT
• Generate a report on results from Premium Surveys from a certain date to another date
USER REPORTS
• Generate report on number of logins for users in groups
• Generate report on all user notes for users in groups.

PowerHouse Talent Admin Guide 7.1
www.powerhousehub.com
160 | Page
Mediasphere Holdings Pty Ltd Copyright © 2020 [email protected]
CPD REPORTS
• Generate a report that shows a list of CPD items gained by Learners (Including courses, events, webinars, and training records).
• Generate a report that shows all hours for each CPD Categories. • Generate a report that shows all users who have achieved their CPD requirements across all required
categories. • Generate a report that shows all users who have Passed a Course, attend an Event/Webinar or added a
Training Record with each CPD Categories.

PowerHouse Talent Admin Guide 7.1
www.powerhousehub.com
161 | Page
Mediasphere Holdings Pty Ltd Copyright © 2020 [email protected]
Generating a Report
1. To start generating your reports, select on any reports displayed in the section above.
2. Provide the basic information required to generate the report and select the Generate Report button.
3. Wait for the Excel spreadsheet to finish downloading, and view and save the document.

PowerHouse Talent Admin Guide 7.1
www.powerhousehub.com
162 | Page
Mediasphere Holdings Pty Ltd Copyright © 2020 [email protected]
Add Report
In addition to the standard reports, you can create a custom report to reflect your organisation’s requirements.
1. Press the Add Report button displayed at the top of the List Reports page.
2. Give the report a name. 3. Select the report type you would like to create, by selecting the dropdown menu. This
will then generate a form for you to complete.
4. Once you have provided the basic information, select Run Report to generate your
custom report.
Scheduled Tasks This is where all the automated tasks are stored. Automated tasks such as Course Re-Induction, is what the system checks once a day to view if a learner has reached their re-induction date on a course.

PowerHouse Talent Admin Guide 7.1
www.powerhousehub.com
163 | Page
Mediasphere Holdings Pty Ltd Copyright © 2020 [email protected]
The Scheduled Tasks module provides a list of tasks that are scheduled to be emailed out to users. There are six scheduled task pre-sets. These pre-sets include:
Course Delay: Sends an email to the user once their delay is over.
Course Expires: Sends an email when course is near
expiration. License Expiry: Sends an email when the
user’s license is expiring. News Emailer: Sends news
items via email.
Workflow Reminders: Sends a reminder emails to users.
These tasks are checked regularly to provide users with up-to-date information.
1. To disable a task, click the Disable button. This can be enabled any time by clicking the
Enable button.
2. Click Run Now under the task title’s Actions column to run the task. A new window should display notifying you that the task has been completed.
3. To view a log of the task emails, click View Log under the Actions column.

PowerHouse Talent Admin Guide 7.1
www.powerhousehub.com
164 | Page
Mediasphere Holdings Pty Ltd Copyright © 2020 [email protected]
Web Content Editor
The Web Content Editor allows you to manage, publish and edit the information displayed to customers on the public area of your training portal.
There are five icons inside the Actions column, to help manage your pages. These include:
• Edit Page Detail – This will open your page content in an editor which allows you to edit your page content and apply styling.
• View Page Content – This will open the content page so you can preview how the page looks in the frontend with all the styling elements applied to it.
• Add Sub Page – This feature will allow you to add a subpage which will be displayed in both the backend and fronted of your site. Adding a subpage to a top menu page will automatically add a link to a dropdown feature in the frontend.
• View Page Archives – This will open a list of archived versions of the selected page. You can also use this feature to save a copy of an old version of your page before making any changes to it. To do this simply go into your archived pages and click the Duplicate
icon , edit and save with the Status as Archived.
• Delete This Page – This will permanently delete the page.
Submit Sitemap
By submitting the structure of your site to search engines you are indexing it in a better way.
It is recommended that you perform this action after adding new content or updating existing content. This action can be performed only once per hour.
Sending your sitemap to the search engines will not warranty a higher rank on the search results, although it might have a positive impact in the long term.
PowerHouse Talent Admin Guide 7.1
www.powerhousehub.com
165 | Page
Mediasphere Holdings Pty Ltd Copyright © 2020 [email protected]
Sending your sitemap to the search engines will not warranty a higher rank on the search results, although it might have a positive impact in the long term.
Adding a New Page
1. Click the Add New Page button to create a new page.
2. Under the General tab, enter the following:
Page Heading – This is a H1 title that will display at the top of your page and plays an important role in SEO, we recommend including keywords here.
Page Sub Heading – This is an optional H2 title that will display under your Page Heading and plays a role in SEO, we recommend including keywords here should you decide to use it.
Page Name (URL Address) – This will be the name attached to the end of your domain name that will direct visitors to the page. It cannot contain any spaces or symbols other than - _ and for good SEO should include a keyword. Type in the name you wish to use for example: contractor-compliance. You can check you do not already have a duplicate page with the same name by clicking the Check Page Name link. Once saved the full link to your page would be: www.yoursite.com/contractor-compliance
External Link - Check this box if you want this link to take visitors to a 3rd party website.
External URL (Address) – Paste your external link address in here. For example: www.3rdparty- webiste.com

PowerHouse Talent Admin Guide 7.1
www.powerhousehub.com
166 | Page
Mediasphere Holdings Pty Ltd Copyright © 2020 [email protected]
Show in Main Menu – Check this box if you would like a link to this page to display in your main menu (top of your page).
Show in Left Menu – Check this box if you would like a link to this page to display in a left menu inside you content page.
Show in Sitemap – Check this box if you would like a link to this page to display on your sitemap page.
Show in Footer – Check this box if you would like a link to this page to display in your footer.
3. Under the Meta tab, enter the following:
Meta Keywords – This is where you will enter the keywords that will help visitors find you when searching in search engines such as Google, Yahoo and Bing.
Meta Description – This is the description that will display on search engine results page such as Google, Yahoo and Bing. For improved SEO results you should include a few keywords here.

PowerHouse Talent Admin Guide 7.1
www.powerhousehub.com
167 | Page
Mediasphere Holdings Pty Ltd Copyright © 2020 [email protected]
4. Next, select the Content tab. This is where you will add all your page content and apply styling such as H1, bold, italic etc. If you mouse over the icons a tool tip will appear naming each button. If you have more advanced skills, you can switch to source view and enter HTML. Please remember not to copy and paste directly from Word or other Websites as this will apply formatting that may conflict with your global stylesheet. We recommend copying and pasting into text editors such as Notepad (PC) and TextEdit (Mac) to strip out formatting and then copying and pasting directly from these programs into the editor below.
5. Once you have provided information to all the tabs, click Save.

PowerHouse Talent Admin Guide 7.1
www.powerhousehub.com
168 | Page
Mediasphere Holdings Pty Ltd Copyright © 2020 [email protected]
That concludes the PowerHouse Hub User Manual. You should now have a good understanding of the basics of using the software. If you require any further information or assistance whilst using Powerhouse Hub products, contact Powerhouse Hub at the following email address:
[email protected] Support Line: Ph: 1300 787 611 Ph: +61 (07) 5555 0180

PowerHouse Talent Admin Guide 7.1
www.powerhousehub.com
169 | Page
Mediasphere Holdings Pty Ltd Copyright © 2020 [email protected]

PowerHouse Talent Admin Guide 7.1
www.powerhousehub.com
170 | Page
Mediasphere Holdings Pty Ltd Copyright © 2020 [email protected]

PowerHouse Talent Admin Guide 7.1
www.powerhousehub.com
171 | Page
Mediasphere Holdings Pty Ltd Copyright © 2020 [email protected]

PowerHouse Talent Admin Guide 7.1
www.powerhousehub.com
172 | Page
Mediasphere Holdings Pty Ltd Copyright © 2020 [email protected]
Technical Support To get additional support on any site issues, please to go the Help page under your user image in the top right-hand corner. Here you can add support documentation, submit a support ticket, and report a bug. If submitting a ticket or bug, please ensure you are as detailed as possible so we can assist you as soon as possible