CGS2060 Computer Applications
23
EVEREST UNIVERSITY ONLINE CGS2060 Computer Applications Lecture One Understanding Windows Explorer & Computer Organization Customizing and Configuring Your Computer 00
-
Upload
independent -
Category
Documents
-
view
1 -
download
0
Transcript of CGS2060 Computer Applications
EVEREST UNIVERSITY ONLINE
CGS2060 Computer Applications
Lecture One
Understanding Windows Explorer & Computer Organization
Customizing and Configuring Your Computer
00
Lecture One 2
Revised 12/25/2014
Table of Contents Welcome to Lecture One .............................................................................................................................. 4
File Explorer .................................................................................................................................................. 4
Finding, Opening and Navigating ...................................................................................................... 4
The File Explorer Window ................................................................................................................. 4
File Explorer - Dissected .................................................................................................................... 5
o Navigation Pane ............................................................................................................................ 5
o File List: ......................................................................................................................................... 5
o Drive List: ...................................................................................................................................... 5
o The Address Bar ............................................................................................................................ 5
o Documents .................................................................................................................................... 5
o Search Box ..................................................................................................................................... 5
o Views ............................................................................................................................................. 5
Documents Folder ............................................................................................................................. 6
Creating the Assignments Folder ...................................................................................................... 7
Another Look at the Address Bar ...................................................................................................... 7
Creating your Class Folder ................................................................................................................ 8
Zipping your files and folders .......................................................................................................... 11
Adding Shortcuts ..................................................................................................................................... 13
Start Menu .......................................................................................................................................... 13
Moving between Windows ..................................................................................................................... 15
Resizing a Window .................................................................................................................................. 16
Using a Scrollbar ...................................................................................................................................... 16
The Snipping Tool .................................................................................................................................... 17
The Print Screen Key ............................................................................................................................... 19
Hot Keys ...................................................................................................................................................... 20
How to use the Hot Keys ......................................................................................................................... 20
Getting the most from your Mouse! ........................................................................................... 21
Laptop Users. .................................................................................................................................. 21
PC Users .......................................................................................................................................... 22
PC Troubleshooting ..................................................................................................................................... 23

Lecture One 3
Revised 12/25/2014
Restart Your Computer to Fix a Variety of Problems ...................................................................... 23
Typing Skills ................................................................................................................................................. 23
Keyboarding and Typing Skills ......................................................................................................... 23
Lecture One 4
Revised 12/25/2014
Welcome to Lecture One Please note that as you work your way through the lecture, you may find that your computer looks
slightly different than the images shown. If you have any questions, please contact your Instructor.
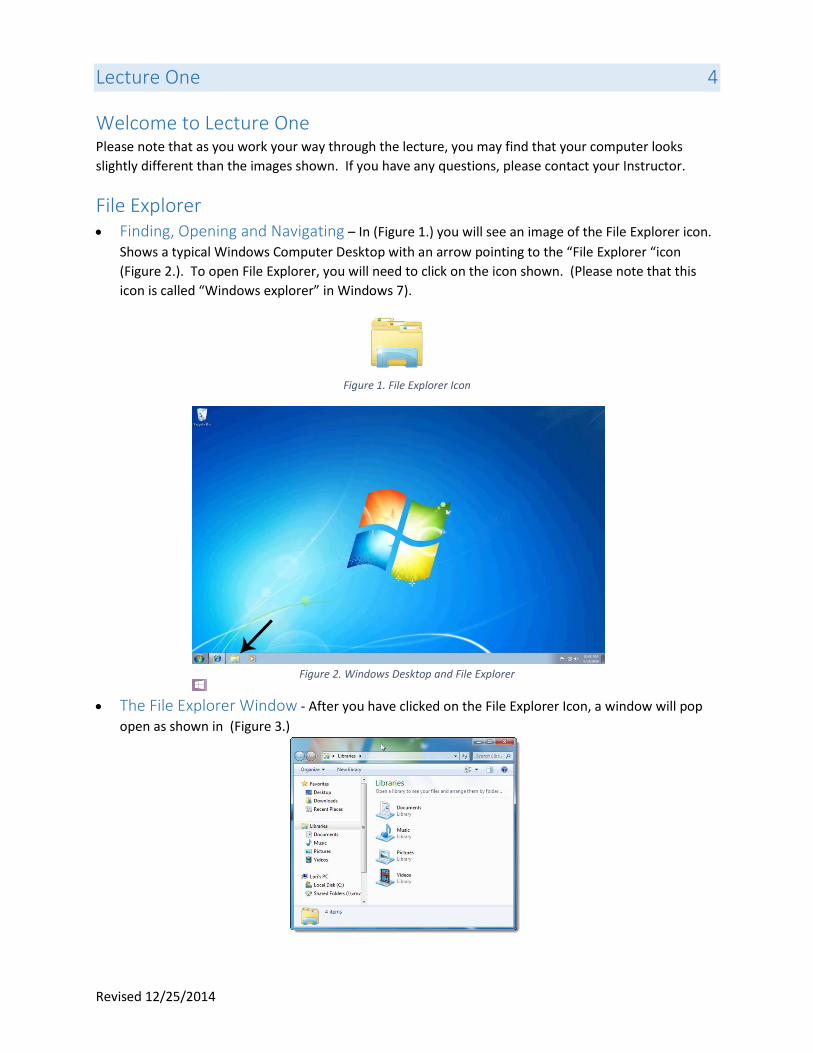
File Explorer Finding, Opening and Navigating – In (Figure 1.) you will see an image of the File Explorer icon.
Shows a typical Windows Computer Desktop with an arrow pointing to the “File Explorer “icon
(Figure 2.). To open File Explorer, you will need to click on the icon shown. (Please note that this
icon is called “Windows explorer” in Windows 7).
Figure 1. File Explorer Icon
Figure 2. Windows Desktop and File Explorer
The File Explorer Window - After you have clicked on the File Explorer Icon, a window will pop
open as shown in (Figure 3.)
Lecture One 5
Revised 12/25/2014
Figure 3. File Explorer
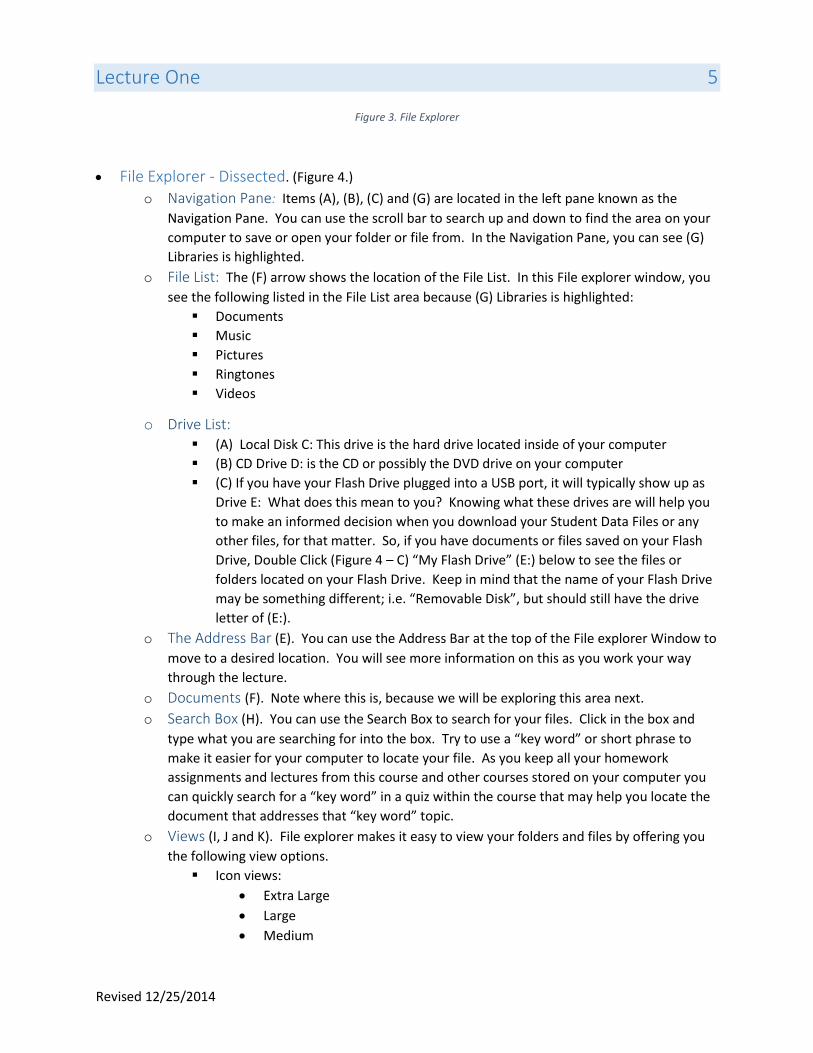
File Explorer - Dissected. (Figure 4.)
o Navigation Pane: Items (A), (B), (C) and (G) are located in the left pane known as the
Navigation Pane. You can use the scroll bar to search up and down to find the area on your
computer to save or open your folder or file from. In the Navigation Pane, you can see (G)
Libraries is highlighted.
o File List: The (F) arrow shows the location of the File List. In this File explorer window, you
see the following listed in the File List area because (G) Libraries is highlighted:
Documents
Music
Pictures
Ringtones
Videos
o Drive List: (A) Local Disk C: This drive is the hard drive located inside of your computer
(B) CD Drive D: is the CD or possibly the DVD drive on your computer
(C) If you have your Flash Drive plugged into a USB port, it will typically show up as
Drive E: What does this mean to you? Knowing what these drives are will help you
to make an informed decision when you download your Student Data Files or any
other files, for that matter. So, if you have documents or files saved on your Flash
Drive, Double Click (Figure 4 – C) “My Flash Drive” (E:) below to see the files or
folders located on your Flash Drive. Keep in mind that the name of your Flash Drive
may be something different; i.e. “Removable Disk”, but should still have the drive
letter of (E:).
o The Address Bar (E). You can use the Address Bar at the top of the File explorer Window to
move to a desired location. You will see more information on this as you work your way
through the lecture.
o Documents (F). Note where this is, because we will be exploring this area next.
o Search Box (H). You can use the Search Box to search for your files. Click in the box and
type what you are searching for into the box. Try to use a “key word” or short phrase to
make it easier for your computer to locate your file. As you keep all your homework
assignments and lectures from this course and other courses stored on your computer you
can quickly search for a “key word” in a quiz within the course that may help you locate the
document that addresses that “key word” topic.
o Views (I, J and K). File explorer makes it easy to view your folders and files by offering you
the following view options.
Icon views:
Extra Large
Large
Medium

Lecture One 6
Revised 12/25/2014
Small.
Other views:
List
Details (offers the following views): The following can sort files by any
category you select. Example: You can sort by Date Modified so you can see
the most recent file worked on within a folder.
o Name of File
o Date Modified
o Date Created
o Type of File
Tiles
Content
o You can click on (I) to scroll through different views with each click or you can click on the
small black arrow (K) to see a View Slide Bar. With the View Slide Bar, click on the bar and
drag it up and down until you see the view you want. Click on (J) if you would like to toggle
the view pane on and off.
Figure 4. File Explorer Dissected.
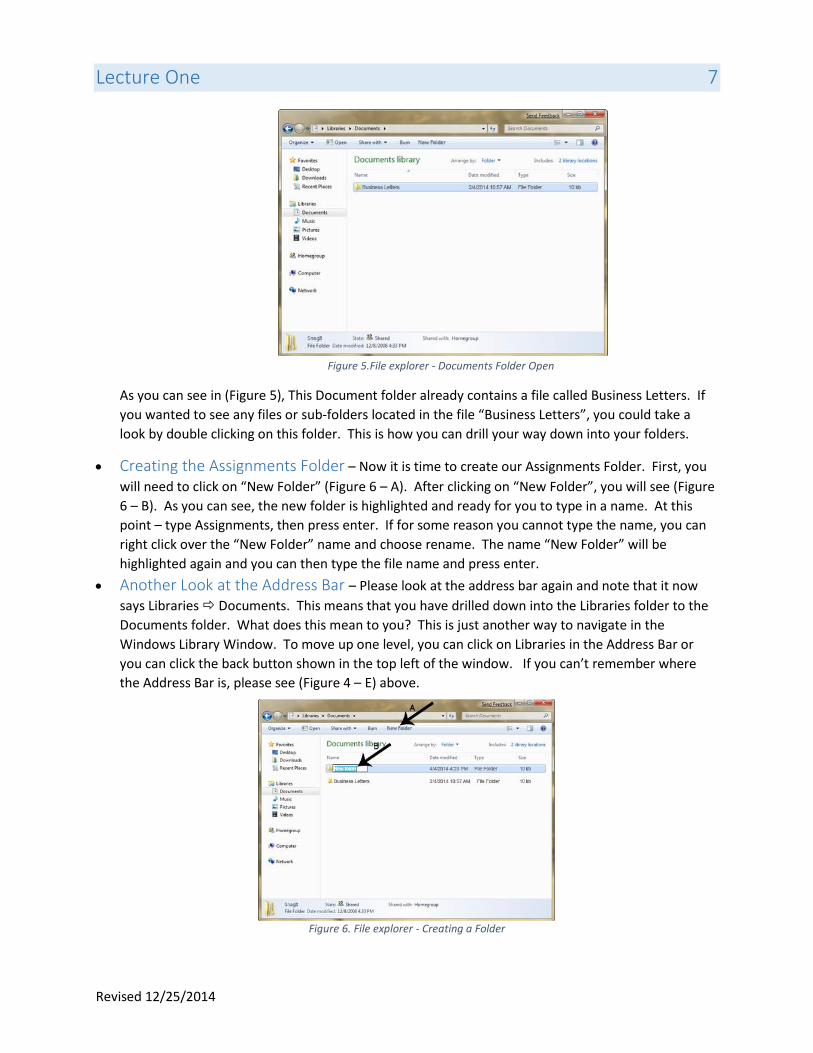
Documents Folder – The most common place to store your files and folders for personal use is in
the Documents folder (Figure 4 – F and G). Please note that there are other options besides the
Documents Folder, i.e. saving your folder/file on your Desktop. Your next step will be to double-click
on the Documents folder (Figure 4–F). You will now see the Documents folder open with its files
displayed (Figure 5.)
Lecture One 7
Revised 12/25/2014
Figure 5.File explorer - Documents Folder Open
As you can see in (Figure 5), This Document folder already contains a file called Business Letters. If
you wanted to see any files or sub-folders located in the file “Business Letters”, you could take a
look by double clicking on this folder. This is how you can drill your way down into your folders.
Creating the Assignments Folder – Now it is time to create our Assignments Folder. First, you
will need to click on “New Folder” (Figure 6 – A). After clicking on “New Folder”, you will see (Figure
6 – B). As you can see, the new folder is highlighted and ready for you to type in a name. At this
point – type Assignments, then press enter. If for some reason you cannot type the name, you can
right click over the “New Folder” name and choose rename. The name “New Folder” will be
highlighted again and you can then type the file name and press enter.
Another Look at the Address Bar – Please look at the address bar again and note that it now
says Libraries Documents. This means that you have drilled down into the Libraries folder to the
Documents folder. What does this mean to you? This is just another way to navigate in the
Windows Library Window. To move up one level, you can click on Libraries in the Address Bar or
you can click the back button shown in the top left of the window. If you can’t remember where
the Address Bar is, please see (Figure 4 – E) above.
Figure 6. File explorer - Creating a Folder
Lecture One 8
Revised 12/25/2014
Creating your Class Folder –
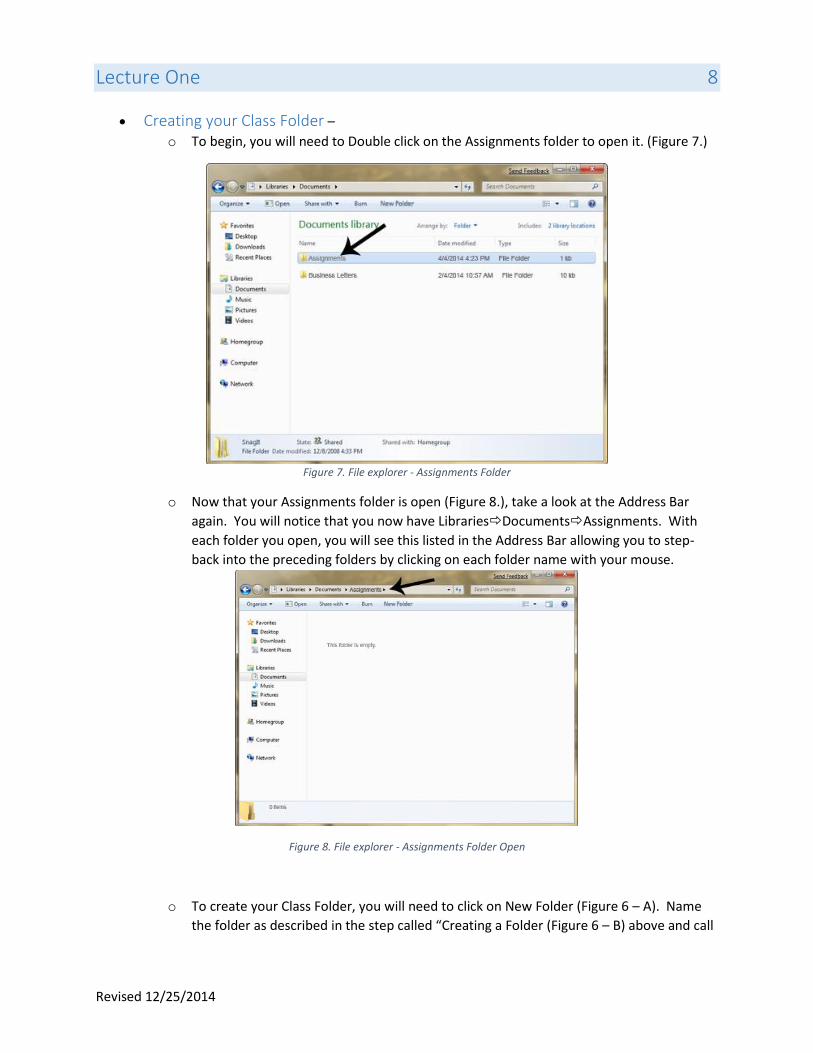
o To begin, you will need to Double click on the Assignments folder to open it. (Figure 7.)
Figure 7. File explorer - Assignments Folder
o Now that your Assignments folder is open (Figure 8.), take a look at the Address Bar
again. You will notice that you now have LibrariesDocumentsAssignments. With
each folder you open, you will see this listed in the Address Bar allowing you to step-
back into the preceding folders by clicking on each folder name with your mouse.
Figure 8. File explorer - Assignments Folder Open
o To create your Class Folder, you will need to click on New Folder (Figure 6 – A). Name
the folder as described in the step called “Creating a Folder (Figure 6 – B) above and call

Lecture One 9
Revised 12/25/2014
it CGS2060. Double click on the name of your new folder and you should now see the
following (Figure 9.)
o Now that your CGS2060 folder is open (Figure 9. – black arrow), take a look at the
Address Bar again. You will notice that you now have
LibrariesDocumentsAssignmentsCGS2060. Again, with each folder you open, you
will see this listed in the Address Bar allowing you to step-back into the preceding
folders.
Figure 9. File explorer - CGS2060 Folder
Copying and Deleting Files and Folders –
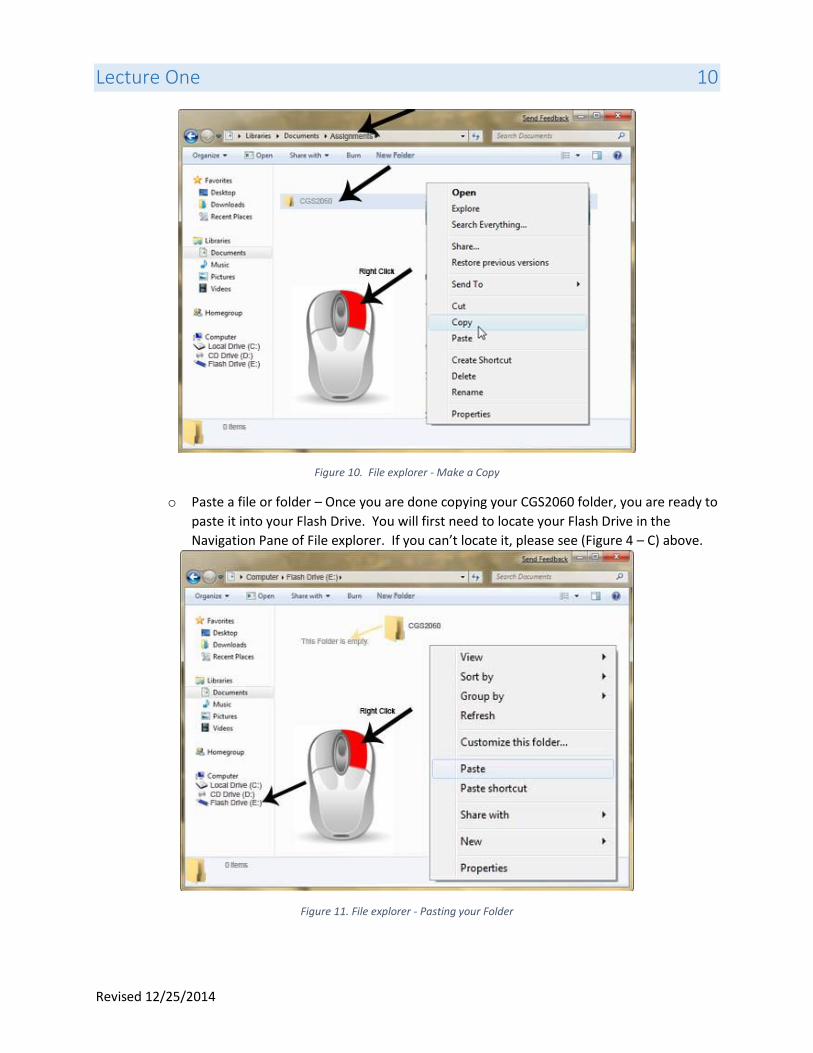
o Copying files and folders – sometimes you may need to make a copy of a file or folder to
place it somewhere else on your computer or to place a copy on your flash drive.
Copying folders and files is done exactly the same way. For our example, we are going
to copy your CGS2060 folder and place the copy on your Flash Drive (E:). First, you will
need to go out of the CGS2060 folder since we are going to copy it. To do this you will
need to click on folder “Assignments” in the Address Bar which will bring you back one
folder. You will then see your CGS2060 file in the File List area. Right click with your
mouse on the file name – CGS2060 and a dialog box will open allowing you to make
several options. Here you can Copy, Past, Delete, Rename, etc. For now, we will use
copy by clicking on the word “Copy”. (Figure 10.)
Lecture One 10
Revised 12/25/2014
Figure 10. File explorer - Make a Copy
o Paste a file or folder – Once you are done copying your CGS2060 folder, you are ready to
paste it into your Flash Drive. You will first need to locate your Flash Drive in the
Navigation Pane of File explorer. If you can’t locate it, please see (Figure 4 – C) above.
Figure 11. File explorer - Pasting your Folder

Lecture One 11
Revised 12/25/2014
o Now that you have located your Flash Drive – double click to open it. Initially, you will
see the words “This Folder is empty” or a list of the files and folders that are available on
your Flash Drive. In the File List Area – right click with your mouse and select “Paste”
from the dialog box. Your CGS2060 File will then appear in the File List Window. (Figure
11.)
o Deleting Files and Folders – If you have a file or folder that you wish to delete, you can
locate the file or folder per the above directions, right click on the file or folder and
select “Delete” from the dialog box. Caution: Be sure that you want to do this, because
once the file is deleted – you will no longer have access to it.
Zipping your files and folders – Zipping is a way to reduce the size of one or more files into a
single file. Compression of files is often used to combine many files into one file to make it
easier to distribute by, for example - email. After your file is zipped, it will often look like a
zipped folder. (Figure 12.)
Figure 12. Zipped folder
Figure 13. File explorer - Zipping a Folder
Lecture One 12
Revised 12/25/2014
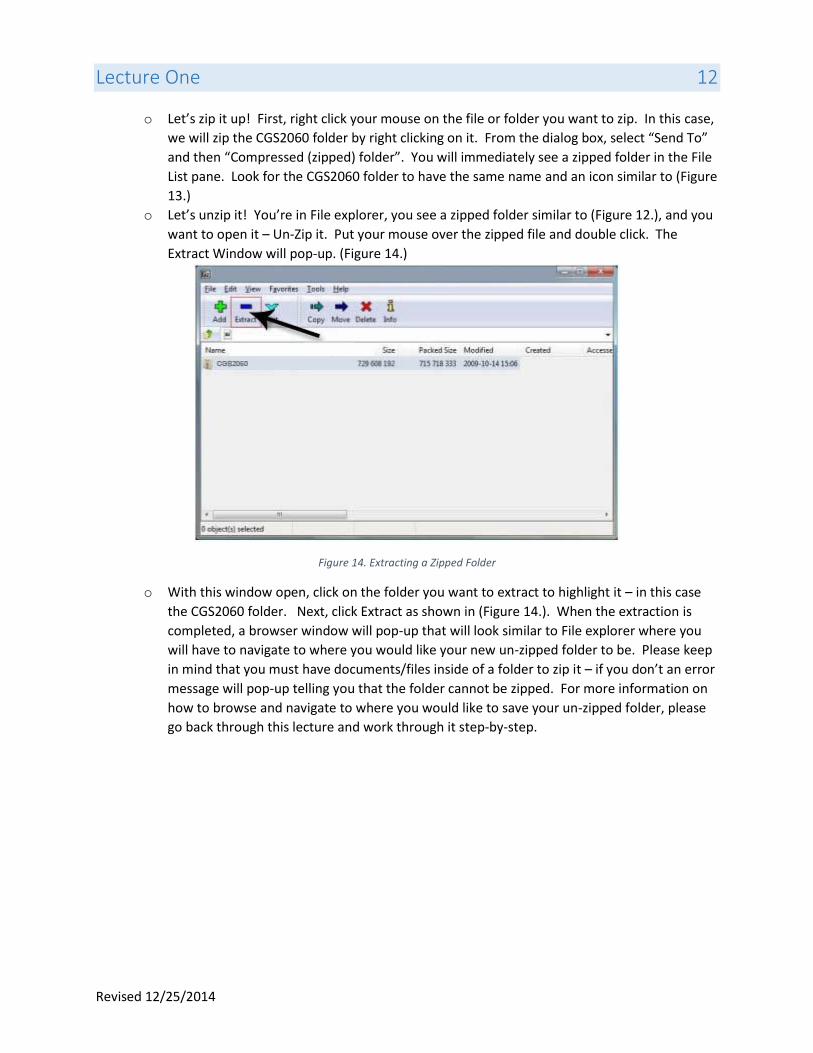
o Let’s zip it up! First, right click your mouse on the file or folder you want to zip. In this case,
we will zip the CGS2060 folder by right clicking on it. From the dialog box, select “Send To”
and then “Compressed (zipped) folder”. You will immediately see a zipped folder in the File
List pane. Look for the CGS2060 folder to have the same name and an icon similar to (Figure
13.)
o Let’s unzip it! You’re in File explorer, you see a zipped folder similar to (Figure 12.), and you
want to open it – Un-Zip it. Put your mouse over the zipped file and double click. The
Extract Window will pop-up. (Figure 14.)
Figure 14. Extracting a Zipped Folder
o With this window open, click on the folder you want to extract to highlight it – in this case
the CGS2060 folder. Next, click Extract as shown in (Figure 14.). When the extraction is
completed, a browser window will pop-up that will look similar to File explorer where you
will have to navigate to where you would like your new un-zipped folder to be. Please keep
in mind that you must have documents/files inside of a folder to zip it – if you don’t an error
message will pop-up telling you that the folder cannot be zipped. For more information on
how to browse and navigate to where you would like to save your un-zipped folder, please
go back through this lecture and work through it step-by-step.
Lecture One 13
Revised 12/25/2014
Figure 15.Charms Bar
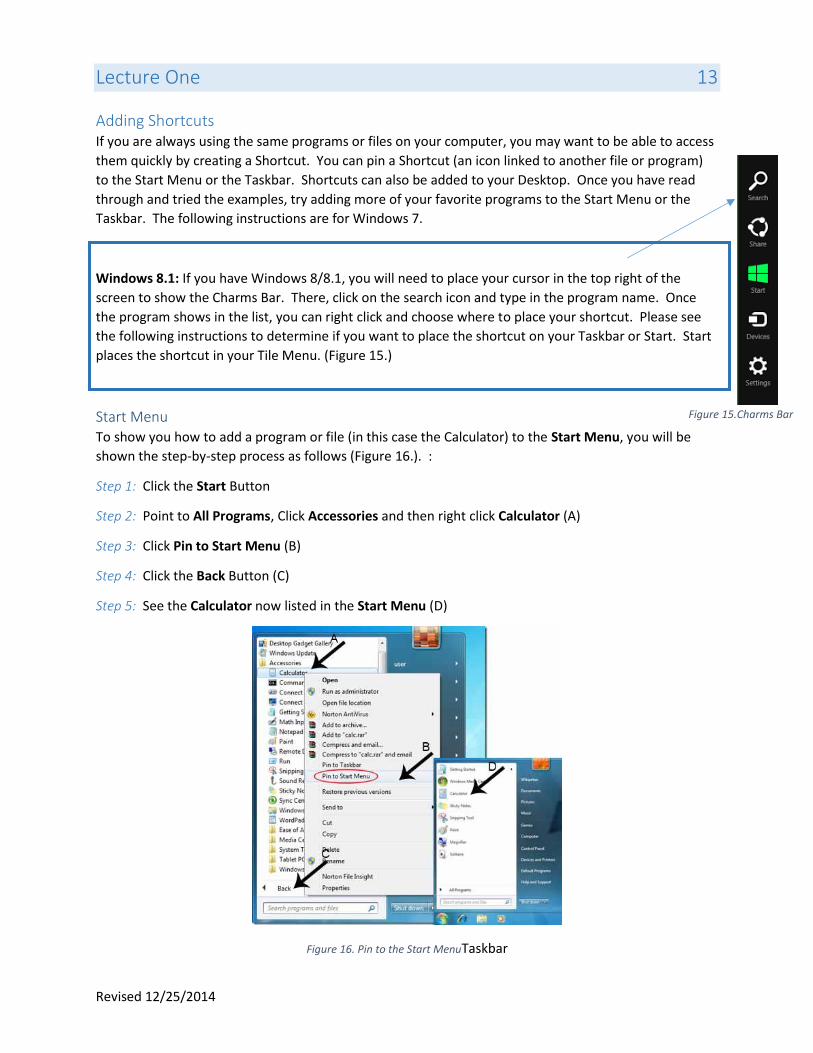
Adding Shortcuts If you are always using the same programs or files on your computer, you may want to be able to access
them quickly by creating a Shortcut. You can pin a Shortcut (an icon linked to another file or program)
to the Start Menu or the Taskbar. Shortcuts can also be added to your Desktop. Once you have read
through and tried the examples, try adding more of your favorite programs to the Start Menu or the
Taskbar. The following instructions are for Windows 7.
Windows 8.1: If you have Windows 8/8.1, you will need to place your cursor in the top right of the
screen to show the Charms Bar. There, click on the search icon and type in the program name. Once
the program shows in the list, you can right click and choose where to place your shortcut. Please see
the following instructions to determine if you want to place the shortcut on your Taskbar or Start. Start
places the shortcut in your Tile Menu. (Figure 15.)
Start Menu To show you how to add a program or file (in this case the Calculator) to the Start Menu, you will be
shown the step-by-step process as follows (Figure 16.). :
Step 1: Click the Start Button
Step 2: Point to All Programs, Click Accessories and then right click Calculator (A)
Step 3: Click Pin to Start Menu (B)
Step 4: Click the Back Button (C)
Step 5: See the Calculator now listed in the Start Menu (D)
Figure 16. Pin to the Start MenuTaskbar
Lecture One 14
Revised 12/25/2014
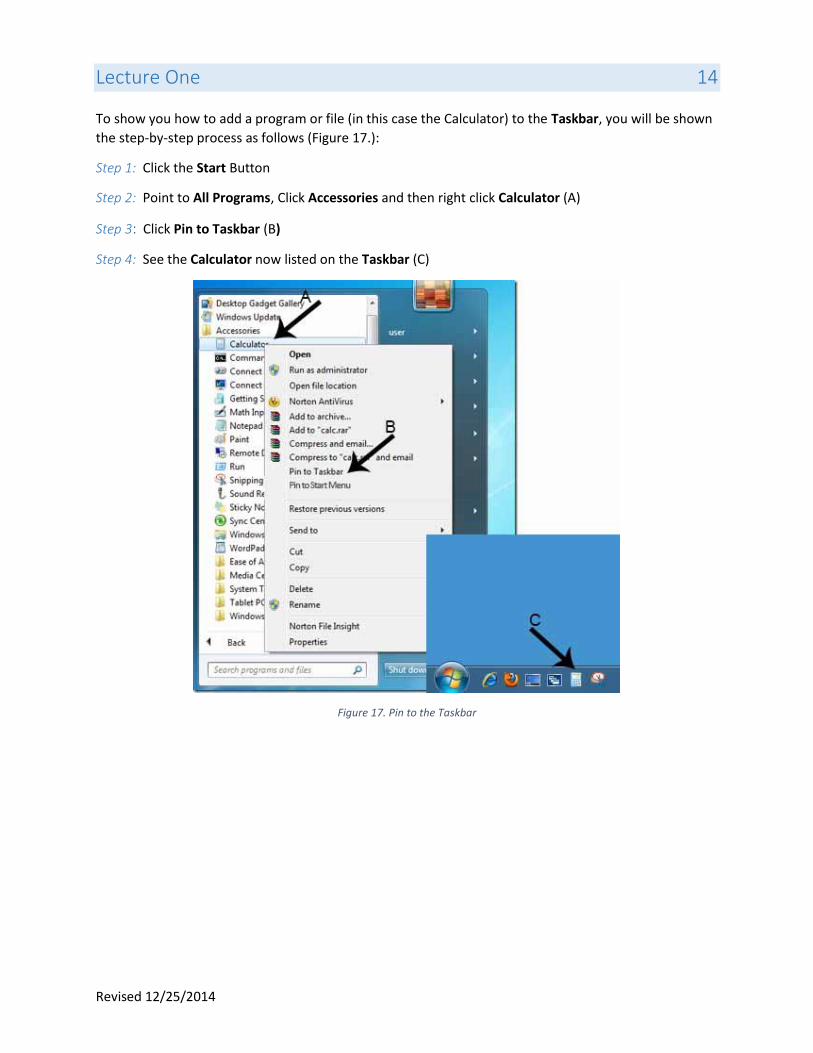
To show you how to add a program or file (in this case the Calculator) to the Taskbar, you will be shown
the step-by-step process as follows (Figure 17.):
Step 1: Click the Start Button
Step 2: Point to All Programs, Click Accessories and then right click Calculator (A)
Step 3: Click Pin to Taskbar (B)
Step 4: See the Calculator now listed on the Taskbar (C)
Figure 17. Pin to the Taskbar
Lecture One 15
Revised 12/25/2014
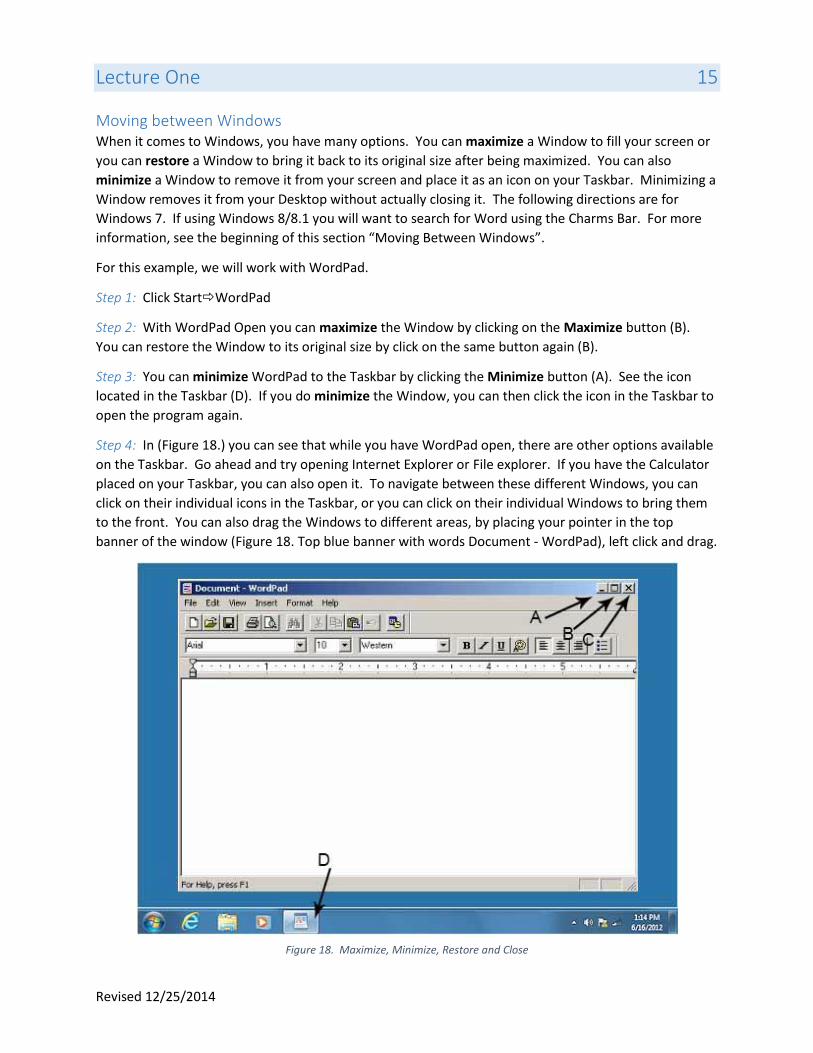
Moving between Windows When it comes to Windows, you have many options. You can maximize a Window to fill your screen or
you can restore a Window to bring it back to its original size after being maximized. You can also
minimize a Window to remove it from your screen and place it as an icon on your Taskbar. Minimizing a
Window removes it from your Desktop without actually closing it. The following directions are for
Windows 7. If using Windows 8/8.1 you will want to search for Word using the Charms Bar. For more
information, see the beginning of this section “Moving Between Windows”.
For this example, we will work with WordPad.
Step 1: Click StartWordPad
Step 2: With WordPad Open you can maximize the Window by clicking on the Maximize button (B).
You can restore the Window to its original size by click on the same button again (B).
Step 3: You can minimize WordPad to the Taskbar by clicking the Minimize button (A). See the icon
located in the Taskbar (D). If you do minimize the Window, you can then click the icon in the Taskbar to
open the program again.
Step 4: In (Figure 18.) you can see that while you have WordPad open, there are other options available
on the Taskbar. Go ahead and try opening Internet Explorer or File explorer. If you have the Calculator
placed on your Taskbar, you can also open it. To navigate between these different Windows, you can
click on their individual icons in the Taskbar, or you can click on their individual Windows to bring them
to the front. You can also drag the Windows to different areas, by placing your pointer in the top
banner of the window (Figure 18. Top blue banner with words Document - WordPad), left click and drag.
Figure 18. Maximize, Minimize, Restore and Close

Lecture One 16
Revised 12/25/2014
Resizing a Window You may want to resize a Window or a few Windows to fit on your screen. To do so, you can place your
pointer at the bottom, the right, the left or the corner of the Window and look for the double arrow.
The double arrow means that you are then allowed to drag and resize the Window. (Figure 19.)
Figure 19. Resizing a Window
Using a Scrollbar In Programs such as Microsoft Word or Internet Explorer, you may not be able to see the whole
document or website. Windows will automatically place a scrollbar on the right side to scroll up and
down. If what you are looking at is too wide for the Window, you will see a Scrollbar at the bottom of
the Window allowing you to scroll left or right. To maneuver the scrollbar, click with your pointer on the
bar and drag it up and down or left and right. (Figure 20.)
Figure 20. Scrollbars
Lecture One 17
Revised 12/25/2014
Figure 21. Windows 8 or 8.118
The Snipping Tool You can use the Snipping Tool to capture images of your Desktop. You can either capture your full
Desktop, the current Window, portions of the Desktop with the Rectangle tool or use Free-form snip to
draw around the object you wish to capture as an image. After you capture an image with the Snipping
Tool, you can copy it to the Clipboard and Paste it into a document. You can also save the image in
several different image formats to your computer and attach the image in an email. The following are
the steps to creating a Screenshot with the Snipping Tool:
Step 1: Have your document open or whatever file, image or program you wish to create an image of
with the Snipping Tool. For our example, we will take a Full Screen Snip and place it into a Word or
WordPad Document.
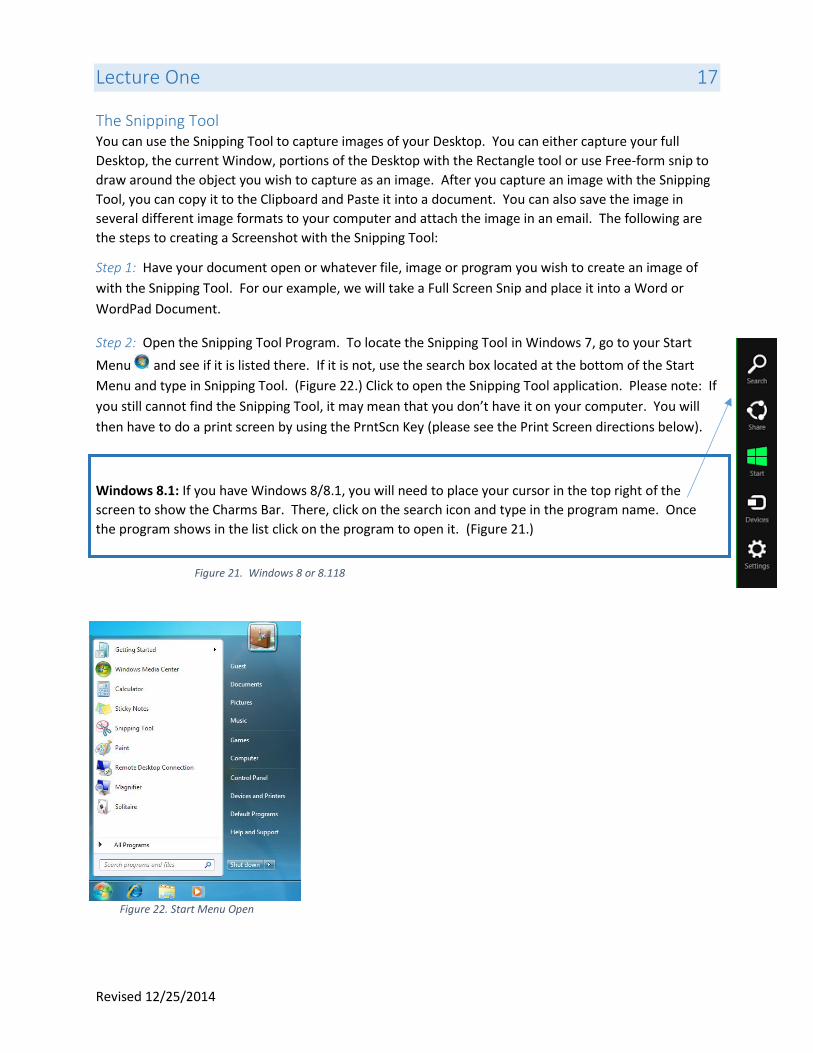
Step 2: Open the Snipping Tool Program. To locate the Snipping Tool in Windows 7, go to your Start
Menu and see if it is listed there. If it is not, use the search box located at the bottom of the Start
Menu and type in Snipping Tool. (Figure 22.) Click to open the Snipping Tool application. Please note: If
you still cannot find the Snipping Tool, it may mean that you don’t have it on your computer. You will
then have to do a print screen by using the PrntScn Key (please see the Print Screen directions below).
Windows 8.1: If you have Windows 8/8.1, you will need to place your cursor in the top right of the
screen to show the Charms Bar. There, click on the search icon and type in the program name. Once
the program shows in the list click on the program to open it. (Figure 21.)
Figure 22. Start Menu Open

Lecture One 18
Revised 12/25/2014
Step 3: Click the arrow next to the “New” button, select Full-Screen Snip from the list. (Figure 23.)
Figure 23. The Snipping Tool
Step 4: The Snip with the image will automatically pop-up in a window. (Figure 24 – shows partial
Window).
Step 5: In the open Snip window, click FileSave as. In the Save As dialog box, enter the name of the snip and choose a location where to save the snip - then click save. Close the Snip window. Note: you have other options in the Snipping Tool Window: A highlighter, pen and an eraser to make changes to your image. (Figure 24.)
Figure 24. The Snip Tool Window
Step 6: Open a Word or WordPad Document. Click on the Insert Tab on the Ribbon. (The ribbon
contains all of your tabs). Go to the Illustrations group and click on the Picture icon. From the Browser
window, search for your file. Next, click on the file and then click open. Your image should appear on
the page. (Figure 25.)
Figure 25. Insert an image
Lecture One 19
Revised 12/25/2014
The Print Screen Key The Print Screen Key “PrntScn” can be used to take full Window snapshots. The following steps will
show you how.
Step 1: Have your document open or whatever file, image or program you wish to create an image of
with the PrntScn Key. For our example, we will take a Full Screen snapshot and place it into a Word or
WordPad Document. If you are having trouble, please see the Note in the Blue Box below.
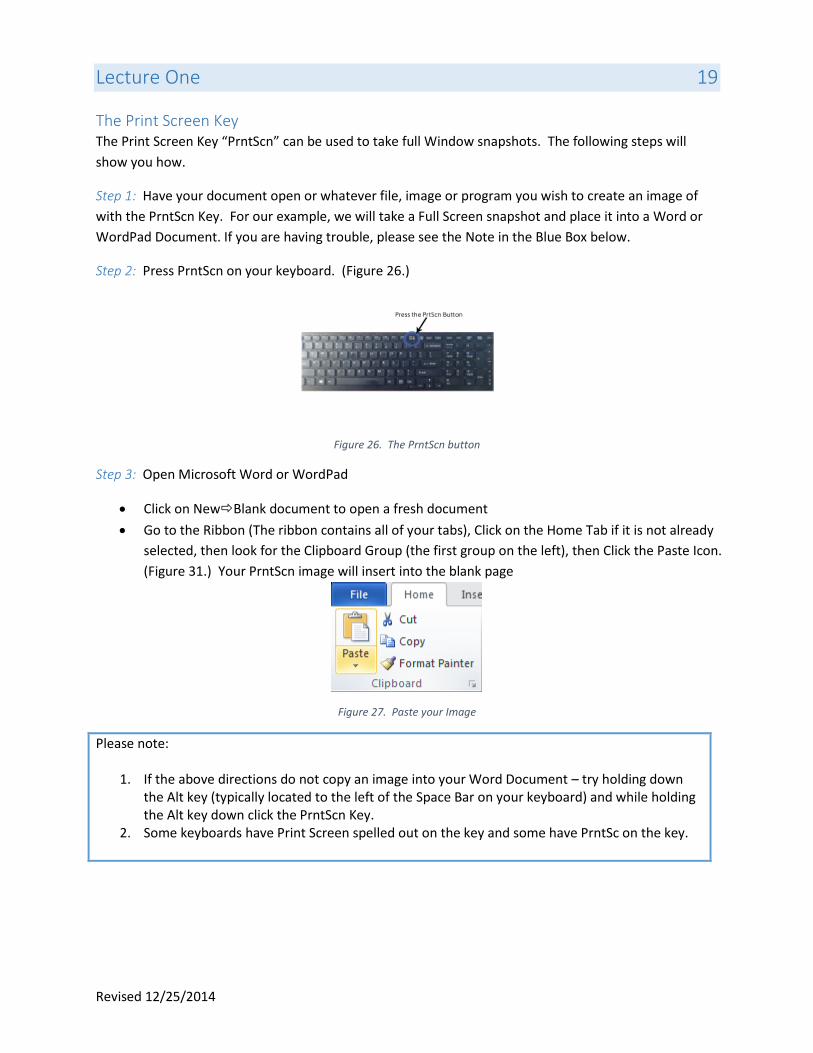
Step 2: Press PrntScn on your keyboard. (Figure 26.)
Figure 26. The PrntScn button
Step 3: Open Microsoft Word or WordPad
Click on NewBlank document to open a fresh document
Go to the Ribbon (The ribbon contains all of your tabs), Click on the Home Tab if it is not already
selected, then look for the Clipboard Group (the first group on the left), then Click the Paste Icon.
(Figure 31.) Your PrntScn image will insert into the blank page
Figure 27. Paste your Image
Please note:
1. If the above directions do not copy an image into your Word Document – try holding down the Alt key (typically located to the left of the Space Bar on your keyboard) and while holding the Alt key down click the PrntScn Key.
2. Some keyboards have Print Screen spelled out on the key and some have PrntSc on the key.
Lecture One 20
Revised 12/25/2014
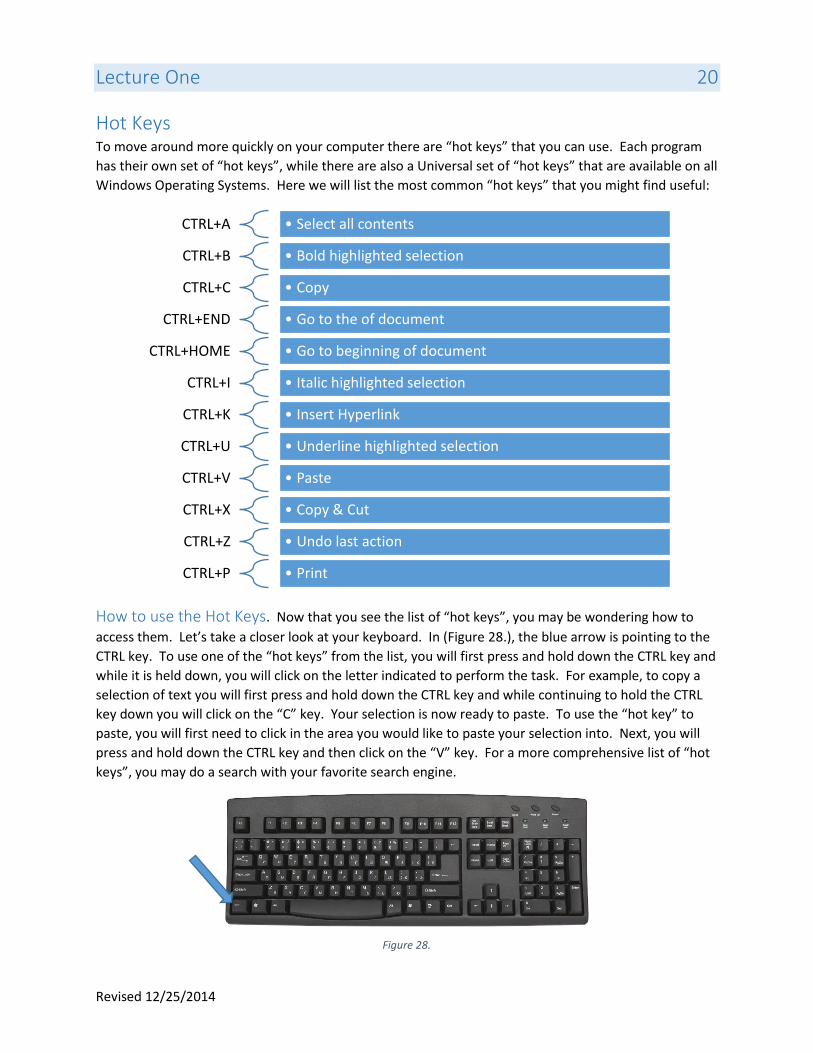
Hot Keys To move around more quickly on your computer there are “hot keys” that you can use. Each program
has their own set of “hot keys”, while there are also a Universal set of “hot keys” that are available on all
Windows Operating Systems. Here we will list the most common “hot keys” that you might find useful:
How to use the Hot Keys. Now that you see the list of “hot keys”, you may be wondering how to
access them. Let’s take a closer look at your keyboard. In (Figure 28.), the blue arrow is pointing to the
CTRL key. To use one of the “hot keys” from the list, you will first press and hold down the CTRL key and
while it is held down, you will click on the letter indicated to perform the task. For example, to copy a
selection of text you will first press and hold down the CTRL key and while continuing to hold the CTRL
key down you will click on the “C” key. Your selection is now ready to paste. To use the “hot key” to
paste, you will first need to click in the area you would like to paste your selection into. Next, you will
press and hold down the CTRL key and then click on the “V” key. For a more comprehensive list of “hot
keys”, you may do a search with your favorite search engine.
CTRL+A • Select all contents
CTRL+B • Bold highlighted selection
CTRL+C • Copy
CTRL+END • Go to the of document
CTRL+HOME • Go to beginning of document
CTRL+I • Italic highlighted selection
CTRL+K • Insert Hyperlink
CTRL+U • Underline highlighted selection
CTRL+V • Paste
CTRL+X • Copy & Cut
CTRL+Z • Undo last action
CTRL+P • Print
Figure 28.
Lecture One 21
Revised 12/25/2014
Figure 29. Charms Bar
Getting the most from your Mouse! Your computer has several input devices which include: Mouse, touch pad, touch screen and keyboard.
Your mouse is your computer pointing device. Typically a mouse has two buttons and sometimes a
scroll wheel. Others have extra buttons for further customization. Even those computers that will have
a touch screen will have a mouse to use along with it. Since the mouse is such an important part of your
computer, we will go over it in more detail. The following instructions are for Windows 7.
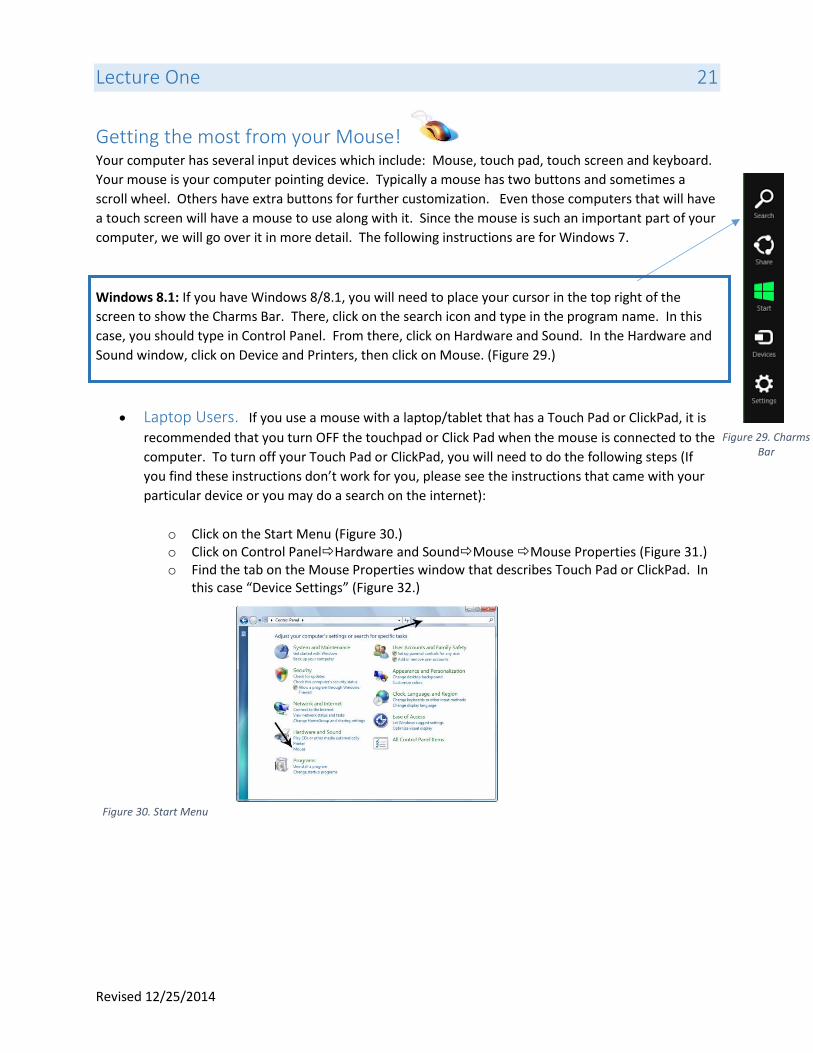
Windows 8.1: If you have Windows 8/8.1, you will need to place your cursor in the top right of the
screen to show the Charms Bar. There, click on the search icon and type in the program name. In this
case, you should type in Control Panel. From there, click on Hardware and Sound. In the Hardware and
Sound window, click on Device and Printers, then click on Mouse. (Figure 29.)
Laptop Users. If you use a mouse with a laptop/tablet that has a Touch Pad or ClickPad, it is
recommended that you turn OFF the touchpad or Click Pad when the mouse is connected to the
computer. To turn off your Touch Pad or ClickPad, you will need to do the following steps (If
you find these instructions don’t work for you, please see the instructions that came with your
particular device or you may do a search on the internet):
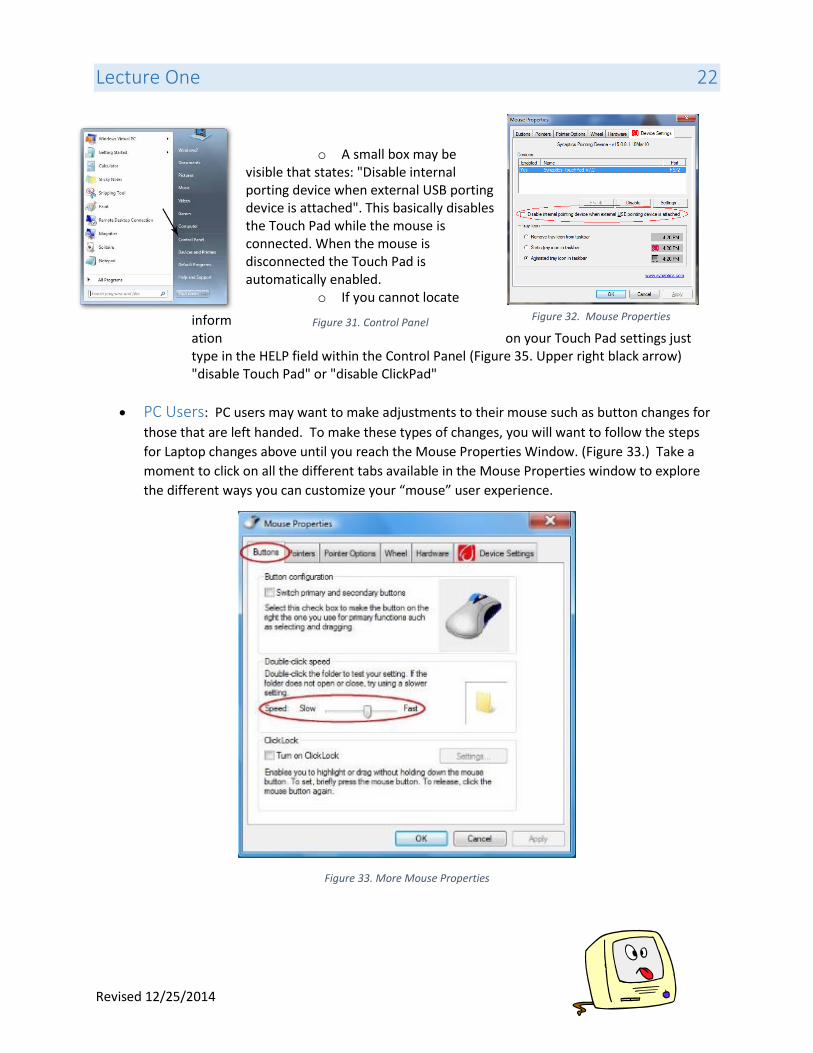
o Click on the Start Menu (Figure 30.) o Click on Control PanelHardware and SoundMouse Mouse Properties (Figure 31.) o Find the tab on the Mouse Properties window that describes Touch Pad or ClickPad. In
this case “Device Settings” (Figure 32.)
Figure 30. Start Menu
Lecture One 22
Revised 12/25/2014
o A small box may be visible that states: "Disable internal porting device when external USB porting device is attached". This basically disables the Touch Pad while the mouse is connected. When the mouse is disconnected the Touch Pad is automatically enabled.
o If you cannot locate
information on your Touch Pad settings just type in the HELP field within the Control Panel (Figure 35. Upper right black arrow) "disable Touch Pad" or "disable ClickPad"
PC Users: PC users may want to make adjustments to their mouse such as button changes for
those that are left handed. To make these types of changes, you will want to follow the steps
for Laptop changes above until you reach the Mouse Properties Window. (Figure 33.) Take a
moment to click on all the different tabs available in the Mouse Properties window to explore
the different ways you can customize your “mouse” user experience.
Figure 33. More Mouse Properties
Figure 32. Mouse Properties Figure 31. Control Panel
Lecture One 23
Revised 12/25/2014
PC Troubleshooting
Restart Your Computer to Fix a Variety of Problems If you are having problems with your computer and you have tried everything you can think of
to get it to work, you may want to try restarting your computer. Restarting/Rebooting can clear
your computer memory, perform certain tests and delete temporary files. If you have a wireless
printer and it doesn’t seem to be working, you will want to restart your computer and restart
your printer. If you internet is not working, you may want to restart your computer and restart
your wireless router as well.
Typing Skills
Keyboarding and Typing Skills The ability to type fast and accurately are crucial if you want to be able to communicate with the
world. Depending on the type of job you are looking for, you may be required to type at a
specific rate per minute or WPM (words per minutes). Brushing up on your typing skills will not
only help you in your job, but in many other aspects of your life such as school and home.
Visit typingtest.com to take a typing speed test that identifies your typing speed and provides
you with a typing skills analysis. Use the provided options to customize your test. After
completing the test, your typing score is provided. This includes your speed, number of errors
and adjusted speed. If the results indicate that your typing skills are slow or average, consider
strategies and/or tools that you can use to improved your skills to become fluent, fast, or even a
pro.