Capture data on Offline software - Ideal Health Facility
19
IDEAL CLINIC PROGRAMME Training module IV part II for Ideal Clinic software CAPTURE DATA ON THE OFFLINE SOFTWARE APRIL 2016
-
Upload
khangminh22 -
Category
Documents
-
view
0 -
download
0
Transcript of Capture data on Offline software - Ideal Health Facility
IDEAL CLINIC PROGRAMME
Training module IV part II for Ideal
Clinic software
CAPTURE DATA ON THE
OFFLINE SOFTWARE
APRIL 2016
1 | P a g e
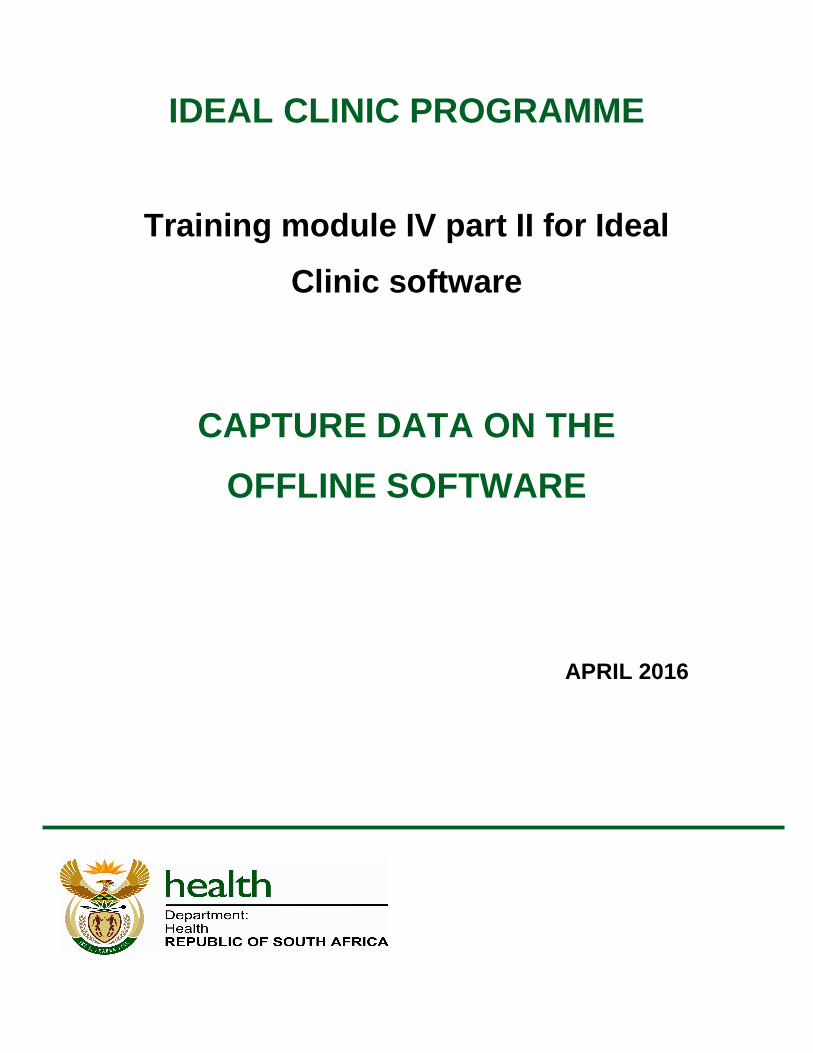
Table of Contents
1. INSTALL OFFLINE APPLICATION ..................................................................... 2
2. CAPTURE OFFLINE ........................................................................................... 5
3. CAPTURE FOR MULTIPLE FACILITIES .......................................................... 10
4. REPORT GENERATION ................................................................................... 11
5. DELETING ‘SUBMITTED’ FILES FROM THE OFFLINE MODULE ................... 13
6. EXPORT AND UPLOAD ONLINE ..................................................................... 15
2 | P a g e
1. Install Offline application
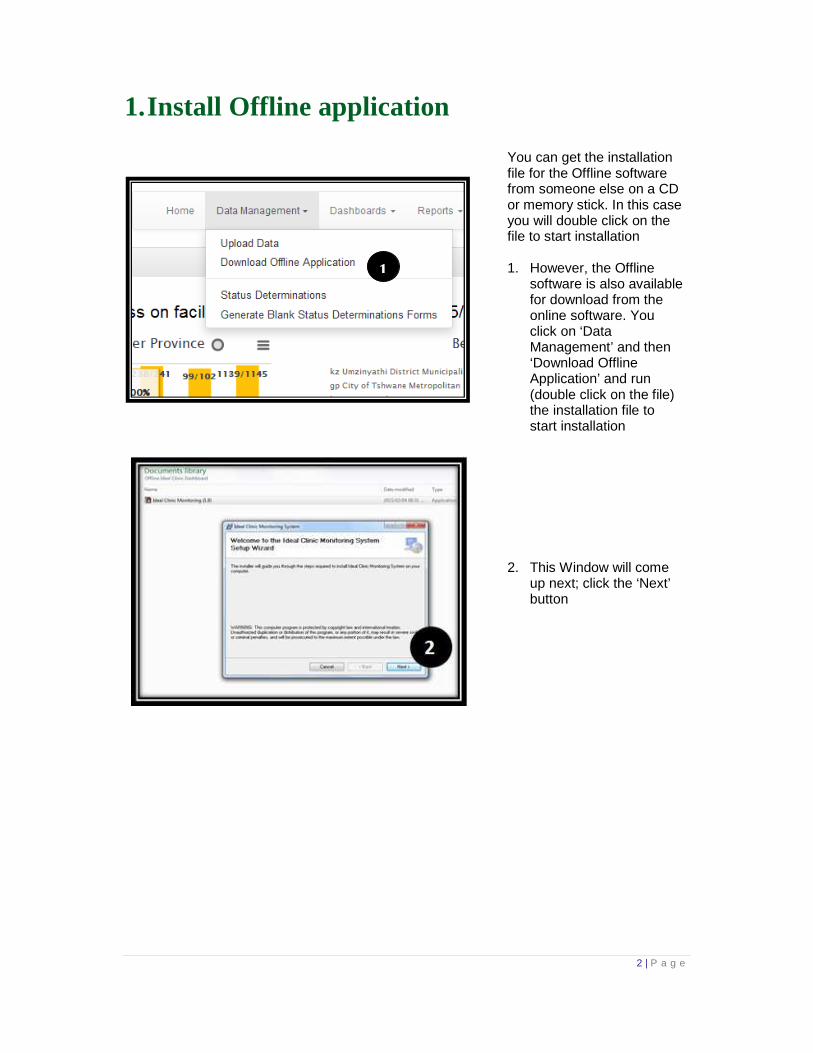
You can get the installation file for the Offline software from someone else on a CD or memory stick. In this case you will double click on the file to start installation 1. However, the Offline
software is also available for download from the online software. You click on ‘Data Management’ and then ‘Download Offline Application’ and run (double click on the file) the installation file to start installation
2. This Window will come up next; click the ‘Next’ button
1
3 | P a g e
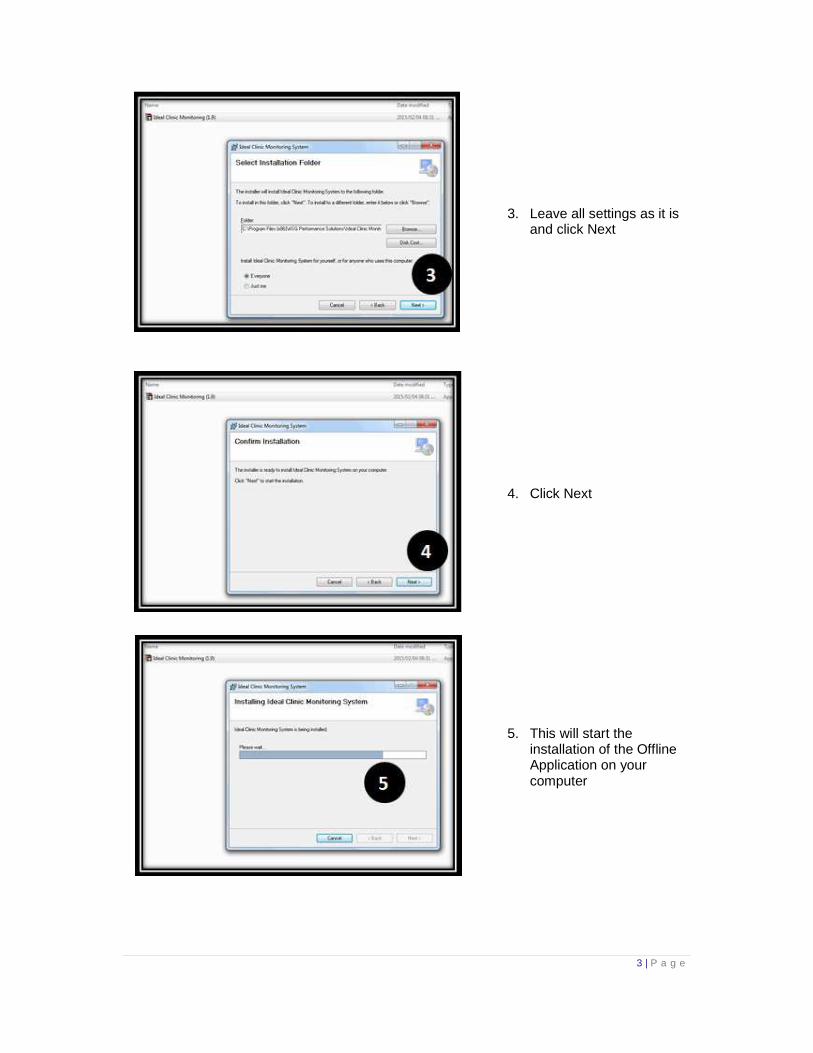
3. Leave all settings as it is and click Next
4. Click Next
5. This will start the installation of the Offline Application on your computer

4 | P a g e
6. Once installation completed; click Close
7. Close all windows and go to the Desktop on your computer where you will find the shortcut for the Offline Ideal Clinic Monitoring System
5 | P a g e
2. Capture Offline
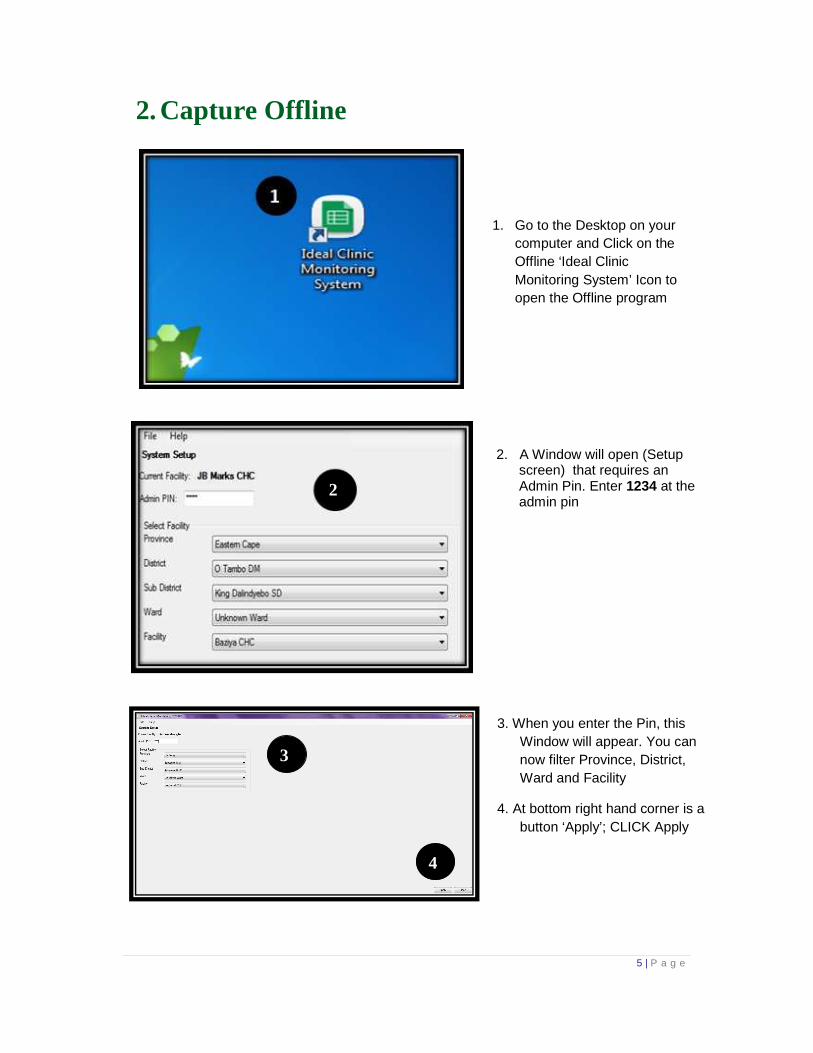
1. Go to the Desktop on your computer and Click on the Offline ‘Ideal Clinic Monitoring System’ Icon to open the Offline program
3
2. A Window will open (Setup screen) that requires an Admin Pin. Enter 1234 at the admin pin
3. When you enter the Pin, this Window will appear. You can now filter Province, District, Ward and Facility
4. At bottom right hand corner is a button ‘Apply’; CLICK Apply
2
4
6 | P a g e
6. The next screen will appear, this is the ‘Home’ screen. Note that the facility chosen upon the setup will be displayed
7. Click on new assessment and your form will appear for capturing.
5. A message will appear that facility set up is updated
5
6
7
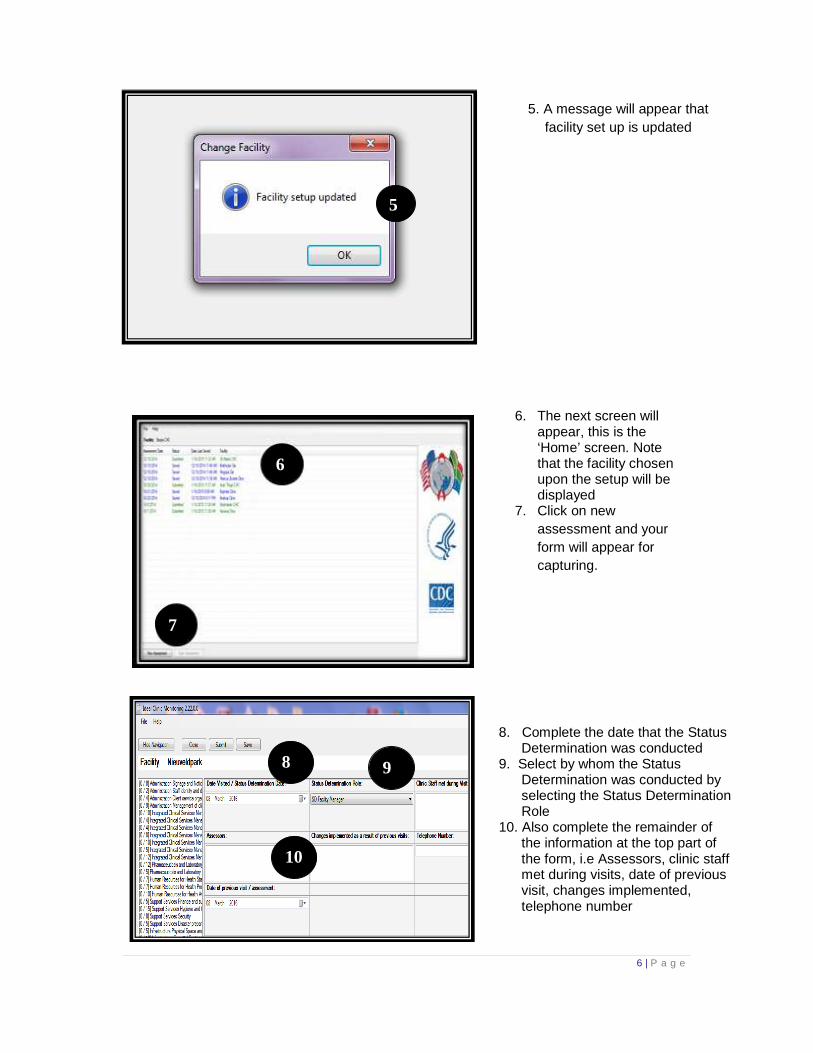
8. Complete the date that the Status Determination was conducted
9. Select by whom the Status Determination was conducted by selecting the Status Determination Role
10. Also complete the remainder of the information at the top part of the form, i.e Assessors, clinic staff met during visits, date of previous visit, changes implemented, telephone number
8 9
10
7 | P a g e
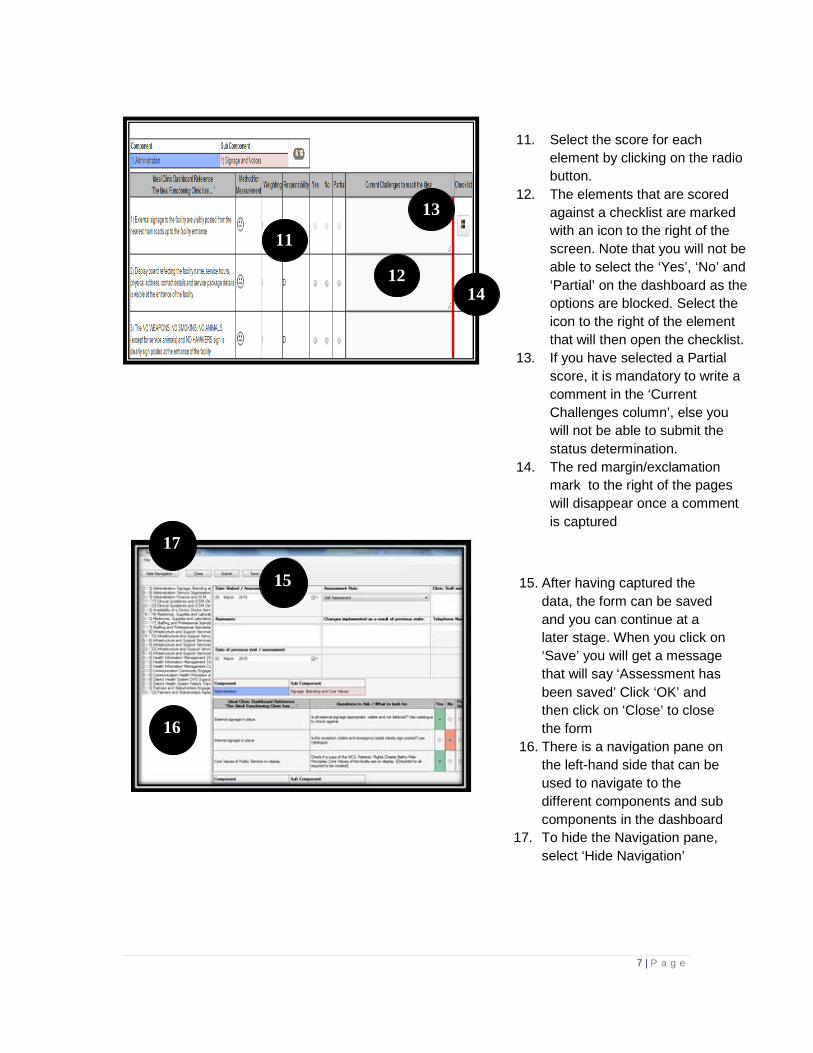
15 15. After having captured the data, the form can be saved and you can continue at a later stage. When you click on ‘Save’ you will get a message that will say ‘Assessment has been saved’ Click ‘OK’ and then click on ‘Close’ to close the form
16. There is a navigation pane on the left-hand side that can be used to navigate to the different components and sub components in the dashboard
17. To hide the Navigation pane, select ‘Hide Navigation’
11. Select the score for each element by clicking on the radio button.
12. The elements that are scored against a checklist are marked with an icon to the right of the screen. Note that you will not be able to select the ‘Yes’, ‘No’ and ‘Partial’ on the dashboard as the options are blocked. Select the icon to the right of the element that will then open the checklist.
13. If you have selected a Partial score, it is mandatory to write a comment in the ‘Current Challenges column’, else you will not be able to submit the status determination.
14. The red margin/exclamation mark to the right of the pages will disappear once a comment is captured
12
13
11
16
17
14
8 | P a g e
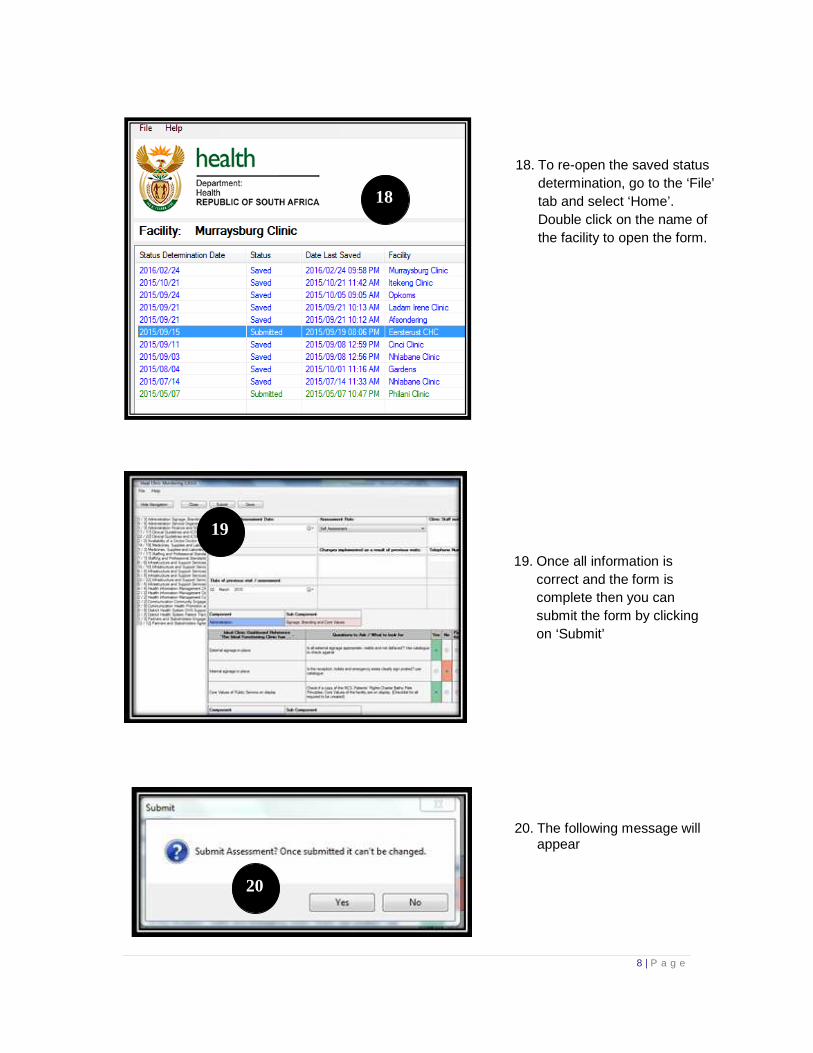
18. To re-open the saved status determination, go to the ‘File’ tab and select ‘Home’. Double click on the name of the facility to open the form.
18
19. Once all information is correct and the form is complete then you can submit the form by clicking on ‘Submit’
19
20. The following message will appear
20
9 | P a g e
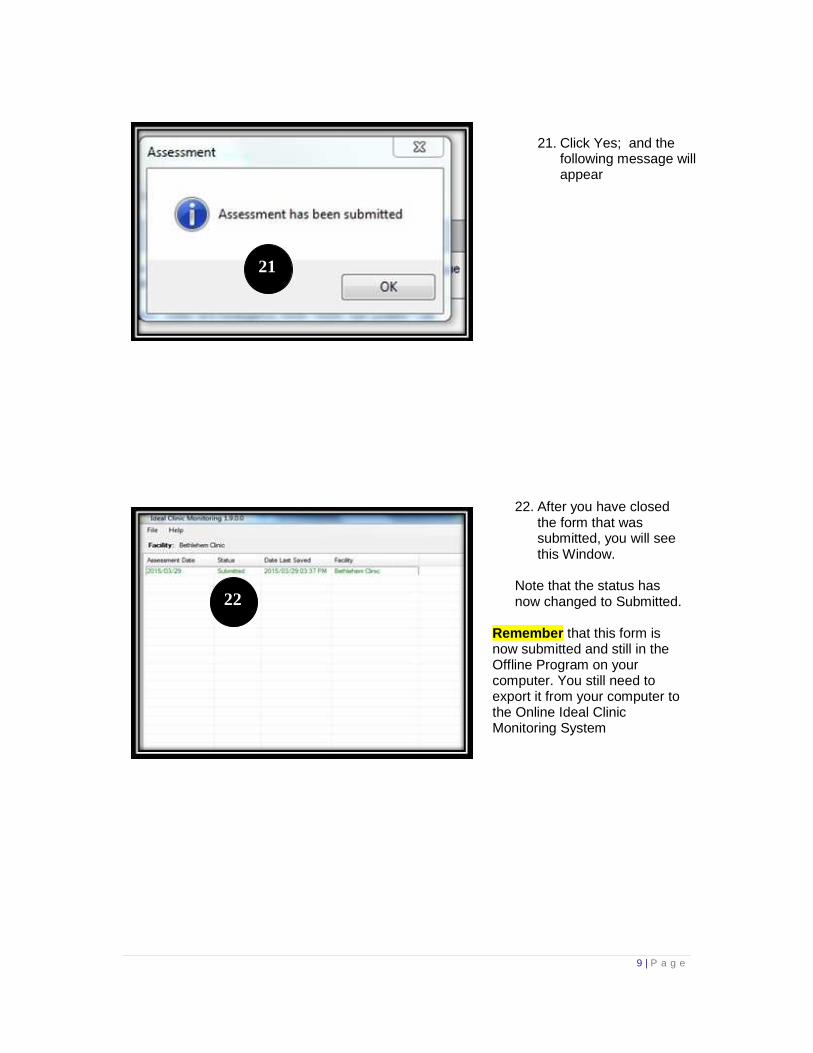
22. After you have closed the form that was submitted, you will see this Window.
Note that the status has now changed to Submitted.
Remember that this form is now submitted and still in the Offline Program on your computer. You still need to export it from your computer to the Online Ideal Clinic Monitoring System
21
21. Click Yes; and the following message will appear
22

10 | P a g e
3. Capture for multiple faclities
1 1. The Offline module can be
used to capture multiple facilities, especially in those areas where the network connectivity is not good, sub-district/district offices can use the Offline module to capture Status Determinations for all the facilities within their sub-district/ district. To capture a different facility after the initial setup was done, go to the ‘Help’ tab and select ‘Setup’
2. The following screen will appear. Type in again the generic pin ‘1234’ in the box for ‘Admin PIN’
3. The list of facilities will appear, select the applicable facility and follow steps 5 to 7 on page 6 to capture data for the new facilities that was setup
2
3

11 | P a g e
4. Report generation
1. The reporting section of the offline module is found on the ‘File’ tab. The Clinic Report, and Quality Improvement Plan can be accessed from this tab
1
Select the Clinic Report from the ‘file’ tab as showed in point 1.
2. On the left side all the status
determination that were captured are displayed. Click on the tick box next to the facility that you want to generate a report for.
3. Select the ‘Print’ or ‘Save’ button.
If you select ‘Save’ you will be prompted where you want to save the file. Select the appropriate location in your document folder.
3
2
12 | P a g e
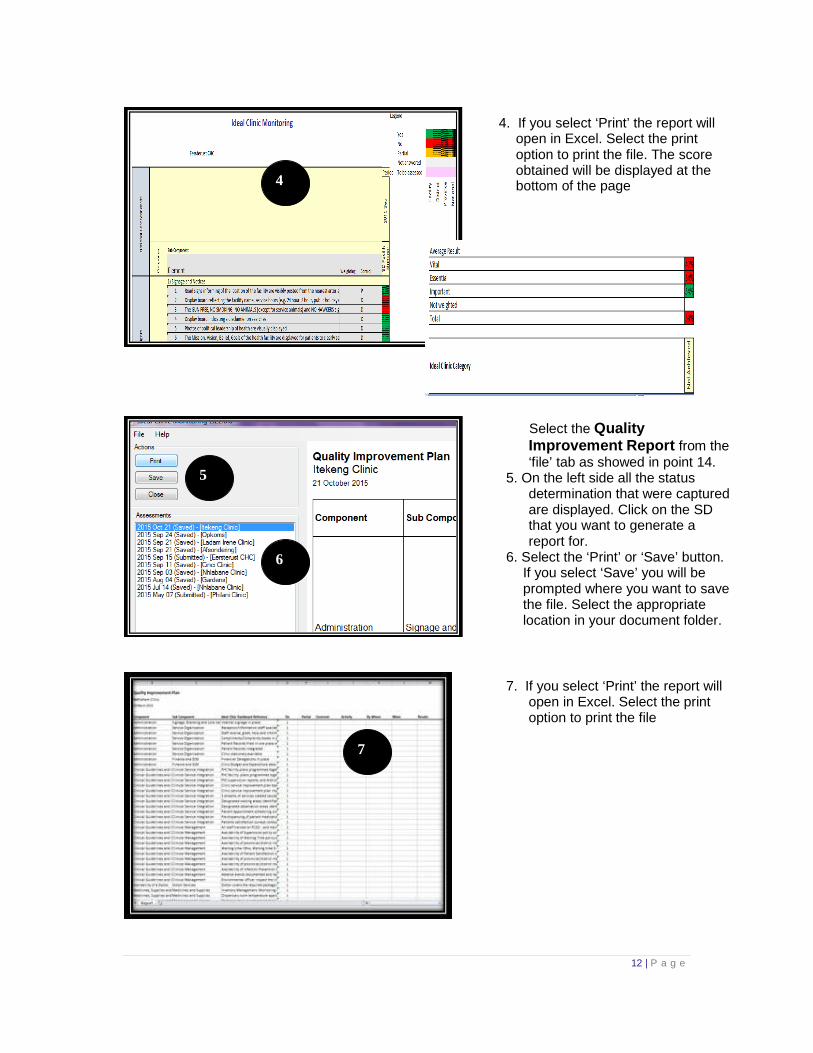
Select the Quality Improvement Report from the ‘file’ tab as showed in point 14.
5. On the left side all the status determination that were captured are displayed. Click on the SD that you want to generate a report for.
6. Select the ‘Print’ or ‘Save’ button. If you select ‘Save’ you will be prompted where you want to save the file. Select the appropriate location in your document folder.
6
5
7. If you select ‘Print’ the report will open in Excel. Select the print option to print the file
4. If you select ‘Print’ the report will open in Excel. Select the print option to print the file. The score obtained will be displayed at the bottom of the page 4
7
13 | P a g e
5. Deleting ‘Submitted’ files from the Offline
module
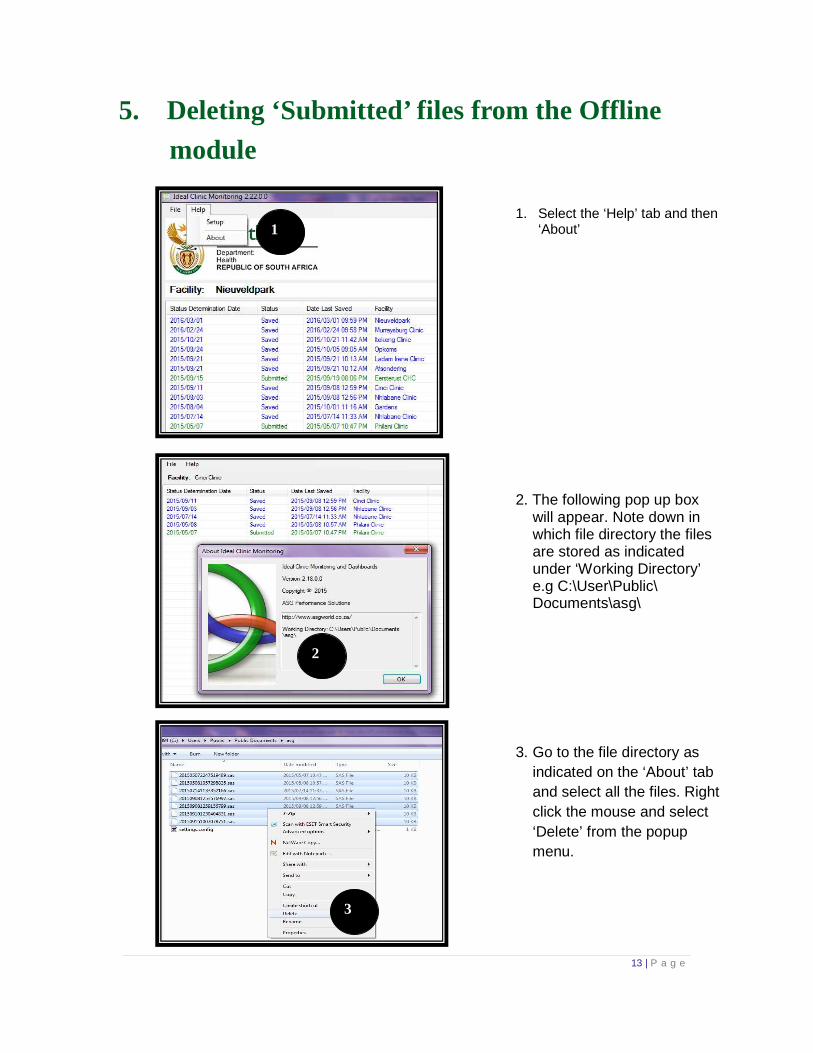
1. Select the ‘Help’ tab and then ‘About’
2. The following pop up box will appear. Note down in which file directory the files are stored as indicated under ‘Working Directory’ e.g C:\User\Public\ Documents\asg\
1
3. Go to the file directory as indicated on the ‘About’ tab and select all the files. Right click the mouse and select ‘Delete’ from the popup menu.
2
3
14 | P a g e
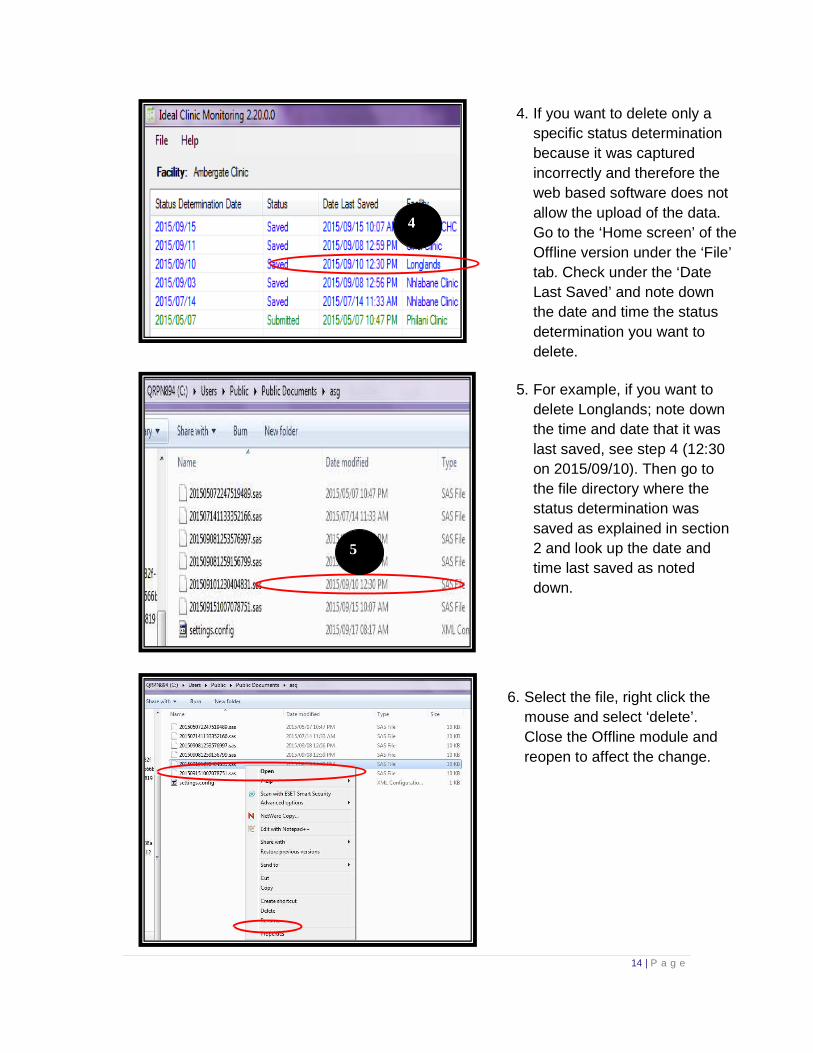
4. If you want to delete only a specific status determination because it was captured incorrectly and therefore the web based software does not allow the upload of the data. Go to the ‘Home screen’ of the Offline version under the ‘File’ tab. Check under the ‘Date Last Saved’ and note down the date and time the status determination you want to delete.
4
5. For example, if you want to delete Longlands; note down the time and date that it was last saved, see step 4 (12:30 on 2015/09/10). Then go to the file directory where the status determination was saved as explained in section 2 and look up the date and time last saved as noted down.
6. Select the file, right click the mouse and select ‘delete’. Close the Offline module and reopen to affect the change.
5

15 | P a g e
6. Export and Upload Online
1. Go to the Desktop on your computer and Click on the Offline ‘Ideal Clinic Monitoring System’ Icon to open the Offline program
2. Go to the ‘File’ tab and select ‘Export Data’. Very import: before exporting, check under the status column that all the assessments show “Submitted”. Assessments that have a “saved” status will not show on the reports and dashboards once the file have been uploaded on the online software.
2
16 | P a g e
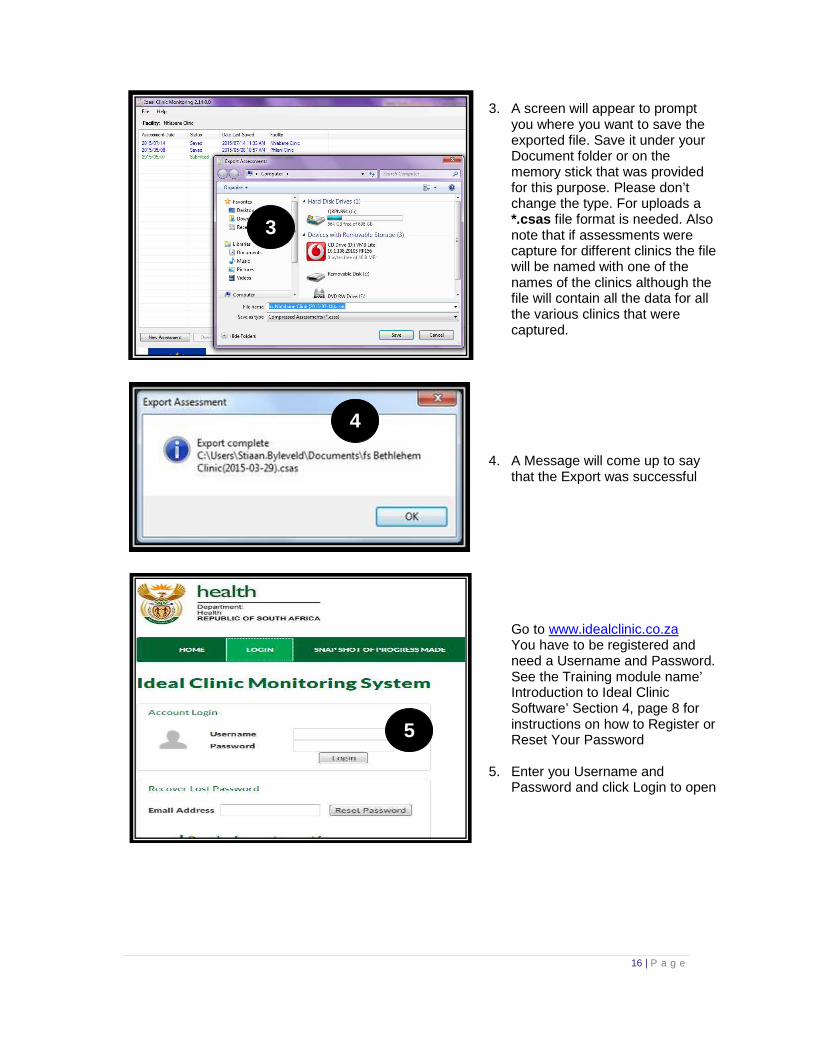
3. A screen will appear to prompt you where you want to save the exported file. Save it under your Document folder or on the memory stick that was provided for this purpose. Please don’t change the type. For uploads a *.csas file format is needed. Also note that if assessments were capture for different clinics the file will be named with one of the names of the clinics although the file will contain all the data for all the various clinics that were captured.
4. A Message will come up to say that the Export was successful
Go to www.idealclinic.co.za You have to be registered and need a Username and Password. See the Training module name’ Introduction to Ideal Clinic Software’ Section 4, page 8 for instructions on how to Register or Reset Your Password
5. Enter you Username and Password and click Login to open
3
4
5
17 | P a g e
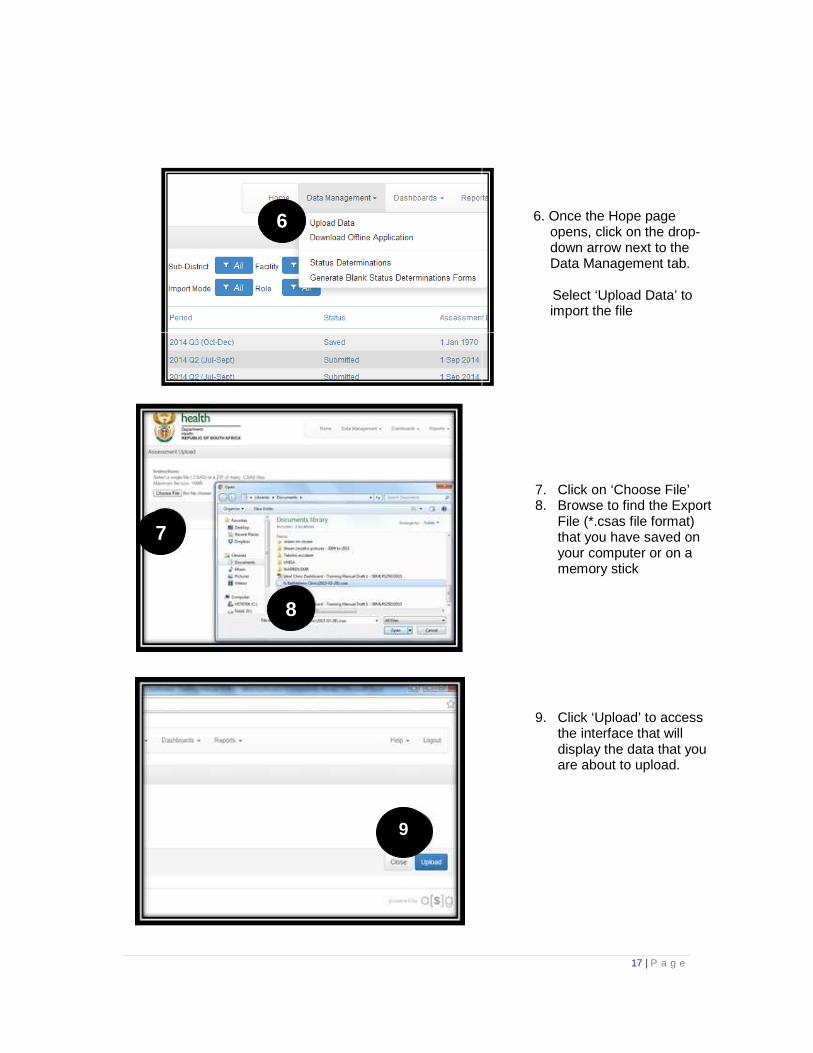
7. Click on ‘Choose File’ 8. Browse to find the Export
File (*.csas file format) that you have saved on your computer or on a memory stick
9. Click ‘Upload’ to access the interface that will display the data that you are about to upload.
6
7
8
9
6. Once the Hope page opens, click on the drop-down arrow next to the Data Management tab.
Select ‘Upload Data’ to
import the file

18 | P a g e
10. A screen will appear, indicating which information will be uploaded, i.e, name of facility, visit date, period, status, number of elements captured and Status Determination role.
11. Verify that this is the information that you want to upload and select ‘Upload’ to upload the data
12. In cases where you want to upload data that you do not have permission to upload (permissions are assigned to user accounts on the Online software) the following message will appear ‘The following files within the exports were ignored’. A list of the files will also be displayed
13. A message will appear ‘ The following facility assessments has been loaded’ once the files have been uploaded.
11
10
12
13