Canada Day 2020
23
Canada Day 2020
-
Upload
khangminh22 -
Category
Documents
-
view
0 -
download
0
Transcript of Canada Day 2020

Canada
Day
2020

Here are a few Canada Day Crafts for your celebration!
There are things to wear, things to wave and things you can use to decorate
your house and yard. And these will just get you started, there are many more
craft ideas available online. Be creative! You can also use your talents and what-
ever materials you have on hand to devise and create your own ideas!
Please send us pictures of your hand-made Canada Day decorations. We
would like to post them as part of the Grimsby Virtual Canada Day cele-
bration!
What You’ll Need
Before you start, here are some of the basic tools and materials that you will
need, plus a few extra ones that could also help.
Scissors (a flexible tape measure)
Masking tape, clear tape (white glue, a stapler)
Pencil (pen)
Crayons (markers, pencil crayons, oil pastels, acrylic or tempera craft paint)
White cardstock or paper that will work in your printer. (Red construction
paper, cardstock or Bristol board. If these materials are not available cereal
boxes or other cardboard can be used)
Glitter, stickers, beads, fabric scraps, pipe-cleaners (for decoration)
Tissue paper
Certain crafts will require other specific items, like smooth rocks, sticks, toi-
let paper rolls, etc.
Read the instructions completely before starting and
Have Fun!

History Lesson
When the first Europeans arrived in North America, the continent was fully inhabited by native peoples.
Like many Indigenous groups, the Huron-Wendat of the Great Lakes region were farmers and hunters,
their way of life successfully adapted to the natural environment of this area.
The arrival of the Europeans changed the native way of life forever, affecting everything from where the
people lived to the diseases they contracted. Despite this, the Aboriginal and European peoples formed
strong ties, which laid the foundations of Canada.
The French established the earliest European settlements in the 17th century at Port Royal in Acadia
(present day Nova Scotia, 1604) and Quebec City, 1608. The colonists struggled against a harsh climate,
often surviving only with the help of their Indigenous neighbours. Driven by the demand for beaver pelts in
Europe, the French and Aboriginal people developed the fur-trade economy and French dominance in Cana-
da. In the 1700s, France and Great Britain battled for control of North America. In 1759, the British defeat-
ed the French in the Battle of the Plains of Abraham at Québec City — marking the end of France’s empire
in America.
In 1776, 13 British colonies further to the south declared independence and formed the United States. More
than 40,000 people loyal to the Crown, called “Loyalists”, fled the oppression of the American Revolution to
settle in Nova Scotia and Quebec [and Ontario?]. The Loyalists came from a variety of backgrounds and
religions.
The Constitutional Act of 1791 divided the Province of Quebec into Upper and Lower Canada (later Ontar-
io and Quebec), the first official use of the name ‘Canada’. The Act also granted legislative assemblies elect-
ed by the people. The Atlantic colonies and the two Canadas were known, collectively, as British North
America.
In 1805, Americans began to resent British interference. They thought it would be easy to conquer Canada,
so in June 1812 the United States invaded British territory. Canadian-born volunteers and First Nations
and British soldiers fought back and by 1814, the American attempt to invade had failed. The present-day
Canada-U.S.A. border is partly an outcome of the War of 1812, which ensured that Canada would remain
independent of the United States. American supporters again pushed joining the United States in the mid
1830’s, but without sufficient public support, they too were defeated.
A few decades later Lord Durham recommended that Upper and Lower Canada merge and be given respon-
sible government. The old Province of Canada (Upper and Lower) would become two new provinces: On-
tario and Quebec. Together with New Brunswick and Nova Scotia, these would form a new country called
the Dominion of Canada. Each province would elect its own legislature and have control of such areas as
education and health.
The British Parliament passed the British North America Act in 1867. The Dominion of Canada was offi-
cially born on July 1, 1867. Until 1982, Canadians celebrated July 1 as “Dominion Day” to commemorate
the day that Canada became a self-governing Dominion. Today July 1st is officially known as Canada Day.

Things to
Wear!

Canada Day Hat and Flag Craft
https://eastcoastmommyblog.blogspot.com/2012/06/ecm-kids-craft-
club-4-canada-day.html
Flag template on the next page
MATERIALS AND TOOLS:
Tape
Scissors
a red crayon or marker
A printout of the template, on white cardstock if possible. Extra cardstock for hatband.
TO MAKE THE FLAGS:
1) Cut out the maple leaf and side bars. Trace the shapes onto the large rectangle, and
colour them. Use your maple leaf and side bars to trace onto as many rectangles as you
need flags.
2) To assemble the flag... simply tape a stick to the back of one of the flags that you col-
ored.
FOR THE HAT:
1) Cut two or three 2” wide strips of cardstock—enough that when taped end to end they
will go completely around the hat-wearer’s head. Tape all joints securely.
2) Tape a flag onto the hat band. Decorate with stickers., glitter, etc if desired


Decorate
your
home

Paper plate Wreath
https://eastcoastmommyblog.blogspot.com/2017/06/simple-and-fun-ways-to-celebrate-canada.html
MATERIALS:
Paper plate
Tissue paper
Glitter, ribbon or yarn (for hanging)
HOW TO MAKE IT:
1) Draw or trace a maple leaf in the centre of a paper
plate, colour it, and trace it with glue and glitter.
2) Use glitter and 1-inch squares of scrunched up tissue paper to decorate the outside
edges of the paper plate.
3) Finish by adding a ribbon to hang the wreath.

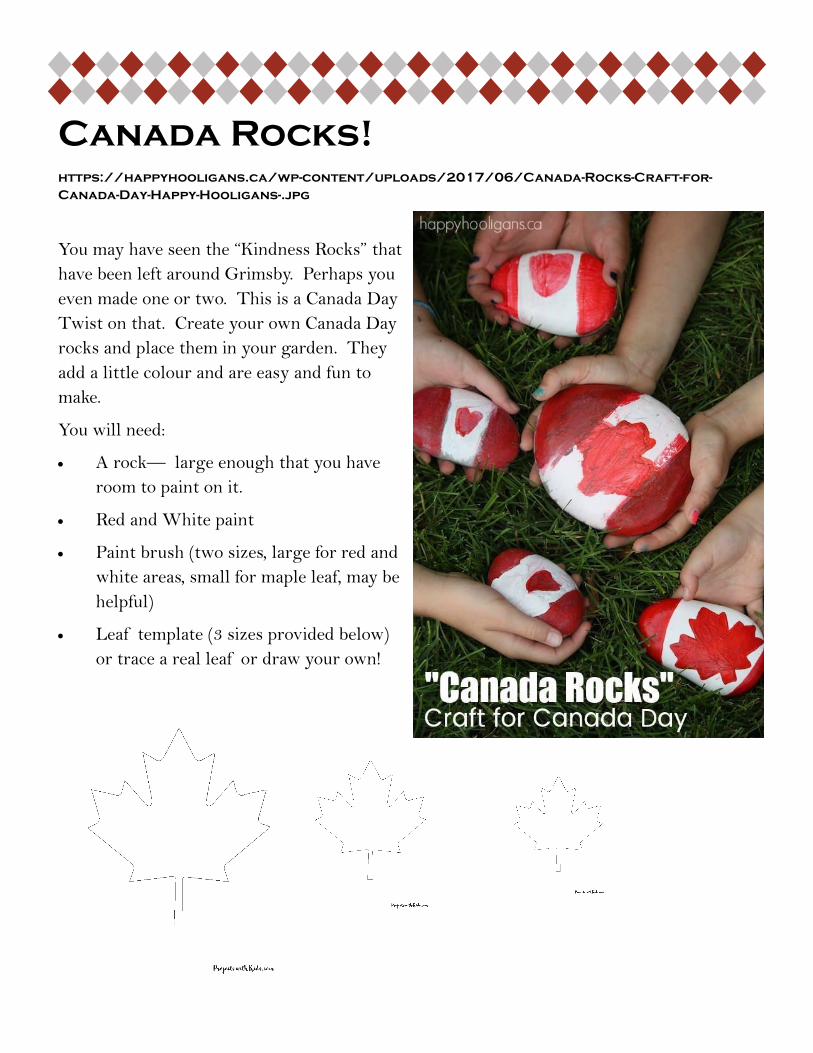
Canada Rocks!
https://happyhooligans.ca/wp-content/uploads/2017/06/Canada-Rocks-Craft-for-
Canada-Day-Happy-Hooligans-.jpg
You may have seen the “Kindness Rocks” that
have been left around Grimsby. Perhaps you
even made one or two. This is a Canada Day
Twist on that. Create your own Canada Day
rocks and place them in your garden. They
add a little colour and are easy and fun to
make.
You will need:
A rock— large enough that you have
room to paint on it.
Red and White paint
Paint brush (two sizes, large for red and
white areas, small for maple leaf, may be
helpful)
Leaf template (3 sizes provided below)
or trace a real leaf or draw your own!

Canada Day Windsock
https://happyhooligans.ca/canada-day-windsock-craft-for-kids/
You will Need:
Cardboard cylinders (recycle
Pringles Cans, take-out coffee
cups, toilet paper rolls etc)
red and white acrylic craft
paint
red and white ribbons or yarn
Scissors
paint brushes
hole punch
TO MAKE YOUR WINDSOCK:
1. Adjust the length of your cylinder. A Pringles can, for example, can be cut in half
with a serrated knife to become two windsocks. This step should be done by an adult.
2. Paint the outside surface white. Let dry completely.
3. Decorate with red. Maple leaves; hand-prints, hearts, Canada Day messages all make
attractive decorations. Create your own unique design!
4. When the paint is dry, use a hole punch to make several holes about an inch up from
the bottom edge of the windsock.
5. Thread long lengths of red and white ribbon through, and knot them in place. If rib-
bon is not available, yarn can be used.
6. To finish, poke a couple of holes in the top of
the can, and thread a piece of ribbon, yarn or
string through for hanging.
Find a branch to hang your windsocks on and dis-
play your patriotic pride!

Maple Leaf Sun Catcher
https://createplaytravel.com/do-it-yourself/stained-glass-tissue-paper-leaf-sun-catchers/
MATERIALS
Red or dark coloured cardstock or box board
Red and white tissue paper
Glue, wax paper, scissors
MAKE THE LEAF SHAPES
On the dark cardstock, trace around the large leaf template provided (pg 9), or use an
actual leaf. A white pencil crayon is useful for tracing.
Cut out the leaf shape. Cut out the inside of the leaf, leaving a 1″ border all the way
around. If you have used recycled boxboard, you may want to paint it red.
FILL IN THE ‘STAINED GLASS’
Cut the red and white tissue paper into 1—1 1/2” pieces. Irregular shapes are fine. Ad-
ditional colours can add interest.
Place a piece of wax paper on your work surface to make removing the finished leaf
easier. Spread glue along the inner edge of the leaf shape and start gluing pieces of tis-
sue paper along the edges, working your way towards the center. You can add dabs of
glue to the edges of the tissue paper pieces to con-
nect everything together.
Allow your finished sun catchers to fully dry on a piece
of wax paper. Tape them in your windows to give your
home some Canada Day colour!

CANADA DAY CHALK PASTEL ART
https://www.projectswithkids.com/canada-day-chalk-pastel-art-kids/
MATERIALS
Maple leaf printable template
White cardstock
Chalk pastels in white and red
Black or dark coloured paper (or a
sidewalk)
Scissors
Tape (masking tape will work well)
Cotton swabs or balls for smudging
Workable fixative (optional)
METHOD
1. Print the maple leaf template onto white cardstock or paper.
2. Cut out the maple leaf template and tape it down in the middle of your black pastel paper
or to the sidewalk. Use loops of tape on the back leaving all edges exposed. Taping your
stencil down keeps the paper from moving and makes it easier to draw around.
3. Using red and white chalk pastels, draw thick lines around the template, alternating the
colours.
4. Time to start smudging! This can be done with q-tips, cotton balls or your fingers.
Smudge outwards, moving all the way around the maple leaf. You may want a rag or paper
towels to clean off you fingers.
5. Carefully pull off the template and take off the tape. If there is chalk dust underneath
take your drawing outside and blow off the excess dust. You can clean up a bit more using a
q-tip or an eraser to get the rest of the dust.
REVERSE THE PROCESS!
Use the same template, but discard the inside of the leaf and use the maple leaf shaped hole
for a stencil. Tape the stencil onto your surface, and dab the exposed area with paint, using a
piece of sponge or stencil brush.


Make
something
to play with

Paper bag beaver puppet
https://www.teacherspayteachers.com/Product/Beaver-paper-bag-puppet-craft-2474542
This is an easy fun craft. See the following pages for the cut outs
Materials
Paper bag
Scissors
Glue
Colouring supplies (crayons, pencil crayons, or what ever your have)
Cut outs from the following pages
Method:
1) Colour the pieces from the following pages
2) Cut out the pieces
3) Glue the pieces to the paper bag!

For paper bag
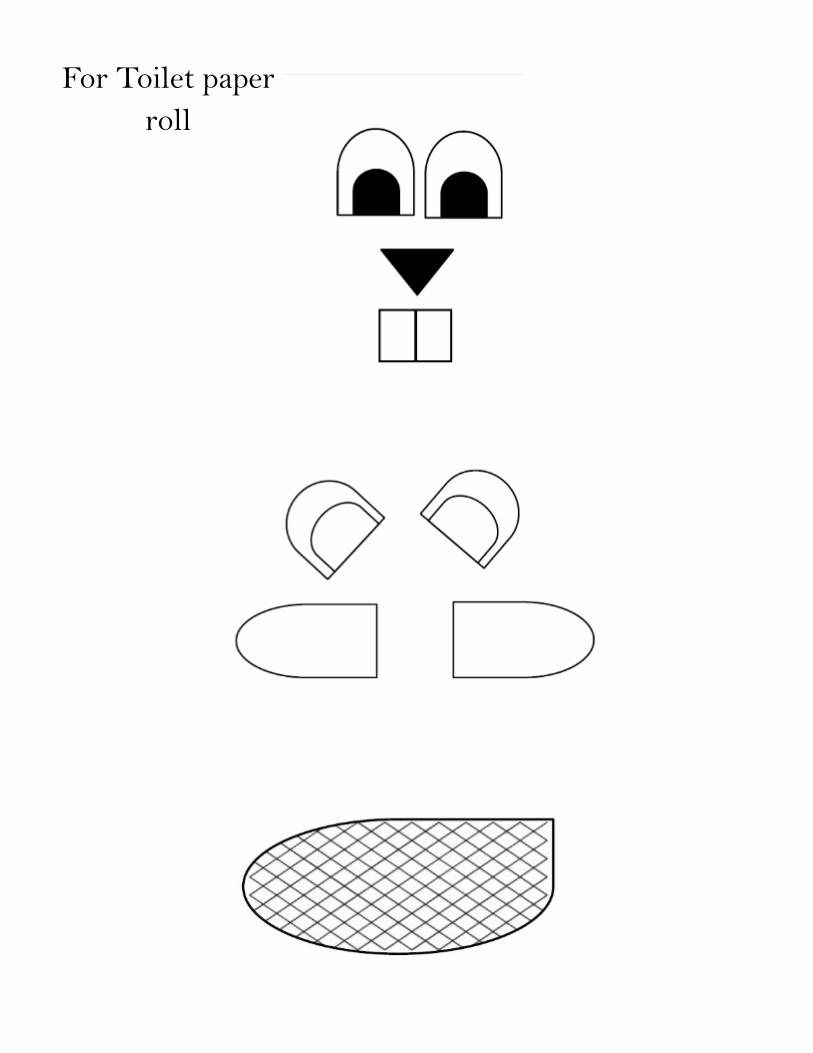
For Toilet paper
roll

Canada Day Wands
https://www.projectswithkids.com/canada-day-printable-wand-craft-kids/
MATERIALS:
Maple leaf pintables templates
White cardstock or paper
Paper straws in red and white
Markers, pencil crayons or
crayons
Glue stick or white glue
Scissors
Bells in silver or gold, Metallic
or red and white pipe cleaners,
glitter, ribbon etc. for decora-
tion
DECORATION
1. Print and cut out your maple leaf designs. Cardstock makes good sturdy wands but regu-
lar printer paper works well too. Templates with preprinted decorations and blank maple
leafs to design yourself are included. Or trace the template or an actual leaf onto paper,
cardstock or box board and cut out.
2. Draw, paint or write on the blank maple leaves and/or colour the designs. Your maple
leaves can show what you do with your family to celebrate Canada Day. Or you can turn them
into wishing wands and write down summer wishes or goals.
ASSEMBLY
3. Assemble your wand using two decorated maple leaves and a straw or stick. Cover the
back of one maple leaf with glue. Place the straw in the middle, aligned with the leaf stem.
Place another maple leaf on top. Make sure everything is lined up and press firmly.
4. Thread a bell (or 2) onto a pipe cleaner and twist around the top of the straw. You can al-
so decorate with whatever you have around the house: Ribbon, glitter, strips of paper etc.


We hope you have a happy and safe Canada
Day as we all celebrate in a different way this
year.
Don’t forget to tag us in your creations
@grimsbymuseum @thegpag
@townofgrimsby
We would love to see anything
creative with a Canada Day theme.
Tag Us!