

Cake & COFFEE Zoe Fancy Cakes - Saracino
100
www.saracinodolci.co.uk www.saracinodolci.com FREE Digital Edition - April 2021 SWEET TABLE Cake & COFFEE Enrique Rojas with his cake story Zoe Fancy Cakes PASTA TOP All you need to know about our sugarpaste displays with that WOW effect Zoe & Richard talking
-
Upload
khangminh22 -
Category
Documents
-
view
0 -
download
0
Transcript of Cake & COFFEE Zoe Fancy Cakes - Saracino

10
www.saracinodolci.co.uk www.saracinodolci.com
FREE Digital Edition - April 2021
SWEET TABLE
Cake & COFFEE Enrique Rojas with his cake story
Zoe Fancy Cakes
PASTA TOP All you need to know about our sugarpaste
displays with that WOW effect
Zoe & Richard talking
by
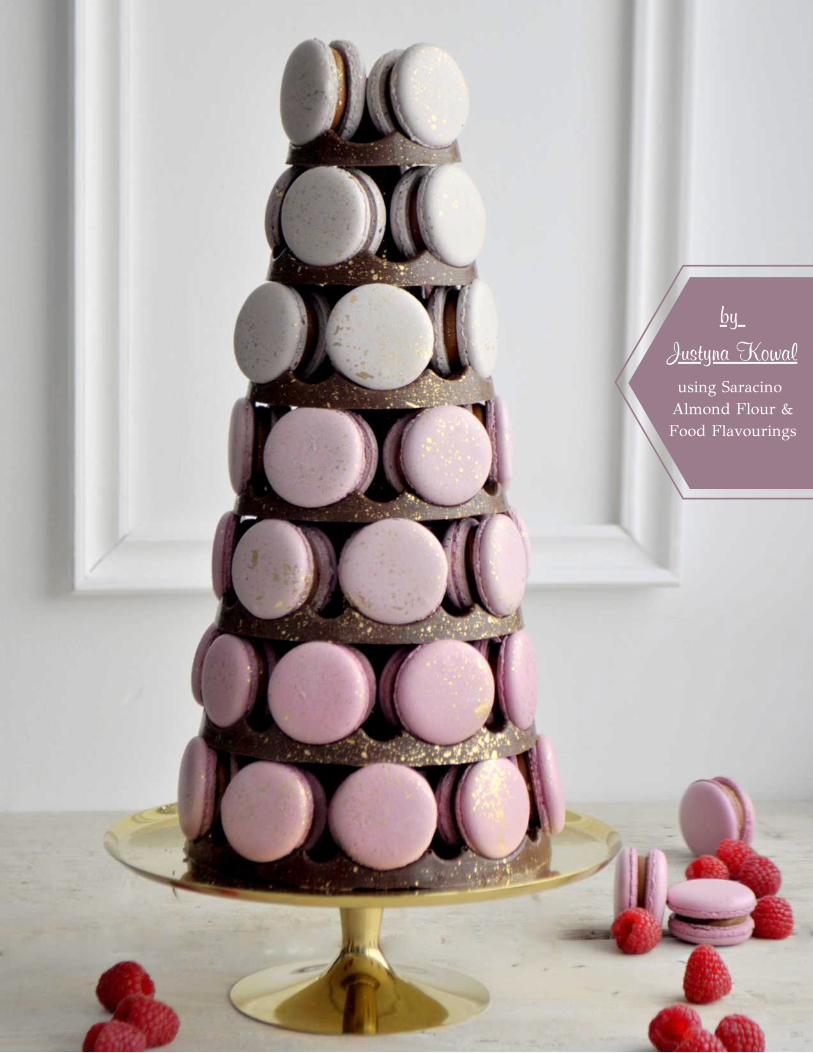
Justyna Kowalusing Saracino Almond Flour &Food Flavourings
I DO I see pictures from weddings, I see loveand magic.
The romance, guests, family, decoration,lights and of course the cake! Becauseany party without cake is not a party it isjust a meeting. What if you could make iteven more special by adding a stunningsweet table or create a unique cake designthat will add that WOW factor?
Wedding cakes have evolved hugely overthe years and they continue to do so withnew trends and ideas. Generally, it is nolonger the traditional fruit cake coveredwith marzipan, royal icing or sugar paste.We see cakes becoming more and moreunique in their appearance and the Brideand Groom are feeling braver to choose avariety of flavourings and style of cake.This is where we like to think we canhelp with our range of amazing naturalfood flavourings. When we look at thecakes we can see more and moreincredible techniques being used makingthe most of the entire range of Saracinoproducts, from our Royal Icing to ‘PastaTop’ sugar paste, from edible Lace to our‘Pasta Bouquet’ flower paste. We can seethat wedding cakes have moved to acompletely new level of appearance andtaste.
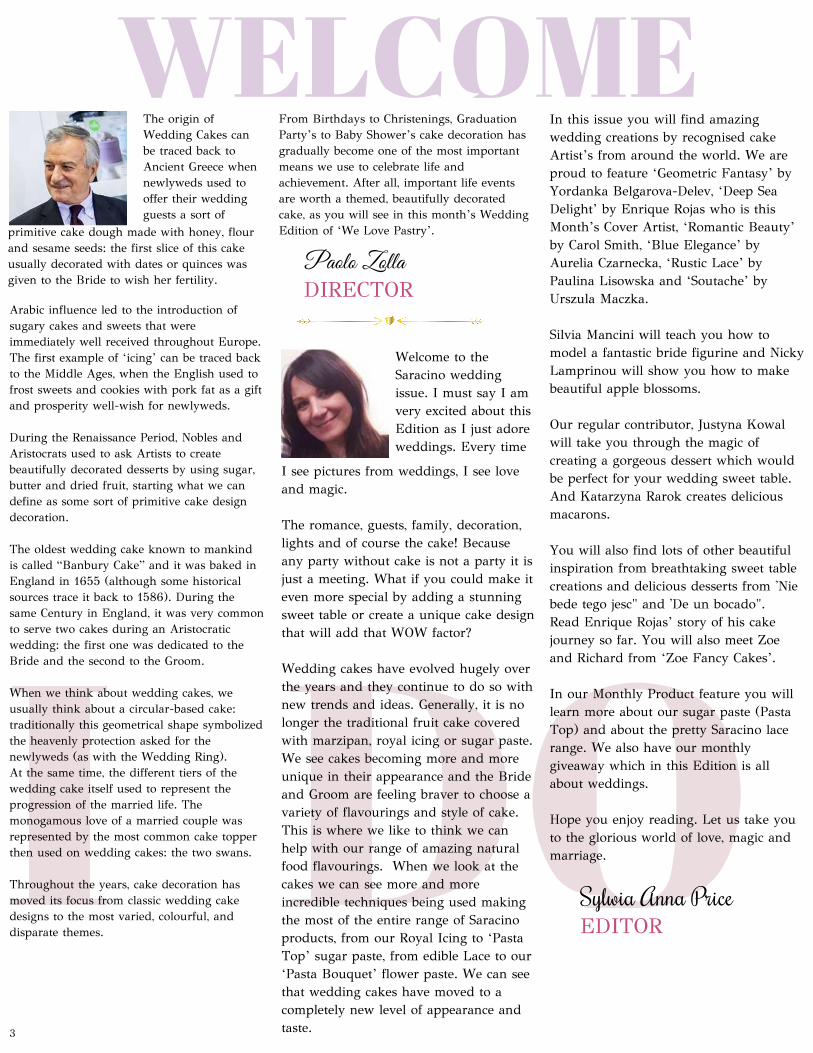
WELCOME
Arabic influence led to the introduction ofsugary cakes and sweets that wereimmediately well received throughout Europe.The first example of ‘icing’ can be traced backto the Middle Ages, when the English used tofrost sweets and cookies with pork fat as a giftand prosperity well-wish for newlyweds.
During the Renaissance Period, Nobles andAristocrats used to ask Artists to createbeautifully decorated desserts by using sugar,butter and dried fruit, starting what we candefine as some sort of primitive cake designdecoration.
The oldest wedding cake known to mankindis called “Banbury Cake” and it was baked inEngland in 1655 (although some historicalsources trace it back to 1586). During thesame Century in England, it was very commonto serve two cakes during an Aristocraticwedding: the first one was dedicated to theBride and the second to the Groom.
When we think about wedding cakes, weusually think about a circular-based cake:traditionally this geometrical shape symbolizedthe heavenly protection asked for thenewlyweds (as with the Wedding Ring).At the same time, the different tiers of thewedding cake itself used to represent theprogression of the married life. Themonogamous love of a married couple wasrepresented by the most common cake topperthen used on wedding cakes: the two swans.
Throughout the years, cake decoration hasmoved its focus from classic wedding cakedesigns to the most varied, colourful, anddisparate themes.
From Birthdays to Christenings, GraduationParty’s to Baby Shower’s cake decoration hasgradually become one of the most importantmeans we use to celebrate life andachievement. After all, important life eventsare worth a themed, beautifully decoratedcake, as you will see in this month’s WeddingEdition of ‘We Love Pastry’.
The origin ofWedding Cakes canbe traced back toAncient Greece whennewlyweds used tooffer their weddingguests a sort of
primitive cake dough made with honey, flourand sesame seeds: the first slice of this cakeusually decorated with dates or quinces wasgiven to the Bride to wish her fertility. DIRECTOR
Paolo Zolla
Sylwia Anna PriceEDITOR
Welcome to theSaracino weddingissue. I must say I amvery excited about thisEdition as I just adoreweddings. Every time
In this issue you will find amazingwedding creations by recognised cakeArtist’s from around the world. We areproud to feature ‘Geometric Fantasy’ byYordanka Belgarova-Delev, ‘Deep SeaDelight’ by Enrique Rojas who is thisMonth’s Cover Artist, ‘Romantic Beauty’by Carol Smith, ‘Blue Elegance’ byAurelia Czarnecka, ‘Rustic Lace’ byPaulina Lisowska and ‘Soutache’ byUrszula Maczka.
Silvia Mancini will teach you how tomodel a fantastic bride figurine and NickyLamprinou will show you how to makebeautiful apple blossoms.
Our regular contributor, Justyna Kowalwill take you through the magic ofcreating a gorgeous dessert which wouldbe perfect for your wedding sweet table.And Katarzyna Rarok creates deliciousmacarons.
You will also find lots of other beautifulinspiration from breathtaking sweet tablecreations and delicious desserts from 'Niebede tego jesc" and 'De un bocado".Read Enrique Rojas’ story of his cakejourney so far. You will also meet Zoeand Richard from ‘Zoe Fancy Cakes’.
In our Monthly Product feature you willlearn more about our sugar paste (PastaTop) and about the pretty Saracino lacerange. We also have our monthlygiveaway which in this Edition is allabout weddings.
Hope you enjoy reading. Let us take youto the glorious world of love, magic andmarriage.
3

W E L O V E P A S T R Y
C O N T E N T S
0 6Geometric Fantasy - unique design byYordanka Bekyarova-Delev
6 0Deep Sea Delight - amazing textures byEnrique Rojas
2 8Romantic Beauty - all about romance byCarol Smith
4 4Delicious Macaron Tower by KatarzynaRarok
5 0Strawberry & Lemon Mousse by JustynaKowal
9 4Apple Blossoms by Nicky Lamprinou
1 8Blue Elegance by Aurelia Czarnecka
7 2Golden Edible Lace by Paulina Lisowska
8 0Bride in Pink by Silvia Mancini
8 6Soutache Paradise by Urszula Maczka
A P R I L I S S U E
6080
06
2818
50
TUTORIALS

1 3Covered with Perfection - all you need toknow about our Pasta Top sugarpaste
2 6Meet our March competition winners
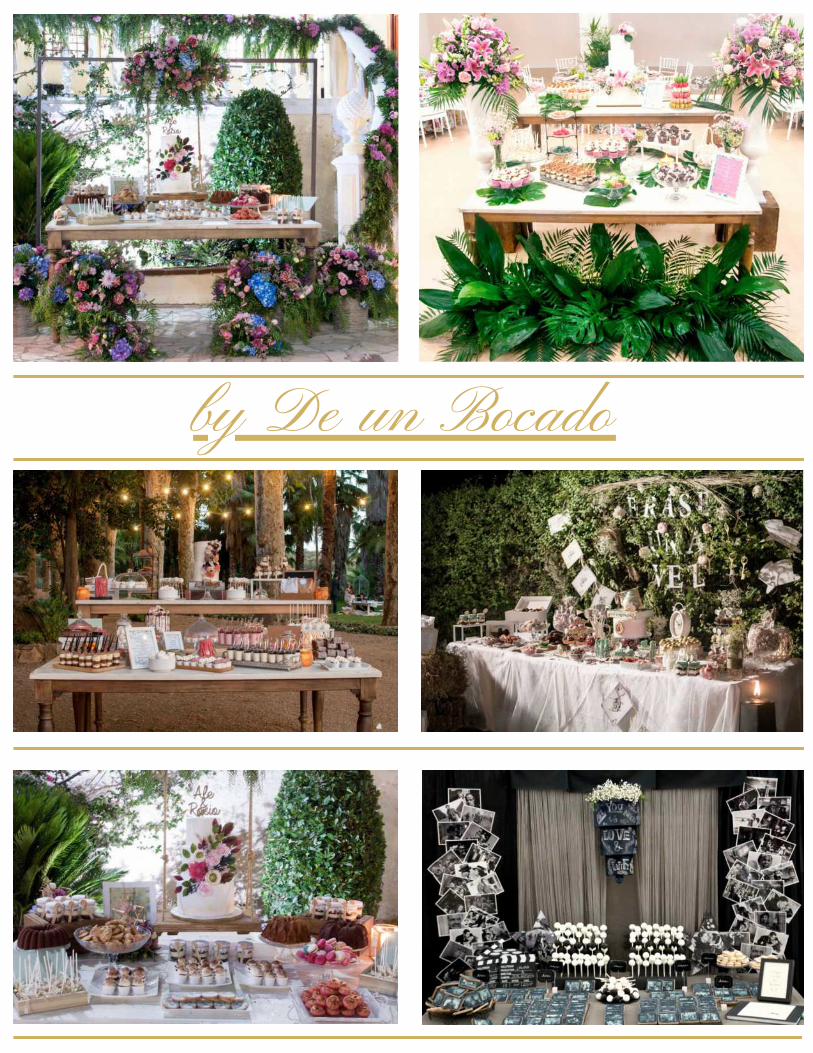
3 9Sweet Tables - 10 gorgeous ideas from DeUn Bocada and Nie bede tego jeść
6 8You made these - and we love them -inspirations that cannot be missed
5 6Cake & Coffee - Enrique Rojas tells us hiscake story
1 0 0 Where to buy Saracino - check out whereto find Saracino in your country
7 1Amazing patterns that can be achievedusing Saracino products
7 6Knowing our products - Edible Laceproduct range
7 75 Minutes with Angelika Chwyc - EdibleCake Lace secrets and tips
6 5Meet 'Zoe Fancy Cakes' and see the offerthey have prepared for you!
56
8644
3994
76
7268
NEWS
2 7WIN Saracino products

Geometric Fantasy
PanelMethodCover the cake usingpanel method
3D EffectAchieve this fabulousgeometric WOW factor
Gold RoyalCreate an effective goldtexture on royal icing
6
Yordanka Bekyarova-DelevC A K E D E S I G N E R
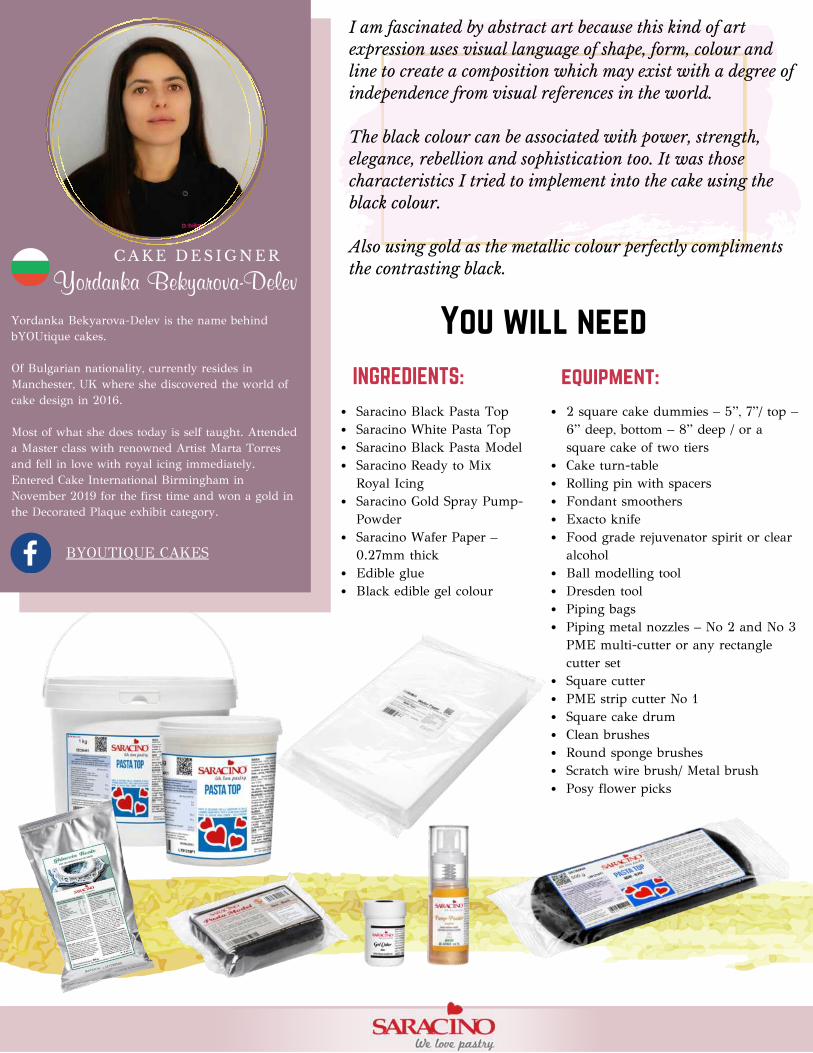
2 square cake dummies – 5”, 7”/ top –6” deep, bottom – 8” deep / or asquare cake of two tiersCake turn-tableRolling pin with spacersFondant smoothersExacto knifeFood grade rejuvenator spirit or clearalcoholBall modelling toolDresden toolPiping bagsPiping metal nozzles – No 2 and No 3PME multi-cutter or any rectanglecutter setSquare cutterPME strip cutter No 1Square cake drumClean brushesRound sponge brushesScratch wire brush/ Metal brushPosy flower picks
I am fascinated by abstract art because this kind of artexpression uses visual language of shape, form, colour andline to create a composition which may exist with a degree ofindependence from visual references in the world.
The black colour can be associated with power, strength,elegance, rebellion and sophistication too. It was thosecharacteristics I tried to implement into the cake using theblack colour.
Also using gold as the metallic colour perfectly complimentsthe contrasting black.
Yordanka Bekyarova-Delev is the name behindbYOUtique cakes.
Of Bulgarian nationality, currently resides inManchester, UK where she discovered the world ofcake design in 2016.
Most of what she does today is self taught. Attendeda Master class with renowned Artist Marta Torresand fell in love with royal icing immediately.Entered Cake International Birmingham inNovember 2019 for the first time and won a gold inthe Decorated Plaque exhibit category.
You will need
Saracino Black Pasta TopSaracino White Pasta TopSaracino Black Pasta ModelSaracino Ready to MixRoyal IcingSaracino Gold Spray Pump-PowderSaracino Wafer Paper –0.27mm thickEdible glueBlack edible gel colour
INGREDIENTS: equipment:
BYOUTIQUE CAKES
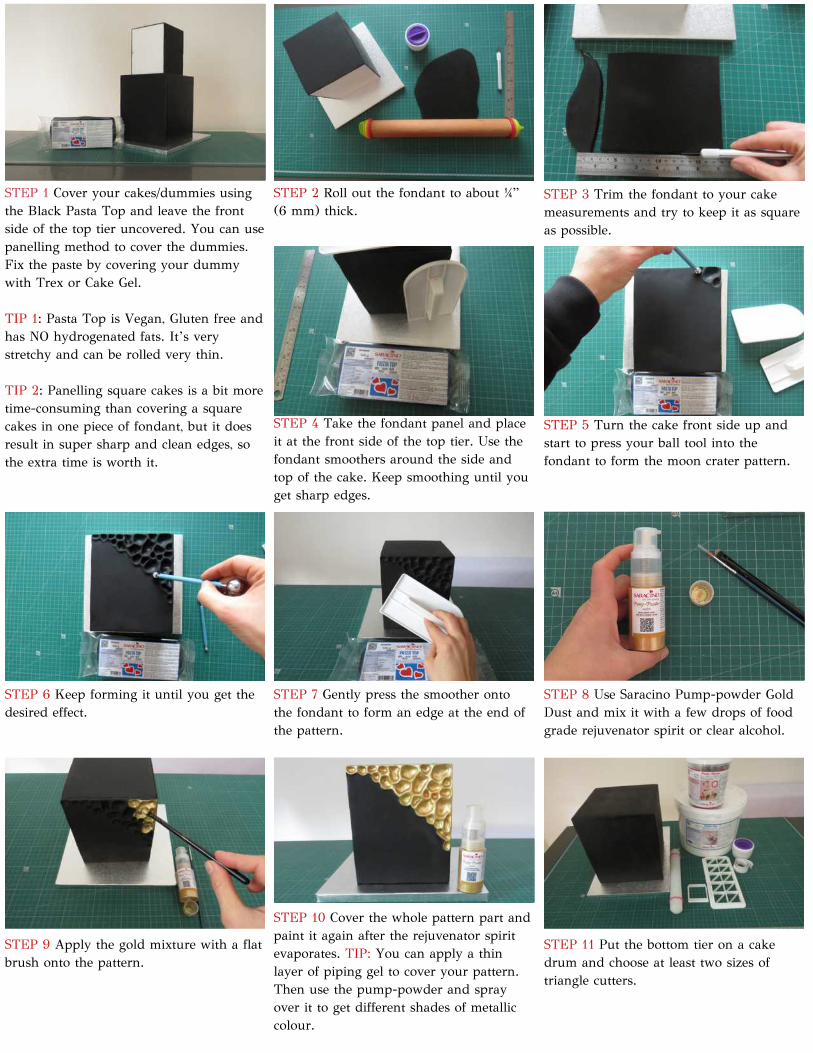
STEP 1 Cover your cakes/dummies usingthe Black Pasta Top and leave the frontside of the top tier uncovered. You can usepanelling method to cover the dummies.Fix the paste by covering your dummywith Trex or Cake Gel.
TIP 1: Pasta Top is Vegan, Gluten free andhas NO hydrogenated fats. It’s verystretchy and can be rolled very thin.
TIP 2: Panelling square cakes is a bit moretime-consuming than covering a squarecakes in one piece of fondant, but it doesresult in super sharp and clean edges, sothe extra time is worth it.
STEP 2 Roll out the fondant to about ¼”(6 mm) thick.
STEP 3 Trim the fondant to your cakemeasurements and try to keep it as squareas possible.
STEP 5 Turn the cake front side up andstart to press your ball tool into thefondant to form the moon crater pattern.
STEP 6 Keep forming it until you get thedesired effect.
STEP 7 Gently press the smoother ontothe fondant to form an edge at the end ofthe pattern.
STEP 8 Use Saracino Pump-powder GoldDust and mix it with a few drops of foodgrade rejuvenator spirit or clear alcohol.
STEP 4 Take the fondant panel and placeit at the front side of the top tier. Use thefondant smoothers around the side andtop of the cake. Keep smoothing until youget sharp edges.
STEP 9 Apply the gold mixture with a flatbrush onto the pattern.
STEP 10 Cover the whole pattern part andpaint it again after the rejuvenator spiritevaporates. TIP: You can apply a thinlayer of piping gel to cover your pattern.Then use the pump-powder and sprayover it to get different shades of metalliccolour.
STEP 11 Put the bottom tier on a cakedrum and choose at least two sizes oftriangle cutters.

STEP 12 Measure your triangle cutter. Usethe height of the small triangle and makesure it’s equal to the length of the side ofthe big triangle. TIP: Use isoscelestriangles for the main part of the design asit has 2 sides of equal lengths and helpsyou to finish it easier.
STEP 13 Roll out a piece of black PastaModel and another piece of white PastaTop.
STEP 14 Cut some squares of both colours.Use the exacto knife to cut each squarefrom corner to corner to form two equallarger triangles.
STEP 15 Leave the shapes aside and letthem dry out.
STEP 17 Use the triangle cutter to cutthem out. You’ll need at least 8 pieces ofeach colour.
STEP 18 Put them aside and allow to dryout.
STEP 19 You’ll need two colours of RoyalIcing – black and white. For the blackone, use gel colour to achieve black RoyalIcing.
STEP 20 Prepare the Royal Icing. Followthe instructions on the package. You willneed a toothpaste consistency (soft peaks).
STEP 16 Roll out a piece of white PastaTop for the small triangles.
STEP 21 You will need approximetly 30gof each colour. Put the Royal Icing in twopiping bags with metal nozzles on – No 2and No 3.
STEP 22 Pipe a few lines across the driedtriangle.
STEP 23 Press the sponge brush firmlyonto the piped lines and pull it out gentlyto form the peaks pattern.
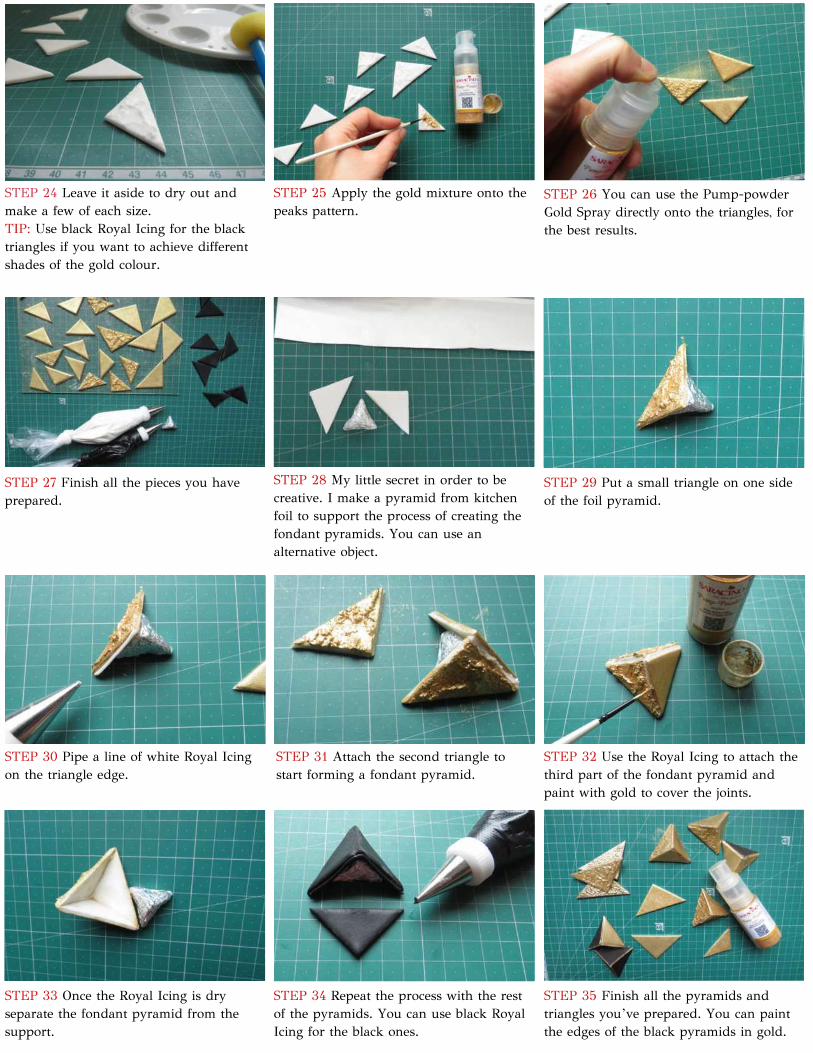
STEP 24 Leave it aside to dry out andmake a few of each size.TIP: Use black Royal Icing for the blacktriangles if you want to achieve differentshades of the gold colour.
STEP 25 Apply the gold mixture onto thepeaks pattern.
STEP 26 You can use the Pump-powderGold Spray directly onto the triangles, forthe best results.
STEP 27 Finish all the pieces you haveprepared.
STEP 29 Put a small triangle on one sideof the foil pyramid.
STEP 30 Pipe a line of white Royal Icingon the triangle edge.
STEP 31 Attach the second triangle tostart forming a fondant pyramid.
STEP 32 Use the Royal Icing to attach thethird part of the fondant pyramid andpaint with gold to cover the joints.
STEP 28 My little secret in order to becreative. I make a pyramid from kitchenfoil to support the process of creating thefondant pyramids. You can use analternative object.
STEP 33 Once the Royal Icing is dryseparate the fondant pyramid from thesupport.
STEP 34 Repeat the process with the restof the pyramids. You can use black RoyalIcing for the black ones.
STEP 35 Finish all the pyramids andtriangles you’ve prepared. You can paintthe edges of the black pyramids in gold.
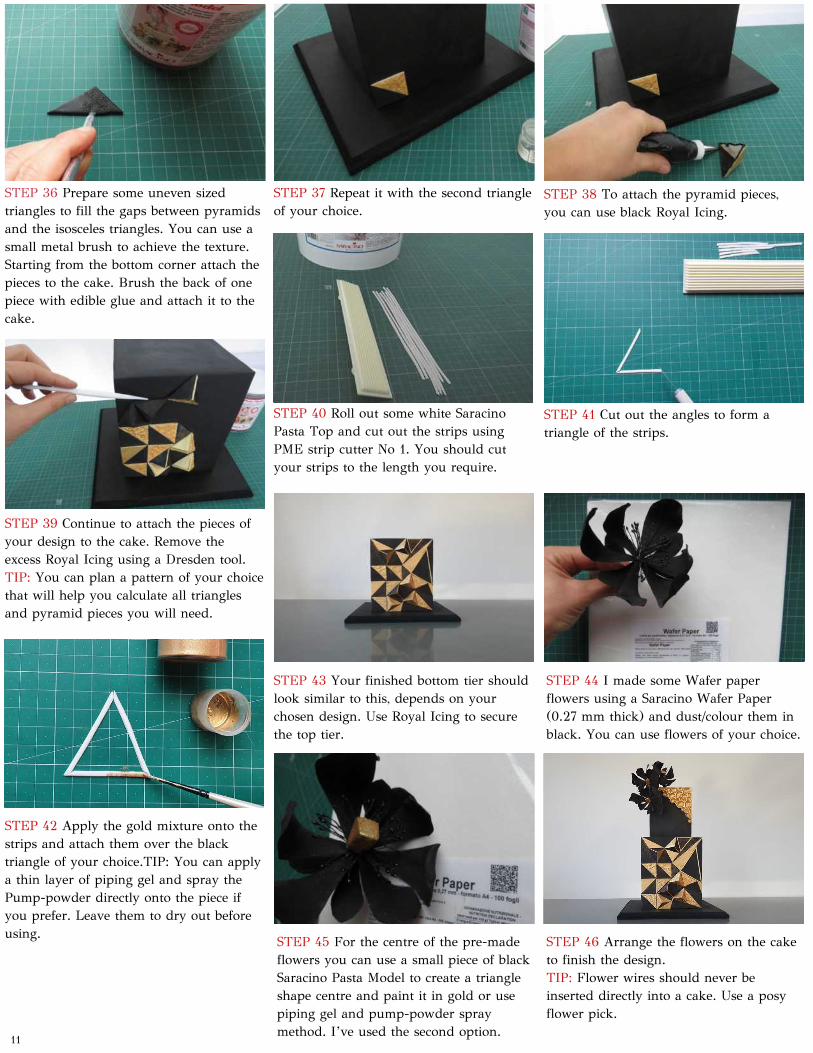
STEP 36 Prepare some uneven sizedtriangles to fill the gaps between pyramidsand the isosceles triangles. You can use asmall metal brush to achieve the texture.Starting from the bottom corner attach thepieces to the cake. Brush the back of onepiece with edible glue and attach it to thecake.
STEP 37 Repeat it with the second triangleof your choice.
STEP 38 To attach the pyramid pieces,you can use black Royal Icing.
STEP 39 Continue to attach the pieces ofyour design to the cake. Remove theexcess Royal Icing using a Dresden tool.TIP: You can plan a pattern of your choicethat will help you calculate all trianglesand pyramid pieces you will need.
STEP 41 Cut out the angles to form atriangle of the strips.
STEP 42 Apply the gold mixture onto thestrips and attach them over the blacktriangle of your choice.TIP: You can applya thin layer of piping gel and spray thePump-powder directly onto the piece ifyou prefer. Leave them to dry out beforeusing.
STEP 44 I made some Wafer paperflowers using a Saracino Wafer Paper(0.27 mm thick) and dust/colour them inblack. You can use flowers of your choice.
STEP 43 Your finished bottom tier shouldlook similar to this, depends on yourchosen design. Use Royal Icing to securethe top tier.
STEP 40 Roll out some white SaracinoPasta Top and cut out the strips usingPME strip cutter No 1. You should cutyour strips to the length you require.
STEP 45 For the centre of the pre-madeflowers you can use a small piece of blackSaracino Pasta Model to create a triangleshape centre and paint it in gold or usepiping gel and pump-powder spraymethod. I’ve used the second option.
STEP 46 Arrange the flowers on the caketo finish the design.TIP: Flower wires should never beinserted directly into a cake. Use a posyflower pick.
11
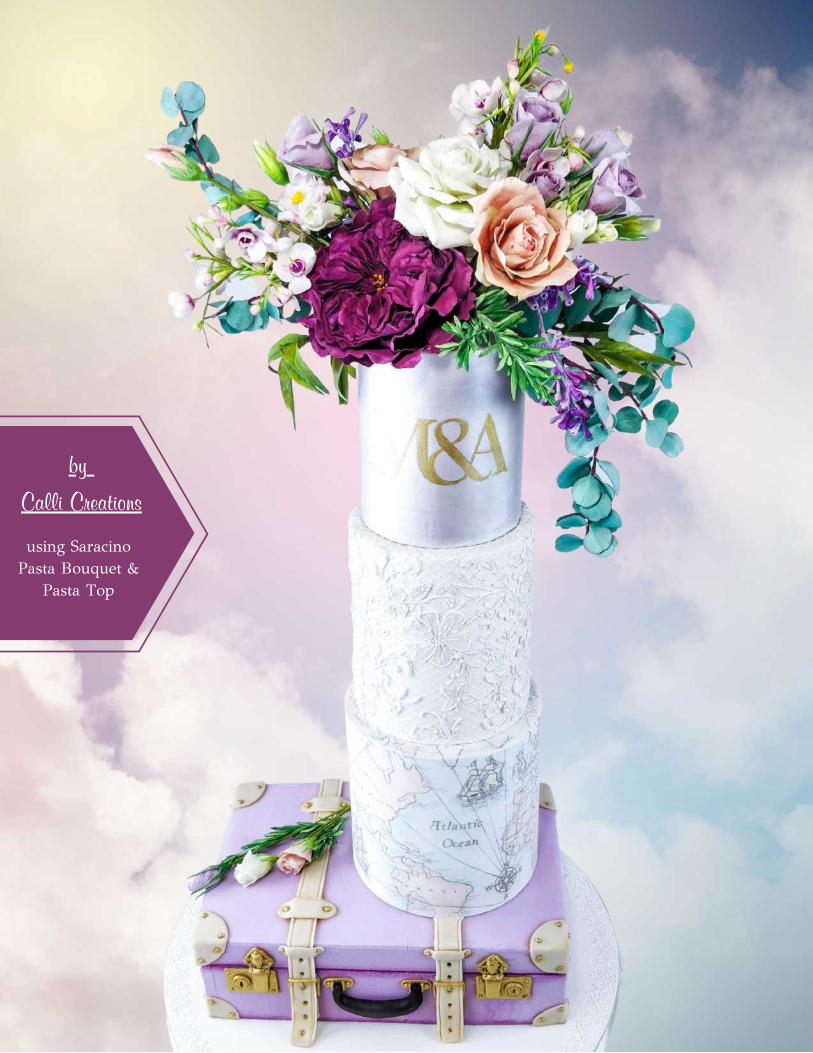
by
Calli Creations
using Saracino Pasta Bouquet &
Pasta Top

Covered with PerfectionB Y A L V I S E Z O L L A
We RECOMMEND to knead the paste
very well before use to activate the
gums and make the paste elastic and
tear resistant.
S(known as Pasta Top) is a ready-madefondant created by Saracino for coveringcakes.
The paste has been designed to allowyou to create a clean and beautiful finishwith no elephant skin or tearing.
Saracino Pasta Top simply won't let youdown, whether you cover a cake forchildren or a very tall wedding cake.
aracino sugar paste/fondant
The paste may feel hard and difficult toknead in cold weather so it can beslightly warmed up in a microwave (10seconds at 700W should be enough)prior to kneading.
The warmth makes the cocoa butteringredient melt and makes the paste softand easy to work with. It is easy to rollto as thin as 3-5mm with a rolling pinor with a sheeter. In this way, it will beperfect to cover tall drums guaranteeinga great look.
It is suitable for use in hot and humid
climates, it easily withstands
temperatures above 35°C and high
humidity levels guaranteeing perfect
stability on the cake.
It can easily cope with temperaturechanges without sweating or cracking.
Cake covering with Pasta Top cannot beeasier.
Pasta Top is available in pure whitecolour in 5kg and 1kg buckets and 500gpacks. It is also available in 14 beautifulcolours in 500g packs.
13
ECONOMIC ECONOMIC
Can a sugar paste be economic, good andelastic? Obviously the three characteristics do not always get along with each other.An economic sugar paste will not alwaysbe good quality or elastic, an elastic pastemay not be good quality or economic, agood quality paste is likely to be not veryelastic and rather expensive.
How then do you choose a sugar pasteand find the right product for thecustomer? The choice is obviouslydictated by the sugar paste producer andthe piece you want to create.
Saracino Pasta Top is:
As it is so strong and pliable you willneed half the quantity of most otherbrands.
Saracino Pasta Top can in fact be rolled isthin as 1mm thick, whilst remainingelastic and pliable.
This is the result of a long product designand production experience and the resultof the designer’s finding the correct blendand type of ingredients. It is also easy towork and roll, it does not break or tearand fits perfectly onto the cake, savingyou or your employee’s time.
And let’s face it, time is money!
Whilst we have concentrated on helpingyou achieve cost savings the Pasta Top isalso
Saracino Pasta Top is definitely a specialsugar paste.
Have you ever stopped and taken time toread the ingredients of the numeroussugar pastes on the market? Manyinclude vegetable fats, such as palm oil,palmisto, rapeseed oil or hydrogenatedfats. Some even have unidentified oils.
For our Pasta Top we decided to useCOCOA BUTTER and sunflower oil.
Yes, you read correctly:
Did you know that Cocoa butter is oneof the most expensive vegetable fats, butit is highly valuable in the production ofour paste.
This is due to a number of reasons –
It is naturalIt performs well at hightemperatures and humidityIt has an unmistakable aroma andtasteIt improves the pastes resistanceto moisture. This is ideal as youcan place the cake in the freezer /fridge without moisture problemsthat would usually cause thesugar paste to melt.
So why don’t most other manufacturersuse it in their cover pastes? Quite simplyit is expensive and many companiestend to focus on price!
Of course, sugar also plays its part andSaracino have made a very importantchoice.
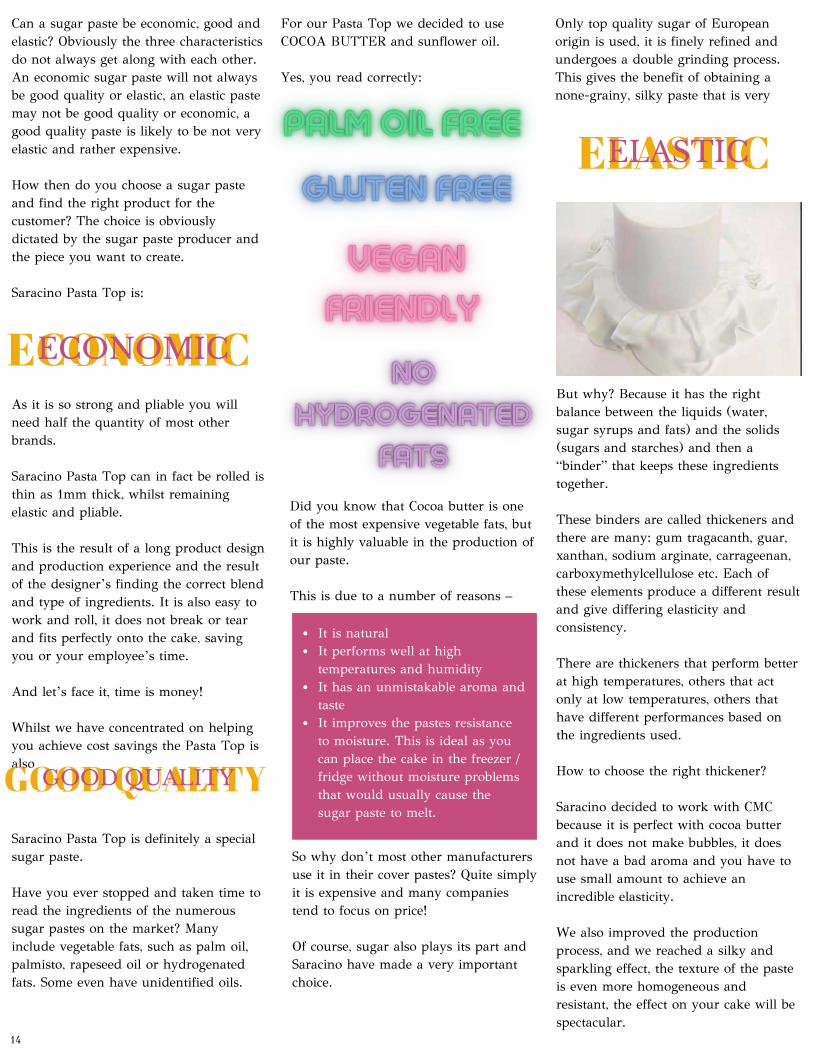
ELASTIC ELASTIC
But why? Because it has the rightbalance between the liquids (water,sugar syrups and fats) and the solids(sugars and starches) and then a“binder” that keeps these ingredientstogether.
These binders are called thickeners andthere are many: gum tragacanth, guar,xanthan, sodium arginate, carrageenan,carboxymethylcellulose etc. Each ofthese elements produce a different resultand give differing elasticity andconsistency.
There are thickeners that perform betterat high temperatures, others that actonly at low temperatures, others thathave different performances based onthe ingredients used. How to choose the right thickener?
Saracino decided to work with CMCbecause it is perfect with cocoa butterand it does not make bubbles, it doesnot have a bad aroma and you have touse small amount to achieve anincredible elasticity.
We also improved the productionprocess, and we reached a silky andsparkling effect, the texture of the pasteis even more homogeneous andresistant, the effect on your cake will bespectacular.
Only top quality sugar of Europeanorigin is used, it is finely refined andundergoes a double grinding process.This gives the benefit of obtaining anone-grainy, silky paste that is very
GOOD QUALITY GOOD QUALITY
14
We are constantly evolving, we try togive a product that can answer all theproblems that a pastry chef and cakeartist has to face in their work. Whenwe believe we have achieved a goodresult, there are new ideas andrequests that lead us to improve theproduct again.
Just in the last few months we havefound a production process thatallows us to reduce the amount of freewater in the sugar paste. This meansthat the Pasta Top, even once rolledout and placed on the cake will notdry out quickly, but will remain softand adherent to the cake or dessert.
The water bound to the molecules ofthe other ingredients does notevaporate and therefore makes thePasta Top consistent. Even after thepack is well closed and re-used later,it will not undergo major changes, ifstored correctly it will not dry out andit will not be any more difficult towork than the first time you openedthe package.
Another new development is aboutthe aroma. We have always focusedon natural flavours that give the pastea unique and well-defined flavour.We categorically rejected aromas likevanilla and preferred a milk-basedaroma with a caramel scent.
Unfortunately, this aroma made ourpaste unsuitable for those sufferingfrom milk allergy or intolerance.
ccording to many users,
We have now developed a new flavourwithout lactose which makes the pasteeven tastier and lighter on the palateand DAIRY FREE.
We also found an incredible cocoabutter, delicate, whiter and sweetwhich gives the paste a marvelloustaste, avoiding all the problemsgenerated by palm oil. Your customerswill love the paste as much as we loveit! It also allows perfect blending so ifyou split the paste by accident, youcan rejoin and smooth it with noproblem.
WHAT BRINGS THEM TO THIS CONCLUS ION?
We can reveal the secret:
We consider sugar paste a process, nota ready and finished recipe.
ASaracino Pasta Top is the best sugar
paste for desserts and cakes.
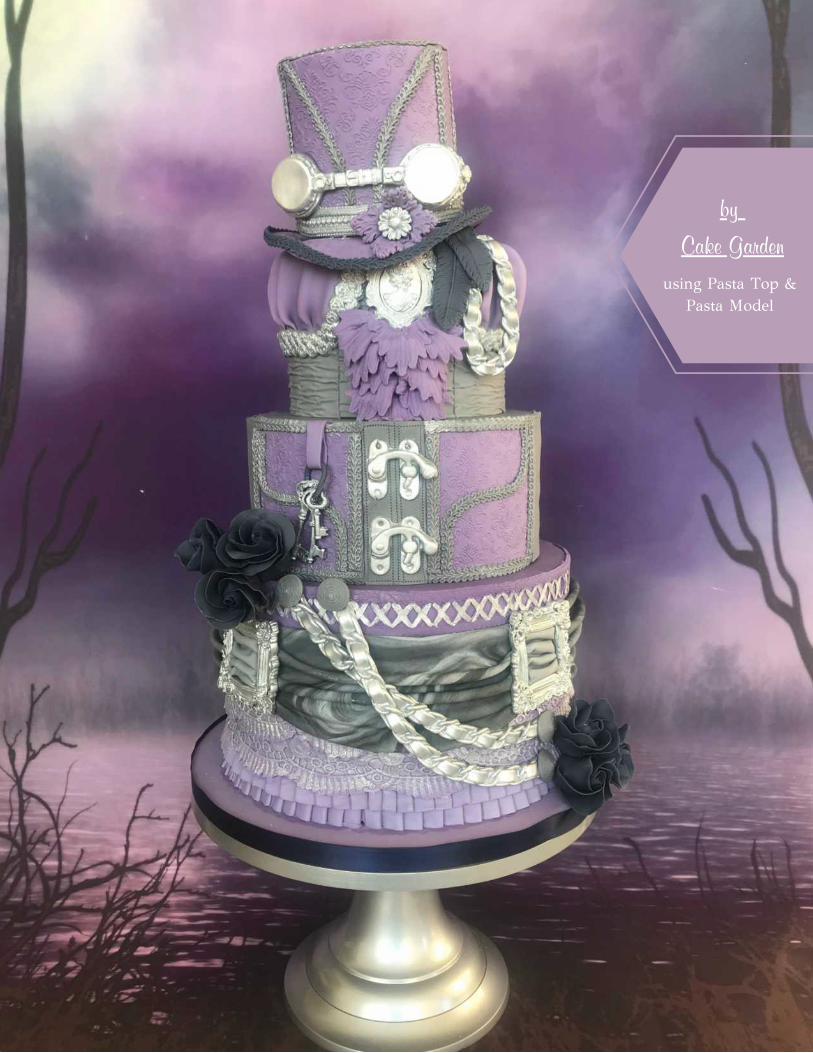
by
Cake Garden
using Pasta Top & Pasta Model

PAINTED WEDDING CAKES
Colourful Magic
by C
alli
Crea
tions
by A
rt C
ake
Des
ign
Dia
na A
luas
by
Kat
arzy
nka
Sztu
ka C
ukro
wa
WITH SARACINO COCOA BUTTER
by K
atar
zynk
a Sz
tuka
Cuk
row
a
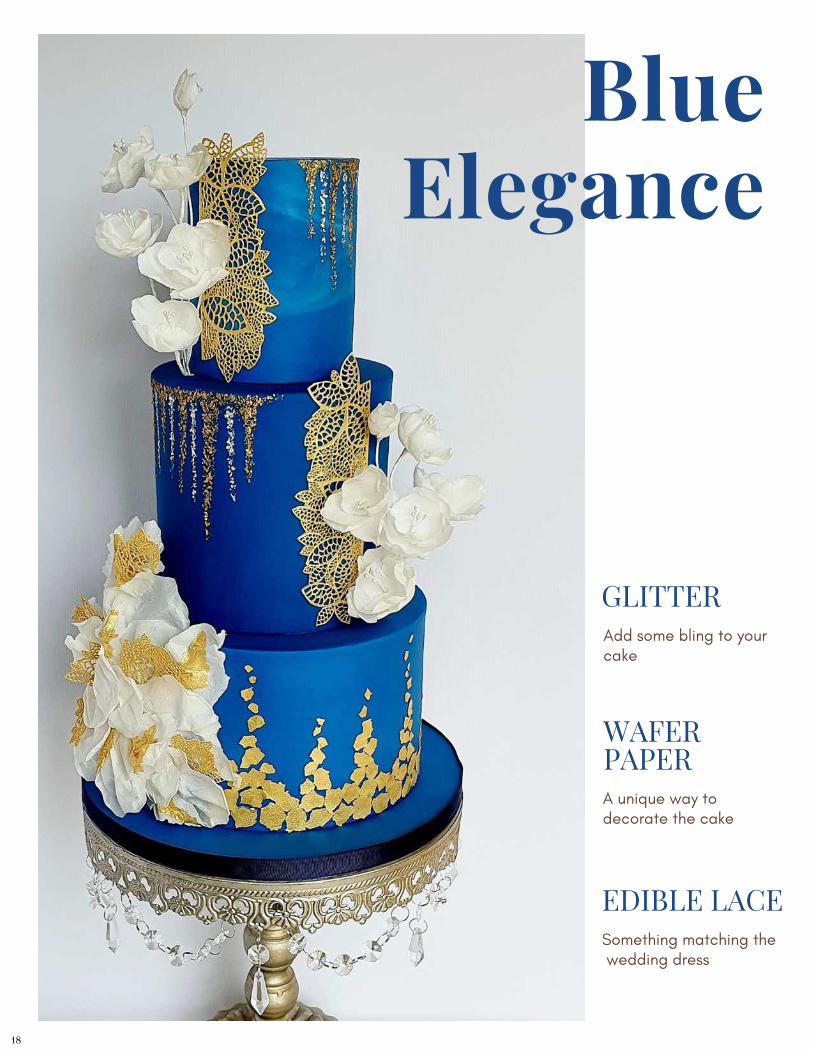
Blue Elegance
GLITTER Add some bling to yourcake
WAFERPAPERA unique way todecorate the cake
EDIBLE LACESomething matching the wedding dress
18

Aurelia Czarnecka
C A K E D E S I G N E R
4in, 6in, 8in cakes or cakedummies top and bottom 5indeep, middle 6in deepCake lace matCake lace spreader or spatulaRolling pinCake steamerScalpel or sharp knifeCake smoothers Modelling toolsPaintbrushes: wide flathead,medium flathead, small pointedCake drumScissorsFlower stamen – medium roundin pearl white24 gauge white flower wiresWhite florist tape
Aurelia is an award winning cake artist, owner ofAurelia’s Cake studio, located in Stirling, Scotland,UK. Aurelia was born and brought up in Poland,after her graduation from University in Wroclaw(Master degree in Accounting) she moved to Scotlandwhere she has lived with her family for the past 14years.
She always loved baking but she discovered herpassion for cake decorating about 6 years ago andsince then sugar art has become her big passion, herhobby and work.
Aurelia loves creating new things and each piece isalways a challenge. Her work has been featuredseveral times in cake magazines such as CakeMasters, Cake Decoration and Sugarcraft, CakeHeaven, Cakes and Sugarcraft, Party Cakes & Bakes,Fondbites School of Sugar Art, Sugar India’s CakeArt.
Saracino Blue Pasta TopSaracino White Pasta TopSaracino Wafer Paper 0.27mmthickSaracino Gold GlitterSaracino Silver GlitterSaracino Gold Ready to Use LacePasteSaracino ready to use Royal IcingmixEdible glue, wafer paper glue orwaterClear alcoholCooled boiled water or Trex
You will need
INGREDIENTS: EQUIPMENT:
AURELIA'S CAKE
My blue elegance wedding cake was inspired by 2020cake decorating trends, which was all about tones of blue,gold details and glamour.
I incorporated subtle white delicate wafer paper flower toadd softness to this classic blue. Gold leaf pattern wasinspired by one of fashion designer Georges Chakragorgeous dresses.
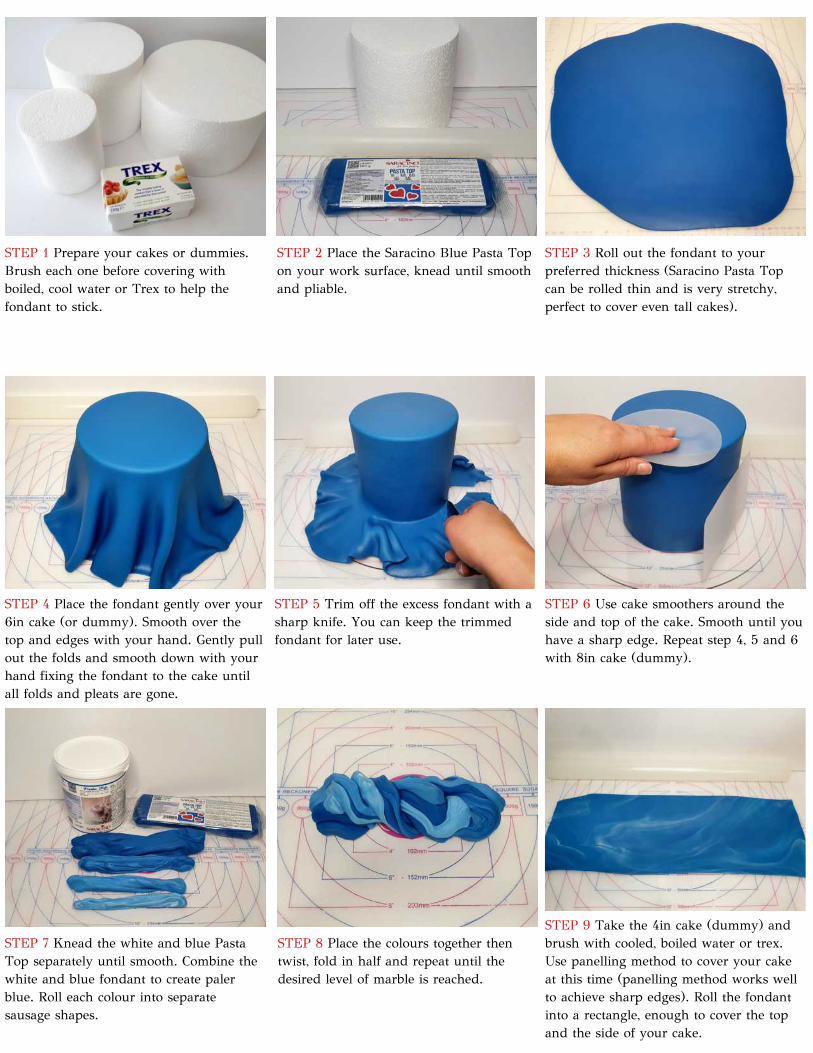
STEP 1 Prepare your cakes or dummies.Brush each one before covering withboiled, cool water or Trex to help thefondant to stick.
STEP 2 Place the Saracino Blue Pasta Topon your work surface, knead until smoothand pliable.
STEP 3 Roll out the fondant to yourpreferred thickness (Saracino Pasta Topcan be rolled thin and is very stretchy,perfect to cover even tall cakes).
STEP 4 Place the fondant gently over your6in cake (or dummy). Smooth over thetop and edges with your hand. Gently pullout the folds and smooth down with yourhand fixing the fondant to the cake untilall folds and pleats are gone.
STEP 5 Trim off the excess fondant with asharp knife. You can keep the trimmedfondant for later use.
STEP 6 Use cake smoothers around theside and top of the cake. Smooth until youhave a sharp edge. Repeat step 4, 5 and 6with 8in cake (dummy).
STEP 7 Knead the white and blue PastaTop separately until smooth. Combine thewhite and blue fondant to create palerblue. Roll each colour into separatesausage shapes.
STEP 8 Place the colours together thentwist, fold in half and repeat until thedesired level of marble is reached.
STEP 9 Take the 4in cake (dummy) andbrush with cooled, boiled water or trex.Use panelling method to cover your cakeat this time (panelling method works wellto achieve sharp edges). Roll the fondantinto a rectangle, enough to cover the topand the side of your cake.
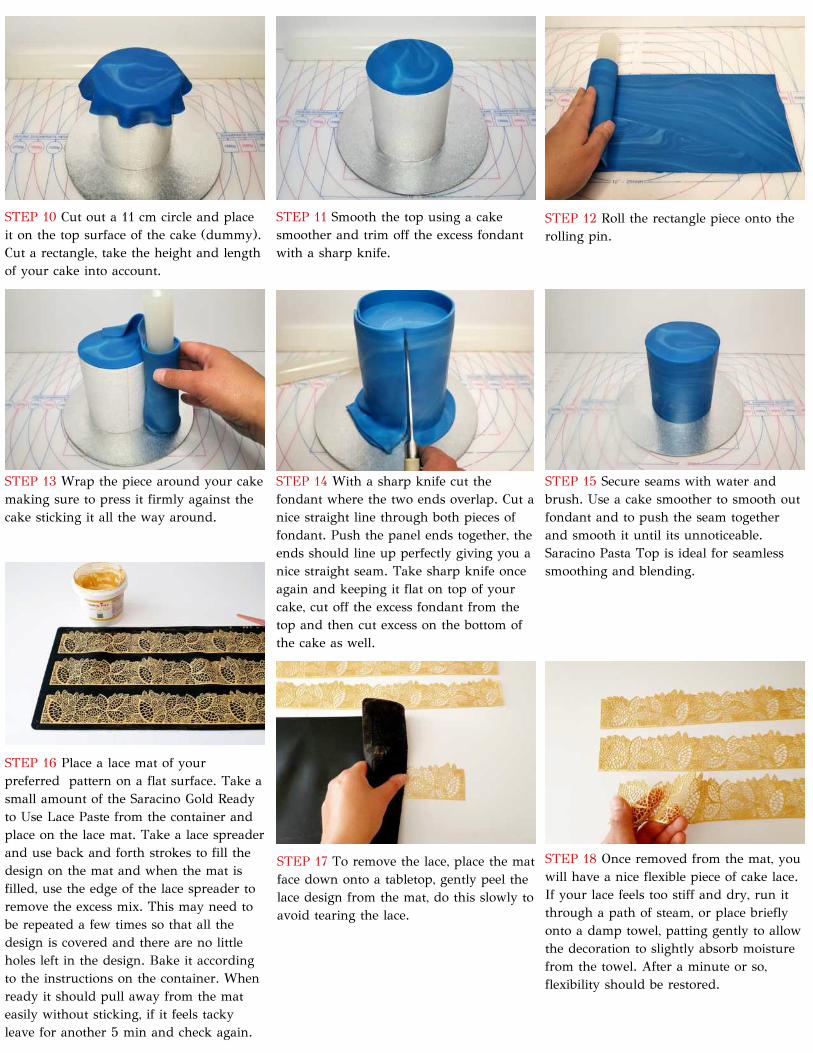
STEP 10 Cut out a 11 cm circle and placeit on the top surface of the cake (dummy).Cut a rectangle, take the height and lengthof your cake into account.
STEP 11 Smooth the top using a cakesmoother and trim off the excess fondantwith a sharp knife.
STEP 14 With a sharp knife cut thefondant where the two ends overlap. Cut anice straight line through both pieces offondant. Push the panel ends together, theends should line up perfectly giving you anice straight seam. Take sharp knife onceagain and keeping it flat on top of yourcake, cut off the excess fondant from thetop and then cut excess on the bottom ofthe cake as well.
STEP 15 Secure seams with water andbrush. Use a cake smoother to smooth outfondant and to push the seam togetherand smooth it until its unnoticeable.Saracino Pasta Top is ideal for seamlesssmoothing and blending.
STEP 12 Roll the rectangle piece onto therolling pin.
STEP 13 Wrap the piece around your cakemaking sure to press it firmly against thecake sticking it all the way around.
STEP 16 Place a lace mat of yourpreferred pattern on a flat surface. Take asmall amount of the Saracino Gold Readyto Use Lace Paste from the container andplace on the lace mat. Take a lace spreaderand use back and forth strokes to fill thedesign on the mat and when the mat isfilled, use the edge of the lace spreader toremove the excess mix. This may need tobe repeated a few times so that all thedesign is covered and there are no littleholes left in the design. Bake it accordingto the instructions on the container. Whenready it should pull away from the mateasily without sticking, if it feels tackyleave for another 5 min and check again.
STEP 17 To remove the lace, place the matface down onto a tabletop, gently peel thelace design from the mat, do this slowly toavoid tearing the lace.
STEP 18 Once removed from the mat, youwill have a nice flexible piece of cake lace.If your lace feels too stiff and dry, run itthrough a path of steam, or place brieflyonto a damp towel, patting gently to allowthe decoration to slightly absorb moisturefrom the towel. After a minute or so,flexibility should be restored.

55
STEP 19 Take the lace mat again and turnit over and use the reverse smooth side ofthe mat. Spread a layer of the SaracinoGold Ready to Use Lace Paste to create anedible gold sheet.
STEP 22 Using scissors, cut 2 pieces oflace to the desired shape and length.Brush a small amount of cooled, boiledwater or edible glue onto the reverse ofyour cake lace. Attach one piece verticallyon the top tier and one piece on themiddle tier the opposite way.
STEP 23 Make a few wide and variouslength vertical streaks using edible glue orcooled, boiled water on the top and middletier, next to the attached lace, leaving agap between each one, then using smallflat brush, transfer and stick the SaracinoGold Glitter to the wet places creating something looking like glitter drip design.
STEP 20 Bake it until the gold sheet isfirm and pulls off the mat by itself.
STEP 21 Break/tear various sized piecesfrom the gold sheet.
STEP 24 Repeat the process with theSaracino Silver Glitter, creating additionalsilver glitter drip in the gaps.
STEP 25 For the simple wafer paperflowers, take 3-6 stamens (medium roundin pearl white), fold in half and loop a 24gauge white wire over. Use white floraltape to secure, starting 3-4mm above thewire. Prepare 10 wires like this.
STEP 26 Cut wafer paper (0.27mm thick)into strips first, then into squares slightlylarger than your petal. No special cuttersor templates are needed, it’s really up toyou how big you want your petals andflowers to be, so cut free-hand squares intotulip/peony shape petals. You will need 3medium and 3 large petals for each flowerand 3-4 small petals for the flower bud, intotal you will need to prepare 8 small, 40medium and 40 large petals.
STEP 27 Brush the wafer paper petal withthe alcohol using wide flathead brush (nottoo much alcohol otherwise the petal willdamage). If you like your flowers to be incertain colour, add a Saracino gel foodcolour to the alcohol at this stage.
55
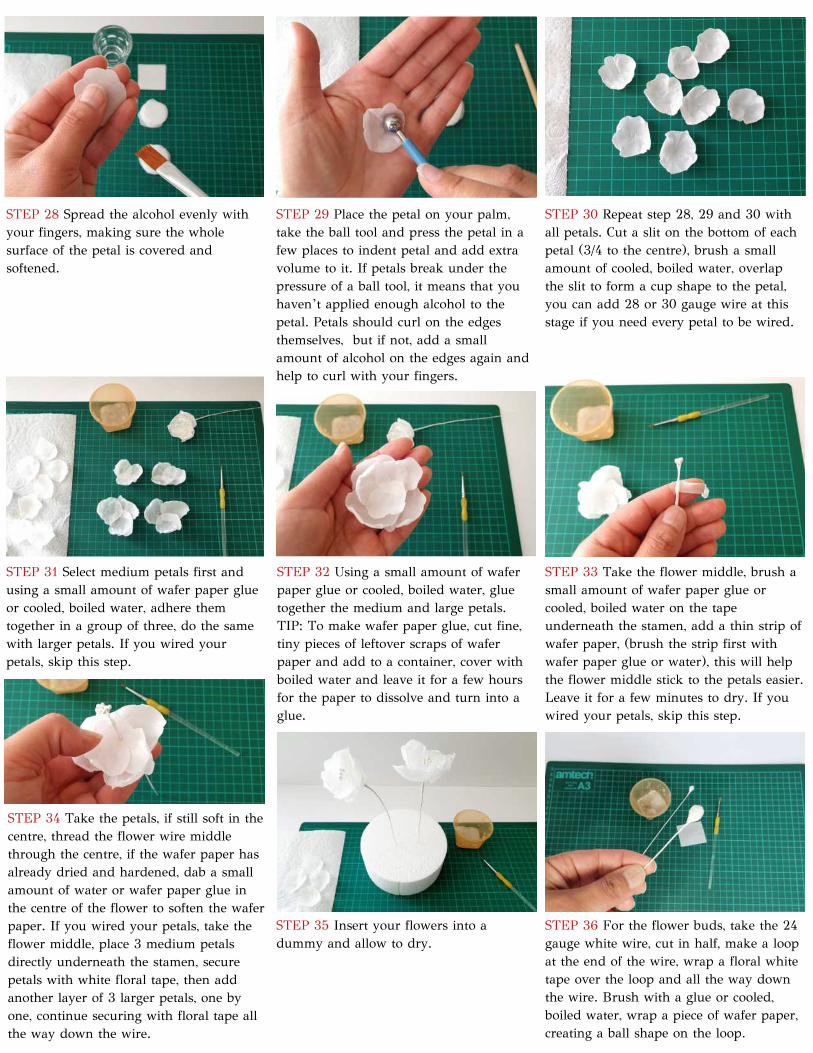
STEP 28 Spread the alcohol evenly withyour fingers, making sure the wholesurface of the petal is covered andsoftened.
STEP 31 Select medium petals first andusing a small amount of wafer paper glueor cooled, boiled water, adhere themtogether in a group of three, do the samewith larger petals. If you wired yourpetals, skip this step.
STEP 32 Using a small amount of waferpaper glue or cooled, boiled water, gluetogether the medium and large petals.TIP: To make wafer paper glue, cut fine,tiny pieces of leftover scraps of waferpaper and add to a container, cover withboiled water and leave it for a few hoursfor the paper to dissolve and turn into aglue.
STEP 29 Place the petal on your palm,take the ball tool and press the petal in afew places to indent petal and add extravolume to it. If petals break under thepressure of a ball tool, it means that youhaven’t applied enough alcohol to thepetal. Petals should curl on the edgesthemselves, but if not, add a smallamount of alcohol on the edges again andhelp to curl with your fingers.
STEP 30 Repeat step 28, 29 and 30 withall petals. Cut a slit on the bottom of eachpetal (3/4 to the centre), brush a smallamount of cooled, boiled water, overlapthe slit to form a cup shape to the petal,you can add 28 or 30 gauge wire at thisstage if you need every petal to be wired.
STEP 34 Take the petals, if still soft in thecentre, thread the flower wire middlethrough the centre, if the wafer paper hasalready dried and hardened, dab a smallamount of water or wafer paper glue inthe centre of the flower to soften the waferpaper. If you wired your petals, take theflower middle, place 3 medium petalsdirectly underneath the stamen, securepetals with white floral tape, then addanother layer of 3 larger petals, one byone, continue securing with floral tape allthe way down the wire.
STEP 35 Insert your flowers into adummy and allow to dry.
STEP 33 Take the flower middle, brush asmall amount of wafer paper glue orcooled, boiled water on the tapeunderneath the stamen, add a thin strip ofwafer paper, (brush the strip first withwafer paper glue or water), this will helpthe flower middle stick to the petals easier.Leave it for a few minutes to dry. If youwired your petals, skip this step.
STEP 36 For the flower buds, take the 24gauge white wire, cut in half, make a loopat the end of the wire, wrap a floral whitetape over the loop and all the way downthe wire. Brush with a glue or cooled,boiled water, wrap a piece of wafer paper,creating a ball shape on the loop.
55
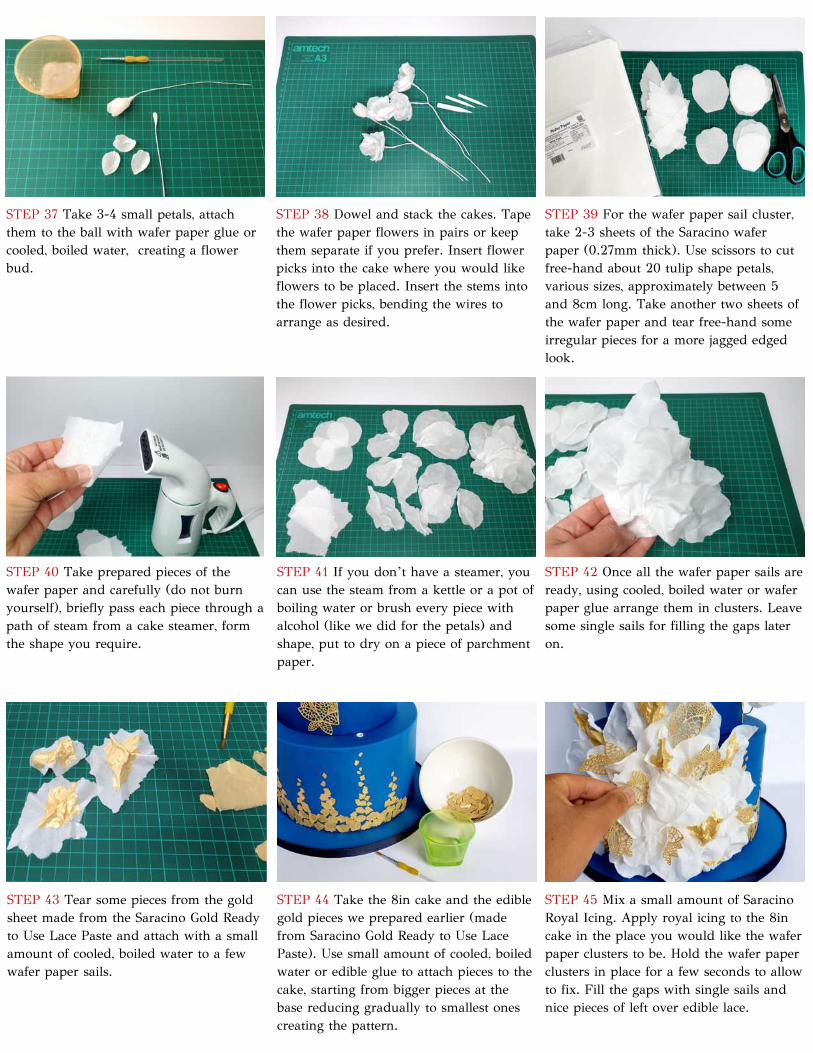
STEP 37 Take 3-4 small petals, attachthem to the ball with wafer paper glue orcooled, boiled water, creating a flowerbud.
STEP 40 Take prepared pieces of thewafer paper and carefully (do not burnyourself), briefly pass each piece through apath of steam from a cake steamer, formthe shape you require.
STEP 41 If you don’t have a steamer, youcan use the steam from a kettle or a pot ofboiling water or brush every piece withalcohol (like we did for the petals) andshape, put to dry on a piece of parchmentpaper.
STEP 38 Dowel and stack the cakes. Tapethe wafer paper flowers in pairs or keepthem separate if you prefer. Insert flowerpicks into the cake where you would likeflowers to be placed. Insert the stems intothe flower picks, bending the wires toarrange as desired.
STEP 39 For the wafer paper sail cluster,take 2-3 sheets of the Saracino waferpaper (0.27mm thick). Use scissors to cutfree-hand about 20 tulip shape petals,various sizes, approximately between 5and 8cm long. Take another two sheets ofthe wafer paper and tear free-hand someirregular pieces for a more jagged edgedlook.
STEP 43 Tear some pieces from the goldsheet made from the Saracino Gold Readyto Use Lace Paste and attach with a smallamount of cooled, boiled water to a fewwafer paper sails.
STEP 44 Take the 8in cake and the ediblegold pieces we prepared earlier (madefrom Saracino Gold Ready to Use LacePaste). Use small amount of cooled, boiledwater or edible glue to attach pieces to thecake, starting from bigger pieces at thebase reducing gradually to smallest onescreating the pattern.
STEP 42 Once all the wafer paper sails areready, using cooled, boiled water or waferpaper glue arrange them in clusters. Leavesome single sails for filling the gaps lateron.
STEP 45 Mix a small amount of SaracinoRoyal Icing. Apply royal icing to the 8incake in the place you would like the waferpaper clusters to be. Hold the wafer paperclusters in place for a few seconds to allowto fix. Fill the gaps with single sails andnice pieces of left over edible lace.
filled with free tutorials
interesting interviews
helpful articles
free competition
and much more
MissedMissedMissed
ourourour
previouspreviousprevious
editions?editions?editions?
S A R A C I N O F R E E M O N T H L Y M A G A Z I N E S
W W W . S A R A C I N O D O L C I . C O M
DOWNLOAD
Download them here -

26
E N J O Y Y O U R P R I Z E S
M E E T L A S T M O N T H S W I N N E R S
DebbieFilippopoliti
ClaudiaBratosin
MichaelaRences
from Romaniafrom Greece from Austria
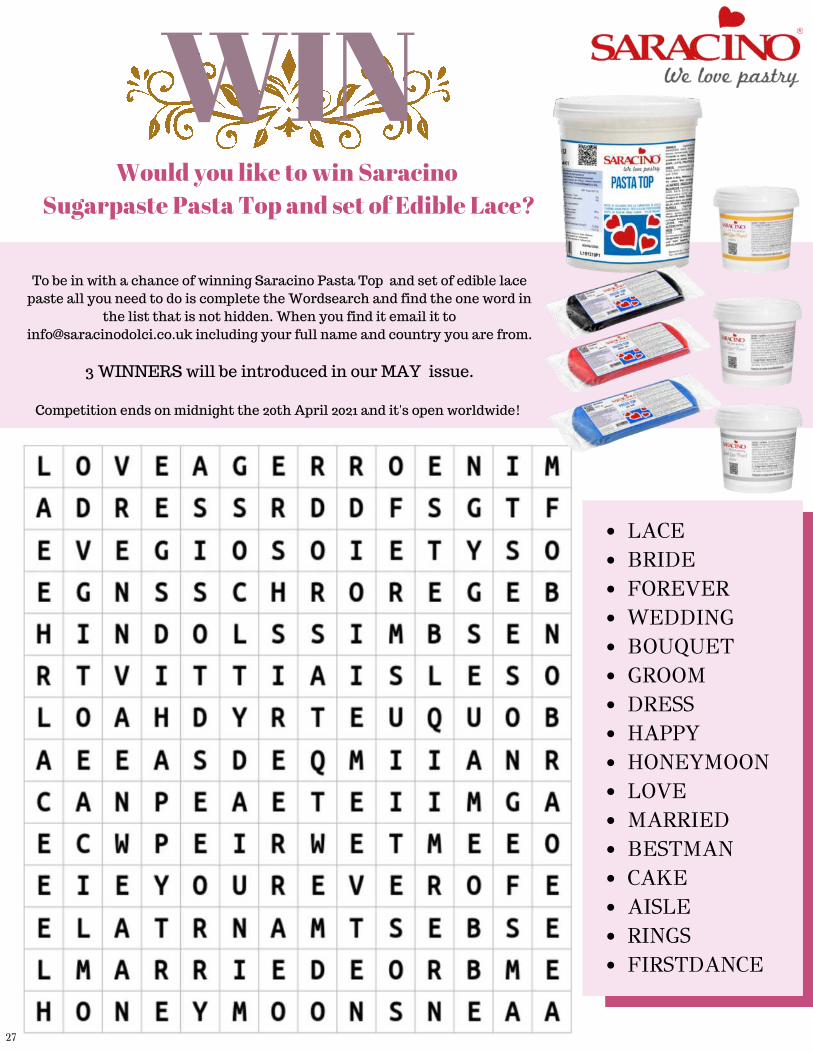
WIN
To be in with a chance of winning Saracino Pasta Top and set of edible lace
paste all you need to do is complete the Wordsearch and find the one word in
the list that is not hidden. When you find it email it to
[email protected] including your full name and country you are from.
3 WINNERS will be introduced in our MAY issue.
Competition ends on midnight the 20th April 2021 and it's open worldwide!
LACEBRIDEFOREVERWEDDINGBOUQUETGROOMDRESSHAPPYHONEYMOONLOVEMARRIEDBESTMANCAKE AISLERINGSFIRSTDANCE
Would you like to win Saracino Sugarpaste Pasta Top and set of Edible Lace?
27
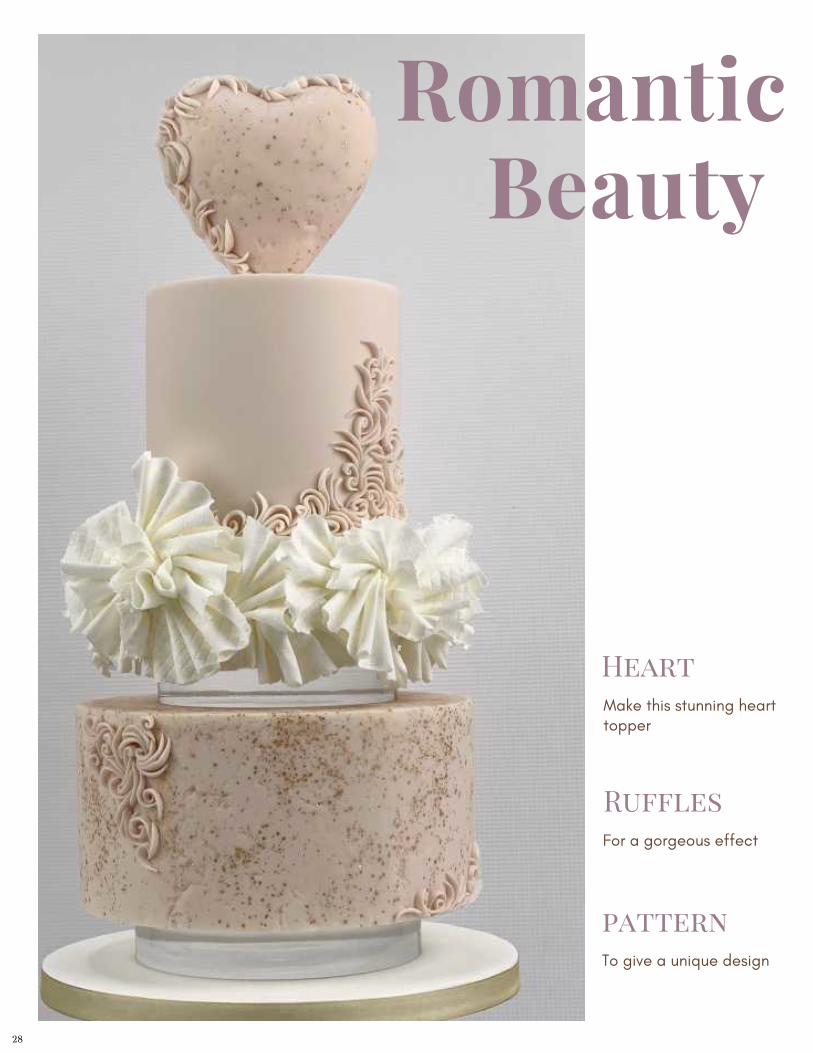
RomanticBeauty
HeartMake this stunning hearttopper
RufflesFor a gorgeous effect
patternTo give a unique design
28
Cakes by Jeanette-Zaneta WasilewskaCake Designer
C A K E D E S I G N E R
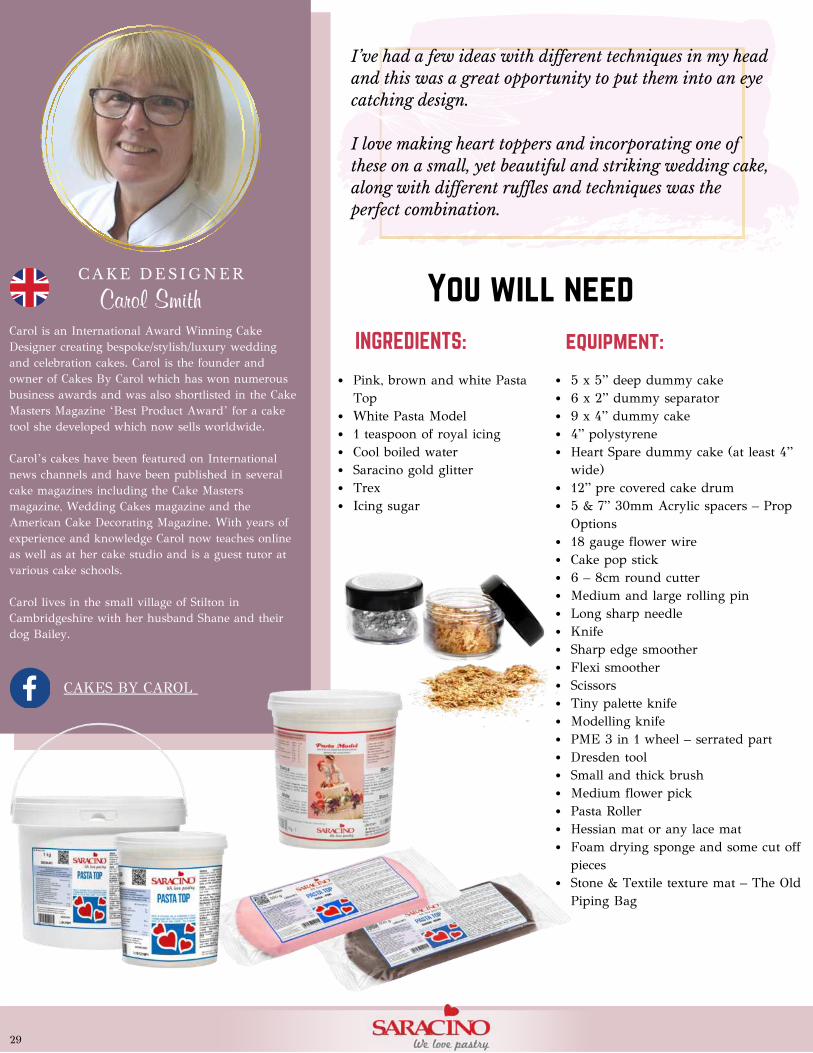
5 x 5” deep dummy cake6 x 2” dummy separator9 x 4” dummy cake4” polystyrene Heart Spare dummy cake (at least 4”wide)12” pre covered cake drum5 & 7” 30mm Acrylic spacers – PropOptions 18 gauge flower wire Cake pop stick6 – 8cm round cutterMedium and large rolling pinLong sharp needle KnifeSharp edge smootherFlexi smootherScissorsTiny palette knifeModelling knifePME 3 in 1 wheel – serrated partDresden toolSmall and thick brushMedium flower pickPasta RollerHessian mat or any lace matFoam drying sponge and some cut offpieces Stone & Textile texture mat – The OldPiping Bag
Carol is an International Award Winning CakeDesigner creating bespoke/stylish/luxury weddingand celebration cakes. Carol is the founder andowner of Cakes By Carol which has won numerousbusiness awards and was also shortlisted in the CakeMasters Magazine ‘Best Product Award’ for a caketool she developed which now sells worldwide.
Carol’s cakes have been featured on Internationalnews channels and have been published in severalcake magazines including the Cake Mastersmagazine, Wedding Cakes magazine and theAmerican Cake Decorating Magazine. With years ofexperience and knowledge Carol now teaches onlineas well as at her cake studio and is a guest tutor atvarious cake schools.
Carol lives in the small village of Stilton inCambridgeshire with her husband Shane and theirdog Bailey.
You will need
Pink, brown and white PastaTop White Pasta Model1 teaspoon of royal icingCool boiled waterSaracino gold glitterTrexIcing sugar
INGREDIENTS: equipment:
Carol Smith
C A K E D E S I G N E R
CAKES BY CAROL
29
I’ve had a few ideas with different techniques in my headand this was a great opportunity to put them into an eyecatching design.
I love making heart toppers and incorporating one ofthese on a small, yet beautiful and striking wedding cake,along with different ruffles and techniques was theperfect combination.
5
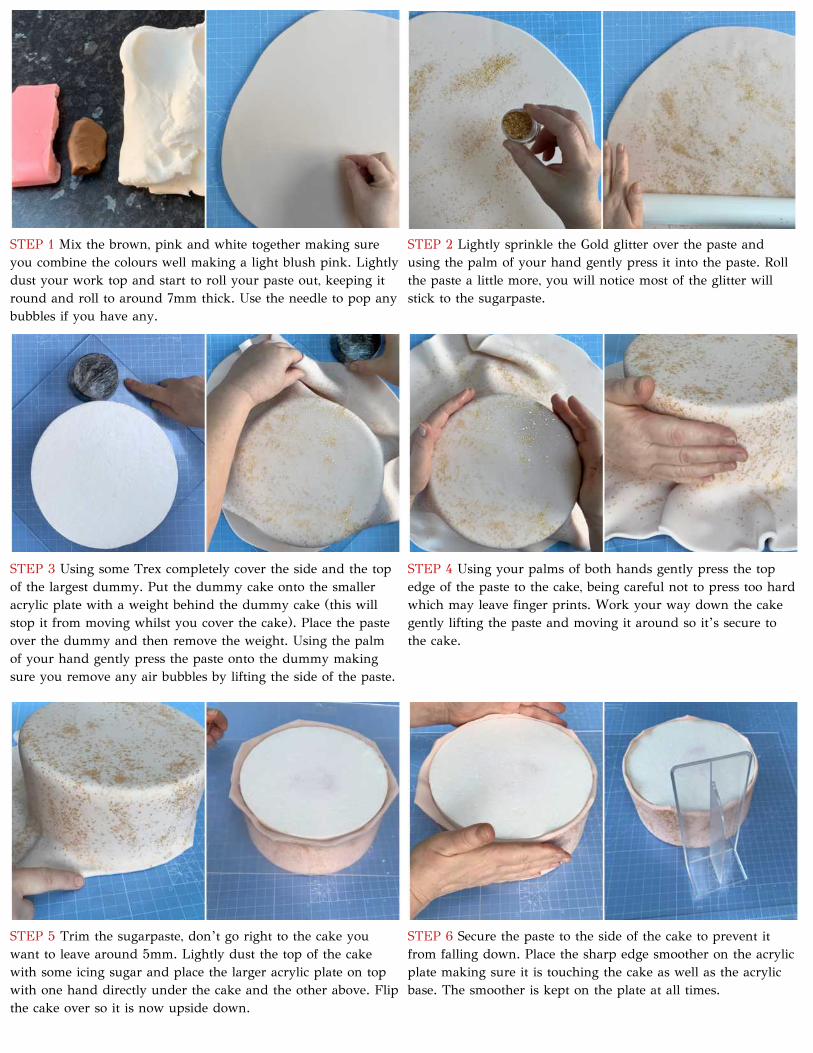
STEP 2 Lightly sprinkle the Gold glitter over the paste andusing the palm of your hand gently press it into the paste. Rollthe paste a little more, you will notice most of the glitter willstick to the sugarpaste.
STEP 4 Using your palms of both hands gently press the topedge of the paste to the cake, being careful not to press too hardwhich may leave finger prints. Work your way down the cakegently lifting the paste and moving it around so it’s secure tothe cake.
STEP 5 Trim the sugarpaste, don’t go right to the cake youwant to leave around 5mm. Lightly dust the top of the cakewith some icing sugar and place the larger acrylic plate on topwith one hand directly under the cake and the other above. Flipthe cake over so it is now upside down.
STEP 6 Secure the paste to the side of the cake to prevent itfrom falling down. Place the sharp edge smoother on the acrylicplate making sure it is touching the cake as well as the acrylicbase. The smoother is kept on the plate at all times.
STEP 1 Mix the brown, pink and white together making sureyou combine the colours well making a light blush pink. Lightlydust your work top and start to roll your paste out, keeping itround and roll to around 7mm thick. Use the needle to pop anybubbles if you have any.
STEP 3 Using some Trex completely cover the side and the topof the largest dummy. Put the dummy cake onto the smalleracrylic plate with a weight behind the dummy cake (this willstop it from moving whilst you cover the cake). Place the pasteover the dummy and then remove the weight. Using the palmof your hand gently press the paste onto the dummy makingsure you remove any air bubbles by lifting the side of the paste.
5
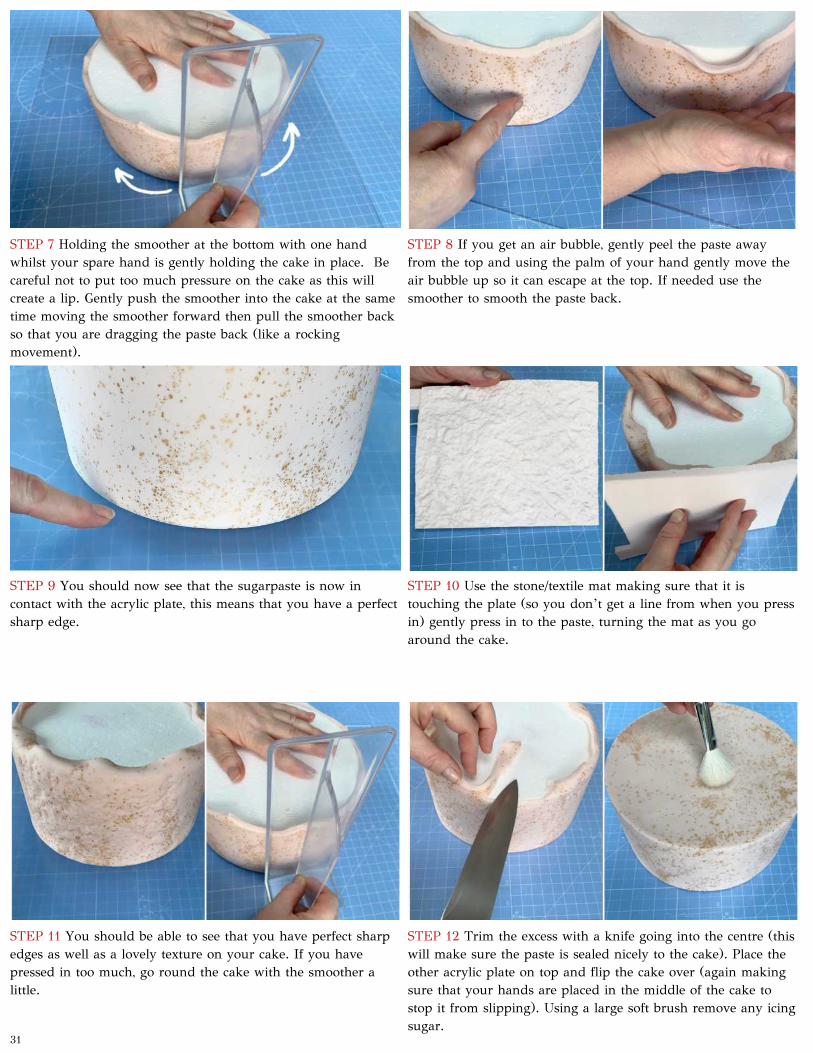
STEP 8 If you get an air bubble, gently peel the paste awayfrom the top and using the palm of your hand gently move theair bubble up so it can escape at the top. If needed use thesmoother to smooth the paste back.
STEP 10 Use the stone/textile mat making sure that it istouching the plate (so you don’t get a line from when you pressin) gently press in to the paste, turning the mat as you goaround the cake.
STEP 11 You should be able to see that you have perfect sharpedges as well as a lovely texture on your cake. If you havepressed in too much, go round the cake with the smoother alittle.
STEP 12 Trim the excess with a knife going into the centre (thiswill make sure the paste is sealed nicely to the cake). Place theother acrylic plate on top and flip the cake over (again makingsure that your hands are placed in the middle of the cake tostop it from slipping). Using a large soft brush remove any icingsugar.
STEP 7 Holding the smoother at the bottom with one handwhilst your spare hand is gently holding the cake in place. Becareful not to put too much pressure on the cake as this willcreate a lip. Gently push the smoother into the cake at the sametime moving the smoother forward then pull the smoother backso that you are dragging the paste back (like a rockingmovement).
STEP 9 You should now see that the sugarpaste is now incontact with the acrylic plate, this means that you have a perfectsharp edge.
31
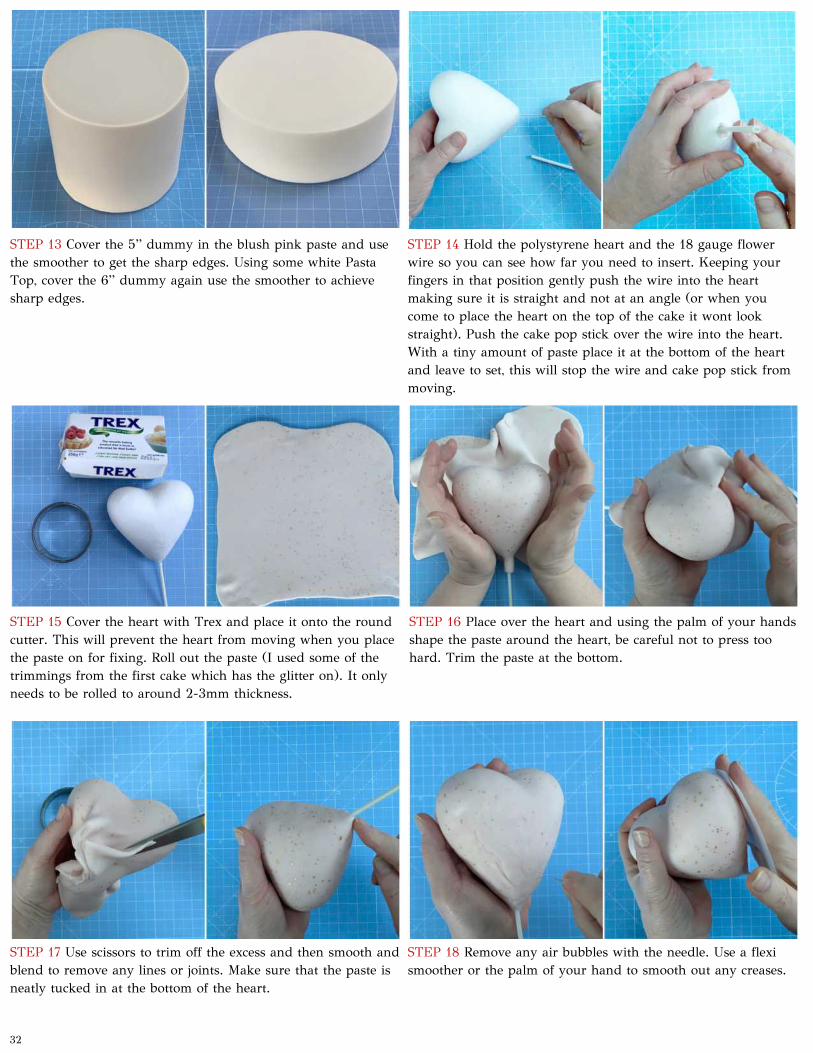
STEP 14 Hold the polystyrene heart and the 18 gauge flowerwire so you can see how far you need to insert. Keeping yourfingers in that position gently push the wire into the heartmaking sure it is straight and not at an angle (or when youcome to place the heart on the top of the cake it wont lookstraight). Push the cake pop stick over the wire into the heart.With a tiny amount of paste place it at the bottom of the heartand leave to set, this will stop the wire and cake pop stick frommoving.
5
STEP 16 Place over the heart and using the palm of your handsshape the paste around the heart, be careful not to press toohard. Trim the paste at the bottom.
STEP 17 Use scissors to trim off the excess and then smooth andblend to remove any lines or joints. Make sure that the paste isneatly tucked in at the bottom of the heart.
STEP 18 Remove any air bubbles with the needle. Use a flexismoother or the palm of your hand to smooth out any creases.
STEP 13 Cover the 5” dummy in the blush pink paste and usethe smoother to get the sharp edges. Using some white PastaTop, cover the 6” dummy again use the smoother to achievesharp edges.
STEP 15 Cover the heart with Trex and place it onto the roundcutter. This will prevent the heart from moving when you placethe paste on for fixing. Roll out the paste (I used some of thetrimmings from the first cake which has the glitter on). It onlyneeds to be rolled to around 2-3mm thickness.
32

5
STEP 20 Mark the centre of the smaller pink tier and push inthe flower pick, making sure its pushed in and not sticking out.Put a little bit of royal icing onto the white cake and place thetop tier on top making sure it is central.
STEP 22 Roll the paste in the palm of your hand making surethat both ends are pointed (not too pointed though). Using theside of your finger to gently flatten one side so that you have aflat side and a wider side. You can make around 15-20 of thesebefore attaching them to the heart.
STEP 23 Brush the top of the heart with some cool boiledwater. The wider part of the paste is placed on to the heart andyou can now start making a scroll pattern, using the tiny paletteknife to curl the paste into position. Gently rolling one end andtucking it in then you can add to your pattern.
STEP 24 Keep applying the pieces of paste making sure thatthey don’t get too big as you want them to look delicate.Continue the pattern across the top of the heart.
STEP 19 With the textile mat gently press into the heart hereand there so it matches the bottom tier of the cake. Place theheart into a spare dummy and leave to dry for 12 – 24hrs.
STEP 21 Roll out some of the blush pink paste into thinsausages (not the trimmings that have the glitter on) and cutinto small pieces.
5
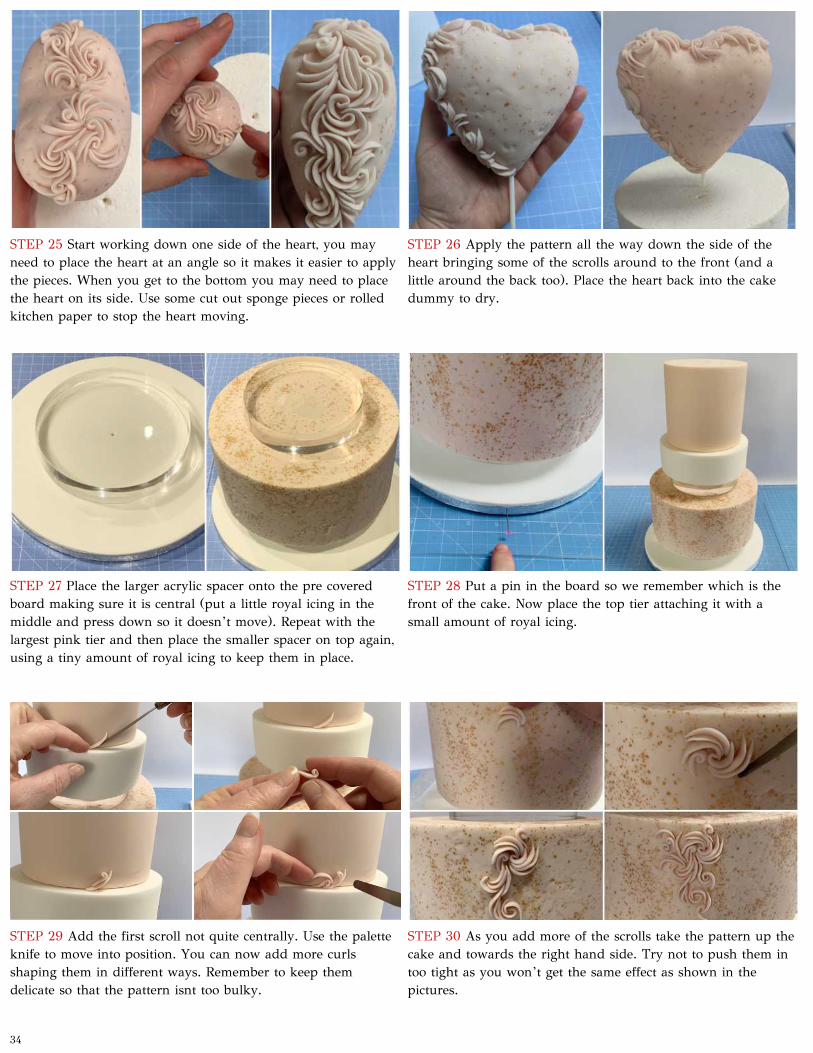
STEP 26 Apply the pattern all the way down the side of theheart bringing some of the scrolls around to the front (and alittle around the back too). Place the heart back into the cakedummy to dry.
STEP 28 Put a pin in the board so we remember which is thefront of the cake. Now place the top tier attaching it with asmall amount of royal icing.
STEP 29 Add the first scroll not quite centrally. Use the paletteknife to move into position. You can now add more curlsshaping them in different ways. Remember to keep themdelicate so that the pattern isnt too bulky.
STEP 30 As you add more of the scrolls take the pattern up thecake and towards the right hand side. Try not to push them intoo tight as you won’t get the same effect as shown in thepictures.
STEP 25 Start working down one side of the heart, you mayneed to place the heart at an angle so it makes it easier to applythe pieces. When you get to the bottom you may need to placethe heart on its side. Use some cut out sponge pieces or rolledkitchen paper to stop the heart moving.
STEP 27 Place the larger acrylic spacer onto the pre coveredboard making sure it is central (put a little royal icing in themiddle and press down so it doesn’t move). Repeat with thelargest pink tier and then place the smaller spacer on top again,using a tiny amount of royal icing to keep them in place.
34
5
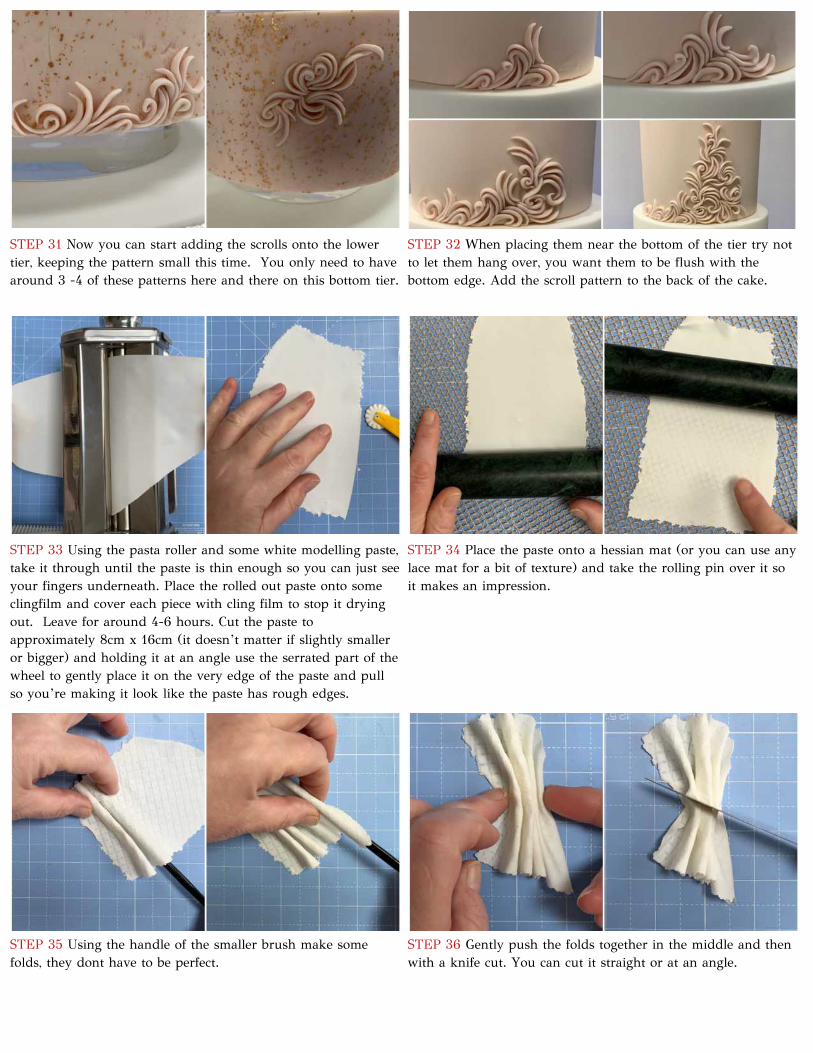
STEP 32 When placing them near the bottom of the tier try notto let them hang over, you want them to be flush with thebottom edge. Add the scroll pattern to the back of the cake.
STEP 34 Place the paste onto a hessian mat (or you can use anylace mat for a bit of texture) and take the rolling pin over it soit makes an impression.
STEP 35 Using the handle of the smaller brush make somefolds, they dont have to be perfect.
STEP 36 Gently push the folds together in the middle and thenwith a knife cut. You can cut it straight or at an angle.
STEP 31 Now you can start adding the scrolls onto the lowertier, keeping the pattern small this time. You only need to havearound 3 -4 of these patterns here and there on this bottom tier.
STEP 33 Using the pasta roller and some white modelling paste,take it through until the paste is thin enough so you can just seeyour fingers underneath. Place the rolled out paste onto someclingfilm and cover each piece with cling film to stop it dryingout. Leave for around 4-6 hours. Cut the paste toapproximately 8cm x 16cm (it doesn’t matter if slightly smalleror bigger) and holding it at an angle use the serrated part of thewheel to gently place it on the very edge of the paste and pullso you’re making it look like the paste has rough edges.
5
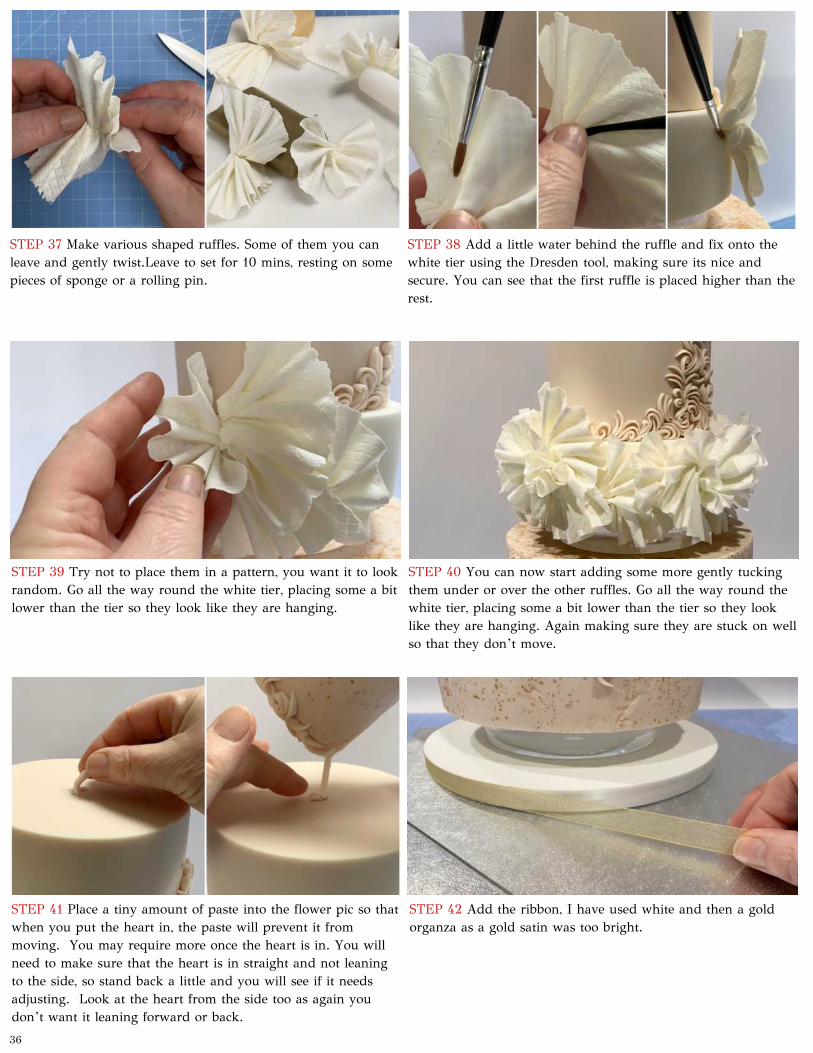
STEP 38 Add a little water behind the ruffle and fix onto thewhite tier using the Dresden tool, making sure its nice andsecure. You can see that the first ruffle is placed higher than therest.
STEP 39 Try not to place them in a pattern, you want it to lookrandom. Go all the way round the white tier, placing some a bitlower than the tier so they look like they are hanging.
STEP 41 Place a tiny amount of paste into the flower pic so thatwhen you put the heart in, the paste will prevent it frommoving. You may require more once the heart is in. You willneed to make sure that the heart is in straight and not leaningto the side, so stand back a little and you will see if it needsadjusting. Look at the heart from the side too as again youdon’t want it leaning forward or back.
STEP 42 Add the ribbon, I have used white and then a goldorganza as a gold satin was too bright.
STEP 37 Make various shaped ruffles. Some of them you canleave and gently twist.Leave to set for 10 mins, resting on somepieces of sponge or a rolling pin.
STEP 40 You can now start adding some more gently tuckingthem under or over the other ruffles. Go all the way round thewhite tier, placing some a bit lower than the tier so they looklike they are hanging. Again making sure they are stuck on wellso that they don’t move.
36
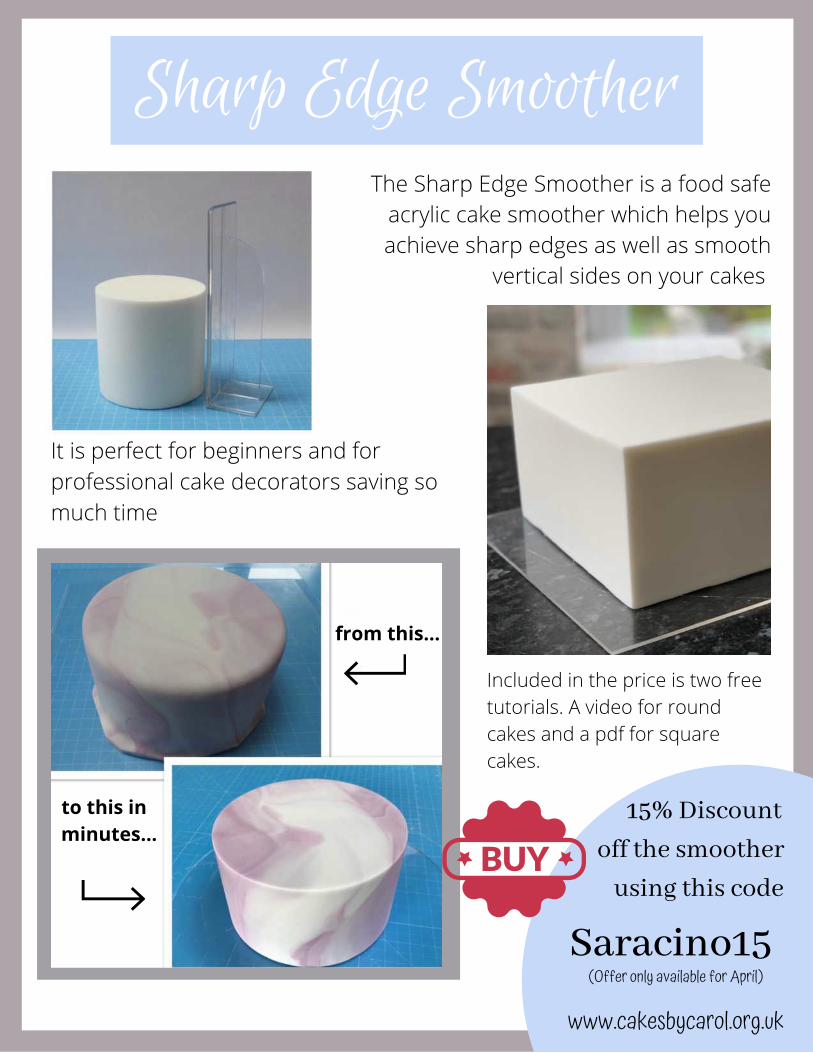
The Sharp Edge Smoother is a food safeacrylic cake smoother which helps youachieve sharp edges as well as smooth
vertical sides on your cakes
Sharp Edge Smoother
15% Discountoff the smoother using this code
It is perfect for beginners and forprofessional cake decorators saving somuch time
Included in the price is two free tutorials. A video for round cakes and a pdf for square cakes.
Saracino15
www.cakesbycarol.org.uk
from this...
to this in minutes...
(Offer only available for April)
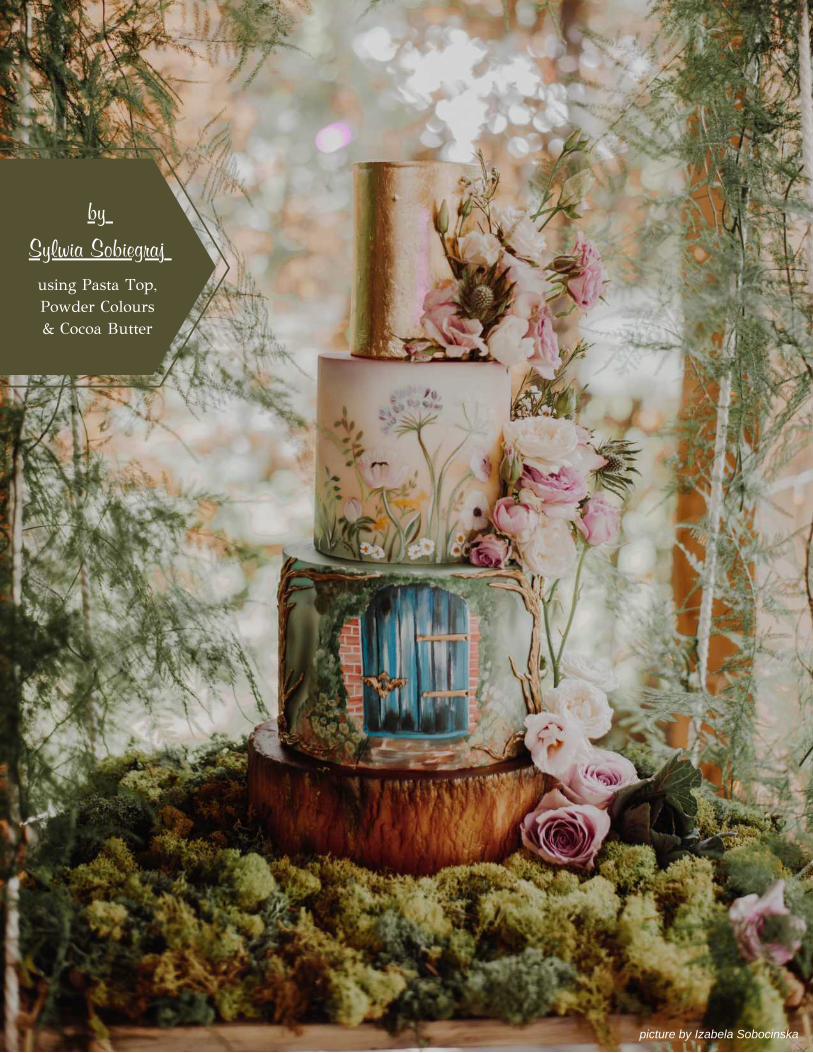
by
Sylwia Sobiegraj
using Pasta Top, Powder Colours & Cocoa Butter
picture by Izabela Sobocinska
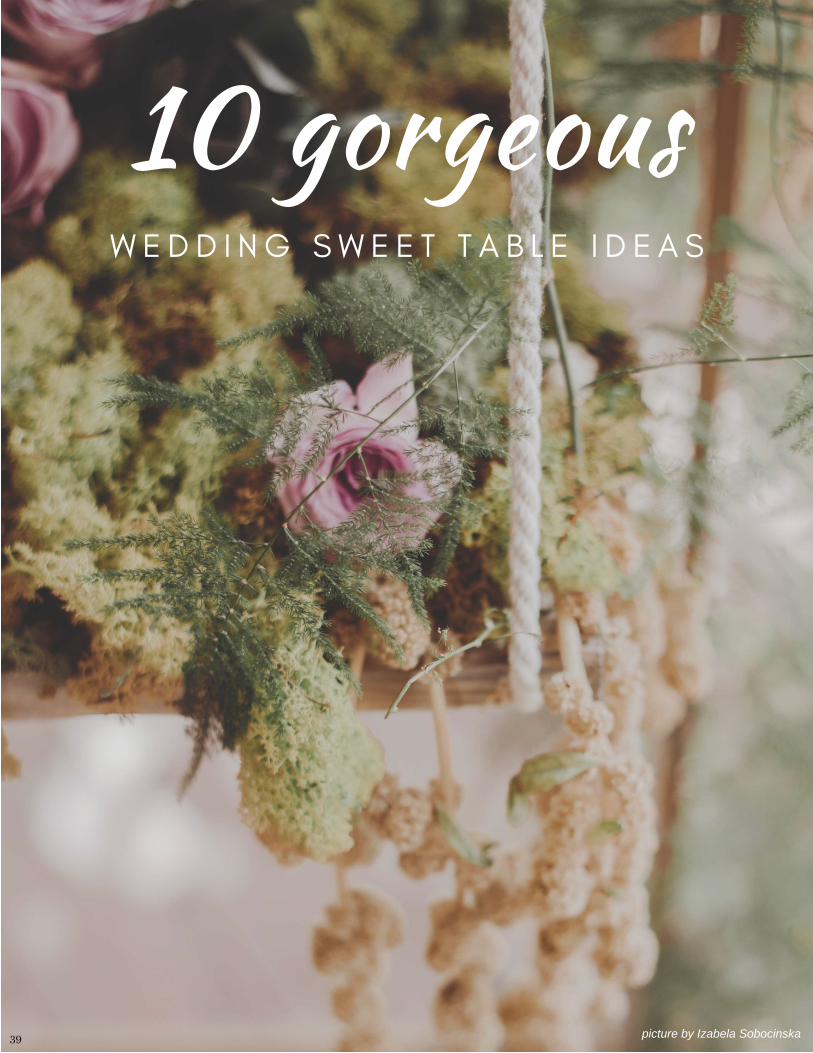
10 gorgeousW E D D I N G S W E E T T A B L E I D E A S
picture by Izabela Sobocinska39
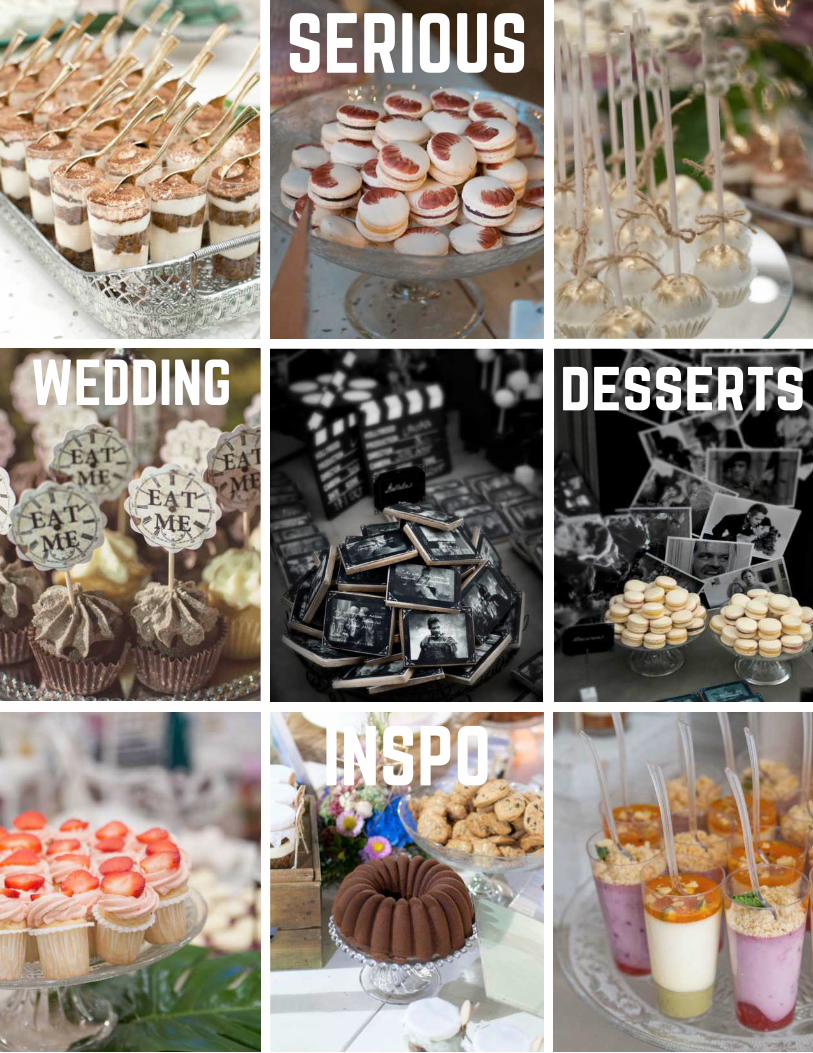
SERIOUS
dessertsWEDDING
INSPO
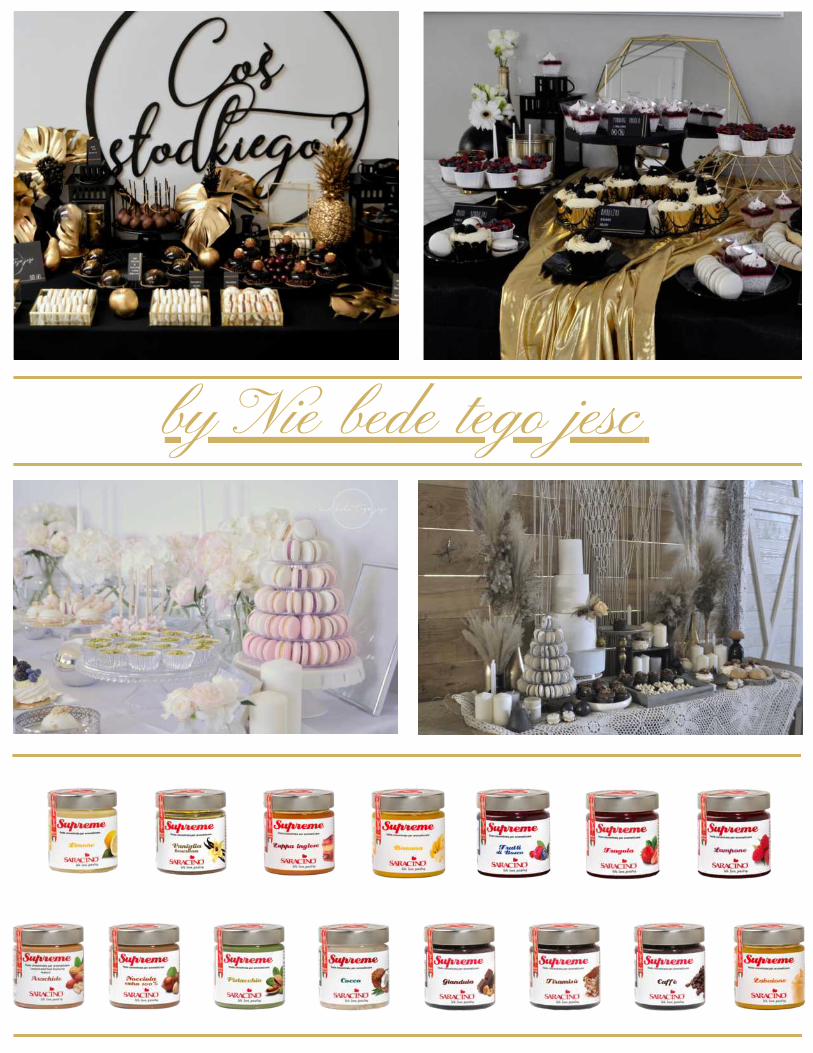
by Nie bede tego jesc

yummy
dessertsWEDDING
INSPO
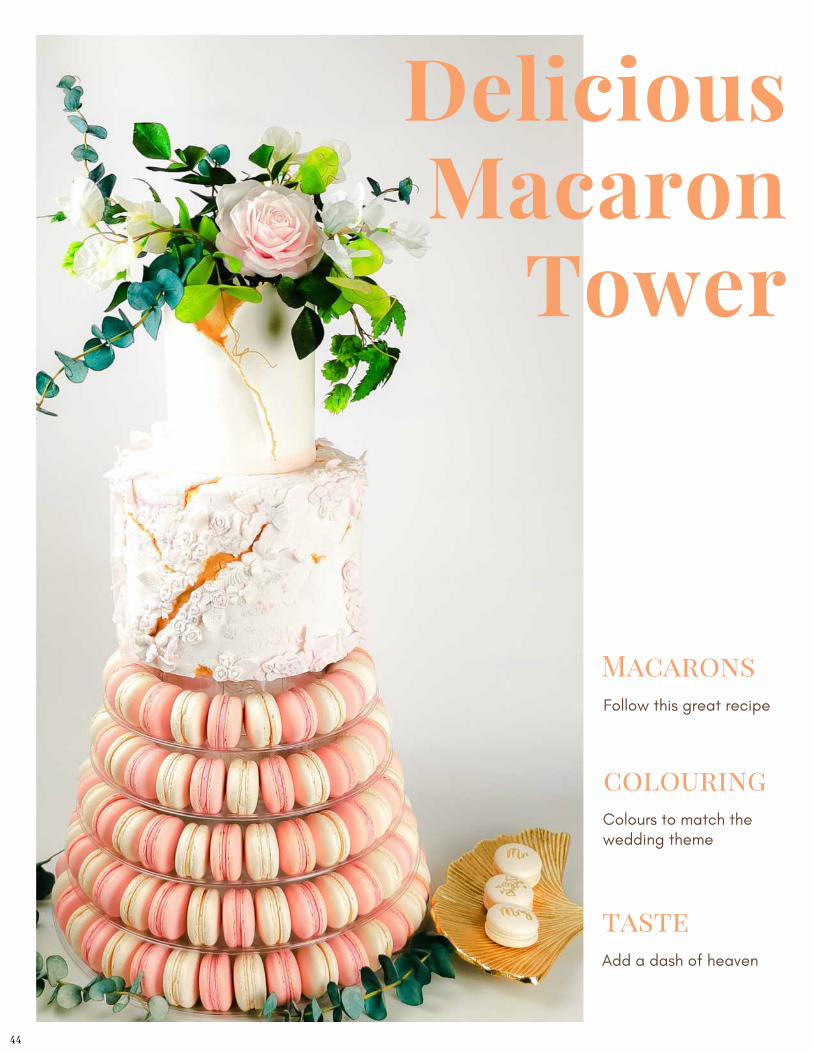
DeliciousMacaron
Tower
MacaronsFollow this great recipe
colouring Colours to match thewedding theme
tasteAdd a dash of heaven
44
Cakes by Jeanette-Zaneta WasilewskaCake Designer
C A K E D E S I G N E R
You will need
INGREDIENTS:
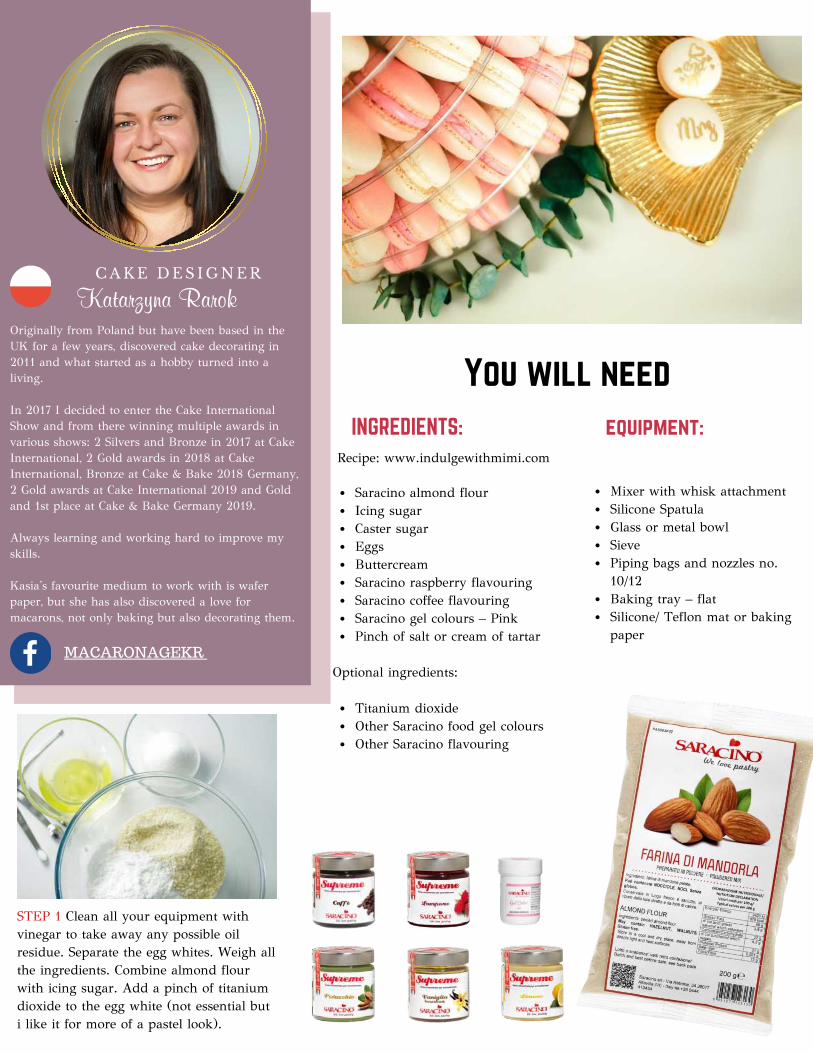
Saracino almond flourIcing sugarCaster sugarEggsButtercreamSaracino raspberry flavouringSaracino coffee flavouring Saracino gel colours – Pink Pinch of salt or cream of tartar
Titanium dioxideOther Saracino food gel coloursOther Saracino flavouring
Optional ingredients:
Mixer with whisk attachmentSilicone SpatulaGlass or metal bowlSievePiping bags and nozzles no.10/12 Baking tray – flatSilicone/ Teflon mat or bakingpaper
equipment:
Originally from Poland but have been based in theUK for a few years, discovered cake decorating in2011 and what started as a hobby turned into aliving.
In 2017 I decided to enter the Cake InternationalShow and from there winning multiple awards invarious shows: 2 Silvers and Bronze in 2017 at CakeInternational, 2 Gold awards in 2018 at CakeInternational, Bronze at Cake & Bake 2018 Germany,2 Gold awards at Cake International 2019 and Goldand 1st place at Cake & Bake Germany 2019.
Always learning and working hard to improve myskills.
Kasia's favourite medium to work with is waferpaper, but she has also discovered a love formacarons, not only baking but also decorating them.
Katarzyna RarokC A K E D E S I G N E R
STEP 1 Clean all your equipment withvinegar to take away any possible oilresidue. Separate the egg whites. Weigh allthe ingredients. Combine almond flourwith icing sugar. Add a pinch of titaniumdioxide to the egg white (not essential buti like it for more of a pastel look).
MACARONAGEKR
Recipe: www.indulgewithmimi.com
5
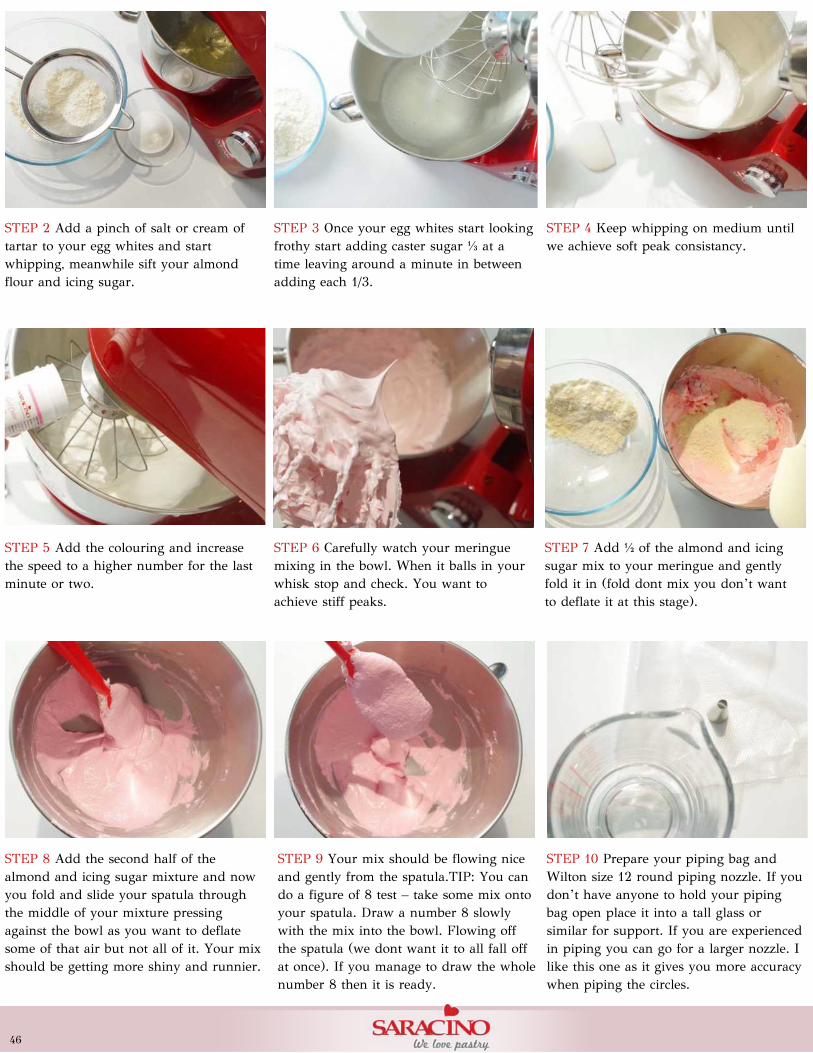
STEP 3 Once your egg whites start lookingfrothy start adding caster sugar ⁄ at atime leaving around a minute in betweenadding each 1/3.
STEP 5 Add the colouring and increasethe speed to a higher number for the lastminute or two.
STEP 6 Carefully watch your meringuemixing in the bowl. When it balls in yourwhisk stop and check. You want toachieve stiff peaks.
STEP 7 Add ⁄ of the almond and icingsugar mix to your meringue and gentlyfold it in (fold dont mix you don’t wantto deflate it at this stage).
STEP 2 Add a pinch of salt or cream oftartar to your egg whites and startwhipping, meanwhile sift your almondflour and icing sugar.
STEP 8 Add the second half of thealmond and icing sugar mixture and nowyou fold and slide your spatula throughthe middle of your mixture pressingagainst the bowl as you want to deflatesome of that air but not all of it. Your mixshould be getting more shiny and runnier.
STEP 10 Prepare your piping bag andWilton size 12 round piping nozzle. If youdon’t have anyone to hold your pipingbag open place it into a tall glass orsimilar for support. If you are experiencedin piping you can go for a larger nozzle. Ilike this one as it gives you more accuracywhen piping the circles.
STEP 9 Your mix should be flowing niceand gently from the spatula.TIP: You cando a figure of 8 test – take some mix ontoyour spatula. Draw a number 8 slowlywith the mix into the bowl. Flowing offthe spatula (we dont want it to all fall offat once). If you manage to draw the wholenumber 8 then it is ready.
STEP 4 Keep whipping on medium untilwe achieve soft peak consistancy.
46

5
STEP 12 Your silicon mat is to be on yourbaking tray. Tap your tray on the counterseveral times to pop any air bubbles.
STEP 14 Before removing them from theoven gently nudge one of the macarons tocheck if it’s ready to come out. If it stillwiggles, give it another minute or two.Remove from the oven and let them coolcompletely before removing the mat.Remember to peel the mat from themacaron not the other way round.
STEP 15 Now the macarons are ready, it’stime to fill them up with a flavour of yourchoice. You will need your favouritebuttercream mix and Saracino naturalfood flavouring. For this tower I haveused a raspberry buttercream and a coffeebuttercream. I find it easier to pair thecircles before piping with one facing upand one facing down.
STEP 16 For this tower I used 250gbuttercream and 50g of Saracinoraspberry flavouring. I find the coffeeflavouring stronger so to another 250g ofbuttercream I only use 30g of theflavouring (this is to personal taste). Mixtogether and transfer to a piping bag withnozzle no. 10/12 (it is not necessary topipe but this does give a cleaner andmore professional look). I like to addsomething to the centre so I haveraspberry jam in another piping bag.
STEP 11 Add the mixture to the pipingbag and start piping. Keep your bagvertical to the mat. Gently squeeze to themiddle of the circle and don’t move thebag around as the batter will spread itself.When it reaches the circle line on the matstop squeezing. Flick the nozzle tip or do aquick small rotation. Do not pull directlyupwards as this will leave a little bump inthe middle.
STEP 17 If you adding the jam in thecentre, pipe a circle of buttercream amillimeter or two from the edge and addthe jam in the middle. If you are not usingthe jam just pipe the buttercream in thecentre of your macaron.
STEP 19 Sandwich the halves of yourmacarons together Place them in the fridgefor 24h. You are then ready to arrangeand enjoy.
STEP 18 Repeat step 17 for all of yourcolours and flavours if you have adifferent ones. This one is caffe latte –vanilla buttercream with coffeebuttercream centre.
STEP 13 The surface should be prettysmooth after step 12 but it will get evensmoother after resting. Preheat the oven to150c and leave your tray for about 30 to45 min (depending on the humidity thismaybe longer). We want the macarons toform a skin. Check after 30 minutes andadd time as necessary. To check if they areready to bake gently touch the top of themacaron, if it’s not sticky to the touch it isready to go into the oven. Add for 20minutes turning the tray halfway throughthe baking process.

by D
i Pas
cale
Pin
a
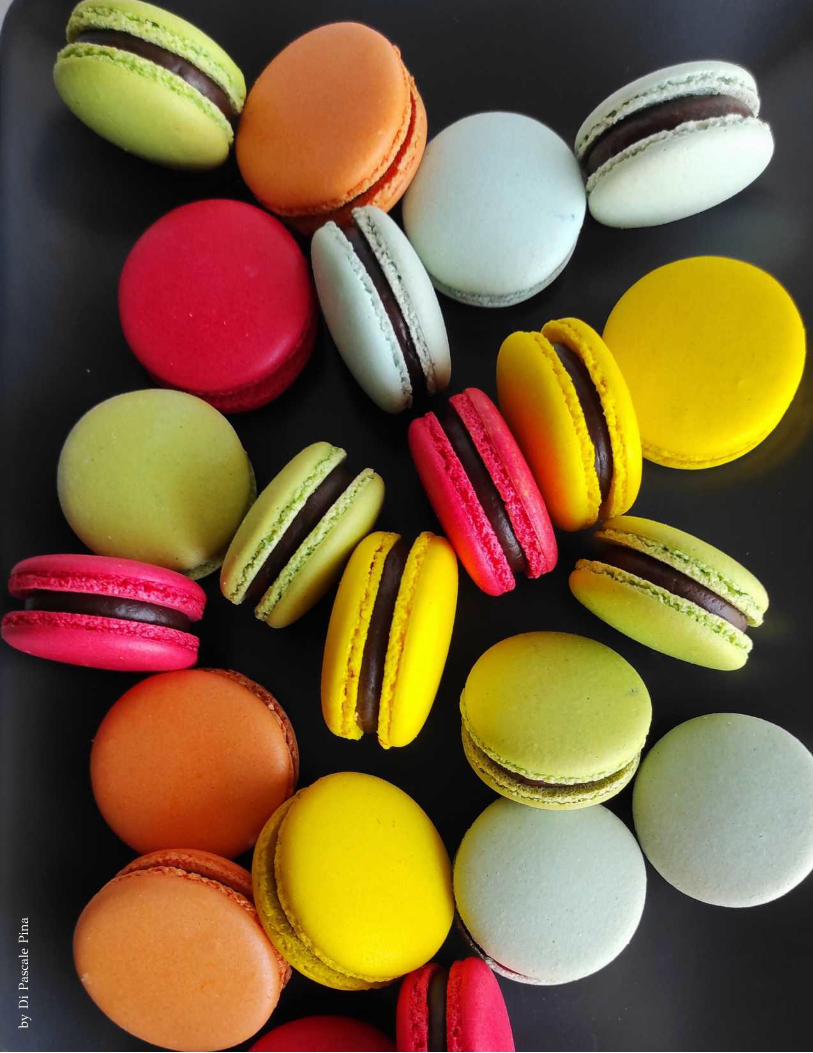
Saracino Almond Flour perfect forMacarons
by D
i Pas
cale
Pin
a
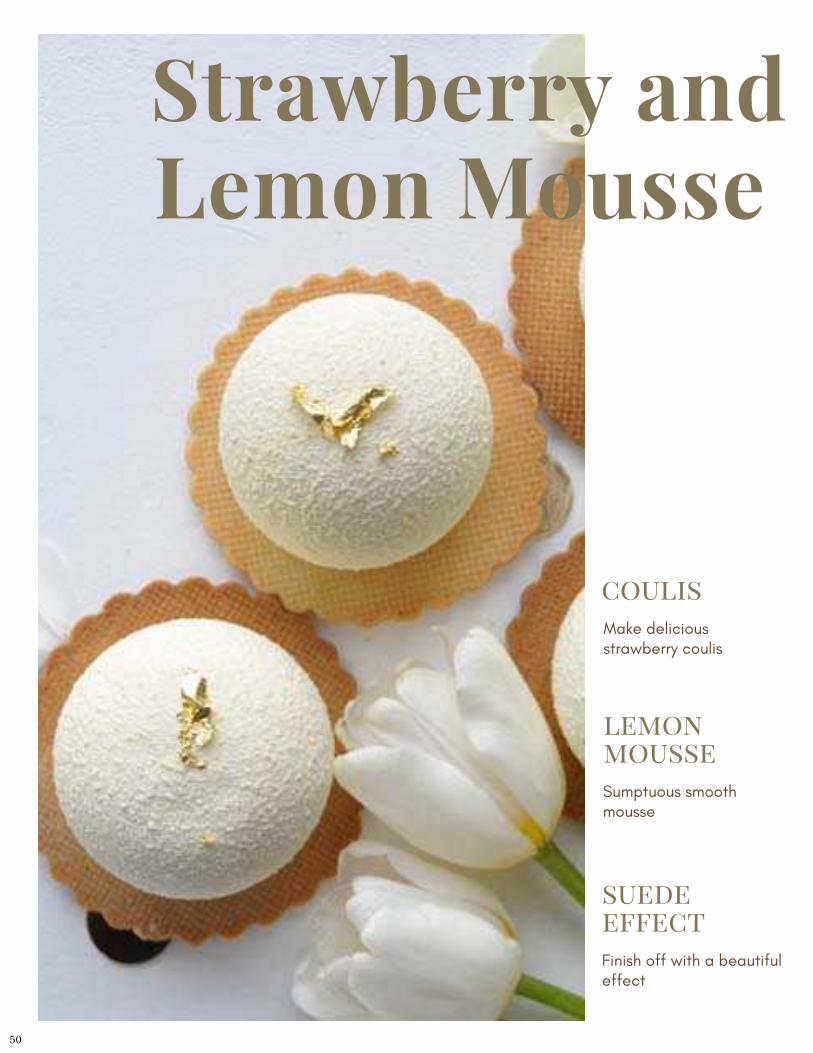
Strawberry andLemon Mousse
coulisMake deliciousstrawberry coulis
lemonmousseSumptuous smoothmousse
suedeeffectFinish off with a beautifuleffect
50
Cakes by Jeanette-Zaneta WasilewskaCake Designer
C A K E D E S I G N E R
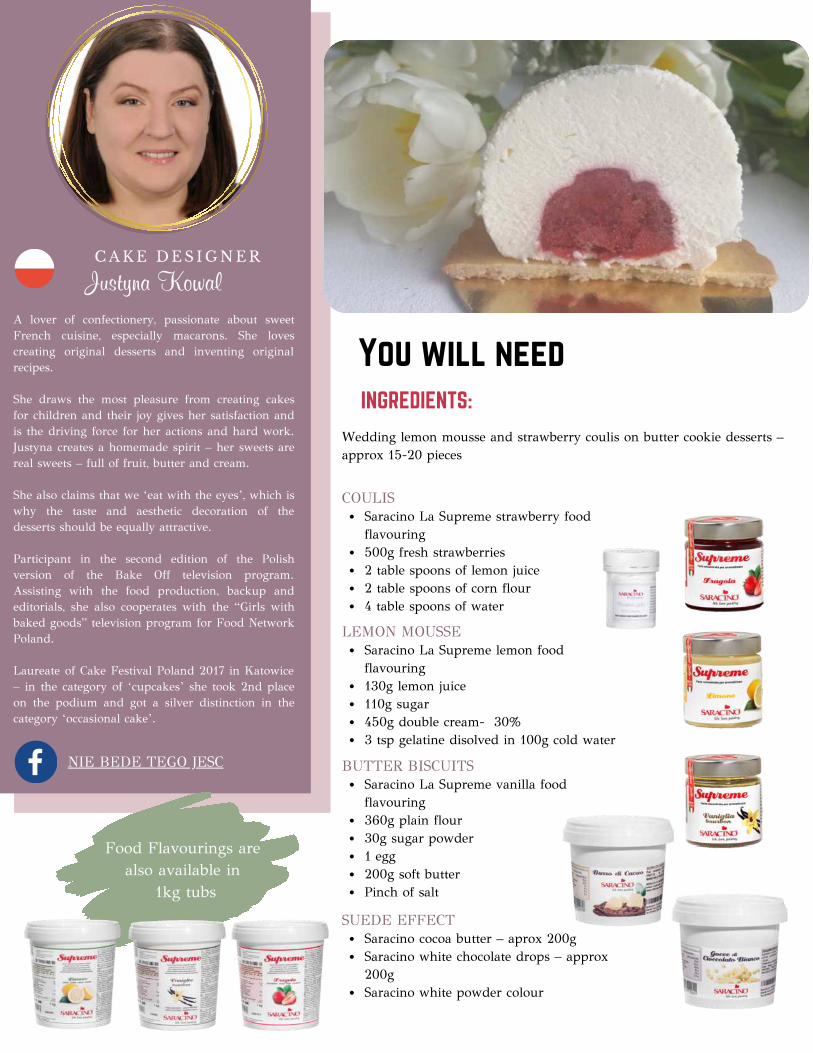
A lover of confectionery, passionate about sweetFrench cuisine, especially macarons. She lovescreating original desserts and inventing originalrecipes.
She draws the most pleasure from creating cakesfor children and their joy gives her satisfaction andis the driving force for her actions and hard work.Justyna creates a homemade spirit – her sweets arereal sweets – full of fruit, butter and cream.
She also claims that we ‘eat with the eyes’, which iswhy the taste and aesthetic decoration of thedesserts should be equally attractive.
Participant in the second edition of the Polishversion of the Bake Off television program.Assisting with the food production, backup andeditorials, she also cooperates with the “Girls withbaked goods” television program for Food NetworkPoland.
Laureate of Cake Festival Poland 2017 in Katowice– in the category of ‘cupcakes’ she took 2nd placeon the podium and got a silver distinction in thecategory ‘occasional cake’.
NIE BEDE TEGO JESC
You will need
INGREDIENTS:
Justyna Kowal C A K E D E S I G N E R
Wedding lemon mousse and strawberry coulis on butter cookie desserts –approx 15-20 pieces
Saracino La Supreme strawberry foodflavouring500g fresh strawberries2 table spoons of lemon juice2 table spoons of corn flour4 table spoons of water
COULIS
Saracino La Supreme lemon foodflavouring130g lemon juice110g sugar450g double cream- 30%3 tsp gelatine disolved in 100g cold water
LEMON MOUSSE
Saracino La Supreme vanilla foodflavouring360g plain flour30g sugar powder1 egg200g soft butterPinch of salt
BUTTER BISCUITS
Saracino cocoa butter – aprox 200gSaracino white chocolate drops – approx200gSaracino white powder colour
SUEDE EFFECT
Food Flavourings are also available in
1kg tubs
5
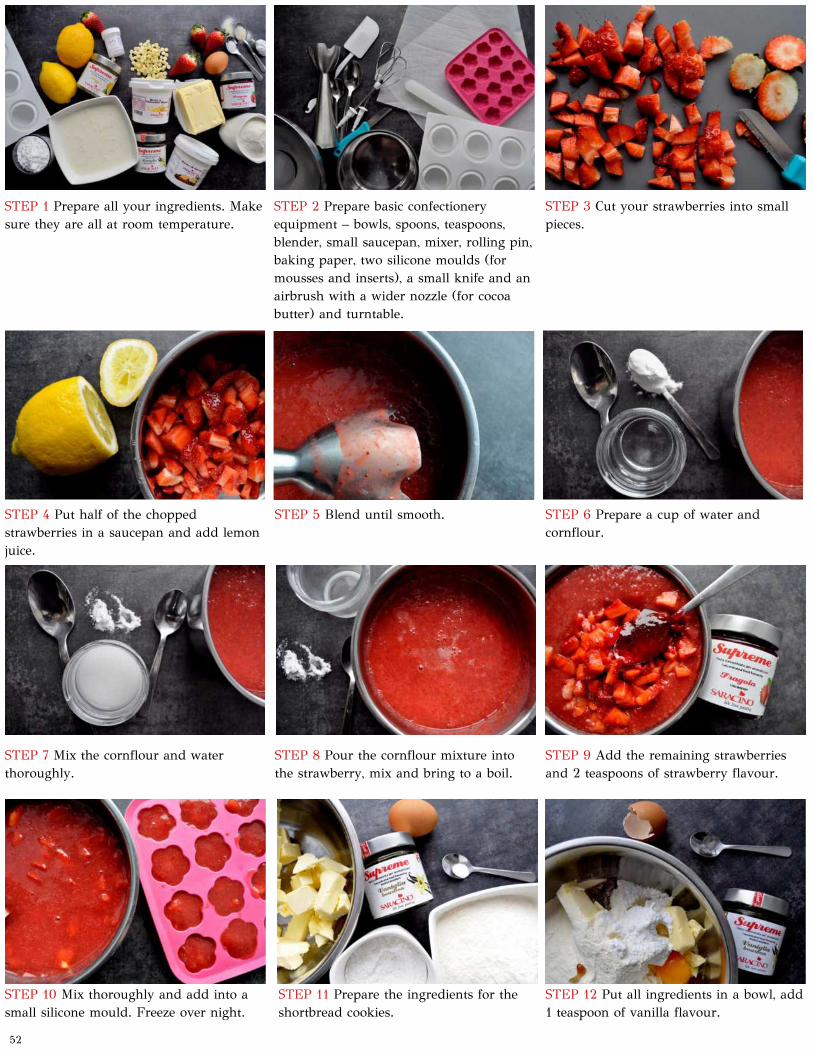
STEP 1 Prepare all your ingredients. Makesure they are all at room temperature.
STEP 2 Prepare basic confectioneryequipment – bowls, spoons, teaspoons,blender, small saucepan, mixer, rolling pin,baking paper, two silicone moulds (formousses and inserts), a small knife and anairbrush with a wider nozzle (for cocoabutter) and turntable.
STEP 3 Cut your strawberries into smallpieces.
STEP 4 Put half of the choppedstrawberries in a saucepan and add lemonjuice.
STEP 6 Prepare a cup of water andcornflour.
STEP 5 Blend until smooth.
STEP 7 Mix the cornflour and waterthoroughly.
STEP 8 Pour the cornflour mixture intothe strawberry, mix and bring to a boil.
STEP 9 Add the remaining strawberriesand 2 teaspoons of strawberry flavour.
STEP 10 Mix thoroughly and add into asmall silicone mould. Freeze over night.
STEP 11 Prepare the ingredients for theshortbread cookies.
STEP 12 Put all ingredients in a bowl, add1 teaspoon of vanilla flavour.
52
5
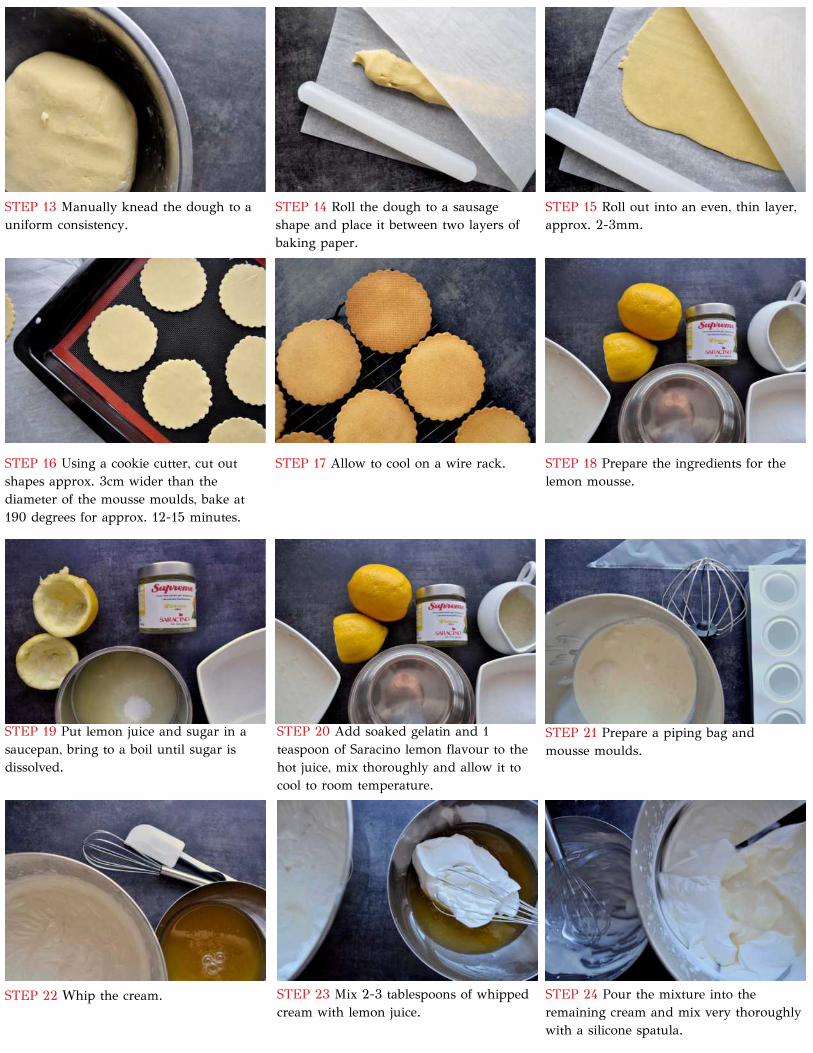
STEP 13 Manually knead the dough to auniform consistency.
STEP 14 Roll the dough to a sausageshape and place it between two layers ofbaking paper.
STEP 15 Roll out into an even, thin layer,approx. 2-3mm.
STEP 16 Using a cookie cutter, cut outshapes approx. 3cm wider than thediameter of the mousse moulds, bake at190 degrees for approx. 12-15 minutes.
STEP 18 Prepare the ingredients for thelemon mousse.
STEP 17 Allow to cool on a wire rack.
STEP 19 Put lemon juice and sugar in asaucepan, bring to a boil until sugar isdissolved.
STEP 20 Add soaked gelatin and 1teaspoon of Saracino lemon flavour to thehot juice, mix thoroughly and allow it tocool to room temperature.
STEP 21 Prepare a piping bag andmousse moulds.
STEP 22 Whip the cream. STEP 23 Mix 2-3 tablespoons of whippedcream with lemon juice.
STEP 24 Pour the mixture into theremaining cream and mix very thoroughlywith a silicone spatula.
5
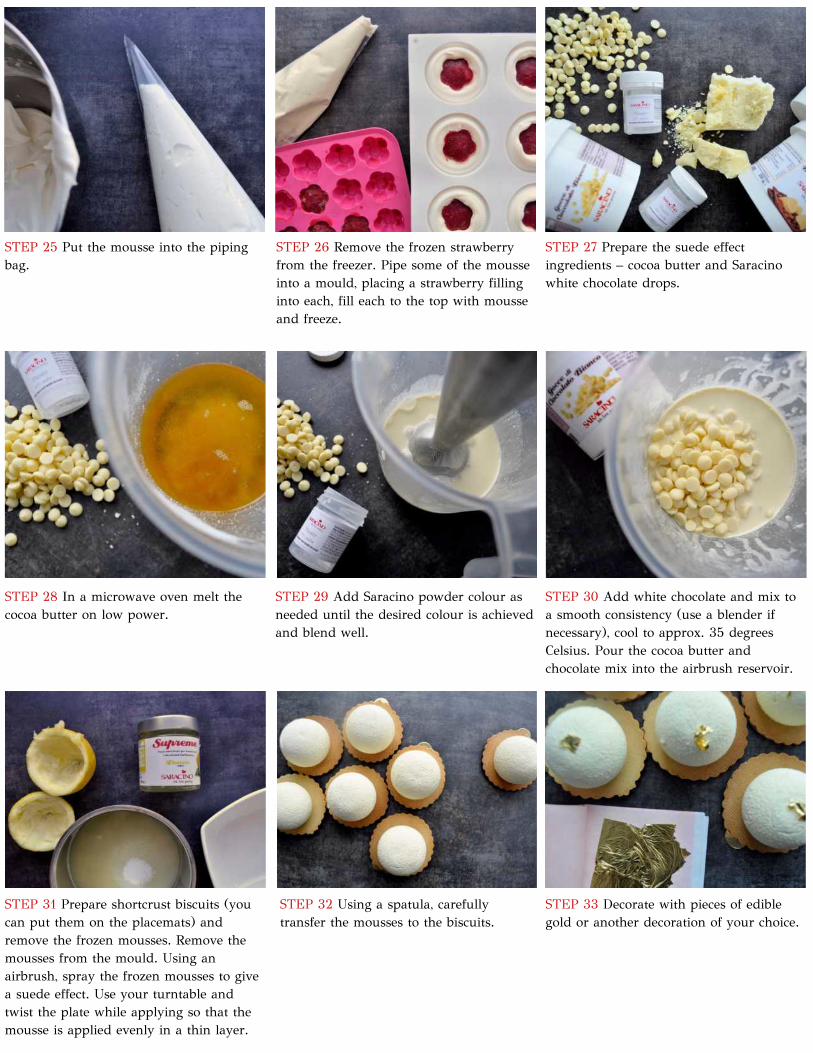
STEP 25 Put the mousse into the pipingbag.
STEP 26 Remove the frozen strawberryfrom the freezer. Pipe some of the mousseinto a mould, placing a strawberry fillinginto each, fill each to the top with mousseand freeze.
STEP 27 Prepare the suede effectingredients – cocoa butter and Saracinowhite chocolate drops.
STEP 28 In a microwave oven melt thecocoa butter on low power.
STEP 30 Add white chocolate and mix toa smooth consistency (use a blender ifnecessary), cool to approx. 35 degreesCelsius. Pour the cocoa butter andchocolate mix into the airbrush reservoir.
STEP 29 Add Saracino powder colour asneeded until the desired colour is achievedand blend well.
STEP 31 Prepare shortcrust biscuits (youcan put them on the placemats) andremove the frozen mousses. Remove themousses from the mould. Using anairbrush, spray the frozen mousses to givea suede effect. Use your turntable andtwist the plate while applying so that themousse is applied evenly in a thin layer.
STEP 32 Using a spatula, carefullytransfer the mousses to the biscuits.
STEP 33 Decorate with pieces of ediblegold or another decoration of your choice.
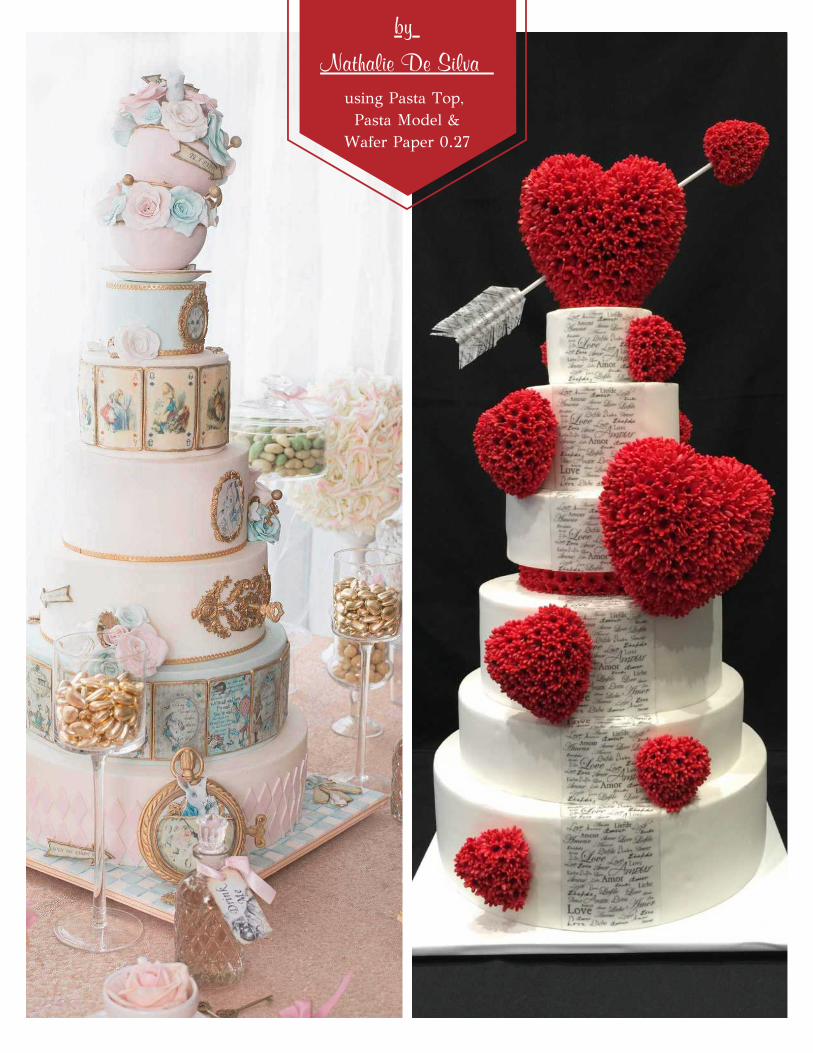
by
Nathalie De Silva using Pasta Top, Pasta Model &
Wafer Paper 0.27
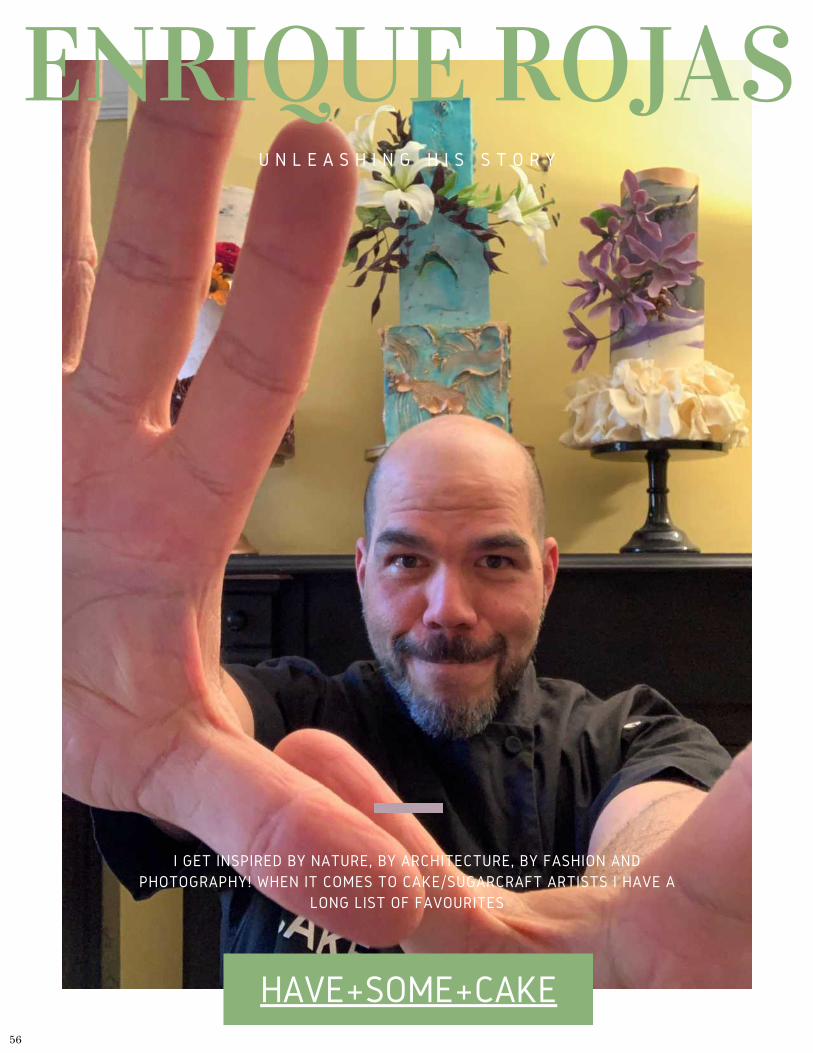
ENRIQUE ROJASU N L E A S H I N G H I S S T O R Y
HAVE+SOME+CAKE
I GET INSPIRED BY NATURE, BY ARCHITECTURE, BY FASHION ANDPHOTOGRAPHY! WHEN IT COMES TO CAKE/SUGARCRAFT ARTISTS I HAVE A
LONG LIST OF FAVOURITES
56
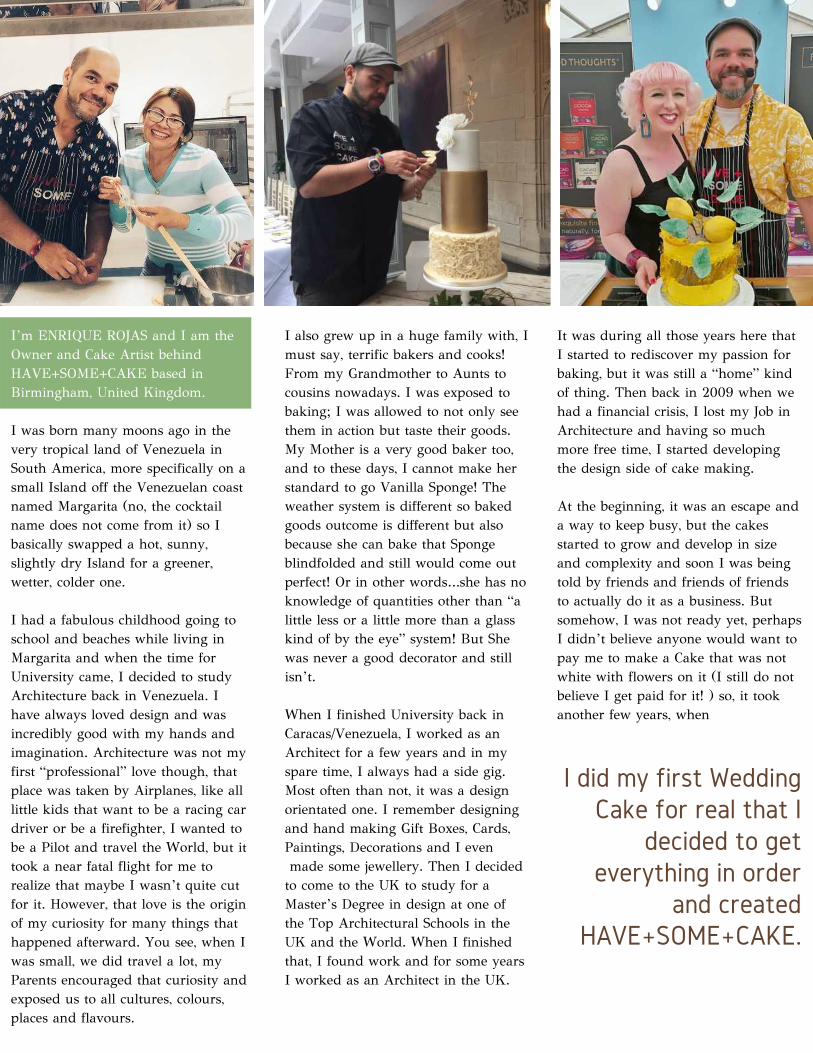
I’m ENRIQUE ROJAS and I am theOwner and Cake Artist behindHAVE+SOME+CAKE based inBirmingham, United Kingdom.
I was born many moons ago in thevery tropical land of Venezuela inSouth America, more specifically on asmall Island off the Venezuelan coastnamed Margarita (no, the cocktailname does not come from it) so Ibasically swapped a hot, sunny,slightly dry Island for a greener,wetter, colder one.
I had a fabulous childhood going toschool and beaches while living inMargarita and when the time forUniversity came, I decided to studyArchitecture back in Venezuela. Ihave always loved design and wasincredibly good with my hands andimagination. Architecture was not myfirst “professional” love though, thatplace was taken by Airplanes, like alllittle kids that want to be a racing car driver or be a firefighter, I wanted tobe a Pilot and travel the World, but ittook a near fatal flight for me torealize that maybe I wasn’t quite cutfor it. However, that love is the originof my curiosity for many things thathappened afterward. You see, when Iwas small, we did travel a lot, myParents encouraged that curiosity andexposed us to all cultures, colours,places and flavours.
I also grew up in a huge family with, Imust say, terrific bakers and cooks!From my Grandmother to Aunts tocousins nowadays. I was exposed tobaking; I was allowed to not only seethem in action but taste their goods.My Mother is a very good baker too,and to these days, I cannot make herstandard to go Vanilla Sponge! Theweather system is different so bakedgoods outcome is different but alsobecause she can bake that Spongeblindfolded and still would come outperfect! Or in other words…she has noknowledge of quantities other than “alittle less or a little more than a glasskind of by the eye” system! But Shewas never a good decorator and stillisn’t.
When I finished University back inCaracas/Venezuela, I worked as anArchitect for a few years and in myspare time, I always had a side gig.Most often than not, it was a designorientated one. I remember designingand hand making Gift Boxes, Cards,Paintings, Decorations and I even made some jewellery. Then I decidedto come to the UK to study for aMaster’s Degree in design at one ofthe Top Architectural Schools in theUK and the World. When I finishedthat, I found work and for some yearsI worked as an Architect in the UK.
I did my first WeddingCake for real that I
decided to geteverything in order
and createdHAVE+SOME+CAKE.
It was during all those years here thatI started to rediscover my passion forbaking, but it was still a “home” kindof thing. Then back in 2009 when wehad a financial crisis, I lost my Job inArchitecture and having so muchmore free time, I started developingthe design side of cake making.
At the beginning, it was an escape anda way to keep busy, but the cakesstarted to grow and develop in sizeand complexity and soon I was beingtold by friends and friends of friendsto actually do it as a business. Butsomehow, I was not ready yet, perhapsI didn’t believe anyone would want topay me to make a Cake that was notwhite with flowers on it (I still do notbelieve I get paid for it! ) so, it tookanother few years, when

I also had no idea or knowledgewhatsoever of the Cake Community orof Cake International or shows orcollaborations. It was all alien to me.They still are if I am fully honest. I dotake part and enjoy meeting likeminded people and seeing theiramazing work but I have always beenon the shy side, so it wasn’t until 2017that I finally stepped onto the HotPink carpet at Cake International afterbeen convinced by one of the mostloveliest person I have met in the cakecommunity and then a whole worldwas open in front of me. Likeeverything, there have been amazingexperiences and also sour ones, but Ithink it is all part of it.
Then in 2018 I was nominated forWedding Cake Award at Cake MasterAwards and I was truly shocked andhumbled beyond belief. I have neverever been nominated for anythingother than Facebook chains and thereI was nominated for such animportant Award. More incredibly andhumbling is that I won! I just couldnot believe it.
From then on there have been a lot ofamazing opportunities. I havetravelled to several countries teaching,combining 4 of my biggest passions:Cake, Planes, Teaching and Travelling.I have also been asked to be a Judge atNational Competitors (The CakeProfessionals and The WeddingIndustry Awards) and also attendedCake Fairs in Colombia and judge atOnline Competitions.
The teaching part has been anincredible thing. I have always enjoyedteaching, did when I was out ofUniversity and to younger cousins sogoing back to it, to share what I knowwith others it is always a fabulousexperience.
Of course, we must talk about the BigElephant in the room….2020! Becauseit has been challenging for everyonebut for Wedding Cake Makers evenmore. It was a challenging year, but Istayed focused on respecting the rulesand making a few Celebration Cakesand also training for a new passion:cycling, which I do because I likecycling but also to raise funds forcharities which right now are verymuch in need and in August 2020 Icycled from Land’s End to JohnO’Groats in 13 days and raised £1000for St Mary’s Hospice. And it issomething I wish to keep doing everyyear.
WHAT’S YOUR BEST ADVICE IN 5 WORDS ORLESS?
Practice makes perfect.You have to practice, practice, practice and morepractice. Forget about apples falling from the tree andturning into gold. You learn something and you need towork on it to make it happen.
DELIVERY – DOWN A LONG BUMPY ROAD ORDURING A RAINSTORM?
I got you a better one...snowy icy roads over hillycountry lanes! YEAP - TERRIFYING!
WHAT MOVIE TITLE BEST DESCRIBES YOUR LIFE?
Hahahaha…hmmmm LA LA LAND! Or Lost in translation!
WHO INSPIRES YOU/WHO’S YOUR FAVOURITECAKE/SUGARCRAFT ARTIST?
I get inspired by nature, by Architecture, by Fashion andPhotography! When it comes to Cake/Sugarcraft Artists Ihave a long list.
PLAN PROPERLY OR WING IT? PLAN! PLAN! Plan like an army woman or man!

PASTA TOP by far!Followed by the FlavourPastes.
Pasta Top isAMAZINGLY flexible,and the taste isincredibly good!
I have never eaten thesugarpaste cuts butwith this one I amalways eating them.
You can also roll itsuper thin and stillwork with it.
Highly recommended!!
Enrique, what is your favouriteSaracino product and why?

Deep Sea Delight
TEXTURECreate a unique texture
CORALAchieve coral effect
modellingForm natural lookingoctopus
60
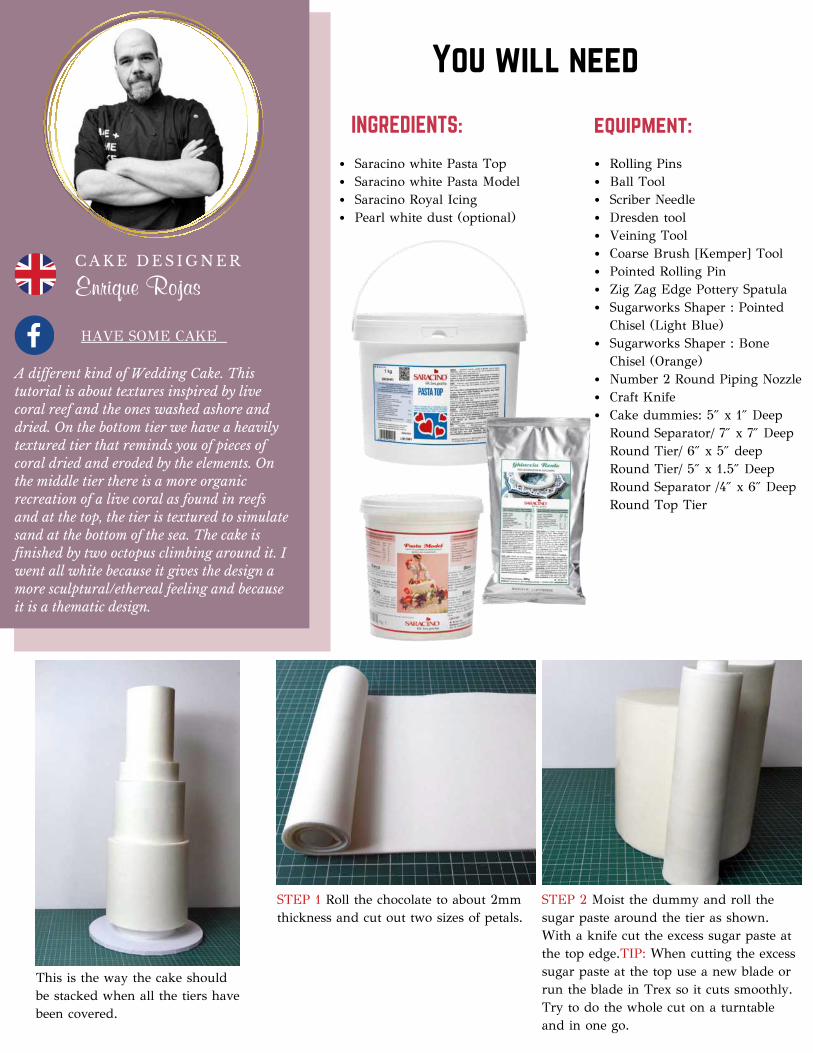
Saracino white Pasta TopSaracino white Pasta ModelSaracino Royal IcingPearl white dust (optional)
Rolling Pins Ball Tool Scriber Needle Dresden tool Veining Tool Coarse Brush [Kemper] ToolPointed Rolling Pin Zig Zag Edge Pottery SpatulaSugarworks Shaper : PointedChisel (Light Blue) Sugarworks Shaper : BoneChisel (Orange) Number 2 Round Piping NozzleCraft Knife Cake dummies: 5″ x 1″ DeepRound Separator/ 7″ x 7″ DeepRound Tier/ 6″ x 5″ deepRound Tier/ 5″ x 1.5″ DeepRound Separator /4″ x 6″ DeepRound Top Tier
Enrique Rojas
C A K E D E S I G N E R
This is the way the cake shouldbe stacked when all the tiers havebeen covered.
STEP 2 Moist the dummy and roll thesugar paste around the tier as shown.With a knife cut the excess sugar paste atthe top edge.TIP: When cutting the excesssugar paste at the top use a new blade orrun the blade in Trex so it cuts smoothly.Try to do the whole cut on a turntableand in one go.
You will need
INGREDIENTS: equipment:
STEP 1 Roll the chocolate to about 2mmthickness and cut out two sizes of petals.
HAVE SOME CAKE
A different kind of Wedding Cake. Thistutorial is about textures inspired by livecoral reef and the ones washed ashore anddried. On the bottom tier we have a heavilytextured tier that reminds you of pieces ofcoral dried and eroded by the elements. Onthe middle tier there is a more organicrecreation of a live coral as found in reefsand at the top, the tier is textured to simulatesand at the bottom of the sea. The cake isfinished by two octopus climbing around it. Iwent all white because it gives the design amore sculptural/ethereal feeling and becauseit is a thematic design.

STEP 4 Using the Kemper coarse brushstart pressing onto the previously coveredtier. Use a moderate force when pressingand occasionally press forcefully to createa variation in the texture you are creating.
STEP 6 Using a pointed chisel tool at anangle start creating cavities. You can go asdeep as you want and lift them as muchas you like as shown.
STEP 7 Using differing modelling toolscomplement the texture with randomcraters around. You will be able to workwith this while the sugar paste has notdried. Be as gentle or as strong as youlike. No limits to create your texture.
STEP 8 Cover the middle tier as describedpreviosuly. This also does not have to beperfect as we will be adding texture.
STEP 3 Your finished tier doesn’t have tobe perfect as we will apply a texture.
STEP 9 Roll a piece of Saracino whitePasta Top the length and height of thesecond tier. Using a small ball tool startpressing onto the strip of sugar paste asshown.
STEP 11 Lift the finished strip and wrap itaround the tier. When doing this, handlethe strip as if you were doing some drapesto create a wavy, organic shape as shown.
STEP 10 Use both ends of the ball tool tocreate different sizes and as close aspossible. This will start deforming theprevious round impression creating amore organic coral like structure. Using aveining tool you can perforate even moreof the hole as shown in image.
STEP 5 You want this kind of appearance.
62

STEP 13 Using a sharp tool, perforate thehole structure where you have somedraping creating some space for light topenetrate.
STEP 15 Prepare some Saracino RoyalIcing to the instructions on the packaging.We need a hard peak mix. Cover the toptier with it.
STEP 16 Using a metal scraper remove theexcess. We do not need a perfect smoothfinish as we are again adding texture.
STEP 17 Before the icing dries use the zigzag edge pottery tool to create wavystripes. It is a very subtle but effectivetexture.
STEP 12 Once the tier is fully covered useyour fingers to tear the top edge randomlyto create an imperfect edge.
STEP 18 To make the head of the octopus,roll Saracino white Pasta Model in yourhands to create an egg shape.
STEP 20 Use a modelling tool to press twoeye sockets.
STEP 19 Make two smaller balls andflatten them to create the eye sockets andattach them to the thin end of the head asshown.
STEP 14 Using the same sharp tool startpunching all around to make little tinyholes on it. Live coral is not completelysmooth and this will give a second moredetailed texture to this tier.
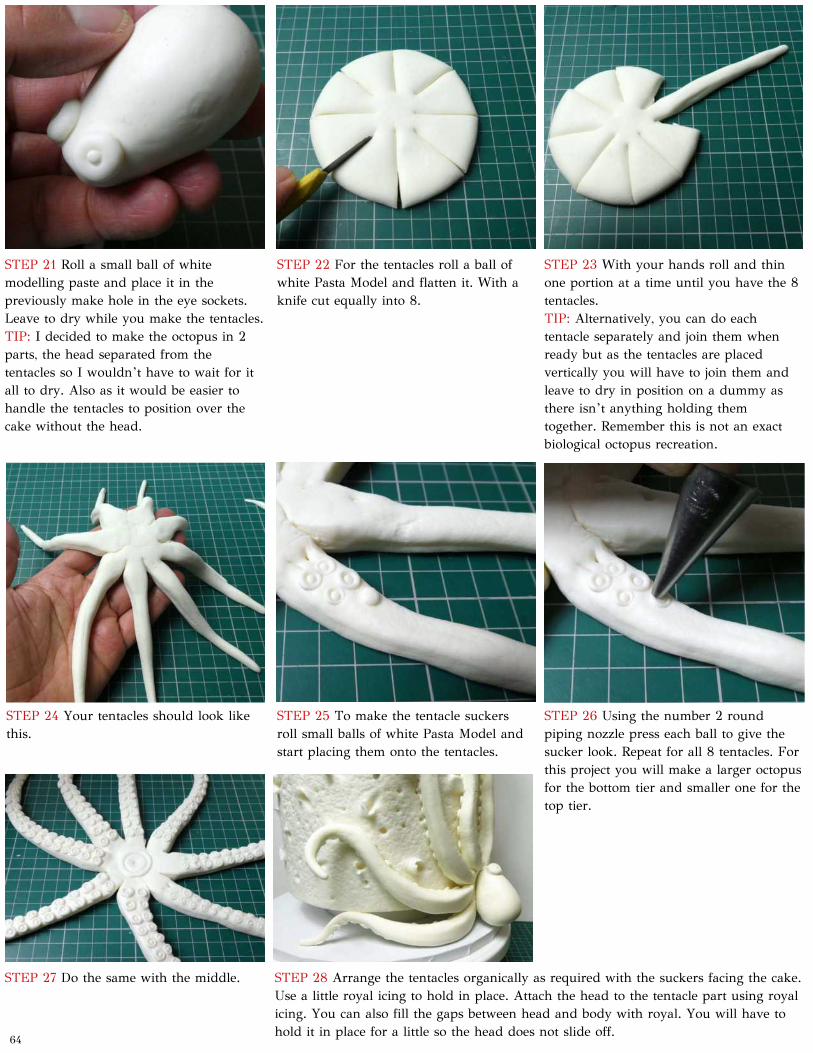
STEP 22 For the tentacles roll a ball ofwhite Pasta Model and flatten it. With aknife cut equally into 8.
STEP 24 Your tentacles should look likethis.
STEP 25 To make the tentacle suckersroll small balls of white Pasta Model andstart placing them onto the tentacles.
STEP 21 Roll a small ball of whitemodelling paste and place it in thepreviously make hole in the eye sockets.Leave to dry while you make the tentacles.TIP: I decided to make the octopus in 2parts, the head separated from thetentacles so I wouldn’t have to wait for itall to dry. Also as it would be easier tohandle the tentacles to position over thecake without the head.
STEP 27 Do the same with the middle.
STEP 26 Using the number 2 roundpiping nozzle press each ball to give thesucker look. Repeat for all 8 tentacles. Forthis project you will make a larger octopusfor the bottom tier and smaller one for thetop tier.
STEP 28 Arrange the tentacles organically as required with the suckers facing the cake.Use a little royal icing to hold in place. Attach the head to the tentacle part using royalicing. You can also fill the gaps between head and body with royal. You will have tohold it in place for a little so the head does not slide off.
STEP 23 With your hands roll and thinone portion at a time until you have the 8tentacles. TIP: Alternatively, you can do eachtentacle separately and join them whenready but as the tentacles are placedvertically you will have to join them andleave to dry in position on a dummy asthere isn’t anything holding themtogether. Remember this is not an exactbiological octopus recreation.
64

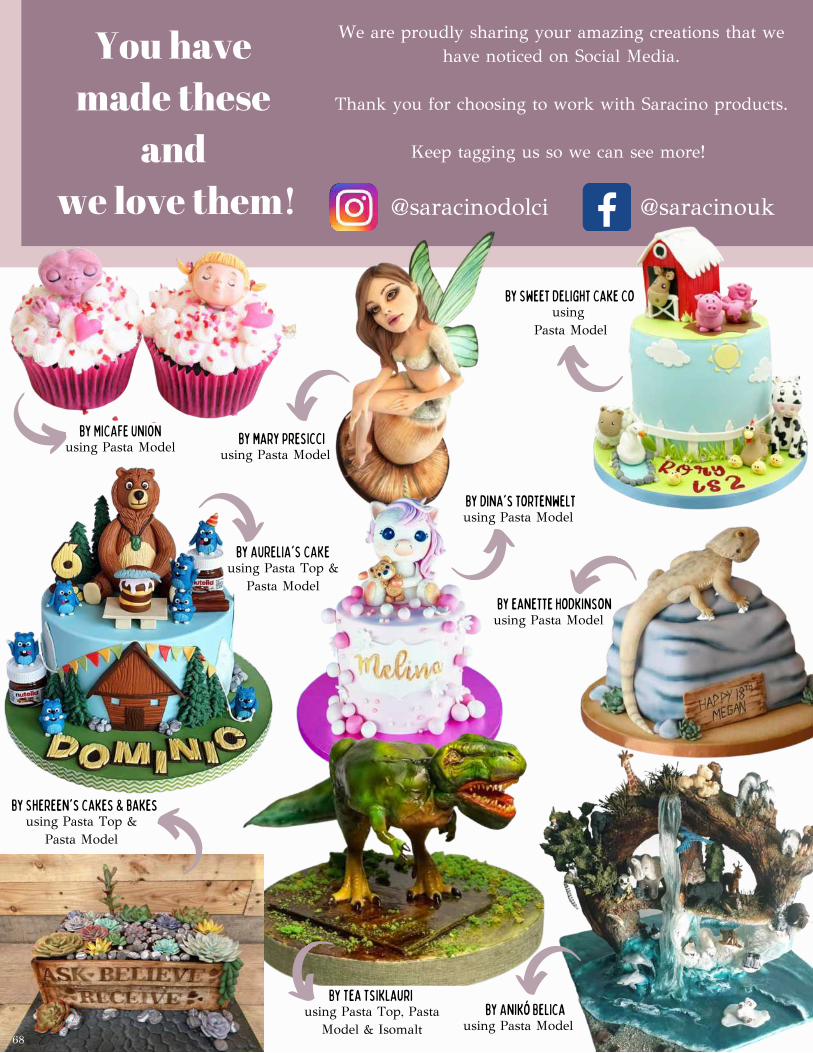
by Anikó Belicausing Pasta Model
by Sweet Delight Cake Cousing
Pasta Model
by MICAFE UNIONusing Pasta Model
by Shereen's cakes & bakes using Pasta Top &
Pasta Model
We are proudly sharing your amazing creations that wehave noticed on Social Media.
Thank you for choosing to work with Saracino products.
Keep tagging us so we can see more!
You have made these
and we love them! @saracinodolci @saracinouk
68
by dina's tortenwelt using Pasta Model
by Tea Tsiklauri using Pasta Top, Pasta
Model & Isomalt
by AURELIA'S CAKEusing Pasta Top &
Pasta Model
by mary presicci using Pasta Model
by eanette Hodkinson using Pasta Model
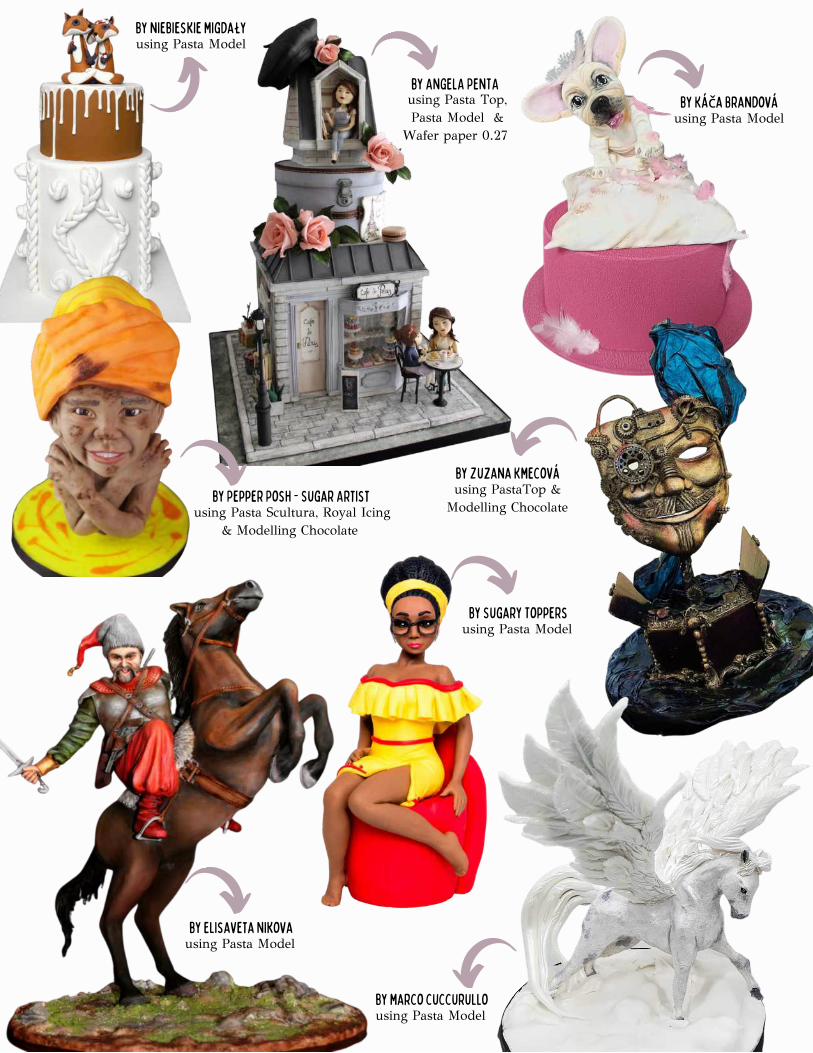
by Zuzana Kmecováusing PastaTop &
Modelling Chocolate by Pepper Posh - Sugar Artist
using Pasta Modelby niebieskie migdały
using Pasta Scultura, Royal Icing& Modelling Chocolate
by Elisaveta Nikova using Pasta Model
by Sugary Toppers using Pasta Model
by marco cuccurullo using Pasta Model
by ANGELA PENTA using Pasta Top,Pasta Model &
Wafer paper 0.27
by Káča Brandováusing Pasta Model
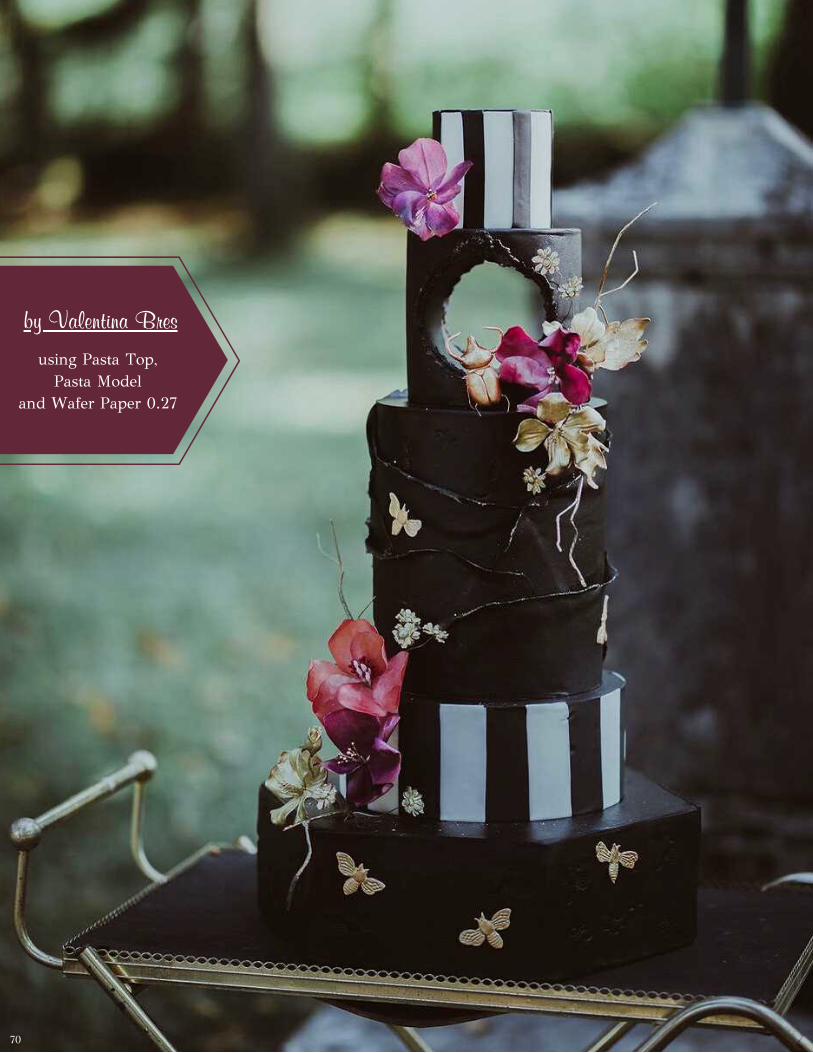
by Valentina Bres
using Pasta Top, Pasta Model
and Wafer Paper 0.27
70
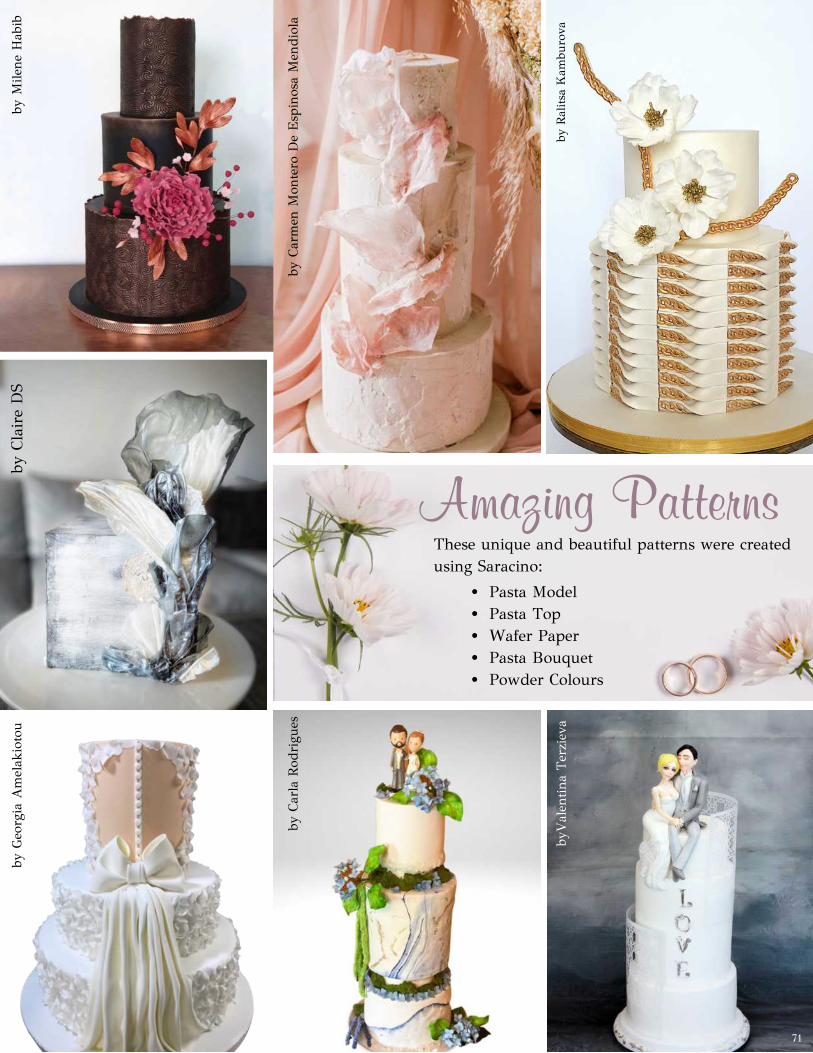
by M
ilene
Hab
ibby
Cla
ire
DS
by G
eorg
ia A
mel
akio
tou
by C
arla
Rod
rigu
es
Amazing Patterns These unique and beautiful patterns were createdusing Saracino:
Pasta ModelPasta TopWafer PaperPasta BouquetPowder Colours
byV
alen
tina
Terz
ieva
by C
arm
en M
onte
ro D
e Esp
inos
a M
endi
ola
by R
alits
a K
ambu
rova
71
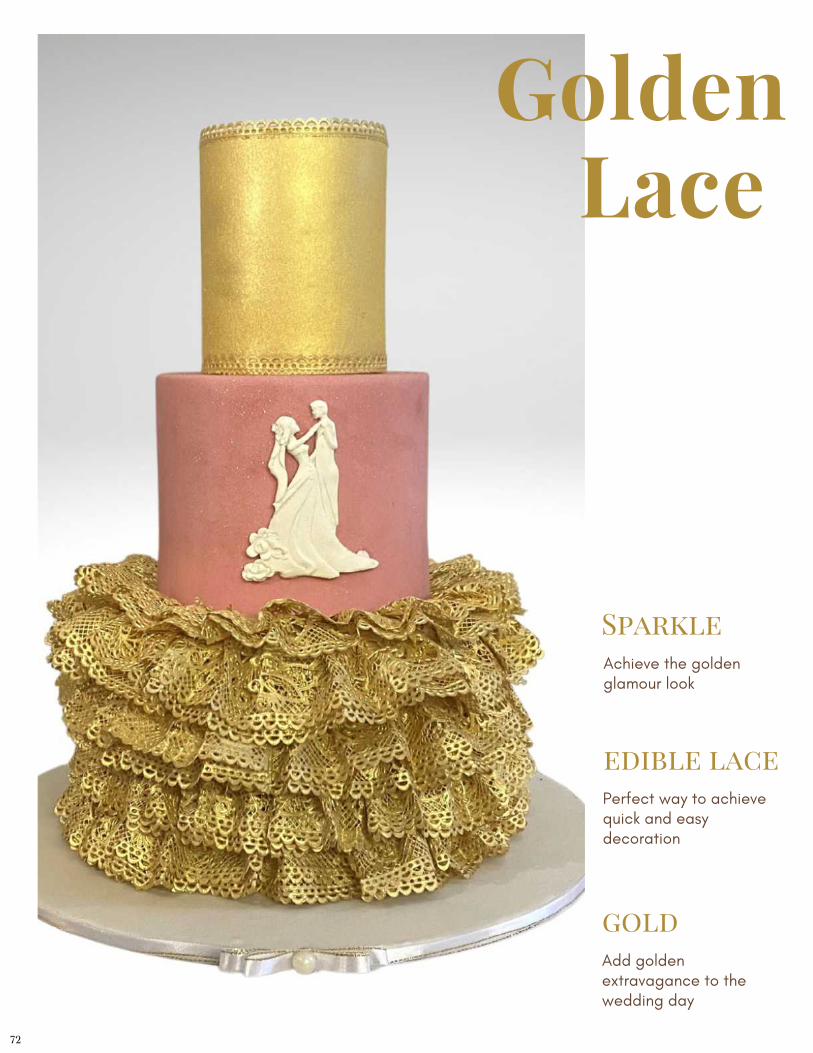
GoldenLace
SparkleAchieve the goldenglamour look
edible lacePerfect way to achievequick and easydecoration
goldAdd goldenextravagance to thewedding day
72
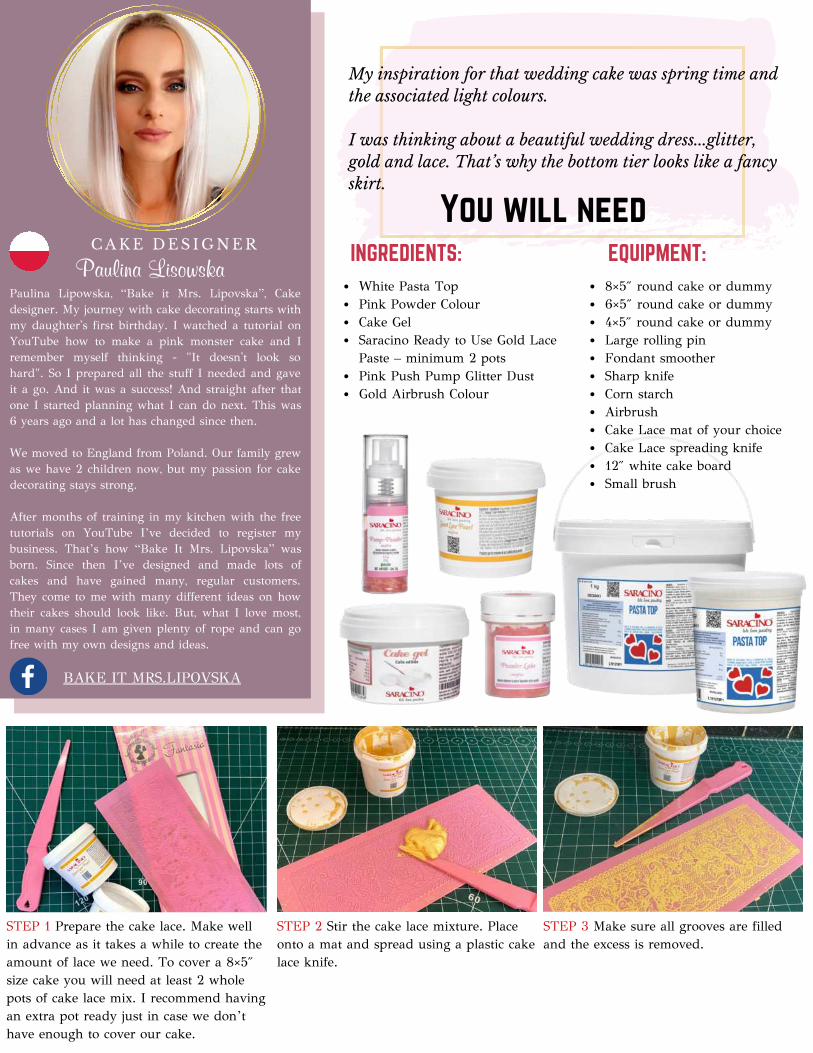
Paulina Lipowska, “Bake it Mrs. Lipovska”, Cakedesigner. My journey with cake decorating starts withmy daughter's first birthday. I watched a tutorial onYouTube how to make a pink monster cake and Iremember myself thinking - "It doesn't look sohard". So I prepared all the stuff I needed and gaveit a go. And it was a success! And straight after thatone I started planning what I can do next. This was6 years ago and a lot has changed since then.
We moved to England from Poland. Our family grewas we have 2 children now, but my passion for cakedecorating stays strong.
After months of training in my kitchen with the freetutorials on YouTube I’ve decided to register mybusiness. That’s how “Bake It Mrs. Lipovska” wasborn. Since then I’ve designed and made lots ofcakes and have gained many, regular customers.They come to me with many different ideas on howtheir cakes should look like. But, what I love most,in many cases I am given plenty of rope and can gofree with my own designs and ideas.
White Pasta TopPink Powder ColourCake GelSaracino Ready to Use Gold LacePaste – minimum 2 pots Pink Push Pump Glitter DustGold Airbrush Colour
8×5″ round cake or dummy6×5″ round cake or dummy4×5″ round cake or dummyLarge rolling pinFondant smootherSharp knifeCorn starchAirbrushCake Lace mat of your choiceCake Lace spreading knife12″ white cake boardSmall brush
You will need
INGREDIENTS:Paulina Lisowska
C A K E D E S I G N E REQUIPMENT:
BAKE IT MRS.LIPOVSKA
STEP 1 Prepare the cake lace. Make wellin advance as it takes a while to create theamount of lace we need. To cover a 8×5″size cake you will need at least 2 wholepots of cake lace mix. I recommend havingan extra pot ready just in case we don’thave enough to cover our cake.
STEP 2 Stir the cake lace mixture. Placeonto a mat and spread using a plastic cakelace knife.
STEP 3 Make sure all grooves are filledand the excess is removed.
My inspiration for that wedding cake was spring time andthe associated light colours.
I was thinking about a beautiful wedding dress...glitter,gold and lace. That’s why the bottom tier looks like a fancyskirt.
5
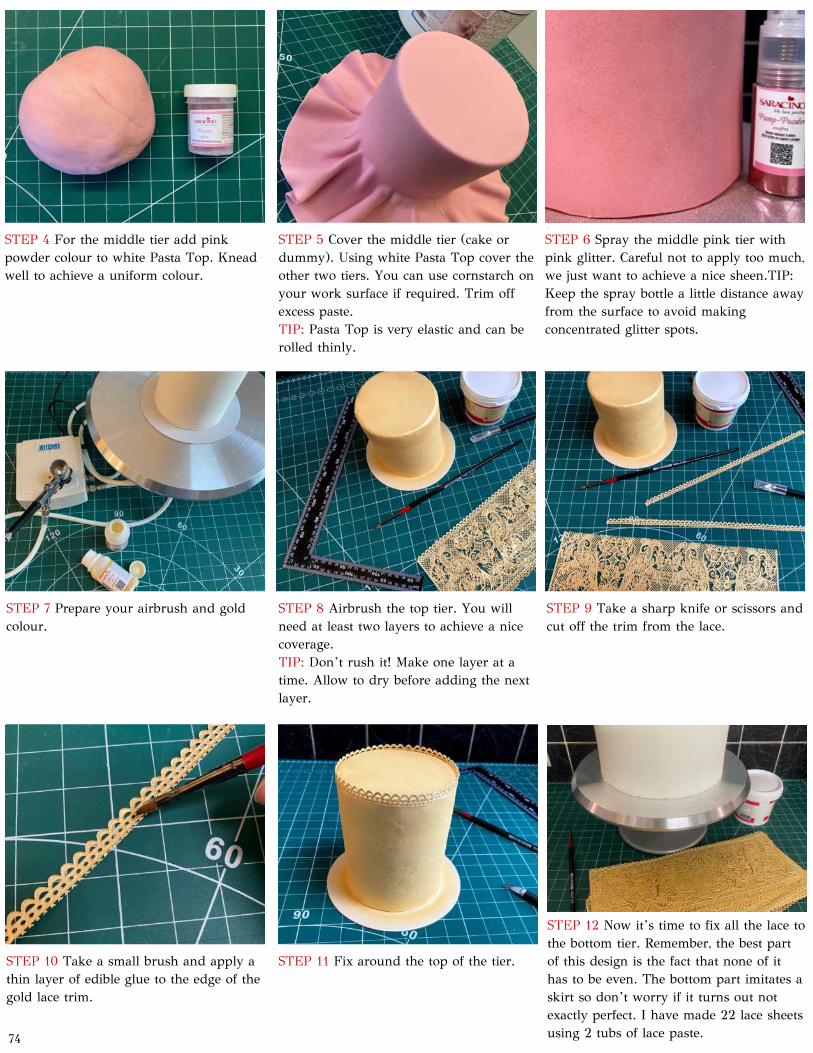
STEP 4 For the middle tier add pinkpowder colour to white Pasta Top. Kneadwell to achieve a uniform colour.
STEP 5 Cover the middle tier (cake ordummy). Using white Pasta Top cover theother two tiers. You can use cornstarch onyour work surface if required. Trim offexcess paste. TIP: Pasta Top is very elastic and can berolled thinly.
STEP 6 Spray the middle pink tier withpink glitter. Careful not to apply too much,we just want to achieve a nice sheen.TIP:Keep the spray bottle a little distance awayfrom the surface to avoid makingconcentrated glitter spots.
STEP 7 Prepare your airbrush and goldcolour.
STEP 8 Airbrush the top tier. You willneed at least two layers to achieve a nicecoverage. TIP: Don’t rush it! Make one layer at atime. Allow to dry before adding the nextlayer.
STEP 9 Take a sharp knife or scissors andcut off the trim from the lace.
STEP 11 Fix around the top of the tier.
STEP 12 Now it’s time to fix all the lace tothe bottom tier. Remember, the best partof this design is the fact that none of ithas to be even. The bottom part imitates askirt so don’t worry if it turns out notexactly perfect. I have made 22 lace sheetsusing 2 tubs of lace paste.
STEP 10 Take a small brush and apply athin layer of edible glue to the edge of thegold lace trim.
74
5
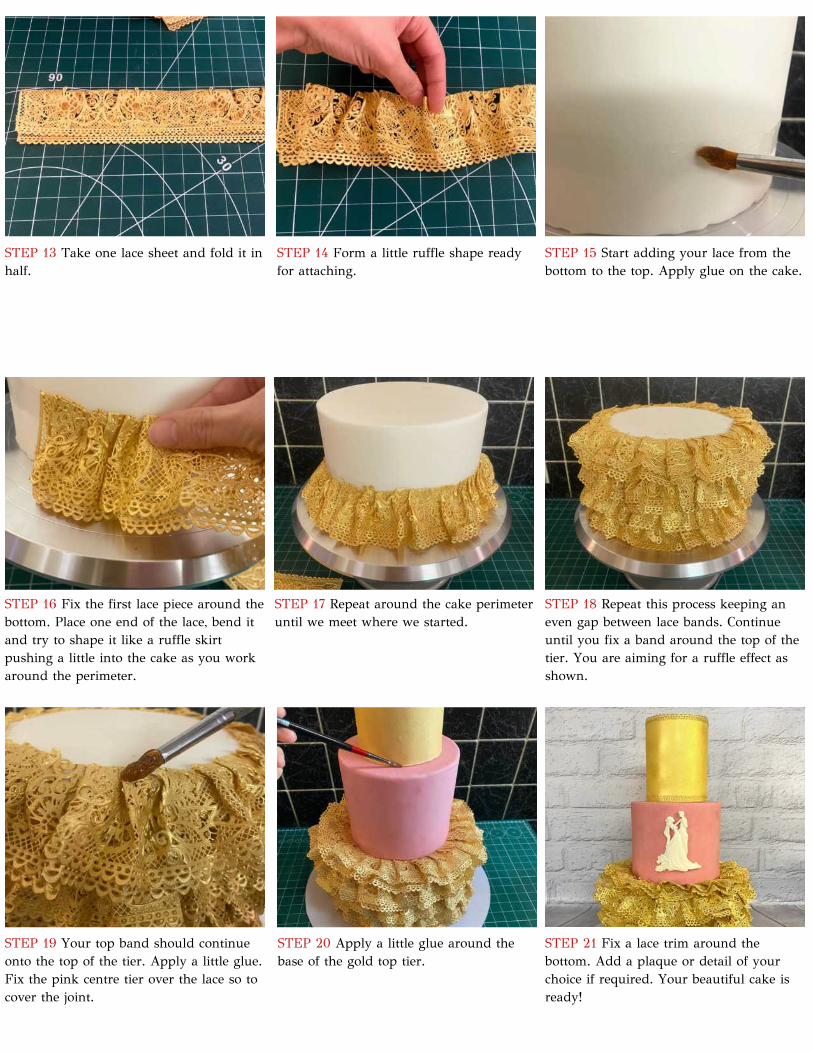
STEP 13 Take one lace sheet and fold it inhalf.
STEP 14 Form a little ruffle shape readyfor attaching.
STEP 15 Start adding your lace from thebottom to the top. Apply glue on the cake.
STEP 16 Fix the first lace piece around thebottom. Place one end of the lace, bend itand try to shape it like a ruffle skirtpushing a little into the cake as you workaround the perimeter.
STEP 17 Repeat around the cake perimeteruntil we meet where we started.
STEP 18 Repeat this process keeping aneven gap between lace bands. Continueuntil you fix a band around the top of thetier. You are aiming for a ruffle effect asshown.
STEP 19 Your top band should continueonto the top of the tier. Apply a little glue.Fix the pink centre tier over the lace so tocover the joint.
STEP 20 Apply a little glue around thebase of the gold top tier.
STEP 21 Fix a lace trim around thebottom. Add a plaque or detail of yourchoice if required. Your beautiful cake isready!

LACE
R O M A N C E & E L E G A N C E
Edible Lace Products
Pasta Merletto is a quick and easyway to make sugar lace andcrochet designs.
It works with any type of mouldmats, dries quickly, stays strongremaining flexible and elastic.
Your lace will easily stick to thecake surface.
Available in white, silver and gold.
Ready made lace is a perfectsolution for those who do not haveany lace mats available and needready to use product.
Available in 4 colours: mother ofpearl, silver, gold and black.
Pasta Merletto and Ready To Use Lace -perfect way for a neat and elegant finish to your cake.
76
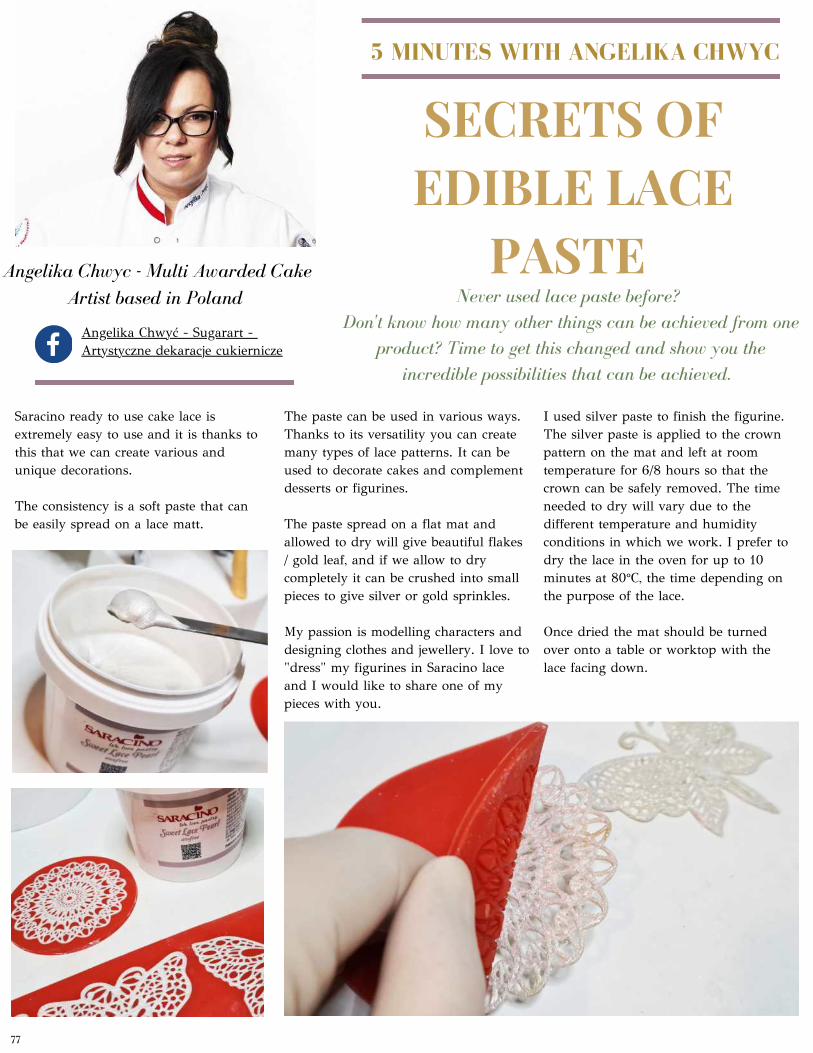
5 MINUTES WITH ANGELIKA CHWYC
SECRETS OFEDIBLE LACE
PASTE Angelika Chwyc - Multi Awarded CakeArtist based in Poland
Angelika Chwyć - Sugarart - Artystyczne dekaracje cukiernicze
Never used lace paste before? Don't know how many other things can be achieved from one
product? Time to get this changed and show you theincredible possibilities that can be achieved.
Saracino ready to use cake lace isextremely easy to use and it is thanks tothis that we can create various andunique decorations. The consistency is a soft paste that canbe easily spread on a lace matt.
The paste can be used in various ways.Thanks to its versatility you can createmany types of lace patterns. It can beused to decorate cakes and complementdesserts or figurines.
The paste spread on a flat mat andallowed to dry will give beautiful flakes/ gold leaf, and if we allow to drycompletely it can be crushed into smallpieces to give silver or gold sprinkles.
My passion is modelling characters anddesigning clothes and jewellery. I love to"dress" my figurines in Saracino laceand I would like to share one of mypieces with you.
I used silver paste to finish the figurine.The silver paste is applied to the crownpattern on the mat and left at roomtemperature for 6/8 hours so that thecrown can be safely removed. The timeneeded to dry will vary due to thedifferent temperature and humidityconditions in which we work. I prefer todry the lace in the oven for up to 10minutes at 80°C, the time depending onthe purpose of the lace. Once dried the mat should be turnedover onto a table or worktop with thelace facing down.
77
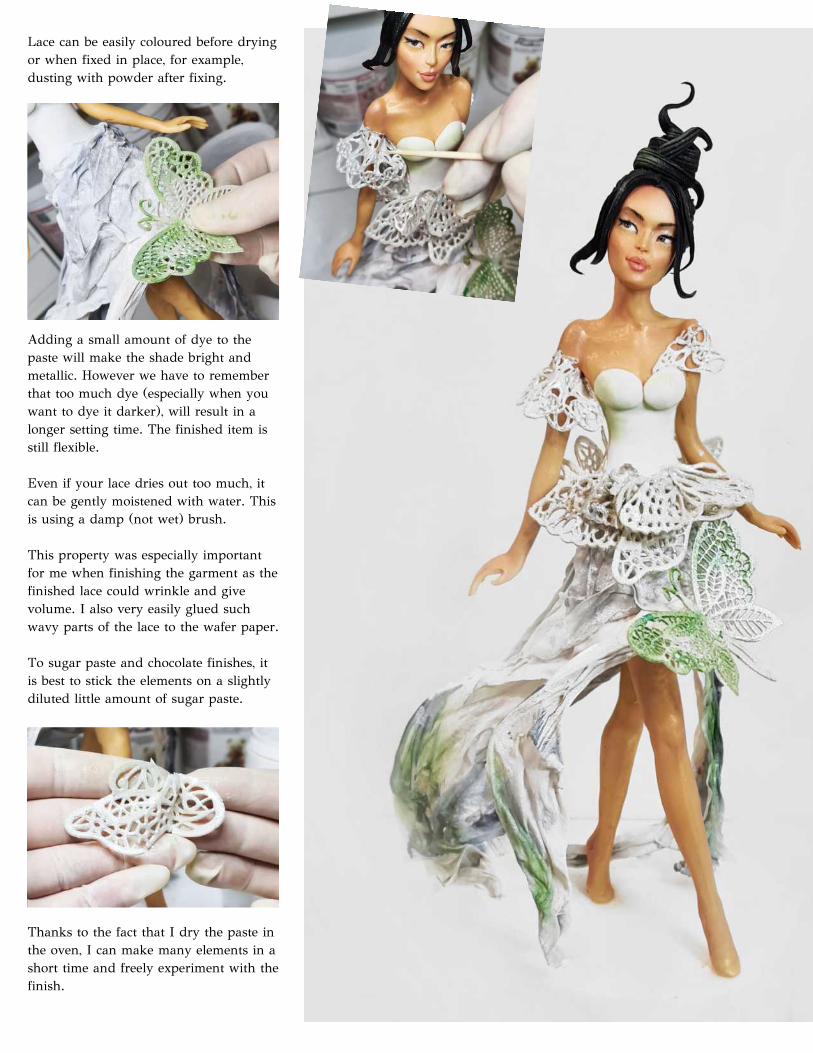
Adding a small amount of dye to thepaste will make the shade bright andmetallic. However we have to rememberthat too much dye (especially when youwant to dye it darker), will result in alonger setting time. The finished item isstill flexible. Even if your lace dries out too much, itcan be gently moistened with water. Thisis using a damp (not wet) brush. This property was especially importantfor me when finishing the garment as thefinished lace could wrinkle and givevolume. I also very easily glued suchwavy parts of the lace to the wafer paper. To sugar paste and chocolate finishes, itis best to stick the elements on a slightlydiluted little amount of sugar paste.
Thanks to the fact that I dry the paste inthe oven, I can make many elements in ashort time and freely experiment with thefinish.
Lace can be easily coloured before dryingor when fixed in place, for example,dusting with powder after fixing.
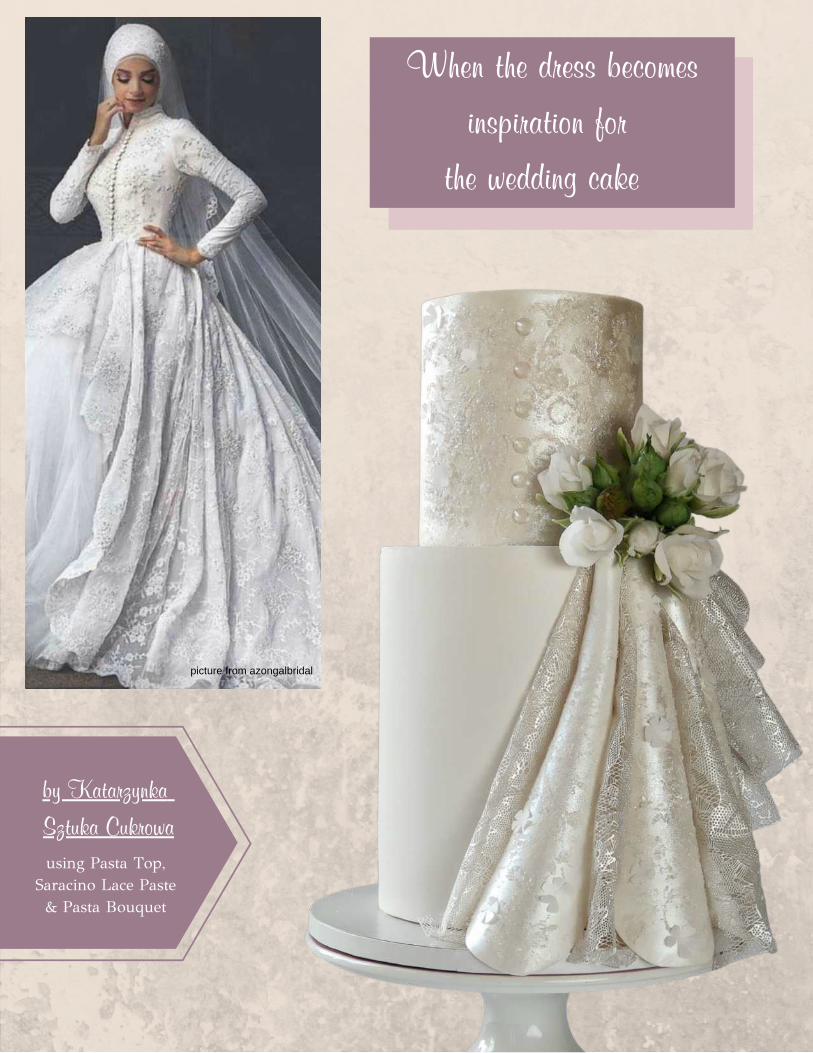
When the dress becomes
inspiration for
the wedding cake
by Katarzynka
Sztuka Cukrowa
using Pasta Top, Saracino Lace Paste & Pasta Bouquet
picture from azongalbridal
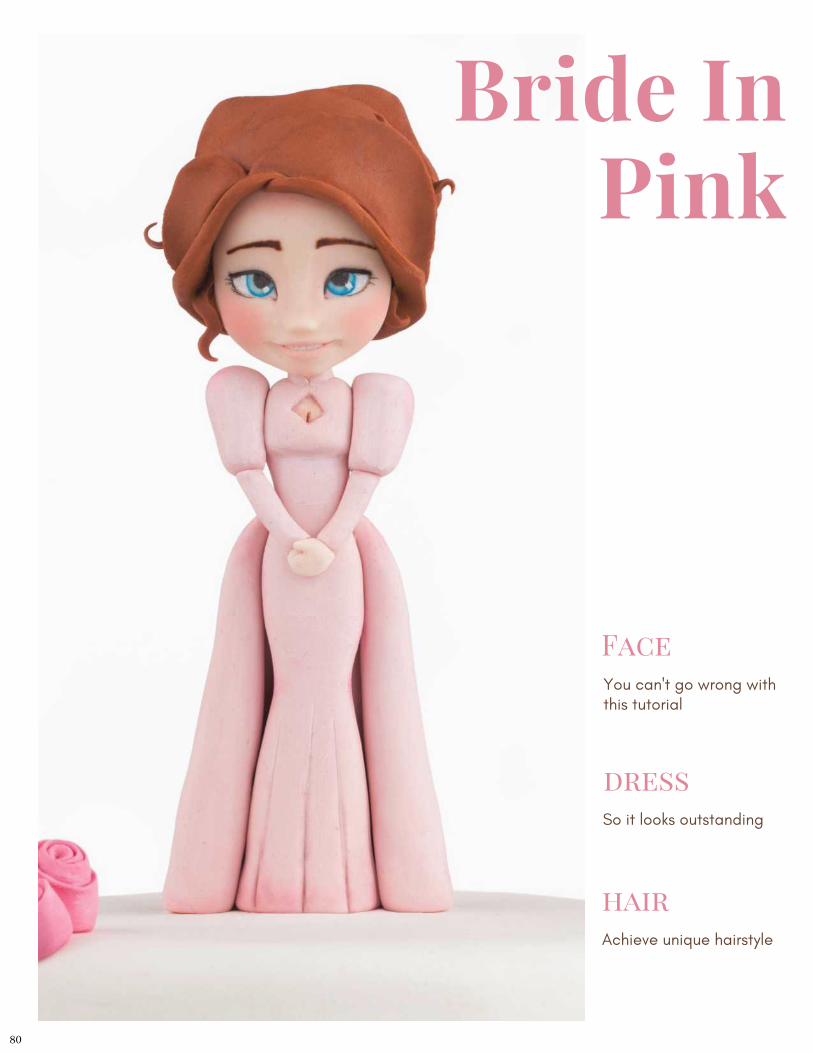
Bride InPink
Face You can't go wrong withthis tutorial
dressSo it looks outstanding
hairAchieve unique hairstyle
80
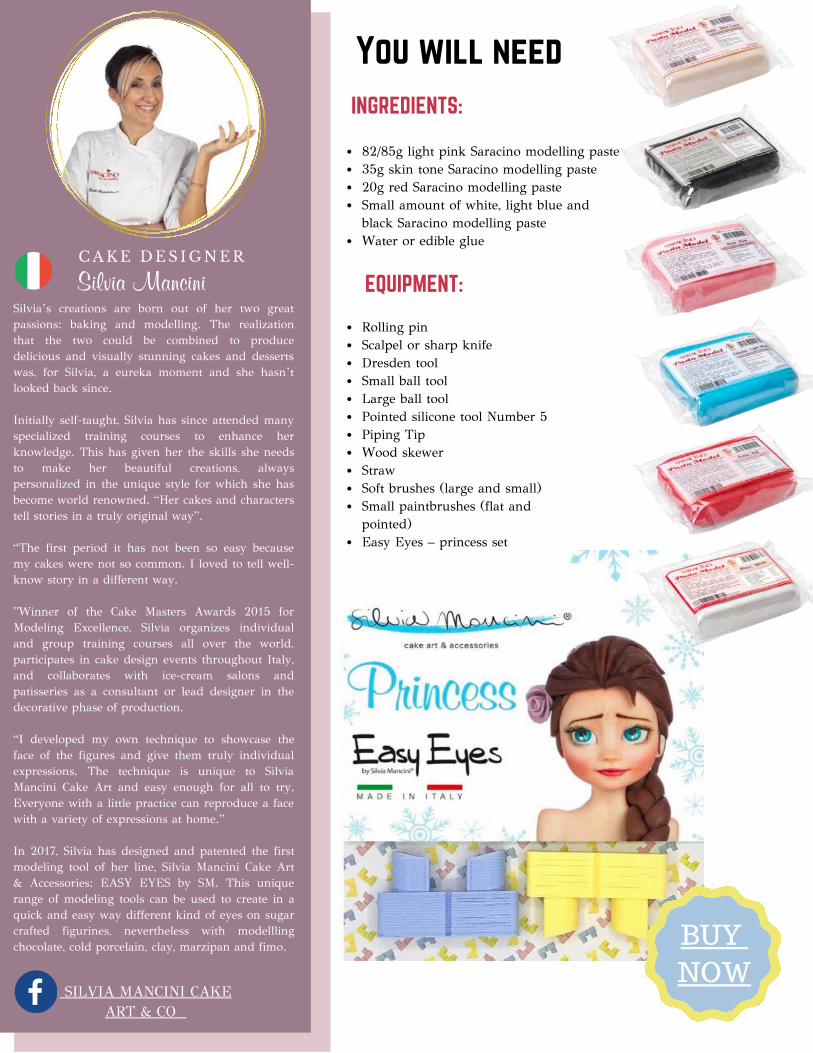
Cakes by Jeanette-Zaneta WasilewskaCake Designer
C A K E D E S I G N E R
Silvia’s creations are born out of her two greatpassions: baking and modelling. The realizationthat the two could be combined to producedelicious and visually stunning cakes and dessertswas, for Silvia, a eureka moment and she hasn’tlooked back since.
Initially self-taught, Silvia has since attended manyspecialized training courses to enhance herknowledge. This has given her the skills she needsto make her beautiful creations, alwayspersonalized in the unique style for which she hasbecome world renowned. “Her cakes and characterstell stories in a truly original way”.
“The first period it has not been so easy becausemy cakes were not so common. I loved to tell well-know story in a different way.
”Winner of the Cake Masters Awards 2015 forModeling Excellence, Silvia organizes individualand group training courses all over the world,participates in cake design events throughout Italy,and collaborates with ice-cream salons andpatisseries as a consultant or lead designer in thedecorative phase of production.
“I developed my own technique to showcase theface of the figures and give them truly individualexpressions. The technique is unique to SilviaMancini Cake Art and easy enough for all to try.Everyone with a little practice can reproduce a facewith a variety of expressions at home.”
In 2017, Silvia has designed and patented the firstmodeling tool of her line, Silvia Mancini Cake Art& Accessories: EASY EYES by SM. This uniquerange of modeling tools can be used to create in aquick and easy way different kind of eyes on sugarcrafted figurines, nevertheless with modelllingchocolate, cold porcelain, clay, marzipan and fimo.
SILVIA MANCINI CAKEART & CO
You will need
Silvia ManciniC A K E D E S I G N E R
82/85g light pink Saracino modelling paste35g skin tone Saracino modelling paste20g red Saracino modelling paste Small amount of white, light blue andblack Saracino modelling pasteWater or edible glue
INGREDIENTS:
EQUIPMENT:
Rolling pinScalpel or sharp knifeDresden tool Small ball toolLarge ball toolPointed silicone tool Number 5 Piping TipWood skewerStrawSoft brushes (large and small)Small paintbrushes (flat andpointed)Easy Eyes – princess set
BUY
NOW
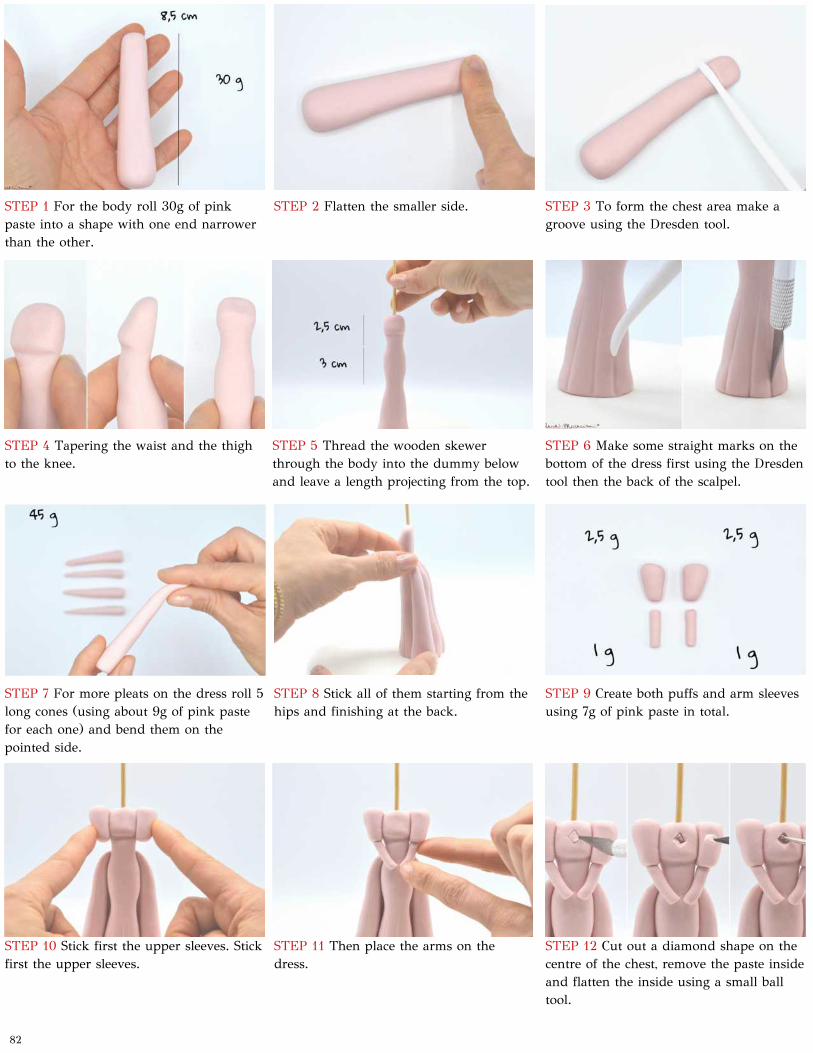
5
STEP 1 For the body roll 30g of pinkpaste into a shape with one end narrowerthan the other.
STEP 2 Flatten the smaller side. STEP 3 To form the chest area make agroove using the Dresden tool.
STEP 4 Tapering the waist and the thighto the knee.
STEP 6 Make some straight marks on thebottom of the dress first using the Dresdentool then the back of the scalpel.
STEP 5 Thread the wooden skewerthrough the body into the dummy belowand leave a length projecting from the top.
STEP 7 For more pleats on the dress roll 5long cones (using about 9g of pink pastefor each one) and bend them on thepointed side.
STEP 8 Stick all of them starting from thehips and finishing at the back.
STEP 9 Create both puffs and arm sleevesusing 7g of pink paste in total.
STEP 10 Stick first the upper sleeves. Stickfirst the upper sleeves.
STEP 11 Then place the arms on thedress.
STEP 12 Cut out a diamond shape on thecentre of the chest, remove the paste insideand flatten the inside using a small balltool.
82
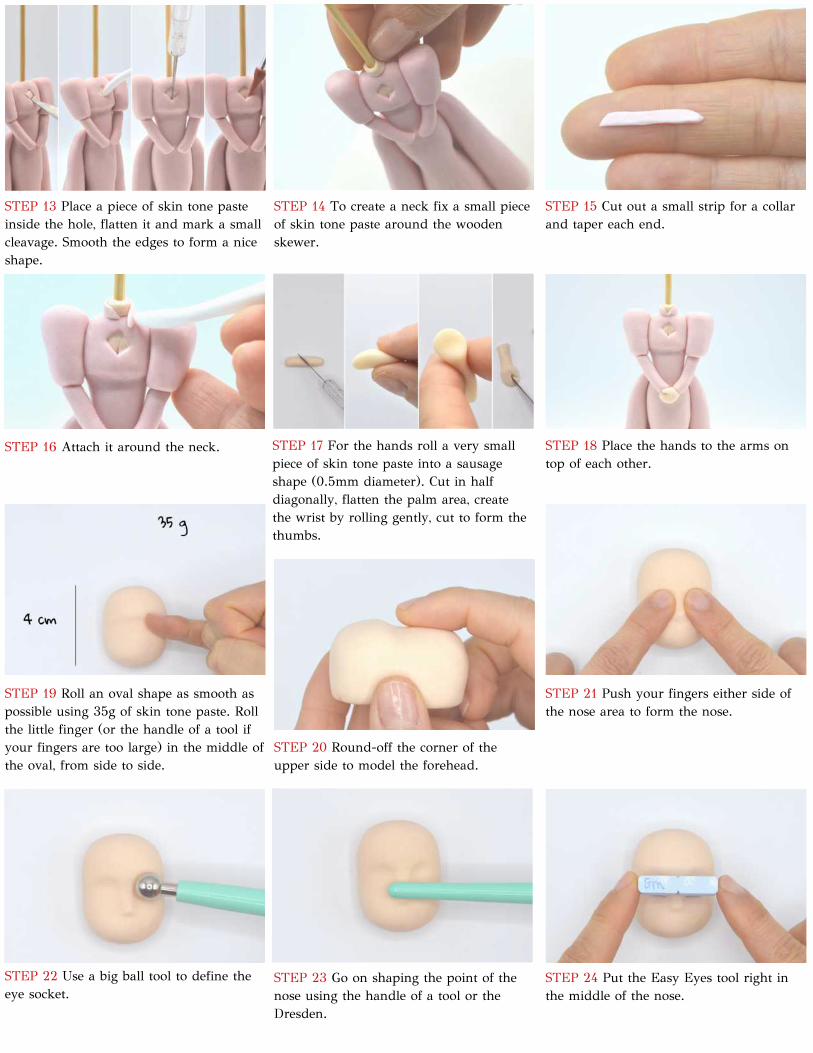
5
STEP 13 Place a piece of skin tone pasteinside the hole, flatten it and mark a smallcleavage. Smooth the edges to form a niceshape.
STEP 14 To create a neck fix a small pieceof skin tone paste around the woodenskewer.
STEP 15 Cut out a small strip for a collarand taper each end.
STEP 16 Attach it around the neck. STEP 18 Place the hands to the arms ontop of each other.
STEP 17 For the hands roll a very smallpiece of skin tone paste into a sausageshape (0.5mm diameter). Cut in halfdiagonally, flatten the palm area, createthe wrist by rolling gently, cut to form thethumbs.
STEP 19 Roll an oval shape as smooth aspossible using 35g of skin tone paste. Rollthe little finger (or the handle of a tool ifyour fingers are too large) in the middle ofthe oval, from side to side.
STEP 20 Round-off the corner of theupper side to model the forehead.
STEP 21 Push your fingers either side ofthe nose area to form the nose.
STEP 22 Use a big ball tool to define theeye socket.
STEP 23 Go on shaping the point of thenose using the handle of a tool or theDresden.
STEP 24 Put the Easy Eyes tool right inthe middle of the nose.
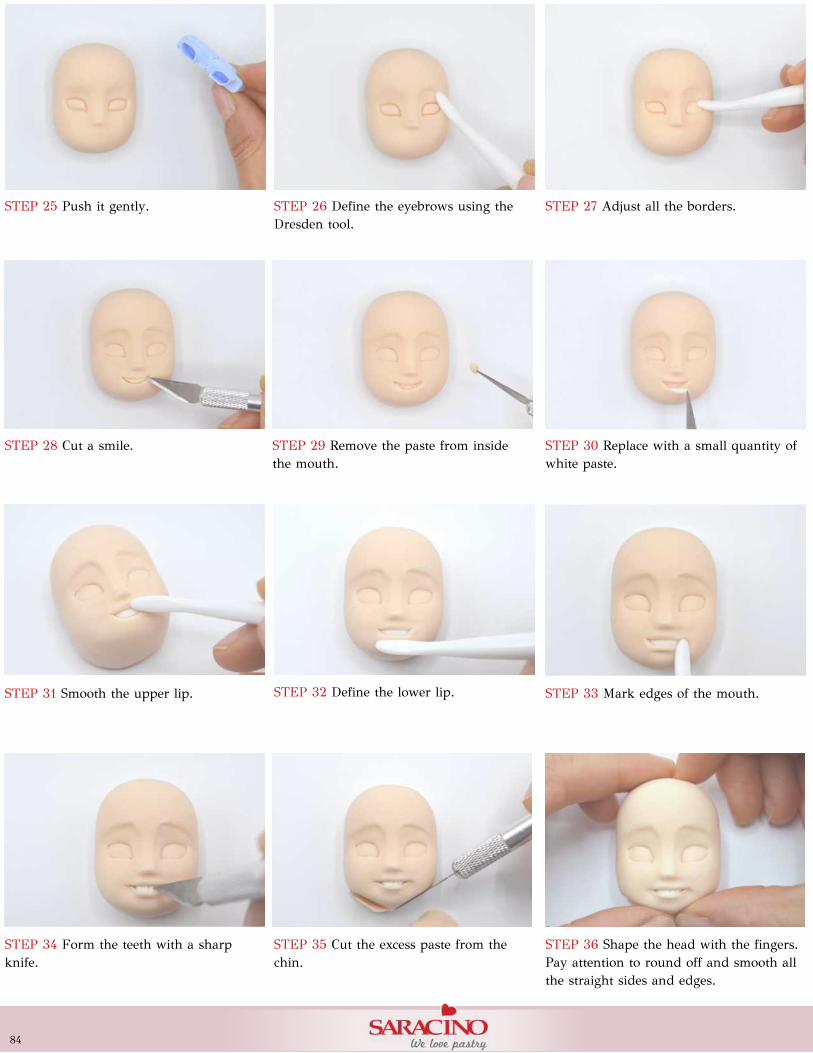
5
STEP 25 Push it gently. STEP 26 Define the eyebrows using theDresden tool.
STEP 27 Adjust all the borders.
STEP 28 Cut a smile. STEP 30 Replace with a small quantity ofwhite paste.
STEP 29 Remove the paste from insidethe mouth.
STEP 31 Smooth the upper lip. STEP 32 Define the lower lip. STEP 33 Mark edges of the mouth.
STEP 34 Form the teeth with a sharpknife.
STEP 35 Cut the excess paste from thechin.
STEP 36 Shape the head with the fingers.Pay attention to round off and smooth allthe straight sides and edges.
84
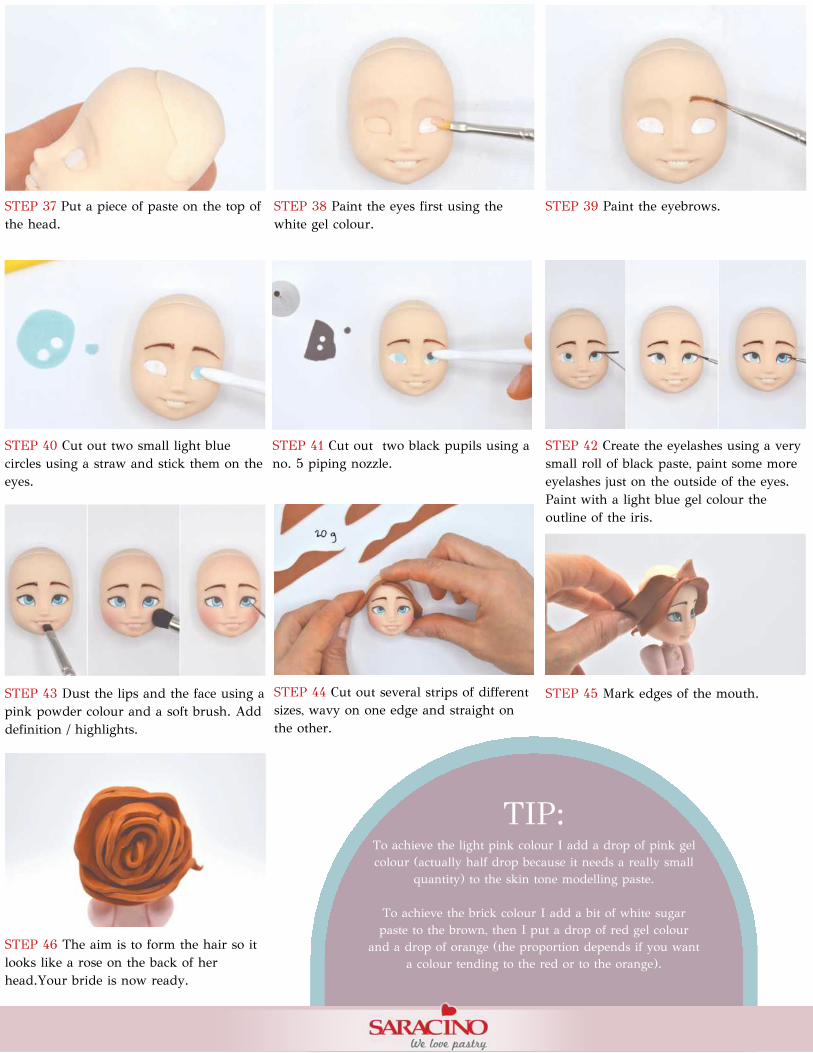
5
STEP 37 Put a piece of paste on the top ofthe head.
STEP 38 Paint the eyes first using thewhite gel colour.
STEP 39 Paint the eyebrows.
STEP 40 Cut out two small light bluecircles using a straw and stick them on theeyes.
STEP 42 Create the eyelashes using a verysmall roll of black paste, paint some moreeyelashes just on the outside of the eyes.Paint with a light blue gel colour theoutline of the iris.
STEP 41 Cut out two black pupils using ano. 5 piping nozzle.
STEP 43 Dust the lips and the face using apink powder colour and a soft brush. Adddefinition / highlights.
STEP 44 Cut out several strips of differentsizes, wavy on one edge and straight onthe other.
STEP 45 Mark edges of the mouth.
STEP 46 The aim is to form the hair so itlooks like a rose on the back of herhead.Your bride is now ready.
TIP:To achieve the light pink colour I add a drop of pink gelcolour (actually half drop because it needs a really small
quantity) to the skin tone modelling paste.
To achieve the brick colour I add a bit of white sugarpaste to the brown, then I put a drop of red gel colour
and a drop of orange (the proportion depends if you wanta colour tending to the red or to the orange).

SoutacheParadise
stonesTo add an amazingtouch to your cake
soutacheFor a perfect styledglamorous wedding
pearlsTo add a littlesophistication
86
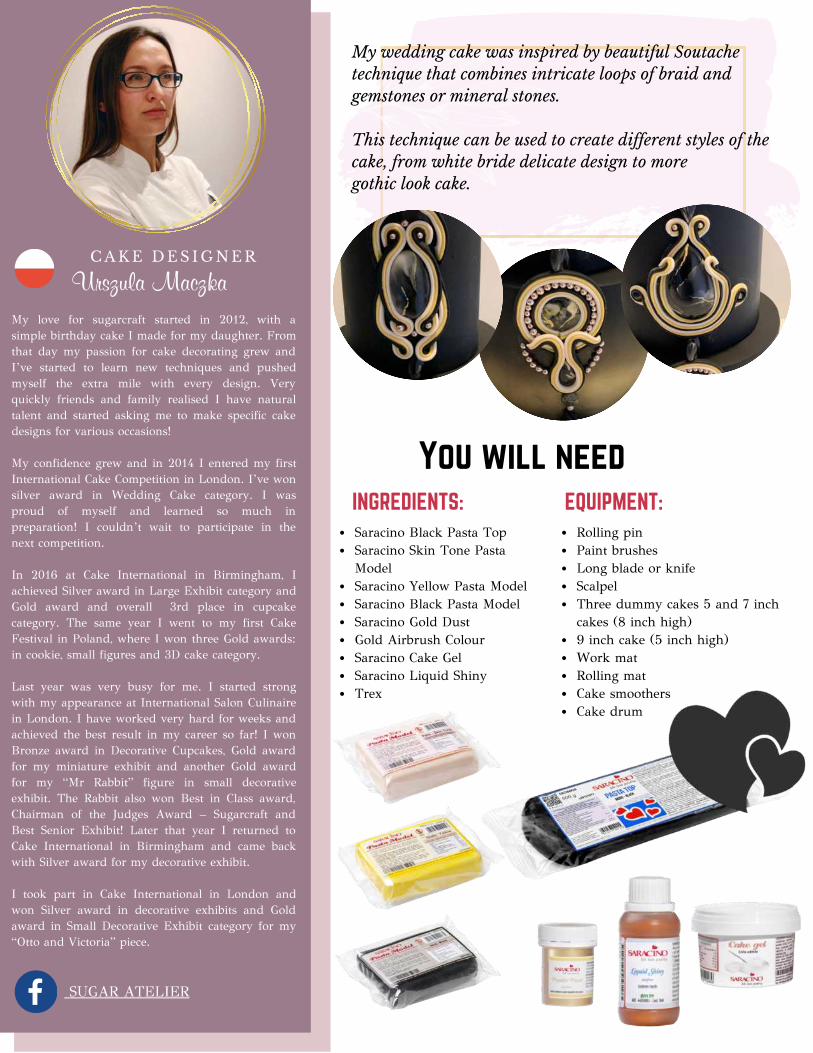
Cakes by Jeanette-Zaneta WasilewskaCake Designer
C A K E D E S I G N E R
My love for sugarcraft started in 2012, with asimple birthday cake I made for my daughter. Fromthat day my passion for cake decorating grew andI’ve started to learn new techniques and pushedmyself the extra mile with every design. Veryquickly friends and family realised I have naturaltalent and started asking me to make specific cakedesigns for various occasions!
My confidence grew and in 2014 I entered my firstInternational Cake Competition in London. I’ve wonsilver award in Wedding Cake category. I wasproud of myself and learned so much inpreparation! I couldn’t wait to participate in thenext competition.
In 2016 at Cake International in Birmingham, Iachieved Silver award in Large Exhibit category andGold award and overall 3rd place in cupcakecategory. The same year I went to my first CakeFestival in Poland, where I won three Gold awards:in cookie, small figures and 3D cake category.
Last year was very busy for me. I started strongwith my appearance at International Salon Culinairein London. I have worked very hard for weeks andachieved the best result in my career so far! I wonBronze award in Decorative Cupcakes, Gold awardfor my miniature exhibit and another Gold awardfor my “Mr Rabbit” figure in small decorativeexhibit. The Rabbit also won Best in Class award,Chairman of the Judges Award – Sugarcraft andBest Senior Exhibit! Later that year I returned toCake International in Birmingham and came backwith Silver award for my decorative exhibit.
I took part in Cake International in London andwon Silver award in decorative exhibits and Goldaward in Small Decorative Exhibit category for my“Otto and Victoria” piece.
SUGAR ATELIER
You will need
Urszula Maczka C A K E D E S I G N E R
Saracino Black Pasta TopSaracino Skin Tone PastaModelSaracino Yellow Pasta ModelSaracino Black Pasta ModelSaracino Gold DustGold Airbrush ColourSaracino Cake GelSaracino Liquid ShinyTrex
INGREDIENTS: EQUIPMENT:
Rolling pinPaint brushesLong blade or knifeScalpelThree dummy cakes 5 and 7 inchcakes (8 inch high) 9 inch cake (5 inch high)Work matRolling mat Cake smoothersCake drum
My wedding cake was inspired by beautiful Soutachetechnique that combines intricate loops of braid andgemstones or mineral stones.
This technique can be used to create different styles of thecake, from white bride delicate design to more gothic look cake.
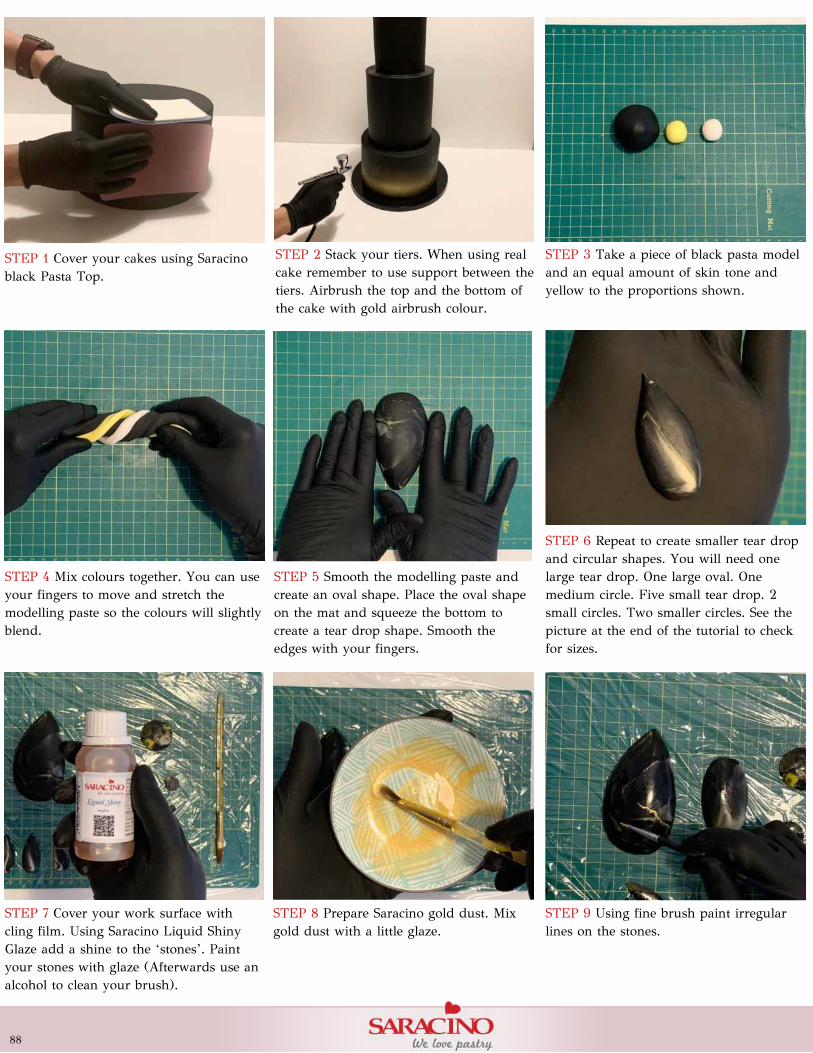
5
STEP 7 Cover your work surface withcling film. Using Saracino Liquid ShinyGlaze add a shine to the ‘stones’. Paintyour stones with glaze (Afterwards use analcohol to clean your brush).
STEP 8 Prepare Saracino gold dust. Mixgold dust with a little glaze.
STEP 9 Using fine brush paint irregularlines on the stones.
STEP 4 Mix colours together. You can useyour fingers to move and stretch themodelling paste so the colours will slightlyblend.
STEP 5 Smooth the modelling paste andcreate an oval shape. Place the oval shapeon the mat and squeeze the bottom tocreate a tear drop shape. Smooth theedges with your fingers.
STEP 6 Repeat to create smaller tear dropand circular shapes. You will need onelarge tear drop. One large oval. Onemedium circle. Five small tear drop. 2small circles. Two smaller circles. See thepicture at the end of the tutorial to checkfor sizes.
STEP 1 Cover your cakes using Saracinoblack Pasta Top.
STEP 2 Stack your tiers. When using realcake remember to use support between thetiers. Airbrush the top and the bottom ofthe cake with gold airbrush colour.
STEP 3 Take a piece of black pasta modeland an equal amount of skin tone andyellow to the proportions shown.
88
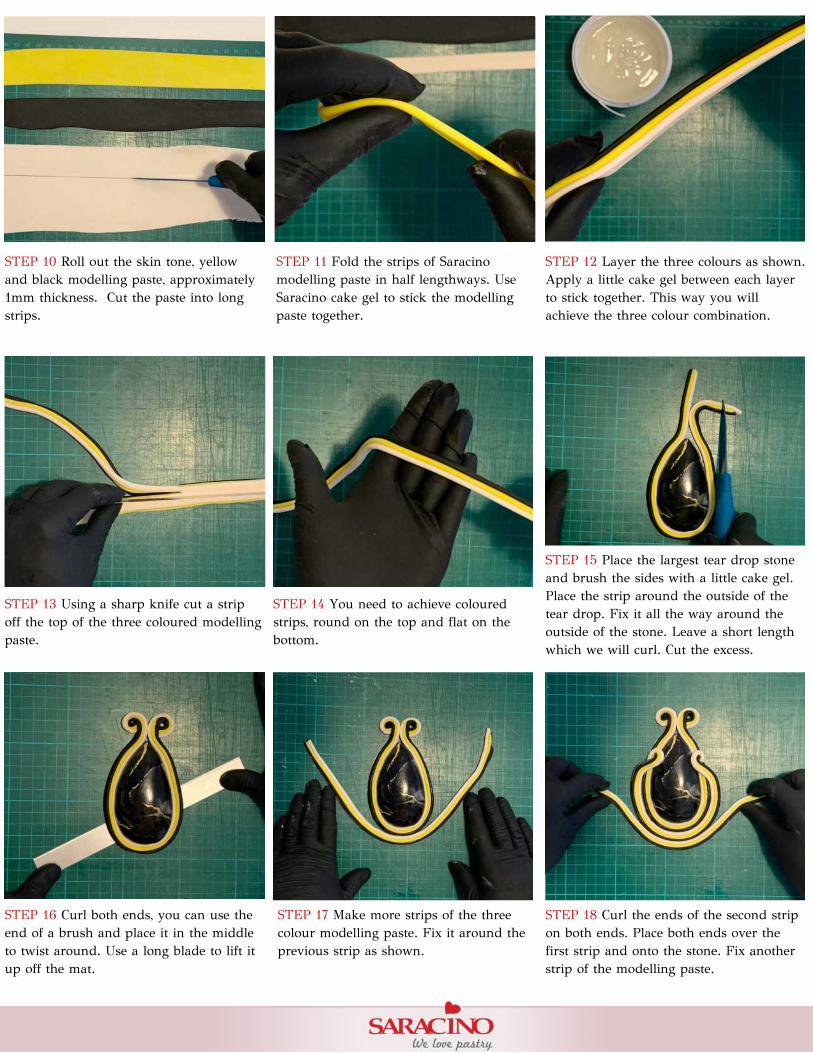
5
STEP 16 Curl both ends, you can use theend of a brush and place it in the middleto twist around. Use a long blade to lift itup off the mat.
STEP 17 Make more strips of the threecolour modelling paste. Fix it around theprevious strip as shown.
STEP 18 Curl the ends of the second stripon both ends. Place both ends over thefirst strip and onto the stone. Fix anotherstrip of the modelling paste.
STEP 13 Using a sharp knife cut a stripoff the top of the three coloured modellingpaste.
STEP 14 You need to achieve colouredstrips, round on the top and flat on thebottom.
STEP 15 Place the largest tear drop stoneand brush the sides with a little cake gel.Place the strip around the outside of thetear drop. Fix it all the way around theoutside of the stone. Leave a short lengthwhich we will curl. Cut the excess.
STEP 10 Roll out the skin tone, yellowand black modelling paste, approximately1mm thickness. Cut the paste into longstrips.
STEP 11 Fold the strips of Saracinomodelling paste in half lengthways. UseSaracino cake gel to stick the modellingpaste together.
STEP 12 Layer the three colours as shown.Apply a little cake gel between each layerto stick together. This way you willachieve the three colour combination.
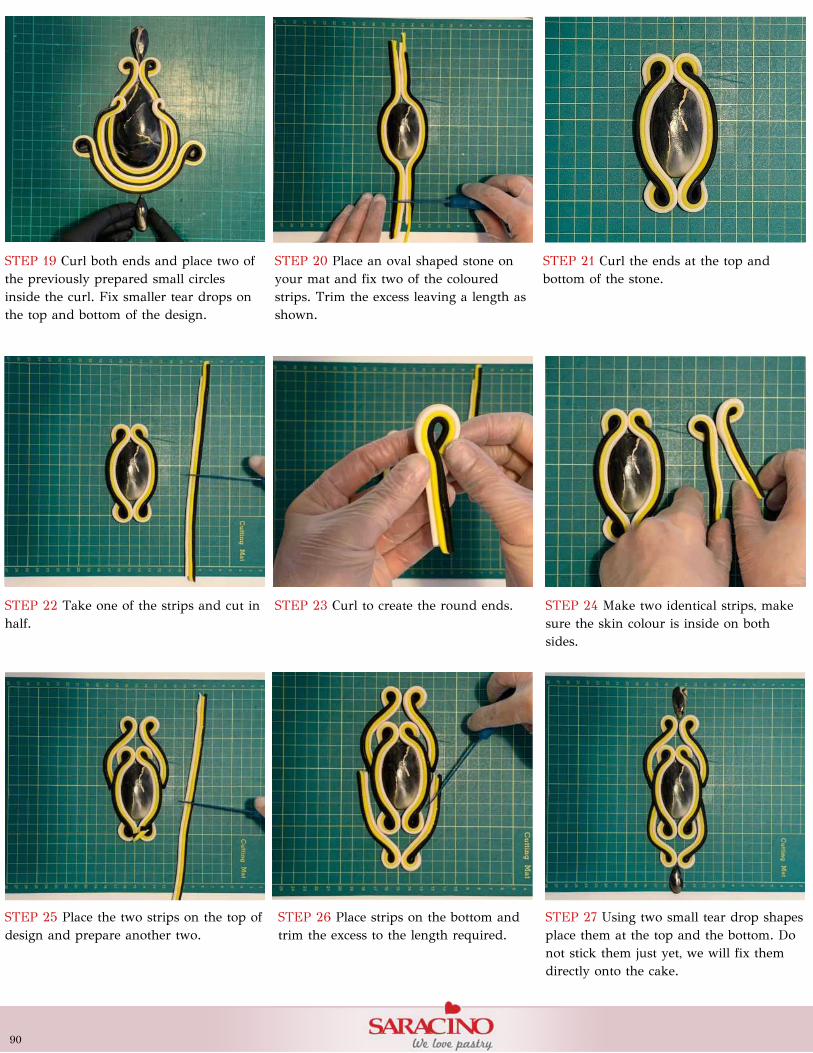
5
STEP 25 Place the two strips on the top ofdesign and prepare another two.
STEP 26 Place strips on the bottom andtrim the excess to the length required.
STEP 27 Using two small tear drop shapesplace them at the top and the bottom. Donot stick them just yet, we will fix themdirectly onto the cake.
STEP 22 Take one of the strips and cut inhalf.
STEP 23 Curl to create the round ends. STEP 24 Make two identical strips, makesure the skin colour is inside on bothsides.
STEP 19 Curl both ends and place two ofthe previously prepared small circlesinside the curl. Fix smaller tear drops onthe top and bottom of the design.
STEP 20 Place an oval shaped stone onyour mat and fix two of the colouredstrips. Trim the excess leaving a length asshown.
STEP 21 Curl the ends at the top andbottom of the stone.
90

5
STEP 34 Place two small round stones atthe bottom of the design.
STEP 35 Mix black modelling paste withTrex and knead well. Use an extruderwith small holes. Push out the paste. Cutto length and repeat the process.
STEP 36 Create the tassel by fixingtogether at the end.
STEP 33 Fix it together at the top. Place iton top of the round stone design alreadymade. Curl the top.
STEP 32 Using a small tear drop stonewrap another three coloured strip aroundthe outside.
STEP 31 Apply a little glue to anotherstrip. Wrap it around the pearls.
STEP 28 Using a round stone wrap a stripof the modelling paste around it. Trim theexcess.
STEP 29 You will need 3mm – 4mmsugar pearls.
STEP 30 Use cake gel to brush the side.Fix sugar pearls around the perimeter.

5
STEP 40 Brush the back of your jewelswith cake gel.
STEP 41 For the middle tier fix two teardrop stones. One on the top and one onthe bottom.
STEP 42 Fix the top tier jewel.
STEP 43 Fix the bottom tier jewel and addsome pearls to the design.
STEP 45 Fix the pearls inside the curls.Fix the tassle and ball to the lower jewel.Place the final sugar pearl just above thetassel.
STEP 44 Add a little glue ready to fixsugar pearls inside the curves on themiddle and top tier.
STEP 37 Place it on the bottom of ourdesign. Do not fix yet.
STEP 38 Our three edible jewels are readyto fix to the cake.
STEP 39 Use Saracino glaze and golddust, mix them together. Paint the yellowlines on all three designs.
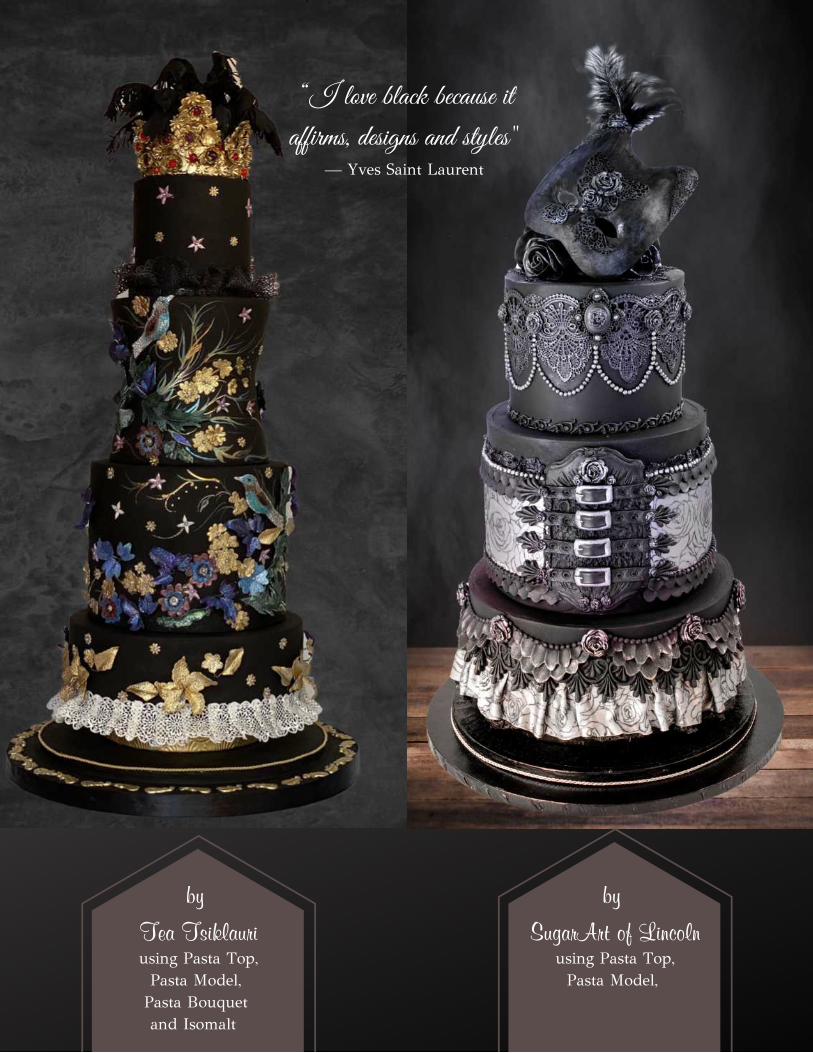
by
SugarArt of Lincolnusing Pasta Top,
Pasta Model,
by
Tea Tsiklauriusing Pasta Top,
Pasta Model, Pasta Bouquet and Isomalt
“I love black because itaffirms, designs and styles"
— Yves Saint Laurent
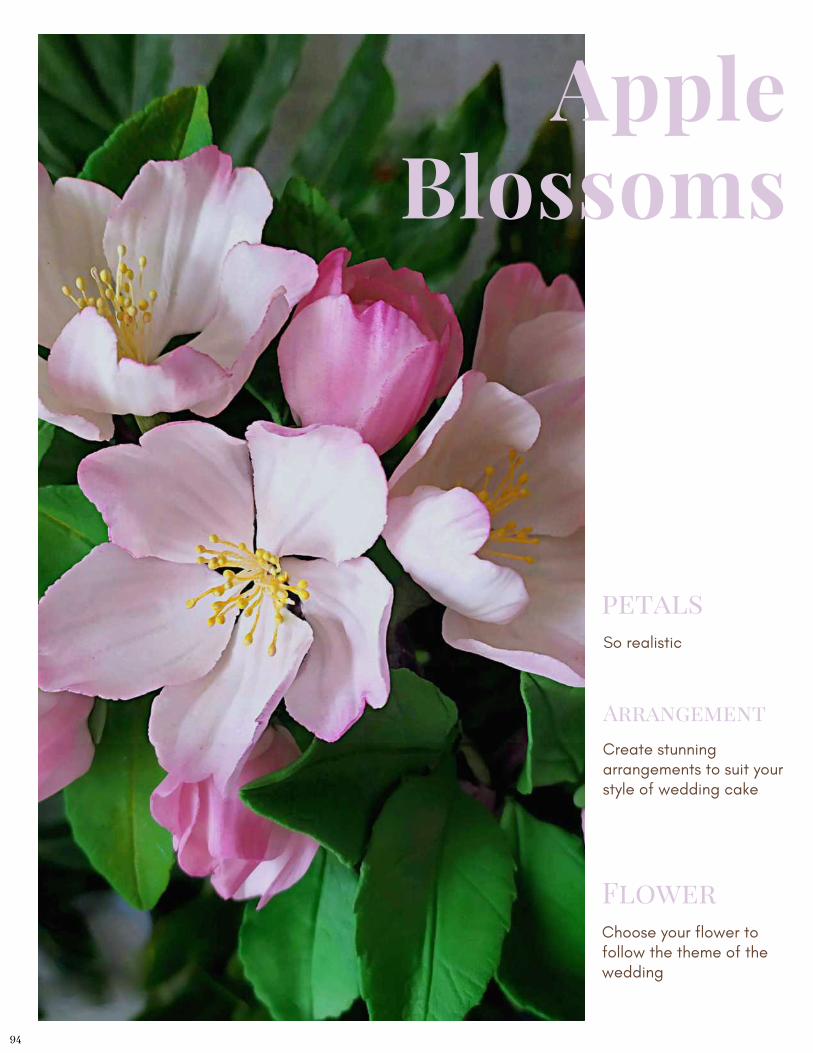
AppleBlossoms
petalsSo realistic
ArrangementCreate stunningarrangements to suit yourstyle of wedding cake
Flower Choose your flower tofollow the theme of thewedding
94
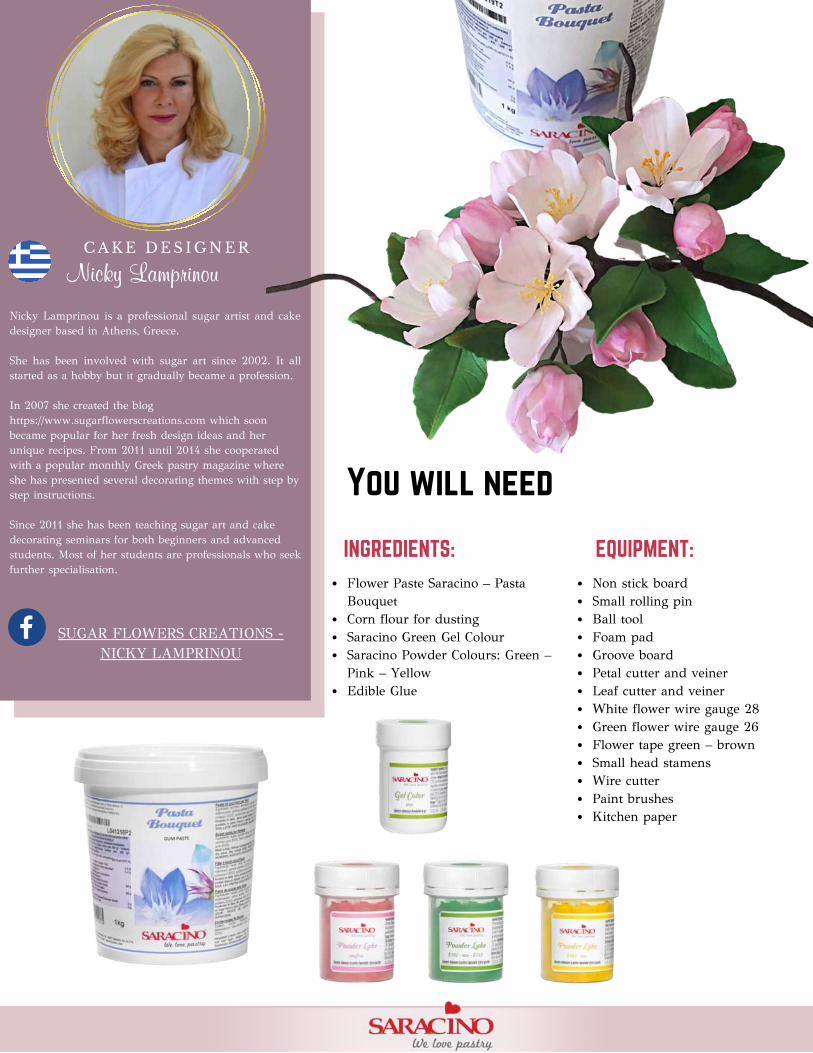
Nicky Lamprinou is a professional sugar artist and cakedesigner based in Athens, Greece.
She has been involved with sugar art since 2002. It allstarted as a hobby but it gradually became a profession.
In 2007 she created the bloghttps://www.sugarflowerscreations.com which soonbecame popular for her fresh design ideas and herunique recipes. From 2011 until 2014 she cooperatedwith a popular monthly Greek pastry magazine whereshe has presented several decorating themes with step bystep instructions.
Since 2011 she has been teaching sugar art and cakedecorating seminars for both beginners and advancedstudents. Most of her students are professionals who seekfurther specialisation.
Non stick boardSmall rolling pinBall toolFoam padGroove boardPetal cutter and veinerLeaf cutter and veinerWhite flower wire gauge 28Green flower wire gauge 26Flower tape green – brownSmall head stamensWire cutterPaint brushesKitchen paper
SUGAR FLOWERS CREATIONS -NICKY LAMPRINOU
Flower Paste Saracino – PastaBouquetCorn flour for dustingSaracino Green Gel ColourSaracino Powder Colours: Green –Pink – YellowEdible Glue
You will need
INGREDIENTS:
Nicky Lamprinou
C A K E D E S I G N E R
EQUIPMENT:
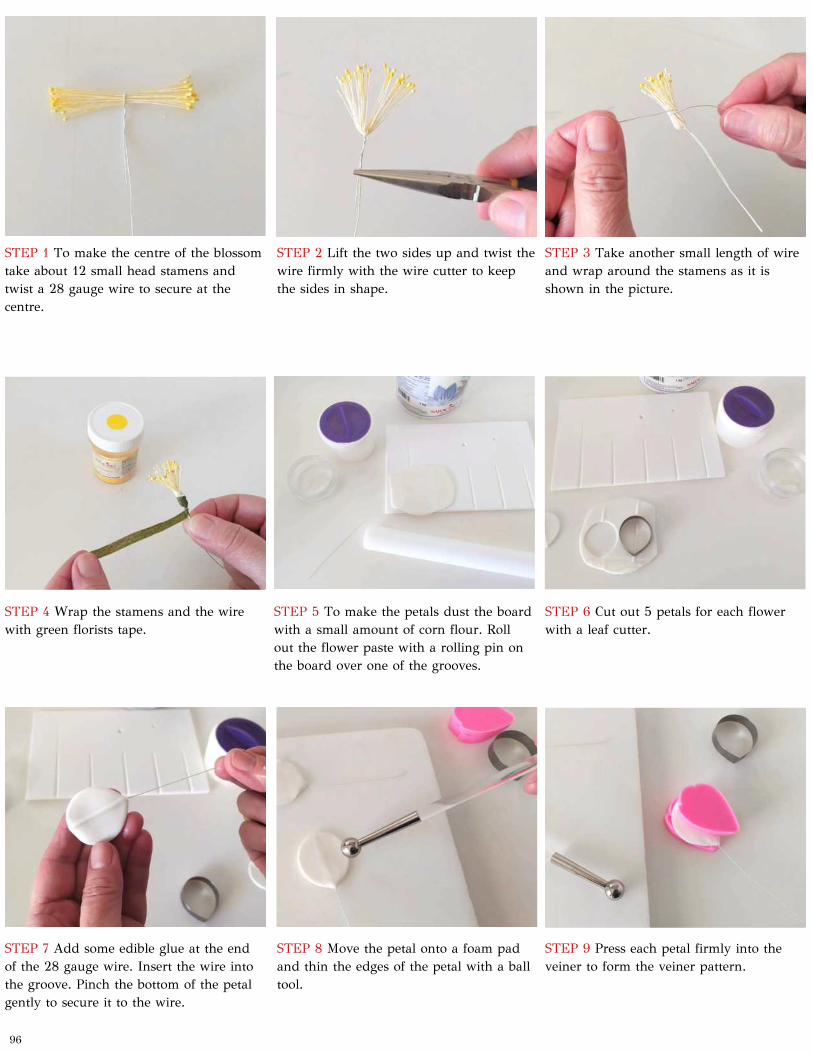
5
STEP 1 To make the centre of the blossomtake about 12 small head stamens andtwist a 28 gauge wire to secure at thecentre.
STEP 2 Lift the two sides up and twist thewire firmly with the wire cutter to keepthe sides in shape.
STEP 3 Take another small length of wireand wrap around the stamens as it isshown in the picture.
STEP 4 Wrap the stamens and the wirewith green florists tape.
STEP 5 To make the petals dust the boardwith a small amount of corn flour. Rollout the flower paste with a rolling pin onthe board over one of the grooves.
STEP 6 Cut out 5 petals for each flowerwith a leaf cutter.
STEP 7 Add some edible glue at the endof the 28 gauge wire. Insert the wire intothe groove. Pinch the bottom of the petalgently to secure it to the wire.
STEP 8 Move the petal onto a foam padand thin the edges of the petal with a balltool.
STEP 9 Press each petal firmly into theveiner to form the veiner pattern.
96

5
STEP 10 By using the corner of yourcutter cut a small notch at the top of thepetal.
STEP 11 Let the petals dry overnight on aformer to give definition and shape (wedo not want flat petals).
STEP 12 To make the leaves roll out asmall amount of green flower paste on thegroove board.
STEP 13 Cut out leaves using the leafcutter in two different sizes.
STEP 14 Add some edible glue at the endof the wire insert into the groove of theleaf.
STEP 15 Move the leaf onto a foam padand thin the edges with the ball tool.
STEP 16 Move the leaf onto the veinerand press firmly to shape the pattern
STEP 17 Let them dry on a foam. If youwish you can also dust the leaves withSaracino green powder or you can useconfectioner glaze, to shine the leaves.
STEP 18 To make the buds take a 24gauge wire and make a small hook at oneend. Roll a small ball of white paste andform a cone shape to create the bud. Addsome edible glue to the hook and insert itinto the bud. Press the bud onto the wireto secure it
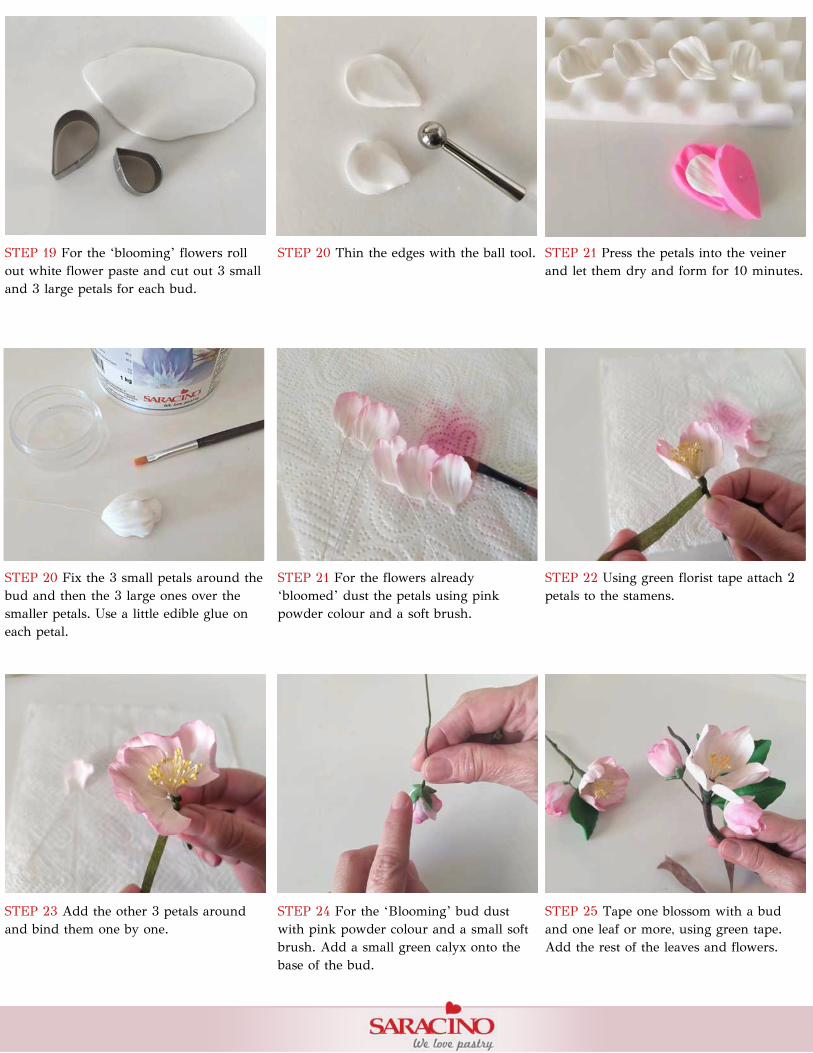
5
STEP 19 For the ‘blooming’ flowers rollout white flower paste and cut out 3 smalland 3 large petals for each bud.
STEP 20 Thin the edges with the ball tool. STEP 21 Press the petals into the veinerand let them dry and form for 10 minutes.
STEP 20 Fix the 3 small petals around thebud and then the 3 large ones over thesmaller petals. Use a little edible glue oneach petal.
STEP 22 Using green florist tape attach 2petals to the stamens.
STEP 23 Add the other 3 petals aroundand bind them one by one.
STEP 24 For the ‘Blooming’ bud dustwith pink powder colour and a small softbrush. Add a small green calyx onto thebase of the bud.
STEP 25 Tape one blossom with a budand one leaf or more, using green tape.Add the rest of the leaves and flowers.
STEP 21 For the flowers already‘bloomed’ dust the petals using pinkpowder colour and a soft brush.

![NIKE - [ZOE CATALOGOS]](https://static.fdokumen.com/doc/165x107/63319780ac2998afa709cc88/nike-zoe-catalogos.jpg)


![“Tell Me, Where is [this] Fancy Bred?”: The Cardiac and Cerebral Accounts of the Lateral Cradling Bias](https://static.fdokumen.com/doc/165x107/6337a31a7dc7407a2703de0f/tell-me-where-is-this-fancy-bred-the-cardiac-and-cerebral-accounts-of.jpg)