C++ GUI Programming with Qt 4 - l-homes.org
431
- C++ GUI Programming with Qt 4 By Jasmin Blanchette, Mark Summerfield ............................................... Publisher: Prentice Hall Pub Date: June 21, 2006 Print ISBN-10: 0-13-187249-4 Print ISBN-13: 978-0-13-187249-3 Pages: 560 Overview The Only Official Best-Practice Guide to Qt 4.1 Programming Using Trolltech's Qt you can build industrial-strength C++ applications that run natively on Windows, Linux/Unix, Mac OS X, and embedded Linux--without making source code changes. With this book Trolltech insiders have written a start-to-finish guide to getting great results with the most powerful version of Qt ever created: Qt 4.1. Using C++ GUI Programming with Qt 4 you'll discover the most effective Qt 4 programming patterns and techniques as you master key technologies ranging from Qt's model/view architecture to Qt's powerful new 2D paint engine. The authors provide readers with unparalleled insight into Qt's event model and layout system. Then, using realistic examples, they introduce superior techniques for everything from basic GUI development to advanced database and XML integration. Includes new chapters on Qt 4's model/view architecture and Qt's new plugin support, along with a brief introduction to Qtopia embedded programming Covers all Qt fundamentals, from dialogs and windows to implementing application functionality Introduces best practices for layout management and event processing Shows how to make the most of Qt 4's new APIs, including the powerful new 2D paint engine and the new easy-to-use container classes Contains completely updated material in every chapter Presents advanced Qt 4 techniques covered in no other book, from creating both Qt and application plugins to interfacing with native APIs Contains an in-depth appendix on C++/Qt programming for experienced Java developers The accompanying CD-ROM includes the open source edition of Qt 4.1.1 for Windows, Mac, Linux, and many Unixes, as well as MinGW, a set of freely available development tools that can be used to build Qt applications on Windows, and also the source code for the book's examples.
-
Upload
khangminh22 -
Category
Documents
-
view
0 -
download
0
Transcript of C++ GUI Programming with Qt 4 - l-homes.org
-
C++ GUI Programming with Qt 4By Jasmin Blanchette, Mark Summerfield...............................................Publisher: Prentice HallPub Date: June 21, 2006Print ISBN-10: 0-13-187249-4Print ISBN-13: 978-0-13-187249-3Pages: 560
OverviewThe Only Official Best-Practice Guide to Qt 4.1 Programming
Using Trolltech's Qt you can build industrial-strength C++ applications that run natively onWindows, Linux/Unix, Mac OS X, and embedded Linux--without making source code changes. Withthis book Trolltech insiders have written a start-to-finish guide to getting great results with the mostpowerful version of Qt ever created: Qt 4.1.
Using C++ GUI Programming with Qt 4 you'll discover the most effective Qt 4 programmingpatterns and techniques as you master key technologies ranging from Qt's model/view architectureto Qt's powerful new 2D paint engine. The authors provide readers with unparalleled insight into Qt'sevent model and layout system. Then, using realistic examples, they introduce superior techniquesfor everything from basic GUI development to advanced database and XML integration.
Includes new chapters on Qt 4's model/view architecture and Qt's new plugin support, alongwith a brief introduction to Qtopia embedded programming
Covers all Qt fundamentals, from dialogs and windows to implementing applicationfunctionality
Introduces best practices for layout management and event processing
Shows how to make the most of Qt 4's new APIs, including the powerful new 2D paint engineand the new easy-to-use container classes
Contains completely updated material in every chapter
Presents advanced Qt 4 techniques covered in no other book, from creating both Qt andapplication plugins to interfacing with native APIs
Contains an in-depth appendix on C++/Qt programming for experienced Java developers
The accompanying CD-ROM includes the open source edition of Qt 4.1.1 for Windows, Mac, Linux,and many Unixes, as well as MinGW, a set of freely available development tools that can be used tobuild Qt applications on Windows, and also the source code for the book's examples.

INDEX
CopyrightForewordPrefaceAcknowledgmentsA Brief History of QtPart 1: Basic Qt
Chapter 1. Getting StartedHello QtMaking ConnectionsLaying Out WidgetsUsing the Reference Documentation
Chapter 2. Creating DialogsSubclassing QDialogSignals and Slots in DepthRapid Dialog DesignShape-Changing DialogsDynamic DialogsBuilt-in Widget and Dialog Classes
Chapter 3. Creating Main WindowsSubclassing QMainWindowCreating Menus and ToolbarsSetting Up the Status BarImplementing the File MenuUsing DialogsStoring SettingsMultiple DocumentsSplash Screens
Chapter 4. Implementing Application FunctionalityThe Central WidgetSubclassing QTableWidgetLoading and SavingImplementing the Edit MenuImplementing the Other MenusSubclassing QTableWidgetItem
Chapter 5. Creating Custom WidgetsCustomizing Qt WidgetsSubclassing QWidgetIntegrating Custom Widgets with Qt DesignerDouble Buffering
Part II: Intermediate QtChapter 6. Layout Management
Laying Out Widgets on a FormStacked LayoutsSplittersScrolling AreasDock Widgets and ToolbarsMultiple Document Interface
Chapter 7. Event ProcessingReimplementing Event HandlersInstalling Event FiltersStaying Responsive During Intensive Processing
Chapter 8. 2D and 3D GraphicsPainting with QPainterPainter Transformations

High-Quality Rendering with QImagePrintingGraphics with OpenGL
Chapter 9. Drag and DropEnabling Drag and DropSupporting Custom Drag TypesClipboard Handling
Chapter 10. Item View ClassesUsing the Item View Convenience ClassesUsing Predefined ModelsImplementing Custom ModelsImplementing Custom Delegates
Chapter 11. Container ClassesSequential ContainersAssociative ContainersGeneric AlgorithmsStrings, Byte Arrays, and Variants
Chapter 12. Input/OutputReading and Writing Binary DataReading and Writing TextTraversing DirectoriesEmbedding ResourcesInter-Process Communication
Chapter 13. DatabasesConnecting and QueryingPresenting Data in Tabular FormImplementing MasterDetail Forms
Chapter 14. NetworkingWriting FTP ClientsWriting HTTP ClientsWriting TCP ClientServer ApplicationsSending and Receiving UDP Datagrams
Chapter 15. XMLReading XML with SAXReading XML with DOMWriting XML
Chapter 16. Providing Online HelpTooltips, Status Tips, and "What's This?" HelpUsing QTextBrowser as a Simple Help EngineUsing Qt Assistant for Powerful Online Help
Part III: Advanced QtChapter 17. Internationalization
Working with UnicodeMaking Applications Translation-AwareDynamic Language SwitchingTranslating Applications
Chapter 18. MultithreadingCreating ThreadsSynchronizing ThreadsCommunicating with the Main ThreadUsing Qt's Classes in Secondary Threads
Chapter 19. Creating PluginsExtending Qt with PluginsMaking Applications Plugin-AwareWriting Application Plugins
Chapter 20. Platform-Specific Features

Interfacing with Native APIsUsing ActiveX on WindowsHandling X11 Session Management
Chapter 21. Embedded ProgrammingGetting Started with QtopiaCustomizing Qtopia Core
Appendix A. Installing QtA Note on LicensingInstalling Qt/WindowsInstalling Qt/MacInstalling Qt/X11
Appendix B. Introduction to C++ for Java and C# ProgrammersGetting Started with C++Main Language DifferencesThe Standard C++ Library
About the AuthorsProductionIndex

CopyrightMany of the designations used by manufacturers and sellers to distinguish their products are claimedas trademarks. Where those designations appear in this book, and the publisher was aware of atrademark claim, the designations have been printed with initial capital letters or in all capitals.
The authors and publisher have taken care in the preparation of this book, but make no expressedor implied warranty of any kind and assume no responsibility for errors or omissions. No liability isassumed for incidental or consequential damages in connection with or arising out of the use of theinformation or programs contained herein.
The publisher offers excellent discounts on this book when ordered in quantity for bulk purchases orspecial sales, which may include electronic versions and/or custom covers and content particular toyour business, training goals, marketing focus, and branding interests. For more information, pleasecontact:
U.S. Corporate and Government Sales(800) [email protected]
For sales outside the United States, please contact:
International [email protected]
Visit us on the Web: www.prenhallprofessional.com
Library of Congress Cataloging-in-Publication DataBlanchette, Jasmin.
C++ GUI programming with Qt 4 / Jasmin Blanchette, Mark Summerfield.p. cm.
Includes bibliographical references and index.ISBN 0-13-187249-4 (pbk.: alk. paper)1. Graphical user interfaces (Computer systems) 2. C++ (Computer program language)
I. Summerfield, Mark. II. Title.QA76.9.U83B532 2006005.4'37dc22
2006013376
Copyright © 2006 Trolltech AS
All rights reserved. Printed in the United States of America. This publication may only be distributedsubject to the terms and conditions set forth in the Open Publication License, v1.0 or later (thelatest version is available at http://www.open-content.org/openpub/).
Trolltech®, Qt®, Qtopia®, and the Trolltech and Qtopia logos are registered trademarks of TrolltechAS.
Text printed in the United States on recycled paper at Courier in Stoughton, Massachusetts.
First printing, June 2006

ForewordWhy Qt? Why do programmers like us choose Qt? Sure, there are the obvious answers: Qt's single-source compatibility, its feature richness, its C++ performance, the availability of the source code,its documentation, the high-quality technical support, and all the other items mentioned inTrolltech's glossy marketing materials. This is all very well, but it misses the most important point:Qt is successful because programmers like it.
How come programmers like one technology, but dislike another? Personally I believe softwareengineers enjoy technology that feels right, but dislike everything that doesn't. "Feels right" meansmany things. In the Qt 3 edition of the book, I mentioned Trolltech's phone system as a particularlygood example of some particularly bad technology. The phone system didn't feel right, because itforced us to do apparently random things depending on some equally random context. Randomnessdoesn't feel right. Another thing that doesn't feel right is repetitiveness and redundancy. Goodprogrammers are lazy. What we love about computers compared to, say, gardening is that we don'thave to do the same things over and over.
Let me emphasize this point with a real-world example: travel reimbursement forms. Typically thoseforms come as fancy spreadsheets; you fill them out, and you get real money. Simple technology,one should think, and given the monetary incentive this should be a simple task for a grown-upengineer.
Reality looks different, though. While nobody else in the company seems to have any problemswhatsoever dealing with those forms,the engineers do. And having talked to people in othercompanies, this seems to be a common pattern. We defer reimbursement until the very lastmoment, and sometimes we might even forget about it. Why is that? Looking at our form, it's astraightforward, standard procedure. One has to collect receipts, number them, and put thosenumbers into the proper fields with the date, the location, a description, and the amount. Thenumbering and copying is designed to ease someone's work, but strictly speaking it is redundant,given that the date, location, description, and amount unambiguously identify a receipt. A tiny bit ofextra work to get your money back, one would think.
A small annoyance is the per-diem rate, though, which depends on the travel location. There's someseparate document somewhere that lists the standardized rates for all the different travel locations.You can't just select "Chicago"; instead you have to look up the rate for Chicago yourself. There's asimilar annoyance with the exchange rate field. One has to find the current exchange ratesomewhereperhaps with Google's helpand then enter the rate in every single field. Well, strictlyspeaking, you should wait for your credit card company to issue a statement to you with the actualexchange rate that they used. While this is not hard to do, looking up different pieces of informationfrom different sources, and then copying the relevant items to several places in the form feelsneedlessly awkward.
Programming can be a lot like filling in travel reimbursement forms, only worse. And this is where Qtcomes to the rescue. Qt is different. For one thing, Qt makes sense. And for another, Qt is fun. Qtlets you concentrate on your tasks. When Qt's original architects faced a problem, they didn't justlook for a good solution, or the simplest solution. They looked for the right solution, and then theydocumented it. Granted they made mistakes, and granted some of their design decisions didn't passthe test of time, but they still got a lot of things right, and what wasn't right could and can becorrected. You can see this by the fact that a system originally designed to bridge Windows 95 andUnix/Motif now unifies modern desktop systems as diverse as Windows XP, Mac OS X, andGNU/Linux, and provides the foundation for the Qtopia application platform for embedded Linux.
Long before Qt became so popular and so widely used, the dedication of Qt's developers to findingthe right solutions made Qt special. That dedication is just as strong today and affects everyone whodevelops and maintains Qt. For us, working on Qt is a responsibility and a privilege. We are proud ofhelping to make your professional and open source lives easier and more enjoyable.
Matthias Ettrich - Oslo, Norway - June 2006

PrefaceQt is a comprehensive C++ framework for developing cross-platform GUI applications using a "writeonce, compile anywhere" approach. Qt lets programmers use a single source tree for applicationsthat will run on Windows 98 to XP, Mac OS X, Linux, Solaris, HP-UX, and many other versions ofUnix with X11. The Qt libraries and tools are also part of Qtopia Core, a product that provides itsown window system on top of embedded Linux.
The purpose of this book is to teach you how to write GUI programs using Qt 4. The book starts with"Hello Qt" and quickly progresses to more advanced topics, such as creating custom widgets andproviding drag and drop. The text is complemented by a CD that contains the source code of theexample programs. The CD also includes the open source edition of Qt 4.1.1 for all supportedplatforms, as well as MinGW, a set of freely available development tools that can be used to build Qtapplications on Windows. Appendix A explains how to install the software.
The book is divided into three parts. Part I covers all the concepts and practices necessary forprogramming GUI applications using Qt. Knowledge of this part alone is sufficient to write useful GUIapplications. Part II covers central Qt topics in greater depth, and Part III provides more specializedand advanced material. The chapters of Parts II and III can be read in any order, but they assumefamiliarity with the contents of Part I.
Readers of the Qt 3 edition of this book will find this new edition familiar in both content and style.This edition has been updated to take advantage of Qt 4's new features (including some that wereintroduced with Qt 4.1) and to present code that shows good idiomatic Qt 4 programmingtechniques. In many cases, we have used examples similar to the ones used in the Qt 3 edition. Thiswill not affect new readers, but will help those who read the previous edition orient themselves to Qt4's cleaner, clearer, and more expressive style.
This edition includes new chapters covering Qt 4's model/view architecture, the new pluginframework, and embedded programming with Qtopia, as well a new appendix. And just like the Qt 3book, the emphasis is on explaining Qt programming rather than simply rehashing or summarizingQt's extensive online documentation.
We have written the book with the assumption that you have a basic knowledge of C++, Java, orC#. The code examples use a subset of C++, avoiding many C++ features that are rarely neededwhen programming Qt. In the few places where a more advanced C++ construct is unavoidable, it isexplained where it is used.
If you already know Java or C# but have little or no experience with C++, we recommend that youbegin by reading Appendix B, which provides sufficient introduction to C++ to be able to use thisbook. For a more thorough introduction to object-oriented programming in C++, we recommendC++ How to Program by Harvey Deitel and Paul Deitel, and the C++ Primer by Stanley B.Lippman, Josée Lajoie, and Barbara E. Moo.
Qt made its reputation as a cross-platform framework, but because of its intuitive and powerful API,many organizations use Qt for single-platform development. Adobe Photoshop Album is just oneexample of a mass-market Windows application written in Qt. Many sophisticated software systemsin vertical markets, such as 3D animation tools, digital film processing, electronic design automation(for chip design), oil and gas exploration, financial services, and medical imaging, are built with Qt.If you are making a living with a successful Windows product written in Qt, you can easily createnew markets in the Mac OS X and Linux worlds simply by recompiling.
Qt is available under various licenses. If you want to build commercial applications, you must buy acommercial Qt license; if you want to build open source programs, you can use the open source(GPL) edition. Qt is the foundation on which the K Desktop Environment (KDE) and the many opensource applications that go with it are built.
In addition to Qt's hundreds of classes, there are add-ons that extend Qt's scope and power. Some

of these products, like Qt Script for Applications (QSA) and the Qt Solutions components, areavailable from Trolltech, while others are supplied by other companies and by the open sourcecommunity. See http://www.trolltech.com/products/3rdparty/ for information on Qt add-ons. Qtalso has a well-established and thriving user community that uses the qt-interest mailing list; seehttp://lists.trolltech.com/ for details.
If you spot errors in the book, have suggestions for the next edition, or want to give us feedback,we would be delighted to hear from you. You can reach us at [email protected]. The errata willbe placed on http://doc.trolltech.com/qt-book-errata.html.

AcknowledgmentsOur first acknowledgment is of Eirik Chambe-Eng, Trolltech's president. Eirik not onlyenthusiastically encouraged us to write the Qt 3 edition of the book, he also allowed us to spend aconsiderable amount of our work time writing it. Eirik and Trolltech CEO Haavard Nord both read themanuscript and provided valuable feedback. Their generosity and foresight was aided and abettedby Matthias Ettrich, Trolltech's lead developer. Matthias cheerfully accepted our neglect of duty aswe obsessed over the writing of the first edition of this book and gave us a lot of advice on good Qtprogramming style.
For the Qt 3 edition, we asked two Qt customers, Paul Curtis and Klaus Schmidinger, to be ourexternal reviewers. Both are Qt experts with an amazing attention to technical detail, which theyproved by spotting some very subtle errors in our manuscript and suggesting numerousimprovements. And within Trolltech, alongside Matthias, our most stalwart reviewer was ReginaldStadlbauer. His technical insight was invaluable, and he taught us how to do some things in Qt thatwe didn't even know were possible.
For this Qt 4 edition, we have continued to benefit from the unstinting help and support of Eirik,Haavard, and Matthias. Klaus Schmidinger continued to give valuable feedback, and within Trolltech,our key reviewers were Andreas Aardal Hanssen, Henrik Hartz, Vivi Glückstad Karlsen, TrentonSchulz, Andy Shaw, and Pål de Vibe.
In addition to the reviewers mentioned above, we received expert help from Harald Fernengel(databases), Volker Hilsheimer (ActiveX), Bradley Hughes (multithreading), Trond Kjernåsen (3Dgraphics and databases), Lars Knoll (2D graphics and internationalization), Sam Magnuson (qmake),Marius Bugge Monsen (item view classes), Dimitri Papadopoulos (Qt/X11), Paul Olav Tvete (customwidgets and embedded programming), Rainer Schmid (networking and XML), Amrit Pal Singh(introduction to C++), and Gunnar Sletta (2D graphics and event processing).
Extra thanks are due to Trolltech's documentation and support teams for handling documentation-related issues while the book consumed so much of our time, and to Trolltech's systemadministrators for keeping our machines running and our networks communicating throughout theproject.
On the production side, Trenton Schulz created the accompanying CD, and Trolltech's Cathrine Borehandled the contracts and legalities on our behalf. Thanks also to Nathan Clement for the Trollillustrations. And last but not least, thanks to Lara Wysong from Pearsons, for handling theproduction practicalities so well.

A Brief History of QtThe Qt framework first became publicly available in May 1995. It was initially developed by HaavardNord (Trolltech's CEO) and Eirik Chambe-Eng (Trolltech's president). Haavard and Eirik met at theNorwegian Institute of Technology in Trondheim, where they both graduated with master's degreesin computer science.
Haavard's interest in C++ GUI development began in 1988 when he was commissioned by aSwedish company to develop a C++ GUI framework. A couple of years later, in the summer of 1990,Haavard and Eirik were working together on a C++ database application for ultrasound images. Thesystem needed to be able to run with a GUI on Unix, Macintosh, and Windows. One day thatsummer, Haavard and Eirik went outside to enjoy the sunshine, and as they sat on a park bench,Haavard said, "We need an object-oriented display system." The resulting discussion laid theintellectual foundation for the object-oriented cross-platform GUI framework they would soon go onto build.
In 1991, Haavard started writing the classes that eventually became Qt, collaborating with Eirik onthe design. The following year, Eirik came up with the idea for "signals and slots", a simple butpowerful GUI programming paradigm that has now been embraced by several other toolkits.Haavard took the idea and produced a hand-coded implementation. By 1993, Haavard and Eirik haddeveloped Qt's first graphics kernel and were able to implement their own widgets. At the end of theyear, Haavard suggested that they go into business together to build "the world's best C++ GUIframework".
The year 1994 began inauspiciously with the two young programmers wanting to enter a well-established market, with no customers, an unfinished product, and no money. Fortunately, boththeir wives were employed and therefore able to support their husbands for the two years Eirik andHaavard expected to need to develop the product and start earning an income.
The letter 'Q' was chosen as the class prefix because the letter looked beautiful in Haavard's Emacsfont. The 't' was added to stand for "toolkit", inspired by Xt, the X Toolkit. The company wasincorporated on March 4, 1994, originally as Quasar Technologies, then as Troll Tech, and today asTrolltech.
In April 1995, thanks to a contact made through one of Haavard's university professors, theNorwegian company Metis gave them a contract to develop software based on Qt. Around this time,Trolltech hired Arnt Gulbrandsen, who during his six years at Trolltech devised and implemented aningenious documentation system as well as contributing to Qt's code.
On May 20, 1995, Qt 0.90 was uploaded to sunsite.unc.edu. Six days later, the release wasannounced on comp.os.linux.announce. This was Qt's first public release. Qt could be used for bothWindows and Unix development, offering the same API on both platforms. Qt was available undertwo licenses from day one: A commercial license was required for commercial development, and afree software edition was available for open source development. The Metis contract kept Trolltechafloat, while for ten long months no one bought a commercial Qt license.
In March 1996, the European Space Agency became the second Qt customer, with a purchase of tencommercial licenses. With unwavering faith, Eirik and Haavard hired another developer. Qt 0.97 wasreleased at the end of May, and on September 24, 1996, Qt 1.0 came out. By the end of the year,Qt had reached version 1.1; eight customers, each in a different country, had bought 18 licensesbetween them. This year also saw the founding of the KDE project, led by Matthias Ettrich.
Qt 1.2 was released in April 1997. Matthias Ettrich's decision to use Qt to build KDE helped Qtbecome the de facto standard for C++ GUI development on Linux. Qt 1.3 was released inSeptember 1997.
Matthias joined Trolltech in 1998, and the last major Qt 1 release, 1.40, was made in September ofthat year. Qt 2.0 was released in June 1999. Qt 2 had a new open source license, the Q Public

License (QPL), which complied with the Open Source Definition. In August 1999, Qt won theLinuxWorld award for best library/tool. Around this time, Trolltech Pty Ltd (Australia) wasestablished.
Trolltech released Qtopia Core (then called Qt/Embedded) in 2000. It was designed to run onembedded Linux devices and provided its own window system as a lightweight replacement for X11.Both Qt/X11 and Qtopia Core were now offered under the widely used GNU General Public License(GPL) as well as under commercial licenses. By the end of 2000, Trolltech had established TrolltechInc.(USA) and had released the first version of Qtopia, an application platform for mobile phonesand PDAs. Qtopia Core won the LinuxWorld "Best Embedded Linux Solution" award in both 2001 and2002, and Qtopia Phone achieved the same distinction in 2004.
Qt 3.0 was released in 2001. Qt was now available on Windows, Mac OS X, Unix, and Linux (desktopand embedded). Qt 3 provided 42 new classes and its code exceeded 500,000 lines. Qt 3 was amajor step forward from Qt 2, including considerably improved locale and Unicode support, acompletely new text viewing and editing widget, and a Perl-like regular expression class. Qt 3 wonthe Software Development Times "Jolt Productivity Award" in 2002.
In the summer of 2005, Qt 4.0 was released. With about 500 classes and more than 9000 functions,Qt 4 is larger and richer than any previous version, and it has been split into several libraries so thatdevelopers only need to link against the parts of Qt that they need. Qt 4 is a huge advance onprevious versions with improvements that include a completely new set of efficient and easy-to-usetemplate containers, advanced model/view functionality, a fast and flexible 2D painting framework,and powerful Unicode text viewing and editing classes, not to mention thousands of smallerenhancements across the complete range of Qt classes. Qt 4 is the first Qt edition to be available forboth commercial and open source development on all the platforms it supports.
Also in 2005, Trolltech opened a representative office in Beijing to provide customers in China andthe region with sales services, training, and technical support for Qtopia.
Since Trolltech's birth, Qt's popularity has grown unabated and continues to grow to this day. Thissuccess is a reflection both of the quality of Qt and of how enjoyable it is to use. In the last decade,Qt has gone from being a product used by a select few "in the know" to one that is used daily bythousands of customers and tens of thousands of open source developers all around the world.

Part 1: Basic Qt
Chapter 1. Getting Started
Chapter 2. Creating Dialogs
Chapter 3. Creating Main Windows
Chapter 4. Implementing Application Functionality
Chapter 5. Creating Custom Widgets

Chapter 1. Getting Started Hello Qt Making Connections Laying Out Widgets Using the Reference Documentation
This chapter shows how to combine basic C++ with the functionality provided by Qt to create a fewsmall graphical user interface (GUI) applications. This chapter also introduces two key Qt ideas:"signals and slots" and layouts. In Chapter 2, we will go into more depth, and in Chapter 3, we willstart building a more realistic application.
If you already know Java or C# but have limited experience with C++, you might want to start byreading the C++ introduction in Appendix B.
Hello QtLet's start with a very simple Qt program. We will first study it line by line, then we will see how tocompile and run it.
1 #include <QApplication>2 #include <QLabel>3 int main(int argc, char *argv[])4 {5 QApplication app(argc, argv);6 QLabel *label = new QLabel("Hello Qt!");7 label->show();8 return app.exec();9 }
Lines 1 and 2 include the definitions of the QApplication and QLabel classes. For every Qt class,there is a header file with the same name (and capitalization) as the class that contains the class'sdefinition.
Line 5 creates a QApplication object to manage application-wide resources. The QApplication
constructor requires argc and argv because Qt supports a few command-line arguments of its own.
Line 6 creates a QLabel widget that displays "Hello Qt!". In Qt and Unix terminology, a widget is avisual element in a user interface. The term stems from "window gadget" and is the equivalent ofboth "control" and "container" in Windows terminology. Buttons, menus, scroll bars, and frames areall examples of widgets. Widgets can contain other widgets; for example, an application window isusually a widget that contains a QMenuBar, a few QToolBars, a QStatusBar, and some other widgets.Most applications use a QMainWindow or a QDialog as the application window, but Qt is so flexible thatany widget can be a window. In this example, the QLabel widget is the application window.
Line 7 makes the label visible. Widgets are always created hidden, so that we can customize thembefore showing them, thereby avoiding flicker.
Line 8 passes control of the application on to Qt. At this point, the program enters the event loop.This is a kind of stand-by mode where the program waits for user actions such as mouse clicks andkey presses. User actions generate events (also called "messages") to which the program canrespond, usually by executing one or more functions. For example, when the user clicks a widget, a
"mouse press" and a "mouse release" event are generated. In this respect, GUI applications differdrastically from conventional batch programs, which typically process input, produce results, andterminate without human intervention.
For simplicity, we don't bother calling delete on the QLabel object at the end of the main() function.This memory leak is harmless in such a small program, since the memory will be reclaimed by theoperating system when the program terminates.
Figure 1.1. Hello on Linux
It is now possible to try the program on your own machine. First, you will need to install Qt 4.1.1 (ora later Qt 4 release), a process that is explained in Appendix A. From now on, we will assume thatyou have a correctly installed copy of Qt 4 and that Qt's bin directory is in your PATH environmentvariable. (On Windows, this is done automatically by the Qt installation program.) You will also needthe program's source code in a file called hello.cpp in a directory called hello. You can type inhello.cpp yourself, or copy it from the CD provided with this book, where it is available as/examples/chap01/hello/hello.cpp.
From a command prompt, change the directory to hello, then type
qmake -project
to create a platform-independent project file (hello.pro), then type
qmake hello.pro
to create a platform-specific makefile from the project file.
Type make to build the program.[*] Run it by typing hello on Windows, ./hello on Unix, and open
hello.app on Mac OS X. To terminate the program, click the close button in the window's title bar.
[*] If you get a compiler error on the <QApplication> include, it probably means that you are using an older version of Qt. Makesure that you are using Qt 4.1.1 or a later Qt 4 release.
If you are using Windows and have installed the Qt Open Source Edition and the MinGW compiler,you will have a shortcut to a DOS Prompt window that has all the environment variables correctlyset up for Qt. If you start this window, you can compile Qt applications within it using qmake and make
as described above. The executables produced are put in the application's debug or release folder,for example, C:\qt-book\hello\release\hello.exe.
If you are using Microsoft Visual C++, you will need to run nmake instead of make. Alternatively, youcan create a Visual Studio project file from hello.pro by typing
qmake -tp vc hello.pro
and then build the program in Visual Studio. If you are using Xcode on Mac OS X, you can generate

an Xcode project using the command
qmake -spec macx-xcode
Figure 1.2. A label with basic HTML formatting
Before we go on to the next example, let's have some fun: Replace the line
QLabel *label = new QLabel("Hello Qt!");
with
QLabel *label = new QLabel("<h2><i>Hello</i> ""<font color=red>Qt!</font></h2>");
and rebuild the application. As the example illustrates, it's easy to brighten up a Qt application'suser interface using some simple HTML-style formatting.
Making ConnectionsThe second example shows how to respond to user actions. The application consists of a button thatthe user can click to quit. The source code is very similar to Hello, except that we are using aQPushButton instead of a QLabel as our main widget, and we are connecting a user action (clicking abutton) to a piece of code.
This application's source code is on the CD in the file /examples/chap01/quit/quit.cpp. Here's thecontents of the file:
1 #include <QApplication> 2 #include <QPushButton> 3 int main(int argc, char *argv[]) 4 { 5 QApplication app(argc, argv); 6 QPushButton *button = new QPushButton("Quit"); 7 QObject::connect(button, SIGNAL(clicked()), 8 &app, SLOT(quit())); 9 button->show();10 return app.exec();11 }
Qt's widgets emit signals to indicate that a user action or a change of state has occurred.[*] For

instance, QPushButton emits a clicked() signal when the user clicks the button. A signal can beconnected to a function (called a slot in that context), so that when the signal is emitted, the slot isautomatically executed. In our example, we connect the button's clicked() signal to theQApplication object's quit() slot. The SIGNAL() and SLOT() macros are part of the syntax; they areexplained in more detail in the next chapter.
[*] Qt signals are unrelated to Unix signals. In this book, we are only concerned with Qt signals.
Figure 1.3. The Quit application
We will now build the application. We assume that you have created a directory called quit
containing quit.cpp. Run qmake in the quit directory to generate the project file, then run it again togenerate a makefile, as follows:
qmake -projectqmake quit.pro
Now build the application, and run it. If you click Quit, or press Space (which presses the button),the application will terminate.
Laying Out WidgetsIn this section, we will create a small example application that demonstrates how to use layouts tomanage the geometry of widgets in a window and how to use signals and slots to synchronize twowidgets. The application asks for the user's age, which the user can enter by manipulating either aspin box or a slider.
The application consists of three widgets: a QSpinBox, a QSlider, and a QWidget. The QWidget is theapplication's main window. The QSpinBox and the QSlider are rendered inside the QWidget; they arechildren of the QWidget. Alternatively, we can say that the QWidget is the parent of the QSpinBox
and the QSlider. The QWidget has no parent itself because it is being used as a top-level window.The constructors for QWidget and all of its subclasses take a QWidget * parameter that specifies theparent widget.
Figure 1.4. The Age application
Here's the source code:
1 #include <QApplication> 2 #include <QHBoxLayout>

3 #include <QSlider> 4 #include <QSpinBox> 5 int main(int argc, char *argv[]) 6 { 7 QApplication app(argc, argv); 8 QWidget *window = new QWidget; 9 window->setWindowTitle("Enter Your Age");10 QSpinBox *spinBox = new QSpinBox;11 QSlider *slider = new QSlider(Qt::Horizontal);12 spinBox->setRange(0, 130);13 slider->setRange(0, 130);14 QObject::connect(spinBox, SIGNAL(valueChanged(int)),15 slider, SLOT(setValue(int)));16 QObject::connect(slider, SIGNAL(valueChanged(int)),17 spinBox, SLOT(setValue(int)));18 spinBox->setValue(35);19 QHBoxLayout *layout = new QHBoxLayout;20 layout->addWidget(spinBox);21 layout->addWidget(slider);22 window->setLayout(layout);23 window->show();24 return app.exec();25 }
Lines 8 and 9 set up the QWidget that will serve as the application's main window. We callsetWindowTitle() to set the text displayed in the window's title bar.
Lines 10 and 11 create a QSpinBox and a QSlider, and lines 12 and 13 set their valid ranges. We cansafely assume that the user is at most 130 years old. We could pass window to the QSpinBox andQSlider constructors, specifying that these widgets should have window as their parent, but it isn'tnecessary here because the layout system will figure this out by itself and automatically set theparent of the spin box and the slider, as we will see shortly.
The two QObject::connect() calls shown in lines 14 to 17 ensure that the spin box and the slider aresynchronized so that they always show the same value. Whenever the value of one widget changes,its valueChanged(int) signal is emitted, and the setValue(int) slot of the other widget is called withthe new value.
Line 18 sets the spin box value to 35. When this happens, the QSpinBox emits the valueChanged(int)
signal with an int argument of 35. This argument is passed to the QSlider's setValue(int) slot,which sets the slider value to 35. The slider then emits the valueChanged(int) signal, because itsown value changed, triggering the spin box's setValue(int) slot. But at this point, setValue(int)doesn't emit any signal, since the spin box value is already 35. This prevents infinite recursion.Figure 1.5 summarizes the situation.
Figure 1.5. Changing one widget's value changes both

In lines 19 to 22, we lay out the spin box and slider widgets using a layout manager. A layoutmanager is an object that sets the size and position of the widgets that lie under its responsibility.Qt has three main layout manager classes:
QHBoxLayout lays out widgets horizontally from left to right (right to left for some cultures). QVBoxLayout lays out widgets vertically from top to bottom. QGridLayout lays out widgets in a grid.
The call to QWidget::setLayout() on line 22 installs the layout manager on the window. Behind thescenes, the QSpinBox and QSlider are "reparented" to be children of the widget on which the layoutis installed, and for this reason we don't need to specify an explicit parent when we construct awidget that will be put in a layout.
Figure 1.6. The Age application's widgets
Even though we didn't set the position or size of any widget explicitly, the QSpinBox and QSlider
appear nicely laid out side by side. This is because QHBox-Layout automatically assigns reasonablepositions and sizes to the widgets for which it is responsible, based on their needs. The layoutmanagers free us from the chore of hard-coding screen positions in our applications and ensure thatwindows resize smoothly.
Qt's approach to building user interfaces is simple to understand and very flexible. The mostcommon pattern that Qt programmers use is to instantiate the required widgets and then set theirproperties as necessary. Programmers add the widgets to layouts, which automatically take care ofsizing and positioning. User interface behavior is managed by connecting widgets together using Qt'ssignals and slots mechanism.

Using the Reference DocumentationQt's reference documentation is an essential tool for any Qt developer, since it covers every classand function in Qt. This book makes use of many Qt classes and functions, but it does not cover allof them, nor does it provide every detail of those that are mentioned. To get the most benefit fromQt, you should familiarize yourself with the Qt reference documentation as quickly as possible.
The documentation is available in HTML format in Qt's doc/html directory and can be read using anyweb browser. You can also use Qt Assistant, the Qt help browser, which has powerful searchingand indexing features that make it quicker and easier to use than a web browser. To launch QtAssistant, click Qt by Trolltech v4.x.y|Assistant in the Start menu on Windows, type assistant onthe command line on Unix, or double-click Assistant in the Mac OS X Finder.
The links in the "API Reference" section on the home page provide different ways of navigating Qt'sclasses. The "All Classes" page lists every class in Qt's API. The "Main Classes" page lists only themost commonly used Qt classes. As an exercise, you might want to look up the classes andfunctions that we have used in this chapter.
Figure 1.7. Qt's documentation in Qt Assistant on Mac OS X
[View full size image]
Note that inherited functions are documented in the base class; for example, QPushButton has noshow() function of its own, but it inherits one from its ancestor QWidget. Figure 1.8 shows how theclasses we have seen so far relate to each other.
Figure 1.8. Inheritance tree for the Qt classes seen so far

The reference documentation for the current version of Qt and for some earlier versions is availableonline at http://doc.trolltech.com/. This site also has selected articles from Qt Quarterly, the Qtprogrammers' newsletter sent to all commercial licensees.
Widget Styles
The screenshots we have seen so far have been taken on Linux, but Qt applications looknative on every supported platform. Qt achieves this by emulating the platform's lookand feel, rather than wrapping a particular platform or toolkit's widget set.
Figure 1.9. Styles available everywhere
With Qt/X11 and Qtopia Core, the default style is Plastique, which uses gradients andanti-aliasing to provide a modern look and feel. Qt application users can override thedefault style by using the -style command-line option. For example, to launch the Ageapplication using the Motif style on X11, simply type
./age -style motif
on the command line.
Figure 1.10. Platform-specific styles

Unlike the other styles, the Windows XP and Mac styles are only available on their nativeplatforms, since they rely on the platforms' theme engines.
This chapter has introduced the key concepts of signalslot connections and layouts. It has alsobegun to reveal Qt's consistent and fully object-oriented approach to the construction and use ofwidgets. If you browse through Qt's documentation, you will find a uniformity of approach thatmakes it straightforward to learn how to use new widgets, and you will also find that Qt's carefullychosen names for functions, parameters, enums, and so on, make programming in Qt surprisinglypleasant and easy.
The following chapters of Part I build on the fundamentals covered here, showing how to createcomplete GUI applications with menus, toolbars, document windows, a status bar, and dialogs,along with the underlying functionality to read, process, and write files.

Chapter 2. Creating Dialogs Subclassing QDialog Signals and Slots in Depth Rapid Dialog Design Shape-Changing Dialogs Dynamic Dialogs Built-in Widget and Dialog Classes
This chapter will teach you how to create dialog boxes using Qt. Dialog boxes present users withoptions and choices, and allow them to set the options to their preferred values and to make theirchoices. They are called dialog boxes, or simply "dialogs", because they provide a means by whichusers and applications can "talk to" each other.
Most GUI applications consist of a main window with a menu bar and toolbar, along with dozens ofdialogs that complement the main window. It is also possible to create dialog applications thatrespond directly to the user's choices by performing the appropriate actions (for example, acalculator application).
We will create our first dialog purely by writing code to show how it is done. Then we will see how tobuild dialogs using Qt Designer, Qt's visual design tool. Using Qt Designer is a lot faster thanhand-coding and makes it easy to test different designs and to change designs later.
Subclassing QDialogOur first example is a Find dialog written entirely in C++. We will implement the dialog as a class inits own right. By doing so, we make it an independent, self-contained component, with its ownsignals and slots.
Figure 2.1. The Find dialog
The source code is spread across two files: finddialog.h and finddialog.cpp. We will start withfinddialog.h.
1 #ifndef FINDDIALOG_H2 #define FINDDIALOG_H3 #include <QDialog>4 class QCheckBox;5 class QLabel;6 class QLineEdit;7 class QPushButton;

Lines 1 and 2 (and 27) protect the header file against multiple inclusions.
Line 3 includes the definition of QDialog, the base class for dialogs in Qt. QDialog inherits QWidget.
Lines 4 to 7 are forward declarations of the Qt classes that we will use to implement the dialog. Aforward declaration tells the C++ compiler that a class exists, without giving all the detail that aclass definition (usually located in a header file of its own) provides. We will say more about thisshortly.
Next, we define FindDialog as a subclass of QDialog:
8 class FindDialog : public QDialog 9 {10 Q_OBJECT11 public:12 FindDialog(QWidget *parent = 0);
The Q_OBJECT macro at the beginning of the class definition is necessary for all classes that definesignals or slots.
The FindDialog constructor is typical of Qt widget classes. The parent parameter specifies the parentwidget. The default is a null pointer, meaning that the dialog has no parent.
13 signals:14 void findNext(const QString &str, Qt::CaseSensitivity cs);15 void findPrevious(const QString &str, Qt::CaseSensitivity cs);
The signals section declares two signals that the dialog emits when the user clicks the Find button.If the Search backward option is enabled, the dialog emits findPrevious(); otherwise, it emitsfindNext().
The signals keyword is actually a macro. The C++ preprocessor converts it into standard C++before the compiler sees it. Qt::CaseSensitivity is an enum type that can take the valuesQt::CaseSensitive and Qt::CaseInsensitive.
16 private slots:17 void findClicked();18 void enableFindButton(const QString &text);19 private:20 QLabel *label;21 QLineEdit *lineEdit;22 QCheckBox *caseCheckBox;23 QCheckBox *backwardCheckBox;24 QPushButton *findButton;25 QPushButton *closeButton;26 };27 #endif
In the class's private section, we declare two slots. To implement the slots, we will need to accessmost of the dialog's child widgets, so we keep pointers to them as well. The slots keyword is, likesignals, a macro that expands into a construct that the C++ compiler can digest.
For the private variables, we used forward declarations of their classes. This was possible because
they are all pointers and we don't access them in the header file, so the compiler doesn't need thefull class definitions. We could have included the relevant header files (<QCheckBox>, <QLabel>, etc.),but using forward declarations when it is possible makes compiling somewhat faster.
We will now look at finddialog.cpp, which contains the implementation of the FindDialog class.
1 #include <QtGui>2 #include "finddialog.h"
First, we include <QtGui>, a header file that contains the definition of Qt's GUI classes. Qt consists ofseveral modules, each of which lives in its own library. The most important modules are QtCore,QtGui, QtNetwork, QtOpenGL, QtSql, QtSvg, and QtXml. The <QtGui> header file contains thedefinition of all the classes that are part of the QtCore and QtGui modules. Including this headersaves us the bother of including every class individually.
In filedialog.h, instead of including <QDialog> and using forward declarations for QCheckBox, QLabel,QLineEdit, and QPushButton, we could simply have included <QtGui>. However, it is generally badstyle to include such a big header file from another header file, especially in larger applications.
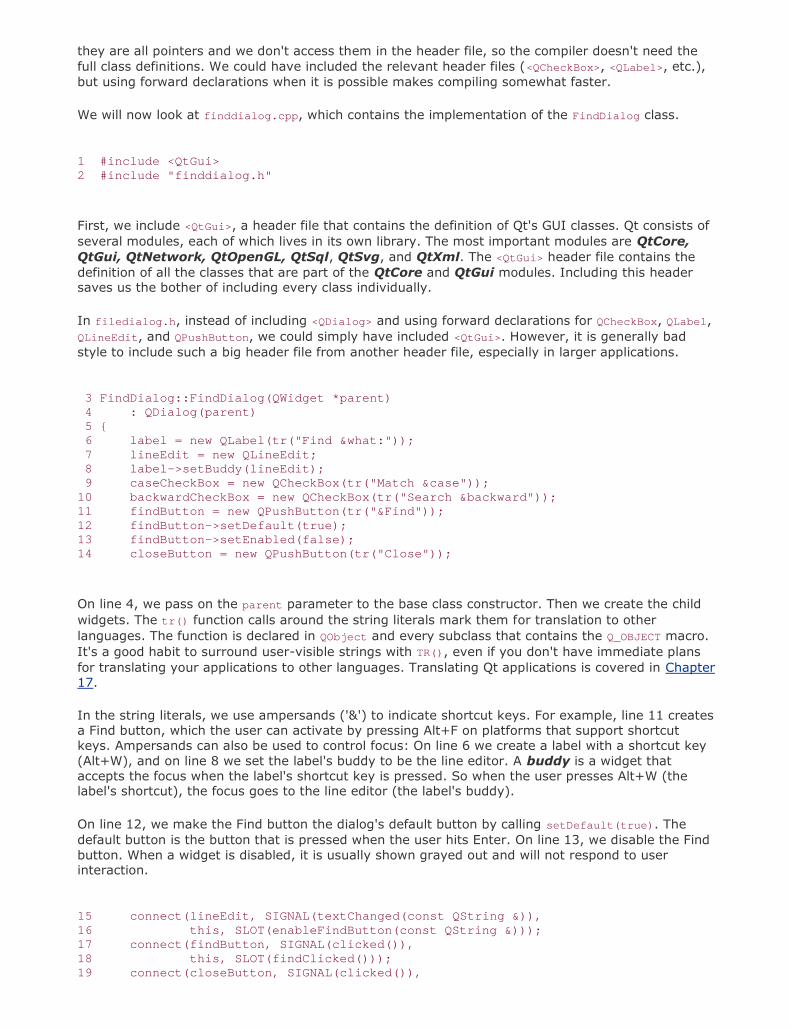
3 FindDialog::FindDialog(QWidget *parent) 4 : QDialog(parent) 5 { 6 label = new QLabel(tr("Find &what:")); 7 lineEdit = new QLineEdit; 8 label->setBuddy(lineEdit); 9 caseCheckBox = new QCheckBox(tr("Match &case"));10 backwardCheckBox = new QCheckBox(tr("Search &backward"));11 findButton = new QPushButton(tr("&Find"));12 findButton->setDefault(true);13 findButton->setEnabled(false);14 closeButton = new QPushButton(tr("Close"));
On line 4, we pass on the parent parameter to the base class constructor. Then we create the childwidgets. The tr() function calls around the string literals mark them for translation to otherlanguages. The function is declared in QObject and every subclass that contains the Q_OBJECT macro.It's a good habit to surround user-visible strings with TR(), even if you don't have immediate plansfor translating your applications to other languages. Translating Qt applications is covered in Chapter17.
In the string literals, we use ampersands ('&') to indicate shortcut keys. For example, line 11 createsa Find button, which the user can activate by pressing Alt+F on platforms that support shortcutkeys. Ampersands can also be used to control focus: On line 6 we create a label with a shortcut key(Alt+W), and on line 8 we set the label's buddy to be the line editor. A buddy is a widget thataccepts the focus when the label's shortcut key is pressed. So when the user presses Alt+W (thelabel's shortcut), the focus goes to the line editor (the label's buddy).
On line 12, we make the Find button the dialog's default button by calling setDefault(true). Thedefault button is the button that is pressed when the user hits Enter. On line 13, we disable the Findbutton. When a widget is disabled, it is usually shown grayed out and will not respond to userinteraction.
15 connect(lineEdit, SIGNAL(textChanged(const QString &)),16 this, SLOT(enableFindButton(const QString &)));17 connect(findButton, SIGNAL(clicked()),18 this, SLOT(findClicked()));19 connect(closeButton, SIGNAL(clicked()),

20 this, SLOT(close()));
The private slot enableFindButton(const QString &) is called whenever the text in the line editorchanges. The private slot findClicked() is called when the user clicks the Find button. The dialogcloses itself when the user clicks Close. The close() slot is inherited from QWidget, and its defaultbehavior is to hide the widget from view (without deleting it). We will look at the code for theenableFindButton() and findClicked() slots later on.
Since QObject is one of FindDialog's ancestors, we can omit the QObject:: prefix in front of theconnect() calls.
21 QHBoxLayout *topLeftLayout = new QHBoxLayout;22 topLeftLayout->addWidget(label);23 topLeftLayout->addWidget(lineEdit);24 QVBoxLayout *leftLayout = new QVBoxLayout;25 leftLayout->addLayout(topLeftLayout);26 leftLayout->addWidget(caseCheckBox);27 leftLayout->addWidget(backwardCheckBox);28 QVBoxLayout *rightLayout = new QVBoxLayout;29 rightLayout->addWidget(findButton);30 rightLayout->addWidget(closeButton);31 rightLayout->addStretch();32 QHBoxLayout *mainLayout = new QHBoxLayout;33 mainLayout->addLayout(leftLayout);34 mainLayout->addLayout(rightLayout);35 setLayout(mainLayout);
Next, we lay out the child widgets using layout managers. Layouts can contain both widgets andother layouts. By nesting QHBoxLayouts, QVBoxLayouts, and QGridLayouts in various combinations, it ispossible to build very sophisticated dialogs.
For the Find dialog, we use two QHBoxLayouts and two QVBoxLayouts, as shown in Figure 2.2. Theouter layout is the main layout; it is installed on the FindDialog on line 35 and is responsible for thedialog's entire area. The other three layouts are sub-layouts. The little "spring" at the bottom rightof Figure 2.2 is a spacer item (or "stretch"). It uses up the empty space below the Find and Closebuttons, ensuring that these buttons occupy the top of their layout.
Figure 2.2. The Find dialog's layouts
[View full size image]
One subtle aspect of the layout manager classes is that they are not widgets. Instead, they inheritQLayout, which in turn inherits QObject. In the figure, widgets are represented by solid outlines andlayouts are represented by dashed outlines to highlight the difference between them. In a runningapplication, layouts are invisible.
When the sub-layouts are added to the parent layout (lines 25, 33, and 34), the sub-layouts are

automatically reparented. Then, when the main layout is installed on the dialog (line 35), it becomesa child of the dialog, and all the widgets in the layouts are reparented to become children of thedialog. The resulting parentchild hierarchy is depicted in Figure 2.3.
Figure 2.3. The Find dialog's parentchild relationships
36 setWindowTitle(tr("Find"));37 setFixedHeight(sizeHint().height());38 }
Finally, we set the title to be shown in the dialog's title bar and we set the window to have a fixedheight, since there aren't any widgets in the dialog that can meaningfully occupy any extra verticalspace. The QWidget::sizeHint() function returns a widget's "ideal" size.
This completes the review of FindDialog's constructor. Since we used new to create the dialog'swidgets and layouts, it would seem that we need to write a destructor that calls delete on each ofthe widgets and layouts we created. But this isn't necessary, since Qt automatically deletes childobjects when the parent is destroyed, and the child widgets and layouts are all descendants of theFindDialog.
Now we will look at the dialog's slots:
39 void FindDialog::findClicked()40 {41 QString text = lineEdit->text();42 Qt::CaseSensitivity cs =43 caseCheckBox->isChecked() ? Qt::CaseSensitive44 : Qt::CaseInsensitive;45 if (backwardCheckBox->isChecked()) {46 emit findPrevious(text, cs);47 } else {48 emit findNext(text, cs);49 }50 }51 void FindDialog::enableFindButton(const QString &text)52 {53 findButton->setEnabled(!text.isEmpty());54 }
The findClicked() slot is called when the user clicks the Find button. It emits the findPrevious() orthe findNext() signal, depending on the Search backward option. The emit keyword is specific to Qt;like other Qt extensions it is converted into standard C++ by the C++ preprocessor.
The enableFindButton() slot is called whenever the user changes the text in the line editor. It

enables the button if there is some text in the editor, and disables it otherwise.
These two slots complete the dialog. We can now create a main.cpp file to test our FindDialog
widget:
1 #include <QApplication>2 #include "finddialog.h"3 int main(int argc, char *argv[])4 {5 QApplication app(argc, argv);6 FindDialog *dialog = new FindDialog;7 dialog->show();8 return app.exec();9 }
To compile the program, run qmake as usual. Since the FindDialog class definition contains theQ_OBJECT macro, the makefile generated by qmake will include special rules to run moc, Qt's meta-object compiler. (Qt's meta-object system is covered in the next section.)
For moc to work correctly, we must put the class definition in a header file, separate from theimplementation file. The code generated by moc includes this header file and adds some C++ magicof its own.
Classes that use the Q_OBJECT macro must have moc run on them. This isn't a problem because qmake
automatically adds the necessary rules to the makefile. But if you forget to regenerate your makefileusing qmake and moc isn't run, the linker will complain that some functions are declared but notimplemented. The messages can be fairly obscure. GCC produces warnings like this one:
finddialog.o: In function 'FindDialog::tr(char const*, char const*)': /usr/lib/qt/src/corelib/global/qglobal.h:1430: undefined reference to 'FindDialog::staticMetaObject'
Visual C++'s output starts like this:
finddialog.obj : error LNK2001: unresolved external symbol "public:~virtual int __thiscall MyClass::qt_metacall(enum QMetaObject ::Call,int,void * *)"
If this ever happens to you, run qmake again to update the makefile, then rebuild the application.
Now run the program. If shortcut keys are shown on your platform, verify that the shortcut keysAlt+W, Alt+C, Alt+B, and Alt+F trigger the correct behavior. Press Tab to navigate through thewidgets with the keyboard. The default tab order is the order in which the widgets were created.This can be changed using QWidget::setTabOrder().
Providing a sensible tab order and keyboard shortcuts ensures that users who don't want to (orcannot) use a mouse are able to make full use of the application. Full keyboard control is alsoappreciated by fast typists.
In Chapter 3, we will use the Find dialog inside a real application, and we will connect thefindPrevious() and findNext() signals to some slots.

Signals and Slots in DepthThe signals and slots mechanism is fundamental to Qt programming. It enables the applicationprogrammer to bind objects together without the objects knowing anything about each other. Wehave already connected some signals and slots together, declared our own signals and slots,implemented our own slots, and emitted our own signals. Let's take a moment to look at themechanism more closely.
Slots are almost identical to ordinary C++ member functions. They can be virtual; they can beoverloaded; they can be public; protected, or private, they can be directly invoked like any otherC++ member functions; and their parameters can be of any types. The difference is that a slot canalso be connected to a signal, in which case it is automatically called each time the signal is emitted.
The connect() statement looks like this:
connect(sender, SIGNAL(signal), receiver, SLOT(slot));
where sender and receiver are pointers to QObjects and where signal and slot are functionsignatures without parameter names. The SIGNAL() and SLOT() macros essentially convert theirargument to a string.
In the examples we have seen so far, we have always connected different signals to different slots.There are other possibilities to consider.
One signal can be connected to many slots: connect(slider, SIGNAL(valueChanged(int)), spinBox, SLOT(setValue(int))); connect(slider, SIGNAL(valueChanged(int)), this, SLOT(updateStatusBarIndicator(int)));
When the signal is emitted, the slots are called one after the other, in an unspecified order.
Many signals can be connected to the same slot: connect(lcd, SIGNAL(overflow()), this, SLOT(handleMathError())); connect(calculator, SIGNAL(divisionByZero()), this, SLOT(handleMathError()));
When either signal is emitted, the slot is called.
A signal can be connected to another signal: connect(lineEdit, SIGNAL(textChanged(const QString &)), this, SIGNAL(updateRecord(const QString &)));
When the first signal is emitted, the second signal is emitted as well. Apart from that,signalsignal connections are indistinguishable from signalslot connections.
Connections can be removed: disconnect(lcd, SIGNAL(overflow()), this, SLOT(handleMathError()));

This is rarely needed, because Qt automatically removes all connections involving an objectwhen that object is deleted.
To successfully connect a signal to a slot (or to another signal), they must have the same parametertypes in the same order:
connect(ftp, SIGNAL(rawCommandReply(int, const QString &)), this, SLOT(processReply(int, const QString &)));
Exceptionally, if a signal has more parameters than the slot it is connected to, the additionalparameters are simply ignored:
connect(ftp, SIGNAL(rawCommandReply(int, const QString &)), this, SLOT(checkErrorCode(int)));
If the parameter types are incompatible, or if the signal or the slot doesn't exist, Qt will issue awarning at run-time if the application is built in debug mode. Similarly, Qt will give a warning ifparameter names are included in the signal or slot signatures.
So far, we have only used signals and slots with widgets. But the mechanism itself is implemented inQObject and isn't limited to GUI programming. The mechanism can be used by any QObject subclass:
class Employee : public QObject{ Q_OBJECTpublic: Employee() { mySalary = 0; } int salary() const { return mySalary; }public slots: void setSalary(int newSalary);signals: void salaryChanged(int newSalary);private: int mySalary;};void Employee::setSalary(int newSalary){ if (newSalary != mySalary) { mySalary = newSalary; emit salaryChanged(mySalary); }}
Notice how the setSalary() slot is implemented. We only emit the salary-Changed() signal ifnewSalary != mySalary. This ensures that cyclic connections don't lead to infinite loops.
Qt's Meta-Object System
One of Qt's major achievements has been the extension of C++ with a mechanism forcreating independent software components that can be bound together without anycomponent knowing anything about the other components it is connected to.

The mechanism is called the meta-object system, and it provides two key services:signalsslots and introspection. The introspection functionality is necessary forimplementing signals and slots, and allows application programmers to obtain "meta-information" about QObject subclasses at run-time, including the list of signals and slotssupported by the object and its class name. The mechanism also supports properties(for Qt Designer) and text translation (for internationalization), and it lays thefoundation for Qt Script for Applications (QSA).
Standard C++ doesn't provide support for the dynamic meta-information needed by Qt'smeta-object system. Qt solves this problem by providing a separate tool, moc, thatparses Q_OBJECT class definitions and makes the information available through C++functions. Since moc implements all its functionality using pure C++, Qt's meta-objectsystem works with any C++ compiler.
The mechanism works as follows:
The Q_OBJECT macro declares some introspection functions that must beimplemented in every QObject subclass: metaObject(), TR(), qt_metacall(), and afew more.
Qt's moc tool generates implementations for the functions declared by Q_OBJECT
and for all the signals. QObject member functions such as connect() and disconnect() use the
introspection functions to do their work.
All of this is handled automatically by qmake, moc, and QObject, so you rarely need tothink about it. But if you are curious, you can check out the QMetaObject classdocumentation and have a look at the C++ source files generated by moc to see how theimplementation works.
Rapid Dialog DesignQt is designed to be pleasant and intuitive to hand-code, and it is not unusual for programmers todevelop entire Qt applications purely by writing C++ source code. Still, many programmers prefer touse a visual approach for designing forms, because they find it more natural and faster than hand-coding, and they want to be able to experiment with and change designs more quickly and easilythan is possible with hand-coded forms.
Qt Designer expands the options available to programmers by providing a visual designcapability.Qt Designer can be used to develop all or just some of an application's forms. Forms thatare created using Qt Designer end up as C++ code, so Qt Designer can be used with aconventional tool chain and imposes no special requirements on the compiler.
In this section, we will use Qt Designer to create the Go-to-Cell dialog shown in Figure 2.4. Andwhether we do it in code or in Qt Designer, creating a dialog always involves the samefundamental steps:
Create and initialize the child widgets. Put the child widgets in layouts. Set the tab order. Establish signalslot connections. Implement the dialog's custom slots.
Figure 2.4. The Go-to-Cell dialog

To launch Qt Designer, click Qt by Trolltech v4.x.y|Designer in the Start menu on Windows, typedesigner on the command line on Unix, or double-click Designer in the Mac OS X Finder. When QtDesigner starts, it will pop up a list of templates. Click the "Widget" template, then click OK. (The"Dialog with Buttons Bottom" template might look tempting, but for this example we will create theOK and Cancel buttons by hand to show how it is done.) You should now have a window called"Untitled".
By default,Qt Designer's user interface consists of several top-level windows. If you prefer an MDI-style interface, with one top-level window and several sub-windows, click Edit|User InterfaceMode|Docked Window.
The first step is to create the child widgets and place them on the form. Create one label, one lineeditor, one horizontal spacer, and two push buttons. For each item, drag its name or icon from QtDesigner's widget box and drop the item roughly where it should go on the form. The spacer item,which is invisible in the final form, is shown in Qt Designer as a blue spring.
Figure 2.5. Qt Designer in docked window mode on Windows
[View full size image]
Now drag the bottom of the form up to make it shorter. This should produce a form that is similar toFigure 2.6. Don't spend too much time positioning the items on the form; Qt's layout managers willlay them out precisely later on.
Figure 2.6. The form with some widgets

Set each widget's properties using Qt Designer's property editor:
1. Click the text label. Make sure that its objectName property is "label" and set the text
property to "&Cell Location:".2. Click the line editor. Make sure that the objectName property is "lineEdit".3. Click the first button. Set the objectName property to "okButton", the enabled property to
"false", the text property to "OK", and the default property to "true".4. Click the second button. Set the objectName property to "cancelButton" and the text property
to "Cancel".5. Click the form's background to select the form itself. Set objectName to "GoToCellDialog" and
windowTitle to "Go to Cell".
All the widgets look fine now, except the text label, which shows &Cell Location. Click Edit|EditBuddies to enter a special mode that allows you to set buddies. Next, click the label and drag thered arrow line to the line editor, then release. The label should now show Cell Location and have theline editor as its buddy. Click Edit|Edit Widgets to leave buddy mode.
Figure 2.7. The form with properties set
The next step is to lay out the widgets on the form:
1. Click the Cell Location label and press Shift as you click the line editor next to it so that theyare both selected. Click Form|Lay Out Horizontally.
2. Click the spacer, then hold Shift as you click the form's OK and Cancel buttons. Click Form|LayOut Horizontally.
3. Click the background of the form to deselect any selected items, then click Form|Lay OutVertically.
4. Click Form|Adjust Size to resize the form to its preferred size.
The red lines that appear on the form show the layouts that have been created. They don't appearwhen the form is run.

Figure 2.8. The form with the layouts
Now click Edit|Edit Tab Order. A number in a blue rectangle will appear next to every widget thatcan accept focus. Click each widget in turn in the order you want them to accept focus, then clickEdit|Edit Widgets to leave tab order mode.
Figure 2.9. Setting the form's tab order
To preview the dialog, click the Form|Preview menu option. Check the tab order by pressing Tabrepeatedly. Close the dialog using the close button in the title bar.
Save the dialog as gotocelldialog.ui in a directory called gotocell, and create a main.cpp file in thesame directory using a plain text editor:
#include <QApplication>#include <QDialog>#include "ui_gotocelldialog.h"int main(int argc, char *argv[]){ QApplication app(argc, argv); Ui::GoToCellDialog ui; QDialog *dialog = new QDialog; ui.setupUi(dialog); dialog->show(); return app.exec();}
Now run qmake to create a .pro file and a makefile (qmake -project; qmake goto-cell.pro). The qmake
tool is smart enough to detect the user interface file goto-celldialog.ui and to generate theappropriate makefile rules to invoke uic, Qt's user interface compiler. The uic tool convertsgotocelldialog.ui into C++ and puts the result in ui_gotocelldialog.h.
The generated ui_gotocelldialog.h file contains the definition of the Ui::GoToCellDialog class, whichis a C++ equivalent of the gotocelldialog.ui file. The class declares member variables that storethe form's child widgets and layouts, and a setupUi() function that initializes the form. Thegenerated class looks like this:
class Ui::GoToCellDialog

{public: QLabel *label; QLineEdit *lineEdit; QSpacerItem *spacerItem; QPushButton *okButton; QPushButton *cancelButton; ... void setupUi(QWidget *widget) { ... }};
The generated class doesn't inherit any Qt class. When we use the form in main.cpp, we create aQDialog and pass it to setupUi().
If you run the program now, the dialog will work, but it doesn't function exactly as we want:
The OK button is always disabled. The Cancel button does nothing. The line editor accepts any text, instead of only accepting valid cell locations.
We can make the dialog function properly by writing some code. The cleanest approach is to createa new class that inherits both QDialog and Ui::GoToCell-Dialog and that implements the missingfunctionality (thus proving the adage that any software problem can be solved simply by addinganother layer of indirection). Our naming convention is to give this new class the same name as theuic-generated class but without the Ui:: prefix.
Using a text editor, create a file called gotocelldialog.h that contains the following code:
#ifndef GOTOCELLDIALOG_H#define GOTOCELLDIALOG_H#include <QDialog>#include "ui_gotocelldialog.h"class GoToCellDialog : public QDialog, public Ui::GoToCellDialog{ Q_OBJECTpublic: GoToCellDialog(QWidget *parent = 0);private slots: void on_lineEdit_textChanged();};#endif
The implementation belongs in gotocelldialog.cpp:
#include <QtGui>#include "gotocelldialog.h"GoToCellDialog::GoToCellDialog(QWidget *parent) : QDialog(parent){
setupUi(this); QRegExp regExp("[A-Za-z][1-9][0-9]{0,2}"); lineEdit->setValidator(new QRegExpValidator(regExp, this)); connect(okButton, SIGNAL(clicked()), this, SLOT(accept())); connect(cancelButton, SIGNAL(clicked()), this, SLOT(reject()));}void GoToCellDialog::on_lineEdit_textChanged(){

okButton->setEnabled(lineEdit->hasAcceptableInput());}
In the constructor, we call setupUi() to initialize the form. Thanks to multiple inheritance, we canaccess Ui::GoToCellDialog's members directly. After creating the user interface, setupUi() will alsoautomatically connect any slots that follow the naming convention on_objectName_signalName() tothe corresponding objectName's signalName() signal. In our example, this means that setupUi() willestablish the following signalslot connection:
connect(lineEdit, SIGNAL(textChanged(const QString &)), this, SLOT(on_lineEdit_textChanged()));
Also in the constructor, we set up a validator to restrict the range of the input. Qt provides threebuilt-in validator classes: QIntValidator, QDoubleValidator, and QRegExpValidator. Here we use aQRegExpValidator with the regular expression "[A-Za-z][1-9][0-9]{0,2}", which means: Allow oneuppercase or lowercase letter, followed by one digit in the range 1 to 9, followed by zero, one, ortwo digits each in the range 0 to 9. (For an introduction to regular expressions, see the QRegExp classdocumentation.)
By passing this to the QRegExpValidator constructor, we make it a child of the GoToCellDialog
object. By doing so, we don't have to worry about deleting the QRegExpValidator later; it will bedeleted automatically when its parent is deleted.
Qt's parentchild mechanism is implemented in QObject. When we create an object (a widget,validator, or any other kind) with a parent, the parent adds the object to the list of its children.When the parent is deleted, it walks through its list of children and deletes each child. The childrenthemselves then delete all of their children, and so on recursively until none remain.
The parentchild mechanism greatly simplifies memory management, reducing the risk of memoryleaks. The only objects we must delete explicitly are the objects we create with new and that have noparent. And if we delete a child object before its parent, Qt will automatically remove that objectfrom the parent's list of children.
For widgets, the parent has an additional meaning: Child widgets are shown within the parent'sarea. When we delete the parent widget, not only does the child vanish from memory, it alsovanishes from the screen.
At the end of the constructor, we connect the OK button to QDialog's accept() slot and the Cancelbutton to the reject() slot. Both slots close the dialog, but accept() sets the dialog's result value toQDialog::Accepted (which equals 1), and reject() sets the value to QDialog::Rejected (which equals0). When we use this dialog, we can use the result value to see if the user clicked OK and actaccordingly.
The on_lineEdit_textChanged() slot enables or disables the OK button, according to whether the lineedit contains a valid cell location. QLineEdit::hasAcceptableInput() uses the validator we set in theconstructor.
This completes the dialog. We can now rewrite main.cpp to use it:
#include <QApplication>#include "gotocelldialog.h"int main(int argc, char *argv[]){ QApplication app(argc, argv); GoToCellDialog *dialog = new GoToCellDialog; dialog->show();

return app.exec();}
Rebuild the application (qmake -project; qmake gotocell.pro) and run it again. Type "A12" in the lineedit, and notice that the OK button becomes enabled. Try typing some random text to see how thevalidator does its job. Click Cancel to close the dialog.
One of the beauties of using Qt Designer is that it allows programmers great freedom to modifytheir form designs without being forced to change their source code. When you develop a formpurely by writing C++ code, changes to the design can be quite time-consuming. With QtDesigner, no time is lost since uic simply regenerates the source code for any forms that havechanged. The dialog's user interface is saved in a .ui file (an XML-based file format), while customfunctionality is implemented by subclassing the uic-generated class.
Shape-Changing DialogsWe have seen how to create dialogs that always show the same widgets whenever they are used. Insome cases, it is desirable to provide dialogs that can change shape. The two most common kinds ofshape-changing dialogs are extension dialogs and multi-page dialogs. Both types of dialog canbe implemented in Qt, either purely in code or using Qt Designer.
Extension dialogs usually present a simple appearance but have a toggle button that allows the userto switch between the dialog's simple and extended appearances. Extension dialogs are commonlyused for applications that are trying to cater for both casual and power users, hiding the advancedoptions unless the user explicitly asks to see them. In this section, we will use Qt Designer tocreate the extension dialog shown in Figure 2.10.
Figure 2.10. The Sort dialog with simple and extended appearances
[View full size image]
The dialog is a Sort dialog in a spreadsheet application, where the user can select one or severalcolumns to sort on. The dialog's simple appearance allows the user to enter a single sort key, and itsextended appearance provides for two extra sort keys. A More button lets the user switch betweenthe simple and extended appearances.
We will create the widget with its extended appearance in Qt Designer, and hide the secondary and
tertiary keys at run-time as needed. The widget looks complicated, but it's fairly easy to do in QtDesigner. The trick is to do the primary key part first, then duplicate it twice to obtain thesecondary and tertiary keys:
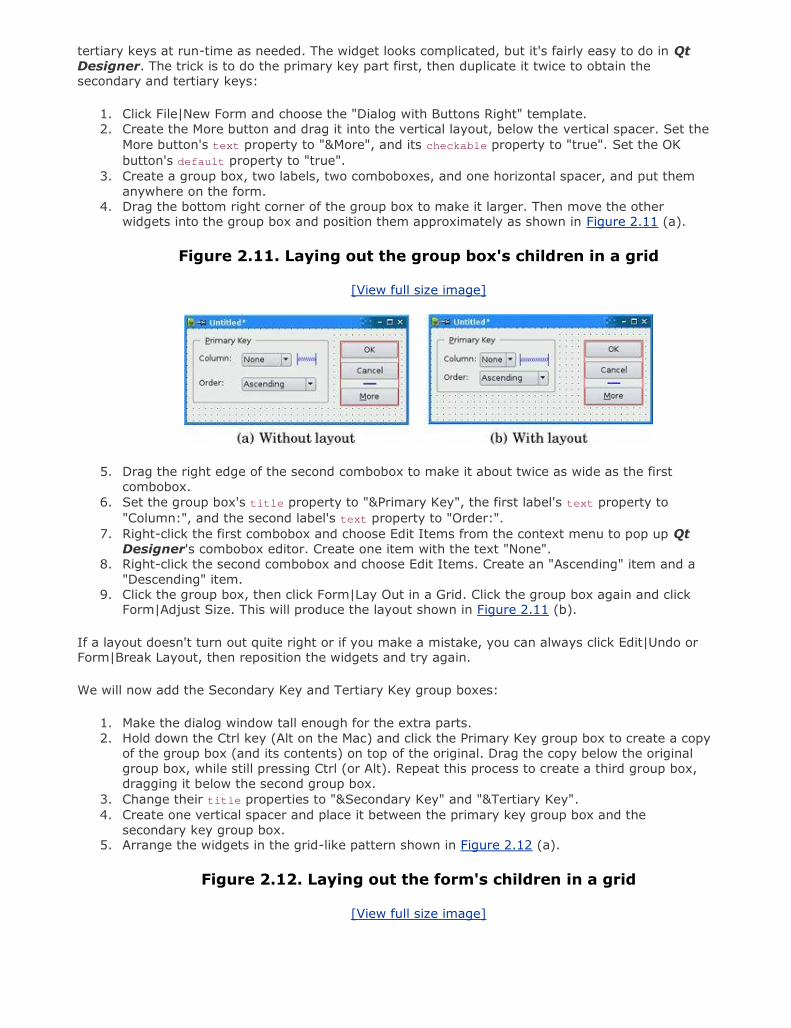
1. Click File|New Form and choose the "Dialog with Buttons Right" template.2. Create the More button and drag it into the vertical layout, below the vertical spacer. Set the
More button's text property to "&More", and its checkable property to "true". Set the OKbutton's default property to "true".
3. Create a group box, two labels, two comboboxes, and one horizontal spacer, and put themanywhere on the form.
4. Drag the bottom right corner of the group box to make it larger. Then move the otherwidgets into the group box and position them approximately as shown in Figure 2.11 (a).
Figure 2.11. Laying out the group box's children in a grid
[View full size image]
5. Drag the right edge of the second combobox to make it about twice as wide as the firstcombobox.
6. Set the group box's title property to "&Primary Key", the first label's text property to"Column:", and the second label's text property to "Order:".
7. Right-click the first combobox and choose Edit Items from the context menu to pop up QtDesigner's combobox editor. Create one item with the text "None".
8. Right-click the second combobox and choose Edit Items. Create an "Ascending" item and a"Descending" item.
9. Click the group box, then click Form|Lay Out in a Grid. Click the group box again and clickForm|Adjust Size. This will produce the layout shown in Figure 2.11 (b).
If a layout doesn't turn out quite right or if you make a mistake, you can always click Edit|Undo orForm|Break Layout, then reposition the widgets and try again.
We will now add the Secondary Key and Tertiary Key group boxes:
1. Make the dialog window tall enough for the extra parts.2. Hold down the Ctrl key (Alt on the Mac) and click the Primary Key group box to create a copy
of the group box (and its contents) on top of the original. Drag the copy below the originalgroup box, while still pressing Ctrl (or Alt). Repeat this process to create a third group box,dragging it below the second group box.
3. Change their title properties to "&Secondary Key" and "&Tertiary Key".4. Create one vertical spacer and place it between the primary key group box and the
secondary key group box.5. Arrange the widgets in the grid-like pattern shown in Figure 2.12 (a).
Figure 2.12. Laying out the form's children in a grid
[View full size image]

6. Click the form to deselect any selected widgets, then click Form|Lay Out in a Grid. The formshould now match Figure 2.12 (b).
7. Set the two vertical spacer items' sizeHint property to [20, 0].
The resulting grid layout has two columns and four rows, giving a total of eight cells. The PrimaryKey group box, the leftmost vertical spacer item, the Secondary Key group box, and the TertiaryKey group box each occupy a single cell. The vertical layout that contains the OK, Cancel, and Morebuttons occupies two cells. That leaves two empty cells in the bottom-right of the dialog. If this isn'twhat you have, undo the layout, reposition the widgets, and try again.
Rename the form "SortDialog" and change the window title to "Sort". Set the names of the childwidgets to those shown in Figure 2.13.
Figure 2.13. Naming the form's widgets
[View full size image]
Click Edit|Edit Tab Order. Click each combobox in turn from topmost to bottommost, then click the

OK, Cancel, and More buttons on the right side. Click Edit|Edit Widgets to leave tab order mode.
Now that the form has been designed, we are ready to make it functional by setting up somesignalslot connections.Qt Designer allows us to establish connections between widgets that are partof the same form. We need to establish two connections.
Click Edit|Edit Signals/Slots to enter Qt Designer's connection mode. Connections are representedby blue arrows between the form's widgets. Because we chose the "Dialog with Buttons Right"template, the OK and Cancel buttons are already connected to QDialog's accept() and reject()
slots. Connections are also listed in Qt Designer's signal/slot editor window.
To establish a connection between two widgets, click the sender widget and drag the red arrow lineto the receiver widget, then release. This pops up a dialog that allows you to choose the signal andthe slot to connect.
Figure 2.14. Connecting the form's widgets
The first connection to establish is between the moreButton and the secondary-GroupBox. Drag the redarrow line between these two widgets, then choose toggled(bool) as the signal andsetVisible(bool) as the slot. By default,Qt Designer doesn't list setVisible(bool) in the list ofslots, but it will appear if you enable the Show all signals and slots option.
Figure 2.15. Qt Designer's connection editor
[View full size image]

The second connection is between the moreButton's toggled(bool) signal and the tertiaryGroupBox'ssetVisible(bool) slot. Once the connections have been made, click Edit|Edit Widgets to leaveconnection mode.
Save the dialog as sortdialog.ui in a directory called sort. To add code to the form, we will use thesame multiple inheritance approach that we used for the Go-to-Cell dialog in the previous section.
First, create a sortdialog.h file with the following contents:
#ifndef SORTDIALOG_H#define SORTDIALOG_H#include <QDialog>#include "ui_sortdialog.h"class SortDialog : public QDialog, public Ui::SortDialog{ Q_OBJECTpublic: SortDialog(QWidget *parent = 0); void setColumnRange(QChar first, QChar last);};#endif
Then create sortdialog.cpp:
1 #include <QtGui> 2 #include "sortdialog.h"3 SortDialog::SortDialog(QWidget *parent)
4 : QDialog(parent) 5 { 6 setupUi(this); 7 secondaryGroupBox->hide(); 8 tertiaryGroupBox->hide(); 9 layout()->setSizeConstraint(QLayout::SetFixedSize);10 setColumnRange('A', 'Z');11 }12 void SortDialog::setColumnRange(QChar first, QChar last)13 {14 primaryColumnCombo->clear();15 secondaryColumnCombo->clear();16 tertiaryColumnCombo->clear();17 secondaryColumnCombo->addItem(tr("None"));

18 tertiaryColumnCombo->addItem(tr("None"));19 primaryColumnCombo->setMinimumSize(20 secondaryColumnCombo->sizeHint());21 QChar ch = first;22 while (ch <= last) {23 primaryColumnCombo->addItem(QString(ch));24 secondaryColumnCombo->addItem(QString(ch));25 tertiaryColumnCombo->addItem(QString(ch));26 ch = ch.unicode() + 1;27 }28 }
The constructor hides the secondary and tertiary parts of the dialog. It also sets the sizeConstraint
property of the form's layout to QLayout::SetFixedSize, making the dialog non-resizable by the user.The layout then takes over the responsibility for resizing, and resizes the dialog automatically whenchild widgets are shown or hidden, ensuring that the dialog is always displayed at its optimal size.
The setColumnRange() slot initializes the contents of the comboboxes based on the selected columnsin the spreadsheet. We insert a "None" item in the comboboxes for the (optional) secondary andtertiary keys.
Lines 19 and 20 present a subtle layout idiom. The QWidget::sizeHint() function returns a widget's"ideal" size, which the layout system tries to honor. This explains why different kinds of widgets, orsimilar widgets with different contents, may be assigned different sizes by the layout system. Forcomboboxes, this means that the secondary and tertiary comboboxes, which contain "None", end uplarger than the primary combobox, which contains only single-letter entries. To avoid thisinconsistency, we set the primary combobox's minimum size to the secondary combobox's idealsize.
Here is a main() test function that sets the range to include columns 'C' to 'F' and then shows thedialog:
#include <QApplication>#include "sortdialog.h"int main(int argc, char *argv[]){ QApplication app(argc, argv); SortDialog *dialog = new SortDialog; dialog->setColumnRange('C', 'F'); dialog->show(); return app.exec();}
That completes the extension dialog. As the example illustrates, an extension dialog isn't much moredifficult to design than a plain dialog: All we needed was a toggle button, a few extra signalslotconnections, and a non-resizable layout. In production applications, it is quite common for thebutton that controls the extension to show the text Advanced >>> when only the basic dialog isvisible and Advanced <<< when the extension is shown. This is easy to achieve in Qt by callingsetText() on the QPushButton whenever it is clicked.
The other common type of shape-changing dialogs, multi-page dialogs, are even easier to create inQt, either in code or using Qt Designer. Such dialogs can be built in many different ways.
A QTabWidget can be used in its own right. It provides a tab bar along the top that controls abuilt-in QStackedWidget.
A QListWidget and a QStackedWidget can be used together, with the QList-Widget's currentitem determining which page the QStackedWidget shows, by connecting theQListWidget::currentRowChanged() signal to the QStackedWidget::setCurrentIndex() slot.

A QtreeWidget can be used with a QStackedWidget in a similar way to a QListWidget.
The QStackedWidget class is covered in Chapter 6 (Layout Management).
Dynamic DialogsDynamic dialogs are dialogs that are created from Qt Designer .ui files at run-time. Instead ofconverting the .ui file to C++ code using uic, we can load the file at run-time using the QUiLoader
class:
QUiLoader uiLoader;QFile file("sortdialog.ui");QWidget *sortDialog = uiLoader.load(&file);if (sortDialog) { ...}
We can access the form's child widgets using QObject::findChild<T>():
QComboBox *primaryColumnCombo = sortDialog->findChild<QComboBox *>("primaryColumnCombo");if (primaryColumnCombo) { ...}
The findChild<T>() function is a template member function that returns the child object thatmatches the given name and type. Because of a compiler limitation, it is not available for MSVC 6. Ifyou need to use the MSVC 6 compiler, call the qFindChild<T>() global function instead, which worksexactly the same way.
The QUiLoader class is located in a separate library. To use QUiLoader from a Qt application, we mustadd this line to the application's .pro file:
CONFIG += uitools
Dynamic dialogs make it possible to change the layout of a form without recompiling the application.They can also be used to create thin-client applications, where the executable merely has a front-end form built-in and all other forms are created as required.
Built-in Widget and Dialog ClassesQt provides a complete set of built-in widgets and common dialogs that cater for most situations. Inthis section, we present screenshots of almost all of them. A few specialized widgets are deferreduntil later: Main window widgets such as QMenuBar, QToolBar, and QStatusBar are covered in Chapter3, and layout-related widgets such as QSplitter and QScrollArea are covered in Chapter 6. Most ofthe built-in widgets and dialogs are used in the examples presented in this book. In the screenshotsbelow, the widgets are shown using the Plastique style.
Figure 2.16. Qt's button widgets

Qt provides four kinds of "buttons": QPushButton, QToolButton, QCheckBox, and QRadioButton.QPushButton and QToolButton are most commonly used to initiate an action when they are clicked,but they can also behave like toggle buttons (click to press down, click to restore). QCheckBox can beused for independent on/off options, whereas QRadioButtons are normally mutually exclusive.
Figure 2.17. Qt's single-page container widgets
[View full size image]
Qt's container widgets are widgets that contain other widgets. QFrame can also be used on its own tosimply draw lines and is inherited by many other widget classes, including QToolBox and QLabel.
Figure 2.18. Qt's multi-page container widgets
[View full size image]
QTabWidget and QToolBox are multi-page widgets. Each page is a child widget, and the pages arenumbered from 0.
Figure 2.19. Qt's item view widgets
[View full size image]

The item views are optimized for handling large amounts of data and often use scroll bars. The scrollbar mechanism is implemented in QAbstractScrollArea, a base class for item views and other kindsof scrollable widgets.
Qt provides a few widgets that are used purely for displaying information. QLabel is the mostimportant of these, and it can be used for showing rich text (using a simple HTML-like syntax) andimages.
QTextBrowser is a read-only QTextEdit subclass that has basic HTML support including lists, tables,images, and hypertext links.Qt Assistant uses QTextBrowser to present documentation to the user.
Figure 2.20. Qt's display widgets
Qt provides several widgets for data entry. QLineEdit can restrict its input using an input mask or a

validator. QTextEdit is a QAbstractScrollArea subclass capable of editing large amounts of text.
Figure 2.21. Qt's input widgets
Qt provides the standard set of common dialogs that make it easy to ask the user to select a color,font, or file, or to print a document.
Figure 2.22. Qt's color dialog and font dialog
[View full size image]
On Windows and Mac OS X, Qt uses the native dialogs rather than its own common dialogs whenpossible.
Figure 2.23. Qt's file and print dialogs

[View full size image]
Qt provides a versatile message box and an error dialog that remembers which messages it hasshown. The progress of time-consuming operations can be indicated using QProgressDialog or usingthe QProgressBar shown earlier. QInputDialog is very convenient when a single line of text or a singlenumber is required from the user.
A lot of ready-to-use functionality is provided by the built-in widgets and common dialogs. Morespecialized requirements can often be satisfied by setting widget properties, or by connecting signalsto slots and implementing custom behavior in the slots.
Figure 2.24. Qt's feedback dialogs
[View full size image]
In some situations, it may be desirable to create a custom widget from scratch. Qt makes thisstraightforward, and custom widgets can access all the same platform-independent drawingfunctionality as Qt's built-in widgets. Custom widgets can even be integrated with Qt Designer sothat they can be used in the same way as Qt's built-in widgets. Chapter 5 explains how to createcustom widgets.

Chapter 3. Creating Main Windows Subclassing QMainWindow Creating Menus and Toolbars Setting Up the Status Bar Implementing the File Menu Using Dialogs Storing Settings Multiple Documents Splash Screens
This chapter will teach you how to create main windows using Qt. By the end, you will be able tobuild an application's entire user interface, complete with menus, toolbars, status bar, and as manydialogs as the application requires.
An application's main window provides the framework upon which the application's user interface isbuilt. The main window for the Spreadsheet application shown in Figure 3.1 will form the basis ofthis chapter. The Spreadsheet application makes use of the Find, Go-to-Cell, and Sort dialogs thatwe created in Chapter 2.
Figure 3.1. Spreadsheet application
[View full size image]
Behind most GUI applications lies a body of code that provides the underlying functionalityforexample, code to read and write files or to process the data presented in the user interface. InChapter 4, we will see how to implement such functionality, again using the Spreadsheet applicationas our example.

Subclassing QMainWindowAn application's main window is created by subclassing QMainWindow. Many of the techniques we sawin Chapter 2 for creating dialogs are also relevant for creating main windows, since both QDialog andQMainWindow inherit from QWidget.
Main windows can be created using Qt Designer, but in this chapter we will do everything in codeto demonstrate how it's done. If you prefer the more visual approach, see the "Creating MainWindows in Qt Designer" chapter in Qt Designer's online manual.
The source code for the Spreadsheet application's main window is spread across mainwindow.h andmainwindow.cpp. Let's start with the header file:
#ifndef MAINWINDOW_H#define MAINWINDOW_H#include <QMainWindow>class QAction;class QLabel;class FindDialog;class Spreadsheet;class MainWindow : public QMainWindow{ Q_OBJECTpublic: MainWindow();protected: void closeEvent(QCloseEvent *event);
We define the class MainWindow as a subclass of QMainWindow. It contains the Q_OBJECT macro since itprovides its own signals and slots.
The closeEvent() function is a virtual function in QWidget that is automatically called when the usercloses the window. It is reimplemented in MainWindow so that we can ask the user the standardquestion "Do you want to save your changes?" and to save user preferences to disk.
private slots: void newFile(); void open(); bool save(); bool saveAs(); void find(); void goToCell(); void sort(); void about();
Some menu options, like File|New and Help|About, are implemented as private slots in MainWindow.Most slots have void as their return value, but save() and saveAs() return a bool. The return value isignored when a slot is executed in response to a signal, but when we call a slot as a function thereturn value is available to us just as it is when we call any ordinary C++ function.
void openRecentFile(); void updateStatusBar(); void spreadsheetModified();private: void createActions();
void createMenus(); void createContextMenu(); void createToolBars(); void createStatusBar();
void readSettings(); void writeSettings(); bool okToContinue(); bool loadFile(const QString &fileName); bool saveFile(const QString &fileName); void setCurrentFile(const QString &fileName); void updateRecentFileActions(); QString strippedName(const QString &fullFileName);
The main window needs some more private slots and several private functions to support the userinterface.
Spreadsheet *spreadsheet; FindDialog *findDialog; QLabel *locationLabel; QLabel *formulaLabel; QStringList recentFiles; QString curFile; enum { MaxRecentFiles = 5 }; QAction *recentFileActions[MaxRecentFiles]; QAction *separatorAction; QMenu *fileMenu; QMenu *editMenu; ... QToolBar *fileToolBar; QToolBar *editToolBar; QAction *newAction; QAction *openAction; ... QAction *aboutQtAction;};#endif
In addition to its private slots and private functions, MainWindow also has lots of private variables. Allof these will be explained as we use them.
We will now review the implementation:
#include <QtGui>#include "finddialog.h"#include "gotocelldialog.h"#include "mainwindow.h"#include "sortdialog.h"#include "spreadsheet.h"
We include the <QtGui> header file, which contains the definition of all the Qt classes used in oursubclass. We also include some custom header files, notably finddialog.h, gotocelldialog.h, andsortdialog.h from Chapter 2.
MainWindow::MainWindow(){ spreadsheet = new Spreadsheet; setCentralWidget(spreadsheet);

createActions(); createMenus(); createContextMenu(); createToolBars(); createStatusBar(); readSettings(); findDialog = 0; setWindowIcon(QIcon(":/images/icon.png")); setCurrentFile("");}
In the constructor, we begin by creating a Spreadsheet widget and setting it to be the main window'scentral widget. The central widget occupies the middle of the main window (see Figure 3.2). TheSpreadsheet class is a QTableWidget subclass with some spreadsheet capabilities, such as support forspreadsheet formulas. We will implement it in Chapter 4.
Figure 3.2. QMainWindow's areas
We call the private functions createActions(), createMenus(), createContext-Menu(),createToolBars(), and createStatusBar() to set up the rest of the main window. We also call theprivate function readSettings() to read the application's stored settings.
We initialize the findDialog pointer to be a null pointer; the first time MainWindow::find() is called,we will create the FindDialog object.
At the end of the constructor, we set the window's icon to icon.png, a PNG file. Qt supports manyimage formats, including BMP, GIF,[*] JPEG, PNG, PNM, XBM, and XPM. CallingQWidget::setWindowIcon() sets the icon shown in the top-left corner of the window. Unfortunately,there is no platform-independent way of setting the application icon that appears on the desktop.Platform-specific procedures are explained at http://doc.trolltech.com/4.1/appicon.html.
[*] GIF support is disabled in Qt by default because the decompression algorithm used by GIF files was patented in some countrieswhere software patents are recognized. We believe that this patent has now expired worldwide. To enable GIF support in Qt, passthe -qt-gif command-line option to the configure script or set the appropriate option in the Qt installer.
GUI applications generally use many images. There are several methods for providing images to theapplication. The most common are:
Storing images in files and loading them at run-time. Including XPM files in the source code. (This works because XPM files are also valid C++
files.) Using Qt's resource mechanism.
Here we use Qt's resource mechanism because it is more convenient than loading files at run-time,
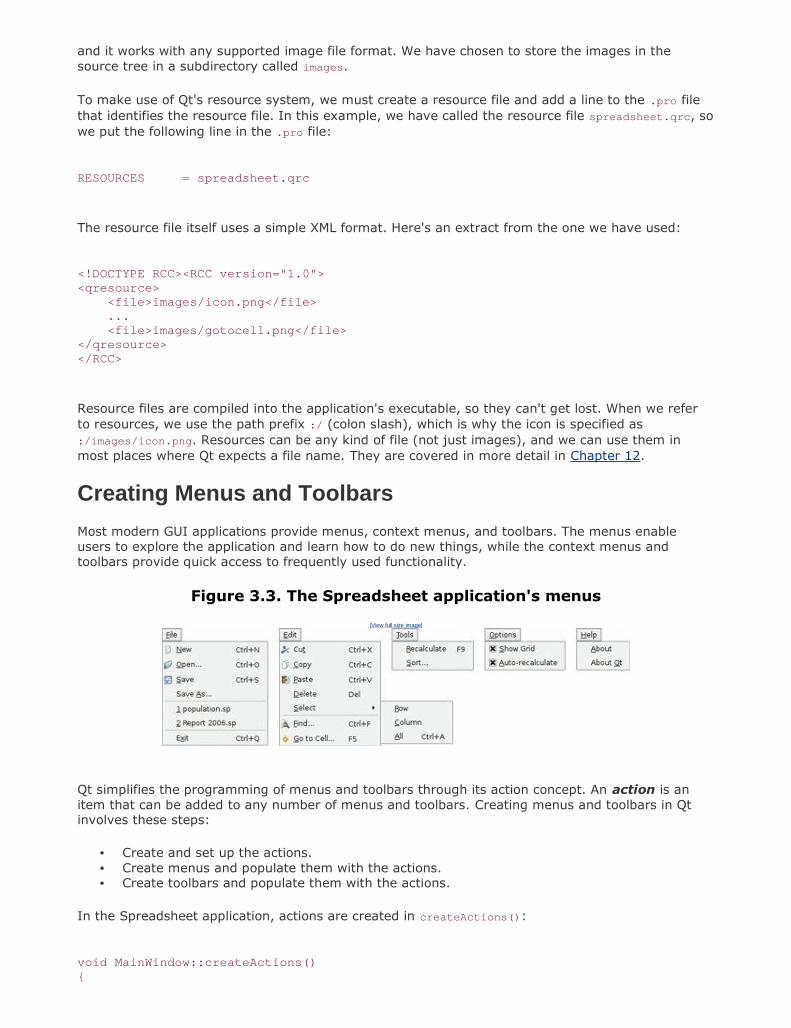
and it works with any supported image file format. We have chosen to store the images in thesource tree in a subdirectory called images.
To make use of Qt's resource system, we must create a resource file and add a line to the .pro filethat identifies the resource file. In this example, we have called the resource file spreadsheet.qrc, sowe put the following line in the .pro file:
RESOURCES = spreadsheet.qrc
The resource file itself uses a simple XML format. Here's an extract from the one we have used:
<!DOCTYPE RCC><RCC version="1.0"><qresource> <file>images/icon.png</file> ... <file>images/gotocell.png</file></qresource></RCC>
Resource files are compiled into the application's executable, so they can't get lost. When we referto resources, we use the path prefix :/ (colon slash), which is why the icon is specified as:/images/icon.png. Resources can be any kind of file (not just images), and we can use them inmost places where Qt expects a file name. They are covered in more detail in Chapter 12.
Creating Menus and ToolbarsMost modern GUI applications provide menus, context menus, and toolbars. The menus enableusers to explore the application and learn how to do new things, while the context menus andtoolbars provide quick access to frequently used functionality.
Figure 3.3. The Spreadsheet application's menus
[View full size image]
Qt simplifies the programming of menus and toolbars through its action concept. An action is anitem that can be added to any number of menus and toolbars. Creating menus and toolbars in Qtinvolves these steps:
Create and set up the actions. Create menus and populate them with the actions. Create toolbars and populate them with the actions.
In the Spreadsheet application, actions are created in createActions():
void MainWindow::createActions(){

newAction = new QAction(tr("&New"), this); newAction->setIcon(QIcon(":/images/new.png")); newAction->setShortcut(tr("Ctrl+N")); newAction->setStatusTip(tr("Create a new spreadsheet file")); connect(newAction, SIGNAL(triggered()), this, SLOT(newFile()));
The New action has an accelerator (New), a parent (the main window), an icon (new.png), a shortcutkey (Ctrl+N), and a status tip. We connect the action's triggered() signal to the main window'sprivate newFile() slot, which we will implement in the next section. This connection ensures thatwhen the user chooses the File|New menu item, clicks the New toolbar button, or presses Ctrl+N,the newFile() slot is called.
The Open, Save, and Save As actions are very similar to the New action, so we will skip directly tothe "recently opened files" part of the File menu:
...for (int i = 0; i < MaxRecentFiles; ++i) { recentFileActions[i] = new QAction(this); recentFileActions[i]->setVisible(false); connect(recentFileActions[i], SIGNAL(triggered()), this, SLOT(openRecentFile()));}
We populate the recentFileActions array with actions. Each action is hidden and connected to theopenRecentFile() slot. Later on, we will see how the recent file actions are made visible and used.
We can now skip to the Select All action:
...selectAllAction = new QAction(tr("&All"), this);selectAllAction->setShortcut(tr("Ctrl+A"));selectAllAction->setStatusTip(tr("Select all the cells in the " "spreadsheet"));connect(selectAllAction, SIGNAL(triggered()),
spreadsheet, SLOT(selectAll()));
The selectAll() slot is provided by one of QTableWidget's ancestors, QAbstractItemView, so we donot have to implement it ourselves.
Let's skip further to the Show Grid action in the Options menu:
...showGridAction = new QAction(tr("&Show Grid"), this);showGridAction->setCheckable(true);showGridAction->setChecked(spreadsheet->showGrid());showGridAction->setStatusTip(tr("Show or hide the spreadsheet's " "grid"));connect(showGridAction, SIGNAL(toggled(bool)), spreadsheet, SLOT(setShowGrid(bool)));
Show Grid is a checkable action. It is rendered with a checkmark in the menu and implemented as atoggle button in the toolbar. When the action is turned on, the Spreadsheet component displays agrid. We initialize the action with the default for the Spreadsheet component, so that they aresynchronized at startup. Then we connect the Show Grid action's toggled(bool) signal to the

Spreadsheet component's setShowGrid(bool) slot, which it inherits from QTableWidget. Once thisaction is added to a menu or toolbar, the user can toggle the grid on and off.
The Show Grid and Auto-Recalculate actions are independent checkable actions. Qt also supportsmutually exclusive actions through the QActionGroup class.
...aboutQtAction = new QAction(tr("About &Qt"), this);aboutQtAction->setStatusTip(tr("Show the Qt library's About box"));
connect(aboutQtAction, SIGNAL(triggered()), qApp, SLOT(aboutQt()));}
For the About Qt action, we use the QApplication object's aboutQt() slot, accessible through the qApp
global variable.
Figure 3.4. About Qt
[View full size image]
Now that we have created the actions, we can move on to building a menu system containing them:
void MainWindow::createMenus(){ fileMenu = menuBar()->addMenu(tr("&File")); fileMenu->addAction(newAction); fileMenu->addAction(openAction); fileMenu->addAction(saveAction); fileMenu->addAction(saveAsAction); separatorAction = fileMenu->addSeparator(); for (int i = 0; i < MaxRecentFiles; ++i) fileMenu->addAction(recentFileActions[i]); fileMenu->addSeparator(); fileMenu->addAction(exitAction);
In Qt, menus are instances of QMenu. The addMenu() function creates a QMenu widget with thespecified text and adds it to the menu bar. The QMainWindow::menuBar() function returns a pointer toa QMenuBar. The menu bar is created the first time menuBar() is called.

We start by creating the File menu and then add the New, Open, Save, and Save As actions to it.We insert a separator to visually group closely related items together. We use a for loop to add the(initially hidden) actions from the recentFileActions array, and then add the exitAction action atthe end.
We have kept a pointer to one of the separators. This will allow us to hide the separator (if there areno recent files) or to show it, since we do not want to show two separators with nothing in between.
editMenu = menuBar()->addMenu(tr("&Edit")); editMenu->addAction(cutAction); editMenu->addAction(copyAction);
editMenu->addAction(pasteAction); editMenu->addAction(deleteAction); selectSubMenu = editMenu->addMenu(tr("&Select")); selectSubMenu->addAction(selectRowAction); selectSubMenu->addAction(selectColumnAction); selectSubMenu->addAction(selectAllAction); editMenu->addSeparator(); editMenu->addAction(findAction); editMenu->addAction(goToCellAction);
Now we create the Edit menu, adding actions with QMenu::addAction() as we did for the File menu,and adding the submenu with QMenu::addMenu() at the position where we want it to appear. Thesubmenu, like the menu it belongs to, is a QMenu.
toolsMenu = menuBar()->addMenu(tr("&Tools")); toolsMenu->addAction(recalculateAction); toolsMenu->addAction(sortAction); optionsMenu = menuBar()->addMenu(tr("&Options")); optionsMenu->addAction(showGridAction); optionsMenu->addAction(autoRecalcAction); menuBar()->addSeparator(); helpMenu = menuBar()->addMenu(tr("&Help")); helpMenu->addAction(aboutAction); helpMenu->addAction(aboutQtAction);}
We create the Tools, Options, and Help menus in a similar fashion. We insert a separator betweenthe Options and Help menu. In Motif and CDE styles, the separator pushes the Help menu to theright; in other styles, the separator is ignored.
Figure 3.5. Menu bar in Motif and Windows styles
void MainWindow::createContextMenu(){ spreadsheet->addAction(cutAction); spreadsheet->addAction(copyAction); spreadsheet->addAction(pasteAction); spreadsheet->setContextMenuPolicy(Qt::ActionsContextMenu);}

Any Qt widget can have a list of QActions associated with it. To provide a context menu for theapplication, we add the desired actions to the Spreadsheet widget and set that widget's contextmenu policy to show a context menu with these actions. Context menus are invoked by right-clicking a widget or by pressing a platform-specific key.
Figure 3.6. The Spreadsheet application's context menu
A more sophisticated way of providing context menus is to reimplement theQWidget::contextMenuEvent() function, create a QMenu widget, populate it with the desired actions,and call exec() on it.
void MainWindow::createToolBars(){ fileToolBar = addToolBar(tr("&File"));
fileToolBar->addAction(newAction); fileToolBar->addAction(openAction); fileToolBar->addAction(saveAction); editToolBar = addToolBar(tr("&Edit")); editToolBar->addAction(cutAction); editToolBar->addAction(copyAction); editToolBar->addAction(pasteAction); editToolBar->addSeparator(); editToolBar->addAction(findAction); editToolBar->addAction(goToCellAction);}
Creating toolbars is very similar to creating menus. We create a File toolbar and an Edit toolbar. Justlike a menu, a toolbar can have separators.
Figure 3.7. The Spreadsheet application's toolbars
Setting Up the Status BarWith the menus and toolbars complete, we are ready to tackle the Spreadsheet application's statusbar.
In its normal state, the status bar contains two indicators: the current cell's location and the currentcell's formula. The status bar is also used to display status tips and other temporary messages.
The MainWindow constructor calls createStatusBar() to set up the status bar:

void MainWindow::createStatusBar(){ locationLabel = new QLabel(" W999 "); locationLabel->setAlignment(Qt::AlignHCenter); locationLabel->setMinimumSize(locationLabel->sizeHint()); formulaLabel = new QLabel; formulaLabel->setIndent(3); statusBar()->addWidget(locationLabel); statusBar()->addWidget(formulaLabel, 1); connect(spreadsheet, SIGNAL(currentCellChanged(int, int, int, int)), this, SLOT(updateStatusBar())); connect(spreadsheet, SIGNAL(modified()), this, SLOT(spreadsheetModified())); updateStatusBar();}
The QMainWindow::statusBar() function returns a pointer to the status bar. (The status bar is createdthe first time statusBar() is called.) The status indicators are simply QLabels whose text we changewhenever necessary. We have added an indent to the formulaLabel so that the text shown in it isoffset slightly from the left edge. When the QLabels are added to the status bar, they areautomatically reparented to make them children of the status bar.
Figure 3.8 shows that the two labels have different space requirements. The cell location indicatorrequires very little space, and when the window is re-sized, any extra space should go to the cellformula indicator on the right. This is achieved by specifying a stretch factor of 1 in the formulalabel's QStatusBar::addWidget() call. The location indicator has the default stretch factor of 0,meaning that it prefers not to be stretched.
Figure 3.8. The Spreadsheet application's status bar
When QStatusBar lays out indicator widgets, it tries to respect each widget's ideal size as given byQWidget::sizeHint() and then stretches any stretchable widgets to fill the available space. Awidget's ideal size is itself dependent on the widget's contents and varies as we change thecontents. To avoid constant resizing of the location indicator, we set its minimum size to be wideenough to contain the largest possible text ("W999"), with a little extra space. We also set itsalignment to Qt::AlignHCenter to horizontally center the text.
Near the end of the function, we connect two of Spreadsheet's signals to two of MainWindow's slots:updateStatusBar() and spreadsheetModified().
void MainWindow::updateStatusBar(){ locationLabel->setText(spreadsheet->currentLocation()); formulaLabel->setText(spreadsheet->currentFormula());}
The updateStatusBar() slot updates the cell location and the cell formula indicators. It is called
whenever the user moves the cell cursor to a new cell. The slot is also used as an ordinary functionat the end of createStatusBar() to initialize the indicators. This is necessary because Spreadsheet
doesn't emit the currentCellChanged() signal at startup.
void MainWindow::spreadsheetModified(){ setWindowModified(true); updateStatusBar();}
The spreadsheetModified() slot sets the windowModified property to true, updating the title bar. Thefunction also updates the location and formula indicators so that they reflect the current state ofaffairs.
Implementing the File MenuIn this section, we will implement the slots and private functions necessary to make the File menuoptions work and to manage the recently opened files list.
void MainWindow::newFile(){ if (okToContinue()) {
spreadsheet->clear(); setCurrentFile(""); }}
The newFile() slot is called when the user clicks the File|New menu option or clicks the New toolbarbutton. The okToContinue() private function asks the user "Do you want to save your changes?" ifthere are unsaved changes. It returns true if the user chooses either Yes or No (saving thedocument on Yes), and it returns false if the user chooses Cancel. The Spreadsheet::clear()
function clears all the spreadsheet's cells and formulas. The setCurrentFile() private functionupdates the window title to indicate that an untitled document is being edited, in addition to settingthe curFile private variable and updating the recently opened files list.
bool MainWindow::okToContinue(){ if (isWindowModified()) { int r = QMessageBox::warning(this, tr("Spreadsheet"), tr("The document has been modified.\n" "Do you want to save your changes?"), QMessageBox::Yes | QMessageBox::Default, QMessageBox::No, QMessageBox::Cancel | QMessageBox::Escape); if (r == QMessageBox::Yes) { return save(); } else if (r == QMessageBox::Cancel) { return false; } } return true;}

In okToContinue(), we check the state of the windowModified property. If it is true, we display themessage box shown in Figure 3.9. The message box has a Yes, a No, and a Cancel button. TheQMessageBox::Default modifier makes Yes the default button. The QMessageBox::Escape modifiermakes the Esc key a synonym for Cancel.
Figure 3.9. "Do you want to save your changes?"
The call to warning() may look a bit intimidating at first sight, but the general syntax isstraightforward:
QMessageBox::warning(parent, title, message, button0, button1, ...);
QMessageBox also provides information(), question(), and critical(), each of which has its ownparticular icon.
Figure 3.10. Message box icons
void MainWindow::open(){ if (okToContinue()) { QString fileName = QFileDialog::getOpenFileName(this, tr("Open Spreadsheet"), ".", tr("Spreadsheet files (*.sp)")); if (!fileName.isEmpty()) loadFile(fileName); }}
The open() slot corresponds to File|Open. Like newFile(), it first calls okToContinue() to handle anyunsaved changes. Then it uses the static convenience function QFileDialog::getOpenFileName() toobtain a new file name from the user. The function pops up a file dialog, lets the user choose a file,and returns the file nameor an empty string if the user clicked Cancel.
The first argument to QFileDialog::getOpenFileName() is the parent widget. The parentchildrelationship doesn't mean the same thing for dialogs as for other widgets. A dialog is always awindow in its own right, but if it has a parent, it is centered on top of the parent by default. A childdialog also shares its parent's taskbar entry.

The second argument is the title the dialog should use. The third argument tells it which directory itshould start from, in our case the current directory.
The fourth argument specifies the file filters. A file filter consists of a descriptive text and a wildcardpattern. Had we supported comma-separated values files and Lotus 1-2-3 files in addition toSpreadsheet's native file format, we would have used the following filter:
tr("Spreadsheet files (*.sp)\n" "Comma-separated values files (*.csv)\n" "Lotus 1-2-3 files (*.wk1 *.wks)")
The loadFile() private function was called in open() to load the file. We make it an independentfunction because we will need the same functionality to load recently opened files:
bool MainWindow::loadFile(const QString &fileName){ if (!spreadsheet->readFile(fileName)) { statusBar()->showMessage(tr("Loading canceled"), 2000); return false; } setCurrentFile(fileName); statusBar()->showMessage(tr("File loaded"), 2000); return true;}
We use Spreadsheet::readFile() to read the file from disk. If loading is successful, we callsetCurrentFile() to update the window title; otherwise, Spread-sheet::readFile() will have alreadynotified the user of the problem through a message box. In general, it is good practice to let thelower-level components issue error messages, since they can provide the precise details of whatwent wrong.
In both cases, we display a message in the status bar for 2 seconds (2000 milliseconds) to keep theuser informed about what the application is doing.
bool MainWindow::save(){ if (curFile.isEmpty()) { return saveAs(); } else { return saveFile(curFile); }}bool MainWindow::saveFile(const QString &fileName){ if (!spreadsheet->writeFile(fileName)) { statusBar()->showMessage(tr("Saving canceled"), 2000); return false; } setCurrentFile(fileName); statusBar()->showMessage(tr("File saved"), 2000); return true;}
The save() slot corresponds to File|Save. If the file already has a name because it was openedbefore or has already been saved, save() calls saveFile() with that name; otherwise, it simply calls

saveAs().
bool MainWindow::saveAs(){ QString fileName = QFileDialog::getSaveFileName(this, tr("Save Spreadsheet"), ".", tr("Spreadsheet files (*.sp)")); if (fileName.isEmpty()) return false; return saveFile(fileName);}
The saveAs() slot corresponds to File|Save As. We call QFileDialog::getSaveFile-Name() to obtain afile name from the user. If the user clicks Cancel, we return false, which is propagated up to itscaller (save() or okToContinue()).
If the file already exists, the getSaveFileName() function will ask the user to confirm that they wantto overwrite. This behavior can be changed by passing QFileDialog::DontConfirmOverwrite as anadditional argument to getSaveFile-Name().
void MainWindow::closeEvent(QCloseEvent *event){ if (okToContinue()) { writeSettings(); event->accept(); } else { event->ignore(); }}
When the user clicks File|Exit or clicks the close button in the window's title bar, theQWidget::close() slot is called. This sends a "close" event to the widget. By reimplementingQWidget::closeEvent(), we can intercept attempts to close the main window and decide whether wewant the window to actually close or not.
If there are unsaved changes and the user chooses Cancel, we "ignore" the event and leave thewindow unaffected by it. In the normal case, we accept the event, resulting in Qt hiding the window.We also call the private function writeSettings() to save the application's current settings.
When the last window is closed, the application terminates. If needed, we can disable this behaviorby setting QApplication's quitOnLastWindowClosed property to false, in which case the applicationkeeps running until we call QApplication::quit().
void MainWindow::setCurrentFile(const QString &fileName){ curFile = fileName; setWindowModified(false); QString shownName = "Untitled"; if (!curFile.isEmpty()) {
shownName = strippedName(curFile); recentFiles.removeAll(curFile); recentFiles.prepend(curFile); updateRecentFileActions(); } setWindowTitle(tr("%1[*] - %2").arg(shownName) .arg(tr("Spreadsheet")));}

QString MainWindow::strippedName(const QString &fullFileName){ return QFileInfo(fullFileName).fileName();}
In setCurrentFile(), we set the curFile private variable that stores the name of the file beingedited. Before we show the file name in the title bar, we remove the file's path with strippedName()
to make it more user-friendly.
Every QWidget has a windowModified property that should be set to TRue if the window's documenthas unsaved changes, and to false otherwise. On Mac OS X, unsaved documents are indicated by adot in the close button of the window's title bar; on other platforms, they are indicated by anasterisk following the file name. Qt takes care of this behavior automatically, as long as we keep thewindowModified property up-to-date and place the marker "[*]" in the window title where we wantthe asterisk to appear when it is required.
The text we passed to the setWindowTitle() function was
tr("%1[*] - %2").arg(shownName) .arg(tr("Spreadsheet"))
The QString::arg() function replaces the lowest-numbered "%n" parameter with its argument andreturns the resulting string. In this case, arg() is used with two "%n" parameters. The first call toarg() replaces "%1"; the second call replaces "%2". If the file name is "budget.sp" and notranslation file is loaded, the resulting string would be "budget.sp[*] - Spreadsheet".It would havebeen easier to write
setWindowTitle(shownName + tr("[*] - Spreadsheet"));
but using arg() provides more flexibility for translators.
If there is a file name, we update recentFiles, the application's recently opened files list. We callremoveAll() to remove any occurrences of the file name in the list, to avoid duplicates; then we callprepend() to add the file name as the first item. After updating the list, we call the private functionupdateRecentFileActions() to update the entries in the File menu.
void MainWindow::updateRecentFileActions(){ QMutableStringListIterator i(recentFiles); while (i.hasNext()) { if (!QFile::exists(i.next())) i.remove(); } for (int j = 0; j < MaxRecentFiles; ++j) { if (j < recentFiles.count()) { QString text = tr("&%1 %2") .arg(j + 1) .arg(strippedName(recentFiles[j])); recentFileActions[j]->setText(text); recentFileActions[j]->setData(recentFiles[j]); recentFileActions[j]->setVisible(true); } else { recentFileActions[j]->setVisible(false); } }

separatorAction->setVisible(!recentFiles.isEmpty());}
We begin by removing any files that no longer exist using a Java-style iterator. Some files mighthave been used in a previous session, but have since been deleted. The recentFiles variable is oftype QStringList (list of QStrings). Chapter 11 explains container classes such as QStringList indetail, showing how they relate to the C++ Standard Template Library (STL), and the use of Qt'sJava-style iterator classes.
We then go through the list of files again, this time using array-style indexing. For each file, wecreate a string consisting of an ampersand, a digit (j + 1), a space, and the file name (without itspath). We set the corresponding action to use this text. For example, if the first file was C:\My
Documents\tab04.sp, the first action's text would be "&1 tab04.sp".
Figure 3.11. File menu with recently opened files
[View full size image]
Every action can have an associated "data" item of type QVariant. The QVariant type can hold valuesof many C++ and Qt types; it is covered in Chapter 11. Here, we store the full name of the file inthe action's "data" item so that we can easily retrieve it later. We also set the action to be visible.
If there are more file actions than recent files, we simply hide the extra actions. Finally, if there is atleast one recent file, we set the separator to be visible.
void MainWindow::openRecentFile(){ if (okToContinue()) { QAction *action = qobject_cast<QAction *>(sender()); if (action) loadFile(action->data().toString()); }}
When the user chooses a recent file, the openRecentFile() slot is called. The okToContinue() functionis used in case there are any unsaved changes, and providing the user did not cancel, we find outwhich particular action invoked the slot using QObject::sender().
The qobject_cast<T>() function performs a dynamic cast based on the meta-information generatedby moc, Qt's meta-object compiler. It returns a pointer of the requested QObject subclass, or 0 if theobject cannot be cast to that type. Unlike the Standard C++ dynamic_cast<T>(), Qt's

qobject_cast<T>() works correctly across dynamic library boundaries. In our example, we useqobject_cast<T>() to cast a QObject pointer to a QAction pointer. If the cast is successful (it shouldbe), we call loadFile() with the full file name that we extract from the action's data.
Incidentally, since we know that the sender is a QAction, the program would still work if we usedstatic_cast<T>() or a traditional C-style cast instead. Refer to the "Type Conversions" section ofAppendix B for an overview of the different C++ casts.
Using DialogsIn this section, we will explain how to use dialogs in Qthow to create and initialize them, run them,and respond to choices made by the user interacting with them. We will make use of the Find, Go-to-Cell, and Sort dialogs that we created in Chapter 2. We will also create a simple About box.
Figure 3.12. The Spreadsheet application's Find dialog
We will begin with the Find dialog. Since we want the user to be able to switch between the mainSpreadsheet window and the Find dialog at will, the Find dialog must be modeless. A modelesswindow is one that runs independently of any other windows in the application.
When modeless dialogs are created,they normally have their signals connected to slots that respondto the user's interactions.
void MainWindow::find(){ if (!findDialog) { findDialog = new FindDialog(this); connect(findDialog, SIGNAL (findNext(const QString &, Qt::CaseSensitivity)), spreadsheet, SLOT (findNext(const QString &, Qt::CaseSensitivity))); connect(findDialog, SIGNAL(findPrevious(const QString &, Qt::CaseSensitivity)), spreadsheet, SLOT(findPrevious(const QString &, Qt::CaseSensitivity))); } findDialog->show(); findDialog->activateWindow();}
The Find dialog is a window that enables the user to search for text in the spreadsheet. The find()
slot is called when the user clicks Edit|Find to pop up the Find dialog. At that point, several scenarios

are possible:
This is the first time the user has invoked the Find dialog. The Find dialog was invoked before, but the user closed it. The Find dialog was invoked before and is still visible.
If the Find dialog doesn't already exist, we create it and connect its findNext() and findPrevious()
signals to the corresponding Spreadsheet slots. We could also have created the dialog in theMainWindow constructor, but delaying its creation makes startup faster. Also, if the dialog is neverused, it is never created, saving both time and memory.
Then we call show() and activateWindow() to ensure that the window is visible and active. A call toshow() alone is sufficient to make a hidden window visible and active, but the Find dialog may beinvoked when its window is already visible, in which case show() does nothing and activateWindow()
is necessary to make the window active. An alternative would have been to write
if (findDialog->isHidden()) { findDialog->show();} else { findDialog->activateWindow();}
which is the programming equivalent of looking both ways before crossing a one-way street.
We will now look at the Go-to-Cell dialog. We want the user to pop it up, use it, and close it withoutbeing able to switch to any other window in the application. This means that the Go-to-Cell dialogmust be modal. A modal window is a window that pops up when invoked and blocks the application,preventing any other processing or interactions from taking place until the window is closed. The filedialogs and message boxes we used earlier were modal.
Figure 3.13. The Spreadsheet application's Go-to-Cell dialog
A dialog is modeless if it's invoked using show() (unless we call setModal() beforehand to make itmodal); it is modal if it's invoked using exec().
void MainWindow::goToCell(){ GoToCellDialog dialog(this); if (dialog.exec()) { QString str = dialog.lineEdit->text().toUpper(); spreadsheet->setCurrentCell(str.mid(1).toInt() - 1, str[0].unicode() - 'A'); }}
The QDialog::exec() function returns a true value (QDialog::Accepted) if the dialog is accepted, and

a false value (QDialog::Rejected) otherwise. Recall that when we created the Go-to-Cell dialog usingQt Designer in Chapter 2, we connected OK to accept() and Cancel to reject(). If the user choosesOK, we set the current cell to the value in the line editor.
The QTableWidget::setCurrentCell() function expects two arguments: a row index and a columnindex. In the Spreadsheet application, cell A1 is cell (0, 0) and cell B27 is cell (26, 1). To obtain therow index from the QString returned by QLineEdit::text(), we extract the row number usingQString::mid() (which returns a substring from the start position to the end of the string), convert itto an int using QString::toInt(), and subtract 1. For the column number, we subtract the numericvalue of 'A' from the numeric value of the string's uppercased first character. We know that thestring will have the correct format because the QRegExpValidator we created for the dialog onlyallows the OK button to be enabled if we have a letter followed by up to three digits.
The goToCell() function differs from all the code seen so far in that it creates a widget (aGoToCellDialog) as a variable on the stack. At the cost of one extra line, we could just as easily haveused new and delete:
void MainWindow::goToCell(){ GoToCellDialog *dialog = new GoToCellDialog(this); if (dialog->exec()) { QString str = dialog->lineEdit->text().toUpper(); spreadsheet->setCurrentCell(str.mid(1).toInt() - 1,
str[0].unicode() - 'A'); } delete dialog;}
Creating modal dialogs (and context menus in QWidget::contextMenuEvent() reimplementations) onthe stack is a common programming pattern since we usually don't need the dialog (or menu) afterwe have used it, and it will automatically be destroyed at the end of the enclosing scope.
We will now turn to the Sort dialog. The Sort dialog is a modal dialog that allows the user to sort thecurrently selected area by the columns they specify. Figure 3.14 shows an example of sorting, withcolumn B as the primary sort key and column A as the secondary sort key (both ascending).
Figure 3.14. Sorting the spreadsheet's selected area
[View full size image]
void MainWindow::sort(){ SortDialog dialog(this); QTableWidgetSelectionRange range = spreadsheet->selectedRange(); dialog.setColumnRange('A' + range.leftColumn(), 'A' + range.rightColumn()); if (dialog.exec()) {

SpreadsheetCompare compare; compare.keys[0] = dialog.primaryColumnCombo->currentIndex(); compare.keys[1] = dialog.secondaryColumnCombo->currentIndex() - 1; compare.keys[2] = dialog.tertiaryColumnCombo->currentIndex() - 1; compare.ascending[0] = (dialog.primaryOrderCombo->currentIndex() == 0); compare.ascending[1] = (dialog.secondaryOrderCombo->currentIndex() == 0); compare.ascending[2] = (dialog.tertiaryOrderCombo->currentIndex() == 0); spreadsheet->sort(compare); }}
The code in sort() follows a similar pattern to that used for goToCell():
We create the dialog on the stack and initialize it. We pop up the dialog using exec(). If the user clicks OK, we extract the values entered by the user from the dialog's widgets and
make use of them.
The setColumnRange() call sets the columns available for sorting to the columns that are selected.For example, using the selection shown in Figure 3.14, range.leftColumn() would yield 0, giving 'A'+ 0 = 'A', and range.rightColumn() would yield 2, giving 'A' + 2 = 'C'.
The compare object stores the primary, secondary, and tertiary sort keys and their sort orders. (Wewill see the definition of the SpreadsheetCompare class in the next chapter.) The object is used bySpreadsheet::sort() to compare two rows. The keys array stores the column numbers of the keys.For example, if the selection extends from C2 to E5, column C has position 0. The ascending arraystores the order associated with each key as a bool. QComboBox::current-Index() returns the index ofthe currently selected item, starting at 0. For the secondary and tertiary keys, we subtract one fromthe current item to account for the "None" item.
The sort() function does the job, but it is a bit fragile. It assumes that the Sort dialog isimplemented in a particular way, with comboboxes and "None" items. This means that if weredesign the Sort dialog, we may also need to rewrite this code. While this approach is adequate fora dialog that is only called from one place, it opens the door to maintenance nightmares if the dialogis used in several places.
A more robust approach is to make the SortDialog class smarter by having it create aSpreadsheetCompare object itself, which can then be accessed by its caller. This simplifiesMainWindow::sort() significantly:
void MainWindow::sort(){ SortDialog dialog(this); QTableWidgetSelectionRange range = spreadsheet->selectedRange(); dialog.setColumnRange('A' + range.leftColumn(), 'A' + range.rightColumn()); if (dialog.exec()) spreadsheet->performSort(dialog.comparisonObject());}
This approach leads to loosely coupled components and is almost always the right choice for dialogs

that will be called from more than one place.
A more radical approach would be to pass a pointer to the Spreadsheet object when initializing theSortDialog object and to allow the dialog to operate directly on the Spreadsheet. This makes theSortDialog much less general, since it will only work on a certain type of widget, but it simplifies thecode even further by eliminating the SortDialog::setColumnRange() function. The MainWindow::sort()
function then becomes
void MainWindow::sort(){ SortDialog dialog(this); dialog.setSpreadsheet(spreadsheet); dialog.exec();}
This approach mirrors the first: Instead of the caller needing intimate knowledge of the dialog, thedialog needs intimate knowledge of the data structures supplied by the caller. This approach may beuseful where the dialog needs to apply changes live. But just as the caller code is fragile using thefirst approach, this third approach breaks if the data structures change.
Some developers choose just one approach to using dialogs and stick with that. This has the benefitof familiarity and simplicity since all their dialog usages follow the same pattern, but it also missesthe benefits of the approaches that are not used. Ideally, the approach to use should be decided ona per-dialog basis.
We will round off this section with the About box. We could create a custom dialog like we did forthe Find or Go-to-Cell dialogs to present the information about the application, but since most Aboutboxes are highly stylized, Qt provides a simpler solution.
void MainWindow::about(){ QMessageBox::about(this, tr("About Spreadsheet"), tr("<h2>Spreadsheet 1.1</h2>" "<p>Copyright © 2006 Software Inc." "<p>Spreadsheet is a small application that " "demonstrates QAction, QMainWindow, QMenuBar, " "QStatusBar, QTableWidget, QToolBar, and many other " "Qt classes."));}
The About box is obtained by calling QMessageBox::about(), a static convenience function. Thefunction is very similar to QMessageBox::warning(), except that it uses the parent window's iconinstead of the standard "warning" icon.
Figure 3.15. About Spreadsheet
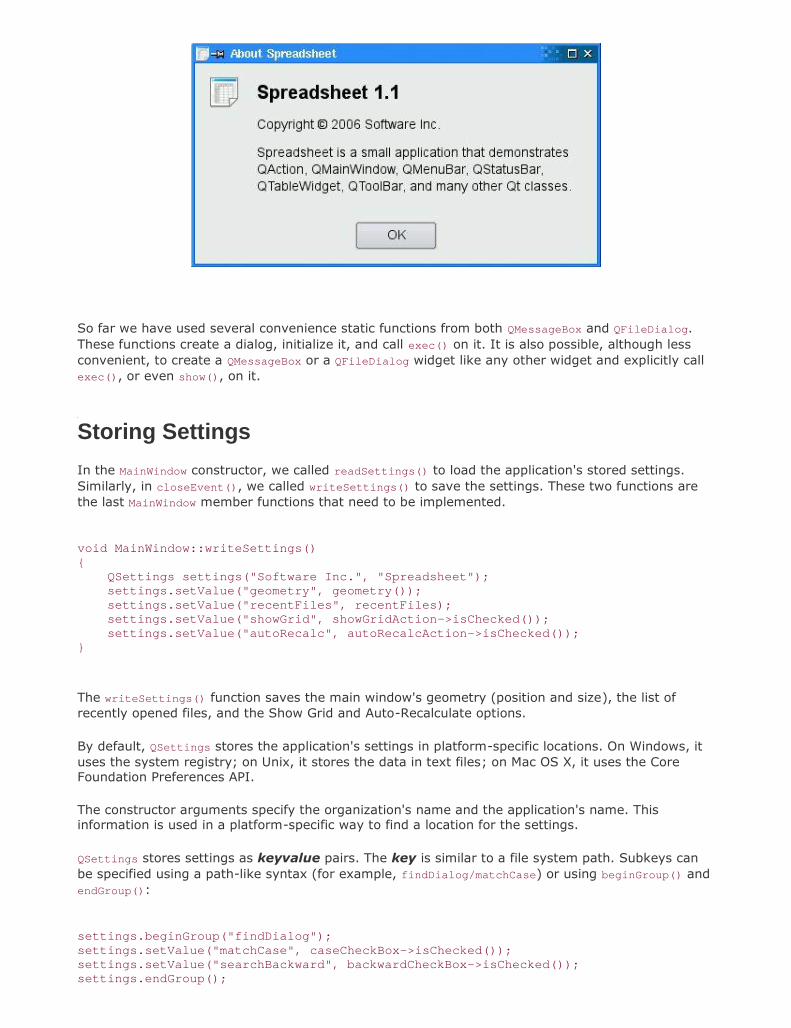
So far we have used several convenience static functions from both QMessageBox and QFileDialog.These functions create a dialog, initialize it, and call exec() on it. It is also possible, although lessconvenient, to create a QMessageBox or a QFileDialog widget like any other widget and explicitly callexec(), or even show(), on it.
Storing SettingsIn the MainWindow constructor, we called readSettings() to load the application's stored settings.Similarly, in closeEvent(), we called writeSettings() to save the settings. These two functions arethe last MainWindow member functions that need to be implemented.
void MainWindow::writeSettings(){ QSettings settings("Software Inc.", "Spreadsheet"); settings.setValue("geometry", geometry()); settings.setValue("recentFiles", recentFiles); settings.setValue("showGrid", showGridAction->isChecked()); settings.setValue("autoRecalc", autoRecalcAction->isChecked());}
The writeSettings() function saves the main window's geometry (position and size), the list ofrecently opened files, and the Show Grid and Auto-Recalculate options.
By default, QSettings stores the application's settings in platform-specific locations. On Windows, ituses the system registry; on Unix, it stores the data in text files; on Mac OS X, it uses the CoreFoundation Preferences API.
The constructor arguments specify the organization's name and the application's name. Thisinformation is used in a platform-specific way to find a location for the settings.
QSettings stores settings as keyvalue pairs. The key is similar to a file system path. Subkeys canbe specified using a path-like syntax (for example, findDialog/matchCase) or using beginGroup() andendGroup():
settings.beginGroup("findDialog");settings.setValue("matchCase", caseCheckBox->isChecked());settings.setValue("searchBackward", backwardCheckBox->isChecked());settings.endGroup();

The value can be an int, a bool, a double, a QString, a QStringList, or any other type supported byQVariant, including registered custom types.
void MainWindow::readSettings(){ QSettings settings("Software Inc.", "Spreadsheet"); QRect rect = settings.value("geometry", QRect(200, 200, 400, 400)).toRect(); move(rect.topLeft()); resize(rect.size()); recentFiles = settings.value("recentFiles").toStringList(); updateRecentFileActions(); bool showGrid = settings.value("showGrid", true).toBool(); showGridAction->setChecked(showGrid);
bool autoRecalc = settings.value("autoRecalc", true).toBool(); autoRecalcAction->setChecked(autoRecalc);}
The readSettings() function loads the settings that were saved by writeSettings(). The secondargument to the value() function specifies a default value, in case there are no settings available.The default values are used the first time the application is run. Since no second argument is givenfor the recent files list, it will be set to an empty list on the first run.
Qt provides a QWidget::setGeometry() function to complement QWidget::geometry(), but it doesn'talways work as we would expect on X11 because of limitations in many window managers. For thatreason, we use move() and resize() instead. (See http://doc.trolltech.com/4.1/geometry.html for adetailed explanation.)
The arrangement we opted for in MainWindow, with all the QSettings-related code in readSettings()
and writeSettings(), is just one of many possible approaches. A QSettings object can be created toquery or modify some setting at any time during the execution of the application and from anywherein the code.
We have now completed the Spreadsheet's MainWindow implementation. In the following sections, wewill discuss how the Spreadsheet application can be modified to handle multiple documents and howto implement a splash screen. We will complete its functionality, including handling formulas andsorting, in the next chapter.
Multiple DocumentsWe are now ready to code the Spreadsheet application's main() function:
include <QApplication>include "mainwindow.h"int main(int argc, char *argv[]){ QApplication app(argc, argv); MainWindow mainWin; mainWin.show(); return app.exec();}

This main() function is a little bit different from those we have written so far: We have created theMainWindow instance as a variable on the stack instead of using new. The MainWindow instance is thenautomatically destroyed when the function terminates.
With the main() function shown above, the Spreadsheet application provides a single main windowand can only handle one document at a time. If we want to edit multiple documents at the sametime, we could start multiple instances of the Spreadsheet application. But this isn't as convenientfor users as having a single instance of the application providing multiple main windows, just as oneinstance of a web browser can provide multiple browser windows simultaneously.
We will modify the Spreadsheet application so that it can handle multiple documents. First, we needa slightly different File menu:
File|New creates a new main window with an empty document, instead of reusing theexisting main window.
File|Close closes the current main window. File|Exit closes all windows.
In the original version of the File menu, there was no Close option because that would have beenthe same as Exit.
Figure 3.16. The new File menu
This is the new main() function:
int main(int argc, char *argv[]){ QApplication app(argc, argv); MainWindow *mainWin = new MainWindow; mainWin->show(); return app.exec();}
With multiple windows, it now makes sense to create MainWindow with new, because then we can usedelete on a main window when we have finished with it to save memory.
This is the new MainWindow::newFile() slot:
void MainWindow::newFile(){

MainWindow *mainWin = new MainWindow; mainWin->show();}
We simply create a new MainWindow instance. It may seem odd that we don't keep any pointer to thenew window, but that isn't a problem since Qt keeps track of all the windows for us.
These are the actions for Close and Exit:
void MainWindow::createActions(){ ... closeAction = new QAction(tr("&Close"), this); closeAction->setShortcut(tr("Ctrl+W")); closeAction->setStatusTip(tr("Close this window")); connect(closeAction, SIGNAL(triggered()), this, SLOT(close())); exitAction = new QAction(tr("E&xit"), this); exitAction->setShortcut(tr("Ctrl+Q")); exitAction->setStatusTip(tr("Exit the application")); connect(exitAction, SIGNAL(triggered()), qApp, SLOT(closeAllWindows())); ...}
The QApplication::closeAllWindows() slot closes all of the application's windows, unless one of themrejects the close event. This is exactly the behavior we need here. We don't have to worry aboutunsaved changes because that's handled in MainWindow::closeEvent() whenever a window is closed.
It looks as if we have finished making the application capable of handling multiple windows.Unfortunately, there is a hidden problem lurking: If the user keeps creating and closing mainwindows, the machine might eventually run out of memory. This is because we keep creatingMainWindow widgets in newFile() but we never delete them. When the user closes a main window,the default behavior is to hide it, so it still remains in memory. With many main windows, this canbe a problem.
The solution is to set the Qt::WA_DeleteOnClose attribute in the constructor:
MainWindow::MainWindow(){ ... setAttribute(Qt::WA_DeleteOnClose);
...}
This tells Qt to delete the window when it is closed. The Qt::WA_DeleteOnClose attribute is one ofmany flags that can be set on a QWidget to influence its behavior.
Memory leaking isn't the only problem that we must deal with. Our original application designincluded an implied assumption that we would only have one main window. With multiple windows,each main window has its own recently opened files list and its own options. Clearly, the recentlyopened files list should be global to the whole application. We can achieve this quite easily bydeclaring the recentFiles variable static, so that only one instance of it exists for the wholeapplication. But then we must ensure that wherever we called updateRecentFileActions() to updatethe File menu, we must call it on all main windows. Here's the code to achieve this:

foreach (QWidget *win, QApplication::topLevelWidgets()) { if (MainWindow *mainWin = qobject_cast<MainWindow *>(win)) mainWin->updateRecentFileActions();}
The code uses Qt's foreach construct (explained in Chapter 11) to iterate over all the application'swindows and calls updateRecentFileActions() on all widgets of type MainWindow. Similar code can beused for synchronizing the Show Grid and Auto-Recalculate options, or to make sure that the samefile isn't loaded twice.
Applications that provide one document per main window are said to be SDI (single documentinterface) applications. A common alternative on Windows is MDI (multiple document interface),where the application has a single main window that manages multiple document windows within itscentral area. Qt can be used to create both SDI and MDI applications on all its supported platforms.Figure 3.17 shows the Spreadsheet application using both approaches. MDI is explained in Chapter 6(Layout Management).
Figure 3.17. SDI versus MDI
[View full size image]
Splash ScreensMany applications present a splash screen at startup. Some developers use a splash screen todisguise a slow startup, while others do it to satisfy their marketing departments. Adding a splashscreen to Qt applications is very easy using the QSplashScreen class.
The QSplashScreen class shows an image before the main window appears. It can also writemessages on the image to inform the user about the progress of the application's initializationprocess. Typically, the splash screen code is located in main(), before the call toQApplication::exec().
Next is an example main() function that uses QSplashScreen to present a splash screen in anapplication that loads modules and establishes network connections at startup.
int main(int argc, char *argv[]){ QApplication app(argc, argv); QSplashScreen *splash = new QSplashScreen; splash->setPixmap(QPixmap(":/images/splash.png")); splash->show(); Qt::Alignment topRight = Qt::AlignRight | Qt::AlignTop; splash->showMessage(QObject::tr("Setting up the main window..."), topRight, Qt::white); MainWindow mainWin;
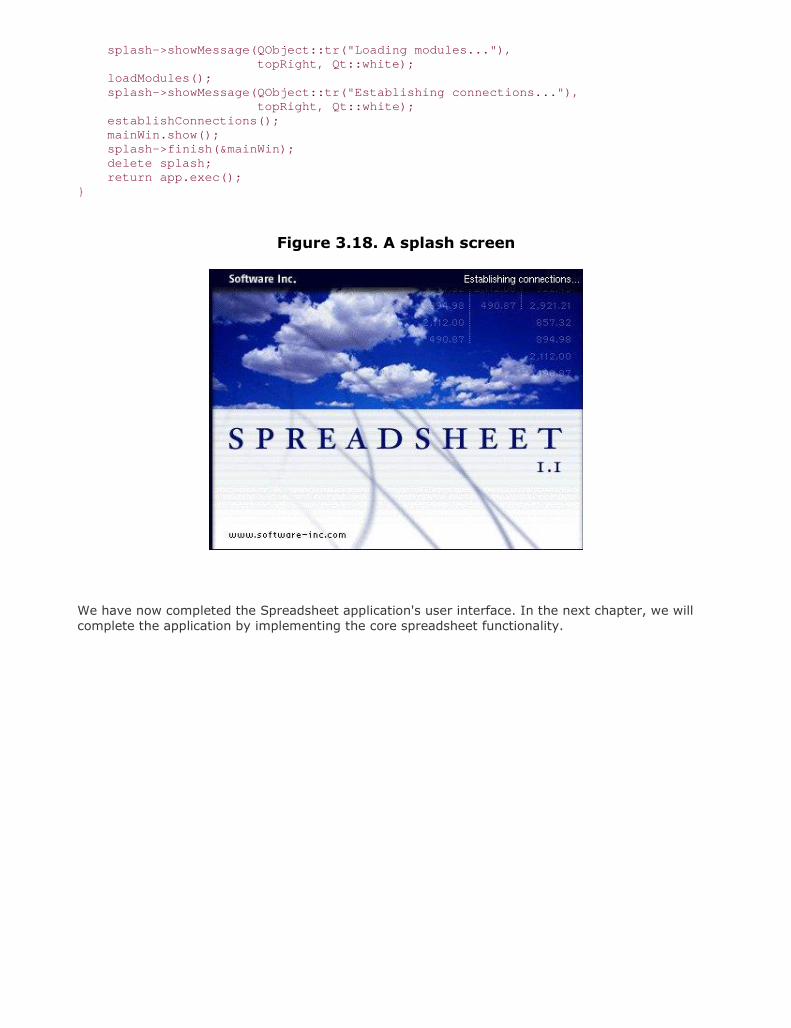
splash->showMessage(QObject::tr("Loading modules..."), topRight, Qt::white); loadModules(); splash->showMessage(QObject::tr("Establishing connections..."), topRight, Qt::white); establishConnections(); mainWin.show(); splash->finish(&mainWin); delete splash; return app.exec();}
Figure 3.18. A splash screen
We have now completed the Spreadsheet application's user interface. In the next chapter, we willcomplete the application by implementing the core spreadsheet functionality.

Chapter 4. Implementing ApplicationFunctionality
The Central Widget Subclassing QTableWidget Loading and Saving Implementing the Edit Menu Implementing the Other Menus Subclassing QTableWidgetItem
In the previous two chapters, we explained how to create the Spreadsheet application's userinterface. In this chapter, we will complete the program by coding its underlying functionality.Among other things, we will see how to load and save files, how to store data in memory, how toimplement clipboard operations, and how to add support for spreadsheet formulas to QTableWidget.
The Central WidgetThe central area of a QMainWindow can be occupied by any kind of widget. Here's an overview of thepossibilities:
1. Use a standard Qt widget.
A standard widget like QTableWidget or QTextEdit can be used as a central widget. In thiscase, the application's functionality, such as loading and saving files, must be implementedelsewhere (for example, in a QMainWindow subclass).
2. Use a custom widget.
Specialized applications often need to show data in a custom widget. For example, an iconeditor program would have an IconEditor widget as its central widget. Chapter 5 explainshow to write custom widgets in Qt.
3. Use a plain QWidget with a layout manager.
Sometimes the application's central area is occupied by many widgets. This can be done byusing a QWidget as the parent of all the other widgets, and using layout managers to size andposition the child widgets.
4. Use a splitter.
Another way of using multiple widgets together is to use a QSplitter. The QSplitter arrangesits child widgets horizontally or vertically, with splitter handles to give some sizing control tothe user. Splitters can contain all kinds of widgets, including other splitters.
5. Use an MDI workspace.
If the application uses MDI, the central area is occupied by a QWorkspace widget, and each ofthe MDI windows is a child of that widget.
Layouts, splitters, and MDI workspaces can be combined with standard Qt widgets or with customwidgets. Chapter 6 covers these classes in depth.
For the Spreadsheet application, a QTableWidget subclass is used as the central widget. The

QTableWidget class already provides most of the spreadsheet capability we need, but it doesn'tsupport clipboard operations and doesn't understand spreadsheet formulas like "=A1+A2+A3". Wewill implement this missing functionality in the Spreadsheet class.
Subclassing QTableWidgetThe Spreadsheet class inherits from QTableWidget. A QTableWidget is effectively a grid that representsa two-dimensional sparse array. It displays whichever cells the user scrolls to, within its specifieddimensions. When the user enters some text into an empty cell, QTableWidget automatically createsa QTableWidgetItem to store the text.
Let's start implementing Spreadsheet, beginning with the header file:
#ifndef SPREADSHEET_H#define SPREADSHEET_H#include <QTableWidget>class Cell;class SpreadsheetCompare;
The header starts with forward declarations for the Cell and SpreadsheetCom-pare classes.
Figure 4.1. Inheritance trees for Spreadsheet and Cell
The attributes of a QTableWidget cell, such as its text and its alignment, are stored in aQTableWidgetItem. Unlike QTableWidget, QTableWidgetItem isn't a widget class; it is a pure data class.The Cell class inherits QTableWidgetItem and is explained when its implementation is shown in thischapter's last section.
class Spreadsheet : public QTableWidget{ Q_OBJECTpublic: Spreadsheet(QWidget *parent = 0); bool autoRecalculate() const { return autoRecalc; } QString currentLocation() const; QString currentFormula() const; QTableWidgetSelectionRange selectedRange() const; void clear(); bool readFile(const QString &fileName); bool writeFile(const QString &fileName); void sort(const SpreadsheetCompare &compare);
The autoRecalculate() function is implemented inline since it just returns whether or not auto-recalculation is in force.

In Chapter 3, we relied on some public functions in Spreadsheet when we implemented MainWindow.For example, we called clear() from MainWindow::newFile() to reset the spreadsheet. We also usedsome functions inherited from QTableWidget, notably setCurrentCell() and setShowGrid().
public slots: void cut(); void copy(); void paste(); void del(); void selectCurrentRow(); void selectCurrentColumn(); void recalculate(); void setAutoRecalculate(bool recalc); void findNext(const QString &str, Qt::CaseSensitivity cs); void findPrevious(const QString &str, Qt::CaseSensitivity cs);signals: void modified();
Spreadsheet provides many slots that implement actions from the Edit, Tools, and Options menus,and it provides one signal, modified(), to announce any change that has occurred.
private slots: void somethingChanged();
We define one private slot used internally by the Spreadsheet class.
private: enum { MagicNumber = 0x7F51C883, RowCount = 999, ColumnCount = 26 }; Cell *cell(int row, int column) const; QString text(int row, int column) const; QString formula(int row, int column) const; void setFormula(int row, int column, const QString &formula); bool autoRecalc;};
In the class's private section, we declare three constants, four functions, and one variable.
class SpreadsheetCompare{public: bool operator()(const QStringList &row1, const QStringList &row2) const; enum { KeyCount = 3 }; int keys[KeyCount]; bool ascending[KeyCount];};#endif
The header file ends with the SpreadsheetCompare class definition. We will explain this when wereview Spreadsheet::sort().
We will now look at the implementation:

#include <QtGui>#include "cell.h"#include "spreadsheet.h"Spreadsheet::Spreadsheet(QWidget *parent) : QTableWidget(parent){ autoRecalc = true; setItemPrototype(new Cell); setSelectionMode(ContiguousSelection); connect(this, SIGNAL(itemChanged(QTableWidgetItem *)), this, SLOT(somethingChanged())); clear();}
Normally, when the user enters some text on an empty cell, the QTableWidget will automaticallycreate a QTableWidgetItem to hold the text. In our spreadsheet, we want Cell items to be createdinstead. This is achieved by the setItemPrototype() call in the constructor. Internally, QTableWidgetclones the item passed as a prototype every time a new item is required.
Also in the constructor, we set the selection mode to QAbstractItemView::ContiguousSelection toallow a single rectangular selection. We connect the table widget's itemChanged() signal to theprivate somethingChanged() slot; this ensures that when the user edits a cell, the somethingChanged()
slot is called. Finally, we call clear() to resize the table and to set the column headings.
void Spreadsheet::clear(){ setRowCount(0); setColumnCount(0); setRowCount(RowCount); setColumnCount(ColumnCount); for (int i = 0; i < ColumnCount; ++i) { QTableWidgetItem *item = new QTableWidgetItem; item->setText(QString(QChar('A' + i))); setHorizontalHeaderItem(i, item); } setCurrentCell(0, 0);}
The clear() function is called from the Spreadsheet constructor to initialize the spreadsheet. It isalso called from MainWindow::newFile().
We could have used QTableWidget::clear() to clear all the items and any selections, but that wouldhave left the headers at their current size. Instead, we resize the table down to 0 x 0. This clearsthe entire spreadsheet, including the headers. We then resize the table to ColumnCount x RowCount
(26 x 999) and populate the horizontal header with QTableWidgetItems containing the column names"A", "B", …, "Z". We don't need to set the vertical header labels, because these default to "1", "2",…, "999". At the end, we move the cell cursor to cell A1.
A QTableWidget is composed of several child widgets. It has a horizontal QHeaderView at the top, avertical QHeaderView on the left, and two QScrollBars. The area in the middle is occupied by a specialwidget called the viewport, on which QTableWidget draws the cells. The different child widgets areaccessible through functions inherited from QTableView and QAbstractScrollArea (see Figure 4.2).QAbstractScrollArea provides a scrollable viewport and two scroll bars, which can be turned on andoff. Its QScrollArea subclass is covered in Chapter 6.
Figure 4.2. QTableWidget's constituent widgets

Storing Data as Items
In the Spreadsheet application, every non-empty cell is stored in memory as anindividual QTableWidgetItem object. Storing data as items is an approach that is alsoused by QListWidget and QTReeWidget, which operate on QListWidgetItems andQTReeWidgetItems.
Qt's item classes can be used out of the box as data holders. For example, aQTableWidgetItem already stores a few attributes, including a string, font, color, andicon, and a pointer back to the QTableWidget. The items can also hold data (QVariants),including registered custom types, and by subclassing the item class we can provideadditional functionality.
Other toolkits provide a void pointer in their item classes to store custom data. In Qt,the more natural approach is to use setData() with a QVariant, but if a void pointer isrequired, it can be trivially achieved by subclassing an item class and adding a void
pointer member variable.
For more challenging data handling requirements, such as large data sets, complex dataitems, database integration, and multiple data views, Qt provides a set of model/viewclasses that separate the data from their visual representation. These are covered inChapter 10.
Cell *Spreadsheet::cell(int row, int column) const{ return static_cast<Cell *>(item(row, column));}
The cell() private function returns the Cell object for a given row and column. It is almost thesame as QTableWidget::item(), except that it returns a Cell pointer instead of a QTableWidgetItem
pointer.
QString Spreadsheet::text(int row, int column) const{ Cell *c = cell(row, column); if (c) { return c->text(); } else { return ""; }}

The text() private function returns the text for a given cell. If cell() returns a null pointer, the cellis empty, so we return an empty string.
QString Spreadsheet::formula(int row, int column) const{ Cell *c = cell(row, column); if (c) { return c->formula(); } else { return ""; }}
The formula() function returns the cell's formula. In many cases, the formula and the text are thesame; for example, the formula "Hello" evaluates to the string "Hello", so if the user types "Hello"into a cell and presses Enter, that cell will show the text "Hello". But there are a few exceptions:
If the formula is a number, it is interpreted as such. For example, the formula "1.50"evaluates to the double value 1.5, which is rendered as a right-aligned "1.5" in thespreadsheet.
If the formula starts with a single quote, the rest of the formula is interpreted as text. Forexample, the formula " '12345" evaluates to the string "12345".
If the formula starts with an equals sign ('='), the formula is interpreted as an arithmeticformula. For example, if cell A1 contains "12" and cell A2 contains "6", the formula "=A1+A2"evaluates to 18.
The task of converting a formula into a value is performed by the Cell class. For the moment, thething to bear in mind is that the text shown in the cell is the result of evaluating the formula, not theformula itself.
void Spreadsheet::setFormula(int row, int column, const QString &formula){ Cell *c = cell(row, column); if (!c) { c = new Cell; setItem(row, column, c); } c->setFormula(formula);}
The setFormula() private function sets the formula for a given cell. If the cell already has a Cell
object, we reuse it. Otherwise, we create a new Cell object and call QTableWidget::setItem() toinsert it into the table. At the end, we call the cell's own setFormula() function, which will cause thecell to be repainted if it's shown on screen. We don't need to worry about deleting the Cell objectlater on; QTableWidget takes ownership of the cell and will delete it automatically at the right time.
QString Spreadsheet::currentLocation() const{ return QChar('A' + currentColumn()) + QString::number(currentRow() + 1);}

The currentLocation() function returns the current cell's location in the usual spreadsheet format ofcolumn letter followed by row number. MainWindow::updateStatusBar() uses it to show the location inthe status bar.
QString Spreadsheet::currentFormula() const{ return formula(currentRow(), currentColumn());}
The currentFormula() function returns the current cell's formula. It is called fromMainWindow::updateStatusBar().
void Spreadsheet::somethingChanged(){ if (autoRecalc) recalculate(); emit modified();}
The somethingChanged() private slot recalculates the whole spreadsheet if "auto-recalculate" isenabled. It also emits the modified() signal.
Loading and SavingWe will now implement the loading and saving of Spreadsheet files using a custom binary format.We will do this using QFile and QDataStream, which together provide platform-independent binaryI/O.
We will start with writing a Spreadsheet file:
bool Spreadsheet::writeFile(const QString &fileName){ QFile file(fileName); if (!file.open(QIODevice::WriteOnly)) { QMessageBox::warning(this, tr("Spreadsheet"), tr("Cannot write file %1:\n%2.")
.arg(file.fileName()) .arg(file.errorString())); return false; } QDataStream out(&file); out.setVersion(QDataStream::Qt_4_1); out << quint32(MagicNumber); QApplication::setOverrideCursor(Qt::WaitCursor); for (int row = 0; row < RowCount; ++row) { for (int column = 0; column < ColumnCount; ++column) { QString str = formula(row, column); if (!str.isEmpty()) out << quint16(row) << quint16(column) << str; } } QApplication::restoreOverrideCursor(); return true;}

The writeFile() function is called from MainWindow::saveFile() to write the file to disk. It returnstrue on success, false on error.
We create a QFile object with the given file name and call open() to open the file for writing. We alsocreate a QDataStream object that operates on the QFile and use it to write out the data.
Just before we write the data, we change the application's cursor to the standard wait cursor(usually an hourglass) and restore the normal cursor once all the data is written. At the end of thefunction, the file is automatically closed by QFile's destructor.
QDataStream supports basic C++ types as well as many of Qt's types. The syntax is modeled afterthe Standard C++ <iostream> classes. For example,
out << x << y << z;
writes the variables x, y, and z to a stream, and
in >> x >> y >> z;
reads them from a stream. Because the C++ basic types char, short, int, long, and long long mayhave different sizes on different platforms, it is safest to cast these values to one of qint8, quint8,qint16, quint16, qint32, quint32, qint64, and quint64, which are guaranteed to be of the size theyadvertise (in bits).
The Spreadsheet application's file format is fairly simple. A Spreadsheet file starts with a 32-bitnumber that identifies the file format (MagicNumber, defined as 0x7F51C883 in spreadsheet.h, anarbitrary random number.) Then comes a series of blocks, each of which contains a single cell's row,column, and formula. To save space, we don't write out empty cells.
Figure 4.3. The Spreadsheet file format
The precise binary representation of the data types is determined by QData-Stream. For example, aquint16 is stored as two bytes in big-endian order, and a QString as the string's length followed bythe Unicode characters.
The binary representation of Qt types has evolved quite a lot since Qt 1.0. It is likely to continueevolving in future Qt releases to keep pace with the evolution of existing types and to allow for newQt types. By default, QDataStream uses the most recent version of the binary format (version 7 in Qt4.1), but it can be set to read older versions. To avoid any compatibility problems if the applicationis recompiled later using a newer Qt release, we explicitly tell QDataStream to use version 7irrespective of the version of Qt we are compiling against. (QDataStream::Qt_4_1 is a convenienceconstant that equals 7.)
QDataStream is very versatile. It can be used on a QFile, and also on a QBuffer, a QProcess, aQTcpSocket, or a QUdpSocket. Qt also offers a QTextStream class that can be used instead ofQDataStream for reading and writing text files. Chapter 12 explains these classes in depth, and alsodescribes various approaches to handling different QDataStream versions.

bool Spreadsheet::readFile(const QString &fileName){ QFile file(fileName); if (!file.open(QIODevice::ReadOnly)) { QMessageBox::warning(this, tr("Spreadsheet"), tr("Cannot read file %1:\n%2.") .arg(file.fileName()) .arg(file.errorString())); return false; } QDataStream in(&file); in.setVersion(QDataStream::Qt_4_1); quint32 magic; in >> magic; if (magic != MagicNumber) { QMessageBox::warning(this, tr("Spreadsheet"), tr("The file is not a Spreadsheet file.")); return false; } clear(); quint16 row; quint16 column; QString str; QApplication::setOverrideCursor(Qt::WaitCursor); while (!in.atEnd()) { in >> row >> column >> str; setFormula(row, column, str); } QApplication::restoreOverrideCursor(); return true;}
The readFile() function is very similar to writeFile(). We use QFile to read in the file, but this timeusing the QIODevice::ReadOnly flag rather than QIODevice:: WriteOnly. Then we set the QDataStream
version to 7. The format for reading must always be the same as for writing.
If the file has the correct magic number at the beginning, we call clear() to blank out all the cells inthe spreadsheet, and we read in the cell data. Since the file only contains the data for non-emptycells, and it is very unlikely that every cell in the spreadsheet will be set, we must ensure that allcells are cleared before reading.
Implementing the Edit MenuWe are now ready to implement the slots that correspond to the application's Edit menu.
void Spreadsheet::cut(){ copy(); del();}
The cut() slot corresponds to Edit|Cut. The implementation is simple since Cut is the same as Copyfollowed by Delete.
Figure 4.4. The Spreadsheet application's Edit menu

void Spreadsheet::copy(){ QTableWidgetSelectionRange range = selectedRange(); QString str; for (int i = 0; i < range.rowCount(); ++i) { if (i > 0) str += "\n"; for (int j = 0; j < range.columnCount(); ++j) { if (j > 0) str += "\t"; str += formula(range.topRow() + i, range.leftColumn() + j); } } QApplication::clipboard()->setText(str);}
The copy() slot corresponds to Edit|Copy. It iterates over the current selection (which is simply thecurrent cell if there is no explicit selection). Each selected cell's formula is added to a QString, withrows separated by newline characters and columns separated by tab characters.
The system clipboard is available in Qt through the QApplication::clipboard() static function. Bycalling QClipboard::setText(), we make the text available on the clipboard, both to this applicationand to other applications that support plain text. Our format with tab and newline characters asseparators is understood by a variety of applications, including Microsoft Excel.
Figure 4.5. Copying a selection onto the clipboard
The QTableWidget::selectedRanges() function returns a list of selection ranges. We know therecannot be more than one because we set the selection mode toQAbstractItemView::ContiguousSelection in the constructor. For our convenience, we define aselectedRange() function that returns the selection range:

QTableWidgetSelectionRange Spreadsheet::selectedRange() const{ QList<QTableWidgetSelectionRange> ranges = selectedRanges(); if (ranges.isEmpty()) return QTableWidgetSelectionRange(); return ranges.first();}
If there is a selection at all, we simply return the first (and only) one. The case where there is noselection should never happen since the ContiguousSelection mode treats the current cell as beingselected. But to protect against the possibility of a bug in our program that makes no cell current,we handle this case.
void Spreadsheet::paste(){ QTableWidgetSelectionRange range = selectedRange(); QString str = QApplication::clipboard()->text(); QStringList rows = str.split('\n'); int numRows = rows.count(); int numColumns = rows.first().count('\t') + 1; if (range.rowCount() * range.columnCount() != 1 && (range.rowCount() != numRows || range.columnCount() != numColumns)) { QMessageBox::information(this, tr("Spreadsheet"), tr("The information cannot be pasted because the copy " "and paste areas aren't the same size."));
return; } for (int i = 0; i < numRows; ++i) { QStringList columns = rows[i].split('\t'); for (int j = 0; j < numColumns; ++j) { int row = range.topRow() + i; int column = range.leftColumn() + j;
if (row < RowCount && column < ColumnCount) setFormula(row, column, columns[j]); } } somethingChanged();}
The paste() slot corresponds to Edit|Paste. We fetch the text on the clipboard and call the staticfunction QString::split() to break the string into a QStringList. Each row becomes one string inthe list.
Next, we determine the dimension of the copy area. The number of rows is the number of strings inthe QStringList; the number of columns is the number of tab characters in the first row, plus 1. Ifonly one cell is selected, we use that cell as the top-left corner of the paste area; otherwise, we usethe current selection as the paste area.
To perform the paste, we iterate over the rows and split each of them into cells by usingQString::split() again, but this time using tab as the separator. Figure 4.6 illustrates the steps.
Figure 4.6. Pasting clipboard text into the spreadsheet

void Spreadsheet::del(){ foreach (QTableWidgetItem *item, selectedItems()) delete item;}
The del() slot corresponds to Edit|Delete. It is sufficient to use delete on each of the Cell objects inthe selection to clear the cells. The QTableWidget notices when its QTableWidgetItems are deleted andautomatically repaints itself if any of the items were visible. If we call cell() with the location of adeleted cell, it will return a null pointer.
void Spreadsheet::selectCurrentRow(){ selectRow(currentRow());}void Spreadsheet::selectCurrentColumn(){ selectColumn(currentColumn());}
The selectCurrentRow() and selectCurrentColumn() functions correspond to the Edit|Select|Row andEdit|Select|Column menu options. The implementations rely on QTableWidget's selectRow() andselectColumn() functions. We do not need to implement the functionality behind Edit|Select|All,since that is provided by QTableWidget's inherited function QAbstractItemView::selectAll().
void Spreadsheet::findNext(const QString &str, Qt::CaseSensitivity cs){ int row = currentRow(); int column = currentColumn() + 1; while (row < RowCount) { while (column < ColumnCount) { if (text(row, column).contains(str, cs)) { clearSelection(); setCurrentCell(row, column); activateWindow(); return; } ++column; } column = 0; ++row;
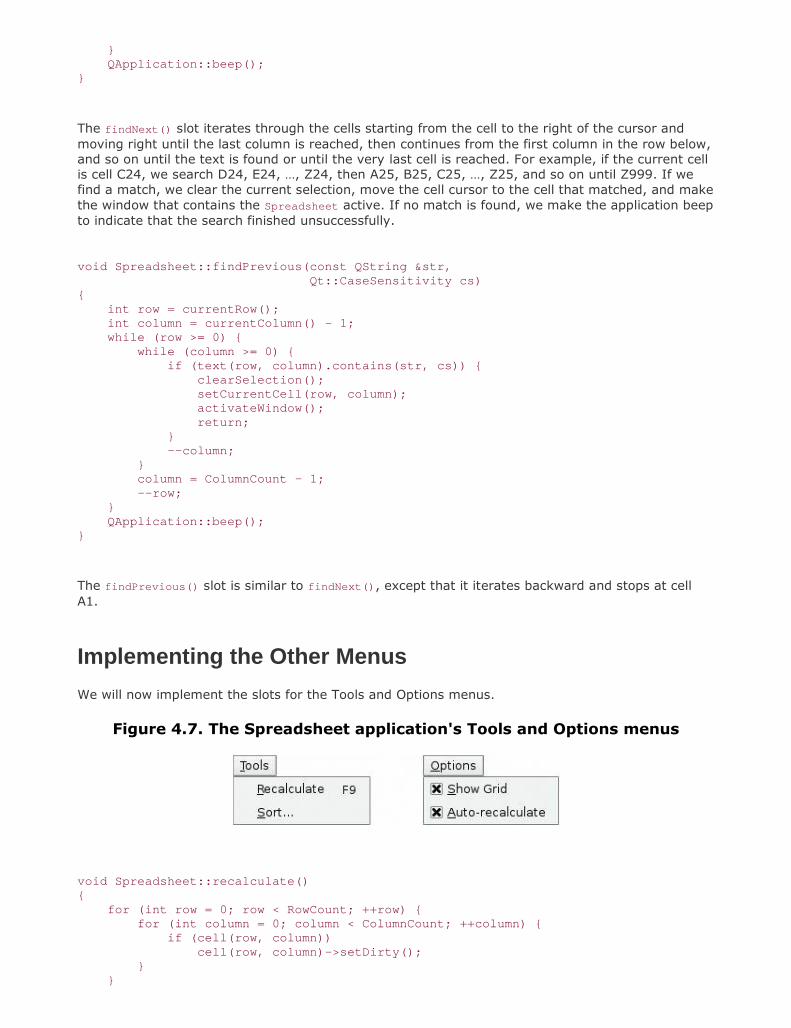
} QApplication::beep();}
The findNext() slot iterates through the cells starting from the cell to the right of the cursor andmoving right until the last column is reached, then continues from the first column in the row below,and so on until the text is found or until the very last cell is reached. For example, if the current cellis cell C24, we search D24, E24, …, Z24, then A25, B25, C25, …, Z25, and so on until Z999. If wefind a match, we clear the current selection, move the cell cursor to the cell that matched, and makethe window that contains the Spreadsheet active. If no match is found, we make the application beepto indicate that the search finished unsuccessfully.
void Spreadsheet::findPrevious(const QString &str, Qt::CaseSensitivity cs){ int row = currentRow(); int column = currentColumn() - 1; while (row >= 0) { while (column >= 0) { if (text(row, column).contains(str, cs)) { clearSelection(); setCurrentCell(row, column); activateWindow(); return; }
--column; } column = ColumnCount - 1;
--row; } QApplication::beep();}
The findPrevious() slot is similar to findNext(), except that it iterates backward and stops at cellA1.
Implementing the Other MenusWe will now implement the slots for the Tools and Options menus.
Figure 4.7. The Spreadsheet application's Tools and Options menus
void Spreadsheet::recalculate(){ for (int row = 0; row < RowCount; ++row) { for (int column = 0; column < ColumnCount; ++column) { if (cell(row, column)) cell(row, column)->setDirty(); } }

viewport()->update();}
The recalculate() slot corresponds to Tools|Recalculate. It is also called automatically bySpreadsheet when necessary.
We iterate over all the cells and call setDirty() on every cell to mark each one as requiringrecalculation. The next time QTableWidget calls text() on a Cell to obtain the value to show in thespreadsheet, the value will be recalculated.
Then we call update() on the viewport to repaint the whole spreadsheet. The repaint code inQTableWidget then calls text() on each visible cell to obtain the value to display. Because we calledsetDirty() on every cell, the calls to text() will use a freshly calculated value. The calculation mayrequire non-visible cells to be recalculated, cascading the calculation until every cell that needs to berecalculated to display the correct text in the viewport has been freshly calculated. The calculation isperformed by the Cell class.
void Spreadsheet::setAutoRecalculate(bool recalc){ autoRecalc = recalc; if (autoRecalc) recalculate();}
The setAutoRecalculate() slot corresponds to Options|Auto-Recalculate. If the feature is beingturned on, we recalculate the whole spreadsheet immediately to make sure that it's up to date;afterward, recalculate() is called automatically from somethingChanged().
We don't need to implement anything for Options|Show Grid because QTableWidget already has asetShowGrid() slot, which it inherits from its base class QTable-View. All that remains isSpreadsheet::sort(), which is called from MainWindow::sort():
void Spreadsheet::sort(const SpreadsheetCompare &compare){ QList<QStringList> rows; QTableWidgetSelectionRange range = selectedRange(); int i; for (i = 0; i < range.rowCount(); ++i) { QStringList row; for (int j = 0; j < range.columnCount(); ++j) row.append(formula(range.topRow() + i, range.leftColumn() + j)); rows.append(row); } qStableSort(rows.begin(), rows.end(), compare); for (i = 0; i < range.rowCount(); ++i) { for (int j = 0; j < range.columnCount(); ++j) setFormula(range.topRow() + i, range.leftColumn() + j, rows[i][j]); } clearSelection(); somethingChanged();}
Sorting operates on the current selection and reorders the rows according to the sort keys and sortorders stored in the compare object. We represent each row of data with a QStringList and store theselection as a list of rows. We use Qt's qStableSort() algorithm, and for simplicity sort by formula

rather than by value. Qt's standard algorithms and data structures are covered in Chapter 11(Container Classes).
Figure 4.8. Storing the selection as a list of rows
[View full size image]
The qStableSort() function accepts a begin iterator, an end iterator, and a comparison function. Thecomparison function is a function that takes two arguments (two QStringLists) and that returns true
if the first argument is "less than" the second argument, false otherwise. The compare object wepass as the comparison function isn't really a function, but it can be used as one, as we will seeshortly.
Figure 4.9. Putting the data back into the table after sorting
[View full size image]
After performing the qStableSort(), we move the data back into the table, clear the selection, andcall somethingChanged().
In spreadsheet.h, the SpreadsheetCompare class was defined like this:
class SpreadsheetCompare{public: bool operator()(const QStringList &row1, const QStringList &row2) const; enum { KeyCount = 3 }; int keys[KeyCount]; bool ascending[KeyCount];};
The SpreadsheetCompare class is special because it implements a () operator. This allows us to usethe class as if it were a function. Such classes are called function objects, or functors. To understandhow functors work, we will start with a simple example:
class Square{public: int operator()(int x) const { return x * x; }}

The Square class provides one function, operator()(int), that returns the square of its parameter.By naming the function operator()(int) rather than, say, compute(int), we gain the capability ofusing an object of type Square as if it were a function:
Square square;int y = square(5);
Now let's see an example involving SpreadsheetCompare:
QStringList row1, row2;QSpreadsheetCompare compare;...if (compare(row1, row2)) { // row1 is less than row2}
The compare object can be used just as if it had been a plain compare() function. Additionally, itsimplementation can access all the sort keys and sort orders, which are stored as member variables.
An alternative to this scheme would have been to store the sort keys and sort orders in globalvariables and use a plain compare() function. However, communicating through global variables isinelegant and can lead to subtle bugs. Functors are a more powerful idiom for interfacing withtemplate functions such as qStableSort().
Here is the implementation of the function that is used to compare two spreadsheet rows:
bool SpreadsheetCompare::operator()(const QStringList &row1, const QStringList &row2) const{ for (int i = 0; i < KeyCount; ++i) { int column = keys[i]; if (column != -1) { if (row1[column] != row2[column]) { if (ascending[i]) { return row1[column] < row2[column]; } else { return row1[column] > row2[column]; } } } } return false;}
The operator returns TRue if the first row is less than the second row; otherwise, it returns false.The qStableSort() function uses the result of this function to perform the sort.
The SpreadsheetCompare object's keys and ascending arrays are populated in the MainWindow::sort()
function (shown in Chapter 2). Each key holds a column index, or -1 ("None").
We compare the corresponding cell entries in the two rows for each key in order. As soon as we finda difference, we return an appropriate true or false value. If all the comparisons turn out to beequal, we return false. The qStableSort() function uses the order before the sort to resolve tiesituations; if row1 preceded row2 originally and neither compares as "less than" the other, row1 will

still precede row2 in the result. This is what distinguishes qStableSort() from its unstable cousinqSort().
We have now completed the Spreadsheet class. In the next section, we will review the Cell class.This class is used to hold cell formulas and provides a reimplementation of theQTableWidgetItem::data() function that Spreadsheet calls indirectly, through theQTableWidgetItem::text() function, to display the result of calculating a cell's formula.
Subclassing QTableWidgetItemThe Cell class inherits from QTableWidgetItem. The class is designed to work well with Spreadsheet,but it has no specific dependencies on that class and could in theory be used in any QTableWidget.Here's the header file:
#ifndef CELL_H#define CELL_H#include <QTableWidgetItem>class Cell : public QTableWidgetItem{public: Cell(); QTableWidgetItem *clone() const; void setData(int role, const QVariant &value); QVariant data(int role) const; void setFormula(const QString &formula); QString formula() const; void setDirty();private: QVariant value() const; QVariant evalExpression(const QString &str, int &pos) const; QVariant evalTerm(const QString &str, int &pos) const; QVariant evalFactor(const QString &str, int &pos) const; mutable QVariant cachedValue; mutable bool cacheIsDirty;};#endif
The Cell class extends QTableWidgetItem by adding two private variables:
cachedValue caches the cell's value as a QVariant. cacheIsDirty is true if the cached value isn't up to date.
We use QVariant because some cells have a double value, while others have a QString value.
The cachedValue and cacheIsDirty variables are declared with the C++ mutable keyword. This allowsus to modify these variables in const functions. Alternatively, we could recalculate the value eachtime text() is called, but that would be needlessly inefficient.
Notice that there is no Q_OBJECT macro in the class definition. Cell is a plain C++ class, with nosignals or slots. In fact, because QTableWidgetItem doesn't inherit from QObject, we cannot havesignals and slots in Cell as it stands. Qt's item classes don't inherit from QObject to keep theiroverhead to the barest minimum. If signals and slots are needed, they can be implemented in thewidget that contains the items or, exceptionally, using multiple inheritance with QObject.

Here's the start of cell.cpp:
#include <QtGui>#include "cell.h"Cell::Cell(){ setDirty();}
In the constructor, we only need to set the cache as dirty. There is no need to pass a parent; whenthe cell is inserted into a QTableWidget with setItem(), the QTableWidget will automatically takeownership of it.
Every QTableWidgetItem can hold some data, up to one QVariant for each data "role". The mostcommonly used roles are Qt::EditRole and Qt::DisplayRole. The edit role is used for data that is tobe edited, and the display role is for data that is to be displayed. Often the data for both is thesame, but in Cell the edit role corresponds to the cell's formula and the display role corresponds tothe cell's value (the result of evaluating the formula).
QTableWidgetItem *Cell::clone() const{ return new Cell(*this);}
The clone() function is called by QTableWidget when it needs to create a new cellfor example, whenthe user starts typing into an empty cell that has not been used before. The instance passed toQTableWidget::setItemPrototype() is the item that is cloned. Since member-wise copying is sufficientfor Cell, we are relying on the default copy constructor automatically created by C++ to create newCell instances in the clone() function.
void Cell::setFormula(const QString &formula){ setData(Qt::EditRole, formula);}
The setFormula() function sets the cell's formula. It is simply a convenience function for callingsetData() with the edit role. It is called from Spreadsheet::setFormula().
QString Cell::formula() const{ return data(Qt::EditRole).toString();}
The formula() function is called from Spreadsheet::formula(). Like setFormula() it is a conveniencefunction, this time retrieving the item's EditRole data.
void Cell::setData(int role, const QVariant &value){ QTableWidgetItem::setData(role, value); if (role == Qt::EditRole) setDirty();}

If we have a new formula, we set cacheIsDirty to true to ensure that the cell is recalculated thenext time text() is called.
There is no text() function defined in Cell, although we call text() on Cell instances inSpreadsheet::text(). The text() function is a convenience function provided by QTableWidgetItem; itis the equivalent of calling data(Qt::Display-Role).toString().
void Cell::setDirty(){ cacheIsDirty = true;}
The setDirty() function is called to force a recalculation of the cell's value. It simply setscacheIsDirty to true, meaning that cachedValue is no longer up to date. The recalculation isn'tperformed until it is necessary.
QVariant Cell::data(int role) const{
if (role == Qt::DisplayRole) { if (value().isValid()) { return value().toString(); } else { return "####"; } } else if (role == Qt::TextAlignmentRole) { if (value().type() == QVariant::String) { return int(Qt::AlignLeft | Qt::AlignVCenter); } else { return int(Qt::AlignRight | Qt::AlignVCenter); } } else { return QTableWidgetItem::data(role); }}
The data() function is reimplemented from QTableWidgetItem. It returns the text that should beshown in the spreadsheet if called with Qt::DisplayRole, and the formula if called with Qt::EditRole.It returns a suitable alignment if called with Qt::TextAlignmentRole. In the DisplayRole case, it relieson value() to compute the cell's value. If the value is invalid (because the formula is wrong), wereturn "####".
The Cell::value() function used in data() returns a QVariant. A QVariant can store values ofdifferent types, such as double and QString, and provides functions to convert the variant to othertypes. For example, calling toString() on a variant that holds a double value produces a stringrepresentation of the double. A QVariant constructed using the default constructor is an "invalid"variant.
const QVariant Invalid;QVariant Cell::value() const{ if (cacheIsDirty) { cacheIsDirty = false; QString formulaStr = formula(); if (formulaStr.startsWith('\'')) { cachedValue = formulaStr.mid(1);

} else if (formulaStr.startsWith('=')) { cachedValue = Invalid; QString expr = formulaStr.mid(1); expr.replace(" ", ""); expr.append(QChar::Null); int pos = 0; cachedValue = evalExpression(expr, pos); if (expr[pos] != QChar::Null) cachedValue = Invalid; } else { bool ok; double d = formulaStr.toDouble(&ok); if (ok) { cachedValue = d; } else {
cachedValue = formulaStr; } } } return cachedValue;}
The value() private function returns the cell's value. If cacheIsDirty is true, we need to recalculatethe value.
If the formula starts with a single quote (for example, " '12345"), the single quote occupies position0 and the value is the string from position 1 to the end.
If the formula starts with an equals sign ('='), we take the string from position 1 and remove anyspaces it may contain. Then we call evalExpression() to compute the value of the expression. Thepos argument is passed by reference; it indicates the position of the character where parsing shouldbegin. After the call to evalExpression(), the character at position pos should be the QChar::Null
character we appended, if it was successfully parsed. If the parse failed before the end, we setcachedValue to be Invalid.
If the formula doesn't begin with a single quote or an equals sign, we attempt to convert it to afloating-point value using toDouble(). If the conversion works, we set cachedValue to be theresulting number; otherwise, we set cachedValue to be the formula string. For example, a formula of"1.50" causes toDouble() to set ok to true and return 1.5, while a formula of "World Population"causes toDouble() to set ok to false and return 0.0.
By giving toDouble() a pointer to a bool, we are able to distinguish between the conversion of astring that represents the numeric value 0.0 and a conversion error (where 0.0 is also returned butthe bool is set to false). Sometimes the returning of a zero value on conversion failure is exactlywhat we need, in which case we do not bother passing a pointer to a bool. For performance andportability reasons, Qt never uses C++ exceptions to report failure. This doesn't prevent you fromusing them in Qt programs, providing your compiler supports them.
The value() function is declared const. We had to declare cachedValue and cacheIsValid as mutablevariables so that the compiler will allow us to modify them in const functions. It might be temptingto make value() non-const and remove the mutable keywords, but that would not compile becausewe call value() from data(), a const function.
We have now completed the Spreadsheet application, apart from parsing formulas. The rest of thissection covers evalExpression() and the two helper functions evalTerm() and evalFactor(). The codeis a bit complicated, but it is included here to make the application complete. Since the code is notrelated to GUI programming, you can safely skip it and continue reading from Chapter 5.
The evalExpression() function returns the value of a spreadsheet expression. An expression isdefined as one or more terms separated by '+' or '+--' operators. The terms themselves are defined

as one or more factors separated by '*' or '/' operators. By breaking down expressions into termsand terms into factors, we ensure that the operators are applied with the correct precedence.
For example, "2*C5+D6" is an expression with "2*C5" as its first term and "D6" as its second term.The term "2*C5" has "2" as its first factor and "C5" as its second factor, and the term "D6" consistsof the single factor "D6". A factor can be a number ("2"), a cell location ("C5"), or an expression inparentheses, optionally preceded by a unary minus.
The syntax of spreadsheet expressions is defined in Figure 4.10. For each symbol in the grammar(Expression, Term, and Factor), there is a corresponding member function that parses it andwhose structure closely follows the grammar. Parsers written this way are called recursive-descentparsers.
Figure 4.10. Syntax diagram for spreadsheet expressions
Let's start with evalExpression(), the function that parses an Expression:
QVariant Cell::evalExpression(const QString &str, int &pos) const{ QVariant result = evalTerm(str, pos); while (str[pos] != QChar::Null) { QChar op = str[pos]; if (op != '+' && op != '-') return result; ++pos; QVariant term = evalTerm(str, pos); if (result.type() == QVariant::Double && term.type() == QVariant::Double) { if (op == '+') { result = result.toDouble() + term.toDouble(); } else { result = result.toDouble() - term.toDouble(); } } else { result = Invalid; } } return result;}
First, we call evalTerm() to get the value of the first term. If the following character is '+' or '+--',we continue by calling evalTerm() a second time; otherwise, the expression consists of a singleterm, and we return its value as the value of the whole expression. After we have the value of thefirst two terms, we compute the result of the operation, depending on the operator. If both termsevaluated to a double, we compute the result as a double; otherwise, we set the result to beInvalid.
We continue like this until there are no more terms. This works correctly because addition and

subtraction are left-associative; that is, "1-2-3" means "(1-2)-3", not "1-(2-3)".
QVariant Cell::evalTerm(const QString &str, int &pos) const{ QVariant result = evalFactor(str, pos); while (str[pos] != QChar::Null) { QChar op = str[pos]; if (op != '*' && op != '/') return result; ++pos; QVariant factor = evalFactor(str, pos); if (result.type() == QVariant::Double && factor.type() == QVariant::Double) { if (op == '*') { result = result.toDouble() * factor.toDouble(); } else { if (factor.toDouble() == 0.0) { result = Invalid; } else { result = result.toDouble() / factor.toDouble(); } } } else { result = Invalid; } } return result;}
The evalTerm() function is very similar to evalExpression(), except that it deals with multiplicationand division. The only subtlety in evalTerm() is that we must avoid division by zero, since it is anerror on some processors. While it is generally inadvisable to test floating-point values for equalitybecause of rounding errors, it is safe to test for equality against 0.0 to prevent division by zero.
QVariant Cell::evalFactor(const QString &str, int &pos) const{ QVariant result; bool negative = false; if (str[pos] == '-') {
negative = true; ++pos; } if (str[pos] == '(') { ++pos; result = evalExpression(str, pos); if (str[pos] != ')') result = Invalid; ++pos; } else { QRegExp regExp("[A-Za-z][1-9][0-9]{0,2}"); QString token; while (str[pos].isLetterOrNumber() || str[pos] == '.') { token += str[pos]; ++pos; } if (regExp.exactMatch(token)) { int column = token[0].toUpper().unicode() - 'A'; int row = token.mid(1).toInt() - 1;
Cell *c = static_cast<Cell *>( tableWidget()->item(row, column)); if (c) { result = c->value();

} else { result = 0.0; } } else { bool ok; result = token.toDouble(&ok); if (!ok) result = Invalid; } } if (negative) { if (result.type() == QVariant::Double) { result = -result.toDouble(); } else { result = Invalid; } } return result;}
The evalFactor() function is a bit more complicated than evalExpression() and evalTerm(). We startby noting whether the factor is negated. We then see if it begins with an open parenthesis. If itdoes, we evaluate the contents of the parentheses as an expression by calling evalExpression().When parsing a parenthesized expression, evalExpression() calls evalTerm(), which calls eval-
Factor(), which calls evalExpression() again. This is where recursion occurs in the parser.
If the factor isn't a nested expression, we extract the next token, which should be a cell location or anumber. If the token matches the QRegExp, we take it to be a cell reference and we call value() onthe cell at the given location. The cell could be anywhere in the spreadsheet, and it could havedependencies on other cells. The dependencies are not a problem; they will simply trigger morevalue() calls and (for "dirty" cells) more parsing until all the dependent cell values are calculated. Ifthe token isn't a cell location, we take it to be a number.
What happens if cell A1 contains the formula "=A1"? Or if cell A1 contains "=A2" and cell A2contains "=A1"? Although we have not written any special code to detect circular dependencies, theparser handles these cases gracefully by returning an invalid QVariant. This works because we setcacheIsDirty to false and cachedValue to Invalid in value() before we call evalExpression(). IfevalExpression() recursively calls value() on the same cell, it returns Invalid immediately, and thewhole expression then evaluates to Invalid.
We have now completed the formula parser. It would be straightforward to extend it to handlepredefined spreadsheet functions, like "sum()" and "avg()", by extending the grammatical definitionof Factor. Another easy extension is to implement the '+' operator with string operands (asconcatenation); this requires no changes to the grammar.

Chapter 5. Creating Custom Widgets Customizing Qt Widgets Subclassing QWidget Integrating Custom Widgets with Qt Designer Double Buffering
This chapter explains how to develop custom widgets using Qt. Custom widgets can be created bysubclassing an existing Qt widget or by subclassing QWidget directly. We will demonstrate bothapproaches, and we will also see how to integrate a custom widget with Qt Designer so that it canbe used just like a built-in Qt widget. We will round off the chapter by presenting a custom widgetthat uses double buffering, a powerful technique for high-speed drawing.
Customizing Qt WidgetsIn some cases, we find that a Qt widget requires more customization than is possible by setting itsproperties in Qt Designer or by calling its functions. A simple and direct solution is to subclass therelevant widget class and adapt it to suit our needs.
Figure 5.1. The HexSpinBox widget
In this section, we will develop a hexadecimal spin box to show how this works. QSpinBox onlysupports decimal integers, but by subclassing it's quite easy to make it accept and displayhexadecimal values.
#ifndef HEXSPINBOX_H#define HEXSPINBOX_H#include <QSpinBox>class QRegExpValidator;class HexSpinBox : public QSpinBox{ Q_OBJECTpublic: HexSpinBox(QWidget *parent = 0);protected: QValidator::State validate(QString &text, int &pos) const; int valueFromText(const QString &text) const; QString textFromValue(int value) const;private: QRegExpValidator *validator;};#endif
The HexSpinBox inherits most of its functionality from QSpinBox. It provides a typical constructor andreimplements three virtual functions from QSpinBox.
#include <QtGui>#include "hexspinbox.h"HexSpinBox::HexSpinBox(QWidget *parent) : QSpinBox(parent)

{ setRange(0, 255); validator = new QRegExpValidator(QRegExp("[0-9A-Fa-f]{1,8}"), this);}
We set the default range to be 0 to 255 (0x00 to 0xFF), which is more appropriate for a hexadecimalspin box than QSpinBox's default of 0 to 99.
The user can modify a spin box's current value either by clicking its up and down arrows or bytyping a value into the spin box's line editor. In the latter case, we want to restrict the user's inputto legitimate hexadecimal numbers. To achieve this, we use a QRegExpValidator that acceptsbetween one and eight characters, each of which must be in one of the sets, '0' to '9', 'A' to 'F', and'a' to 'f'.
QValidator::State HexSpinBox::validate(QString &text, int &pos) const{ return validator->validate(text, pos);}
This function is called by QSpinBox to see if the text entered so far is valid. There are three possibleresults: Invalid (the text doesn't match the regular expression), Intermediate (the text is aplausible part of a valid value), and Acceptable (the text is valid). The QRegExpValidator has asuitable validate() function, so we simply return the result of calling it. In theory, we should returnInvalid or Intermediate for values that lie outside the spin box's range, but QSpinBox is smartenough to detect that condition without any help.
QString HexSpinBox::textFromValue(int value) const{ return QString::number(value, 16).toUpper();}
The textFromValue() function converts an integer value to a string. QSpinBox calls it to update theeditor part of the spin box when the user presses the spin box's up or down arrows. We use thestatic function QString::number() with a second argument of 16 to convert the value to lowercasehexadecimal, and call QString::toUpper() on the result to make it uppercase.
int HexSpinBox::valueFromText(const QString &text) const{ bool ok; return text.toInt(&ok, 16);}
The valueFromText() function performs the reverse conversion, from a string to an integer value. Itis called by QSpinBox when the user types a value into the editor part of the spin box and pressesEnter. We use the QString::toInt() function to attempt to convert the current text to an integervalue, again using base 16. If the string is not valid hexadecimal, ok is set to false and toInt()
returns 0. Here, we don't have to consider this possibility because the validator only permits validhexadecimal strings to be entered. Instead of passing the address of a dummy variable (ok), wecould instead pass a null pointer as the first argument to toInt().
We have now finished the hexadecimal spin box. Customizing other Qt widgets follows the samepattern: Pick a suitable Qt widget, subclass it, and reimplement some virtual functions to change itsbehavior.

Subclassing QWidgetMany custom widgets are simply a combination of existing widgets, whether they are built-in Qtwidgets or other custom widgets such as HexSpinBox. Custom widgets that are built by composingexisting widgets can usually be developed in Qt Designer:
Create a new form using the "Widget" template. Add the necessary widgets to the form, and lay them out. Set up the signals and slots connections. If behavior beyond what can be achieved through signals and slots is required, write the
necessary code in a class that inherits both QWidget and the uic-generated class.
Naturally, combining existing widgets can also be done entirely in code. Whichever approach istaken, the resulting class inherits directly from QWidget.
If the widget has no signals and slots of its own and doesn't reimplement any virtual functions, it iseven possible to simply assemble the widget by combining existing widgets without a subclass.That's the approach we used in Chapter 1 to create the Age application, with a QWidget, a QSpinBox,and a QSlider. Even so, we could just as easily have subclassed QWidget and created the QSpinBox
and QSlider in the subclass's constructor.
When none of Qt's widgets are suitable for the task at hand, and when there's no way to combine oradapt existing widgets to obtain the desired result, we can still create the widget we want. This isachieved by subclassing QWidget and reimplementing a few event handlers to paint the widget and torespond to mouse clicks. This approach gives us complete freedom to define and control both theappearance and the behavior of our widget. Qt's built-in widgets, like QLabel, QPushButton, andQTableWidget, are implemented this way. If they didn't exist in Qt, it would still be possible to createthem ourselves using the public functions provided by QWidget in a completely platform-independentmanner.
To demonstrate how to write a custom widget using this approach, we will create the IconEditor
widget shown in Figure 5.2. The IconEditor is a widget that could be used in an icon editingprogram.
Figure 5.2. The IconEditor widget

Let's begin by reviewing the header file.
#ifndef ICONEDITOR_H#define ICONEDITOR_H#include <QColor>#include <QImage>#include <QWidget>class IconEditor : public QWidget{ Q_OBJECT Q_PROPERTY(QColor penColor READ penColor WRITE setPenColor) Q_PROPERTY(QImage iconImage READ iconImage WRITE setIconImage) Q_PROPERTY(int zoomFactor READ zoomFactor WRITE setZoomFactor)public: IconEditor(QWidget *parent = 0); void setPenColor(const QColor &newColor); QColor penColor() const { return curColor; }
void setZoomFactor(int newZoom); int zoomFactor() const { return zoom; } void setIconImage(const QImage &newImage);
QImage iconImage() const { return image; } QSize sizeHint() const;
The IconEditor class uses the Q_PROPERTY() macro to declare three custom properties: penColor,iconImage, and zoomFactor. Each property has a data type, a "read" function, and an optional "write"function. For example, the penColor property is of type QColor and can be read and written using thepenColor() and setPenColor() functions.
When we make use of the widget in Qt Designer, custom properties appear in Qt Designer'sproperty editor below the properties inherited from QWidget. Properties may be of any typesupported by QVariant. The Q_OBJECT macro is necessary for classes that define properties.
protected: void mousePressEvent(QMouseEvent *event); void mouseMoveEvent(QMouseEvent *event); void paintEvent(QPaintEvent *event);private: void setImagePixel(const QPoint &pos, bool opaque); QRect pixelRect(int i, int j) const; QColor curColor; QImage image; int zoom;};#endif
IconEditor reimplements three protected functions from QWidget and has a few private functions andvariables. The three private variables hold the values of the three properties.
The implementation file begins with the IconEditor's constructor:
#include <QtGui>#include "iconeditor.h"IconEditor::IconEditor(QWidget *parent) : QWidget(parent){ setAttribute(Qt::WA_StaticContents);

setSizePolicy(QSizePolicy::Minimum, QSizePolicy::Minimum); curColor = Qt::black; zoom = 8; image = QImage(16, 16, QImage::Format_ARGB32); image.fill(qRgba(0, 0, 0, 0));}
The constructor has some subtle aspects such as the Qt::WA_StaticContents attribute and thesetSizePolicy() call. We will discuss them shortly.
The pen color is set to black. The zoom factor is set to 8, meaning that each pixel in the icon will berendered as an 8 x 8 square.
The icon data is stored in the image member variable and can be accessed through thesetIconImage() and iconImage() functions. An icon editor program would typically callsetIconImage() when the user opens an icon file and icon-Image() to retrieve the icon when the userwants to save it. The image variable is of type QImage. We initialize it to 16 x 16 pixels and 32-bitARGB format, a format that supports semi-transparency. We clear the image data by filling it with atransparent color.
The QImage class stores an image in a hardware-independent fashion. It can be set to use a 1-bit, 8-bit, or 32-bit depth. An image with 32-bit depth uses 8 bits for each of the red, green, and bluecomponents of a pixel. The remaining 8 bits store the pixel's alpha component (opacity). Forexample, a pure red color's red, green, blue, and alpha components have the values 255, 0, 0, and255. In Qt, this color can be specified as
QRgb red = qRgba(255, 0, 0, 255);
or, since the color is opaque, as
QRgb red = qRgb(255, 0, 0);
QRgb is simply a typedef for unsigned int, and qRgb() and qRgba() are inline functions that combinetheir arguments into one 32-bit integer value. It is also possible to write
QRgb red = 0xFFFF0000;
where the first FF corresponds to the alpha component and the second FF to the red component. Inthe IconEditor constructor, we fill the QImage with a transparent color by using 0 as the alphacomponent.
Qt provides two types for storing colors: QRgb and QColor. While QRgb is only a typedef used in QImage
to store 32-bit pixel data, QColor is a class with many useful functions and is widely used in Qt tostore colors. In the IconEditor widget, we only use QRgb when dealing with the QImage; we useQColor for everything else, including the penColor property.
QSize IconEditor::sizeHint() const{ QSize size = zoom * image.size(); if (zoom >= 3) size += QSize(1, 1); return size;

}
The sizeHint() function is reimplemented from QWidget and returns the ideal size of a widget. Here,we take the image size multiplied by the zoom factor, with one extra pixel in each direction toaccommodate a grid if the zoom factor is 3 or more. (We don't show a grid if the zoom factor is 2 or1, because the grid would then hardly leave any room for the icon's pixels.)
A widget's size hint is mostly useful in conjunction with layouts. Qt's layout managers try as muchas possible to respect a widget's size hint when they lay out a form's child widgets. For IconEditor
to be a good layout citizen, it must report a credible size hint.
In addition to the size hint, widgets have a size policy that tells the layout system whether they liketo be stretched and shrunk. By calling setSizePolicy() in the constructor with QSizePolicy::Minimum
as horizontal and vertical policies, we tell any layout manager that is responsible for this widget thatthe widget's size hint is really its minimum size. In other words, the widget can be stretched ifrequired, but it should never shrink below the size hint. This can be overridden in Qt Designer bysetting the widget's sizePolicy property. The meaning of the various size policies is explained inChapter 6 (Layout Management).
void IconEditor::setPenColor(const QColor &newColor){ curColor = newColor;}
The setPenColor() function sets the current pen color. The color will be used for newly drawn pixels.
void IconEditor::setIconImage(const QImage &newImage){ if (newImage != image) {
image = newImage.convertToFormat(QImage::Format_ARGB32); update(); updateGeometry(); }}
The setIconImage() function sets the image to edit. We call convertToFormat() to make the image32-bit with an alpha buffer, if it isn't already. Elsewhere in the code, we will assume that the imagedata is stored as 32-bit ARGB values.
After setting the image variable, we call QWidget::update() to force a repainting of the widget usingthe new image. Next, we call QWidget::updateGeometry() to tell any layout that contains the widgetthat the widget's size hint has changed. The layout will then automatically adapt to the new sizehint.
void IconEditor::setZoomFactor(int newZoom){ if (newZoom < 1) newZoom = 1; if (newZoom != zoom) { zoom = newZoom; update(); updateGeometry(); }}

The setZoomFactor() function sets the zoom factor for the image. To prevent division by zeroelsewhere, we correct any value below 1. Again, we call update() and updateGeometry() to repaintthe widget and to notify any managing layout about the size hint change.
The penColor(), iconImage(), and zoomFactor() functions are implemented as inline functions in theheader file.
We will now review the code for the paintEvent() function. This function is IconEditor's mostimportant function. It is called whenever the widget needs repainting. The default implementation inQWidget does nothing, leaving the widget blank.
Just like closeEvent(), which we met in Chapter 3, paintEvent() is an event handler. Qt has manyother event handlers, each of which corresponds to a different type of event. Chapter 7 covers eventprocessing in depth.
There are many situations when a paint event is generated and paintEvent() is called:
When a widget is shown for the first time, the system automatically generates a paint eventto force the widget to paint itself.
When a widget is resized, the system generates a paint event. If the widget is obscured by another window and then revealed again, a paint event is
generated for the area that was hidden (unless the window system stored the area).
We can also force a paint event by calling QWidget::update() or QWidget::re-paint(). The differencebetween these two functions is that repaint() forces an immediate repaint, whereas update() simplyschedules a paint event for when Qt next processes events. (Both functions do nothing if the widgetisn't visible on screen.) If update() is called multiple times, Qt compresses the consecutive paintevents into a single paint event to avoid flicker. In IconEditor, we always use update().
Here's the code:
void IconEditor::paintEvent(QPaintEvent *event){ QPainter painter(this); if (zoom >= 3) {
painter.setPen(palette().foreground().color()); for (int i = 0; i <= image.width(); ++i) painter.drawLine(zoom * i, 0, zoom * i, zoom * image.height()); for (int j = 0; j <= image.height(); ++j) painter.drawLine(0, zoom * j, zoom * image.width(), zoom * j); } for (int i = 0; i < image.width(); ++i) { for (int j = 0; j < image.height(); ++j) { QRect rect = pixelRect(i, j);
if (!event->region().intersect(rect).isEmpty()) { QColor color = QColor::fromRgba(image.pixel(i, j)); painter.fillRect(rect, color); } } }}
We start by constructing a QPainter object on the widget. If the zoom factor is 3 or more, we drawthe horizontal and vertical lines that form the grid using the QPainter::drawLine() function.

A call to QPainter::drawLine() has the following syntax:
painter.drawLine(x1, y1, x2, y2);
where (x1, y1) is the position of one end of the line and (x2, y2) is the position of the other end.There is also an overloaded version of the function that takes two QPoints instead of four ints.
The top-left pixel of a Qt widget is located at position (0, 0), and the bottom-right pixel is located at(width() - 1, height() - 1). This is similar to the conventional Cartesian coordinate system, butupside down. We can change QPainter's coordinate system by using transformations, such astranslation, scaling, rotation, and shearing. This is covered in Chapter 8 (2D and 3D Graphics).
Figure 5.3. Drawing a line using QPainter
Before we call drawLine() on the QPainter, we set the line's color using setPen(). We could hard-code a color, like black or gray, but a better approach is to use the widget's palette.
Every widget is equipped with a palette that specifies which colors should be used for what. Forexample, there is a palette entry for the background color of widgets (usually light gray) and one forthe color of text on that background (usually black). By default, a widget's palette adopts thewindow system's color scheme. By using colors from the palette, we ensure that IconEditor respectsthe user's preferences.
A widget's palette consists of three color groups: active, inactive, and disabled. Which color groupshould be used depends on the widget's current state:
The Active group is used for widgets in the currently active window. The Inactive group is used for widgets in the other windows. The Disabled group is used for disabled widgets in any window.
The QWidget::palette() function returns the widget's palette as a QPalette object. Color groups arespecified as enums of type QPalette::ColorGroup.
When we want to get an appropriate brush or color for drawing, the correct approach is to use thecurrent palette, obtained from QWidget::palette(), and the required role, for example,QPalette::foreground(). Each role function returns a brush, which is normally what we want, but ifwe just need the color we can extract it from the brush, as we did in the paintEvent(). By default,the brushes returned are those appropriate to the widget's state, so we do not need to specify acolor group.
The paintEvent() function finishes by drawing the image itself. The call to IconEditor::pixelRect()
returns a QRect that defines the region to repaint. As an easy optimization, we don't redraw pixels

that fall outside this region.
Figure 5.4. Drawing a line using QPainter
We call QPainter::fillRect() to draw a zoomed pixel. QPainter::fillRect() takes a QRect and aQBrush. By passing a QColor as the brush, we obtain a solid fill pattern.
QRect IconEditor::pixelRect(int i, int j) const{ if (zoom >= 3) { return QRect(zoom * i + 1, zoom * j + 1, zoom - 1, zoom - 1); } else { return QRect(zoom * i, zoom * j, zoom, zoom); }}
The pixelRect() function returns a QRect suitable for QPainter::fillRect(). The i and j parametersare pixel coordinates in the QImagenot in the widget. If the zoom factor is 1, the two coordinatesystems coincide exactly.
The QRect constructor has the syntax QRect(x, y, width, height), where (x, y) is the position of thetop-left corner of the rectangle and width x height is the size of the rectangle. If the zoom factor is 3or more, we reduce the size of the rectangle by one pixel horizontally and vertically so that the filldoes not draw over the grid lines.
void IconEditor::mousePressEvent(QMouseEvent *event){ if (event->button() == Qt::LeftButton) { setImagePixel(event->pos(), true); } else if (event->button() == Qt::RightButton) { setImagePixel(event->pos(), false); }}
When the user presses a mouse button, the system generates a "mouse press" event. Byreimplementing QWidget::mousePressEvent(), we can respond to this event and set or clear theimage pixel under the mouse cursor.
If the user pressed the left mouse button, we call the private function setImagePixel() with true asthe second argument, telling it to set the pixel to the current pen color. If the user pressed the right

mouse button, we also call setImagePixel(), but pass false to clear the pixel.
void IconEditor::mouseMoveEvent(QMouseEvent *event){ if (event->buttons() & Qt::LeftButton) { setImagePixel(event->pos(), true); } else if (event->buttons() & Qt::RightButton) { setImagePixel(event->pos(), false); }}
The mouseMoveEvent() handles "mouse move" events. By default, these events are only generatedwhen the user is holding down a button. It is possible to change this behavior by callingQWidget::setMouseTracking(), but we don't need to do so for this example.
Just as pressing the left or right mouse button sets or clears a pixel, keeping it pressed and hoveringover a pixel is also enough to set or clear a pixel. Since it's possible to hold more than one buttonpressed down at a time, the value returned by QMouseEvent::buttons() is a bitwise OR of the mousebuttons. We test whether a certain button is pressed down using the & operator, and if this is thecase we call setImagePixel().
void IconEditor::setImagePixel(const QPoint &pos, bool opaque){ int i = pos.x() / zoom; int j = pos.y() / zoom; if (image.rect().contains(i, j)) { if (opaque) { image.setPixel(i, j, penColor().rgba()); } else { image.setPixel(i, j, qRgba(0, 0, 0, 0));
} update(pixelRect(i, j)); }}
The setImagePixel() function is called from mousePressEvent() and mouseMove-Event() to set or cleara pixel. The pos parameter is the position of the mouse on the widget.
The first step is to convert the mouse position from widget coordinates to image coordinates. This isdone by dividing the x() and y() components of the mouse position by the zoom factor. Next, wecheck whether the point is within the correct range. The check is easily made using QImage::rect()
and QRect::contains(); this effectively checks that i is between 0 and image.width() - 1 and that jis between 0 and image.height() - 1.
Depending on the opaque parameter, we set or clear the pixel in the image. Clearing a pixel is reallysetting it to be transparent. We must convert the pen QColor to an 32-bit ARGB value for theQImage::setPixel() call. At the end, we call update() with a QRect of the area that needs to berepainted.
Now that we have reviewed the member functions, we will return to the Qt:: WA_StaticContents
attribute that we used in the constructor. This attribute tells Qt that the widget's content doesn'tchange when the widget is resized and that the content stays rooted to the widget's top-left corner.Qt uses this information to avoid needlessly repainting areas that are already shown when resizingthe widget.
Normally, when a widget is resized, Qt generates a paint event for the widget's entire visible area.But if the widget is created with the Qt::WA_StaticContents attribute, the paint event's region is

restricted to the pixels that were not previously shown. This implies that if the widget is resized to asmaller size, no paint event is generated at all.
Figure 5.5. Resizing a Qt::WA_StaticContents widget
The IconEditor widget is now complete. Using the information and examples from earlier chapters,we could write code that uses the IconEditor as a window in its own right, as a central widget in aQMainWindow, as a child widget inside a layout, or as a child widget inside a QScrollArea (p. 148). Inthe next section, we will see how to integrate it with Qt Designer.
Integrating Custom Widgets with Qt DesignerBefore we can use custom widgets in Qt Designer, we must make Qt Designer aware of them.There are two techniques for doing this: the "promotion" approach and the plugin approach.
The promotion approach is the quickest and easiest. It consists of choosing a built-in Qt widget thathas a similar API to the one we want our custom widget to have and completing a dialog box in QtDesigner with some information about the custom widget. The widget can then be used in formsdeveloped with Qt Designer, although it will be represented by the associated built-in Qt widgetwhile the form is edited or previewed.
Here's how to insert a HexSpinBox widget into a form using this approach:
1. Create a QSpinBox by dragging it from Qt Designer's widget box onto the form.2. Right-click the spin box and choose Promote to Custom Widget from the context menu.3. Fill in the dialog that pops up with "HexSpinBox" as the class name and "hexspinbox.h" as
the header file.
Voilà! The code generated by uic will include hexspinbox.h instead of <QSpinBox> and instantiate aHexSpinBox. In Qt Designer, the HexSpinBox widget will be represented by a QSpinBox, allowing us toset all the properties of a QSpinBox (for example, the range and the current value).
Figure 5.6. Qt Designer's custom widget dialog

The drawbacks of the promotion approach are that properties that are specific to the custom widgetaren't accessible in Qt Designer and that the widget isn't rendered as itself. Both these problemscan be solved by using the plugin approach.
The plugin approach requires the creation of a plugin library that Qt Designer can load at run-timeand use to create instances of the widget. The real widget is then used by Qt Designer whenediting the form and for previewing, and thanks to Qt's meta-object system,Qt Designer candynamically obtain the list of its properties. To show how this works, we will integrate theIconEditor from the previous section as a plugin.
First, we must subclass QDesignerCustomWidgetInterface and reimplement some virtual functions.We will assume that the plugin source code is located in a directory called iconeditorplugin and thatthe IconEditor source code is located in a parallel directory called iconeditor.
Here's the class definition:
#include <QDesignerCustomWidgetInterface>class IconEditorPlugin : public QObject, public QDesignerCustomWidgetInterface{ Q_OBJECT Q_INTERFACES(QDesignerCustomWidgetInterface)public: IconEditorPlugin(QObject *parent = 0); QString name() const; QString includeFile() const; QString group() const; QIcon icon() const; QString toolTip() const; QString whatsThis() const; bool isContainer() const; QWidget *createWidget(QWidget *parent);};
The IconEditorPlugin subclass is a factory class that encapsulates the IconEditor widget. It inheritsboth QObject and QDesignerCustomWidgetIterface and uses the Q_INTERFACES() macro to tell moc thatthe second base class is a plugin interface. The functions are used by Qt Designer to createinstances of the class and to obtain information about it.
IconEditorPlugin::IconEditorPlugin(QObject *parent) : QObject(parent){}

The constructor is trivial.
QString IconEditorPlugin::name() const{ return "IconEditor";}
The name() function returns the name of the widget provided by the plugin.
QString IconEditorPlugin::includeFile() const{ return "iconeditor.h";}
The includeFile() function returns the name of the header file for the specified widget encapsulatedby the plugin. The header file is included in the code generated by the uic tool.
QString IconEditorPlugin::group() const{ return tr("Image Manipulation Widgets");}
The group() function returns the name of the widget box group this custom widget should belong to.If the name isn't already in use,Qt Designer will create a new group for the widget.
QIcon IconEditorPlugin::icon() const{ return QIcon(":/images/iconeditor.png");}
The icon() function returns the icon to use to represent the custom widget in Qt Designer's widgetbox. Here, we assume that the IconEditorPlugin has an associated Qt resource file with a suitableentry for the icon editor image.
QString IconEditorPlugin::toolTip() const{ return tr("An icon editor widget");}
The toolTip() function returns the tooltip to show when the mouse hovers over the custom widgetin Qt Designer's widget box.
QString IconEditorPlugin::whatsThis() const{ return tr("This widget is presented in Chapter 5 of <i>C++ GUI " "Programming with Qt 4</i> as an example of a custom Qt " "widget.");}

The whatsThis() function returns the "What's This?" text for Qt Designer to display.
bool IconEditorPlugin::isContainer() const{ return false;}
The isContainer() function returns true if the widget can contain other widgets; otherwise, itreturns false. For example, QFrame is a widget that can contain other widgets. In general, any Qtwidget can contain other widgets, but Qt Designer disallows this when isContainer() returns false.
QWidget *IconEditorPlugin::createWidget(QWidget *parent){ return new IconEditor(parent);}
The create() function is called by Qt Designer to create an instance of a widget class with thegiven parent.
Q_EXPORT_PLUGIN2(iconeditorplugin, IconEditorPlugin)
At the end of the source file that implements the plugin class, we must use the Q_EXPORT_PLUGIN2()
macro to make the plugin available to Qt Designer. The first argument is the name we want to givethe plugin; the second argument is the name of the class that implements it.
The .pro file for building the plugin looks like this:
TEMPLATE = libCONFIG += designer plugin releaseHEADERS = ../iconeditor/iconeditor.h \ iconeditorplugin.hSOURCES = ../iconeditor/iconeditor.cpp \
iconeditorplugin.cppRESOURCES = iconeditorplugin.qrcDESTDIR = $(QTDIR)/plugins/designer
The .pro file assumes that the QtdIR environment variable is set to the directory where Qt isinstalled. When you type make or nmake to build the plugin, it will automatically install itself in QtDesigner's plugins directory. Once the plugin is built, the IconEditor widget can be used in QtDesigner in the same way as any of Qt's built-in widgets.
If you want to integrate several custom widgets with Qt Designer, you can either create one pluginfor each one of them or combine them into a single plugin by deriving fromQDesignerCustomWidgetCollectionInterface.

Double BufferingDouble buffering is a GUI programming technique that consists of rendering a widget to an off-screen pixmap and copying the pixmap onto the display. With earlier versions of Qt, this techniquewas frequently used to eliminate flicker and to provide a snappier user interface.
In Qt 4, QWidget handles this automatically, so we rarely need to worry about widgets flickering.Still, explicit double buffering remains beneficial if the widget's rendering is complex and neededrepeatedly. We can then store a pixmap permanently with the widget, always ready for the nextpaint event, and copy the pixmap to the widget whenever we receive a paint event. It is especiallyhelpful when we want to do small modifications, such as drawing a rubber band, withoutrecomputing the whole widget's rendering over and over.
We will round off this chapter by reviewing the Plotter custom widget. This widget uses doublebuffering and also demonstrates some other aspects of Qt programming, including keyboard eventhandling, manual layout, and coordinate systems.
The Plotter widget displays one or more curves specified as vectors of coordinates. The user candraw a rubber band on the image, and the Plotter will zoom in on the area enclosed by the rubberband. The user draws the rubber band by clicking a point on the graph, dragging the mouse toanother position with the left mouse button held down, and releasing the mouse button.
Figure 5.7. Zooming in on the Plotter widget
[View full size image]
The user can zoom in repeatedly by drawing a rubber band multiple times, zooming out using theZoom Out button, and then zooming back in using the Zoom In button. The Zoom In and Zoom Outbuttons appear the first time they become available, so that they don't clutter the display if the userdoesn't zoom the graph.
The Plotter widget can hold the data for any number of curves. It also maintains a stack ofPlotSettings objects, each of which corresponds to a particular zoom level.
Let's review the class, starting with plotter.h:
#ifndef PLOTTER_H#define PLOTTER_H#include <QMap>#include <QPixmap>#include <QVector>#include <QWidget>class QToolButton;class PlotSettings;

class Plotter : public QWidget{ Q_OBJECTpublic: Plotter(QWidget *parent = 0); void setPlotSettings(const PlotSettings &settings); void setCurveData(int id, const QVector<QPointF> &data); void clearCurve(int id); QSize minimumSizeHint() const; QSize sizeHint() const;public slots: void zoomIn(); void zoomOut();
We start by including the header files for the Qt classes that are used in the plotter file's header, andforward declaring the classes that have pointers or references in the header.
In the Plotter class, we provide three public functions for setting up the plot, and two public slotsfor zooming in and out. We also reimplement minimum-SizeHint() and sizeHint() from QWidget. Westore a curve's points as a QVector<QPointF>, where QPointF is a floating-point version of QPoint.
protected: void paintEvent(QPaintEvent *event);
void resizeEvent(QResizeEvent *event); void mousePressEvent(QMouseEvent *event); void mouseMoveEvent(QMouseEvent *event); void mouseReleaseEvent(QMouseEvent *event); void keyPressEvent(QKeyEvent *event); void wheelEvent(QWheelEvent *event);
In the protected section of the class, we declare all the QWidget event handlers that we want toreimplement.
private: void updateRubberBandRegion(); void refreshPixmap(); void drawGrid(QPainter *painter); void drawCurves(QPainter *painter); enum { Margin = 50 }; QToolButton *zoomInButton; QToolButton *zoomOutButton; QMap<int, QVector<QPointF> > curveMap; QVector<PlotSettings> zoomStack; int curZoom; bool rubberBandIsShown; QRect rubberBandRect; QPixmap pixmap;};
In the private section of the class, we declare a few functions for painting the widget, a constant,and several member variables. The Margin constant is used to provide some spacing around thegraph.
Among the member variables is pixmap of type QPixmap. This variable holds a copy of the wholewidget's rendering, identical to what is shown on screen. The plot is always drawn onto this off-screen pixmap first; then the pixmap is copied onto the widget.

class PlotSettings{public: PlotSettings();
void scroll(int dx, int dy); void adjust(); double spanX() const { return maxX - minX; } double spanY() const { return maxY - minY; }
double minX; double maxX; int numXTicks; double minY; double maxY; int numYTicks;
private: static void adjustAxis(double &min, double &max, int &numTicks);};#endif
The PlotSettings class specifies the range of the x and y axes and the number of ticks for theseaxes. Figure 5.8 shows the correspondence between a PlotSettings object and a Plotter widget.
Figure 5.8. PlotSettings's member variables
By convention, numXTicks and numYTicks are off by one; if numXTicks is 5, Plotter will actually draw 6tick marks on the x axis. This simplifies the calculations later on.
Now let's review the implementation file:
#include <QtGui>#include <cmath>
#include "plotter.h"
We include the expected header files and import all the std namespace's symbols into the globalnamespace. This allows us to access the functions that are declared in <cmath> without prefixing

them with std:: (for example, floor() instead of std::floor()).
Plotter::Plotter(QWidget *parent) : QWidget(parent){ setBackgroundRole(QPalette::Dark); setAutoFillBackground(true); setSizePolicy(QSizePolicy::Expanding, QSizePolicy::Expanding); setFocusPolicy(Qt::StrongFocus); rubberBandIsShown = false;
zoomInButton = new QToolButton(this); zoomInButton->setIcon(QIcon(":/images/zoomin.png")); zoomInButton->adjustSize(); connect(zoomInButton, SIGNAL(clicked()), this, SLOT(zoomIn()));
zoomOutButton = new QToolButton(this); zoomOutButton->setIcon(QIcon(":/images/zoomout.png")); zoomOutButton->adjustSize(); connect(zoomOutButton, SIGNAL(clicked()), this, SLOT(zoomOut()));
setPlotSettings(PlotSettings());}
The setBackgroundRole() call tells QWidget to use the "dark" component of the palette as the color forerasing the widget, instead of the "window" component. This gives Qt a default color that it can useto fill any newly revealed pixels when the widget is resized to a larger size, before paintEvent() evenhas the chance to paint the new pixels. We also need to call setAutoFillBackground(true) to enablethis mechanism. (By default, child widgets inherit the background from their parent widget.)
The setSizePolicy() call sets the widget's size policy to QSizePolicy::Expanding in both directions.This tells any layout manager that is responsible for the widget that the widget is especially willingto grow, but can also shrink. This setting is typical for widgets that can take up a lot of screenspace. The default is QSizePolicy::Preferred in both directions, which means that the widget prefersto be the size of its size hint, but it can be shrunk down to its minimum size hint or expandedindefinitely if necessary.
The setFocusPolicy(Qt::StrongFocus) call makes the widget accept focus by clicking or by pressingTab. When the Plotter has focus, it will receive events for key presses. The Plotter widgetunderstands a few keys: + to zoom in; - to zoom out; and the arrow keys to scroll up, down, left,and right.
Figure 5.9. Scrolling the Plotter widget
[View full size image]
Still in the constructor, we create two QToolButtons, each with an icon. These buttons allow the userto zoom in and out. The button's icons are stored in a resource file, so any application that uses the

Plotter widget will need this entry in its .pro file:
RESOURCES = plotter.qrc
The resource file is similar to the one we have used for the Spreadsheet application:
<!DOCTYPE RCC><RCC version="1.0"><qresource> <file>images/zoomin.png</file> <file>images/zoomout.png</file></qresource></RCC>
The adjustSize() calls on the buttons set their sizes to be that of their size hints. The buttons arenot put in a layout; instead, we will position them manually in the Plotter's resize event. Since weare not using any layouts, we must specify the buttons' parent explicitly by passing this to theQPushButton constructor.
The call to setPlotSettings() at the end completes the initialization.
void Plotter::setPlotSettings(const PlotSettings &settings){ zoomStack.clear(); zoomStack.append(settings); curZoom = 0; zoomInButton->hide(); zoomOutButton->hide(); refreshPixmap();}
The setPlotSettings() function is used to specify the PlotSettings to use for displaying the plot. Itis called by the Plotter constructor and can be called by users of the class. The plotter starts out atits default zoom level. Each time the user zooms in, a new PlotSettings instance is created and putonto the zoom stack. The zoom stack is represented by two member variables:
zoomStack holds the different zoom settings as a QVector<PlotSettings>. curZoom holds the current PlotSettings's index in the zoomStack.
After the call to setPlotSettings(), the zoom stack contains only one entry, and the Zoom In andZoom Out buttons are hidden. These buttons will not be shown until we call show() on them in thezoomIn() and zoomOut() slots. (Normally, it is sufficient to call show() on the top-level widget to showall the children. But when we explicitly call hide() on a child widget, it is hidden until we call show()on it.)
The call to refreshPixmap() is necessary to update the display. Usually, we would call update(), buthere we do things slightly differently because we want to keep a QPixmap up to date at all times.After regenerating the pixmap, refreshPixmap() calls update() to copy the pixmap onto the widget.
void Plotter::zoomOut(){ if (curZoom > 0) {
--curZoom; zoomOutButton->setEnabled(curZoom > 0);
zoomInButton->setEnabled(true);

zoomInButton->show(); refreshPixmap(); }}
The zoomOut() slot zooms out if the graph is zoomed in. It decrements the current zoom level andenables the Zoom Out button depending on whether the graph can be zoomed out any more or not.The Zoom In button is enabled and shown, and the display is updated with a call to refreshPixmap().
void Plotter::zoomIn(){ if (curZoom < zoomStack.count() - 1) {
++curZoom; zoomInButton->setEnabled(curZoom < zoomStack.count() - 1); zoomOutButton->setEnabled(true); zoomOutButton->show(); refreshPixmap(); }}
If the user has previously zoomed in and then out again, the PlotSettings for the next zoom levelwill be in the zoom stack, and we can zoom in. (Otherwise, it is still possible to zoom in using arubber band.)
The slot increments curZoom to move one level deeper into the zoom stack, sets the Zoom In buttonenabled or disabled depending on whether it's possible to zoom in any further, and enables andshows the Zoom Out button. Again, we call refreshPixmap() to make the plotter use the latest zoomsettings.
void Plotter::setCurveData(int id, const QVector<QPointF> &data){ curveMap[id] = data; refreshPixmap();}
The setCurveData() function sets the curve data for a given curve ID. If a curve with the same IDalready exists in curveMap, it is replaced with the new curve data; otherwise, the new curve is simplyinserted. The curveMap member variable is of type QMap<int, QVector<QPointF> >.
void Plotter::clearCurve(int id){ curveMap.remove(id); refreshPixmap();}
The clearCurve() function removes the specified curve from the curve map.
QSize Plotter::minimumSizeHint() const{ return QSize(6 * Margin, 4 * Margin);}

The minimumSizeHint() function is similar to sizeHint(); just as sizeHint() spec-ifies a widget's idealsize, minimumSizeHint() specifies a widget's ideal minimum size. A layout never resizes a widgetbelow its minimum size hint.
The value we return is 300 x 200 (since Margin equals 50) to allow for the margin on all four sidesand some space for the plot itself. Below that size, the plot would be too small to be useful.
QSize Plotter::sizeHint() const{ return QSize(12 * Margin, 8 * Margin);}
In sizeHint(), we return an "ideal" size in proportion to the Margin constant and with the samepleasing 3:2 aspect ratio we used for the minimumSizeHint().
This finishes the review of the Plotter's public functions and slots. Now let's review the protectedevent handlers.
void Plotter::paintEvent(QPaintEvent * /* event */){ QStylePainter painter(this); painter.drawPixmap(0, 0, pixmap); if (rubberBandIsShown) { painter.setPen(palette().light().color()); painter.drawRect(rubberBandRect.normalized() .adjusted(0, 0, -1, -1)); } if (hasFocus()) { QStyleOptionFocusRect option; option.initFrom(this); option.backgroundColor = palette().dark().color(); painter.drawPrimitive(QStyle::PE_FrameFocusRect, option); }}
Normally, paintEvent() is the place where we perform all the drawing. But here all the plot drawingis done beforehand in refreshPixmap(), so we can render the entire plot simply by copying thepixmap onto the widget at position (0, 0).
If the rubber band is visible, we draw it on top of the plot. We use the "light" component from thewidget's current color group as the pen color to ensure good contrast with the "dark" background.Notice that we draw directly on the widget, leaving the off-screen pixmap untouched. UsingQRect::normalized() ensures that the rubber band rectangle has positive width and height (swap-ping coordinates if necessary), and adjusted() reduces the size of the rectangle by one pixel to allowfor its own 1-pixel-wide outline.
If the Plotter has focus, a focus rectangle is drawn using the widget style's draw-Primitive()
function with QStyle::PE_FrameFocusRect as its first argument and a QStyleOptionFocusRect object asits second argument. The focus rectangle's drawing options are inherited from the Plotter widget(by the initFrom() call). The background color must be specified explicitly.
When we want to paint using the current style, we can either call a QStyle function directly, forexample,
style()->drawPrimitive(QStyle::PE_FrameFocusRect, &option, &painter,

this);
or we can use a QStylePainter instead of a normal QPainter, as we have done in Plotter, and paintmore conveniently using that.
The QWidget::style() function returns the style that should be used to draw the widget. In Qt, awidget style is a subclass of QStyle. The built-in styles include QWindowsStyle, QWindowsXPStyle,QMotifStyle, QCDEStyle, QMacStyle, and QPlastiqueStyle. Each of these styles reimplements thevirtual functions in QStyle to perform the drawing in the correct way for the platform the style isemulating. QStylePainter's drawPrimitive() function calls the QStyle function of the same name,which can be used for drawing "primitive elements" like panels, buttons, and focus rectangles. Thewidget style is usually the same for all widgets in an application (QApplication::style()), but it canbe overridden on a per-widget basis using QWidget::setStyle().
By subclassing QStyle, it is possible to define a custom style. This can be done to give a distinctivelook to an application or a suite of applications. While it is generally advisable to use the targetplatform's native look and feel, Qt offers a lot of flexibility if you want to be adventurous.
Qt's built-in widgets rely almost exclusively on QStyle to paint themselves. This is why they look likenative widgets on all platforms supported by Qt. Custom widgets can be made style-aware either byusing QStyle to paint themselves or by using built-in Qt widgets as child widgets. For Plotter, weuse a combination of both approaches: The focus rectangle is drawn using QStyle (via aQStylePainter), and the Zoom In and Zoom Out buttons are built-in Qt widgets.
void Plotter::resizeEvent(QResizeEvent * /* event */){ int x = width() - (zoomInButton->width() + zoomOutButton->width() + 10); zoomInButton->move(x, 5); zoomOutButton->move(x + zoomInButton->width() + 5, 5); refreshPixmap();}
Whenever the Plotter widget is resized, Qt generates a "resize" event. Here, we reimplementresizeEvent() to place the Zoom In and Zoom Out buttons at the top right of the Plotter widget.
We move the Zoom In button and the Zoom Out button to be side by side, separated by a 5-pixelgap and with a 5-pixel offset from the top and right edges of the parent widget.
If we wanted the buttons to stay rooted to the top-left corner, whose coordinates are (0, 0), wewould simply have moved them there in the Plotter constructor. But we want to track the top-rightcorner, whose coordinates depend on the size of the widget. Because of this, it's necessary toreimplement resizeEvent() and to set the buttons' position there.
We didn't set any positions for the buttons in the Plotter constructor. This isn't a problem, since Qtalways generates a resize event before a widget is shown for the first time.
An alternative to reimplementing resizeEvent() and laying out the child widgets manually wouldhave been to use a layout manager (for example, QGridLayout). Using a layout would have been alittle more complicated and would have consumed more resources; on the other hand, it wouldgracefully handle right-to-left layouts, necessary for languages such as Arabic and Hebrew.
At the end, we call refreshPixmap() to redraw the pixmap at the new size.
void Plotter::mousePressEvent(QMouseEvent *event){

QRect rect(Margin, Margin, width() - 2 * Margin, height() - 2 * Margin); if (event->button() == Qt::LeftButton) { if (rect.contains(event->pos())) { rubberBandIsShown = true; rubberBandRect.setTopLeft(event->pos()); rubberBandRect.setBottomRight(event->pos()); updateRubberBandRegion(); setCursor(Qt::CrossCursor); } }}
When the user presses the left mouse button, we start displaying a rubber band. This involvessetting rubberBandIsShown to true, initializing the rubber-BandRect member variable with the currentmouse pointer position, scheduling a paint event to paint the rubber band, and changing the mousecursor to have a crosshair shape.
The rubberBandRect variable is of type QRect. A QRect can be defined either as an (x, y, width,height) quadruplewhere (x, y) is the position of the top-left corner and width x height is the sizeof the rectangleor as a top-left and a bottom-right coordinate pair. Here, we have used thecoordinate pair representation. We set the point where the user clicked as both the top-left cornerand as the bottom-right corner. Then we call updateRubberBandRegion() to force a repaint of the(tiny) area covered by the rubber band.
Qt provides two mechanisms for controlling the mouse cursor's shape:
QWidget::setCursor() sets the cursor shape to use when the mouse hovers over a particularwidget. If no cursor is set for a widget, the parent widget's cursor is used. The default fortop-level widgets is an arrow cursor.
QApplication::setOverrideCursor() sets the cursor shape for the entire application,overriding the cursors set by individual widgets until restore-OverrideCursor() is called.
In Chapter 4, we called QApplication::setOverrideCursor() with Qt::WaitCursor to change theapplication's cursor to the standard wait cursor.
void Plotter::mouseMoveEvent(QMouseEvent *event){ if (rubberBandIsShown) { updateRubberBandRegion(); rubberBandRect.setBottomRight(event->pos()); updateRubberBandRegion(); }}
When the user moves the mouse cursor while holding the left button, we first callupdateRubberBandRegion() to schedule a paint event to repaint the area where the rubber band was,then we recompute rubberBandRect to account for the mouse move, and finally we callupdateRubberBandRegion() a second time to repaint the area where the rubber band has moved to.This effectively erases the rubber band and redraws it at the new coordinates.
If the user moves the mouse upward or leftward, it's likely that rubberBandRect's nominal bottom-right corner will end up above or to the left of its top-left corner. If this occurs, the QRect will have anegative width or height. We used QRect::normalized() in paintEvent() to ensure that the top-leftand bottom-right coordinates are adjusted to obtain a nonnegative width and height.
void Plotter::mouseReleaseEvent(QMouseEvent *event)

{ if ((event->button() == Qt::LeftButton) && rubberBandIsShown) { rubberBandIsShown = false; updateRubberBandRegion(); unsetCursor(); QRect rect = rubberBandRect.normalized(); if (rect.width() < 4 || rect.height() < 4) return; rect.translate(-Margin, -Margin); PlotSettings prevSettings = zoomStack[curZoom]; PlotSettings settings;
double dx = prevSettings.spanX() / (width() - 2 * Margin); double dy = prevSettings.spanY() / (height() - 2 * Margin); settings.minX = prevSettings.minX + dx * rect.left(); settings.maxX = prevSettings.minX + dx * rect.right(); settings.minY = prevSettings.maxY - dy * rect.bottom(); settings.maxY = prevSettings.maxY - dy * rect.top(); settings.adjust(); zoomStack.resize(curZoom + 1); zoomStack.append(settings); zoomIn(); }}
When the user releases the left mouse button, we erase the rubber band and restore the standardarrow cursor. If the rubber band is at least 4 x 4, we perform the zoom. If the rubber band issmaller than that, it's likely that the user clicked the widget by mistake or to give it focus, so we donothing.
The code to perform the zoom is a bit complicated. This is because we deal with widget coordinatesand plotter coordinates at the same time. Most of the work we perform here is to convert therubberBandRect from widget coordinates to plotter coordinates. Once we have done the conversion,we call PlotSettings::adjust() to round the numbers and find a sensible number of ticks for eachaxis. Figures 5.10 and 5.11 depict the situation.
Figure 5.10. Converting the rubber band from widget to plotter coordinates
Figure 5.11. Adjusting plotter coordinates and zooming in on the rubberband
[View full size image]
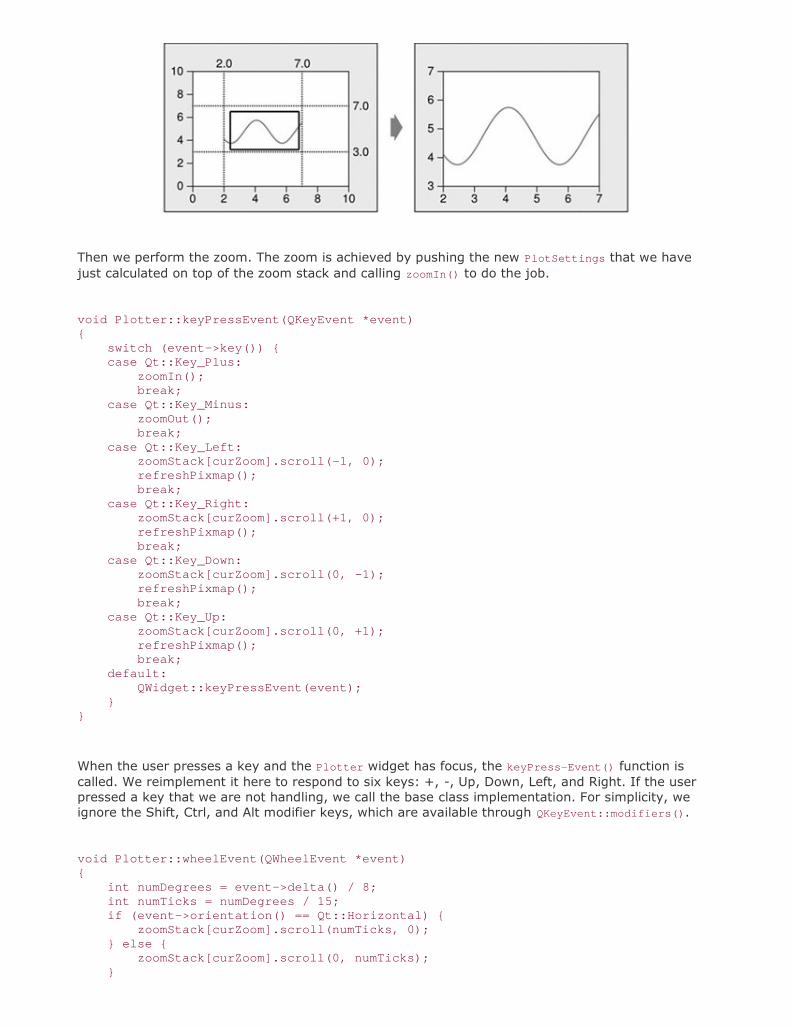
Then we perform the zoom. The zoom is achieved by pushing the new PlotSettings that we havejust calculated on top of the zoom stack and calling zoomIn() to do the job.
void Plotter::keyPressEvent(QKeyEvent *event){ switch (event->key()) { case Qt::Key_Plus: zoomIn(); break; case Qt::Key_Minus: zoomOut(); break; case Qt::Key_Left: zoomStack[curZoom].scroll(-1, 0); refreshPixmap(); break; case Qt::Key_Right: zoomStack[curZoom].scroll(+1, 0); refreshPixmap(); break; case Qt::Key_Down: zoomStack[curZoom].scroll(0, -1); refreshPixmap(); break; case Qt::Key_Up: zoomStack[curZoom].scroll(0, +1); refreshPixmap(); break; default: QWidget::keyPressEvent(event); }}
When the user presses a key and the Plotter widget has focus, the keyPress-Event() function iscalled. We reimplement it here to respond to six keys: +, -, Up, Down, Left, and Right. If the userpressed a key that we are not handling, we call the base class implementation. For simplicity, weignore the Shift, Ctrl, and Alt modifier keys, which are available through QKeyEvent::modifiers().
void Plotter::wheelEvent(QWheelEvent *event){ int numDegrees = event->delta() / 8; int numTicks = numDegrees / 15; if (event->orientation() == Qt::Horizontal) { zoomStack[curZoom].scroll(numTicks, 0); } else { zoomStack[curZoom].scroll(0, numTicks); }

refreshPixmap();}
Wheel events occur when a mouse wheel is turned. Most mice only provide a vertical wheel, butsome also have a horizontal wheel. Qt supports both kinds of wheel. Wheel events go to the widgetthat has the focus. The delta() function returns the distance the wheel was rotated in eighths of adegree. Mice typically work in steps of 15 degrees. Here, we scroll by the requested number of ticksby modifying the topmost item on the zoom stack and update the display using refreshPixmap().
The most common use of the wheel mouse is to scroll a scroll bar. When we use QScrollArea
(covered in Chapter 6) to provide scroll bars, QScrollArea handles the wheel mouse eventsautomatically, so we don't need to reimplement wheelEvent() ourselves.
This finishes the implementation of the event handlers. Now let's review the private functions.
void Plotter::updateRubberBandRegion(){ QRect rect = rubberBandRect.normalized(); update(rect.left(), rect.top(), rect.width(), 1); update(rect.left(), rect.top(), 1, rect.height()); update(rect.left(), rect.bottom(), rect.width(), 1); update(rect.right(), rect.top(), 1, rect.height());}
The updateRubberBand() function is called from mousePressEvent(), mouseMove-Event(), andmouseReleaseEvent() to erase or redraw the rubber band. It consists of four calls to update() thatschedule a paint event for the four small rectangular areas that are covered by the rubber band (twovertical and two horizontal lines). Qt provides the QRubberBand class for drawing rubber bands, buthere, hand-coding provided finer control.
void Plotter::refreshPixmap(){ pixmap = QPixmap(size()); pixmap.fill(this, 0, 0); QPainter painter(&pixmap); painter.initFrom(this); drawGrid(&painter); drawCurves(&painter); update();}
The refreshPixmap() function redraws the plot onto the off-screen pixmap and updates the display.We resize the pixmap to have the same size as the widget and fill it with the widget's erase color.This color is the "dark" component of the palette, because of the call to setBackgroundRole() in thePlotter constructor. If the background is a non-solid brush, QPixmap::fill() needs to know theoffset in the widget where the pixmap will end up to align the brush pattern correctly. Here, thepixmap corresponds to the entire widget, so we specify position (0, 0).
Then we create a QPainter to draw on the pixmap. The initFrom() call sets the painter's pen,background, and font to the same ones as the Plotter widget. Next we call drawGrid() anddrawCurves() to perform the drawing. At the end, we call update() to schedule a paint event for thewhole widget. The pixmap is copied to the widget in the paintEvent() function (p. 123).
void Plotter::drawGrid(QPainter *painter){

QRect rect(Margin, Margin, width() - 2 * Margin, height() - 2 * Margin); if (!rect.isValid()) return; PlotSettings settings = zoomStack[curZoom]; QPen quiteDark = palette().dark().color().light(); QPen light = palette().light().color(); for (int i = 0; i <= settings.numXTicks; ++i) { int x = rect.left() + (i * (rect.width() - 1) / settings.numXTicks); double label = settings.minX + (i * settings.spanX() / settings.numXTicks);
painter->setPen(quiteDark); painter->drawLine(x, rect.top(), x, rect.bottom()); painter->setPen(light); painter->drawLine(x, rect.bottom(), x, rect.bottom() + 5); painter->drawText(x - 50, rect.bottom() + 5, 100, 15,
Qt::AlignHCenter | Qt::AlignTop, QString::number(label)); } for (int j = 0; j <= settings.numYTicks; ++j) { int y = rect.bottom() - (j * (rect.height() - 1) / settings.numYTicks); double label = settings.minY + (j * settings.spanY() / settings.numYTicks); painter->setPen(quiteDark); painter->drawLine(rect.left(), y, rect.right(), y); painter->setPen(light); painter->drawLine(rect.left() - 5, y, rect.left(), y); painter->drawText(rect.left() - Margin, y - 10, Margin - 5, 20, Qt::AlignRight | Qt::AlignVCenter, QString::number(label)); } painter->drawRect(rect.adjusted(0, 0, -1, -1));}
The drawGrid() function draws the grid behind the curves and the axes. The area on which we drawthe grid is specified by rect. If the widget isn't large enough to accommodate the graph, we returnimmediately.
The first for loop draws the grid's vertical lines and the ticks along the x axis. The second for loopdraws the grid's horizontal lines and the ticks along the y axis. At the end, we draw a rectanglealong the margins. The drawText() function is used to draw the numbers corresponding to the tickmarks on both axes.
The calls to drawText() have the following syntax:
painter->drawText(x, y, width, height, alignment, text);
where (x, y, width, height) define a rectangle, alignment the position of the text within thatrectangle, and text the text to draw.
void Plotter::drawCurves(QPainter *painter){ static const QColor colorForIds[6] = { Qt::red, Qt::green, Qt::blue, Qt::cyan, Qt::magenta, Qt::yellow }; PlotSettings settings = zoomStack[curZoom]; QRect rect(Margin, Margin,

width() - 2 * Margin, height() - 2 * Margin); if (!rect.isValid()) return; painter->setClipRect(rect.adjusted(+1, +1, -1, -1)); QMapIterator<int, QVector<QPointF> > i(curveMap); while (i.hasNext()) { i.next(); int id = i.key(); const QVector<QPointF> &data = i.value(); QPolygonF polyline(data.count()); for (int j = 0; j < data.count(); ++j) { double dx = data[j].x() - settings.minX; double dy = data[j].y() - settings.minY; double x = rect.left() + (dx * (rect.width() - 1) / settings.spanX()); double y = rect.bottom() - (dy * (rect.height() - 1) / settings.spanY()); polyline[j] = QPointF(x, y); } painter->setPen(colorForIds[uint(id) % 6]); painter->drawPolyline(polyline); }}
The drawCurves() function draws the curves on top of the grid. We start by calling setClipRect() toset the QPainter's clip region to the rectangle that contains the curves (excluding the margins andthe frame around the graph). QPainter will then ignore drawing operations on pixels outside thearea.
Next, we iterate over all the curves using a Java-style iterator, and for each curve, we iterate overits constituent QPointFs. The key() function gives the curve's ID, and the value() function gives thecorresponding curve data as a QVector<QPointF>. The inner for loop converts each QPointF fromplotter coordinates to widget coordinates and stores them in the polyline variable.
Once we have converted all the points of a curve to widget coordinates, we set the pen color for thecurve (using one of a set of predefined colors) and call drawPolyline() to draw a line that goesthrough all the curve's points.
This is the complete Plotter class. All that remains are a few functions in PlotSettings.
PlotSettings::PlotSettings(){ minX = 0.0; maxX = 10.0; numXTicks = 5; minY = 0.0; maxY = 10.0; numYTicks = 5;}
The PlotSettings constructor initializes both axes to the range 0 to 10 with 5 tick marks.
void PlotSettings::scroll(int dx, int dy){ double stepX = spanX() / numXTicks; minX += dx * stepX; maxX += dx * stepX; double stepY = spanY() / numYTicks; minY += dy * stepY;

maxY += dy * stepY;}
The scroll() function increments (or decrements) minX, maxX, minY, and maxY by the interval betweentwo ticks times a given number. This function is used to implement scrolling inPlotter::keyPressEvent().
void PlotSettings::adjust(){ adjustAxis(minX, maxX, numXTicks); adjustAxis(minY, maxY, numYTicks);}
The adjust() function is called from mouseReleaseEvent() to round the minX, maxX, minY, and maxY
values to "nice" values and to determine the number of ticks appropriate for each axis. The privatefunction adjustAxis() does its work one axis at a time.
void PlotSettings::adjustAxis(double &min, double &max, int &numTicks){ const int MinTicks = 4; double grossStep = (max - min) / MinTicks; double step = pow(10.0, floor(log10(grossStep))); if (5 * step < grossStep) { step *= 5; } else if (2 * step < grossStep) { step *= 2; } numTicks = int(ceil(max / step) - floor(min / step)); if (numTicks < MinTicks) numTicks = MinTicks; min = floor(min / step) * step; max = ceil(max / step) * step;}
The adjustAxis() function converts its min and max parameters into "nice" numbers and sets itsnumTicks parameter to the number of ticks it calculates to be appropriate for the given [min, max]range. Because adjustAxis() needs to modify the actual variables (minX, maxX, numXTicks, etc.) andnot just copies, its parameters are non-const references.
Most of the code in adjustAxis() simply attempts to determine an appropriate value for the intervalbetween two ticks (the "step"). To obtain nice numbers along the axis, we must select the step withcare. For example, a step value of 3.8 would lead to an axis with multiples of 3.8, which is difficultfor people to relate to. For axes labeled in decimal notation, "nice" step values are numbers of theform 10n, 2·10n, or 5·10n.
We start by computing the "gross step", a kind of maximum for the step value. Then we find thecorresponding number of the form 10n that is smaller than or equal to the gross step. We do this bytaking the decimal logarithm of the gross step, rounding that value down to a whole number, thenraising 10 to the power of this rounded number. For example, if the gross step is 236, we computelog 236 = 2.37291…; then we round it down to 2 and obtain 102 = 100 as the candidate step valueof the form 10n.
Once we have the first candidate step value, we can use it to calculate the other two candidates:2·10n and 5·10n. For the example above, the two other candidates are 200 and 500. The 500candidate is larger than the gross step, so we can't use it. But 200 is smaller than 236, so we use

200 for the step size in this example.
It's fairly easy to derive numTicks, min, and max from the step value. The new min value is obtainedby rounding the original min down to the nearest multiple of the step, and the new max value isobtained by rounding up to the nearest multiple of the step. The new numTicks is the number ofintervals between the rounded min and max values. For example, if min is 240 and max is 1184 uponentering the function, the new range becomes [200, 1200], with 5 tick marks.
This algorithm will give suboptimal resultsin some cases. A more sophisticated algorithm isdescribed in Paul S. Heckbert's article "Nice Numbers for Graph Labels" published in GraphicsGems (ISBN 0-12-286166-3).
This chapter has brought us to the end of Part I. It has explained how to customize an existing Qtwidget and how to build a widget from the ground up using QWidget as the base class. We havealready seen how to compose a widget from existing widgets in Chapter 2, and we will explore thetheme further in Chapter 6.
At this point, we know enough to write complete GUI applications using Qt. In Parts II and III, wewill explore Qt in greater depth so that we can make full use of Qt's power.
Part II: Intermediate QtChapter 6. Layout Management
Chapter 7. Event Processing
Chapter 8. 2D and 3D Graphics
Chapter 9. Drag and Drop
Chapter 10. Item View Classes
Chapter 11. Container Classes
Chapter 12. Input/Output
Chapter 13. Databases
Chapter 14. Networking
Chapter 15. XML
Chapter 16. Providing Online Help

Chapter 6. Layout Management Laying Out Widgets on a Form Stacked Layouts Splitters Scrolling Areas Dock Widgets and Toolbars Multiple Document Interface
Every widget that is placed on a form must be given an appropriate size and position. Qt providesseveral classes that lay out widgets on a form: QHBoxLayout, QVBoxLayout, QGridLayout, andQStackLayout. These classes are so convenient and easy to use that almost every Qt developer usesthem, either directly in source code or through Qt Designer.
Another reason to use Qt's layout classes is that they ensure that forms adapt automatically todifferent fonts, languages, and platforms. If the user changes the system's font settings, theapplication's forms will respond immediately, resizing themselves if necessary. And if you translatethe application's user interface to other languages, the layout classes take into consideration thewidgets' translated contents to avoid text truncation.
Other classes that perform layout management include QSplitter, QScrollArea, QMainWindow, andQWorkspace. What these classes have in common is that they provide a flexible layout that the usercan manipulate. For example, QSplitter provides a splitter bar that the user can drag to resizewidgets, and QWorkspace provides support for MDI (multiple document interface), a means ofshowing many documents simultaneously within an application's main window. Because they areoften used as alternatives to the layout classes proper, they are covered in this chapter.
Laying Out Widgets on a FormThere are three basic ways of managing the layout of child widgets on a form: absolutepositioning,manual layout, and layout managers. We will look at each of these approaches in turn,using the Find File dialog shown in Figure 6.1 as our example.
Figure 6.1. The Find File dialog

Absolute positioning is the crudest way of laying out widgets. It is achieved by assigning hard-codedsizes and positions to the form's child widgets and a fixed size to the form. Here's what theFindFileDialog constructor looks like using absolute positioning:
FindFileDialog::FindFileDialog(QWidget *parent) : QDialog(parent){ ... namedLabel->setGeometry(9, 9, 50, 25); namedLineEdit->setGeometry(65, 9, 200, 25); lookInLabel->setGeometry(9, 40, 50, 25); lookInLineEdit->setGeometry(65, 40, 200, 25); subfoldersCheckBox->setGeometry(9, 71, 256, 23); tableWidget->setGeometry(9, 100, 256, 100); messageLabel->setGeometry(9, 206, 256, 25); findButton->setGeometry(271, 9, 85, 32); stopButton->setGeometry(271, 47, 85, 32); closeButton->setGeometry(271, 84, 85, 32); helpButton->setGeometry(271, 199, 85, 32); setWindowTitle(tr("Find Files or Folders")); setFixedSize(365, 240);}
Absolute positioning has many disadvantages:
The user cannot resize the window. Some text may be truncated if the user chooses an unusually large font or if the application
is translated into another language. The widgets might have inappropriate sizes for some styles. The positions and sizes must be calculated manually. This is tedious and error-prone, and
makes maintenance painful.
An alternative to absolute positioning is manual layout. With manual layout, the widgets are stillgiven absolute positions, but their sizes are made proportional to the size of the window rather thanbeing entirely hard-coded. This can be achieved by reimplementing the form's resizeEvent()
function to set its child widgets' geometries:
FindFileDialog::FindFileDialog(QWidget *parent) : QDialog(parent){ ... setMinimumSize(265, 190); resize(365, 240);}void FindFileDialog::resizeEvent(QResizeEvent * /* event */){ int extraWidth = width() - minimumWidth(); int extraHeight = height() - minimumHeight(); namedLabel->setGeometry(9, 9, 50, 25); namedLineEdit->setGeometry(65, 9, 100 + extraWidth, 25); lookInLabel->setGeometry(9, 40, 50, 25); lookInLineEdit->setGeometry(65, 40, 100 + extraWidth, 25); subfoldersCheckBox->setGeometry(9, 71, 156 + extraWidth, 23); tableWidget->setGeometry(9, 100, 156 + extraWidth, 50 + extraHeight); messageLabel->setGeometry(9, 156 + extraHeight, 156 + extraWidth, 25);
findButton->setGeometry(171 + extraWidth, 9, 85, 32); stopButton->setGeometry(171 + extraWidth, 47, 85, 32); closeButton->setGeometry(171 + extraWidth, 84, 85, 32);

helpButton->setGeometry(171 + extraWidth, 149 + extraHeight, 85, 32);}
In the FindFileDialog constructor, we set the form's minimum size to 265 x 190 and the initial sizeto 365 x 240. In the resizeEvent() handler, we give any extra space to the widgets that we want togrow. This ensures that the form scales smoothly when the user resizes it.
Figure 6.2. Resizing a resizable dialog
[View full size image]
Just like absolute positioning, manual layout requires a lot of hard-coded constants to be calculatedby the programmer. Writing code like this is tiresome, especially if the design changes. And there isstill the risk of text truncation. We can avoid this risk by taking account of the child widgets' sizehints, but that would complicate the code even further.
The most convenient solution for laying out widgets on a form is to use Qt's layout managers. Thelayout managers provide sensible defaults for every type of widget and take into account eachwidget's size hint, which in turn typically depends on the widget's font, style, and contents. Layoutmanagers also respect minimum and maximum sizes, and automatically adjust the layout inresponse to font changes, content changes, and window resizing.
The three most important layout managers are QHBoxLayout, QVBoxLayout, and QGridLayout. Theseclasses inherit QLayout, which provides the basic framework for layouts. All three classes are fullysupported by Qt Designer and can also be used directly in code.
Here's the FindFileDialog code using layout managers:
FindFileDialog::FindFileDialog(QWidget *parent) : QDialog(parent){ ... QGridLayout *leftLayout = new QGridLayout; leftLayout->addWidget(namedLabel, 0, 0); leftLayout->addWidget(namedLineEdit, 0, 1); leftLayout->addWidget(lookInLabel, 1, 0); leftLayout->addWidget(lookInLineEdit, 1, 1); leftLayout->addWidget(subfoldersCheckBox, 2, 0, 1, 2);
leftLayout->addWidget(tableWidget, 3, 0, 1, 2); leftLayout->addWidget(messageLabel, 4, 0, 1, 2); QVBoxLayout *rightLayout = new QVBoxLayout; rightLayout->addWidget(findButton); rightLayout->addWidget(stopButton); rightLayout->addWidget(closeButton); rightLayout->addStretch(); rightLayout->addWidget(helpButton); QHBoxLayout *mainLayout = new QHBoxLayout; mainLayout->addLayout(leftLayout);

mainLayout->addLayout(rightLayout); setLayout(mainLayout); setWindowTitle(tr("Find Files or Folders"));}
The layout is handled by one QHBoxLayout, one QGridLayout, and one QVBoxLayout. The QGridLayout
on the left and the QVBoxLayout on the right are placed side by side by the outer QHBoxLayout. Themargin around the dialog and the spacing between the child widgets are set to default values basedon the current widget style; they can be changed using QLayout::setMargin() andQLayout::setSpacing().
The same dialog could be created visually in Qt Designer by placing the child widgets in theirapproximate positions; selecting those that need to be laid out together; and clicking Form|Lay OutHorizontally, Form|Lay Out Vertically, or Form|Lay Out in a Grid. We used this approach in Chapter2 for creating the Spreadsheet application's Go-to-Cell and Sort dialogs.
Figure 6.3. The Find File dialog's layout
[View full size image]
Using QHBoxLayout and QVBoxLayout is fairly straightforward, but using QGrid-Layout is a bit moreinvolved. QGridLayout works on a two-dimensional grid of cells. The QLabel in the top-left corner ofthe layout is at position (0, 0), and the corresponding QLineEdit is at position (0, 1). The QCheckBox
spans two columns; it occupies the cells in positions (2, 0) and (2, 1). The QtreeWidget and theQLabel beneath it also span two columns. The calls to addWidget() have the following syntax:
layout->addWidget(widget, row, column, rowSpan, columnSpan);
Here, widget is the child widget to insert into the layout, (row, column) is the top-left cell occupied bythe widget, rowSpan is the number of rows occupied by the widget, and columnSpan is the number ofcolumns occupied by the widget. If omitted, the rowSpan and columnSpan parameters default to 1.
The addStretch() call tells the layout manager to consume space at that point in the layout. Byadding a stretch item, we have told the layout manager to put any excess space between the Closebutton and the Help button. In Qt Designer, we can achieve the same effect by inserting a spacer.Spacers appear in Qt Designer as blue "springs".
Using layout managers provides additional benefits to those we have discussed so far. If we add awidget to a layout or remove a widget from a layout, the layout will automatically adapt to the new

situation. The same applies if we call hide() or show() on a child widget. If a child widget's size hintchanges, the layout will be automatically redone, taking into account the new size hint. Also, layoutmanagers automatically set a minimum size for the form as a whole, based on the form's childwidgets' minimum sizes and size hints.
In the examples presented so far, we have simply put widgets into layouts and used spacer items(stretches) to consume any excess space. In some cases, this isn't sufficient to make the layout lookexactly the way we want. In these situations, we can adjust the layout by changing the size policiesand size hints of the widgets being laid out.
A widget's size policy tells the layout system how it should stretch or shrink. Qt provides sensibledefault size policies for all its built-in widgets, but since no single default can account for everypossible layout, it is still common for developers to change the size policies for one or two widgetson a form. A QSizePolicy has both a horizontal and a vertical component. Here are the most usefulvalues:
Fixed means that the widget cannot grow or shrink. The widget always stays at the size of itssize hint.
Minimum means that the widget's size hint is its minimum size. The widget cannot shrinkbelow the size hint, but it can grow to fill available space if necessary.
Maximum means that the widget's size hint is its maximum size. The widget can be shrunkdown to its minimum size hint.
Preferred means that the widget's size hint is its preferred size, but that the widget can stillshrink or grow if necessary.
Expanding means that the widget can shrink or grow and that it is especially willing to grow.
Figure 6.4 summarizes the meaning of the different size policies, using a QLabel showing the text"Some Text" as an example.
Figure 6.4. The meaning of the different size policies
[View full size image]
In the figure, Preferred and Expanding are depicted the same way. So what is the difference? Whena form that contains both Preferred and Expanding widgets is resized, extra space is given to theExpanding widgets, while the Preferred widgets stay at their size hint.
There are two other size policies: MinimumExpanding and Ignored. The former was necessary in a fewrare cases in older versions of Qt, but it isn't useful anymore; the preferred approach is to useExpanding and reimplement minimumSizeHint() appropriately. The latter is similar to Expanding,except that it ignores the widget's size hint and minimum size hint.
In addition to the size policy's horizontal and vertical components,the QSizePolicy class stores ahorizontal and a vertical stretch factor. These stretch factors can be used to indicate that differentchild widgets should grow at different rates when the form expands. For example, if we have aQtreeWidget above a QTextEdit and we want the QTextEdit to be twice as tall as the QtreeWidget, we

can set the QTextEdit's vertical stretch factor to 2 and the QtreeWidget's vertical stretch factor to 1.
Yet another way of influencing a layout is to set a minimum size, a maximum size, or a fixed size onthe child widgets. The layout manager will respect these constraints when laying out the widgets.And if this isn't sufficient, we can always derive from the child widget's class and reimplementsizeHint() to obtain the size hint we need.
Stacked LayoutsThe QStackedLayout class lays out a set of child widgets, or "pages", and shows only one at a time,hiding the others from the user. The QStackedLayout itself is invisible and provides no intrinsic meansfor the user to change page. The small arrows and the dark gray frame in Figure 6.5 are provided byQt Designer to make the layout easier to design with. For convenience, Qt also includesQStackedWidget, which provides a QWidget with a built-in QStackedLayout.
Figure 6.5. QStackedLayout
The pages are numbered from 0. To make a specific child widget visible, we can callsetCurrentIndex() with a page number. The page number for a child widget is available usingindexOf().
The Preferences dialog shown in Figure 6.6 is an example that uses QStacked-Layout. The dialogconsists of a QListWidget on the left and a QStackedLayout on the right. Each item in the QListWidget
corresponds to a different page in the QStackedLayout. Here's the relevant code from the dialog'sconstructor:
PreferenceDialog::PreferenceDialog(QWidget *parent) : QDialog(parent){ ... listWidget = new QListWidget; listWidget->addItem(tr("Appearance")); listWidget->addItem(tr("Web Browser")); listWidget->addItem(tr("Mail & News")); listWidget->addItem(tr("Advanced")); stackedLayout = new QStackedLayout; stackedLayout->addWidget(appearancePage); stackedLayout->addWidget(webBrowserPage); stackedLayout->addWidget(mailAndNewsPage); stackedLayout->addWidget(advancedPage); connect(listWidget, SIGNAL(currentRowChanged(int)), stackedLayout, SLOT(setCurrentIndex(int))); ... listWidget->setCurrentRow(0);}

Figure 6.6. Two pages of the Preferences dialog
[View full size image]
We create a QListWidget and populate it with the page names. Then we create a QStackedLayout andcall addWidget() for each page. We connect the list widget's currentRowChanged(int) signal to thestacked layout's setCurrentIndex(int) to implement the page switching and call setCurrentRow() onthe list widget at the end of the constructor to start on page 0.
Forms like this are also very easy to create using Qt Designer:
1. Create a new form based on the "Dialog" or the "Widget" template.2. Add a QListWidget and a QStackedWidget to the form.3. Fill each page with child widgets and layouts.
(To create a new page, right-click and choose Insert Page; to switch pages, click the tiny leftor right arrow located at the top-right of the QStackedWidget.)
4. Lay the widgets out side by side using a horizontal layout.5. Connect the list widget's currentRowChanged(int) signal to the stacked widget's
setCurrentIndex(int) slot.6. Set the value of the list widget's currentRow property to 0.
Since we have implemented page switching using predefined signals and slots, the dialog will exhibitthe correct behavior when previewed in Qt Designer.
SplittersA QSplitter is a widget that contains other widgets. The widgets in a splitter are separated bysplitter handles. Users can change the sizes of a splitter's child widgets by dragging the handles.Splitters can often be used as an alternative to layout managers, to give more control to the user.
The child widgets of a QSplitter are automatically placed side by side (or one below the other) inthe order in which they are created, with splitter bars between adjacent widgets. Here's the code forcreating the window depicted in Figure 6.7:
int main(int argc, char *argv[]){ QApplication app(argc, argv); QTextEdit *editor1 = new QTextEdit; QTextEdit *editor2 = new QTextEdit;
QTextEdit *editor3 = new QTextEdit; QSplitter splitter(Qt::Horizontal); splitter.addWidget(editor1);

splitter.addWidget(editor2); splitter.addWidget(editor3); ... splitter.show(); return app.exec();}
Figure 6.7. The Splitter application
[View full size image]
The example consists of three QTextEdits laid out horizontally by a QSplitter widget. Unlike layoutmanagers, which simply lay out a form's child widgets and have no visual representation, QSplitter
inherits from QWidget and can be used like any other widget.
Figure 6.8. The Splitter application's widgets
Complex layouts can be achieved by nesting horizontal and vertical QSplitters. For example, theMail Client application shown in Figure 6.9 consists of a horizontal QSplitter that contains a verticalQSplitter on its right side.
Figure 6.9. The Mail Client application on Mac OS X
[View full size image]

Here's the code in the constructor of the Mail Client application's QMainWindow subclass:
MailClient::MailClient(){ ...
rightSplitter = new QSplitter(Qt::Vertical); rightSplitter->addWidget(messagesTreeWidget); rightSplitter->addWidget(textEdit); rightSplitter->setStretchFactor(1, 1); mainSplitter = new QSplitter(Qt::Horizontal); mainSplitter->addWidget(foldersTreeWidget); mainSplitter->addWidget(rightSplitter); mainSplitter->setStretchFactor(1, 1); setCentralWidget(mainSplitter); setWindowTitle(tr("Mail Client")); readSettings();}
After creating the three widgets that we want to display, we create a vertical splitter, rightSplitter,and add the two widgets we want on the right. Then we create a horizontal splitter, mainSplitter,and add the widget we want it to display on the left and rightSplitter whose widgets we wantshown on the right. We make mainSplitter the QMainWindow's central widget.
When the user resizes a window, QSplitter normally distributes the space so that the relative sizesof the child widgets stay the same. In the Mail Client example, we don't want this behavior; instead,we want the QtreeWidget and the QTableWidget to keep their sizes and we want to give any extraspace to the QTextEdit. This is achieved by the two setStretchFactor() calls. The first argument isthe 0-based index of the splitter's child widget, and the second argument is the stretch factor wewant to set; the default is 0.
Figure 6.10. The Mail Client's splitter indexing

The first setStretchFactor() call is on rightSplitter, and it sets the widget at position 1 (textEdit)to have a stretch factor of 1. The second setStretchFactor() call is on mainSplitter, and it sets thewidget at position 1 (rightSplitter) to have a stretch factor of 1. This ensures that the textEdit willget any additional space that is available.
When the application is started, QSplitter gives the child widgets appropriate sizes based on theirinitial sizes (or based on their size hint if no initial size is specified). We can move the splitterhandles programmatically by calling QSplitter::setSizes(). The QSplitter class also provides ameans of saving and restoring its state the next time the application is run. Here's thewriteSettings() function that saves the Mail Client's settings:
void MailClient::writeSettings(){ QSettings settings("Software Inc.", "Mail Client"); settings.beginGroup("mainWindow"); settings.setValue("size", size()); settings.setValue("mainSplitter", mainSplitter->saveState()); settings.setValue("rightSplitter", rightSplitter->saveState()); settings.endGroup();}
Here's the corresponding readSettings() function:
void MailClient::readSettings(){ QSettings settings("Software Inc.", "Mail Client"); settings.beginGroup("mainWindow"); resize(settings.value("size", QSize(480, 360)).toSize()); mainSplitter->restoreState( settings.value("mainSplitter").toByteArray()); rightSplitter->restoreState( settings.value("rightSplitter").toByteArray()); settings.endGroup();}
QSplitter is fully supported by Qt Designer. To put widgets into a splitter, place the child widgetsapproximately in their desired positions, select them, and click Form|Lay Out Horizontally in Splitteror Form|Lay Out Vertically in Splitter.

Scrolling AreasThe QScrollArea class provides a scrollable viewport and two scroll bars. If we want to add scrollbars to a widget, it is much simpler to use a QScrollArea than to instantiate our own QScrollBarsand implement the scrolling functionality ourselves.
Figure 6.11. QScrollArea's constituent widgets
The way to use QScrollArea is to call setWidget() with the widget we want to add scroll bars to.QScrollArea automatically reparents the widget to make it a child of the viewport (accessiblethrough QScrollArea::viewport()) if it isn't already. For example, if we want scroll bars around theIconEditor widget we developed in Chapter 5, we can write this:
int main(int argc, char *argv[]){ QApplication app(argc, argv); IconEditor *iconEditor = new IconEditor; iconEditor->setIconImage(QImage(":/images/mouse.png"));
QScrollArea scrollArea; scrollArea.setWidget(iconEditor);
scrollArea.viewport()->setBackgroundRole(QPalette::Dark); scrollArea.viewport()->setAutoFillBackground(true); scrollArea.setWindowTitle(QObject::tr("Icon Editor")); scrollArea.show(); return app.exec();}
The QScrollArea presents the widget at its current size or uses the size hint if the widget hasn't beenresized yet. By calling setWidgetResizable(true), we can tell QScrollArea to automatically resize thewidget to take advantage of any extra space beyond its size hint.
By default, the scroll bars are only displayed when the viewport is smaller than the child widget. Wecan force the scroll bars to always be shown by setting scroll bar policies:
scrollArea.setHorizontalScrollBarPolicy(Qt::ScrollBarAlwaysOn);scrollArea.setVerticalScrollBarPolicy(Qt::ScrollBarAlwaysOn);
Figure 6.12. Resizing a QScrollArea

QScrollArea inherits much of its functionality from QAbstractScrollArea. Classes like QTextEdit andQAbstractItemView (the base class of Qt's item view classes) derive from QAbstractScrollArea, so wedon't need to wrap them in a QScrollArea to get scroll bars.
Dock Widgets and ToolbarsDock widgets are widgets that can be docked inside a QMainWindow or floated as independentwindows. QMainWindow provides four dock widget areas: one above, one below, one to the left, andone to the right of the central widget. Applications like Microsoft Visual Studio and Qt Linguistmake extensive use of dock windows to provide a very flexible user interface. In Qt, dock widgetsare instances of QDockWidget.
Figure 6.13. A QMainWindow with a dock widget
[View full size image]

Every dock widget has its own title bar, even when it is docked. Users can move dock windows fromone dock area to another by dragging the title bar. They can also detach a dock window from anarea and let the dock window float as an independent window by dragging the dock window outsideof any dock area. Free-floating dock windows are always "on top" of their main window. Users canclose a QDockWidget by clicking the close button in the widget's title bar. Any combination of thesefeatures can be disabled by calling QDockWidget::setFeatures().
In earlier versions of Qt, toolbars were treated like dock widgets and shared the same dock areas.Starting with Qt 4, toolbars occupy their own areas around the central widget (as shown in Figure6.14) and can't be undocked. If a floating toolbar is required, we can simply put it inside aQDockWindow.
Figure 6.14. QMainWindow's dock and toolbar areas
The corners indicated with dotted lines can belong to either of their two adjoining dock areas. Forexample, we could make the top-left corner belong to the left dock area by callingQMainWindow::setCorner(Qt::TopLeftCorner, Qt:: LeftDockWidgetArea).
The following code snippet shows how to wrap an existing widget (in this case, a QtreeWidget) in aQDockWidget and insert it into the right dock area:
QDockWidget *shapesDockWidget = new QDockWidget(tr("Shapes"));shapesDockWidget->setWidget(treeWidget);shapesDockWidget->setAllowedAreas(Qt::LeftDockWidgetArea | Qt::RightDockWidgetArea);addDockWidget(Qt::RightDockWidgetArea, shapesDockWidget);
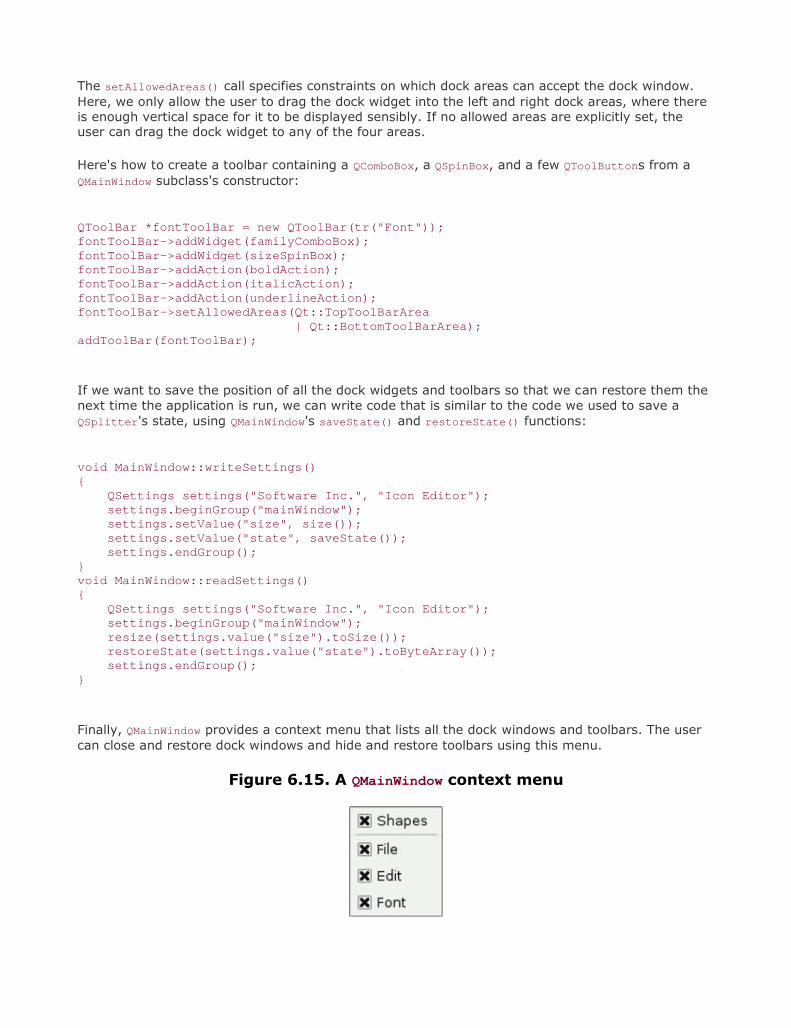
The setAllowedAreas() call specifies constraints on which dock areas can accept the dock window.Here, we only allow the user to drag the dock widget into the left and right dock areas, where thereis enough vertical space for it to be displayed sensibly. If no allowed areas are explicitly set, theuser can drag the dock widget to any of the four areas.
Here's how to create a toolbar containing a QComboBox, a QSpinBox, and a few QToolButtons from aQMainWindow subclass's constructor:
QToolBar *fontToolBar = new QToolBar(tr("Font"));fontToolBar->addWidget(familyComboBox);fontToolBar->addWidget(sizeSpinBox);fontToolBar->addAction(boldAction);fontToolBar->addAction(italicAction);fontToolBar->addAction(underlineAction);fontToolBar->setAllowedAreas(Qt::TopToolBarArea | Qt::BottomToolBarArea);addToolBar(fontToolBar);
If we want to save the position of all the dock widgets and toolbars so that we can restore them thenext time the application is run, we can write code that is similar to the code we used to save aQSplitter's state, using QMainWindow's saveState() and restoreState() functions:
void MainWindow::writeSettings(){ QSettings settings("Software Inc.", "Icon Editor"); settings.beginGroup("mainWindow"); settings.setValue("size", size()); settings.setValue("state", saveState()); settings.endGroup();}void MainWindow::readSettings(){ QSettings settings("Software Inc.", "Icon Editor"); settings.beginGroup("mainWindow"); resize(settings.value("size").toSize()); restoreState(settings.value("state").toByteArray()); settings.endGroup();}
Finally, QMainWindow provides a context menu that lists all the dock windows and toolbars. The usercan close and restore dock windows and hide and restore toolbars using this menu.
Figure 6.15. A QMainWindow context menu
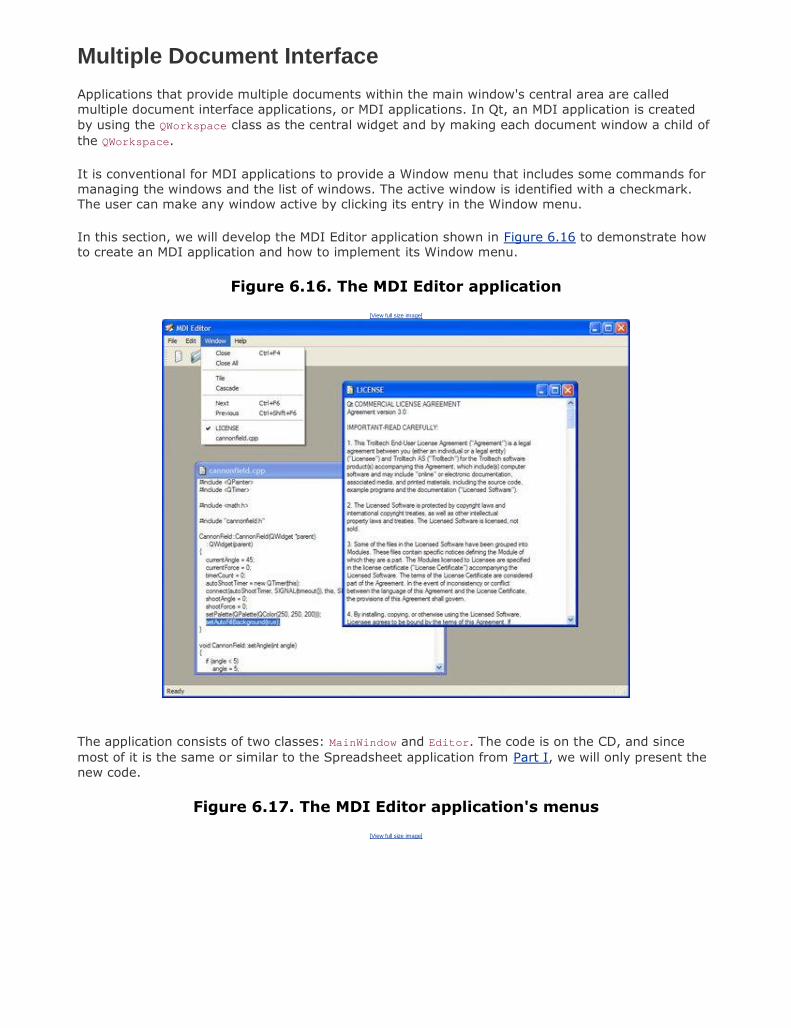
Multiple Document InterfaceApplications that provide multiple documents within the main window's central area are calledmultiple document interface applications, or MDI applications. In Qt, an MDI application is createdby using the QWorkspace class as the central widget and by making each document window a child ofthe QWorkspace.
It is conventional for MDI applications to provide a Window menu that includes some commands formanaging the windows and the list of windows. The active window is identified with a checkmark.The user can make any window active by clicking its entry in the Window menu.
In this section, we will develop the MDI Editor application shown in Figure 6.16 to demonstrate howto create an MDI application and how to implement its Window menu.
Figure 6.16. The MDI Editor application
[View full size image]
The application consists of two classes: MainWindow and Editor. The code is on the CD, and sincemost of it is the same or similar to the Spreadsheet application from Part I, we will only present thenew code.
Figure 6.17. The MDI Editor application's menus
[View full size image]

Let's start with the MainWindow class.
MainWindow::MainWindow(){ workspace = new QWorkspace; setCentralWidget(workspace); connect(workspace, SIGNAL(windowActivated(QWidget *)), this, SLOT(updateMenus())); createActions(); createMenus(); createToolBars(); createStatusBar(); setWindowTitle(tr("MDI Editor")); setWindowIcon(QPixmap(":/images/icon.png"));}
In the MainWindow constructor, we create a QWorkspace widget and make it the central widget. Weconnect the QWorkspace's windowActivated() signal to the slot we will use to keep the window menuup to date.
void MainWindow::newFile(){ Editor *editor = createEditor(); editor->newFile(); editor->show();}
The newFile() slot corresponds to the File|New menu option. It depends on the createEditor()
private function to create a child Editor widget.
Editor *MainWindow::createEditor(){ Editor *editor = new Editor; connect(editor, SIGNAL(copyAvailable(bool)), cutAction, SLOT(setEnabled(bool))); connect(editor, SIGNAL(copyAvailable(bool)), copyAction, SLOT(setEnabled(bool))); workspace->addWindow(editor); windowMenu->addAction(editor->windowMenuAction()); windowActionGroup->addAction(editor->windowMenuAction()); return editor;}

The createEditor() function creates an Editor widget and sets up two signalslot connections. Theseconnections ensure that Edit|Cut and Edit|Copy are enabled or disabled depending on whether thereis any selected text.
Because we are using MDI, it is possible that there will be multiple Editor widgets in use. This is aconcern since we are only interested in responding to the copyAvailable(bool) signal from the activeEditor window, not from the others. But these signals can only ever be emitted by the activewindow, so this isn't a problem in practice.
Once we have set up the Editor, we add a QAction representing the window to the Window menu.The action is provided by the Editor class, which we will cover in a moment. We also add the actionto a QActionGroup object. The QActionGroup ensures that only one Window menu item is checked at atime.
void MainWindow::open(){ Editor *editor = createEditor(); if (editor->open()) { editor->show(); } else { editor->close(); }}
The open() function corresponds to File|Open. It creates an Editor for the new document and callsopen() on the Editor. It makes more sense to implement the file operations in the Editor class thanin the MainWindow class, because each Editor needs to maintain its own independent state.
If the open() fails, we simply close the editor since the user will have already been notified of theerror. We don't need to explicitly delete the Editor object ourselves; this is done automatically byEditor through the Qt::WA_DeleteOn-Close widget attribute, which is set in the Editor constructor.
void MainWindow::save(){ if (activeEditor()) activeEditor()->save();}
The save() slot calls Editor::save() on the active editor, if there is one. Again, the code thatperforms the real work is located in the Editor class.
Editor *MainWindow::activeEditor(){ return qobject_cast<Editor *>(workspace->activeWindow());}
The activeEditor() private function returns the active child window as an Editor pointer, or a nullpointer if there isn't one.
void MainWindow::cut(){ if (activeEditor()) activeEditor()->cut();

}
The cut() slot calls Editor::cut() on the active editor. We don't show the copy() and paste() slotsbecause they follow the same pattern.
void MainWindow::updateMenus(){ bool hasEditor = (activeEditor() != 0); bool hasSelection = activeEditor() && activeEditor()->textCursor().hasSelection(); saveAction->setEnabled(hasEditor); saveAsAction->setEnabled(hasEditor); pasteAction->setEnabled(hasEditor); cutAction->setEnabled(hasSelection);
copyAction->setEnabled(hasSelection); closeAction->setEnabled(hasEditor); closeAllAction->setEnabled(hasEditor); tileAction->setEnabled(hasEditor); cascadeAction->setEnabled(hasEditor); nextAction->setEnabled(hasEditor); previousAction->setEnabled(hasEditor); separatorAction->setVisible(hasEditor); if (activeEditor()) activeEditor()->windowMenuAction()->setChecked(true);}
The updateMenus() slot is called whenever a window is activated (and when the last window isclosed) to update the menu system, due to the signalslot connection we put in the MainWindow
constructor.
Most menu options only make sense if there is an active window, so we disable them if there isn'tone. At the end, we call setChecked() on the QAction representing the active window. Thanks to theQActionGroup, we don't need to explicitly uncheck the previously active window.
void MainWindow::createMenus(){ ... windowMenu = menuBar()->addMenu(tr("&Window")); windowMenu->addAction(closeAction); windowMenu->addAction(closeAllAction); windowMenu->addSeparator(); windowMenu->addAction(tileAction); windowMenu->addAction(cascadeAction); windowMenu->addSeparator(); windowMenu->addAction(nextAction); windowMenu->addAction(previousAction); windowMenu->addAction(separatorAction); ...}
The createMenus() private function fills the Window menu with actions. The actions are all typical ofsuch menus and are easily implemented using QWorkspace's closeActiveWindow(), closeAllWindows(),tile(), and cascade() slots. Every time the user opens a new window, it is added to the Windowmenu's list of actions. (This is done in the createEditor() function that we saw on page 154.) Whenthe user closes an editor window, its action in the Window menu is deleted (since the action isowned by the editor window), and so the action is automatically removed from the Window menu.

void MainWindow::closeEvent(QCloseEvent *event){ workspace->closeAllWindows(); if (activeEditor()) { event->ignore(); } else { event->accept(); }}
The closeEvent() function is reimplemented to close all child windows, causing each child to receivea close event. If one of the child widgets "ignores" its close event (because the user canceled an"unsaved changes" message box), we ignore the close event for the MainWindow; otherwise, weaccept it, resulting in Qt closing the entire window. If we didn't reimplement closeEvent() inMainWindow, the user would not be given the opportunity to save unsaved changes.
We have now finished our review of MainWindow, so we can move on to the Editor implementation.The Editor class represents one child window. It inherits QTextEdit, which provides the text editingfunctionality. Just as any Qt widget can be used as a stand-alone window, any Qt widget can beused as a child window in an MDI workspace.
Here's the class definition:
class Editor : public QTextEdit{ Q_OBJECTpublic: Editor(QWidget *parent = 0); void newFile(); bool open(); bool openFile(const QString &fileName); bool save(); bool saveAs(); QSize sizeHint() const; QAction *windowMenuAction() const { return action; }protected: void closeEvent(QCloseEvent *event);private slots: void documentWasModified();private: bool okToContinue(); bool saveFile(const QString &fileName); void setCurrentFile(const QString &fileName); bool readFile(const QString &fileName); bool writeFile(const QString &fileName); QString strippedName(const QString &fullFileName); QString curFile; bool isUntitled; QString fileFilters; QAction *action;};
Four of the private functions that were in the Spreadsheet application's Main-Window class (p. 57) arealso present in the Editor class: okToContinue(), save-File(), setCurrentFile(), and strippedName().
Editor::Editor(QWidget *parent) : QTextEdit(parent){ action = new QAction(this);

action->setCheckable(true); connect(action, SIGNAL(triggered()), this, SLOT(show())); connect(action, SIGNAL(triggered()), this, SLOT(setFocus())); isUntitled = true; fileFilters = tr("Text files (*.txt)\n" "All files (*)"); connect(document(), SIGNAL(contentsChanged()), this, SLOT(documentWasModified())); setWindowIcon(QPixmap(":/images/document.png")); setAttribute(Qt::WA_DeleteOnClose);}
First, we create a QAction representing the editor in the application's Window menu and connect thataction to the show() and setFocus() slots.
Since we allow users to create any number of editor windows, we must make some provision fornaming them so that they can be distinguished before they have been saved for the first time. Onecommon way of handling this is to allocate names that include a number (for example,document1.txt). We use the isUntitled variable to distinguish between names supplied by the userand names we have created programmatically.
We connect the text document's contentsChanged() signal to the private documentWasModified() slot.This slot simply calls setWindowModified(true).
Finally, we set the Qt::WA_DeleteOnClose attribute to prevent memory leaks when the user closes anEditor window.
After the constructor, we expect either newFile() or open() to be called.
void Editor::newFile(){ static int documentNumber = 1; curFile = tr("document%1.txt").arg(documentNumber); setWindowTitle(curFile + "[*]"); action->setText(curFile); isUntitled = true; ++documentNumber;}
The newFile() function generates a name like document1.txt for the new document. The codebelongs in newFile(), rather than the constructor, because we don't want to consume numbers whenwe call open() to open an existing document in a newly created Editor. Since documentNumber isdeclared static, it is shared across all Editor instances.
The "[*]" marker in the window title is a place marker for where we want the asterisk to appearwhen the file has unsaved changes on platforms other than Mac OS X. We covered this place markerin Chapter 3 (p. 58).
bool Editor::open(){ QString fileName = QFileDialog::getOpenFileName(this, tr("Open"), ".", fileFilters); if (fileName.isEmpty()) return false;
return openFile(fileName);}

The open() function tries to open an existing file using openFile().
bool Editor::save(){ if (isUntitled) { return saveAs(); } else { return saveFile(curFile); }}
The save() function uses the isUntitled variable to determine whether it should call saveFile() orsaveAs().
void Editor::closeEvent(QCloseEvent *event){ if (okToContinue()) { event->accept(); } else { event->ignore(); }}
The closeEvent() function is reimplemented to allow the user to save unsaved changes. The logic iscoded in the okToContinue() function, which pops up a message box that asks, "Do you want to saveyour changes?" If okToContinue() returns TRue, we accept the close event; otherwise, we "ignore" itand leave the window unaffected by it.
void Editor::setCurrentFile(const QString &fileName){ curFile = fileName; isUntitled = false; action->setText(strippedName(curFile));
document()->setModified(false); setWindowTitle(strippedName(curFile) + "[*]"); setWindowModified(false);}
The setCurrentFile() function is called from openFile() and saveFile() to update the curFile andisUntitled variables, to set the window title and action text, and to set the document's "modified"flag to false. Whenever the user modifies the text in the editor, the underlying QTexTDocument emitsthe contents-Changed() signal and sets its internal "modified" flag to true.
QSize Editor::sizeHint() const{ return QSize(72 * fontMetrics().width('x'), 25 * fontMetrics().lineSpacing());}
The sizeHint() function returns a size based on the width of the letter 'x' and the height of a text

line. QWorkspace uses the size hint to give an initial size to the window.
Here's the MDI Editor application's main.cpp file:
#include <QApplication>#include "mainwindow.h"int main(int argc, char *argv[]){ QApplication app(argc, argv); QStringList args = app.arguments(); MainWindow mainWin; if (args.count() > 1) { for (int i = 1; i < args.count(); ++i) mainWin.openFile(args[i]); } else { mainWin.newFile(); } mainWin.show(); return app.exec();}
If the user specifies any files on the command line, we attempt to load them. Otherwise, we startwith an empty document. Qt-specific command-line options, such as -style and -font, areautomatically removed from the argument list by the QApplication constructor. So if we write
mdieditor -style motif readme.txt
on the command line, QApplication::arguments() returns a QStringList containing two items("mdieditor" and "readme.txt"), and the MDI Editor application starts up with the documentreadme.txt.
MDI is one way of handling multiple documents simultaneously. On Mac OS X, the preferredapproach is to use multiple top-level windows. This approach is covered in the "Multiple Documents"section of Chapter 3.

Chapter 7. Event Processing Reimplementing Event Handlers Installing Event Filters Staying Responsive During Intensive Processing
Events are generated by the window system or by Qt itself in response to various occurrences.When the user presses or releases a key or mouse button, a key or mouse event is generated; whena window is shown for the first time, a paint event is generated to tell the newly visible window thatit needs to draw itself. Most events are generated in response to user actions, but some, like timerevents, are generated independently by the system.
When we program with Qt, we seldom need to think about events, because Qt widgets emit signalswhen something significant occurs. Events become useful when we write our own custom widgets orwhen we want to modify the behavior of existing Qt widgets.
Events should not be confused with signals. As a rule, signals are useful when using a widget,whereas events are useful when implementing a widget. For example, when we are usingQPushButton, we are more interested in its clicked() signal than in the low-level mouse or keyevents that caused the signal to be emitted. But if we are implementing a class like QPushButton, weneed to write code to handle mouse and key events and emit the clicked() signal when necessary.
Reimplementing Event Handlers
In Qt, an event is an object that inherits QEvent. Qt handles more than a hundred types of event,each identified by an enum value. For example, QEvent::type() returns QEvent::MouseButtonPress formouse press events.
Many event types require more information than can be stored in a plain QEvent object; for example,mouse press events need to store which mouse button triggered the event as well as where themouse pointer was positioned when the event occurred. This additional information is stored indedicated QEvent subclasses, such as QMouseEvent.
Events are notified to objects through their event() function, inherited from QObject. The event()
implementation in QWidget forwards the most common types of event to specific event handlers,such as mousePressEvent(), keyPress-Event(), and paintEvent().
We have already seen many event handlers when implementing MainWindow, IconEditor, and Plotter
in earlier chapters. There are many other types of event listed in the QEvent referencedocumentation, and it is also possible to create custom event types and to dispatch eventsourselves. Here, we will review two common event types that deserve more explanation: key eventsand timer events.
Key events are handled by reimplementing keyPressEvent() and keyRelease-Event(). The Plotter
widget reimplements keyPressEvent(). Normally, we only need to reimplement keyPressEvent()
since the only keys for which release is important are the modifier keys Ctrl, Shift, and Alt, andthese can be checked for in a keyPressEvent() using QKeyEvent::modifiers(). For example, if wewere implementing a CodeEditor widget, its stripped-down keyPressEvent() that distinguishesbetween Home and Ctrl+Home would look like this:
void CodeEditor::keyPressEvent(QKeyEvent *event){ switch (event->key()) {

case Qt::Key_Home: if (event->modifiers() & Qt::ControlModifier) { goToBeginningOfDocument(); } else {
goToBeginningOfLine(); } break; case Qt::Key_End: ... default: QWidget::keyPressEvent(event); }}
The Tab and Backtab (Shift+Tab) keys are special cases. They are handled by QWidget::event()
before it calls keyPressEvent(), with the semantic of passing the focus to the next or previous widgetin the focus chain. This behavior is usually what we want, but in a CodeEditor widget, we mightprefer to make Tab indent a line. The event() reimplementation would then look like this:
bool CodeEditor::event(QEvent *event){ if (event->type() == QEvent::KeyPress) { QKeyEvent *keyEvent = static_cast<QKeyEvent *>(event); if (keyEvent->key() == Qt::Key_Tab) { insertAtCurrentPosition('\t'); return true;
} } return QWidget::event(event);}
If the event is a key press, we cast the QEvent object to a QKeyEvent and check which key waspressed. If the key is Tab, we do some processing and return true to tell Qt that we have handledthe event. If we returned false, Qt would propagate the event to the parent widget.
A higher-level approach for implementing key bindings is to use a QAction. For example, ifgoToBeginningOfLine() and goToBeginningOfDocument() are public slots in the CodeEditor widget, andthe CodeEditor is used as the central widget in a MainWindow class, we could add the key bindingswith the following code:
MainWindow::MainWindow(){ editor = new CodeEditor; setCentralWidget(editor); goToBeginningOfLineAction = new QAction(tr("Go to Beginning of Line"), this); goToBeginningOfLineAction->setShortcut(tr("Home")); connect(goToBeginningOfLineAction, SIGNAL(activated()), editor, SLOT(goToBeginningOfLine())); goToBeginningOfDocumentAction = new QAction(tr("Go to Beginning of Document"), this); goToBeginningOfDocumentAction->setShortcut(tr("Ctrl+Home")); connect(goToBeginningOfDocumentAction, SIGNAL(activated()), editor, SLOT(goToBeginningOfDocument())); ...}
This makes it easy to add the commands to a menu or a toolbar, as we saw in Chapter 3. If the

commands don't appear in the user interface, the QAction objects could be replaced with a QShortcut
object, the class used by QAction internally to support key bindings.
By default, key bindings set using QAction or QShortcut on a widget are enabled whenever thewindow that contains the widget is active. This can be changed using QAction::setShortcutContext()
or QShortcut::setContext().
Another common type of event is the timer event. While most other event types occur as a result ofa user action, timer events allow applications to perform processing at regular time intervals. Timerevents can be used to implement blinking cursors and other animations, or simply to refresh thedisplay.
To demonstrate timer events, we will implement a Ticker widget. This widget shows a text bannerthat scrolls left by one pixel every 30 milliseconds. If the widget is wider than the text, the text isrepeated as often as necessary to fill the entire width of the widget.
Figure 7.1. The Ticker widget
Here's the header file:
#ifndef TICKER_H#define TICKER_H#include <QWidget>class Ticker : public QWidget{ Q_OBJECT Q_PROPERTY(QString text READ text WRITE setText)public: Ticker(QWidget *parent = 0); void setText(const QString &newText); QString text() const { return myText; }
QSize sizeHint() const;protected: void paintEvent(QPaintEvent *event); void timerEvent(QTimerEvent *event); void showEvent(QShowEvent *event); void hideEvent(QHideEvent *event);private: QString myText; int offset; int myTimerId;};#endif
We reimplement four event handlers in Ticker, three of which we have not seen before:timerEvent(), showEvent(), and hideEvent().
Now let's review the implementation:
#include <QtGui>#include "ticker.h"Ticker::Ticker(QWidget *parent)
: QWidget(parent)

{ offset = 0; myTimerId = 0;}
The constructor initializes the offset variable to 0. The x coordinate at which the text is drawn isderived from the offset value. Timer IDs are always non-zero, so we use 0 to indicate that no timerhas been started.
void Ticker::setText(const QString &newText){ myText = newText; update(); updateGeometry();}
The setText() function sets the text to display. It calls update() to request a repaint andupdateGeometry() to notify any layout manager responsible for the Ticker widget about a size hintchange.
QSize Ticker::sizeHint() const{ return fontMetrics().size(0, text());}
The sizeHint() function returns the space needed by the text as the widget's ideal size.QWidget::fontMetrics() returns a QFontMetrics object that can be queried to obtain informationrelating to the widget's font. In this case, we ask for the size required by the given text. (The firstargument to QFontMetrics::size() is a flag that isn't needed for simple strings, so we just pass 0.)
void Ticker::paintEvent(QPaintEvent * /* event */){ QPainter painter(this); int textWidth = fontMetrics().width(text()); if (textWidth < 1) return; int x = -offset; while (x < width()) { painter.drawText(x, 0, textWidth, height(), Qt::AlignLeft | Qt::AlignVCenter, text()); x += textWidth; }}
The paintEvent() function draws the text using QPainter::drawText(). It uses fontMetrics() toascertain how much horizontal space the text requires, and then draws the text as many times asnecessary to fill the entire width of the widget, taking offset into account.
void Ticker::showEvent(QShowEvent * /* event */){ myTimerId = startTimer(30);}

The showEvent() function starts a timer. The call to QObject::startTimer() returns an ID number,which we can use later to identify the timer. QObject supports multiple independent timers, eachwith its own time interval. After the call to startTimer(), Qt will generate a timer eventapproximately every 30 milliseconds; the accuracy depends on the underlying operating system.
We could have called startTimer() in the Ticker constructor, but we save some resources by havingQt generate timer events only when the widget is actually visible.
void Ticker::timerEvent(QTimerEvent *event){ if (event->timerId() == myTimerId) { ++offset; if (offset >= fontMetrics().width(text())) offset = 0; scroll(-1, 0); } else { QWidget::timerEvent(event); }}
The timerEvent() function is called at intervals by the system. It increments offset by 1 to simulatemovement, wrapping at the width of the text. Then it scrolls the contents of the widget one pixel tothe left using QWidget::scroll(). It would have been sufficient to call update() instead of scroll(),but scroll() is more efficient because it simply moves the existing pixels on screen and onlygenerates a paint event for the widget's newly revealed area (a 1-pixel-wide strip in this case).
If the timer event isn't for the timer we are interested in, we pass it on to our base class.
void Ticker::hideEvent(QHideEvent * /* event */){ killTimer(myTimerId);}
The hideEvent() function calls QObject::killTimer() to stop the timer.
Timer events are low level, and if we need multiple timers, it can become cumbersome to keep trackof all the timer IDs. In such situations, it is usually easier to create a QTimer object for each timer.QTimer emits the timeout() signal at each time interval. QTimer also provides a convenient interfacefor single-shot timers (timers that time out just once).
Installing Event Filters
One really powerful feature of Qt's event model is that a QObject instance can be set to monitor theevents of another QObject instance before the latter object even sees them.
Let's suppose that we have a CustomerInfoDialog widget composed of several QLineEdits and thatwe want to use the Space key to move the focus to the next QLineEdit. This non-standard behaviormight be appropriate for an in-house application whose users are trained in its use. Astraightforward solution is to subclass QLineEdit and reimplement keyPressEvent() to call
focusNextChild(), like this:
void MyLineEdit::keyPressEvent(QKeyEvent *event){ if (event->key() == Qt::Key_Space) { focusNextChild(); } else { QLineEdit::keyPressEvent(event); }}
This approach has one main disadvantage: If we use several different kinds of widgets in the form(for example, QComboBoxes and QSpinBoxes), we must also subclass them to make them exhibit thesame behavior. A better solution is to make CustomerInfoDialog monitor its child widgets' key pressevents and implement the required behavior in the monitoring code. This can be achieved usingevent filters. Setting up an event filter involves two steps:
1. Register the monitoring object with the target object by calling install-EventFilter() on thetarget.
2. Handle the target object's events in the monitor's eventFilter() function.
A good place to register the monitoring object is in the CustomerInfoDialog constructor:
CustomerInfoDialog::CustomerInfoDialog(QWidget *parent) : QDialog(parent){ ... firstNameEdit->installEventFilter(this); lastNameEdit->installEventFilter(this); cityEdit->installEventFilter(this); phoneNumberEdit->installEventFilter(this);}
Once the event filter is registered, the events that are sent to the firstName-Edit, lastNameEdit,cityEdit, and phoneNumberEdit widgets are first sent to the CustomerInfoDialog's eventFilter()
function before they are sent on to their intended destination.
Here's the eventFilter() function that receives the events:
bool CustomerInfoDialog::eventFilter(QObject *target, QEvent *event){ if (target == firstNameEdit || target == lastNameEdit || target == cityEdit || target == phoneNumberEdit) { if (event->type() == QEvent::KeyPress) { QKeyEvent *keyEvent = static_cast<QKeyEvent *>(event); if (keyEvent->key() == Qt::Key_Space) { focusNextChild();
return true; } } } return QDialog::eventFilter(target, event);}

First, we check to see if the target widget is one of the QLineEdits. If the event was a key press, wecast it to QKeyEvent and check which key was pressed. If the pressed key was Space, we callfocusNextChild() to pass focus on to the next widget in the focus chain, and we return true to tellQt that we have handled the event. If we returned false, Qt would send the event to its intendedtarget, resulting in a spurious space being inserted into the QLineEdit.
If the target widget isn't a QLineEdit, or if the event isn't a Space key press, we pass control to thebase class's implementation of eventFilter(). The target widget could also be some widget that thebase class, QDialog, is monitoring. (In Qt 4.1, this is not the case for QDialog. However, other Qtwidget classes, such as QScrollArea, do monitor some of their child widgets for various reasons.)
Qt offers five levels at which events can be processed and filtered:
1. We can reimplement a specific event handler.
Reimplementing event handlers such as mousePressEvent(), keyPress-Event(), andpaintEvent() is by far the most common way to process events. We have already seen manyexamples of this.
2. We can reimplement QObject::event().
By reimplementing the event() function, we can process events before they reach the specificevent handlers. This approach is mostly needed to override the default meaning of the Tabkey, as shown earlier (p. 164). This is also used to handle rare types of event for which nospecific event handler exists (for example, QEvent::HoverEnter). When we reimplementevent(), we must call the base class's event() function for handling the cases we don'texplicitly handle.
3. We can install an event filter on a single QObject.
Once an object has been registered using installEventFilter(), all the events for the targetobject are first sent to the monitoring object's event-Filter() function. If multiple eventfilters are installed on the same object, the filters are activated in turn, from the mostrecently installed back to the first installed.
4. We can install an event filter on the QApplication object.
Once an event filter has been registered for qApp (the unique QApplication object), everyevent for every object in the application is sent to the event-Filter() function before it issent to any other event filter. This approach is mostly useful for debugging. It can also beused to handle mouse events sent to disabled widgets, which QApplication normally discards.
5. We can subclass QApplication and reimplement notify().
Qt calls QApplication::notify() to send out an event. Reimplementing this function is theonly way to get all the events, before any event filters get the opportunity to look at them.Event filters are generally more useful, because there can be any number of concurrent eventfilters, but only one notify() function.
Many event types, including mouse and key events, can be propagated. If the event has not beenhandled on the way to its target object or by the target object itself, the whole event processingprocess is repeated, but this time with the target object's parent as the new target. This continues,going from parent to parent, until either the event is handled or the top-level object is reached.
Figure 7.2 shows how a key press event is propagated from child to parent in a dialog. When theuser presses a key, the event is first sent to the widget that has focus, in this case the bottom-rightQCheckBox. If the QCheckBox doesn't handle the event, Qt sends it to the QGroupBox, and finally to the

QDialog object.
Figure 7.2. Event propagation in a dialog
Staying Responsive During Intensive ProcessingWhen we call QApplication::exec(), we start Qt's event loop. Qt issues a few events on startup toshow and paint the widgets. After that, the event loop is running, constantly checking to see if anyevents have occurred and dispatching these events to QObjects in the application.
While one event is being processed,additional events may be generated and appended to Qt's eventqueue. If we spend too much time processing a particular event, the user interface will becomeunresponsive. For example, any events generated by the window system while the application issaving a file to disk will not be processed until the file is saved. During the save, the application willnot respond to requests from the window system to repaint itself.
One solution is to use multiple threads: one thread for the application's user interface and anotherthread to perform file saving (or any other time-consuming operation). This way, the application'suser interface will stay responsive while the file is being saved. We will see how to achieve this inChapter 18.
A simpler solution is to make frequent calls to QApplication::processEvents() in the file saving code.This function tells Qt to process any pending events, and then returns control to the caller. In fact,QApplication::exec() is little more than a while loop around a processEvents() function call.
Here's an example of how we can keep the user interface responsive using processEvents(), basedon the file saving code for Spreadsheet (p. 80):
bool Spreadsheet::writeFile(const QString &fileName){ QFile file(fileName); ... for (int row = 0; row < RowCount; ++row) { for (int column = 0; column < ColumnCount; ++column) { QString str = formula(row, column); if (!str.isEmpty()) out << quint16(row) << quint16(column) << str; } qApp->processEvents(); } return true;}

One danger with this approach is that the user might close the main window while the application isstill saving, or even click File|Save a second time, resulting in undefined behavior. The easiestsolution to this problem is to replace
qApp->processEvents();
with
qApp->processEvents(QEventLoop::ExcludeUserInputEvents);
telling Qt to ignore mouse and key events.
Often, we want to show a QProgressDialog while a long-running operation is taking place.QProgressDialog has a progress bar that keeps the user informed about the progress being made bythe application. QProgressDialog also provides a Cancel button that allows the user to abort theoperation. Here's the code for saving a Spreadsheet file using this approach:
bool Spreadsheet::writeFile(const QString &fileName){ QFile file(fileName); ... QProgressDialog progress(this); progress.setLabelText(tr("Saving %1").arg(fileName)); progress.setRange(0, RowCount); progress.setModal(true); for (int row = 0; row < RowCount; ++row) { progress.setValue(row); qApp->processEvents(); if (progress.wasCanceled()) { file.remove(); return false; } for (int column = 0; column < ColumnCount; ++column) {
QString str = formula(row, column); if (!str.isEmpty()) out << quint16(row) << quint16(column) << str; } } return true;}
We create a QProgressDialog with NumRows as the total number of steps. Then, for each row, we callsetValue() to update the progress bar. QProgressDialog automatically computes a percentage bydividing the current progress value by the total number of steps. We callQApplication::processEvents() to process any repaint events or any user clicks or key presses (forexample, to allow the user to click Cancel). If the user clicks Cancel, we abort the save and removethe file.
We don't call show() on the QProgressDialog because progress dialogs do that for themselves. If theoperation turns out to be short, presumably because the file to save is small or because the machineis fast, QProgressDialog will detect this and will not show itself at all.
In addition to multithreading and using QProgressDialog, there is a completely different way ofdealing with long-running operations: Instead of performing the processing when the user requests,

we can defer the processing until the application is idle. This can work if the processing can be safelyinterrupted and resumed, since we cannot predict how long the application will be idle.
In Qt, this approach can be implemented by using a 0-millisecond timer. These timers time outwhenever there are no pending events. Here's an example timerEvent() implementation that showsthe idle processing approach:
void Spreadsheet::timerEvent(QTimerEvent *event){ if (event->timerId() == myTimerId) { while (step < MaxStep && !qApp->hasPendingEvents()) { performStep(step); ++step; } } else { QTableWidget::timerEvent(event); }}
If hasPendingEvents() returns true, we stop processing and give control back to Qt. The processingwill resume when Qt has handled all its pending events.

Chapter 8. 2D and 3D Graphics Painting with QPainter Painter Transformations High-Quality Rendering with QImage Printing Graphics with OpenGL
Qt's 2D graphics engine is based on the QPainter class. QPainter can draw geometric shapes (points,lines, rectangles, ellipses, arcs, chords, pie segments, polygons, and Bézier curves), as well aspixmaps, images, and text. Furthermore, QPainter supports advanced features such as antialiasing(for text and shape edges), alpha blending, gradient filling, and vector paths. QPainter also supportstransformations, which makes it possible to draw resolution-independent 2D graphics.
QPainter can be used to draw on a "paint device", such as a QWidget, a QPixmap, or a QImage. It isuseful when we write custom widgets or custom item classes with their own look and feel. QPainter
can also be used in conjunction with QPrinter for printing and for generating PDFs. This means thatwe can often use the same code to display data on screen and to produce printed reports.
An alternative to QPainter is to use OpenGL. OpenGL is a standard library for drawing 2D and 3Dgraphics. The QtOpenGL module makes it very easy to integrate OpenGL code into Qt applications.
Painting with QPainterTo start painting to a paint device (typically a widget), we simply create a QPainter and pass apointer to the device. For example:
void MyWidget::paintEvent(QPaintEvent *event){ QPainter painter(this); ...}
We can draw various shapes using QPainter's draw...() functions. Figure 8.1 lists the mostimportant ones. The way the drawing is performed is influenced by QPainter's settings. Some ofthese are adopted from the device, others are initialized to default values. The three main paintersettings are the pen, the brush, and the font:
The pen is used for drawing lines and shape outlines. It consists of a color, a width, a linestyle, a cap style, and a join style.
The brush is the pattern used for filling geometric shapes. It normally consists of a color anda style, but can also be a texture (a pixmap that is repeated infinitely) or a gradient.
The font is used for drawing text. A font has many attributes, including a family and a pointsize.
Figure 8.1. QPainter's most frequently used draw...() functions

These settings can be modified at any time by calling setPen(), setBrush(), and setFont() with aQPen, QBrush, or QFont object.
Figure 8.2. Cap and join styles

Figure 8.3. Pen styles
Figure 8.4. Predefined brush styles
[View full size image]
Let's see a few examples in practice. Here's the code to draw the ellipse shown in Figure 8.5 (a):
QPainter painter(this);painter.setRenderHint(QPainter::Antialiasing, true);painter.setPen(QPen(Qt::black, 12, Qt::DashDotLine, Qt::RoundCap));

painter.setBrush(QBrush(Qt::green, Qt::SolidPattern));painter.drawEllipse(80, 80, 400, 240);
Figure 8.5. Geometric shape examples
[View full size image]
The setRenderHint() call enables antialiasing, telling QPainter to use different color intensities on theedges to reduce the visual distortion that normally occurs when the edges of a shape are convertedinto pixels. The result is smoother edges on platforms and devices that support this feature.
Here's the code to draw the pie segment shown in Figure 8.5 (b):
QPainter painter(this);painter.setRenderHint(QPainter::Antialiasing, true);painter.setPen(QPen(Qt::black, 15, Qt::SolidLine, Qt::RoundCap, Qt::MiterJoin));painter.setBrush(QBrush(Qt::blue, Qt::DiagCrossPattern));painter.drawPie(80, 80, 400, 240, 60 * 16, 270 * 16);
The last two arguments to drawPie() are expressed in sixteenths of a degree.
Here's the code to draw the cubic Bézier curve shown in Figure 8.5 (c):
QPainter painter(this);painter.setRenderHint(QPainter::Antialiasing, true);QPainterPath path;path.moveTo(80, 320);path.cubicTo(200, 80, 320, 80, 480, 320);painter.setPen(QPen(Qt::black, 8));painter.drawPath(path);
The QPainterPath class can specify arbitrary vector shapes by connecting basic graphical elementstogether: straight lines, ellipses, polygons, arcs, quadratic and cubic Bézier curves, and otherpainter paths. Painter paths are the ultimate drawing primitive in the sense that any shape orcombination of shapes can be expressed as a path.
A path specifies an outline, and the area described by the outline can be filled using a brush. In theexample of Figure 8.5 (c), we didn't set a brush, so only the outline is drawn.
The three examples above use built-in brush patterns (Qt::SolidPattern, Qt:: DiagCrossPattern,and Qt::NoBrush). In modern applications, gradient fills are a popular alternative to monochrome fillpatterns. Gradients rely on color interpolation to obtain smooth transitions between two or morecolors. They are frequently used to produce 3D effects; for example, the Plastique style usesgradients to render QPushButtons.
Qt supports three types of gradients: linear, conical, and radial. The Oven Timer example in the next

section combines all three types of gradients in a single widget to make it look like the real thing.
Linear gradients are defined by two control points and by a series of "color stops" on theline that connects these two points. For example, the linear gradient of Figure 8.6 is createdusing the following code:
QLinearGradient gradient(50, 100, 300, 350); gradient.setColorAt(0.0, Qt::white); gradient.setColorAt(0.2, Qt::green); gradient.setColorAt(1.0, Qt::black);
Figure 8.6. QPainter's gradient brushes
[View full size image]
We specify three colors at three different positions between the two control points. Positionsare specified as floating-point values between 0 and 1, where 0 corresponds to the firstcontrol point and 1 to the second control point. Colors between the specified stops areinterpolated.
Radial gradients are defined by a center point (xc,yc), a radius r, and a focal point (xf,yf),in addition to the color stops. The center point and the radius specify a circle. The colorsspread outward from the focal point, which can be the center point or any other point insidethe circle.
Conical gradients are defined by a center point (xc,yc) and an angle . The colors spreadaround the center point like the sweep of a watch's seconds hand.
So far we have mentioned QPainter's pen, brush, and font settings. In addition to these, QPainterhas other settings that influence the way shapes and text are drawn:
The background brush is used to fill the background of geometric shapes (underneath thebrush pattern), text, or bitmaps when the background mode is Qt::OpaqueMode (the defaultis Qt::transparentMode).
The brush origin is the starting point for brush patterns, normally the top-left corner of thewidget.
The clip region is the area of the device that can be painted. Painting outside the clip regionhas no effect.
The viewport, window, and world matrix determine how logical QPainter coordinates map

to physical paint device coordinates. By default, these are set up so that the logical andphysical coordinate systems coincide. Coordinate systems are covered in the next section.
The composition mode specifies how the newly drawn pixels should interact with the pixelsalready present on the paint device. The default is "source over", where drawn pixels aredrawn on top of existing pixels. This is supported only on certain devices and is covered laterin this chapter.
At any time, we can save the current state of a painter on an internal stack by calling save() andrestore it later on by calling restore(). This can be useful if we want to temporarily change somepainter settings and then reset them to their previous values, as we will see in the next section.
Painter TransformationsWith QPainter's default coordinate system, the point (0, 0) is located at the top-left corner of thepaint device;x coordinates increase rightward and y coordinates increase downward. Each pixeloccupies an area of size 1 x 1 in the default coordinate system.
One important thing to understand is that the center of a pixel lies on "half-pixel" coordinates. Forexample, the top-left pixel covers the area between points (0, 0) and (1, 1), and its center is locatedat (0.5, 0.5). If we ask QPainter to draw a pixel at, say, (100, 100), it will approximate the result byshifting the coordinate by +0.5 in both directions, resulting in the pixel centered at (100.5, 100.5)being drawn.
This distinction may seem rather academic at first, but it has important consequences in practice.First, the shifting by +0.5 only occurs if antialiasing is disabled (the default); if antialiasing isenabled and we try to draw a pixel at (100, 100) in black, QPainter will actually color the four pixels(99.5, 99.5), (99.5, 100.5), (100.5, 99.5), and (100.5, 100.5) light gray, to give the impression of apixel lying exactly at the meeting point of the four pixels. If this effect is undesirable, we can avoid itby specifying half-pixel coordinates, for example, (100.5, 100.5).
When drawing shapes such as lines, rectangles, and ellipses, similar rules apply. Figure 8.7 showshow the result of a drawRect(2, 2, 6, 5) call varies according to the pen's width, when antialiasingis off. In particular, it is important to notice that a 6 x 5 rectangle drawn with a pen width of 1effectively covers an area of size 7 x 6. This is different from older toolkits, including earlier versionsof Qt, but it is essential for making truly scalable, resolution-independent vector graphics possible.
Figure 8.7. Drawing a 6 x 5 rectangle with no antialiasing
Now that we understand the default coordinate system, we can take a closer look at how it can bechanged using QPainter's viewport, window, and world matrix. (In this context, the term "window"does not refer to a window in the sense of a top-level widget, and the "viewport" has nothing to dowith QScrollArea's viewport.)
The viewport and the window are tightly bound. The viewport is an arbitrary rectangle specified in

physical coordinates. The window specifies the same rectangle, but in logical coordinates. When wedo the painting, we specify points in logical coordinates, and those coordinates are converted intophysical coordinates in a linear algebraic manner, based on the current windowviewport settings.
By default, the viewport and the window are set to the device's rectangle. For example, if the deviceis a 320 x 200 widget, both the viewport and the window are the same 320 x 200 rectangle with itstop-left corner at position (0, 0). In this case, the logical and physical coordinate systems are thesame.
The windowviewport mechanism is useful to make the drawing code independent of the size orresolution of the paint device. For example, if we want the logical coordinates to extend from (-50, -50) to (+50, +50), with (0, 0) in the middle, we can set the window as follows:
painter.setWindow(-50, -50, 100, 100);
The (-50, -50) pair specifies the origin, and the (100, 100) pair specifies the width and height. Thismeans that the logical coordinates (-50, -50) now correspond to the physical coordinates (0, 0), andthe logical coordinates (+50, +50) correspond to the physical coordinates (320, 200). In thisexample, we didn't change the viewport.
Figure 8.8. Converting logical coordinates into physical coordinates
Now comes the world matrix. The world matrix is a transformation matrix that is applied in additionto the windowviewport conversion. It allows us to translate, scale, rotate, or shear the items we aredrawing. For example, if we wanted to draw text at a 45° angle, we would use this code:
QMatrix matrix;matrix.rotate(45.0);painter.setMatrix(matrix);painter.drawText(rect, Qt::AlignCenter, tr("Revenue"));
The logical coordinates we pass to drawText() are transformed by the world matrix, then mapped tophysical coordinates using the windowviewport settings.
If we specify multiple transformations, they are applied in the order in which they are given. Forexample, if we want to use the point (10, 20) as the rotation's pivot point, we can do so bytranslating the window, performing the rotation, and then translating the window back to its originalposition:
QMatrix matrix;matrix.translate(-10.0, -20.0);matrix.rotate(45.0);matrix.translate(+10.0, +20.0);painter.setMatrix(matrix);

painter.drawText(rect, Qt::AlignCenter, tr("Revenue"));
A simpler way to specify transformations is to use QPainter's translate(), scale(), rotate(), andshear() convenience functions:
painter.translate(-10.0, -20.0);painter.rotate(45.0);painter.translate(+10.0, +20.0);painter.drawText(rect, Qt::AlignCenter, tr("Revenue"));
But if we want to use the same transformations repeatedly, it's more efficient to store them in aQMatrix object and set the world matrix on the painter whenever the transformations are needed.
To illustrate painter transformations, we will review the code of the OvenTimer widget shown inFigure 8.9. The OvenTimer widget is modeled after the kitchen timers that were used before it wascommon to have ovens with clocks built-in. The user can click a notch to set the duration. The wheelautomatically turns counterclockwise until 0 is reached, at which point OvenTimer emits the timeout()
signal.
Figure 8.9. The OvenTimer widget
class OvenTimer : public QWidget{ Q_OBJECTpublic: OvenTimer(QWidget *parent = 0); void setDuration(int secs); int duration() const; void draw(QPainter *painter);signals: void timeout();protected: void paintEvent(QPaintEvent *event); void mousePressEvent(QMouseEvent *event);private: QDateTime finishTime; QTimer *updateTimer; QTimer *finishTimer;};
The OvenTimer class inherits QWidget and reimplements two virtual functions: paintEvent() and

mousePressEvent().
const double DegreesPerMinute = 7.0;const double DegreesPerSecond = DegreesPerMinute / 60;const int MaxMinutes = 45;const int MaxSeconds = MaxMinutes * 60;const int UpdateInterval = 1;
We start by defining a few constants that control the oven timer's look and feel.
OvenTimer::OvenTimer(QWidget *parent) : QWidget(parent){ finishTime = QDateTime::currentDateTime();
updateTimer = new QTimer(this); connect(updateTimer, SIGNAL(timeout()), this, SLOT(update())); finishTimer = new QTimer(this); finishTimer->setSingleShot(true); connect(finishTimer, SIGNAL(timeout()), this, SIGNAL(timeout())); connect(finishTimer, SIGNAL(timeout()), updateTimer, SLOT(stop()));}
In the constructor, we create two QTimer objects: updateTimer is used to refresh the appearance ofthe widget every second, and finishTimer emits the widget's timeout() signal when the oven timerreaches 0. The finishTimer only needs to timeout once, so we call setSingleShot(true); by default,timers fire repeatedly until they are stopped or destroyed. The last connect() call is an optimizationto stop updating the widget every second when the timer is inactive.
void OvenTimer::setDuration(int secs){ if (secs > MaxSeconds) { secs = MaxSeconds; } else if (secs <= 0) { secs = 0; } finishTime = QDateTime::currentDateTime().addSecs(secs); if (secs > 0) { updateTimer->start(UpdateInterval * 1000); finishTimer->start(secs * 1000); } else { updateTimer->stop(); finishTimer->stop(); } update();}
The setDuration() function sets the duration of the oven timer to the given number of seconds. Wecompute the finish time by adding the duration to the current time (obtained fromQDateTime::currentDateTime()) and store it in the finishTime private variable. At the end, we callupdate() to redraw the widget with the new duration.
The finishTime variable is of type QDateTime. Since the variable holds both a date and a time, weavoid a wrap-around bug when the current time is before midnight and the finish time is aftermidnight.

int OvenTimer::duration() const{ int secs = QDateTime::currentDateTime().secsTo(finishTime); if (secs < 0) secs = 0; return secs;}
The duration() function returns the number of seconds left before the timer is due to finish. If thetimer is inactive, we return 0.
void OvenTimer::mousePressEvent(QMouseEvent *event){ QPointF point = event->pos() - rect().center(); double theta = atan2(-point.x(), -point.y()) * 180 / 3.14159265359; setDuration(duration() + int(theta / DegreesPerSecond)); update();}
If the user clicks the widget, we find the closest notch using a subtle but effective mathematicalformula, and we use the result to set the new duration. Then we schedule a repaint. The notch thatthe user clicked will now be at the top and will move counterclockwise as time passes until 0 isreached.
void OvenTimer::paintEvent(QPaintEvent * /* event */){ QPainter painter(this); painter.setRenderHint(QPainter::Antialiasing, true); int side = qMin(width(), height()); painter.setViewport((width() - side) / 2, (height() - side) / 2, side, side); painter.setWindow(-50, -50, 100, 100); draw(&painter);}
In paintEvent(), we set the viewport to be the largest square area that fits inside the widget, andwe set the window to be the rectangle (-50, -50, 100, 100), that is, the 100 x 100 rectangleextending from (-50, -50) to (+50, +50). The qMin() template function returns the lowest of its twoarguments. Then we call the draw() function to actually perform the drawing.
Figure 8.10. The OvenTimer widget at three different sizes

If we had not set the viewport to be a square, the oven timer would be an ellipse when the widget isresized to a non-square rectangle. To avoid such deformations, we must set the viewport and thewindow to rectangles with the same aspect ratio.
Now let's look at the drawing code:
void OvenTimer::draw(QPainter *painter){ static const int triangle[3][2] = { { -2, -49 }, { +2, -49 }, { 0, -47 } }; QPen thickPen(palette().foreground(), 1.5); QPen thinPen(palette().foreground(), 0.5); QColor niceBlue(150, 150, 200); painter->setPen(thinPen); painter->setBrush(palette().foreground()); painter->drawPolygon(QPolygon(3, &triangle[0][0]));
We start by drawing the tiny triangle that marks the 0 position at the top of the widget. The triangleis specified by three hard-coded coordinates, and we use drawPolygon() to render it.
What is so convenient about the windowviewport mechanism is that we can hard-code thecoordinates we use in the draw commands and still get good resizing behavior.
QConicalGradient coneGradient(0, 0, -90.0);coneGradient.setColorAt(0.0, Qt::darkGray);coneGradient.setColorAt(0.2, niceBlue);coneGradient.setColorAt(0.5, Qt::white);coneGradient.setColorAt(1.0, Qt::darkGray);painter->setBrush(coneGradient);painter->drawEllipse(-46, -46, 92, 92);
We draw the outer circle and fill it using a conical gradient. The gradient's center point is located at(0, 0), and the angle is -90°.

QRadialGradient haloGradient(0, 0, 20, 0, 0);haloGradient.setColorAt(0.0, Qt::lightGray);haloGradient.setColorAt(0.8, Qt::darkGray);haloGradient.setColorAt(0.9, Qt::white);haloGradient.setColorAt(1.0, Qt::black);painter->setPen(Qt::NoPen);painter->setBrush(haloGradient);painter->drawEllipse(-20, -20, 40, 40);
We fill the inner circle using a radial gradient. The center point and the focal point of the gradientare located at (0, 0). The radius of the gradient is 20.
QLinearGradient knobGradient(-7, -25, 7, -25); knobGradient.setColorAt(0.0, Qt::black); knobGradient.setColorAt(0.2, niceBlue); knobGradient.setColorAt(0.3, Qt::lightGray); knobGradient.setColorAt(0.8, Qt::white); knobGradient.setColorAt(1.0, Qt::black); painter->rotate(duration() * DegreesPerSecond); painter->setBrush(knobGradient); painter->setPen(thinPen); painter->drawRoundRect(-7, -25, 14, 50, 150, 50);
for (int i = 0; i <= MaxMinutes; ++i) { if (i % 5 == 0) { painter->setPen(thickPen); painter->drawLine(0, -41, 0, -44); painter->drawText(-15, -41, 30, 25, Qt::AlignHCenter | Qt::AlignTop, QString::number(i)); } else { painter->setPen(thinPen); painter->drawLine(0, -42, 0, -44); } painter->rotate(-DegreesPerMinute); }}
We call rotate() to rotate the painter's coordinate system. In the old coordinate system, the 0-minute mark was on top; now, the 0-minute mark is moved to the place that is appropriate for thetime left. We draw the rectangular knob handle after the rotation, since its orientation depends onthe rotation angle.
In the for loop, we draw the tick marks along the outer circle's edge and the numbers for eachmultiple of 5 minutes. The text is drawn in an invisible rectangle underneath the tick mark. At theend of each iteration, we rotate the painter clockwise by 7°, which corresponds to one minute. Thenext time we draw a tick mark, it will be at a different position around the circle, even though thecoordinates we pass to the drawLine() and drawText() calls are always the same.
The code in the for loop suffers from a minor flaw, which would quickly become apparent if weperformed more iterations. Each time we call rotate(), we effectively multiply the current worldmatrix with a rotation matrix, producing a new world matrix. The rounding errors associated withfloating-point arithmetic add up, resulting in an increasingly inaccurate world matrix. Here's one wayto rewrite the code to avoid this issue, using save() and restore() to save and reload the originaltransformation matrix for each iteration:
for (int i = 0; i <= MaxMinutes; ++i) { painter->save(); painter->rotate(-i * DegreesPerMinute);

if (i % 5 == 0) { painter->setPen(thickPen); painter->drawLine(0, -41, 0, -44); painter->drawText(-15, -41, 30, 25, Qt::AlignHCenter | Qt::AlignTop, QString::number(i)); } else { painter->setPen(thinPen); painter->drawLine(0, -42, 0, -44); } painter->restore();}
Another way of implementing an oven timer would have been to compute the (x, y) positionsourselves, using sin() and cos() to find the positions along the circle. But then we would still needto use a translation and a rotation to draw the text at an angle.
High-Quality Rendering with QImageWhen drawing, we may be faced with a trade-off between speed and accuracy. For example, on X11and Mac OS X, drawing on a QWidget or QPixmap relies on the platform's native paint engine. On X11,this ensures that communication with the X server is kept to a minimum; only paint commands aresent rather than actual image data. The main drawback of this approach is that Qt is limited by theplatform's native support:
On X11, features such as antialiasing and support for fractional coordinates are available onlyif the X Render extension is present on the X server.
On Mac OS X, the native aliased graphics engine uses different algorithms for drawingpolygons than X11 and Windows, with slightly different results.
When accuracy is more important than efficiency, we can draw to a QImage and copy the result ontothe screen. This always uses Qt's own internal paint engine, giving identical results on all platforms.The only restriction is that the QImage on which we paint must be created with an argument of eitherQImage::Format_RGB32 or QImage::Format_ARGB32_Premultiplied.
The premultiplied ARGB32 format is almost identical to the conventional ARGB32 format(0xaarrggbb), the difference being that the red, green, and blue channels are "premultiplied" withthe alpha channel. This means that the RGB values, which normally range from 0x00 to 0xFF, arescaled from 0x00 to the alpha value. For example, a 50%-transparent blue color is represented as0x7F0000FF in ARGB32 format, but 0x7F00007F in premultiplied ARGB32 format, and similarly a 75%-transparent dark green of 0x3F008000 in ARGB32 format would be 0x3F002000 in premultipliedARGB32 format.
Let's suppose we want to use antialiasing for drawing a widget, and we want to obtain good resultseven on X11 systems with no X Render extension. The original paintEvent() handler, which relies onX Render for the antialiasing, might look like this:
void MyWidget::paintEvent(QPaintEvent *event){ QPainter painter(this); painter.setRenderHint(QPainter::Antialiasing, true); draw(&painter);}

Here's how to rewrite the widget's paintEvent() function to use Qt's platform-independent graphicsengine:
void MyWidget::paintEvent(QPaintEvent *event){ QImage image(size(), QImage::Format_ARGB32_Premultiplied); QPainter imagePainter(&image); imagePainter.initFrom(this); imagePainter.setRenderHint(QPainter::Antialiasing, true); imagePainter.eraseRect(rect()); draw(&imagePainter); imagePainter.end(); QPainter widgetPainter(this); widgetPainter.drawImage(0, 0, image);}
We create a QImage of the same size as the widget in premultiplied ARGB32 format, and a QPainter
to draw on the image. The initFrom() call initializes the painter's pen, background, and font basedon the widget. We perform the drawing using the QPainter as usual, and at the end we reuse theQPainter object to copy the image onto the widget.
This approach produces identical high-quality results on all platforms, with the exception of fontrendering, which depends on the installed fonts.
One particularly powerful feature of Qt's graphics engine is its support for composition modes. Thesespecify how a source and a destination pixel are merged together when drawing. This applies to allpainting operations, including pen, brush, gradient, and image drawing.
The default composition mode is QImage::CompositionMode_SourceOver, meaning that the source pixel(the pixel we are drawing) is blended on top of the destination pixel (the existing pixel) in such away that the alpha component of the source defines its translucency. Figure 8.11 shows the result ofdrawing a semi-transparent butterfly on top of a checker pattern with the different modes.
Figure 8.11. QPainter's composition modes
[View full size image]
Compositions modes are set using QPainter::setCompositionMode(). For example, here's how tocreate a QImage containing the XOR of the butterfly and the checker pattern:
QImage resultImage = checkerPatternImage;QPainter painter(&resultImage);painter.setCompositionMode(QPainter::CompositionMode_Xor);painter.drawImage(0, 0, butterflyImage);

One issue to be aware of is that the QImage::CompositionMode_Xor operation applies to the alphachannel. This means that if we XOR the color white (0xFFFFFFFF) with itself, we obtain a transparentcolor (0x00000000), not black (0xFF000000).
PrintingPrinting in Qt is similar to drawing on a QWidget, QPixmap, or QImage. It consists of the followingsteps:
1. Create a QPrinter to serve as the paint device.
2. Pop up a QPrintDialog, allowing the user to choose a printer and to set a few options.
3. Create a QPainter to operate on the QPrinter.
4. Draw a page using the QPainter.
5. Call QPrinter::newPage() to advance to the next page.
6. Repeat steps 4 and 5 until all the pages are printed.
On Windows and Mac OS X, QPrinter uses the system's printer drivers. On Unix, it generatesPostScript and sends it to lp or lpr (or to the program set using QPrinter::setPrintProgram()).QPrinter can also be used to generate PDF files by calling setOutputFormat(QPrinter::PdfFormat).
Figure 8.12. Printing a QImage

Let's start with some simple examples that all print on a single page. The first example prints aQImage:
void PrintWindow::printImage(const QImage &image){ QPrintDialog printDialog(&printer, this); if (printDialog.exec()) { QPainter painter(&printer); QRect rect = painter.viewport(); QSize size = image.size(); size.scale(rect.size(), Qt::KeepAspectRatio); painter.setViewport(rect.x(), rect.y(), size.width(), size.height()); painter.setWindow(image.rect());
painter.drawImage(0, 0, image); }

}
We assume that the PrintWindow class has a member variable called printer of type QPrinter. Wecould simply have created the QPrinter on the stack in printImage(), but then it would notremember the user's settings from one print run to another.
We create a QPrintDialog and call exec() to show it. It returns true if the user clicked the OKbutton; otherwise, it returns false. After the call to exec(), the QPrinter object is ready to use. (It isalso possible to print without using a QPrintDialog, by directly calling QPrinter member functions toset things up.)
Next, we create a QPainter to draw on the QPrinter. We set the window to the image's rectangle andthe viewport to a rectangle with the same aspect ratio, and we draw the image at position (0, 0).
By default, QPainter's window is initialized so that the printer appears to have a similar resolution asthe screen (usually somewhere between 72 and 100 dots per inch), making it easy to reuse widgetpainting code for printing. Here, it didn't matter, because we set our own window.
Printing items that take up no more than a single page is simple, but many applications need toprint multiple pages. For those, we need to paint one page at a time and call newPage() to advanceto the next page. This raises the problem of determining how much information we can print oneach page. There are two main approaches to handling multi-page documents with Qt:
We can convert our data to HTML and render it using QTextdocument, Qt's rich text engine. We can perform the drawing and the page breaking by hand.
We will review both approaches in turn. As an example, we will print a flower guide: a list of flowernames, each with a textual description. Each entry in the guide is stored as a string of the format"name:description", for example:
Miltonopsis santanae: A most dangerous orchid species.
Since each flower's data is represented by a single string, we can represent all the flowers in theguide using one QStringList. Here's the function that prints a flower guide using Qt's rich textengine:
void PrintWindow::printFlowerGuide(const QStringList &entries){ QString html; foreach (QString entry, entries) { QStringList fields = entry.split(": "); QString title = Qt::escape(fields[0]); QString body = Qt::escape(fields[1]); html += "<table width=\"100%\" border=1 cellspacing=0>\n" "<tr><td bgcolor=\"lightgray\"><font size=\"+1\">" "<b><i>" + title + "</i></b></font>\n<tr><td>" + body + "\n</table>\n<br>\n"; } printHtml(html);}
The first step is to convert the QStringList into HTML. Each flower becomes an HTML table with twocells. We use Qt::escape() to replace the special characters '&', '<', '>' with the corresponding HTMLentities ("&", "<", ">"). Then we call printHtml() to print the text.

void PrintWindow::printHtml(const QString &html){ QPrintDialog printDialog(&printer, this); if (printDialog.exec()) { QPainter painter(&printer); QTextDocument textDocument; textDocument.setHtml(html); textDocument.print(&printer); }}
The printHtml() function pops up a QPrintDialog and takes care of printing an HTML document. Itcan be reused "as is" in any Qt application to print arbitrary HTML pages.
Figure 8.13. Printing a flower guide using QTextdocument
[View full size image]
Converting a document to HTML and using QTextdocument to print it is by far the most convenientalternative for printing reports and other complex documents. In cases where we need more control,we can do the page layout and the drawing by hand. Let's now see how we can use this approach toprint a flower guide. Here's the new printFlowerGuide() function:
void PrintWindow::printFlowerGuide(const QStringList &entries){ QPrintDialog printDialog(&printer, this);
if (printDialog.exec()) {
QPainter painter(&printer); QList<QStringList> pages; paginate(&painter, &pages, entries); printPages(&painter, pages); }}
After setting up the printer and constructing the painter, we call the paginate() helper function todetermine which entry should appear on which page. The result of this is a list of QStringLists, with

each QStringList holding the entries for one page. We pass on that result to printPages().
For example, let's suppose that the flower guide contains 6 entries, which we will refer to as A, B, C,D, E, and F Now let's suppose that there is room for A and B on the first page;C, D, and E on thesecond page; and F on the third page. The pages list would then have the list [A, B] at indexposition 0, the list [C, D, E] at index position 1, and the list [F ] at index position 2.
void PrintWindow::paginate(QPainter *painter, QList<QStringList> *pages, const QStringList &entries){ QStringList currentPage; int pageHeight = painter->window().height() - 2 * LargeGap; int y = 0; foreach (QString entry, entries) { int height = entryHeight(painter, entry); if (y + height > pageHeight && !currentPage.empty()) { pages->append(currentPage); currentPage.clear(); y = 0; } currentPage.append(entry); y += height + MediumGap; } if (!currentPage.empty()) pages->append(currentPage);}
The paginate() function distributes the flower guide entries into pages. It relies on the entryHeight()
function, which computes the height of one entry. It also takes into account the vertical gaps at thetop and bottom of the page, of size LargeGap.
We iterate through the entries and append them to the current page until we come to an entry thatdoesn't fit; then we append the current page to the pages list and start a new page.
int PrintWindow::entryHeight(QPainter *painter, const QString &entry){ QStringList fields = entry.split(": "); QString title = fields[0]; QString body = fields[1];
int textWidth = painter->window().width() - 2 * SmallGap; int maxHeight = painter->window().height(); painter->setFont(titleFont); QRect titleRect = painter->boundingRect(0, 0, textWidth, maxHeight, Qt::TextWordWrap, title); painter->setFont(bodyFont); QRect bodyRect = painter->boundingRect(0, 0, textWidth, maxHeight, Qt::TextWordWrap, body); return titleRect.height() + bodyRect.height() + 4 * SmallGap;}
The enTRyHeight() function uses QPainter::boundingRect() to compute the vertical space needed byone entry. Figure 8.14 shows the layout of a flower entry and the meaning of the SmallGap andMediumGap constants.
Figure 8.14. A flower entry's layout
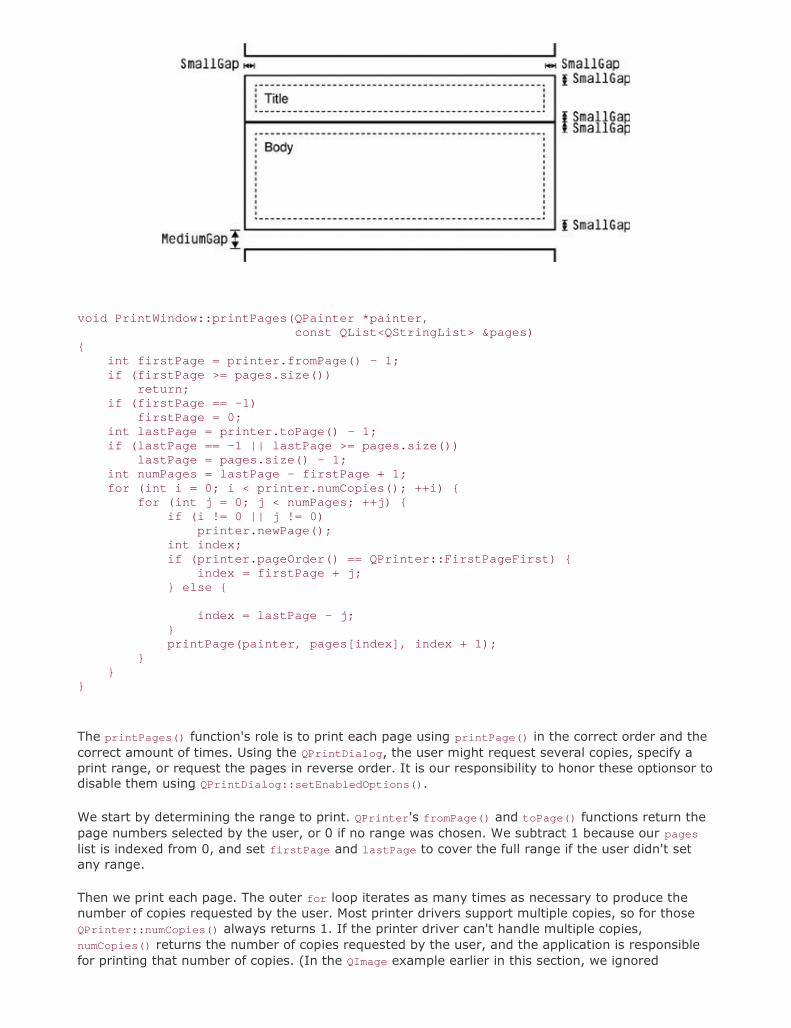
void PrintWindow::printPages(QPainter *painter, const QList<QStringList> &pages)
{ int firstPage = printer.fromPage() - 1; if (firstPage >= pages.size()) return; if (firstPage == -1) firstPage = 0; int lastPage = printer.toPage() - 1; if (lastPage == -1 || lastPage >= pages.size()) lastPage = pages.size() - 1; int numPages = lastPage - firstPage + 1; for (int i = 0; i < printer.numCopies(); ++i) { for (int j = 0; j < numPages; ++j) { if (i != 0 || j != 0)
printer.newPage(); int index; if (printer.pageOrder() == QPrinter::FirstPageFirst) { index = firstPage + j; } else {
index = lastPage - j; } printPage(painter, pages[index], index + 1); } }}
The printPages() function's role is to print each page using printPage() in the correct order and thecorrect amount of times. Using the QPrintDialog, the user might request several copies, specify aprint range, or request the pages in reverse order. It is our responsibility to honor these optionsor todisable them using QPrintDialog::setEnabledOptions().
We start by determining the range to print. QPrinter's fromPage() and toPage() functions return thepage numbers selected by the user, or 0 if no range was chosen. We subtract 1 because our pages
list is indexed from 0, and set firstPage and lastPage to cover the full range if the user didn't setany range.
Then we print each page. The outer for loop iterates as many times as necessary to produce thenumber of copies requested by the user. Most printer drivers support multiple copies, so for thoseQPrinter::numCopies() always returns 1. If the printer driver can't handle multiple copies,numCopies() returns the number of copies requested by the user, and the application is responsiblefor printing that number of copies. (In the QImage example earlier in this section, we ignored

numCopies() for the sake of simplicity.)
Figure 8.15. Printing a flower guide using QPainter
[View full size image]
The inner for loop iterates through the pages. If the page isn't the first page, we call newPage() toflush the old page and start painting on a fresh page. We call printPage() to paint each page.
void PrintWindow::printPage(QPainter *painter, const QStringList &entries, int pageNumber){ painter->save(); painter->translate(0, LargeGap); foreach (QString entry, entries) { QStringList fields = entry.split(": "); QString title = fields[0]; QString body = fields[1]; printBox(painter, title, titleFont, Qt::lightGray); printBox(painter, body, bodyFont, Qt::white); painter->translate(0, MediumGap); } painter->restore(); painter->setFont(footerFont); painter->drawText(painter->window(), Qt::AlignHCenter | Qt::AlignBottom, QString::number(pageNumber));}
The printPage() function iterates through all the flower guide entries and prints them using two callsto printBox(): one for the title (the flower's name) and one for the body (its description). It alsodraws the page number centered at the bottom of the page.
Figure 8.16. The flower guide's page layout

void PrintWindow::printBox(QPainter *painter, const QString &str, const QFont &font, const QBrush &brush){ painter->setFont(font); int boxWidth = painter->window().width(); int textWidth = boxWidth - 2 * SmallGap; int maxHeight = painter->window().height(); QRect textRect = painter->boundingRect(SmallGap, SmallGap, textWidth, maxHeight, Qt::TextWordWrap, str); int boxHeight = textRect.height() + 2 * SmallGap; painter->setPen(QPen(Qt::black, 2, Qt::SolidLine)); painter->setBrush(brush); painter->drawRect(0, 0, boxWidth, boxHeight); painter->drawText(textRect, Qt::TextWordWrap, str); painter->translate(0, boxHeight);}
The printBox() function draws the outline of a box, then draws the text inside the box.
Graphics with OpenGLOpenGL is a standard API for rendering 2D and 3D graphics. Qt applications can draw 3D graphicsby using the QtOpenGL module, which relies on the system's OpenGL library. This section assumesthat you are familiar with OpenGL. If OpenGL is new to you, a good place to start learning it ishttp://www.opengl.org/.
Drawing graphics with OpenGL from a Qt application is straightforward: We must subclassQGLWidget, reimplement a few virtual functions, and link the application against the QtOpenGL andOpenGL libraries. Because QGLWidget inherits from QWidget, most of what we already know stillapplies. The main difference is that we use standard OpenGL functions to perform the drawinginstead of QPainter.

To show how this works, we will review the code of the Tetrahedron application shown in Figure8.17. The application presents a 3D tetrahedron, or four-sided die, with each face drawn using adifferent color. The user can rotate the tetrahedron by pressing a mouse button and dragging. Theuser can set the color of a face by double-clicking it and choosing a color from the QColorDialog thatpops up.
Figure 8.17. The Tetrahedron application
class Tetrahedron : public QGLWidget{ Q_OBJECTpublic: Tetrahedron(QWidget *parent = 0);protected: void initializeGL(); void resizeGL(int width, int height); void paintGL(); void mousePressEvent(QMouseEvent *event); void mouseMoveEvent(QMouseEvent *event); void mouseDoubleClickEvent(QMouseEvent *event);private: void draw(); int faceAtPosition(const QPoint &pos); GLfloat rotationX; GLfloat rotationY; GLfloat rotationZ; QColor faceColors[4]; QPoint lastPos;};
The Tetrahedron class inherits from QGLWidget. The initializeGL(), resizeGL(), and paintGL()
functions are reimplemented from QGLWidget. The mouse event handlers are reimplemented fromQWidget as usual.
Tetrahedron::Tetrahedron(QWidget *parent) : QGLWidget(parent)

{ setFormat(QGLFormat(QGL::DoubleBuffer | QGL::DepthBuffer)); rotationX = -21.0; rotationY = -57.0; rotationZ = 0.0; faceColors[0] = Qt::red; faceColors[1] = Qt::green; faceColors[2] = Qt::blue; faceColors[3] = Qt::yellow;}
In the constructor, we call QGLWidget::setFormat() to specify the OpenGL display context, and weinitialize the class's private variables.
void Tetrahedron::initializeGL(){ qglClearColor(Qt::black); glShadeModel(GL_FLAT); glEnable(GL_DEPTH_TEST); glEnable(GL_CULL_FACE);}
The initializeGL() function is called just once, before paintGL() is called. This is the place wherewe can set up the OpenGL rendering context, define display lists, and perform other initializations.
All the code is standard OpenGL, except for the call to QGLWidget's qglClear-Color() function. If wewanted to stick to standard OpenGL, we would call glClearColor() in RGBA mode andglClearIndex() in color index mode instead.
void Tetrahedron::resizeGL(int width, int height){ glViewport(0, 0, width, height); glMatrixMode(GL_PROJECTION); glLoadIdentity(); GLfloat x = GLfloat(width) / height; glFrustum(-x, x, -1.0, 1.0, 4.0, 15.0); glMatrixMode(GL_MODELVIEW);}
The resizeGL() function is called before paintGL() is called the first time, but after initializeGL() iscalled. It is also called whenever the widget is resized. This is the place where we can set up theOpenGL viewport, projection, and any other settings that depend on the widget's size.
void Tetrahedron::paintGL(){ glClear(GL_COLOR_BUFFER_BIT | GL_DEPTH_BUFFER_BIT); draw();}
The paintGL() function is called whenever the widget needs to be repainted. This is similar toQWidget::paintEvent(), but instead of QPainter functions we use OpenGL functions. The actualdrawing is performed by the private function draw().
void Tetrahedron::draw()

{ static const GLfloat P1[3] = { 0.0, -1.0, +2.0 }; static const GLfloat P2[3] = { +1.73205081, -1.0, -1.0 }; static const GLfloat P3[3] = { -1.73205081, -1.0, -1.0 }; static const GLfloat P4[3] = { 0.0, +2.0, 0.0 }; static const GLfloat * const coords[4][3] = { { P1, P2, P3 }, { P1, P3, P4 }, { P1, P4, P2 }, { P2, P4, P3 }
}; glMatrixMode(GL_MODELVIEW); glLoadIdentity(); glTranslatef(0.0, 0.0, -10.0); glRotatef(rotationX, 1.0, 0.0, 0.0); glRotatef(rotationY, 0.0, 1.0, 0.0); glRotatef(rotationZ, 0.0, 0.0, 1.0); for (int i = 0; i < 4; ++i) { glLoadName(i); glBegin(GL_TRIANGLES); qglColor(faceColors[i]); for (int j = 0; j < 3; ++j) { glVertex3f(coords[i][j][0], coords[i][j][1], coords[i][j][2]);
} glEnd(); }}
In draw(), we draw the tetrahedron, taking into account the x, y, and z rotations and the colorsstored in the faceColors array. Everything is standard OpenGL, except for the qglColor() call. Wecould have used one of the OpenGL functions glColor3d() or glIndex() instead, depending on themode.
void Tetrahedron::mousePressEvent(QMouseEvent *event){ lastPos = event->pos();}void Tetrahedron::mouseMoveEvent(QMouseEvent *event){ GLfloat dx = GLfloat(event->x() - lastPos.x()) / width(); GLfloat dy = GLfloat(event->y() - lastPos.y()) / height(); if (event->buttons() & Qt::LeftButton) { rotationX += 180 * dy; rotationY += 180 * dx; updateGL(); } else if (event->buttons() & Qt::RightButton) { rotationX += 180 * dy; rotationZ += 180 * dx; updateGL(); } lastPos = event->pos();}
The mousePressEvent() and mouseMoveEvent() functions are reimplemented from QWidget to allow theuser to rotate the view by clicking and dragging. The left mouse button allows the user to rotatearound the x and y axes, the right mouse button around the x and z axes.
After modifying the rotationX variable, and either the rotationY or the rotationZ variable, we callupdateGL() to redraw the scene.
void Tetrahedron::mouseDoubleClickEvent(QMouseEvent *event){

int face = faceAtPosition(event->pos()); if (face != -1) { QColor color = QColorDialog::getColor(faceColors[face], this); if (color.isValid()) { faceColors[face] = color; updateGL(); } }}
The mouseDoubleClickEvent() is reimplemented from QWidget to allow the user to set the color of atetrahedron face by double-clicking it. We call the private function faceAtPosition() to determinewhich face, if any, is located under the cursor. If a face was double-clicked, we callQColorDialog::getColor() to obtain a new color for that face. Then we update the faceColors arraywith the new color, and we call updateGL() to redraw the scene.
int Tetrahedron::faceAtPosition(const QPoint &pos){ const int MaxSize = 512; GLuint buffer[MaxSize]; GLint viewport[4]; glGetIntegerv(GL_VIEWPORT, viewport); glSelectBuffer(MaxSize, buffer); glRenderMode(GL_SELECT); glInitNames(); glPushName(0); glMatrixMode(GL_PROJECTION); glPushMatrix(); glLoadIdentity(); gluPickMatrix(GLdouble(pos.x()), GLdouble(viewport[3] - pos.y()), 5.0, 5.0, viewport); GLfloat x = GLfloat(width()) / height();
glFrustum(-x, x, -1.0, 1.0, 4.0, 15.0); draw(); glMatrixMode(GL_PROJECTION); glPopMatrix(); if (!glRenderMode(GL_RENDER)) return -1; return buffer[3];}
The faceAtPosition() function returns the number of the face at a certain position on the widget, or-1 if there is no face at that position. The code for determining this in OpenGL is a bit complicated.Essentially, what we do is render the scene in GL_SELECT mode to take advantage of OpenGL'spicking capabilities and then retrieve the face number (its "name") from the OpenGL hit record.
Here's main.cpp:
#include <QApplication>#include <iostream>#include "tetrahedron.h"using namespace std;int main(int argc, char *argv[]){ QApplication app(argc, argv); if (!QGLFormat::hasOpenGL()) { cerr << "This system has no OpenGL support" << endl; return 1; } Tetrahedron tetrahedron;

tetrahedron.setWindowTitle(QObject::tr("Tetrahedron")); tetrahedron.resize(300, 300); tetrahedron.show();
return app.exec();}
If the user's system doesn't support OpenGL, we print an error message to the console and returnimmediately.
To link the application against the QtOpenGL module and the system's OpenGL library, the .pro fileneeds this entry:
QT += opengl
That completes the Tetrahedron application. For more information about the QtOpenGL module,see the reference documentation for QGLWidget, QGLFormat, QGLContext, QGLColormap, andQGLPixelBuffer.

Chapter 9. Drag and Drop Enabling Drag and Drop Supporting Custom Drag Types Clipboard Handling
Drag and drop is a modern and intuitive way of transferring information within an application orbetween different applications. It is often provided in addition to clipboard support for moving andcopying data.
In this chapter, we will see how to add drag and drop support to an application and how to handlecustom formats. Then we will show how to reuse the drag and drop code to add clipboard support.This code reuse is possible because both mechanisms are based on QMimeData, a class that canprovide data in several formats.
Enabling Drag and DropDrag and drop involves two distinct actions: dragging and dropping. Qt widgets can serve as dragsites, as drop sites, or as both.
Our first example shows how to make a Qt application accept a drag initiated by another application.The Qt application is a main window with a QTextEdit as its central widget. When the user drags atext file from the desktop or from a file explorer and drops it onto the application, the applicationloads the file into the QTextEdit.
Here's the definition of the example's MainWindow class:
class MainWindow : public QMainWindow{ Q_OBJECTpublic: MainWindow();protected: void dragEnterEvent(QDragEnterEvent *event); void dropEvent(QDropEvent *event);private: bool readFile(const QString &fileName); QTextEdit *textEdit;};
The MainWindow class reimplements dragEnterEvent() and dropEvent() from QWidget. Since thepurpose of the example is to show drag and drop, much of the functionality we would expect to bein a main window class has been omitted.
MainWindow::MainWindow(){ textEdit = new QTextEdit; setCentralWidget(textEdit); textEdit->setAcceptDrops(false); setAcceptDrops(true); setWindowTitle(tr("Text Editor"));}
In the constructor, we create a QTextEdit and set it as the central widget. By default, QTextEdit

accepts textual drags from other applications, and if the user drops a file onto it, it will insert the filename into the text. Since drop events are propagated from child to parent, by disabling dropping onthe QTextEdit and enabling it on the main window, we get the drop events for the whole window inMainWindow.
void MainWindow::dragEnterEvent(QDragEnterEvent *event){
if (event->mimeData()->hasFormat("text/uri-list")) event->acceptProposedAction();}
The dragEnterEvent() is called whenever the user drags an object onto a widget. If we callacceptProposedAction() on the event, we indicate that the user can drop the drag object on thiswidget. By default, the widget wouldn't accept the drag. Qt automatically changes the cursor toindicate to the user whether or not the widget is a legitimate drop site.
Here we want the user to be allowed to drag files but nothing else. To do so, we check the MIMEtype of the drag. The MIME type text/uri-list is used to store a list of universal resource identifiers(URIs), which can be file names, URLs (such as HTTP or FTP paths), or other global resourceidentifiers. Standard MIME types are defined by the Internet Assigned Numbers Authority (IANA).They consist of a type and a subtype separated by a slash. MIME types are used by the clipboardand by the drag and drop system to identify different types of data. The official list of MIME types isavailable at http://www.iana.org/assignments/media-types/.
void MainWindow::dropEvent(QDropEvent *event){ QList<QUrl> urls = event->mimeData()->urls(); if (urls.isEmpty()) return; QString fileName = urls.first().toLocalFile(); if (fileName.isEmpty()) return; if (readFile(fileName)) setWindowTitle(tr("%1 - %2").arg(fileName) .arg(tr("Drag File")));}
The dropEvent() is called when the user drops an object onto the widget. We call QMimeData::urls()to obtain a list of QUrls. Typically, users only drag one file at a time, but it is possible for them todrag multiple files by dragging a selection. If there's more that one URL, or if the URL is not a localfile name, we return immediately.
QWidget also provides dragMoveEvent() and dragLeaveEvent(), but for most applications they don'tneed to be reimplemented.
The second example illustrates how to initiate a drag and accept a drop. We will create aQListWidget subclass that supports drag and drop, and use it as a component in the Project Chooserapplication shown in Figure 9.1.
Figure 9.1. The Project Chooser application

The Project Chooser application presents the user with two list widgets, populated with names. Eachlist widget represents a project. The user can drag and drop the names in the list widgets to move aperson from one project to another.
The drag and drop code is all located in the QListWidget subclass. Here's the class definition:
class ProjectListWidget : public QListWidget{ Q_OBJECTpublic: ProjectListWidget(QWidget *parent = 0);protected: void mousePressEvent(QMouseEvent *event); void mouseMoveEvent(QMouseEvent *event); void dragEnterEvent(QDragEnterEvent *event); void dragMoveEvent(QDragMoveEvent *event); void dropEvent(QDropEvent *event);private: void startDrag(); QPoint startPos;};
The ProjectListWidget class reimplements five event handlers declared in QWidget.
ProjectListWidget::ProjectListWidget(QWidget *parent) : QListWidget(parent){ setAcceptDrops(true);}
In the constructor, we enable drops on the list widget.
void ProjectListWidget::mousePressEvent(QMouseEvent *event){ if (event->button() == Qt::LeftButton) startPos = event->pos(); QListWidget::mousePressEvent(event);}
When the user presses the left mouse button, we store the mouse position in the startPos private

variable. We call QListWidget's implementation of mousePressEvent() to ensure that the QListWidget
has the opportunity to process mouse press events as usual.
void ProjectListWidget::mouseMoveEvent(QMouseEvent *event){ if (event->buttons() & Qt::LeftButton) { int distance = (event->pos() - startPos).manhattanLength(); if (distance >= QApplication::startDragDistance()) startDrag(); } QListWidget::mouseMoveEvent(event);}
When the user moves the mouse cursor while holding the left mouse button, we consider starting adrag. We compute the distance between the current mouse position and the position where the leftmouse button was pressed. If the distance is larger than QApplication's recommended drag startdistance (normally 4 pixels), we call the private function startDrag() to start dragging. This avoidsinitiating a drag just because the user's hand shakes.
void ProjectListWidget::startDrag(){ QListWidgetItem *item = currentItem(); if (item) { QMimeData *mimeData = new QMimeData; mimeData->setText(item->text()); QDrag *drag = new QDrag(this); drag->setMimeData(mimeData); drag->setPixmap(QPixmap(":/images/person.png")); if (drag->start(Qt::MoveAction) == Qt::MoveAction) delete item; }}
In startDrag(), we create an object of type QDrag with this as its parent. The QDrag object stores thedata in a QMimeData object. For this example, we provide the data as a text/plain string usingQMimeData::setText(). QMimeData provides several functions for handling the most common types ofdrags (images, URLs, colors, etc.) and can handle arbitrary MIME types represented as QByteArrays.The call to QDrag::setPixmap() sets the icon that follows the cursor while the drag is taking place.
The QDrag::start() call starts the dragging operation and blocks until the user drops or cancels thedrag. It takes a combination of supported "drag actions" as argument (Qt::CopyAction,Qt::MoveAction, and Qt::LinkAction) and returns the drag action that was executed (orQt::IgnoreAction if none was executed). Which action is executed depends on what the sourcewidget allows, what the target supports, and which modifier keys are pressed when the drop occurs.After the start() call, Qt takes ownership of the drag object and will delete it when it is no longerrequired.
void ProjectListWidget::dragEnterEvent(QDragEnterEvent *event){ ProjectListWidget *source = qobject_cast<ProjectListWidget *>(event->source()); if (source && source != this) { event->setDropAction(Qt::MoveAction); event->accept(); }}

The ProjectListWidget widget not only originates drags, it also accepts such drags if they come fromanother ProjectListWidget in the same application. QDragEnterEvent::source() returns a pointer tothe widget that initiated the drag if that widget is part of the same application; otherwise, it returnsa null pointer. We use qobject_cast<T>() to ensure that the drag comes from a ProjectListWidget. Ifall is correct, we tell Qt that we are ready to accept the action as a move action.
void ProjectListWidget::dragMoveEvent(QDragMoveEvent *event){ ProjectListWidget *source = qobject_cast<ProjectListWidget *>(event->source()); if (source && source != this) { event->setDropAction(Qt::MoveAction); event->accept(); }}
The code in dragMoveEvent() is identical to what we did in dragEnterEvent(). It is necessary becausewe need to override QListWidget's (actually, QAbstractItem-View's) implementation of the function.
void ProjectListWidget::dropEvent(QDropEvent *event){ ProjectListWidget *source = qobject_cast<ProjectListWidget *>(event->source()); if (source && source != this) { addItem(event->mimeData()->text()); event->setDropAction(Qt::MoveAction); event->accept(); }}
In dropEvent(), we retrieve the dragged text using QMimeData::text() and create an item with thattext. We also need to accept the event as a "move action" to tell the source widget that it can nowremove the original version of the dragged item.
Drag and drop is a powerful mechanism for transferring data between applications. But in somecases,it's possible to implement drag and drop without using Qt's drag and drop facilities. If all wewant to do is to move data within one widget in one application, we can often simply reimplementmousePressEvent() and mouseReleaseEvent().
Supporting Custom Drag TypesIn the examples so far, we have relied on QMimeData's support for common MIME types. Thus, wecalled QMimeData::setText() to create a text drag, and we used QMimeData:urls() to retrieve thecontents of a text/uri-list drag. If we want to drag plain text, HTML text, images, URLs, or colors,we can use QMimeData without formality. But if we want to drag custom data, we must choosebetween the following alternatives:
1. We can provide arbitrary data as a QByteArray using QMimeData::setData() and extract it laterusing QMimeData::data().
2. We can subclass QMimeData and reimplement formats() and retrieveData() to handle ourcustom data types.
3. For drag and drop operations within a single application, we can subclass QMimeData and storethe data using any data structure we want.
The first approach does not involve any subclassing, but does have some drawbacks: We need to

convert our data structure to a QByteArray even if the drag is not ultimately accepted, and if wewant to provide several MIME types to interact nicely with a wide range of applications, we need tostore the data several times (once per MIME type). If the data is large, this can slow down theapplication needlessly. The second and third approaches can avoid or minimize these problems.They give us complete control and can be used together.
To show how these approaches work, we will show how to add drag and drop capabilities to aQTableWidget. The drag will support the following MIME types: text/plain, text/html, and text/csv.Using the first approach, starting a drag looks like this:
void MyTableWidget::mouseMoveEvent(QMouseEvent *event){ if (event->buttons() & Qt::LeftButton) { int distance = (event->pos() - startPos).manhattanLength(); if (distance >= QApplication::startDragDistance()) startDrag(); } QTableWidget::mouseMoveEvent(event);}void MyTableWidget::startDrag(){ QString plainText = selectionAsPlainText(); if (plainText.isEmpty()) return; QMimeData *mimeData = new QMimeData; mimeData->setText(plainText); mimeData->setHtml(toHtml(plainText)); mimeData->setData("text/csv", toCsv(plainText).toUtf8()); QDrag *drag = new QDrag(this); drag->setMimeData(mimeData); if (drag->start(Qt::CopyAction | Qt::MoveAction) == Qt::MoveAction) deleteSelection();}
The startDrag() private function is called from mouseMoveEvent() to start dragging a rectangularselection. We set the text/plain and text/html MIME types using setText() and setHtml(), and weset the text/csv type using set-Data(), which takes an arbitrary MIME type and a QByteArray. Thecode for the selectionAsString() is more or less the same as the Spreadsheet::copy() function fromChapter 4 (p. 83).
QString MyTableWidget::toCsv(const QString &plainText){ QString result = plainText; result.replace("\\", "\\\\"); result.replace("\"", "\\\""); result.replace("\t", "\", \""); result.replace("\n", "\"\n\""); result.prepend("\""); result.append("\""); return result;}QString MyTableWidget::toHtml(const QString &plainText){ QString result = Qt::escape(plainText); result.replace("\t", "<td>");
result.replace("\n", "\n<tr><td>"); result.prepend("<table>\n<tr><td>"); result.append("\n</table>"); return result;}

The toCsv() and toHtml() functions convert a "tabs and newlines" string into a CSV (comma-separated values) or an HTML string. For example, the data
Red Green BlueCyan Yellow Magenta
is converted to
"Red", "Green", "Blue""Cyan", "Yellow", "Magenta"
or to
<table><tr><td>Red<td>Green<td>Blue<tr><td>Cyan<td>Yellow<td>Magenta</table>
The conversion is performed in the simplest way possible, using QString::replace(). To escapeHTML special characters, we use Qt::escape().
void MyTableWidget::dropEvent(QDropEvent *event){ if (event->mimeData()->hasFormat("text/csv")) { QByteArray csvData = event->mimeData()->data("text/csv"); QString csvText = QString::fromUtf8(csvData); ... event->acceptProposedAction(); } else if (event->mimeData()->hasFormat("text/plain")) { QString plainText = event->mimeData()->text(); ... event->acceptProposedAction(); }}
Although we provide the data in three different formats, we only accept two of them in dropEvent().If the user drags cells from a QTableWidget to an HTML editor, we want the cells to be converted intoan HTML table. But if the user drags arbitrary HTML into a QTableWidget, we don't want to accept it.
To make this example work, we also need to call setAcceptDrops(true) andsetSelectionMode(ContiguousSelection) in the MyTableWidget constructor.
We will now redo the example, but this time we will subclass QMimeData to postpone or avoid the(potentially expensive) conversions between QTableWidget-Items and QByteArray. Here's thedefinition of our subclass:
class TableMimeData : public QMimeData{ Q_OBJECTpublic:

TableMimeData(const QTableWidget *tableWidget, const QTableWidgetSelectionRange &range); const QTableWidget *tableWidget() const { return myTableWidget; } QTableWidgetSelectionRange range() const { return myRange; } QStringList formats() const;protected: QVariant retrieveData(const QString &format, QVariant::Type preferredType) const;private: static QString toHtml(const QString &plainText); static QString toCsv(const QString &plainText); QString text(int row, int column) const; QString rangeAsPlainText() const; const QTableWidget *myTableWidget; QTableWidgetSelectionRange myRange; QStringList myFormats;};
Instead of storing actual data, we store a QTableWidgetSelectionRange that spec-ifies which cells arebeing dragged and keep a pointer to the QTableWidget. The formats() and retrieveData() functionsare reimplemented from QMimeData.
TableMimeData::TableMimeData(const QTableWidget *tableWidget, const QTableWidgetSelectionRange &range){ myTableWidget = tableWidget; myRange = range; myFormats << "text/csv" << "text/html" << "text/plain";}
In the constructor, we initialize the private variables.
QStringList TableMimeData::formats() const{ return myFormats;}
The formats() function returns a list of MIME types provided by the MIME data object. The preciseorder of the formats is usually irrelevant, but it's good practice to put the "best" formats first.Applications that support many formats will sometimes use the first one that matches.
QVariant TableMimeData::retrieveData(const QString &format, QVariant::Type preferredType) const{ if (format == "text/plain") { return rangeAsPlainText(); } else if (format == "text/csv") { return toCsv(rangeAsPlainText()); } else if (format == "text/html") { return toHtml(rangeAsPlainText()); } else { return QMimeData::retrieveData(format, preferredType); }}
The retrieveData() function returns the data for a given MIME type as a QVariant. The value of the

format parameter is normally one of the strings returned by formats(), but we cannot assume that,since not all applications check the MIME type against formats(). The getter functions text(),html(), urls(), image-Data(), colorData(), and data() provided by QMimeData are implemented interms of retrieveData().
The preferredType parameter gives us a hint about which type we should put in the QVariant. Here,we ignore it and trust QMimeData to convert the return value into the desired type, if necessary.
void MyTableWidget::dropEvent(QDropEvent *event){ const TableMimeData *tableData = qobject_cast<const TableMimeData *>(event->mimeData()); if (tableData) { const QTableWidget *otherTable = tableData->tableWidget(); QTableWidgetSelectionRange otherRange = tableData->range(); ... event->acceptProposedAction(); } else if (event->mimeData()->hasFormat("text/csv")) { QByteArray csvData = event->mimeData()->data("text/csv"); QString csvText = QString::fromUtf8(csvData); ... event->acceptProposedAction(); } else if (event->mimeData()->hasFormat("text/plain")) { QString plainText = event->mimeData()->text(); ... event->acceptProposedAction(); } QTableWidget::mouseMoveEvent(event);}
The dropEvent() function is similar to the one we had earlier in this section, but this time weoptimize it by checking first if we can safely cast the QMimeData object to a TableMimeData. If theqobject_cast<T>() works, this means the drag was originated by a MyTableWidget in the sameapplication, and we can directly access the table data instead of going through QMimeData's API. Ifthe cast fails, we extract the data the standard way.
In this example, we encoded the CSV text using the UTF-8 encoding. If we want to be certain ofusing the right encoding, we could use the charset parameter of the text/plain MIME type tospecify an explicit encoding. Here are a few examples:
text/plain;charset=US-ASCIItext/plain;charset=ISO-8859-1text/plain;charset=Shift_JIStext/plain;charset=UTF-8
Clipboard HandlingMost applications make use of Qt's built-in clipboard handling in one way or another. For example,the QTextEdit class provides cut(), copy(), and paste() slots as well as keyboard shortcuts, so littleor no additional code is required.
When writing our own classes, we can access the clipboard through QApplication::clipboard(),which returns a pointer to the application's QClipboard object. Handling the system clipboard iseasy: Call setText(), setImage(), or setPixmap() to put data onto the clipboard, and call text(),image(), or pixmap() to retrieve data from the clipboard. We have already seen examples of

clipboard use in the Spreadsheet application from Chapter 4.
For some applications, the built-in functionality might not be sufficient. For example, we might wantto provide data that isn't just text or an image, or we might want to provide data in many differentformats for maximum interoperability with other applications. The issue is very similar to what weencountered earlier with drag and drop, and the answer is also similar: We can subclass QMimeData
and reimplement a few virtual functions.
If our application supports drag and drop through a custom QMimeData subclass, we can simply reusethe QMimeData subclass and put it on the clipboard using the setMimeData() function. To retrieve thedata, we can call mimeData() on the clipboard.
On X11, it is usually possible to paste a selection by clicking the middle button of a three-buttonmouse. This is done using a separate "selection" clipboard. If you want your widgets to support thiskind of clipboard as well as the standard one, you must pass QClipboard::Selection as an additionalargument to the various clipboard calls. For example, here's how we would reimplementmouseReleaseEvent() in a text editor to support pasting using the middle mouse button:
void MyTextEditor::mouseReleaseEvent(QMouseEvent *event){ QClipboard *clipboard = QApplication::clipboard(); if (event->button() == Qt::MidButton && clipboard->supportsSelection()) { QString text = clipboard->text(QClipboard::Selection); pasteText(text); }}
On X11, the supportsSelection() function returns true. On other platforms, it returns false.
If we want to be notified whenever the clipboard's contents change, we can connect theQClipboard::dataChanged() signal to a custom slot.

Chapter 10. Item View Classes Using the Item View Convenience Classes Using Predefined Models Implementing Custom Models Implementing Custom Delegates
Many applications let the user search, view, and edit individual items that belong to a data set. Thedata might be held in files or accessed from a database or a network server. The standard approachto dealing with data sets like this is to use Qt's item view classes.
In earlier versions of Qt, the item view widgets were populated with the entire contents of a dataset; the users would perform all their searches and edits on the data held in the widget, and atsome point the changes would be written back to the data source. Although simple to understandand use, this approach doesn't scale well to very large data sets and doesn't lend itself to situationswhere we want to display the same data set in two or more different widgets.
The Smalltalk language popularized a flexible approach to visualizing large data sets:modelviewcontroller (MVC). In the MVC approach, the model represents the data set and isresponsible for fetching the data that is needed for viewing and for writing back any changes. Eachtype of data set has its own model, but the API that the models provide to the views is uniform nomatter what the underlying data set. The view presents the data to the user. With any large dataset only a limited amount of data will be visible at any one time, so that is the only data that theview asks for. The controller mediates between the user and the view, converting user actions intorequests to navigate or edit data, which the view then transmits to the model as necessary.
Figure 10.1. Qt's model/view architecture
Qt provides a model/view architecture inspired by the MVC approach. In Qt, the model behaves thesame as it does for classic MVC. But instead of a controller, Qt uses a slightly different abstraction:the delegate. The delegate is used to provide fine control over how items are rendered and edited.Qt provides a default delegate for every type of view. This is sufficient for most applications, so weusually don't need to care about it.
Using Qt's model/view architecture, we can use models that only fetch the data that is actuallyneeded for display in the view. This makes handling very large data sets much faster and lessmemory hungry than reading all the data. And by registering a model with two or more views, wecan give the user the opportunity of viewing and interacting with the data in different ways, withlittle overhead. Qt automatically keeps multiple views in sync, reflecting changes to one in all theothers. An additional benefit of the model/view architecture is that if we decide to change how theunderlying data set is stored, we just need to change the model; the views will continue to behavecorrectly.
Figure 10.2. One model can serve multiple views

In many situations, we only need to present relatively small numbers of items to the user. In thesecommon cases, we can use Qt's convenience item view classes (QListWidget, QTableWidget, andQTReeWidget) and populate them with items directly. These classes behave in a similar way to theitem view classes provided by earlier versions of Qt. They store their data in "items" (for example, aQTableWidget contains QTableWidgetItems). Internally, the convenience classes use custom modelsthat make the items visible to the views.
For large data sets, duplicating the data is often not an option. In these cases, we can use Qt'sviews (QListView, QTableView, and QtreeView), in conjunction with a data model, which can be acustom model or one of Qt's predefined models. For example, if the data set is held in a database,we can combine a QTableView with a QSqlTableModel.
Using the Item View Convenience ClassesUsing Qt's item view convenience subclasses is usually simpler than defining a custom model and isappropriate when we don't need the benefits of separating the model and the view. We used thistechnique in Chapter 4 when we subclassed QTableWidget and QTableWidgetItem to implementspreadsheet functionality.
In this section, we will show how to use the convenience item view subclasses to display items. Thefirst example shows a read-only QListWidget, the second example shows an editable QTableWidget,and the third example shows a read-only QtreeWidget.
We begin with a simple dialog that lets the user pick a flowchart symbol from a list. Each itemconsists of an icon, a text, and a unique ID.
Figure 10.3. The Flowchart Symbol Picker application

Let's start with an extract from the dialog's header file:
class FlowChartSymbolPicker : public QDialog{ Q_OBJECTpublic:
FlowChartSymbolPicker(const QMap<int, QString> &symbolMap, QWidget *parent = 0); int selectedId() const { return id; } void done(int result); ...};
When we construct the dialog, we must pass it a QMap<int, QString>, and after it has executed wecan retrieve the chosen ID (or -1 if the user didn't select any item) by calling selectedId().
FlowChartSymbolPicker::FlowChartSymbolPicker( const QMap<int, QString> &symbolMap, QWidget *parent) : QDialog(parent){ id = -1; listWidget = new QListWidget; listWidget->setIconSize(QSize(60, 60)); QMapIterator<int, QString> i(symbolMap); while (i.hasNext()) { i.next(); QListWidgetItem *item = new QListWidgetItem(i.value(),
listWidget); item->setIcon(iconForSymbol(i.value())); item->setData(Qt::UserRole, i.key()); } ...}
We initialize id (the last selected ID) to -1. Next we construct a QListWidget, a convenience itemview widget. We iterate over each item in the flowchart symbol map and create a QListWidgetItem torepresent each one. The QListWidget-Item constructor takes a QString that represents the text todisplay, followed by the parent QListWidget.
Then we set the item's icon and we call setData() to store our arbitrary ID in the QListWidgetItem.The iconForSymbol() private function returns a QIcon for a given symbol name.
QListWidgetItem's have several roles, each of which has an associated QVariant. The most commonroles are Qt::DisplayRole, Qt::EditRole, and Qt::IconRole, and for these there are conveniencesetter and getter functions (setText(), setIcon()), but there are several other roles. We can alsodefine custom roles by specifying a numeric value of Qt::UserRole or higher. In our example, we useQt::UserRole to store each item's ID.
The omitted part of the constructor is concerned with creating the buttons, laying out the widgets,and setting the window's title.
void FlowChartSymbolPicker::done(int result){ id = -1; if (result == QDialog::Accepted) { QListWidgetItem *item = listWidget->currentItem();

if (item) id = item->data(Qt::UserRole).toInt(); } QDialog::done(result);}
The done() function is reimplemented from QDialog. It is called when the user presses OK or Cancel.If the user clicked OK, we retrieve the relevant item and extract the ID using the data() function. Ifwe were interested in the item's text, we could retrieve it by calling item-
>data(Qt::DisplayRole).toString() or more conveniently, item->text().
By default, QListWidget is read-only. If we wanted the user to edit the items, we could set the view'sedit triggers using QAbstractItemView::setEditTriggers(); for example, a setting ofQAbstractItemView::AnyKeyPressed means that the user can begin editing an item just by starting totype. Alternatively, we could provide an Edit button (and perhaps Add and Delete buttons) andconnect them to slots so that we could handle the editing operations programmatically.
Now that we have seen how to use a convenience item view class for viewing and selecting data, wewill look at an example where we can edit data. Again we are using a dialog, this time one thatpresents a set of (x, y) coordinates that the user can edit.
Figure 10.4. The Coordinate Setter application
As with the previous example, we will focus on the item view relevant code, starting with theconstructor.
CoordinateSetter::CoordinateSetter(QList<QPointF> *coords, QWidget *parent) : QDialog(parent){ coordinates = coords; tableWidget = new QTableWidget(0, 2); tableWidget->setHorizontalHeaderLabels(
QStringList() << tr("X") << tr("Y")); for (int row = 0; row < coordinates->count(); ++row) { QPointF point = coordinates->at(row); addRow(); tableWidget->item(row, 0)->setText(QString::number(point.x()));

tableWidget->item(row, 1)->setText(QString::number(point.y())); } ...}
The QTableWidget constructor takes the initial number of table rows and columns to display. Everyitem in a QTableWidget is represented by a QTableWidgetItem, including horizontal and vertical headeritems. The setHorizontalHeaderLabels() function sets the text for each horizontal table widget itemto the corresponding text in the string list it is passed. By default, QTableWidget provides a verticalheader with rows labeled from 1, which is exactly what we want, so we don't need to set the verticalheader labels manually.
Once we have created and centered the column labels, we iterate through the coordinate data thatwas passed in. For every (x, y) pair, we create two QTableWidgetItems corresponding to the x and ycoordinates. The items are added to the table using QTableWidget::setItem(), which takes a row anda column in addition to the item.
By default, QTableWidget allows editing. The user can edit any cell in the table by navigating to it andthen either pressing F2 or simply by typing. All changes made by the user in the view will beautomatically reflected into the QTableWidgetItems. To prevent editing, we can callsetEditTriggers(QAbstractItemView:: NoEditTriggers).
void CoordinateSetter::addRow(){ int row = tableWidget->rowCount(); tableWidget->insertRow(row); QTableWidgetItem *item0 = new QTableWidgetItem; item0->setTextAlignment(Qt::AlignRight | Qt::AlignVCenter); tableWidget->setItem(row, 0, item0); QTableWidgetItem *item1 = new QTableWidgetItem; item1->setTextAlignment(Qt::AlignRight | Qt::AlignVCenter); tableWidget->setItem(row, 1, item1); tableWidget->setCurrentItem(item0);}
The addRow() slot is invoked when the user clicks the Add Row button. We append a new row usinginsertRow(). If the user attempts to edit a cell in the new row, the QTableWidget will automaticallycreate a new QTableWidgetItem.
void CoordinateSetter::done(int result){ if (result == QDialog::Accepted) { coordinates->clear(); for (int row = 0; row < tableWidget->rowCount(); ++row) { double x = tableWidget->item(row, 0)->text().toDouble(); double y = tableWidget->item(row, 1)->text().toDouble(); coordinates->append(QPointF(x, y)); } } QDialog::done(result);}
Finally, when the user clicks OK, we clear the coordinates that were passed in to the dialog, andcreate a new set based on the coordinates in the QTableWidget's items.
For our third and final example of Qt's convenience item view widgets, we will look at some snippets

from an application that shows Qt application settings using a QTReeWidget. Read-only is the defaultfor QtreeWidget.
Figure 10.5. The Settings Viewer application
Here's an extract from the constructor:
SettingsViewer::SettingsViewer(QWidget *parent) : QDialog(parent){ organization = "Trolltech"; application = "Designer"; treeWidget = new QTreeWidget; treeWidget->setColumnCount(2); treeWidget->setHeaderLabels( QStringList() << tr("Key") << tr("Value")); treeWidget->header()->setResizeMode(0, QHeaderView::Stretch); treeWidget->header()->setResizeMode(1, QHeaderView::Stretch); ... setWindowTitle(tr("Settings Viewer")); readSettings();}
To access an application's settings, a QSettings object must be created with the organization's nameand the application's name as parameters. We set default names ("Designer" by "Trolltech") andthen construct a new QtreeWidget. At the end, we call the readSettings() function.
void SettingsViewer::readSettings(){ QSettings settings(organization, application); treeWidget->clear(); addChildSettings(settings, 0, ""); treeWidget->sortByColumn(0); treeWidget->setFocus(); setWindowTitle(tr("Settings Viewer - %1 by %2") .arg(application).arg(organization));}
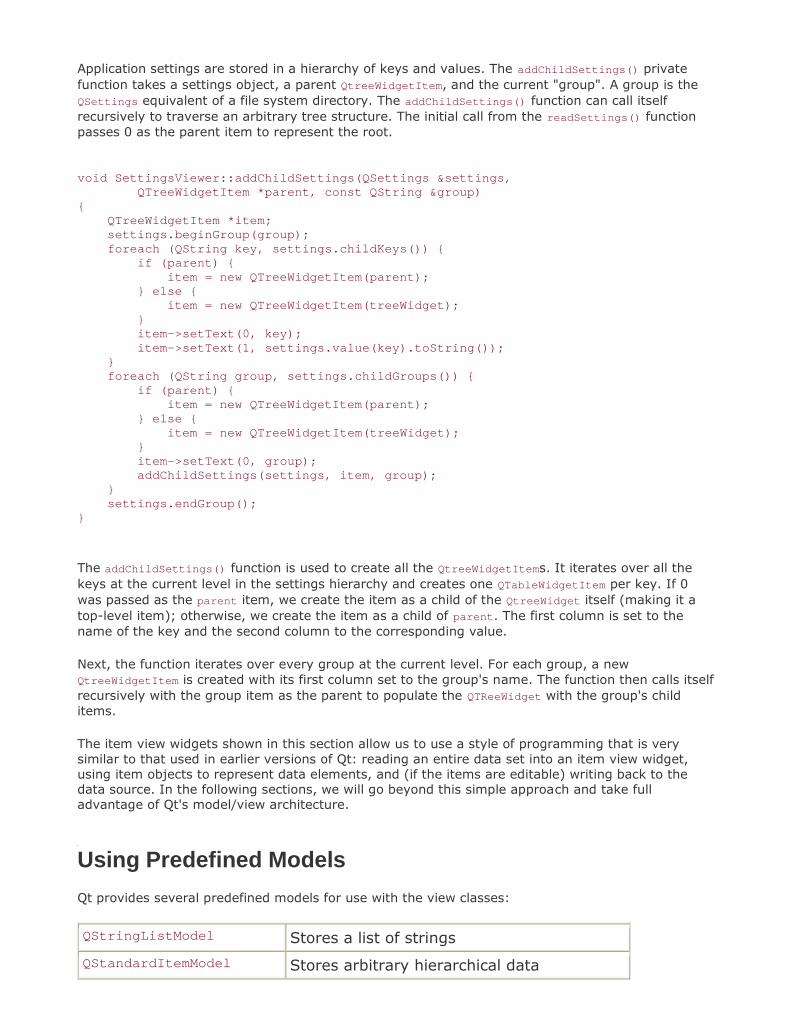
Application settings are stored in a hierarchy of keys and values. The addChildSettings() privatefunction takes a settings object, a parent QtreeWidgetItem, and the current "group". A group is theQSettings equivalent of a file system directory. The addChildSettings() function can call itselfrecursively to traverse an arbitrary tree structure. The initial call from the readSettings() functionpasses 0 as the parent item to represent the root.
void SettingsViewer::addChildSettings(QSettings &settings, QTreeWidgetItem *parent, const QString &group){ QTreeWidgetItem *item; settings.beginGroup(group); foreach (QString key, settings.childKeys()) { if (parent) { item = new QTreeWidgetItem(parent); } else { item = new QTreeWidgetItem(treeWidget); } item->setText(0, key); item->setText(1, settings.value(key).toString()); } foreach (QString group, settings.childGroups()) { if (parent) { item = new QTreeWidgetItem(parent); } else { item = new QTreeWidgetItem(treeWidget); } item->setText(0, group); addChildSettings(settings, item, group); } settings.endGroup();}
The addChildSettings() function is used to create all the QtreeWidgetItems. It iterates over all thekeys at the current level in the settings hierarchy and creates one QTableWidgetItem per key. If 0was passed as the parent item, we create the item as a child of the QtreeWidget itself (making it atop-level item); otherwise, we create the item as a child of parent. The first column is set to thename of the key and the second column to the corresponding value.
Next, the function iterates over every group at the current level. For each group, a newQtreeWidgetItem is created with its first column set to the group's name. The function then calls itselfrecursively with the group item as the parent to populate the QTReeWidget with the group's childitems.
The item view widgets shown in this section allow us to use a style of programming that is verysimilar to that used in earlier versions of Qt: reading an entire data set into an item view widget,using item objects to represent data elements, and (if the items are editable) writing back to thedata source. In the following sections, we will go beyond this simple approach and take fulladvantage of Qt's model/view architecture.
Using Predefined ModelsQt provides several predefined models for use with the view classes:
QStringListModel Stores a list of strings
QStandardItemModel Stores arbitrary hierarchical data

QDirModel Encapsulates the local file system
QSqlQueryModel Encapsulates an SQL result set
QSqlTableModel Encapsulates an SQL table
QSqlRelationalTableModel Encapsulates an SQL table with foreign keys
QSortFilterProxyModel Sorts and/or filters another model
In this section, we will look at how to use the QStringListModel, the QDirModel, and theQSortFilterProxyModel. The SQL models are covered in Chapter 13.
Let's begin with a simple dialog that users can use to add, delete, and edit a QStringList, whereeach string represents a team leader.
Figure 10.6. The Team Leaders application
Here's the relevant extract from the constructor:
TeamLeadersDialog::TeamLeadersDialog(const QStringList &leaders, QWidget *parent) : QDialog(parent){ model = new QStringListModel(this); model->setStringList(leaders); listView = new QListView; listView->setModel(model); listView->setEditTriggers(QAbstractItemView::AnyKeyPressed | QAbstractItemView::DoubleClicked); ...}
We begin by creating and populating a QStringListModel. Next we create a QListView and set itsmodel to the one we have just created. We also set some editing triggers to allow the user to edit astring simply by starting to type on it or by double-clicking it. By default, no editing triggers are seton a QListView, making the view effectively read-only.

void TeamLeadersDialog::insert(){ int row = listView->currentIndex().row(); model->insertRows(row, 1); QModelIndex index = model->index(row); listView->setCurrentIndex(index); listView->edit(index);}
When the user clicks the Insert button, the insert() slot is invoked. The slot begins by retrieving therow number for the list view's current item. Every data item in a model has a corresponding "modelindex", which is represented by a QModelIndex object. We will look at model indexes in detail in thenext section, but for now it is sufficient to know that an index has three main components: a row, acolumn, and a pointer to the model to which it belongs. For a one-dimensional list model, thecolumn is always 0.
Once we have the row number, we insert one new row at that position. The insertion is performedon the model, and the model automatically updates the list view. We then set the list view's currentindex to the blank row we just inserted. Finally, we set the list view to editing mode on the new row,just as if the user had pressed a key or double-clicked to initiate editing.
void TeamLeadersDialog::del(){ model->removeRows(listView->currentIndex().row(), 1);}
In the constructor, the Delete button's clicked() signal is connected to the del() slot. Since we arejust deleting the current row, we can call removeRows() with the current index position and a rowcount of 1. Just like with insertion, we rely on the model to update the view accordingly.
QStringList TeamLeadersDialog::leaders() const{ return model->stringList();}
Finally, the leaders() function provides a means of reading back the edited strings when the dialogis closed.
TeamLeadersDialog could be made into a generic string list editing dialog simply by parameterizing itswindow title. Another generic dialog that is often required is one that presents a list of files ordirectories to the user. The next example uses the QDirModel class, which encapsulates thecomputer's file system and is capable of showing (and hiding) various file attributes. This model canapply a filter to restrict the kinds of file system entries that are shown and can order the entries invarious ways.
Figure 10.7. The Directory Viewer application
[View full size image]

We will begin by looking at the creation and setting up of the model and the view in the DirectoryViewer dialog's constructor.
DirectoryViewer::DirectoryViewer(QWidget *parent) : QDialog(parent){ model = new QDirModel; model->setReadOnly(false); model->setSorting(QDir::DirsFirst | QDir::IgnoreCase | QDir::Name); treeView = new QTreeView; treeView->setModel(model); treeView->header()->setStretchLastSection(true); treeView->header()->setSortIndicator(0, Qt::AscendingOrder); treeView->header()->setSortIndicatorShown(true); treeView->header()->setClickable(true); QModelIndex index = model->index(QDir::currentPath()); treeView->expand(index); treeView->scrollTo(index); treeView->resizeColumnToContents(0); ...}
Once the model has been constructed, we make it editable and set various initial sort orderingattributes. We then create the QtreeView that will display the model's data. The QtreeView's headercan be used to provide user-controlled sorting. By making the header clickable, the user can sort bywhichever column header they click, with repeated clicks alternating between ascending anddescending orders. Once the tree view's header has been set up, we get the model index of thecurrent directory and make sure that this directory is visible by expanding its parents if necessaryusing expand(), and scrolling to it using scrollTo(). Then we make sure that the first column is wideenough to show all its entries without using ellipses (…).
In the part of the constructor code that isn't shown here, we connected the Create Directory andRemove buttons to slots to perform these actions. We do not need a Rename button since users canrename in-place by pressing F2 and typing.
void DirectoryViewer::createDirectory(){ QModelIndex index = treeView->currentIndex(); if (!index.isValid()) return; QString dirName = QInputDialog::getText(this,

tr("Create Directory"), tr("Directory name")); if (!dirName.isEmpty()) { if (!model->mkdir(index, dirName).isValid()) QMessageBox::information(this, tr("Create Directory"), tr("Failed to create the directory")); }}
If the user enters a directory name in the input dialog, we attempt to create a directory with thisname as a child of the current directory. The QDirModel::mkdir() function takes the parentdirectory's index and the name of the new directory, and returns the model index of the directory itcreated. If the operation fails, it returns an invalid model index.
void DirectoryViewer::remove(){ QModelIndex index = treeView->currentIndex(); if (!index.isValid()) return; bool ok; if (model->fileInfo(index).isDir()) { ok = model->rmdir(index); } else { ok = model->remove(index); } if (!ok) QMessageBox::information(this, tr("Remove"), tr("Failed to remove %1").arg(model->fileName(index)));}
If the user clicks Remove, we attempt to remove the file or directory associated with the currentitem. We could use QDir to accomplish that, but QDirModel offers convenience functions that work onQModelIndexes.
The last example in this section shows how to use QSortFilterProxyModel. Unlike the otherpredefined models, this model encapsulates an existing model and manipulates the data that passesbetween the underlying model and the view. In our example, the underlying model is aQStringListModel initialized with the list of color names recognized by Qt (obtained throughQColor::colorNames()). The user can type a filter string in a QLineEdit and specify how this string isto be interpreted (as a regular expression, a wildcard pattern, or a fixed string) using a combobox.
Figure 10.8. The Color Names application

Here's an extract from the ColorNamesDialog constructor:
ColorNamesDialog::ColorNamesDialog(QWidget *parent) : QDialog(parent){ sourceModel = new QStringListModel(this); sourceModel->setStringList(QColor::colorNames()); proxyModel = new QSortFilterProxyModel(this); proxyModel->setSourceModel(sourceModel); proxyModel->setFilterKeyColumn(0); listView = new QListView; listView->setModel(proxyModel); ...
syntaxComboBox = new QComboBox; syntaxComboBox->addItem(tr("Regular expression"), QRegExp::RegExp); syntaxComboBox->addItem(tr("Wildcard"), QRegExp::Wildcard); syntaxComboBox->addItem(tr("Fixed string"), QRegExp::FixedString); ...}
The QStringListModel is created and populated in the usual way. This is followed by the constructionof the QSortFilterProxyModel. We pass the underlying model using setSourceModel() and tell theproxy to filter based on column 0 of the original model. The QComboBox::addItem() function acceptsan optional "data" argument of type QVariant; we use this to store the QRegExp::PatternSyntax valuethat corresponds to each item's text.
void ColorNamesDialog::reapplyFilter(){ QRegExp::PatternSyntax syntax =
QRegExp::PatternSyntax(syntaxComboBox->itemData( syntaxComboBox->currentIndex()).toInt()); QRegExp regExp(filterLineEdit->text(), Qt::CaseInsensitive, syntax); proxyModel->setFilterRegExp(regExp);}
The reapplyFilter() slot is invoked whenever the user changes the filter string or the pattern syntaxcombobox. We create a QRegExp using the text in the line edit. Then we set its pattern syntax to theone stored in the syntax combobox's current item's data. When we call setFilterRegExp(), the new
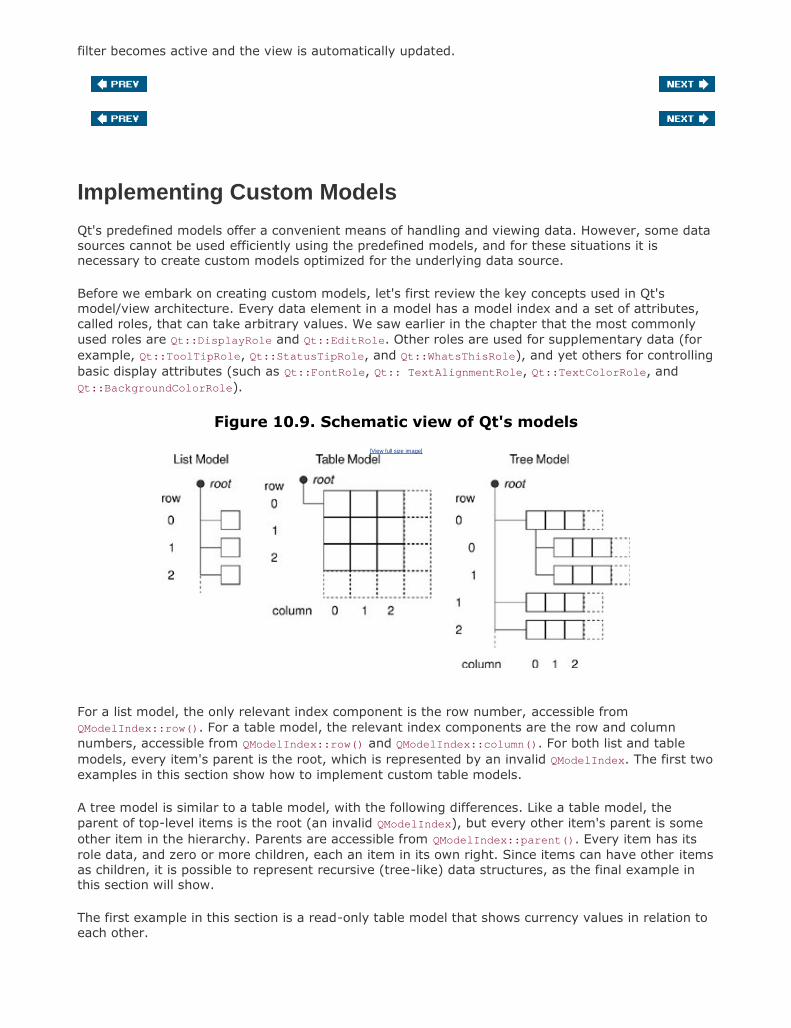
filter becomes active and the view is automatically updated.
Implementing Custom ModelsQt's predefined models offer a convenient means of handling and viewing data. However, some datasources cannot be used efficiently using the predefined models, and for these situations it isnecessary to create custom models optimized for the underlying data source.
Before we embark on creating custom models, let's first review the key concepts used in Qt'smodel/view architecture. Every data element in a model has a model index and a set of attributes,called roles, that can take arbitrary values. We saw earlier in the chapter that the most commonlyused roles are Qt::DisplayRole and Qt::EditRole. Other roles are used for supplementary data (forexample, Qt::ToolTipRole, Qt::StatusTipRole, and Qt::WhatsThisRole), and yet others for controllingbasic display attributes (such as Qt::FontRole, Qt:: TextAlignmentRole, Qt::TextColorRole, andQt::BackgroundColorRole).
Figure 10.9. Schematic view of Qt's models
[View full size image]
For a list model, the only relevant index component is the row number, accessible fromQModelIndex::row(). For a table model, the relevant index components are the row and columnnumbers, accessible from QModelIndex::row() and QModelIndex::column(). For both list and tablemodels, every item's parent is the root, which is represented by an invalid QModelIndex. The first twoexamples in this section show how to implement custom table models.
A tree model is similar to a table model, with the following differences. Like a table model, theparent of top-level items is the root (an invalid QModelIndex), but every other item's parent is someother item in the hierarchy. Parents are accessible from QModelIndex::parent(). Every item has itsrole data, and zero or more children, each an item in its own right. Since items can have other itemsas children, it is possible to represent recursive (tree-like) data structures, as the final example inthis section will show.
The first example in this section is a read-only table model that shows currency values in relation toeach other.

Figure 10.10. The Currencies application
[View full size image]
The application could be implemented using a simple table, but we want to use a custom model totake advantage of certain properties of the data to minimize storage. If we were to store the 162currently traded currencies in a table, we would need to store 162 x 162 = 26 244 values; with thecustom model presented below, we only need to store 162 values (the value of each currency inrelation to the U.S. dollar).
The CurrencyModel class will be used with a standard QTableView. The Currency-Model is populatedwith a QMap<QString,double>; each key is a currency code and each value is the value of thecurrency in U.S. dollars. Here's a code snippet that shows how the map is populated and how themodel is used:
QMap<QString, double> currencyMap;currencyMap.insert("AUD", 1.3259);currencyMap.insert("CHF", 1.2970);...currencyMap.insert("SGD", 1.6901);currencyMap.insert("USD", 1.0000);CurrencyModel currencyModel;currencyModel.setCurrencyMap(currencyMap);QTableView tableView;tableView.setModel(¤cyModel);tableView.setAlternatingRowColors(true);
Now we can look at the implementation of the model, starting with its header:
class CurrencyModel : public QAbstractTableModel{public: CurrencyModel(QObject *parent = 0); void setCurrencyMap(const QMap<QString, double> &map); int rowCount(const QModelIndex &parent) const; int columnCount(const QModelIndex &parent) const; QVariant data(const QModelIndex &index, int role) const; QVariant headerData(int section, Qt::Orientation orientation, int role) const;private: QString currencyAt(int offset) const; QMap<QString, double> currencyMap;};
We have chosen to subclass QAbstractTableModel for our model since that most closely matches our
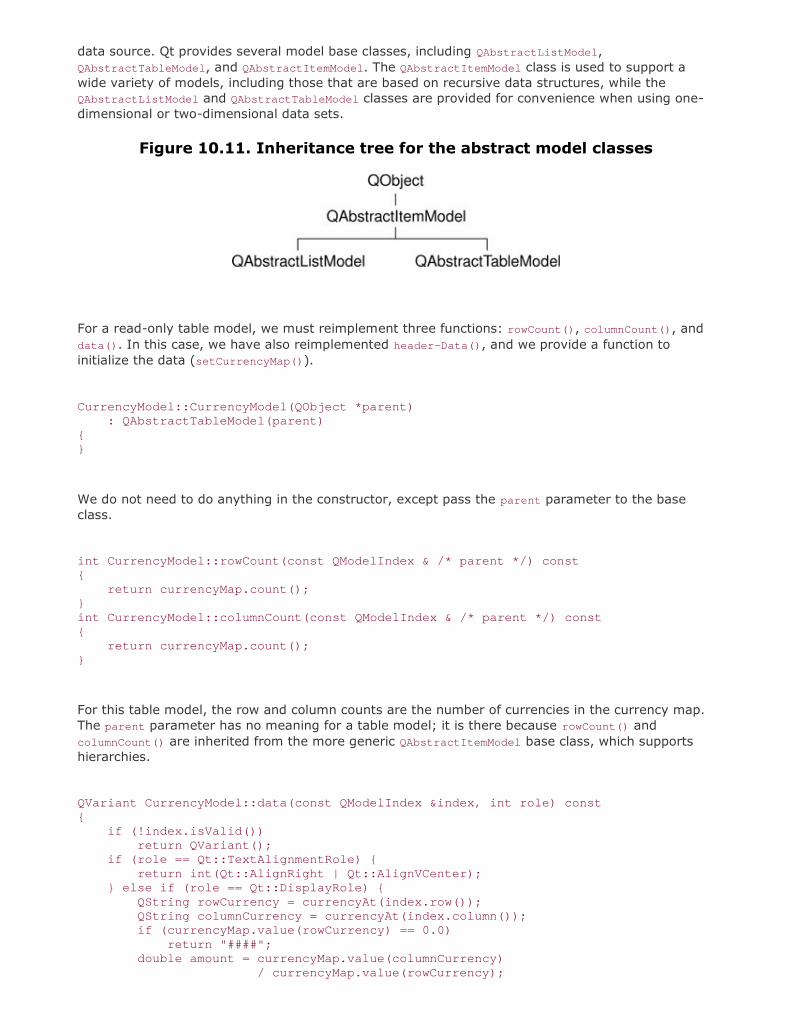
data source. Qt provides several model base classes, including QAbstractListModel,QAbstractTableModel, and QAbstractItemModel. The QAbstractItemModel class is used to support awide variety of models, including those that are based on recursive data structures, while theQAbstractListModel and QAbstractTableModel classes are provided for convenience when using one-dimensional or two-dimensional data sets.
Figure 10.11. Inheritance tree for the abstract model classes
For a read-only table model, we must reimplement three functions: rowCount(), columnCount(), anddata(). In this case, we have also reimplemented header-Data(), and we provide a function toinitialize the data (setCurrencyMap()).
CurrencyModel::CurrencyModel(QObject *parent) : QAbstractTableModel(parent){}
We do not need to do anything in the constructor, except pass the parent parameter to the baseclass.
int CurrencyModel::rowCount(const QModelIndex & /* parent */) const{ return currencyMap.count();}int CurrencyModel::columnCount(const QModelIndex & /* parent */) const{ return currencyMap.count();}
For this table model, the row and column counts are the number of currencies in the currency map.The parent parameter has no meaning for a table model; it is there because rowCount() andcolumnCount() are inherited from the more generic QAbstractItemModel base class, which supportshierarchies.
QVariant CurrencyModel::data(const QModelIndex &index, int role) const{ if (!index.isValid()) return QVariant(); if (role == Qt::TextAlignmentRole) { return int(Qt::AlignRight | Qt::AlignVCenter); } else if (role == Qt::DisplayRole) { QString rowCurrency = currencyAt(index.row()); QString columnCurrency = currencyAt(index.column()); if (currencyMap.value(rowCurrency) == 0.0) return "####"; double amount = currencyMap.value(columnCurrency) / currencyMap.value(rowCurrency);

return QString("%1").arg(amount, 0, 'f', 4); } return QVariant();}
The data() function returns the value of any of an item's roles. The item is specified as aQModelIndex. For a table model, the interesting components of a QModelIndex are its row and columnnumber, available using row() and column().
If the role is Qt::TextAlignmentRole, we return an alignment suitable for numbers. If the display roleis Qt::DisplayRole, we look up the value for each currency and calculate the exchange rate.
We could return the calculated value as a double, but then we would have no control over how manydecimal places were shown (unless we use a custom delegate). Instead, we return the value as astring, formatted as we want.
QVariant CurrencyModel::headerData(int section, Qt::Orientation /* orientation */, int role) const{ if (role != Qt::DisplayRole) return QVariant(); return currencyAt(section);}
The headerData() function is called by the view to populate its horizontal and vertical headers. Thesection parameter is the row or column number (depending on the orientation). Since the rows andcolumns have the same currency codes, we do not care about the orientation and simply return thecode of the currency for the given section number.
void CurrencyModel::setCurrencyMap(const QMap<QString, double> &map){ currencyMap = map; reset();}
The caller can change the currency map using setCurrencyMap(). The QAbstractItemModel::reset()
call tells any views that are using the model that all their data is invalid; this forces them to requestfresh data for the items that are visible.
QString CurrencyModel::currencyAt(int offset) const{ return (currencyMap.begin() + offset).key();}
The currencyAt() function returns the key (the currency code) at the given offset in the currencymap. We use an STL-style iterator to find the item and call key() on it.
As we have just seen, it is not difficult to create read-only models, and depending on the nature ofthe underlying data, there are potential savings in memory and speed with a well-designed model.The next example, the Cities application, is also table-based, but this time all the data is entered bythe user.
This application is used to store values indicating the distance between any two cities. Like the

previous example, we could simply use a QTableWidget and store one item for every city pair.However, a custom model could be more efficient, because the distance from any city A to anydifferent city B is the same whether traveling from A to B or from B to A, so the items are mirroredalong the main diagonal.
To see how a custom model compares with a simple table, let us assume that we have threecities,A, B, and C. If we store a value for every combination, we would need to store nine values. Acarefully designed model would require only the three items (A, B), (A, C), and (B, C).
Figure 10.12. The Cities application
[View full size image]
Here's how we set up and use the model:
QStringList cities;cities << "Arvika" << "Boden" << "Eskilstuna" << "Falun" << "Filipstad" << "Halmstad" << "Helsingborg" << "Karlstad" << "Kiruna" << "Kramfors" << "Motala" << "Sandviken" << "Skara" << "Stockholm" << "Sundsvall" << "Trelleborg";CityModel cityModel;cityModel.setCities(cities);QTableView tableView;tableView.setModel(&cityModel);tableView.setAlternatingRowColors(true);
We must reimplement the same functions as we did for the previous example. In addition, we mustalso reimplement setData() and flags() to make the model editable. Here is the class definition:
class CityModel : public QAbstractTableModel{ Q_OBJECTpublic: CityModel(QObject *parent = 0); void setCities(const QStringList &cityNames); int rowCount(const QModelIndex &parent) const; int columnCount(const QModelIndex &parent) const; QVariant data(const QModelIndex &index, int role) const; bool setData(const QModelIndex &index, const QVariant &value, int role); QVariant headerData(int section, Qt::Orientation orientation, int role) const; Qt::ItemFlags flags(const QModelIndex &index) const;

private: int offsetOf(int row, int column) const; QStringList cities; QVector<int> distances;};
For this model, we are using two data structures: cities of type QStringList to hold the city names,and distances of type QVector<int> to hold the distance between each unique pair of cities.
CityModel::CityModel(QObject *parent) : QAbstractTableModel(parent){}
The constructor does nothing beyond pass on the parent parameter to the base class.
int CityModel::rowCount(const QModelIndex & /* parent */) const{ return cities.count();}int CityModel::columnCount(const QModelIndex & /* parent */) const{ return cities.count();}
Since we have a square grid of cities, the number of rows and columns is the number of cities in ourlist.
QVariant CityModel::data(const QModelIndex &index, int role) const{ if (!index.isValid()) return QVariant(); if (role == Qt::TextAlignmentRole) { return int(Qt::AlignRight | Qt::AlignVCenter); } else if (role == Qt::DisplayRole) { if (index.row() == index.column()) return 0; int offset = offsetOf(index.row(), index.column()); return distances[offset]; } return QVariant();}
The data() function is similar to what we did in CurrencyModel. It returns 0 if the row and column arethe same, because that corresponds to the case where the two cities are the same; otherwise, itfinds the entry for the given row and column in the distances vector and returns the distance forthat particular pair of cities.
QVariant CityModel::headerData(int section, Qt::Orientation /* orientation */, int role) const{ if (role == Qt::DisplayRole) return cities[section]; return QVariant();

}
The headerData() function is simple because we have a square table with every row having anidentical column header. We simply return the name of the city at the given offset in the cities
string list.
bool CityModel::setData(const QModelIndex &index, const QVariant &value, int role){ if (index.isValid() && index.row() != index.column() && role == Qt::EditRole) { int offset = offsetOf(index.row(), index.column()); distances[offset] = value.toInt(); QModelIndex transposedIndex = createIndex(index.column(), index.row()); emit dataChanged(index, index); emit dataChanged(transposedIndex, transposedIndex); return true; } return false;}
The setData() function is called when the user edits an item. Providing the model index is valid, thetwo cities are different, and the data element to modify is the Qt::EditRole, the function stores thevalue the user entered in the distances vector.
The createIndex() function is used to generate a model index. We need it to get the model index ofthe item on the other side of the main diagonal that corresponds with the item being set, since bothitems must show the same data. The createIndex() function takes the row before the column; herewe invert the parameters to get the model index of the diagonally opposite item to the one specifiedby index.
We emit the dataChanged() signal with the model index of the item that was changed. The reasonthis signal takes two model indexes is that it is possible for a change to affect a rectangular regionof more than one row and column, so the indexes passed are the index of the top left and bottomright items of those that have changed. We also emit the dataChanged() signal for the transposedindex to ensure that the view will refresh the item. Finally, we return true or false to indicatewhether or not the edit succeeded.
Qt::ItemFlags CityModel::flags(const QModelIndex &index) const{ Qt::ItemFlags flags = QAbstractItemModel::flags(index); if (index.row() != index.column()) flags |= Qt::ItemIsEditable; return flags;}
The flags() function is used by the model to communicate what can be done with an item (forexample, whether it is editable). The default implementation from QAbstractTableModel returnsQt::ItemIsSelectable | Qt::ItemIsEnabled. We add the Qt::ItemIsEditable flag for all items exceptthose lying on the diagonals (which are always 0).
void CityModel::setCities(const QStringList &cityNames){ cities = cityNames;

distances.resize(cities.count() * (cities.count() - 1) / 2); distances.fill(0); reset();}
If a new list of cities is given, we set the private QStringList to the new list, resize and clear thedistances vector, and call QAbstractItemModel::reset() to notify any views that their visible itemsmust be refetched.
int CityModel::offsetOf(int row, int column) const{ if (row < column) qSwap(row, column); return (row * (row - 1) / 2) + column;}
The offsetOf() private function computes the index of a given city pair in the distances vector. Forexample, if we had cities A, B, C, and D, and the user updated row 3, column 1,B to D, the offsetwould be 3 x (3 - 1)/2 + 1 = 4. If the user had instead updated row 1, column 3,D to B, thanks tothe qSwap(), exactly the same calculation would be performed and an identical offset would bereturned.
Figure 10.13. The cities and distances data structures and the table model
The last example in this section is a model that shows the parse tree for a given regular expression.A regular expression consists of one or more terms, separated by '|' characters. Thus, the regularexpression "alpha|bravo|charlie" contains three terms. Each term is a sequence of one or morefactors; for example, the term "bravo" consists of five factors (each letter is a factor). The factorscan be further decomposed into an atom and an optional quantifier, such as '*', '+', and '?'. Sinceregular expressions can have parenthesized subexpressions, they can have recursive parse trees.
The regular expression shown in Figure 10.14, "ab|(cd)?e", matches an 'a' followed by a 'b', oralternatively either a 'c' followed by a 'd' followed by an 'e', or just an 'e' on its own. So it will match"ab" and "cde", but not "bc" or "cd".
Figure 10.14. The Regexp Parser application
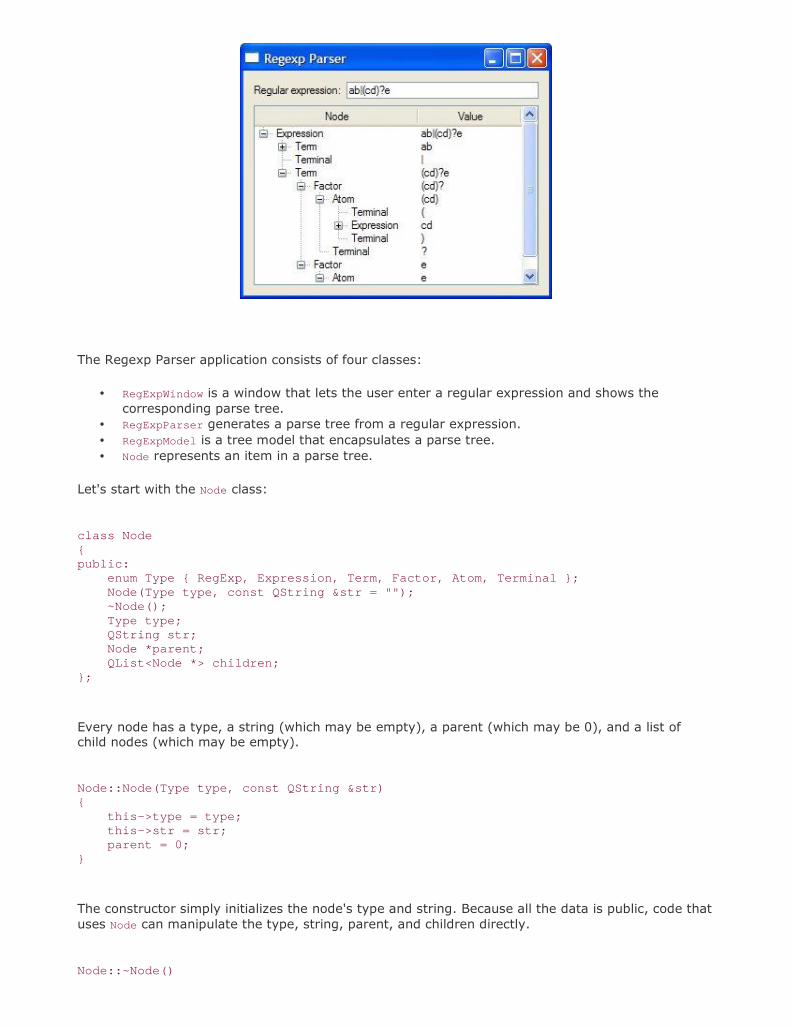
The Regexp Parser application consists of four classes:
RegExpWindow is a window that lets the user enter a regular expression and shows thecorresponding parse tree.
RegExpParser generates a parse tree from a regular expression. RegExpModel is a tree model that encapsulates a parse tree. Node represents an item in a parse tree.
Let's start with the Node class:
class Node{public: enum Type { RegExp, Expression, Term, Factor, Atom, Terminal }; Node(Type type, const QString &str = ""); ~Node(); Type type; QString str; Node *parent; QList<Node *> children;};
Every node has a type, a string (which may be empty), a parent (which may be 0), and a list ofchild nodes (which may be empty).
Node::Node(Type type, const QString &str){ this->type = type; this->str = str; parent = 0;}
The constructor simply initializes the node's type and string. Because all the data is public, code thatuses Node can manipulate the type, string, parent, and children directly.
Node::~Node()

{ qDeleteAll(children);}
The qDeleteAll() function iterates over a container of pointers and calls delete on each one. It doesnot set the pointers to 0, so if it is used outside of a destructor it is common to follow it with a call toclear() on the container that holds the pointers.
Now that we have defined our data items (each represented by a Node), we are ready to create amodel:
class RegExpModel : public QAbstractItemModel{public: RegExpModel(QObject *parent = 0); ~RegExpModel(); void setRootNode(Node *node); QModelIndex index(int row, int column, const QModelIndex &parent) const; QModelIndex parent(const QModelIndex &child) const; int rowCount(const QModelIndex &parent) const; int columnCount(const QModelIndex &parent) const; QVariant data(const QModelIndex &index, int role) const; QVariant headerData(int section, Qt::Orientation orientation, int role) const;private: Node *nodeFromIndex(const QModelIndex &index) const; Node *rootNode;};
This time we have inherited from QAbstractItemModel rather than from its convenience subclassQAbstractTableModel, because we want to create a hierarchical model. The essential functions thatwe must reimplement remain the same, except that we must also implement index() and parent().To set the model's data, we have a setRootNode() function that must be called with a parse tree'sroot node.
RegExpModel::RegExpModel(QObject *parent) : QAbstractItemModel(parent){ rootNode = 0;}
In the model's constructor, we just need to set the root node to a safe null value and pass on theparent to the base class.
RegExpModel::~RegExpModel(){ delete rootNode;}
In the destructor we delete the root node. If the root node has children, each of these is deleted,and so on recursively, by the Node destructor.
void RegExpModel::setRootNode(Node *node)
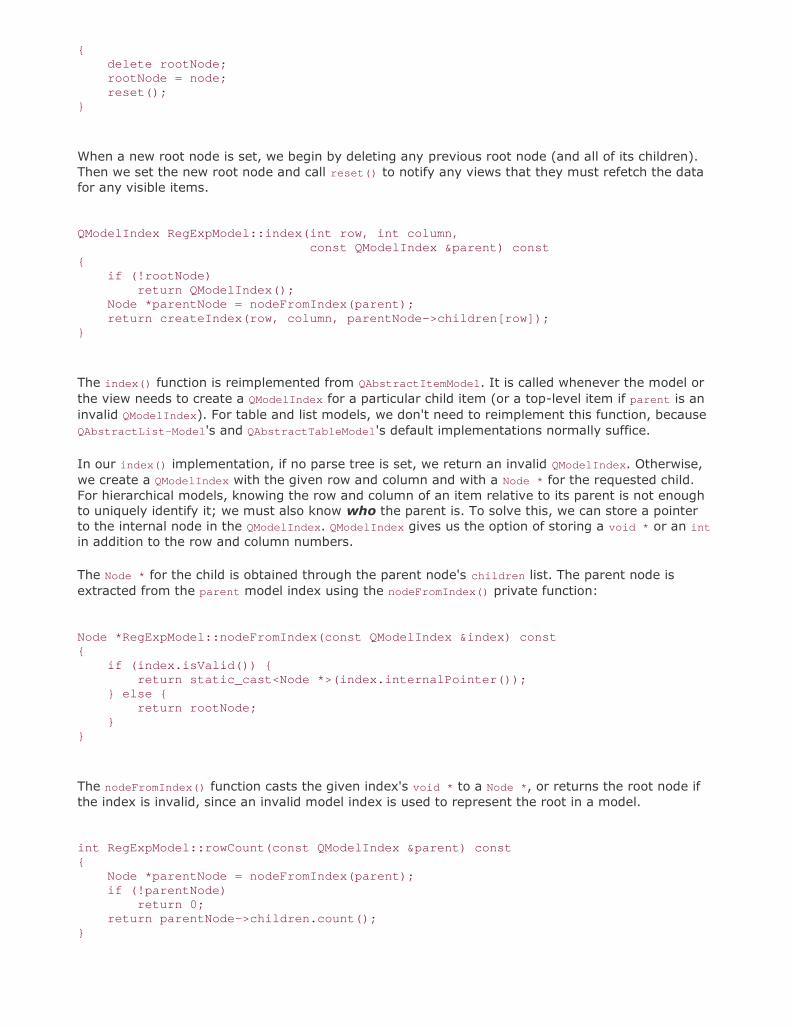
{ delete rootNode; rootNode = node; reset();}
When a new root node is set, we begin by deleting any previous root node (and all of its children).Then we set the new root node and call reset() to notify any views that they must refetch the datafor any visible items.
QModelIndex RegExpModel::index(int row, int column, const QModelIndex &parent) const{ if (!rootNode) return QModelIndex(); Node *parentNode = nodeFromIndex(parent); return createIndex(row, column, parentNode->children[row]);}
The index() function is reimplemented from QAbstractItemModel. It is called whenever the model orthe view needs to create a QModelIndex for a particular child item (or a top-level item if parent is aninvalid QModelIndex). For table and list models, we don't need to reimplement this function, becauseQAbstractList-Model's and QAbstractTableModel's default implementations normally suffice.
In our index() implementation, if no parse tree is set, we return an invalid QModelIndex. Otherwise,we create a QModelIndex with the given row and column and with a Node * for the requested child.For hierarchical models, knowing the row and column of an item relative to its parent is not enoughto uniquely identify it; we must also know who the parent is. To solve this, we can store a pointerto the internal node in the QModelIndex. QModelIndex gives us the option of storing a void * or an int
in addition to the row and column numbers.
The Node * for the child is obtained through the parent node's children list. The parent node isextracted from the parent model index using the nodeFromIndex() private function:
Node *RegExpModel::nodeFromIndex(const QModelIndex &index) const{ if (index.isValid()) { return static_cast<Node *>(index.internalPointer()); } else { return rootNode; }}
The nodeFromIndex() function casts the given index's void * to a Node *, or returns the root node ifthe index is invalid, since an invalid model index is used to represent the root in a model.
int RegExpModel::rowCount(const QModelIndex &parent) const{ Node *parentNode = nodeFromIndex(parent); if (!parentNode) return 0; return parentNode->children.count();}
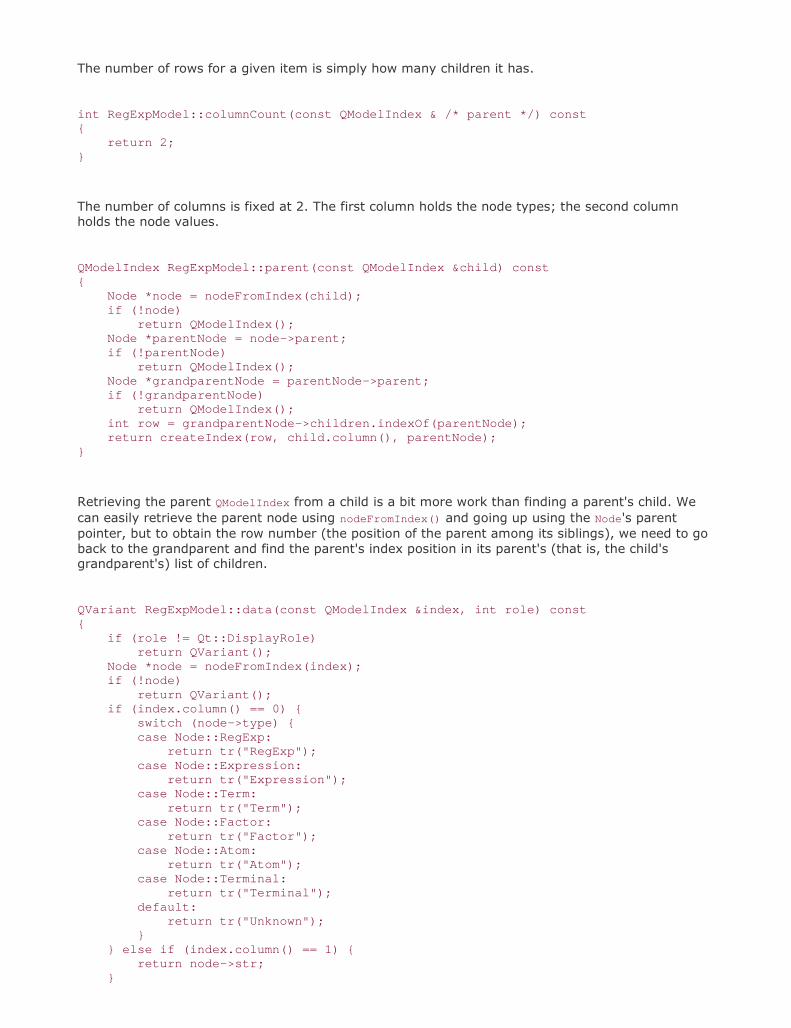
The number of rows for a given item is simply how many children it has.
int RegExpModel::columnCount(const QModelIndex & /* parent */) const{ return 2;}
The number of columns is fixed at 2. The first column holds the node types; the second columnholds the node values.
QModelIndex RegExpModel::parent(const QModelIndex &child) const{ Node *node = nodeFromIndex(child); if (!node)
return QModelIndex(); Node *parentNode = node->parent; if (!parentNode) return QModelIndex(); Node *grandparentNode = parentNode->parent; if (!grandparentNode) return QModelIndex(); int row = grandparentNode->children.indexOf(parentNode); return createIndex(row, child.column(), parentNode);}
Retrieving the parent QModelIndex from a child is a bit more work than finding a parent's child. Wecan easily retrieve the parent node using nodeFromIndex() and going up using the Node's parentpointer, but to obtain the row number (the position of the parent among its siblings), we need to goback to the grandparent and find the parent's index position in its parent's (that is, the child'sgrandparent's) list of children.
QVariant RegExpModel::data(const QModelIndex &index, int role) const{ if (role != Qt::DisplayRole) return QVariant(); Node *node = nodeFromIndex(index); if (!node) return QVariant(); if (index.column() == 0) { switch (node->type) { case Node::RegExp: return tr("RegExp"); case Node::Expression: return tr("Expression"); case Node::Term: return tr("Term"); case Node::Factor: return tr("Factor"); case Node::Atom: return tr("Atom"); case Node::Terminal: return tr("Terminal"); default: return tr("Unknown"); } } else if (index.column() == 1) { return node->str; }

return QVariant();}
In data(), we retrieve the Node * for the requested item and we use it to access the underlying data.If the caller wants a value for any role except Qt:: DisplayRole or if we cannot retrieve a Node forthe given model index, we return an invalid QVariant. If the column is 0, we return the name of thenode's type; if the column is 1, we return the node's value (its string).
QVariant RegExpModel::headerData(int section, Qt::Orientation orientation,
int role) const{ if (orientation == Qt::Horizontal && role == Qt::DisplayRole) { if (section == 0) { return tr("Node"); } else if (section == 1) { return tr("Value"); } } return QVariant();}
In our headerData() reimplementation, we return appropriate horizontal header labels. TheQTReeView class, which is used to visualize hierarchical models, has no vertical header, so we ignorethat possibility.
Now that we have covered the Node and RegExpModel classes, let's see how the root node is createdwhen the user changes the text in the line edit:
void RegExpWindow::regExpChanged(const QString ®Exp){ RegExpParser parser; Node *rootNode = parser.parse(regExp);
regExpModel->setRootNode(rootNode);}
When the user changes the text in the application's line edit, the main window's regExpChanged() slotis called. In this slot, the user's text is parsed and the parser returns a pointer to the root node ofthe parse tree.
We have not shown the RegExpParser class because it is not relevant for GUI or model/viewprogramming. The full source for this example is on the CD.
In this section, we have seen how to create three different custom models. Many models are muchsimpler than those shown here, with one-to-one correspondences between items and modelindexes. Further model/view examples are provided with Qt itself, along with extensivedocumentation.
Implementing Custom DelegatesIndividual items in views are rendered and edited using delegates. In most cases, the defaultdelegate supplied by a view is sufficient. If we want to have finer control over the rendering ofitems, we can often achieve what we want simply by using a custom model: In our data()
reimplementation we can handle the Qt::FontRole, Qt::TextAlignmentRole, Qt::TextColorRole, and

Qt::BackgroundColorRole, and these are used by the default delegate. For example, in the Cities andCurrencies examples shown earlier, we handled the Qt::TextAlignmentRole to get right-alignednumbers.
If we want even greater control, we can create our own delegate class and set it on the views thatwe want to make use of it. The Track Editor dialog shown below makes use of a custom delegate. Itshows the titles of music tracks and their durations. The data held by the model will be simplyQStrings (titles) and ints (seconds), but the durations will be separated into minutes and secondsand will be editable using a QTimeEdit.
Figure 10.15. The Track Editor dialog
The Track Editor dialog uses a QTableWidget, a convenience item view subclass that operates onQTableWidgetItems. The data is provided as a list of tracks:
class Track{public: Track(const QString &title = "", int duration = 0); QString title; int duration;};
Here is an extract from the constructor that shows the creation and population of the table widget:
TrackEditor::TrackEditor(QList<Track> *tracks, QWidget *parent) : QDialog(parent){ this->tracks = tracks; tableWidget = new QTableWidget(tracks->count(), 2); tableWidget->setItemDelegate(new TrackDelegate(1)); tableWidget->setHorizontalHeaderLabels( QStringList() << tr("Track") << tr("Duration")); for (int row = 0; row < tracks->count(); ++row) { Track track = tracks->at(row); QTableWidgetItem *item0 = new QTableWidgetItem(track.title); tableWidget->setItem(row, 0, item0); QTableWidgetItem *item1 = new QTableWidgetItem(QString::number(track.duration)); item1->setTextAlignment(Qt::AlignRight);

tableWidget->setItem(row, 1, item1); }
...}
The constructor creates a table widget, and instead of simply using the default delegate, we set ourcustom TRackDelegate, passing it the column that holds time data. We begin by setting the columnheadings, and then iterate through the data, populating the rows with the name and duration ofeach track.
The rest of the constructor and the rest of the TRackEditor dialog holds no surprises, so we will nowlook at the trackDelegate that handles the rendering and editing of track data.
class TrackDelegate : public QItemDelegate{ Q_OBJECTpublic: TrackDelegate(int durationColumn, QObject *parent = 0); void paint(QPainter *painter, const QStyleOptionViewItem &option, const QModelIndex &index) const; QWidget *createEditor(QWidget *parent, const QStyleOptionViewItem &option, const QModelIndex &index) const; void setEditorData(QWidget *editor, const QModelIndex &index) const; void setModelData(QWidget *editor, QAbstractItemModel *model, const QModelIndex &index) const; private slots: void commitAndCloseEditor(); private: int durationColumn;};
We use QItemDelegate as our base class, so that we benefit from the default delegateimplementation. We could also have used QAbstractItemDelegate if we had wanted to start fromscratch. To provide a delegate that can edit data, we must implement createEditor(),setEditorData(), and setModelData(). We also implement paint() to change the rendering of theduration column.
TrackDelegate::TrackDelegate(int durationColumn, QObject *parent) : QItemDelegate(parent){ this->durationColumn = durationColumn;}
The durationColumn parameter to the constructor tells the delegate which column holds the trackduration.
void TrackDelegate::paint(QPainter *painter, const QStyleOptionViewItem &option, const QModelIndex &index) const{ if (index.column() == durationColumn) { int secs = index.model()->data(index, Qt::DisplayRole).toInt(); QString text = QString("%1:%2") .arg(secs / 60, 2, 10, QChar('0')) .arg(secs % 60, 2, 10, QChar('0'));
QStyleOptionViewItem myOption = option;

myOption.displayAlignment = Qt::AlignRight | Qt::AlignVCenter; drawDisplay(painter, myOption, myOption.rect, text); drawFocus(painter, myOption, myOption.rect); } else{ QItemDelegate::paint(painter, option, index); }}
Since we want to render the duration in the form "minutes :seconds", we have reimplemented thepaint() function. The arg() calls take an integer to render as a string, how many characters thestring should have, the base of the integer (10 for decimal), and the padding character.
To right-align the text, we copy the current style options and overwrite the default alignment. Wethen call QItemDelegate::drawDisplay() to draw the text, followed by QItemDelegate::drawFocus(),which will draw a focus rectangle if the item has focus and will do nothing otherwise. UsingdrawDisplay() is very convenient, especially when used with our own style options. We could alsodraw using the painter directly.
QWidget *TrackDelegate::createEditor(QWidget *parent, const QStyleOptionViewItem &option, const QModelIndex &index) const{ if (index.column() == durationColumn) { QTimeEdit *timeEdit = new QTimeEdit(parent); timeEdit->setDisplayFormat("mm:ss"); connect(timeEdit, SIGNAL(editingFinished()), this, SLOT(commitAndCloseEditor())); return timeEdit; } else { return QItemDelegate::createEditor(parent, option, index); }}
We only want to control the editing of track durations, leaving the editing of track names to thedefault delegate. We achieve this by checking which column the delegate has been asked to providean editor for. If it's the duration column, we create a QTimeEdit, set the display formatappropriately,and connect its editingFinished() signal to our commitAndCloseEditor() slot. For anyother column, we pass on the edit handling to the default delegate.
void TrackDelegate::commitAndCloseEditor(){ QTimeEdit *editor = qobject_cast<QTimeEdit *>(sender()); emit commitData(editor); emit closeEditor(editor);}
If the user presses Enter or moves the focus out of the QTimeEdit (but not if they press Esc), theeditingFinished() signal is emitted and the commitAndCloseEditor() slot is called. This slot emits thecommitData() signal to inform the view that there is edited data to replace existing data. It alsoemits the closeEditor() signal to notify the view that this editor is no longer required, at which pointthe model will delete it. The editor is retrieved using QObject::sender(), which returns the objectthat emitted the signal that triggered the slot. If the user cancels (by pressing Esc), the view willsimply delete the editor.
void TrackDelegate::setEditorData(QWidget *editor, const QModelIndex &index) const

{ if (index.column() == durationColumn) { int secs = index.model()->data(index, Qt::DisplayRole).toInt(); QTimeEdit *timeEdit = qobject_cast<QTimeEdit *>(editor); timeEdit->setTime(QTime(0, secs / 60, secs % 60)); } else { QItemDelegate::setEditorData(editor, index); }}
When the user initiates editing, the view calls createEditor() to create an editor, and thensetEditorData() to initialize the editor with the item's current data. If the editor is for the durationcolumn, we extract the track's duration in seconds and set the QTimeEdit's time to the correspondingnumber of minutes and seconds; otherwise, we let the default delegate handle the initialization.
void TrackDelegate::setModelData(QWidget *editor, QAbstractItemModel *model, const QModelIndex &index) const{ if (index.column() == durationColumn) { QTimeEdit *timeEdit = qobject_cast<QTimeEdit *>(editor); QTime time = timeEdit->time(); int secs = (time.minute() * 60) + time.second(); model->setData(index, secs); } else { QItemDelegate::setModelData(editor, model, index); }}
If the user completes the edit (for example, by left-clicking outside the editor widget, or by pressingEnter or Tab) rather than canceling it, the model must be updated with the editor's data. If theduration was edited, we extract the minutes and seconds from the QTimeEdit, and set the data tothe corresponding number of seconds.
Although not necessary in this case, it is entirely possible to create a custom delegate that finelycontrols the editing and rendering of any item in a model. We have chosen to take control of aparticular column, but since the QModelIndex is passed to all the QItemDelegate functions that wereimplement, we can take control by column, row, rectangular region, parent, or any combination ofthese, right down to individual items if required.
In this chapter, we have presented a broad overview of Qt's model/view architecture. We haveshown how to use the view convenience subclasses, how to use Qt's predefined models, and how tocreate custom models and custom delegates. But the model/view architecture is so rich that wehave not had the space to cover all the things it makes possible. For example, we could create acustom view that does not render its items as a list, table, or tree. This is done by the Chartexample located in Qt's examples/itemviews/chart directory, which shows a custom view thatrenders model data in the form of a pie chart.
It is also possible to use multiple views to view the same model without any formality. Any editsmade through one view will be automatically and immediately reflected in the other views. This kindof functionality is particularly useful for viewing large data sets where the user may wish to seesections of data that are logically far apart. The architecture also supports selections: Where two ormore views are using the same model, each view can be set to have its own independent selections,or the selections can be shared across the views.
Qt's online documentation provides comprehensive coverage of item view programming and theclasses that implement it. See http://doc.trolltech.com/4.1/model-view.html for a list of all therelevant classes, and http://doc.trolltech.com/4.1/model-view-programming.html for additionalinformation and links to the relevant examples included with Qt.

Chapter 11. Container Classes Sequential Containers Associative Containers Generic Algorithms Strings, Byte Arrays, and Variants
Container classes are general-purpose template classes that store items of a given type in memory.C++ already offers many containers as part of the Standard Template Library (STL), which isincluded in the Standard C++ library.
Qt provides its own container classes, so for Qt programs we can use both the Qt and the STLcontainers. The main advantages of the Qt containers are that they behave the same on allplatforms and that they are implicitly shared. Implicit sharing, or "copy on write", is an optimizationthat makes it possible to pass entire containers as values without any significant performance cost.The Qt containers also feature easy-to-use iterator classes inspired by Java, they can be streamedusing QDataStream, and they usually result in less code in the executable than the corresponding STLcontainers. Finally, on some hardware platforms supported by Qtopia Core (the Qt version formobile devices), the Qt containers are the only ones available.
Qt offers both sequential containers such as QVector<T>, QLinkedList<T>, and QList<T>, andassociative containers such as QMap<K, T> and QHash<K, T>. Conceptually, the sequential containersstore items one after another, whereas the associative containers store keyvalue pairs.
Qt also provides generic algorithms that perform operations on arbitrary containers. For example,the qSort() algorithm sorts a sequential container, and qBinaryFind() performs a binary search on asorted sequential container. These algorithms are similar to those offered by the STL.
If you are already familiar with the STL containers and have STL available on your target platforms,you might want to use them instead of, or in addition to, the Qt containers. For more informationabout the STL classes and functions, a good place to start is SGI's STL web site:http://www.sgi.com/tech/stl/.
In this chapter, we will also look at QString, QByteArray, and QVariant, since they have a lot incommon with containers. QString is a 16-bit Unicode string used throughout Qt's API. QByteArray isan array of 8-bit chars useful for storing raw binary data. QVariant is a type that can store mostC++ and Qt value types.
Sequential ContainersA QVector<T> is an array-like data structure that stores its items at adjacent positions in memory.What distinguishes a vector from a plain C++ array is that a vector knows its own size and can beresized. Appending extra items to the end of a vector is fairly efficient, while inserting items at thefront or in the middle of a vector can be expensive.
Figure 11.1. A vector of doubles
If we know in advance how many items we are going to need, we can give the vector an initial sizewhen we define it and use the [] operator to assign a value to the items; otherwise, we must eitherresize the vector later on or append items. Here's an example where we specify the initial size:

QVector<double> vect(3);vect[0] = 1.0;vect[1] = 0.540302;vect[2] = -0.416147;
Here's the same example, this time starting with an empty vector and using the append() function toappend items at the end:
QVector<double> vect;vect.append(1.0);vect.append(0.540302);vect.append(-0.416147);
We can also use the << operator instead of append():
vect << 1.0 << 0.540302 << -0.416147;
One way to iterate over the vector's items is to use [] and count():
double sum = 0.0;for (int i = 0; i < vect.count(); ++i) sum += vect[i];
Vector entries that are created without being assigned an explicit value are initialized using the itemclass's default constructor. Basic types and pointer types are initialized to zero.
Inserting items at the beginning or in the middle of a QVector<T>, or removing items from thesepositions, can be inefficient for large vectors. For this reason, Qt also offers QLinkedList<T>, a datastructure that stores its items at non-adjacent locations in memory. Unlike vectors, linked lists don'tsupport random access, but they provide "constant time" insertions and removals.
Figure 11.2. A linked list of doubles
Linked lists do not provide the [] operator, so iterators must be used to traverse their items.Iterators are also used to specify the position of items. For example, the following code inserts thestring "Tote Hosen" between "Clash" and "Ramones":
QLinkedList<QString> list;list.append("Clash");list.append("Ramones");QLinkedList<QString>::iterator i = list.find("Ramones");list.insert(i, "Tote Hosen");
We will take a more detailed look at iterators later in this section.

The QList<T> sequential container is an "array-list" that combines the most important benefits ofQVector<T> and QLinkedList<T> in a single class. It supports random access, and its interface isindex-based like QVector's. Inserting or removing an item at either end of a QList<T> is very fast,and inserting in the middle is fast for lists with up to about one thousand items. Unless we want toperform insertions in the middle of huge lists or need the list's items to occupy consecutiveaddresses in memory, QList<T> is usually the most appropriate general-purpose container class touse.
The QStringList class is a subclass of QList<QString> that is widely used in Qt's API. In addition tothe functions it inherits from its base class, it provides some extra functions that make the classmore versatile for string handling. QStringList is discussed in the last section of this chapter (p.268).
QStack<T> and QQueue<T> are two more examples of convenience subclasses. QStack<T> is a vectorthat provides push(), pop(), and top(). QQueue<T> is a list that provides enqueue(), dequeue(), andhead().
For all the container classes seen so far, the value type T can be a basic type like int or double, apointer type, or a class that has a default constructor (a constructor that takes no arguments), acopy constructor, and an assignment operator. Classes that qualify include QByteArray, QDateTime,QRegExp, QString, and QVariant. Qt classes that inherit from QObject do not qualify, because theylack a copy constructor and an assignment operator. This is no problem in practice, since we cansimply store pointers to QObject types rather than the objects themselves.
The value type T can also be a container, in which case we must remember to separate consecutiveangle brackets with spaces; otherwise, the compiler will choke on what it thinks is a >> operator. Forexample:
QList<QVector<double> > list;
In addition to the types just mentioned, a container's value type can be any custom class that meetsthe criteria described earlier. Here is an example of such a class:
class Movie{public: Movie(const QString &title = "", int duration = 0); void setTitle(const QString &title) { myTitle = title; } QString title() const { return myTitle; } void setDuration(int duration) { myDuration = duration; } QString duration() const { return myDuration; }private: QString myTitle; int myDuration;};
The class has a constructor that requires no arguments (although it can take up to two). It also hasa copy constructor and an assignment operator, both implicitly provided by C++. For this class,member-by-member copy is sufficient, so there's no need to implement our own copy constructorand assignment operator.
Qt provides two categories of iterators for traversing the items stored in a container: Java-styleiterators and STL-style iterators. The Java-style iterators are easier to use, whereas the STL-styleiterators can be combined with Qt's and STL's generic algorithms and are more powerful.
For each container class, there are two Java-style iterator types: a read-only iterator and a read-

write iterator. The read-only iterator classes are QVectorIterator<T>, QLinkedListIterator<T>, andQListIterator<T>. The corresponding read-write iterators have Mutable in their name (for example,QMutableVectorIterator<T>). In this discussion, we will concentrate on QList's iterators; the iteratorsfor linked lists and vectors have the same API.
Figure 11.3. Valid positions for Java-style iterators
The first thing to keep in mind when using Java-style iterators is that they don't point directly atitems. Instead, they can be located before the first item, after the last item, or between two items.A typical iteration loop looks like this:
QList<double> list;... QListIterator<double> i(list);while (i.hasNext()) { do_something(i.next());}
The iterator is initialized with the container to traverse. At this point, the iterator is located justbefore the first item. The call to hasNext() returns true if there is an item to the right of the iterator.The next() function returns the item to the right of the iterator and advances the iterator to the nextvalid position.
Iterating backward is similar, except that we must first call toBack() to position the iterator after thelast item:
QListIterator<double> i(list);i.toBack();while (i.hasPrevious()) { do_something(i.previous());}
The hasPrevious() function returns true if there is an item to the left of the iterator; previous()
returns the item to the left of the iterator and moves the iterator back by one position. Another wayof thinking about the next() and previous() iterators is that they return the item that the iteratorhas just jumped over.
Figure 11.4. Effect of previous() and next() on a Java-style iterator
Mutable iterators provide functions to insert, modify, and remove items while iterating. The followingloop removes all the negative numbers from a list:

QMutableListIterator<double> i(list);while (i.hasNext()) { if (i.next() < 0.0) i.remove();}
The remove() function always operates on the last item that was jumped over. It also works wheniterating backward:
QMutableListIterator<double> i(list);i.toBack();while (i.hasPrevious()) { if (i.previous() < 0.0) i.remove();}
Similarly, the mutable Java-style iterators provide a setValue() function that modifies the last itemthat was jumped over. Here's how we would replace negative numbers with their absolute value:
QMutableListIterator<double> i(list);while (i.hasNext()) { int val = i.next(); if (val < 0.0) i.setValue(-val);}
It is also possible to insert an item at the current iterator position by calling insert(). The iterator isthen advanced to point between the new item and the following item.
In addition to the Java-style iterators, every sequential container class C<T> has two STL-styleiterator types: C<T>::iterator and C<T>::const_iterator. The difference between the two is thatconst_iterator doesn't let us modify the data.
A container's begin() function returns an STL-style iterator that refers to the first item in thecontainer (for example, list[0]), whereas end() returns an iterator to the "one past the last" item(for example, list[5] for a list of size 5). If a container is empty, begin() equals end(). This can beused to see if the container has any items, although it is usually more convenient to call isEmpty()for this purpose.
Figure 11.5. Valid positions for STL-style iterators
The STL-style iterator syntax is modeled after that of C++ pointers into an array. We can use the ++
and -- operators to move to the next or previous item, and the unary * operator to retrieve thecurrent item. For QVector<T>, the iterator and const_iterator types are merely typedefs for T * andconst T *. (This is possible because QVector<T> stores its items in consecutive memory locations.)
The following example replaces each value in a QList<double> with its absolute value:

QList<double>::iterator i = list.begin();while (i != list.end()) { *i = qAbs(*i); ++i;}
A few Qt functions return a container. If we want to iterate over the return value of a function usingan STL-style iterator, we must take a copy of the container and iterate over the copy. For example,the following code is the correct way to iterate over the QList<int> returned by QSplitter::sizes():
QList<int> list = splitter->sizes();QList<int>::const_iterator i = list.begin();while (i != list.end()) { do_something(*i); ++i;}
The following code is wrong:
// WRONG QList<int>::const_iterator i = splitter->sizes().begin();while (i != splitter->sizes().end()) { do_something(*i); ++i;}
This is because QSplitter::sizes() returns a new QList<int> by value every time it is called. If wedon't store the return value, C++ automatically destroys it before we have even started iterating,leaving us with a dangling iterator. To make matters worse, each time the loop is run,QSplitter::sizes() must generate a new copy of the list because of the splitter->sizes().end()
call. In summary: When using STL-style iterators, always iterate on a copy of a container returnedby value.
With read-only Java-style iterators, we don't need to take a copy. The iterator takes a copy for usbehind the scenes, ensuring that we always iterate over the data that the function first returned. Forexample:
QListIterator<int> i(splitter->sizes());while (i.hasNext()) { do_something(i.next());}
Copying a container like this sounds expensive, but it isn't, thanks to an optimization called implicitsharing. This means that copying a Qt container is about as fast as copying a single pointer. Only ifone of the copies is changed is data actually copiedand this is all handled automatically behind thescenes. For this reason, implicit sharing is sometimes called "copy on write".
The beauty of implicit sharing is that it is an optimization that we don't need to think about; itsimply works, without requiring any programmer intervention. At the same time, implicit sharingencourages a clean programming style where objects are returned by value. Consider the followingfunction:
QVector<double> sineTable()

{ QVector<double> vect(360); for (int i = 0; i < 360; ++i) vect[i] = sin(i / (2 * M_PI)); return vect;}
The call to the function looks like this:
QVector<double> table = sineTable();
STL, in comparison, encourages us to pass the vector as a non-const reference to avoid the copythat takes place when the function's return value is stored in a variable:
using namespace std;void sineTable(vector<double> &vect){ vect.resize(360); for (int i = 0; i < 360; ++i)
vect[i] = sin(i / (2 * M_PI));}
The call then becomes more tedious to write and less clear to read:
vector<double> table;sineTable(table);
Qt uses implicit sharing for all of its containers and for many other classes, including QByteArray,QBrush, QFont, QImage, QPixmap, and QString. This makes these classes very efficient to pass byvalue, both as function parameters and as return values.
Implicit sharing is a guarantee from Qt that the data won't be copied if we don't modify it. To getthe best out of implicit sharing, we can adopt a couple of new programming habits. One habit is touse the at() function rather than the [] operator for read-only access on a (non-const) vector orlist. Since Qt's containers cannot tell whether [] appears on the left side of an assignment or not, itassumes the worst and forces a deep copy to occurwhereas at() isn't allowed on the left side of anassignment.
A similar issue arises when we iterate over a container with STL-style iterators. Whenever we callbegin() or end() on a non-const container, Qt forces a deep copy to occur if the data is shared. Toprevent this inefficiency, the solution is to use const_iterator, constBegin(), and constEnd()
whenever possible.
Qt provides one last method for iterating over items in a sequential container: the foreach loop. Itlooks like this:
QLinkedList<Movie> list;...foreach (Movie movie, list) { if (movie.title() == "Citizen Kane") { cout << "Found Citizen Kane" << endl; break; }

}
The foreach pseudo-keyword is implemented in terms of the standard for loop. At each iteration ofthe loop, the iteration variable (movie) is set to a new item, starting at the first item in the containerand progressing forward. The foreach loop automatically takes a copy of the container when theloop is entered, and for this reason the loop is not affected if the container is modified duringiteration.
How Implicit Sharing Works
Implicit sharing works automatically behind the scenes, so we don't have to do anythingin our code to make this optimization happen. But since it's nice to know how thingswork, we will study an example and see what happens under the hood. The exampleuses QString, one of Qt's many implicitly shared classes.
QString str1 = "Humpty";QString str2 = str1;
We set str1 to "Humpty" and str2 to be equal to str1. At this point, both QString
objects point to the same internal data structure in memory. Along with the characterdata, the data structure holds a reference count that indicates how many QStrings pointto the same data structure. Since both str1 and str2 point to the same data, thereference count is 2.
str2[0] = 'D';
When we modify str2, it first makes a deep copy of the data, to ensure that str1 andstr2 point to different data structures, and it then applies the change to its own copy ofthe data. The reference count of str1's data ("Humpty") becomes 1, and the referencecount of str2's data ("Dumpty") is set to 1. A reference count of 1 means that the dataisn't shared.
str2.truncate(4);
If we modify str2 again, no copying takes place because the reference count of str2'sdata is 1. The TRuncate() function operates directly on str2's data, resulting in the string"Dump". The reference count stays at 1.
str1 = str2;
When we assign str2 to str1, the reference count for str1's data goes down to 0, whichmeans that no QString is using the "Humpty" data anymore. The data is then freed frommemory. Both QStrings point to "Dump", which now has a reference count of 2.
Data sharing is often disregarded as an option in multithreaded programs, because ofrace conditions in the reference counting. With Qt, this is not an issue. Internally, thecontainer classes use assembly language instructions to perform atomic referencecounting. This technology is available to Qt users through the QSharedData and

QSharedDataPointer classes.
The break and continue loop statements are supported. If the body consists of a single statement,the braces are unnecessary. Just like a for statement, the iteration variable can be defined outsidethe loop, like this:
QLinkedList<Movie> list;Movie movie;...foreach (movie, list) { if (movie.title() == "Citizen Kane") { cout << "Found Citizen Kane" << endl; break; }}
Defining the iteration variable outside the loop is the only option for containers that hold data typesthat contain a comma (for example, QPair<QString,int>).
Associative ContainersAn associative container holds an arbitrary number of items of the same type, indexed by a key. Qtprovides two main associative container classes: QMap<K, T> and QHash<K, T>.
A QMap<K, T> is a data structure that stores keyvalue pairs in ascending key order. This arrangementmakes it possible to provide good lookup and insertion performance, and in-order iteration.Internally, QMap<K, T> is implemented as a skip-list.
Figure 11.6. A map of QString to int
One simple way to insert items into a map is to call insert():
QMap<QString, int> map;map.insert("eins", 1);map.insert("sieben", 7);map.insert("dreiundzwanzig", 23);
Alternatively, we can simply assign a value to a given key as follows:
map["eins"] = 1;map["sieben"] = 7;

map["dreiundzwanzig"] = 23;
The [] operator can be used for both insertion and retrieval. If [] is used to retrieve a value for anon-existent key in a non-const map, a new item will be created with the given key and an emptyvalue. To avoid accidentally creating empty values, we can use the value() function to retrieve itemsinstead of []:
int val = map.value("dreiundzwanzig");
If the key doesn't exist, a default value is returned using the value type's default constructor, andno new item is created. For basic and pointer types, zero is returned. We can specify another defaultvalue as second argument to value(), for example:
int seconds = map.value("delay", 30);
This is equivalent to
int seconds = 30;if (map.contains("delay")) seconds = map.value("delay");
The K and T data types of a QMap<K, T> can be basic data types like int and double, pointer types, orclasses that have a default constructor, a copy constructor, and an assignment operator. In addition,the K type must provide an operator<() since QMap<K, T> uses this operator to store the items inascending key order.
QMap<K, T> has a couple of convenience functions, keys() and values(), that are especially usefulwhen dealing with small data sets. They return QLists of a map's keys and values.
Maps are normally single-valued: If a new value is assigned to an existing key, the old value isreplaced by the new value, ensuring that no two items share the same key. It is possible to havemultiple keyvalue pairs with the same key by using the insertMulti() function or the QMultiMap<K,
T> convenience subclass. QMap<K, T> has a values(const K &) overload that returns a QList of all thevalues for a given key. For example:
QMultiMap<int, QString> multiMap;multiMap.insert(1, "one");multiMap.insert(1, "eins");multiMap.insert(1, "uno");QList<QString> vals = multiMap.values(1);
A QHash<K, T> is a data structure that stores keyvalue pairs in a hash table. Its interface is almostidentical to that of QMap<K, T>, but it has different requirements for the K template type and usuallyprovides much faster lookups than QMap<K, T> can achieve. Another difference is that QHash<K, T> isunordered.
In addition to the standard requirements on any value type stored in a container, the K type of aQHash<K, T> needs to provide an operator==() and be supported by a global qHash() function thatreturns a hash value for a key. Qt already provides qHash() functions for integer types, pointer

types, QChar, QString, and QByteArray.
QHash<K, T> automatically allocates a prime number of buckets for its internal hash table and resizesthis as items are inserted or removed. It is also possible to fine-tune performance by callingreserve() to specify the number of items expected to be stored in the hash and squeeze() to shrinkthe hash table based on the current number of items. A common idiom is to call reserve() with themaximum number of items we expect, then insert the data, and finally call squeeze() to minimizememory usage if there were fewer items than expected.
Hashes are normally single-valued, but multiple values can be assigned to the same key using theinsertMulti() function or the QMultiHash<K, T> convenience subclass.
Besides QHash<K, T>, Qt also provides a QCache<K, T> class that can be used to cache objectsassociated with a key, and a QSet<K> container that only stores keys. Internally, both rely onQHash<K, T> and both have the same requirements for the K type as QHash<K, T>.
The easiest way to iterate through all the keyvalue pairs stored in an associative container is to usea Java-style iterator. Because the iterators must give access to both a key and a value, the Java-style iterators for associative containers work slightly differently from their sequential counterparts.The main difference is that the next() and previous() functions return an object that represents akeyvalue pair, rather than simply a value. The key and value components are accessible from thisobject as key() and value(). For example:
QMap<QString, int> map;...int sum = 0;QMapIterator<QString, int> i(map);while (i.hasNext()) sum += i.next().value();
If we need to access both the key and the value, we can simply ignore the return value of next() orprevious() and use the iterator's key() and value() functions, which operate on the last item thatwas jumped over:
QMapIterator<QString, int> i(map);while (i.hasNext()) { i.next(); if (i.value() > largestValue) { largestKey = i.key(); largestValue = i.value(); }}
Mutable iterators have a setValue() function that modifies the value associated with the currentitem:
QMutableMapIterator<QString, int> i(map);while (i.hasNext()) { i.next(); if (i.value() < 0.0) i.setValue(-i.value());}
STL-style iterators also provide key() and value() functions. With the nonconst iterator types,value() returns a non-const reference, allowing us to change the value as we iterate. Note that
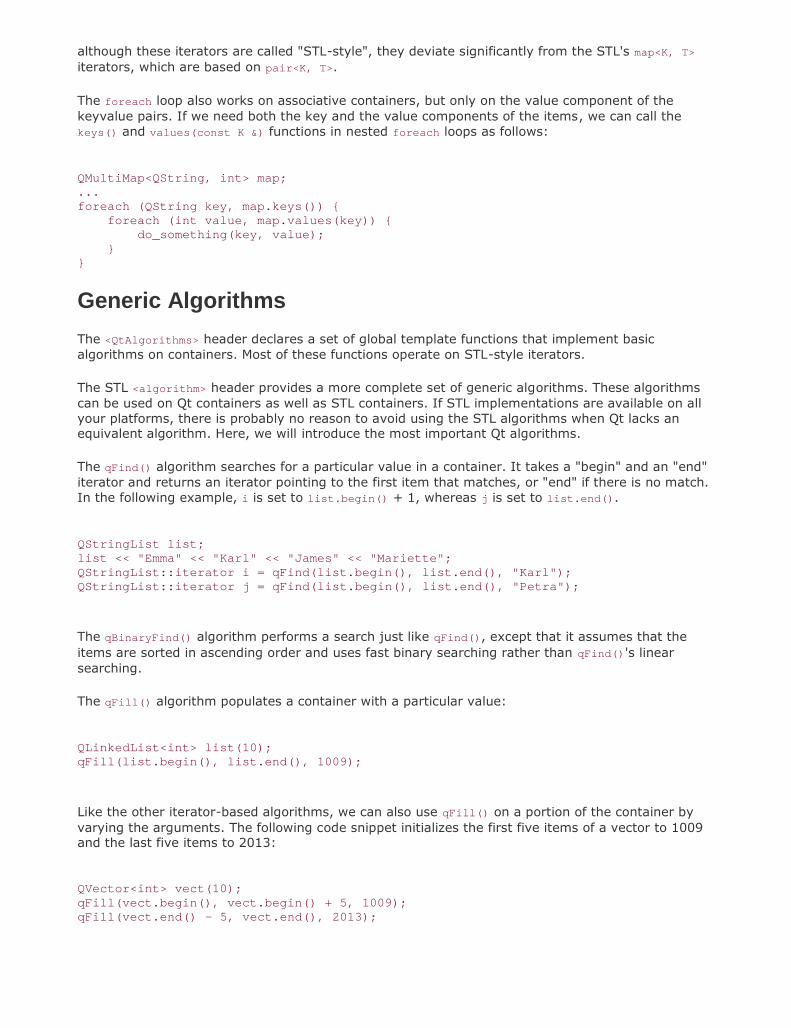
although these iterators are called "STL-style", they deviate significantly from the STL's map<K, T>
iterators, which are based on pair<K, T>.
The foreach loop also works on associative containers, but only on the value component of thekeyvalue pairs. If we need both the key and the value components of the items, we can call thekeys() and values(const K &) functions in nested foreach loops as follows:
QMultiMap<QString, int> map;...foreach (QString key, map.keys()) { foreach (int value, map.values(key)) {
do_something(key, value); }}
Generic AlgorithmsThe <QtAlgorithms> header declares a set of global template functions that implement basicalgorithms on containers. Most of these functions operate on STL-style iterators.
The STL <algorithm> header provides a more complete set of generic algorithms. These algorithmscan be used on Qt containers as well as STL containers. If STL implementations are available on allyour platforms, there is probably no reason to avoid using the STL algorithms when Qt lacks anequivalent algorithm. Here, we will introduce the most important Qt algorithms.
The qFind() algorithm searches for a particular value in a container. It takes a "begin" and an "end"iterator and returns an iterator pointing to the first item that matches, or "end" if there is no match.In the following example, i is set to list.begin() + 1, whereas j is set to list.end().
QStringList list;list << "Emma" << "Karl" << "James" << "Mariette";QStringList::iterator i = qFind(list.begin(), list.end(), "Karl");QStringList::iterator j = qFind(list.begin(), list.end(), "Petra");
The qBinaryFind() algorithm performs a search just like qFind(), except that it assumes that theitems are sorted in ascending order and uses fast binary searching rather than qFind()'s linearsearching.
The qFill() algorithm populates a container with a particular value:
QLinkedList<int> list(10);qFill(list.begin(), list.end(), 1009);
Like the other iterator-based algorithms, we can also use qFill() on a portion of the container byvarying the arguments. The following code snippet initializes the first five items of a vector to 1009and the last five items to 2013:
QVector<int> vect(10);qFill(vect.begin(), vect.begin() + 5, 1009);qFill(vect.end() - 5, vect.end(), 2013);

The qCopy() algorithm copies values from one container to another:
QVector<int> vect(list.count());qCopy(list.begin(), list.end(), vect.begin());
qCopy() can also be used to copy values within the same container, as long as the source range andthe target range don't overlap. In the next code snippet, we use it to overwrite the last two items ofa list with the first two items:
qCopy(list.begin(), list.begin() + 2, list.end() - 2);
The qSort() algorithm sorts the container's items into ascending order:
qSort(list.begin(), list.end());
By default, qSort() uses the < operator to compare the items. To sort items in descending order,pass qGreater<T>() as the third argument (where T is the container's value type), as follows:
qSort(list.begin(), list.end(), qGreater<int>());
We can use the third parameter to define custom sort criteria. For example, here's a "less than"comparison function that compares QStrings in a case-insensitive way:
bool insensitiveLessThan(const QString &str1, const QString &str2){ return str1.toLower() < str2.toLower();}
The call to qSort() then becomes
QStringList list;...qSort(list.begin(), list.end(), insensitiveLessThan);
The qStableSort() algorithm is similar to qSort(), except it guarantees that items that compareequal appear in the same order after the sort as before. This is useful if the sort criterion only takesinto account parts of the value and the results are visible to the user. We used qStableSort() inChapter 4 to implement sorting in the Spreadsheet application (p. 88).
The qDeleteAll() algorithm calls delete on every pointer stored in a container. It only makes senseon containers whose value type is a pointer type. After the call, the items are still present clear()
on the container. For example:
qDeleteAll(list);list.clear();

The qSwap() algorithm exchanges the value of two variables. For example:
int x1 = line.x1();int x2 = line.x2();if (x1 > x2) qSwap(x1, x2);
Finally, the <QtGlobal> header, which is included by every other Qt header, provides several usefuldefinitions, including the qAbs() function, that returns the absolute value of its argument, and theqMin() and qMax() functions, that return the minimum or maximum of two values.
Strings, Byte Arrays, and VariantsQString, QByteArray, and QVariant are three classes that have many things in common withcontainers and that can be used as alternatives to containers in some contexts. Also, like thecontainers, these classes use implicit sharing as a memory and speed optimization.
We will start with QString. Strings are used by every GUI program, not only for the user interfacebut often also as data structures. C++ natively provides two kinds of strings: traditional C-style '\0'-terminated character arrays and the std::string class. Unlike these, QString holds 16-bit Unicodevalues. Unicode contains ASCII and Latin-1 as a subset, with their usual numeric values. But sinceQString is 16-bit, it can represent thousands of other characters for writing most of the world'slanguages. See Chapter 17 for more information about Unicode.
When using QString, we don't need to worry about such arcane details as allocating enough memoryor ensuring that the data is '\0'-terminated. Conceptually, QStrings can be thought of as a vector ofQChars. A QString can embed '\0' characters. The length() function returns the size of the entirestring, including embedded '\0' characters.
QString provides a binary + operator to concatenate two strings and a += operator to append onestring to another. Because QString automatically preallocates memory at the end of the string data,building up a string by repeatedly appending characters is very fast. Here's an example thatcombines + and +=:
QString str = "User: ";str += userName + "\n";
There is also a QString::append() function that does the same thing as the += operator:
str = "User: ";str.append(userName);str.append("\n");
A completely different way of combining strings is to use QString's sprintf() function:
str.sprintf("%s %.1f%%", "perfect competition", 100.0);

This function supports the same format specifiers as the C++ library's sprintf() function. In theexample above, str is assigned "perfect competition 100.0%".
Yet another way of building a string from other strings or from numbers is to use arg():
str = QString("%1 %2 (%3s-%4s)") .arg("permissive").arg("society").arg(1950).arg(1970);
In this example, "%1" is replaced by "permissive", "%2" is replaced by "society", "%3" is replacedby "1950", and "%4" is replaced by "1970". The result is "permissive society (1950s-1970s)". Thereare arg() overloads to handle various data types. Some overloads have extra parameters forcontrolling the field width, the numerical base, or the floating-point precision. In general, arg() is amuch better solution than sprintf(), because it is type-safe, fully supports Unicode, and allowstranslators to reorder the "%n" parameters.
QString can convert numbers into strings using the QString::number() static function:
str = QString::number(59.6);
Or using the setNum() function:
str.setNum(59.6);
The reverse conversion, from a string to a number, is achieved using toInt(), toLongLong(),toDouble(), and so on. For example:
bool ok;double d = str.toDouble(&ok);
These functions accept an optional pointer to a bool variable and set the variable to TRue or false
depending on the success of the conversion. If the conversion fails, these functions return zero.
Once we have a string, we often want to extract parts of it. The mid() function returns the substringstarting at a given position (the first argument) and of up to a given length (the second argument).For example, the following code prints "pays" to the console:[*]
[*] The convenient qDebug() << arg syntax used here requires the inclusion of the <QtDebug> header file, while theqDebug("...", arg) syntax is available in any file that includes at least one Qt header.
QString str = "polluter pays principle";qDebug() << str.mid(9, 4);
If we omit the second argument, mid() returns the substring starting at the given position andending at the end of the string. For example, the following code prints "pays principle" to theconsole:
QString str = "polluter pays principle";qDebug() << str.mid(9);

There are also left() and right() functions that perform a similar job. Both accept a number ofcharacters,n, and return the first or last n characters of the string. For example, the following codeprints "polluter principle" to the console:
QString str = "polluter pays principle";
qDebug() << str.left(8) << " " << str.right(9);
If we want to find out if a string contains a particular character, substring, or regular expression, wecan use one of QString's indexOf() functions:
QString str = "the middle bit";int i = str.indexOf("middle");
This will set i to 4. The indexOf() function returns -1 on failure, and accepts an optional startposition and case-sensitivity flag.
If we just want to check whether a string starts or ends with something, we can use thestartsWith() and endsWith() functions:
if (url.startsWith("http:") && url.endsWith(".png")) ...
This is both simpler and faster than this:
if (url.left(5) == "http:" && url.right(4) == ".png")...
String comparison with the == operator is case sensitive. If we are comparing user-visible strings,localeAwareCompare() is usually the right choice, and if we want to make the comparisons case-insensitive, we can use toUpper() or toLower(). For example:
if (fileName.toLower() == "readme.txt") ...
If we want to replace a certain part of a string by another string, we can use replace():
QString str = "a cloudy day";str.replace(2, 6, "sunny");
The result is "a sunny day". The code can be rewritten to use remove() and insert():
str.remove(2, 6);

str.insert(2, "sunny");
First, we remove six characters starting at position 2, resulting in the string "a day" (with twospaces), then we insert "sunny" at position 2.
There are overloaded versions of replace() that replace all occurrences of their first argument withtheir second argument. For example, here's how to replace all occurrences of "&" with "&" in astring:
str.replace("&", "&");
One very frequent need is to strip the whitespace (such as spaces, tabs, and newlines) from astring. QString has a function that eliminates whitespace from both ends of a string:
QString str = " BOB \t THE \nDOG \n";
qDebug() << str.trimmed();
String str can be depicted as
The string returned by trimmed() is
When handling user input, we often also want to replace every sequence of one or more internalwhitespace characters with single spaces, in addition to stripping whitespace from both ends. This iswhat the simplified() function does:
QString str = " BOB \t THE \nDOG \n";qDebug() << str.simplified();
The string returned by simplified() is
A string can be split into a QStringList of substrings using QString::split():
QString str = "polluter pays principle";QStringList words = str.split(" ");
In the example above, we split the string "polluter pays principle" into three substrings: "polluter","pays", and "principle". The split() function has an optional third argument that specifies whetherempty substrings should be kept (the default) or discarded.
The items in a QStringList can be joined to form a single string using join(). The argument tojoin() is inserted between each pair of joined strings. For example, here's how to create a single

string that is composed of all the strings contained in a QStringList sorted into alphabetical orderand separated by newlines:
words.sort();str = words.join("\n");
When dealing with strings, we often need to determine whether a string is empty or not. This isdone by calling isEmpty() or by checking whether length() is 0.
The conversion from const char * strings to QString is automatic in most cases, for example:
str += " (1870)";
Here we add a const char * to a QString without formality. To explicitly convert a const char * to aQString, simply use a QString cast, or call fromAscii() or fromLatin1(). (See Chapter 17 for anexplanation of handling literal strings in other encodings.)
To convert a QString to a const char *, use toAscii() or toLatin1(). These functions return aQByteArray, which can be converted into a const char * using QByteArray::data() orQByteArray::constData(). For example:
printf("User: %s\n", str.toAscii().data());
For convenience, Qt provides the qPrintable() macro that performs the same as the sequencetoAscii().constData():
printf("User: %s\n", qPrintable(str));
When we call data() or constData() on a QByteArray, the returned string is owned by the QByteArray
object. This means that we don't need to worry about memory leaks; Qt will reclaim the memory forus. On the other hand, we must be careful not to use the pointer for too long. If the QByteArray isnot stored in a variable, it will be automatically deleted at the end of the statement.
The QByteArray class has a very similar API to QString. Functions like left(), right(), mid(),toLower(), toUpper(), TRimmed(), and simplified() exist in QByteArray with the same semantics astheir QString counterparts. QByteArray is useful for storing raw binary data and 8-bit encoded textstrings. In general, we recommend using QString for storing text rather than QByteArray becauseQString supports Unicode.
For convenience, QByteArray automatically ensures that the "one past the last" byte is always '\0',making it easy to pass a QByteArray to a function taking a const char *. QByteArray also supportsembedded '\0' characters, allowing us to use it to store arbitrary binary data.
In some situations, we need to store data of different types in the same variable. One approach is toencode the data as a QByteArray or a QString. For example, a string could hold a textual value or anumeric value in string form. These approaches give complete flexibility, but do away with some ofC++'s benefits, in particular type safety and efficiency. Qt provides a much cleaner way of handlingvariables that can hold different types: QVariant.
The QVariant class can hold values of many Qt types, including QBrush, QColor, QCursor, QDateTime,QFont, QKeySequence, QPalette, QPen, QPixmap, QPoint, QRect, QRegion, QSize, and QString, as well as
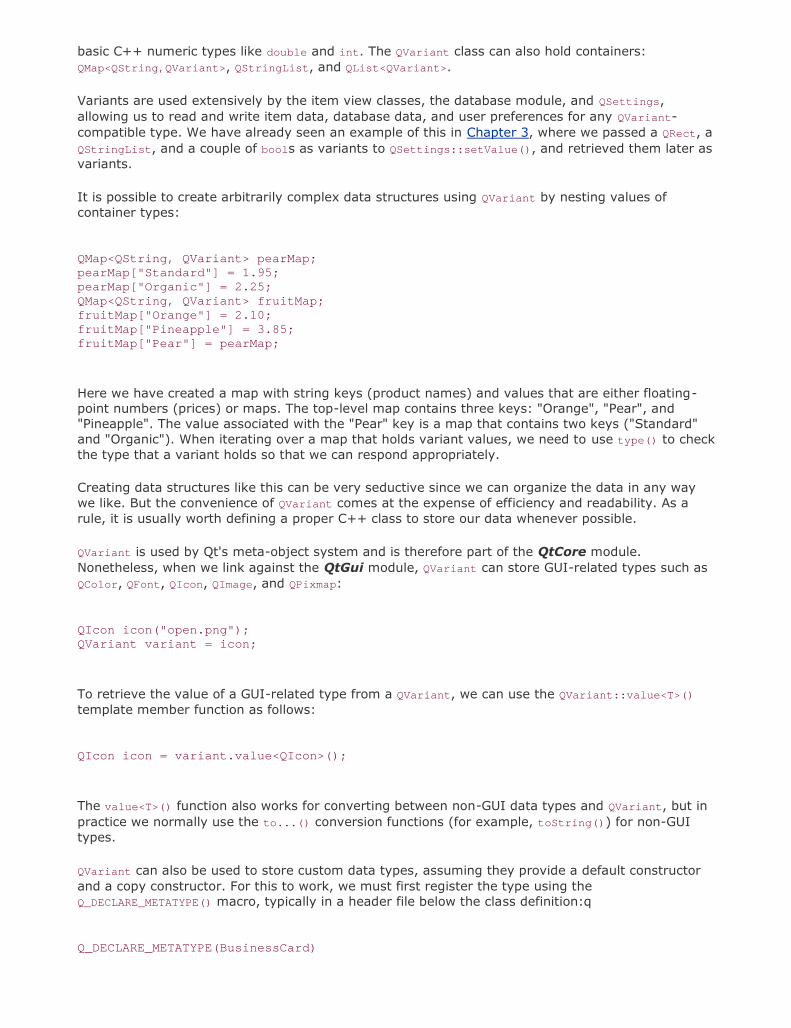
basic C++ numeric types like double and int. The QVariant class can also hold containers:QMap<QString,QVariant>, QStringList, and QList<QVariant>.
Variants are used extensively by the item view classes, the database module, and QSettings,allowing us to read and write item data, database data, and user preferences for any QVariant-compatible type. We have already seen an example of this in Chapter 3, where we passed a QRect, aQStringList, and a couple of bools as variants to QSettings::setValue(), and retrieved them later asvariants.
It is possible to create arbitrarily complex data structures using QVariant by nesting values ofcontainer types:
QMap<QString, QVariant> pearMap;pearMap["Standard"] = 1.95;pearMap["Organic"] = 2.25;QMap<QString, QVariant> fruitMap;fruitMap["Orange"] = 2.10;fruitMap["Pineapple"] = 3.85;fruitMap["Pear"] = pearMap;
Here we have created a map with string keys (product names) and values that are either floating-point numbers (prices) or maps. The top-level map contains three keys: "Orange", "Pear", and"Pineapple". The value associated with the "Pear" key is a map that contains two keys ("Standard"and "Organic"). When iterating over a map that holds variant values, we need to use type() to checkthe type that a variant holds so that we can respond appropriately.
Creating data structures like this can be very seductive since we can organize the data in any waywe like. But the convenience of QVariant comes at the expense of efficiency and readability. As arule, it is usually worth defining a proper C++ class to store our data whenever possible.
QVariant is used by Qt's meta-object system and is therefore part of the QtCore module.Nonetheless, when we link against the QtGui module, QVariant can store GUI-related types such asQColor, QFont, QIcon, QImage, and QPixmap:
QIcon icon("open.png");QVariant variant = icon;
To retrieve the value of a GUI-related type from a QVariant, we can use the QVariant::value<T>()
template member function as follows:
QIcon icon = variant.value<QIcon>();
The value<T>() function also works for converting between non-GUI data types and QVariant, but inpractice we normally use the to...() conversion functions (for example, toString()) for non-GUItypes.
QVariant can also be used to store custom data types, assuming they provide a default constructorand a copy constructor. For this to work, we must first register the type using theQ_DECLARE_METATYPE() macro, typically in a header file below the class definition:q
Q_DECLARE_METATYPE(BusinessCard)

This enables us to write code like this:
BusinessCard businessCard;QVariant variant = QVariant::fromValue(businessCard);...if (variant.canConvert<BusinessCard>()) { BusinessCard card = variant.value<BusinessCard>(); ...}
Because of a compiler limitation, these template member functions are not available for MSVC 6. Ifyou need to use this compiler, use the qVariantFromValue(), qVariantValue<T>(), andqVariantCanConvert<T>() global functions instead.
If the custom data type has << and >> operators for writing to and reading from a QDataStream, wecan register them using qRegisterMetaTypeStreamOperators<T>(). This makes it possible to storepreferences of custom data types using QSettings, among other things. For example:
qRegisterMetaTypeStreamOperators<BusinessCard>("BusinessCard");
This chapter has focused on the Qt containers, as well as on QString, QByteArray, and QVariant. Inaddition to these classes, Qt also provides a few other containers. One is QPair<T1, T2>, whichsimply stores two values and is similar to std::pair<T1, T2>. Another is QBitArray, which we will usein the first section of Chapter 19. Finally, there is QVarLengthArray<T,Prealloc>, a low-levelalternative to QVector<T>. Because it preallocates memory on the stack and isn't implicitly shared, itsoverhead is less than that of QVector<T>, making it more appropriate for tight loops.
Qt's algorithms, including a few not covered here such as qCopyBackward() and qEqual(), aredescribed in Qt's documentation at http://doc.trolltech.com/4.1/algorithms.html. And for moredetails of Qt's containers, including information on their time complexity and growth strategies, seehttp://doc.trolltech.com/4.1/containers.html.

Chapter 12. Input/Output Reading and Writing Binary Data Reading and Writing Text Traversing Directories Embedding Resources Inter-Process Communication
The need to read from or write to files or other devices is common to almost every application. Qtprovides excellent support for I/O through QIODevice, a powerful abstraction that encapsulates"devices" capable of reading and writing blocks of bytes. Qt includes the following QIODevice
subclasses:
QFile Accesses files in the local file system and in embedded resources
QTemporaryFile Creates and accesses temporary files in the local file system
QBuffer Reads data from or writes data to a QByteArray
QProcess Runs external programs and handles inter-process communication
QTcpSocket Transfers a stream of data over the network using TCP
QUdpSocket Sends or receives UDP datagrams over the network
QProcess, QTcpSocket, and QUdpSocket are sequential devices, meaning that the data can only beaccessed once, starting from the first byte and progressing serially to the last byte. QFile,QTemporaryFile, and QBuffer are random-access devices, so bytes can be read any number of timesfrom any position; they provide the QIODevice::seek() function for repositioning the file pointer.
In addition to the device classes, Qt also provides two higher-level stream classes that we can useto read from and write to any I/O device: QDataStream for binary data and QTextStream for text.These classes take care of issues such as byte ordering and text encodings, ensuring that Qtapplications running on different platforms or in different countries can read and write each other'sfiles. This makes Qt's I/O classes much more convenient than the corresponding Standard C++classes, which leave these issues to the application programmer.
QFile makes it easy to access individual files, whether they are in the file system or embedded inthe application's executable as resources. For applications that need to identify whole sets of files towork on, Qt provides the QDir and QFileInfo classes, which handle directories and provideinformation about the files inside them.
The QProcess class allows us to launch external programs and to communicate with them throughtheir standard input, standard output, and standard error channels (cin, cout, and cerr). We can setthe environment variables and working directory that the external application will use. By default,communication with the process is asynchronous (non-blocking), but it is also possible to block oncertain operations.
Networking and reading and writing XML are such substantial topics that they are coveredseparately in their own dedicated chapters (Chapter 14 and Chapter 15).

Reading and Writing Binary DataThe simplest way to load and save binary data with Qt is to instantiate a QFile, to open the file, andto access it through a QDataStream object. QDataStream provides a platform-independent storageformat that supports basic C++ types like int and double, and many Qt data types, includingQByteArray, QFont, QImage, QPixmap, QString, and QVariant, as well as Qt container classes such asQList<T> and QMap<K, T>.
Here's how we would store an integer, a QImage, and a QMap<QString, QColor> in a file calledfacts.dat:
QImage image("philip.png");QMap<QString, QColor> map;map.insert("red", Qt::red);map.insert("green", Qt::green);map.insert("blue", Qt::blue);QFile file("facts.dat");if (!file.open(QIODevice::WriteOnly)) { cerr << "Cannot open file for writing: " << qPrintable(file.errorString()) << endl; return;}QDataStream out(&file);out.setVersion(QDataStream::Qt_4_1);out << quint32(0x12345678) << image << map;
If we cannot open the file, we inform the user and return. The qPrintable() macro returns a const
char * for a QString. (Another approach would have been to use QString::toStdString(), whichreturns a std::string, for which <iostream> has a << overload.)
If the file is opened successfully, we create a QDataStream and set its version number. The versionnumber is an integer that influences the way Qt data types are represented (basic C++ data typesare always represented the same way). In Qt 4.1, the most comprehensive format is version 7. Wecan either hard-code the constant 7 or use the QDataStream::Qt_4_1 symbolic name.
To ensure that the number 0x12345678 is written as an unsigned 32-bit integer on all platforms, wecast it to quint32, a data type that is guaranteed to be exactly 32 bits. To ensure interoperability,QDataStream standardizes on big-endian by default; this can be changed by calling setByteOrder().
We don't need to explicitly close the file since this is done automatically when the QFile variablegoes out of scope. If we want to verify that the data has actually been written, we can call flush()and check its return value (true on success).
The code to read back the data mirrors the code we used to write it:
quint32 n;QImage image;QMap<QString, QColor> map;QFile file("facts.dat");if (!file.open(QIODevice::ReadOnly)) { cerr << "Cannot open file for reading: " << qPrintable(file.errorString()) << endl; return;}QDataStream in(&file);in.setVersion(QDataStream::Qt_4_1);

in >> n >> image >> map;
The QDataStream version we use for reading is the same as the one we used for writing. This mustalways be the case. By hard-coding the version number, we guarantee that the application canalways read and write the data (assuming it is compiled with Qt 4.1 or any later Qt version).
QDataStream stores data in such a way that we can read it back seamlessly. For example, aQByteArray is represented as a 32-bit byte count followed by the bytes themselves. QDataStream canalso be used to read and write raw bytes, without any byte count header, using readRawBytes() andwriteRawBytes().
Error handling when reading from a QDataStream is fairly easy. The stream has a status() value thatcan be QDataStream::Ok, QDataStream::ReadPastEnd, or QDataStream::ReadCorruptData. Once an errorhas occurred, the >> operator always reads zero or empty values. This means that we can oftensimply read an entire file without worrying about potential errors and check the status() value atthe end to see if what we read was valid.
QDataStream handles a variety of C++ and Qt data types; the complete list is available athttp://doc.trolltech.com/4.1/datastreamformat.html. We can also add support for our own customtypes by overloading the << and >> operators. Here's the definition of a custom data type that can beused with QDataStream:
class Painting{public: Painting() { myYear = 0; } Painting(const QString &title, const QString &artist, int year) { myTitle = title; myArtist = artist; myYear = year; } void setTitle(const QString &title) { myTitle = title; } QString title() const { return myTitle; } ...private: QString myTitle; QString myArtist; int myYear;};QDataStream &operator<<(QDataStream &out, const Painting &painting);QDataStream &operator>>(QDataStream &in, Painting &painting);
Here's how we would implement the << operator:
QDataStream &operator<<(QDataStream &out, const Painting &painting){ out << painting.title() << painting.artist() << quint32(painting.year()); return out;}
To output a Painting, we simply output two QStrings and a quint32. At the end of the function, wereturn the stream. This is a common C++ idiom that allows us to use a chain of << operators with anoutput stream. For example:

out << painting1 << painting2 << painting3;
The implementation of operator>>() is similar to that of operator<<():
QDataStream &operator>>(QDataStream &in, Painting &painting){ QString title; QString artist; quint32 year; in >> title >> artist >> year; painting = Painting(title, artist, year); return in;}
There are several benefits to providing streaming operators for custom data types. One of them isthat it allows us to stream containers that use the custom type. For example:
QList<Painting> paintings = ...;
out << paintings;
We can read in containers just as easily:
QList<Painting> paintings;in >> paintings;
This would result in a compiler error if Painting didn't support << or >>. Another benefit of providingstreaming operators for custom types is that we can store values of these types as QVariants, whichmakes them more widely usable, for example by QSettings. This works provided that we register thetype using qRegisterMetaTypeStreamOperators<T>() beforehand, as explained in Chapter 11 (p. 270).
When we use QDataStream, Qt takes care of reading and writing each type, including containers withan arbitrary number of items. This relieves us from the need to structure what we write and fromperforming any kind of parsing on what we read. Our only obligation is to ensure that we read allthe types in exactly the same order as we wrote them, leaving Qt to handle all the details.
QDataStream is useful both for our own custom application file formats and for standard binaryformats. We can read and write standard binary formats using the streaming operators on basictypes (like quint16 or float) or using readRawBytes() and writeRawBytes(). If the QDataStream isbeing used purely to read and write basic C++ data types, we don't even need to call setVersion().
So far, we loaded and saved data with the stream's version hard-coded as QDataStream::Qt_4_1. Thisapproach is simple and safe, but it does have one small drawback: We cannot take advantage ofnew or updated formats. For example, if a later version of Qt added a new attribute to QFont (inaddition to its point size, family, etc.) and we hard-coded the version number to Qt_4_1, thatattribute wouldn't be saved or loaded. There are two solutions. The first approach is to embed theQDataStream version number in the file:
QDataStream out(&file);out << quint32(MagicNumber) << quint16(out.version());

(MagicNumber is a constant that uniquely identifies the file type.) This approach ensures that wealways write the data using the most recent version of QDataStream, whatever that happens to be.When we come to read the file, we read the stream version:
quint32 magic;quint16 streamVersion;QDataStream in(&file);in >> magic >> streamVersion;if (magic != MagicNumber) { cerr << "File is not recognized by this application" << endl;} else if (streamVersion > in.version()) { cerr << "File is from a more recent version of the application" << endl; return false;}in.setVersion(streamVersion);
We can read the data as long as the stream version is less than or equal to the version used by theapplication; otherwise, we report an error.
If the file format contains a version number of its own, we can use it to deduce the stream versionnumber instead of storing it explicitly. For example, let's suppose that the file format is for version1.3 of our application. We might then write the data as follows:
QDataStream out(&file);out.setVersion(QDataStream::Qt_4_1);out << quint32(MagicNumber) << quint16(0x0103);
When we read it back, we determine which QDataStream version to use based on the application'sversion number:
QDataStream in(&file);in >> magic >> appVersion;if (magic != MagicNumber) { cerr << "File is not recognized by this application" << endl; return false;} else if (appVersion > 0x0103) { cerr << "File is from a more recent version of the application" << endl; return false;}if (appVersion < 0x0103) {
in.setVersion(QDataStream::Qt_3_0);} else { in.setVersion(QDataStream::Qt_4_1);}
In this example, we specify that any file saved with versions prior to 1.3 of the application uses datastream version 4 (Qt_3_0), and that files saved with version 1.3 of the application use data streamversion 7 (Qt_4_1).
In summary, there are three policies for handling QDataStream versions: hard-coding the versionnumber, explicitly writing and reading the version number, and using different hard-coded versionnumbers depending on the application's version. Any of these policies can be used to ensure thatdata written by an old version of an application can be read by a new version, even if the new

version links against a more recent version of Qt. Once we have chosen a policy for handlingQDataStream versions, reading and writing binary data using Qt is both simple and reliable.
If we want to read or write a file in one go, we can avoid using QDataStream altogether and insteaduse QIODevice's write() and readAll() functions. For example:
bool copyFile(const QString &source, const QString &dest){ QFile sourceFile(source); if (!sourceFile.open(QIODevice::ReadOnly)) return false; QFile destFile(dest); if (!destFile.open(QIODevice::WriteOnly)) return false;
destFile.write(sourceFile.readAll()); return sourceFile.error() == QFile::NoError && destFile.error() == QFile::NoError;}
In the line where readAll() is called, the entire contents of the input file is read into a QByteArray,which is then passed to the write() function to be written to the output file. Having all the data in aQByteArray requires more memory than reading item by item, but it offers some advantages. Forexample, we can then use qCompress() and qUncompress() to compress and uncompress the data.
There are other scenarios where accessing QIODevice directly is more appropriate than usingQDataStream. QIODevice provides a peek() function that returns the next data bytes without movingthe device position as well as an unget-Char() function that "unreads" a byte. This works both forrandom-access devices (such as files) and for sequential devices (such as network sockets). There isalso a seek() function that sets the device position, for devices that support random access.
Binary file formats provide the most versatile and most compact means of storing data, andQDataStream makes accessing binary data easy. In addition to the examples in this section, we havealready seen the use of QDataStream in Chapter 4 to read and write Spreadsheet files, and we willsee it again in Chapter 19, where we use it to read and write Windows cursor files.
Reading and Writing TextWhile binary file formats are typically more compact than text-based formats, they are not human-readable or human-editable. In cases where this is an issue, we can use text formats instead. Qtprovides the QTextStream class for reading and writing plain text files and for files using other textformats, such as HTML, XML, and source code. Handling XML files is covered separately in Chapter15.
QTextStream takes care of converting between Unicode and the system's local encoding or any otherencoding, and transparently handles the different line-ending conventions used by differentoperating systems ("\r\n" on Windows, "\n" on Unix and Mac OS X). QTextStream uses the 16-bitQChar type as its fundamental unit of data. In addition to characters and strings, QTextStream
supports C++'s basic numeric types, which it converts to and from strings. For example, thefollowing code writes "Thomas M. Disch: 334\n" to the file sf-book.txt:
QFile file("sf-book.txt");if (!file.open(QIODevice::WriteOnly)) { cerr << "Cannot open file for writing: " << qPrintable(file.errorString()) << endl; return;}

QTextStream out(&file);out << "Thomas M. Disch: " << 334 << endl;
Writing text is very easy, but reading text can be challenging, because textual data (unlike binarydata written using QDataStream) is fundamentally ambiguous. Let's consider the following example:
out << "Norway" << "Sweden";
If out is a QTextStream, the data that actually gets written is the string "NorwaySweden". We can'treally expect the following code to read back the data correctly:
in >> str1 >> str2;
In fact, what happens is that str1 gets the whole word "NorwaySweden", and str2 gets nothing.This problem doesn't occur with QDataStream because it stores the length of each string in front ofthe character data.
For complex file formats, a full-blown parser might be required. Such a parser might work byreading the data character-by-character using >> on a QChar, or line by line usingQTextStream::readLine(). At the end of this section, we present two small examples, one that readsan input file line by line, and another that reads it character by character. For parsers that work onan entire text, we could read the complete file in one go using QTextStream::readAll() if we are notconcerned about memory usage, or if we know the file will be small.
By default, QTextStream uses the system's local encoding (for example, ISO 8859-1 or ISO 8859-15in America and much of Europe) for reading and writing. This can be changed using setCodec() asfollows:
stream.setCodec("UTF-8");
The UTF-8 encoding used in the example is a popular ASCII-compatible encoding that can representthe entire Unicode character set. For more information about Unicode and QTextStream's support forencodings, see Chapter 17 (Inter-nationalization).
QTextStream has various options modeled after those offered by <iostream>. These can be set bypassing special objects, called stream manipulators, on the stream to alter its state. The followingexample sets the showbase, upper-casedigits, and hex options before it outputs the integer12345678, producing the text "0xBC614E":
out << showbase << uppercasedigits << hex << 12345678;
Options can also be set using member functions:
out.setNumberFlags(QTextStream::ShowBase | QTextStream::UppercaseDigits);out.setIntegerBase(16);out << 12345678;

Figure 12.1. Functions to set QTextStream's options
[View full size image]
Like QDataStream, QTextStream operates on a QIODevice subclass, which can be a QFile, aQTemporaryFile, a QBuffer, a QProcess, a QTcpSocket, or a QUdpSocket. In addition, it can be useddirectly on a QString. For example:
QString str;QTextStream(&str) << oct << 31 << " " << dec << 25 << endl;
This makes the contents of str "37 25\ n", since the decimal number 31 is expressed as 37 in octal.In this case, we don't need to set an encoding on the stream, since QString is always Unicode.
Let's look at a simple example of a text-based file format. In the Spreadsheet application describedin Part I, we used a binary format for storing Spreadsheet data. The data consisted of a sequence of(row, column, formula) triples, one for every non-empty cell. Writing the data as text isstraightforward; here is an extract from a revised version of Spreadsheet::writeFile():

QTextStream out(&file);for (int row = 0; row < RowCount; ++row) { for (int column = 0; column < ColumnCount; ++column) { QString str = formula(row, column); if (!str.isEmpty()) out << row << " " << column << " " << str << endl; }}
We have used a simple format, with each line representing one cell and with spaces between therow and the column and between the column and the formula. The formula can contain spaces, butwe can assume that it contains no '\n' (which we use to terminate lines). Now let's look at thecorresponding reading code:
QTextStream in(&file);while (!in.atEnd()) { QString line = in.readLine(); QStringList fields = line.split(' '); if (fields.size() >= 3) { int row = fields.takeFirst().toInt(); int column = fields.takeFirst().toInt(); setFormula(row, column, fields.join(' ')); }}
We read in the Spreadsheet data one line at a time. The readLine() function removes the trailing'\n'. QString::split() returns a string list, having split its string wherever the separator it is givenappears. For example, the line "5 19 Total value" results in the four-item list ["5", "19", "Total","value"].
If we have at least three fields, we are ready to extract the data. The QStringList::takeFirst()
function removes the first item in a list and returns the removed item. We use it to extract the rowand column numbers. We don't perform any error checking; if we read a non-integer row or columnvalue, QString::toInt() will return 0. When we call setFormula(), we must concatenate theremaining fields back into a single string.
In our second QTextStream example, we will use a character by character approach to implement aprogram that reads in a text file and outputs the same text but with trailing spaces removed fromlines and all tabs replaced by spaces. The program's work is done by the tidyFile() function:
void tidyFile(QIODevice *inDevice, QIODevice *outDevice){ QTextStream in(inDevice);
QTextStream out(outDevice); const int TabSize = 8; int endlCount = 0; int spaceCount = 0; int column = 0; QChar ch; while (!in.atEnd()) { in >> ch; if (ch == '\n') { ++endlCount; spaceCount = 0; column = 0; } else if (ch == '\t') { int size = TabSize - (column % TabSize); spaceCount += size;
column += size; } else if (ch == ' ') { ++spaceCount; ++column; } else { while (endlCount > 0) { out << endl;
--endlCount; column = 0; } while (spaceCount > 0) { out << ' ';
--spaceCount; ++column; } out << ch; ++column; } } out << endl;}
We create an input and an output QTextStream based on the QIODevices that are passed to thefunction. We maintain three elements of state: one counting newlines, one counting spaces, and onemarking the current column position in the current line (for converting the tabs to the correctnumber of spaces).
The parsing is done in a while loop that iterates over every character in the input file, one at a time.The code is a bit subtle in places. For example, although we set TabSize to 8, we replace tabs withprecisely enough spaces to pad to the next tab boundary, rather than crudely replacing each tabwith eight spaces. If we get a newline, tab, or space, we simply update the state data. Only whenwe get another kind of character do we produce any output, and before writing the character wewrite any pending newlines and spaces (to respect blank lines and to preserve indentation) andupdate the state.
int main(){ QFile inFile; QFile outFile; inFile.open(stdin, QFile::ReadOnly); outFile.open(stdout, QFile::WriteOnly); tidyFile(&inFile, &outFile); return 0;}
For this example, we don't need a QApplication object, because we are only using Qt's tool classes.See http://doc.trolltech.com/4.1/tools.html for the list of all tool classes. We have assumed that theprogram is used as a filter, for example:
tidy < cool.cpp > cooler.cpp
It would be easy to extend it to be able to handle file names given on the command line if they aregiven, and to filter cin to cout otherwise.
Since this is a console application, it has a slightly different .pro file from those we have seen forGUI applications:

TEMPLATE = appQT = coreCONFIG += consoleCONFIG -= app_bundleSOURCES = tidy.cpp
We only link against QtCore since we don't use any GUI functionality. Then we specify that we wantto enable console output on Windows and that we don't want the application to live in a bundle onMac OS X.
For reading and writing plain ASCII files or ISO 8859-1 (Latin-1) files, it is possible to useQIODevice's API directly instead of using a QTextStream. It is rarely wise to do this since mostapplications need support for other encodings at some point or other, and only QTextStream providesseamless support for these. If you still want to write text directly to a QIODevice, you must explicitlyspecify the QIODevice::Text flag to the open() function, for example:
file.open(QIODevice::WriteOnly | QIODevice::Text);
When writing, this flag tells QIODevice to convert '\n' characters into "\r\n" sequences on Windows.When reading, this flag tells the device to ignore '\r' characters on all platforms. We can thenassume that the end of each line is signified with a '\n' newline character regardless of the line-ending convention used by the operating system.
Traversing DirectoriesThe QDir class provides a platform-independent means of traversing directories and retrievinginformation about files. To see how QDir is used, we will write a small console application thatcalculates the space consumed by all the images in a particular directory and all its subdirectories toany depth.
The heart of the application is the imageSpace() function, which recursively computes the cumulativesize of a given directory's images:
qlonglong imageSpace(const QString &path){ QDir dir(path); qlonglong size = 0; QStringList filters; foreach (QByteArray format, QImageReader::supportedImageFormats()) filters += "*." + format; foreach (QString file, dir.entryList(filters, QDir::Files)) size += QFileInfo(dir, file).size();
foreach (QString subDir, dir.entryList(QDir::Dirs | QDir::NoDotAndDotDot)) size += imageSpace(path + QDir::separator() + subDir); return size;}
We begin by creating a QDir object using the given path, which may be relative to the currentdirectory or absolute. We pass the entryList() function two arguments. The first is a list of filename filters. These can contain '*' and '?' wildcard characters. In this example, we are filtering toinclude only file formats that QImage can read. The second argument specifies what kind of entrieswe want (normal files, directories, drives, etc.).

We iterate over the list of files, accumulating their sizes. The QFileInfo class allows us to access afile's attributes, such as the file's size, permissions, owner, and timestamps.
The second entryList() call retrieves all the subdirectories in this directory. We iterate over them(excluding . and ..) and recursively call imageSpace() to ascertain their accumulated image sizes.
To create each subdirectory's path, we combine the current directory's path with the subdirectoryname, separating them with a slash. QDir treats '/' as a directory separator on all platforms, inaddition to recognizing '\' on Windows. When presenting paths to the user, we can call the staticfunction QDir::convertSeparators() to convert slashes to the correct platform-specific separator.
Let's add a main() function to our small program:
int main(int argc, char *argv[]){ QCoreApplication app(argc, argv); QStringList args = app.arguments(); QString path = QDir::currentPath(); if (args.count() > 1) path = args[1]; cout << "Space used by images in " << qPrintable(path) << " and its subdirectories is " << (imageSpace(path) / 1024) << " KB" << endl; return 0;}
We use QDir::currentPath() to initialize the path to the current directory. Alternatively, we couldhave used QDir::homePath() to initialize it to the user's home directory. If the user has specified apath on the command line, we use that instead. Finally, we call our imageSpace() function tocalculate how much space is consumed by images.
The QDir class provides other file- and directory-related functions, including entryInfoList() (whichreturns a list of QFileInfo objects), rename(), exists(), mkdir(), and rmdir(). The QFile classprovides some static convenience functions, including remove() and exists().
Embedding ResourcesSo far in this chapter we have talked about accessing data in external devices, but with Qt it is alsopossible to embed binary data or text inside the application's executable. This is achieved using Qt'sresource system. In other chapters, we used resource files to embed images in the executable, butit is possible to embed any kind of file. Embedded files can be read using QFile just like normal filesin the file system.
Resources are converted into C++ code by rcc, Qt's resource compiler. We can tell qmake to includespecial rules to run rcc by adding this line to the .pro file:
RESOURCES = myresourcefile.qrc
The myresourcefile.qrc file is an XML file that lists the files to embed in the executable.
Let's imagine that we are writing an application that keeps contact details. For the convenience ofour users, we want to embed the international dialing codes in the executable. If the file is in thedatafiles directory in the application's build directory, the resource file might look like this:

<!DOCTYPE RCC><RCC version="1.0"><qresource> <file>datafiles/phone-codes.dat</file></qresource></RCC>
From the application, resources are identified by the :/ path prefix. In this example, the dialingcodes file has the path :/datafiles/phone-codes.dat and can be read just like any other file usingQFile.
Embedding data in the executable has the advantage that it cannot get lost and makes it possible tocreate truly stand-alone executables (if static linking is also used). Two disadvantages are that if theembedded data needs changing the whole executable must be replaced, and the size of theexecutable will be larger because it must accommodate the embedded data.
Qt's resource system provides more features than we presented in this example, including supportfor file name aliases and for localization. These facilities are documented athttp://doc.trolltech.com/4.1/resources.html.
Inter-Process CommunicationThe QProcess class allows us to run external programs and to interact with them. The class worksasynchronously, doing its work in the background so that the user interface remains responsive.QProcess emits signals to notify us when the external process has data or has finished.
We will review the code of a small application that provides a user interface for an external imageconversion program. For this example, we rely on the ImageMagick convert program, which is freelyavailable for all major platforms.
Figure 12.2. The Image Converter application
The user interface was created in Qt Designer. The .ui file is on the CD that accompanies thisbook. Here, we will focus on the subclass that inherits from the uic-generated Ui::ConvertDialog

class, starting with the header:
#ifndef CONVERTDIALOG_H#define CONVERTDIALOG_H#include <QDialog>#include <QProcess>#include "ui_convertdialog.h"class ConvertDialog : public QDialog, public Ui::ConvertDialog{ Q_OBJECTpublic: ConvertDialog(QWidget *parent = 0);private slots: void on_browseButton_clicked(); void on_convertButton_clicked(); void updateOutputTextEdit(); void processFinished(int exitCode, QProcess::ExitStatus exitStatus); void processError(QProcess::ProcessError error);private: QProcess process; QString targetFile;};#endif
The header follows the familiar pattern for subclasses of Qt Designer forms. Thanks to QtDesigner's automatic connection mechanism (p. 28), the on_browseButton_clicked() andon_convertButton_clicked() slots are automatically connected to the Browse and Convert buttons'clicked() signals.
ConvertDialog::ConvertDialog(QWidget *parent) : QDialog(parent){ setupUi(this); connect(&process, SIGNAL(readyReadStandardError()), this, SLOT(updateOutputTextEdit())); connect(&process, SIGNAL(finished(int, QProcess::ExitStatus)), this, SLOT(processFinished(int, QProcess::ExitStatus))); connect(&process, SIGNAL(error(QProcess::ProcessError)), this, SLOT(processError(QProcess::ProcessError)));}
The setupUi() call creates and lays out all the form's widgets, establishes the signalslot connectionsfor the on_objectName_signalName() slots, and connects the Quit button to QDialog::accept(). Afterthat, we manually connect three signals from the QProcess object to three private slots. Wheneverthe external process has data on its cerr, we will handle it in updateOutputTextEdit().
void ConvertDialog::on_browseButton_clicked(){ QString initialName = sourceFileEdit->text(); if (initialName.isEmpty()) initialName = QDir::homePath(); QString fileName = QFileDialog::getOpenFileName(this, tr("Choose File"), initialName); fileName = QDir::convertSeparators(fileName); if (!fileName.isEmpty()) { sourceFileEdit->setText(fileName); convertButton->setEnabled(true); }

}
The Browse button's clicked() signal is automatically connected to the on_browseButton_clicked()
slot by setupUi(). If the user has previously selected a file, we initialize the file dialog with that file'sname; otherwise, we use the user's home directory.
void ConvertDialog::on_convertButton_clicked(){ QString sourceFile = sourceFileEdit->text(); targetFile = QFileInfo(sourceFile).path() + QDir::separator() + QFileInfo(sourceFile).baseName() + "." + targetFormatComboBox->currentText().toLower(); convertButton->setEnabled(false); outputTextEdit->clear(); QStringList args; if (enhanceCheckBox->isChecked()) args << "-enhance"; if (monochromeCheckBox->isChecked()) args << "-monochrome"; args << sourceFile << targetFile; process.start("convert", args);}
When the user clicks the Convert button, we copy the source file's name and change the extensionto match the target file format. We use the platform-specific directory separator ('/' or '\', availableas QDir::separator()) instead of hard-coding slashes because the file name will be visible to theuser.
We then disable the Convert button to avoid the user accidentally launching multiple conversions,and we clear the text edit that we use to show status information.
To initiate the external process, we call QProcess::start() with the name of the program we want torun (convert) and any arguments it requires. In this case we pass the -enhance and -monochrome
flags if the user checked the appropriate options, followed by the source and target file names. Theconvert program infers the required conversion from the file extensions.
void ConvertDialog::updateOutputTextEdit(){ QByteArray newData = process.readAllStandardError(); QString text = outputTextEdit->toPlainText() + QString::fromLocal8Bit(newData); outputTextEdit->setPlainText(text);}
Whenever the external process writes to cerr, the updateOutputTextEdit() slot is called. We read theerror text and add it to the QTextEdit's existing text.
void ConvertDialog::processFinished(int exitCode, QProcess::ExitStatus exitStatus){ if (exitStatus == QProcess::CrashExit) { outputTextEdit->append(tr("Conversion program crashed")); } else if (exitCode != 0) { outputTextEdit->append(tr("Conversion failed")); } else { outputTextEdit->append(tr("File %1 created").arg(targetFile));

} convertButton->setEnabled(true);}
When the process has finished, we let the user know the outcome and enable the Convert button.
void ConvertDialog::processError(QProcess::ProcessError error){ if (error == QProcess::FailedToStart) { outputTextEdit->append(tr("Conversion program not found")); convertButton->setEnabled(true); }}
If the process cannot be started, QProcess emits error() instead of finished(). We report any errorand enable the Click button.
In this example, we have performed the file conversions asynchronouslythat is, we have toldQProcess to run the convert program and to return control to the application immediately. This keepsthe user interface responsive while the processing occurs in the background. But in some situationswe need the external process to complete before we can go any further in our application, and insuch cases we need QProcess to operate synchronously.
One common example where synchronous behavior is desirable is for applications that support plaintext editing using the user's preferred text editor. This is straightforward to implement usingQProcess. For example, let's assume that we have the plain text in a QTextEdit, and provide an Editbutton that the user can click, connected to an edit() slot.
void ExternalEditor::edit(){ QTemporaryFile outFile; if (!outFile.open()) return; QString fileName = outFile.fileName(); QTextStream out(&outFile); out << textEdit->toPlainText(); outFile.close(); QProcess::execute(editor, QStringList() << options << fileName); QFile inFile(fileName); if (!inFile.open(QIODevice::ReadOnly)) return; QTextStream in(&inFile); textEdit->setPlainText(in.readAll());}
We use QTemporaryFile to create an empty file with a unique name. We don't specify any argumentsto QTemporaryFile::open() since it conveniently defaults to opening in read/write mode. We write thecontents of the text edit to the temporary file, and then we close the file because some text editorscannot work on already open files.
The QProcess::execute() static function runs an external process and blocks until the process hasfinished. The editor argument is a QString holding the name of an editor executable (for example,"gvim"). The options argument is a QStringList (containing one item, "-f", if we are using gvim).
After the user has closed the text editor, the process finishes and the execute() call returns. Wethen open the temporary file and read its contents into the QTextEdit. QTemporaryFile automatically

deletes the temporary file when the object goes out of scope.
Signalslot connections are not needed when QProcess is used synchronously. If finer control isrequired than provided by the static execute() function, we can use an alternative approach. Thisinvolves creating a QProcess object and calling start() on it, and then forcing it to block by callingQProcess::waitFor-Started(), and if that is successful, calling QProcess::waitForFinished(). See theQProcess reference documentation for an example that uses this approach.
In this section, we used QProcess to give us access to preexisting functionality. Using applicationsthat already exist can save development time and can insulate us from the details of issues that areof marginal interest to our main application's purpose. Another way to access preexistingfunctionality is to link against a library that provides it. But where no suitable library exists,wrapping a console application using QProcess can work well.
Another use of QProcess is to launch other GUI applications, such as a web browser or an emailclient. However, if our aim is communication between applications rather than simply running onefrom another, we might be better off having them communicate directly, using Qt's networkingclasses or the ActiveQt extension on Windows.

Chapter 13. Databases Connecting and Querying Presenting Data in Tabular Form Implementing MasterDetail Forms
The QtSql module provides a platform- and database-independent interface for accessing SQLdatabases. This interface is supported by a set of classes that use Qt's model/view architecture toprovide database integration with the user interface. This chapter assumes familiarity with Qt'smodel/view classes, covered in Chapter 10.
A database connection is represented by a QSqlDatabase object. Qt uses drivers to communicate withthe various database APIs. The Qt Desktop Edition includes the following drivers:
Driver Database
QDB2 IBM DB2 version 7.1and later
QIBASE Borland InterBase
QMYSQL MySQL
QOCI Oracle (Oracle Call Interface)
QODBC ODBC (includes Microsoft SQL Server)
QPSQL PostgreSQL versions 6.x and 7.x
QSQLITE SQLite version 3 and later
QSQLITE2 SQLite version 2
QTDS Sybase Adaptive Server
Due to license restrictions, not all of the drivers are provided with the Qt Open Source Edition. Whenconfiguring Qt, we can choose between including the SQL drivers inside Qt itself and building themas plugins. Qt is supplied with the SQLite database, a public domain in-process database.
For users who are comfortable with SQL syntax, the QSqlQuery class provides a means of directlyexecuting arbitrary SQL statements and handling their results. For users who prefer a higher-leveldatabase interface that avoids SQL syntax, QSqlTableModel and QSqlRelationalTableModel providesuitable abstractions. These classes represent an SQL table in the same way as Qt's other modelclasses (covered in Chapter 10). They can be used stand-alone to traverse and edit data in code, orthey can be attached to views through which end-users can view and edit the data themselves.
Qt also makes it straightforward to program the common database idioms, such as masterdetail anddrill-down, as some of the examples in this chapter will demonstrate.
Connecting and QueryingTo execute SQL queries, we must first establish a connection with a database. Typically, databaseconnections are set up in a separate function that we call at application startup. For example:
bool createConnection(){ QSqlDatabase db = QSqlDatabase::addDatabase("QMYSQL");

db.setHostName("mozart.konkordia.edu"); db.setDatabaseName("musicdb"); db.setUserName("gbatstone"); db.setPassword("T17aV44"); if (!db.open()) { QMessageBox::critical(0, QObject::tr("Database Error"), db.lastError().text()); return false; } return true;}
First, we call QSqlDatabase::addDatabase() to create a QSqlDatabase object. The first argument toaddDatabase() specifies which database driver Qt must use to access the database. In this case, weuse MySQL.
Next, we set the database host name, the database name, the user name, and the password, andwe open the connection. If open() fails, we show an error message.
Typically, we would call createConnection() in main():
int main(int argc, char *argv[]){ QApplication app(argc, argv); if (!createConnection()) return 1; ... return app.exec();}
Once a connection is established, we can use QSqlQuery to execute any SQL statement that theunderlying database supports. For example, here's how to execute a SELECT statement:
QSqlQuery query;query.exec("SELECT title, year FROM cd WHERE year >= 1998");
After the exec() call, we can navigate through the query's result set:
while (query.next()) { QString title = query.value(0).toString(); int year = query.value(1).toInt(); cerr << qPrintable(title) << ": " << year << endl;}
We call next() once to position the QSqlQuery on the first record of the result set. Subsequent callsto next() advance the record pointer by one record each time, until the end is reached, at whichpoint next() returns false. If the result set is empty (or if the query failed), the first call to next()
will return false.
The value() function returns the value of a field as a QVariant. The fields are numbered from 0 inthe order given in the SELECT statement. The QVariant class can hold many C++ and Qt types,including int and QString. The different types of data that can be stored in a database are mappedinto the corresponding C++ and Qt types and stored in QVariants. For example, a VARCHAR is

represented as a QString and a DATETIME as a QDateTime.
QSqlQuery provides some other functions to navigate through the result set: first(), last(),previous(), and seek(). These functions are convenient, but for some databases they can be slowerand more memory-hungry than next(). For an easy optimization when operating on large data sets,we can call QSqlQuery::setForwardOnly(true) before calling exec(), and then only use next() fornavigating the result set.
Earlier we specified the SQL query as an argument to QSqlQuery::exec(), but we can also pass itdirectly to the constructor, which executes it immediately:
QSqlQuery query("SELECT title, year FROM cd WHERE year >= 1998");
We can check for an error by calling isActive() on the query:
if (!query.isActive()) QMessageBox::warning(this, tr("Database Error"), query.lastError().text());
If no error occurs, the query will become "active" and we can use next() to navigate through theresult set.
Doing an INSERT is almost as easy as performing a SELECT:
QSqlQuery query("INSERT INTO cd (id, artistid, title, year) " "VALUES (203, 102, 'Living in America', 2002)");
After this, numRowsAffected() returns the number of rows that were affected by the SQL statement(or -1 on error).
If we need to insert a lot of records, or if we want to avoid converting values to strings (andescaping them correctly), we can use prepare() to specify a query that contains placeholders andthen bind the values we want to insert. Qt supports both the Oracle-style and the ODBC-style syntaxfor placeholders for all databases, using native support where it is available and simulating itotherwise. Here's an example that uses the Oracle-style syntax with named placeholders:
QSqlQuery query;query.prepare("INSERT INTO cd (id, artistid, title, year) " "VALUES (:id, :artistid, :title, :year)");query.bindValue(":id", 203);query.bindValue(":artistid", 102);query.bindValue(":title", "Living in America");query.bindValue(":year", 2002);query.exec();
Here's the same example using ODBC-style positional placeholders:
QSqlQuery query;query.prepare("INSERT INTO cd (id, artistid, title, year) " "VALUES (?, ?, ?, ?)");query.addBindValue(203);

query.addBindValue(102);query.addBindValue("Living in America");query.addBindValue(2002);query.exec();
After the call to exec(), we can call bindValue() or addBindValue() to bind new values, then callexec() again to execute the query with the new values.
Placeholders are often used to specify binary data or strings that contain non-ASCII or non-Latin-1characters. Behind the scenes, Qt uses Unicode with those databases that support Unicode, and forthose that don't, Qt transparently converts strings to the appropriate encoding.
Qt supports SQL transactions on databases where they are available. To start a transaction, we calltransaction() on the QSqlDatabase object that represents the database connection. To finish thetransaction, we call either commit() or rollback(). For example, here's how we would look up aforeign key and execute an INSERT statement inside a transaction:
QSqlDatabase::database().transaction();QSqlQuery query;query.exec("SELECT id FROM artist WHERE name = 'Gluecifer'");if (query.next()) { int artistId = query.value(0).toInt(); query.exec("INSERT INTO cd (id, artistid, title, year) " "VALUES (201, " + QString::number(artistId) + ", 'Riding the Tiger', 1997)");}QSqlDatabase::database().commit();
The QSqlDatabase::database() function returns a QSqlDatabase object representing the connection wecreated in createConnection(). If a transaction cannot be started, QSqlDatabase::transaction()returns false. Some databases don't support transactions. For those, the transaction(), commit(),and rollback() functions do nothing. We can test whether a database supports transactions usinghasFeature() on the QSqlDriver associated with the database:
QSqlDriver *driver = QSqlDatabase::database().driver();if (driver->hasFeature(QSqlDriver::Transactions))
...
Several other database features can be tested for, including whether the database supports BLOBs(Binary Large Objects), Unicode, and prepared queries.
In the examples so far, we have assumed that the application is using a single database connection.If we want to create multiple connections, we can pass a name as second argument toaddDatabase(). For example:
QSqlDatabase db = QSqlDatabase::addDatabase("QPSQL", "OTHER");db.setHostName("saturn.mcmanamy.edu");db.setDatabaseName("starsdb");db.setUserName("hilbert");db.setPassword("ixtapa7");
We can then retrieve a pointer to the QSqlDatabase object by passing the name toQSqlDatabase::database():

QSqlDatabase db = QSqlDatabase::database("OTHER");
To execute queries using the other connection, we pass the QSqlDatabase object to the QSqlQuery
constructor:
QSqlQuery query(db);query.exec("SELECT id FROM artist WHERE name = 'Mando Diao'");
Multiple connections are useful if we want to perform more than one transaction at a time, sinceeach connection can only handle a single active transaction. When we use multiple databaseconnections, we can still have one unnamed connection, and QSqlQuery will use that connection ifnone is spec-ified.
In addition to QSqlQuery, Qt provides the QSqlTableModel class as a higher-level interface, allowing usto avoid using raw SQL for performing the most common SQL operations (SELECT, INSERT, UPDATE,and DELETE). The class can be used stand-alone to manipulate a database without any GUIinvolvement, or it can be used as a data source for QListView or QTableView.
Here's an example that uses QSqlTableModel to perform a SELECT:
QSqlTableModel model;model.setTable("cd");model.setFilter("year >= 1998");model.select();
This is equivalent to the query
SELECT * FROM cd WHERE year >= 1998
Navigating through the result set is done by retrieving a given record usingQSqlTableModel::record() and by accessing individual fields using value():
for (int i = 0; i < model.rowCount(); ++i) { QSqlRecord record = model.record(i); QString title = record.value("title").toString(); int year = record.value("year").toInt(); cerr << qPrintable(title) << ": " << year << endl;}
The QSqlRecord::value() function takes either a field name or a field index. When operating on largedata sets, it is recommended that fields are specified by their indexes. For example:
int titleIndex = model.record().indexOf("title");int yearIndex = model.record().indexOf("year");for (int i = 0; i < model.rowCount(); ++i) { QSqlRecord record = model.record(i); QString title = record.value(titleIndex).toString(); int year = record.value(yearIndex).toInt(); cerr << qPrintable(title) << ": " << year << endl;}

To insert a record into a database table, we use the same approach as we would inserting into anytwo-dimensional model: First, we call insertRow() to create a new empty row (record), and then weuse setData() to set the values of each column (field).
QSqlTableModel model;model.setTable("cd");int row = 0;model.insertRows(row, 1);model.setData(model.index(row, 0), 113);model.setData(model.index(row, 1), "Shanghai My Heart");model.setData(model.index(row, 2), 224);model.setData(model.index(row, 3), 2003);model.submitAll();
After the call to submitAll(), the record might be moved to a different row position, depending onhow the table is ordered. The submitAll() call will return false if the insertion failed.
An important difference between an SQL model and a standard model is that for an SQL model wemust call submitAll() to have any changes written to the database.
To update a record, we must first position the QSqlTableModel on the record we want to modify (forexample, using select()). We then extract the record, update the fields we want to change, andwrite our changes back to the database:
QSqlTableModel model;model.setTable("cd");model.setFilter("id = 125");model.select();if (model.rowCount() == 1) { QSqlRecord record = model.record(0); record.setValue("title", "Melody A.M."); record.setValue("year", record.value("year").toInt() + 1); model.setRecord(0, record); model.submitAll();}
If there is a record that matches the specified filter, we retrieve it using QSqlTableModel::record().We apply our changes and overwrite the original record with our modified record.
It is also possible to perform an update using setData(), just as we would do for a non-SQL model.The model indexes that we retrieve are for a given row and column:
model.select();if (model.rowCount() == 1) { model.setData(model.index(0, 1), "Melody A.M."); model.setData(model.index(0, 3), model.data(model.index(0, 3)).toInt() + 1); model.submitAll();}
Deleting a record is similar to updating:

model.setTable("cd");model.setFilter("id = 125");model.select();if (model.rowCount() == 1) { model.removeRows(0, 1); model.submitAll();}
The removeRows() call takes the row number of the first record to delete and the number of recordsto delete. The next example deletes all the records that match the filter:
model.setTable("cd");model.setFilter("year < 1990");model.select();if (model.rowCount() > 0) { model.removeRows(0, model.rowCount()); model.submitAll();}
The QSqlQuery and QSqlTableModel classes provide an interface between Qt and an SQL database.Using these classes, we can create forms that present data to users and that let them insert,update, and delete records.
Presenting Data in Tabular FormIn many cases, it is simplest to present users with a tabular view of a data set. In this section andthe following section, we present a simple CD Collection application that uses QSqlTableModel and itssubclass QSqlRelationalTableModel to let users view and interact with data stored in a database.
The main form shows a masterdetail view of CDs and the tracks on the currently selected CD, asshown in Figure 13.1.
Figure 13.1. The CD Collection application
[View full size image]

The application uses three tables, defined as follows:
CREATE TABLE artist ( id INTEGER PRIMARY KEY, name VARCHAR(40) NOT NULL, country VARCHAR(40));CREATE TABLE cd ( id INTEGER PRIMARY KEY, title VARCHAR(40) NOT NULL, artistid INTEGER NOT NULL, year INTEGER NOT NULL, FOREIGN KEY (artistid) REFERENCES artist);CREATE TABLE track ( id INTEGER PRIMARY KEY, title VARCHAR(40) NOT NULL, duration INTEGER NOT NULL, cdid INTEGER NOT NULL, FOREIGN KEY (cdid) REFERENCES cd);
Some databases don't support foreign keys. For those, we must remove the FOREIGN KEY clauses.The example will still work, but the database will not enforce referential integrity.
Figure 13.2. The CD Collection application's tables

In this section, we will write a dialog that allows the user to edit a list of artists using a simpletabular form. The user can insert or delete artists using the form's buttons. Updates can be applieddirectly, simply by editing cell text. Changes are applied to the database when the user pressesEnter or navigates to another record.
Figure 13.3. The ArtistForm dialog
Here's the class definition for the ArtistForm dialog:
class ArtistForm : public QDialog{ Q_OBJECTpublic: ArtistForm(const QString &name, QWidget *parent = 0);private slots: void addArtist(); void deleteArtist(); void beforeInsertArtist(QSqlRecord &record);private: enum { Artist_Id = 0, Artist_Name = 1, Artist_Country = 2 }; QSqlTableModel *model; QTableView *tableView; QPushButton *addButton; QPushButton *deleteButton; QPushButton *closeButton;};

The constructor is very similar to one that would be used to create a form based on a non-SQLmodel:
ArtistForm::ArtistForm(const QString &name, QWidget *parent) : QDialog(parent){ model = new QSqlTableModel(this); model->setTable("artist"); model->setSort(Artist_Name, Qt::AscendingOrder); model->setHeaderData(Artist_Name, Qt::Horizontal, tr("Name")); model->setHeaderData(Artist_Country, Qt::Horizontal, tr("Country")); model->select(); connect(model, SIGNAL(beforeInsert(QSqlRecord &)), this, SLOT(beforeInsertArtist(QSqlRecord &))); tableView = new QTableView; tableView->setModel(model); tableView->setColumnHidden(Artist_Id, true); tableView->setSelectionBehavior(QAbstractItemView::SelectRows); tableView->resizeColumnsToContents(); for (int row = 0; row < model->rowCount(); ++row) { QSqlRecord record = model->record(row); if (record.value(Artist_Name).toString() == name) { tableView->selectRow(row); break; } } ...}
We begin the constructor by creating a QSqlTableModel. We pass this as parent to give ownership tothe form. We have chosen to sort by column 1 (specified by the constant Artist_Name), whichcorresponds to the name field. If we did not specify column headers, the field names would be used.We prefer to name them ourselves to ensure that they are properly capitalized and internationalized.
Next, we create a QTableView to visualize the model. We hide the id field and set the column widthsto accommodate their text without needing to show ellipses.
The ArtistForm constructor takes the name of the artist that should be selected when the dialogpops up. We iterate through the artist table's records and select the specified artist. The rest of theconstructor's code is used to create and connect the buttons and to lay out the child widgets.
void ArtistForm::addArtist(){ int row = model->rowCount(); model->insertRow(row); QModelIndex index = model->index(row, Artist_Name); tableView->setCurrentIndex(index); tableView->edit(index);}
To add a new artist, we insert a single blank row at the bottom of the QTable-View. Now the user canenter a new artist's name and country. If the user confirms the insertion by pressing Enter, thebeforeInsert() signal is emitted and then the new record is inserted into the database.
void ArtistForm::beforeInsertArtist(QSqlRecord &record){ record.setValue("id", generateId("artist"));

}
In the constructor, we connected the model's beforeInsert() signal to this slot. We are passed anon-const reference to the record just before it is inserted into the database. At this point, wepopulate its id field.
Since we will need generateId() a few times, we define it inline in a header file and include it eachtime we need it. Here's a quick (and inefficient) way of implementing it:
inline int generateId(const QString &table){ QSqlQuery query; query.exec("SELECT MAX(id) FROM " + table); int id = 0; if (query.next()) id = query.value(0).toInt() + 1; return id;}
The generateId() function can only be guaranteed to work correctly if it is executed within thecontext of the same transaction as the corresponding INSERT statement. Some databases supportauto-generated fields, and it is usually far better to use the database-specific support for thisoperation.
The last possibility the ArtistForm dialog offers is deletion. Rather than performing cascadingdeletions (covered shortly), we have chosen to only permit deletions of artists who have no CDs inthe collection.
void ArtistForm::deleteArtist(){ tableView->setFocus(); QModelIndex index = tableView->currentIndex(); if (!index.isValid()) return; QSqlRecord record = model->record(index.row()); QSqlTableModel cdModel; cdModel.setTable("cd"); cdModel.setFilter("artistid = " + record.value("id").toString());
cdModel.select(); if (cdModel.rowCount() == 0) { model->removeRow(tableView->currentIndex().row()); } else { QMessageBox::information(this, tr("Delete Artist"), tr("Cannot delete %1 because there are CDs associated " "with this artist in the collection.") .arg(record.value("name").toString())); }}
If there is a record selected, we check to see if the artist has any CDs, and if they don't, we deletethem immediately. Otherwise, we pop up a message box explaining why the deletion was notperformed. Strictly speaking, we should have used a transaction, because as the code stands, it ispossible for a CD to have its artist set to the one we are deleting in-between the cdModel.select()
and model->removeRow() calls. We will show a transaction in the next section.

Implementing MasterDetail FormsWe will now review the main form which takes a masterdetail approach. The master view is a list ofCDs. The detail view is a list of tracks for the current CD. This form is the main window of the CDCollection application as shown in Figure 13.1 (p. 300).
class MainForm : public QWidget{ Q_OBJECTpublic: MainForm();private slots: void addCd(); void deleteCd(); void addTrack(); void deleteTrack(); void editArtists(); void currentCdChanged(const QModelIndex &index); void beforeInsertCd(QSqlRecord &record); void beforeInsertTrack(QSqlRecord &record); void refreshTrackViewHeader();private: enum { Cd_Id = 0, Cd_Title = 1, Cd_ArtistId = 2, Cd_Year = 3 }; enum { Track_Id = 0, Track_Title = 1, Track_Duration = 2, Track_CdId = 3 }; QSqlRelationalTableModel *cdModel; QSqlTableModel *trackModel; QTableView *cdTableView; QTableView *trackTableView; QPushButton *addCdButton; QPushButton *deleteCdButton; QPushButton *addTrackButton; QPushButton *deleteTrackButton; QPushButton *editArtistsButton; QPushButton *quitButton;};
We use a QSqlRelationalTableModel for the cd table rather than a plain QSqlTableModel because weneed to handle foreign keys. We will now review each function in turn, beginning with theconstructor, which we will look at in sections because it is quite long.
MainForm::MainForm(){ cdModel = new QSqlRelationalTableModel(this); cdModel->setTable("cd"); cdModel->setRelation(Cd_ArtistId, QSqlRelation("artist", "id", "name")); cdModel->setSort(Cd_Title, Qt::AscendingOrder); cdModel->setHeaderData(Cd_Title, Qt::Horizontal, tr("Title"));
cdModel->setHeaderData(Cd_ArtistId, Qt::Horizontal, tr("Artist")); cdModel->setHeaderData(Cd_Year, Qt::Horizontal, tr("Year")); cdModel->select();
The constructor begins by setting up the QSqlRelationalTableModel that handles the cd table. ThesetRelation() call tells the model that its artistid field (whose field index is held by Cd_ArtistId)holds the id foreign key from the artist table, and that it should display the corresponding name
field's contents instead of IDs. If the user chooses to edit this field (for example, by pressing F2),the model will automatically present a combobox with the names of all the artists, and if the userchooses a different artist, will update the cd table.
cdTableView = new QTableView;cdTableView->setModel(cdModel);cdTableView->setItemDelegate(new QSqlRelationalDelegate(this));cdTableView->setSelectionMode(QAbstractItemView::SingleSelection);cdTableView->setSelectionBehavior(QAbstractItemView::SelectRows);cdTableView->setColumnHidden(Cd_Id, true);cdTableView->resizeColumnsToContents();
Setting up the view for the cd table is again similar to what we have already seen. The onlysignificant difference is that instead of using the view's default delegate we useQSqlRelationalDelegate. It is this delegate that does the foreign key handling.
trackModel = new QSqlTableModel(this);trackModel->setTable("track");trackModel->setHeaderData(Track_Title, Qt::Horizontal, tr("Title"));trackModel->setHeaderData(Track_Duration, Qt::Horizontal, tr("Duration"));trackTableView = new QTableView;trackTableView->setModel(trackModel);trackTableView->setItemDelegate( new TrackDelegate(Track_Duration, this));trackTableView->setSelectionMode( QAbstractItemView::SingleSelection);trackTableView->setSelectionBehavior(QAbstractItemView::SelectRows);
For tracks, we are only going to show their names and durations, so a QSqlTableModel is sufficient.(The id and cdid field's are hidden in the currentCd-Changed() slot shown later.) The only notableaspect of this part of the code is that we use the trackDelegate developed in Chapter 10 to showtrack times as "minutes:seconds" and to allow them to be edited using a suitable QTimeEdit.
The creation, connecting, and laying out of the views and buttons holds no surprises, so the onlyother part of the constructor that we will show are a few non-obvious connections.
... connect(cdTableView->selectionModel(),
SIGNAL(currentRowChanged(const QModelIndex &, const QModelIndex &)), this, SLOT(currentCdChanged(const QModelIndex &))); connect(cdModel, SIGNAL(beforeInsert(QSqlRecord &)), this, SLOT(beforeInsertCd(QSqlRecord &))); connect(trackModel, SIGNAL(beforeInsert(QSqlRecord &)), this, SLOT(beforeInsertTrack(QSqlRecord &))); connect(trackModel, SIGNAL(rowsInserted(const QModelIndex &, int, int)), this, SLOT(refreshTrackViewHeader()));
...}
The first connection is unusual since instead of connecting a widget, we connect to a selectionmodel. The QItemSelectionModel class is used to keep track of selections in views. By beingconnected to the table view's selection model, our currentCdChanged() slot will be called wheneverthe user navigates from one record to another.
void MainForm::currentCdChanged(const QModelIndex &index){ if (index.isValid()) { QSqlRecord record = cdModel->record(index.row()); int id = record.value("id").toInt(); trackModel->setFilter(QString("cdid = %1").arg(id)); } else { trackModel->setFilter("cdid = -1");
} trackModel->select(); refreshTrackViewHeader();}
This slot is called whenever the current CD changes. This occurs when the user navigates to anotherCD (by clicking or by using the Up and Down keys). If the CD is invalid (for example, if there are noCDs or a new one is being inserted, or the current one has just been deleted), we set the TRack
table's cdid to -1 (an invalid ID that we know will match no records).
Then, having set the filter, we select the matching track records. The refresh-TrackViewHeader()
function will be explained in a moment.
void MainForm::addCd(){ int row = 0; if (cdTableView->currentIndex().isValid()) row = cdTableView->currentIndex().row(); cdModel->insertRow(row); cdModel->setData(cdModel->index(row, Cd_Year), QDate::currentDate().year()); QModelIndex index = cdModel->index(row, Cd_Title); cdTableView->setCurrentIndex(index); cdTableView->edit(index);}
When the user clicks the Add CD button, a new blank row is inserted in the cdTableView and weenter edit mode. We also set a default value for the year field. At this point, the user can edit therecord, filling in the blank fields and selecting an artist from the artist combobox that isautomatically provided by the QSqlRelationalTableModel because of the setRelation() call, and editthe year if the default was not appropriate. If the user confirms the insertion by pressing Enter, therecord is inserted. The user can cancel by pressing Esc.
void MainForm::beforeInsertCd(QSqlRecord &record){ record.setValue("id", generateId("cd"));}
This slot is called when the cdModel emits its beforeInsert() signal. We use it to populate the id field

just as we did for inserting new artists, and the same caveat applies: It should be done within thescope of a transaction, and ideally the database-specific means of creating IDs (for example, auto-generated IDs) should be used instead.
void MainForm::deleteCd(){ QModelIndex index = cdTableView->currentIndex();
if (!index.isValid()) return; QSqlDatabase db = QSqlDatabase::database(); db.transaction(); QSqlRecord record = cdModel->record(index.row()); int id = record.value(Cd_Id).toInt(); int tracks = 0; QSqlQuery query; query.exec(QString("SELECT COUNT(*) FROM track WHERE cdid = %1") .arg(id)); if (query.next()) tracks = query.value(0).toInt(); if (tracks > 0) { int r = QMessageBox::question(this, tr("Delete CD"), tr("Delete \"%1\" and all its tracks?") .arg(record.value(Cd_ArtistId).toString()), QMessageBox::Yes | QMessageBox::Default, QMessageBox::No | QMessageBox::Escape); if (r == QMessageBox::No) { db.rollback(); return; } query.exec(QString("DELETE FROM track WHERE cdid = %1") .arg(id)); } cdModel->removeRow(index.row()); cdModel->submitAll(); db.commit();
currentCdChanged(QModelIndex());}
If the user clicks the Delete CD button, this slot is called. If there is a current CD we find out howmany tracks it has. If there are no tracks we simply delete the CD's record. If there is at least onetrack we ask the user to confirm the deletion, and if they click Yes, we delete all the track records,and then the CD's record. All this is done within the scope of a transaction, so the cascade deletionwill either fail as a whole or succeed as a wholeassuming that the underlying database supportstransactions.
Handling the track data is very similar to handling CD data. Updates can be performed simply by theuser editing cells. In the case of track durations, our TRackDelegate ensures that times are shown ina nice format and are easily edited using a QTimeEdit.
void MainForm::addTrack(){ if (!cdTableView->currentIndex().isValid()) return; int row = 0; if (trackTableView->currentIndex().isValid()) row = trackTableView->currentIndex().row(); trackModel->insertRow(row); QModelIndex index = trackModel->index(row, Track_Title); trackTableView->setCurrentIndex(index); trackTableView->edit(index);}

This works in the same way as addCd(), with a new blank row being inserted into the view.
void MainForm::beforeInsertTrack(QSqlRecord &record){ QSqlRecord cdRecord = cdModel->record(cdTableView->currentIndex() .row()); record.setValue("id", generateId("track")); record.setValue("cdid", cdRecord.value(Cd_Id).toInt());}
If the user confirms the insertion initiated by addTrack(), this function is called to populate the id
and cdid fields. The caveats mentioned earlier still apply of course.
void MainForm::deleteTrack(){ trackModel->removeRow(trackTableView->currentIndex().row()); if (trackModel->rowCount() == 0) trackTableView->horizontalHeader()->setVisible(false);}
If the user clicks the Delete Track button, we delete the track without formality. It would be easy touse a Yes/No message box if we preferred deletions to be confirmed.
void MainForm::refreshTrackViewHeader(){ trackTableView->horizontalHeader()->setVisible( trackModel->rowCount() > 0); trackTableView->setColumnHidden(Track_Id, true); trackTableView->setColumnHidden(Track_CdId, true); trackTableView->resizeColumnsToContents();}
The refreshTrackViewHeader() slot is invoked from various places to ensure that the horizontalheader of the track view is shown if and only if there are tracks to show. It also hides the id andcdid fields and resizes the visible table columns based on the current contents of the table.
void MainForm::editArtists(){ QSqlRecord record = cdModel->record(cdTableView->currentIndex()
.row()); ArtistForm artistForm(record.value(Cd_ArtistId).toString(), this); artistForm.exec(); cdModel->select();}
This slot is called if the user clicks the Edit Artists button. It provides drill-down on the current CD'sartist, invoking the ArtistForm covered in the previous section and selecting the appropriate artist. Ifthere is no current record, a safe empty record is returned by record(), and this will harmlessly notmatch (and therefore not select) any artist in the artists form. What actually happens is that whenwe call record.value(Cd_ArtistId), because we are using a QSqlRelationalTableModel that mapsartist IDs to artist names, the value that is returned is the artist's name (which will be an empty

string if the record is empty). At the end, we get the cdModel to re-select its data, which causes thecdTableView to refresh its visible cells. This is done to ensure that the artist names are showncorrectly since some could have been changed by the user in the ArtistForm dialog.
For projects that use the SQL classes, we must add the line
QT += sql
to the .pro files; this will ensure that the application is linked against the QtSql library.
This chapter has shown that Qt's model/view classes make viewing and editing data in SQLdatabases as easy as possible. In cases where foreign keys refer to tables with lots of records (say,thousands or more), it is probably best to create our own delegate and use it to present a "list ofvalues" form with a search capability rather than relying on QSqlRelationalTableModel's defaultcomboboxes. And in situations where we want to present records using a form view, we must handlethis ourselves: by using a QSqlQuery or QSqlTableModel to handle the database interaction, andmapping the contents of the user interface widgets we want to use for presenting and editing thedata to the underlying database in our own code.

Chapter 14. Networking Writing FTP Clients Writing HTTP Clients Writing TCP ClientServer Applications Sending and Receiving UDP Datagrams
Qt provides the QFtp and QHttp classes for working with FTP and HTTP. These protocols are easy touse for downloading and uploading files and, in the case of HTTP, for sending requests to webservers and retrieving the results.
Qt also provides the lower-level QTcpSocket and QUdpSocket classes, which implement the TCP andUDP transport protocols. TCP is a reliable connection-oriented protocol that operates in terms ofdata streams transmitted between network nodes, while UDP is an unreliable connectionless protocolbased on discrete packets sent between network nodes. Both can be used to create network clientand server applications. For servers, we also need the QTcpServer class to handle incoming TCPconnections.
Writing FTP ClientsThe QFtp class implements the client side of the FTP protocol in Qt. It offers various functions toperform the most common FTP operations and lets us execute arbitrary FTP commands.
The QFtp class works asynchronously. When we call a function like get() or put(), it returnsimmediately and the data transfer occurs when control passes back to Qt's event loop. This ensuresthat the user interface remains responsive while FTP commands are executed.
We will start with an example that shows how to retrieve a single file using get(). The example is aconsole application called ftpget that downloads the remote file specified on the command line. Let'sbegin with the main() function:
int main(int argc, char *argv[]){ QCoreApplication app(argc, argv); QStringList args = app.arguments(); if (args.count() != 2) { cerr << "Usage: ftpget url" << endl << "Example:" << endl << " ftpget ftp://ftp.trolltech.com/mirrors" << endl; return 1; } FtpGet getter; if (!getter.getFile(QUrl(args[1]))) return 1; QObject::connect(&getter, SIGNAL(done()), &app, SLOT(quit())); return app.exec();}
We create a QCoreApplication rather than its subclass QApplication to avoid linking in the QtGuilibrary. The QCoreApplication::arguments() function returns the command-line arguments as aQStringList, with the first item being the name the program was invoked as, and any Qt-specificarguments such as -style removed. The heart of the main() function is the construction of theFtpGet object and the getFile() call. If the call succeeds, we let the event loop run until the

download finishes.
All the work is done by the FtpGet subclass, which is defined as follows:
class FtpGet : public QObject{ Q_OBJECTpublic: FtpGet(QObject *parent = 0); bool getFile(const QUrl &url);signals: void done();private slots: void ftpDone(bool error);private: QFtp ftp; QFile file;};
The class has a public function, getFile(), that retrieves the file specified by a URL. The QUrl classprovides a high-level interface for extracting the different parts of a URL, such as the file name,path, protocol, and port.
FtpGet has a private slot, ftpDone(), that is called when the file transfer is completed, and a done()
signal that it emits when the file has been downloaded. The class also has two private variables: Theftp variable, of type QFtp, encapsulates the connection to an FTP server, and the file variable thatis used for writing the downloaded file to disk.
FtpGet::FtpGet(QObject *parent) : QObject(parent){ connect(&ftp, SIGNAL(done(bool)), this, SLOT(ftpDone(bool)));}
In the constructor, we connect the QFtp::done(bool) signal to our ftpDone(bool) private slot. QFtpemits done(bool) when it has finished processing all requests. The bool parameter indicates whetheran error occurred or not.
bool FtpGet::getFile(const QUrl &url){ if (!url.isValid()) { cerr << "Error: Invalid URL" << endl; return false; } if (url.scheme() != "ftp") { cerr << "Error: URL must start with 'ftp:'" << endl; return false; } if (url.path().isEmpty()) { cerr << "Error: URL has no path" << endl; return false; } QString localFileName = QFileInfo(url.path()).fileName(); if (localFileName.isEmpty()) localFileName = "ftpget.out"; file.setFileName(localFileName); if (!file.open(QIODevice::WriteOnly)) { cerr << "Error: Cannot open " << qPrintable(file.fileName())

<< " for writing: " << qPrintable(file.errorString()) << endl; return false; } ftp.connectToHost(url.host(), url.port(21)); ftp.login(); ftp.get(url.path(), &file); ftp.close(); return true;}
The getFile() function begins by checking the URL that was passed in. If a problem is encountered,the function prints an error message to cerr and returns false to indicate that the download failed.
Instead of forcing the user to make up a local file name, we try to create a sensible name using theURL itself, with a fallback of ftpget.out. If we fail to open the file, we print an error message andreturn false.
Next, we execute a sequence of four FTP commands using our QFtp object. The url.port(21) callreturns the port number specified in the URL, or port 21 if none is specified in the URL itself. Sinceno user name or password are given to the login() function, an anonymous login is attempted. Thesecond argument to get() specifies the output I/O device.
The FTP commands are queued and executed in Qt's event loop. The completion of all thecommands is indicated by QFtp's done(bool) signal, which we connected to ftpDone(bool) in theconstructor.
void FtpGet::ftpDone(bool error){ if (error) { cerr << "Error: " << qPrintable(ftp.errorString()) << endl; } else { cerr << "File downloaded as " << qPrintable(file.fileName()) << endl; } file.close(); emit done();}
Once the FTP commands have all been executed, we close the file and emit our own done() signal. Itmay appear strange that we close the file here, rather than after the ftp.close() call at the end ofthe getFile() function, but remember that the FTP commands are executed asynchronously andmay well be in progress after the getFile() function has returned. Only when the QFtp object'sdone() signal is emitted do we know that the download is finished and that it is safe to close the file.
QFtp provides several FTP commands, including connectToHost(), login(), close(), list(), cd(),get(), put(), remove(), mkdir(), rmdir(), and rename(). All of these functions schedule an FTPcommand and return an ID number that identifies the command. It is also possible to control thetransfer mode (the default is passive) and the transfer type (the default is binary).
Arbitrary FTP commands can be executed using rawCommand(). For example, here's how to execute aSITE CHMOD command:
ftp.rawCommand("SITE CHMOD 755 fortune");
QFtp emits the commandStarted(int) signal when it starts executing a command, and it emits the
commandFinished(int, bool) signal when the command is finished. The int parameter is the IDnumber that identifies the command. If we are interested in the fate of individual commands, wecan store the ID numbers when we schedule the commands. Keeping track of the ID numbers allowsus to provide detailed feedback to the user. For example:
bool FtpGet::getFile(const QUrl &url){ ... connectId = ftp.connectToHost(url.host(), url.port(21)); loginId = ftp.login(); getId = ftp.get(url.path(), &file); closeId = ftp.close(); return true;}void FtpGet::ftpCommandStarted(int id){ if (id == connectId) { cerr << "Connecting..." << endl; } else if (id == loginId) { cerr << "Logging in..." << endl; ...}
Another way of providing feedback is to connect to QFtp's stateChanged() signal, which is emittedwhenever the connection enters a new state (QFtp::Connecting, QFtp::Connected, QFtp::LoggedIn,etc.).
In most applications, we are only interested in the fate of the sequence of commands as a wholerather than in particular commands. In such cases, we can simply connect to the done(bool) signal,which is emitted whenever the command queue becomes empty.
When an error occurs, QFtp automatically clears the command queue. This means that if theconnection or the login fails, the commands that follow in the queue are never executed. If weschedule new commands after the error has occurred using the same QFtp object, these commandswill be queued and executed.
In the application's .pro file, we need the following line to link against the QtNetwork library:
QT += network
We will now review a more advanced example. The spider command-line program downloads all thefiles located in an FTP directory, recursively downloading from all the directory's subdirectories. Thenetwork logic is located in the Spider class:
class Spider : public QObject{ Q_OBJECTpublic: Spider(QObject *parent = 0); bool getDirectory(const QUrl &url);signals: void done();private slots: void ftpDone(bool error); void ftpListInfo(const QUrlInfo &urlInfo);private: void processNextDirectory();

QFtp ftp; QList<QFile *> openedFiles; QString currentDir; QString currentLocalDir; QStringList pendingDirs;};
The starting directory is specified as a QUrl and is set using the getdirectory() function.
Spider::Spider(QObject *parent) : QObject(parent){ connect(&ftp, SIGNAL(done(bool)), this, SLOT(ftpDone(bool))); connect(&ftp, SIGNAL(listInfo(const QUrlInfo &)), this, SLOT(ftpListInfo(const QUrlInfo &)));}
In the constructor, we establish two signalslot connections. The listInfo(const QUrlInfo &) signal isemitted by QFtp when we request a directory listing (in getdirectory()) for each file that it retrieves.This signal is connected to a slot called ftpListInfo(), which downloads the file associated with theURL it is given.
bool Spider::getDirectory(const QUrl &url){ if (!url.isValid()) { cerr << "Error: Invalid URL" << endl; return false; } if (url.scheme() != "ftp") { cerr << "Error: URL must start with 'ftp:'" << endl; return false; } ftp.connectToHost(url.host(), url.port(21)); ftp.login(); QString path = url.path(); if (path.isEmpty()) path = "/"; pendingDirs.append(path); processNextDirectory(); return true;}
When the getdirectory() function is called, it begins by doing some sanity checks, and if all is well,attempts to establish an FTP connection. It keeps track of the paths that it must process and callsprocessNextDirectory() to start downloading the root directory.
void Spider::processNextDirectory(){ if (!pendingDirs.isEmpty()) { currentDir = pendingDirs.takeFirst(); currentLocalDir = "downloads/" + currentDir; QDir(".").mkpath(currentLocalDir); ftp.cd(currentDir); ftp.list(); } else { emit done(); }

}
The processNextDirectory() function takes the first remote directory out of the pendingDirs list andcreates a corresponding directory in the local file system. It then tells the QFtp object to changedirectory into the taken directory and to list its files. For every file that list() processes, it emits alistInfo() signal that causes the ftpListInfo() slot to be called.
If there are no more directories to process, the function emits the done() signal to indicate that thedownloading is complete.
void Spider::ftpListInfo(const QUrlInfo &urlInfo){ if (urlInfo.isFile()) { if (urlInfo.isReadable()) { QFile *file = new QFile(currentLocalDir + "/" + urlInfo.name()); if (!file->open(QIODevice::WriteOnly)) { cerr << "Warning: Cannot open file " << qPrintable( QDir::convertSeparators(file->fileName())) << endl; return;
} ftp.get(urlInfo.name(), file); openedFiles.append(file); } } else if (urlInfo.isDir() && !urlInfo.isSymLink()) { pendingDirs.append(currentDir + "/" + urlInfo.name()); }}
The ftpListInfo() slot's urlInfo parameter provides detailed information about a remote file. If thefile is a normal file (not a directory) and is readable, we call get() to download it. The QFile objectused for downloading is allocated using new and a pointer to it is stored in the openedFiles list.
If the QUrlInfo holds the details of a remote directory that is not a symbolic link, we add thisdirectory to the pendingDirs list. We skip symbolic links because they can easily lead to infiniterecursion.
void Spider::ftpDone(bool error){ if (error) { cerr << "Error: " << qPrintable(ftp.errorString()) << endl; } else { cout << "Downloaded " << qPrintable(currentDir) << " to " << qPrintable(QDir::convertSeparators( QDir(currentLocalDir).canonicalPath())); } qDeleteAll(openedFiles); openedFiles.clear(); processNextDirectory();}
The ftpDone() slot is called when all the FTP commands have finished or if an error occurred. Wedelete the QFile objects to prevent memory leaks and also to close each file. Finally, we callprocessNextDirectory(). If there are any directories left, the whole process begins again with the

next directory in the list; otherwise, the downloading stops and done() is emitted.
If there are no errors, the sequence of FTP commands and signals is as follows:
connectToHost(host, port)login()cd(directory_1)list() emit listInfo(file_1_1) get(file_1_1) emit listInfo(file_1_2) get(file_1_2) ...emit done()...cd(directory_N)list() emit listInfo(file_N_1) get(file_N_1) emit listInfo(file_N_2) get(file_N_2) ...emit done()
If a file is in fact a directory, it is added to the pendingDirs list, and when the last file of the currentlist() command has been downloaded, a new cd() command is issued, followed by a new list()
command with the next pending directory, and the whole process begins again with the newdirectory. This is repeated, with new files being downloaded, and new directories added to thependingDirs list, until every file has been downloaded from every directory, at which point thependingDirs list will finally be empty.
If a network error occurs while downloading the fifth of, say, twenty files in a directory, theremaining files will not be downloaded. If we wanted to download as many files as possible, onesolution would be to schedule the GET operations one at a time and to wait for the done(bool) signalbefore scheduling a new GET operation. In listInfo(), we would simply append the file name to aQStringList, instead of calling get() right away, and in done(bool) we would call get() on the nextfile to download in the QStringList. The sequence of execution would then look like this:
connectToHost(host, port)login()cd(directory_1)list()...cd(directory_N)list() emit listInfo(file_1_1) emit listInfo(file_1_2) ... emit listInfo(file_N_1) emit listInfo(file_N_2) ...emit done()get(file_1_1)emit done()get(file_1_2)emit done()...get(file_N_1)emit done()get(file_N_2)

emit done()...
Another solution would be to use one QFtp object per file. This would enable us to download the filesin parallel, through separate FTP connections.
int main(int argc, char *argv[]){ QCoreApplication app(argc, argv); QStringList args = app.arguments(); if (args.count() != 2) { cerr << "Usage: spider url" << endl << "Example:" << endl << " spider ftp://ftp.trolltech.com/freebies/leafnode" << endl;
return 1; } Spider spider; if (!spider.getDirectory(QUrl(args[1]))) return 1; QObject::connect(&spider, SIGNAL(done()), &app, SLOT(quit())); return app.exec();}
The main() function completes the program. If the user does not specify a URL on the commandline, we give an error message and terminate the program.
In both FTP examples, the data retrieved using get() was written to a QFile. This need not be thecase. If we wanted the data in memory, we could use a QBuffer, the QIODevice subclass that wraps aQByteArray. For example:
QBuffer *buffer = new QBuffer;buffer->open(QIODevice::WriteOnly);ftp.get(urlInfo.name(), buffer);
We could also omit the I/O device argument to get() or pass a null pointer. The QFtp class thenemits a readyRead() signal every time new data is available, and the data can be read using read()
or readAll().
Writing HTTP ClientsThe QHttp class implements the client side of the HTTP protocol in Qt. It provides various functionsto perform the most common HTTP operations, including get() and post(), and provides a means ofsending arbitrary HTTP requests. If you have read the previous section about QFtp, you will find thatthere are many similarities between QFtp and QHttp.
The QHttp class works asynchronously. When we call a function like get() or post(), the functionreturns immediately, and the data transfer occurs later, when control returns to Qt's event loop.This ensures that the application's user interface remains responsive while HTTP requests are beingprocessed.
We will review a console application example called httpget that shows how to download a file usingthe HTTP protocol. It is very similar to the ftpget example from the previous section, both in

functionality and implementation, so we will not show the header file.
HttpGet::HttpGet(QObject *parent) : QObject(parent){ connect(&http, SIGNAL(done(bool)), this, SLOT(httpDone(bool)));}
In the constructor, we connect the QHttp object's done(bool) signal to the private httpDone(bool)
slot.
bool HttpGet::getFile(const QUrl &url){ if (!url.isValid()) { cerr << "Error: Invalid URL" << endl; return false; } if (url.scheme() != "http") {
cerr << "Error: URL must start with 'http:'" << endl; return false; } if (url.path().isEmpty()) { cerr << "Error: URL has no path" << endl; return false; } QString localFileName = QFileInfo(url.path()).fileName(); if (localFileName.isEmpty()) localFileName = "httpget.out"; file.setFileName(localFileName); if (!file.open(QIODevice::WriteOnly)) { cerr << "Error: Cannot open " << qPrintable(file.fileName()) << " for writing: " << qPrintable(file.errorString()) << endl; return false; } http.setHost(url.host(), url.port(80)); http.get(url.path(), &file); http.close(); return true;}
The getFile() function performs the same kind of error checks as the FtpGet::getFile() shownearlier and uses the same approach to giving the file a local name. When retrieving from web sites,no login is necessary, so we simply set the host and port (using the default HTTP port 80 if none isspecified in the URL) and download the data into the file, since the second argument to QHttp::get()
specifies the output I/O device.
The HTTP requests are queued and executed asynchronously in Qt's event loop. The completion ofthe requests is indicated by QHttp's done(bool) signal, which we connected to httpDone(bool) in theconstructor.
void HttpGet::httpDone(bool error){ if (error) { cerr << "Error: " << qPrintable(http.errorString()) << endl; } else { cerr << "File downloaded as " << qPrintable(file.fileName()) << endl;

} file.close(); emit done();}
Once the HTTP requests are finished, we close the file, notifying the user if an error occurred.
The main() function is very similar to the one used by ftpget:
int main(int argc, char *argv[]){ QCoreApplication app(argc, argv); QStringList args = app.arguments(); if (args.count() != 2) { cerr << "Usage: httpget url" << endl << "Example:" << endl
<< " httpget http://doc.trolltech.com/qq/index.html" << endl; return 1; } HttpGet getter; if (!getter.getFile(QUrl(args[1]))) return 1; QObject::connect(&getter, SIGNAL(done()), &app, SLOT(quit()));
return app.exec();}
The QHttp class provides many operations, including setHost(), get(), post(), and head(). If a siterequires authentication, setUser() can be used to supply a user name and password. QHttp can usea socket supplied by the programmer rather than its own internal QTcpSocket. This makes it possibleto use a secure QtSslSocket, provided as a Qt Solution from Trolltech, to achieve HTTP over SSL.
To send a list of "name =value" pairs to a CGI script, we can use post():
http.setHost("www.example.com");http.post("/cgi/somescript.py", "x=200&y=320", &file);
We can pass the data either as an 8-bit string or by passing an open QIODevice, such as a QFile. Formore control, we can use the request() function, which accepts an arbitrary HTTP header and data.For example:
QHttpRequestHeader header("POST", "/search.html");header.setValue("Host", "www.trolltech.com");header.setContentType("application/x-www-form-urlencoded");http.setHost("www.trolltech.com");http.request(header, "qt-interest=on&search=opengl");
QHttp emits the requestStarted(int) signal when it starts executing a request, and it emits therequestFinished(int, bool) signal when the request has finished. The int parameter is an IDnumber that identifies a request. If we are interested in the fate of individual requests, we can storethe ID numbers when we schedule the requests. Keeping track of the ID numbers allows us toprovide detailed feedback to the user.
In most applications, we only want to know whether the entire sequence of requests completed
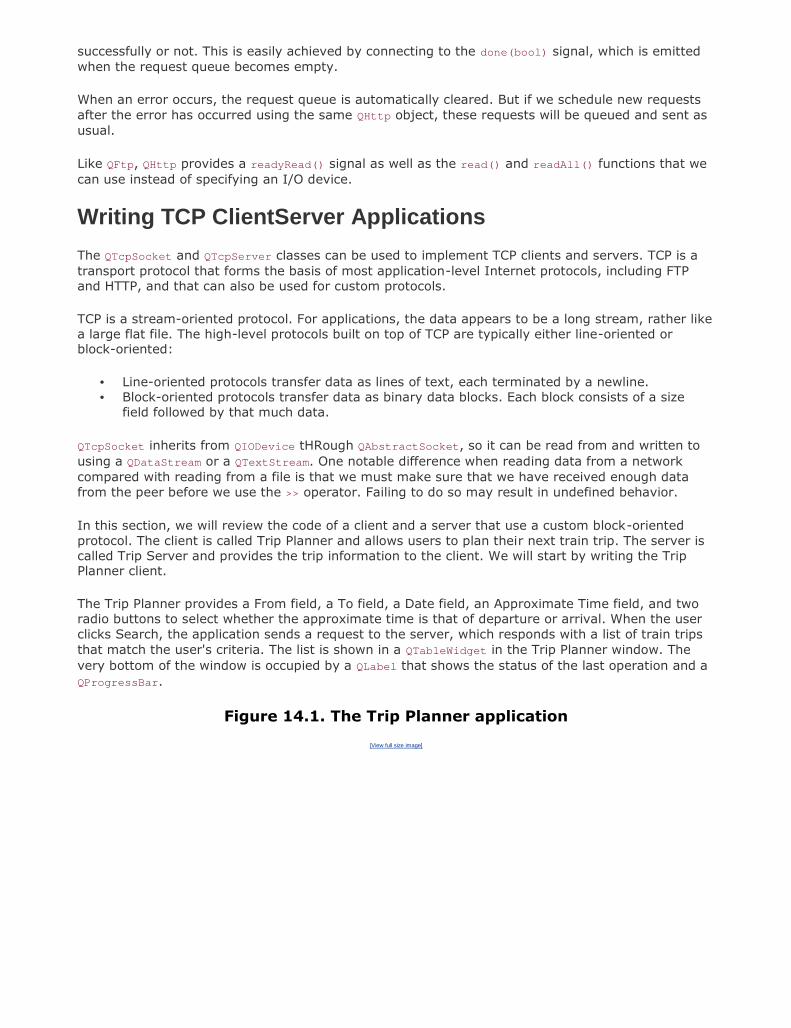
successfully or not. This is easily achieved by connecting to the done(bool) signal, which is emittedwhen the request queue becomes empty.
When an error occurs, the request queue is automatically cleared. But if we schedule new requestsafter the error has occurred using the same QHttp object, these requests will be queued and sent asusual.
Like QFtp, QHttp provides a readyRead() signal as well as the read() and readAll() functions that wecan use instead of specifying an I/O device.
Writing TCP ClientServer ApplicationsThe QTcpSocket and QTcpServer classes can be used to implement TCP clients and servers. TCP is atransport protocol that forms the basis of most application-level Internet protocols, including FTPand HTTP, and that can also be used for custom protocols.
TCP is a stream-oriented protocol. For applications, the data appears to be a long stream, rather likea large flat file. The high-level protocols built on top of TCP are typically either line-oriented orblock-oriented:
Line-oriented protocols transfer data as lines of text, each terminated by a newline. Block-oriented protocols transfer data as binary data blocks. Each block consists of a size
field followed by that much data.
QTcpSocket inherits from QIODevice tHRough QAbstractSocket, so it can be read from and written tousing a QDataStream or a QTextStream. One notable difference when reading data from a networkcompared with reading from a file is that we must make sure that we have received enough datafrom the peer before we use the >> operator. Failing to do so may result in undefined behavior.
In this section, we will review the code of a client and a server that use a custom block-orientedprotocol. The client is called Trip Planner and allows users to plan their next train trip. The server iscalled Trip Server and provides the trip information to the client. We will start by writing the TripPlanner client.
The Trip Planner provides a From field, a To field, a Date field, an Approximate Time field, and tworadio buttons to select whether the approximate time is that of departure or arrival. When the userclicks Search, the application sends a request to the server, which responds with a list of train tripsthat match the user's criteria. The list is shown in a QTableWidget in the Trip Planner window. Thevery bottom of the window is occupied by a QLabel that shows the status of the last operation and aQProgressBar.
Figure 14.1. The Trip Planner application
[View full size image]
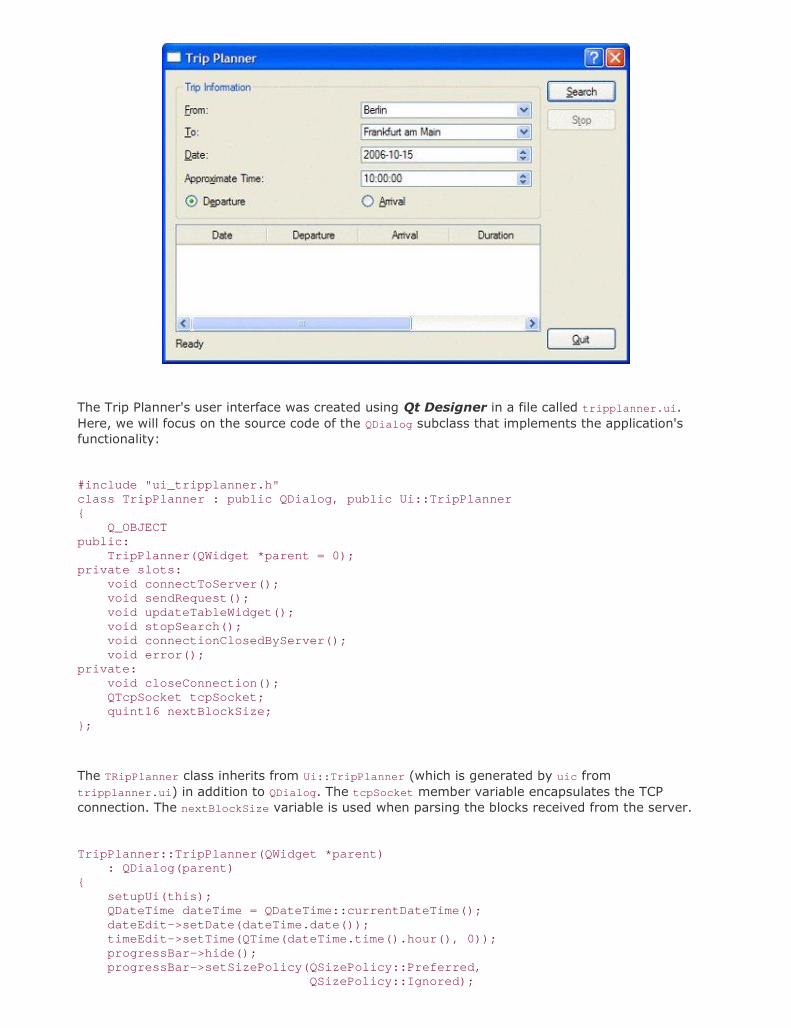
The Trip Planner's user interface was created using Qt Designer in a file called tripplanner.ui.Here, we will focus on the source code of the QDialog subclass that implements the application'sfunctionality:
#include "ui_tripplanner.h"class TripPlanner : public QDialog, public Ui::TripPlanner{ Q_OBJECTpublic: TripPlanner(QWidget *parent = 0);private slots: void connectToServer(); void sendRequest(); void updateTableWidget(); void stopSearch(); void connectionClosedByServer(); void error();private: void closeConnection(); QTcpSocket tcpSocket; quint16 nextBlockSize;};
The TRipPlanner class inherits from Ui::TripPlanner (which is generated by uic fromtripplanner.ui) in addition to QDialog. The tcpSocket member variable encapsulates the TCPconnection. The nextBlockSize variable is used when parsing the blocks received from the server.
TripPlanner::TripPlanner(QWidget *parent) : QDialog(parent){ setupUi(this); QDateTime dateTime = QDateTime::currentDateTime(); dateEdit->setDate(dateTime.date()); timeEdit->setTime(QTime(dateTime.time().hour(), 0)); progressBar->hide(); progressBar->setSizePolicy(QSizePolicy::Preferred, QSizePolicy::Ignored);

tableWidget->verticalHeader()->hide(); tableWidget->setEditTriggers(QAbstractItemView::NoEditTriggers); connect(searchButton, SIGNAL(clicked()),
this, SLOT(connectToServer())); connect(stopButton, SIGNAL(clicked()), this, SLOT(stopSearch())); connect(&tcpSocket, SIGNAL(connected()), this, SLOT(sendRequest())); connect(&tcpSocket, SIGNAL(disconnected()), this, SLOT(connectionClosedByServer())); connect(&tcpSocket, SIGNAL(readyRead()), this, SLOT(updateTableWidget())); connect(&tcpSocket, SIGNAL(error(QAbstractSocket::SocketError)), this, SLOT(error()));}
In the constructor, we initialize the date and time editors based on the current date and time. Wealso hide the progress bar, because we only want to show it when a connection is active. In QtDesigner, the progress bar's minimum and maximum properties were both set to 0. This tells theQProgressBar to behave as a busy indicator instead of as a standard percentage-based progress bar.
Also in the constructor, we connect the QTcpSocket's connected(), disconnected(), readyRead(), anderror(QAbstractSocket::SocketError) signals to private slots.
void TripPlanner::connectToServer(){ tcpSocket.connectToHost("tripserver.zugbahn.de", 6178); tableWidget->setRowCount(0); searchButton->setEnabled(false); stopButton->setEnabled(true); statusLabel->setText(tr("Connecting to server...")); progressBar->show(); nextBlockSize = 0;}
The connectToServer() slot is executed when the user clicks Search to start a search. We callconnectToHost() on the QTcpSocket object to connect to the server, which we assume is accessible atport 6178 on the fictitious host TRipserver.zugbahn.de. (If you want to try the example on your ownmachine, replace the host name with QHostAddress::LocalHost.) The connectToHost() call isasynchronous; it always returns immediately. The connection is typically established later. TheQTcpSocket object emits the connected() signal when the connection is up and running, orerror(QAbstractSocket::SocketError) if the connection failed.
Next, we update the user interface, in particular making the progress bar visible.
Finally, we set the nextBlockSize variable to 0. This variable stores the length of the next blockreceived from the server. We have chosen to use the value of 0 to mean that we don't yet know thesize of the next block.
void TripPlanner::sendRequest(){ QByteArray block; QDataStream out(&block, QIODevice::WriteOnly); out.setVersion(QDataStream::Qt_4_1); out << quint16(0) << quint8('S') << fromComboBox->currentText() << toComboBox->currentText() << dateEdit->date() << timeEdit->time(); if (departureRadioButton->isChecked()) { out << quint8('D');
} else {

out << quint8('A'); } out.device()->seek(0); out << quint16(block.size() - sizeof(quint16)); tcpSocket.write(block); statusLabel->setText(tr("Sending request..."));}
The sendRequest() slot is executed when the QTcpSocket object emits the connected() signal,indicating that a connection has been established. The slot's task is to generate a request to theserver, with all the information entered by the user.
The request is a binary block with the following format:
quint16 Block size in bytes (excluding this field)
quint8 Request type (always 'S')
QString Departure city
QString Arrival city
QDate Date of travel
QTime Approximate time of travel
quint8 Time is for departure ('D') or arrival ('A')
We first write the data to a QByteArray called block. We can't write the data directly to theQTcpSocket because we don't know the size of the block, which must be sent first, until after we haveput all the data into the block.
We initially write 0 as the block size, followed by the rest of the data. Then we call seek(0) on theI/O device (a QBuffer created by QDataStream behind the scenes) to move back to the beginning ofthe byte array, and overwrite the initial 0 with the size of the block's data. The size is calculated bytaking the block's size and subtracting sizeof(quint16) (that is, 2) to exclude the size field from thebyte count. After that, we call write() on the QTcpSocket to send the block to the server.
void TripPlanner::updateTableWidget(){ QDataStream in(&tcpSocket); in.setVersion(QDataStream::Qt_4_1); forever { int row = tableWidget->rowCount(); if (nextBlockSize == 0) { if (tcpSocket.bytesAvailable() < sizeof(quint16)) break; in >> nextBlockSize; } if (nextBlockSize == 0xFFFF) { closeConnection(); statusLabel->setText(tr("Found %1 trip(s)").arg(row));
break; } if (tcpSocket.bytesAvailable() < nextBlockSize) break; QDate date; QTime departureTime; QTime arrivalTime;

quint16 duration; quint8 changes; QString trainType; in >> date >> departureTime >> duration >> changes >> trainType; arrivalTime = departureTime.addSecs(duration * 60); tableWidget->setRowCount(row + 1); QStringList fields; fields << date.toString(Qt::LocalDate)
<< departureTime.toString(tr("hh:mm"))<< arrivalTime.toString(tr("hh:mm"))<< tr("%1 hr %2 min").arg(duration / 60)
.arg(duration % 60) << QString::number(changes)
<< trainType; for (int i = 0; i < fields.count(); ++i) tableWidget->setItem(row, i, new QTableWidgetItem(fields[i])); nextBlockSize = 0; }}
The updateTableWidget() slot is connected to the QTcpSocket's readyRead() signal, which is emittedwhenever the QTcpSocket has received new data from the server. The server sends us a list ofpossible train trips that match the user's criteria. Each matching trip is sent as a single block, andeach block starts with a size. The forever loop is necessary because we don't necessarily get oneblock of data from the server at a time.[*] We might have received an entire block, or just part of ablock, or one and a half blocks, or even all of the blocks at once.
[*] The forever keyword is provided by Qt. It simply expands to for (;;).
Figure 14.2. The Trip Server's blocks
So how does the forever loop work? If the nextBlockSize variable is 0, this means that we have notread the size of the next block. We try to read it (assuming there are at least 2 bytes available forreading). The server uses a size value of 0xFFFF to signify that there is no more data to receive, so ifwe read this value, we know that we have reached the end.
If the block size is not 0xFFFF, we try to read in the next block. First, we check to see if there areblock size bytes available to read. If there are not, we stop there for now. The readyRead() signalwill be emitted again when more data is available, and we will try again then.
Once we are sure that an entire block has arrived, we can safely use the >> operator on theQDataStream to extract the information related to a trip, and we create QTableWidgetItems with thatinformation. A block received from the server has the following format:
quint16 Block size in bytes (excluding this field)
QDate Departure date
QTime Departure time

quint8 Number of changes
QString Train type
At the end, we reset the nextBlockSize variable to 0 to indicate that the next block's size is unknownand needs to be read.
void TripPlanner::closeConnection(){ tcpSocket.close(); searchButton->setEnabled(true); stopButton->setEnabled(false); progressBar->hide();}
The closeConnection() private function closes the connection to the TCP server and updates the userinterface. It is called from updateTableWidget() when the 0xFFFF is read and from several other slotsthat we will cover shortly.
void TripPlanner::stopSearch(){ statusLabel->setText(tr("Search stopped")); closeConnection();}
The stopSearch() slot is connected to the Stop button's clicked() signal. Essentially it just callscloseConnection().
void TripPlanner::connectionClosedByServer(){ if (nextBlockSize != 0xFFFF) statusLabel->setText(tr("Error: Connection closed by server")); closeConnection();}
The connectionClosedByServer() slot is connected to QTcpSocket's disconnected() signal. If theserver closes the connection and we have not yet received the 0xFFFF end-of-data marker, we tellthe user that an error occurred. We call closeConnection() as usual to update the user interface.
void TripPlanner::error(){
statusLabel->setText(tcpSocket.errorString()); closeConnection();}
The error() slot is connected to QTcpSocket's error(QAbstractSocket::SocketError) signal. We ignorethe error code and use QTcpSocket::errorString(), which returns a human-readable error messagefor the last error that occurred.

we would expect:
int main(int argc, char *argv[]){ QApplication app(argc, argv); TripPlanner tripPlanner; tripPlanner.show(); return app.exec();}
Now let's implement the server. The server consists of two classes: TRipServer and ClientSocket.The TRipServer class inherits QTcpServer, a class that allows us to accept incoming TCP connections.ClientSocket reimplements QTcpSocket and handles a single connection. At any one time, there areas many Client-Socket objects in memory as there are clients being served.
class TripServer : public QTcpServer{ Q_OBJECTpublic: TripServer(QObject *parent = 0);private: void incomingConnection(int socketId);};
The tripServer class reimplements the incomingConnection() function from QTcpServer. This functionis called whenever a client attempts to connect to the port the server is listening to.
TripServer::TripServer(QObject *parent) : QTcpServer(parent){}
The tripServer constructor is trivial.
void TripServer::incomingConnection(int socketId){ ClientSocket *socket = new ClientSocket(this); socket->setSocketDescriptor(socketId);}
In incomingConnection(), we create a ClientSocket object as a child of the tripServer object, and weset its socket descriptor to the number provided to us. The ClientSocket object will delete itselfautomatically when the connection is terminated.
class ClientSocket : public QTcpSocket{ Q_OBJECTpublic: ClientSocket(QObject *parent = 0);private slots: void readClient();private: void generateRandomTrip(const QString &from, const QString &to,

const QDate &date, const QTime &time); quint16 nextBlockSize;};
The ClientSocket class inherits from QTcpSocket and encapsulates the state of a single client.
ClientSocket::ClientSocket(QObject *parent) : QTcpSocket(parent){ connect(this, SIGNAL(readyRead()), this, SLOT(readClient())); connect(this, SIGNAL(disconnected()), this, SLOT(deleteLater())); nextBlockSize = 0;}
In the constructor, we establish the necessary signalslot connections, and we set the nextBlockSize
variable to 0, indicating that we do not yet know the size of the block sent by the client.
The disconnected() signal is connected to deleteLater(), a QObject-inherited function that deletesthe object when control returns to Qt's event loop. This ensures that the ClientSocket object isdeleted when the socket connection is closed.
void ClientSocket::readClient(){ QDataStream in(this); in.setVersion(QDataStream::Qt_4_1); if (nextBlockSize == 0) { if (bytesAvailable() < sizeof(quint16)) return; in >> nextBlockSize; } if (bytesAvailable() < nextBlockSize) return; quint8 requestType; QString from; QString to; QDate date; QTime time; quint8 flag; in >> requestType; if (requestType == 'S') {
in >> from >> to >> date >> time >> flag; srand(from.length() * 3600 + to.length() * 60 + time.hour()); int numTrips = rand() % 8; for (int i = 0; i < numTrips; ++i) generateRandomTrip(from, to, date, time);
QDataStream out(this); out << quint16(0xFFFF); } close();}
The readClient() slot is connected to QTcpSocket's readyRead() signal. If next-BlockSize is 0, westart by reading the block size; otherwise, we have already read it, and instead we check to see if awhole block has arrived. Once an entire block is ready for reading, we read it in one go. We use theQDataStream directly on the QTcpSocket (the this object) and read the fields using the >> operator.
Once we have read the client's request, we are ready to generate a reply. If this were a realapplication, we would look up the information in a train schedule database and try to find matching

train trips. But here we will be content with a function called generateRandomTrip() that will generatea random trip. We call the function a random number of times, and then we send 0xFFFF to signifythe end of the data. At the end, we close the connection.
void ClientSocket::generateRandomTrip(const QString & /* from */, const QString & /* to */, const QDate &date, const QTime &time){ QByteArray block; QDataStream out(&block, QIODevice::WriteOnly); out.setVersion(QDataStream::Qt_4_1); quint16 duration = rand() % 200; out << quint16(0) << date << time << duration << quint8(1) << QString("InterCity"); out.device()->seek(0); out << quint16(block.size() - sizeof(quint16)); write(block);}
The generateRandomTrip() function shows how to send a block of data over a TCP connection. This isvery similar to what we did in the client in the sendRequest() function (p. 326). Once again, we writethe block to a QByteArray so that we can determine its size before we send it using write().
int main(int argc, char *argv[]){ QApplication app(argc, argv); TripServer server; if (!server.listen(QHostAddress::Any, 6178)) { cerr << "Failed to bind to port" << endl; return 1; } QPushButton quitButton(QObject::tr("&Quit")); quitButton.setWindowTitle(QObject::tr("Trip Server")); QObject::connect(&quitButton, SIGNAL(clicked()), &app, SLOT(quit())); quitButton.show(); return app.exec();}
In main(), we create a tripServer object and a QPushButton that enables the user to stop the server.We start the server by calling QTcpSocket::listen(), which takes the IP address and port number onwhich we want to accept connections. The special address 0.0.0.0 (QHostAddress::Any) signifies anyIP interface present on the local host.
This completes our clientserver example. In this case, we used a block-oriented protocol that allowsus to use QDataStream for reading and writing. If we wanted to use a line-oriented protocol, thesimplest approach would be to use QTcpSocket's canReadLine() and readLine() functions in a slotconnected to the readyRead() signal:
QStringList lines;while (tcpSocket.canReadLine()) lines.append(tcpSocket.readLine());
We would then process each line that has been read. As for sending data, that can be done using aQTextStream on the QTcpSocket.
The server implementation that we have used doesn't scale very well when there are lots of

connections. The problem is that while we are processing a request, we don't handle the otherconnections. A more scalable approach would be to start a new thread for each connection. TheThreaded Fortune Server example located in Qt's examples/network/threadedfortuneserver directoryillustrates how to do this.
Sending and Receiving UDP DatagramsThe QUdpSocket class can be used to send and receive UDP datagrams. UDP is an unreliable,datagram-oriented protocol. Some application-level protocols use UDP because it is more lightweightthan TCP. With UDP, data is sent as packets (datagrams) from one host to another. There is noconcept of connection, and if a UDP packet doesn't get delivered successfully, no error is reported tothe sender.
Figure 14.3. The Weather Station application
We will see how to use UDP from a Qt application through the Weather Balloon and Weather Stationexample. The Weather Balloon application mimics a weather balloon that sends a UDP datagram(presumably using a wireless connection) containing the current atmospheric conditions every 2seconds. The Weather Station application receives these datagrams and displays them on screen.We will start by reviewing the code for the Weather Balloon.
class WeatherBalloon : public QPushButton{ Q_OBJECTpublic: WeatherBalloon(QWidget *parent = 0); double temperature() const; double humidity() const; double altitude() const;private slots: void sendDatagram();private: QUdpSocket udpSocket; QTimer timer;};
The WeatherBalloon class inherits from QPushButton. It uses its QUdpSocket private variable forcommunicating with the Weather Station.
WeatherBalloon::WeatherBalloon(QWidget *parent) : QPushButton(tr("Quit"), parent){ connect(this, SIGNAL(clicked()), this, SLOT(close()));

connect(&timer, SIGNAL(timeout()), this, SLOT(sendDatagram())); timer.start(2 * 1000); setWindowTitle(tr("Weather Balloon"));}
In the constructor, we start a QTimer to invoke sendDatagram() every 2 seconds.
void WeatherBalloon::sendDatagram(){ QByteArray datagram; QDataStream out(&datagram, QIODevice::WriteOnly); out.setVersion(QDataStream::Qt_4_1); out << QDateTime::currentDateTime() << temperature() << humidity() << altitude(); udpSocket.writeDatagram(datagram, QHostAddress::LocalHost, 5824);}
In sendDatagram(), we generate and send a datagram containing the current date, time,temperature, humidity, and altitude:
QDateTime Date and time of measurement
double Temperature (in °C)
double Humidity (in %)
double Altitude (in meters)
The datagram is sent using QUdpSocket::writeDatagram(). The second and third arguments towriteDatagram() are the IP address and the port number of the peer (the Weather Station). For thisexample, we assume that the Weather Station is running on the same machine as the WeatherBalloon, so we use an IP address of 127.0.0.1 (QHostAddress::LocalHost), a special address thatdesignates the local host.
Unlike the QAbstractSocket subclasses, QUdpSocket does not accept host names, only host addresses.If we wanted to resolve a host name to its IP address here, we have two choices: If we are preparedto block while the lookup takes place, we can use the static QHostInfo::fromName() function.Otherwise, we can use the static QHostInfo::lookupHost() function, which returns immediately andcalls the slot it is passed with a QHostInfo object containing the corresponding addresses when thelookup is complete.
int main(int argc, char *argv[]){ QApplication app(argc, argv); WeatherBalloon balloon; balloon.show(); return app.exec();}
The main() function simply creates a WeatherBalloon object, which serves both as a UDP peer and asa QPushButton on screen. By clicking the QPushButton, the user can quit the application.
Now let's review the source code for the Weather Station client.

class WeatherStation : public QDialog{ Q_OBJECTpublic: WeatherStation(QWidget *parent = 0);private slots: void processPendingDatagrams();private: QUdpSocket udpSocket;
QLabel *dateLabel; QLabel *timeLabel; ... QLineEdit *altitudeLineEdit;};
The WeatherStation class inherits from QDialog. It listens to a particular UDP port, parses anyincoming datagrams (from the Weather Balloon), and displays their contents in five read-onlyQLineEdits. The only private variable of interest here is udpSocket of type QUdpSocket, which we willuse to receive datagrams.
WeatherStation::WeatherStation(QWidget *parent) : QDialog(parent){ udpSocket.bind(5824); connect(&udpSocket, SIGNAL(readyRead()), this, SLOT(processPendingDatagrams())); ...}
In the constructor, we start by binding the QUdpSocket to the port that the weather balloon istransmitting to. Since we have not specified a host address, the socket will accept datagrams sent toany IP address that belongs to the machine the Weather Station is running on. Then, we connect thesocket's readyRead() signal to the private processPendingDatagrams() that extracts and displays thedata.
void WeatherStation::processPendingDatagrams(){ QByteArray datagram;
do { datagram.resize(udpSocket.pendingDatagramSize()); udpSocket.readDatagram(datagram.data(), datagram.size()); } while (udpSocket.hasPendingDatagrams()); QDateTime dateTime; double temperature; double humidity; double altitude; QDataStream in(&datagram, QIODevice::ReadOnly); in.setVersion(QDataStream::Qt_4_1); in >> dateTime >> temperature >> humidity >> altitude; dateLineEdit->setText(dateTime.date().toString()); timeLineEdit->setText(dateTime.time().toString()); temperatureLineEdit->setText(tr("%1 ° C").arg(temperature)); humidityLineEdit->setText(tr("%1%").arg(humidity)); altitudeLineEdit->setText(tr("%1 m").arg(altitude));}
The processPendingDatagrams() slot is called when a datagram has arrived. QUdpSocket queues the
incoming datagrams and lets us access them one at a time. Normally, there should be only onedatagram, but we can't exclude the possibility that the sender would send a few datagrams in a rowbefore the readyRead() signal is emitted. In that case, we can ignore all the datagrams except thelast one, since the earlier ones contain obsolete atmospheric conditions.
The pendingDatagramSize() function returns the size of the first pending datagram. From theapplication's point of view, datagrams are always sent and received as a single unit of data. Thismeans that if any bytes are available, an entire datagram can be read. The readDatagram() callcopies the contents of the first pending datagram into the specified char * buffer (truncating data ifthe buffer is too small) and advances to the next pending datagram. Once we have read all thedatagrams, we decompose the last one (the one with the most recent atmospheric measurements)into its parts and populate the QLineEdits with the new data.
int main(int argc, char *argv[]){ QApplication app(argc, argv); WeatherStation station; station.show(); return app.exec();}
Finally, in main(), we create and show the WeatherStation.
We have now finished our UDP sender and receiver. The applications are as simple as possible, withthe Weather Balloon sending datagrams and the Weather Station receiving them. In most real-worldapplications, both applications would need to both read and write on their socket. TheQUdpSocket::writeDatagram() functions can be passed a host address and port number, so theQUdpSocket can read from the host and port it is bound to with bind(), and write to some other hostand port.

Chapter 15. XML Reading XML with SAX Reading XML with DOM Writing XML
XML (Extensible Markup Language) is a general-purpose text file format that is popular for datainterchange and data storage. Qt provides two distinct APIs for reading XML documents as part ofthe QtXml module:
SAX (Simple API for XML) reports "parsing events" directly to the application through virtualfunctions.
DOM (Document Object Model) converts an XML document into a tree structure, which theapplication can then navigate.
There are many factors to take into account when choosing between DOM and SAX for a particularapplication. SAX is more low level and usually faster, which makes it especially appropriate both forsimple tasks (like finding all the occurrences of a given tag in an XML document) and for readingvery large files that may not fit in memory. But for many applications, the convenience offered byDOM outweighs the potential speed and memory benefits of SAX.
For writing XML files, two options are available as well: We can generate the XML by hand, or wecan represent the data as a DOM tree in memory and ask the tree to write itself to a file.
Reading XML with SAXSAX is a public domain de facto standard API for reading XML documents. Qt's SAX classes aremodeled after the SAX2 Java implementation, with some differences in naming to match the Qtconventions. For more information about SAX, see http://www.saxproject.org/.
Qt provides a SAX-based non-validating XML parser called QXmlSimpleReader. This parser recognizeswell-formed XML and supports XML namespaces. When the parser goes through the document, itcalls virtual functions in registered handler classes to indicate parsing events. (These "parsingevents" are unrelated to Qt events, such as key and mouse events.) For example, let's assume theparser is analyzing the following XML document:
<doc> <quote>Ars longa vita brevis</quote></doc>
The parser would call the following parsing event handlers:
startDocument()startElement("doc")startElement("quote")characters("Ars longa vita brevis")endElement("quote")endElement("doc")endDocument()

The above functions are all declared in QXmlContentHandler. For simplicity, we omitted some of thearguments to startElement() and endElement().
QXmlContentHandler is just one of many handler classes that can be used in conjunction withQXmlSimpleReader. The others are QXmlEntityResolver, QXmlDTDHandler, QXmlErrorHandler,QXmlDeclHandler, and QXmlLexicalHandler. These classes only declare pure virtual functions and giveinformation about different kinds of parsing events. For most applications, QXmlContentHandler andQXmlErrorHandler are the only two that are needed.
For convenience, Qt also provides QXmlDefaultHandler, a class that inherits from all the handlerclasses and that provides trivial implementations for all the functions. This design, with manyabstract handler classes and one trivial subclass, is unusual for Qt; it was adopted to closely followthe model Java implementation.
We will now review an example that shows how to use QXmlSimpleReader and QXmlDefaultHandler toparse an ad hoc XML file format and render its contents in a QtreeWidget. The QXmlDefaultHandler
subclass is called SaxHandler, and the format it handles is that of a book index, with index entriesand subentries.
Figure 15.1. Inheritance tree for SaxHandler
Here's the book index file that is displayed in the QTReeWidget in Figure 15.2:
<?xml version="1.0"?><bookindex> <entry term="sidebearings"> <page>10</page> <page>34-35</page> <page>307-308</page> </entry> <entry term="subtraction"> <entry term="of pictures"> <page>115</page> <page>244</page> </entry> <entry term="of vectors"> <page>9</page> </entry> </entry></bookindex>
Figure 15.2. A book index file displayed in a QtreeWidget

The first step to implement the parser is to subclass QXmlDefaultHandler:
class SaxHandler : public QXmlDefaultHandler{public: SaxHandler(QTreeWidget *tree); bool startElement(const QString &namespaceURI, const QString &localName, const QString &qName, const QXmlAttributes &attributes); bool endElement(const QString &namespaceURI, const QString &localName, const QString &qName); bool characters(const QString &str); bool fatalError(const QXmlParseException &exception);private: QTreeWidget *treeWidget; QTreeWidgetItem *currentItem; QString currentText;};
The SaxHandler class inherits QXmlDefaultHandler and reimplements four functions: startElement(),endElement(), characters(), and fatalError(). The first three functions are declared inQXmlContentHandler; the last function is declared in QXmlErrorHandler.
SaxHandler::SaxHandler(QTreeWidget *tree){ treeWidget = tree; currentItem = 0;}
The SaxHandler constructor accepts the QtreeWidget we want to populate with the information storedin the XML file.
bool SaxHandler::startElement(const QString & /* namespaceURI */, const QString & /* localName */, const QString &qName, const QXmlAttributes &attributes){ if (qName == "entry") { if (currentItem) { currentItem = new QTreeWidgetItem(currentItem); } else { currentItem = new QTreeWidgetItem(treeWidget); } currentItem->setText(0, attributes.value("term")); } else if (qName == "page") { currentText.clear();

} return true;}
The startElement() function is called when the reader encounters a new opening tag. The thirdparameter is the tag's name (or more precisely, its "qualified name"). The fourth parameter is thelist of attributes. In this example, we ignore the first and second parameters. They are useful forXML files that use XML's namespace mechanism, a subject that is discussed in detail in the referencedocumentation.
If the tag is <entry>, we create a new QtreeWidget item. If the tag is nested within another <entry>
tag, the new tag defines a subentry in the index, and the new QtreeWidgetItem is created as a childof the QtreeWidgetItem that represents the encompassing entry. Otherwise, we create theQTReeWidgetItem with treeWidget as its parent, making it a top-level item. We call setText() to setthe text shown in column 0 to the value of the <entry> tag's term attribute.
If the tag is <page>, we set the currentText to be an empty string. The currentText serves as anaccumulator for the text located between the <page> and </page> tags.
At the end, we return true to tell SAX to continue parsing the file. If we wanted to report unknowntags as errors, we would return false in those cases. We would then also reimplementerrorString() from QXmlDefaultHandler to return an appropriate error message.
bool SaxHandler::characters(const QString &str){ currentText += str; return true;}
The characters() function is called to report character data in the XML document. We simply appendthe characters to the currentText variable.
bool SaxHandler::endElement(const QString & /* namespaceURI */, const QString & /* localName */, const QString &qName){ if (qName == "entry") { currentItem = currentItem->parent(); } else if (qName == "page") { if (currentItem) { QString allPages = currentItem->text(1); if (!allPages.isEmpty())
allPages += ", "; allPages += currentText; currentItem->setText(1, allPages); } } return true;}
The endElement() function is called when the reader encounters a closing tag. Just as withstartElement(), the third parameter is the name of the tag.
If the tag is </entry>, we update the currentItem private variable to point to the currentQtreeWidgetItem's parent. This ensures that the currentItem variable is restored to the value it held

before the corresponding <entry> tag was read.
If the tag is </page>, we add the specified page number or page range to the comma-separated listin the current item's text in column 1.
bool SaxHandler::fatalError(const QXmlParseException &exception){ QMessageBox::warning(0, QObject::tr("SAX Handler"), QObject::tr("Parse error at line %1, column " "%2:\n%3.") .arg(exception.lineNumber()) .arg(exception.columnNumber()) .arg(exception.message())); return false;}
The fatalError() function is called when the reader fails to parse the XML file. If this occurs, wesimply display a message box, giving the line number, the column number, and the parser's errortext.
This completes the implementation of the SaxHandler class. Now let's see how we can make use ofit:
bool parseFile(const QString &fileName){ QStringList labels; labels << QObject::tr("Terms") << QObject::tr("Pages"); QTreeWidget *treeWidget = new QTreeWidget; treeWidget->setHeaderLabels(labels); treeWidget->setWindowTitle(QObject::tr("SAX Handler")); treeWidget->show(); QFile file(fileName); QXmlInputSource inputSource(&file); QXmlSimpleReader reader; SaxHandler handler(treeWidget); reader.setContentHandler(&handler); reader.setErrorHandler(&handler); return reader.parse(inputSource);}
We set up a QtreeWidget with two columns. Then we create a QFile object for the file that is to beread and a QXmlSimpleReader to parse the file. We don't need to open the QFile ourselves;QXmlInputSource does that automatically.
Finally, we create a SaxHandler object, we install it on the reader both as a content handler and asan error handler, and we call parse() on the reader to perform the parsing.
Instead of passing a simple file object to the parse() function, we pass a QXmlInputSource. This classopens the file it is given, reads it (taking into account any character encoding specified in the<?xml?> declaration), and provides an interface through which the parser reads the file.
In SaxHandler, we only reimplemented functions from the QXmlContentHandler and QXmlErrorHandler
classes. If we had implemented functions from other handler classes, we would also have needed tocall their corresponding setter functions on the reader.
To link the application against the QtXml library, we must add this line to the .pro file:

QT += xml
Reading XML with DOMDOM is a standard API for parsing XML developed by the World Wide Web Consortium (W3C). Qtprovides a non-validating DOM Level 2 implementation for reading, manipulating, and writing XMLdocuments.
DOM represents an XML file as a tree in memory. We can navigate through the DOM tree as muchas we want, and we can modify the tree and save it back to disk as an XML file.
Let's consider the following XML document:
<doc> <quote>Ars longa vita brevis</quote>
<translation>Art is long, life is short</translation></doc>
It corresponds to the following DOM tree:
The DOM tree contains nodes of different types. For example, an Element node corresponds to anopening tag and its matching closing tag. The material that falls between the tags appears as childnodes of the Element node.
In Qt, the node types (like all other DOM-related classes) have a QDom prefix. Thus, QDomElementrepresents an Element node, and QDomText represents a Text node.
Different types of nodes can have different kinds of child nodes. For example, an Element node cancontain other Element nodes, and also EntityReference, Text, CDATASection, ProcessingInstruction,and Comment nodes. Figure 15.3 shows which nodes can have which kinds of child nodes. The nodesshown in gray cannot have any child nodes of their own.
Figure 15.3. Parentchild relationships between DOM nodes
[View full size image]

To illustrate how to use DOM for reading XML files, we will write a parser for the book index fileformat described in the previous section (p. 340).
class DomParser{public: DomParser(QIODevice *device, QTreeWidget *tree);private: void parseEntry(const QDomElement &element, QTreeWidgetItem *parent); QTreeWidget *treeWidget;};
We define a class called DomParser that will parse a book index XML document and display the resultin a QTReeWidget. This class does not inherit from any other class.
DomParser::DomParser(QIODevice *device, QTreeWidget *tree){ treeWidget = tree;
QString errorStr; int errorLine; int errorColumn; QDomDocument doc; if (!doc.setContent(device, true, &errorStr, &errorLine, &errorColumn)) { QMessageBox::warning(0, QObject::tr("DOM Parser"),
QObject::tr("Parse error at line %1, " "column %2:\n%3") .arg(errorLine) .arg(errorColumn) .arg(errorStr));
return; } QDomElement root = doc.documentElement(); if (root.tagName() != "bookindex") return; QDomNode node = root.firstChild(); while (!node.isNull()) { if (node.toElement().tagName() == "entry") parseEntry(node.toElement(), 0); node = node.nextSibling(); }}
In the constructor, we create a QDomDocument object and call setContent() on it to have it read theXML document provided by the QIODevice. The setContent() function automatically opens the deviceif it isn't already open. Then we call documentElement() on the QDomDocument to obtain its singleQDomElement child, and we check that it is a <bookindex> element. We iterate over all the child nodes,and if the node is an <entry> element, we call parseEntry() to parse it.
The QDomNode class can store any type of node. If we want to process a node further, we must firstconvert it to the right data type. In this example, we only care about Element nodes, so we calltoElement() on the QDomNode to convert it to a QDomElement and then call tagName() to retrieve theelement's tag name. If the node is not of type Element, the toElement() function returns a nullQDomElement object, with an empty tag name.
void DomParser::parseEntry(const QDomElement &element, QTreeWidgetItem *parent){ QTreeWidgetItem *item; if (parent) { item = new QTreeWidgetItem(parent); } else { item = new QTreeWidgetItem(treeWidget); } item->setText(0, element.attribute("term")); QDomNode node = element.firstChild(); while (!node.isNull()) { if (node.toElement().tagName() == "entry") { parseEntry(node.toElement(), item); } else if (node.toElement().tagName() == "page") { QDomNode childNode = node.firstChild(); while (!childNode.isNull()) { if (childNode.nodeType() == QDomNode::TextNode) { QString page = childNode.toText().data(); QString allPages = item->text(1); if (!allPages.isEmpty()) allPages += ", "; allPages += page; item->setText(1, allPages); break; } childNode = childNode.nextSibling(); } } node = node.nextSibling(); }}
In parseEntry(), we create a QTReeWidget item. If the tag is nested within another <entry> tag, thenew tag defines a subentry in the index, and we create the QTReeWidgetItem as a child of theQtreeWidgetItem that represents the encompassing entry. Otherwise, we create the QtreeWidgetItem
with treeWidget as its parent, making it a top-level item. We call setText() to set the text shown incolumn 0 to the value of the <entry> tag's term attribute.
Once we have initialized the QtreeWidgetItem, we iterate over the child nodes of the QDomElement
node corresponding to the current <entry> tag.
If the element is <entry>, we call parseEntry() with the current item as the second argument. Thenew entry's QTReeWidgetItem will then be created with the encompassing entry's QTReeWidgetItem asits parent.
If the element is <page>, we navigate through the element's child list to find a Text node. Once we

have found it, we call toText() to convert it to a QDomText object and data() to extract the text as aQString. Then we add the text to the comma-separated list of page numbers in column 1 of theQtreeWidgetItem.
Let's now see how we can use the DomParser class to parse a file:
void parseFile(const QString &fileName){ QStringList labels; labels << QObject::tr("Terms") << QObject::tr("Pages"); QTreeWidget *treeWidget = new QTreeWidget; treeWidget->setHeaderLabels(labels); treeWidget->setWindowTitle(QObject::tr("DOM Parser")); treeWidget->show(); QFile file(fileName); DomParser(&file, treeWidget);}
We start by setting up a QtreeWidget. Then we create a QFile and a DomParser. When the DomParser
is constructed, it parses the file and populates the tree widget.
Like the previous example, we need the following line in the application's .pro file to link against theQtXml library:
QT += xml
As the example illustrates, navigating through a DOM tree can be cumbersome. Simply extractingthe text between <page> and </page> required us to iterate through a list of QDomNodes usingfirstChild() and nextSibling(). Programmers who use DOM a lot often write their own higher-levelwrapper functions to simplify commonly needed operations, such as extracting the text betweenopening and closing tags.
Writing XMLThere are basically two approaches for generating XML files from Qt applications:
We can build a DOM tree and call save() on it. We can generate XML by hand.
The choice between these approaches is often independent of whether we use SAX or DOM forreading XML documents.
Here's a code snippet that illustrates how we can create a DOM tree and write it using aQTextStream:
const int Indent = 4;QDomDocument doc;QDomElement root = doc.createElement("doc");QDomElement quote = doc.createElement("quote");QDomElement translation = doc.createElement("translation");QDomText latin = doc.createTextNode("Ars longa vita brevis");QDomText english = doc.createTextNode("Art is long, life is short");doc.appendChild(root);root.appendChild(quote);root.appendChild(translation);

quote.appendChild(latin);translation.appendChild(english);QTextStream out(&file);doc.save(out, Indent);
The second argument to save() is the indentation size to use. A non-zero value makes the file easierfor humans to read. Here's the XML file output:
<doc> <quote>Ars longa vita brevis</quote> <translation>Art is long, life is short</translation></doc>
Another scenario occurs in applications that use the DOM tree as their primary data structure. Theseapplications would normally read in XML documents using DOM, then modify the DOM tree inmemory, and finally call save() to convert the tree back to XML.
By default, QDomDocument::save() uses UTF-8 as the encoding for the generated file. We can useanother encoding by prepending an XML declaration such as
<?xml version="1.0" encoding="ISO-8859-1"?>
to the DOM tree. The following code snippet shows how to do this:
QTextStream out(&file);QDomNode xmlNode = doc.createProcessingInstruction("xml", "version=\"1.0\" encoding=\"ISO-8859-1\"");doc.insertBefore(xmlNode, doc.firstChild());doc.save(out, Indent);
Generating XML files by hand isn't much harder than using DOM. We can use QTextStream and writethe strings as we would do with any other text file. The most tricky part is to escape specialcharacters in text and attribute values. The Qt::escape() function escapes the characters '<', '>',and '&'. Here's some code that makes use of it:
QTextStream out(&file);out.setCodec("UTF-8");out << "<doc>\n" << " <quote>" << Qt::escape(quoteText) << "</quote>\n" << " <<" <translation>" << Qt::escape(translationText) << "</translation>\n" << "</doc>\n";
The Qt Quarterly article "Generating XML", available online at http://doc.trolltech.com/qq/qq05-generating-xml.html, presents a very simple class that makes it easy to generate XML files. Theclass takes care of the details such as special characters, indentation, and encoding issues, leavingus free to concentrate on the XML we want to generate. The class was designed to work with Qt 3but it is trivial to port to Qt 4.

Chapter 16. Providing Online Help Tooltips, Status Tips, and "What's This?" Help Using QTextBrowser as a Simple Help Engine Using Qt Assistant for Powerful Online Help
Most applications provide their users with online help. Some help is short, such as tooltips, statustips, and "What's This?" help. Naturally, Qt supports all of these. Other help can be much moreextensive, involving many pages of text. For this kind of help, you can use QTextBrowser as a simpleonline help browser, or you can invoke Qt Assistant or an HTML browser from your application.
Tooltips, Status Tips, and "What's This?" HelpA tooltip is a small piece of text that appears when the mouse hovers over a widget for a certainperiod of time. Tooltips are presented with black text on a yellow background. Their primary use isto provide textual descriptions of toolbar buttons.
We can add tooltips to arbitrary widgets in code using QWidget::setToolTip(). For example:
findButton->setToolTip(tr("Find next"));
To set the tooltip of a QAction that could be added to a menu or a toolbar, we can simply callsetToolTip() on the action. For example:
newAction = new QAction(tr("&New"), this);newAction->setToolTip(tr("New document"));
If we don't explicitly set a tooltip, QAction will automatically use the action text.
A status tip is also a short piece of descriptive text, usually a little longer than a tooltip. When themouse hovers over a toolbar button or a menu option, a status tip appears in the status bar. CallsetStatusTip() to add a status tip to an action or to a widget:
newAction->setStatusTip(tr("Create a new document"));
Figure 16.1. An application showing a tooltip and a status tip
[View full size image]

In some situations, it is desirable to provide more information about a widget than can be given bytooltips or status tips. For example, we might want to provide a complex dialog with explanatorytext about each field without forcing the user to invoke a separate help window. "What's This?"mode is an ideal solution for this. When a window is in "What's This?" mode, the cursor changes to
and the user can click on any user interface component to obtain its help text. To enter "What'sThis?" mode, the user can either click the ? button in the dialog's title bar (on Windows and KDE) orpress Shift+F1.
Here is an example of a "What's This?" text set on a dialog:
dialog->setWhatsThis(tr("<img src=\":/images/icon.png\">" " The meaning of the Source field depends " "on the Type field:" "<ul>" "<li><b>Books</b> have a Publisher" "<li><b>Articles</b> have a Journal name with "
"volume and issue number" "<li><b>Theses</b> have an Institution name " "and a Department name" "</ul>"));
We can use HTML tags to format the text of a "What's This?" text. In the example, we include animage (which is listed in the application's resource file), a bulleted list, and some text in bold. Thetags and attributes that Qt supports are specified at http://doc.trolltech.com/4.1/richtext-html-subset.html.
Figure 16.2. A dialog showing a "What's This?" help text

When we set a "What's This?" text on an action, the text will be shown when the user clicks themenu item or toolbar button or presses the shortcut key while in "What's This?" mode. When theuser interface components of an application's main window provide "What's This?" text, it iscustomary to provide a What's This? option in the Help menu and a corresponding toolbar button.This can be done by creating a What's This? action with the static QWhatsThis::createAction()
function and adding the action it returns to a Help menu and to a toolbar. The QWhatsThis class alsoprovides static functions to programmatically enter and leave "What's This?" mode.
Using QTextBrowser as a Simple Help EngineLarge applications may require more online help than tooltips, status tips, and "What's This?" helpcan reasonably show. A simple solution to this is to provide a help browser. Applications that includea help browser typically have a Help entry in the main window's Help menu and a Help button inevery dialog.
In this section, we present the simple help browser shown in Figure 16.3 and explain how it can beused within an application. The window uses a QTextBrowser to display help pages that are markedup with an HTML-based syntax. QTextBrowser can handle a lot of HTML tags, so it is ideal for thispurpose.
Figure 16.3. The HelpBrowser widget
[View full size image]
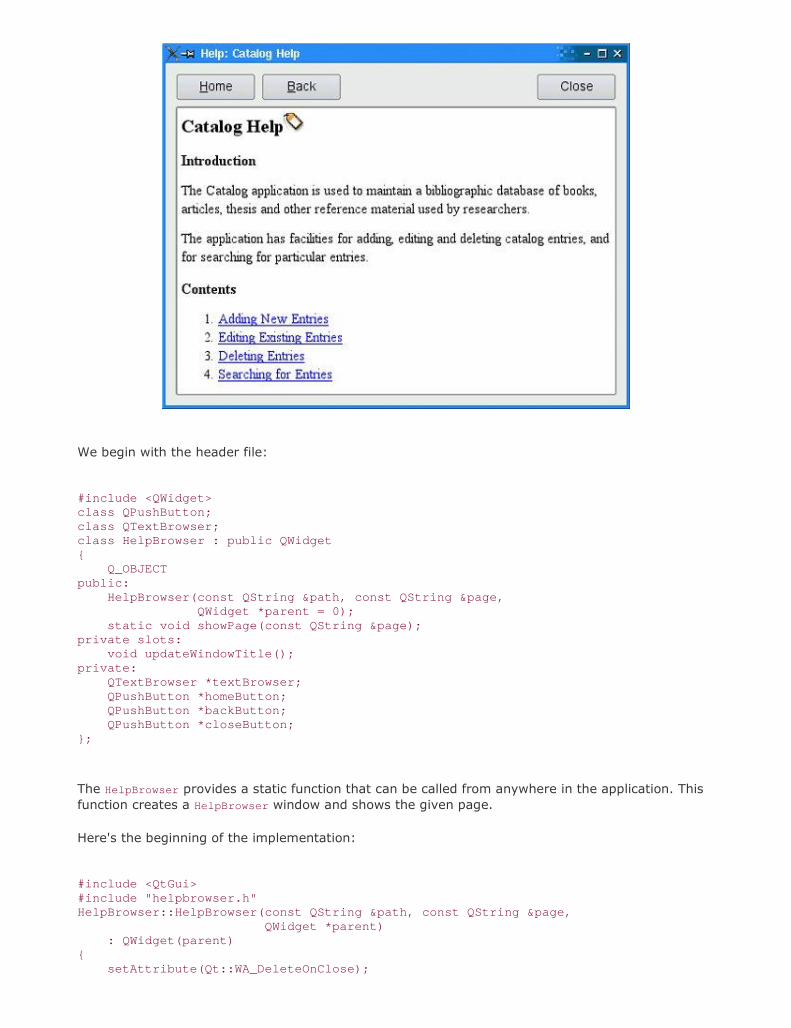
We begin with the header file:
#include <QWidget>class QPushButton;class QTextBrowser;class HelpBrowser : public QWidget{ Q_OBJECTpublic: HelpBrowser(const QString &path, const QString &page,
QWidget *parent = 0); static void showPage(const QString &page);private slots: void updateWindowTitle();private: QTextBrowser *textBrowser; QPushButton *homeButton; QPushButton *backButton; QPushButton *closeButton;};
The HelpBrowser provides a static function that can be called from anywhere in the application. Thisfunction creates a HelpBrowser window and shows the given page.
Here's the beginning of the implementation:
#include <QtGui>#include "helpbrowser.h"HelpBrowser::HelpBrowser(const QString &path, const QString &page, QWidget *parent) : QWidget(parent){ setAttribute(Qt::WA_DeleteOnClose);

setAttribute(Qt::WA_GroupLeader); textBrowser = new QTextBrowser; homeButton = new QPushButton(tr("&Home")); backButton = new QPushButton(tr("&Back")); closeButton = new QPushButton(tr("Close")); closeButton->setShortcut(tr("Esc")); QHBoxLayout *buttonLayout = new QHBoxLayout; buttonLayout->addWidget(homeButton); buttonLayout->addWidget(backButton); buttonLayout->addStretch(); buttonLayout->addWidget(closeButton); QVBoxLayout *mainLayout = new QVBoxLayout; mainLayout->addLayout(buttonLayout); mainLayout->addWidget(textBrowser); setLayout(mainLayout); connect(homeButton, SIGNAL(clicked()), textBrowser, SLOT(home())); connect(backButton, SIGNAL(clicked()), textBrowser, SLOT(backward())); connect(closeButton, SIGNAL(clicked()), this, SLOT(close())); connect(textBrowser, SIGNAL(sourceChanged(const QUrl &)), this, SLOT(updateWindowTitle())); textBrowser->setSearchPaths(QStringList() << path << ":/images"); textBrowser->setSource(page);}
We set the Qt::WA_GroupLeader attribute because we want to pop up HelpBrowser windows frommodal dialogs in addition to the main window. Modal dialogs normally prevent the user frominteracting with any other window in the application. However, after requesting help, the user mustobviously be allowed to interact with both the modal dialog and with the help browser. Setting theQt::WA_GroupLeader attribute makes this interaction possible.
We provide two search paths, the first a path in the file system that contains the application'sdocumentation, and the second the location of the image resources. The HTML can includereferences to images in the file system in the normal way and also references to image resources byusing a path that begins with :/ (colon slash). The page parameter is the name of the documentationfile, with an optional HTML anchor.
void HelpBrowser::updateWindowTitle(){ setWindowTitle(tr("Help: %1").arg(textBrowser->documentTitle()));}
Whenever the source page changes, the updateWindowTitle() slot is called. The documentTitle()
function returns the text specified in the page's <title> tag.
void HelpBrowser::showPage(const QString &page){ QString path = QApplication::applicationDirPath() + "/doc"; HelpBrowser *browser = new HelpBrowser(path, page); browser->resize(500, 400); browser->show();}
In the showPage() static function, we create the HelpBrowser window and then show it. The windowwill be destroyed automatically when the user closes it, since we set the Qt::WA_DeleteOnClose
attribute in the HelpBrowser constructor.
For this example, we assume that the documentation is located in the doc subdirectory of thedirectory containing the application's executable. All the pages passed to the showPage() function willbe taken from this subdirectory.
Now we are ready to invoke the help browser from the application. In the application's main window,we would create a Help action and connect it to a help() slot that could look like this:
void MainWindow::help(){ HelpBrowser::showPage("index.html");}
This assumes that the main help file is called index.html. For dialogs, we would connect the Helpbutton to a help() slot that might look like this:
void EntryDialog::help(){ HelpBrowser::showPage("forms.html#editing");}
Here we look in a different help file, forms.html, and scroll the QTextBrowser to the editing anchor.
Using Qt Assistant for Powerful Online HelpQt Assistant is a redistributable online help application supplied by Trolltech. Its main virtues arethat it supports indexing and full text search and that it can handle documentation sets for multipleapplications.
To make use of Qt Assistant, we must incorporate the necessary code in our application, and wemust make Qt Assistant aware of our documentation.
Communication between a Qt application and Qt Assistant is handled by the QAssistantClient
class, which is located in a separate library. To link this library with an application, we must add thefollowing line to the application's .pro file:
CONFIG += assistant
We will now review the code of a new HelpBrowser class that uses Qt Assistant.
#ifndef HELPBROWSER_H#define HELPBROWSER_Hclass QAssistantClient;class QString;class HelpBrowser{public: static void showPage(const QString &page);private: static QAssistantClient *assistant;};#endif
Here's the new helpbrowser.cpp file:
#include <QApplication>#include <QAssistantClient>#include "helpbrowser.h"QAssistantClient *HelpBrowser::assistant = 0;void HelpBrowser::showPage(const QString &page){ QString path = QApplication::applicationDirPath() + "/doc/" + page; if (!assistant) assistant = new QAssistantClient(""); assistant->showPage(path);}
The QAssistantClient constructor accepts a path string as its first argument, which it uses to locatethe Qt Assistant executable. By passing an empty path, we signify that QAssistantClient shouldlook for the executable in the PATH environment variable. QAssistantClient has a showPage() functionthat accepts a page name with an optional HTML anchor.
The next step is to prepare a table of contents and an index for the documentation. This is done bycreating a Qt Assistant profile and writing a .dcf file that provides information about thedocumentation. All this is explained in Qt Assistant's online documentation, so we will not duplicatethat information here.
An alternative to using QTextBrowser or Qt Assistant is to use platform-specific approaches toproviding online help. For Windows applications, it might be desirable to create Windows HTML Helpfiles and to provide access to them using Microsoft Internet Explorer. You could use Qt's QProcess
class or the ActiveQt framework for this. For X11 applications, a suitable approach might be toprovide HTML files and to launch a web browser using QProcess. On Mac OS X, Apple Help providessimilar functionality to Qt Assistant.
We have now reached the end of Part II. The chapters that follow in Part III cover more advancedand specialized features of Qt. The C++ and Qt coding they present are no more difficult than thatseen in Part II, but some of the concepts and ideas may be more challenging in those areas that arenew to you.

Part III: Advanced Qt
Chapter 17. Internationalization
Chapter 18. Multithreading
Chapter 19. Creating Plugins
Chapter 20. Platform-Specific Features
Chapter 21. Embedded Programming

Chapter 17. Internationalization Working with Unicode Making Applications Translation-Aware Dynamic Language Switching Translating Applications
In addition to the Latin alphabet used for English and for many European languages, Qt 4 alsoprovides extensive support for the rest of the world's writing systems:
Qt uses Unicode throughout the API and internally. No matter what language we use for theuser interface, the application can support all users alike.
Qt's text engine can handle all the major non-Latin writing systems, including Arabic,Chinese, Cyrillic, Hebrew, Japanese, Korean, Thai, and the Indic languages.
Qt's layout engine supports right-to-left layouts for languages such as Arabic and Hebrew. Certain languages require special input methods for entering text. Editor widgets such as
QLineEdit and QTextEdit work well with any input method installed on the user's system.
Often, it isn't enough to allow users to enter text in their native language; the entire user interface'smust be translated as well. Qt makes this easy: Simply wrap all user-visible strings with the tr()
function (as we have done in earlier chapters) and use Qt's supporting tools to prepare translationfiles in the required languages. Qt provides a GUI tool called Qt Linguist for use by translators.QtLinguist is complemented by two command-line programs, lupdate and lrelease, which aretypically run by the application's developers.
For most applications, a translation file is loaded at startup, based on the user's locale settings. Butin a few cases, it is also necessary for users to be able to switch language at run-time. This isperfectly possible with Qt, although it does require a bit of extra work. And thanks to Qt's layoutsystem, the various user interface components will automatically adjust to make room for thetranslated texts when they are longer than the original texts.
Working with UnicodeUnicode is a character encoding standard that supports most of the world's writing systems. Theoriginal idea behind Unicode is that by using 16 bits for storing characters instead of 8 bits, it wouldbe possible to encode around 65,000 characters instead of only 256.[*] Unicode contains ASCII andISO 8859-1 (Latin-1) as subsets at the same code positions. For example, the character 'A' hasvalue 0x41 in ASCII, Latin-1, and Unicode, and the character 'Â' has value 0xD1 in both Latin-1 andUnicode.
[*] Recent versions of the Unicode standard assign character values above 65,535. These characters can be represented usingsequences of two 16-bit values called "surrogate pairs".
Qt's QString class stores strings as Unicode. Each character in a QString is a 16-bit QChar rather thanan 8-bit char. Here are two ways of setting the first character of a string to 'A':
str[0] = 'A';str[0] = QChar(0x41);
If the source file is encoded in Latin-1, specifying Latin-1 characters is just as easy:
str[0] = 'Ñ';

And if the source file has another encoding, the numeric value works fine:
str[0] = QChar(0xD1);
We can specify any Unicode character by its numeric value. For example, here's how to specify theGreek capital letter sigma ('') and the euro currency symbol (' € '):
str[0] = QChar(0x3A3);str[0] = QChar(0x20AC);
The numeric values of all the characters supported by Unicode are listed athttp://www.unicode.org/standard/. If you rarely need non-Latin-1 Unicode characters, looking upcharacters online is sufficient; but Qt provides more convenient ways of entering Unicode strings ina Qt program, as we will see later in this section.
Qt 4's text engine supports the following writing systems on all platforms: Arabic, Chinese, Cyrillic,Greek, Hebrew, Japanese, Korean, Lao, Latin, Thai, and Vietnamese. It also supports all the Unicode4.1 scripts that don't require any special processing. In addition, the following writing systems aresupported on X11 with Fontconfig and on recent versions of Windows: Bengali, Devanagari, Gujarati,Gurmukhi, Kannada, Khmer, Malayalam, Syriac, Tamil, Telugu, Thaana (Dhivehi), and Tibetan.Finally, Oriya is supported on X11, and Mongolian and Sinhala are supported on Windows XP.Assuming that the proper fonts are installed on the system, Qt can render text using any of thesewriting systems. And assuming that the proper input methods are installed, users will be able toenter text that uses these writing systems in their Qt applications.
Programming with QChar is slightly different from programming with char. To obtain the numericvalue of a QChar, call unicode() on it. To obtain the ASCII or Latin-1 value of a QChar (as a char), calltoLatin1(). For non-Latin-1 characters, toLatin1() returns '\0'.
If we know that all the strings in a program are ASCII, we can use standard <cctype> functions likeisalpha(), isdigit(), and isspace() on the return value of toLatin1(). However, it is generallybetter to use QChar's member functions for performing these operations, since they will work for anyUnicode character. The functions QChar provides include isPrint(), isPunct(), isSpace(), isMark(),isLetter(), isNumber(), isLetterOrNumber(), isDigit(), isSymbol(), isLower(), and isUpper(). Forexample, here's one way to test that a character is a digit or an uppercase letter:
if (ch.isDigit() || ch.isUpper()) ...
The code snippet works for any alphabet that distinguishes between uppercase and lowercase,including Latin, Greek, and Cyrillic.
Once we have a Unicode string, we can use it anywhere in Qt's API where a QString is expected. Itis then Qt's responsibility to display it properly and to convert it to the relevant encodings whentalking to the operating system.
Special care is needed when we read and write text files. Text files can use a variety of encodings,and it is often impossible to guess a text file's encoding from its contents. By default, QTextStream
uses the system's local 8-bit encoding (available as QTextCodec::codecForLocale()) for both readingand writing. For American and West European locales, this usually means Latin-1.
If we design our own file format and want to be able to read and write arbitrary Unicode characters,
we can save the data as Unicode by calling
stream.setCodec("UTF-16");stream.setGenerateByteOrderMark(true);
before we start writing to the QTextStream. The data will then be saved in UTF-16, a format thatrequires two bytes per character, and will be prefixed with a special 16-bit value (the Unicode byteorder mark, 0xFFFE) identifying that the file is in Unicode and whether the bytes are in little-endianor big-endian order. The UTF-16 format is identical to the memory representation of a QString, soreading and writing Unicode strings in UTF-16 can be very fast. However, there is an inherentoverhead when saving pure ASCII data in UTF-16 format, since it stores two bytes for everycharacter instead of just one.
Other encodings can be specified by calling setCodec() with an appropriate QTextCodec. A QTextCodec
is an object that converts between Unicode and a given encoding. QTextCodecs are used in a varietyof contexts by Qt. Internally, they are used to support fonts, input methods, the clipboard, drag anddrop, and file names. But they are also available to us when we write Qt applications.
When reading a text file, QTextStream detects Unicode automatically if the file starts with the byteorder mark. This behavior can be turned off by calling setAutoDetectUnicode(false). If the data can'tbe assumed to start with the byte order mark, it is best to call setCodec() with "UTF-16" beforereading.
Another encoding that supports the whole of Unicode is UTF-8. Its main advantage over UTF-16 isthat it is a superset of ASCII. Any character in the range 0x00 to 0x7F is represented as a singlebyte. Other characters, including Latin-1 characters above 0x7F, are represented by multi-bytesequences. For text that is mostly ASCII, UTF-8 takes up about half the space consumed by UTF-16.To use UTF-8 with QTextStream, call setCodec() with "UTF-8" as the codec name before reading andwriting.
If we always want to read and write Latin-1 regardless of the user's locale, we can set the "ISO8859-1" codec on the QTextStream. For example:
QTextStream in(&file);in.setCodec("ISO 8859-1");
Some file formats specify their encoding in their header. The header is typically plain ASCII toensure that it is read correctly no matter what encoding is used (assuming that it is a superset ofASCII). The XML file format is an interesting example of this. XML files are normally encoded asUTF-8 or UTF-16. The proper way to read them in is to call setCodec() with "UTF-8". If the format isUTF-16, QTextStream will automatically detect this and adjust itself. The <?xml?> header of an XMLfile sometimes contains an encoding argument, for example:
<?xml version="1.0" encoding="EUC-KR"?>
Since QTextStream doesn't allow us to change the encoding once it has started reading, the right wayto respect an explicit encoding is to start reading the file afresh, using the correct codec (obtainedfrom QTextCodec::codecForName()). In the case of XML, we can avoid having to handle the encodingourselves by using Qt's XML classes, described in Chapter 15.
Another use of QTextCodecs is to specify the encoding of strings that occur in the source code. Let'sconsider for example a team of Japanese programmers who are writing an application targetedprimarily at Japan's home market. These programmers are likely to write their source code in a text

editor that uses an encoding such as EUC-JP or Shift-JIS. Such an editor allows them to type inJapanese characters seamlessly, so that they can write code like this:
QPushButton *button = new QPushButton(tr(" "));
By default, Qt interprets arguments to TR() as Latin-1. To change this, call theQTextCodec::setCodecForTr() static function. For example:
QTextCodec::setCodecForTr(QTextCodec::codecForName("EUC-JP"));
This must be done before the first call to tr(). Typically, we would do this in main(), immediatelyafter the QApplication object is created.
Other strings specified in the program will still be interpreted as Latin-1 strings. If the programmerswant to enter Japanese characters in those as well, they can explicitly convert them to Unicodeusing a QTextCodec:
QString text = japaneseCodec->toUnicode(" ");
Alternatively, they can tell Qt to use a specific codec when converting between const char * andQString by calling QTextCodec::setCodecForCStrings():
QTextCodec::setCodecForCStrings(QTextCodec::codecForName("EUC-JP"));
The techniques described above can be applied to any non-Latin-1 language, including Chinese,Greek, Korean, and Russian.
Here's a list of the encodings supported by Qt 4:
Apple Roman Big5 Big5-HKSCS EUC-JP EUC-KR GB18030-0 IBM 850 IBM 866 IBM 874 ISO 2022-JP ISO 8859-1 ISO 8859-2 ISO 8859-3 ISO 8859-4 ISO 8859-5 ISO 8859-6 ISO 8859-7 ISO 8859-8 ISO 8859-9 ISO 8859-10 ISO 8859-13 ISO 8859-14

ISO 8859-15 ISO 8859-16 Iscii-Bng Iscii-Dev Iscii-Gjr Iscii-Knd Iscii-Mlm Iscii-Ori Iscii-Pnj Iscii-Tlg Iscii-Tml JIS X 0201 JIS X 0208 KOI8-R KOI8-U MuleLao-1 ROMAN8 Shift-JIS TIS-620 TSCII UTF-8 UTF-16 UTF-16BE UTF-16LE Windows-1250 Windows-1251 Windows-1252 Windows-1253 Windows-1254 Windows-1255 Windows-1256 Windows-1257 Windows-1258 WINSAMI2
For all of these, QTextCodec::codecForName() will always return a valid pointer. Other encodings canbe supported by subclassing QTextCodec.
Making Applications Translation-AwareIf we want to make our applications available in multiple languages, we must do two things:
Make sure that every user-visible string goes through tr(). Load a translation (.qm) file at startup.
Neither of these is necessary for applications that will never be translated. However, using TR()
requires almost no effort and leaves the door open for doing translations at a later date.
The tr() function is a static function defined in QObject and overridden in every subclass definedwith the Q_OBJECT macro. When writing code inside a QObject subclass, we can call tr() withoutformality. A call to TR() returns a translation if one is available; otherwise, the original text isreturned.
To prepare translation files, we must run Qt's lupdate tool. This tool extracts all the string literalsthat appear in TR() calls and produces translation files that contain all of these strings ready to betranslated. The files can then be sent to a translator to have the translations added. This process isexplained in the "Translating Applications" section later in this chapter.

A tr() call has the following general syntax:
Context::tr(sourceText, comment)
The Context part is the name of a QObject subclass defined with the Q_OBJECT macro. We don't needto specify it if we call tr() from a member function of the class in question. The sourceText part isthe string literal that needs to be translated. The comment part is optional; it can be used to provideadditional information to the translator.
Here are a few examples:
RockyWidget::RockyWidget(QWidget *parent) : QWidget(parent){ QString str1 = tr("Letter"); QString str2 = RockyWidget::tr("Letter"); QString str3 = SnazzyDialog::tr("Letter"); QString str4 = SnazzyDialog::tr("Letter", "US paper size");}
The first two calls to tr() have "RockyWidget" as context, and the last two calls have"SnazzyDialog". All four have "Letter" as source text. The last call also has a comment to help thetranslator understand the meaning of the source text.
Strings in different contexts (classes) are translated independently of each other. Translatorstypically work on one context at a time, often with the application running and showing the widgetor dialog being translated.
When we call TR() from a global function, we must specify the context explicitly. Any QObject
subclass in the application can be used as the context. If none is appropriate, we can always useQObject itself. For example:
int main(int argc, char *argv[]){ QApplication app(argc, argv); ... QPushButton button(QObject::tr("Hello Qt!")); button.show(); return app.exec();}
In every example so far, the context has been a class name. This is convenient, because we canalmost always omit it, but this doesn't have to be the case. The most general way of translating astring in Qt is to use the QApplication::translate() function, which accepts up to three arguments:the context, the source text, and the optional comment. For example, here's another way totranslate "Hello Qt!":
QApplication::translate("Global Stuff", "Hello Qt!")
This time, we put the text in the "Global Stuff" context.
The tr() and translate() functions serve a dual purpose: They are markers that lupdate uses to
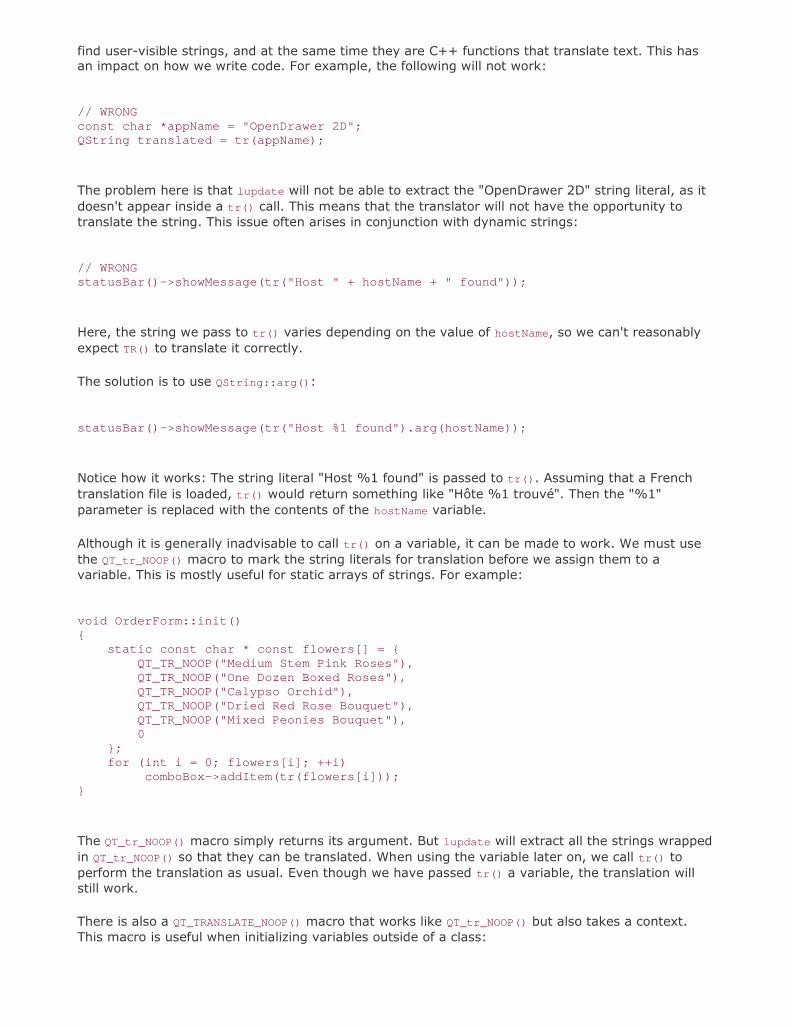
find user-visible strings, and at the same time they are C++ functions that translate text. This hasan impact on how we write code. For example, the following will not work:
// WRONGconst char *appName = "OpenDrawer 2D";QString translated = tr(appName);
The problem here is that lupdate will not be able to extract the "OpenDrawer 2D" string literal, as itdoesn't appear inside a tr() call. This means that the translator will not have the opportunity totranslate the string. This issue often arises in conjunction with dynamic strings:
// WRONGstatusBar()->showMessage(tr("Host " + hostName + " found"));
Here, the string we pass to tr() varies depending on the value of hostName, so we can't reasonablyexpect TR() to translate it correctly.
The solution is to use QString::arg():
statusBar()->showMessage(tr("Host %1 found").arg(hostName));
Notice how it works: The string literal "Host %1 found" is passed to tr(). Assuming that a Frenchtranslation file is loaded, tr() would return something like "Hôte %1 trouvé". Then the "%1"parameter is replaced with the contents of the hostName variable.
Although it is generally inadvisable to call tr() on a variable, it can be made to work. We must usethe QT_tr_NOOP() macro to mark the string literals for translation before we assign them to avariable. This is mostly useful for static arrays of strings. For example:
void OrderForm::init(){
static const char * const flowers[] = { QT_TR_NOOP("Medium Stem Pink Roses"), QT_TR_NOOP("One Dozen Boxed Roses"), QT_TR_NOOP("Calypso Orchid"), QT_TR_NOOP("Dried Red Rose Bouquet"), QT_TR_NOOP("Mixed Peonies Bouquet"), 0 }; for (int i = 0; flowers[i]; ++i) comboBox->addItem(tr(flowers[i]));}
The QT_tr_NOOP() macro simply returns its argument. But lupdate will extract all the strings wrappedin QT_tr_NOOP() so that they can be translated. When using the variable later on, we call tr() toperform the translation as usual. Even though we have passed tr() a variable, the translation willstill work.
There is also a QT_TRANSLATE_NOOP() macro that works like QT_tr_NOOP() but also takes a context.This macro is useful when initializing variables outside of a class:

static const char * const flowers[] = { QT_TRANSLATE_NOOP("OrderForm", "Medium Stem Pink Roses"), QT_TRANSLATE_NOOP("OrderForm", "One Dozen Boxed Roses"), QT_TRANSLATE_NOOP("OrderForm", "Calypso Orchid"), QT_TRANSLATE_NOOP("OrderForm", "Dried Red Rose Bouquet"), QT_TRANSLATE_NOOP("OrderForm", "Mixed Peonies Bouquet"), 0};
The context argument must be the same as the context given to TR() or translate() later on.
When we start using TR() in an application, it's easy to forget to surround some user-visible stringswith a tr() call, especially when we are just beginning to use it. These missing TR() calls areeventually discovered by the translator or, worse, by users of the translated application, when somestrings appear in the original language. To avoid this problem, we can tell Qt to forbid implicitconversions from const char * to QString. We do this by defining the QT_NO_CAST_FROM_ASCII
preprocessor symbol before including any Qt header. The easiest way to ensure this symbol is set isto add the following line to the application's .pro file:
DEFINES += QT_NO_CAST_FROM_ASCII
This will force every string literal to require wrapping by TR() or by QLatin1String(), depending onwhether it should be translated or not. Strings that are not suitably wrapped will produce a compile-time error, thereby compelling us to add the missing TR() or QLatin1String() call.
Once we have wrapped every user-visible string by a tr() call, the only thing left to do to enabletranslation is to load a translation file. Typically, we would do this in the application's main()
function. For example, here's how we would try to load a translation file depending on the user'slocale:
int main(int argc, char *argv[]){ QApplication app(argc, argv); QTranslator appTranslator; appTranslator.load("myapp_" + QLocale::system().name(), qApp->applicationDirPath()); app.installTranslator(&appTranslator);
... return app.exec();}
The QLocale::system() function returns a QLocale object that provides information about the user'slocale. Conventionally, we use the locale's name as part of the .qm file name. Locale names can bemore or less precise; for example, fr specifies a French-language locale, fr_CA specifies a FrenchCanadian locale, and fr_CA.ISO8859-15 specifies a French Canadian locale with ISO 8859-15
encoding (an encoding that supports '€', 'Œ', 'œ', and ' ').
Assuming that the locale is fr_CA.ISO8859-15, the Qtranslator::load() function first tries to load thefile myapp_fr_CA.ISO8859-15.qm. If this file does not exist, load() next tries myapp_fr_CA.qm, thenmyapp_fr.qm, and finally myapp.qm, before giving up. Normally, we would only provide myapp_fr.qm,containing a standard French translation, but if we need a different file for French-speaking Canada,we can also provide myapp_fr_CA.qm and it will be used for fr_CA locales.
The second argument to QTRanslator::load() is the directory where we want load() to look for thetranslation file. In this case, we assume that the translation files are located in the same directory as

the executable.
The Qt libraries contain a few strings that need to be translated. Trolltech provides French, German,and Simplified Chinese translations in Qt's translations directory. A few other languages areprovided as well, but these are contributed by Qt users and are not officially supported. The Qtlibraries' translation file should also be loaded:
QTranslator qtTranslator;qtTranslator.load("qt_" + QLocale::system().name(), qApp->applicationDirPath());app.installTranslator(&qtTranslator);
A QTRanslator object can only hold one translation file at a time, so we use a separate Qtranslator
for Qt's translation. Having just one file per translator is not a problem since we can install as manytranslators as we need. QApplication will use all of them when searching for a translation.
Some languages, such as Arabic and Hebrew, are written right-to-left instead of left-to-right. Inthose languages, the whole layout of the application must be reversed, and this is done by callingQApplication::setLayoutDirection(Qt::RightToLeft). The translation files for Qt contain a specialmarker called "LTR" that tells Qt whether the language is left-to-right or right-to-left, so we normallydon't need to call setLayoutDirection() ourselves.
It may prove more convenient for our users if we supply our applications with the translation filesembedded in the executable, using Qt's resource system. Not only does this reduce the number offiles distributed as part of the product, it also avoids the risk of translation files getting lost ordeleted by accident.
Assuming that the .qm files are located in a TRanslations subdirectory in the source tree, we wouldthen have a myapp.qrc file with the following contents:
<!DOCTYPE RCC><RCC version="1.0"><qresource> <file>translations/myapp_de.qm</file> <file>translations/myapp_fr.qm</file> <file>translations/myapp_zh.qm</file> <file>translations/qt_de.qm</file> <file>translations/qt_fr.qm</file> <file>translations/qt_zh.qm</file></qresource></RCC>
The .pro file would contain the following entry:
RESOURCES = myapp.qrc
Finally, in main(), we must specify :/translations as the path for the translation files. The leadingcolon indicates that the path refers to a resource as opposed to a file in the file system.
We have now covered all that is required to make an application able to operate using translationsinto other languages. But language and the direction of the writing system are not the only thingsthat vary between countries and cultures. An internationalized program must also take into accountthe local date and time formats, monetary formats, numeric formats, and string collation order. Qtincludes a QLocale class that provides localized numeric and date/time formats. To query other

locale-specific information, we can use the standard C++ setlocale() and localeconv() functions.
Some Qt classes and functions adapt their behavior to the locale:
QString::localeAwareCompare() compares two strings in a locale-dependent manner. It isuseful for sorting user-visible items.
The toString() function provided by QDate, QTime, and QDateTime returns a string in a localformat when called with Qt::LocalDate as argument.
By default, the QDateEdit and QDateTimeEdit widgets present dates in the local format.
Finally, a translated application may need to use different icons in certain situations rather than theoriginal icons. For example, the left and right arrows on a web browser's Back and Forward buttonsshould be swapped when dealing with a right-to-left language. We can do this as follows:
if (QApplication::isRightToLeft()) { backAction->setIcon(forwardIcon); forwardAction->setIcon(backIcon);} else { backAction->setIcon(backIcon); forwardAction->setIcon(forwardIcon);}
Icons that contain alphabetic characters very commonly need to be translated. For example, theletter 'I' on a toolbar button associated with a word processor's Italic option should be replaced by a'C' in Spanish (Cursivo) and by a 'K' in Danish, Dutch, German, Norwegian, and Swedish (Kursiv).Here's a simple way to do it:
if (tr("Italic")[0] == 'C') { italicAction->setIcon(iconC);} else if (tr("Italic")[0] == 'K') {
italicAction->setIcon(iconK);} else { italicAction->setIcon(iconI);}
An alternative is to use the resource system's support for multiple locales. In the .qrc file, we canspecify a locale for a resource using the lang attribute. For example:
<qresource> <file>italic.png</file></qresource><qresource lang="es"> <file alias="italic.png">cursivo.png</file></qresource><qresource lang="sv"> <file alias="italic.png">kursiv.png</file></qresource>
If the user's locale is es (Español), :/italic.png becomes a reference to the cursivo.png image. Ifthe locale is sv (Svenska), the kursiv.png image is used. For other locales, italic.png is used.

Dynamic Language SwitchingFor most applications, detecting the user's preferred language in main() and loading the appropriate.qm files there is perfectly satisfactory. But there are some situations where users might need theability to switch language dynamically. An application that is used continuously by different people inshifts may need to change language without having to be restarted. For example, applications usedby call center operators, by simultaneous translators, and by computerized cash register operatorsoften require this capability.
Making an application able to switch language dynamically requires a little more work than loading asingle translation at startup, but it is not difficult. Here's what must be done:
Provide a means by which the user can switch language. For every widget or dialog, set all of its translatable strings in a separate function (often
called retranslateUi()) and call this function when the language changes.
Let's review the relevant parts of a "call center" application's source code. The application provides aLanguage menu to allow the user to set the language at run-time. The default language is English.
Figure 17.1. A dynamic Language menu
Since we don't know which language the user will want to use when the application is started, we nolonger load translations in the main() function. Instead, we will load them dynamically when they areneeded, so all the code that we need to handle translations must go in the main window and dialogclasses.
Let's have a look at the application's QMainWindow subclass.
MainWindow::MainWindow(){ journalView = new JournalView; setCentralWidget(journalView); qApp->installTranslator(&appTranslator); qApp->installTranslator(&qtTranslator); qmPath = qApp->applicationDirPath() + "/translations"; createActions(); createMenus(); retranslateUi();}
In the constructor, we set the central widget to be a JournalView, a QTableWidget subclass. Then weset up a few private member variables related to translation:
The appTranslator variable is a QTRanslator object used for storing the current application'stranslation.

The qttranslator variable is a QTRanslator object used for storing Qt's translation. The qmPath variable is a QString that specifies the path of the directory that contains the
application's translation files.
At the end, we call the createActions() and createMenus() private functions to create the menusystem, and we call retranslateUi(), also a private function, to set the user-visible strings for thefirst time.
void MainWindow::createActions(){ newAction = new QAction(this); connect(newAction, SIGNAL(triggered()), this, SLOT(newFile())); ... aboutQtAction = new QAction(this); connect(aboutQtAction, SIGNAL(triggered()), qApp, SLOT(aboutQt()));}
The createActions() function creates the QAction objects as usual, but without setting any of thetexts or shortcut keys. These will be done in retranslate-Ui().
void MainWindow::createMenus(){ fileMenu = new QMenu(this); fileMenu->addAction(newAction); fileMenu->addAction(openAction); fileMenu->addAction(saveAction); fileMenu->addAction(exitAction); ... createLanguageMenu(); helpMenu = new QMenu(this); helpMenu->addAction(aboutAction); helpMenu->addAction(aboutQtAction); menuBar()->addMenu(fileMenu); menuBar()->addMenu(editMenu); menuBar()->addMenu(reportsMenu); menuBar()->addMenu(languageMenu); menuBar()->addMenu(helpMenu);}
The createMenus() function creates menus, but does not give them any titles. Again, this will bedone in retranslateUi().
In the middle of the function, we call createLanguageMenu() to fill the Language menu with the list ofsupported languages. We will review its source code in a moment. First, let's look atretranslateUi():
void MainWindow::retranslateUi(){ newAction->setText(tr("&New")); newAction->setShortcut(tr("Ctrl+N")); newAction->setStatusTip(tr("Create a new journal")); ... aboutQtAction->setText(tr("About &Qt")); aboutQtAction->setStatusTip(tr("Show the Qt library's About box")); fileMenu->setTitle(tr("&File")); editMenu->setTitle(tr("&Edit")); reportsMenu->setTitle(tr("&Reports")); languageMenu->setTitle(tr("&Language"));

helpMenu->setTitle(tr("&Help")); setWindowTitle(tr("Call Center"));}
The retranslateUi() function is where all the TR() calls for the MainWindow class occur. It is called atthe end of the MainWindow constructor and also every time a user changes the application's languageusing the Language menu.
We set each QAction's text, shortcut key, and status tip. We also set each QMenu's title, as well as thewindow title.
The createMenus() function presented earlier called createLanguageMenu() to populate the Languagemenu with a list of languages:
void MainWindow::createLanguageMenu(){ languageMenu = new QMenu(this); languageActionGroup = new QActionGroup(this); connect(languageActionGroup, SIGNAL(triggered(QAction *)), this, SLOT(switchLanguage(QAction *))); QDir dir(qmPath); QStringList fileNames = dir.entryList(QStringList("callcenter_*.qm")); for (int i = 0; i < fileNames.size(); ++i) { QString locale = fileNames[i]; locale.remove(0, locale.indexOf('_') + 1); locale.truncate(locale.lastIndexOf('.')); QTranslator translator; translator.load(fileNames[i], qmPath); QString language = translator.translate("MainWindow", "English"); QAction *action = new QAction(tr("&%1 %2") .arg(i + 1).arg(language), this); action->setCheckable(true); action->setData(locale); languageMenu->addAction(action); languageActionGroup->addAction(action); if (language == "English") action->setChecked(true); }}
Instead of hard-coding the languages supported by the application, we create one menu entry foreach .qm file located in the application's translations directory. For simplicity, we assume thatEnglish also has a .qm file. An alternative would have been to call clear() on the Qtranslator objectswhen the user chooses English.
One particular difficulty is to present a nice name for the language provided by each .qm file. Justshowing "en" for "English" or "de" for "Deutsch", based on the name of the .qm file, looks crude andwill confuse some users. The solution used in createLanguageMenu() is to check the translation of thestring "English" in the "MainWindow" context. That string should be translated to "Deutsch" in aGerman translation, to "Français" in a French translation, and to " " in a Japanese translation.
We create one checkable QAction for each language and store the locale name in the action's "data"item. We add them to a QActionGroup object to ensure that only one Language menu item is checkedat a time. When an action from the group is chosen by the user, the QActionGroup emits thetriggered(QAction *) signal, which is connected to switchLanguage().

void MainWindow::switchLanguage(QAction *action){ QString locale = action->data().toString(); appTranslator.load("callcenter_" + locale, qmPath); qtTranslator.load("qt_" + locale, qmPath); retranslateUi();}
The switchLanguage() slot is called when the user chooses a language from the Language menu. Weload the translation files for the application and for Qt, and we call retranslateUi() to retranslate allthe strings for the main window.
On Windows, an alternative to providing a Language menu is to respond to LocaleChange events, atype of event emitted by Qt when it detects a change in the environment's locale. The event typeexists on all platforms supported by Qt, but is only actually generated on Windows, when the userchanges the system's locale settings (in the Control Panel's Regional and Language Options). Tohandle LocaleChange events, we can reimplement QWidget::changeEvent() as follows:
void MainWindow::changeEvent(QEvent *event){ if (event->type() == QEvent::LocaleChange) { appTranslator.load("callcenter_" + QLocale::system().name(), qmPath); qtTranslator.load("qt_" + QLocale::system().name(), qmPath); retranslateUi(); } QMainWindow::changeEvent(event);}
If the user switches locale while the application is being run, we attempt to load the correcttranslation files for the new locale and call retranslateUi() to update the user interface. In all cases,we pass the event on to the base class's changeEvent() function, since the base class may also beinterested in LocaleChange or other change events.
We have now finished our review of the MainWindow code. Next we will look at the code for one of theapplication's widget classes, the JournalView class, to see what changes are needed to make itsupport dynamic translation.
JournalView::JournalView(QWidget *parent) : QTableWidget(parent){ ... retranslateUi();}
The JournalView class is a QTableWidget subclass. At the end of the constructor, we call the privatefunction retranslateUi() to set the widget's strings. This is similar to what we did for MainWindow.
void JournalView::changeEvent(QEvent *event){ if (event->type() == QEvent::LanguageChange) retranslateUi(); QTableWidget::changeEvent(event);}

We also reimplement the changeEvent() function to call retranslateUi() on LanguageChange events.Qt generates a LanguageChange event when the contents of a QTRanslator currently installed onQApplication changes. In our application, this occurs when we call load() on appTranslator orqttranslator, either from MainWindow::switchLanguage() or from MainWindow::changeEvent().
LanguageChange events should not be confused with LocaleChange events. Locale-Change events aregenerated by the system and tell the application, "Maybe you should load a new translation."LanguageChange events are generated by Qt and tell the application's widgets, "Maybe you shouldretranslate all your strings."
When we implemented MainWindow, we didn't need to respond to LanguageChange. Instead, we simplycalled retranslateUi() whenever we called load() on a Qtranslator.
void JournalView::retranslateUi(){ QStringList labels; labels << tr("Time") << tr("Priority") << tr("Phone Number") << tr("Subject"); setHorizontalHeaderLabels(labels);}
The retranslateUi() function updates the column headers with newly translated texts, completingthe translation-related code of a hand written widget. For widgets and dialogs developed with QtDesigner, the uic tool automatically generates a function similar to our retranslateUi() functionthat is automatically called in response to LanguageChange events.
Translating ApplicationsTranslating a Qt application that contains tr() calls is a three-step process:
1. Run lupdate to extract all the user-visible strings from the application's source code.
2. Translate the application using Qt Linguist.
3. Run lrelease to generate binary .qm files that the application can load using QTRanslator.
Steps 1 and 3 are performed by application developers. Step 2 is handled by translators. This cyclecan be repeated as often as necessary during the application's development and lifetime.
As an example, we will show how to translate the Spreadsheet application of Chapter 3. Theapplication already contains TR() calls around every user-visible string.
First, we must modify the application's .pro file slightly to specify which languages we want tosupport. For example, if we want to support German and French in addition to English, we wouldadd the following trANSLATIONS enTRy to spreadsheet.pro:
TRANSLATIONS = spreadsheet_de.ts \ spreadsheet_fr.ts
Here, we specify two translation files: one for German and one for French. These files will be created

the first time we run lupdate and are updated every time we subsequently run lupdate.
These files normally have a .ts extension. They are in a straightforward XML format and are not ascompact as the binary .qm files understood by Qtranslator. It is lrelease's job to convert human-readable .ts files into machine-efficient .qm files. For the curious, .ts stands for "translation source"and .qm for "Qt message" file.
Assuming that we are located in the directory that contains the Spreadsheet application's sourcecode, we can run lupdate on spreadsheet.pro from the command line as follows:
lupdate -verbose spreadsheet.pro
The -verbose option tells lupdate to provide more feedback than usual. Here's the expected output:
Updating 'spreadsheet_de.ts'... Found 98 source texts (98 new and 0 already existing)Updating 'spreadsheet_fr.ts'... Found 98 source texts (98 new and 0 already existing)
Every string that appears within a tr() call in the application's source code is stored in the .ts files,along with an empty translation. Strings that appear in the application's .ui files are also included.
The lupdate tool assumes by default that the arguments to tr() are Latin-1 strings. If this isn't thecase, we must add a CODECFORTR entry to the .pro file. For example:
CODECFORTR = EUC-JP
This must be done in addition to calling QTextCodec::setCodecForTr() from the application's main()
function.
Translations then need to be added to the spreadsheet_de.ts and spreadsheet_fr.ts files using QtLinguist.
To run Qt Linguist, click Qt by Trolltech v4.x.y|Linguist in the Start menu on Windows, typelinguist on the command line on Unix, or double-click Linguist in the Mac OS X Finder. To startadding translations to a .ts file, click File|Open and choose the file to translate.
The left-hand side of Qt Linguist's main window shows the list of contexts for the application beingtranslated. For the Spreadsheet application, the contexts are "FindDialog", "GoToCellDialog","MainWindow", "SortDialog", and "Spreadsheet". The top-right area is the list of source texts for thecurrent context. Each source text is shown along with a translation and a Done flag. The middle-right area is where we can enter a translation for the current source item. The bottom-right area is alist of suggestions automatically provided by Qt Linguist.
Once we have a translated .ts file, we need to convert it to a binary .qm file for it to be usable byQtranslator. To do this from within Qt Linguist, click File|Release. Typically, we would start bytranslating only a few strings and run the application with the .qm file to make sure that everythingworks properly.
Figure 17.2. Qt Linguist in action
[View full size image]

If we want to regenerate the .qm files for all .ts files, we can use the lrelease tool as follows:
lrelease -verbose spreadsheet.pro
Assuming that we translated 19 strings to French and clicked the Done flag for 17 of them, lrelease
produces the following output:
Updating 'spreadsheet_de.qm'... Generated 0 translations (0 finished and 0 unfinished) Ignored 98 untranslated source textsUpdating 'spreadsheet_fr.qm'... Generated 19 translations (17 finished and 2 unfinished) Ignored 79 untranslated source texts
Untranslated strings are shown in the original languages when running the application. The Doneflag is ignored by lrelease; it can be used by translators to identify which translations are finishedand which ones must be revisited.
When we modify the source code of the application, the translation files may become out of date.The solution is to run lupdate again, provide translations for the new strings, and regenerate the .qm
files. Some development teams find it useful to run lupdate frequently, while others prefer to waituntil the application is almost ready to release.
The lupdate and Qt Linguist tools are quite smart. Translations that are no longer used are kept inthe .ts files in case they are needed in later releases. When updating .ts files, lupdate uses anintelligent merging algorithm that can save translators considerable time with text that is the sameor similar in different contexts.
For more information about Qt Linguist, lupdate, and lrelease, refer to the Qt Linguist manual athttp://doc.trolltech.com/4.1/linguist-manual.html. The manual contains a full explanation of QtLinguist's user interface and a step-by-step tutorial for programmers.

Chapter 18. Multithreading Creating Threads Synchronizing Threads Communicating with the Main Thread Using Qt's Classes in Secondary Threads
Conventional GUI applications have one thread of execution and perform one operation at a time. Ifthe user invokes a time-consuming operation from the user interface, the interface typically freezeswhile the operation is in progress. Chapter 7 (Event Processing) presents some solutions to thisproblem. Multi-threading is another solution.
In a multithreaded application, the GUI runs in its own thread and the processing takes place in oneor more other threads. This results in applications that have responsive GUIs even during intensiveprocessing. Another benefit of multithreading is that multiprocessor systems can execute severalthreads simultaneously on different processors, resulting in better performance.
In this chapter, we will start by showing how to subclass QTHRead and how to use QMutex, QSemaphore,and QWaitCondition to synchronize threads. Then we will see how to communicate with the mainthread from secondary threads while the event loop is running. Finally, we round off with a review ofwhich Qt classes can be used in secondary threads and which cannot.
Multithreading is a large topic with many books devoted exclusively to the subject. Here it isassumed that you already understand the fundamentals of multithreaded programming, so the focusis on explaining how to develop multithreaded Qt applications rather than on the subject ofthreading itself.
Creating ThreadsProviding multiple threads in a Qt application is straightforward: We just subclass QThread andreimplement its run() function. To show how this works, we will start by reviewing the code for avery simple QThread subclass that repeatedly prints a given string on a console.
class Thread : public QThread{ Q_OBJECTpublic: Thread(); void setMessage(const QString &message); void stop();protected: void run();private: QString messageStr; volatile bool stopped;};
The Thread class inherits from QThread and reimplements the run() function. It provides twoadditional functions: setMessage() and stop().
The stopped variable is declared volatile because it is accessed from different threads and we wantto be sure that it is freshly read every time it is needed. If we omitted the volatile keyword, thecompiler might optimize access to the variable, possibly leading to incorrect results.

Thread::Thread(){ stopped = false;}
We set stopped to false in the constructor.
void Thread::run(){ while (!stopped) cerr << qPrintable(messageStr); stopped = false; cerr << endl;}
The run() function is called to start executing the thread. As long as the stopped variable is false,the function keeps printing the given message to the console. The thread terminates when controlleaves the run() function.
void Thread::stop(){ stopped = true;}
The stop() function sets the stopped variable to true, thereby telling run() to stop printing text tothe console. This function can be called from any thread at any time. For the purposes of thisexample, we assume that assignment to a bool is an atomic operation. This is a reasonableassumption, considering that a bool can only have two states. We will see later in this section howto use QMutex to guarantee that assigning to a variable is an atomic operation.
QThread provides a terminate() function that terminates the execution of a thread while it is stillrunning. Using terminate() is not recommended, since it can stop the thread at any point and doesnot give the thread any chance to clean up after itself. It is always safer to use a stopped variableand a stop() function as we did here.
Figure 18.1. The Threads application
We will now see how to use the THRead class in a small Qt application that uses two threads, A andB, in addition to the main thread.
class ThreadDialog : public QDialog{ Q_OBJECTpublic: ThreadDialog(QWidget *parent = 0);

protected: void closeEvent(QCloseEvent *event);private slots: void startOrStopThreadA(); void startOrStopThreadB();private: Thread threadA; Thread threadB; QPushButton *threadAButton; QPushButton *threadBButton; QPushButton *quitButton;};
The ThreadDialog class declares two variables of type Thread and some buttons to provide a basicuser interface.
ThreadDialog::ThreadDialog(QWidget *parent) : QDialog(parent){ threadA.setMessage("A"); threadB.setMessage("B"); threadAButton = new QPushButton(tr("Start A")); threadBButton = new QPushButton(tr("Start B")); quitButton = new QPushButton(tr("Quit")); quitButton->setDefault(true); connect(threadAButton, SIGNAL(clicked()), this, SLOT(startOrStopThreadA())); connect(threadBButton, SIGNAL(clicked()), this, SLOT(startOrStopThreadB())); ...}
In the constructor, we call setMessage() to make the first thread repeatedly print 'A's and the secondthread 'B's.
void ThreadDialog::startOrStopThreadA(){ if (threadA.isRunning()) { threadA.stop(); threadAButton->setText(tr("Start A")); } else { threadA.start(); threadAButton->setText(tr("Stop A")); }}
When the user clicks the button for thread A, startOrStopThreadA() stops the thread if it wasrunning and starts it otherwise. It also updates the button's text.
void ThreadDialog::startOrStopThreadB(){ if (threadB.isRunning()) { threadB.stop(); threadBButton->setText(tr("Start B")); } else { threadB.start(); threadBButton->setText(tr("Stop B")); }

}
The code for startOrStopThreadB() is very similar.
void ThreadDialog::closeEvent(QCloseEvent *event){ threadA.stop(); threadB.stop(); threadA.wait(); threadB.wait(); event->accept();}
If the user clicks Quit or closes the window, we stop any running threads and wait for them to finish(using QThread::wait()) before we call QCloseEvent::accept(). This ensures that the application exitsin a clean state, although it doesn't really matter in this example.
If you run the application and click Start A, the console will be filled with 'A's. If you click Start B, itwill now fill with alternating sequences of 'A's and 'B's. Click Stop A, and now it will only print 'B's.
Synchronizing ThreadsA common requirement for multithreaded applications is that of synchronizing several threads. Qtprovides the following synchronization classes: QMutex, QReadWriteLock, QSemaphore, andQWaitCondition.
The QMutex class provides a means of protecting a variable or a piece of code so that only one threadcan access it at a time. The class provides a lock() function that locks the mutex. If the mutex isunlocked, the current thread seizes it immediately and locks it; otherwise, the current thread isblocked until the thread that holds the mutex unlocks it. Either way, when the call to lock() returns,the current thread holds the mutex until it calls unlock(). The QMutex class also provides a tryLock()
function that returns immediately if the mutex is already locked.
For example, let's suppose that we wanted to protect the stopped variable of the Thread class fromthe previous section with a QMutex. We would then add the following data member to Thread:
private: ... QMutex mutex;};
The run() function would change to this:
void Thread::run(){ forever { mutex.lock(); if (stopped) { stopped = false; mutex.unlock(); break;
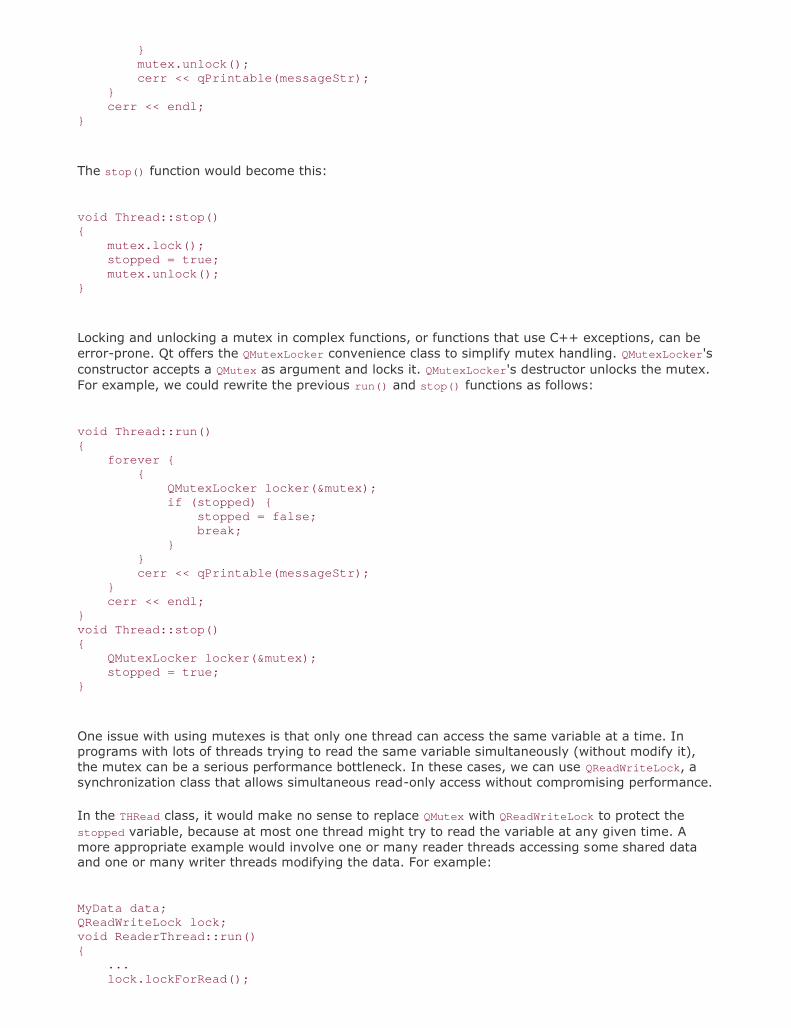
} mutex.unlock(); cerr << qPrintable(messageStr); } cerr << endl;}
The stop() function would become this:
void Thread::stop(){ mutex.lock(); stopped = true; mutex.unlock();}
Locking and unlocking a mutex in complex functions, or functions that use C++ exceptions, can beerror-prone. Qt offers the QMutexLocker convenience class to simplify mutex handling. QMutexLocker'sconstructor accepts a QMutex as argument and locks it. QMutexLocker's destructor unlocks the mutex.For example, we could rewrite the previous run() and stop() functions as follows:
void Thread::run(){ forever { { QMutexLocker locker(&mutex); if (stopped) { stopped = false; break; } } cerr << qPrintable(messageStr); } cerr << endl;}void Thread::stop(){ QMutexLocker locker(&mutex); stopped = true;}
One issue with using mutexes is that only one thread can access the same variable at a time. Inprograms with lots of threads trying to read the same variable simultaneously (without modify it),the mutex can be a serious performance bottleneck. In these cases, we can use QReadWriteLock, asynchronization class that allows simultaneous read-only access without compromising performance.
In the THRead class, it would make no sense to replace QMutex with QReadWriteLock to protect thestopped variable, because at most one thread might try to read the variable at any given time. Amore appropriate example would involve one or many reader threads accessing some shared dataand one or many writer threads modifying the data. For example:
MyData data;QReadWriteLock lock;void ReaderThread::run(){ ... lock.lockForRead();

access_data_without_modifying_it(&data); lock.unlock(); ...}void WriterThread::run(){ ... lock.lockForWrite(); modify_data(&data); lock.unlock(); ...}
For convenience, we can use the QReadLocker and QWriteLocker classes to lock and unlock aQReadWriteLock.
QSemaphore is another generalization of mutexes, but unlike read/write locks, semaphores can beused to guard a certain number of identical resources. The following two code snippets show thecorrespondence between QSemaphore and QMutex:
QSemaphore semaphore(1); | QMutex mutex;semaphore.acquire(); | mutex.lock();semaphore.release(); | mutex.unlock();
By passing 1 to the constructor, we tell the semaphore that it controls a single resource. Theadvantage of using a semaphore is that we can pass numbers other than 1 to the constructor andthen call acquire() multiple times to acquire many resources.
A typical application of semaphores is when transferring a certain amount of data (DataSize)between two threads using a shared circular buffer of a certain size (BufferSize):
const int DataSize = 100000;const int BufferSize = 4096;char buffer[BufferSize];
The producer thread writes data to the buffer until it reaches the end and then restarts from thebeginning, overwriting existing data. The consumer thread reads the data as it is generated. Figure18.2 illustrates this, assuming a tiny 16-byte buffer.
Figure 18.2. The producerconsumer model
The need for synchronization in the producerconsumer example is twofold: If the producergenerates the data too fast, it will overwrite data that the consumer hasn't yet read; if the consumer

reads the data too fast, it will pass the producer and read garbage.
A crude way to solve this problem is to have the producer fill the buffer, then wait until theconsumer has read the entire buffer, and so on. However, on multiprocessor machines, this isn't asfast as letting the producer and consumer threads operate on different parts of the buffer at thesame time.
One way to efficiently solve the problem involves two semaphores:
QSemaphore freeSpace(BufferSize);QSemaphore usedSpace(0);
The freeSpace semaphore governs the part of the buffer that the producer can fill with data. TheusedSpace semaphore governs the area that the consumer can read. These two areas arecomplementary. The freeSpace semaphore is initialized with BufferSize (4096), meaning that it hasthat many resources that can be acquired. When the application starts, the reader thread will startacquiring "free" bytes and convert them into "used" bytes. The usedSpace semaphore is initializedwith 0 to ensure that the consumer won't read garbage at startup.
For this example, each byte counts as one resource. In a real-world application, we would probablyoperate on larger units (for example, 64 or 256 bytes at a time) to reduce the overhead associatedwith using semaphores.
void Producer::run(){ for (int i = 0; i < DataSize; ++i) { freeSpace.acquire(); buffer[i % BufferSize] = "ACGT"[uint(rand()) % 4]; usedSpace.release(); }}
In the producer, every iteration starts by acquiring one "free" byte. If the buffer is full of data thatthe consumer hasn't read yet, the call to acquire() will block until the consumer has started toconsume the data. Once we have acquired the byte, we fill it with some random data ('A', 'C', 'G', or'T') and release the byte as "used", so that it can be read by the consumer thread.
void Consumer::run(){ for (int i = 0; i < DataSize; ++i) { usedSpace.acquire(); cerr << buffer[i % BufferSize]; freeSpace.release(); } cerr << endl;}
In the consumer, we start by acquiring one "used" byte. If the buffer contains no data to read, thecall to acquire() will block until the producer has produced some. Once we have acquired the byte,we print it and release the byte as "free", making it possible for the producer to fill it with dataagain.
int main(){

Producer producer; Consumer consumer; producer.start(); consumer.start(); producer.wait(); consumer.wait(); return 0;}
Finally, in main(), we start the producer and consumer threads. What happens then is that theproducer converts some "free" space into "used" space, and the consumer can then convert it backto "free" space.
When we run the program, it writes a random sequence of 100,000 'A's, 'C's, 'G's, and 'T's to theconsole and terminates. To really understand what is going on, we can disable writing the outputand instead write 'P' each time the producer generates a byte and 'c' each time the consumer readsa byte. And to make things as simple to follow as possible, we can use smaller values for DataSize
and BufferSize.
For example, here's a possible run with a DataSize of 10 and a BufferSize of 4:"PcPcPcPcPcPcPcPcPcPc". In this case, the consumer reads the bytes as soon as they are generatedby the producer; the two threads are executing at the same speed. Another possibility is that theproducer fills the whole buffer before the consumer even starts reading it: "PPPPccccPPPPccccPPcc".There are many other possibilities. Semaphores give a lot of latitude to the system-specific threadscheduler, which can study the threads' behavior and choose an appropriate scheduling policy.
A different approach to the problem of synchronizing a producer and a consumer is to useQWaitCondition and QMutex. A QWaitCondition allows a thread to wake up other threads when somecondition has been met. This allows for more precise control than is possible with mutexes alone. Toshow how it works, we will redo the producerconsumer example using wait conditions.
const int DataSize = 100000;const int BufferSize = 4096;char buffer[BufferSize];QWaitCondition bufferIsNotFull;QWaitCondition bufferIsNotEmpty;QMutex mutex;int usedSpace = 0;
In addition to the buffer, we declare two QWaitConditions, one QMutex, and one variable that storeshow many bytes in the buffer are "used" bytes.
void Producer::run(){ for (int i = 0; i < DataSize; ++i) { mutex.lock(); while (usedSpace == BufferSize) bufferIsNotFull.wait(&mutex); buffer[i % BufferSize] = "ACGT"[uint(rand()) % 4]; ++usedSpace; bufferIsNotEmpty.wakeAll(); mutex.unlock();
}}
In the producer, we start by checking whether the buffer is full. If it is, we wait on the "buffer is notfull" condition. When that condition is met, we write one byte to the buffer, increment usedSpace,

and wake any thread waiting for the "buffer is not empty" condition to turn true.
We use a mutex to protect all accesses to the usedSpace variable. The QWaitCondition::wait()
function can take a locked mutex as its first argument, which it unlocks before blocking the currentthread and then locks before returning.
For this example, we could have replaced the while loop
while (usedSpace == BufferSize) bufferIsNotFull.wait(&mutex);
with this if statement:
if (usedSpace == BufferSize) { mutex.unlock(); bufferIsNotFull.wait(); mutex.lock();}
However, this would break as soon as we allow more than one producer thread, since anotherproducer could seize the mutex immediately after the wait() call and make the "buffer is not full"condition false again.
void Consumer::run(){ for (int i = 0; i < DataSize; ++i) { mutex.lock(); while (usedSpace == 0) bufferIsNotEmpty.wait(&mutex); cerr << buffer[i % BufferSize];
--usedSpace; bufferIsNotFull.wakeAll(); mutex.unlock(); }
cerr << endl;}
The consumer does the exact opposite of the producer: It waits for the "buffer is not empty"condition and wakes up any thread waiting for the "buffer is not full" condition.
In all the examples so far, our threads have accessed the same global variables. But some threadedapplications need to have a global variable hold different values in different threads. This is oftencalled thread-local storage or thread-specific data. We can fake it using a map keyed on thread IDs(returned by QThread::currentThread()), but a nicer approach is to use the QTHReadStorage<T> class.
A common use of QThreadStorage<T> is for caches. By having a separate cache in different threads,we avoid the overhead of locking, unlocking, and possibly waiting for a mutex. For example:
QThreadStorage<QHash<int, double> *> cache;void insertIntoCache(int id, double value){ if (!cache.hasLocalData()) cache.setLocalData(new QHash<int, double>); cache.localData()->insert(id, value);}

void removeFromCache(int id){ if (cache.hasLocalData()) cache.localData()->remove(id);}
The cache variable holds one pointer to a QMap<int, double> per thread. (Because of problems withsome compilers, the template type in QThreadStorage<T> must be a pointer type.) The first time weuse the cache in a particular thread, hasLocalData() returns false and we create the QHash<int,
double> object.
In addition to caching, QTHReadStorage<T> can be used for global error-state variables (similar toerrno) to ensure that modifications in one thread don't affect other threads.
Communicating with the Main ThreadWhen a Qt application starts, only one thread is runningthe main thread. This is the only thread thatis allowed to create the QApplication or QCoreApplication object and call exec() on it. After the callto exec(), this thread is either waiting for an event or processing an event.
The main thread can start new threads by creating objects of a QThread subclass, as we did in theprevious section. If these new threads need to communicate among themselves, they can useshared variables together with mutexes, read/write locks, semaphores, or wait conditions. But noneof these techniques can be used to communicate with the main thread, since they would lock theevent loop and freeze the user interface.
The solution for communicating from a secondary thread to the main thread is to use signalslotconnections across threads. Normally, the signals and slots mechanism operates synchronously,meaning that the slots connected to a signal are invoked immediately when the signal is emitted,using a direct function call.
However, when we connect objects that "live" in different threads, the mechanism becomesasynchronous. (This behavior can be changed through an optional fifth parameter toQObject::connect().) Behind the scenes, these connections are implemented by posting an event.The slot is then called by the event loop of the thread in which the receiver object exists. By default,a QObject exists in the thread in which it was created; this can be changed at any time by callingQObject::moveToThread().
Figure 18.3. The Image Pro application

To illustrate how signalslot connections across threads work, we will review the code of the ImagePro application,a basic image processing application that allows the user to rotate, resize, andchange the color depth of an image. The application uses one secondary thread to performoperations on images without locking the event loop. This makes a significant difference whenprocessing very large images. The secondary thread has a list of tasks, or "transactions", toaccomplish and sends events to the main window to report progress.
ImageWindow::ImageWindow(){ imageLabel = new QLabel; imageLabel->setBackgroundRole(QPalette::Dark); imageLabel->setAutoFillBackground(true); imageLabel->setAlignment(Qt::AlignLeft | Qt::AlignTop); setCentralWidget(imageLabel); createActions(); createMenus(); statusBar()->showMessage(tr("Ready"), 2000); connect(&thread, SIGNAL(transactionStarted(const QString &)), statusBar(), SLOT(showMessage(const QString &))); connect(&thread, SIGNAL(finished()), this, SLOT(allTransactionsDone())); setCurrentFile("");}
The interesting part of the ImageWindow constructor is the two signalslot connections. Both of theminvolve signals emitted by the transactionThread object, which we will cover in a moment.
void ImageWindow::flipHorizontally(){ addTransaction(new FlipTransaction(Qt::Horizontal));

}
The flipHorizontally() slot creates a "flip" transaction and registers it using the private functionaddTransaction(). The flipVertically(), resizeImage(), convertTo32Bit(), convertTo8Bit(), andconvertTo1Bit() functions are similar.
void ImageWindow::addTransaction(Transaction *transact){ thread.addTransaction(transact); openAction->setEnabled(false); saveAction->setEnabled(false); saveAsAction->setEnabled(false);}
The addTransaction() function adds a transaction to the secondary thread's transaction queue anddisables the Open, Save, and Save As actions while transactions are being processed.
void ImageWindow::allTransactionsDone(){ openAction->setEnabled(true); saveAction->setEnabled(true); saveAsAction->setEnabled(true); imageLabel->setPixmap(QPixmap::fromImage(thread.image())); setWindowModified(true); statusBar()->showMessage(tr("Ready"), 2000);}
The allTransactionsDone() slot is called when the transactionThread's transaction queue becomesempty.
Now, let's turn to the TRansactionThread class:
class TransactionThread : public QThread{ Q_OBJECTpublic: void addTransaction(Transaction *transact); void setImage(const QImage &image); QImage image();signals: void transactionStarted(const QString &message);protected: void run();private: QMutex mutex; QImage currentImage; QQueue<Transaction *> transactions;};
The transactionThread class maintains a list of transactions to process and executes them one afterthe other in the background.
void TransactionThread::addTransaction(Transaction *transact){

QMutexLocker locker(&mutex); transactions.enqueue(transact); if (!isRunning()) start();}
The addTransaction() function adds a transaction to the transaction queue and starts the transactionthread if it isn't already running. All accesses to the TRansactions member variable are protected bya mutex, because the main thread might modify them through addTransaction() at the same timeas the secondary thread is iterating over transactions.
void TransactionThread::setImage(const QImage &image){ QMutexLocker locker(&mutex); currentImage = image;}QImage TransactionThread::image(){ QMutexLocker locker(&mutex); return currentImage;}
The setImage() and image() functions let the main thread set the image on which to perform thetransactions and retrieve the resulting image once all transactions are done. Again, we protectaccesses to a member variable using a mutex.
void TransactionThread::run(){ Transaction *transact; forever { mutex.lock(); if (transactions.isEmpty()) { mutex.unlock(); break; } QImage oldImage = currentImage; transact = transactions.dequeue(); mutex.unlock();
emit transactionStarted(transact->message()); QImage newImage = transact->apply(oldImage); delete transact; mutex.lock(); currentImage = newImage; mutex.unlock(); }}
The run() function goes through the transaction queue and executes each transaction in turn bycalling apply() on them.
When a transaction is started, we emit the transactionStarted() signal with a message to display inthe application's status bar. When all the transactions have finished processing, the run() functionreturns and QThread emits the finished() signal.
class Transaction{public:

virtual ~Transaction() { } virtual QImage apply(const QImage &image) = 0; virtual QString message() = 0;};
The transaction class is an abstract base class for operations that the user can perform on animage. The virtual destructor is necessary because we need to delete instances of TRansaction
subclasses through a transaction pointer. (Also, if we omit it, some compilers emit a warning.)TRansaction has three concrete subclasses: FlipTransaction, ResizeTransaction, andConvertDepthTransaction. We will only review FlipTransaction; the other two classes are similar.
class FlipTransaction : public Transaction{public: FlipTransaction(Qt::Orientation orientation); QImage apply(const QImage &image); QString message();private: Qt::Orientation orientation;};
The FlipTransaction constructor takes one parameter that specifies the orientation of the flip(horizontal or vertical).
QImage FlipTransaction::apply(const QImage &image){ return image.mirrored(orientation == Qt::Horizontal, orientation == Qt::Vertical);}
The apply() function calls QImage::mirrored() on the QImage it receives as parameter and returns theresulting QImage.
QString FlipTransaction::message(){ if (orientation == Qt::Horizontal) { return QObject::tr("Flipping image horizontally..."); } else { return QObject::tr("Flipping image vertically..."); }}
The message() function returns the message to display in the status bar while the operation is inprogress. This function is called in transactionThread::run() when emitting thetransactionStarted() signal.
Using Qt's Classes in Secondary ThreadsA function is said to be thread-safe when it can safely be called from different threadssimultaneously. If two thread-safe functions are called from different threads on the same shareddata, the result is always defined. By extension, a class is said to be thread-safe when all of itsfunctions can be called from different threads simultaneously without interfering with each other,

even when operating on the same object.
Qt's thread-safe classes are QMutex, QMutexLocker, QReadWriteLock, QReadLocker, QWriteLocker,QSemaphore, QThreadStorage<T>, QWaitCondition, and parts of the QThread API. In addition, severalfunctions are thread-safe, including QObject::connect(), QObject::disconnect(),QCoreApplication::postEvent(), QCoreApplication::removePostedEvent(), andQCoreApplication::removePostedEvents().
Most of Qt's non-GUI classes meet a less stringent requirement: They are reentrant. A class isreentrant if different instances of the class can be used simultaneously in different threads.However, accessing the same reentrant object in multiple threads simultaneously is not safe, andsuch accesses should be protected with a mutex. Reentrant classes are marked as such in the Qtreference documentation. Typically, any C++ class that doesn't reference global or otherwise shareddata is reentrant.
QObject is reentrant, but there are three constraints to keep in mind:
Child QObjects must be created in their parent's thread.
In particular, this means that the objects created in a secondary thread must never becreated with the QThread object as their parent, because that object was created in anotherthread (either the main thread or a different secondary thread).
We must delete all QObjects created in a secondary thread before deleting thecorresponding QThread object.
This can be done by creating the objects on the stack in QTHRead::run().
QObjects must be deleted in the thread that created them.
If we need to delete a QObject that exists in a different thread, we must call the thread-safeQObject::deleteLater() function instead, which posts a "deferred delete" event.
Non-GUI QObject subclasses such as QTimer, QProcess, and the network classes are reentrant. Wecan use them in any thread, as long as the thread has an event loop. For secondary threads, theevent loop is started by calling QTHRead::exec() or by convenience functions such asQProcess::waitForFinished() and QAbstractSocket::waitForDisconnected().
Because of limitations inherited from the low-level libraries on which Qt's GUI support is built,QWidget and its subclasses are not reentrant. One consequence of this is that we cannot directly callfunctions on a widget from a secondary thread. If we want to, say, change the text of a QLabel froma secondary thread, we can emit a signal connected to QLabel::setText() or callQMetaObject::invokeMethod() from that thread. For example:
void MyThread::run(){ ... QMetaObject::invokeMethod(label, SLOT(setText(const QString &)), Q_ARG(QString, "Hello")); ...}
Many of Qt's non-GUI classes, including QImage, QString, and the container classes,use implicitsharing as an optimization technique. While this optimization usually makes a class non-reentrant, inQt this is not an issue because Qt uses atomic assembly language instructions to implement thread-safe reference counting, making Qt's implicitly shared classes reentrant.

Qt's QtSql module can also be used in multithreaded applications, but it has its own restrictions,which vary from database to database. For details, see http://doc.trolltech.com/4.1/sql-driver.html.For a complete list of multi-threading caveats, see http://doc.trolltech.com/4.1/threads.html.

Chapter 19. Creating Plugins Extending Qt with Plugins Making Applications Plugin-Aware Writing Application Plugins
Dynamic libraries (also called shared libraries or DLLs) are independent modules that are stored in aseparate file on disk and can be accessed by multiple applications. Programs usually specify whichdynamic libraries they need at link time, in which case the libraries are automatically loaded whenthe application starts. This approach usually involves adding the library and possibly its include pathto the application's .pro file and including the relevant headers in the source files. For example:
LIBS += -ldb_cxxINCLUDEPATH += /usr/local/BerkeleyDB.4.2/include
The alternative is to dynamically load the library when it is required, and then resolve the symbolsthat we want to use from it. Qt provides the QLibrary class to achieve this in a platform-independentmanner. Given the stem of a library's name, QLibrary searches the platform's standard locations forthe library looking for an appropriate file. For example, given the name mimetype, it will look formimetype.dll on Windows, mimetype.so on Linux, and mimetype.dylib on Mac OS X.
Modern GUI applications can often be extended by the use of plugins. A plugin is a dynamic librarythat implements a particular interface to provide optional extra functionality. For example, inChapter 5, we created a plugin to integrate a custom widget with Qt Designer (p. 113).
Qt recognizes its own set of plugin interfaces for various domains, including image formats,database drivers, widget styles, text encodings, and accessibility. This chapter's first sectionexplains how to extend Qt with a Qt plugin.
It is also possible to create application-specific plugins for particular Qt applications. Qt makeswriting such plugins easy through its plugin framework, which adds crash safety and convenience toQLibrary. In the last two sections of this chapter, we show how to make an application supportplugins and how to create a custom plugin for an application.
Extending Qt with PluginsQt can be extended with a variety of plugin types, the most common being database drivers, imageformats, styles, and text codecs. For each type of plugin, we normally need at least two classes: aplugin wrapper class that implements the generic plugin API functions, and one or more handlerclasses that each implement the API for a particular type of plugin. The handlers are accessedthrough the wrapper class.
Figure 19.1. Qt plugin and handler classes (excluding Qtopia Core)
Plugin Class Handler Base Class
QAccessibleBridgePlugin QAccessibleBridge
QAccessiblePlugin QAccessibleInterface
QIconEnginePlugin QIconEngine
QImageIOPlugin QImageIOHandler

QInputContextPlugin QInputContext
QPictureFormatPlugin N/A
QSqlDriverPlugin QSqlDriver
QStylePlugin QStyle
QTextCodecPlugin QTextCodec
To demonstrate this, we will implement a plugin that can read monochrome Windows cursor files(.cur files). These files can hold several images of the same cursor at different sizes. Once thecursor plugin is built and installed, Qt will be able to read .cur files and access individual cursors (forexample, through QImage, QImageReader, or QMovie), and will be able to write the cursors out in any ofQt's other image file formats, such as BMP, JPEG, and PNG. The plugin could also be deployed withQt applications since they automatically check the standard locations for Qt plugins and load anythat they find.
New image format plugin wrappers must subclass QImageIOPlugin and reimplement a few virtualfunctions:
class CursorPlugin : public QImageIOPlugin{public: QStringList keys() const; Capabilities capabilities(QIODevice *device, const QByteArray &format) const; QImageIOHandler *create(QIODevice *device, const QByteArray &format) const;};
The keys() function returns a list of the image formats the plugin supports. The format parameter ofthe capabilities() and create() functions can be assumed to have a value from that list.
QStringList CursorPlugin::keys() const{ return QStringList() << "cur";}
Our plugin only supports one image format, so it returns a list with just one name. Ideally the nameshould be the file extension used by the format. When dealing with formats with several extensions(such as .jpg and .jpeg for JPEG), we can return a list with several entries for the same format, onefor each extension.
QImageIOPlugin::CapabilitiesCursorPlugin::capabilities(QIODevice *device, const QByteArray &format) const
{ if (format == "cur") return CanRead; if (format.isEmpty()) { CursorHandler handler; handler.setDevice(device); if (handler.canRead())

return CanRead; } return 0;}
The capabilities() function returns what the image handler is capable of doing with the givenimage format. There are three capabilities (CanRead, CanWrite, and CanReadIncremental), and thereturn value is a bitwise OR of those that apply.
If the format is "cur", our implementation returns CanRead. If no format is given, we create a cursorhandler and check whether it is capable of reading the data from the given device. The canRead()
function only peeks at the data, seeing if it recognizes the file, without changing the file pointer. Acapability of 0 means that the file cannot be read or written by this handler.
QImageIOHandler *CursorPlugin::create(QIODevice *device, const QByteArray &format) const{ CursorHandler *handler = new CursorHandler; handler->setDevice(device); handler->setFormat(format); return handler;}
When a cursor file is opened (for example, by QImageReader), the plugin wrap-per's create() functionwill be called with the device pointer and with "cur" as the format. We create a CursorHandler
instance and set it up with the specified device and format. The caller takes ownership of thehandler and will delete it when it is no longer required. If multiple files are to be read, a freshhandler will be created for each one.
Q_EXPORT_PLUGIN2(cursorplugin, CursorPlugin)
At the end of the .cpp file, we use the Q_EXPORT_PLUGIN2() macro to ensure that the plugin isrecognized by Qt. The first parameter is an arbitrary name that we want to give to the plugin. Thesecond parameter is the plugin class name.
Subclassing QImageIOPlugin is straightforward. The real work of the plugin is done in the handler.Image format handlers must subclass QImageIOHandler and reimplement some or all of its publicfunctions. Let's start with the header:
class CursorHandler : public QImageIOHandler{public: CursorHandler(); bool canRead() const; bool read(QImage *image); bool jumpToNextImage(); int currentImageNumber() const; int imageCount() const;private: enum State { BeforeHeader, BeforeImage, AfterLastImage, Error }; void readHeaderIfNecessary() const; QBitArray readBitmap(int width, int height, QDataStream &in) const; void enterErrorState() const; mutable State state; mutable int currentImageNo; mutable int numImages;

};
The signatures of all the public functions are fixed. We have omitted several functions that we don'tneed to reimplement for a read-only handler, in particular write(). The member variables aredeclared with the mutable keyword because they are modified inside const functions.
CursorHandler::CursorHandler(){ state = BeforeHeader; currentImageNo = 0; numImages = 0;}
When the handler is constructed, we begin by setting its state. We set the current cursor imagenumber to the first cursor, but since we set numImages to 0 it is clear that we have no images yet.
bool CursorHandler::canRead() const{ if (state == BeforeHeader) { return device()->peek(4) == QByteArray("\0\0\2\0", 4); } else { return state != Error; }}
The canRead() function can be called at any time to determine whether the image handler can readmore data from the device. If the function is called before we have read any data, while we are stillin the BeforeHeader state, we check for the particular signature that identifies Windows cursor files.The QIODevice::peek() call reads the first four bytes without changing the device's file pointer. IfcanRead() is called later on, we return true unless an error has occurred.
int CursorHandler::currentImageNumber() const{ return currentImageNo;}
This trivial function returns the number of the cursor at which the device file pointer is positioned.
Once the handler is constructed, it is possible for the user to call any of its public functions, in anyorder. This is a potential problem since we must assume that we can only read serially, so we needto read the file header once before doing anything else. We solve the problem by calling thereadHeaderIfNecessary() function in those functions that depend on the header having been read.
int CursorHandler::imageCount() const{ readHeaderIfNecessary(); return numImages;}
This function returns the number of images in the file. For a valid file where no reading errors haveoccurred, it will return a count of at least 1.
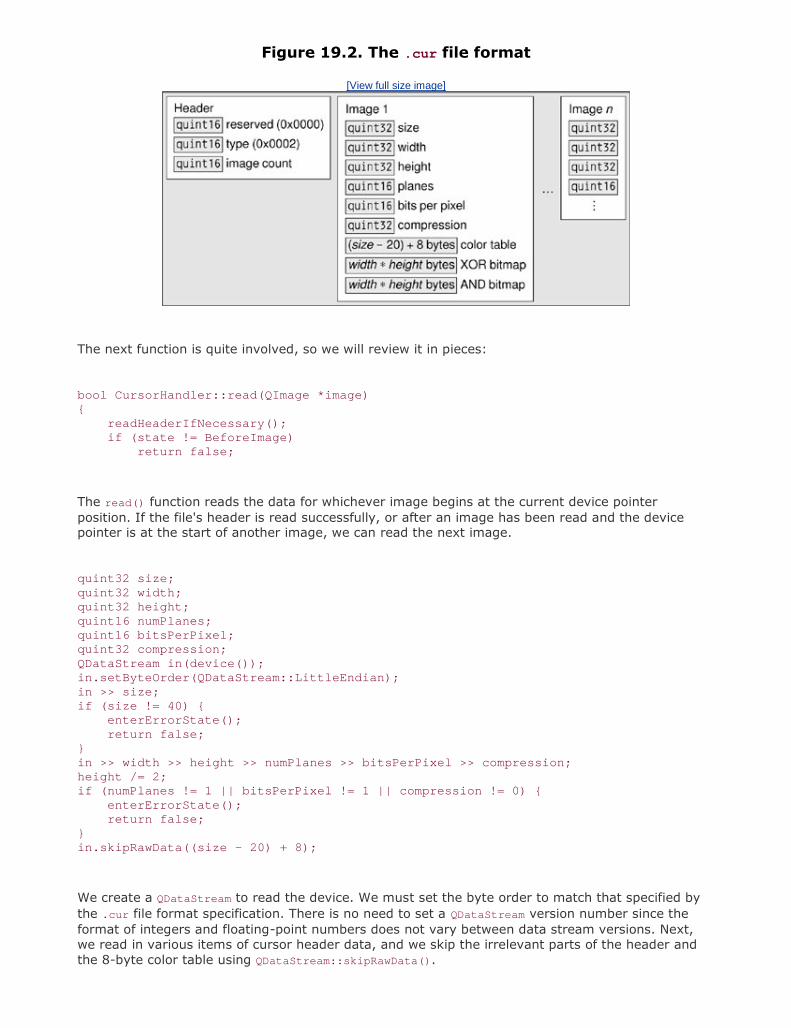
Figure 19.2. The .cur file format
[View full size image]
The next function is quite involved, so we will review it in pieces:
bool CursorHandler::read(QImage *image){ readHeaderIfNecessary(); if (state != BeforeImage) return false;
The read() function reads the data for whichever image begins at the current device pointerposition. If the file's header is read successfully, or after an image has been read and the devicepointer is at the start of another image, we can read the next image.
quint32 size;quint32 width;quint32 height;quint16 numPlanes;quint16 bitsPerPixel;quint32 compression;QDataStream in(device());in.setByteOrder(QDataStream::LittleEndian);in >> size;if (size != 40) { enterErrorState(); return false;}in >> width >> height >> numPlanes >> bitsPerPixel >> compression;height /= 2;if (numPlanes != 1 || bitsPerPixel != 1 || compression != 0) { enterErrorState(); return false;}in.skipRawData((size - 20) + 8);
We create a QDataStream to read the device. We must set the byte order to match that specified bythe .cur file format specification. There is no need to set a QDataStream version number since theformat of integers and floating-point numbers does not vary between data stream versions. Next,we read in various items of cursor header data, and we skip the irrelevant parts of the header andthe 8-byte color table using QDataStream::skipRawData().

We must account for all the format's idiosyncrasiesfor example, halving the height because the .cur
format gives a height that is twice as high as the actual image's height. The bitsPerPixel andcompression values are always 1 and 0 in a monochrome .cur file. If we have any problems, we callenterErrorState() and return false.
QBitArray xorBitmap = readBitmap(width, height, in);QBitArray andBitmap = readBitmap(width, height, in);if (in.status() != QDataStream::Ok) { enterErrorState(); return false;}
The next items in the file are two bitmaps, one an XOR mask and the other an AND mask. We readthese into QBitArrays rather than into QBitmaps. A QBitmap is a class designed to be drawn on andpainted on-screen, but what we need here is a plain array of bits.
When we are done with reading the file, we check the QDataStream's status. This works because if aQDataStream enters an error state, it stays in that state and can only return zeros. For example, ifreading fails on the first bit array, the attempt to read the second will result in an empty QBitArray.
*image = QImage(width, height, QImage::Format_ARGB32);for (int i = 0; i < int(height); ++i) { for (int j = 0; j < int(width); ++j) { QRgb color; int bit = (i * width) + j; if (andBitmap.testBit(bit)) { if (xorBitmap.testBit(bit)) { color = 0x7F7F7F7F; } else {
color = 0x00FFFFFF; } } else { if (xorBitmap.testBit(bit)) { color = 0xFFFFFFFF; } else { color = 0xFF000000; } } image->setPixel(j, i, color); }}
We construct a new QImage of the correct size and set image to point to it. Then we iterate over everypixel in the XOR and AND bit arrays and convert them into 32-bit ARGB color specifications. TheAND and XOR bit arrays are used as shown in the following table to obtain the color of each cursorpixel:
AND XOR Result
1 1 Inverted background pixel
1 0 Transparent pixel
0 1 White pixel
0 0 Black pixel

Black, white, and transparent pixels are no problem, but there's no way of obtaining an invertedbackground pixel using an ARGB color specification without knowing the color of the originalbackground pixel. As a substitute, we use a semi-transparent gray color (0x7F7F7F7F).
++currentImageNo; if (currentImageNo == numImages) state = AfterLastImage; return true;}
Once we have finished reading the image, we update the current image number and update thestate if we have reached the last image. At the end of the function, the device will be positioned atthe next image or at the end of the file.
bool CursorHandler::jumpToNextImage(){ QImage image; return read(&image);}
The jumpToNextImage() function is used to skip an image. For simplicity, we simply call read() andignore the resulting QImage. A more efficient implementation would use the information stored in the.cur file header to skip directly to the appropriate offset in the file.
void CursorHandler::readHeaderIfNecessary() const{ if (state != BeforeHeader) return; quint16 reserved; quint16 type; quint16 count; QDataStream in(device()); in.setByteOrder(QDataStream::LittleEndian); in >> reserved >> type >> count; in.skipRawData(16 * count); if (in.status() != QDataStream::Ok || reserved != 0 || type != 2 || count == 0) { enterErrorState(); return; } state = BeforeImage; currentImageNo = 0; numImages = int(count);}
The readHeaderIfNecessary() private function is called from imageCount() and read(). If the file'sheader has already been read, the state is not BeforeHeader and we return immediately. Otherwise,we open a data stream on the device, read in some generic data (including the number of cursors inthe file), and set the state to BeforeImage. At the end, the device's file pointer is positioned beforethe first image.
void CursorHandler::enterErrorState() const{ state = Error;

currentImageNo = 0; numImages = 0;}
If an error occurs, we assume that there are no valid images and set the state to Error. Once in theError state, the handler's state cannot change.
QBitArray CursorHandler::readBitmap(int width, int height, QDataStream &in) const{ QBitArray bitmap(width * height); quint8 byte; quint32 word; for (int i = 0; i < height; ++i) { for (int j = 0; j < width; ++j) { if ((j % 32) == 0) { word = 0; for (int k = 0; k < 4; ++k) { in >> byte;
word = (word << 8) | byte; } } bitmap.setBit(((height - i - 1) * width) + j, word & 0x80000000); word <<= 1; } } return bitmap;}
The readBitmap() function is used to read a cursor's AND and XOR masks. These masks have twounusual features. First, they store the rows from bottom to top, instead of the more common top-to-bottom approach. Second, the endianness of the data appears to be reversed from that usedeverywhere else in .cur files. In view of this, we must invert the y coordinate in the setBit() call,and we read in the mask values one byte at a time, bit-shifting and masking to extract their correctvalues.
This completes the implementation of the CursorHandler image format plugin. Plugins for otherimage formats would follow the same pattern, although some might implement more of theQImageIOHandler API, in particular the functions used for writing images. Plugins of other kinds, forexample, text codecs or database drivers, follow the same pattern of having a plugin wrapper toprovide a generic API that applications can use, and a handler to provide the underlyingfunctionality.
The .pro file is different for plugins than for applications, so we will end with that:
TEMPLATE = libCONFIG += pluginHEADERS = cursorhandler.h \ cursorplugin.hSOURCES = cursorhandler.cpp \ cursorplugin.cppDESTDIR = $(QTDIR)/plugins/imageformats
By default, .pro files use the app template, but here we must specify the lib template because aplugin is a library, not a stand-alone application. The CONFIG line is used to tell Qt that the library isnot just a plain library, but a plugin library. The DESTDIR specifies the directory where the plugin

should go. All Qt plugins must go in the appropriate plugins subdirectory where Qt was installed,and since our plugin provides a new image format we put it in plugins/imageformats. The list ofdirectory names and plugin types is given at http://doc.trolltech.com/4.1/plugins-howto.html. Forthis example, we assume that the QtdIR environment variable is set to the directory where Qt isinstalled.
Plugins built for Qt in release mode and debug mode are different, so if both versions of Qt areinstalled, it is wise to specify which one to use in the .pro filefor example, by adding the line
CONFIG += release
Applications that use Qt plugins must be deployed with the plugins they are intended to use. Qtplugins must be placed in specific subdirectories (for example, imageformats for image formats). Qtapplications search for plugins in the plugins directory in the directory where the application'sexecutable resides, so for image plugins they search application_dir/plugins/imageformats. If wewant to deploy Qt plugins in a different directory, the plugins search path can be augmented byusing QCoreApplication::addLibraryPath().
Making Applications Plugin-AwareAn application plugin is a dynamic library that implements one or more interfaces. An interface is aclass that consists exclusively of pure virtual functions. The communication between the applicationand the plugins is done through the interface's virtual table. In this section, we will focus on how touse a plugin in a Qt application through its interfaces, and in the next section we will show how toimplement a plugin.
To provide a concrete example, we will create the simple Text Art application shown in Figure 19.3.The text effects are provided by plugins; the application retrieves the list of text effects provided byeach plugin and iterates over them to show each one as an item in a QListWidget.
Figure 19.3. The Text Art application
[View full size image]
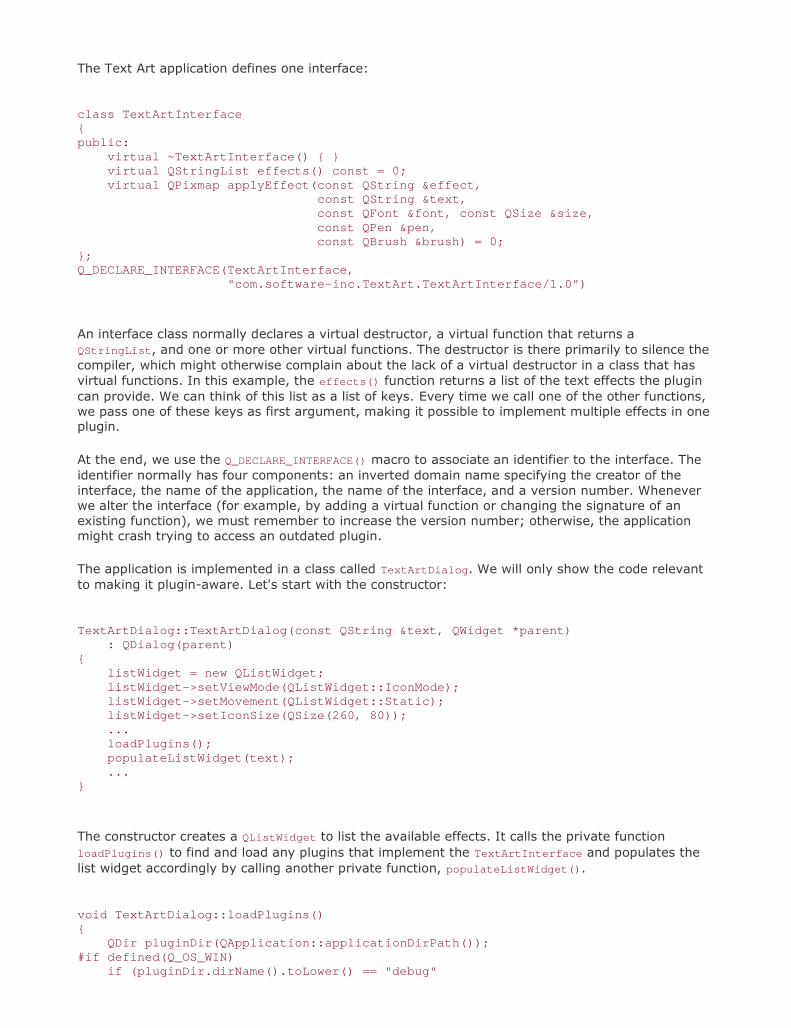
The Text Art application defines one interface:
class TextArtInterface{public: virtual ~TextArtInterface() { } virtual QStringList effects() const = 0; virtual QPixmap applyEffect(const QString &effect,
const QString &text, const QFont &font, const QSize &size, const QPen &pen, const QBrush &brush) = 0;};Q_DECLARE_INTERFACE(TextArtInterface,
"com.software-inc.TextArt.TextArtInterface/1.0")
An interface class normally declares a virtual destructor, a virtual function that returns aQStringList, and one or more other virtual functions. The destructor is there primarily to silence thecompiler, which might otherwise complain about the lack of a virtual destructor in a class that hasvirtual functions. In this example, the effects() function returns a list of the text effects the plugincan provide. We can think of this list as a list of keys. Every time we call one of the other functions,we pass one of these keys as first argument, making it possible to implement multiple effects in oneplugin.
At the end, we use the Q_DECLARE_INTERFACE() macro to associate an identifier to the interface. Theidentifier normally has four components: an inverted domain name specifying the creator of theinterface, the name of the application, the name of the interface, and a version number. Wheneverwe alter the interface (for example, by adding a virtual function or changing the signature of anexisting function), we must remember to increase the version number; otherwise, the applicationmight crash trying to access an outdated plugin.
The application is implemented in a class called TextArtDialog. We will only show the code relevantto making it plugin-aware. Let's start with the constructor:
TextArtDialog::TextArtDialog(const QString &text, QWidget *parent) : QDialog(parent){ listWidget = new QListWidget; listWidget->setViewMode(QListWidget::IconMode); listWidget->setMovement(QListWidget::Static); listWidget->setIconSize(QSize(260, 80)); ... loadPlugins(); populateListWidget(text); ...}
The constructor creates a QListWidget to list the available effects. It calls the private functionloadPlugins() to find and load any plugins that implement the TextArtInterface and populates thelist widget accordingly by calling another private function, populateListWidget().
void TextArtDialog::loadPlugins(){ QDir pluginDir(QApplication::applicationDirPath());#if defined(Q_OS_WIN) if (pluginDir.dirName().toLower() == "debug"

|| pluginDir.dirName().toLower() == "release") pluginDir.cdUp();#elif defined(Q_OS_MAC) if (pluginDir.dirName() == "MacOS") {
pluginDir.cdUp(); pluginDir.cdUp(); pluginDir.cdUp(); }#endif if (!pluginDir.cd("plugins")) return; foreach (QString fileName, pluginDir.entryList(QDir::Files)) { QPluginLoader loader(pluginDir.absoluteFilePath(fileName)); if (TextArtInterface *interface = qobject_cast<TextArtInterface *>(loader.instance())) interfaces.append(interface); }}
In loadPlugins(), we attempt to load all the files in the application's plugins directory. (OnWindows, the application's executable usually lives in a debug or release subdirectory, so we moveone directory up. On Mac OS X, we take the bundle directory structure into account.)
If the file we try to load is a Qt plugin that uses the same version of Qt as the application,QPluginLoader::instance() will return a QObject * that points to a Qt plugin. We useqobject_cast<T>() to check whether the plugin implements the TextArtInterface. Each time the castis successful, we add the interface to the TextArtDialog's list of interfaces (of typeQList<TextArtInterface *>).
Some applications may want to load two or more different interfaces, in which case the code forobtaining the interfaces would look more like that shown below:
QObject *plugin = loader.instance();if (TextArtInterface *i = qobject_cast<TextArtInterface *>(plugin)) textArtInterfaces.append(i);if (BorderArtInterface *i = qobject_cast<BorderArtInterface *>(plugin)) borderArtInterfaces.append(i);if (TextureInterface *i = qobject_cast<TextureInterface *>(plugin)) textureInterfaces.append(i);
The same plugin may successfully cast to more than one interface pointer, since it is possible forplugins to provide multiple interfaces by using multiple inheritance.
void TextArtDialog::populateListWidget(const QString &text){ QSize iconSize = listWidget->iconSize(); QPen pen(QColor("darkseagreen")); QLinearGradient gradient(0, 0, iconSize.width() / 2, iconSize.height() / 2);
gradient.setColorAt(0.0, QColor("darkolivegreen")); gradient.setColorAt(0.8, QColor("darkgreen")); gradient.setColorAt(1.0, QColor("lightgreen")); QFont font("Helvetica", iconSize.height(), QFont::Bold); foreach (TextArtInterface *interface, interfaces) { foreach (QString effect, interface->effects()) { QListWidgetItem *item = new QListWidgetItem(effect, listWidget); QPixmap pixmap = interface->applyEffect(effect, text, font, iconSize, pen,

gradient); item->setData(Qt::DecorationRole, pixmap); } } listWidget->setCurrentRow(0);}
The populateListWidget() function begins by creating some variables to pass to the applyEffect()
function, in particular a pen, a linear gradient, and a font. It then iterates over everyTextArtInterface that was found by loadPlugins(). For each effect provided by each interface, anew QListWidgetItem is created with its text set to the name of the effect it represents, and aQPixmap is created using applyEffect().
In this section we have seen how to load plugins by calling loadPlugins() in the constructor, andhow to make use of them in populateListWidget(). The code copes gracefully whether there are noplugins providing TextArtInterfaces, just one, or more than one. Furthermore, additional pluginscould be added later: Every time the application starts up it loads whatever plugins it finds thatprovide the interfaces it wants. This makes it easy to extend the application's functionality withoutchanging the application itself.
Writing Application PluginsAn application plugin is a subclass of QObject and of the interfaces it wants to provide. The CD thataccompanies this book includes two plugins for the Text Art application presented in the previoussection, to show that the application correctly handles multiple plugins.
Here, we will only review the code for one of them, the Basic Effects Plugin. We will assume that theplugin's source code is located in a directory called basiceffectsplugin and that the Text Artapplication is located in a parallel directory called textart. Here's the declaration of the plugin class:
class BasicEffectsPlugin : public QObject, public TextArtInterface{ Q_OBJECT Q_INTERFACES(TextArtInterface)public:
QStringList effects() const; QPixmap applyEffect(const QString &effect, const QString &text, const QFont &font, const QSize &size, const QPen &pen, const QBrush &brush);};
The plugin implements only one interface, TextArtInterface. In addition to Q_OBJECT, we must usethe Q_INTERFACES() macro for each of the interfaces that are subclassed to ensure smoothcooperation between moc and qobject_cast<T>().
QStringList BasicEffectsPlugin::effects() const{ return QStringList() << "Plain" << "Outline" << "Shadow";
}
The effects() function returns a list of text effects supported by the plugin. This plugin supportsthree effects, so we just return a list containing the name of each one.
The applyEffect() function provides the plugin's functionality and is slightly involved, so we will
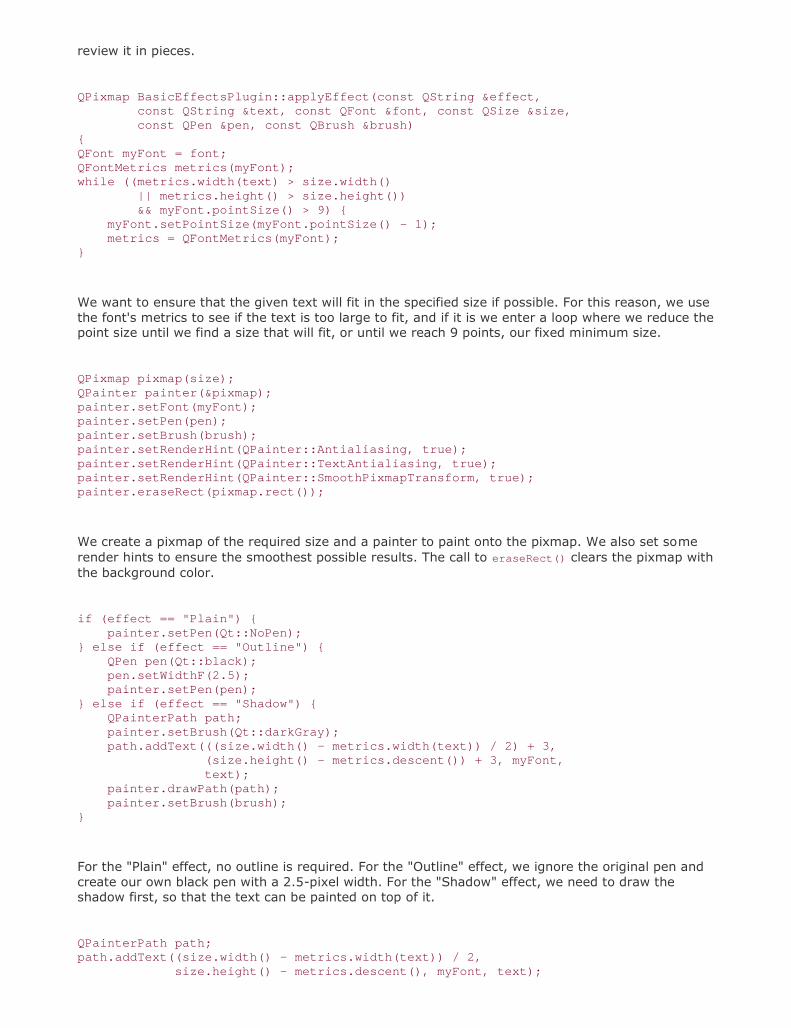
review it in pieces.
QPixmap BasicEffectsPlugin::applyEffect(const QString &effect, const QString &text, const QFont &font, const QSize &size, const QPen &pen, const QBrush &brush){QFont myFont = font;QFontMetrics metrics(myFont);while ((metrics.width(text) > size.width() || metrics.height() > size.height()) && myFont.pointSize() > 9) { myFont.setPointSize(myFont.pointSize() - 1); metrics = QFontMetrics(myFont);}
We want to ensure that the given text will fit in the specified size if possible. For this reason, we usethe font's metrics to see if the text is too large to fit, and if it is we enter a loop where we reduce thepoint size until we find a size that will fit, or until we reach 9 points, our fixed minimum size.
QPixmap pixmap(size);QPainter painter(&pixmap);painter.setFont(myFont);painter.setPen(pen);painter.setBrush(brush);painter.setRenderHint(QPainter::Antialiasing, true);painter.setRenderHint(QPainter::TextAntialiasing, true);painter.setRenderHint(QPainter::SmoothPixmapTransform, true);painter.eraseRect(pixmap.rect());
We create a pixmap of the required size and a painter to paint onto the pixmap. We also set somerender hints to ensure the smoothest possible results. The call to eraseRect() clears the pixmap withthe background color.
if (effect == "Plain") { painter.setPen(Qt::NoPen);} else if (effect == "Outline") { QPen pen(Qt::black); pen.setWidthF(2.5); painter.setPen(pen);} else if (effect == "Shadow") { QPainterPath path; painter.setBrush(Qt::darkGray); path.addText(((size.width() - metrics.width(text)) / 2) + 3, (size.height() - metrics.descent()) + 3, myFont, text); painter.drawPath(path); painter.setBrush(brush);}
For the "Plain" effect, no outline is required. For the "Outline" effect, we ignore the original pen andcreate our own black pen with a 2.5-pixel width. For the "Shadow" effect, we need to draw theshadow first, so that the text can be painted on top of it.
QPainterPath path;path.addText((size.width() - metrics.width(text)) / 2, size.height() - metrics.descent(), myFont, text);

painter.drawPath(path); return pixmap;}
We now have the pen and brushes set appropriately for each text effect, and in the "Shadow" effectcase have drawn the shadow. We are now ready to render the text. The text is horizontally centeredand drawn far enough above the bottom of the pixmap to allow room for descenders.
Q_EXPORT_PLUGIN2(basiceffectsplugin, BasicEffectsPlugin)
At the end of the .cpp file, we use the Q_EXPORT_PLUGIN2() macro to make the plugin available to Qt.
The .pro file is similar to the one we used for the Windows cursor plugin earlier in this chapter (p.408):
TEMPLATE = libCONFIG += pluginHEADERS = ../textart/textartinterface.h \ basiceffectsplugin.hSOURCES = basiceffectsplugin.cppDESTDIR = ../textart/plugins
If this chapter has whet your appetite for application plugins, you might like to study the moreadvanced Plug & Paint example provided with Qt. The application supports three different interfacesand includes a useful Plugin Information dialog that lists the plugins and interfaces that are availableto the application.

Chapter 20. Platform-Specific Features Interfacing with Native APIs Using ActiveX on Windows Handling X11 Session Management
In this chapter, we will review some of the platform-specific options available to Qt programmers.We begin by looking at how to access native APIs such as the Win32 API on Windows, Carbon onMac OS X, and Xlib on X11. We then move on to explore the ActiveQt extension, showing how to useActiveX controls within Qt/Windows applications and how to create applications that act as ActiveXservers. In the last section, we explain how to make Qt applications cooperate with the sessionmanager under X11.
In addition to the features presented here, Trolltech offers several platform-specific Qt Solutions,including the Qt/Motif and Qt/MFC migration frameworks to ease the migration of Motif/Xt and MFCapplications to Qt. A similar extension for Tcl/Tk applications is provided by froglogic, and aMicrosoft Windows resource converter is available from Klarälvdalens Datakonsult. See the followingweb pages for details:
http://www.trolltech.com/products/solutions/catalog/ http://www.froglogic.com/tq/ http://www.kdab.net/knut/
For embedded development, Trolltech offers the Qtopia application platform. This is covered inChapter 21.
Interfacing with Native APIsQt's comprehensive API caters for most needs on all platforms, but in some circumstances, we maywant to use the underlying platform-specific APIs. In this section, we will show how to use thenative APIs for the different platforms supported by Qt to accomplish particular tasks.
On every platform, QWidget provides a winId() function that returns the window ID or handle.QWidget also provides a static function called find() that returns the QWidget with a particularwindow ID. We can pass this ID to native API functions to achieve platform-specific effects. Forexample, the following code uses winId() to move the title bar of a tool window to the left usingnative Mac OS X functions:
#ifdef Q_WS_MACChangeWindowAttributes(HIViewGetWindow(HIViewRef(toolWin.winId())),
kWindowSideTitlebarAttribute, kWindowNoAttributes);#endif
Figure 20.1. A Mac OS X tool window with the title bar on the side

On X11, here's how we would modify a window property:
#ifdef Q_WS_X11 Atom atom = XInternAtom(QX11Info::display(), "MY_PROPERTY", False); long data = 1; XChangeProperty(QX11Info::display(), window->winId(), atom, atom, 32, PropModeReplace, reinterpret_cast<uchar *>(&data), 1);#endif
The #ifdef and #endif directives around the platform-specific code ensure that the application willstill compile on other platforms.
For a Windows-only application, here's an example of how we can use GDI calls to draw on a Qtwidget:
void GdiControl::paintEvent(QPaintEvent * /* event */){ RECT rect; GetClientRect(winId(), &rect); HDC hdc = GetDC(winId()); FillRect(hdc, &rect, HBRUSH(COLOR_WINDOW + 1));
SetTextAlign(hdc, TA_CENTER | TA_BASELINE);TextOutW(hdc, width() / 2, height() / 2, text.utf16(), text.size());
ReleaseDC(winId(), hdc);}
For this to work, we must also reimplement QPaintDevice::paintEngine() to return a null pointer andset the Qt::WA_PaintOnScreen attribute in the widget's constructor.
The next example shows how to combine QPainter and GDI calls in a paint event handler using
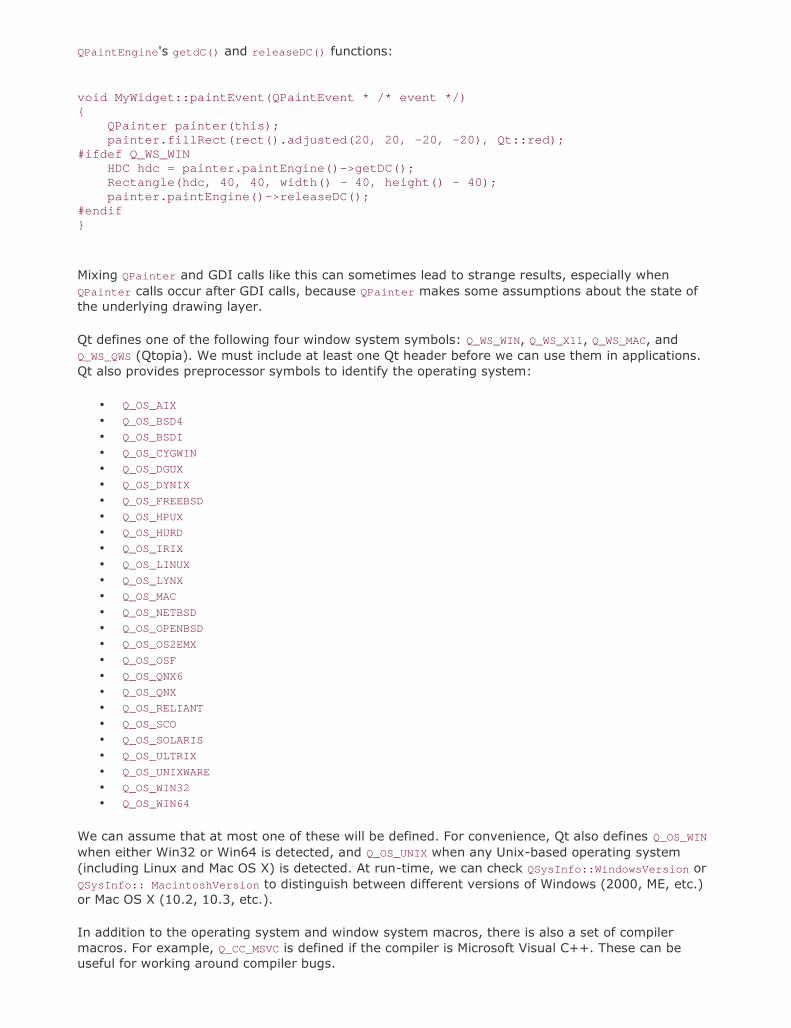
QPaintEngine's getdC() and releaseDC() functions:
void MyWidget::paintEvent(QPaintEvent * /* event */){ QPainter painter(this); painter.fillRect(rect().adjusted(20, 20, -20, -20), Qt::red);#ifdef Q_WS_WIN HDC hdc = painter.paintEngine()->getDC(); Rectangle(hdc, 40, 40, width() - 40, height() - 40); painter.paintEngine()->releaseDC();#endif}
Mixing QPainter and GDI calls like this can sometimes lead to strange results, especially whenQPainter calls occur after GDI calls, because QPainter makes some assumptions about the state ofthe underlying drawing layer.
Qt defines one of the following four window system symbols: Q_WS_WIN, Q_WS_X11, Q_WS_MAC, andQ_WS_QWS (Qtopia). We must include at least one Qt header before we can use them in applications.Qt also provides preprocessor symbols to identify the operating system:
Q_OS_AIX
Q_OS_BSD4
Q_OS_BSDI
Q_OS_CYGWIN
Q_OS_DGUX
Q_OS_DYNIX
Q_OS_FREEBSD
Q_OS_HPUX
Q_OS_HURD
Q_OS_IRIX
Q_OS_LINUX
Q_OS_LYNX
Q_OS_MAC
Q_OS_NETBSD
Q_OS_OPENBSD
Q_OS_OS2EMX
Q_OS_OSF
Q_OS_QNX6
Q_OS_QNX
Q_OS_RELIANT
Q_OS_SCO
Q_OS_SOLARIS
Q_OS_ULTRIX
Q_OS_UNIXWARE
Q_OS_WIN32
Q_OS_WIN64
We can assume that at most one of these will be defined. For convenience, Qt also defines Q_OS_WIN
when either Win32 or Win64 is detected, and Q_OS_UNIX when any Unix-based operating system(including Linux and Mac OS X) is detected. At run-time, we can check QSysInfo::WindowsVersion orQSysInfo:: MacintoshVersion to distinguish between different versions of Windows (2000, ME, etc.)or Mac OS X (10.2, 10.3, etc.).
In addition to the operating system and window system macros, there is also a set of compilermacros. For example, Q_CC_MSVC is defined if the compiler is Microsoft Visual C++. These can beuseful for working around compiler bugs.

Several of Qt's GUI-related classes provide platform-specific functions that return low-level handlesto the underlying object. These are listed in Figure 20.2.
Figure 20.2. Platform-specific functions to access low-level handles
Mac OS X
ATSFontFormatRef QFont::handle()
CGImageRef QPixmap::macCGHandle()
GWorldPtr QPixmap::macQDAlphaHandle()
GWorldPtr QPixmap::macQDHandle()
RgnHandle QRegion::handle()
HIViewRef QWidget::winId()
Windows
HCURSOR QCursor::handle()
HDC QPaintEngine::getDC()
HDC QPrintEngine::getPrinterDC()
HFONT QFont::handle()
HPALETTE QColormap::hPal()
HRGN QRegion::handle()
HWND QWidget::winId()
X11
Cursor QCursor::handle()
Font QFont::handle()
Picture QPixmap::x11PictureHandle()
Picture QWidget::x11PictureHandle()
Pixmap QPixmap::handle()
QX11Info QPixmap::x11Info()
QX11Info QWidget::x11Info()
Region QRegion::handle()
Screen QCursor::x11Screen()
SmcConn QSessionManager::handle()
Window QWidget::handle()
Window QWidget::winId()

On X11, QPixmap::x11Info() and QWidget::x11Info() return a QX11Info object that provides variouspointers or handles, such as display(), screen(), colormap(), and visual(). We can use these to setup an X11 graphics context on a QPixmap or QWidget, for example.
Qt applications that need to interface with other toolkits or libraries frequently need to access thelow-level events (XEvents on X11, MSGs on Windows, Eventref on Mac OS X, QWSEvents on Qtopia)before they are converted into QEvents. We can do this by subclassing QApplication andreimplementing the relevant platform-specific event filter, one of x11EventFilter(),winEventFilter(), macEventFilter(), and qwsEventFilter(). Alternatively, we can access theplatform-specific events that are sent to a given QWidget by reimplementing one of x11Event(),winEvent(), macEvent(), and qwsEvent(). This can be useful for handling certain types of events thatQt normally ignores, such as joystick events.
For more information about platform-specific issues, including how to deploy Qt applications ondifferent platforms, see http://doc.trolltech.com/4.1/winsystem.html.
Using ActiveX on WindowsMicrosoft'sActiveX technology allows applicationsto incorporate user interface components providedby other applications or libraries. It is built on Microsoft COM and defines one set of interfaces forapplications that use components and another set of interfaces for applications and libraries thatprovide components.
The Qt/Windows Desktop Edition provides the ActiveQt framework to seam-lessly combine ActiveXand Qt. ActiveQt consists of two modules:
The QAxContainer module allows us to use COM objects and to embed ActiveX controls inQt applications.
The QAxServer module allows us to export custom COM objects and ActiveX controls writtenusing Qt.
Our first example will embed the Windows Media Player in a Qt application using the QAxContainermodule. The Qt application adds an Open button, a Play/Pause button, a Stop button, and a slider tothe Windows Media Player ActiveX control.
Figure 20.3. The Media Player application

The application's main window is of type PlayerWindow:
class PlayerWindow : public QWidget{ Q_OBJECT Q_ENUMS(ReadyStateConstants)public: enum PlayStateConstants { Stopped = 0, Paused = 1, Playing = 2 }; enum ReadyStateConstants { Uninitialized = 0, Loading = 1, Interactive = 3, Complete = 4 }; PlayerWindow();protected: void timerEvent(QTimerEvent *event);private slots: void onPlayStateChange(int oldState, int newState); void onReadyStateChange(ReadyStateConstants readyState); void onPositionChange(double oldPos, double newPos); void sliderValueChanged(int newValue); void openFile();private: QAxWidget *wmp; QToolButton *openButton; QToolButton *playPauseButton; QToolButton *stopButton; QSlider *seekSlider; QString fileFilters; int updateTimer;};
The PlayerWindow class inherits from QWidget. The Q_ENUMS() macro (just below Q_OBJECT) isnecessary to tell moc that the ReadyStateConstants type used in the onReadyStateChange() slot is anenum type. In the private section, we declare a QAxWidget * data member.
PlayerWindow::PlayerWindow(){ wmp = new QAxWidget; wmp->setControl("{22D6F312-B0F6-11D0-94AB-0080C74C7E95}");
In the constructor, we start by creating a QAxWidget object to encapsulate the Windows Media PlayerActiveX control. The QAxContainer module consists of three classes: QAxObject encapsulates a COMobject, QAxWidget encapsulates an ActiveX control, and QAxBase implements the core COMfunctionality for QAxObject and QAxWidget.
We call setControl() on the QAxWidget with the class ID of the Windows Media Player 6.4 control.This will create an instance of the required component. From then on, all the properties, events, andmethods of the ActiveX control are available as Qt properties, signals, and slots through theQAxWidget object.
Figure 20.4. Inheritance tree for the QAxContainer module
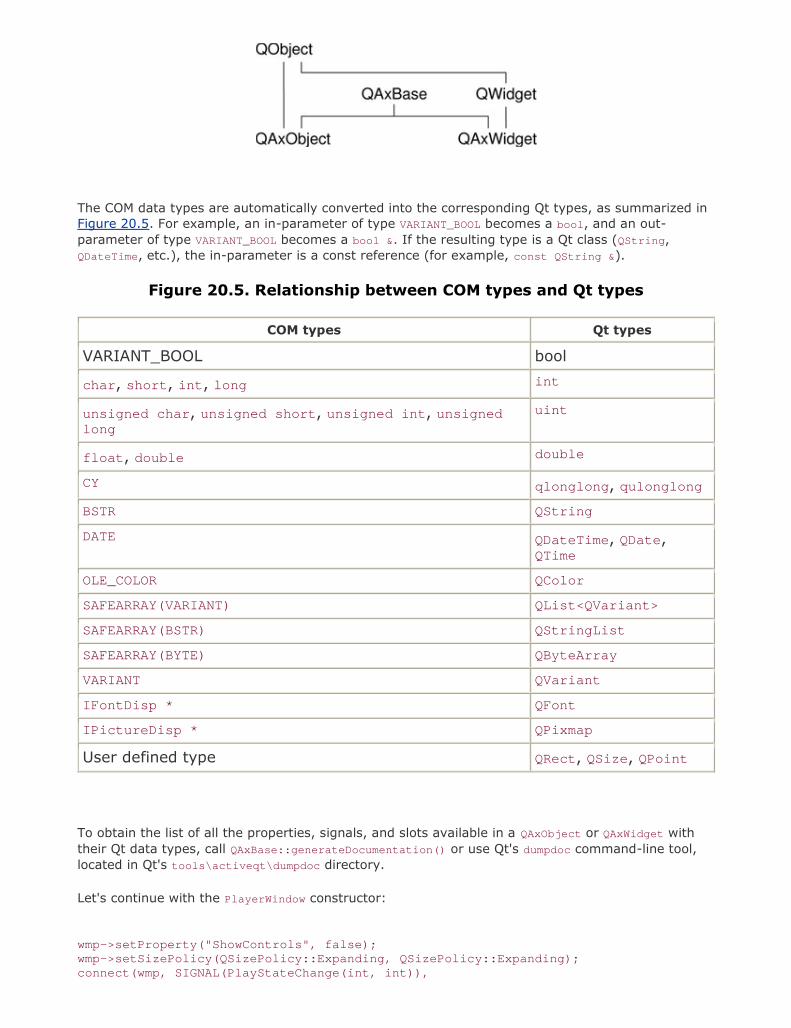
The COM data types are automatically converted into the corresponding Qt types, as summarized inFigure 20.5. For example, an in-parameter of type VARIANT_BOOL becomes a bool, and an out-parameter of type VARIANT_BOOL becomes a bool &. If the resulting type is a Qt class (QString,QDateTime, etc.), the in-parameter is a const reference (for example, const QString &).
Figure 20.5. Relationship between COM types and Qt types
COM types Qt types
VARIANT_BOOL bool
char, short, int, long int
unsigned char, unsigned short, unsigned int, unsignedlong
uint
float, double double
CY qlonglong, qulonglong
BSTR QString
DATE QDateTime, QDate,QTime
OLE_COLOR QColor
SAFEARRAY(VARIANT) QList<QVariant>
SAFEARRAY(BSTR) QStringList
SAFEARRAY(BYTE) QByteArray
VARIANT QVariant
IFontDisp * QFont
IPictureDisp * QPixmap
User defined type QRect, QSize, QPoint
To obtain the list of all the properties, signals, and slots available in a QAxObject or QAxWidget withtheir Qt data types, call QAxBase::generateDocumentation() or use Qt's dumpdoc command-line tool,located in Qt's tools\activeqt\dumpdoc directory.
Let's continue with the PlayerWindow constructor:
wmp->setProperty("ShowControls", false);wmp->setSizePolicy(QSizePolicy::Expanding, QSizePolicy::Expanding);connect(wmp, SIGNAL(PlayStateChange(int, int)),

this, SLOT(onPlayStateChange(int, int)));connect(wmp, SIGNAL(ReadyStateChange(ReadyStateConstants)), this, SLOT(onReadyStateChange(ReadyStateConstants)));connect(wmp, SIGNAL(PositionChange(double, double)), this, SLOT(onPositionChange(double, double)));
After calling QAxWidget::setControl(), we call QObject::setProperty() to set the ShowControls
property of the Windows Media Player to false, since we provide our own buttons to manipulate thecomponent. QObject::setProperty() can be used both for COM properties and for normal Qtproperties. Its second parameter is of type QVariant.
Next, we call setSizePolicy() to make the ActiveX control take all the available space in the layout,and we connect three ActiveX events from the COM component to three slots.
... stopButton = new QToolButton; stopButton->setText(tr("&Stop")); stopButton->setEnabled(false); connect(stopButton, SIGNAL(clicked()), wmp, SLOT(Stop())); ...}
The rest of the PlayerWindow constructor follows the usual pattern, except that we connect some Qtsignals to slots provided by the COM object (Play(), Pause(), and Stop()). Since the buttons aresimilar, we have only shown the Stop button's implementation here.
Let's leave the constructor and look at the timerEvent() function:
void PlayerWindow::timerEvent(QTimerEvent *event){ if (event->timerId() == updateTimer) { double curPos = wmp->property("CurrentPosition").toDouble(); onPositionChange(-1, curPos); } else { QWidget::timerEvent(event); }}
The timerEvent() function is called at regular intervals while a media clip is playing. We use it toadvance the slider. This is done by calling property() on the ActiveX control to obtain the value ofthe CurrentPosition property as a QVariant and calling toDouble() to convert it to a double. We thencall onPositionChange() to perform the update.
We will not review the rest of the code because most of it isn't directly relevant to ActiveX anddoesn't show anything that we haven't covered already. The code is included on the CD.
In the .pro file, we need this entry to link with the QAxContainer module:
CONFIG += qaxcontainer
One frequent need when dealing with COM objects is to be able to call a COM method directly (asopposed to connecting it to a Qt signal). The easiest way to do this is to invokeQAxBase::dynamicCall() with the name and signature of the method as first parameter and the

arguments to the method as additional parameters. For example:
wmp->dynamicCall("TitlePlay(uint)", 6);
The dynamicCall() function takes up to eight parameters of type QVariant and returns a QVariant. Ifwe need to pass an IDispatch * or an IUnknown * this way, we can encapsulate the component in aQAxObject and call asVariant() on it to convert it to a QVariant. If we need to call a COM methodthat returns an IDispatch * or an IUnknown *, or if we need to access a COM property of one ofthose types, we can use querySubObject() instead:
QAxObject *session = outlook.querySubObject("Session");QAxObject *defaultContacts = session->querySubObject("GetDefaultFolder(OlDefaultFolders)", "olFolderContacts");
If we want to call methods that have unsupported data types in their parameter list, we can useQAxBase::queryInterface() to retrieve the COM interface and call the method directly. As usual withCOM, we must call Release() when we have finished using the interface. If we often need to callsuch methods, we can subclass QAxObject or QAxWidget and provide member functions thatencapsulate the COM interface calls. Be aware that QAxObject and QAxWidget subclasses cannotdefine their own properties, signals, or slots.
We will now review the QAxServer module. This module enables us to turn a standard Qt programinto an ActiveX server. The server can either be a shared library or a stand-alone application.Servers built as shared libraries are often called in-process servers; stand-alone applications arecalled out-of-process servers.
Our first QAxServer example is an in-process server that provides a widget that shows a ballbouncing left and right. We will also see how to embed the widget in Internet Explorer.
Here's the beginning of the class definition of the AxBouncer widget:
class AxBouncer : public QWidget, public QAxBindable{ Q_OBJECT Q_ENUMS(SpeedValue) Q_PROPERTY(QColor color READ color WRITE setColor) Q_PROPERTY(SpeedValue speed READ speed WRITE setSpeed) Q_PROPERTY(int radius READ radius WRITE setRadius) Q_PROPERTY(bool running READ isRunning)
AxBouncer inherits from both QWidget and QAxBindable. The QAxBindable class provides an interfacebetween the widget and an ActiveX client. Any QWidget can be exported as an ActiveX control, but bysubclassing QAxBindable we can notify the client when a property's value changes, and we canimplement COM interfaces to supplement those already implemented by QAxServer.
Figure 20.6. The AxBouncer widget in Internet Explorer
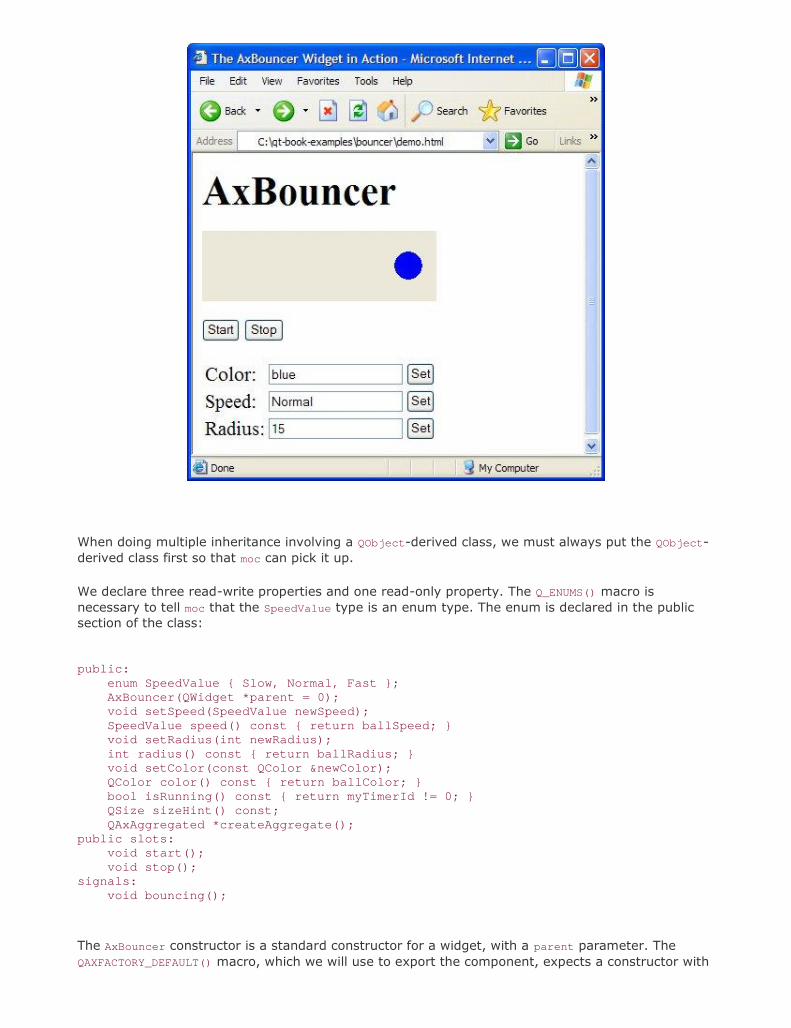
When doing multiple inheritance involving a QObject-derived class, we must always put the QObject-derived class first so that moc can pick it up.
We declare three read-write properties and one read-only property. The Q_ENUMS() macro isnecessary to tell moc that the SpeedValue type is an enum type. The enum is declared in the publicsection of the class:
public: enum SpeedValue { Slow, Normal, Fast }; AxBouncer(QWidget *parent = 0); void setSpeed(SpeedValue newSpeed); SpeedValue speed() const { return ballSpeed; } void setRadius(int newRadius); int radius() const { return ballRadius; } void setColor(const QColor &newColor); QColor color() const { return ballColor; } bool isRunning() const { return myTimerId != 0; } QSize sizeHint() const; QAxAggregated *createAggregate();public slots: void start(); void stop();signals: void bouncing();
The AxBouncer constructor is a standard constructor for a widget, with a parent parameter. TheQAXFACTORY_DEFAULT() macro, which we will use to export the component, expects a constructor with
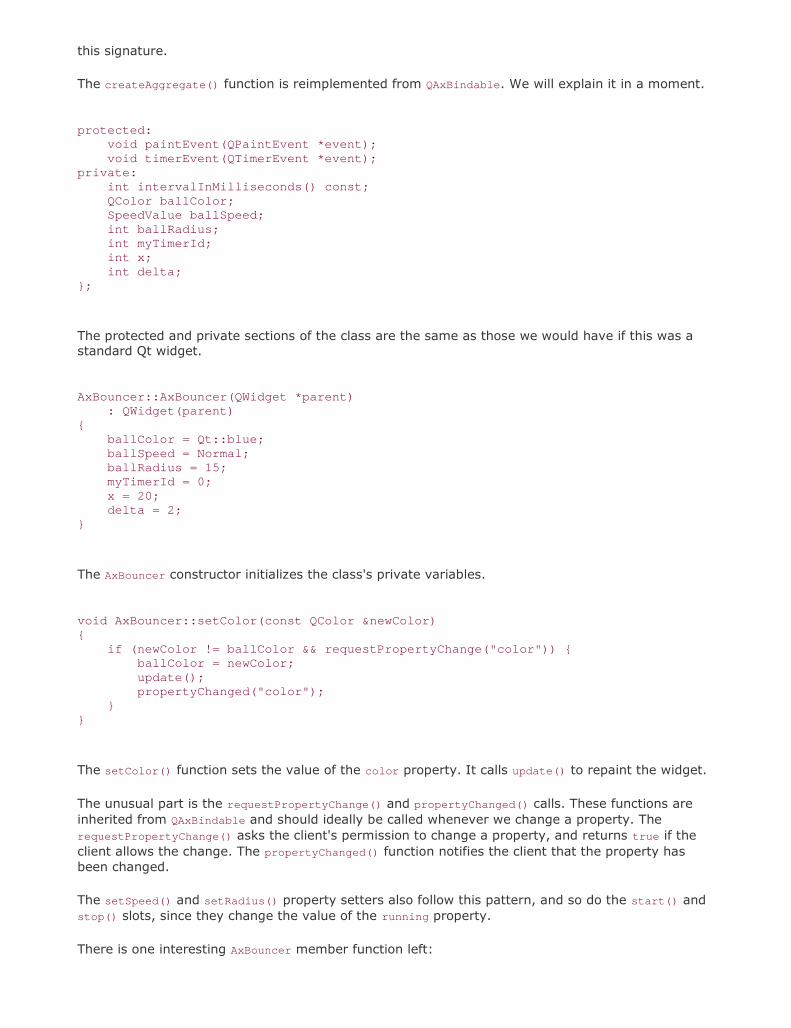
this signature.
The createAggregate() function is reimplemented from QAxBindable. We will explain it in a moment.
protected: void paintEvent(QPaintEvent *event); void timerEvent(QTimerEvent *event);private: int intervalInMilliseconds() const; QColor ballColor; SpeedValue ballSpeed; int ballRadius; int myTimerId; int x;
int delta;};
The protected and private sections of the class are the same as those we would have if this was astandard Qt widget.
AxBouncer::AxBouncer(QWidget *parent) : QWidget(parent){ ballColor = Qt::blue; ballSpeed = Normal; ballRadius = 15; myTimerId = 0; x = 20; delta = 2;}
The AxBouncer constructor initializes the class's private variables.
void AxBouncer::setColor(const QColor &newColor){ if (newColor != ballColor && requestPropertyChange("color")) {
ballColor = newColor; update(); propertyChanged("color"); }}
The setColor() function sets the value of the color property. It calls update() to repaint the widget.
The unusual part is the requestPropertyChange() and propertyChanged() calls. These functions areinherited from QAxBindable and should ideally be called whenever we change a property. TherequestPropertyChange() asks the client's permission to change a property, and returns true if theclient allows the change. The propertyChanged() function notifies the client that the property hasbeen changed.
The setSpeed() and setRadius() property setters also follow this pattern, and so do the start() andstop() slots, since they change the value of the running property.
There is one interesting AxBouncer member function left:

QAxAggregated *AxBouncer::createAggregate(){ return new ObjectSafetyImpl;}
The createAggregate() function is reimplemented from QAxBindable. It allows us to implement COMinterfaces that the QAxServer module doesn't already implement or to bypass QAxServer's defaultCOM interfaces. Here, we do it to provide the IObjectSafety interface, which is used by InternetExplorer to access a component's safety options. This is the standard trick to get rid of InternetExplorer's infamous "Object not safe for scripting" error message.
Here's the definition of the class that implements the IObjectSafety interface:
class ObjectSafetyImpl : public QAxAggregated, public IObjectSafety{public: long queryInterface(const QUuid &iid, void **iface); QAXAGG_IUNKNOWN HRESULT WINAPI GetInterfaceSafetyOptions(REFIID riid, DWORD *pdwSupportedOptions, DWORD *pdwEnabledOptions); HRESULT WINAPI SetInterfaceSafetyOptions(REFIID riid, DWORD pdwSupportedOptions, DWORD pdwEnabledOptions);};
The ObjectSafetyImpl class inherits both QAxAggregated and IObjectSafety. The QAxAggregated classis an abstract base class for implementations of additional COM interfaces. The COM object that theQAxAggregated extends is accessible through controllingUnknown(). This COM object is createdbehind the scenes by the QAxServer module.
The QAXAGG_IUNKNOWN macro provides standard implementations of QueryInter-face(), AddRef(), andRelease(). These implementations simply call the same functions on the controlling COM object.
long ObjectSafetyImpl::queryInterface(const QUuid &iid, void **iface){ *iface = 0; if (iid == IID_IObjectSafety) { *iface = static_cast<IObjectSafety *>(this); } else {
return E_NOINTERFACE; } AddRef(); return S_OK;}
The queryInterface() function is a pure virtual function of QAxAggregated. It is called by thecontrolling COM object to give access to the interfaces provided by the QAxAggregated subclass. Wemust return E_NOINTERFACE for interfaces that we don't implement and for IUnknown.
HRESULT WINAPI ObjectSafetyImpl::GetInterfaceSafetyOptions( REFIID /* riid */, DWORD *pdwSupportedOptions, DWORD *pdwEnabledOptions){ *pdwSupportedOptions = INTERFACESAFE_FOR_UNTRUSTED_DATA | INTERFACESAFE_FOR_UNTRUSTED_CALLER; *pdwEnabledOptions = *pdwSupportedOptions; return S_OK;

}HRESULT WINAPI ObjectSafetyImpl::SetInterfaceSafetyOptions( REFIID /* riid */, DWORD /* pdwSupportedOptions */, DWORD /* pdwEnabledOptions */){ return S_OK;}
The GetInterfaceSafetyOptions() and SetInterfaceSafetyOptions() functions are declared inIObjectSafety. We implement them to tell the world that our object is safe for scripting.
Let's now review main.cpp:
#include <QAxFactory>#include "axbouncer.h"QAXFACTORY_DEFAULT(AxBouncer, "{5e2461aa-a3e8-4f7a-8b04-307459a4c08c}", "{533af11f-4899-43de-8b7f-2ddf588d1015}",
"{772c14a5-a840-4023-b79d-19549ece0cd9}","{dbce1e56-70dd-4f74-85e0-95c65d86254d}",
"{3f3db5e0-78ff-4e35-8a5d-3d3b96c83e09}")
The QAXFACTORY_DEFAULT() macro exports an ActiveX control. We can use it for ActiveX servers thatexport only one control. The next example in this section will show how to export many ActiveXcontrols.
The first argument to QAXFACTORY_DEFAULT() is the name of the Qt class to export. This is also thename under which the control is exported. The other five arguments are the class ID, the interfaceID, the event interface ID, the type library ID, and the application ID. We can use standard tools likeguidgen or uuidgen to generate these identifiers. Because the server is a library, we don't need amain() function.
Here's the .pro file for our in-process ActiveX server:
TEMPLATE = libCONFIG += dll qaxserverHEADERS = axbouncer.h \ objectsafetyimpl.hSOURCES = axbouncer.cpp \ main.cpp \
objectsafetyimpl.cppRC_FILE = qaxserver.rcDEF_FILE = qaxserver.def
The qaxserver.rc and qaxserver.def files referred to in the .pro file are standard files that can becopied from Qt's src\activeqt\control directory.
The makefile or Visual C++ project file generated by qmake contains rules to register the server inthe Windows registry. To register the server on end-user machines, we can use the regsvr32 toolavailable on all Windows systems.
We can then include the Bouncer component in an HTML page using the <object> tag:
<object id="AxBouncer" classid="clsid:5e2461aa-a3e8-4f7a-8b04-307459a4c08c">

<b>The ActiveX control is not available. Make sure you have built andregistered the component server.</b></object>
We can create buttons that invoke slots:
<input type="button" value="Start" onClick="AxBouncer.start()"><input type="button" value="Stop" onClick="AxBouncer.stop()">
We can manipulate the widget using JavaScript or VBScript just like any other ActiveX control. Seethe demo.html file on the CD for a rudimentary page that uses the ActiveX server.
Our last example is a scriptable Address Book application. The application can serve as a standardQt/Windows application or an out-of-process ActiveX server. The latter possibility allows us to scriptthe application using, say, Visual Basic.
class AddressBook : public QMainWindow{ Q_OBJECT Q_PROPERTY(int count READ count) Q_CLASSINFO("ClassID", "{588141ef-110d-4beb-95ab-ee6a478b576d}")
Q_CLASSINFO("InterfaceID", "{718780ec-b30c-4d88-83b3-79b3d9e78502}")Q_CLASSINFO("ToSuperClass", "AddressBook")
public: AddressBook(QWidget *parent = 0); ~AddressBook(); int count() const;public slots: ABItem *createEntry(const QString &contact); ABItem *findEntry(const QString &contact) const; ABItem *entryAt(int index) const;private slots: void addEntry(); void editEntry(); void deleteEntry();private: void createActions(); void createMenus(); QTreeWidget *treeWidget;
QMenu *fileMenu; QMenu *editMenu; QAction *exitAction; QAction *addEntryAction; QAction *editEntryAction; QAction *deleteEntryAction;};
The AddressBook widget is the application's main window. The property and the slots it provides willbe available for scripting. The Q_CLASSINFO() macro is used to specify the class and interface IDsassociated with the class. These were generated using a tool such as guid or uuid.
In the previous example, we specified the class and interface IDs when we exported the QAxBouncer
class using the QAXFACTORY_DEFAULT() macro. In this example, we want to export several classes, sowe cannot use QAXFACTORY_DEFAULT(). There are two options available to us:
We can subclass QAxFactory, reimplement its virtual functions to provide information aboutthe types we want to export, and use the QAXFACTORY_EXPORT() macro to register the factory.

We can use the QAXFACTORY_BEGIN(), QAXFACTORY_END(), QAXCLASS(), and QAX-TYPE() macros todeclare and register the factory. This approach requires us to specify the class and interfaceIDs using Q_CLASSINFO().
Back to the AddressBook class definition: The third occurrence of Q_CLASSINFO() may seem a bitmysterious. By default, ActiveX controls expose not only their own properties, signals, and slots toclients, but also those of their superclasses up to QWidget. The ToSuperClass attribute lets us specifythe highest superclass (in the inheritance tree) that we want to expose. Here, we specify the classname of the component (AddressBook) as the highest superclass to export, meaning that properties,signals, and slots defined in AddressBook's superclasses will not be exported.
class ABItem : public QObject, public QTreeWidgetItem{ Q_OBJECT Q_PROPERTY(QString contact READ contact WRITE setContact) Q_PROPERTY(QString address READ address WRITE setAddress) Q_PROPERTY(QString phoneNumber READ phoneNumber WRITE setPhoneNumber)
Q_CLASSINFO("ClassID", "{bc82730e-5f39-4e5c-96be-461c2cd0d282}") Q_CLASSINFO("InterfaceID", "{c8bc1656-870e-48a9-9937-fbe1ceff8b2e}")
Q_CLASSINFO("ToSuperClass", "ABItem")public: ABItem(QTreeWidget *treeWidget); void setContact(const QString &contact); QString contact() const { return text(0); } void setAddress(const QString &address); QString address() const { return text(1); } void setPhoneNumber(const QString &number); QString phoneNumber() const { return text(2); }public slots: void remove();};
The ABItem class represents one entry in the address book. It inherits from QtreeWidgetItem so thatit can be shown in a QtreeWidget and from QObject so that it can be exported as a COM object.
int main(int argc, char *argv[]){ QApplication app(argc, argv); if (!QAxFactory::isServer()) { AddressBook addressBook; addressBook.show(); return app.exec(); } return app.exec();}
In main(), we check whether the application is being run stand-alone or as a server. The -activex
command-line option is recognized by QApplication and makes the application run as a server. If theapplication isn't run as a server, we create the main widget and show it as we would normally do inany stand-alone Qt application.
In addition to -activex, ActiveX servers understand the following command-line options:
-regserver registers the server in the system registry. -unregserver unregisters the server from the system registry. -dumpidl file writes the server's IDL to the specified file.
When the application is run as a server, we must export the AddressBook and ABItem classes as COM

components:
QAXFACTORY_BEGIN("{2b2b6f3e-86cf-4c49-9df5-80483b47f17b}", "{8e827b25-148b-4307-ba7d-23f275244818}")QAXCLASS(AddressBook)QAXTYPE(ABItem)QAXFACTORY_END()
The above macros export a factory for creating COM objects. Since we want to export two types ofCOM objects, we cannot simply use QAXFACTORY_DEFAULT() as we did in the previous example.
The first argument to QAXFACTORY_BEGIN() is the type library ID; the second argument is theapplication ID. Between QAXFACTORY_BEGIN() and QAXFACTORY_END(), we specify all the classes thatcan be instantiated and all the data types that we want to make accessible as COM objects.
This is the .pro file for our out-of-process ActiveX server:
TEMPLATE = appCONFIG += qaxserverHEADERS = abitem.h \ addressbook.h \ editdialog.hSOURCES = abitem.cpp \ addressbook.cpp \ editdialog.cpp \ main.cppFORMS = editdialog.uiRC_FILE = qaxserver.rc
The qaxserver.rc file referred to in the .pro file is a standard file that can be copied from Qt'ssrc\activeqt\control directory.
Look in the example's vb directory for a Visual Basic project that uses the Address Book server.
This completes our overview of the ActiveQt framework. The Qt distribution includes additionalexamples, and the documentation contains information about how to build the QAxContainer andQAxServer modules and how to solve common interoperability issues.
Handling X11 Session ManagementWhen we log out on X11, some window managers ask us whether we want to save the session. Ifwe say yes, the applications that were running are automatically restarted the next time we log in,with the same screen positions and, ideally, with the same state as they had when we logged out.
The X11-specific component that takes care of saving and restoring the session is called the sessionmanager. To make a Qt/X11 application aware of the session manager, we must reimplementQApplication::saveState() and save the application's state there.
Figure 20.7. Logging out on KDE

Windows 2000 and XP, and some Unix systems, offer a different mechanism called hibernation.When the user puts the computer into hibernation, the operating system simply dumps thecomputer's memory onto disk and reloads it when it wakes up. Applications do not need to doanything or even be aware that this happens.
When the user initiates a shutdown, we can take control just before the shutdown occurs byreimplementing QApplication::commitData(). This allows us to save any unsaved data and tointeract with the user if required. This part of session management is supported on both X11 andWindows.
We will explore session management by going through the code of a session-aware Tic-Tac-Toeapplication. First, let's look at the main() function:
int main(int argc, char *argv[]){ Application app(argc, argv); TicTacToe toe; toe.setObjectName("toe"); app.setTicTacToe(&toe); toe.show(); return app.exec();}
We create an Application object. The Application class inherits from QApplication andreimplements both commitData() and saveState() to support session management.
Next, we create a TicTacToe widget, make the Application object aware of it, and show it. We havecalled the TicTacToe widget "toe". We must give unique object names to top-level widgets if we wantthe session manager to restore the windows' sizes and positions.
Figure 20.8. The Tic-Tac-Toe application

Here's the definition of the Application class:
class Application : public QApplication{ Q_OBJECTpublic: Application(int &argc, char *argv[]); void setTicTacToe(TicTacToe *tic); void saveState(QSessionManager &sessionManager); void commitData(QSessionManager &sessionManager);private: TicTacToe *ticTacToe;};
The Application class keeps a pointer to the TicTacToe widget as a private variable.
void Application::saveState(QSessionManager &sessionManager){ QString fileName = ticTacToe->saveState(); QStringList discardCommand; discardCommand << "rm" << fileName; sessionManager.setDiscardCommand(discardCommand);}
On X11, the saveState() function is called when the session manager wants the application to saveits state. The function is available on other platforms as well, but it is never called. TheQSessionManager parameter allows us to communicate with the session manager.
We start by asking the TicTacToe widget to save its state to a file. Then we set the sessionmanager's discard command. A discard command is a command that the session manager mustexecute to delete any stored information regarding the current state. For this example, we set it to
rm sessionfile
where sessionfile is the name of the file that contains the saved state for the session, and rm is thestandard Unix command to remove files.
The session manager also has a restart command. This is the command that the session manager

must execute to restart the application. By default, Qt provides the following restart command:
appname -session id_key
The first part, appname, is derived from argv[0]. The id part is the session ID provided by the sessionmanager; it is guaranteed to be unique among different applications and among different runs of thesame application. The key part is added to uniquely identify the time at which the state was saved.For various reasons, the session manager can call saveState() multiple times during the samesession, and the different states must be distinguished.
Because of limitations in existing session managers, we must ensure that the application's directoryis in the PATH environment variable if we want the application to restart correctly. In particular, ifyou want to try out the Tic-TacToe example for yourself, you must install it in, say, /usr/bin andinvoke it as tictactoe.
For simple applications, including Tic-Tac-Toe, we could save the state as an additional command-line argument to the restart command. For example:
tictactoe -state OX-XO-X-O
This would save us from storing the data in a file and providing a discard command to remove thefile.
void Application::commitData(QSessionManager &sessionManager){ if (ticTacToe->gameInProgress() && sessionManager.allowsInteraction()) { int r = QMessageBox::warning(ticTacToe, tr("Tic-Tac-Toe"), tr("The game hasn't finished.\n" "Do you really want to quit?"), QMessageBox::Yes | QMessageBox::Default, QMessageBox::No | QMessageBox::Escape); if (r == QMessageBox::Yes) { sessionManager.release(); } else { sessionManager.cancel(); } }}
The commitData() function is called when the user logs out. We can reimplement it to pop up amessage box warning the user about potential data loss. The default implementation closes all top-level widgets, which results in the same behavior as when the user closes the windows one afteranother by clicking the close button in their title bars. In Chapter 3, we saw how to reimplementcloseEvent() to catch this and pop up a message box.
For the purposes of this example, we reimplement commitData() and pop up a message box askingthe user to confirm the log out if a game is in progress and if the session manager allows us tointeract with the user. If the user clicks Yes, we call release() to tell the session manager tocontinue logging out; if the user clicks No, we call cancel() to cancel the log out.
Figure 20.9. "Do you really want to quit?"

Now let's look at the TicTacToe class:
class TicTacToe : public QWidget{ Q_OBJECTpublic: TicTacToe(QWidget *parent = 0); bool gameInProgress() const; QString saveState() const; QSize sizeHint() const;protected: void paintEvent(QPaintEvent *event); void mousePressEvent(QMouseEvent *event);private: enum { Empty = '-', Cross = 'X', Nought = 'O' }; void clearBoard(); void restoreState(); QString sessionFileName() const; QRect cellRect(int row, int column) const; int cellWidth() const { return width() / 3; } int cellHeight() const { return height() / 3; } bool threeInARow(int row1, int col1, int row3, int col3) const; char board[3][3]; int turnNumber;};
The TicTacToe class inherits QWidget and reimplements sizeHint(), paintEvent(), andmousePressEvent(). It also provides the gameInProgress() and saveState() functions that we used inour Application class.
TicTacToe::TicTacToe(QWidget *parent) : QWidget(parent){ clearBoard(); if (qApp->isSessionRestored()) restoreState(); setWindowTitle(tr("Tic-Tac-Toe"));}
In the constructor, we clear the board, and if the application was invoked with the -session option,we call the private function restoreState() to reload the old session.
void TicTacToe::clearBoard(){ for (int row = 0; row < 3; ++row) { for (int column = 0; column < 3; ++column) {

board[row][column] = Empty; } } turnNumber = 0;}
In clearBoard(), we clear all the cells and set turnNumber to 0.
QString TicTacToe::saveState() const{ QFile file(sessionFileName()); if (file.open(QIODevice::WriteOnly)) { QTextStream out(&file); for (int row = 0; row < 3; ++row) { for (int column = 0; column < 3; ++column) out << board[row][column]; } } return file.fileName();}
In saveState(), we write the state of the board to disk. The format is straightforward, with 'X' forcrosses, 'O' for noughts, and '-' for empty cells.
QString TicTacToe::sessionFileName() const{ return QDir::homePath() + "/.tictactoe_" + qApp->sessionId() + "_" + qApp->sessionKey();}
The sessionFileName() private function returns the file name for the current session ID and sessionkey. This function is used for both saveState() and restoreState(). The file name is derived fromthe session ID and session key.
void TicTacToe::restoreState(){ QFile file(sessionFileName()); if (file.open(QIODevice::ReadOnly)) { QTextStream in(&file); for (int row = 0; row < 3; ++row) { for (int column = 0; column < 3; ++column) { in >> board[row][column]; if (board[row][column] != Empty) ++turnNumber; } } } update();}
In restoreState(), we load the file that corresponds to the restored session and fill the board withthat information. We deduce the value of turnNumber from the number of X's and O's on the board.
In the TicTacToe constructor, we called restoreState() if QApplication::isSessionRestored()returned true. In that case, sessionId() and sessionKey() return the same values as when the

application's state was saved, and so sessionFile-Name() returns the file name for that session.
Testing and debugging session management can be frustrating, because we need to log in and outall the time. One way to avoid this is to use the standard xsm utility provided with X11. The first timewe invoke xsm, it pops up a session manager window and a terminal. The applications we start fromthat terminal will all use xsm as their session manager instead of the usual, system-wide sessionmanager. We can then use xsm's window to end, restart, or discard a session, and see if ourapplication behaves as it should. For details about how to do this, seehttp://doc.trolltech.com/4.1/session.html.

Chapter 21. Embedded Programming Getting Started with Qtopia Customizing Qtopia Core
Developing software to run on mobile devices such as PDAs and mobile phones can be verychallenging because embedded systems generally have slower processors, less permanent storage(flash memory or hard disk), less memory, and smaller displays than desktop computers.
Qtopia Core (previously called Qt/Embedded) is a version of Qt optimized for embedded Linux.Qtopia Core provides the same API and tools as the desktop versions of Qt (Qt/Windows, Qt/X11,and Qt/Mac), and adds the classes and tools necessary for embedded programming. Through duallicensing, it is available for both open source and commercial development.
Qtopia Core can run on any hardware that runs Linux (including Intel x86, MIPS, ARM, StrongARM,Motorola 68000, and PowerPC architectures). It has a memory-mapped frame buffer and supports aC++ compiler. Unlike Qt/X11, it does not need the X Window System; instead, it implements its ownwindow system (QWS), enabling significant storage and memory savings. To reduce its memoryfootprint even more, Qtopia Core can be recompiled to exclude unused features. If the applicationsand components used on a device are known in advance, they can be compiled together into oneexecutable that links statically against the Qtopia Core libraries.
Qtopia Core also benefits from various features that are also part of the desktop versions of Qt,including the extensive use of implicit data sharing ("copy on write") as a memory-saving technique,support for custom widget styles through QStyle, and a layout system that adapts to make the bestuse of the available screen space.
Qtopia Core forms the basis of Trolltech's embedded offering, which also includes Qtopia Platform,Qtopia PDA, and Qtopia Phone. These provide classes and applications designed specifically forportable devices and can be integrated with several third-party Java virtual machines.
Getting Started with QtopiaQtopia Core applications can be developed on any platform equipped with a multi-platform toolchain. The most common option is to build a GNU C++ cross-compiler on a Unix system. Thisprocess is simplified by a script and a set of patches provided by Dan Kegel athttp://kegel.com/crosstool/. Since Qtopia Core contains the Qt API, it is usually possible to use adesktop version of Qt, such as Qt/X11 or Qt/Windows, for most of the development.
Qtopia Core's configuration system supports cross-compilers, through the configure script's -
embedded option. For example, to build for the ARM architecture we would type
./configure -embedded arm
We can create custom configurations by adding new files to Qt's mkspecs/qws directory.
Qtopia Core draws directly to the Linux frame buffer (the memory area associated with the videodisplay). To access the frame buffer, you might need to grant write permissions to the /dev/fb0
device.
To run Qtopia Core applications, we must first start one process to act as a server. The server isresponsible for allocating screen regions to clients and for generating mouse and keyboard events.Any Qtopia Core application can become a server by specifying -qws on its command line or by

passing QApplication:: GuiServer as the third parameter to the QApplication constructor.
Client applications communicate with the Qtopia Core server using shared memory. Behind thescenes, the clients draw themselves into shared memory and are responsible for painting their ownwindow decorations. This keeps communication between the clients and the server to a minimum,resulting in a snappy user interface. Qtopia Core applications normally use QPainter to drawthemselves, but they can also access the video hardware directly using QDirectPainter.
Clients can communicate with each other using the QCOP procotol. A client can listen on a namedchannel by creating a QCopChannel object and connecting to its received() signal. For example:
QCopChannel *channel = new QCopChannel("System", this);connect(channel, SIGNAL(received(const QString &, const QByteArray &)), this, SLOT(received(const QString &, const QByteArray &)));
A QCOP message consists of a name and an optional QByteArray. The static QCopChannel::send()
broadcasts a message on a channel. For example:
QByteArray data;QDataStream out(&data, QIODevice::WriteOnly);out << QDateTime::currentDateTime();QCopChannel::send("System", "clockSkew(QDateTime)", data);
The previous example illustrates a common idiom: We use QDataStream to encode the data, and toensure that the QByteArray is interpreted correctly by the receiver, we mangle the data format in themessage name as if it were a C++ function.
Various environment variables affect Qtopia Core applications. The most important ones areQWS_MOUSE_PROTO and QWS_KEYBOARD, which specify the mouse device and the keyboard type. Seehttp://doc.trolltech.com/4.1/emb-envvars.html for a complete list of environment variables.
If we use Unix as our development platform, we can test the application using the Qtopia virtualframe buffer (qvfb), an X11 application that simulates, pixel for pixel, the actual frame buffer. Thisaccelerates the development cycle considerably. To enable virtual buffer support in Qtopia Core,pass the -qvfb option to the configure script. Be aware that this option is not intended forproduction use. The virtual frame buffer application is located in tools/qvfb and can be invoked asfollows:
qvfb -width 320 -height 480 -depth 32
Another option that works on most platforms is to use VNC (Virtual Network Computing) to run theapplications remotely. To enable VNC support in Qtopia Core, pass the -qt-gfx-vnc option toconfigure. Then launch your Qtopia Core applications with the -display VNC:0 command-line optionand run a VNC client pointing at the host on which your applications are running. The display sizeand bit depth can be specified by setting the QWS_SIZE and QWS_DEPTH environment variables on thehost that runs the Qtopia Core applications (for example, QWS_SIZE=320x480 and QWS_DEPTH=32).
Customizing Qtopia CoreWhen installing Qtopia Core, we can specify features we want to leave out to reduce its memoryfootprint. Qtopia Core includes over a hundred configurable features, each of which is associated toa preprocessor symbol. For example, QT_NO_FILEDIALOG excludes QFileDialog from the QtGui library,and QT_NO_I18N leaves out all support for internationalization. The features are listed

src/corelib/qfeatures.txt.
Qtopia Core provides five example configurations (minimum, small, medium, large, and dist) that arestored in src/corelib/qconfig_xxx.h files. These configu-rations can be specified using the configure
script's -qconfig xxx option, for example:
./configure -qconfig small
To create custom configurations, we can manually provide a qconfig-xxx.h file and use it as if itwere a standard configuration. Alternatively, we can use the qconfig graphical tool, located in Qt'stools subdirectory.
Qtopia Core provides the following classes for interfacing with input and output devices and forcustomizing the look and feel of the window system:
Class Base class for
QScreen screen drivers
QScreenDriverPlugin screen driver plugins
QWSMouseHandler mouse drivers
QMouseDriverPlugin mouse driver plugins
QWSKeyboardHandler keyboard drivers
QKbdDriverPlugin keyboard driver plugins
QWSInputMethod input methods
QDecoration window decoration styles
QDecorationPlugin plugins providing window decoration styles
To obtain the list of predefined drivers, input methods, and window decoration styles, run theconfigure script with the -help option.
The screen driver can be specified using the -display command-line option when starting the QtopiaCore server, as seen in the previous section, or by setting the QWS_DISPLAY environment variable.The mouse driver and the associated device can be specified using the QWS_MOUSE_PROTO environmentvariable, whose value must have the syntax type :device, where type is one of the supporteddrivers and device the path to the device (for example, QWS_MOUSE_PROTO=IntelliMouse:/dev/mouse).Keyboards are handled similarly through the QWS_KEYBOARD environment variable. Input methods andwindow decorations are set programmatically in the server usingQWSServer::setCurrentInputMethod() and QApplication::qwsSetDecoration().
Window decoration styles can be set independently of the widget style, which inherits from QStyle.For example, it is entirely possible to set Windows as the window decoration style and Plastique asthe widget style. If desired, decorations can be set on a per-window basis.
The QWSServer class provides various functions for customizing the window system. Applications thatrun as Qtopia Core servers can access the unique QWSServer instance through the qwsServer globalvariable, which is initialized by the QApplication constructor.
Qtopia Core supports the following font formats: TrueType (TTF), PostScript Type 1, Bitmap

Distribution Format (BDF), and Qt Pre-rendered Fonts (QPF).
Because QPF is a raster format, it is faster and usually more compact than vector formats such asTTF and Type 1 if we need it only at one or two different sizes. The makeqpf tool lets us pre-render aTTF or a Type 1 file and save the result in QPF format. An alternative is to run our applications withthe -savefonts command-line option.
At the time of writing, Trolltech is developing an additional layer on top of Qtopia Core to makeembedded application development even faster and more convenient. It is hoped that a later editionof this book will include more information on this topic.
Appendix A. Installing Qt A Note on Licensing Installing Qt/Windows Installing Qt/Mac Installing Qt/X11
This appendix explains how to install Qt from the CD that accompanies this book onto your system.The CD has editions of Qt 4.1.1 for Windows, Mac OS X, and X11 (for Linux and most versions ofUnix). They all include SQLite, a public domain in-process database, together with a SQLite driver.The editions of Qt on the CD are provided for your convenience. For serious software development,it is best to download the latest version of Qt from http://www.trolltech.com/download/ or to buy acommercial version.
Trolltech also provides Qtopia Core for building applications for Linux-based embedded devices suchas PDAs and mobile phones. If you are interested in creating embedded applications, you can obtainQtopia Core from Trolltech's download web page.
The example applications used in the book are on the CD in the examples directory. In addition, Qtprovides many small example applications located in the examples subdirectory.
A Note on LicensingQt is produced in two forms: open source and commercial. The open source editions are availablefree of charge; the commercial editions must be paid for.
The software on the CD is suitable for creating applications for your own educational and personaluse.
If you want to distribute the applications that you create with an open source edition of Qt, youmust comply with the specific terms and conditions laid down in the licenses for the software youuse to create the applications. For open source editions, the terms and conditions include therequirement to use the GNU General Public License (GPL). Open licenses like the GPL give theapplications' users certain rights, including the right to view and modify the source and to distributethe applications (on the same terms).If you want to distribute your applications without source code(to keep your code private) or if you want to apply your own commercial license conditions to yourapplications, you must buy commercial editions of the software you use to create the applications.The commercial editions of the software allow you to sell and distribute your applications on yourown terms.
The CD contains GPL versions of Qt for Windows, Mac OS X, and X11. The full legal texts of thelicenses are included with the packages on the CD, along with information on how to obtaincommercial versions.

Installing Qt/WindowsWhen you insert the CD on a Windows machine, the installation program should start automatically.If this does not occur, use File Explorer to navigate to the CD's root folder and double-clickinstall.exe. (This program may appear as install depending on how your system is configured.)
If you already have the MinGW C++ compiler you must specify the directory where it is located;otherwise, set the check box and have the installer install MinGW for you. The GPL version of Qtsupplied on the CD will not work with Visual C++, so if you do not have MinGW already installed youwill need to install it. The installer also gives you the option to install the examples that accompanythe book. Qt's standard examples are automatically installed, along with the documentation.
If you choose to install the MinGW compiler, there may be a small delay between the completion ofthe MinGW installation and the start of the Qt installation.
After installation you will have a new folder in the Start menu called "Qt by Trolltech v4.1.1(opensource)". This folder has shortcuts to Qt Assistant and Qt Designer, and also one called "Qt4.1.1 Command Prompt" that starts a console window. When you start this window it will set theenvironment variables for compiling Qt programs with MinGW. It is in this window that you can runqmake and make to build Qt applications.
Installing Qt/MacBefore Qt can be installed on Mac OS X, Apple's Xcode Tools must already be installed. The CD (orDVD) containing these tools is usually supplied with Mac OS X; they can also be downloaded fromthe Apple Developer Connection, http://developer.apple.com.
If you have Mac OS X 10.4 (Tiger) and Xcode Tools 2.x (with GCC 4.0.x), you can use the installerdescribed below. If you have an earlier version of Mac OS X, or an older version of GCC, you willneed to install the source package manually. This package is called qt-mac-opensource-4.1.1.tar.gz
and is located in the mac folder on the CD. If you install this package, follow the instructions in thenext section for installing Qt on X11.
To use the installer, insert the CD and double-click the package called Qt.mpkg. This will launch theinstaller, Installer.app, and Qt will be installed with the standard examples, documentation, andthe examples that accompany this book. Qt will be installed in /Developer, with the book's examplesin /Developer/Examples/Qt4Book.
To run commands like qmake and make, you will need to use a terminal window, for example,Terminal.app in /Applications/Utilities. It is also possible to generate Xcode projects using qmake.For example, to generate an Xcode project for the hello example, start a console such asTerminal.app, change directory to /Developer/Examples/Qt4Book/chap01/hello, and enter thefollowing command:
qmake -spec macx-xcode hello.pro
Installing Qt/X11To install Qt in its default location on X11, you will need to be root. If you do not have root access,use configure's -prefix argument to specify a directory to which you have permission to write.
1. Change directory to a temporary directory. For example:2.3. cd /tmp

4. Unpack the archive file from the CD:5.6. cp /cdrom/x11/qt-x11-opensource-src-4.1.1.tgz .7. gunzip qt-x11-opensource-src-4.1.1.tgz8. tar xvf qt-x11-opensource-src-4.1.1.tar
This will create the directory /tmp/qt-x11-opensource-src-4.1.1, assuming that your CD-ROMis mounted at /cdrom. Qt requires GNU tar; on some systems it is called gtar.
9. Execute the configure tool with your preferred options to build the Qt library and the toolssupplied with it:
10.11. cd /tmp/qt-x11-opensource-src-4.1.112. ./configure
You can run ./configure -help to get a list of configuration options.
13. To build Qt, type14.15. make
This will create the library and compile all the demos, examples, and tools. On some systemsmake is called gmake.
16. To install Qt, type17.18. su -c "make install"
and enter the root password. This will install Qt into /usr/local/Troll-tech/Qt-4.1.1. You canchange the destination by using the -prefix option with configure, and if you have writeaccess to the destination you can simply type:
make install
19.Set up certain environment variables for Qt.
If your shell is bash, ksh, zsh, or sh, add the following lines to your .profile file:
PATH=/usr/local/Trolltech/Qt-4.1.1/bin:$PATHexport PATH
If your shell is csh or tcsh, add the following line to your .login file:
setenv PATH /usr/local/Trolltech/Qt-4.1.1/bin:$PATH
If you used -prefix with configure, use the path you specified instead of the default pathshown above.
If you are using a compiler that does not support rpath you must also extend theLD_LIBRARY_PATH environment variable to include /usr/local/Trolltech/Qt-4.1.1/lib. This isnot necessary on Linux with GCC.
Qt comes with a demo application, qtdemo, that shows off many of the library's features. It serves asa nice starting point to see what Qt can do. To see Qt's documentation, either visithttp://doc.trolltech.com, or run Qt Assistant, Qt's help application, invoked by typing assistant ina console window.

Appendix B. Introduction to C++ for Javaand C# Programmers
Getting Started with C++ Main Language Differences The Standard C++ Library
This appendix provides a short introduction to C++ for developers who already know Java or C#. Itassumes that you are familiar with object-oriented concepts such as inheritance and polymorphismand want to learn C++. To avoid making this book an unwieldy 1,500 page doorstop by including acomplete C++ primer, this appendix confines itself to essentials. It presents the basic knowledgeand techniques necessary to understand the programs presented in the rest of the book, withenough information to start developing cross-platform C++ GUI applications using Qt.
At the time of writing, C++ is the only realistic option for writing cross-platform, high-performanceobject-oriented GUI applications. Its detractors usually point out that Java or C#, which dropped Ccompatibility, are nicer to use; in fact, Bjarne Stroustrup, the inventor of C++, noted in The Designand Evolution of C++ that "within C++, there is a much smaller and cleaner language strugglingto get out".
Fortunately, when we program with Qt, we usually stick to a subset of C++ that is very close to theutopian language envisioned by Stroustrup, leaving us free to concentrate on the problem at hand.Furthermore, Qt extends C++ in several respects, through its innovative "signals and slots"mechanism, its Unicode support, and its foreach keyword.
In the first section of this appendix, we will see how to combine C++ source files to obtain anexecutable program. This will lead us to explore core C++ concepts such as compilation units,header files, object files, librariesand to get familiar with the C++ preprocessor, compiler, andlinker.
Then we will turn to the most important language differences between C++, Java and C#: how todefine classes, how to use pointers and references, how to overload operators, how to use thepreprocessor, and so on. Although the C++ syntax is superficially similar to that of Java or C#, theunderlying concepts differ in subtle ways. At the same time, as an inspirational source for Java andC#, the C++ language has a lot in common with these two languages, including similar data types,the same arithmetic operators, and the same basic control flow statements.
The last section is dedicated to the Standard C++ library, which provides ready-made functionalitythat can be used in any C++ program. The library is the result of over 30 years of evolution, and assuch provides a wide range of approaches including procedural, object-oriented, and functionalprogramming styles, and both macros and templates. Compared with the libraries provided withJava and C#, the Standard C++ library has a rather limited scope; for example, it has no supportfor GUI programming, multithreading, databases, internationalization, networking, XML, or Unicode.To broaden C++'s scope into these areas, C++ developers are expected to use various (oftenplatform-specific) libraries.
This is where Qt saves the day. Qt began as a cross-platform GUI toolkit (a set of classes thatmakes it possible to write portable graphical user interface applications) but rapidly evolved into afull-blown framework that partly extends and partly replaces the Standard C++ library. Althoughthis book uses Qt, it is useful to know what the Standard C++ library has to offer, since you mayhave to work with code that uses it.
Getting Started with C++A C++ program consists of one or more compilation units. Each compilation unit is a separate

source code file, typically with a .cpp extension (other common extensions are .cc and .cxx) thatthe compiler processes in one run. For each compilation unit, the compiler generates an object file,with the extension .obj (on Windows) or .o (on Unix and Mac OS X). The object file is a binary filethat contains machine code for the architecture on which the program will run.
Once all the .cpp files have been compiled, we can combine the object files together to create anexecutable using a special program called the linker. The linker concatenates the object files andresolves the memory addresses of functions and other symbols referenced in the compilation units.
Exhibit B.1. The C++ compilation process (on Windows)
When building a program, exactly one compilation unit must contain a main() function that serves asthe program's entry point. This function doesn't belong to any class; it is a global function.
Unlike Java, where each source file must contain exactly one class, C++ lets us organize thecompilation units as we want. We can implement several classes in the same .cpp file, or spread theimplementation of a class across several .cpp files, and we can give the source files any names welike. When we make a change in one particular .cpp file, we only need to recompile that file andthen relink the application to create a new executable.
Before we go further, let's quickly review the source code of a trivial C++ program that computesthe square of an integer. The program consists of two compilation units: main.cpp and square.cpp.
Here's square.cpp:
1 double square(double n) 2 { 3 return n * n; 4 }
This file simply contains a global function called square() that returns the square of its parameter.
Here's main.cpp:
1 #include <cstdlib> 2 #include <iostream> 3 using namespace std; 4 double square(double); 5 int main(int argc, char *argv[]) 6 { 7 if (argc != 2) { 8 cerr << "Usage: square <number>" << endl; 9 return 1;10 }11 double n = strtod(argv[1], 0);12 cout << "The square of " << argv[1] << " is " << square(n) << endl;13 return 0;

14 }
The main.cpp source file contains the main() function's definition. In C++, this function takes an int
and a char * array (an array of character strings) as parameters. The program's name is availableas argv[0] and the command-line arguments as argv[1], argv[2], …, argv[argc - 1]. The parameternames argc ("argument count") and argv ("argument values") are conventional. If the programdoesn't access the command-line arguments, we can define main() with no parameters.
The main() function uses strtod() ("string to double"), cout (C++'s standard output stream), andcerr (C++'s standard error stream) from the Standard C++ library to convert the command-lineargument to a double and to print text to the console. Strings, numbers, and end-of-line markers(endl) are output using the << operator, which is also used for bit-shifting. To access this standardfunctionality, we need the #include directives on lines 1 and 2.
The using namespace directive on line 3 tells the compiler that we want to import all identifiersdeclared in the std namespace into the global namespace. This enables us to write strtod(), cout,cerr, and endl instead of the fully-qualified std::strtod(), std::cout, std::cerr, and std::endl. InC++, the :: operator separates the components of a complex name.
The declaration on line 4 is a function prototype. It tells the compiler that a function exists withthe given parameters and return value. The actual function can be located in the same compilationunit or in another compilation unit. Without the function prototype, the compiler wouldn't let us callthe function on line 12. Parameter names in function prototypes are optional.
The procedure to compile the program varies from platform to platform. For example, to compile onSolaris with the Sun C++ compiler, we would type the following commands:
CC -c main.cppCC -c square.cppld main.o square.o -o square
The first two lines invoke the compiler to generate .o files for the .cpp files. The third line invokesthe linker and generates an executable called square, which we can invoke as follows:
./square 64
The program outputs the following message to the console:
The square of 64 is 4096
To compile the program, you probably want to get help from your local C++ guru. Failing this, youcan still read the rest of this appendix without compiling anything and follow the instructions inChapter 1 to compile your first C++/Qt application. Qt provides tools that make it easy to buildapplications on all platforms.
Back to our program: In a real-world application, we would normally put the square() functionprototype in a separate file and include that file in all the compilation units where we need to call thefunction. Such a file is called a header file and usually has a .h extension (.hh, .hpp, and .hxx arealso common). If we redo our example using the header file approach, we would create a file calledsquare.h with the following contents:

1 #ifndef SQUARE_H2 #define SQUARE_H3 double square(double);4 #endif
The header file is bracketed by three preprocessor directives (#ifndef, #define, and #endif). Thesedirectives ensure that the header file is processed only once, even if the header file is includedseveral times in the same compilation unit (a situation that can arise when header files include otherheader files). By convention, the preprocessor symbol used to accomplish this is derived from thefile name (in our example, SQUARE_H). We will come back to the preprocessor later in this appendix.
The new main.cpp file looks like this:
1 #include <cstdlib> 2 #include <iostream> 3 #include "square.h" 4 using namespace std; 5 int main(int argc, char *argv[]) 6 { 7 if (argc != 2) { 8 cerr << "Usage: square <number>" << endl; 9 return 1;10 }11 double n = strtod(argv[1], 0);12 cout << "The square of " << argv[1] << " is " << square(n) << endl;13 return 0;14 }
The #include directive on line 3 expands to the contents of the file square.h. Directives that startwith a # are picked up by the C++ preprocessor before the compilation proper takes place. In theold days, the preprocessor was a separate program that the programmer invoked manually beforerunning the compiler. Modern compilers handle the preprocessor step implicitly.
The #include directives on lines 1 and 2 expand to the contents of the cstdlib and iostream headerfiles, which are part of the Standard C++ library. Standard header files have no .h suffix. The anglebrackets around the file names indicate that the header files are located in a standard location onthe system, while double quotes tell the compiler to look in the current directory. Includes arenormally gathered at the top of a .cpp file.
Unlike .cpp files, header files are not compilation units in their own right and do not result in anyobject files. They may only contain declarations that enable different compilation units tocommunicate with each other. Consequently, it would be inappropriate to put the square() function'simplementation in a header file. If we did so in our example, nothing bad would happen, because weinclude square.h only once, but if we included square.h from several .cpp files, we would getmultiple implementations of the square() function (one per .cpp file that includes it). The linkerwould then complain about multiple (identical) definitions of square() and refuse to generate anexecutable. Inversely, if we declare a function but never implement it, the linker complains about an"unresolved symbol".
So far, we have assumed that an executable only consists of object files. In practice, they often alsolink against libraries that implement ready-made functionality. There are two main types of library:
Static libraries are put directly into the executable, as if they were object files. This ensuresthat the library cannot get lost but increases the size of the executable.
Dynamic libraries (also called shared libraries or DLLs) are located at a standard locationon the user's machine and are automatically loaded at application startup.
For the square program, we link against the Standard C++ library, which is implemented as a

dynamic library on most platforms. Qt itself is a collection of libraries that can be built either asstatic or as dynamic libraries (the default is dynamic).
Main Language DifferencesWe will now take a more structured look at the areas where C++ differs from Java and C#. Many ofthe language differences are due to C++'s compiled nature and commitment to performance. Thus,C++ does not check array bounds at run-time, and there is no garbage collector to reclaim unuseddynamically allocated memory.
For the sake of brevity, C++ constructs that are nearly identical to their Java and C# counterpartsare not reviewed. In addition, some C++ topics are not covered here because they are notnecessary when programming using Qt. Among these are defining template classes and functions,defining union types, and using exceptions. For the whole story, refer to a book such as The C++Programming Language by Bjarne Stroustrup or C++ for Java Programmers by Mark AllenWeiss.
Primitive Data Types
The primitive data types offered by the C++ language are similar to those found in Java or C#.Figure B.2 lists C++'s primitive types and their definition on the platforms supported by Qt 4.
By default, the short, int, long, and long long data types are signed, meaning that they can holdnegative values as well as positive values. If we only need to store nonnegative integers, we can putthe unsigned keyword in front of the type. While a short can hold any value between -32,768 and+32,767, an unsigned short goes from 0 to 65,535. The right-shift operator >> has unsigned ("fillwith 0s") semantics if one of the operands is unsigned.
Figure B.2. Primitive C++ types
C++ type Description
bool Boolean value
char 8-bit integer
short 16-bit integer
int 32-bit integer
long 32-bit or 64-bit integer
long long[*] 64-bit integer
float 32-bit floating-point value (IEEE 754)
double 64-bit floating-point value (IEEE 754)
[*] Microsoft calls the long long type __int64. In Qt programs, qlonglong is available as an alternative that works on all Qtplatforms.
The bool type can take the values true and false. In addition, numeric types can be used where abool is expected, with the rule that 0 means false and any non-zero value means TRue.
The char type is used both for storing ASCII characters and 8-bit integers (bytes). When used as aninteger, it can be signed or unsigned, depending on the platform. The types signed char and

unsigned char are available as unambiguous alternatives to char. Qt provides a QChar type thatstores 16-bit Unicode characters.
Instances of built-in types are not initialized by default. When we create an int variable, its valuecould conceivably be 0, but could just as likely be -209,486,515. Fortunately, most compilers warnus when we attempt to read the contents of an uninitialized variable, and we can use tools likeRational PurifyPlus and Valgrind to detect unitialized memory accesses and other memory-relatedproblems at run-time.
In memory, the numeric types (except long) have identical sizes on the different platformssupported by Qt, but their representation varies depending on the system's byte order. On big-endian architectures (such as PowerPC and SPARC), the 32-bit value 0x12345678 is stored as the fourbytes 0x12 0x34 0x56 0x78, whereas on little-endian architectures (such as Intel x86), the bytesequence is reversed. This makes a difference in programs that copy memory areas onto disk orthat send binary data over the network. Qt's QDataStream class, presented in Chapter 12(Input/Output), can be used to store binary data in a platform-independent way.
Class Definitions
Class definitions in C++ are similar to those in Java and C#, but there are several differences to beaware of. We will study these differences using a series of examples. Let's start with a class thatrepresent an (x, y) coordinate pair:
#ifndef POINT2D_H#define POINT2D_Hclass Point2D{public: Point2D() { xVal = 0; yVal = 0; } Point2D(double x, double y) { xVal = x; yVal = y; } void setX(double x) { xVal = x; } void setY(double y) { yVal = y; } double x() const { return xVal; } double y() const { return yVal; }private: double xVal; double yVal;};#endif
The above class definition would appear in a header file, typically called point2d.h. The exampleexhibits the following C++ idiosyncrasies:
A class definition is divided in public, protected, and private sections, and ends with asemicolon. If no section is specified, the default is private. (For compatibility with C, C++provides a struct keyword that is identical to class except that the default is public if nosection is specified.)
The class has two constructors (one that has no parameters and one that has two). If wedeclared no constructor, C++ would automatically supply one with no parameters and anempty body.
The getter functions x() and y() are declared to be const. This means that they don't (andcan't) modify the member variables or call non-const member functions (such as setX() and

setY()).
The functions above were implemented inline, as part of the class definition. An alternative is toprovide only function prototypes in the header file and to implement the functions in a .cpp file.Using this approach, the header file would look like this:
#ifndef POINT2D_H#define POINT2D_Hclass Point2D{public: Point2D(); Point2D(double x, double y); void setX(double x); void setY(double y); double x() const; double y() const;private: double xVal; double yVal;};#endif
The functions would then be implemented in point2d.cpp:
#include "point2d.h"Point2D::Point2D(){ xVal = 0.0;
yVal = 0.0;}Point2D::Point2D(double x, double y){ xVal = x; yVal = y;}void Point2D::setX(double x){ xVal = x;}void Point2D::setY(double y){ yVal = y;}double Point2D::x() const{ return xVal;}double Point2D::y() const{
return yVal;}
We start by including point2d.h because the compiler needs the class definition before it can parsemember function implementations. Then we implement the functions, prefixing the function namewith the class name using the :: operator.
We have seen how to implement a function inline and now how to implement it in a .cpp file. Thetwo approaches are semantically equivalent, but when we call a function that is declared inline, most

compilers simply expand the function's body instead of generating an actual function call. Thisnormally leads to faster code, but might increase the size of your application. For this reason, onlyvery short functions should be implemented inline; longer functions should always be implementedin a .cpp file. In addition, if we forget to implement a function and try to call it, the linker willcomplain about an unresolved symbol.
Now, let's try to use the class.
#include "point2d.h"int main(){ Point2D alpha; Point2D beta(0.666, 0.875); alpha.setX(beta.y()); beta.setY(alpha.x()); return 0;}
In C++, variables of any types can be declared directly without using new. The first variable isinitialized using the default Point2D constructor (the constructor that has no parameters). Thesecond variable is initialized using the second constructor. Access to an object's member isperformed using the . (dot) operator.
Variables declared this way behave like Java/C# primitive types such as int and double. Forexample, when we use the assignment operator, the contents of the variable is copiednot just areference to an object. And if we modify a variable later on, any other variables that were assignedfrom it are left unchanged.
As an object-oriented language, C++ supports inheritance and polymorphism. To illustrate how itworks, we will review the example of a Shape abstract base class and a subclass called Circle. Let'sstart with the base class:
#ifndef SHAPE_H#define SHAPE_H#include "point2d.h"class Shape{public: Shape(Point2D center) { myCenter = center; } virtual void draw() = 0;protected: Point2D myCenter;};#endif
The definition appears in a header file called shape.h. Since the class definition refers to the Point2D
class, we include point2d.h.
The Shape class has no base class. Unlike Java and C#, C++ doesn't provide a generic Object classfrom which all classes inherit. Qt provides QObject as a natural base class for all kinds of objects.
The draw() function declaration has two interesting features: It contains the virtual keyword, and itends with = 0. The virtual keyword indicates that the function may be reimplemented in subclasses.Like in C#, C++ member functions aren't reimplementable by default. The bizarre = 0 syntaxindicates that the function is a pure virtual functiona function that has no default implementationand that must be implemented in subclasses. The concept of an "interface" in Java and C# maps to

a class with only pure virtual functions in C++.
Here's the definition of the Circle subclass:
#ifndef CIRCLE_H#define CIRCLE_H#include "shape.h"class Circle : public Shape{public: Circle(Point2D center, double radius = 0.5) : Shape(center) { myRadius = radius; } void draw() { // do something here }private: double myRadius;};#endif
The Circle class inherits publicly from Shape, meaning that all public members of Shape remainpublic in Circle. C++ also supports protected and private inheritance, which restrict the access ofthe base class's public and protected members.
The constructor takes two parameters. The second parameter is optional and takes the value 0.5 ifnot specified. The constructor passes the center parameter to the base class's constructor using aspecial syntax between the function signature and the function body. In the body, we initialize themyRadius member variable. We could also have initialized the variable on the same line as the baseclass constructor initialization:
Circle(Point2D center, double radius = 0.5) : Shape(center), myRadius(radius) { }
On the other hand, C++ doesn't allow us to initialize a member variable in the class definition, sothe following code is wrong:
// WON'T COMPILEprivate: double myRadius = 0.5;};
The draw() function has the same signature as the virtual draw() function declared in Shape. It is areimplementation and it will be invoked polymorphically when draw() is called on a Circle instancethrough a Shape reference or pointer. C++ has no override keyword like in C#. Nor does C++ havea super or base keyword that refers to the base class. If we need to call the base implementation ofa function, we can prefix the function name with the base class name and the :: operator. Forexample:
class LabeledCircle : public Circle{public: void draw() { Circle::draw();

drawLabel(); } ...};
C++ supports multiple inheritance, meaning that a class can derive from several classes at thesame time. The syntax is as follows:
class DerivedClass : public BaseClass1, public BaseClass2, ..., public BaseClassN{ ...};
By default, functions and variables declared in a class are associated with instances of that class. Wecan also declare static member functions and static member variables, which can be used without aninstance. For example:
#ifndef TRUCK_H#define TRUCK_Hclass Truck{public: Truck() { ++counter; } ~Truck() { --counter; } static int instanceCount() { return counter; }private: static int counter;};#endif
The static member variable counter keeps track of how many truck instances exist at any time. Thetruck constructor increments it. The destructor, recognizable by the ~ prefix, decrements it. In C++,the destructor is automatically invoked when a statically allocated variable goes out of scope orwhen a variable allocated using new is deleted. This is similar to the finalize() method in Java,except that we can rely on it being called at a specific point in time.
A static member variable has a single existence in a class: Such variables are "class variables"rather than "instance variables". Each static member variable must be defined in a .cpp file (butwithout repeating the static keyword). For example:
#include "truck.h"int Truck::counter = 0;
Failing to do this would result in an "unresolved symbol" error at link time. The instanceCount()
static function can be accessed from outside the class, prefixed by the class name. For example:
#include <iostream>#include "truck.h"using namespace std;int main(){ Truck truck1; Truck truck2;

cout << Truck::instanceCount() << " equals 2" << endl; return 0;}
Pointers
A pointer in C++ is a variable that stores the memory address of an object (instead of storing theobject directly). Java and C# have a similar concept, that of a "reference", but the syntax isdifferent. We will start by studying a contrived example that illustrates pointers in action:
1 #include "point2d.h" 2 int main() 3 { 4 Point2D alpha; 5 Point2D beta; 6 Point2D *ptr; 7 ptr = α 8 ptr->setX(1.0); 9 ptr->setY(2.5);10 ptr = β11 ptr->setX(4.0);12 ptr->setY(4.5);13 ptr = 0;14 return 0;15 }
The example relies on the Point2D class from the previous subsection. Lines 4 and 5 define twoobjects of type Point2D. These objects are initialized to (0, 0) by the default Point2D constructor.
Line 6 defines a pointer to a Point2D object. The syntax for pointers uses an asterisk in front of thevariable name. Since we did not initialize the pointer, it contains a random memory address. This issolved on line 7 by assigning alpha's address to the pointer. The unary & operator returns thememory address of an object. An address is typically a 32-bit or a 64-bit integer value specifying theoffset of an object in memory.
On lines 8 and 9, we access the alpha object through the ptr pointer. Because ptr is a pointer andnot an object, we must use the -> (arrow) operator instead of the . (dot) operator.
On line 10, we assign beta's address to the pointer. From then on, any operation we performthrough the pointer will affect the beta object.
Line 13 sets the pointer to be a null pointer. C++ has no keyword for representing a pointer thatdoes not point to an object; instead, we use the value 0 (or the symbolic constant NULL, whichexpands to 0). Trying to use a null pointer results in a crash with an error message such as"Segmentation fault", "General protection fault", or "Bus error". Using a debugger, we can find outwhich line of code caused the crash.
At the end of the function, the alpha object holds the coordinate pair (1.0, 2.5), whereas beta holds(4.0, 4.5).
Pointers are often used to store objects allocated dynamically using new. In C++ jargon, we say thatthese objects are allocated on the "heap", whereas local variables (variables defined inside afunction) are stored on the "stack".
Here's a code snippet that illustrates dynamic memory allocation using new:

#include "point2d.h"int main(){ Point2D *point = new Point2D; point->setX(1.0); point->setY(2.5); delete point; return 0;}
The new operator returns the memory address of a newly allocated object. We store the address in apointer variable and access the object through that pointer. When we are done with the object, werelease its memory using the delete operator. Unlike Java and C#, C++ has no garbage collector;dynamically allocated objects must be explicitly released using delete when we don't need themanymore. Chapter 2 describes Qt's parentchild mechanism, which greatly simplifies memorymanagement in C++ programs.
If we forget to call delete, the memory is kept around until the program finishes. This would not bean issue in the example above, because we only allocate one object, but in a program that allocatesnew objects all the time, this could cause the program to keep allocating memory until themachine's memory is exhausted. Once an object is deleted, the pointer variable still holds theaddress of the object. Such a pointer is a "dangling pointer" and should not be used to access theobject. Qt provides a "smart" pointer, QPointer<T>, that automatically sets itself to 0 if the QObject itpoints to is deleted.
In the example above, we invoked the default constructor and called setX() and setY() to initializethe object. We could have used the two-parameter constructor instead:q
Point2D *point = new Point2D(1.0, 2.5);
The example didn't require the use of new and delete. We could just as well have allocated theobject on the stack as follows:
Point2D point;point.setX(1.0);point.setY(2.5);
Objects allocated like this are automatically freed at the end of the block in which they appear.
If we don't intend to modify the object through the pointer, we can declare the pointer const. Forexample:
const Point2D *ptr = new Point2D(1.0, 2.5);double x = ptr->x();double y = ptr->y();// WON'T COMPILEptr->setX(4.0);*ptr = Point2D(4.0, 4.5);
The ptr const pointer can only be used to call const member functions such as x() and y(). It isgood style to declare pointers const when we don't intend to modify the object using them.Furthermore, if the object itself is const, we have no choice but to use a const pointer to store itsaddress. The use of const provides information to the compiler that can lead to early bug detection

and performance gains. C# has a const keyword that is very similar to that of C++. The closest Javaequivalent is final, but it only protects variables from assignment, not from calling "non-const"member functions on it.
Pointers can be used with built-in types as well as with classes. In an expression, the unary *
operator returns the value of the object associated with the pointer. For example:
int i = 10;int j = 20;int *p = &i;int *q = &j;cout << *p << " equals 10" << endl;cout << *q << " equals 20" << endl;*p = 40;cout << i << " equals 40" << endl;p = q;*p = 100;cout << i << " equals 40" << endl;cout << j << " equals 100" << endl;
The -> operator, which can be used to access an object's members through a pointer, is puresyntactic sugar. Instead of ptr->member, we can also write (*ptr).member. The parentheses arenecessary because the . (dot) operator has precedence over the unary * operator.
Pointers had a poor reputation in C and C++, to the extent that Java is often advertised as havingno pointers. In reality,C++ pointers are conceptually similar to Java and C# references except thatwe can use pointers to iterate through memory, as we will see later in this section. Furthermore,theinclusion of "copy on write" container classes in Qt, along with C++'s ability to instantiate any classon the stack, means that we can often avoid pointers.
References
In addition to pointers, C++ also supports the concept of a "reference". Like a pointer, a C++reference stores the address of an object. The main differences are these:
References are declared using & instead of *. The reference must be initialized and can't be reassigned later. The object associated with a reference is directly accessible; there is no special syntax such
as * or ->. A reference cannot be null.
References are mostly used when declaring parameters. By default, C++ uses call-by-value as itsparameter-passing mechanism, meaning that when an argument is passed to a function, thefunction receives a brand new copy of the object. Here's the definition of a function that receives itsparameters through call-by-value:
#include <cstdlib>using namespace std;double manhattanDistance(Point2D a, Point2D b){ return abs(b.x() - a.x()) + abs(b.y() - a.y());}
We would then invoke the function as follows:
Point2D broadway(12.5, 40.0);

Point2D harlem(77.5, 50.0);double distance = manhattanDistance(broadway, harlem);
Reformed C programmers avoid needless copy operations by declaring their parameters as pointersinstead of as values:
double manhattanDistance(const Point2D *ap, const Point2D *bp){ return abs(bp->x() - ap->x()) + abs(bp->y() - ap->y());}
They must then pass addresses instead of values when calling the function:
Point2D broadway(12.5, 40.0);Point2D harlem(77.5, 50.0);double distance = manhattanDistance(&broadway, &harlem);
C++ introduced references to make the syntax less cumbersome and to prevent the caller frompassing a null pointer. If we use references instead of pointers, the function looks like this:
double manhattanDistance(const Point2D &a, const Point2D &b){ return abs(b.x() - a.x()) + abs(b.y() - a.y());}
The declaration of a reference is similar to that of a pointer, with & instead of *. But when weactually use the reference, we can forget that it is a memory address and treat it like an ordinaryvariable. In addition, calling a function that takes references as arguments doesn't require anyspecial care (no & operator).
All in all, by replacing Point2D with const Point2D & in the parameter list, we reduced the overheadof the function call: Instead of copying 256 bits (the size of four doubles), we copy only 64 or 128bits, depending on the target platform's pointer size.
The previous example used const references, preventing the function from modifying the objectsassociated with the references. When this kind of side effect is desired, we can pass a non-constreference or pointer. For example:
void transpose(Point2D &point){ double oldX = point.x(); point.setX(point.y()); point.setY(oldX);}
In some cases, we have a reference and we need to call a function that takes a pointer, or viceversa. To convert a reference to a pointer, we can simply use the unary & operator:
Point2D point;Point2D &ref = point;Point2D *ptr = &ref;

To convert a pointer to a reference, there's the unary * operator:
Point2D point;Point2D *ptr = &point;Point2D &ref = *ptr;
References and pointers are represented the same way in memory, and they can often be usedinterchangeably, which begs the question of when to use which. On the one hand, references have amore convenient syntax; on the other hand, pointers can be reassigned at any time to point toanother object, they can hold a null value, and their more explicit syntax is often a blessing indisguise. For these reasons, pointers tend to prevail, with references almost exclusively used fordeclaring function parameters, in conjunction with const.
Arrays
Arrays in C++ are declared by specifying the number of items in the array within brackets in thevariable declaration after the variable name. Two-dimensional arrays are possible using an array ofarrays. Here's the definition of a one-dimensional array containing 10 items of type int:
int fibonacci[10];
The items are accessible as fibonacci[0], fibonacci[1], …, fibonacci[9]. Often we want to initializethe array as we define it:
int fibonacci[10] = { 0, 1, 1, 2, 3, 5, 8, 13, 21, 34 };
In such cases, we can then omit the array size, since the compiler can deduce it from the number ofinitializers:
int fibonacci[] = { 0, 1, 1, 2, 3, 5, 8, 13, 21, 34 };
Static initialization also works for complex types, such as Point2D:
Point2D triangle[] = { Point2D(0.0, 0.0), Point2D(1.0, 0.0), Point2D(0.5, 0.866)};
If we have no intention of altering the array later on, we can make it const:
const int fibonacci[] = { 0, 1, 1, 2, 3, 5, 8, 13, 21, 34 };
To find out how many items an array contains, we can use the sizeof() operator as follows:
int n = sizeof(fibonacci) / sizeof(fibonacci[0]);
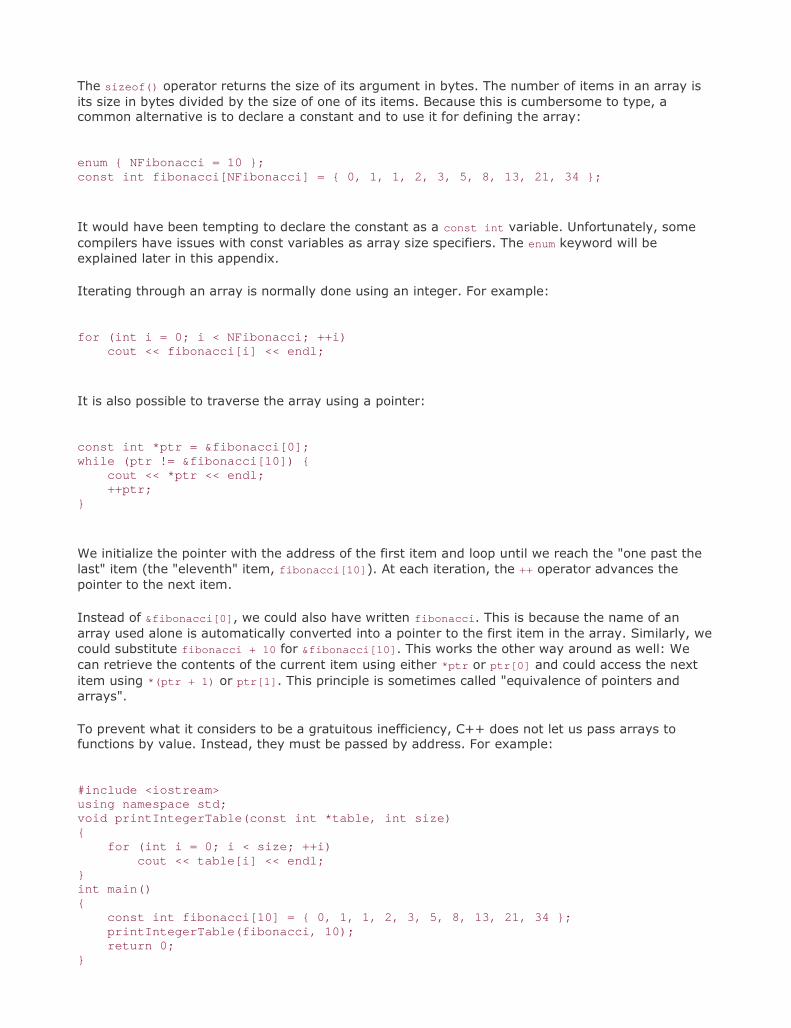
The sizeof() operator returns the size of its argument in bytes. The number of items in an array isits size in bytes divided by the size of one of its items. Because this is cumbersome to type, acommon alternative is to declare a constant and to use it for defining the array:
enum { NFibonacci = 10 };const int fibonacci[NFibonacci] = { 0, 1, 1, 2, 3, 5, 8, 13, 21, 34 };
It would have been tempting to declare the constant as a const int variable. Unfortunately, somecompilers have issues with const variables as array size specifiers. The enum keyword will beexplained later in this appendix.
Iterating through an array is normally done using an integer. For example:
for (int i = 0; i < NFibonacci; ++i) cout << fibonacci[i] << endl;
It is also possible to traverse the array using a pointer:
const int *ptr = &fibonacci[0];while (ptr != &fibonacci[10]) { cout << *ptr << endl; ++ptr;}
We initialize the pointer with the address of the first item and loop until we reach the "one past thelast" item (the "eleventh" item, fibonacci[10]). At each iteration, the ++ operator advances thepointer to the next item.
Instead of &fibonacci[0], we could also have written fibonacci. This is because the name of anarray used alone is automatically converted into a pointer to the first item in the array. Similarly, wecould substitute fibonacci + 10 for &fibonacci[10]. This works the other way around as well: Wecan retrieve the contents of the current item using either *ptr or ptr[0] and could access the nextitem using *(ptr + 1) or ptr[1]. This principle is sometimes called "equivalence of pointers andarrays".
To prevent what it considers to be a gratuitous inefficiency, C++ does not let us pass arrays tofunctions by value. Instead, they must be passed by address. For example:
#include <iostream>using namespace std;void printIntegerTable(const int *table, int size){ for (int i = 0; i < size; ++i) cout << table[i] << endl;}int main(){ const int fibonacci[10] = { 0, 1, 1, 2, 3, 5, 8, 13, 21, 34 }; printIntegerTable(fibonacci, 10);
return 0;}
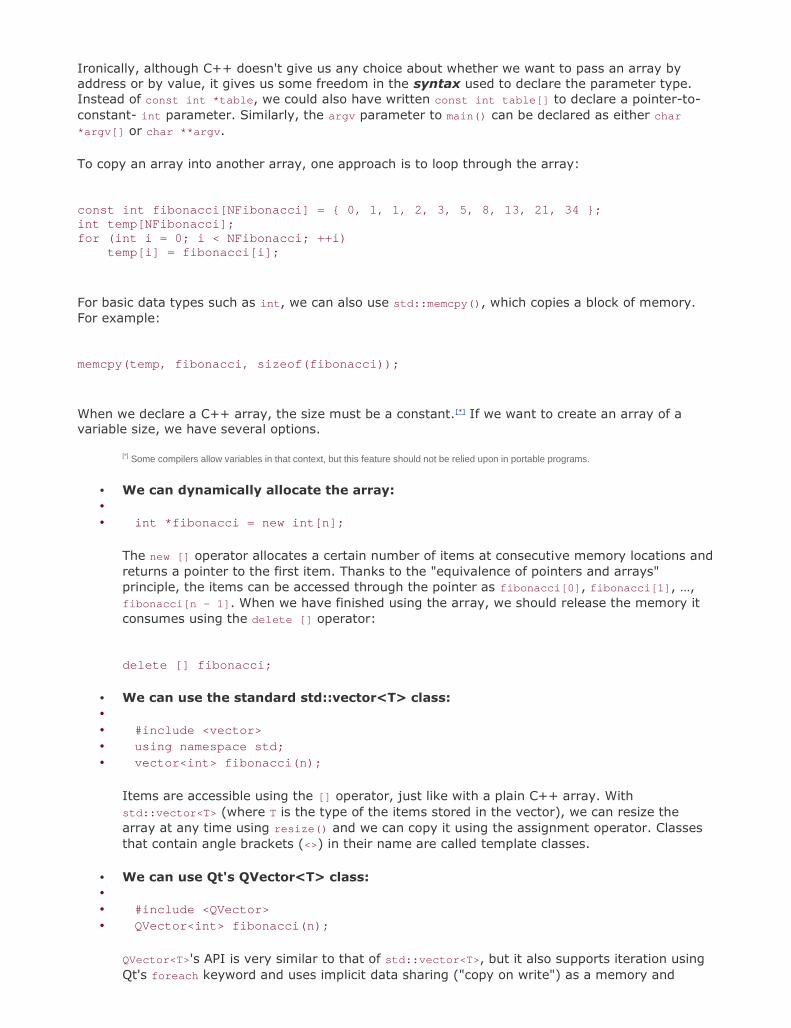
Ironically, although C++ doesn't give us any choice about whether we want to pass an array byaddress or by value, it gives us some freedom in the syntax used to declare the parameter type.Instead of const int *table, we could also have written const int table[] to declare a pointer-to-constant- int parameter. Similarly, the argv parameter to main() can be declared as either char
*argv[] or char **argv.
To copy an array into another array, one approach is to loop through the array:
const int fibonacci[NFibonacci] = { 0, 1, 1, 2, 3, 5, 8, 13, 21, 34 };int temp[NFibonacci];for (int i = 0; i < NFibonacci; ++i)
temp[i] = fibonacci[i];
For basic data types such as int, we can also use std::memcpy(), which copies a block of memory.For example:
memcpy(temp, fibonacci, sizeof(fibonacci));
When we declare a C++ array, the size must be a constant.[*] If we want to create an array of avariable size, we have several options.
[*] Some compilers allow variables in that context, but this feature should not be relied upon in portable programs.
We can dynamically allocate the array: int *fibonacci = new int[n];
The new [] operator allocates a certain number of items at consecutive memory locations andreturns a pointer to the first item. Thanks to the "equivalence of pointers and arrays"principle, the items can be accessed through the pointer as fibonacci[0], fibonacci[1], …,fibonacci[n - 1]. When we have finished using the array, we should release the memory itconsumes using the delete [] operator:
delete [] fibonacci;
We can use the standard std::vector<T> class: #include <vector> using namespace std; vector<int> fibonacci(n);
Items are accessible using the [] operator, just like with a plain C++ array. Withstd::vector<T> (where T is the type of the items stored in the vector), we can resize thearray at any time using resize() and we can copy it using the assignment operator. Classesthat contain angle brackets (<>) in their name are called template classes.
We can use Qt's QVector<T> class: #include <QVector> QVector<int> fibonacci(n);
QVector<T>'s API is very similar to that of std::vector<T>, but it also supports iteration usingQt's foreach keyword and uses implicit data sharing ("copy on write") as a memory and
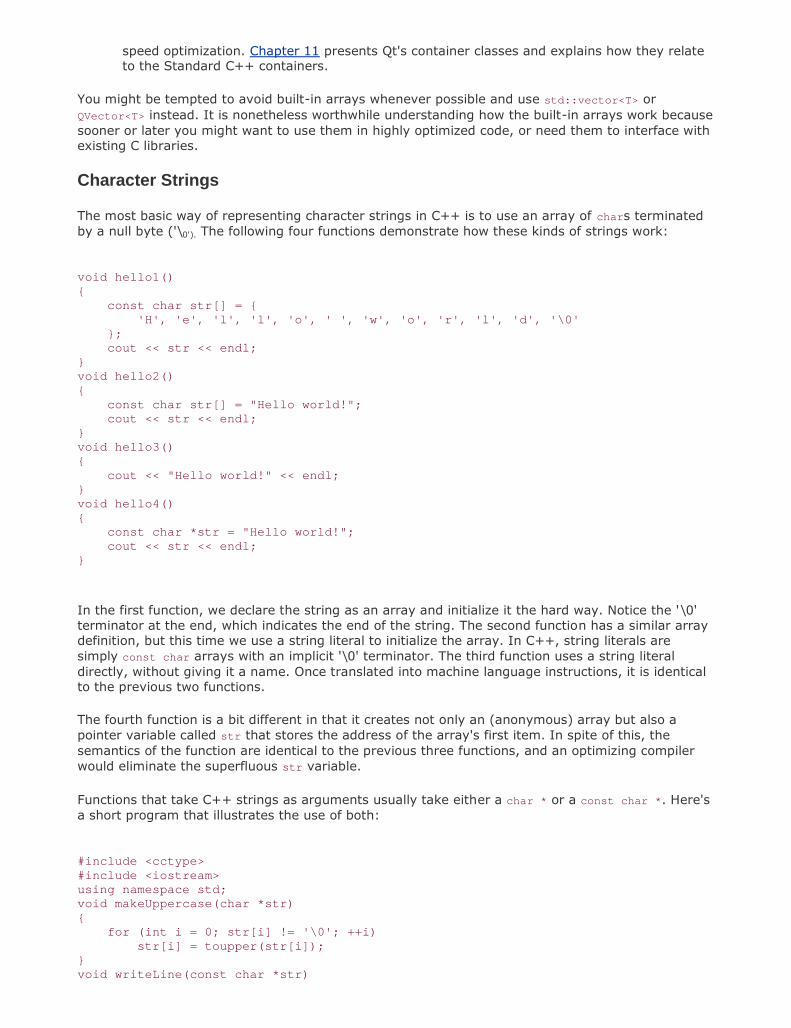
speed optimization. Chapter 11 presents Qt's container classes and explains how they relateto the Standard C++ containers.
You might be tempted to avoid built-in arrays whenever possible and use std::vector<T> orQVector<T> instead. It is nonetheless worthwhile understanding how the built-in arrays work becausesooner or later you might want to use them in highly optimized code, or need them to interface withexisting C libraries.
Character Strings
The most basic way of representing character strings in C++ is to use an array of chars terminatedby a null byte ('\0'). The following four functions demonstrate how these kinds of strings work:
void hello1(){ const char str[] = {
'H', 'e', 'l', 'l', 'o', ' ', 'w', 'o', 'r', 'l', 'd', '\0'};
cout << str << endl;}void hello2(){ const char str[] = "Hello world!"; cout << str << endl;}void hello3(){ cout << "Hello world!" << endl;}void hello4(){ const char *str = "Hello world!"; cout << str << endl;}
In the first function, we declare the string as an array and initialize it the hard way. Notice the '\0'terminator at the end, which indicates the end of the string. The second function has a similar arraydefinition, but this time we use a string literal to initialize the array. In C++, string literals aresimply const char arrays with an implicit '\0' terminator. The third function uses a string literaldirectly, without giving it a name. Once translated into machine language instructions, it is identicalto the previous two functions.
The fourth function is a bit different in that it creates not only an (anonymous) array but also apointer variable called str that stores the address of the array's first item. In spite of this, thesemantics of the function are identical to the previous three functions, and an optimizing compilerwould eliminate the superfluous str variable.
Functions that take C++ strings as arguments usually take either a char * or a const char *. Here'sa short program that illustrates the use of both:
#include <cctype>#include <iostream>using namespace std;void makeUppercase(char *str){ for (int i = 0; str[i] != '\0'; ++i) str[i] = toupper(str[i]);}void writeLine(const char *str)

{ cout << str << endl;}int main(int argc, char *argv[]){ for (int i = 1; i < argc; ++i) { makeUppercase(argv[i]); writeLine(argv[i]); } return 0;}
In C++, the char type normally holds an 8-bit value. This means that we can easily store ASCII, ISO8859-1 (Latin-1), and other 8-bit-encoded strings in a char array, but that we can't store arbitraryUnicode characters without resorting to multibyte sequences. Qt provides the powerful QStringclass, which stores Unicode strings as sequences of 16-bit QChars and internally uses the implicitdata sharing ("copy on write") optimization. Chapter 11 (Container Classes) and Chapter 17(Internationalization) explain QString in more detail.
Enumerations
C++ has an enumeration feature for declaring a set of named constants similar to that provided byC#. Let's suppose that we want to store days of the week in a program:
enum DayOfWeek { Sunday, Monday, Tuesday, Wednesday, Thursday, Friday, Saturday};
Normally, we would put this declaration in a header file, or even inside a class. The abovedeclaration is superficially equivalent to the following constant definitions:
const int Sunday = 0;const int Monday = 1;const int Tuesday = 2;const int Wednesday = 3;const int Thursday = 4;const int Friday = 5;const int Saturday = 6;
By using the enumeration construct, we can later declare variables or parameters of type DayOfWeek
and the compiler will ensure that only values from the DayOfWeek enumeration are assigned to it. Forexample:
DayOfWeek day = Sunday;
If we don't care about type safety, we can also write
int day = Sunday;
Notice that to refer to the Sunday constant from the DayOfWeek enum, we simply write Sunday, not
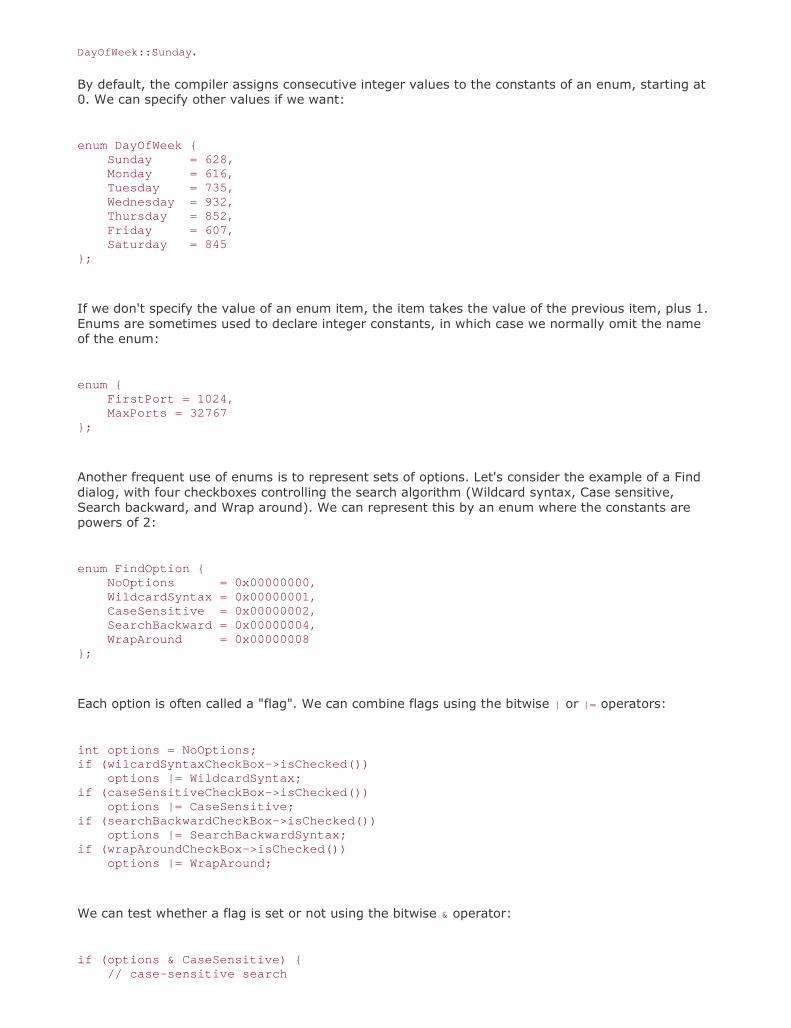
DayOfWeek::Sunday.
By default, the compiler assigns consecutive integer values to the constants of an enum, starting at0. We can specify other values if we want:
enum DayOfWeek { Sunday = 628, Monday = 616, Tuesday = 735, Wednesday = 932, Thursday = 852, Friday = 607, Saturday = 845};
If we don't specify the value of an enum item, the item takes the value of the previous item, plus 1.Enums are sometimes used to declare integer constants, in which case we normally omit the nameof the enum:
enum { FirstPort = 1024, MaxPorts = 32767};
Another frequent use of enums is to represent sets of options. Let's consider the example of a Finddialog, with four checkboxes controlling the search algorithm (Wildcard syntax, Case sensitive,Search backward, and Wrap around). We can represent this by an enum where the constants arepowers of 2:
enum FindOption { NoOptions = 0x00000000, WildcardSyntax = 0x00000001, CaseSensitive = 0x00000002, SearchBackward = 0x00000004, WrapAround = 0x00000008};
Each option is often called a "flag". We can combine flags using the bitwise | or |= operators:
int options = NoOptions;if (wilcardSyntaxCheckBox->isChecked()) options |= WildcardSyntax;if (caseSensitiveCheckBox->isChecked()) options |= CaseSensitive;if (searchBackwardCheckBox->isChecked()) options |= SearchBackwardSyntax;if (wrapAroundCheckBox->isChecked()) options |= WrapAround;
We can test whether a flag is set or not using the bitwise & operator:
if (options & CaseSensitive) { // case-sensitive search

}
A variable of type FindOption can only contain one flag at a time. The result of combining severalflags using | is a plain integer. Unfortunately, this is not type-safe: The compiler won't complain if afunction expecting a combination of FindOptions through an int parameter receives Saturday
instead. Qt uses QFlags<T> to provide type safety for its own flag types. The class is also availablewhen we define custom flag types. See the QFlags<T> online documentation for details.
Typedefs
C++ lets us give an alias to a data type using the typedef keyword. For example, if we useQVector<Point2D> a lot and want to save a few keystrokes (or are unfortunate enough to be stuckwith a Norwegian keyboard and have trouble locating the angle brackets), we can put this typedefdeclaration in one of our header files:
typedef QVector<Point2D> PointVector;
From then on, we can use PointVector as a shorthand for QVector<Point2D>. Notice that the newname for the type appears after the old name. The typedef syntax deliberately mimics that ofvariable declarations.
In Qt, typedefs are used mainly for three reasons:
Convenience: Qt declares uint and QWidgetList as typedefs for unsigned int andQList<QWidget *> to save a few keystrokes.
Platform differences: Certain types need different definitions on different platforms. Forexample, qlonglong is defined as __int64 on Windows and as long long on other platforms.
Compatibility: The QIconSet class from Qt 3 was renamed QIcon in Qt 4. To help Qt 3 usersport their applications to Qt 4, QIconSet is provided as a typedef for QIcon when Qt 3compatibility is enabled.
Type Conversions
C++ provides several syntaxes for casting values from one type to another. The traditional syntax,inherited from C, involves putting the resulting type in parentheses before the value to convert:
const double Pi = 3.14159265359;int x = (int)(Pi * 100);cout << x << " equals 314" << endl;
This syntax is very powerful. It can be used to change the type of pointers, to remove const, andmuch more. For example:
short j = 0x1234;if (*(char *)&j == 0x12) cout << "The byte order is big-endian" << endl;
In the example above, we cast a short * to a char * and we use the unary * operator to access thebyte at the given memory location. On big-endian systems, that byte is 0x12; on little-endiansystems, that byte is 0x34. Since pointers and references are represented the same way, it should

come as no surprise that the code above can be rewritten using a reference cast:
short j = 0x1234;if ((char &)j == 0x12) cout << "The byte order is big-endian" << endl;
If the data type is a class name, a typedef, or a primitive type that can be expressed as a singlealphanumeric token, we can use the constructor syntax as a cast:
int x = int(Pi * 100);
Casting pointers and references using the traditional C-style casts is a kind of extreme sport, on parwith paragliding and elevator surfing, because the compiler lets us cast any pointer (or reference)type into any other pointer (or reference) type. For that reason, C++ introduced four new-stylecasts with more precise semantics. For pointers and references, the new-style casts are preferableto the risky C-style casts and are used in this book.
static_cast<T>() can be used to cast a pointer-to- A to a pointer-to- B, with the constraintthat class B must inherit from class A. For example:
A *obj = new B; B *b = static_cast<B *>(obj); b->someFunctionDeclaredInB();
If the object isn't an instance of B (but still inherits from A), using the resulting pointer canlead to obscure crashes.
dynamic_cast<T>() is similar to static_cast<T>(), except that it uses runtime type information(RTTI) to check that the object associated with the pointer is an instance of class B. If this isnot the case, the cast returns a null pointer. For example:
A *obj = new B; B *b = dynamic_cast<B *>(obj); if (b) b->someFunctionDeclaredInB();
On some compilers, dynamic_cast<T>() doesn't work across dynamic library boundaries. Italso relies on the compiler supporting RTTI, a feature that programmers can turn off toreduce the size of their executables. Qt solves these problems by providingqobject_cast<T>() for QObject subclasses.
const_cast<T>() adds or removes a const qualifier to a pointer or reference. For example: int MyClass::someConstFunction() const { if (isDirty()) { MyClass *that = const_cast<MyClass *>(this); that->recomputeInternalData(); } ... }
In the previous example, we cast away the const qualifier of the this pointer to call the non-const member function recomputeInternalData(). Doing so is not recommended and cannormally be avoided by using the mutable keyword, as explained in Chapter 4 (Implementing

Application Functionality).
reinterpret_cast<T>() converts any pointer or reference type to any other such type. Forexample:
short j = 0x1234; if (reinterpret_cast<char &>(j) == 0x12) cout << "The byte order is big-endian" << endl;
In Java and C#, any reference can be stored as an Object reference if needed. C++ doesn't haveany universal base class, but it provides a special data type, void *, that stores the address of aninstance of any type. A void * must be cast back to another type (using static_cast<T>()) before itcan be used.
C++ provides many ways of casting types, but most of the time we don't even need a cast. Whenusing container classes such as std::vector<T> or QVector<T>, we can specify the T type and extractitems without casts. In addition, for primitive types, certain conversions occur implicitly (forexample, from char to int), and for custom types we can define implicit conversions by providing aone-parameter constructor. For example:
class MyInteger{public: MyInteger(); MyInteger(int i); ...};int main(){ MyInteger n; n = 5; ...}
For some one-parameter constructors, the automatic conversion makes little sense. We can disableit by declaring the constructor with the explicit keyword:
class MyVector{public: explicit MyVector(int size); ...};
Operator Overloading
C++ allows us to overload functions, meaning that we can declare several functions with the samename in the same scope, as long as they have different parameter lists. In addition, C++ supportsoperator overloadingthe possibility of assigning special semantics to built-in operators (such as +,<<, and []) when they are used with custom types.
We have already seen a few examples of overloaded operators. When we used << to output text tocout or cerr, we didn't trigger C++'s left-shift operator, but rather a special version of the operatorthat takes an ostream object (such as cout and cerr) on the left and a string (alternatively, anumber or a stream manipulator such as endl) on the right side and that returns the ostream object,
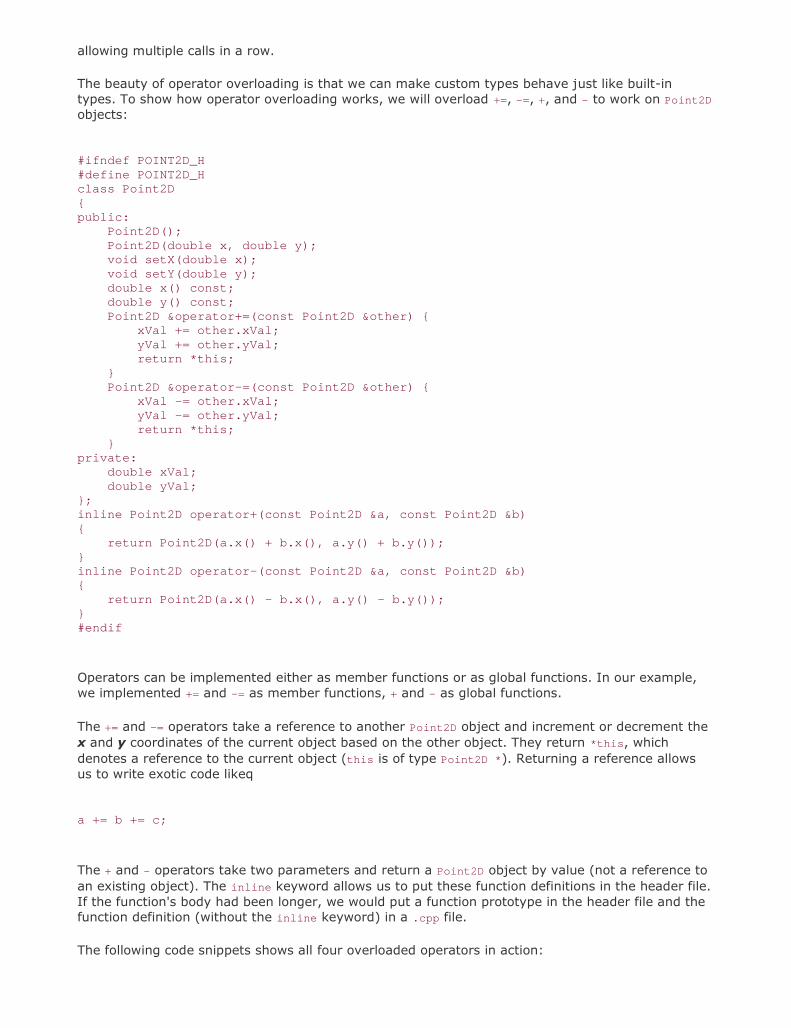
allowing multiple calls in a row.
The beauty of operator overloading is that we can make custom types behave just like built-intypes. To show how operator overloading works, we will overload +=, -=, +, and - to work on Point2D
objects:
#ifndef POINT2D_H#define POINT2D_Hclass Point2D{public: Point2D(); Point2D(double x, double y); void setX(double x); void setY(double y); double x() const; double y() const; Point2D &operator+=(const Point2D &other) { xVal += other.xVal; yVal += other.yVal; return *this; } Point2D &operator-=(const Point2D &other) {
xVal -= other.xVal; yVal -= other.yVal; return *this; }private: double xVal; double yVal;};inline Point2D operator+(const Point2D &a, const Point2D &b){ return Point2D(a.x() + b.x(), a.y() + b.y());}inline Point2D operator-(const Point2D &a, const Point2D &b){ return Point2D(a.x() - b.x(), a.y() - b.y());}#endif
Operators can be implemented either as member functions or as global functions. In our example,we implemented += and -= as member functions, + and - as global functions.
The += and -= operators take a reference to another Point2D object and increment or decrement thex and y coordinates of the current object based on the other object. They return *this, whichdenotes a reference to the current object (this is of type Point2D *). Returning a reference allowsus to write exotic code likeq
a += b += c;
The + and - operators take two parameters and return a Point2D object by value (not a reference toan existing object). The inline keyword allows us to put these function definitions in the header file.If the function's body had been longer, we would put a function prototype in the header file and thefunction definition (without the inline keyword) in a .cpp file.
The following code snippets shows all four overloaded operators in action:
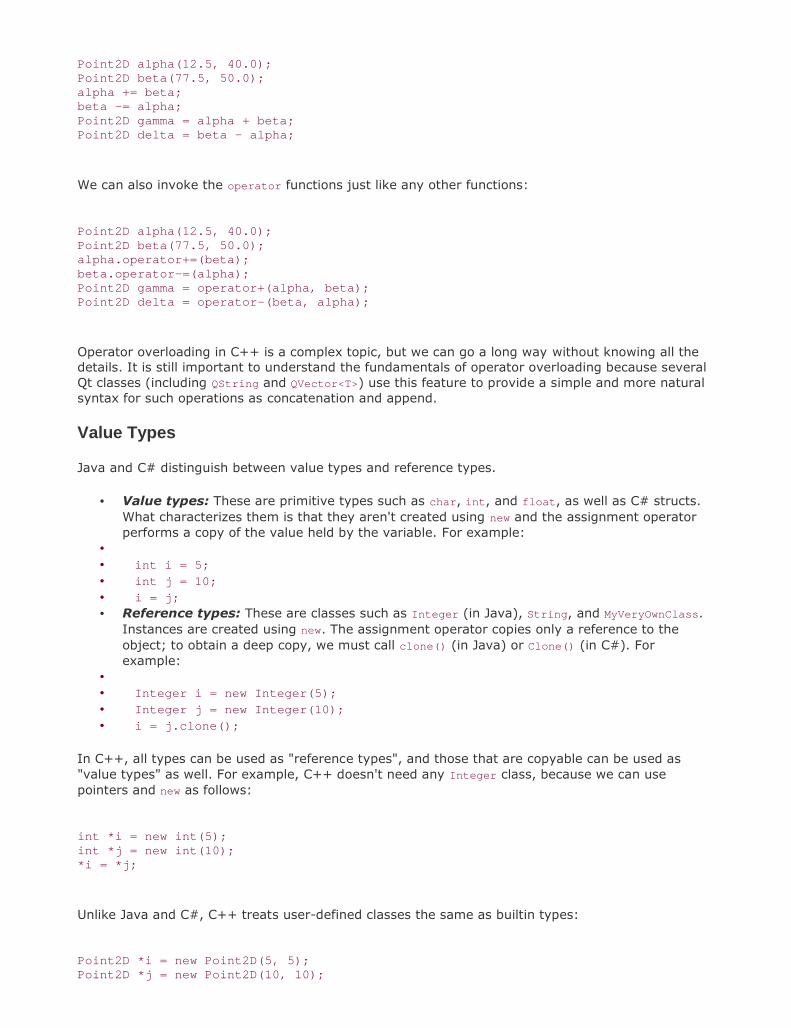
Point2D alpha(12.5, 40.0);Point2D beta(77.5, 50.0);alpha += beta;beta -= alpha;Point2D gamma = alpha + beta;Point2D delta = beta - alpha;
We can also invoke the operator functions just like any other functions:
Point2D alpha(12.5, 40.0);Point2D beta(77.5, 50.0);alpha.operator+=(beta);beta.operator-=(alpha);Point2D gamma = operator+(alpha, beta);Point2D delta = operator-(beta, alpha);
Operator overloading in C++ is a complex topic, but we can go a long way without knowing all thedetails. It is still important to understand the fundamentals of operator overloading because severalQt classes (including QString and QVector<T>) use this feature to provide a simple and more naturalsyntax for such operations as concatenation and append.
Value Types
Java and C# distinguish between value types and reference types.
Value types: These are primitive types such as char, int, and float, as well as C# structs.What characterizes them is that they aren't created using new and the assignment operatorperforms a copy of the value held by the variable. For example:
int i = 5; int j = 10; i = j; Reference types: These are classes such as Integer (in Java), String, and MyVeryOwnClass.
Instances are created using new. The assignment operator copies only a reference to theobject; to obtain a deep copy, we must call clone() (in Java) or Clone() (in C#). Forexample:
Integer i = new Integer(5); Integer j = new Integer(10); i = j.clone();
In C++, all types can be used as "reference types", and those that are copyable can be used as"value types" as well. For example, C++ doesn't need any Integer class, because we can usepointers and new as follows:
int *i = new int(5);int *j = new int(10);*i = *j;
Unlike Java and C#, C++ treats user-defined classes the same as builtin types:
Point2D *i = new Point2D(5, 5);Point2D *j = new Point2D(10, 10);

*i = *j;
If we want to make a C++ class copyable, we must ensure that our class has a copy constructor andan assignment operator. The copy constructor is invoked when we initialize an object with anotherobject of the same type. C++ provides two equivalent syntaxes for this:
Point2D i(20, 20);Point2D j(i); // first syntaxPoint2D k = i; // second syntax
The assignment operator is invoked when we use the assignment operator on an existing variable:
Point2D i(5, 5);Point2D j(10, 10);j = i;
When we define a class, the C++ compiler automatically provides a copy constructor and anassignment operator that perform member-by-member copy. For the Point2D class, this is as if wehad written the following code in the class definition:
class Point2D{public: ... Point2D(const Point2D &other) : xVal(other.xVal), yVal(other.yVal) { } Point2D &operator=(const Point2D &other) { xVal = other.xVal; yVal = other.yVal; return *this; } ...private: double xVal; double yVal;};
For some classes, the default copy constructor and assignment operator are unsuitable. Thistypically occurs if the class uses dynamic memory. To make the class copyable, we must thenimplement the copy constructor and the assignment operator ourselves.
For classes that don't need to be copyable, we can disable the copy constructor and assignmentoperator by making them private. If we accidentally attempt to copy instances of such a class, thecompiler reports an error. For example:
class BankAccount{public: ...private: BankAccount(const BankAccount &other); BankAccount &operator=(const BankAccount &other);};

In Qt, many classes are designed to be used as value classes. These have a copy constructor and anassignment operator, and are normally instantiated on the stack without new. This is the case forQDateTime, QImage, QString, and container classes such as QList<T>, QVector<T>, and QMap<K, T>.
Other classes fall in the "reference type" category, notably QObject and its subclasses (QWidget,QTimer, QTcpSocket, etc.). These have virtual functions and cannot be copied. For example, a QWidget
represents a specific window or control on screen. If there are 75 QWidget instances in memory,there are also 75 windows or controls on screen. These classes are typically instantiated using thenew operator.
Global Variables and Functions
C++ lets us declare functions and variables that don't belong to any classes and that are accessiblefrom any other function. We have seen several examples of global functions, including main(), theprogram's entry point. Global variables are rarer, because they compromise modularity and threadreentrancy. It is still important to understand them because you might encounter them in codewritten by reformed C programmers and other C++ users.
To illustrate how global functions and variables work, we will study a small program that prints a listof 128 pseudo-random numbers using a quick-and-dirty algorithm. The program's source code isspread over two .cpp files.
The first source file is random.cpp:
int randomNumbers[128];static int seed = 42;static int nextRandomNumber(){
seed = 1009 + (seed * 2011); return seed;}void populateRandomArray(){ for (int i = 0; i < 128; ++i) randomNumbers[i] = nextRandomNumber();}
The file declares two global variables (randomNumbers and seed) and two global functions(nextrandomNumber() and populateRandomArray()). Two of the declarations contain the static
keyword; these are visible only within the current compilation unit (random.cpp) and are said to havestatic linkage. The two others can be accessed from any compilation unit in the program; thesehave external linkage.
Static linkage is ideal for helper functions and internal variables that should not be used in othercompilation units. It reduces the risks of having colliding identifiers (global variables with the samename or global functions with the same signature in different compilation units) and preventsmalicious or otherwise ill-advised users from accessing the internals of a compilation unit.
Let's now look at the second file, main.cpp, which uses the two global variables declared withexternal linkage in random.cpp:
#include <iostream>using namespace std;extern int randomNumbers[128];void populateRandomArray();int main()

{ populateRandomArray(); for (int i = 0; i < 128; ++i) cout << randomNumbers[i] << endl; return 0;}
We declare the external variables and functions before we call them. The external variabledeclaration (which makes an external variable visible in the current compilation unit) forrandomNumbers starts with the extern keyword. Without extern, the compiler would think it has todeal with a variable definition, and the linker would complain because the same variable is definedin two compilation units (random.cpp and main.cpp). Variables can be declared as many times as wewant, but they may only be defined once. The definition is what causes the compiler to reservespace for the variable.
The populateRandomArray() function is declared using a function prototype. The extern keyword isoptional for functions.
Typically we would put the external variable and function declarations in a header file and include itin all the files that need them:
#ifndef RANDOM_H#define RANDOM_Hextern int randomNumbers[128];void populateRandomArray();#endif
We have already seen how static can be used to declare member variables and functions that arenot attached to a specific instance of the class, and now we have seen how to use it to declarefunctions and variables with static linkage. There is one more use of the static keyword that shouldbe noted in passing. In C++, we can declare a local variable static. Such variables are initialized thefirst time the function is called and hold their value between function invocations. For example:
void nextPrime(){ static int n = 1; do { ++n; } while (!isPrime(n)); return n;}
Static local variables are similar to global variables, except that they are only visible inside thefunction where they are defined.
Namespaces
Namespaces are a mechanism for reducing the risks of name clashes in C++ programs. Nameclashes are often an issue in large programs that use several third-party libraries. In your ownprograms, you can choose whether you want to use namespaces or not.
Typically, we put a namespace around all the declarations in a header file to ensure that theidentifiers declared in that header file don't leak into the global namespace. For example:
#ifndef SOFTWAREINC_RANDOM_H
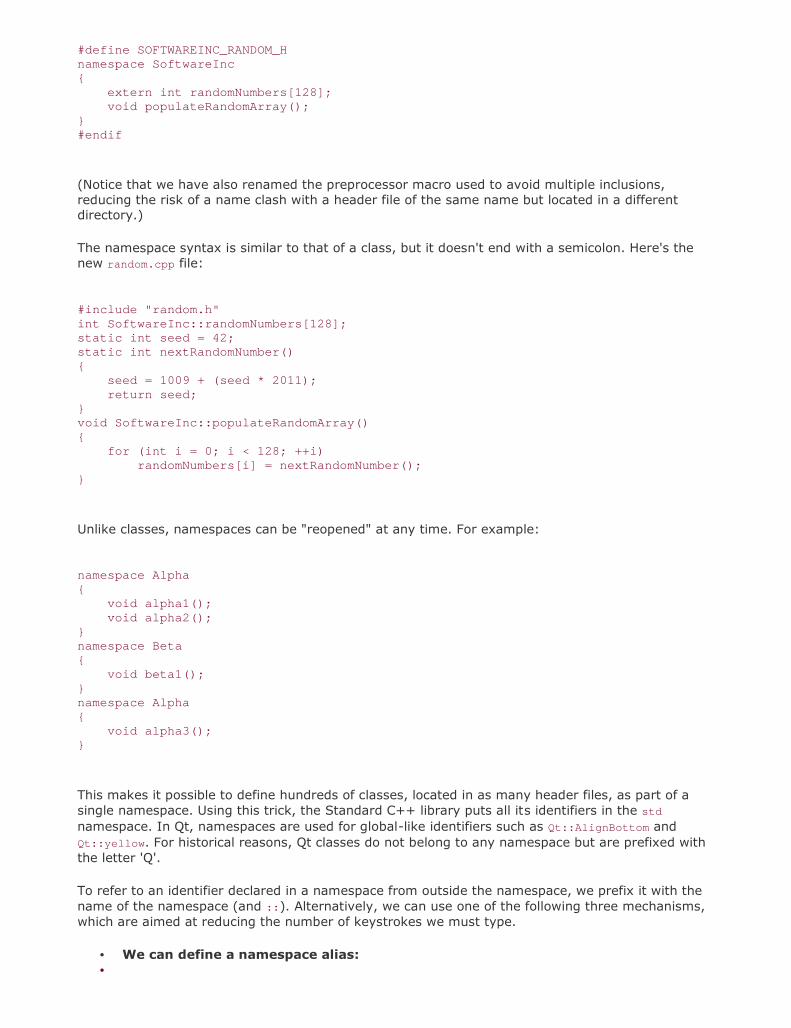
#define SOFTWAREINC_RANDOM_Hnamespace SoftwareInc{ extern int randomNumbers[128]; void populateRandomArray();}#endif
(Notice that we have also renamed the preprocessor macro used to avoid multiple inclusions,reducing the risk of a name clash with a header file of the same name but located in a differentdirectory.)
The namespace syntax is similar to that of a class, but it doesn't end with a semicolon. Here's thenew random.cpp file:
#include "random.h"int SoftwareInc::randomNumbers[128];static int seed = 42;static int nextRandomNumber(){ seed = 1009 + (seed * 2011); return seed;}void SoftwareInc::populateRandomArray(){ for (int i = 0; i < 128; ++i) randomNumbers[i] = nextRandomNumber();}
Unlike classes, namespaces can be "reopened" at any time. For example:
namespace Alpha{ void alpha1(); void alpha2();}namespace Beta{ void beta1();}namespace Alpha{ void alpha3();}
This makes it possible to define hundreds of classes, located in as many header files, as part of asingle namespace. Using this trick, the Standard C++ library puts all its identifiers in the std
namespace. In Qt, namespaces are used for global-like identifiers such as Qt::AlignBottom andQt::yellow. For historical reasons, Qt classes do not belong to any namespace but are prefixed withthe letter 'Q'.
To refer to an identifier declared in a namespace from outside the namespace, we prefix it with thename of the namespace (and ::). Alternatively, we can use one of the following three mechanisms,which are aimed at reducing the number of keystrokes we must type.
We can define a namespace alias:

namespace ElPuebloDeLaReinaDeLosAngeles { void beverlyHills(); void culverCity(); void malibu(); void santaMonica(); } namespace LA = ElPuebloDeLaReinaDeLosAngeles;
After the alias definition, the alias can be used instead of the original name.q
We can import a single identifier from a namespace: int main() { using ElPuebloDeLaReinaDeLosAngeles::beverlyHills; beverlyHills(); ... }
The using declaration allows us to access a given identifier from a name-space withouthaving to prefix it with the name of the namespace.
We can import an entire namespace with a single directive: int main() { using namespace ElPuebloDeLaReinaDeLosAngeles; santaMonica(); malibu(); ... }
With this approach, name clashes are more likely to occur. If the compiler complains about anambiguous name (for example, two classes with the same name defined in two differentnamespaces), we can always qualify the identifier with the name of the namespace when referringto it.
The Preprocessor
The C++ preprocessor is a program that converts a .cpp source file containing #-directives (such as#include, #ifndef, and #endif) into a source file that contains no such directives. These directivesperform simple textual operations on the source file, such as conditional compilation, file inclusion,and macro expansion. Normally, the preprocessor is invoked automatically by the compiler, butmost systems still offer a way of invoking it alone (often through a -E or /E compiler option).
The #include directive expands to the contents of the file specified within angle brackets (<>)or double quotes (""), depending on whether the header file is installed at a standardlocation or is part of the current project. The file name may contain .. and / (which Windowscompilers correctly interpret as a directory separator). For example:
#include "../shared/globaldefs.h" The #define directive defines a macro. Occurrences of the macro appearing after the #define
directive are replaced with the macro's definition. For example, the directive #define PI 3.14159265359
tells the preprocessor to replace all future occurrences of the token PI in the current

compilation unit with the token 3.14159265359. To avoid clashes with variable and classnames, it is common practice to give macros alluppercase names. It is possible to definemacros that take arguments:
#define SQUARE(x) ((x) * (x))
In the macro body, it is good style to surround all occurrences of the parameters withparentheses, as well as the entire body, to avoid problems with operator precedence. Afterall, we want 7 * SQUARE(2 + 3) to expand to 7 * ((2 + 3) * (2 + 3)), not to 7 * 2 + 3 * 2 +
3.
C++ compilers normally allow us to define macros on the command line, using the -D or /D
option. For example:
CC -DPI=3.14159265359 -c main.cpp
Macros were very popular in the old days, before typedefs, enums, constants, inlinefunctions, and templates were introduced. Nowadays, their most important role is to protectheader files against multiple inclusions.
Macros can be undefined at any point using #undef: #undef PI
This is useful if we want to redefine a macro, since the preprocessor doesn't let us define thesame macro twice. It is also useful to control conditional compilation.
Portions of code can be processed or skipped using #if, #elif, #else, and #endif, based onthe numeric value of macros. For example:
#define NO_OPTIM 0 #define OPTIM_FOR_SPEED 1 #define OPTIM_FOR_MEMORY 2 #define OPTIMIZATION OPTIM_FOR_MEMORY ... #if OPTIMIZATION == OPTIM_FOR_SPEED typedef int MyInt; #elif OPTIMIZATION == OPTIM_FOR_MEMORY typedef short MyInt; #else typedef long long MyInt; #endif
In the example above, only the second typedef declaration would be processed by thecompiler, resulting in MyInt being defined as a synonym for short. By changing the definitionof the OPTIMIZATION macro, we get different programs. If a macro isn't defined, its value istaken to be 0.
Another approach to conditional compilation is to test whether a macro is defined or not. Thiscan be done using the using the defined() operator as follows:
#define OPTIM_FOR_MEMORY...#if defined(OPTIM_FOR_SPEED)typedef int MyInt;#elif defined(OPTIM_FOR_MEMORY)

typedef short MyInt;#elsetypedef long long MyInt;#endif
For convenience, the preprocessor recognizes #ifdef X and #ifndef X as synonyms for #if
defined(X) and #if !defined(X). To protect a header file against multiple inclusions, we wrapits contents with the following idiom:
#ifndef MYHEADERFILE_H #define MYHEADERFILE_H ... #endif
The first time the header file is included, the symbol MYHEADERFILE_H is not defined, so thecompiler processes the code between #ifndef and #endif. The second and any subsequenttimes the header file is included, MYHEADERFILE_H is defined, so the entire #ifndef … #endif
block is skipped.
The #error directive emits a user-defined error message at compile time. This is often used inconjunction with conditional compilation to report an impossible case. For example:
class UniChar { public: #if BYTE_ORDER == BIG_ENDIAN uchar row; uchar cell; #elif BYTE_ORDER == LITTLE_ENDIAN uchar cell; uchar row; #else #error "BYTE_ORDER must be BIG_ENDIAN or LITTLE_ENDIAN" #endif };
Unlike most other C++ constructs,where whitespace is irrelevant,preprocessor directives standalone on a line and require no semicolon. Very long directives can be split across multiple lines byending every line except the last with a backslash.

The Standard C++ LibraryIn this section, we will briefly review the Standard C++ library. Figure B.3 lists the core C++ headerfiles. The <exception>, <limits>, <new>, and <typeinfo> headers support the C++ language; forexample, <limits> allows us to test properties of the compiler's integer and floating-point arithmeticsupport, and <typeinfo> offers basic introspection. The other headers provide generally usefulclasses, including a string class and a complex numeric type. The functionality offered by <bitset>,<locale>, <string>, and <typeinfo> loosely overlaps with the QBitArray, QLocale, QString, andQMetaObject classes in Qt.
Figure B.3. Core C++ library header files
Header file Description
<bitset> Template class for representing fixed-length bit sequences
<complex> Template class for representing complex numbers
<exception> Types and functions related to exception handling
<limits> Template class that specifies properties of numeric types
<locale> Classes and functions related to localization
<new> Functions that manage dynamic memory allocation
<stdexcept> Predefined types of exceptions for reporting errors
<string> Template string container and character traits
<typeinfo> Class that provides basic meta-information about a type
<valarray> Template classes for representing value arrays
Standard C++ also includes a set of header files that deal with I/O, listed in Figure B.4. Thestandard I/O classes' design harks back to the 1980s and is needlessly complex, making them veryhard to extendso difficult, in fact, that entire books have been written on the subject. It also leavesthe programmer with a Pandora's box of unresolved issues related to character encodings andplatform-dependent binary representations of primitive data types.
Figure B.4. C++ I/O library header files
Header file Description
<fstream> Template classes that manipulate external files
<iomanip> I/O stream manipulators that take an argument
<ios> Template base class for I/O streams
<iosfwd> Forward declarations for several I/O stream template classes
<iostream> Standard I/O streams (cin, cout, cerr, clog)
<istream> Template class that controls input from a stream buffer

<ostream> Template class that controls output to a stream buffer
<sstream> Template classes that associate stream buffers with strings
<streambuf> Template classes that buffer I/O operations
<strstream> Classes for performing I/O stream operations on character arrays
Chapter 12 (Input/Output) presents the corresponding Qt classes, which feature Unicode I/O as wellas a large set of national character encodings and a platform-independent abstraction for storingbinary data. Qt's I/O classes form the basis of Qt's inter-process communication, networking, andXML support. Qt's binary and text stream classes are very easy to extend to handle custom datatypes.
The early 1990s saw the introduction of the Standard Template Library (STL), a set of template-based container classes, iterators, and algorithms that slipped into the ISO C++ standard at theeleventh hour. Figure B.5 lists the header files that form the STL. The STL has a very clean, almostmathematical design that provides generic type-safe functionality. Qt provides its own containerclasses, whose design is partly inspired by STL. These are described in Chapter 11.
Figure B.5. STL header files
Header file Description
<algorithm> General-purpose template functions
<deque> Double-ended queue template container
<functional> Templates that help construct and manipulate functors
<iterator> Templates that help construct and manipulate iterators
<list> Doubly-linked list template container
<map> Single-valued and multi-valued map template containers
<memory> Utilities for simplifying memory management
<numeric> Template numeric operations
<queue> Queue template container
<set> Single-valued and multi-valued set template containers
<stack> Stack template container
<utility> Basic template functions
<vector> Vector template container
Since C++ is essentially a superset of the C programming language, C++ programmers also havethe entire C library at their disposal. The C header files are available either with their traditionalnames (for example, <stdio.h>) or with new-style names with a c- prefix and no .h (for example,<cstdio>). When we use the new-style version, the functions and data types are declared in the std
namespace. (This doesn't apply to macros such as ASSERT(), because the preprocessor is unaware ofnamespaces.) The new-style syntax is recommended if your compiler supports it.

Figure B.6 lists the C library header files. Most of these offer functionality that overlaps with morerecent C++ headers or with Qt. One notable exception is <cmath>, which declares mathematicalfunctions such as sin(), sqrt(), and pow().
Figure B.6. C++ header files for C library facilities
Header file Description
<cassert> The ASSERT() macro
<cctype> Functions for classifying and mapping characters
<cerrno> Macros related to error condition reporting
<cfloat> Macros that specify properties of primitive floating-point types
<ciso646> Alternative spellings for ISO 646 charset users
<climits> Macros that specify properties of primitive integer types
<clocale> Functions and types related to localization
<cmath> Mathematical functions and constants
<csetjmp> Functions for performing non-local jumps
<csignal> Functions for handling system signals
<cstdarg> Macros for implementing variable argument list functions
<cstddef> Common definitions for several standard headers
<cstdio> Functions for performing I/O
<cstdlib> General utility functions
<cstring> Functions for manipulating char arrays
<ctime> Types and functions for manipulating time
<cwchar> Extended multibyte and wide character utilities
<cwctype> Functions for classifying and mapping wide characters
This completes our quick overview of the Standard C++ library. On the Internet, Dinkumware offerscomplete reference documentation for the Standard C++ library athttp://www.dinkumware.com/refxcpp.html, and SGI has a comprehensive STL programmer's guideat http://www.sgi.com/tech/stl/. The official definition of the Standard C++ library is found in the Cand C++ standards, available as PDF files or paper copies from the International Organization forStandardization (ISO).
In this appendix, we have covered a lot of ground at a fast pace. When you start learning Qt fromChapter 1, you should find that the syntax is a lot simpler and clearer than this appendix might havesuggested. Good Qt programming only requires the use of a subset of C++ and usually avoids theneed for the more complex and obscure syntax that C++ makes possible. Once you start typing incode and building and running executables, the clarity and simplicity of the Qt approach will becomeapparent. And as soon as you start writing more ambitious programs, especially those that need fastand fancy graphics, the C++/Qt combination will continue to keep pace with your needs.

Appendix. About the AuthorsJasmin Blanchette
Jasmin graduated in computer science in 2001 from the University of Sher-brooke, Quebec. He did awork term at Trolltech in the summer of 2000 as a software engineer and has been working therecontinuously since early 2001. In 2003, Jasmin co-wroteC++ GUI Programming with Qt 3. Henow combines the roles of Trolltech's documentation manager and senior software engineer. He wasthe driving force behind theQt Linguist translation tool and is still a key player in Qt 4's containerclasses. He is also co-editor ofQt Quarterly, Trolltech's technical newsletter.
Mark Summerfield
Mark graduated in computer science in 1993 from the University of Wales Swansea. He followed thiswith a year's postgraduate research before going into industry. He spent many years working as asoftware engineer for a variety of firms before joining Trolltech. He spent almost three years asTrolltech's documentation manager, during which he foundedQt Quarterly and co-wrote C++ GUIProgramming with Qt 3. Mark owns Qtraining.eu and works as an independent trainer andconsultant specializing in C++, Qt, and Python.