Box y Studio One Artist L'e - Strumenti Musicali
17
www.presonus.com 1BOX ™ ™ Recording made easy with AudioBox ™ USB and Studio One ™ Artist Grabación sin esfuerzo con Audio- Box y Studio One Artist L'enregis- trement facile avec l'AudioBox ™ et Studio One ™ Artist Aufneh- men leicht gemacht – mit AudioBox ™ und Studio One ™ Artist Kit completo de hardware/software de grabación Complete Hardware/Software Recording Kit Kit matériel/logiciel complet pour l'enregistrement Komplettes Hard- ware-/Software- Recording-Kit ARTIST Music Creation and Production System M7
-
Upload
khangminh22 -
Category
Documents
-
view
1 -
download
0
Transcript of Box y Studio One Artist L'e - Strumenti Musicali
www.presonus.com
1BOX™
™
Recording made easy with AudioBox™ USB and Studio One™ Artist
Grabación sin esfuerzo con Audio-Box y Studio One Artist
L'enregis-trement facile avec l'AudioBox™ et Studio One™ Artist
Aufneh-men leicht gemacht – mit AudioBox™ und Studio One™ Artist
Kit completo de hardware/software de grabación
Complete Hardware/Software Recording Kit
Kit matériel/logiciel complet pour l'enregistrement
Komplettes Hard-ware-/Software-Recording-Kit
ARTIST Music Creation and Production System
M7
PreSonus 1Box™
2
Recording Made Easy with AudioBox™ and Studio One™ Artist
3
Welcome to 1Box
Welcome to 1BoxYou now own the tools you need to capture your audio creativity. If you carefully follow the instructions in this guide, you’ll be recording very soon.
1Box Contents
Bienvenido/a a 1BoxAhora ya posee las herra-mientas necesarias para cap-turar su creatividad musical. Si sigue al pie de la letra las instrucciones de esta guía, muy pronto estará realizando grabaciones.
Contenidos de 1Box
Bienvenue dans la 1BoxVous possédez maintenant les outils nécessaires pour cap-turer votre créativité audio. Si vous suivez attentivement les instructions de ce guide, vous allez très vite enregistrer.
Contenu de la 1Box
Herzlich will-kommen bei 1Box!Mit 1Box verfügen Sie jetzt über Werkzeuge, mit denen Sie Ihre Kreativität freien Lauf lassen können. Wenn Sie die Anweisungen in diesem Handbuch befolgen, können Sie schon bald mit dem Auf-nehmen beginnen.
Inhalt von 1Box
AudioBox USB 2-in / 2-out interface
Interface AudioBox 2-in / 2-out
Interface AudioBox USB à 2 entrées / 2 sorties
AudioBox USB Interface (2 Eingänge / 2 Ausgänge)
Studio One Artist recording and production software for Windows® and Mac®
Software de grabación y producción Studio One Artist para Windows® y Mac®
Logiciel d'enregistrement et de production Studio One Artist pour Window® et Mac®
Recording- und Production-Software Studio One Artist für Windows® und Mac®
M7 Studio Condenser Microphone
Micrófono de condensador M7 Studio
Microphone à condensateur de studio M7
Studio-Kondensatormikrofon M7
HD7 Studio Monitoring Headphones
Auriculares de monitorización de estudio HD7
Casque d'écoute de studio HD7
Studio-Monitoring-Kopfhörer HD7
Microphone cable
Cable del micrófono
Câble de microphone
Mikrofonkabel
USB cable
Cable USB
Câble USB
USB-Kabel
AudioBox owner’s manual (English only) and other stuff
Manual del usuario de AudioBox (sólo en inglés) y otro material
Mode d'emploi AudioBox (anglais uniquement) et autres accessoires
Handbuch für AudioBox (nur in englischer Sprache) und weiteres Material
Very cool metal carrying case
Maletín de transporte de metal con un aspecto muy atractivo
Malette de transport en métal très sympa
Schicker Transportkoffer aus Metall
ARTIST Music Creation and Production System
M7
© 2009, PreSonus Audio Electronics, Inc.
AudioBox USB
24 bit/48k Recording Interface
User’s Manual
Version 2.0
ARTIST Music Creation and Production System
M7

PreSonus 1Box™
4
Recording Made Easy with AudioBox™ and Studio One™ Artist
5
A Computer Requirements Windows® Driver Installation B
A. Computer RequirementsThe first step is to confirm that your computer has the brains and muscles needed to work with AudioBox and Studio One Artist.
MacintoshMac OS X 10.4.11 or Mac OS X 10.5.2 or higher
Minimum Hardware:• PowerPC G4 1.25 GHz or
Intel Core Solo 1.5 GHz processor
• 1 GB RAM• DVD drive
Recommended:• PowerPC G5 or better or
Intel Core Duo or Intel Xeon processor or better
• 2 GB or more RAM• DVD drive
WindowsWindows XP SP2 or later, Vista (32- or 64-bit), or Windows 7
Minimum Hardware:• Intel Pentium 4 1.6 GHz
processor or AMD Athlon 64 (Turion)
• 1 GB RAM• DVD drive
Recommended:• Intel Pentium 4 2.8 GHz
EM64T or better or AMD Athlon 64 3000+ or better
• 2 GB or more RAM• DVD drive
NOTE: The speed of your processor, amount of RAM, and size and speed of your hard drives greatly affect the overall performance of your record-ing system. A more powerful system (faster processor with more RAM) allows for lower latency (signal delay) and better overall performance.
A. Requisitos del ordenadorEl primer paso consiste en confirmar que su ordenador posee el cerebro y músculo suficiente para trabajar con AudioBox y Studio One Artist.
MacintoshMac OS X 10.4.11 ó Mac OS X 10.5.2 ó superior
Hardware mínimo:• Procesador PowerPC G4 1.25
GHz ó Intel Core Solo 1.5 GHz
• 1 GB de RAM• Unidad DVD
Recomendado:• PowerPC G5 ó superior ó
procesador Intel Core Duo o Intel Xeon ó superior
• 2 GB ó más de RAM• Unidad DVD
WindowsWindows XP SP2 ó superior o Vista (sólo 32-bit)
Hardware mínimo:• Procesador Intel Pentium 4
1.6 GHz o AMD Athlon 64 (Turion)
• 1 GB de RAM• Unidad DVD
Recomendado:• Intel Pentium 4 2.8 GHz
EM64T ó superior o AMD Athlon 64 3000+ ó superior
• 2 GB ó más de RAM• Unidad DVD
NOTA: La velocidad de su procesador, la cantidad de RAM, y el tamaño y ve-locidad de sus discos duros afecta en gran medida al rendimiento general de su sistema de grabación. Un siste-ma más potente (con un procesador más rápido y más RAM) ofrece una menor latencia (retardo de la señal) y mejor rendimiento general.
A. Configuration informatique requiseLa première étape consiste à vérifier que votre ordinateur a le cerveau et les muscles nécessaires pour fonctionner avec l'AudioBox et Studio One Artist.
MacintoshMac OS X 10.4.11 ou Mac OS X 10.5.2 ou supérieur
Configuration minimale :• Processeur PowerPC G4 1,25
GHz ou Intel Core Solo 1,5 GHz
• 1 Go de RAM• Lecteur de DVD
Recommandée :• Processeur PowerPC G5 ou
mieux ou Intel Core Duo ou Intel Xeon ou mieux
• 2 Go ou plus de RAM• Lecteur de DVD
WindowsWindows XP SP2 ou supérieur ou Vista (32 bits uniquement)
Configuration minimale :• Processeur Intel Pentium 4
1,6 GHz ou AMD Athlon 64 (Turion)
• 1 Go de RAM• Lecteur de DVD
Recommandée :• Intel Pentium 4 2,8 GHz
EM64T ou mieux ou AMD Athlon 64 3000+ ou mieux
• 2 Go ou plus de RAM• Lecteur de DVD
NOTE : la vitesse de votre processeur, la quantité de RAM et la taille et la vitesse de vos disques durs affectent grandement les performances globales de votre système d'enregis-trement. Un système plus puissant (processeur plus rapide avec plus de RAM) permet une moindre latence (retard du signal) et de meilleures performances globales.
A. Computer-Voraussetzun-genZunächst müssen Sie sicher-stellen, dass Ihr Computer über die benötigte Hardware und Leistung für AudioBox und Studio One Artist verfügt.
MacintoshMac OS X 10.4.11 bzw. Mac OS X 10.5.2 oder höher
Hardware:• mindestens PowerPC G4
mit 1,25-GHz- oder 1,5-GHz-Prozessor Intel Core Solo
• 1 GB RAM• DVD-Laufwerk
Empfohlen:• mindestens PowerPC G5
bzw. Intel Core Duo- oder Intel Xeon-Prozessor
• mindestens 2 GB RAM• DVD-Laufwerk
WindowsWindows XP SP2 oder später bzw. Vista (nur 32-Bit-Syste-me)
Hardware:• mindestens Intel Pentium
4-Prozessor mit 1,6 GHz bzw. AMD Athlon 64 (Turion)
• 1 GB RAM• DVD-Laufwerk
Empfohlen:• mindestens Intel Pentium
4 mit 2,8 GHz EM64T oder AMD Athlon 64 3000+
• mindestens 2 GB RAM• DVD-Laufwerk
ACHTUNG: Die Taktrate des Pro-zessors, der Umfang des Arbeits-speichers sowie die Größe und Geschwindigkeit der Festplatten haben einen großen Einfluss auf die Gesamtleistung Ihres Recording-Sys-tems. Je leistungsstärker das System ist (schnellerer Prozessor mit mehr RAM), desto geringer ist die Latenz (Signalverzögerung) und desto höher fällt die Gesamtleistung aus.
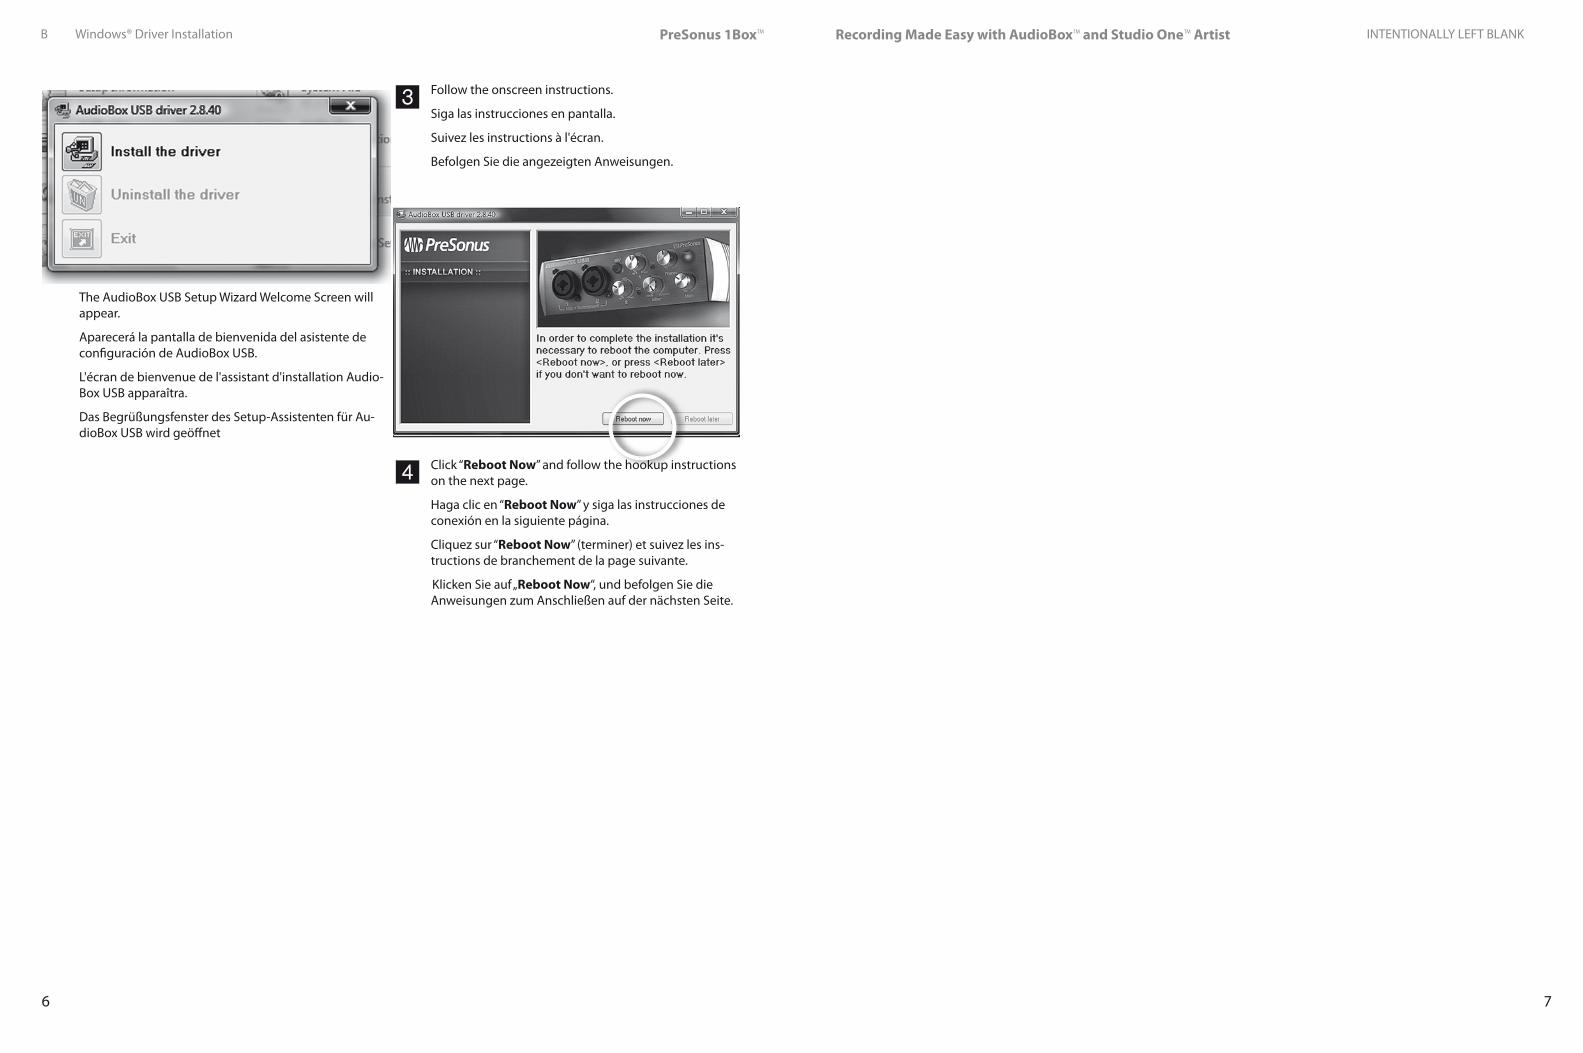
B. Install Software Driver (Windows® Only)
If you own a Mac®, you can skip to page 6.
Since AudioBox is a class-compliant Core Audio device, no driver is necessary.
nus Audio Elect-A
Windows 7 / Vista / XP
(Windows 32 & 64-bit)
OSX Universal
1 Insert the AudioBox Installation Drivers and User’s
Manual CD into your computer’s CD-ROM drive.
Inserte el CD con el manual del usuario y los drivers de instalaci_ón de AudioBox en la unidad CD-ROM de su ordenador.
Insérez dans le lecteur de CD-ROM de votre ordinateur le CD d'installation de l'AudioBox contenant les pilotes et le mode d'emploi.
Legen Sie die AudioBox-CD mit den Installationstrei-bern und dem Benutzerhandbuch in das CD-ROM-Lauf-werk Ihres Computers ein.
B. Instalación del driver del software (sólo Windows®)
Si dispone de un Mac®, puede saltar a la página
6. Puesto que AudioBox es un dispositivo adaptado a Core Audio, no necesita de ningún driver o controlador.
B. Installation du pilote du logiciel (Windows® uniquement)
Si vous possédez un Mac®, vous pouvez
sauter à la page 6. Comme l'AudioBox est un périphé-rique nativement compatible Core Audio (class-compliant), aucun pilote n'est nécessaire.
B. Installieren des Softwaret-reibers (nur Windows®)
Wenn Sie mit einem Mac® arbeiten, können
Sie dies überspringen und mit Seite 6 fortfahren. Da die AudioBox ein klassenkompa-tibles Core Audio-Gerät ist, wird kein Treiber benötigt.
2 Open either the 32-bit or 64-bit folder (depending on
your PC processor type) and double-click on Setup.exe.
Abra, o bien la carpeta de 32-bit o la de 64-bit (depen-diendo del tipo de procesador de su PC) y pulse dos veces sobre Setup.exe.
Ouvrez le dossier 32 bits ou 64 bits (selon le type de pro-cesseur de votre PC) et double-cliquez sur Setup.exe.
Öffnen Sie den 32-Bit- oder 64-Bit-Ordner (je nach Typ Ihres PC-Prozessors), und doppelklicken Sie auf die Setup.exe.
PreSonus 1Box™
6
Recording Made Easy with AudioBox™ and Studio One™ Artist
7
B Windows® Driver Installation INTENTIONALLY LEFT BLANK
The AudioBox USB Setup Wizard Welcome Screen will appear.
Aparecerá la pantalla de bienvenida del asistente de configuración de AudioBox USB.
L'écran de bienvenue de l'assistant d'installation Audio-Box USB apparaîtra.
Das Begrüßungsfenster des Setup-Assistenten für Au-dioBox USB wird geöffnet
3 Follow the onscreen instructions.
Siga las instrucciones en pantalla.
Suivez les instructions à l'écran.
Befolgen Sie die angezeigten Anweisungen.
4 Click “Reboot Now” and follow the hookup instructions
on the next page.
Haga clic en “Reboot Now” y siga las instrucciones de conexión en la siguiente página.
Cliquez sur “Reboot Now” (terminer) et suivez les ins-tructions de branchement de la page suivante.
Klicken Sie auf „Reboot Now“, und befolgen Sie die Anweisungen zum Anschließen auf der nächsten Seite.
PreSonus 1Box™
8
Recording Made Easy with AudioBox™ and Studio One™ Artist
9
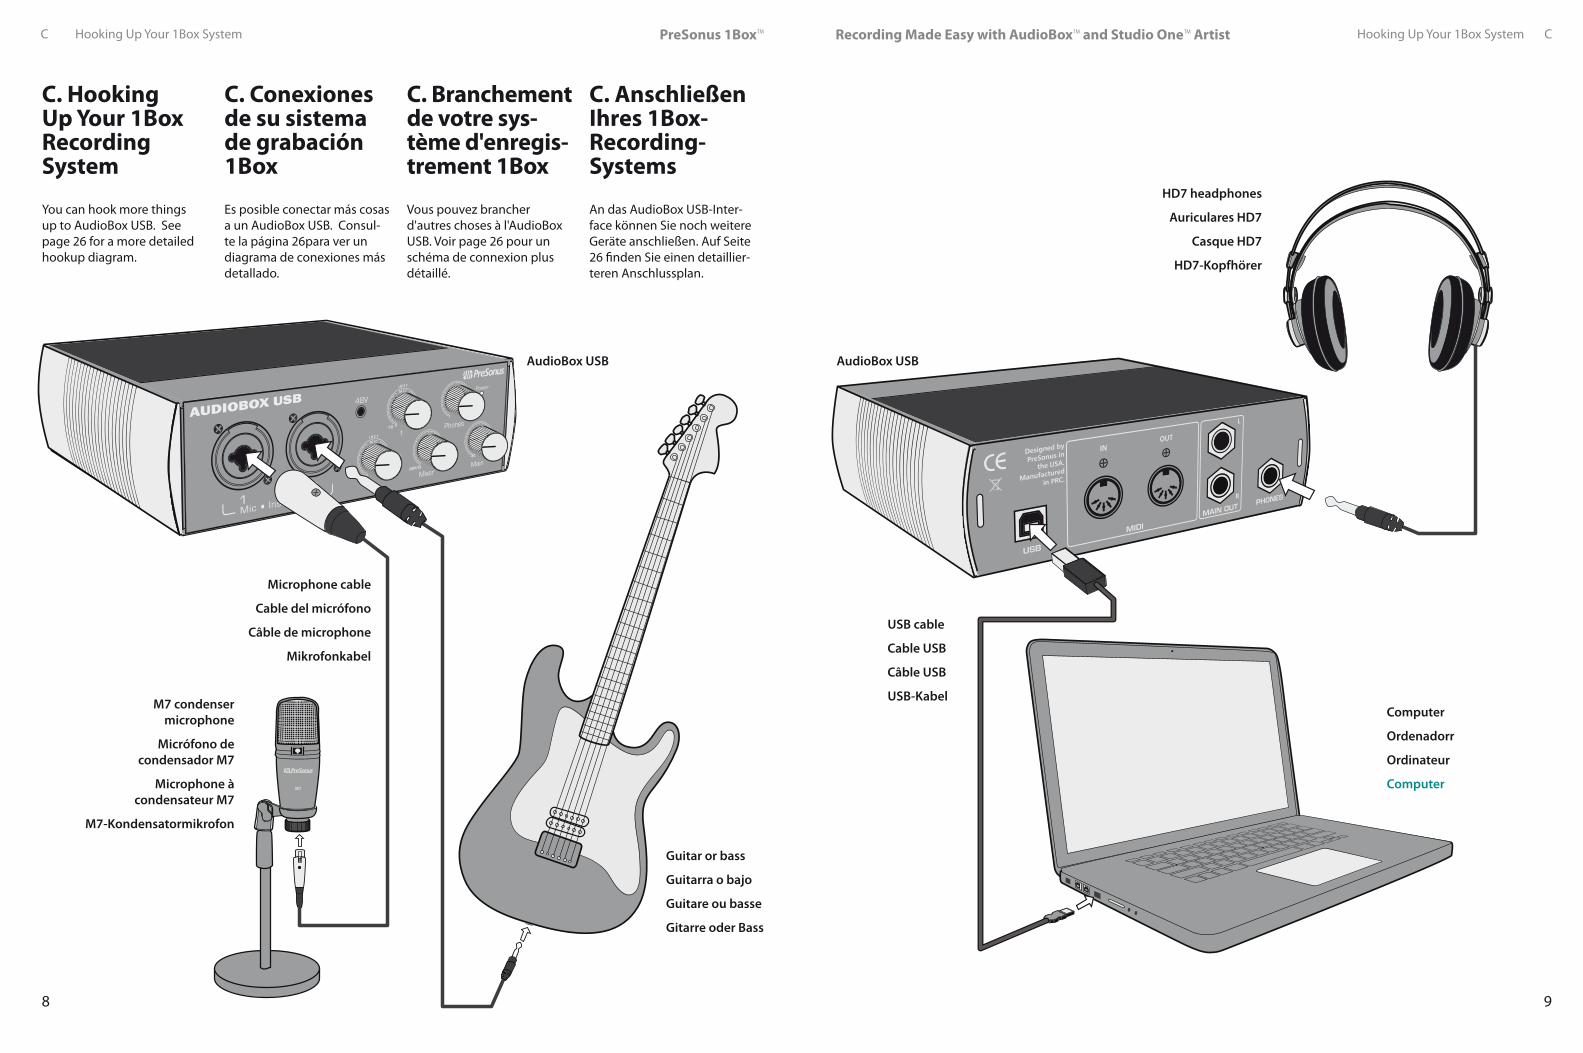
C Hooking Up Your 1Box System Hooking Up Your 1Box System C
C. Hooking Up Your 1Box Recording System You can hook more things up to AudioBox USB. See page 26 for a more detailed hookup diagram.
C. Conexiones de su sistema de grabación 1Box Es posible conectar más cosas a un AudioBox USB. Consul-te la página 26para ver un diagrama de conexiones más detallado.
C. Branchement de votre sys-tème d'enregis-trement 1Box Vous pouvez brancher d'autres choses à l'AudioBox USB. Voir page 26 pour un schéma de connexion plus détaillé.
C. Anschließen Ihres 1Box- Recording- Systems An das AudioBox USB-Inter-face können Sie noch weitere Geräte anschließen. Auf Seite 26 finden Sie einen detaillier-teren Anschlussplan.
Guitar or bass
Guitarra o bajo
Guitare ou basse
Gitarre oder Bass
Computer
Ordenadorr
Ordinateur
Computer
HD7 headphones
Auriculares HD7
Casque HD7
HD7-Kopfhörer
M7 condenser microphone
Micrófono de condensador M7
Microphone à condensateur M7
M7-Kondensatormikrofon
Microphone cable
Cable del micrófono
Câble de microphone
Mikrofonkabel
USB cable
Cable USB
Câble USB
USB-Kabel
AudioBox USB AudioBox USB
M7
PreSonus 1Box™
10
Recording Made Easy with AudioBox™ and Studio One™ Artist
11
D Installing Studio One Artist Installing Studio One Artist D
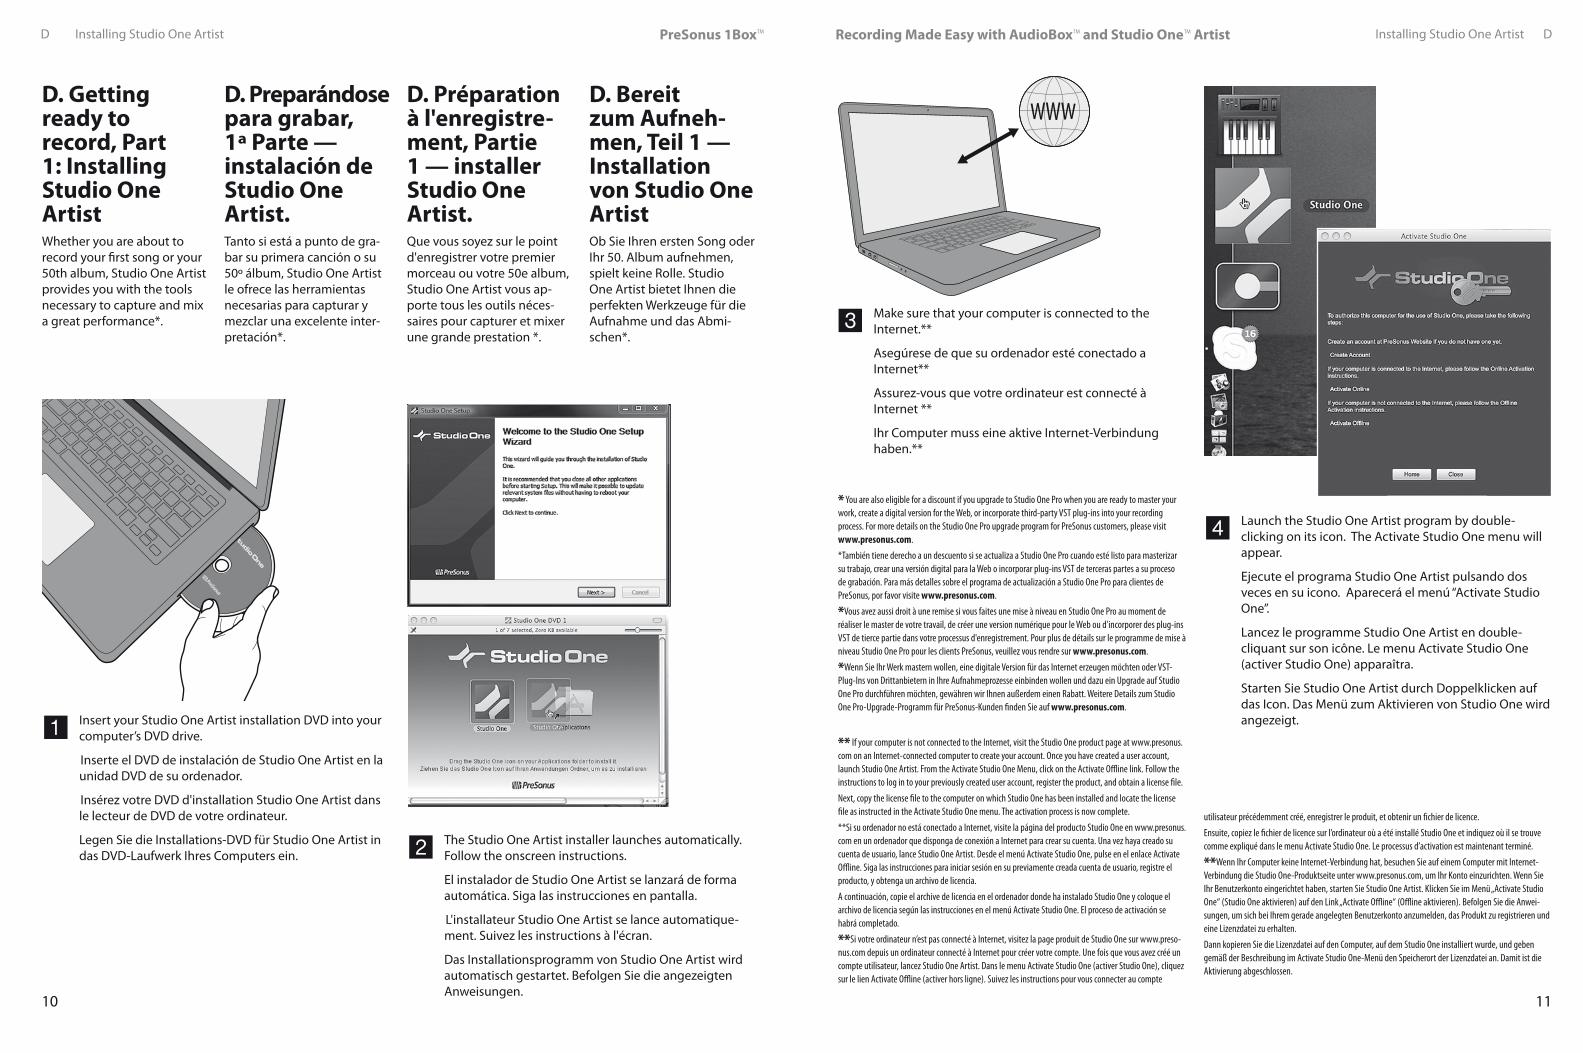
D. Getting ready to record, Part 1: Installing Studio One ArtistWhether you are about to record your first song or your 50th album, Studio One Artist provides you with the tools necessary to capture and mix a great performance*.
D. Preparándose para grabar, 1ª Parte — instalación de Studio One Artist.Tanto si está a punto de gra-bar su primera canción o su 50º álbum, Studio One Artist le ofrece las herramientas necesarias para capturar y mezclar una excelente inter-pretación*.
D. Préparation à l'enregistre-ment, Partie 1 — installer Studio One Artist.Que vous soyez sur le point d'enregistrer votre premier morceau ou votre 50e album, Studio One Artist vous ap-porte tous les outils néces-saires pour capturer et mixer une grande prestation *.
D. Bereit zum Aufneh-men, Teil 1 — Installation von Studio One ArtistOb Sie Ihren ersten Song oder Ihr 50. Album aufnehmen, spielt keine Rolle. Studio One Artist bietet Ihnen die perfekten Werkzeuge für die Aufnahme und das Abmi-schen*.
nus Audio Elect-A
1 Insert your Studio One Artist installation DVD into your
computer’s DVD drive.
Inserte el DVD de instalación de Studio One Artist en la unidad DVD de su ordenador.
Insérez votre DVD d'installation Studio One Artist dans le lecteur de DVD de votre ordinateur.
Legen Sie die Installations-DVD für Studio One Artist in das DVD-Laufwerk Ihres Computers ein. 2
The Studio One Artist installer launches automatically. Follow the onscreen instructions.
El instalador de Studio One Artist se lanzará de forma automática. Siga las instrucciones en pantalla.
L'installateur Studio One Artist se lance automatique-ment. Suivez les instructions à l'écran.
Das Installationsprogramm von Studio One Artist wird automatisch gestartet. Befolgen Sie die angezeigten Anweisungen.
3 Make sure that your computer is connected to the
Internet.**
Asegúrese de que su ordenador esté conectado a I nternet**
Assurez-vous que votre ordinateur est connecté à Internet **
Ihr Computer muss eine aktive Internet-Verbindung haben.**
4 Launch the Studio One Artist program by double-
clicking on its icon. The Activate Studio One menu will appear.
Ejecute el programa Studio One Artist pulsando dos veces en su icono. Aparecerá el menú “Activate Studio One”.
Lancez le programme Studio One Artist en double-cliquant sur son icône. Le menu Activate Studio One (activer Studio One) apparaîtra.
Starten Sie Studio One Artist durch Doppelklicken auf das Icon. Das Menü zum Aktivieren von Studio One wird angezeigt.
* You are also eligible for a discount if you upgrade to Studio One Pro when you are ready to master your work, create a digital version for the Web, or incorporate third-party VST plug-ins into your recording process. For more details on the Studio One Pro upgrade program for PreSonus customers, please visit www.presonus.com.
*También tiene derecho a un descuento si se actualiza a Studio One Pro cuando esté listo para masterizar su trabajo, crear una versión digital para la Web o incorporar plug-ins VST de terceras partes a su proceso de grabación. Para más detalles sobre el programa de actualización a Studio One Pro para clientes de PreSonus, por favor visite www.presonus.com.
*Vous avez aussi droit à une remise si vous faites une mise à niveau en Studio One Pro au moment de réaliser le master de votre travail, de créer une version numérique pour le Web ou d'incorporer des plug-ins VST de tierce partie dans votre processus d'enregistrement. Pour plus de détails sur le programme de mise à niveau Studio One Pro pour les clients PreSonus, veuillez vous rendre sur www.presonus.com.
*Wenn Sie Ihr Werk mastern wollen, eine digitale Version für das Internet erzeugen möchten oder VST-Plug-Ins von Drittanbietern in Ihre Aufnahmeprozesse einbinden wollen und dazu ein Upgrade auf Studio One Pro durchführen möchten, gewähren wir Ihnen außerdem einen Rabatt. Weitere Details zum Studio One Pro-Upgrade-Programm für PreSonus-Kunden finden Sie auf www.presonus.com.
** If your computer is not connected to the Internet, visit the Studio One product page at www.presonus.com on an Internet-connected computer to create your account. Once you have created a user account, launch Studio One Artist. From the Activate Studio One Menu, click on the Activate Offline link. Follow the instructions to log in to your previously created user account, register the product, and obtain a license file.
Next, copy the license file to the computer on which Studio One has been installed and locate the license file as instructed in the Activate Studio One menu. The activation process is now complete.
**Si su ordenador no está conectado a Internet, visite la página del producto Studio One en www.presonus.com en un ordenador que disponga de conexión a Internet para crear su cuenta. Una vez haya creado su cuenta de usuario, lance Studio One Artist. Desde el menú Activate Studio One, pulse en el enlace Activate Offline. Siga las instrucciones para iniciar sesión en su previamente creada cuenta de usuario, registre el producto, y obtenga un archivo de licencia.
A continuación, copie el archive de licencia en el ordenador donde ha instalado Studio One y coloque el archivo de licencia según las instrucciones en el menú Activate Studio One. El proceso de activación se habrá completado.
**Si votre ordinateur n’est pas connecté à Internet, visitez la page produit de Studio One sur www.preso-nus.com depuis un ordinateur connecté à Internet pour créer votre compte. Une fois que vous avez créé un compte utilisateur, lancez Studio One Artist. Dans le menu Activate Studio One (activer Studio One), cliquez sur le lien Activate Offline (activer hors ligne). Suivez les instructions pour vous connecter au compte
utilisateur précédemment créé, enregistrer le produit, et obtenir un fichier de licence.
Ensuite, copiez le fichier de licence sur l’ordinateur où a été installé Studio One et indiquez où il se trouve comme expliqué dans le menu Activate Studio One. Le processus d’activation est maintenant terminé.
**Wenn Ihr Computer keine Internet-Verbindung hat, besuchen Sie auf einem Computer mit Internet-Verbindung die Studio One-Produktseite unter www.presonus.com, um Ihr Konto einzurichten. Wenn Sie Ihr Benutzerkonto eingerichtet haben, starten Sie Studio One Artist. Klicken Sie im Menü „Activate Studio One“ (Studio One aktivieren) auf den Link „Activate Offline“ (Offline aktivieren). Befolgen Sie die Anwei-sungen, um sich bei Ihrem gerade angelegten Benutzerkonto anzumelden, das Produkt zu registrieren und eine Lizenzdatei zu erhalten.
Dann kopieren Sie die Lizenzdatei auf den Computer, auf dem Studio One installiert wurde, und geben gemäß der Beschreibung im Activate Studio One-Menü den Speicherort der Lizenzdatei an. Damit ist die Aktivierung abgeschlossen.
PreSonus 1Box™
12
Recording Made Easy with AudioBox™ and Studio One™ Artist
13
Installing Studio One Artist DD Installing Studio One Artist
5 To create a User Account, click on the Create User
Account link. You will be taken to PreSonus Registration.
Para crear una Cuenta de usuario (User Account), pulse en el enlace “Create User Account”. Esto le redirigirá al proceso de registro de PreSonus.
Pour créer un compte utilisateur (User Account), cliquez sur le lien Create User Account. Vous serez dirigé vers l'enregistrement PreSonus (Registration).
Zum Anlegen eines Benutzerkontos klicken Sie auf den Link „Create User Account“ (Benutzerkonto anlegen). Damit rufen Sie die PreSonus Registration auf.
6 Click Create New Account. An online form will appear.
Pulse en “Create New Account”. Aparecerá un formula-rio online.
Cliquez sur Create New Account (créer un nouveau compte). Un formulaire en ligne apparaîtra.
Klicken Sie auf „Create New Account“ (Neues Konto anlegen). Ein Online-Formular wird angezeigt.
7 Fill in the required information. Please be certain that
your email address is correct and that email from PreSo-nus will not be filtered or deleted by a spam filter or other software.
Rellene la información requerida. Por favor, asegúre-se de que su dirección de email es correcta, y que los emails de PreSonus no se filtrarán o borrarán por ningún filtro antispam u otro software.
Remplissez-le avec les informations requises. Veillez bien à ce que votre adresse e-mail soit correcte, et que les courriers venant de PreSonus ne soient pas filtrés ou supprimés par un filtre anti-spam ou autre logiciel.
Geben Sie die erforderlichen Daten ein. Die angegebene E-Mail-Adresse muss richtig sein. Außerdem darf die E-Mail, die Sie von PreSonus erhalten, nicht von einem Spam-Filter oder anderer Software herausgefiltert oder gelöscht werden.
8 Click "Submit."
Pulse en enviar (“submit”).
Cliquez sur Submit (sou-mettre).
Klicken Sie auf „Submit“ (Senden).
9 To verify your email address, an email from PreSonus
Registration will be automatically sent to the address you provided.
Para verificar su dirección de email, se le enviará un email desde PreSonus Registration de forma automática a la dirección que usted suministre.
Afin de vérifier votre adresse e-mail, un e-mail venant de PreSonus Registration sera automatiquement envoyé à l'adresse que vous avez indiquée.
Zur Überprüfung der Richtigkeit Ihrer E-Mail-Adresse erhalten Sie von PreSonus Registration automatisch eine E-Mail an die von Ihnen angegebene Adresse.
Write down the username and password.
Escriba su nombre de usuario y su contraseña.
Notez bien le nom d'utilisateur et le mot de passe.
Notieren Sie sich Benutzername und Passwort.
Username ___________________________ Nom d'utilisateur Benutzername
Password ___________________________ Mot de passe Passwort
Click on the link in this email to activate your account.
If you do not see the email within a few minutes of clicking on Submit, then it probably ended up in a spam folder or was deleted automatically by your email client. In this case, please contact Technical Support to have your account manually activated.
Pulse en el enlace de este email para activar su cuenta. Si no puede ver el email unos pocos minutos después de haber pulsado en “Submit”, seguramente habrá
acabado en alguna carpeta antispam, o se borró de forma automática por su cliente de emails. En este caso, por favor contacte con el soporte técnico (Technical Su-pport) para que le activen su cuenta de forma manual.
Cliquez sur le lien contenu dans cet e-mail pour activer votre compte. Si vous n'avez pas reçu l'e-mail quelques minutes après avoir cliqué sur Submit, c'est qu'il a probablement fini dans un dossier pour courriers indé-sirables (spam), ou a été automatiquement supprimé par votre logiciel de messagerie. Dans ce cas, veuillez contacter l'assistance technique pour faire activer manuellement votre compte.
Klicken Sie auf den Link in dieser E-Mail, um Ihr Konto zu aktivieren. Wenn die E-Mail nach dem Klicken auf „Submit“ nicht innerhalb weniger Minuten bei Ihnen eintrifft, wurde sie möglicherweise als Spam behandelt und/oder von Ihrem E-Mail-Client automatisch gelöscht. In diesem Fall wenden Sie sich an den technischen Sup-port, um Ihr Konto manuell aktivieren zu lassen.

PreSonus 1Box™
14
Recording Made Easy with AudioBox™ and Studio One™ Artist
15
D Installing Studio One Artist Installing Extras 0
Close your Web browser to reveal the Activate Studio
One menu.
Cierre su navegador web y aparecerá el menú de “Activate Studio One”.
Fermez votre navigateur web pour laisser apparaître le menu Activate Studio One (Activer Studio One).
Schließen Sie Ihren Browser. Daraufhin wird das Menü zum Aktivieren von Studio One eingeblendet.
Click on the Activate Online link and enter your previ-
ously created account username, your password, and the product key from your Studio One Artist installation disc.
Pulse sobre el enlace “Activate Online” e introduzca el nombre de usuario y la clave de su recién creada cuenta, además de la clave del producto (Product Key) que se encuentra en el disco de instalación de Studio One Artist.
Cliquez sur le lien Activate Online (activer en ligne) et saisissez le nom d'utilisateur (Username) et le mot de passe (Password) du compte précédemment créé ainsi que la clé de produit (Product Key) de votre disque d'installation Studio One Artist.
Klicken Sie auf den Link „Activate Online“ (Online aktivieren), und geben Sie den eingerichteten Benutzer-namen und das Passwort für das angelegte Konto sowie den Produktschlüssel von Ihrer Studio One Artist-Instal-lations-DVD ein.
Click on the "Activate" button to finish the activation
process.
Pulse sobre el botón “Activate” para finalizar el proceso de activación.
Cliquez sur le bouton Activate (activer) pour terminer le processus d'activation.
Klicken Sie auf „Activate“, um den Aktivierungsvorgang abzuschließen.
Your Studio One Artist DVD contains a wealth of instruments, loops, and samples for enhancing your recordings.
El DVD de Studio One Artist contiene una gran cantidad de instrumentos, loops y muestras para ayudarle y realzar su grabación.
Votre DVD Stu-dio One Artist contient une foule d'ins-truments, de boucles et d'échantillons pour améliorer vos enregistre-ments.
Ihre Studio One Artist-DVD enthält eine Vielzahl von Instrumenten, Loops und Samples zur Aufwertung Ihrer Aufnah-men.
Studio One Artist content can be installed at any time by ac-cessing the Help/Studio One Installation menu. If you choose not to install any portion of the content, you can install it at a later time.
El contenido de Studio One Artist puede instalarse en cual-quier momento accediendo al menú “Help/Studio One Insta-llation”. Si elije no instalar cualquier parte del contenido, puede instalarlo más tarde.
Le contenu de Studio One Artist peut être installé à tout mo-ment en accédant au menu d'installation Help/Studio One. Si vous choisissez de ne pas installer certains éléments fournis, vous pourrez les installer ultérieurement.
Diese Installation von Studio One Artist-Inhalt können Sie auch zu einem anderen Zeitpunkt vornehmen. Dazu gehen Sie zu Help/Studio One Installation. Wenn Sie keinerlei Inhalt instal-lieren möchten, können Sie dies später nachholen.
1 After Studio One Artist is installed and activated, the
Studio One Content Installer will appear. If it does not appear, navigate to Help/Studio One Installation.
Una vez haya instalado y activado Studio One Artist, aparecerá el instalador de contenidos de Studio One. Si no aparece, navegue hasta “Help/Studio One Installa-tion”.
Après que Studio One Artist ait été installé et activé, l'installateur de contenu Studio One apparaît. S'il n'ap-paraît pas, naviguez jusqu'à Help/Studio One Installa-tion.
Nach der Installation und Aktivierung von Studio One Artist wird der Studio One Content Installer angezeigt. Ist dies nicht der Fall, navigieren Sie zu Help/Studio One Installation.

PreSonus 1Box™
16
Recording Made Easy with AudioBox™ and Studio One™ Artist
17
Getting Ready to Record DD Installing Extras
2 At the top of the installation menu, select the source
from which the content will be installed, as well as the location where you wish to install the content. The source of the content will be the same DVD from which you installed Studio One Artist. By default, Studio One Artist will point to your DVD drive as the content source.
En la parte superior del menú de instalación, seleccio-ne la fuente desde la que se instalará el contenido, así como la ubicación en donde quiere instalar dicho conte-nido. La fuente del contenido será el mismo DVD desde el que instaló Studio One Artist. Por defecto, Studio One Artist apuntará a su unidad de DVD como fuente del contenido.
En haut du menu d'installation, sélectionnez la source à partir de laquelle le contenu sera installé, ainsi que l'emplacement où vous voulez l'installer. La source de contenu sera le même DVD que celui avec lequel vous avez installé Studio One Artist. Par défaut, Studio One Artist pointera vers votre lecteur de DVD comme source de contenu.
Wählen Sie im oberen Teil des Installationsmenüs die Quelle, von der die Inhalte installiert werden sollen, sowie den Ort, an dem die Installation erfolgen soll. Die Quelle ist die DVD, die Sie auch für die Installation von Studio One Artist verwendet haben. Von Studio One Artist wird standardmäßig Ihr DVD-Laufwerk als Quelle angegeben.
3 Listed in the installation menu are
separate entries for each available item. Click in the checkbox next to each item you wish to install.
En el menú de instalación aparece un listado con distintas entradas para cada artículo disponible. Mar-que la casilla de verificación junto a cada artículo que desee instalar.
Des rubriques séparées sont listées dans le menu d'ins-tallation pour chaque élément disponible. Cochez la case située en face de chaque élément que vous désirez installer.
Im Installationsmenü sind separate Einträge für jedes verfügbare Element aufgelistet. Klicken Sie in das Käst-chen neben den Elementen, die Sie installieren möch-ten.
4 Click on the "Install Packets" button at the bottom left
of the menu to install the selected content.
Pulse en el botón “Install Packets” en la parte inferior izquierda del menú para instalar el contenido seleccio-nado.
Cliquez sur le bouton Install Packets (installer paquets) en bas à gauche du menu pour installer le contenu sélectionné.
Klicken Sie auf „Install Packets“ (Pakete installieren) am linken unteren Rand des Menüs, um den ausgewählten Inhalt zu installieren.
5 When finished installing content, click on the "Done"
button to exit the menu.
Cuando termine de instalar el contenido, pulse sobre el botón “Done” para salir del menú.
Une fois le contenu installé, cliquez sur le bouton Done (terminé) pour quitter le menu.
Nach der Installation des Inhalts klicken Sie auf „Done“ (Fertig), um das Menü zu schließen..
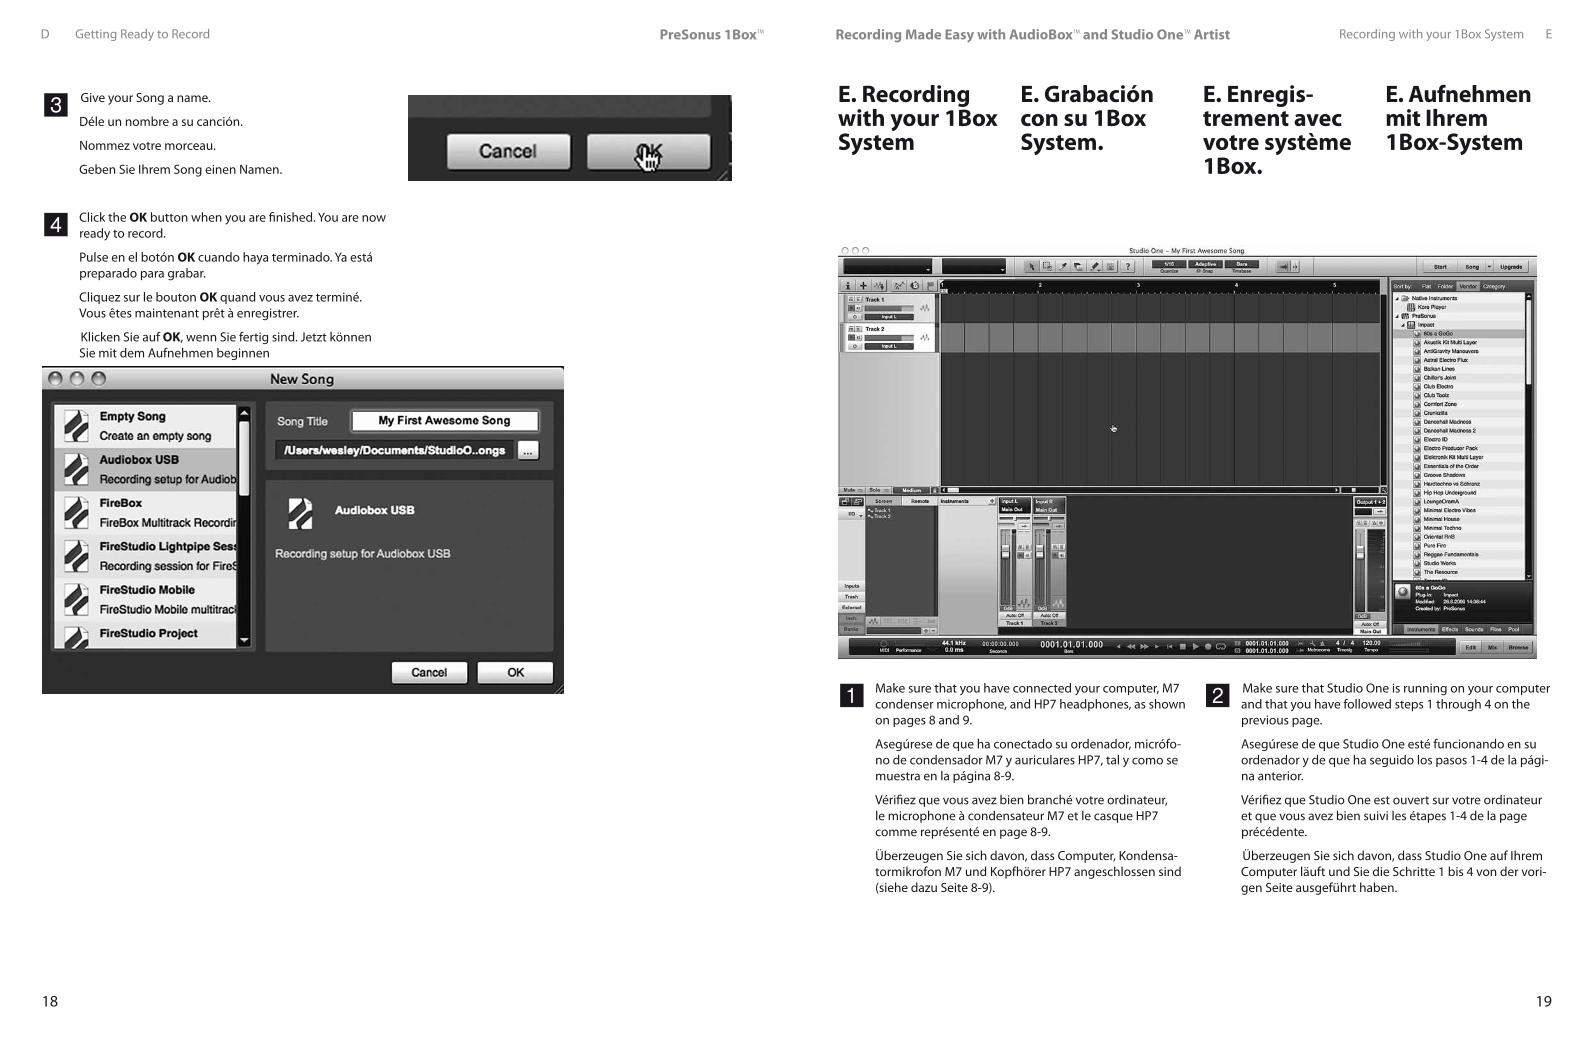
Getting Ready to Record, Part 2: AudioBox, Studio One Artist, and Your Computer Meet and Greet Let’s create a new Song and get ready to record.
Preparándose para grabar, 2ª Parte — AudioBox, Studio One Artist y su ordenador se conocen y saludan. Vamos a crear una nueva can-ción (new Song) y a preparar-nos para grabar.
Préparation à l'enregistre-ment, Partie 2 — AudioBox, Studio One Artist et votre ordinateur font connaissance. Créons un nouveau morceau (Song) et préparons-nous à l'enregistrement.
Bereit zum Auf-nehmen, Teil 2 — AudioBox, Studio One Artist und Ihr Computer neh-men Kontakt miteinander auf Beginnen wir gleich mit dem Aufnehmen eines neuen Songs.
1 From the Start page, select “Create a new Song.”
Desde la página “Start” (Inicio) seleccione “Create a new Song.”
Dans la page de démarrage, sélectionnez “Create a new Song” (créer un nouveau morceau).”
Wählen Sie auf der Startseite die Option „Create a new Song“ (Neuer Song).
2 To begin a new Song, select “AudioBox USB” from the
Templates list.
Para iniciar una nueva canción, seleccione “AudioBox USB” desde la lista de plantillas (“Templates”).
Pour commencer un nouveau morceau, sélectionnez “AudioBox USB” dans la liste des modèles (Templates).
Dann wählen Sie zunächst aus der Liste mit den Vorla-gen „AudioBox USB“.
PreSonus 1Box™
18
Recording Made Easy with AudioBox™ and Studio One™ Artist
19
Recording with your 1Box System ED Getting Ready to Record
3 Give your Song a name.
Déle un nombre a su canción.
Nommez votre morceau.
Geben Sie Ihrem Song einen Namen.
4 Click the OK button when you are finished. You are now
ready to record.
Pulse en el botón OK cuando haya terminado. Ya está preparado para grabar.
Cliquez sur le bouton OK quand vous avez terminé. Vous êtes maintenant prêt à enregistrer.
Klicken Sie auf OK, wenn Sie fertig sind. Jetzt können Sie mit dem Aufnehmen beginnen
E. Recording with your 1Box System
1 Make sure that you have connected your computer, M7
condenser microphone, and HP7 headphones, as shown on pages 8 and 9.
Asegúrese de que ha conectado su ordenador, micrófo-no de condensador M7 y auriculares HP7, tal y como se muestra en la página 8-9.
Vérifiez que vous avez bien branché votre ordinateur, le microphone à condensateur M7 et le casque HP7 comme représenté en page 8-9.
Überzeugen Sie sich davon, dass Computer, Kondensa-tormikrofon M7 und Kopfhörer HP7 angeschlossen sind (siehe dazu Seite 8-9).
2 Make sure that Studio One is running on your computer
and that you have followed steps 1 through 4 on the previous page.
Asegúrese de que Studio One esté funcionando en su ordenador y de que ha seguido los pasos 1-4 de la pági-na anterior.
Vérifiez que Studio One est ouvert sur votre ordinateur et que vous avez bien suivi les étapes 1-4 de la page précédente.
Überzeugen Sie sich davon, dass Studio One auf Ihrem Computer läuft und Sie die Schritte 1 bis 4 von der vori-gen Seite ausgeführt haben.
E. Enregis-trement avec votre système 1Box.
E. Grabación con su 1Box System.
E. Aufnehmen mit Ihrem 1Box-System
PreSonus 1Box™
20
Recording Made Easy with AudioBox™ and Studio One™ Artist
21
Recording with your 1Box System E E Recording with your 1Box System
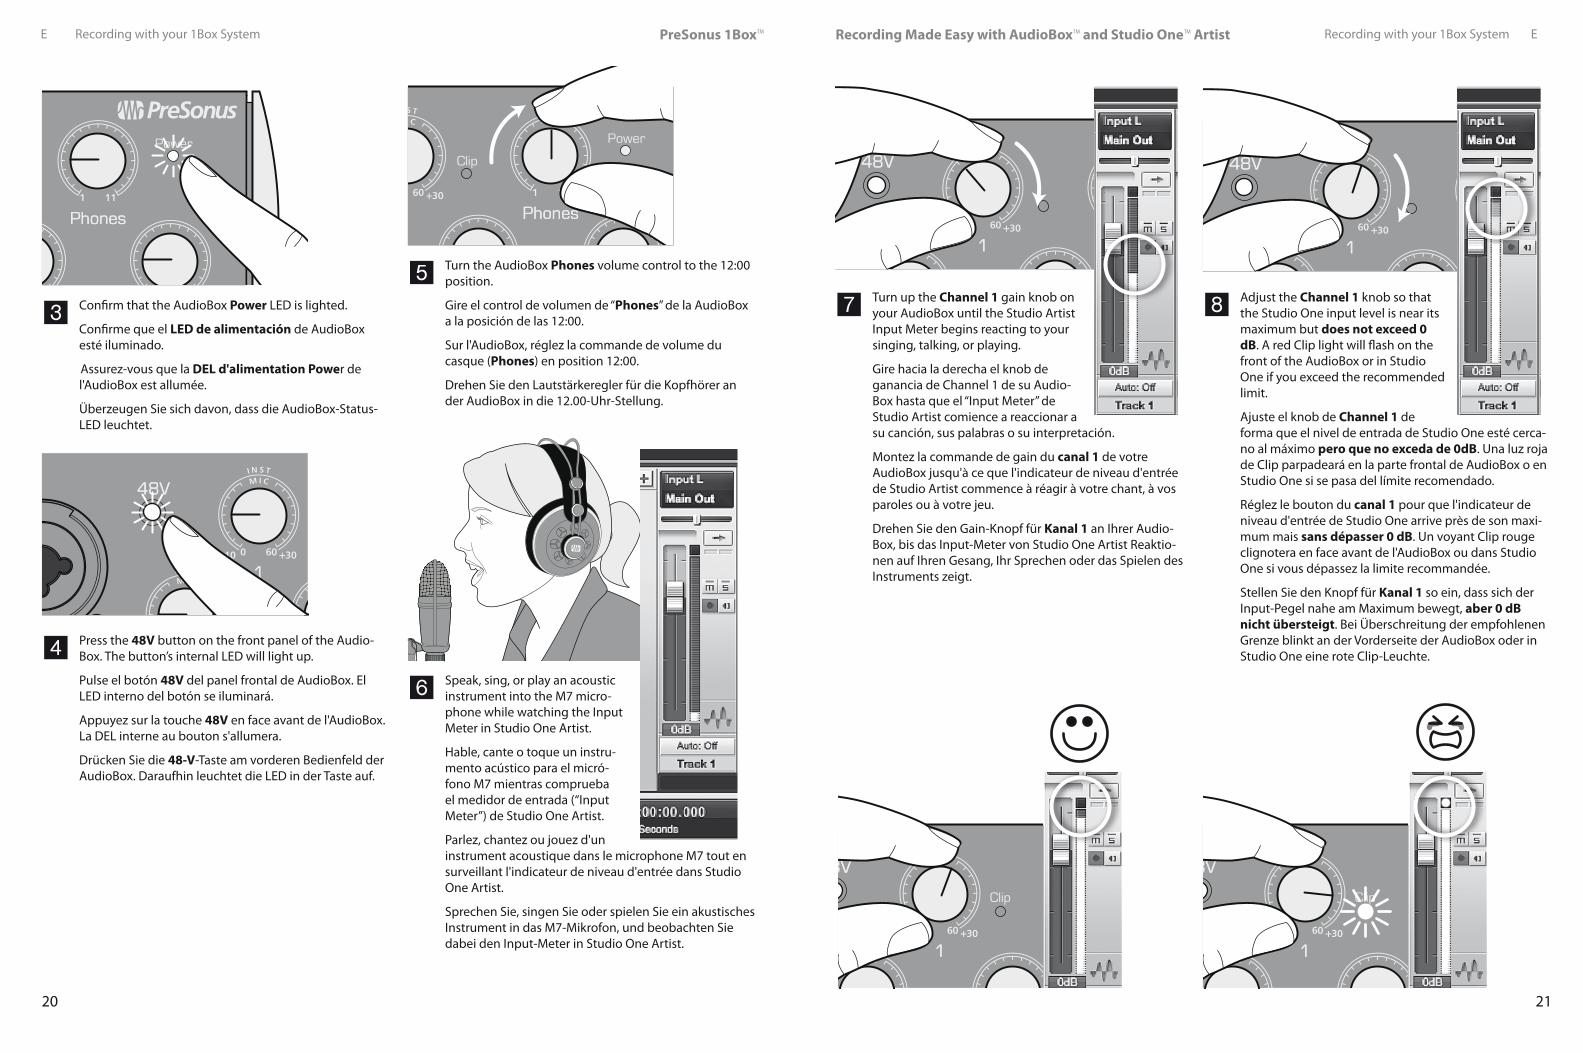
3 Confirm that the AudioBox Power LED is lighted.
Confirme que el LED de alimentación de AudioBox esté iluminado.
Assurez-vous que la DEL d'alimentation Power de l'AudioBox est allumée.
Überzeugen Sie sich davon, dass die AudioBox-Status-LED leuchtet.
4 Press the 48V button on the front panel of the Audio-
Box. The button’s internal LED will light up.
Pulse el botón 48V del panel frontal de AudioBox. El LED interno del botón se iluminará.
Appuyez sur la touche 48V en face avant de l'AudioBox. La DEL interne au bouton s'allumera.
Drücken Sie die 48-V-Taste am vorderen Bedienfeld der AudioBox. Daraufhin leuchtet die LED in der Taste auf.
5 Turn the AudioBox Phones volume control to the 12:00
position.
Gire el control de volumen de “Phones” de la AudioBox a la posición de las 12:00.
Sur l'AudioBox, réglez la commande de volume du casque (Phones) en position 12:00.
Drehen Sie den Lautstärkeregler für die Kopfhörer an der AudioBox in die 12.00-Uhr-Stellung.
6 Speak, sing, or play an acoustic
instrument into the M7 micro-phone while watching the Input Meter in Studio One Artist.
Hable, cante o toque un instru-mento acústico para el micró-fono M7 mientras comprueba el medidor de entrada (“Input Meter”) de Studio One Artist.
Parlez, chantez ou jouez d'un instrument acoustique dans le microphone M7 tout en surveillant l'indicateur de niveau d'entrée dans Studio One Artist.
Sprechen Sie, singen Sie oder spielen Sie ein akustisches Instrument in das M7-Mikrofon, und beobachten Sie dabei den Input-Meter in Studio One Artist.
7 Turn up the Channel 1 gain knob on
your AudioBox until the Studio Artist Input Meter begins reacting to your singing, talking, or playing.
Gire hacia la derecha el knob de ganancia de Channel 1 de su Audio-Box hasta que el “Input Meter” de Studio Artist comience a reaccionar a su canción, sus palabras o su interpretación.
Montez la commande de gain du canal 1 de votre AudioBox jusqu'à ce que l'indicateur de niveau d'entrée de Studio Artist commence à réagir à votre chant, à vos paroles ou à votre jeu.
Drehen Sie den Gain-Knopf für Kanal 1 an Ihrer Audio-Box, bis das Input-Meter von Studio One Artist Reaktio-nen auf Ihren Gesang, Ihr Sprechen oder das Spielen des Instruments zeigt.
8 Adjust the Channel 1 knob so that
the Studio One input level is near its maximum but does not exceed 0 dB. A red Clip light will flash on the front of the AudioBox or in Studio One if you exceed the recommended limit.
Ajuste el knob de Channel 1 de forma que el nivel de entrada de Studio One esté cerca-no al máximo pero que no exceda de 0dB. Una luz roja de Clip parpadeará en la parte frontal de AudioBox o en Studio One si se pasa del límite recomendado.
Réglez le bouton du canal 1 pour que l'indicateur de niveau d'entrée de Studio One arrive près de son maxi-mum mais sans dépasser 0 dB. Un voyant Clip rouge clignotera en face avant de l'AudioBox ou dans Studio One si vous dépassez la limite recommandée.
Stellen Sie den Knopf für Kanal 1 so ein, dass sich der Input-Pegel nahe am Maximum bewegt, aber 0 dB nicht übersteigt. Bei Überschreitung der empfohlenen Grenze blinkt an der Vorderseite der AudioBox oder in Studio One eine rote Clip-Leuchte.
PreSonus 1Box™
22
Recording Made Easy with AudioBox™ and Studio One™ Artist
23
E Recording with your 1Box System Recording with your 1Box System E
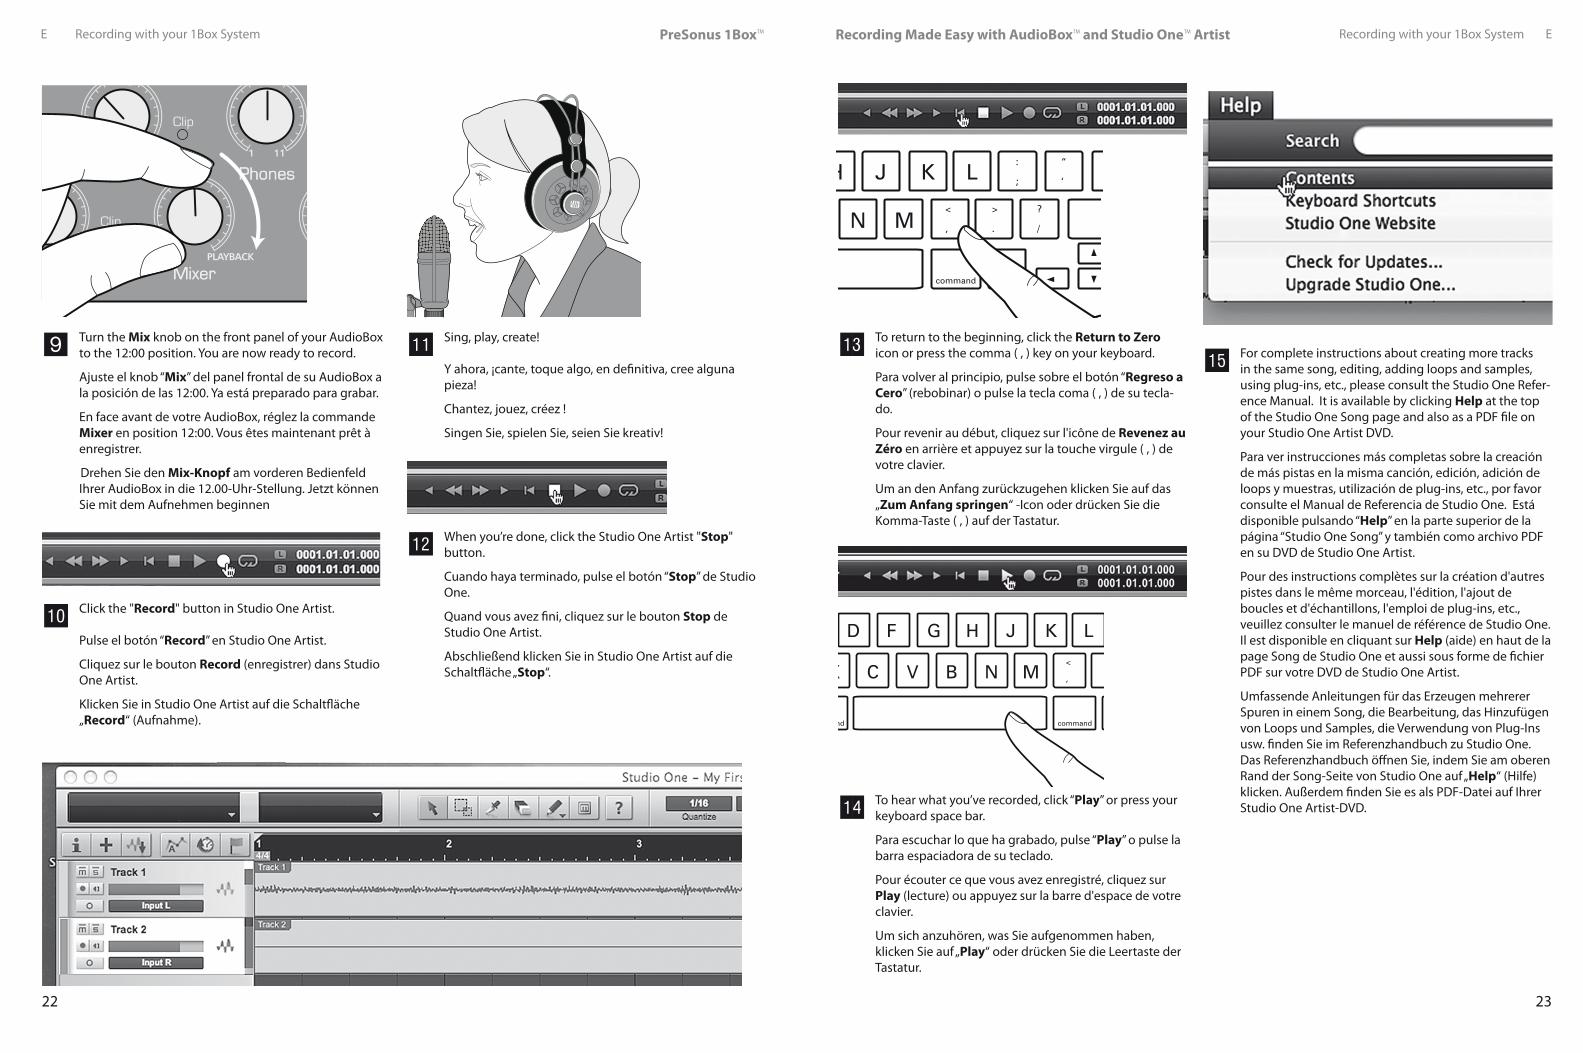
9 Turn the Mix knob on the front panel of your AudioBox
to the 12:00 position. You are now ready to record.
Ajuste el knob “Mix” del panel frontal de su AudioBox a la posición de las 12:00. Ya está preparado para grabar.
En face avant de votre AudioBox, réglez la commande Mixer en position 12:00. Vous êtes maintenant prêt à enregistrer.
Drehen Sie den Mix-Knopf am vorderen Bedienfeld Ihrer AudioBox in die 12.00-Uhr-Stellung. Jetzt können Sie mit dem Aufnehmen beginnen
Click the "Record" button in Studio One Artist.
Pulse el botón “Record” en Studio One Artist.
Cliquez sur le bouton Record (enregistrer) dans Studio One Artist.
Klicken Sie in Studio One Artist auf die Schaltfläche „Record“ (Aufnahme).
Sing, play, create!
Y ahora, ¡cante, toque algo, en definitiva, cree alguna pieza!
Chantez, jouez, créez !
Singen Sie, spielen Sie, seien Sie kreativ!
When you’re done, click the Studio One Artist "Stop"
button.
Cuando haya terminado, pulse el botón “Stop” de Studio One.
Quand vous avez fini, cliquez sur le bouton Stop de Studio One Artist.
Abschließend klicken Sie in Studio One Artist auf die Schaltfläche „Stop“.
, /.
< ? >
‘;
“ :
command option
N M
H J K L
To return to the beginning, click the Return to Zero
icon or press the comma ( , ) key on your keyboard.
Para volver al principio, pulse sobre el botón “Regreso a Cero” (rebobinar) o pulse la tecla coma ( , ) de su tecla-do.
Pour revenir au début, cliquez sur l'icône de Revenez au Zéro en arrière et appuyez sur la touche virgule ( , ) de votre clavier.
Um an den Anfang zurückzugehen klicken Sie auf das „Zum Anfang springen“ -Icon oder drücken Sie die Komma-Taste ( , ) auf der Tastatur.
, .
< >
command command
X C V B N M
D G H JF K L
To hear what you’ve recorded, click “Play” or press your
keyboard space bar.
Para escuchar lo que ha grabado, pulse “Play” o pulse la barra espaciadora de su teclado.
Pour écouter ce que vous avez enregistré, cliquez sur Play (lecture) ou appuyez sur la barre d'espace de votre clavier.
Um sich anzuhören, was Sie aufgenommen haben, klicken Sie auf „Play“ oder drücken Sie die Leertaste der Tastatur.
For complete instructions about creating more tracks
in the same song, editing, adding loops and samples, using plug-ins, etc., please consult the Studio One Refer-ence Manual. It is available by clicking Help at the top of the Studio One Song page and also as a PDF file on your Studio One Artist DVD.
Para ver instrucciones más completas sobre la creación de más pistas en la misma canción, edición, adición de loops y muestras, utilización de plug-ins, etc., por favor consulte el Manual de Referencia de Studio One. Está disponible pulsando “Help” en la parte superior de la página “Studio One Song” y también como archivo PDF en su DVD de Studio One Artist.
Pour des instructions complètes sur la création d'autres pistes dans le même morceau, l'édition, l'ajout de boucles et d'échantillons, l'emploi de plug-ins, etc., veuillez consulter le manuel de référence de Studio One. Il est disponible en cliquant sur Help (aide) en haut de la page Song de Studio One et aussi sous forme de fichier PDF sur votre DVD de Studio One Artist.
Umfassende Anleitungen für das Erzeugen mehrerer Spuren in einem Song, die Bearbeitung, das Hinzufügen von Loops und Samples, die Verwendung von Plug-Ins usw. finden Sie im Referenzhandbuch zu Studio One. Das Referenzhandbuch öffnen Sie, indem Sie am oberen Rand der Song-Seite von Studio One auf „Help“ (Hilfe) klicken. Außerdem finden Sie es als PDF-Datei auf Ihrer Studio One Artist-DVD.

PreSonus 1Box™
24
Recording Made Easy with AudioBox™ and Studio One™ Artist
25
Getting Help FF. Getting Help
F. ? ? ? ? ? ? There are many ways to get more help with 1Box, Audio-Box, and Studio One Artist.
F. ? ¿ ? ¿? ¿ Hay muchas maneras de conseguir ayuda con 1Box, AudioBox y Studio One Artist.
F. ? ? ? ? ? ? Il existe de nombreux moyens d'obtenir plus d'aide pour la 1Box, l'AudioBox et Studio One Artist.
F. ? ? ? ? ? ? Wenn Sie mehr Unterstüt-zung bei der Arbeit mit 1Box, AudioBox und Studio One Ar-tist benötigen, haben Sie eine Vielzahl von Möglichkeiten:
The entire Studio One Reference Manual is available by clicking Help in Studio One Artist.
Puede disponer el Manual de Referencia completo de Studio One pulsando en “Help” en Studio One Artist.
Le manuel de référence Studio One complet est disponible en cliquant sur Help (aide) dans Studio One Artist.
Das Referenzhandbuch zu Studio One rufen Sie auf, indem Sie in Studio One Artist auf „Help“ klicken.
Adobe
You can print out the manual from the PDF file on your Studio One Artist DVD.
Puede imprimir el manual desde el archive PDF que está en el DVD de Studio One Artist.
Vous pouvez imprimer le manuel depuis le fichier PDF présent sur votre DVD Studio One Artist.
Die PDF-Datei mit dem Handbuch auf Ihrer Studio One Artist-DVD können Sie ausdrucken.
© 2009, PreSonus Audio Electronics, Inc.
AudioBox USB
24 bit/48k Recording Interface
User’s Manual
Version 2.0
A complete English-language manual is provided for AudioBox.
Se ofrece un completo manual en lengua inglesa para Audio-Box.
Un mode d'emploi complet en anglais est fourni pour l'Audio-Box.
Für die AudioBox gibt es ein Handbuch in englischer Sprache.
We have prepared a video on how to use 1Box, available in English, French, German, and Spanish. Visit www.presonus.com/blog and look for “1Box: Recording Made Easy”.
Hemos preparado un video sobre cómo usar 1Box, disponible en inglés, francés, alemán y español. Visite www.presonus.com/blog y busque “1Box: Recording made easy” o sea, la grabación sin esfuerzo.
Nous avons préparé une vidéo sur la façon d'utiliser la 1Box, disponible en anglais, français, allemand et espagnol. Visitez www.presonus.com/blog et recherchez “1Box : l'enregistre-ment facile”.Wir haben ein Video zur Verwendung von 1Box gedreht. Dieses Video ist in englischer, französischer, deutscher und spanischer Sprache verfügbar. Besuchen Sie www.preso-nus.com/blog, und suchen Sie nach „1Box: Recording made easy“.
Visit www.presonus.com and select Knowledge Base from the TECHNICAL SUPPORT tab for answers to many commonly asked questions.
Visite www.presonus.com y seleccione la base de datos de conocimientos o “Knowledge Base” en la pestaña TECHNI-CAL SUPPORT para obtener respuestas a muchas preguntas frecuentes.
Visitez www.presonus.com et sélectionnez Knowledge Base (base de connaissances) dans l'onglet TECHNICAL SUPPORT (assistance technique) pour des réponses à de nombreuses questions fréquemment posées.
Besuchen Sie www.presonus.com, und wählen Sie unter TECHNICAL SUPPORT die Knowledge Base. Dort finden Sie Antworten auf viele häufig gestellte Fragen.
If all else fails…
In the USA: Call or email PreSonus Technical Support at 1-225-216-7887 or [email protected]
Outside the USA: Contact your PreSonus distributor.
Y si todo lo demás falla…Fuera de los EE.UU.: Contacte con su distribuidor de PreSonus.
Si tout cela échoue…En dehors des USA : contactez votre distributeur PreSonus.
IWenn Ihnen das alles nicht weiterhilft…Außerhalb der USA: Wenden Sie sich an Ihren PreSonus-Händler.
PreSonus 1Box™
26
Recording Made Easy with AudioBox™ and Studio One™ Artist
27
Warranty and Boring Fine Print G Adding a MIDI keyboard and monitor speakers
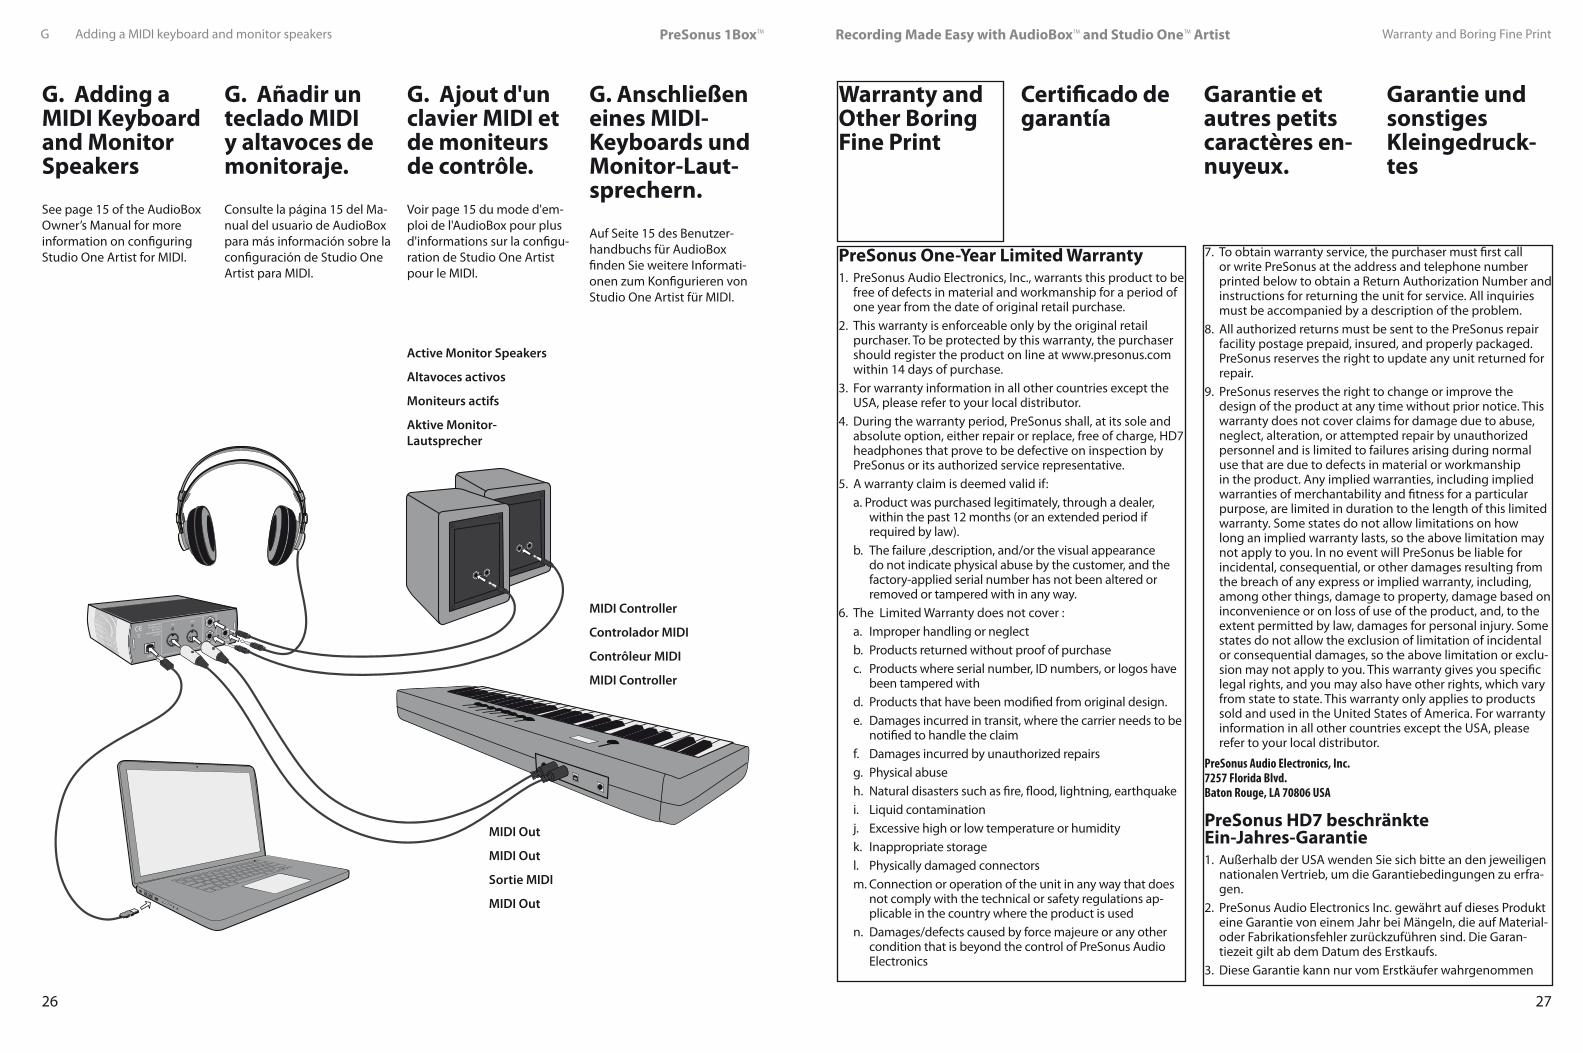
G. Adding a MIDI Keyboard and Monitor Speakers See page 15 of the AudioBox Owner’s Manual for more information on configuring Studio One Artist for MIDI.
G. Añadir un teclado MIDI y altavoces de monitoraje. Consulte la página 15 del Ma-nual del usuario de AudioBox para más información sobre la configuración de Studio One Artist para MIDI.
G. Ajout d'un clavier MIDI et de moniteurs de contrôle. Voir page 15 du mode d'em-ploi de l'AudioBox pour plus d'informations sur la configu-ration de Studio One Artist pour le MIDI.
G. Anschließen eines MIDI-Keyboards und Monitor-Laut-sprechern. Auf Seite 15 des Benutzer-handbuchs für AudioBox finden Sie weitere Informati-onen zum Konfigurieren von Studio One Artist für MIDI.
MIDI Out
MIDI Out
Sortie MIDI
MIDI Out
MIDI Controller
Controlador MIDI
Contrôleur MIDI
MIDI Controller
Active Monitor Speakers
Altavoces activos
Moniteurs actifs
Aktive Monitor-Lautsprecher
Warranty and Other Boring Fine Print
Certificado de garantía
Garantie et autres petits caractères en-nuyeux.
Garantie und sonstiges Kleingedruck-tes
PreSonus One-Year Limited Warranty1. PreSonus Audio Electronics, Inc., warrants this product to be
free of defects in material and workmanship for a period of one year from the date of original retail purchase.
2. This warranty is enforceable only by the original retail purchaser. To be protected by this warranty, the purchaser should register the product on line at www.presonus.com within 14 days of purchase.
3. For warranty information in all other countries except the USA, please refer to your local distributor.
4. During the warranty period, PreSonus shall, at its sole and absolute option, either repair or replace, free of charge, HD7 headphones that prove to be defective on inspection by PreSonus or its authorized service representative.
5. A warranty claim is deemed valid if:a. Product was purchased legitimately, through a dealer,
within the past 12 months (or an extended period if required by law).
b. The failure ,description, and/or the visual appearance do not indicate physical abuse by the customer, and the factory-applied serial number has not been altered or removed or tampered with in any way.
6. The Limited Warranty does not cover :a. Improper handling or neglectb. Products returned without proof of purchasec. Products where serial number, ID numbers, or logos have
been tampered withd. Products that have been modified from original design.e. Damages incurred in transit, where the carrier needs to be
notified to handle the claimf. Damages incurred by unauthorized repairsg. Physical abuseh. Natural disasters such as fire, flood, lightning, earthquakei. Liquid contaminationj. Excessive high or low temperature or humidityk. Inappropriate storagel. Physically damaged connectorsm. Connection or operation of the unit in any way that does
not comply with the technical or safety regulations ap-plicable in the country where the product is used
n. Damages/defects caused by force majeure or any other condition that is beyond the control of PreSonus Audio Electronics
7. To obtain warranty service, the purchaser must first call or write PreSonus at the address and telephone number printed below to obtain a Return Authorization Number and instructions for returning the unit for service. All inquiries must be accompanied by a description of the problem.
8. All authorized returns must be sent to the PreSonus repair facility postage prepaid, insured, and properly packaged. PreSonus reserves the right to update any unit returned for repair.
9. PreSonus reserves the right to change or improve the design of the product at any time without prior notice. This warranty does not cover claims for damage due to abuse, neglect, alteration, or attempted repair by unauthorized personnel and is limited to failures arising during normal use that are due to defects in material or workmanship in the product. Any implied warranties, including implied warranties of merchantability and fitness for a particular purpose, are limited in duration to the length of this limited warranty. Some states do not allow limitations on how long an implied warranty lasts, so the above limitation may not apply to you. In no event will PreSonus be liable for incidental, consequential, or other damages resulting from the breach of any express or implied warranty, including, among other things, damage to property, damage based on inconvenience or on loss of use of the product, and, to the extent permitted by law, damages for personal injury. Some states do not allow the exclusion of limitation of incidental or consequential damages, so the above limitation or exclu-sion may not apply to you. This warranty gives you specific legal rights, and you may also have other rights, which vary from state to state. This warranty only applies to products sold and used in the United States of America. For warranty information in all other countries except the USA, please refer to your local distributor.
PreSonus Audio Electronics, Inc.7257 Florida Blvd.Baton Rouge, LA 70806 USA
PreSonus HD7 beschränkte Ein-Jahres-Garantie1. Außerhalb der USA wenden Sie sich bitte an den jeweiligen
nationalen Vertrieb, um die Garantiebedingungen zu erfra-gen.
2. PreSonus Audio Electronics Inc. gewährt auf dieses Produkt eine Garantie von einem Jahr bei Mängeln, die auf Material- oder Fabrikationsfehler zurückzuführen sind. Die Garan-tiezeit gilt ab dem Datum des Erstkaufs.
3. Diese Garantie kann nur vom Erstkäufer wahrgenommen
PreSonus 1Box™
28
Recording Made Easy with AudioBox™ and Studio One™ Artist
29
Warranty and StuffWarranty and Stuff
werden. Dieser sollte den Kauf binnen 14 Tagen online unter www.presonus.com registrieren.
4. Während der Garantiedauer werden HD7-Kopfhörer, bei denen PreSonus oder von PreSonus autorisierte Service-Werkstätten einen Defekt feststellen, entweder kostenfrei repariert oder umgetauscht – die Entscheidung liegt dabei im Ermessen von PreSonus.
5. Ein Garantieanspruch ist berechtigt wenn:a. das Produkt innerhalb der zurückliegenden 12 Monate
erworben wurde (je nach nationaler Gesetzgebung ggf. davor).
b. die Fehlerbeschreibung und/oder der äußerliche Zustand nicht auf eine unsachgemäße Behandlung des Geräts schließen lässt und die werksseitig angebrachte Serien-nummer weder verändert, entfernt oder anderweitig manipuliert wurde.
6. Es besteht kein Garantieanspruch bei:a. unsachgemäßem oder fahrlässigem Umgang mit dem
Gerät.b. Geräten, die ohne Kaufbeleg eingeschickt wurden.c. Geräten, deren Seriennummer, Kennung oder Logo ma-
nipuliert wurde. d. Geräten, bei denen eigenmächtige Modifikationen
vorgenommen wurden.e. Transportschäden, für die nach erfolgter Meldung das
jeweilige Versandunternehmen haftbar zu machen ist.f. Schäden, die auf eigenmächtigen Reparaturversuchen
beruhen. g. Schäden, die auf physischer Gewalt beruhen.h. Schäden, die durch Naturkatastrophen wie Brände, Fluten,
Gewitter oder Erdbeben hervorgerufen wurden.i. Schäden, die durch Einwirkung von Flüssigkeit hervorg-
erufen wurden.j. Schäden, die durch Einwirkung von extrem hohen oder
niedrigen Temperaturen oder Feuchtigkeit hervorgerufen wurden.
k. Schäden, die auf unsachgemäßer Lagerung beruhen.l. mechanisch beschädigten Steckverbindern.m. Geräten, die entgegen der jeweiligen, national geltenden
Sicherheitsbestimmungen angeschlossen oder benutzt wurden.
n. Schäden/Defekten, die auf höherer Gewalt oder anderen Umstände beruhen, die PreSonus Audio Electronics nicht zu vertreten hat.
7. PreSonus behält sich das Recht vor, das Design des Geräts ohne Vorankündigung zu ändern oder zu verbessern. Diese Garantie gilt nur für Geräte, die innerhalb der Vereinigten Staaten von Amerika erworben wurden. Außerhalb der USA wenden Sie sich bitte an den jeweiligen nationalen Vertrieb, um die Garantiebedingungen zu erfragen.
PreSonus HD7 Garantie limitée d’un an1. Pour des informations sur la garantie dans tout autre pays
que les USA, veuillez vous référer à votre distributeur local.2. PreSonus Audio Electronics Inc. garantit ce produit contre
tout défaut de pièces et de fabrication pour une période d’un an à compter de la date de l’achat initial.
3. Cette garantie ne s’applique qu’à l’acquéreur initial. Pour bénéficier de cette garantie, l’acquéreur doit enregistrer le produit en ligne sur www.presonus.com dans les 14 jours suivant l’achat.
4. Durant la période de garantie, PreSonus devra, à sa seule et absolue discrétion, réparer ou remplacer gratuitement les écouteurs HD7 qui s’avéreront défectueux après inspection par PreSonus ou son représentant agréé pour le service après-vente.
5. Une demande de prise en charge sous garantie est considé-rée comme valable si :a. L’achat du produit a eu lieu lors des derniers 12 mois (ou
plus si une extension de période est requise par la loi) et légitimement auprès d’un revendeur.
b. La description de la panne et/ou l’aspect visuel n’indiquent pas de mauvais traitements physiques par le client et si le numéro de série apposé en usine n’a pas été changé, retiré ou maquillé d’une quelconque manière.
6. La garantie limitée ne couvre pas :a. Le maniement incorrect ou la négligence.b. Les produits retournés sans preuve d’achat.c. Les produits dont le numéro de série, les numéros d’identi-
fication ou logos ont été maquillés.d. Les produits dont la conception originale a été modifiée.e. Les dommages survenus durant le transport, dont le trans-
porteur doit être informé pour traiter la réclamation.f. Les dommages occasionnés par des réparations non
agréées.g. Les mauvais traitements physiques.h. Les catastrophes naturelles telles qu’incendie, inondation,
foudre, tremblement de terre.i. La dégradation par un liquide.j. Une température ou une humidité excessivement élevées
ou basses.k. Un rangement inadapté.l. Les connecteurs physiquement endommagés.m. La connexion ou l’emploi de l’unité d’une façon quel-
conque ne se conformant pas aux réglementations techniques ou de sécurité applicables dans le pays où le produit est utilisé.
n. Les dommages/défauts causés par une force majeure ou toute autre cause hors du champ de contrôle de PreSonus Audio Electronics.
7. PreSonus se réserve le droit de changer ou d’améliorer la conception du produit à tout moment sans préavis. Cette garantie ne s’applique qu’aux produits vendus et utilisés aux U.S.A. Pour des informations sur la garantie dans tout autre pays que les USA, veuillez vous référer à votre distri-buteur local.
PreSonus HD7 Garantía Limitada de un Año1. Por información sobre garantía en todos los demás países,
excepto Estados Unidos, por favor consulte a su distribuidor local.
2. Audio PreSonus Electronics Inc. garantiza este producto a ser libre de defectos en materiales y en su construcción durante un período de un año a partir de la fecha original de compra.
3. Esta garantía es exigible sólo por el comprador minorista original. Para ser protegidos por la garantía, el comprador deberá registrar el producto en línea en www.presonus.com dentro de 14 días de compra.
4. Durante el período de garantía PreSonus deberá, en su única y absoluta opción, reparar o reemplazar, sin costo alguno, aquellos auriculares HD7 que resulten defectuosos en la inspección de PreSonus o de sus representantes de servicio autorizados
5. Un reclamo por garantía se considerara valido si:a. La compra del producto tuvo lugar dentro de los doce (12)
meses (o periodo extendido si es requerido por la ley) y comprado legítimamente a través de un comercio.
b. La descripción de la falla y/o la apariencia visual no indi-quen maltrato por parte del consumidor y el número de serie aplicado por el fabricante no ha sido alterado, remo-vido o manipulado de ninguna forma.
6. La garantía limitada no cubre :a. Manipulación indebida o negligenciab. Productos devueltos sin prueba o evidencia de comprac. Productos donde, números de identificación o logos han
sido manipulados.d. Productos que han sido modificados en su diseño originale. Daños provocados en tránsito, donde el transportista
necesita ser notificado a fin de manejar el reclamo.f. Daños provocados por reparaciones no autorizasg. Maltratoh. Desastres naturales tales como fuego, inundaciones, de-
scargas eléctricas de rayos, terremotos.i. Contaminación por líquidosj. Excesiva alta o baja temperatura o humedad.k. Almacenaje inapropiado.l. Conectores dañados.m. Conexión u operación de la unidad en cualquier forma que
no cumpla con las regulaciones técnicas o de seguridad aplicables en el país en donde es usado el producto.
n. Daños/defectos causados por fuerza mayor o cualquier condición que este mas allá del control de PreSonus Audio Electronics.
7. PreSonus se reserve el derecho de cambiar o mejorar el diseño del producto en cualquier momento sin notificación previa. Esta garantía solamente es aplicable a productos usados y comercializados en los Estados Unidos de América. Por información sobre garantía en todos los demás países, excepto USA, por favor diríjase a su distribuidor local.
EU directives on the protection of the environment RoHS. This product is compliant with the EU Directive 2002/95/EG for the Restriction of the Use of Certain Hazard-ous Substances in Electrical and Electronic Equipment. No Lead (Pb), Cadmium (Cd), Mercury (Hg), Hexavalent Chromium (Cr+6), PBB or PBDE is intentionally added to this device. Any traces of impurities of these substances contained in the parts are below the RoHS specified threshold levels.
REACh. This product is compliant with the European Union Directive EC1907/206 for the Registration, Evaluation, Authori-zation and Restriction of chemicals (REACh), and contains none or less than 0.1% of the chemicals listed as hazardous chemi-cals in the REACh regulation.
WEEE. Within the disposal of old electrical and electronic equipment this product is not to be treated as regular household waste. Instead it shall be handed over to the applicable collection point for the recycling of electrical and electronic equipment.
CE . This product complies with the European Union Council Directives and Standards relating to electromagnetic compat-ibility (EMC Directive 89/336/EEC) and the Low Voltage Direc-tive (73/23/EEC).
EU Richtlinien zum Schutz der Umwelt RoHS. Das Produkt enthält keine der folgenden Stoffe in Konzentrationen oder Anwendungen, deren in Verkehrbringen in Produkten entsprechend den geltenden Anforderungen der Richtlinie 2002/95/EG (RoHS) verboten ist: Blei, Cadmium, Quecksilber, sechswertiges Chrom, polybromierte Biphenyle (PBB) und polybromierte Diphenylether (PBDE).
REACh. Dieses Gerät entspricht den Anforderungen der EU-Verordnung zur Registrierung <http://de.wikipedia.org/wiki/Chemikalien-Registrierung/oChemikalien-Registrierung> , Bewertung, Zulassung und Beschränkung chemischer Stoffe und enthält keinen oder nicht mehr als 0,1% der Chemikalien, die in der entsprechenden Verordnung aufgelistet sind.
WEEE. Im Rahmen der Entsorgung von gebrauchten elek-tronischen Geräten ist dieses Produkt nicht als normaler Haushaltsabfall zu behandeln, sondern muss an einer Annahmestelle für das Recycling von elektrischen und elektronischen Geräten abgegeben werden.
CE. Dieses Gerät stimmt mit den Normen oder normativen Dokumenten der folgenden Richtlinien überein: 2004/108/EG (Elektromagnetische Verträglichkeit von Elektro- und Elektroni-kprodukten) und 2006/95/EG (Niederspannungsrichtlinie).
PreSonus 1Box™
30
Recording Made Easy with AudioBox™ and Studio One™ Artist
31
None of the AboveWarranty and Stuff
Directivas Europeas para la protección del Medio AmbienteRoHS. Este producto cumple con la Directiva Europea 2002/95/EG para la Restricción en el uso de ciertas Substancias Peligrosas en Equipamientos Eléctricos y Electrónicos. No se ha añadido intencionadamente Plomo (Pb), Cadmio (Cd), Mercu-rio (Hg), Cromo hexavalente (Cr+6), PBB o PBDE. Cualquier indi-cio de estas sustancias contenidas en las piezas del producto están por debajo de los niveles especificados por RoHS.
REACh. Este producto cumple con la Directiva de la Unión Europea EC1907/206 para el Registro, Evaluación, Autorización y Restricción de productos químicos (REACh) y el contenido de productos químicos listados por Reach es nulo o inferior al 0.1%.
WEEE. En el proceso de desecho de viejos aparatos eléctricos y electrónicos, este producto no debe tratarse como un residuo doméstico habitual. Sino que debe entregarse en el correspondiente punto de recogida para el reciclaje de aparatos eléctricos y electrónicos.
CE. Este producto cumple con las Directivas y Estándares del Consejo de la Unión Europea en relación a la compatibilidad electromagnética (Directiva EMC 89/336/EEC) y la Directiva de Bajo Voltaje (73/23/EEC).
Directives de l’UE sur la protection de l’environnement RoHS. Ce produit est conforme à la directive européenne 2002/95/EG sur la restriction de l’usage de substances dan-gereuses dans les équipements électriques et électroniques. Aucun Plomb (Pb), Cadmium (Cd), Mercure (Hg), Chrome Héxavalent (Cr+6), PBB ou PBDE n’a été intentionnellement ajouté à cet appareil. Toute trace d’impureté de ces substances contenues dans les composants sont en dessous du seuil certifié ROHS.
REACh. Ce produit est conforme à la directive européenne EC1907/206 sur l’enregistrement, l’évaluation, l’autorisation et la restriction des produits chimiques (REACh), et ne contient pas ou moins de 0.1% des produits chimiques listés comme dangereux par la réglementation REACh.
WEEE. Lors de l’élimination des vieux produits électriques ou électroniques ; ce produit ne doit pas être traité comme un temps limité.”>un déchet ménager conventionnel. En conséquence, il doit être remis à un organisme de collecte compétent pour le recyclage de produits électroniques et électriques.
CE. Ce produit est conforme aux directives et aux normes du Conseil de l’Union Européenne relatifs à la compatibilité électromagnétique (EMC Directive 89/336/EEC) et à la direc-tive sur les basses tensions (73/23/EEC).Directives de l’UE sur la protection de l’environnement
©2010 PreSonus Audio Electronics, Inc., All Rights Reserved. AudioBox is a trademark of PreSonus Audio Electronics, Inc. Studio One is a trademark of PreSonus, Ltd. Mac is a registered trademark of Apple, Inc. Windows and Vista are registered trademarks of Microsoft.
P/N 825-1BX0013-A©2010 PreSonus Audio Electronics, Todos los derechos reservados. AudioBox y Studio One son marcas registradas de PreSonus Audio Electronics. Mac es una marca registrada de Apple, Inc. Windows y Vista son marcas registradas de Microsoft.
©2010 PreSonus Audio Electronics, tous droits réservés. AudioBox et Studio One sont des marques commer-ciales de PreSonus Audio Electronics. Mac est une marque déposée d'Apple, Inc. Windows et Vista sont des marques déposées de Microsoft.
©2010 PreSonus Audio Electronics, Alle Rechte vorbehalten. AudioBox und Studio One sind Marken von PreSonus Audio Electronics. Mac ist eine eingetragene Marke von Apple, Inc. Windows und Vista sind eingetragene Marken von Microsoft.
Added bonus: PreSonus' previously Top Secret recipe for…
JambalayaIngredients: • 5 lbs link andouille sausage • 3 lbs boneless chicken • 2 lbs ground beef • 3 lbs onions (yellow or purple) • 2 stalks of celery • 1 lb bell peppers (green or red) • 1 batch green onions • 3 lbs rice • Tony Chachere’s Cajun Seasoning • 1 bottle chicken stock concentrate (or 3 cubes chicken bullion) • 1 can Rotel tomotoes with chilies, diced (regular hot) • Tabasco sauce
Cooking Instructions:1. In a 16 qt. pot or larger, slice link sausage and pan-fry until brown.
2. Add ground beef and brown.
3. Do not remove from pot. Add diced onions, celery, and bell pep-pers, 1 can Rotel Original diced tomatoes w/chilies, 3 oz concen-trate chicken stock, ½ teaspoon of Cajun seasoning, 1 teaspoon of Tabasco hot sauce (or more…maybe lots more).
4. Cook until onions are translucent.
5. Add chicken and cook until it turns white.
6. Add diced green onions, 1 tsp. salt, ½ gallon water and bring to a boil.
7. Add rice and bring to a boil. Cook on high for 8 minutes, covered, stirring every 2 minutes
8. Cook covered on low for 10 minutes, stirring only once.
9. Turn off and let sit for 30 minutes.
10. Serve and enjoy!
Serves 20
www.presonus.com
™
7257 Florida Boulevard Baton Rouge, Louisiana 70806 USA • 1+ 225.216.7887
1BOX™
Kit completo de hardware/software de grabación
Complete Hardware/Software Recording Kit
EMC Statement:NOTE: This equipment has been tested and found to comply with the limits for a Class B digital device, pursuant to part 15 of the FCC Rules. These limits are designed to provide reasonable protection against harmful interference in a residential installation. This equipment generates, uses, and can radiate radio frequency energy and, if not installed and used in accordance with the instructions, may cause harmful interference to radio communications. However, there is no guarantee that interference will not occur in a particular installation. If this equipment does cause harmful interference to radio or television reception, which can be determined by turning the equipment off and on, the user is encouraged to try to correct the interference by one or more of the following measures:
• Reorient or relocate the receiving antenna.
• Increase the separation between the equipment and the receiver.
• Connect the equipment into an outlet on a circuit different from that to which the receiver is connected.
• Consult the dealer or an experienced radio/TV technician for help.
CAUTION: Changes or modifications to this device not expressly approved by PreSonus Audio Electronics could void the user’s authority to operate the equipment under FCC rules.
This apparatus does not exceed the Class A/Class B (whichever is applicable) limits for radio noise emissions from digital apparatus as set out in the radio interference regulations of the Canadian Department of Communications.
ATTENTION — Le présent appareil numérique n’émet pas de bruits radioélectriques dépassant las limites applicables aux appareils numériques de class A/de class B (selon le cas) prescrites dans le réglement sur le brouillage radioélectrique édicté par les ministere des communications du Canada.
Kit matériel/logiciel complet pour l'enregistrement
Komplettes Hard-ware-/Software- Recording-Kit