BMW M62TU Vanos Valve Timing Unit Removal and Repair
59
BMW M62TU Vanos Valve Timing Unit Removal and Repair Proper service and repair procedures are vital to the safe, reliable operation of all motor vehicles as well as the personal safety of those performing the repairs. Standard safety procedures and precautions (including use of safety goggles and proper tools and equipment) should be followed at all times to eliminate the possibility of personal injury or improper service which could damage the vehicle or compromise its safety.
-
Upload
khangminh22 -
Category
Documents
-
view
2 -
download
0
Transcript of BMW M62TU Vanos Valve Timing Unit Removal and Repair

BMW M62TUVanos Valve Timing UnitRemoval and Repair
Proper service and repair procedures are vital to the safe, reliable operation of all motor vehicles as well as the personal safety of those performing the repairs. Standard safety procedures and precautions (including use of safety goggles and proper tools and equipment) should be followed at all times to eliminate the possibility of personal injury or improper service which could damage the vehicle or compromise its safety.

2Table of ContentsWWW.ECSTUNING.COM© 2018 ECS TUNING 1000 SEVILLE RD. WADSWORTH, OH 44281 1.800.924.5172
BMW M62TU VANOS REMOVAL AND REPAIR ES#3410414
ECS Difficulty Gauge
I I I I I I I I I
I I I I
I I I
I I I I I
I I I I I I I I I I I I I I I I I I I I I I
1
2 4
3
Advanced - 3
Pro - 4
2 - Moderate
1 - Easy
BMW’s Vanos variable valve timing system is one of the most recognized systems in the industry. There are a number of different designs, and they all work off of ingeniously simple mechanical principals. Their notoriety, however, is not likely to be from their design and performance, but more so from the fact that they frequently wear out. Luckily, the majority of the problems are caused by worn seals, which can easily be replaced. Today we’re going to be installing our rebuild kit into the Vanos units that are found in the 8 cylinder M62TU engines. One of the symptoms of Vanos malfunction is the well known “Vanos rattle”. In the case of the M62TU engines, it’s caused by a loose Vanos seal carrier which is housed inside the Vanos unit itself. The only way to remedy this problem is to replace the seals and crimp down the outer lip of the Vanos unit to secure the seal carrier in place, and we now offer a special crimping tool that will allow you to successfully complete this repair. Installing the rebuild kit into your M62TU Vanos may seem a little daunting at first, but it’s really a fairly easy project, and it’ll restore smooth, consistent performance, some of which you may not even realize you’ve lost.
You'll want to take your time on this project, and it’s best to plan a couple days for it so you don’t try to rush through it. The best advice, as always, is to read through these instructions first to familiarize yourself with the job and make sure you have all of the required tools on hand. This job will require specific engine timing tools - see Page 6. There is no work-around or "trick" method available. These tools are a must have for the job.
One more thing, you’ll see that we don’t get too in-depth with our instructions until we get down to the Vanos unit itself. We list everything that you'll need to remove, but the disassembly up to that point is fairly routine, and we’re confident you can handle it.
Thank you for looking to ECS Tuning for all your performance and repair needs, we appreciate your business!
BMW M62TU Vanos Removal and Repair
INTRODUCTION

3WWW.ECSTUNING.COM© 2018 ECS TUNING 1000 SEVILLE RD. WADSWORTH, OH 44281 1.800.924.5172
BMW M62TU VANOS REMOVAL AND REPAIR ES#3410414
M62TU Vanos Rebuild Components .......................................................................pg.4
Required Tools and Equipment ................................................................................pg.5
Special Tools ....................................................................................................................pg.6
Shop Supplies and Materials .....................................................................................pg.7
Installation and Safety Information ........................................................................pg.8
Vanos Theory and Operation ....................................................................................pg.9
Accessing the Vanos Units .........................................................................................pg.18
Vanos Timing and Repair ............................................................................................pg.20
Rebuilding the Vanos Units .......................................................................................pg.33
Crimping the Vanos Housing ....................................................................................pg.44
Reassembly ......................................................................................................................pg.49
Torquing Tips ..................................................................................................................pg.56
Torque Specifications ...................................................................................................pg.57
Schwaben Tools .............................................................................................................pg.58
This water pump and fan clutch tool kit will make disassembly much easier - ES#2627584
This Vanos and Cam Timing Tool Kit is required for the job (see page 6) - ES#3188300
This Vanos Press tool is required (see page 6) - ES#3241167
TABLE OF CONTENTS

4Table of ContentsWWW.ECSTUNING.COM© 2018 ECS TUNING 1000 SEVILLE RD. WADSWORTH, OH 44281 1.800.924.5172
BMW M62TU VANOS REMOVAL AND REPAIR ES#3410414
Vanos Unit Seals- Required -ES#3183388
Vanos Repair Sealing Kit- Optional but recommended -
ES#3515087Includes:
• Valve cover gasket set• Vanos solenoid gaskets• Upper timing cover gaskets• Timing cover gasket w/
flange• Non-return valve• All required o-rings• "Right Stuff" gasket maker
Valve Cover Gasket Set- Optional -ES#257203
Includes:• Valve cover gasket set
ONLY
Vanos & Timing Tool Kit- Required for Vanos R&R -
ES#3188300Includes:
• Camshaft locking blocks
• Flywheel locking pin• Timing chain tension
block• Upper chain tension
locks• Timing wheel
alignment tools• Vanos adjustment
socket• Vanos solenoid socket
Vanos Crimping Tool- Required for Anti Rattle
Repair -ES#3241167
Includes:• Press cup• Press plate• Press bolt
Timing Chain Tensioner Kit- Optional -
ES#3515088Includes:
• Upper and lower timing chain tensioners
Teflon™ Coated Distribution Housings And Sealing Ring Kit- Optional -
ES#3515090Includes:
• Both distribution housings and all camshaft o-rings
1. Select your seals: 3. Select your tools:2. Select your additional replacement parts:
M62TU VANOS REBUILD COMPONENTS View our Dynamic Kit (ES#3410414) and select from multiple options

5Table of ContentsWWW.ECSTUNING.COM© 2018 ECS TUNING 1000 SEVILLE RD. WADSWORTH, OH 44281 1.800.924.5172
BMW M62TU VANOS REMOVAL AND REPAIR ES#3410414
• Protecta-Sockets (for lug nuts) ........................................................ES#2221243• 3/8” Drive Ratchet ....................................................................... ES#2765902• 3/8” Drive Torque Wrench ....................................................... ES#2221245• 3/8” Drive Deep and Shallow Sockets ................................. ES#2763772• 3/8” Drive Extensions ................................................................ ES#2804822• Hydraulic Floor Jack ................................................................ ES#240941• Torx Drivers and Sockets ...............................................................ES#11417/8• 1/2” Drive Deep and Shallow Sockets ................................. ES#2839106• 1/2” Drive Ratchet• 1/2” Drive Extensions• 1/2” Drive Torque Wrench........................................................ ES#2221244• 1/2” Drive Breaker Bar ............................................................... ES#2776653• File Set• Air Nozzle/Blow Gun• Bench Mounted Vise• Crows Foot Wrenches• Hook and Pick Tool Set ........................................................... ES#2778980
• 1/4” Drive Ratchet ...................................................................................ES#2823235• 1/4” Drive Deep and Shallow Sockets ...................................... ES#2823235• 1/4” Drive Extensions .................................................................... ES#2823235• 1/4” Drive Torque Wrench• Plier and Cutter Set ..................................................................... ES#2804496• Flat and Phillips Screwdrivers .....................................................ES#2225921• Jack Stands ...........................................................................................ES#2763355• Ball Pein Hammers• Pry Bar Set ...............................................................................................ES#1899378• Electric/Cordless Drill• Wire Strippers/Crimpers• Adjustable (Crescent) Type Wrenches• Drill Bits• Punch and Chisel Set• Hex Bit (Allen) Wrenches and Sockets ..........................................ES#11420• Thread Repair Tools .............................................................................ES#1306824• Open/Boxed End Wrench Set .......................................................ES#2765907
• Vanos & Timing Tool Kit ....................................................................ES#3188300• Vanos Crimping Tool .........................................................................ES#3241167• 27mm Socket ........................................................................................ES#2702840• 27mm Open End Wrench
REQUIRED TOOLS Note: The tools required for each step will be listed by the step number throughout these instructions.
Standard Automotive Tools Available On Our WebsiteRequired For This Install
Specialty Tools

6Table of ContentsWWW.ECSTUNING.COM© 2018 ECS TUNING 1000 SEVILLE RD. WADSWORTH, OH 44281 1.800.924.5172
BMW M62TU VANOS REMOVAL AND REPAIR ES#3410414
Camshaft Locking Blocks
Camshaft Timing Wheel Alignment Fixtures
Vanos Lip Crimping Tool ES#3241167
Crankshaft Locking Pin
Vanos Solenoid Socket
Timing Chain Tensioning Screw
Tensioning Screw Block
900 Crankshaft Locking Pin
Exhaust Cam Chain Tensioner Locking Pins
Vanos Hub Rotating Tool
SPECIAL TOOLS Note: All tools in RED text are available as a complete M62TU Timing Tool Kit (ES#3188300).

7Table of ContentsWWW.ECSTUNING.COM© 2018 ECS TUNING 1000 SEVILLE RD. WADSWORTH, OH 44281 1.800.924.5172
BMW M62TU VANOS REMOVAL AND REPAIR ES#3410414
Standard Shop Supply Recommendations: We recommend that you have a standard inventory of automotive shop supplies before beginning this or any automotive repair procedure. The following list outlines the basic shop supplies that we like to keep on hand. Shop supplies with a hyperlink are available on our website.
• Hand Cleaner/Degreaser - Click Here• Pig Mats - for protecting your garage floor and work area from spills and stains - Click Here• Spray detailer - for rapid cleaning of anything that comes into contact with your paint such as brake fluid - Click Here• Micro Fiber Towels - for cleaning the paint on your car - Click Here• Latex Gloves - for the extra oily and dirty jobs - Click Here• Medium and High Strength Loctite Thread lock compound - to prevent bolts from backing out - Click Here• Anti-Seize Compound - to prevent seizing, galling, and corrosion of fasteners - Click Here• Aerosol Brake/Parts Cleaner - for cleaning and degreasing parts• Shop Rags - used for wiping hands, tools, and parts• Penetrating oil - for helping to free rusted or stuck bolts and nuts• Mechanics wire - for securing components out of the way• Silicone spray lube - for rubber components such as exhaust hangers• Paint Marker - for marking installation positions or bolts during a torquing sequence• Plastic Wire Ties/Zip Ties - for routing and securing wiring harnesses or vacuum hoses• Electrical tape - for wrapping wiring harnesses or temporary securing of small components
SHOP SUPPLIES AND MATERIALS
8Table of ContentsWWW.ECSTUNING.COM© 2018 ECS TUNING 1000 SEVILLE RD. WADSWORTH, OH 44281 1.800.924.5172
BMW M62TU VANOS REMOVAL AND REPAIR ES#3410414
NEVER get underneath a vehicle that is supported only by a jack, andALWAYS make sure that the vehicle is securely supported on jack stands.
• RH refers to the passenger side of the vehicle.• LH refers to the driver side of the vehicle.• Always use the proper torque specifications.• If applicable to this installation, torque specifications will be listed throughout the document and at the end as well.• Please read all of these instructions and familiarize yourself with the complete process BEFORE you begin.
• Park your car in a safe, well lit, level area.• Shut the engine off and remove the key from the ignition switch.• Make sure any remote start devices are properly disabled.• ALWAYS wear safety glasses.• Make sure the parking brake is applied until the vehicle is safely lifted and supported.• If using an automotive lift, be sure and utilize the factory specified lift points. Lifting a vehicle in an incorrect location can cause damage to the• suspension/running gear.• When lifting a vehicle using a jack, always utilize the factory specified lift points. Lifting a vehicle in an incorrect location can cause• damage to the suspension/running gear. ALWAYS support the vehicle with jack stands.• Always read and follow all safety information and warnings for the equipment you are using.
ECS Tuning cares about your health and safety. Please read the following safety information. This information pertains to automotive service in general, and while it may not pertain to every job you do, please remember and share these important safety tips.
INSTALLATION NOTES
GENERAL PREPARATION AND SAFETY INFORMATION

9Table of ContentsWWW.ECSTUNING.COM© 2018 ECS TUNING 1000 SEVILLE RD. WADSWORTH, OH 44281 1.800.924.5172
BMW M62TU VANOS REMOVAL AND REPAIR ES#3410414
BMW’s M62TU Vanos (Variable Valve Timing) system is actually quite simple to work on and understand. To explain its operation, we’ll first look at a few basic points regarding the timing chain and cam timing, then we’ll run through the operation.
• Each intake camshaft has a double sprocket mounted on the end.• Each exhaust camshaft has a single sprocket mounted on the end.• The M62TU Vanos units are integrated into the intake camshaft sprockets.• One timing chain runs from the crankshaft and drives the larger intake camshaft sprockets.• On each bank, one timing chain runs from the smaller intake camshaft sprocket and drives the exhaust camshaft sprocket.
Now let’s start to get familiar with some of the components. Shown on the right is a view of what you will see once you have removed the valve covers and upper timing covers in order to perform Vanos service.
Camshaft timing wheel
Exhaust camshaft sprocket
Intake camshaft sprocket w/integrated Vanos unit
To crankshaft
The LH side (Bank #2) is shown, and the RH side - for the sake of understanding system operation
- is exactly the same. (There are some relevant differences, but they will be covered later).
Exhaust camshaft chain
The camshaft timing wheel does not time or adjust the actual intake camshaft itself, but it serves as the pickup for the camshaft position sensor that is mounted in the front of each upper timing cover. Using a special tool, the timing wheel must be precisely positioned for proper system operation. The nut that holds it in place is “reverse” (LH) thread.
“Reverse” (LH) thread timing wheel nut - 24mm40 Nm (29.5 Ft-lbs)
M62TU VANOS - THEORY AND OPERATION
10Table of ContentsWWW.ECSTUNING.COM© 2018 ECS TUNING 1000 SEVILLE RD. WADSWORTH, OH 44281 1.800.924.5172
BMW M62TU VANOS REMOVAL AND REPAIR ES#3410414
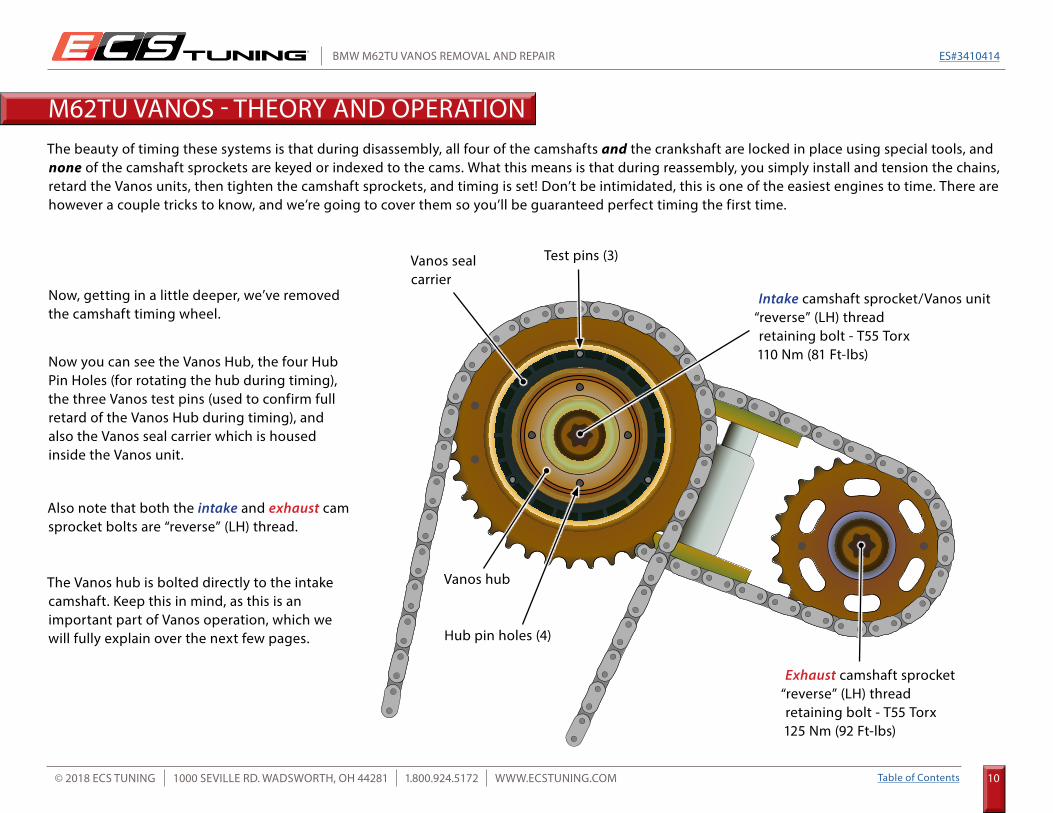
The beauty of timing these systems is that during disassembly, all four of the camshafts and the crankshaft are locked in place using special tools, and none of the camshaft sprockets are keyed or indexed to the cams. What this means is that during reassembly, you simply install and tension the chains, retard the Vanos units, then tighten the camshaft sprockets, and timing is set! Don’t be intimidated, this is one of the easiest engines to time. There are however a couple tricks to know, and we’re going to cover them so you’ll be guaranteed perfect timing the first time.
Now, getting in a little deeper, we’ve removed the camshaft timing wheel.
Vanos hub
Intake camshaft sprocket/Vanos unit“reverse” (LH) threadretaining bolt - T55 Torx110 Nm (81 Ft-lbs)
Exhaust camshaft sprocket “reverse” (LH) thread retaining bolt - T55 Torx125 Nm (92 Ft-lbs)
Test pins (3)
Hub pin holes (4)
Now you can see the Vanos Hub, the four Hub Pin Holes (for rotating the hub during timing), the three Vanos test pins (used to confirm full retard of the Vanos Hub during timing), and also the Vanos seal carrier which is housed inside the Vanos unit.
Also note that both the intake and exhaust cam sprocket bolts are “reverse” (LH) thread.
The Vanos hub is bolted directly to the intake camshaft. Keep this in mind, as this is an important part of Vanos operation, which we will fully explain over the next few pages.
Vanos seal carrier
M62TU VANOS - THEORY AND OPERATION

11Table of ContentsWWW.ECSTUNING.COM© 2018 ECS TUNING 1000 SEVILLE RD. WADSWORTH, OH 44281 1.800.924.5172
BMW M62TU VANOS REMOVAL AND REPAIR ES#3410414
Once the intake sprocket/Vanos unit is removed from the intake camshaft, the Vanos hub can be pulled out and removed. With the hub removed, you’ll see the gear teeth on the O.D. of the Vanos piston. When you flip the Vanos hub over, you’ll see the mating gear teeth on it’s I.D. It’s these gears, and oil being directed to either side of the Vanos piston, that makes the Vanos unit work. There is a thrust washer underneath the Vanos hub and when you remove the Vanos hub, sometimes it comes off with it, and sometimes it stays in the piston as shown here.
Intake camshaft sprocket w/integrated Vanos unit
Intake camshaft sprocket w/integrated Vanos unit (Vanos hub removed)
Vanos hub (front view) Vanos hub (rear view)
Vanos piston O.D. gearVanos hub
Vanos hub gear
Thrust washer
M62TU VANOS - THEORY AND OPERATION

12Table of ContentsWWW.ECSTUNING.COM© 2018 ECS TUNING 1000 SEVILLE RD. WADSWORTH, OH 44281 1.800.924.5172
BMW M62TU VANOS REMOVAL AND REPAIR ES#3410414
OK, now we’re getting to the nitty-gritty. When you pull out the Vanos hub, it rotates slightly, when you push it back in, it rotates in the other direction. This is due to the angle of the gear teeth on the Vanos piston and Vanos hub (these are called helical gears). With the Vanos hub removed, you can also move the Vanos piston in and out - and you’ll see that it rotates back and forth too. Now, if you remove the thrust washer, you’ll see two more sets of gear teeth. One on the I.D. of the Vanos piston (you’ll have to move the piston outward to see them), and the final set in the middle of that, which is actually a fixed part of the intake camshaft sprocket itself.
Intake camshaft sprocket gear
The Vanos hub rotates back and forth inside the Vanos unit
Vanos piston O.D. gear
Vanos piston I.D. gear
The Vanos piston rotates back and forth as it moves in and out of the Vanos unit.
( ( (
(((
( ( (
(((
M62TU VANOS - THEORY AND OPERATION

13Table of ContentsWWW.ECSTUNING.COM© 2018 ECS TUNING 1000 SEVILLE RD. WADSWORTH, OH 44281 1.800.924.5172
BMW M62TU VANOS REMOVAL AND REPAIR ES#3410414
Let’s review up to this point: • We know there is a helical gear on the intake camshaft sprocket.• We know there is a helical gear on the inside of the Vanos hub.• The Vanos piston has two helical gears, the inner that meshes with the intake cam sprocket
gear, and outer that meshes with the gear on the inside of the Vanos hub.
Oil pressure, directed to the front or back of the Vanos piston causes it to move in and out within the Vanos unit. Since we know that the piston is connected by helical gears to the intake camshaft sprocket on one side and the Vanos hub on the other, and we have seen how the Vanos piston and Vanos hub rotate, we can then understand:
As the Vanos piston moves in and out, it causes the Vanos hub to rotate back and forth. This back and forth rotation is referred to as Advancing and Retarding.
And, since the Vanos hub is bolted directly to the intake camshaft, we therefore know that as the Vanos piston moves in and out within the Vanos unit, the intake camshaft rotates back and forth, or advances and retards. Remember, the camshaft gears are permanently timed to the crankshaft via the chains, it’s only the Vanos hub, and intake camshaft that can advance or retard.
The cam gears are permanently timed to the crankshaft via the chains.
When oil is directed to the back of the Vanos piston, it moves outward and causes the Vanos hub to rotate counter-clockwise, retarding the intake cam timing.
When oil is directed to the front of the Vanos piston, it moves inward and causes the Vanos hub to rotate clockwise, advancing the intake cam timing.
( ( (
(((
M62TU VANOS - THEORY AND OPERATION

14Table of ContentsWWW.ECSTUNING.COM© 2018 ECS TUNING 1000 SEVILLE RD. WADSWORTH, OH 44281 1.800.924.5172
BMW M62TU VANOS REMOVAL AND REPAIR ES#3410414
Now let’s take a look under the hood at some of the components in their installed locations. The valve covers and coolant hoses have been removed to gain access to this point.
Bank #2 Intake camshaft sprocket w/integrated Vanos unit
Bank #1 Intake camshaft sprocket w/integrated Vanos unit
Camshaft timing wheel
Camshaft timing wheel
Camshaft position sensor
Camshaft position sensor
Vanos control solenoid
Vanos control solenoid
Control solenoid sealing plates
M62TU VANOS - THEORY AND OPERATION
Lower timing chain tensioner

15Table of ContentsWWW.ECSTUNING.COM© 2018 ECS TUNING 1000 SEVILLE RD. WADSWORTH, OH 44281 1.800.924.5172
BMW M62TU VANOS REMOVAL AND REPAIR ES#3410414
Here’s the final piece of the puzzle to bring it all together. Once you remove the upper timing covers, the chains, and the camshaft sprockets/Vanos units, you’ll see the Vanos oil distribution housings.
The Vanos oil distribution housings bolt to the front of each cylinder head, and the Vanos control solenoids mount into a cavity in each one. The distribution housing does nothing more than direct the oil to the end of each intake camshaft.
Here’s a close up of the end of the intake camshaft. There are three sealing rings on the end to provide a continuous seal between the camshaft and the oil distribution housing. Note the holes in the end of the camshaft. The pressurized oil travels through the Vanos solenoid and distribution housing, then through the end of the camshaft and into the intended chamber of the Vanos unit housed in the intake camshaft sprocket.
Vanos control solenoid cavity
Oil distribution housing
Sealing rings
M62TU VANOS - THEORY AND OPERATION
16Table of ContentsWWW.ECSTUNING.COM© 2018 ECS TUNING 1000 SEVILLE RD. WADSWORTH, OH 44281 1.800.924.5172
BMW M62TU VANOS REMOVAL AND REPAIR ES#3410414
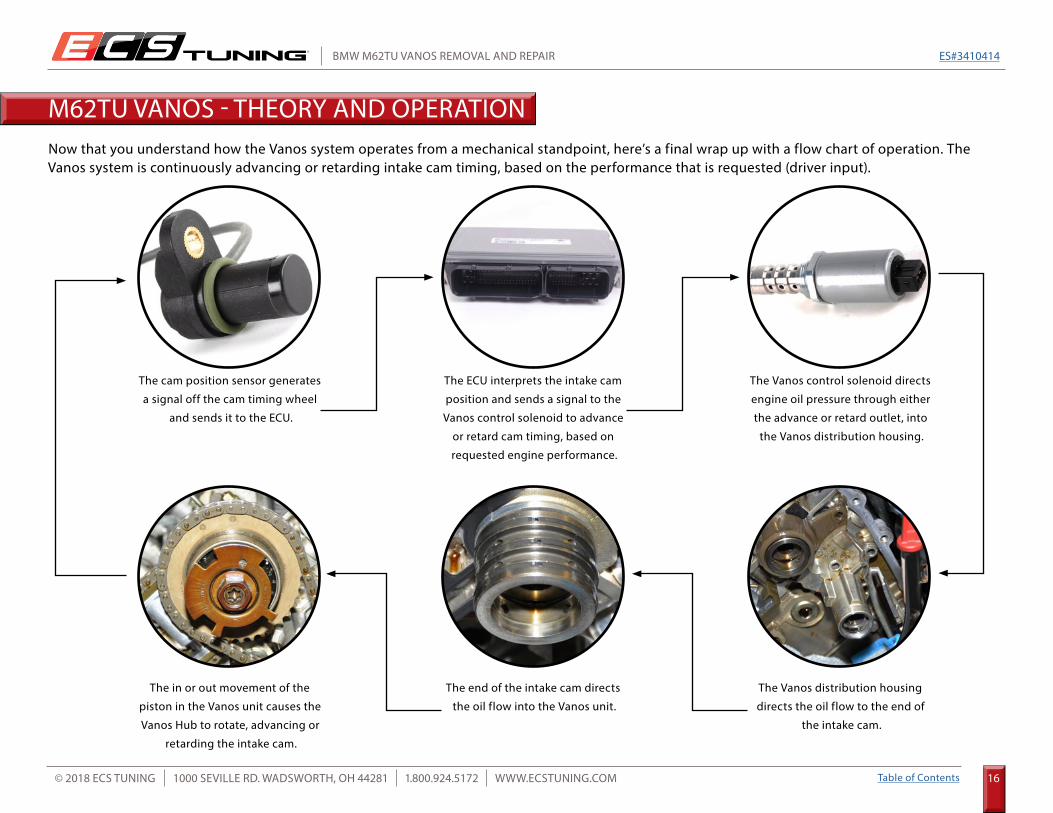
Now that you understand how the Vanos system operates from a mechanical standpoint, here’s a final wrap up with a flow chart of operation. The Vanos system is continuously advancing or retarding intake cam timing, based on the performance that is requested (driver input).
The cam position sensor generates
a signal off the cam timing wheel
and sends it to the ECU.
The ECU interprets the intake cam
position and sends a signal to the
Vanos control solenoid to advance
or retard cam timing, based on
requested engine performance.
The Vanos control solenoid directs
engine oil pressure through either
the advance or retard outlet, into
the Vanos distribution housing.
The in or out movement of the
piston in the Vanos unit causes the
Vanos Hub to rotate, advancing or
retarding the intake cam.
The end of the intake cam directs
the oil flow into the Vanos unit.
The Vanos distribution housing
directs the oil flow to the end of
the intake cam.
M62TU VANOS - THEORY AND OPERATION

17Table of ContentsWWW.ECSTUNING.COM© 2018 ECS TUNING 1000 SEVILLE RD. WADSWORTH, OH 44281 1.800.924.5172
BMW M62TU VANOS REMOVAL AND REPAIR ES#3410414
The exhaust camshaft timing chain tensioners are different from LH to RH, even though they look like they are the same parts.
Side to Side Comparison
Here are the side to side differences of the M62TU Vanos/timing chain setup.
Bank #1 Bank #2
The exhaust camshaft timing chain tensioners are different from LH to RH, even though they look like they are the same parts.
The camshaft timing wheels, even though the same parts, are clocked differently when they are correctly timed.
Bank #2 has fixed timing chain guides
Bank #1 has one fixed timing chain guide -and- one tensioning guide.
The lower timing chain tensioner is on Bank #1, and is mounted in the upper timing cover (timing cover not shown).
M62TU VANOS - THEORY AND OPERATION

18Table of ContentsWWW.ECSTUNING.COM© 2018 ECS TUNING 1000 SEVILLE RD. WADSWORTH, OH 44281 1.800.924.5172
BMW M62TU VANOS REMOVAL AND REPAIR ES#3410414
Now that you’re an expert on Vanos operation, it’s time to get started! As we mentioned in the introduction, we’re just going to list the preliminary steps to get you down to the good stuff, then we’ll dig in from there. Here we go.
Step 1:Step 2:Step 3:Step 4:Step 5:Step 6:Step 7:Step 8:Step 9:Step 10:
Step 11:Step 12:Step 13:Step 14:
You will find that some parts are symmetrical front-to-back and top-to-bottom, and can be installed on either side. While in most cases this is not a problem, in order to make absolutely sure that everything is correctly reassembled and parts that have worn in together continue to work in harmony, we highly recommend that you have a large, clean work area and as you remove components, be sure to lay them out, keeping them organized side-to-side and front-to-back.
ACCESSING THE VANOS UNITS
Disconnect the battery (the positive jump start lug is on the LH valve cover and it’ll have to come off).Remove the upper engine cover.Remove the air box and intake tube.Remove the lower engine insulation panels (or skid plate if you have one).Drain the engine coolant.Remove the mechanical radiator fan, the radiator shroud, and the coolant reservoir.Remove the upper and lower radiator hoses.Remove the left and right cabin filter housings and ducts.Remove the ignition coil covers and all 8 ignition coils.
Disconnect the coil and fuel injector connector housings and tie them together in the middle so they are clear of the valve covers. There are a couple of solenoids and brackets here that you’ll have to remove and the fuel injector connectors are a little hidden, so you’ll need a flashlight and a long pick to release them.Remove the valve covers.Remove the four oil rails.Remove the secondary air pipe across the front of the engine.Remove the dipstick tube bracket, hose and cable mounting brackets, and fuel purge valve bracket (anything that is in the way of removing the timing covers).

19Table of ContentsWWW.ECSTUNING.COM© 2018 ECS TUNING 1000 SEVILLE RD. WADSWORTH, OH 44281 1.800.924.5172
BMW M62TU VANOS REMOVAL AND REPAIR ES#3410414
It’s time to take a break and switch gears. We’re going to get a little more detailed at this point in the game, and before we continue, there’s a few things we like to do that will make things go a little easier.
You will find that some parts that are symmetrical front-to-back and top-to-bottom, and can be installed on either side. While in most cases this is not a problem, in order to make absolutely sure that everything is correctly reassembled and parts that have worn in together continue to work in harmony, we highly recommend that you have a large, clean work area and as you remove components, be sure to lay them out, keeping them organized side-to-side and front-to-back.
To begin with, it’s a good time to clean up and put tools away. This will eliminate extra clutter and give you a little more working room to lay out all of the timing and Vanos components and keep them in order.
OK, back to it!
INTERMISSION

20Table of ContentsWWW.ECSTUNING.COM© 2018 ECS TUNING 1000 SEVILLE RD. WADSWORTH, OH 44281 1.800.924.5172
BMW M62TU VANOS REMOVAL AND REPAIR ES#3410414
Step 1:
Step 2:
27mm Socket, Ratchet
Rotate the engine in a clockwise direction using a socket and ratchet on the crankshaft pulley bolt, until cylinder #1 is at TDC. There are two conditions that must be met which will indicate this:
1. Lining up the marks on the crank pulley and the lower timing cover.
2. The lobes on the intake and exhaust camshafts for cylinder #1 will face each other.
Confirm that the crankshaft and lower timing cover marks are lined up and that the cylinder #1 cam lobes are facing each other.
0 T
Timing marks
Cylinder #1
VANOS - TIMING AND REPAIR

21Table of ContentsWWW.ECSTUNING.COM© 2018 ECS TUNING 1000 SEVILLE RD. WADSWORTH, OH 44281 1.800.924.5172
BMW M62TU VANOS REMOVAL AND REPAIR ES#3410414
Step 3:
Step 4: 19mm Socket, Ratchet
Locate the crankshaft locking pin hole and inspection plug, underneath between the engine and transmission.
Remove the inspection plug, then using a flashlight and rotating the engine slightly backward or forward as necessary, insert the crankshaft locking pin through the hole and into the flywheel or flexplate.
Remove the lower timing chain tensioner, located on the side of the upper timing cover on Bank #1 (passenger side).
Inspection plug
Locking pin
Lower timing chain tensioner
VANOS - TIMING AND REPAIR
If you are using a straight locking pin, you will have to turn the steering wheels full lock to one side or the other. This will cause the center link to swing towards the front, allowing the tool to be inserted into the hole.

22Table of ContentsWWW.ECSTUNING.COM© 2018 ECS TUNING 1000 SEVILLE RD. WADSWORTH, OH 44281 1.800.924.5172
BMW M62TU VANOS REMOVAL AND REPAIR ES#3410414
Step 5:
Step 6:
10mm Socket, Ratchet, Vanos Solenoid Socket
10mm Socket, Ratchet
Remove the Vanos control solenoids (highlighted in GREEN) in three steps:
1. Disconnect each solenoid electrical connector.2. Remove each solenoid sealing plate.3. Remove each solenoid using the solenoid socket.
On each timing cover, disconnect the camshaft position sensor electrical connector, then remove the six bolts and remove the covers. The camshaft position sensors can remain installed in each cover, and you may have to pry the covers loose due to sealant holding them in place.
Sealing Plate
Vanos Solenoid
Timing cover Timing cover
VANOS - TIMING AND REPAIR
On the Bank #2 cover (driver side), the inner lowest bolt will not slide out due to interference. The bolt will remain in place and be removed with the cover.

23Table of ContentsWWW.ECSTUNING.COM© 2018 ECS TUNING 1000 SEVILLE RD. WADSWORTH, OH 44281 1.800.924.5172
BMW M62TU VANOS REMOVAL AND REPAIR ES#3410414
Step 7:
Step 8:
Now it’s time to lock the cams in place. Take a look at the cam locking blocks. They are marked with the cylinder identification 1-4 (Bank #1) and 5-8 (Bank #2). They are also marked indicating the intake or exhaust cam, which on some tools, such as the ones shown here, carry the German abbreviation of “A” for Auspuff (exhaust) or “E” for Einlass (intake).
Each one is held together in the middle by a bolt requiring a 6mm Allen.
Close inspection of the end of each camshaft will reveal the same identification as on the cam blocks, such as this one shown here indicating the intake camshaft for cylinders 5-8 (Bank #2).
Notice how the end of each camshaft is squared off, which correspondingly fits into the squared off portion of the cam locking blocks.
Another important detail to notice is that each camshaft has a hex cast into it towards the rear of the cam. This hex can be used to rotate the camshaft back and forth slightly with a 27mm or adjustable wrench in order to line it up precisely with the cam locking block.
HexIdentifying marks
VANOS - TIMING AND REPAIR

24Table of ContentsWWW.ECSTUNING.COM© 2018 ECS TUNING 1000 SEVILLE RD. WADSWORTH, OH 44281 1.800.924.5172
BMW M62TU VANOS REMOVAL AND REPAIR ES#3410414
Step 9:
Step 10:
27mm Wrench
27mm Wrench
Slide each camshaft locking block into place so it is fully engaged with the end of each camshaft, and also completely flat against the surface of the cylinder head. You may loosen the center bolt if necessary to allow for easier alignment, however you must be sure and re-tighten it once the blocks are installed and against the cylinder head.
Don’t forget to rotate or rock the cam back and forth slightly if necessary (using a wrench on the hex) to line it up while installing the locking blocks.
You will find that the Bank #1 intake camshaft seems to be misaligned more than the rest. This is normal, and you will have to rotate it counter clockwise (using a wrench on the hex) to overcome valve spring pressure and align it with the locking block.
VANOS - TIMING AND REPAIR
25Table of ContentsWWW.ECSTUNING.COM© 2018 ECS TUNING 1000 SEVILLE RD. WADSWORTH, OH 44281 1.800.924.5172
BMW M62TU VANOS REMOVAL AND REPAIR ES#3410414
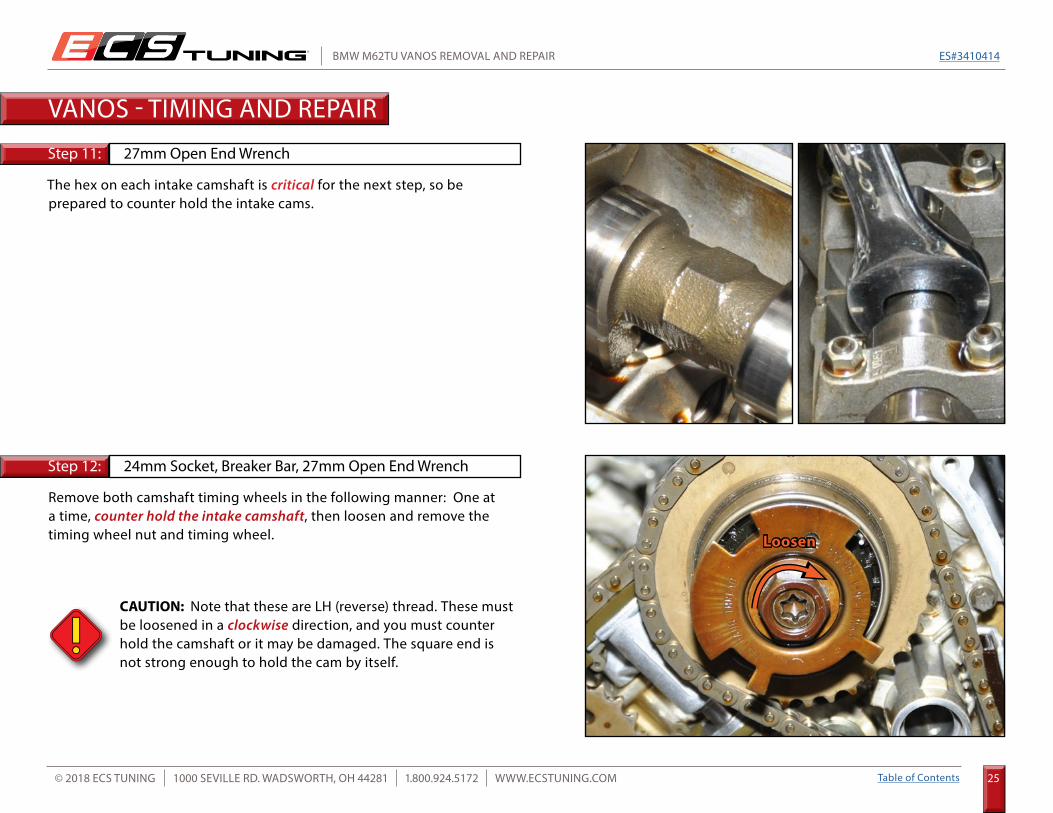
Step 11:
Step 12:
27mm Open End Wrench
Remove both camshaft timing wheels in the following manner: One at a time, counter hold the intake camshaft, then loosen and remove the timing wheel nut and timing wheel. Loosen
The hex on each intake camshaft is critical for the next step, so be prepared to counter hold the intake cams.
24mm Socket, Breaker Bar, 27mm Open End Wrench
VANOS - TIMING AND REPAIR
CAUTION: Note that these are LH (reverse) thread. These must be loosened in a clockwise direction, and you must counter hold the camshaft or it may be damaged. The square end is not strong enough to hold the cam by itself.

26Table of ContentsWWW.ECSTUNING.COM© 2018 ECS TUNING 1000 SEVILLE RD. WADSWORTH, OH 44281 1.800.924.5172
BMW M62TU VANOS REMOVAL AND REPAIR ES#3410414
Step 13:
Step 14:
T55 Torx, Breaker Bar, 27mm Open End Wrench
Counter-hold each camshaft, then loosen the two Vanos mounting bolts (highlighted green) and the two exhaust camshaft sprocket bolts (highlighted red). Do not remove them at this time, loosen them only.
Compress both exhaust cam chain tensioners and insert the locking pins into place (highlighted in GREEN in the photo below).
Loosen clockwise
VANOS - TIMING AND REPAIR
CAUTION: Note that these are LH (reverse) thread. These must be loosened in a clockwise direction, and you must counter hold each camshaft or it may be damaged. The square end is not strong enough to hold the cams by themselves.
Be sure and leave these locking pins in place until the chains are reinstalled during assembly.

27Table of ContentsWWW.ECSTUNING.COM© 2018 ECS TUNING 1000 SEVILLE RD. WADSWORTH, OH 44281 1.800.924.5172
BMW M62TU VANOS REMOVAL AND REPAIR ES#3410414
Step 15:
Step 16:
T55 Torx
Remove both Vanos mounting bolts and both exhaust camshaft sprocket bolts, but leave the Vanos units and exhaust sprockets in place.
Carefully remove the exhaust sprockets and the Vanos units by pulling them off the camshafts and lifting off the chain, laying them on a bench to keep them in position.
If you are replacing the distribution housings, camshaft sealing rings, and oil check valves, continue with step 17. If you are not replacing these components and rebuilding the Vanos units only, skip to Step 1 on Page 33. Note that an inspection/replacement of these items is highly recommended unless you are certain of their service history.
VANOS - TIMING AND REPAIR
CAUTION: These are LH (reverse) thread and MUST be removed in a clockwise direction.

28Table of ContentsWWW.ECSTUNING.COM© 2018 ECS TUNING 1000 SEVILLE RD. WADSWORTH, OH 44281 1.800.924.5172
BMW M62TU VANOS REMOVAL AND REPAIR ES#3410414
Step 17:
Step 18:
Gently guide the timing chains around the distribution housings and lay them off to the side.
Using lint free rags or towels, cover the lower timing cover openings so you do not drop anything down into the engine in the following steps.
VANOS - TIMING AND REPAIR

29Table of ContentsWWW.ECSTUNING.COM© 2018 ECS TUNING 1000 SEVILLE RD. WADSWORTH, OH 44281 1.800.924.5172
BMW M62TU VANOS REMOVAL AND REPAIR ES#3410414
Step 19:
Step 20:
E10 Torx Socket
Remove the Vanos distribution housing bolts on both the left and right banks. There are five bolts on each one (the housings are highlighted in GREEN in the photo).
Gently work the distribution housings back and forth until they slide off the ends of each camshaft.
With the distribution housings removed take note of the following four items on each side:
• 3x Camshaft Sealing Rings (GREEN Arrows)• 1x Distribution Housing Gasket (RED Arrow)• 1x Oil Check Valve (BLUE Arrow)• 1x Exhaust Cam Chain Tensioner (ORANGE Arrow)
VANOS - TIMING AND REPAIR

30Table of ContentsWWW.ECSTUNING.COM© 2018 ECS TUNING 1000 SEVILLE RD. WADSWORTH, OH 44281 1.800.924.5172
BMW M62TU VANOS REMOVAL AND REPAIR ES#3410414
Step 21:
Step 22:
Closely inspect the bore of the distribution housings. It should be smooth, with no grooves or scoring. If there is any scoring present, the housings must be replaced. Early housing versions were not coated, and they should always be replaced with later Teflon™ coated housings.
Replace both oil check valves. Use a 10mm x 1.0 bolt threaded into the end to pull them out and reinstall them.
Bore should be smooth w/no grooves.
A grooved, worn out bore
VANOS - TIMING AND REPAIR

31Table of ContentsWWW.ECSTUNING.COM© 2018 ECS TUNING 1000 SEVILLE RD. WADSWORTH, OH 44281 1.800.924.5172
BMW M62TU VANOS REMOVAL AND REPAIR ES#3410414
Step 23:
Step 24:
Clean the sealing surfaces and install new distribution housing gaskets.
Replace the three camshaft sealing rings by unhooking the ends and guiding them out of their grooves.
VANOS - TIMING AND REPAIR

32Table of ContentsWWW.ECSTUNING.COM© 2018 ECS TUNING 1000 SEVILLE RD. WADSWORTH, OH 44281 1.800.924.5172
BMW M62TU VANOS REMOVAL AND REPAIR ES#3410414
Step 25:
Step 26:
The exhaust cam chain tensioners are replaced by removing the two nuts holding them in place, then prying them upward to remove them off of the cylinder head. If you replace these, remember to leave the locking pins installed for now.
Once you have inspected and replaced the camshaft sealing rings, distribution housings gaskets, oil check valves, and exhaust cam chain tensioners as needed, carefully slide the distribution housing over the end of each camshaft until they are fully seated on the cylinder head, then install and torque the five bolts on each one.
It's time to rebuild your Vanos units!
VANOS - TIMING AND REPAIR

33Table of ContentsWWW.ECSTUNING.COM© 2018 ECS TUNING 1000 SEVILLE RD. WADSWORTH, OH 44281 1.800.924.5172
BMW M62TU VANOS REMOVAL AND REPAIR ES#3410414
Step 1:
Step 2:
Thoroughly clean the Vanos unit, but be careful that it does not come apart. The hub easily separates from it, but they must be marked first so they can be reassembled correctly.
Hold the Vanos unit and rotate the hub fully clockwise until it stops. To ensure that it is fully clockwise, it helps to rotate it back and forth so you can feel the stops. The hub only rotates a total of about 25-30 degrees.
Hub
Vanos unit
Rotate hub fully clockwise
REBUILDING THE VANOS UNITS

34Table of ContentsWWW.ECSTUNING.COM© 2018 ECS TUNING 1000 SEVILLE RD. WADSWORTH, OH 44281 1.800.924.5172
BMW M62TU VANOS REMOVAL AND REPAIR ES#3410414
Step 3:
Step 4:
With the hub rotated fully clockwise, make alignment marks on the hub and the Vanos unit. Use a permanent marker or paint so they cannot be easily wiped off.
Pull up on the hub and remove it from the Vanos unit. Because of the angle of the gears inside, the hub will rotate slightly clockwise as you remove it. Take note of this, and the relative position of the marked line on the hub. This will be important for reassembly.
REBUILDING THE VANOS UNITS

35Table of ContentsWWW.ECSTUNING.COM© 2018 ECS TUNING 1000 SEVILLE RD. WADSWORTH, OH 44281 1.800.924.5172
BMW M62TU VANOS REMOVAL AND REPAIR ES#3410414
Step 5:
Step 6:
After removing the hub from the Vanos unit, you will find a washer that is located in between the two. The washer will either stay in the center of the Vanos piston, or it will stick onto the bottom side of the hub. It has been removed and placed in between the two in this picture.
Reinstall the washer (if it's not still there) into the center of the Vanos piston. Although it does not affect the rebuilding of the unit, it allows you to keep track of it and it gives you a small lip to grab onto that will help you slide the piston outward.
Note the position of the Vanos piston in these pictures. The piston (arrow)is all the way in.
Without Washer With Washer
REBUILDING THE VANOS UNITS

36Table of ContentsWWW.ECSTUNING.COM© 2018 ECS TUNING 1000 SEVILLE RD. WADSWORTH, OH 44281 1.800.924.5172
BMW M62TU VANOS REMOVAL AND REPAIR ES#3410414
Step 7:
Step 8:
The seals that need to be replaced are not visible, but located just under the lip of the plastic seal carrier as indicated by the highlighted green area in the photo.
To gain the necessary access to remove the seals, you must slide the Vanos piston fully upward in the housing, as shown in the picture. You can do this by pulling it upward with help of the center washer, or by turning the housing upside down and shaking it until the piston slides out.
REBUILDING THE VANOS UNITS
37Table of ContentsWWW.ECSTUNING.COM© 2018 ECS TUNING 1000 SEVILLE RD. WADSWORTH, OH 44281 1.800.924.5172
BMW M62TU VANOS REMOVAL AND REPAIR ES#3410414
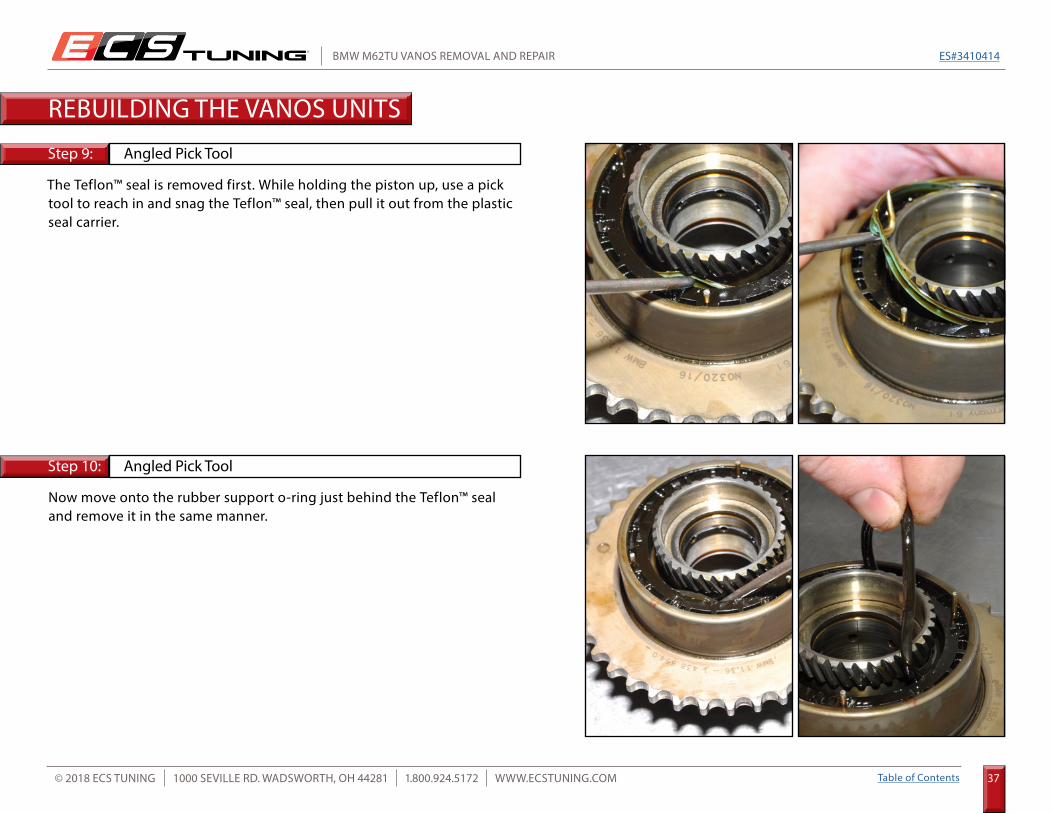
Step 9:
Step 10:
Angled Pick Tool
Angled Pick Tool
The Teflon™ seal is removed first. While holding the piston up, use a pick tool to reach in and snag the Teflon™ seal, then pull it out from the plastic seal carrier.
Now move onto the rubber support o-ring just behind the Teflon™ seal and remove it in the same manner.
REBUILDING THE VANOS UNITS

38Table of ContentsWWW.ECSTUNING.COM© 2018 ECS TUNING 1000 SEVILLE RD. WADSWORTH, OH 44281 1.800.924.5172
BMW M62TU VANOS REMOVAL AND REPAIR ES#3410414
Step 11:
Step 12:
Flush out the groove of the plastic seal carrier (where the Teflon™ seal and plastic o-rings were just removed from) using brake cleaner.
Start the new Vanos o-ring into the groove.
REBUILDING THE VANOS UNITS

39Table of ContentsWWW.ECSTUNING.COM© 2018 ECS TUNING 1000 SEVILLE RD. WADSWORTH, OH 44281 1.800.924.5172
BMW M62TU VANOS REMOVAL AND REPAIR ES#3410414
Step 13:
Step 14:
Angled Pick Tool
Gently guide the o-ring into place, carefully using a pick tool to push it into the groove. As you work your way around the carrier, you will end up with a small area of the o-ring protruding which you can push into place to complete the installation.
Now it's time to install the Teflon™ seal, which is just a little trickier. The key is to warm it up first, so begin by placing it in a bowl of warm water for at least two minutes.
CAUTION: Make sure the piston remains fully extended upward while installing the seal to avoid slicing it on the teeth.
REBUILDING THE VANOS UNITS

40Table of ContentsWWW.ECSTUNING.COM© 2018 ECS TUNING 1000 SEVILLE RD. WADSWORTH, OH 44281 1.800.924.5172
BMW M62TU VANOS REMOVAL AND REPAIR ES#3410414
Step 15:
Step 16: Angled Pick Tool
With the seal warmed up, and making sure the Vanos piston stays fully extended upward, insert the new Teflon™ seal into one side of the groove, pushing it against the o-ring as shown.
Take your time, carefully and slowly working the Teflon™ seal into place against the o-ring. Use a small angled pick to guide it into place, and keep it seated against the o-ring as you work. It usually, takes 3-5 minutes to work the seal into place, so don't think you're doing it wrong, it just takes time. Continue to work until you get close to the end, as shown in this picture.
CAUTION: Do not use the sharp end of the pick so the seal isn't damaged, but don't be concerned about pressing against it with the sides or edges. The Teflon™ is incredibly resilient, and will recover from small indentations.
REBUILDING THE VANOS UNITS

41Table of ContentsWWW.ECSTUNING.COM© 2018 ECS TUNING 1000 SEVILLE RD. WADSWORTH, OH 44281 1.800.924.5172
BMW M62TU VANOS REMOVAL AND REPAIR ES#3410414
Step 17:
Step 18:
Angled Pick Tool
Angled Pick Tool
Use a pick to push and guide the final part of the Teflon™ seal down into place over the o-ring. It is normal for the Teflon™ seal to wrinkle slightly at this point.
With the Teflon™ seal in place, work your way all around it, seating it against the o-ring underneath.
REBUILDING THE VANOS UNITS

42Table of ContentsWWW.ECSTUNING.COM© 2018 ECS TUNING 1000 SEVILLE RD. WADSWORTH, OH 44281 1.800.924.5172
BMW M62TU VANOS REMOVAL AND REPAIR ES#3410414
Step 19:
Step 20:
As a final check to confirm that the Teflon™ seal is properly installed, inspect it closely around the entire circumference. If fully seated against the o-ring, only the very edge of it will be visible.
Reinstall the hub, making sure to start with the alignment mark slightly clockwise of the mark on the Vanos unit, so when the hub is fully installed the two marks will be perfectly aligned.
REBUILDING THE VANOS UNITS

43Table of ContentsWWW.ECSTUNING.COM© 2018 ECS TUNING 1000 SEVILLE RD. WADSWORTH, OH 44281 1.800.924.5172
BMW M62TU VANOS REMOVAL AND REPAIR ES#3410414
Step 21:
Step 22:
The two marks should be perfectly aligned when the hub is reinstalled in the correct position.
As a final check, rotate the hub back and forth to make sure it operates smoothly.
When crimping the lip of the Vanos housing (beginning on the next page) you will have to remove the hub, so be sure and leave the alignment marks intact.
REBUILDING THE VANOS UNITS

44Table of ContentsWWW.ECSTUNING.COM© 2018 ECS TUNING 1000 SEVILLE RD. WADSWORTH, OH 44281 1.800.924.5172
BMW M62TU VANOS REMOVAL AND REPAIR ES#3410414
Step 1:
Step 2:
Over time, a gap will form between the plastic seal retainer and the upper lip of the housing. The gap may be close to 1mm in size and can easily be seen. The Vanos lip must be crimped down to eliminate this gap. Pressing down on the plastic seal carrier with a flat blade screwdriver will fully seat it in the Vanos unit and expose the gap.
Inspect the ECS Tuning Vanos press cup and the Vanos unit. There are three holes in the Vanos tool which are designed to fit over the pins in the Vanos unit.
CRIMPING THE VANOS HOUSING LIP
To crimp the lip of the Vanos housing, the hub will have to be removed. Make sure the alignment marks are still visible between the hub and housing.
CAUTION: If no gap is found between the plastic seal retainer and the upper lip of the housing DO NOT perform this procedure. Skip to Page 49.

45Table of ContentsWWW.ECSTUNING.COM© 2018 ECS TUNING 1000 SEVILLE RD. WADSWORTH, OH 44281 1.800.924.5172
BMW M62TU VANOS REMOVAL AND REPAIR ES#3410414
Step 3:
Step 4:
Place the press cup on top of the Vanos unit, making sure the pins are all located inside the holes.
Securely clamp the flats on the press cup into a vise.
CRIMPING THE VANOS HOUSING LIP

46Table of ContentsWWW.ECSTUNING.COM© 2018 ECS TUNING 1000 SEVILLE RD. WADSWORTH, OH 44281 1.800.924.5172
BMW M62TU VANOS REMOVAL AND REPAIR ES#3410414
Step 5:
Step 6:
Insert the pressing screw through the press plate so the step on the plate is on the thread side of the screw, then apply graphite grease to the threads on the pressing screw, and apply grease underneath the head of the screw as well.
Insert the pressing screw through the press plate and Vanos unit, then thread it into the press cup on the bottom.
CRIMPING THE VANOS HOUSING LIP

47Table of ContentsWWW.ECSTUNING.COM© 2018 ECS TUNING 1000 SEVILLE RD. WADSWORTH, OH 44281 1.800.924.5172
BMW M62TU VANOS REMOVAL AND REPAIR ES#3410414
Step 7:
Step 8:
27mm Socket, Ratchet
27mm Socket, 1/2" Torque Wrench
Tighten the pressing screw until it snugs up and the Vanos unit is held between the press cup and plate.
Torque the pressing screw to 136 Nm (100 Ft-lbs).
CRIMPING THE VANOS HOUSING LIP
48Table of ContentsWWW.ECSTUNING.COM© 2018 ECS TUNING 1000 SEVILLE RD. WADSWORTH, OH 44281 1.800.924.5172
BMW M62TU VANOS REMOVAL AND REPAIR ES#3410414
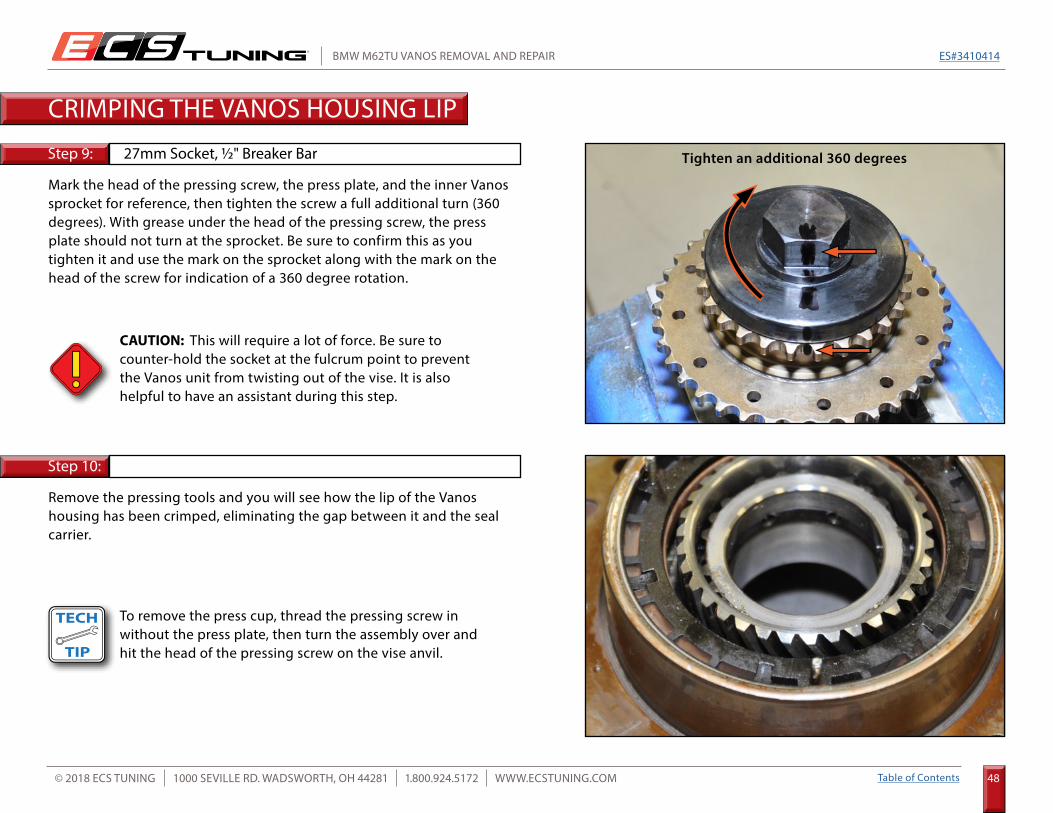
Step 9:
Step 10:
27mm Socket, 1/2" Breaker Bar
Mark the head of the pressing screw, the press plate, and the inner Vanos sprocket for reference, then tighten the screw a full additional turn (360 degrees). With grease under the head of the pressing screw, the press plate should not turn at the sprocket. Be sure to confirm this as you tighten it and use the mark on the sprocket along with the mark on the head of the screw for indication of a 360 degree rotation.
Remove the pressing tools and you will see how the lip of the Vanos housing has been crimped, eliminating the gap between it and the seal carrier.
Tighten an additional 360 degrees
CRIMPING THE VANOS HOUSING LIP
CAUTION: This will require a lot of force. Be sure to counter-hold the socket at the fulcrum point to prevent the Vanos unit from twisting out of the vise. It is also helpful to have an assistant during this step.
To remove the press cup, thread the pressing screw in without the press plate, then turn the assembly over and hit the head of the pressing screw on the vise anvil.

49Table of ContentsWWW.ECSTUNING.COM© 2018 ECS TUNING 1000 SEVILLE RD. WADSWORTH, OH 44281 1.800.924.5172
BMW M62TU VANOS REMOVAL AND REPAIR ES#3410414
Step 1:
Step 2: T55 Torx
Reassembly is almost easy enough to say "reverse of removal", but we're going to give you a little more than that. To begin the process, mount the Vanos units and exhaust sprockets back onto the camshafts along with the chains (both banks - only one is shown here for reference).
Install the Vanos and exhaust camshaft sprocket bolts, tighten them just until they are snug so the sprockets are fully seated, then loosen them slightly so both sprockets can rotate during tensioning of the timing chains.
Now remove the locking pins from the exhaust cam chain tensioners.
REASSEMBLY
There is no specific orientation of the cam chains to the sprockets.

50Table of ContentsWWW.ECSTUNING.COM© 2018 ECS TUNING 1000 SEVILLE RD. WADSWORTH, OH 44281 1.800.924.5172
BMW M62TU VANOS REMOVAL AND REPAIR ES#3410414
Step 3:
Step 4:
10mm Socket, Ratchet
Install the timing chain tensioning block onto the front of the Bank #1 cylinder head, using timing cover bolts.
Tighten the tensioning screw by hand until the slack is taken out of all three chains.
REASSEMBLY
If the slack is not removed from all three chains, check to make sure that the Vanos and exhaust camshaft bolts are loose.

51Table of ContentsWWW.ECSTUNING.COM© 2018 ECS TUNING 1000 SEVILLE RD. WADSWORTH, OH 44281 1.800.924.5172
BMW M62TU VANOS REMOVAL AND REPAIR ES#3410414
Step 5:
Step 6: Vanos Hub Tool
Double check both camshaft locking blocks to make sure they are engaged onto the camshafts and flat on the cylinder head surface. Reposition them as necessary.
Fully retard both Vanos hubs by turning them counter-clockwise to their stops (special tool from kit), then tighten the Vanos hub bolts and exhaust camshaft bolts by hand only to lock the timing in place.
The three pins on the Vanos unit can be used to check for a fully retarded position of the Vanos hub. In this position, the pins will contact the Vanos piston, creating electrical continuity between the pins and a good ground. Using a DVOM, a zero ohm reading will indicate this fully retarded position. This is a common practice, but sometimes difficult to obtain a reading, so we prefer simply rotating the hub counter-clockwise until it stops.
REASSEMBLY

52Table of ContentsWWW.ECSTUNING.COM© 2018 ECS TUNING 1000 SEVILLE RD. WADSWORTH, OH 44281 1.800.924.5172
BMW M62TU VANOS REMOVAL AND REPAIR ES#3410414
Step 7:
Step 8:
T55 Torx, Torque Wrench
Counter-hold the camshafts and torque the Vanos and exhaust sprocket bolts to their final torque.
Mount the timing wheels onto the Vanos mounting bolts, and loosely install the timing wheel nuts.
Torque counter clockwise
REASSEMBLY

53Table of ContentsWWW.ECSTUNING.COM© 2018 ECS TUNING 1000 SEVILLE RD. WADSWORTH, OH 44281 1.800.924.5172
BMW M62TU VANOS REMOVAL AND REPAIR ES#3410414
Step 9:
Step 10:
Timing Wheel Tool, 24mm Socket, Torque Wrench
On both sides, rotate the timing wheel to align the hole in the wheel with the pin on the alignment fixture, then mount the alignment fixture onto each cylinder head using timing cover bolts.
Once the fixture is in place, torque the timing wheel mounting nut (in a counter clockwise direction) to 40 Nm (29.5 Ft-lbs).
Remove the camshaft blocks, the timing wheel alignment fixtures, and the crankshaft pin.
Rotate the crankshaft two full revolutions in a clockwise direction, then reinstall the crankshaft pin, the cam blocks, and the timing wheel alignment fixtures. Everything must line up correctly or you will need to adjust the timing.
0 T
REASSEMBLY
The Bank #1 intake camshaft will rotate when the locking blocks are removed due to valve spring pressure.

54Table of ContentsWWW.ECSTUNING.COM© 2018 ECS TUNING 1000 SEVILLE RD. WADSWORTH, OH 44281 1.800.924.5172
BMW M62TU VANOS REMOVAL AND REPAIR ES#3410414
Step 11:
Step 12:
Once you have confirmed all timing, remove all timing fixtures, including the chain tensioning block.
Be sure and install a new chain tensioner seal at this time (arrow).
Clean the upper timing covers and replace both seals. Prior to installing the covers, apply sealant to the lower corners (arrows).
REASSEMBLY
55Table of ContentsWWW.ECSTUNING.COM© 2018 ECS TUNING 1000 SEVILLE RD. WADSWORTH, OH 44281 1.800.924.5172
BMW M62TU VANOS REMOVAL AND REPAIR ES#3410414
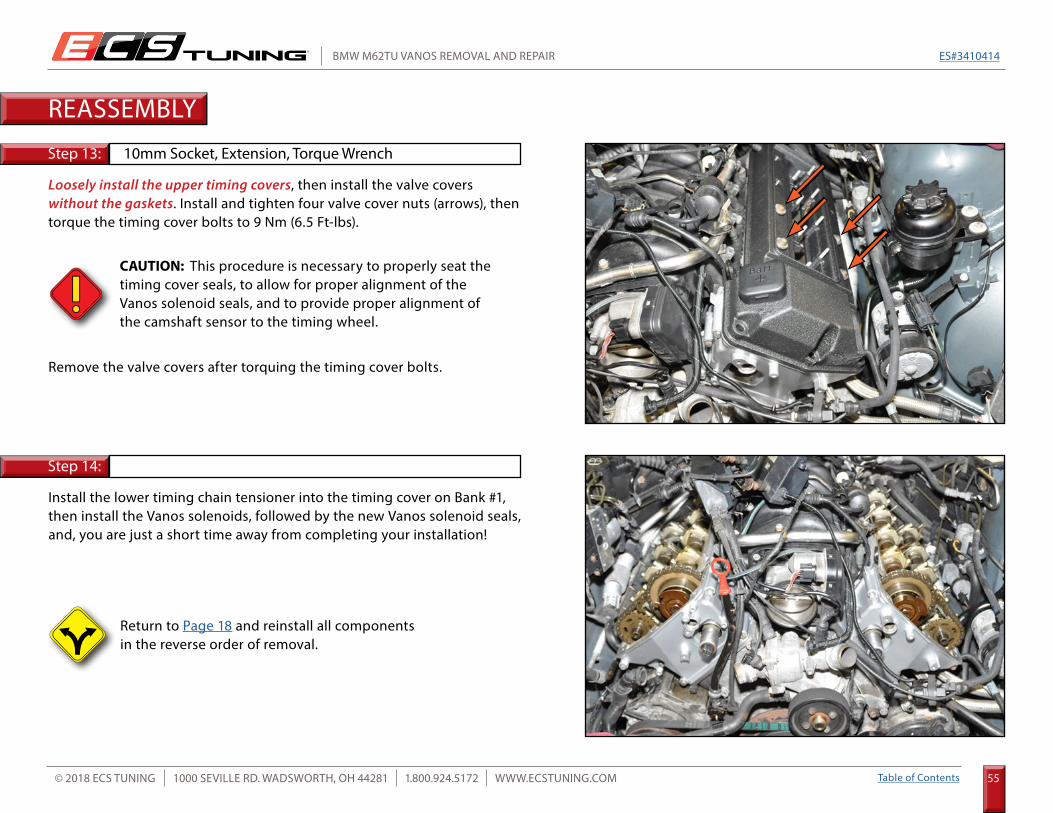
Step 13:
Step 14:
10mm Socket, Extension, Torque Wrench
Loosely install the upper timing covers, then install the valve covers without the gaskets. Install and tighten four valve cover nuts (arrows), then torque the timing cover bolts to 9 Nm (6.5 Ft-lbs).
Install the lower timing chain tensioner into the timing cover on Bank #1, then install the Vanos solenoids, followed by the new Vanos solenoid seals, and, you are just a short time away from completing your installation!
Remove the valve covers after torquing the timing cover bolts.
REASSEMBLY
CAUTION: This procedure is necessary to properly seat the timing cover seals, to allow for proper alignment of the Vanos solenoid seals, and to provide proper alignment of the camshaft sensor to the timing wheel.
Return to Page 18 and reinstall all components in the reverse order of removal.

56Table of ContentsWWW.ECSTUNING.COM© 2018 ECS TUNING 1000 SEVILLE RD. WADSWORTH, OH 44281 1.800.924.5172
BMW M62TU VANOS REMOVAL AND REPAIR ES#3410414
Torque to Yield or “Stretch” Bolts
A ribbed bolt is identified by the ribs on the contact surface
A non-ribbed bolt is identified by the smooth contact surface
Ribbed vs. Non-Ribbed Bolts
Many bolts will have a torque specification listed in the format - xx Nm (xx Ft-lbs) + xx degrees. These bolts are torque to yield bolts, commonly referred to as “stretch” bolts. The correct procedure for torquing these bolts is:
Stage One - Torque the bolt(s) to the initial Nm or Ft-lb specification. If there is more than one, be sure to torque them in the correct sequence.Stage Two - Tighten or “stretch” the bolt(s) the additional specified number of degrees. If there is more than one, be sure to follow the correct sequence.
Note - Some bolts may have two or more stages of torquing before the final stage of “stretching” the bolts.
When tightening more than one bolt in a specified sequence, be sure to mark each fastener with paint immediately after performing the final stage or “stretching” of the bolts. This will ensure that you keep track of which bolts have already been “stretched”.
All Torque to Yield bolts should only be used once and should be replaced each time they are removed. If they are reused, they will not be able to achieve the proper clamping force with the specified torque.
Lubrication
Torque specifications are always listed for a dry fastener (no lubrication) unless specified otherwise.
Some fasteners require lubrication on the threads -or- on the contact surface while torquing. These fasteners will be listed with the specific location and type of lubrication required. Always follow manufacturers recommendations exactly.
Lubricating a fastener that is intended to be installed dry and then torquing it to factory specifications will increase the clamping force and stress on the fastener and components, which can result in damage or failure.
Do not lubricate the threads of any fastener unless it is specifically recommended by the manufacturer.
Ribbed and Non-Ribbed bolts in the same location generally require a different torque specification.
TORQUING TIPS

57Table of ContentsWWW.ECSTUNING.COM© 2018 ECS TUNING 1000 SEVILLE RD. WADSWORTH, OH 44281 1.800.924.5172
BMW M62TU VANOS REMOVAL AND REPAIR ES#3410414
Distribution Housing Bolts .......................................................................................................................... 10 Nm (7.5 Ft-lbs)
Intake Camshaft Sprocket (Vanos Unit) .................................................................................................... 110 Nm (81 Ft-lbs)
Exhaust Camshaft Sprocket ......................................................................................................................... 125 Nm (92 Ft-lbs)
Timing Wheel Nut .......................................................................................................................................... 40 Nm (29.5 Ft-lbs)
Upper Timing Covers .................................................................................................................................... 9 Nm (6.5 Ft-lbs)
Vanos Solenoid ............................................................................................................................................... 25 Nm (18.5 Ft-lbs)
Vanos Solenoid Sealing Plate ...................................................................................................................... 9 Nm (6.5 Ft-lbs)
Lower Timing Chain Tensioner ................................................................................................................... 40 Nm (29.5 Ft-lbs)
Camshaft Oil Rails .......................................................................................................................................... 8 Nm (6 Ft-lbs)
Valve Cover Bolts ............................................................................................................................................ 8 Nm (6 Ft-lbs)
TORQUE SPECIFICATIONS

58Table of ContentsWWW.ECSTUNING.COM© 2018 ECS TUNING 1000 SEVILLE RD. WADSWORTH, OH 44281 1.800.924.5172
BMW M62TU VANOS REMOVAL AND REPAIR ES#3410414
SCHWABEN - BUILD THE ULTIMATE TOOL COLLECTIONAt ECS Tuning, we carry a line of high quality Schwaben Tools and Equipment to help you build your ultimate tool collection. Never before has
affordability and quality been so closely related. Our entire Schwaben line is subjected to strict in house testing for strength and durability. See what we have to offer and equip your garage without breaking the bank.

Your BMW M62TU Vanos rebuild is complete!
These instructions are provided as a courtesy by ECS TuningProper service and repair procedures are vital to the safe, reliable operation of all motor vehicles as well as the personal safety of those performing the repairs. Standard safety procedures and precautions (including use of safety goggles and proper tools and equipment) should be followed at all times to eliminate the possibility of personal injury or improper service which could damage the vehicle or compromise its safety.
Although this material has been prepared with the intent to provide reliable information, no warranty (express or implied) is made as to its accuracy or completeness. Neither is any liability assumed for loss or damage resulting from reliance on this material. SPECIFICALLY, NO WARRANTY OF MERCHANTABILITY, FITNESS FOR A PARTICULAR PURPOSE OR ANY OTHER WARRANTY IS MADE OR TO BE IMPLIED WITH RESPECT TO THIS MATERIAL. In no event will ECS Tuning, Incorporated or its affiliates be liable for any damages, direct or indirect, consequential or compensatory, arising out of the use of this material.