
blast trauma care - Shop ICRC
164
BLAST TRAUMA CARE COURSE MANUAL REFERENCE
-
Upload
khangminh22 -
Category
Documents
-
view
2 -
download
0
Transcript of blast trauma care - Shop ICRC

BLAST TRAUMA CARECOURSE MANUAL
REF
EREN
CE

The ICRC would like to acknowledge the following doctors and medical staff for their
contribution to the Blast Trauma Care Manual:
• Enzo Chemello, Chief of emergency department, Pieve di Cadore Hospital, Italy
• Katrine Finsnes, Anaesthetist, Stavanger University Hospital, Norway
• Stefano Donato, Anaesthetist, Belcolle General Hospital, Italy
• Mauro Dalla Torre, Medical Adviser, Weapon Contamination Unit, ICRC Switzerland

BLAST TRAUMA CARECOURSE MANUAL

CONTENTS
INTRODUCTION .................................................................................................6
CHAPTER 1 – THE PHYSICS OF EXPLOSIONS ......................................................8HOLLYWOOD VERSUS REALITY ................................................................................................ 8EXPLOSIVES ......................................................................................................................................8
LOW AND HIGH EXPLOSIVES ................................................................................................... 8PRIMARY AND SECONDARY EXPLOSIVES ............................................................................. 9DEPLOYMENT, ARMING AND DETONATION ........................................................................ 9
EFFECTS OF EXPLOSIONS AND MECHANISMS OF INJURY .......................................... 10
CHAPTER 2 – EXPLOSIONS AND BLAST INJURIES ............................................ 14PRIMARY BLAST INJURY .............................................................................................................17SECONDARY BLAST INJURY ......................................................................................................20TERTIARY BLAST INJURY ..........................................................................................................22QUATERNARY BLAST INJURY ...................................................................................................22QUINARY BLAST INJURY ............................................................................................................23LUNG TRAUMA ..............................................................................................................................23
CHAPTER 3 – SAFETY FIRST! ...........................................................................26BEFORE ENTERING THE SCENE .............................................................................................26
EVALUATE THE SCENE ...........................................................................................................26ASSESS SAFETY ........................................................................................................................ 27WEAR PERSONAL PROTECTIVE EQUIPMENT......................................................................28
ON THE SCENE ...............................................................................................................................29PRIMARY SURVEY: PRIORITIZE CARE (cABCDE) ................................................................29SECONDARY SURVEY .............................................................................................................. 33DO A QUICK HEAD-TO-TOE CHECK ..................................................................................... 33PACKAGING ..............................................................................................................................34
CHAPTER 4 – A/B: MANAGING THE AIRWAY AND RESPIRATORY SYSTEM ......36THE AIRWAY AND RESPIRATORY SYSTEM .........................................................................36AIRWAY OBSTRUCTIONS ...........................................................................................................39VENTILATION .................................................................................................................................44
CHAPTER 5 – C: CIRCULATION AND BLEEDING CONTROL ...............................48OXYGEN AND THE CIRCULATORY SYSTEM ........................................................................48
CAPILLARY REFILL TIME ....................................................................................................... 52

BLEEDING ........................................................................................................................................52PRIMARY SURVEY ....................................................................................................................54STOPPING BLOOD LOSS ..........................................................................................................54DIRECT PRESSURE .................................................................................................................. 55PACKING THE WOUND............................................................................................................56TOURNIQUET ........................................................................................................................... 57OTHER MAJOR BLEEDS .......................................................................................................... 63
ADVANCED CONSIDERATIONS ................................................................................................63SHOCK .......................................................................................................................................63INTRAVENOUS LINES ..............................................................................................................64HEMOSTATIC AGENTS ............................................................................................................65
CHAPTER 6 – D: HEAD AND SPINE INJURIES ...................................................68EPIDEMIOLOGY .............................................................................................................................68ANATOMY ....................................................................................................................................... 69MECHANISMS OF INJURY ........................................................................................................ 69
COUP-CONTRECOUP MECHANISM ......................................................................................70MASS MECHANISM .................................................................................................................70
SCALP WOUNDS ..............................................................................................................................71SKULL FRACTURES ......................................................................................................................72
EARLY SIGNS OF A SKULL-BASE FRACTURE ...................................................................... 72LATE SIGNS OF A SKULL-BASE FRACTURE......................................................................... 73
PENETRATING / IMPALED OBJECTS ......................................................................................73INITIAL ASSESSMENT AND MANAGEMENT ......................................................................73
UNCONSCIOUS PATIENTS ......................................................................................................74PATIENTS WITH ALTERED MENTAL STATUS ..................................................................... 75PATIENTS WITH MILD HEAD TRAUMA ................................................................................ 75
SPINE INJURIES .............................................................................................................................76EYE INJURIES..................................................................................................................................77
CHEMICAL BURNS ................................................................................................................... 77SMALL FOREIGN OBJECTS ..................................................................................................... 77PENETRATING EYE INJURY .................................................................................................... 78
NOSE INJURIES ..............................................................................................................................78
CHAPTER 7 – CHEST, ABDOMEN AND GENITALIA INJURIES ...........................80CHEST ................................................................................................................................................80
SIGNS AND SYMPTOMS .........................................................................................................82RIB FRACTURES ...................................................................................................................... 83OPEN / TENSION PNEUMOTHORAX ......................................................................................84IMPALED OBJECT ....................................................................................................................86HAEMOTHORAX ......................................................................................................................86

SMOKE INHALATION / THERMAL INJURY / CARBON MONOXIDE POISONING .............. 87ACUTE RESPIRATORY DISTRESS SYNDROME ..................................................................... 87CARDIAC CONTUSION / TAMPONADE ..................................................................................88DIAPHRAGMATIC HERNIA .....................................................................................................88
ABDOMEN ........................................................................................................................................88GENITALIA ...................................................................................................................................... 91
CHAPTER 8 – LIMB INJURIES ..........................................................................92BROKEN BONES .............................................................................................................................93SPLINTING ......................................................................................................................................95PELVIC FRACTURE........................................................................................................................97COMPARTMENT SYNDROME .................................................................................................. 99CRUSH SYNDROME ....................................................................................................................100PATIENT SURVEYS ......................................................................................................................101
PRIMARY SURVEY ...................................................................................................................101CATASTROPHIC BLEEDING ...................................................................................................101AIRWAY ....................................................................................................................................101BREATHING .............................................................................................................................101CIRCULATION ..........................................................................................................................101SECONDARY SURVEY .............................................................................................................101PACKAGING .............................................................................................................................101
TISSUE DESTRUCTION DUE TO MINES ..............................................................................102
CHAPTER 9 – MANAGING PAIN ..................................................................... 104TREATING PAIN ..........................................................................................................................105DRUGS TO REDUCE PAIN (ANALGESICS) ..........................................................................108
COMMON DOSAGE GUIDELINES .........................................................................................109NON-STEROIDAL ANTI-INFLAMMATORY DRUGS ...........................................................110PARACETAMOL (ACETAMINOPHEN) ..................................................................................110THE NEXT LEVEL ....................................................................................................................110
CHAPTER 10 – SNAKEBITES............................................................................ 112VENOMOUS SNAKES ...................................................................................................................112
ELAPIDAE ................................................................................................................................112VIPERIDAE ...............................................................................................................................113COLUBRIDAE ...........................................................................................................................113AVOIDING SNAKEBITES .........................................................................................................113
SNAKEBITE VICTIMS ..................................................................................................................114SIGNS AND SYMPTOMS OF SYSTEMIC INJURY ................................................................114
BLEEDING AND CLOTTING DISORDERS ..............................................................................115NEUROLOGICAL DISORDERS ................................................................................................115COBRA SPIT .............................................................................................................................115
TREATMENT ..................................................................................................................................115

CHAPTER 11 – TREATING BURNS .................................................................... 118SKIN ANATOMY ............................................................................................................................119EXPLOSIVE THERMAL INJURIES ...........................................................................................119SEVERITY OF BURNS .................................................................................................................120FIRST AID FOR BURNS ...............................................................................................................121
CATASTROPHIC BLEEDING .................................................................................................. 122AIRWAY ................................................................................................................................... 122BREATHING ............................................................................................................................ 123CIRCULATION ......................................................................................................................... 123DISABILITY (NEUROLOGICAL STATUS) ............................................................................. 123
SPECIAL CIRCUMSTANCES ..................................................................................................... 127WHITE PHOSPHORUS ........................................................................................................... 127SMOKE-INHALATION INJURY AND INHALATION OF TOXIC GASES ............................. 127CHEMICALS ............................................................................................................................ 129ELECTRICAL BURNS .............................................................................................................. 129RULE OF NINES ...................................................................................................................... 130
FLUID RESUSCITATION .............................................................................................................131
CHAPTER 12 – TRIAGE PROCEDURES ..............................................................134PLANNING ..................................................................................................................................... 134RISK EVALUATION...................................................................................................................... 135ROLES AND RESPONSIBILITIES ............................................................................................ 135COMMUNICATION AND COORDINATION .......................................................................... 136PRIORITY CATEGORIES ............................................................................................................ 137TRIAGE PROCESS ........................................................................................................................ 138TRANSPORT ..................................................................................................................................140
BIBLIOGRAPHY .............................................................................................. 142
APPENDICES .................................................................................................. 148APPENDIX 1: EQUIPMENT LISTS ..........................................................................................148
PERSONAL FIRST-AID KIT ................................................................................................... 148TRAUMA FIRST-AID KIT (ONE PER DEMINING TEAM / EXPLOSIVE ORDNANCE DISPOSAL TEAM) ..................................................................................................................149
APPENDIX 2: KETAMINE AND OPIOIDS ............................................................................. 150KETAMINE .............................................................................................................................. 150OPIOIDS ....................................................................................................................................151
APPENDIX 3: GLASGOW COMA SCALE ............................................................................... 153APPENDIX 4: CLASSIFYING SPINAL CORD INJURIES ................................................... 154APPENDIX 5: IMMOBILIZATION SKILLS ...........................................................................156
IMMOBILIZING THE CERVICAL SPINE ............................................................................... 156PERFORMING A LOG ROLL....................................................................................................157APPLYING FULL SPINAL IMMOBILIZATION ...................................................................... 158HOW TO POSITION PREGNANT PATIENTS ........................................................................ 158

6 BLAST TRAUMA CARE
INTRODUCTION
When carrying out survey and clearance operations for weapon contamination, personnel from the armed forces, the police and other agencies face the risk of serious injury from explosions. Landmines and explosive ordnance – including unexploded ordnance and abandoned ammunition – are designed to injure and kill, and they are most dangerous to those near the epicentre of the blast. Anyone exposed to the blast, fragmentation and heat – should they survive the initial explosion – may have serious, even life-threatening injuries.
The effects of an exploding landmine or explosive remnant of war create patterns of injuries distinct from what is taught in general medical training. The wounds, often numerous, are of such a nature that specialized knowledge, techniques and equipment must be used to give blast victims the best chance of survival.
Most anti-personnel blast mines are designed to injure people rather than kill them. Weapons like mortar shells are designed to kill and injure groups of people. White phosphorous burns with an intense heat and will not stop so long as it has access to oxygen. These are just some of the designed lethalities (ways in which explosive ordnance is designed to injure or kill) that those involved in clearing contaminated areas face on a daily basis. First-aid staff and other medical personnel supporting these operations – as well as the deminers and members of explosive ordnance disposal teams themselves – must therefore be prepared for them.
Too often, personnel in these circumstances have not been provided the necessary training and support to be able to deal with injuries caused by devices like landmines, and lives are being lost that otherwise could have been saved. The International Committee of the Red Cross’s Weapon Contamination Unit therefore saw the need for a customized training manual that could be offered to organizations involved in humanitarian survey and clearance operations.

INTRODUCTION 7
This manual, which is intended for use alongside the International Committee of the Red Cross’s course on blast trauma care, is divided into 12 chapters. Each addresses specific challenges and suggested responses. As the targeted audience includes those without any medical training and first-aid staff without university degrees in a related subject, the language, examples and illustrations used are intended to be accessible to the broadest possible audience.
Note: Information and directions in blue are intended for those with advanced medical training, such as doctors and nurses.
The manual has been harmonized with the April 2020 version of International
Mine Action Standard 10.40: Medical Support to Demining Operations, which was written by the International Committee of the Red Cross and includes the most up-to-date guidelines for trauma treatment.1 The International Mine Action Standards apply to all mine action operations; worldwide, the majority of States that are affected by landmines and explosive remnants of war have used the standards in establishing national frameworks for mine action.
Survey and clearance operations are critical to keeping communities safe, yet the people who carry them out risk weapons injuries of a ferocious nature. Training and equipping medical personnel, deminers and members of explosive ordnance disposal teams to give life-saving care to the injured is not just an important element of duty of care: it also ensures that we can continue to bring vital humanitarian aid to communities faced with weapon contamination.
Best regards,E. Tollefsen
1 The latest version can be downloaded at https://www.mineactionstandards.org/en/standards/.

8 BLAST TRAUMA CARE
CHAPTER 1 – THE PHYSICS OF EXPLOSIONS
This chapter gives a brief introduction to explosives and explosions, providing a foundation for understanding the injuries they can cause to the human body.
Key concepts
• Types of explosives and weapons
• Explosions’ effects
• Four main categories of injuries
HOLLYWOOD VERSUS REALITYIn the movies, explosions are shown as huge fireballs; the heroes are propelled through the air and roll to safety without a scratch. You may have at least a suspicion that this is not what happens in reality – if so, you are right. The aim of this chapter is to provide some basic information on what really happens when weapons explode.
The reality is that explosions are over in the blink of an eye. Large, visible fireballs are less common than one would think (the damage is actually done through a rapid flash of radiant heat), and often the injuries that explosions cause are not obvious in the period immediately following a blast.
EXPLOSIVESLOW AND HIGH EXPLOSIVESGunpowder was invented in China in the ninth century. Gunpowder is a physical mix of sulphur, charcoal and saltpetre. The more fine-grained the mixture is, the more powerful the explosive. Black powder, as it is also known, has been used as a blasting agent and propellant up to modern times. Because it is a physical mix of fuel and oxidizer – meaning they are not combined into one compound – the speed at which the explosive reaction takes place is

CHAPTER 1 – THE PHYSICS OF EXPLOSIONS 9
limited, but still greater than the speed of sound, i.e. 300 meters/second. This type of explosive is therefore known as a “low explosive”.
Low explosives can still do considerable damage – when black powder is confined in a pipe, as in a pipe bomb, the speed and power of the explosion can be increased, and fragmentation can be generated from the material holding the explosives.
More effective explosives are made when fuel and oxidizer are combined in the same chemical compound. Nitroglycerine, TNT and RDX are all examples of this type of explosive. Having the fuel and oxidizer mixed together means that the velocity of detonation is that much quicker (in excess of 3000–5000 meters/second); the explosive is therefore more powerful. These are called “high explosives”.
PRIMARY AND SECONDARY EXPLOSIVESExplosives also come in different categories of sensitivity. Primary explosives are very unstable and cannot be transported in bulk. Tiny quantities are used in fuse or initiation systems so that a physical impact, such as a shell hitting the ground, can be used to detonate a larger quantity of a less sensitive explosive (the secondary explosive).
Secondary high explosives do most of the work in weapons used on the battlefield. They are powerful (with high velocities of detonation) but also have some degree of insensitivity so that they can survive transport, handling and firing without endangering the operators.
DEPLOYMENT, ARMING AND DETONATIONExplosives can be projected, thrown or dropped. They can also be placed, as in the case of mines, improvised explosive devices and booby traps. In each case, there is a way of arming the munition and a method of detonating it so that it reaches the target and works as intended.
When something in the arming and firing sequence fails, the munition is classed as unexploded ordnance, and it can pose an explosion risk to combatants and non-combatants alike long after it is deployed.

10 BLAST TRAUMA CARE
EFFECTS OF EXPLOSIONS AND MECHANISMS OF INJURYAn explosion is a sudden release of energy caused by a very rapid chemical reaction that turns the solid or liquid explosive into heat and gas. This reaction takes place in less than a millisecond. The expanding gas is produced very rapidly, which is what makes explosives so effective.
The following effects are associated with explosions:
• Thermal radiation: While a fireball can occur, the most likely heat effect is a short, sharp, intense flash. This can burn human skin in an instant, and inhaling superheated air can cause internal burns.
• Brisance: The shattering effect of an explosive, brisance is what makes an explosive useful for demolition or other destruction. Shattering the concrete of a strategic bridge or shattering the metal casing of an artillery shell – both rely on the explosive’s brisance.
• Primary fragments: Fragments (from a shell casing or from a fragmentation matrix) propelled outwards at high speed are part of a weapon’s destructive design. Fragments spread out in a spherical shape and are subjected to air resistance. They therefore slow down the further away they get from the source of the explosion (in accordance with an inverse-square rule).
• Blast wave: A blast wave is the compression of air caused by the rapid expansion of gas produced by an explosion. It travels through any medium, and problems are caused where different materials meet. As it moves outwards from the source of the explosion, the blast wave decays faster than fragments slow down (obeying a cube-root rule).
• Ground shock: This is the transmission of kinetic energy from an explosion through the ground. Ground shock can damage buildings and other infrastructure.
• Secondary fragments: These are produced when the blast wave or primary fragments from an explosion hit an object, causing it to break apart and be propelled onwards.
Explosions can injure people in a number of ways; for the purposes of this manual, mechanisms of injury are grouped into four categories. These map directly to the categories of injuries outlined in Chapter 2.

CHAPTER 1 – THE PHYSICS OF EXPLOSIONS 11
MECHANISM OF INJURY
INJURY CATEGORY
Blast Primary: caused solely by the effect on tissue of blast overpressure (the excess pressure caused by an explosion)
Fragmentation Secondary: caused by flying objects (fragments)
Blast impact Tertiary: caused by high-energy explosions; occurs when people are thrown through the air (accelerating quickly) and strike other objects (decelerating quickly)
Heat, smoke, contamination, other
Quaternary: encompass all other injuries caused by explosions
The picture below shows the initial set up of a demonstration where an anti-personnel mine, mounted on a stake, is detonated next to a dead pig.
E. T
olle
fsen
/ICRC
Figure 1. Demonstration set-up

12 BLAST TRAUMA CARE
Following detonation, the following effects could be observed:
Burn marks on witness screen (quaternary)
Amputation of limb (primary)
Fragments of various sizes (secondary)
Foliage cleared by blast wind/wave (primary)
E. T
olle
fsen
/ICRC
Figure 2. Effects noted after an explosion
Understanding the various physical effects of explosions will enable you to understand the nature of blast victims’ injuries.

CHAPTER 1 – THE PHYSICS OF EXPLOSIONS 13
NOTES

14 BLAST TRAUMA CARE
CHAPTER 2 – EXPLOSIONS AND BLAST INJURIES
2 J.H. Stuhmiller, “Blast injury: Translating research into operational medicine”, in K.E. Friedl and W.R. Santee (eds), Military Quantitative Physiology: Problems and Concepts in Military Operational Medicine, Office of the Surgeon General, Falls Church, Virginia, 2008, pp. 267–302.
Key concepts
• The consequences of an explosion can be devastating owing to unique patterns of injury, with victims typically sustaining a combination of penetrating and blunt-trauma injuries
• Blast injuries, which may affect multiple organs and are potentially life-threatening, call for complex triage and a specific diagnostic approach; they can pose significant care-management challenges to first responders
• Blast lung is the most common fatal injury among victims of explosions
This chapter gives basic information about the effects of an explosion, particularly its effects on the human body.
Explosions in closed spaces (e.g. in buildings or large vehicles) are associated with higher rates of injury and death when compared with explosions in open spaces. (Barotrauma – trauma caused by changes in pressure – resulting from diving will be discussed briefly during the course.)
A blast injury is physical trauma due to direct or indirect exposure
to an explosion.2
Blast injuries occur from the detonation of high explosives (e.g. TNT, C-4, Semtex, nitroglycerine, dynamite and ammonium nitrate) as well as from the deflagration of low explosives (e.g. gunpowder), especially where that explosive has been confined, as in a pipe bomb.

CHAPTER 2 – EXPLOSIONS AND BLAST INJURIES 15
The severity of the blast injury depends on several factors, such as the type explosive used and the victim’s distance from the seat of the explosion. An explosion is a chemical reaction which results in the rapid change of state of a liquid or solid to a gas, generating heat and kinetic energy. Explosives cause unique patterns of injury as well as a number of common injuries.
Just after an explosion, pressure increases most rapidly in the surrounding environment and then falls off exponentially. The additional pressure created by an explosion is known as overpressure; an overpressure of 60–80 pounds per square inch, or 400–550 kilopascals, is considered potentially lethal. What the overpressure is at its peak and how long the initial positive pressure phase lasts will depend on how big the explosion is and how far one is from the seat of the blast. In air, the overpressure peak increases with the amount of explosives (it is proportional to the cube root of the explosives’ weight); however, it decreases the further one is from the source of the explosion (it is the inverse of the cube of the distance from the detonation). Given this, how far someone is from the explosion is the primary factor in determining what physical effects the explosion will have on them.
The physical sequence of an explosion can be seen in the following diagram. In the first phase, the positive pressure phase, the effect of overpressure squeezes the internal organs, especially the hollow organs such as the eardrums, lungs and gastrointestinal tract. This is immediately followed by a vacuum or suction effect (the negative pressure phase), which usually lasts longer than the positive pressure phase. The last phase is the blast wind, where extremely hot air rushes into the vacuum.
Time
Peak blast overpressure
Positive pressurephase
Negative pressurephase
Atmosphericpressure
Blast wind
Pressure
Figure 3. Pressure distribution in an explosion

16 BLAST TRAUMA CARE
About 7.8% of blast injuries in open air are lethal.3 This jumps to nearly 49% when the blast occurs in confined spaces.4
Simple blast waves in an open space create a rapid rise in air pressure usually lasting less than ten milliseconds. In enclosed environments the reflection of blast waves from walls and other surfaces creates complex waves of longer duration, hitting the victim several times.
Time
Atmosphericpressure
Positive pressure phase
Blast overpressurePressure
Figure 4. Oscillation of blast overpressure in enclosed environment
This enables a greater transfer of energy to the body, increasing the risk of primary blast injuries – such as ruptured eardrums and blast lung5 – and
3 N.M. Elsayed, “Toxicology of blast overpressure”, Toxicology, Vol. 121, No. 1, July 1997, pp. 1–15.
4 S. Mallonee et al., “Physical injuries and fatalities resulting from the Oklahoma City bombing”, JAMA, Vol. 276, No. 5, August 1996, pp. 382–387. K.D. Boffard and C. MacFarlane, “Urban bomb blast injuries: Patterns of injury and treatment”, Surgery Annual, Vol. 25, No. 1, 1993, pp. 29–47.
5 G.J. Cooper, “Protection of the lung from blast overpressure by thoracic stress wave decouplers”, Journal of Trauma and Acute Care Surgery, Vol. 40, No. 3 suppl., March 1996, pp. S105–S110.

CHAPTER 2 – EXPLOSIONS AND BLAST INJURIES 17
increasing displacement of the body wall, which may cause a shearing effect on larger organs, especially the organs in the upper abdomen.6
About 70% of victims sustain minor soft-tissue injuries.7 Traumatic amputations occur in about 11% of victims.
The following categories of injury are based on how the human body is affected by the blast wave, the blast wind and environmental/material factors present in the area of the blast:
• primary blast injury
• secondary blast injury
• tertiary blast injury
• quaternary blast injury
• quinary blast injury.
These will now be considered in more detail.
6 G.J. Cooper and D.E. Taylor, “Biophysics of impact injury to the chest and abdomen”, Journal of the Royal Army Medical Corps, Vol. 135, No. 2, June 1989, pp. 58–67.
7 K. Peleg et al., “Patterns of injury in hospitalized terrorist victims”, The American Journal of Emergency Medicine, Vol. 21, No. 4, July 2003, pp. 258–262.
PRIMARY BLAST INJURYThe blast wave is the main factor in primary blast injuries and is made of the front of high pressure that compresses the surrounding air and falls rapidly to negative pressure (relative to atmospheric pressure, 760 mm Hg at sea level). It travels at supersonic speed, and within a few milliseconds it damages surrounding structures and affects the heart, lungs and gastrointestinal tract. As the wave travels through things with different densities, its behaviour changes – the wave behaves differently depending on whether it is going through a liquid, a solid or air. This can create serious problems at the parts of the body where organs or other structures of differing densities meet. In the human body, the spaces and cavities between liquids and solids (as in the liver) or air and solids (as in the lungs and ears) are particularly prone to blast-wave damage.

18 BLAST TRAUMA CARE
The main primary blast injuries are:
• eardrum injuries. A ruptured eardrum is the most common injury to the middle ear. It is also the most common injury after a blast and may occur at pressures as low as five to 15 pounds per square inch. Look for a potential ear injury in any patient with hearing loss, ringing in the ears, ear pain, vertigo, or bleeding or other discharge from the ear. A tympanic membrane and ocular exam should be performed.
• lung injuries. So-called blast lung results from the increased pressure caused by the blast wave. It typically causes temporary cessation of breathing (apnoea), a slower than normal heart rate (bradycardia) and low blood pressure (hypotension). Blast lung should be suspected in anyone having difficulty breathing, coughing, coughing up blood or experiencing chest pain following a blast. The overpressure from the shock wave first affects the blood vessels in contact with the alveoli (the air sacs in the lungs). The blood in blood vessels is a liquid, while the alveoli hold air, a gas. Liquids are not compressible, while gases are (and are also less dense). When a force hits this area, it displaces the vessels into the alveolar space (a mechanism called “spalling”), rupturing the alveoli and compressing the air into the interior (lumen) of the broken vessels (a mechanism called “implosion”). This can lead to the lethal phenomenon of an air embolism, when an air bubble blocks a blood vessel, or acute respiratory distress syndrome. This produces a characteristic butterfly pattern on chest X-rays. Chest X-rays are recommended for all patients exposed to blasts. If blast lung is suspected, prophylactic chest tubes are recommended before general anaesthesia or air transport.8
8 Centers for Disease Control and Prevention, Blast Injuries: Blast Lung Injury, Centers for Disease Control and Prevention, Atlanta, Georgia, 2009: https://www.acep.org/globalassets/uploads/uploaded-files/acep/clinical-and-practice-management/ems-and-disaster-preparedness/disaster-preparedness-grant-projects/blastinjury_lung_eng.pdf, accessed 18 Nov 19.

CHAPTER 2 – EXPLOSIONS AND BLAST INJURIES 19
Natio
nal C
ance
r Ins
titut
e
Figure 5. Diagram of the respiratory system

20 BLAST TRAUMA CARE
• abdominal injuries. The shock wave can also cause bowel perforation, bleeding, lacerations to the solid organs and testicular rupture. Signs of an abdominal injury include: abdominal pain, nausea, vomiting, vomiting blood, rectal pain, testicular pain, unexplained hypovolemia (a decrease in the volume of the body’s blood) or recent severe, sudden abdominal pain (known as acute abdomen). Gastrointestinal injuries are more likely to occur in victims of blasts detonated inside a building than those exposed to explosions in an open-air environment.
• brain injuries. In addition to more severe coup-contrecoup brain injuries (where the brain is injured both at the site of impact and on the opposite side from hitting the skull), primary blast waves can cause concussions or mild traumatic brain injury without a direct blow to the head. Brain injury should be suspected with complaints of headache, fatigue, poor concentration or lethargy.
SECONDARY BLAST INJURY
M. D
alla
Tor
re/IC
RC
Figure 6. Massive wound due to shrapnel effect

CHAPTER 2 – EXPLOSIONS AND BLAST INJURIES 21
M. D
alla
Tor
re/IC
RC
Figure 7. Penetrating abdominal injury
Secondary blast injuries are caused by any object or debris that is displaced by the blast wind of the explosion. The debris can come from fragmentation of the case of the explosive device and its contents, or from any objects found in the area surrounding the explosion site. The effect can be severe, and penetration is the one of the main causes of death in blast situations.
Secondary blast injuries are indeed the most common cause of mortality in victims of an explosion. There is a high risk of debris propelled by the explosion penetrating exposed areas of the victim’s body. Often the areas at the highest risk of injury are the head, neck and extremities. Secondary blast injuries can be obvious, but they can also be deceptive. The force of the explosion can propel debris many times faster than a bullet. Thus a seemingly small wound could be hiding a devastating injury underneath. Injuries can include fractures, amputations, lacerations, dislocations and any type of soft-tissue injury.9
9 S.T. Shuker, “Emergency treatment of blast, shell fragment and bullet injuries to the central midface complex”, Journal of Maxillofacial and Oral Surgery, Vol. 18, No. 1, 2019, pp. 124–130.

22 BLAST TRAUMA CARE
At this point, you face a unique challenge as a first responder: caring for patients with both blunt-trauma and penetrating injuries.
TERTIARY BLAST INJURYTertiary blast injuries are caused when the blast wind propels the victim through the air, causing them to hit another object, or when a structure collapses and injures the victim. How someone is injured is determined by what they hit. The resulting injury can be either blunt trauma due to the impact or a penetrating injury if the victim is propelled into something that then enters the body. The most common tertiary injuries are fractures and closed head injuries.
In addition, heavy material might collapse on the victim and trap them, which could lead to compartment syndrome or crush syndrome.
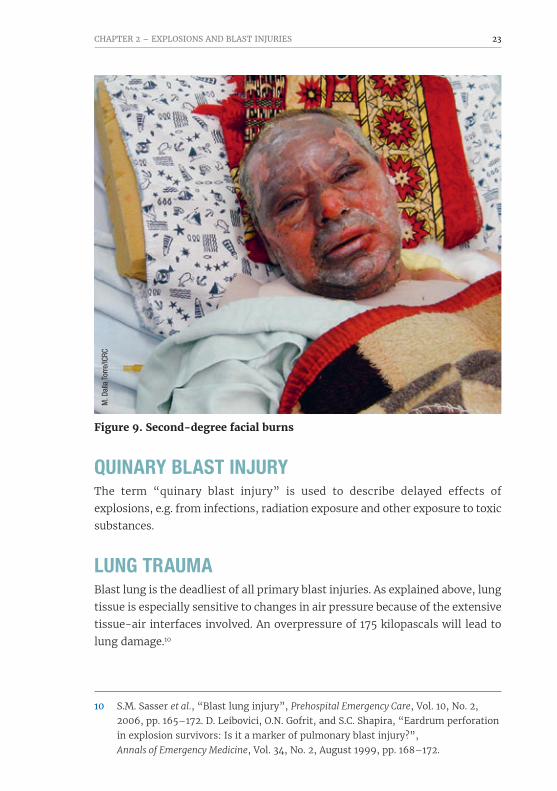
QUATERNARY BLAST INJURYThis term encompasses all other injuries caused by explosions, including burns, crush injuries, toxic inhalations and asphyxia. The fireball of the explosion may reach up to 3,000°C and cause flash burns. Toxic fumes containing carbon monoxide or cyanide are lethal if they are breathed in for an extended period. In this case, special airway and breathing support are mandatory, including oxygen therapy. Special attention must be given to patients with facial burns, which could cause an airway obstruction.
M. D
alla
Tor
re/IC
RC
Figure 8. Endotracheal intubation due to massive supraglottic oedema
CHAPTER 2 – EXPLOSIONS AND BLAST INJURIES 23
M. D
alla
Tor
re/IC
RC
Figure 9. Second-degree facial burns
10 S.M. Sasser et al., “Blast lung injury”, Prehospital Emergency Care, Vol. 10, No. 2, 2006, pp. 165–172. D. Leibovici, O.N. Gofrit, and S.C. Shapira, “Eardrum perforation in explosion survivors: Is it a marker of pulmonary blast injury?”, Annals of Emergency Medicine, Vol. 34, No. 2, August 1999, pp. 168–172.
QUINARY BLAST INJURYThe term “quinary blast injury” is used to describe delayed effects of explosions, e.g. from infections, radiation exposure and other exposure to toxic substances.
LUNG TRAUMABlast lung is the deadliest of all primary blast injuries. As explained above, lung tissue is especially sensitive to changes in air pressure because of the extensive tissue-air interfaces involved. An overpressure of 175 kilopascals will lead to lung damage.10

24 BLAST TRAUMA CARE
Lung injury is more severe in enclosed space events. Rapid compression and expansion of alveolar spaces leads to alveolar rupture and such problems as pulmonary contusions (bruising of the lung), pneumothorax (a collapsed lung), interstitial emphysema (where air leaks into the tissue outside of the alveoli), pneumomediastinum (where air gets trapped between the lungs) and subcutaneous emphysema (where air gets trapped in the lower layers of the skin).
The most common lung injury associated with a blast wave, pulmonary contusion, is manifested by alveolar haemorrhage and interstitial oedema. Resulting in microhaemorrhages and perivascular and peribronchial disrup-tion, such contusions may occur as late as 48 hours after the explosion.

CHAPTER 3 – SAFETY FIRST! 25
NOTES

26 BLAST TRAUMA CARE
CHAPTER 3 – SAFETY FIRST!
11 C. Giannou and E. Bernes, First Aid in Armed Conflicts and Other Situations of Violence, International Committee of the Red Cross, Geneva, 2006.
Key concepts
• In case of an incident call for help first
• First responders’ safety is a priority, especially in the aftermath of an explosion
• Initial assessment and care of a blast victim should follow the cABCDE approach
This chapter describes how to approach all emergency scenes, especially mine fields. You should act cautiously until you have fully evaluated the situation for your safety and the safety of those helping you.
BEFORE ENTERING THE SCENEEVALUATE THE SCENEJust as you should know how to give proper first aid, it is also vital that you know how to look after yourself. Both skills save lives! Before entering the scene of an accident, you should evaluate the scene as a whole and assess any possible safety concerns.
Your safety depends to a large extent on your behaviour and your assessment of actual and potential dangers. However, in certain circumstances (e.g. in minefields or burning buildings) and in accordance with local security procedures, you may need to request protection or rescue by the military, police, fire brigade, etc.11
Approach all emergency scenes (especially minefields) with caution until you have fully evaluated the situation for your safety and the safety of those helping you.

CHAPTER 3 – SAFETY FIRST! 27
ASSESS SAFETYA critical part of approaching any ill or injured patient is keeping first responders and others safe. An ill or injured first responder will be unable to help anyone and instead becomes an extra patient for other responders to treat. Assessing safety involves checking for:12
• hazards. Is there a fire, electrical wire or chemical spill that could injure providers or bystanders? At a traffic accident, is the scene closed to oncoming traffic? If a building has collapsed, is it safe to enter? At the scene of an explosion, always consider the possibility of further explosions. Remember that delayed building collapse may follow explosions, fires and earthquakes.
• violence. Is there a chance that first responders may be harmed by the patient or by others? For patients who are agitated, request help as needed before beginning your assessment. Depending on the situation, remain alert to the risk of secondary attack.
Follow these guidelines when arriving on an emergency scene:
• Take time to evaluate the scene and recognize existing and potential dangers.
• Never attempt to do anything you are not trained to do.
• Get the help you need to ensure your safety, the safety of those assisting you and, to the extent possible, the patient.
• Discourage other people from entering an area that appears unsafe.
• Never move patients until you treat and stabilize them unless immediate danger threatens you or the patient.
• If it is necessary to move a patient, do so safely and quickly.
Maintaining a safe distance is critical to minimize the risks to first responders. Stand at a sufficient distance to be able to assess possible hazards. After a blast due either to a suicide bomber or a terrorist attack, the greatest danger is a secondary attack on emergency services or the emergency department itself.
12 World Health Organization and International Committee of the Red Cross, Basic Emergency Care: Approach to the Acutely Ill and Injured, World Health Organization/International Committee of the Red Cross, Geneva, 2018. International Federation of Red Cross and Red Crescent Societies, International First Aid and Resuscitation Guidelines 2016, International Federation of Red Cross and Red Crescent Societies, Geneva, 2016.

28 BLAST TRAUMA CARE
To maintain a safe distance:
• stand upwind and/or uphill
• use binoculars to look for: - liquids, chemical fumes, contaminants, etc. - the number of victims
• follow the incident command system.
Potential hazards include:
• further explosive devices
• shrapnel
• building collapse
• airborne contaminants
• contaminated patients
• contaminated scene/environment
• perpetrators
• terrorist patients.
Table 1. Bomb threat stand-off distances13
SIZE OF BOMB THREAT OUTDOOR EVACUATION DISTANCE
Pipe bomb 259 metres
Car 533 metres
Minibus 838 metres
Medium-sized truck 1,981 metres
WEAR PERSONAL PROTECTIVE EQUIPMENTYou may not know the cause of illness or injury when you first approach a patient, and without appropriate personal protective equipment you will increase your exposure to a second explosion.
You must use appropriate personal protective every time you approach a patient. This should be fitted correctly – helmets, body armour, face shields, etc. should all be correctly fastened, or they will not work as designed.
13 The National Counterterrorism Center, Bomb Threat Stand-off Distance Chart, The National Counterterrorism Center, Washington, DC, 2006.

CHAPTER 3 – SAFETY FIRST! 29
If there is no risk of a second explosion, always protect yourself from any exposure to bodily fluids. This will almost always require gloves and eye protection and may require a gown and mask. Always be sure that you are up to date on current local recommendations,14 but in the absence of these it is vital to use standard precautions, such as wearing gloves, to protect yourself from potential contact with blood and other body fluids.
In case you are alone in assisting a victim:
• call for help
• stay calm
• do not rush to the patient
• do not try to rescue them in a potentially unsafe area
• talk to the patient and tell them how to self-administer first aid
• prepare the first-aid kit.
14 World Health Organization and International Committee of the Red Cross, Basic Emergency Care: Approach to the Acutely Ill and Injured, World Health Organization/International Committee of the Red Cross, Geneva, 2018.
ON THE SCENEPRIMARY SURVEY: PRIORITIZE CARE (cABCDE)The cABCDE approach to treating injured patients is often also called the trauma primary survey. The cABCDE approach provides a framework for the systematic and organized evaluation of acutely ill patients to rapidly identify and treat life-threatening conditions. The foremost concern is to try to stem the flow of blood at major bleeding points, such as fragment wounds, where pressure can be applied.
Approaching every patient in a systematic way ensures that life-threatening conditions are recognized promptly and that the most critical interventions happen first. In a stable patient, the initial cABCDE approach may only take seconds to a few minutes.
The goal of cABCDE is to rapidly identify life-threatening conditions; ensure the airway stays open; and ensure that breathing and circulation are adequate to deliver oxygen to the body.
30 BLAST TRAUMA CARE
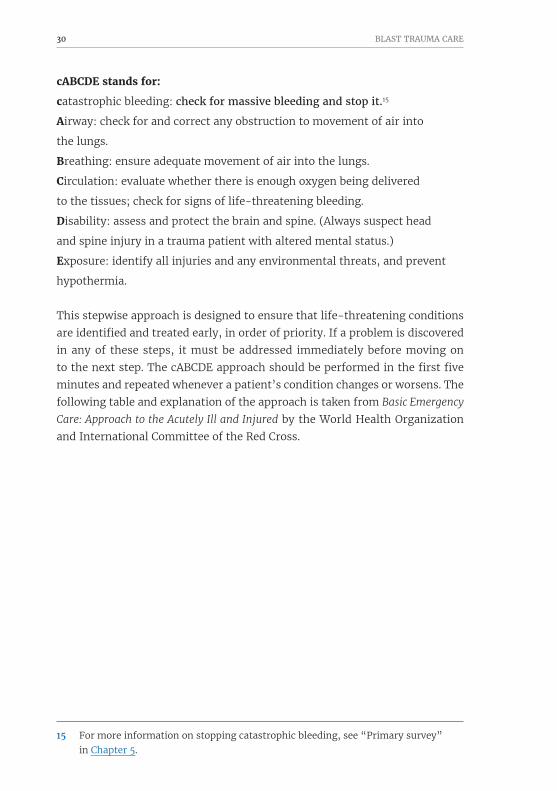
cABCDE stands for:
catastrophic bleeding: check for massive bleeding and stop it.15
Airway: check for and correct any obstruction to movement of air into
the lungs.
Breathing: ensure adequate movement of air into the lungs.
Circulation: evaluate whether there is enough oxygen being delivered
to the tissues; check for signs of life-threatening bleeding.
Disability: assess and protect the brain and spine. (Always suspect head
and spine injury in a trauma patient with altered mental status.)
Exposure: identify all injuries and any environmental threats, and prevent
hypothermia.
This stepwise approach is designed to ensure that life-threatening conditions are identified and treated early, in order of priority. If a problem is discovered in any of these steps, it must be addressed immediately before moving on to the next step. The cABCDE approach should be performed in the first five minutes and repeated whenever a patient’s condition changes or worsens. The following table and explanation of the approach is taken from Basic Emergency
Care: Approach to the Acutely Ill and Injured by the World Health Organization and International Committee of the Red Cross.
15 For more information on stopping catastrophic bleeding, see “Primary survey” in Chapter 5.

CHAPTER 3 – SAFETY FIRST! 31
ASSESSMENT IMMEDIATE MANAGEMENT
Airway with cervical spine immobilization
Look for: • blood, vomit, tongue or objects obstructing the airway • burned nasal hairs or soot around the nose or mouth • head or neck trauma • neck haematoma (bleeding under the skin) • altered mental status, as this can affect the patient’s ability to protect their airway.
Listen for abnormal airway sounds (such as gurgling, snoring, stridor or noisy breathing).
• Stabilize the cervical spine. • Open the airway using jaw thrust, not head-tilt chin-lift, if spine injury suspected. • Suction out airway secretions, blood and/or vomit. Remove any visible foreign objects from the airway. • Insert an oral airway (avoid nasal airway in the presence of facial trauma). • If the patient has an expanding neck haematoma or evidence of airway burns or trauma, plan for rapid handover/transfer to a provider capable of advanced airway management.
If the airway is open, move on to breathing (B).
Breathing Look for: • increased work of breathing • abnormal chest wall movement, which may indicate flail chest • tracheal shift • sucking chest wound • cyanosis (blue-grey colour of the skin) around the lips and fingertips • abrasion, bruising or other signs of injury to the chest • circumferential burns (burns that go all the way around a body part) to the chest or abdomen.
Listen for: • absent or decreased breath sounds • dull sounds or hyperresonance with percussion.
Feel for crepitus (cracking and popping as you press on the skin).
• Give oxygen. • Perform needle decompression immediately and give oxygen and intravenous (IV) fluids for tension pneumothorax. • Place three-sided dressing for a sucking chest wound. • If breathing is not adequate or the patient remains hypoxic on oxygen, assist breathing with bag-valve mask ventilation. • For chest or abdominal burns that restrict breathing, hand patient over for escharotomy (a surgical procedure to cut and release burned tissue that may restrict breathing or blood supply to a limb).
If breathing is adequate, move on to circulation (C).

32 BLAST TRAUMA CARE
ASSESSMENT IMMEDIATE MANAGEMENT
Circulation Look for: • capillary refill takes longer than three seconds • pale extremities • distended neck veins • external and internal bleeding.
Common sources of serious bleeding are: • chest injuries • abdominal injuries • pelvic fractures • femur fractures • amputations or large external wounds • burns (note size and depth).
Feel for: • cold extremities • weak pulse or tachycardia (fast heart rate).
• Apply direct pressure to control active bleeding, or pack wounds if wounds are large or gaping. • If amputated limbs or any other source of uncontrolled bleeding are present, apply a tourniquet (document time of application) and plan for urgent transfer to a surgical unit. • If there is ongoing blood loss or evidence of poor perfusion, place two large-bore IVs, give IV fluids and reassess. • If there is a burn injury, start IV fluid according to the burn size. • Splint suspected femur fractures. • Bind pelvic fractures. • Leave any penetrating objects in place and stabilize the objects for transfer to a surgical team. • Position pregnant patients on their left side while maintaining spinal immobilization.
If circulation is adequate, move on to disability (D).
Disability Look for: • confusion, lethargy or agitation • seizures/convulsions • unequal or poorly reactive pupils • deformities of the skull • blood or fluid from the ear or nose.
Check: • AVPU scale (alert, verbal, pain, unresponsive) or Glasgow Coma Scale (GCS) – the AVPU scale is simpler to use for children • movement and sensation in all extremities • blood glucose level if the patient is confused or unconscious.
• If the patient’s GCS score is <9 or if the patient has an AVPU score of P or U, plan for rapid handover/transfer to a provider capable of advanced airway management. • If the patient is lethargic or unconscious, reassess the airway frequently (see “Airway”, above). • Suspect a spine injury or closed head injury if there is any trauma with altered mental status. • Give oxygen if you suspect hypoxia may be a cause of the patient’s altered mental status. • Give glucose if there is altered mental status and: you have measured low blood glucose, you are unable to check blood glucose, or there is a history of diabetes. • If patient is seizing, give a benzodiazepine.

CHAPTER 3 – SAFETY FIRST! 33
Exposure Remove all clothing, especially wet and restrictive clothing.
Examine entire body for evidence of injury (including the back, spine, groin and underarms).
• If a spinal injury is suspected, perform the log-roll manoeuvre to examine the back. • Remove all jewellery. • If necessary, dry patient thoroughly after removing wet clothing. • Cover the patient as soon as possible to prevent hypothermia. Acutely injured patients have difficulty regulating their body temperature. • Respect the patient and protect their modesty during exposure.
SECONDARY SURVEYCarried out after the primary survey and SAMPLE history, the secondary sur-vey is a detailed head-to-toe examination designed to identify any additional injuries or issues requiring intervention.
In the aftermath of an explosion, and during mass-casualty incidents in gen-eral, the secondary survey is carried out at the hospital where the victims are being treated.
The secondary survey gives the provider an organized way to assess the entire body for signs of trauma that may not have been obvious on the primary survey. Remember that very painful or frightening injuries may distract both patients and providers from recognizing other injuries.
Always examine the entire body. If the secondary survey identifies a primary- survey condition, stop and return immediately to the primary survey to manage it.
DO A QUICK HEAD-TO-TOE CHECKInformation about an injured person and how they were injured can be critical to planning patient management. Children, older adults and people with chronic diseases have an increased risk of complications from trauma especially if it is related to an explosion. They may need to be watched for several hours, even when they appear well. Certain trauma mechanisms are often associated with multiple injuries, some of which may not be obvious right away. High-risk mechanisms include:

34 BLAST TRAUMA CARE
• falls from heights greater than three metres resulting from being thrown by the blast wind (i.e. tertiary blast injuries)
• an explosion or fire in an enclosed space as a direct consequence of the blast wave.
Use the SAMPLE approach to obtain a medical history. Remember that you may be able to obtain information from bystanders, family, police, the fire service or other health-care workers.
If the history reveals a condition that falls under the primary survey, stop and return immediately to the primary survey to manage it.
To take a history with the SAMPLE approach, ask about:Signs and symptomsAllergiesMedicationsPast medical historyLast oral intakeEvents surrounding injury
PACKAGINGBy now, you know to handle the patient with care, both to protect the spine and to prevent further bleeding. In addition to securing a mode of transport, you must think of the patient’s body temperature. Even when it is warm outside, someone who is injured will quickly get cold and then bleed more. Try to shield the patient from the environment to the degree possible by wrapping them up in something warm and protecting them from moisture with a tarp. If you do not have a stretcher, you can improvise one in many ways using materials that will protect the patient from the elements.
K.Fi
nsne
s/IC
RC
K.Fi
nsne
s/IC
RC
K.Fi
nsne
s/IC
RC
Figure 10. Packaging a patient for transportation

CHAPTER 3 – SAFETY FIRST! 35
NOTES

36 BLAST TRAUMA CARE
CHAPTER 4 – A/B: MANAGING THE AIRWAY AND RESPIRATORY SYSTEM
Key concepts
• How oxygen normally reaches cells through the respiratory system
• How to make a diagnosis using your senses of hearing, sight, smell and touch
• How to recognize an obstructed airway and respiratory failure
• How to clear an airway obstruction while protecting the cervical spine
• How to assist ventilation
This chapter will cover basic and advanced airway management, which are the medical processes for checking and ensuring an open pathway to and from a patient’s lungs.
THE AIRWAY AND RESPIRATORY SYSTEMFor the body to work properly all the vital systems and organs must cooperate with one another (i.e. the airway, lungs, chest, heart and blood vessels, including the blood). In this way the oxygen contained in the air can reach the smallest cells of the body and produce the energy the body needs to live, like a candle needs oxygen to burn, producing light and heat.

CHAPTER 4 – A/B: MANAGING THE AIRWAY AND RESPIRATORY SYSTEM 37
Natio
nal C
ance
r Ins
titut
e
Figure 11. Diagram of the respiratory system
relecteur
Note
reprendre ici

38 BLAST TRAUMA CARE
The first part of the oxygen path is the airway. This is a sequence of pipes of different shapes and sizes that allow the oxygen contained in the air to enter the body and reach the lower parts of the lungs, where it can be transferred to red blood cells16 to be distributed around the body through the arteries and their final branches, the capillaries.
The airway starts with the nose and the mouth. Breathing through the nose is the default (especially in children and infants) as it filters dust, humidifies the air and warms it up, but the mouth is also used with varying frequency. The nose and the mouth join in the pharynx, just before the larynx.
The larynx is the organ that enables speech (through the vocal cords) and at the same time is the narrowest part of the airway. It is made of cartilage and small muscles that move the vocal cords for speech and let the air in and out of the lungs. It is a very well protected structure, with many reflexes to ensure that only air passes through it.
After the larynx is the trachea, a rigid pipe made of cartilage rings that forks into the right and left bronchi. They are conduits to the right and left lungs.
The bronchi divide like the branches of a tree, and blood vessels travel with them closely so that ultimately the smallest parts of the lungs (called alveoli) can exchange oxygen with the smallest parts of the lung vessels (called capillaries). They are separated by a very thin layer, many times smaller than the cross section of a hair.
Connective tissue
AlveoliAtrium
Pulmonary vein
Pulmonary artery
Capillary beds
Alveolar sacs
Alveolar duct
Mucous gland
Mucosal lining
Fran
cis
Mac
ard
Figure 12. Alveoli
16 See Figure 20.
CHAPTER 4 – A/B: MANAGING THE AIRWAY AND RESPIRATORY SYSTEM 39
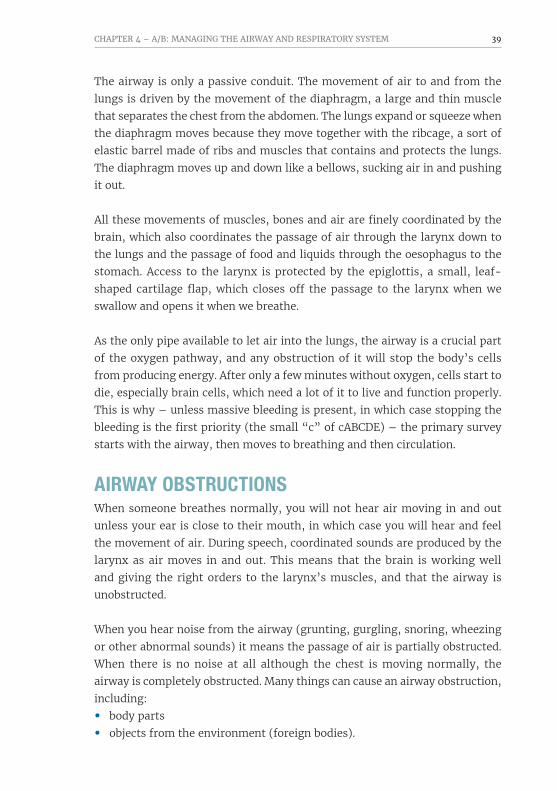
The airway is only a passive conduit. The movement of air to and from the lungs is driven by the movement of the diaphragm, a large and thin muscle that separates the chest from the abdomen. The lungs expand or squeeze when the diaphragm moves because they move together with the ribcage, a sort of elastic barrel made of ribs and muscles that contains and protects the lungs. The diaphragm moves up and down like a bellows, sucking air in and pushing it out.
All these movements of muscles, bones and air are finely coordinated by the brain, which also coordinates the passage of air through the larynx down to the lungs and the passage of food and liquids through the oesophagus to the stomach. Access to the larynx is protected by the epiglottis, a small, leaf-shaped cartilage flap, which closes off the passage to the larynx when we swallow and opens it when we breathe.
As the only pipe available to let air into the lungs, the airway is a crucial part of the oxygen pathway, and any obstruction of it will stop the body’s cells from producing energy. After only a few minutes without oxygen, cells start to die, especially brain cells, which need a lot of it to live and function properly. This is why – unless massive bleeding is present, in which case stopping the bleeding is the first priority (the small “c” of cABCDE) – the primary survey starts with the airway, then moves to breathing and then circulation.
AIRWAY OBSTRUCTIONSWhen someone breathes normally, you will not hear air moving in and out unless your ear is close to their mouth, in which case you will hear and feel the movement of air. During speech, coordinated sounds are produced by the larynx as air moves in and out. This means that the brain is working well and giving the right orders to the larynx’s muscles, and that the airway is unobstructed.
When you hear noise from the airway (grunting, gurgling, snoring, wheezing or other abnormal sounds) it means the passage of air is partially obstructed. When there is no noise at all although the chest is moving normally, the airway is completely obstructed. Many things can cause an airway obstruction, including:
• body parts
• objects from the environment (foreign bodies).

40 BLAST TRAUMA CARE
In the first case, the airway may be obstructed by the tongue falling back on the pharynx (the bottom of the throat – see Figure 11), secretions from the mouth, blood, broken teeth, soft tissue in the mouth or nose disrupted by the blast, food or vomit, or oedema (swelling of the tissues) due to trauma, fire or heat. In the case of oedema caused by fire or heat, there will be signs of burns on the face (e.g. blisters, burned skin or singed nose hair). Oedema of the larynx (see Figure 11) causes hoarseness, like that caused by a severe sore throat, and stridor (a high-pitched sound during respiration); these are signs of impending total airway obstruction.
In the second case, something from the environment gets into the airway, such as soil or dust from a building collapsing or something displaced by the blast.
The blast wave itself can simply cause the airway to rupture. In addition, debris accelerated by the explosion can cause blunt trauma (i.e. trauma that does not break through the skin) or penetrating trauma to the neck. In this case the skin is penetrated, and the subcutaneous tissues are damaged, e.g. by nails and bolts from an improvised explosive device or by glass from shattered windows.
M. D
alla
Tor
re/IC
RC
Figure 13. Shrapnel wound to the neck compromising the airway

CHAPTER 4 – A/B: MANAGING THE AIRWAY AND RESPIRATORY SYSTEM 41
The airway can also become compromised by a massive haematoma (an abnormal collection of blood in the tissues) of the neck, when blood from a blunt trauma expands within the neck and compresses the soft tissue around the airway.
After securing the scene (and stopping any massive bleeding, where necessary), the first thing to do for a blast victim is to assess their consciousness. In doing so, you can assess the airway at the same time. Conscious patients who answer questions, and are therefore able to speak, have an open airway. If no sounds are heard, you must assess the airway to see if it is open or blocked. By positioning your head close to the patient’s face, you can simultaneously assess whether their chest is moving and air is passing through the airway. If their chest is moving but you do not hear or feel air sounds, the airway is blocked and you must clear it (make it patent), using a technique such as the jaw thrust.
�g 14
�g 15
Fran
cis
Mac
ard
Figure 14. Jaw thrust
The jaw thrust moves the tongue forward and relieves any obstruction it may have caused. If the cause of obstruction is a foreign body in the mouth, you must remove it carefully to avoid the risk of pushing it deeper into the mouth. If the cause is soil or debris in the mouth, you can gently remove it with your gloved finger, taking care not to be bitten. Once rescue teams arrive, if available, using vacuum suction is the safest and most effective way to remove secretions or small foreign bodies.

42 BLAST TRAUMA CARE
Another way to do this is by using gravity. Turning the patient on their side in the lateral recovery position – shown in Figure 15 – will position the patient’s cheek below the larynx, and any secretion, blood or vomit will drain out.
�g 14
�g 15
Fran
cis
Mac
ard
Figure 15. Lateral recovery position
There are also tools you can use to keep an airway patent. In the trauma kit there is an oropharyngeal airway (also known as an oral or Guedel airway), which can only be used to keep the airway open for unconscious patients. It must be used with caution to avoid pushing anything deeper in the throat while positioning it. An alternative to the oral airway is the nasal airway. As the mouth and nose both join before the larynx, inserting the small tube of the nasal airway through the nose can also prevent the tongue from obstructing the airway. However, if there is a major head and face trauma it is better to avoid using a nasal airway.
If you try all of this and the airway is still noisy and the passage of air is not satisfactory, it is possible that the obstruction is deep, at the level of the larynx or even deeper in the trachea or bronchi. In this case, an airway obstruction can be difficult to treat without advanced skills and tools, so you must triage properly (see Chapter 12) to ensure it is a priority when the rescue team arrives.
If a patient with a compromised airway can find a comfortable position, allow them to do so – if sitting makes them more comfortable, do not force them to lie flat.

CHAPTER 4 – A/B: MANAGING THE AIRWAY AND RESPIRATORY SYSTEM 43
Always suspect damage to the airway when the patient is unconscious and the trauma includes the neck and the head, and consider the possibility that the cervical spine is injured.
In the presence of an airway disruption or tension pneumothorax (see Chapter 7) a particularly concerning sign is surgical emphysema, where air collects under the skin and muscles. It causes the skin folds to flatten and can easily reach the face, making it puffy and closing the eyes. When the swelling is not too advanced, palpating the skin will produce fine crepitation17 under your fingertips.
The definitive treatment of an obstructed airway is to insert an endotracheal tube. This is particularly important to keep in mind when the airway is obstructed, or obstruction is developing, owing to oedema caused by inhal-ation of hot fumes or vapour from a blast, fire or chemicals. Burns around the nose and mouth or singed nose hairs after a fire or explosion may be indica-tions of injury necessitating a definitive airway. A large neck haematoma can be a sign of impending complete obstruction. In these circumstances, acting quickly can be life-saving, as once fully developed an airway obstruction makes intubation very difficult or impossible. At that point, the only solution is an emergency cricothyrotomy or tracheotomy. Intubation and emergency- tracheotomy techniques are beyond the scope of this manual.
Sometimes a foreign body deep in the hypopharynx or even in the larynx needs to be removed under direct laryngoscopy with the help of Magill for-ceps. After the object is removed a decision must be made as to whether a definitive airway is needed.
Other devices that can be used to maintain an open airway and ventilate the patient are supraglottic devices. There are many different kinds, but the most popular ones are the laryngeal mask airway and the i-gel. Using these devices requires some advance training, as the learning curve is very steep, but their use is increasing in prehospital care. Remember that supraglottic devices are useless if the obstruction is at or below the level of the larynx.
17 Crepitation, or crepitus, is an unusual crackling or popping sound and sensation that occurs as gas is pushed through subcutaneous tissue. United States National Library of Medicine, “Subcutaneous emphysema”, MedLine Plus, 24 June 2018: https://medlineplus.gov/ency/article/003286.htm, accessed 20 July 2020.

44 BLAST TRAUMA CARE
VENTILATIONWe have so far focused on the airway, but this is just the windpipe delivering air to the lungs, the organs where oxygen is transferred to the red blood cells. The lungs are very soft and elastic organs. They look like two big sponges covered by a thin slippery membrane, called the pleura.
A person at rest breathes slowly, the normal range being from 12 to 20 breaths per minute (bpm). When breathing, the chest expands symmetrically (both the right and left sides of the chest move outwards laterally), but at rest this is barely noticeable. If you exercise for a while, your respiratory rate will increase to 30 bpm or more, and your chest’s expansion will become evident. This happens because at rest we need only enough oxygen for the organs to work at their baseline, while when we exercise the body needs much more oxygen to enable the muscles to work. The same happens when we have a fever, are injured or lose a lot of blood. The body needs more oxygen, and the respiratory system works much faster to provide it. When the respiratory system is unable to transfer enough oxygen to the red blood cells, the patient is in respiratory failure.
When you approach someone who has been injured, you can often see from a distance whether their respiration is abnormal. When you move to the “B” of cABCDE (breathing) you may begin by assessing their respiratory rate. After someone undergoes the stress of a blast, it is normal for their respiratory rate to rise, with a normal range being between 21 and 29 bpm, inclusively. A respiratory rate higher than 29 bpm is abnormal, but it indicates that the body is reacting to the injury. If, in the context of trauma, the respiratory rate slows to lower than 10 bpm, this is not only abnormal but even more serious than a high respiratory rate. It can be a sign of severe head trauma, severe hypothermic shock or impending death, whatever the cause.
A first glance will tell you if the patient’s breathing is fast, normal or slow. Then you should count the number of breaths per minute. Next, look at the movement of their chest. It should expand outwards to the front and sides, followed by the expansion of the abdomen. The left and right sides of the chest should move symmetrically and simultaneously, and the chest should not produce noise. Check for abnormal movements, where one or more parts of the chest do not move in the same way as the others; such movements can indicate multiple rib fractures.

CHAPTER 4 – A/B: MANAGING THE AIRWAY AND RESPIRATORY SYSTEM 45
Examine the skin over the chest, looking for bruises, bleeding and signs of penetrating injuries. If it is too cold to remove the patient’s clothes or there is not enough time, use gloved hands to examine the patient’s front and sides under their clothes, feeling for abnormalities such as holes, skin lacerations or foreign objects and looking at your gloves for signs of bleeding. If the abdomen expands but the chest collapses, this is called paradoxical breathing and can be a sign of an airway obstruction. Remember that most of the chest cavity is near the back of the body, so it is essential that you inspect the patient’s back before moving on.
Check the patient’s oxygenation (whether they are getting enough oxygen) by looking the tips of the fingers, the lips and the inner cheeks. Bluish discoloration can be a sign that, for whatever reason, there is not enough oxygen in the patient’s blood.
A pulse oximeter is an essential tool to measure oxygenation. It is a handheld device that is applied to the fingertips or the earlobes. It emits red and infra-red light on one side and reads absorption through the skin on the other side, measuring the pulse and what percentage of the blood’s haemoglobin is carry ing oxygen. Normal values in healthy people are 98% to 100%. A reading of over 95% in trauma patients is reassuring. At levels under 95%, the patient needs oxygen and must be assessed for treatable causes of respiratory failure. Always be aware that after major haemorrhage or in a cold environment, the pulse oximeter can give false low readings because of peripheral vasocon-striction. False high readings can occur only with carbon monoxide poisoning.
M. D
alla
Tor
re/IC
RC
Figure 16. Pulse oximeter

46 BLAST TRAUMA CARE
What can we do to treat respiratory failure? First, reassure the patient. Treat an obstructed or partially obstructed airway immediately. If there is a sucking wound, treat it immediately with a three-sided occlusive dressing (Chapter 7).
If the patient’s respiratory rate is very low or they are not breathing but there is a pulse, we can insufflate (blow) air into their mouth after opening the airway, keeping the nostrils closed with two fingers (i.e. mouth-to-mouth ventilation). As this poses some risk of infection to you, from secretions and blood in the patient’s mouth, use a face mask with a one-way valve, if one is available; the mask creates a barrier preventing cross-contamination. You can also ventilate the patient with a bag valve mask.
M. D
alla
Tor
re/IC
RC
Figure 17. Bag valve mask
If a patient needs to be ventilated, check their pulse. If there is no pulse and there are mass casualties, consider the patient dead and move on. Triaging properly saves valuable time that can be used to help other patients. If a pulse is present, continue to ventilate the patient until backup arrives. If you are the most skilled person on the scene, show a bystander how to do it and search for more injured people – you may save other lives.

CHAPTER 4 – A/B: MANAGING THE AIRWAY AND RESPIRATORY SYSTEM 47
NOTES

48 BLAST TRAUMA CARE
CHAPTER 5 – C: CIRCULATION AND BLEEDING CONTROL
Key concepts
• Stop bleeding as soon as possible – the body needs blood to stay alive
• Never remove foreign objects that are stuck in a wound, and never probe a wound to see where it goes
• Apply direct pressure, first with a gloved hand (as you collect your materials) followed by a dressing and bandage; this will control most external bleeding
• A wound cavity that is bleeding needs to be packed tight with as much gauze as possible
• Rapidly apply a tourniquet to any patient with evident massive bleeding from the extremities (i.e. the arms, legs, hands and feet) to prevent more blood loss
• Continue to check that what you have done has worked and keeps working
OXYGEN AND THE CIRCULATORY SYSTEMThe previous chapter described how oxygen is vital to survival. The whole body consists of many small building blocks – cells – and each block needs oxygen as fuel to function.
Arda
zi/D
ream
stim
e.co
m
Figure 18. Each building brick in the body requires oxygen to survive

CHAPTER 5 – C: CIRCULATION AND BLEEDING CONTROL 49
Oxygen is breathed into the lungs, and this oxygen is then circulated around the body by red blood cells. These are like trucks that transport the oxygen around the body via a road network of blood vessels. Blood is made up of many red blood cells, together with several other ingredients like platelets, white blood cells, sugar and salts.
Fran
cis
Mac
ard
Figure 19. Cross section of a blood vessel, with red blood cells enlarged
Fran
cis
Mac
ard
Figure 20. Carbon dioxide offloading and oxygen loading for transport
This network of blood vessels runs throughout the body, from vessels close to the heart that are like large highways to small roads and even smaller pathways further away. They almost look like the branches of a tree.

50 BLAST TRAUMA CARE
Lond
on_e
ngla
nd/D
ream
stim
e.co
mEz
umei
mag
es/D
ream
stim
e.co
m
Figure 21. Circulatory system
Visible in the map above are two sets of roads. One set comprises the arteries, and the other the veins. The arteries are the blood vessels that carry blood full of fresh oxygen from the lungs out to the rest of the body.
The veins are the blood vessels that carry the blood back to the lungs, after it has delivered its oxygen to the cells and picked up their waste products (e.g. carbon dioxide).
The heart acts like a hydraulic pump pushing the blood out into the arteries and around the body. If someone dies because of bleeding, there is little use in starting standard cardiopulmonary resuscitation (CPR) by pushing on the patient’s chest. At this point, the heart is essentially empty of blood, so squeezing it will not help to get the pump going again and deliver oxygen.18 The person needs blood and can, in rare cases, be saved by advanced resuscitation, which is beyond the scope of this course.
18 S. Watts et al., “Closed chest compressions reduce survival in a model of haemorrhage-induced traumatic cardiac arrest”, Emergency Medicine Journal, Vol. 34, No. 12, 2017, pp. A866. S. Watts et al., “Closed chest compressions reduce survival in an animal model of haemorrhage-induced traumatic cardiac arrest”, Resuscitation, Vol. 140, July 2019, pp. 37–42.
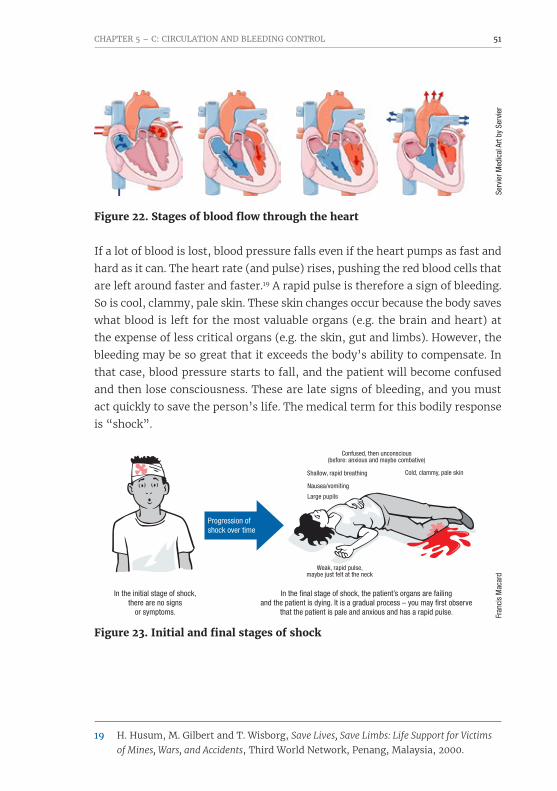
CHAPTER 5 – C: CIRCULATION AND BLEEDING CONTROL 51
Serv
ier M
edic
al A
rt by
Ser
vier
Figure 22. Stages of blood flow through the heart
If a lot of blood is lost, blood pressure falls even if the heart pumps as fast and hard as it can. The heart rate (and pulse) rises, pushing the red blood cells that are left around faster and faster.19 A rapid pulse is therefore a sign of bleeding. So is cool, clammy, pale skin. These skin changes occur because the body saves what blood is left for the most valuable organs (e.g. the brain and heart) at the expense of less critical organs (e.g. the skin, gut and limbs). However, the bleeding may be so great that it exceeds the body’s ability to compensate. In that case, blood pressure starts to fall, and the patient will become confused and then lose consciousness. These are late signs of bleeding, and you must act quickly to save the person’s life. The medical term for this bodily response is “shock”.
�g 23 b
chapter 11
In the initial stage of shock, there are no signs
or symptoms.
Confused, then unconscious(before: anxious and maybe combative)
Shallow, rapid breathing
Nausea/vomiting
Large pupils
Weak, rapid pulse, maybe just felt at the neck
Cold, clammy, pale skin
In the final stage of shock, the patient’s organs are failing and the patient is dying. It is a gradual process – you may first observe
that the patient is pale and anxious and has a rapid pulse.
Progression of shock over time
Fran
cis
Mac
ard
Figure 23. Initial and final stages of shock
19 H. Husum, M. Gilbert and T. Wisborg, Save Lives, Save Limbs: Life Support for Victims of Mines, Wars, and Accidents, Third World Network, Penang, Malaysia, 2000.

52 BLAST TRAUMA CARE
CAPILLARY REFILL TIMECapillary refill time (CRT) is a simple metric for checking whether bleeding is severe. CRT is measured by pushing on the patient’s sternum (breastbone) or finger for three to five seconds with your finger. Then count how long it takes for colour to return to normal. It should be less than two seconds, but other factors influence this, such as the temperature, ambient lighting and the pressure applied. That is why all signs are taken together, not in isolation, to make a diagnosis.
Count how many seconds it takes for colour to return to normal. K.
Fins
nes/
ICRC
K.Fi
nsne
s/IC
RC
Figure 24. Measuring CRT
BLEEDINGBleeding from arteries tends to be a brighter red colour (because the blood has more oxygen in it) and pulses in time with the heart. Bleeding from veins tends to be darker red in colour and oozes instead of pulsating. Bleeding from the veins is not as rapid as blood loss from the arteries, but it can still be very dangerous. With significant injuries, there can be bleeding from both the arteries and the veins at the same time.
Serd
ar C
orba
ci/D
ream
stim
e.co
m
Figure 25. Bleeding rates – arteries vs. veins
It is important to stop bleeding because that means the patient is losing red blood cells, the trucks in the blood that carry oxygen. Nothing apart from the blood can do this vital task. Delivering water into the blood vessels of someone bleeding will not help because water contains no red blood cells or platelets, the cells that work to construct a temporary roof (blood clot) over the hole in

CHAPTER 5 – C: CIRCULATION AND BLEEDING CONTROL 53
the blood vessel. The first clot that the platelets make is the most effective one, so it is best to try to keep the initial blood clot in place. Clotting takes minutes, not seconds, so it is very important to keep pressure on the wound to stop bleeding. Do not check the clot every minute. In addition, platelets are limited in number. The more someone bleeds, the more difficult it is for the body to stop the bleeding because it will run out of the cells which make clots.
If someone loses a lot of blood, they may need a blood transfusion from someone with a similar blood type. Blood is a scarce resource and not something that is part of basic first aid. What you can do to save their life is stop blood loss early (and donate blood to health services, so they have something to transfuse when a patient arrives in shock from bleeding).
Patta
raw
it Ch
ompi
pat/D
ream
stim
e.co
m
Figure 26. Formation of a blood clot

54 BLAST TRAUMA CARE
PRIMARY SURVEYRemember that bleeding must be dealt with at two separate places in the primary survey. First, deal with catastrophic bleeding (the small “c” of cABCDE). The following figure shows what “catastrophic bleeding” means.
Fran
cis
Mac
ard
�g 27 suite
�g 27 suite �g 27
�g 27
�g 27
Loss of all or part of an arm or a leg
Blood that is spurting out of the wound
Blood that won’t stop coming out of the wound
Bandages that are soaked with blood
Blood that is pooling on the ground
Figure 27. Signs of catastrophic bleeding
The patient must be examined from head to toe, front and back, to find any and all sources of bleeding. Small wounds that do not bleed a lot can be dealt with at the end if there is time. It can be challenging to find all injuries if patients are fully clothed, but only remove clothing if there is time and it is not too cold out. Make sure the patient is covered afterwards, especially in winter. If you cannot remove clothing, use a gloved hand to feel everywhere on the patient and check for blood, or cut clothes away to expose the wound in such a way that you can cover the patient again afterwards.
STOPPING BLOOD LOSSFirst responders must be properly protected. As discussed in Chapter 3, make sure the scene is safe. Wear gloves to protect yourself against blood-borne diseases.

CHAPTER 5 – C: CIRCULATION AND BLEEDING CONTROL 55
DIRECT PRESSUREStop the bleeding by applying direct pressure. Use gauze, cloth, an elbow or a knee – whatever it takes to slow or stop the flow as soon as possible until there is time to get out wound-packing supplies.
L. N
orla
nd/S
AFER
Figure 28. Applying direct pressure
Do not worry too much if it is not sterile or completely clean – remember the wound has just been filled with dirt from the explosion and will need a proper clean later on. When ready, a dressing should be pressed firmly with the palm onto the wound and the source of the bleeding. Constant pressure should be maintained until the bleeding has stopped. The dressing should be tied in place with a thick bandage or a piece of clean cloth to keep pressure on it. A big wound will require lots of gauze or cloth to pack it tightly (see below). If blood seeps through the bandage, it should not be removed and replaced with a new one, but another should be placed on top. As explained above, there are cells in the blood that are working hard to construct a temporary roof over the hole. Removal of the bandage will remove the blood clot, the scaffolding for the first and best roof.
Direct pressure should not be used on an injury to the eye or when there is an object stuck in the wound. Instead, build the dressing around the eye or object.

56 BLAST TRAUMA CARE
PACKING THE WOUNDIf there is a cavity (hole) in the body that is bleeding, it is essential to pack the hole with gauze or cloth.
Remove any clothing over a bleeding wound and wipe out any blood. Locate the source of the bleeding as accurately as possible.
L. N
orla
nd/S
AFER
Figure 29. Gain access to the wound
Use your fingers to push gauze into the wound while you maintain pressure on the source of bleeding.
L. N
orla
nd/S
AFER
Figure 30. Packing the wound
Pack the wound tightly! Keep packing until no more gauze will fit in the wound. The goal is to create pressure on the vessel to stop the bleeding.
L. N
orla
nd/S
AFER
Figure 31. A packed wound

CHAPTER 5 – C: CIRCULATION AND BLEEDING CONTROL 57
Apply direct pressure to the wound with both hands for at least three minutes.
L. N
orla
nd/S
AFER
Figure 32. Apply direct pressure for at least three minutes
Finally, an elastic bandage should be tied on the outside to keep pressure on the wound. If it starts bleeding after this, more gauze can be pushed into the wound to increase pressure. If this does not help, remove what gauze you can without damaging the initial clot and repack the wound, as it probably was not packed well enough the first time or the packing did not quite get to the bleeding vessel.
While doing this, if possible, raise the injured body part above the level of the heart. The heart is the pump that pushes the blood around the body. Pushing the blood uphill is harder, and so circulation slows down, meaning there will be less bleeding. Elevation is especially helpful for wounds below the knee or elbow.20 Raising the limb is only a temporary measure while you apply a pressure bandage or tourniquet to stop the bleeding until the patient arrives at a hospital. Use elevation carefully, taking precautions in case of a potential spine injury.
TOURNIQUETA tourniquet creates a roadblock so that blood is prevented from entering the part of the vessels where there is bleeding. This only works for the arms or the legs. As described above, the big vessels branch out and become smaller ones, like highways that gradually branch out into minor roads. The highways enter the arms through the armpits and enter the legs through the groin. It used to be recommended to apply pressure there (so-called “pressure points”),
20 D. Du Pont et al., “The effect of limb elevation on bleeding control in a human venous hemorrhage model”, Annals of Emergency Medicine, Vol. 68, No. 4 suppl., 2016, p. S117.

58 BLAST TRAUMA CARE
but this is no longer advised as it is difficult and the effect of this temporary roadblock, even when done well, is short-lived.21
Fran
cis
Mac
ard
�g 33Figure 33. Tourniquet as roadblock
A tourniquet is applied by tying a broad band around the arm or leg, applying so much pressure that the blood vessels are squeezed shut against the bone.
Windlass
Figure 34. Commercial tourniquet
Applying a commercial tourniquet:A) Pass the tip of the tourniquet into the slit of the buckle (it already comes
like this in the package) and pull it tightly. Do it like you are buckling a belt around your waist.
B) Twist the windlass in either direction until the bleeding stops. You should not need to twist the windlass on a commercial tourniquet more than three rounds (otherwise it risks breaking). If the bleeding still has not stopped when tightened like this, then apply a second one a bit closer to the centre of the body.
C) Place the windlass inside the clip of the tourniquet to secure it and write the time of application on the tourniquet and on the forehead of the patient where it is visible.
21 D. Markenson et al., “Part 17: First aid: 2010 American Heart Association and American Red Cross guidelines for first aid”, Circulation, Vol. 122, No. 18 suppl. 3, November 2010, pp. S934–S946. B. Drew et al., “Tourniquet conversion: A recommended approach in the prolonged field care setting”, Journal of Special Operations Medicine, Vol. 15, No. 3, Fall 2015, pp. 81–85.

CHAPTER 5 – C: CIRCULATION AND BLEEDING CONTROL 59
Usually, a tourniquet should not be used unless a pressure dressing has failed to stop life-threatening bleeding or an arm or leg has been cut off. If however there are many casualties in a bomb blast and few helping hands, you must prioritize. Rather than applying pressure bandages, it is better to apply tourniquets where needed during initial triage. Applying a tourniquet straight away helps save as many lives as possible with the limited resources you have available. The sooner a tourniquet is applied to someone with life-threatening bleeding, the greater the chance that they will survive.22
For those with prior first-aid knowledge:If patients must wait a long time to get to a hospital and you have triaged everyone, you can then do a second round to see if some of the wounds can be packed instead (not for amputations or patients in shock). Normally you should never release a tourniquet after you have put one on, but during a situation with many casualties and few people to help you can apply a tourniquet as a temporary measure and then try once to release it briefly to see if a pressure bandage is enough. Before releasing the tourniquet, apply a pressure bandage to the wound and place a second tourniquet (without tightening it) just above the first tourniquet in case the first tourniquet breaks. If the wound bleeds when the tourniquet is released despite your pressure bandage, retighten the tourniquet immediately and use the second tourniquet as well if necessary!
Only do this if it has been less than two hours. Otherwise, there’s a risk of reperfusion injury when you release the tourniquet.
CAT
Reso
urce
s LL
C
A
C
B
D
Figure 35. Applying a CAT tourniquet
22 J.F. Kragh, Jr., et al., “Survival with emergency tourniquet use to stop bleeding in major limb trauma”, Annals of Surgery, Vol. 249, No. 1, January 2009, pp. 1–7.

60 BLAST TRAUMA CARE
Commercial tourniquets are best, as it can be difficult to get enough tension to stop the bleeding without a windlass (e.g. when using something like a belt). If bleeding does not stop when you tightening the tourniquet, you may be making the situation worse by compressing the vessels returning to the heart (the veins) instead of the ones going into the limb (the arteries). In this case, you are creating a roadblock for blood exiting the limb instead of entering it. In addition to increasing bleeding, this can cause compartment syndrome (see Chapter 8). If the tourniquet is too narrow (like a rope), it will create more damage by cutting into the flesh. An improvised tourniquet, if used, must be made from strong, flexible material such as gauze or strips of canvas or kerchiefs. To minimize damage to the flesh, ensure that it is at least five centimetres wide. A strong stick or something else rigid should be used as a windlass to tighten it.23
K.Fi
nsne
s/IC
RC
A
D
B C
K.Fi
nsne
s/IC
RC
K.Fi
nsne
s/IC
RC
K.Fi
nsne
s/IC
RC
Figure 36. Applying an improvised tourniquet
23 J.F. Kragh, Jr., et al., “Survival with emergency tourniquet use to stop bleeding in major limb trauma”, Annals of Surgery, Vol. 249, No. 1, January 2009, pp. 1–7. J.F. Kragh, Jr., et al., “Which improvised tourniquet windlasses work well and which ones won’t?” Wilderness & Environmental Medicine, Vol. 26, No. 3, September 2015, pp. 401–405. B.W. Bequette et al., “Belts evaluated as limb tourniquets: BELT study comparing trouser supporters used as medical devices in a manikin model of wound bleeding”, Wilderness & Environmental Medicine, Vol. 28, No. 2, June 2017, pp. 84–93.

CHAPTER 5 – C: CIRCULATION AND BLEEDING CONTROL 61
Applying an improvised tourniquet:A) Tighten and make a half knot.B) Place a stick on the knot, and tie a full knot around it.C) Twist the stick until it is tight enough (i.e. there is no bleeding
or pulsation below the tourniquet).D) Secure the stick with a separate tie (e.g. from the bandage) or with the
tails of the tourniquet (if they are long enough) by tying a strong knot.
It is important to understand that when a tourniquet is applied, all blood flowing to the limb is stopped. The body needs oxygen to survive, so the part that is not receiving oxygen will slowly die. A tourniquet is also painful, and even the best-designed tourniquets begin to cause nerve, skin and vessel damage once they have been on over two hours, although most complications result from the improper application.24 Therefore, the tourniquet should be positioned as far down the arm or leg as possible, around five to ten centimetres proximal to the wound (i.e. five to ten centimetres nearer to the centre of the body than the wound). The time of application of the tourniquet should be written on it (and somewhere visible, like the patient’s forehead).
The longer the tourniquet has been on, the more waste products accumulate distal to the roadblock (away from the centre of the body), and these waste products can create problems for the body when they re-enter general circulation, even after only an hour (i.e. reperfusion injury).
Vale
ntyn
a Ch
ukhl
yebo
va/D
ream
stim
e.co
m
Figure 37. Lower arm and lower leg
24 B. Drew, B.L. Bennett and L. Littlejohn, “Application of current hemorrhage control techniques for backcountry care: Part one, tourniquets and hemorrhage control adjuncts”, Wilderness & Environmental Medicine, Vol. 26, No. 2, June 2015, pp. 236–245.

62 BLAST TRAUMA CARE
The lower arm and the lower leg each have two bones. If a tourniquet is applied to the forearm or the lower leg, it might not be effective in stopping the bleeding because the blood vessel can hide between the two bones, effectively protecting it from being compressed.
Fran
cis
Mac
ard
Figure 38. Tourniquet limitations in the lower arm and lower leg
If the catastrophic bleeding is in the lower arm or lower leg, you can try applying the tourniquet just above the wound. If this does not stop the bleeding, a second one should be applied just above the elbow or knee. Never place a tourniquet directly over a joint! Even if the initial tourniquet is on the upper limb, sometimes a second one may be needed above the first one to stop the bleeding. If the patient still has clothes on, make sure there are no items in their pockets underneath the tourniquet before tightening it.
Always check whether what has been done for the patient has worked as intended, and continue to monitor the patient (starting cABCDE again) until they reach professional care. They may start bleeding again, in which case you may need to tighten the tourniquet a bit more.
Now it is essential to get the patient to the hospital as soon as possible. The sooner they arrive, the higher their chance of survival and maybe also of saving the injured limb.

CHAPTER 5 – C: CIRCULATION AND BLEEDING CONTROL 63
OTHER MAJOR BLEEDSSometimes there is bleeding from places you cannot see. Remember that the blood vessels travel all around the body, including inside the stomach and chest. Use the mnemonic “CARTS” to look for signs of major bleeding.
CARTS:ChestAbdomenRetroperitoneal (a compartment inside the body that you cannot see)Thigh (refers to broken bones in the thigh)Street (blood you see outside the body, e.g. from an amputation)
If a patient is suspected to be bleeding but the source cannot be identified, the likely sources are the ones that are harder to see. This is called internal bleeding, and it is vital to get the patient to the hospital as soon as you can.
General things to keep in mind: Make sure the patient is handled with care so that the blood clots that have formed are not disturbed. Cold blood bleeds more, so it is crucial to keep the patient warm. When blood is lost, so is heat, so even when it is warm outside you must try to warm up the patient. Make sure the patient is dry and covered in blankets or otherwise appropriately shielded from the weather. Broken bones should be splinted, especially the pelvis, so they bleed less. There is more about this in Chapter 8. Finally, it helps to give oxygen if available, to make sure that the few red blood cells left are fully loaded with oxygen as they pass through the body.
ADVANCED CONSIDERATIONSSHOCKThe signs of shock are generally the same regardless of its source. The causes of shock can be divided into four categories: hypovolaemic, distributive, obstructive or cardiogenic.
Bleeding leads to hypovolaemic shock. In the context of blast trauma, burns can also lead to hypovolaemic shock, either alone or together with bleeding. This is because the body loses a lot of fluid through the burned skin.
Neurogenic shock is an example of distributive shock seen in blast trauma. Neurogenic shock can occur when transection of the spinal cord occurs,

64 BLAST TRAUMA CARE
meaning there is no communication between the brain and the peripheral blood vessels. The blood vessels will expand too much to be able to maintain adequate blood pressure with the available blood.
Obstructive shock is possible in such cases as: trauma resulting in a pneumo-thorax; cardiac tamponade, where blood fills the sac around the heart so it cannot pump properly; or a large amount of air entering the blood vessels and creating an obstruction.
Cardiogenic shock is less likely, but not impossible. It can occur, for example, from trauma causing myocardial infarction or cardiac contusion (bruising of the heart muscle), or from arrhythmias secondary to crush injuries.
INTRAVENOUS LINESIf you have the equipment and ability, insert two wide-bore intravenous (IV) lines and consider IV fluids when you come to circulation (C) under your cABCDE primary assessment.
Blood is the preferred resuscitation fluid for trauma victims. If you do not have any blood products, you must give careful consideration as to whether you should give fluids and, if so, what type and how much. Avoid giving dextrose as this is the same as administering pure water, which means it will mainly go outside of the blood vessels: only 5% stays in the blood. You may give a crystalloid (preferably Ringer’s lactate) if the radial pulse is absent, systolic blood pressure is less than 80 to 90 (less than 100 when the patient has a brain injury), or if the patient is unconscious and you suspect it is because of bleeding.
However, there is a danger of overlooking other causes for the patient being unconscious, such as a tension pneumothorax, which is why you must have a systematic approach to examining the patient. You should not aim to normalize blood pressure before the source of bleeding is stopped because the higher pressure may disrupt an blood clot that is still forming, thereby worsen ing bleeding. Maintaining low blood pressure is not a treatment goal; it is a compromise you must make pending haemorrhage control.25
25 B. Drew, B.L. Bennett and L. Littlejohn, “Application of current hemorrhage control techniques for backcountry care: Part one, tourniquets and hemorrhage control adjuncts”, Wilderness & Environmental Medicine, Vol. 26, No. 2, June 2015, pp. 236–245.

CHAPTER 5 – C: CIRCULATION AND BLEEDING CONTROL 65
Around 25% of the crystalloid that you give will stay inside the blood ves-sels. Only start after you have stopped bleeding sources, and do not try to normalize blood pressure, as this dilutes clotting factors and may push off blood clots that are forming. Start with 250 ml and repeat until the radial pulse is present or the patient is conscious (even if the radial pulse is absent). If you suspect a head injury and you do not have the means to measure blood pressure, then continue resuscitation until you have a normal radial pulse.
If the patient does not need fluids immediately, it is still good to obtain IV access for drugs and in case it is needed later. If transport time to the hospital is long, you may also consider maintenance fluids. Usually, you should keep someone with an injury fasting to avoid the risk of aspiration, i.e. the content of the stomach being regurgitated and going into the lungs, which can cause pneumonia. If you must care for an injured patient for a long time before they reach the hospital, it is a good idea to try to give them some fluid. If IV fluids are not available, carefully try to give them something orally, but only if they do not have any injuries to their stomach and are completely alert and awake. First, try giving them small sips of clean water. If the patient tolerates this well, without nausea or vomiting, you can give oral rehydration solution (ORS), which is more easily absorbed from the stomach. There are pre-made sachets of ORS you can add to clean water, or you can make it yourself by combining half a teaspoon of table salt and two tablespoons of sugar in a clean container with one litre of drinking water. Fluids given by mouth take a long time to reach the bloodstream.
HEMOSTATIC AGENTSBlast injuries are often devastating and associated with massive tissue dam-age. Haemostatic agents were explicitly developed to address these types of wounds. They are especially useful if the source of the bleeding is not amena-ble to applying a tourniquet, for instance an extensive injury to the groin or shoulder area. Only use haemostatic agents for catastrophic bleeding; for most wounds, they are not necessary, as wound packing with normal gauze will provide haemostasis in most cases.
Most of these agents absorb water in some capacity, which means they con-centrate the cells in the blood to help form a clot. Some of the more advanced haemostatic agents are impregnated with clotting factors, meaning they have

66 BLAST TRAUMA CARE
some of the ingredients to help create a blood clot. They are available in dif-ferent forms: as a granular powder or embedded in dressings such as gauze or a sponge. All are effective, but the z-folded gauze is the most versatile. The granular powder initially had a bad reputation because it relied on a chemical reaction that produced a lot of heat when it came into contact with blood, sometimes leading to burns. The chemical reaction has changed with newer formulas, so that is no longer a problem.
When you decide to use a haemostatic dressing, the proper technique is the same as with ordinary gauze, where you pack the wound and apply pressure until the bleeding stops. The clotting factors in the bandage will only clot blood they come into contact with, so it is crucial that the bandage cover the entire bleeding surface, including the deep areas of the wound. Sometimes the wound will need to be opened a bit to get the dressing in properly. Apply pressure for at least three minutes. If the bleeding does not stop and it is seeping through the haemostatic dressing after three minutes, remove it and apply a fresh one. This step is different from when using standard gauze, as you want to add new clotting factors to the wound surface. If the wound is deep and requires a lot of packing, you can add regular gauze to fill out the wound if you do not have enough haemostatic material to fill it completely. Just make sure the haemostatic material is at the bottom, in direct contact with the bleeding surfaces. Then apply a pressure dressing on top, followed by a bandage to maintain the pressure.
Haemostatic dressings can only be used for bleeds you can compress, which means you must not use them inside an open chest wound or for a head injury. If you have used a haemostatic dressing, make sure you let the staff at the receiving hospital know, for instance by sticking the wrapper inside the last layer of bandage. They will need to be careful when removing the dressing and irrigate the wound thoroughly.

CHAPTER 5 – C: CIRCULATION AND BLEEDING CONTROL 67
NOTES

68 BLAST TRAUMA CARE
CHAPTER 6 – D: HEAD AND SPINE INJURIES
26 J.P. Gutierrez de Ceballos et al., “11 March 2004: The terrorist bomb explosions in Madrid, Spain – an analysis of the logistics, injuries sustained and clinical management of casualties treated at the closest hospital”, Critical Care, Vol. 9, No. 1, 2004, p. 104.
27 Centers for Disease Control, Blast Injuries: Traumatic Brain Injuries from Explosions, Centers for Disease Control, Atlanta, Georgia, 2009. J.P. Gutierrez de Ceballos et al., “Casualties treated at the closest hospital in the Madrid, March 11, terrorist bombings”, Critical Care Medicine, Vol. 33, No. 1 suppl., January 2005, pp. S107–S112.
Key concepts
• Head trauma is often seen in victims of explosions; severe head trauma from a blast is usually associated with other life-threatening injuries
• The most common life-threatening injury to the head is upper airway obstruction and must be addressed immediately
• Spine injuries are quite rare and result from blunt or penetrating trauma; complete spinal cord injuries frequently result in complications or death
This chapter considers the source of injuries to the head and spine and how best to manage them.
EPIDEMIOLOGYIn both civilian and military environments, exposure to a blast may cause instant death, injuries with immediately apparent symptoms or latent injuries, which manifest over or after an extended period after the blast.
Head trauma is seen in about 20% of all people involved in a blast.26 However, severe head trauma is the most common cause of death in terrorist bombings, and over half of people critically injured in such incidents have severe traumatic head injuries.27

CHAPTER 6 – D: HEAD AND SPINE INJURIES 69
ANATOMY
28 J.V. Rosenfeld, R.S. Bell and R. Armonda, “Current concepts in penetrating and blast injury to the central nervous system”, World Journal of Surgery, Vol. 39, No. 6, June 2015, pp. 1352–1362.
The brain and spinal cord are very soft, delicate organs. That is why they are protected by strong, thick bone structures: the skull (which looks like a rigid box) and the backbone containing the spinal canal (which looks like a tunnel through the vertebrae). To further protect the brain and the spinal cord, they are immersed in a crystal-clear liquid called cerebrospinal fluid (CSF).
The brain processes all the external stimuli it receives from the environment through the senses in the form of sensory signals. It also directs the muscles to contract (enabling you to walk, for example) through motor signals. The sensory and motor signals travel to the brain and back through the spinal cord and nerves.
MECHANISMS OF INJURY Any damage to the skull and the vertebrae can affect the brain and the spinal cord. The brain is clearly vulnerable to both secondary blast injuries (penetrating trauma caused by flying debris) and tertiary blast injuries (trauma caused when someone is thrown by the blast wind). Some controversy exists around whether the brain is vulnerable to primary blast injuries, which are caused by the blast wave; however, recent studies on animals suggest that it is.
Shear waves and stress waves from overpressurization can cause traumatic brain injury (TBI) directly, resulting in concussion, haemorrhage, oedema and diffuse axonal injury, among others. They can also cause TBI indirectly, through blast lung injury: the gas emboli that form can in turn result in cere-bral infarction. The blast wave frequently causes severe cerebral oedema. Moderate and severe blast injuries frequently involve penetrating craniocere-bral injury, which is usually one component of polytrauma rather than occurring in isolation. Such wounds are usually heavily contaminated. Sub-arachnoid haemorrhage is common.28 Blast injuries to the spine with pene-trating fragments are usually heavily contaminated and require debridement. Lumbar burst fractures and lumbosacral dissociation may occur in spinal blast injuries.

70 BLAST TRAUMA CARE
COUP-CONTRECOUP MECHANISMIn blunt trauma, the brain can bounce around inside the skull if the head is struck with sufficient force. This explains why you can often observe:
• severe brain injury despite negligible external signs.
• a major brain injury close to the site of the blow and a second, usually less severe, lesion on the opposite side of the brain. In the worst-case scenario, you may see multiple lesions, usually haemorrhagic.
MASS MECHANISMThe brain is confined inside the rigid box of the skull, which has very little room to accommodate any additional mass. Brain tissue can therefore be compressed and injured when there is swelling or bleeding inside the skull. Like any other body tissue, the brain will swell when injured. Swelling very frequently occurs after a trauma as a consequence of brain contusion (bruising) and sometimes intracranial bleeding.
In the early phase, a compensatory mechanism will maintain normal intra-cranial pressure (ICP) by pushing CSF and part of the venous blood pool out of the skull. If the oedema or bleeding (or both) increase in volume, the com-pensatory mechanism is not enough to maintain normal ICP. In that case any further increase in volume, even if minimal, will create a big increase in ICP. This is known as the Monro-Kellie doctrine (Figure 39).
To compensate for the raised ICP and maintain a normal cerebral blood flow, the mean arterial pressure will rise. Any further increase in ICP will interfere with brain functioning, to the point of causing brain herniation and eventu-ally death. At a very late stage, you will see hypertension, bradycardia and bradypnea – Cushing’s triad – as well as unequal pupils.
Some autoregulatory mechanisms are in place in the brain tissue to maintain constant cerebral blood flow, i.e. arterial vasoconstriction proportional to the mean arterial pressure and arterial vasodilation proportional to the increase of the partial pressure of carbon dioxide.

CHAPTER 6 – D: HEAD AND SPINE INJURIES 71
Another cause of ICP is reduced cranial venous outflow, caused by body pos-ition or increased intrathoracic or intra-abdominal pressure.29 These patho-physiologic mechanisms can be used to temporarily mitigate the effects of dangerously high ICP.
Volume-Pressure Curve
ICP
(mm
Hg)
Volume of Mass
Herniation
Point of Decompensation
Compensation5
10
15
20
25
30
35
40
45
50
55
60
Amer
ican
Col
lege
of S
urge
ons
Normal state – ICP normal
Decompensated state – ICP elevated
Compensated state – ICP normal
Venous volume
Venous volume
Venous volume
Arterial volume
Arterial volume
Arterial volume
Brain
Brain
Brain
75 mL 75 mL
Mass
Mass
CSF
CSF
CSF
Figure 39. Monro–Kellie doctrine (top) and Volume-Pressure curve (below)
29 M.H. Wilson, “Monro-Kellie 2.0: The dynamic vascular and venous pathophysiological components of intracranial pressure”, Journal of Cerebral Blood Flow & Metabolism, Vol. 36, No. 8, August 2016, pp. 1338–1350.
SCALP WOUNDSScalp wounds bleed a lot. If a skull fracture is not suspected, treat a scalp wound as you would other wounds: with local irrigation with sterile or clean water and sterile gauzes to cover it. A compression dressing should be made to control the bleeding. If possible, elevate the patient’s head and shoulders to reduce blood pressure and slow the bleeding.

72 BLAST TRAUMA CARE
Do not:
• remove an embedded object
• explore the wound if a skull fracture is suspected
• push back bone pieces.
ICRC
Figure 40. Small wound and underlying depressed fracture
SKULL FRACTURESSkull fractures are the direct result of blunt trauma. Unless you see an overt deformity, you will usually only detect skull fractures from other symptoms, like local pain. Fractures of the base of the skull are even harder to detect. There are some signs that suggest a skull-base fracture.
EARLY SIGNS OF A SKULL-BASE FRACTURE • Profuse bleeding from large scalp wounds
• Bleeding from the ear or the nose, sometimes together with CSF leakage
A quick way to identify CSF is to drop some of the blood flowing out of the patient’s ear or nose onto a piece of gauze, cloth or white paper. A target sign will appear after a few seconds if CSF is present. This means a communica-tion exists between the brain and the environment, and you should follow protocol for an open fracture (i.e. fast referral to a neurosurgical facility and antibiotic prophylaxis).
Do not try to stop the bleeding from the nose or the ear if you suspect a skull-base fracture.
CHAPTER 6 – D: HEAD AND SPINE INJURIES 73
LATE SIGNS OF A SKULL-BASE FRACTURE • Raccoon eyes: bilateral periorbital ecchymosis
• Battle’s sign: retroauricular ecchymosis
PENETRATING / IMPALED OBJECTSDo not remove an impaled object. Taking out an impaled object could cause further bleeding, further damage to surrounding tissues and possibly further contamination. Taking out an impaled object should be done in a medical facility under the supervision of an expert surgeon, usually in the operating theatre.
Instead, stabilize the object with bulky dressing.
INITIAL ASSESSMENT AND MANAGEMENTAfter addressing any massive external bleeding and assessing the patient’s airway, breathing and circulation (cABC), you should do a quick evaluation for injury to the head and spine. Only life-saving procedures should be performed during the initial phase.
Victims of an explosion are likely to have some form of head and/or spine injury. A quick way to evaluate a patient’s mental status is by using the AVPU scale, where A is the best score and U is the worst. AVPU stands for:
Alert The patient is awake and has their eyes open. (They may nonetheless be confused, disoriented, agitated, scared or anxious, which is quite common in the immediate aftermath of an explosion.)
Verbal The patient reacts to your voice. Remember that blast victims may have eardrum injuries, so you should speak loudly or gently touch the patient to get their attention.
Pain The patient reacts only after pressure or pain stimulus has been applied. The patient may open their eyes, move their limbs or produce some words or sounds but is generally considered to have seriously altered mental status.
Unresponsive The patient shows overt signs of life (such as spontaneous breathing) but is not reacting to any stimulus. They should be considered comatose.

74 BLAST TRAUMA CARE
A more sophisticated way to assess mental status is the Glasgow Coma Scale (GCS). The GCS was developed in 1974 and has since become an integral part of clinical practice and research around the world.30 The GCS helps you better assess how a patient spontaneously behaves or reacts to verbal or pressure stimuli; it also enables you to follow up better in the following hours or days. Three areas are independently scored: eye opening, verbal response and motor response. The sum of the three scores is the overall score, which is classed as follows:
• 15–13: mild brain trauma
• 12–9: moderate brain trauma
• 8–3: severe brain trauma.An explanation of the GCS can be found later in this chapter. There is also a very interesting short movie on the GCS at www.glasgowcomascale.org.31
UNCONSCIOUS PATIENTSPatients who do not respond to loud calls or pressure stimuli have most probably suffered severe head trauma. After massive external bleeding has been addressed, the first priority is airway control because a comatose patient cannot reliably maintain an open airway (and therefore cannot get enough oxygen to their blood). Full spine immobilization is required. Comatose patients should be evacuated to a medical centre with neurosurgical facilities if possible, especially if unequal pupil size is detected. Peripheral oxygen saturation should be maintained above 95% by giving oxygen, if available.
Early advanced medical treatment should include:
• performing definitive airway management
• elevating the head to reduce increased intracranial venous blood pressure if there is no hypotension and there is no concern for trauma (in this case, elevate the head of the stretcher or bed)
• maintaining normal ventilation (with partial pressure of carbon dioxide at 35 mm Hg)
• targeting a systolic blood pressure at or above 100 mm Hg for patients ages 50 to 69, or at or above 110 mm Hg for patients ages 15 to 49 or over 70 years old;32 treating hypotension aggressively
30 G. Teasdale and B. Jennett, “Assessment of coma and impaired consciousness: A practical scale”, The Lancet, Vol. 304, No. 7872, July 1974, pp. 81–84.
31 As of July 2020.32 N. Carney et al., “Guidelines for the management of severe traumatic brain injury”,
Neurosurgery, Vol. 80, No. 1, January 2017, pp. 6–15.

CHAPTER 6 – D: HEAD AND SPINE INJURIES 75
• giving glucose solution intravenously only to correct hypoglycaemia (blood glucose level under 3.5 mmol/l or 63 mg/dl)
• giving benzodiazepines if seizures or convulsions ensue
• monitoring immobilized patients for vomiting to avoid aspiration
• giving IV antibiotics if an open skull fracture is suspected.
PATIENTS WITH ALTERED MENTAL STATUSPay special attention to patients with altered mental status in case there is a change for the worse. Closely monitor their vitals. If their mental status worsens rapidly (a decrease of two points in the GCS) you should treat them as if they were unconscious.
PATIENTS WITH MILD HEAD TRAUMAPrimary blast waves can cause concussions or mild traumatic brain injury even without signs of blunt trauma to the head. Mild head trauma should be suspected in any patients who show the following red flags:33
• deteriorating level of consciousness
• double vision
• increased restlessness or combative or agitated behaviour
• repeated episodes of vomiting
• seizures
• weakness or tingling in the arms or legs
• severe or worsening headaches.If any of the above signs is present, immediately consult someone at a higher level of care, and consider evacuation, taking into account other patients’ injuries and priority level.
If the patient is vomiting, turn them on one side and slightly elevate their head, unless a spine injury is suspected.
What not to doUnder no circumstances should you:
• stop the flow of CSF (bleeding from the ear or nose) if a skull-base fracture is suspected
• clean open skull fracture wounds, which risks contamination or further local damage
• elevate the patient’s legs, which could increase intracranial pressure.
33 Defense and Veterans Brain Injury Center, Military Acute Concussion Evaluation 2 (MACE 2), Department of Veterans Affairs, Arlington, Virginia, 2018.

76 BLAST TRAUMA CARE
SPINE INJURIESWhen first approaching someone with a possible spine injury, you should ask the following three questions:
• Does your neck or back hurt?
• Can you move your hands and fingers?
• Can you move your feet and toes?
The tertiary effect of a blast, when someone is thrown into something else by the blast wind, has a very high likelihood of causing a spine injury. If the patient is unconscious – or is conscious and has neck pain, cervical spine tenderness, numbness or weakness – then immobilize the spine. Under the cABCDE approach, protecting the cervical spine is included during the assessment of the airway (A). It is important to maintain the cervical spine in neutral position using a stiff neck collar.
A spinal cord injury causes loss of muscle function or sensation. The effects of the injury occur in the parts of the body connected to the spinal cord below the level of the damage. Injury can happen at any level of the spinal cord and can be complete, with a total loss of sensory and motor function, or incomplete, where some sensory and motor signals are still able to pass through the damaged area of the cord. The spinal cord can be injured by any direct penetrating trauma or any blunt trauma that causes a vertebra to fracture and penetrate the spinal canal. Fractured bones can injure the spinal cord, causing paralysis. Spinal trauma is not always obvious. If you suspect a spinal injury, document your findings so that future providers can evaluate whether there have been any changes.
When log-rolling the person (always with assistance, see instructions in Appendix 5), look along the entire spine for bruising or deformity and feel for tenderness, crepitus or misalignment when there is visible evidence of trauma.
Start treatment by restricting further motion of the spine: perform proper immobilization before transport to minimize the risk of a spinal cord injury (see Appendix 5). Remember that spinal boards are only used to move patients. Do not leave patients on spinal boards. This can cause pressure sores, especially in unconscious patients.

CHAPTER 6 – D: HEAD AND SPINE INJURIES 77
Table 2 summarizes the key signs and symptoms of head and spine injuries, as well as the basics for early treatment.
Table 2. Signs and symptoms of head and spine injury 34
SIGNS AND SYMPTOMS MANAGEMENT
• Movement problems • Weakness • Sensation problems (pins and needles) • Priapism (a persistent erection) • Crepitus when you touch the spine • Difficulty breathing (upper cervical spine injury) • Pain or tenderness along the spine • Paralysis • Decreased reflexes • Loss of bladder or bowel control • Hypotension (low blood pressure) or bradycardia (slow heart rate) • Misalignment of spinal bones
• Perform spinal immobilization • Use a rolled sheet or neck collar to immobilize the cervical spine • Keep the patient lying flat • Use the log-roll manoeuvre when examining or moving the patient • Give IV fluids • Plan for rapid handover/transfer
The American Spinal Injury Association recently updated its standards for performing neurological assessments of patients with spinal cord injuries.35 The worksheet can be found in Appendix 4.
34 World Health Organization and International Committee of the Red Cross, Basic Emergency Care: Approach to the Acutely Ill and Injured, World Health Organization/International Committee of the Red Cross, Geneva, 2018.
35 American Spinal Injury Association, International Standards for Neurological Classification of SCI (ISNCSCI) Worksheet, American Spinal Injury Association, Richmond, Virginia, 2019.
EYE INJURIESCHEMICAL BURNS • Immediately flush eyes with water for at least 20 minutes.
• Loosely bandage with a cold, wet dressing.
SMALL FOREIGN OBJECTS • Try to flush the objects out by rinsing the eyes gently with warm water.
• Examine the eyes, and remove any superficial foreign objects you see.

78 BLAST TRAUMA CARE
PENETRATING EYE INJURY
Table 3. Signs and symptoms of penetrating eye injury36
SIGNS AND SYMPTOMS MANAGEMENT
• Object stuck in the eye • Painful, red eye or a reported feeling of something in eye • Problems with vision • Abnormally shaped pupil • Clear liquid draining from the eye • Signs of trauma around the eye
• Do not push on the eye • Do not remove objects penetrating the eye • Give antibiotics • Give a tetanus booster if needed • Elevate the head of the bed and place a patch over both eyes • Plan for handover/transfer
36 World Health Organization and International Committee of the Red Cross, Basic Emergency Care: Approach to the Acutely Ill and Injured, World Health Organization/International Committee of the Red Cross, Geneva, 2018.
NOSE INJURIESIn the case of isolated blow to the nose, as long as a skull-base fracture is not suspected, you can try to stop the bleeding by:
• having the patient sit upright
• keeping their head tilted slightly forward
• pinching the nostrils shut for five minutes
• applying an ice pack.

CHAPTER 6 – D: HEAD AND SPINE INJURIES 79
NOTES

80 BLAST TRAUMA CARE
CHAPTER 7 – CHEST, ABDOMEN AND GENITALIA INJURIES
Key concepts
• Basic anatomy of the chest and abdomen
• Why chest injuries can be life-threatening
• Differences between closed (blunt) and open (penetrating) injuries
• The most common injuries and initial stages of treatment
• Signs and treatment of an open pneumothorax
• When to suspect tension pneumothorax/cardiac tamponade
• How to manage flail chest
• How to manage impaled objects and evisceration
This chapter describes the chest and abdomen, common injuries that occur because of blast trauma and how to deal with them in the initial stages of treatment.
CHESTThe chest is shaped a bit like a barrel that is narrower at the top than at the base and has some elasticity to allow it to expand as you breathe. It is made up of the thoracic vertebrae (the parts of the backbone that attach to the ribs) and ten of the twelve pairs of ribs (right and left), which merge at the sternum (breastbone). On top of these bones are various layers of muscles.
The bottom of the chest is large and oval in shape, and it is separated from the abdomen by the diaphragm, the main respiratory muscle, which acts as a pair of bellows moving air in and out of the lungs. At the front of the body, the diaphragm is attached in a high position, but at the back it is attached to the lower chest ribs; most of the chest cavity therefore extends towards the back. This is important to know because to inspect a patient’s chest thoroughly you must examine their back.

CHAPTER 7 – CHEST, ABDOMEN AND GENITALIA INJURIES 81
At the top of the chest, the opening is small and narrow: the first ribs are short and flat, with only enough space for the trachea (windpipe), the oesophagus (food pipe) and the blood vessels to the head (a big vein and a big artery on both sides of the neck). Inside the chest are:
• the trachea.
• the bronchi (smaller branches of the airway).
• the two lungs covered by the pleurae (membranes).
• the heart wrapped in the pericardium (a slippery sack that allows the heart to beat without friction).
• the big vessels carrying blood to the heart (the superior and inferior venae cavae).
• our biggest artery, the aorta. The aorta originates at the heart and carries blood to the whole body via its branches.
If you think in terms of the cABCDE assessment, you will immediately see why injuries to the chest and its contents are potentially fatal. The chest contains vital elements of A, B and C – the airway (trachea and bronchi), breathing (both lungs) and circulation (the heart and its big vessels).
In general, we can divide trauma into two categories: closed (blunt) and open (penetrating). In trauma caused by a blast, however, these conditions are always combined.
• Closed trauma is a transfer of energy that can cause damage inside the body without breaking the skin, like a punch. The force is transmitted inside the body without much damage to the outside.
• Open trauma occurs when the skin has been penetrated, as with a knife. Anything inside the body under the wound may also be damaged.
Always remember that only the diaphragm separates the chest from the abdomen, and any penetrating injury on one side of the diaphragm can extend without obvious signs to the other. For example, an impaled object or a bullet in the chest can easily penetrate the abdomen, causing damage to both regions.
In a blast, closed trauma can be caused by the shock wave; it can also be a secondary, tertiary or quaternary injury. These last three can also include open trauma. The shock wave (see Chapter 2) can cause serious damage to air-filled spaces in the body, and within the chest there are plenty. The lungs and even the trachea and bronchi can be stretched and lacerated, without obvious signs

82 BLAST TRAUMA CARE
of injury on the skin. We will not focus here on injuries that can cause severe respiratory failure over the course of many hours or days. Instead we will focus on those that are immediately life-threatening and manageable with minimal training, with only some notes about blast lung. Injuries include:
• rib fractures and flail chest
• open pneumothorax and tension pneumothorax
• impaled objects
• haemothorax
• smoke inhalation and carbon monoxide poisoning
• acute respiratory distress syndrome
• cardiac tamponade
• diaphragmatic hernia.
SIGNS AND SYMPTOMS We assess patients in the field using our senses. We look, we hear, we smell, and we touch. With all the information gathered, we make a preliminary diagnosis and then act according to our team’s shared priorities.
When someone has chest trauma, sign and symptoms typical of airway, breathing and circulation problems (A/B/C) can be present, and they often overlap.
Start your head-to-toe assessment by looking at the head and mouth. You may hear abnormal air sounds due to airway obstruction (see Chapter 4), but the most concerning sign is an increased respiratory rate. Anxiety and fear can cause faster breathing, but a persistent increase in respiratory rate is always present in cases of respiratory or circulatory dysfunction. Heart rate also increases with anxiety or fear, but in such cases the pulse is strong, the skin is warm, and capillary refill time is normal (under three seconds). If there is bleeding, which can happen inside the chest or the abdomen, or in the presence of a tension pneumothorax or a cardiac tamponade – all conditions that reduce the blood returned to the heart – the heart rate will be high, between 100 and 150 beats per minute. However, in these cases the pulse will be weak or undetectable and the skin cool, pale and bluish in colour (cyanosis). Capillary refill time is slow (over three seconds).

CHAPTER 7 – CHEST, ABDOMEN AND GENITALIA INJURIES 83
Looking at the neck, the trachea is normally centred, but in presence of a tension pneumothorax or massive haemothorax it will be moved opposite to the affected side. Such injuries must be treated immediately. Expose the patient’s chest and look for any sign of penetration, bruising, foreign bodies or deformity. (You can carefully use your gloved hand to find lesions that might be responsible for a pneumothorax, which can be very small.) If the patient is conscious, ask where they have pain. Check whether the movements of their chest and abdomen look normal and coordinated. Coughing up blood can be a sign of bleeding in the upper or lower airways and must be never overlooked. Remember that the chest cavity extends mainly towards the back. Always check the patient’s back so as not to miss any potentially life-threatening injuries.
RIB FRACTURES Rib fractures are very common; they result from rapid compression of the chest or from closed trauma, either from a foreign object or from the body being thrown against the something. A single fracture can be easily overlooked, but it can still lacerate blood vessels and/or the lungs. Multiple rib fractures can compromise the chest’s ability to act as a bellows. With multiple rib fractures the lung underneath can also receive a blunt wound (causing contusion, or blood within the lung) or a penetrating wound (causing either pneumothorax, where air leaks from the lung into the pleural cavity, or haemothorax, where blood spills into the pleural cavity). Rib fractures are very painful, and even without any serious lung or vessel damage they can cause respiratory distress.
You can find a single rib fracture during primary or secondary inspection by looking for bruises on the chest and by palpating – a rib fracture will feel like a step along the ribcage and/or produce a cracking feeling under your fingers. In a conscious patient, pain will guide you to the fracture. When multiple fractures are present and affect several adjacent ribs, that part of the chest wall will move opposite to the rest of the chest, compromising ventilation. This is called flail chest.
As for any broken bone, the first treatment for a rib fracture is immobilization. In this case, if the chest wall is not penetrated the best treatment is a tight dressing with elastic bandages and administration of a painkiller. Pain can be severe because a real splint, as for a broken leg, is impossible since the ribs continuously move during respiration.

84 BLAST TRAUMA CARE
OPEN / TENSION PNEUMOTHORAXA pneumothorax is the collection of air in the pleural cavity, which is formed by the pleural membrane that wraps the inside of the chest and the outside of the lungs like an empty bag. The chest (which tends to expand) and the lungs (which tend to collapse) are kept together by the vacuum present in the pleural cavity. When a hole is made in the chest wall or in a lung, air is sucked into the pleural cavity, and the lung is unable to ventilate properly, causing respiratory distress.
An open pneumothorax occurs when air can move in and out of the chest through a laceration of the chest wall. In this case the pressure in the pleural cavity is equal to atmospheric pressure. This type of injury is easier to recognize as it usually presents as a sucking chest wound, where air moves in and out through the laceration during respiration and makes hissing or sucking noise. The condition is very serious but not immediately life-threatening.
M. D
alla
Tor
re/IC
RC
Figure 41. Open pneumothorax
A tension pneumothorax occurs when the collection of air in the pleural space cannot escape through the chest. It can be caused by blunt trauma to the lungs or a broken rib or small penetrating object that allows only air to enter the pleural cavity but not escape. In this case, every time the patient breathes

CHAPTER 7 – CHEST, ABDOMEN AND GENITALIA INJURIES 85
some air collects in the pleural cavity; breath by breath the amount of air increases, pressure builds up pressure in the pleural space. This increase in pressure can push the lung, heart and trachea to the opposite side, comprom-ising not only respiration (a B problem) but also the return of blood from the veins to the heart (a C problem). It is a life-threatening condition if not promptly recognized and treated.
An open pneumothorax is treated with a semi-occlusive dressing or a vented chest seal, a sort of valve that allows air to exit the chest and the affected lung to expand again.
M. N
akad
e/Ja
pane
se R
ed C
ross
Soc
iety
Figure 42. Semi-occlusive dressing
A tension pneumothorax is more difficult to diagnose and treat. The patient will be breathless and extremely distressed, the chest will not expand nor-mally, the trachea may be deviated, and the veins in the neck may be dis-tended and the pulse weak and fast.
This is a life-threatening condition. To treat a tension pneumothorax, insert a needle or a tube through chest wall on the affected side to let the air under pressure move out of the cavity.

86 BLAST TRAUMA CARE
IMPALED OBJECTAs we already mentioned, an object that enters the body should never be removed in the field. This applies to impaled objects in the chest and in the abdomen. Removing an impaled object can cause more harm than good. Removal can cause severe bleeding, lacerate more tissue or create an open pneumothorax, making first aid more difficult or even causing death. The only treatment is stabilizing the object and applying a dressing around the entrance to avoid unnecessary and dangerous movements within the body.
EMER
GENC
Y
Figure 43. Impaled object: Removal in surgery only
HAEMOTHORAXJust as air can flow into the pleural cavity, blood can also collect in the pleural cavity as a result of rib fractures or lacerated arteries or veins within the chest. In this case we face B and C problems: if serious enough, the bleeding can cause the compression of the lung on the same side and compromise breathing, and the bleeding can easily cause circulatory collapse. It is not easy to detect, and definitive treatment requires professional skills to drain the

CHAPTER 7 – CHEST, ABDOMEN AND GENITALIA INJURIES 87
blood out of the chest. In the field treatment is supportive, giving the patient oxygen if available and triaging properly. Always let the patient stay in the most comfortable position possible.
SMOKE INHALATION / THERMAL INJURY / CARBON MONOXIDE POISONINGWhen an explosion occurs, fire and smoke are always present. Inhaling hot vapours or hot air can cause internal burns at the level of the airway or deeper within the lungs. This can cause the quick development of respiratory failure. Most of the time, such damage can be suspected when there are burns around the mouth or nostrils, and nose hair can be singed. It may be followed by airway oedema (swelling) and signs of an obstructed airway (such as noisy breathing or hoarseness). In the presence of fire, there are also toxic vapours and carbon monoxide (CO), and CO poisoning can be present even without signs of thermal injury. There are no specific signs of it, but dizziness and shortness of breath without blue fingertips can be a sign.
Pulse oximetry can be falsely reassuring in severe CO poisoning, as the probe is unable to detect carboxyhaemoglobin and will show a normal reading. After fire or smoke inhalation, always suspect CO poisoning when there is respira-tory distress with normal oxygen saturation readings. Diagnosis is made with an arterial blood sample for blood gas analysis. Administration of 100% oxy-gen with a non-rebreathing mask is the first-line treatment.
ACUTE RESPIRATORY DISTRESS SYNDROMEAcute respiratory distress syndrome is in essence the collection of water within the lung tissue due to many different non-cardiac causes. After an explosion, it can result from the combination of trauma to the chest causing contusion to the lungs, the effect of the blast wave on air-filled spaces and the inhalation of toxic substances. It develops relatively slowly: a patient can do well immediately after the blast and still develop severe respiratory failure after 24 to 48 hours.

88 BLAST TRAUMA CARE
CARDIAC CONTUSION / TAMPONADEAs we mentioned, the heart is contained within the chest and can suffer the effects of chest trauma. The heart is located just behind the breastbone, and the blast wave or direct trauma can cause a contusion. A cardiac contusion is like a bruise to the cardiac muscle. If extensive, it can cause dysfunction and compromise the heart’s ability to pump blood efficiently. After a blunt or penetrating trauma, the sac that encloses the heart, the pericardium, can fill with blood. Because the pericardium is very stiff and has space for only a few millilitres of fluid, this can squeeze the heart’s chambers, causing a condition called cardiac tamponade. This can be a surgical emergency because if the heart cannot fill properly it cannot pump enough blood to the arteries, and the patient will go into cardiac shock.
Clinical diagnosis of cardiac tamponade is difficult in case of blunt trauma, but if suspected it can confirmed by ultrasound or emergency thoracotomy. Treatment entails quickly removing the blood from the pericardium using a needle or in surgery.
DIAPHRAGMATIC HERNIAAs mentioned, the diaphragm is a large, flat and thin muscle that separates the chest from the abdomen. It can be lacerated from blunt or open trauma to the chest and/or abdomen. When this happens, it can easily be overlooked, as only there are only indirect signs of it, such as the movement of the abdo-men’s contents into the chest, which may be seen on a chest X-ray or with more specific imaging such as a computed tomography scan. Treatment is surgical.
ABDOMENThe abdomen is internally divided from the chest by the diaphragm. Externally, there is no clearly defined line where the chest wall ends and the abdomen starts. On the front of the body, imagine a line running across the trunk just below the nipples. The diaphragm is attached at a lower level at the back of the body than at the front, so the chest cavity extends much lower down the back. Below the abdomen, the pelvic bones form a ring that is closed by layers of muscle. At the back and the sides, the spine and ribs give some protection to the organs in the upper abdomen. A layer of muscles forms a wall around the mid-lower back, the sides of the body and the front; the muscles merge at the midline, the body’s vertical axis.

CHAPTER 7 – CHEST, ABDOMEN AND GENITALIA INJURIES 89
In the abdomen there are some structures related to circulation but none to the airway or breathing (C, but not A or B). The main immediate threat to life is bleeding, but a very swollen, painful and distended abdomen can compromise breathing, pushing the diaphragm up and consequently making respiration more difficult.
Facing the body from the front, we can imagine dividing the abdomen into four parts by two perpendicular lines, running top to bottom and side to side: the right upper, left upper, right lower and left lower quadrants. When describing an injury or pain in a handover, locate it using one of these quadrants.
The main solid organs are the liver in the right upper quadrant and the spleen in the left upper quadrant, mainly protected under the ribs, and the two kidneys near the back, lying on either side of the spine and partially protected by the last two ribs. All of these can bleed profusely if damaged. Deep inside the body, close to the spine, are the inferior vena cava, the abdominal aorta and the thoracic aorta with its branches, all major blood vessels. If damaged, they can cause death in a matter of minutes.
The stomach, the small intestine and the large intestine are the parts of the digestive tract found in the abdomen. The stomach starts after the oesophagus, and the large intestine ends with its opening, the anus. The caecum with its appendix and the sigmoid colon – other parts of the digestive tract – lie in the right lower and left lower quadrants, respectively. Centred just behind the pubic bone is the bladder, which receives urine from the kidneys through the ureters and empties it through the urethra, in the penis and near the vagina.
All these organs can be damaged. As already mentioned, the air-filled cavities suffer the most from the effects of the blast wave. Also, a full bladder can easily rupture from the blast wave’s effects. Such lesions can cause the intestines to suffer and later rupture and leak. Stool contaminating the abdominal cavity poses a serious health risk but is not immediately life-threatening. Penetrating injuries can easily lacerate these soft organs.
As mentioned, the liver and the spleen can bleed profusely when lacerated. This can happen with open or blunt trauma. In open trauma this may be visible, while in blunt trauma the abdomen may be distended, painful and hard, and the patient may show the signs of shock. Bruises can be present in the right upper or left upper quadrant. The kidneys can bleed profusely as well,

90 BLAST TRAUMA CARE
but they are protected by a thick membrane, and blood tends to collect under it before leaking into the abdomen. Pink or red urine or blood coming from the urethra is a sign of urinary tract trauma. When the bladder is lacerated, urine leaks into the lower abdomen, causing pain and impeding normal urination. Fractures or penetrating injuries to the pelvic bones can also cause laceration of the urethra, with red urine or blood spilling from the urethral opening.
Never insert a urinary catheter without medical supervision in these cases, as the catheter can make the damage worse.
When the abdominal wall is lacerated, part of the organs, often the intestines, can spill out, which is called evisceration. It looks nasty, but this is not a life-threatening condition. First do your cABCDE assessment, and only afterwards focus on it. Pour on some clean water, or saline if available, and cover the wound with clean and wet gauze or clothes. Cling film, if available, may be used, as it keeps the organs moist and avoids further contamination from the outside. Never push the organs back inside the abdomen, as this can push bacteria and dirt from the outside directly inside the body.
B. S
angt
hong
/Son
gkla
U. H
ospi
tal,
Thai
land
Figure 44. Thoraco-abdominal evisceration due to bomb blast: survival is rare

CHAPTER 7 – CHEST, ABDOMEN AND GENITALIA INJURIES 91
The typical signs and symptoms of abdominal injuries are pain, nausea, vomiting and guarding of the affected part (tensing of the abdominal muscles). Severe abdominal injuries can cause an increase in the heart and respiratory rates, which can progress to shock (where the cardiorespiratory system cannot provide enough oxygen to match the needs of the body) if left untreated.
R. S
alea
h/Pa
ttini
Pro
vinc
ial H
ospi
tal,
Thai
land
Figure 45. Blunt injury to the flank: tertiary blast injury after a bomb explosion
GENITALIAGenitalia can be damaged like any other part of the body. Anti-personnel mines in particular can cause direct damage to the genitals for obvious reasons. Genital injuries can be missed if the full body inspection (the secondary survey) is done without properly undressing the patient. The genitals have many nerves and blood vessels, and any injury to them causes severe pain but usually no immediate threat to life, unless they bleed profusely. Treat the patient with bleeding control, analgesics and reassurance.

92 BLAST TRAUMA CARE
CHAPTER 8 – LIMB INJURIES
Key concepts
• Injuries to the limbs are among the most frequent in survivors of blast trauma
• Look, feel and move when you examine a potentially broken bone
• If you think a bone is broken, immobilize it with a splint
• The patient may bleed a lot when larger bones in the body are broken
• A pelvic splint should be applied to everyone with a suspected broken pelvis to minimize bleeding
• If there is a wound over a broken bone, it is called an open fracture, which means there is a risk of infection
• Patients that are trapped can develop crush syndrome; give IV fluids if possible
Injuries to the limbs are among the most frequent in survivors of blast trauma. Major blast injuries include broken bones, amputations, crush injuries, burns, cuts, lacerations, acute blockage of arteries, compartment syndrome and others.
Remember from the start of the manual that secondary blast injuries are caused by any object or debris displaced by the blast wind of the explosion. The debris can come from fragmentation of the case of the explosive device itself and its contents or from any objects found in the area surrounding the explosion site, and it can cause penetrating wounds. These injuries may be life-threatening and can necessitate limb amputation and produce severe contamination and risk of infection.
Tertiary blast injuries are caused when someone is thrown through the air by the blast wind and hits another object or when a structure collapses and causes injury to the person. This can result in injuries to limbs from the impact and can also result in amputations, broken bones and severe soft-tissue injuries.

CHAPTER 8 – LIMB INJURIES 93
Quaternary injuries are all other injuries from the blast. Most of these are burns, but they can also include crush injuries or compartment syndrome.37 In this chapter we will go through each of these injuries in turn.
37 M. Bumbasirevic et al., “Treatment of blast injuries of the extremity”, Journal of the American Academy of Orthopaedic Surgeons, Vol. 14, No. 10 suppl., November 2006, pp. S77–S81. A. Mayo and Y. Kluger, “Terrorist bombing”, World Journal of Emergency Surgery, Vol. 1, November 2006, p. 33. C. Lee and K.M. Porter, “Prehospital management of lower limb fractures”, Emergency Medicine Journal, Vol. 22, No. 9, September 2005, pp. 660–663.
BROKEN BONESBroken bones are called fractures. Signs and symptoms of fractures include:
• pain in the affected area
• swelling
• bruising and discoloured skin
• a bent or strange angle of a bone
• an inability to use the body part (no movement or weight-bearing)
• a grating feeling from the moving bone parts or maybe a strange sensation below the area (due to affected nerves)
• for open fractures, a wound, potentially with visible bone.
Look, feel and move the affected body part when you examine for a fracture. However, if a broken bone is evident straight away, there is no need to do this examination, as it will only cause further pain.
Vale
ntyn
a Ch
ukhl
yebo
va/D
ream
stim
e.co
m
Femur
Pelvis
Figure 46. Pelvis and femur

94 BLAST TRAUMA CARE
Broken bones can cause significant bleeding, which can be visible (external) or hidden inside the body (internal). The bleeding is either from the bone itself, as there is blood inside it in the bone marrow, or sometimes from the sharp edges of a broken bone tearing big, deep blood vessels.
Serv
ier M
edic
al A
rt by
Ser
vier
Figure 47. Blood in bone marrow
Certain fractures of the femur (the long bone in the thigh) may lead to blood loss of one to 1.5 litres, which can lead to shock.38 If the pelvis breaks completely (an open book fracture), it can cause massive bleeding, often leading to death. This massive bleeding happens because blood from a completely broken pelvis goes into free space, so nothing will compress, and therefore slow or stop, the bleeding.
Serv
ier M
edic
al A
rt by
Ser
vier
Figure 48. Fracture lines causing an open book pelvic fracture
Bones can break in a variety of ways. The important thing to know is whether a fracture is open or closed. Part of the bone does not have to be sticking out of the skin for it to be an open fracture. Sometimes a bone piece goes through the skin at the time of impact and then recedes back out of sight under the muscle. It is still classified as an open fracture whenever there is a wound over the break. Open fractures are at higher risk of infection, including in the bone, which is hard to treat, so try to keep the wound as clean as possible. When the patient arrives at a hospital, they will need an operation to clean it out properly and stabilize the bone.
38 C. Lee and K.M. Porter, “Prehospital management of lower limb fractures”, Emergency Medicine Journal, Vol. 22, No. 9, September 2005, pp. 660–663.

CHAPTER 8 – LIMB INJURIES 95
Alex
ande
r Pok
usay
/Dre
amst
ime.
com
Normal
Comminuted
Transverse
Segmental
Open/compound
Avulsed
Oblique displaced
Greenstick
Oblique
Spiral
Figure 49. Classification of bone fractures
SPLINTINGCorrectly splinting a fracture may significantly reduce bleeding by minimizing movement and enhancing a tamponade effect of the muscle (which means applying pressure to the source of the bleeding). It also provides pain relief for the patient, minimizes further damage to the tissue and may reduce the risk of a complication called a fat embolism (a clot of fat from the broken bone travelling in the bloodstream, which can block blood vessels).
To splint a fracture, you need to immobilize one joint above and one joint below the injury. You can use splints designed for the purpose or anything else that is rigid, with padding to avoid wounds from pressure areas and bandages or duct tape to keep it in place. If the arm or leg is bent out of shape, splint it in that position.

96 BLAST TRAUMA CARE
Splinting material designed for the purpose includes SAM splints; you can also use any rigid material, such as sticks, cardboard or foam sleeping pads. Make sure you include some soft padding, such as torn clothing, to avoid wounds from pressure areas (especially if using something rough like a board or sticks). Keep your makeshift splint in place by securing bandages, bandannas or duct tape around it. As mentioned above, if the broken bone is bent out of shape, splint it in that position (i.e. in a comfortable position).
If there is an open wound (meaning it is an open fracture), cover it with sterile gauze before splinting. Unless there is active bleeding you should not pack the wound, as threads from the packing material can come off and contaminate the wound. Check whether the patient can feel normally below the fracture by touching both limbs and asking whether it feels the same on both sides. Also check whether there is blood moving past the level of the injury. You can do this by feeling for a pulse in the limb and looking at its colour and temperature compared to the uninjured limb’s (if present). If it is cooler and paler compared with the uninjured side, it means there is less blood coming past the injury. You can also measure capillary refill time (see “Capillary refill time” in Chapter 5) and see if it is higher in the affected limb than in the uninjured side. If you discover signs of injury to the nerves or blood vessels, it is urgent to get the limb realigned. In general, one should only reposition broken bones with training and after providing sufficient analgesia, so this is not part of basic first aid.
M. D
alla
Tor
re/IC
RC
K. F
insn
es/IC
RC
Figure 50. Improvised splints: Lower leg (L) and forearm (R)

CHAPTER 8 – LIMB INJURIES 97
PELVIC FRACTURE
39 A.M. Cross et al., “The incidence of pelvic fractures with traumatic lower limb amputation in modern warfare due to improvised explosive devices”, Journal of the Royal Naval Medical Service, Vol. 100, No. 2, October 2014, pp. 152–56.
40 C. Lee and K. Porter, “The prehospital management of pelvic fractures”, Emergency Medicine Journal, Vol. 24, No. 2, February 2007, pp. 130–133.
It is easy to miss a pelvic fracture, but you must suspect it in all patients injured in a blast. It is a severe injury and is often associated with other injuries to internal organs. In addition to the bleeding from the broken pelvis, there can be bleeding from damage to the big blood vessels in the area, to the nerves, to the ureters and bladder (which help you pee) and to organs inside the abdomen like the intestines, liver and spleen.
Signs of a pelvic injury are:
• pain in the lower back, stomach or pelvic area
• signs of shock
• open wounds over the pelvic area
• a difference in length between the two legs
• bruising over the flanks
• swelling and bruising in the genital area
• blood around the opening of the penis.
After a blast, make sure you apply a pelvic splint to anyone in shock, anyone who has broken both legs, anyone with an amputated leg and anyone with pain in the pelvic area, reduced consciousness or distracting injuries.39 By “distracting injuries” we mean that something else really hurts, so the patient will not necessarily notice that something is wrong with their pelvis as well because they are only pay attention to the most painful injury. Do not try to move the pelvis to check whether it is broken before applying a pelvic splint. You usually cannot tell whether it is broken by touching it – a broken pelvis often feels normal – and moving a broken pelvis causes more bleeding.40
Apply a specific pelvic binder (a splint for the pelvis) over the area where the femur goes into the pelvis (the greater trochanter, see below). This area is often at the level of pant pockets, so please ensure there is nothing in the patient’s pockets before tightening this splint if their clothes are still on. Make sure you also minimize movement of the patient after you have applied the splint. Part of this involves taping or binding both legs together in a straight position with feet pointing upwards (called inwards rotation). Doing this reduces movement

98 BLAST TRAUMA CARE
of the legs and the pelvis. Include something rigid like a padded plank to keep the entire legs and pelvis still if you suspect a femur is broken as well.
The greater trochanter, where the pelvic splint should be positioned
K. F
insn
es/IC
RC
Serv
ier M
edic
al A
rt by
Ser
vier
Figure 51. Positioning a pelvic splint
It is best to use specifically designed splints, but if you do not have one you can use a sheet as pelvic splint. Place the sheet in under the patient’s knees and slide it up without moving the patient. Have two people pull the ends of the sheet to either side and then twist the ends together before tying them around a stick. Then twist the stick to tighten the sheet further, and secure the stick using the sheet’s ends.
K. F
insn
es/IC
RCK.
Fin
snes
/ICRC
K. F
insn
es/IC
RC
Figure 52. Using a sheet as a pelvic splint

CHAPTER 8 – LIMB INJURIES 99
There are also specific splints for broken femurs. Even if you have them available, you should not use them in after a blast, as you also need to immobilize the pelvis. Most devices for splinting femur fractures do this by applying traction from the pelvis to the foot to straighten out the leg, which is not ideal for a broken pelvis. Use a pelvic binder instead and immobilize both legs entirely to protect the pelvis by binding the legs with some padding between them to immobilize them in a neutral position.
COMPARTMENT SYNDROMEInside the body, we have different spaces called “compartments”. The obvi-ous compartments are inside the stomach and chest, but there are more com-partments inside the legs and arms. If you cross-section an arm or a leg, you can see the walls between the different compartments inside the limb.
After an injury, blood and swelling (oedema) fill up any available space. The skin and the walls of the compartment cannot budge that much, so when the compartment is full the pressure will start to rise. Eventually, the pressure will be so high that there is no room for blood to flow through the blood vessels travelling through the compartment. As you know, when there is no blood flow, the tissue will start dying.
Fran
cis
Mac
ard
im005
im006
im005
im006
Swelling of anterior compartment
tibia
medial muscle compartment
anterior muscle compartment
lateral muscle compartment
blood vessels and nerves
posterior muscle compartment
periosteum
fibula
Figure 53. Compartment syndrome
Causes of compartment syndrome are broken bones, crush injuries, elec-trical or circumferential burns, overly tight bandaging or snake bites. If the pressure in the compartments is not released by surgery, the whole area can become gangrenous (i.e. die). If a patient has pain in an area that seems out of proportion to the injury, you must try to get them to a hospital quickly,

100 BLAST TRAUMA CARE
as they may be developing compartment syndrome. Late signs include when the nerves are affected and sensation is altered as well as signs that there is no or reduced blood flow coming to the limb.
Compartment syndrome can be difficult to recognize early, but if you stretch the muscle and it causes pain that can be an early warning. Other signs are muscle weakness and, later, signs of no blood supply, where the limb is pale in colour, cool to the touch and pulseless. Before this it can feel firm and a bit like a piece of wood.
CRUSH SYNDROMECrush syndrome occurs when there is extensive damage to muscle tissue from an accident or when the body has been trapped (crushed) for a protracted period. As compression occurs, cells in the immediate area are quickly dam-aged. Within the next hour, the pressure continues to create a partial road-block, which means that less (or no) blood makes it through to the tissues beyond. When cells do not get enough oxygen they start to die, and waste products begin to accumulate. When the patient is freed, the roadblock is removed, and blood can again come through and transport all the waste products out. When too many waste products enter the blood at the same time, it can be dangerous; in the worst case it can lead to cardiac arrhythmias (an irregular heartbeat that can be fatal) and death. Extensively damaged muscle can also lead to kidney damage by clogging the filtration tubes inside the kidneys. It is like trying to rinse out filthy clothes in the sink – the grass and soil will plug the drains. When the kidneys fail because of all these dam-aged muscle cells, it is called rhabdomyolysis. One can treat rhabdomyolysis in the hospital by flushing out the kidneys.
The patient may not be able to deal with the additional metabolic demands when they are released after being trapped for an extended period. If you can manage the patient’s airway with intubation or a laryngeal mask airway and medication, you may need to do this before freeing the patient. You may also consider a gradual release or applying a tourniquet. If using a tourniquet, it must remain in place until the patient reaches the hospital. If possible, giving IV fluids is good. It can be difficult to get IV access to someone who is trapped, but early fluid resuscitation is vital to treat crush syndrome. Start giving an isotonic fluid (preferably normal saline) at a rate of one to two litres per hour. After being released, the patient can go into a cardiac arrhythmia from hyperkalaemia. There are certain treatments like calcium chloride, beta

CHAPTER 8 – LIMB INJURIES 101
agonists and insulin/glucose that helps to lower potassium levels, so it is important to get the patient to the hospital as soon as possible.
PATIENT SURVEYSPRIMARY SURVEYSevere injuries to the limbs can be distracting when assessing a patient. Before starting your treatment of limb injuries, you must begin with a primary survey, as for all blast victims. Here are some considerations related to limbs during your cABCDE assessment.
CATASTROPHIC BLEEDINGThere may be catastrophic bleeding from limb injuries when there is amputation or damage to a large artery causing massive bleeding. You must quickly stop this first before proceeding, as discussed in Chapter 5.
AIRWAYNo additional points.
BREATHINGNo additional points.
CIRCULATIONBroken bones bleed, and the long bones and the pelvis can cause extensive blood loss. As part of your circulatory assessment, you should stop any sources of bleeding that are significant (but not catastrophic, as you have already dealt with them in the first stage of your assessment). Splint the pelvis, stabilize long bones if needed, and stop any other bleeding from wounds.
SECONDARY SURVEYThis is where you find any other injuries, such as compartment syndrome, a broken wrist or minor wounds. Address what you can if you have time before transportation.
PACKAGINGTo transfer the patient to hospital it is important to handle the patient with care, both to protect the spine and to prevent further bleeding. In addition

102 BLAST TRAUMA CARE
to considering the mode of transport, you should think of the patient’s temperature. Even when it is warm outside, someone who is injured will quickly get cold, and then bleed more. Try to shield them from the environment as much as possible, wrapping them up in something warm and protecting them from moisture with a tarpaulin. If you do not have a stretcher, one can be improvised with protective elements built into it.
41 K. Trimble, and J. Clasper, “Anti-personnel mine injury; mechanism and medical management”, Journal of the Royal Army Medical Corps, Vol. 147, No. 1, February 2001, pp. 73–79.
42 V. Langer, “Management of major limb injuries”, The Scientific World Journal, 2014.
TISSUE DESTRUCTION DUE TO MINESHigh-energy blast sources produce wounds characterized by violent tissue destruction. The majority of anti-personnel mines are triggered by being stepped on, with a minority triggered by tripwires. There are three patterns of mine injuries. A pattern 1 injury results from stepping on a buried mine and usually entails amputation of the foot or leg. Pattern 2 injuries result from a fragmentation mine being triggered near the victim and entail pene-trating injuries from multiple fragments. A pattern 3 injury results from handling the mine, e.g. when a child picks up a mine to play.
Violent tissue destruction and contamination requires radical debridement. When a mine explodes, an umbrella-shaped shock wave extends upwards, along with heated air and fragments from the detonation.41 The skin and bones are relatively resistant to the spreading shock wave and fragments, and thus contamination, but the muscles are not. There is often more contamin-ation and damaged tissue than it looks like from the outside.42
ICRC
ICRC
Figure 54. Pattern 1 injury from stepping on an anti-personnel landmine
In Pattern 1, the extent of the damage depends on the amount of explosive.

CHAPTER 8 – LIMB INJURIES 103
ICRC
Figure 55. Pattern 2 injuries arise from fragmentation mines
In Pattern 2, the degree of injury depends on the person’s distance from the device. When someone is further away, the surface area of the injury is larger, but less energy transfers.
M. D
alla
Tor
re/IC
RC
Figure 56. Pattern 3: Injury pattern from handling a mine or piece of ordnance
Pattern 3 injuries are seen following a close-range explosion when deminers or other people handle anti-personnel mines or unexploded ordnance, including children who have unwittingly picked them up. Besides the traumatic amputation of the arm holding the explosive, injuries to the face could compromise the airway and lead to death.

104 BLAST TRAUMA CARE
CHAPTER 9 – MANAGING PAIN
43 K. McGreevy, M.M. Bottros and S.N. Raja, “Preventing chronic pain following acute pain: Risk factors, preventive strategies, and their efficacy”, European Journal of Pain Supplements, Vol. 5, No. 2, November 2011, pp. 365–372.
Key concepts
• It is important to treat pain immediately after an injury
• Use the three Ps to treat pain: psychological, physical and pharmacological means
• Intravenous medications are the best way to give someone pain relief after trauma
This chapter covers the basic methods for managing pain in the immediate aftermath of trauma.
Pain is a signal from the nervous system that something may be wrong. One way to classify pain is by calling it acute or chronic. Acute pain is usually severe but does not last very long. It is protective because it lets you know that you are injured so that you can take steps to prevent further damage. Chronic pain can be anywhere from mild to severe and is present after the injury has healed.
It is important to treat pain as soon as possible, as continuous pain can be dangerous. Someone who is suffering from pain will have fast, shallow breathing. Their heart rate will be rapid, and their blood pressure will rise higher than necessary, increasing the risk of more bleeding. The stress response from pain leads to increased blood sugar and lowers the body’s defences, making healing more difficult and increasing the risk of infection. Untreated acute pain also increases the risk of suffering from chronic pain long after the initial injury has healed.43 Prevention is key, as it is difficult to treat chronic pain, and it often leads to depression and reduced quality of life.

CHAPTER 9 – MANAGING PAIN 105
TREATING PAINPain cannot always be completely relieved, but there are many ways to reduce it. Treatment depends on the type of pain and its cause. This chapter will only deal with the treatment of acute pain after trauma, as that is most relevant for first aid.
To treat pain effectively, start by measuring its intensity to understand how treatment is progressing. Patients will often not report pain spontaneously, and it is difficult as an external observer to assess someone’s pain level. A person can be talking, and even laughing or sleeping, but still be in a lot of pain. The easiest way to evaluate pain quickly is to ask the person using the numeric rating scale. The numeric rating scale runs from zero to ten, where zero is no pain and ten is the worst pain imaginable, e.g. being run over by a truck a couple of times. It is quick, and you can easily do this without any equipment.
If the patient is a child or does not know numbers, the Wong-Baker FACES pain rating scale can be used. This is a scale with a series of six faces to help patients identify what level of pain they feel, from no pain to severe pain. Explain to the patient that each face represents a person who has no pain, some pain or a lot of pain. Ask the patient to choose the picture that best depicts the pain they are experiencing.
chapter 11 b
�g 58
chapter 11 b
�g 58
chapter 11 b
�g 58
chapter 11 b
�g 58
chapter 11 b
�g 58
chapter 11 b
�g 58
0 1
0
No Pain
No Pain2 3
2A Little Pain
4 5
4A Little More Pain
6
6Even More Pain
8A Whole Lot Of Pain
10987
10Worst Pain
Worst Possible PainModerate Pain
NUMERIC RATING SCALE
Fran
cis
Mac
ard
Figure 57. The numeric rating scale and FACES pain rating scale

106 BLAST TRAUMA CARE
Both the rating scales are useful as simple measures for pain levels, although they do not indicate the type, duration or location of the pain, nor what relieves or worsens it. You should aim to get the score down to three or less with treatment.
Pain is treated with the three Ps: psychology, physical methods and pharmacology.44
Psychology refers to how you respond to the patient and control the environment around them. If the patient is a child, make sure they have one or both parents or another trusted adult by their side. Always talk to the patient in a reassuring and calm voice. The best comfort is human touch and the human voice. Look the person in the eye and explain what you are going to do. Listen to them and use encouraging and positive words, such as “you are strong” and “you can handle this”. Be honest in your communication. If you say it is not going to hurt before you move a broken arm or leg, the patient may experience more pain because they do not feel safe and no longer trust what you say.
K. F
insn
es/IC
RC
Figure 58. Importance of psychological reassurance
Psychological stress plays a significant role in pain. We can all tolerate painful stimuli better if we are well rested and well fed and feel cared for and safe. People experience less pain when relaxed, so encourage slow, deep breathing.
After an explosion, everyone present will be experiencing a severe stress reaction. In the immediate aftermath of a loud and destructive blast, witnesses experience a rush of adrenaline in their bloodstream. This hormone raises the heart rate, speeds up breathing, increases sweating and dilates the pupils.
44 International Committee of the Red Cross, Anaesthesia Handbook, International Committee of the Red Cross, Geneva, 2018.

CHAPTER 9 – MANAGING PAIN 107
It can also temporarily block pain sensation (which is called “stress-induced analgesia”). This is all part of the fight-or-flight response that prepares us to deal with dangerous situations.
Stress-induced analgesia does not occur for everyone and is only temporary. The pain system is divided into two processing networks: one is involved in locating the pain and identifying the type of pain, and the other is more concerned with the emotional and psychological effects of the pain. The psychological terror of a blast has a direct effect on pain through the second network.45 You cannot help the initial psychological impact of the noises, smells and sights, but you can help by providing empathy and support.
If you have the human resources to designate one person to be responsible for talking to and reassuring each patient until they reach the hospital, this is the best solution. Remember that you can use the patients’ relatives if they are present.
Physical methods for minimizing painful stimuli include immobilizing fractured bones. It is painful if the fractured pieces move, and patients will be more comfortable if the bones are kept steady with a splint, as described in Chapter 8. For the same reason, try to move the patient as little and as carefully as possible. Use a stretcher, and only move the patient when necessary for assessment, treatment or transport to a hospital. Other ways to provide pain relief are elevating the broken limb and applying something cold, such as a bag of frozen peas. Make sure the patient is not cold (or uncomfortable in direct sun), and treat burns with cool water and dressings as described in Chapter 10. For some injuries, it will help to apply ice if available.
K. F
insn
es/IC
RCK. F
insn
es/IC
RC
Figure 59. Physical comfort: Shielding from the sun (L) and immobilization and warmth (R)
45 Y. Filanovsky, P. Miller and J. Kao, “Myth: Ketamine should not be used as an induction agent for intubation in patients with head injury”, Canadian Journal of Emergency Medicine, Vol. 12, No. 2, March 2010, pp. 154–157.

108 BLAST TRAUMA CARE
Pharmacology means giving painkillers (analgesics). Ideally, pain medication should only be given intravenously in the initial phase after trauma because it works better and faster. Give the drug in repeated, small doses. Wait to see the effect of one injection before giving the next. If the patient has lost a lot of blood, intramuscular injections have little effect but are better than swallowing tablets if the drug cannot be given intravenously. In the initial phases after trauma, medications are unlikely to be absorbed from the stomach. The patient might also be nauseated and vomit, so it is best to keep their stomach empty. However, if the transit time to hospital is long and only tablets are available, it is better to give these than not to administer any painkillers, so long as the patient is conscious and has no injuries to the stomach.
DRUGS TO REDUCE PAIN (ANALGESICS)Pain medications are divided into different levels on a ladder according to pain intensity. Typically, analgesia is increased in gradual stages, but for significant trauma the patient should receive everything in combination from the beginning. Therapy can then be de-escalated as acute pain is controlled.
NSAID(if needed)
NSAID or weak opioid
NSAID or weak opioid
Strong opioid or ketamine
Paracetamol
Mild pain
Paracetamol
Moderate pain
Psychological and physical methods for analgesia
Time
+
+
+
+
+
+
+
Paracetamol
Severe pain
Figure 60. Pain spectrum and analgesia options
All medications have two names: the name of the actual drug (the generic name) and the brand name given by the drug company. The brand names used are different in different countries. In this book, we use the generic names of drugs because these are the same all over the world. You may not have heard the generic name before, even if you have it available and use it regularly. Look on the packaging of the drugs to see what the generic name is.
Before giving any drug, check that the patient is not allergic to the medication.

CHAPTER 9 – MANAGING PAIN 109
COMMON DOSAGE GUIDELINES
COMMON MEDICATION DOSES FOR ADULTS
DRUG ROUTE/DOSE COMMENT
PARACETAMOL 1 g orally or 15 mg/kg* IV 4 times a day
Max 4 g per day
Max 2 g per day if body weight < 50 kg
IBUPROFEN 200–400 mg orally 3 times a day
See comment below on NSAIDs
DICLOFENAC 75 mg IV or rectally 2 times a day
or
50 mg orally 3 times a day
Max 150 mg per day
See comment below on NSAIDs
TRAMADOL 50–100 mg orally
or
IV Every 4 to 6 hours
Max 600 mg per day
IV loading dose of 50–200 mg
It is not derived from poppy plants and therefore not an opiate, but it works on the opiate receptors in the brain (it is an opioid)
*The notation mg/kg means milligrams of medication per kilogram
of the patient’s body weight.
COMMON MEDICATION DOSES FOR CHILDREN
DRUG ROUTE/DOSE COMMENT
PARACETAMOL 15 mg/kg* IV or orally 4 times a day
Max 90 mg/kg* per day
Max 2 g per day if body weight < 50 kg
IBUPROFEN 10 mg/kg* orally 3 times a day
Only for children weighing > 5 kg
See comment below on NSAIDs
DICLOFENAC 1 mg/kg* orally 3 times a day
Only for children weighing > 12 kg
Max 100 mg per day
See comment below on NSAIDs
TRAMADOL 2–3 mg/kg* (between 50 and 100 mg per dose) Every 6 hours
Only for children > 12 years
Max 400 mg per day
*The notation mg/kg means milligrams of medication per kilogram
of the patient’s body weight.

110 BLAST TRAUMA CARE
NON-STEROIDAL ANTI-INFLAMMATORY DRUGSNon-steroidal anti-inflammatory drugs (NSAIDs) are a class of medications that includes ibuprofen and diclofenac, mentioned in the table. These drugs work by reducing the production of prostaglandins, which promote inflammation, pain and fever.
NSAIDs are good for pain relief and reducing fevers, but they are not great in the context of trauma. They have multiple side effects (undesired effects); one side effect is that they affect the capabilities of the platelets and make it more difficult for the body to stop bleeding (see Chapter 5). They also increase the risk of kidney injury and make it more difficult for broken long bones to heal. For these reasons, it is not recommended to give these drugs to patients suffering from major trauma. Other side effects include sores inside the stomach that can bleed, increased risk of heart attacks, and asthma attacks in patients with asthma. Before giving an NSAID to someone not suffering from trauma, check for pre-existing conditions first to avoid causing harm.
PARACETAMOL (ACETAMINOPHEN)Paracetamol has the generic name acetaminophen in some countries. It also works by reducing the production of prostaglandins, but only inside the brain and spinal cord.
Paracetamol is a good medication for pain relief and reducing fever, and it does not carry the same risks as NSAIDs of bleeding or kidney injury in trauma patients. It is a very safe drug with few side effects. However, if the patient is severely malnourished or has liver failure or kidney failure, they may be harmed by paracetamol.
THE NEXT LEVELSometimes simple analgesics are not enough. A doctor may choose to give stronger medications or add a sedative. Sedatives are drugs that affect the brain, making the person more relaxed (which in itself can relieve pain) and reducing anxiety. For performing procedures, the doctor may give an anaes-thetic. Anaesthetics either take away all pain sensation in a specific part of the body (by blocking nerve signals coming from the nerves in that region, i.e. local anaesthetics) or affect the brain so that the person becomes unconscious (i.e. general anaesthetics). For general anaesthesia, it is best the stomach is empty. Otherwise, the contents of the stomach could be regurgitated and go into the lungs when the patient is unconscious, resulting in pneumonia.

CHAPTER 9 – MANAGING PAIN 111
NOTES

112 BLAST TRAUMA CARE
CHAPTER 10 – SNAKEBITES
Key concepts
• Identifying the species of snake responsible for the bite is important for the patient’s care – take a photo if possible
• Antivenom is the only effective antidote for snake venom
• A large proportion of bites are dry bites and do not require the use of antivenom
• Immobilization is the main treatment; it is also vital to reassure the patient and transport them to a hospital
• In general, vipers cause bleeding disorders and elapids cause neurological symptoms
Although not related directly to explosions, deminers and members of bomb squads may fall victim to snakebites during the course of their work. This chapter introduces three main families of snakes and covers how to prevent and treat snakebites.
VENOMOUS SNAKESMost venomous snakes fall into three families: Elapidae, Viperidae and Colubridae.
If a human is bitten, venom is usually injected into the skin or muscles. However, spitting cobras can squeeze venom out of the tips of their fangs and spray it at the person’s eyes.
ELAPIDAECobras belong to this family, including king cobras. Elapids are quite long, thin, uniformly-coloured snakes with large, smooth, symmetrical scales on the top of the head.

CHAPTER 10 – SNAKEBITES 113
Crea
tive
Com
mon
s lic
ense
Figure 61. A king cobra
VIPERIDAEViperids, or vipers, have relatively long fangs which are normally folded flat against the upper jaw but are erected when the snakes strike. Vipers are relatively short, thick-bodied snakes with many small, rough scales on the top of their triangular heads.
COLUBRIDAEMost colubrids are not venomous. or have venom that is not known to be harmful to humans. Although mostly harmless, some colubrids can be deadly, such as the boomslang, twig snakes and keelback snakes.
AVOIDING SNAKEBITESSnakes do not hear sound, but they are able to hear by sensing vibrations with their jaws as they slither along the ground. It is a good idea to learn about the general behaviour of snakes in your area so that you can reduce your chances of encountering one and being bitten. Be especially careful about snakebites after rain or during flooding (as snakes cannot enter their burrows), at harvest time and at night.
Snakes prefer not to attack large animals that are too big to eat, such as humans so give them the chance to go away on their own. Half of bites by venomous snakes are so-called dry bites, where very little or no venom is injected. The likelihood of receiving a dry bite ranges from 10% to 80%, depending on the snake.46
46 L.R. Sharma, V. Lal and I.D. Simpson, "Snakes of medical significance in India: the first reported case of envenoming by the Levantine viper (Macrovipera lebetina)", Wilderness & Environmental Medicine, Vol. 19, No. 3, 2008, pp. 195–198.

114 BLAST TRAUMA CARE
SNAKEBITE VICTIMSVictims of snakebites may suffer any of the following:
• venom affecting the part of the body that has been bitten. Signs of the bite and slight bleeding are present. The effects of the venom can be debilitating, sometimes permanently.
• venom affecting organs and tissues away from the part of the body that has been bitten (called “systemic injury”). This can be debilitating or even life-threatening.
• anxiety caused by the scare of being bitten and by exaggerated beliefs about snake venom, including what it can do and how quickly it acts.
Following the immediate pain of the snake’s fangs penetrating the skin, there may be increasing pain at the site of the bite (burning, bursting and throbbing), swelling around the site that gradually extends up the bitten limb towards the heart, and tender, painful enlargement of the nearby lymph nodes.
Signs and symptoms of snakebite around the site of the bite
• Fang marks
• Pain
• Bleeding
• Bruising
• Raised red lines extending up the bitten limb (an indication of inflammation or infection of a lymph vessel)
• Lymph-node enlargement
• Inflammation (swelling, redness and heat)
• Blistering
• Infection, abscess formation
• Dead tissue (necrosis)
SIGNS AND SYMPTOMS OF SYSTEMIC INJURYFor many snake species, the signs and symptoms of systemic injury include nausea, vomiting, malaise (general discomfort), abdominal pain, weakness, drowsiness and exhaustion.
Viper venom can cause certain cardiovascular symptoms such as problems with eyesight, dizziness, collapse, shock, hypotension (abnormally low blood pressure), cardiac arrhythmias (an irregular heartbeat), pulmonary oedema (fluid in the lungs) and conjunctival oedema (a type of swelling of the eye).

CHAPTER 10 – SNAKEBITES 115
BLEEDING AND CLOTTING DISORDERSVipers, and certain elapids in Australia, can cause bleeding and clotting disorders. There may be traumatic bleeding from recent wounds, including prolonged bleeding from the site of the bite and from old, partly healed wounds.
They can also cause spontaneous bleeding throughout the body – e.g. from the gums, the nose or the rectum or in the retinae (the backs of the eyes). Other signs of bleeding include vomiting blood or blood in the urine.
NEUROLOGICAL DISORDERSElapids can cause neurological problems, including muscle weakness or paralysis. One of the first signs is drooping eyelids, with the weakness descending down the body from there. Other signs and symptoms include: drowsiness, paraesthesia (pins and needles), abnormalities of taste and smell, paralysis of facial muscles, a nasal voice or the inability to speak, regurgitation through the nose, difficulty swallowing, respiratory paralysis and generalized paralysis.
COBRA SPITIf a cobra spits venom into someone’s eyes, they will feel immediate, intense and persistent burning, stinging pain, and their eyes will water profusely.
TREATMENTCarry out first-aid treatment as soon as possible after the snakebite occurs. This can be done by the snakebite victim themselves or by anyone else present. Remember that many popular methods for treating snakebites, such as sucking out the venom, are ineffective or even dangerous.
Reassure the patient if they are agitated. Remove jewellery and watches, which could cut into the skin if there is swelling. Wash the site of the bite with soap and water, and cover the injury with a clean, dry dressing. Lay the patient down in a comfortable and safe position; immobilize the bitten limb with a splint or sling. Movement can increase the venom’s spread.

116 BLAST TRAUMA CARE
�g 64
�g 64
�g 64
�g 64�g 64
Fran
cis
Mac
ard
Figure 62. Immobilization bandaging

CHAPTER 10 – SNAKEBITES 117
NOTES

118 BLAST TRAUMA CARE
CHAPTER 11 – TREATING BURNS
Key concepts
• Depth of burns
• Critical issues in management
• Cooling the burn and managing patient temperature
• Dressing burns appropriately
• Smoke inhalation and oxygen treatment
• Use of fluids
This chapter considers the skin’s anatomy, the categorization of burns and how each category is best treated.
Our skin is like a cloak that acts as our first line of defence against the rest of the world. It protects us against harmful intruders like toxins, agents of infection, radiation and harmful pollutants. Our skin does this both by being a protective barrier (like a wall) and by having cells that act like soldiers who fight potential intruders.
Not just part of our defence system, our skin also helps maintain balance in the body, for instance by regulating temperature. When we sweat, the water on the skin evaporates, thereby giving off heat and cooling us down. When we are cold, we get goosebumps, where the rising of the hairs creates a microclimate around our skin and slightly increases our temperature.
Skin has numerous nerve endings which send signals to the brain to tell us if we are hot or cold. If we are cold, the brain tells our muscles to start shivering. These muscle contractions release energy that warms the body. The nerve endings also help protect us by telling us to pull away if something is painful. The skin also helps excrete waste products and absorb nourishment such as water and vitamins.

CHAPTER 11 – TREATING BURNS 119
SKIN ANATOMY
F
7act
ive
Stud
io/D
ream
stim
e.co
m
igure 63. Skin anatomy
If you take a piece of skin and look at it in cross section, it is like a piece of cake with three layers. The epidermis is the outermost part of the skin, like the marzipan covering a cake. It makes us waterproof and determines our skin tone. The dermis, the layer underneath the epidermis, contains tough connective tissue, hair follicles and sweat glands. The layer at the bottom is called subcutaneous tissue and is made up of fat and connective tissue.
Figure 64. Layer cake
EXPLOSIVE THERMAL INJURIESBurns from explosions (chemical or thermal) are quaternary blast injuries. There may be a fireball, but more often there is a short, intense flash of heat that can cause flash burns over exposed body parts (e.g. the hands, neck and head). Flammable materials on the scene may be ignited by the explosion, especially when incendiary devices (designed to start fires) are used.

120 BLAST TRAUMA CARE
Thermal lung injuries can develop directly from the very high air temperatures at the site of the explosion.47 Explosions in confined spaces can enhance thermal effects and increase the risk of smoke inhalation. Being in a closed space also increases the concentration of potentially toxic gases produced from burning materials. This is also dangerous to rescuers if they enter the scene without protective equipment. Smoke inhalation is the most common cause of death at the scene of a fire owing to the various compounds that are breathed in.48
47 A. Mayo and Y. Kluger, “Terrorist bombing”, World Journal of Emergency Surgery, Vol. 1, November 2006, p. 33.
48 P. Gill and R.V. Martin, “Smoke inhalation injury”, BJA Education, Vol. 15, No. 3, June 2015, pp. 143–148.
SEVERITY OF BURNS
Figure 65. Levels of burn
The severity of a burn depends on depth of injury, how much of the body surface area is damaged and whether the airway is involved through inhalation of smoke or heated gases. In the past, burns were classified from first to third degree, but today the burn’s depth (in terms of the layers of skin affected) is used to determine its severity.
A superficial burn only involves the epidermis (the topmost layer of the skin). Superficial burns are erythematous (red) but have no blisters. They are painful but not dangerous and therefore are not considered when determining the severity of burn injuries. It will take around three to six days for a superficial burn to heal completely without any specific treatment, and it will not result in scarring.

CHAPTER 11 – TREATING BURNS 121
A deep partial-thickness burn extends down through the dermis at varying depths. A full-thickness burn extends all the way through the skin and is likely to require skin grafting (taking healthy skin from another part of the body to use at the site of the burn). This means the patient needs to be treated in a centre that has the capacity to do skin grafts. A burn can also extend beyond the skin itself, affecting tissue such as muscles, bones and tendons (a subdermal burn).
BURN
TYPE
SURFACE BLOOD
SUPPLY
PAIN COLOUR EXAMPLE DEPTH
Superficial patial- thickness
Dry Hyperaemia (lots of blood in vessels)
Moderate Red
Deep partial- thickness
Moist/shiny, with blisters (fewer the deeper it is)
Normal or reduced
Severe Red/dark
Full thickness
Dry, leathery None (blood vessels in skin are burned)
Minor to none
White/brown
Figure 66. How to distinguish different types of burns
FIRST AID FOR BURNSTo give first aid for burns, it is critical that you:
• stay safe – do not catch fire yourself, avoid inhaling smoke, decontaminate the patient if you suspect chemical burns and be wary of electricity
• stop the burning process
• perform the primary survey (cABCDE), including pain relief.

122 BLAST TRAUMA CARE
Your first priority is to stop the burning process. If the person’s clothes are on fire, try to cover them in a blanket made of natural fibres (e.g. wool) and roll them around on the ground. Synthetics should not be used, as some of these can worsen the damage by melting onto the skin. If you do not have a blanket or water to put out the fire, have the person roll around on the ground to put it out. Do not catch fire yourself in the process! Try to remove the patient’s clothes unless they are stuck to the skin. Cut around such sections instead. Remove any jewellery or watch that is near the burned skin before swelling makes it impossible to remove them – the heat of the metal could still be transmitted to the skin.
Before starting treating the burns specifically, you should go through the usual primary assessment, cABCDE. Especially when the burns are part of a blast injury, it is important to remember that the patient may also have other injuries and to treat them a trauma patient. What follows are some considerations specific to burns during the cABCDE approach.
CATASTROPHIC BLEEDINGNo additional points.
AIRWAYDirect airway burns from hot air or flame can cause oedema (swelling) of the upper airway within minutes to hours. Signs of airway burns are soot around the mouth or nose or in the sputum; singed nasal hairs, eyebrows and other facial hair; a raspy voice; and a cough. Another cause of airway obstruction is extensive circumferential neck burns (burns going all the way around the neck), where the skin may become rigid while there is an underlying oedema.
An oedema is a gradually worsening process, but it is at its worst during the first six hours after injury. Therefore, it is crucial for these patients to be continuously reassessed, as their condition may change during the time you have them under your care. Even if you cleared the airway to begin with, this does not mean it will remain open permanently. If there are any signs of an airway burn, the patient may need help with their breathing through the placement of an endotracheal tube. The sooner this is done the better, as it becomes more complicated when the swelling progresses. The patient must, therefore, get to the hospital quickly.

CHAPTER 11 – TREATING BURNS 123
BREATHINGBurn injuries can compromise breathing because of smoke inhalation, toxic gas poisoning or mechanical restriction from extensive chest burns (more details below). Signs of an injury to the respiratory tract are soot in the upper airway or sputum, wheezing, crackles or an unexplained headache and altered mental status.
Furthermore, circumferential deep burns may interfere with chest movement owing to the formation of eschar, where the skin becomes leathery. Eschar may compromise breathing when it extends all the way around the chest. In this case escharotomy needs to be done.
These burn injuries comes in addition to pulmonary blast injuries already discussed earlier in the manual. Give the patient oxygen if you have this available.
Respiration is often compromised in the initial phases, even without a direct inhalation injury or blast lung injury. Such breathing difficulties can be due either to water in the lungs (pulmonary oedema) from excessive fluid resus-citation or to mechanical restriction of breathing from full-thickness burns surrounding the chest or neck.
CIRCULATIONLow blood pressure and a fast heart rate (signs of shock) are unlikely to be due to fluid loss in the initial phase after a burn injury. Look for other causes, as discussed elsewhere in the manual. If the burn injury is extensive, the patient will need extra fluids, but this comes later.
Less blood is pumped by the heart (there is reduced cardiac output) because of hypovolaemia due to fluid shifting from inside the injured small blood vessels (capillaries) to the interstitial tissue (extravasation). Consequently, the body will release vasopressors (e.g. noradrenaline, adrenaline and vaso-pressin) that will squeeze the blood vessels to a smaller diameter.
DISABILITY (NEUROLOGICAL STATUS)The patient may be confused or unconscious from severe blast trauma. If you cannot see any signs of damage, keep in mind that other possible causes of this are hypoxia (low oxygen levels in the body) and inhalation of toxic gases.

124 BLAST TRAUMA CARE
Partial-thickness burns are also intensely painful, so make sure you give some analgesia (see Chapter 9).
Cooling down the burn helps to reduce the damage and provide pain relief. Only cool the burned area, not the whole patient. Patients with burns often become hypothermic (i.e. have too low a body temperature), especially children. Water should ideally be around 20ºC and applied only for about 20 minutes. After this, you need to dress the burn if it goes beyond superficial layers of the skin, as this will lessen the pain and help with infection control and fluid management. Do not apply any ointments or other remedies directly to the burn before adding the dressing. Doing so can contaminate the wounded area and makes it difficult to assess when the patient arrives at the hospital.
If you do not have a burn dressing, or the burn area is too large, you can use the cleanest gauze you have and keep it moist with drinking water (or IV fluids, if you have them available).
Figure 67. Applying sterile gauze to healing wounds before moistening with normal saline
If you do not have enough gauze, you can use thin cling film, like what is used to cover food. Remove the outer layer to get to the clean section of the roll, and place long strips of cling film down along the affected area.49 Do not wrap
49 A.Y. Liao et al., “The infection risk of plastic wrap as an acute burns dressing”, Burns, Vol. 40, No. 3, May 2014, pp. 443–445.

CHAPTER 11 – TREATING BURNS 125
it around the limb or body. When the body swells, this can become too tight, acting as a tourniquet, which you will remember from the chapter on bleeding. For the same reason, you should remove any jewellery that encircles any part of the patient’s body.
Figure 68. Cling film applied in overlapping sheets to burns on the arm
Alternatively, an occlusive dressing can be made from plastic bags or surgical gloves. This method can be used for burns to the hands and feet. After cleaning the burn and applying silver sulphadiazine directly to the wound with a spatula or gloved hand, use a plastic bag like a glove or sock, tying it closed around the wrist or ankle. Like the cling film, it should not be too tight. The limb should be elevated to reduce swelling. Keep the burned area moist and encourage movement of the joints, both passive and active.
K. Y
agi/U
. of K
harto
um
Figure 69. Plastic bags used as occlusive dressings

126 BLAST TRAUMA CARE
Blisters that are part of deep partial-thickness burns are like a roof protecting the underlying injury. If they are intact, it will be clean underneath, but if you break them you risk infection in the underlying tissue.
When the burns are dressed, it is time to ensure that the patient does not get any colder, e.g. by wrapping them in a rescue blanket. Before covering the burns completely, make a rough assessment of their severity to determine where the patient needs to go and when (if you are triaging owing to multiple casualties). If you have access to a specialized burn centre, you should take the patients with the most severe burns there, including:
• any full-thickness burns
• extensive partial-thickness burns (e.g. larger than the whole front of a leg)
• burns that involve areas like the face, genitals, hands or feet
• burns to the respiratory tract
• chemical or electrical burns.
ICRC
Figure 70. Burn to the face with intact blisters
If there are many casualties with burns, such as after an incendiary bomb attack, turn to alternative national burn-management resources, if they exist. Large numbers of burn victims can quickly overwhelm local medical capabilities.

CHAPTER 11 – TREATING BURNS 127
SPECIAL CIRCUMSTANCES
50 Agency for Toxic Substances and Disease Registry, White Phosphorus – ToxFAQs, Agency for Toxic Substances and Disease Registry, Atlanta, Georgia: https://www.atsdr.cdc.gov/toxfaqs/tfacts103.pdf, accessed 20 July 2020.
WHITE PHOSPHORUS White phosphorus is a colorless, white or yellow waxy solid with a garlic-like
odor. It does not occur naturally but is manufactured from phosphate rocks. White
phosphorus reacts rapidly with oxygen, easily catching fire at temperatures ten to 15
degrees above room temperature [five to eight degrees Celsius]. White phosphorus
is used by the military in various types of ammunition and to produce smoke for
concealing troop movements and identifying targets.
- Agency for Toxic Substances and Disease Registry50
There are two main ways white phosphorus causes injuries and sometimes death: by burning deep into tissue and by being inhaled as a smoke. It can also cause cardiovascular collapse due to hypovolemia from chemical burns and dysthymias due to hypocalcemia.
When white phosphorus ignites, the particles in it can produce extensive burns on the human body. The chemical tends to stick to the skin, so the burns can be horrific. Phosphorus burns can be particularly deadly because the skin can absorb the phosphorus, leading to liver, heart and kidney damage and, in particularly bad cases, multiple organ failure.
White phosphorus also produces hot, dense, white smoke. Simply inhaling the smoke can cause illness, burns or even death. This condition is worst in an enclosed environment, such as a building.
The first priority is to extinguish the phosphorus as quickly as possible. This should be done by submerging the burning part in water, if possible, or by covering the burning with saline- or water-soaked dressings.
SMOKE-INHALATION INJURY AND INHALATION OF TOXIC GASESThe effects of inhaling smoke with toxic fumes vary depending on the compound. Chapter 5 deals with bleeding and explains how red blood cells transport oxygen. If one inhales carbon monoxide (CO), it loads onto red blood cells like oxygen, but cells cannot use CO as fuel. The CO also binds much more tightly to the red blood cells than oxygen, making it harder for the blood to pick up fresh oxygen as it travels through the lungs again.

128 BLAST TRAUMA CARE
Fran
cis
Mac
ard
Figure 71. CO reduces the ability of red blood cells to transport oxygen
The result is that the patient is suffocating, even if they have a clear airway. You must consider that anyone unconscious where there has been a fire may be suffering from smoke-inhalation injury. Give them the highest concentration of oxygen as soon as possible because oxygen displaces CO from red blood cells. It will usually take four hours for the CO to clear off red blood cells, but only 45 minutes if the patient is given 100% oxygen. Continue oxygen therapy for at least 24 hours, as it takes many hours to displace CO from inside the cells.51
Another gas produced from the burning of synthetic or natural fibres is hydrogen cyanide, often together with CO. Cyanide makes it impossible for the cells to use oxygen even if they receive it. Signs of cyanide toxicity are like those of CO poisoning, including hyperventilation (rapid breathing) and low blood pressure as well as signs that the brain is not working correctly, e.g. confusion and eventual coma and death.
Using a bag-valve mask for rescue breathing is fine, but do not attempt mouth-to-mouth resuscitation because the cyanide may poison you through the patient’s exhaled breath. For all smoke-inhalation injuries, give as much oxygen as you can and transport the patient to a hospital as soon as possible.
51 C. Gomersall et al., Basic Assessment and Support in Intensive Care for Developing Healthcare Systems (BASIC DHS), The Chinese University of Hong Kong, Hong Kong, 2017.

CHAPTER 11 – TREATING BURNS 129
There are multiple antidotes available for hydrogen cyanide poisoning, but when you do not have any of the specific treatments give humidified 100% oxygen via a non-rebreathing mask for a minimum of 24 hours after the accident.
CHEMICALSChemicals can cause burns to the skin and to the airway through inhalation. Breathing in chemicals is the more common of the two, and the treatment of this kind of inhalation injury is the same as for smoke inhalation. Give oxygen if you can, and ensure the patient gets help as soon as possible at a hospital. There, staff can intubate the patient and initiate careful ventilation (lung-protective ventilation), as well as give them fluids and sometimes treatment specific to the type of injury.
When there are chemical burns to the skin, it is essential to thoroughly decontaminate the patient, thereby avoiding contaminating yourself and hospital staff. The first step is to move away from the exposed area; then remove the patient’s clothing while being careful not to contaminate other areas of the patient or yourself. You can do a first round of decontamination (known as gross decontamination) by rinsing off the exposed areas of the body: brush away powder residue or any other particles from the explosion, and then flush with copious amounts of water to thoroughly irrigate the affected area and dilute the chemical as much as possible. Take care that you and the patient do not get injured by the run-off, which contains the chemicals being rinsed off.
ELECTRICAL BURNSElectrical burns result from electrical currents passing through the body. Sometimes you cannot see any burns on the outside, but there is still internal damage. An electric shock can also cause the victim to fall or be thrown away, potentially leading to broken bones or other injuries. In an explosion, electrical burns can occur because of broken wires that are still conducting electricity, either directly through a person or through a water source. If you see someone lying on a wire, do not touch them or the wire with your hands until you know the electricity has been turned off. Keep at a distance, as the ground can be electrified as well (especially if it is wet). When assessing the patient, keep in mind that their outer skin might not appear too bad, but internal damage can still be extensive – heat conducted along the bone causes the most damage.

130 BLAST TRAUMA CARE
Electricity travelling through the body can cause brain injury, cardiac arrhythmias (an irregular heartbeat that can be fatal) and extensive muscle damage with the potential for compartment syndrome and kidney damage (from rhabdomyolysis, see Chapter 8). Start with your cABCDE assessment after ensuring the scene is safe, then dress both the entrance and exit wounds as you are readying for rapid transport to a hospital.
RULE OF NINESThe rule of nines divides the body into sections of 9% of the total body sur-face area (TBSA). It is used to assess the extent of the damage. If you do not remember what percentage of the body a certain section is, you can use the patient’s hand (not your own). The patient’s palm, including the fingers, is 1% of their TBSA.52 For your calculations, leave out the superficial epidermal burns; only count deep partial-thickness and full-thickness burns. A child under one year has 9% taken from the legs and added to the head region. For each year of life, 1% is distributed back to the lower extremities until age nine, when the head region is the same as an adult’s.
~1%
K. F
insn
es/IC
RC
chapter 11 b
�g 58
chapter 11 b
�g 58
1%
9%
9%
9%
18%
18%18%
18%
Figure 72. Rules of nine
Burns affecting over 15% of TBSA have significant effects on many organ systems.
52 P. Agarwal and S. Sahu, “Determination of hand and palm area as a ratio of body surface area in Indian population”, Indian Journal of Plastic Surgery, Vol. 43, No. 1, June 2010, pp. 49–53.

CHAPTER 11 – TREATING BURNS 131
FLUID RESUSCITATION
53 C. Gomersall et al., Basic Assessment and Support in Intensive Care for Developing Healthcare Systems (BASIC DHS), The Chinese University of Hong Kong, Hong Kong, 2017.
Extensive burns also cause a generalized inflammatory reaction in unburned body tissues and vital organs. This causes hypovolaemia, generalized oedema and a net loss of water and sodium. Without adequate fluid resuscitation, the patient can go into hypovolaemic shock, but this will not happen immedi-ately.53 If you give too much fluid, the patient may experience worsened oedema and potentially pulmonary oedema, which is especially detrimental in the case of blast injury of the lungs (when excessive fluids can be particu-larly dangerous). Twenty-four hours after the burn, capillary permeability is generally restored to normal, and two to three days after the burn fluids start moving back into the intravascular compartment.
Fluid loss starts immediately after the burn injury occurs because of the extravasation and leakage described above. Early fluid resuscitation to coun-terbalance fluid shifts and losses is a vital part of major burn care in the first 24 hours. Fluids should be given to all patients over one year with burns covering 15% or more of TBSA and to all infants under one year with burns covering 10% or more of TBSA. The goal is to restore and maintain oxygen delivery to the whole body following the loss of water, salts and proteins while minimizing the risk of worsening oedema. Too much fluid increases the risk of circulatory overload, pulmonary and cerebral oedema, and com-partment syndrome (see Chapter 8).
We usually start by using the Parkland formula to calculate the patient’s fluid requirement over the first 24 hours. The formula tells what volume of Ringer’s lactate to give, in millilitres.
Parkland formulaVolume (ml) = 4 x body weight (kg) x % TBSA burned
Give half of this volume in the first eight hours from the time of injury (not the time of presentation). Subtract any fluid already given before calculating the fluid requirement for the first eight hours.

132 BLAST TRAUMA CARE
Then give the second half of the volume over the following 16 hours.
For inhalation injuries and high-voltage electrical burns, increase the fluid volume by 50%, so:
Volume (ml) = 6 x body weight (kg) x % TBSA burned.54
The end-goal of treatment is a urine output of 0.5–1 ml/kg per hour and a heart rate of less than 110 (as well as biochemical markers). If the patient is also in shock from bleeding, then resuscitation from the bleeding takes pre-cedence over resuscitation from burns.
54 C. Gomersall et al., Basic Assessment and Support in Intensive Care for Developing Healthcare Systems (BASIC DHS), The Chinese University of Hong Kong, Hong Kong, 2017.

CHAPTER 11 – TREATING BURNS 133
NOTES

134 BLAST TRAUMA CARE
CHAPTER 12 – TRIAGE PROCEDURES
Key concepts
• Sort patients into groups based on their need and the severity of their condition
• Triage is based on prioritizing the patient’s condition according to the cABCDE assessment
• Triage is a dynamic process, which means that triage decisions must be re-evaluated and adjusted according to changes in the patient’s condition and the effects of interventions
In this chapter you will learn the basics of triage and why, following a mass-casualty incident, it is important to do the most good for the greatest number of people.
Triage, from the French trier (to sort), is a process of assessing and prioritizing injured people, regardless of whether the injuries were sustained in a run-of-the-mill car accident with few injured people or from a mass-casualty incident due to an explosion.
In a nutshell, triage is a rapid process that you should carry out as soon as there are multiple patients to treat or any time a patient’s clinical condition changes during the course of their care (according to available resources and the patient’s chance of survival).
In triage, you use physiologic measures to help sort patients, such as the their respiratory rate, whether the pulse can be felt at the wrist, their capillary refill time and their level of consciousness.
PLANNINGDisaster preparedness includes designing a plan, training and coordinating those who will execute it and ensuring the availability of needed resources.

CHAPTER 12 – TRIAGE PROCEDURES 135
Exercises and the use of moulages to get familiar with the procedures should occur twice a year. To face disasters, response capacity must be improved through preparedness.
RISK EVALUATIONThe site of an explosion is a very dangerous and chaotic place. Before entering the scene, you must do a risk evaluation. This involves analysing potential threats to the first responders and victims and how vulnerable they are. You should consider what potential threats to the community exist and how the community would be affected. Look for any possible unexploded ordnance or, in case of a terrorist attack, the possibility of a closed second explosion that would threaten bystanders or the deminers or members of the explosive ordnance disposal (EOD) team.
It is pivotal that the rescue activities during a disaster include measures to guarantee the safety of the patients, the members of the rescue units, bystanders (who are likely to be near the scene) and the general population.
ROLES AND RESPONSIBILITIESKey roles that must be fulfilled in a triage operation
• triage team leader – responsible for coordination
• clinical triage officer – responsible for assessing victims’ condition
• deminer/EOD team leader – responsible for securing the area and maintaining safety on site
The triage team leader is the person responsible for all aspects of an emergency response; they control everything not related to medical treatment. The triage team leader oversees logistics and monitors evolving objectives, manages all operations, allocates resources and is responsible for everyone involved. The triage team leader also directs and coordinates emergency personnel and the use of equipment and other resources, from the scene of the incident, to the transportation of patients to definitive care, to the conclusion of the incident. In a clearance operation the role of triage team leader goes to the head of the team.
The clinical triage officer is responsible for prioritizing victims’ treatment according to their clinical condition. There is no strict rule for who takes on this role. Organizations should assign the role according to the individual

136 BLAST TRAUMA CARE
circumstances. Logically, the most experienced and respected person able to take on the role should do so. In the scenario of a bomb-clearance incident, the nurse or paramedic should serve as the clinical triage officer.
As they will have received first-aid training, the members of the demining or EOD team also play a role, supporting the clinical triage officer by performing basic first aid on the patients.
Assigning roles and responsibilities is meant to answer the following questions:
• Who does what?
• When?
• How?
• With what?
Every member of the team needs to know their role and responsibilities precisely, so there should be a proper briefing at the start of the clearance activities.
It is important to have a clear system for communication; there should be backup systems in case mobile phones cannot be used, such as radios, megaphones, flags and portable sound systems.
COMMUNICATION AND COORDINATIONThe communication system should include directions for notifying emergency responder units (including police, firefighters and civilian protection), and whom to contact first, until all the necessary individuals have been contacted. Establish the means of communication to be used, indicating the radio band and frequency, telephone numbers and rendezvous locations, if necessary. All deminers and EOD team members must have emergency numbers saved in their mobile phones. The triage team leader is in charge of this.
The triage leader will forward essential information to the central dispatch service, such as:
• the type of incident (e.g. explosion of a bomb, unexploded ordnance or anti-personnel mine)
• how many were injured and the kinds of injuries
• what medical treatment has already been started
• how many people need to be transferred to the hospital by ambulances
• when and how they will be transported (e.g. if there will be a rendez-vous point).

CHAPTER 12 – TRIAGE PROCEDURES 137
After the initial triage, patients should receive first aid according to their status. When, owing to the number of victims or the location of the incident, not all victims can be transported directly to hospitals, an advanced medical post may be established nearby, but not in, the site of the incident.
Following triage classification, refer patients to the treatment areas near the site, where they should be stabilized. Depending on the skills and training of the first responders and following the cABCDE approach, stabilization procedures may include: advanced airway management, fluid therapy to maintain circulation and treat shock, control of bleeding and pain medication. Write down the patient’s clinical condition and what treatment they received in the patient’s evacuation report that will accompany them to the hospital.
PRIORITY CATEGORIESSorting victims and prioritizing treatment according to the severity of their injuries is the essence of triage. A quick way to determine the severity of patients’ injuries is using the cABCDE approach to look for life-threatening conditions.
Injuries are sorted into four categories that reflect their treatment priority:
Category 1 (code red): life-threatening injuries that require immediate medical intervention. Examples include massive bleeding or injury to the airway, such as burns or other trauma to the nose or mouth. This category is for critically injured patients who nevertheless have a high chance of survival if given treatment that requires relatively little time.
Category 2 (code yellow): major but not immediately life-threatening injuries, where survival is possible even with some delay in treatment (e.g. major fractures or uncomplicated major burns).
Category 3 (code green): minor injuries requiring minimum medical care.
Category 4 (code black): injuries so severe that the patient has little chance of survival.
Remember that triage is a dynamic process: a patient’s condition can change at any time. You must constantly reassess patients’ clinical situations.

138 BLAST TRAUMA CARE
TRIAGE PROCESSPrioritizing victims’ care must be rapid. It is done in two phases: sift and sort. In cases of mass casualties, this needs to be done in less than 30 seconds per victim.
During the sift phase, the clinical triage officer must identify those with severe injuries, separating them from the dead, those with only slight injuries (walking patients) and the uninjured.
During the sort phase, the severely injured victims must be categorized, and decisions must be made as to which Category 1 (code red) patients should be treated first or immediately evacuated.
What treatment first responders give depends on their skills and training, and a generalist first responder is only expected to use simple equipment, as shown in the following tables.
Table 4. Basic and advanced first aid
BASIC ADVANCED
SPINAL CONTROL
Immobilization Cervical collar, spinal board
AIRWAY Opening with chin-lift, jaw-thrustMouth-to-mask ventilation
Oro-/nasopharyngeal airway, oxygen supply, bag-valve mask
BREATHING Oxygen Chest drain, needle
CIRCULATION Controlling external bleeding Peripheral/central venous or intraosseous access

CHAPTER 12 – TRIAGE PROCEDURES 139
Table 5. Basic first-aid equipment
TREATMENT EQUIPMENT
Clear airway Manual-suction apparatus
Support ventilation Pocket mask
Seal open pneumothorax Three-sided occlusive dressing
Stop bleeding Pressure dressings
Ideally, expert first responders will carry advanced first-aid bags to treat critical patients; the following table lists equipment and supplies that would be worth having in an advanced first-aid bag.
Table 6. Advanced first-aid equipment
TREATMENT EQUIPMENT
Secure airway Laryngeal mask airway/i-gel airway/endotracheal tube
Deliver oxygen Portable oxygen source and mask
Support ventilation Bag-valve mask
Spinal immobilization Cervical collar, vacuum mattress
Decompress tension pneumothorax Cannula for needle thoracentesis
Treat cardiac arrest Defibrillator and IV drugs for CPR
Replace fluids IV cannula, intraosseous device, fluids
Relieve pain Splint, IV drugs

140 BLAST TRAUMA CARE
TRANSPORTTransporting patients is always challenging: sometimes it takes longer than expected, and there may be limited capacity for treating the patient in transit. Many ambulances are not equipped with necessary medical supplies and equipment. Furthermore, the first responder often must continue to treat the patient as the vehicle is moving, which makes all procedures more difficult and often more dangerous. Before leaving the site of the incident, you must contact the hospital about the patient’s estimated time of arrival, their condition and what medical treatment they have already received. Remember too that there is an important distinction between the priority to treat and the priority to evacuate. First move patients who have a better chance of surviving before moving severely wounded patients who have little chance of surviving.

CHAPTER 12 – TRIAGE PROCEDURES 141
NOTES

142 BLAST TRAUMA CARE
BIBLIOGRAPHY
Agarwal, P., and Sahu, S., “Determination of hand and palm area as a ratio of body surface area in Indian population”, Indian Journal of Plastic Surgery, Vol. 43, No. 1, June 2010, pp. 49–53.
American College of Surgeons Committee on Trauma, Advanced Trauma Life
Support Student Course Manual, 10th ed., American College of Surgeons, Chicago, 2018.
American Spinal Injury Association, International Standards for Neurological
Classification of SCI (ISNCSCI) Worksheet, American Spinal Injury Association, Richmond, Virginia, 2019.
Bequette, B.W., et al., “Belts evaluated as limb tourniquets: BELT study comparing trouser supporters used as medical devices in a manikin model of wound bleeding”, Wilderness & Environmental Medicine, Vol. 28, No. 2, June 2017, pp. 84–93.
Bickell, W.H., et al., “Immediate versus delayed fluid resuscitation for hypotensive patients with penetrating torso injuries”, New England Journal
of Medicine, Vol. 331, No. 17, 1994, pp. 1105–1109.
Boffard, K.D., and MacFarlane, C., “Urban bomb blast injuries: Patterns of injury and treatment”, Surgery Annual, Vol. 25, No. 1, 1993, pp. 29–47.
BrainLine, “Blast injuries and the brain”, brainline: All about brain injury and
PTSD, 13 December 2010: www.brainline.org/article/blast-injuries-and-brain, accessed 20 July 2020.
Bumbasirevic, M., et al., “Treatment of blast injuries of the extremity”, Journal
of the American Academy of Orthopaedic Surgeons, Vol. 14, No. 10 suppl., November 2006, pp. S77–S81.
Carney, N., et al., “Guidelines for the management of severe traumatic brain injury”, Neurosurgery, Vol. 80, No. 1, January 2017, pp. 6–15.
Centers for Disease Control, Blast Injuries: Traumatic Brain Injuries from
Explosions, Centers for Disease Control, Atlanta, Georgia, 2009.
Cernak, I., and Noble-Haeusslein, L.J., “Traumatic brain injury: An overview of pathobiology with emphasis on military populations”, Journal of Cerebral
Blood Flow & Metabolism, Vol. 30, No. 2, February 2010, pp. 255–266.

BIBLIOGRAPHY 143
Cooper, G.J., “Protection of the lung from blast overpressure by thoracic stress wave decouplers”, Journal of Trauma and Acute Care Surgery, Vol. 40, No. 3 suppl., March 1996, pp. S105–S110.
Cooper, G.J., and Taylor, D.E., “Biophysics of impact injury to the chest and abdomen”, Journal of the Royal Army Medical Corps, Vol. 135, No. 2, June 1989, pp. 58–67.
Cross, A.M., et al., “The incidence of pelvic fractures with traumatic lower limb amputation in modern warfare due to improvised explosive devices”, Journal
of the Royal Naval Medical Service, Vol. 100, No. 2, October 2014, pp. 152–56.
Defense and Veterans Brain Injury Center, Military Acute Concussion Evaluation 2
(MACE 2), Department of Veterans Affairs, Arlington, Virginia, 2018.
Drew, B, et al., “Tourniquet conversion: A recommended approach in the prolonged field care setting”, Journal of Special Operations Medicine, Vol. 15, No. 3, Fall 2015, pp. 81–85.
Drew, B., Bennett, B.L., and Littlejohn, L., “Application of current hemorrhage control techniques for backcountry care: Part one, tourniquets and hemorrhage control adjuncts”, Wilderness & Environmental Medicine, Vol. 26, No. 2, June 2015, pp. 236–245.
Du Pont, D., et al., “The effect of limb elevation on bleeding control in a human venous hemorrhage model”, Annals of Emergency Medicine, Vol. 68, No. 4 suppl., 2016, p. S117.
Elsayed, N.M., “Toxicology of blast overpressure”, Toxicology, Vol. 121, No. 1, July 1997, pp. 1–15.
Filanovsky, Y., Miller, P., and Kao, J., “Myth: Ketamine should not be used as an induction agent for intubation in patients with head injury”, Canadian
Journal of Emergency Medicine, Vol. 12, No. 2, March 2010, pp. 154–157.
Giannou, C., and Bernes, E., First Aid in Armed Conflicts and Other Situations of
Violence, International Committee of the Red Cross, Geneva, 2006.
Gill, P., and Martin, R.V., “Smoke inhalation injury”, BJA Education, Vol. 15, No. 3, June 2015, pp. 143–148.
Gomersall, C., et al., Basic Assessment and Support in Intensive Care for Developing
Healthcare Systems (BASIC DHS), The Chinese University of Hong Kong, Hong Kong, 2017.
Gutierrez de Ceballos, J.P., et al., “11 March 2004: The terrorist bomb explosions in Madrid, Spain – an analysis of the logistics, injuries sustained and clinical management of casualties treated at the closest hospital”, Critical
Care, Vol. 9, No. 1, 2004, p. 104.

144 BLAST TRAUMA CARE
Gutierrez de Ceballos, J.P., et al., “Casualties treated at the closest hospital in the Madrid, March 11, terrorist bombings”, Critical Care Medicine, Vol. 33, No. 1 suppl., January 2005, pp. S107–S112.
Husum, H., Gilbert, M., and Wisborg, T., Save Lives, Save Limbs: Life Support
for Victims of Mines, Wars, and Accidents, Third World Network, Penang, Malaysia, 2000.
International Committee of the Red Cross, Anaesthesia Handbook, International Committee of the Red Cross, Geneva, 2018.
International Federation of Red Cross and Red Crescent Societies, International
First Aid and Resuscitation Guidelines 2016, International Federation of Red Cross and Red Crescent Societies, Geneva, 2016.
Kragh, Jr., J.F., et al., “Which improvised tourniquet windlasses work well and which ones won’t?” Wilderness & Environmental Medicine, Vol. 26, No. 3, September 2015, pp. 401–405.
Kragh, Jr., J.F., et al., “Survival with emergency tourniquet use to stop bleeding in major limb trauma”, Annals of Surgery, Vol. 249, No. 1, January 2009, pp. 1–7.
Kreinest, M., et al., “Development of a new emergency medicine spinal immobilization protocol for trauma patients and a test of applicability by German emergency care providers”, Scandinavian Journal of Trauma,
Resuscitation and Emergency Medicine, Vol. 24, No. 1, December 2016, p. 71.
Langer, V., “Management of major limb injuries”, The Scientific World Journal, 2014.
Lee, C., and Porter, K., “The prehospital management of pelvic fractures”, Emergency Medicine Journal, Vol. 24, No. 2, February 2007, pp. 130–133.
Lee, C., and Porter, K.M., “Prehospital management of lower limb fractures”, Emergency Medicine Journal, Vol. 22, No. 9, September 2005, pp. 660–663.
Leibovici, D., Gofrit, O.N., and Shapira, S.C., “Eardrum perforation in explosion survivors: is it a marker of pulmonary blast injury?”, Annals of Emergency
Medicine, Vol. 34, No. 2, August 1999, pp. 168–172.
Liao, A.Y., et al., “The infection risk of plastic wrap as an acute burns dressing”, Burns, Vol. 40, No. 3, May 2014, pp. 443–445.
Lumley, M.A., et al., “Pain and emotion: A biopsychosocial review of recent research”, Journal of Clinical Psychology, Vol. 67, No. 9, September 2011, pp. 942–968.

BIBLIOGRAPHY 145
Mallonee, S., et al., “Physical injuries and fatalities resulting from the Oklahoma City bombing”, JAMA, Vol. 276, No. 5, August 1996, pp. 382–387.
Markenson, D., et al., “Part 17: First aid: 2010 American Heart Association and American Red Cross guidelines for first aid”, Circulation, Vol. 122, No. 18 suppl. 3, November 2010, pp. S934–S946.
Mayo, A., and Kluger, Y., “Terrorist bombing”, World Journal of Emergency
Surgery, Vol. 1, November 2006, p. 33.
McGreevy, K., Bottros, M.M., and Raja, S.N., “Preventing chronic pain following acute pain: Risk factors, preventive strategies, and their efficacy”, European
Journal of Pain Supplements, Vol. 5, No. 2, November 2011, pp. 365–372.
Peleg, K., et al., “Patterns of injury in hospitalized terrorist victims”, The
American Journal of Emergency Medicine, Vol. 21, No. 4, July 2003, pp. 258–262.
Rosenfeld, J.V., Bell, R.S., and Armonda, R., “Current concepts in penetrating and blast injury to the central nervous system”, World Journal of Surgery, Vol. 39, No. 6, June 2015, pp. 1352–1362.
Royal College of Physicians and Surgeons of Glasgow, “The Glasgow structured approach to assessment of the Glasgow Coma Scale”, Glasgow Coma Scale, 2014: www.glasgowcomascale.org, accessed 9 April 2016.
Sasser, S.M., et al., “Blast lung injury”, Prehospital Emergency Care, Vol. 10, No. 2, 2006, pp. 165–172.
Shakur, H., et al., “Effects of tranexamic acid on death, vascular occlusive events, and blood transfusion in trauma patients with significant haemorrhage (CRASH-2): A randomised, placebo-controlled trial”, Lancet, Vol. 376, No. 9734, 3 July, 2010, pp. 23–32.
Sharma, L.R., Lal, V., and Simpson, I.D., "Snakes of medical significance in India: the first reported case of envenoming by the Levantine viper (Macrovipera lebetina)", Wilderness & Environmental Medicine, Vol. 19, No. 3, 2008, pp. 195–198.
Shuker, S.T., “Emergency treatment of blast, shell fragment and bullet injuries to the central midface complex”, Journal of Maxillofacial and Oral Surgery, Vol. 18, No. 1, 2019, pp. 124–130.
Stuhmiller, J.H., “Blast injury: Translating research into operational medicine”, in K.E. Friedl and W.R. Santee (eds), Military Quantitative Physiology: Problems
and Concepts in Military Operational Medicine, Office of the Surgeon General, Falls Church, Virginia, 2008, pp. 267–302.

146 BLAST TRAUMA CARE
Teasdale, G., and Jennett, B., “Assessment of coma and impaired consciousness: A practical scale”, The Lancet, Vol. 304, No. 7872, July 1974, pp. 81–84.
Theakston, R.D.G., et al., “Report of a WHO workshop on the standardization and control of antivenoms”, Wilderness & Environmental Medicine, Vol. 41, No. 5, April 2003, pp. 541–557.
Trimble, K., and Clasper, J., “Anti-personnel mine injury; mechanism and medical management”, Journal of the Royal Army Medical Corps, Vol. 147, No. 1, February 2001, pp. 73–79.
Watts, S., et al., “Closed chest compressions reduce survival in an animal model of haemorrhage-induced traumatic cardiac arrest”, Resuscitation, Vol. 140, July 2019, pp. 37–42.
Watts, S., et al., “Closed chest compressions reduce survival in a model of haemorrhage-induced traumatic cardiac arrest”, Emergency Medicine
Journal, Vol. 34, No. 12, 2017, pp. A866.
Wilson, M.H., “Monro-Kellie 2.0: The dynamic vascular and venous pathophysiological components of intracranial pressure”, Journal of Cerebral
Blood Flow & Metabolism, Vol. 36, No. 8, August 2016, pp. 1338–1350.
World Health Organization and International Committee of the Red Cross, Basic Emergency Care: Approach to the Acutely Ill and Injured, World Health Organization/International Committee of the Red Cross, Geneva, 2018.

BIBLIOGRAPHY 147
NOTES

148 BLAST TRAUMA CARE
APPENDICES
APPENDIX 1: EQUIPMENT LISTSPERSONAL FIRST-AID KITA first-aid kit should be assembled and used according to your knowledge and skills.
Under special conditions and with legal permission, certain drugs such as antibiotics or opioids may be added.
Prior to starting any activity in the field, the person in charge of the first-aid kit should check its contents.
CONTENTS QUANTITY NOTES
First-aid bag 1 The bag should be suitable for carrying during clearance operations, with two main pockets. The external pocket should contain the CAT tourniquet and gloves.
CAT tourniquet, black 1 One-handed application, for controlling immediately severe bleeding
Scissors 1 For cutting dressings
Guedel airway 1 For protecting the airway
Bandages 1 For dressing wounds
Gauze 2 squares For dressing wounds
Aluminium emergency blanket
1 For controlling body temperature
Tape 1 For dressing wounds
CPR mask 1 For respiratory resuscitation
ORS 1 Oral rehydration salt
Gloves 2 pairs For self-protection
Marker pen 1 For recording time of tourniquet application

APPENDICES 149
TRAUMA FIRST-AID KIT (ONE PER DEMINING TEAM / EXPLOSIVE ORDNANCE DISPOSAL TEAM)
CONTENTS QUANTITY CHARACTERISTICS
Ambu Mark IV resuscitator
1 For manual ventilation
Extrication collar 1 For immobilizing the cervical spine
Guedel airway 3 For protecting the airway
Aluminium emergency blanket
4 For controlling body temperature
Pen marker 1 For recording time of tourniquet application
Gloves 1 package For self-protection
Elastic bandages 10 For dressing wounds
Gauze compresses, 10 x 20 cm
20 For dressing wounds
CAT tourniquet, black 3 One-handed application, for controlling immediately severe bleeding
Scissors 1 For cutting dressings
Gauzes compresses, 10 x 10 cm
20 For dressing wounds
Rubbish bag 1 For collecting waste
Towels 2 For dressing wounds
Adhesive tape 3 For dressing wounds
Spinal board 1 For immobilization during transport
Thermometer 1 For measuring body temperature
Head light and batteries
1
Triangular bandages 3 For dressing wounds
Cardboard splint, upper extremities
2 For immobilizing fractures
Cardboard splint, lower extremities
2 For immobilizing fractures

150 BLAST TRAUMA CARE
APPENDIX 2: KETAMINE AND OPIOIDS
55 H. Husum, M. Gilbert and T. Wisborg, Save Lives, Save Limbs: Life Support for Victims of Mines, Wars, and Accidents, Third World Network, Penang, Malaysia, 2000.
56 Y. Filanovsky, P. Miller and J. Kao, “Myth: Ketamine Should Not Be Used as an Induction Agent for Intubation in Patients with Head Injury”, Canadian Journal of Emergency Medicine, Vol. 12, No. 2, March 2010, pp. 154–157.
Further information on ketamine and opioids is given below for those who have access to these drugs. The preferred administration route is intraven ous (IV), but sometimes it can be difficult to get rapid IV access. Doses may be given intranasally using a mucosal atomization device while IV access is being obtained. The mucosal atomization device is a nozzle you can attach to a syringe with the desired amount of medication and a bit of air (ideally no more than 0.3 ml of liquid per dose). Squirting this up a nostril gives rapid analgesia depending on the dose and medication used.
KETAMINEKetamine is a powerful and safe analgesic. It can be given IV, intramuscularly (IM), orally or intranasally. It does not affect the gag or swallow reflexes, so patients can protect their airways. It does not reduce breathing or cause vomit ing in analgesic doses. Also, ketamine is better for the circulatory sys-tem in trauma patients. It may increase salivation, especially in children. Some patients get hallucinations and vivid dreams but usually not enough to cause problems during transport.55 It is a good idea nevertheless to remove any weapons in advance to keep everyone safe (e.g. from an injured soldier or police officer). Traditionally, ketamine was avoided in cases of head injuries owing to fears that it increased intracranial pressure. This myth has been debunked, however, particularly regarding head injuries: overall the benefits to the circulatory system outweigh the small, transient rise in intracranial pressure.56
Give the first dose of ketamine and repeat when the patient starts to feel more pain. If salivation becomes a problem, 0.5 mg of atropine can be given IV to adults (for children, 0.02 mg/kg IV or IM). To counteract hallucinations, administer diazepam. One dose of 2.5 mg IV for an adult is enough, but care should be taken with repeated doses in someone who has lost a lot of blood.

APPENDICES 151
After five minutes a repeat dose of ketamine should be given until pain is controlled or the patient has nystagmus (rhythmic back-and-forth move-ment of the eyes).
OPIOIDSHistorically, the gold standard of analgesia has been morphine. Opioids may only be administered by trained personnel in monitored environments so that oversedation or respiratory depression can be detected and treated. Naloxone must be available anywhere opioids are used.57 It is also useful to have an anti-emetic available. Morphine is a potent analgesic, but it causes dilation of the blood vessels, so blood pressure can fall. Patients often experience nausea and vomiting, especially in bumpy ambulance rides to the hospital.
A practical way to administer opioids in a multiple-casualty event is orally with fentanyl lollipops, if available. The United States Department of Defense Committee on Tactical Combat Casualty Care has developed guidelines for prehospital care that cover pain management in the field. They recommend using an 800 µg lollipop of oral transmucosal fentanyl citrate (OTFC) for those who need a higher level of analgesia so long as they do not have any respiratory problems and are not at risk for shock (the same risks as for mor-phine). The patient may self-titrate, and it can be attached to their thumb or body for easy access. The Committee on Tactical Combat Casualty Care recommends ketamine for patients at risk of respiratory distress or shock.
Give naloxone to all unresponsive patients with a respiratory rate under eight breaths per minute:58
• For adults, use one ampoule (0.4 mg) diluted to 8 ml (0.05 mg/ml) and inject 1 ml IV incrementally until the patient responds.
• The contents of one ampoule (0.4 mg) may be repeated up to a maximum dose of 4 mg.
• After treatment, the patient must be observed closely, as the effects of naloxone are short-lived. Naloxone as an infusion (1–5 µg/kg per hour) is an alternative.
57 International Committee of the Red Cross, Anaesthesia Handbook, International Committee of the Red Cross, Geneva, 2018, p. 180.
58 International Committee of the Red Cross, Anaesthesia Handbook, International Committee of the Red Cross, Geneva, 2018, p. 180.

152 BLAST TRAUMA CARE
• For children under 12 years of age, the dose is 100 µg/kg, diluted to one-tenth concentration and administered incrementally. This can be repeated up to a maximum dose of 2 mg.
Before giving any pain relief like opioids or ketamine for moderate to severe pain, check the patient’s mental status using the AVPU scale (see Chapter 6, Initial assessment and management). Continue to monitor the airway, breathing and circulation closely.

APPENDICES 153
APPENDIX 3: GLASGOW COMA SCALESee www.glasgowcomascale.org for more information.

154 BLAST TRAUMA CARE
APPENDIX 4: CLASSIFYING SPINAL CORD INJURIESThe International Standards for Neurological Classification of Spinal Cord Injury Worksheet can be downloaded at asia-spinalinjury.org/information/downloads/.
REV
04/19
Page
1/2
This
form
may
be c
opied
free
ly bu
t sho
uld
not b
e alte
red
with
out p
erm
issio
n fro
m th
e Am
erica
n Sp
inal
Inju
ry A
ssoc
iatio
n.
NEUR
OLOG
ICAL
LE
VELS
as
on
reve
rse
1. S
ENSO
RY
2. M
OTOR
R
L
3. N
EURO
LOGI
CAL
LEVE
L OF
INJU
RY(N
LI)
4. CO
MPL
ETE
OR IN
COM
PLET
E?In
com
plete
= A
ny se
nsor
y or m
otor
func
tion
in S4
-5
5. AS
IA IM
PAIR
MEN
T SC
ALE
(AIS
)
(In in
jurie
s with
abse
nt m
otor
OR
sens
ory f
unct
ion
in S
4-5 o
nly)
6. ZO
NE O
F PA
RTIA
LPR
ESER
VATI
ONMo
st ca
udal
levels
with
any i
nner
vatio
n
SENS
ORY
MOT
OR
R
L
MO
TOR
SU
BSC
OR
ES
SEN
SORY
SU
BSC
OR
ES
UER
+UEL
= UEM
S TO
TAL
LER
+ LEL
= LEM
S TO
TAL
PPR
+ PPL
= PP
TOTA
LLT
R+ L
TL= L
T TO
TAL
MAX
(25)
(25)
(50)
(25)
(25)
(50)
(56)
(56)
(112)
MAX
MAX
(56)
(56)
(112)
MAX
(50)
(56)
(56)
RIGH
T TO
TALS
(MA
XIMU
M)(5
6)(5
6)(5
0)LE
FT T
OTAL
S(M
AXIM
UM)
(VAC
) Vol
unta
ry A
nal C
ontra
ctio
n (Y
es/N
o)(D
AP) D
eep A
nal P
ress
ure
(Yes
/No)
C5 C6 C7 C8 T1
C5 C6 C7 C8 T1
L2 L3 L4 L5 S1
L2 L3 L4 L5 S1
C2 C3 C4 S2 S3 S4-5
T2 T3 T4 T5 T6 T7 T8 T9 T10
T11
T12
L1
C2 C3 C4 S2 S3S4
-5T2 T3 T4 T5 T6 T7 T8 T9 T10
T11
T12 L1
RIGH
TLE
FT
UER
(Upp
er E
xtre
mity
Rig
ht)
LER
(Low
er E
xtre
mity
Rig
ht)
UEL
(Upp
er E
xtre
mity
Lef
t)
LEL
(Low
er E
xtre
mity
Lef
t)
Wris
t exte
nsor
sEl
bow
exte
nsor
s
Knee
exte
nsor
s
Long
toe
exte
nsor
s
Wris
t exte
nsor
sEl
bow
exte
nsor
s
Knee
exte
nsor
s
Long
toe
exte
nsor
s
Pin
Prick
(PPR
)Lig
ht To
uch (
LTR)
Pin Pr
ick (P
PL)
Light
Touc
h (LT
L)
SENS
ORY
KEY
SENS
ORY
POIN
TSSE
NSOR
YKE
Y SE
NSOR
Y PO
INTS
MOT
ORKE
Y M
USCL
ESM
OTOR
KEY
MUS
CLES
0 = A
bsen
t1
= Alte
red
2 =
Norm
al
NT =
Not
testa
ble0*
, 1*,
NT* =
Non
-SCI
cond
ition
pres
ent
SENS
ORY
(SCO
RING
ON
REVE
RSE
SIDE
)
0 =
Tota
l par
alysis
1 =
Palp
able
or vi
sible
cont
racti
on 2
= A
ctive
mov
emen
t, gr
avity
elim
inate
d 3
= A
ctive
mov
emen
t, ag
ainst
grav
ity4
= Acti
ve m
ovem
ent,
again
st so
me
resis
tanc
e 5
= Acti
ve m
ovem
ent,
again
st fu
ll res
istan
ceNT
= N
ot te
stable
0*
, 1*,
2*, 3
*, 4*
, NT*
= N
on-S
CI co
nditio
n pr
esen
t
MOTO
R(S
CORI
NG O
N RE
VERS
E SI
DE)
Comm
ents
(Non
-key M
uscle
? Rea
son f
or NT
? Pain
?No
n-SCI
cond
ition?
):
CLAS
SIFIC
ATIO
N OF
SPI
NAL C
ORD
INJU
RY(IS
NCSC
I)
Patie
nt Na
meDa
te/Tim
e of E
xam
Exam
iner N
ame
Sign
ature
INTE
RNAT
IONA
L STA
NDAR
DS FO
R NE
UROL
OGIC
AL
C2
C3 C
4
C6
T1
C5
L1 L2 L3
L4
L5
Pal
m
Key
Sen
sory
Poi
nts
S4-
5
S3
S2 S
1L5
L 4L 3L 2
C2
C3
C4 T3
T2
T4 T5 T6 T7 T8 T9 T10
T11
T12
C8 C7
C6
Dor
sum

APPENDICES 155
Page
2/2
A = C
ompl
ete.
No se
nsor
y or m
otor f
uncti
on is
pres
erve
d in
the sa
cral s
egme
nts S
4-5.
B = S
enso
ry In
com
plet
e. Se
nsor
y but
not m
otor f
uncti
on
is pr
eser
ved b
elow
the ne
urolo
gical
level
and i
nclud
es th
e sa
cral s
egme
nts S
4-5 (
light
touch
or pi
n pric
k at S
4-5 o
r de
ep an
al pr
essu
re) A
ND no
moto
r fun
ction
is pr
eser
ved
more
than
thre
e lev
els be
low th
e moto
r leve
l on e
ither
side
of
the bo
dy.
C = M
otor
Inco
mpl
ete.
Motor
func
tion i
s pre
serve
d at th
e mo
st ca
udal
sacra
l seg
ments
for v
olunta
ry an
al co
ntrac
tion
(VAC
) OR
the pa
tient
meets
the c
riteria
for s
enso
ry inc
omple
te sta
tus (s
enso
ry fun
ction
pres
erve
d at th
e mos
t ca
udal
sacra
l seg
ments
S4-
5 by L
T, PP
or D
AP),
and h
as
some
spar
ing of
moto
r fun
ction
mor
e tha
n thr
ee le
vels
below
the
ipsil
atera
l moto
r leve
l on e
ither
side
of th
e bod
y.(T
his in
clude
s key
or no
n-ke
y mus
cle fu
nctio
ns to
deter
mine
mo
tor in
comp
lete s
tatus
.) Fo
r AIS
C –
less t
han h
alf of
key
musc
le fun
ction
s belo
w the
sing
le NL
I hav
e a m
uscle
grad
e ≥ 3.
D = M
otor
Inco
mpl
ete.
Motor
inco
mplet
e stat
us as
de
fined
abov
e, wi
th at
least
half (
half o
r mor
e) of
key m
uscle
fun
ction
s belo
w the
sing
le NL
I hav
ing a
musc
le gr
ade ≥
3.
E = N
orm
al. If
sens
ation
and m
otor f
uncti
on as
teste
d with
the
ISNC
SCI a
re gr
aded
as no
rmal
in all
segm
ents,
and t
he
patie
nt ha
d prio
r defi
cits,
then t
he A
IS gr
ade i
s E. S
omeo
ne
witho
ut an
initia
l SCI
does
not r
eceiv
e an A
IS gr
ade.
Usin
g ND
: To d
ocum
ent th
e sen
sory,
moto
r and
NLI
levels
, the
ASI
A Im
pairm
ent S
cale
grad
e, an
d/or t
he zo
ne of
partia
l pr
eser
vatio
n (ZP
P) w
hen t
hey a
re un
able
to be
deter
mine
d ba
sed o
n the
exam
inatio
n res
ults.
ASIA
Impa
irmen
t Sca
le (A
IS)
Step
s in
Clas
sifica
tion
Musc
le Fu
nctio
n Gr
adin
g
Sens
ory G
radi
ng
Whe
n to
Test
Non
-Key
Mus
cles:
0 = To
tal pa
ralys
is1 =
Palp
able
or vi
sible
contr
actio
n2 =
Acti
ve m
ovem
ent, f
ull ra
nge o
f moti
on (R
OM) w
ith gr
avity
elim
inated
3 = A
ctive
mov
emen
t, full
ROM
again
st gr
avity
4 = A
ctive
mov
emen
t, full
ROM
again
st gr
avity
and m
oder
ate re
sistan
ce in
a mu
scle
spec
ific po
sition
5 = (N
orma
l) acti
ve m
ovem
ent, f
ull R
OM ag
ainst
grav
ity an
d full
resis
tance
in a
functi
onal
musc
le po
sition
expe
cted f
rom
an ot
herw
ise un
impa
ired p
erso
nNT
= No
t testa
ble (i.
e. du
e to i
mmob
ilizati
on, s
ever
e pain
such
that
the pa
tient
cann
ot be
grad
ed, a
mputa
tion o
f limb
, or c
ontra
cture
of >
50%
of th
e nor
mal R
OM)
0*, 1
*, 2*
, 3*,
4*, N
T* =
Non
-SCI
cond
ition p
rese
nt a
0 = A
bsen
t 1
= Alte
red,
eithe
r dec
reas
ed/im
paire
d sen
satio
n or h
yper
sens
itivity
2 = N
orma
l N
T =
Not te
stable
0*
, 1*,
NT* =
Non
-SCI
cond
ition p
rese
nt a
In a
patie
nt wi
th an
app
aren
t AIS
B cl
assifi
catio
n, no
n-ke
y mus
cle fu
nctio
ns
more
than
3 le
vels
below
the
motor
leve
l on
each
side
sho
uld b
e tes
ted to
mo
st ac
cura
tely c
lassif
y the
injur
y (dif
feren
tiate
betw
een A
IS B
and C
).
The f
ollow
ing or
der is
reco
mmen
ded f
or de
termi
ning t
he cl
assifi
catio
n of
indivi
duals
with
SCI
.
INTE
RNAT
IONA
L STA
NDAR
DS FO
R NE
UROL
OGIC
AL
CLAS
SIFIC
ATIO
N OF
SPI
NAL C
ORD
INJU
RY
Move
men
tSh
ould
er: F
lexion
, exte
nsion
, adb
uctio
n, ad
ducti
on,
inter
nal a
nd ex
terna
l rotat
ionEl
bow:
Sup
inatio
n
Elbo
w: P
rona
tion
Wris
t: Fle
xion
Fing
er: F
lexion
at pr
oxim
al joi
nt, ex
tensio
nTh
umb:
Flex
ion, e
xtens
ion an
d abd
uctio
n in p
lane o
f thum
b
Fing
er: F
lexion
at M
CP jo
intTh
umb:
Opp
ositio
n, ad
ducti
on an
d abd
uctio
npe
rpen
dicula
r to p
alm
Fing
er: A
bduc
tion o
f the i
ndex
finge
r
Hip:
Add
uctio
n
Hip:
Exte
rnal
rotat
ion
Hallu
x and
Toe:
DIP
and P
IP fle
xion a
nd ab
ducti
on
Hallu
x: A
dduc
tion
Hip:
Exte
nsion
, abd
uctio
n, int
erna
l rotat
ionKn
ee: F
lexion
Ankle
: Inv
ersio
n and
ever
sion
Toe:
MP
and I
P ex
tensio
n
Root
leve
l
C5 C6 C7 C8 T1 L2 L3 L4 L5 S1
4. De
term
ine w
heth
er th
e inj
ury i
s Com
plet
e or I
ncom
plet
e.(i.e
. abs
ence
or pr
esen
ce of
sacra
l spa
ring)
If v
olunta
ry an
al co
ntrac
tion =
No A
ND al
l S4-
5 sen
sory
scor
es =
0
AND
deep
anal
pres
sure
= N
o, th
en in
jury i
s Com
plet
e. Ot
herw
ise, in
jury i
s Inc
ompl
ete.
6. De
term
ine t
he zo
ne o
f par
tial p
rese
rvat
ion
(ZPP
).Th
e ZPP
is us
ed on
ly in
injur
ies w
ith ab
sent
motor
(no V
AC) O
R se
nsor
y fun
ction
(no D
AP, n
o LT
and n
o PP
sens
ation
) in th
e low
est s
acra
l seg
ments
S4
-5, a
nd re
fers t
o tho
se de
rmato
mes a
nd m
yotom
es ca
udal
to the
sens
ory
and m
otor le
vels
that r
emain
partia
lly in
nerva
ted. W
ith sa
cral s
parin
g of
sens
ory f
uncti
on, th
e sen
sory
ZPP
is no
t app
licab
le an
d the
refor
e “NA
” is
reco
rded
in th
e bloc
k of th
e wor
kshe
et. A
ccor
dingly
, if V
AC is
pres
ent, t
he
motor
ZPP
is no
t app
licab
le an
d is n
oted a
s “NA
”.
3. De
term
ine t
he n
euro
logi
cal le
vel o
f inj
ury (
NLI).
This
refer
s to t
he m
ost c
auda
l seg
ment
of the
cord
with
intac
t sen
satio
n and
an
tigra
vity (
3 or m
ore)
mus
cle fu
nctio
n stre
ngth,
prov
ided t
hat th
ere i
s nor
mal
(intac
t) se
nsor
y and
moto
r fun
ction
rostr
ally r
espe
ctive
ly.Th
e NLI
is the
mos
t cep
halad
of th
e sen
sory
and m
otor le
vels
deter
mine
d in
steps
1 an
d 2.
2. De
term
ine m
otor
leve
ls fo
r rig
ht an
d lef
t sid
es.
Defin
ed by
the l
owes
t key
mus
cle fu
nctio
n tha
t has
a gr
ade o
f at le
ast 3
(on
supin
e tes
ting)
, pro
viding
the k
ey m
uscle
func
tions
repr
esen
ted by
segm
ents
abov
e tha
t leve
l are
judg
ed to
be in
tact (
grad
ed as
a 5)
.No
te: in
regio
ns w
here
ther
e is n
o myo
tome t
o tes
t, the
moto
r leve
l is
pres
umed
to be
the s
ame a
s the
sens
ory l
evel,
if tes
table
motor
func
tion
abov
e tha
t leve
l is al
so no
rmal.
1. De
term
ine s
enso
ry le
vels
for r
ight
and
left s
ides
.Th
e sen
sory
level
is the
mos
t cau
dal, i
ntact
derm
atome
for b
oth pi
n pric
k an
d ligh
t touc
h sen
satio
n.
a Note:
Abn
orma
l moto
r and
sens
ory s
core
s sho
uld be
tagg
ed w
ith a
‘*’ to
indica
te an
im
pairm
ent d
ue to
a no
n-SC
I con
dition
. The
non-
SCI c
ondit
ion sh
ould
be ex
plaine
d in
the co
mmen
ts bo
x tog
ether
with
infor
matio
n abo
ut ho
w the
scor
e is r
ated f
or
class
ificati
on pu
rpos
es (a
t leas
t nor
mal /
not n
orma
l for c
lassifi
catio
n).
5. De
term
ine A
SIA
Impa
irmen
t Sca
le (A
IS) G
rade
.Is
inju
ry C
ompl
ete?
If Y
ES, A
IS=A
Is in
jury
Mot
or C
ompl
ete?
If Y
ES, A
IS=B
Are a
t lea
st h
alf (h
alf o
r mor
e) o
f the
key m
uscle
s belo
w th
e ne
urol
ogica
l leve
l of i
njur
y gra
ded
3 or b
ette
r?
If se
nsat
ion
and
mot
or fu
nctio
n is
norm
al in
all s
egm
ents
, AIS
=ENo
te: A
IS E
is us
ed in
follo
w-up
testi
ng w
hen a
n ind
ividu
al wi
th a d
ocum
ented
SC
I has
reco
vere
d nor
mal fu
nctio
n. If a
t initia
l testi
ng no
defic
its ar
e fou
nd, th
e ind
ividu
al is
neur
ologic
ally i
ntact
and t
he A
SIA
Impa
irmen
t Sca
le do
es no
t app
ly.
(No=
volun
tary a
nal c
ontra
ction
OR
motor
fun
ction
mor
e tha
n thr
ee le
vels
below
the m
otor
level
on a
given
side
, if th
e pati
ent h
as se
nsor
y inc
omple
te cla
ssific
ation
)

156 BLAST TRAUMA CARE
APPENDIX 5: IMMOBILIZATION SKILLS
59 World Health Organization and International Committee of the Red Cross, Basic Emergency Care: Approach to the Acutely Ill and Injured, World Health Organization/International Committee of the Red Cross, Geneva, 2018.
The following appendix is reproduced from Basic Emergency Care: Approach to the
Acutely Ill and Injured by the World Health Organization and the International Committee of the Red Cross.59
There are two types of spinal immobilization: cervical spine and thoracic/lumbar spine. Together, these are called full spine immobilization. Immobilization stabilizes the bones to avoid further injury to the spine. Provide spinal immobilization to any person with multiple traumatic injuries who is unconscious, or who is conscious and has neck pain, spine tenderness, numbness or weakness. Remember, immobilized patients cannot move normally and are at a higher risk of airway blockage (by secretions or vomit) and pressure-sore development. Monitor them closely.
IMMOBILIZING THE CERVICAL SPINETo immobilize the cervical spine:
• keep the patient flat on their back and face up on a level surface such as a bed.
• tell the patient what you are doing.
• hold the patient’s head in line with their spine with two hands on either side of the head.
• prevent the patient’s neck from moving with locally available materials (towel rolls, newspaper, sandbags or bags of IV fluids) or a cervical collar if available. These can be secured to the head with tape (plaster) but should never be secured to the bed. (If the patient vomits, you will not be able to turn them, and if the patient falls the tape/plaster could cause a cervical spine injury.)
• if the patient vomits, use the log-roll technique (see below) to turn the whole patient onto their side, keeping the head in line with the body.
• keep someone with the patient at all times to watch the airway.
• remember, a patient who has severe pain or injury elsewhere may not be able to feel neck pain even if there is a fracture. For mechanisms of injury such as being thrown by a blast wind, always suspect cervical spine injury.

APPENDICES 157
PERFORMING A LOG ROLLTo move any immobilized patient or anyone with a suspected spine injury (e.g. if the patient has to vomit or needs to be transferred), use the log-roll technique (see figure below):
• Ask for assistance. Ideally, have one person at the head to hold the neck, one or two people to hold the body and one person to hold the legs.
• The person at the head must keep the head, neck and torso aligned with the rest of the spine. They should place their forearms tightly alongside the patient’s head with hands gripping the patient’s shoulders to keep the head and neck in line with the rest of the spine. Keep this alignment when turning the patient.
• The person controlling the head and neck leads the team and will say, “One, two, three, roll”, to guide everyone’s timing of the roll.
• Working together, roll the patient onto their side, keeping the spine in line.
• During the roll, the person holding the head and neck must ensure the cervical spine remains aligned with the rest of the spine. The people rolling the body should also ensure that the rest of the spine stays in as straight a line as possible.
• When the patient is turned onto one side, someone can examine their back, place or remove a backboard and/or manage back wounds, as needed.
• To lay the patient flat again, the person controlling the head and neck again uses the “one, two, three, roll” command to ensure coordinated movement.
• Always remove a backboard as soon as possible using the log-roll technique. Time on a backboard increases the risk of pressure sores. Check pressure areas frequently using the log roll.
Fran
cis
Mac
ard
�g 23 b
chapter 11
Performing a log roll

158 BLAST TRAUMA CARE
APPLYING FULL SPINAL IMMOBILIZATIONTo immobilize the thoracic and lumbar spine (see previous section for cervical spine immobilization):
• immobilize the cervical spine as in previous section.
• keep the person on a flat surface with instructions to lie flat and not to move.
• for transport, log-roll the patient onto a flat surface (such as a backboard) to prevent movement of the spine. Do not attach the backboard to the bed, as you will be unable to log-roll the patient if needed (see above).
• before immobilizing the patient, be sure there is no glass or debris on or under the patient’s back. Use the log-roll technique to check. Immobilized patients must be checked regularly to avoid wounds at pressure points.
• if the person needs to vomit, use the log-roll technique to roll the person to one side so that no vomit enters the airway.
• spine boards should only be used to move patients. Leaving patients on spine boards for long periods of time can cause pressure sores. Remove patients from boards as soon as they arrive at the facility and can be laid flat.
Fran
cis
Mac
ard
Spinal immobilization for moving a patient
HOW TO POSITION PREGNANT PATIENTSIf a patient is over 20 weeks pregnant and needs spinal immobilization, immobilize the spine as above. Then place padding under the side of the board near the back and hips to tilt the patient onto her left side (about 30°). This helps to prevent compression of the large internal blood vessels by the pregnant uterus, which could decrease blood returning to the heart.

APPENDICES 159
NOTES


4500
/002
11
.202
0
Cove
r ph
oto:
Ill
ustr
atio
n b
y Fr
anci
s M
acar
d
facebook.com/icrc
twitter.com/icrc
instagram.com/icrc
International Committee of the Red Cross19 avenue de la Paix1202 Geneva, SwitzerlandT +41 22 734 60 01shop.icrc.org© ICRC, November 2020
The ICRC helps people around the world affected by armed conflict and other violence, doing everything it can to protect their lives and dignity and to relieve their suffering, often with its Red Cross and Red Crescent partners. The organization also seeks to prevent hardship by promoting and strengthening humanitarian law and championing universal humanitarian principles.
People know they can count on the ICRC to carry out a range of life-saving activities in conflict zones and to work closely with the communities there to understand and meet their needs. The organization’s experience and expertise enables it to respond quickly and effectively, without taking sides.