Basing Your Miniatures (the basics)
16
By Realm of Warhammer 40k www.row40k.blogspot.co.uk Basing Your Miniatures (the basics) The other day I mentioned at the end of the ' Strike Squad II' post, that I was going to do a little tutorial on how I based my miniatures, so as promised here it is. The process is very simple and the end results are often quite effective, I also think it gives completion to the model and looks great on the gaming table when your entire army are all based the same. Below are the basic steps I follow for achieving the above result. Texture
-
Upload
khangminh22 -
Category
Documents
-
view
3 -
download
0
Transcript of Basing Your Miniatures (the basics)

By Realm of Warhammer 40k www.row40k.blogspot.co.uk
Basing Your Miniatures (the basics)
The other day I mentioned at the end of the 'Strike Squad II' post, that I was going to do a little tutorial on how I based my miniatures, so as promised here it is. The process is very simple and the end results are often quite effective, I also think it gives completion to the model and looks great on the gaming table when your entire army are all based the same. Below are the basic steps I follow for achieving the above result.
Texture
By Realm of Warhammer 40k www.row40k.blogspot.co.uk
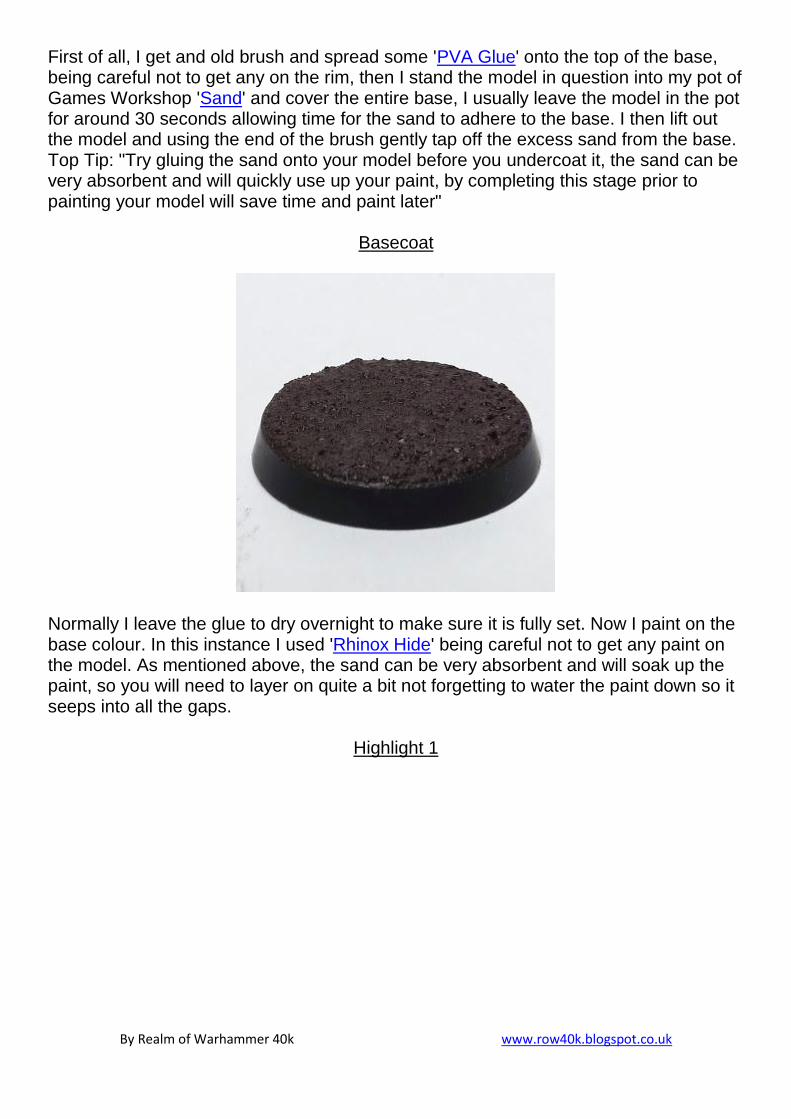
First of all, I get and old brush and spread some 'PVA Glue' onto the top of the base, being careful not to get any on the rim, then I stand the model in question into my pot of Games Workshop 'Sand' and cover the entire base, I usually leave the model in the pot for around 30 seconds allowing time for the sand to adhere to the base. I then lift out the model and using the end of the brush gently tap off the excess sand from the base. Top Tip: "Try gluing the sand onto your model before you undercoat it, the sand can be very absorbent and will quickly use up your paint, by completing this stage prior to painting your model will save time and paint later"
Basecoat
Normally I leave the glue to dry overnight to make sure it is fully set. Now I paint on the base colour. In this instance I used 'Rhinox Hide' being careful not to get any paint on the model. As mentioned above, the sand can be very absorbent and will soak up the paint, so you will need to layer on quite a bit not forgetting to water the paint down so it seeps into all the gaps.
Highlight 1

By Realm of Warhammer 40k www.row40k.blogspot.co.uk
Once dry, I overbrush my first layer making sure I don't overload the brush too much, as I want to keep some of the base colour visible. For this I used 'Steel Legion Drab'.
Highlight 2
Again waiting for the paint to dry, I proceed to Drybrush on a second layer, this time using 'Ushabti Bone'.
Rim

By Realm of Warhammer 40k www.row40k.blogspot.co.uk
When dry which does not take long, I carefully paint around the rim of the base using Steel Legion Drab again. This tidies up the base and gives it that finished feel. I also usually apply two watered down layers. And that's it, you’re done! You now have a based model worthy of any table top gaming.
Scatter
Going a step further, I have added some static grass to my models to give them that little extra detail. This is really easy to do and takes just minutes.
By Realm of Warhammer 40k www.row40k.blogspot.co.uk
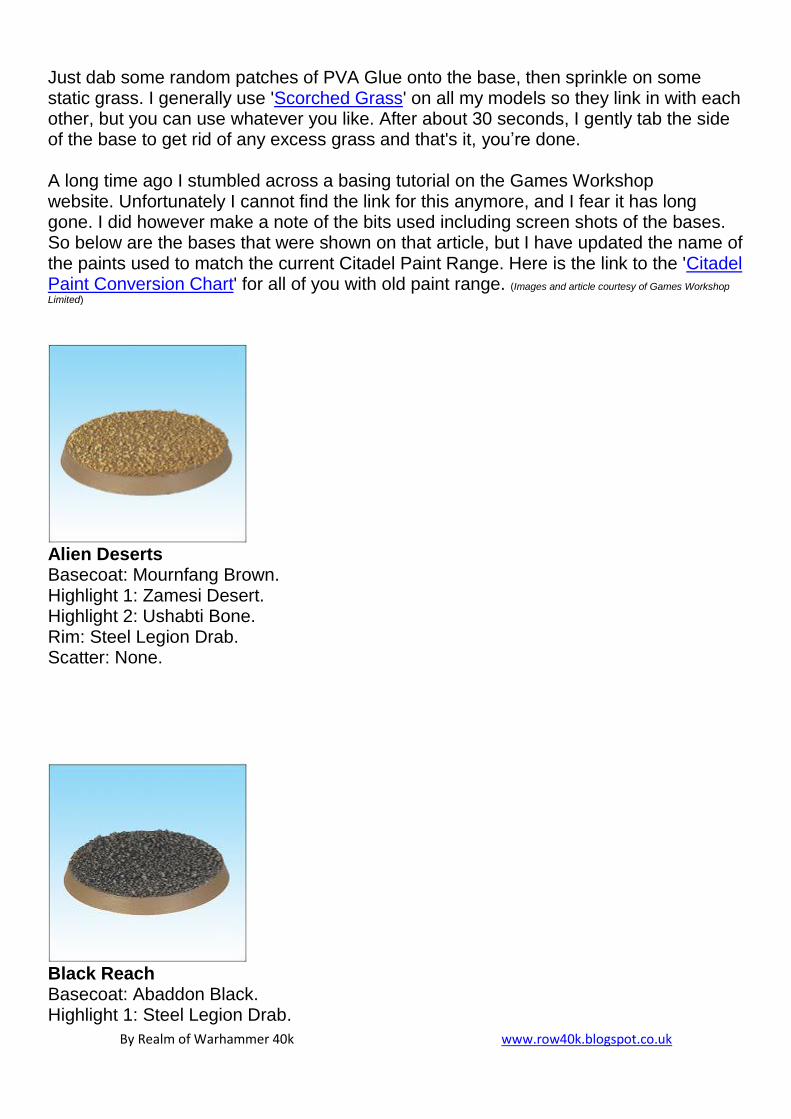
Just dab some random patches of PVA Glue onto the base, then sprinkle on some static grass. I generally use 'Scorched Grass' on all my models so they link in with each other, but you can use whatever you like. After about 30 seconds, I gently tab the side of the base to get rid of any excess grass and that's it, you’re done. A long time ago I stumbled across a basing tutorial on the Games Workshop website. Unfortunately I cannot find the link for this anymore, and I fear it has long gone. I did however make a note of the bits used including screen shots of the bases. So below are the bases that were shown on that article, but I have updated the name of the paints used to match the current Citadel Paint Range. Here is the link to the 'Citadel Paint Conversion Chart' for all of you with old paint range. (Images and article courtesy of Games Workshop
Limited)
Alien Deserts
Basecoat: Mournfang Brown. Highlight 1: Zamesi Desert. Highlight 2: Ushabti Bone. Rim: Steel Legion Drab. Scatter: None.
Black Reach Basecoat: Abaddon Black. Highlight 1: Steel Legion Drab.

By Realm of Warhammer 40k www.row40k.blogspot.co.uk
Highlight 2: Administratum Grey. Rim: Steel Legion Drab. Scatter: None.
Warptainted Lands Basecoat: Abaddon Black. Highlight 1: Dawnstone. Highlight 2: Ushabti Bone. Rim: Steel Legion Drab. Scatter: None.
Cities of Death Basecoat: Dawnstone. Wash: Badab Black. Highlight: Administratum Grey. Rim: Steel Legion Drab . Scatter: None.

By Realm of Warhammer 40k www.row40k.blogspot.co.uk
Wasteland Basecoat: Stormvermin Fur. Highlight 1: Dawnstone. Highlight 2: Ushabti Bone. Rim: Abaddon Black. Scatter: Dead Grass.
Mars Basecoat: Abaddon Black. Highlight 1: Khorne Red. Highlight 2: Mephiston Red. Rim: Abaddon Black. Scatter: None.

By Realm of Warhammer 40k www.row40k.blogspot.co.uk
Tombworld Basecoat: Abaddon Black. Highlight 1: Dawnstone. Highlight 2: Administratum Grey. Rim: Abaddon Black. Scatter: None.
Mudland Basecoat: Mournfang Brown. Highlight: Ushabti Bone. Rim: Mournfang Brown. Scatter: Static Grass.

By Realm of Warhammer 40k www.row40k.blogspot.co.uk
Light Desert Basecoat: Zamesi Desert. Highlight 1: Ushabti Bone. Highlight 2: White Scar. Rim: Abaddon Black. Scatter: None.
Ash Wastes Basecoat: Doombull Brown. Highlight 1: Dawnstone. Highlight 2: Nurgling Green. Highlight 3: Administratum Grey. Rim: Abaddon Black. Scatter: None.

By Realm of Warhammer 40k www.row40k.blogspot.co.uk
Doooooomed World Basecoat: Mechanicus Standard Grey. Highlight 1: Baneblade Brown. Highlight 2: Ushabti Bone. Rim: Steel Legion Drab. Scatter: None.
Blasted Plain Basecoat: Stormvermin Fur. Wash: Nuln oil. Highlight 1: Mournefang Brown. Highlight 2: Baneblade Brown. Highlight 3: Ushabti Bone. Rim: Steel Legion Drab. Scatter: Static Grass and Glade Grass.
By Realm of Warhammer 40k www.row40k.blogspot.co.uk
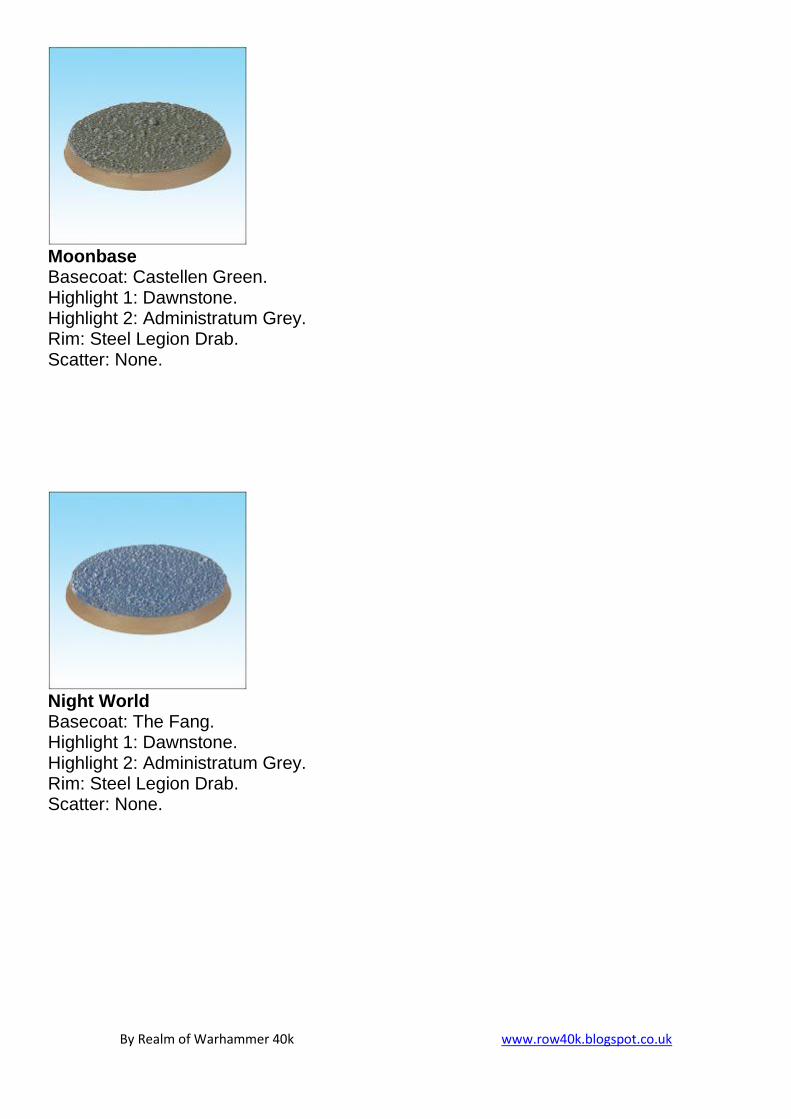
Moonbase Basecoat: Castellen Green. Highlight 1: Dawnstone. Highlight 2: Administratum Grey. Rim: Steel Legion Drab. Scatter: None.
Night World Basecoat: The Fang. Highlight 1: Dawnstone. Highlight 2: Administratum Grey. Rim: Steel Legion Drab. Scatter: None.

By Realm of Warhammer 40k www.row40k.blogspot.co.uk
Ice World Basecoat: White Scar. Wash 1: wash with Lothern Blue. Wash 2: wash with Sotek Green. Highlight: White Scar. Rim: Administratum Grey. Scatter: None.
Scorched Ground Basecoat: Rhinox Hide. Highlight 1: Steel Legion Drab. Highlight 2: Ushabti Bone. Rim: Steel Legion Drab. Scatter: Scorched Grass.

By Realm of Warhammer 40k www.row40k.blogspot.co.uk
Exodite World Basecoat: Caliban Green. Highlight 1: Loren Forest. Highlight 2: Deathworld Forest. Rim: Abaddon Black. Scatter: None.
Alien Tundra Basecoat: Abaddon Black. Highlight 1: Baneblade Brown. Highlight 2: Ushabti Bone. Rim: Steel Legion Drab. Scatter: None.

By Realm of Warhammer 40k www.row40k.blogspot.co.uk
Burnt-Out Waste Basecoat: wash with a 50/50 mix of Abaddon Black and Rhinox Hide. Highlight 1: Mournfang Brown. Highlight 2: Balor Brown. Rim: Rhinox Hide. Scatter: Burnt Grass.
Catachan Basecoat: Steel Legion Drab. Highlight 1: Tau Light Ochre. Highlight 2: Ushabti Bone. Rim: Steel Legion Drab. Scatter: Static Grass, Glade Grass and Citadel Jungle Foliage. (Citadel Jungle Foliage no longer available
from Games Workshop Limited)
By Realm of Warhammer 40k www.row40k.blogspot.co.uk
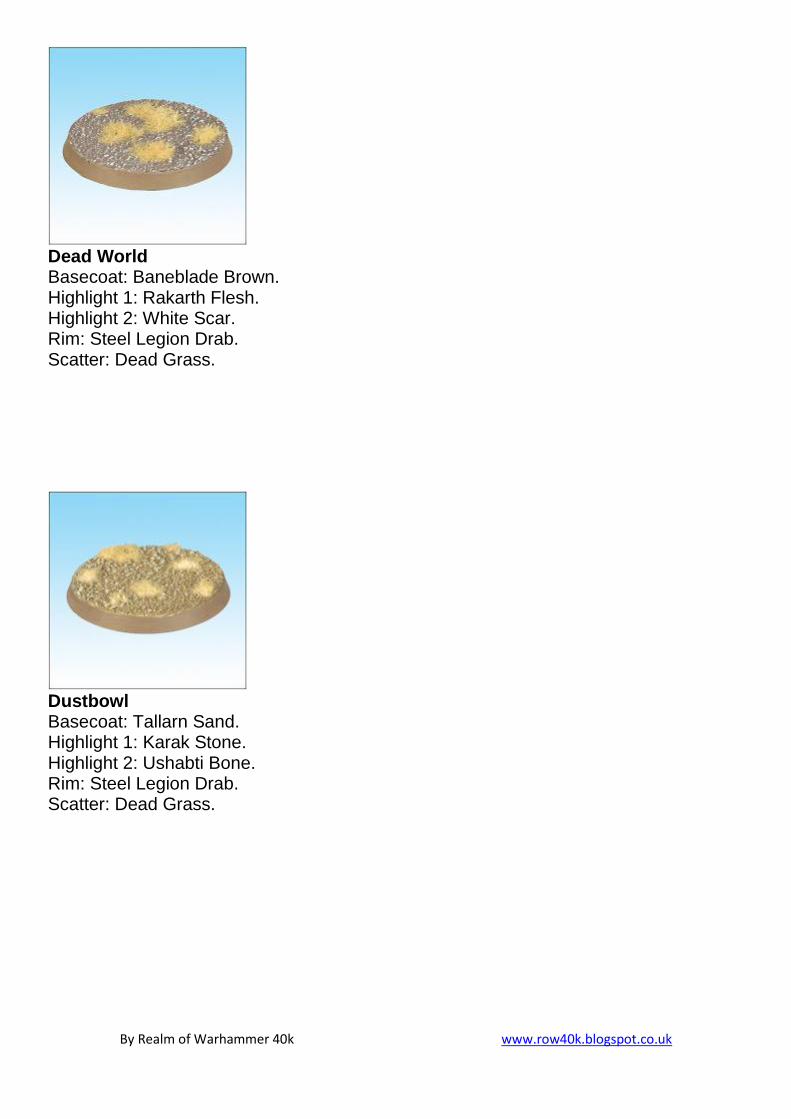
Dead World Basecoat: Baneblade Brown. Highlight 1: Rakarth Flesh. Highlight 2: White Scar. Rim: Steel Legion Drab. Scatter: Dead Grass.
Dustbowl Basecoat: Tallarn Sand. Highlight 1: Karak Stone. Highlight 2: Ushabti Bone. Rim: Steel Legion Drab. Scatter: Dead Grass.

By Realm of Warhammer 40k www.row40k.blogspot.co.uk
Underhive Basecoat: 50/50 mix of Dawnstone and Abaddon Black. Wash: Patches of Mournfang Brown. Highlight 1: Dawnstone. Highlight 2: Administratum Grey. Rim: 50/50 mix of Dawnstone and Abaddon Black. Scatter: None.
The Sump Basecoat: 50/50 mix of Mournfang Brown and Dawnstone. Wash: Patches of Castallen Green. Highlight 1: Zamesi Desert. Highlight 2: Ushabti Bone. Rim: Steel Legion Drab. Scatter: None. Well that's it, have fun basing your models. And why not Email me pics of your basing ideas and I will collate them all together and put them out on a post. Just head over to the 'Contact' page. ~ Life is a Prison, Death a Release ~