Basic IV Arm - Kyoto Kagaku
12
Contents Instruction Manual M50D / M50E Introduction /DOs and DON’Ts Before you start After training P.1 P.2 P.3-P.5 P.6-P.7 ● ● Preparation ● ● Replacement of injection pad P.8 ● Set includes Manufacturer s note ’ Basic IV Arm Caution Do not mark on the model with a pen or leave printed materials in contact with the model surface. Ink marks on the model are not removable.
-
Upload
khangminh22 -
Category
Documents
-
view
4 -
download
0
Transcript of Basic IV Arm - Kyoto Kagaku

Contents
InstructionManual
M50D / M50E
Introduction /DOs and DON’Ts
Before you start
After training
P.1
P.2
P.3-P.5
P.6-P.7
●
●
Preparation●
●
Replacement of injection pad P.8●
Set includes
Manufacturer s note’
Basic IV Arm
Caution Do not mark on the model with a pen or leave printed materials in contact with the model surface. Ink marks on the model are not removable.


1
Introduction
Features●
DOs DON’Ts
DOs and DON’Ts
Manufacturer s note’
- Life-like vein and realistic needle tip feeling.
- Injection pad is easily repleceable and durable.
- No needle marks remain.
- Hemorrhage can be stopped by compressing with the �nger.
- Adhesive tape sticks well to the arm and can be easily removed.
- Arm and integrated support stand allows for quick and easy set up.- Compact, light weight and portable
The Intravenous Arm is realistic with �ne details, inexpensive and durable, making it perfect for a large number of trainees to practice basic skills required for their courses. There are four New Intravenous Arms included in the set. Light weight and portable, these arms are easy to set up for trainees to practice on.
Don’t mark on the simulator with pen or leave any printed materials in contact with their surface. Ink marks cannot be wiped out.
The materials for the models are special compositions of soft and hard resin.
Please handle them with the utmost care at all times. Store the training set at room temperature, away from heat, moisture and direct sunlight.
Never wipe the simulator with thinner or organic solvent.

a.b.c.d.
2
e.
a
b
c
d
e
Set Includes
Before your first use, ensure that you have all components listed below.
Before You Start Set includes
Arm model with support stand
Simulated blood
Carrying bag (M50D only)
Instruction manual
1
11
111
Simulator contents〉
Injection pad
Syringe
Bottle for simulated blood
〈

3
1. Pour approx 200mL of water into the bottle. Scoop red blood powder to the tip of the small spoon provided in the set and stir the water sufficiently to prepare the simulated blood.
1
Preparation Preparation the simulated blood
Preparation the simulated blood
Prepare the simulated blood.
Take care not to drop simulated blood on clothes, as simulated blood stains can be very di�cult to remove.
Caution
2 Connection of the tube
Connection of the tube
1. Connect the tubes from the pad and from the bottle.
Injection pads are set on the arm model body when delivered. Two tubes, which are connected to the pad, come out from the shoulder side of the arm model.
Please note that the connector ends for the two tubes are di�erent.
connector Aconnector B

4
2
connector A connector C
Caution
Connection of the tube
Connection of the tubePreparation
Engage the connector A by rotating it clockwise while pressing it to the connector C.
Ensure to rotate the connector until it stops to release the interlock. If the rotation is halfway, liquid would not �ow through the tube.
connector C
connector A
connector B
syringe
2. Connect the tube (connector C) from the bottle with the tube (connector A) from the injection pad.
Tube from the pad
3. Aspirate a small amount of air pulled into the syringe. Then connect the syringe to the connector B.
connector B
Rotate while pressing connector
syringe
5
3
Caution
Preparation
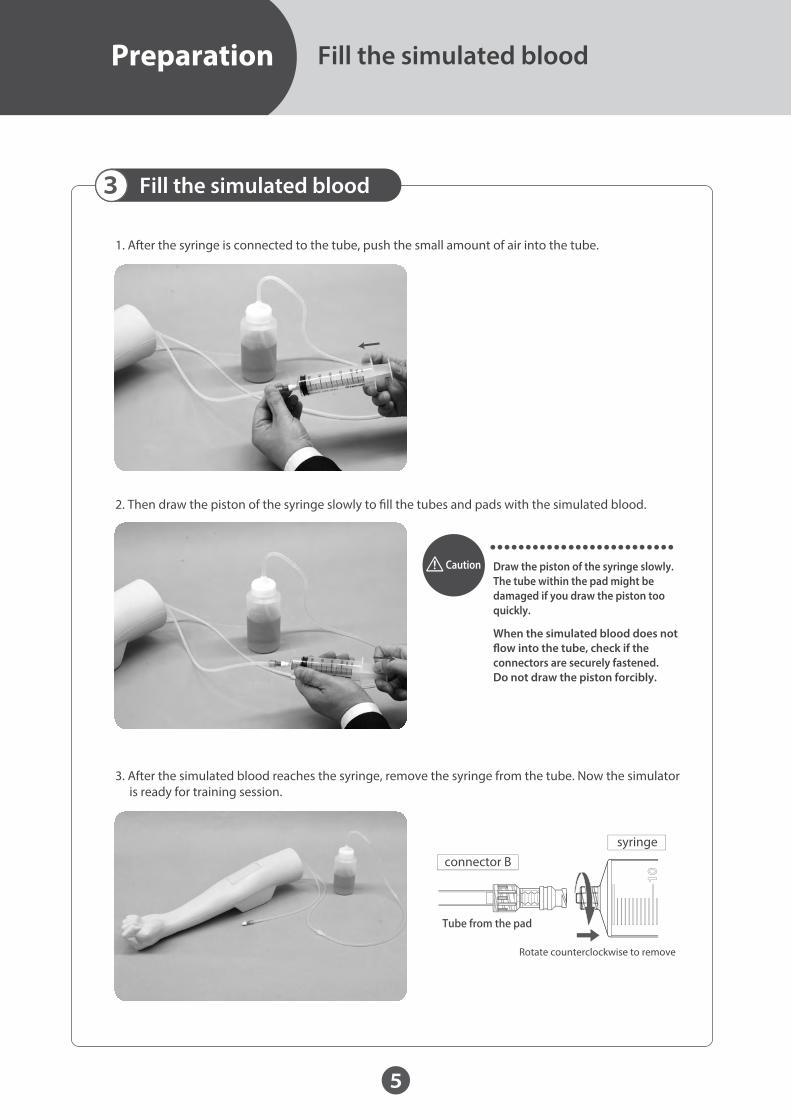
Fill the simulated blood
Fill the simulated blood
2. Then draw the piston of the syringe slowly to �ll the tubes and pads with the simulated blood.
1. After the syringe is connected to the tube, push the small amount of air into the tube.
3. After the simulated blood reaches the syringe, remove the syringe from the tube. Now the simulator is ready for training session.
Draw the piston of the syringe slowly.The tube within the pad might be damaged if you draw the piston too quickly.
Tube from the pad
connector B
Rotate counterclockwise to remove
syringe
When the simulated blood does not �ow into the tube, check if the connectors are securely fastened. Do not draw the piston forcibly.

6
1
After training
After training
Discard the simulated blood from the pads and tubes after practice.1. Discard the simulated blood left in the blood bottle.
2. Connect the syringe (50mL) to connector B at the free end of the tube. Draw the piston slowly to pull the simulated blood into the tube. Discard the simulated blood in the syringe.
3. Pour approx. 50mL of water into the empty bottle. Then draw the water with the syringe to clean the inside of the tubes. Suck up the water to empty the tubes completely.
Always draw the piston of the syringe slowly and carefully.
The tubes in the pads could be damaged if you push the piston of the syringe, which increases the internal pressure of the tube, or draw the piston too quickly.
Tube from the pad
connector B
Rotate while pressing connector
syringe
Caution

7
1
After training
After training
4. After the inside of the tubes is cleaned, disconnect the connectors that join the syringe and the tubes.
Store all the cleaned components in the storage case after they have dried completely.
Tube from the pad
connector Asyringe
Caution
Rotate counterclockwise to remove
Rotate connector A counterclockwise
connector A connector C

8
1
Replacement of injection pad
Remove the injection pad
Remove the injection pad
1. Remove the pad from the arm model by lifting up a corner of the pad on the periphery side.
2. Pull out the tubes that run through the arm model body by drawing the Injection pad after the pad is detached from the model.
To remove it smoothly, pull o� the pad from the arm model body while holding the tubes on the other side with one hand.
Caution
2 Installation the injection pad
Installation the injection pad
1. Insert the two tubes of the new injection pad into the hole in the trench of the pad. Push forward the tubes to the shoulder side of the arm model body. When the ends of the tubes come out from the hole on the shoulder side, pull the two tubes to guide them to the trench for the pad.
2. Insert the pad into the trench from the end on which the tubes are connected. Fit the other end into the periphery side of the trench.
When inserting the tubes of the injection pad, always hold the pad by one hand and the tubes by the other hand. To avoid breakage of parts, do not pull the tubes to install the pad without holding the pad by hand.
Caution


11388-200
2017.12
Caution
URL http://www.kyotokagaku.com e-mail [email protected]
■ Kyotokagaku Head Office and Factories: ■ Kyotokagaku America Inc.: USA,Canada, and South America15 Kitanekoya-cho Fushimi-ku Kyoto 612-8388, JapanTelephone : 81-75-605-2510Facsimile : 81-75-605-2519
3109 Lomita Boulevard, Torrance, CA 90505 ,USATelephone : 1-310-325-8860Facsimile : 1-310-325-8867
The contents of the instruction manual are subject to change without prior notice.No part of this instruction manual may be reproduced or transmitted in any form without permission from the manufacturer. Please contact manufacturer for extra copies of this manual which may contain important updates and revisions. Please contact manufacturer with any discrepancies in this manual or product feedback. Your cooperation is greatly appreciated.
● ●
For inquiries and service, please contact your distributor or KYOTO KAGAKU CO., LTD.
Consumable parts
code name
Injection pad for medianartebrachial vein
Do not mark on the model with a pen or leave printed materials in contact with the model surface. Ink marks on the model are not removable.