
assembly manual 49cc go kart - Go Easy Online
15
GMX 49cc GO KART - OFF ROAD
-
Upload
khangminh22 -
Category
Documents
-
view
3 -
download
0
Transcript of assembly manual 49cc go kart - Go Easy Online

GMX 49cc GO KART - OFF ROAD

This assembly guide covers basic step by step instructions to assist you with the assembly process. Products are always subject to further improvement, which will cause some di¬�erence between vehicle and this manual, without further notice. We wish you happy riding.
UNPACKINGPlease CAREFULLY remove all external box and metal frame packaging TIP: These parts can be sharp so when unpacking the packaging hand with caution.
CHECK LOOSE PARTS On most occasions your bike will come 90% assembled (depending on the model). Please go through all lose parts and check packaging that has been taken out, to ensure no parts get thrown out so you can assemble your GMX Product.
READ MANUALEnsure that you read and go over the manual and UNDERSTAND before assembling product.
MINOR ASSEMBLY IS REQUIRED, BUT IN THE INTEREST OF SAFETY IT IS RECOMMENDED THAT YOU HAVE THIS BIKE ASSEMBLED BY A SKILLED BIKE MECHANIC.
ATTENTION MAKE SURE TO REMOVE ALL SWING TAGS AND TAG STRING.

CONTENT
GMX MOTORBIKES WARRANTY 1
WARNINGS 2
ASSEMBLY 3-6
MAINTENANCE 7-8
TROUBLESHOOTING 9-10

Our goods come with guarantees that cannot be excluded under the Australian Consumer Law. You are entitled to a replacement or refund for a major failure and compensation for any other reasonably foreseeable loss or damage. You are also entitled to have the goods repaired or replaced if the goods fail to be of acceptable quality and the failure does not amount to a major failure.
The manufacturer warrants this product to be free of manufacturing defects for a period of 12 months from date of purchase. This Limited Warranty does not cover normal wear and tear (exclusions apply) or any damage, failure or loss caused by improper assembly, maintenance, or storage or use of the GMX product. Some parts will have a limited warranty period, please see below. This warranty is a part replacement warranty.
3 Month Parts Replacement PartsElectrical components, suspension, drive train and brakes/�ttings.
30 Days Parts Replacement PartsBearings, tires, tubes, cables, clutches, brake pads, seats
Minor assembly is required and in the interest of safety and warranty it is recommended that you have this product assembled by a quali�ed, skilled small engine mechanic.
You may need to provide proof of being assembled by a skilled mechanic if not a report from a small engine mechanic advising of the issues to process your warranty claims.
The warranty is a parts replacement warranty and labor is not included, defective parts may need to be sent back for inspection.
This Limited Warranty will be void if the product is ever; - Used in a manner other than for recreation or transportation - Modi�ed in anyway - Rented or commercial use.The manufacturer is not liable for incidental or consequential loss or damage due directly or indirectly to the use of this product.
Always adhere to the maximum load of the product, over loading the product will void the warranty.
How a claim is madeWhen making a claim, you will need to provide proof of purchase, condition photos of the item. This information is required to be submitted via the support center and communication is made through the support center. When the claim is created, the customer will receive the claim number and the customer support team should reply within 48 hours.
.1

YOU MUST CHECK THAT THE FRONT STEERING IS ADJUSTED CORRECTLY PRIOR TO RIDING.
WARNING: This product is powered by a 2 stroke engine and requires pre-mixing petrol and 2 stroke oil. The oil mix should be 25:1. Never mix petrol and oil directly in the engine tank.
CHECK BRAKESARE ADJUSTEDCORRECTLY PRIORTO RIDING.
YOU MUST CHECK THAT THE CHAIN IS ADJUSTED CORRECTLY PRIOR TO RIDING.
.2
PLEASE READ AND UNDERSTAND ALL INSTRUCTIONS AND WARNINGS PRIOR TO ASSEMBLY AND OPERATING OF YOUR VEHICLE.
Swing tags have been placed on your vehicle for you to identify checks that are located within this manual. Once you have performed the check required remove these swing tags and nylon loops attaching them to the vehicle.
MAKE SURE TO REMOVE THE SWING TAGS AND TAKE SPECIAL NOTICE TO REMOVE THE NYLON LOOP.
The tags and loops that need to be removed from this model: GMX Mini 49cc Go Kart
Mix only enough fuel for your immediate needs. Fuel should not be stored for more than 30 days.
Petrol/Oil1 litre/40ml2 litres/80ml3 litres/120ml4 litres/160ml5 litres/200ml
ONCE SWING TAGS AND NYLON LOOPS ARE REMOVED YOU ARE ACKNOWLEDGING THAT THESE CHECKS HAVE BEEN PERFORMED There may be a “Spare Parts Package” within the carton so please check all of the packaging and DO NOT THROW OUT
WARNINGS
SWING TAG’S & WARNINGS
BRAKE ADJUSTMENT x2STEERING ADJUSTMENT x2 CHAIN ADJUSTMENT

ASSEMBLY
GMX Mini 49cc Go Kart is very easy to assemble. The Assembly should only take 10 to 15 minutes. There are 4 bolts that attach the seat to the frame. Fasten the 4 bolts into the pre drilled holes and also attach the rear bumper with 2 bolts and you’re done. Make sure u check over of all nuts and bolts on the GMX Mini 49cc Go Kart making sure they are all tight. If you �nd a loose nut or bolt take a little thread locker or lock tight and put it on the nut and bolt. You can get lock tight from any local hardware store. Occasionally the fuel line need to be attached to the carburetor. Attach the clear line to the bent valve on the carburetor and the line to the straight valve.
Before riding your new GMX Mini 49cc Go Kart be sure to check that ALL nuts and bolts are secure as this is extremely important.
.3

ASSEMBLYOverlook the Go KartAfter assembling the GMX Mini 49cc Go Kart rear bumper, seat and checking over all the nuts and bolts are tight. While doing this make sure to check all of the components are functioning correctly before riding. Check the Brakes, chain, wheels, nuts and bolts etc. You want to make sure that the brakes feel �rm, the wheels spin smoothly and the nuts and bolts are properly secured with lock tight on them. If brake adjustment is needed see the trouble shooting section before proceeding.
Mixing your fuel and OilYour new GMX Mini Go Kart requires a ratio of 25 to 1 ratio. A mixture of fuel and 2 stroke oil. It is VERY IMPORTANT that the fuel is mixed with the oil correctly to avoid engine damage or failure. Mixing your fuel is very easy. To get your 25:1 ratio mixture simply sure a 5 litre tin of fuel and mix 200 ml of 2 stroke oil. You must also make sure that the fuel you are using is not old or dirty as this also can cause damage to the engine and void all warranty.
If ever in any doubt on how old the fuel is, just drain and mix a new batch of fuel to use.
Breaking in your new GMX Mini 49cc Go KartAll new motors need to be broken in. To break in your new motor we recommend not giving the kart full throttle for at least the �rst 20 minutes of use. After that you can go full throttle.
Before you rideIt is very important that you read your user manual before riding the GMX Mini 49cc Go Kart.
Please read these warnings carefully.
PARENTS/SUPERVISING ADULTS MUST TEACH CHILDREN HOW TO RIDE THIS PRODUCT.
If the rider does not use common sense and heed these warnings, there is an increased risk of damage, serious injury or possibly death.
Riding this product presents potential risks.
Like any OFF ROAD riding product, riding this product can be hazardous (e.g., falling o�¬ or riding into a hazardous situation).
.4

ASSEMBLYThese items are meant to move and it is therefore possible for a rider to lose control or otherwise get into dangerous situations.
Persons responsible for supervising the rider must recognize that if such things occur, a rider can be seriously injured or possibly die, even when using safety equipment and taking other safety precautions.
SAFETY PRECAUTIONS
USE PRODUCT(S) AT YOUR OWN RISK AND PLEASE USE COMMON SENSEParents and adult responsibility and supervision are necessary for any o� road vehicle.
This product can be hazardous and not always appropriate for every age or size user – age recommendations are found on these items that should re�ect the nature of the hazards and the expected mental or physical ability, or both, of a rider to be able to handle the hazards.
Persons that are supervising need to select themselves the appropriate product for the age of the user that is riding and need to take care to prevent any user who may be too immature or not experienced for a products.
RIDING PRACTICES
- This product is designed for o¬� road use. Follow all rules applicable in the area of intended use. - Ride defensively to avoid dangers that may enter your path. - Always check and obey local laws or regulations which may a¬�ect where the item can be used. Keep safely away from motor vehicles and tra�c at all times and only used where allowed and with caution. Watch out for potential obstacles - The product is intended for use on �at, dry surfaces such as concrete or level ground, without loose debris such as sand, leaves, rocks or gravel. - Riding on wet, slick, bumpy uneven or rough surfaces may give less traction and in turn increase the risk of accidents. - Watch out for obstacles that could stop or catch your wheel or make you swerve suddenly or lose control. - Do not ride indoors - Never use near steps or swimming pools. - Do not use the brake and accelerator at the same time as the brake may make the brakes hot and to fail. - Always have your hands on the handlebars and hold them at all times when riding. - Do not touch the motor or brakes whilst riding or directly after riding as they can become hot. - Avoid high speeds on downhill slopes where you might lose control.
.5

ASSEMBLYRIDING PRACTICES
- Do not ride at night or when visibility is low.- Do not attempt to do stunts or tricks on your item.- It is not strong enough to withstand use such as jumping or any other types of stunts.- Never carry a passenger on an ATV.- Do not allow hands, feet, hair, body parts, clothing or similar articles come in contact with moving parts, wheels or drive train.- Never use headphones or a mobile phone/s whilst riding.- Do not use under the in�uence of drugs and alcohol.- Always wear protective gear, such as an approved safety helmet, gloves, goggles, boots and protective clothing.- A long sleeve shirt, long pants and gloves are recommended.- Never ride barefoot or in thongs.- Never modify the kart through improper installation or use of accessories.- Never exceed the stated load capacity for an ATV.- Do not tow a trailer, the vehicle is not designed for such use.- Turn o�¬ vehicle after each ride and make sure keys are placed out of reach of children.- Always ware an Australian standard Motor Cross helmet when riding an o¬� road vehicle.- Never �ll fuel tank whilst product is on. - Do not jump or go over jumps.
1. Put your 25:1 mixed fuel into the fuel tank.
2. Pump the primer bulb until you see fuel going through the clear fuel line. The Primer bulb is on the bottom of the carburetor.
3. Put the choke lever in the up or on position, the choke lever is on the left of the carburetor.
4. Pull start the engine. A good technique is to pull the cord 3 times with no throttle. Then Pull the cord 3 times while giving the go kart half
throttle. Rotate back and forth between the two techniques. Your go kart should start within 3-5 pulls.
5. Leave the choke on until the engine warms up. This should only take 30 seconds to 1 minute. Once the motor is warm put the choke lever
down or o� position.
STARTING YOUR GMX MINI 49CC GO KART
.6
MAINTENANCEBEFORE EVERY RIDE
Be sure to check over all nuts and bolts before riding as these can become loose after a ride. They all need to be secure, you can purchase lock tight from any hardware store. After checking all nuts, bolts and screws the next part to check is the brakes, throttle and the wheels to makes sure they operate smoothly. If any components appear to be worn out order new part or parts as soon as possible. All parts are very easy to replace.
Air Filter Check the air �lter regularly. If it requires cleaning be sure to remove it �rst. To remove the �lter you must loosen the thumb screen on the air �lter cover. Once you have taken the air �lter cover o� there will be foam �lter that you can clean. You can user �lter cleaner about every 1 to 2 months if you use the go kart regularly.
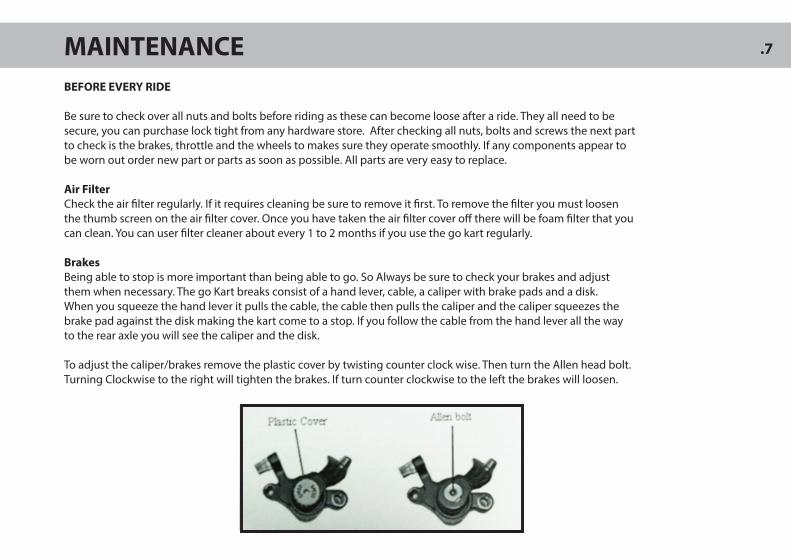
Brakes Being able to stop is more important than being able to go. So Always be sure to check your brakes and adjust them when necessary. The go Kart breaks consist of a hand lever, cable, a caliper with brake pads and a disk. When you squeeze the hand lever it pulls the cable, the cable then pulls the caliper and the caliper squeezes the brake pad against the disk making the kart come to a stop. If you follow the cable from the hand lever all the way to the rear axle you will see the caliper and the disk.
To adjust the caliper/brakes remove the plastic cover by twisting counter clock wise. Then turn the Allen head bolt. Turning Clockwise to the right will tighten the brakes. If turn counter clockwise to the left the brakes will loosen.
.7

MAINTENANCEEngineGMX Mini 49cc Go Kart come with a powerful 49cc 2 stroke engine. It is a well-built engine that requires little maintenance. Tis engine requires that you mix 2 stroke oil with fuel. The recommended mixture is 25:1. You must mix the fuel with the 2 stroke oil.
Transmission/ClutchYou Go kart is equipped with a centrifugal clutch transmission. This style transmission makes it so you don’t need to change over gears. Your go kart is automatic. Grab the throttle give your go kart some gas and away you go. You can always leave o� the throttle grab the brakes if you want to stop. The transmission is what turns your motor side sprocket and powers your chain.
Carburetor The carburetor is attached to the motor right behind the air �lter. If you use your go kart on a regular basis you should not have to do any maintenance with your carburetor. If you are going to store your go kart or not use it for more than 3 weeks. You will need to drain the fuel out of your carburetor so it does not dry out and clog it up. If your carburetor is already clogged or your go kart will not start you will want to use carburetor cleaner to spray into your carburetor. If this doesn’t not get you running you will need to replace the carburetor with a new one.
Spark PlugIf your spark plug is no longer sparking you may want to double check your fuel mixture. If you have too much oil in your fuel it will foul the plug. You can order a new spark plug from the supplier.
Checking for SparkIf the motor is not starting and does not sound like it is even trying. You may not be getting any spark and have a bad spark plug. To check the spark simply remove the plug from the motor, and re-install the tip of the plug back into the wire sleeve. Next grab the spark plug holding into the wire sleeve and touch the threaded part if the spark plug against the steel motor head and pull the pull start. You should see a small spark at the gap of the spark plug. If you do not see a small spark at the gap of the spark plug replace the spark plug when a new one. If you see a part it is �xed. If you do not see a spark check to see if your kill switch wire is not grounding its self against the frame. Just follow the wire from the kill switch all the way down to the motor. If you still are not getting spark your ignition coil is bad and you may need to replace it.
.8

Motor will not start or hard start
Check the fuel/oil mixture Check spark plugMake sure your fuel lines are not kinked Choke is not in correct position
Motor dies when I give it gas
Make sure your choke is o� after the engine is warm You may have way to much oil in your fuel, check the mixtureExcessive amounts of smoke means too much oil, you should see some smoke but not too much
Engine runs but kart will not move
Check chainMake sure the sprockets are secure and still attached Is your choke o�?Check or replace transmission
Steering pulls to one side
Check tie rods for damageAdjust tie rods to align front wheelsCheck wheel bearingsReplace damaged tie rods
Chain falls o�
Check motor mount bolts to see if they are loose. If they are loose align the motor sprocket and the axle sprocket then tighten the motor mount bolts.
TROUBLESHOOTING .9

Make sure sprockets are tight and aligned
Motor not turning with pull start
Remove and check pill starter Check the starter catch for damage (behind pull starter)Motor seized (not enough 2 stroke oil mixed with fuel)
Motor will not turn o�
Turn choke on, and give it throttle engine will stallCheck kill switch and wire Replace kill switch
Bumpy ride
Check tires for �at tires Check tires for uneven wearInspect wheel bearing for a smooth spin Replace tires in sets of 2 (front or rear)
TROUBLESHOOTING .10

NOTES

GMX 49cc GO KART - ATV OFF ROAD