
Application Notes for G-Tek SIP Telephone MT-102H version ...
34
QT; Reviewed: SPOC 11/16/2010 Solution & Interoperability Test Lab Application Notes ©2010 Avaya Inc. All Rights Reserved. 1 of 34 MT102H-SCS3 Avaya Solution & Interoperability Test Lab Application Notes for G-Tek SIP Telephone MT-102H version 1510X.27.1.02i with Avaya Software Communication System Release 3.0 – Issue 1.0 Abstract These Application Notes describe a solution comprised of Avaya Software Communication System Release 3.0 (SCS) and the G-Tek SIP telephones MT-102H firmware version 1510X.27.1.02i. During the compliance testing, the MT-102H was able to register, as a SIP Client endpoint, with the Software Communication System. The MT-102H was able to place and receive calls from the Software Communication System Release 3.0 SIP Line clients. Other telephony features such as transfer as the transferee, Forward in Parallel, Forward Sequentially, Forked Invite, Call Pick-up, Call Park and Retrieved were executed. This solution is currently supported only in Malaysia, Japan, and Brazil. Information in these Application Notes has been obtained through DevConnect compliance testing and additional technical discussions. Testing was conducted via the DevConnect Program at the Avaya Solution and Interoperability Test Lab.
-
Upload
khangminh22 -
Category
Documents
-
view
2 -
download
0
Transcript of Application Notes for G-Tek SIP Telephone MT-102H version ...

QT; Reviewed:
SPOC 11/16/2010
Solution & Interoperability Test Lab Application Notes
©2010 Avaya Inc. All Rights Reserved.
1 of 34
MT102H-SCS3
Avaya Solution & Interoperability Test Lab
Application Notes for G-Tek SIP Telephone MT-102H version
1510X.27.1.02i with Avaya Software Communication System
Release 3.0 – Issue 1.0
Abstract
These Application Notes describe a solution comprised of Avaya Software Communication
System Release 3.0 (SCS) and the G-Tek SIP telephones MT-102H firmware version
1510X.27.1.02i. During the compliance testing, the MT-102H was able to register, as a SIP Client
endpoint, with the Software Communication System. The MT-102H was able to place and receive
calls from the Software Communication System Release 3.0 SIP Line clients. Other telephony
features such as transfer as the transferee, Forward in Parallel, Forward Sequentially, Forked
Invite, Call Pick-up, Call Park and Retrieved were executed. This solution is currently supported
only in Malaysia, Japan, and Brazil.
Information in these Application Notes has been obtained through DevConnect compliance testing
and additional technical discussions. Testing was conducted via the DevConnect Program at the
Avaya Solution and Interoperability Test Lab.

QT; Reviewed:
SPOC 11/16/2010
Solution & Interoperability Test Lab Application Notes
©2010 Avaya Inc. All Rights Reserved.
2 of 34
MT102H-SCS3
Introduction These application notes provide detailed configurations of Avaya Software Communication
System Release 3.0 and G-Tek SIP telephone MT-102H rel. 1510X.27.1.02i during the
compatibility testing session. The MT-102H was tested against the SIP clients of the Software
Communication System Release 3.0. All the applicable telephony feature test cases of Avaya
Software Communication System Release 3.0 were executed on the MT-102H, to ensure the
interoperability with Avaya Software Communication System.
1.1. Interoperability Compliance Testing
The focus of this compliance testing is to verify that the MT-102H is able to interoperate with
Avaya Software Communication System Release 3.0. The following interoperability areas are:
Registration of MT-102H to the Avaya Software Communication System Release 3.0.
Calls establishment of MT-102H with Avaya SIP phones on the Avaya Software
Communication System.
Telephony features: DTMF transmission, voicemail with MWI notification, speed dial,
perform blind transfer as the transferee, Forward in Parallel, Forward Sequentially,
Forked Invite, Call Pick-up, Call Park and Retrieved.
Specific hospitality feature requirement such as handling of detected loops or too many
hops, long “Via” path resulting in large SIP messages.
Codec negotiation.
1.2. Support
For technical support on G-Tek SIP telephones, please contact G-Tek technical support at:
Telephone: +886-2-26962665 ext. 221
E-mail: [email protected]

QT; Reviewed:
SPOC 11/16/2010
Solution & Interoperability Test Lab Application Notes
©2010 Avaya Inc. All Rights Reserved.
3 of 34
MT102H-SCS3
2. Reference Configuration Figure 1 illustrates the test configuration used during the compliance testing between the Avaya
Software Communication System Release 3.0 and the MT-102H.
Figure 1: Test Configuration
3. Equipment and Software Validated
System Software/Hardware Version Avaya Software Communication System Server 4.0.4-017289 2009-11-19T05
Avaya 1210 SIP client
Avaya 1230 SIP client
Avaya SMC3456
Model NTYS18, series
01.02.02.00
Model NTYS20, series
01.02.02.00
Version 2.6, build 56076
G-Tek MT-102H SIP Telephones 1510X.27.1.02i
QT; Reviewed:
SPOC 11/16/2010
Solution & Interoperability Test Lab Application Notes
©2010 Avaya Inc. All Rights Reserved.
4 of 34
MT102H-SCS3
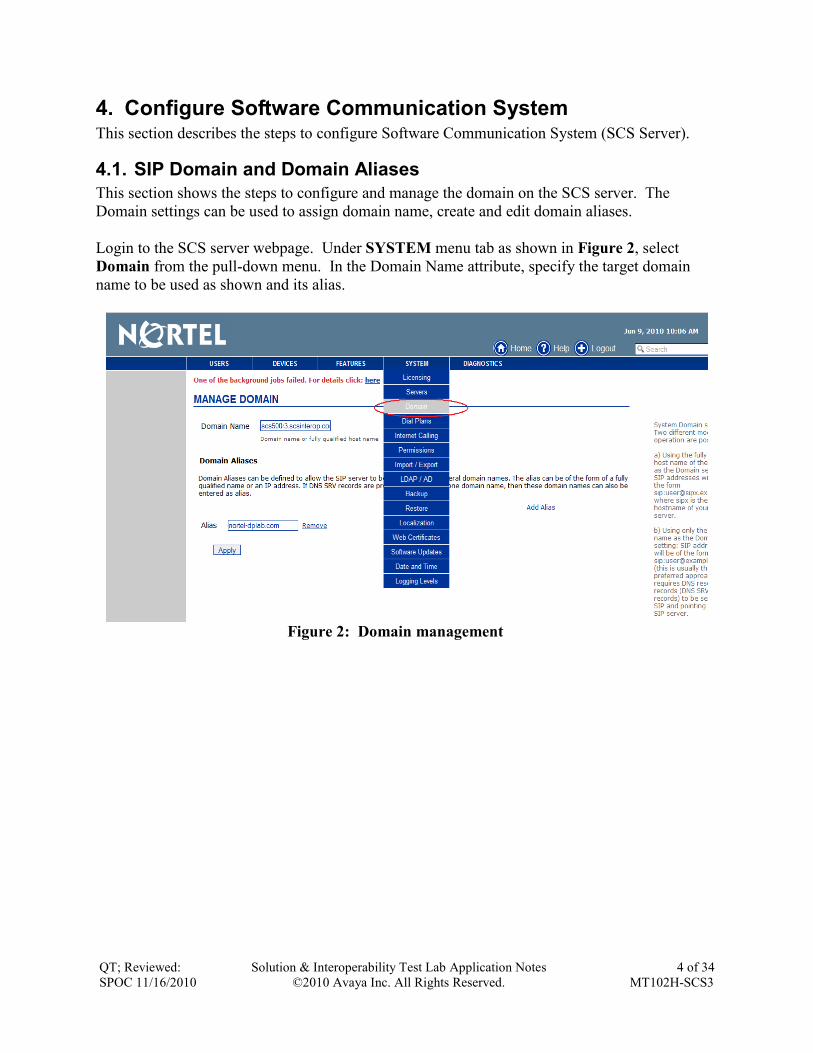
4. Configure Software Communication System This section describes the steps to configure Software Communication System (SCS Server).
4.1. SIP Domain and Domain Aliases
This section shows the steps to configure and manage the domain on the SCS server. The
Domain settings can be used to assign domain name, create and edit domain aliases.
Login to the SCS server webpage. Under SYSTEM menu tab as shown in Figure 2, select
Domain from the pull-down menu. In the Domain Name attribute, specify the target domain
name to be used as shown and its alias.
Figure 2: Domain management

QT; Reviewed:
SPOC 11/16/2010
Solution & Interoperability Test Lab Application Notes
©2010 Avaya Inc. All Rights Reserved.
5 of 34
MT102H-SCS3
On Figure 2, click “Add Alias” to enter the IP address of host server as shown in Figure 3.
Figure 3: Alias management
4.2. Domain Server Configuration
On the SCS server webpage, navigate to SYSTEM menu tab and select Server from pull down
list. The list of Host Server name will be shown in Figure 4 below.
+ Hostname: scs500r3.scsinterop.com
+ IP Address: 47.248.100.216

QT; Reviewed:
SPOC 11/16/2010
Solution & Interoperability Test Lab Application Notes
©2010 Avaya Inc. All Rights Reserved.
6 of 34
MT102H-SCS3
Figure 4: Domain Server Configuration Overview
From the servers list shown in Figure 4, choose the target server name. The details
configuration of this server will be shown in Figure 5. The Management, Primary SIP Router,
Call Center and Voicemail server roles are selected and enabled by default.
Figure 5: Domain Server Configuration with default Server Role

QT; Reviewed:
SPOC 11/16/2010
Solution & Interoperability Test Lab Application Notes
©2010 Avaya Inc. All Rights Reserved.
7 of 34
MT102H-SCS3
In Figure 5, under Server Roles, click on the check boxes of SIP Trunking and Conferencing
to enable these roles on the target server as shown in Figure 6.
Figure 6: Server Roles Configuration
4.3. User Configuration – Identification
This section is to show how to create and configure user settings. Click on the USERS menu tab,
select Users on the pull down list. The users‟ page will appear as shown in Figure 7.
Figure 7: User Configuration
Click on Add New User, the user details configuration page will appear as shown in Figure 8.

QT; Reviewed:
SPOC 11/16/2010
Solution & Interoperability Test Lab Application Notes
©2010 Avaya Inc. All Rights Reserved.
8 of 34
MT102H-SCS3
Figure 8: Adding New User

QT; Reviewed:
SPOC 11/16/2010
Solution & Interoperability Test Lab Application Notes
©2010 Avaya Inc. All Rights Reserved.
9 of 34
MT102H-SCS3
Enter the user information details as shown in Figure 9.
The following fields are required: User ID, Last name, First name, Active greeting,
PIN, Confirm PIN, SIP password, and Groups. The User ID and PIN will be used to
configure the MB-102H in Section 5.1.
Other fields are optional and can be left blank.
Click Apply to save the user information and click OK to return to Figure 7.
Figure 9: New User Details

QT; Reviewed:
SPOC 11/16/2010
Solution & Interoperability Test Lab Application Notes
©2010 Avaya Inc. All Rights Reserved.
10 of 34
MT102H-SCS3
4.4. User Configuration – Permission Settings
To assign permission settings for the new user click on USERS menu tab and select Users from
the pull down menu. Select the new user created in Section 4.3 and click Permissions on the left
menu column to display the page as shown in Figure 10. All the check boxes are checked by
default except Change PIN from IVR attribute. Administrator can uncheck the box
individually to turn specific function/feature off for the user. In this case, we leave everything at
default values.
Figure 10: User permission setting

QT; Reviewed:
SPOC 11/16/2010
Solution & Interoperability Test Lab Application Notes
©2010 Avaya Inc. All Rights Reserved.
11 of 34
MT102H-SCS3
4.5. User Configuration – Assigning Conference Bridge
The following steps will show how to configure a Conference Bridge.
- On the SCS Server web page, navigate to FEATURES menu tab.
- Select Conferencing from the pull down menu as shown in Figure 11.
Figure 11: Conference Bridge overview page
Choose the target server from the server list (not shown) to display the page in Figure 12. On
the left column menu, select Conferences and click on Add New Conference.
Figure 12: Adding Conference Bridge

QT; Reviewed:
SPOC 11/16/2010
Solution & Interoperability Test Lab Application Notes
©2010 Avaya Inc. All Rights Reserved.
12 of 34
MT102H-SCS3
- A page will appear as shown in Figure 13 for the detail configuration of a conference bridge.
- Check Enabled box to enable this conference bridge, enter conference name and its associated
Extension.
- Choose the owner of the conference.
- Enter participant pin.
- Other fields are left at default.
- Click on Apply button to save the setting information.
- Click OK to return to the Conference Server page.
Figure 13: Conference Bridge configuration

QT; Reviewed:
SPOC 11/16/2010
Solution & Interoperability Test Lab Application Notes
©2010 Avaya Inc. All Rights Reserved.
13 of 34
MT102H-SCS3
4.6. Hunt Group Creation
The SCS system can be configured with a hunt group extension that when called, triggers a
calling sequence to a group of member extensions. The calling sequence can be determined by
the SCS administrator.
The following steps define how a Hunt Group can be configured:
- On the SCS Server web page, navigate to FEATURES menu tab.
- Select Hunt Groups from pull down menu as shown in Figure 14.
Figure 14: Hunt Group overview page
From the Hunt Groups page as shown in Figure 15, click Add Hunt Group.
Figure 15: Hunt Group adding

QT; Reviewed:
SPOC 11/16/2010
Solution & Interoperability Test Lab Application Notes
©2010 Avaya Inc. All Rights Reserved.
14 of 34
MT102H-SCS3
- A page will appear as shown in Figure 16 for the detail configuration of a hunt group.
- Check Enabled box to enable this hunt group, enter hunt group name and its associated
Extension.
- Enter the Description for the Hunt Group.
- Click on Apply button to save the setting information.
- Click OK to return to the Hunt Group page.
Figure 16: Hunt Group configuration
4.7. Dial Plan Configuration
Dial Plan Rules determine how calls are routed to and from the SCS system. The rules can be
associated with configured SIP Trunk Gateways. The dial plan rules can be created to route calls
internally and externally both locally and internationally. There are several types of rules that can
be configured. Custom dial plan rules for specific call routing scenarios can be defined. From the
main Dial Plans screen new rules can be created, existing rules can be modified, enabled or
disabled, and the order of rules can be modified. Voicemail Dial Plan and Auto Attendant Dial
Plan are available by default.
On the SCS server webpage, navigate to SYSTEM menu tab; select Dial Plans from pull down
list. The list of dial plans will be shown in Figure 17 below.

QT; Reviewed:
SPOC 11/16/2010
Solution & Interoperability Test Lab Application Notes
©2010 Avaya Inc. All Rights Reserved.
15 of 34
MT102H-SCS3
Figure 17: Dial Plan overview page
On the Dialing plan page, Auto Attendant and Voicemail are enabled by default as shown in
Figure 18 below.
Figure 18: Dial Plan rules overview

QT; Reviewed:
SPOC 11/16/2010
Solution & Interoperability Test Lab Application Notes
©2010 Avaya Inc. All Rights Reserved.
16 of 34
MT102H-SCS3
On the Dial plan rules on Figure 18, click on Voicemail link. The Dial Rule for voice mail is
displayed with extension 101 as default in Figure 19 as shown below.
Figure 19: Dial Plan rules for Voice Mail

QT; Reviewed:
SPOC 11/16/2010
Solution & Interoperability Test Lab Application Notes
©2010 Avaya Inc. All Rights Reserved.
17 of 34
MT102H-SCS3
Return to the Figure 18 above and click on Auto Attendant link. The Dial Plan Rule for auto
attendant is displayed. The Auto Attendant Dial Plan allows user to select an auto attendant and
its extension. By default, there is a single Auto Attendant Dialing rule that associates extension
100 with the operator as shown in Figure 20 below.
Figure 20: Dialing Plan rules for Auto Attendant

QT; Reviewed:
SPOC 11/16/2010
Solution & Interoperability Test Lab Application Notes
©2010 Avaya Inc. All Rights Reserved.
18 of 34
MT102H-SCS3
4.8. ACD Queue Configuration
An Automated Call Distribution (ACD) can be configured on the SCS system. This facilitates
the management of incoming calls and their distribution to ACD agents. The agents are required
to „login‟ to their telephones in order to receive ACD calls.
On the SCS Server web page, click on the FEATURES menu tab; select Call Center on the pull
down list. The list of Host Server name will be as shown in Figure 21 below.
Figure 21: ACD Server list
Select the target server name as shown in Figure 22.
Figure 22: ACD Server Name

QT; Reviewed:
SPOC 11/16/2010
Solution & Interoperability Test Lab Application Notes
©2010 Avaya Inc. All Rights Reserved.
19 of 34
MT102H-SCS3
The ACD Server configuration will be shown as in Figure 23.
Figure 23: ACD Server Configuration
Click on Queues on the left panel to show the ACD Queues screen in Figure 24.
Figure 24: ACD Server Queue overview

QT; Reviewed:
SPOC 11/16/2010
Solution & Interoperability Test Lab Application Notes
©2010 Avaya Inc. All Rights Reserved.
20 of 34
MT102H-SCS3
Create a new ACD Queue by clicking Add New Queue as shown in Figure 25.
Figure 25: ACD Server Add New Queue
A page will appear as shown in Figure 26 for detail configuration of an ACD Queue.
- Enter Name of ACD Queue.
- Others are at default.
- Click on Apply button to save the setting information.
- Click OK to return to the ACD Queue page.

QT; Reviewed:
SPOC 11/16/2010
Solution & Interoperability Test Lab Application Notes
©2010 Avaya Inc. All Rights Reserved.
21 of 34
MT102H-SCS3
Figure 26: ACD Server Queue configuration

QT; Reviewed:
SPOC 11/16/2010
Solution & Interoperability Test Lab Application Notes
©2010 Avaya Inc. All Rights Reserved.
22 of 34
MT102H-SCS3
4.9. ACD Line Configuration
This section is to show how to create and configure ACD Line settings.
On Figure 23, on the left column menu, select Lines and click Add New Line as shown in
Figure 27 below.
Figure 27: ACD Line overview
A page will appear as shown in Figure 28 for the detail configuration of an ACD Line.
- Enter ACD Line Name and its associated Extension.
- Choose Queue from the Queue list box.
- Others are at default.
- Click on Apply button to save the setting information.
- Click OK to return to the ACD Line page.
Figure 28: ACD Line configuration

QT; Reviewed:
SPOC 11/16/2010
Solution & Interoperability Test Lab Application Notes
©2010 Avaya Inc. All Rights Reserved.
23 of 34
MT102H-SCS3
4.10. Adding ACD Queue Agents
The agents who will answer the ACD calls can now be created and added to the ACD Queue.
On the SCS server webpage, navigate to FEATURE menu tab followed by Call Center. The list
of Host Server name will be as shown in Figure 29 below.
Figure 29: ACD Queue Agent overview
From the servers list shown in Figure 30, choose the target server name.
Figure 30: ACD Queue Agent overview

QT; Reviewed:
SPOC 11/16/2010
Solution & Interoperability Test Lab Application Notes
©2010 Avaya Inc. All Rights Reserved.
24 of 34
MT102H-SCS3
Then click on the ACD Queue name to which the agents will be added as shown in Figure 31
below. In this example, a queue named ACD1 has been selected.
Figure 31: ACD Queue Server
A page will appear. User clicks the Agents on the left panel and click on Add New Agent to
create a new Agent as shown in Figure 32 below.
Figure 32: ACD Agents Adding

QT; Reviewed:
SPOC 11/16/2010
Solution & Interoperability Test Lab Application Notes
©2010 Avaya Inc. All Rights Reserved.
25 of 34
MT102H-SCS3
The Add ACD Agents screen will be displayed as shown in Figure 33. To view a list of
administered agents, click on the Search button.
Figure 33: ACD Agents searching page
Select the check boxes next to the users to be added as agents to this ACD Queue. Then click the
Select button.
Figure 34: ACD Agents searching result page

QT; Reviewed:
SPOC 11/16/2010
Solution & Interoperability Test Lab Application Notes
©2010 Avaya Inc. All Rights Reserved.
26 of 34
MT102H-SCS3
The agents assigned to this ACD Queue will be displayed as shown in Figure 35 below.
Figure 35: ACD Agents list on ACD Queue
4.11. Call Park Extension Creation
The call park feature enables calls to be transferred to a specified park „extension‟. When a call is
parked, it can be retrieved by pressing *4 followed by the extension number. Music files can be
uploaded to the SCS system to provide background music to parked callers. If there are several
calls parked on the same „extension‟, the first parked call is retrieved.
On the SCS server web page, navigate to FEATURES menu tab; select Call Park from pull
down list as shown in Figure 36 below.
Figure 36: Call Park overview

QT; Reviewed:
SPOC 11/16/2010
Solution & Interoperability Test Lab Application Notes
©2010 Avaya Inc. All Rights Reserved.
27 of 34
MT102H-SCS3
The Call Park screen will be displayed. Click on the Add Call Park Extension link as shown in
Figure 37 below.
Figure 37: Call Park adding
A page will appear as shown in Figure 38 for detail configuration of a Call Park Extension.
- Check Enabled box to enable this call park, enter call park name and its associated Extension.
- Enter Description.
- Select Background music.
- Others are at default.
- Click on Apply button to save the setting information.
- Click OK to return to the Call Park page.
Figure 38: Call Park Extension configuration

QT; Reviewed:
SPOC 11/16/2010
Solution & Interoperability Test Lab Application Notes
©2010 Avaya Inc. All Rights Reserved.
28 of 34
MT102H-SCS3
The Call Park configuration details will be displayed on Figure 39.
Figure 39: Call Park Extension list

QT; Reviewed:
SPOC 11/16/2010
Solution & Interoperability Test Lab Application Notes
©2010 Avaya Inc. All Rights Reserved.
29 of 34
MT102H-SCS3
5. Configure G-Tek MT-102H SIP Telephone The following sections below explains the configuration for the G-Tek MT-102H SIP
Telephones with respect to SIP account, Codec and Speed dial settings.
5.1. SIP Account Settings
Configure SIP Settings as displayed in the below screenshot. The Domain Server, Proxy Server
and Outbound Proxy attribute values are as per the configurations explained in Section 4.1 and
4.2.
Figure 40 – G-Tek MT-102H SIP Account Settings

QT; Reviewed:
SPOC 11/16/2010
Solution & Interoperability Test Lab Application Notes
©2010 Avaya Inc. All Rights Reserved.
30 of 34
MT102H-SCS3
5.2. Codec settings
Configure Codec Settings as displayed in the below screenshot.
Figure 41 – G-Tek MT-102H Codec Settings

QT; Reviewed:
SPOC 11/16/2010
Solution & Interoperability Test Lab Application Notes
©2010 Avaya Inc. All Rights Reserved.
31 of 34
MT102H-SCS3
5.3. Speed Dial
Configure Speed Dial Settings as displayed in the below screenshot. The example 20206 shown
below is configured in Section 4.3.
Figure 42 – G-Tek MT-102H Speed Dial Settings

QT; Reviewed:
SPOC 11/16/2010
Solution & Interoperability Test Lab Application Notes
©2010 Avaya Inc. All Rights Reserved.
32 of 34
MT102H-SCS3
6. General Test Approach and Test Results The focus of this interoperability compliance testing was primarily to verify the call
establishment on the G-Tek MT-102H SIP telephones and the feature operations such as: DTMF,
MWI, codec negotiation, perform blind transfer as the transferee, Forward in Parallel, Forward
Sequentially, Forked Invite, Call Pick-up, Call Park and Retrieved.
6.1. General Test Approach
The general test approach was to have one of the SCS clients/users to place a call to and from the
G-Tek MT-102H and exercise the telephony features. The main objectives were to verify the
MT-102H successfully perform the following:
Register to Software Communication System Release 3.0.
Call establishment with Avaya Software Communication System SIP clients
Basic call operation: DTMF transmission, voicemail with MWI notification,
Advance Software Communication System features: perform blind transfer as the
transferee, Forward in Parallel, Forward Sequentially, Forked Invite, Call Pick-up, Call
Park and Retrieved, ACD Server, Meet me conference.
Handle of loop or too many hops, long “Via” path resulting in large SIP messages.
Call redirection and conference: Avaya phones as a transferor for blind/consultative
transfers and as a moderator for the 3 way conference call.
Specific hospitality feature requirement, speed dial.
Codec negotiations.
6.2. Test Results
The objectives outlined in Section 6.1 were verified and met. The following observations were
made during the compliance testing:
On Blind Transfer scenario with Avaya Sip Phone 12xx as transferor, "Ringback –
Remote Hold” shows on LCD of the transferee MT 102H instead of “DN Transferring”.
Media Service on the SCS supports only G711; therefore the MT/MB102H codec options
should be set to either G711 only or G711/G729.
The CLID is not displayed correctly sometimes when Auto Attendant transfers. It is
intermittent.

QT; Reviewed:
SPOC 11/16/2010
Solution & Interoperability Test Lab Application Notes
©2010 Avaya Inc. All Rights Reserved.
33 of 34
MT102H-SCS3
7. Verification Steps This section includes some steps that can be followed to verify the configuration.
Verify that the MT-102H telephone registers successfully with the Software
Communication System by using its Web GUI http: //<IPAddress>:8000 with
username/password: admin/1234.
On Web GUI of MT-102H phone, check for the status as “Registered” on SIP Setting >
Service Domain.
Place a call from and to the MT-102H phone and verify that the call is established with 2
way speech path.
During the call, use pcap tool (ethereal/wireshark) at the SCS Server and clients to make
sure that all SIP request/response messages are displayed correctly.
8. Conclusion All of the executed test cases have passed and met the objectives outlined in Section 6.1, with
some exceptions outlined in Section 6.2. The outstanding issues are being investigated by G-Tek
and Avaya. Some of these issues are considered as exceptions. G-Tek MT-102H SIP telephone
version 1510X.27.1.02i has passed compliance testing with Software Communication System
Release 3.0.
9. Additional References Product documentation for Avaya Software Communication System may be found at:
http://support.nortel.com/go/main.jsp
Product information for G-Tek products can be found at
http://www.gtek.com.tw/en/offering_products.php?mw=9

QT; Reviewed:
SPOC 11/16/2010
Solution & Interoperability Test Lab Application Notes
©2010 Avaya Inc. All Rights Reserved.
34 of 34
MT102H-SCS3
©2010 Avaya Inc. All Rights Reserved.
Avaya and the Avaya Logo are trademarks of Avaya Inc. All trademarks identified by ® and
™ are registered trademarks or trademarks, respectively, of Avaya Inc. All other trademarks
are the property of their respective owners. The information provided in these Application
Notes is subject to change without notice. The configurations, technical data, and
recommendations provided in these Application Notes are believed to be accurate and
dependable, but are presented without express or implied warranty. Users are responsible for
their application of any products specified in these Application Notes.
Please e-mail any questions or comments pertaining to these Application Notes along with the
full title name and filename, located in the lower right corner, directly to the Avaya
DevConnect Program at [email protected].