Application Notes for Avaya Proactive Contact R5.1.1 with ...
70
SJW; Reviewed SPOC 5/10/2016 Solution & Interoperability Test Lab Application Notes ©2016 Avaya Inc. All Rights Reserved. 1 of 70 PC511HDSyntel Avaya Solution & Interoperability Test Lab Application Notes for Avaya Proactive Contact R5.1.1 with Inisoft synTelate 5.1 using Avaya PG230 Digital Switch and Agent Blending – Issue 1.0 Abstract These Application Notes describe the configuration steps required for Inisoft synTelate 5.1 to interoperate with Avaya Proactive Contact R5.1.1 using Avaya PG230 Digital Switch and Agent Blending. In the compliance testing, Inisoft synTelate used the Agent API from Avaya Proactive Contact and the Telephony Services Application Programmer Interface from Avaya Aura® Application Enablement Services to provide a custom agent desktop for Avaya Proactive Contact agents to handle outbound calls initiated by Avaya Proactive Contact and inbound calls received by Avaya Aura® Communication Manager. Readers should pay attention to Section 2, in particular the scope of testing as outlined in Section 2.1 as well as the observations noted in Section 2.2, to ensure that their own use cases are adequately covered by this scope and results. Information in these Application Notes has been obtained through DevConnect Compliance Testing and additional technical discussions. Testing was conducted via the DevConnect Program at the Avaya Solution and Interoperability Test Lab.
-
Upload
khangminh22 -
Category
Documents
-
view
1 -
download
0
Transcript of Application Notes for Avaya Proactive Contact R5.1.1 with ...

SJW; Reviewed
SPOC 5/10/2016
Solution & Interoperability Test Lab Application Notes
©2016 Avaya Inc. All Rights Reserved.
1 of 70
PC511HDSyntel
Avaya Solution & Interoperability Test Lab
Application Notes for Avaya Proactive Contact R5.1.1 with
Inisoft synTelate 5.1 using Avaya PG230 Digital Switch and
Agent Blending – Issue 1.0
Abstract
These Application Notes describe the configuration steps required for Inisoft synTelate 5.1 to
interoperate with Avaya Proactive Contact R5.1.1 using Avaya PG230 Digital Switch and
Agent Blending. In the compliance testing, Inisoft synTelate used the Agent API from Avaya
Proactive Contact and the Telephony Services Application Programmer Interface from Avaya
Aura® Application Enablement Services to provide a custom agent desktop for Avaya
Proactive Contact agents to handle outbound calls initiated by Avaya Proactive Contact and
inbound calls received by Avaya Aura® Communication Manager.
Readers should pay attention to Section 2, in particular the scope of testing as outlined in
Section 2.1 as well as the observations noted in Section 2.2, to ensure that their own use cases
are adequately covered by this scope and results.
Information in these Application Notes has been obtained through DevConnect Compliance
Testing and additional technical discussions. Testing was conducted via the DevConnect
Program at the Avaya Solution and Interoperability Test Lab.
SJW; Reviewed
SPOC 5/10/2016
Solution & Interoperability Test Lab Application Notes
©2016 Avaya Inc. All Rights Reserved.
2 of 70
PC511HDSyntel
1. Introduction These Application Notes describe the configuration steps required for Inisoft synTelate to
interoperate with Avaya Proactive Contact using Avaya PG230 Digital Switch and agent
blending. In the compliance testing, Inisoft synTelate used the Agent API from Avaya Proactive
Contact and the Telephony Services Application Programmer Interface (TSAPI) from Avaya
Aura® Application Enablement Services (AES) to provide a custom agent desktop for Avaya
Proactive Contact agents, to handle outbound calls initiated by Avaya Proactive Contact and
inbound calls received by Avaya Aura® Communication Manager.
Inisoft synTelate is a call center scripting application for creating inbound and outbound
campaigns, and consists of the Inisoft synTelate Designer and the Inisoft synTelate Agent.
Inisoft synTelate Designer is a graphical tool that is used for the definition of the call flow and
agent screens. A subset of the Avaya Proactive Contact Agent API is used by synTelate Designer
to obtain jobs, call lists, and data fields to facilitate the agent screen customization.
The Avaya Proactive Contact Agent API is used by synTelate Agent to obtain information such
as job type, agent state, customer record fields and values from Avaya Proactive Contact to
display on the customized agent desktop, and to request customer record update functions
initiated from the agent desktop, such as set callback parameters. The Avaya Proactive Contact
Agent API is also used to request call control functions for outbound calls delivered by Avaya
Proactive Contact.
In the agent blending environment, the inbound calls are delivered to the agents by Avaya Aura®
Communication Manager. The TSAPI interface from Avaya Aura® Application Enablement
Services is used by synTelate Agent to request call control functions for the inbound calls.
2. General Test Approach and Test Results The interoperability compliance testing evaluated the ability of synTelate to carry out call
handling functions in a variety of scenarios through its TSAPI and Agent API interface with
AES and Proactive Contact respectively. The feature test cases were performed automatically.
Outbound calls were automatically placed and delivered to synTelate Web Agent by Proactive
Contact. Different types of jobs were exercised, along with different actions initiated from
synTelate Web Agent, to verify proper generation and handling of supported messages from
Proactive Contact. The Proactive Contact Editor was used to start/stop jobs. The verification
included checking the display of fields, options, and values on synTelate Web Agent, and the
exchanged API events in the agent1_API.trans logfiles.

SJW; Reviewed
SPOC 5/10/2016
Solution & Interoperability Test Lab Application Notes
©2016 Avaya Inc. All Rights Reserved.
3 of 70
PC511HDSyntel
Interoperability Compliance Testing
The feature testing focused on verifying proper display of the customized synTelate Agent with
appropriate options, fields, and values for the following scenarios:
Outbound, inbound and managed jobs
Proactive Agent Blending
Log in, join job, go on/off break, leave job, and logoff
Hold, retrieve, NVDT call transfer, conference, place manual call, agent drop, customer
drop, release line/hang-up, and finish work
Set callback and update customer fields
2.1. Test Results
All test cases that were executed have successfully passed.
2.2. Support
Technical support on synTelate can be obtained through the following:
Phone: +1 (603) 383-4999 or +44 (0) 141-552-8800
Email: [email protected]

SJW; Reviewed
SPOC 5/10/2016
Solution & Interoperability Test Lab Application Notes
©2016 Avaya Inc. All Rights Reserved.
4 of 70
PC511HDSyntel
3. Reference Configuration The configuration used for the compliance testing is shown in Figure 1. In the compliance
testing, synTelate used the Agent API to monitor and control outbound calls for the agents, and
used TSAPI to monitor and control the inbound calls to the agents.
Figure 1: Inisoft synTelate with Avaya Proactive Contact using Avaya PG230 Digital
Switch and Proactive Agent Blending

SJW; Reviewed
SPOC 5/10/2016
Solution & Interoperability Test Lab Application Notes
©2016 Avaya Inc. All Rights Reserved.
5 of 70
PC511HDSyntel
4. Equipment and Software Validated The following equipment and software were used for the sample configuration provided:
Equipment Software
VMware virtual machine Avaya Aura® Communication Manager 7.0.1
R17x.00.0.441.0-22477
G430 Media Gateway FW 37.20.0
Avaya S8730 Server Avaya Proactive Contact 5.1.1 with Patch 392
VMware virtual machine Avaya Aura® Application Enablement Services
7.0.0.0.0.13-0
Inisoft synTelate Enterprise
5.1.0
5. Configure Avaya Aura® Communication Manager This section provides the procedures for configuring Communication Manager to support the
PG230 integration and CTI for Agent Blending. The procedures include the following areas.
Configure AEServices
Configure Inbound ACD
Configure Avaya Proactive Contact Acquire feature
Configure ACD agent for Proactive Agent Blend
Configure Feature Access Codes for Call Centre features
Configure Trunks to Avaya PG230 Digital Switch

SJW; Reviewed
SPOC 5/10/2016
Solution & Interoperability Test Lab Application Notes
©2016 Avaya Inc. All Rights Reserved.
6 of 70
PC511HDSyntel
5.1. Configure AEServices
Use change node-names ip to enter the node-name and IP address for the Application
Enablement Server. Take a note of the CLAN node Name and IP Address.
change node-names ip Page 1 of 2
IP NODE NAMES
Name IP Address
CLAN 10.10.40.31
CM521 10.10.16.23
Gateway 10.10.16.1
IPbuffer 10.10.16.184
Intuition 10.10.16.51
MedPro 10.10.16.32
Presence 10.10.16.83
RDTT 10.10.16.185
SESMNGR 10.10.16.44
SM1 10.10.16.43
SM61 10.10.16.201
default 0.0.0.0
devconaes61 10.10.16.30
In order for Communication Manager to establish a connection to Application Enablement
Services, administer the CTI Link as shown below. Specify an available Extension number, set
the Type as ADJ-IP, which denotes that this is a link to an IP connected adjunct, and name the
link for easy identification, in this instance, the node-name defined in previous step is used.
add cti-link 1 Page 1 of 3
CTI LINK
CTI Link: 1
Extension: 1111
Type: ADJ-IP
COR: 1
Name: devconaes61

SJW; Reviewed
SPOC 5/10/2016
Solution & Interoperability Test Lab Application Notes
©2016 Avaya Inc. All Rights Reserved.
7 of 70
PC511HDSyntel
Using the command change ip-services, configure IP-Services for the AESVCS serviceas
follows:
change ip-services Page 1 of 4
IP SERVICES
Service Enabled Local Local Remote Remote
Type Node Port Node Port
CDR1 CLAN 0 IPbuffer 9000
CDR2 CLAN 0 RDTT 9001
AESVCS y CLAN 8765
On Page 4, set the AE Services Server node name and Password the AES Server will use to
authenticate with Communication Manager.
change ip-services Page 4 of 4
AE Services Administration
Server ID AE Services Password Enabled Status
Server
1: devconaes61 Avayapassword1 y in use
SJW; Reviewed
SPOC 5/10/2016
Solution & Interoperability Test Lab Application Notes
©2016 Avaya Inc. All Rights Reserved.
8 of 70
PC511HDSyntel
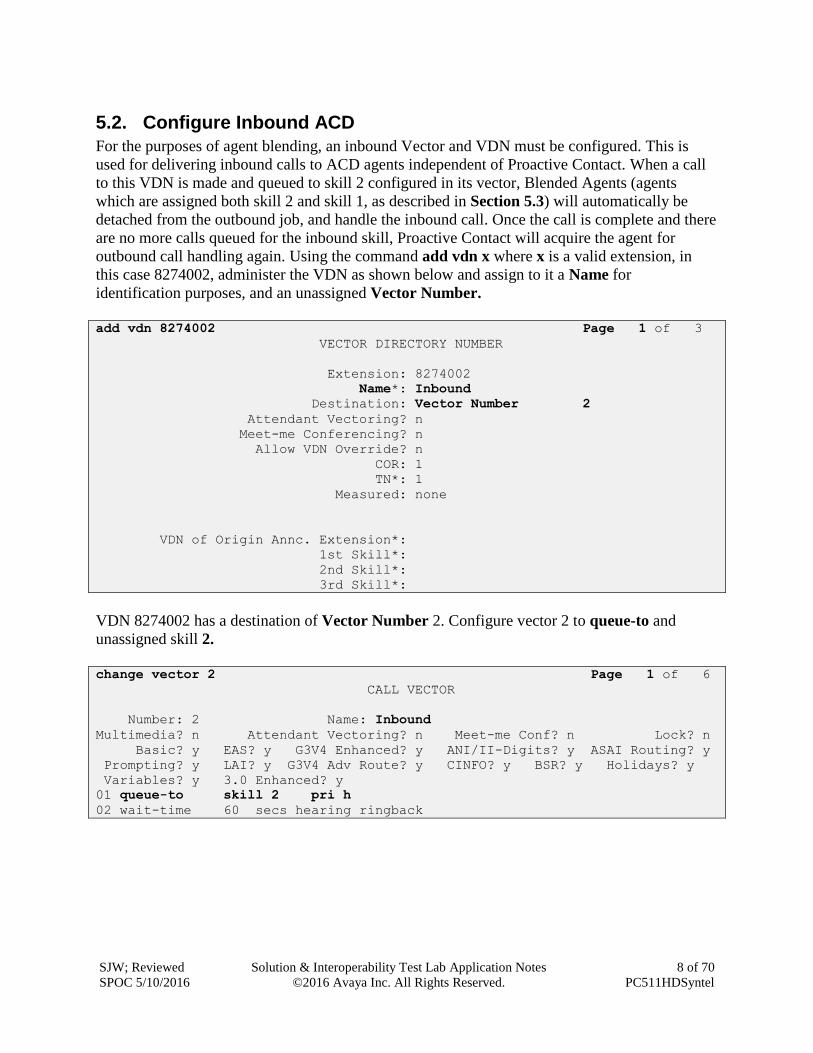
5.2. Configure Inbound ACD
For the purposes of agent blending, an inbound Vector and VDN must be configured. This is
used for delivering inbound calls to ACD agents independent of Proactive Contact. When a call
to this VDN is made and queued to skill 2 configured in its vector, Blended Agents (agents
which are assigned both skill 2 and skill 1, as described in Section 5.3) will automatically be
detached from the outbound job, and handle the inbound call. Once the call is complete and there
are no more calls queued for the inbound skill, Proactive Contact will acquire the agent for
outbound call handling again. Using the command add vdn x where x is a valid extension, in
this case 8274002, administer the VDN as shown below and assign to it a Name for
identification purposes, and an unassigned Vector Number.
add vdn 8274002 Page 1 of 3
VECTOR DIRECTORY NUMBER
Extension: 8274002
Name*: Inbound
Destination: Vector Number 2
Attendant Vectoring? n
Meet-me Conferencing? n
Allow VDN Override? n
COR: 1
TN*: 1
Measured: none
VDN of Origin Annc. Extension*:
1st Skill*:
2nd Skill*:
3rd Skill*:
VDN 8274002 has a destination of Vector Number 2. Configure vector 2 to queue-to and
unassigned skill 2.
change vector 2 Page 1 of 6
CALL VECTOR
Number: 2 Name: Inbound
Multimedia? n Attendant Vectoring? n Meet-me Conf? n Lock? n
Basic? y EAS? y G3V4 Enhanced? y ANI/II-Digits? y ASAI Routing? y
Prompting? y LAI? y G3V4 Adv Route? y CINFO? y BSR? y Holidays? y
Variables? y 3.0 Enhanced? y
01 queue-to skill 2 pri h
02 wait-time 60 secs hearing ringback

SJW; Reviewed
SPOC 5/10/2016
Solution & Interoperability Test Lab Application Notes
©2016 Avaya Inc. All Rights Reserved.
9 of 70
PC511HDSyntel
Calls routed to VDN 8274002 will route to skill 2administered as a hunt group. Configure the
hunt group with an appropriate Group Extension as per the dial plan, in this case, 3092, and a
Group Name for identification. Set ACD, Queue and Vector to y (yes), these parameters
define that the group is an ACD group, controlled by a vector with queuing enabled.
add hunt-group 2 Page 1 of 4
HUNT GROUP
Group Number: 2 ACD? y
Group Name: Inbound Queue? y
Group Extension: 3092 Vector? y
Group Type: ucd-mia
TN: 1
COR: 1 MM Early Answer? n
Security Code: Local Agent Preference? n
ISDN/SIP Caller Display:
Queue Limit: unlimited
Calls Warning Threshold: Port:
Time Warning Threshold: Port:
On Page 2, set Skill to y (yes). This tells the ACD that the calls routed to this group will be
handled by agents assigned to this skill.
add hunt-group 2 Page 2 of 4
HUNT GROUP
Skill? y Expected Call Handling Time (sec): 180
AAS? n
Measured: none
Supervisor Extension:
Controlling Adjunct: none
Timed ACW Interval (sec):
Multiple Call Handling: none

SJW; Reviewed
SPOC 5/10/2016
Solution & Interoperability Test Lab Application Notes
©2016 Avaya Inc. All Rights Reserved.
10 of 70
PC511HDSyntel
5.3. Configure Avaya Proactive Contact Acquire feature
In order for Proactive Agent Blending to function, Communication Manager must be configured
with a VDN monitored by Proactive Contact. When the agents who belong to the skill to which
the Acquire VDN routes are not taking any inbound ACD calls, they are automatically acquired
by Proactive Contact to service calls delivered by the outbound job administered in Proactive
Contact Editor.
add vdn 8274000 Page 1 of 3
VECTOR DIRECTORY NUMBER
Extension: 8274000
Name*: Dialer Acquire-Out
Destination: Vector Number 1
Attendant Vectoring? n
Meet-me Conferencing? n
Allow VDN Override? n
COR: 1
TN*: 1
Measured: none
VDN of Origin Annc. Extension*:
1st Skill*:
2nd Skill*:
3rd Skill*:
VDN 8274000 has a destination of Vector Number 1.
change vector 1 Page 1 of 6
CALL VECTOR
Number: 1 Name: DialerAcquireOut
Multimedia? n Attendant Vectoring? n Meet-me Conf? n Lock? n
Basic? y EAS? y G3V4 Enhanced? y ANI/II-Digits? y ASAI Routing? y
Prompting? y LAI? y G3V4 Adv Route? y CINFO? y BSR? y Holidays? y
Variables? y 3.0 Enhanced? y
01 queue-to skill 1 pri m
02 wait-time 60 secs hearing ringback

SJW; Reviewed
SPOC 5/10/2016
Solution & Interoperability Test Lab Application Notes
©2016 Avaya Inc. All Rights Reserved.
11 of 70
PC511HDSyntel
As shown in vector 1, skill 1 will be the skill in which the agents required for Proactive Agent
Blending will reside. Skill 1 is administered as a hunt group using the command add hunt-
group 1 and specify and identifying Group Name, Group Extension, and setting ACD, Queue
and Vector to y.
add hunt-group 1 Page 1 of 4
HUNT GROUP
Group Number: 1 ACD? y
Group Name: Dialer Acquire-Out Queue? y
Group Extension: 3091 Vector? y
Group Type: ucd-mia
TN: 1
COR: 1 MM Early Answer? n
Security Code: Local Agent Preference? n
ISDN/SIP Caller Display:
Queue Limit: unlimited
Calls Warning Threshold: Port:
Time Warning Threshold: Port:
On Page 2, set Skill to y
add hunt-group 1 Page 2 of 4
HUNT GROUP
Skill? y Expected Call Handling Time (sec): 180
AAS? n
Measured: none
Supervisor Extension:
Controlling Adjunct: none
Timed ACW Interval (sec):
Multiple Call Handling: none

SJW; Reviewed
SPOC 5/10/2016
Solution & Interoperability Test Lab Application Notes
©2016 Avaya Inc. All Rights Reserved.
12 of 70
PC511HDSyntel
5.4. Configure ACD agent for Proactive Agent Blend
In order for the ACD agent to be acquired by Proactive Contact once it has completed taking
inbound calls using the Proactive Agent Blending feature, it must be in both the inbound skill (2)
and the Acquire skill (1). Using the command add agent-loginID x where x is a valid extension
in the dialplan. Administer the Name, Security Code, and Password fields as shown below.
add agent-loginID 8271001 Page 1 of 3
AGENT LOGINID
Login ID: 8271001 AAS? n
Name: Agent1 AUDIX? n
TN: 1 LWC Reception: spe
COR: 1 LWC Log External Calls? n
Coverage Path: AUDIX Name for Messaging:
Security Code: 6002
LoginID for ISDN/SIP Display? n
Password: 6002
Password (enter again): 6002
Auto Answer: station
MIA Across Skills: system
ACW Agent Considered Idle: system
Aux Work Reason Code Type: system
Logout Reason Code Type: system
Maximum time agent in ACW before logout (sec): system
Forced Agent Logout Time: :
WARNING: Agent must log in again before changes take effect
On Page 2 configure the agent in both the inbound skill and the acquire skill.
add agent-loginID 8271001 Page 2 of 3
AGENT LOGINID
Direct Agent Skill: Service Objective? n
Call Handling Preference: skill-level Local Call Preference? n
SN RL SL SN RL SL SN RL SL SN RL SL
1: 1 2 16: 31: 46:
2: 2 1 17: 32: 47:

SJW; Reviewed
SPOC 5/10/2016
Solution & Interoperability Test Lab Application Notes
©2016 Avaya Inc. All Rights Reserved.
13 of 70
PC511HDSyntel
5.5. Configure feature access codes for Call Centre features
These will be referenced later in the Proactive Contact Configuration and used by AES to change
the state of the agent on Communication Manager during blend operation. Enter the command
change feature-access-codes, and on Page 5 configure Auto-In Access Code, Login Access
Code and Logout Access Code as per the dialplan.
change feature-access-codes Page 5 of 10
FEATURE ACCESS CODE (FAC)
Call Center Features
AGENT WORK MODES
After Call Work Access Code: *36
Assist Access Code: *37
Auto-In Access Code: *38
Aux Work Access Code: *39
Login Access Code: *40
Logout Access Code: *41
Manual-in Access Code: *42

SJW; Reviewed
SPOC 5/10/2016
Solution & Interoperability Test Lab Application Notes
©2016 Avaya Inc. All Rights Reserved.
14 of 70
PC511HDSyntel
5.6. Configure Trunks to Avaya PG230 Digital Switch
A number of trunks are required for the purpose of communication between PG230 and
Communication Manager. One trunk for calls in each of the following categories.
Agent Headsets (Dialback)
Outbound
Inbound
Transfer
The physical connection is made between PG230 and the MM710 contained within the G430
Media Gateway. Enter the add ds1 xxxx command, where xxxx is the location of the DS1 circuit
pack and configure as follows:
Name Set to any descriptive string value, in this case, it was CM-
PG230
Bit Rate Set to 2.048
Line Coding Set to hdb3
Signaling Mode Set to isdn-pri
Connect Set to pbx
Interface Set to peer-master
Peer Protocol Set to Q-SIG
Interface Companding Set to alaw
Idle Code Set to 01010100
add ds1 001v2 Page 1 of 1
DS1 CIRCUIT PACK
Location: 001v2 Name: CM-PG230
Bit Rate: 2.048 Line Coding: hdb3
Signaling Mode: isdn-pri
Connect: pbx Interface: peer-master
TN-C7 Long Timers? n Peer Protocol: Q-SIG
Interworking Message: PROGress Side: a
Interface Companding: alaw CRC? y
Idle Code: 01010100 Channel Numbering: timeslot
DCP/Analog Bearer Capability: 3.1kHz
T303 Timer(sec): 4
Disable Restarts? n
Slip Detection? y Near-end CSU Type: other
Echo Cancellation? n

SJW; Reviewed
SPOC 5/10/2016
Solution & Interoperability Test Lab Application Notes
©2016 Avaya Inc. All Rights Reserved.
15 of 70
PC511HDSyntel
Configure a Signaling Group for the previously configured DS1 board 001v2. Enter the add
signaling-group n command, where n is an unused signaling group number. Configure as
follows:
Group Type Set to isdn-pri
Primary D-Channel Enter the DS1 board number followed by 16
Trunk Group for Channel Selection Enter the 1st trunk group number that was
configured for DS1 board 001v2 in this case
that was trunk group 21
TSC Supplementary Service Protocol Set to b
add signaling-group 10 Page 1 of 1
SIGNALING GROUP
Group Number: 10 Group Type: isdn-pri
Associated Signaling? y Max number of NCA TSC: 0
Primary D-Channel: 001v216 Max number of CA TSC: 0
Trunk Group for NCA TSC:21
Trunk Group for Channel Selection: 21 X-Mobility/Wireless Type: NONE
TSC Supplementary Service Protocol: b Network Call Transfer? n

SJW; Reviewed
SPOC 5/10/2016
Solution & Interoperability Test Lab Application Notes
©2016 Avaya Inc. All Rights Reserved.
16 of 70
PC511HDSyntel
Configure a trunk group used for inbound calls. Enter the add trunk-group n command, where
n is an available trunk group number. Configure as follows:
Group Type Set to isdn
Group Name Set to any descriptive string value, in this case, it was QSIG to PG230 -
Inbound
TAC Enter a Trunk Access Code that is valid in the provisioned dial plan
Dial Access Set to y
Service Type Set to tie
add trunk-group 23 Page 1 of 21
TRUNK GROUP
Group Number: 23 Group Type: isdn CDR Reports: y
Group Name: QSIG to PG230 - Inbound COR: 1 TN: 1 TAC: 723
Direction: two-way Outgoing Display? n Carrier Medium:
PRI/BRI
Dial Access? y Busy Threshold: 255 Night Service:
Queue Length: 0
Service Type: tie Auth Code? n TestCall ITC:
rest
Far End Test Line No:
TestCall BCC: 4
On Page 2 of the trunk group configuration, configure as follows:
Supplementary Service Protocol - Set to b
Disconnect Supervision
o In - set to y
o Out - set to y
add trunk-group 23 Page 2 of 21
Group Type: isdn
TRUNK PARAMETERS
Codeset to Send Display: 6 Codeset to Send National IEs: 6
Max Message Size to Send: 260 Charge Advice: none
Supplementary Service Protocol: b Digit Handling (in/out): enbloc/enbloc
Trunk Hunt: cyclical
Digital Loss Group: 13
Incoming Calling Number - Delete: Insert: Format:
Bit Rate: 1200 Synchronization: async Duplex: full
Disconnect Supervision - In? y Out? y
Answer Supervision Timeout: 0
Administer Timers? n CONNECT Reliable When Call Leaves ISDN? n
Delay Call Setup When Accessed Via IGAR? N

SJW; Reviewed
SPOC 5/10/2016
Solution & Interoperability Test Lab Application Notes
©2016 Avaya Inc. All Rights Reserved.
17 of 70
PC511HDSyntel
On Page 5, configure GROUP MEMBER ASSIGNMENTS as follows.
Port Enter the DS1 board number followed by the trunk member number. The
ports configured on Communication Manager must be mapped to the ports
configured on the PG230 Digital Switch
Sig Grp Enter the number of the signaling group configured for the DS1 board 001v2
in this case it is Signaling Group 10
add trunk-group 21 Page 5 of 21
TRUNK GROUP
Administered Members (min/max): 1/5
GROUP MEMBER ASSIGNMENTS Total Administered Members: 5
Port Code Sfx Name Night Sig Grp
1: 001v217 MM710 C 10
2: 001v218 MM710 C 10
3: 001v219 MM710 C 10
4: 001v220 MM710 C 10
5: 001v221 MM710 C 10
Note: There is different port numbering between PG230 Digital Switch and Communication
Manager; therefore ports 18-22 on PG230 Digital Switch correspond to ports 17-21 on
Communication Manager.
Repeat the above configuration steps in order to configure remaining trunk groups for Agent
Headsets (Dial Back), Outbound and Transfer calls. For each trunk group make sure that the
number of ports in GROUP MEMBER ASSIGNMENTS is correctly mapped to the number of
ports configured on the PG230. Also, for every trunk group, configure each port with signaling
group 10.

SJW; Reviewed
SPOC 5/10/2016
Solution & Interoperability Test Lab Application Notes
©2016 Avaya Inc. All Rights Reserved.
18 of 70
PC511HDSyntel
Enter list trunk-group command, to list all trunk groups that were configured on the
Communication Manager. Below is the list of all trunk groups that were configured for the E1
QSIG trunk between Communication Manager and PG230 Digital Switch.
list trunk-group Page 1
TRUNK GROUPS
Grp No. Out Que
No. TAC Group Type Group Name Mem TN COR CDR Meas Dsp Len
21 721 isdn QSIG to PG230 - Headsets 5 1 1 y none y 0
22 722 isdn QSIG to PG230 - Outbound 10 1 1 y none n 0
23 723 isdn QSIG to PG230 - Inbound 5 1 1 y none n 0
24 724 isdn QSIG to PG230 - Transfer 5 1 1 y none n 0

SJW; Reviewed
SPOC 5/10/2016
Solution & Interoperability Test Lab Application Notes
©2016 Avaya Inc. All Rights Reserved.
19 of 70
PC511HDSyntel
6. Configure Avaya Aura® Application Enablement Services Server
This section provide the procedures for configuring Application Enablement Services. The
procedures include the following areas:
Verify TSAPI License
Administer the Switch Connection
Administer TSAPI Link
Disable Security Database
Resetart TSAPI Service
Obtain Tlink name
Administer Avaya Proactive Contact and synTelate user
Configure Devices
6.1. Verify TSAPI License
To access the maintenance console, enter https://<ip-addr> as the URL in an Internet browser,
where <ip-addr> is the active IP address of AES. The login screen is displayed, log in with the
appropriate credentials and then select the Login button.
SJW; Reviewed
SPOC 5/10/2016
Solution & Interoperability Test Lab Application Notes
©2016 Avaya Inc. All Rights Reserved.
20 of 70
PC511HDSyntel
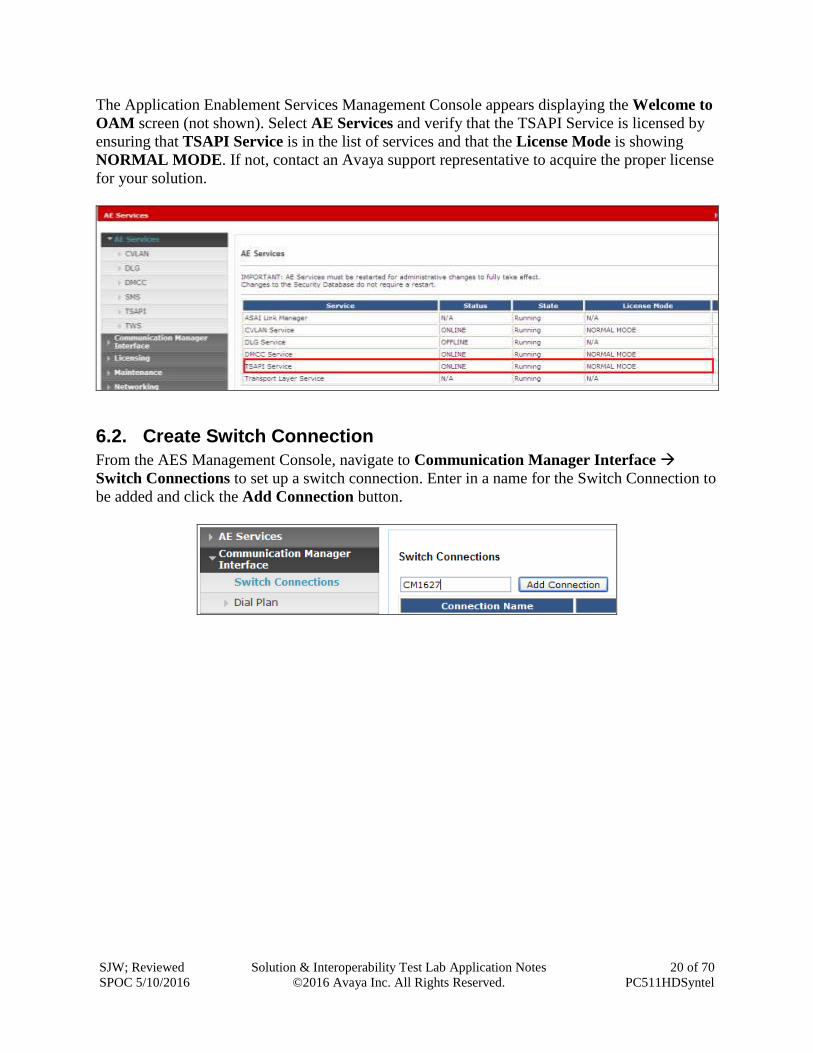
The Application Enablement Services Management Console appears displaying the Welcome to
OAM screen (not shown). Select AE Services and verify that the TSAPI Service is licensed by
ensuring that TSAPI Service is in the list of services and that the License Mode is showing
NORMAL MODE. If not, contact an Avaya support representative to acquire the proper license
for your solution.
6.2. Create Switch Connection
From the AES Management Console, navigate to Communication Manager Interface
Switch Connections to set up a switch connection. Enter in a name for the Switch Connection to
be added and click the Add Connection button.
SJW; Reviewed
SPOC 5/10/2016
Solution & Interoperability Test Lab Application Notes
©2016 Avaya Inc. All Rights Reserved.
21 of 70
PC511HDSyntel
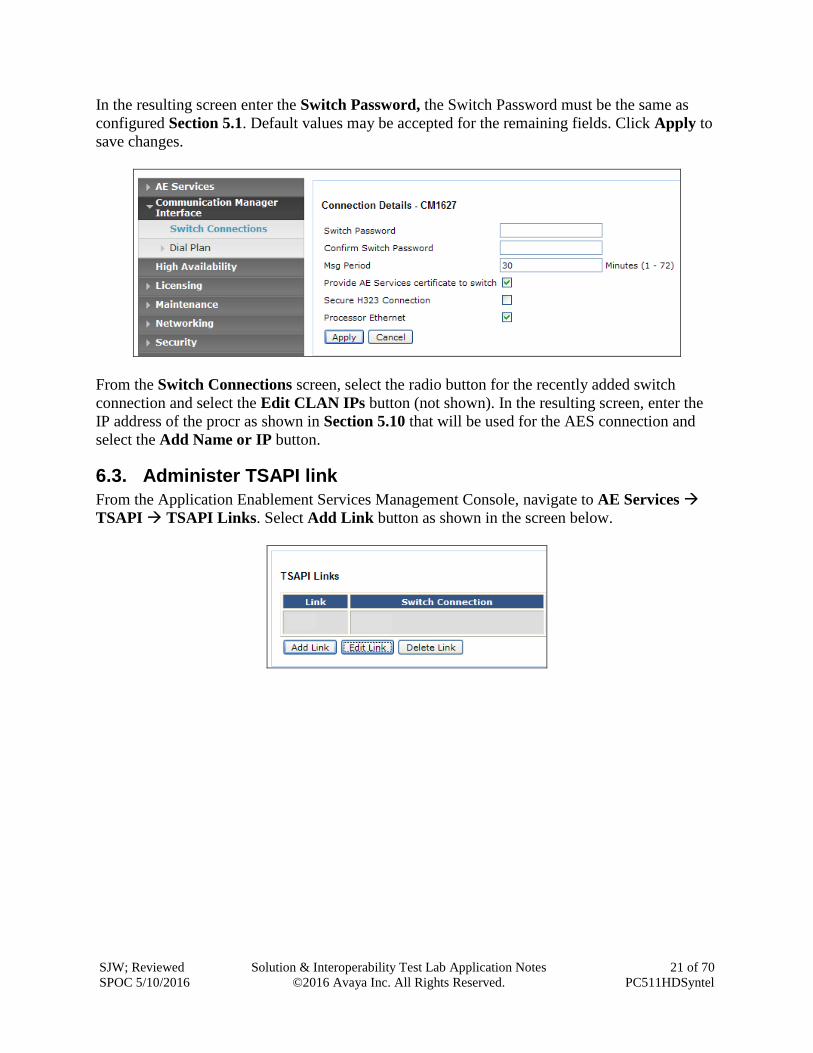
In the resulting screen enter the Switch Password, the Switch Password must be the same as
configured Section 5.1. Default values may be accepted for the remaining fields. Click Apply to
save changes.
From the Switch Connections screen, select the radio button for the recently added switch
connection and select the Edit CLAN IPs button (not shown). In the resulting screen, enter the
IP address of the procr as shown in Section 5.10 that will be used for the AES connection and
select the Add Name or IP button.
6.3. Administer TSAPI link
From the Application Enablement Services Management Console, navigate to AE Services
TSAPI TSAPI Links. Select Add Link button as shown in the screen below.

SJW; Reviewed
SPOC 5/10/2016
Solution & Interoperability Test Lab Application Notes
©2016 Avaya Inc. All Rights Reserved.
22 of 70
PC511HDSyntel
On the Add TSAPI Links screen, enter the following values:
Link: Use the drop-down list to select an unused link number.
Switch Connection: Choose the switch connection CM63VMPG, configured in
Section 6.2 from the drop-down list.
Switch CTI Link Number: Corresponding CTI link number configured in Section 5.1
ASAI Link Version: This can be left at the default value
Security: This can be left at the default value. The value Both was used in this test.
Once completed, select Apply Changes.
Another screen appears for confirmation of the changes. Choose Apply.

SJW; Reviewed
SPOC 5/10/2016
Solution & Interoperability Test Lab Application Notes
©2016 Avaya Inc. All Rights Reserved.
23 of 70
PC511HDSyntel
The TSAPI Service must be restarted to effect the changes made in this section. From the
Management Console menu, navigate to Maintenance Service Controller. On the Service
Controller screen, tick the TSAPI Service and select Restart Service.

SJW; Reviewed
SPOC 5/10/2016
Solution & Interoperability Test Lab Application Notes
©2016 Avaya Inc. All Rights Reserved.
24 of 70
PC511HDSyntel
6.4. Identify Tlinks
Navigate to Security Security Database Tlinks. Verify the value of the Tlink Name.
This will be needed to configure Presence Suite in Section 7.1.

SJW; Reviewed
SPOC 5/10/2016
Solution & Interoperability Test Lab Application Notes
©2016 Avaya Inc. All Rights Reserved.
25 of 70
PC511HDSyntel
6.5. Create Avaya CTI User
A User ID and password needs to be configured for the Inisoft server to communicate as a
TSAPI client with the Application Enablement Services server. Navigate to the User
Management User Admin screen then choose the Add User option (not shown). In the Add
User screen shown below, enter the following values:
User Id - This will be used by the Inisoft Server in Section 7.1.
Common Name and Surname - Descriptive names need to be entered.
User Password and Confirm Password - CT User - Select Yes from the drop-down
menu.
Complete the process by choosing Apply at the bottom of the screen (not shown).
The next screen will show a message indicating that the user was created successfully (not
shown).

SJW; Reviewed
SPOC 5/10/2016
Solution & Interoperability Test Lab Application Notes
©2016 Avaya Inc. All Rights Reserved.
26 of 70
PC511HDSyntel
6.6. Enable Unrestricted Access for CTI User
Navigate to the CTI Users screen by selecting Security Security Database CTI Users
List All Users (not shown). Select the user that was created in Section 6.5 and select the Edit
option (not shown). The Edit CTI User screen appears. Check the Unrestricted Access box and
click Apply Changes at the bottom of the screen.
A screen (not shown) appears to confirm applied changes to CTI User, choose Apply. This CTI
user should now be enabled.

SJW; Reviewed
SPOC 5/10/2016
Solution & Interoperability Test Lab Application Notes
©2016 Avaya Inc. All Rights Reserved.
27 of 70
PC511HDSyntel
6.7. Configure Devices
In order for Proactive Contact to perform Proactive Agent Blending, AE Services needs to be
configured with the devices which are to be monitored. Click on Security Security Database
Devices (not shown) next Add Device (not shown), enter the VDN extension number you
created for the VDN administered in Section 5.3 in this instance, VDN 8274000. Click on Add
Device (not shown), the following screen will be displayed. Complete the fields as shown and
click Apply Changes and click Confirm at the subsequent confirmation screen.
Perform the same for the Inbound VDN, in this case, VDN 8274001, as shown.

SJW; Reviewed
SPOC 5/10/2016
Solution & Interoperability Test Lab Application Notes
©2016 Avaya Inc. All Rights Reserved.
28 of 70
PC511HDSyntel
7. Configure Avaya Proactive Contact This section provides the procedures for configuring Proactive Contact. The procedures include
the following areas:
Verify Avaya Proactive Contact Licensing
Configure CTI
Configure Avaya Proactive Contact with CTI for Agent Blending
Configure master.cfg
Configure number format
Configure the calling list
Configure Avaya Proactive Contact Administration Software
7.1. Verify Avaya Proactive Contact Licensing
Access the Web License Manager of the Avaya Proactive Contact, in this instance using the
URL https://10.10.16.91:52233/WebLM/. The Web License Manager Screen is displayed; login
using the appropriate credentials.

SJW; Reviewed
SPOC 5/10/2016
Solution & Interoperability Test Lab Application Notes
©2016 Avaya Inc. All Rights Reserved.
29 of 70
PC511HDSyntel
The Web License Manager screen below is displayed. Select Licensed products
Avaya_Proactive_Contact in the left pane, to display the Licensed Features screen in the right
pane. Verify that there are sufficient licenses for each of the fields displayed:

SJW; Reviewed
SPOC 5/10/2016
Solution & Interoperability Test Lab Application Notes
©2016 Avaya Inc. All Rights Reserved.
30 of 70
PC511HDSyntel
7.2. Configure CTI
In order to establish the TSAPI link between Proactive Contact and Application Enablement
Services Server, the relevant files were edited.From the Proactive Contact Telnet Session create
a cti_passwd.cfg file by doing the following:
type cti_passwd -s (s denotes the CTI Option).
When prompted for the password enter the password assigned to the CTI user configured earlier
on the Application Enablement Services Server in Section 6.5, and hit return, re-enter as
requested.
Navigate to the /opt/avaya/pds/config/swif_ct.cfg file and change the parameters as shown
follows.
SERVER:AVAYA#CM#CSTA-S#DEVCONAES61
LOGIN:syntelate
REASONCODE:1
PHANTOMNUMBERS:1850-1854
WORKMODE:AUTO_IN
AGENTANSWER:NO
PRIORITYCALL:NO
Notes: The Tlink and the Proactive Contact CTI username as configured in Section 6
Navigate to the /opt/avaya/pds/config/ directory. Copy and rename the tslibrc file, by typing cp
tslibrc .tslibrc. Edit .tslibrc with the IP Address of the Application Enablement Services Server,
as shown.
[Telephony Servers]
; This is a list of the servers offering Telephony Services via TCP/IP.
; Either domain name or IP address may be used; default port number is 450
; The form is: host_name=port_number For example:
;
; tserver.mydomain.com=450
10.10.16.30
;
; This file should be copied to CONFIG directory as .tslibrc.
; See master.cfg for the directory name.
; This entry overrides the [Telephony Servers] section, if any.

SJW; Reviewed
SPOC 5/10/2016
Solution & Interoperability Test Lab Application Notes
©2016 Avaya Inc. All Rights Reserved.
31 of 70
PC511HDSyntel
For Agent Blending, copy the .tslibrc file to the /opt/avaya/pab/config/ directory by entering the
command cp /opt/avaya/pab/config/.tslibrc /opt/avaya/pab/config/.tslibrc. Navigate to
/opt/avaya/pds/config – edit opmon.cfg as shown below:
CFGTIME:15
DIALBACK:1-15:15:1::
DIALBACKNUM:ALL
Edit dgswitch.cfg as shown below. The format used is based on the location of the ports in the
PG230 Digital Switch; therefore Proactive Contact is configured with the same number of
Inbound Ports as the number of inbound lines on the PG230 Digital Switch. The inbound ports
configured on Proactive Contact correspond to the ports of the inbound trunk group configured
on Communication Manager in Section 5.6; the same is true for Headset, Outbound and Transfer
trunk ports.
# Headset Ports
H:1:361:1::#H:15:1:1-1-21-4-2
H:2:362:1::#H:15:1:1-1-21-4-3
H:3:363:1::#H:15:1:1-1-21-4-4
H:4:364:1::#H:15:1:1-1-21-4-5
H:5:365:1::#H:15:1:1-1-21-4-6
# Normal Outbound Trunks
N:1:366:1::#O:10:1:1-1-21-4-7
N:2:367:1::#O:10:1:1-1-21-4-8
N:3:368:1::#O:10:1:1-1-21-4-9
N:4:369:1::#O:10:1:1-1-21-4-10
N:5:370:1::#O:10:1:1-1-21-4-11
N:6:371:1::#O:10:1:1-1-21-4-12
N:7:372:1::#O:10:1:1-1-21-4-13
N:8:373:1::#O:10:1:1-1-21-4-14
N:9:374:1::#O:10:1:1-1-21-4-15
N:10:375:1::#O:10:1:1-1-21-4-16
# Normal Inbound Trunks
N:11:377:1::#I:11:1:1-1-21-4-18
N:12:378:1::#I:11:1:1-1-21-4-19
N:13:379:1::#I:11:1:1-1-21-4-20
N:14:380:1::#I:11:1:1-1-21-4-21
N:15:381:1::#I:11:1:1-1-21-4-22
# Transfer-thru Trunks
T:1:12:1::#T:12:1:1-1-21-4-1
SJW; Reviewed
SPOC 5/10/2016
Solution & Interoperability Test Lab Application Notes
©2016 Avaya Inc. All Rights Reserved.
32 of 70
PC511HDSyntel
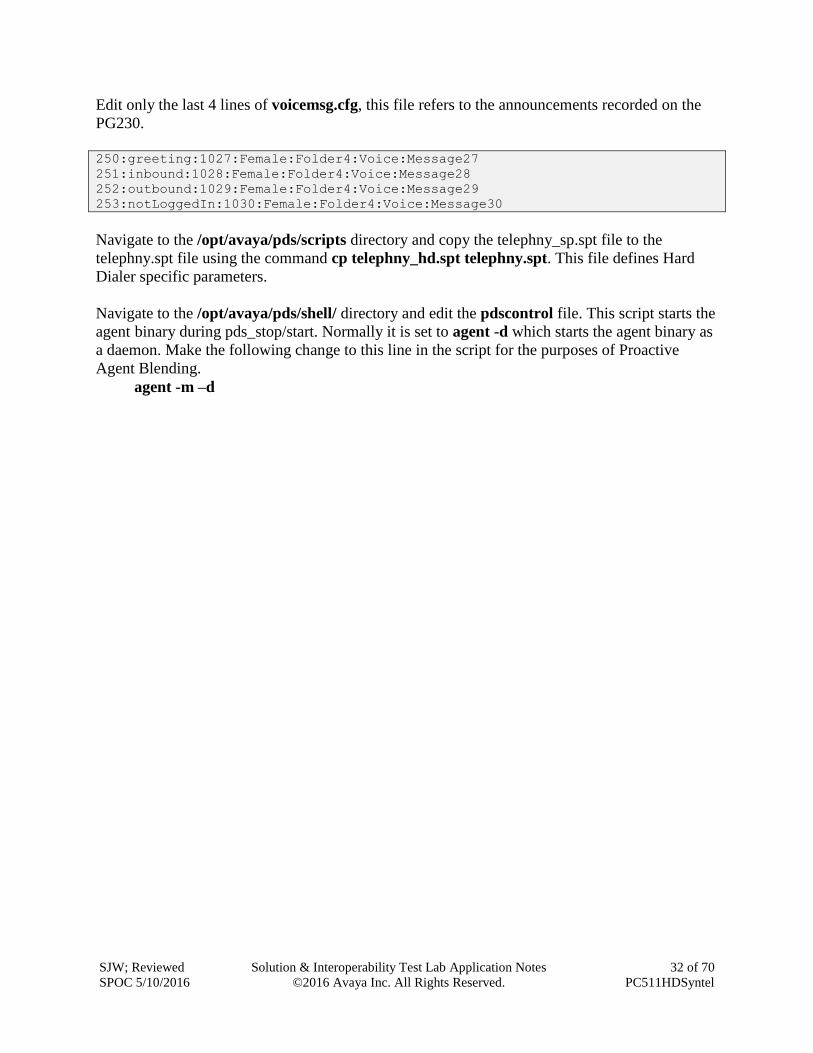
Edit only the last 4 lines of voicemsg.cfg, this file refers to the announcements recorded on the
PG230.
250:greeting:1027:Female:Folder4:Voice:Message27
251:inbound:1028:Female:Folder4:Voice:Message28
252:outbound:1029:Female:Folder4:Voice:Message29
253:notLoggedIn:1030:Female:Folder4:Voice:Message30
Navigate to the /opt/avaya/pds/scripts directory and copy the telephny_sp.spt file to the
telephny.spt file using the command cp telephny_hd.spt telephny.spt. This file defines Hard
Dialer specific parameters.
Navigate to the /opt/avaya/pds/shell/ directory and edit the pdscontrol file. This script starts the
agent binary during pds_stop/start. Normally it is set to agent -d which starts the agent binary as
a daemon. Make the following change to this line in the script for the purposes of Proactive
Agent Blending.
agent -m –d

SJW; Reviewed
SPOC 5/10/2016
Solution & Interoperability Test Lab Application Notes
©2016 Avaya Inc. All Rights Reserved.
33 of 70
PC511HDSyntel
7.3. Configure Avaya Proactive Contact with CTI for Agent Blending
From the Proactive Contact Telnet Session create a cti_passwd.cfg file by entering the following
Type cti_passwd -b (b denotes the blend). When prompted for the password enter the password
assigned to the CTI user configured earlier in Section 6.5.
Navigate to the /opt/avaya/pab/config/ directory. Copy and rename the ctirc.cvct file, by typing
cp ctirc.cvct ctirc1. Edit ctirc1 as shown below.
##############################################################################
# LAST REVISION $Date: 2002/02/20 16:24:55 $
##############################################################################
# The only configurable line is the 14th line after the comments (third from
# the bottom). There are five fields in this line:
# Field 1: TLINK
# Field 2: Login name for CVCT (run "cti_passwd -b" to setup the encrypted
password)
# Field 3: Application Name (PDS)
# Field 4: TS2 - This is the library version that we used. Do no change.
0 # CVCT CEP (switch type)
0x11 # CEP CHGSVR
0x2015A # Supported Events
0 # Stats and Counts (No MIS for Aspect)
0 # Appear and Vanish (No LM for Aspect)
0 # Agent Available, Login, Logout
0 # per-outstanding-move (N/A for Aspect)
0 # seconds added to LM (N/A for Aspect)
0 # seconds added to LC (N/A for Aspect)
Port SupId SupPass
NotUsed
AVAYA#CM#CSTA-S#DEVCONAES61:pc5hd:PDS:TS2
chgsvr
cep_pway

SJW; Reviewed
SPOC 5/10/2016
Solution & Interoperability Test Lab Application Notes
©2016 Avaya Inc. All Rights Reserved.
34 of 70
PC511HDSyntel
Copy and rename the CBA_procs.example file, type cp CBA_procs.example CBA_procs and
edit CBA_procs as shown below:
############################################################################
# |Max Wait|Max Wait|Max Wait|Max Wait|Kill
# | Before | Before | Before | Before |Cfg-
# Process|Startup|Shutdown|Shutdown| Abort | SIGTERM| SIGKILL|Only
# Type | Order | Order | Message| Message| Signal | Signal |Mode
#---------------------------------------------------------------------------
# NOTE - Startup Order and Shutdown Order MUST start at the value one(1) and
# increment WITHOUT any sequence gaps
PROCESS_CONTROL
SOE| 1 | 5 | -1 | -1 | -1 | 25 | 0
USR| 2 | 4 | -1 | -1 | 21 | 24 | 0
CTI| 3 | 3 | 11 | 15 | 24 | 35 | 1
ACD| 4 | 2 | 0 | 5 | 10 | 11 | 1
MSC| 5 | 1 | -1 | -1 | -1 | 25 | 0
###############################################################
# Process | Host | Path | Binary | Parameters
# Type | Name | | Name |
#--------------------------------------------------------------
PROCESS_INSTANCE
USR|devconhd|/opt/avaya/pab/bin/|cbauser|1
CTI|devconhd|/opt/avaya/pab/bin/|cti|1
ACD|devconhd|/opt/avaya/pab/bin/|acdmon|1 nocancel min_asa 2sec gen_rel
MSC|devconhd|/opt/avaya/pab/scripts/|acdsnap_mon|
Copy and rename the CBA_cfg.example file, type cp CBA_cfg.example CBA_cfg and press
Enter. This establishes the Application, PBX and Gateway IDs used by Agent Blending.

SJW; Reviewed
SPOC 5/10/2016
Solution & Interoperability Test Lab Application Notes
©2016 Avaya Inc. All Rights Reserved.
35 of 70
PC511HDSyntel
Proactive Contact needs to be configured with the inbound VDN to be monitored and the acquire
VDN for acquiring agents in order to handle calls from the outbound job. The Proactive Contact
name for a VDN is Domain. Configured in /opt/avaya/pab/config/dom_group.data – this
defines an outbound only Domain Group called NORTH_USA, an IB (inbound) Domain called
8274002, with specific reference to VDN 8274002, and a TEAM (acquire) Domain called
8274000 with specific reference to VDN 8274000. Both of these Domain have a Domain Group
ID of NORTH_USA.
*VERSION | 1
########################### Defined Domains Groups #########################
# Domain Group Record Layout - To Create a new domain group copy the template
# below and replace all field holders with appropriate values.
# NOTE - All fields that retain their place holder values(TR,TT,etc)
# will be assumed to be empty.
# NOTE - Line breaks may happen between any fields but not within a field
# NOTE - Do not change lower case field holders
#
# WARNING - Remove the "#" comment field indicator to activate the template
#
# TEMPLATE
# ----------------------------------------------------------------------------
--
# *DG | DG_NM | dg_id | RTI | CM | MAAS | SC | DSL | MSL |
# AUT | MAO | TR | TT | ACWT | MQR | afi | rti |
# ----------------------------------------------------------------------------
--
#
# Description of fields within a Domain Group
# -------------------------------------------
# * - Start Of New Record { MUST be in first column of record}
# DG - Domain Group Record Key { Always DG}
# DG_NM - Domain Group Name {Descriptive name use by UI to specify a domain}
# dg_id - Domain Group ID { FILLED IN BY SYSTEM}
# RTI - Time Interval (hours)
# CM - Control Method {ASA-Avg.Spd Answered,SL-Sevice Lvl,OB_ONLY-
Outbound}
# MAAS - [Target] Average Speed to Answer (seconds)
# SC - Service Criterion (seconds)
# DSL - Desired Service Level (%)
# MSL - Abatement Service Level (%)
# AUT - Traffic Intensity Threshold (%)
# MAO - Minimum # of Agents on Outbound (# agents)
# TR - Initial Traffic Rate (calls/second)
# TT - Minimum Talk Time (seconds)
# ACWT - Minimum After Call Work Time (seconds)
# MQR - Minimum Queued for Release (OB_ONLY groups)
# afi - Acquisitions From Inbound { FILLED IN BY SYSTEM }
# rti - Releases To Inbound { FILLED IN BY SYSTEM }
#
*DG | NORTH_USA | 1 | RTI | OB_ONLY | MAAS | SC |
DSL | MSL | AUT | MAO | TR | TT |
ACWT | 0 | afi | rti |

SJW; Reviewed
SPOC 5/10/2016
Solution & Interoperability Test Lab Application Notes
©2016 Avaya Inc. All Rights Reserved.
36 of 70
PC511HDSyntel
########################### Defined Domains #########################
# Domain Record Layout - To Create a new domain copy the template below
# and replace all field holders with appropriate values.
# NOTE - All notes/warnings from domain group field still apply.
#
# TEMPLATE
# ---------------------------------------------------------------------------
# *DM | DM_ADRS | DM_EXT | DG_NM | dg_id | AP_ID | PBX_ID | GW_ID | DM_TYP |
# ---------------------------------------------------------------------------
#
# Description of fields within a Domain
# -------------------------------------------
# * - Start Of New Record {MUST be in first column of record}
# DM - Domain Record Keyword {Always DM}
#
# DM_ADRS- Domain Address
# DM_EXT - Domain Phone Number
# DG_NM - Domain Group Name {Descriptive name use by UI to specify a D.G.}
# Use TRANS if defining a floating transient domain.
# dg_id - Domain Group ID {FILLED IN BY SYSTEM}
# AP_ID - PDS ID
# PBX_ID - PBX ID
# GW_ID - Gateway ID
# DM_TYP - Domain Type -- one of:
# IB - Inbound,
# TRANS - Transient Acquire,
# TEAM - Team Acquire,
# OV_FLOW - Overflow
#
*DM | 8274000 | 8274000 | NORTH_USA | 1 | 1 | 1 |
1 | TEAM |
*DM | 8274002 | 8274002 | NORTH_USA | 1 | 1 | 1 |
1 | IB |

SJW; Reviewed
SPOC 5/10/2016
Solution & Interoperability Test Lab Application Notes
©2016 Avaya Inc. All Rights Reserved.
37 of 70
PC511HDSyntel
Edit ACD.cfg – This file contains the Communication Manager feature access codes for ACD
login and logout s noted in Section 5.5 and also specifies the TESTMODE, configured as shown
below:
TESTMODE:OFF
DELAYTIME:5
LOGIN:*40
LOGOUT:*41
Edit acd_ext.cfg – This file contains the Communication Manager extension number which
Proactive Contact Agents and ACD Agents will be logging in, as show below, extension
8271001 is the extension onto which agents are logged into in this case:
1:8271001
Agent Blending is a feature add-on for Proactive Contact. Ensure that PDS is stopped and as
root, enter the command menu install which will run a script. When prompted Select option 2.
For Value added products, and then 2 again for Install Predictive Agent Blend and follow the
instructions prompted on screen as shown below:
Have you stopped PDS processes: y
Following AES servers are configured:
10.10.16.30 Do you want to add another AES server: n
CTI password seems to be already set in /opt/avaya/pab/config/cti_passwd.cfg
Do you wish to change the CTI password? n
AES_LINK set to AVAYA#CM#CSTA-S#DEVCONAES61
Do you want to change it now?: n
AES_USER set to pc5hd
Do you want to change it now?: n
Do you wish to configure Domains now?: n
Do you wish to change number of users that can be acquired for outbound
calling now?: n
Now we’ll install ACD extensions
Enter q to quit
When prompted, press any key to continue.
Enter 0 to exit, and 0 again

SJW; Reviewed
SPOC 5/10/2016
Solution & Interoperability Test Lab Application Notes
©2016 Avaya Inc. All Rights Reserved.
38 of 70
PC511HDSyntel
7.4. Configure master.cfg
Amendments to the master.cfg file, located in /opt/avaya/pds/etc were made as follows.
CALL_BLENDING:YES
DBKGROUP:15,1,1
DBSERVERIP:10.10.16.91
IICB_HOST:devconhd
INBNDSYS:YES
LINEASSIGN:REG,O=1-10;INB,I=11-15
NAMESERVICEHOST:devconhd
OPERATORS:5
OPLIMIT:I=5,O=5,B=5,P=5,M=5
PORTS:15
PRIMARY:YES
SWITCHNAME:switch1
SWITCHTESTMODE:NO
SWITCHTYPE:DIGITAL
VISUAL_CPA:YES
WEBLMURL:http,//10.10.16.91,8080/WebLM/LicenseServer:
Note: INBNDSYS was set to YES for the purposes of Inisoft testing.
7.5. Configure Number Format
The phonefmt.cfg file located in /opt/avaya/pds/config contains details of how Proactive
Contact needs to manipulate numbers in the calling list in order to successfully place calls. The
last line in the file is configured as follows:
STD_TO_DIALFMT:*:ALLTYPES:10:8230003::
In this instance, of the digits dialed, 10 are deleted and the digits 8230003 are inserted.

SJW; Reviewed
SPOC 5/10/2016
Solution & Interoperability Test Lab Application Notes
©2016 Avaya Inc. All Rights Reserved.
39 of 70
PC511HDSyntel
7.6. Configure Calling List
Proactive Contact is delivered with default calling lists. The author assumes an inbound and
outbound calling list is created using Proactive Contact Editor. The administration of calling lists
is outside of the scope of this document.
7.7. Configure Avaya Proactive Contact Administration Software
In order for the Proactive Contact Editor application to communicate with the Proactive Contact
Server, the PC on which it resides must be configured.
7.7.1. Configure Windows Host File
Edit %WINDIR%\system32\drivers\etc\hosts to include the hostname and IP address of the
Proactive Contact Server, as follows:
10.10.16.91 devconhd
7.7.2. Check Avaya Proactive Contact Services
Ensure all necessary services are running on the Proactive Contact Server. The following
commands start, check and stop the three services. The services must be stopped and started in
the order shown. All services must be started before proceeding.
start_db
start_mts
start_pds
check_db
check_mts
check_pds
stop_pds
stop_mts
stop_db

SJW; Reviewed
SPOC 5/10/2016
Solution & Interoperability Test Lab Application Notes
©2016 Avaya Inc. All Rights Reserved.
40 of 70
PC511HDSyntel
7.7.3. Configure Avaya Proactive Contact Administration Software
Double click on the Health Manager icon on the desktop. The screen below will be presented;
complete it as shown with the Proactive Contact IP address and hostname.
It is now possible to log in to the Health Manager with the sysadm login credentials. Close
Health Manager and double click on the Editor icon on the desktop. Log in with the sysadm
login credentials.
SJW; Reviewed
SPOC 5/10/2016
Solution & Interoperability Test Lab Application Notes
©2016 Avaya Inc. All Rights Reserved.
41 of 70
PC511HDSyntel
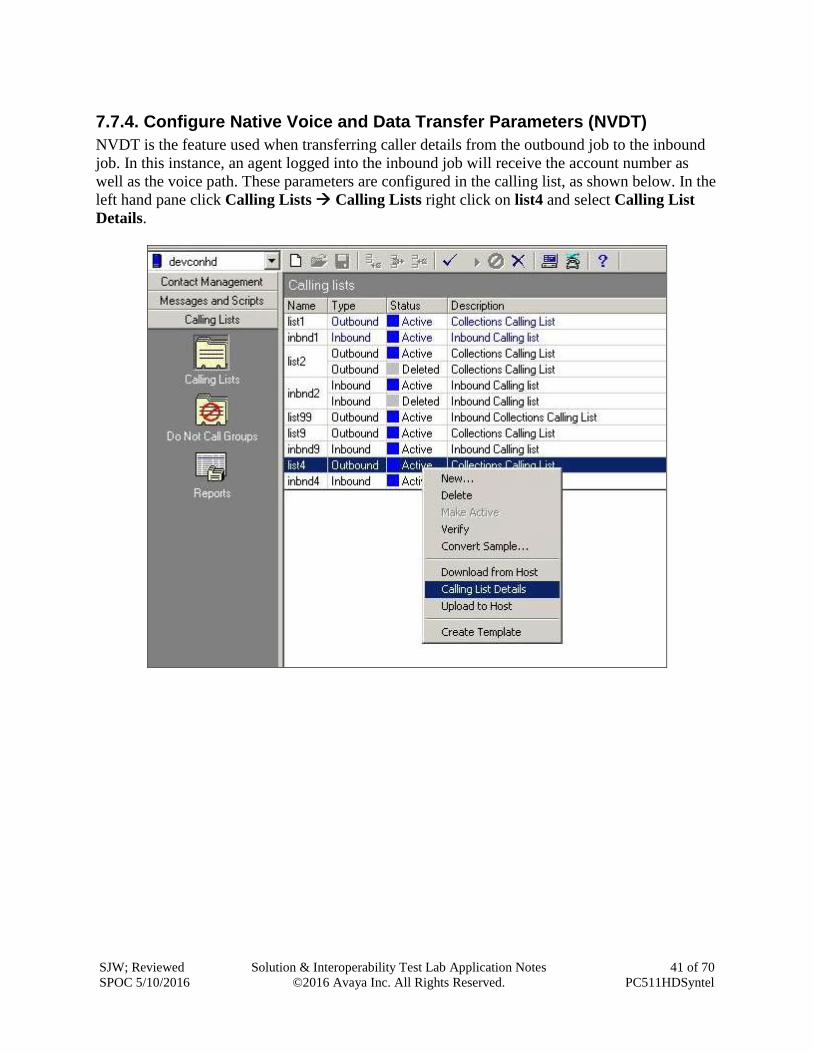
7.7.4. Configure Native Voice and Data Transfer Parameters (NVDT)
NVDT is the feature used when transferring caller details from the outbound job to the inbound
job. In this instance, an agent logged into the inbound job will receive the account number as
well as the voice path. These parameters are configured in the calling list, as shown below. In the
left hand pane click Calling Lists Calling Lists right click on list4 and select Calling List
Details.

SJW; Reviewed
SPOC 5/10/2016
Solution & Interoperability Test Lab Application Notes
©2016 Avaya Inc. All Rights Reserved.
42 of 70
PC511HDSyntel
Click to place a tick in the field to enable NVDT (Native Voice and Data Transfer).
Click on the Calling List Dictionary tab, and click to place a tick in the NVDT column next to
ACCTNUM, ensure the LENGTH field is set to 25 and save (not shown) when completed.

SJW; Reviewed
SPOC 5/10/2016
Solution & Interoperability Test Lab Application Notes
©2016 Avaya Inc. All Rights Reserved.
43 of 70
PC511HDSyntel
The same needs to be performed for the inbnd4 list. Right click on inbnd4 and select Calling
List Details.
Click to place a tick in the column next to ACCTNUM, and ensure the LENGTH field is set to
25. Save when completed (not shown).

SJW; Reviewed
SPOC 5/10/2016
Solution & Interoperability Test Lab Application Notes
©2016 Avaya Inc. All Rights Reserved.
44 of 70
PC511HDSyntel
7.7.5. Configure Strategy
Assuming that strategy phone1 and calling list list4 (as specified in the previous section), are
being used, configure editor as shown below and click verify. Ensure verification is successful.

SJW; Reviewed
SPOC 5/10/2016
Solution & Interoperability Test Lab Application Notes
©2016 Avaya Inc. All Rights Reserved.
45 of 70
PC511HDSyntel
7.7.6. Configure Selections
Click Selections, select all4, and calling list4, click verify and ensure verification is
successful.

SJW; Reviewed
SPOC 5/10/2016
Solution & Interoperability Test Lab Application Notes
©2016 Avaya Inc. All Rights Reserved.
46 of 70
PC511HDSyntel
Click Run , and ensure that the Results pop-up screen shows some records in the Records
Selected field.

SJW; Reviewed
SPOC 5/10/2016
Solution & Interoperability Test Lab Application Notes
©2016 Avaya Inc. All Rights Reserved.
47 of 70
PC511HDSyntel
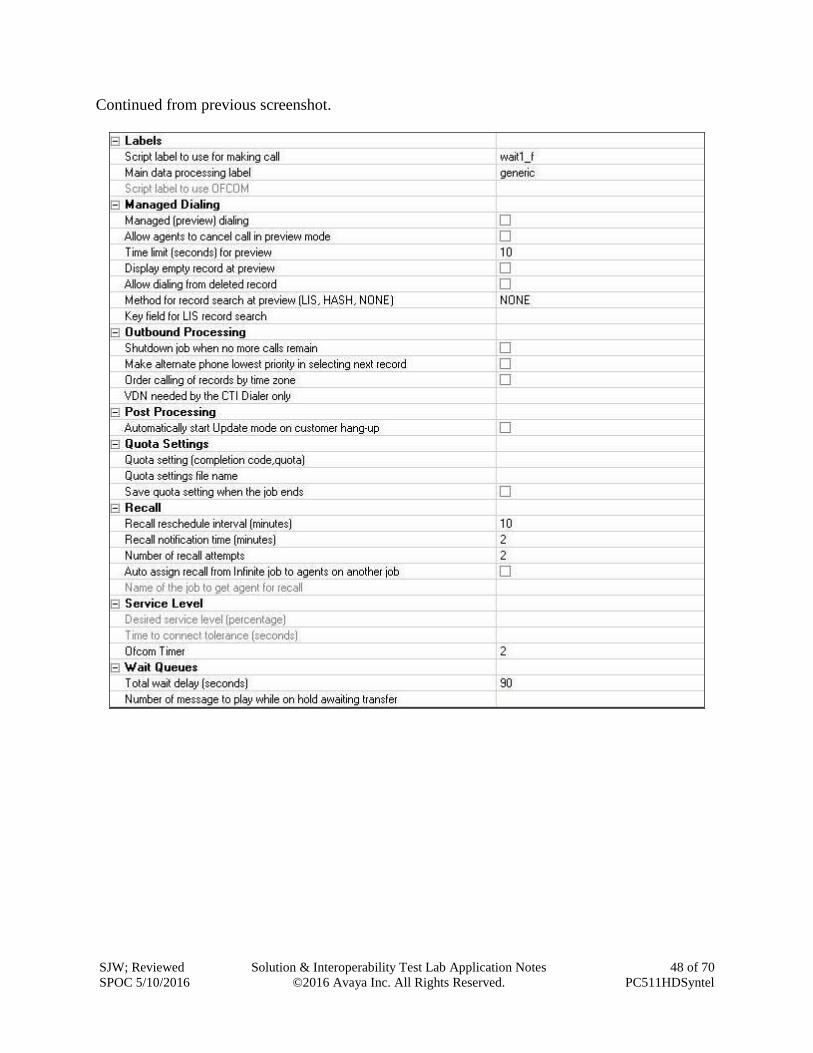
7.7.7. Configure Outbound Job
Click Jobs, select outbnd2 and configure as shown below:
Note: Name of inbound job to transfer calls to field is set to inbnd1
SJW; Reviewed
SPOC 5/10/2016
Solution & Interoperability Test Lab Application Notes
©2016 Avaya Inc. All Rights Reserved.
48 of 70
PC511HDSyntel
Continued from previous screenshot.

SJW; Reviewed
SPOC 5/10/2016
Solution & Interoperability Test Lab Application Notes
©2016 Avaya Inc. All Rights Reserved.
49 of 70
PC511HDSyntel
Click verify and ensure verification completes successfully.
SJW; Reviewed
SPOC 5/10/2016
Solution & Interoperability Test Lab Application Notes
©2016 Avaya Inc. All Rights Reserved.
50 of 70
PC511HDSyntel
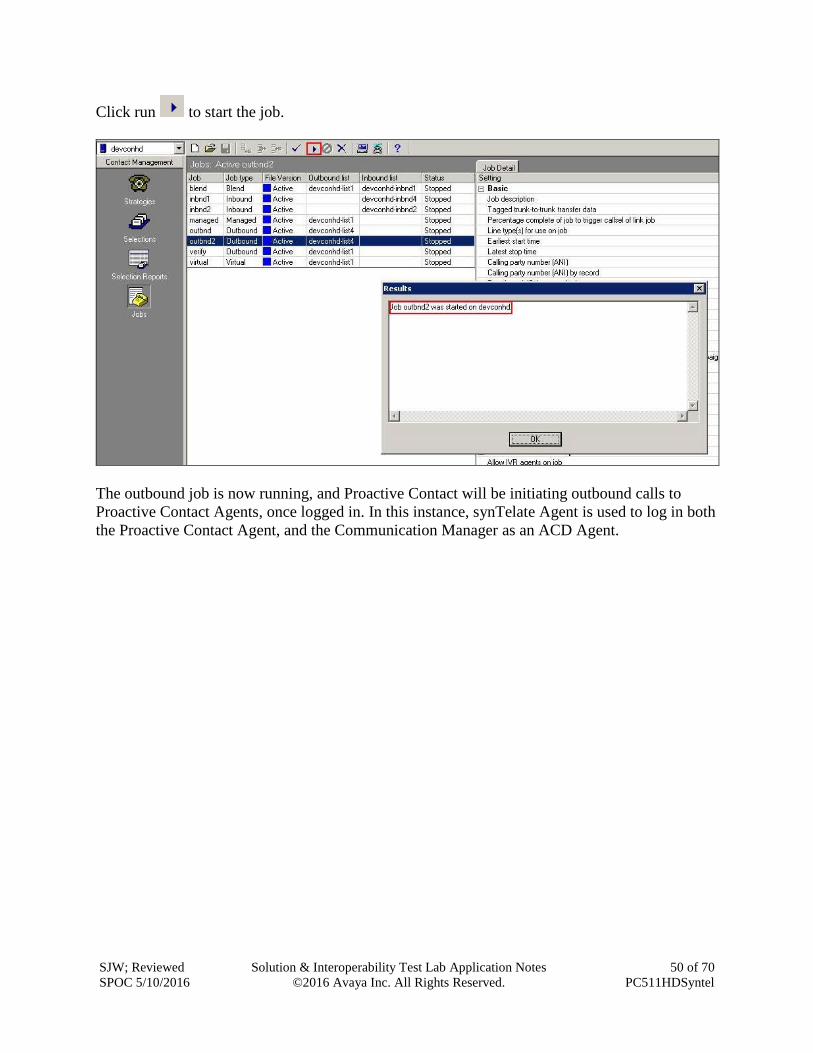
Click run to start the job.
The outbound job is now running, and Proactive Contact will be initiating outbound calls to
Proactive Contact Agents, once logged in. In this instance, synTelate Agent is used to log in both
the Proactive Contact Agent, and the Communication Manager as an ACD Agent.

SJW; Reviewed
SPOC 5/10/2016
Solution & Interoperability Test Lab Application Notes
©2016 Avaya Inc. All Rights Reserved.
51 of 70
PC511HDSyntel
7.7.8. Configure Inbound Job
Click Jobs in the left pane, select inbnd4 and set the inbound calling list field as configured in
Section 7.7.4.
Click verify and ensure verification completes successfully.

SJW; Reviewed
SPOC 5/10/2016
Solution & Interoperability Test Lab Application Notes
©2016 Avaya Inc. All Rights Reserved.
52 of 70
PC511HDSyntel
Click to start the job.
If the job fails to run as expected, ensure the job file within the /opt/avaya/pds/job/ directory has
the following parameters set.
TESTMODE::
TESTOPER::

SJW; Reviewed
SPOC 5/10/2016
Solution & Interoperability Test Lab Application Notes
©2016 Avaya Inc. All Rights Reserved.
53 of 70
PC511HDSyntel
8. Configure Inisoft synTelate Designer This section provides the procedures for configuring synTelate Designer. The procedures include
the following areas:
Administer Moagent32.ini
Launch Designer
Administer campaigns
Administer scripts and screens
Administer CTI
8.1. Administer Moagent32.ini
From the PC running Designer, navigate to the C:\WINDOWS\system32 directory to locate the
Moagent32.ini file, amend this file with the Proactive Contact IP address as servername and set
UseDIIDbs=0. [logon]
servername = 10.10.16.91
[ConfigSettings]
UseDllDbs=0
8.2. Launch Designer
From the PC running Designer, select Start Programs synTelate synTelate Designer
to display the Welcome - synTelate screen (not shown). Select the Designer tab (not shown).
From the top menu, select the Home tab. Click New and select Wizard Dialler Wizard from
the drop-down list to create a new campaign.

SJW; Reviewed
SPOC 5/10/2016
Solution & Interoperability Test Lab Application Notes
©2016 Avaya Inc. All Rights Reserved.
54 of 70
PC511HDSyntel
8.3. Administer campaigns
On Step 1 of 6 screen configure as follows:
Click on the arrow pointing right above, the Avaya PCS Login screen is displayed. Enter the
credentials for the Proactive Contact supervisor and click on the green tick.

SJW; Reviewed
SPOC 5/10/2016
Solution & Interoperability Test Lab Application Notes
©2016 Avaya Inc. All Rights Reserved.
55 of 70
PC511HDSyntel
On Step 2 of 6 screen select the proper values for Call List and Job Name. Retain the default
value for Client Status Table, and select the proper Job Type.

SJW; Reviewed
SPOC 5/10/2016
Solution & Interoperability Test Lab Application Notes
©2016 Avaya Inc. All Rights Reserved.
56 of 70
PC511HDSyntel
Configure Step 3 of 6 screen as below:

SJW; Reviewed
SPOC 5/10/2016
Solution & Interoperability Test Lab Application Notes
©2016 Avaya Inc. All Rights Reserved.
57 of 70
PC511HDSyntel
The Step 4 of 6 screen is displayed.

SJW; Reviewed
SPOC 5/10/2016
Solution & Interoperability Test Lab Application Notes
©2016 Avaya Inc. All Rights Reserved.
58 of 70
PC511HDSyntel
Click on the double arrow highlighted below to select all fields.

SJW; Reviewed
SPOC 5/10/2016
Solution & Interoperability Test Lab Application Notes
©2016 Avaya Inc. All Rights Reserved.
59 of 70
PC511HDSyntel
The Step 5 of 6 screen is displayed, amend as required.

SJW; Reviewed
SPOC 5/10/2016
Solution & Interoperability Test Lab Application Notes
©2016 Avaya Inc. All Rights Reserved.
60 of 70
PC511HDSyntel
The Step 6 of 6 screen is displayed shows the summary of the configuration. Click on the door
icon highlighted to complete the Campaign Wizard.

SJW; Reviewed
SPOC 5/10/2016
Solution & Interoperability Test Lab Application Notes
©2016 Avaya Inc. All Rights Reserved.
61 of 70
PC511HDSyntel
8.4. Administer scripts and screens
For the purposes of this compliance test, it is assumed that scripts and screens have already been
created according to requirements. A sample screen is shown below.
SJW; Reviewed
SPOC 5/10/2016
Solution & Interoperability Test Lab Application Notes
©2016 Avaya Inc. All Rights Reserved.
62 of 70
PC511HDSyntel
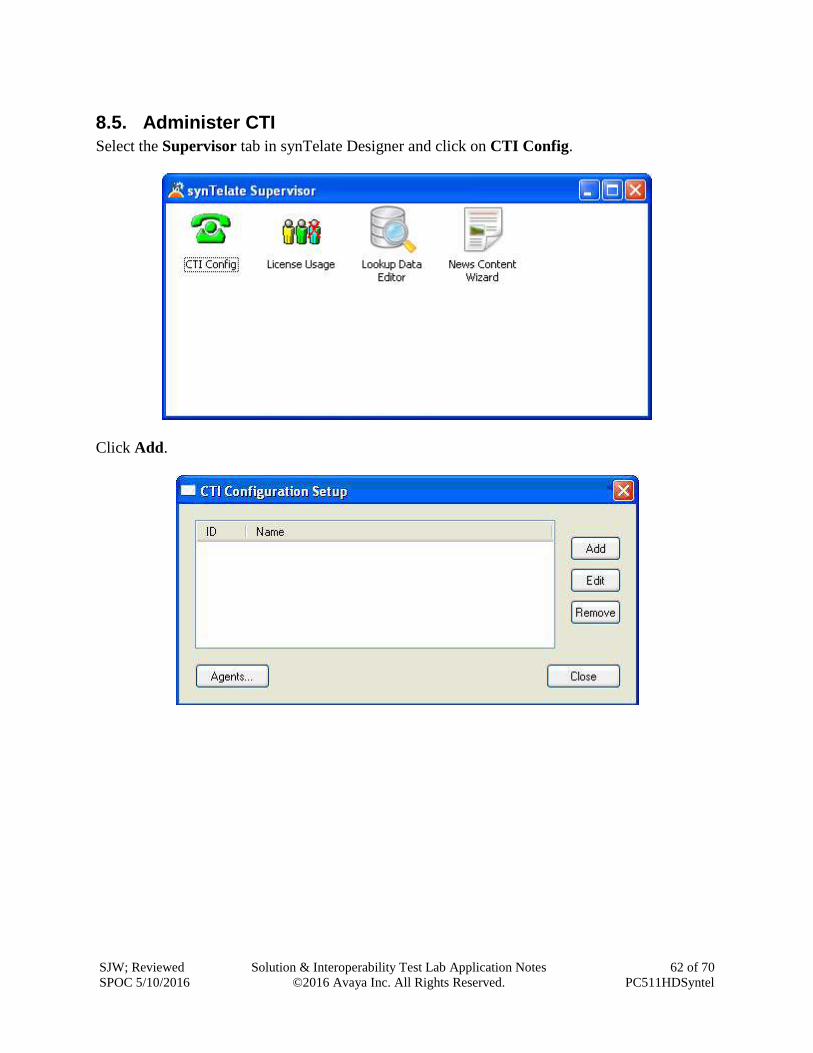
8.5. Administer CTI
Select the Supervisor tab in synTelate Designer and click on CTI Config.
Click Add.

SJW; Reviewed
SPOC 5/10/2016
Solution & Interoperability Test Lab Application Notes
©2016 Avaya Inc. All Rights Reserved.
63 of 70
PC511HDSyntel
On Edit CTI Config Details screen shown below enter any descriptive string in the Name field
and ensure the Pass Through Telephony Server is set to TSAPI based switch. Click OK.
SJW; Reviewed
SPOC 5/10/2016
Solution & Interoperability Test Lab Application Notes
©2016 Avaya Inc. All Rights Reserved.
64 of 70
PC511HDSyntel
9. Verification Steps This section provides the tests that can be performed to verify proper configuration of
synTelateagent to interoperate with Proactive Contact. Prior to verification, start an outbound
job on Proactive Contact.
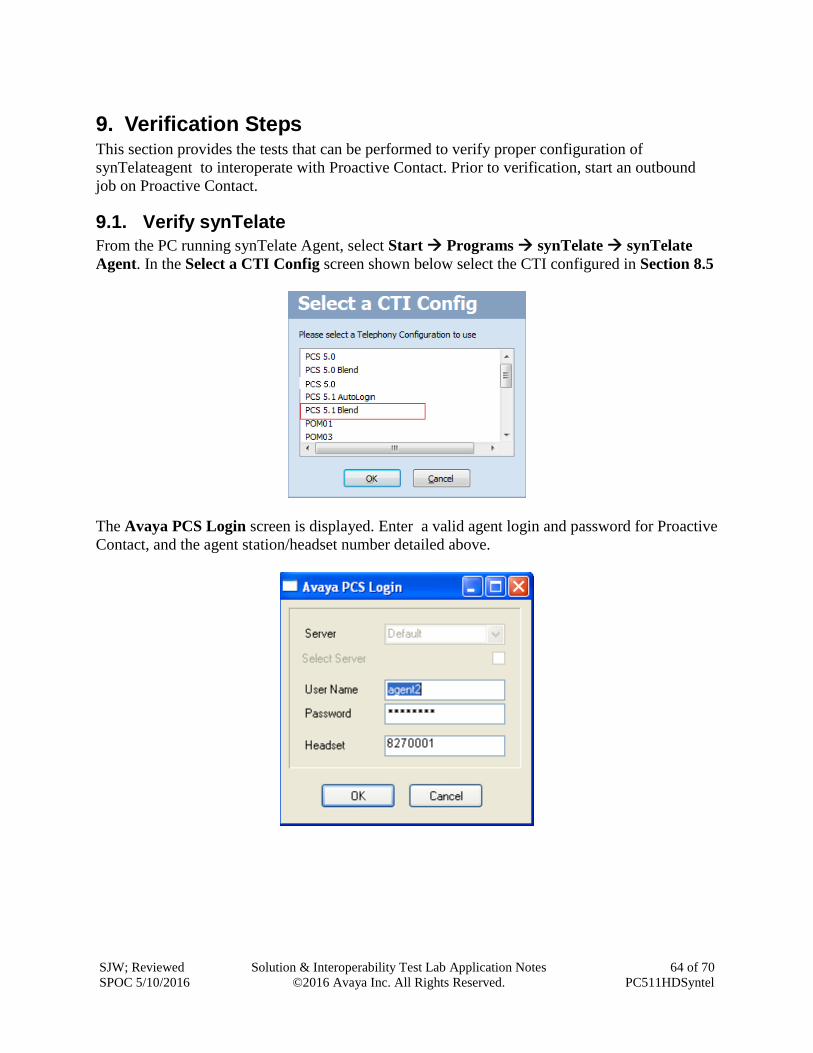
9.1. Verify synTelate
From the PC running synTelate Agent, select Start Programs synTelate synTelate
Agent. In the Select a CTI Config screen shown below select the CTI configured in Section 8.5
The Avaya PCS Login screen is displayed. Enter a valid agent login and password for Proactive
Contact, and the agent station/headset number detailed above.

SJW; Reviewed
SPOC 5/10/2016
Solution & Interoperability Test Lab Application Notes
©2016 Avaya Inc. All Rights Reserved.
65 of 70
PC511HDSyntel
The synTelate splash screen is shown:
synTelate opens with welcome screen showing list of available jobs. Verify the active outbound
job is displayed. Click outbnd2 (not shown).
SJW; Reviewed
SPOC 5/10/2016
Solution & Interoperability Test Lab Application Notes
©2016 Avaya Inc. All Rights Reserved.
66 of 70
PC511HDSyntel
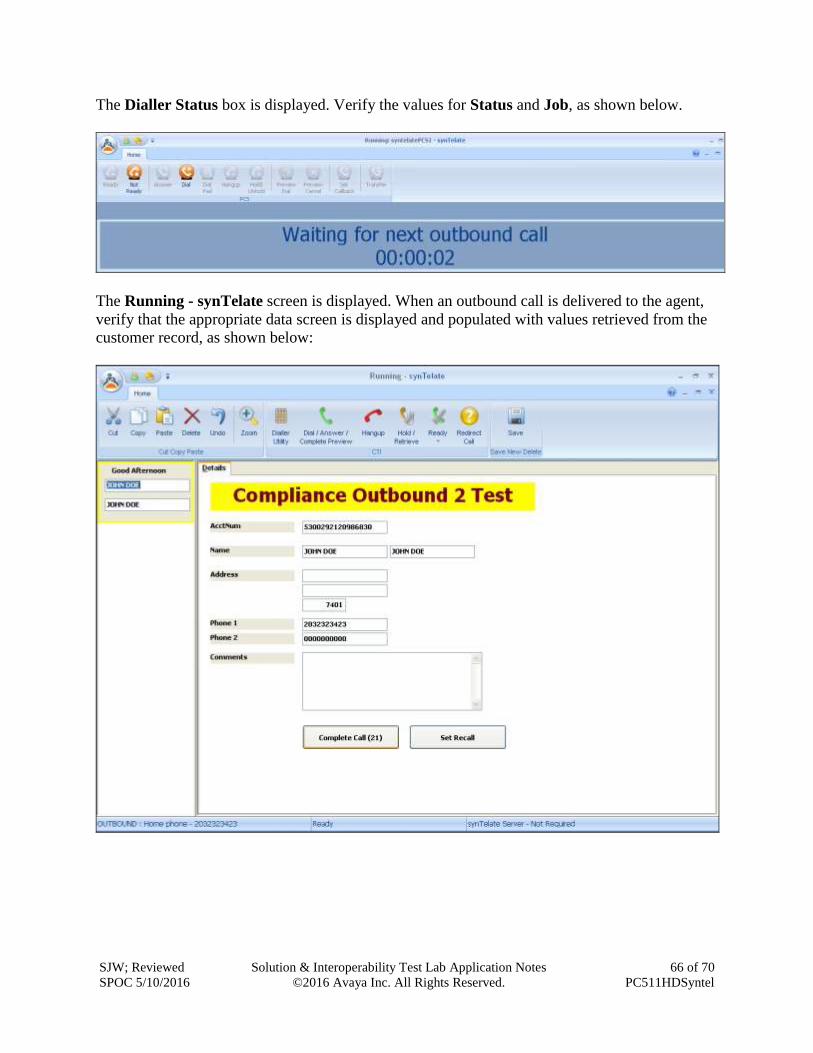
The Dialler Status box is displayed. Verify the values for Status and Job, as shown below.
The Running - synTelate screen is displayed. When an outbound call is delivered to the agent,
verify that the appropriate data screen is displayed and populated with values retrieved from the
customer record, as shown below:

SJW; Reviewed
SPOC 5/10/2016
Solution & Interoperability Test Lab Application Notes
©2016 Avaya Inc. All Rights Reserved.
67 of 70
PC511HDSyntel
9.2. Verify Avaya Aura® Communication Manager
The following steps can ensure that signaling group and trunk groups configured between
Communication Manager and PG230 Digital Switch are in-service. From the Communication
Manager SAT enter the command status signaling-group 10 to verify that the signaling group
for the 0001v2 DS1 board is in-service.
status signaling-group 10
STATUS SIGNALING GROUP
Group ID: 10 Active NCA-TSC Count: 0
Group Type: isdn-pri Active CA-TSC Count: 0
Signaling Type: facility associated signaling
Group State: in-service
Primary D-Channel
Port: 01A0916 Level 3 State: in-service
Secondary D-Channel
Port: Level 3 State: no-link
Enter the command status trunk 21 to verify that the headset trunk group 21 is in-service.
status trunk 10
TRUNK GROUP STATUS
Member Port Service State Mtce Connected Ports
Busy
0021/001 001v201 in-service/idle no
0021/002 001v202 in-service/idle no
0021/003 001v203 in-service/idle no
0021/004 001v204 in-service/idle no
0021/005 001v205 in-service/idle no
Repeat the above test for other trunk groups configured on E1 trunk line between
Communication Manager and PG230 Digital Switch.

SJW; Reviewed
SPOC 5/10/2016
Solution & Interoperability Test Lab Application Notes
©2016 Avaya Inc. All Rights Reserved.
68 of 70
PC511HDSyntel
9.3. Verify Avaya Proactive Contact
From Proactive Contact shell, type the command jobmon to verify agent is logged into the job
outbnd2 and handling a call:
[STANDARD] Job Activity [ALLID]
Summary Statistics
Job: [outbnd2][60]
Start time: 10.43.09 Current time: 10.56.11
Agent Activity Line Usage
----------------------------------- --------------------------------------
-
All Outb ACD PTP Outbound Lines Cur Avg Peak
Logged in: 1 1 0 0 Demand : 1 1 1
Assigned : 1 1 Available : 9
On Phone : 1 1 Total Lines : 10
Calling Activities
---------------------------------------------------------------------------
-
Outbound Phone Calls
Records Selected: 372
Phone Calls made: 34
Cur/Run Hit Rate: 20/5 %
Agent Connects : 1
Queue : 0
Recalls : 0
Phone Calls Left: 338
[ Job outbnd2 ready for calling ]

SJW; Reviewed
SPOC 5/10/2016
Solution & Interoperability Test Lab Application Notes
©2016 Avaya Inc. All Rights Reserved.
69 of 70
PC511HDSyntel
9.4. Verify Avaya Aura® Application Enablement Services
On Application Enablement Services, verify the status of the TSAPI link by selecting Status
Status and Control TSAPI Service Summary from the left pane. The TSAPI Link Details
screen is displayed. Verify the Status is Talking for the TSAPI link administered in Section 6 as
shown below.
10. Conclusion These Application Notes describe the configuration steps required for Inisoft synTelate to
successfully interoperate with Avaya Proactive Contact with Avaya PG230 Digital Switch using
agent blending. All feature test cases were completed successfully.
11. Additional References This section references the product documentation relevant to these Application Notes.
1. Administering Avaya Proactive Contact, Release 5.1.1 April 2015, available at
http://support.avaya.com.
2. synTelate v5.1 Training Manual 2015 Issue 01.doc – available directly from synTelate
support.

SJW; Reviewed
SPOC 5/10/2016
Solution & Interoperability Test Lab Application Notes
©2016 Avaya Inc. All Rights Reserved.
70 of 70
PC511HDSyntel
©2016 Avaya Inc. All Rights Reserved.
Avaya and the Avaya Logo are trademarks of Avaya Inc. All trademarks identified by ® and
™ are registered trademarks or trademarks, respectively, of Avaya Inc. All other trademarks
are the property of their respective owners. The information provided in these Application
Notes is subject to change without notice. The configurations, technical data, and
recommendations provided in these Application Notes are believed to be accurate and
dependable, but are presented without express or implied warranty. Users are responsible for
their application of any products specified in these Application Notes.
Please e-mail any questions or comments pertaining to these Application Notes along with the
full title name and filename, located in the lower right corner, directly to the Avaya
DevConnect Program at [email protected].