Animation Step by Step Guide - WordPress.com
7
www.reellifescience.com Animation Step by Step Guide Step 1 Click into https://www.wickeditor.com/#/ Click on the Launch Web Editor button (free and no log in’s required) Step 2 This screen will appear In this session the following will be demonstrated. How to; Use tools such as paintbrush, pencil, shapes etc. Add frames on timeline Canvas tool – Onion Skinning How to name project, change background colour and frame rate per second Add images and sound Save / Export Animation
-
Upload
khangminh22 -
Category
Documents
-
view
1 -
download
0
Transcript of Animation Step by Step Guide - WordPress.com
www.reellifescience.com
Animation Step by Step Guide
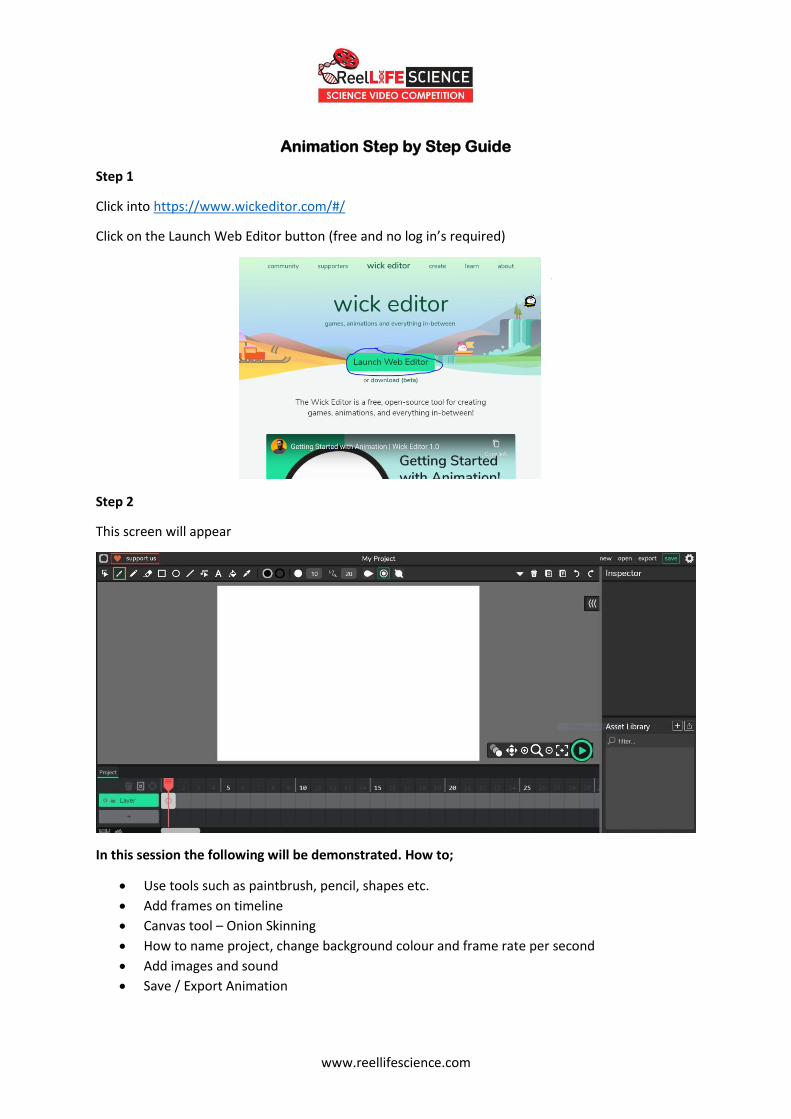
Step 1
Click into https://www.wickeditor.com/#/
Click on the Launch Web Editor button (free and no log in’s required)
Step 2
This screen will appear
In this session the following will be demonstrated. How to;
Use tools such as paintbrush, pencil, shapes etc.
Add frames on timeline
Canvas tool – Onion Skinning
How to name project, change background colour and frame rate per second
Add images and sound
Save / Export Animation
www.reellifescience.com
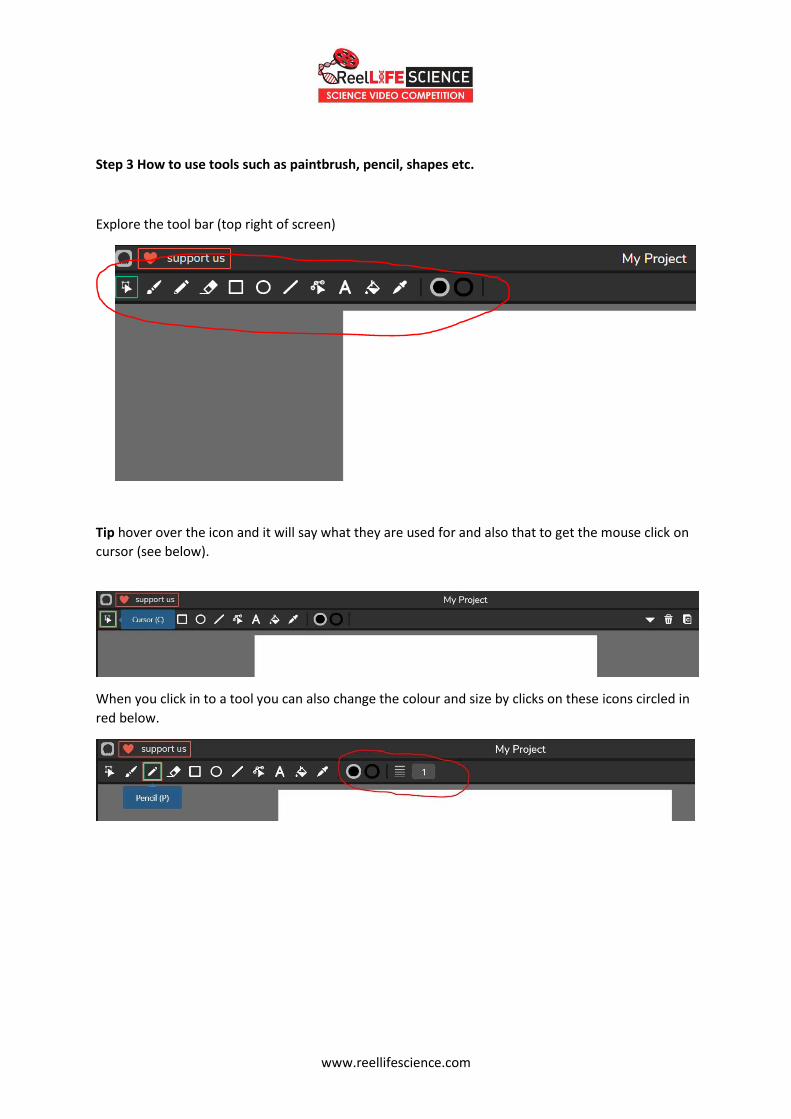
Step 3 How to use tools such as paintbrush, pencil, shapes etc.
Explore the tool bar (top right of screen)
Tip hover over the icon and it will say what they are used for and also that to get the mouse click on
cursor (see below).
When you click in to a tool you can also change the colour and size by clicks on these icons circled in
red below.
www.reellifescience.com
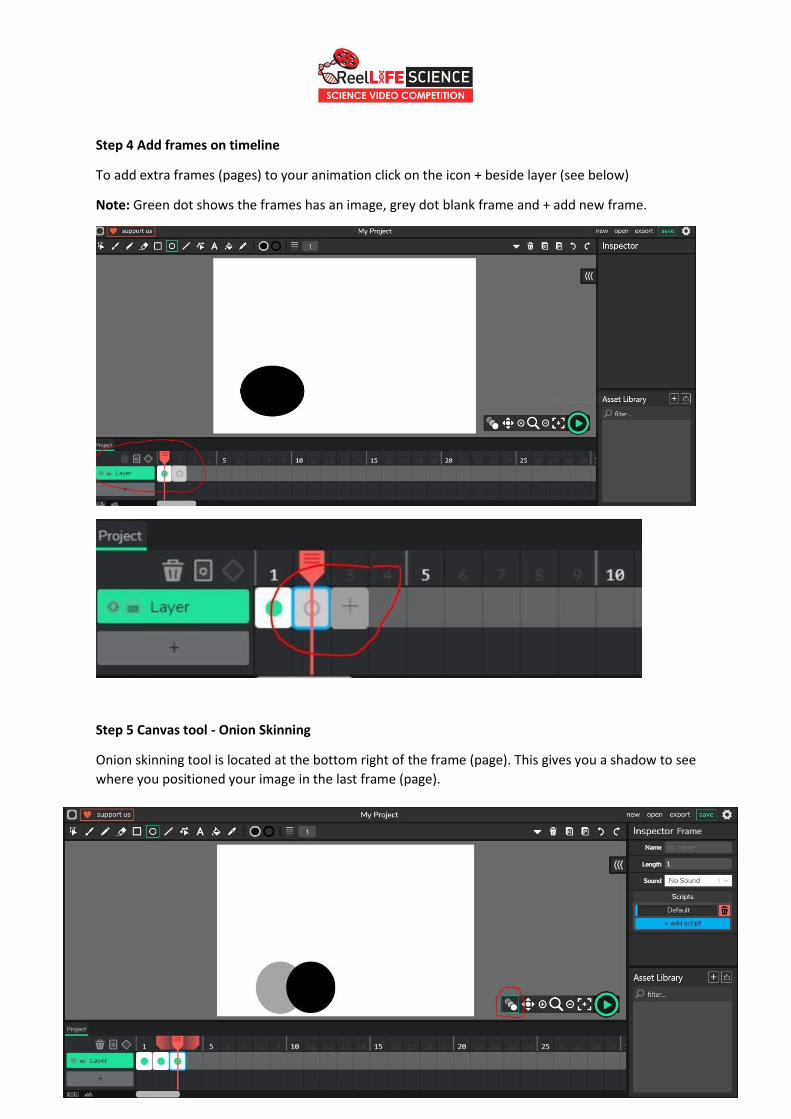
Step 4 Add frames on timeline
To add extra frames (pages) to your animation click on the icon + beside layer (see below)
Note: Green dot shows the frames has an image, grey dot blank frame and + add new frame.
Step 5 Canvas tool - Onion Skinning
Onion skinning tool is located at the bottom right of the frame (page). This gives you a shadow to see
where you positioned your image in the last frame (page).
www.reellifescience.com
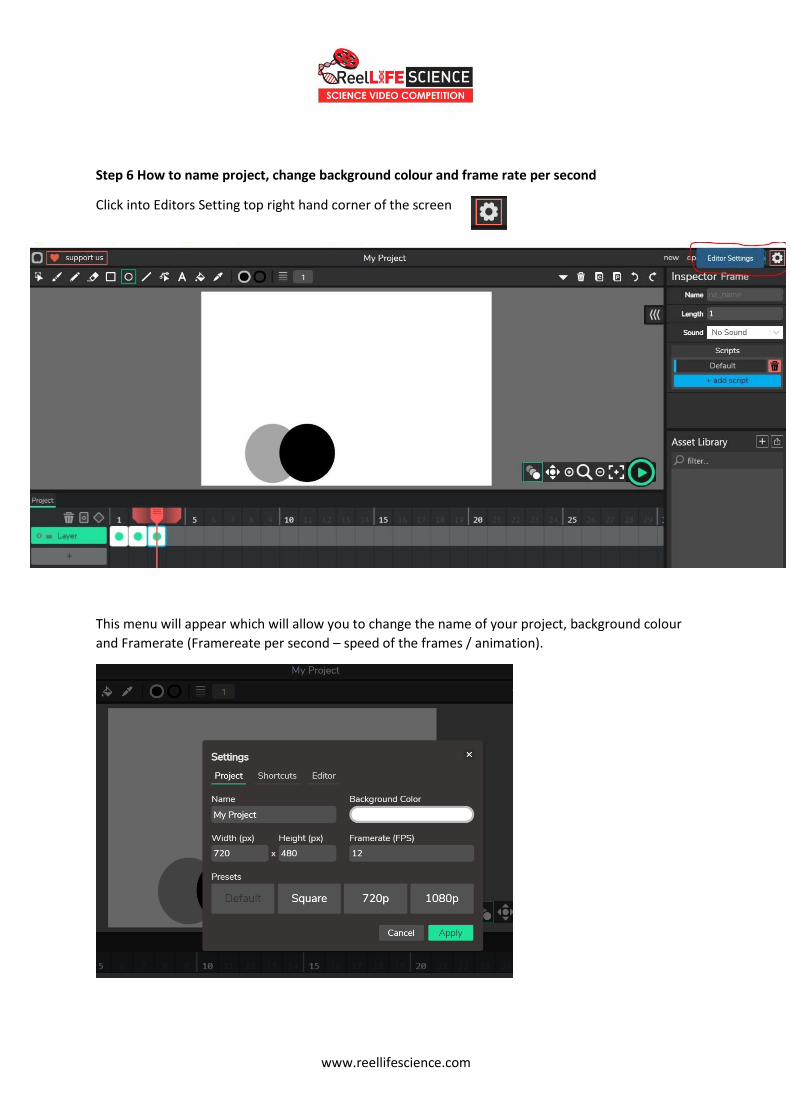
Step 6 How to name project, change background colour and frame rate per second
Click into Editors Setting top right hand corner of the screen
This menu will appear which will allow you to change the name of your project, background colour
and Framerate (Framereate per second – speed of the frames / animation).

www.reellifescience.com
Step 7 Add images and sound (optional)
Images and sounds can be added to your animation.
Go to Asset Library at the bottom right, to upload assets click this will allow you to upload
images or sounds.
Note: Wickeditor has some limited sounds, in the Asset Library
section click plus sign below.
This menu will appear and you can
add different short sounds into your
Asset Library.
Tip add new layer (click on +), click
on new frame and drag to the
length you would like the sound to
cover. Drag music / sound to frame.
www.reellifescience.com
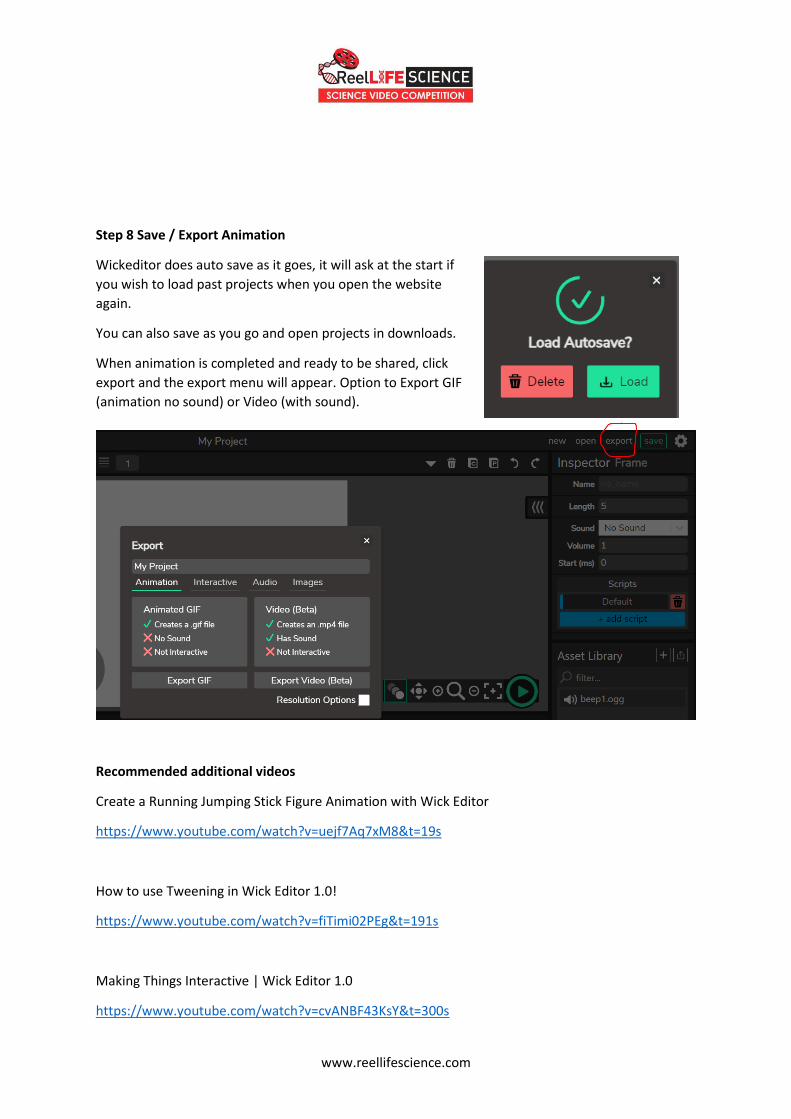
Step 8 Save / Export Animation
Wickeditor does auto save as it goes, it will ask at the start if
you wish to load past projects when you open the website
again.
You can also save as you go and open projects in downloads.
When animation is completed and ready to be shared, click
export and the export menu will appear. Option to Export GIF
(animation no sound) or Video (with sound).
Recommended additional videos
Create a Running Jumping Stick Figure Animation with Wick Editor
https://www.youtube.com/watch?v=uejf7Aq7xM8&t=19s
How to use Tweening in Wick Editor 1.0!
https://www.youtube.com/watch?v=fiTimi02PEg&t=191s
Making Things Interactive | Wick Editor 1.0
https://www.youtube.com/watch?v=cvANBF43KsY&t=300s
www.reellifescience.com
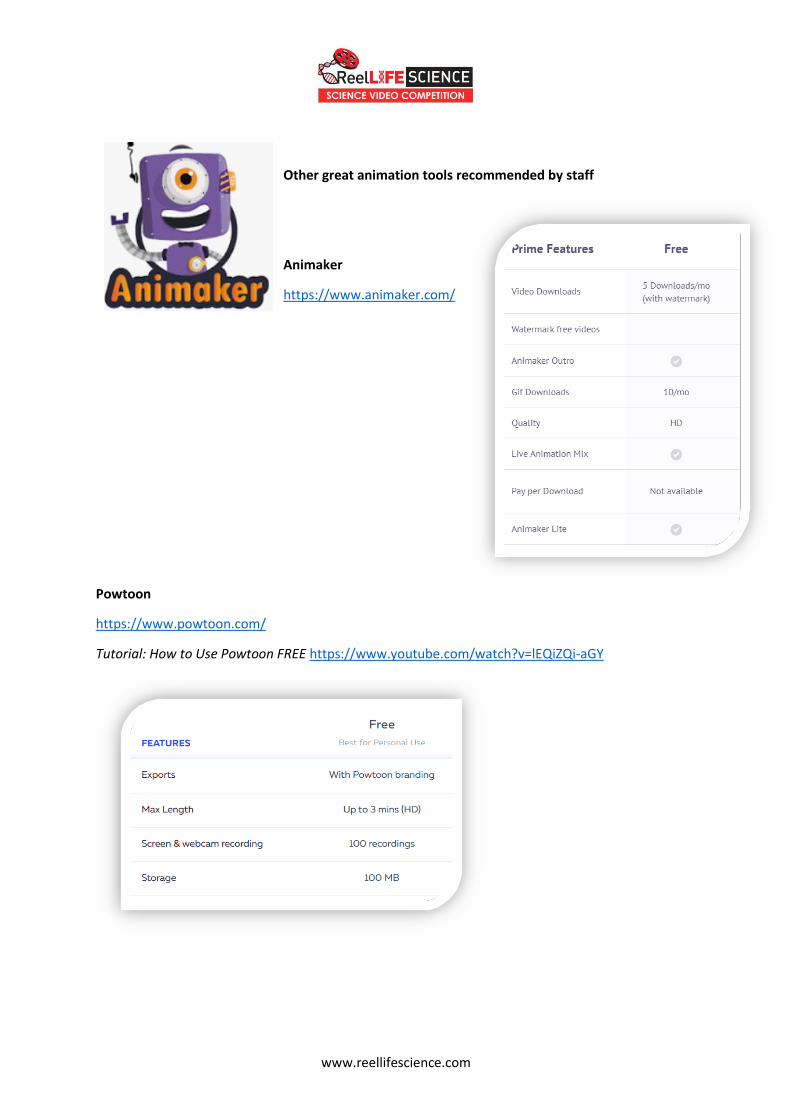
Other great animation tools recommended by staff
Animaker
https://www.animaker.com/
Powtoon
https://www.powtoon.com/
Tutorial: How to Use Powtoon FREE https://www.youtube.com/watch?v=lEQiZQi-aGY