
AFO 483 – Circulation notice parameters
32
AFO 483 – Circulation notice parameters 483.1 Introduction Using AFO 483, you can control of the layout and content of the print functions in the circulation administration. The system distinguishes between a number of different types of print functions. Per type of print function, you can indicate how the information is to be sorted and what the printouts should look like. With reference to the layout of the print functions, the system distinguishes between two types: • Card formats - The information is printed on the size of a postcard. The actual information is printed on the left; the address of the addressee (the patron) is printed on the right. This print method is coupled to sorting according to postal code or according to name as the first printing criterion; the second sorting criterion is according to name. • SSP formats - The information is printed in a size to be defined; this will usually be A4. The address of the addressee precedes the actual information which, with reference to the possibilities offered by SSP, can be printed in columns or blocks. This printing method is coupled to sorting according to the patron category as the first sorting criterion and the name as the second. Note With both card and SSP formats the messages, when sent via email, will be part of the body of the email (so not an attachment). SSP notices will be formatted to Courier text. After choosing this option the following menu will be displayed :
-
Upload
khangminh22 -
Category
Documents
-
view
1 -
download
0
Transcript of AFO 483 – Circulation notice parameters

AFO 483 – Circulation notice parameters
483.1 Introduction
Using AFO 483, you can control of the layout and content of the print functions in the circulation administration. The system distinguishes between a number of different types of print functions. Per type of print function, you can indicate how the information is to be sorted and what the printouts should look like.
With reference to the layout of the print functions, the system distinguishes between two types:
• Card formats
- The information is printed on the size of a postcard. The actual information is printed on the left; the address of the addressee (the patron) is printed on the right. This print method is coupled to sorting according to postal code or according to name as the first printing criterion; the second sorting criterion is according to name.
• SSP formats
- The information is printed in a size to be defined; this will usually be A4. The address of the addressee precedes the actual information which, with reference to the possibilities offered by SSP, can be printed in columns or blocks. This printing method is coupled to sorting according to the patron category as the first sorting criterion and the name as the second.
Note
With both card and SSP formats the messages, when sent via email, will be part of the body of the email (so not an attachment). SSP notices will be formatted to Courier text.
After choosing this option the following menu will be displayed
:

These menu options are described in the next sections.
483.2 Notices
You can define the sorting criteria and the printout format per type of print function.
When this menu option is selected, a menu screen will be displayed with the types of print functions that have been defined:

The menu options relate to the various output types within the circulation module. They are described below.
• If you opt for the card format for a certain type of print function, a layout must be defined for that type of print function (option “Card format: layout” in the start menu of this AFO) and the texts must be defined (option “Card format: texts” in the start menu of this AFO). If you opt for SSP formats, an SSP print profile must be defined for that type of print function (option “SSP formats” in the start menu of this AFO).
• The type (card format or SSP format) and the sorting method may always be changed, except when a print file has been generated but not yet printed. If this parameter is changed in that intermediate period, this will result in printing problems.
483.2.1 Overdues, Reservations, Recalls
After choosing this option the following form will be displayed:

Overdues, reservations and recalls offer the same options.
483.2.2 Acceptgiros + overdues
After choosing this option the following form will be displayed:
All three acceptgiro definitions offer the same options.
483.2.3 Invoices
After choosing this option the following form will be displayed:

483.2.4 Output format acceptgiros
After choosing this option the following form will be displayed:
483.3 Card format layout
After choosing this option an overview screen will be displayed with the relevant codes:

For each of the four options you can define the following:
Fields on the screen
Card measurements : In this field, enter the three parameters that pertain to the dimensions of the card, separated by a “:” (colon):
the length of the card, expressed in the number of lines;
the margin at the top (the number of blank lines);

the margin at the bottom (the number of blank lines).
Example “18:2:2”
Meaning: The card is eighteen lines long and both the top and bottom margins consist of two blank lines.
Position of columns : In this field, enter the two parameters that pertain to the positions of the columns on the card, separated by a “:” (colon). Per parameter, the start position and the maximum width of the relevant column should be entered, separated by a “~” (tilde).
Example “3~35:45~23”
Meaning The column on the left is printed starting in position three and has a maximum width of 35 characters. The column on the right is printed starting in position 45 and has a maximum width of 23 characters.
Delimiter position : In this field, enter the two parameters that pertain to the delimiter, separated by a “:” (colon).
Enter the position at which the delimiter between the column on the left (which contains the information on the item level) and the column on the right (which contains the patron information) is to be printed, and the punctuation mark to be used as the delimiter.
Please note! The punctuation marks space, tilde (“~”), up arrow (“ ↑”) and underscore (“_”) may not be used. If you do not want to use a delimiter, e.g. because the card has a pre-printed delimiter, leave this field empty.
Example “41:|”
Meaning “|” (the pipe symbol) is used as delimiter. The pipe symbol is to be printed at position 41.
Data to be printed : In this field, enter one or more code for the information to be printed on the card. Separate the codes using a “:” (colon). Per code, indicate what is to be printed (as indicated in the table below), then a “~” (tilde) and the maximum length for that type of information.
No. Meaning
1 Title

2 Author
3 Volume
4 Due date
5 Overdue number
6 Item number
7 Call number
8 Title + due date (on one line)
Example “2~1:1~1:6~1”
Meaning The system will print in the following order:
the author (2), maximum length one line;
the title (1), maximum length one line;
the item number (6), maximum length one line.
Max. no. of items per card : Enter the maximum number of items to be included on a single card. The number entered must be greater than “0”. This can be used to indicate, for example, that a separate card is to be used for each item for which a hold request has been submitted. In that case, you should enter “1” in this field.
Leading sign : In this field, enter the character to be printed as leading sign. This character is printed on the card preceding each item.
Please note! The punctuation marks space, tilde (“~”), up arrow (“ ↑”) and underscore (“_”) may not be used.
Example A overdue card with three items with no introductory character:
The Duck Symphony in DoReMi Boston Philharmonic A34124000000055B Pretty Woman Orbison, Roy A34124000009355B Suddenly

Ocean, Billy A34124000012345B
A overdue card with three items, with the introductory character “*” (star):
* The Duck Symphony in DoReMi Boston Philharmonic A34124000000055B * Pretty Woman Orbison, Roy A34124000009355B * Suddenly Ocean, Billy A34124000012345B
483.4 Card format text
After choosing this option an overview screen will be displayed with the relevant codes:
For each of the fourteen options you can define the following:

Indicate in this field the level on which the texts are to be defined. The system distinguishes between three levels:
• general: the texts apply to the entire system; in other words: for all locations of all agencies
• per agency: the texts apply to all locations of the agency for which your workstation is logged in
• per agency/location: the texts apply only to the agency/location for which your workstation is logged in.
Please note!
Texts can be defined on multiple levels. When printing the texts, the system will select the most specific text available.
483.4.1 Overdues
When you have selected the text level, an input screen will be displayed:

Indicate in this field that text you want to enter. When you select this option, an input screen will be displayed. Enter the text in this field.
483.4.2 Acceptgiros
Print function ‘Accept giros’, ‘Accept giros(overdue 1)’ and ‘Accept giros(overdue 2)’
When you have selected the text level, an input screen will be displayed:
Indicate in this field that text you want to enter. When you select this option, an input screen will be displayed. Enter the text in this field.
Note
When entering a text, be sure to take the available space into account.
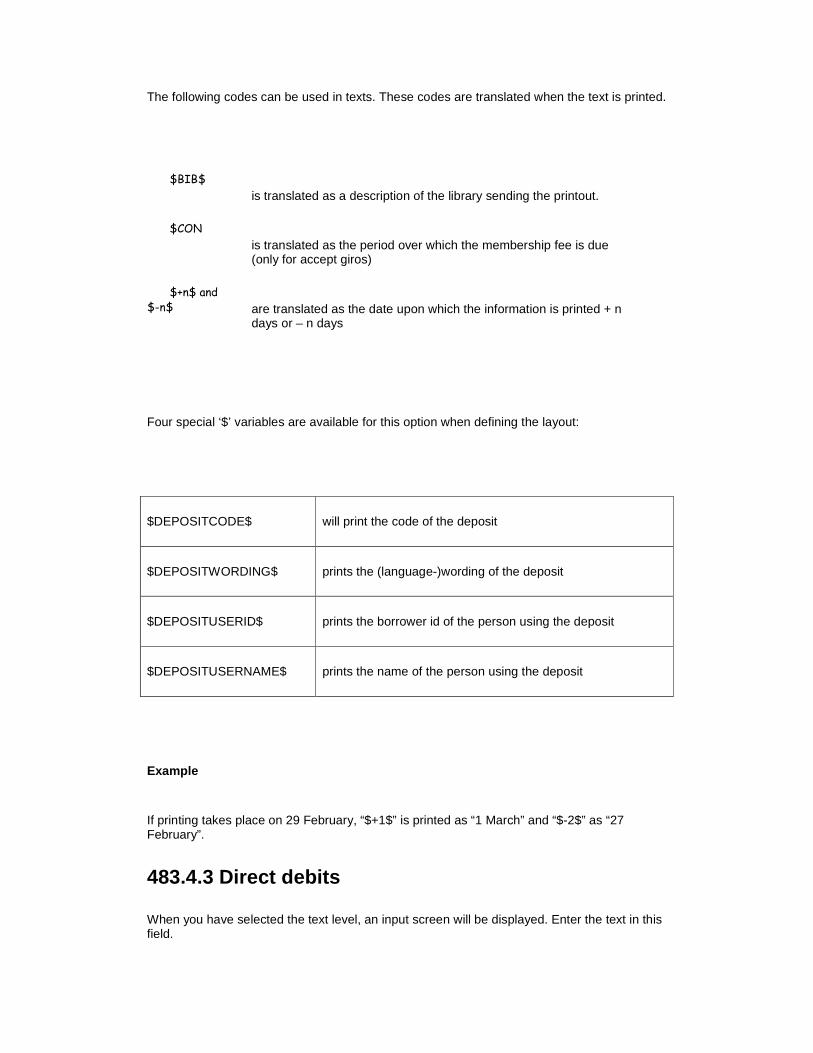
The following codes can be used in texts. These codes are translated when the text is printed.
$BIB$
is translated as a description of the library sending the printout.
$CON
is translated as the period over which the membership fee is due (only for accept giros)
$+n$ and $-n$ are translated as the date upon which the information is printed + n
days or – n days
Four special ‘$’ variables are available for this option when defining the layout:
$DEPOSITCODE$ will print the code of the deposit
$DEPOSITWORDING$ prints the (language-)wording of the deposit
$DEPOSITUSERID$ prints the borrower id of the person using the deposit
$DEPOSITUSERNAME$ prints the name of the person using the deposit
Example
If printing takes place on 29 February, “$+1$” is printed as “1 March” and “$-2$” as “27 February”.
483.4.3 Direct debits
When you have selected the text level, an input screen will be displayed. Enter the text in this field.

Note
With ‘Direct debit’, the text has a slightly different function. The text should consist of a number of codes, followed by a “= “ (equals sign) and the value of the code. This information is then used to generate a file with payment orders for direct debit to be sent to the BGC (Bank Giro Center).
The following texts must be included in the text. The codes and their meaning are given here. For the exact values, please see the brochure published by the BGC titled ‘ClieOp02”, which can be requested from the Bank Giro Center.
Codes Meaning Examples:
INZEND sender identification OBG
DUPL Duplicate code 1
GROEP Transaction group 10
RKBG account number principal 567885
VAST fixed description Membership fee through $CON
NAW Name and address code 1
VWDAT desired processing date $+28$
NAME name of principal O.B. Geldrop
TEST test code P
SOORT Transaction type 1002
OMSCH Description $BIB$

483.5 SSP format
If you would rather use SSP formats for some types of print functions, this has the following consequences:
• The print function is sorted according to patron category, and then according to name;
• The print function can differ from one patron category to another;
• The layout and content of the print function can be defined using the principles of the SSP print module, by which the entire range of functions can be applied.
When you select this menu option, an overview screen will be displayed with print function types and patron categories. By displaying “OK”, the system indicates which print profiles
have been defined.
On this screen you see what layouts have been defined for each borrower category in the system.
Explanation of the layout types:

Abbreviation Print function type Code
H1 Overdue 1 “RAP1
H2 Overdue 2 “RAP2
H3 Overdue 3 RAP3
H4 Overdue 4 RAP4
H8 Overdue concerning patron conversion program RAP101
H9 Second for overdue concerning patron conversion program
RAP102
Rv Hold messages RESV
Tg Automatic reclaims TRUG
Ta manual reclaims TRUA
11 debt invoice RK11
12 overdue debt invoice RK12
21 invoice items not returned RK21
22 overdue items not returned RK22
31 free invoices RK31
32 overdue free invoices RK32
41 invoice concerning loan charge RK41

Abbreviation Print function type Code
42 overdue invoice concerning loan charge RK42
51 [currently not in use] RK51
52 [currently not in use] RK52
Options on the screen
Copy profile : After choosing this option the following form will be displayed:
Enter the details for copying one profile to another of for creation of a new profile based on the definition of an existing profile.
Modify profile : After choosing this option the following form will be displayed:

Here you can modify an existing profile or create a new profile. This is explained in the next section.
483.5.1 Modify profile
When you do this for a new profile the following input screens will be offered sequentially:
Print profile type : choose “Blocks” to have the data printed in blocks for each title (title etc. information will be displayed in blocks containing a line for each element defined) or “Columns”(title etc. information will be displayed in columns containing the various data elements for all overdues, pickups etc.).
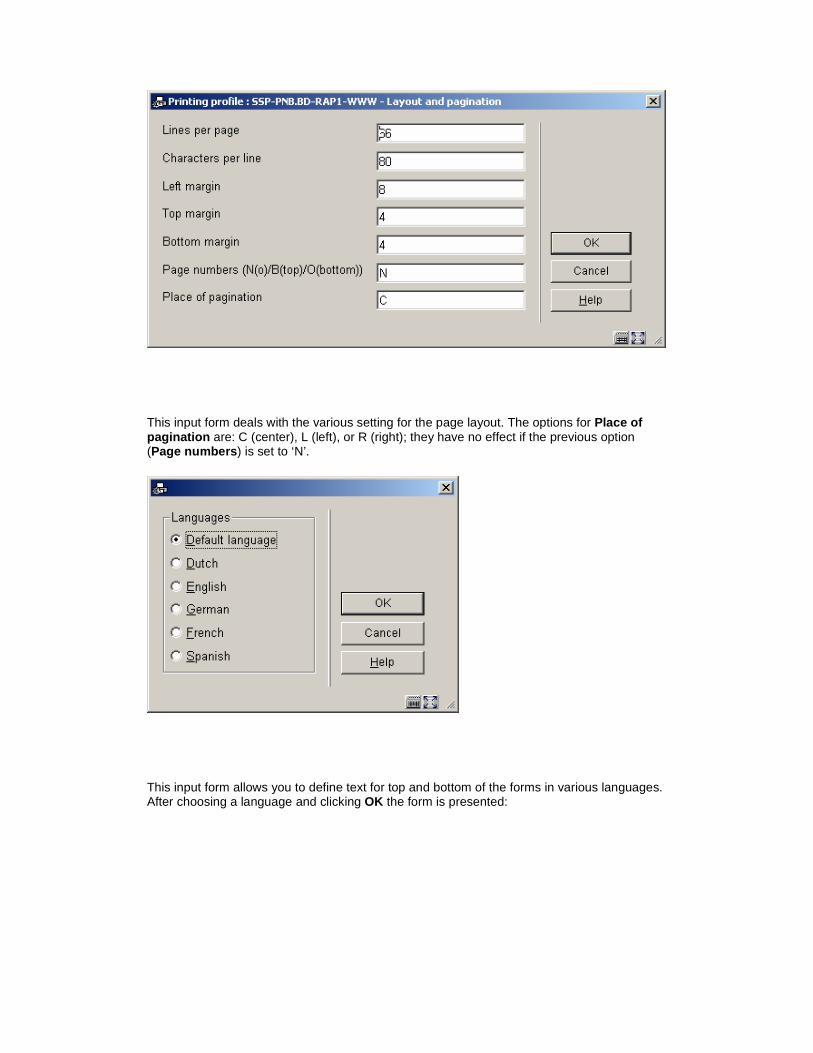
This input form deals with the various setting for the page layout. The options for Place of pagination are: C (center), L (left), or R (right); they have no effect if the previous option (Page numbers ) is set to ‘N’.
This input form allows you to define text for top and bottom of the forms in various languages. After choosing a language and clicking OK the form is presented:

Enter texts as appropriate and repeat this for as many languages as necessary. When you have finished this section click Cancel to proceed to the next form:

This form deals with the general characteristics of the (overdue, pick-up etc.) notice.
The No columns/blocks option allows you to define the number of columns or blocks (depending on the choice you made on the first screen) containing data such as title, item number, due date etc. you want to print on the (overdue, pick-up etc.) notice.
Next you are prompted with this input form:
Choose the appropriate data element from the dropdown list and click OK.
The next input form allows you to define labels (Blocks) or headers (Columns) for the chosen data element in several languages:

After which you are prompted for more parameters regarding the positioning etc. of this data element:
The system will repeat this prompt for the number of blocks/columns you specified in the earlier screen.

When you have finished the system will display a screen similar to the example below. You must now complete the layout by amending the following sections.
Free text : when you select this a new menu is displayed:
Choose Text before print-out to define the text that will appear at the beginning of a letter. Again you can do this for several languages:

After choosing a language you are presented with an editor window:
Enter texts as appropriate and repeat this for as many languages as necessary. When you have finished this section click Cancel to return to the menu. Then repeat this for Text after print-out to define the text that will appear at the bottom of a letter.
Valid codes to be used here are::

• $$ADMINISTRAT The administration costs (only valid for invoices).
• $$BIBADRES The address of the library.
• $$ADLOC The address of the location (as defined in AFO 617)
• $$BTW The VAT amount (only valid for invoices).
• $$CONTACT The contact person as entered in the borrower record.
• $$LEE=nr1,nr2, …. (Only valid for pre-printed checks) everyone whose age is no.1, no.2 (or higher) who is sent a pre-printed check, the indication “(N)” is added after the first line of the text that is printed at the top right of the pre-printed check
• $$LENAD The name of the borrower, street and number, postcode and city as included in the first address of the borrower record.
• $$LENAT The form of address (‘Mr’/‘Mrs’) based on the field ‘gender’ in the borrower record.
• $$LENNR The current borrower number.
• $$LENTA The name of the borrower, street and number, postcode and city as included in the second address of the borrower record.
• $$LENWA The name of the borrower, department, street and number, postcode and city as included in the work address in the borrower record.
• $$LENZO The name of the borrower.
• $$REKENING The invoice number (only valid for invoices).
• $$TOTAAL The total amount as included in an invoice of the circulation module (only valid for invoices)
When you select an already defined type of printout from the overview screen, the system will display a screen as shown in the example below immediately:

Options on this screen
Modify/display : Select a line and click on this icon to edit the chosen part of the layout.

Print : The standard form for generating output will be presented. You can print the complete definition of the defined layout.
Note:
This will not print a sample letter based on the layout, just a listing of all the definitions that have been made.
Comment : To add a free text explanation to this layout definition.
Delete : To the delete the whole definition of this layout. You cannot delete lines from the ‘Blocks’ (or ‘Columns’) definition.
Exchange places : Select two lines from the ‘Blocks’ (or ‘Columns’) definition (by using mouse and the CTRL-key) to swop their positions. This can be useful when you have made a mistake, because you cannot delete lines from the ‘Blocks’ (or ‘Columns’) definition.
Note:
Line 4 (General structure ) determines the number of lines (‘Blocks’) or (‘Columns’) that will actually be printed. So more ‘Blocks’ (or ‘Columns’) can be defined than are set in this parameter. Make sure you amend this setting when you wish not to print all ‘Blocks’ (or ‘Columns’). Again this can come in useful when you have made a mistake: use the Exchange places option first to move a no longer required data element to the last position. Then decrease the number specified in General structure .
See the previous section for information on the various fields how to edit them.

483.6 Loan receipts
Texts for various slips can be defined in the system. For the time being, this option is only used to print a freely definable text at the bottom of loan slips and the like.
When you select this menu option, an input screen will appear in which the language of the text can be defined. Next an input screen will appear in which the desired text can be entered.
Please note!
The width of the slips is normally rather limited.
483.7 Address priority for cards
For the checkout print functions that do not use SSP, you can determine the address in the borrower administration to which the printed matter is to be sent. The system offers the possibility of defining the address to be printed per borrower category combined with the type of print function.
When you select this menu option, an input screen will be displayed:

For each patron category, enter a parameter with ten digits in this field. Each of these digits pertains to a type of print function, in the sequence indicated below:
1 overdues
2 Hold requests
3 Accept giros
4 first overdue accept giros
5 second overdue accept giros

6 automatic recalls
7 manual recalls
8 accept giro with invoice
9 direct debit
10 Invoice
Each digit can be given one of the following values:
1 send the printed matter to the first address
2 send the printed matter to the second address
3 send the printed matter to the work address
Please note!
If no values from this table are entered, all printed matter will be sent to the first address.
483.8 Collection overdues
When this menu option is selected, a submenu will be displayed with the types of reminders have been defined:

Select a reminder and then this option to define the print profile for the collection.
Next a survey screen will be displayed with the selected print profile.
The print profile can be modified in this screen. The working method and options are explained in the section on SSP formats.
483.9 Email notice text
With this option you can define Subject and Contents of notices sent via email.
When this menu option is selected, a submenu will be displayed with the various notice types:

Choose an option, after which an input form is displayed:
Choose an overdue number, after which a choice of language is offered:

Choose a language, after which an input form is displayed:
Note
When you use SSP format, the notice will be sent as an attachment. In that case you must put an explanation of the attachment in Message .
The method for the other options is identical, except for manual recalls, where there is no language option.