![[Second Edition,.]](https://static.fdokumen.com/doc/165x107/6322fad1887d24588e04752c/second-edition.jpg)
Advanced .NET Remoting, Second Edition
593
Advanced .NET Remoting, Second Edition INGO RAMMER AND MARIO SZPUSZTA
-
Upload
khangminh22 -
Category
Documents
-
view
1 -
download
0
Transcript of Advanced .NET Remoting, Second Edition

Advanced .NET Remoting,Second Edition
INGO RAMMER AND MARIO SZPUSZTA
Advanced .NET Remoting, Second Edition
Copyright © 2005 by Ingo Rammer and Mario Szpuszta
All rights reserved. No part of this work may be reproduced or transmitted in any form or by any means,electronic or mechanical, including photocopying, recording, or by any information storage or retrievalsystem, without the prior written permission of the copyright owner and the publisher.
ISBN (pbk): 1-59059-417-7
Printed and bound in the United States of America 9 8 7 6 5 4 3 2 1
Trademarked names may appear in this book. Rather than use a trademark symbol with every occurrenceof a trademarked name, we use the names only in an editorial fashion and to the benefit of the trademarkowner, with no intention of infringement of the trademark.
Lead Editor: Ewan BuckinghamTechnical Reviewer: Kent SharkeyEditorial Board: Steve Anglin, Dan Appleman, Ewan Buckingham, Gary Cornell, Tony Davis, Jason Gilmore,
Jonathan Hassell, Chris Mills, Dominic Shakeshaft, Jim SumserProject Manager: Laura E. BrownCopy Manager: Nicole LeClercCopy Editor: Ami KnoxProduction Manager: Kari Brooks-CoponyProduction Editor: Ellie FountainCompositor: Kinetic Publishing Services, LLCProofreader: Elizabeth BerryIndexer: John CollinArtist: Kinetic Publishing Services, LLCCover Designer: Kurt KramesManufacturing Manager: Tom Debolski
Distributed to the book trade in the United States by Springer-Verlag New York, Inc., 233 Spring Street, 6thFloor, New York, NY 10013, and outside the United States by Springer-Verlag GmbH & Co. KG, Tiergartenstr. 17,69112 Heidelberg, Germany.
In the United States: phone 1-800-SPRINGER, fax 201-348-4505, e-mail [email protected], or visithttp://www.springer-ny.com. Outside the United States: fax +49 6221 345229, e-mail [email protected],or visit http://www.springer.de.
For information on translations, please contact Apress directly at 2560 Ninth Street, Suite 219, Berkeley,CA 94710. Phone 510-549-5930, fax 510-549-5939, e-mail [email protected], or visit http://www.apress.com.
The information in this book is distributed on an “as is” basis, without warranty. Although every precautionhas been taken in the preparation of this work, neither the author(s) nor Apress shall have any liability toany person or entity with respect to any loss or damage caused or alleged to be caused directly or indirectlyby the information contained in this work.
The source code for this book is available to readers at http://www.apress.com in the Downloads section.

To Katja,Who was courageous enough to marry me
even though she knew I would write another book.—Ingo
To my parents—I am so happy that I have you!And to my best friends Dominik and Edi—I enjoy every single moment with you!
—Mario
Contents at a Glance
About the Authors . . . . . . . . . . . . . . . . . . . . . . . . . . . . . . . . . . . . . . . . . . . . . . . . . . . . . . . . . . . . . . . . xvii
About the Technical Reviewer . . . . . . . . . . . . . . . . . . . . . . . . . . . . . . . . . . . . . . . . . . . . . . . . . . . . . . xix
Acknowledgments . . . . . . . . . . . . . . . . . . . . . . . . . . . . . . . . . . . . . . . . . . . . . . . . . . . . . . . . . . . . . . . . xxi
Introduction . . . . . . . . . . . . . . . . . . . . . . . . . . . . . . . . . . . . . . . . . . . . . . . . . . . . . . . . . . . . . . . . . . . . . xxiii
PART 1 ■ ■ ■ UnderstandingCHAPTER 1 Introduction to Remoting. . . . . . . . . . . . . . . . . . . . . . . . . . . . . . . . . . . . . . . . 3
CHAPTER 2 .NET Remoting Basics . . . . . . . . . . . . . . . . . . . . . . . . . . . . . . . . . . . . . . . . . . 9
CHAPTER 3 .NET Remoting in Action . . . . . . . . . . . . . . . . . . . . . . . . . . . . . . . . . . . . . . . 25
CHAPTER 4 Configuration and Deployment . . . . . . . . . . . . . . . . . . . . . . . . . . . . . . . . . 75
CHAPTER 5 Securing .NET Remoting . . . . . . . . . . . . . . . . . . . . . . . . . . . . . . . . . . . . . . 123
CHAPTER 6 Creating Remoting Clients . . . . . . . . . . . . . . . . . . . . . . . . . . . . . . . . . . . . 161
CHAPTER 7 In-Depth .NET Remoting . . . . . . . . . . . . . . . . . . . . . . . . . . . . . . . . . . . . . . 185
CHAPTER 8 The Ins and Outs of Versioning . . . . . . . . . . . . . . . . . . . . . . . . . . . . . . . . 225
CHAPTER 9 .NET Remoting Tips and Best Practices . . . . . . . . . . . . . . . . . . . . . . . . 275
CHAPTER 10 Troubleshooting .NET Remoting . . . . . . . . . . . . . . . . . . . . . . . . . . . . . . . 303
PART 2 ■ ■ ■ ExtendingCHAPTER 11 Inside the Framework. . . . . . . . . . . . . . . . . . . . . . . . . . . . . . . . . . . . . . . . . 321
CHAPTER 12 Creation of Sinks . . . . . . . . . . . . . . . . . . . . . . . . . . . . . . . . . . . . . . . . . . . . . 349
CHAPTER 13 Extending .NET Remoting . . . . . . . . . . . . . . . . . . . . . . . . . . . . . . . . . . . . . 359
CHAPTER 14 Developing a Transport Channel . . . . . . . . . . . . . . . . . . . . . . . . . . . . . . . 421
CHAPTER 15 Context Matters . . . . . . . . . . . . . . . . . . . . . . . . . . . . . . . . . . . . . . . . . . . . . . 469
v
■CONTENTS AT A GLANCEvi
PART 3 ■ ■ ■ ReferenceAPPENDIX A .NET Remoting Usage Reference . . . . . . . . . . . . . . . . . . . . . . . . . . . . . . 487
APPENDIX B .NET Remoting Extensibility Reference . . . . . . . . . . . . . . . . . . . . . . . . 525
APPENDIX C .NET Remoting Links. . . . . . . . . . . . . . . . . . . . . . . . . . . . . . . . . . . . . . . . . . 541
INDEX . . . . . . . . . . . . . . . . . . . . . . . . . . . . . . . . . . . . . . . . . . . . . . . . . . . . . . . . . . . . . . . . . . . . . . . . . 549
Contents
About the Authors . . . . . . . . . . . . . . . . . . . . . . . . . . . . . . . . . . . . . . . . . . . . . . . . . . . . . . . . . . . . . . . . xvii
About the Technical Reviewer . . . . . . . . . . . . . . . . . . . . . . . . . . . . . . . . . . . . . . . . . . . . . . . . . . . . . . xix
Acknowledgments . . . . . . . . . . . . . . . . . . . . . . . . . . . . . . . . . . . . . . . . . . . . . . . . . . . . . . . . . . . . . . . . xxi
Introduction . . . . . . . . . . . . . . . . . . . . . . . . . . . . . . . . . . . . . . . . . . . . . . . . . . . . . . . . . . . . . . . . . . . . . xxiii
PART 1 ■ ■ ■ Understanding
■CHAPTER 1 Introduction to Remoting . . . . . . . . . . . . . . . . . . . . . . . . . . . . . . . . . . . . 3
What Is Remoting? . . . . . . . . . . . . . . . . . . . . . . . . . . . . . . . . . . . . . . . . . . . . . . . 3
Scenarios for .NET Remoting. . . . . . . . . . . . . . . . . . . . . . . . . . . . . . . . . . . . . . . 3
Centralized Business Logic . . . . . . . . . . . . . . . . . . . . . . . . . . . . . . . . . . . 4
Physical Separation of Layers . . . . . . . . . . . . . . . . . . . . . . . . . . . . . . . . . 4
Accessing Other Platforms. . . . . . . . . . . . . . . . . . . . . . . . . . . . . . . . . . . . 4
Evolution of Remoting. . . . . . . . . . . . . . . . . . . . . . . . . . . . . . . . . . . . . . . . . . . . . 4
DCE/RPC . . . . . . . . . . . . . . . . . . . . . . . . . . . . . . . . . . . . . . . . . . . . . . . . . . . 5
CORBA . . . . . . . . . . . . . . . . . . . . . . . . . . . . . . . . . . . . . . . . . . . . . . . . . . . . . 5
DCOM. . . . . . . . . . . . . . . . . . . . . . . . . . . . . . . . . . . . . . . . . . . . . . . . . . . . . . 5
MTS/COM+ . . . . . . . . . . . . . . . . . . . . . . . . . . . . . . . . . . . . . . . . . . . . . . . . . 6
Java RMI . . . . . . . . . . . . . . . . . . . . . . . . . . . . . . . . . . . . . . . . . . . . . . . . . . . 6
Java EJB . . . . . . . . . . . . . . . . . . . . . . . . . . . . . . . . . . . . . . . . . . . . . . . . . . . 6
Web Services/SOAP/XML-RPC. . . . . . . . . . . . . . . . . . . . . . . . . . . . . . . . . 7
.NET Remoting . . . . . . . . . . . . . . . . . . . . . . . . . . . . . . . . . . . . . . . . . . . . . . 7
Summary . . . . . . . . . . . . . . . . . . . . . . . . . . . . . . . . . . . . . . . . . . . . . . . . . . . . . . . 7
■CHAPTER 2 .NET Remoting Basics . . . . . . . . . . . . . . . . . . . . . . . . . . . . . . . . . . . . . . . 9
Advantages of .NET Remoting. . . . . . . . . . . . . . . . . . . . . . . . . . . . . . . . . . . . . . 9
Ease of Implementation . . . . . . . . . . . . . . . . . . . . . . . . . . . . . . . . . . . . . . 9
Extensible Architecture . . . . . . . . . . . . . . . . . . . . . . . . . . . . . . . . . . . . . . 10
Interface Definitions . . . . . . . . . . . . . . . . . . . . . . . . . . . . . . . . . . . . . . . . 11
Serialization of Data . . . . . . . . . . . . . . . . . . . . . . . . . . . . . . . . . . . . . . . . 12
Lifetime Management . . . . . . . . . . . . . . . . . . . . . . . . . . . . . . . . . . . . . . . 12
Multiserver/Multiclient . . . . . . . . . . . . . . . . . . . . . . . . . . . . . . . . . . . . . . 13vii
Your First Remoting Application. . . . . . . . . . . . . . . . . . . . . . . . . . . . . . . 13
The First Sample . . . . . . . . . . . . . . . . . . . . . . . . . . . . . . . . . . . . . . . . . . . 14
Extending the Sample . . . . . . . . . . . . . . . . . . . . . . . . . . . . . . . . . . . . . . . 20
Summary . . . . . . . . . . . . . . . . . . . . . . . . . . . . . . . . . . . . . . . . . . . . . . . . . . . . . . 23
■CHAPTER 3 .NET Remoting in Action . . . . . . . . . . . . . . . . . . . . . . . . . . . . . . . . . . . . 25
Types of Remoting. . . . . . . . . . . . . . . . . . . . . . . . . . . . . . . . . . . . . . . . . . . . . . . 25
ByValue Objects . . . . . . . . . . . . . . . . . . . . . . . . . . . . . . . . . . . . . . . . . . . . 25
MarshalByRefObjects . . . . . . . . . . . . . . . . . . . . . . . . . . . . . . . . . . . . . . . 26
Types of Invocation . . . . . . . . . . . . . . . . . . . . . . . . . . . . . . . . . . . . . . . . . . . . . . 46
Synchronous Calls . . . . . . . . . . . . . . . . . . . . . . . . . . . . . . . . . . . . . . . . . . 47
Asynchronous Calls . . . . . . . . . . . . . . . . . . . . . . . . . . . . . . . . . . . . . . . . . 51
One-Way Calls . . . . . . . . . . . . . . . . . . . . . . . . . . . . . . . . . . . . . . . . . . . . . 55
Multiserver Configuration. . . . . . . . . . . . . . . . . . . . . . . . . . . . . . . . . . . . . . . . . 59
Examining a Sample Multiserver Application . . . . . . . . . . . . . . . . . . . 60
Sharing Assemblies. . . . . . . . . . . . . . . . . . . . . . . . . . . . . . . . . . . . . . . . . . . . . . 67
Shared Implementation. . . . . . . . . . . . . . . . . . . . . . . . . . . . . . . . . . . . . . 67
Shared Interfaces. . . . . . . . . . . . . . . . . . . . . . . . . . . . . . . . . . . . . . . . . . . 67
Shared Base Classes. . . . . . . . . . . . . . . . . . . . . . . . . . . . . . . . . . . . . . . . 67
SoapSuds-Generated Metadata . . . . . . . . . . . . . . . . . . . . . . . . . . . . . . 68
Summary . . . . . . . . . . . . . . . . . . . . . . . . . . . . . . . . . . . . . . . . . . . . . . . . . . . . . . 74
■CHAPTER 4 Configuration and Deployment. . . . . . . . . . . . . . . . . . . . . . . . . . . . . 75
Configuration Files. . . . . . . . . . . . . . . . . . . . . . . . . . . . . . . . . . . . . . . . . . . . . . . 76
Watch for the Metadata! . . . . . . . . . . . . . . . . . . . . . . . . . . . . . . . . . . . . . 77
The Problem with SoapSuds . . . . . . . . . . . . . . . . . . . . . . . . . . . . . . . . . 77
Porting the Sample to Use Configuration Files . . . . . . . . . . . . . . . . . . 82
Standard Configuration Options . . . . . . . . . . . . . . . . . . . . . . . . . . . . . . 85
What About Interfaces? . . . . . . . . . . . . . . . . . . . . . . . . . . . . . . . . . . . . . . . . . 100
Using the IPC Channel in .NET Remoting 2.0 . . . . . . . . . . . . . . . . . . 102
Deployment . . . . . . . . . . . . . . . . . . . . . . . . . . . . . . . . . . . . . . . . . . . . . . . . . . . 108
Console Applications . . . . . . . . . . . . . . . . . . . . . . . . . . . . . . . . . . . . . . . 108
Windows Services . . . . . . . . . . . . . . . . . . . . . . . . . . . . . . . . . . . . . . . . . 108
Deployment Using IIS . . . . . . . . . . . . . . . . . . . . . . . . . . . . . . . . . . . . . . 116
Summary . . . . . . . . . . . . . . . . . . . . . . . . . . . . . . . . . . . . . . . . . . . . . . . . . . . . . 121
■CONTENTSviii
■CHAPTER 5 Securing .NET Remoting . . . . . . . . . . . . . . . . . . . . . . . . . . . . . . . . . . . 123
Building Secure Systems . . . . . . . . . . . . . . . . . . . . . . . . . . . . . . . . . . . . . . . . 123
Authentication Protocols in Windows. . . . . . . . . . . . . . . . . . . . . . . . . . . . . . 124
NTLM Authentication . . . . . . . . . . . . . . . . . . . . . . . . . . . . . . . . . . . . . . . 124
Kerberos: Very Fast Track . . . . . . . . . . . . . . . . . . . . . . . . . . . . . . . . . . . 126
Security Package Negotiate . . . . . . . . . . . . . . . . . . . . . . . . . . . . . . . . . 128
Security Support Provider Interface . . . . . . . . . . . . . . . . . . . . . . . . . . 128
Identities and Principals: A Short Overview. . . . . . . . . . . . . . . . . . . . . . . . . 129
Securing with IIS . . . . . . . . . . . . . . . . . . . . . . . . . . . . . . . . . . . . . . . . . . . . . . . 133
Authentication with IIS . . . . . . . . . . . . . . . . . . . . . . . . . . . . . . . . . . . . . 133
Encryption and IIS . . . . . . . . . . . . . . . . . . . . . . . . . . . . . . . . . . . . . . . . . 138
Security Outside of IIS . . . . . . . . . . . . . . . . . . . . . . . . . . . . . . . . . . . . . . . . . . 140
Using the MSDN Security Samples. . . . . . . . . . . . . . . . . . . . . . . . . . . 140
Implementing Authorization in the Server . . . . . . . . . . . . . . . . . . . . . . . . . . 149
Security with Remoting in .NET 2.0 (Beta) . . . . . . . . . . . . . . . . . . . . . . . . . 151
Summary . . . . . . . . . . . . . . . . . . . . . . . . . . . . . . . . . . . . . . . . . . . . . . . . . . . . . 160
■CHAPTER 6 Creating Remoting Clients . . . . . . . . . . . . . . . . . . . . . . . . . . . . . . . . 161
Creating a Server for Your Clients. . . . . . . . . . . . . . . . . . . . . . . . . . . . . . . . . 161
Creating a Console Client. . . . . . . . . . . . . . . . . . . . . . . . . . . . . . . . . . . . . . . . 163
Creating Windows Forms Clients . . . . . . . . . . . . . . . . . . . . . . . . . . . . . . . . . 167
Creating Back-End–Based Clients . . . . . . . . . . . . . . . . . . . . . . . . . . . . . . . . 169
ASP.NET-Based Clients . . . . . . . . . . . . . . . . . . . . . . . . . . . . . . . . . . . . . 169
Remoting Components Hosted in IIS As Clients . . . . . . . . . . . . . . . . 172
Security Considerations . . . . . . . . . . . . . . . . . . . . . . . . . . . . . . . . . . . . 177
Summary . . . . . . . . . . . . . . . . . . . . . . . . . . . . . . . . . . . . . . . . . . . . . . . . . . . . . 184
■CHAPTER 7 In-Depth .NET Remoting . . . . . . . . . . . . . . . . . . . . . . . . . . . . . . . . . . . 185
Managing an Object’s Lifetime . . . . . . . . . . . . . . . . . . . . . . . . . . . . . . . . . . . 185
Understanding Leases. . . . . . . . . . . . . . . . . . . . . . . . . . . . . . . . . . . . . . 186
Working with Sponsors . . . . . . . . . . . . . . . . . . . . . . . . . . . . . . . . . . . . . 196
Using the CallContext . . . . . . . . . . . . . . . . . . . . . . . . . . . . . . . . . . . . . . . . . . . 209
Best Practices. . . . . . . . . . . . . . . . . . . . . . . . . . . . . . . . . . . . . . . . . . . . . 212
Security and the Call Context. . . . . . . . . . . . . . . . . . . . . . . . . . . . . . . . 213
Remoting Events . . . . . . . . . . . . . . . . . . . . . . . . . . . . . . . . . . . . . . . . . . . . . . . 213
Events: First Take . . . . . . . . . . . . . . . . . . . . . . . . . . . . . . . . . . . . . . . . . . 214
Refactoring the Event Handling . . . . . . . . . . . . . . . . . . . . . . . . . . . . . . 217
Why [OneWay] Events Are a Bad Idea . . . . . . . . . . . . . . . . . . . . . . . . 222
Summary . . . . . . . . . . . . . . . . . . . . . . . . . . . . . . . . . . . . . . . . . . . . . . . . . . . . . 224
■CONTENTS ix
■CHAPTER 8 The Ins and Outs of Versioning . . . . . . . . . . . . . . . . . . . . . . . . . . . 225
.NET Framework Versioning Basics . . . . . . . . . . . . . . . . . . . . . . . . . . . . . . . 225
A Short Introduction to Strong Naming . . . . . . . . . . . . . . . . . . . . . . . 225
Versioning in .NET Remoting—Fundamentals . . . . . . . . . . . . . . . . . . . . . . 233
Versioning of Server-Activated Objects . . . . . . . . . . . . . . . . . . . . . . . 233
Versioning of Client-Activated Objects . . . . . . . . . . . . . . . . . . . . . . . . 240
Versioning of [Serializable] Objects . . . . . . . . . . . . . . . . . . . . . . . . . . 242
Advanced Versioning Concepts . . . . . . . . . . . . . . . . . . . . . . . . . . . . . . . . . . . 246
Versioning with Interfaces . . . . . . . . . . . . . . . . . . . . . . . . . . . . . . . . . . 246
Versioning Concepts for Serialized Types . . . . . . . . . . . . . . . . . . . . . 256
Summary . . . . . . . . . . . . . . . . . . . . . . . . . . . . . . . . . . . . . . . . . . . . . . . . . . . . . 273
■CHAPTER 9 .NET Remoting Tips and Best Practices . . . . . . . . . . . . . . . . . . 275
.NET Remoting Use Cases . . . . . . . . . . . . . . . . . . . . . . . . . . . . . . . . . . . . . . . 275
Cross-AppDomain Remoting . . . . . . . . . . . . . . . . . . . . . . . . . . . . . . . . 276
Cross-Process on a Single Machine. . . . . . . . . . . . . . . . . . . . . . . . . . 276
Cross-Process on Multiple Machines in a LAN. . . . . . . . . . . . . . . . . 276
Cross-Process via WAN/Internet . . . . . . . . . . . . . . . . . . . . . . . . . . . . . 278
Nonusage Scenarios . . . . . . . . . . . . . . . . . . . . . . . . . . . . . . . . . . . . . . . 279
The Nine Rules of Scalable Remoting . . . . . . . . . . . . . . . . . . . . . . . . . . . . . 280
Using Events and Sponsors . . . . . . . . . . . . . . . . . . . . . . . . . . . . . . . . . . . . . . 281
How to Notify Nevertheless . . . . . . . . . . . . . . . . . . . . . . . . . . . . . . . . . 282
Message Queuing to the Rescue. . . . . . . . . . . . . . . . . . . . . . . . . . . . . 283
Other Approaches . . . . . . . . . . . . . . . . . . . . . . . . . . . . . . . . . . . . . . . . . 286
SoapSuds vs. Interfaces in .NET Remoting . . . . . . . . . . . . . . . . . . . . . . . . . 286
Custom Exceptions . . . . . . . . . . . . . . . . . . . . . . . . . . . . . . . . . . . . . . . . . . . . . 288
Scaling Out Remoting Solutions . . . . . . . . . . . . . . . . . . . . . . . . . . . . . . . . . . 290
Load Balancing Basics . . . . . . . . . . . . . . . . . . . . . . . . . . . . . . . . . . . . . 290
Taking Nodes Online/Offline. . . . . . . . . . . . . . . . . . . . . . . . . . . . . . . . . 299
Designing Applications for Static Scalability . . . . . . . . . . . . . . . . . . . 299
Summary . . . . . . . . . . . . . . . . . . . . . . . . . . . . . . . . . . . . . . . . . . . . . . . . . . . . . 301
■CHAPTER 10 Troubleshooting .NET Remoting. . . . . . . . . . . . . . . . . . . . . . . . . . . 303
Debugging Hints . . . . . . . . . . . . . . . . . . . . . . . . . . . . . . . . . . . . . . . . . . . . . . . 303
Manual Breakpoints. . . . . . . . . . . . . . . . . . . . . . . . . . . . . . . . . . . . . . . . 304
Configuration File Settings. . . . . . . . . . . . . . . . . . . . . . . . . . . . . . . . . . . . . . . 305
Local or Remote?. . . . . . . . . . . . . . . . . . . . . . . . . . . . . . . . . . . . . . . . . . 307
Checking Types on Your Server . . . . . . . . . . . . . . . . . . . . . . . . . . . . . . 308
■CONTENTSx
BinaryFormatter Version Incompatibility . . . . . . . . . . . . . . . . . . . . . . . . . . . 309
Troubleshooting with a Custom Sink . . . . . . . . . . . . . . . . . . . . . . . . . 310
Changing Security Restrictions with TypeFilterLevel . . . . . . . . . . . . . . . . . 311
Using Custom Exceptions. . . . . . . . . . . . . . . . . . . . . . . . . . . . . . . . . . . . . . . . 313
Multihomed Machines and Firewalls . . . . . . . . . . . . . . . . . . . . . . . . . . . . . . 315
Client-Activated Objects Behind Firewalls. . . . . . . . . . . . . . . . . . . . . 317
Summary . . . . . . . . . . . . . . . . . . . . . . . . . . . . . . . . . . . . . . . . . . . . . . . . . . . . . 318
PART 2 ■ ■ ■ Extending
■CHAPTER 11 Inside the Framework . . . . . . . . . . . . . . . . . . . . . . . . . . . . . . . . . . . . . 321
Looking at the Five Elements of Remoting . . . . . . . . . . . . . . . . . . . . . . . . . 321
A Bit About Proxies . . . . . . . . . . . . . . . . . . . . . . . . . . . . . . . . . . . . . . . . 322
Understanding the Role of Messages. . . . . . . . . . . . . . . . . . . . . . . . . 326
Examining Message Sinks . . . . . . . . . . . . . . . . . . . . . . . . . . . . . . . . . . 328
Serialization Through Formatters . . . . . . . . . . . . . . . . . . . . . . . . . . . . 329
Moving Messages Through Transport Channels. . . . . . . . . . . . . . . . 330
Client-Side Messaging . . . . . . . . . . . . . . . . . . . . . . . . . . . . . . . . . . . . . . . . . . 331
ClientContextTerminatorSink and Dynamic Sinks . . . . . . . . . . . . . . 332
SoapClientFormatterSink . . . . . . . . . . . . . . . . . . . . . . . . . . . . . . . . . . . 333
HttpClientChannel . . . . . . . . . . . . . . . . . . . . . . . . . . . . . . . . . . . . . . . . . 333
Server-Side Messaging . . . . . . . . . . . . . . . . . . . . . . . . . . . . . . . . . . . . . . . . . 333
HttpServerChannel and HttpServerTransportSink . . . . . . . . . . . . . . 335
SDLChannelSink. . . . . . . . . . . . . . . . . . . . . . . . . . . . . . . . . . . . . . . . . . . 335
SoapServerFormatterSink and BinaryServerFormatterSink . . . . . . 336
DispatchChannelSink . . . . . . . . . . . . . . . . . . . . . . . . . . . . . . . . . . . . . . 336
CrossContextChannel . . . . . . . . . . . . . . . . . . . . . . . . . . . . . . . . . . . . . . 336
ServerContextTerminatorSink . . . . . . . . . . . . . . . . . . . . . . . . . . . . . . . 337
LeaseSink . . . . . . . . . . . . . . . . . . . . . . . . . . . . . . . . . . . . . . . . . . . . . . . . 337
ServerObjectTerminatorSink and StackbuilderSink . . . . . . . . . . . . . 337
All About Asynchronous Messaging . . . . . . . . . . . . . . . . . . . . . . . . . . . . . . . 338
Asynchronous IMessageSink Processing . . . . . . . . . . . . . . . . . . . . . 338
Asynchronous IClientChannelSink Processing . . . . . . . . . . . . . . . . . 340
Generating the Request . . . . . . . . . . . . . . . . . . . . . . . . . . . . . . . . . . . . 342
Handling the Response . . . . . . . . . . . . . . . . . . . . . . . . . . . . . . . . . . . . . 345
Server-Side Asynchronous Processing. . . . . . . . . . . . . . . . . . . . . . . . 347
Summary . . . . . . . . . . . . . . . . . . . . . . . . . . . . . . . . . . . . . . . . . . . . . . . . . . . . . 348
■CONTENTS xi
■CHAPTER 12 Creation of Sinks . . . . . . . . . . . . . . . . . . . . . . . . . . . . . . . . . . . . . . . . . . . 349
Understanding Sink Providers . . . . . . . . . . . . . . . . . . . . . . . . . . . . . . . . . . . . 349
Creating Client-Side Sinks . . . . . . . . . . . . . . . . . . . . . . . . . . . . . . . . . . 350
Creating Server-Side Sinks . . . . . . . . . . . . . . . . . . . . . . . . . . . . . . . . . 354
Using Dynamic Sinks . . . . . . . . . . . . . . . . . . . . . . . . . . . . . . . . . . . . . . . . . . . 356
Summary . . . . . . . . . . . . . . . . . . . . . . . . . . . . . . . . . . . . . . . . . . . . . . . . . . . . . 357
■CHAPTER 13 Extending .NET Remoting. . . . . . . . . . . . . . . . . . . . . . . . . . . . . . . . . . 359
Creating a Compression Sink . . . . . . . . . . . . . . . . . . . . . . . . . . . . . . . . . . . . 359
Implementing the Client-Side Sink . . . . . . . . . . . . . . . . . . . . . . . . . . . 361
Implementing the Server-Side Sink . . . . . . . . . . . . . . . . . . . . . . . . . . 364
Creating the Sink Providers . . . . . . . . . . . . . . . . . . . . . . . . . . . . . . . . . 367
Using the Sinks . . . . . . . . . . . . . . . . . . . . . . . . . . . . . . . . . . . . . . . . . . . 369
Extending the Compression Sink . . . . . . . . . . . . . . . . . . . . . . . . . . . . 371
Encrypting the Transfer . . . . . . . . . . . . . . . . . . . . . . . . . . . . . . . . . . . . . . . . . 375
Essential Symmetric Encryption . . . . . . . . . . . . . . . . . . . . . . . . . . . . . 376
Creating the Sinks . . . . . . . . . . . . . . . . . . . . . . . . . . . . . . . . . . . . . . . . . 380
Creating the Providers. . . . . . . . . . . . . . . . . . . . . . . . . . . . . . . . . . . . . . 386
Passing Runtime Information . . . . . . . . . . . . . . . . . . . . . . . . . . . . . . . . . . . . 390
Changing the Programming Model. . . . . . . . . . . . . . . . . . . . . . . . . . . . . . . . 402
Using This Sink. . . . . . . . . . . . . . . . . . . . . . . . . . . . . . . . . . . . . . . . . . . . 408
Avoiding the BinaryFormatter Version Mismatch . . . . . . . . . . . . . . . . . . . . 409
Using a Custom Proxy. . . . . . . . . . . . . . . . . . . . . . . . . . . . . . . . . . . . . . . . . . . 413
Some Final Words of Caution. . . . . . . . . . . . . . . . . . . . . . . . . . . . . . . . . . . . . 419
Summary . . . . . . . . . . . . . . . . . . . . . . . . . . . . . . . . . . . . . . . . . . . . . . . . . . . . . 419
■CHAPTER 14 Developing a Transport Channel . . . . . . . . . . . . . . . . . . . . . . . . . . 421
Protocol Considerations . . . . . . . . . . . . . . . . . . . . . . . . . . . . . . . . . . . . . . . . . 421
The Shortcut Route to SMTP . . . . . . . . . . . . . . . . . . . . . . . . . . . . . . . 422
. . . And Round-Trip to POP3. . . . . . . . . . . . . . . . . . . . . . . . . . . . . . . . . 423
Character Encoding Essentials . . . . . . . . . . . . . . . . . . . . . . . . . . . . . . 424
Creating E-Mail Headers. . . . . . . . . . . . . . . . . . . . . . . . . . . . . . . . . . . . 425
Encapsulating the Protocols . . . . . . . . . . . . . . . . . . . . . . . . . . . . . . . . . . . . . 426
Checking for New Mail . . . . . . . . . . . . . . . . . . . . . . . . . . . . . . . . . . . . . 433
Registering a POP3 Server . . . . . . . . . . . . . . . . . . . . . . . . . . . . . . . . . . 435
Connecting to .NET Remoting . . . . . . . . . . . . . . . . . . . . . . . . . . . . . . . 437
Implementing the Client Channel . . . . . . . . . . . . . . . . . . . . . . . . . . . . . . . . . 445
Creating the Client’s Sink and Provider . . . . . . . . . . . . . . . . . . . . . . . 449
■CONTENTSxii
Implementing the Server Channel . . . . . . . . . . . . . . . . . . . . . . . . . . . . . . . . 453
Creating the Server’s Sink . . . . . . . . . . . . . . . . . . . . . . . . . . . . . . . . . . 458
Wrapping the Channel . . . . . . . . . . . . . . . . . . . . . . . . . . . . . . . . . . . . . . . . . . 462
Using the SmtpChannel . . . . . . . . . . . . . . . . . . . . . . . . . . . . . . . . . . . . . . . . . 465
Preparing Your Machine . . . . . . . . . . . . . . . . . . . . . . . . . . . . . . . . . . . . 467
Some Final Words of Caution. . . . . . . . . . . . . . . . . . . . . . . . . . . . . . . . . . . . . 468
Summary . . . . . . . . . . . . . . . . . . . . . . . . . . . . . . . . . . . . . . . . . . . . . . . . . . . . . 468
■CHAPTER 15 Context Matters . . . . . . . . . . . . . . . . . . . . . . . . . . . . . . . . . . . . . . . . . . . . 469
Working at the MetaData Level. . . . . . . . . . . . . . . . . . . . . . . . . . . . . . . . . . . 471
Creating a Context. . . . . . . . . . . . . . . . . . . . . . . . . . . . . . . . . . . . . . . . . . . . . . 472
Checking Parameters in an IMessageSink . . . . . . . . . . . . . . . . . . . . . . . . . 480
Summary . . . . . . . . . . . . . . . . . . . . . . . . . . . . . . . . . . . . . . . . . . . . . . . . . . . . . 483
Conclusion . . . . . . . . . . . . . . . . . . . . . . . . . . . . . . . . . . . . . . . . . . . . . . . . . . . . 484
PART 3 ■ ■ ■ Reference
■APPENDIX A .NET Remoting Usage Reference . . . . . . . . . . . . . . . . . . . . . . . . . . 487
System Types . . . . . . . . . . . . . . . . . . . . . . . . . . . . . . . . . . . . . . . . . . . . . . . . . . 487
System.Activator Class . . . . . . . . . . . . . . . . . . . . . . . . . . . . . . . . . . . . . 488
System.MarshalByRefObject Class. . . . . . . . . . . . . . . . . . . . . . . . . . . 488
System.SerializableAttribute Class . . . . . . . . . . . . . . . . . . . . . . . . . . . 489
System.Delegate Class . . . . . . . . . . . . . . . . . . . . . . . . . . . . . . . . . . . . . 490
System.IAsyncResult Interface . . . . . . . . . . . . . . . . . . . . . . . . . . . . . . 491
System.Runtime.Remoting . . . . . . . . . . . . . . . . . . . . . . . . . . . . . . . . . . . . . . 491
Basic Infrastructure Classes . . . . . . . . . . . . . . . . . . . . . . . . . . . . . . . . 491
Configuration Classes . . . . . . . . . . . . . . . . . . . . . . . . . . . . . . . . . . . . . . 493
Exception Classes . . . . . . . . . . . . . . . . . . . . . . . . . . . . . . . . . . . . . . . . . 497
General Interfaces . . . . . . . . . . . . . . . . . . . . . . . . . . . . . . . . . . . . . . . . . 498
System.Runtime.Remoting.Channels. . . . . . . . . . . . . . . . . . . . . . . . . . . . . . 499
General Interfaces and Classes . . . . . . . . . . . . . . . . . . . . . . . . . . . . . . 499
System.Runtime.Remoting.Channels.Http . . . . . . . . . . . . . . . . . . . . . . . . . 504
HttpChannel Class . . . . . . . . . . . . . . . . . . . . . . . . . . . . . . . . . . . . . . . . . 504
HttpClientChannel Class . . . . . . . . . . . . . . . . . . . . . . . . . . . . . . . . . . . . 505
HttpServerChannel Class . . . . . . . . . . . . . . . . . . . . . . . . . . . . . . . . . . . 506
System.Runtime.Remoting.Channels.Tcp . . . . . . . . . . . . . . . . . . . . . . . . . . 506
TcpChannel Class . . . . . . . . . . . . . . . . . . . . . . . . . . . . . . . . . . . . . . . . . 506
TcpClientChannel Class . . . . . . . . . . . . . . . . . . . . . . . . . . . . . . . . . . . . 507
TcpServerChannel Class. . . . . . . . . . . . . . . . . . . . . . . . . . . . . . . . . . . . 508
■CONTENTS xiii
System.Runtime.Remoting.Lifetime. . . . . . . . . . . . . . . . . . . . . . . . . . . . . . . 508
ILease Interface . . . . . . . . . . . . . . . . . . . . . . . . . . . . . . . . . . . . . . . . . . . 508
ISponsor Interface . . . . . . . . . . . . . . . . . . . . . . . . . . . . . . . . . . . . . . . . . 509
ClientSponsor Class. . . . . . . . . . . . . . . . . . . . . . . . . . . . . . . . . . . . . . . . 510
LifetimeServices Class . . . . . . . . . . . . . . . . . . . . . . . . . . . . . . . . . . . . . 511
LeaseState Enumeration. . . . . . . . . . . . . . . . . . . . . . . . . . . . . . . . . . . . 511
System.Runtime.Remoting.Messaging . . . . . . . . . . . . . . . . . . . . . . . . . . . . 512
AsyncResult Class . . . . . . . . . . . . . . . . . . . . . . . . . . . . . . . . . . . . . . . . . 512
CallContext Class . . . . . . . . . . . . . . . . . . . . . . . . . . . . . . . . . . . . . . . . . . 512
LogicalCallContext Class. . . . . . . . . . . . . . . . . . . . . . . . . . . . . . . . . . . . 514
OneWayAttribute Class . . . . . . . . . . . . . . . . . . . . . . . . . . . . . . . . . . . . . 514
System.Runtime.Remoting.Metadata . . . . . . . . . . . . . . . . . . . . . . . . . . . . . 514
SoapAttribute Class . . . . . . . . . . . . . . . . . . . . . . . . . . . . . . . . . . . . . . . . 515
SoapTypeAttribute Class. . . . . . . . . . . . . . . . . . . . . . . . . . . . . . . . . . . . 515
SoapFieldAttribute Class. . . . . . . . . . . . . . . . . . . . . . . . . . . . . . . . . . . . 515
SoapMethodAttribute Class . . . . . . . . . . . . . . . . . . . . . . . . . . . . . . . . . 516
SoapParameterAttribute Class. . . . . . . . . . . . . . . . . . . . . . . . . . . . . . . 516
SoapOption Enumeration . . . . . . . . . . . . . . . . . . . . . . . . . . . . . . . . . . . 516
System.Runtime.Remoting.Services . . . . . . . . . . . . . . . . . . . . . . . . . . . . . . 516
EnterpriseServicesHelper Class. . . . . . . . . . . . . . . . . . . . . . . . . . . . . . 516
RemotingClientProxy Class . . . . . . . . . . . . . . . . . . . . . . . . . . . . . . . . . 517
ITrackingHandler Interface . . . . . . . . . . . . . . . . . . . . . . . . . . . . . . . . . . 517
TrackingServices Class . . . . . . . . . . . . . . . . . . . . . . . . . . . . . . . . . . . . . 517
System.Runtime.Serialization . . . . . . . . . . . . . . . . . . . . . . . . . . . . . . . . . . . . 518
ISerializable Interface . . . . . . . . . . . . . . . . . . . . . . . . . . . . . . . . . . . . . . 519
SerializationInfo Class. . . . . . . . . . . . . . . . . . . . . . . . . . . . . . . . . . . . . . 520
StreamingContext Structure. . . . . . . . . . . . . . . . . . . . . . . . . . . . . . . . . 520
SerializationException Class . . . . . . . . . . . . . . . . . . . . . . . . . . . . . . . . 521
System.Runtime.Serialization.Formatters . . . . . . . . . . . . . . . . . . . . . . . . . . 521
SoapFault Class . . . . . . . . . . . . . . . . . . . . . . . . . . . . . . . . . . . . . . . . . . . 521
SoapMessage Class . . . . . . . . . . . . . . . . . . . . . . . . . . . . . . . . . . . . . . . 521
TypeFilterLevel Enumeration . . . . . . . . . . . . . . . . . . . . . . . . . . . . . . . . 521
Summary . . . . . . . . . . . . . . . . . . . . . . . . . . . . . . . . . . . . . . . . . . . . . . . . . . . . . 523
■APPENDIX B .NET Remoting Extensibility Reference . . . . . . . . . . . . . . . . . . . 525
System.Runtime.Remoting.Messaging . . . . . . . . . . . . . . . . . . . . . . . . . . . . 525
IMessage Interface . . . . . . . . . . . . . . . . . . . . . . . . . . . . . . . . . . . . . . . . 525
IMessageSink Interface . . . . . . . . . . . . . . . . . . . . . . . . . . . . . . . . . . . . 526
IMethodMessage Interface. . . . . . . . . . . . . . . . . . . . . . . . . . . . . . . . . . 527
IMethodCallMessage Interface . . . . . . . . . . . . . . . . . . . . . . . . . . . . . . 528
■CONTENTSxiv
IMethodReturnMessage Interface . . . . . . . . . . . . . . . . . . . . . . . . . . . . 528
MethodCall Class . . . . . . . . . . . . . . . . . . . . . . . . . . . . . . . . . . . . . . . . . . 529
MethodResponse Class. . . . . . . . . . . . . . . . . . . . . . . . . . . . . . . . . . . . . 529
System.Runtime.Remoting.Activation . . . . . . . . . . . . . . . . . . . . . . . . . . . . . 529
IConstructionCallMessage Interface . . . . . . . . . . . . . . . . . . . . . . . . . . 530
IConstructionReturnMessage Interface . . . . . . . . . . . . . . . . . . . . . . . 530
System.Runtime.Remoting.Proxies . . . . . . . . . . . . . . . . . . . . . . . . . . . . . . . 530
RealProxy Class . . . . . . . . . . . . . . . . . . . . . . . . . . . . . . . . . . . . . . . . . . . 531
ProxyAttribute Class . . . . . . . . . . . . . . . . . . . . . . . . . . . . . . . . . . . . . . . 531
System.Runtime.Remoting.Channels. . . . . . . . . . . . . . . . . . . . . . . . . . . . . . 531
IChannelSinkBase Interface . . . . . . . . . . . . . . . . . . . . . . . . . . . . . . . . . 532
IClientChannelSink Interface . . . . . . . . . . . . . . . . . . . . . . . . . . . . . . . . 532
IClientChannelSinkProvider Interface . . . . . . . . . . . . . . . . . . . . . . . . . 533
IClientFormatterSink Interface . . . . . . . . . . . . . . . . . . . . . . . . . . . . . . . 534
IClientFormatterSinkProvider Interface . . . . . . . . . . . . . . . . . . . . . . . 534
IServerChannelSink Interface . . . . . . . . . . . . . . . . . . . . . . . . . . . . . . . 534
IServerChannelSinkProvider Interface . . . . . . . . . . . . . . . . . . . . . . . . 535
ITransportHeaders Interface. . . . . . . . . . . . . . . . . . . . . . . . . . . . . . . . . 536
IChannel Interface . . . . . . . . . . . . . . . . . . . . . . . . . . . . . . . . . . . . . . . . . 537
IChannelReceiver Interface . . . . . . . . . . . . . . . . . . . . . . . . . . . . . . . . . 538
IChannelSender Interface . . . . . . . . . . . . . . . . . . . . . . . . . . . . . . . . . . . 539
BaseChannelObjectWithProperties Class. . . . . . . . . . . . . . . . . . . . . . 539
BaseChannelWithProperties Class . . . . . . . . . . . . . . . . . . . . . . . . . . . 540
BaseChannelSinkWithProperties Class . . . . . . . . . . . . . . . . . . . . . . . 540
Summary . . . . . . . . . . . . . . . . . . . . . . . . . . . . . . . . . . . . . . . . . . . . . . . . . . . . . 540
■APPENDIX C .NET Remoting Links . . . . . . . . . . . . . . . . . . . . . . . . . . . . . . . . . . . . . . . 541
Ingo’s .NET Remoting FAQ Corner . . . . . . . . . . . . . . . . . . . . . . . . . . . . . . . . 541
MSDN and MSDN Magazine Articles . . . . . . . . . . . . . . . . . . . . . . . . . . . . . . 541
“Improving Remoting Performance” . . . . . . . . . . . . . . . . . . . . . . . . . 541
“.NET Remoting Security” . . . . . . . . . . . . . . . . . . . . . . . . . . . . . . . . . . 541
“Boundaries: Processes and Application Domains”. . . . . . . . . . . . . 542
“.NET Remoting Architectural Assessment” . . . . . . . . . . . . . . . . . . . 542
“.NET Remoting Overview” . . . . . . . . . . . . . . . . . . . . . . . . . . . . . . . . . 542
“Building Secure ASP.NET Applications: Authentication,Authorization, and Secure Communication” . . . . . . . . . . . . . . . . . . . 542
“NET Remoting Authentication and Authorization Sample” . . . . . . 542
“Managed Extensions for C++ and .NET Remoting Tutorial” . . . . 543
“.NET Remoting Use-Cases and Best Practices” and “ASP.NET Web Services or .NET Remoting: How to Choose”. . . . . 543
■CONTENTS xv

“Remoting Examples”. . . . . . . . . . . . . . . . . . . . . . . . . . . . . . . . . . . . . . 543
“Secure Your .NET Remoting Traffic by Writing an Asymmetric Encryption Channel” . . . . . . . . . . . . . . . . . . . . . . . . . . . . 543
“Create a Custom Marshaling Implementation Using .NET Remoting and COM Interop” . . . . . . . . . . . . . . . . . . . . . . . . . . . . . . . . 543
.NET Remoting Interoperability . . . . . . . . . . . . . . . . . . . . . . . . . . . . . . . . . . . 544
.NET Remoting: CORBA Interoperability . . . . . . . . . . . . . . . . . . . . . . . 544
.NET Remoting: Java RMI Bridges . . . . . . . . . . . . . . . . . . . . . . . . . . . 544
XML-RPC with .NET Remoting. . . . . . . . . . . . . . . . . . . . . . . . . . . . . . . 544
Custom .NET Remoting Channels. . . . . . . . . . . . . . . . . . . . . . . . . . . . . . . . . 544
Named Pipes Channel for .NET Remoting . . . . . . . . . . . . . . . . . . . . . 545
TcpEx Channel for .NET Remoting . . . . . . . . . . . . . . . . . . . . . . . . . . . 545
Jabber Channel . . . . . . . . . . . . . . . . . . . . . . . . . . . . . . . . . . . . . . . . . . . 545
Remoting Channel Framework Extension . . . . . . . . . . . . . . . . . . . . . 545
“Using MSMQ for Custom Remoting Channel”. . . . . . . . . . . . . . . . . 545
“Using WSE-DIME for Remoting over Internet” . . . . . . . . . . . . . . . . 546
Interesting Technical Articles . . . . . . . . . . . . . . . . . . . . . . . . . . . . . . . . . . . . . 546
C# Corner: Remoting Section. . . . . . . . . . . . . . . . . . . . . . . . . . . . . . . . 546
“Share the ClipBoard Using .NET Remoting” . . . . . . . . . . . . . . . . . . 546
“Chaining Channels in .NET Remoting”. . . . . . . . . . . . . . . . . . . . . . . 546
“Applying Observer Pattern in .NET Remoting” . . . . . . . . . . . . . . . . 546
“Aspect-Oriented Programming Enables Better Code Encapsulation and Reuse” and “.NET Remoting Spied On” . . . . . . 547
“Persistent Events in Stateless Remoting Server”. . . . . . . . . . . . . . 547
“Intrinsyc’s Ja.NET—Extending the Reach of .NET Remoting” . . . . . . . . . . . . . . . . . . . . . . . . . . . . . . . . . . . . . . . . . . . 547
“Implementing Object Pooling with .NET Remoting—Part I”. . . . . 547
“.NET Remoting Versus Web Services” . . . . . . . . . . . . . . . . . . . . . . . 547
“.NET Remoting Central” . . . . . . . . . . . . . . . . . . . . . . . . . . . . . . . . . . . 547
“Output Caching for .NET Remoting” . . . . . . . . . . . . . . . . . . . . . . . . . 548
“Abstract Client Formatter Sink”. . . . . . . . . . . . . . . . . . . . . . . . . . . . . 548
Remoting Tools. . . . . . . . . . . . . . . . . . . . . . . . . . . . . . . . . . . . . . . . . . . . . . . . . 548
Remoting Management Console . . . . . . . . . . . . . . . . . . . . . . . . . . . . . 548
Remoting Probe . . . . . . . . . . . . . . . . . . . . . . . . . . . . . . . . . . . . . . . . . . . 548
■INDEX . . . . . . . . . . . . . . . . . . . . . . . . . . . . . . . . . . . . . . . . . . . . . . . . . . . . . . . . . . . . . . . . . . . . . . . 549
■CONTENTSxvi
About the Authors
■INGO RAMMER is cofounder of thinktecture, a company supporting software architects anddevelopers with architecture and design of .NET and Web Services applications. He is a regularspeaker about these topics at conferences around the world, author of numerous online andprint articles, and winner of the .NET Developer’s Journal’s Readers’ Choice Award for Best .NETBook of 2003. You can reach him at http://www.thinktecture.com/staff/ingo.
■MARIO SZPUSZTA is working in the Developer and Platform Group of Microsoft Austria. Beforehe started working for Microsoft, Mario was involved in several projects based on COM+ andDCOM with Visual Basic and Visual C++ as well as projects based on Java and J2SE. With Beta 2of the .NET Framework, he started developing Web applications with ASP.NET. Right now, asdeveloper evangelist for Microsoft Austria, he is doing workshops, trainings, and proof-of-conceptprojects together with independent software vendors in Austria based on .NET, Web Services,and Office 2003 technologies.
xvii

About the Technical Reviewer
■KENT SHARKEY is currently the content strategist for ASP.NET and Visual Studio content forMSDN. When not answering e-mail, he occasionally writes, codes, and sleeps. He lives in green,green Redmond with his wife, and two furry “children,” Squirrel and Cica.
xix
Acknowledgments
First and foremost, I want to thank Mario for taking the challenge to write the second editionof this book together with me. Without him, this book could not exist.
I especially want to thank those people whom I’ve met in the previous years and whose insightconstantly influenced the way I think about software. A big “thank you” therefore needs to goto Beat Schwegler, Clemens Vasters, Don Box, and Steve Swartz.
But the biggest “thank you” needs to go to the thousands of software developers and archi-tects who contacted me by e-mail, who chatted with me at various conferences, and who wrotethought-provoking Weblog and newsgroup posts. You are the reason why I wrote this book.
Of course, writing a book would not be possible without the support of many people. Eventhough only Mario’s and my name appear on the cover, this book would not have been possiblewithout my fellows at thinktecture: Christian Weyer, Christian Nagel, and Ralf Westphal; myfriend and the technical reviewer for this book, Kent Sharkey; and the fine editorial staff atApress: Laura Brown, Ami Knox, and Ellie Fountain. Thank you for making this book a reality!
—Ingo Rammer
The first large project I started working on was one of the most interesting projects I have everbeen part of. The enthusiasm and creativity of the two masterminds in this team, HaraldLeitenmüller and Benedikt Redl, have inspired me. These two persons have shown me whatsoftware development in large projects really means, and they have shown me how interestingsoftware architecture is! Without them, I would not have progressed even half as far as I havetoday. Therefore, my biggest thanks go to Harald and Benedikt.
Without Beat Schwegler, I would not have had the chance to get involved in writing thisbook. Thank you, Beat, for this great opportunity and much more for the things I have learnedin the past two years from you. These two years have been a really great time!
Last but not least, I want to thank you, Ingo, for giving me the chance to write this book withyou. It was really great. I learned many things, and right now I recognize that writing conceptsand thoughts down is something that can be really funny and, even more so, interesting.
—Mario Szpuszta
xxi
Introduction
In the time since the first edition of this book has been published, quite a bit has changed in theworld of software development on Microsoft’s platforms. The .NET Framework has becomea tried-and-true development platform, and service orientation gained a larger-than-expectedmomentum. The latter especially presents a very challenging task for the developer using .NETRemoting: the need to avoid possible incompatibilities with future paradigms. If service orien-tation will, in the next few years, gain the success it deserves, it might be important for yourapplication to be developed in a way to easily adopt these new ideas.
In this book, I have therefore followed a slightly different approach from the one I did inthe previous edition. While the first book focused only on covering all the features of the .NETRemoting framework, Mario and I tried to extend this second edition with the best practicesfor using this technology. While it still covers nearly each and every feature of the .NET Remot-ing framework, the largest part of the new chapters of this book—especially Chapters 5, 8, 9,and 10—deals with security, best practices, and the general avoidance of problems.
What Is Covered in This BookThis book covers the means of cross-process and cross-machine interaction of applicationsdeveloped with the .NET Framework. It will provide you with an in-depth understanding ofthe remoting capabilities that are built into the .NET Framework.
.NET Remoting is different from most other means of remote object access because it canbe as easy as writing COM components in Visual Basic 6, yet also gives you the option to extendremoting to include virtually any protocol on any transportation layer you will come across.
Part 1 of the book gives you a thorough introduction to .NET Remoting basics and howyou can use .NET Remoting “out of the box.” This gives you a whole range of possibilities, fromfast binary transfer protocol to a cross-platform SOAP protocol, with the potential to switchbetween both without changing a single line in your code. At the end of this part, you will beable to design and develop remoteable components and know just what you have to do to achieveyour goals. This part also deals with objects’ lifetimes, security, versioning, marshalling, anddeployment.
Part 2 covers the advanced features of .NET Remoting and its extensibility model. At theend of the second part, you will have an in-depth understanding of the inner workings ofremoting and will know how to extend the framework to meet your requirements. You shouldnot be afraid, especially as you go through the sample code in the second part of the book, toeither hit F1 or to insert a breakpoint and examine the Locals window in your custom channelsink to see the exact contents of the objects that get passed as parameters to your methods.
xxiii
What This Book Doesn’t CoverThis book is in no way a rehash of the supplied documentation, but is meant to be used inconjunction with it. You will only find a small percentage of the information that is coveredin the online documentation in this book and vice versa, so it is very important for you to usethe .NET Framework SDK documentation as well.
I chose this approach to writing a book for one simple reason: I assume that, as an advanceddeveloper, you don’t have much time to waste going through a 1,000-page book of which 600pages are a reproduction of the online documentation. Instead, you want to read the informa-tion that has not been covered before. If you think so as well, this book is right for you.
Who This Book Is ForThis book is for the intermediate-to-advanced programmer who wants a hands-on guide to .NETRemoting. Although this book is not an introduction to .NET, the CLR, or any .NET language,you nevertheless will be able to use the knowledge and insight you’ll get from this book withany of these programming languages. All the samples printed in this book are written in VisualBasic .NET, but you can download each and every sample in both C# and Visual Basic .NET.
If you are a “use-it” developer, Part 1 (Chapters 1 through 10) of this book will serve you wellby providing a general introduction to the possibilities of remoting and giving you in-depthinformation on how to use the capabilities that come with .NET Remoting “out of the box.” Thispart also includes guidance on security, best practices, and troubleshooting.
If you are more of an “understand-it-and-extend-it” developer, Part 2 of this book is for you.Chapters 11 through 15 were written for those who want to understand what’s going on behindthe scenes of .NET Remoting and how the framework can be customized using proxies, messages,channel sinks, and providers. It also demonstrates how a complete transport channel is imple-mented from scratch.
At the end of the book, you’ll find a collection of appendixes that provide a reference ofthe namespaces, classes, and interfaces that comprise the .NET Remoting framework.
How This Book Is StructuredAdvanced .NET Remoting is divided into two parts. Part 1 (Chapters 1 through 10) covers every-thing you need to know for developing distributed applications within the .NET Framework.Part 2 (Chapters 11 through 15) gives you a thorough technical insight that will allow you toreally understand what’s happening behind the scenes and how you can tap into customizingthe framework to suit your exact needs. Following is a brief chapter-by-chapter summary ofthe topics covered in this book.
Chapter 1: Introduction to RemotingThis chapter gives you a short introduction to the world of distributed application developmentand the respective technologies. It presents some scenarios in which .NET Remoting can beemployed and includes historical background on the progress and development of variousremoting frameworks during the last ten years.
■INTRODUCTIONxxiv
Chapter 2: .NET Remoting BasicsThis chapter gets you started with your first remoting application. Before going directly into thecode, I present the distinctions between .NET Remoting and other distributed application frame-works. I then introduce you to the basic types of remote objects, which are server-activatedobjects and client-activated objects, and show you how to pass data by value. I also give yousome basic information about lifetime management issues and the generation of metadata,which is needed for the client to know about the interfaces of the server-side objects.
Chapter 3: .NET Remoting in ActionIn this chapter, I demonstrate the key techniques you’ll need to know to use .NET Remoting inyour real-world applications. I show you the differences between Singleton and SingleCall objectsand untangle the mysteries of client-activated objects. I also introduce you to SoapSuds, whichcan be used to generate proxy objects containing only methods’ stubs.
Chapter 4: Configuration and DeploymentThis chapter introduces you to the aspects of configuration and deployment of .NET Remotingapplications. It shows you how to use configuration files to avoid the hard coding of URLs orchannel information for your remote object. You also learn about hosting your server-sidecomponents in Windows Services and IIS.
Chapter 5: Securing .NET RemotingThis chapter shows you how to leverage IIS’s features when it comes to hosting your componentsin a secured environment. In this chapter, you learn how to enable basic HTTP sign-on andthe more secure Windows-integrated authentication scheme, which is based on a challenge/response protocol. You also see how to enable encrypted access by using standard SSL certifi-cates at the server side.
You will also read about ways to use .NET Remoting in a secure way when not relying on IIS.
Chapter 6: Creating Remoting ClientsWhenever I explain a new feature of the .NET Remoting framework, I tend to present it in aneasily digestible console application to avoid having to show you numerous lines of boilerplate.NET code.
Of course, most of your real-world applications will either be Windows Forms or ASP.NETWeb applications or Web Services. In this chapter, you therefore learn how to create remotingclients either as desktop or Web applications.
Chapter 7: In-Depth .NET RemotingAs a developer of distributed applications using .NET Remoting, you have to consider severalfundamental differences from other remoting techniques and, of course, from the developmentof local applications. These differences, including lifetime management, versioning, and thehandling of asynchronous calls and events, are covered in this chapter.
■INTRODUCTION xxv
Chapter 8: The Ins and Outs of VersioningHere you learn how to create .NET Remoting applications that are version resilient in a waythat allows you to support different versions of clients with the same server.
Chapter 9: .NET Remoting Tips and Best PracticesIn this chapter, I introduce you to a number of best practices that I’ve learned in more thanthree years of using .NET Remoting in numerous projects. This chapter will help you to increasescalability, performance, and stability of your distributed applications.
Chapter 10: Troubleshooting .NET RemotingUnfortunately, things can and will go wrong at some point in time. That’s why this chapter givesyou a number of techniques and tools that help you to troubleshoot various issues you mightencounter when using .NET Remoting. But don’t be afraid: most of these can be remedied ina very brief amount of time.
Chapter 11: Inside the Framework.NET provides an unprecedented extensibility for the remoting framework. The layered archi-tecture of the .NET Remoting framework can be customized by either completely replacing theexisting functionality of a given tier or chaining new implementation with the baseline .NETfeatures.
Before working on the framework and its extensibility, I really encourage you to get a thoroughunderstanding of the existing layers and their inner workings in this architecture. This chaptergives you that information.
Chapter 12: Creation of SinksThis chapter covers the instantiation of message and channel sinks and sink chains. It showsyou the foundation on which to build your own sinks—something you need to know beforetackling the implementation of custom sinks.
Chapter 13: Extending .NET RemotingThis chapter builds on the information from Chapters 7 and 8 and shows you how to implementcustom remoting sinks. This includes channel sinks that compress or encrypt the transportedinformation, and message sinks to pass additional runtime information from a client to theserver or to change the .NET Remoting programming model. This chapter concludes with show-ing you how to implement custom remoting proxies that forward method calls to remote objects.
Chapter 14: Developing a Transport ChannelThis chapter builds on the information you gained in Chapters 7, 8, and 9 and presents thedevelopment of a custom .NET Remoting channel that transfers messages via standard Internete-mail by using SMTP and POP3. It shows not only the implementation of this channel, butalso the necessary phase of analyzing the underlying protocol to combine it with the featuresand requirements of .NET Remoting.
■INTRODUCTIONxxvi

■INTRODUCTION xxvii
Chapter 15: Context MattersThis last chapter is about message-based processing in local applications. Here you learn howyou can intercept calls to objects to route them through IMessageSinks. This routing allows youto create and maintain parts of your application’s business logic at the metadata level by usingcustom attributes. You also discover why it might or might not be a good idea to do so.
Appendix A: .NET Remoting Usage ReferenceThis first appendix includes reference information you’ll need when using .NET Remoting inyour application. You’ll learn about all the namespaces involved when creating clients andservers, and configuring and troubleshooting your application.
Appendix B: .NET Remoting Extensibility ReferenceThis second appendix covers the namespaces, classes, and interfaces that allow you to extendthe .NET Remoting framework.
Appendix C: .NET Remoting LinksAt the end of this book are collected a number of links to additional .NET Remoting–specificcontent on the Web. This includes everything from Microsoft-provided additional articles tocustom channels and remoting extensions.
Source Code DownloadYou can find all source code presented in this book at the Apress download page at http://www.apress.com. If you have further suggestions or comments or want to access even moresample code on .NET Remoting, you are invited to visit thinktecture’s .NET Remoting FAQ,which is hosted at http://www.thinktecture.com/Resources/RemotingFAQ.
We hope that you will benefit from the techniques and information we provide in this bookwhen building your distributed applications based on the .NET Framework.
Ingo Rammer and Mario SzpusztaVienna, Austria
P A R T 1■ ■ ■
Understanding
3
C H A P T E R 1
■ ■ ■
1. .NET extends this concept to include the ability to define additional contexts within one running appli-cation. Object accesses crossing these boundaries will pass the .NET Remoting framework as well.
Introduction to Remoting
This chapter gives you a short introduction to the world of distributed application develop-ment and its respective technologies. Here you get a chance to examine some scenarios inwhich .NET Remoting can be employed and learn some historical background on the progressand development of various remoting frameworks during the last ten years.
What Is Remoting?Remoting is the process of programs or components interacting across certain boundaries.These contexts will normally resemble either different processes or machines.1 In the .NETFramework, this technology provides the foundation for distributed applications—it simplyreplaces DCOM.
Remoting implementations generally distinguish between remote objects and mobile objects.The former provide the ability to execute methods on remote servers, passing parameters andreceiving return values. The remote object will always “stay” at the server, and only a referenceto it will be passed around among other machines.
When mobile objects pass a context boundary, they are serialized (marshaled) into a generalrepresentation—either a binary or a human readable format like XML—and then deserializedin the other context involved in the process. Server and client both hold copies of the sameobject. Methods executed on those copies of the object will always be carried out in the localcontext, and no message will travel back to the machine from which the object originated. Infact, after serialization and deserialization, the copied objects are indistinguishable from regu-lar local objects, and there is also no distinction between a server object and a client object.
Scenarios for .NET RemotingAt the beginning of the client/server era, remoting was mostly used for accessing a server’sresources. Every database or file server is an implementation of some technique that allows codeto be executed remotely. Programming these older frameworks was so difficult a task that fewproducts except for these server-side core services implemented remoting.
CHAPTER 1 ■ INTRODUCTION TO REMOTING4
Nowadays the building of distributed applications has gotten a lot easier so that it’s quitefeasible to distribute business applications among various machines to improve performance,scalability, and maintainability.
Centralized Business LogicOne of the key scenarios for implementing remoting is the concentration of business logic onone or more central servers. This considerably simplifies the maintainability and operability oflarge-scale applications. Changes in business logic do not entail your having to roll out an appli-cation to your organization’s 10,000 worldwide users—you just have to update one single server.
When this centralized business logic is shared among different applications, this labor-savingeffect multiplies considerably; instead of patching several applications, you just have to changethe server’s implementation.
Physical Separation of LayersThe security of a company’s vital databases represents a common concern in this time ofWeb-enabled businesses. The general recommendation is against directly connecting fromthe Web server to the database because this setup would allow attackers easy access to criticaldata after they have seized control of the Web server.
Instead of this direct connection, an intermediate application server is introduced. Thisserver is placed in a so-called demilitarized zone (DMZ), located between two firewalls. Firewall #1only allows connections from the Web server to the app server, and Firewall #2 only allows con-nections from the app server to the databases.
Because the application server doesn’t allow the execution of arbitrary SQL statements, yetprovides object-oriented or function-based access to business logic, a security compromise ofthe Web server (which can only talk to the app server) is noncritical to a company’s operations.
Accessing Other PlatformsIn today’s mid- to large-scale enterprises, you will normally encounter a heterogeneous combi-nation of different platforms, frameworks, and programming languages. It is not uncommon tofind that a bunch of tools have been implemented: Active Server Pages (ASP), Java Server Pages(JSP), PHP, or ColdFusion for Web applications, Visual Basic or Java for in-house applications,C++ for server-side batch jobs, scripting languages for customizing CRM systems, and so on.
Integrating these systems can be a daunting task for system architects. Remoting architec-tures like CORBA, SOAP, and .NET Remoting are an absolute necessity in large-scale enterpriseapplication integration. (CORBA and SOAP are introduced and compared later in this chapter.)
Evolution of RemotingThe scenarios presented thus far have only been possible due to the constant evolution ofremoting frameworks. The implementation of large-scale business applications in a distributedmanner has only been practicable after the technical problems have been taken care of by theframeworks. CORBA, COM+, and EJB started this process several years ago, and .NET Remotingsimplifies this process even more.
To underscore how far remoting has evolved from its cumbersome beginnings, the followingsections give you a brief history of the various remoting frameworks.
CHAPTER 1 ■ INTRODUCTION TO REMOTING 5
DCE/RPCDistributed Computing Environment (DCE), designed by the Open Software Foundation (OSF)during the early 1990s, was created to provide a collection of tools and services that wouldallow easier development and administration of distributed applications. The DCE frameworkprovides several base services such as Remote Procedure Calls (DCE/RPC), Security Services,Time Services, and so on.
Implementing DCE is quite a daunting task; the interfaces have to be specified in InterfaceDefinition Language (IDL) and compiled to C headers, client proxies, and server stubs by an IDLcompiler. When implementing the server, one has to link the binary with DCE/Threads, whichare available for C/C++. The use of programming languages other than these is somewhatrestricted due to the dependence on the underlying services, like DCE/Threads, with the resultthat one has to live with single-threaded servers when refraining from using C/C++.
DCE/RPC nevertheless is the foundation for many current higher-level protocols includingDCOM and COM+. Several application-level protocols such as MS SQL Server, Exchange Server,Server Message Block (SMB), which is used for file and printer sharing, and Network File System(NFS) are also based on DCE/RPC.
CORBADesigned by the Object Management Group (OMG), an international consortium of about 800companies, CORBA’s aim is to be the middleware of choice for heterogeneous systems. OMG’sCORBA, which stands for Common Object Request Broker Architecture, is only a collection ofstandards; the implementation of object request brokers (ORBs) is done by various third parties.Because parts of the standard are optional and the vendors of ORBs are allowed to include addi-tional features that are not in the specifications, the world has ended up with some incompatiblerequest brokers. As a result, an application developed to make use of one vendor’s featurescould not easily be ported to another ORB. When you buy a CORBA-based program or compo-nent, you just can’t be sure if it will integrate with your CORBA applications, which probablywere developed for a different request broker.
Aside from this potential problem, CORBA also has quite a steep learning curve. The standardreads like a complete wish list of everything that’s possible with remoted components—sometimesit simply is too much for the “standard business.” You’ll probably end up reading documentsfor days or weeks before your first request is ever sent to a server object.
Nevertheless, when you have managed to implement your first CORBA application, you’llbe able to integrate a lot of programming languages and platforms. There are even layers forCOM or EJB integration, and apart from SOAP, CORBA is the only true multiplatform, multi-programming language environment for distributed applications.
DCOMDistributed Component Object Model (DCOM) is an “extension” that fits in the ComponentObject Model (COM) architecture, which is a binary interoperability standard that allows forcomponent-oriented application development. You’ll usually come in contact with COM whenusing ActiveX controls or ActiveX DLLs.
DCOM allows the distribution of those components among different computers. Scalability,manageability, and its use in WANs pose several issues that need to be addressed. DCOM uses
CHAPTER 1 ■ INTRODUCTION TO REMOTING6
a pinging process to manage the object’s lifetimes; all clients that use a certain object will sendmessages after certain intervals. When a server receives these messages, it knows that the clientis still alive; otherwise it will destroy the object.
Additionally, reliance on the binary DCE/RPC protocol poses the need for direct TCPconnections between the client and its server. Use of HTTP proxies is not possible. DCOM isavailable for Microsoft Windows and for some UNIX dialects (ported by the German companySoftware AG).
MTS/COM+COM+, formerly Microsoft Transaction Server (MTS), was Microsoft’s first serious attempt toreach into the enterprise application domain. It not only serves as a remoting platform, butalso provides transaction, security, scalability, and deployment services. COM+ componentscan even be used via Microsoft Message Queue Server to provide asynchronous execution ofmethods.
Despite its advantages, COM+ does not yet support the automatic marshalling of objects topass them by value between applications; instead you have to pass your data structures usingADO recordsets or other means of serialization. Other disadvantages that keep people fromusing COM+ are the somewhat difficult configuration and deployment, which complicates itsuse for real-world applications.
Java RMITraditional Java Remote Method Invocation (Java RMI) uses a manual proxy/stub compilationcycle. In contrast to DCE/RPC and DCOM, the interfaces are not written in an abstract IDL butin Java. This is possible due to Java being the only language for which the implementation ofRMI is possible.
This limitation locked RMI out of the game of enterprise application integration. Even thoughall relevant platforms support a Java Virtual Machine, integration with legacy applications isnot easily done.
Java EJBEnterprise Java Beans (EJB) was Sun’s answer to Microsoft’s COM+. Unlike CORBA, which is onlya standard, EJB comes with a reference implementation. This allows developers to check if theirproducts run in any standard-complying EJB container. EJB has been widely accepted by theindustry, and there are several container implementations ranging from free open source tocommercial implementations by well-known middleware vendors.
One problem with EJB is that even though a reference implementation exists, most vendorsadd features to their application servers. When a developer writes a component that uses oneof those features, the application will not run on another vendor’s EJB container.
Former versions of EJB have been limited to the Java platform because of their internalreliance on RMI. The current version allows the use of IIOP, which is the same transfer protocolCORBA uses, and third parties already provide commercial COM/EJB bridges.
CHAPTER 1 ■ INTRODUCTION TO REMOTING 7
Web Services/SOAP/XML-RPCWeb Services provided the first easy to understand and implement solution to true cross-platformand cross-language interoperability. Web Services technically are stateless calls to remote compo-nents via HTTP POST with a payload encoded in some XML format.
Two different XML encodings are currently in major use: XML-RPC and SOAP. XML-RPC canbe described as a poor man’s SOAP. It defines a very lightweight protocol with a specification sizeof about five printed pages. Implementations are already available for a lot of programmingenvironments, ranging from AppleScript to C/C++, COM, Java, Perl, PHP, Python, Tcl, andZope—and of course there’s also an implementation for .NET.
SOAP, or Simple Object Access Protocol, defines a much richer set of services; the specificationcovers not only remote procedure calls, but also the Web Services Description Language (WSDL)and Universal Description, Discovery, and Integration (UDDI). WSDL is SOAP’s interface defini-tion language, and UDDI serves as a directory service for the discovery of Web Services. Thoseadditional protocols and specifications are also based on XML, which allows all SOAP featuresto be implemented on a lot of platforms.
The specifications and white papers for SOAP, WSDL, UDDI, and corresponding technolo-gies cover several hundred pages, and you can safely assume that this document will grow fur-ther when topics like routing and transactions are addressed. Fortunately for .NET developers,the .NET platform takes care of all issues regarding SOAP.
.NET RemotingAt first look, .NET Remoting is to Web Services what ASP has been to CGI programming. It takescare of a lot of issues for you: contrary to Web Services, for example, .NET Remoting enables youto work with stateful objects.
In addition to the management of stateful objects, .NET Remoting gives you a flexible andextensible framework that allows for different transfer mechanisms (HTTP and TCP are supportedby default), encodings (SOAP and binary come with the framework), and security settings (IISSecurity and SSL come out of the box).
With these options, and the possibility of extending all of them or providing completely newimplementations, .NET Remoting is well suited to today’s distributed applications. You canchoose between HTTP-based transport for the Internet or a faster TCP-based one for LANapplications by literally changing a single line in a configuration file.
Interface description does not have to be manually coded in any way, even though it’ssupported if you like to design your applications this way. Instead, metadata can be extractedfrom running servers, or from any .NET assembly.
SummaryThis chapter provided a short introduction to the world of distributed application developmentand the respective technologies. You now know about the various scenarios in which .NETRemoting can be applied and understand how it differs from other distributed applicationprotocols and techniques.
9
C H A P T E R 2
■ ■ ■
.NET Remoting Basics
This chapter gets you started with your first remoting application. Before going directly intothe code, I present the differences between .NET Remoting and other distributed applicationframeworks. I then introduce you to the basic types of remote objects, server-activated objects,and client-activated objects, and show you how to pass data by value. I also give you some basicinformation about lifetime management issues and the generation of metadata, which is neededfor the client to know about the interfaces of the server-side objects.
Advantages of .NET RemotingAs you’ve seen in the previous chapter, several different architectures for the development ofdistributed applications already exist. You might therefore wonder why .NET introduces another,quite different way of developing those kinds of applications. One of the major benefits of .NETRemoting is that it’s centralized around well-known and well-defined standards like HTTP andthat it is directly tied to the .NET Framework and has not been retrofitted later.
Ease of ImplementationComparing .NET Remoting to other remoting schemas is like comparing COM development inVisual Basic to C++. Visual Basic 6 allowed developers to concentrate on the business needs theirapplications had to fulfill without having to bother with the technical details of COM. The C++programmers had to know the exact specifications of COM (at least before the introduction ofATL) and implement truckloads of code for supporting them.
With .NET this concept of absolute ease of implementation has been extended to the devel-opment of distributed applications. There are no proxy/stub-compilation cycles as in Java RMI.You don’t have to define your interfaces in a different programming language as you would withCORBA or DCOM. A unique feature is that you don’t have to decide up front on the encodingformat of remoting requests; instead, you can switch from a fast TCP transport to HTTP bychanging one word in a configuration file. You can even provide both communication channelsfor the same objects by adding another line to the configuration. You are not fixed on one plat-form or programming language as with DCOM, COM+, and Java EJB. Configuration and deploy-ment is a lot easier than it was in DCOM.
CHAPTER 2 ■ .NET REMOTING BASICS10
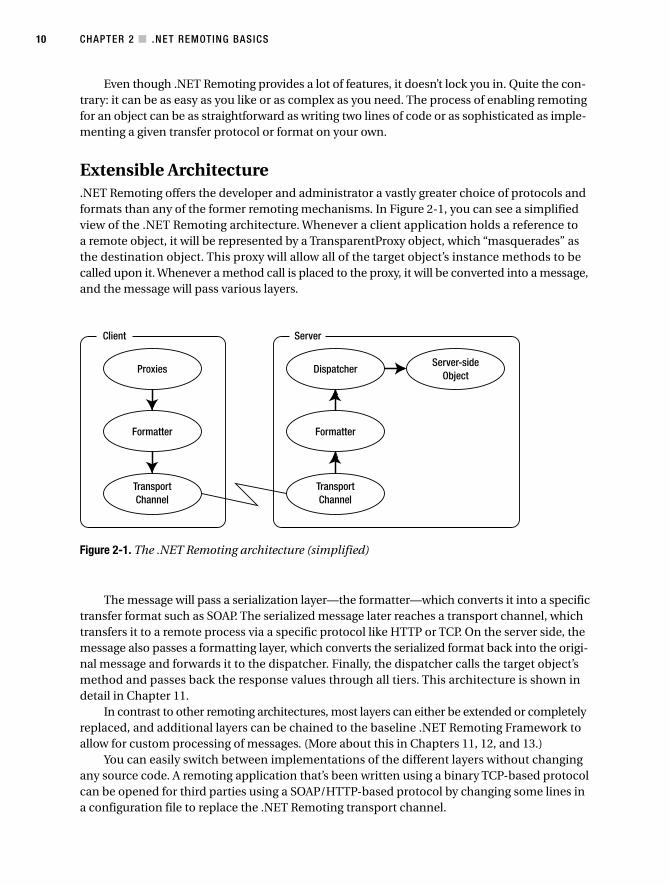
Figure 2-1. The .NET Remoting architecture (simplified)
Even though .NET Remoting provides a lot of features, it doesn’t lock you in. Quite the con-trary: it can be as easy as you like or as complex as you need. The process of enabling remotingfor an object can be as straightforward as writing two lines of code or as sophisticated as imple-menting a given transfer protocol or format on your own.
Extensible Architecture.NET Remoting offers the developer and administrator a vastly greater choice of protocols andformats than any of the former remoting mechanisms. In Figure 2-1, you can see a simplifiedview of the .NET Remoting architecture. Whenever a client application holds a reference toa remote object, it will be represented by a TransparentProxy object, which “masquerades” asthe destination object. This proxy will allow all of the target object’s instance methods to becalled upon it. Whenever a method call is placed to the proxy, it will be converted into a message,and the message will pass various layers.
The message will pass a serialization layer—the formatter—which converts it into a specifictransfer format such as SOAP. The serialized message later reaches a transport channel, whichtransfers it to a remote process via a specific protocol like HTTP or TCP. On the server side, themessage also passes a formatting layer, which converts the serialized format back into the origi-nal message and forwards it to the dispatcher. Finally, the dispatcher calls the target object’smethod and passes back the response values through all tiers. This architecture is shown indetail in Chapter 11.
In contrast to other remoting architectures, most layers can either be extended or completelyreplaced, and additional layers can be chained to the baseline .NET Remoting Framework toallow for custom processing of messages. (More about this in Chapters 11, 12, and 13.)
You can easily switch between implementations of the different layers without changingany source code. A remoting application that’s been written using a binary TCP-based protocolcan be opened for third parties using a SOAP/HTTP-based protocol by changing some lines ina configuration file to replace the .NET Remoting transport channel.
CHAPTER 2 ■ .NET REMOTING BASICS 11
1. This is partly the same as it was in Visual Basic 6. VB 6 allowed you to create applications without a lotof up-front design work. This often led to applications that were hardly maintainable in the long run.
Interface DefinitionsMost remoting systems like DCE/RPC, RMI, and J2EE demand a manual creation of so-calledproxy/stub objects. The proxy encapsulates the connection to the remote object on the clientand forwards calls to a stub object on the server, which in turn passes them on to the “real”object. In most of these environments (at least in CORBA, DCE/RPC, and DCOM) the “sourcecode” for generating these objects has to be written in an abstract Interface Definition Languageand precompiled to generate implementation headers for a certain programming language.
In comparison to this traditional approach, .NET Remoting uses a generic proxy for all kindsof remote objects. This is possible because .NET is the first framework that has been designedwith remoting in mind; on other platforms these capabilities have been retrofitted and thereforehave to be integrated into the given architecture and programming model.
Such ease of remoting poses the potential problem of your using an incorrect design.1 Thisbook will help you to make the right architectural decisions. For example, even though you don’thave to write any interface definitions in IDL, you still should separate interface from implemen-tation; you can, however, write both in the same language—in any .NET programming language.
.NET Remoting provides several different ways of defining those interfaces, as discussed inthe following sections.
Shared AssemblyIn this case, the server-side object’s implementation exists on the client as well. Only duringinstantiation is it determined whether a local object or an object on the remote server will becreated. This method allows for a semitransparent switch between invoking the local imple-mentation (for example, when working offline) and invoking server-side objects (for example,to make calculations on better-performing servers when connected to the network).
When using this method with “conventional” distributed applications that don’t need towork in a disconnected scenario, you need to use a lot of care, because it poses some risks dueto easy-to-miss programming and configuration errors. When the object is mistakenly instantiatedas a local object on the client and passed to the server (as a method’s parameter, for example)you might run into serious troubles, ranging from InvalidCastExceptions to code that works inthe development environment but doesn’t work in the production environment because offirewall restrictions. In this case the client has in reality become the server, and further calls tothe object will pass from the server to your clients.
Shared Interfaces or Base ObjectsWhen creating a distributed application, you define the base classes or interfaces to your remoteobjects in a separated assembly. This assembly is used on both the client and the server. The realimplementation is placed only on the server and is a class that extends the base class or imple-ments the interface.
The advantage is that you have a distinct boundary between the server and the clientapplication, but you have to build this intermediate assembly as well. Good object-orientedpractices nevertheless recommend this approach!
CHAPTER 2 ■ .NET REMOTING BASICS12
■Note This is the recommended way of creating .NET Remoting applications.
Generated Metadata AssemblyThis approach seems to be the most elegant one at first glance. You develop the server in thesame way as when using the shared assemblies method. Instead of really sharing the DLL orEXE, you later extract the necessary metadata, which contains the interface information, usingSoapSuds.
SoapSuds will either need the URL to a running server or the name of an assembly as a param-eter, and will extract the necessary information (interfaces, base classes, objects passed byvalue, and so on). It will put this data into a new assembly, which can be referenced from theclient application. You can then continue to work as if you’d separated your interfaces rightfrom the beginning.
■Caution Even though using SoapSuds might seem intriguing when you look at it for the first time, experi-ence shows otherwise. Nowadays, Microsoft recommends using this tool in only very specific cases as detailedin Chapter 9.
Serialization of DataWith the exception of earlier TCP/IP RPC implementations, in which you even had to worryabout little-endian/big-endian conversions, all current remoting frameworks support theautomatic encoding of simple data types into the chosen transfer format. The problem startswhen you want to pass a copy of an object from server to client. Java RMI and EJB support theserequirements, but COM+, for example, did not. The commonly used serializable objects withinCOM+ were PropertyBag and ADO Recordsets—but there was no easy way of passing large objectstructures around.
In .NET Remoting the encoding/decoding of objects is natively supported. You just needto mark such objects with the [Serializable] attribute or implement the interface ISerializableand the rest will be taken care of by the framework.
The underlying .NET runtime formatting mechanism marshals simple data types andsubobjects (which have to be serializable or exist as remote objects), and even ensures thatcircular references will be tracked and transferred correctly.
Lifetime ManagementIn distributed applications there are generally three ways of managing lifetime. The first is tohave an open network connection (for example, using TCP) from the client to the server. When-ever this connection is terminated, the server’s memory will be freed.
Another possibility is the DCOM approach, where a combined reference counting andpinging mechanism is used. In this case the server receives messages from its clients at certainintervals. As soon as no more messages are received, it will free its resources.
CHAPTER 2 ■ .NET REMOTING BASICS 13
2. Called so because every object of this kind has to extend System.MarshalByRefObject, or one of itschildren.
In the Internet age, in which you don’t know your users up front, you cannot rely on thepossibility of creating a direct TCP connection between the client and the server. Your usersmight be sitting behind a firewall that only allows HTTP traffic to pass through. The same routerwill block any pings the server might send to your users. Because of those issues, the .NET Remot-ing lifetime service is customizable as well. By default an object will get a lifetime assigned to it,and each call from the client will reset this “time to live.” The .NET Framework also allows a so-called sponsor to be registered with a server-side object. It will be contacted just before thelifetime is over and can also increase the object’s time to live.
The combination of these two approaches allows for a configurable lifetime service thatdoes not depend on any specific connection from the server to the client.
■Note This is one of the core features of .NET Remoting: it never depends on any existing connections.These are created and destroyed on demand.
Multiserver/MulticlientWhen you use remote objects (as opposed to using copies of remotely generated objects thatare passed by value), .NET automatically keeps track of where they originated. So a client canask one server to create an object and safely pass this as a method’s parameter to another server.
The second server will then directly execute its methods on the first server, withouta round-trip through the client. Nevertheless, this also means there has to be a direct way ofcommunication from the second server to the first one—that is, there must not be a firewall inbetween, or at least the necessary ports should be opened.
Your First Remoting ApplicationIn the following sections, you create a sample .NET Remoting application that demonstratessome of the concepts discussed earlier in this chapter. First and foremost, there are two verydifferent kinds of objects when it comes to remoting: objects that are passed by reference andthose that are passed by value. MarshalByRefObjects2 allow you to execute remote methodcalls on the server side. These objects will live on the server and only a so-called ObjRef will bepassed around. You can think of the ObjRef as a networked pointer that shows on which serverthe object lives and contains an ID to uniquely identify the object. The client will usually nothave the compiled objects in one of its assemblies; instead only an interface or a base class willbe available. Every method, including property gets/sets, will be executed on the server. The.NET Framework’s proxy objects will take care of all remoting tasks, so that the object will lookjust like a local one on the client.
The second kind of objects will be referred to as ByValue objects or serializable objectsthroughout this book. When these objects are passed over remoting boundaries (as methodparameters or return values), they are serialized into a string or a binary representation andrestored as a copy on the other side of the communications channel. After this re-creation,there is no notation of client or server for this kind of object; each one has its own copy, and
CHAPTER 2 ■ .NET REMOTING BASICS14
both run absolutely independently. Methods called on these objects will execute in the samecontext as the origination of the method call. For example, when the client calls a function onthe server that returns a ByValue object, the object’s state (its instance variables) will be transferredto the client and subsequent calls of methods will be executed directly on the client. This alsomeans that the client has to have the compiled object in one of its assemblies. The only otherrequirement for an object to be passable by value is that it supports serialization. This is imple-mented using a class-level attribute: [Serializable]. In addition to this “standard” serializationmethod, you’ll also be able to implement ISerializable, which I show you how to do in Chapter 6.
The First SampleThis sample remoting application exposes a server-side MarshalByRefObject in Singleton mode.You will call this object CustomerManager, and it will provide a method to load a Customerobject (which is a ByValue object) from a fictitious database. The resulting object will then bepassed as a copy to the client.
ArchitectureWhen using remote objects, both client and server must have access to the same interface defi-nitions and serializable objects that are passed by value. This leads to the general requirementthat at least three assemblies are needed for any .NET Remoting project: a shared assembly,which contains serializable objects and interfaces or base classes to MarshalByRefObjects;a server assembly, which implements the MarshalByRefObjects; and a client assembly, whichconsumes them.
■Note It is not sufficient to copy and paste interface definitions from the server’s source code directly intothe client’s. Instead, they really have to share a reference to the same DLL because the assembly’s namebecomes part of the complete type name. The interface ICustomerManager in the assembly server.exe wouldtherefore be completely independent from (and different from) the interface ICustomerManager in the assem-bly client.exe.
In most of the examples throughout this book, you will end up with these three assemblies:
• General: This represents the shared assembly, which contains the interface ICustomerManager and the ByValue object Customer. As the methods of a Customerobject will be executed either on the client or on the server, its implementation is con-tained within the General assembly as well.
• Server: This assembly contains the server-side implementation of CustomerManager.
• Client: This assembly contains a sample client.
Defining the Remote InterfaceAs a first step, you have to define the interface ICustomerManager, which will be implementedby the server. In this interface, you’ll define a single method, GetCustomer(), that returns a Customerobject to the caller.
CHAPTER 2 ■ .NET REMOTING BASICS 15
public interface ICustomerManager{
Customer GetCustomer(int id);}
This interface will allow the client to load a Customer object by a given ID.
Defining the Data ObjectBecause you want to provide access to customer data, you first need to create a Customer classthat will hold this information. This object needs to be passed as a copy (by value), so you haveto mark it with the [Serializable] attribute.
In addition to the three properties FirstName, LastName, and DateOfBirth, you will also adda method called GetAge() that will calculate a customer’s age. Next to performing this calculation,this method will write a message to the console so that you can easily see in which context(client or server) the method is executing.
[Serializable]public class Customer{
public String FirstName;public String LastName;public DateTime DateOfBirth;
public Customer(){
Console.WriteLine(Customer.constructor: Object created);}
public int GetAge(){
Console.WriteLine("Customer.GetAge(): Calculating age of {0}, " +"born on {1}.",FirstName,DateOfBirth.ToShortDateString());
TimeSpan tmp = DateTime.Today.Subtract(DateOfBirth);return tmp.Days / 365; // rough estimation
}}
Up to this point in the code, there’s not much difference from a local application. Before beingable to start developing the server, you have to put the interface and the class in the namespaceGeneral and compile this project to a separate DLL, which will later be referenced by the serverand the client.
Implementing the ServerOn the server you need to provide an implementation of ICustomerManager that will allowyou to load a customer from a fictitious database; in the current example, this implementationwill only fill the Customer object with static data.
CHAPTER 2 ■ .NET REMOTING BASICS16
■Note To create concise samples, I will present throughout the book mostly console applications that focuson demonstrating one single aspect of .NET Remoting at a time. Using console applications as servers, however,is not recommended in production environments, and I’ll discuss the more serious hosting options (Windowsservices and Internet Information Server) in Chapter 4. It’s important to note that you can still use all thedemonstrated techniques no matter which host you choose—it’s just that console applications are easier touse as a tool to explain concepts.
To implement the sample server, you create a new console application in Visual Studio .NETcalled Server and add a reference to the framework assembly System.Runtime.Remoting.dll andthe newly compiled General.dll from the previous step (you will have to use the Browse buttonhere, because you didn’t copy the assembly to the global assembly cache [GAC]). The server willhave to access the namespace General and System.Runtime.Remoting plus a remoting channel,so you have to add the following lines to the declaration:
using System.Runtime.Remoting;using General;using System.Runtime.Remoting.Channels;using System.Runtime.Remoting.Channels.Http;
As described previously, you will have to implement ICustomerManager in an object derivedfrom MarshalByRefObject. The method GetCustomer()will just return a dummy Customer object:
class CustomerManager: MarshalByRefObject, ICustomerManager{
public CustomerManager(){
Console.WriteLine("CustomerManager.constructor: Object created");}
public Customer GetCustomer(int id){
Console.WriteLine("CustomerManager.GetCustomer(): Called");Customer tmp = new Customer();tmp.FirstName = "John";tmp.LastName = "Doe";tmp.DateOfBirth = new DateTime(1970,7,4);Console.WriteLine("CustomerManager.GetCustomer(): Returning " +
"Customer-Object");return tmp;
}}
It still looks more or less the same as a “conventional” nonremoting class would—the only differenceis that the class doesn’t inherit directly from System.Object, but from System.MarshalByRefObject.
Now let’s have a look at the server startup code. This is a very basic variant of registeringa server-side object. It doesn’t yet use a configuration file, but the server’s parameters are hardcoded in void Main().

CHAPTER 2 ■ .NET REMOTING BASICS 17
class ServerStartup{
static void Main(string[] args){
HttpChannel chnl = new HttpChannel(1234);ChannelServices.RegisterChannel(chnl);RemotingConfiguration.RegisterWellKnownServiceType(
typeof(CustomerManager),"CustomerManager.soap",WellKnownObjectMode.Singleton);
// the server will keep running until keypress.Console.ReadLine();
}}
Now take a closer look at the startup sequence of the server:
HttpChannel chnl = new HttpChannel(1234);
A new HTTP channel (System.Runtime.Remoting.Channels.Http.HttpChannel) is created andconfigured to listen on port 1234. The default transfer format for HTTP is SOAP.
ChannelServices.RegisterChannel(chnl);
The channel is registered in the remoting system. This will allow incoming requests to be forwardedto the corresponding objects.
RemotingConfiguration.RegisterWellKnownServiceType(typeof(CustomerManager),"CustomerManager.soap",WellKnownObjectMode.Singleton);
The class CustomerManager is registered as a WellKnownServiceType, which allows the clientto remotely call its methods. The URL will be CustomerManager.soap—whereas this can beany string you like, the extension .soap or .rem should be used for consistency. This is absolutelynecessary when hosting the components in IIS as it maps these two extensions to the .NETRemoting Framework (as shown in Chapter 4).
The object’s mode is set to Singleton to ensure that only one instance will exist at anygiven time.
Console.ReadLine();
This last line is not directly a part of the startup sequence but just prevents the programfrom exiting while the server is running. You can now compile and start this server.
■Note If you look closely at the startup sequence, you’ll notice that the registered class is not directlybound to the channel. In fact, you’d be right in thinking that all available channels can be used to accessall registered objects.
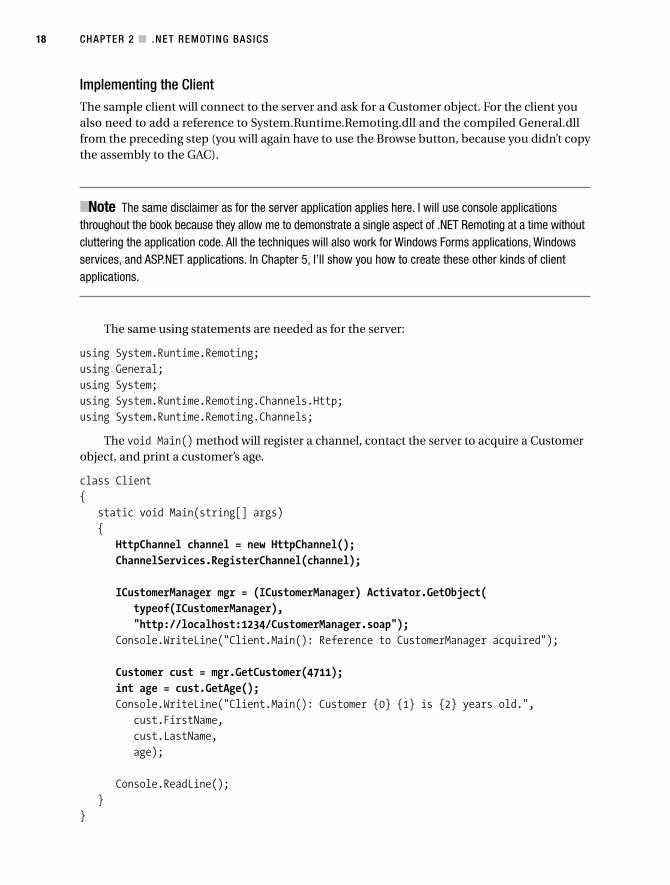
CHAPTER 2 ■ .NET REMOTING BASICS18
Implementing the ClientThe sample client will connect to the server and ask for a Customer object. For the client youalso need to add a reference to System.Runtime.Remoting.dll and the compiled General.dllfrom the preceding step (you will again have to use the Browse button, because you didn’t copythe assembly to the GAC).
■Note The same disclaimer as for the server application applies here. I will use console applicationsthroughout the book because they allow me to demonstrate a single aspect of .NET Remoting at a time withoutcluttering the application code. All the techniques will also work for Windows Forms applications, Windowsservices, and ASP.NET applications. In Chapter 5, I’ll show you how to create these other kinds of clientapplications.
The same using statements are needed as for the server:
using System.Runtime.Remoting;using General;using System;using System.Runtime.Remoting.Channels.Http;using System.Runtime.Remoting.Channels;
The void Main() method will register a channel, contact the server to acquire a Customerobject, and print a customer’s age.
class Client{
static void Main(string[] args){
HttpChannel channel = new HttpChannel();ChannelServices.RegisterChannel(channel);
ICustomerManager mgr = (ICustomerManager) Activator.GetObject(typeof(ICustomerManager),"http://localhost:1234/CustomerManager.soap");
Console.WriteLine("Client.Main(): Reference to CustomerManager acquired");
Customer cust = mgr.GetCustomer(4711);int age = cust.GetAge();Console.WriteLine("Client.Main(): Customer {0} {1} is {2} years old.",
cust.FirstName,cust.LastName,age);
Console.ReadLine();}
}

CHAPTER 2 ■ .NET REMOTING BASICS 19
3. This is the proxy object that has been returned from the call to Activator.GetObject().
Now let’s take a detailed look at the client:
HttpChannel channel = new HttpChannel();ChannelServices.RegisterChannel(channel);
With these two lines, the HTTP channel is registered on the client. It is not necessary to specifya port number here, because the client-side TCP port will be assigned automatically.
ICustomerManager mgr = (ICustomerManager) Activator.GetObject(typeof(ICustomerManager),"http://localhost:1234/CustomerManager.soap");
This line creates a local proxy object that will support the interface ICustomerManager.Let’s examine the call to Activator.GetObject() a little closer:
Activator.GetObject(typeof(ICustomerManager),"http://localhost:1234/CustomerManager.soap");
Instead of using the new operator, you have to let the Activator create an object. You need to spec-ify the class or interface of the object—in this case, ICustomerManager—and the URL to theserver. This is not necessary when using configuration files—as shown in Chapter 4—becausein that situation the new operator will know which classes will be remotely instantiated and willshow the corresponding behavior.
In this example, the Activator will create a proxy object on the client side but will not yetcontact the server.
Customer cust = mgr.GetCustomer(4711);
The GetCustomer() method is executed on the TransparentProxy3 object. Now the first con-nection to the server is made and a message is transferred that will trigger the execution ofGetCustomer() on the server-side Singleton object CustomerManager. You can verify this becauseyou included a Console.WriteLine() statement in the server’s GetCustomer() code. This linewill be written into the server’s console window.
The server now creates a Customer object and fills it with data. When the method returns,this object will be serialized and all public and private properties converted to an XML fragment.This XML document is encapsulated in a SOAP return message and transferred back to the client.The .NET Remoting Framework on the client now implicitly generates a new Customer objecton the client and fills it with the serialized data that has been received from the server.
The client now has an exact copy of the Customer object that has been created on the server;there is no difference between a normal locally generated object and this serialized and deseri-alized one. All methods will be executed directly in the client’s context! This can easily be seenin Figure 2-2, which shows the included WriteLine() statement in the Customer object’s GetAge()method that will be output to the client’s console window. Figure 2-3 shows the correspondingoutput of the server application.
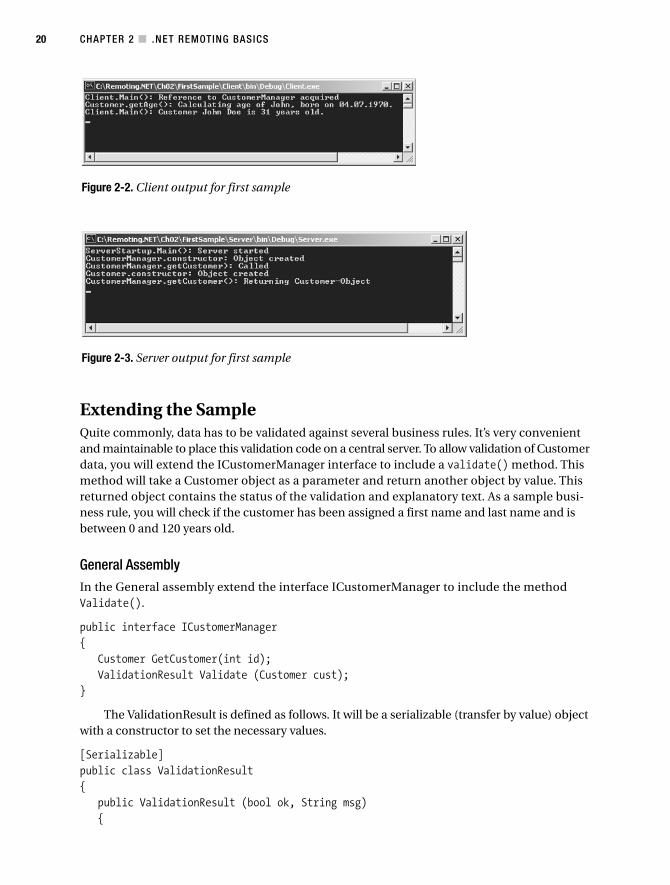
CHAPTER 2 ■ .NET REMOTING BASICS20
Figure 2-2. Client output for first sample
Figure 2-3. Server output for first sample
Extending the SampleQuite commonly, data has to be validated against several business rules. It’s very convenientand maintainable to place this validation code on a central server. To allow validation of Customerdata, you will extend the ICustomerManager interface to include a validate() method. Thismethod will take a Customer object as a parameter and return another object by value. Thisreturned object contains the status of the validation and explanatory text. As a sample busi-ness rule, you will check if the customer has been assigned a first name and last name and isbetween 0 and 120 years old.
General AssemblyIn the General assembly extend the interface ICustomerManager to include the methodValidate().
public interface ICustomerManager{
Customer GetCustomer(int id);ValidationResult Validate (Customer cust);
}
The ValidationResult is defined as follows. It will be a serializable (transfer by value) objectwith a constructor to set the necessary values.
[Serializable]public class ValidationResult{
public ValidationResult (bool ok, String msg){

CHAPTER 2 ■ .NET REMOTING BASICS 21
Console.WriteLine("ValidationResult.ctor: Object created");this.Ok = ok;this.ValidationMessage = msg;
}
public bool Ok;public String ValidationMessage;
}
ServerOn the server, you have to provide an implementation of the mentioned business rule:
public ValidationResult Validate(Customer cust){
int age = cust.GetAge();Console.WriteLine("CustomerManager.Validate() for {0} aged {1}",
cust.FirstName, age);if ((cust.FirstName == null) || (cust.FirstName.Length == 0)){
return new ValidationResult(false,"Firstname missing");}
if ((cust.LastName == null) || (cust.LastName.Length == 0)){
return new ValidationResult(false, "Lastname missing");}
if (age < 0 || age > 120){
return new ValidationResult(false,"Customer must be " +"younger than 120 years");
}
return new ValidationResult(true,"Validation succeeded");}
This function just checks the given criteria and returns a corresponding ValidationResultobject, which contains the state of the validation (success/failure) and some explanatory text.
ClientTo run this sample, you also have to change the client to create a new Customer object and letthe server validate it.
static void Main(string[] args){
HttpChannel channel = new HttpChannel();ChannelServices.RegisterChannel(channel);
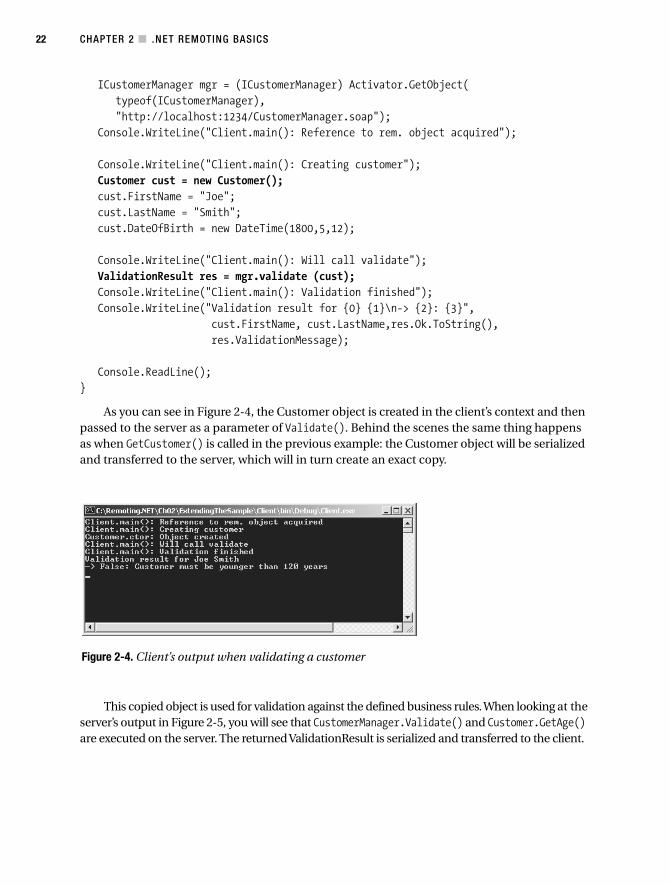
CHAPTER 2 ■ .NET REMOTING BASICS22
Figure 2-4. Client’s output when validating a customer
ICustomerManager mgr = (ICustomerManager) Activator.GetObject(typeof(ICustomerManager),"http://localhost:1234/CustomerManager.soap");
Console.WriteLine("Client.main(): Reference to rem. object acquired");
Console.WriteLine("Client.main(): Creating customer");Customer cust = new Customer();cust.FirstName = "Joe";cust.LastName = "Smith";cust.DateOfBirth = new DateTime(1800,5,12);
Console.WriteLine("Client.main(): Will call validate");ValidationResult res = mgr.validate (cust);Console.WriteLine("Client.main(): Validation finished");Console.WriteLine("Validation result for {0} {1}\n-> {2}: {3}",
cust.FirstName, cust.LastName,res.Ok.ToString(),res.ValidationMessage);
Console.ReadLine();}
As you can see in Figure 2-4, the Customer object is created in the client’s context and thenpassed to the server as a parameter of Validate(). Behind the scenes the same thing happensas when GetCustomer() is called in the previous example: the Customer object will be serializedand transferred to the server, which will in turn create an exact copy.
This copied object is used for validation against the defined business rules. When looking at theserver’s output in Figure 2-5, you will see that CustomerManager.Validate() and Customer.GetAge()are executed on the server. The returned ValidationResult is serialized and transferred to the client.
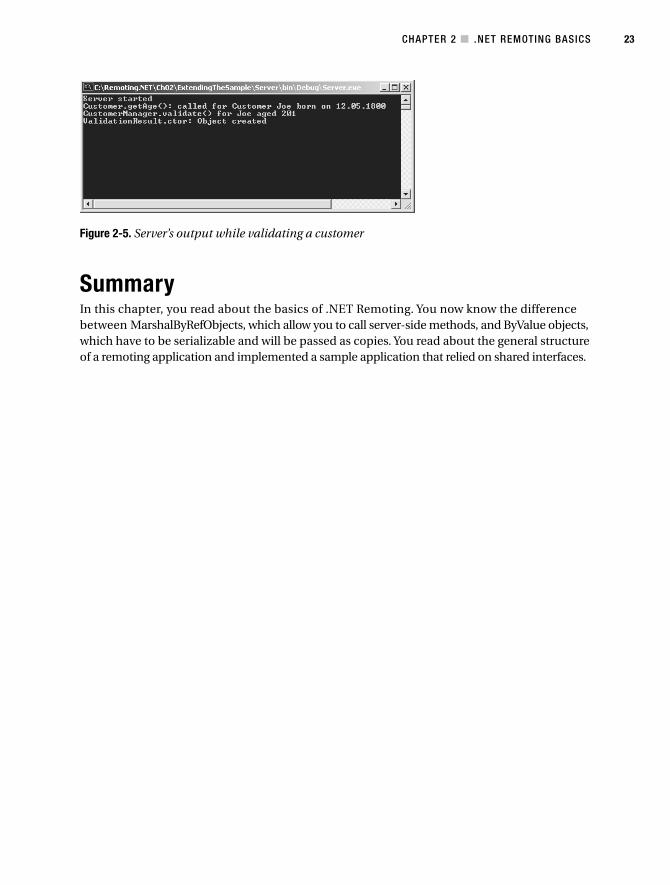
CHAPTER 2 ■ .NET REMOTING BASICS 23
Figure 2-5. Server’s output while validating a customer
SummaryIn this chapter, you read about the basics of .NET Remoting. You now know the differencebetween MarshalByRefObjects, which allow you to call server-side methods, and ByValue objects,which have to be serializable and will be passed as copies. You read about the general structureof a remoting application and implemented a sample application that relied on shared interfaces.

25
C H A P T E R 3
■ ■ ■
.NET Remoting in Action
In this chapter, I demonstrate the key techniques you’ll need to know to use .NET Remoting inyour real-world applications. I show you the differences between Singleton and SingleCallobjects and untangle the mysteries of client-activated objects. I also introduce you to the dif-ferent techniques to create the necessary metadata for your client applications. This chapter issomewhat code based, so prepare yourself to start VS .NET quite often!
Types of RemotingAs you have seen in the previous chapter’s examples, there are two very different types ofremote interaction between components. One uses serializable objects that are passed asa copy to the remote process. The second employs server-side (remote) objects that allow theclient to call their methods.
ByValue ObjectsMarshalling objects by value means to serialize their state (instance variables), including allobjects referenced by instance variables, to some persistent form from which they can bedeserialized in a different context. This ability to serialize objects is provided by the .NETFramework when you set the attribute [Serializable] for a class or implement ISerializable.
When passing the Customer object in the previous chapter’s validation example to theserver, it is serialized to XML like this:
<a1:Customer id="ref-4"><FirstName id="ref-5">Joe</FirstName><LastName id="ref-6">Smith</LastName><DateOfBirth>1800-05-12T00:00:00.0000+02:00</DateOfBirth></a1:Customer>
This XML document is read by the server and an exact copy of the object is created.
■Note An important point to know about ByValue objects is that they are not remote objects. All methodson those objects will be executed locally (in the same context) to the caller.. This also means that, unlike withMarshalByRefObjects, the compiled class has to be available to the client. You can see this in the precedingsnippet, where “age” is not serialized but will be recalculated at the client using the GetAge() method.

CHAPTER 3 ■ .NET REMOTING IN ACTION26
When a ByValue object holds references to other objects, those have to be either serializableor MarshalByRefObjects; otherwise, an exception will be thrown, indicating that those objectsare not remoteable.
MarshalByRefObjectsA MarshalByRefObject is a remote object that runs on the server and accepts method calls fromthe client. Its data is stored in the server’s memory and its methods executed in the server’sAppDomain. Instead of passing around a variable that points to an object of this type, in realityonly a pointer-like construct—called an ObjRef—is passed around. Contrary to common point-ers, this ObjRef does not contain the memory address, rather the server name/IP address andan object identity that identifies exactly one object of the many that are probably running onthe server. I cover this in depth later in this chapter. MarshalByRefObjects can be categorizedinto two groups: server-activated objects (SAOs) and client-activated objects (CAOs).
Server-Activated ObjectsServer-activated objects are somewhat comparable to classic stateless Web Services. Whena client requests a reference to a SAO, no message will travel to the server. Only when methodsare called on this remote reference will the server be notified.
Depending on the configuration of its objects, the server then decides whether a newinstance will be created or an existing object will be reused. SAOs can be marked as eitherSingleton or SingleCall. In the first case, one instance serves the requests of all clients in amultithreaded fashion. When using objects in SingleCall mode, as the name implies, a newobject will be created for each request and destroyed afterwards.
■Note As Singleton objects will be accessed by multiple threads at the same time, it’s important that youuse correct locking and resource sharing patterns to prevent data corruption. For example, if your objectsaccess a database, you should never use a class-level member that holds a SqlConnection object. Instead,you should create and destroy this connection object directly inside the methods.
In the following examples, you’ll see the differences between these two kinds of services.You’ll use the same shared interface, client- and server-side implementation of the service, andonly change the object mode on the server.
The shared assembly General.dll will contain the interface to a very simple remote objectthat allows the storage and retrieval of stateful information in the form of an int value, as shownin Listing 3-1.
Listing 3-1. The Interface Definition That Will Be Compiled to a DLL
using System;
namespace General{
public interface IMyRemoteObject{
CHAPTER 3 ■ .NET REMOTING IN ACTION 27
void SetValue (int newval);int GetValue();
}}
The client that is shown in Listing 3-2 provides the means for opening a connection to theserver and tries to set and retrieve the instance values of the server-side remote object. You’llhave to add a reference to System.Runtime.Remoting.DLL to your Visual Studio .NET projectfor this example.
Listing 3-2. A Simple Client Application
using System;using System.Runtime.Remoting;using General;using System.Runtime.Remoting.Channels.Http;using System.Runtime.Remoting.Channels;
namespace Client{
class Client{
static void Main(string[] args){
HttpChannel channel = new HttpChannel();ChannelServices.RegisterChannel(channel);
IMyRemoteObject obj = (IMyRemoteObject) Activator.GetObject(typeof(IMyRemoteObject),"http://localhost:1234/MyRemoteObject.soap");
Console.WriteLine("Client.Main(): Reference to rem. obj acquired");
int tmp = obj.GetValue();Console.WriteLine("Client.Main(): Original server side value: {0}",tmp);
Console.WriteLine("Client.Main(): Will set value to 42");obj.SetValue(42);
tmp = obj.GetValue();Console.WriteLine("Client.Main(): New server side value {0}", tmp);
Console.ReadLine();}
}}
The sample client will read and output the server’s original value, change it to 42, and thenread and output it again.
CHAPTER 3 ■ .NET REMOTING IN ACTION28
SingleCall Objects
For SingleCall objects the server will create a single object, execute the method, and destroythe object again. SingleCall objects are registered at the server using the following statement:
RemotingConfiguration.RegisterWellKnownServiceType(typeof(<YourClass>), "<URL>",WellKnownObjectMode.SingleCall);
Objects of this kind can obviously not hold any state information, as all internal variableswill be discarded at the end of the method call. The reason for using objects of this kind is thatthey can be deployed in a very scalable manner. These objects can be located on differentcomputers with an intermediate multiplexing/load-balancing device, which would not be pos-sible when using stateful objects. The complete server for this example can be seen in Listing 3-3.
Listing 3-3. The Complete Server Implementation
using System;using System.Runtime.Remoting;using General;using System.Runtime.Remoting.Channels.Http;using System.Runtime.Remoting.Channels;
namespace Server{
class MyRemoteObject: MarshalByRefObject, IMyRemoteObject{
int myvalue;
public MyRemoteObject(){
Console.WriteLine("MyRemoteObject.Constructor: New Object created");}
public MyRemoteObject(int startvalue){
Console.WriteLine("MyRemoteObject.Constructor: .ctor called with {0}",startvalue);
myvalue = startvalue;}
public void SetValue(int newval){
Console.WriteLine("MyRemoteObject.setValue(): old {0} new {1}",myvalue,newval);
myvalue = newval;}
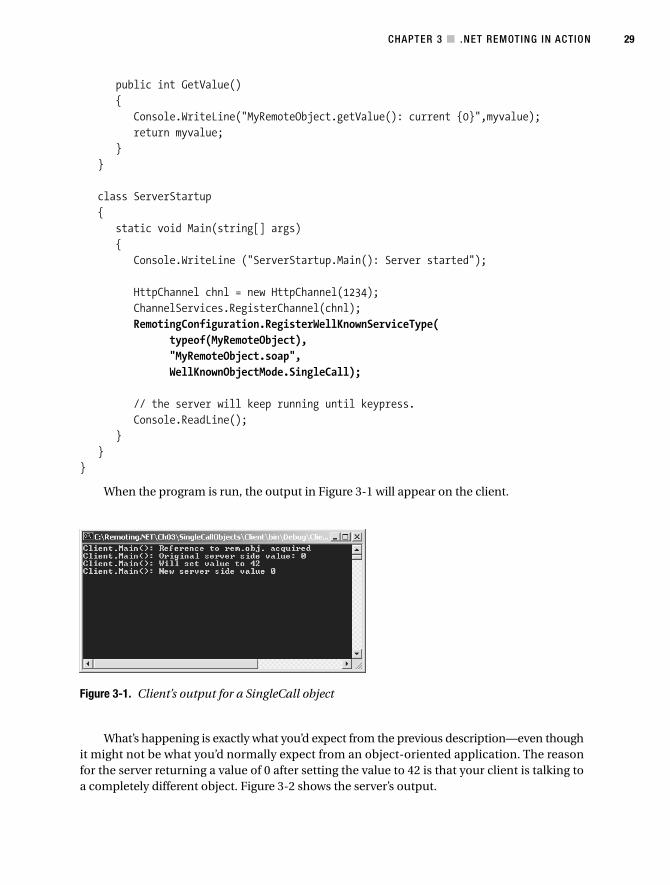
CHAPTER 3 ■ .NET REMOTING IN ACTION 29
public int GetValue(){
Console.WriteLine("MyRemoteObject.getValue(): current {0}",myvalue);return myvalue;
}}
class ServerStartup{
static void Main(string[] args){
Console.WriteLine ("ServerStartup.Main(): Server started");
HttpChannel chnl = new HttpChannel(1234);ChannelServices.RegisterChannel(chnl);RemotingConfiguration.RegisterWellKnownServiceType(
typeof(MyRemoteObject),"MyRemoteObject.soap",WellKnownObjectMode.SingleCall);
// the server will keep running until keypress.Console.ReadLine();
}}
}
When the program is run, the output in Figure 3-1 will appear on the client.
What’s happening is exactly what you’d expect from the previous description—even thoughit might not be what you’d normally expect from an object-oriented application. The reasonfor the server returning a value of 0 after setting the value to 42 is that your client is talking toa completely different object. Figure 3-2 shows the server’s output.
Figure 3-1. Client’s output for a SingleCall object
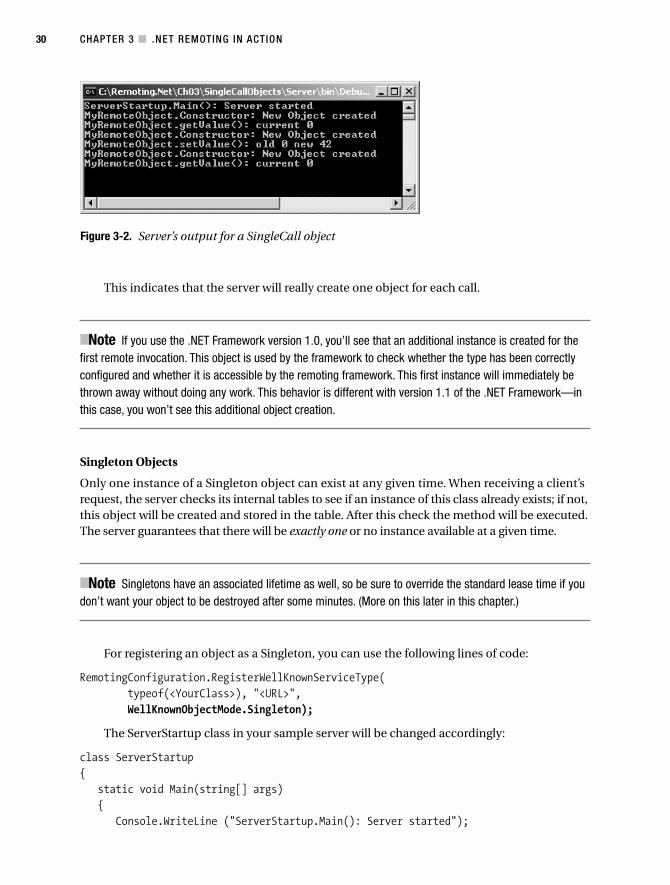
CHAPTER 3 ■ .NET REMOTING IN ACTION30
This indicates that the server will really create one object for each call.
■Note If you use the .NET Framework version 1.0, you’ll see that an additional instance is created for thefirst remote invocation. This object is used by the framework to check whether the type has been correctlyconfigured and whether it is accessible by the remoting framework. This first instance will immediately bethrown away without doing any work. This behavior is different with version 1.1 of the .NET Framework—inthis case, you won’t see this additional object creation.
Singleton Objects
Only one instance of a Singleton object can exist at any given time. When receiving a client’srequest, the server checks its internal tables to see if an instance of this class already exists; if not,this object will be created and stored in the table. After this check the method will be executed.The server guarantees that there will be exactly one or no instance available at a given time.
■Note Singletons have an associated lifetime as well, so be sure to override the standard lease time if youdon’t want your object to be destroyed after some minutes. (More on this later in this chapter.)
For registering an object as a Singleton, you can use the following lines of code:
RemotingConfiguration.RegisterWellKnownServiceType(typeof(<YourClass>), "<URL>",WellKnownObjectMode.Singleton);
The ServerStartup class in your sample server will be changed accordingly:
class ServerStartup{
static void Main(string[] args){
Console.WriteLine ("ServerStartup.Main(): Server started");
Figure 3-2. Server’s output for a SingleCall object
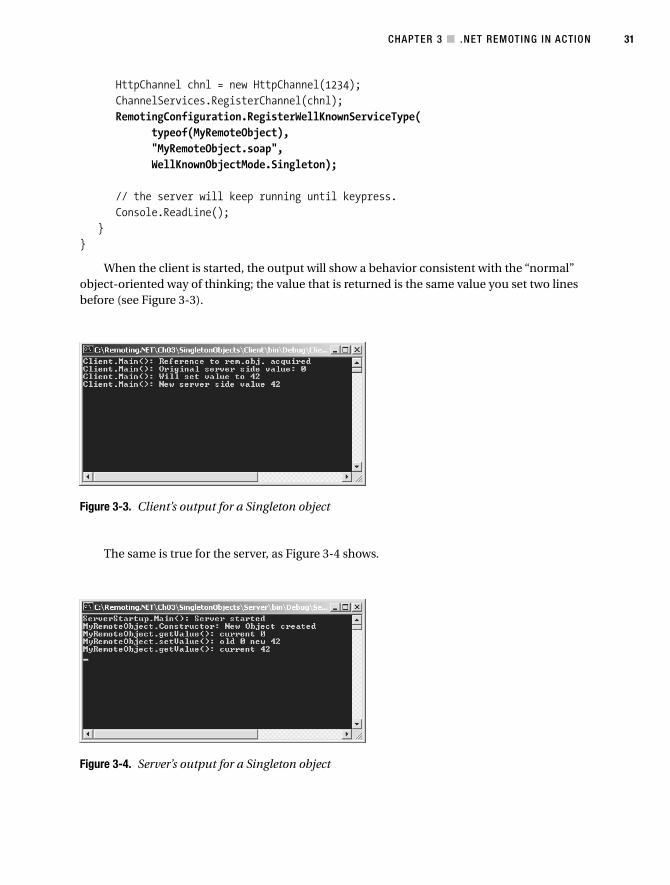
CHAPTER 3 ■ .NET REMOTING IN ACTION 31
HttpChannel chnl = new HttpChannel(1234);ChannelServices.RegisterChannel(chnl);RemotingConfiguration.RegisterWellKnownServiceType(
typeof(MyRemoteObject),"MyRemoteObject.soap",WellKnownObjectMode.Singleton);
// the server will keep running until keypress.Console.ReadLine();
}}
When the client is started, the output will show a behavior consistent with the “normal”object-oriented way of thinking; the value that is returned is the same value you set two linesbefore (see Figure 3-3).
The same is true for the server, as Figure 3-4 shows.
Figure 3-3. Client’s output for a Singleton object
Figure 3-4. Server’s output for a Singleton object
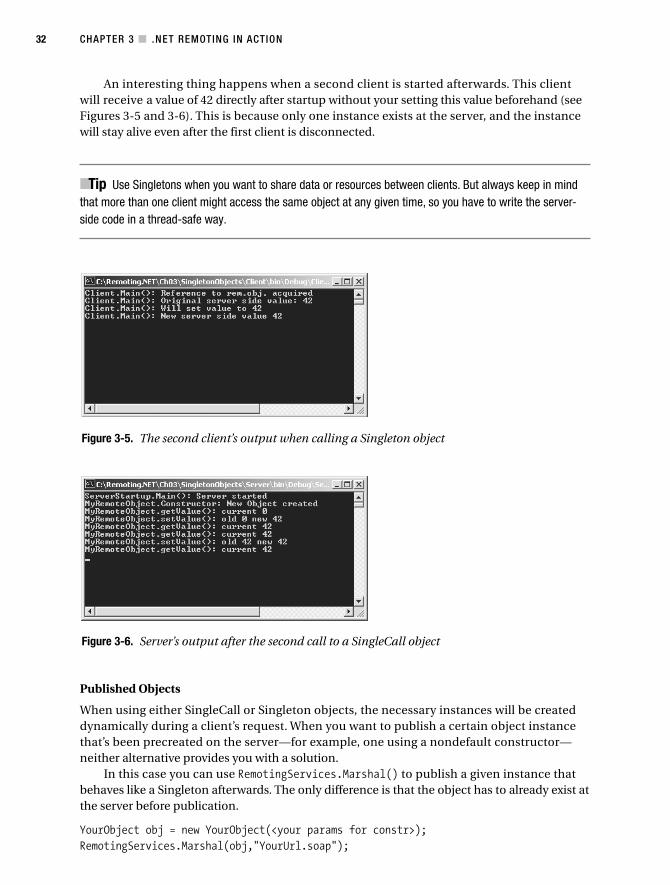
CHAPTER 3 ■ .NET REMOTING IN ACTION32
An interesting thing happens when a second client is started afterwards. This clientwill receive a value of 42 directly after startup without your setting this value beforehand (seeFigures 3-5 and 3-6). This is because only one instance exists at the server, and the instancewill stay alive even after the first client is disconnected.
■Tip Use Singletons when you want to share data or resources between clients. But always keep in mindthat more than one client might access the same object at any given time, so you have to write the server-side code in a thread-safe way.
Published Objects
When using either SingleCall or Singleton objects, the necessary instances will be createddynamically during a client’s request. When you want to publish a certain object instancethat’s been precreated on the server—for example, one using a nondefault constructor—neither alternative provides you with a solution.
In this case you can use RemotingServices.Marshal() to publish a given instance thatbehaves like a Singleton afterwards. The only difference is that the object has to already exist atthe server before publication.
YourObject obj = new YourObject(<your params for constr>);RemotingServices.Marshal(obj,"YourUrl.soap");
Figure 3-5. The second client’s output when calling a Singleton object
Figure 3-6. Server’s output after the second call to a SingleCall object
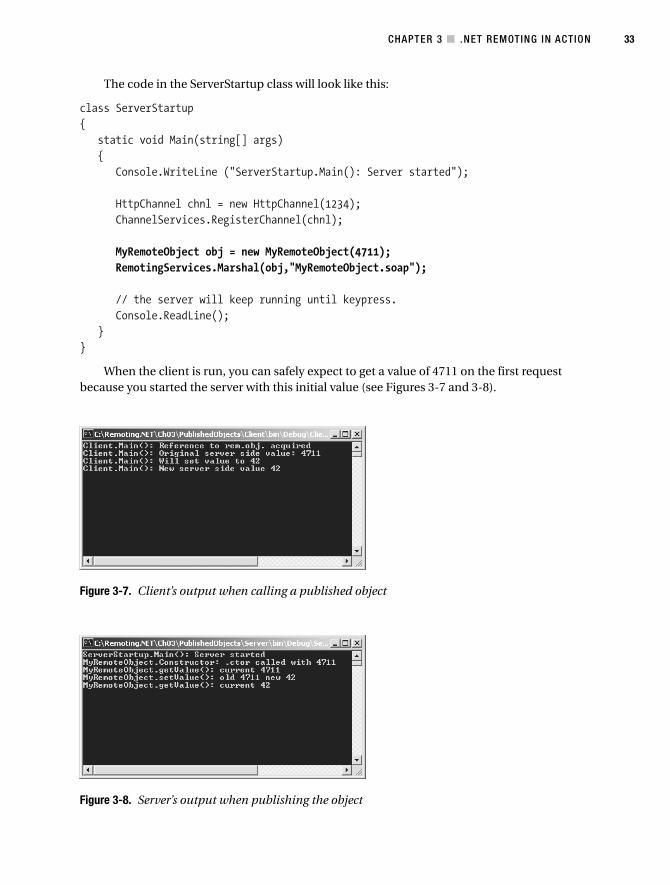
CHAPTER 3 ■ .NET REMOTING IN ACTION 33
The code in the ServerStartup class will look like this:
class ServerStartup{
static void Main(string[] args){
Console.WriteLine ("ServerStartup.Main(): Server started");
HttpChannel chnl = new HttpChannel(1234);ChannelServices.RegisterChannel(chnl);
MyRemoteObject obj = new MyRemoteObject(4711);RemotingServices.Marshal(obj,"MyRemoteObject.soap");
// the server will keep running until keypress.Console.ReadLine();
}}
When the client is run, you can safely expect to get a value of 4711 on the first requestbecause you started the server with this initial value (see Figures 3-7 and 3-8).
Figure 3-7. Client’s output when calling a published object
Figure 3-8. Server’s output when publishing the object
CHAPTER 3 ■ .NET REMOTING IN ACTION34
1. The only exception from this rule lies in the object’s lifetime, which is managed completely differentlyfrom the way it is in .NET generally or in COM.
Client-Activated ObjectsA client-activated object (CAO) behaves mostly the same way as does a “normal” .NETobject (or a COM object).1 When a creation request on the client is encountered (usingActivator.CreateInstance() or the new operator), an activation message is sent to the server,where an instance of the specified class is created. The server then creates an ObjRef, which isused to uniquely identify this object and returns it to the client. On the client proxy, this ObjRefwill be turned into a TransparentProxy, which points to the underlying server-side instance.
A client-activated object’s lifetime is managed by the same lifetime service used by SAOs,as shown later in this chapter. CAOs are so-called stateful objects; an instance variable that hasbeen set by the client can be retrieved again and will contain the correct value. These objectswill store state information from one method call to the other. CAOs are explicitly created bythe client, so they can have distinct constructors like normal .NET objects do.
Direct/Transparent Creation
The .NET Remoting framework can be configured to allow client-activated objects to be createdlike normal objects using the new operator. Unfortunately, this manner of creation has one seri-ous drawback: you cannot use shared interfaces or base classes. This means that you either haveto ship the compiled objects to your clients or use SoapSuds to extract the metadata.
This tool allows you to extract a metadata-only assembly out of a running server or a server-side implementation assembly. In the past two years, experience has taught me that relying onthis tool is not a good choice for most applications. As of today, Microsoft suggests not to use itfor .NET to .NET distributed applications. I will nevertheless demonstrate the use of SoapSuds.exein case you are willing to take the risk.
■Caution If you use the initial version 1.1 of the .NET Framework (without service packs), metadata gener-ated by SoapSuds cannot be used for client-activated objects. This is a bug that has been detailed inarticle 823445 in the Microsoft Knowledge Base. You can find more details about this problem—and how tocontact Product Support Services (PSS) to obtain a hotfix—at http://support.microsoft.com/default.aspx?scid=kb;en-us;823445.
In the following example, you’ll use more or less the same class you did in the previousexamples; it will provide your client with a SetValue() and GetValue() method to store andretrieve an int value as the object’s state. The metadata that is needed for the client to createa reference to the CAO will be extracted with SoapSuds.exe, about which you’ll read more laterin this chapter.
The reliance on SoapSuds allows you to develop the server application without any needfor up-front design of a shared assembly, therefore the server will simply include the CAOsimplementation. You can see this in Listing 3-4.
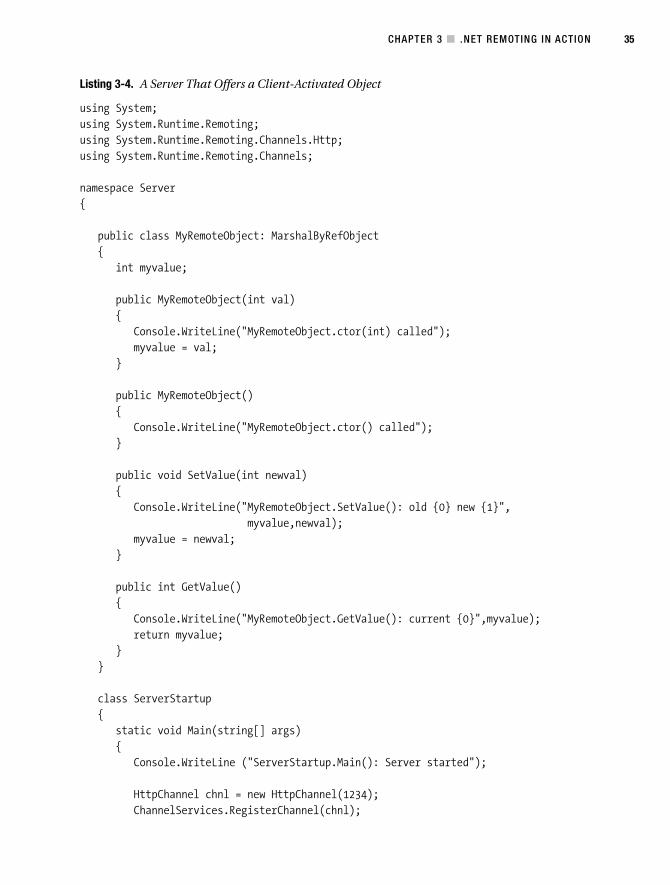
CHAPTER 3 ■ .NET REMOTING IN ACTION 35
Listing 3-4. A Server That Offers a Client-Activated Object
using System;using System.Runtime.Remoting;using System.Runtime.Remoting.Channels.Http;using System.Runtime.Remoting.Channels;
namespace Server{
public class MyRemoteObject: MarshalByRefObject{
int myvalue;
public MyRemoteObject(int val){
Console.WriteLine("MyRemoteObject.ctor(int) called");myvalue = val;
}
public MyRemoteObject(){
Console.WriteLine("MyRemoteObject.ctor() called");}
public void SetValue(int newval){
Console.WriteLine("MyRemoteObject.SetValue(): old {0} new {1}",myvalue,newval);
myvalue = newval;}
public int GetValue(){
Console.WriteLine("MyRemoteObject.GetValue(): current {0}",myvalue);return myvalue;
}}
class ServerStartup{
static void Main(string[] args){
Console.WriteLine ("ServerStartup.Main(): Server started");
HttpChannel chnl = new HttpChannel(1234);ChannelServices.RegisterChannel(chnl);
CHAPTER 3 ■ .NET REMOTING IN ACTION36
RemotingConfiguration.ApplicationName = "MyServer";RemotingConfiguration.RegisterActivatedServiceType(
typeof(MyRemoteObject));
// the server will keep running until keypress.Console.ReadLine();
}}
}
On the server you now have the new startup code needed to register a channel and this classas a client-activated object. When adding a Type to the list of activated services, you cannot pro-vide a single URL for each object; instead, you have to set RemotingConfiguration.ApplicationNameto a string value that identifies your server.
The URL to your remote object will be http://<hostname>:<port>/<ApplicationName>.What happens behind the scenes is that a general activation SAO is automatically createdby the framework and published at the URL http://<hostname>:<port>/<ApplicationName>/RemoteActivationService.rem. This SAO will take the clients’ requests to create a new instanceand pass it on to the remoting framework.
To extract the necessary interface information, you can run the following SoapSuds com-mand line in the directory where the server.exe assembly has been placed:
soapsuds -ia:server -nowp -oa:generated_metadata.dll
■Note You should perform all command-line operations from the Visual Studio command prompt, whichyou can bring up by selecting Start ➤ All Programs ➤ Microsoft Visual Studio .NET 2003 ➤ Visual Studio.NET Tools. This command prompt sets the correct “path” variable to include the .NET SDK tools.
The resulting generated_metadata.dll assembly must be referenced by the client. Thesample client also registers the CAO and acquires two references to (different) remote objects.It then sets the value of those objects and outputs them again, which shows that you really aredealing with two different objects.
As you can see in Listing 3-5, the activation of the remote object is done with the new oper-ator. This is possible because you registered the Type as ActivatedClientType before. The runtimenow knows that whenever your application creates an instance of this class, it instead shouldcreate a reference to a remote object running on the server.
Listing 3-5. The Client Accesses the Client-Activated Object
using System;using System.Runtime.Remoting;using System.Runtime.Remoting.Channels.Http;using System.Runtime.Remoting.Channels;using System.Runtime.Remoting.Activation;using Server;
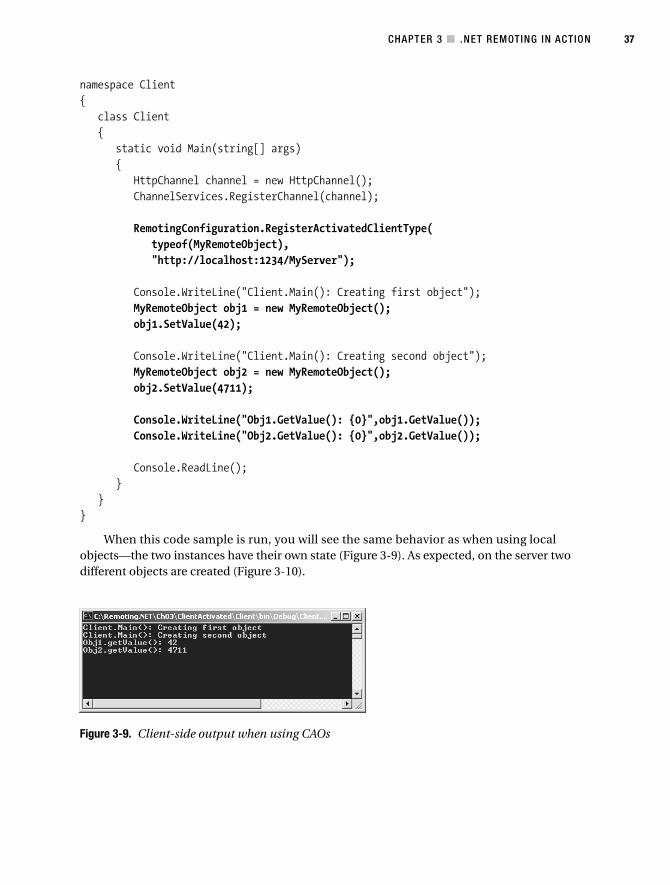
CHAPTER 3 ■ .NET REMOTING IN ACTION 37
namespace Client{
class Client{
static void Main(string[] args){
HttpChannel channel = new HttpChannel();ChannelServices.RegisterChannel(channel);
RemotingConfiguration.RegisterActivatedClientType(typeof(MyRemoteObject),"http://localhost:1234/MyServer");
Console.WriteLine("Client.Main(): Creating first object");MyRemoteObject obj1 = new MyRemoteObject();obj1.SetValue(42);
Console.WriteLine("Client.Main(): Creating second object");MyRemoteObject obj2 = new MyRemoteObject();obj2.SetValue(4711);
Console.WriteLine("Obj1.GetValue(): {0}",obj1.GetValue());Console.WriteLine("Obj2.GetValue(): {0}",obj2.GetValue());
Console.ReadLine();}
}}
When this code sample is run, you will see the same behavior as when using localobjects—the two instances have their own state (Figure 3-9). As expected, on the server twodifferent objects are created (Figure 3-10).
Figure 3-9. Client-side output when using CAOs
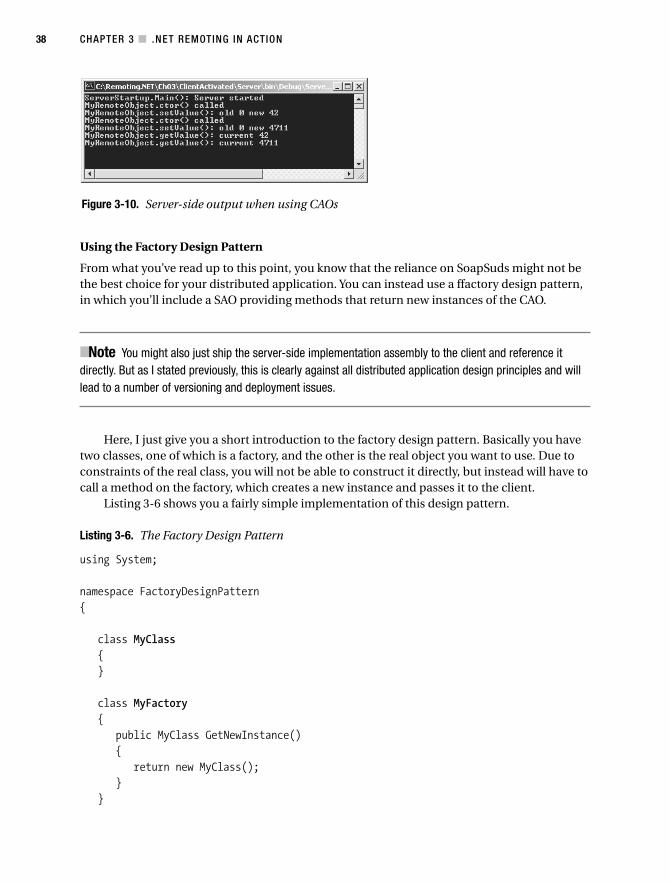
CHAPTER 3 ■ .NET REMOTING IN ACTION38
Using the Factory Design Pattern
From what you’ve read up to this point, you know that the reliance on SoapSuds might not bethe best choice for your distributed application. You can instead use a ffactory design pattern,in which you’ll include a SAO providing methods that return new instances of the CAO.
■Note You might also just ship the server-side implementation assembly to the client and reference itdirectly. But as I stated previously, this is clearly against all distributed application design principles and willlead to a number of versioning and deployment issues.
Here, I just give you a short introduction to the factory design pattern. Basically you havetwo classes, one of which is a factory, and the other is the real object you want to use. Due toconstraints of the real class, you will not be able to construct it directly, but instead will have tocall a method on the factory, which creates a new instance and passes it to the client.
Listing 3-6 shows you a fairly simple implementation of this design pattern.
Listing 3-6. The Factory Design Pattern
using System;
namespace FactoryDesignPattern{
class MyClass{}
class MyFactory{
public MyClass GetNewInstance(){
return new MyClass();}
}
Figure 3-10. Server-side output when using CAOs
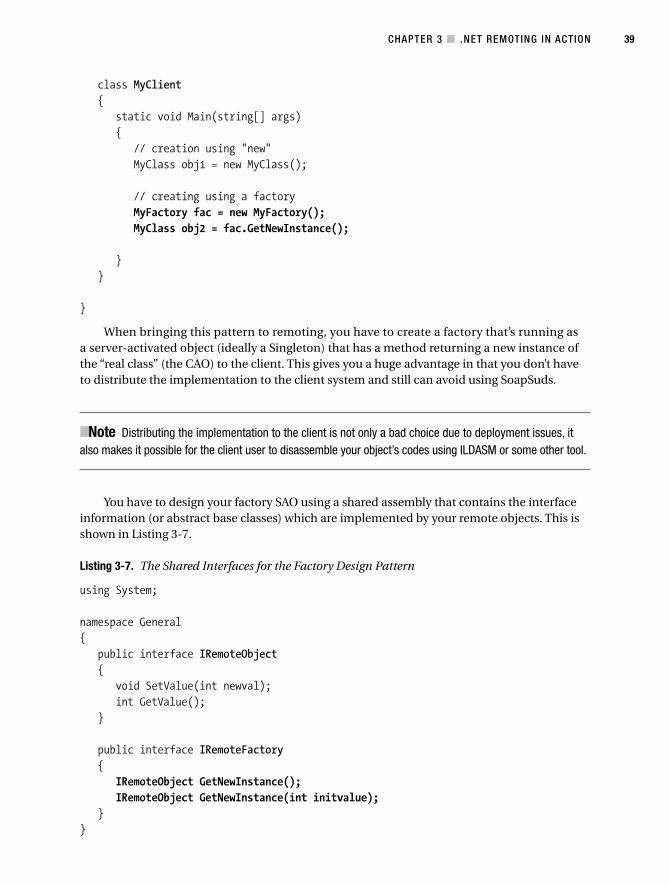
CHAPTER 3 ■ .NET REMOTING IN ACTION 39
class MyClient{
static void Main(string[] args){
// creation using "new"MyClass obj1 = new MyClass();
// creating using a factoryMyFactory fac = new MyFactory();MyClass obj2 = fac.GetNewInstance();
}}
}
When bringing this pattern to remoting, you have to create a factory that’s running asa server-activated object (ideally a Singleton) that has a method returning a new instance ofthe “real class” (the CAO) to the client. This gives you a huge advantage in that you don’t haveto distribute the implementation to the client system and still can avoid using SoapSuds.
■Note Distributing the implementation to the client is not only a bad choice due to deployment issues, italso makes it possible for the client user to disassemble your object’s codes using ILDASM or some other tool.
You have to design your factory SAO using a shared assembly that contains the interfaceinformation (or abstract base classes) which are implemented by your remote objects. This isshown in Listing 3-7.
Listing 3-7. The Shared Interfaces for the Factory Design Pattern
using System;
namespace General{
public interface IRemoteObject{
void SetValue(int newval);int GetValue();
}
public interface IRemoteFactory{
IRemoteObject GetNewInstance();IRemoteObject GetNewInstance(int initvalue);
}}
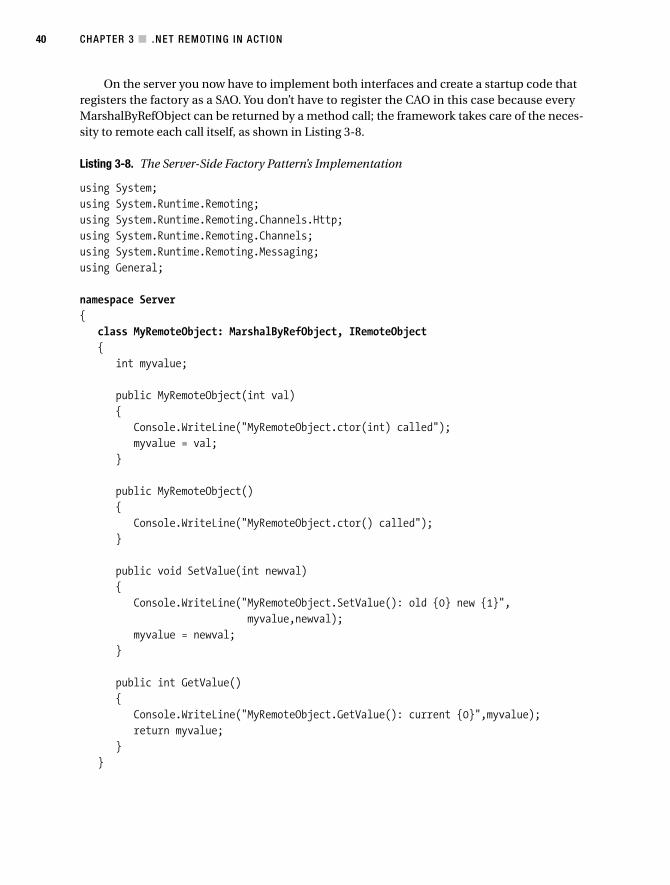
CHAPTER 3 ■ .NET REMOTING IN ACTION40
On the server you now have to implement both interfaces and create a startup code thatregisters the factory as a SAO. You don’t have to register the CAO in this case because everyMarshalByRefObject can be returned by a method call; the framework takes care of the neces-sity to remote each call itself, as shown in Listing 3-8.
Listing 3-8. The Server-Side Factory Pattern’s Implementation
using System;using System.Runtime.Remoting;using System.Runtime.Remoting.Channels.Http;using System.Runtime.Remoting.Channels;using System.Runtime.Remoting.Messaging;using General;
namespace Server{
class MyRemoteObject: MarshalByRefObject, IRemoteObject{
int myvalue;
public MyRemoteObject(int val){
Console.WriteLine("MyRemoteObject.ctor(int) called");myvalue = val;
}
public MyRemoteObject(){
Console.WriteLine("MyRemoteObject.ctor() called");}
public void SetValue(int newval){
Console.WriteLine("MyRemoteObject.SetValue(): old {0} new {1}",myvalue,newval);
myvalue = newval;}
public int GetValue(){
Console.WriteLine("MyRemoteObject.GetValue(): current {0}",myvalue);return myvalue;
}}
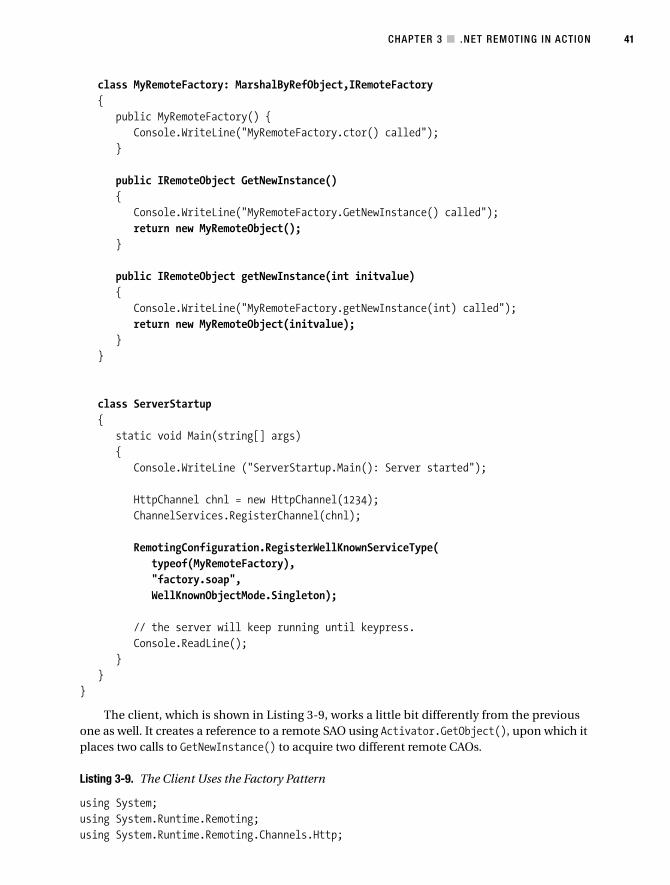
CHAPTER 3 ■ .NET REMOTING IN ACTION 41
class MyRemoteFactory: MarshalByRefObject,IRemoteFactory{
public MyRemoteFactory() {Console.WriteLine("MyRemoteFactory.ctor() called");
}
public IRemoteObject GetNewInstance(){
Console.WriteLine("MyRemoteFactory.GetNewInstance() called");return new MyRemoteObject();
}
public IRemoteObject getNewInstance(int initvalue){
Console.WriteLine("MyRemoteFactory.getNewInstance(int) called");return new MyRemoteObject(initvalue);
}}
class ServerStartup{
static void Main(string[] args){
Console.WriteLine ("ServerStartup.Main(): Server started");
HttpChannel chnl = new HttpChannel(1234);ChannelServices.RegisterChannel(chnl);
RemotingConfiguration.RegisterWellKnownServiceType(typeof(MyRemoteFactory),"factory.soap",WellKnownObjectMode.Singleton);
// the server will keep running until keypress.Console.ReadLine();
}}
}
The client, which is shown in Listing 3-9, works a little bit differently from the previousone as well. It creates a reference to a remote SAO using Activator.GetObject(), upon which itplaces two calls to GetNewInstance() to acquire two different remote CAOs.
Listing 3-9. The Client Uses the Factory Pattern
using System;using System.Runtime.Remoting;using System.Runtime.Remoting.Channels.Http;
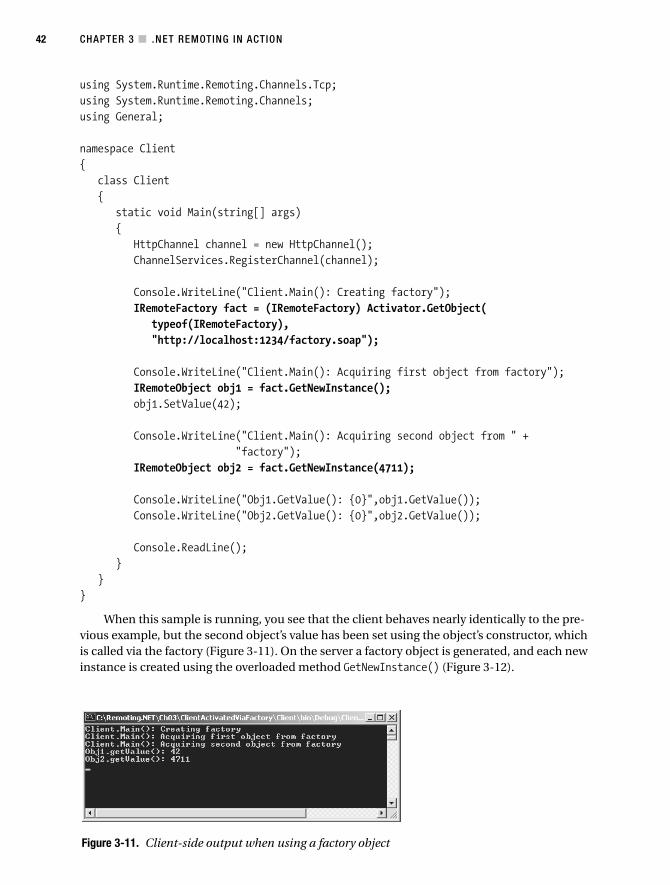
CHAPTER 3 ■ .NET REMOTING IN ACTION42
using System.Runtime.Remoting.Channels.Tcp;using System.Runtime.Remoting.Channels;using General;
namespace Client{
class Client{
static void Main(string[] args){
HttpChannel channel = new HttpChannel();ChannelServices.RegisterChannel(channel);
Console.WriteLine("Client.Main(): Creating factory");IRemoteFactory fact = (IRemoteFactory) Activator.GetObject(
typeof(IRemoteFactory),"http://localhost:1234/factory.soap");
Console.WriteLine("Client.Main(): Acquiring first object from factory");IRemoteObject obj1 = fact.GetNewInstance();obj1.SetValue(42);
Console.WriteLine("Client.Main(): Acquiring second object from " +"factory");
IRemoteObject obj2 = fact.GetNewInstance(4711);
Console.WriteLine("Obj1.GetValue(): {0}",obj1.GetValue());Console.WriteLine("Obj2.GetValue(): {0}",obj2.GetValue());
Console.ReadLine();}
}}
When this sample is running, you see that the client behaves nearly identically to the pre-vious example, but the second object’s value has been set using the object’s constructor, whichis called via the factory (Figure 3-11). On the server a factory object is generated, and each newinstance is created using the overloaded method GetNewInstance() (Figure 3-12).
Figure 3-11. Client-side output when using a factory object
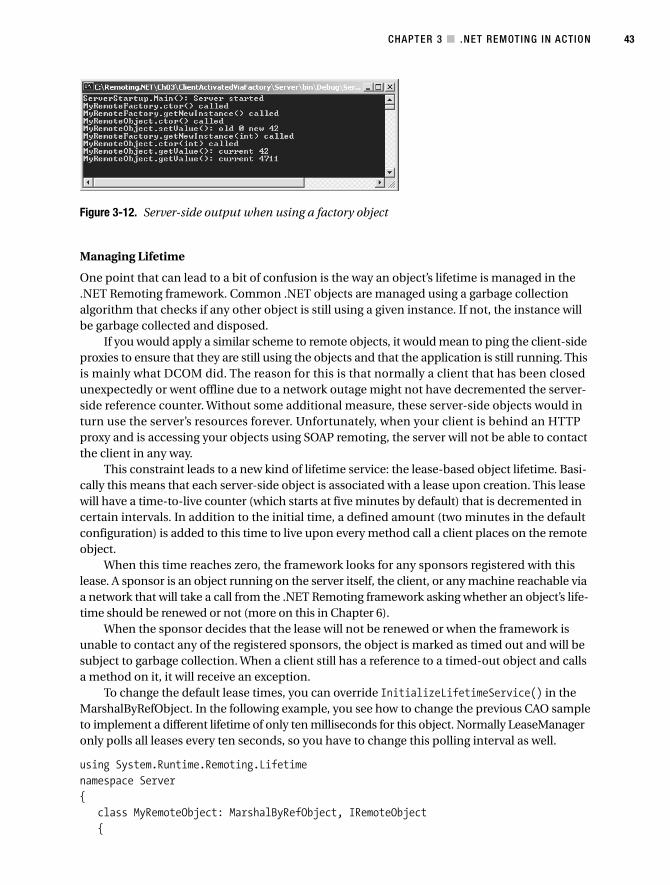
CHAPTER 3 ■ .NET REMOTING IN ACTION 43
Managing Lifetime
One point that can lead to a bit of confusion is the way an object’s lifetime is managed in the.NET Remoting framework. Common .NET objects are managed using a garbage collectionalgorithm that checks if any other object is still using a given instance. If not, the instance willbe garbage collected and disposed.
If you would apply a similar scheme to remote objects, it would mean to ping the client-sideproxies to ensure that they are still using the objects and that the application is still running. Thisis mainly what DCOM did. The reason for this is that normally a client that has been closedunexpectedly or went offline due to a network outage might not have decremented the server-side reference counter. Without some additional measure, these server-side objects would inturn use the server’s resources forever. Unfortunately, when your client is behind an HTTPproxy and is accessing your objects using SOAP remoting, the server will not be able to contactthe client in any way.
This constraint leads to a new kind of lifetime service: the lease-based object lifetime. Basi-cally this means that each server-side object is associated with a lease upon creation. This leasewill have a time-to-live counter (which starts at five minutes by default) that is decremented incertain intervals. In addition to the initial time, a defined amount (two minutes in the defaultconfiguration) is added to this time to live upon every method call a client places on the remoteobject.
When this time reaches zero, the framework looks for any sponsors registered with thislease. A sponsor is an object running on the server itself, the client, or any machine reachable viaa network that will take a call from the .NET Remoting framework asking whether an object’s life-time should be renewed or not (more on this in Chapter 6).
When the sponsor decides that the lease will not be renewed or when the framework isunable to contact any of the registered sponsors, the object is marked as timed out and will besubject to garbage collection. When a client still has a reference to a timed-out object and callsa method on it, it will receive an exception.
To change the default lease times, you can override InitializeLifetimeService() in theMarshalByRefObject. In the following example, you see how to change the previous CAO sampleto implement a different lifetime of only ten milliseconds for this object. Normally LeaseManageronly polls all leases every ten seconds, so you have to change this polling interval as well.
using System.Runtime.Remoting.Lifetimenamespace Server{
class MyRemoteObject: MarshalByRefObject, IRemoteObject{
Figure 3-12. Server-side output when using a factory object
CHAPTER 3 ■ .NET REMOTING IN ACTION44
public override object InitializeLifetimeService(){
Console.WriteLine("MyRemoteObject.InitializeLifetimeService() called");ILease lease = (ILease)base.InitializeLifetimeService();if (lease.CurrentState == LeaseState.Initial){
lease.InitialLeaseTime = TimeSpan.FromMilliseconds(10);lease.SponsorshipTimeout = TimeSpan.FromMilliseconds(10);lease.RenewOnCallTime = TimeSpan.FromMilliseconds(10);
}return lease;
}
// rest of implementation ...}
class MyRemoteFactory: MarshalByRefObject,IRemoteFactory{
// rest of implementation ...}
class ServerStartup{
static void Main(string[] args){
Console.WriteLine ("ServerStartup.Main(): Server started");
LifetimeServices.LeaseManagerPollTime = TimeSpan.FromMilliseconds(10);
HttpChannel chnl = new HttpChannel(1234);ChannelServices.RegisterChannel(chnl);
RemotingConfiguration.RegisterWellKnownServiceType(typeof(MyRemoteFactory),"factory.soap",WellKnownObjectMode.Singleton);
// the server will keep running until keypress.Console.ReadLine();
}}
}
On the client side, you can add a one-second delay between creation and the first call onthe remote object to see the effects of the changed lifetime. You also need to provide somecode to handle the RemotingException that will get thrown because the object is no longeravailable at the server. The client is shown in Listing 3-10.
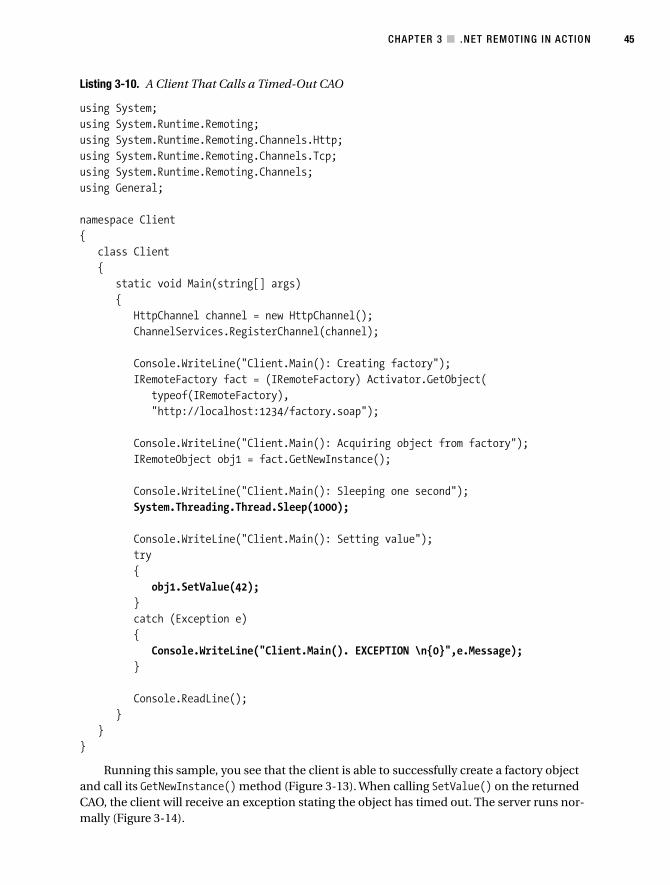
CHAPTER 3 ■ .NET REMOTING IN ACTION 45
Listing 3-10. A Client That Calls a Timed-Out CAO
using System;using System.Runtime.Remoting;using System.Runtime.Remoting.Channels.Http;using System.Runtime.Remoting.Channels.Tcp;using System.Runtime.Remoting.Channels;using General;
namespace Client{
class Client{
static void Main(string[] args){
HttpChannel channel = new HttpChannel();ChannelServices.RegisterChannel(channel);
Console.WriteLine("Client.Main(): Creating factory");IRemoteFactory fact = (IRemoteFactory) Activator.GetObject(
typeof(IRemoteFactory),"http://localhost:1234/factory.soap");
Console.WriteLine("Client.Main(): Acquiring object from factory");IRemoteObject obj1 = fact.GetNewInstance();
Console.WriteLine("Client.Main(): Sleeping one second");System.Threading.Thread.Sleep(1000);
Console.WriteLine("Client.Main(): Setting value");try{
obj1.SetValue(42);}catch (Exception e){
Console.WriteLine("Client.Main(). EXCEPTION \n{0}",e.Message);}
Console.ReadLine();}
}}
Running this sample, you see that the client is able to successfully create a factory objectand call its GetNewInstance() method (Figure 3-13). When calling SetValue() on the returnedCAO, the client will receive an exception stating the object has timed out. The server runs nor-mally (Figure 3-14).
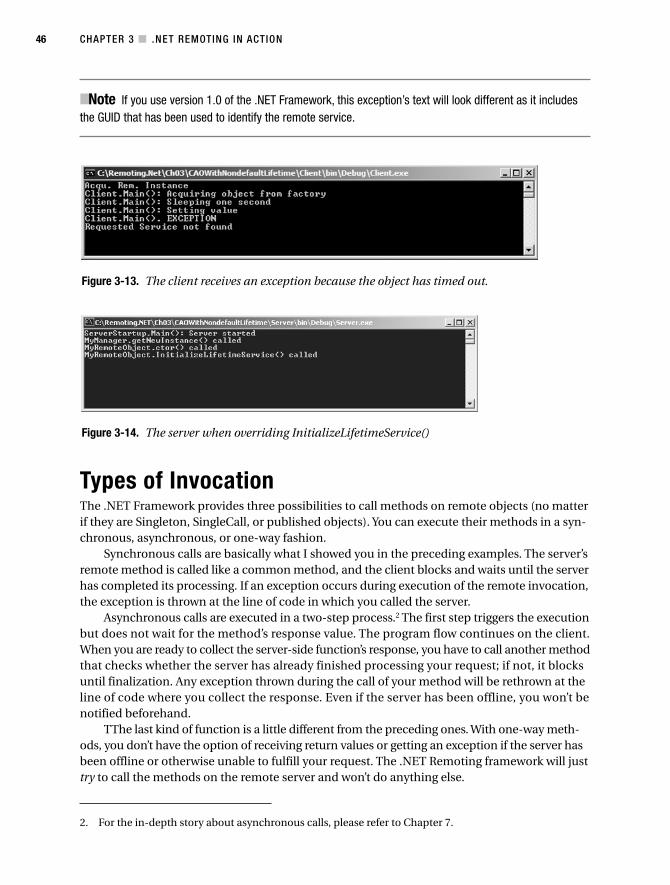
CHAPTER 3 ■ .NET REMOTING IN ACTION46
■Note If you use version 1.0 of the .NET Framework, this exception’s text will look different as it includesthe GUID that has been used to identify the remote service.
2. For the in-depth story about asynchronous calls, please refer to Chapter 7.
Types of InvocationThe .NET Framework provides three possibilities to call methods on remote objects (no matterif they are Singleton, SingleCall, or published objects). You can execute their methods in a syn-chronous, asynchronous, or one-way fashion.
Synchronous calls are basically what I showed you in the preceding examples. The server’sremote method is called like a common method, and the client blocks and waits until the serverhas completed its processing. If an exception occurs during execution of the remote invocation,the exception is thrown at the line of code in which you called the server.
Asynchronous calls are executed in a two-step process.2 The first step triggers the executionbut does not wait for the method’s response value. The program flow continues on the client.When you are ready to collect the server-side function’s response, you have to call another methodthat checks whether the server has already finished processing your request; if not, it blocksuntil finalization. Any exception thrown during the call of your method will be rethrown at theline of code where you collect the response. Even if the server has been offline, you won’t benotified beforehand.
TThe last kind of function is a little different from the preceding ones. With one-way meth-ods, you don’t have the option of receiving return values or getting an exception if the server hasbeen offline or otherwise unable to fulfill your request. The .NET Remoting framework will justtry to call the methods on the remote server and won’t do anything else.
Figure 3-13. The client receives an exception because the object has timed out.
Figure 3-14. The server when overriding InitializeLifetimeService()
CHAPTER 3 ■ .NET REMOTING IN ACTION 47
Synchronous CallsAs I’ve mentioned, synchronous calls are the usual way of calling a function in the .NETFramework. The server will be contacted directly and, except when using multiple client-sidethreads, the client code will block until the server has finished executing its method. If theserver is unavailable or an exception occurs while carrying out your request, the exception willbe rethrown at the line of code where you called the remote method.
Using Synchronous CallsIn the following series of examples for the different types of invocation, you use a commonserver and a shared assembly called General.dll (you’ll see some slight modifications in the lastpart). This server just provides you with a Singleton object that stores an int as its state and hasan additional method that returns a String. You’ll use this later to demonstrate the collection ofreturn values when using asynchronous calls.
Defining the General.dll
In Listing 3-11, you see the shared General.dll in which the necessary interface is defined.
Listing 3-11. The Shared Assembly’s Source Code
using System;using System.Runtime.Remoting.Messaging;
namespace General{
public interface IMyRemoteObject{
void SetValue(int newval);int GetValue();String GetName();
}}
Creating the Server
The server, shown in Listing 3-12, implements the defined methods with the addition of mak-ing the SetValue() and GetName() functions long-running code. In both methods, a five-seconddelay is introduced so you can see the effects of long-lasting execution in the different invocationcontexts.
Listing 3-12. A Server with Some Long-Running Methods
using System;using System.Runtime.Remoting;using General;using System.Runtime.Remoting.Channels.Http;using System.Runtime.Remoting.Channels;using System.Runtime.Remoting.Messaging;

CHAPTER 3 ■ .NET REMOTING IN ACTION48
using System.Collections;using System.Threading;
namespace Server{
class MyRemoteObject: MarshalByRefObject, IMyRemoteObject{
int myvalue;
public MyRemoteObject(){
Console.WriteLine("MyRemoteObject.Constructor: New Object created");}
public void SetValue(int newval){
Console.WriteLine("MyRemoteObject.setValue(): old {0} new {1}",myvalue,newval);
// we simulate a long running actionConsole.WriteLine(" .setValue() -> waiting 5 sec before setting" +
" value");Thread.Sleep(5000);
myvalue = newval;Console.WriteLine(" .SetValue() -> value is now set");
}
public int GetValue(){
Console.WriteLine("MyRemoteObject.GetValue(): current {0}",myvalue);return myvalue;
}
public String GetName(){
Console.WriteLine("MyRemoteObject.getName(): called");
// we simulate a long running actionConsole.WriteLine(" .GetName() -> waiting 5 sec before continuing");Thread.Sleep(5000);
Console.WriteLine(" .GetName() -> returning name");return "John Doe";
}}
CHAPTER 3 ■ .NET REMOTING IN ACTION 49
class ServerStartup{
static void Main(string[] args){
Console.WriteLine ("ServerStartup.Main(): Server started");
HttpChannel chnl = new HttpChannel(1234);ChannelServices.RegisterChannel(chnl);
RemotingConfiguration.RegisterWellKnownServiceType(typeof(MyRemoteObject),"MyRemoteObject.soap",WellKnownObjectMode.Singleton);
// the server will keep running until keypress.Console.ReadLine();
}
}}
Creating the Client
The first client, which is shown in Listing 3-13, calls the server synchronously, as in all preceding examples. It calls all three methods and gives you statistics on how long the total execution took.
Listing 3-13. The First Client Calls the Methods Synchronously
using System;using System.Runtime.Remoting;using General;using System.Runtime.Remoting.Channels.Http;using System.Runtime.Remoting.Channels.Tcp;using System.Runtime.Remoting.Channels;using System.Runtime.Remoting.Proxies;using System.Threading;using System.Reflection;
namespace Client{
class Client{
static void Main(string[] args){
DateTime start = System.DateTime.Now;
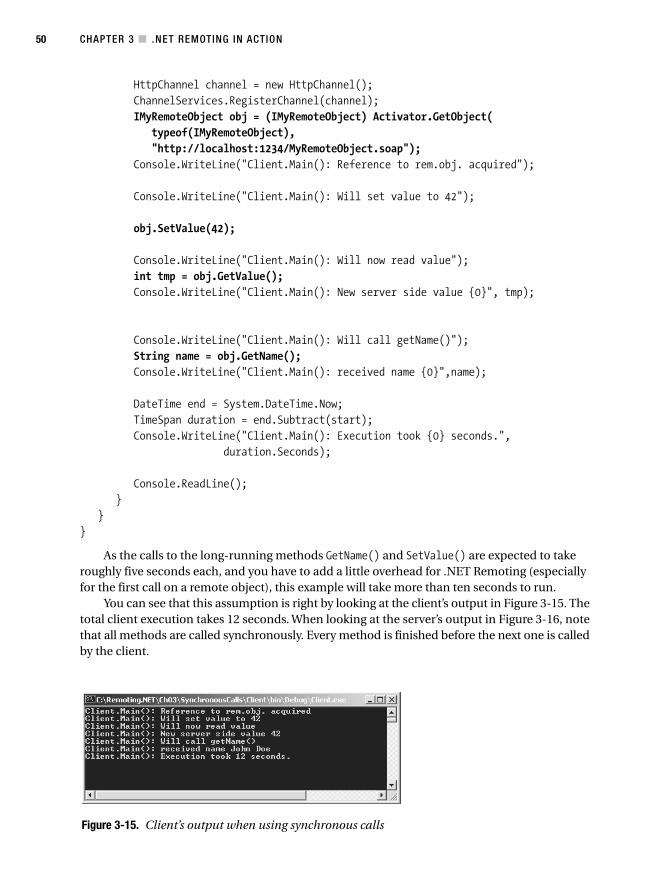
CHAPTER 3 ■ .NET REMOTING IN ACTION50
HttpChannel channel = new HttpChannel();ChannelServices.RegisterChannel(channel);IMyRemoteObject obj = (IMyRemoteObject) Activator.GetObject(
typeof(IMyRemoteObject),"http://localhost:1234/MyRemoteObject.soap");
Console.WriteLine("Client.Main(): Reference to rem.obj. acquired");
Console.WriteLine("Client.Main(): Will set value to 42");
obj.SetValue(42);
Console.WriteLine("Client.Main(): Will now read value");int tmp = obj.GetValue();Console.WriteLine("Client.Main(): New server side value {0}", tmp);
Console.WriteLine("Client.Main(): Will call getName()");String name = obj.GetName();Console.WriteLine("Client.Main(): received name {0}",name);
DateTime end = System.DateTime.Now;TimeSpan duration = end.Subtract(start);Console.WriteLine("Client.Main(): Execution took {0} seconds.",
duration.Seconds);
Console.ReadLine();}
}}
As the calls to the long-running methods GetName() and SetValue() are expected to takeroughly five seconds each, and you have to add a little overhead for .NET Remoting (especiallyfor the first call on a remote object), this example will take more than ten seconds to run.
You can see that this assumption is right by looking at the client’s output in Figure 3-15. Thetotal client execution takes 12 seconds. When looking at the server’s output in Figure 3-16, notethat all methods are called synchronously. Every method is finished before the next one is calledby the client.
Figure 3-15. Client’s output when using synchronous calls
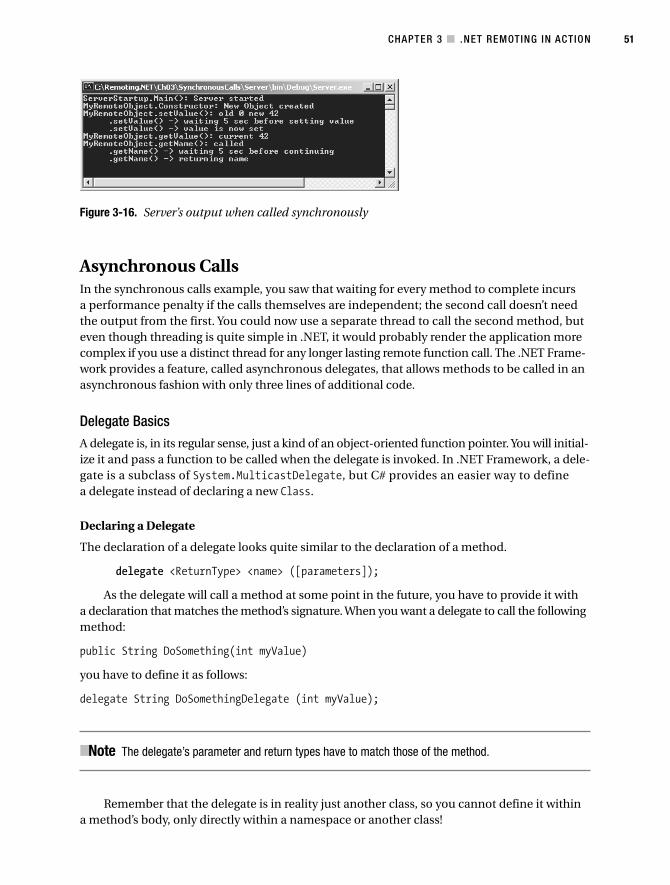
CHAPTER 3 ■ .NET REMOTING IN ACTION 51
Asynchronous CallsIn the synchronous calls example, you saw that waiting for every method to complete incursa performance penalty if the calls themselves are independent; the second call doesn’t needthe output from the first. You could now use a separate thread to call the second method, buteven though threading is quite simple in .NET, it would probably render the application morecomplex if you use a distinct thread for any longer lasting remote function call. The .NET Frame-work provides a feature, called asynchronous delegates, that allows methods to be called in anasynchronous fashion with only three lines of additional code.
Delegate BasicsA delegate is, in its regular sense, just a kind of an object-oriented function pointer. You will initial-ize it and pass a function to be called when the delegate is invoked. In .NET Framework, a dele-gate is a subclass of System.MulticastDelegate, but C# provides an easier way to definea delegate instead of declaring a new Class.
Declaring a Delegate
The declaration of a delegate looks quite similar to the declaration of a method.
delegate <ReturnType> <name> ([parameters]);
As the delegate will call a method at some point in the future, you have to provide it witha declaration that matches the method’s signature. When you want a delegate to call the followingmethod:
public String DoSomething(int myValue)
you have to define it as follows:
delegate String DoSomethingDelegate (int myValue);
■Note The delegate’s parameter and return types have to match those of the method.
Remember that the delegate is in reality just another class, so you cannot define it withina method’s body, only directly within a namespace or another class!
Figure 3-16. Server’s output when called synchronously
CHAPTER 3 ■ .NET REMOTING IN ACTION52
Asynchronously Invoking a Delegate
When you want to use a delegate, you first have to create an instance of it, passing the methodto be called as a constructor parameter:
DoSomethingDelegate del = new DoSomethingDelegate(DoSomething);
■Note When passing the method to the constructor, be sure not to include an opening or closing parenthe-sis— ( or ) —as in DoSomething(). The previous example uses a static method DoSomething in the sameclass. When using static methods of other classes, you have to pass SomeClass.SomeMethod, and forinstance methods, you pass SomeObject.DoSomething.
The asynchronous invocation of a delegate is a two-step process. In the first step, you haveto trigger the execution using BeginInvoke(), as follows:
IAsyncResult ar = del.BeginInvoke(42,null,null);
■Note If you use Microsoft Visual Studio 2002, BeginInvoke() behaves a little strangely in the IDE. Youwon’t see it using IntelliSense, as it is automatically generated during compilation. The parameters are thesame as the method parameters, according to the delegate definition, followed by two other objects; youwon’t be using these two objects in the following examples, instead passing null to BeginInvoke(). InVisual Studio 2003, you will see the complete information in the IDE.
BeginInvoke() then returns an IAsyncResult object that will be used later to retrieve themethod’s return values. When ready to do so, you call EndInvoke() on the delegate passing theIAsyncResult as a parameter. The EndInvoke() method will block until the server has com-pleted executing the underlying method.
String res = del.EndInvoke(ar);
■Note EndInvoke() will not be visible in the Visual Studio 2002 IDE either. The method takes anIAsyncResult as a parameter, and its return type will be defined in the delegate’s declaration.
Creating an Example DelegateIn Listing 3-14, a delegate is used to asynchronously call a local function and wait for its result.The method returns a String built from the passed int parameter.
Listing 3-14. Using a Delegate in a Local Application
using System;
namespace SampleDelegate{
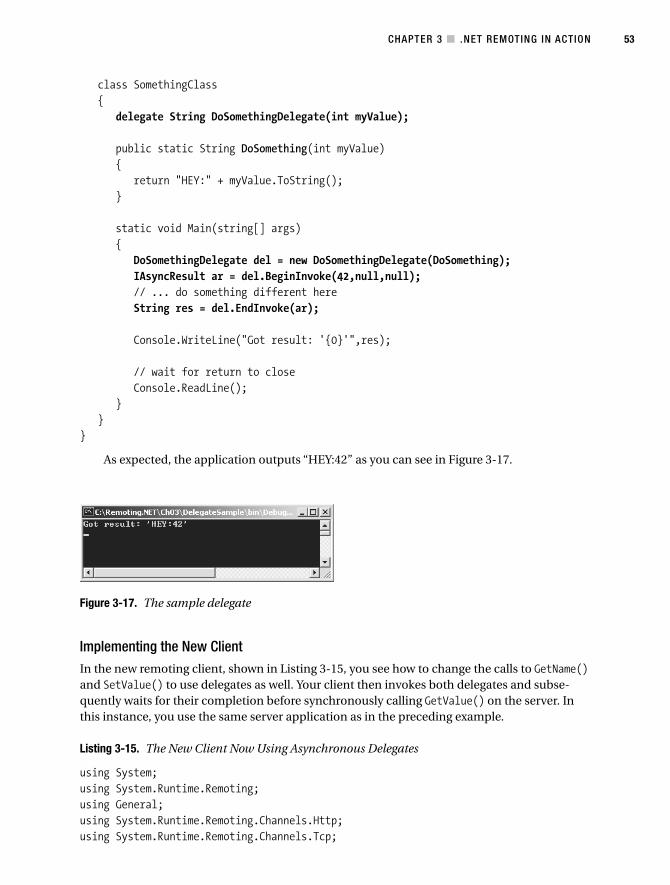
CHAPTER 3 ■ .NET REMOTING IN ACTION 53
class SomethingClass{
delegate String DoSomethingDelegate(int myValue);
public static String DoSomething(int myValue){
return "HEY:" + myValue.ToString();}
static void Main(string[] args){
DoSomethingDelegate del = new DoSomethingDelegate(DoSomething);IAsyncResult ar = del.BeginInvoke(42,null,null);// ... do something different hereString res = del.EndInvoke(ar);
Console.WriteLine("Got result: '{0}'",res);
// wait for return to closeConsole.ReadLine();
}}
}
As expected, the application outputs “HEY:42” as you can see in Figure 3-17.
Implementing the New ClientIn the new remoting client, shown in Listing 3-15, you see how to change the calls to GetName()and SetValue() to use delegates as well. Your client then invokes both delegates and subse-quently waits for their completion before synchronously calling GetValue() on the server. Inthis instance, you use the same server application as in the preceding example.
Listing 3-15. The New Client Now Using Asynchronous Delegates
using System;using System.Runtime.Remoting;using General;using System.Runtime.Remoting.Channels.Http;using System.Runtime.Remoting.Channels.Tcp;
Figure 3-17. The sample delegate
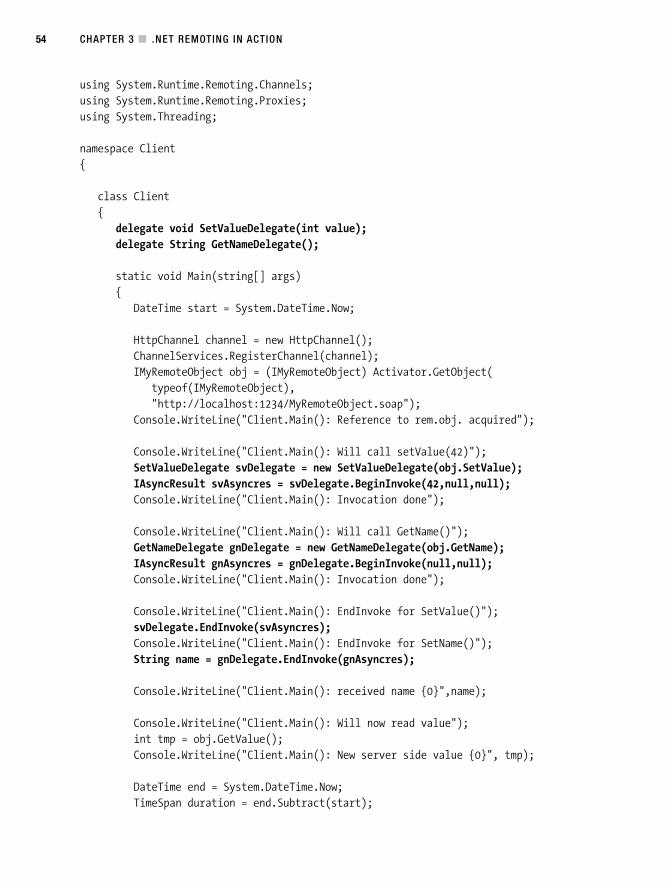
CHAPTER 3 ■ .NET REMOTING IN ACTION54
using System.Runtime.Remoting.Channels;using System.Runtime.Remoting.Proxies;using System.Threading;
namespace Client{
class Client{
delegate void SetValueDelegate(int value);delegate String GetNameDelegate();
static void Main(string[] args){
DateTime start = System.DateTime.Now;
HttpChannel channel = new HttpChannel();ChannelServices.RegisterChannel(channel);IMyRemoteObject obj = (IMyRemoteObject) Activator.GetObject(
typeof(IMyRemoteObject),"http://localhost:1234/MyRemoteObject.soap");
Console.WriteLine("Client.Main(): Reference to rem.obj. acquired");
Console.WriteLine("Client.Main(): Will call setValue(42)");SetValueDelegate svDelegate = new SetValueDelegate(obj.SetValue);IAsyncResult svAsyncres = svDelegate.BeginInvoke(42,null,null);Console.WriteLine("Client.Main(): Invocation done");
Console.WriteLine("Client.Main(): Will call GetName()");GetNameDelegate gnDelegate = new GetNameDelegate(obj.GetName);IAsyncResult gnAsyncres = gnDelegate.BeginInvoke(null,null);Console.WriteLine("Client.Main(): Invocation done");
Console.WriteLine("Client.Main(): EndInvoke for SetValue()");svDelegate.EndInvoke(svAsyncres);Console.WriteLine("Client.Main(): EndInvoke for SetName()");String name = gnDelegate.EndInvoke(gnAsyncres);
Console.WriteLine("Client.Main(): received name {0}",name);
Console.WriteLine("Client.Main(): Will now read value");int tmp = obj.GetValue();Console.WriteLine("Client.Main(): New server side value {0}", tmp);
DateTime end = System.DateTime.Now;TimeSpan duration = end.Subtract(start);
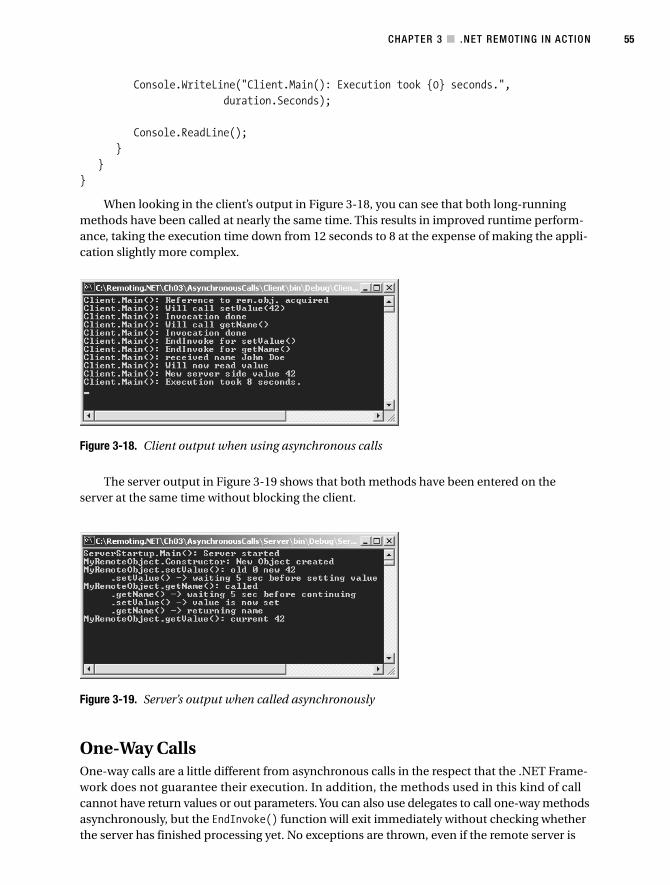
CHAPTER 3 ■ .NET REMOTING IN ACTION 55
Console.WriteLine("Client.Main(): Execution took {0} seconds.",duration.Seconds);
Console.ReadLine();}
}}
When looking in the client’s output in Figure 3-18, you can see that both long-runningmethods have been called at nearly the same time. This results in improved runtime perform-ance, taking the execution time down from 12 seconds to 8 at the expense of making the appli-cation slightly more complex.
The server output in Figure 3-19 shows that both methods have been entered on theserver at the same time without blocking the client.
One-Way CallsOne-way calls are a little different from asynchronous calls in the respect that the .NET Frame-work does not guarantee their execution. In addition, the methods used in this kind of callcannot have return values or out parameters. You can also use delegates to call one-way methodsasynchronously, but the EndInvoke() function will exit immediately without checking whetherthe server has finished processing yet. No exceptions are thrown, even if the remote server is
Figure 3-18. Client output when using asynchronous calls
Figure 3-19. Server’s output when called asynchronously
CHAPTER 3 ■ .NET REMOTING IN ACTION56
down or the method call is malformed. Reasons for using these kind of methods (which aren’tguaranteed to be executed at all) can be found in uncritical logging or tracing facilities, wherethe nonexistence of the server should not slow down the application.
Demonstrating a One-Way CallYou define one-way methods using the [OneWay] attribute. This happens in the defining meta-data (in the General.dll in these examples) and doesn’t need a change in the server or the client.
Defining the General.dll
The attribute [OneWay()] has to be specified in the interface definition of each method thatwill be called this way. As shown in Listing 3-16, you change only the SetValue() method tobecome a one-way method; the others are still defined as earlier.
Listing 3-16. The Shared Interfaces DLL Defines the One-Way Method.
using System;using System.Runtime.Remoting.Messaging;
namespace General{
public interface IMyRemoteObject{
[OneWay()]void SetValue(int newval);int GetValue();String GetName();
}}
Implementing the Client
On the server side, no change is needed, so you can directly look at the client. In theory, nomodification is needed for the client as well, but extend it a little here to catch the eventualexception during execution, as shown in Listing 3-17.
Listing 3-17. Try/Catch Blocks Are Added to the Client.
using System;using System.Runtime.Remoting;using General;using System.Runtime.Remoting.Channels.Http;using System.Runtime.Remoting.Channels.Tcp;using System.Runtime.Remoting.Channels;using System.Runtime.Remoting.Proxies;using System.Threading;
namespace Client{
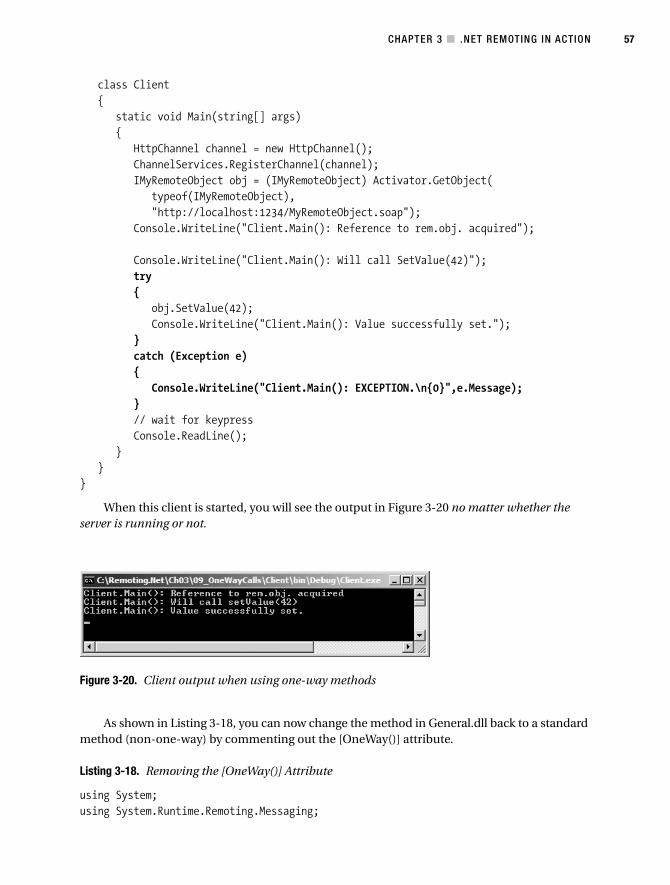
CHAPTER 3 ■ .NET REMOTING IN ACTION 57
class Client{
static void Main(string[] args){
HttpChannel channel = new HttpChannel();ChannelServices.RegisterChannel(channel);IMyRemoteObject obj = (IMyRemoteObject) Activator.GetObject(
typeof(IMyRemoteObject),"http://localhost:1234/MyRemoteObject.soap");
Console.WriteLine("Client.Main(): Reference to rem.obj. acquired");
Console.WriteLine("Client.Main(): Will call SetValue(42)");try{
obj.SetValue(42);Console.WriteLine("Client.Main(): Value successfully set.");
}catch (Exception e){
Console.WriteLine("Client.Main(): EXCEPTION.\n{0}",e.Message);}// wait for keypressConsole.ReadLine();
}}
}
When this client is started, you will see the output in Figure 3-20 no matter whether theserver is running or not.
As shown in Listing 3-18, you can now change the method in General.dll back to a standardmethod (non-one-way) by commenting out the [OneWay()] attribute.
Listing 3-18. Removing the [OneWay()] Attribute
using System;using System.Runtime.Remoting.Messaging;
Figure 3-20. Client output when using one-way methods
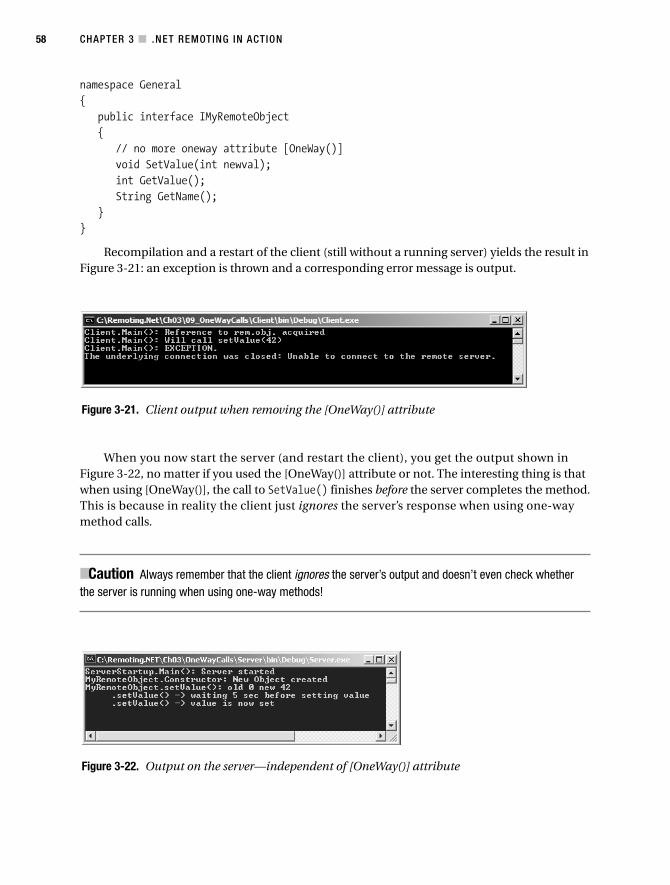
CHAPTER 3 ■ .NET REMOTING IN ACTION58
namespace General{
public interface IMyRemoteObject{
// no more oneway attribute [OneWay()]void SetValue(int newval);int GetValue();String GetName();
}}
Recompilation and a restart of the client (still without a running server) yields the result inFigure 3-21: an exception is thrown and a corresponding error message is output.
When you now start the server (and restart the client), you get the output shown inFigure 3-22, no matter if you used the [OneWay()] attribute or not. The interesting thing is thatwhen using [OneWay()], the call to SetValue() finishes before the server completes the method.This is because in reality the client just ignores the server’s response when using one-waymethod calls.
■Caution Always remember that the client ignores the server’s output and doesn’t even check whetherthe server is running when using one-way methods!
Figure 3-21. Client output when removing the [OneWay()] attribute
Figure 3-22. Output on the server—independent of [OneWay()] attribute
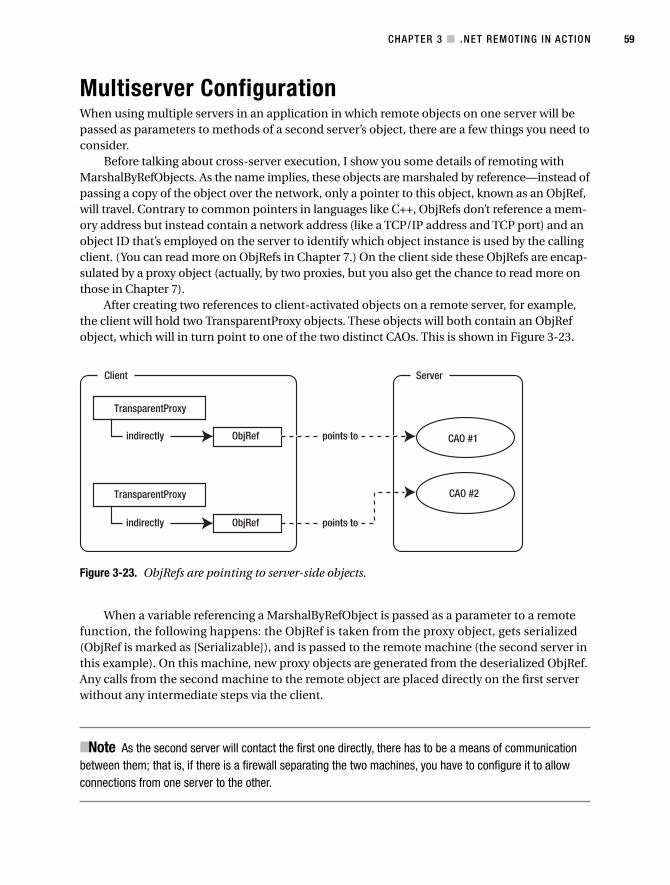
CHAPTER 3 ■ .NET REMOTING IN ACTION 59
Multiserver ConfigurationWhen using multiple servers in an application in which remote objects on one server will bepassed as parameters to methods of a second server’s object, there are a few things you need toconsider.
Before talking about cross-server execution, I show you some details of remoting withMarshalByRefObjects. As the name implies, these objects are marshaled by reference—instead ofpassing a copy of the object over the network, only a pointer to this object, known as an ObjRef,will travel. Contrary to common pointers in languages like C++, ObjRefs don’t reference a mem-ory address but instead contain a network address (like a TCP/IP address and TCP port) and anobject ID that’s employed on the server to identify which object instance is used by the callingclient. (You can read more on ObjRefs in Chapter 7.) On the client side these ObjRefs are encap-sulated by a proxy object (actually, by two proxies, but you also get the chance to read more onthose in Chapter 7).
After creating two references to client-activated objects on a remote server, for example,the client will hold two TransparentProxy objects. These objects will both contain an ObjRefobject, which will in turn point to one of the two distinct CAOs. This is shown in Figure 3-23.
When a variable referencing a MarshalByRefObject is passed as a parameter to a remotefunction, the following happens: the ObjRef is taken from the proxy object, gets serialized(ObjRef is marked as [Serializable]), and is passed to the remote machine (the second server inthis example). On this machine, new proxy objects are generated from the deserialized ObjRef.Any calls from the second machine to the remote object are placed directly on the first serverwithout any intermediate steps via the client.
■Note As the second server will contact the first one directly, there has to be a means of communicationbetween them; that is, if there is a firewall separating the two machines, you have to configure it to allowconnections from one server to the other.
TransparentProxy
ObjRefindirectly
TransparentProxy
ObjRefindirectly
CAO #2
CAO #1
Client Server
points to
points to
Figure 3-23. ObjRefs are pointing to server-side objects.

CHAPTER 3 ■ .NET REMOTING IN ACTION60
Examining a Sample Multiserver ApplicationIn the following example, I show you how to create a multiserver application in which Server 1will provide a Singleton object that has an instance variable of type int. The client will obtaina remote reference to this object and pass it to a “worker object” located on a secondary server.This worker object is a SingleCall service providing a DoSomething() method, which takes aninstance of the first object as a parameter. Figure 3-24 shows the Unified Modeling Language(UML) diagram for this setup.
■Note If you use version 1.0 of the .NET Framework, you have to change the approach from using inter-faces in General.dll to using abstract base classes. This first version of the .NET Remoting framework did notcorrectly serialize the interface hierarchy in the ObjRef, so these interface casts would not succeed. Thisproblem has been fixed with version 1.1.
Figures 3-25 to 3-27 illustrate the data flow between the various components. In Figure 3-25,you see the situation after the first method call of the client on the first server object. The clientholds a proxy object containing the ObjRef that points to the server-side Singleton object.
■Note I use IDs like MRO#1 for an instance of MyRemoteObject not because that’s .NET-like, but because itallows me to more easily refer to a certain object instance when describing the architecture.
System.Runtime.Remoting:: MarshalByRefObject
+setValue(in newval : int) : void+getValue() : int
General:: BaseRemoteObject
+doSomething(in usethis : BaseRemoteObject)
General:: BaseWorkerObject
Server1:: MyRemoteObjectServer2:: MyWorkerObject
Figure 3-24. UML diagram of the multiserver example
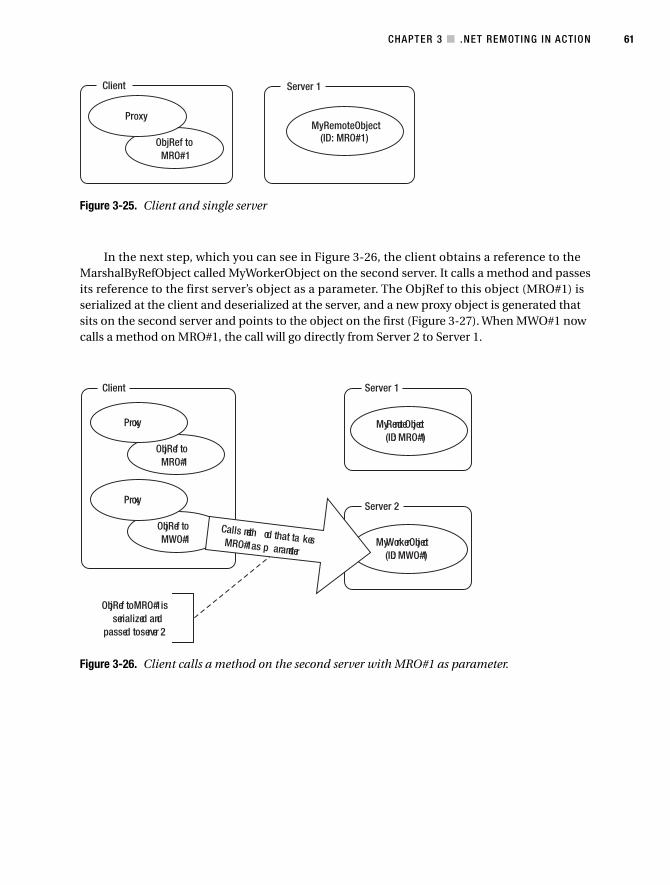
CHAPTER 3 ■ .NET REMOTING IN ACTION 61
In the next step, which you can see in Figure 3-26, the client obtains a reference to theMarshalByRefObject called MyWorkerObject on the second server. It calls a method and passesits reference to the first server’s object as a parameter. The ObjRef to this object (MRO#1) isserialized at the client and deserialized at the server, and a new proxy object is generated thatsits on the second server and points to the object on the first (Figure 3-27). When MWO#1 nowcalls a method on MRO#1, the call will go directly from Server 2 to Server 1.
Proxy
ObjRef toMRO#1
MyRemoteObject(ID: MRO#1)
Client Server 1
Figure 3-25. Client and single server
ObjRef to MRO#1 isserialized and
passed to server 2
Client Server 1
Server 2
Proxy
ObjRef toMRO#1
Proxy
ObjRef toMWO#1
MyRemoteObject(ID: MRO#1)
MyWorkerObject(ID: MWO#1)
Calls meth od that ta kesMRO#1 as p arameter
Figure 3-26. Client calls a method on the second server with MRO#1 as parameter.
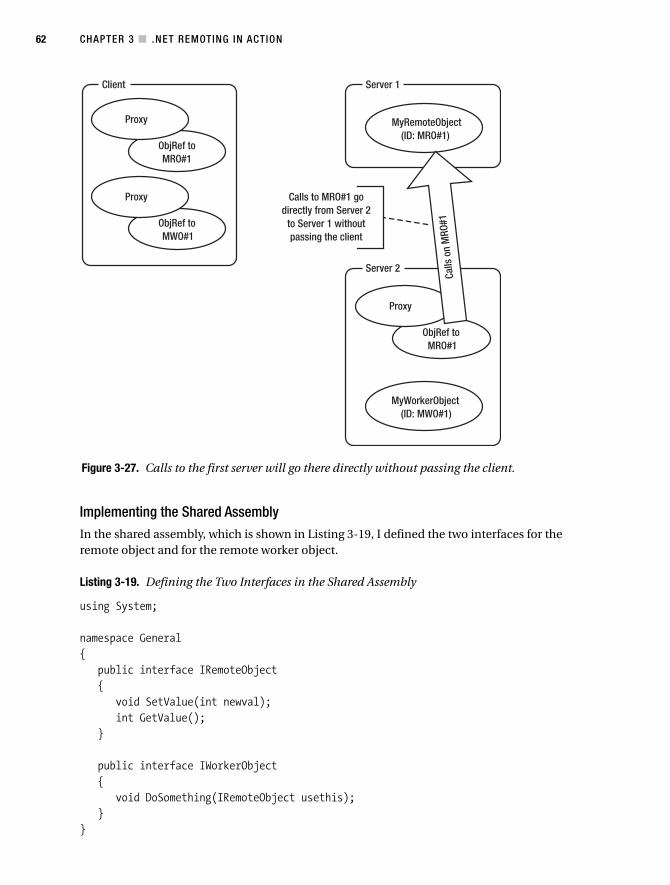
CHAPTER 3 ■ .NET REMOTING IN ACTION62
Implementing the Shared AssemblyIn the shared assembly, which is shown in Listing 3-19, I defined the two interfaces for theremote object and for the remote worker object.
Listing 3-19. Defining the Two Interfaces in the Shared Assembly
using System;
namespace General{
public interface IRemoteObject{
void SetValue(int newval);int GetValue();
}
public interface IWorkerObject{
void DoSomething(IRemoteObject usethis);}
}
Calls to MRO#1 godirectly from Server 2
to Server 1 withoutpassing the client
Client Server 1
Server 2
Proxy
ObjRef toMRO#1
Proxy
ObjRef toMRO#1
Proxy
ObjRef toMWO#1
MyRemoteObject(ID: MRO#1)
MyWorkerObject(ID: MWO#1)
Calls
on
MRO
#1
Figure 3-27. Calls to the first server will go there directly without passing the client.

CHAPTER 3 ■ .NET REMOTING IN ACTION 63
The IRemoteObject’s implementation is a Singleton located on the first server, and itallows the client to set and read an int as state information. The IWorkerObject’s implementa-tion is placed in Server 2 and provides a method that takes an object of type IRemoteObject asa parameter.
Implementing the First ServerThe first server very closely resembles the servers from the other examples and is shown inListing 3-20.
Listing 3-20. The First Server
using System;using System.Runtime.Remoting;using General;using System.Runtime.Remoting.Channels.Http;using System.Runtime.Remoting.Channels;
namespace Server{
class MyRemoteObject: MarshalByRefObject, IRemoteObject{
int myvalue;
public MyRemoteObject(){
Console.WriteLine("MyRemoteObject.Constructor: New Object created");}
public void SetValue(int newval){
Console.WriteLine("MyRemoteObject.SetValue(): old {0} new {1}",myvalue,newval);
myvalue = newval;}
public int GetValue(){
Console.WriteLine("MyRemoteObject.GetValue(): current {0}",myvalue);return myvalue;
}}
class ServerStartup{
static void Main(string[] args){
Console.WriteLine ("ServerStartup.Main(): Server [1] started");
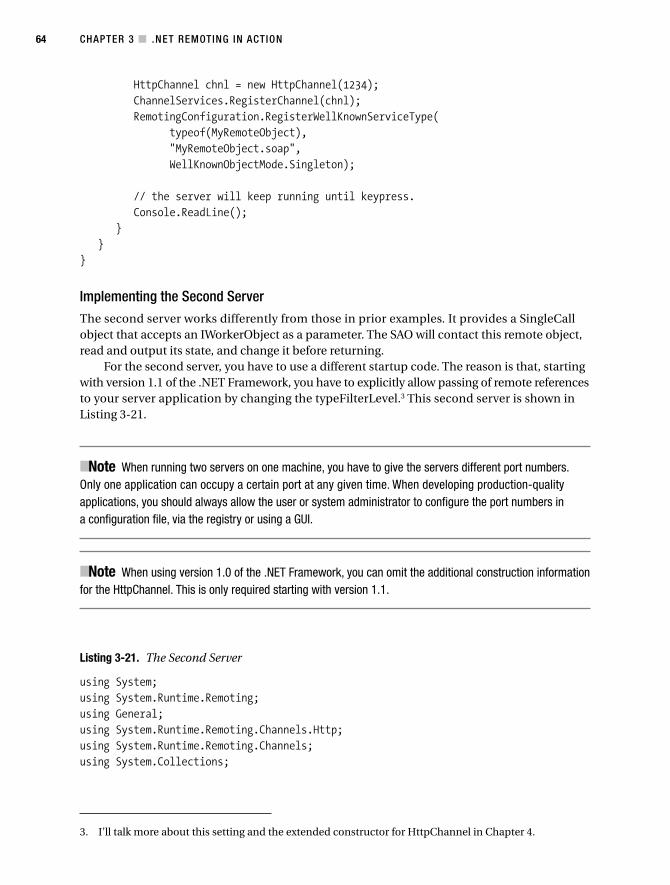
CHAPTER 3 ■ .NET REMOTING IN ACTION64
3. I’ll talk more about this setting and the extended constructor for HttpChannel in Chapter 4.
HttpChannel chnl = new HttpChannel(1234);ChannelServices.RegisterChannel(chnl);RemotingConfiguration.RegisterWellKnownServiceType(
typeof(MyRemoteObject),"MyRemoteObject.soap",WellKnownObjectMode.Singleton);
// the server will keep running until keypress.Console.ReadLine();
}}
}
Implementing the Second ServerThe second server works differently from those in prior examples. It provides a SingleCallobject that accepts an IWorkerObject as a parameter. The SAO will contact this remote object,read and output its state, and change it before returning.
For the second server, you have to use a different startup code. The reason is that, startingwith version 1.1 of the .NET Framework, you have to explicitly allow passing of remote referencesto your server application by changing the typeFilterLevel.3 This second server is shown inListing 3-21.
■Note When running two servers on one machine, you have to give the servers different port numbers.Only one application can occupy a certain port at any given time. When developing production-qualityapplications, you should always allow the user or system administrator to configure the port numbers ina configuration file, via the registry or using a GUI.
■Note When using version 1.0 of the .NET Framework, you can omit the additional construction informationfor the HttpChannel. This is only required starting with version 1.1.
Listing 3-21. The Second Server
using System;using System.Runtime.Remoting;using General;using System.Runtime.Remoting.Channels.Http;using System.Runtime.Remoting.Channels;using System.Collections;
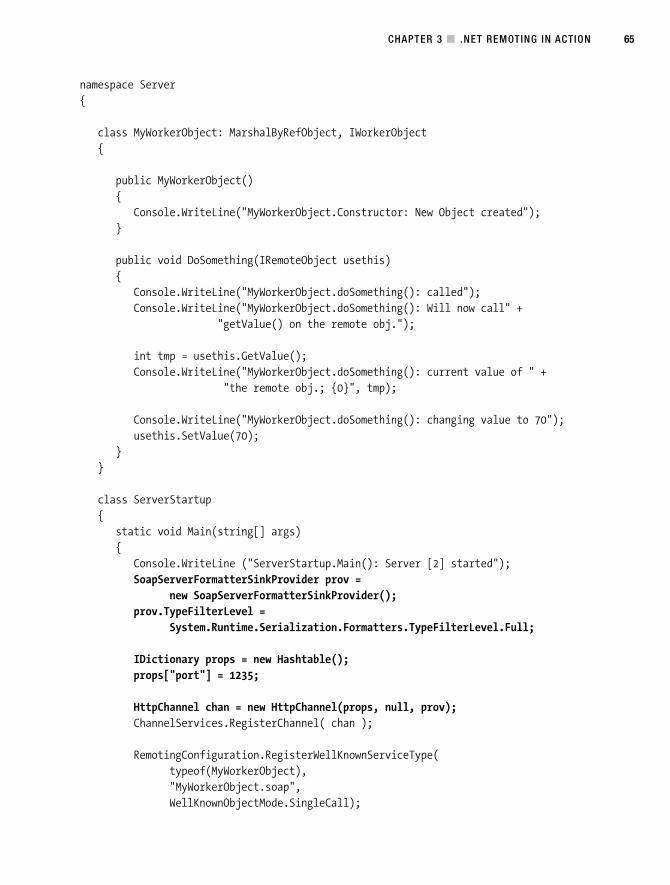
CHAPTER 3 ■ .NET REMOTING IN ACTION 65
namespace Server{
class MyWorkerObject: MarshalByRefObject, IWorkerObject{
public MyWorkerObject(){
Console.WriteLine("MyWorkerObject.Constructor: New Object created");}
public void DoSomething(IRemoteObject usethis){
Console.WriteLine("MyWorkerObject.doSomething(): called");Console.WriteLine("MyWorkerObject.doSomething(): Will now call" +
"getValue() on the remote obj.");
int tmp = usethis.GetValue();Console.WriteLine("MyWorkerObject.doSomething(): current value of " +
"the remote obj.; {0}", tmp);
Console.WriteLine("MyWorkerObject.doSomething(): changing value to 70");usethis.SetValue(70);
}}
class ServerStartup{
static void Main(string[] args){
Console.WriteLine ("ServerStartup.Main(): Server [2] started");SoapServerFormatterSinkProvider prov =
new SoapServerFormatterSinkProvider();prov.TypeFilterLevel =
System.Runtime.Serialization.Formatters.TypeFilterLevel.Full;
IDictionary props = new Hashtable();props["port"] = 1235;
HttpChannel chan = new HttpChannel(props, null, prov);ChannelServices.RegisterChannel( chan );
RemotingConfiguration.RegisterWellKnownServiceType(typeof(MyWorkerObject),"MyWorkerObject.soap",WellKnownObjectMode.SingleCall);
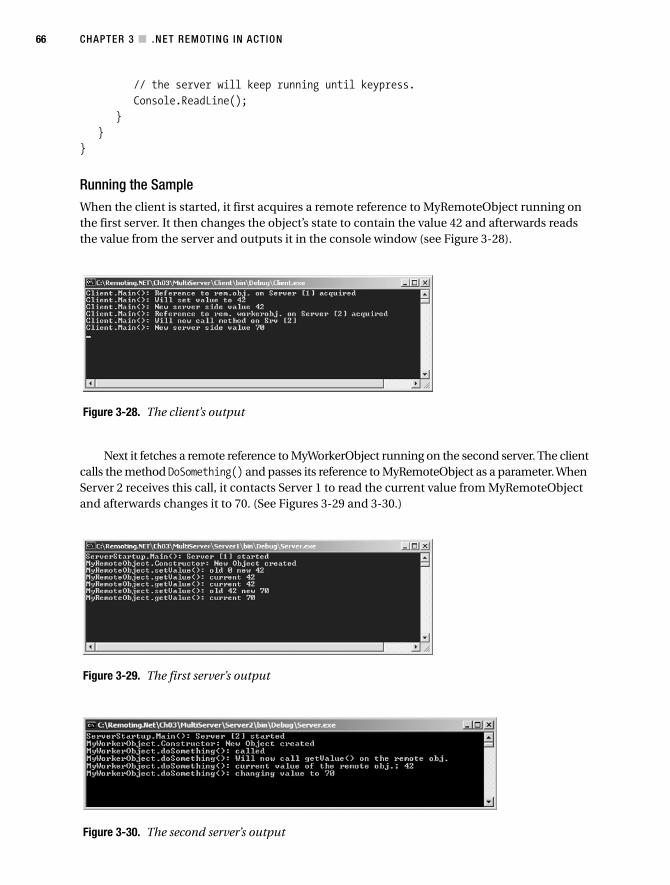
CHAPTER 3 ■ .NET REMOTING IN ACTION66
// the server will keep running until keypress.Console.ReadLine();
}}
}
Running the SampleWhen the client is started, it first acquires a remote reference to MyRemoteObject running onthe first server. It then changes the object’s state to contain the value 42 and afterwards readsthe value from the server and outputs it in the console window (see Figure 3-28).
Next it fetches a remote reference to MyWorkerObject running on the second server. The clientcalls the method DoSomething() and passes its reference to MyRemoteObject as a parameter. WhenServer 2 receives this call, it contacts Server 1 to read the current value from MyRemoteObjectand afterwards changes it to 70. (See Figures 3-29 and 3-30.)
Figure 3-28. The client’s output
Figure 3-29. The first server’s output
Figure 3-30. The second server’s output

CHAPTER 3 ■ .NET REMOTING IN ACTION 67
When the call from the client to the second server returns, the client again contactsMyRemoteObject to obtain the current value, 70, which shows that your client really hasbeen talking to the same object from both processes.
Sharing AssembliesAs you’ve seen in this chapter, .NET Remoting applications need to share common informa-tion about remoteable types between server and client. Contrary to other remoting schemaslike CORBA, Java RMI, and J2EE EJBs, with which you don’t have a lot of choice for writingthese shared interfaces, base classes, and metadata, the .NET Framework gives you at leastfour possible ways to do so, as I discuss in the following sections.
Shared ImplementationThe first way to share information about remoteable types is to implement your server-sideobjects in a shared assembly and deploy this to the client as well. The main advantage here isthat you don’t have any extra work. Even though this might save you some time during imple-mentation, I really recommend against this approach. Not only does it violate the core princi-ples of distributed application development, but it also allows your clients, which are probablythird parties accessing your ERP system to automate order entry, to use ILDASM or one of theupcoming MSIL-to-C# decompilers to disassemble and view your business logic. Unfortu-nately, this approach is shown in several MSDN examples.
Nevertheless, there are application scenarios that depend on this way of sharing the meta-data. When you have an application that can be used either connected or disconnected andwill access the same logic in both cases, this might be the way to go. You can then “switch”dynamically between using the local implementation and using the remote one.
Shared InterfacesIn the first examples in this book, I show the use of shared interfaces. With this approach, youcreate an assembly that is copied to both the server and the client. The assembly contains theinterfaces that will be implemented by the server.
■Tip I absolutely recommend this approach for most .NET Remoting applications!
Shared Base ClassesInstead of sharing interfaces between the client and the server, you can also create abstractbase classes in a shared assembly. The server-side object will inherit from these classes andimplement the necessary functionality. I recommend against this approach because it pollutesthe inheritance hierarchy with too many protocol- and framework-specific constructs.
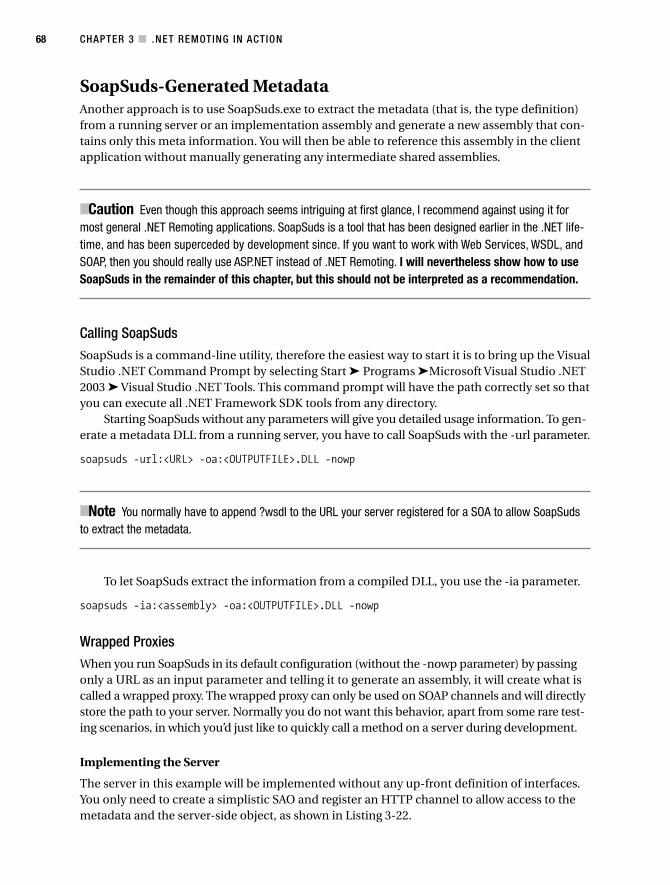
CHAPTER 3 ■ .NET REMOTING IN ACTION68
SoapSuds-Generated MetadataAnother approach is to use SoapSuds.exe to extract the metadata (that is, the type definition)from a running server or an implementation assembly and generate a new assembly that con-tains only this meta information. You will then be able to reference this assembly in the clientapplication without manually generating any intermediate shared assemblies.
■Caution Even though this approach seems intriguing at first glance, I recommend against using it formost general .NET Remoting applications. SoapSuds is a tool that has been designed earlier in the .NET life-time, and has been superceded by development since. If you want to work with Web Services, WSDL, andSOAP, then you should really use ASP.NET instead of .NET Remoting. I will nevertheless show how to useSoapSuds in the remainder of this chapter, but this should not be interpreted as a recommendation.
Calling SoapSudsSoapSuds is a command-line utility, therefore the easiest way to start it is to bring up the VisualStudio .NET Command Prompt by selecting Start ➤ Programs ➤Microsoft Visual Studio .NET2003 ➤ Visual Studio .NET Tools. This command prompt will have the path correctly set so thatyou can execute all .NET Framework SDK tools from any directory.
Starting SoapSuds without any parameters will give you detailed usage information. To gen-erate a metadata DLL from a running server, you have to call SoapSuds with the -url parameter.
soapsuds -url:<URL> -oa:<OUTPUTFILE>.DLL -nowp
■Note You normally have to append ?wsdl to the URL your server registered for a SOA to allow SoapSudsto extract the metadata.
To let SoapSuds extract the information from a compiled DLL, you use the -ia parameter.
soapsuds -ia:<assembly> -oa:<OUTPUTFILE>.DLL -nowp
Wrapped ProxiesWhen you run SoapSuds in its default configuration (without the -nowp parameter) by passingonly a URL as an input parameter and telling it to generate an assembly, it will create what iscalled a wrapped proxy. The wrapped proxy can only be used on SOAP channels and will directlystore the path to your server. Normally you do not want this behavior, apart from some rare test-ing scenarios, in which you’d just like to quickly call a method on a server during development.
Implementing the Server
The server in this example will be implemented without any up-front definition of interfaces.You only need to create a simplistic SAO and register an HTTP channel to allow access to themetadata and the server-side object, as shown in Listing 3-22.
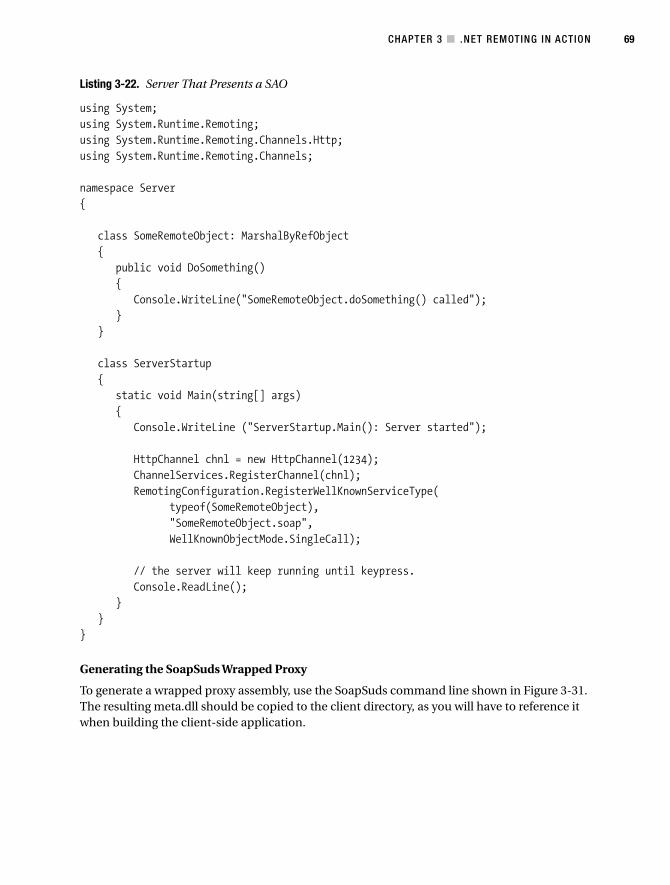
CHAPTER 3 ■ .NET REMOTING IN ACTION 69
Listing 3-22. Server That Presents a SAO
using System;using System.Runtime.Remoting;using System.Runtime.Remoting.Channels.Http;using System.Runtime.Remoting.Channels;
namespace Server{
class SomeRemoteObject: MarshalByRefObject{
public void DoSomething(){
Console.WriteLine("SomeRemoteObject.doSomething() called");}
}
class ServerStartup{
static void Main(string[] args){
Console.WriteLine ("ServerStartup.Main(): Server started");
HttpChannel chnl = new HttpChannel(1234);ChannelServices.RegisterChannel(chnl);RemotingConfiguration.RegisterWellKnownServiceType(
typeof(SomeRemoteObject),"SomeRemoteObject.soap",WellKnownObjectMode.SingleCall);
// the server will keep running until keypress.Console.ReadLine();
}}
}
Generating the SoapSuds Wrapped Proxy
To generate a wrapped proxy assembly, use the SoapSuds command line shown in Figure 3-31.The resulting meta.dll should be copied to the client directory, as you will have to reference itwhen building the client-side application.
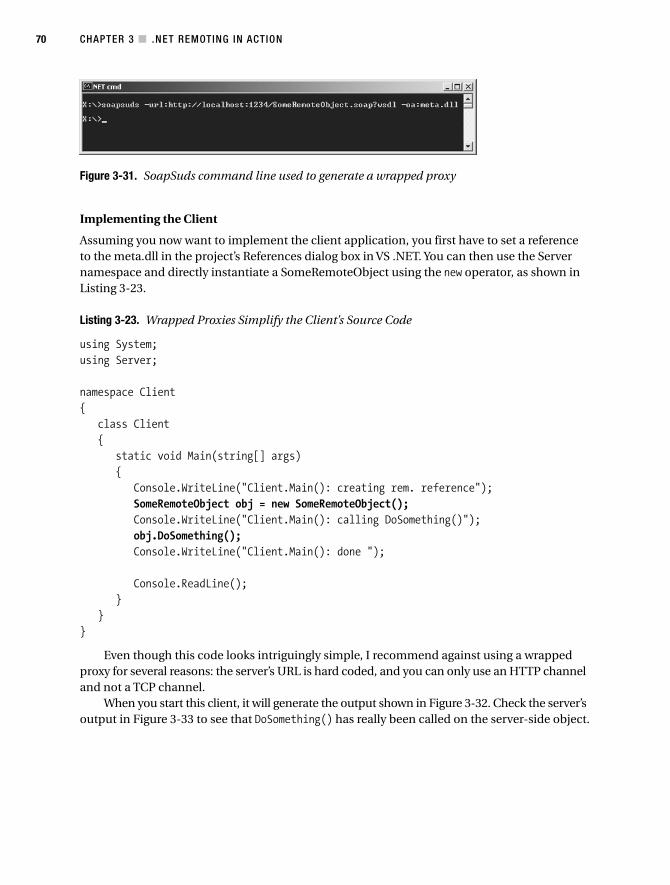
CHAPTER 3 ■ .NET REMOTING IN ACTION70
Implementing the Client
Assuming you now want to implement the client application, you first have to set a referenceto the meta.dll in the project’s References dialog box in VS .NET. You can then use the Servernamespace and directly instantiate a SomeRemoteObject using the new operator, as shown inListing 3-23.
Listing 3-23. Wrapped Proxies Simplify the Client’s Source Code
using System;using Server;
namespace Client{
class Client{
static void Main(string[] args){
Console.WriteLine("Client.Main(): creating rem. reference");SomeRemoteObject obj = new SomeRemoteObject();Console.WriteLine("Client.Main(): calling DoSomething()");obj.DoSomething();Console.WriteLine("Client.Main(): done ");
Console.ReadLine();}
}}
Even though this code looks intriguingly simple, I recommend against using a wrappedproxy for several reasons: the server’s URL is hard coded, and you can only use an HTTP channeland not a TCP channel.
When you start this client, it will generate the output shown in Figure 3-32. Check the server’soutput in Figure 3-33 to see that DoSomething() has really been called on the server-side object.
Figure 3-31. SoapSuds command line used to generate a wrapped proxy
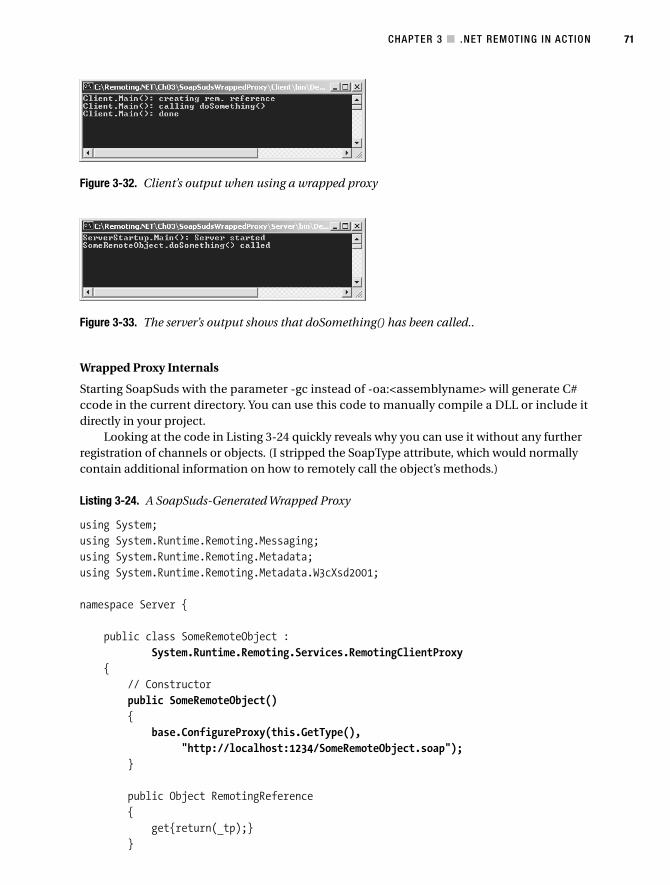
CHAPTER 3 ■ .NET REMOTING IN ACTION 71
Wrapped Proxy Internals
Starting SoapSuds with the parameter -gc instead of -oa:<assemblyname> will generate C#ccode in the current directory. You can use this code to manually compile a DLL or include itdirectly in your project.
Looking at the code in Listing 3-24 quickly reveals why you can use it without any furtherregistration of channels or objects. (I stripped the SoapType attribute, which would normallycontain additional information on how to remotely call the object’s methods.)
Listing 3-24. A SoapSuds-Generated Wrapped Proxy
using System;using System.Runtime.Remoting.Messaging;using System.Runtime.Remoting.Metadata;using System.Runtime.Remoting.Metadata.W3cXsd2001;
namespace Server {
public class SomeRemoteObject :System.Runtime.Remoting.Services.RemotingClientProxy
{// Constructorpublic SomeRemoteObject(){
base.ConfigureProxy(this.GetType(),"http://localhost:1234/SomeRemoteObject.soap");
}
public Object RemotingReference{
get{return(_tp);}}
Figure 3-32. Client’s output when using a wrapped proxy
Figure 3-33. The server’s output shows that doSomething() has been called..
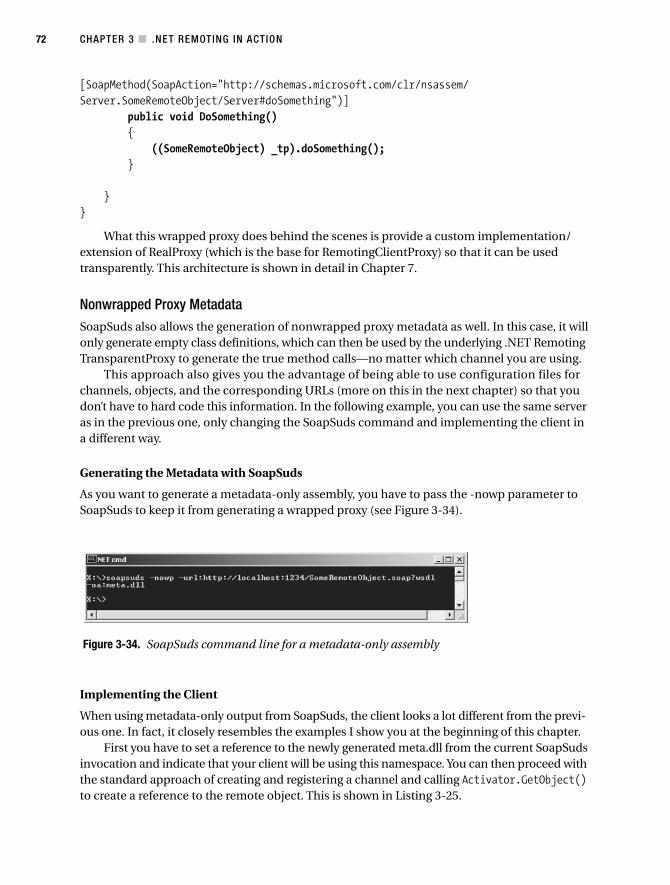
CHAPTER 3 ■ .NET REMOTING IN ACTION72
[SoapMethod(SoapAction="http://schemas.microsoft.com/clr/nsassem/Server.SomeRemoteObject/Server#doSomething")]
public void DoSomething(){
((SomeRemoteObject) _tp).doSomething();}
}}
What this wrapped proxy does behind the scenes is provide a custom implementation/extension of RealProxy (which is the base for RemotingClientProxy) so that it can be usedtransparently. This architecture is shown in detail in Chapter 7.
Nonwrapped Proxy MetadataSoapSuds also allows the generation of nonwrapped proxy metadata as well. In this case, it willonly generate empty class definitions, which can then be used by the underlying .NET RemotingTransparentProxy to generate the true method calls—no matter which channel you are using.
This approach also gives you the advantage of being able to use configuration files forchannels, objects, and the corresponding URLs (more on this in the next chapter) so that youdon’t have to hard code this information. In the following example, you can use the same serveras in the previous one, only changing the SoapSuds command and implementing the client ina different way.
Generating the Metadata with SoapSuds
As you want to generate a metadata-only assembly, you have to pass the -nowp parameter toSoapSuds to keep it from generating a wrapped proxy (see Figure 3-34).
Implementing the Client
When using metadata-only output from SoapSuds, the client looks a lot different from the previ-ous one. In fact, it closely resembles the examples I show you at the beginning of this chapter.
First you have to set a reference to the newly generated meta.dll from the current SoapSudsinvocation and indicate that your client will be using this namespace. You can then proceed withthe standard approach of creating and registering a channel and calling Activator.GetObject()to create a reference to the remote object. This is shown in Listing 3-25.
Figure 3-34. SoapSuds command line for a metadata-only assembly
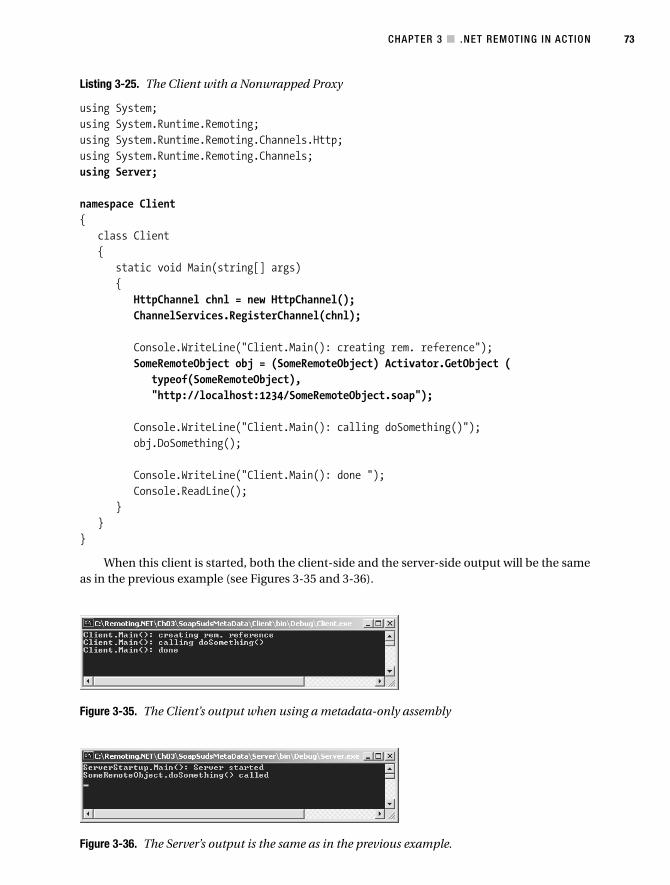
CHAPTER 3 ■ .NET REMOTING IN ACTION 73
Listing 3-25. The Client with a Nonwrapped Proxy
using System;using System.Runtime.Remoting;using System.Runtime.Remoting.Channels.Http;using System.Runtime.Remoting.Channels;using Server;
namespace Client{
class Client{
static void Main(string[] args){
HttpChannel chnl = new HttpChannel();ChannelServices.RegisterChannel(chnl);
Console.WriteLine("Client.Main(): creating rem. reference");SomeRemoteObject obj = (SomeRemoteObject) Activator.GetObject (
typeof(SomeRemoteObject),"http://localhost:1234/SomeRemoteObject.soap");
Console.WriteLine("Client.Main(): calling doSomething()");obj.DoSomething();
Console.WriteLine("Client.Main(): done ");Console.ReadLine();
}}
}
When this client is started, both the client-side and the server-side output will be the sameas in the previous example (see Figures 3-35 and 3-36).
Figure 3-35. The Client’s output when using a metadata-only assembly
Figure 3-36. The Server’s output is the same as in the previous example.
CHAPTER 3 ■ .NET REMOTING IN ACTION74
SummaryIn this chapter you read about the basics of distributed .NET applications using .NET Remoting.You now know the difference between ByValue objects and MarshalByRefObjects, which canbe either server-activated objects (SAO) or client-activated objects (CAO). You can call remotemethods asynchronously, and you know about the dangers and benefits of one-way methods.You also learned about the different ways in which a client can receive the necessary metadatato access remote objects, and that you should normally use shared interfaces as a best practicesapproach.
It seems that the only thing that can keep you from developing your first real-world .NETRemoting application is that you don’t yet know about various issues surrounding configurationand deployment of such applications. These two topics are covered in the following chapter.
75
C H A P T E R 4
■ ■ ■
Configuration and Deployment
This chapter introduces you to the aspects of configuration and deployment of .NET Remot-ing applications. It shows you how to use configuration files to avoid the hard coding of URLsor channel information for your remote object.
You also learn about hosting your server-side components in Windows services or InternetInformation Server (IIS)—the latter of which gives you the possibilities to deploy your componentsfor authenticated or encrypted connections, which is covered in detail in Chapter 5.
To configure your applications, you can choose to either implement all channel and objectregistrations on your own or employ the standard .NET Remoting configuration files. These filesare XML documents, and they allow you to configure nearly every aspect of remoting, rangingfrom various default and custom channels (including custom properties for your own channels)to the instantiation behavior of your objects.
The big advantage, and the main reason you should always use configuration files in pro-duction applications, is that you can change the application’s remoting behavior without theneed to recompile. For example, you could create a configuration file for users located directlywithin your LAN who might use a direct TCP channel, and another file for WAN users who willuse a secured HTTP channel with SSL encryption. All this can be done without changing a sin-gle line in your application’s source code.
■Note Of course, this also adds the possibility for the user to change your configuration file. If this is notdesired, you should make sure to protect the configuration file with security Access Control Lists (ACL) toallow only administrators to edit the file.
With other remoting architectures, the choice of deployment and configuration is largelydetermined when choosing the framework. With Java EJBs, for example, the “container,” whichcan be compared to an application server, defines the means of configuration and locks youinto a single means of deployment. The same is true for the COM+ component, which has tobe hosted in Windows Component services.
In the .NET Remoting framework, you have several possibilities for operation: you can runyour remote objects in a distinct stand-alone application (as shown in the previous examplesin this book), run them in a Windows service, or host them in IIS.
CHAPTER 4 ■ CONFIGURATION AND DEPLOYMENT76
Configuration Files.NET Remoting configuration files allow you to specify parameters for most aspects of theremoting framework. These files can define tasks as simple as registering a channel and speci-fying a type as a server-activated object, or can be as complex as defining a whole chain ofIMessageSinks with custom properties.
Instead of writing code like this on the server:
HttpChannel chnl = new HttpChannel(1234);ChannelServices.RegisterChannel(chnl);RemotingConfiguration.RegisterWellKnownServiceType(
typeof(CustomerManager),"CustomerManager.soap",WellKnownObjectMode.Singleton);
You can use a configuration file that contains the following XML document to specify the samebehavior:
<configuration><system.runtime.remoting><application><channels><channel ref="http" port="1234" />
</channels><service><wellknown mode="Singleton"
type="Server.CustomerManager, Server"objectUri="CustomerManager.soap" />
</service>
</application></system.runtime.remoting>
</configuration>
To employ this configuration file in your application, you have to call RemotingConfiguration.Configure() and pass the filename of your *.config file to it.
String filename = "server.exe.config";RemotingConfiguration.Configure(filename);
■Note As a convention for .NET applications, the configuration filename should be <applicationname>.config,whereas an application filename includes the extension .exe or .dll. Visual Studio automates this process foryou, so that you can simply add a file called app.config to your solution. Upon deployment, this file will berenamed according to the schema presented previously, and will be copied to the appropriate output directory(debug/release).
CHAPTER 4 ■ CONFIGURATION AND DEPLOYMENT 77
Watch for the Metadata!Instead of using Activator.GetObject() and passing a URL to it, you can use the new operatorafter loading the configuration file with RemotingConfiguration.Configure().
In terms of the sample application in Chapter 2, this means that instead of the following call:
ICustomerManager mgr = (ICustomerManager) Activator.GetObject(typeof(ICustomerManager),"http://localhost:1234/CustomerManager.soap");
you might simply use this statement after the configuration file has been loaded:
CustomerManager mgr = new CustomerManager()
And here the problem starts: you need the definition of the class CustomerManager on theclient. The interface is not sufficient anymore, because you cannot use IInterface x = newIInterface(), as this would represent the instantiation of an interface, which is not possible.
In Chapter 3, I showed you several tools for supplying the necessary metadata in a sharedassembly: interfaces, abstract base classes, and SoapSuds-generated metadata-only assemblies.When using the configured new operator, you won’t be able to employ abstract base classes orinterfaces—instead you basically have to resort to shipping the implementation or usingSoapSuds-generated metadata.
■Note I will show you an alternative approach later in this chapter which allows you to take advantage ofconfiguration files with interface-based remote objects.
The Problem with SoapSudsWhen your application includes only SAOs/CAOs (and no [Serializable] objects), you’re usuallyfine with using soapsuds -ia:<assembly> -nowp -oa:<meta_data.dll> to generate the necessarymetadata. However, when you are using [Serializable] objects, which not only hold some databut also have methods defined, you need to provide their implementation (the General.dll inthe examples) to the client as well.
To see the problem and its solution, take a look at Listing 4-1. This code shows youa [Serializable] class in a shared assembly that will be called General.dll.
Listing 4-1. A Shared [Serializable] Class
using System;namespace General{
[Serializable]public class Customer{
public String FirstName;public String LastName;public DateTime DateOfBirth;
CHAPTER 4 ■ CONFIGURATION AND DEPLOYMENT78
public int GetAge(){
TimeSpan tmp = DateTime.Today.Subtract(DateOfBirth);return tmp.Days / 365; // rough estimation
}}
}
On the server side you use the following configuration file, which allows you to writeCustomerManager obj = new CustomerManager() to acquire a reference to the remote object.
<configuration><system.runtime.remoting><application><channels><channel ref="http" port="1234" />
</channels><service><wellknown mode="Singleton"
type="Server.CustomerManager, Server"objectUri="CustomerManager.soap" />
</service>
</application></system.runtime.remoting>
</configuration>
The server itself, which is shown in Listing 4-2, implements a MarshalByRefObject thatprovides a GetCustomer() method, which will return a Customer object by value.
Listing 4-2. The Server-Side Implementation of CustomerManager
using System;using System.Runtime.Remoting;using General;
namespace Server{
class CustomerManager: MarshalByRefObject{
public Customer GetCustomer(int id){
Customer tmp = new Customer();tmp.FirstName = "John";

CHAPTER 4 ■ CONFIGURATION AND DEPLOYMENT 79
Figure 4-1. SoapSuds command line for extracting the metadata
tmp.LastName = "Doe";tmp.DateOfBirth = new DateTime(1970,7,4);return tmp;
}}
class ServerStartup{
static void Main(string[] args){
Console.WriteLine ("ServerStartup.Main(): Server started");
String filename = "server.exe.config";RemotingConfiguration.Configure(filename);
// the server will keep running until keypress.Console.WriteLine("Server is running, Press <return> to exit.");Console.ReadLine();
}}
}
After compiling, starting the server, and running the SoapSuds command shown inFigure 4-1, you’ll unfortunately end up with a little bit more output than expected.
The Generated_General.dll file (which you can see in Figure 4-2) contains not only themetadata for Server.CustomerManager, but also the definition for General.Customer. This isbecause SoapSuds generates metadata-only assemblies for all classes and assemblies that arereferenced by your server. You’ll run into the same problems when referencing parts frommscorlib.dll or other classes from the System.* namespaces.
Comparing Generated_General.dll to the original General.Customer in General.dll (the onethat has been created by compiling the shared project) in Figure 4-3, you can see that althoughthe generated Customer class contains all defined fields, it does not include the GetAge() method.

CHAPTER 4 ■ CONFIGURATION AND DEPLOYMENT80
Figure 4-2. The Generated_General.dll that has been created by SoapSuds
Figure 4-3. The original General.dll contains the method Customer.GetAge().
You can now safely assume that using the Generated_General.dll will not be sufficient forthe application; after all, you want access to the GetAge() method.
If you try to reference both General.dll and Generated_General.dll in your client application,you will end up with a namespace clash. Both assemblies contain the same namespace and thesame class (General.Customer). Depending on the order of referencing the two DLLs, you’ll endup with either a compile-time error message telling you that the GetAge() method is missing oran InvalidCastException when calling CustomerManager.GetCustomer().
Using SoapSuds to Generate Source CodeThere is, however, a possibility to work around this problem: although SoapSuds can be usedto generate DLLs from the WSDL information provided by your server, it can also generate C#code files, including not only the definition but also the required SoapMethodAttributes, sothat the remoting framework will know the server’s namespace identifier.

CHAPTER 4 ■ CONFIGURATION AND DEPLOYMENT 81
To generate code instead of DLLs, you have to specify the parameter -gc instead of -oa:<someassembly>.dll. This command, shown in Figure 4-4, generates one C# source codefile for each server-side assembly. You will therefore end up with one file called general.cs andanother called server.cs (both are placed in the current directory).
The generated server.cs file is shown in Listing 4-3.
Listing 4-3. The SoapSuds-Generated Server.cs File
using System;using System.Runtime.Remoting.Messaging;using System.Runtime.Remoting.Metadata;using System.Runtime.Remoting.Metadata.W3cXsd2001;namespace Server {
[Serializable, SoapType(XmlNamespace="http://schemas.microsoft.com/clr/nsassem/Server/Server%2C%20Version%3D1.0.678.38058%2C%20Culture%3Dneutral%2C%20PublicKeyToken%3Dnull", XmlTypeNamespace="http://schemas.microsoft.com/clr/nsassem/Server/Server%2C%20Version%3D1.0.678.38058%2C%20Culture%3Dneutral%2C%20PublicKeyToken%3Dnull")]
public class CustomerManager : System.MarshalByRefObject{
[SoapMethod(SoapAction="http://schemas.microsoft.com/clr/nsassem/Server.CustomerManager/Server#GetCustomer")]
public General.Customer GetCustomer(Int32 id){
return((General.Customer) (Object) null);}
}}
Generally speaking, these lines represent the interface and the attributes necessary to clearlyresolve this remoting call to the server.
Instead of including the Generated_General.dll file (which also contains the namespaceGeneral), you can include this C# file in the client-side project or compile it to a DLL ina separate C# project.
You can now safely reference the shared General.dll, without any namespace clashes, inyour project to have access to the Customer class’s implementation.
Figure 4-4. SoapSuds command line for generating C# code
CHAPTER 4 ■ CONFIGURATION AND DEPLOYMENT82
Porting the Sample to Use Configuration Files
■Note I will use SoapSuds-generated metadata for the following introduction to configuration files. The useof SoapSuds for your real production applications is not a best practice and should be avoided wheneverpossible. I will show you an alternative approach in the section “What About Interfaces?” later in this chapterthat allows you to use configuration files with interface-based remote objects.
Taking the first sample application in Chapter 2 (the CustomerManager SAO that returnsa Customer object by value), I’ll show you here how to enhance it to use configuration files.
Assume that on the server side of this application you want an HTTP channel to listen onport 1234 and provide remote access to a well-known Singleton object. You can do this with thefollowing configuration file:
<configuration><system.runtime.remoting><application>
<channels><channel ref="http" port="1234" />
</channels>
<service><wellknown mode="Singleton"
type="Server.CustomerManager, Server"objectUri="CustomerManager.soap" />
</service>
</application></system.runtime.remoting>
</configuration>
The server-side implementation will simply load the configuration file and wait for<Return> to be pressed before exiting the application. The implementation of CustomerManageris the same as shown previously, and only the server’s startup code is reproduced here:
using System;using System.Runtime.Remoting;using General;
namespace Server{
class ServerStartup{
static void Main(string[] args){
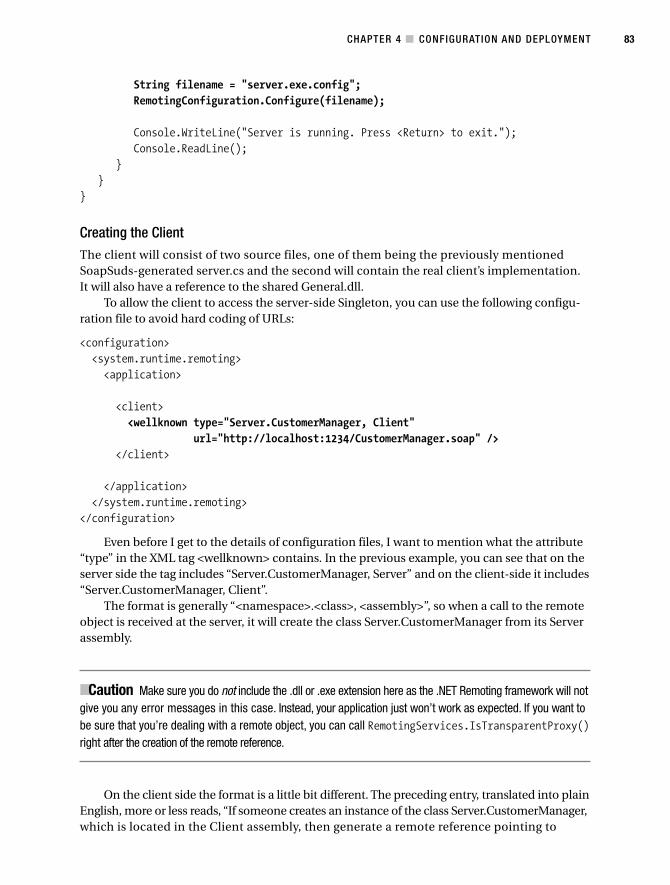
CHAPTER 4 ■ CONFIGURATION AND DEPLOYMENT 83
String filename = "server.exe.config";RemotingConfiguration.Configure(filename);
Console.WriteLine("Server is running. Press <Return> to exit.");Console.ReadLine();
}}
}
Creating the ClientThe client will consist of two source files, one of them being the previously mentionedSoapSuds-generated server.cs and the second will contain the real client’s implementation.It will also have a reference to the shared General.dll.
To allow the client to access the server-side Singleton, you can use the following configu-ration file to avoid hard coding of URLs:
<configuration><system.runtime.remoting><application>
<client><wellknown type="Server.CustomerManager, Client"
url="http://localhost:1234/CustomerManager.soap" /></client>
</application></system.runtime.remoting>
</configuration>
Even before I get to the details of configuration files, I want to mention what the attribute“type” in the XML tag <wellknown> contains. In the previous example, you can see that on theserver side the tag includes “Server.CustomerManager, Server” and on the client-side it includes“Server.CustomerManager, Client”.
The format is generally “<namespace>.<class>, <assembly>”, so when a call to the remoteobject is received at the server, it will create the class Server.CustomerManager from its Serverassembly.
■Caution Make sure you do not include the .dll or .exe extension here as the .NET Remoting framework will notgive you any error messages in this case. Instead, your application just won’t work as expected. If you want tobe sure that you’re dealing with a remote object, you can call RemotingServices.IsTransparentProxy()right after the creation of the remote reference.
On the client side the format is a little bit different. The preceding entry, translated into plainEnglish, more or less reads, “If someone creates an instance of the class Server.CustomerManager,which is located in the Client assembly, then generate a remote reference pointing to
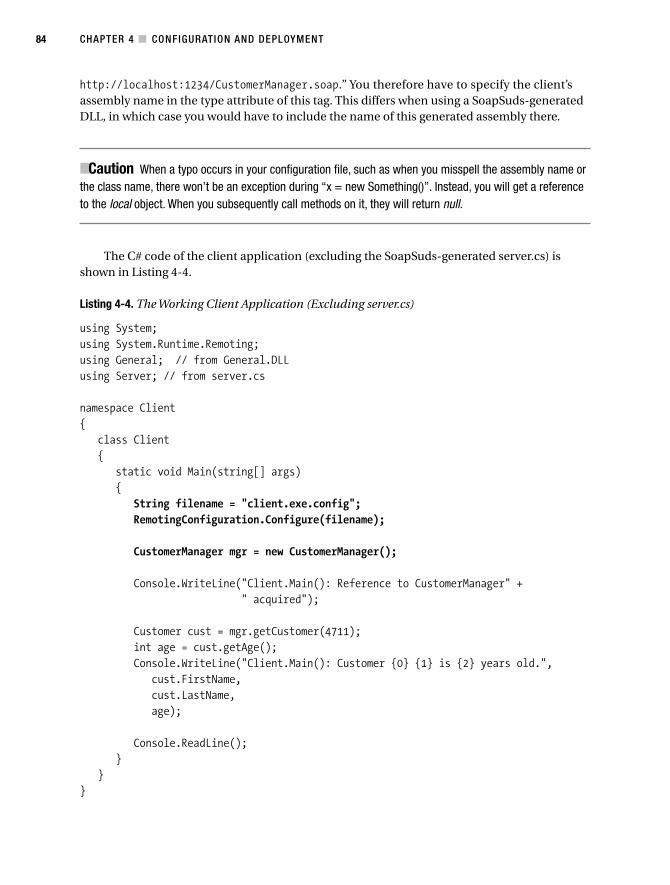
CHAPTER 4 ■ CONFIGURATION AND DEPLOYMENT84
http://localhost:1234/CustomerManager.soap.” You therefore have to specify the client’sassembly name in the type attribute of this tag. This differs when using a SoapSuds-generatedDLL, in which case you would have to include the name of this generated assembly there.
■Caution When a typo occurs in your configuration file, such as when you misspell the assembly name orthe class name, there won’t be an exception during “x = new Something()”. Instead, you will get a referenceto the local object. When you subsequently call methods on it, they will return null.
The C# code of the client application (excluding the SoapSuds-generated server.cs) isshown in Listing 4-4.
Listing 4-4. The Working Client Application (Excluding server.cs)
using System;using System.Runtime.Remoting;using General; // from General.DLLusing Server; // from server.cs
namespace Client{
class Client{
static void Main(string[] args){
String filename = "client.exe.config";RemotingConfiguration.Configure(filename);
CustomerManager mgr = new CustomerManager();
Console.WriteLine("Client.Main(): Reference to CustomerManager" +" acquired");
Customer cust = mgr.getCustomer(4711);int age = cust.getAge();Console.WriteLine("Client.Main(): Customer {0} {1} is {2} years old.",
cust.FirstName,cust.LastName,age);
Console.ReadLine();}
}}
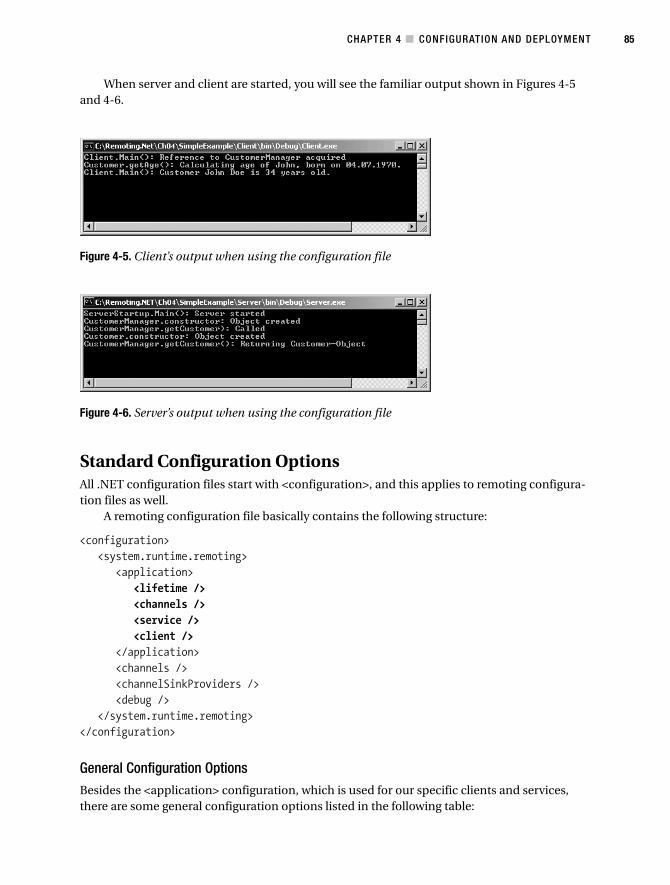
CHAPTER 4 ■ CONFIGURATION AND DEPLOYMENT 85
When server and client are started, you will see the familiar output shown in Figures 4-5and 4-6.
Standard Configuration OptionsAll .NET configuration files start with <configuration>, and this applies to remoting configura-tion files as well.
A remoting configuration file basically contains the following structure:
<configuration><system.runtime.remoting>
<application><lifetime /><channels /><service /><client />
</application><channels /><channelSinkProviders /><debug />
</system.runtime.remoting></configuration>
General Configuration OptionsBesides the <application> configuration, which is used for our specific clients and services,there are some general configuration options listed in the following table:
Figure 4-5. Client’s output when using the configuration file
Figure 4-6. Server’s output when using the configuration file
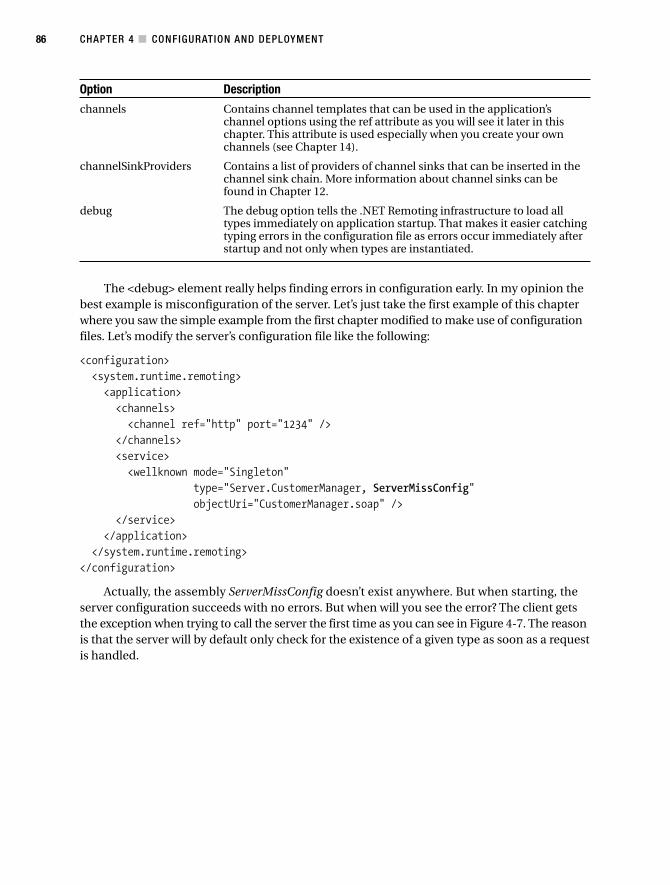
CHAPTER 4 ■ CONFIGURATION AND DEPLOYMENT86
Option Description
channels Contains channel templates that can be used in the application’schannel options using the ref attribute as you will see it later in thischapter. This attribute is used especially when you create your ownchannels (see Chapter 14).
channelSinkProviders Contains a list of providers of channel sinks that can be inserted in thechannel sink chain. More information about channel sinks can befound in Chapter 12.
debug The debug option tells the .NET Remoting infrastructure to load alltypes immediately on application startup. That makes it easier catchingtyping errors in the configuration file as errors occur immediately afterstartup and not only when types are instantiated.
The <debug> element really helps finding errors in configuration early. In my opinion thebest example is misconfiguration of the server. Let’s just take the first example of this chapterwhere you saw the simple example from the first chapter modified to make use of configurationfiles. Let’s modify the server’s configuration file like the following:
<configuration><system.runtime.remoting><application><channels><channel ref="http" port="1234" />
</channels><service><wellknown mode="Singleton"
type="Server.CustomerManager, ServerMissConfig"objectUri="CustomerManager.soap" />
</service></application>
</system.runtime.remoting></configuration>
Actually, the assembly ServerMissConfig doesn’t exist anywhere. But when starting, theserver configuration succeeds with no errors. But when will you see the error? The client getsthe exception when trying to call the server the first time as you can see in Figure 4-7. The reasonis that the server will by default only check for the existence of a given type as soon as a requestis handled.
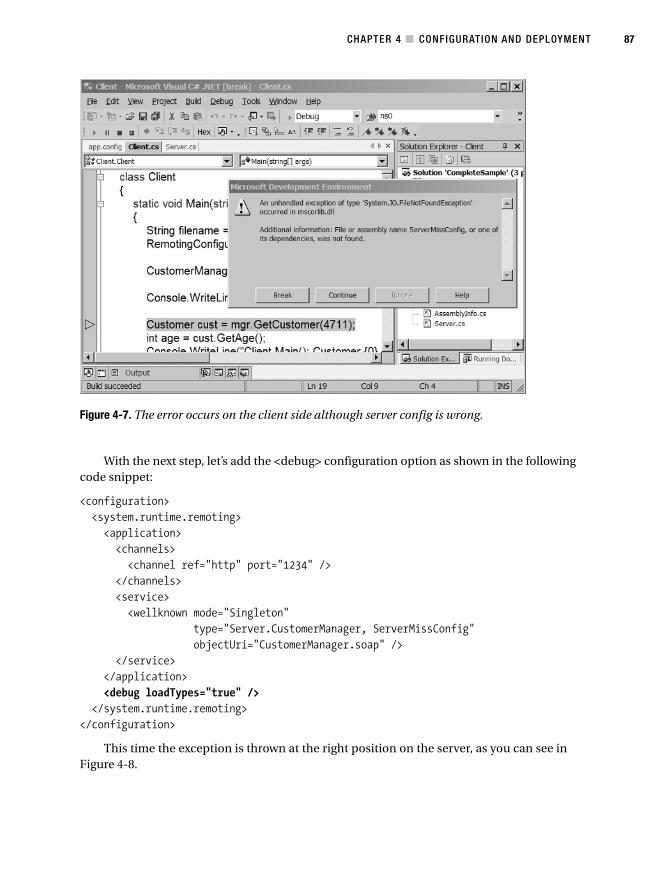
CHAPTER 4 ■ CONFIGURATION AND DEPLOYMENT 87
With the next step, let’s add the <debug> configuration option as shown in the followingcode snippet:
<configuration><system.runtime.remoting><application><channels><channel ref="http" port="1234" />
</channels><service><wellknown mode="Singleton"
type="Server.CustomerManager, ServerMissConfig"objectUri="CustomerManager.soap" />
</service></application><debug loadTypes="true" />
</system.runtime.remoting></configuration>
This time the exception is thrown at the right position on the server, as you can see inFigure 4-8.
Figure 4-7. The error occurs on the client side although server config is wrong.
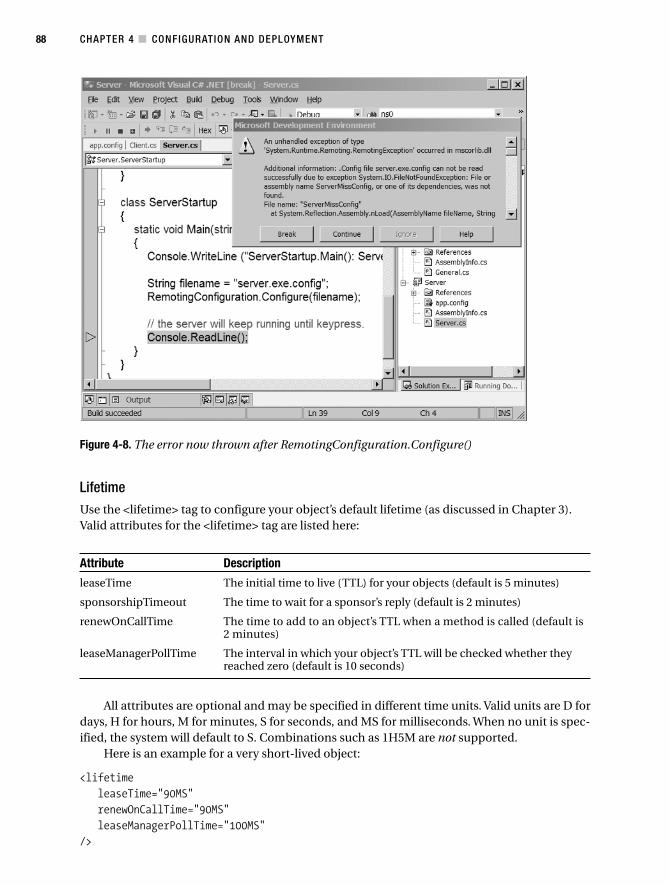
CHAPTER 4 ■ CONFIGURATION AND DEPLOYMENT88
Figure 4-8. The error now thrown after RemotingConfiguration.Configure()
LifetimeUse the <lifetime> tag to configure your object’s default lifetime (as discussed in Chapter 3).Valid attributes for the <lifetime> tag are listed here:
Attribute Description
leaseTime The initial time to live (TTL) for your objects (default is 5 minutes)
sponsorshipTimeout The time to wait for a sponsor’s reply (default is 2 minutes)
renewOnCallTime The time to add to an object’s TTL when a method is called (default is2 minutes)
leaseManagerPollTime The interval in which your object’s TTL will be checked whether theyreached zero (default is 10 seconds)
All attributes are optional and may be specified in different time units. Valid units are D fordays, H for hours, M for minutes, S for seconds, and MS for milliseconds. When no unit is spec-ified, the system will default to S. Combinations such as 1H5M are not supported.
Here is an example for a very short-lived object:
<lifetimeleaseTime="90MS"renewOnCallTime="90MS"leaseManagerPollTime="100MS"
/>
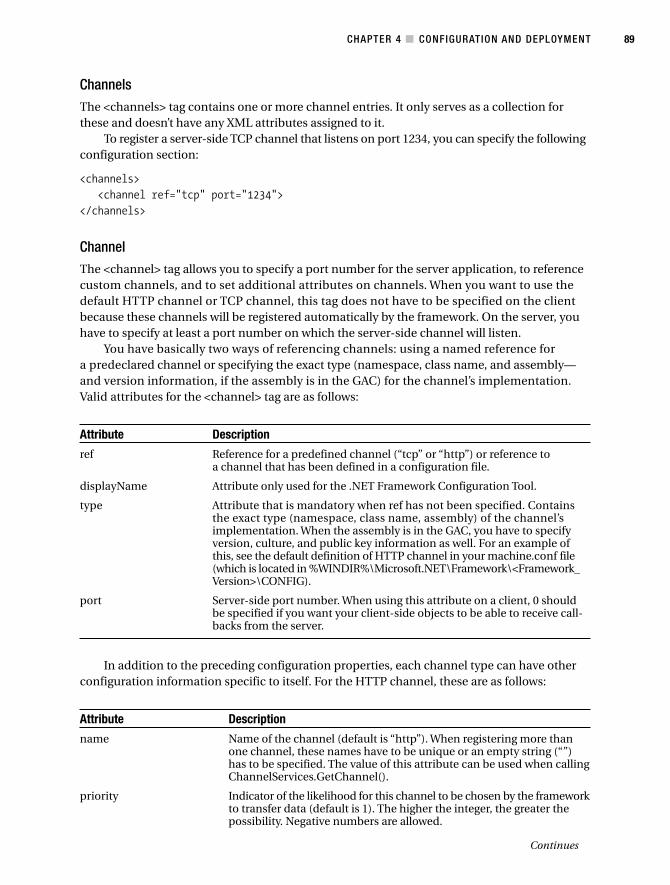
CHAPTER 4 ■ CONFIGURATION AND DEPLOYMENT 89
ChannelsThe <channels> tag contains one or more channel entries. It only serves as a collection forthese and doesn’t have any XML attributes assigned to it.
To register a server-side TCP channel that listens on port 1234, you can specify the followingconfiguration section:
<channels><channel ref="tcp" port="1234">
</channels>
ChannelThe <channel> tag allows you to specify a port number for the server application, to referencecustom channels, and to set additional attributes on channels. When you want to use thedefault HTTP channel or TCP channel, this tag does not have to be specified on the clientbecause these channels will be registered automatically by the framework. On the server, youhave to specify at least a port number on which the server-side channel will listen.
You have basically two ways of referencing channels: using a named reference fora predeclared channel or specifying the exact type (namespace, class name, and assembly—and version information, if the assembly is in the GAC) for the channel’s implementation.Valid attributes for the <channel> tag are as follows:
Attribute Description
ref Reference for a predefined channel (“tcp” or “http”) or reference toa channel that has been defined in a configuration file.
displayName Attribute only used for the .NET Framework Configuration Tool.
type Attribute that is mandatory when ref has not been specified. Containsthe exact type (namespace, class name, assembly) of the channel’simplementation. When the assembly is in the GAC, you have to specifyversion, culture, and public key information as well. For an example ofthis, see the default definition of HTTP channel in your machine.conf file(which is located in %WINDIR%\Microsoft.NET\Framework\<Framework_Version>\CONFIG).
port Server-side port number. When using this attribute on a client, 0 shouldbe specified if you want your client-side objects to be able to receive call-backs from the server.
In addition to the preceding configuration properties, each channel type can have otherconfiguration information specific to itself. For the HTTP channel, these are as follows:
Attribute Description
name Name of the channel (default is “http”). When registering more thanone channel, these names have to be unique or an empty string (“”)has to be specified. The value of this attribute can be used when callingChannelServices.GetChannel().
priority Indicator of the likelihood for this channel to be chosen by the frameworkto transfer data (default is 1). The higher the integer, the greater thepossibility. Negative numbers are allowed.
Continues
CHAPTER 4 ■ CONFIGURATION AND DEPLOYMENT90
Attribute Description
clientConnectionLimit Number of connections that can be simultaneously opened to a givenserver (default is 2).
proxyName Name of the proxy server.
proxyPort Port number for your proxy server.
suppressChannelData Directive specifying whether the channel will contribute to theChannelData that is used when creating an ObjRef. Takes a value oftrue or false (default is false).
useIpAddress Directive specifying whether the channel shall use IP addresses in thegiven URLs instead of using the hostname of the server computer.Takes a value of true or false (default is true).
listen Directive specifying whether activation shall be allowed to hook intothe listener service. Takes a value of true or false (default is true).
bindTo IP address on which the server will listen. Used only on computerswith more than one IP address.
machineName A string that specifies the machine name used with the current channel.This property overrides the useIpAddress property.
In addition, there are some security-related properties that are only supported by theHTTP channel that can be used in conjunction with remoting servers hosted in IIS.
Attribute Description
useDefaultCredentials When you use this property on the client side, the security credentialsof the currently logged in user are passed to the remoting server hostedin IIS for authentication purposes (actually, it automatically gets thecredentials from System.Net.CredentialCache.DefaultCredentials).
useAuthenticated This attribute can be used together with the useDefaultCredentials ConnectionSharing attribute of the channel on the client side. It enables the server to reuse
authenticated connections rather than authenticating each incomingcall. This feature is improving performance significantly and worksonly with default credentials.
unsafeAuthenticated While the useAuthenticatedConnectionSharing attribute works only ConnectionSharing with the default credentials, setting this attribute to true allows connection
sharing for credentials passed by your own to the server (which meansnot the default credentials). The goal is avoiding authentication witheach call, but this time with credentials other than default credentials.This attribute must be used together with the connectionGroupNameattribute described next. But pay attention, if you set it to true,unauthenticated clients can possibly authenticate to the server using thecredentials of a previously authenticated client. This setting is ignoredif the useAuthenticatedConnectionSharing property is set to true.
connectionGroupName The connection group name specifies the name for the connectionpool that is used by the server for authenticated clients when theunsafeAuthenticatedConnectionSharing attribute is set to true. Thisname/value pair is ignored if unsafeAuthenticatedConnectionSharingis not set to true. If specified, make sure that this name maps to onlyone authenticated user.
The TCP channel, which is created by specifying <channel ref=“tcp”>, supports the same prop-erties as the HTTP channel (except the security properties) and the following additional property:
CHAPTER 4 ■ CONFIGURATION AND DEPLOYMENT 91
Attribute Description
rejectRemoteRequests Indicator specifying whether the server will accept requests from remotesystems. When set to true, the server will not accept such requests, onlyallowing interapplication communication from the local machine.
On the server side, the following entry can be used to specify an HTTP channel listeningon port 1234:
<channels><channel ref="http" port="1234">
</channels>
On the client, you can specify an increased connection limit using the following section:
<channels><channel ref="http" port="0" clientConnectionLimit="100">
</channels>
ClientProviders/ServerProvidersUnderneath each channel property, you can configure nondefault client-side and server-sidesink providers and formatter providers.
■Caution When any of these elements are specified, it’s important to note that no default providers will becreated by the system. This means that appending ?WSDL to the URL will only work if you explicitly specify<provider ref="wsdl" />; otherwise you’ll receive an exception stating that “no message has been deserialized.”
The .NET Remoting framework is based on messages that travel through various layers. Thoselayers can be extended or replaced and additional layers can be added. (I discuss layers in moredetail in Chapter 11.)
These layers are implemented using so-called message sinks. A message will pass a chainof sinks, each of which will have the possibility to work with the message’s content or to evenchange the message.
Using the ClientProviders and ServerProviders properties in the configuration file, you canspecify this chain of sinks through which you want a message to travel and the formatter withwhich a message will be serialized.
The structure for this property for the server side is as follows:
<channels><channel ref="http" port="1234">
<serverProviders><formatter /><provider />
</serverProviders></channel>
</channels>
CHAPTER 4 ■ CONFIGURATION AND DEPLOYMENT92
You may only have one formatter entry but several provider properties. Also note thatsequence does matter.
The following attributes are common between formatters and providers:
Attribute Description
ref Reference for a predefined SinkProvider (“soap”, “binary”, or “wsdl”) or reference toa SinkProvider that has been defined in a configuration file.
type Attribute that is mandatory when ref has not been specified. Contains the exact type(namespace, class name, assembly) of the SinkProvider’s implementation. When theassembly is in the GAC, you have to specify version, culture, and public key informa-tion as well.
Here are additional attributes that are optional for formatters:
Attribute Description
includeVersions Indicator of whether version information should be included in the requests.Takes a value of true or false (defaults to true for built-in formatters). Thisattribute changes behavior on the client side.
strictBinding Indicator of whether the server will look for the exact type (including version)or any type with the given name. Takes a value of true or false (defaults to falsefor built-in formatters).
In addition to these attributes, both formatters and providers can accept custom attributes,as shown in the following example. You have to check the documentation of your custom sinkprovider for the names and possible values of such properties:
<channels><channel ref="http" port="1234">
<serverProviders><provider type="MySinks.SampleProvider, Server" myAttribute="myValue" />
<sampleProp>This is a Sample</sampleProp><sampleProp>This is another Sample</sampleProp>
</provider><formatter ref="soap" />
</serverProviders></channel>
</channels>
typeFilterLevel Attribute on Formatters
Last but not least, there is one additional attribute I have to mention, the typeFilterLevel attribute,which can be applied on formatters on the server side as well as the client side. Although theattribute already existed in version 1.0 of the .NET Framework, with the trustworthy comput-ing initiative of Microsoft and the principle of Secure By Default, the behavior of this attributefrom version 1.0 to 1.1 of the .NET Framework has changed.
CHAPTER 4 ■ CONFIGURATION AND DEPLOYMENT 93
1. APTCA is the acronym for AllowPartiallyTrustedCallersAttribute. This attribute can be applied onstrong-named assemblies so that they can be called from partially trusted code, which is not allowedby default.
When objects are sent across the wire using .NET Remoting, they have to be serialized anddeserialized. That’s true for both MarshalByRef objects, whereby an ObjRef is serialized,and MarshalByValue objects, whereby the whole object is serialized and deserialized.
Theoretically an unauthorized and malicious client could try to exploit the moment ofdeserialization. Here you can find an outline of threats that might happen with deserializationof objects:
• If a remoting server exposes a method or member that takes a delegate, this delegatemay be used to invoke methods on other types that have the same method signature.
• When the remoting server takes a MarshalByRef object from the client, the URL storedin the ObjRef passed from the client to the server can be tampered with so that the servercalls back to malicious clients.
• Implementing the ISerializable interface on a serializable type means that code is exe-cuted on this type each time it is serialized and deserialized. If a malicious client passespotentially dangerous data on such types, which leads to code execution on the serverduring deserialization, this can result in security vulnerabilities.
• Often remote servers enable clients to register sponsors. But the number of sponsors thatcan be registered is not limited, which can lead to denial of service attacks.
These are just a few threats that can be (partially) mitigated using the typeFilterLevelattribute. Basically this attribute has two possible values for type filtering by the runtime: lowand full. The effects of each value are described in the following table.
Attribute Description
Low With .NET 1.1 this is the default value. The default level permits deserialization ofthe following types:Remoting infrastructure objects necessary for doing basic remoting tasksPrimitive types and reference and value types composed of only primitivesReference- and value-types that are marked as [Serializable] but don’t implementISerializableSystem-provided types that implement ISerializable but don’t make furtherpermission demandsSystem-provided, serializable types in assemblies that are not marked with theAPTCA1 attributeCustom types in strong-named assemblies that are not marked with APTCACustom types that implement ISerializable without making further demandsoutside serializationTypes that implement ILease but are not MarshalByRef objectsObjRef objects needed for activation of CAO, which can be deserialized on clientsbut not on servers
Full The full setting allows deserialization of any remoted types sent across the wire.This means ObjRef objects passed as parameters, objects that implement ISponsor,as well as objects that are inserted between the proxy and client pipeline by theIContributeEnvoySink interface are supported in addition to supported types of theLow deserialization level.
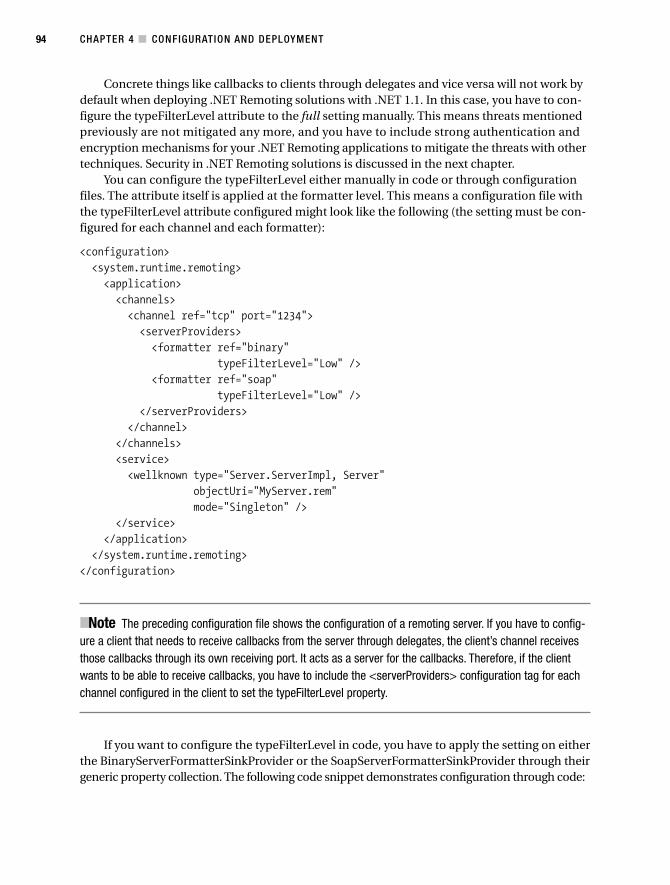
CHAPTER 4 ■ CONFIGURATION AND DEPLOYMENT94
Concrete things like callbacks to clients through delegates and vice versa will not work bydefault when deploying .NET Remoting solutions with .NET 1.1. In this case, you have to con-figure the typeFilterLevel attribute to the full setting manually. This means threats mentionedpreviously are not mitigated any more, and you have to include strong authentication andencryption mechanisms for your .NET Remoting applications to mitigate the threats with othertechniques. Security in .NET Remoting solutions is discussed in the next chapter.
You can configure the typeFilterLevel either manually in code or through configurationfiles. The attribute itself is applied at the formatter level. This means a configuration file withthe typeFilterLevel attribute configured might look like the following (the setting must be con-figured for each channel and each formatter):
<configuration><system.runtime.remoting><application><channels><channel ref="tcp" port="1234"><serverProviders><formatter ref="binary"
typeFilterLevel="Low" /><formatter ref="soap"
typeFilterLevel="Low" /></serverProviders>
</channel></channels><service><wellknown type="Server.ServerImpl, Server"
objectUri="MyServer.rem"mode="Singleton" />
</service></application>
</system.runtime.remoting></configuration>
■Note The preceding configuration file shows the configuration of a remoting server. If you have to config-ure a client that needs to receive callbacks from the server through delegates, the client’s channel receivesthose callbacks through its own receiving port. It acts as a server for the callbacks. Therefore, if the clientwants to be able to receive callbacks, you have to include the <serverProviders> configuration tag for eachchannel configured in the client to set the typeFilterLevel property.
If you want to configure the typeFilterLevel in code, you have to apply the setting on eitherthe BinaryServerFormatterSinkProvider or the SoapServerFormatterSinkProvider through theirgeneric property collection. The following code snippet demonstrates configuration through code:
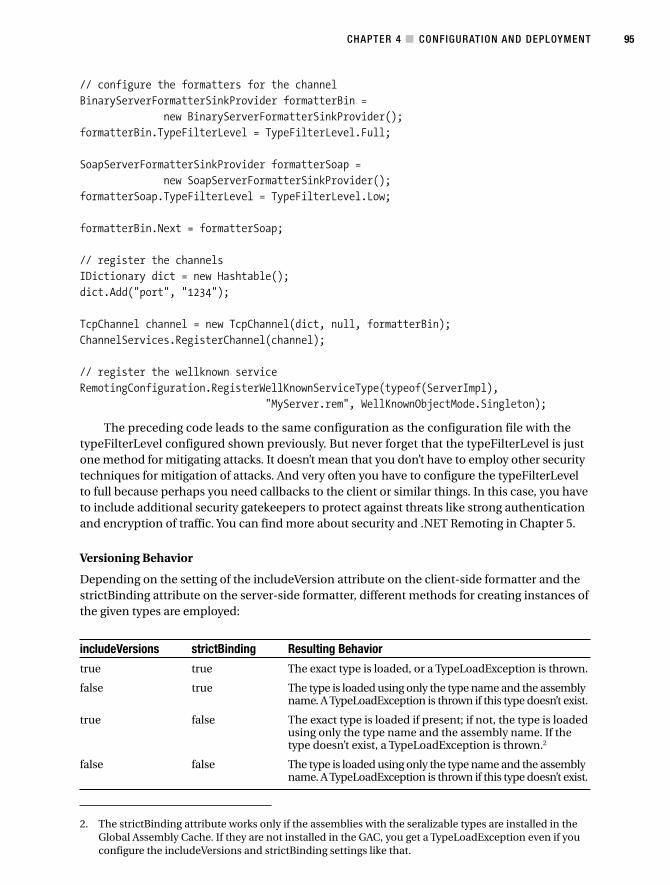
CHAPTER 4 ■ CONFIGURATION AND DEPLOYMENT 95
// configure the formatters for the channelBinaryServerFormatterSinkProvider formatterBin =
new BinaryServerFormatterSinkProvider();formatterBin.TypeFilterLevel = TypeFilterLevel.Full;
SoapServerFormatterSinkProvider formatterSoap =new SoapServerFormatterSinkProvider();
formatterSoap.TypeFilterLevel = TypeFilterLevel.Low;
formatterBin.Next = formatterSoap;
// register the channelsIDictionary dict = new Hashtable();dict.Add("port", "1234");
TcpChannel channel = new TcpChannel(dict, null, formatterBin);ChannelServices.RegisterChannel(channel);
// register the wellknown serviceRemotingConfiguration.RegisterWellKnownServiceType(typeof(ServerImpl),
"MyServer.rem", WellKnownObjectMode.Singleton);
The preceding code leads to the same configuration as the configuration file with thetypeFilterLevel configured shown previously. But never forget that the typeFilterLevel is justone method for mitigating attacks. It doesn’t mean that you don’t have to employ other securitytechniques for mitigation of attacks. And very often you have to configure the typeFilterLevelto full because perhaps you need callbacks to the client or similar things. In this case, you haveto include additional security gatekeepers to protect against threats like strong authenticationand encryption of traffic. You can find more about security and .NET Remoting in Chapter 5.
Versioning Behavior
Depending on the setting of the includeVersion attribute on the client-side formatter and thestrictBinding attribute on the server-side formatter, different methods for creating instances ofthe given types are employed:
includeVersions strictBinding Resulting Behavior
true true The exact type is loaded, or a TypeLoadException is thrown.
false true The type is loaded using only the type name and the assemblyname. A TypeLoadException is thrown if this type doesn’t exist.
true false The exact type is loaded if present; if not, the type is loadedusing only the type name and the assembly name. If thetype doesn’t exist, a TypeLoadException is thrown.2
false false The type is loaded using only the type name and the assemblyname. A TypeLoadException is thrown if this type doesn’t exist.
2. The strictBinding attribute works only if the assemblies with the seralizable types are installed in theGlobal Assembly Cache. If they are not installed in the GAC, you get a TypeLoadException even if youconfigure the includeVersions and strictBinding settings like that.

CHAPTER 4 ■ CONFIGURATION AND DEPLOYMENT96
Binary Encoding via HTTP
As you already know, the default HTTP channel will use a SoapFormatter to encode the messages.Using configuration files and the previously mentioned properties, you can easily switch toa BinaryFormatter for an HTTP channel.
On the server side, you use the following section in your configuration file:
<channels><channel ref="http" port="1234">
<serverProviders><formatter ref="binary" />
</serverProviders></channel>
</channels>
And on the client side, you can take the following configuration file snippet:
<channels><channel ref="http">
<clientProviders><formatter ref="binary" />
</clientProviders></channel>
</channels>
■Note The server-side entry is not strictly necessary, because the server-side HTTP channel automaticallyuses both formatters and detects which encoding has been chosen at the client side.
ServiceThe <service> property in the configuration file allows you to register SAOs and CAOs that willbe made accessible by your server application. This section may contain a number of <wellknown>and <activated> properties.
The main structure of these entries is as follows:
<configuration><system.runtime.remoting>
<application><service>
<wellknown /><activated />
</service></application>
</system.runtime.remoting></configuration>
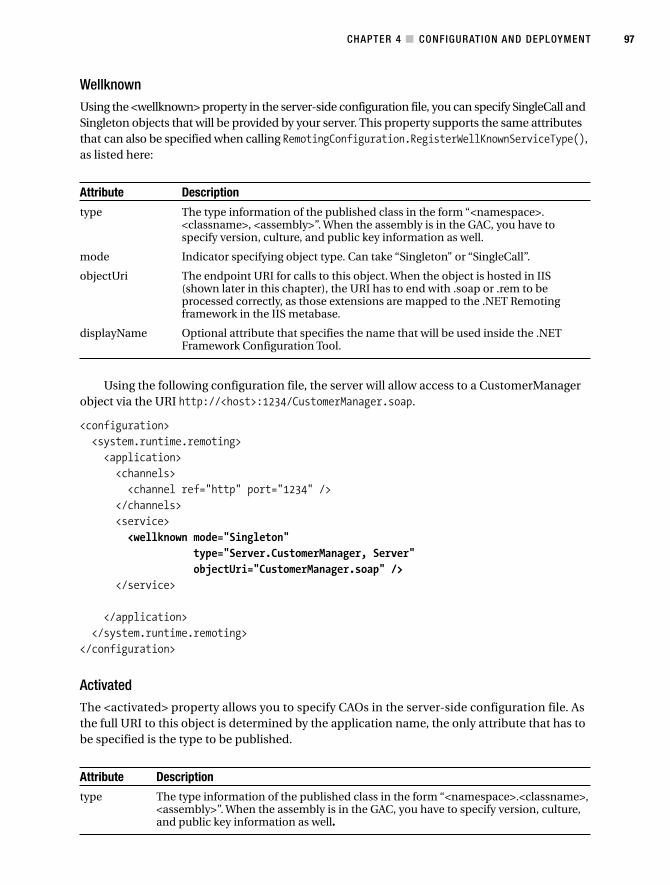
CHAPTER 4 ■ CONFIGURATION AND DEPLOYMENT 97
WellknownUsing the <wellknown> property in the server-side configuration file, you can specify SingleCall andSingleton objects that will be provided by your server. This property supports the same attributesthat can also be specified when calling RemotingConfiguration.RegisterWellKnownServiceType(),as listed here:
Attribute Description
type The type information of the published class in the form “<namespace>.<classname>, <assembly>”. When the assembly is in the GAC, you have tospecify version, culture, and public key information as well.
mode Indicator specifying object type. Can take “Singleton” or “SingleCall”.
objectUri The endpoint URI for calls to this object. When the object is hosted in IIS(shown later in this chapter), the URI has to end with .soap or .rem to beprocessed correctly, as those extensions are mapped to the .NET Remotingframework in the IIS metabase.
displayName Optional attribute that specifies the name that will be used inside the .NETFramework Configuration Tool.
Using the following configuration file, the server will allow access to a CustomerManagerobject via the URI http://<host>:1234/CustomerManager.soap.
<configuration><system.runtime.remoting><application><channels><channel ref="http" port="1234" />
</channels><service><wellknown mode="Singleton"
type="Server.CustomerManager, Server"objectUri="CustomerManager.soap" />
</service>
</application></system.runtime.remoting>
</configuration>
ActivatedThe <activated> property allows you to specify CAOs in the server-side configuration file. Asthe full URI to this object is determined by the application name, the only attribute that has tobe specified is the type to be published.
Attribute Description
type The type information of the published class in the form “<namespace>.<classname>,<assembly>”. When the assembly is in the GAC, you have to specify version, culture,and public key information as well.
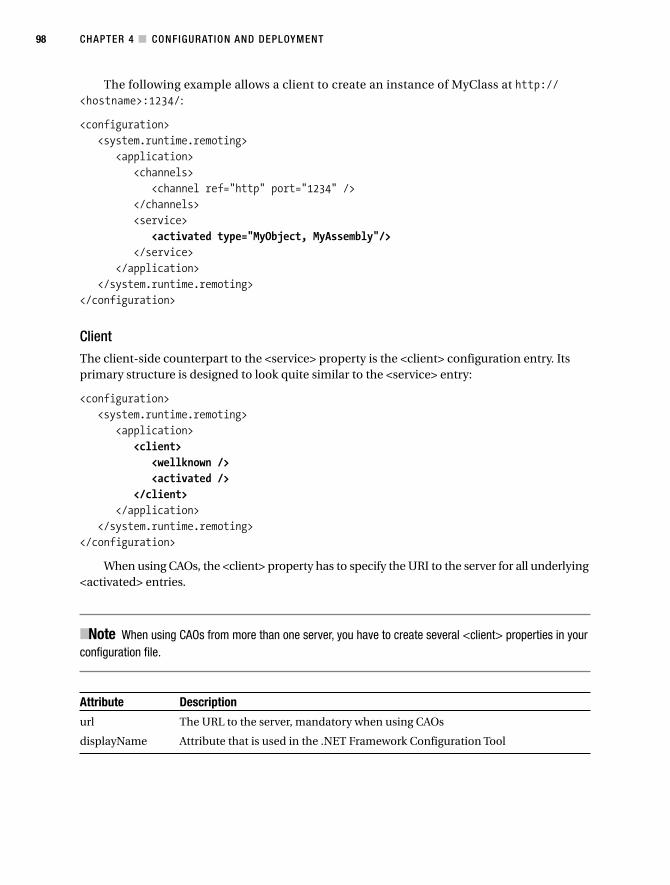
CHAPTER 4 ■ CONFIGURATION AND DEPLOYMENT98
The following example allows a client to create an instance of MyClass at http://<hostname>:1234/:
<configuration><system.runtime.remoting>
<application><channels>
<channel ref="http" port="1234" /></channels><service>
<activated type="MyObject, MyAssembly"/></service>
</application></system.runtime.remoting>
</configuration>
ClientThe client-side counterpart to the <service> property is the <client> configuration entry. Itsprimary structure is designed to look quite similar to the <service> entry:
<configuration><system.runtime.remoting>
<application><client>
<wellknown /><activated />
</client></application>
</system.runtime.remoting></configuration>
When using CAOs, the <client> property has to specify the URI to the server for all underlying<activated> entries.
■Note When using CAOs from more than one server, you have to create several <client> properties in yourconfiguration file.
Attribute Description
url The URL to the server, mandatory when using CAOs
displayName Attribute that is used in the .NET Framework Configuration Tool
CHAPTER 4 ■ CONFIGURATION AND DEPLOYMENT 99
WellknownThe <wellknown> property is used to register SAOs on the client and allows you to use the newoperator to instantiate references to remote objects. The client-side <wellknown> entry has thesame attributes as the call to Activator.GetObject(), as listed here:
Attribute Description
url The full URL to the server’s registered object.
type Type information in the form “<namespace>.<classname>, <assembly>”. Whenthe target assembly is registered in the GAC, you have to specify version, culture,and public key information as well.
displayName Optional attribute that is used in the .NET Framework Configuration Tool.
When registering a type to be remote, the behavior of the new operator will be changed.The framework will intercept each call to this operator and check whether it’s for a registeredremote object. If this is the case, a reference to the server will be created instead of an instanceof the local type.
When the following configuration file is in place, you can simply write CustomerManagerx = new CustomerManager() to obtain a remote reference.
<configuration><system.runtime.remoting><application>
<client><wellknown type="Server.CustomerManager, Client"
url="http://localhost:1234/CustomerManager.soap" /></client>
</application></system.runtime.remoting>
</configuration>
ActivatedThis is the client-side counterpart to the <activated> property on the server. As the URL to theserver has already been specified in the <client> entry, the only attribute to specify is the typeof the remote object.
Attribute Description
type The type information in the form “<namespace>.<classname>, <assembly>”. Whenthe target assembly is registered in the GAC, you have to specify version, culture, andpublic key information as well.
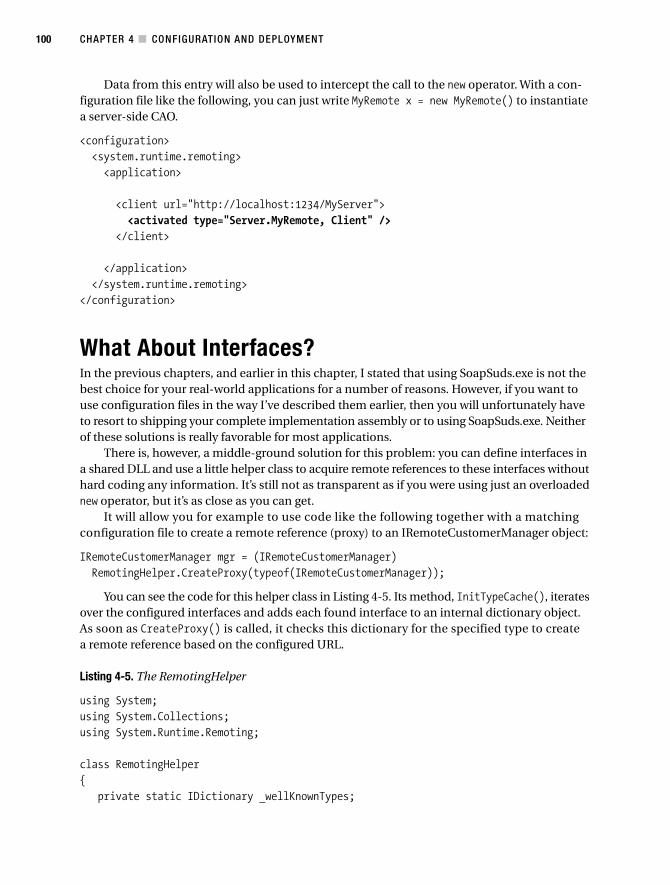
CHAPTER 4 ■ CONFIGURATION AND DEPLOYMENT100
Data from this entry will also be used to intercept the call to the new operator. With a con-figuration file like the following, you can just write MyRemote x = new MyRemote() to instantiatea server-side CAO.
<configuration><system.runtime.remoting><application>
<client url="http://localhost:1234/MyServer"><activated type="Server.MyRemote, Client" />
</client>
</application></system.runtime.remoting>
</configuration>
What About Interfaces?In the previous chapters, and earlier in this chapter, I stated that using SoapSuds.exe is not thebest choice for your real-world applications for a number of reasons. However, if you want touse configuration files in the way I’ve described them earlier, then you will unfortunately haveto resort to shipping your complete implementation assembly or to using SoapSuds.exe. Neitherof these solutions is really favorable for most applications.
There is, however, a middle-ground solution for this problem: you can define interfaces ina shared DLL and use a little helper class to acquire remote references to these interfaces withouthard coding any information. It’s still not as transparent as if you were using just an overloadednew operator, but it’s as close as you can get.
It will allow you for example to use code like the following together with a matchingconfiguration file to create a remote reference (proxy) to an IRemoteCustomerManager object:
IRemoteCustomerManager mgr = (IRemoteCustomerManager)RemotingHelper.CreateProxy(typeof(IRemoteCustomerManager));
You can see the code for this helper class in Listing 4-5. Its method, InitTypeCache(), iteratesover the configured interfaces and adds each found interface to an internal dictionary object.As soon as CreateProxy() is called, it checks this dictionary for the specified type to createa remote reference based on the configured URL.
Listing 4-5. The RemotingHelper
using System;using System.Collections;using System.Runtime.Remoting;
class RemotingHelper{
private static IDictionary _wellKnownTypes;
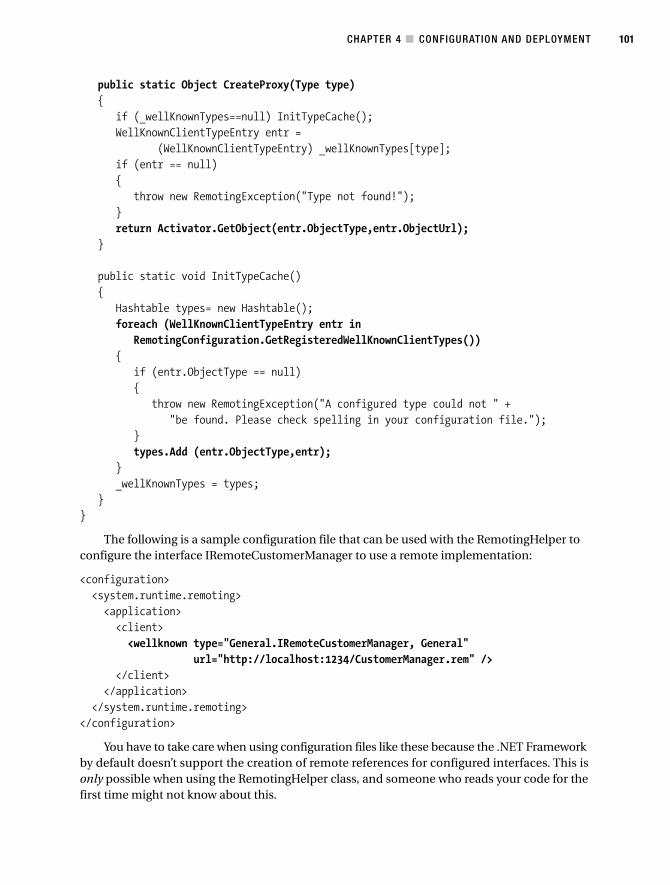
CHAPTER 4 ■ CONFIGURATION AND DEPLOYMENT 101
public static Object CreateProxy(Type type){
if (_wellKnownTypes==null) InitTypeCache();WellKnownClientTypeEntry entr =
(WellKnownClientTypeEntry) _wellKnownTypes[type];if (entr == null){
throw new RemotingException("Type not found!");}return Activator.GetObject(entr.ObjectType,entr.ObjectUrl);
}
public static void InitTypeCache(){
Hashtable types= new Hashtable();foreach (WellKnownClientTypeEntry entr in
RemotingConfiguration.GetRegisteredWellKnownClientTypes()){
if (entr.ObjectType == null){
throw new RemotingException("A configured type could not " +"be found. Please check spelling in your configuration file.");
}types.Add (entr.ObjectType,entr);
}_wellKnownTypes = types;
}}
The following is a sample configuration file that can be used with the RemotingHelper toconfigure the interface IRemoteCustomerManager to use a remote implementation:
<configuration><system.runtime.remoting><application><client><wellknown type="General.IRemoteCustomerManager, General"
url="http://localhost:1234/CustomerManager.rem" /></client>
</application></system.runtime.remoting>
</configuration>
You have to take care when using configuration files like these because the .NET Frameworkby default doesn’t support the creation of remote references for configured interfaces. This isonly possible when using the RemotingHelper class, and someone who reads your code for thefirst time might not know about this.
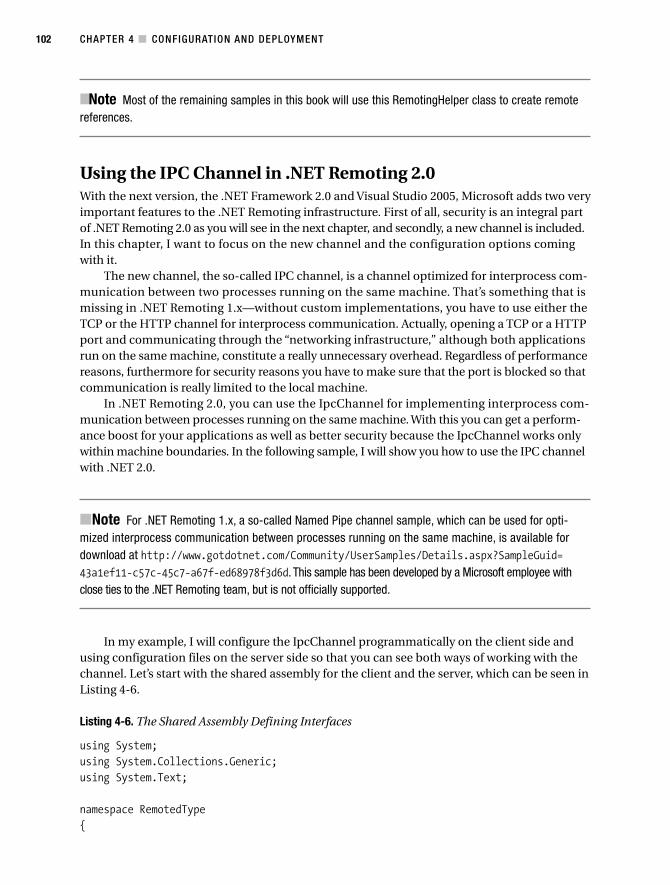
CHAPTER 4 ■ CONFIGURATION AND DEPLOYMENT102
■Note Most of the remaining samples in this book will use this RemotingHelper class to create remotereferences.
Using the IPC Channel in .NET Remoting 2.0With the next version, the .NET Framework 2.0 and Visual Studio 2005, Microsoft adds two veryimportant features to the .NET Remoting infrastructure. First of all, security is an integral partof .NET Remoting 2.0 as you will see in the next chapter, and secondly, a new channel is included.In this chapter, I want to focus on the new channel and the configuration options comingwith it.
The new channel, the so-called IPC channel, is a channel optimized for interprocess com-munication between two processes running on the same machine. That’s something that ismissing in .NET Remoting 1.x—without custom implementations, you have to use either theTCP or the HTTP channel for interprocess communication. Actually, opening a TCP or a HTTPport and communicating through the “networking infrastructure,” although both applicationsrun on the same machine, constitute a really unnecessary overhead. Regardless of performancereasons, furthermore for security reasons you have to make sure that the port is blocked so thatcommunication is really limited to the local machine.
In .NET Remoting 2.0, you can use the IpcChannel for implementing interprocess com-munication between processes running on the same machine. With this you can get a perform-ance boost for your applications as well as better security because the IpcChannel works onlywithin machine boundaries. In the following sample, I will show you how to use the IPC channelwith .NET 2.0.
■Note For .NET Remoting 1.x, a so-called Named Pipe channel sample, which can be used for opti-mized interprocess communication between processes running on the same machine, is available fordownload at http://www.gotdotnet.com/Community/UserSamples/Details.aspx?SampleGuid=43a1ef11-c57c-45c7-a67f-ed68978f3d6d. This sample has been developed by a Microsoft employee withclose ties to the .NET Remoting team, but is not officially supported.
In my example, I will configure the IpcChannel programmatically on the client side andusing configuration files on the server side so that you can see both ways of working with thechannel. Let’s start with the shared assembly for the client and the server, which can be seen inListing 4-6.
Listing 4-6. The Shared Assembly Defining Interfaces
using System;using System.Collections.Generic;using System.Text;
namespace RemotedType{
CHAPTER 4 ■ CONFIGURATION AND DEPLOYMENT 103
public interface IRemotedType{
void DoCall(string message, int counter);}
}
The server is going to implement this fairly simple interface and will do nothing otherthan taking the message passed through the method parameters and outputting it the numberof times specified in the counter parameter (see Listing 4-7).
Listing 4-7. The Server Implementation
using System;using System.Collections.Generic;using System.Text;using System.Runtime.Remoting;using System.Runtime.Remoting.Channels;using System.Runtime.Remoting.Channels.Ipc;using System.Runtime.Remoting.Messaging;using System.Runtime.Remoting.Contexts;using System.Runtime.Remoting.Activation;
using System.Security;using System.Security.Principal;
namespace RemotingServer{public class MyRemoteObject : MarshalByRefObject, RemotedType.IRemotedType{public void DoCall(string message, int counter){// get some information about the caller's contextIIdentity remoteIdentity =
CallContext.GetData("__remotePrincipal") as IIdentity;if (remoteIdentity != null){System.Console.WriteLine("Authenticated user:\n-){0}\n-){1}",
remoteIdentity.Name,remoteIdentity.AuthenticationType.ToString());
}else{System.Console.Write("!! Attention, not authenticated !!");
}
// just do the stupid workfor (int i = 0; i < counter; i++){
CHAPTER 4 ■ CONFIGURATION AND DEPLOYMENT104
System.Console.WriteLine("You told me to say {0}: {1}!",counter.ToString(), message);
}}
}
public class RemoteServerApp{static void Main(string[] args){try{System.Console.WriteLine("Configuring server...");System.Runtime.Remoting.RemotingConfiguration.Configure(
"RemotingServer.exe.config");
System.Console.WriteLine("Configured channels:");foreach (IChannel channel in ChannelServices.RegisteredChannels){System.Console.WriteLine("Registered channel: " + channel.ChannelName);if (channel is IpcChannel){if (((IpcChannel)channel).ChannelData != null){ChannelDataStore dataStore =
(ChannelDataStore)((IpcChannel)channel).ChannelData;foreach (string uri in dataStore.ChannelUris){System.Console.WriteLine("-) Found URI: " + uri);
}}else{System.Console.WriteLine("-) No channel data");
}}else{System.Console.WriteLine("-) not a IpcChannel data store");
}}
System.Console.WriteLine("--- waiting for requests...");System.Console.ReadLine();System.Console.WriteLine("Finished!!");
}catch (Exception ex){
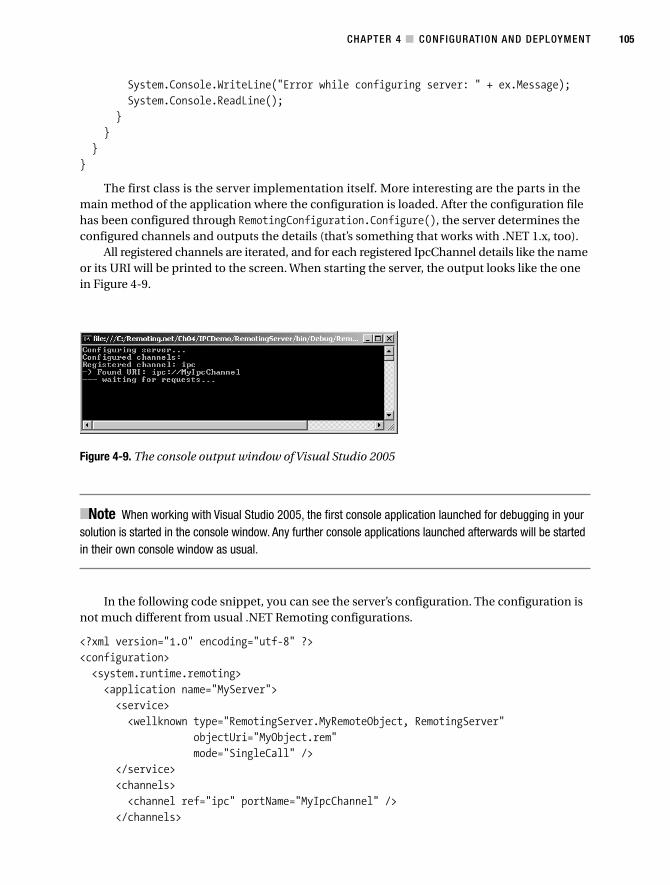
CHAPTER 4 ■ CONFIGURATION AND DEPLOYMENT 105
System.Console.WriteLine("Error while configuring server: " + ex.Message);System.Console.ReadLine();
}}
}}
The first class is the server implementation itself. More interesting are the parts in themain method of the application where the configuration is loaded. After the configuration filehas been configured through RemotingConfiguration.Configure(), the server determines theconfigured channels and outputs the details (that’s something that works with .NET 1.x, too).
All registered channels are iterated, and for each registered IpcChannel details like the nameor its URI will be printed to the screen. When starting the server, the output looks like the onein Figure 4-9.
■Note When working with Visual Studio 2005, the first console application launched for debugging in yoursolution is started in the console window. Any further console applications launched afterwards will be startedin their own console window as usual.
In the following code snippet, you can see the server’s configuration. The configuration isnot much different from usual .NET Remoting configurations.
<?xml version="1.0" encoding="utf-8" ?><configuration><system.runtime.remoting><application name="MyServer"><service><wellknown type="RemotingServer.MyRemoteObject, RemotingServer"
objectUri="MyObject.rem"mode="SingleCall" />
</service><channels><channel ref="ipc" portName="MyIpcChannel" />
</channels>
Figure 4-9. The console output window of Visual Studio 2005

CHAPTER 4 ■ CONFIGURATION AND DEPLOYMENT106
3. If you end the pipe’s name with "$", other users have to know the exact name and cannot search for it.
</application></system.runtime.remoting>
</configuration>
There is just one thing to note: instead of configuring a port number for an IPC channel, itgets a unique name. This name identifies the IPC port (that said, each named pipe port needsits own unique name) and is used by the client to connect to the server as you will see in theclient’s implementation in Listing 4-8.3 Therefore, the name must be unique at the machinelevel to avoid conflicts between your application and other applications running on the samemachine.
In the client application, the IPC channel is manually configured in the source code.Listing 4-8 shows the client’s implementation.
Listing 4-8. The .NET 2.0 Client Implementation
using System;using System.Collections.Generic;using System.Runtime.Remoting;using System.Runtime.Remoting.Channels;using System.Runtime.Remoting.Channels.Ipc;using System.Runtime.Remoting.Activation;using System.Text;
using RemotedType;
namespace RemotingClient{class Program{static void Main(string[] args){try{System.Console.WriteLine("Configuring channel...");IpcClientChannel clientChannel = new IpcClientChannel();ChannelServices.RegisterChannel(clientChannel);
System.Console.WriteLine("Configuring remote object...");IRemotedType TheObject = (IRemotedType)Activator.GetObject(
typeof(RemotedType.IRemotedType),"ipc://MyIpcChannel/MyObject.rem");
System.Console.WriteLine("Please enter data, 'exit' quits the program!");string input = string.Empty;
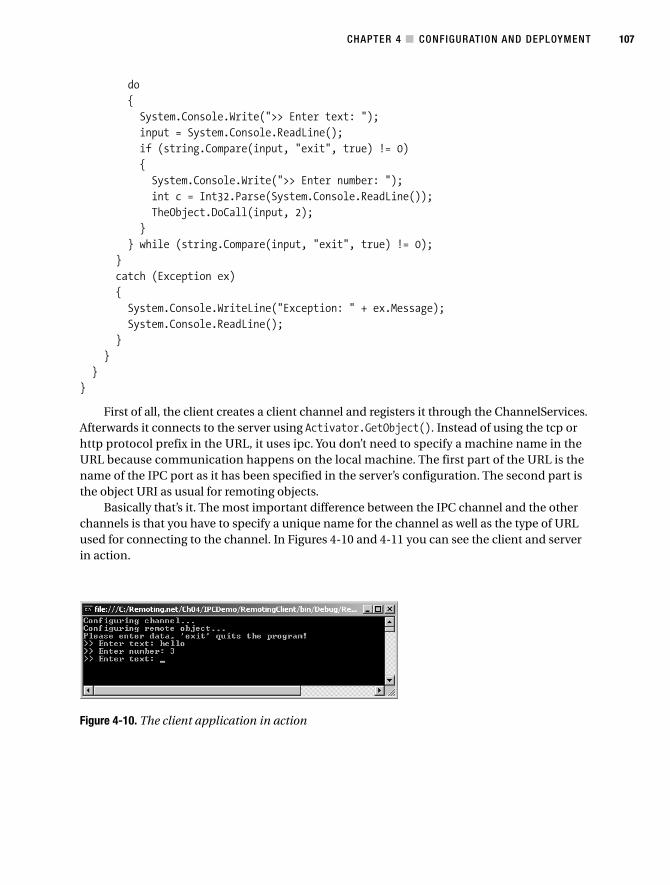
CHAPTER 4 ■ CONFIGURATION AND DEPLOYMENT 107
do{System.Console.Write(">> Enter text: ");input = System.Console.ReadLine();if (string.Compare(input, "exit", true) != 0){System.Console.Write(">> Enter number: ");int c = Int32.Parse(System.Console.ReadLine());TheObject.DoCall(input, 2);
}} while (string.Compare(input, "exit", true) != 0);
}catch (Exception ex){System.Console.WriteLine("Exception: " + ex.Message);System.Console.ReadLine();
}}
}}
First of all, the client creates a client channel and registers it through the ChannelServices.Afterwards it connects to the server using Activator.GetObject(). Instead of using the tcp orhttp protocol prefix in the URL, it uses ipc. You don’t need to specify a machine name in theURL because communication happens on the local machine. The first part of the URL is thename of the IPC port as it has been specified in the server’s configuration. The second part isthe object URI as usual for remoting objects.
Basically that’s it. The most important difference between the IPC channel and the otherchannels is that you have to specify a unique name for the channel as well as the type of URLused for connecting to the channel. In Figures 4-10 and 4-11 you can see the client and serverin action.
Figure 4-10. The client application in action
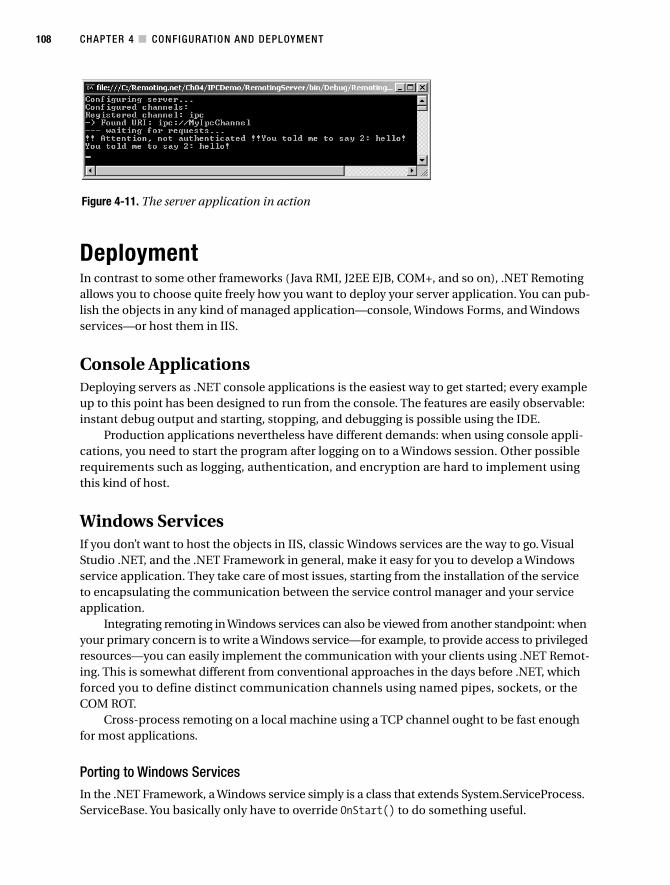
CHAPTER 4 ■ CONFIGURATION AND DEPLOYMENT108
Figure 4-11. The server application in action
DeploymentIn contrast to some other frameworks (Java RMI, J2EE EJB, COM+, and so on), .NET Remotingallows you to choose quite freely how you want to deploy your server application. You can pub-lish the objects in any kind of managed application—console, Windows Forms, and Windowsservices—or host them in IIS.
Console ApplicationsDeploying servers as .NET console applications is the easiest way to get started; every exampleup to this point has been designed to run from the console. The features are easily observable:instant debug output and starting, stopping, and debugging is possible using the IDE.
Production applications nevertheless have different demands: when using console appli-cations, you need to start the program after logging on to a Windows session. Other possiblerequirements such as logging, authentication, and encryption are hard to implement usingthis kind of host.
Windows ServicesIf you don’t want to host the objects in IIS, classic Windows services are the way to go. VisualStudio .NET, and the .NET Framework in general, make it easy for you to develop a Windowsservice application. They take care of most issues, starting from the installation of the serviceto encapsulating the communication between the service control manager and your serviceapplication.
Integrating remoting in Windows services can also be viewed from another standpoint: whenyour primary concern is to write a Windows service—for example, to provide access to privilegedresources—you can easily implement the communication with your clients using .NET Remot-ing. This is somewhat different from conventional approaches in the days before .NET, whichforced you to define distinct communication channels using named pipes, sockets, or theCOM ROT.
Cross-process remoting on a local machine using a TCP channel ought to be fast enoughfor most applications.
Porting to Windows ServicesIn the .NET Framework, a Windows service simply is a class that extends System.ServiceProcess.ServiceBase. You basically only have to override OnStart() to do something useful.
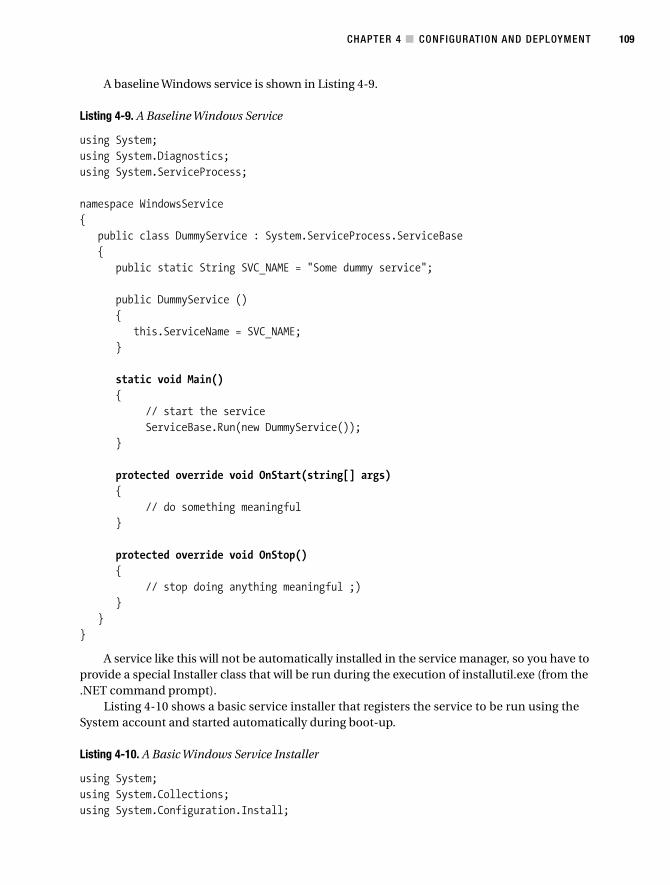
CHAPTER 4 ■ CONFIGURATION AND DEPLOYMENT 109
A baseline Windows service is shown in Listing 4-9.
Listing 4-9. A Baseline Windows Service
using System;using System.Diagnostics;using System.ServiceProcess;
namespace WindowsService{
public class DummyService : System.ServiceProcess.ServiceBase{
public static String SVC_NAME = "Some dummy service";
public DummyService (){
this.ServiceName = SVC_NAME;}
static void Main(){
// start the serviceServiceBase.Run(new DummyService());
}
protected override void OnStart(string[] args){
// do something meaningful}
protected override void OnStop(){
// stop doing anything meaningful ;)}
}}
A service like this will not be automatically installed in the service manager, so you have toprovide a special Installer class that will be run during the execution of installutil.exe (from the.NET command prompt).
Listing 4-10 shows a basic service installer that registers the service to be run using theSystem account and started automatically during boot-up.
Listing 4-10. A Basic Windows Service Installer
using System;using System.Collections;using System.Configuration.Install;

CHAPTER 4 ■ CONFIGURATION AND DEPLOYMENT110
using System.ServiceProcess;using System.ComponentModel;using WindowsService;
[RunInstallerAttribute(true)]public class MyProjectInstaller: Installer{
private ServiceInstaller serviceInstaller;private ServiceProcessInstaller processInstaller;
public MyProjectInstaller(){
processInstaller = new ServiceProcessInstaller();serviceInstaller = new ServiceInstaller();
processInstaller.Account = ServiceAccount.LocalSystem;serviceInstaller.StartType = ServiceStartMode.Automatic;serviceInstaller.ServiceName = DummyService.SVC_NAME;
Installers.Add(serviceInstaller);Installers.Add(processInstaller);
}}
The installer has to be in your main assembly and has to have [RunInstallerAttribute(true)]set. After compiling the preceding C# files, you will have created a baseline Windows servicethat can be installed with installutil.exe.
When porting the remoting server to become a Windows service, you might want to extendthe base service to also allow it to write to the Windows event log. Therefore, you have to adda static variable of type EventLog to hold an instance acquired during void Main(). As analternative, you could also set the AutoLog property of the service and use the static methodEventLog.WriteEntry(). You will also have to extend onStart() to configure remoting to allowthe handling of requests as specified in the configuration file. The complete source code forthe Windows service–based remoting server is shown in Listing 4-11.
Listing 4-11. A Simple Windows Service to Host Your Remote Components
using System;using System.Diagnostics;using System.ServiceProcess;using System.Runtime.Remoting;
namespace WindowsService{
public class RemotingService : System.ServiceProcess.ServiceBase{
private static EventLog evt = new EventLog("Application");public static String SVC_NAME = ".NET Remoting Sample Service";
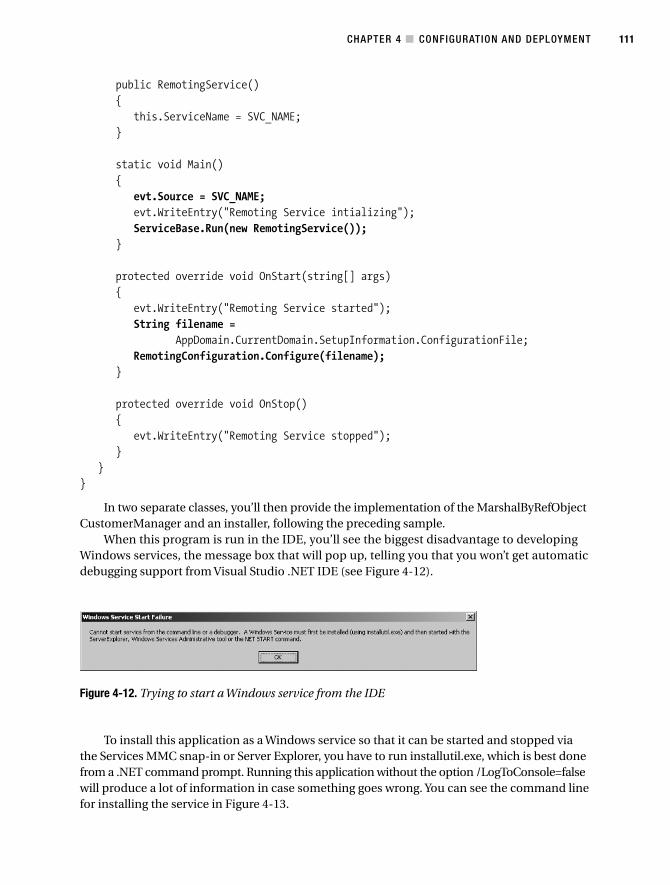
CHAPTER 4 ■ CONFIGURATION AND DEPLOYMENT 111
public RemotingService(){
this.ServiceName = SVC_NAME;}
static void Main(){
evt.Source = SVC_NAME;evt.WriteEntry("Remoting Service intializing");ServiceBase.Run(new RemotingService());
}
protected override void OnStart(string[] args){
evt.WriteEntry("Remoting Service started");String filename =
AppDomain.CurrentDomain.SetupInformation.ConfigurationFile;RemotingConfiguration.Configure(filename);
}
protected override void OnStop(){
evt.WriteEntry("Remoting Service stopped");}
}}
In two separate classes, you’ll then provide the implementation of the MarshalByRefObjectCustomerManager and an installer, following the preceding sample.
When this program is run in the IDE, you’ll see the biggest disadvantage to developingWindows services, the message box that will pop up, telling you that you won’t get automaticdebugging support from Visual Studio .NET IDE (see Figure 4-12).
To install this application as a Windows service so that it can be started and stopped viathe Services MMC snap-in or Server Explorer, you have to run installutil.exe, which is best donefrom a .NET command prompt. Running this application without the option /LogToConsole=falsewill produce a lot of information in case something goes wrong. You can see the command linefor installing the service in Figure 4-13.
Figure 4-12. Trying to start a Windows service from the IDE
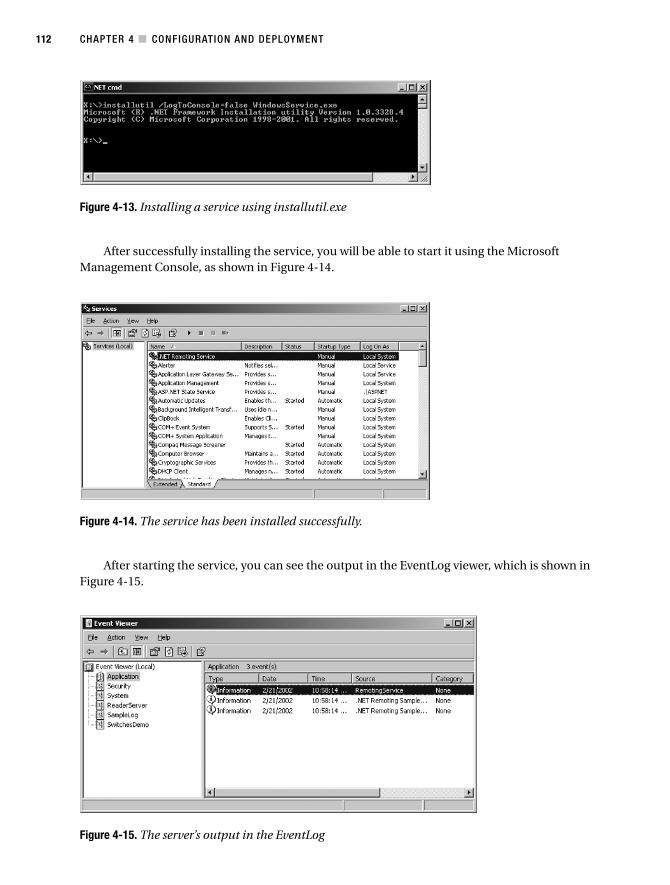
CHAPTER 4 ■ CONFIGURATION AND DEPLOYMENT112
After successfully installing the service, you will be able to start it using the MicrosoftManagement Console, as shown in Figure 4-14.
After starting the service, you can see the output in the EventLog viewer, which is shown inFigure 4-15.
Figure 4-13. Installing a service using installutil.exe
Figure 4-14. The service has been installed successfully.
Figure 4-15. The server’s output in the EventLog
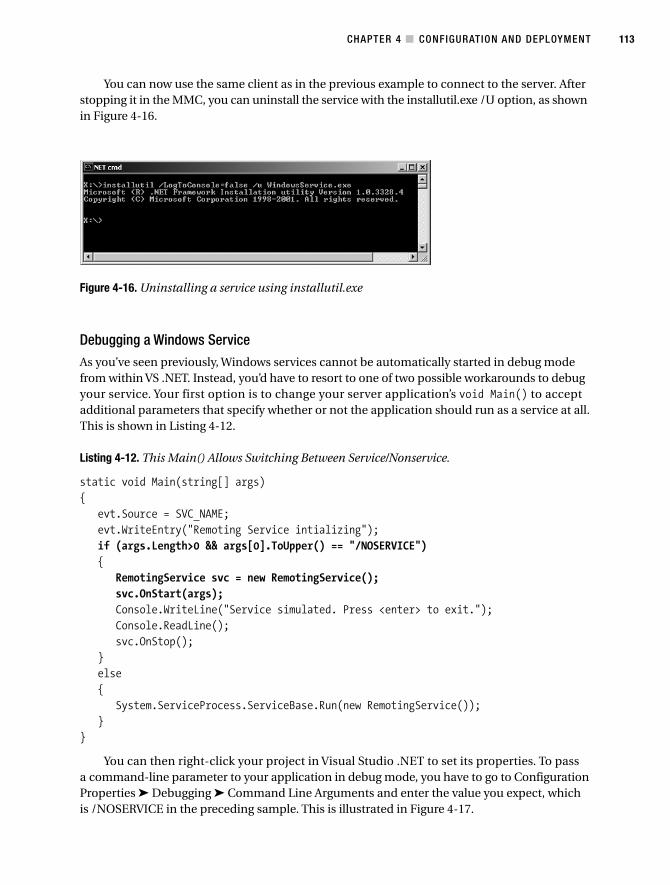
CHAPTER 4 ■ CONFIGURATION AND DEPLOYMENT 113
You can now use the same client as in the previous example to connect to the server. Afterstopping it in the MMC, you can uninstall the service with the installutil.exe /U option, as shownin Figure 4-16.
Debugging a Windows ServiceAs you’ve seen previously, Windows services cannot be automatically started in debug modefrom within VS .NET. Instead, you’d have to resort to one of two possible workarounds to debugyour service. Your first option is to change your server application’s void Main() to acceptadditional parameters that specify whether or not the application should run as a service at all.This is shown in Listing 4-12.
Listing 4-12. This Main() Allows Switching Between Service/Nonservice.
static void Main(string[] args){
evt.Source = SVC_NAME;evt.WriteEntry("Remoting Service intializing");if (args.Length>0 && args[0].ToUpper() == "/NOSERVICE"){
RemotingService svc = new RemotingService();svc.OnStart(args);Console.WriteLine("Service simulated. Press <enter> to exit.");Console.ReadLine();svc.OnStop();
}else{
System.ServiceProcess.ServiceBase.Run(new RemotingService());}
}
You can then right-click your project in Visual Studio .NET to set its properties. To passa command-line parameter to your application in debug mode, you have to go to ConfigurationProperties ➤ Debugging ➤ Command Line Arguments and enter the value you expect, whichis /NOSERVICE in the preceding sample. This is illustrated in Figure 4-17.
Figure 4-16. Uninstalling a service using installutil.exe
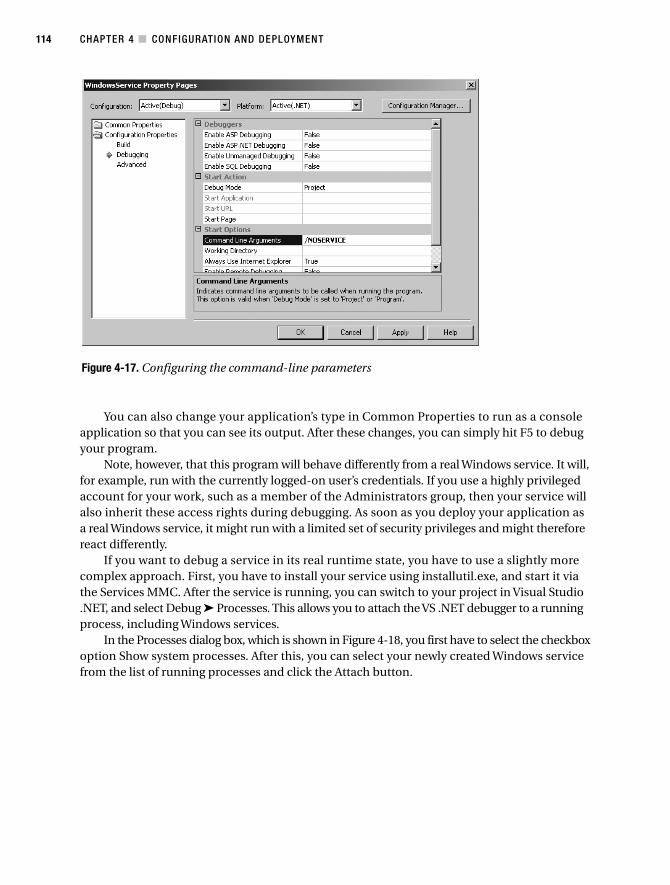
CHAPTER 4 ■ CONFIGURATION AND DEPLOYMENT114
You can also change your application’s type in Common Properties to run as a consoleapplication so that you can see its output. After these changes, you can simply hit F5 to debugyour program.
Note, however, that this program will behave differently from a real Windows service. It will,for example, run with the currently logged-on user’s credentials. If you use a highly privilegedaccount for your work, such as a member of the Administrators group, then your service willalso inherit these access rights during debugging. As soon as you deploy your application asa real Windows service, it might run with a limited set of security privileges and might thereforereact differently.
If you want to debug a service in its real runtime state, you have to use a slightly morecomplex approach. First, you have to install your service using installutil.exe, and start it viathe Services MMC. After the service is running, you can switch to your project in Visual Studio.NET, and select Debug ➤ Processes. This allows you to attach the VS .NET debugger to a runningprocess, including Windows services.
In the Processes dialog box, which is shown in Figure 4-18, you first have to select the checkboxoption Show system processes. After this, you can select your newly created Windows servicefrom the list of running processes and click the Attach button.
Figure 4-17. Configuring the command-line parameters
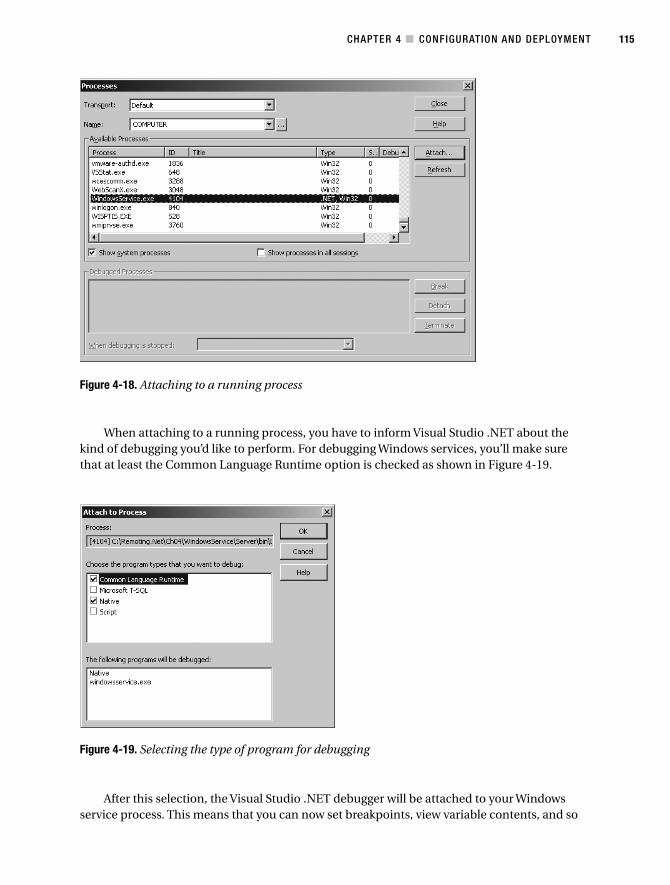
CHAPTER 4 ■ CONFIGURATION AND DEPLOYMENT 115
When attaching to a running process, you have to inform Visual Studio .NET about thekind of debugging you’d like to perform. For debugging Windows services, you’ll make surethat at least the Common Language Runtime option is checked as shown in Figure 4-19.
After this selection, the Visual Studio .NET debugger will be attached to your Windowsservice process. This means that you can now set breakpoints, view variable contents, and so
Figure 4-18. Attaching to a running process
Figure 4-19. Selecting the type of program for debugging
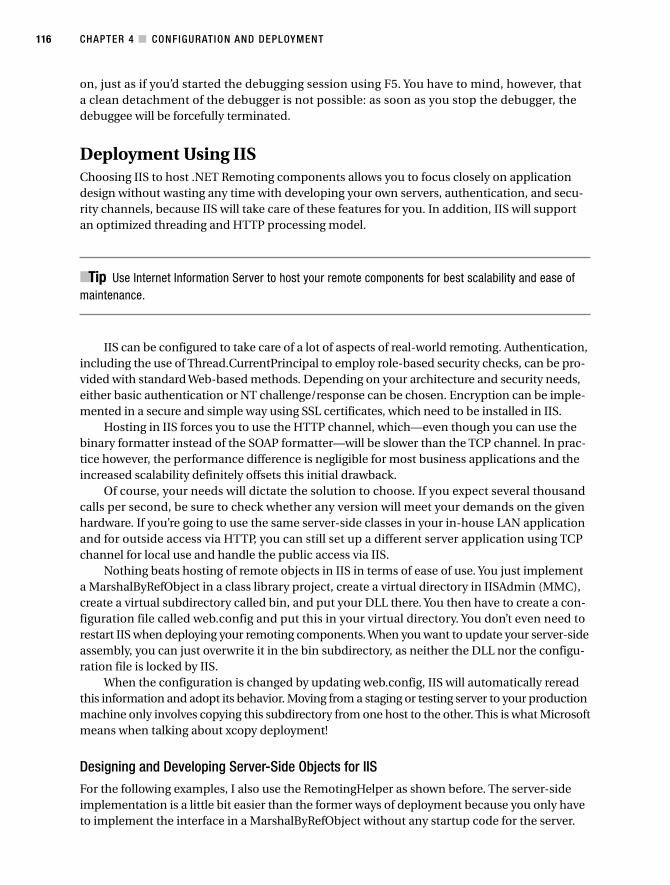
CHAPTER 4 ■ CONFIGURATION AND DEPLOYMENT116
on, just as if you’d started the debugging session using F5. You have to mind, however, thata clean detachment of the debugger is not possible: as soon as you stop the debugger, thedebuggee will be forcefully terminated.
Deployment Using IISChoosing IIS to host .NET Remoting components allows you to focus closely on applicationdesign without wasting any time with developing your own servers, authentication, and secu-rity channels, because IIS will take care of these features for you. In addition, IIS will supportan optimized threading and HTTP processing model.
■Tip Use Internet Information Server to host your remote components for best scalability and ease ofmaintenance.
IIS can be configured to take care of a lot of aspects of real-world remoting. Authentication,including the use of Thread.CurrentPrincipal to employ role-based security checks, can be pro-vided with standard Web-based methods. Depending on your architecture and security needs,either basic authentication or NT challenge/response can be chosen. Encryption can be imple-mented in a secure and simple way using SSL certificates, which need to be installed in IIS.
Hosting in IIS forces you to use the HTTP channel, which—even though you can use thebinary formatter instead of the SOAP formatter—will be slower than the TCP channel. In prac-tice however, the performance difference is negligible for most business applications and theincreased scalability definitely offsets this initial drawback.
Of course, your needs will dictate the solution to choose. If you expect several thousandcalls per second, be sure to check whether any version will meet your demands on the givenhardware. If you’re going to use the same server-side classes in your in-house LAN applicationand for outside access via HTTP, you can still set up a different server application using TCPchannel for local use and handle the public access via IIS.
Nothing beats hosting of remote objects in IIS in terms of ease of use. You just implementa MarshalByRefObject in a class library project, create a virtual directory in IISAdmin (MMC),create a virtual subdirectory called bin, and put your DLL there. You then have to create a con-figuration file called web.config and put this in your virtual directory. You don’t even need torestart IIS when deploying your remoting components. When you want to update your server-sideassembly, you can just overwrite it in the bin subdirectory, as neither the DLL nor the configu-ration file is locked by IIS.
When the configuration is changed by updating web.config, IIS will automatically rereadthis information and adopt its behavior. Moving from a staging or testing server to your productionmachine only involves copying this subdirectory from one host to the other. This is what Microsoftmeans when talking about xcopy deployment!
Designing and Developing Server-Side Objects for IISFor the following examples, I also use the RemotingHelper as shown before. The server-sideimplementation is a little bit easier than the former ways of deployment because you only haveto implement the interface in a MarshalByRefObject without any startup code for the server.
CHAPTER 4 ■ CONFIGURATION AND DEPLOYMENT 117
Listing 4-13 shows everything you need to code when using IIS to host your components.
Listing 4-13. Server-Side Implementation of the SAO
using System;using General;
namespace Server{
class CustomerManager: MarshalByRefObject, IRemoteCustomerManager{
public Customer GetCustomer(int id){
Customer tmp = new Customer();tmp.FirstName = "John";tmp.LastName = "Doe";tmp.DateOfBirth = new DateTime(1970,7,4);return tmp;
}}
}
After compiling this assembly to a DLL, you can proceed with setting up Internet Informa-tion Server.
Preparing Internet Information ServerBefore being able to use IIS as a container for server-side objects, you have to configure severalaspects of IIS. At the very least you have to create a new virtual root and set the correspondingpermissions and security requirements.
Creating a Virtual Root
An IIS virtual root will allow a certain directory to be accessed using a URL. You can basicallyspecify that the URL http://yourhost/yourdirectory will be served from c:\somedirectory,whereas the standard base URL http://yourhost/ is taken from c:\inetpub\wwwroot by default.
You create virtual roots using the MMC, which you bring up by selecting Start ➤ Programs➤ Administrative Tools ➤ Internet Services Manager. In the Internet Services Manager you willsee Default Web Site if you’re running workstation software (when using server software, you’llprobably see more Web sites).
Right-click Default Web Site and choose New ➤ Virtual Directory. The Virtual DirectoryCreation Wizard appears. Use this wizard to specify an alias and the directory it will point to.For usage as a remoting container, the default security permissions (Read and Run scripts) aresufficient.
In the directory to which the new IIS virtual directory points, you have to place your .NETRemoting configuration file. As the server will automatically watch for this file and read it, youhave to call it web.config—you cannot specify a custom name.
Below this directory you can now create a folder called bin\ and place your assemblies there.As an alternative, you can place your assemblies in the GAC using gacutil.exe, but remember
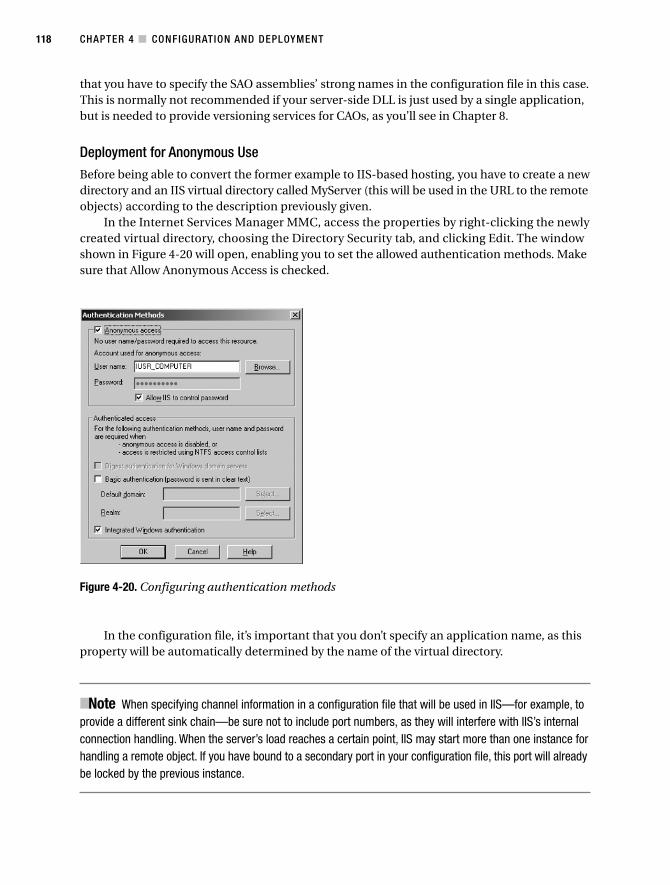
CHAPTER 4 ■ CONFIGURATION AND DEPLOYMENT118
that you have to specify the SAO assemblies’ strong names in the configuration file in this case.This is normally not recommended if your server-side DLL is just used by a single application,but is needed to provide versioning services for CAOs, as you’ll see in Chapter 8.
Deployment for Anonymous UseBefore being able to convert the former example to IIS-based hosting, you have to create a newdirectory and an IIS virtual directory called MyServer (this will be used in the URL to the remoteobjects) according to the description previously given.
In the Internet Services Manager MMC, access the properties by right-clicking the newlycreated virtual directory, choosing the Directory Security tab, and clicking Edit. The windowshown in Figure 4-20 will open, enabling you to set the allowed authentication methods. Makesure that Allow Anonymous Access is checked.
In the configuration file, it’s important that you don’t specify an application name, as thisproperty will be automatically determined by the name of the virtual directory.
■Note When specifying channel information in a configuration file that will be used in IIS—for example, toprovide a different sink chain—be sure not to include port numbers, as they will interfere with IIS’s internalconnection handling. When the server’s load reaches a certain point, IIS may start more than one instance forhandling a remote object. If you have bound to a secondary port in your configuration file, this port will alreadybe locked by the previous instance.
Figure 4-20. Configuring authentication methods
CHAPTER 4 ■ CONFIGURATION AND DEPLOYMENT 119
<configuration><system.runtime.remoting><application><service><wellknown mode="Singleton"
type="Server.CustomerManager, Server"objectUri="CustomerManager.rem" />
</service></application>
</system.runtime.remoting></configuration>
After putting the configuration file in your virtual directory, you have to copy the assemblies(both the shared one and the server’s implementation) into its bin subdirectory. The resultingstructure should be like this:
Directory Contents
x:\<path_to_your_virtual_dir> web.config
x:\<path_to_your_virtual_dir>\bin Assemblies that contain your remote objects and assem-blies upon which your objects depend if they are not inthe GAC
The client is basically the same as in the previous examples. I use a shared interface approachand reference the assembly in which it is contained. The client itself is quite simple, as shownin Listing 4-14.
Listing 4-14. An Anonymous Client
using System;using System.Runtime.Remoting;using General; // from General.DLLusing Server; // from server.cs
namespace Client{
class Client{
static void Main(string[] args){
String filename =AppDomain.CurrentDomain.SetupInformation.ConfigurationFile;
RemotingConfiguration.Configure(filename);
IRemoteCustomerManager mgr = (IRemoteCustomerManager)RemotingHelper.CreateProxy(typeof(IRemoteCustomerManager));
Console.WriteLine("Client.Main(): Reference to CustomerManager " +"acquired");

CHAPTER 4 ■ CONFIGURATION AND DEPLOYMENT120
Customer cust = mgr.GetCustomer(4711);int age = cust.GetAge();Console.WriteLine("Client.Main(): Customer {0} {1} is {2} years old.",
cust.FirstName,cust.LastName,age);
Console.ReadLine();}
}}
In contrast to the examples earlier in this chapter, the client’s configuration file needs tobe changed to contain the correct URL to the newly deployed components.
<configuration><system.runtime.remoting><application><client><!-- This entry only works with the RemotingHelper class --><wellknown type="General.IRemoteCustomerManager, General"
url="http://localhost/MyServer/CustomerManager.rem" /></client>
</application></system.runtime.remoting>
</configuration>
Debugging in IISTo debug your server application in IIS, you could follow the same approach presented earlierfor the Windows service. You could select Debug ➤ Processes and manually attach the debuggerto the ASP.NET worker process (aspnet_wp.exe or w3wp.exe, depending on the OS).
There is, however, an easier but not very obvious solution to debugging your remotingserver inside of IIS. In essence, you have to “trick” Visual Studio .NET into attaching itself auto-matically to the ASP.NET worker process. To do this, you add a new ASP.NET Web ApplicationProject to your solution. This project will host your remoting configuration information andserver-side assemblies.
In this project, you can add the <system.runtime.remoting> section to your web.config fileas discussed previously. To add server-side implementation and interface assemblies, you justhave to reference them using the Add Reference dialog box. These will be automatically deployedto the correct subdirectory.
You must not delete the default WebForm1.aspx, as this will be used by Visual Studio to startthe debugger. Now as soon as you hit F5, VS .NET will open an Internet Explorer window thatdisplays this empty WebForm1.aspx. You can ignore this IE window, but you must not close itas this would stop the debugger. Instead, you can go to your server-side implementation codein VS .NET and simply set breakpoints, view variables, and so on as if you were running in a normalremoting host.

CHAPTER 4 ■ CONFIGURATION AND DEPLOYMENT 121
SummaryIn this chapter, you learned about the different settings that can be employed in a configurationfile. You now also know why configuration files are important and why you shouldn’t hard codethe connection information in your .NET Remoting clients.
You know how to use configuration files to allow for transparent use of configuration files forall types of remote objects. I also demonstrated a possible workaround for some problems thatyou might encounter when using [Serializable] objects in combination with SoapSuds-generatedmetadata. In the section “What About Interfaces?” in this chapter I also introduced an approachfor using configuration files with an interface-based remote object, which eliminates the needfor SoapSuds.exe.
I showed you different deployment scenarios, including managed applications such asa console application or a Windows service. You also read about the benefits of using IIS to hostyour remote objects and how to debug Windows services and IIS as remoting hosts.
In the next chapter, I show you how to build .NET Remoting clients for various technologies:Windows Forms, ASP.NET Web sites, and Web Services.
123
C H A P T E R 5
■ ■ ■
Securing .NET Remoting
Unfortunately .NET Remoting does not incorporate a standard means of authentication.Instead, Microsoft opened the interfaces so that any authentication (and encryption) variantcan be used by implementing custom sinks and sink providers. The effort to implement thesesinks may be reasonable when developing large-scale distributed applications that have to inte-grate with already installed third-party sign-on solutions, but is definitely cumbersome, too.
In this chapter, I will go through the basic concepts for securing .NET Remoting componentswhen hosted within Internet Information Services (IIS) as well as outside of IIS. You will learnhow to enable authentication through IIS by leveraging basic HTTP sign-on as well as the moresecure Windows-integrated authentication. Furthermore, you will see how to secure commu-nication between the client and the server by enabling SSL at the server side.
Afterwards you will learn how to leverage additional components offered by Microsoft tosecure .NET Remoting when not hosted within IIS, which is a little bit more complicated becauseyou have to configure the security channels within the configuration.
Last but not least, you will learn about the security enhancements that will come with the.NET Framework 2.0 and Visual Studio 2005.
Building Secure SystemsSome of the major basic concepts for building secure systems are authentication, authorization,confidentiality, and integrity. Authentication and authorization are concepts that deal with anidentity like a user or machine. Authentication is the process of determining who an actor is,and authorization is the process of permitting or denying access to resources to the actor.
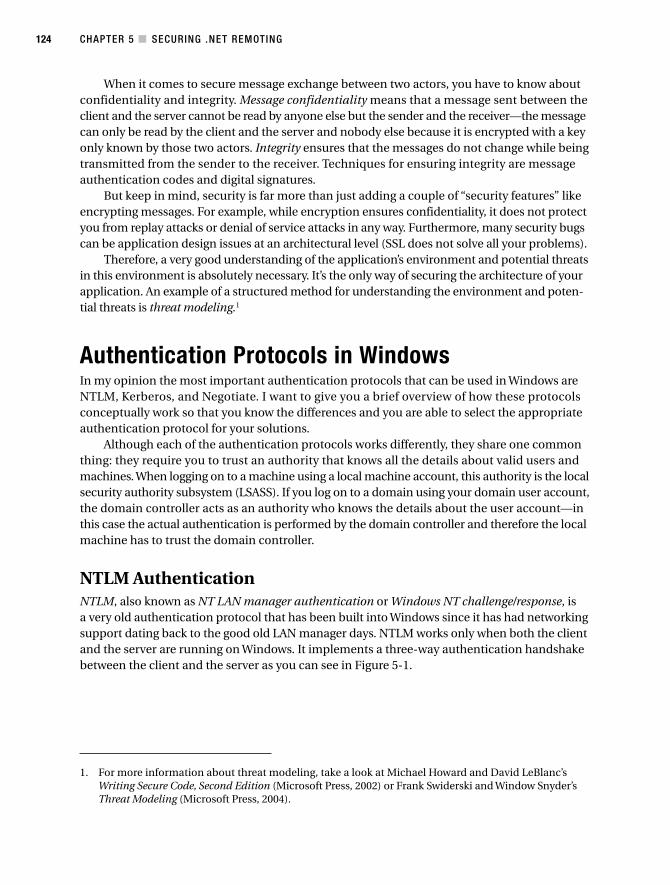
CHAPTER 5 ■ SECURING .NET REMOTING124
1. For more information about threat modeling, take a look at Michael Howard and David LeBlanc’sWriting Secure Code, Second Edition (Microsoft Press, 2002) or Frank Swiderski and Window Snyder’sThreat Modeling (Microsoft Press, 2004).
When it comes to secure message exchange between two actors, you have to know aboutconfidentiality and integrity. Message confidentiality means that a message sent between theclient and the server cannot be read by anyone else but the sender and the receiver—the messagecan only be read by the client and the server and nobody else because it is encrypted with a keyonly known by those two actors. Integrity ensures that the messages do not change while beingtransmitted from the sender to the receiver. Techniques for ensuring integrity are messageauthentication codes and digital signatures.
But keep in mind, security is far more than just adding a couple of “security features” likeencrypting messages. For example, while encryption ensures confidentiality, it does not protectyou from replay attacks or denial of service attacks in any way. Furthermore, many security bugscan be application design issues at an architectural level (SSL does not solve all your problems).
Therefore, a very good understanding of the application’s environment and potential threatsin this environment is absolutely necessary. It’s the only way of securing the architecture of yourapplication. An example of a structured method for understanding the environment and poten-tial threats is threat modeling.1
Authentication Protocols in WindowsIn my opinion the most important authentication protocols that can be used in Windows areNTLM, Kerberos, and Negotiate. I want to give you a brief overview of how these protocolsconceptually work so that you know the differences and you are able to select the appropriateauthentication protocol for your solutions.
Although each of the authentication protocols works differently, they share one commonthing: they require you to trust an authority that knows all the details about valid users andmachines. When logging on to a machine using a local machine account, this authority is the localsecurity authority subsystem (LSASS). If you log on to a domain using your domain user account,the domain controller acts as an authority who knows the details about the user account—inthis case the actual authentication is performed by the domain controller and therefore the localmachine has to trust the domain controller.
NTLM AuthenticationNTLM, also known as NT LAN manager authentication or Windows NT challenge/response, isa very old authentication protocol that has been built into Windows since it has had networkingsupport dating back to the good old LAN manager days. NTLM works only when both the clientand the server are running on Windows. It implements a three-way authentication handshakebetween the client and the server as you can see in Figure 5-1.
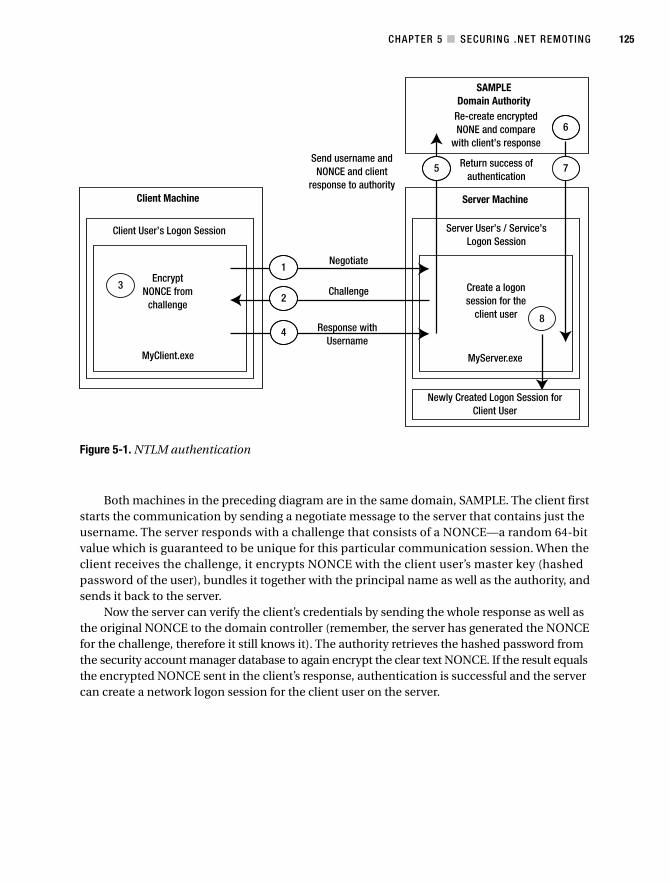
CHAPTER 5 ■ SECURING .NET REMOTING 125
Server MachineClient Machine
Server User’s / Service’sLogon Session
SAMPLEDomain Authority
MyClient.exe MyServer.exe
Negotiate
Challenge
Response withUsername
EncryptNONCE from
challenge
Newly Created Logon Session forClient User
Return success ofauthentication
Re-create encryptedNONE and compare
with client’s response
Create a logonsession for the
client user
Send username andNONCE and client
response to authority
Client User’s Logon Session
1
23
4
5
6
8
7
Figure 5-1. NTLM authentication
Both machines in the preceding diagram are in the same domain, SAMPLE. The client firststarts the communication by sending a negotiate message to the server that contains just theusername. The server responds with a challenge that consists of a NONCE—a random 64-bitvalue which is guaranteed to be unique for this particular communication session. When theclient receives the challenge, it encrypts NONCE with the client user’s master key (hashedpassword of the user), bundles it together with the principal name as well as the authority, andsends it back to the server.
Now the server can verify the client’s credentials by sending the whole response as well asthe original NONCE to the domain controller (remember, the server has generated the NONCEfor the challenge, therefore it still knows it). The authority retrieves the hashed password fromthe security account manager database to again encrypt the clear text NONCE. If the result equalsthe encrypted NONCE sent in the client’s response, authentication is successful and the servercan create a network logon session for the client user on the server.
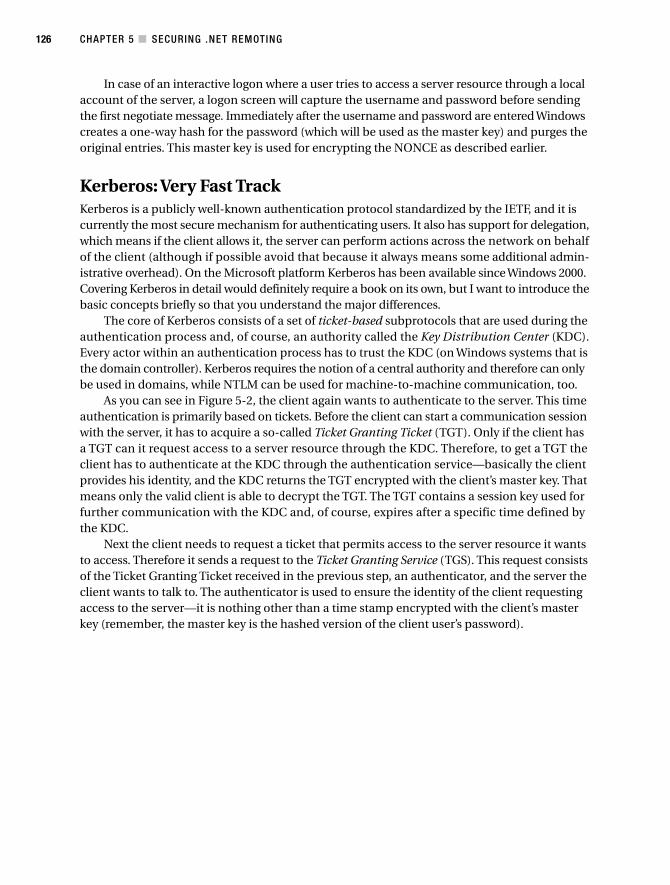
CHAPTER 5 ■ SECURING .NET REMOTING126
In case of an interactive logon where a user tries to access a server resource through a localaccount of the server, a logon screen will capture the username and password before sendingthe first negotiate message. Immediately after the username and password are entered Windowscreates a one-way hash for the password (which will be used as the master key) and purges theoriginal entries. This master key is used for encrypting the NONCE as described earlier.
Kerberos: Very Fast TrackKerberos is a publicly well-known authentication protocol standardized by the IETF, and it iscurrently the most secure mechanism for authenticating users. It also has support for delegation,which means if the client allows it, the server can perform actions across the network on behalfof the client (although if possible avoid that because it always means some additional admin-istrative overhead). On the Microsoft platform Kerberos has been available since Windows 2000.Covering Kerberos in detail would definitely require a book on its own, but I want to introduce thebasic concepts briefly so that you understand the major differences.
The core of Kerberos consists of a set of ticket-based subprotocols that are used during theauthentication process and, of course, an authority called the Key Distribution Center (KDC).Every actor within an authentication process has to trust the KDC (on Windows systems that isthe domain controller). Kerberos requires the notion of a central authority and therefore can onlybe used in domains, while NTLM can be used for machine-to-machine communication, too.
As you can see in Figure 5-2, the client again wants to authenticate to the server. This timeauthentication is primarily based on tickets. Before the client can start a communication sessionwith the server, it has to acquire a so-called Ticket Granting Ticket (TGT). Only if the client hasa TGT can it request access to a server resource through the KDC. Therefore, to get a TGT theclient has to authenticate at the KDC through the authentication service—basically the clientprovides his identity, and the KDC returns the TGT encrypted with the client’s master key. Thatmeans only the valid client is able to decrypt the TGT. The TGT contains a session key used forfurther communication with the KDC and, of course, expires after a specific time defined bythe KDC.
Next the client needs to request a ticket that permits access to the server resource it wantsto access. Therefore it sends a request to the Ticket Granting Service (TGS). This request consistsof the Ticket Granting Ticket received in the previous step, an authenticator, and the server theclient wants to talk to. The authenticator is used to ensure the identity of the client requestingaccess to the server—it is nothing other than a time stamp encrypted with the client’s masterkey (remember, the master key is the hashed version of the client user’s password).
CHAPTER 5 ■ SECURING .NET REMOTING 127
The TGS responds with two parts. One part just contains the session key for the clientencrypted with the client’s master key and a Session Ticket (ST) encrypted with the server’smaster key that subsequently will be forwarded to the server. This ST also contains the sessionkey as well as an expiration time and information about the client that wants to talk to the server.
SampleDomain Authority
(KDC)
AuthenticationService
AuthenticationRequest
Client Machine
MyClient.exe
Newly Created Logon Session forClient User
Client User’s Logon Session
Server Machine
Server User’s / Service’sLogon Session
Create logonsession for
client if sessionticket valid
Ticket GrantingTicket issued ifauthenticationwas successful
Return sessionticket if TGT is
valid
Requestsession
ticketfor server
Request session withissued session ticket
Accept sessionresponse or reject
Ticket GrantingService
6
23
4
5
7
1
Figure 5-2. Kerberos authentication actors
CHAPTER 5 ■ SECURING .NET REMOTING128
When the server receives the ST, it decrypts it using its own master key (remember, the author-ity encrypted the ST using the server’s master key). As the server and the KDC are the only partiesthat know the server’s master key, they are the only ones that can decrypt the Session Ticket.Therefore, if decryption of the Session Ticket is successful on the server, the server knows thatthis ticket has been issued by a trusted authority (the KDC) and communication between theclient and the server can start. Messages sent between the client and the server are encryptedusing the session key issued by the TGS before (remember, the client got the session key asa response from its request to the TGS and the server found the session key in the Session Ticketreceived from the client).
Again, my intention in giving you this brief introduction was to outline the differencesbetween NTLM and Kerberos so that you know what the prerequisites for using one of theseprotocols are. In general, you are always better off when using Kerberos because it is more secure,but as you have seen, this is not always possible (Windows 2000 and above required; activedirectory domain required). For more information about Kerberos version 5, take a look athttp://msdn.microsoft.com/library/default.asp?url=/library/en-us/secauthn/security/microsoft_kerberos.asp.
Security Package NegotiateThe last authentication protocol I want to mention is the easiest one to understand—the securitypackage negotiate (SPNEGO) authentication protocol. Basically this protocol is not doing theactual authentication itself, it just figures out the best (most secure) security package to use forthe authentication process.
The idea of SPNEGO is fairly simple. Let’s assume that both the client and the server selectSPNEGO (negotiate) as their authentication protocol. SPNEGO always tries the most secureauthentication package available. Therefore the client starts by selecting Kerberos and just sendsthe Kerberos authentication request across the wire to the server. If the server accepts the request,it directly responds with the corresponding Kerberos authentication reply (in this case the serveraccepts because SPNEGO has been selected on the server as well). If the server does not under-stand (or does not want to understand) the request, additional roundtrips are necessary forfiguring out the next available security package (e.g., NTLM).
Security Support Provider InterfaceAs you have seen in the previous chapters, Windows supports a bunch of authenticationprotocols, and each of these protocols has its own specifics. Now imagine you want to developan application that needs to support all of those protocols. Basically it means implementinga library for each authentication protocol that can be used from within the application, whichis really cumbersome.
That’s exactly where the Security Support Provider (SSP) and the Security Support ProviderInterface (SSPI) become important. SSPI basically is an abstraction layer provided by Windowsfor encapsulating the specifics of authentication and secure conversation. As an applicationdeveloper, you can appreciate how it enables you to authenticate a user across process andmachine boundaries by just specifying the authentication protocol you want to use, and all thedetails of the protocol are handled by SSPI.
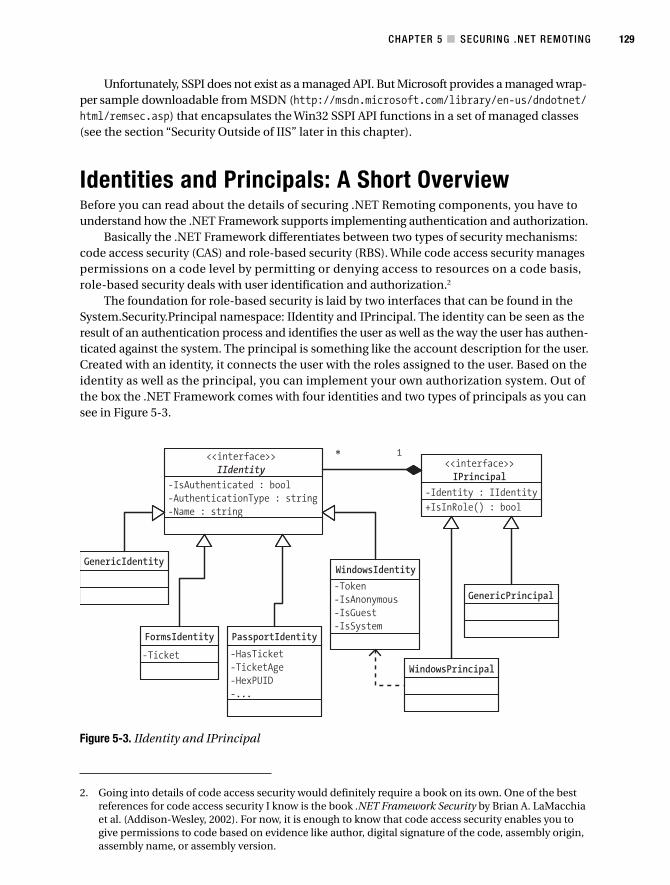
CHAPTER 5 ■ SECURING .NET REMOTING 129
2. Going into details of code access security would definitely require a book on its own. One of the bestreferences for code access security I know is the book .NET Framework Security by Brian A. LaMacchiaet al. (Addison-Wesley, 2002). For now, it is enough to know that code access security enables you togive permissions to code based on evidence like author, digital signature of the code, assembly origin,assembly name, or assembly version.
Unfortunately, SSPI does not exist as a managed API. But Microsoft provides a managed wrap-per sample downloadable from MSDN (http://msdn.microsoft.com/library/en-us/dndotnet/html/remsec.asp) that encapsulates the Win32 SSPI API functions in a set of managed classes(see the section “Security Outside of IIS” later in this chapter).
Identities and Principals: A Short OverviewBefore you can read about the details of securing .NET Remoting components, you have tounderstand how the .NET Framework supports implementing authentication and authorization.
Basically the .NET Framework differentiates between two types of security mechanisms:code access security (CAS) and role-based security (RBS). While code access security managespermissions on a code level by permitting or denying access to resources on a code basis,role-based security deals with user identification and authorization.2
The foundation for role-based security is laid by two interfaces that can be found in theSystem.Security.Principal namespace: IIdentity and IPrincipal. The identity can be seen as theresult of an authentication process and identifies the user as well as the way the user has authen-ticated against the system. The principal is something like the account description for the user.Created with an identity, it connects the user with the roles assigned to the user. Based on theidentity as well as the principal, you can implement your own authorization system. Out ofthe box the .NET Framework comes with four identities and two types of principals as you cansee in Figure 5-3.
<<interface>>IIdentity
<<interface>>IPrincipal
GenericPrincipal
WindowsPrincipal
GenericIdentity
FormsIdentity PassportIdentity
WindowsIdentity
-IsAuthenticated : bool-AuthenticationType : string-Name : string
-Ticket -HasTicket-TicketAge-HexPUID-...
-Token-IsAnonymous-IsGuest-IsSystem
-Identity : IIdentity+IsInRole() : bool
* 1
Figure 5-3. IIdentity and IPrincipal
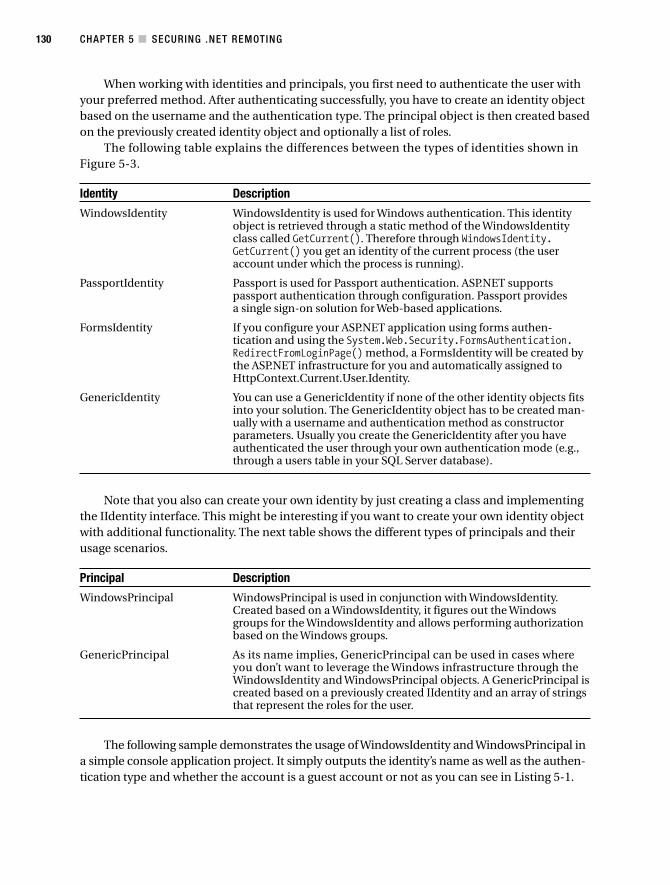
CHAPTER 5 ■ SECURING .NET REMOTING130
When working with identities and principals, you first need to authenticate the user withyour preferred method. After authenticating successfully, you have to create an identity objectbased on the username and the authentication type. The principal object is then created basedon the previously created identity object and optionally a list of roles.
The following table explains the differences between the types of identities shown inFigure 5-3.
Identity Description
WindowsIdentity WindowsIdentity is used for Windows authentication. This identityobject is retrieved through a static method of the WindowsIdentityclass called GetCurrent(). Therefore through WindowsIdentity.GetCurrent() you get an identity of the current process (the useraccount under which the process is running).
PassportIdentity Passport is used for Passport authentication. ASP.NET supportspassport authentication through configuration. Passport providesa single sign-on solution for Web-based applications.
FormsIdentity If you configure your ASP.NET application using forms authen-tication and using the System.Web.Security.FormsAuthentication.RedirectFromLoginPage() method, a FormsIdentity will be created bythe ASP.NET infrastructure for you and automatically assigned toHttpContext.Current.User.Identity.
GenericIdentity You can use a GenericIdentity if none of the other identity objects fitsinto your solution. The GenericIdentity object has to be created man-ually with a username and authentication method as constructorparameters. Usually you create the GenericIdentity after you haveauthenticated the user through your own authentication mode (e.g.,through a users table in your SQL Server database).
Note that you also can create your own identity by just creating a class and implementingthe IIdentity interface. This might be interesting if you want to create your own identity objectwith additional functionality. The next table shows the different types of principals and theirusage scenarios.
Principal Description
WindowsPrincipal WindowsPrincipal is used in conjunction with WindowsIdentity.Created based on a WindowsIdentity, it figures out the Windowsgroups for the WindowsIdentity and allows performing authorizationbased on the Windows groups.
GenericPrincipal As its name implies, GenericPrincipal can be used in cases whereyou don’t want to leverage the Windows infrastructure through theWindowsIdentity and WindowsPrincipal objects. A GenericPrincipal iscreated based on a previously created IIdentity and an array of stringsthat represent the roles for the user.
The following sample demonstrates the usage of WindowsIdentity and WindowsPrincipal ina simple console application project. It simply outputs the identity’s name as well as the authen-tication type and whether the account is a guest account or not as you can see in Listing 5-1.
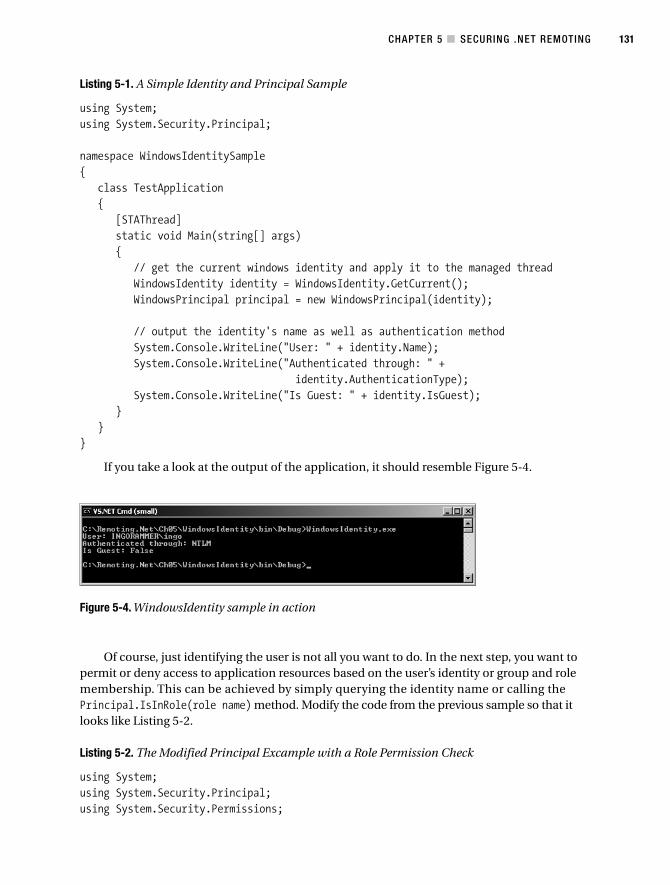
CHAPTER 5 ■ SECURING .NET REMOTING 131
Listing 5-1. A Simple Identity and Principal Sample
using System;using System.Security.Principal;
namespace WindowsIdentitySample{
class TestApplication{
[STAThread]static void Main(string[] args){
// get the current windows identity and apply it to the managed threadWindowsIdentity identity = WindowsIdentity.GetCurrent();WindowsPrincipal principal = new WindowsPrincipal(identity);
// output the identity's name as well as authentication methodSystem.Console.WriteLine("User: " + identity.Name);System.Console.WriteLine("Authenticated through: " +
identity.AuthenticationType);System.Console.WriteLine("Is Guest: " + identity.IsGuest);
}}
}
If you take a look at the output of the application, it should resemble Figure 5-4.
Of course, just identifying the user is not all you want to do. In the next step, you want topermit or deny access to application resources based on the user’s identity or group and rolemembership. This can be achieved by simply querying the identity name or calling thePrincipal.IsInRole(role name) method. Modify the code from the previous sample so that itlooks like Listing 5-2.
Listing 5-2. The Modified Principal Excample with a Role Permission Check
using System;using System.Security.Principal;using System.Security.Permissions;
Figure 5-4. WindowsIdentity sample in action
CHAPTER 5 ■ SECURING .NET REMOTING132
namespace WindowsIdentitySample{
class TestApplication{
[STAThread]static void Main(string[] args){
// get the current windows identity and apply it to the managed threadWindowsIdentity identity = WindowsIdentity.GetCurrent();WindowsPrincipal principal = new WindowsPrincipal(identity);
// output the identity's name as well as authentication methodSystem.Console.WriteLine("User: " + identity.Name);System.Console.WriteLine("Authenticated through: " +
identity.AuthenticationType);System.Console.WriteLine("Is Guest: " + identity.IsGuest);
// set the identity to the managed thread's CurrentPrincipalSystem.Threading.Thread.CurrentPrincipal = principal;
// first of all demonstrate imperative securitySystem.Console.WriteLine("\nTesting imperative security...");if(principal.IsInRole(@"BUILTIN\Administrators")){
System.Console.WriteLine(">> Administrative task performed <<");}else{
System.Console.WriteLine("!! You are not an administrator !!");}
// at last test declarative securitytry{
System.Console.WriteLine("\nTesting declarative security...");DeclarativeSecurity();System.Console.WriteLine("Test succeeded!\n");
}catch(System.Security.SecurityException ex){
System.Console.WriteLine("Security exception occured: " +ex.Message);
}}
[PrincipalPermission(SecurityAction.Demand, Role=@"BUILTIN\Users")]static void DeclarativeSecurity(){
CHAPTER 5 ■ SECURING .NET REMOTING 133
System.Console.WriteLine("Function called successfully!");}
}}
In the preceding sample, you can see one important fact: the .NET Framework role-basedsecurity distinguishes between two types of authorization checks! Authorization checks basedon Principal.IsInRole() are called imperative security checks; you can also enforce securitychecks through the CLR itself by adding a permission demand attribute to the function as youcan see with the DeclarativeSecurity function.
When using declarative security, the CLR itself enforces the permission as specified in thepermission attribute. But to make declarative security work, the # for the executing managedthread must be initialized correctly (otherwise access is denied per default). When working withASP.NET and IIS or the .NET Remoting security samples (see the section “Securing with IIS”in this chapter) the thread’s CurrentPrincipal will be initialized automatically. In other appli-cations you have to initialize the CurrentPrincipal yourself on each launched thread or callAppDomain.CurrentDomain.SetThreadPrincipal(your principal) to automatically let the CLRinitialize the CurrentPrincipal for the threads of the AppDomain automatically.
■Note For more information on identities and principals, refer to the MSDN documentation (http://msdn.microsoft.com/library/default.asp?url=/library/en-us/cpguide/html/
cpconRole-BasedSecurity.asp).
Now that you know how the .NET Framework supports different security models, I can showyou the details of securing .NET Remoting solutions. First of all, I dive into the authenticationwithin IIS and outside of IIS, and last but not least I will leverage the knowledge of principals andidentities to perform simple authorization tasks.
Securing with IISThe easiest way for securing .NET Remoting components is hosting them in Internet InformationServices, or IIS. IIS provides you with authentication against Windows accounts as well astransport-level security through SSL. It allows you to restrict your callers through IP addressrestrictions, too.
Authentication with IISThe functionality of IIS is not tailored to remoting, but applies to all IIS applications, includingstatic HTML pages and ASP.NET Web applications. Actually, .NET Remoting components arehosted within the ASP.NET runtime infrastructure. Because SSL will be configured through theIIS management console the same way as for any other IIS application without any effects onthe code of your .NET Remoting application, the focus will be on authentication. The followingtable lists the authentication modes supported by IIS.
CHAPTER 5 ■ SECURING .NET REMOTING134
Authentication Mode Description
Anonymous access Configures the Web application so that the client does not need toauthenticate to the server when doing requests. In this case, theapplication defaults to a user account called IUSR_MACHINENAME.
Basic authentication Basic authentication is a standard authentication mode defined bythe W3C. When using basic authentication, the client has to send usercredentials in the HTTP header to the server. The server afterwardsauthenticates the user and grants or denies access based on theauthenticated credentials. Basic authentication sends the usernameand password in clear text across the wire and therefore should beused only together with SSL.
Digest authentication Digest authentication is a more secure authentication mode. It hashesthe password before sending it across the wire. Therefore, the passwordis not sent clear text across the wire. However, a hacker can still try tobreak the password using brute force attacks or dictionary attacks.
Windows authentication Windows authentication is the most secure authentication protocolavailable for IIS because it uses NTLM or, if possible, Kerberosauthentication (see the section “Authentication Protocols in Windows”earlier in this chapter). Windows authentication is the best case forany intranet scenarios or extranet scenarios, but it does not work inany case for Internet scenarios because some proxies and firewallsblock the authentication requests as well as necessary ports. Win-dows authentication has to be supported by the client, server, andany proxy server in between.
It doesn’t matter which of these authentication modes you are using. Whether basic, digest,or Windows, for any user who wants to access the Web application or .NET Remoting componenthosted in IIS, a valid Windows user account must be available (either a local machine or ActiveDirectory account). That is different from, for example, ASP.NET forms authentication, whichcan be used with ASP.NET Web applications and provides developers with the possibility ofvalidating credentials against a custom store like a SQL Server database.
The security properties can be specified in the IIS snap-in to the MMC. You can see a ver-sion of the previous server configured for authenticated use in Figure 5-5.
■Caution The basic authentication scheme, which is usable for remoting components, is not at all secure.Using a TCP/IP packet sniffer, one can easily capture the authentication tokens and resend them with theirown requests to “impersonate” the original user. For really secure applications, encryption using SSL is highlyrecommended, and may even be a necessity.
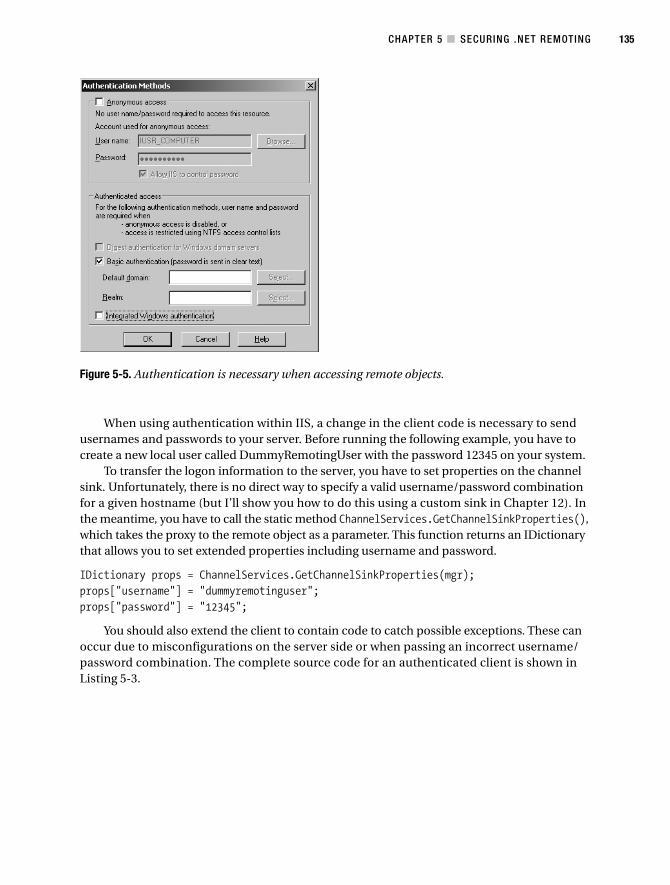
CHAPTER 5 ■ SECURING .NET REMOTING 135
Figure 5-5. Authentication is necessary when accessing remote objects.
When using authentication within IIS, a change in the client code is necessary to sendusernames and passwords to your server. Before running the following example, you have tocreate a new local user called DummyRemotingUser with the password 12345 on your system.
To transfer the logon information to the server, you have to set properties on the channelsink. Unfortunately, there is no direct way to specify a valid username/password combinationfor a given hostname (but I’ll show you how to do this using a custom sink in Chapter 12). Inthe meantime, you have to call the static method ChannelServices.GetChannelSinkProperties(),which takes the proxy to the remote object as a parameter. This function returns an IDictionarythat allows you to set extended properties including username and password.
IDictionary props = ChannelServices.GetChannelSinkProperties(mgr);props["username"] = "dummyremotinguser";props["password"] = "12345";
You should also extend the client to contain code to catch possible exceptions. These canoccur due to misconfigurations on the server side or when passing an incorrect username/password combination. The complete source code for an authenticated client is shown inListing 5-3.
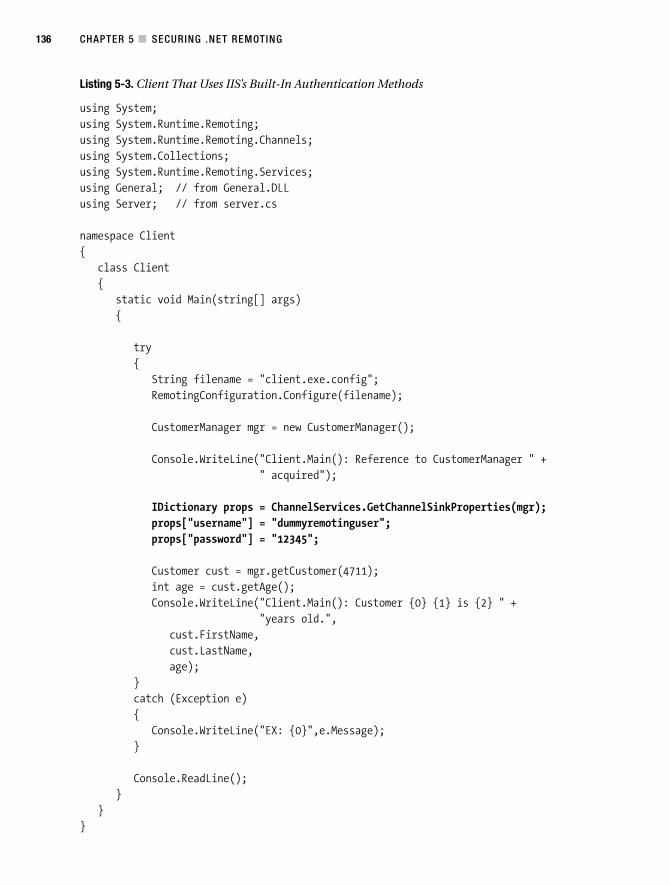
CHAPTER 5 ■ SECURING .NET REMOTING136
Listing 5-3. Client That Uses IIS’s Built-In Authentication Methods
using System;using System.Runtime.Remoting;using System.Runtime.Remoting.Channels;using System.Collections;using System.Runtime.Remoting.Services;using General; // from General.DLLusing Server; // from server.cs
namespace Client{
class Client{
static void Main(string[] args){
try{
String filename = "client.exe.config";RemotingConfiguration.Configure(filename);
CustomerManager mgr = new CustomerManager();
Console.WriteLine("Client.Main(): Reference to CustomerManager " +" acquired");
IDictionary props = ChannelServices.GetChannelSinkProperties(mgr);props["username"] = "dummyremotinguser";props["password"] = "12345";
Customer cust = mgr.getCustomer(4711);int age = cust.getAge();Console.WriteLine("Client.Main(): Customer {0} {1} is {2} " +
"years old.",cust.FirstName,cust.LastName,age);
}catch (Exception e){
Console.WriteLine("EX: {0}",e.Message);}
Console.ReadLine();}
}}
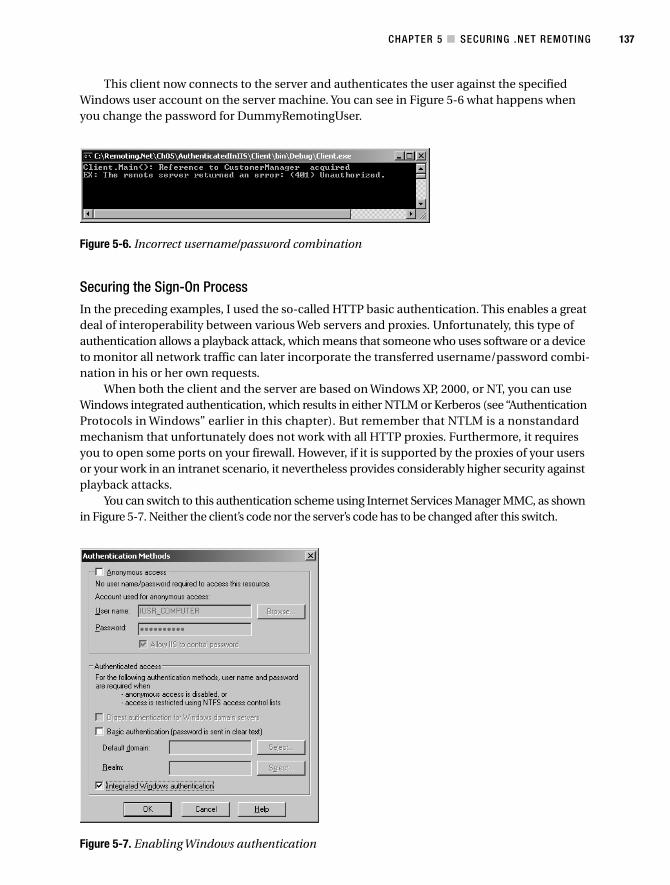
CHAPTER 5 ■ SECURING .NET REMOTING 137
Figure 5-6. Incorrect username/password combination
Figure 5-7. Enabling Windows authentication
This client now connects to the server and authenticates the user against the specifiedWindows user account on the server machine. You can see in Figure 5-6 what happens whenyou change the password for DummyRemotingUser.
Securing the Sign-On ProcessIn the preceding examples, I used the so-called HTTP basic authentication. This enables a greatdeal of interoperability between various Web servers and proxies. Unfortunately, this type ofauthentication allows a playback attack, which means that someone who uses software or a deviceto monitor all network traffic can later incorporate the transferred username/password combi-nation in his or her own requests.
When both the client and the server are based on Windows XP, 2000, or NT, you can useWindows integrated authentication, which results in either NTLM or Kerberos (see “AuthenticationProtocols in Windows” earlier in this chapter). But remember that NTLM is a nonstandardmechanism that unfortunately does not work with all HTTP proxies. Furthermore, it requiresyou to open some ports on your firewall. However, if it is supported by the proxies of your usersor your work in an intranet scenario, it nevertheless provides considerably higher security againstplayback attacks.
You can switch to this authentication scheme using Internet Services Manager MMC, as shownin Figure 5-7. Neither the client’s code nor the server’s code has to be changed after this switch.
CHAPTER 5 ■ SECURING .NET REMOTING138
■Note You can also enable both basic and Windows authentication at the same time. The remoting frame-work (as well as standard Internet Explorer) will choose the most secure method that has been announced bythe server.
Enabling Single Sign-OnWhen your user is authenticated against the same Windows domain in which your server islocated, you finally can use integrated security. This will log your users on to the server withoutfurther need of specifying usernames or passwords.
The HTTP channel has a property called useDefaultCredentials. When this property is set totrue via the configuration file and no username or password is specified within the ChannelSink’sproperties, the credentials of the currently logged-on user will be passed to the server. BecauseWindows 2000 can’t get to a user’s cleartext password, this scheme is only possible when usingWindows authentication on your Web server.
When you want to switch to this authentication scheme, you just have to remove all callsto the channel sink’s properties, which set the username or password, and instead include thefollowing configuration file:
<configuration><system.runtime.remoting><application><channels>
<channel ref="http" useDefaultCredentials="true" /></channels>
<client><wellknown type="Server.CustomerManager, Client"
url="http://localhost:8080/MyAuthServer/CustomerManager.soap" /></client>
</application></system.runtime.remoting>
</configuration>
Encryption and IISUsing authentication, especially the Windows NT challenge/response authentication method,will give you a somewhat secured environment. Nevertheless, when transferring sensitive dataover the Internet, authentication is just not enough—encryption needs to be applied as well.
Hosting your components in IIS gives you a head start when it comes to encryption, asyou can easily leverage the built-in SSL capabilities. All it takes is installing a server-side
CHAPTER 5 ■ SECURING .NET REMOTING 139
3. Hint: you can get free certificates for development purposes from VeriSign (http://www.verisign.com).You can also download and install the IIS resource kit from http://www.microsoft.com/downloads,which includes a tool called selfssl.exe that can be used for creating a SSL certificate as well as enablingSSL on IIS with just one step. SelfSSL is intended for installing SSL on development and/or testmachines.
4. To get to the Windows certificate store, log on as administrator and start a management consolethrough Start ➤ Run ➤ mmc.exe. Afterwards select File ➤ Add/Remove Snap In and add the Certifi-cates MMC snap-in. This snap-in allows you to manage the certificates of your local machine as wellas the current user profile. Actually, certificates are stored in the Documents and Settings\All Users\Application Data\Microsoft directory.
certificate3 and changing the URL in the client-side configuration file. After making an edit tojust one line (changing “http:” to “https:”), all traffic will be secured—including the HTTP headers,authentication information, and, of course, the transferred data.
The changed configuration file looks like this:
<configuration><system.runtime.remoting><application><client><wellknown type="Server.CustomerManager, Client"
url="https://localhost/MyAuthServer/CustomerManager.soap" /></client>
</application></system.runtime.remoting>
</configuration>
SSL encryption is sometimes accused of imposing a somewhat huge overhead. This is notalways true, because the “real” asymmetric cryptography only takes place during the processof establishing the secured HTTP connection. This secure connection will be reused, and theoverhead thus minimized.
■Note You can get certificates either through buying them from a well-known authority like VeriSign or youcan set up your own certificate authority (Windows 2000 Server or Windows Server 2003 includes certificateservices that can be installed). When using your own certificate authority or using selfssl.exe of the IISresource kit for issuing a server certificate, you have to configure the client to trust your certificate authorityby installing the authority’s certificate in the Trusted root Certification Authorities area in your Windows certifi-cate store.4
When testing the example in Chapter 2 using both HTTPS and HTTP, you’ll see that a binaryformatter via HTTPS/SSL is faster, and fewer bytes are transferred over the network than whenusing a SOAP formatter via conventional HTTP.
CHAPTER 5 ■ SECURING .NET REMOTING140
5. I discuss these sinks and how to create them in Chapter 13.
Security Outside of IISEven though IIS provides a secure and scalable hosting environment for .NET applications, youmight want or need to host your components in a custom Windows service. In this case, thereis no built-in support for security in the .NET Remoting framework.
Of course, the first idea would be to manually serialize and transfer the user’s credentialsacross the wire, but that is definitely insecure as the server has no way to figure out whether trust-ing the information received is a good idea or not. Furthermore, information is not encrypted soyou would have to provide your own encryption and digital signature functionality, which leads tokey exchange issues. (When and how to exchange keys? Where should you store the keys?)
Instead, there are other cryptographically safe methods for exchanging these credentials.Microsoft for example released an additional component in 2003 that provides for new securityfeatures for .NET Remoting. This component is now available in version 2.0 including completesource code and extensive documentation from http://msdn.microsoft.com/library/en-us/dndotnet/html/remsec.asp. To compile and use this component, you also have to downloada managed wrapper of the SSPI features, which provide access to the underlying securityinfrastructure of the Windows operating system. You can download the SSPI component—alsoincluding source code and lots of documentation—from http://msdn.microsoft.com/library/en-us/dndotnet/html/remsspi.asp.
■Note Please be aware that this component is not officially supported by Microsoft, the publisher of thisbook, or its authors. Version 2.0 of .NET will, however, include similar security functions that can be usedindependently of the chosen transport protocol.
Using the MSDN Security SamplesAfter downloading and extracting these components, you will find two new DLLs in subdirec-tories of the installation folders:
• Microsoft.Samples.Security.SSPI.DLL
• Microsoft.Samples.Runtime.Remoting.Security.DLL
The first component is a managed wrapper around the SSPI Win32 API functions, whilethe second component is a set of remoting extensibility classes (remoting sinks5) that leveragesthe SSPI wrapper for providing the security features to .NET Remoting.
For using the components provided with the sample, you have to complete two steps: firstof all you have to add a reference to both assembly DLLs in the client as well as the server throughthe Visual Studio .NET Add Reference dialog box. In a second step, you have to configure theextensions through configuration files.
Let’s start with implementing a sample that leverages the security samples provided byMicrosoft. At first you will get a short look at the shared assembly that defines the serializabletypes that will be sent across the wire as well as the interface for the server-side singleton objectas you can see in Listing 5-4.
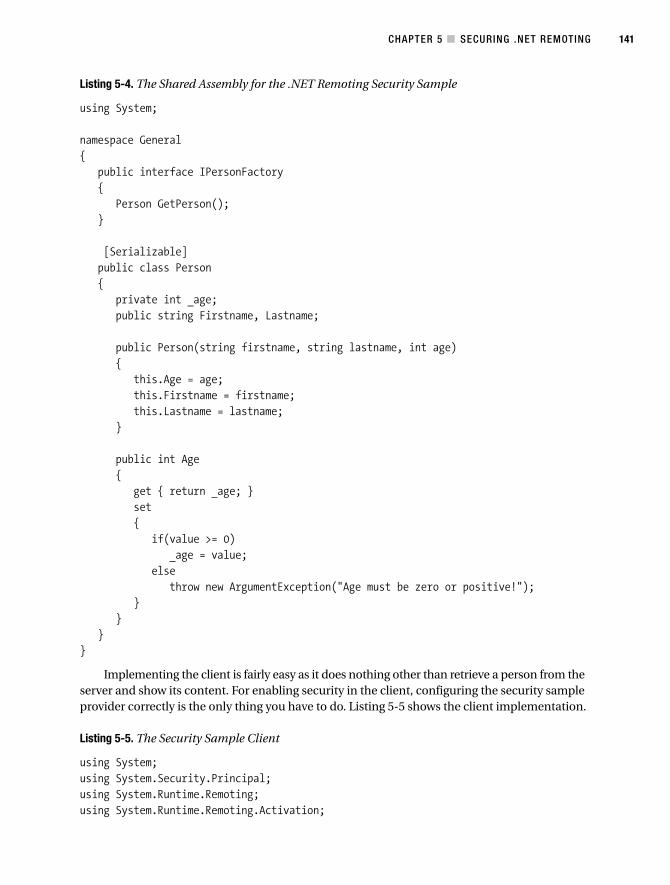
CHAPTER 5 ■ SECURING .NET REMOTING 141
Listing 5-4. The Shared Assembly for the .NET Remoting Security Sample
using System;
namespace General{
public interface IPersonFactory{
Person GetPerson();}
[Serializable]public class Person{
private int _age;public string Firstname, Lastname;
public Person(string firstname, string lastname, int age){
this.Age = age;this.Firstname = firstname;this.Lastname = lastname;
}
public int Age{
get { return _age; }set{
if(value >= 0)_age = value;
elsethrow new ArgumentException("Age must be zero or positive!");
}}
}}
Implementing the client is fairly easy as it does nothing other than retrieve a person from theserver and show its content. For enabling security in the client, configuring the security sampleprovider correctly is the only thing you have to do. Listing 5-5 shows the client implementation.
Listing 5-5. The Security Sample Client
using System;using System.Security.Principal;using System.Runtime.Remoting;using System.Runtime.Remoting.Activation;
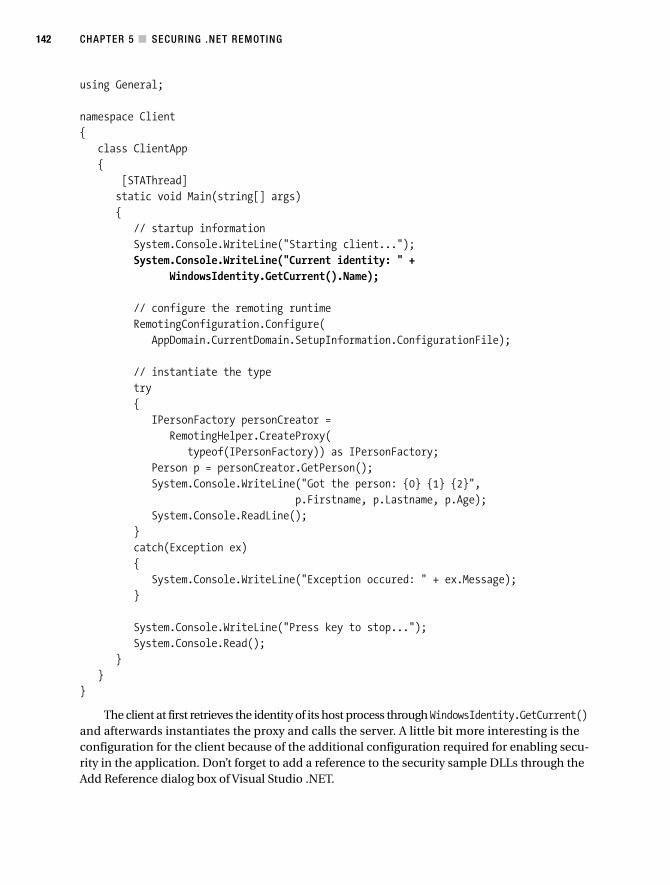
CHAPTER 5 ■ SECURING .NET REMOTING142
using General;
namespace Client{
class ClientApp{
[STAThread]static void Main(string[] args){
// startup informationSystem.Console.WriteLine("Starting client...");System.Console.WriteLine("Current identity: " +
WindowsIdentity.GetCurrent().Name);
// configure the remoting runtimeRemotingConfiguration.Configure(
AppDomain.CurrentDomain.SetupInformation.ConfigurationFile);
// instantiate the typetry{
IPersonFactory personCreator =RemotingHelper.CreateProxy(
typeof(IPersonFactory)) as IPersonFactory;Person p = personCreator.GetPerson();System.Console.WriteLine("Got the person: {0} {1} {2}",
p.Firstname, p.Lastname, p.Age);System.Console.ReadLine();
}catch(Exception ex){
System.Console.WriteLine("Exception occured: " + ex.Message);}
System.Console.WriteLine("Press key to stop...");System.Console.Read();
}}
}
The client at first retrieves the identity of its host process through WindowsIdentity.GetCurrent()and afterwards instantiates the proxy and calls the server. A little bit more interesting is theconfiguration for the client because of the additional configuration required for enabling secu-rity in the application. Don’t forget to add a reference to the security sample DLLs through theAdd Reference dialog box of Visual Studio .NET.
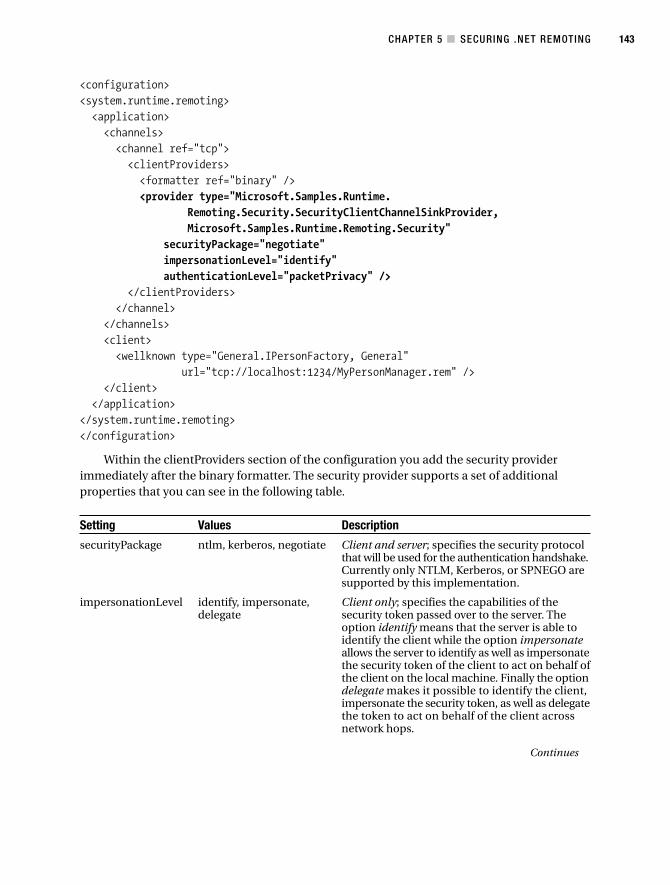
CHAPTER 5 ■ SECURING .NET REMOTING 143
<configuration><system.runtime.remoting><application><channels><channel ref="tcp"><clientProviders><formatter ref="binary" /><provider type="Microsoft.Samples.Runtime.
Remoting.Security.SecurityClientChannelSinkProvider,Microsoft.Samples.Runtime.Remoting.Security"
securityPackage="negotiate"impersonationLevel="identify"authenticationLevel="packetPrivacy" />
</clientProviders></channel>
</channels><client><wellknown type="General.IPersonFactory, General"
url="tcp://localhost:1234/MyPersonManager.rem" /></client>
</application></system.runtime.remoting></configuration>
Within the clientProviders section of the configuration you add the security providerimmediately after the binary formatter. The security provider supports a set of additionalproperties that you can see in the following table.
Setting Values Description
securityPackage ntlm, kerberos, negotiate Client and server; specifies the security protocolthat will be used for the authentication handshake.Currently only NTLM, Kerberos, or SPNEGO aresupported by this implementation.
impersonationLevel identify, impersonate, Client only; specifies the capabilities of the delegate security token passed over to the server. The
option identify means that the server is able toidentify the client while the option impersonateallows the server to identify as well as impersonatethe security token of the client to act on behalf ofthe client on the local machine. Finally the optiondelegate makes it possible to identify the client,impersonate the security token, as well as delegatethe token to act on behalf of the client acrossnetwork hops.
Continues
CHAPTER 5 ■ SECURING .NET REMOTING144
Setting Values Description
authenticationLevel call, packetIntegrity, Client and server; essentially the authentication packetPrivacy level specifies the level of protection for mes-
sages being exchanged between the client andthe server (therefore I think that the name isa little bit misleading): call means that the clientgets authenticated on each method call. Mes-sages are sent unprotected across the wire. Withthe option packetIntegrity the client gets authen-ticated on each method call and the sender addsa digital signature to the message. On thereceiver’s side the digital signature will be veri-fied. The last option, packetPrivacy, means thatthe client gets authenticated on each methodcall and the message will be encrypted by thesender. The receiver decrypts and subsequentlyprocesses the message. The reason why you canselect these different levels is that you have tomake a performance vs. security decision. Themore secure your application becomes, themore processing power is needed.
The Kerberos security package can only be used when working within a domain and hav-ing a connection to the domain controller (KDC). Otherwise, NTLM must be used (you canalso use negotiate, which will result in NTLM in this case and in Kerberos if you are workingwithin the domain having a connection to the KDC).
■Note Windows 2000 and above supports cached credentials, which allow you to log on to your machinewith your Active Directory domain account even if you don’t have a connection to the KDC (on Windows thisis the domain controller). If you are testing or developing .NET Remoting components under your domain useraccount using the SSPI security solution, you will not be able to impersonate credentials from your client(running under your domain user account) to a .NET Remoting server running in a different logon sessionunder a different user account because you either don’t have a ticket for impersonation or the ticket is expired.
The authentication level must be set on both the client and the server. But what happensif the level on the client does not match the level on the server? Similar to DCOM, the behavioris as follows: if the authentication level on the client is lower than the authentication level onthe server, then an exception will be thrown. If the authentication level on the client is higherthan on the server, the server will switch to the higher authentication level. Of course, the low-est authentication level is call and the highest authentication level is packetPrivacy.
Essentially, this means that a minimum authentication level can be enforced by the server.If the client exceeds this level, the server is okay; if not, it rejects the request and throws an excep-tion. For example, if the server is configured for packetIntegrity and the client for call, then theserver will not accept the message and throws an exception. On the other hand, if the client isconfigured to packetPrivacy, in this case the server switches to the higher authentication leveland also uses packetPrivacy.
CHAPTER 5 ■ SECURING .NET REMOTING 145
Now let’s switch to the implementation of the server that will only accept authenticatedrequests. The server outputs information about the client user calling the server as well as theidentity of the process in which the server is hosted. Listing 5-6 shows the complete implemen-tation of the server.
Listing 5-6. The Server for the Security Sample
using System;using System.Security.Principal;using System.Runtime.Remoting;
namespace Server{
public class PersonManager : MarshalByRefObject, General.IPersonFactory{
public General.Person GetPerson(){
try{
WindowsIdentity identity = WindowsIdentity.GetCurrent();
System.Console.WriteLine("\nIncoming request...");System.Console.WriteLine("Current windows identity: " +
identity.Name);System.Console.WriteLine("Current thread identity: " +
System.Threading.Thread.CurrentPrincipal.Identity.Name);}catch(Exception ex){
System.Console.WriteLine("Exception occured: " + ex.Message);}
System.Console.WriteLine("Returning a new person...");return new General.Person("Mini", "Coperground", 50);
}}
public class ServerApp{
[STAThread]static void Main(string[] args){
string configFile =AppDomain.CurrentDomain.SetupInformation.ConfigurationFile;
RemotingConfiguration.Configure(configFile);System.Console.WriteLine("Server started, waiting for requests...");System.Console.WriteLine("Server's process user: " +
WindowsIdentity.GetCurrent().Name);
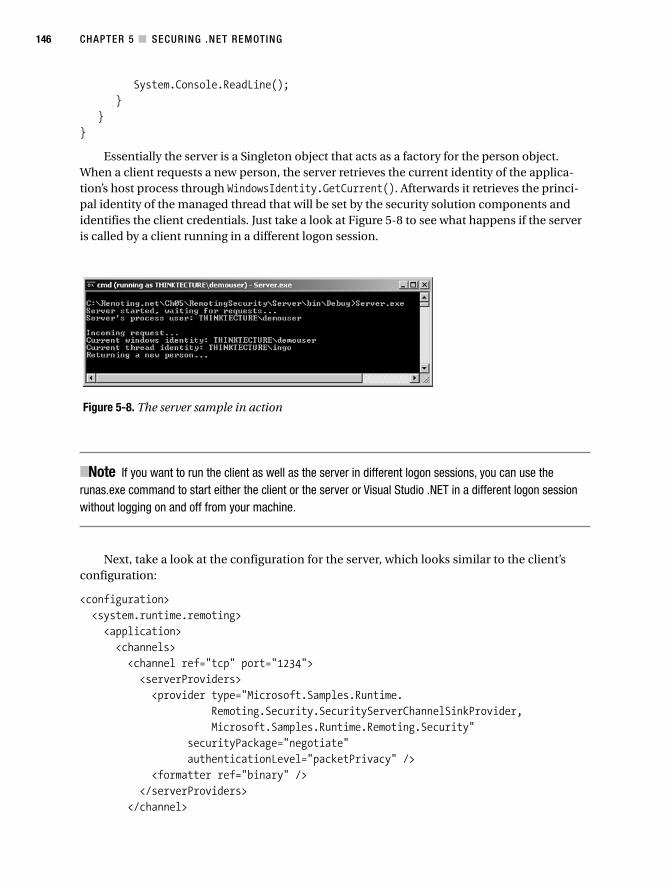
CHAPTER 5 ■ SECURING .NET REMOTING146
System.Console.ReadLine();}
}}
Essentially the server is a Singleton object that acts as a factory for the person object.When a client requests a new person, the server retrieves the current identity of the applica-tion’s host process through WindowsIdentity.GetCurrent(). Afterwards it retrieves the princi-pal identity of the managed thread that will be set by the security solution components andidentifies the client credentials. Just take a look at Figure 5-8 to see what happens if the serveris called by a client running in a different logon session.
■Note If you want to run the client as well as the server in different logon sessions, you can use therunas.exe command to start either the client or the server or Visual Studio .NET in a different logon sessionwithout logging on and off from your machine.
Next, take a look at the configuration for the server, which looks similar to the client’sconfiguration:
<configuration><system.runtime.remoting><application><channels><channel ref="tcp" port="1234"><serverProviders><provider type="Microsoft.Samples.Runtime.
Remoting.Security.SecurityServerChannelSinkProvider,Microsoft.Samples.Runtime.Remoting.Security"
securityPackage="negotiate"authenticationLevel="packetPrivacy" />
<formatter ref="binary" /></serverProviders>
</channel>
Figure 5-8. The server sample in action
CHAPTER 5 ■ SECURING .NET REMOTING 147
</channels><service><wellknown type="Server.PersonManager, Server"
objectUri="MyPersonManager.rem"mode="Singleton" />
</service></application>
</system.runtime.remoting></configuration>
The only difference between the configuration of the client and the configuration of the server is that the serverProviders configuration option is used this time, and theSecurityServerChannelSinkProvider is used instead of the SecurityClientChannelSinkProvider.Also the formatter is specified after the security provider to verify security before deserializingthe message.
■Note The impersonationLevel option is not used by the server as it gives the client the capability to spec-ify the capabilities of the token sent from to the server. As only the client should be able to specify the capa-bilities of the security token sent to the server, this option is not useful for the server at all.
Specifying an impersonationLevel of impersonate or delegate allows the client to specifythe capabilities of the security token sent to the server. The server authenticates the user buttakes no further action—this means it does not impersonate the caller automatically. To verifyand test this, append the following code within the try block of the GetPerson() method of thePersonManager class in the server:
// get the client's identity and impersonate the tokenidentity = System.Threading.Thread.CurrentPrincipal.Identity as WindowsIdentity;WindowsImpersonationContext impCtx = identity.Impersonate();
// now output the current windows identitySystem.Console.WriteLine("Identity impersonated...");System.Console.WriteLine("Current identity: {0}",
WindowsIdentity.GetCurrent().Name);
// revert the identity to itself and again output the current windows identityimpCtx.Undo();System.Console.WriteLine("Identity reverted: {0}",
WindowsIdentity.GetCurrent().Name);
Now let’s test the application again and take a look at the output of the server. Notice thatyou originally configured the impersonationLevel in the first version of the client to the settingidentify, which only allows the server to identify the client but not impersonate or delegate thesecurity token. Therefore you are running in an exception this time, as you can see in Figure 5-9.
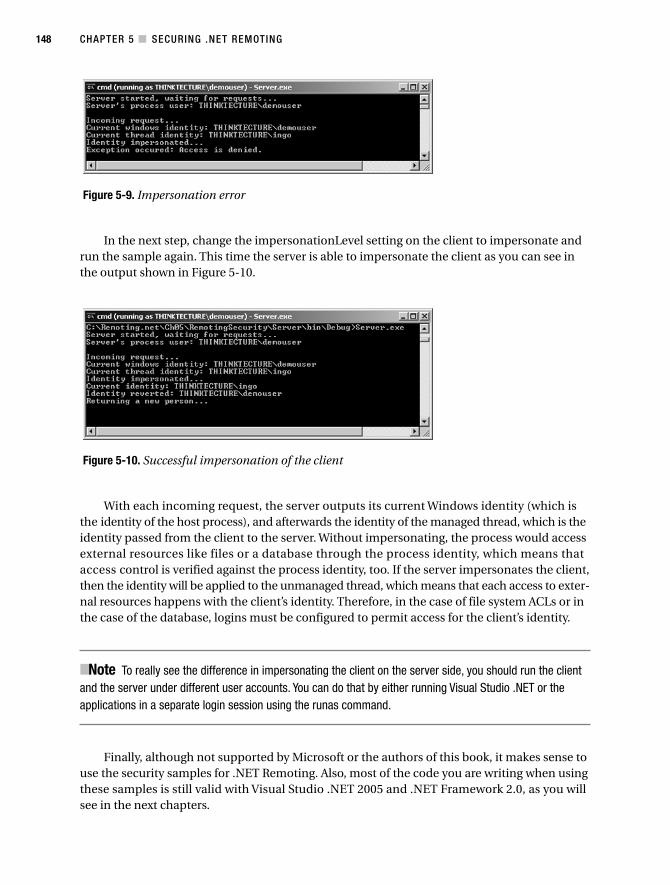
CHAPTER 5 ■ SECURING .NET REMOTING148
In the next step, change the impersonationLevel setting on the client to impersonate andrun the sample again. This time the server is able to impersonate the client as you can see inthe output shown in Figure 5-10.
With each incoming request, the server outputs its current Windows identity (which isthe identity of the host process), and afterwards the identity of the managed thread, which is theidentity passed from the client to the server. Without impersonating, the process would accessexternal resources like files or a database through the process identity, which means thataccess control is verified against the process identity, too. If the server impersonates the client,then the identity will be applied to the unmanaged thread, which means that each access to exter-nal resources happens with the client’s identity. Therefore, in the case of file system ACLs or inthe case of the database, logins must be configured to permit access for the client’s identity.
■Note To really see the difference in impersonating the client on the server side, you should run the clientand the server under different user accounts. You can do that by either running Visual Studio .NET or theapplications in a separate login session using the runas command.
Finally, although not supported by Microsoft or the authors of this book, it makes sense touse the security samples for .NET Remoting. Also, most of the code you are writing when usingthese samples is still valid with Visual Studio .NET 2005 and .NET Framework 2.0, as you willsee in the next chapters.
Figure 5-9. Impersonation error
Figure 5-10. Successful impersonation of the client
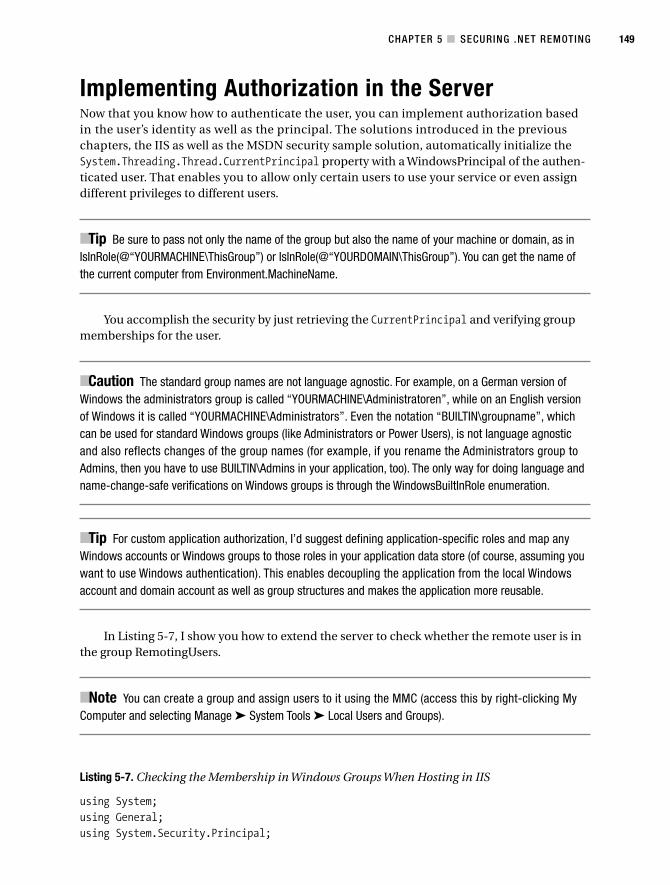
CHAPTER 5 ■ SECURING .NET REMOTING 149
Implementing Authorization in the ServerNow that you know how to authenticate the user, you can implement authorization basedin the user’s identity as well as the principal. The solutions introduced in the previouschapters, the IIS as well as the MSDN security sample solution, automatically initialize theSystem.Threading.Thread.CurrentPrincipal property with a WindowsPrincipal of the authen-ticated user. That enables you to allow only certain users to use your service or even assigndifferent privileges to different users.
■Tip Be sure to pass not only the name of the group but also the name of your machine or domain, as inIsInRole(@“YOURMACHINE\ThisGroup”) or IsInRole(@“YOURDOMAIN\ThisGroup”). You can get the name ofthe current computer from Environment.MachineName.
You accomplish the security by just retrieving the CurrentPrincipal and verifying groupmemberships for the user.
■Caution The standard group names are not language agnostic. For example, on a German version ofWindows the administrators group is called “YOURMACHINE\Administratoren”, while on an English versionof Windows it is called “YOURMACHINE\Administrators”. Even the notation “BUILTIN\groupname”, whichcan be used for standard Windows groups (like Administrators or Power Users), is not language agnosticand also reflects changes of the group names (for example, if you rename the Administrators group toAdmins, then you have to use BUILTIN\Admins in your application, too). The only way for doing language andname-change-safe verifications on Windows groups is through the WindowsBuiltInRole enumeration.
■Tip For custom application authorization, I’d suggest defining application-specific roles and map anyWindows accounts or Windows groups to those roles in your application data store (of course, assuming youwant to use Windows authentication). This enables decoupling the application from the local Windowsaccount and domain account as well as group structures and makes the application more reusable.
In Listing 5-7, I show you how to extend the server to check whether the remote user is inthe group RemotingUsers.
■Note You can create a group and assign users to it using the MMC (access this by right-clicking MyComputer and selecting Manage ➤ System Tools ➤ Local Users and Groups).
Listing 5-7. Checking the Membership in Windows Groups When Hosting in IIS
using System;using General;using System.Security.Principal;
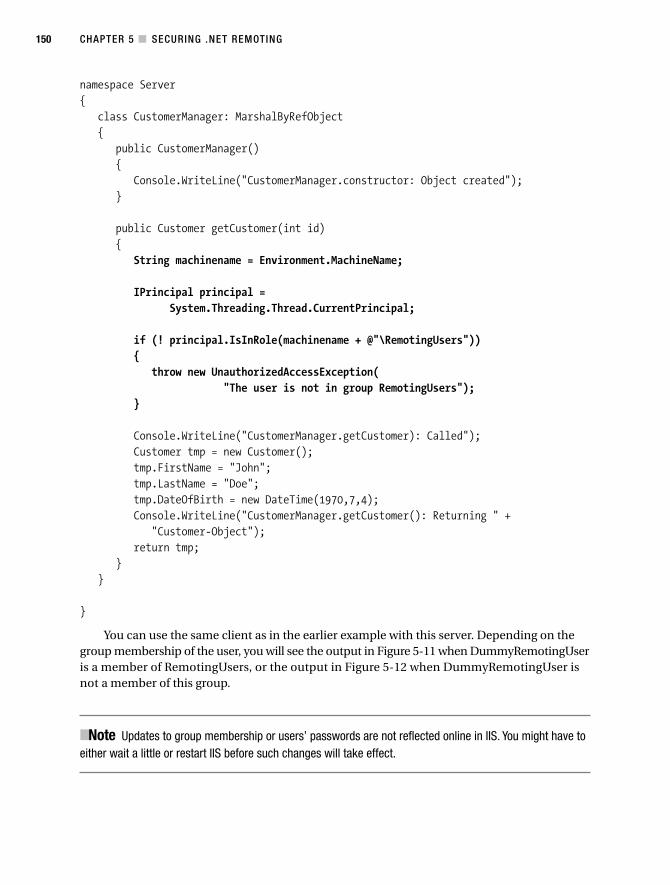
CHAPTER 5 ■ SECURING .NET REMOTING150
namespace Server{
class CustomerManager: MarshalByRefObject{
public CustomerManager(){
Console.WriteLine("CustomerManager.constructor: Object created");}
public Customer getCustomer(int id){
String machinename = Environment.MachineName;
IPrincipal principal =System.Threading.Thread.CurrentPrincipal;
if (! principal.IsInRole(machinename + @"\RemotingUsers")){
throw new UnauthorizedAccessException("The user is not in group RemotingUsers");
}
Console.WriteLine("CustomerManager.getCustomer): Called");Customer tmp = new Customer();tmp.FirstName = "John";tmp.LastName = "Doe";tmp.DateOfBirth = new DateTime(1970,7,4);Console.WriteLine("CustomerManager.getCustomer(): Returning " +
"Customer-Object");return tmp;
}}
}
You can use the same client as in the earlier example with this server. Depending on thegroup membership of the user, you will see the output in Figure 5-11 when DummyRemotingUseris a member of RemotingUsers, or the output in Figure 5-12 when DummyRemotingUser isnot a member of this group.
■Note Updates to group membership or users’ passwords are not reflected online in IIS. You might have toeither wait a little or restart IIS before such changes will take effect.
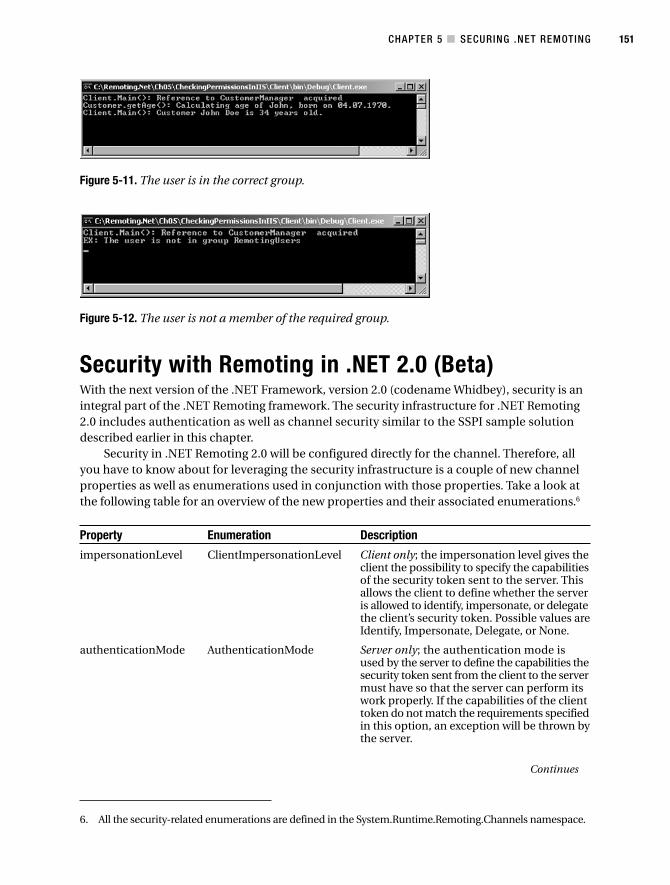
CHAPTER 5 ■ SECURING .NET REMOTING 151
Figure 5-11. The user is in the correct group.
Figure 5-12. The user is not a member of the required group.
6. All the security-related enumerations are defined in the System.Runtime.Remoting.Channels namespace.
Security with Remoting in .NET 2.0 (Beta)With the next version of the .NET Framework, version 2.0 (codename Whidbey), security is anintegral part of the .NET Remoting framework. The security infrastructure for .NET Remoting2.0 includes authentication as well as channel security similar to the SSPI sample solutiondescribed earlier in this chapter.
Security in .NET Remoting 2.0 will be configured directly for the channel. Therefore, allyou have to know about for leveraging the security infrastructure is a couple of new channelproperties as well as enumerations used in conjunction with those properties. Take a look atthe following table for an overview of the new properties and their associated enumerations.6
Property Enumeration Description
impersonationLevel ClientImpersonationLevel Client only; the impersonation level gives theclient the possibility to specify the capabilitiesof the security token sent to the server. Thisallows the client to define whether the serveris allowed to identify, impersonate, or delegatethe client’s security token. Possible values areIdentify, Impersonate, Delegate, or None.
authenticationMode AuthenticationMode Server only; the authentication mode isused by the server to define the capabilities thesecurity token sent from the client to the servermust have so that the server can perform itswork properly. If the capabilities of the clienttoken do not match the requirements specifiedin this option, an exception will be thrown bythe server.
Continues
CHAPTER 5 ■ SECURING .NET REMOTING152
Property Enumeration Description
encryption Encryption Client and server; the encryption optionspecifies the transport-level security for themessages sent between the client and theserver. Both the client and the server must beconfigured with the same encryption set-tings. Possible options are None, Sign, andEncryptAndSign.
The first major difference between the SSPI security solution sample for .NET Remoting 1.xand the security infrastructure of .NET Remoting 2.0 is the fact that the server can specify therequirements for the client security token so that these requirements can be verified up frontand not at the moment when the server, for example, tries to impersonate the client (as is thecase with the SSPI sample solution).
Secondly, with .NET 2.0 the server automatically impersonates the client’s identity if boththe server and the client are configured for impersonation. You can see this when retrieving theWindows identity through WindowsIdentity.GetCurrent() without calling WindowsIdentity.Impersonate() up front.
Next you’ll see a code sample that will give you a closer look at the new .NET Remotinginfrastructure. You will develop a client as well as a server but will configure the client’s channelprogrammatically and the server through the configuration file so that you can see both ways.The server of the sample offers a simple method that takes a string message as well as an inte-ger counter. For this purpose, you’ll define the server’s interface in a shared assembly as youcan see in the following code snippet:
namespace RemotedType{
public interface IRemotedType{
void DoCall(string message, int counter);}
}
Listing 5-8 contains the server’s implementation. The server offers a simple remote objectthat implements the interface. For each request the server outputs the authenticated user aswell as the managed and the unmanaged thread’s identity.
Listing 5-8. A Server Using the .NET Remoting 2.0 Security Infrastructure
using System;using System.Collections.Generic;using System.Runtime.Remoting;using System.Runtime.Remoting.Messaging;
using System.Security;using System.Security.Principal;
namespace RemotingServer{
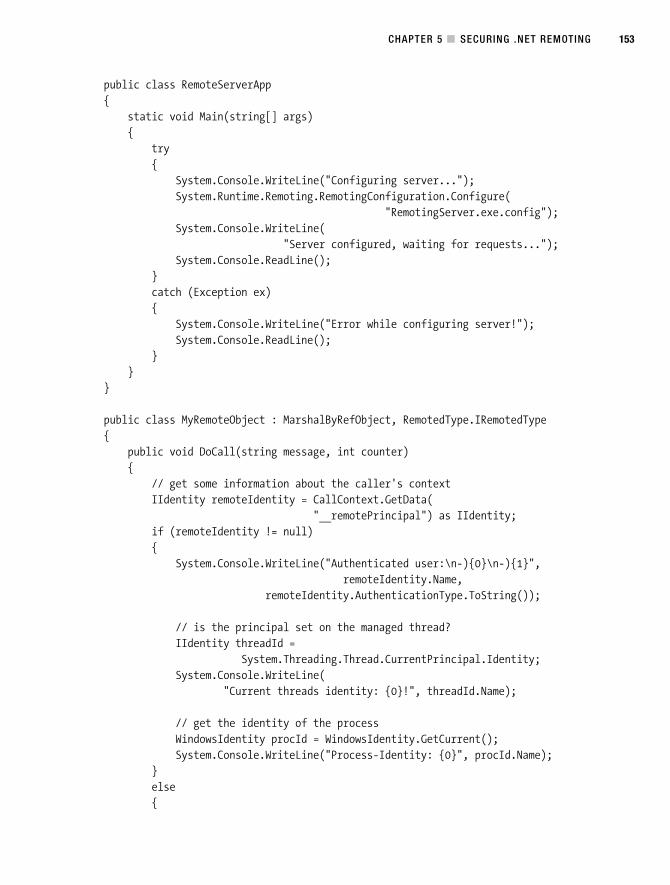
CHAPTER 5 ■ SECURING .NET REMOTING 153
public class RemoteServerApp{
static void Main(string[] args){
try{
System.Console.WriteLine("Configuring server...");System.Runtime.Remoting.RemotingConfiguration.Configure(
"RemotingServer.exe.config");System.Console.WriteLine(
"Server configured, waiting for requests...");System.Console.ReadLine();
}catch (Exception ex){
System.Console.WriteLine("Error while configuring server!");System.Console.ReadLine();
}}
}
public class MyRemoteObject : MarshalByRefObject, RemotedType.IRemotedType{
public void DoCall(string message, int counter){
// get some information about the caller's contextIIdentity remoteIdentity = CallContext.GetData(
"__remotePrincipal") as IIdentity;if (remoteIdentity != null){
System.Console.WriteLine("Authenticated user:\n-){0}\n-){1}",remoteIdentity.Name,
remoteIdentity.AuthenticationType.ToString());
// is the principal set on the managed thread?IIdentity threadId =
System.Threading.Thread.CurrentPrincipal.Identity;System.Console.WriteLine(
"Current threads identity: {0}!", threadId.Name);
// get the identity of the processWindowsIdentity procId = WindowsIdentity.GetCurrent();System.Console.WriteLine("Process-Identity: {0}", procId.Name);
}else{

CHAPTER 5 ■ SECURING .NET REMOTING154
System.Console.Write("!! Attention, not authenticated !!");}
// just do the workfor (int i = 0; i < counter; i++){
System.Console.WriteLine("You told me to say {0}: {1}!",counter.ToString(), message);
}}
}}
All you have to do for enabling security on the server is configure the authenticationModesetting for the server channel. Optionally you can configure the encryption setting for ensuringtransport-level security.
<configuration><system.runtime.remoting>
<application name="MyServer"><service>
<wellknowntype="RemotingServer.MyRemoteObject, RemotingServer"objectUri="MyObject.rem"mode="SingleCall" />
</service><channels>
<channel ref="tcp"port="9001"encryption="None"authenticationMode="IdentifyCallers" />
</channels></application>
</system.runtime.remoting></configuration>
In this case the server requires the client to authenticate itself. Encryption is not required.To encrypt the traffic or to sign the messages sent across the wire, just specify the encryptionoption Sign or EncryptAndSign. For other authentication modes, configure the server with oneof the options available in the AuthenticationMode enumeration.
Before you start changing the configuration, you create the client and test the solution withauthentication through the TCP channel. This example demonstrates using the TCP channelinstead of the IPC channel so that network traffic can be traced to see the effect of the optionson the wire. In the client you configure the security options programmatically as you can see inListing 5-9.
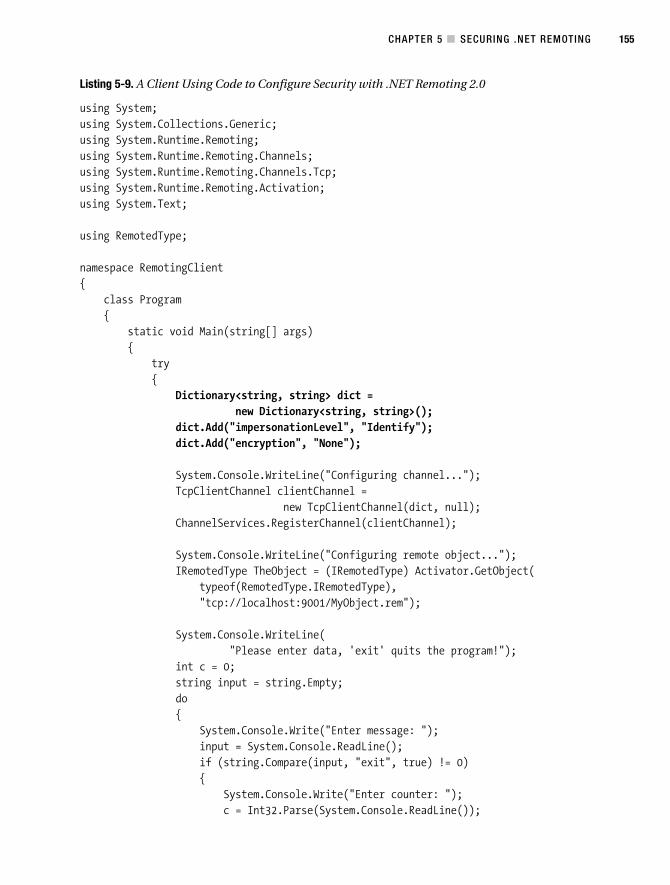
CHAPTER 5 ■ SECURING .NET REMOTING 155
Listing 5-9. A Client Using Code to Configure Security with .NET Remoting 2.0
using System;using System.Collections.Generic;using System.Runtime.Remoting;using System.Runtime.Remoting.Channels;using System.Runtime.Remoting.Channels.Tcp;using System.Runtime.Remoting.Activation;using System.Text;
using RemotedType;
namespace RemotingClient{
class Program{
static void Main(string[] args){
try{
Dictionary<string, string> dict =new Dictionary<string, string>();
dict.Add("impersonationLevel", "Identify");dict.Add("encryption", "None");
System.Console.WriteLine("Configuring channel...");TcpClientChannel clientChannel =
new TcpClientChannel(dict, null);ChannelServices.RegisterChannel(clientChannel);
System.Console.WriteLine("Configuring remote object...");IRemotedType TheObject = (IRemotedType) Activator.GetObject(
typeof(RemotedType.IRemotedType),"tcp://localhost:9001/MyObject.rem");
System.Console.WriteLine("Please enter data, 'exit' quits the program!");
int c = 0;string input = string.Empty;do{
System.Console.Write("Enter message: ");input = System.Console.ReadLine();if (string.Compare(input, "exit", true) != 0){
System.Console.Write("Enter counter: ");c = Int32.Parse(System.Console.ReadLine());
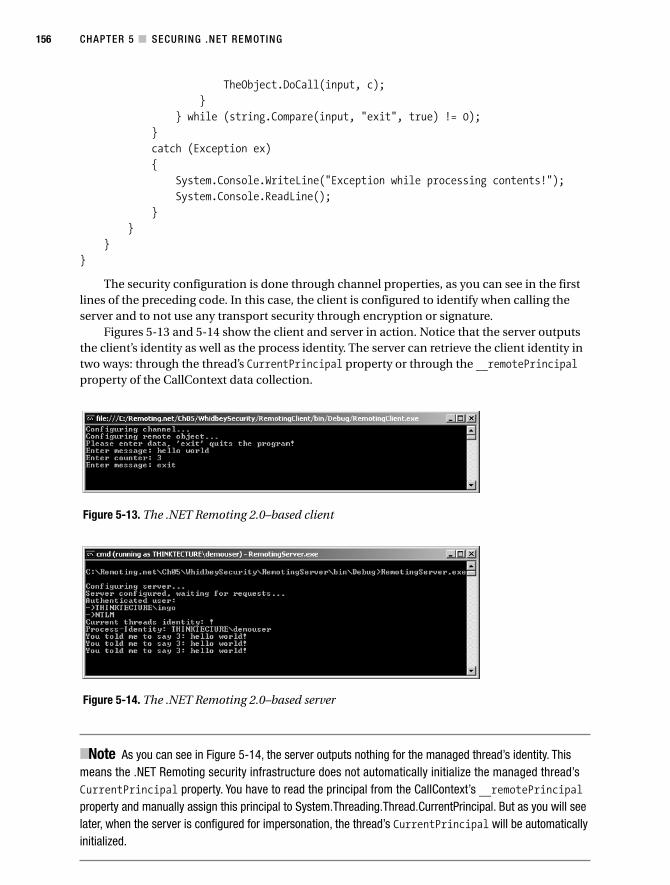
CHAPTER 5 ■ SECURING .NET REMOTING156
Figure 5-14. The .NET Remoting 2.0–based server
Figure 5-13. The .NET Remoting 2.0–based client
TheObject.DoCall(input, c);}
} while (string.Compare(input, "exit", true) != 0);}catch (Exception ex){
System.Console.WriteLine("Exception while processing contents!");System.Console.ReadLine();
}}
}}
The security configuration is done through channel properties, as you can see in the firstlines of the preceding code. In this case, the client is configured to identify when calling theserver and to not use any transport security through encryption or signature.
Figures 5-13 and 5-14 show the client and server in action. Notice that the server outputsthe client’s identity as well as the process identity. The server can retrieve the client identity intwo ways: through the thread’s CurrentPrincipal property or through the __remotePrincipalproperty of the CallContext data collection.
■Note As you can see in Figure 5-14, the server outputs nothing for the managed thread’s identity. Thismeans the .NET Remoting security infrastructure does not automatically initialize the managed thread’sCurrentPrincipal property. You have to read the principal from the CallContext’s __remotePrincipalproperty and manually assign this principal to System.Threading.Thread.CurrentPrincipal. But as you will seelater, when the server is configured for impersonation, the thread’s CurrentPrincipal will be automaticallyinitialized.
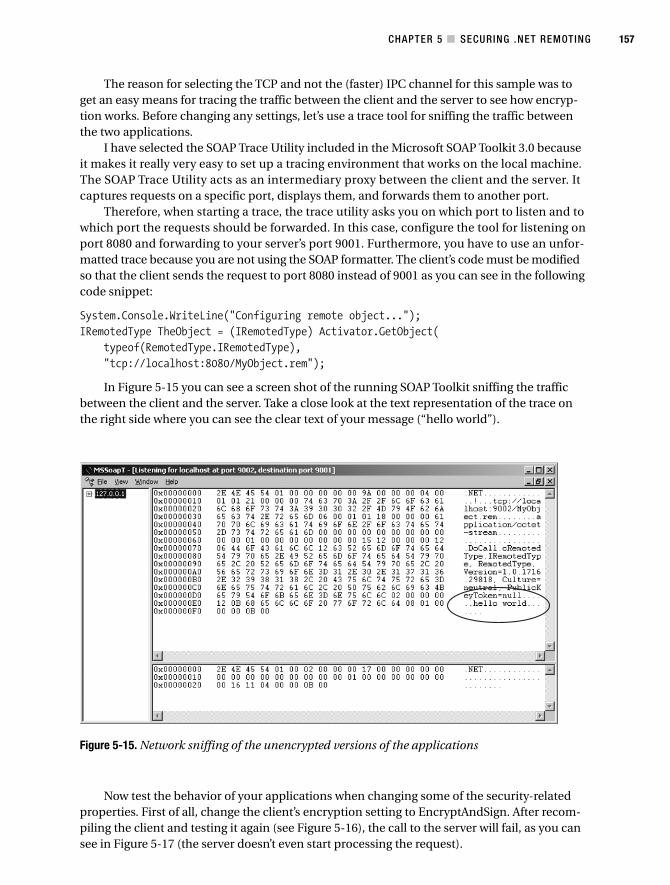
CHAPTER 5 ■ SECURING .NET REMOTING 157
Figure 5-15. Network sniffing of the unencrypted versions of the applications
The reason for selecting the TCP and not the (faster) IPC channel for this sample was toget an easy means for tracing the traffic between the client and the server to see how encryp-tion works. Before changing any settings, let’s use a trace tool for sniffing the traffic betweenthe two applications.
I have selected the SOAP Trace Utility included in the Microsoft SOAP Toolkit 3.0 becauseit makes it really very easy to set up a tracing environment that works on the local machine.The SOAP Trace Utility acts as an intermediary proxy between the client and the server. Itcaptures requests on a specific port, displays them, and forwards them to another port.
Therefore, when starting a trace, the trace utility asks you on which port to listen and towhich port the requests should be forwarded. In this case, configure the tool for listening onport 8080 and forwarding to your server’s port 9001. Furthermore, you have to use an unfor-matted trace because you are not using the SOAP formatter. The client’s code must be modifiedso that the client sends the request to port 8080 instead of 9001 as you can see in the followingcode snippet:
System.Console.WriteLine("Configuring remote object...");IRemotedType TheObject = (IRemotedType) Activator.GetObject(
typeof(RemotedType.IRemotedType),"tcp://localhost:8080/MyObject.rem");
In Figure 5-15 you can see a screen shot of the running SOAP Toolkit sniffing the trafficbetween the client and the server. Take a close look at the text representation of the trace onthe right side where you can see the clear text of your message (“hello world”).
Now test the behavior of your applications when changing some of the security-relatedproperties. First of all, change the client’s encryption setting to EncryptAndSign. After recom-piling the client and testing it again (see Figure 5-16), the call to the server will fail, as you cansee in Figure 5-17 (the server doesn’t even start processing the request).
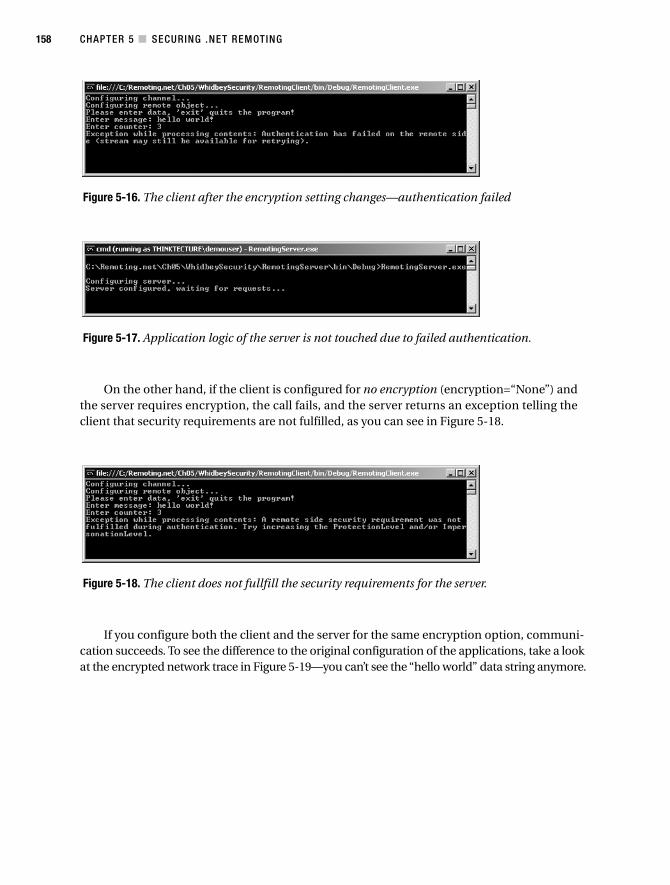
CHAPTER 5 ■ SECURING .NET REMOTING158
Figure 5-18. The client does not fullfill the security requirements for the server.
Figure 5-17. Application logic of the server is not touched due to failed authentication.
On the other hand, if the client is configured for no encryption (encryption=“None”) andthe server requires encryption, the call fails, and the server returns an exception telling theclient that security requirements are not fulfilled, as you can see in Figure 5-18.
If you configure both the client and the server for the same encryption option, communi-cation succeeds. To see the difference to the original configuration of the applications, take a lookat the encrypted network trace in Figure 5-19—you can’t see the “hello world” data string anymore.
Figure 5-16. The client after the encryption setting changes—authentication failed

CHAPTER 5 ■ SECURING .NET REMOTING 159
Figure 5-19. Sniffing the encrypted network traffic
Figure 5-20. The client runs under the current user’s account.
7. The impersonationLevel option on the client must be configured to either impersonate or delegate toallow the server to impersonate or delegate the client’s security token.
Next, change the configuration settings for the impersonation level. If you change the serversetting for the authenticationMode to ImpersonateCallers the server tries to impersonate eachclient. If the client’s token does not allow the server to impersonate or delegate the securitytoken7 the server rejects the call and you get an exception on the client. If the client and theserver are configured properly, impersonation (or delegation) works. To test delegation ona single machine, run the client under a different identity using the runas.exe command.Figures 5-20 and 5-21 show the two applications in action when the client’s impersonationLevelproperty is set to impersonate and the server’s authenticationMode is set to ImpersonateCallers.
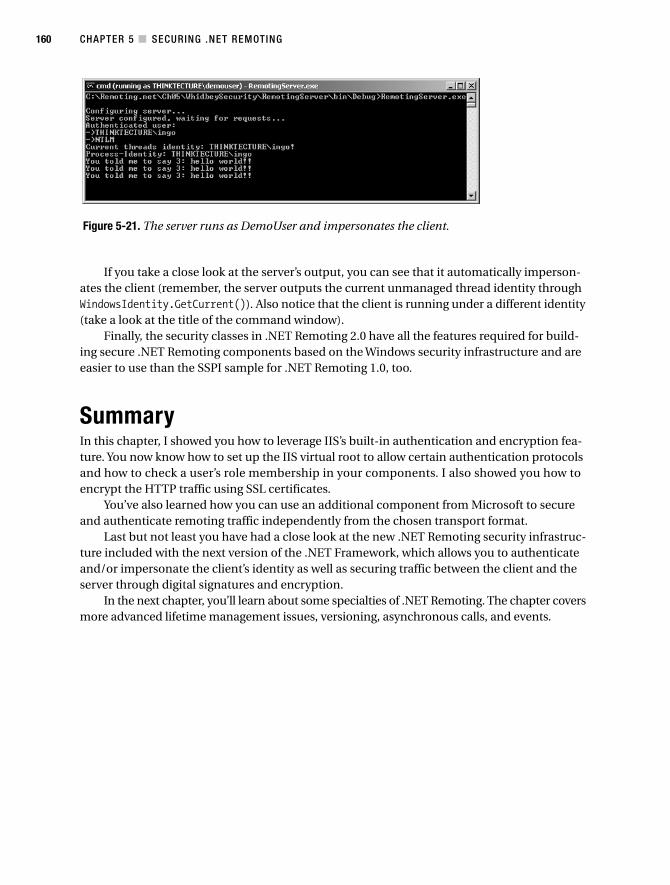
CHAPTER 5 ■ SECURING .NET REMOTING160
Figure 5-21. The server runs as DemoUser and impersonates the client.
If you take a close look at the server’s output, you can see that it automatically imperson-ates the client (remember, the server outputs the current unmanaged thread identity throughWindowsIdentity.GetCurrent()). Also notice that the client is running under a different identity(take a look at the title of the command window).
Finally, the security classes in .NET Remoting 2.0 have all the features required for build-ing secure .NET Remoting components based on the Windows security infrastructure and areeasier to use than the SSPI sample for .NET Remoting 1.0, too.
SummaryIn this chapter, I showed you how to leverage IIS’s built-in authentication and encryption fea-ture. You now know how to set up the IIS virtual root to allow certain authentication protocolsand how to check a user’s role membership in your components. I also showed you how toencrypt the HTTP traffic using SSL certificates.
You’ve also learned how you can use an additional component from Microsoft to secureand authenticate remoting traffic independently from the chosen transport format.
Last but not least you have had a close look at the new .NET Remoting security infrastruc-ture included with the next version of the .NET Framework, which allows you to authenticateand/or impersonate the client’s identity as well as securing traffic between the client and theserver through digital signatures and encryption.
In the next chapter, you’ll learn about some specialties of .NET Remoting. The chapter coversmore advanced lifetime management issues, versioning, asynchronous calls, and events.
161
C H A P T E R 6
■ ■ ■
Creating Remoting Clients
Now that you know how to create, deploy, and secure basic .NET Remoting components, thischapter will focus on creating different types of client applications. The reason for doing this isto show you how to configure .NET Remoting for each different type of client. Also, the hostingenvironment for the client has some implications on security—especially when it comes toauthenticating against the server or accessing system resources.
Creating a Server for Your ClientsBefore you start digging into the details for creating different types of .NET Remoting clients,you need a server that you can call. To keep things simple, your server will run in a consoleapplication itself, as you have already seen creation of different types of servers in Chapter 4.
For all your applications, you will use the same shared assembly named General where youput the server interfaces as well as the classes serialized across the network. For simplicity, also putthe RemotingHelper, which you know from Chapter 4, into the shared assembly. The sharedassembly defines two server interfaces: IRemoteFactory, which will be used for your primaryserver, and IRemoteSecond, which will be used later (for now it is not important). Also, a personclass similar to the one of Chapter 5 is defined as you can see in Listing 6-1.
Listing 6-1. The Shared Assembly for the Sample Applications
using System;
namespace General{public interface IRemoteFactory{Person GetPerson();
}
CHAPTER 6 ■ CREATING REMOTING CLIENTS162
public interface IRemoteSecond{int GetNewAge();
}
[Serializable]public class Person{public int Age;public string Firstname, Lastname;
public Person(string first, string last, int age){this.Age = age;this.Firstname = first;this.Lastname = last;
}}
}
Your primary server is a console application and just implements the IRemoteFactoryinterface and is configured in the application’s configuration file. Listing 6-2 shows the imple-mentation of the server.
Listing 6-2. The Implementation of the Primary Server
using System;using System.Runtime.Remoting;
using General;
namespace Server{public class ServerImpl : MarshalByRefObject, IRemoteFactory{private int _ageCount = 10;
public Person GetPerson(){System.Console.WriteLine(">> Incoming request...");System.Console.WriteLine(">> Returning person {0}...", _ageCount);
Person p = new Person("Test", "App", _ageCount++);return p;
}}
class ServerApp{
CHAPTER 6 ■ CREATING REMOTING CLIENTS 163
[STAThread]static void Main(string[] args){System.Console.WriteLine("Starting server...");RemotingConfiguration.Configure("Server.exe.config");
System.Console.WriteLine("Server configured, waiting for requests!");System.Console.ReadLine();
}}
}
The server will be configured with a TCP channel listening on port 1234 and runs as a server-activated Singleton object as you can see via the following configuration file:
<configuration><system.runtime.remoting><application><channels><channel ref="tcp" port="1234" />
</channels><service><wellknown type="Server.ServerImpl, Server"
objectUri="MyServer.rem"mode="Singleton" />
</service></application>
</system.runtime.remoting></configuration>
For all the clients you will create in the following sections, you will use this server. Just fortesting purposes, you start with creation of a console client to verify whether the server worksor not. You should already know how to implement a console client, so I will go through thesteps very briefly.
Creating a Console ClientThe simplest .NET Remoting clients you can create are console applications. That was the reasonfor using them in the previous chapters. Configuration is put into the application configuration(Exename.exe.config) but can be put in any other file, too. In your console application project,which you can create with Visual Studio, just add references to System.Runtime.Remoting.dlland to your shared assembly General.dll. Afterwards, add a new item to your application—anapplication configuration file. In Listing 6-3, you can see the very simple implementation ofthe console client.
Listing 6-3. Console Client Implementation
using System;using System.Runtime.Remoting;using System.Runtime.Remoting.Activation;

CHAPTER 6 ■ CREATING REMOTING CLIENTS164
using General;using General.Client;
namespace ConsoleClient{class ClientApp{
[STAThread]static void Main(string[] args){System.Console.WriteLine("Configuring client...");RemotingConfiguration.Configure("ConsoleClient.exe.config");
System.Console.WriteLine("Calling server...");IRemoteFactory factory =
(IRemoteFactory)RemotingHelper.CreateProxy(typeof(IRemoteFactory));Person p = factory.GetPerson();System.Console.WriteLine(">> Person retrieved: {0} {1}, {2}",
p.Firstname, p.Lastname, p.Age.ToString());System.Console.WriteLine();
}}
}
You can see the client configuration file in the following code excerpt. The client configuresthe TCP channel as well as the well-known server object running on localhost on port 1234.
<configuration><system.runtime.remoting><application><channels><channel ref="tcp" />
</channels><client><wellknown type="General.IRemoteFactory, General"
url="tcp://localhost:1234/MyServer.rem" /></client>
</application></system.runtime.remoting>
</configuration>
In the client code just shown, the RemotingHelper class introduced in Chapter 4 is usedfor instantiating the client proxy class. Now that you have created the client, you can test theapplication. In Figures 6-1 and 6-2 you can see the client as well as the server.
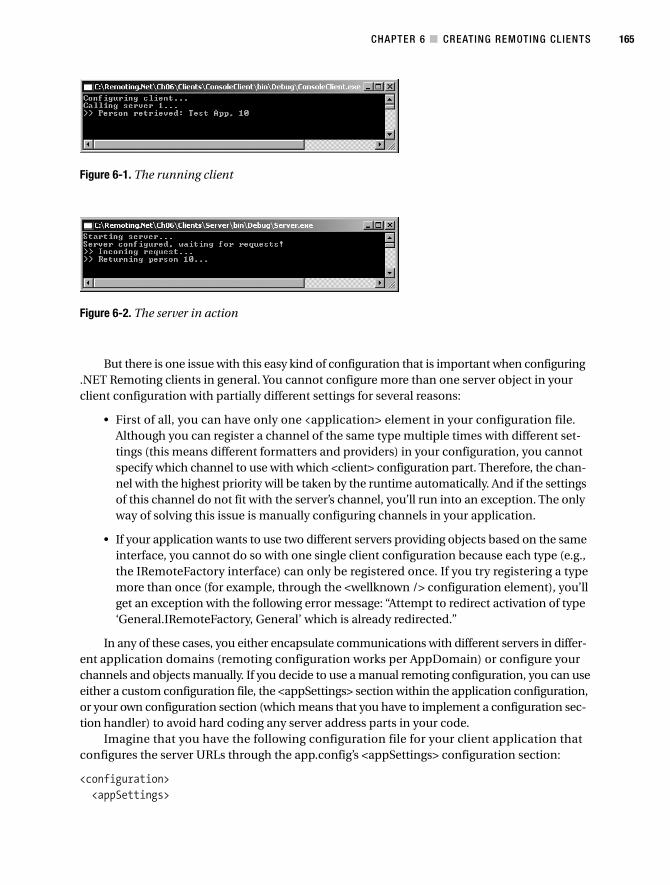
CHAPTER 6 ■ CREATING REMOTING CLIENTS 165
Figure 6-1. The running client
Figure 6-2. The server in action
But there is one issue with this easy kind of configuration that is important when configuring.NET Remoting clients in general. You cannot configure more than one server object in yourclient configuration with partially different settings for several reasons:
• First of all, you can have only one <application> element in your configuration file.Although you can register a channel of the same type multiple times with different set-tings (this means different formatters and providers) in your configuration, you cannotspecify which channel to use with which <client> configuration part. Therefore, the chan-nel with the highest priority will be taken by the runtime automatically. And if the settingsof this channel do not fit with the server’s channel, you’ll run into an exception. The onlyway of solving this issue is manually configuring channels in your application.
• If your application wants to use two different servers providing objects based on the sameinterface, you cannot do so with one single client configuration because each type (e.g.,the IRemoteFactory interface) can only be registered once. If you try registering a typemore than once (for example, through the <wellknown /> configuration element), you’llget an exception with the following error message: “Attempt to redirect activation of type‘General.IRemoteFactory, General’ which is already redirected.”
In any of these cases, you either encapsulate communications with different servers in differ-ent application domains (remoting configuration works per AppDomain) or configure yourchannels and objects manually. If you decide to use a manual remoting configuration, you can useeither a custom configuration file, the <appSettings> section within the application configuration,or your own configuration section (which means that you have to implement a configuration sec-tion handler) to avoid hard coding any server address parts in your code.
Imagine that you have the following configuration file for your client application thatconfigures the server URLs through the app.config’s <appSettings> configuration section:
<configuration><appSettings>
CHAPTER 6 ■ CREATING REMOTING CLIENTS166
<add key="Server1" value="tcp://localhost:1234/MyServer.rem" /><add key="Server2"
value="http://localhost/ClientWebRemoting/SecondIntermed.soap" /></appSettings>
</configuration>
In this case, you can use the following code for getting the URLs of the two servers fromthe configuration files when using manual configuration of .NET Remoting:
// calling first serverConsole.WriteLine("\r\nCalling first server...");url = ConfigurationSettings.AppSettings["Server1"];
ChannelServices.RegisterChannel(new TcpChannel());factory = (IRemoteFactory)Activator.GetObject(
typeof(IRemoteFactory), url);
p = factory.GetPerson();System.Console.WriteLine(">> Person retrieved: {0} {1}, {2}",
p.Firstname, p.Lastname, p.Age.ToString());System.Console.WriteLine();
// calling second serverConsole.WriteLine("Calling second server...");url = ConfigurationSettings.AppSettings["Server2"];ChannelServices.RegisterChannel(new HttpChannel());factory = (IRemoteFactory)Activator.GetObject(
typeof(IRemoteFactory), url);
p = factory.GetPerson();System.Console.WriteLine(">> Person retrieved: {0} {1}, {2}", p.Firstname,p.Lastname, p.Age.ToString());System.Console.WriteLine();
For client-activated objects, you have to use the Activator.CreateInstance() methodinstead of the Activator.GetObject() method. When doing so, you have to specify the type aswell as an activation URL within the parameters as can be seen in the following code snippet:
string Url = ConfigurationSettings.AppSettings["Server1"];System.Runtime.Remoting.Activation.UrlAttribute urlattr =
new System.Runtime.Remoting.Activation.UrlAttribute (Url);
object[] actparams = {urlattr};server = (YourServerType)Activator.CreateInstance(
typeof(YourServerType),null, actparams);
The UrlAttribute class can be found in the System.Runtime.Remoting.Activation namespaceand specifies the activation URL for the client-activated object in that case.
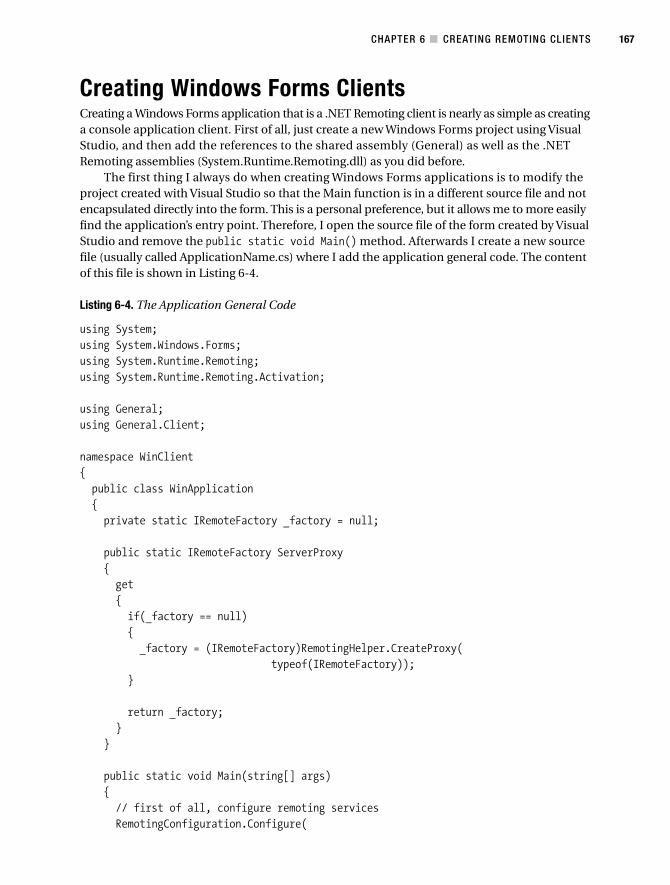
CHAPTER 6 ■ CREATING REMOTING CLIENTS 167
Creating Windows Forms ClientsCreating a Windows Forms application that is a .NET Remoting client is nearly as simple as creatinga console application client. First of all, just create a new Windows Forms project using VisualStudio, and then add the references to the shared assembly (General) as well as the .NETRemoting assemblies (System.Runtime.Remoting.dll) as you did before.
The first thing I always do when creating Windows Forms applications is to modify theproject created with Visual Studio so that the Main function is in a different source file and notencapsulated directly into the form. This is a personal preference, but it allows me to more easilyfind the application’s entry point. Therefore, I open the source file of the form created by VisualStudio and remove the public static void Main() method. Afterwards I create a new sourcefile (usually called ApplicationName.cs) where I add the application general code. The contentof this file is shown in Listing 6-4.
Listing 6-4. The Application General Code
using System;using System.Windows.Forms;using System.Runtime.Remoting;using System.Runtime.Remoting.Activation;
using General;using General.Client;
namespace WinClient{public class WinApplication{private static IRemoteFactory _factory = null;
public static IRemoteFactory ServerProxy{get{if(_factory == null){_factory = (IRemoteFactory)RemotingHelper.CreateProxy(
typeof(IRemoteFactory));}
return _factory;}
}
public static void Main(string[] args){// first of all, configure remoting servicesRemotingConfiguration.Configure(
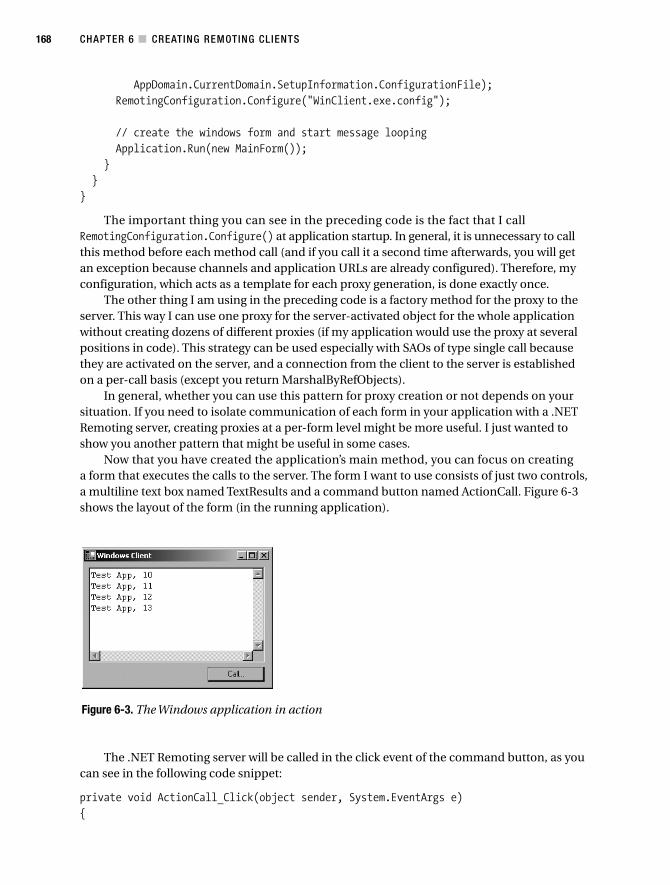
CHAPTER 6 ■ CREATING REMOTING CLIENTS168
Figure 6-3. The Windows application in action
AppDomain.CurrentDomain.SetupInformation.ConfigurationFile);RemotingConfiguration.Configure("WinClient.exe.config");
// create the windows form and start message loopingApplication.Run(new MainForm());
}}
}
The important thing you can see in the preceding code is the fact that I call RemotingConfiguration.Configure() at application startup. In general, it is unnecessary to callthis method before each method call (and if you call it a second time afterwards, you will getan exception because channels and application URLs are already configured). Therefore, myconfiguration, which acts as a template for each proxy generation, is done exactly once.
The other thing I am using in the preceding code is a factory method for the proxy to theserver. This way I can use one proxy for the server-activated object for the whole applicationwithout creating dozens of different proxies (if my application would use the proxy at severalpositions in code). This strategy can be used especially with SAOs of type single call becausethey are activated on the server, and a connection from the client to the server is establishedon a per-call basis (except you return MarshalByRefObjects).
In general, whether you can use this pattern for proxy creation or not depends on yoursituation. If you need to isolate communication of each form in your application with a .NETRemoting server, creating proxies at a per-form level might be more useful. I just wanted toshow you another pattern that might be useful in some cases.
Now that you have created the application’s main method, you can focus on creatinga form that executes the calls to the server. The form I want to use consists of just two controls,a multiline text box named TextResults and a command button named ActionCall. Figure 6-3shows the layout of the form (in the running application).
The .NET Remoting server will be called in the click event of the command button, as youcan see in the following code snippet:
private void ActionCall_Click(object sender, System.EventArgs e){
CHAPTER 6 ■ CREATING REMOTING CLIENTS 169
1. On Windows 2000 or Windows XP with IIS 5.x, any ASP.NET application usually runs in an externalprocess called aspnet_wp.exe (ASP.NET worker process). The identity of the worker process can beconfigured in the processModel, too. On Windows Server 2003 with IIS 6.0, you can configure applicationpools. Each pool results in a separate process running under its own identity (default is NetworkService).
// get the transparent proxy for the factoryIRemoteFactory proxy = WinApplication.ServerProxy;Person p = proxy.GetPerson();
TextResults.AppendText(string.Format("{0} {1}, {2}\r\n", p.Firstname, p.Lastname, p.Age));
}
The server proxy is retrieved from the static ServerProxy property of the application classWinApplication introduced in Listing 6-4. Afterwards the application calls the server’s methodand appends the results to the text box of the form.
The rules for configuring .NET Remoting in Windows clients are exactly the same as forconsole application. The only difference that you have to keep in mind is to not configure .NETRemoting for each call—you can do that once at application startup, and the best way for doingso is in the application’s main method.
■Note If you keep state on the server and don’t call the server for a while, you have to keep lifetime man-agement in mind. In my example, the server keeps a counter state that is used for initializing the person’sage property. If you wait a while (five minutes is the default), the state is lost because the .NET Remotinginfrastructure releases the server’s resources and automatically creates a new server instance, and, ofcourse, any information stored in the previous instance of the server is lost. You can configure lifetime, too.For more information about lifetime management, take a look at Chapter 7.
Creating Back-End–Based ClientsThe client applications you have seen so far are all “front-end” based. This means they aretypically started by an end user and running within the end user’s logon session. In the follow-ing two chapters, I want to go into details about creating clients that typically run on a serverwithin the logon session of a service account. Examples of such clients are ASP.NET-basedapplications (which run either as ASPNET within the Web server process or a worker processif IIS 6.0 is used).1
Basically, configuration and calls work the same way with front-end clients as shown earlier.But when it comes to configuration in ASP.NET-based applications, as well as to security, thereare some differences that I want to show you now.
ASP.NET-Based ClientsThe first thing I want to show you is creating an ASP.NET-based application (either Web appli-cation or Web service) that calls the .NET Remoting server created at the very beginning of thischapter.
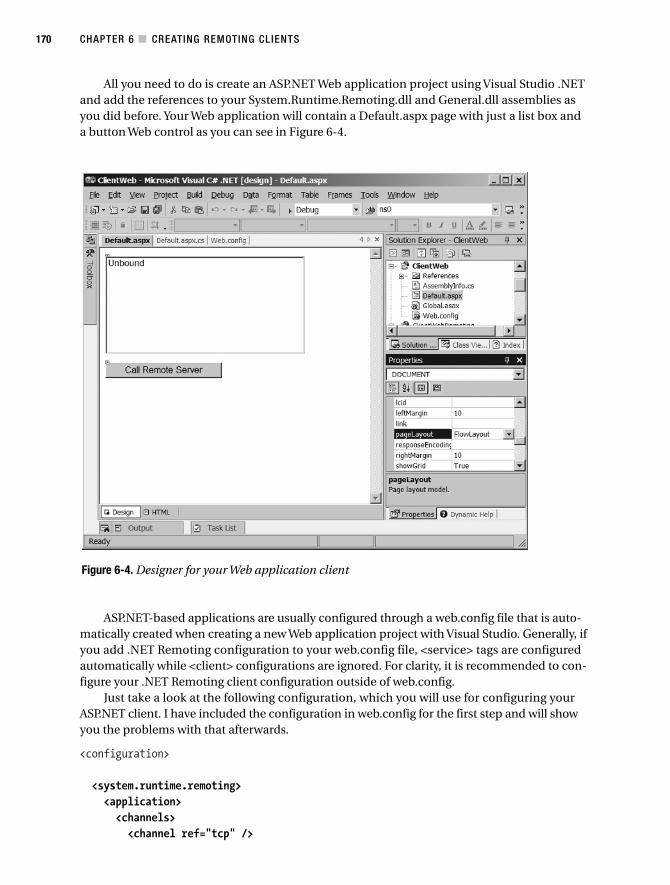
CHAPTER 6 ■ CREATING REMOTING CLIENTS170
Figure 6-4. Designer for your Web application client
All you need to do is create an ASP.NET Web application project using Visual Studio .NETand add the references to your System.Runtime.Remoting.dll and General.dll assemblies asyou did before. Your Web application will contain a Default.aspx page with just a list box anda button Web control as you can see in Figure 6-4.
ASP.NET-based applications are usually configured through a web.config file that is auto-matically created when creating a new Web application project with Visual Studio. Generally, ifyou add .NET Remoting configuration to your web.config file, <service> tags are configuredautomatically while <client> configurations are ignored. For clarity, it is recommended to con-figure your .NET Remoting client configuration outside of web.config.
Just take a look at the following configuration, which you will use for configuring yourASP.NET client. I have included the configuration in web.config for the first step and will showyou the problems with that afterwards.
<configuration>
<system.runtime.remoting><application><channels><channel ref="tcp" />

CHAPTER 6 ■ CREATING REMOTING CLIENTS 171
2. As you have seen before, the host process can be the Web server itself, the ASP.NET worker processaspnet_wp.exe, or on machines with an IIS 6.0 worker process for the application pool.
</channels><client><wellknown type="General.IRemoteFactory, General"
url="tcp://localhost:1234/MyServer.rem" /></client>
</application></system.runtime.remoting>
<system.web><compilation defaultLanguage="c#" debug="true" /><customErrors mode="RemoteOnly" /><authentication mode="Windows" /><authorization><allow users="*" />
</authorization><sessionState mode="InProc"
stateConnectionString="tcpip=127.0.0.1:42424"sqlConnectionString=
"data source=127.0.0.1;Trusted_Connection=yes"cookieless="false" timeout="20" />
<globalization requestEncoding="utf-8" responseEncoding="utf-8" /></system.web>
</configuration>
But why configure the application now? The naïve way would simply configure remotingin the Page_Load or in the event procedure of the button where the server component will becalled. But if you do this, you will fail with the second request—but why?
Actually, the reason is very simple. As mentioned before, RemotingConfiguration.Configure()configures .NET Remoting on an AppDomain basis. This means within the application domainchannels and remote objects are registered. Of course, each channel must have a unique name,and each type can be configured only once within one AppDomain.
In ASP.NET, for each virtual root in IIS an instance of HttpApplication is launched by theASP.NET runtime. Each HttpApplication on its own resides in a separate application domain.The application itself exists as long as the host process2 is alive—this means the applicationstays the same between different browser requests. If you configure .NET Remoting in one ofthe page-level events, you try to configure the same channels and well-known objects multipletimes for the application domain of the HttpApplication (which stays alive between the requests).
The solution again is fairly simple. ASP.NET has the capability to catch application-wideevents within the Global.asax, which is created automatically when creating an ASP.NET projectwith Visual Studio. The Global.asax actually is a class for your own Web application that inheritsfrom System.Web.HttpApplication. The important event in this case is the Application_Start eventof the application. The following code fragment shows how to configure your application withinthis event, which you can find in the code-behind for the Global.asax file (Global.asax.cs):
CHAPTER 6 ■ CREATING REMOTING CLIENTS172
protected void Application_Start(Object sender, EventArgs e){// configure the remoting serverRemotingConfiguration.Configure(Server.MapPath("web.config"));
}
The path to the web.config file is retrieved through Server.MapPath(), which returns thephysical path to the file on the local system. The call to your server component is again fairlysimple. The following code snippet shows the event handler for the command button you haveseen previously in Figure 6-4:
private void ActionCall_Click(object sender, System.EventArgs e){IRemoteFactory proxy = (IRemoteFactory)RemotingHelper.CreateProxy(
typeof(IRemoteFactory));Person p = proxy.GetPerson();
ListResults.Items.Add(string.Format("{0} {1}, {2}",p.Firstname, p.Lastname, p.Age));
}
That’s it, now you have created an ASP.NET-based client for a .NET Remoting server com-ponent. Most importantly, remember to configure .NET Remoting within the Application_Startevent of the Global.asax code-behind file.
Remoting Components Hosted in IIS As ClientsAs you already know from the previous chapters, it is possible to host .NET Remoting compo-nents in IIS, too. In this case, the ASP.NET runtime itself hosts the server component, andconfiguration of the server is done through web.config.
Any <service> configuration found in web.config is automatically handled by ASP.NET, whichmeans that you don’t need to call RemotingConfiguration.Configure() for your server configu-ration. If a client configuration is found in web.config, it will be ignored by the ASP.NET runtime—therefore clients must be configured manually.
Although configuring clients in web.config is basically possible, I will not recommenddoing so for reasons discussed in the last chapter. It is better to add another configuration fileto your solution (even if you are writing simple ASP.NET Web applications or Web servers thatdon’t host remoting components) and do your client configuration in this file.
So you can see how to configure a .NET Remoting component hosted in IIS as a client foranother server (the server you created at the very beginning of the chapter), start with creatinga Web application project with Visual Studio that you will use for your .NET Remoting servercomponent. Because you don’t need it, you can delete the ASPX page that is created automaticallyafter Visual Studio has created the project. The other files, especially web.config and Global.asax,will be necessary for your component.
After you have added the references to System.Runtime.Remoting as well as General.dll, youcan add a class to your project that will be the server. The server’s implementation is shown inListing 6-5.

CHAPTER 6 ■ CREATING REMOTING CLIENTS 173
Listing 6-5. An Intermediary .NET Remoting Server Hosted in IIS
using System;using System.Runtime.Remoting;
using General;using General.Client;
namespace ClientWebRemoting{public class SecondServer : MarshalByRefObject, IRemoteSecond{private int _counter = 1;private IRemoteFactory _proxy;
public SecondServer(){System.Diagnostics.Debug.WriteLine("Initializing server...");
_proxy = (IRemoteFactory)RemotingHelper.CreateProxy(typeof(IRemoteFactory));
System.Diagnostics.Debug.WriteLine("Server initialized!");}
public int GetNewAge(){Person p = _proxy.GetPerson();int ret = p.Age + (_counter++);
System.Diagnostics.Debug.WriteLine(">> Incoming request returns " + ret.ToString());
return ret;}
}}
Remember that in the preceding code you don’t use any client-side remoting configu-ration because you are hosting the component in ASP.NET and IIS. Therefore, you have to dothe same thing as you did before—perform the client configuration within the Global.asaxApplication_Start event. I’ll show the configuration for this component as client of the otherserver later in this chapter.
Now you know why you need to define the interface IRemoteSecond in the shared assemblyat the very beginning of this chapter—your second server is implementing exactly this inter-face now.
CHAPTER 6 ■ CREATING REMOTING CLIENTS174
■Note Because you don’t have a console window for viewing what happens on the server, useDebug.WriteLine() so that you can view activity in the output window from Visual Studio whendebugging the solution.
Because the component is hosted in IIS, you can use the HTTP channel only. Therefore,the configuration of the server component in the web.config file looks like the following:
<configuration>
<system.runtime.remoting><application><channels><channel ref="http" />
</channels><service><wellknown type="ClientWebRemoting.SecondServer, ClientWebRemoting"
objectUri="SecondServer.soap"mode="Singleton" />
</service></application>
</system.runtime.remoting>
<system.web><compilation defaultLanguage="c#" debug="true" /><authentication mode="None" />
</system.web></configuration>
The service configuration is done automatically by the ASP.NET runtime. You want to callyour other remoting server component from within this server, so you need to add the clientconfiguration. Adding the client configuration to the web.config would be a very bad idea inthis case. Remember that RemotingConfiguration.Configure() configures anything in the<system.runtime.remoting> section. If you just add your client’s configuration and try to callRemotingConfiguration.Configure(), an exception will occur because the .NET Remotingruntime tries to configure the client and the server. Remember that the server has alreadybeen configured by the ASP.NET runtime. Therefore, in this situation you would register theserver as well as the server’s channel twice, which is not possible within an application domain.
A simple, effective, and in my opinion much more readable solution is to add anotherconfiguration file (e.g., RemotingClient.config) to the project and add the client configurationto this file. The client configuration is shown in the following code snippet:
<configuration><system.runtime.remoting><application><channels><channel ref="tcp" />
CHAPTER 6 ■ CREATING REMOTING CLIENTS 175
</channels><client><wellknown type="General.IRemoteFactory, General"
url="tcp://localhost:1234/MyServer.rem" /></client>
</application></system.runtime.remoting>
</configuration>
■Note I’d also recommend creating your own client configuration files for ASP.NET Web applications andWeb services.
As you did before in the ASP.NET client application, you perform client configurationwithin the Application_StartUp event of the Global.asax code behind as you can see in thefollowing code snippet:
protected void Application_Start(Object sender, EventArgs e){
RemotingConfiguration.Configure(Server.MapPath("RemotingClient.config"));}
This time you are using your own configuration file RemotingClient.config, which isplaced in the application’s root directory.
■Note The file that contains the configuration can be any file; the file extension doesn’t matter. Nevertheless,it is a good idea to use files with a .config extension because they are protected by the ASP.NET runtime bydefault and not returned to the client, while other files with extensions like .txt are by default not protectedby the ASP.NET runtime and therefore can be browsed using the browser when the URL is known.
Because you have created a Web application project, you can debug without manuallyattaching to the ASP.NET worker process or the IIS 6.0 worker process. But Visual Studio wantsyou to select a start page for debugging. Now you have two possibilities: either add a dummypage that is used as a start page for debugging or just select the Global.asax or another file asthe start page. In this case, you will see an error in the browser, but debugging works anyway.
For testing your intermediary .NET Remoting server, you will need to create another clientthat calls this server through the IRemoteSecond interface. For simplicity, create a consoleclient. Take a look at the client’s implementation in Listing 6-6.
Listing 6-6. A Client for Your Second Server Component
using System;using System.Runtime.Remoting;
CHAPTER 6 ■ CREATING REMOTING CLIENTS176
using General;using General.Client;
namespace ClientOfWebRemoting{class ClientApp{
[STAThread]static void Main(string[] args){System.Console.WriteLine("Configuring client...");RemotingConfiguration.Configure("ClientOfWebRemoting.exe.config");
System.Console.WriteLine("Calling server...");IRemoteSecond second = (IRemoteSecond)RemotingHelper.CreateProxy(
typeof(IRemoteSecond));for(int i=0; i < 5; i++){System.Console.WriteLine("Result: {0}", second.GetNewAge());
}
System.Console.ReadLine();}
}}
The client itself, of course, is configured with the HTTP channel. This time you don’t have tospecify any port information because the server is hosted in IIS and can be reached at port 80.
<configuration><system.runtime.remoting><application><channels><channel ref="http" />
</channels><client><wellknown type="General.IRemoteSecond, General"
url="http://localhost/ClientWebRemoting/SecondServer.soap" /></client>
</application></system.runtime.remoting>
</configuration>
Now that you have implemented the intermediary service and a client for the service, you cantest the application. Just start debugging the .NET Remoting component and the client (for serveractivity take a look at the Visual Studio output window because you are using Debug.WriteLine()for logging activity). Figures 6-5, 6-6, and 6-7 demonstrate the activities in the client, the inter-mediary server, and the final server, respectively.
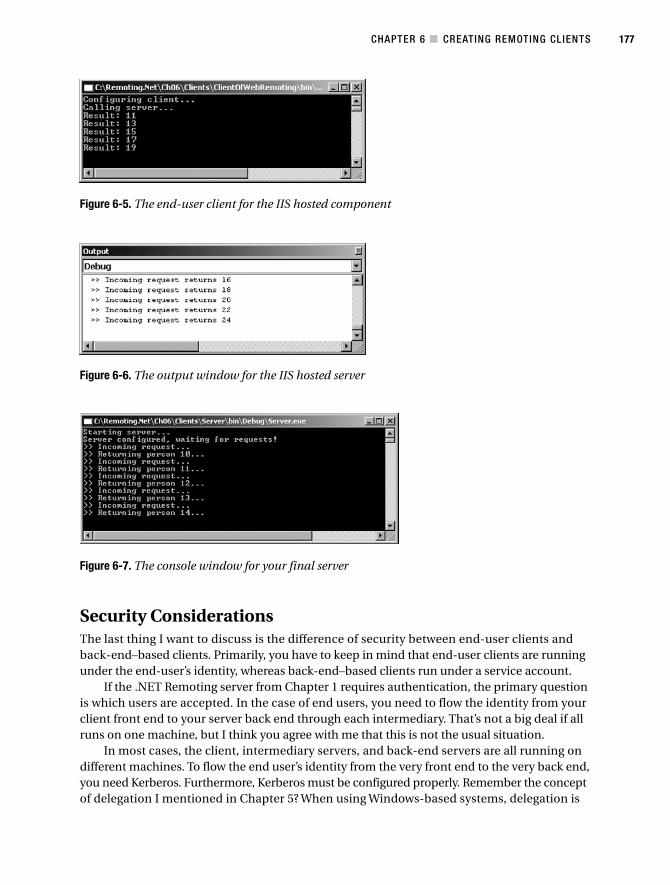
CHAPTER 6 ■ CREATING REMOTING CLIENTS 177
Figure 6-5. The end-user client for the IIS hosted component
Figure 6-6. The output window for the IIS hosted server
Figure 6-7. The console window for your final server
Security ConsiderationsThe last thing I want to discuss is the difference of security between end-user clients andback-end–based clients. Primarily, you have to keep in mind that end-user clients are runningunder the end-user’s identity, whereas back-end–based clients run under a service account.
If the .NET Remoting server from Chapter 1 requires authentication, the primary questionis which users are accepted. In the case of end users, you need to flow the identity from yourclient front end to your server back end through each intermediary. That’s not a big deal if allruns on one machine, but I think you agree with me that this is not the usual situation.
In most cases, the client, intermediary servers, and back-end servers are all running ondifferent machines. To flow the end user’s identity from the very front end to the very back end,you need Kerberos. Furthermore, Kerberos must be configured properly. Remember the conceptof delegation I mentioned in Chapter 5? When using Windows-based systems, delegation is

CHAPTER 6 ■ CREATING REMOTING CLIENTS178
Server A Server B
Map users toroles
Role 1
Role 2
Authorize based onRole 1 and Role 2
Figure 6-8. Impersonation, flowing the user to the back end
a separate privilege. To enable delegation, you must specifically allow machines to delegatetickets they get from the client. That’s a configuration option that must be set at Active Directorydomain and machine level.
On the other hand, flowing the identity from the very front end to the very back end issomething that leads to extensive management tasks and potential risks as you now have totrust all your end users to adhere to sensible password management practices. As soon as thevery back end accesses resources and impersonates the client (that’s necessary for the inter-mediary to pass the token to the back end), you have to configure all access control lists on theintermediary as well as the back end properly. Figure 6-8 demonstrates the situation describedearlier.
And it’s exactly the intense configuration overhead that makes impersonation and delegationfragile and dangerous. Any misconfiguration can lead to a potential security hole (although theapplication itself might be secure—configuration and applications have to work together forreally secure systems). Therefore, it should only be used if it is inherently necessary.
A better way would be using roles for logically related groups of users and letting theservice impersonate a specific user for each role. Doing so makes management much easierbecause you don’t have to think about hundreds of users but only about a couple for roles youhave to manage. This strategy is called trusted subsystem. The concept is shown in Figure 6-9.

CHAPTER 6 ■ CREATING REMOTING CLIENTS 179
Server A Server B
User 2
User 3
Authorize eachuser separately
User 1
User 4
Figure 6-9. Trusted subsystem
If you don’t impersonate specific users (or users for roles as you would do in the trustedsubsystem), on the other hand, you have to keep in mind that service accounts are often justaccounts of the local machine. Therefore, authentication of a service account on another machinewill fail (the ASPNET account on machine A is not the same as the ASPNET account on machine B).In this case, you have two possibilities: either create domain accounts for the services or flowidentity through impersonation (but do that based on roles, not for each user!).
■Caution If you are configuring service accounts at a domain level, keep the principle of least privilege inmind. Never configure too many privileges for such accounts to limit damage if one of your services getshacked. Configure as few privileges as possible.
The last option for flowing identities across machines would be manually implementingyour own protocols. But never underestimate the effort to build such protocols that are as secureas, for example, Kerberos is.
Now that you have seen the concepts you have to keep in mind, just take a short look at howsecurity behaves by configuring the back-end server using the SSPI security solution demon-strated in the last chapter.
Let’s start with the simplest example, the Windows Forms client created in the previous chap-ter calling the .NET Remoting server directly with SSPI configured. First of all, you have to addreferences to the Microsoft.Samples.Security.SSPI.dll and Microsoft.Samples.Remoting.Security.dllassemblies as explained in Chapter 5.
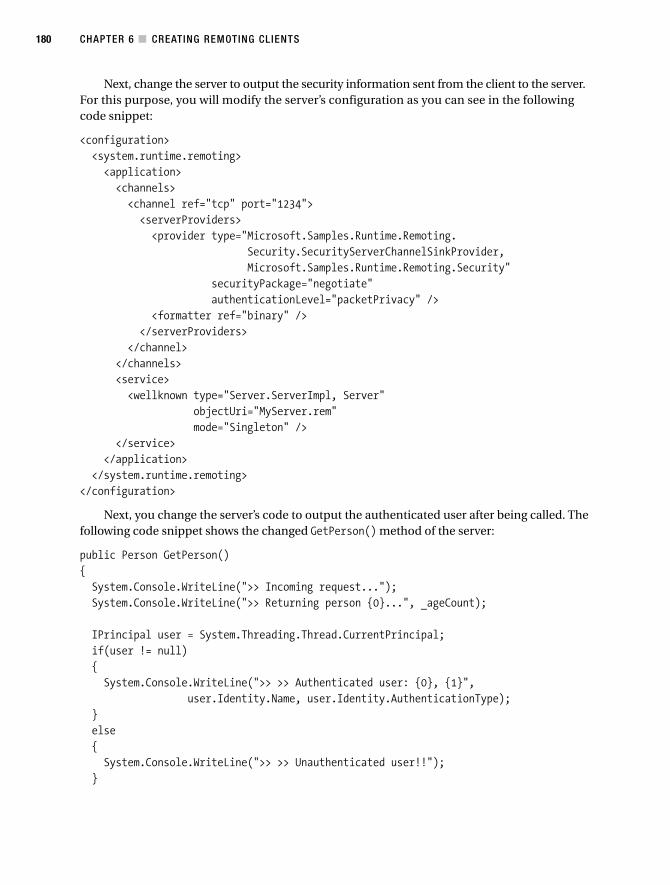
CHAPTER 6 ■ CREATING REMOTING CLIENTS180
Next, change the server to output the security information sent from the client to the server.For this purpose, you will modify the server’s configuration as you can see in the followingcode snippet:
<configuration><system.runtime.remoting><application><channels><channel ref="tcp" port="1234"><serverProviders><provider type="Microsoft.Samples.Runtime.Remoting.
Security.SecurityServerChannelSinkProvider,Microsoft.Samples.Runtime.Remoting.Security"
securityPackage="negotiate"authenticationLevel="packetPrivacy" />
<formatter ref="binary" /></serverProviders>
</channel></channels><service><wellknown type="Server.ServerImpl, Server"
objectUri="MyServer.rem"mode="Singleton" />
</service></application>
</system.runtime.remoting></configuration>
Next, you change the server’s code to output the authenticated user after being called. Thefollowing code snippet shows the changed GetPerson() method of the server:
public Person GetPerson(){System.Console.WriteLine(">> Incoming request...");System.Console.WriteLine(">> Returning person {0}...", _ageCount);
IPrincipal user = System.Threading.Thread.CurrentPrincipal;if(user != null){System.Console.WriteLine(">> >> Authenticated user: {0}, {1}",
user.Identity.Name, user.Identity.AuthenticationType);}else{System.Console.WriteLine(">> >> Unauthenticated user!!");
}
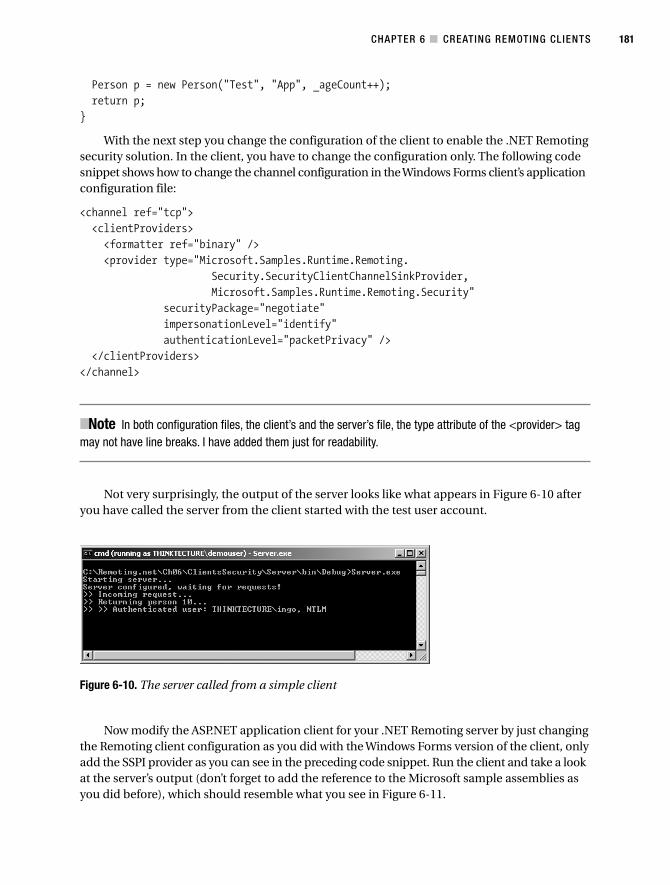
CHAPTER 6 ■ CREATING REMOTING CLIENTS 181
Figure 6-10. The server called from a simple client
Person p = new Person("Test", "App", _ageCount++);return p;
}
With the next step you change the configuration of the client to enable the .NET Remotingsecurity solution. In the client, you have to change the configuration only. The following codesnippet shows how to change the channel configuration in the Windows Forms client’s applicationconfiguration file:
<channel ref="tcp"><clientProviders><formatter ref="binary" /><provider type="Microsoft.Samples.Runtime.Remoting.
Security.SecurityClientChannelSinkProvider,Microsoft.Samples.Runtime.Remoting.Security"
securityPackage="negotiate"impersonationLevel="identify"authenticationLevel="packetPrivacy" />
</clientProviders></channel>
■Note In both configuration files, the client’s and the server’s file, the type attribute of the <provider> tagmay not have line breaks. I have added them just for readability.
Not very surprisingly, the output of the server looks like what appears in Figure 6-10 afteryou have called the server from the client started with the test user account.
Now modify the ASP.NET application client for your .NET Remoting server by just changingthe Remoting client configuration as you did with the Windows Forms version of the client, onlyadd the SSPI provider as you can see in the preceding code snippet. Run the client and take a lookat the server’s output (don’t forget to add the reference to the Microsoft sample assemblies asyou did before), which should resemble what you see in Figure 6-11.
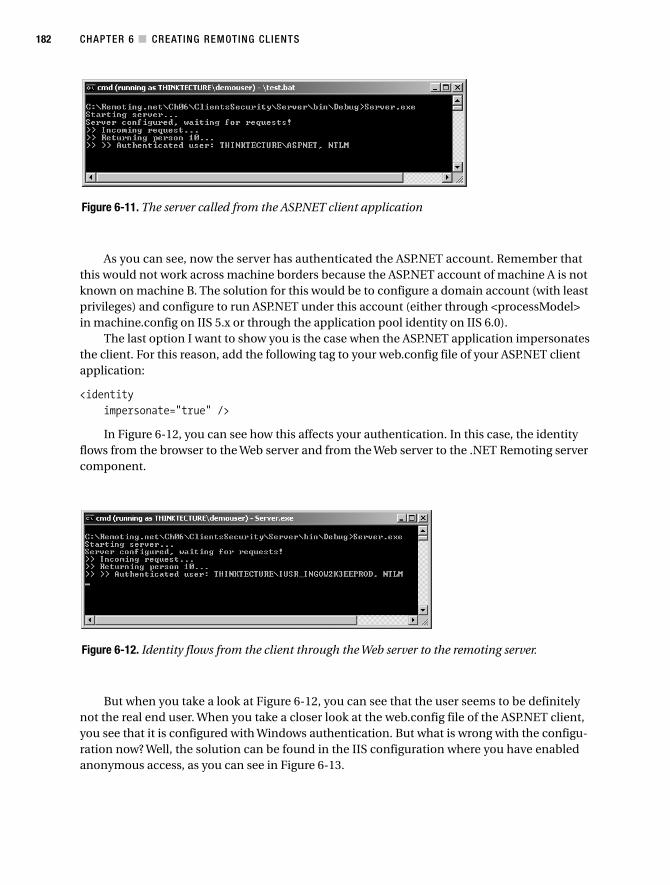
CHAPTER 6 ■ CREATING REMOTING CLIENTS182
As you can see, now the server has authenticated the ASP.NET account. Remember thatthis would not work across machine borders because the ASP.NET account of machine A is notknown on machine B. The solution for this would be to configure a domain account (with leastprivileges) and configure to run ASP.NET under this account (either through <processModel>in machine.config on IIS 5.x or through the application pool identity on IIS 6.0).
The last option I want to show you is the case when the ASP.NET application impersonatesthe client. For this reason, add the following tag to your web.config file of your ASP.NET clientapplication:
<identityimpersonate="true" />
In Figure 6-12, you can see how this affects your authentication. In this case, the identityflows from the browser to the Web server and from the Web server to the .NET Remoting servercomponent.
But when you take a look at Figure 6-12, you can see that the user seems to be definitelynot the real end user. When you take a closer look at the web.config file of the ASP.NET client,you see that it is configured with Windows authentication. But what is wrong with the configu-ration now? Well, the solution can be found in the IIS configuration where you have enabledanonymous access, as you can see in Figure 6-13.
Figure 6-11. The server called from the ASP.NET client application
Figure 6-12. Identity flows from the client through the Web server to the remoting server.
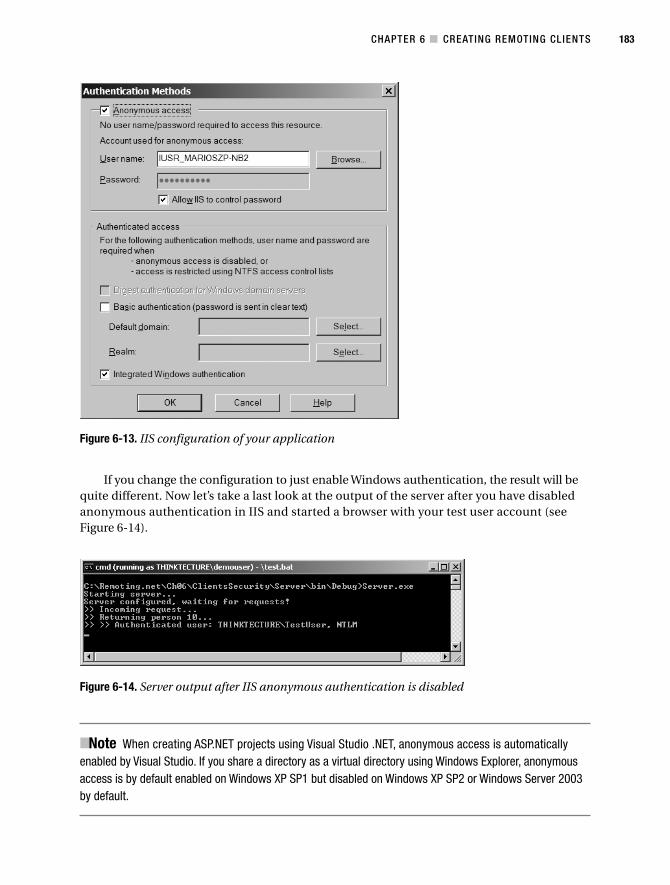
CHAPTER 6 ■ CREATING REMOTING CLIENTS 183
If you change the configuration to just enable Windows authentication, the result will bequite different. Now let’s take a last look at the output of the server after you have disabledanonymous authentication in IIS and started a browser with your test user account (seeFigure 6-14).
■Note When creating ASP.NET projects using Visual Studio .NET, anonymous access is automaticallyenabled by Visual Studio. If you share a directory as a virtual directory using Windows Explorer, anonymousaccess is by default enabled on Windows XP SP1 but disabled on Windows XP SP2 or Windows Server 2003by default.
Figure 6-13. IIS configuration of your application
Figure 6-14. Server output after IIS anonymous authentication is disabled
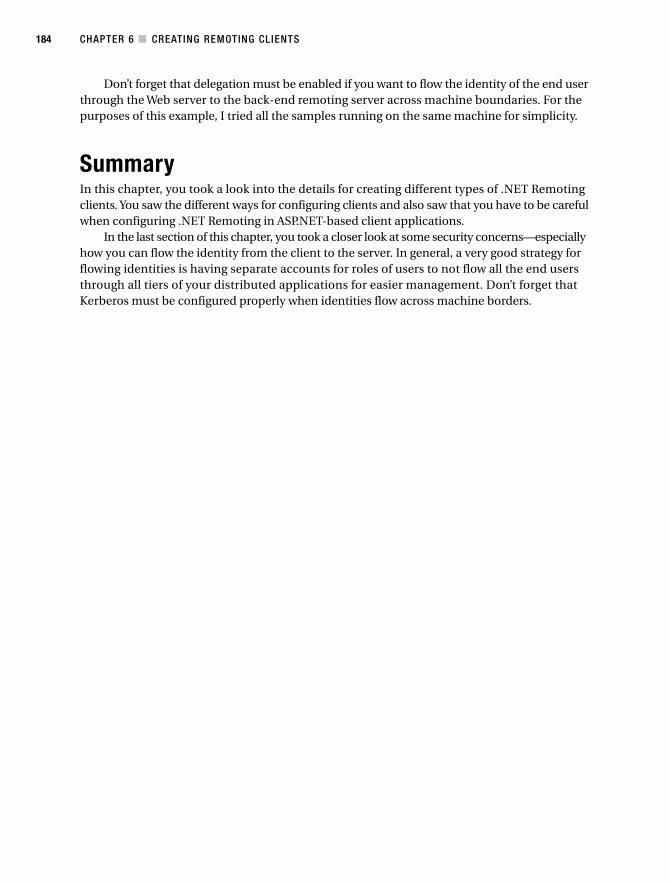
CHAPTER 6 ■ CREATING REMOTING CLIENTS184
Don’t forget that delegation must be enabled if you want to flow the identity of the end userthrough the Web server to the back-end remoting server across machine boundaries. For thepurposes of this example, I tried all the samples running on the same machine for simplicity.
SummaryIn this chapter, you took a look into the details for creating different types of .NET Remotingclients. You saw the different ways for configuring clients and also saw that you have to be carefulwhen configuring .NET Remoting in ASP.NET-based client applications.
In the last section of this chapter, you took a closer look at some security concerns—especiallyhow you can flow the identity from the client to the server. In general, a very good strategy forflowing identities is having separate accounts for roles of users to not flow all the end usersthrough all tiers of your distributed applications for easier management. Don’t forget thatKerberos must be configured properly when identities flow across machine borders.
185
C H A P T E R 7
■ ■ ■
In-Depth .NET Remoting
As you’ve already seen in the previous chapters, developers of distributed applications using.NET Remoting have to consider several fundamental differences from other remoting tech-niques and, of course, from the development of local applications. One of the major issues youface in any distributed object framework is the decision of how to manage an object’s lifetime.Generally you have two possibilities: using distributed reference counting/garbage collectionor using time-to-live counters associated with each object.
Managing an Object’s LifetimeBoth CORBA and DCOM have employed distributed reference counting. With DCOM, for example,the server’s objects keep counters of referrers that rely on the AddRef() and Release() methodsin the same way as it’s done for common COM objects. Unfortunately this has some seriousdrawbacks: each call to increase or decrease the reference counter has to travel to the remoteobject without any “real” application benefit (that is, the remote call does not do any “real” work).In DCOM, the clients will also ping the server at certain intervals to signal that they are still alive.
Both pinging and the calls to change the reference counter result in an increased networkload, and the former will very likely not work with some firewalls or proxies that only allow state-less HTTP connections to pass through.
Because of those implications, Java RMI introduced a lease-based lifetime service that bearsa close resemblance to what you can see in .NET Remoting today. The lease-based conceptessentially assigns a time-to-live (TTL) count to each object that’s created at the server. A Lease-Manager then polls all server-side objects at certain intervals and decrements this TTL. As soonas this time reaches zero, the object is marked as timed out and will be marked for garbage col-lection. Additionally, for each method call placed on the remote object, the TTL is incrementedagain to ensure that objects currently in use will not time out.
In reality, though, there are applications in which objects may exist that are not used all thetime. A pure TTL-based approach would time-out these objects too soon. Because of this, the .NETRemoting framework also supports a concept called sponsorship. For each object, one or moresponsors might be registered. Upon reaching zero TTL, the LeaseManager contacts each sponsorand asks if it wants to increase the object’s lifetime. Only when none of them responds positivelyin a given time is the object marked for garbage collection.
A sponsor itself is a MarshalByRefObject as well. It can therefore be located on the client, theserver, or any other machine that is reachable via .NET Remoting.
CHAPTER 7 ■ IN-DEPTH .NET REMOTING186
Understanding LeasesA lease holds the time-to-live information for a given object. It is therefore directly associatedwith a certain MarshalByRefObject’s instance. At the creation of a lease, the following informa-tion is set (all of the following are of type TimeSpan):
Property Default Description
InitialLeaseTime 5 minutes The initial TTL after an object’s creation.
RenewOnCallTime 2 minutes The grace time for a method call that is placed on theobject. Mind, though, that these times are not additive—for instance, calling a method a thousand times will notresult in a TTL of 2,000 minutes, but one of 2 minutes.
SponsorShipTimeout 2 minutes When sponsors are registered for this lease, they will becontacted upon expiration of the TTL. They then cancontact the LeaseManager to request additional leasetime for the sponsored object. When no sponsor reactsduring the time defined by this property, the lease willexpire and the object will be garbage collected.
Both the ILease interface and the Lease class that provides the standard implementationare located in System.Runtime.Remoting.Lifetime. Whenever a MarshalByRefObject is instan-tiated (either as a CAO or as a SAO—even when using Singleton mode), the framework callsthe object’s InitializeLifetimeService() method, which will return an ILease object. In thedefault implementation (that is, when you don’t override this method), the framework callsLifetimeServices.GetLeaseInitial(), which returns a Lease object containing the defaultsshown in the preceding table.
■Tip Whenever I mention some class for which you don’t know the containing namespace, you can useWinCV.exe, which is in the Framework SDK, to locate the class and get some information about its public interface.An even better (free) tool is .NET Reflector, available for download at http://www.aisto.com/roeder/dotnet.
The Role of the LeaseManagerThe LeaseManager runs in the background of each server-side application and checks allremoted objects for their TTL. It uses a timer and a delegate that calls its LeaseTimeAnalyzer()method at certain intervals.
The initial value for this interval is set to 10 seconds. You can change this interval by usingeither the following line of code:
LifetimeServices.LeaseManagerPollTime = TimeSpan.FromSeconds(1);
or, when using configuration files, you can add the following settings to it:
<configuration><system.runtime.remoting>
<application><lifetime leaseManagerPollTime="1s" />
CHAPTER 7 ■ IN-DEPTH .NET REMOTING 187
</application></system.runtime.remoting>
</configuration>
You may specify different time units for the leaseManagerPollTime attribute. Valid units areD for Days, H for hours, M for minutes, S for seconds, and MS for milliseconds. When nothingis specified, the system will default to S; combinations such as “1H5M” are not supported.
Changing the Default Lease TimeYou can easily change the default TTL for all objects in a given server-side app-domain in twoways. First, you can use the following code fragment to alter the application-wide initial leasetimes:
LifetimeServices.LeaseTime = System.TimeSpan.FromMinutes(10);LifetimeServices.RenewOnCallTime = System.TimeSpan.FromMinutes(5);
As the preferred alternative, you can add the following sections to your configuration files:
<configuration><system.runtime.remoting>
<application><lifetime
leaseTimeout="10M"renewOnCallTime="5M"
/></application>
</system.runtime.remoting></configuration>
However, you have to be aware of the fact that this change affects each and every remoteobject that is published by the server application which uses this configuration file. Increasingthe TTL therefore can have negative effects toward the memory and resource utilization of yourapplication, whereas decreasing it can lead to objects being prematurely destroyed.
■Caution Whenever a client places a method call to a remote object with an expired TTL, an exception willbe thrown.
Changing the Lease Time on a Per-Class BasisFor certain MarshalByRefObjects (especially Singleton-mode services or objects published byRemotingServices.Marshal()), it is desirable to have either an “unlimited” TTL or a differentlease time from that of other objects on the same server.
You can implement this functionality by overriding MarshalByRefObject’s InitializeLifetimeService(). This method is defined to return an object, but later uses inthe framework will cast this object to Lease, so make sure not to return anything else. Forexample, to provide a Singleton with unlimited lifetime, implement the following:
CHAPTER 7 ■ IN-DEPTH .NET REMOTING188
class InifinitelyLivingSingleton: MarshalByRefObject{
public override object InitializeLifetimeService(){
return null;}// ...
}
To set a custom lifetime different from “infinity,” you can call base.InitializeLifetimeService() to acquire the reference to the standard ILease object and set the corresponding values afterwards.
class LongerLivingSingleton: MarshalByRefObject{
public override object InitializeLifetimeService(){
ILease tmp = (ILease) base.InitializeLifetimeService();if (tmp.CurrentState == LeaseState.Initial){
tmp.InitialLeaseTime = TimeSpan.FromSeconds(5);tmp.RenewOnCallTime = TimeSpan.FromSeconds(1);
}return tmp;
}}
Examining a Basic Lifetime ExampleIn the following example, I show you how to implement the different changes in an object’slifetime in one application. The server will therefore export three MarshalByRefObjects asSingletons: DefaultLifeTimeSingleton, which will use the “base” lifetime set by a configurationfile; LongerLivingSingleton, which will override InitializeLifetimeService() to returna different lease time; and finally InfinitelyLivingSingleton, which will just return null fromInitializeLifetimeServices().
As you can see in the following configuration file, I change the default lifetime to a consid-erably lower value so that you can observe the effects without having to wait five minutes untilthe objects time out:
<configuration><system.runtime.remoting><application>
<channels><channel ref="http" port="1234" />
</channels>
CHAPTER 7 ■ IN-DEPTH .NET REMOTING 189
<lifetimeleaseTime="10MS"renewOnCallTime="10MS"leaseManagerPollTime = "5MS"
/>
<service>
<wellknown mode="Singleton"type="Server.DefaultLifeTimeSingleton, Server"objectUri="DefaultLifeTimeSingleton.soap" />
<wellknown mode="Singleton"type="Server.LongerLivingSingleton, Server"objectUri="LongerLivingSingleton.soap" />
<wellknown mode="Singleton"type="Server.InfinitelyLivingSingleton, Server"objectUri="InfinitelyLivingSingleton.soap" />
</service></application>
</system.runtime.remoting></configuration>
In the server-side implementation shown in Listing 7-1, I just include some Console.WriteLine() statements so that you can see when new objects are created by the framework.These components can be hosted by a simple .NET EXE that calls RemotingConfiguration.Configure() to read the preceding configuration file.
Listing 7-1. Implementation Showing the Effects of Different Lifetime Settings
using System;using System.Runtime.Remoting.Lifetime;using System.Runtime.Remoting;
namespace Server{
class DefaultLifeTimeSingleton: MarshalByRefObject{
public DefaultLifeTimeSingleton(){
Console.WriteLine("DefaultLifeTimeSingleton.CTOR called");}
public void DoSomething(){
CHAPTER 7 ■ IN-DEPTH .NET REMOTING190
Console.WriteLine("DefaultLifeTimeSingleton.DoSomething called");}
}
class LongerLivingSingleton: MarshalByRefObject{
public override object InitializeLifetimeService(){
ILease tmp = (ILease) base.InitializeLifetimeService();if (tmp.CurrentState == LeaseState.Initial){
tmp.InitialLeaseTime = TimeSpan.FromSeconds(5);tmp.RenewOnCallTime = TimeSpan.FromSeconds(1);
}return tmp;
}
public LongerLivingSingleton(){Console.WriteLine("LongerLivingSingleton.CTOR called");
}
public void DoSomething(){
Console.WriteLine("LongerLivingSingleton.DoSomething called");}
}
class InfinitelyLivingSingleton: MarshalByRefObject{
public override object InitializeLifetimeService(){
return null;}public InfinitelyLivingSingleton(){
Console.WriteLine("InfinitelyLivingSingleton.CTOR called");}
public void DoSomething(){
Console.WriteLine("InfinitelyLivingSingleton.DoSomething called");}
}
}
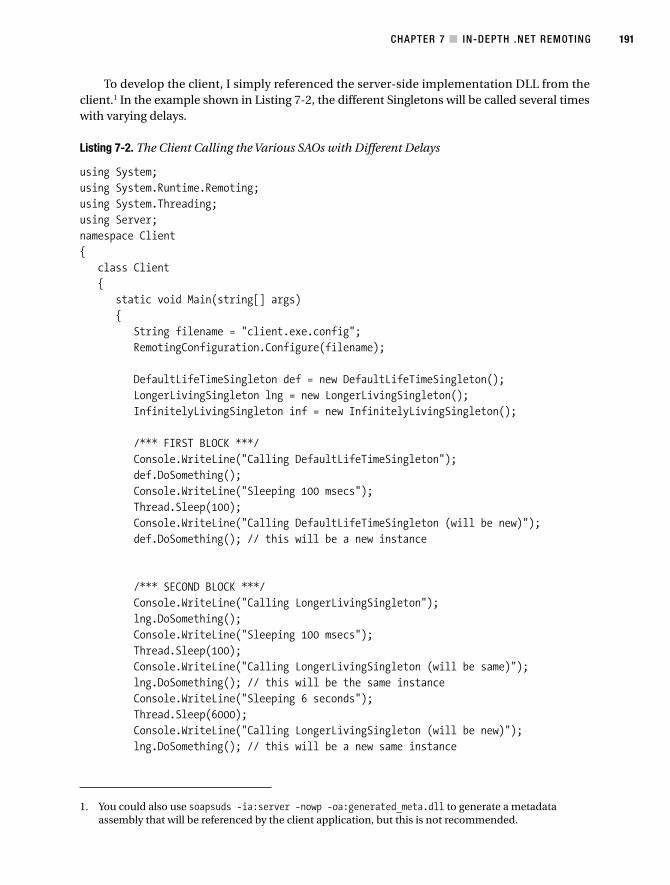
CHAPTER 7 ■ IN-DEPTH .NET REMOTING 191
1. You could also use soapsuds -ia:server -nowp -oa:generated_meta.dll to generate a metadataassembly that will be referenced by the client application, but this is not recommended.
To develop the client, I simply referenced the server-side implementation DLL from theclient.1 In the example shown in Listing 7-2, the different Singletons will be called several timeswith varying delays.
Listing 7-2. The Client Calling the Various SAOs with Different Delays
using System;using System.Runtime.Remoting;using System.Threading;using Server;namespace Client{
class Client{
static void Main(string[] args){
String filename = "client.exe.config";RemotingConfiguration.Configure(filename);
DefaultLifeTimeSingleton def = new DefaultLifeTimeSingleton();LongerLivingSingleton lng = new LongerLivingSingleton();InfinitelyLivingSingleton inf = new InfinitelyLivingSingleton();
/*** FIRST BLOCK ***/Console.WriteLine("Calling DefaultLifeTimeSingleton");def.DoSomething();Console.WriteLine("Sleeping 100 msecs");Thread.Sleep(100);Console.WriteLine("Calling DefaultLifeTimeSingleton (will be new)");def.DoSomething(); // this will be a new instance
/*** SECOND BLOCK ***/Console.WriteLine("Calling LongerLivingSingleton");lng.DoSomething();Console.WriteLine("Sleeping 100 msecs");Thread.Sleep(100);Console.WriteLine("Calling LongerLivingSingleton (will be same)");lng.DoSomething(); // this will be the same instanceConsole.WriteLine("Sleeping 6 seconds");Thread.Sleep(6000);Console.WriteLine("Calling LongerLivingSingleton (will be new)");lng.DoSomething(); // this will be a new same instance
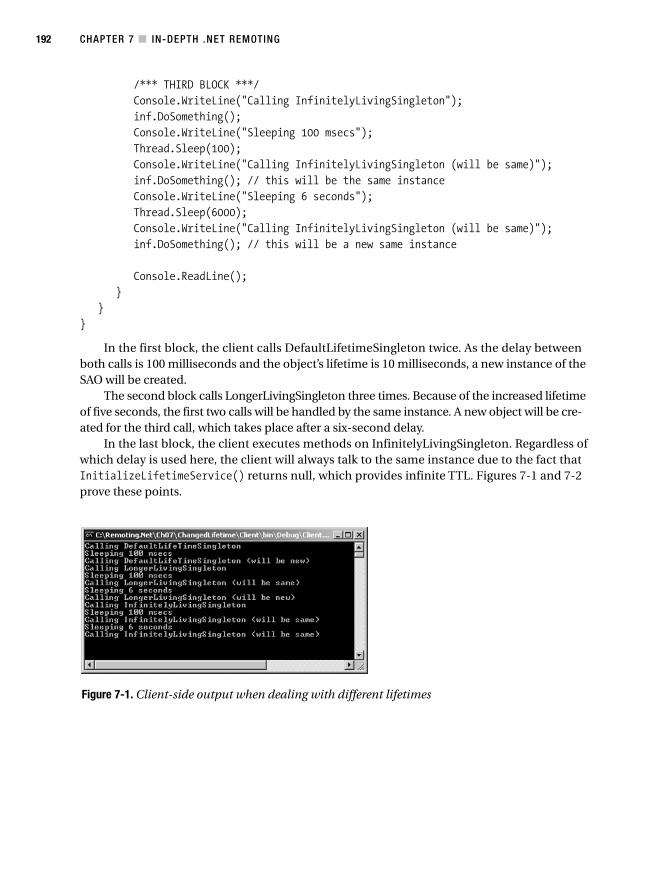
CHAPTER 7 ■ IN-DEPTH .NET REMOTING192
Figure 7-1. Client-side output when dealing with different lifetimes
/*** THIRD BLOCK ***/Console.WriteLine("Calling InfinitelyLivingSingleton");inf.DoSomething();Console.WriteLine("Sleeping 100 msecs");Thread.Sleep(100);Console.WriteLine("Calling InfinitelyLivingSingleton (will be same)");inf.DoSomething(); // this will be the same instanceConsole.WriteLine("Sleeping 6 seconds");Thread.Sleep(6000);Console.WriteLine("Calling InfinitelyLivingSingleton (will be same)");inf.DoSomething(); // this will be a new same instance
Console.ReadLine();}
}}
In the first block, the client calls DefaultLifetimeSingleton twice. As the delay betweenboth calls is 100 milliseconds and the object’s lifetime is 10 milliseconds, a new instance of theSAO will be created.
The second block calls LongerLivingSingleton three times. Because of the increased lifetimeof five seconds, the first two calls will be handled by the same instance. A new object will be cre-ated for the third call, which takes place after a six-second delay.
In the last block, the client executes methods on InfinitelyLivingSingleton. Regardless ofwhich delay is used here, the client will always talk to the same instance due to the fact thatInitializeLifetimeService() returns null, which provides infinite TTL. Figures 7-1 and 7-2prove these points.
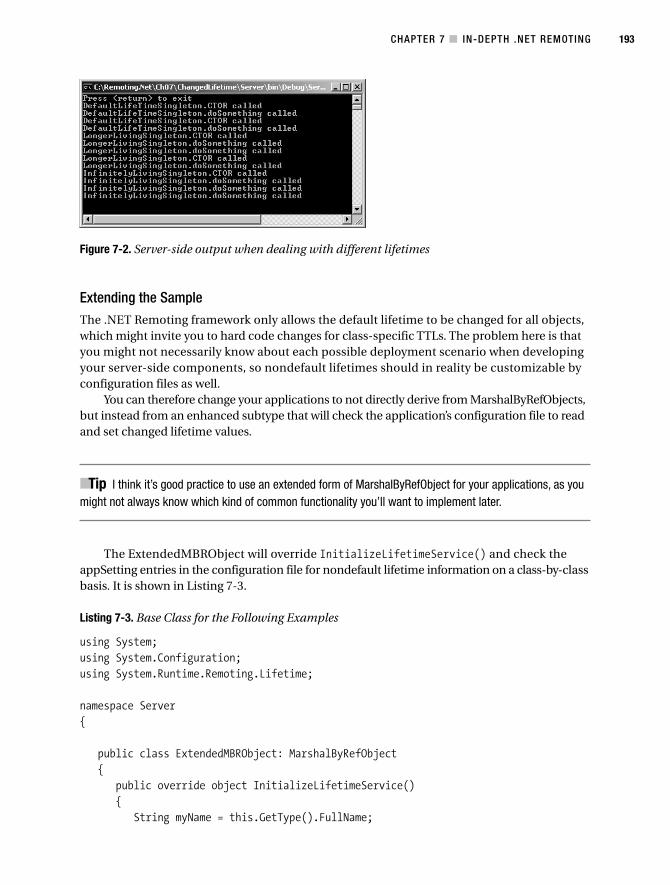
CHAPTER 7 ■ IN-DEPTH .NET REMOTING 193
Figure 7-2. Server-side output when dealing with different lifetimes
Extending the SampleThe .NET Remoting framework only allows the default lifetime to be changed for all objects,which might invite you to hard code changes for class-specific TTLs. The problem here is thatyou might not necessarily know about each possible deployment scenario when developingyour server-side components, so nondefault lifetimes should in reality be customizable byconfiguration files as well.
You can therefore change your applications to not directly derive from MarshalByRefObjects,but instead from an enhanced subtype that will check the application’s configuration file to readand set changed lifetime values.
■Tip I think it’s good practice to use an extended form of MarshalByRefObject for your applications, as youmight not always know which kind of common functionality you’ll want to implement later.
The ExtendedMBRObject will override InitializeLifetimeService() and check theappSetting entries in the configuration file for nondefault lifetime information on a class-by-classbasis. It is shown in Listing 7-3.
Listing 7-3. Base Class for the Following Examples
using System;using System.Configuration;using System.Runtime.Remoting.Lifetime;
namespace Server{
public class ExtendedMBRObject: MarshalByRefObject{
public override object InitializeLifetimeService(){
String myName = this.GetType().FullName;
CHAPTER 7 ■ IN-DEPTH .NET REMOTING194
String lifetime =ConfigurationSettings.AppSettings[myName + "_Lifetime"];
String renewoncall =ConfigurationSettings.AppSettings[myName + "_RenewOnCallTime"];
String sponsorshiptimeout =ConfigurationSettings.AppSettings[myName + "_SponsorShipTimeout"];
if (lifetime == "infinity"){
return null;}else{
ILease tmp = (ILease) base.InitializeLifetimeService();if (tmp.CurrentState == LeaseState.Initial){
if (lifetime != null){
tmp.InitialLeaseTime =TimeSpan.FromMilliseconds(Double.Parse(lifetime));
}
if (renewoncall != null){
tmp.RenewOnCallTime =TimeSpan.FromMilliseconds(Double.Parse(renewoncall));
}
if (sponsorshiptimeout != null){
tmp.SponsorshipTimeout =TimeSpan.FromMilliseconds(Double.Parse(sponsorshiptimeout));
}}return tmp;
}}
}}
In the following example, all server-side objects are changed to inherit from ExtendedMBRObjectinstead of MarshalByRefObject. You’ll also have to remove the calls to InitializeLifetimeService(),as this is currently done by the superclass. You can now add the following properties for eachclass (all of them are optional) to the server-side configuration file:
CHAPTER 7 ■ IN-DEPTH .NET REMOTING 195
Property Description
<Typename>_Lifetime Initial TTL in milliseconds, or “infinity”
<Typename>_RenewOnCallTime Time to add to a method call in milliseconds
<Typename>_SponsorshipTimeout Maximum time to react for sponsor objects in milliseconds
To make this example behave the same as the previous one, you can use the followingserver-side configuration file:
<configuration><system.runtime.remoting><application>
<channels><channel ref="http" port="5555" />
</channels>
<lifetimeleaseTime="10MS"renewOnCallTime="10MS"leaseManagerPollTime = "5MS"
/>
<service>
<wellknown mode="Singleton"type="Server.DefaultLifeTimeSingleton, Server"objectUri="DefaultLifeTimeSingleton.soap" />
<wellknown mode="Singleton"type="Server.LongerLivingSingleton, Server"objectUri="LongerLivingSingleton.soap" />
<wellknown mode="Singleton"type="Server.InfinitelyLivingSingleton, Server"objectUri="InfinitelyLivingSingleton.soap" />
</service></application>
</system.runtime.remoting><appSettings>
<add key="Server.LongerLivingSingleton_LifeTime" value="5000" /><add key="Server.LongerLivingSingleton_RenewOnCallTime" value="1000" /><add key="Server.InfinitelyLivingSingleton_LifeTime" value="infinity" />
</appSettings></configuration>
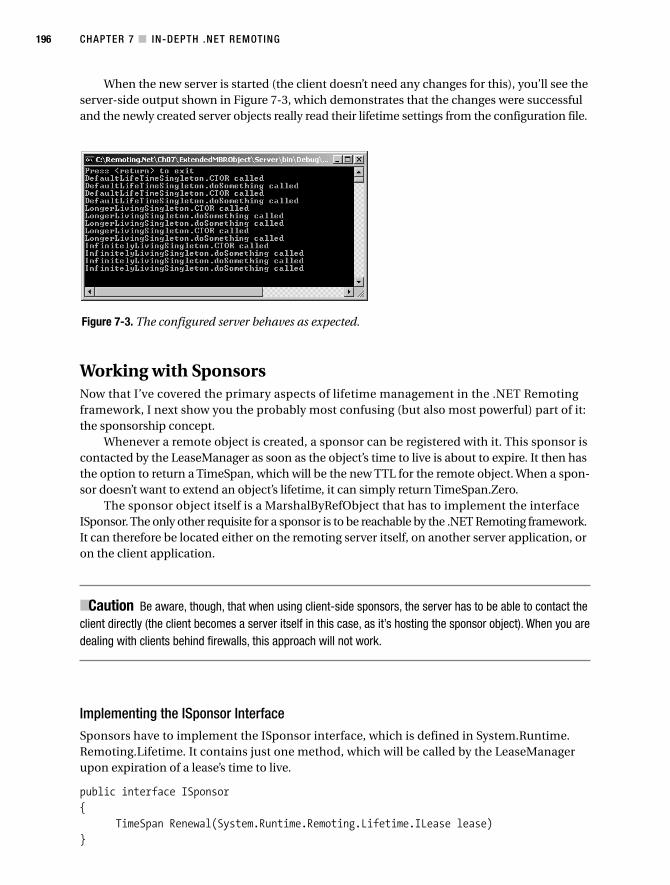
CHAPTER 7 ■ IN-DEPTH .NET REMOTING196
Figure 7-3. The configured server behaves as expected.
When the new server is started (the client doesn’t need any changes for this), you’ll see theserver-side output shown in Figure 7-3, which demonstrates that the changes were successfuland the newly created server objects really read their lifetime settings from the configuration file.
Working with SponsorsNow that I’ve covered the primary aspects of lifetime management in the .NET Remotingframework, I next show you the probably most confusing (but also most powerful) part of it:the sponsorship concept.
Whenever a remote object is created, a sponsor can be registered with it. This sponsor iscontacted by the LeaseManager as soon as the object’s time to live is about to expire. It then hasthe option to return a TimeSpan, which will be the new TTL for the remote object. When a spon-sor doesn’t want to extend an object’s lifetime, it can simply return TimeSpan.Zero.
The sponsor object itself is a MarshalByRefObject that has to implement the interfaceISponsor. The only other requisite for a sponsor is to be reachable by the .NET Remoting framework.It can therefore be located either on the remoting server itself, on another server application, oron the client application.
■Caution Be aware, though, that when using client-side sponsors, the server has to be able to contact theclient directly (the client becomes a server itself in this case, as it’s hosting the sponsor object). When you aredealing with clients behind firewalls, this approach will not work.
Implementing the ISponsor InterfaceSponsors have to implement the ISponsor interface, which is defined in System.Runtime.Remoting.Lifetime. It contains just one method, which will be called by the LeaseManagerupon expiration of a lease’s time to live.
public interface ISponsor{
TimeSpan Renewal(System.Runtime.Remoting.Lifetime.ILease lease)}
CHAPTER 7 ■ IN-DEPTH .NET REMOTING 197
The sponsor has to return a TimeSpan that specifies the new TTL for the object. If thesponsor decides not to increase the LeaseTime, it can return TimeSpan.Zero. A basic sponsorcan look like the following:
public class MySponsor: MarshalByRefObject, ISponsor{
private bool NeedsRenewal(){
// check some internal conditions
return true;}
public TimeSpan Renewal(System.Runtime.Remoting.Lifetime.ILease lease){
if (NeedsRenewal()){
return TimeSpan.FromMinutes(5);}else{
return TimeSpan.Zero;}
}}
Using Client-Side SponsorsWhen using client-side sponsors, you are basically mimicking the DCOM behavior of pinging,although you have more control over the process here. After acquiring the reference to a remoteobject (you’ll do this mostly for CAOs, as for SAOs the lifetime should normally be managedonly by the server), you contact its lifetime service and register the sponsor with it.
You can get an object’s LifetimeService, which will be an ILease object, using the followingline of code:
ILease lease = (ILease) obj.GetLifetimeService();
■Note If you used an interface-based remoting approach, you might first have to cast your proxy object toMarshalByRefObject before you can call GetLifetimeService(). The preceding line would in this caseread ILease lease = (ILease) ((MarshalByRefObject) obj).GetLifetimeService();.
The ILease interface supports a Register() method to add another sponsor for the under-lying object. When you want to hold a reference to an object for an unspecified amount of time(maybe while your client application is waiting for some user input), you can register a client-sidesponsor with it and increase the TTL on demand.
CHAPTER 7 ■ IN-DEPTH .NET REMOTING198
Calling an Expired Object’s Method
In the example shown in Listing 7-4, you see the result of calling an expired object’s method. Thishappens because the server-side lifetime is set to one second, whereas the client uses a five-second delay between two calls to the CAO. Please note that, contrary to the previous example,I decided that I will only share two interfaces between client and server. I have used a so-calledobject factory approach in which the client contacts a SAO which will in turn create an instanceof the requested object and hand back a reference to this explicitly created CAO. In addition,I’ll use the RemotingHelper class, which I’ve introduced in Chapter 4.
I will use the following interfaces for this communication:
interface IRemoteFactory{IRemoteObject CreateInstance();
}
interface IRemoteObject{void DoSomething();
}
The output is shown in Figure 7-4.
Listing 7-4. Catching the Exception When Calling an Expired Object
using System;using System.Runtime.Remoting;using System.Threading;using Server;namespace Client{
class Client{static void Main(string[] args){String filename =
AppDomain.CurrentDomain.SetupInformation.ConfigurationFile;RemotingConfiguration.Configure(filename);
IRemoteFactory fact =(IRemoteFactory) RemotingHelper.CreateProxy(typeof(IRemoteFactory));
IRemoteObject cao = fact.CreateInstance();
try{Console.WriteLine("{0} CLIENT: Calling doSomething()", DateTime.Now);

CHAPTER 7 ■ IN-DEPTH .NET REMOTING 199
cao.DoSomething();}catch (Exception e){Console.WriteLine(" --> EX: Timeout in first call\n{0}",e.Message);
}
Console.WriteLine("{0} CLIENT: Sleeping for 5 seconds", DateTime.Now);Thread.Sleep(5000);
try{Console.WriteLine("{0} CLIENT: Calling doSomething()", DateTime.Now);cao.DoSomething();
}catch (Exception e){Console.WriteLine(" --> EX: Timeout in second call\n{0}",e.Message );
}
Console.WriteLine("Finished ... press <return> to exit");Console.ReadLine();Console.ReadLine();
}}
}
■Note Starting with .NET Framework 1.1, you will receive the generic message “Requested Service not found”whereas previous versions of the .NET Framework included the complete ObjectURI in the error message.
There are two ways of correcting this application’s issues. First, you can simply increase theobject’s lifetime on the server as shown in the previous examples. In a lot of scenarios, however,you won’t know which TTL will be sufficient. Just imagine an application that acquires a refer-ence to a CAO and will only call another method of this object after waiting for user input. Inthis case, it might be desirable to add a client-side sponsor to your application and register itwith the CAO’s lease.
Figure 7-4. You’ve been calling an expired object’s method.
CHAPTER 7 ■ IN-DEPTH .NET REMOTING200
As the first step in enabling your application to work with client-side sponsors, you have toinclude a port="" attribute in the channel section of the configuration file. Without this attribute,the channel will not accept callbacks from the server.
Because you might not know which port will be available at the client, you can supply a valueof 0, which allows the .NET Remoting framework to choose a free port on its own. When the spon-sor is created and passed to the server, the channel information that gets passed to the remoteprocess will contain the correct port number.
<configuration><system.runtime.remoting><application>
<channels><channel ref="http" port="0" />
</channels><!-- client entries removed -->
</application></system.runtime.remoting>
</configuration>
In the client’s code, you then add another class that implements ISponsor. To see the exactbehavior of the client-side sponsor, you might also want to add a boolean flag that indicateswhether the lease time should be extended or not.
public class MySponsor: MarshalByRefObject, ISponsor{
public bool doRenewal = true;
public TimeSpan Renewal(System.Runtime.Remoting.Lifetime.ILease lease){
Console.WriteLine("{0} SPONSOR: Renewal() called", DateTime.Now);
if (doRenewal){
Console.WriteLine("{0} SPONSOR: Will renew (10 secs)", DateTime.Now);return TimeSpan.FromSeconds(10);
}else{
Console.WriteLine("{0} SPONSOR: Won't renew further", DateTime.Now);return TimeSpan.Zero;
}}
}
In Listing 7-5 you can see a client application that registers this sponsor with the serverobject’s lease. When the application is ready to allow the server to destroy the instance of theCAO, it will tell the sponsor to stop renewing. Normally you would call Lease.Unregister()instead, but in this case I want to show you that the sponsor won’t be contacted further afterreturning TimeSpan.Zero to the lease manager.
CHAPTER 7 ■ IN-DEPTH .NET REMOTING 201
Listing 7-5. Registering the Sponsor to Avoid Premature Termination of the Object
using System;using System.Runtime.Remoting;using System.Runtime.Remoting.Lifetime;using System.Threading;using Server;
class ClientApp{
static void Main(string[] args){
String filename =AppDomain.CurrentDomain.SetupInformation.ConfigurationFile;
RemotingConfiguration.Configure(filename);
IRemoteFactory fact =(IRemoteFactory) RemotingHelper.CreateProxy(typeof(IRemoteFactory));
IRemoteObject cao = fact.CreateInstance();
ILease le = (ILease) ((MarshalByRefObject) cao).GetLifetimeService();MySponsor sp = new MySponsor();le.Register(sp);
try{
Console.WriteLine("{0} CLIENT: Calling doSomething()", DateTime.Now);cao.DoSomething();
}catch (Exception e){
Console.WriteLine(" --> EX: Timeout in first call\n{0}",e.Message);}
Console.WriteLine("{0} CLIENT: Sleeping for 5 seconds", DateTime.Now);Thread.Sleep(5000);
try{
Console.WriteLine("{0} CLIENT: Calling doSomething()", DateTime.Now);cao.DoSomething();
}catch (Exception e){
Console.WriteLine(" --> EX: Timeout in second call\n{0}",e.Message );}

CHAPTER 7 ■ IN-DEPTH .NET REMOTING202
Console.WriteLine("{0} CLIENT: Unregistering sponsor", DateTime.Now);le.Unregister(sp);
Console.WriteLine("Finished ... press <return> to exit");Console.ReadLine();Console.ReadLine();
}}
If you were to run this application as-is with the previous client-side and server-sideconfiguration files, you would receive an exception telling you that this operation is not allowedat the current security level. This is due to a new security setting that has been introduced withversion 1.1 of the .NET framework. If you want to use sponsors, you now have to specificallyallow this feature in your client- and server-side configuration files. To allow it, you have toexplicitly state the formatters that should be used to communicate with the other party. Inaddition, you have to set the attribute typeFilterLevel to “Full” for each server-side formatter.
A valid server-side configuration file could therefore look like this:
<configuration><system.runtime.remoting><application>
<channels><channel ref="http" port="5555">
<serverProviders><formatter ref="binary" typeFilterLevel="Full" />
</serverProviders><clientProviders>
<formatter ref="binary" /></clientProviders>
</channel></channels>
<!-- Services removed --></application>
</system.runtime.remoting></configuration>
On the client side, a similar change is necessary:
<configuration><system.runtime.remoting><application><channels>
<channel ref="http" port="0"><clientProviders>
<formatter ref="binary" /></clientProviders><serverProviders>
<formatter ref="binary" typeFilterLevel="Full" />
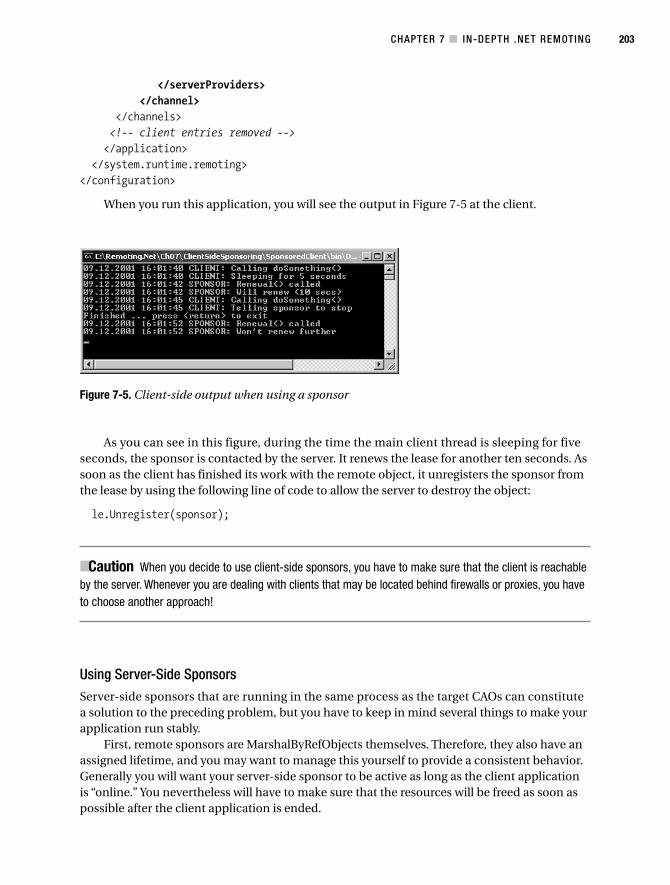
CHAPTER 7 ■ IN-DEPTH .NET REMOTING 203
</serverProviders></channel>
</channels><!-- client entries removed --></application>
</system.runtime.remoting></configuration>
When you run this application, you will see the output in Figure 7-5 at the client.
As you can see in this figure, during the time the main client thread is sleeping for fiveseconds, the sponsor is contacted by the server. It renews the lease for another ten seconds. Assoon as the client has finished its work with the remote object, it unregisters the sponsor fromthe lease by using the following line of code to allow the server to destroy the object:
le.Unregister(sponsor);
■Caution When you decide to use client-side sponsors, you have to make sure that the client is reachableby the server. Whenever you are dealing with clients that may be located behind firewalls or proxies, you haveto choose another approach!
Using Server-Side SponsorsServer-side sponsors that are running in the same process as the target CAOs can constitutea solution to the preceding problem, but you have to keep in mind several things to make yourapplication run stably.
First, remote sponsors are MarshalByRefObjects themselves. Therefore, they also have anassigned lifetime, and you may want to manage this yourself to provide a consistent behavior.Generally you will want your server-side sponsor to be active as long as the client applicationis “online.” You nevertheless will have to make sure that the resources will be freed as soon aspossible after the client application is ended.
Figure 7-5. Client-side output when using a sponsor
CHAPTER 7 ■ IN-DEPTH .NET REMOTING204
One possible approach is to continuously send a command to the sponsors so that theystay alive. This can be accomplished with a simple KeepAlive() method that is called periodi-cally from a background thread of the client application.
Another thing to watch out for is that the sponsor will be called from the .NET Remotingframework’s LeaseManager. This call might well increase the time to live of your sponsor, depend-ing on the RenewOnCallTime set in the configuration file. Without taking special care here, youmight end up with sponsors that keep running forever when Unregister() has not been calledcorrectly for each and every sponsored object. This could happen, for example, when the clientapplication crashes or experiences a network disconnect.
To remove this potential problem, I suggest you add a DateTime instance variable that holdsthe time of the last call to the sponsor’s KeepAlive() method. When the LeaseManager callsRenew(), the difference between the current time and the last time KeepAlive() has been calledwill be checked, and the sponsored object’s lease will only be renewed when the interval is belowa certain limit. As soon as all objects that are monitored by this sponsor are timed out, no furthercalls will be placed to the sponsor itself, and its own lease will therefore expire as well.
In the following example, I used very short lease times to show you the implications ingreater detail. In production applications, you should probably keep this in the range of the defaultTTL, which is five minutes. The source code in Listing 7-6 (which has to be defined in the sharedDLL) shows you the implementation of a sponsor that supports the described functionality.
Listing 7-6. The Server-Side Sponsor That Is Pinged by the Client
using System;using System.Runtime.Remoting.Lifetime;using System.Runtime.Remoting;using Server; // for ExtendedMBRObject
namespace Sponsors{
public class InstanceSponsor: MarshalByRefObject, ISponsor{
public DateTime lastKeepAlive;
public InstanceSponsor(){
Console.WriteLine("{0} SPONSOR: Created ", DateTime.Now);lastKeepAlive = DateTime.Now;
}
public void KeepAlive(){
Console.WriteLine("{0} SPONSOR: KeepAlive() called", DateTime.Now);// tracks the time of the last keepalive calllastKeepAlive = DateTime.Now;
}
public TimeSpan Renewal(System.Runtime.Remoting.Lifetime.ILease lease){
Console.WriteLine("{0} SPONSOR: Renewal() called", DateTime.Now);
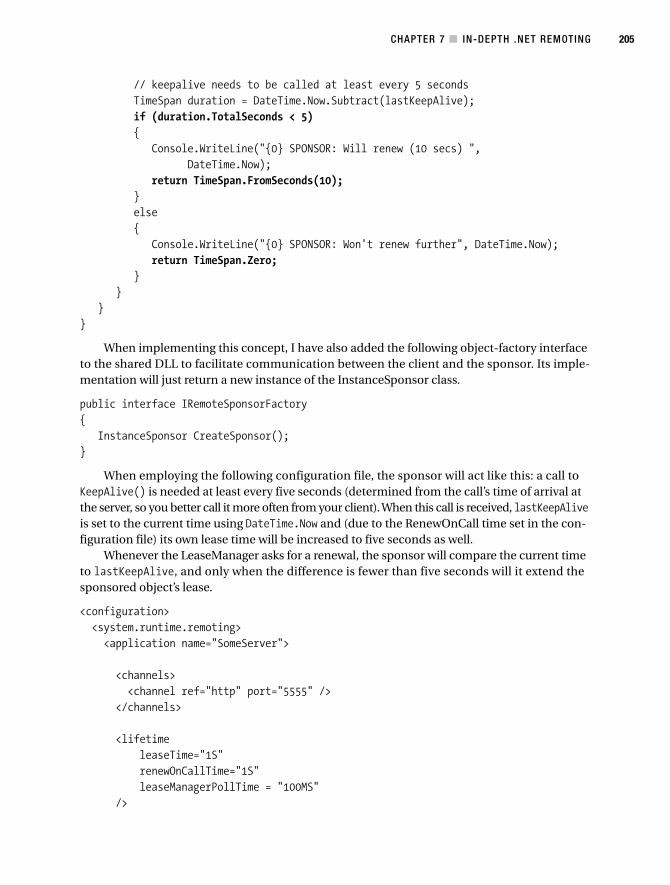
CHAPTER 7 ■ IN-DEPTH .NET REMOTING 205
// keepalive needs to be called at least every 5 secondsTimeSpan duration = DateTime.Now.Subtract(lastKeepAlive);if (duration.TotalSeconds < 5){
Console.WriteLine("{0} SPONSOR: Will renew (10 secs) ",DateTime.Now);
return TimeSpan.FromSeconds(10);}else{
Console.WriteLine("{0} SPONSOR: Won't renew further", DateTime.Now);return TimeSpan.Zero;
}}
}}
When implementing this concept, I have also added the following object-factory interfaceto the shared DLL to facilitate communication between the client and the sponsor. Its imple-mentation will just return a new instance of the InstanceSponsor class.
public interface IRemoteSponsorFactory{
InstanceSponsor CreateSponsor();}
When employing the following configuration file, the sponsor will act like this: a call toKeepAlive() is needed at least every five seconds (determined from the call’s time of arrival atthe server, so you better call it more often from your client). When this call is received, lastKeepAliveis set to the current time using DateTime.Now and (due to the RenewOnCall time set in the con-figuration file) its own lease time will be increased to five seconds as well.
Whenever the LeaseManager asks for a renewal, the sponsor will compare the current timeto lastKeepAlive, and only when the difference is fewer than five seconds will it extend thesponsored object’s lease.
<configuration><system.runtime.remoting><application name="SomeServer">
<channels><channel ref="http" port="5555" />
</channels>
<lifetimeleaseTime="1S"renewOnCallTime="1S"leaseManagerPollTime = "100MS"
/>
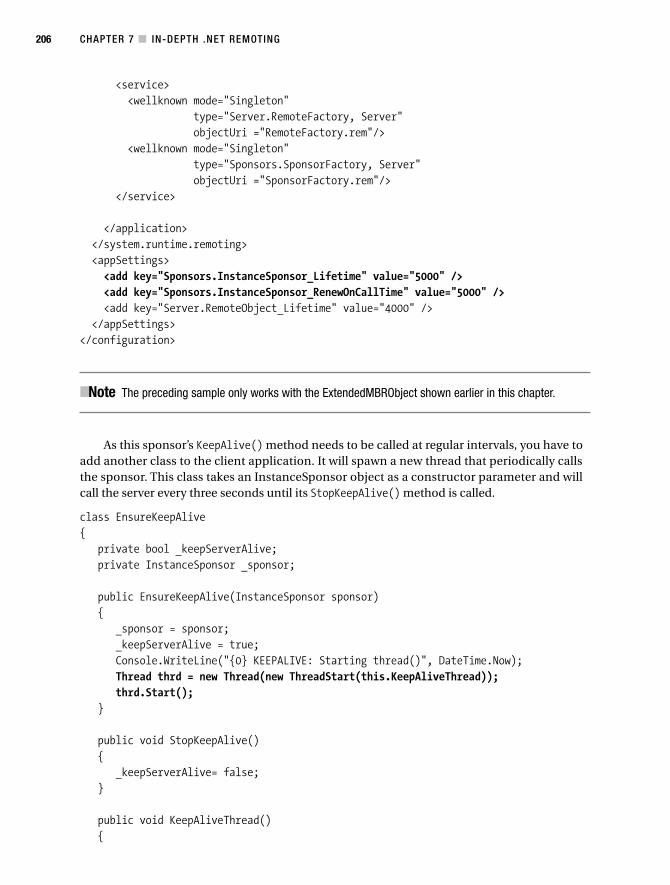
CHAPTER 7 ■ IN-DEPTH .NET REMOTING206
<service><wellknown mode="Singleton"
type="Server.RemoteFactory, Server"objectUri ="RemoteFactory.rem"/>
<wellknown mode="Singleton"type="Sponsors.SponsorFactory, Server"objectUri ="SponsorFactory.rem"/>
</service>
</application></system.runtime.remoting><appSettings><add key="Sponsors.InstanceSponsor_Lifetime" value="5000" /><add key="Sponsors.InstanceSponsor_RenewOnCallTime" value="5000" /><add key="Server.RemoteObject_Lifetime" value="4000" />
</appSettings></configuration>
■Note The preceding sample only works with the ExtendedMBRObject shown earlier in this chapter.
As this sponsor’s KeepAlive() method needs to be called at regular intervals, you have toadd another class to the client application. It will spawn a new thread that periodically callsthe sponsor. This class takes an InstanceSponsor object as a constructor parameter and willcall the server every three seconds until its StopKeepAlive() method is called.
class EnsureKeepAlive{
private bool _keepServerAlive;private InstanceSponsor _sponsor;
public EnsureKeepAlive(InstanceSponsor sponsor){
_sponsor = sponsor;_keepServerAlive = true;Console.WriteLine("{0} KEEPALIVE: Starting thread()", DateTime.Now);Thread thrd = new Thread(new ThreadStart(this.KeepAliveThread));thrd.Start();
}
public void StopKeepAlive(){
_keepServerAlive= false;}
public void KeepAliveThread(){

CHAPTER 7 ■ IN-DEPTH .NET REMOTING 207
while (_keepServerAlive){
Console.WriteLine("{0} KEEPALIVE: Will KeepAlive()", DateTime.Now);_sponsor.KeepAlive();Thread.Sleep(3000);
}}
}
To use this sponsor and its factory from a client-side project, I’ve added the following lineto the client-side remoting configuration file:
<wellknown type="Shared.IRemoteSponsorFactory, Shared"url="http://localhost:5555/SponsorFactory.rem" />
In the application itself, you have to add calls to create the server-side sponsor and to startthe client-side keepalive thread:
IRemoteFactory fact =(IRemoteFactory) RemotingHelper.CreateProxy(typeof(IRemoteFactory));
IRemoteObject cao = fact.CreateInstance();
IRemoteSponsorFactory sf =(IRemoteSponsorFactory)
RemotingHelper.CreateProxy(typeof(IRemoteSponsorFactory));
// create remote (server-side) sponsorInstanceSponsor sp = sf.CreateSponsor();
// start the keepalive threadEnsureKeepAlive keepalive = new EnsureKeepAlive(sp);
ILease le = (ILease) ((MarshalByRefObject) cao).GetLifetimeService();
// register the sponsorle.Register(sp);
// ... rest of implementation removed
When you are finished using the CAO, you have to unregister the sponsor using ILease.Unregister() and stop the keepalive thread:
le.Unregister(sp);keepalive.StopKeepAlive();
Even though in the preceding example I just used a single CAO, you can register this sponsorwith multiple leases for different CAOs at the same time. When you run this application, you’llsee the output shown in Figures 7-6 and 7-7 on the client and the server, respectively.
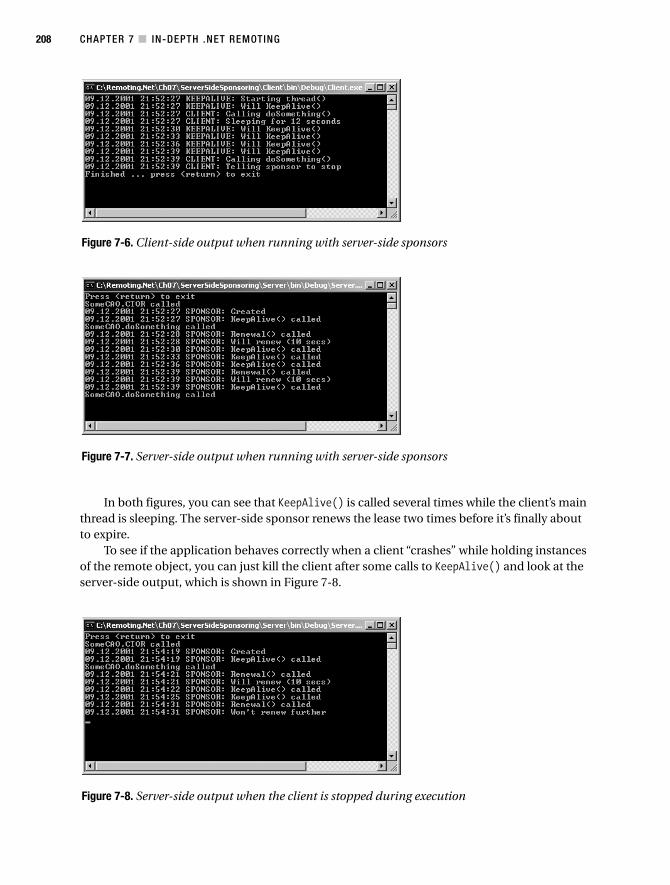
CHAPTER 7 ■ IN-DEPTH .NET REMOTING208
Figure 7-6. Client-side output when running with server-side sponsors
Figure 7-7. Server-side output when running with server-side sponsors
Figure 7-8. Server-side output when the client is stopped during execution
In both figures, you can see that KeepAlive() is called several times while the client’s mainthread is sleeping. The server-side sponsor renews the lease two times before it’s finally aboutto expire.
To see if the application behaves correctly when a client “crashes” while holding instancesof the remote object, you can just kill the client after some calls to KeepAlive() and look at theserver-side output, which is shown in Figure 7-8.
CHAPTER 7 ■ IN-DEPTH .NET REMOTING 209
Here you can see that the sponsor processed three calls to KeepAlive() before the clientstopped pinging. It received the call to Renewal() more than five seconds later than the last callto KeepAlive(), and therefore refused to further prolong the object’s lease time. Hence you canbe sure that both objects (the CAO and its sponsor) are timed out and correctly marked forgarbage collection.
Using the CallContextWhen creating distributed applications, one of the recurring requirements is to transfer runtimeinformation between server and client. This is information that allows you to determine thecontext in which a piece of code is running.
When you call a method locally, for example, the called code will immediately know about thecaller’s security permissions based on the thread’s security token, and based on .NET’s own codeaccess security. When you call code remotely, however, the called code cannot do a simple stack-based lookup to get access to this information. Instead, the information has to be somehowtransferred to the server.
Information like this can be transferred in two different ways: as a method parameter or viasome other means. The latter case is what we call “out-of-band” (OOB) data—information thatis transferred alongside the real method call, but which helps to create the server-side context.
Some parts of these OOB data are transferred automatically by the protocol. If you host yourcomponents in IIS, for example, and activate Windows-Integrated security as discussed earlierin this book, then you don’t have to manually pass username/password information. The under-lying HTTP protocol and the .NET Remoting framework will automatically take care of securelytransferring this OOB information for you.
In addition to security, applications can have the more generic need to pass out-of-bandinformation between client and server. To facilitate this, the .NET Remoting framework providesthe CallContext class. The call context is essentially a dictionary with a special behavior: all itemsthat implement ILogicalThreadAffinative will travel alongside your method calls between serverand client. If your client, for example, stores one of these items in the call context, then yourserver-side code will be able to retrieve the item from its call context.
Both the CallContext class and the interface are defined in the namespace System.Runtime.Remoting.Messaging.
An example of OOB data is to enable/disable logging based on a client-side setting. Globallyenabling/disabling of server-side logging is usually not enough if you have hundreds of con-current clients and want to isolate problems with only one of them. In this case, you can createa command-line or menu option for the client application which would then pass the necessaryinformation to the server.
In the following application, I will again present the CustomerManager class, which I’vebeen using throughout the book. I will extend it to include additional logging information (whichis, admittedly, simulated by just using Console.WriteLine()). This logging information shouldonly be written if the client has been started with the command-line switch “/enablelog”. For allother concurrent clients, no information should be written to the log file.
I first need to define an object that is [Serializable] and that implements ILogicalThreadAffinative in a DLL that is shared between client and server. I use the sameDLL that also contains the definition of the IRemoteCustomerManager interface and theCustomer object as you can see in Listing 7-7.
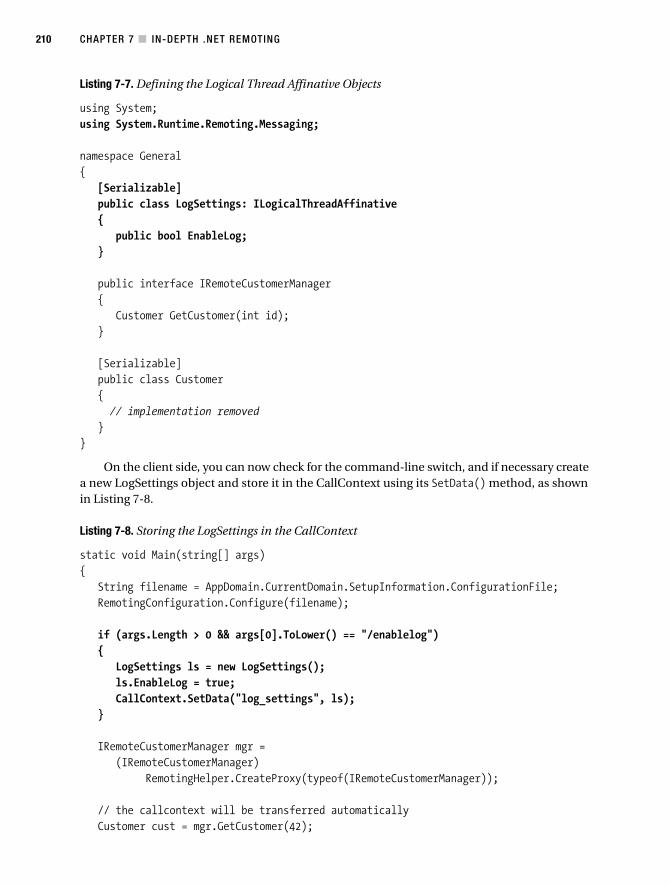
CHAPTER 7 ■ IN-DEPTH .NET REMOTING210
Listing 7-7. Defining the Logical Thread Affinative Objects
using System;using System.Runtime.Remoting.Messaging;
namespace General{
[Serializable]public class LogSettings: ILogicalThreadAffinative{
public bool EnableLog;}
public interface IRemoteCustomerManager{
Customer GetCustomer(int id);}
[Serializable]public class Customer{// implementation removed
}}
On the client side, you can now check for the command-line switch, and if necessary createa new LogSettings object and store it in the CallContext using its SetData() method, as shownin Listing 7-8.
Listing 7-8. Storing the LogSettings in the CallContext
static void Main(string[] args){
String filename = AppDomain.CurrentDomain.SetupInformation.ConfigurationFile;RemotingConfiguration.Configure(filename);
if (args.Length > 0 && args[0].ToLower() == "/enablelog"){
LogSettings ls = new LogSettings();ls.EnableLog = true;CallContext.SetData("log_settings", ls);
}
IRemoteCustomerManager mgr =(IRemoteCustomerManager)
RemotingHelper.CreateProxy(typeof(IRemoteCustomerManager));
// the callcontext will be transferred automaticallyCustomer cust = mgr.GetCustomer(42);
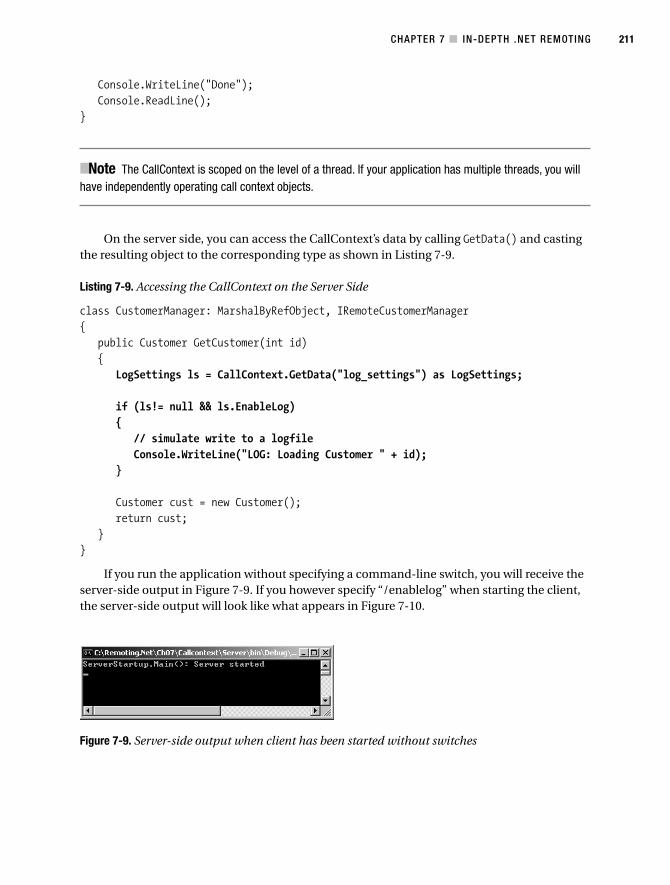
CHAPTER 7 ■ IN-DEPTH .NET REMOTING 211
Console.WriteLine("Done");Console.ReadLine();
}
■Note The CallContext is scoped on the level of a thread. If your application has multiple threads, you willhave independently operating call context objects.
On the server side, you can access the CallContext’s data by calling GetData() and castingthe resulting object to the corresponding type as shown in Listing 7-9.
Listing 7-9. Accessing the CallContext on the Server Side
class CustomerManager: MarshalByRefObject, IRemoteCustomerManager{
public Customer GetCustomer(int id){
LogSettings ls = CallContext.GetData("log_settings") as LogSettings;
if (ls!= null && ls.EnableLog){
// simulate write to a logfileConsole.WriteLine("LOG: Loading Customer " + id);
}
Customer cust = new Customer();return cust;
}}
If you run the application without specifying a command-line switch, you will receive theserver-side output in Figure 7-9. If you however specify “/enablelog” when starting the client,the server-side output will look like what appears in Figure 7-10.
Figure 7-9. Server-side output when client has been started without switches
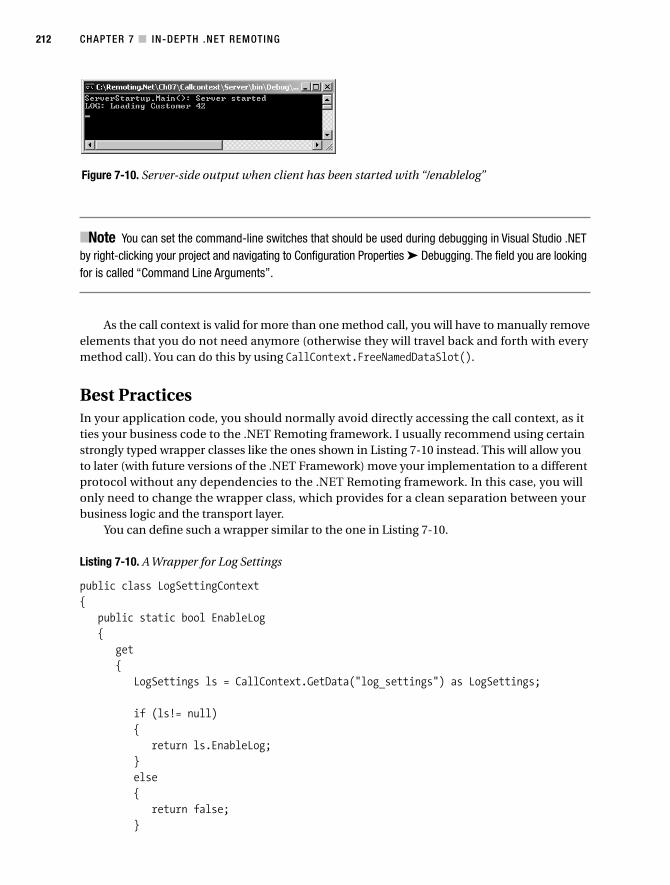
CHAPTER 7 ■ IN-DEPTH .NET REMOTING212
Figure 7-10. Server-side output when client has been started with “/enablelog”
■Note You can set the command-line switches that should be used during debugging in Visual Studio .NETby right-clicking your project and navigating to Configuration Properties ➤ Debugging. The field you are lookingfor is called “Command Line Arguments”.
As the call context is valid for more than one method call, you will have to manually removeelements that you do not need anymore (otherwise they will travel back and forth with everymethod call). You can do this by using CallContext.FreeNamedDataSlot().
Best PracticesIn your application code, you should normally avoid directly accessing the call context, as itties your business code to the .NET Remoting framework. I usually recommend using certainstrongly typed wrapper classes like the ones shown in Listing 7-10 instead. This will allow youto later (with future versions of the .NET Framework) move your implementation to a differentprotocol without any dependencies to the .NET Remoting framework. In this case, you willonly need to change the wrapper class, which provides for a clean separation between yourbusiness logic and the transport layer.
You can define such a wrapper similar to the one in Listing 7-10.
Listing 7-10. A Wrapper for Log Settings
public class LogSettingContext{
public static bool EnableLog{
get{
LogSettings ls = CallContext.GetData("log_settings") as LogSettings;
if (ls!= null){
return ls.EnableLog;}else{
return false;}
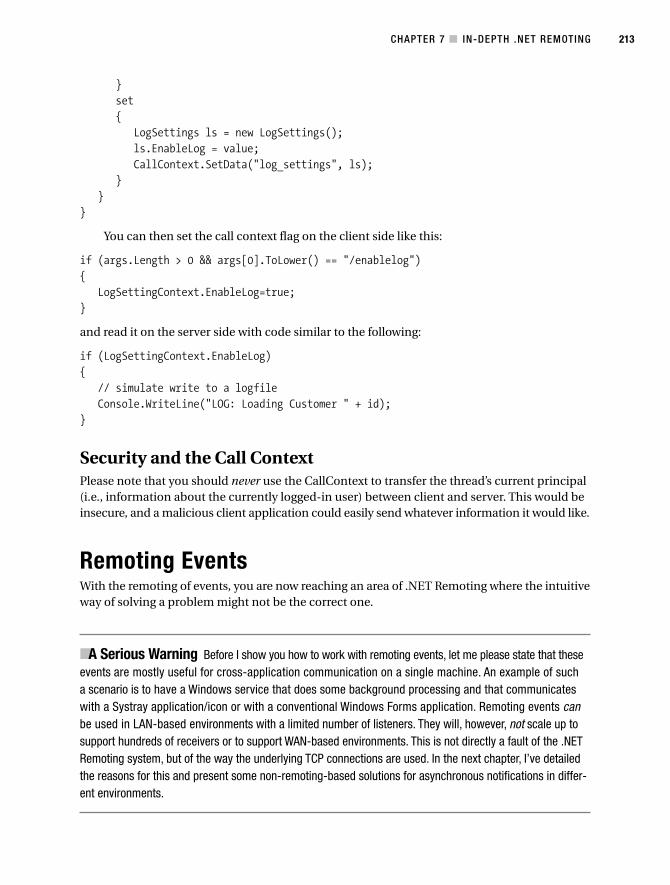
CHAPTER 7 ■ IN-DEPTH .NET REMOTING 213
}set{
LogSettings ls = new LogSettings();ls.EnableLog = value;CallContext.SetData("log_settings", ls);
}}
}
You can then set the call context flag on the client side like this:
if (args.Length > 0 && args[0].ToLower() == "/enablelog"){
LogSettingContext.EnableLog=true;}
and read it on the server side with code similar to the following:
if (LogSettingContext.EnableLog){
// simulate write to a logfileConsole.WriteLine("LOG: Loading Customer " + id);
}
Security and the Call ContextPlease note that you should never use the CallContext to transfer the thread’s current principal(i.e., information about the currently logged-in user) between client and server. This would beinsecure, and a malicious client application could easily send whatever information it would like.
Remoting EventsWith the remoting of events, you are now reaching an area of .NET Remoting where the intuitiveway of solving a problem might not be the correct one.
■A Serious Warning Before I show you how to work with remoting events, let me please state that theseevents are mostly useful for cross-application communication on a single machine. An example of sucha scenario is to have a Windows service that does some background processing and that communicateswith a Systray application/icon or with a conventional Windows Forms application. Remoting events canbe used in LAN-based environments with a limited number of listeners. They will, however, not scale up tosupport hundreds of receivers or to support WAN-based environments. This is not directly a fault of the .NETRemoting system, but of the way the underlying TCP connections are used. In the next chapter, I’ve detailedthe reasons for this and present some non-remoting-based solutions for asynchronous notifications in differ-ent environments.
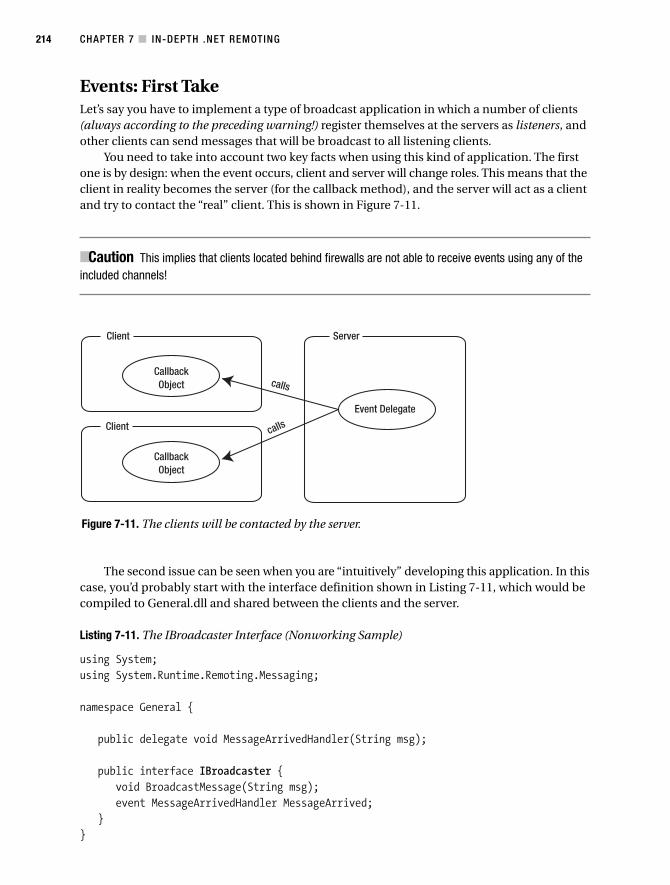
CHAPTER 7 ■ IN-DEPTH .NET REMOTING214
ServerClient
Client
callsCallbackObject
CallbackObject
Event Delegate
calls
Figure 7-11. The clients will be contacted by the server.
Events: First TakeLet’s say you have to implement a type of broadcast application in which a number of clients(always according to the preceding warning!) register themselves at the servers as listeners, andother clients can send messages that will be broadcast to all listening clients.
You need to take into account two key facts when using this kind of application. The firstone is by design: when the event occurs, client and server will change roles. This means that theclient in reality becomes the server (for the callback method), and the server will act as a clientand try to contact the “real” client. This is shown in Figure 7-11.
■Caution This implies that clients located behind firewalls are not able to receive events using any of theincluded channels!
The second issue can be seen when you are “intuitively” developing this application. In thiscase, you’d probably start with the interface definition shown in Listing 7-11, which would becompiled to General.dll and shared between the clients and the server.
Listing 7-11. The IBroadcaster Interface (Nonworking Sample)
using System;using System.Runtime.Remoting.Messaging;
namespace General {
public delegate void MessageArrivedHandler(String msg);
public interface IBroadcaster {void BroadcastMessage(String msg);event MessageArrivedHandler MessageArrived;
}}
CHAPTER 7 ■ IN-DEPTH .NET REMOTING 215
This interface allows clients to register themselves to receive a notification by using theMessageArrived event. When another client calls BroadcastMessage(), this event will be invokedand the listening clients called back. The server-side implementation of this interface is shownin Listing 7-12.
Listing 7-12. The Server-Side Implementation of IBroadcaster
using System;using System.Runtime.Remoting;using System.Threading;using General;
namespace Server{
public class Broadcaster: MarshalByRefObject, IBroadcaster{
public event General.MessageArrivedHandler MessageArrived;
public void BroadcastMessage(string msg) {// call the delegate to notify all listenersConsole.WriteLine("Will broadcast message: {0}", msg);MessageArrived(msg);
}
public override object InitializeLifetimeService() {// this object has to live "forever"return null;
}}
class ServerStartup{
static void Main(string[] args){
String filename = "server.exe.config";RemotingConfiguration.Configure(filename);
Console.WriteLine ("Server started, press <return> to exit.");Console.ReadLine();
}}
}
The listening client’s implementation would be quite straightforward in this case. The onlything you’d have to take care of is that the object that is going to be called back to handle theevent has to be a MarshalByRefObject as well. This is shown in Listing 7-13.
CHAPTER 7 ■ IN-DEPTH .NET REMOTING216
Listing 7-13. The First Client’s Implementation, Which Won’t Work
using System;using System.Runtime.Remoting;using General;using RemotingTools; // RemotingHelper
namespace EventListener{
class EventListener{
static void Main(string[] args){
String filename = "eventlistener.exe.config";RemotingConfiguration.Configure(filename);
IBroadcaster bcaster =(IBroadcaster) RemotingHelper.CreateProxy(typeof(IBroadcaster));
Console.WriteLine("Registering event at server");
// callbacks can only work on MarshalByRefObjects, so// I created a different class for this as wellEventHandler eh = new EventHandler();bcaster.MessageArrived +=
new MessageArrivedHandler(eh.HandleMessage);
Console.WriteLine("Event registered. Waiting for messages.");Console.ReadLine();
}}
public class EventHandler: MarshalByRefObject {public void HandleMessage(String msg) {
Console.WriteLine("Received: {0}",msg);}
public override object InitializeLifetimeService() {// this object has to live "forever"return null;
}}
}
When implementing this so-called intuitive solution, you’ll be presented with the errormessage shown in Figure 7-12.
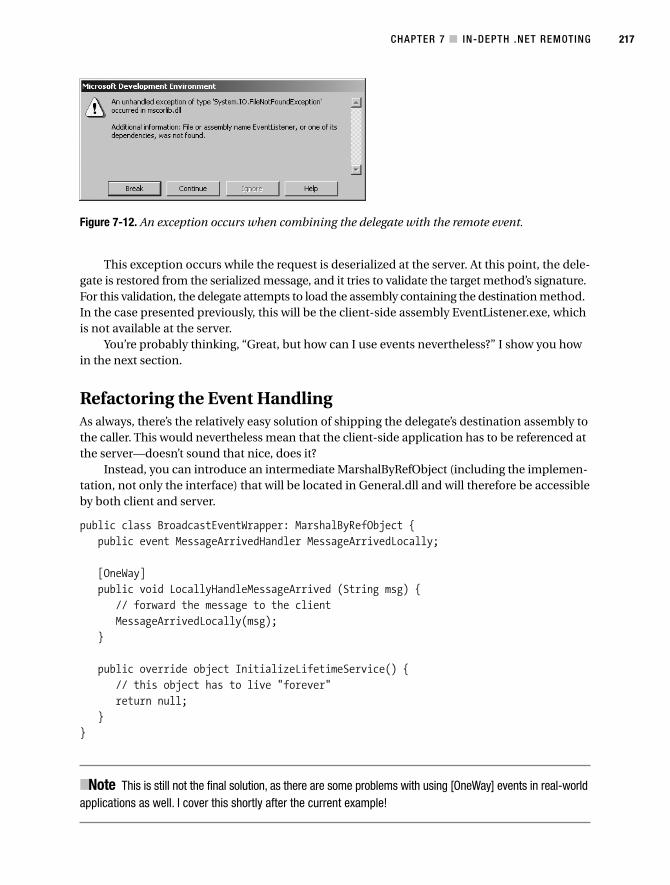
CHAPTER 7 ■ IN-DEPTH .NET REMOTING 217
Figure 7-12. An exception occurs when combining the delegate with the remote event.
This exception occurs while the request is deserialized at the server. At this point, the dele-gate is restored from the serialized message, and it tries to validate the target method’s signature.For this validation, the delegate attempts to load the assembly containing the destination method.In the case presented previously, this will be the client-side assembly EventListener.exe, whichis not available at the server.
You’re probably thinking, “Great, but how can I use events nevertheless?” I show you howin the next section.
Refactoring the Event HandlingAs always, there’s the relatively easy solution of shipping the delegate’s destination assembly tothe caller. This would nevertheless mean that the client-side application has to be referenced atthe server—doesn’t sound that nice, does it?
Instead, you can introduce an intermediate MarshalByRefObject (including the implemen-tation, not only the interface) that will be located in General.dll and will therefore be accessibleby both client and server.
public class BroadcastEventWrapper: MarshalByRefObject {public event MessageArrivedHandler MessageArrivedLocally;
[OneWay]public void LocallyHandleMessageArrived (String msg) {
// forward the message to the clientMessageArrivedLocally(msg);
}
public override object InitializeLifetimeService() {// this object has to live "forever"return null;
}}
■Note This is still not the final solution, as there are some problems with using [OneWay] events in real-worldapplications as well. I cover this shortly after the current example!

CHAPTER 7 ■ IN-DEPTH .NET REMOTING218
ServerClient
LocallyHandleMessageArrived()Event Delegate BroadcastEventWrapper
Client Application
Hand
leM
essa
ge()
Figure 7-13. Event handling with an intermediate wrapper
This wrapper is created in the client’s context and provides an event that can be used to callback the “real” client. The server in turn receives a delegate to the BroadcastEventWrapper’sLocallyHandleMessageArrived() method. This method activates the BroadcastEventWrapper’sMessageArrivedLocally event, which will be handled by the client. You can see the sequence inFigure 7-13.
The server’s event will therefore be handled by a MarshalByRefObject that is known to it(as it’s contained in General.dll) so that the delegate can resolve the method’s signature. As theBroadcastEventWrapper runs in the client context, its own delegate has access to the realclient-side event handler’s signature.
The complete source code to General.dll is shown in Listing 7-14.
Listing 7-14. The Shared Assembly Now Contains the BroadcastEventWrapper.
using System;using System.Runtime.Remoting.Messaging;
namespace General {
public delegate void MessageArrivedHandler(String msg);
public interface IBroadcaster {void BroadcastMessage(String msg);event MessageArrivedHandler MessageArrived;
}
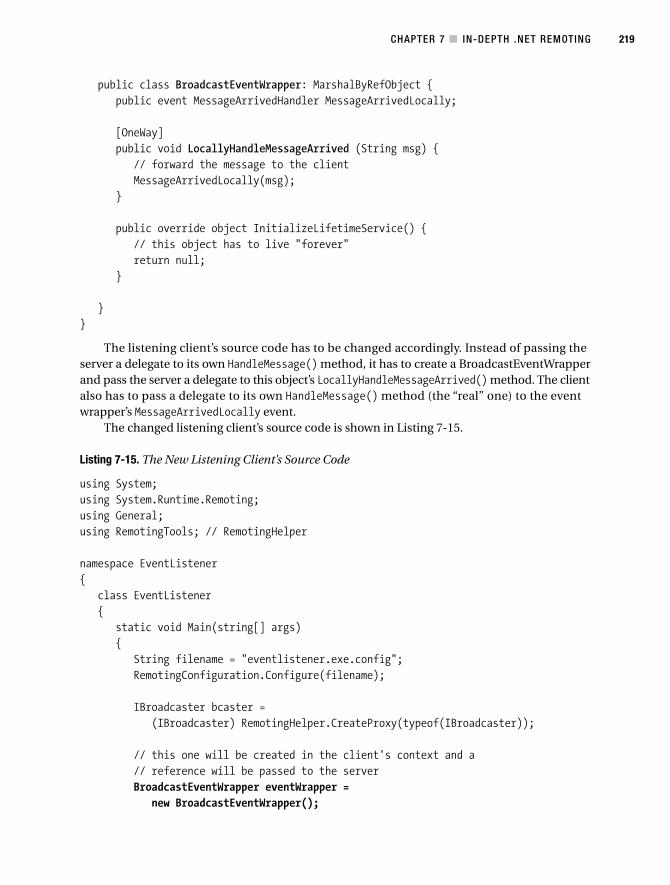
CHAPTER 7 ■ IN-DEPTH .NET REMOTING 219
public class BroadcastEventWrapper: MarshalByRefObject {public event MessageArrivedHandler MessageArrivedLocally;
[OneWay]public void LocallyHandleMessageArrived (String msg) {
// forward the message to the clientMessageArrivedLocally(msg);
}
public override object InitializeLifetimeService() {// this object has to live "forever"return null;
}
}}
The listening client’s source code has to be changed accordingly. Instead of passing theserver a delegate to its own HandleMessage() method, it has to create a BroadcastEventWrapperand pass the server a delegate to this object’s LocallyHandleMessageArrived() method. The clientalso has to pass a delegate to its own HandleMessage() method (the “real” one) to the eventwrapper’s MessageArrivedLocally event.
The changed listening client’s source code is shown in Listing 7-15.
Listing 7-15. The New Listening Client’s Source Code
using System;using System.Runtime.Remoting;using General;using RemotingTools; // RemotingHelper
namespace EventListener{
class EventListener{
static void Main(string[] args){
String filename = "eventlistener.exe.config";RemotingConfiguration.Configure(filename);
IBroadcaster bcaster =(IBroadcaster) RemotingHelper.CreateProxy(typeof(IBroadcaster));
// this one will be created in the client's context and a// reference will be passed to the serverBroadcastEventWrapper eventWrapper =
new BroadcastEventWrapper();
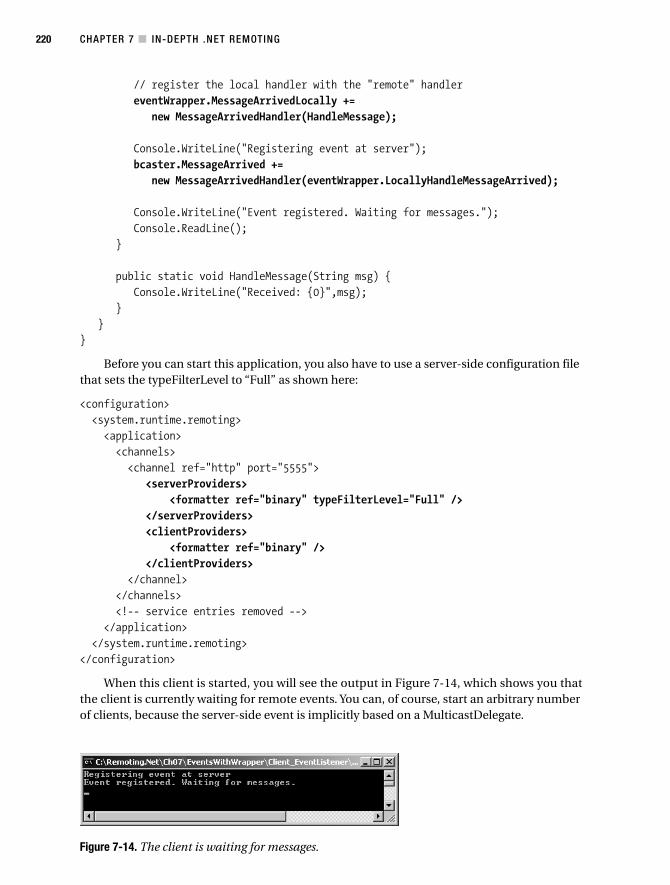
CHAPTER 7 ■ IN-DEPTH .NET REMOTING220
Figure 7-14. The client is waiting for messages.
// register the local handler with the "remote" handlereventWrapper.MessageArrivedLocally +=
new MessageArrivedHandler(HandleMessage);
Console.WriteLine("Registering event at server");bcaster.MessageArrived +=
new MessageArrivedHandler(eventWrapper.LocallyHandleMessageArrived);
Console.WriteLine("Event registered. Waiting for messages.");Console.ReadLine();
}
public static void HandleMessage(String msg) {Console.WriteLine("Received: {0}",msg);
}}
}
Before you can start this application, you also have to use a server-side configuration filethat sets the typeFilterLevel to “Full” as shown here:
<configuration><system.runtime.remoting><application><channels><channel ref="http" port="5555">
<serverProviders><formatter ref="binary" typeFilterLevel="Full" />
</serverProviders><clientProviders>
<formatter ref="binary" /></clientProviders>
</channel></channels><!-- service entries removed -->
</application></system.runtime.remoting>
</configuration>
When this client is started, you will see the output in Figure 7-14, which shows you thatthe client is currently waiting for remote events. You can, of course, start an arbitrary numberof clients, because the server-side event is implicitly based on a MulticastDelegate.
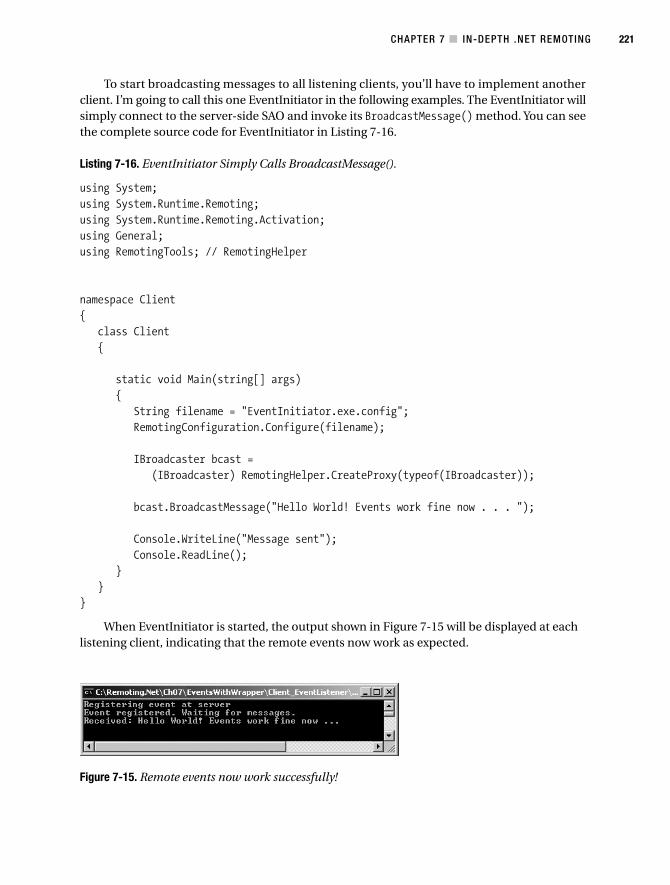
CHAPTER 7 ■ IN-DEPTH .NET REMOTING 221
To start broadcasting messages to all listening clients, you’ll have to implement anotherclient. I’m going to call this one EventInitiator in the following examples. The EventInitiator willsimply connect to the server-side SAO and invoke its BroadcastMessage() method. You can seethe complete source code for EventInitiator in Listing 7-16.
Listing 7-16. EventInitiator Simply Calls BroadcastMessage().
using System;using System.Runtime.Remoting;using System.Runtime.Remoting.Activation;using General;using RemotingTools; // RemotingHelper
namespace Client{
class Client{
static void Main(string[] args){
String filename = "EventInitiator.exe.config";RemotingConfiguration.Configure(filename);
IBroadcaster bcast =(IBroadcaster) RemotingHelper.CreateProxy(typeof(IBroadcaster));
bcast.BroadcastMessage("Hello World! Events work fine now . . . ");
Console.WriteLine("Message sent");Console.ReadLine();
}}
}
When EventInitiator is started, the output shown in Figure 7-15 will be displayed at eachlistening client, indicating that the remote events now work as expected.
Figure 7-15. Remote events now work successfully!

CHAPTER 7 ■ IN-DEPTH .NET REMOTING222
Why [OneWay] Events Are a Bad IdeaYou might have read in some documents and articles that remoting event handlers should bedefined as [OneWay] methods. The reason is that without defining remote event handlers thisway, an exception will occur whenever a client is unreachable or has been disconnected with-out first unregistering the event handler.
When just forwarding the call to your event’s delegate, as shown in the previous server-sideexample, two things will happen: the event will not reach all listeners, and the client that initi-ated the event in the first place will receive an exception. This is certainly not what you want tohappen.
When using [OneWay] event handlers instead, the server will try to contact each listenerbut won’t throw an exception if it’s unreachable. This seems to be a good thing at first glance.Imagine, however, that your application will run for several months without restarting. As a result,a lot of “unreachable” event handlers will end up registered, and the server will try to contacteach of them every time. Not only will this take up network bandwidth, but your performancewill suffer as well, as each “nonworking” call might take up some seconds, adding up to minutesof processing time for each event. This, again, is something you wouldn’t want in your broad-cast application.
Instead of using the default event invocation mechanism (which is fine for local applica-tions), you will have to develop a server-side wrapper that calls all event handlers in a try/catchblock and removes all nonworking handlers afterwards. This implies that you define the eventhandlers without the [OneWay] attribute! To make this work, you first have to remove thisattribute from the shared assembly.
public class BroadcastEventWrapper: MarshalByRefObject {public event MessageArrivedHandler MessageArrivedLocally;
// don't use OneWay here!public void LocallyHandleMessageArrived (String msg) {
// forward the message to the clientMessageArrivedLocally(msg);
}
public override object InitializeLifetimeService() {// this object has to live "forever"return null;
}}
In the server-side code, you remove the call to MessageArrived() and instead implementthe logic shown in Listing 7-17, which iterates over the list of registered delegates and calls eachone. When an exception is thrown by the framework because the destination object is unreach-able, the delegate will be removed from the event.
Listing 7-17. Invoking Each Delegate on Your Own
using System;using System.Runtime.Remoting;using System.Threading;using General;
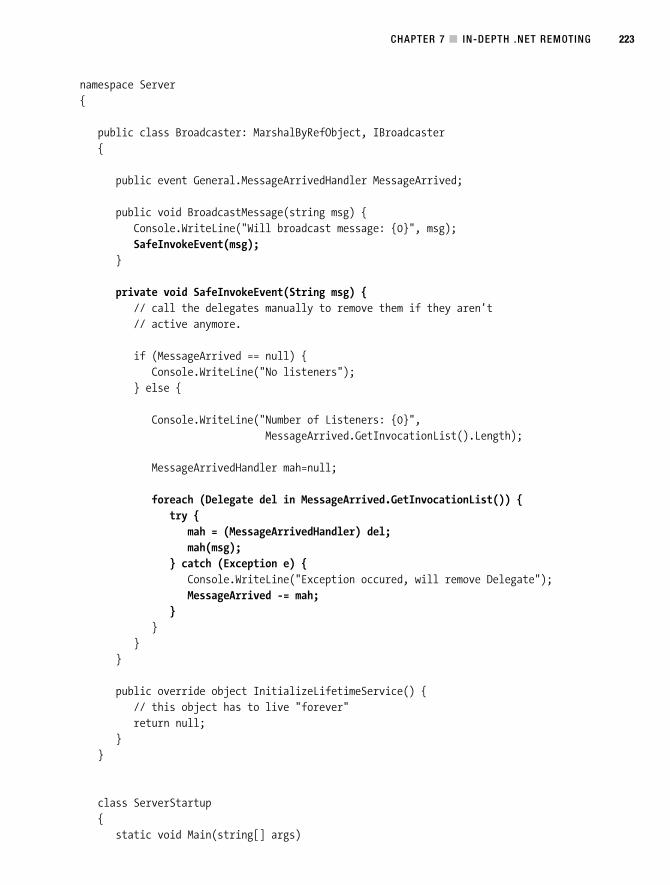
CHAPTER 7 ■ IN-DEPTH .NET REMOTING 223
namespace Server{
public class Broadcaster: MarshalByRefObject, IBroadcaster{
public event General.MessageArrivedHandler MessageArrived;
public void BroadcastMessage(string msg) {Console.WriteLine("Will broadcast message: {0}", msg);SafeInvokeEvent(msg);
}
private void SafeInvokeEvent(String msg) {// call the delegates manually to remove them if they aren't// active anymore.
if (MessageArrived == null) {Console.WriteLine("No listeners");
} else {
Console.WriteLine("Number of Listeners: {0}",MessageArrived.GetInvocationList().Length);
MessageArrivedHandler mah=null;
foreach (Delegate del in MessageArrived.GetInvocationList()) {try {
mah = (MessageArrivedHandler) del;mah(msg);
} catch (Exception e) {Console.WriteLine("Exception occured, will remove Delegate");MessageArrived -= mah;
}}
}}
public override object InitializeLifetimeService() {// this object has to live "forever"return null;
}}
class ServerStartup{
static void Main(string[] args)
CHAPTER 7 ■ IN-DEPTH .NET REMOTING224
{String filename = "server.exe.config";RemotingConfiguration.Configure(filename);
Console.WriteLine ("Server started, press <return> to exit.");Console.ReadLine();
}}
}
When using events in this way, you ensure the best possible performance, no matter howlong your server application keeps running. But you still have to keep in mind that the use of.NET Remoting events might not be the best choice to broadcast information to a large num-ber of clients! You can read more about these scenarios in the following chapter.
SummaryIn this chapter you learned about the details of .NET Remoting–based applications. You nowknow how lifetime is managed and how you can dynamically configure an object’s time to live.If this doesn’t suffice, implementing client- or server-side sponsors gives you the opportunityto manage an object’s lifetime independently of any TTLs.
You also read about versioning, and you can now look at the whole application’s lifecycleover various versions and know what to watch out for in regard to SAOs and CAOs, and knowhow the ISerializable interface can help you when using [Serializable] objects.
On the last pages of this chapter, you read about how you can use delegates and events,and what to take care of when designing an application that relies on these features. In partic-ular, you learned that using [OneWay] event handlers the intuitive way certainly isn’t the bestpractice.
You should now be able to solve most challenges that might confront you during designand development of a .NET Remoting application. In the next two chapters, I will share someadditional tips, best practices, and troubleshooting guides that you should take into accountbefore designing your .NET Remoting–based solution.
225
C H A P T E R 8
■ ■ ■
The Ins and Outs of Versioning
In most distributed applications, it’s of uttermost importance to look at the application’s life-cycle right from the beginning. You might have to ensure that your already deployed clientswill keep working, even when your server is available in newer versions and will be providingmore functionality.
Generally speaking, .NET Remoting supports the base .NET versioning services, whichalso implies that you have to use strong names for versioning of CAOs or serializable objects,for example. Nevertheless, in details the means of lifecycle management differ quite heavilybetween .NET Remoting and common .NET versioning and also differ between the varioustypes of remoteable objects.
.NET Framework Versioning BasicsVersioning itself is an integral part of the .NET Framework and the common language runtimeitself. Although versioning of distributed applications is different, the basic concepts of version-ing .NET Framework are still valid. Therefore, let’s start with a short introduction of versioningwith .NET.
Basically, each .NET component has a version attribute stored in the assembly manifest.This version consists of four parts: major and minor version as well as build number and revisionnumber (major.minor.build.revision). When it comes to versioning, a general rule is that com-ponents with different major and/or minor version might be incompatible with previous versions,whereas components with the same major or minor version and different build or revision num-bers leave interfaces intact to stay compatible with previous versions of the component.
The ffull assembly name consists of the simple, unencrypted assembly name, the versionas described previously, the assembly culture, and a public key signature. As soon as an assem-bly is signed with a private key, we are talking about a so-called strong name.
A Short Introduction to Strong NamingA strong name consists of the assembly’s name, version, culture information, and a fingerprintfrom the publisher’s public/private key pair. This scheme is used to identify an assembly “with-out doubt,” because even though another Person could possibly create an assembly having thesame name, version, and culture information, only the owner of the correct key pair can signthe assembly and provide the correct fingerprint. Furthermore, the signature avoids tamperingof code when it gets downloaded, for example, from a Web server.
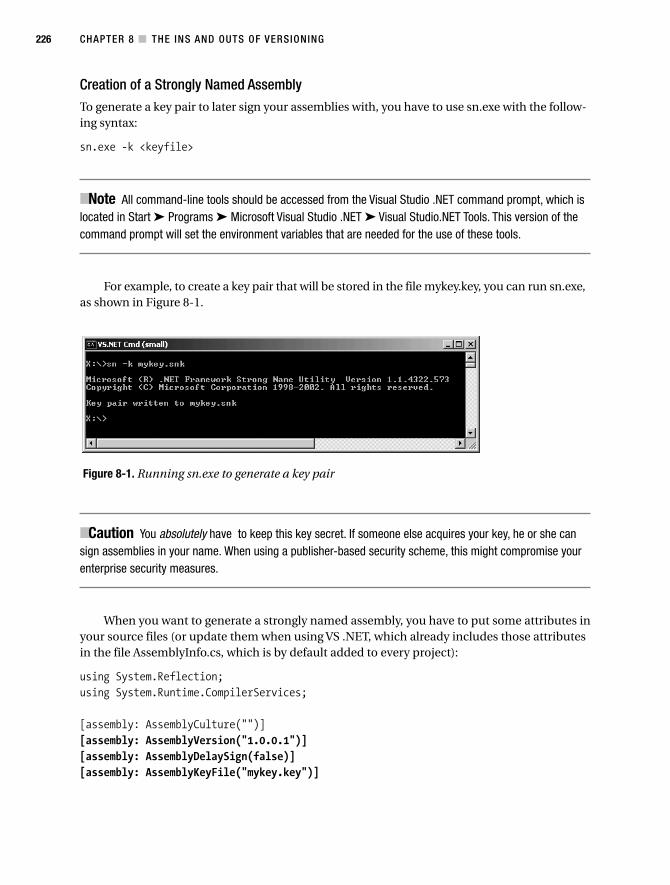
CHAPTER 8 ■ THE INS AND OUTS OF VERSIONING226
Figure 8-1. Running sn.exe to generate a key pair
Creation of a Strongly Named AssemblyTo generate a key pair to later sign your assemblies with, you have to use sn.exe with the follow-ing syntax:
sn.exe -k <keyfile>
■Note All command-line tools should be accessed from the Visual Studio .NET command prompt, which islocated in Start ➤ Programs ➤ Microsoft Visual Studio .NET ➤ Visual Studio.NET Tools. This version of thecommand prompt will set the environment variables that are needed for the use of these tools.
For example, to create a key pair that will be stored in the file mykey.key, you can run sn.exe,as shown in Figure 8-1.
■Caution You absolutely have to keep this key secret. If someone else acquires your key, he or she cansign assemblies in your name. When using a publisher-based security scheme, this might compromise yourenterprise security measures.
When you want to generate a strongly named assembly, you have to put some attributes inyour source files (or update them when using VS .NET, which already includes those attributesin the file AssemblyInfo.cs, which is by default added to every project):
using System.Reflection;using System.Runtime.CompilerServices;
[assembly: AssemblyCulture("")][assembly: AssemblyVersion("1.0.0.1")][assembly: AssemblyDelaySign(false)][assembly: AssemblyKeyFile("mykey.key")]
CHAPTER 8 ■ THE INS AND OUTS OF VERSIONING 227
1. The * in this case means that this part of the version number is assigned automatically.2. This rule can be overridden by configuring an assembly redirection in your application configuration
using <dependentAssembly> together with a <bindingRedirect> or with an assembly publisher policythrough the .NET Framework configuration utility.
3. Using assemblies in a shared directory requires the <codeBase> option to be configured in the applica-tion that is using the shared assembly. This can be done in the application configuration file (app.config).
As the AssemblyVersion attribute defaults to “1.0.*”1 in VS .NET, you’ll have to change thisto allow for definite assignment of version numbers for your components. Make sure, though,to change it whenever you distribute a new version of your DLL.
The attributeA AssemblyKeyFile has to point to the file generated by sn.exe. When usingVisual Studio .NET, you have to place it in the directory that contains your project file (<proj-ect>.csproj for C# projects).
Upon compilation of this project, no matter whether you’re using VS .NET or the command-line compilers, the keyfile will be used to sign the assembly, and you’ll end up with a stronglynamed assembly that can be installed in the GAC.
How the CLR Locates AssembliesWhen an assembly is loaded, the CLR determines all referenced assemblies through the meta-data. The CLR takes the exact version of the referenced assemblies and, if available on the targetmachine, loads them. An application always automatically runs with the versions of referencedassemblies against which it has been compiled.2 Therefore, the CLR needs a mechanism forlocating these assemblies.
For this purpose, basically the CLR differentiates between private and shared assemblies.Private assemblies are stored in the same directory as the application using the assembly. Onlyother assemblies running in the same directory can use the assembly, as others won’t find it.
A shared assembly can be used across multiple A shared assembly can be used acrossmultiple assemblies stored in different directories. Shared assemblies are either stored ina shared directory3 or in the Global Assembly Cache (GAC). The GAC is a central directory in theWindows system directory that can store multiple versions of the same assembly—but allassemblies in the GAC must have a strong name so that they can be identified uniquely.
If an assembly gets loaded, the CLR resolves assembly references in the following order:
1. First of all, for all sstrongly named assemblies the CLR looks into the GAC, and if thereferenced assembly in the correct version can be found there, it uses this version ofthe assembly.
2. If no assembly has been found in the GAC, the CLR verifies whether there are anypublisher policies or <codeBase> configurations available. If yes, these will be used forlocating the referenced assemblies.
3. When the referenced assemblies are not found in the <codeBase> or through publisherpolicies, the CLR starts a so-called probing process. This means that the CLR tries to find thereferenced assemblies within the application base directory and well-defined subdirec-tories (either determined by the assembly name, the culture, or through configuration).More about pprobing can be found on MSDN at http://msdn.microsoft.com/library/default.asp?url=/library/en-us/cpguide/html/cpconHowRuntimeLocatesAssemblies.asp.
CHAPTER 8 ■ THE INS AND OUTS OF VERSIONING228
After the CLR has resolved the assembly reference based on its (full) assembly name, itcan locate the referenced assemblies through the process described previously and load them.Whereas private assemblies and <codeBase> configuration basically enables xcopy deployment,putting an assembly into the Global Assembly Cache requires an extra installation step.
Installation in the GACTo manipulate the contents of the GAC, you can use either Explorer to drag and drop yourassemblies to %WINDOWS%\Assembly or GacUtil from the .NET Framework SDK. Here arethe parameters you’ll use most:
Parameter Description
/i <assemblyname> Installs the specified assembly in the GAC. <assemblyname> has toinclude the extension (.DLL or .EXE).
/l [<filter>] Lists the contents of the GAC. If <filter> is present, only assembliesmatching the filter will be listed.
/u <assembly> Unregisters and removes a given assembly from the GAC. When <assembly>contains a weak name (that is, it contains only the assembly’s name), allversions of this assembly will be uninstalled. When using a strong name,only the matching assembly will be removed from the GAC.
A Simple Versioning ExampleFFor demonstrating the versioning concepts of the .NET Framework, I will walk you througha simple example. The example will consist of an assembly DLL doing some simple calculationsand a client application using this component. The component will be installed in the GAC.
Afterwards, you’ll see how to create a new version of the assembly component withoutrecompiling the old client. The new version will be installed in the GAC, too. When two versionsof the component exist on your machine, you can create another client using the new version. Bothclients will run side by side, without any problems. Last but not least, you will configure yourfirst client for using the newer version of the component via a binding redirect. Of course, thatonly works when the interface of the component will not be broken.
Start by creating a new class library project. In the project directory, create a strong namekey pair for the component using sn -k SimpleComponent.snk. After you have created the strongname key pair, you can sign the assembly using the AssemblyKeyFile attribute, as you seein Listing 8-1.
Listing 8-1. A Simple Component—Version 1.0
using System;using System.Reflection;
[assembly: AssemblyDelaySign(false)][assembly: AssemblyKeyFile(@"..\..\SimpleComponent.snk")][assembly: AssemblyVersion("1.0.0.0")]

CHAPTER 8 ■ THE INS AND OUTS OF VERSIONING 229
Figure 8-2. Configuring the properties for the reference correctly
namespace SimpleComponent{public class SimpleClass{public SimpleClass(){}
public string DoSomething(string a){return string.Format("First version {0}", a);
}}
}
When you have created and compiled the component, you install them in the globalassembly cache using gacutil /i SimpleComponent.dll.
Next, start a new Visual Studio solution and create the first client application. This will bea console application. For referencing the previously created component, you now have tobrowse manually to the component DLL (SimpleComponent.dll) with the Add References dialogbox. After you’ve added the reference, you have to set the CopyLocal property for the referenceto false because you’ve installed the component in the GAC and will use the shared assembly(see Figure 8-2).
The code for the first client is fairly simple and can be seen in Listing 8-2.
CHAPTER 8 ■ THE INS AND OUTS OF VERSIONING230
Listing 8-2. The First Client of Your Component
using System;using SimpleComponent;
namespace FirstClientApp{class ClientOne{[STAThread]static void Main(string[] args){Console.WriteLine("Client 1");
SimpleClass cls = new SimpleClass();Console.WriteLine(cls.DoSomething("Called from client 1"));Console.ReadLine();
}}
}
Now that you have the first version of your component as well as the first client in place,you can start creating a new version of the component. For this purpose, you change the codeof the component as shown in Listing 8-3.
Listing 8-3. The Changed (Version 2) of the Component
using System;using System.Reflection;
[assembly: AssemblyDelaySign(false)][assembly: AssemblyKeyFile(@"..\..\SimpleComponent.snk")][assembly: AssemblyVersion("2.0.0.0")]
namespace SimpleComponent{public class SimpleClass{public SimpleClass(){}
public string DoSomething(string a){return string.Format("Second version {0}", a);
}}
}
CHAPTER 8 ■ THE INS AND OUTS OF VERSIONING 231
Figure 8-3. The Global Assembly Cache with two versions of the component
The new version of your simple component must again be installed in the GAC. When youtake a look at the installed assemblies in the GAC now, you should see two versions of yourSimpleComponent class in the Global Assembly Cache, as appears in Figure 8-3.
Now you can create a new client that uses the new version. For this purpose, create a newsolution with Visual Studio .NET (again a console application) that looks very similar to the firstversion of the client as you can see in Listing 8-4.
■Note After you have recompiled the second version of the SimpleComponent, don’t recompile the firstclient, because in that case the first client will be compiled against the new version of SimpleComponent. Youcan avoid this by copying the different versions of SimpleComponent into separate directories after you havebuilt them and reference them from these directories instead of directly from the bin directory of theSimpleComponent.
Listing 8-4. The Second Client—As Simple As the First Client
using System;using SimpleComponent;
namespace SecondClientApp{class SecondClientApp{[STAThread]static void Main(string[] args){Console.WriteLine("Second Client started!");
SimpleClass cls = new SimpleClass();string result = cls.DoSomething("Called from 2nd client...");

CHAPTER 8 ■ THE INS AND OUTS OF VERSIONING232
Figure 8-4. The first client works with the first version.
Figure 8-5. The second client works with the second version.
Console.WriteLine("Result: " + result);}
}}
Figures 8-4 and 8-5 show the output of the two applications. You can see that they areusing the versions of SimpleComponent they have been built with.
The last thing I want to show you is doing a binding redirect for the first client so that ituses the second version, too. For this purpose, you have to add an application configurationfile for the first client (FirstClientApp.exe.config in the same directory as the application itself)with the following content:
<configuration><runtime><assemblyBinding xmlns="urn:schemas-microsoft-com:asm.v1"><dependentAssembly><assemblyIdentity name="SimpleComponent"
publicKeyToken="4bb94794cb2f4ab2"culture="neutral" />
<bindingRedirect oldVersion="1.0.0.0"newVersion="2.0.0.0" />
</dependentAssembly></assemblyBinding>
</runtime></configuration>
When you have this configuration file in place, the client uses the second version of theassembly, although it has been compiled against the first version, as you can see in the assem-bly manifest. Figure 8-6 shows an ILDASM extract with the contained metadata (still referenc-ing version 1.0.0.0 of SimpleComponent), whereas Figure 8-7 shows that the application isalready using the new version.
CHAPTER 8 ■ THE INS AND OUTS OF VERSIONING 233
Figure 8-6. Metadata shows that FirstClient still references version 1.0.0.0.
Figure 8-7. The first client calls the second version because of the bindingRedirect.
■Caution Generally, the GAC should be used as infrequently as possible because of the additional man-agement and deployment actions that are necessary. Only very general components used by most of yourdifferent applications should be installed in GAC. In other cases, it is better to deploy assemblies in theassembly directory. (Why deploy them in GAC if they are used by just one application?)
Versioning in .NET Remoting—FundamentalsAlthough versioning is built into the Common Language Runtime, versioning for distributedapplications is still (and will ever be) a hard challenge. Before I share some architectural anddesign thoughts, let’s take a look at how versioning can be implemented technically with .NETRemoting.
Versioning of Server-Activated ObjectsAs SAOs are instantiated on demand by the server itself, there is no direct way of managing theirlifecycle. The client cannot specify to which version of a given SAO a call should be placed. The
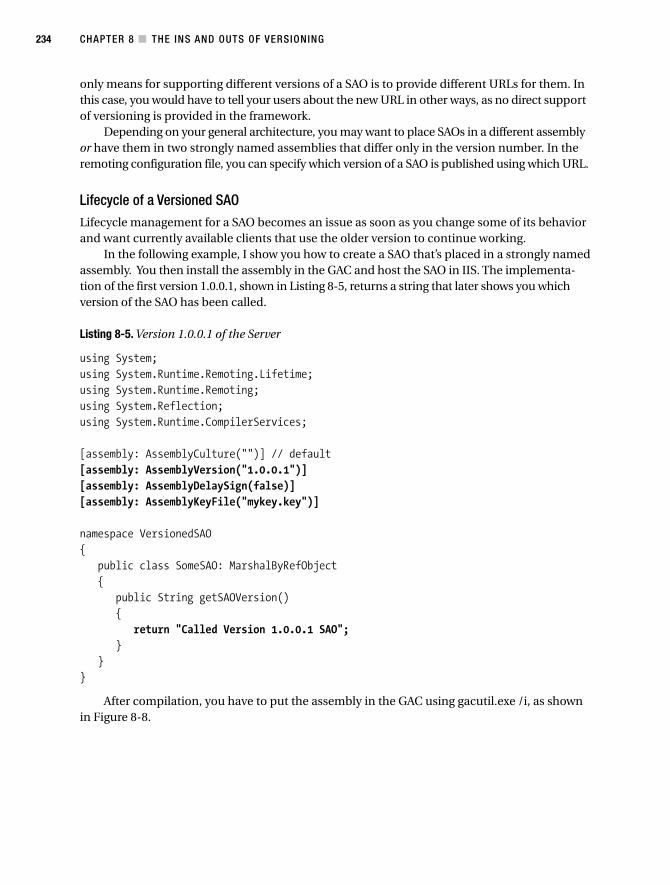
CHAPTER 8 ■ THE INS AND OUTS OF VERSIONING234
only means for supporting different versions of a SAO is to provide different URLs for them. Inthis case, you would have to tell your users about the new URL in other ways, as no direct supportof versioning is provided in the framework.
Depending on your general architecture, you may want to place SAOs in a different assemblyor have them in two strongly named assemblies that differ only in the version number. In theremoting configuration file, you can specify which version of a SAO is published using which URL.
Lifecycle of a Versioned SAOLifecycle management for a SAO becomes an issue as soon as you change some of its behaviorand want currently available clients that use the older version to continue working.
In the following example, I show you how to create a SAO that’s placed in a strongly namedassembly. You then install the assembly in the GAC and host the SAO in IIS. The implementa-tion of the first version 1.0.0.1, shown in Listing 8-5, returns a string that later shows you whichversion of the SAO has been called.
Listing 8-5. Version 1.0.0.1 of the Server
using System;using System.Runtime.Remoting.Lifetime;using System.Runtime.Remoting;using System.Reflection;using System.Runtime.CompilerServices;
[assembly: AssemblyCulture("")] // default[assembly: AssemblyVersion("1.0.0.1")][assembly: AssemblyDelaySign(false)][assembly: AssemblyKeyFile("mykey.key")]
namespace VersionedSAO{
public class SomeSAO: MarshalByRefObject{
public String getSAOVersion(){
return "Called Version 1.0.0.1 SAO";}
}}
After compilation, you have to put the assembly in the GAC using gacutil.exe /i, as shownin Figure 8-8.
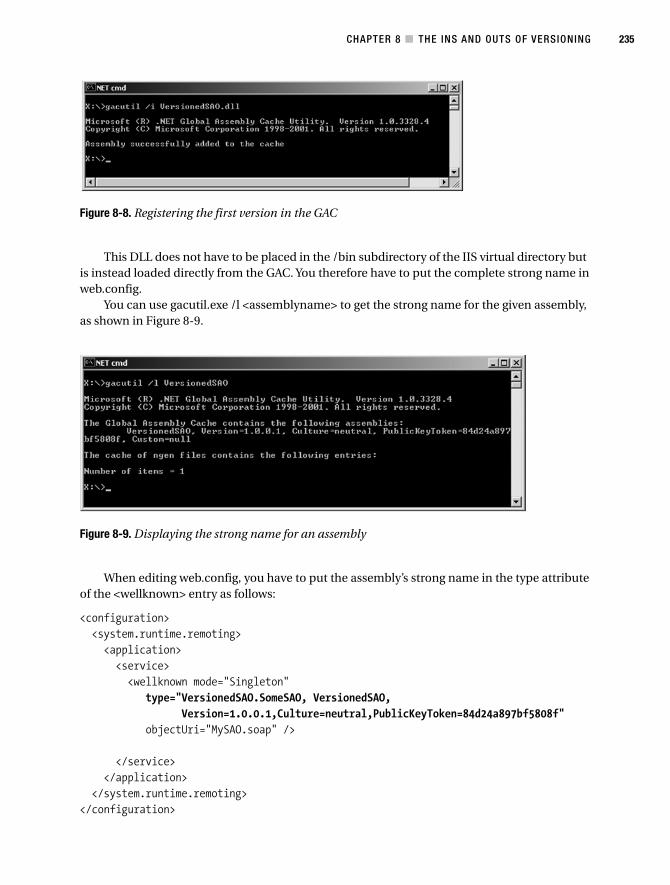
CHAPTER 8 ■ THE INS AND OUTS OF VERSIONING 235
Figure 8-8. Registering the first version in the GAC
Figure 8-9. Displaying the strong name for an assembly
This DLL does not have to be placed in the /bin subdirectory of the IIS virtual directory butis instead loaded directly from the GAC. You therefore have to put the complete strong name inweb.config.
You can use gacutil.exe /l <assemblyname> to get the strong name for the given assembly,as shown in Figure 8-9.
When editing web.config, you have to put the assembly’s strong name in the type attributeof the <wellknown> entry as follows:
<configuration><system.runtime.remoting><application><service><wellknown mode="Singleton"
type="VersionedSAO.SomeSAO, VersionedSAO, Version=1.0.0.1,Culture=neutral,PublicKeyToken=84d24a897bf5808f"
objectUri="MySAO.soap" />
</service></application>
</system.runtime.remoting></configuration>

CHAPTER 8 ■ THE INS AND OUTS OF VERSIONING236
■Note The type entry may only be line wrapped between the class name and the assembly’s strongname—no breaks are allowed within the name!
Building the First Client
For the implementation of the client, you can extract the metadata using SoapSuds.
soapsuds-ia:VersionedSAO -nowp -oa:generated_meta_V1_0_0_1.dll
In the following example, I show you the implementation of a basic client that contacts theSAO and requests version information using the getSAOVersion() method. After setting a refer-ence to generated_meta_V1_0_0_1.dll, you can compile the source code shown in Listing 8-6.
Listing 8-6. Version 1.0.0.1 of the Client Application
using System;using System.Runtime.Remoting;using System.Runtime.Remoting.Lifetime;using System.Threading;using VersionedSAO; // from generated_meta_xxx.dll
namespace Client{
class Client{
static void Main(string[] args){
String filename = "client.exe.config";RemotingConfiguration.Configure(filename);
SomeSAO obj = new SomeSAO();String result = obj.getSAOVersion();
Console.WriteLine("Result: {0}",result);
Console.WriteLine("Finished ... press <return> to exit");Console.ReadLine();
}}
}
As the metadata assembly (generated_meta_V1_0_0_1.dll) does not have to be accessedusing its strong name, the configuration file for the client looks quite similar to the previousexamples.
<configuration><system.runtime.remoting><application>
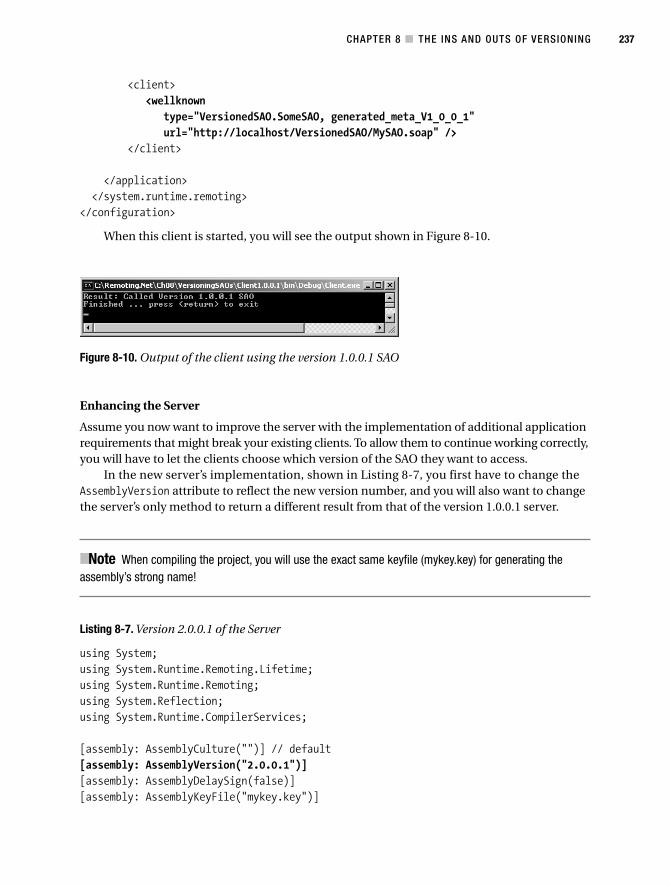
CHAPTER 8 ■ THE INS AND OUTS OF VERSIONING 237
Figure 8-10. Output of the client using the version 1.0.0.1 SAO
<client><wellknown
type="VersionedSAO.SomeSAO, generated_meta_V1_0_0_1"url="http://localhost/VersionedSAO/MySAO.soap" />
</client>
</application></system.runtime.remoting>
</configuration>
When this client is started, you will see the output shown in Figure 8-10.
Enhancing the Server
Assume you now want to improve the server with the implementation of additional applicationrequirements that might break your existing clients. To allow them to continue working correctly,you will have to let the clients choose which version of the SAO they want to access.
In the new server’s implementation, shown in Listing 8-7, you first have to change theAssemblyVersion attribute to reflect the new version number, and you will also want to changethe server’s only method to return a different result from that of the version 1.0.0.1 server.
■Note When compiling the project, you will use the exact same keyfile (mykey.key) for generating theassembly’s strong name!
Listing 8-7. Version 2.0.0.1 of the Server
using System;using System.Runtime.Remoting.Lifetime;using System.Runtime.Remoting;using System.Reflection;using System.Runtime.CompilerServices;
[assembly: AssemblyCulture("")] // default[assembly: AssemblyVersion("2.0.0.1")][assembly: AssemblyDelaySign(false)][assembly: AssemblyKeyFile("mykey.key")]
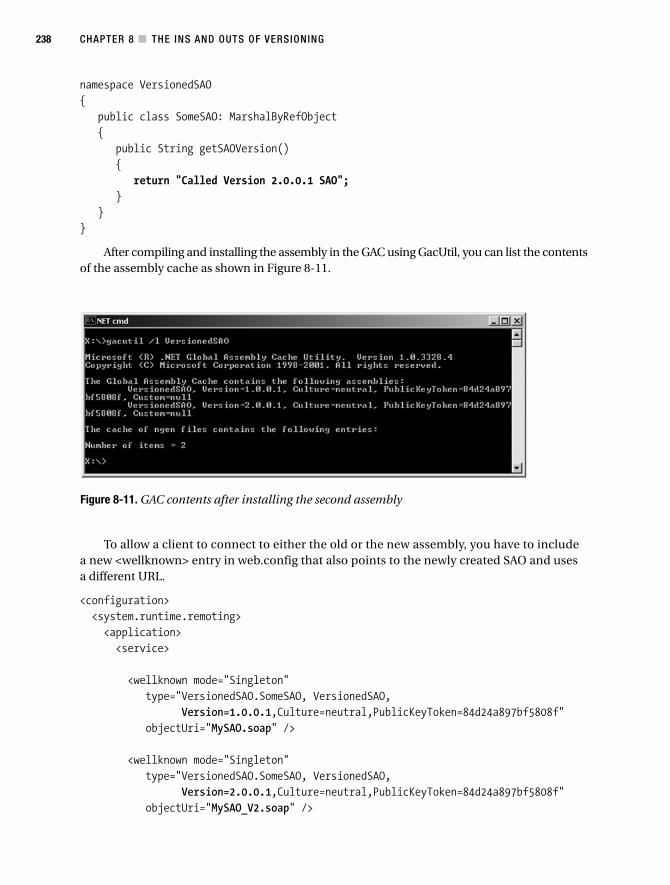
CHAPTER 8 ■ THE INS AND OUTS OF VERSIONING238
Figure 8-11. GAC contents after installing the second assembly
namespace VersionedSAO{
public class SomeSAO: MarshalByRefObject{
public String getSAOVersion(){
return "Called Version 2.0.0.1 SAO";}
}}
After compiling and installing the assembly in the GAC using GacUtil, you can list the contentsof the assembly cache as shown in Figure 8-11.
To allow a client to connect to either the old or the new assembly, you have to includea new <wellknown> entry in web.config that also points to the newly created SAO and usesa different URL.
<configuration><system.runtime.remoting><application><service>
<wellknown mode="Singleton"type="VersionedSAO.SomeSAO, VersionedSAO,
Version=1.0.0.1,Culture=neutral,PublicKeyToken=84d24a897bf5808f"objectUri="MySAO.soap" />
<wellknown mode="Singleton"type="VersionedSAO.SomeSAO, VersionedSAO,
Version=2.0.0.1,Culture=neutral,PublicKeyToken=84d24a897bf5808f"objectUri="MySAO_V2.soap" />
CHAPTER 8 ■ THE INS AND OUTS OF VERSIONING 239
Figure 8-12. Version 1 client running
Figure 8-13. Version 2 client running
</service></application>
</system.runtime.remoting></configuration>
Developing the New Client
To allow a client application to access the second version of the SAO, you again have to generatethe necessary metadata using SoapSuds.
soapsuds -ia:VersionedSAO -nowp -oa:generated_meta_V2_0_0_1.dll
After adding the reference to the newly generated metadata assembly, you also have tochange the client-side configuration file to point to the new URL.
<configuration><system.runtime.remoting><application>
<client><wellknown
type="VersionedSAO.SomeSAO, generated_meta_V2_0_0_1"url="http://localhost/VersionedSAO/MySAO_V2.soap" />
</client>
</application></system.runtime.remoting>
</configuration>
You can now start both the new and the old client to get the outputs shown in Figure 8-12for the first version and in Figure 8-13 for the second.
Both clients are running side by side at the same time, accessing the same physical server.You can also see that there was no change needed to the first client, which is the primary req-uisite for consistent lifecycle management.
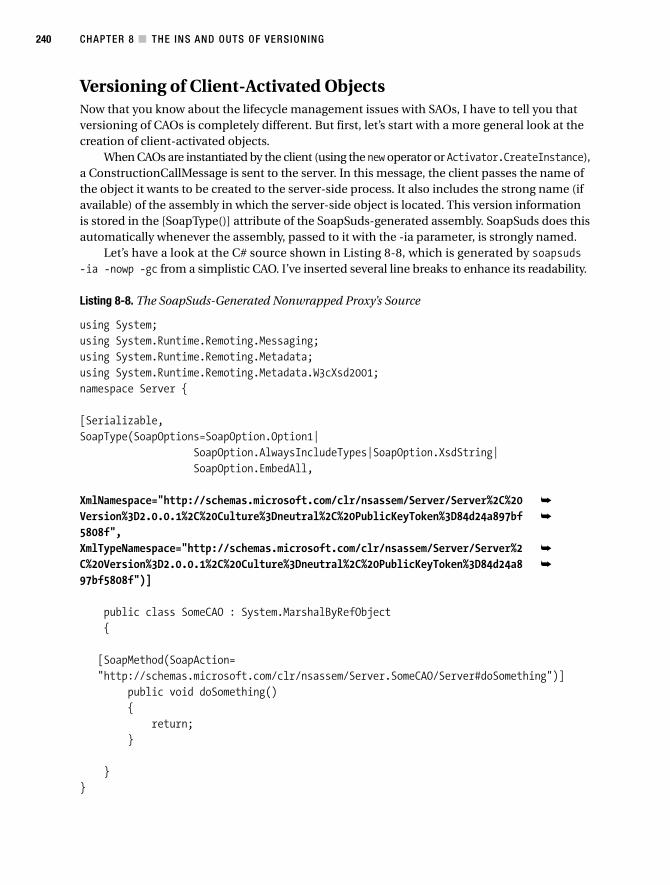
CHAPTER 8 ■ THE INS AND OUTS OF VERSIONING240
Versioning of Client-Activated ObjectsNow that you know about the lifecycle management issues with SAOs, I have to tell you thatversioning of CAOs is completely different. But first, let’s start with a more general look at thecreation of client-activated objects.
When CAOs are instantiated by the client (using the new operator or Activator.CreateInstance),a ConstructionCallMessage is sent to the server. In this message, the client passes the name ofthe object it wants to be created to the server-side process. It also includes the strong name (ifavailable) of the assembly in which the server-side object is located. This version informationis stored in the [SoapType()] attribute of the SoapSuds-generated assembly. SoapSuds does thisautomatically whenever the assembly, passed to it with the -ia parameter, is strongly named.
Let’s have a look at the C# source shown in Listing 8-8, which is generated by soapsuds-ia -nowp -gc from a simplistic CAO. I’ve inserted several line breaks to enhance its readability.
Listing 8-8. The SoapSuds-Generated Nonwrapped Proxy’s Source
using System;using System.Runtime.Remoting.Messaging;using System.Runtime.Remoting.Metadata;using System.Runtime.Remoting.Metadata.W3cXsd2001;namespace Server {
[Serializable,SoapType(SoapOptions=SoapOption.Option1|
SoapOption.AlwaysIncludeTypes|SoapOption.XsdString|SoapOption.EmbedAll,
XmlNamespace="http://schemas.microsoft.com/clr/nsassem/Server/Server%2C%20 ➥
Version%3D2.0.0.1%2C%20Culture%3Dneutral%2C%20PublicKeyToken%3D84d24a897bf ➥
5808f",XmlTypeNamespace="http://schemas.microsoft.com/clr/nsassem/Server/Server%2 ➥
C%20Version%3D2.0.0.1%2C%20Culture%3Dneutral%2C%20PublicKeyToken%3D84d24a8 ➥
97bf5808f")]
public class SomeCAO : System.MarshalByRefObject{
[SoapMethod(SoapAction="http://schemas.microsoft.com/clr/nsassem/Server.SomeCAO/Server#doSomething")]
public void doSomething(){
return;}
}}

CHAPTER 8 ■ THE INS AND OUTS OF VERSIONING 241
The strings in the XmlNamespace and XmlTypeNamespace attributes are URLEncoded variants ofthe standard version information. In plain text, they read as follows (omitting the base namespace):
Server, Version=2.0.0.1, Culture=neutral, PublicKeyToken= 84d24a897bf5808f
Doesn’t look that scary anymore? In fact, this is the common .NET representation of a strongname as seen before.
What you can see now is that this proxy assembly will reference a server-side object calledServer.SomeCAO, which is located in the assembly server with the strong name shown previously.Whenever a client creates a remote instance of this CAO, the server will try to instantiate theexact version of this type.
What the server does when the requested version is not available is to take the highest versionof the specified assembly. When versions 1.0.1.0 and 2.0.0.1 are available in the GAC, and version1.0.0.1 is requested, the server will choose 2.0.0.1 to instantiate the requested object—eventhough the versions differ in the major version number.
■Note This behavior differs from the standard .NET versioning approach, in which the highest version withthe same major and minor version is chosen.
To emulate the standard behavior for resolving assembly versions, or to redirect to a completelydifferent version, you can use the assemblyBinding entry in the application’s configuration file.
<configuration><system.runtime.remoting><application name="SomeServer">
<channels><channel ref="http" port="5555" />
</channels>
<service><activated type="Server.SomeCAO, Server" />
</service>
</application></system.runtime.remoting><runtime><assemblyBinding xmlns="urn:schemas-microsoft-com:asm.v1">
<dependentAssembly><assemblyIdentity name="server"
publicKeyToken="84d24a897bf5808f"culture="neutral" /><bindingRedirect oldVersion="1.0.0.1"newVersion="1.0.1.1" />
</dependentAssembly></assemblyBinding></runtime>
</configuration>
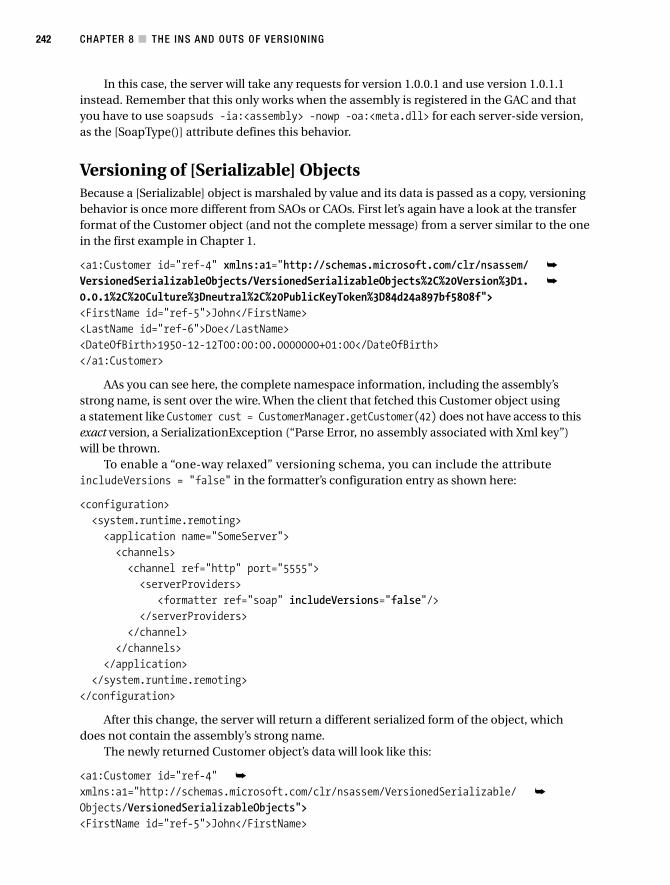
CHAPTER 8 ■ THE INS AND OUTS OF VERSIONING242
In this case, the server will take any requests for version 1.0.0.1 and use version 1.0.1.1instead. Remember that this only works when the assembly is registered in the GAC and thatyou have to use soapsuds -ia:<assembly> -nowp -oa:<meta.dll> for each server-side version,as the [SoapType()] attribute defines this behavior.
Versioning of [Serializable] ObjectsBecause a [Serializable] object is marshaled by value and its data is passed as a copy, versioningbehavior is once more different from SAOs or CAOs. First let’s again have a look at the transferformat of the Customer object (and not the complete message) from a server similar to the onein the first example in Chapter 1.
<a1:Customer id="ref-4" xmlns:a1="http://schemas.microsoft.com/clr/nsassem/ ➥
VersionedSerializableObjects/VersionedSerializableObjects%2C%20Version%3D1. ➥
0.0.1%2C%20Culture%3Dneutral%2C%20PublicKeyToken%3D84d24a897bf5808f"><FirstName id="ref-5">John</FirstName><LastName id="ref-6">Doe</LastName><DateOfBirth>1950-12-12T00:00:00.0000000+01:00</DateOfBirth></a1:Customer>
AAs you can see here, the complete namespace information, including the assembly’sstrong name, is sent over the wire. When the client that fetched this Customer object usinga statement like Customer cust = CustomerManager.getCustomer(42) does not have access to thisexact version, a SerializationException (“Parse Error, no assembly associated with Xml key”)will be thrown.
To enable a “one-way relaxed” versioning schema, you can include the attributeincludeVersions = "false" in the formatter’s configuration entry as shown here:
<configuration><system.runtime.remoting><application name="SomeServer"><channels><channel ref="http" port="5555"><serverProviders>
<formatter ref="soap" includeVersions="false"/></serverProviders>
</channel></channels>
</application></system.runtime.remoting>
</configuration>
After this change, the server will return a different serialized form of the object, whichdoes not contain the assembly’s strong name.
The newly returned Customer object’s data will look like this:
<a1:Customer id="ref-4" ➥
xmlns:a1="http://schemas.microsoft.com/clr/nsassem/VersionedSerializable/ ➥
Objects/VersionedSerializableObjects"><FirstName id="ref-5">John</FirstName>
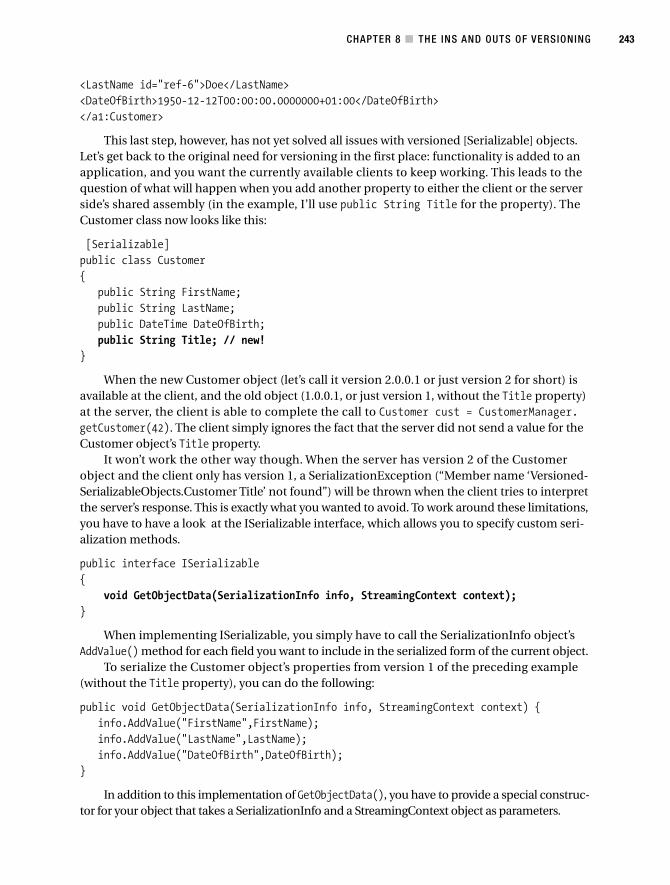
CHAPTER 8 ■ THE INS AND OUTS OF VERSIONING 243
<LastName id="ref-6">Doe</LastName><DateOfBirth>1950-12-12T00:00:00.0000000+01:00</DateOfBirth></a1:Customer>
This last step, however, has not yet solved all issues with versioned [Serializable] objects.Let’s get back to the original need for versioning in the first place: functionality is added to anapplication, and you want the currently available clients to keep working. This leads to thequestion of what will happen when you add another property to either the client or the serverside’s shared assembly (in the example, I’ll use public String Title for the property). TheCustomer class now looks like this:
[Serializable]public class Customer{
public String FirstName;public String LastName;public DateTime DateOfBirth;public String Title; // new!
}
When the new Customer object (let’s call it version 2.0.0.1 or just version 2 for short) isavailable at the client, and the old object (1.0.0.1, or just version 1, without the Title property)at the server, the client is able to complete the call to Customer cust = CustomerManager.getCustomer(42). The client simply ignores the fact that the server did not send a value for theCustomer object’s Title property.
It won’t work the other way though. When the server has version 2 of the Customerobject and the client only has version 1, a SerializationException (“Member name ‘Versioned-SerializableObjects.Customer Title’ not found”) will be thrown when the client tries to interpretthe server’s response. This is exactly what you wanted to avoid. To work around these limitations,you have to have a look at the ISerializable interface, which allows you to specify custom seri-alization methods.
public interface ISerializable{
void GetObjectData(SerializationInfo info, StreamingContext context);}
When implementing ISerializable, you simply have to call the SerializationInfo object’sAddValue() method for each field you want to include in the serialized form of the current object.
To serialize the Customer object’s properties from version 1 of the preceding example(without the Title property), you can do the following:
public void GetObjectData(SerializationInfo info, StreamingContext context) {info.AddValue("FirstName",FirstName);info.AddValue("LastName",LastName);info.AddValue("DateOfBirth",DateOfBirth);
}
In addition to this implementation of GetObjectData(), you have to provide a special construc-tor for your object that takes a SerializationInfo and a StreamingContext object as parameters.
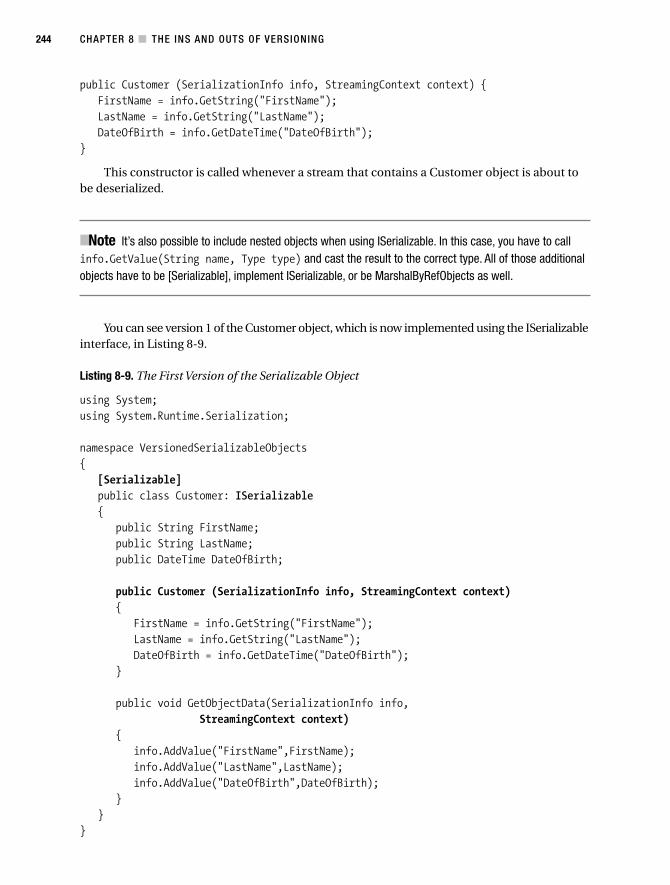
CHAPTER 8 ■ THE INS AND OUTS OF VERSIONING244
public Customer (SerializationInfo info, StreamingContext context) {FirstName = info.GetString("FirstName");LastName = info.GetString("LastName");DateOfBirth = info.GetDateTime("DateOfBirth");
}
This constructor is called whenever a stream that contains a Customer object is about tobe deserialized.
■Note It’s also possible to include nested objects when using ISerializable. In this case, you have to callinfo.GetValue(String name, Type type) and cast the result to the correct type. All of those additionalobjects have to be [Serializable], implement ISerializable, or be MarshalByRefObjects as well.
You can see version 1 of the Customer object, which is now implemented using the ISerializableinterface, in Listing 8-9.
Listing 8-9. The First Version of the Serializable Object
using System;using System.Runtime.Serialization;
namespace VersionedSerializableObjects{
[Serializable]public class Customer: ISerializable{
public String FirstName;public String LastName;public DateTime DateOfBirth;
public Customer (SerializationInfo info, StreamingContext context){
FirstName = info.GetString("FirstName");LastName = info.GetString("LastName");DateOfBirth = info.GetDateTime("DateOfBirth");
}
public void GetObjectData(SerializationInfo info,StreamingContext context)
{info.AddValue("FirstName",FirstName);info.AddValue("LastName",LastName);info.AddValue("DateOfBirth",DateOfBirth);
}}
}
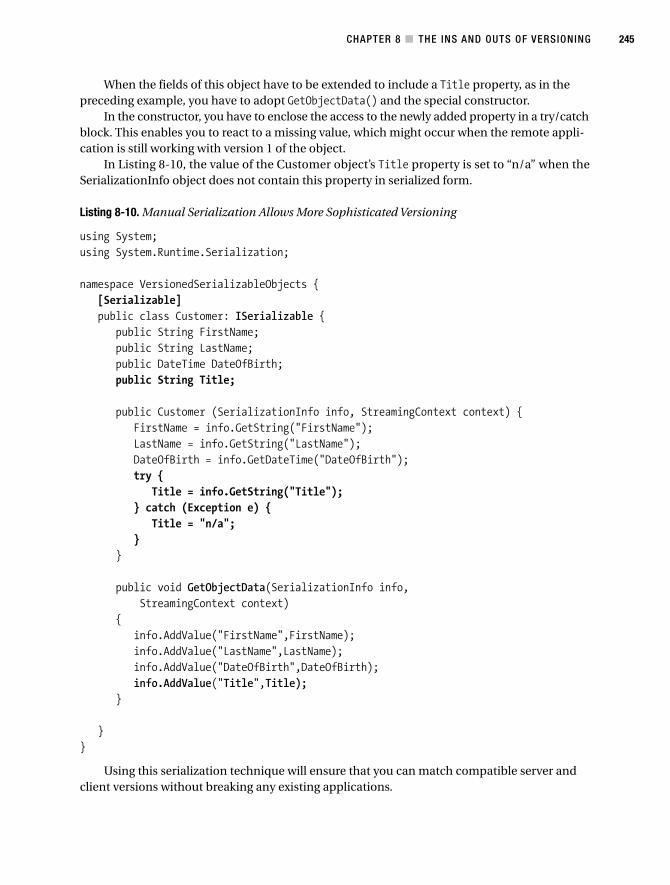
CHAPTER 8 ■ THE INS AND OUTS OF VERSIONING 245
When the fields of this object have to be extended to include a Title property, as in thepreceding example, you have to adopt GetObjectData() and the special constructor.
In the constructor, you have to enclose the access to the newly added property in a try/catchblock. This enables you to react to a missing value, which might occur when the remote appli-cation is still working with version 1 of the object.
In Listing 8-10, the value of the Customer object’s Title property is set to “n/a” when theSerializationInfo object does not contain this property in serialized form.
Listing 8-10. Manual Serialization Allows More Sophisticated Versioning
using System;using System.Runtime.Serialization;
namespace VersionedSerializableObjects {[Serializable]public class Customer: ISerializable {
public String FirstName;public String LastName;public DateTime DateOfBirth;public String Title;
public Customer (SerializationInfo info, StreamingContext context) {FirstName = info.GetString("FirstName");LastName = info.GetString("LastName");DateOfBirth = info.GetDateTime("DateOfBirth");try {
Title = info.GetString("Title");} catch (Exception e) {
Title = "n/a";}
}
public void GetObjectData(SerializationInfo info,StreamingContext context)
{info.AddValue("FirstName",FirstName);info.AddValue("LastName",LastName);info.AddValue("DateOfBirth",DateOfBirth);info.AddValue("Title",Title);
}
}}
Using this serialization technique will ensure that you can match compatible server andclient versions without breaking any existing applications.
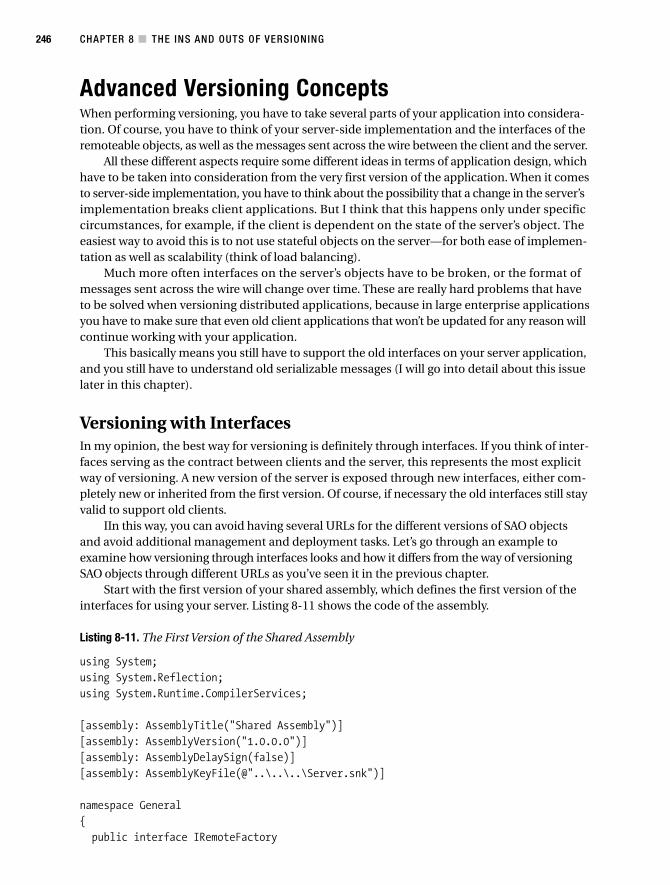
CHAPTER 8 ■ THE INS AND OUTS OF VERSIONING246
Advanced Versioning ConceptsWhen performing versioning, you have to take several parts of your application into considera-tion. Of course, you have to think of your server-side implementation and the interfaces of theremoteable objects, as well as the messages sent across the wire between the client and the server.
All these different aspects require some different ideas in terms of application design, whichhave to be taken into consideration from the very first version of the application. When it comesto server-side implementation, you have to think about the possibility that a change in the server’simplementation breaks client applications. But I think that this happens only under specificcircumstances, for example, if the client is dependent on the state of the server’s object. Theeasiest way to avoid this is to not use stateful objects on the server—for both ease of implemen-tation as well as scalability (think of load balancing).
Much more often interfaces on the server’s objects have to be broken, or the format ofmessages sent across the wire will change over time. These are really hard problems that haveto be solved when versioning distributed applications, because in large enterprise applicationsyou have to make sure that even old client applications that won’t be updated for any reason willcontinue working with your application.
This basically means you still have to support the old interfaces on your server application,and you still have to understand old serializable messages (I will go into detail about this issuelater in this chapter).
Versioning with InterfacesIn my opinion, the best way for versioning is definitely through interfaces. If you think of inter-faces serving as the contract between clients and the server, this represents the most explicitway of versioning. A new version of the server is exposed through new interfaces, either com-pletely new or inherited from the first version. Of course, if necessary the old interfaces still stayvalid to support old clients.
IIn this way, you can avoid having several URLs for the different versions of SAO objectsand avoid additional management and deployment tasks. Let’s go through an example toexamine how versioning through interfaces looks and how it differs from the way of versioningSAO objects through different URLs as you’ve seen it in the previous chapter.
Start with the first version of your shared assembly, which defines the first version of theinterfaces for using your server. Listing 8-11 shows the code of the assembly.
Listing 8-11. The First Version of the Shared Assembly
using System;using System.Reflection;using System.Runtime.CompilerServices;
[assembly: AssemblyTitle("Shared Assembly")][assembly: AssemblyVersion("1.0.0.0")][assembly: AssemblyDelaySign(false)][assembly: AssemblyKeyFile(@"..\..\..\Server.snk")]
namespace General{
public interface IRemoteFactory
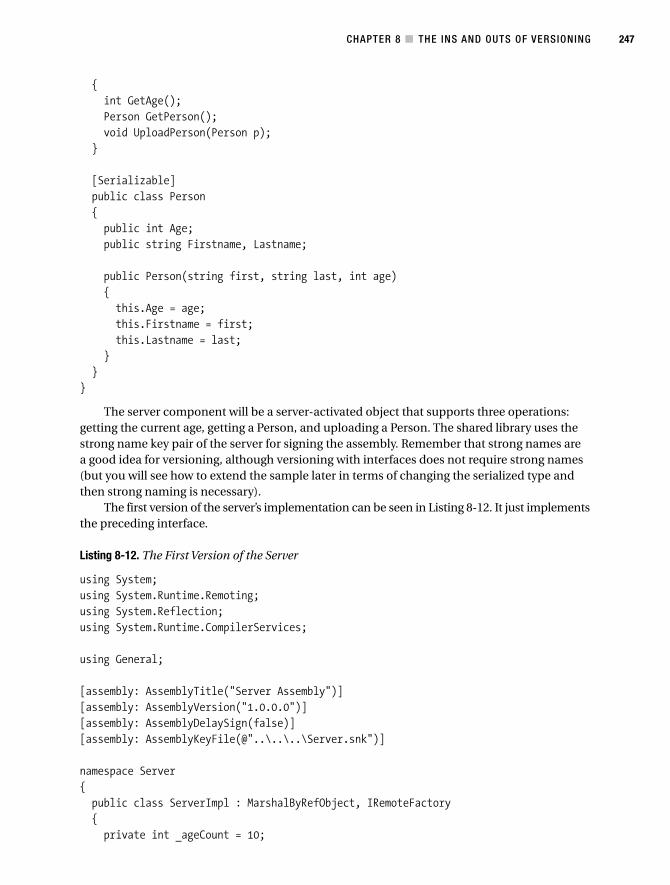
CHAPTER 8 ■ THE INS AND OUTS OF VERSIONING 247
{int GetAge();Person GetPerson();void UploadPerson(Person p);
}
[Serializable]public class Person{public int Age;public string Firstname, Lastname;
public Person(string first, string last, int age){this.Age = age;this.Firstname = first;this.Lastname = last;
}}
}
The server component will be a server-activated object that supports three operations:getting the current age, getting a Person, and uploading a Person. The shared library uses thestrong name key pair of the server for signing the assembly. Remember that strong names area good idea for versioning, although versioning with interfaces does not require strong names(but you will see how to extend the sample later in terms of changing the serialized type andthen strong naming is necessary).
The first version of the server’s implementation can be seen in Listing 8-12. It just implementsthe preceding interface.
Listing 8-12. The First Version of the Server
using System;using System.Runtime.Remoting;using System.Reflection;using System.Runtime.CompilerServices;
using General;
[assembly: AssemblyTitle("Server Assembly")][assembly: AssemblyVersion("1.0.0.0")][assembly: AssemblyDelaySign(false)][assembly: AssemblyKeyFile(@"..\..\..\Server.snk")]
namespace Server{
public class ServerImpl : MarshalByRefObject, IRemoteFactory{private int _ageCount = 10;
CHAPTER 8 ■ THE INS AND OUTS OF VERSIONING248
public int GetAge(){Console.WriteLine(">> GetAge {0}", _ageCount);return _ageCount;
}
public Person GetPerson(){Console.WriteLine(">> GetPerson()");Console.WriteLine(">> Returning person {0}...", _ageCount);
Person p = new Person("Test", "App", _ageCount++);return p;
}
public void UploadPerson(Person p){Console.WriteLine(">> UploadPerson()");Console.WriteLine(">> Person {0} {1} {2}", p.Firstname, p.Lastname, p.Age);
_ageCount += p.Age;}
}
class ServerApp{[STAThread]static void Main(string[] args){Console.WriteLine("Starting server...");RemotingConfiguration.Configure("Server.exe.config");
Console.WriteLine("Server configured, waiting for requests!");System.Console.ReadLine();
}}
}
The server itself is configured as a server-activated object of type Singleton, which can bereached through the binary formatter and a TCP channel, as you can see in the following codesnippet. Remember that you are trying to upload custom strongly named types. Therefore, you have to adjust the typeFilterLevel to allow deserialization of such types.
<?xml version="1.0" encoding="utf-8" ?><configuration><system.runtime.remoting><application><channels><channel ref="tcp" port="1234">
CHAPTER 8 ■ THE INS AND OUTS OF VERSIONING 249
<serverProviders><formatter ref="binary" typeFilterLevel="Full" />
</serverProviders></channel>
</channels><service><wellknown type="Server.ServerImpl, Server"
objectUri="MyServer.rem"mode="Singleton" />
</service></application>
</system.runtime.remoting></configuration>
■Caution Setting the typeFilterLevel tto full as you can see in the preceding code snippet means that youneed strong authentication and encryption to secure your .NET Remoting component. You can find moreabout security in Chapter 5.
The first version of the client just references the shared library created previously and callsseveral methods on the server. This client will not be touched anymore later on. This means itis going to play the role of the client that should continue working after changing the interfaceson the server’s implementation (see Listing 8-13).
Listing 8-13. The Client Using the First Version of the Server
using System;using System.Runtime.Remoting;using System.Runtime.Remoting.Activation;using System.Reflection;using System.Runtime.CompilerServices;
using General;using General.Client;
[assembly: AssemblyVersion("1.0.0.0")][assembly: AssemblyDelaySign(false)][assembly: AssemblyKeyFile(@"..\..\..\Client.snk")]
namespace ConsoleClient{
class ClientApp{[STAThread]static void Main(string[] args){Console.WriteLine("Configuring client...");RemotingConfiguration.Configure("ConsoleClient.exe.config");
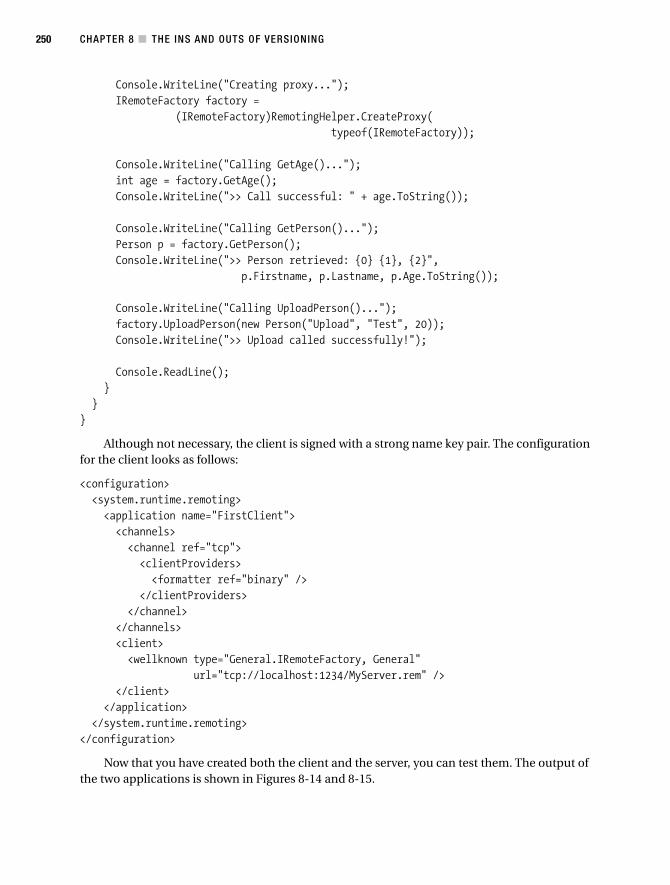
CHAPTER 8 ■ THE INS AND OUTS OF VERSIONING250
Console.WriteLine("Creating proxy...");IRemoteFactory factory =
(IRemoteFactory)RemotingHelper.CreateProxy(typeof(IRemoteFactory));
Console.WriteLine("Calling GetAge()...");int age = factory.GetAge();Console.WriteLine(">> Call successful: " + age.ToString());
Console.WriteLine("Calling GetPerson()...");Person p = factory.GetPerson();Console.WriteLine(">> Person retrieved: {0} {1}, {2}",
p.Firstname, p.Lastname, p.Age.ToString());
Console.WriteLine("Calling UploadPerson()...");factory.UploadPerson(new Person("Upload", "Test", 20));Console.WriteLine(">> Upload called successfully!");
Console.ReadLine();}
}}
Although not necessary, the client is signed with a strong name key pair. The configurationfor the client looks as follows:
<configuration><system.runtime.remoting><application name="FirstClient"><channels><channel ref="tcp"><clientProviders><formatter ref="binary" />
</clientProviders></channel>
</channels><client><wellknown type="General.IRemoteFactory, General"
url="tcp://localhost:1234/MyServer.rem" /></client>
</application></system.runtime.remoting>
</configuration>
Now that you have created both the client and the server, you can test them. The output ofthe two applications is shown in Figures 8-14 and 8-15.
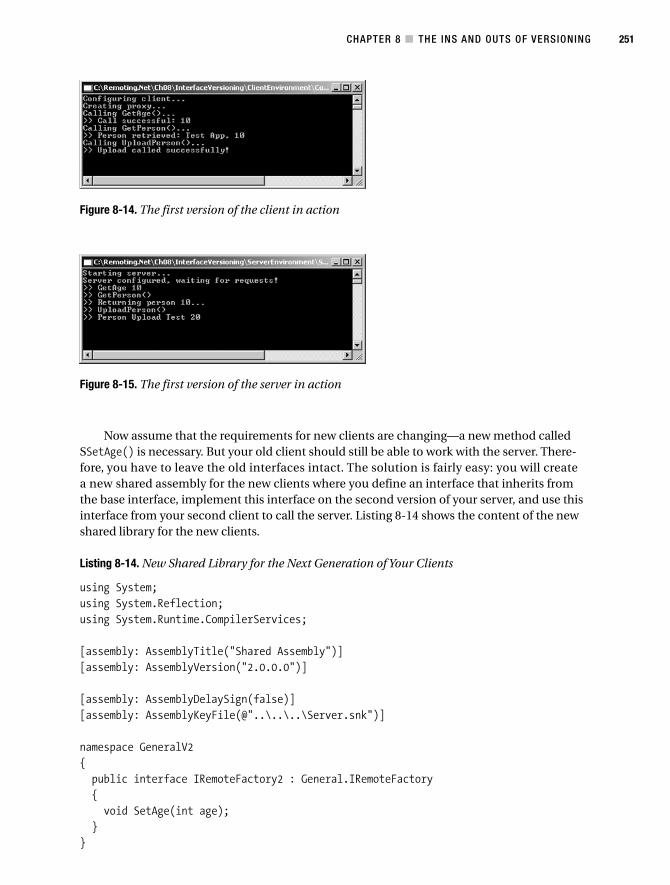
CHAPTER 8 ■ THE INS AND OUTS OF VERSIONING 251
Figure 8-14. The first version of the client in action
Figure 8-15. The first version of the server in action
Now assume that the requirements for new clients are changing—a new method calledSSetAge() is necessary. But your old client should still be able to work with the server. There-fore, you have to leave the old interfaces intact. The solution is fairly easy: you will createa new shared assembly for the new clients where you define an interface that inherits fromthe base interface, implement this interface on the second version of your server, and use thisinterface from your second client to call the server. Listing 8-14 shows the content of the newshared library for the new clients.
Listing 8-14. New Shared Library for the Next Generation of Your Clients
using System;using System.Reflection;using System.Runtime.CompilerServices;
[assembly: AssemblyTitle("Shared Assembly")][assembly: AssemblyVersion("2.0.0.0")]
[assembly: AssemblyDelaySign(false)][assembly: AssemblyKeyFile(@"..\..\..\Server.snk")]
namespace GeneralV2{
public interface IRemoteFactory2 : General.IRemoteFactory{void SetAge(int age);
}}
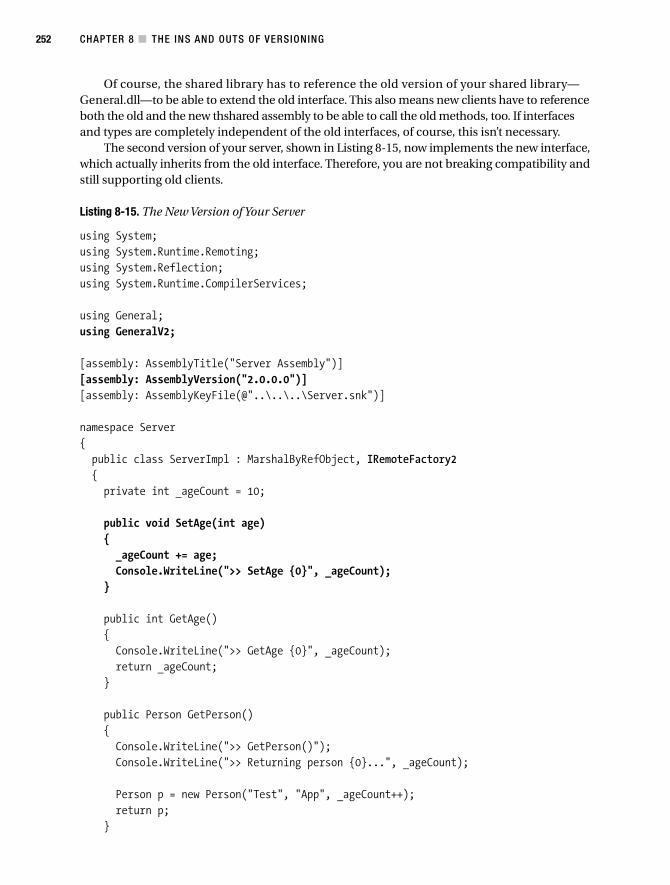
CHAPTER 8 ■ THE INS AND OUTS OF VERSIONING252
Of course, the shared library has to reference the old version of your shared library—General.dll—to be able to extend the old interface. This also means new clients have to referenceboth the old and the new thshared assembly to be able to call the old methods, too. If interfacesand types are completely independent of the old interfaces, of course, this isn’t necessary.
The second version of your server, shown in Listing 8-15, now implements the new interface,which actually inherits from the old interface. Therefore, you are not breaking compatibility andstill supporting old clients.
Listing 8-15. The New Version of Your Server
using System;using System.Runtime.Remoting;using System.Reflection;using System.Runtime.CompilerServices;
using General;using GeneralV2;
[assembly: AssemblyTitle("Server Assembly")][assembly: AssemblyVersion("2.0.0.0")][assembly: AssemblyKeyFile(@"..\..\..\Server.snk")]
namespace Server{
public class ServerImpl : MarshalByRefObject, IRemoteFactory2{private int _ageCount = 10;
public void SetAge(int age){_ageCount += age;Console.WriteLine(">> SetAge {0}", _ageCount);
}
public int GetAge(){Console.WriteLine(">> GetAge {0}", _ageCount);return _ageCount;
}
public Person GetPerson(){Console.WriteLine(">> GetPerson()");Console.WriteLine(">> Returning person {0}...", _ageCount);
Person p = new Person("Test", "App", _ageCount++);return p;
}
CHAPTER 8 ■ THE INS AND OUTS OF VERSIONING 253
public void UploadPerson(Person p){Console.WriteLine(">> UploadPerson()");Console.WriteLine(">> Person {0} {1} {2}", p.Firstname, p.Lastname, p.Age);
_ageCount += p.Age;}
}
class ServerApp{[STAThread]static void Main(string[] args){Console.WriteLine("Starting server...");RemotingConfiguration.Configure("Server.exe.config");
Console.WriteLine("Server configured, waiting for requests!");System.Console.ReadLine();
}}
}
In this case it’s quite easy—as the new interface inherits from the old one and just addsnew functionality, you have ensured that old clients are still supported. If an interface wouldreally break the signature of existing methods, you cannot create an interface that inherits fromthe old version. In this case, you have to create a completely new interface that defines thecontract for the new clients.
But this still means you are avoiding changes in configuration of your server components,making version management and updating server components in any case (not only new inter-faces but also bug fixes and patching) much easier than deploying multiple versions of yourserver component under different URLs.
The second client just references the two shared assemblies (General.dll and GeneralV2.dll)and uses the new interface for calling the remoting server, as you can see in Listing 8-16.
Listing 8-16. The Implementation of the Second Client
using System;using System.Runtime.Remoting;
using General;using GeneralV2;using General.Client;
namespace ClientConsole2{
class Class1{
CHAPTER 8 ■ THE INS AND OUTS OF VERSIONING254
[STAThread]static void Main(string[] args){Console.WriteLine("Configuring client...");RemotingConfiguration.Configure("ClientConsole2.exe.config");
Console.WriteLine("Creating proxy...");IRemoteFactory2 factory =
(IRemoteFactory2)RemotingHelper.CreateProxy(typeof(IRemoteFactory2));
Console.WriteLine("Calling GetAge()...");int age = factory.GetAge();Console.WriteLine(">> Call successful: " + age.ToString());
Console.WriteLine("Calling SetAge()...");factory.SetAge(age * 2);Console.WriteLine(">> Call successful!");
Console.WriteLine("Calling GetPerson()...");Person p = factory.GetPerson();Console.WriteLine(">> Person retrieved: {0} {1}, {2}",
p.Firstname, p.Lastname, p.Age.ToString());
Console.ReadLine();}
}}
The second client performs quite the same tasks as the first one. But it imports the name-space of both shared assemblies, General and GeneralV2, and in addition it calls the SetAge()function, which has been added with the second version of the interface. The configuration ofthe second client looks very similar to the first one despite the fact that you are using the newinterface in your well-known client configuration.
<configuration><system.runtime.remoting><application name="SecondClient"><channels><channel ref="tcp"><clientProviders><formatter ref="binary" />
</clientProviders></channel>
</channels><client><wellknown type="GeneralV2.IRemoteFactory2, GeneralV2"
url="tcp://localhost:1234/MyServer.rem" />
CHAPTER 8 ■ THE INS AND OUTS OF VERSIONING 255
Figure 8-16. The old client in action—still works
Figure 8-17. The new client in action—leverages new functionality
Figure 8-18. The new version of the server after both clients have submitted requests
</client></application>
</system.runtime.remoting></configuration>
Now you can run all three applications. The output is shown in Figures 8-16, 8-17, and 8-18.
Basically the interface-based approach cannot be adapted to client-activated objects directlybecause CAO works with an activation message sent by the client. This request includes thenecessary version information for instantiating the right object on the server as you have seenearlier in this chapter.

CHAPTER 8 ■ THE INS AND OUTS OF VERSIONING256
Server A
Version 2
NameAgeDate
Server A serializesversion 2 of the
message, which containsa date field in
addition to name and age.
Server B deserializesdata received as
version 1. Version 1doesn't know about dateand therefore ignores it.
Server C deserializesversion 2 of the
message. But the dateis missing because it
is not present in version 1.
NameAge
NameAge
Date - ?
Version 1 Version 2
Server B Server C
Figure 8-19. An extended versioning scenario
But if you need an instance of a MarshalByRef object per client on the server, you can solvethis problem differently by implementing a factory object as a Singleton running on the server,which instantiates the client-activated objects and returns them to the client. In this case, theinterface-based approach works again, and you can start versioning the contract of yourclient-activated objects through interfaces.
Versioning Concepts for Serialized TypesEarlier in this chapter, you have been introduced to a way for versioning [Serializable] objects.The things you have seen there will be the foundation for the concepts you are using now. Butwhat do you have to keep in mind when versioning objects sent serialized across the wire?Well, if you have only a couple of clients talking directly to the server, versioning is easier andcan be done as described previously in the section “Versioning of [Serializable] Objects.”
But think about a situation in which servers are exchanging data and different serversrequire different versions of the serializable object exchanged. What if server A works withversion 2 of an object and sends this object across the wire to server B, which requires version 1?You have already seen how to solve this problem easily, but if server B sends the object acrossthe wire to another server, server C, that understands version 2 and requires the data from theoriginal message sent by server A, you have a problem. With the original strategy on deserial-ization of the extended version, the additional data of version 2 is lost on server B in the middle.Server B sends the message without the new data to server C, and therefore information for serverC is missing. The scenario is described in Figure 8-19.
Such a situation requires you to have versioning in mind from the very first moment of yourapplication development process. Therefore, if the probability of getting in such a situation ishigh, you should think about the concepts being discussed in this section.
CHAPTER 8 ■ THE INS AND OUTS OF VERSIONING 257
■Very Important The concepts I am introducing in this chapter should only be used if they are reallynecessary—this means a situation like the one described previously can potentially become reality. In anyother cases, avoid the additional effort of implementing versioning in this way. Furthermore, in such situations,Web Services might be more appropriate than .NET Remoting solutions. My primary intention with thischapter is to show you that versioning of serializable types is not easy and needs to be kept in mindfrom the very first moment of the application design and development process!
■Note The next generation of messaging runtime, codename IIndigo, has such concepts built into the infra-structure through data contracts. This means with Indigo you really can concentrate on your data contractdesign and not—as is happening here—digging into some details of runtime serialization.
In the next example, you’ll see how to implement a similar situation to the one describedin Figure 8-19. Your starting position will be the first version of the client and the server fromthe previous example. This time you’ll add an intermediary remoting server, and the client willcommunicate with this server instead of the original server. As you know that you are going toversion your message sent across the wire—the Person object introduced in the shared libraryin Listing 8-11 of the first version of your interface versioning sample—you are going to changethis class a little bit. Modify the Person object to support custom serialization as follows:
[Serializable]public class Person : ISerializable{public int Age;public string Firstname;public string Lastname;
public Person(string first, string last, int age){this.Age = age;this.Firstname = first;this.Lastname = last;
}
public Person(SerializationInfo info, StreamingContext context){Age = info.GetInt32("Age");Firstname = info.GetString("Firstname");Lastname = info.GetString("Lastname");
}
public void GetObjectData(SerializationInfo info, StreamingContext context){info.AddValue("Age", Age);
CHAPTER 8 ■ THE INS AND OUTS OF VERSIONING258
info.AddValue("Firstname", Firstname);info.AddValue("Lastname", Lastname);
}}
This will be the first version of your Person object. You’ll see later on that this kind of seri-alization will not be sufficient for scenarios described at the beginning of this chapter. But forthe moment, you will leave it to see what the problem is. Next, create your intermediary server.For simplicity, the intermediary implements the same interface as your final back-end server andjust routes messages from the client to the server. The complete code for the intermediary servercan be seen in Listing 8-17.
Listing 8-17. The Intermediary Server
using System;using System.Runtime.Remoting;using System.Reflection;using System.Runtime.CompilerServices;
using General;using General.Client;
[assembly: AssemblyTitle("Intermediary Server Assembly")][assembly: AssemblyVersion("1.0.0.0")][assembly: AssemblyKeyFile("")]
namespace IntermedServer{
public class IntermedImpl : MarshalByRefObject, IRemoteFactory{private IRemoteFactory _server;
public IntermedImpl(){_server = (IRemoteFactory)RemotingHelper.CreateProxy(
typeof(IRemoteFactory));}
public int GetAge(){Console.WriteLine(">> Routing GetAge()...");int ret = _server.GetAge();Console.WriteLine(">>>> GetAge() returned {0}", ret);return ret;
}
public Person GetPerson(){Console.WriteLine(">> Routing GetPerson()...");

CHAPTER 8 ■ THE INS AND OUTS OF VERSIONING 259
Person p = _server.GetPerson();Console.WriteLine(">>>> GetPerson() returned {0} {1} {2}",p.Firstname, p.Lastname, p.Age);
return p;}
public void UploadPerson(Person p){Console.WriteLine(">> Routing UploadPerson()...");_server.UploadPerson(p);Console.WriteLine(">>>> UploadPerson() routed successfully");
}}
class IntermedApp{[STAThread]static void Main(string[] args){Console.WriteLine("Starting intermediary...");RemotingConfiguration.Configure("IntermedServer.exe.config");
Console.WriteLine("Intermediary configured, waiting for requests!");System.Console.ReadLine();
}}
}
The intermediary is configured to listen on port 1235 for the object URI MyIntermed.rem,as you can see in the following configuration code. Furthermore, the intermediary is configuredas a client for your original server.
<configuration><system.runtime.remoting><application><channels><channel ref="tcp" port="1235"><serverProviders><formatter ref="binary" typeFilterLevel="Full" />
</serverProviders></channel>
</channels><service><wellknown type="IntermedServer.IntermedImpl, IntermedServer"
objectUri="MyIntermed.rem"mode="Singleton" />
</service><client>
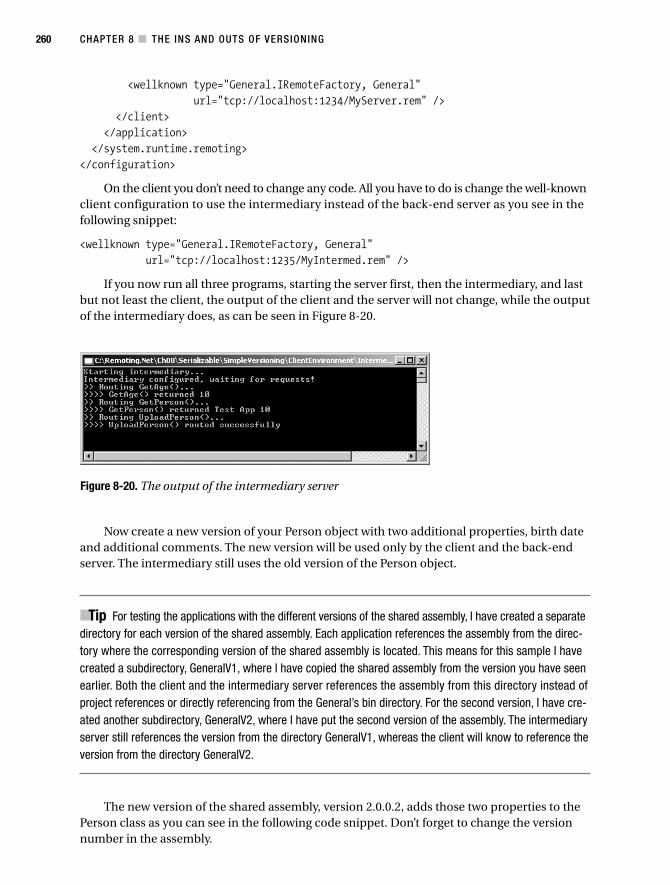
CHAPTER 8 ■ THE INS AND OUTS OF VERSIONING260
Figure 8-20. The output of the intermediary server
<wellknown type="General.IRemoteFactory, General"url="tcp://localhost:1234/MyServer.rem" />
</client></application>
</system.runtime.remoting></configuration>
On the client you don’t need to change any code. All you have to do is change the well-knownclient configuration to use the intermediary instead of the back-end server as you see in thefollowing snippet:
<wellknown type="General.IRemoteFactory, General"url="tcp://localhost:1235/MyIntermed.rem" />
If you now run all three programs, starting the server first, then the intermediary, and lastbut not least the client, the output of the client and the server will not change, while the outputof the intermediary does, as can be seen in Figure 8-20.
Now create a new version of your Person object with two additional properties, birth dateand additional comments. The new version will be used only by the client and the back-endserver. The intermediary still uses the old version of the Person object.
■Tip For testing the applications with the different versions of the shared assembly, I have created a separatedirectory for each version of the shared assembly. Each application references the assembly from the direc-tory where the corresponding version of the shared assembly is located. This means for this sample I havecreated a subdirectory, GeneralV1, where I have copied the shared assembly from the version you have seenearlier. Both the client and the intermediary server references the assembly from this directory instead ofproject references or directly referencing from the General’s bin directory. For the second version, I have cre-ated another subdirectory, GeneralV2, where I have put the second version of the assembly. The intermediaryserver still references the version from the directory GeneralV1, whereas the client will know to reference theversion from the directory GeneralV2.
The new version of the shared assembly, version 2.0.0.2, adds those two properties to thePerson class as you can see in the following code snippet. Don’t forget to change the versionnumber in the assembly.
CHAPTER 8 ■ THE INS AND OUTS OF VERSIONING 261
[Serializable]public class Person : ISerializable{public int Age;public string Firstname;public string Lastname;public DateTime Birthdate;public string Comments;
public Person(string first, string last, int age){this.Age = age;this.Firstname = first;this.Lastname = last;
}
public Person(SerializationInfo info, StreamingContext context){Age = info.GetInt32("Age");Firstname = info.GetString("Firstname");Lastname = info.GetString("Lastname");
try{Birthdate = info.GetDateTime("Birthdate");Comments = info.GetString("Comments");
}catch { }
}
public void GetObjectData(SerializationInfo info, StreamingContext context){info.AddValue("Age", Age);info.AddValue("Firstname", Firstname);info.AddValue("Lastname", Lastname);info.AddValue("Birthdate", Birthdate);info.AddValue("Comments", Comments);
}}
The implementation of the Person object exactly follows the strategy you’ve already seenin the section “Versioning of [Serializable] Objects” earlier in this chapter. On serialization, itjust adds the new information, whereas on deserialization it tries to retrieve the new informa-tion, but if it fails it just leaves it empty. Of course, the client and the back-end server must bemodified to initialize these properties. For example, the server’s GetPerson() and UploadPerson()methods could be modified as follows:

CHAPTER 8 ■ THE INS AND OUTS OF VERSIONING262
public Person GetPerson(){Console.WriteLine(">> GetPerson()");Console.WriteLine(">> Returning person {0}...", _ageCount);
Person p = new Person("Test", "App", _ageCount++);p.Birthdate = DateTime.Now;p.Comments = "Try to find this info on the client!";
return p;}
public void UploadPerson(Person p){Console.WriteLine(">> UploadPerson()");Console.WriteLine(">> Person {0} {1} {2}", p.Firstname, p.Lastname, p.Age);Console.WriteLine(">>>> Additional properties {0} {1}",
p.Birthdate, p.Comments);
_ageCount += p.Age;}
Of course, the original client’s code must read or initialize the properties, too. Therefore,the code of the client could be modified as demonstrated in the following code snippet:
Console.WriteLine("Calling GetPerson()...");Person p = factory.GetPerson();Console.WriteLine(">> Person retrieved: {0} {1}, {2}",
p.Firstname, p.Lastname, p.Age.ToString());Console.WriteLine(">>>> Additional properties: {0} {1}",
p.Birthdate, p.Comments);
Console.WriteLine("Calling UploadPerson()...");Person up = new Person("Upload", "Test", 20);up.Birthdate = DateTime.Now.AddDays(2);up.Comments = "Person. Two days older.";factory.UploadPerson(up);Console.WriteLine(">> Upload called successfully!");
If you now let the client talk directly to the back-end server by configuring the well-known entry in the configuration of the client with the port and URL for the back-end server(<wellknown type="General.IRemoteFactory, General" url="tcp://localhost:1234/MyServer.rem" />) and test your solutions, you will see that the new properties are acceptedas shown in Figures 8-21 and 8-22.
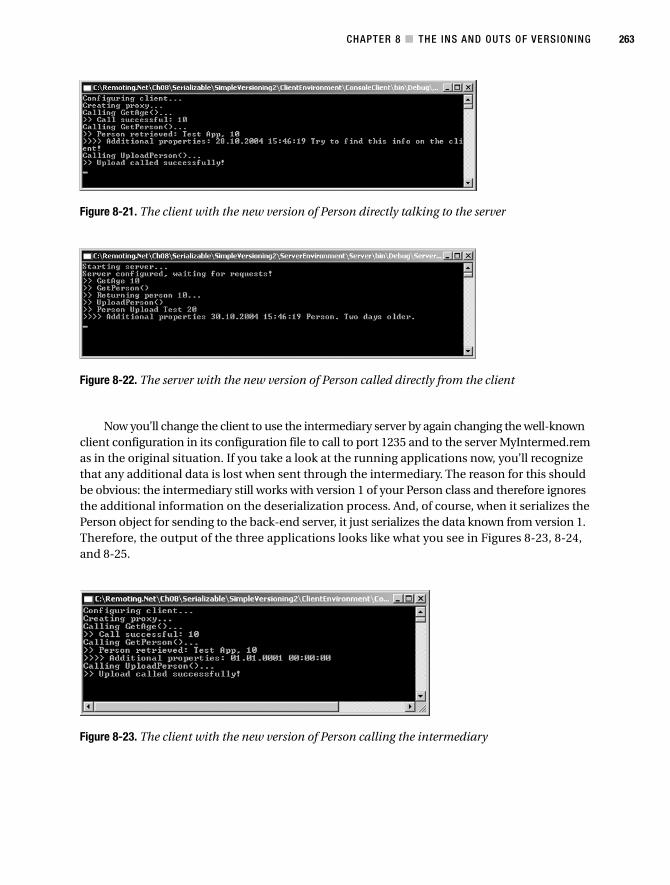
CHAPTER 8 ■ THE INS AND OUTS OF VERSIONING 263
Figure 8-21. The client with the new version of Person directly talking to the server
Figure 8-22. The server with the new version of Person called directly from the client
Figure 8-23. The client with the new version of Person calling the intermediary
Now you’ll change the client to use the intermediary server by again changing the well-knownclient configuration in its configuration file to call to port 1235 and to the server MyIntermed.remas in the original situation. If you take a look at the running applications now, you’ll recognizethat any additional data is lost when sent through the intermediary. The reason for this shouldbe obvious: the intermediary still works with version 1 of your Person class and therefore ignoresthe additional information on the deserialization process. And, of course, when it serializes thePerson object for sending to the back-end server, it just serializes the data known from version 1.Therefore, the output of the three applications looks like what you see in Figures 8-23, 8-24,and 8-25.
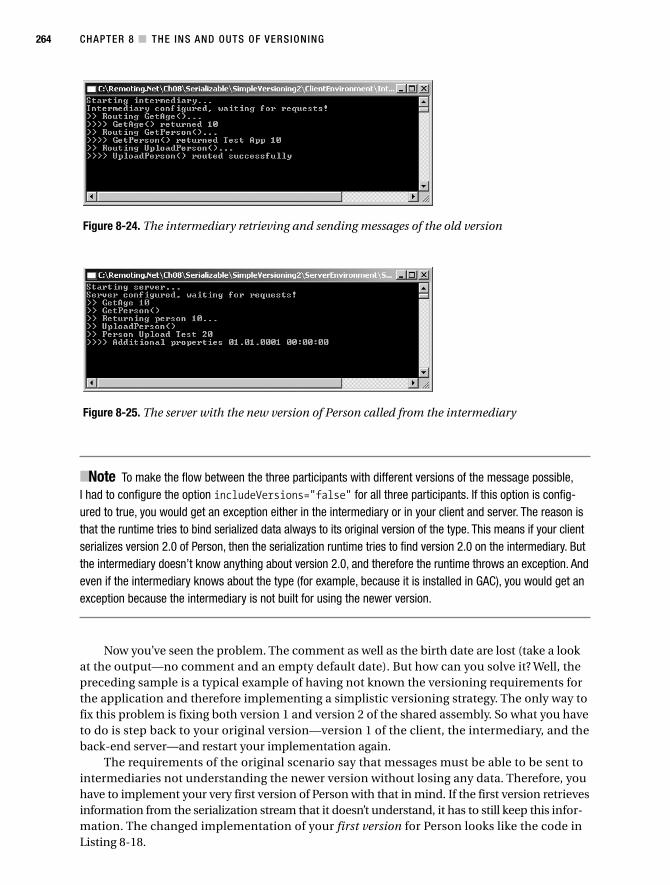
CHAPTER 8 ■ THE INS AND OUTS OF VERSIONING264
Figure 8-24. The intermediary retrieving and sending messages of the old version
Figure 8-25. The server with the new version of Person called from the intermediary
■Note To make the flow between the three participants with different versions of the message possible,I had to configure the option includeVersions="false" for all three participants. If this option is config-ured to true, you would get an exception either in the intermediary or in your client and server. The reason isthat the runtime tries to bind serialized data always to its original version of the type. This means if your clientserializes version 2.0 of Person, then the serialization runtime tries to find version 2.0 on the intermediary. Butthe intermediary doesn’t know anything about version 2.0, and therefore the runtime throws an exception. Andeven if the intermediary knows about the type (for example, because it is installed in GAC), you would get anexception because the intermediary is not built for using the newer version.
Now you’ve seen the problem. The comment as well as the birth date are lost (take a lookat the output—no comment and an empty default date). But how can you solve it? Well, thepreceding sample is a typical example of having not known the versioning requirements forthe application and therefore implementing a simplistic versioning strategy. The only way tofix this problem is fixing both version 1 and version 2 of the shared assembly. So what you haveto do is step back to your original version—version 1 of the client, the intermediary, and theback-end server—and restart your implementation again.
The requirements of the original scenario say that messages must be able to be sent tointermediaries not understanding the newer version without losing any data. Therefore, youhave to implement your very first version of Person with that in mind. If the first version retrievesinformation from the serialization stream that it doesn’t understand, it has to still keep this infor-mation. The changed implementation of your first version for Person looks like the code inListing 8-18.
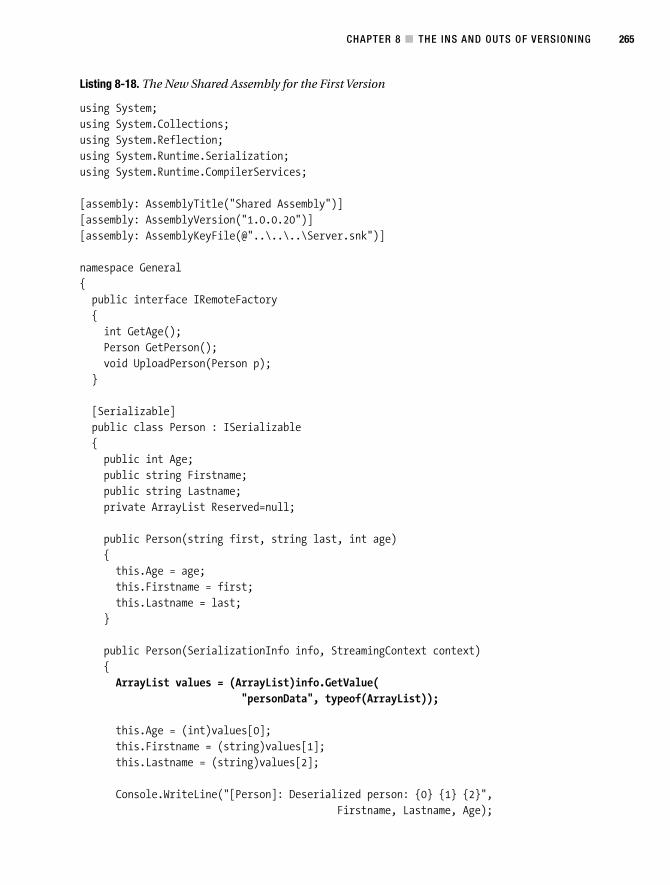
CHAPTER 8 ■ THE INS AND OUTS OF VERSIONING 265
Listing 8-18. The New Shared Assembly for the First Version
using System;using System.Collections;using System.Reflection;using System.Runtime.Serialization;using System.Runtime.CompilerServices;
[assembly: AssemblyTitle("Shared Assembly")][assembly: AssemblyVersion("1.0.0.20")][assembly: AssemblyKeyFile(@"..\..\..\Server.snk")]
namespace General{
public interface IRemoteFactory{int GetAge();Person GetPerson();void UploadPerson(Person p);
}
[Serializable]public class Person : ISerializable{public int Age;public string Firstname;public string Lastname;private ArrayList Reserved=null;
public Person(string first, string last, int age){this.Age = age;this.Firstname = first;this.Lastname = last;
}
public Person(SerializationInfo info, StreamingContext context){ArrayList values = (ArrayList)info.GetValue(
"personData", typeof(ArrayList));
this.Age = (int)values[0];this.Firstname = (string)values[1];this.Lastname = (string)values[2];
Console.WriteLine("[Person]: Deserialized person: {0} {1} {2}",Firstname, Lastname, Age);
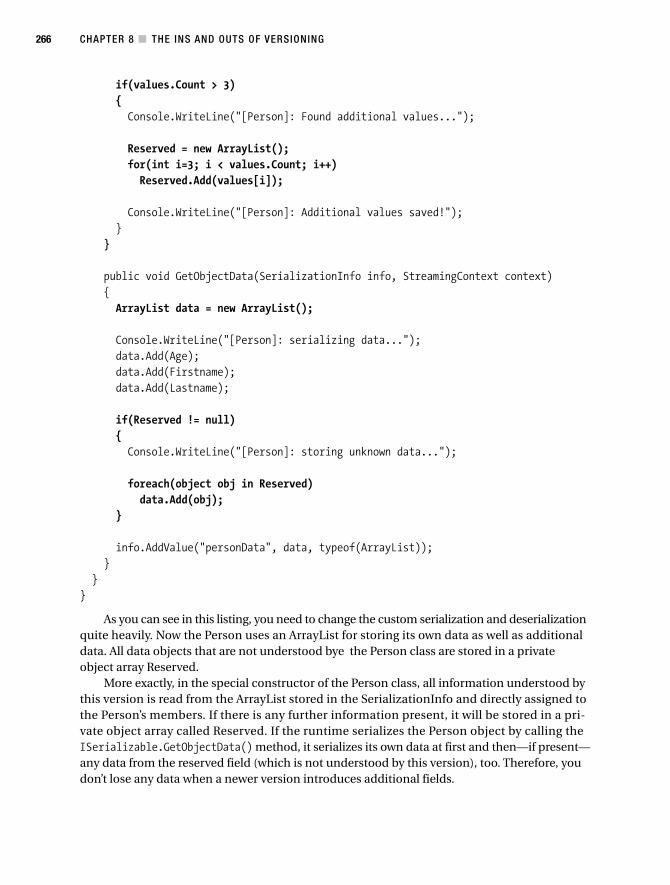
CHAPTER 8 ■ THE INS AND OUTS OF VERSIONING266
if(values.Count > 3){Console.WriteLine("[Person]: Found additional values...");
Reserved = new ArrayList();for(int i=3; i < values.Count; i++)Reserved.Add(values[i]);
Console.WriteLine("[Person]: Additional values saved!");}
}
public void GetObjectData(SerializationInfo info, StreamingContext context){ArrayList data = new ArrayList();
Console.WriteLine("[Person]: serializing data...");data.Add(Age);data.Add(Firstname);data.Add(Lastname);
if(Reserved != null){Console.WriteLine("[Person]: storing unknown data...");
foreach(object obj in Reserved)data.Add(obj);
}
info.AddValue("personData", data, typeof(ArrayList));}
}}
As you can see in this listing, you need to change the custom serialization and deserializationquite heavily. Now the Person uses an ArrayList for storing its own data as well as additionaldata. All data objects that are not understood bye the Person class are stored in a privateobject array Reserved.
More exactly, in the special constructor of the Person class, all information understood bythis version is read from the ArrayList stored in the SerializationInfo and directly assigned tothe Person’s members. If there is any further information present, it will be stored in a pri-vate object array called Reserved. If the runtime serializes the Person object by calling the ISerializable.GetObjectData() method, it serializes its own data at first and then—if present—any data from the reserved field (which is not understood by this version), too. Therefore, youdon’t lose any data when a newer version introduces additional fields.
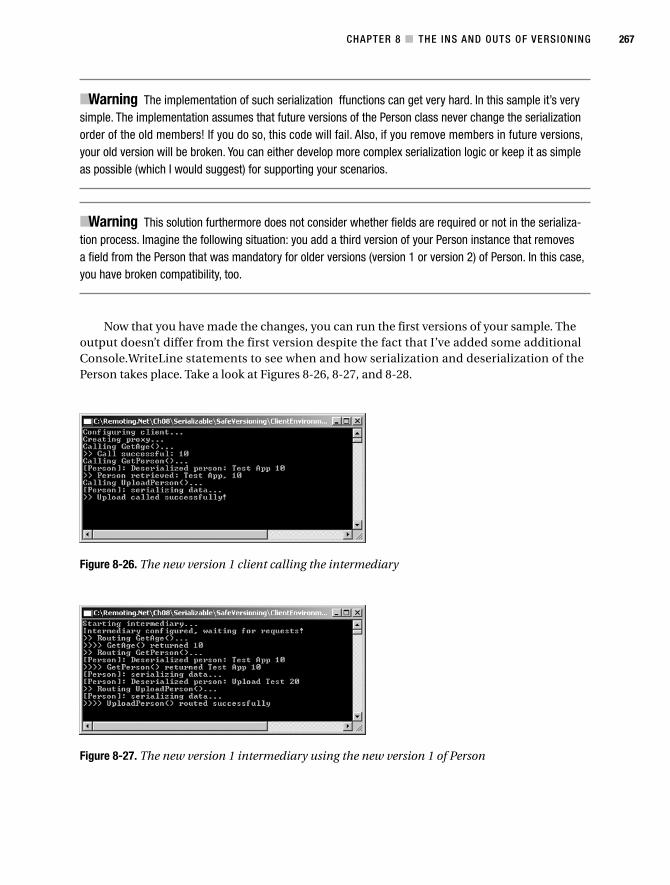
CHAPTER 8 ■ THE INS AND OUTS OF VERSIONING 267
Figure 8-26. The new version 1 client calling the intermediary
Figure 8-27. The new version 1 intermediary using the new version 1 of Person
■Warning The implementation of such serialization ffunctions can get very hard. In this sample it’s verysimple. The implementation assumes that future versions of the Person class never change the serializationorder of the old members! If you do so, this code will fail. Also, if you remove members in future versions,your old version will be broken. You can either develop more complex serialization logic or keep it as simpleas possible (which I would suggest) for supporting your scenarios.
■Warning This solution furthermore does not consider whether fields are required or not in the serializa-tion process. Imagine the following situation: you add a third version of your Person instance that removesa field from the Person that was mandatory for older versions (version 1 or version 2) of Person. In this case,you have broken compatibility, too.
Now that you have made the changes, you can run the first versions of your sample. Theoutput doesn’t differ from the first version despite the fact that I’ve added some additionalConsole.WriteLine statements to see when and how serialization and deserialization of thePerson takes place. Take a look at Figures 8-26, 8-27, and 8-28.
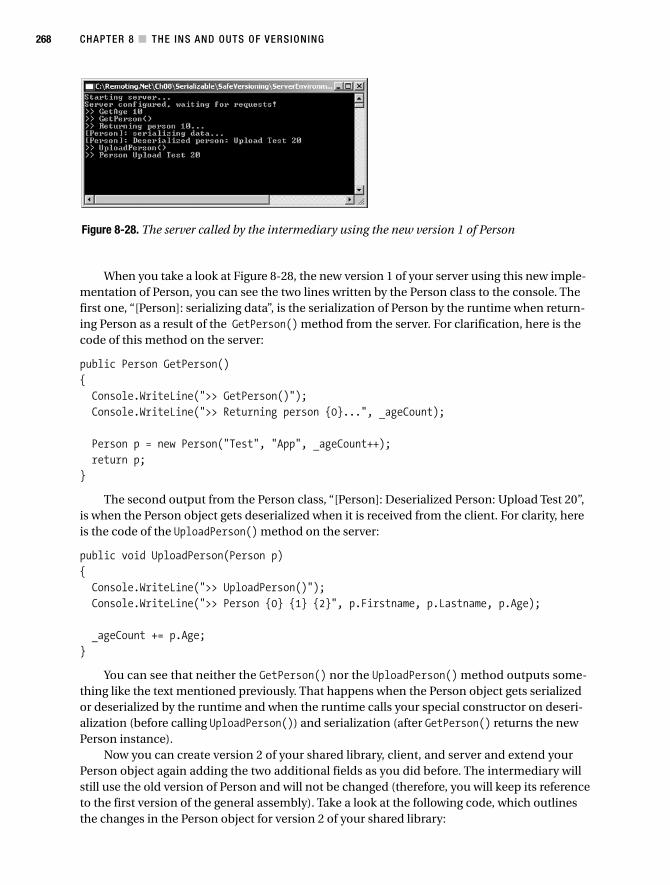
CHAPTER 8 ■ THE INS AND OUTS OF VERSIONING268
Figure 8-28. The server called by the intermediary using the new version 1 of Person
When you take a look at Figure 8-28, the new version 1 of your server using this new imple-mentation of Person, you can see the two lines written by the Person class to the console. Thefirst one, “[Person]: serializing data”, is the serialization of Person by the runtime when return-ing Person as a result of the GetPerson() method from the server. For clarification, here is thecode of this method on the server:
public Person GetPerson(){Console.WriteLine(">> GetPerson()");Console.WriteLine(">> Returning person {0}...", _ageCount);
Person p = new Person("Test", "App", _ageCount++);return p;
}
The second output from the Person class, “[Person]: Deserialized Person: Upload Test 20”,is when the Person object gets deserialized when it is received from the client. For clarity, hereis the code of the UploadPerson() method on the server:
public void UploadPerson(Person p){Console.WriteLine(">> UploadPerson()");Console.WriteLine(">> Person {0} {1} {2}", p.Firstname, p.Lastname, p.Age);
_ageCount += p.Age;}
You can see that neither the GetPerson() nor the UploadPerson() method outputs some-thing like the text mentioned previously. That happens when the Person object gets serializedor deserialized by the runtime and when the runtime calls your special constructor on deseri-alization (before calling UploadPerson()) and serialization (after GetPerson() returns the newPerson instance).
Now you can create version 2 of your shared library, client, and server and extend yourPerson object again adding the two additional fields as you did before. The intermediary willstill use the old version of Person and will not be changed (therefore, you will keep its referenceto the first version of the general assembly). Take a look at the following code, which outlinesthe changes in the Person object for version 2 of your shared library:
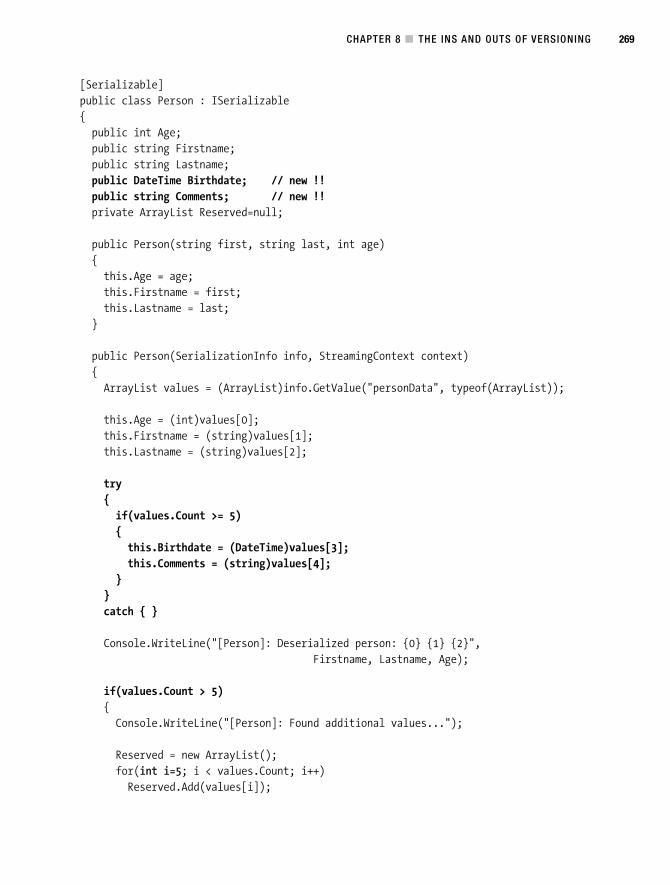
CHAPTER 8 ■ THE INS AND OUTS OF VERSIONING 269
[Serializable]public class Person : ISerializable{public int Age;public string Firstname;public string Lastname;public DateTime Birthdate; // new !!public string Comments; // new !!private ArrayList Reserved=null;
public Person(string first, string last, int age){this.Age = age;this.Firstname = first;this.Lastname = last;
}
public Person(SerializationInfo info, StreamingContext context){ArrayList values = (ArrayList)info.GetValue("personData", typeof(ArrayList));
this.Age = (int)values[0];this.Firstname = (string)values[1];this.Lastname = (string)values[2];
try{if(values.Count >= 5){this.Birthdate = (DateTime)values[3];this.Comments = (string)values[4];
}}catch { }
Console.WriteLine("[Person]: Deserialized person: {0} {1} {2}",Firstname, Lastname, Age);
if(values.Count > 5){Console.WriteLine("[Person]: Found additional values...");
Reserved = new ArrayList();for(int i=5; i < values.Count; i++)Reserved.Add(values[i]);
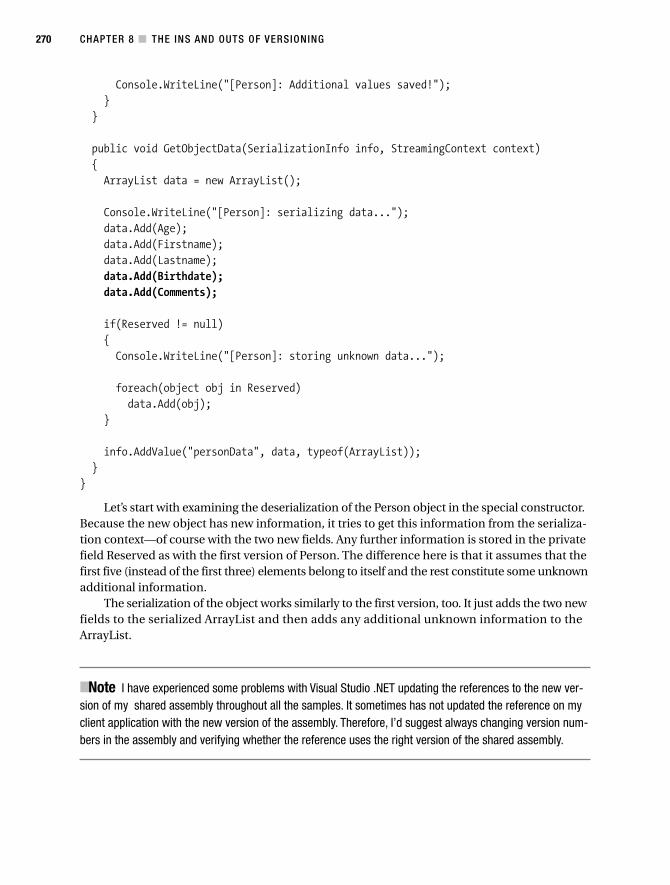
CHAPTER 8 ■ THE INS AND OUTS OF VERSIONING270
Console.WriteLine("[Person]: Additional values saved!");}
}
public void GetObjectData(SerializationInfo info, StreamingContext context){ArrayList data = new ArrayList();
Console.WriteLine("[Person]: serializing data...");data.Add(Age);data.Add(Firstname);data.Add(Lastname);data.Add(Birthdate);data.Add(Comments);
if(Reserved != null){Console.WriteLine("[Person]: storing unknown data...");
foreach(object obj in Reserved)data.Add(obj);
}
info.AddValue("personData", data, typeof(ArrayList));}
}
Let’s start with examining the deserialization of the Person object in the special constructor.Because the new object has new information, it tries to get this information from the serializa-tion context—of course with the two new fields. Any further information is stored in the privatefield Reserved as with the first version of Person. The difference here is that it assumes that thefirst five (instead of the first three) elements belong to itself and the rest constitute some unknownadditional information.
The serialization of the object works similarly to the first version, too. It just adds the two newfields to the serialized ArrayList and then adds any additional unknown information to theArrayList.
■Note I have experienced some problems with Visual Studio .NET updating the references to the new ver-sion of my shared assembly throughout all the samples. It sometimes has not updated the reference on myclient application with the new version of the assembly. Therefore, I’d suggest always changing version num-bers in the assembly and verifying whether the reference uses the right version of the shared assembly.
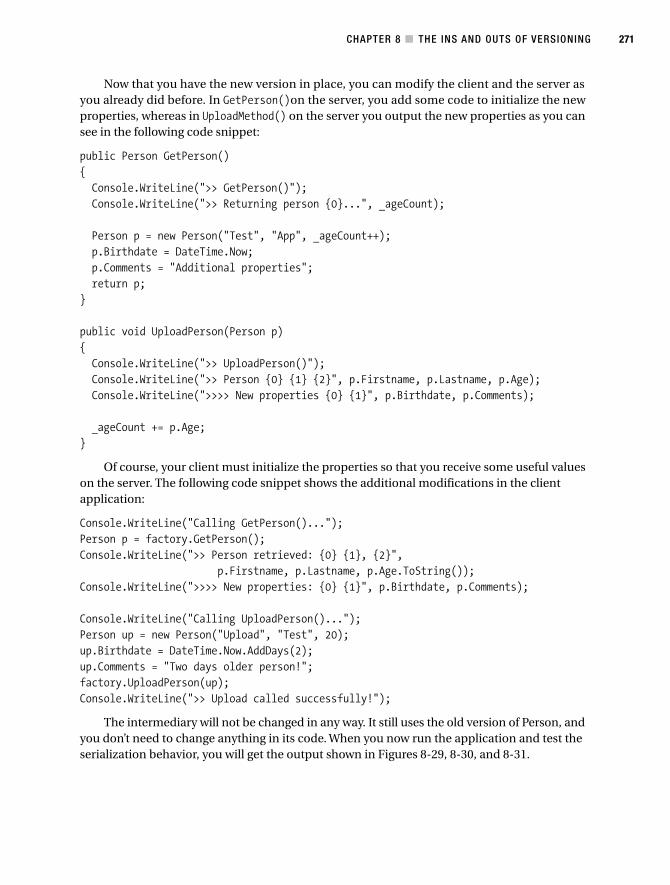
CHAPTER 8 ■ THE INS AND OUTS OF VERSIONING 271
Now that you have the new version in place, you can modify the client and the server asyou already did before. In GetPerson()on the server, you add some code to initialize the newproperties, whereas in UploadMethod() on the server you output the new properties as you cansee in the following code snippet:
public Person GetPerson(){Console.WriteLine(">> GetPerson()");Console.WriteLine(">> Returning person {0}...", _ageCount);
Person p = new Person("Test", "App", _ageCount++);p.Birthdate = DateTime.Now;p.Comments = "Additional properties";return p;
}
public void UploadPerson(Person p){Console.WriteLine(">> UploadPerson()");Console.WriteLine(">> Person {0} {1} {2}", p.Firstname, p.Lastname, p.Age);Console.WriteLine(">>>> New properties {0} {1}", p.Birthdate, p.Comments);
_ageCount += p.Age;}
Of course, your client must initialize the properties so that you receive some useful valueson the server. The following code snippet shows the additional modifications in the clientapplication:
Console.WriteLine("Calling GetPerson()...");Person p = factory.GetPerson();Console.WriteLine(">> Person retrieved: {0} {1}, {2}",
p.Firstname, p.Lastname, p.Age.ToString());Console.WriteLine(">>>> New properties: {0} {1}", p.Birthdate, p.Comments);
Console.WriteLine("Calling UploadPerson()...");Person up = new Person("Upload", "Test", 20);up.Birthdate = DateTime.Now.AddDays(2);up.Comments = "Two days older person!";factory.UploadPerson(up);Console.WriteLine(">> Upload called successfully!");
The intermediary will not be changed in any way. It still uses the old version of Person, andyou don’t need to change anything in its code. When you now run the application and test theserialization behavior, you will get the output shown in Figures 8-29, 8-30, and 8-31.
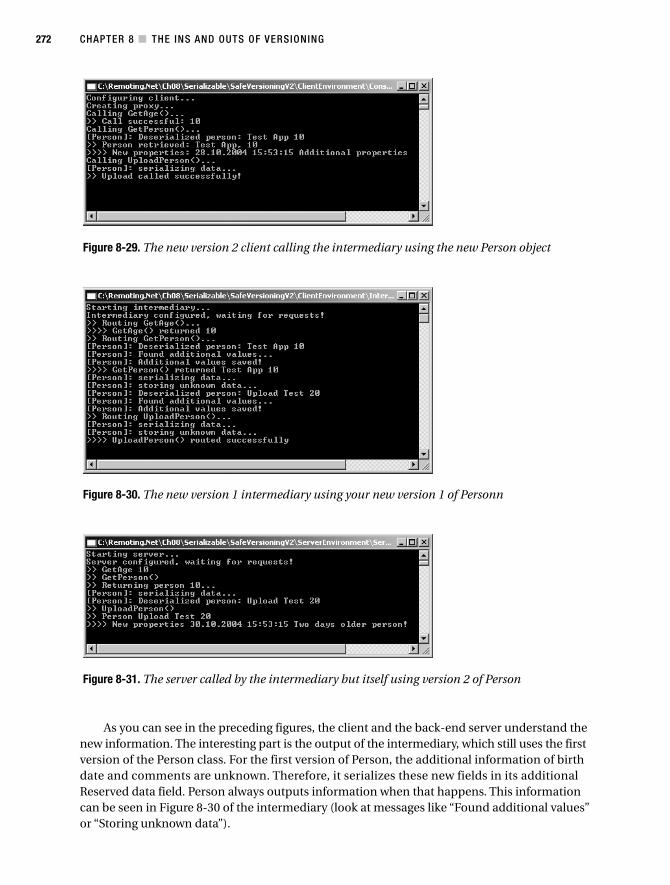
CHAPTER 8 ■ THE INS AND OUTS OF VERSIONING272
Figure 8-29. The new version 2 client calling the intermediary using the new Person object
Figure 8-30. The new version 1 intermediary using your new version 1 of Personn
Figure 8-31. The server called by the intermediary but itself using version 2 of Person
As you can see in the preceding figures, the client and the back-end server understand thenew information. The interesting part is the output of the intermediary, which still uses the firstversion of the Person class. For the first version of Person, the additional information of birthdate and comments are unknown. Therefore, it serializes these new fields in its additionalReserved data field. Person always outputs information when that happens. This informationcan be seen in Figure 8-30 of the intermediary (look at messages like “Found additional values”or “Storing unknown data”).

CHAPTER 8 ■ THE INS AND OUTS OF VERSIONING 273
With those changes in your custom serialization logic in the serializable Person class, yousupport the scenario of sending newer versions to remoting objects supporting older versionsonly, without losing any additional information.
■Security Warning If data added to newer versions of the serializable type should not be readable byolder versions, you have to encrypt them during serialization as well as decrypt them when deserializing thedata. With this, only the newer version will be able to read potentially confidential data.
SummaryIn the last sections, you have explored the details for versioning .NET components in general aswell as versioning .NET Remoting components in distributed application scenarios. Independentof how you are implementing it technically, versioning must be kept in mind from the very firstmoment you start designing and developing the first version of your application.
Although .NET Remoting offers you several possibilities for versioning server-activatedobjects and client-activated objects, the most explicit and therefore safest way for versioningremoteable components is through interfaces. A new version of a remoteable object usuallycontinues supporting the old interface, and just adding a new interface allows newer clients touse new functionality offered by the remoteable object.
When it comes to versioning of serializable objects, you have to define exactly the require-ments for versioning in the future: will exchanging serializable objects between two differentremoting objects be necessary without losing any new information introduced by newer versionsof the serializable object? If yes, the very first implementation of the serializable object has totake this into consideration to not lose new information just because it doesn’t understand it.But this will only happen if you cannot or are not allowed to update software based on an olderversion of your serializable object. Usually this happens when it comes to interaction betweenapplications of two different departments within organizations or even more likely betweentwo companies. In both cases, you don’t have detailed control over what happens with the otherapplication. But in this case, I think Web Services might definitely be a better choice for doingapplication communication—except you have some requirements for using .NET Remoting(e.g., if you rely on specific types of the runtime that cannot be transmitted through Web services,or if you rely on callback—in both cases I would really encourage you to rethink the architectureand try to find some more loosely coupled solutions for such scenarios).
Also, don’t forget to use the includeVersions="false" option on sending formatters ifa remote object (either client or server) requires receiving different versions of the serializabletype. Otherwise, the runtime always tries to load the exact assembly version for the serializedobject, and if it doesn’t find it, it throws an exception. Remember that if you don’t use include-Versions and install more than one version of the assembly in the Global Assembly Cache, theruntime definitely will find the right version of the assembly for deserialization. But becauseyour application has potentially been built against a different version—different version meansdifferent type—in this case you will get an exception when assigning the deserialized instanceto a variable of the wrong type. Therefore, on a machine that runs two clients with differentversioning requirements for serialized objects, I’d suggest you avoid installing assemblies inGlobal Assembly Cache to steer clear of this problem. Last but not least, in general I’d avoidputting assemblies in GAC if possible and really only add them if it’s really necessary.

CHAPTER 8 ■ THE INS AND OUTS OF VERSIONING274
One thing you should never forget is that versioning is not easy. It is not easy for a simpleapplication, although it has become much easier with the .NET Framework because of its built-in support for versioning. And it is even harder for distributed applications, because outside ofdetailed technological aspects, you have to keep in mind all implications on operational manage-ment and organizational challenges, too. Therefore, again, keep versioning in mind from thevery first moment in your software development process.
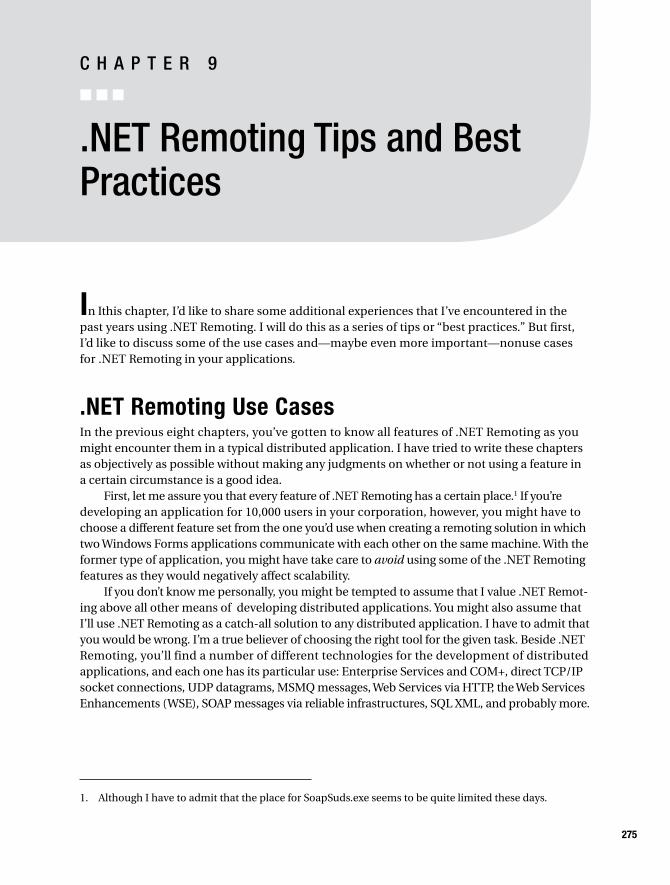
275
C H A P T E R 9
■ ■ ■
.NET Remoting Tips and BestPractices
In Ithis chapter, I’d like to share some additional experiences that I’ve encountered in thepast years using .NET Remoting. I will do this as a series of tips or “best practices.” But first,I’d like to discuss some of the use cases and—maybe even more important—nonuse casesfor .NET Remoting in your applications.
.NET Remoting Use CasesIn the previous eight chapters, you’ve gotten to know all features of .NET Remoting as youmight encounter them in a typical distributed application. I have tried to write these chaptersas objectively as possible without making any judgments on whether or not using a feature ina certain circumstance is a good idea.
First, let me assure you that every feature of .NET Remoting has a certain place.1 If you’redeveloping an application for 10,000 users in your corporation, however, you might have tochoose a different feature set from the one you’d use when creating a remoting solution in whichtwo Windows Forms applications communicate with each other on the same machine. With theformer type of application, you might have take care to avoid using some of the .NET Remotingfeatures as they would negatively affect scalability.
If you don’t know me personally, you might be tempted to assume that I value .NET Remot-ing above all other means of developing distributed applications. You might also assume thatI’ll use .NET Remoting as a catch-all solution to any distributed application. I have to admit thatyou would be wrong. I’m a true believer of choosing the right tool for the given task. Beside .NETRemoting, you’ll find a number of different technologies for the development of distributedapplications, and each one has its particular use: Enterprise Services and COM+, direct TCP/IPsocket connections, UDP datagrams, MSMQ messages, Web Services via HTTP, the Web ServicesEnhancements (WSE), SOAP messages via reliable infrastructures, SQL XML, and probably more.
1. Although I have to admit that the place for SoapSuds.exe seems to be quite limited these days.
CHAPTER 9 ■ .NET REMOTING TIPS AND BEST PRACTICES276
But let’s first look at some of the areas in which you can find .NET Remoting. The four main usecases in terms of remoting boundaries are as follows. It can be used if you want your method calls to
• Cross AppDomain boundaries.
• Cross process boundaries on a local machine.
• Cross a LAN.
• Cross a WAN or the Internet.
Cross-AppDomain RemotingAs soon as you create a new application domain in .NET, you are automatically using remotingbehind the scenes to communicate between the two AppDomains. In this case, the remotingframework will set up all channels and sinks for you—and in fact it will use a highly optimizedformatting process and an in-memory channel.
This provides for two different implications: a) you can’t change formatters or add channelsink chains, and b) you don’t have to care too much about it. It just works. You can use all .NETRemoting features without any problems.
In fact, cross-AppDomain calls are one of the primary use cases for .NET Remoting. Theyare so well integrated in the framework that you usually don’t even notice you’re using remoting.
Safe Features
• All
Cross-Process on a Single MachineLet’s assume you have two Windows Forms applications running on a single machine, and youwant the two applications to be able to communicate with each other. Or suppose you havea Windows service that should exchange data with your GUI application. Which protocol canyou use? Remoting!
This is one of the cases where the TCPChannel is extremely helpful as it allows you to specifyrejectRemoteRequests="true" upon its construction, which limits all incoming connections tothe ones originating from your own machine. No need to take too many precautions aboutsecurity in this case. (However, if you use fixed port numbers for WinForms-to-WinForms com-munication, you might encounter trouble when running on Windows Terminal Services withtwo or more users trying to use your application at the same time.)
I have good news regarding the features of .NET Remoting—all of them work as expectedon a local machine.
Safe Features
• All
Cross-Process on Multiple Machines in a LANOK, now we start to get real. This is your usual distributed LAN application. Applications of thiskind can be separated into two additional categories:
CHAPTER 9 ■ .NET REMOTING TIPS AND BEST PRACTICES 277
• Single-server applications
• Applications that need to scale to multiple hosts in a network load balancing (NLB)cluster
Don’t Use Events or CallbacksNo matter which category your application belongs to, I heavily recommend not using events,callbacks, or client-side sponsors for networked applications. Yes, it’s possible to use them. Yes,they might work after applying one or another workaround. The real trouble is that they aren’texactly stable and don’t really perform that nicely.
The reason for this stability/performance drawback lies in the invocation model. First, youhave to make a decision on whether to invoke events synchronously or asynchronously fromthe server’s point of view. In the first case, your server has to wait until all clients acknowledge(and process) the callback, which increases the request time by a magnitude. If, however, youdecide to use them asynchronously, you might run into a number of different issues—of whichThreadPool starvation is only the smallest and lost events is the more critical.
But what if you need notification of clients? In this case, you should either look into UserDatagram Protocol (UDP) or message queuing, depending on your need for reliability. The useof Microsoft Message Queue Server (MSMQ) allows your server-side application to send messagesto listening clients without having to wait for acknowledgements of reception (or even wait forprocessing at the client). This allows for way better turnaround times for your requests.
I will cover asynchronous notifications in more depth later in this chapter in the section“Using Events and Sponsors.”
How About Client-Activated Objects?The main problem with CAOs is that they are always bound to the machine on which they havebeen created. This means that you can’t use load balancing or failover clustering for these objects.If, on the other hand, you use SingleCall SAOs designed with clustering in mind, you could useWindows Network Load Balancing (NLB) quite easily to randomly dispatch the method invo-cations to one out of a number of available servers.
If you are running a single-server application, this doesn’t matter too much for you. If,however, there is the slightest chance that the application has to scale out to a server-sidecluster, than CAOs might limit its scalability.
But you shouldn’t just be concerned about scalability: CAOs also affect you on a single server.When running SingleCall SAOs (and when strictly keeping all state information in a database),you can shut down and restart your server on demand. For example, you could upgrade toa newer version or apply some bug fix without having to tell any user to close and restart yourclient-side application. As soon as you use CAOs, however, you instantly lose this feature. If yourestart a server in which you host CAOs, the client application will receive exceptions whencalling any methods on these objects. CAOs aren’t restored after restarting your server. Don’tuse them if you care about high availability and transparent failover, unless you want to writethese features yourself.
I’ll talk about clustering in more depth later in this chapter in the section “Scaling OutRemoting Solutions.”
CHAPTER 9 ■ .NET REMOTING TIPS AND BEST PRACTICES278
What’s the Best Channel/Formatter?I recommend the use of the HttpChannel with the binary formatter for any application thatspans multiple hosts. The reason is quite simple: you can develop and debug your applicationin a standard Visual Studio .NET project, but when it comes to deployment, you can easilyhost your server-side components in IIS, which provides you with a number of advantages—a reasonable process model, built-in authentication (HTTP Basic or Windows integrated),built-in encryption (SSL), and the ability to disable HTTP KeepAlives, which further increasesthe scalability of your application because it reduces dependencies on single servers.
Safe Features
• SingleCall SAOs hosted in IIS with HttpChannel and BinaryFormatter
That’s it. If you want to be on the safe side, don’t use more than these features. Also, pleasekeep in mind that whenever you return a MarshalByRefObject from a server-side method, youare actually creating an object that behaves like a CAO and should therefore be avoided.
Cross-Process via WAN/InternetAs soon as your application grows and you leave the boundaries of your local area network,a number of additional issues have to be taken care of. The absolute number one issue is networklatency. You have to take care to reduce the number of cross-network calls by using chunkyinterfaces. In a chunky interface, you will try to transfer as much data as possible (and necessary)in a single network roundtrip. If your client application, for example, works with customerobjects and addresses, then you should definitely transfer all known addresses for a givencustomer whenever the client application requests information about a customer. The alternativeof having two different methods, GetCustomer() and GetAddresses(), will simply double the num-ber of network roundtrips and will therefore heavily decrease your application’s response times.
But keep in mind that you have to strike a balance here. It might not be the best idea totransfer all of the customer’s orders or the complete contact history at the same time, if youdon’t need that data in 99 percent of the cases. It’s really all about balance here.
I guess the most important advice I can give you for applications like this is to actuallydevelop them with a low-bandwidth, high-latency network. Run your server and client ondifferent machines not connected by a LAN. Instead, connect the client to the Internet witha plain old modem or ISDN line, if this is what you expect your users to use. This will allow youto see and experience the performance hot spots during development—nothing is more embar-rassing than having a user call you up and tell you that your application is way too slow, right?
Regarding the use of remoting features, I can give you basically the same advice as for theLAN environment: use SingleCall SAOs hosted in IIS with HttpChannel and BinaryFormatter.In addition, you have to make absolutely sure that you don’t use events, callbacks, or client-sidesponsors, as these might not work whenever a firewall, proxy, or NAT device is used betweenthe client computer and your server. Whereas the use of events in a LAN environment might“just” render your application instable, they will simply prevent it from working in WANenvironments.
When using .NET Remoting on a WAN or the Internet, it is very important to develop witha sound versioning strategy. In practice, this for example means that you shouldn’t use [Serializable]without implementing ISerializable. The reason is that you usually cannot force all worldwideusers who run your application to install a new version right at the instant it becomes available.

CHAPTER 9 ■ .NET REMOTING TIPS AND BEST PRACTICES 279
You will usually have to support multiple versions of your client software at the same time. Evenif the WAN is completely controlled by your own organization, you will still have a hard timeconvincing your traveling salespeople to download a new 5- to 10-megabyte installer if they onlyconnect via GPRS from their cell phones.
Whenever you use .NET Remoting on the Internet, however, you have to be aware of theissue with HTTP proxying, as discussed in the section “Authenticating HTTP Proxying.”
Safe Features
• SingleCall SAOs hosted in IIS with HttpChannel and BinaryFormatter
Nonusage ScenariosAfter presenting four different application scenarios for remoting in the previous sections, I’dalso like to point out some environments in which I wouldn’t use remoting at all.
Let’s Do SOAPIf you plan on using SOAP Web Services to integrate different platforms or different companies,I really urge you to look into ASP.NET Web Services (ASMX) instead of remoting. These Web Servicesare built on top of industry standards, and together with additional frameworks like the WebServices Enhancements, will allow you to use additional infrastructure-level and application-level specifications (WS-Security, WS-Routing, WS-Policy, WS-Trust, WS-SecureConversation,etc.) in a platform-independent and message-oriented way.
ASMX Web Services provide essential features for Web Services like WSDL-first development,the use of doc/literal, easier checking of SOAP headers, and so on.
So let me repeat: if you want SOAP, the use of ASP.NET Web Services together with WSE isthe only way to go!
Service-Oriented ArchitecturesOne of the current industry buzzwords is Service-Oriented Architecture (SOA), which providesplatform-independent, message-oriented, and loosely coupled services in Enterprise environ-ments. As you might already have guessed, remoting is not the right choice for these. Thinkabout going ASMX and WSE here as well.
The reason is that remoting depends on the .NET runtime and on the availability of a binaryinterface contract (in the form of the “real” server-side classes or in the form of .NET interfaces)on the client machine. These are two requirements that essentially bind this framework to .NET.
Authenticated HTTP Proxying.NET Remoting generally supports HTTP proxies with both the SoapFormatter and the Binary-Formatter. Unfortunately, it isn’t possible to use proxies that require any form of authenticationbefore allowing to send any data to remote hosts.
You can, however, look into the third-party product Genuine Channels,2 which providesan HTTP channel with support for authenticated proxy traffic.
2. Genuine Channels is an independently developed product. The author has no relationship with thiscompany. You can reach them at http://www.genuinechannels.com.
CHAPTER 9 ■ .NET REMOTING TIPS AND BEST PRACTICES280
Distributed Transactions, Fine-Grained Security Requirements, Etc.A completely different no-go scenario for remoting is the necessity for distributed transactions,fine-grained security requirements, configurable process isolation, publish-and-subscribe events,and so on. Yes, you could in fact develop your own channel sinks and plug them into the .NETRemoting framework to enable these features. But why would you want to do so? Why shouldyou spend your time on these features instead of implementing your application’s businessrequirements? There already is another framework in .NET that includes all these features:Enterprise Services.
If your application can make use of any of the following services, you should really thinkabout using Enterprise Services instead of .NET Remoting:
• Distributed declarative transactions
• Highly flexible, configurable means of authentication and authorization
• Role-based security with roles independent of Windows user accounts
• Just-in-time activation of objects
• Object pooling
• Process isolation
• Server-side components as Windows Services
• Automatic queuing of component interactions with MSMQ
In addition, COM+ 1.5, as it is available with Windows Server 2003, provides the addedbenefit of so-called Services Without Components (SWC). This allows you to use most of theservices of the Enterprise Services framework without the necessity to derive your componentfrom System.EnterpriseServices.ServicedComponents and without having to register yourcomponents in the COM+ catalog.
To learn more about Enterprise Services and COM+, I’d like to point you to Juval Löwy’sbook, COM and .NET Component Services (O’Reilly, 2001).
The Nine Rules of Scalable RemotingAs you’ve seen previously, remoting provides a number of features whose applicability differsfor a number of usage scenarios. To ensure that your application is reliable, stable, and scalable,you should follow these nine rules if you want to create highly scalable remoting solutions:
• Use only server-activated objects configured as SingleCall.
• Use the HttpChannel with the BinaryFormatter. Host your components in IIS if you needscalability, authentication, and authorization features.
• Use IIS’s ability to deactivate HTTP KeepAlives for maximum scalability.
• Use a Network Load Balancing cluster of servers during development if you want toachieve scalability. Make sure to deactivate any client affinity and make sure that youdeactivate HTTP KeepAlives during development!

CHAPTER 9 ■ .NET REMOTING TIPS AND BEST PRACTICES 281
• Don’t use client-activated objects, and don’t pass any MarshalByRefObject over a remotingboundary. Starting with version 1.1 of the .NET Framework, a SecurityException ora SerializationException would be thrown in this case. (Yes, you could change the under-lying TypeFilterLevel setting—but you shouldn’t!)
• Don’t use events, callbacks, and client-side sponsors.
• Use static fields and other forms of caching with caution. If you keep state in memory, youmight run into problems if you try to scale your application out to a cluster of servers.Cache information only if it’s not going to change or if you can anticipate the level andnumber of changes in advance. Otherwise, you will run into cache-synchronizationnightmares on your cluster.
• Don’t use remoting for anything else apart from .NET-to-.NET communications. UseASP.NET Web Services and WSE for anything related to SOAP, Service-Oriented Architec-tures, and platform independence.
• Don’t try to fit distributed transactions, security, and such into custom channel sinks.Instead, use Enterprise Services if applicable in your environment. .NET Remoting isn’ta middleware, it is just a transport protocol—if you need services, use a service-orientedframework!
Please keep in mind that these guidelines are only for remoting solutions that should scaleout. If you communicate between two applications on a single server, it is usually perfectly soundto use some of the more advanced features of .NET Remoting.
Using Events and SponsorsWhen looking at the remoting of events for the first time, it seems like a perfect solution fora recurring design question: what if I need to notify a number of clients of important changesin data? Can’t they just subscribe to a certain server-side event that will be invoked later?
The theoretical answer is yes. In practice, however, the way .NET Remoting handles thesekinds of events might not be up to your requirements of stability and reliability. Actually, it’snot really all the fault of the .NET Remoting framework, but is partly caused by the way the TCPprotocol works. But let’s start with the basics: let’s assume that you have a few hundred clients thatsubscribe to a server-side event. From the previous chapters, you already know that wheneveran event is invoked, a TCP connection originating from the server to the client is established.The invocation of the event is transferred to the client as if it were a normal .NET Remotingmethod call. In fact, it is just this: a normal method call with the main distinction that client andserver have changed their roles.
Knowing this, you now have basically two options: you can notify all clients sequentiallyor in parallel. If you want to notify them in sequence, you have to take into account that thedistribution of data might take a while, as some clients might react more slowly than others. Infact, if a client couldn’t respond in time, then this might in turn cause your server applicationto hang.
However, if you decide to notify all clients in parallel—for example, by using BeginInvoke()—you can run into another issue. The .NET Remoting framework uses the underlying standard.NET thread pool to handle incoming requests. This pool consists of 25 threads per CPU.
CHAPTER 9 ■ .NET REMOTING TIPS AND BEST PRACTICES282
Unfortunately, the same thread pool is employed whenever you use BeginInvoke(). This meansthat your server will not be able to handle incoming requests while it is processing the out-going events 25 at a time.
As you can see, the support for events in the .NET Remoting framework has not been designedfor global broadcast operations. Listeners should be confined to applications running on thesame machine, for example, in communication with a local Windows service that uses .NETRemoting as its preferred protocol.
How to Notify NeverthelessBut what if you nevertheless have to notify a number of clients? I am afraid that .NET Remotingmight not be the best solution for the notification scenario (although you can, of course, stilluse it for all client-to-server communication.) Instead, you should take a look at technologieslike UDP, MSMQ, or IP Multicasting, which allow you to broadcast events efficiently to a num-ber of subscribers.
UDP broadcasts can be used if all clients are located in the same IP subnet and if you don’tneed reliable delivery (i.e., if the events are not critical and when it wouldn’t matter whether a smallpercentage of them are never received at all clients). In addition, UDP limits the payload to64KB. The main advantage of using UDP broadcasts is that only a single IP packet will be sentto your network, no matter how many applications are listening.
A simple UDP client that listens for broadcast packets on port 10000 will look like this:
using System;using System.Text;using System.Net.Sockets;using System.Net;
public class Receiver{public static void Main(){Socket sck = new Socket(AddressFamily.InterNetwork,SocketType.Dgram,ProtocolType.Udp);
sck.Bind(new IPEndPoint( IPAddress.Any, 10000));
byte[] buf = new byte[65000];
while (true){int size = sck.Receive(buf);String str = Encoding.ASCII.GetString(buf,0,size);Console.WriteLine("Received: {0}", str);
}}
}
CHAPTER 9 ■ .NET REMOTING TIPS AND BEST PRACTICES 283
3. If you are interested in more details, I’d recommend having a look at the book Pro .NET 1.1 NetworkProgramming, Second Edition by Christian Nagel et al. (Apress, 2004).
The following application is a matching sender that allows the user to enter a string thatshould be broadcast:
using System;using System.Text;using System.Net;using System.Net.Sockets;
public class Sender{public static void Main(){Console.Write("Enter String to broadcast:");String str = Console.ReadLine();byte[] data = Encoding.ASCII.GetBytes(str);
Socket sck = new Socket(AddressFamily.InterNetwork,SocketType.Dgram,ProtocolType.Udp);
sck.Connect(new IPEndPoint( IPAddress.Broadcast,10000));sck.Send(data);sck.Close();
}}
When using broadcasting schemes based on UDP, you have to be aware that events might belost and that a single packet might be received multiple times if the code binds the socket to allexisting network interfaces. This has been done in the preceding code by using IPAddress.Anyat the receiving side, and by using IPAddress.Broadcast on the sending side.3
Message Queuing to the RescueContrary to UDP, MSMQ is the technology of choice if you need guaranteed asynchronousdelivery of notifications.
■Note MSMQ is a built-in part of Windows XP, Windows 2000, and Windows Server 2003 that has to beselected during installation and might not be available on all client machines by default. There are no addi-tional licensing costs for using MSMQ in your applications.
CHAPTER 9 ■ .NET REMOTING TIPS AND BEST PRACTICES284
By default, MSMQ does not use broadcasting or multicasting, but instead requires that thedata for each client be sent in a separate connection. This sending is, however, performed inthe background by the MSMQ Server running on the sending machine. (Machines using thecurrent version of MSMQ are server and client at the same time!) The sending application basi-cally only needs to tell the messaging framework to take care of delivering the messages but doesnot have to wait for completion.
Whenever you want to use MSMQ for notifications, you will usually create a destinationqueue on each of your clients. This can be done programmatically during installation or use ofyour application (if the user has the necessary permissions to create queues).
A very simple receiving application can, for example, look like this (you have to adda reference to System.Messaging.DLL):
using System;using System.Messaging;
class Receiver{static void Main(string[] args){String queuename = @".\private$\NOTIFICATIONS";
if (!MessageQueue.Exists(queuename)){MessageQueue.Create(queuename);
}
MessageQueue que = new MessageQueue(queuename);que.Formatter = new BinaryMessageFormatter();
while (true){using (Message msg = que.Receive()){String str = (String) msg.Body;Console.WriteLine("Received: {0}", str);
}}
}}
This application creates an incoming private queue called “NOTIFICATIONS” and waitsfor incoming messages.
■Note “Private” queues can be reached from other machines if the sender knows their exact name. Theysimply do not appear in the Active Directory (AD).
CHAPTER 9 ■ .NET REMOTING TIPS AND BEST PRACTICES 285
A matching sender application that can send notifications to multiple receivers could, forexample, look like this:
using System;using System.Text;using System.Collections;using System.Messaging;
class Sender{static void Main(string[] args){Console.Write("Enter String to broadcast:");String str = Console.ReadLine();
ArrayList clients = new ArrayList();clients.Add("localhost");clients.Add("client1");clients.Add("client2");
String formatName = BuildFormatName(clients);MessageQueue que = new MessageQueue(formatName);
Message msg = new Message();msg.Formatter = new BinaryMessageFormatter();msg.Body = str;que.Send(msg);
Console.ReadLine();}
static string BuildFormatName(ArrayList clients){if (clients.Count == 0)throw new ArgumentException("List of clients empty.", "clients");
StringBuilder bld = new StringBuilder();bld.Append("FormatName:");foreach (String cli in clients){bld.Append("direct=os:");bld.Append(cli);bld.Append("\\private$\\NOTIFICATIONS");bld.Append(",");
}bld.Remove(bld.Length-1,1);return bld.ToString();
}}
CHAPTER 9 ■ .NET REMOTING TIPS AND BEST PRACTICES286
In this example, the method BuildFormatName() takes a list of clients that should receivethe notification and builds a destination name containing all the individual queues.
If you don’t want to hard code the queue names on the client side (for example, if multipleinstances of your application can be started on one host), it is advisable to create a new queueupon application startup, giving it a random or GUID-based name. You would then contact theserver (by either using MSMQ or maybe also using .NET Remoting) to have it add the newlycreated queue to its list of subscribers. You would then also have to include mechanisms forunsubscribing, deleting the dynamically created queues, and detecting stale entries in the listof subscribers.
Other ApproachesDelivering notifications to a large number of clients is a very complex topic for which a numberof additional strategies have been developed depending on the usage scenario. An approachnot discussed previously is, for example, the use of TCP connections that have been created bya client solely for the purpose of allowing a server to use it for notifications. Point-to-point UDPconnections and HTTP-based “polling” are other approaches that might be necessary depend-ing on the number and kinds of clients your application should support.
SoapSuds vs. Interfaces in .NET RemotingWhenever people have approached me in the previous years to ask for my opinion on SoapSuds,I have been recommending using interfaces to access remote objects instead. My exact wordsmight even have been close to “I’d generally recommend avoiding SoapSuds whenever possible.”
The idea behind SoapSuds is to run it on an existing assembly to extract the metadata forall MarshalByRefObjects so that you don’t need to deploy the complete implementation assem-bly to your clients. This goal is pretty ambitious, and in fact, I truly believe that it just can’t work.As soon as you have [Serializable] or ISerializable classes in your assembly, you are pretty muchon your own because SoapSuds will only extract the metadata (i.e., the fields) but not the imple-mentation. Even if it would extract the implementation, this might also not match your expec-tation because it might contain source code that should only run on the server side.
Just imagine that you have a class like this:
[Serializable]public class Foo{
private String _bar;
public String Bar{get { return _bar; }
set{
if (value.Length > 30){
throw new ApplicationException("Bar might not be longer than 30 chars");

CHAPTER 9 ■ .NET REMOTING TIPS AND BEST PRACTICES 287
}_bar = value;
}}
}
When running SoapSuds here, it will extract only the metadata, which basically leaves youwith the following class, which is quite a bit different:
[Serializable]public class Foo{
public String Bar;}
But even if you can work around this issue (by including your [Serializable] classes in a dif-ferent assembly that is shared between server and client), you might still run into some issues.
As soon as your application increases in complexity, you encounter one or more of thefollowing problems, depending on the version of the .NET Framework and its service packs:
• Typed DataSets are not supported by SoapSuds.
• If you use System.ComponentModel.Component (and some others), SoapSuds will simplythrow an exception instead of generating anything.
• Various conditions trigger the generation of non-compilable code (duplicate usingstatements in a file, and so on).
• Async calls via Delegate.BeginInvoke() won’t work.
One of the reasons for using SoapSuds is the ability to register these metadata-only classesat the client side so that you can basically use the new operator to instantiate remote references.But at the end of the day, location transparency—as it is implied in this case—might even turnout to be dangerous for an application’s stability. It can affect your application’s performancein negative ways (for example, when using way too chatty interfaces). Normally, you shouldknow exactly which method will be executed remotely and which class will run in a remotecontext—therefore my conclusion:
• Use explicitly defined remote interfaces.
• Use a helper class like the one shown here if you want to go with configuration files.
• Use factory SAOs instead of CAOs (“activated” types don’t work with interfaces, therefore,factory). Or even better: avoid CAOs if possible, especially if your application shouldsupport transparent failover on a cluster.
Let me give you one more reason why I definitely advocate the use of explicit interfaces toaccess remote objects. Just imagine that you inherit client-side code written by someone elseand you see code like the following.
private double CalculateSum(Order o){
double sum = 0;foreach (OrderDetail od in o.Details)
CHAPTER 9 ■ .NET REMOTING TIPS AND BEST PRACTICES288
{sum = sum + od.LineTotal;
}return sum;
}
Your user complains that the “application is too slow,” but you just can’t find any problems.You didn’t instantly notice that Order and OrderDetail are actually configured as remote objectsand a single execution of this method might result in a dozen or more network roundtrips.
If you would have used interfaces instead, problems like this can be much more obvious.
private double CalculateSum(IRemoteOrder o){
double sum = 0;foreach (IRemoteOrderDetail od in o.Details){
sum = sum + od.LineTotal;}return sum;
}
Actually, if the initial developer would have used interfaces right from the start, the codemight have looked differently. As soon as he or she noticed that this method would involvemultiple roundtrips, he or she might have changed the interface and calculated the completevalue at the server.
private double CalculateSum(IRemoteOrder o){
return o.CalculateSum();}
That’s why I use interfaces. They help me to avoid mistakes.
Custom ExceptionsEven though remoting supports high type fidelity, transferring custom exceptions over remotingboundaries comes with its very own challenge: using [Serializable] is not enough because thebase class System.Exception already implements ISerializable. If you want to pass your customexceptions over remoting boundaries, you therefore have to override GetObjectData() and pro-vide a custom constructor for deserialization. And don’t forget to call base.GetObjectData().
Please also note that your custom exception has to be deployed to a shared DLL that iscopied to, and referenced from, your client and server applications. It doesn’t suffice to simplycopy and paste the source code to your client and server project!
Any custom exception you develop should be based on the following skeleton:
[Serializable]public class MyException: ApplicationException
CHAPTER 9 ■ .NET REMOTING TIPS AND BEST PRACTICES 289
{public MyException(): base(){}
public MyException(String msg): base(msg) {}
public MyException(SerializationInfo info,StreamingContext context): base(info, context)
{}
public override void GetObjectData(SerializationInfo info,StreamingContext context)
{base.GetObjectData (info, context);
}}
If you want to transfer custom information with your exception, you have to add it tothe SerializationInfo object on the call to GetObjectData() and to take it from this object in thesecondary constructor.
[Serializable]public class ConcurrencyException: ApplicationException{string _databaseTable;
public ConcurrencyException(): base(){}
public ConcurrencyException(String msg, String databaseTable): base(msg){_databaseTable = databaseTable;
}
public ConcurrencyException(SerializationInfo info,StreamingContext context): base(info, context)
{_databaseTable = info.GetString("table");
}
public override void GetObjectData(SerializationInfo info,StreamingContext context)
{base.GetObjectData (info, context);info.AddValue("table", _databaseTable);
}

CHAPTER 9 ■ .NET REMOTING TIPS AND BEST PRACTICES290
4. It is, of course, also possible to run your remoting solution using Application Center 2000 or third-party TCP/IP load-balancing appliances, but this is beyond the scope of this book.
public String DatabaseTable{get { return _databaseTable; }
}
}
If you don’t override GetObjectData() and/or don’t provide the additional constructorConcurrencyException(info, context), you would instead end up with a very different excep-tion in your Catch block:
The constructor to deserialize an object of type General.ConcurrencyException wasnot found.
This exception simply indicates that the client-side of the remoting framework has notbeen able to correctly deserialize your custom exception (called ConcurrencyException in thissample).
Scaling Out Remoting SolutionsAs .NET Remoting is a TCP/IP-based RPC mechanism, you can scale out remoting solutions ontoa cluster using standard Windows Network Load Balancing (NLB) without the need to purchaseand implement additional software.4
Load Balancing BasicsNetwork Load Balancing is an easy way to distribute incoming requests amongst a number ofworker servers. Windows NLB—as it is built into Windows 2000 Server and Windows Server 2003—is a load-balancing implementation that works for up to 32 nodes without the necessity to definea dedicated “gatekeeper” machine. This means that you can take advantage of load balancingwith as little as two standard server machines.
To illustrate the behavior of a cluster, let’s assume that you have two servers, SERVER01 andSERVER02, with the following IP addresses:
• SERVER01: 192.168.0.41
• SERVER02: 192.168.0.42
Using Windows NLB, you can now create a cluster with a so-called virtual IP Address (VIP)of, for example, 192.168.0.40, resulting in the configuration shown in Figure 9-1.
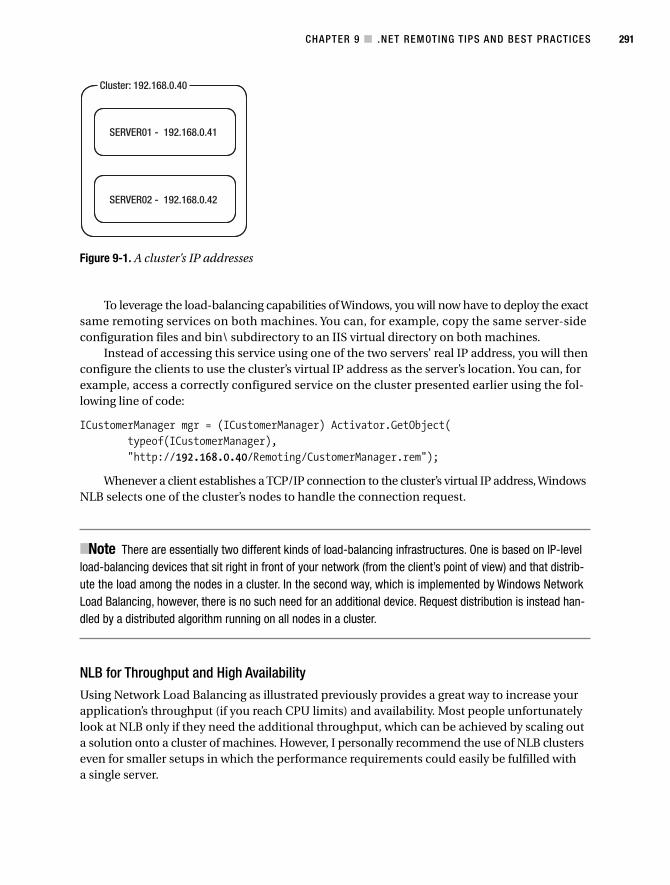
CHAPTER 9 ■ .NET REMOTING TIPS AND BEST PRACTICES 291
Cluster: 192.168.0.40
SERVER01 - 192.168.0.41
SERVER02 - 192.168.0.42
Figure 9-1. A cluster’s IP addresses
To leverage the load-balancing capabilities of Windows, you will now have to deploy the exactsame remoting services on both machines. You can, for example, copy the same server-sideconfiguration files and bin\ subdirectory to an IIS virtual directory on both machines.
Instead of accessing this service using one of the two servers’ real IP address, you will thenconfigure the clients to use the cluster’s virtual IP address as the server’s location. You can, forexample, access a correctly configured service on the cluster presented earlier using the fol-lowing line of code:
ICustomerManager mgr = (ICustomerManager) Activator.GetObject(typeof(ICustomerManager),"http://192.168.0.40/Remoting/CustomerManager.rem");
Whenever a client establishes a TCP/IP connection to the cluster’s virtual IP address, WindowsNLB selects one of the cluster’s nodes to handle the connection request.
■Note There are essentially two different kinds of load-balancing infrastructures. One is based on IP-levelload-balancing devices that sit right in front of your network (from the client’s point of view) and that distrib-ute the load among the nodes in a cluster. In the second way, which is implemented by Windows NetworkLoad Balancing, however, there is no such need for an additional device. Request distribution is instead han-dled by a distributed algorithm running on all nodes in a cluster.
NLB for Throughput and High AvailabilityUsing Network Load Balancing as illustrated previously provides a great way to increase yourapplication’s throughput (if you reach CPU limits) and availability. Most people unfortunatelylook at NLB only if they need the additional throughput, which can be achieved by scaling outa solution onto a cluster of machines. However, I personally recommend the use of NLB clusterseven for smaller setups in which the performance requirements could easily be fulfilled witha single server.
CHAPTER 9 ■ .NET REMOTING TIPS AND BEST PRACTICES292
The reason for this is simple: increased availability. If you design your application correctly,then it is possible to take nodes offline from your cluster without affecting a single runningclient. All future requests will then be handled by the remaining node(s). This allows you toinstall new versions of your application or service packs or even update operating systemswithout taking your application offline.
After you’ve finished administrative work on one node, you allow it to join the cluster again;you can then proceed to take the next node offline.
■Note Windows NLB is compatible across all supported operating systems. You could have some nodesrunning on Windows NT 4.0, and a few on Windows 2000, while at the same time updating the remainingpart of your cluster to Windows Server 2003. As I personally believe that this will also be true for futureoperating systems, it essentially means that you will never again have to take your application offline forscheduled maintenance—even if you upgrade your operating system. Your system administrators will loveyou for not having to work during late night and weekend maintenance timeslots.
HTTP, TCP, Connections, and SessionsI am sure that you are already looking forward to getting your hands dirty with your first NLBcluster configuration. But before I show you how to set up an NLB cluster (which shouldn’t takemuch more than about 15 clicks), there is one more important technical peculiarity that I haveto tell you: as briefly mentioned earlier, NLB actually only balances connection requests. As soonas a TCP connection has been established, all future communication using the specific socketlink will take place between the client and the originally selected cluster node. If a single clusternode fails, all clients that currently have open communication links to it will therefore receivean exception, telling them that the connection has been dropped. This wouldn’t be that big ofa problem if it weren’t for .NET Remoting reusing the underlying TCP connection.
Remoting uses the so-called HTTP 1.1 KeepAlive functionality. This means that multipleHTTP requests will be sent using a single TCP/IP connection. The connection will be kept openfor a certain period of time (usually around two minutes), and all further requests occurring dur-ing that time window will be sent over the same connection. This is usually a good thing becauseit eliminates the need for reestablishing dozens of TCP connections whenever you open a con-ventional Web page containing multiple images. Otherwise, the client would have to openseparate TCP connections for each and every image file.
In cases when you want to provide maximum availability for your application, this Web-originating optimization in the HTTP protocol actually causes a number of problems. As soonas a node fails, all clients who currently have an open (cached) connection to this node willreceive exceptions whenever they invoke a method on the server-side object. In this case, itwould actually be beneficial if no connections were cached at all so that every single remotingrequest causes a new TCP connection that could then be load balanced on its own.
Fortunately, this is easily possible when hosting your remoting components in IIS—which isactually the only load-balancing configuration that is officially supported by Microsoft. You justhave to open an IIS management console and navigate to the Web site that contains your remot-ing servers. After right-clicking, you will be presented with the dialog box shown in Figure 9-2in which you can uncheck the checkbox option “HTTP Keep-Alives Enabled.”
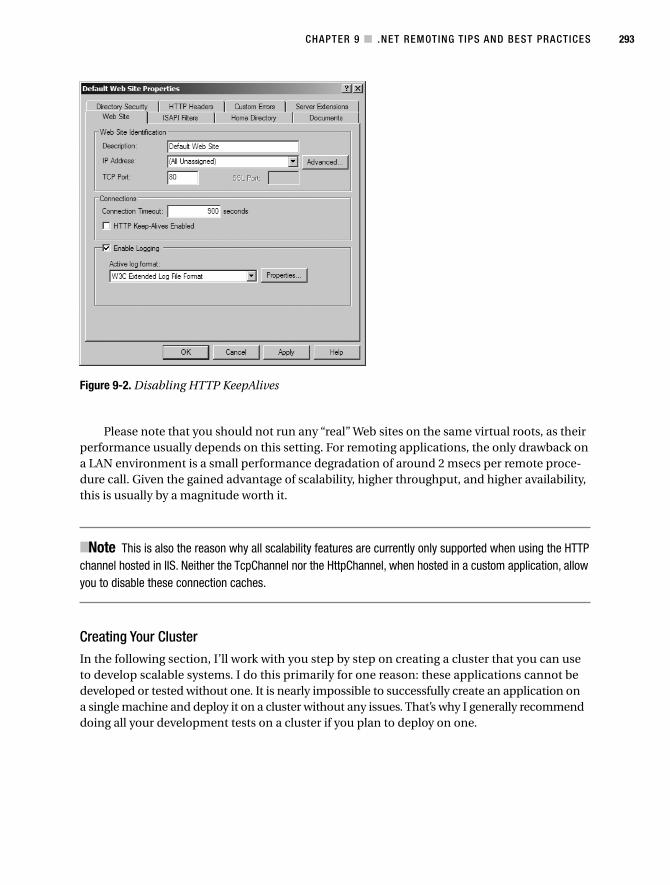
CHAPTER 9 ■ .NET REMOTING TIPS AND BEST PRACTICES 293
Figure 9-2. Disabling HTTP KeepAlives
Please note that you should not run any “real” Web sites on the same virtual roots, as theirperformance usually depends on this setting. For remoting applications, the only drawback ona LAN environment is a small performance degradation of around 2 msecs per remote proce-dure call. Given the gained advantage of scalability, higher throughput, and higher availability,this is usually by a magnitude worth it.
■Note This is also the reason why all scalability features are currently only supported when using the HTTPchannel hosted in IIS. Neither the TcpChannel nor the HttpChannel, when hosted in a custom application, allowyou to disable these connection caches.
Creating Your ClusterIn the following section, I’ll work with you step by step on creating a cluster that you can useto develop scalable systems. I do this primarily for one reason: these applications cannot bedeveloped or tested without one. It is nearly impossible to successfully create an application ona single machine and deploy it on a cluster without any issues. That’s why I generally recommenddoing all your development tests on a cluster if you plan to deploy on one.
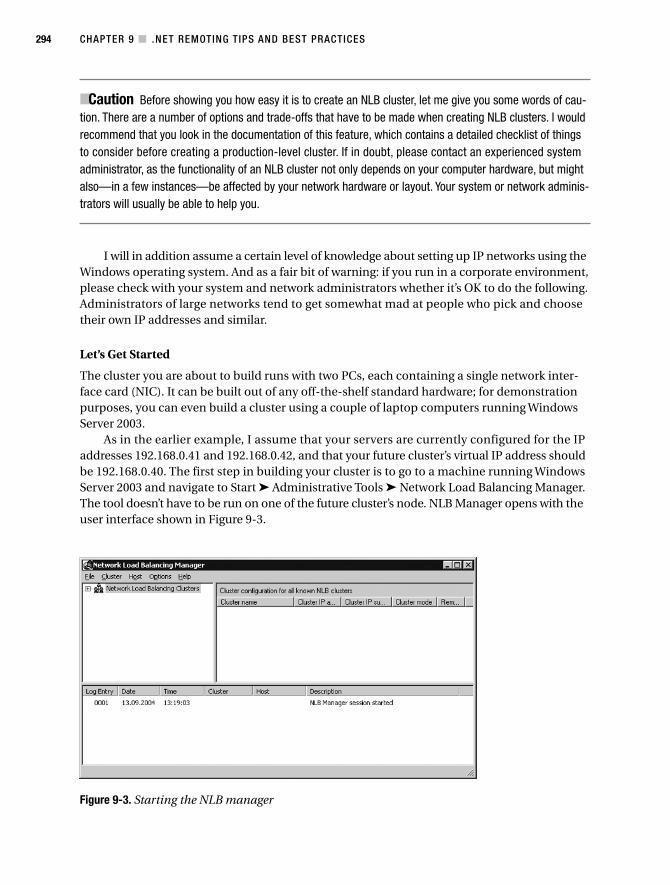
CHAPTER 9 ■ .NET REMOTING TIPS AND BEST PRACTICES294
Figure 9-3. Starting the NLB manager
■Caution Before showing you how easy it is to create an NLB cluster, let me give you some words of cau-tion. There are a number of options and trade-offs that have to be made when creating NLB clusters. I wouldrecommend that you look in the documentation of this feature, which contains a detailed checklist of thingsto consider before creating a production-level cluster. If in doubt, please contact an experienced systemadministrator, as the functionality of an NLB cluster not only depends on your computer hardware, but mightalso—in a few instances—be affected by your network hardware or layout. Your system or network adminis-trators will usually be able to help you.
I will in addition assume a certain level of knowledge about setting up IP networks using theWindows operating system. And as a fair bit of warning: if you run in a corporate environment,please check with your system and network administrators whether it’s OK to do the following.Administrators of large networks tend to get somewhat mad at people who pick and choosetheir own IP addresses and similar.
Let’s Get Started
The cluster you are about to build runs with two PCs, each containing a single network inter-face card (NIC). It can be built out of any off-the-shelf standard hardware; for demonstrationpurposes, you can even build a cluster using a couple of laptop computers running WindowsServer 2003.
As in the earlier example, I assume that your servers are currently configured for the IPaddresses 192.168.0.41 and 192.168.0.42, and that your future cluster’s virtual IP address shouldbe 192.168.0.40. The first step in building your cluster is to go to a machine running WindowsServer 2003 and navigate to Start ➤ Administrative Tools ➤ Network Load Balancing Manager.The tool doesn’t have to be run on one of the future cluster’s node. NLB Manager opens with theuser interface shown in Figure 9-3.
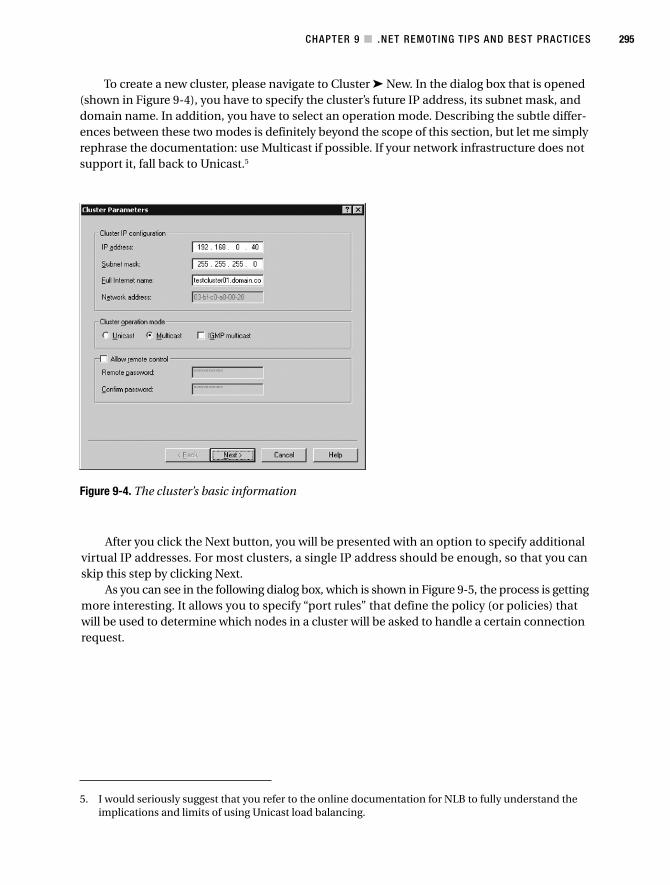
CHAPTER 9 ■ .NET REMOTING TIPS AND BEST PRACTICES 295
Figure 9-4. The cluster’s basic information
To create a new cluster, please navigate to Cluster ➤ New. In the dialog box that is opened(shown in Figure 9-4), you have to specify the cluster’s future IP address, its subnet mask, anddomain name. In addition, you have to select an operation mode. Describing the subtle differ-ences between these two modes is definitely beyond the scope of this section, but let me simplyrephrase the documentation: use Multicast if possible. If your network infrastructure does notsupport it, fall back to Unicast.5
5. I would seriously suggest that you refer to the online documentation for NLB to fully understand theimplications and limits of using Unicast load balancing.
After you click the Next button, you will be presented with an option to specify additionalvirtual IP addresses. For most clusters, a single IP address should be enough, so that you canskip this step by clicking Next.
As you can see in the following dialog box, which is shown in Figure 9-5, the process is gettingmore interesting. It allows you to specify “port rules” that define the policy (or policies) thatwill be used to determine which nodes in a cluster will be asked to handle a certain connectionrequest.
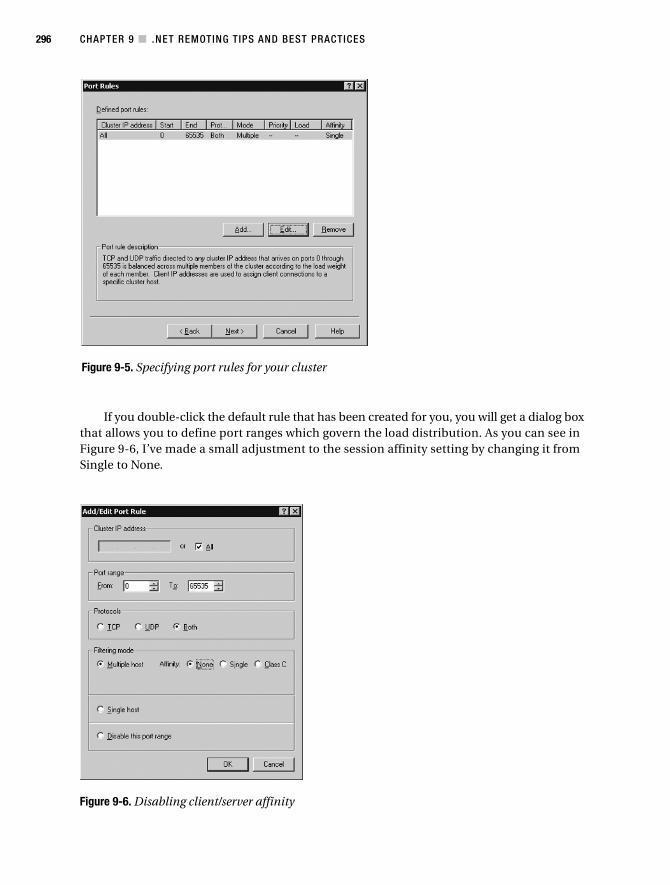
CHAPTER 9 ■ .NET REMOTING TIPS AND BEST PRACTICES296
Figure 9-5. Specifying port rules for your cluster
Figure 9-6. Disabling client/server affinity
If you double-click the default rule that has been created for you, you will get a dialog boxthat allows you to define port ranges which govern the load distribution. As you can see inFigure 9-6, I’ve made a small adjustment to the session affinity setting by changing it fromSingle to None.

CHAPTER 9 ■ .NET REMOTING TIPS AND BEST PRACTICES 297
This setting determines whether or not subsequent incoming requests originating froma same single IP address or Class C IP subnet will always be routed to the same node in a cluster.This is, for example, necessary if you run a Web site that uses the old ASP Session model of pre-.NET times. In this case, the session state has been stored in memory and is therefore tied toa single machine. Using session affinity allows the developer to be relatively sure that all incom-ing requests from a client will always be forwarded to the same machine that contains thesession data.
■Note This has never been a reliable setting because some—especially larger—providers employ trans-parent HTTP proxy arrays, which can cause subsequent requests from a single client to be tunneled viadifferent HTTP proxies (maybe even in different class C subnets). From a server’s or cluster’s point of view,each request would therefore be originating from a different client without any kind of session affinity. As analternative, there are third-party network appliances that can, for example, look at an HTTP cookie insteadto determine the correct host to handle an incoming session. But this is mostly only relevant for Web sites butnot for application servers.
After clicking OK and confirming the underlying dialog box, you can proceed to add nodesto your cluster. To do so, you need to specify a future node’s IP address, click Connect, selecta LAN interface on the node, and click Next as illustrated in Figure 9-7.
Figure 9-7. Adding a node to a cluster
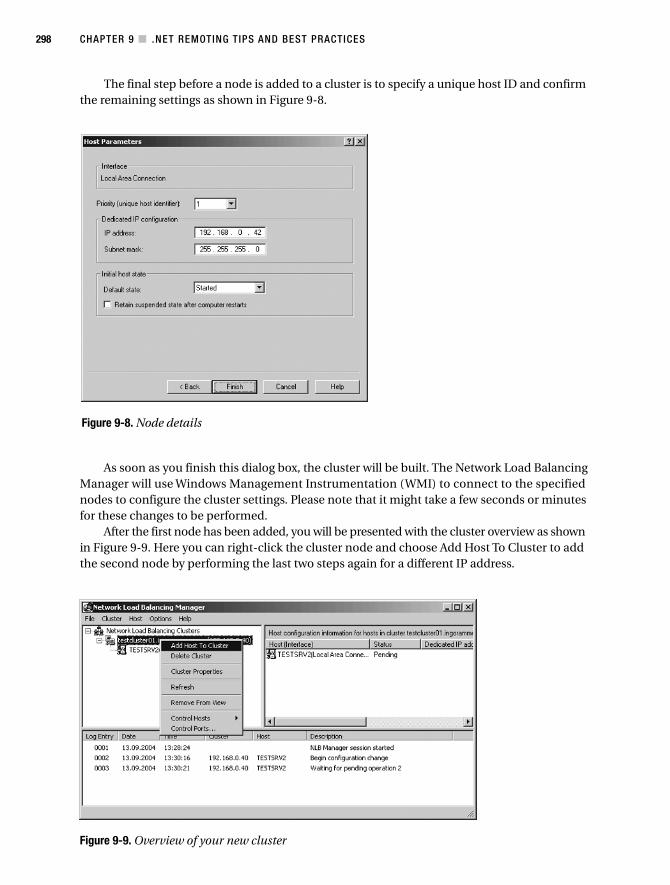
CHAPTER 9 ■ .NET REMOTING TIPS AND BEST PRACTICES298
The final step before a node is added to a cluster is to specify a unique host ID and confirmthe remaining settings as shown in Figure 9-8.
As soon as you finish this dialog box, the cluster will be built. The Network Load BalancingManager will use Windows Management Instrumentation (WMI) to connect to the specifiednodes to configure the cluster settings. Please note that it might take a few seconds or minutesfor these changes to be performed.
After the first node has been added, you will be presented with the cluster overview as shownin Figure 9-9. Here you can right-click the cluster node and choose Add Host To Cluster to addthe second node by performing the last two steps again for a different IP address.
Figure 9-8. Node details
Figure 9-9. Overview of your new cluster
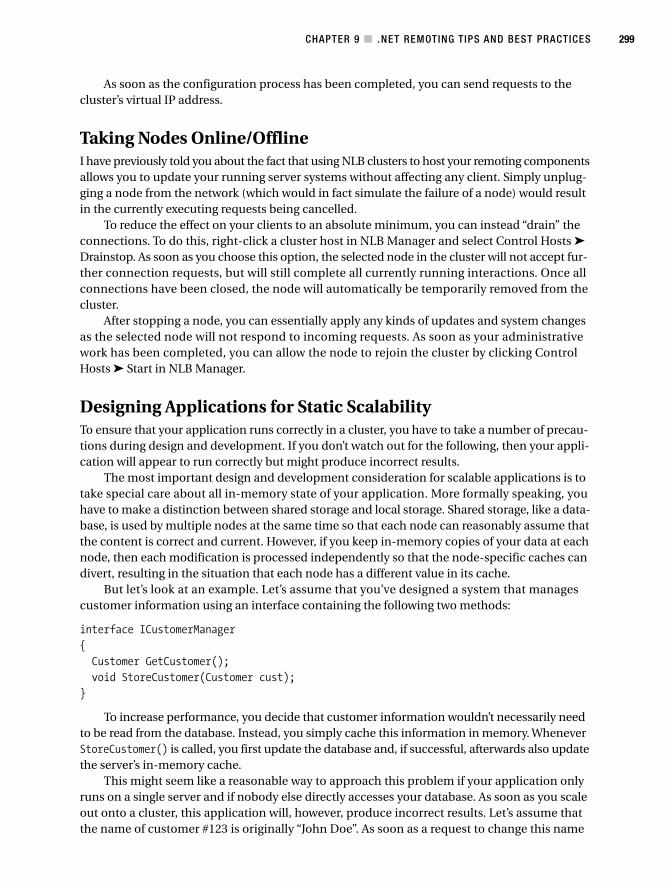
CHAPTER 9 ■ .NET REMOTING TIPS AND BEST PRACTICES 299
As soon as the configuration process has been completed, you can send requests to thecluster’s virtual IP address.
Taking Nodes Online/OfflineI have previously told you about the fact that using NLB clusters to host your remoting componentsallows you to update your running server systems without affecting any client. Simply unplug-ging a node from the network (which would in fact simulate the failure of a node) would resultin the currently executing requests being cancelled.
To reduce the effect on your clients to an absolute minimum, you can instead “drain” theconnections. To do this, right-click a cluster host in NLB Manager and select Control Hosts ➤Drainstop. As soon as you choose this option, the selected node in the cluster will not accept fur-ther connection requests, but will still complete all currently running interactions. Once allconnections have been closed, the node will automatically be temporarily removed from thecluster.
After stopping a node, you can essentially apply any kinds of updates and system changesas the selected node will not respond to incoming requests. As soon as your administrativework has been completed, you can allow the node to rejoin the cluster by clicking ControlHosts ➤ Start in NLB Manager.
Designing Applications for Static ScalabilityTo ensure that your application runs correctly in a cluster, you have to take a number of precau-tions during design and development. If you don’t watch out for the following, then your appli-cation will appear to run correctly but might produce incorrect results.
The most important design and development consideration for scalable applications is totake special care about all in-memory state of your application. More formally speaking, youhave to make a distinction between shared storage and local storage. Shared storage, like a data-base, is used by multiple nodes at the same time so that each node can reasonably assume thatthe content is correct and current. However, if you keep in-memory copies of your data at eachnode, then each modification is processed independently so that the node-specific caches candivert, resulting in the situation that each node has a different value in its cache.
But let’s look at an example. Let’s assume that you’ve designed a system that managescustomer information using an interface containing the following two methods:
interface ICustomerManager{Customer GetCustomer();void StoreCustomer(Customer cust);
}
To increase performance, you decide that customer information wouldn’t necessarily needto be read from the database. Instead, you simply cache this information in memory. WheneverStoreCustomer() is called, you first update the database and, if successful, afterwards also updatethe server’s in-memory cache.
This might seem like a reasonable way to approach this problem if your application onlyruns on a single server and if nobody else directly accesses your database. As soon as you scaleout onto a cluster, this application will, however, produce incorrect results. Let’s assume thatthe name of customer #123 is originally “John Doe”. As soon as a request to change this name
CHAPTER 9 ■ .NET REMOTING TIPS AND BEST PRACTICES300
reaches one of the nodes, it will update the database and its in-memory cache to reflect thenew value of, say, “John Moe”. If a second request to retrieve the customer information forcustomer #123 hits a different node, the returned data will, however, still contain the old—andmeanwhile incorrect—value of “John Doe”.
Does this mean that you cannot use any in-memory caches when planning to deploy yourapplication in a cluster? No, definitely not. It just means that you have to look quite carefully atthe type of data you are working with.
Therefore, one of the first steps in creating scalable applications is to analyze the differentkinds of data that is used by your application. It can be advantageous to split the list of databasetables into three groups:
• Group 1: Static data.
• Group 2: Near-static, seldom changed data. Data that is updated in advance or that isonly changed during certain time windows (for example, daily at midnight).
• Group 3: Operative, dynamic data.
If you look at an online shop as a sample, static data are usually lists of zip codes, cities, pay-ment terms, or the list of acceptable means of payment (various credit cards, bank transfer, check,cash, etc.). More often than not, this is also data that cannot be changed by the application itselfbut that is statically defined or altered using specific administrative tools.
In the second group, you will find data that usually doesn’t change more often than oncea day. These are things like a list of articles, prices, etc. This group can also contain data that ischanged at certain intervals, like once a day or once every hour. It is only important that youknow exactly when and how often this data is changed. The last group of operative data containsall your real transaction data, the “meat” of your business. This is usually the most heavily changeddata in your application, like customer information, inventory levels, and orders.
You will see that, in practice, most of the tables in your database will contain data of thefirst two groups, and only few tables actually contain data that is changed on a regular basis bybusiness transactions. If you notice during the analysis process that some tables in your systemactually contain data of different categories, you can change the database model or simply treatthe two kinds of data differently in your application. This happens, for example, if you originallydecided to store your article’s inventory levels (which change all the time) together with the staticdata in the same table. You would have to separate this (either in the database or just in yourobject model) into the “real” product information on one hand and the transactional information(the inventory level) on the other hand.
Based on these three categories, you can now quite easily define matching caching strate-gies. The decision of whether or not to cache static data is made quite easily: you can usuallycache everything that fits in terms of memory usage. Equally easy is the decision of whether ornot to cache the operative data of the third group: you shouldn’t store this data in memory, butinstead always read/write the data to shared storage, for example, a database. Of course, thereare exceptions for very specific applications, for example, if you can create fixed assignmentsbetween a number of customers and a number of hosts. In these applications, for example, youwould store the complete customer data for all customers with names from A to G on one server,the data from H to N on a second, and the data from O to Z on a third one. But for most generalapplications, you should assume that these kinds of data should not be cached.
The most complex category in terms of caching strategies is the second group of seldomchanged data, as there are two different types. On one hand, you’ll find information that is usu-ally very stable for a longer period of time and that will be changed over a longer period of time,
CHAPTER 9 ■ .NET REMOTING TIPS AND BEST PRACTICES 301
6. Starting with .NET 2.0 and SQL Server 2005, you will in addition find features to let your server applica-tion be notified whether critical data changes. For example, you will be able subscribe to a query likeselect userid, locked_out from users in a way that SQL Server automatically informs you whetherany of the corresponding records have been changed.
but that will become active at a previously known reference date (for example, “price list validfrom July 4, 2004 00:00 am”). As you know the effective date up front, data of this kind will usu-ally be easy to cache. You just have to make sure to remove any old copies at the correct pointin time.
The second kind of data in this group is more complex. This is data that is usually not changed,but once it is changed it has to become effective immediately. This includes user permissionsor similar user or customer lockout flags. Normally, this flag will never be set, but if someonedecides to lock out a certain user, you have to make absolutely sure that it is done right now. Ifyou cache this kind of data, you have to make sure to provide a sound cache-invalidation strat-egy as well. You can, for example, expose an additional remoting service on each node in yourcluster that can be used to explicitly tell every machine on its own (and not just “the cluster”)to remove some pieces of data from its in-memory cache.6
■Note Please keep in mind that this refers not only to explicit caches, but generally to any information that isstored in memory, no matter whether it is a static field or a private member of a remoting server in Singletonmode.
SummaryIn this chapter, you’ve seen some of the most important best practices for developing .NETRemoting applications. This list is, of course, not complete, but it reflects the most commonpoints I have encountered on consulting projects, and in personal e-mail exchanges withseveral hundred developers who are using .NET Remoting in their daily projects.
Apart from a detailed look at several scenarios for .NET Remoting, you’ve learned thatthere are also numerous cases for which remoting is not the right solution. I have briefly introducedyou to UDP and MSMQ, which can be used for scalable delivery of asynchronous notifications.
At the end of this chapter, you’ve seen how easy it is to configure a Windows Network LoadBalancing cluster, which provides your applications with transparent failover and the possibilityto scale out.
In the following chapter, I’ll discuss the most common causes—and solutions—for problemsand issues when using .NET Remoting.

303
C H A P T E R 1 0
■ ■ ■
Troubleshooting .NET Remoting
Whenever you develop applications spanning multiple processes, machines, networks, andmaybe even versions of the .NET runtime, you might have to deal with a number of potentialdevelopment or deployment issues. In this chapter, I present to you the most common problems,their causes, and how to resolve them. Some of these issues and workarounds will also bementioned in chapters covering related topics throughout the book, but here I want to providean additional concise section that you can refer to during your debugging and troubleshootingefforts.
Debugging HintsBefore going into the details of these common mistakes, I’d like to show you how to debug remot-ing applications. As you’ve seen in the previous chapters, any .NET application can be a server for.NET Remoting. The recommended way, however, is to host your remoting components in InternetInformation Server (IIS).
The following is a reiteration of what I stated in Chapter 4, repeated here in case you’ve comedirectly to this chapter instead for debugging and troubleshooting guidance.
To debug a server application in IIS, you can select Debug ➤ Processes and manually attachthe debugger to the ASP.NET worker process. This process is called w3p.exe on machines runningWindows Server 2003 and aspnet_wp.exe on Windows XP. If you host your remoting compo-nents in a Windows service, you can use the same Debug ➤ Processes command to attach toyour running service.
For IIS-hosted applications, however, there is also an easier but not very obvious solution todebugging your remoting server. In essence, you have to “trick” Visual Studio .NET into attachingitself automatically to the ASP.NET worker process. To do this, you add a new ASP.NET Webapplication project to your solution. This project will host your remoting configuration infor-mation and server-side assemblies.
In this project, you can add the <system.runtime.remoting> section to your web.config fileas discussed previously. To add server-side implementation and interface assemblies, you justhave to reference them using the Add Reference dialog box. These will be automatically deployedto the correct subdirectory.
CHAPTER 10 ■ TROUBLESHOOTING .NET REMOTING304
You must not delete the default WebForm1.aspx as this will be used by Visual Studio to startthe debugger. Now as soon as you hit F5, VS .NET will open an Internet Explorer window thatdisplays this empty WebForm1.aspx. You can ignore this IE window, but you must not close it,because this would stop the debugger. Instead, you can go to your server-side implementationcode in VS .NET and simply set breakpoints, view variables, and so on as if you were running ina normal remoting host.
Manual BreakpointsEspecially when troubleshooting applications running as Windows services or inside anotherhost like IIS, you might want to set explicit breakpoints that should be triggered without firstattaching a debugger. You can do this by including a call to System.Diagnostics.Debugger.Break() inside your server-side code.
This allows you to create conditional breakpoints that, for example, will only be triggeredwhen some application-specific condition is met.
class CustomerManager: MarshalByRefObject, IRemoteCustomerManager{
public Customer GetCustomer(int id){if (id == 42){System.Diagnostics.Debugger.Break();
}
// ... implementation removed}
}
Please note that a call to Debugger.Break() will execute even if your application has beencompiled in Release mode. To adapt this behavior to be consistent with your generic debuggingrequirements, it is recommended that you include this code in an #if/#endif if you intend tokeep this code in your application.
class CustomerManager: MarshalByRefObject, IRemoteCustomerManager{
public Customer GetCustomer(int id){#if DEBUGif (id == 42){System.Diagnostics.Debugger.Break();
}#endif
// ... implementation removed}
}
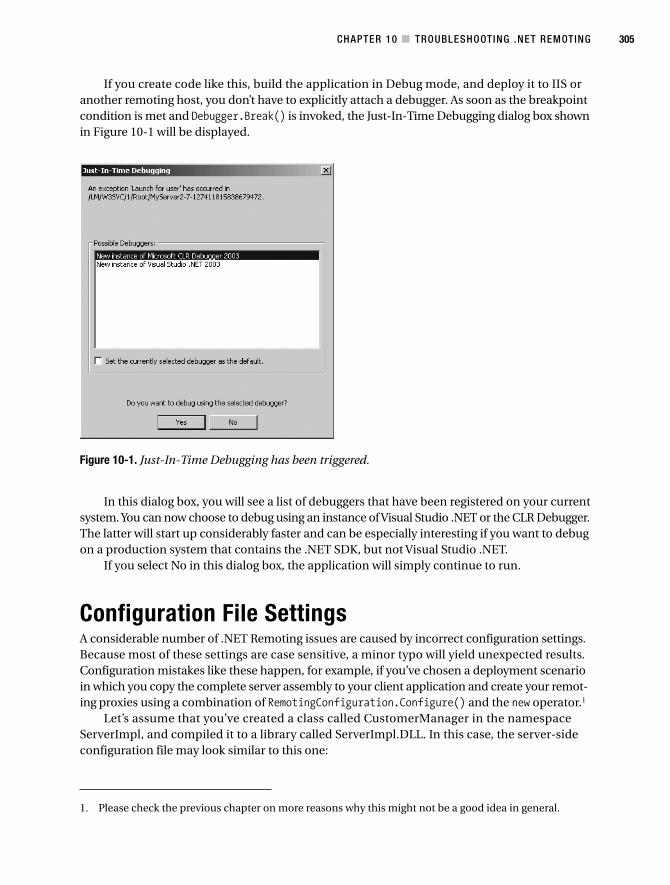
CHAPTER 10 ■ TROUBLESHOOTING .NET REMOTING 305
Figure 10-1. Just-In-Time Debugging has been triggered.
If you create code like this, build the application in Debug mode, and deploy it to IIS oranother remoting host, you don’t have to explicitly attach a debugger. As soon as the breakpointcondition is met and Debugger.Break() is invoked, the Just-In-Time Debugging dialog box shownin Figure 10-1 will be displayed.
1. Please check the previous chapter on more reasons why this might not be a good idea in general.
In this dialog box, you will see a list of debuggers that have been registered on your currentsystem. You can now choose to debug using an instance of Visual Studio .NET or the CLR Debugger.The latter will start up considerably faster and can be especially interesting if you want to debugon a production system that contains the .NET SDK, but not Visual Studio .NET.
If you select No in this dialog box, the application will simply continue to run.
Configuration File SettingsA considerable number of .NET Remoting issues are caused by incorrect configuration settings.Because most of these settings are case sensitive, a minor typo will yield unexpected results.Configuration mistakes like these happen, for example, if you’ve chosen a deployment scenarioin which you copy the complete server assembly to your client application and create your remot-ing proxies using a combination of RemotingConfiguration.Configure() and the new operator.1
Let’s assume that you’ve created a class called CustomerManager in the namespaceServerImpl, and compiled it to a library called ServerImpl.DLL. In this case, the server-sideconfiguration file may look similar to this one:
CHAPTER 10 ■ TROUBLESHOOTING .NET REMOTING306
<configuration><system.runtime.remoting><application><channels><channel ref="http" port="1234" />
</channels><service><wellknown mode="Singleton"
type="ServerImpl.CustomerManager, ServerImpl"objectUri="CustomerManager.rem" />
</service></application>
</system.runtime.remoting></configuration>
If you were to now—mistakenly—create a client-side configuration like the following, yourapplication would expose a strange behavior:
<configuration><system.runtime.remoting><application><client><wellknown type="ServerImpl.Customermanager, ServerImpl"
url="http://localhost:1234/CustomerManager.rem" /></client>
</application></system.runtime.remoting>
</configuration>
To complete this example, let’s have a look at the respective snippet of your clientapplication:
class Client{static void Main(string[] args){
String filename =AppDomain.CurrentDomain.SetupInformation.ConfigurationFile;
RemotingConfiguration.Configure(filename);
CustomerManager mgr = new CustomerManager();Customer cust = mgr.GetCustomer(43);
}}
When the line CustomerManager mgr = new CustomerManager() is executed, you won’t receivea remoting proxy pointing to your server as expected. Instead, the .NET Framework will createa local object of this type, and any further calls will be handled by the local object. The reasonfor this is that a small typo occurs in the client-side configuration file. Instead of specifying
CHAPTER 10 ■ TROUBLESHOOTING .NET REMOTING 307
“CustomerManager”, you used “Customermanager”. This is a mistake that happens quiteoften, especially because the .NET Remoting framework doesn’t throw an exception duringRemotingConfiguration.Configure() when it encounters an incorrectly specified type attribute.This usually leads to a larger debugging session, as your configuration file might contain a largenumber of configured types.
■Note This is especially true because some remoting objects might even work if they are instantiated inyour client application and not on the server as desired. They could, however, cease to work as soon as yourapplication is deployed to your user’s PC. A very common cause for this is a remoting component accessinga database, which might work directly on your (the developer’s) machine because you have correct credentialsto access your database server, but might not work on the user’s machine because that user isn’t known toSQL Server’s integrated security system.
Local or Remote?To verify whether or not a certain instance contains a “real” local object or a proxy pointing toa server, you can call RemotingServices.IsTransparentProxy() as illustrated in the followingsnippet:
String filename = AppDomain.CurrentDomain.SetupInformation.ConfigurationFile;RemotingConfiguration.Configure(filename);CustomerManager mgr = new CustomerManager();
if ( ! RemotingServices.IsTransparentProxy(mgr)){throw new Exception("CustomerManager has not been correctly configured");
}
Checking each object after a call to new is, however, rather cumbersome and errorprone, so you may want to use an alternative solution that checks the configured types afteryour application has read its remoting configuration file. To do this, you can simply iterateover the result of RemotingConfiguration.GetRegisteredWellKnownClientTypes(). For eachWellKnownClientTypeEntry, you would then check whether its ObjectType property has beenset to an existing type object. If this property is null, this means that the remoting frameworkcould not find the type you have specified in your configuration file. In practice, this helps youto pinpoint potential typos in your client-side configuration file. This solution also works ifyou have chosen to use a purely interface-based method of remoting!
If you like to use this approach in your applications, you can simply follow a pattern similarto the following in your client-side code:
static void Main(string[] args){String filename = AppDomain.CurrentDomain.SetupInformation.ConfigurationFile;RemotingConfiguration.Configure(filename);VerifyRemotingConfiguration();
CHAPTER 10 ■ TROUBLESHOOTING .NET REMOTING308
CustomerManager mgr = new CustomerManager();// ... implementation removed ...
}
static void VerifyRemotingConfiguration(){foreach (WellKnownClientTypeEntry en in
RemotingConfiguration.GetRegisteredWellKnownClientTypes()){if (en.ObjectType == null){throw new Exception("Could not find type " +
en.TypeName + " in assembly " + en.AssemblyName);}
}}
The call to VerifyRemotingConfiguration() will only succeed if you’ve previously calledRemotingConfiguration.Configure() and if all type attributes contained in this configurationfile could be correctly resolved.
Checking Types on Your ServerA solution like the one presented previously, whereby you call a certain method to ensure a cor-rect remoting configuration, unfortunately can’t help you with your debugging efforts if youhost your components in IIS. In this case, however, the solution is even easier: a special config-uration setting, <debug>, can be used in server-side configuration files to verify the existence ofall specified server-side type entries.
After including this setting in your server-side web.config file as shown in the followingexample, you will receive an exception as soon as the server tries to read this configuration file:
<configuration><system.runtime.remoting><application><channels><channel ref="http" port="1234" />
</channels><service><wellknown mode="Singleton"
type="ServerImpl.CustomerManager, ServerImpl"objectUri="CustomerManager.rem" />
</service></application><debug loadTypes="true" />
</system.runtime.remoting></configuration>
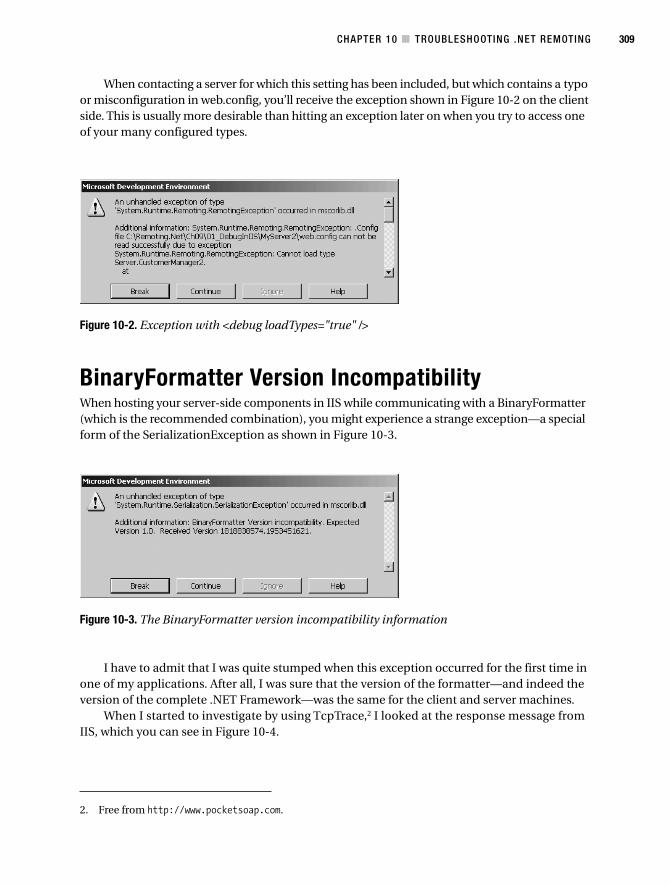
CHAPTER 10 ■ TROUBLESHOOTING .NET REMOTING 309
Figure 10-2. Exception with <debug loadTypes="true" />
Figure 10-3. The BinaryFormatter version incompatibility information
When contacting a server for which this setting has been included, but which contains a typoor misconfiguration in web.config, you’ll receive the exception shown in Figure 10-2 on the clientside. This is usually more desirable than hitting an exception later on when you try to access oneof your many configured types.
BinaryFormatter Version IncompatibilityWhen hosting your server-side components in IIS while communicating with a BinaryFormatter(which is the recommended combination), you might experience a strange exception—a specialform of the SerializationException as shown in Figure 10-3.
2. Free from http://www.pocketsoap.com.
I have to admit that I was quite stumped when this exception occurred for the first time inone of my applications. After all, I was sure that the version of the formatter—and indeed theversion of the complete .NET Framework—was the same for the client and server machines.
When I started to investigate by using TcpTrace,2 I looked at the response message fromIIS, which you can see in Figure 10-4.
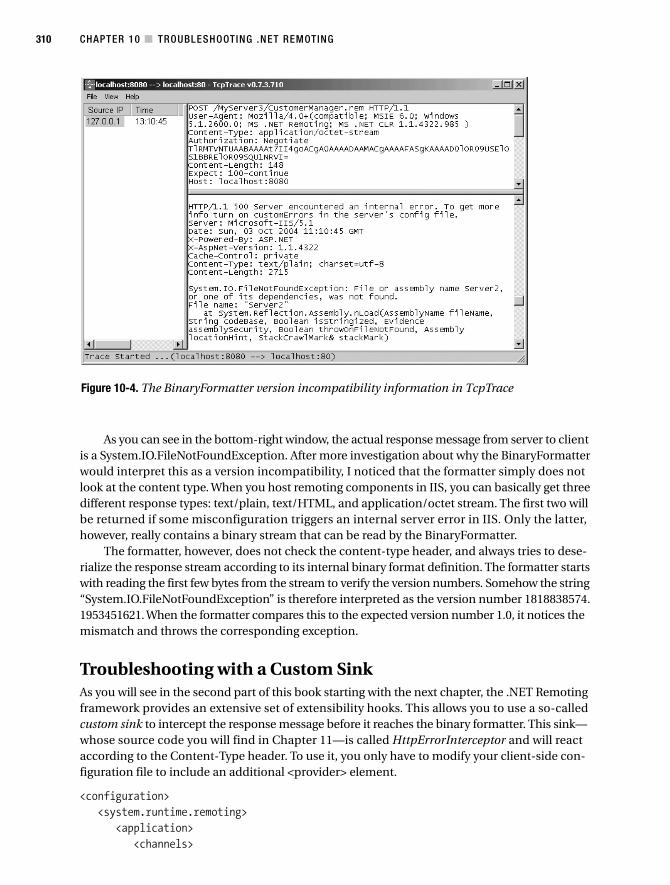
CHAPTER 10 ■ TROUBLESHOOTING .NET REMOTING310
As you can see in the bottom-right window, the actual response message from server to clientis a System.IO.FileNotFoundException. After more investigation about why the BinaryFormatterwould interpret this as a version incompatibility, I noticed that the formatter simply does notlook at the content type. When you host remoting components in IIS, you can basically get threedifferent response types: text/plain, text/HTML, and application/octet stream. The first two willbe returned if some misconfiguration triggers an internal server error in IIS. Only the latter,however, really contains a binary stream that can be read by the BinaryFormatter.
The formatter, however, does not check the content-type header, and always tries to dese-rialize the response stream according to its internal binary format definition. The formatter startswith reading the first few bytes from the stream to verify the version numbers. Somehow the string“System.IO.FileNotFoundException” is therefore interpreted as the version number 1818838574.1953451621. When the formatter compares this to the expected version number 1.0, it notices themismatch and throws the corresponding exception.
Troubleshooting with a Custom SinkAs you will see in the second part of this book starting with the next chapter, the .NET Remotingframework provides an extensive set of extensibility hooks. This allows you to use a so-calledcustom sink to intercept the response message before it reaches the binary formatter. This sink—whose source code you will find in Chapter 11—is called HttpErrorInterceptor and will reactaccording to the Content-Type header. To use it, you only have to modify your client-side con-figuration file to include an additional <provider> element.
<configuration><system.runtime.remoting>
<application><channels>
Figure 10-4. The BinaryFormatter version incompatibility information in TcpTrace
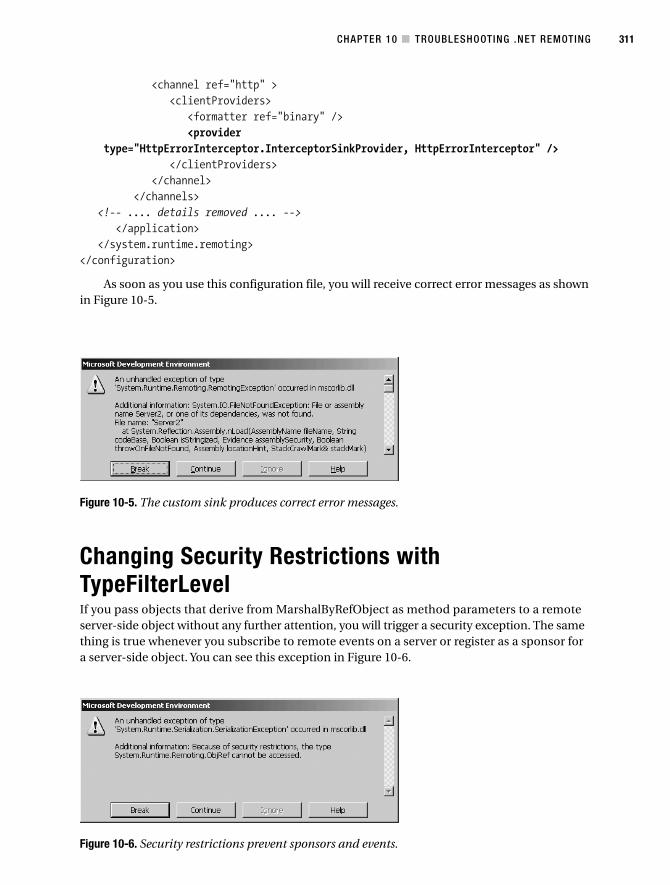
CHAPTER 10 ■ TROUBLESHOOTING .NET REMOTING 311
Figure 10-5. The custom sink produces correct error messages.
Figure 10-6. Security restrictions prevent sponsors and events.
<channel ref="http" ><clientProviders>
<formatter ref="binary" /><provider
type="HttpErrorInterceptor.InterceptorSinkProvider, HttpErrorInterceptor" /></clientProviders>
</channel></channels>
<!-- .... details removed .... --></application>
</system.runtime.remoting></configuration>
As soon as you use this configuration file, you will receive correct error messages as shownin Figure 10-5.
Changing Security Restrictions withTypeFilterLevelIf you pass objects that derive from MarshalByRefObject as method parameters to a remoteserver-side object without any further attention, you will trigger a security exception. The samething is true whenever you subscribe to remote events on a server or register as a sponsor fora server-side object. You can see this exception in Figure 10-6.

CHAPTER 10 ■ TROUBLESHOOTING .NET REMOTING312
■Note I include this here, in the troubleshooting chapter of this book, because this problem happens quitefrequently when you take code from the Internet or from other sources that have been written for version 1.0of the .NET Framework. The typeFilterLevel has been introduced only with version 1.1.
The reason for this exception is that these three operations can cause security or stabilityproblems in remoting servers. In the first case, a malicious remote user could pass an incorrectURL to your remoting components that could point to resources inside a protected intranetzone. This way, the attacker might be able to invoke operations on internal servers that are notdirectly accessible to him or her.
For events and delegates, ,this same problem is true, but a malicious user might in additionnegatively affect stability, performance, or scalability of your server by registering multiple—maybe even nonexistent—sponsors or events with your server-side objects. Whenever one ofthese implicit callbacks is invoked, the server will have to wait for all registered clients to acknowl-edge its requests. A malicious client could just keep the connection open without ever sendingany response and therefore tie up valuable server-side resources. As remoting by default uses25 threads per CPU, this would mean that a malicious client would only need to keep 25 callbackconnections open to halt your server.
This stability risk only applies to callbacks, events, and sponsors but not to regular methodcalls. A client only has the power to halt a server whenever the server invokes one of these callbacks.That’s why you’ve received the exception mentioned earlier: to protect your server.
However, if you decide that you can ultimately trust all your client applications—for example,because you are running in an intranet and use corresponding authentication and authoriza-tion before allowing a client to subscribe to events—you can disable this security check. To doso, you have to specify the property typeFilterLevel as “Full” (default is “Low”) for yourserver-side formatters. You can do this using a configuration file like the following:
<configuration><system.runtime.remoting><application><channels><channel ref="http" port="1234" >
<serverProviders><formatter ref="binary" typeFilterLevel="Full" />
</serverProviders><clientProviders>
<formatter ref="binary" /></clientProviders>
</channel></channels><service><wellknown mode="Singleton"
type="Server.RemoteFactory, Server"objectUri="Factory.rem" />
</service></application>
</system.runtime.remoting></configuration>
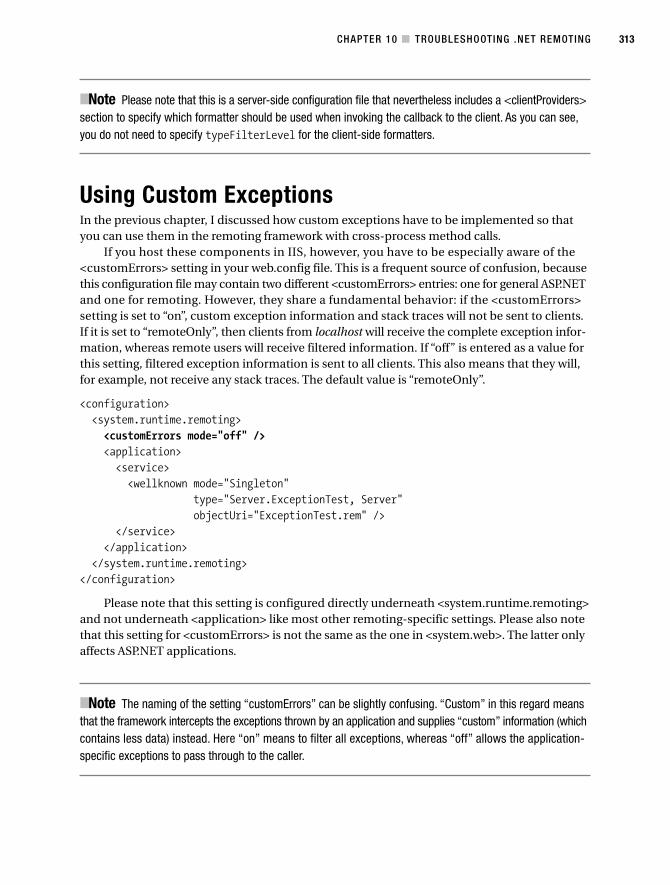
CHAPTER 10 ■ TROUBLESHOOTING .NET REMOTING 313
■Note Please note that this is a server-side configuration file that nevertheless includes a <clientProviders>section to specify which formatter should be used when invoking the callback to the client. As you can see,you do not need to specify typeFilterLevel for the client-side formatters.
Using Custom ExceptionsIn the previous chapter, I discussed how custom exceptions have to be implemented so thatyou can use them in the remoting framework with cross-process method calls.
If you host these components in IIS, however, you have to be especially aware of the<customErrors> setting in your web.config file. This is a frequent source of confusion, becausethis configuration file may contain two different <customErrors> entries: one for general ASP.NETand one for remoting. However, they share a fundamental behavior: if the <customErrors>setting is set to “on”, custom exception information and stack traces will not be sent to clients.If it is set to “remoteOnly”, then clients from localhost will receive the complete exception infor-mation, whereas remote users will receive filtered information. If “off” is entered as a value forthis setting, filtered exception information is sent to all clients. This also means that they will,for example, not receive any stack traces. The default value is “remoteOnly”.
<configuration><system.runtime.remoting><customErrors mode="off" /><application><service><wellknown mode="Singleton"
type="Server.ExceptionTest, Server"objectUri="ExceptionTest.rem" />
</service></application>
</system.runtime.remoting></configuration>
Please note that this setting is configured directly underneath <system.runtime.remoting>and not underneath <application> like most other remoting-specific settings. Please also notethat this setting for <customErrors> is not the same as the one in <system.web>. The latter onlyaffects ASP.NET applications.
■Note The naming of the setting “customErrors” can be slightly confusing. “Custom” in this regard meansthat the framework intercepts the exceptions thrown by an application and supplies “custom” information (whichcontains less data) instead. Here “on” means to filter all exceptions, whereas “off” allows the application-specific exceptions to pass through to the caller.
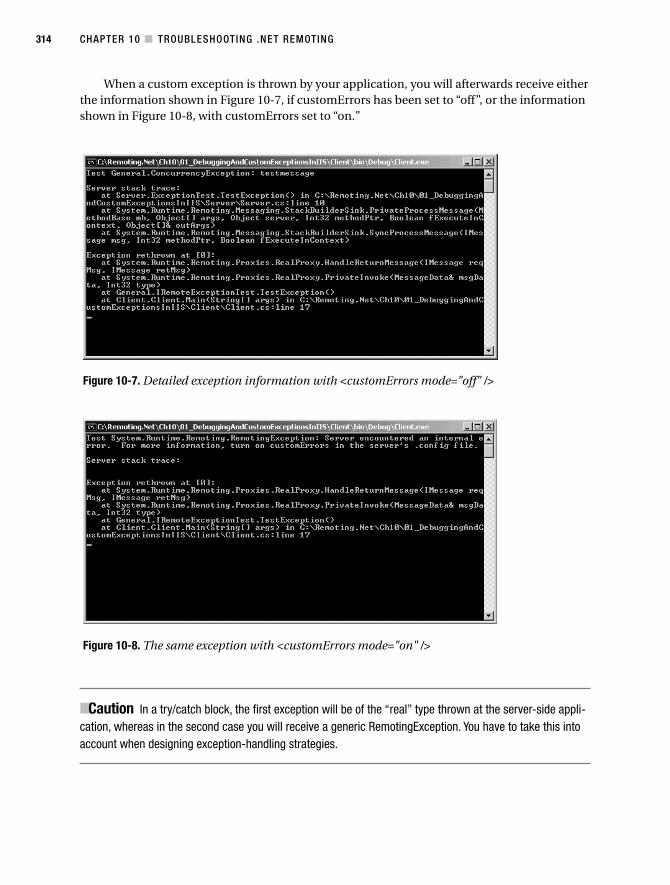
CHAPTER 10 ■ TROUBLESHOOTING .NET REMOTING314
When a custom exception is thrown by your application, you will afterwards receive eitherthe information shown in Figure 10-7, if customErrors has been set to “off”, or the informationshown in Figure 10-8, with customErrors set to “on.”
■Caution In a try/catch block, the first exception will be of the “real” type thrown at the server-side appli-cation, whereas in the second case you will receive a generic RemotingException. You have to take this intoaccount when designing exception-handling strategies.
Figure 10-7. Detailed exception information with <customErrors mode="off" />
Figure 10-8. The same exception with <customErrors mode="on" />
CHAPTER 10 ■ TROUBLESHOOTING .NET REMOTING 315
Multihomed Machines and FirewallsA multihomed machine is a computer that contains more than one network interface, or, in thecontext of remoting, more than one IP address. This includes routers, firewalls, and also serversthat act as VPN gateways or that are connected to a dial-up line.
If your remoting services run on a multihomed machine, you might have to take some extraprecautions to enable correct functionality. If your application only contains server-activatedobjects and if you never pass MarshalByRefObjects method parameters or return values, thenyou do not need the following.
To support client-activated objects and MarshalByRefObject as ref/out parameters for yourreturn values, you have to specify the server’s IP address or machine name in the configurationfile. The reason for this is that, whenever you return a MarshalByRefObject, the server will returnthe complete URL for the given object to the client. The client will in turn use this URL to con-tact the remote object in subsequent calls.
To illustrate this, let’s have a look at the data that is returned from the server when youcreate a client-activated object with a factory pattern. To do so, the example reuses the followinginterfaces to the remote components originally presented in Chapter 3:
public interface IRemoteFactory{IRemoteObject GetNewInstance();
}
public interface IRemoteObject{// ... removed
}
The implementation of the server-side IRemoteFactory just returns a new instance ofa remote MarshalByRefObject.
class MyRemoteFactory: MarshalByRefObject,IRemoteFactory{public IRemoteObject GetNewInstance(){return new MyRemoteObject();
}}
class MyRemoteObject: MarshalByRefObject, IRemoteObject{// ... removed
}
When a client calls GetNewInstance() on the factory, the server will create a new objectinstance and marshal it to the client’s process upon return on the method call. During thismarshalling process, an ObjRef will be created that looks similar to the following (note thoughthat this sample is simplified):
CHAPTER 10 ■ TROUBLESHOOTING .NET REMOTING316
<ObjRef><uri>/a34e3c81_66de_44a5_93c8_283add24d2cd/jhv+d3JpXxV69M431d+cInTK_1.rem</uri><!-- parts removed -->
</ObjRef><!-- parts removed --><SOAP-ENC:Array id="ref-14" SOAP-ENC:arrayType="xsd:string[1]">
<item>http://192.168.0.54:1234</item></SOAP-ENC:Array>
The complete URL to a remote object consists of the destination channel’s base URL asshown in the <item> element at the end of this capture. The value that is contained in the ObjRef’s<uri> property is subsequently appended to this base URL. As you can see, the server transfersits own IP address inside of this response packet.
Now imagine that your server has two IP addresses: an official Internet IP of 212.24.125.14and an internal IP of 192.168.0.54. If you were to now marshal a MarshalByRefObject from thisserver to a client (for example, as a return value of a remote procedure call), the transferred ObjRefmight either contain the internal or the external IP address. You may be tempted to expect thatthe remoting framework automatically uses the IP address on which the server has received thecall to create this object, but this is not the case. Quite the contrary: you have to explicitly statewhich IP address or machine name should be returned to clients. Otherwise, a client outsideyour local network could receive the server’s internal IP address and would not be able to callany method on the server-side objects.
To configure this setting, you can specify either the bindTo or the machineName property inyour configuration file. In the first case, you can bind the remoting server to a specific IP address,whereas in the second case the system will use the specified machine name when returningMarshalByRefObjects to your clients. The framework does not check whether this machinename is associated with your machine or whether it even resolves to the same IP address asyour server machine. This is a good thing as you will see shortly.
These two properties are specified on the <channel> level in your server-side configurationfile, for example:
<channel ref="http" port="5555" bindTo="212.24.125.14" />
or
<channel ref="http" port="5555" machineName="yourserver.domain.com" />
Alternatively, you can use the following server-side code if you do not want to use configu-ration files:
Hashtable chnlProps = new Hashtable();chnlProps["port"] = 1234;chnlProps["machineName"] = "yourserver.domain.com";// chnlProps["bindTo"] = "212.24.125.14";HttpChannel chnl = new HttpChannel(chnlProps,null,null);ChannelServices.RegisterChannel(chnl);
In the latter case, for example, the server will return the following information in theObjRef (again, simplified):
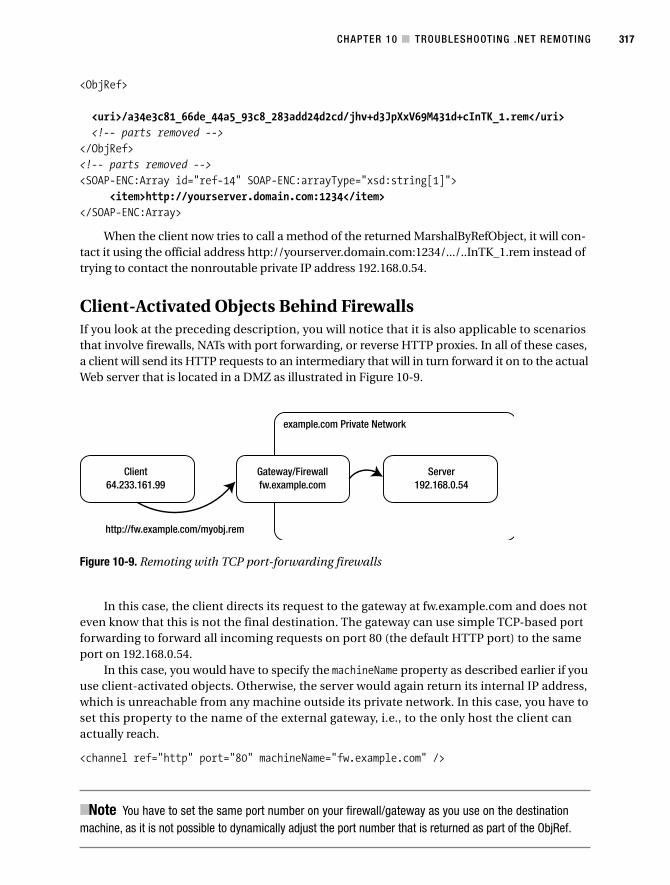
CHAPTER 10 ■ TROUBLESHOOTING .NET REMOTING 317
<ObjRef>
<uri>/a34e3c81_66de_44a5_93c8_283add24d2cd/jhv+d3JpXxV69M431d+cInTK_1.rem</uri><!-- parts removed -->
</ObjRef><!-- parts removed --><SOAP-ENC:Array id="ref-14" SOAP-ENC:arrayType="xsd:string[1]">
<item>http://yourserver.domain.com:1234</item></SOAP-ENC:Array>
When the client now tries to call a method of the returned MarshalByRefObject, it will con-tact it using the official address http://yourserver.domain.com:1234/.../..InTK_1.rem instead oftrying to contact the nonroutable private IP address 192.168.0.54.
Client-Activated Objects Behind FirewallsIf you look at the preceding description, you will notice that it is also applicable to scenariosthat involve firewalls, NATs with port forwarding, or reverse HTTP proxies. In all of these cases,a client will send its HTTP requests to an intermediary that will in turn forward it on to the actualWeb server that is located in a DMZ as illustrated in Figure 10-9.
In this case, the client directs its request to the gateway at fw.example.com and does noteven know that this is not the final destination. The gateway can use simple TCP-based portforwarding to forward all incoming requests on port 80 (the default HTTP port) to the sameport on 192.168.0.54.
In this case, you would have to specify the machineName property as described earlier if youuse client-activated objects. Otherwise, the server would again return its internal IP address,which is unreachable from any machine outside its private network. In this case, you have toset this property to the name of the external gateway, i.e., to the only host the client canactually reach.
<channel ref="http" port="80" machineName="fw.example.com" />
■Note You have to set the same port number on your firewall/gateway as you use on the destinationmachine, as it is not possible to dynamically adjust the port number that is returned as part of the ObjRef.
http://fw.example.com/myobj.rem
example.com Private Network
Client64.233.161.99
Gateway/Firewallfw.example.com
Server192.168.0.54
Figure 10-9. Remoting with TCP port-forwarding firewalls
CHAPTER 10 ■ TROUBLESHOOTING .NET REMOTING318
SummaryThe .NET Remoting framework offers a big number of features with a relatively small numberof “well-known pitfalls.” In this chapter, I’ve illustrated the most common issues that turn upwhen remoting applications are developed or deployed.
You’ve seen how to debug different kinds of remoting application, and how to make surethat your configuration files are correct. This is especially important because most remoting-related problems stem from incorrect configuration files—a small typo or case mismatch in themcan result in several hours of searching for a bug.
In addition, you’ve learned how to enable custom exceptions when hosting in IIS, and howto use client-activated objects behind firewalls.
This chapter is the last of the first part of this book. In the next five chapters, I’ll show youhow you can hook into the .NET Remoting framework to intercept remote procedure calls oreven implement your own transport protocols.
Extending
P A R T 2
■ ■ ■
321
C H A P T E R 1 1
■ ■ ■
Inside the Framework
As I stated in the introduction to this book, .NET provides an unprecedented extensibility forthe remoting framework. The layered architecture of the .NET Remoting framework can becustomized by either completely replacing the existing functionality of a given tier or chainingnew implementation with the baseline .NET features.
Before working on the framework and its extensibility, I really encourage you to get a thoroughunderstanding of the existing layers and their inner workings in this architecture. This chapterwill give you that information. But be forewarned: this chapter contains some heavy stuff. Itshows you how .NET Remoting really works. Some of the underlying concepts are quite abstract,but you don’t necessarily need to know them if you just want to use .NET Remoting. If you wantto understand or extend it, however, the information contained in this chapter is vital.
If you’re only interested in the use of additional sinks, you’ll find information pertaining tothat topic in Chapter 12.
Looking at the Five Elements of RemotingThe .Net Remoting architecture, as you can see in Figure 11-1, is based on five core types ofobjects:
• Proxies: These objects masquerade as remote objects and forward calls.
• Messages: Message objects contain the necessary data to execute a remote method call.
• Message sinks: These objects allow custom processing of messages during a remoteinvocation.
• Formatters: These objects are message sinks as well and will serialize a message toa transfer format like SOAP.
• Transport channels: Message sinks yet again, these objects will transfer the serializedmessage to a remote process, for example, via HTTP.

CHAPTER 11 ■ INSIDE THE FRAMEWORK322 CHAPTER 11 ■ INSIDE THE FRAMEWORK
Msg
MessageSink
Proxy
Client Server
Server-SideObject
A Message object is generated bythe proxy and passed through achain of MessageSinks.
A Message object is generated by a special MessageSink (theChannelSink) and passed through a chain of MessageSinks.When received by the Dispatcher, it will be translated into amethod call on the server-side.
Method Call
MessageSink
Dispatcher
Msg
Figure 11-1. Simplified version of the .NET Remoting architecture
A Bit About ProxiesInstead of dealing with “real” object references (memory references, pointers, and so on), whenusing remote objects, the client application can only perform methods on object proxies. Theseproxies masquerade, and therefore provide the same interface, as the target object. Instead ofexecuting any method on their own, the proxies forward each method call to the .NET Remotingframework as a Message object.
This message then passes through the sinks shown previously, until it is finally handled bythe server, where it passes through another set of message sinks until the call is placed on the“real” destination object. The server then creates a return message that will be passed back tothe proxy. The proxy handles the return message and converts it to the eventual out/ref param-eters and the method’s return value, which will be passed back to the client application.
Creating ProxiesWhen using the new operator or calling Activator.GetObject() to acquire a reference to a remoteobject, the .NET Remoting framework generates two proxy objects. The first is an instance ofthe generic TransparentProxy (from System.Runtime.Remoting.Proxies). This is the object thatwill be returned from the new operator for a remote object.
Whenever you call a method on the reference to a remote object, you will in reality call iton this TransparentProxy. This proxy holds a reference to a RemotingProxy, which is a descen-dent of the abstract RealProxy class.
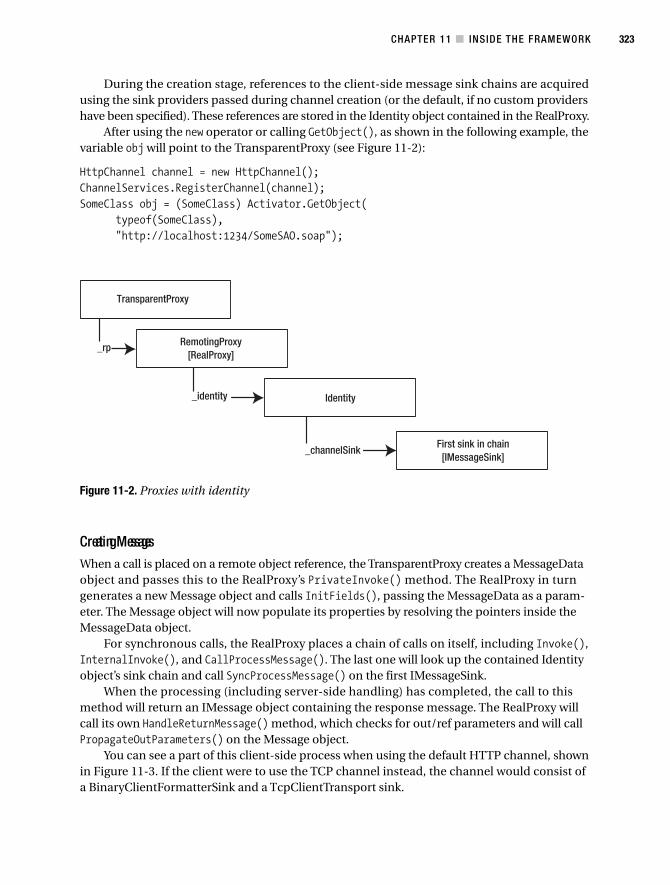
CHAPTER 11 ■ INSIDE THE FRAMEWORK 323
TransparentProxy
RemotingProxy[RealProxy]
Identity
First sink in chain[IMessageSink]
_rp
_identity
_channelSink
Figure 11-2. Proxies with identity
During the creation stage, references to the client-side message sink chains are acquiredusing the sink providers passed during channel creation (or the default, if no custom providershave been specified). These references are stored in the Identity object contained in the RealProxy.
After using the new operator or calling GetObject(), as shown in the following example, thevariable obj will point to the TransparentProxy (see Figure 11-2):
HttpChannel channel = new HttpChannel();ChannelServices.RegisterChannel(channel);SomeClass obj = (SomeClass) Activator.GetObject(
typeof(SomeClass),"http://localhost:1234/SomeSAO.soap");
Creating MessagesWhen a call is placed on a remote object reference, the TransparentProxy creates a MessageDataobject and passes this to the RealProxy’s PrivateInvoke() method. The RealProxy in turngenerates a new Message object and calls InitFields(), passing the MessageData as a param-eter. The Message object will now populate its properties by resolving the pointers inside theMessageData object.
For synchronous calls, the RealProxy places a chain of calls on itself, including Invoke(),InternalInvoke(), and CallProcessMessage(). The last one will look up the contained Identityobject’s sink chain and call SyncProcessMessage() on the first IMessageSink.
When the processing (including server-side handling) has completed, the call to thismethod will return an IMessage object containing the response message. The RealProxy willcall its own HandleReturnMessage() method, which checks for out/ref parameters and will callPropagateOutParameters() on the Message object.
You can see a part of this client-side process when using the default HTTP channel, shownin Figure 11-3. If the client were to use the TCP channel instead, the channel would consist ofa BinaryClientFormatterSink and a TcpClientTransport sink.
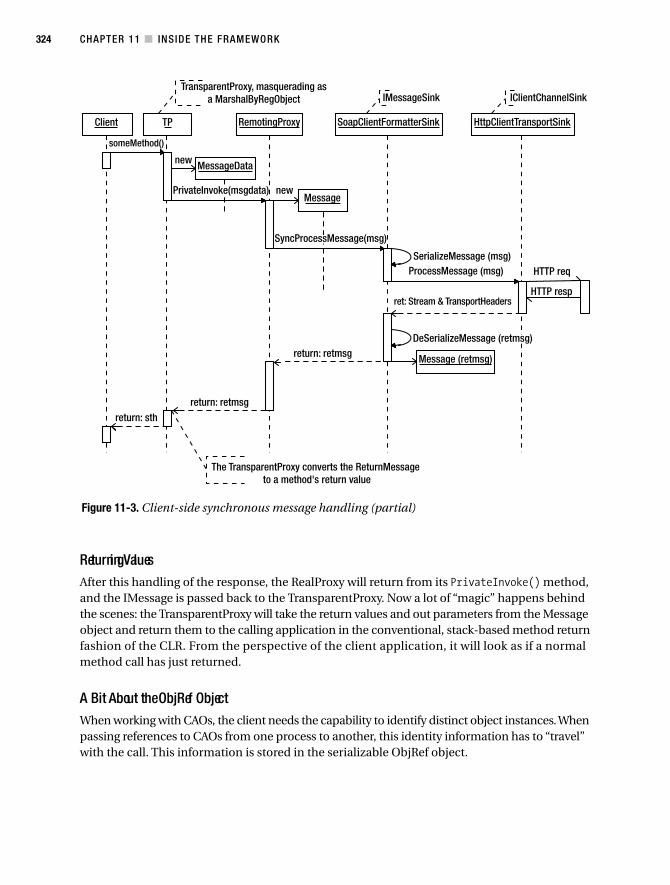
CHAPTER 11 ■ INSIDE THE FRAMEWORK324
Returning ValuesAfter this handling of the response, the RealProxy will return from its PrivateInvoke() method,and the IMessage is passed back to the TransparentProxy. Now a lot of “magic” happens behindthe scenes: the TransparentProxy will take the return values and out parameters from the Messageobject and return them to the calling application in the conventional, stack-based method returnfashion of the CLR. From the perspective of the client application, it will look as if a normalmethod call has just returned.
A Bit About the ObjRef ObjectWhen working with CAOs, the client needs the capability to identify distinct object instances. Whenpassing references to CAOs from one process to another, this identity information has to “travel”with the call. This information is stored in the serializable ObjRef object.
Client
TransparentProxy, masquerading asa MarshalByRegObject
The TransparentProxy converts the ReturnMessage to a method's return value
someMethod()
TP
new
SerializeMessage (msg)
DeSerializeMessage (retmsg)
ProcessMessage (msg) HTTP req
HTTP respret: Stream & TransportHeaders
new
MessageData
Message
IMessageSink IClientChannelSink
return: retmsg
return: retmsgreturn: sth
Message (retmsg)
PrivateInvoke(msgdata)
SyncProcessMessage(msg)
RemotingProxy SoapClientFormatterSink HttpClientTransportSink
Figure 11-3. Client-side synchronous message handling (partial)

CHAPTER 11 ■ INSIDE THE FRAMEWORK 325
Figure 11-4. Browsing to the ObjRef ’s properties in the Locals window
When instantiating a CAO (either by using a custom factory SAO as shown in Chapter 3 orby using the default RemoteActivation.rem SAO that is provided by the framework when theCAO is registered at the server side), a serialized ObjRef will be returned by the server.
This ObjRef is taken as a base to initialize the Identity object, and a reference to it will alsobe kept by the Identity. The ObjRef stores the unique URL to the CAO. This URL is based ona GUID and looks like the following:
/b8c0c989_68be_40d6_97b2_0c3fda5bb7ad/1014675796_1.rem
Additionally, the ObjRef object stores the server’s base URL, which has also been returnedby the server.
■Caution This behavior is very different from that of SAOs, whereby the URL to the server is specified atthe client. With CAOs, only the URL needed for the creation of the CAO is known to the client. The real con-nection endpoint URL for the CAO will be returned when creating the object. This can also mean that a hostthat’s behind a firewall might return its private IP address and will therefore render the CAO unusable. Toprevent this behavior, make sure to use either the machineName or bindTo attribute in the channel’s configu-ration section as shown in Chapter 4.
You can check the ObjRef (or any other properties of the proxies) in a sample project sim-ply by setting a breakpoint after the line where you acquire the remote reference of a CAO (forexample, SomeObj obj1 = new SomeObj() when using configuration files). You can then openthe Locals window and browse to the obj1’s properties as show in Figure 11-4.
You’ll find the ObjRef shown in Figure 11-5 at obj1/_TransparentProxy/_rp/_identity/_objRef.
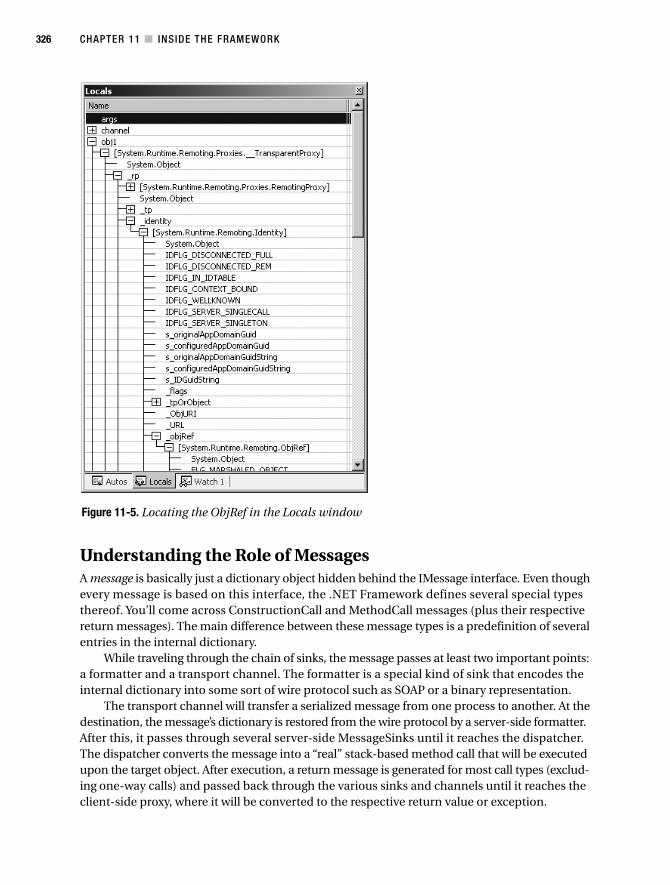
CHAPTER 11 ■ INSIDE THE FRAMEWORK326
Understanding the Role of MessagesA message is basically just a dictionary object hidden behind the IMessage interface. Even thoughevery message is based on this interface, the .NET Framework defines several special typesthereof. You’ll come across ConstructionCall and MethodCall messages (plus their respectivereturn messages). The main difference between these message types is a predefinition of severalentries in the internal dictionary.
While traveling through the chain of sinks, the message passes at least two important points:a formatter and a transport channel. The formatter is a special kind of sink that encodes theinternal dictionary into some sort of wire protocol such as SOAP or a binary representation.
The transport channel will transfer a serialized message from one process to another. At thedestination, the message’s dictionary is restored from the wire protocol by a server-side formatter.After this, it passes through several server-side MessageSinks until it reaches the dispatcher.The dispatcher converts the message into a “real” stack-based method call that will be executedupon the target object. After execution, a return message is generated for most call types (exclud-ing one-way calls) and passed back through the various sinks and channels until it reaches theclient-side proxy, where it will be converted to the respective return value or exception.
Figure 11-5. Locating the ObjRef in the Locals window
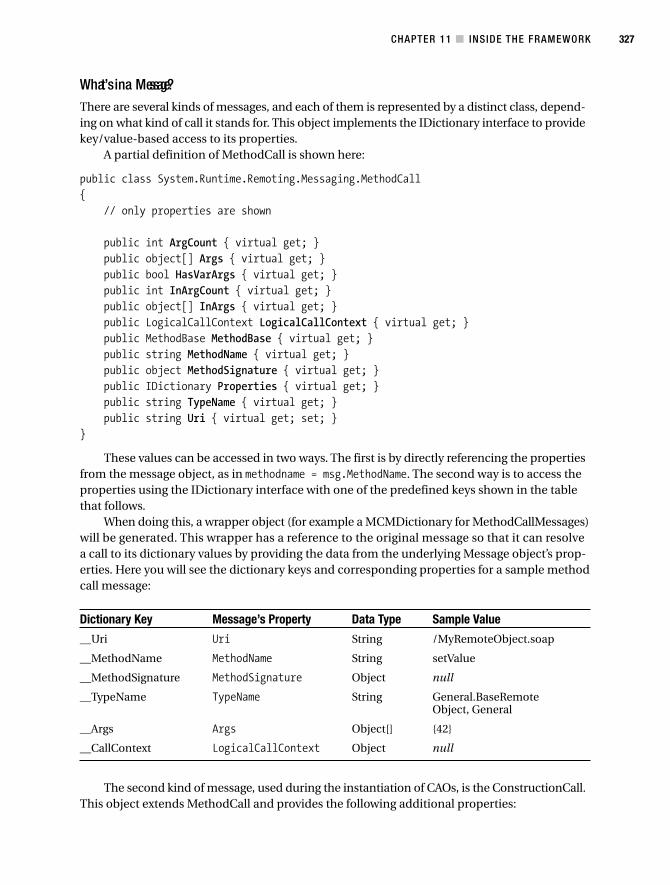
CHAPTER 11 ■ INSIDE THE FRAMEWORK 327
What’s in a Message?There are several kinds of messages, and each of them is represented by a distinct class, depend-ing on what kind of call it stands for. This object implements the IDictionary interface to providekey/value-based access to its properties.
A partial definition of MethodCall is shown here:
public class System.Runtime.Remoting.Messaging.MethodCall{
// only properties are shown
public int ArgCount { virtual get; }public object[] Args { virtual get; }public bool HasVarArgs { virtual get; }public int InArgCount { virtual get; }public object[] InArgs { virtual get; }public LogicalCallContext LogicalCallContext { virtual get; }public MethodBase MethodBase { virtual get; }public string MethodName { virtual get; }public object MethodSignature { virtual get; }public IDictionary Properties { virtual get; }public string TypeName { virtual get; }public string Uri { virtual get; set; }
}
These values can be accessed in two ways. The first is by directly referencing the propertiesfrom the message object, as in methodname = msg.MethodName. The second way is to access theproperties using the IDictionary interface with one of the predefined keys shown in the tablethat follows.
When doing this, a wrapper object (for example a MCMDictionary for MethodCallMessages)will be generated. This wrapper has a reference to the original message so that it can resolvea call to its dictionary values by providing the data from the underlying Message object’s prop-erties. Here you will see the dictionary keys and corresponding properties for a sample methodcall message:
Dictionary Key Message’s Property Data Type Sample Value
__Uri Uri String /MyRemoteObject.soap
__MethodName MethodName String setValue
__MethodSignature MethodSignature Object null
__TypeName TypeName String General.BaseRemoteObject, General
__Args Args Object[] {42}
__CallContext LogicalCallContext Object null
The second kind of message, used during the instantiation of CAOs, is the ConstructionCall.This object extends MethodCall and provides the following additional properties:
CHAPTER 11 ■ INSIDE THE FRAMEWORK328
public class System.Runtime.Remoting.Messaging.ConstructionCall{
// only properties are shownpublic Type ActivationType { virtual get; }public string ActivationTypeName { virtual get; }public IActivator Activator { virtual get; virtual set; }public object[] CallSiteActivationAttributes { virtual get; }public IList ContextProperties { virtual get; }
}
Examining Message SinksThe transfer of a message from a client application to a server-side object is done by so-calledmessage sinks. A sink will basically receive a message from another object, apply its own process-ing, and delegate any additional work to the next sink in a chain.
There are three basic interfaces for message sinks: IMessageSink, IClientChannelSink, andIServerChannelSink. As you can see in the following interface description, IMessageSink definestwo methods for processing a message and a property getter for acquiring the reference for thenext sink in the chain:
public interface IMessageSink{
IMessageSink NextSink { get; }
IMessageCtrl AsyncProcessMessage(IMessage msg,IMessageSink replySink);
IMessage SyncProcessMessage(IMessage msg);}
Whenever an IMessageSink receives a message using either SyncProcessMessage() orAsyncProcessMessage(), it may first check whether it can handle this message. If it’s able to doso, it will apply its own processing and afterwards pass the message on to the IMessageSinkreferenced in its NextSink property.
At some point in the chain, the message will reach a formatter (which is also an IMessageSink) that will serialize the message to a defined format and pass it on to a secondarychain of IClientChannelSink objects.
■Note Formatters implement IClientFormatterSink by convention. This interface is a combination ofIMessageSink and IClientChannelSink.
public interface IClientChannelSink{
// propertiesIClientChannelSink NextChannelSink { get; }
CHAPTER 11 ■ INSIDE THE FRAMEWORK 329
1. Current prerelease information as of late 2004 mentions a possible future deprecation of the SoapFormatterwith Version 2.0 of the .NET Framework.
// methodsvoid AsyncProcessRequest(IClientChannelSinkStack sinkStack,
IMessage msg,ITransportHeaders headers,Stream stream);
void AsyncProcessResponse(IClientResponseChannelSinkStack sinkStack,object state,ITransportHeaders headers,Stream stream);
Stream GetRequestStream(IMessage msg,ITransportHeaders headers);
void ProcessMessage(IMessage msg,ITransportHeaders requestHeaders,Stream requestStream,ref ITransportHeaders responseHeaders,ref Stream responseStream);
}
The main difference between IMessageSink and IClientChannelSink is that the former canaccess and change the original dictionary, independent of any serialization format, whereas thelatter has access to the serialized message as a stream.
After processing the message, the IClientChannelSink also passes it on to the next sink inits chain until it reaches a transport channel like HttpClientTransportSink (which also imple-ments IClientChannelSink) for the default HTTP channel.
Serialization Through FormattersA Message object needs to be serialized into a stream before it can be transferred to a remoteprocess, a task which is performed by a formatter. The .NET Remoting framework provides youwith two default formatters, the SoapFormatter1 and the BinaryFormatter, which can both beused via HTTP, IPC, or TCP connections.
■Note In the samples that follow, you get a chance to take a look at the SoapFormatter, but the same infor-mation applies to BinaryFormatter (or any custom formatter) as well.
After the message completes the preprocessing stage by passing through the chain ofIMessageSink objects, it will reach the formatter via the SyncProcessMessage() method.
CHAPTER 11 ■ INSIDE THE FRAMEWORK330
On the client side, the SoapClientFormatterSink passes the IMessage on to its SerializeMessage() method. This function sets up the TransportHeaders and asks its NextSink(which will be the respective IClientChannelSink—that is, the HttpClientTransportSink) for therequest stream onto which it should write the serialized data. If the request stream is not yetavailable, it will create a new ChunkedMemoryStream that will later be passed to the channel sink.
The real serialization is started from CoreChannel.SerializeSoapMessage(), which createsa SoapFormatter (from the System.Runtime.Serialization.Formatters.Soap namespace) and callsits Serialize() method.
You can see the SOAP output of the formatter for a sample call to obj.setValue(42) in thefollowing excerpt. Remember that this is only the serialized form of the request—it is not yettransfer dependent (it does not contain any HTTP headers, for example).
<SOAP-ENV:Envelopexmlns:xsi="http://www.w3.org/2001/XMLSchema-instance"xmlns:xsd="http://www.w3.org/2001/XMLSchema"xmlns:SOAP-ENC="http://schemas.xmlsoap.org/soap/encoding/"xmlns:SOAP-ENV="http://schemas.xmlsoap.org/soap/envelope/"SOAP-ENV:encodingStyle="http://schemas.xmlsoap.org/soap/encoding/"xmlns:i2="http://schemas.microsoft.com/clr/nsassem/General.BaseRemoteObj ➥
ect/General"><SOAP-ENV:Body><i2:setValue id="ref-1">
<newval>42</newval></i2:setValue>
</SOAP-ENV:Body></SOAP-ENV:Envelope>
Moving Messages Through Transport ChannelsAfter the last IClientChannelSink (which can be either the formatter or custom channel sink)has been called, it forwards the message, stream, and headers to the ProcessMessage() methodof the associated transfer channel. In addition to the stream generated by the formatter, thisfunction needs an ITransportHeaders object, which has been populated by the formatter aswell, as a parameter.
The transport sink’s responsibility is to convert these headers into a protocol-dependentformat—for example, into HTTP headers. It will then open a connection to the server (or checkif it’s is already open, for TCP channels or HTTP 1.1 KeepAlive connections) and send the headersand the stream’s content over this connection.
Following the previous example, the HTTP headers for the SOAP remoting call will looklike this:
POST /MyRemoteObject.soap HTTP/1.1User-Agent: Mozilla/4.0+(compatible; MSIE 6.0; Windows 5.0.2195.0; MS .NETRemoting;MS .NET CLR 1.0.2914.16 )SOAPAction:"http://schemas.microsoft.com/clr/nsassem/General.BaseRemoteObject/General#setValueContent-Type: text/xml; charset="utf-8"
CHAPTER 11 ■ INSIDE THE FRAMEWORK 331
Content-Length: 510Expect: 100-continueConnection: Keep-AliveHost: localhost
This leads to the following complete HTTP request for the setValue(int) method ofa sample remote object:
POST /MyRemoteObject.soap HTTP/1.1User-Agent: Mozilla/4.0+(compatible; MSIE 6.0; Windows 5.0.2195.0; MS .NET Remoting;MS .NET CLR 1.0.2914.16 )SOAPAction:"http://schemas.microsoft.com/clr/nsassem/General.BaseRemoteObject/General#setValue"Content-Type: text/xml; charset="utf-8"Content-Length: 510Expect: 100-continueConnection: Keep-AliveHost: localhost
<SOAP-ENV:Envelopexmlns:xsi="http://www.w3.org/2001/XMLSchema-instance"xmlns:xsd="http://www.w3.org/2001/XMLSchema"xmlns:SOAP-ENC="http://schemas.xmlsoap.org/soap/encoding/"xmlns:SOAP-ENV="http://schemas.xmlsoap.org/soap/envelope/"SOAP-ENV:encodingStyle="http://schemas.xmlsoap.org/soap/encoding/"xmlns:i2="http://schemas.microsoft.com/clr/nsassem/General.BaseRemoteObject/General">
<SOAP-ENV:Body><i2:setValue id="ref-1"><newval>42</newval>
</i2:setValue></SOAP-ENV:Body>
</SOAP-ENV:Envelope>
I highlighted the important parts in this request so that you can see the values that havebeen taken from the message object’s dictionary.
Client-Side MessagingAs you know by now, the message is created by the combination of the TransparentProxy andRemotingProxy, which send it to the first entry of the message sink chain. After this creation,the message will pass four to six stages, depending on the channel’s configuration. You can seethis in Figure 11-6.
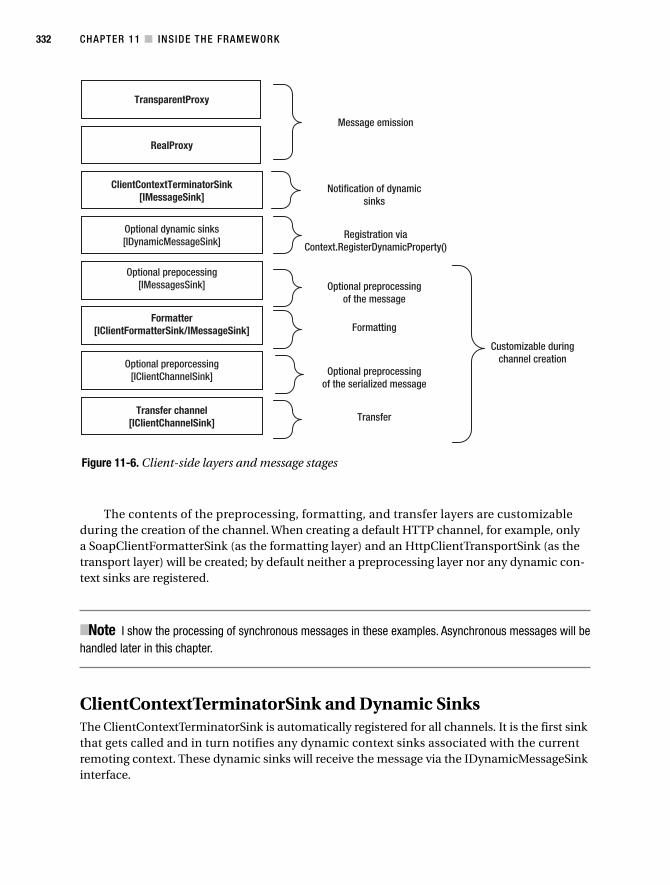
CHAPTER 11 ■ INSIDE THE FRAMEWORK332
The contents of the preprocessing, formatting, and transfer layers are customizableduring the creation of the channel. When creating a default HTTP channel, for example, onlya SoapClientFormatterSink (as the formatting layer) and an HttpClientTransportSink (as thetransport layer) will be created; by default neither a preprocessing layer nor any dynamic con-text sinks are registered.
■Note I show the processing of synchronous messages in these examples. Asynchronous messages will behandled later in this chapter.
ClientContextTerminatorSink and Dynamic SinksThe ClientContextTerminatorSink is automatically registered for all channels. It is the first sinkthat gets called and in turn notifies any dynamic context sinks associated with the currentremoting context. These dynamic sinks will receive the message via the IDynamicMessageSinkinterface.
TransparentProxy
RealProxy
ClientContextTerminatorSink[IMessageSink]
Optional dynamic sinks[IDynamicMessageSink]
Optional prepocessing[IMessagesSink]
Formatter[IClientFormatterSink/IMessageSink]
Optional preporcessing[IClientChannelSink]
Transfer channel[IClientChannelSink]
Message emission
Notification of dynamicsinks
Registration viaContext.RegisterDynamicProperty()
Optional preprocessingof the message
Formatting
Optional preprocessingof the serialized message
Transfer
Customizable duringchannel creation
Figure 11-6. Client-side layers and message stages
CHAPTER 11 ■ INSIDE THE FRAMEWORK 333
public interface IDynamicMessageSink{
void ProcessMessageStart(IMessage reqMsg, bool bCliSide, bool bAsync);void ProcessMessageFinish(IMessage replyMsg, bool bCliSide, bool bAsync);
}
These sinks don’t need to pass the information to any other sink in a chain. Instead, this isdone automatically by the context terminator sink, which will call the relevant methods ona list of registered dynamic sinks before passing the message on to the next IMessageSink.
You’ll find more on the creation and implementation of dynamic sinks in Chapter 12.
SoapClientFormatterSinkAfter passing through optional custom IMessageSink objects, the message reaches the format-ter. As shown previously, the formatter’s task is to take the message’s internal dictionary andserialize it to a defined wire format. The output of the serialization is an object implementingITransferHeaders and a stream from which the channel sink will be able to read the serialized data.
After generating these objects, the formatter calls ProcessMessage() on its assignedIClientChannelSink and as a result starts to pass the message to the secondary chain—thechannel sink chain.
HttpClientChannelAt the end of the chain of client channel sinks, the message ultimately reaches the transferchannel, which also implements the IClientChannelSink interface. When the ProcessMessage()method of this channel sink is called, it opens a connection to the server (or uses an existingconnection) and passes the data using the defined transfer protocol. The server now processesthe request message and returns a ReturnMessage in serialized form. The client-side channelsink will take this data and split it into an ITransferHeader object, which contains the headers,and into a stream containing the serialized payload. These two objects are then returned as outparameters of the ProcessMessage() method.
After this splitting, the response message travels back through the chain of IClientChannelSinks until reaching the formatter, where it is deserialized and an IMessageobject created. This object is then returned back through the chain of IMessageSinks until itreaches the two proxies. The TransparentProxy decodes the message, generates the method returnvalue, and fills the respective out or ref parameters.
The original method call—which has been placed by the client application—then returnsand the client now has access to the method’s responses.
Server-Side MessagingDuring the creation of the server-side channel (I use the HttpServerChannel in the followingdescription, but the same applies to other server channels as well), the server-side sink chain iscreated and a TcpListener is spawned in a new thread. This object starts to listen on the speci-fied port and notifies the HttpServerSocketHandler when a connection is made.
The message then passes through the layers shown in Figure 11-7.
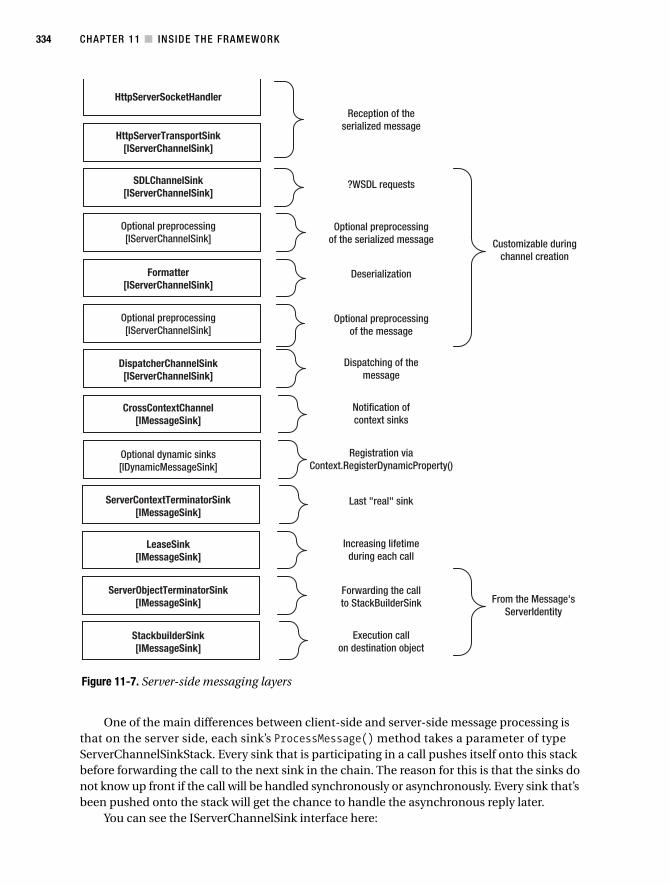
CHAPTER 11 ■ INSIDE THE FRAMEWORK334
One of the main differences between client-side and server-side message processing isthat on the server side, each sink’s ProcessMessage() method takes a parameter of typeServerChannelSinkStack. Every sink that is participating in a call pushes itself onto this stackbefore forwarding the call to the next sink in the chain. The reason for this is that the sinks donot know up front if the call will be handled synchronously or asynchronously. Every sink that’sbeen pushed onto the stack will get the chance to handle the asynchronous reply later.
You can see the IServerChannelSink interface here:
HttpServerSocketHandler
HttpServerTransportSink[IServerChannelSink]
SDLChannelSink[IServerChannelSink]
Optional preprocessing[IServerChannelSink]
Reception of theserialized message
?WSDL requests
Optional preprocessingof the serialized message
Deserialization
Optional preprocessingof the message
Dispatching of themessage
Notification ofcontext sinks
Registration viaContext.RegisterDynamicProperty()
Last "real" sink
Increasing lifetimeduring each call
Forwarding the callto StackBuilderSink
Execution callon destination object
Customizable duringchannel creation
From the Message'sServerIdentity
Optional preprocessing[IServerChannelSink]
Formatter[IServerChannelSink]
DispatcherChannelSink[IServerChannelSink]
CrossContextChannel[IMessageSink]
Optional dynamic sinks[IDynamicMessageSink]
ServerContextTerminatorSink[IMessageSink]
LeaseSink[IMessageSink]
ServerObjectTerminatorSink[IMessageSink]
StackbuilderSink[IMessageSink]
Figure 11-7. Server-side messaging layers
CHAPTER 11 ■ INSIDE THE FRAMEWORK 335
public interface IServerChannelSink{
IServerChannelSink NextChannelSink { get; }
ServerProcessing ProcessMessage(IServerChannelSinkStack sinkStack,IMessage requestMsg,ITransportHeaders requestHeaders,Stream requestStream,ref IMessage responseMsg,ref ITransportHeaders responseHeaders,ref Stream responseStream);
void AsyncProcessResponse(IServerResponseChannelSinkStack sinkStack,object state,IMessage msg,ITransportHeaders headers,Stream stream);
Stream GetResponseStream(IServerResponseChannelSinkStack sinkStack,object state,IMessage msg,ITransportHeaders headers);
}
HttpServerChannel and HttpServerTransportSinkWhen a connection to the server-side channel is opened, an instance of HttpServerSocketHandleris created and supplied with a delegate that points to the HttpServerTransportSink’sServiceRequest() method. This method will be called after the background thread finishesreading the request stream.
The HttpServerTransportSink sets up the ServerChannelSinkStack and pushes itself ontothis stack before forwarding the call to the next sink.
After the chain has finished processing the message (that is, after the method call has beenexecuted), it generates the HTTP response headers. These will be either “200 OK” for synchro-nous calls or “202 Accepted” for one-way messages.
SDLChannelSinkThe SDLChannelSink is a very special kind of sink that really shows the power of the .NETRemoting framework’s extensibility. Contrary to most other sinks, it does not forward anyrequests to the destination object, but instead generates the WSDL information needed for thecreation of proxies.
It does this whenever it encounters either of the strings “?WSDL” or “?SDL” at the end of an HTTP GET request. In this case, the WSDL will be generated by calling theConvertTypesToSchemaToStream() method from System.Runtime.Remoting.MetadataServices.MetaData.

CHAPTER 11 ■ INSIDE THE FRAMEWORK336
■Note MetaData is the same class SoapSuds uses when generating proxies.
When the HTTP request is of type POST or when it is a GET request that does not end withthe string “?WSDL” or “?SDL”, the message will be passed to the next sink.
SoapServerFormatterSink and BinaryServerFormatterSinkThe default server-side HTTP channel uses both formatters in a chained fashion. The firstformatter that’s used is the SoapServerFormatterSink. This sink first checks whether the serializedmessage contained in the request stream is a SOAP message. If this is the case, it is deserialized,and the resulting IMessage object is passed to the next sink (which is BinaryServerFormatterSink).In this case, the stream (which is needed as an input parameter to the next sink) will be passedas null.
If the stream does not contain a SOAP-encoded message, it will be copied to a MemoryStreamand passed to the BinaryServerFormatterSink.
The binary formatter employs the same logic and passes either the deserialized message(which it might have already gotten from the SOAP formatter, or which it can deserialize on itsown) or the stream (if it cannot decode the message) to the next sink.
Both BinaryServerFormatterSink and SoapServerFormatterSink only push themselves ontothe SinkStack (before calling ProcessMessage() on the subsequent sink) when they can handlethe message. If neither BinaryServerFormatterSink nor SoapServerFormatterSink could deseri-alize the message and the next sink is not another formatter, an exception is thrown.
DispatchChannelSinkAfter passing through an optional layer of IMessageSink objects, the message reaches the dispatcher.The DispatchChannelSink takes the decoded IMessage and forwards it to ChannelServices.DispatchMessage(). This method checks for disconnected or timed-out objects and dynamicallyinstantiates SAOs (Singleton or SingleCall) if they do not exist at the server.
After the possible creation of the necessary destination object, it promotes this call toCrossContextChannel.SyncProcessMessage() or CrossContextChannel.AsyncProcessMessage()if the call’s target is a one-way method.
CrossContextChannelThe CrossContextChannel notifies dynamic context sinks and passes the IMessage on toServerContextTerminatorSink. A dynamic sink does not implement IMessageSink, but ratherthe interface IDynamicMessageSink, which is shown here:
public interface IDynamicMessageSink{
void ProcessMessageStart(IMessage reqMsg, bool bCliSide, bool bAsync);void ProcessMessageFinish(IMessage replyMsg, bool bCliSide, bool bAsync);
}
The same logic is applied as with client-side dynamic sinks: these sinks do not have to callany additional sinks in the chain, as this will be taken care of by the framework.
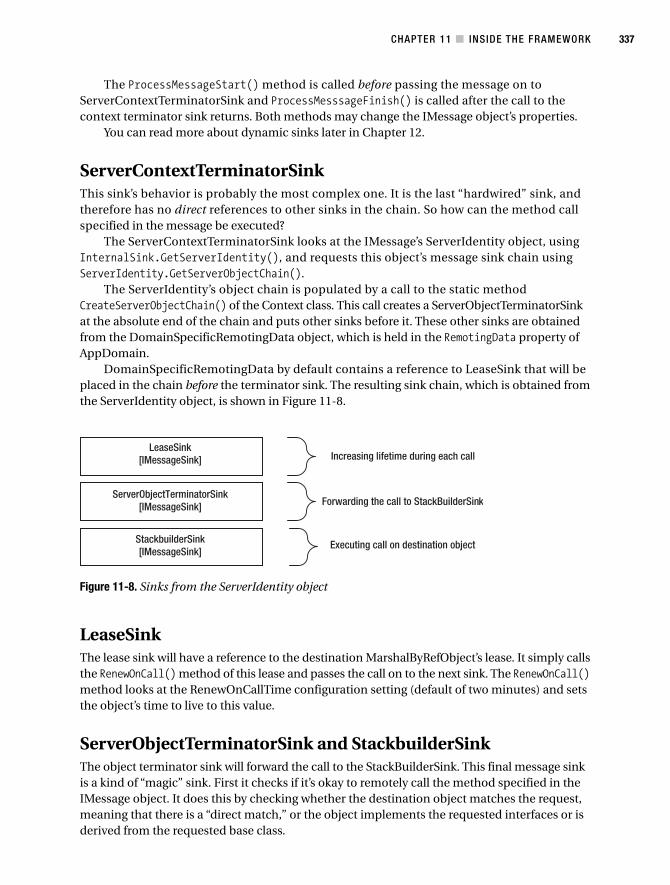
CHAPTER 11 ■ INSIDE THE FRAMEWORK 337
The ProcessMessageStart() method is called before passing the message on to ServerContextTerminatorSink and ProcessMesssageFinish() is called after the call to thecontext terminator sink returns. Both methods may change the IMessage object’s properties.
You can read more about dynamic sinks later in Chapter 12.
ServerContextTerminatorSinkThis sink’s behavior is probably the most complex one. It is the last “hardwired” sink, andtherefore has no direct references to other sinks in the chain. So how can the method callspecified in the message be executed?
The ServerContextTerminatorSink looks at the IMessage’s ServerIdentity object, usingInternalSink.GetServerIdentity(), and requests this object’s message sink chain usingServerIdentity.GetServerObjectChain().
The ServerIdentity’s object chain is populated by a call to the static method CreateServerObjectChain() of the Context class. This call creates a ServerObjectTerminatorSinkat the absolute end of the chain and puts other sinks before it. These other sinks are obtainedfrom the DomainSpecificRemotingData object, which is held in the RemotingData property ofAppDomain.
DomainSpecificRemotingData by default contains a reference to LeaseSink that will beplaced in the chain before the terminator sink. The resulting sink chain, which is obtained fromthe ServerIdentity object, is shown in Figure 11-8.
LeaseSinkThe lease sink will have a reference to the destination MarshalByRefObject’s lease. It simply callsthe RenewOnCall() method of this lease and passes the call on to the next sink. The RenewOnCall()method looks at the RenewOnCallTime configuration setting (default of two minutes) and setsthe object’s time to live to this value.
ServerObjectTerminatorSink and StackbuilderSinkThe object terminator sink will forward the call to the StackBuilderSink. This final message sinkis a kind of “magic” sink. First it checks if it’s okay to remotely call the method specified in theIMessage object. It does this by checking whether the destination object matches the request,meaning that there is a “direct match,” or the object implements the requested interfaces or isderived from the requested base class.
LeaseSink[IMessageSink]
ServerObjectTerminatorSink[IMessageSink]
StackbuilderSink[IMessageSink]
Increasing lifetime during each call
Forwarding the call to StackBuilderSink
Executing call on destination object
Figure 11-8. Sinks from the ServerIdentity object
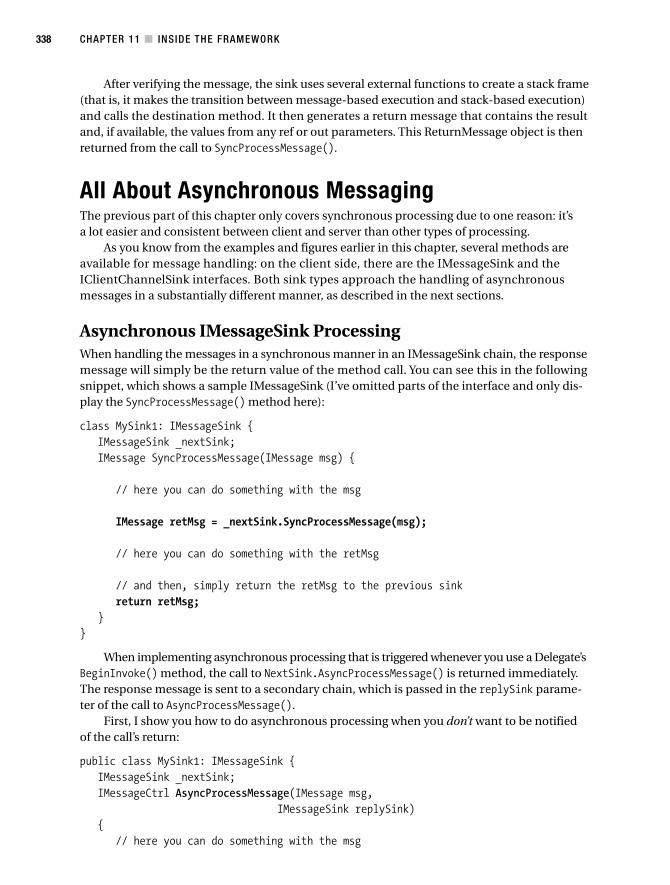
CHAPTER 11 ■ INSIDE THE FRAMEWORK338
After verifying the message, the sink uses several external functions to create a stack frame(that is, it makes the transition between message-based execution and stack-based execution)and calls the destination method. It then generates a return message that contains the resultand, if available, the values from any ref or out parameters. This ReturnMessage object is thenreturned from the call to SyncProcessMessage().
All About Asynchronous MessagingThe previous part of this chapter only covers synchronous processing due to one reason: it’sa lot easier and consistent between client and server than other types of processing.
As you know from the examples and figures earlier in this chapter, several methods areavailable for message handling: on the client side, there are the IMessageSink and theIClientChannelSink interfaces. Both sink types approach the handling of asynchronousmessages in a substantially different manner, as described in the next sections.
Asynchronous IMessageSink ProcessingWhen handling the messages in a synchronous manner in an IMessageSink chain, the responsemessage will simply be the return value of the method call. You can see this in the followingsnippet, which shows a sample IMessageSink (I’ve omitted parts of the interface and only dis-play the SyncProcessMessage() method here):
class MySink1: IMessageSink {IMessageSink _nextSink;IMessage SyncProcessMessage(IMessage msg) {
// here you can do something with the msg
IMessage retMsg = _nextSink.SyncProcessMessage(msg);
// here you can do something with the retMsg
// and then, simply return the retMsg to the previous sinkreturn retMsg;
}}
When implementing asynchronous processing that is triggered whenever you use a Delegate’sBeginInvoke() method, the call to NextSink.AsyncProcessMessage() is returned immediately.The response message is sent to a secondary chain, which is passed in the replySink parame-ter of the call to AsyncProcessMessage().
First, I show you how to do asynchronous processing when you don’t want to be notifiedof the call’s return:
public class MySink1: IMessageSink {IMessageSink _nextSink;IMessageCtrl AsyncProcessMessage(IMessage msg,
IMessageSink replySink){
// here you can do something with the msg
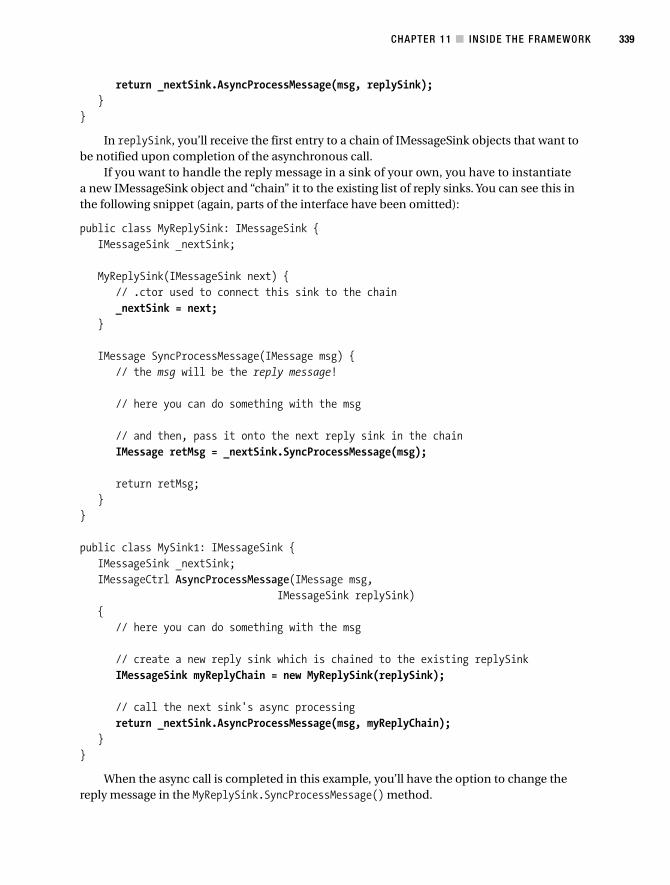
CHAPTER 11 ■ INSIDE THE FRAMEWORK 339
return _nextSink.AsyncProcessMessage(msg, replySink);}
}
In replySink, you’ll receive the first entry to a chain of IMessageSink objects that want tobe notified upon completion of the asynchronous call.
If you want to handle the reply message in a sink of your own, you have to instantiatea new IMessageSink object and “chain” it to the existing list of reply sinks. You can see this inthe following snippet (again, parts of the interface have been omitted):
public class MyReplySink: IMessageSink {IMessageSink _nextSink;
MyReplySink(IMessageSink next) {// .ctor used to connect this sink to the chain_nextSink = next;
}
IMessage SyncProcessMessage(IMessage msg) {// the msg will be the reply message!
// here you can do something with the msg
// and then, pass it onto the next reply sink in the chainIMessage retMsg = _nextSink.SyncProcessMessage(msg);
return retMsg;}
}
public class MySink1: IMessageSink {IMessageSink _nextSink;IMessageCtrl AsyncProcessMessage(IMessage msg,
IMessageSink replySink){
// here you can do something with the msg
// create a new reply sink which is chained to the existing replySinkIMessageSink myReplyChain = new MyReplySink(replySink);
// call the next sink's async processingreturn _nextSink.AsyncProcessMessage(msg, myReplyChain);
}}
When the async call is completed in this example, you’ll have the option to change thereply message in the MyReplySink.SyncProcessMessage() method.
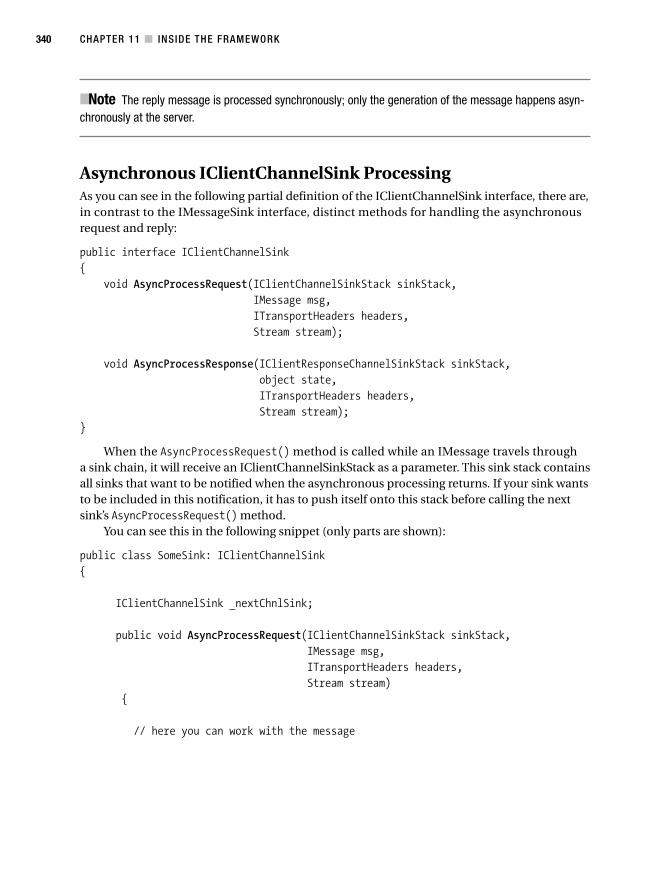
CHAPTER 11 ■ INSIDE THE FRAMEWORK340
■Note The reply message is processed synchronously; only the generation of the message happens asyn-chronously at the server.
Asynchronous IClientChannelSink ProcessingAs you can see in the following partial definition of the IClientChannelSink interface, there are,in contrast to the IMessageSink interface, distinct methods for handling the asynchronousrequest and reply:
public interface IClientChannelSink{
void AsyncProcessRequest(IClientChannelSinkStack sinkStack,IMessage msg,ITransportHeaders headers,Stream stream);
void AsyncProcessResponse(IClientResponseChannelSinkStack sinkStack,object state,ITransportHeaders headers,Stream stream);
}
When the AsyncProcessRequest() method is called while an IMessage travels througha sink chain, it will receive an IClientChannelSinkStack as a parameter. This sink stack containsall sinks that want to be notified when the asynchronous processing returns. If your sink wantsto be included in this notification, it has to push itself onto this stack before calling the nextsink’s AsyncProcessRequest() method.
You can see this in the following snippet (only parts are shown):
public class SomeSink: IClientChannelSink{
IClientChannelSink _nextChnlSink;
public void AsyncProcessRequest(IClientChannelSinkStack sinkStack,IMessage msg,ITransportHeaders headers,Stream stream)
{
// here you can work with the message
CHAPTER 11 ■ INSIDE THE FRAMEWORK 341
// pushing this sink onto the stacksinkStack.Push (this,null);
// calling the next sink_nextChnlSink.AsyncProcessRequest(sinkStack,msg,headers,stream);
}}
The sinkStack object that is passed to AsyncProcessRequest() is of type ClientChannelSinkStackand implements the following IClientChannelSinkStack interface, which allows a sink to push itselfonto the stack:
public interface IClientChannelSinkStack : IClientResponseChannelSinkStack{
object Pop(IClientChannelSink sink);void Push(IClientChannelSink sink, object state);
}
Whatever is being passed as the state parameter of Push() will be received by sink’sAsyncProcessResponse() method upon completion of the call. It can contain any informationthe sink might need while processing the response. For built-in sinks, this will be the originalmessage that triggered the request.
As the previous interface extends the IClientReponseChannelSinkStack interface, I’ll showyou this one here as well:
public interface IClientResponseChannelSinkStack{
void AsyncProcessResponse(ITransportHeaders headers, Stream stream);void DispatchException(Exception e);void DispatchReplyMessage(IMessage msg);
}
The AsyncProcessResponse() method of the ClientChannelSinkStack pops one sink fromstack and calls this sink’s AsyncProcessResponse() method. Therefore, the “reverse” chainingthat uses the sink stack works simply by recursively calling the stack’s AsyncProcessResponse()method from each sink. This is shown in the following piece of code:
public class SomeSink: IClientChannelSink{
public void AsyncProcessResponse(IClientResponseChannelSinkStack sinkStack,object state,ITransportHeaders headers,Stream stream)
{
// here you can work with the stream or headers
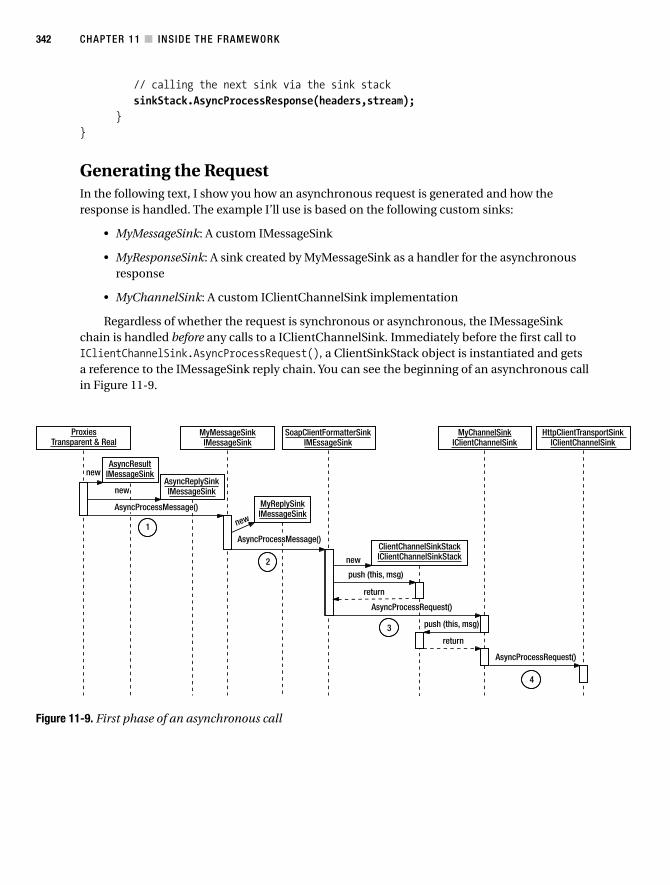
CHAPTER 11 ■ INSIDE THE FRAMEWORK342
// calling the next sink via the sink stacksinkStack.AsyncProcessResponse(headers,stream);
}}
Generating the RequestIn the following text, I show you how an asynchronous request is generated and how theresponse is handled. The example I’ll use is based on the following custom sinks:
• MyMessageSink: A custom IMessageSink
• MyResponseSink: A sink created by MyMessageSink as a handler for the asynchronousresponse
• MyChannelSink: A custom IClientChannelSink implementation
Regardless of whether the request is synchronous or asynchronous, the IMessageSinkchain is handled before any calls to a IClientChannelSink. Immediately before the first call toIClientChannelSink.AsyncProcessRequest(), a ClientSinkStack object is instantiated and getsa reference to the IMessageSink reply chain. You can see the beginning of an asynchronous callin Figure 11-9.
ProxiesTransparent & Real
AsyncResultIMessageSink
AsyncReplySinkIMessageSink
MyReplySinkIMessageSink
ClientChannelSinkStackIClientChannelSinkStack
MyMessageSinkIMessageSink
SoapClientFormatterSinkIMEssageSink
MyChannelSinkIClientChannelSink
HttpClientTransportSinkIClientChannelSink
new
AsyncProcessMessage()
AsyncProcessMessage()
AsyncProcessRequest()
AsyncProcessRequest()
new
new
return
return
push (this, msg)
push (this, msg)
new1
2
3
4
Figure 11-9. First phase of an asynchronous call
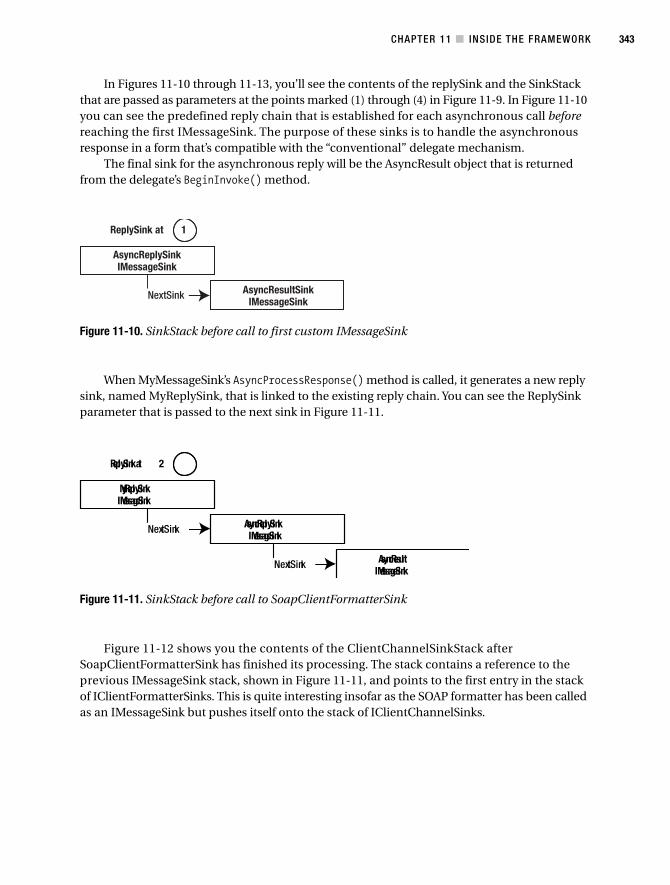
CHAPTER 11 ■ INSIDE THE FRAMEWORK 343
In Figures 11-10 through 11-13, you’ll see the contents of the replySink and the SinkStackthat are passed as parameters at the points marked (1) through (4) in Figure 11-9. In Figure 11-10you can see the predefined reply chain that is established for each asynchronous call beforereaching the first IMessageSink. The purpose of these sinks is to handle the asynchronousresponse in a form that’s compatible with the “conventional” delegate mechanism.
The final sink for the asynchronous reply will be the AsyncResult object that is returnedfrom the delegate’s BeginInvoke() method.
ReplySink at 1
AsyncReplySinkIMessageSink
AsyncResultSinkIMessageSink
NextSink
Figure 11-10. SinkStack before call to first custom IMessageSink
When MyMessageSink’s AsyncProcessResponse() method is called, it generates a new replysink, named MyReplySink, that is linked to the existing reply chain. You can see the ReplySinkparameter that is passed to the next sink in Figure 11-11.
ReplySink at 2
MyReplySinkIMessageSink
AsyncReplySinkIMessageSink
NextSink
AsyncResultIMessageSink
NextSink
Figure 11-11. SinkStack before call to SoapClientFormatterSink
Figure 11-12 shows you the contents of the ClientChannelSinkStack after SoapClientFormatterSink has finished its processing. The stack contains a reference to theprevious IMessageSink stack, shown in Figure 11-11, and points to the first entry in the stackof IClientFormatterSinks. This is quite interesting insofar as the SOAP formatter has been calledas an IMessageSink but pushes itself onto the stack of IClientChannelSinks.
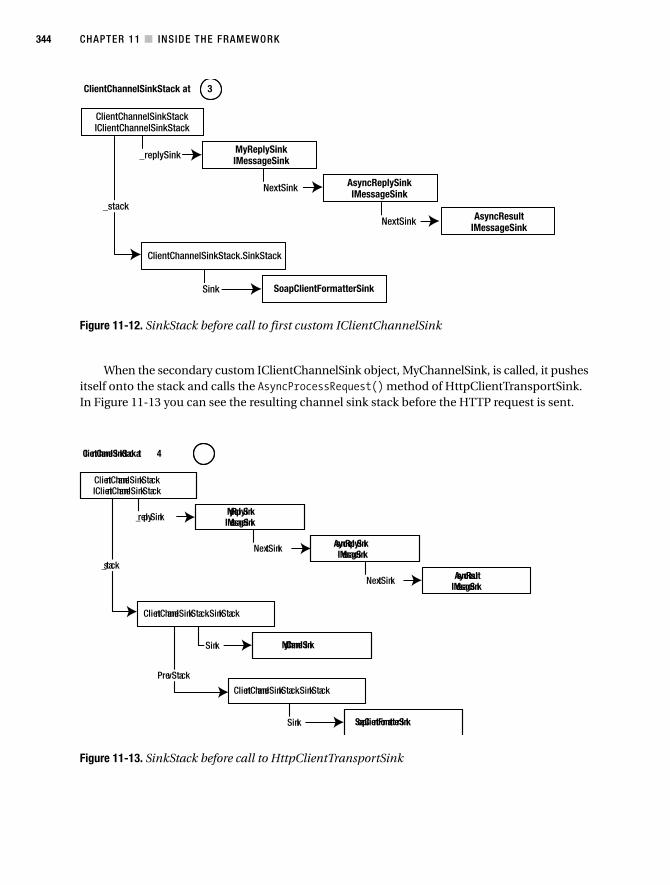
CHAPTER 11 ■ INSIDE THE FRAMEWORK344
ClientChannelSinkStack at 3
MyReplySinkIMessageSink
AsyncReplySinkIMessageSink
NextSink
ClientChannelSinkStackIClientChannelSinkStack
_replySink
SoapClientFormatterSink
_stack
ClientChannelSinkStack.SinkStack
Sink
AsyncResultIMessageSink
NextSink
Figure 11-12. SinkStack before call to first custom IClientChannelSink
When the secondary custom IClientChannelSink object, MyChannelSink, is called, it pushesitself onto the stack and calls the AsyncProcessRequest() method of HttpClientTransportSink.In Figure 11-13 you can see the resulting channel sink stack before the HTTP request is sent.
ClientChannelSinkStack at 4
MyReplySinkIMessageSink
AsyncReplySinkIMessageSink
NextSink
ClientChannelSinkStackIClientChannelSinkStack
_replySink
MyChannelSink
PrevStack
ClientChannelSinkStack.SinkStack
Sink
SoapClientFormatterSink
ClientChannelSinkStack.SinkStack
Sink
AsyncResultIMessageSink
NextSink
_stack
Figure 11-13. SinkStack before call to HttpClientTransportSink
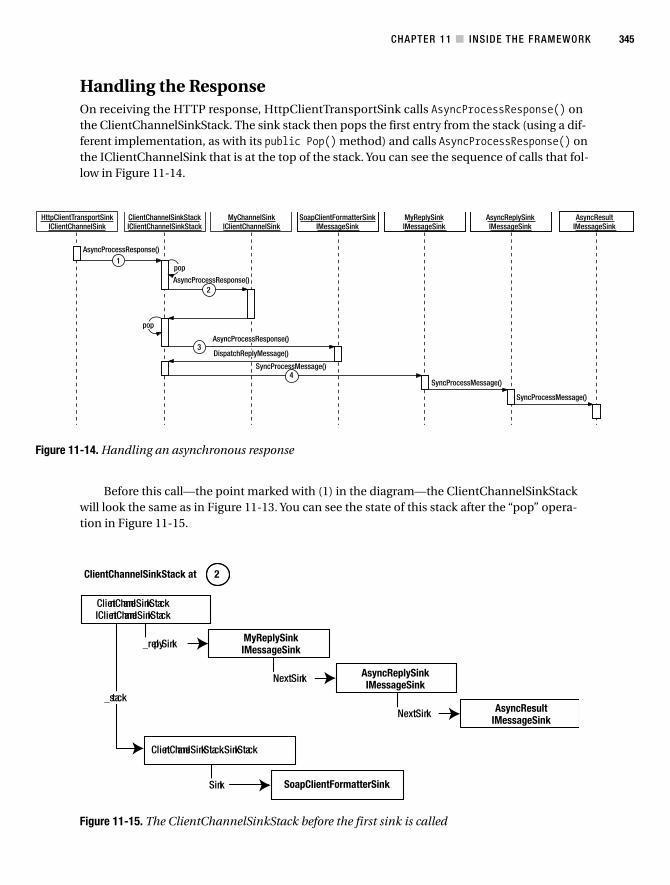
CHAPTER 11 ■ INSIDE THE FRAMEWORK 345
Handling the ResponseOn receiving the HTTP response, HttpClientTransportSink calls AsyncProcessResponse() onthe ClientChannelSinkStack. The sink stack then pops the first entry from the stack (using a dif-ferent implementation, as with its public Pop() method) and calls AsyncProcessResponse() onthe IClientChannelSink that is at the top of the stack. You can see the sequence of calls that fol-low in Figure 11-14.
HttpClientTransportSinkIClientChannelSink
ClientChannelSinkStackIClientChannelSinkStack
AsyncProcessResponse()1
2
pop
pop
3
AsyncProcessResponse()
SyncProcessMessage()
SyncProcessMessage()
SyncProcessMessage()
AsyncProcessResponse()
DispatchReplyMessage()
MyChannelSinkIClientChannelSink
SoapClientFormatterSinkIMessageSink
MyReplySinkIMessageSink
AsyncReplySinkIMessageSink
AsyncResultIMessageSink
4
Figure 11-14. Handling an asynchronous response
ClientChannelSinkStack at 2
MyReplySinkIMessageSink
AsyncReplySinkIMessageSink
NextSink
ClientChannelSinkStackIClientChannelSinkStack
_replySink
SoapClientFormatterSink
_stack
ClientChannelSinkStack.SinkStack
Sink
AsyncResultIMessageSink
NextSink
Figure 11-15. The ClientChannelSinkStack before the first sink is called
Before this call—the point marked with (1) in the diagram—the ClientChannelSinkStackwill look the same as in Figure 11-13. You can see the state of this stack after the “pop” opera-tion in Figure 11-15.
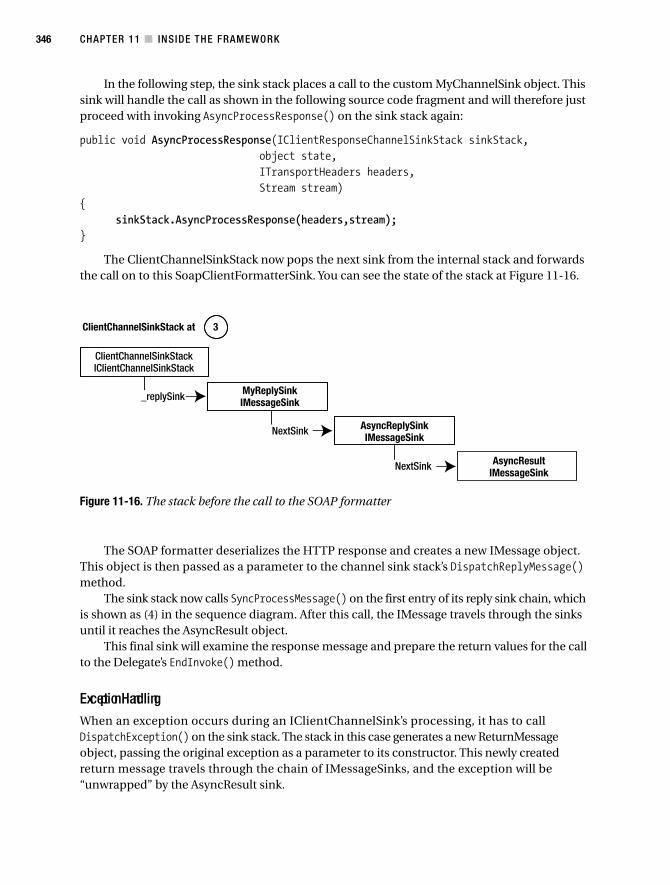
CHAPTER 11 ■ INSIDE THE FRAMEWORK346
In the following step, the sink stack places a call to the custom MyChannelSink object. Thissink will handle the call as shown in the following source code fragment and will therefore justproceed with invoking AsyncProcessResponse() on the sink stack again:
public void AsyncProcessResponse(IClientResponseChannelSinkStack sinkStack,object state,ITransportHeaders headers,Stream stream)
{sinkStack.AsyncProcessResponse(headers,stream);
}
The ClientChannelSinkStack now pops the next sink from the internal stack and forwardsthe call on to this SoapClientFormatterSink. You can see the state of the stack at Figure 11-16.
ClientChannelSinkStack at 3
MyReplySinkIMessageSink
AsyncReplySinkIMessageSink
NextSink
ClientChannelSinkStackIClientChannelSinkStack
_replySink
AsyncResultIMessageSink
NextSink
Figure 11-16. The stack before the call to the SOAP formatter
The SOAP formatter deserializes the HTTP response and creates a new IMessage object.This object is then passed as a parameter to the channel sink stack’s DispatchReplyMessage()method.
The sink stack now calls SyncProcessMessage() on the first entry of its reply sink chain, whichis shown as (4) in the sequence diagram. After this call, the IMessage travels through the sinksuntil it reaches the AsyncResult object.
This final sink will examine the response message and prepare the return values for the callto the Delegate’s EndInvoke() method.
Exception HandlingWhen an exception occurs during an IClientChannelSink’s processing, it has to callDispatchException() on the sink stack. The stack in this case generates a new ReturnMessageobject, passing the original exception as a parameter to its constructor. This newly createdreturn message travels through the chain of IMessageSinks, and the exception will be“unwrapped” by the AsyncResult sink.
CHAPTER 11 ■ INSIDE THE FRAMEWORK 347
Server-Side Asynchronous ProcessingOn the server side, there are also two kinds of interfaces: IServerChannelSink and IMessageSink.The asynchronous processing for objects implementing IMessageSink is handled in the sameway as on the client: the sink has to create another reply sink and pass this to the next sink’sAsyncProcessMessage() method.
The handling of asynchronous messages for IServerChannelSink objects is a little bit different.You can see the relevant parts of this interface here:
public interface IServerChannelSink {ServerProcessing ProcessMessage(IServerChannelSinkStack sinkStack,
IMessage requestMsg,ITransportHeaders requestHeaders,Stream requestStream,ref IMessage responseMsg,ref ITransportHeaders responseHeaders,ref Stream responseStream);
void AsyncProcessResponse(IServerResponseChannelSinkStack sinkStack,object state,IMessage msg,ITransportHeaders headers,Stream stream);
}
When a serialized message is received by an object implementing this interface, it is notyet determined whether it will be handled synchronously or asynchronously. This can only bedefined after the message later reaches the formatter.
In the meantime, the sink has to assume that the response might be received asynchro-nously, and therefore will have to push itself (and a possible state object) onto a stack beforecalling the next sink.
The call to the next sink returns a ServerProcessing value that can be Completed, Async, orOneWay. The sink has to check whether this value is Completed and only in such a case mightdo any post-processing work in ProcessMessage(). If this returned value is OneWay, the sinkwill not receive any further information when the processing has been finished.
When the next sink’s return value is ServerProcessing.Async, the current sink will benotified via the sink stack when the processing has been completed. The sink stack will callAsyncProcessResponse() in this case. After the sink has completed the processing of the response,it has to call sinkStack.AsyncProcessResponse() to forward the call to further sinks.
A sample implementation of ProcessMessage() and AsyncProcessResponse() might looklike this:
public ServerProcessing ProcessMessage(IServerChannelSinkStack sinkStack,IMessage requestMsg,ITransportHeaders requestHeaders,Stream requestStream,out IMessage responseMsg,out ITransportHeaders responseHeaders,out Stream responseStream)
{
CHAPTER 11 ■ INSIDE THE FRAMEWORK348
// handling of the request will be implemented here
// pushing onto stack and forwarding the callsinkStack.Push(this,null);
ServerProcessing srvProc = _nextSink.ProcessMessage(sinkStack,requestMsg,requestHeaders,requestStream,out responseMsg,out responseHeaders,out responseStream);
if (srvProc == ServerProcessing.Complete) {// handling of the response will be implemented here
}
// returning status informationreturn srvProc;
}
public void AsyncProcessResponse(IServerResponseChannelSinkStack sinkStack,object state,IMessage msg,ITransportHeaders headers,Stream stream)
{
// handling of the response will be implemented here
// forwarding to the stack for further processingsinkStack.AsyncProcessResponse(msg,headers,stream);
}
SummaryIn this chapter, you learned about the details and inner workings of .NET Remoting. You readabout the various processing stages of a message, and you now know the difference betweenIMessageSink, IClientChannelSink, and IServerChannelSink. You also know how asynchronousrequests are processed, and that the inner workings of the asynchronous message handling isdifferent for message sinks and channel sinks.
In the next chapter, I’ll show you how those sinks are created using sink providers.
349
C H A P T E R 1 2
■ ■ ■
Creation of Sinks
The previous chapter showed you the various kinds of sinks and their synchronous and asyn-chronous processing of requests. What I have omitted until now is one of the most importantsteps: the instantiation of sinks and sink chains. Sinks are normally not created directly in eitheryour code or with the definition in configuration files. Instead, a chain of sink providers is set up,which will in turn return the sink chains on demand. This chapter shows you the foundationon which to build your own sinks. The implementation of those custom sinks is presented inChapter 13.
Understanding Sink ProvidersAs you saw in Chapter 4, you can define a chain of sinks in a .NET configuration file as shown inthe following code. (This example is for a client-side configuration file; for server-side chains,you have to replace clientProviders with serverProviders.)
<configuration><system.runtime.remoting><application><channels><channel ref="http"><clientProviders>
<provider type="MySinks.SomeMessageSinkProvider, Client" /><formatter ref="soap" /><provider type="MySinks.SomeClientChannelSinkProvider, Client" />
</clientProviders></channel>
</channels></application>
</system.runtime.remoting></configuration>
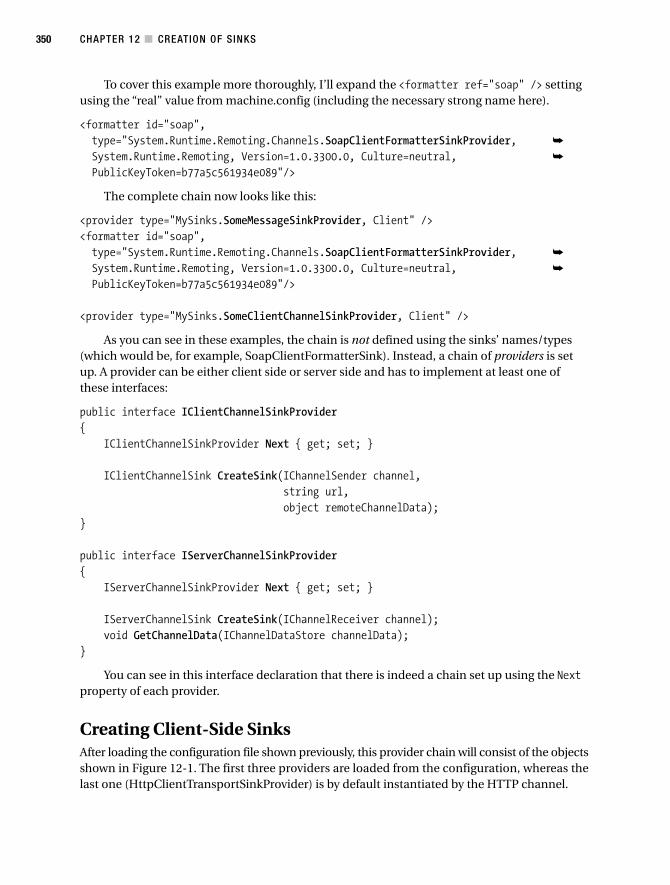
CHAPTER 12 ■ CREATION OF SINKS350
To cover this example more thoroughly, I’ll expand the <formatter ref="soap" /> settingusing the “real” value from machine.config (including the necessary strong name here).
<formatter id="soap",type="System.Runtime.Remoting.Channels.SoapClientFormatterSinkProvider, ➥
System.Runtime.Remoting, Version=1.0.3300.0, Culture=neutral, ➥
PublicKeyToken=b77a5c561934e089"/>
The complete chain now looks like this:
<provider type="MySinks.SomeMessageSinkProvider, Client" /><formatter id="soap",type="System.Runtime.Remoting.Channels.SoapClientFormatterSinkProvider, ➥
System.Runtime.Remoting, Version=1.0.3300.0, Culture=neutral, ➥
PublicKeyToken=b77a5c561934e089"/>
<provider type="MySinks.SomeClientChannelSinkProvider, Client" />
As you can see in these examples, the chain is not defined using the sinks’ names/types(which would be, for example, SoapClientFormatterSink). Instead, a chain of providers is setup. A provider can be either client side or server side and has to implement at least one ofthese interfaces:
public interface IClientChannelSinkProvider{
IClientChannelSinkProvider Next { get; set; }
IClientChannelSink CreateSink(IChannelSender channel,string url,object remoteChannelData);
}
public interface IServerChannelSinkProvider{
IServerChannelSinkProvider Next { get; set; }
IServerChannelSink CreateSink(IChannelReceiver channel);void GetChannelData(IChannelDataStore channelData);
}
You can see in this interface declaration that there is indeed a chain set up using the Nextproperty of each provider.
Creating Client-Side SinksAfter loading the configuration file shown previously, this provider chain will consist of the objectsshown in Figure 12-1. The first three providers are loaded from the configuration, whereas thelast one (HttpClientTransportSinkProvider) is by default instantiated by the HTTP channel.
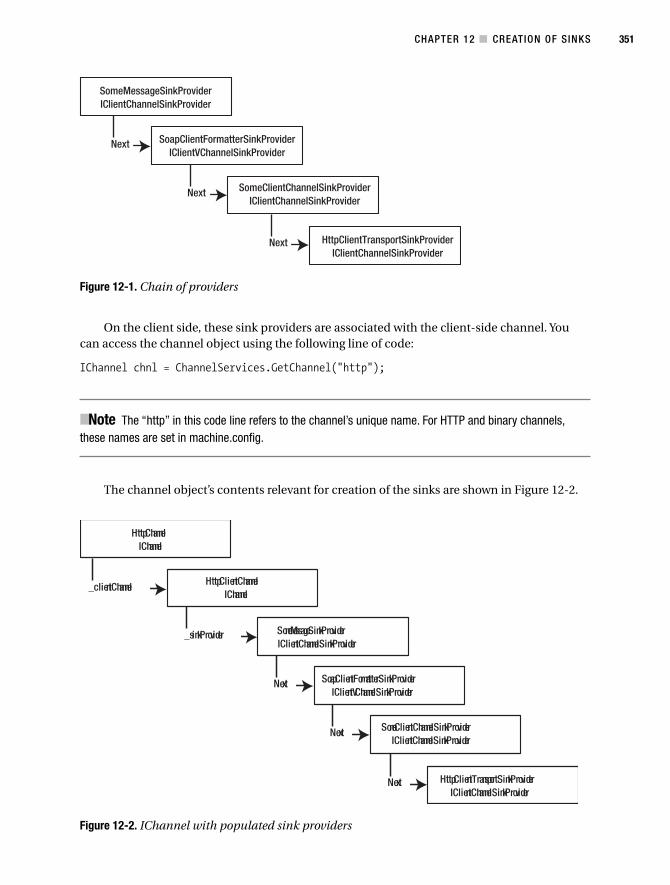
CHAPTER 12 ■ CREATION OF SINKS 351
SomeMessageSinkProviderIClientChannelSinkProvider
SoapClientFormatterSinkProviderIClientVChannelSinkProvider
SomeClientChannelSinkProviderIClientChannelSinkProvider
HttpClientTransportSinkProviderIClientChannelSinkProvider
Next
Next
Next
Figure 12-1. Chain of providers
SomeMessageSinkProviderIClientChannelSinkProvider
SoapClientFormatterSinkProviderIClientVChannelSinkProvider
SomeClientChannelSinkProviderIClientChannelSinkProvider
HttpClientTransportSinkProviderIClientChannelSinkProvider
Next
Next
HttpChannelIChannel
HttpClientChannelIChannel
_sinkProvider
_clientChannel
Next
Figure 12-2. IChannel with populated sink providers
On the client side, these sink providers are associated with the client-side channel. Youcan access the channel object using the following line of code:
IChannel chnl = ChannelServices.GetChannel("http");
■Note The “http” in this code line refers to the channel’s unique name. For HTTP and binary channels,these names are set in machine.config.
The channel object’s contents relevant for creation of the sinks are shown in Figure 12-2.

CHAPTER 12 ■ CREATION OF SINKS352
RemotingServices ChannelServices HttpChannel HttpClientChannel SomeMessageSinkProvider
SomeClientChannelSinkProvider
Connect()
CreateMessageSink()
CreateMessageSink()This will be called forall registered channelsuntil one returnsa IMessageSink ! = null
CreateSink()
CreateSink()
CreateSink()
CreateMessageSink
Figure 12-3. Creation of sinks from a chain of providers
When a reference to a remote SAO object is created (for CAOs, an additional ConstructionCallmessage is sent to the server and the proxy’s identity object populated), a lot of things happenbehind the scenes. At some time during the use of the new operator or the call to Activator.GetObject(), the method RemotingServices.Connect() is called. What happens after this call isshown (in part) in Figure 12-3.
After being invoked from RemotingServices, ChannelServices calls CreateMessageSink()on each registered channel until one of them accepts the URL that is passed as a parameter. TheHTTP channel, for example, will work on any URLs that start with http: or https:, whereas the TCPchannel will only accept those with a tcp: protocol designator.
When the channel recognizes the given URL, it calls CreateMessageSink() on its client-sidechannel.
■Note The HTTP channel internally consists of both the client-side and the server-side transport channel.
HttpClientChannel, in turn, invokes CreateSink() on the first sink provider (as shown inFigure 12-3). What the different sink providers do now corresponds to the following code (shownfor a sample SomeClientChannelSinkProvider):
public class SomeClientChannelSinkProvider: IClientChannelSinkProvider{
private IClientChannelSinkProvider next = null;
public IClientChannelSink CreateSink(IChannelSender channel,string url,object remoteChannelData)
{IClientChannelSink nextSink = null;
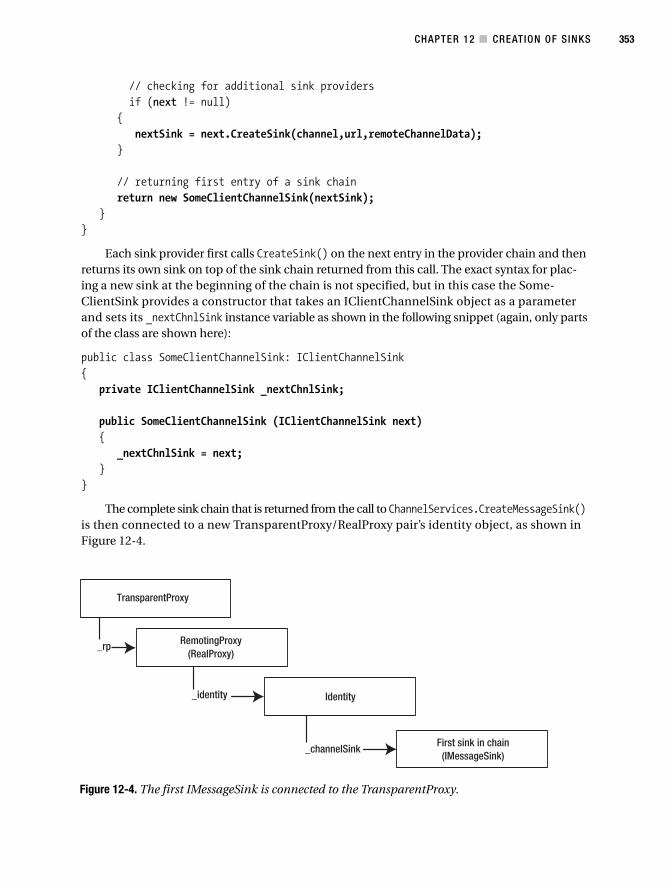
CHAPTER 12 ■ CREATION OF SINKS 353
// checking for additional sink providersif (next != null)
{nextSink = next.CreateSink(channel,url,remoteChannelData);
}
// returning first entry of a sink chainreturn new SomeClientChannelSink(nextSink);
}}
Each sink provider first calls CreateSink() on the next entry in the provider chain and thenreturns its own sink on top of the sink chain returned from this call. The exact syntax for plac-ing a new sink at the beginning of the chain is not specified, but in this case the Some-ClientSink provides a constructor that takes an IClientChannelSink object as a parameterand sets its _nextChnlSink instance variable as shown in the following snippet (again, only partsof the class are shown here):
public class SomeClientChannelSink: IClientChannelSink{
private IClientChannelSink _nextChnlSink;
public SomeClientChannelSink (IClientChannelSink next){
_nextChnlSink = next;}
}
The complete sink chain that is returned from the call to ChannelServices.CreateMessageSink()is then connected to a new TransparentProxy/RealProxy pair’s identity object, as shown inFigure 12-4.
TransparentProxy
RemotingProxy(RealProxy)
Identity
First sink in chain(IMessageSink)
_rp
_identity
_channelSink
Figure 12-4. The first IMessageSink is connected to the TransparentProxy.
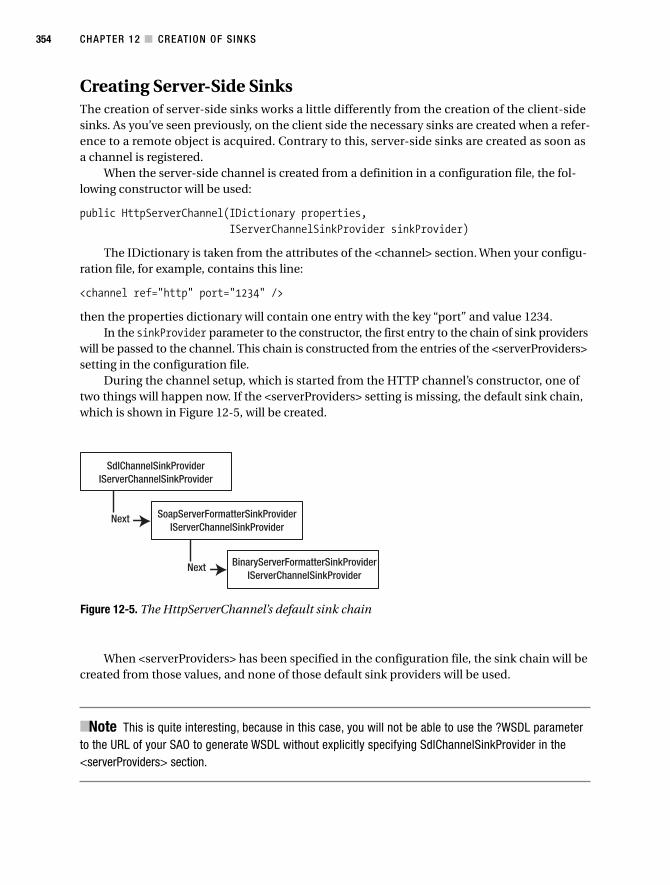
CHAPTER 12 ■ CREATION OF SINKS354
SdlChannelSinkProviderIServerChannelSinkProvider
SoapServerFormatterSinkProviderIServerChannelSinkProvider
BinaryServerFormatterSinkProviderIServerChannelSinkProvider
Next
Next
Figure 12-5. The HttpServerChannel’s default sink chain
Creating Server-Side SinksThe creation of server-side sinks works a little differently from the creation of the client-sidesinks. As you’ve seen previously, on the client side the necessary sinks are created when a refer-ence to a remote object is acquired. Contrary to this, server-side sinks are created as soon asa channel is registered.
When the server-side channel is created from a definition in a configuration file, the fol-lowing constructor will be used:
public HttpServerChannel(IDictionary properties,IServerChannelSinkProvider sinkProvider)
The IDictionary is taken from the attributes of the <channel> section. When your configu-ration file, for example, contains this line:
<channel ref="http" port="1234" />
then the properties dictionary will contain one entry with the key “port” and value 1234.In the sinkProvider parameter to the constructor, the first entry to the chain of sink providers
will be passed to the channel. This chain is constructed from the entries of the <serverProviders>setting in the configuration file.
During the channel setup, which is started from the HTTP channel’s constructor, one oftwo things will happen now. If the <serverProviders> setting is missing, the default sink chain,which is shown in Figure 12-5, will be created.
When <serverProviders> has been specified in the configuration file, the sink chain will becreated from those values, and none of those default sink providers will be used.
■Note This is quite interesting, because in this case, you will not be able to use the ?WSDL parameterto the URL of your SAO to generate WSDL without explicitly specifying SdlChannelSinkProvider in the<serverProviders> section.
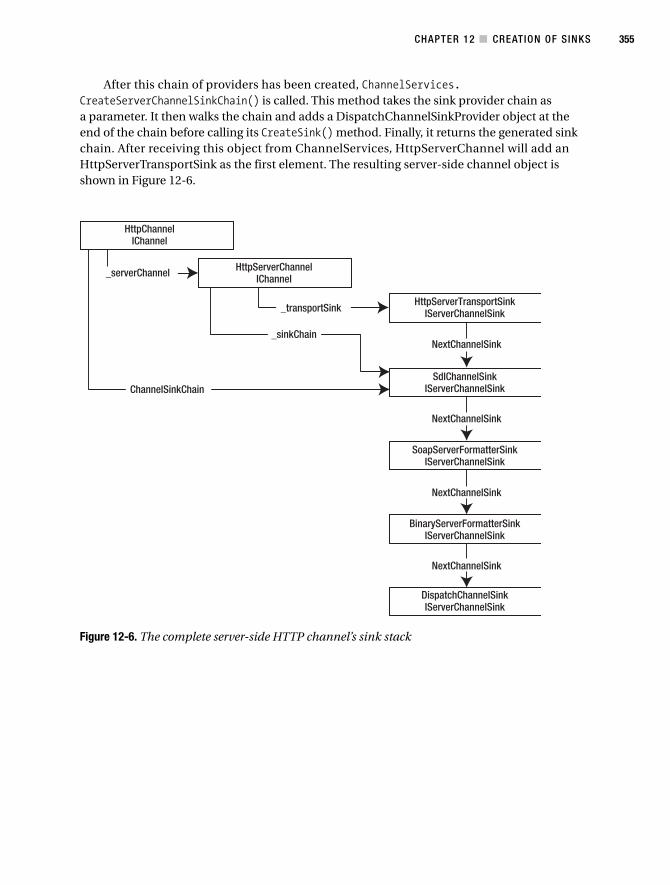
CHAPTER 12 ■ CREATION OF SINKS 355
After this chain of providers has been created, ChannelServices.CreateServerChannelSinkChain() is called. This method takes the sink provider chain asa parameter. It then walks the chain and adds a DispatchChannelSinkProvider object at theend of the chain before calling its CreateSink() method. Finally, it returns the generated sinkchain. After receiving this object from ChannelServices, HttpServerChannel will add anHttpServerTransportSink as the first element. The resulting server-side channel object isshown in Figure 12-6.
HttpChannelIChannel
_serverChannel
_transportSink
ChannelSinkChain
_sinkChainNextChannelSink
NextChannelSink
NextChannelSink
NextChannelSink
HttpServerChannelIChannel
HttpServerTransportSinkIServerChannelSink
SdlChannelSinkIServerChannelSink
SoapServerFormatterSinkIServerChannelSink
BinaryServerFormatterSinkIServerChannelSink
DispatchChannelSinkIServerChannelSink
Figure 12-6. The complete server-side HTTP channel’s sink stack
CHAPTER 12 ■ CREATION OF SINKS356
Using Dynamic SinksAs you’ve seen in the previous chapter, both the client-side and the server-side sink chain cancall dynamic sinks. On the server side this is done by the CrossContextChannel and on theclient side by the ClientContextTerminatorSink.
Dynamic sinks are associated with a specific context (you can read more about contexts inChapter 11) and therefore will be called for all calls passing a context boundary. They cannotbe assigned to a specific channel and will even be called for local cross-context or cross-AppDomain calls. The sinks are created by dynamic context properties, which are classesimplementing IDynamicProperty and IContributeDynamicSink.
■Note IContributeDynamicSink can be compared to a sink provider for dynamic sinks.
The corresponding interfaces are shown here:
public interface IDynamicProperty{
string Name { get; }}
public interface IContributeDynamicSink{
IDynamicMessageSink GetDynamicSink();}
The dynamic sink itself, which has to be returned from GetDynamicSink(), implements thefollowing IDynamicMessageSink interface:
public interface IDynamicMessageSink{
void ProcessMessageStart(IMessage reqMsg, bool bCliSide, bool bAsync);void ProcessMessageFinish(IMessage replyMsg, bool bCliSide, bool bAsync);
}
As the names imply, the ProcessMessageStart() method is called before the message trav-els further through the chain, and ProcessMessageFinish() is called when the call has beenhandled by the sink.
The following dynamic sink will simply write a line to the console, whenever a messagepasses a remoting boundary:
public class MyDynamicSinkProvider: IDynamicProperty, IContributeDynamicSink{
public string Name{
get { return "MyDynamicSinkProvider"; }}
CHAPTER 12 ■ CREATION OF SINKS 357
public IDynamicMessageSink GetDynamicSink(){
return new MyDynamicSink();}
}
public class MyDynamicSink: IDynamicMessageSink{
public void ProcessMessageStart(IMessage reqMsg, bool bCliSide,bool bAsync)
{Console.WriteLine("--> MyDynamicSink: ProcessMessageStart");
}
public void ProcessMessageFinish(IMessage replyMsg, bool bCliSide,bool bAsync)
{Console.WriteLine("--> MyDynamicSink: ProcessMessageFinish");
}}
To register an IDynamicProperty with the current context, you can use the following code:
Context ctx = Context.DefaultContext;IDynamicProperty prp = new MyDynamicSinkProvider();Context.RegisterDynamicProperty(prp, null, ctx);
SummaryIn this chapter, you read about the creation of the various kinds of sinks. Together with the pre-vious chapter, you’re now fully equipped to implement your own sinks to enhance the featureset of .NET Remoting. You also made first contact with dynamic context sinks, a topic that iscovered in more detail in Chapter 15.
I admit that the last two chapters have been quite heavy in content, but in the next chapterI reward your patience by showing some real-world sinks that employ all the techniques pre-sented here.
359
C H A P T E R 1 3
■ ■ ■
Extending .NET Remoting
In Chapters 11 and 12, I told you a lot about the various places in your remoting applicationsthat can be extended by custom sinks and providers. What I didn’t tell you is why you’d want tochange the default remoting behavior. There are a lot of reasons for doing so:
• Compression or encryption of the message’s contents.
• Passing additional information from the client to the server. For example, you could passthe client-side thread’s priority to the server so that the remote execution is performedusing the same priority.
• Extending the “look and feel” of .NET Remoting. You could, for example, switch to a per-host authentication model instead of the default per-object model.
• Debugging your applications by dumping the message’s contents to the console or toa log file.
• And last but not least, custom sinks and providers enable you to use other transportmediums such as MSMQ or even SMTP/POP3.
You might ask why Microsoft hasn’t already implemented these features itself. The onlyanswer I can give you is that most programmers, including myself, really prefer being able tochange the framework and add the necessary features themselves in a clean and documentedway. You can look forward to getting message sinks from various third-party providers, includ-ing Web sites from which you can download sinks with included source code.
Creating a Compression SinkThe first thing to ask yourself before starting to implement a new feature for .NET Remoting iswhether you’ll want to work on the original message (that is, the underlying dictionary) or onthe serialized message that you’ll get from the stream. In the case of compression, you won’t reallycare about the message’s contents and instead just want to compress the resulting stream at theclient side and decompress it on the server side before reaching the server’s SoapFormatter.
You can see the planned client-side sink chain in Figure 13-1 and the server-side chain inFigure 13-2.
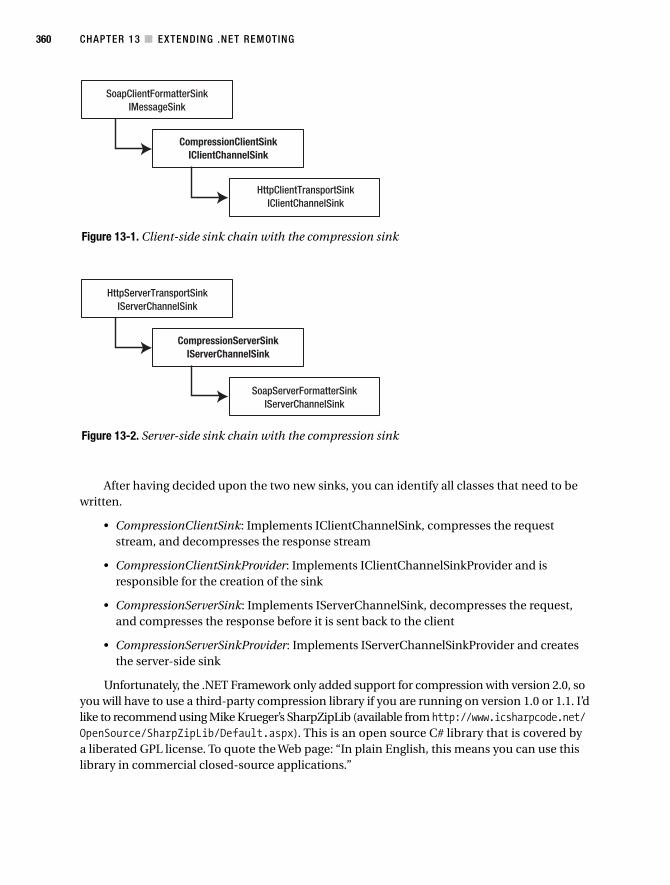
CHAPTER 13 ■ EXTENDING .NET REMOTING360
SoapClientFormatterSinkIMessageSink
CompressionClientSinkIClientChannelSink
HttpClientTransportSinkIClientChannelSink
Figure 13-1. Client-side sink chain with the compression sink
SoapServerFormatterSinkIServerChannelSink
CompressionServerSinkIServerChannelSink
HttpServerTransportSinkIServerChannelSink
Figure 13-2. Server-side sink chain with the compression sink
After having decided upon the two new sinks, you can identify all classes that need to bewritten.
• CompressionClientSink: Implements IClientChannelSink, compresses the requeststream, and decompresses the response stream
• CompressionClientSinkProvider: Implements IClientChannelSinkProvider and isresponsible for the creation of the sink
• CompressionServerSink: Implements IServerChannelSink, decompresses the request,and compresses the response before it is sent back to the client
• CompressionServerSinkProvider: Implements IServerChannelSinkProvider and createsthe server-side sink
Unfortunately, the .NET Framework only added support for compression with version 2.0, soyou will have to use a third-party compression library if you are running on version 1.0 or 1.1. I’dlike to recommend using Mike Krueger’s SharpZipLib (available from http://www.icsharpcode.net/OpenSource/SharpZipLib/Default.aspx). This is an open source C# library that is covered bya liberated GPL license. To quote the Web page: “In plain English, this means you can use thislibrary in commercial closed-source applications.”

CHAPTER 13 ■ EXTENDING .NET REMOTING 361
Implementing the Client-Side SinkThe client-side sink extends BaseChannelSinkWithProperties and implements IClientChannelSink.In Listing 13-1, you can see a skeleton client channel sink. The positions at which you’ll have toimplement the preprocessing and post-processing logic have been marked “TODO.” This is a fullyworking sink—it simply doesn’t do anything useful yet.
Listing 13-1. A Skeleton IClientChannelSink
using System;using System.Runtime.Remoting.Channels;using System.Runtime.Remoting.Messaging;using System.IO;
namespace CompressionSink{
public class CompressionClientSink: BaseChannelSinkWithProperties,IClientChannelSink
{private IClientChannelSink _nextSink;
public CompressionClientSink(IClientChannelSink next){
_nextSink = next;}
public IClientChannelSink NextChannelSink{
get {return _nextSink;
}}
public void AsyncProcessRequest(IClientChannelSinkStack sinkStack,IMessage msg,ITransportHeaders headers,Stream stream)
{// TODO: Implement the preprocessing
sinkStack.Push(this,null);_nextSink.AsyncProcessRequest(sinkStack,msg,headers,stream);
}
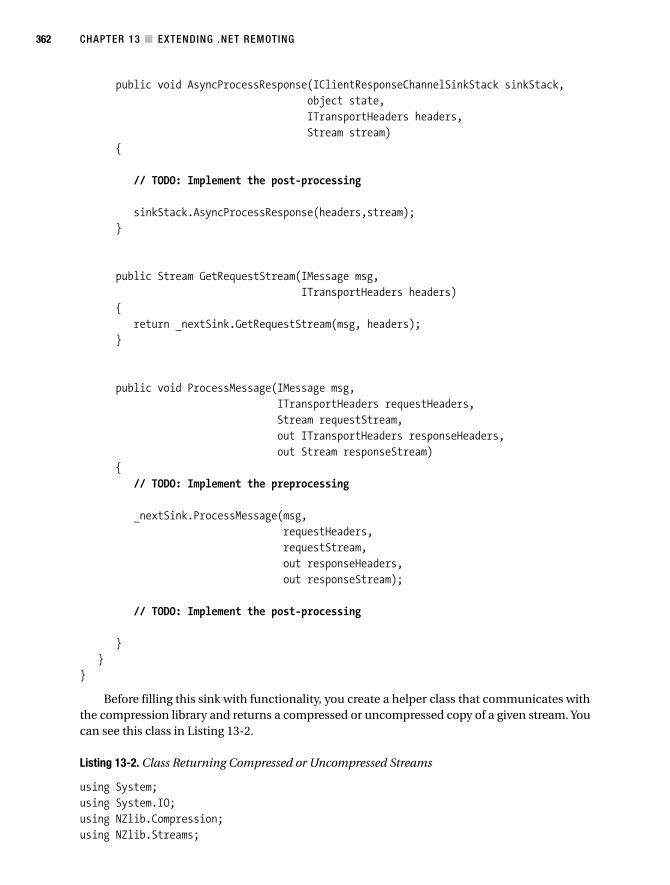
CHAPTER 13 ■ EXTENDING .NET REMOTING362
public void AsyncProcessResponse(IClientResponseChannelSinkStack sinkStack,object state,ITransportHeaders headers,Stream stream)
{
// TODO: Implement the post-processing
sinkStack.AsyncProcessResponse(headers,stream);}
public Stream GetRequestStream(IMessage msg,ITransportHeaders headers)
{return _nextSink.GetRequestStream(msg, headers);
}
public void ProcessMessage(IMessage msg,ITransportHeaders requestHeaders,Stream requestStream,out ITransportHeaders responseHeaders,out Stream responseStream)
{// TODO: Implement the preprocessing
_nextSink.ProcessMessage(msg,requestHeaders,requestStream,out responseHeaders,out responseStream);
// TODO: Implement the post-processing
}}
}
Before filling this sink with functionality, you create a helper class that communicates withthe compression library and returns a compressed or uncompressed copy of a given stream. Youcan see this class in Listing 13-2.
Listing 13-2. Class Returning Compressed or Uncompressed Streams
using System;using System.IO;using NZlib.Compression;using NZlib.Streams;
CHAPTER 13 ■ EXTENDING .NET REMOTING 363
namespace CompressionSink {public class CompressionHelper {
public static Stream GetCompressedStreamCopy(Stream inStream) {Stream outStream = new System.IO.MemoryStream();DeflaterOutputStream compressStream = new DeflaterOutputStream(
outStream,new Deflater(Deflater.BEST_COMPRESSION));byte[] buf = new Byte[1000];int cnt = inStream.Read(buf,0,1000);while (cnt>0) {
compressStream.Write(buf,0,cnt);cnt = inStream.Read(buf,0,1000);
}compressStream.Finish();compressStream.Flush();outStream.Seek(0,SeekOrigin.Begin);return outStream;
}
public static Stream GetUncompressedStreamCopy(Stream inStream) {MemoryStream outStream = new MemoryStream();inStream = new InflaterInputStream(inStream);byte[] buf = new Byte[1000];int cnt = inStream.Read(buf,0,1000);while (cnt>0){
outStream.Write(buf,0,cnt);cnt = inStream.Read(buf,0,1000);
}outStream.Seek(0,SeekOrigin.Begin);return outStream;
}}
}
When implementing the compression functionality in the client-side sink, you have todeal with both synchronous and asynchronous processing. The synchronous implementationis quite straightforward. Before passing control further down the chain, the sink simply com-presses the stream. When it has finished processing (that is, when the server has sent its response),the message sink will decompress the stream and return it to the calling function as an outparameter.
public void ProcessMessage(IMessage msg,ITransportHeaders requestHeaders,Stream requestStream,out ITransportHeaders responseHeaders,out Stream responseStream)
{// generate a compressed stream using NZipLibrequestStream = CompressionHelper.GetCompressedStreamCopy(requestStream);
CHAPTER 13 ■ EXTENDING .NET REMOTING364
// forward the call to the next sink_nextSink.ProcessMessage(msg, requestHeaders, requestStream,
out responseHeaders, out responseStream);// uncompress the responseresponseStream = CompressionHelper.GetUncompressedStreamCopy(responseStream);
}
As you’ve seen in the previous chapter, asynchronous handling is split between two methods.In the current example, you add the compression to AsyncProcessRequest() and the decom-pression to AsyncProcessResponse(), as shown in the following piece of code:
public void AsyncProcessRequest(IClientChannelSinkStack sinkStack,IMessage msg,ITransportHeaders headers,Stream stream)
{
// generate a compressed stream using NZipLibstream = CompressionHelper.GetCompressedStreamCopy(stream);
// push onto stack and forward the requestsinkStack.Push(this,null);_nextSink.AsyncProcessRequest(sinkStack,msg,headers,stream);
}
public void AsyncProcessResponse(IClientResponseChannelSinkStack sinkStack,object state,ITransportHeaders headers,Stream stream)
{
// uncompress the responsestream = CompressionHelper.GetUncompressedStreamCopy(stream);
// forward the requestsinkStack.AsyncProcessResponse(headers,stream);
}
Implementing the Server-Side SinkThe server-side sink’s task is to decompress the incoming stream before passing it on to theformatter. In Listing 13-3, you can see a skeleton IServerChannelSink.
Listing 13-3. A Basic IServerChannelSink
using System;using System.Runtime.Remoting.Channels;
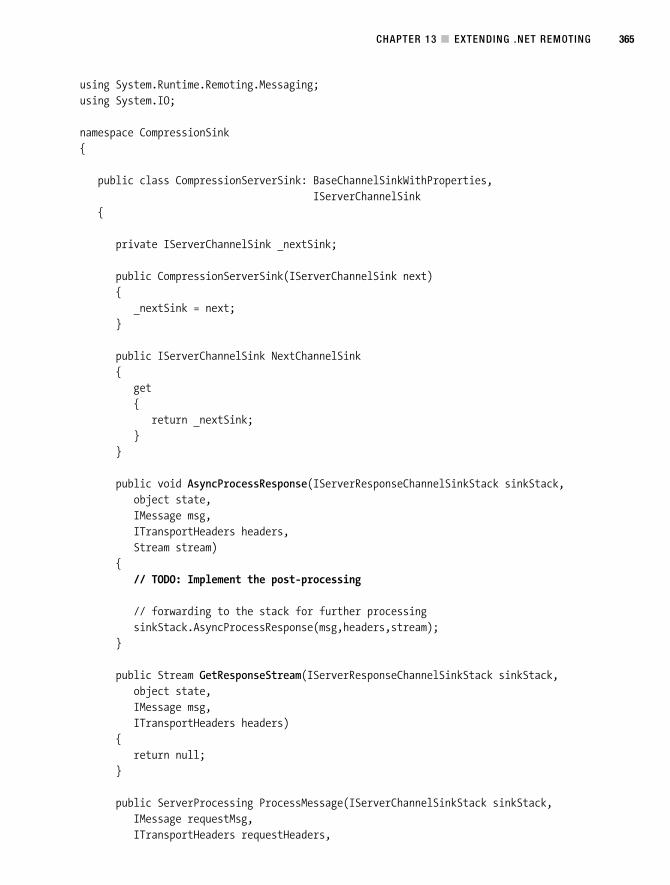
CHAPTER 13 ■ EXTENDING .NET REMOTING 365
using System.Runtime.Remoting.Messaging;using System.IO;
namespace CompressionSink{
public class CompressionServerSink: BaseChannelSinkWithProperties,IServerChannelSink
{
private IServerChannelSink _nextSink;
public CompressionServerSink(IServerChannelSink next){
_nextSink = next;}
public IServerChannelSink NextChannelSink{
get{
return _nextSink;}
}
public void AsyncProcessResponse(IServerResponseChannelSinkStack sinkStack,object state,IMessage msg,ITransportHeaders headers,Stream stream)
{// TODO: Implement the post-processing
// forwarding to the stack for further processingsinkStack.AsyncProcessResponse(msg,headers,stream);
}
public Stream GetResponseStream(IServerResponseChannelSinkStack sinkStack,object state,IMessage msg,ITransportHeaders headers)
{return null;
}
public ServerProcessing ProcessMessage(IServerChannelSinkStack sinkStack,IMessage requestMsg,ITransportHeaders requestHeaders,
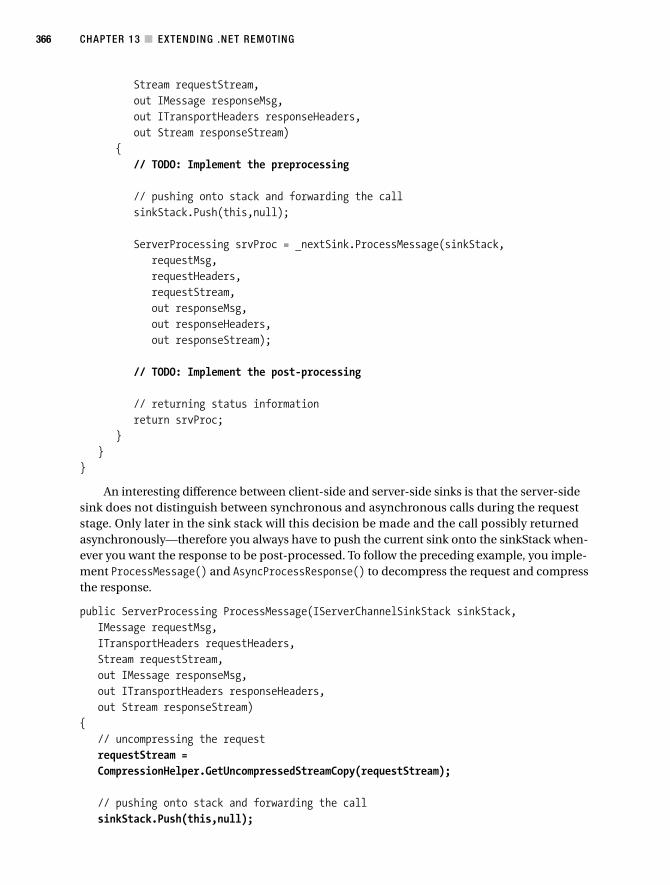
CHAPTER 13 ■ EXTENDING .NET REMOTING366
Stream requestStream,out IMessage responseMsg,out ITransportHeaders responseHeaders,out Stream responseStream)
{// TODO: Implement the preprocessing
// pushing onto stack and forwarding the callsinkStack.Push(this,null);
ServerProcessing srvProc = _nextSink.ProcessMessage(sinkStack,requestMsg,requestHeaders,requestStream,out responseMsg,out responseHeaders,out responseStream);
// TODO: Implement the post-processing
// returning status informationreturn srvProc;
}}
}
An interesting difference between client-side and server-side sinks is that the server-sidesink does not distinguish between synchronous and asynchronous calls during the requeststage. Only later in the sink stack will this decision be made and the call possibly returnedasynchronously—therefore you always have to push the current sink onto the sinkStack when-ever you want the response to be post-processed. To follow the preceding example, you imple-ment ProcessMessage() and AsyncProcessResponse() to decompress the request and compressthe response.
public ServerProcessing ProcessMessage(IServerChannelSinkStack sinkStack,IMessage requestMsg,ITransportHeaders requestHeaders,Stream requestStream,out IMessage responseMsg,out ITransportHeaders responseHeaders,out Stream responseStream)
{// uncompressing the requestrequestStream =CompressionHelper.GetUncompressedStreamCopy(requestStream);
// pushing onto stack and forwarding the callsinkStack.Push(this,null);
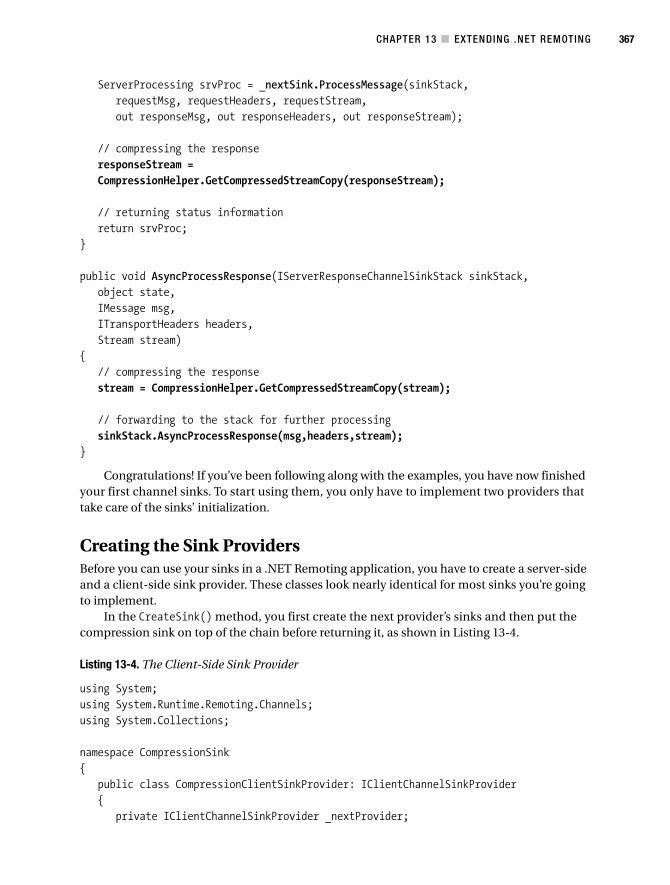
CHAPTER 13 ■ EXTENDING .NET REMOTING 367
ServerProcessing srvProc = _nextSink.ProcessMessage(sinkStack,requestMsg, requestHeaders, requestStream,out responseMsg, out responseHeaders, out responseStream);
// compressing the responseresponseStream =CompressionHelper.GetCompressedStreamCopy(responseStream);
// returning status informationreturn srvProc;
}
public void AsyncProcessResponse(IServerResponseChannelSinkStack sinkStack,object state,IMessage msg,ITransportHeaders headers,Stream stream)
{// compressing the responsestream = CompressionHelper.GetCompressedStreamCopy(stream);
// forwarding to the stack for further processingsinkStack.AsyncProcessResponse(msg,headers,stream);
}
Congratulations! If you’ve been following along with the examples, you have now finishedyour first channel sinks. To start using them, you only have to implement two providers thattake care of the sinks’ initialization.
Creating the Sink ProvidersBefore you can use your sinks in a .NET Remoting application, you have to create a server-sideand a client-side sink provider. These classes look nearly identical for most sinks you’re goingto implement.
In the CreateSink() method, you first create the next provider’s sinks and then put thecompression sink on top of the chain before returning it, as shown in Listing 13-4.
Listing 13-4. The Client-Side Sink Provider
using System;using System.Runtime.Remoting.Channels;using System.Collections;
namespace CompressionSink{
public class CompressionClientSinkProvider: IClientChannelSinkProvider{
private IClientChannelSinkProvider _nextProvider;
CHAPTER 13 ■ EXTENDING .NET REMOTING368
public CompressionClientSinkProvider(IDictionary properties,ICollection providerData)
{// not yet needed
}
public IClientChannelSinkProvider Next{
get {return _nextProvider; }set {_nextProvider = value;}
}
public IClientChannelSink CreateSink(IChannelSender channel,string url,object remoteChannelData)
{// create other sinks in the chainIClientChannelSink next = _nextProvider.CreateSink(channel,
url,remoteChannelData);
// put our sink on top of the chain and return itreturn new CompressionClientSink(next);
}}
}
The server-side sink provider that is shown in Listing 13-5 looks nearly identical, butreturns IServerChannelSink instead of IClientChannelSink.
Listing 13-5. The Server-Side Sink Provider
using System;using System.Runtime.Remoting.Channels;using System.Collections;
namespace CompressionSink{
public class CompressionServerSinkProvider: IServerChannelSinkProvider{
private IServerChannelSinkProvider _nextProvider;
public CompressionServerSinkProvider(IDictionary properties,ICollection providerData)
{// not yet needed
}
CHAPTER 13 ■ EXTENDING .NET REMOTING 369
public IServerChannelSinkProvider Next{
get {return _nextProvider; }set {_nextProvider = value;}
}
public IServerChannelSink CreateSink(IChannelReceiver channel){
// create other sinks in the chainIServerChannelSink next = _nextProvider.CreateSink(channel);
// put our sink on top of the chain and return itreturn new CompressionServerSink(next);
}
public void GetChannelData(IChannelDataStore channelData){
// not yet needed}
}}
Using the SinksTo use the sinks on the client and server side of a channel, you simply have to include them inyour configuration files. In the client-side configuration file, you have to incorporate the infor-mation shown in the following code. If you place the CompressionSink assembly in the GAC,mind that you have to specify the complete strong name in the type attribute!
<configuration><system.runtime.remoting><application><channels><channel ref="http">
<clientProviders><formatter ref="soap" /><providertype="CompressionSink.CompressionClientSinkProvider, CompressionSink" />
</clientProviders>
</channel></channels></application></system.runtime.remoting></configuration>
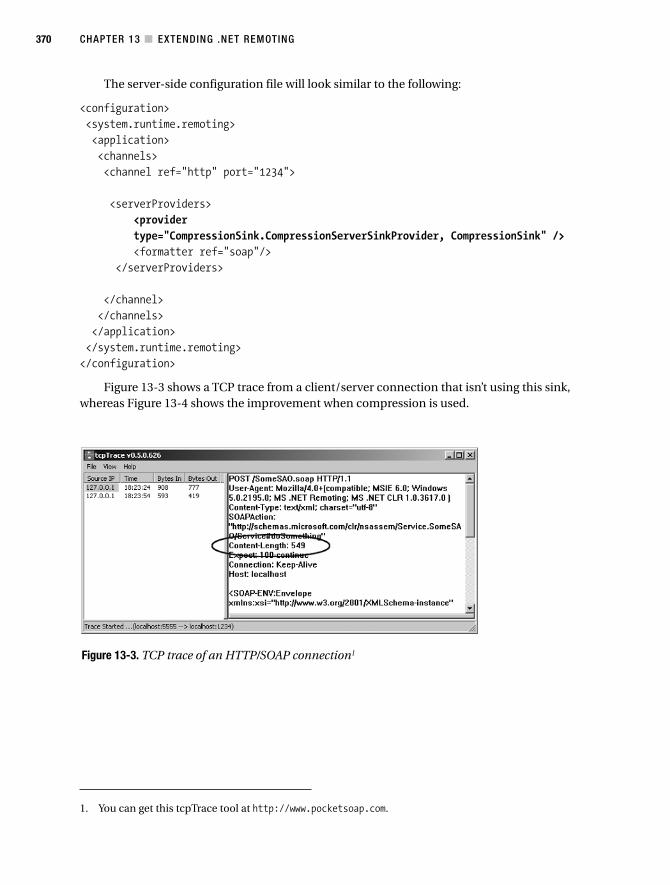
CHAPTER 13 ■ EXTENDING .NET REMOTING370
Figure 13-3. TCP trace of an HTTP/SOAP connection1
The server-side configuration file will look similar to the following:
<configuration><system.runtime.remoting><application><channels><channel ref="http" port="1234">
<serverProviders><providertype="CompressionSink.CompressionServerSinkProvider, CompressionSink" /><formatter ref="soap"/>
</serverProviders>
</channel></channels></application></system.runtime.remoting></configuration>
Figure 13-3 shows a TCP trace from a client/server connection that isn’t using this sink,whereas Figure 13-4 shows the improvement when compression is used.
1. You can get this tcpTrace tool at http://www.pocketsoap.com.
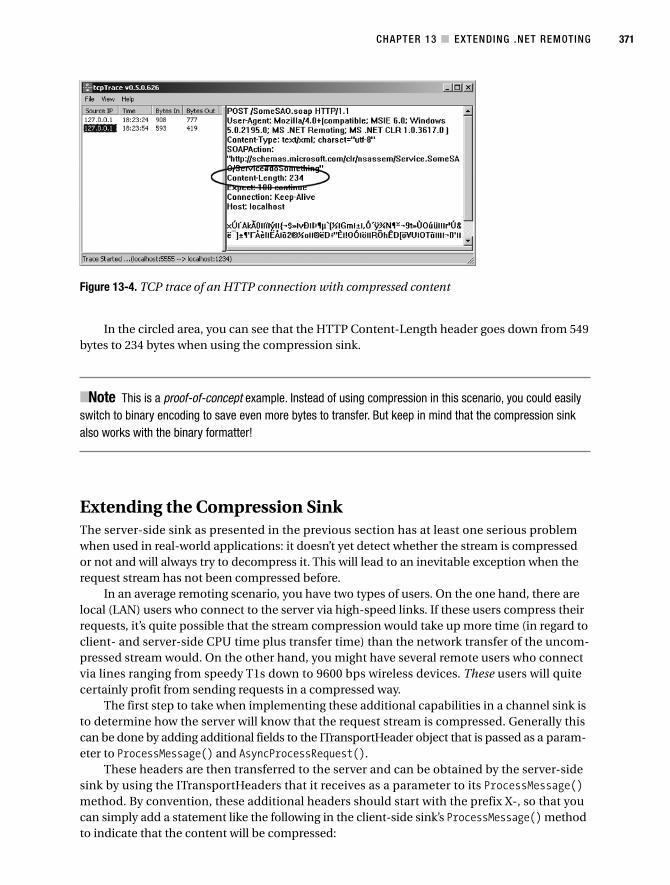
CHAPTER 13 ■ EXTENDING .NET REMOTING 371
Figure 13-4. TCP trace of an HTTP connection with compressed content
In the circled area, you can see that the HTTP Content-Length header goes down from 549bytes to 234 bytes when using the compression sink.
■Note This is a proof-of-concept example. Instead of using compression in this scenario, you could easilyswitch to binary encoding to save even more bytes to transfer. But keep in mind that the compression sinkalso works with the binary formatter!
Extending the Compression SinkThe server-side sink as presented in the previous section has at least one serious problemwhen used in real-world applications: it doesn’t yet detect whether the stream is compressedor not and will always try to decompress it. This will lead to an inevitable exception when therequest stream has not been compressed before.
In an average remoting scenario, you have two types of users. On the one hand, there arelocal (LAN) users who connect to the server via high-speed links. If these users compress theirrequests, it’s quite possible that the stream compression would take up more time (in regard toclient- and server-side CPU time plus transfer time) than the network transfer of the uncom-pressed stream would. On the other hand, you might have several remote users who connectvia lines ranging from speedy T1s down to 9600 bps wireless devices. These users will quitecertainly profit from sending requests in a compressed way.
The first step to take when implementing these additional capabilities in a channel sink isto determine how the server will know that the request stream is compressed. Generally thiscan be done by adding additional fields to the ITransportHeader object that is passed as a param-eter to ProcessMessage() and AsyncProcessRequest().
These headers are then transferred to the server and can be obtained by the server-sidesink by using the ITransportHeaders that it receives as a parameter to its ProcessMessage()method. By convention, these additional headers should start with the prefix X-, so that youcan simply add a statement like the following in the client-side sink’s ProcessMessage() methodto indicate that the content will be compressed:
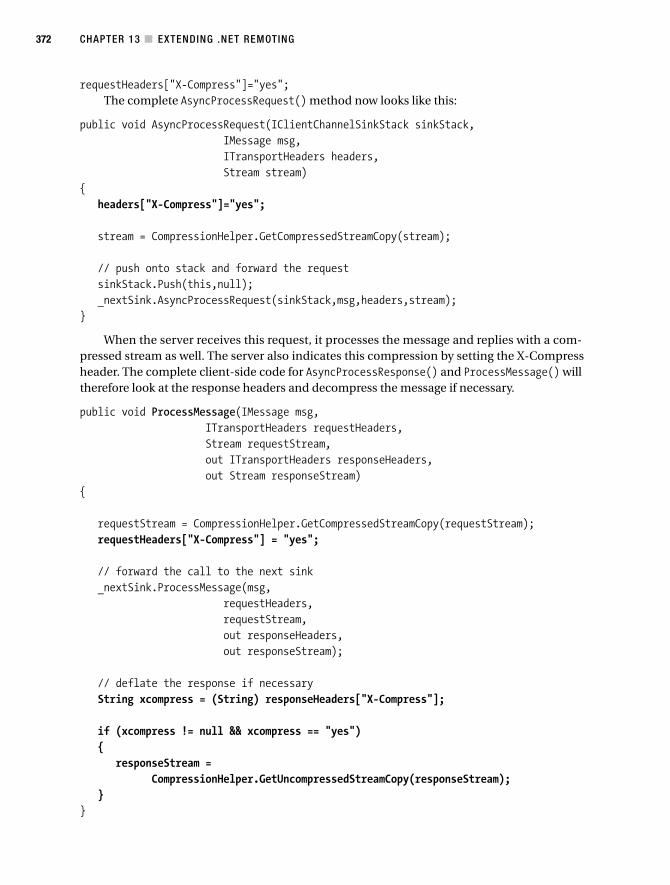
CHAPTER 13 ■ EXTENDING .NET REMOTING372
requestHeaders["X-Compress"]="yes";The complete AsyncProcessRequest() method now looks like this:
public void AsyncProcessRequest(IClientChannelSinkStack sinkStack,IMessage msg,ITransportHeaders headers,Stream stream)
{headers["X-Compress"]="yes";
stream = CompressionHelper.GetCompressedStreamCopy(stream);
// push onto stack and forward the requestsinkStack.Push(this,null);_nextSink.AsyncProcessRequest(sinkStack,msg,headers,stream);
}
When the server receives this request, it processes the message and replies with a com-pressed stream as well. The server also indicates this compression by setting the X-Compressheader. The complete client-side code for AsyncProcessResponse() and ProcessMessage() willtherefore look at the response headers and decompress the message if necessary.
public void ProcessMessage(IMessage msg,ITransportHeaders requestHeaders,Stream requestStream,out ITransportHeaders responseHeaders,out Stream responseStream)
{
requestStream = CompressionHelper.GetCompressedStreamCopy(requestStream);requestHeaders["X-Compress"] = "yes";
// forward the call to the next sink_nextSink.ProcessMessage(msg,
requestHeaders,requestStream,out responseHeaders,out responseStream);
// deflate the response if necessaryString xcompress = (String) responseHeaders["X-Compress"];
if (xcompress != null && xcompress == "yes"){
responseStream =CompressionHelper.GetUncompressedStreamCopy(responseStream);
}}
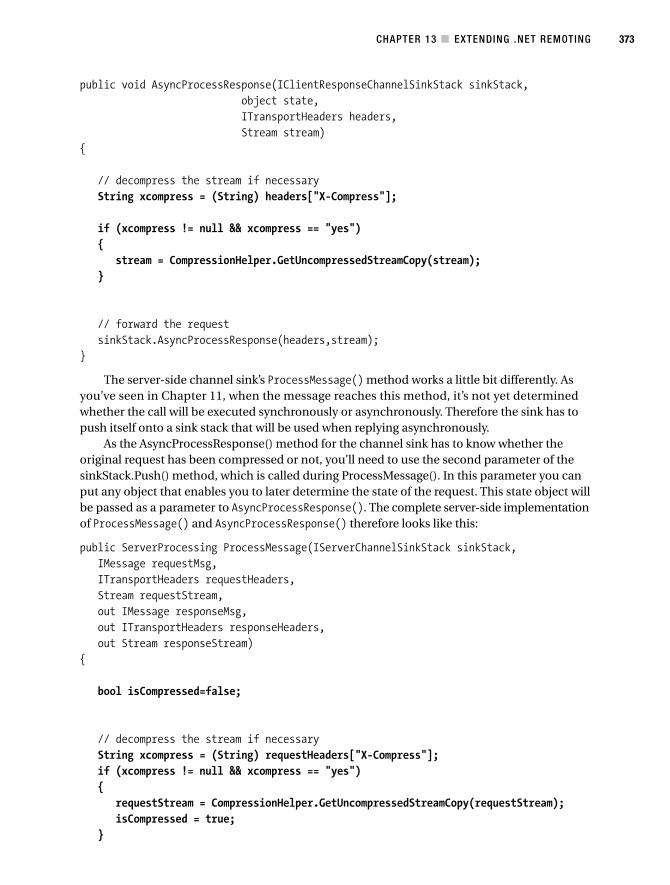
CHAPTER 13 ■ EXTENDING .NET REMOTING 373
public void AsyncProcessResponse(IClientResponseChannelSinkStack sinkStack,object state,ITransportHeaders headers,Stream stream)
{
// decompress the stream if necessaryString xcompress = (String) headers["X-Compress"];
if (xcompress != null && xcompress == "yes"){
stream = CompressionHelper.GetUncompressedStreamCopy(stream);}
// forward the requestsinkStack.AsyncProcessResponse(headers,stream);
}
The server-side channel sink’s ProcessMessage() method works a little bit differently. Asyou’ve seen in Chapter 11, when the message reaches this method, it’s not yet determinedwhether the call will be executed synchronously or asynchronously. Therefore the sink has topush itself onto a sink stack that will be used when replying asynchronously.
As the AsyncProcessResponse() method for the channel sink has to know whether theoriginal request has been compressed or not, you’ll need to use the second parameter of thesinkStack.Push() method, which is called during ProcessMessage(). In this parameter you canput any object that enables you to later determine the state of the request. This state object willbe passed as a parameter to AsyncProcessResponse(). The complete server-side implementationof ProcessMessage() and AsyncProcessResponse() therefore looks like this:
public ServerProcessing ProcessMessage(IServerChannelSinkStack sinkStack,IMessage requestMsg,ITransportHeaders requestHeaders,Stream requestStream,out IMessage responseMsg,out ITransportHeaders responseHeaders,out Stream responseStream)
{
bool isCompressed=false;
// decompress the stream if necessaryString xcompress = (String) requestHeaders["X-Compress"];if (xcompress != null && xcompress == "yes"){
requestStream = CompressionHelper.GetUncompressedStreamCopy(requestStream);isCompressed = true;
}
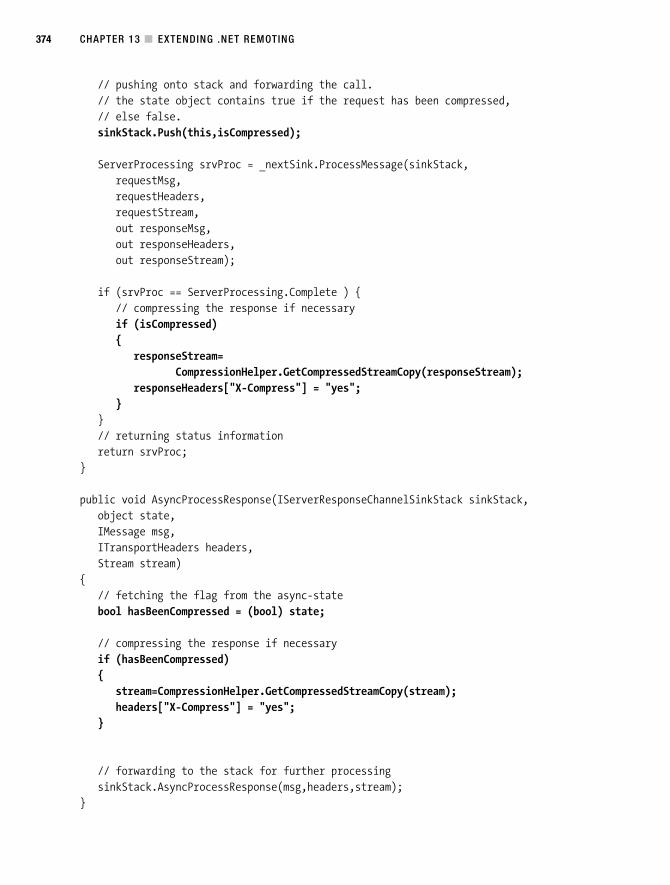
CHAPTER 13 ■ EXTENDING .NET REMOTING374
// pushing onto stack and forwarding the call.// the state object contains true if the request has been compressed,// else false.sinkStack.Push(this,isCompressed);
ServerProcessing srvProc = _nextSink.ProcessMessage(sinkStack,requestMsg,requestHeaders,requestStream,out responseMsg,out responseHeaders,out responseStream);
if (srvProc == ServerProcessing.Complete ) {// compressing the response if necessaryif (isCompressed){
responseStream=CompressionHelper.GetCompressedStreamCopy(responseStream);
responseHeaders["X-Compress"] = "yes";}
}// returning status informationreturn srvProc;
}
public void AsyncProcessResponse(IServerResponseChannelSinkStack sinkStack,object state,IMessage msg,ITransportHeaders headers,Stream stream)
{// fetching the flag from the async-statebool hasBeenCompressed = (bool) state;
// compressing the response if necessaryif (hasBeenCompressed){
stream=CompressionHelper.GetCompressedStreamCopy(stream);headers["X-Compress"] = "yes";
}
// forwarding to the stack for further processingsinkStack.AsyncProcessResponse(msg,headers,stream);
}
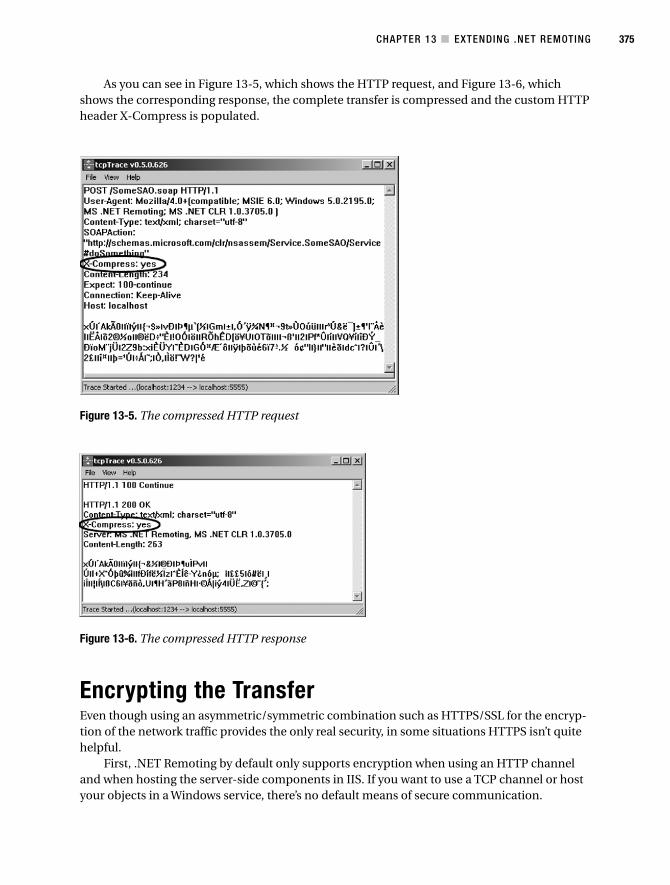
CHAPTER 13 ■ EXTENDING .NET REMOTING 375
Figure 13-5. The compressed HTTP request
Figure 13-6. The compressed HTTP response
As you can see in Figure 13-5, which shows the HTTP request, and Figure 13-6, whichshows the corresponding response, the complete transfer is compressed and the custom HTTPheader X-Compress is populated.
Encrypting the TransferEven though using an asymmetric/symmetric combination such as HTTPS/SSL for the encryp-tion of the network traffic provides the only real security, in some situations HTTPS isn’t quitehelpful.
First, .NET Remoting by default only supports encryption when using an HTTP channeland when hosting the server-side components in IIS. If you want to use a TCP channel or hostyour objects in a Windows service, there’s no default means of secure communication.
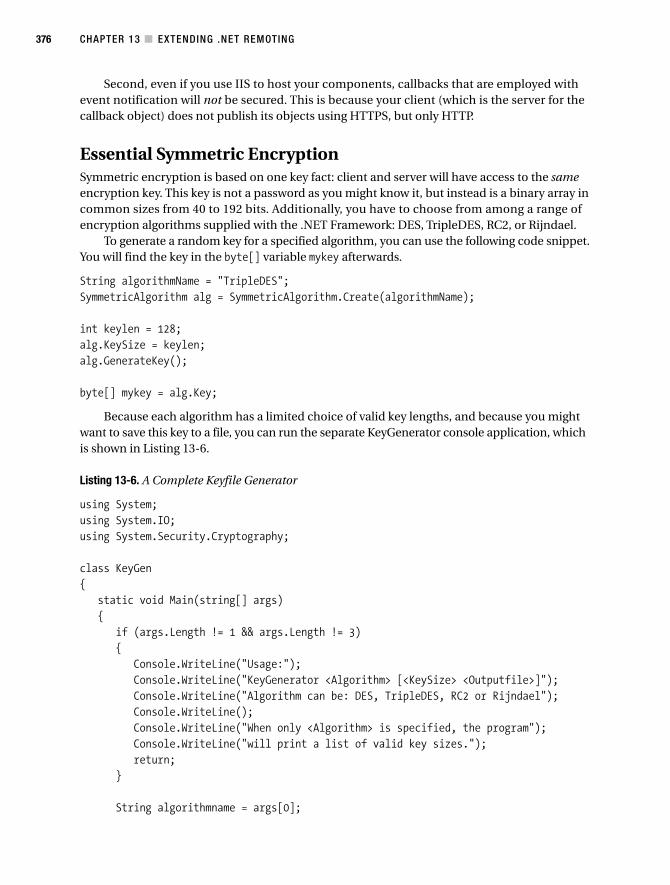
CHAPTER 13 ■ EXTENDING .NET REMOTING376
Second, even if you use IIS to host your components, callbacks that are employed withevent notification will not be secured. This is because your client (which is the server for thecallback object) does not publish its objects using HTTPS, but only HTTP.
Essential Symmetric EncryptionSymmetric encryption is based on one key fact: client and server will have access to the sameencryption key. This key is not a password as you might know it, but instead is a binary array incommon sizes from 40 to 192 bits. Additionally, you have to choose from among a range ofencryption algorithms supplied with the .NET Framework: DES, TripleDES, RC2, or Rijndael.
To generate a random key for a specified algorithm, you can use the following code snippet.You will find the key in the byte[] variable mykey afterwards.
String algorithmName = "TripleDES";SymmetricAlgorithm alg = SymmetricAlgorithm.Create(algorithmName);
int keylen = 128;alg.KeySize = keylen;alg.GenerateKey();
byte[] mykey = alg.Key;
Because each algorithm has a limited choice of valid key lengths, and because you mightwant to save this key to a file, you can run the separate KeyGenerator console application, whichis shown in Listing 13-6.
Listing 13-6. A Complete Keyfile Generator
using System;using System.IO;using System.Security.Cryptography;
class KeyGen{
static void Main(string[] args){
if (args.Length != 1 && args.Length != 3){
Console.WriteLine("Usage:");Console.WriteLine("KeyGenerator <Algorithm> [<KeySize> <Outputfile>]");Console.WriteLine("Algorithm can be: DES, TripleDES, RC2 or Rijndael");Console.WriteLine();Console.WriteLine("When only <Algorithm> is specified, the program");Console.WriteLine("will print a list of valid key sizes.");return;
}
String algorithmname = args[0];
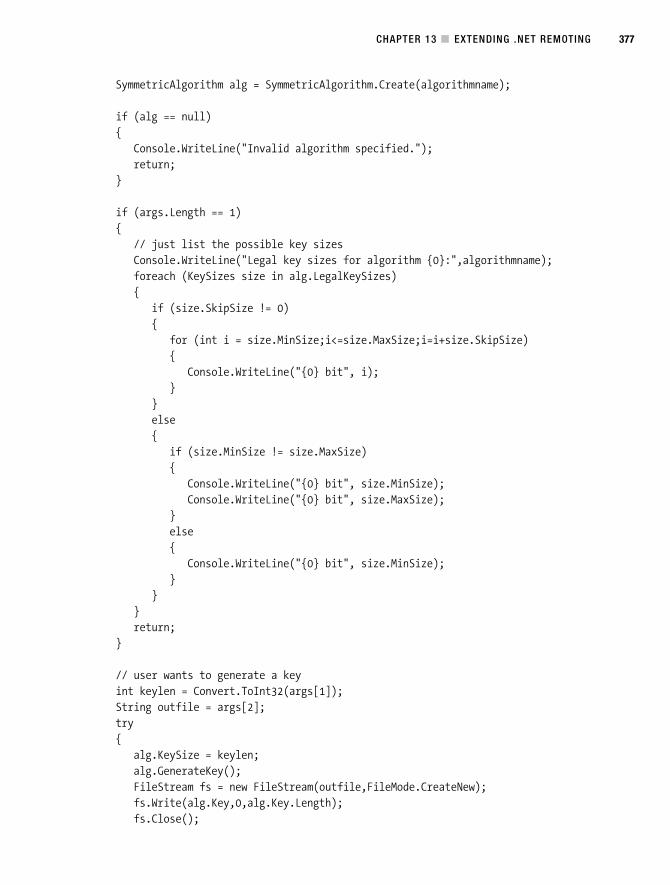
CHAPTER 13 ■ EXTENDING .NET REMOTING 377
SymmetricAlgorithm alg = SymmetricAlgorithm.Create(algorithmname);
if (alg == null){
Console.WriteLine("Invalid algorithm specified.");return;
}
if (args.Length == 1){
// just list the possible key sizesConsole.WriteLine("Legal key sizes for algorithm {0}:",algorithmname);foreach (KeySizes size in alg.LegalKeySizes){
if (size.SkipSize != 0){
for (int i = size.MinSize;i<=size.MaxSize;i=i+size.SkipSize){
Console.WriteLine("{0} bit", i);}
}else{
if (size.MinSize != size.MaxSize){
Console.WriteLine("{0} bit", size.MinSize);Console.WriteLine("{0} bit", size.MaxSize);
}else{
Console.WriteLine("{0} bit", size.MinSize);}
}}return;
}
// user wants to generate a keyint keylen = Convert.ToInt32(args[1]);String outfile = args[2];try{
alg.KeySize = keylen;alg.GenerateKey();FileStream fs = new FileStream(outfile,FileMode.CreateNew);fs.Write(alg.Key,0,alg.Key.Length);fs.Close();

CHAPTER 13 ■ EXTENDING .NET REMOTING378
Console.WriteLine("{0} bit key written to {1}.",alg.Key.Length * 8,outfile);
}catch (Exception e){
Console.WriteLine("Exception: {0}" ,e.Message);return;
}
}}
When this key generator is invoked with KeyGenerator.exe (without any parameters), itwill print a list of possible algorithms. You can then run KeyGenerator.exe <AlgorithmName>to get a list of possible key sizes for the chosen algorithm. To finally generate the key, you haveto start KeyGenerator.exe <AlgorithmName> <KeySize> <OutputFile>. To generate a 128-bitkey for a TripleDES algorithm and save it in c:\testfile.key, run KeyGenerator.exe TripleDES 128c:\testfile.key.
The Initialization VectorAnother basic of symmetric encryption is the use of a random initialization vector (IV). This isagain a byte array, but it’s not statically computed during the application’s development. Instead,a new one is generated for each encryption taking place.
To successfully decrypt the message, both the key and the initialization vector have to beknown to the second party. The key is determined during the application’s deployment (at leastin the following example) and the IV has to be sent via remoting boundaries with the originalmessage. The IV is therefore not secret on its own.
Creating the Encryption HelperNext I show you how to build this sink in the same manner as the previous CompressionSink,which means that the sink’s core logic will be extracted to a helper class. I call this classEncryptionHelper. The encryption helper will implement two methods, ProcessOutboundStream()and ProcessInboundStream(). The methods’ signatures look like this:
public static Stream ProcessOutboundStream(Stream inStream,String algorithm,byte[] encryptionkey,out byte[] encryptionIV)
public static Stream ProcessInboundStream(Stream inStream,String algorithm,byte[] encryptionkey,byte[] encryptionIV)
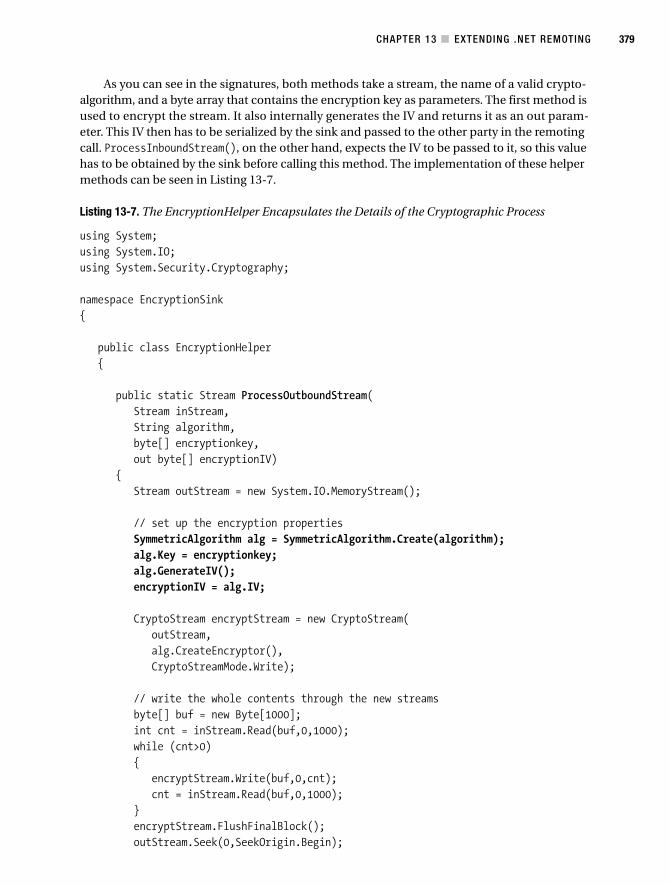
CHAPTER 13 ■ EXTENDING .NET REMOTING 379
As you can see in the signatures, both methods take a stream, the name of a valid crypto-algorithm, and a byte array that contains the encryption key as parameters. The first method isused to encrypt the stream. It also internally generates the IV and returns it as an out param-eter. This IV then has to be serialized by the sink and passed to the other party in the remotingcall. ProcessInboundStream(), on the other hand, expects the IV to be passed to it, so this valuehas to be obtained by the sink before calling this method. The implementation of these helpermethods can be seen in Listing 13-7.
Listing 13-7. The EncryptionHelper Encapsulates the Details of the Cryptographic Process
using System;using System.IO;using System.Security.Cryptography;
namespace EncryptionSink{
public class EncryptionHelper{
public static Stream ProcessOutboundStream(Stream inStream,String algorithm,byte[] encryptionkey,out byte[] encryptionIV)
{Stream outStream = new System.IO.MemoryStream();
// set up the encryption propertiesSymmetricAlgorithm alg = SymmetricAlgorithm.Create(algorithm);alg.Key = encryptionkey;alg.GenerateIV();encryptionIV = alg.IV;
CryptoStream encryptStream = new CryptoStream(outStream,alg.CreateEncryptor(),CryptoStreamMode.Write);
// write the whole contents through the new streamsbyte[] buf = new Byte[1000];int cnt = inStream.Read(buf,0,1000);while (cnt>0){
encryptStream.Write(buf,0,cnt);cnt = inStream.Read(buf,0,1000);
}encryptStream.FlushFinalBlock();outStream.Seek(0,SeekOrigin.Begin);
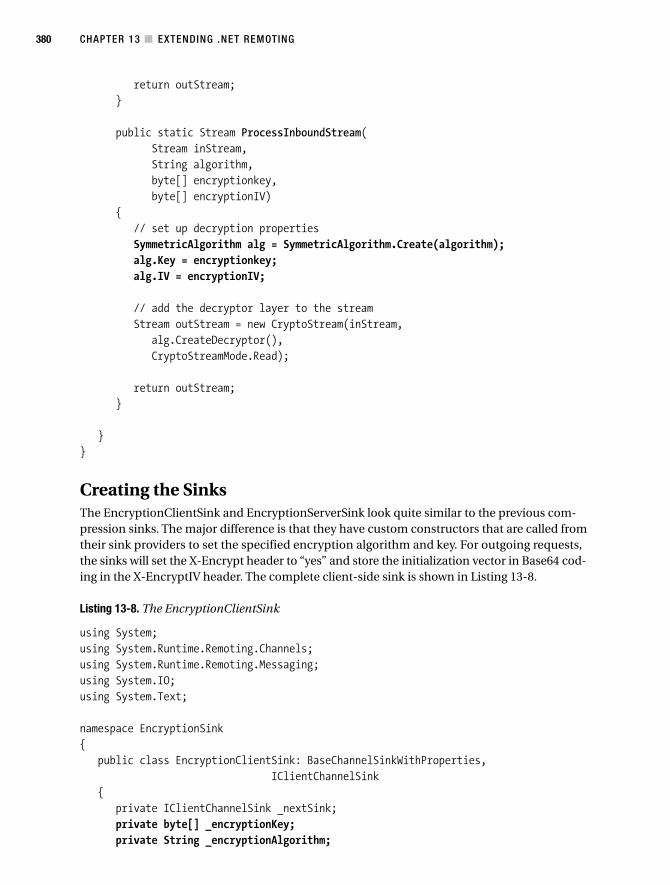
CHAPTER 13 ■ EXTENDING .NET REMOTING380
return outStream;}
public static Stream ProcessInboundStream(Stream inStream,String algorithm,byte[] encryptionkey,byte[] encryptionIV)
{// set up decryption propertiesSymmetricAlgorithm alg = SymmetricAlgorithm.Create(algorithm);alg.Key = encryptionkey;alg.IV = encryptionIV;
// add the decryptor layer to the streamStream outStream = new CryptoStream(inStream,
alg.CreateDecryptor(),CryptoStreamMode.Read);
return outStream;}
}}
Creating the SinksThe EncryptionClientSink and EncryptionServerSink look quite similar to the previous com-pression sinks. The major difference is that they have custom constructors that are called fromtheir sink providers to set the specified encryption algorithm and key. For outgoing requests,the sinks will set the X-Encrypt header to “yes” and store the initialization vector in Base64 cod-ing in the X-EncryptIV header. The complete client-side sink is shown in Listing 13-8.
Listing 13-8. The EncryptionClientSink
using System;using System.Runtime.Remoting.Channels;using System.Runtime.Remoting.Messaging;using System.IO;using System.Text;
namespace EncryptionSink{
public class EncryptionClientSink: BaseChannelSinkWithProperties,IClientChannelSink
{private IClientChannelSink _nextSink;private byte[] _encryptionKey;private String _encryptionAlgorithm;
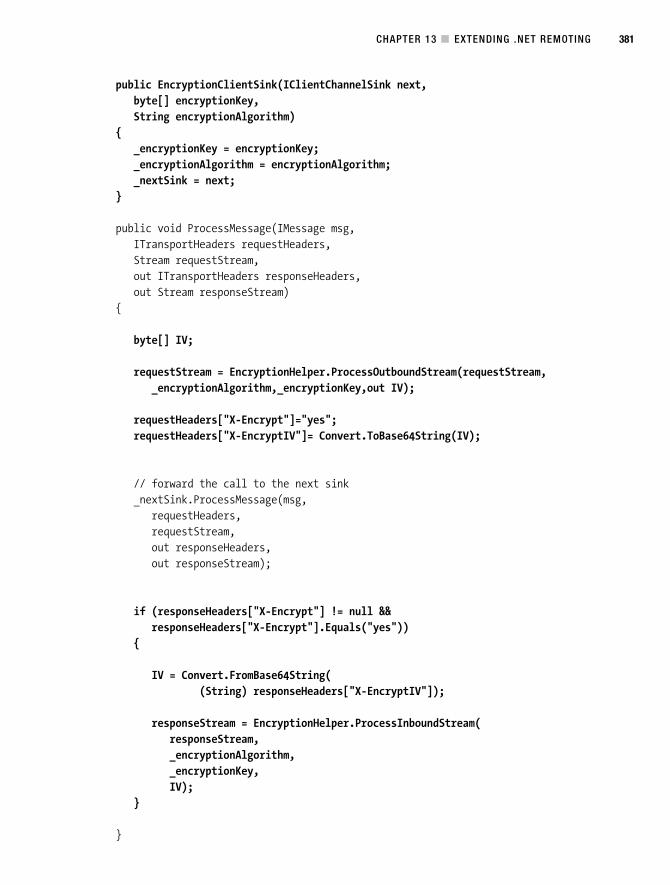
CHAPTER 13 ■ EXTENDING .NET REMOTING 381
public EncryptionClientSink(IClientChannelSink next,byte[] encryptionKey,String encryptionAlgorithm)
{_encryptionKey = encryptionKey;_encryptionAlgorithm = encryptionAlgorithm;_nextSink = next;
}
public void ProcessMessage(IMessage msg,ITransportHeaders requestHeaders,Stream requestStream,out ITransportHeaders responseHeaders,out Stream responseStream)
{
byte[] IV;
requestStream = EncryptionHelper.ProcessOutboundStream(requestStream,_encryptionAlgorithm,_encryptionKey,out IV);
requestHeaders["X-Encrypt"]="yes";requestHeaders["X-EncryptIV"]= Convert.ToBase64String(IV);
// forward the call to the next sink_nextSink.ProcessMessage(msg,
requestHeaders,requestStream,out responseHeaders,out responseStream);
if (responseHeaders["X-Encrypt"] != null &&responseHeaders["X-Encrypt"].Equals("yes"))
{
IV = Convert.FromBase64String((String) responseHeaders["X-EncryptIV"]);
responseStream = EncryptionHelper.ProcessInboundStream(responseStream,_encryptionAlgorithm,_encryptionKey,IV);
}
}
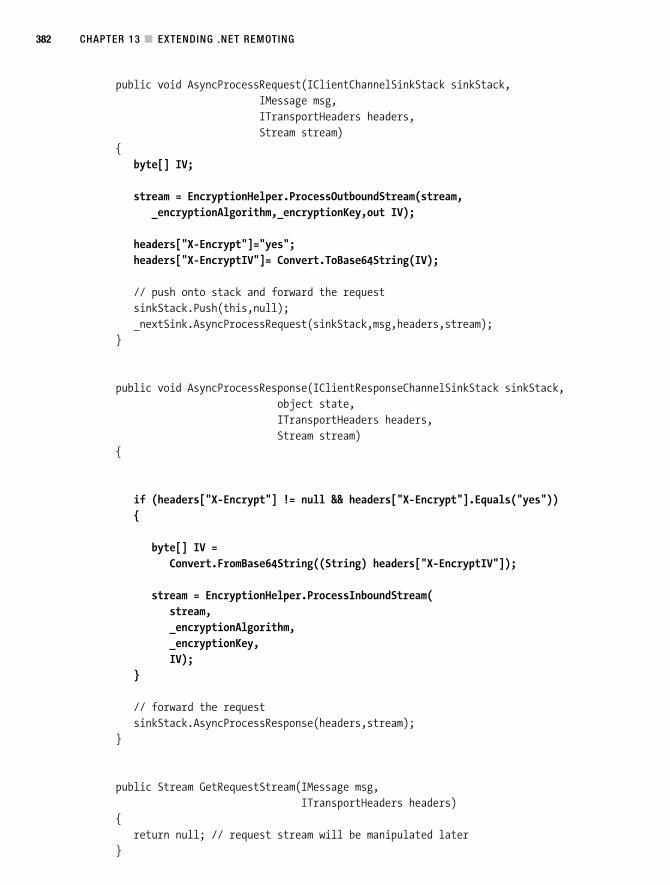
CHAPTER 13 ■ EXTENDING .NET REMOTING382
public void AsyncProcessRequest(IClientChannelSinkStack sinkStack,IMessage msg,ITransportHeaders headers,Stream stream)
{byte[] IV;
stream = EncryptionHelper.ProcessOutboundStream(stream,_encryptionAlgorithm,_encryptionKey,out IV);
headers["X-Encrypt"]="yes";headers["X-EncryptIV"]= Convert.ToBase64String(IV);
// push onto stack and forward the requestsinkStack.Push(this,null);_nextSink.AsyncProcessRequest(sinkStack,msg,headers,stream);
}
public void AsyncProcessResponse(IClientResponseChannelSinkStack sinkStack,object state,ITransportHeaders headers,Stream stream)
{
if (headers["X-Encrypt"] != null && headers["X-Encrypt"].Equals("yes")){
byte[] IV =Convert.FromBase64String((String) headers["X-EncryptIV"]);
stream = EncryptionHelper.ProcessInboundStream(stream,_encryptionAlgorithm,_encryptionKey,IV);
}
// forward the requestsinkStack.AsyncProcessResponse(headers,stream);
}
public Stream GetRequestStream(IMessage msg,ITransportHeaders headers)
{return null; // request stream will be manipulated later
}
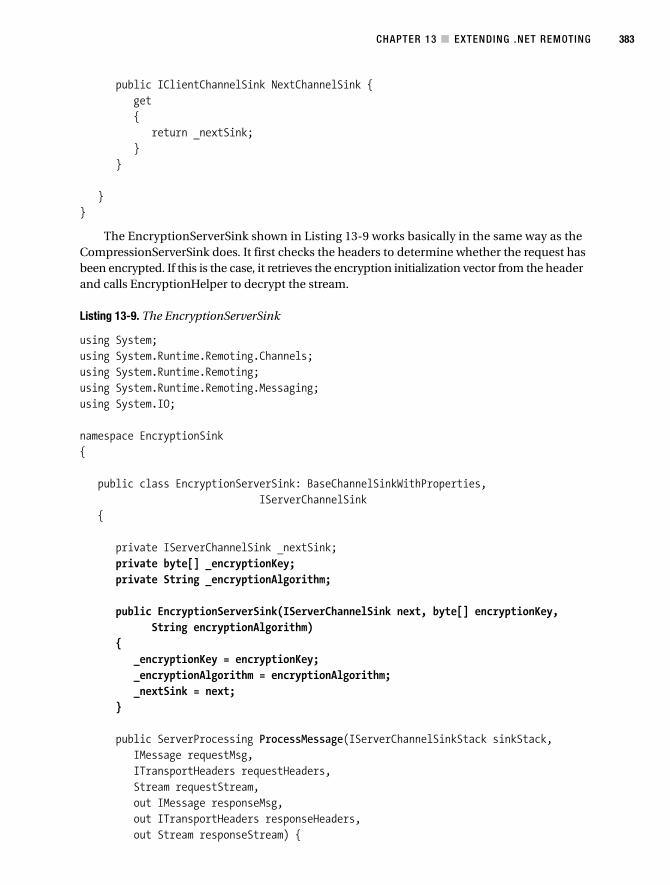
CHAPTER 13 ■ EXTENDING .NET REMOTING 383
public IClientChannelSink NextChannelSink {get{
return _nextSink;}
}
}}
The EncryptionServerSink shown in Listing 13-9 works basically in the same way as theCompressionServerSink does. It first checks the headers to determine whether the request hasbeen encrypted. If this is the case, it retrieves the encryption initialization vector from the headerand calls EncryptionHelper to decrypt the stream.
Listing 13-9. The EncryptionServerSink
using System;using System.Runtime.Remoting.Channels;using System.Runtime.Remoting;using System.Runtime.Remoting.Messaging;using System.IO;
namespace EncryptionSink{
public class EncryptionServerSink: BaseChannelSinkWithProperties,IServerChannelSink
{
private IServerChannelSink _nextSink;private byte[] _encryptionKey;private String _encryptionAlgorithm;
public EncryptionServerSink(IServerChannelSink next, byte[] encryptionKey,String encryptionAlgorithm)
{_encryptionKey = encryptionKey;_encryptionAlgorithm = encryptionAlgorithm;_nextSink = next;
}
public ServerProcessing ProcessMessage(IServerChannelSinkStack sinkStack,IMessage requestMsg,ITransportHeaders requestHeaders,Stream requestStream,out IMessage responseMsg,out ITransportHeaders responseHeaders,out Stream responseStream) {
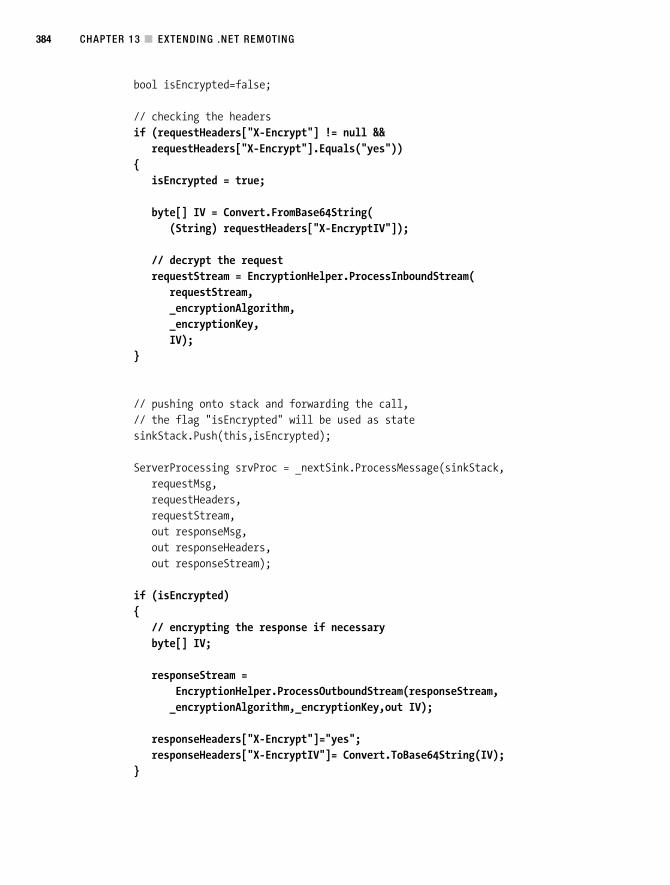
CHAPTER 13 ■ EXTENDING .NET REMOTING384
bool isEncrypted=false;
// checking the headersif (requestHeaders["X-Encrypt"] != null &&
requestHeaders["X-Encrypt"].Equals("yes")){
isEncrypted = true;
byte[] IV = Convert.FromBase64String((String) requestHeaders["X-EncryptIV"]);
// decrypt the requestrequestStream = EncryptionHelper.ProcessInboundStream(
requestStream,_encryptionAlgorithm,_encryptionKey,IV);
}
// pushing onto stack and forwarding the call,// the flag "isEncrypted" will be used as statesinkStack.Push(this,isEncrypted);
ServerProcessing srvProc = _nextSink.ProcessMessage(sinkStack,requestMsg,requestHeaders,requestStream,out responseMsg,out responseHeaders,out responseStream);
if (isEncrypted){
// encrypting the response if necessarybyte[] IV;
responseStream =EncryptionHelper.ProcessOutboundStream(responseStream,_encryptionAlgorithm,_encryptionKey,out IV);
responseHeaders["X-Encrypt"]="yes";responseHeaders["X-EncryptIV"]= Convert.ToBase64String(IV);
}
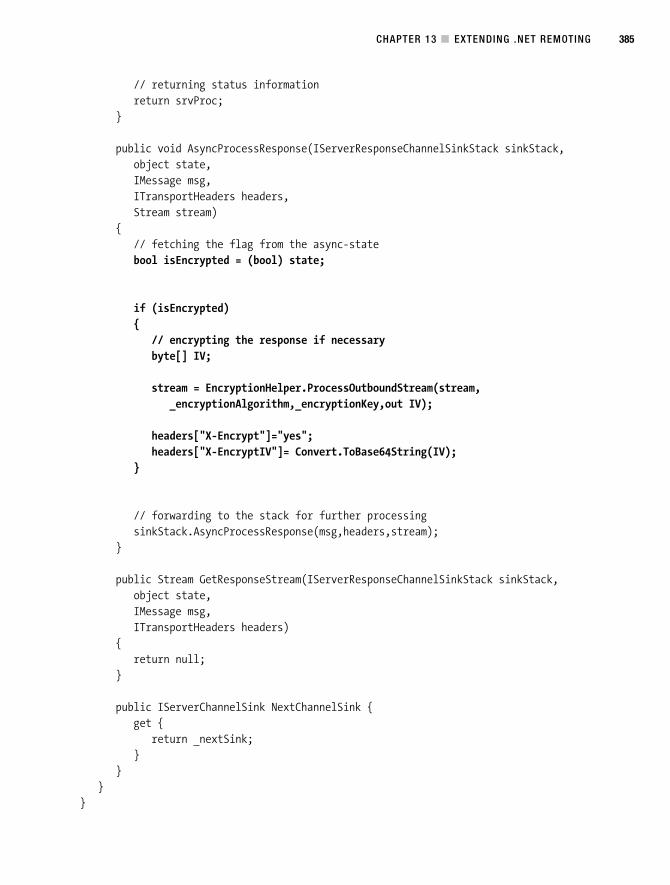
CHAPTER 13 ■ EXTENDING .NET REMOTING 385
// returning status informationreturn srvProc;
}
public void AsyncProcessResponse(IServerResponseChannelSinkStack sinkStack,object state,IMessage msg,ITransportHeaders headers,Stream stream)
{// fetching the flag from the async-statebool isEncrypted = (bool) state;
if (isEncrypted){
// encrypting the response if necessarybyte[] IV;
stream = EncryptionHelper.ProcessOutboundStream(stream,_encryptionAlgorithm,_encryptionKey,out IV);
headers["X-Encrypt"]="yes";headers["X-EncryptIV"]= Convert.ToBase64String(IV);
}
// forwarding to the stack for further processingsinkStack.AsyncProcessResponse(msg,headers,stream);
}
public Stream GetResponseStream(IServerResponseChannelSinkStack sinkStack,object state,IMessage msg,ITransportHeaders headers)
{return null;
}
public IServerChannelSink NextChannelSink {get {
return _nextSink;}
}}
}
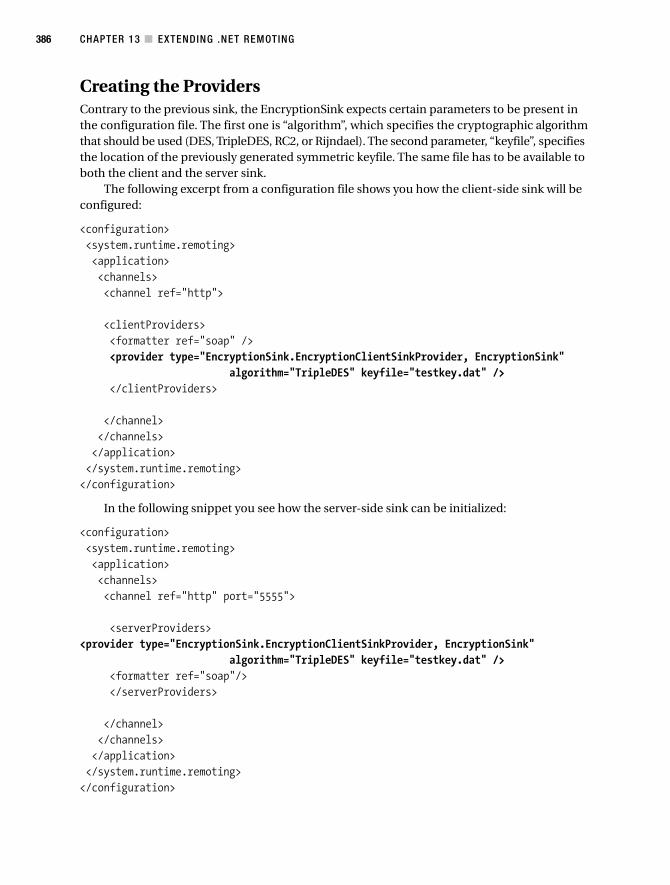
CHAPTER 13 ■ EXTENDING .NET REMOTING386
Creating the ProvidersContrary to the previous sink, the EncryptionSink expects certain parameters to be present inthe configuration file. The first one is “algorithm”, which specifies the cryptographic algorithmthat should be used (DES, TripleDES, RC2, or Rijndael). The second parameter, “keyfile”, specifiesthe location of the previously generated symmetric keyfile. The same file has to be available toboth the client and the server sink.
The following excerpt from a configuration file shows you how the client-side sink will beconfigured:
<configuration><system.runtime.remoting><application><channels><channel ref="http">
<clientProviders><formatter ref="soap" /><provider type="EncryptionSink.EncryptionClientSinkProvider, EncryptionSink"
algorithm="TripleDES" keyfile="testkey.dat" /></clientProviders>
</channel></channels></application></system.runtime.remoting></configuration>
In the following snippet you see how the server-side sink can be initialized:
<configuration><system.runtime.remoting><application><channels><channel ref="http" port="5555">
<serverProviders><provider type="EncryptionSink.EncryptionClientSinkProvider, EncryptionSink"
algorithm="TripleDES" keyfile="testkey.dat" /><formatter ref="soap"/></serverProviders>
</channel></channels></application></system.runtime.remoting></configuration>
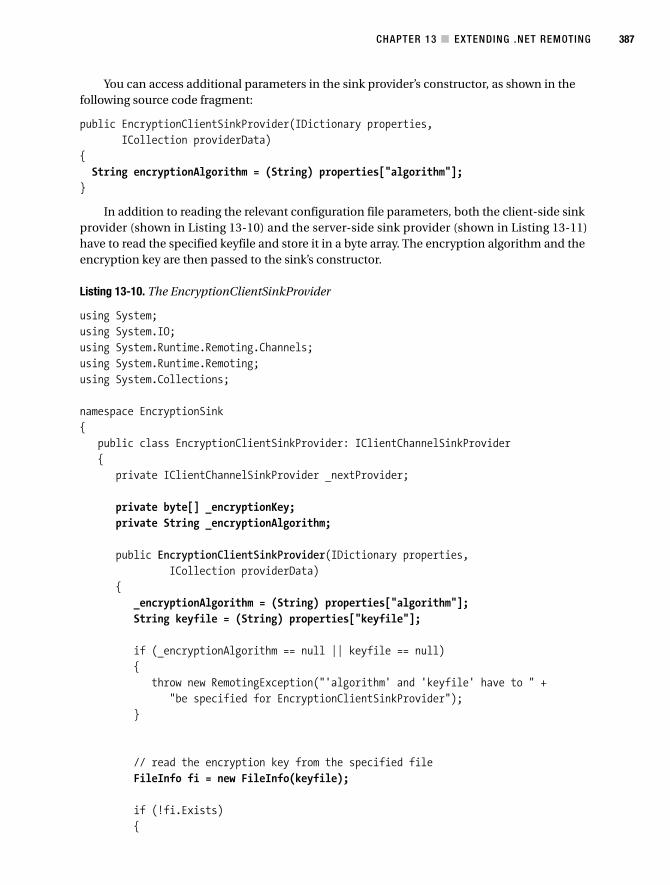
CHAPTER 13 ■ EXTENDING .NET REMOTING 387
You can access additional parameters in the sink provider’s constructor, as shown in thefollowing source code fragment:
public EncryptionClientSinkProvider(IDictionary properties,ICollection providerData)
{String encryptionAlgorithm = (String) properties["algorithm"];
}
In addition to reading the relevant configuration file parameters, both the client-side sinkprovider (shown in Listing 13-10) and the server-side sink provider (shown in Listing 13-11)have to read the specified keyfile and store it in a byte array. The encryption algorithm and theencryption key are then passed to the sink’s constructor.
Listing 13-10. The EncryptionClientSinkProvider
using System;using System.IO;using System.Runtime.Remoting.Channels;using System.Runtime.Remoting;using System.Collections;
namespace EncryptionSink{
public class EncryptionClientSinkProvider: IClientChannelSinkProvider{
private IClientChannelSinkProvider _nextProvider;
private byte[] _encryptionKey;private String _encryptionAlgorithm;
public EncryptionClientSinkProvider(IDictionary properties,ICollection providerData)
{_encryptionAlgorithm = (String) properties["algorithm"];String keyfile = (String) properties["keyfile"];
if (_encryptionAlgorithm == null || keyfile == null){
throw new RemotingException("'algorithm' and 'keyfile' have to " +"be specified for EncryptionClientSinkProvider");
}
// read the encryption key from the specified fileFileInfo fi = new FileInfo(keyfile);
if (!fi.Exists){

CHAPTER 13 ■ EXTENDING .NET REMOTING388
throw new RemotingException("Specified keyfile does not exist");}
FileStream fs = new FileStream(keyfile,FileMode.Open);_encryptionKey = new Byte[fi.Length];fs.Read(_encryptionKey,0,_encryptionKey.Length);
}
public IClientChannelSinkProvider Next{
get {return _nextProvider; }set {_nextProvider = value;}
}
public IClientChannelSink CreateSink(IChannelSender channel, string url,object remoteChannelData)
{// create other sinks in the chainIClientChannelSink next = _nextProvider.CreateSink(channel,
url, remoteChannelData);
// put our sink on top of the chain and return itreturn new EncryptionClientSink(next,_encryptionKey,
_encryptionAlgorithm);}
}}
Listing 13-11. The EncryptionServerSinkProvider
using System;using System.IO;using System.Runtime.Remoting.Channels;using System.Runtime.Remoting;using System.Collections;
namespace EncryptionSink{
public class EncryptionServerSinkProvider: IServerChannelSinkProvider{
private byte[] _encryptionKey;private String _encryptionAlgorithm;
private IServerChannelSinkProvider _nextProvider;
public EncryptionServerSinkProvider(IDictionary properties,ICollection providerData)
{
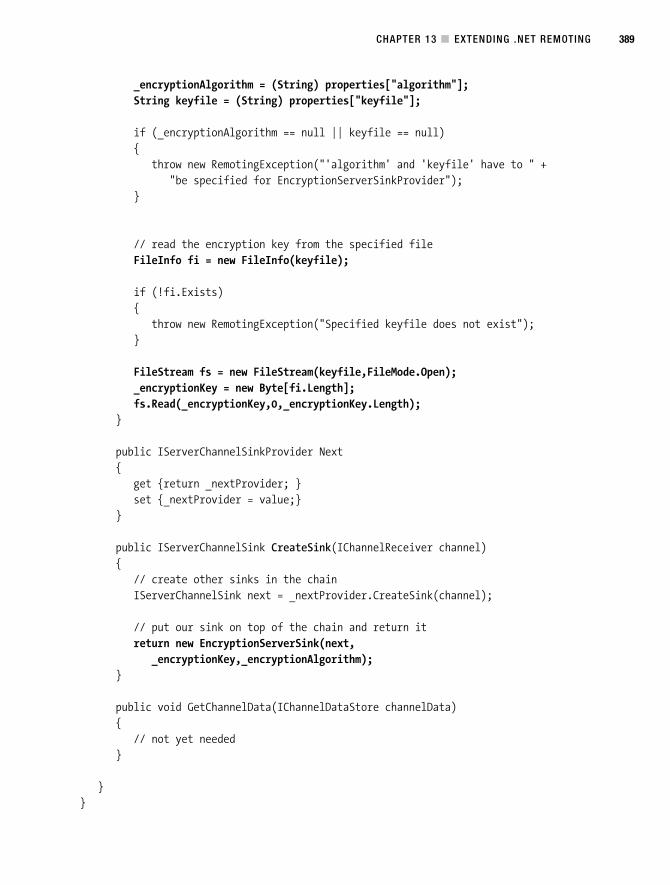
CHAPTER 13 ■ EXTENDING .NET REMOTING 389
_encryptionAlgorithm = (String) properties["algorithm"];String keyfile = (String) properties["keyfile"];
if (_encryptionAlgorithm == null || keyfile == null){
throw new RemotingException("'algorithm' and 'keyfile' have to " +"be specified for EncryptionServerSinkProvider");
}
// read the encryption key from the specified fileFileInfo fi = new FileInfo(keyfile);
if (!fi.Exists){
throw new RemotingException("Specified keyfile does not exist");}
FileStream fs = new FileStream(keyfile,FileMode.Open);_encryptionKey = new Byte[fi.Length];fs.Read(_encryptionKey,0,_encryptionKey.Length);
}
public IServerChannelSinkProvider Next{
get {return _nextProvider; }set {_nextProvider = value;}
}
public IServerChannelSink CreateSink(IChannelReceiver channel){
// create other sinks in the chainIServerChannelSink next = _nextProvider.CreateSink(channel);
// put our sink on top of the chain and return itreturn new EncryptionServerSink(next,
_encryptionKey,_encryptionAlgorithm);}
public void GetChannelData(IChannelDataStore channelData){
// not yet needed}
}}

CHAPTER 13 ■ EXTENDING .NET REMOTING390
Figure 13-7. A TCP-trace of the encrypted HTTP traffic
When including the sink providers in your configuration files as presented previously, thetransfer will be encrypted, as shown in Figure 13-7.
You can, of course, also chain the encryption and compression sinks together to receive anencrypted and compressed stream.
Passing Runtime InformationThe previous sinks were IClientChannelSinks and IServerChannelSinks. This means that theywork on the resulting stream after the formatter has serialized the IMessage object. IMessageSinks,in contrast, can work directly on the message’s contents before they are formatted. This meansthat any changes you make to the IMessage’s contents will be serialized and therefore reflectedin the resulting stream.
■Caution Even though you might be tempted to change the IMessage object’s content in an IClientChannelSink,be aware that this change is not propagated to the server, because the serialized stream has already beengenerated from the underlying IMessage!
Because of this distinction, client-side IMessageSinks can be used to pass runtime informa-tion from the client to the server. In the following example, I show you how to send the client-side thread’s current priority to the server so that remote method calls will execute with the samepriority.
To send arbitrary data from the client to the server, you can put it into the Message object’slogical call context. In this way, you can transfer objects that either are serializable or extendMarshalByRefObject. For example, to pass the client-side thread’s current context for everymethod call to the server, you can implement the following SyncProcessMessage() method:
CHAPTER 13 ■ EXTENDING .NET REMOTING 391
public IMessage SyncProcessMessage(IMessage msg){
if (msg as IMethodCallMessage != null){
LogicalCallContext lcc =(LogicalCallContext) msg.Properties["__CallContext"];
lcc.SetData("priority",Thread.CurrentThread.Priority);return _nextMsgSink.SyncProcessMessage(msg);
}else{
return _nextMsgSink.SyncProcessMessage(msg);}
}
The same has to be done for AsyncProcessMessage() as well.
public IMessageCtrl AsyncProcessMessage(IMessage msg, IMessageSink replySink){
if (msg as IMethodCallMessage != null){
LogicalCallContext lcc =(LogicalCallContext) msg.Properties["__CallContext"];
lcc.SetData("priority",Thread.CurrentThread.Priority);return _nextMsgSink.AsyncProcessMessage(msg,replySink);
}else{
return _nextMsgSink.AsyncProcessMessage(msg,replySink);}
}
On the server side, you have to implement an IServerChannelSink to take the call contextfrom the IMessage object and set Thread.CurrentThread.Priority to the contained value.
public ServerProcessing ProcessMessage(IServerChannelSinkStack sinkStack,IMessage requestMsg,ITransportHeaders requestHeaders,Stream requestStream,out IMessage responseMsg,out ITransportHeaders responseHeaders,out Stream responseStream)
{LogicalCallContext lcc =
(LogicalCallContext) requestMsg.Properties["__CallContext"];
// storing the current priorityThreadPriority oldprio = Thread.CurrentThread.Priority;
CHAPTER 13 ■ EXTENDING .NET REMOTING392
// check if the logical call context contains "priority"if (lcc != null && lcc.GetData("priority") != null){
// fetch the priority from the call contextThreadPriority priority =
(ThreadPriority) lcc.GetData("priority");
Console.WriteLine(" -> Pre-execution priority change {0} to {1}",oldprio.ToString(),priority.ToString());
// set the priorityThread.CurrentThread.Priority = priority;
}
// push on the stack and pass the call to the next sink// the old priority will be used as "state" for the responsesinkStack.Push(this,oldprio);
ServerProcessing spres = _next.ProcessMessage (sinkStack,requestMsg, requestHeaders, requestStream,out responseMsg,out responseHeaders,out responseStream);
// restore priority if call is not asynchronous
if (spres != ServerProcessing.Async){
if (lcc != null && lcc.GetData("priority") != null){
Console.WriteLine(" -> Post-execution change back to {0}",oldprio);Thread.CurrentThread.Priority = oldprio;
}}return spres;
}
The sink provider for the server-side sink is quite straightforward. It looks more or less thesame as those for the previous IServerChannelSinks.
On the client side, some minor inconveniences stem from this approach. Rememberthat you implemented an IMessageSink and not an IClientChannelSink in this case. Lookingfor an IMessageSinkProvider will not give you any results, so you’ll have to implement anIClientChannelSink provider in this case as well—even though the sink is in reality anIMessageSink. The problem with this can be seen when looking at the following part of theIClientChannelSinkProvider interface:
CHAPTER 13 ■ EXTENDING .NET REMOTING 393
IClientChannelSink CreateSink(IChannelSender channel,string url,object remoteChannelData);
This indicates CreateSink() has to return an IClientChannelSink in any case, even if yoursink only needs to implement IMessageSink. You now have to extend your IMessageSink toimplement IClientChannelSink as well. You also have to use caution because IClientChannelSinkdefines more methods that have to be implemented. Those methods are called when the sinkis used as a channel sink (that is, after the formatter) and not as a message sink. You might notwant to allow your users to position the sink after the formatter (because it wouldn’t work therebecause it’s changing the IMessage object’s content), so you want to throw exceptions in thosemethods.
The complete client-side PriorityEmitterSink, which throws those exceptions when usedin the wrong sequence, is shown in Listing 13-12.
Listing 13-12. The Complete PriorityEmitterSink
using System;using System.Collections;using System.IO;using System.Runtime.Remoting;using System.Runtime.Remoting.Channels;using System.Runtime.Remoting.Messaging;using System.Threading;
namespace PrioritySinks{public class PriorityEmitterSink : BaseChannelObjectWithProperties,
IClientChannelSink, IMessageSink{private IMessageSink _nextMsgSink;
public IMessageCtrl AsyncProcessMessage(IMessage msg, IMessageSink replySink){
// only for method callsif (msg as IMethodCallMessage != null){
LogicalCallContext lcc =(LogicalCallContext) msg.Properties["__CallContext"];
lcc.SetData("priority",Thread.CurrentThread.Priority);return _nextMsgSink.AsyncProcessMessage(msg,replySink);
}else{
return _nextMsgSink.AsyncProcessMessage(msg,replySink);}
}
CHAPTER 13 ■ EXTENDING .NET REMOTING394
public IMessage SyncProcessMessage(IMessage msg){
// only for method callsif (msg as IMethodCallMessage != null){
LogicalCallContext lcc =(LogicalCallContext) msg.Properties["__CallContext"];
lcc.SetData("priority",Thread.CurrentThread.Priority);return _nextMsgSink.SyncProcessMessage(msg);
}else{
return _nextMsgSink.SyncProcessMessage(msg);}
}
public PriorityEmitterSink (object next){
if (next as IMessageSink != null){
_nextMsgSink = (IMessageSink) next;}
}
public IMessageSink NextSink{
get{
return _nextMsgSink;}
}
public IClientChannelSink NextChannelSink{
get{
throw new RemotingException("Wrong sequence.");}
}
public void AsyncProcessRequest(IClientChannelSinkStack sinkStack,IMessage msg,ITransportHeaders headers,Stream stream)
{throw new RemotingException("Wrong sequence.");
}
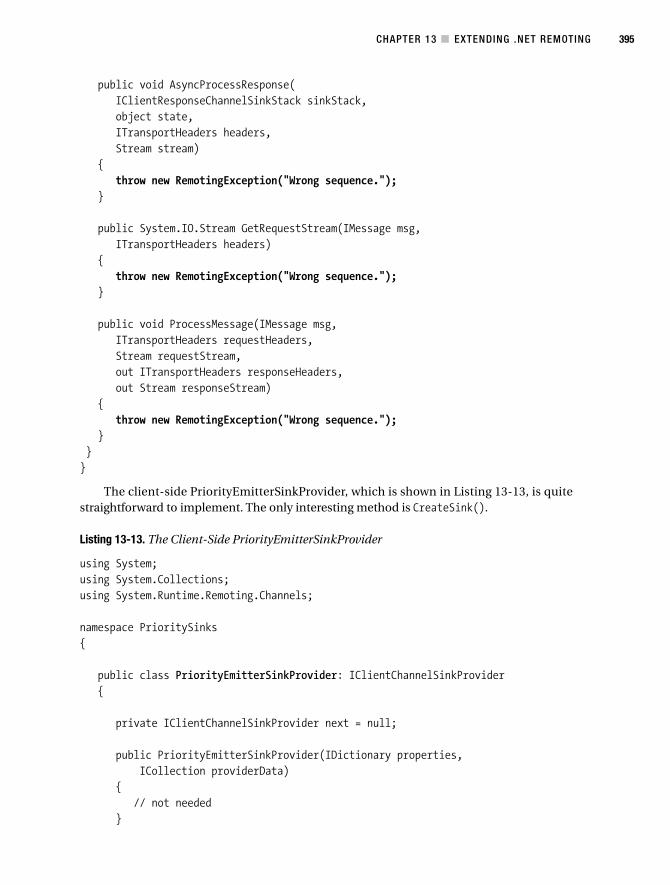
CHAPTER 13 ■ EXTENDING .NET REMOTING 395
public void AsyncProcessResponse(IClientResponseChannelSinkStack sinkStack,object state,ITransportHeaders headers,Stream stream)
{throw new RemotingException("Wrong sequence.");
}
public System.IO.Stream GetRequestStream(IMessage msg,ITransportHeaders headers)
{throw new RemotingException("Wrong sequence.");
}
public void ProcessMessage(IMessage msg,ITransportHeaders requestHeaders,Stream requestStream,out ITransportHeaders responseHeaders,out Stream responseStream)
{throw new RemotingException("Wrong sequence.");
}}}
The client-side PriorityEmitterSinkProvider, which is shown in Listing 13-13, is quitestraightforward to implement. The only interesting method is CreateSink().
Listing 13-13. The Client-Side PriorityEmitterSinkProvider
using System;using System.Collections;using System.Runtime.Remoting.Channels;
namespace PrioritySinks{
public class PriorityEmitterSinkProvider: IClientChannelSinkProvider{
private IClientChannelSinkProvider next = null;
public PriorityEmitterSinkProvider(IDictionary properties,ICollection providerData)
{// not needed
}
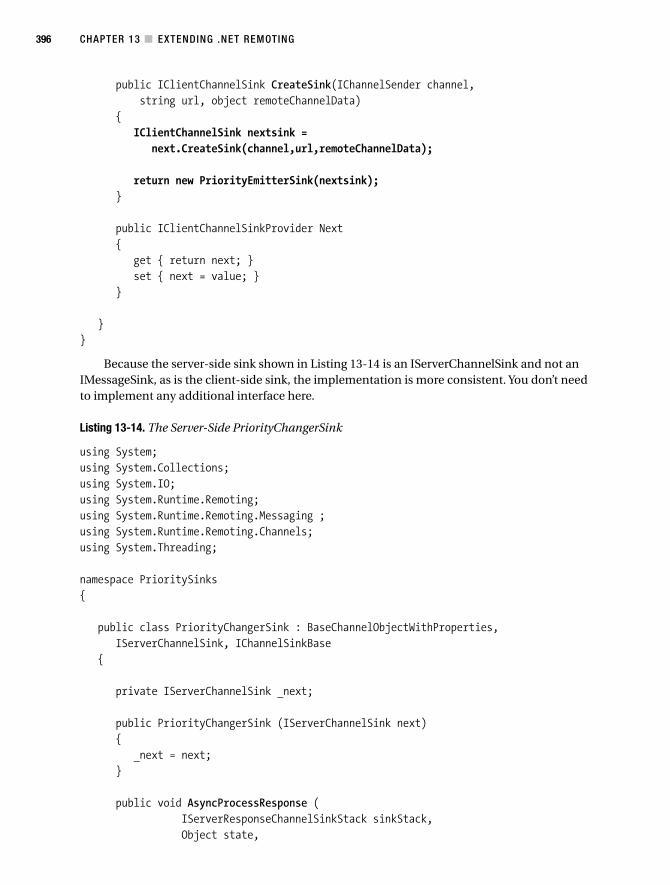
CHAPTER 13 ■ EXTENDING .NET REMOTING396
public IClientChannelSink CreateSink(IChannelSender channel,string url, object remoteChannelData)
{IClientChannelSink nextsink =
next.CreateSink(channel,url,remoteChannelData);
return new PriorityEmitterSink(nextsink);}
public IClientChannelSinkProvider Next{
get { return next; }set { next = value; }
}
}}
Because the server-side sink shown in Listing 13-14 is an IServerChannelSink and not anIMessageSink, as is the client-side sink, the implementation is more consistent. You don’t needto implement any additional interface here.
Listing 13-14. The Server-Side PriorityChangerSink
using System;using System.Collections;using System.IO;using System.Runtime.Remoting;using System.Runtime.Remoting.Messaging ;using System.Runtime.Remoting.Channels;using System.Threading;
namespace PrioritySinks{
public class PriorityChangerSink : BaseChannelObjectWithProperties,IServerChannelSink, IChannelSinkBase
{
private IServerChannelSink _next;
public PriorityChangerSink (IServerChannelSink next){
_next = next;}
public void AsyncProcessResponse (IServerResponseChannelSinkStack sinkStack,Object state,
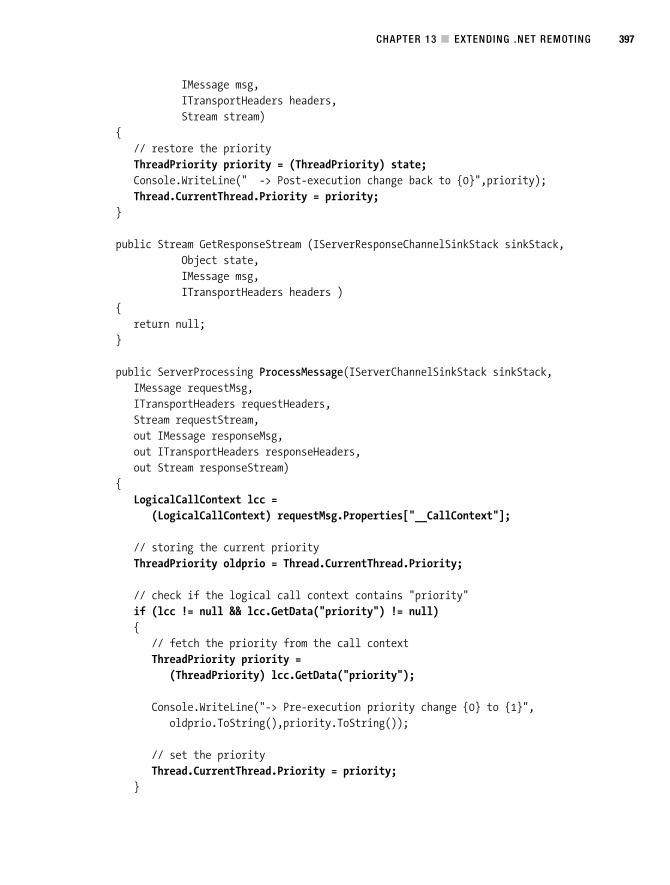
CHAPTER 13 ■ EXTENDING .NET REMOTING 397
IMessage msg,ITransportHeaders headers,Stream stream)
{// restore the priorityThreadPriority priority = (ThreadPriority) state;Console.WriteLine(" -> Post-execution change back to {0}",priority);Thread.CurrentThread.Priority = priority;
}
public Stream GetResponseStream (IServerResponseChannelSinkStack sinkStack,Object state,IMessage msg,ITransportHeaders headers )
{return null;
}
public ServerProcessing ProcessMessage(IServerChannelSinkStack sinkStack,IMessage requestMsg,ITransportHeaders requestHeaders,Stream requestStream,out IMessage responseMsg,out ITransportHeaders responseHeaders,out Stream responseStream)
{LogicalCallContext lcc =
(LogicalCallContext) requestMsg.Properties["__CallContext"];
// storing the current priorityThreadPriority oldprio = Thread.CurrentThread.Priority;
// check if the logical call context contains "priority"if (lcc != null && lcc.GetData("priority") != null){
// fetch the priority from the call contextThreadPriority priority =
(ThreadPriority) lcc.GetData("priority");
Console.WriteLine("-> Pre-execution priority change {0} to {1}",oldprio.ToString(),priority.ToString());
// set the priorityThread.CurrentThread.Priority = priority;
}
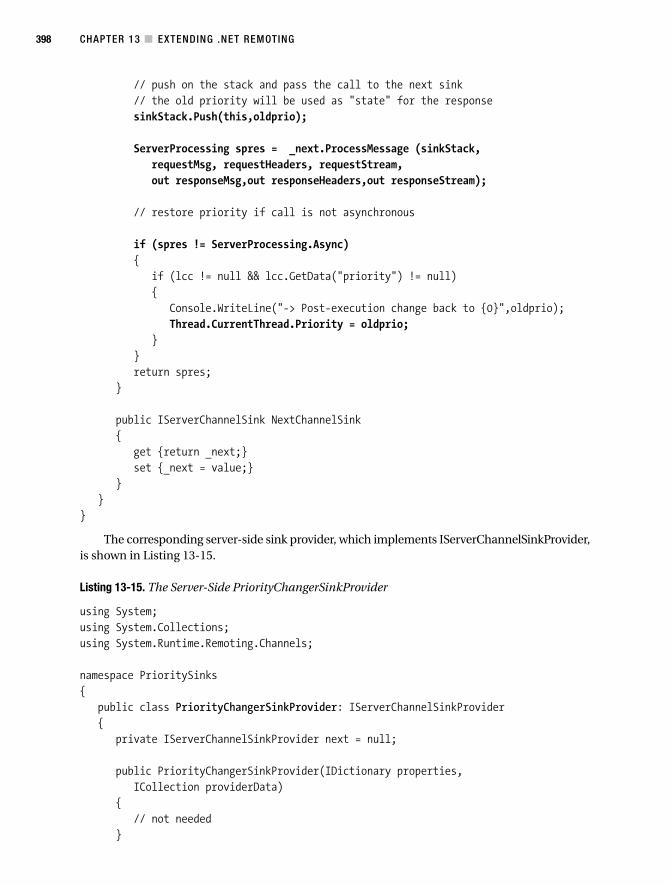
CHAPTER 13 ■ EXTENDING .NET REMOTING398
// push on the stack and pass the call to the next sink// the old priority will be used as "state" for the responsesinkStack.Push(this,oldprio);
ServerProcessing spres = _next.ProcessMessage (sinkStack,requestMsg, requestHeaders, requestStream,out responseMsg,out responseHeaders,out responseStream);
// restore priority if call is not asynchronous
if (spres != ServerProcessing.Async){
if (lcc != null && lcc.GetData("priority") != null){
Console.WriteLine("-> Post-execution change back to {0}",oldprio);Thread.CurrentThread.Priority = oldprio;
}}return spres;
}
public IServerChannelSink NextChannelSink{
get {return _next;}set {_next = value;}
}}
}
The corresponding server-side sink provider, which implements IServerChannelSinkProvider,is shown in Listing 13-15.
Listing 13-15. The Server-Side PriorityChangerSinkProvider
using System;using System.Collections;using System.Runtime.Remoting.Channels;
namespace PrioritySinks{
public class PriorityChangerSinkProvider: IServerChannelSinkProvider{
private IServerChannelSinkProvider next = null;
public PriorityChangerSinkProvider(IDictionary properties,ICollection providerData)
{// not needed
}
CHAPTER 13 ■ EXTENDING .NET REMOTING 399
public void GetChannelData (IChannelDataStore channelData){
// not needed}
public IServerChannelSink CreateSink (IChannelReceiver channel){
IServerChannelSink nextSink = next.CreateSink(channel);return new PriorityChangerSink(nextSink);
}
public IServerChannelSinkProvider Next{
get { return next; }set { next = value; }
}
}}
To test this sink combination, use the following SAO, which returns the server-sidethread’s current priority:
public class TestSAO: MarshalByRefObject{
public String getPriority(){
return System.Threading.Thread.CurrentThread.Priority.ToString();}
}
This SAO is called several times with different client-side thread priorities. The configura-tion file that is used by the server is shown here:
<configuration><system.runtime.remoting><application><channels><channel ref="http" port="5555">
<serverProviders><formatter ref="soap" />
<providertype="PrioritySinks.PriorityChangerSinkProvider, PrioritySinks" />
</serverProviders>
</channel></channels>
CHAPTER 13 ■ EXTENDING .NET REMOTING400
<service><wellknown mode="Singleton"
type="Server.TestSAO, Server" objectUri="TestSAO.soap" /></service>
</application></system.runtime.remoting>
</configuration>
The client-side configuration file will look like this:
<configuration><system.runtime.remoting>
<application><channels><channel ref="http">
<clientProviders><provider
type="PrioritySinks.PriorityEmitterSinkProvider, PrioritySinks" /><formatter ref="soap" />
</clientProviders>
</channel></channels>
<client><wellknown type="Server.TestSAO, generated_meta"
url="http://localhost:5555/TestSAO.soap" /></client>
</application></system.runtime.remoting>
</configuration>
For the test client, you can use SoapSuds to extract the metadata. When you run the appli-cation in Listing 13-16, you’ll see the output shown in Figure 13-8.
Listing 13-16. The Test Client
using System;using System.Runtime.Remoting;using Server; // from generated_meta.dllusing System.Threading;
namespace Client{
delegate String getPrioAsync();
class Client{
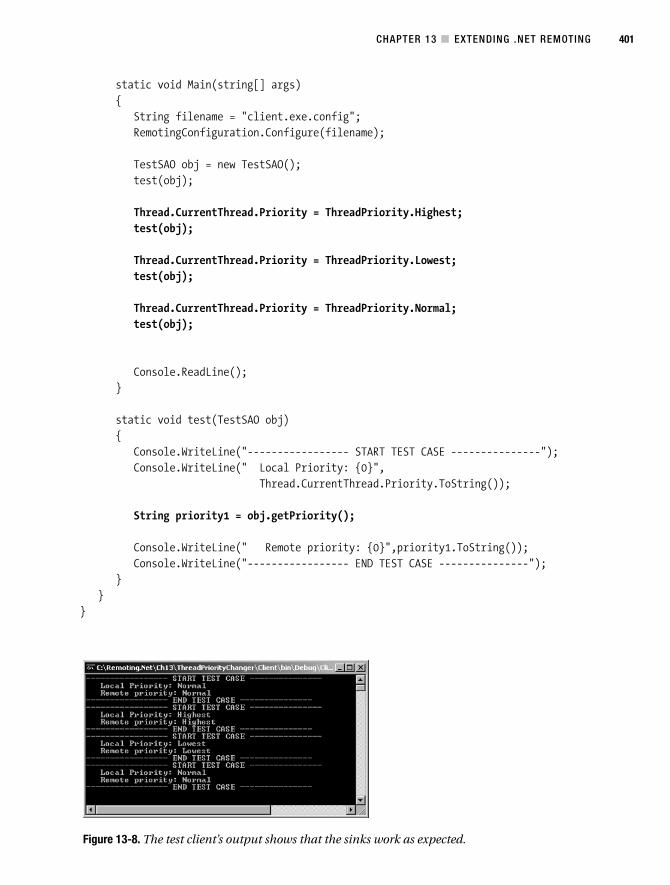
CHAPTER 13 ■ EXTENDING .NET REMOTING 401
static void Main(string[] args){
String filename = "client.exe.config";RemotingConfiguration.Configure(filename);
TestSAO obj = new TestSAO();test(obj);
Thread.CurrentThread.Priority = ThreadPriority.Highest;test(obj);
Thread.CurrentThread.Priority = ThreadPriority.Lowest;test(obj);
Thread.CurrentThread.Priority = ThreadPriority.Normal;test(obj);
Console.ReadLine();}
static void test(TestSAO obj){
Console.WriteLine("----------------- START TEST CASE ---------------");Console.WriteLine(" Local Priority: {0}",
Thread.CurrentThread.Priority.ToString());
String priority1 = obj.getPriority();
Console.WriteLine(" Remote priority: {0}",priority1.ToString());Console.WriteLine("----------------- END TEST CASE ---------------");
}}
}
Figure 13-8. The test client’s output shows that the sinks work as expected.
CHAPTER 13 ■ EXTENDING .NET REMOTING402
Changing the Programming ModelThe previous sinks all add functionality to both the client- and the server-side of a .NETRemoting application. The pluggable sink architecture nevertheless also allows the creation ofsinks, which change several aspects of the programming model. In Chapter 5, for example,you’ve seen that passing custom credentials such as username and password involves manualsetting of the channel sink’s properties for each object.
CustomerManager mgr = new CustomerManager();IDictionary props = ChannelServices.GetChannelSinkProperties(mgr);props["username"] = "dummyremotinguser";props["password"] = "12345";
In most real-world applications, it is nevertheless preferable to set these properties ona per-host basis, or set them according to the base URL of the destination object. In a perfectworld, this would be possible using either configuration files or code, as in the following example:
<configuration><system.runtime.remoting><application><channels><channel ref="http"><clientProviders>
<formatter ref="soap" /><provider type="UrlAuthenticationSink.UrlAuthenticationSinkProvider,
UrlAuthenticationSink">
<urlbase="http://localhost"username="DummyRemotingUser"password="12345"
/>
<urlbase="http://www.somewhere.org"username="MyUser"password="12345"
/></provider>
</clientProviders></channel></channels></application>
</system.runtime.remoting></configuration>
When setting these properties in code, you can simply omit the <url> entries from theconfiguration file and instead use the following lines to achieve the same behavior:
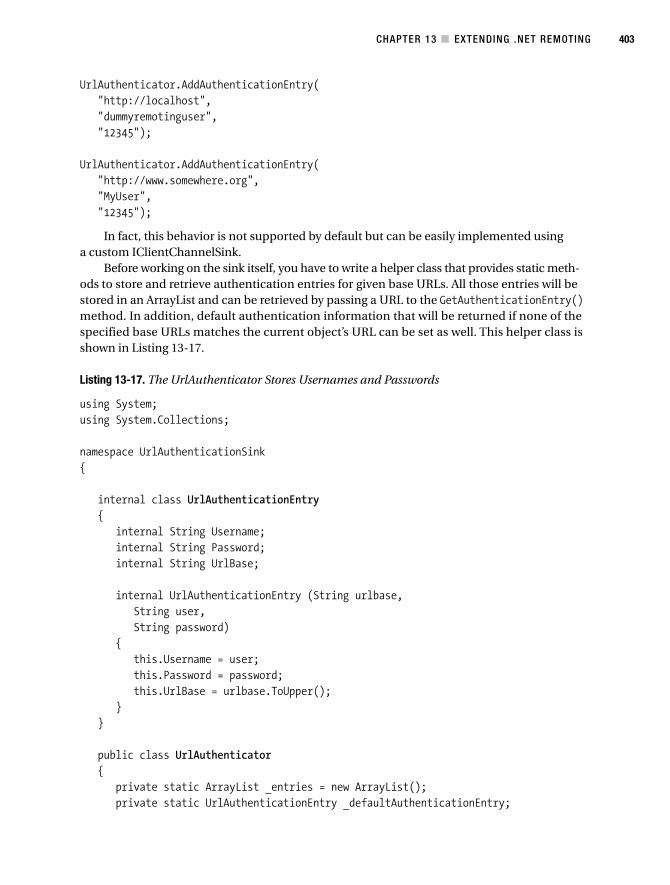
CHAPTER 13 ■ EXTENDING .NET REMOTING 403
UrlAuthenticator.AddAuthenticationEntry("http://localhost","dummyremotinguser","12345");
UrlAuthenticator.AddAuthenticationEntry("http://www.somewhere.org","MyUser","12345");
In fact, this behavior is not supported by default but can be easily implemented usinga custom IClientChannelSink.
Before working on the sink itself, you have to write a helper class that provides static meth-ods to store and retrieve authentication entries for given base URLs. All those entries will bestored in an ArrayList and can be retrieved by passing a URL to the GetAuthenticationEntry()method. In addition, default authentication information that will be returned if none of thespecified base URLs matches the current object’s URL can be set as well. This helper class isshown in Listing 13-17.
Listing 13-17. The UrlAuthenticator Stores Usernames and Passwords
using System;using System.Collections;
namespace UrlAuthenticationSink{
internal class UrlAuthenticationEntry{
internal String Username;internal String Password;internal String UrlBase;
internal UrlAuthenticationEntry (String urlbase,String user,String password)
{this.Username = user;this.Password = password;this.UrlBase = urlbase.ToUpper();
}}
public class UrlAuthenticator{
private static ArrayList _entries = new ArrayList();private static UrlAuthenticationEntry _defaultAuthenticationEntry;
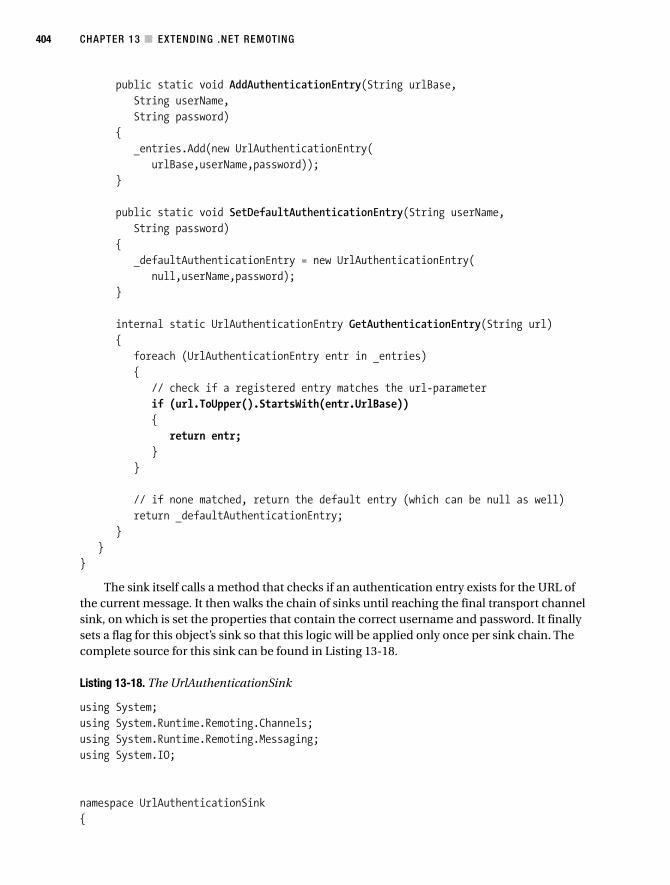
CHAPTER 13 ■ EXTENDING .NET REMOTING404
public static void AddAuthenticationEntry(String urlBase,String userName,String password)
{_entries.Add(new UrlAuthenticationEntry(
urlBase,userName,password));}
public static void SetDefaultAuthenticationEntry(String userName,String password)
{_defaultAuthenticationEntry = new UrlAuthenticationEntry(
null,userName,password);}
internal static UrlAuthenticationEntry GetAuthenticationEntry(String url){
foreach (UrlAuthenticationEntry entr in _entries){
// check if a registered entry matches the url-parameterif (url.ToUpper().StartsWith(entr.UrlBase)){
return entr;}
}
// if none matched, return the default entry (which can be null as well)return _defaultAuthenticationEntry;
}}
}
The sink itself calls a method that checks if an authentication entry exists for the URL ofthe current message. It then walks the chain of sinks until reaching the final transport channelsink, on which is set the properties that contain the correct username and password. It finallysets a flag for this object’s sink so that this logic will be applied only once per sink chain. Thecomplete source for this sink can be found in Listing 13-18.
Listing 13-18. The UrlAuthenticationSink
using System;using System.Runtime.Remoting.Channels;using System.Runtime.Remoting.Messaging;using System.IO;
namespace UrlAuthenticationSink{

CHAPTER 13 ■ EXTENDING .NET REMOTING 405
public class UrlAuthenticationSink: BaseChannelSinkWithProperties,IClientChannelSink
{private IClientChannelSink _nextSink;private bool _authenticationParamsSet;
public UrlAuthenticationSink(IClientChannelSink next){
_nextSink = next;}
public IClientChannelSink NextChannelSink{
get {return _nextSink;
}}
public void AsyncProcessRequest(IClientChannelSinkStack sinkStack,IMessage msg,ITransportHeaders headers,Stream stream)
{SetSinkProperties(msg);// don't push on the sinkstack because this sink doesn't need// to handle any replies!_nextSink.AsyncProcessRequest(sinkStack,msg,headers,stream);
}
public void AsyncProcessResponse(IClientResponseChannelSinkStack sinkStack,object state,ITransportHeaders headers,Stream stream)
{// not needed
}
public Stream GetRequestStream(IMessage msg,ITransportHeaders headers)
{return _nextSink.GetRequestStream(msg, headers);
}

CHAPTER 13 ■ EXTENDING .NET REMOTING406
public void ProcessMessage(IMessage msg,ITransportHeaders requestHeaders,Stream requestStream,out ITransportHeaders responseHeaders,out Stream responseStream)
{
SetSinkProperties(msg);
_nextSink.ProcessMessage(msg,requestHeaders,requestStream,out responseHeaders,out responseStream);
}
private void SetSinkProperties(IMessage msg){
if (! _authenticationParamsSet){
String url = (String) msg.Properties["__Uri"];
UrlAuthenticationEntry entr =UrlAuthenticator.GetAuthorizationEntry(url);
if (entr != null){
IClientChannelSink last = this;
while (last.NextChannelSink != null){
last = last.NextChannelSink;}
// last now contains the transport channel sink
last.Properties["username"] = entr.Username;last.Properties["password"] = entr.Password;
}
_authenticationParamsSet = true;}
}}
}
The corresponding sink provider examines the <url> entry, which can be specified in theconfiguration file below the sink provider.
<provider type="UrlAuthenticationSink.UrlAuthenticationSinkProvider,UrlAuthenticationSink">
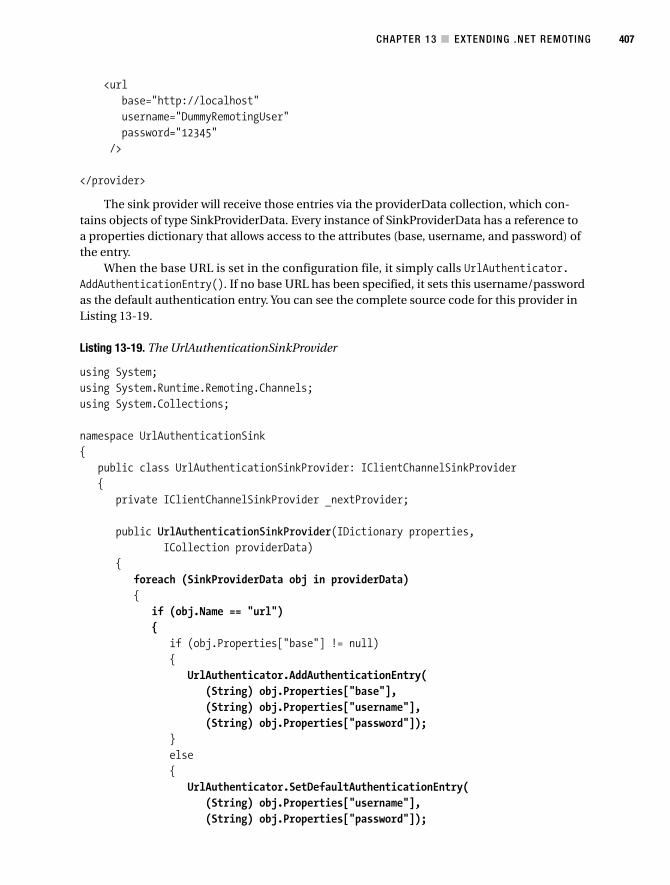
CHAPTER 13 ■ EXTENDING .NET REMOTING 407
<urlbase="http://localhost"username="DummyRemotingUser"password="12345"
/>
</provider>
The sink provider will receive those entries via the providerData collection, which con-tains objects of type SinkProviderData. Every instance of SinkProviderData has a reference toa properties dictionary that allows access to the attributes (base, username, and password) ofthe entry.
When the base URL is set in the configuration file, it simply calls UrlAuthenticator.AddAuthenticationEntry(). If no base URL has been specified, it sets this username/passwordas the default authentication entry. You can see the complete source code for this provider inListing 13-19.
Listing 13-19. The UrlAuthenticationSinkProvider
using System;using System.Runtime.Remoting.Channels;using System.Collections;
namespace UrlAuthenticationSink{
public class UrlAuthenticationSinkProvider: IClientChannelSinkProvider{
private IClientChannelSinkProvider _nextProvider;
public UrlAuthenticationSinkProvider(IDictionary properties,ICollection providerData)
{foreach (SinkProviderData obj in providerData){
if (obj.Name == "url"){
if (obj.Properties["base"] != null){
UrlAuthenticator.AddAuthenticationEntry((String) obj.Properties["base"],(String) obj.Properties["username"],(String) obj.Properties["password"]);
}else{
UrlAuthenticator.SetDefaultAuthenticationEntry((String) obj.Properties["username"],(String) obj.Properties["password"]);
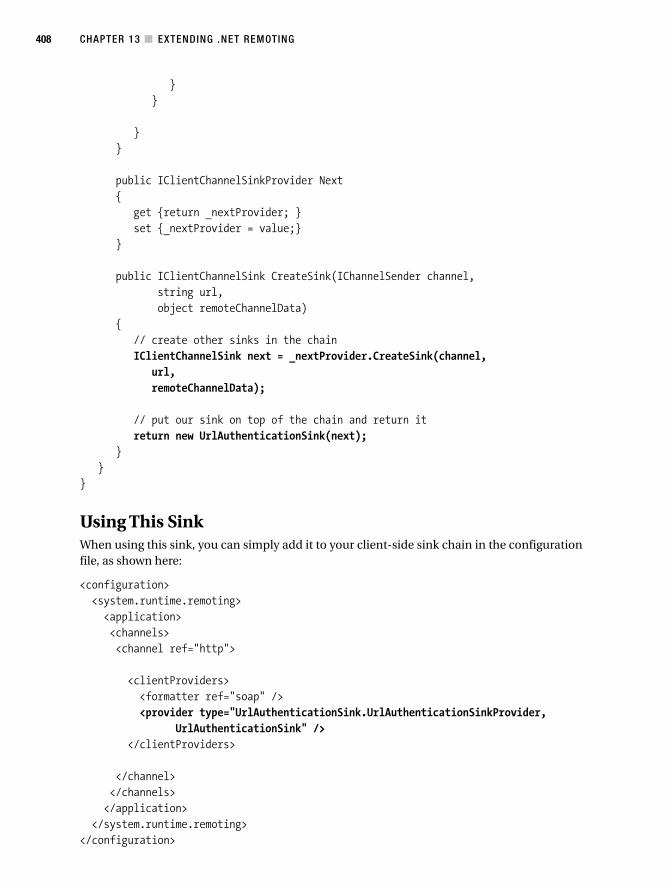
CHAPTER 13 ■ EXTENDING .NET REMOTING408
}}
}}
public IClientChannelSinkProvider Next{
get {return _nextProvider; }set {_nextProvider = value;}
}
public IClientChannelSink CreateSink(IChannelSender channel,string url,object remoteChannelData)
{// create other sinks in the chainIClientChannelSink next = _nextProvider.CreateSink(channel,
url,remoteChannelData);
// put our sink on top of the chain and return itreturn new UrlAuthenticationSink(next);
}}
}
Using This SinkWhen using this sink, you can simply add it to your client-side sink chain in the configurationfile, as shown here:
<configuration><system.runtime.remoting><application><channels><channel ref="http">
<clientProviders><formatter ref="soap" /><provider type="UrlAuthenticationSink.UrlAuthenticationSinkProvider,
UrlAuthenticationSink" /></clientProviders>
</channel></channels></application>
</system.runtime.remoting></configuration>
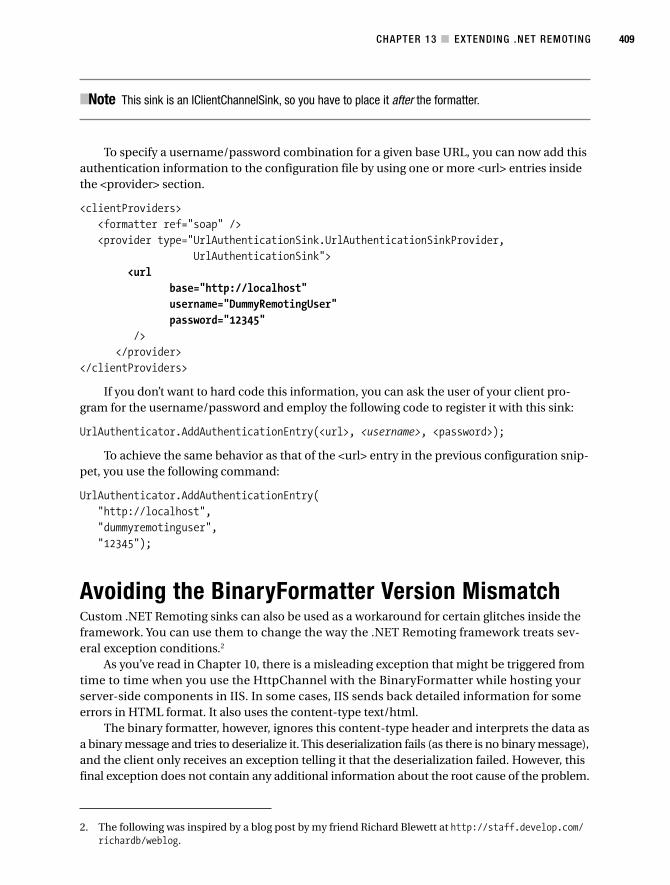
CHAPTER 13 ■ EXTENDING .NET REMOTING 409
2. The following was inspired by a blog post by my friend Richard Blewett at http://staff.develop.com/richardb/weblog.
■Note This sink is an IClientChannelSink, so you have to place it after the formatter.
To specify a username/password combination for a given base URL, you can now add thisauthentication information to the configuration file by using one or more <url> entries insidethe <provider> section.
<clientProviders><formatter ref="soap" /><provider type="UrlAuthenticationSink.UrlAuthenticationSinkProvider,
UrlAuthenticationSink"><url
base="http://localhost"username="DummyRemotingUser"password="12345"
/></provider>
</clientProviders>
If you don’t want to hard code this information, you can ask the user of your client pro-gram for the username/password and employ the following code to register it with this sink:
UrlAuthenticator.AddAuthenticationEntry(<url>, <username>, <password>);
To achieve the same behavior as that of the <url> entry in the previous configuration snip-pet, you use the following command:
UrlAuthenticator.AddAuthenticationEntry("http://localhost","dummyremotinguser","12345");
Avoiding the BinaryFormatter Version MismatchCustom .NET Remoting sinks can also be used as a workaround for certain glitches inside theframework. You can use them to change the way the .NET Remoting framework treats sev-eral exception conditions.2
As you’ve read in Chapter 10, there is a misleading exception that might be triggered fromtime to time when you use the HttpChannel with the BinaryFormatter while hosting yourserver-side components in IIS. In some cases, IIS sends back detailed information for someerrors in HTML format. It also uses the content-type text/html.
The binary formatter, however, ignores this content-type header and interprets the data asa binary message and tries to deserialize it. This deserialization fails (as there is no binary message),and the client only receives an exception telling it that the deserialization failed. However, thisfinal exception does not contain any additional information about the root cause of the problem.
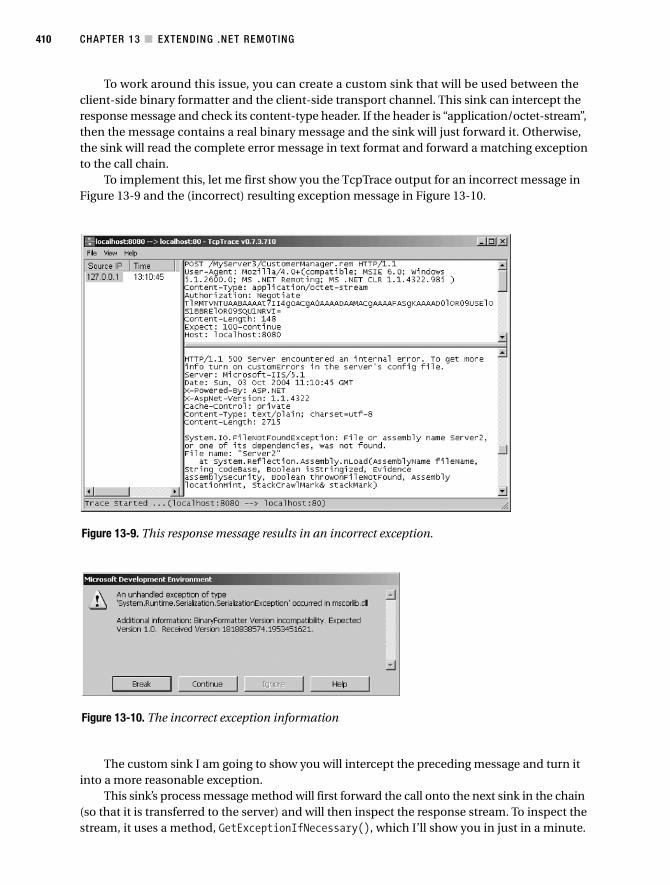
CHAPTER 13 ■ EXTENDING .NET REMOTING410
Figure 13-9. This response message results in an incorrect exception.
Figure 13-10. The incorrect exception information
To work around this issue, you can create a custom sink that will be used between theclient-side binary formatter and the client-side transport channel. This sink can intercept theresponse message and check its content-type header. If the header is “application/octet-stream”,then the message contains a real binary message and the sink will just forward it. Otherwise,the sink will read the complete error message in text format and forward a matching exceptionto the call chain.
To implement this, let me first show you the TcpTrace output for an incorrect message inFigure 13-9 and the (incorrect) resulting exception message in Figure 13-10.
The custom sink I am going to show you will intercept the preceding message and turn itinto a more reasonable exception.
This sink’s process message method will first forward the call onto the next sink in the chain(so that it is transferred to the server) and will then inspect the response stream. To inspect thestream, it uses a method, GetExceptionIfNecessary(), which I’ll show you in just in a minute.

CHAPTER 13 ■ EXTENDING .NET REMOTING 411
This method returns either null, if everything is OK, or an exception with a more meaningfulerror message.
If an exception is returned, ProcessMessage() will simply throw the exception.
public void ProcessMessage(IMessage msg,ITransportHeaders requestHeaders,Stream requestStream,out ITransportHeaders responseHeaders,out Stream responseStream)
{_next.ProcessMessage(msg, requestHeaders, requestStream,
out responseHeaders, out responseStream);Exception ex =
GetExceptionIfNecessary(ref responseHeaders, ref responseStream);
if (ex!=null) throw ex;}
The method for examining the content of the response stream first looks at the “Content-Type”header. If this header has the value “application/octet-stream”, it is not modified and the methoddoes not return an exception. Otherwise, it reads the complete response text and creates a newException object, setting its description to the text that has been received from the server.
This method can look like this:
private Exception GetExceptionIfNecessary(ref ITransportHeaders headers, ref Stream stream)
{int chunksize=0x400;MemoryStream ms = new MemoryStream();
string ct = headers["Content-Type"] as String;
if (ct==null || ct != "application/octet-stream"){
byte[] buf = new byte[chunksize];StringBuilder bld = new StringBuilder();for (int size = stream.Read(buf, 0, chunksize);
size > 0; size = stream.Read(buf, 0, chunksize)){
bld.Append(Encoding.ASCII.GetString(buf, 0, size));}return new RemotingException(bld.ToString());
}return null;
}
Additionally, you will need to implement AsyncProcessRequest() and AsyncProcessResponse()to provide a similar behavior.
public void AsyncProcessRequest(IClientChannelSinkStack sinkStack,IMessage msg,
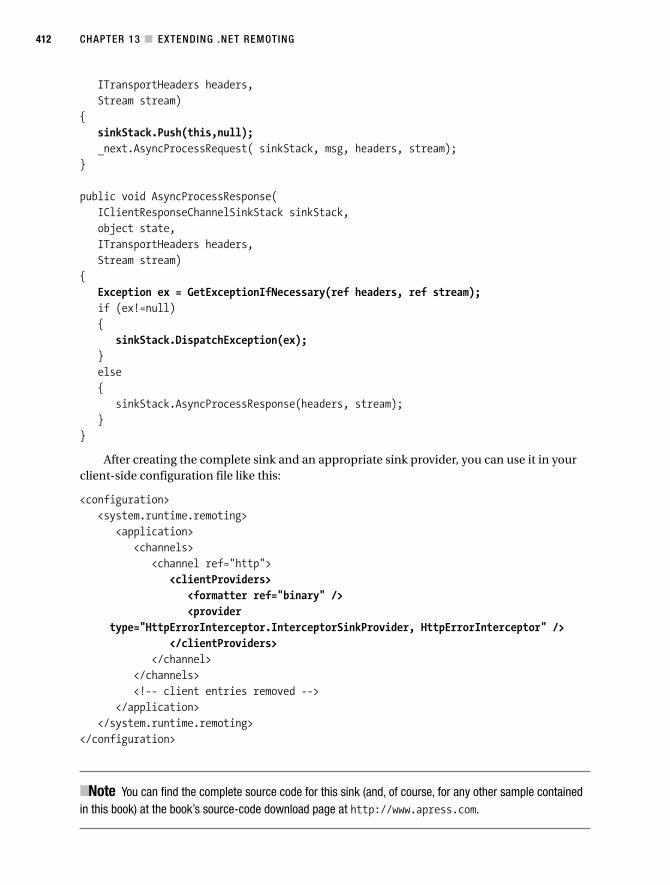
CHAPTER 13 ■ EXTENDING .NET REMOTING412
ITransportHeaders headers,Stream stream)
{sinkStack.Push(this,null);_next.AsyncProcessRequest( sinkStack, msg, headers, stream);
}
public void AsyncProcessResponse(IClientResponseChannelSinkStack sinkStack,object state,ITransportHeaders headers,Stream stream)
{Exception ex = GetExceptionIfNecessary(ref headers, ref stream);if (ex!=null){
sinkStack.DispatchException(ex);}else{
sinkStack.AsyncProcessResponse(headers, stream);}
}
After creating the complete sink and an appropriate sink provider, you can use it in yourclient-side configuration file like this:
<configuration><system.runtime.remoting>
<application><channels>
<channel ref="http"><clientProviders>
<formatter ref="binary" /><provider
type="HttpErrorInterceptor.InterceptorSinkProvider, HttpErrorInterceptor" /></clientProviders>
</channel></channels><!-- client entries removed -->
</application></system.runtime.remoting>
</configuration>
■Note You can find the complete source code for this sink (and, of course, for any other sample containedin this book) at the book’s source-code download page at http://www.apress.com.

CHAPTER 13 ■ EXTENDING .NET REMOTING 413
Figure 13-11. The corrected exception information
After you apply this configuration file and run the same client-side command that initiallyresulted in the incorrect exception, you will now receive the information shown in Figure 13-11.This information correctly reflects the source of the problem.
Using a Custom ProxyIn the previous parts of this chapter, you read about the possible ways you can extend the .NETRemoting framework using additional custom message sinks. There is another option for chang-ing the default behavior of the remoting system: custom proxy objects. Figure 13-12 shows youthe default proxy configuration.
You can change this by replacing RemotingProxy with a custom proxy that inherits fromRealProxy.
■Note You’ll normally miss the opportunity to use configuration files in this case. To work around this issue,you can use the RemotingHelper class, discussed in Chapter 6.
TransparentProxy
RemotingProxy[RealProxy]
Identity
First sink in chain[IMessageSink]
_rp
_identity
_channelSink
Figure 13-12. The default combination of proxy objects
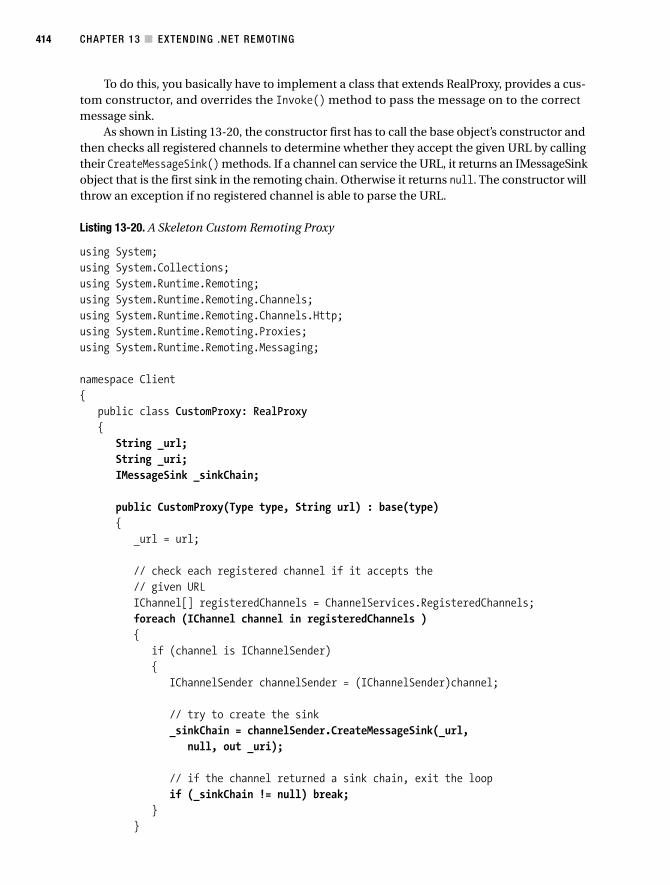
CHAPTER 13 ■ EXTENDING .NET REMOTING414
To do this, you basically have to implement a class that extends RealProxy, provides a cus-tom constructor, and overrides the Invoke() method to pass the message on to the correctmessage sink.
As shown in Listing 13-20, the constructor first has to call the base object’s constructor andthen checks all registered channels to determine whether they accept the given URL by callingtheir CreateMessageSink() methods. If a channel can service the URL, it returns an IMessageSinkobject that is the first sink in the remoting chain. Otherwise it returns null. The constructor willthrow an exception if no registered channel is able to parse the URL.
Listing 13-20. A Skeleton Custom Remoting Proxy
using System;using System.Collections;using System.Runtime.Remoting;using System.Runtime.Remoting.Channels;using System.Runtime.Remoting.Channels.Http;using System.Runtime.Remoting.Proxies;using System.Runtime.Remoting.Messaging;
namespace Client{
public class CustomProxy: RealProxy{
String _url;String _uri;IMessageSink _sinkChain;
public CustomProxy(Type type, String url) : base(type){
_url = url;
// check each registered channel if it accepts the// given URLIChannel[] registeredChannels = ChannelServices.RegisteredChannels;foreach (IChannel channel in registeredChannels ){
if (channel is IChannelSender){
IChannelSender channelSender = (IChannelSender)channel;
// try to create the sink_sinkChain = channelSender.CreateMessageSink(_url,
null, out _uri);
// if the channel returned a sink chain, exit the loopif (_sinkChain != null) break;
}}
CHAPTER 13 ■ EXTENDING .NET REMOTING 415
// no registered channel accepted the URLif (_sinkChain == null){
throw new Exception("No channel has been found for " + _url);}
}
public override IMessage Invoke(IMessage msg){
msg.Properties["__Uri"] = _url;
// TODO: process the request message
IMessage retMsg = _sinkChain.SyncProcessMessage(msg);
// TODO: process the return message
return retMsg;}
}}
To employ this proxy, you have to instantiate it using the special constructor by passingthe Type of the remote object and its URL. You can then call GetTransparentProxy() on theresulting CustomProxy object and cast the returned TransparentProxy to the remote object’stype, as shown in Listing 13-21.
Listing 13-21. Using a Custom Proxy
using System;using System.Runtime.Remoting;using System.Runtime.Remoting.Channels;using System.Runtime.Remoting.Channels.Http;using Service; // from service.dll
namespace Client{
class Client{
static void Main(string[] args){
ChannelServices.RegisterChannel(new HttpChannel());
CustomProxy prx = new CustomProxy(typeof(Service.SomeSAO),"http://localhost:1234/SomeSAO.soap");
SomeSAO obj = (SomeSAO) prx.GetTransparentProxy();
String res = obj.doSomething();
CHAPTER 13 ■ EXTENDING .NET REMOTING416
Console.WriteLine("Got result: {0}",res);Console.ReadLine();
}}
}
To show you an example for a custom proxy, I implement some methods that dump therequest and return messages’ contents. These methods are called from the proxy’s Invoke(),which will be executed whenever your client calls a method on the TransparentProxy object.This is shown in Listing 13-22.
■Note You can also call these content dump methods in an IMessageSink!
Listing 13-22. Custom Proxy That Dumps the Request and Response Messages’ Contents
using System;using System.Collections;using System.Runtime.Remoting;using System.Runtime.Remoting.Channels;using System.Runtime.Remoting.Channels.Http;using System.Runtime.Remoting.Proxies;using System.Runtime.Remoting.Messaging;
namespace Client{
public class CustomProxy: RealProxy{
String _url;String _uri;IMessageSink _sinkChain;
public CustomProxy(Type type, String url) : base(type){
_url = url;
// check each registered channel if it accepts the// given URLIChannel[] registeredChannels = ChannelServices.RegisteredChannels;foreach (IChannel channel in registeredChannels ){
if (channel is IChannelSender){
IChannelSender channelSender = (IChannelSender)channel;
// try to create the sink_sinkChain = channelSender.CreateMessageSink(_url,
null, out _uri);
CHAPTER 13 ■ EXTENDING .NET REMOTING 417
// if the channel returned a sink chain, exit the loopif (_sinkChain != null) break;
}}
// no registered channel accepted the URLif (_sinkChain == null){
throw new Exception("No channel has been found for " + _url);}
}
public override IMessage Invoke(IMessage msg){
msg.Properties["__Uri"] = _url;DumpMessageContents(msg);IMessage retMsg = _sinkChain.SyncProcessMessage(msg);DumpMessageContents(retMsg);return retMsg;
}
private String GetPaddedString(String str){
String ret = str + " ";return ret.Substring(0,17);
}
private void DumpMessageContents(IMessage msg){
Console.WriteLine("========================================");Console.WriteLine("============ Message Dump ==============");Console.WriteLine("========================================");
Console.WriteLine("Type: {0}", msg.GetType().ToString());
Console.WriteLine("--- Properties ---");IDictionary dict = msg.Properties;IDictionaryEnumerator enm =
(IDictionaryEnumerator) dict.GetEnumerator();
while (enm.MoveNext()){
Object key = enm.Key;String keyName = key.ToString();Object val = enm.Value;
Console.WriteLine("{0}: {1}", GetPaddedString(keyName), val);
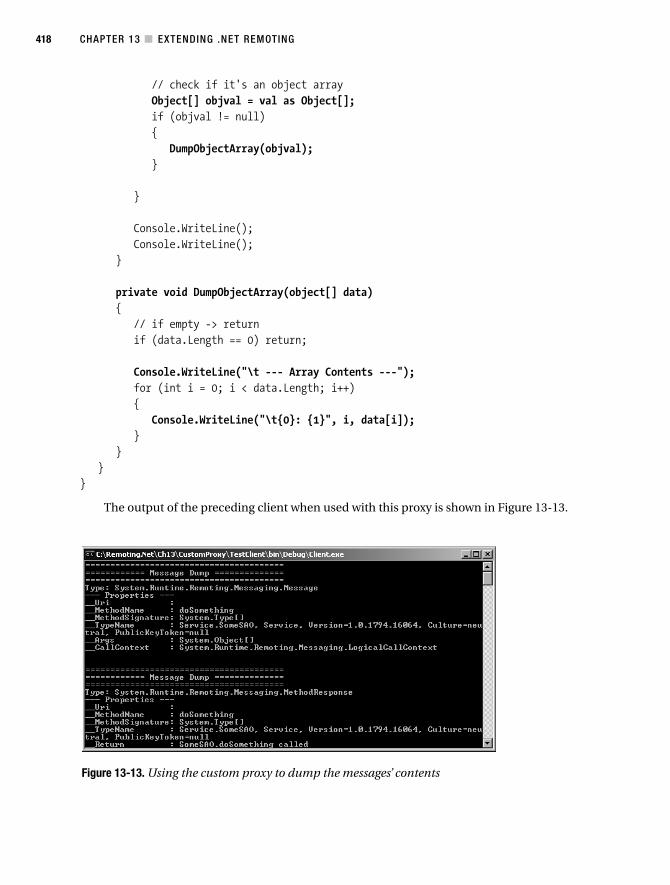
CHAPTER 13 ■ EXTENDING .NET REMOTING418
Figure 13-13. Using the custom proxy to dump the messages’ contents
// check if it's an object arrayObject[] objval = val as Object[];if (objval != null){
DumpObjectArray(objval);}
}
Console.WriteLine();Console.WriteLine();
}
private void DumpObjectArray(object[] data){
// if empty -> returnif (data.Length == 0) return;
Console.WriteLine("\t --- Array Contents ---");for (int i = 0; i < data.Length; i++){
Console.WriteLine("\t{0}: {1}", i, data[i]);}
}}
}
The output of the preceding client when used with this proxy is shown in Figure 13-13.

CHAPTER 13 ■ EXTENDING .NET REMOTING 419
As nearly all the functionality you’ll want to implement in a common .NET Remoting scenariocan be implemented with IMessageSinks, IClientChannelSinks, or IServerChannelSinks, I sug-gest you implement functionality by using these instead of custom proxies in .NET Remoting.Sinks provide the additional benefits of being capable of working with configuration files andbeing chainable. This chaining allows you to develop a set of very focused sinks that can thenbe combined to solve your application’s needs.
Custom proxies are nevertheless interesting because they can also be used for local objects.In this case, you don’t have to implement a special constructor, only override Invoke(). You canthen pass any MarshalByRefObject to another constructor (which is provided by the parentRealProxy) during creation of the proxy. All method calls to this local object then pass the proxyas an IMessage object and can therefore be processed. You can read more on message-basedprocessing for local applications in Chapter 11.
Some Final Words of CautionCustom .NET Remoting sinks should enhance the transport protocol, but should not normallyprovide application-specific functionality. Or to rephrase it: you should not implement businesslogic in custom sinks. The reason is that this would tie your business logic code to the transportprotocol you are using.
Experience shows that business applications outlive their initial environments. In my con-sulting practice, I have seen several applications developed with VB4 for example, then portedto VB5, then to VB6. Subsequently, some parts have been ported to VB .NET, but some parts havesimply been wrapped as COM DLLs to expose their functionality to .NET and Web Services appli-cations. These pieces of code have definitely outlived their initial environments.
If you therefore tie your business logic code to some side effects of your custom sinks, you’llmake it harder for your code to live without the .NET Remoting framework. However, this mightbecome critical as in the future you might want to expose the same components via Web Services,or by using the upcoming stack of Indigo technologies.
All of these alternative protocols also have means of extensibility. This means you wouldnot just have to port your business logic (which will usually be a fairly trivial task), but also yourcustom sinks. The latter might prove harder, as the extensibility models of these other technolo-gies are completely different.
So, to summarize: custom .NET Remoting sinks are a great means to enhance the distributedapplication protocol used in your application. However, they should in most cases not be usedto create side effects that unnecessarily tie your business logic code to the .NET Remoting frame-work. If you decide that it makes sense for your project to do this nevertheless, you have to takeinto account that migrating your code might be more difficult in the future.
SummaryIn this chapter you have seen how you can leverage the .NET Remoting framework’s extensibility.You should now be able to apply the internals shown in Chapters 11 and 12 to extend and cus-tomize the .NET Remoting programming model to suit your needs.
You now know the differences between IMessageSink, which is used before the mes-sage reaches the client-side formatter, and IClientChannelSink, which is used after the seriali-zation of the IMessage object. You know that you can add properties to the IMessage object’s
CHAPTER 13 ■ EXTENDING .NET REMOTING420
LogicalCallContext to pass it to the server, where it can be read by an IServerChannelSink,and you can also encrypt or compress a request by using a combination of IClientChannelSinks andIServerChannelSinks.
You also learned how sink providers are developed, and that a client-side IMessageSinkhas to be created by an IClientChannelSinkProvider as well and therefore has to implementthe IClientChannelSink’s methods. Finally, you read about custom proxies, which allow you toimplement additional functionality before the message reaches the chain of sinks.
In the next chapter, you get a chance to use the knowledge gained here to implement a com-plete transport channel from scratch.
421
C H A P T E R 1 4
■ ■ ■
1. Which will be provided by the IpcChannel, which will be shipped with version 2.0 of the .NET Framework.
Developing a Transport Channel
In the last three chapters you’ve seen how the .NET Remoting framework’s various layers canbe extended. The ultimate example of customization is nevertheless the creation of a specifictransport channel.
As you already know by now, the .NET Remoting framework comes out of the box withthree transport channels: HTTP channel, IPC channel, and TCP channel. Even though theseprotocols cover a lot of common scenarios, you might have a special need for other transportchannels for some applications. On one hand, protocols like named pipes,1 for example,could allow for higher performance (with security!) for applications communicating with eachother on the same machine. On the other hand, you might have the need for asynchronouscommunication with MSMQ or even by standard Internet e-mail using SMTP and POP3.
No matter which protocol you choose, you must watch for one thing: most protocols areeither synchronous or asynchronous in their nature. As the remoting framework supports bothkinds of calls, you’ll need to either map asynchronous .NET Remoting calls onto a synchronousprotocol like HTTP or TCP or map synchronous .NET Remoting calls onto an asynchronous pro-tocol like MSMQ or SMTP/POP3.
With the former, you will, for example, have to spawn a secondary thread that waits forthe reply and notifies the IAsyncResult (as seen in Chapter 7) whenever a response is returned. Thelatter demands that you block the calling thread and wake it up as soon as the asynchronousresponse has been received from the underlying protocol.
Protocol ConsiderationsFirst, I have to place a disclaimer here: this chapter will provide you with the necessary ideasand walk you through the process of designing and developing a specialized transport chan-nel. It isn’t the objective of this chapter to give you a commercial grade SMTP/POP3 channel.Even though you could just use this channel in your application, you’ll need to understand itfully before doing so because neither the author nor the publisher will provide any supportwhen you include this channel in your applications.
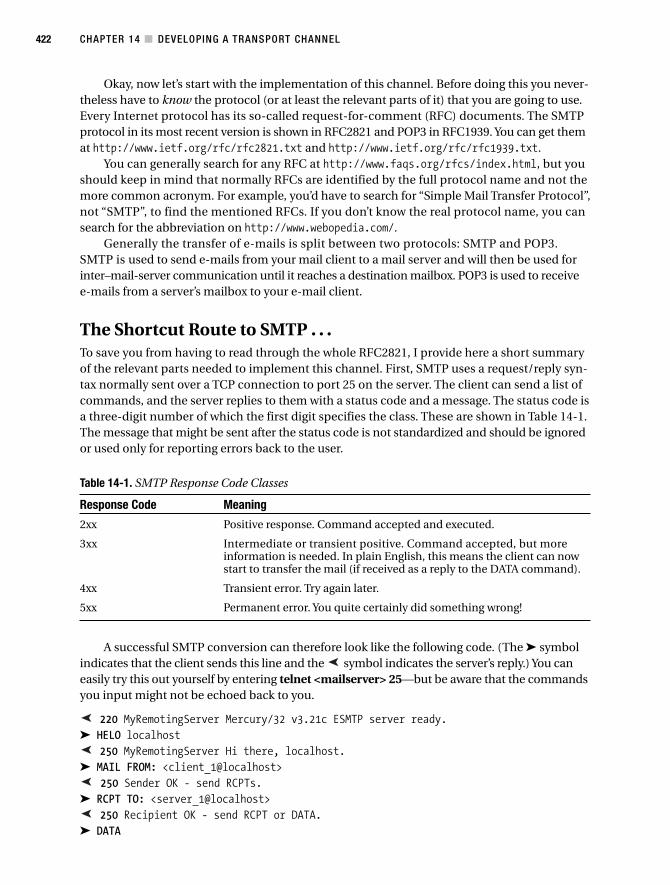
CHAPTER 14 ■ DEVELOPING A TRANSPORT CHANNEL422
Okay, now let’s start with the implementation of this channel. Before doing this you never-theless have to know the protocol (or at least the relevant parts of it) that you are going to use.Every Internet protocol has its so-called request-for-comment (RFC) documents. The SMTPprotocol in its most recent version is shown in RFC2821 and POP3 in RFC1939. You can get themat http://www.ietf.org/rfc/rfc2821.txt and http://www.ietf.org/rfc/rfc1939.txt.
You can generally search for any RFC at http://www.faqs.org/rfcs/index.html, but youshould keep in mind that normally RFCs are identified by the full protocol name and not themore common acronym. For example, you’d have to search for “Simple Mail Transfer Protocol”,not “SMTP”, to find the mentioned RFCs. If you don’t know the real protocol name, you cansearch for the abbreviation on http://www.webopedia.com/.
Generally the transfer of e-mails is split between two protocols: SMTP and POP3.SMTP is used to send e-mails from your mail client to a mail server and will then be used forinter–mail-server communication until it reaches a destination mailbox. POP3 is used to receivee-mails from a server’s mailbox to your e-mail client.
The Shortcut Route to SMTP . . .To save you from having to read through the whole RFC2821, I provide here a short summaryof the relevant parts needed to implement this channel. First, SMTP uses a request/reply syn-tax normally sent over a TCP connection to port 25 on the server. The client can send a list ofcommands, and the server replies to them with a status code and a message. The status code isa three-digit number of which the first digit specifies the class. These are shown in Table 14-1.The message that might be sent after the status code is not standardized and should be ignoredor used only for reporting errors back to the user.
Table 14-1. SMTP Response Code Classes
Response Code Meaning
2xx Positive response. Command accepted and executed.
3xx Intermediate or transient positive. Command accepted, but moreinformation is needed. In plain English, this means the client can nowstart to transfer the mail (if received as a reply to the DATA command).
4xx Transient error. Try again later.
5xx Permanent error. You quite certainly did something wrong!
A successful SMTP conversion can therefore look like the following code. (The ➤ symbolindicates that the client sends this line and the symbol indicates the server’s reply.) You caneasily try this out yourself by entering telnet <mailserver> 25—but be aware that the commandsyou input might not be echoed back to you.
220 MyRemotingServer Mercury/32 v3.21c ESMTP server ready.➤ HELO localhost
250 MyRemotingServer Hi there, localhost.➤ MAIL FROM: <client_1@localhost>
250 Sender OK - send RCPTs.➤ RCPT TO: <server_1@localhost>
250 Recipient OK - send RCPT or DATA.➤ DATA
➤
➤
➤
➤
➤
CHAPTER 14 ■ DEVELOPING A TRANSPORT CHANNEL 423
354 OK, send data, end with CRLF.CRLF➤ <sending message contents inclusive headers>➤_ sending <CR><LF>.<CR><LF> (i.e. a "dot" between two CR/LFs)
250 Data received OK.➤ QUIT
221 MyRemotingServer Service closing channel.
As you can see here, several commands can be sent by the client. At the beginning of thesession, after the server announces itself with 220 servername message, the client will sendHELO hostname. This starts the SMTP session, and the server responds with 250 servernamemessage.
For each e-mail the client wants to send via this server, the following process takes place.First, the client starts with MAIL FROM: <e-mail address> (note that the e-mail address has tobe enclosed in angle brackets). The server replies with 250 message if it allows e-mails from thissender; otherwise, it replies with a 4xx or 5xx status code. The client then sends one or moreRCPT TO: <e-mail address> commands that designate the recipients of this e-mail and that arealso confirmed by 250 message replies.
As soon as all recipients have been specified, the client sends DATA to notify the server thatit’s going to send the e-mail’s content. The server replies with 354 message and expects theclient to send the e-mail and finish with “.” (dot) on a single new line (that is, the client sends<CR><LF><DOT><CR><LF>). The server then acknowledges the e-mail by replying with 250message.
At this point the client can send further e-mails by issuing MAIL FROM or can terminate thesession with the QUIT command, which will be confirmed by the server via a 221 message reply.The server will then also close the TCP connection. Sometime after the message is sent, it willbe placed in a user’s mailbox from where it can be retrieved by the POP3 protocol.
. . . And Round-Trip to POP3Generally POP3 works in quite the same way as SMTP: it’s also a request/response protocol.POP3 messages are generally sent over a TCP connection to port 110. Instead of the statuscodes SMTP relies on, POP3 supports three kinds of replies. The first two are +OK message toindicate success and -ERR message to indicate failure. The messages after the status code aren’tstandardized, and as such should be used only to report errors to your user and not be parsedby a program.
Another type of reply is a content reply, which is used whenever you request informationfrom the server that might span multiple lines. In this case the server will indicate the end ofthe response with the same <CR><LF><DOT><CR><LF> sequence that is used by SMTP to endthe transfer of the e-mail text.
A sample POP3 session might look like this. To start it, enter telnet <mailserver> 110.
+OK <1702038211.21388@vienna01>, MercuryP/32 v3.21c ready.➤_ USER server_1
+OK server_1 is known here.➤_ PASS server_1
+OK Welcome! 1 messages (231 bytes)➤_ LIST
+OK 1 messages, 3456 bytes1 231
➤
➤
➤
➤
➤
➤
➤
➤
CHAPTER 14 ■ DEVELOPING A TRANSPORT CHANNEL424
.➤_ RETR 1
+OK Here it comes...<e-mail text>.
➤_ DELE 1+OK Message deleted.
➤_ QUIT+OK vienna01 Server closing down.
As you can see in this connection trace, the client authenticates itself at the server by send-ing the commands USER username and PASS password. In this case the password is transportedin clear text over the network. Most POP3 servers also support an APOP command based on anMD5 digest that incorporates a server-side timestamp to disable replay attacks. You can readmore about this in RFC1939.
The server then replies with a message like +OK Welcome! 1 messages (231 bytes). You shouldnever try to parse this reply to receive the message count; instead, either send the command STAT,which will be answered by +OK number_of_messages total_bytes or issue a LIST command, whichwill first return +OK message and then return this line once for each message: message_numberbytes. The reply concludes with a <CR><LF><DOT><CR><LF> sequence.
The client can then issue a RETR message_number command to retrieve the content of a spe-cific message (with a final <CR><LF><DOT><CR><LF> as well) and a DELE message_numberstatement to delete it at the server. This deletion is only carried out after sending QUIT to theserver, which then closes the connection.
Character Encoding EssentialsAfter reading the last few pages, you are almost fully equipped to start with the design of yourchannel. The last thing you need to know before you can start to write some code is how theresulting e-mail has to look.
Because there’s no standard for the binding of .NET Remoting to custom transfer protocols,I just elected Simon Fell’s recommendation for SOAP binding to SMTP as the target specifi-cation for this implementation. You can find the latest version of this document at http://www.pocketsoap.com/specs/smtpbinding/. In essence, it basically says that the content has tobe either Base64 or Quoted-Printable encoded and needs to supply a given number of e-mailheaders. So, what does this mean? Essentially, the e-mail format we know today was designed agesago when memory was expensive, WAN links were slow, and computers liked to deal with 7-bitASCII characters.
Nowadays we instead use Unicode, which allows us to have huge numbers of characters sothat even languages like Japanese, Chinese, or Korean can be encoded. This is, of course, far from7 bit, so you have to find a way to bring such data back to a 7-bit format of “printable characters.”Base64 does this for you; it is described in detail in section 5.2 of RFC1521, available at http://www.ietf.org/rfc/rfc1521.txt. To encode a given byte array with the Base64 algorithm, youcan use Convert.ToBase64String().
➤
➤
➤
➤
➤
➤
CHAPTER 14 ■ DEVELOPING A TRANSPORT CHANNEL 425
Creating E-Mail HeadersAn e-mail contains not only the body, but also header information. For a sample SOAP-via-SMTPrequest, the complete e-mail might look like this:
From: client_1@localhostTo: server_1@localhostMessage-Id: <26fc4f4cd8de4567a66ccea6897dc481@REMOTING>MIME-Version: 1.0Content-Type: text/xml; charset=utf-8Content-Transfer-Encoding: BASE64
...encoded SOAP request here...
To match a response message to the correct request, the value of the Message-Id headerwill be included in the In-Reply-To header of the response message.
From: server_1@localhostTo: client_1@localhostMessage-Id: <97809278530983552398576545869067@REMOTING>In-Reply-To: <26fc4f4cd8de4567a66ccea6897dc481@REMOTING>MIME-Version: 1.0Content-Type: text/xml; charset=utf-8Content-Transfer-Encoding: BASE64
...encoded SOAP response here...
You also need to include some special headers that are taken from the ITransportHeadersobject of the .NET Remoting request. Those will be preceded by X-REMOTING- so that a completeremoting request e-mail might look like this:
From: client_1@localhostTo: server_1@localhostMessage-Id: <26fc4f4cd8de4567a66ccea6897dc481@REMOTING>MIME-Version: 1.0Content-Type: text/xml; charset=utf-8Content-Transfer-Encoding: BASE64X-REMOTING-Content-Type: text/xml; charset="utf-8"X-REMOTING-SOAPAction:"http://schemas.microsoft.com/clr/ns/System.Runtime ➥
.Remoting.Activation.IActivator#Activate"X-REMOTING-URI: /RemoteActivationService.rem
...encoded .NET Remoting request here...
The encoded .NET Remoting request itself can be based on either the binary formatteror SOAP!
CHAPTER 14 ■ DEVELOPING A TRANSPORT CHANNEL426
Encapsulating the ProtocolsNow that you’ve got some of the protocol basics down, you’re ready for the source code for thischannel. Okay, here goes. First you have to encapsulate the SMTP and POP3 protocols that arelater used in the client-side and server-side transport channel sinks.
The first part of this is shown in Listing 14-1. This source file encapsulates the lower-levelSMTP protocol. It provides a public constructor that needs the hostname of your SMTP-serveras a parameter. Its SendMessage() method takes the sender’s and recipient’s e-mail address andthe full e-mail’s text (including the headers) as parameters. It then connects to the SMTP serverand sends the specified mail.
Listing 14-1. Encapsulating the Lower-Level SMTP Protocol
using System;using System.Net.Sockets;using System.Net;using System.IO;using System.Text;
namespace SmtpChannel{
public class SmtpConnection{
private String _hostname;private TcpClient _SmtpConnection;private NetworkStream _smtpStream;private StreamReader _smtpResponse;
public SmtpConnection(String hostname) {_hostname = hostname;
}
private void Connect() {_SmtpConnection = new TcpClient(_hostname,25);_smtpStream = _SmtpConnection.GetStream();_smtpResponse = new StreamReader(_smtpStream);
}
private void Disconnect() {_smtpStream.Close();_smtpResponse.Close();_SmtpConnection.Close();
}
private void SendCommand(String command, int expectedResponseClass) {// command: the SMTP command to send// expectedResponseClass: first digit of the expected smtp response
CHAPTER 14 ■ DEVELOPING A TRANSPORT CHANNEL 427
// throws an exception if the server's responsecode's first// digit (resonse class) is > the expectedResponseClass.
// if expectedResponseClass == 0, it will be ignored
command = command + "\r\n";byte[] cmd = Encoding.ASCII.GetBytes(command);_smtpStream.Write(cmd,0,cmd.Length);String response = _smtpResponse.ReadLine();
if (expectedResponseClass != 0) {int resp = Convert.ToInt32(response.Substring(0,1));if (resp > expectedResponseClass) {
throw new Exception("SMTP Server returned unexpected " +"response:\n'" + response + "'");
}}
}
public void SendMessage(String from, String to, String text) {try{
Connect();SendCommand("HELO localhost",2);SendCommand("MAIL FROM: <" + from + ">",2);SendCommand("RCPT TO: <" + to + ">",2);SendCommand("DATA",3);byte[] bodybytes = Encoding.ASCII.GetBytes(text + "\r\n");_smtpStream.Write(bodybytes,0,bodybytes.Length);SendCommand(".",3);SendCommand("QUIT",0);
} finally {try {
Disconnect();} catch (Exception e) {/*ignore*/};
}}
}}
To encapsulate the POP3 protocol, you first have to add a class that will hold the parsedmessage and its headers. This is shown in Listing 14-2.
Listing 14-2. A Retrieved and Parsed Message
using System;using System.Collections;
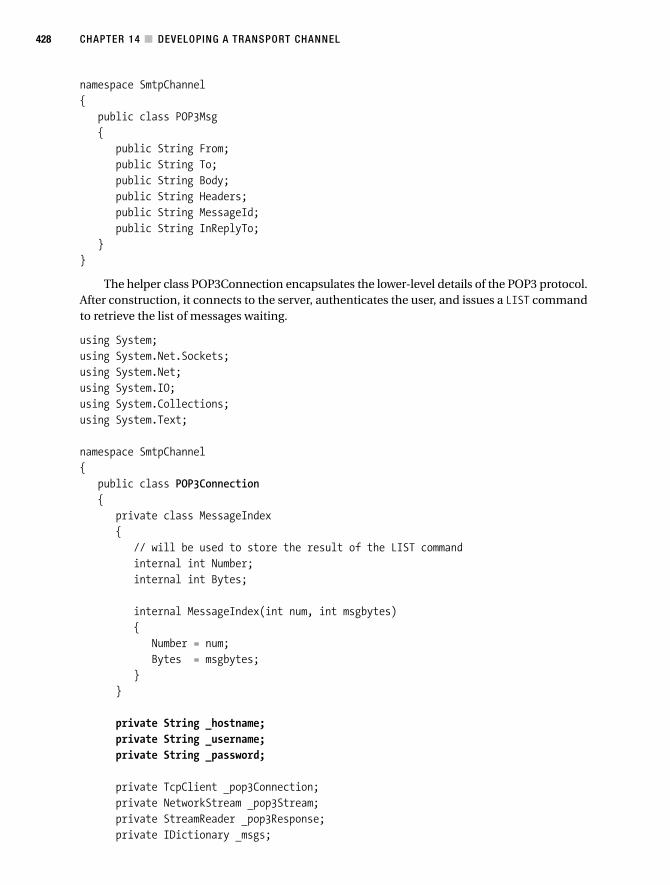
CHAPTER 14 ■ DEVELOPING A TRANSPORT CHANNEL428
namespace SmtpChannel{
public class POP3Msg{
public String From;public String To;public String Body;public String Headers;public String MessageId;public String InReplyTo;
}}
The helper class POP3Connection encapsulates the lower-level details of the POP3 protocol.After construction, it connects to the server, authenticates the user, and issues a LIST commandto retrieve the list of messages waiting.
using System;using System.Net.Sockets;using System.Net;using System.IO;using System.Collections;using System.Text;
namespace SmtpChannel{
public class POP3Connection{
private class MessageIndex{
// will be used to store the result of the LIST commandinternal int Number;internal int Bytes;
internal MessageIndex(int num, int msgbytes){
Number = num;Bytes = msgbytes;
}}
private String _hostname;private String _username;private String _password;
private TcpClient _pop3Connection;private NetworkStream _pop3Stream;private StreamReader _pop3Response;private IDictionary _msgs;

CHAPTER 14 ■ DEVELOPING A TRANSPORT CHANNEL 429
public POP3Connection(String hostname, String username, String password){
// try to connect to the server with the supplied username// and password.
_hostname = hostname;_username = username;_password = password;try{
Connect();}catch (Exception e){
try{
Disconnect();}catch (Exception ex) {/* ignore */}
throw e;}
}
private void Connect(){
// initialize the list of messages_msgs = new Hashtable();
// open the connection_pop3Connection = new TcpClient(_hostname,110);_pop3Stream = _pop3Connection.GetStream();_pop3Response = new StreamReader(_pop3Stream);
// ignore first line (server's greeting)String response = _pop3Response.ReadLine();
// authenticateSendCommand("USER " + _username,true);SendCommand("PASS " + _password,true);
// retrieve the list of messagesSendCommand("LIST",true);response = _pop3Response.ReadLine();while (response != "."){
// add entries to _msgs dictionaryint pos = response.IndexOf(" ");
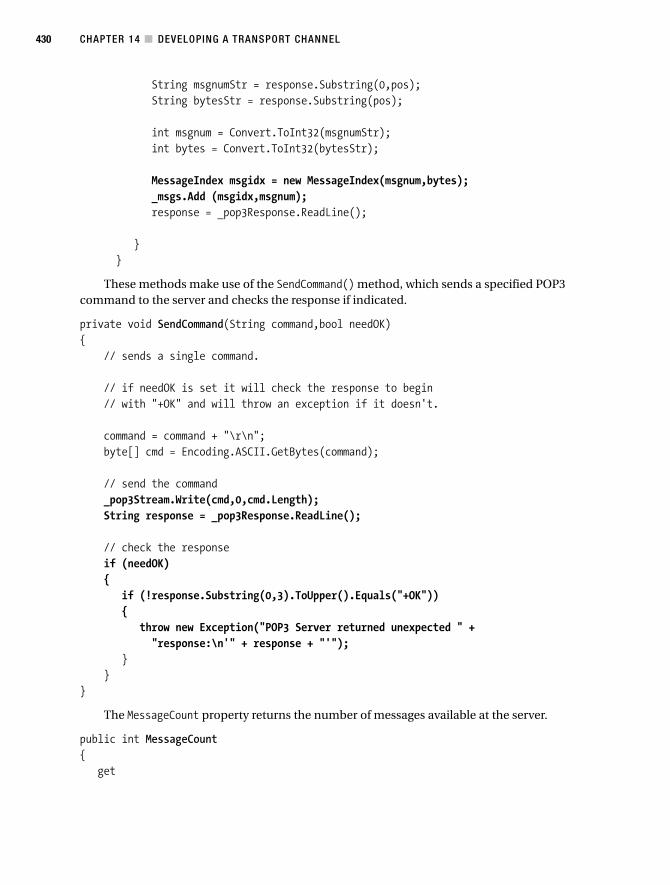
CHAPTER 14 ■ DEVELOPING A TRANSPORT CHANNEL430
String msgnumStr = response.Substring(0,pos);String bytesStr = response.Substring(pos);
int msgnum = Convert.ToInt32(msgnumStr);int bytes = Convert.ToInt32(bytesStr);
MessageIndex msgidx = new MessageIndex(msgnum,bytes);_msgs.Add (msgidx,msgnum);response = _pop3Response.ReadLine();
}}
These methods make use of the SendCommand() method, which sends a specified POP3command to the server and checks the response if indicated.
private void SendCommand(String command,bool needOK){
// sends a single command.
// if needOK is set it will check the response to begin// with "+OK" and will throw an exception if it doesn't.
command = command + "\r\n";byte[] cmd = Encoding.ASCII.GetBytes(command);
// send the command_pop3Stream.Write(cmd,0,cmd.Length);String response = _pop3Response.ReadLine();
// check the responseif (needOK){
if (!response.Substring(0,3).ToUpper().Equals("+OK")){
throw new Exception("POP3 Server returned unexpected " +"response:\n'" + response + "'");
}}
}
The MessageCount property returns the number of messages available at the server.
public int MessageCount{
get
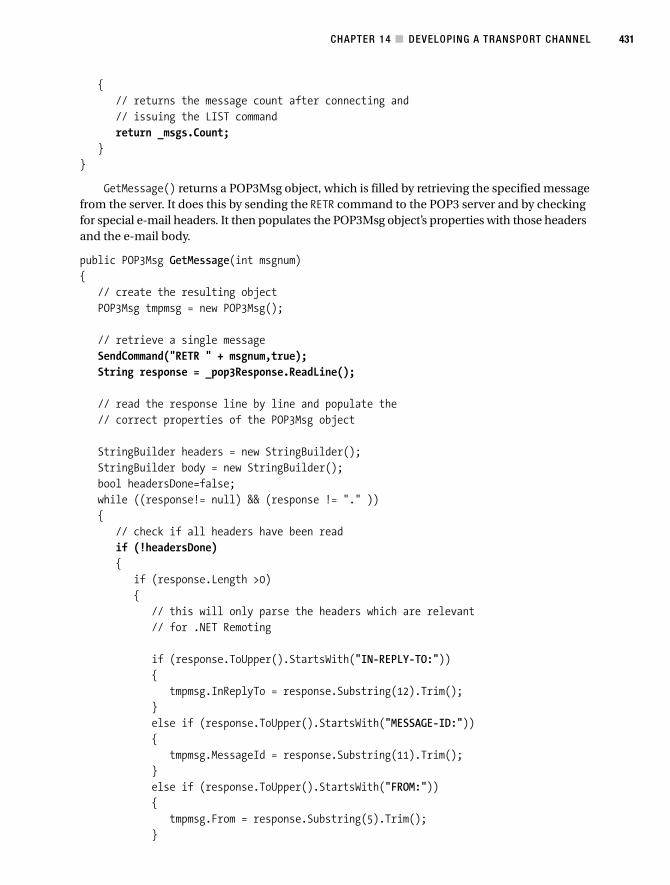
CHAPTER 14 ■ DEVELOPING A TRANSPORT CHANNEL 431
{// returns the message count after connecting and// issuing the LIST commandreturn _msgs.Count;
}}
GetMessage() returns a POP3Msg object, which is filled by retrieving the specified messagefrom the server. It does this by sending the RETR command to the POP3 server and by checkingfor special e-mail headers. It then populates the POP3Msg object’s properties with those headersand the e-mail body.
public POP3Msg GetMessage(int msgnum){
// create the resulting objectPOP3Msg tmpmsg = new POP3Msg();
// retrieve a single messageSendCommand("RETR " + msgnum,true);String response = _pop3Response.ReadLine();
// read the response line by line and populate the// correct properties of the POP3Msg object
StringBuilder headers = new StringBuilder();StringBuilder body = new StringBuilder();bool headersDone=false;while ((response!= null) && (response != "." )){
// check if all headers have been readif (!headersDone){
if (response.Length >0){
// this will only parse the headers which are relevant// for .NET Remoting
if (response.ToUpper().StartsWith("IN-REPLY-TO:")){
tmpmsg.InReplyTo = response.Substring(12).Trim();}else if (response.ToUpper().StartsWith("MESSAGE-ID:")){
tmpmsg.MessageId = response.Substring(11).Trim();}else if (response.ToUpper().StartsWith("FROM:")){
tmpmsg.From = response.Substring(5).Trim();}
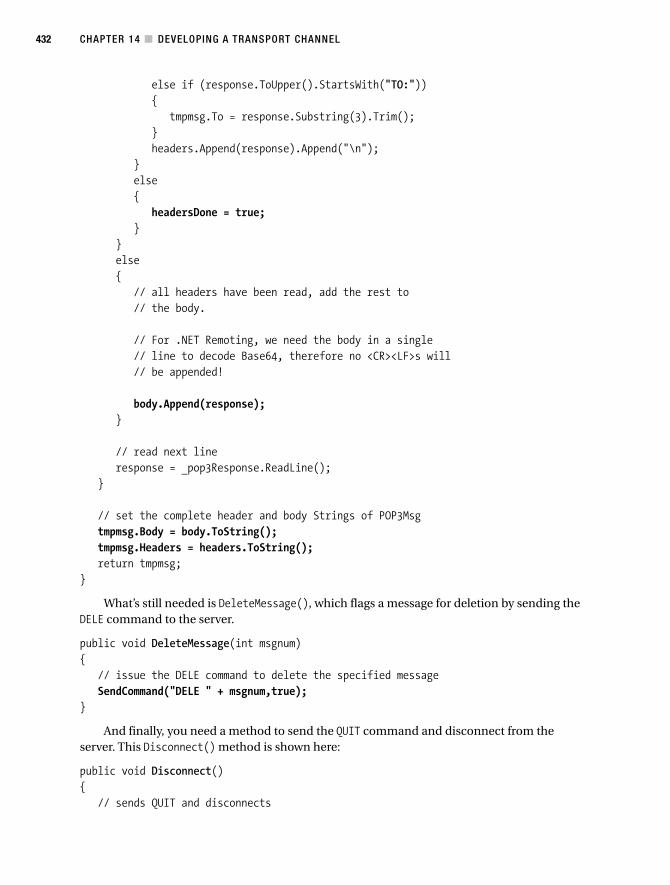
CHAPTER 14 ■ DEVELOPING A TRANSPORT CHANNEL432
else if (response.ToUpper().StartsWith("TO:")){
tmpmsg.To = response.Substring(3).Trim();}headers.Append(response).Append("\n");
}else{
headersDone = true;}
}else{
// all headers have been read, add the rest to// the body.
// For .NET Remoting, we need the body in a single// line to decode Base64, therefore no <CR><LF>s will// be appended!
body.Append(response);}
// read next lineresponse = _pop3Response.ReadLine();
}
// set the complete header and body Strings of POP3Msgtmpmsg.Body = body.ToString();tmpmsg.Headers = headers.ToString();return tmpmsg;
}
What’s still needed is DeleteMessage(), which flags a message for deletion by sending theDELE command to the server.
public void DeleteMessage(int msgnum){
// issue the DELE command to delete the specified messageSendCommand("DELE " + msgnum,true);
}
And finally, you need a method to send the QUIT command and disconnect from theserver. This Disconnect() method is shown here:
public void Disconnect(){
// sends QUIT and disconnects

CHAPTER 14 ■ DEVELOPING A TRANSPORT CHANNEL 433
try{
// send QUIT to commit the DELEsSendCommand("QUIT",false);
}finally{
// close the connection_pop3Stream.Close();_pop3Response.Close();_pop3Connection.Close();
}}
With those two helper classes presented previously, you’ll be able to access SMTP andPOP3 servers without having to deal further with the details of those protocols. Nevertheless,what’s still missing is a mapping between the .NET Remoting framework and those e-mailmessages.
Checking for New MailAs POP3 will not notify the client whenever a message has been received, it is necessary tocontinuously log on to the server to check for new e-mails. This is done by the POP3Pollingclass. Each instance of this class contacts a given server in regular intervals. If a message isavailable, it will fetch it and invoke a delegate on another helper class that will then processthis message.
The POP3Polling class can be run in two modes: client or server mode. Whenever it’s inclient mode, it only starts polling after the client has sent a request to the server. As soon as theserver’s reply is handled, this class stops polling to save network bandwidth. In server mode, itchecks the server regularly to handle any remoting requests.
As you can see in the following part of this class, it provides a custom constructor thataccepts the server’s hostname, username, password, the polling interval, and a flag indicatingwhether it should run in server or client mode:
using System;using System.Collections;using System.Threading;
namespace SmtpChannel{
public class POP3Polling{
delegate void HandleMessageDelegate(POP3Msg msg);
// if it's a remoting server, we will poll foreverinternal bool _isServer;
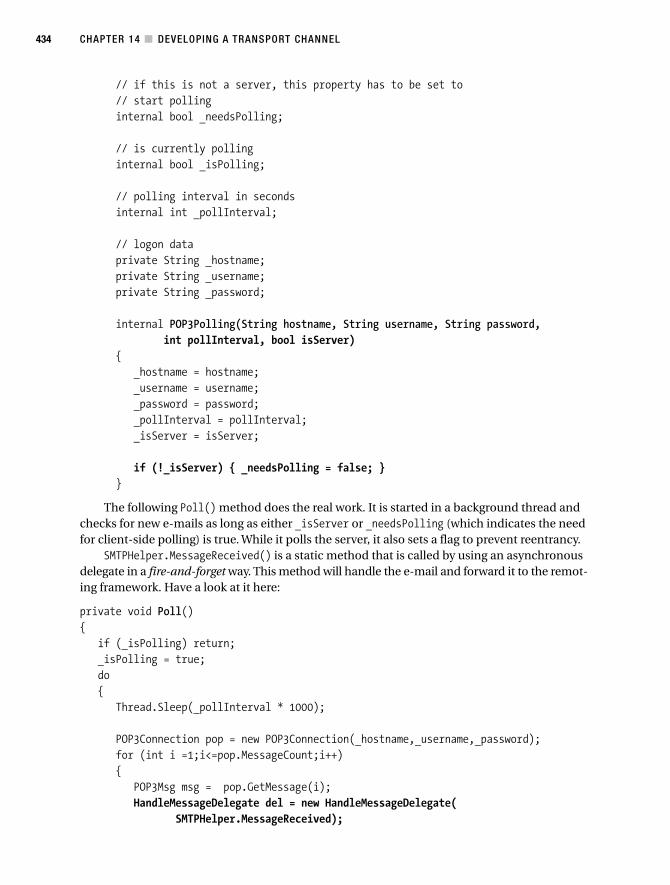
CHAPTER 14 ■ DEVELOPING A TRANSPORT CHANNEL434
// if this is not a server, this property has to be set to// start pollinginternal bool _needsPolling;
// is currently pollinginternal bool _isPolling;
// polling interval in secondsinternal int _pollInterval;
// logon dataprivate String _hostname;private String _username;private String _password;
internal POP3Polling(String hostname, String username, String password,int pollInterval, bool isServer)
{_hostname = hostname;_username = username;_password = password;_pollInterval = pollInterval;_isServer = isServer;
if (!_isServer) { _needsPolling = false; }}
The following Poll() method does the real work. It is started in a background thread andchecks for new e-mails as long as either _isServer or _needsPolling (which indicates the needfor client-side polling) is true. While it polls the server, it also sets a flag to prevent reentrancy.
SMTPHelper.MessageReceived() is a static method that is called by using an asynchronousdelegate in a fire-and-forget way. This method will handle the e-mail and forward it to the remot-ing framework. Have a look at it here:
private void Poll(){
if (_isPolling) return;_isPolling = true;do{
Thread.Sleep(_pollInterval * 1000);
POP3Connection pop = new POP3Connection(_hostname,_username,_password);for (int i =1;i<=pop.MessageCount;i++){
POP3Msg msg = pop.GetMessage(i);HandleMessageDelegate del = new HandleMessageDelegate(
SMTPHelper.MessageReceived);
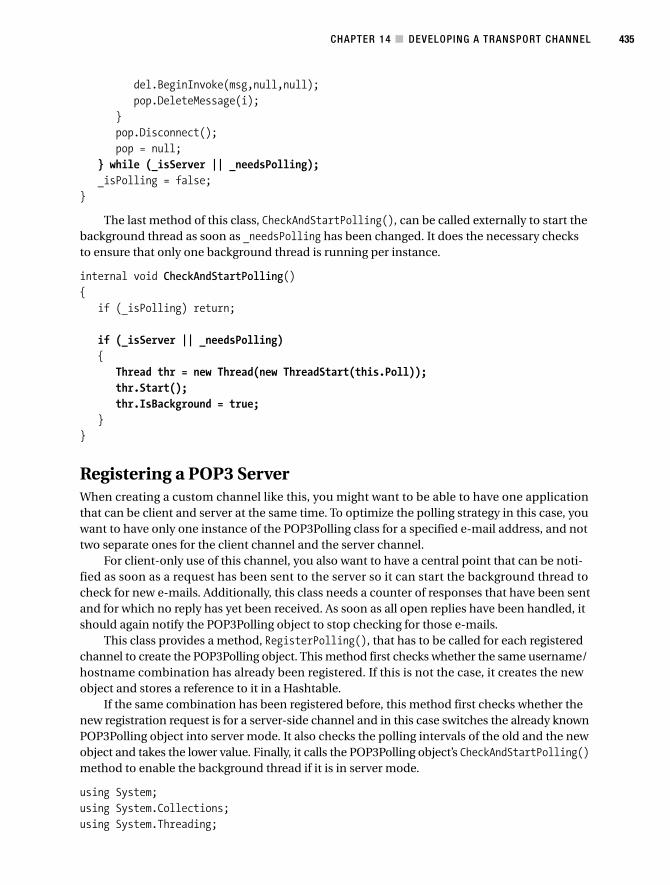
CHAPTER 14 ■ DEVELOPING A TRANSPORT CHANNEL 435
del.BeginInvoke(msg,null,null);pop.DeleteMessage(i);
}pop.Disconnect();pop = null;
} while (_isServer || _needsPolling);_isPolling = false;
}
The last method of this class, CheckAndStartPolling(), can be called externally to start thebackground thread as soon as _needsPolling has been changed. It does the necessary checksto ensure that only one background thread is running per instance.
internal void CheckAndStartPolling(){
if (_isPolling) return;
if (_isServer || _needsPolling){
Thread thr = new Thread(new ThreadStart(this.Poll));thr.Start();thr.IsBackground = true;
}}
Registering a POP3 ServerWhen creating a custom channel like this, you might want to be able to have one applicationthat can be client and server at the same time. To optimize the polling strategy in this case, youwant to have only one instance of the POP3Polling class for a specified e-mail address, and nottwo separate ones for the client channel and the server channel.
For client-only use of this channel, you also want to have a central point that can be noti-fied as soon as a request has been sent to the server so it can start the background thread tocheck for new e-mails. Additionally, this class needs a counter of responses that have been sentand for which no reply has yet been received. As soon as all open replies have been handled, itshould again notify the POP3Polling object to stop checking for those e-mails.
This class provides a method, RegisterPolling(), that has to be called for each registeredchannel to create the POP3Polling object. This method first checks whether the same username/hostname combination has already been registered. If this is not the case, it creates the newobject and stores a reference to it in a Hashtable.
If the same combination has been registered before, this method first checks whether thenew registration request is for a server-side channel and in this case switches the already knownPOP3Polling object into server mode. It also checks the polling intervals of the old and the newobject and takes the lower value. Finally, it calls the POP3Polling object’s CheckAndStartPolling()method to enable the background thread if it is in server mode.
using System;using System.Collections;using System.Threading;

CHAPTER 14 ■ DEVELOPING A TRANSPORT CHANNEL436
namespace SmtpChannel{
public class POP3PollManager{
// dictionary of polling instancesstatic IDictionary _listeners = Hashtable.Synchronized(new Hashtable());
// number of sent messages for which no response has been receivedprivate static int _pendingResponses;private static int _lastPendingResponses;
public static void RegisterPolling(String hostname, String username,String password, int pollInterval, bool isServer)
{String key = username + "|" + hostname;
// check if this combination has already been registeredPOP3Polling pop3 = (POP3Polling) _listeners[key];if (pop3 == null){
// create a new listenerpop3 = new POP3Polling(hostname,username,password,
pollInterval,isServer);
_listeners[key]= pop3;}else{
// change to server-mode if neededif (!pop3._isServer && isServer){
pop3._isServer = true;}
// check for pollInterval => lowest interval will be takenif (! (pop3._pollInterval > pollInterval)){
pop3._pollInterval = pollInterval;}
}pop3.CheckAndStartPolling();
}
Two other methods that are provided in this class have to be called to notify all registeredPOP3Polling objects that the remoting framework is waiting for a reply or that it has receiveda reply.

CHAPTER 14 ■ DEVELOPING A TRANSPORT CHANNEL 437
internal static void RequestSent(){
_pendingResponses++;if (_lastPendingResponses<=0 && _pendingResponses > 0){
IEnumerator enmr = _listeners.GetEnumerator();while (enmr.MoveNext()){
DictionaryEntry entr = (DictionaryEntry) enmr.Current;POP3Polling pop3 = (POP3Polling) entr.Value;pop3._needsPolling = true;pop3.CheckAndStartPolling();
}}_lastPendingResponses = _pendingResponses;
}
internal static void ResponseReceived(){
_pendingResponses--;if (_pendingResponses <=0){
IEnumerator enmr = _listeners.GetEnumerator();while (enmr.MoveNext()){
DictionaryEntry entr = (DictionaryEntry) enmr.Current;POP3Polling pop3 = (POP3Polling) entr.Value;pop3._needsPolling = false;
}}_lastPendingResponses = _pendingResponses;
}
Connecting to .NET RemotingWhat you’ve seen until now has been quite protocol specific, because I haven’t yet covered anyconnections between the underlying protocol to .NET Remoting. This task is handled by theSMTPHelper class. This class holds three synchronized Hashtables containing the following data:
• Objects that are waiting for a response to a given SMTP message ID. These can be eitherThread objects or SmtpChannel.AsyncResponseHandler objects, both of which are shownlater. These are stored in _waitingFor.
• The server-side transport sink for any e-mail address that has been registered witha SMTPServerChannel in _servers.
• The received responses that will be cached while waking up the thread that has beenblocked is stored in _responses. This is a short-term storage that is only used for the frac-tions of a second it takes for the thread to wake up and fetch and remove the response.
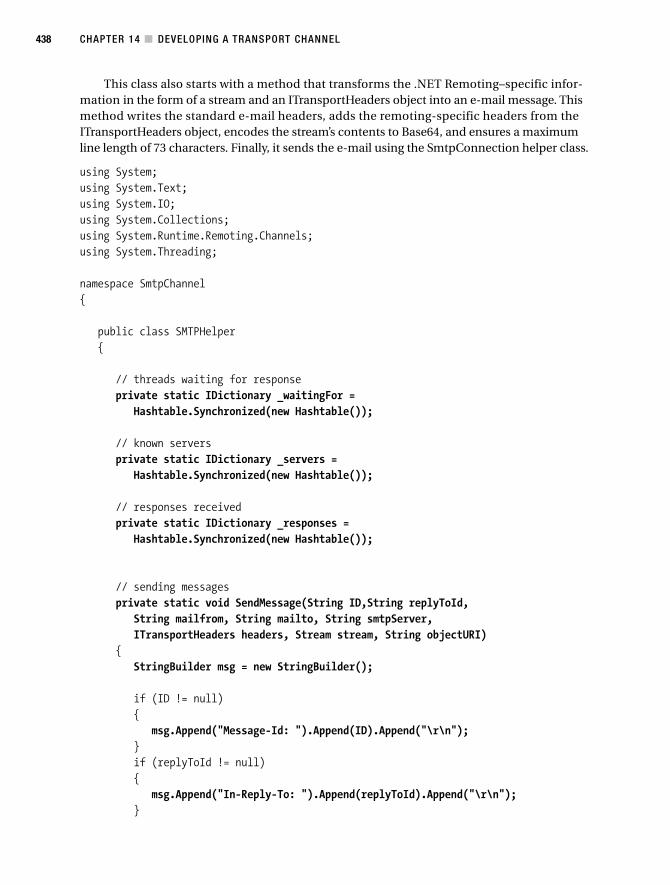
CHAPTER 14 ■ DEVELOPING A TRANSPORT CHANNEL438
This class also starts with a method that transforms the .NET Remoting–specific infor-mation in the form of a stream and an ITransportHeaders object into an e-mail message. Thismethod writes the standard e-mail headers, adds the remoting-specific headers from theITransportHeaders object, encodes the stream’s contents to Base64, and ensures a maximumline length of 73 characters. Finally, it sends the e-mail using the SmtpConnection helper class.
using System;using System.Text;using System.IO;using System.Collections;using System.Runtime.Remoting.Channels;using System.Threading;
namespace SmtpChannel{
public class SMTPHelper{
// threads waiting for responseprivate static IDictionary _waitingFor =
Hashtable.Synchronized(new Hashtable());
// known serversprivate static IDictionary _servers =
Hashtable.Synchronized(new Hashtable());
// responses receivedprivate static IDictionary _responses =
Hashtable.Synchronized(new Hashtable());
// sending messagesprivate static void SendMessage(String ID,String replyToId,
String mailfrom, String mailto, String smtpServer,ITransportHeaders headers, Stream stream, String objectURI)
{StringBuilder msg = new StringBuilder();
if (ID != null){
msg.Append("Message-Id: ").Append(ID).Append("\r\n");}if (replyToId != null){
msg.Append("In-Reply-To: ").Append(replyToId).Append("\r\n");}
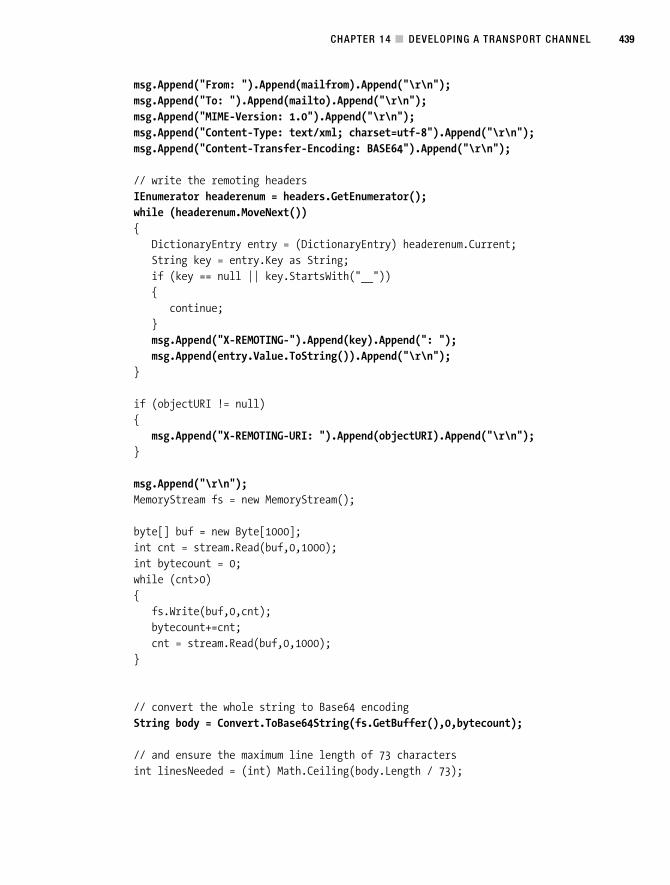
CHAPTER 14 ■ DEVELOPING A TRANSPORT CHANNEL 439
msg.Append("From: ").Append(mailfrom).Append("\r\n");msg.Append("To: ").Append(mailto).Append("\r\n");msg.Append("MIME-Version: 1.0").Append("\r\n");msg.Append("Content-Type: text/xml; charset=utf-8").Append("\r\n");msg.Append("Content-Transfer-Encoding: BASE64").Append("\r\n");
// write the remoting headersIEnumerator headerenum = headers.GetEnumerator();while (headerenum.MoveNext()){
DictionaryEntry entry = (DictionaryEntry) headerenum.Current;String key = entry.Key as String;if (key == null || key.StartsWith("__")){
continue;}msg.Append("X-REMOTING-").Append(key).Append(": ");msg.Append(entry.Value.ToString()).Append("\r\n");
}
if (objectURI != null){
msg.Append("X-REMOTING-URI: ").Append(objectURI).Append("\r\n");}
msg.Append("\r\n");MemoryStream fs = new MemoryStream();
byte[] buf = new Byte[1000];int cnt = stream.Read(buf,0,1000);int bytecount = 0;while (cnt>0){
fs.Write(buf,0,cnt);bytecount+=cnt;cnt = stream.Read(buf,0,1000);
}
// convert the whole string to Base64 encodingString body = Convert.ToBase64String(fs.GetBuffer(),0,bytecount);
// and ensure the maximum line length of 73 charactersint linesNeeded = (int) Math.Ceiling(body.Length / 73);
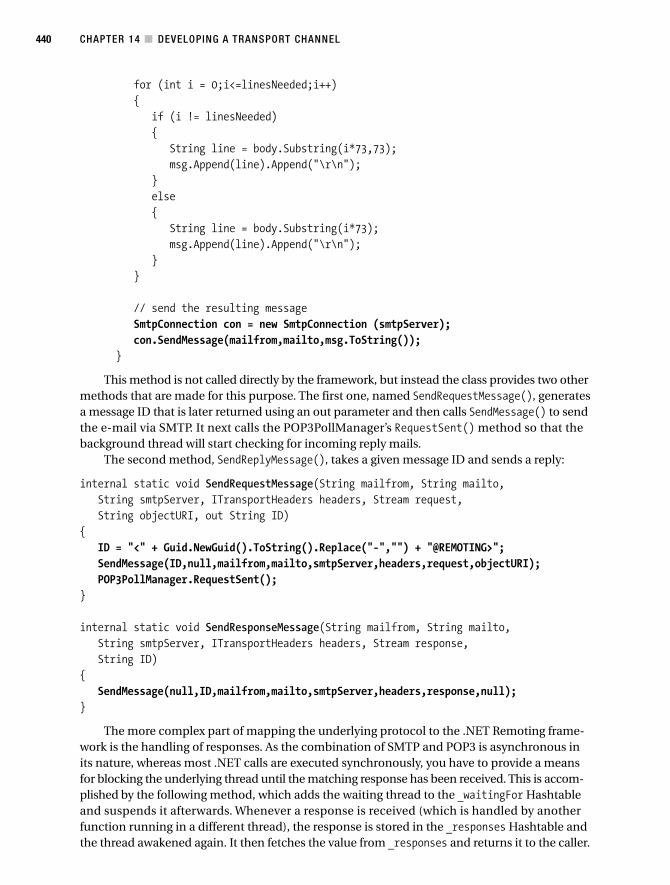
CHAPTER 14 ■ DEVELOPING A TRANSPORT CHANNEL440
for (int i = 0;i<=linesNeeded;i++){
if (i != linesNeeded){
String line = body.Substring(i*73,73);msg.Append(line).Append("\r\n");
}else{
String line = body.Substring(i*73);msg.Append(line).Append("\r\n");
}}
// send the resulting messageSmtpConnection con = new SmtpConnection (smtpServer);con.SendMessage(mailfrom,mailto,msg.ToString());
}
This method is not called directly by the framework, but instead the class provides two othermethods that are made for this purpose. The first one, named SendRequestMessage(), generatesa message ID that is later returned using an out parameter and then calls SendMessage() to sendthe e-mail via SMTP. It next calls the POP3PollManager’s RequestSent() method so that thebackground thread will start checking for incoming reply mails.
The second method, SendReplyMessage(), takes a given message ID and sends a reply:
internal static void SendRequestMessage(String mailfrom, String mailto,String smtpServer, ITransportHeaders headers, Stream request,String objectURI, out String ID)
{ID = "<" + Guid.NewGuid().ToString().Replace("-","") + "@REMOTING>";SendMessage(ID,null,mailfrom,mailto,smtpServer,headers,request,objectURI);POP3PollManager.RequestSent();
}
internal static void SendResponseMessage(String mailfrom, String mailto,String smtpServer, ITransportHeaders headers, Stream response,String ID)
{SendMessage(null,ID,mailfrom,mailto,smtpServer,headers,response,null);
}
The more complex part of mapping the underlying protocol to the .NET Remoting frame-work is the handling of responses. As the combination of SMTP and POP3 is asynchronous inits nature, whereas most .NET calls are executed synchronously, you have to provide a meansfor blocking the underlying thread until the matching response has been received. This is accom-plished by the following method, which adds the waiting thread to the _waitingFor Hashtableand suspends it afterwards. Whenever a response is received (which is handled by anotherfunction running in a different thread), the response is stored in the _responses Hashtable andthe thread awakened again. It then fetches the value from _responses and returns it to the caller.
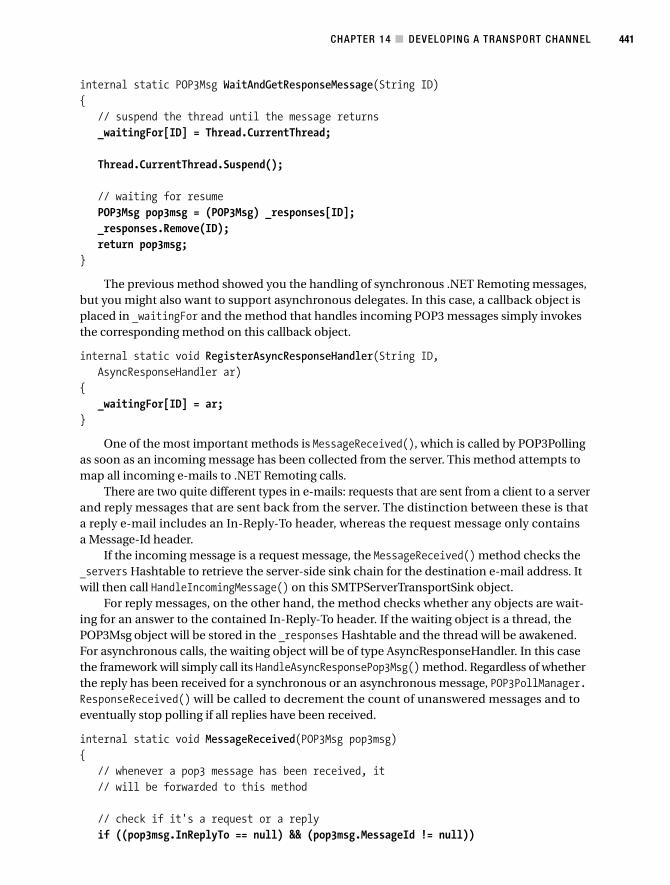
CHAPTER 14 ■ DEVELOPING A TRANSPORT CHANNEL 441
internal static POP3Msg WaitAndGetResponseMessage(String ID){
// suspend the thread until the message returns_waitingFor[ID] = Thread.CurrentThread;
Thread.CurrentThread.Suspend();
// waiting for resumePOP3Msg pop3msg = (POP3Msg) _responses[ID];_responses.Remove(ID);return pop3msg;
}
The previous method showed you the handling of synchronous .NET Remoting messages,but you might also want to support asynchronous delegates. In this case, a callback object isplaced in _waitingFor and the method that handles incoming POP3 messages simply invokesthe corresponding method on this callback object.
internal static void RegisterAsyncResponseHandler(String ID,AsyncResponseHandler ar)
{_waitingFor[ID] = ar;
}
One of the most important methods is MessageReceived(), which is called by POP3Pollingas soon as an incoming message has been collected from the server. This method attempts tomap all incoming e-mails to .NET Remoting calls.
There are two quite different types in e-mails: requests that are sent from a client to a serverand reply messages that are sent back from the server. The distinction between these is thata reply e-mail includes an In-Reply-To header, whereas the request message only containsa Message-Id header.
If the incoming message is a request message, the MessageReceived() method checks the_servers Hashtable to retrieve the server-side sink chain for the destination e-mail address. Itwill then call HandleIncomingMessage() on this SMTPServerTransportSink object.
For reply messages, on the other hand, the method checks whether any objects are wait-ing for an answer to the contained In-Reply-To header. If the waiting object is a thread, thePOP3Msg object will be stored in the _responses Hashtable and the thread will be awakened.For asynchronous calls, the waiting object will be of type AsyncResponseHandler. In this casethe framework will simply call its HandleAsyncResponsePop3Msg() method. Regardless of whetherthe reply has been received for a synchronous or an asynchronous message, POP3PollManager.ResponseReceived() will be called to decrement the count of unanswered messages and toeventually stop polling if all replies have been received.
internal static void MessageReceived(POP3Msg pop3msg){
// whenever a pop3 message has been received, it// will be forwarded to this method
// check if it's a request or a replyif ((pop3msg.InReplyTo == null) && (pop3msg.MessageId != null))
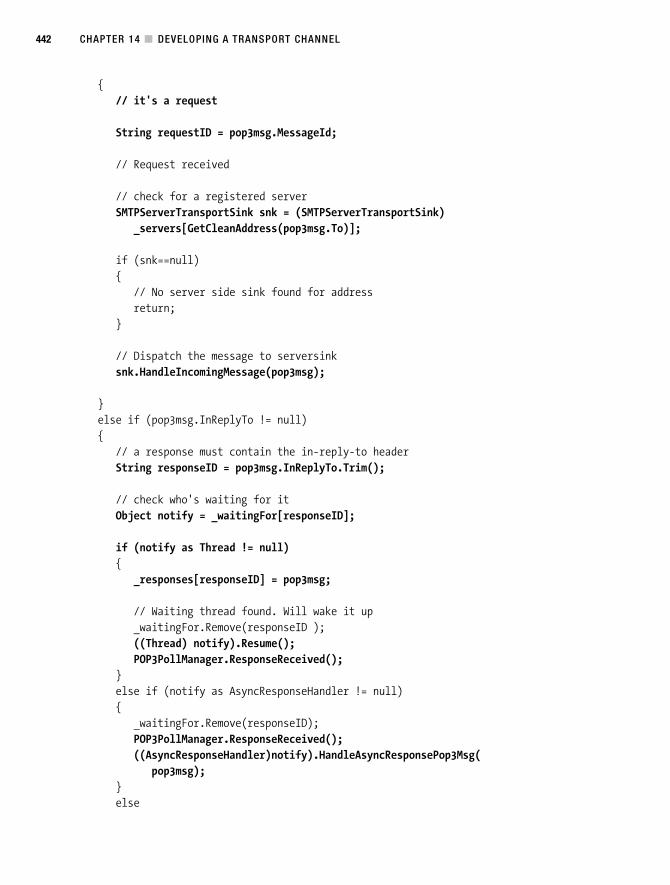
CHAPTER 14 ■ DEVELOPING A TRANSPORT CHANNEL442
{// it's a request
String requestID = pop3msg.MessageId;
// Request received
// check for a registered serverSMTPServerTransportSink snk = (SMTPServerTransportSink)
_servers[GetCleanAddress(pop3msg.To)];
if (snk==null){
// No server side sink found for addressreturn;
}
// Dispatch the message to serversinksnk.HandleIncomingMessage(pop3msg);
}else if (pop3msg.InReplyTo != null){
// a response must contain the in-reply-to headerString responseID = pop3msg.InReplyTo.Trim();
// check who's waiting for itObject notify = _waitingFor[responseID];
if (notify as Thread != null){
_responses[responseID] = pop3msg;
// Waiting thread found. Will wake it up_waitingFor.Remove(responseID );((Thread) notify).Resume();POP3PollManager.ResponseReceived();
}else if (notify as AsyncResponseHandler != null){
_waitingFor.Remove(responseID);POP3PollManager.ResponseReceived();((AsyncResponseHandler)notify).HandleAsyncResponsePop3Msg(
pop3msg);}else
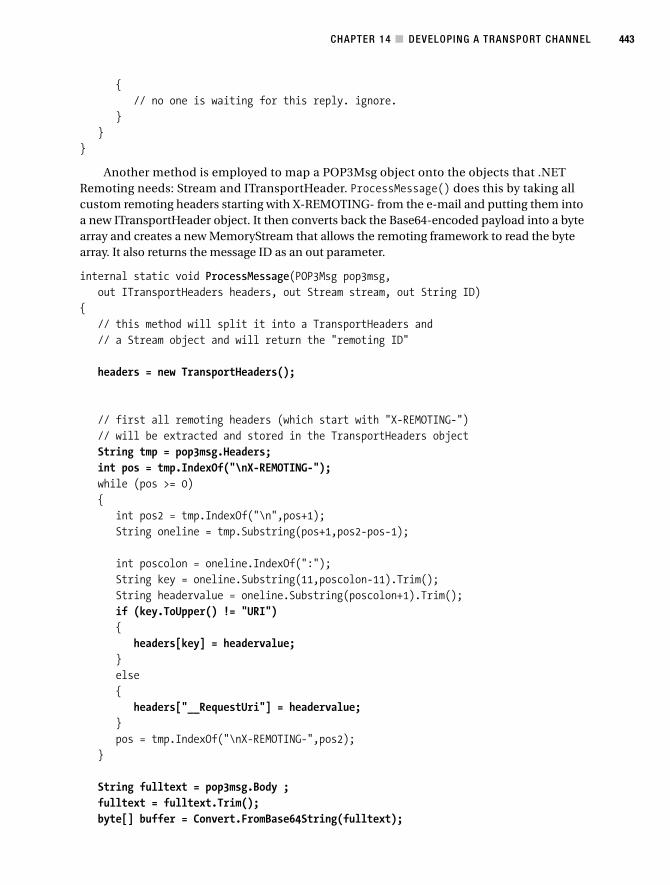
CHAPTER 14 ■ DEVELOPING A TRANSPORT CHANNEL 443
{// no one is waiting for this reply. ignore.
}}
}
Another method is employed to map a POP3Msg object onto the objects that .NETRemoting needs: Stream and ITransportHeader. ProcessMessage() does this by taking allcustom remoting headers starting with X-REMOTING- from the e-mail and putting them intoa new ITransportHeader object. It then converts back the Base64-encoded payload into a bytearray and creates a new MemoryStream that allows the remoting framework to read the bytearray. It also returns the message ID as an out parameter.
internal static void ProcessMessage(POP3Msg pop3msg,out ITransportHeaders headers, out Stream stream, out String ID)
{// this method will split it into a TransportHeaders and// a Stream object and will return the "remoting ID"
headers = new TransportHeaders();
// first all remoting headers (which start with "X-REMOTING-")// will be extracted and stored in the TransportHeaders objectString tmp = pop3msg.Headers;int pos = tmp.IndexOf("\nX-REMOTING-");while (pos >= 0){
int pos2 = tmp.IndexOf("\n",pos+1);String oneline = tmp.Substring(pos+1,pos2-pos-1);
int poscolon = oneline.IndexOf(":");String key = oneline.Substring(11,poscolon-11).Trim();String headervalue = oneline.Substring(poscolon+1).Trim();if (key.ToUpper() != "URI"){
headers[key] = headervalue;}else{
headers["__RequestUri"] = headervalue;}pos = tmp.IndexOf("\nX-REMOTING-",pos2);
}
String fulltext = pop3msg.Body ;fulltext = fulltext.Trim();byte[] buffer = Convert.FromBase64String(fulltext);
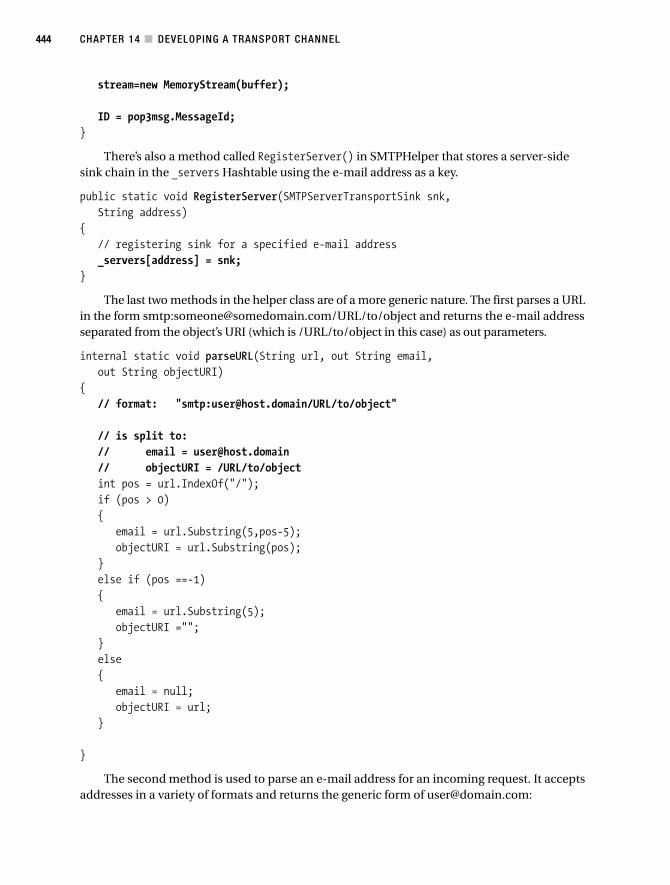
CHAPTER 14 ■ DEVELOPING A TRANSPORT CHANNEL444
stream=new MemoryStream(buffer);
ID = pop3msg.MessageId;}
There’s also a method called RegisterServer() in SMTPHelper that stores a server-sidesink chain in the _servers Hashtable using the e-mail address as a key.
public static void RegisterServer(SMTPServerTransportSink snk,String address)
{// registering sink for a specified e-mail address_servers[address] = snk;
}
The last two methods in the helper class are of a more generic nature. The first parses a URLin the form smtp:[email protected]/URL/to/object and returns the e-mail addressseparated from the object’s URI (which is /URL/to/object in this case) as out parameters.
internal static void parseURL(String url, out String email,out String objectURI)
{// format: "smtp:[email protected]/URL/to/object"
// is split to:// email = [email protected]// objectURI = /URL/to/objectint pos = url.IndexOf("/");if (pos > 0){
email = url.Substring(5,pos-5);objectURI = url.Substring(pos);
}else if (pos ==-1){
email = url.Substring(5);objectURI ="";
}else{
email = null;objectURI = url;
}
}
The second method is used to parse an e-mail address for an incoming request. It acceptsaddresses in a variety of formats and returns the generic form of [email protected]:
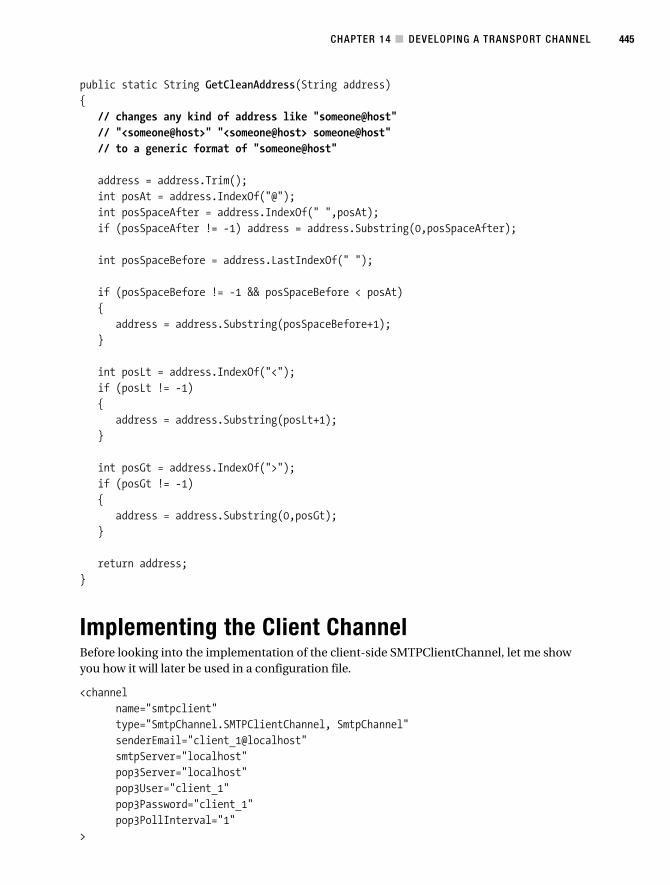
CHAPTER 14 ■ DEVELOPING A TRANSPORT CHANNEL 445
public static String GetCleanAddress(String address){
// changes any kind of address like "someone@host"// "<someone@host>" "<someone@host> someone@host"// to a generic format of "someone@host"
address = address.Trim();int posAt = address.IndexOf("@");int posSpaceAfter = address.IndexOf(" ",posAt);if (posSpaceAfter != -1) address = address.Substring(0,posSpaceAfter);
int posSpaceBefore = address.LastIndexOf(" ");
if (posSpaceBefore != -1 && posSpaceBefore < posAt){
address = address.Substring(posSpaceBefore+1);}
int posLt = address.IndexOf("<");if (posLt != -1){
address = address.Substring(posLt+1);}
int posGt = address.IndexOf(">");if (posGt != -1){
address = address.Substring(0,posGt);}
return address;}
Implementing the Client ChannelBefore looking into the implementation of the client-side SMTPClientChannel, let me showyou how it will later be used in a configuration file.
<channelname="smtpclient"type="SmtpChannel.SMTPClientChannel, SmtpChannel"senderEmail="client_1@localhost"smtpServer="localhost"pop3Server="localhost"pop3User="client_1"pop3Password="client_1"pop3PollInterval="1"
>

CHAPTER 14 ■ DEVELOPING A TRANSPORT CHANNEL446
All of these parameters are mandatory, and I explain their meanings in Table 14-2.
Table 14-2. Parameters for SMTPClientChannel
Parameter Description
name Unique name for this channel.
senderEmail The value for the e-mail’s From: header. The server will reply to theaddress specified here.
smtpServer Your outgoing e-mail server’s name.
pop3Server Your incoming mail server’s name.
pop3User The POP3 user account that is assigned to this client application.
pop3Password The password for the application’s POP3 account.
pop3PollInterval Interval in seconds at which the framework will check for new mail atthe server.
A client channel has to extend BaseChannelWithProperties and implement IChannelSender,which in turn extends IChannel. These interfaces are shown in Listing 14-3.
Listing 14-3. IChannel and IChannelSender
public interface IChannel{
// propertiesstring ChannelName { get; }int ChannelPriority { get; }
// methodsstring Parse(string url, ref String objectURI);
}
public interface IChannelSender: IChannel{
// methodsIMessageSink CreateMessageSink(string url, object remoteChannelData,
ref String objectURI);}
Let’s have a look at the basic implementation of a channel and the IChannel interface first.Each channel that is creatable using a configuration file has to supply a special constructorthat takes two parameters: an IDictionary object, which will contain the attributes specified inthe configuration file (for example, smtpServer); and an IClientChannelSinkProvider object,which points to the first entry of the chain of sink providers specified in the configuration file.
In the case of the SMPTClientChannel, this constructor will store those values to membervariables and call POP3PollManager.RegisterPolling() to register the connection information.
using System;using System.Collections;

CHAPTER 14 ■ DEVELOPING A TRANSPORT CHANNEL 447
using System.Runtime.Remoting.Channels;using System.Runtime.Remoting;using System.Runtime.Remoting.Messaging;
namespace SmtpChannel{
public class SMTPClientChannel: BaseChannelWithProperties, IChannelSender{
IDictionary _properties;IClientChannelSinkProvider _provider;String _name;
public SMTPClientChannel (IDictionary properties,IClientChannelSinkProvider clientSinkProvider)
{_properties = properties;_provider = clientSinkProvider;_name = (String) _properties["name"];
POP3PollManager.RegisterPolling((String) _properties["pop3Server"],(String) _properties["pop3User"],(String) _properties["pop3Password"],Convert.ToInt32((String)_properties["pop3PollInterval"]),false);
}
The implementation of IChannel itself is quite straightforward. You basically have toreturn a priority and a name for the channel, both of which can be either configurable or hardcoded. You also have to implement a Parse() method that takes a URL as its input parameter.It then has to check if the given URL is valid for this channel (returning null if it isn’t) and splitit into its base URL, which is the return value from the method, and the object’s URI, which isreturned as an out parameter.
public string ChannelName{
get{
return _name;}
}
public int ChannelPriority{
get{
return 0;}
}
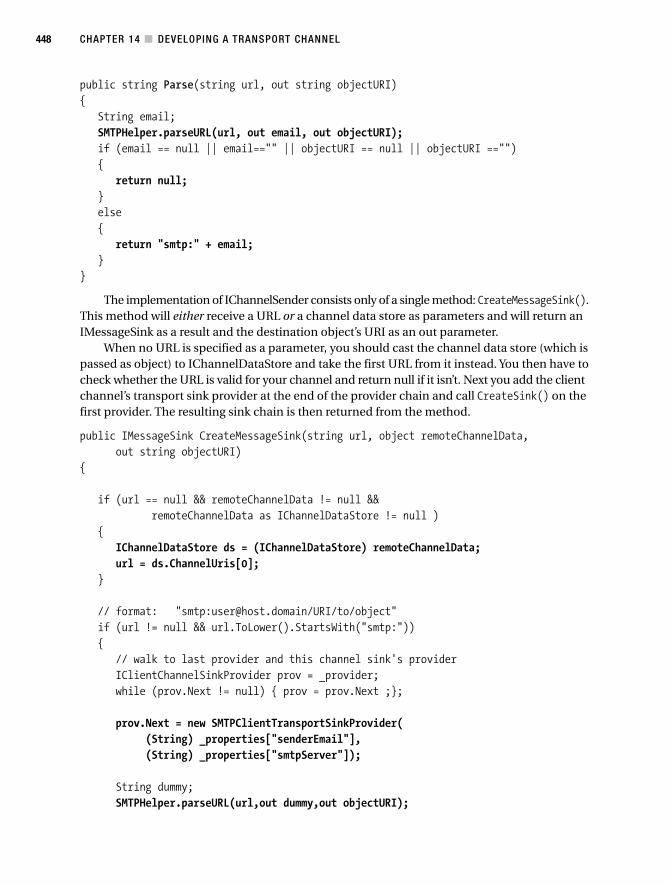
CHAPTER 14 ■ DEVELOPING A TRANSPORT CHANNEL448
public string Parse(string url, out string objectURI){
String email;SMTPHelper.parseURL(url, out email, out objectURI);if (email == null || email=="" || objectURI == null || objectURI ==""){
return null;}else{
return "smtp:" + email;}
}
The implementation of IChannelSender consists only of a single method: CreateMessageSink().This method will either receive a URL or a channel data store as parameters and will return anIMessageSink as a result and the destination object’s URI as an out parameter.
When no URL is specified as a parameter, you should cast the channel data store (which ispassed as object) to IChannelDataStore and take the first URL from it instead. You then have tocheck whether the URL is valid for your channel and return null if it isn’t. Next you add the clientchannel’s transport sink provider at the end of the provider chain and call CreateSink() on thefirst provider. The resulting sink chain is then returned from the method.
public IMessageSink CreateMessageSink(string url, object remoteChannelData,out string objectURI)
{
if (url == null && remoteChannelData != null &&remoteChannelData as IChannelDataStore != null )
{IChannelDataStore ds = (IChannelDataStore) remoteChannelData;url = ds.ChannelUris[0];
}
// format: "smtp:[email protected]/URI/to/object"if (url != null && url.ToLower().StartsWith("smtp:")){
// walk to last provider and this channel sink's providerIClientChannelSinkProvider prov = _provider;while (prov.Next != null) { prov = prov.Next ;};
prov.Next = new SMTPClientTransportSinkProvider((String) _properties["senderEmail"],(String) _properties["smtpServer"]);
String dummy;SMTPHelper.parseURL(url,out dummy,out objectURI);
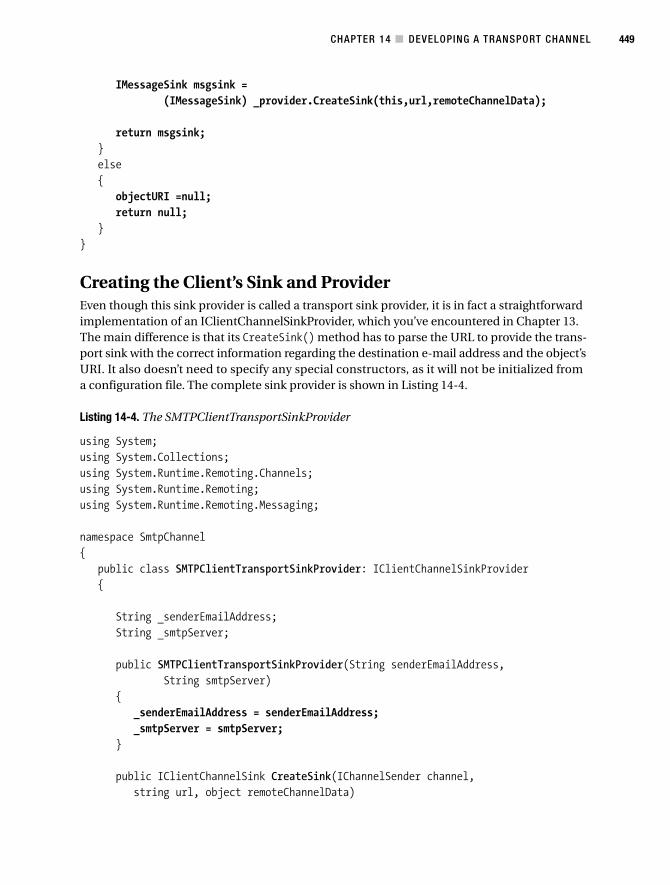
CHAPTER 14 ■ DEVELOPING A TRANSPORT CHANNEL 449
IMessageSink msgsink =(IMessageSink) _provider.CreateSink(this,url,remoteChannelData);
return msgsink;}else{
objectURI =null;return null;
}}
Creating the Client’s Sink and ProviderEven though this sink provider is called a transport sink provider, it is in fact a straightforwardimplementation of an IClientChannelSinkProvider, which you’ve encountered in Chapter 13.The main difference is that its CreateSink() method has to parse the URL to provide the trans-port sink with the correct information regarding the destination e-mail address and the object’sURI. It also doesn’t need to specify any special constructors, as it will not be initialized froma configuration file. The complete sink provider is shown in Listing 14-4.
Listing 14-4. The SMTPClientTransportSinkProvider
using System;using System.Collections;using System.Runtime.Remoting.Channels;using System.Runtime.Remoting;using System.Runtime.Remoting.Messaging;
namespace SmtpChannel{
public class SMTPClientTransportSinkProvider: IClientChannelSinkProvider{
String _senderEmailAddress;String _smtpServer;
public SMTPClientTransportSinkProvider(String senderEmailAddress,String smtpServer)
{_senderEmailAddress = senderEmailAddress;_smtpServer = smtpServer;
}
public IClientChannelSink CreateSink(IChannelSender channel,string url, object remoteChannelData)
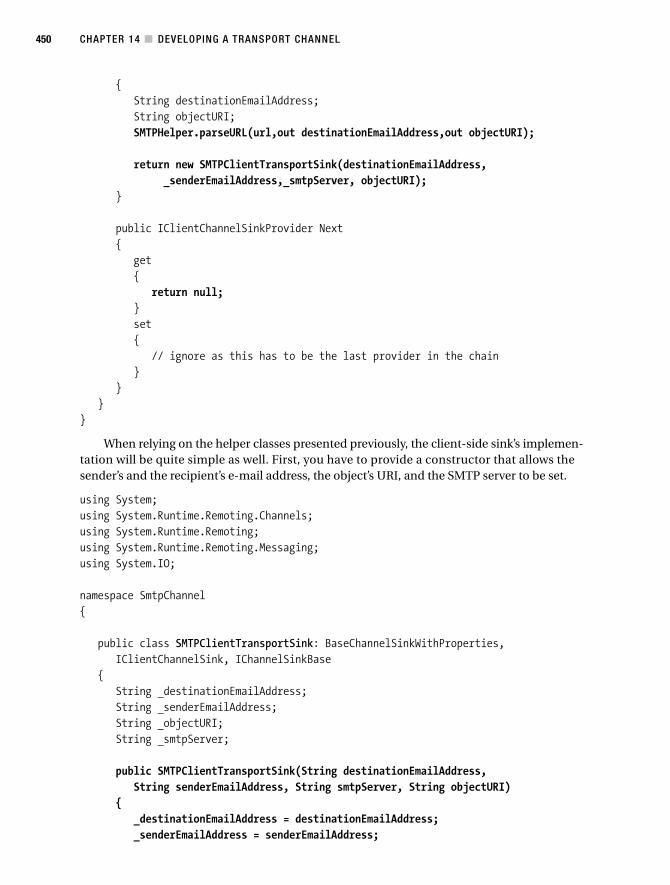
CHAPTER 14 ■ DEVELOPING A TRANSPORT CHANNEL450
{String destinationEmailAddress;String objectURI;SMTPHelper.parseURL(url,out destinationEmailAddress,out objectURI);
return new SMTPClientTransportSink(destinationEmailAddress,_senderEmailAddress,_smtpServer, objectURI);
}
public IClientChannelSinkProvider Next{
get{
return null;}set{
// ignore as this has to be the last provider in the chain}
}}
}
When relying on the helper classes presented previously, the client-side sink’s implemen-tation will be quite simple as well. First, you have to provide a constructor that allows thesender’s and the recipient’s e-mail address, the object’s URI, and the SMTP server to be set.
using System;using System.Runtime.Remoting.Channels;using System.Runtime.Remoting;using System.Runtime.Remoting.Messaging;using System.IO;
namespace SmtpChannel{
public class SMTPClientTransportSink: BaseChannelSinkWithProperties,IClientChannelSink, IChannelSinkBase
{String _destinationEmailAddress;String _senderEmailAddress;String _objectURI;String _smtpServer;
public SMTPClientTransportSink(String destinationEmailAddress,String senderEmailAddress, String smtpServer, String objectURI)
{_destinationEmailAddress = destinationEmailAddress;_senderEmailAddress = senderEmailAddress;
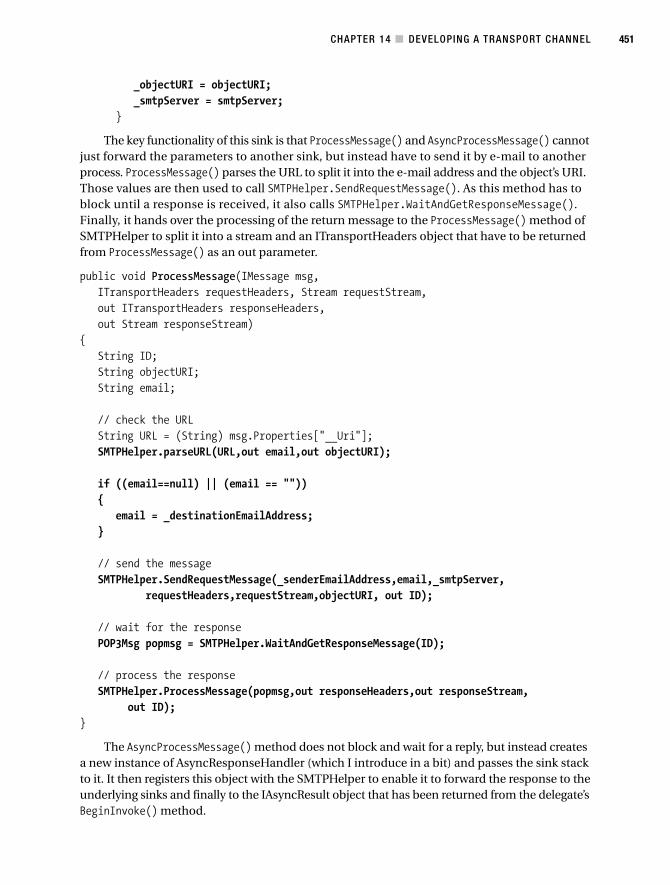
CHAPTER 14 ■ DEVELOPING A TRANSPORT CHANNEL 451
_objectURI = objectURI;_smtpServer = smtpServer;
}
The key functionality of this sink is that ProcessMessage() and AsyncProcessMessage() cannotjust forward the parameters to another sink, but instead have to send it by e-mail to anotherprocess. ProcessMessage() parses the URL to split it into the e-mail address and the object’s URI.Those values are then used to call SMTPHelper.SendRequestMessage(). As this method has toblock until a response is received, it also calls SMTPHelper.WaitAndGetResponseMessage().Finally, it hands over the processing of the return message to the ProcessMessage() method ofSMTPHelper to split it into a stream and an ITransportHeaders object that have to be returnedfrom ProcessMessage() as an out parameter.
public void ProcessMessage(IMessage msg,ITransportHeaders requestHeaders, Stream requestStream,out ITransportHeaders responseHeaders,out Stream responseStream)
{String ID;String objectURI;String email;
// check the URLString URL = (String) msg.Properties["__Uri"];SMTPHelper.parseURL(URL,out email,out objectURI);
if ((email==null) || (email == "")){
email = _destinationEmailAddress;}
// send the messageSMTPHelper.SendRequestMessage(_senderEmailAddress,email,_smtpServer,
requestHeaders,requestStream,objectURI, out ID);
// wait for the responsePOP3Msg popmsg = SMTPHelper.WaitAndGetResponseMessage(ID);
// process the responseSMTPHelper.ProcessMessage(popmsg,out responseHeaders,out responseStream,
out ID);}
The AsyncProcessMessage() method does not block and wait for a reply, but instead createsa new instance of AsyncResponseHandler (which I introduce in a bit) and passes the sink stackto it. It then registers this object with the SMTPHelper to enable it to forward the response to theunderlying sinks and finally to the IAsyncResult object that has been returned from the delegate’sBeginInvoke() method.
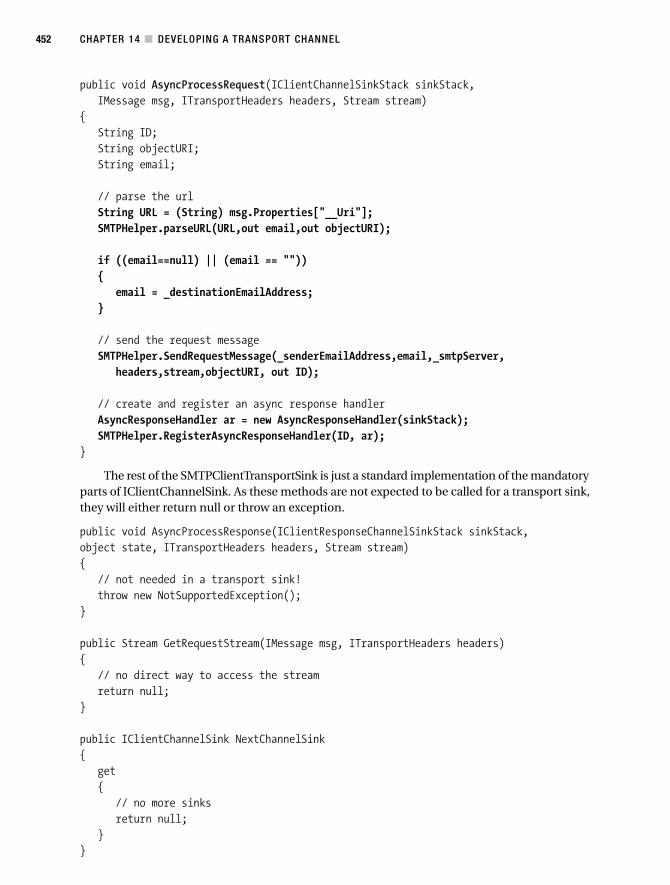
CHAPTER 14 ■ DEVELOPING A TRANSPORT CHANNEL452
public void AsyncProcessRequest(IClientChannelSinkStack sinkStack,IMessage msg, ITransportHeaders headers, Stream stream)
{String ID;String objectURI;String email;
// parse the urlString URL = (String) msg.Properties["__Uri"];SMTPHelper.parseURL(URL,out email,out objectURI);
if ((email==null) || (email == "")){
email = _destinationEmailAddress;}
// send the request messageSMTPHelper.SendRequestMessage(_senderEmailAddress,email,_smtpServer,
headers,stream,objectURI, out ID);
// create and register an async response handlerAsyncResponseHandler ar = new AsyncResponseHandler(sinkStack);SMTPHelper.RegisterAsyncResponseHandler(ID, ar);
}
The rest of the SMTPClientTransportSink is just a standard implementation of the mandatoryparts of IClientChannelSink. As these methods are not expected to be called for a transport sink,they will either return null or throw an exception.
public void AsyncProcessResponse(IClientResponseChannelSinkStack sinkStack,object state, ITransportHeaders headers, Stream stream){
// not needed in a transport sink!throw new NotSupportedException();
}
public Stream GetRequestStream(IMessage msg, ITransportHeaders headers){
// no direct way to access the streamreturn null;
}
public IClientChannelSink NextChannelSink{
get{
// no more sinksreturn null;
}}
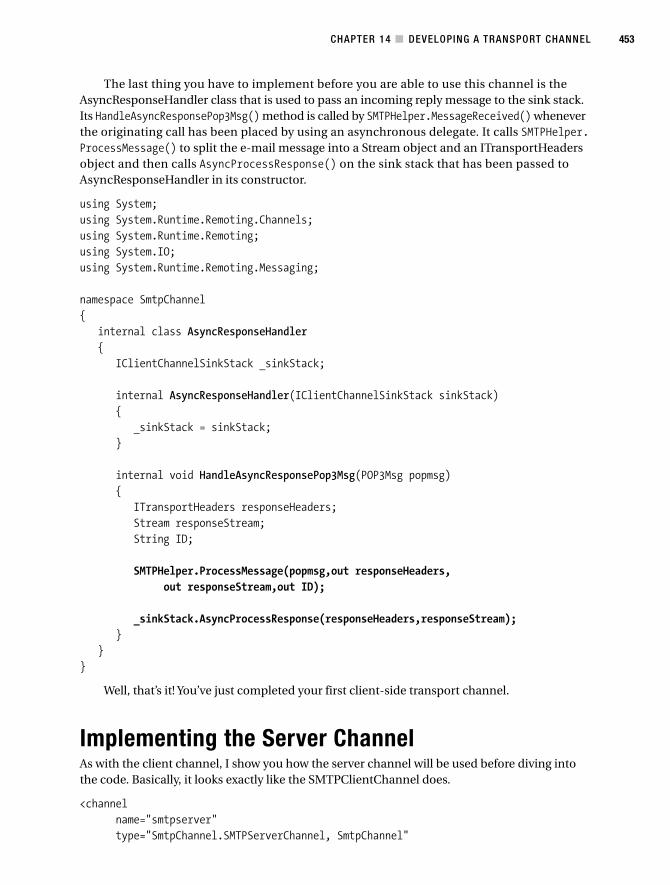
CHAPTER 14 ■ DEVELOPING A TRANSPORT CHANNEL 453
The last thing you have to implement before you are able to use this channel is theAsyncResponseHandler class that is used to pass an incoming reply message to the sink stack.Its HandleAsyncResponsePop3Msg() method is called by SMTPHelper.MessageReceived() wheneverthe originating call has been placed by using an asynchronous delegate. It calls SMTPHelper.ProcessMessage() to split the e-mail message into a Stream object and an ITransportHeadersobject and then calls AsyncProcessResponse() on the sink stack that has been passed toAsyncResponseHandler in its constructor.
using System;using System.Runtime.Remoting.Channels;using System.Runtime.Remoting;using System.IO;using System.Runtime.Remoting.Messaging;
namespace SmtpChannel{
internal class AsyncResponseHandler{
IClientChannelSinkStack _sinkStack;
internal AsyncResponseHandler(IClientChannelSinkStack sinkStack){
_sinkStack = sinkStack;}
internal void HandleAsyncResponsePop3Msg(POP3Msg popmsg){
ITransportHeaders responseHeaders;Stream responseStream;String ID;
SMTPHelper.ProcessMessage(popmsg,out responseHeaders,out responseStream,out ID);
_sinkStack.AsyncProcessResponse(responseHeaders,responseStream);}
}}
Well, that’s it! You’ve just completed your first client-side transport channel.
Implementing the Server ChannelAs with the client channel, I show you how the server channel will be used before diving intothe code. Basically, it looks exactly like the SMTPClientChannel does.
<channelname="smtpserver"type="SmtpChannel.SMTPServerChannel, SmtpChannel"

CHAPTER 14 ■ DEVELOPING A TRANSPORT CHANNEL454
senderEmail="server_1@localhost"smtpServer="localhost"pop3Server="localhost"pop3User="server_1"pop3Password="server_1"pop3PollInterval="1"
>
The parameters for this channel are shown in Table 14-3.
Table 14-3. Parameters for SMTPServerChannel
Parameter Description
name Unique name for this channel.
senderEmail The value for the e-mail’s From: header. The server will reply to theaddress specified here.
smtpServer Your outgoing e-mail server’s name.
pop3Server Your incoming mail server’s name.
pop3User The POP3 user account that is assigned to this client application.
pop3Password The password for the application’s POP3 account.
pop3PollInterval Interval in seconds at which the framework will check for new mail atthe server.
The basic difference between the SMTPClientChannel and the SMTPServerChannel is that thelatter registers itself with the POP3PollManager as a server. This means that the POP3Pollinginstance will constantly check for new e-mails.
The server-side channel has to implement IChannelReceiver, which in turn inherits fromIChannel again. These interfaces are shown in Listing 14-5.
Listing 14-5. IChannel and IChannelReceiver
public interface IChannel{
string ChannelName { get; }int ChannelPriority { get; }
string Parse(string url, ref String objectURI);}
public interface IChannelReceiver: IChannel{
object ChannelData { get; }
string[] GetUrlsForUri(string objectURI);void StartListening(object data);void StopListening(object data);
}
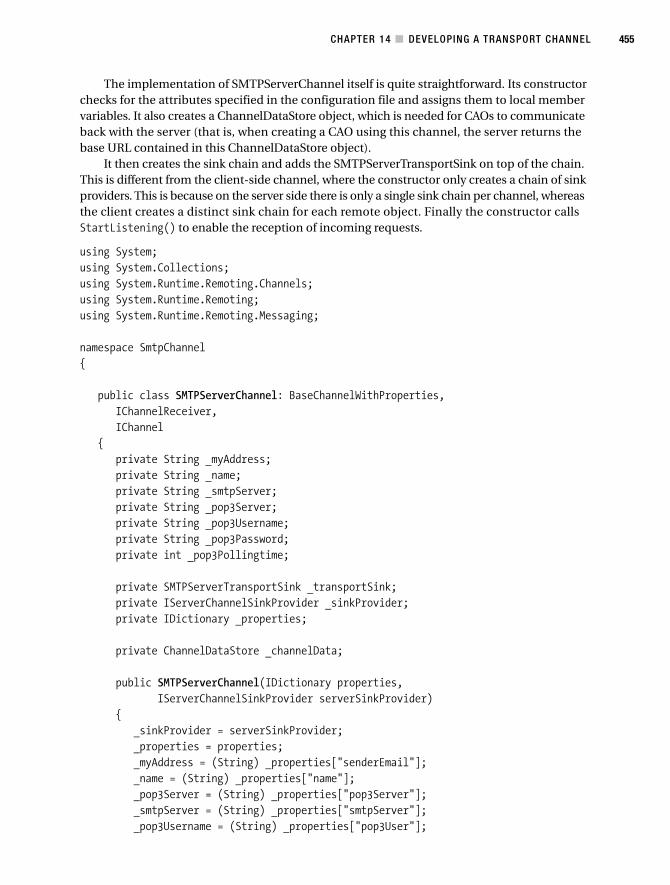
CHAPTER 14 ■ DEVELOPING A TRANSPORT CHANNEL 455
The implementation of SMTPServerChannel itself is quite straightforward. Its constructorchecks for the attributes specified in the configuration file and assigns them to local membervariables. It also creates a ChannelDataStore object, which is needed for CAOs to communicateback with the server (that is, when creating a CAO using this channel, the server returns thebase URL contained in this ChannelDataStore object).
It then creates the sink chain and adds the SMTPServerTransportSink on top of the chain.This is different from the client-side channel, where the constructor only creates a chain of sinkproviders. This is because on the server side there is only a single sink chain per channel, whereasthe client creates a distinct sink chain for each remote object. Finally the constructor callsStartListening() to enable the reception of incoming requests.
using System;using System.Collections;using System.Runtime.Remoting.Channels;using System.Runtime.Remoting;using System.Runtime.Remoting.Messaging;
namespace SmtpChannel{
public class SMTPServerChannel: BaseChannelWithProperties,IChannelReceiver,IChannel
{private String _myAddress;private String _name;private String _smtpServer;private String _pop3Server;private String _pop3Username;private String _pop3Password;private int _pop3Pollingtime;
private SMTPServerTransportSink _transportSink;private IServerChannelSinkProvider _sinkProvider;private IDictionary _properties;
private ChannelDataStore _channelData;
public SMTPServerChannel(IDictionary properties,IServerChannelSinkProvider serverSinkProvider)
{_sinkProvider = serverSinkProvider;_properties = properties;_myAddress = (String) _properties["senderEmail"];_name = (String) _properties["name"];_pop3Server = (String) _properties["pop3Server"];_smtpServer = (String) _properties["smtpServer"];_pop3Username = (String) _properties["pop3User"];

CHAPTER 14 ■ DEVELOPING A TRANSPORT CHANNEL456
_pop3Password = (String) _properties["pop3Password"];_pop3Pollingtime =
Convert.ToInt32((String) _properties["pop3PollInterval"]);
// needed for CAOs!String[] urls = { this.GetURLBase() };_channelData = new ChannelDataStore(urls);
// collect channel data from all providersIServerChannelSinkProvider provider = _sinkProvider;while (provider != null){
provider.GetChannelData(_channelData);provider = provider.Next;
}
// create the sink chainIServerChannelSink snk =
ChannelServices.CreateServerChannelSinkChain(_sinkProvider,this);
// add the SMTPServerTransportSink as a first element to the chain_transportSink = new SMTPServerTransportSink(snk, _smtpServer,
_myAddress);
// start to listenthis.StartListening(null);
}
The constructor calls GetURLBase(), which provides a way for this channel to return itsbase URL.
private String GetURLBase(){
return "smtp:" + _myAddress;}
You also have to implement IChannel’s methods and properties: Parse(), ChannelName,and ChannelPriority. The implementation itself looks exactly the same as it did for the client-side channel.
public string Parse(string url, out string objectURI){
String email;SMTPHelper.parseURL(url, out email, out objectURI);if (email == null || email=="" || objectURI == null || objectURI ==""){
return null;}else
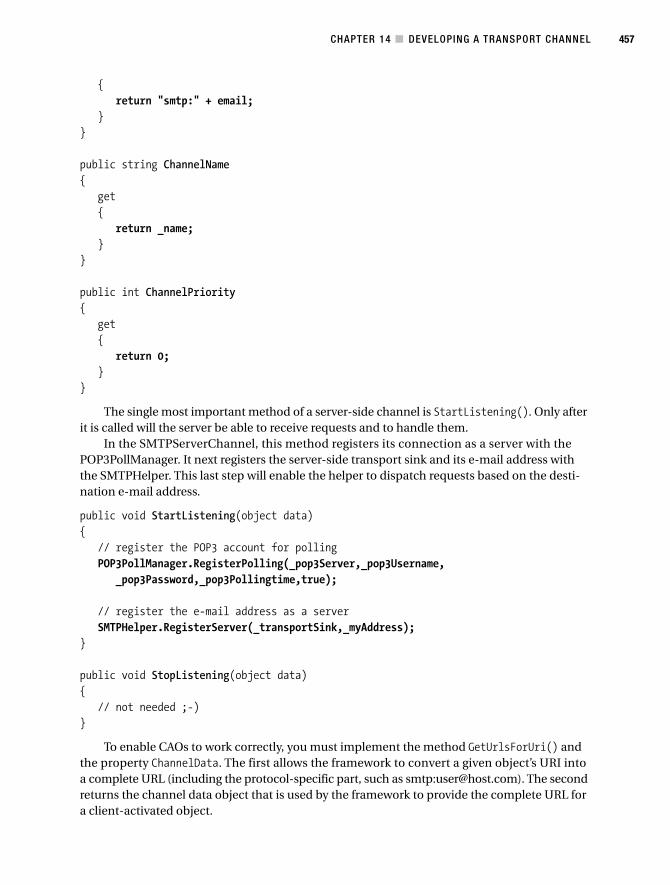
CHAPTER 14 ■ DEVELOPING A TRANSPORT CHANNEL 457
{return "smtp:" + email;
}}
public string ChannelName{
get{
return _name;}
}
public int ChannelPriority{
get{
return 0;}
}
The single most important method of a server-side channel is StartListening(). Only afterit is called will the server be able to receive requests and to handle them.
In the SMTPServerChannel, this method registers its connection as a server with thePOP3PollManager. It next registers the server-side transport sink and its e-mail address withthe SMTPHelper. This last step will enable the helper to dispatch requests based on the desti-nation e-mail address.
public void StartListening(object data){
// register the POP3 account for pollingPOP3PollManager.RegisterPolling(_pop3Server,_pop3Username,
_pop3Password,_pop3Pollingtime,true);
// register the e-mail address as a serverSMTPHelper.RegisterServer(_transportSink,_myAddress);
}
public void StopListening(object data){
// not needed ;-)}
To enable CAOs to work correctly, you must implement the method GetUrlsForUri() andthe property ChannelData. The first allows the framework to convert a given object’s URI intoa complete URL (including the protocol-specific part, such as smtp:[email protected]). The secondreturns the channel data object that is used by the framework to provide the complete URL fora client-activated object.
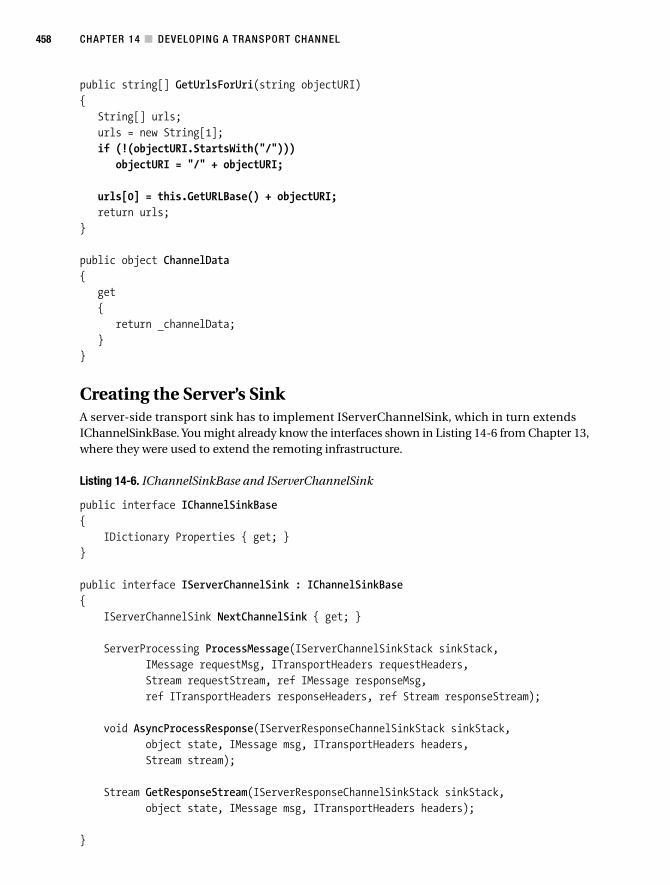
CHAPTER 14 ■ DEVELOPING A TRANSPORT CHANNEL458
public string[] GetUrlsForUri(string objectURI){
String[] urls;urls = new String[1];if (!(objectURI.StartsWith("/")))
objectURI = "/" + objectURI;
urls[0] = this.GetURLBase() + objectURI;return urls;
}
public object ChannelData{
get{
return _channelData;}
}
Creating the Server’s SinkA server-side transport sink has to implement IServerChannelSink, which in turn extendsIChannelSinkBase. You might already know the interfaces shown in Listing 14-6 from Chapter 13,where they were used to extend the remoting infrastructure.
Listing 14-6. IChannelSinkBase and IServerChannelSink
public interface IChannelSinkBase{
IDictionary Properties { get; }}
public interface IServerChannelSink : IChannelSinkBase{
IServerChannelSink NextChannelSink { get; }
ServerProcessing ProcessMessage(IServerChannelSinkStack sinkStack,IMessage requestMsg, ITransportHeaders requestHeaders,Stream requestStream, ref IMessage responseMsg,ref ITransportHeaders responseHeaders, ref Stream responseStream);
void AsyncProcessResponse(IServerResponseChannelSinkStack sinkStack,object state, IMessage msg, ITransportHeaders headers,Stream stream);
Stream GetResponseStream(IServerResponseChannelSinkStack sinkStack,object state, IMessage msg, ITransportHeaders headers);
}
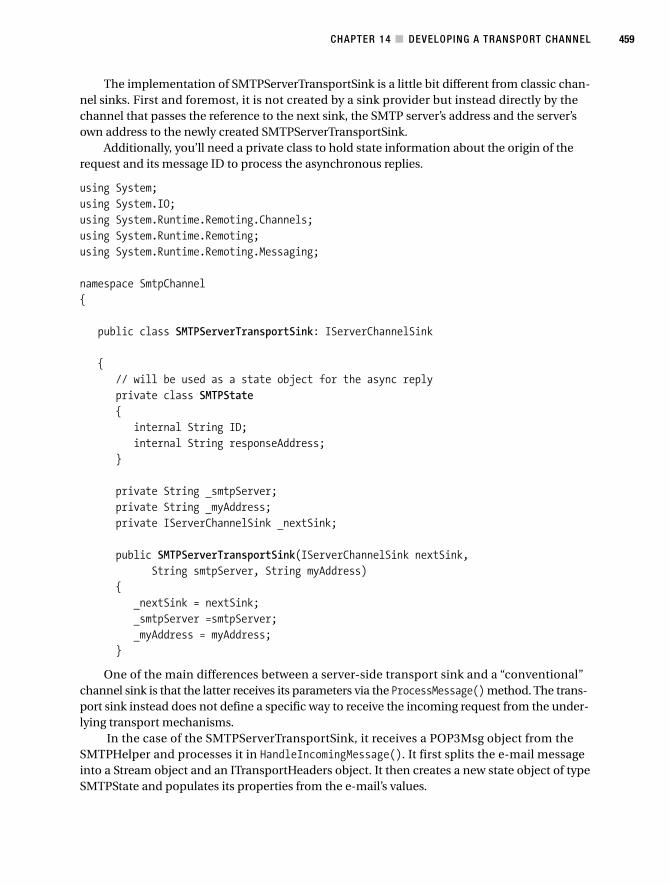
CHAPTER 14 ■ DEVELOPING A TRANSPORT CHANNEL 459
The implementation of SMTPServerTransportSink is a little bit different from classic chan-nel sinks. First and foremost, it is not created by a sink provider but instead directly by thechannel that passes the reference to the next sink, the SMTP server’s address and the server’sown address to the newly created SMTPServerTransportSink.
Additionally, you’ll need a private class to hold state information about the origin of therequest and its message ID to process the asynchronous replies.
using System;using System.IO;using System.Runtime.Remoting.Channels;using System.Runtime.Remoting;using System.Runtime.Remoting.Messaging;
namespace SmtpChannel{
public class SMTPServerTransportSink: IServerChannelSink
{// will be used as a state object for the async replyprivate class SMTPState{
internal String ID;internal String responseAddress;
}
private String _smtpServer;private String _myAddress;private IServerChannelSink _nextSink;
public SMTPServerTransportSink(IServerChannelSink nextSink,String smtpServer, String myAddress)
{_nextSink = nextSink;_smtpServer =smtpServer;_myAddress = myAddress;
}
One of the main differences between a server-side transport sink and a “conventional”channel sink is that the latter receives its parameters via the ProcessMessage() method. The trans-port sink instead does not define a specific way to receive the incoming request from the under-lying transport mechanisms.
In the case of the SMTPServerTransportSink, it receives a POP3Msg object from theSMTPHelper and processes it in HandleIncomingMessage(). It first splits the e-mail messageinto a Stream object and an ITransportHeaders object. It then creates a new state object of typeSMTPState and populates its properties from the e-mail’s values.

CHAPTER 14 ■ DEVELOPING A TRANSPORT CHANNEL460
Next, it creates a ServerChannelSinkStack and pushes itself and the newly created state objectonto it before handing over the processing to the next sink in its chain. When this method isfinished, it returns a ServerProcessing value. This indicates whether the message has been han-dled synchronously, asynchronously, or as a one-way message.
The SMTPServerTransportSink now behaves accordingly. If the request has been handledsynchronously, it generates and sends a response message. For asynchronous calls, it waits forthe framework to call its AsyncProcessResponse() method. For one-way calls, it does nothing at all.
public void HandleIncomingMessage(POP3Msg popmsg){
Stream requestStream;ITransportHeaders requestHeaders;String ID;
// split the message in Stream and ITransportHeadersSMTPHelper.ProcessMessage(popmsg,out requestHeaders,
out requestStream, out ID);
// create a new sink stackServerChannelSinkStack stack = new ServerChannelSinkStack();
// create a new state object and populate itSMTPState state = new SMTPState();state.ID = ID;state.responseAddress = SMTPHelper.GetCleanAddress(popmsg.From );
// push this sink onto the stackstack.Push(this,state);
IMessage responseMsg;Stream responseStream;ITransportHeaders responseHeaders;
// forward the call to the next sinkServerProcessing proc = _nextSink.ProcessMessage(stack,null,requestHeaders,
requestStream, out responseMsg, out responseHeaders,out responseStream);
// check the return valueswitch (proc){
// this message has been handled synchronouslycase ServerProcessing.Complete:
// send a response messageSMTPHelper.SendResponseMessage(_myAddress,
state.responseAddress,_smtpServer,responseHeaders,responseStream,state.ID);
break;
CHAPTER 14 ■ DEVELOPING A TRANSPORT CHANNEL 461
// this message has been handled asynchronouslycase ServerProcessing.Async:
// nothing needs to be done yetbreak;
// it's been a one way messagecase ServerProcessing.OneWay:
// nothing needs to be done yetbreak;
}}
AsyncProcessResponse() is called when the framework has completed the execution of anunderlying asynchronous method. The SMTPServerTransportSink in this case generates a responsemessage and sends it to the client.
public void AsyncProcessResponse(IServerResponseChannelSinkStack sinkStack, object state,IMessage msg, ITransportHeaders headers, System.IO.Stream stream)
{
// fetch the state objectSMTPState smtpstate = (SMTPState) state;
// send the response e-mailSMTPHelper.SendResponseMessage(_myAddress,
smtpstate.responseAddress,_smtpServer,headers,stream,smtpstate.ID);
}
What’s still left in SMTPServerTransportSink is the implementation of the other manda-tory methods and properties defined in IServerChannelSink. Most of them will not be calledfor a transport sink and will therefore only return null or throw an exception.
public IServerChannelSink NextChannelSink{
get{
return _nextSink;}
}
public System.Collections.IDictionary Properties{
get{
// not neededreturn null;
}}
CHAPTER 14 ■ DEVELOPING A TRANSPORT CHANNEL462
public ServerProcessing ProcessMessage(IServerChannelSinkStack sinkStack, IMessage requestMsg,ITransportHeaders requestHeaders, Stream requestStream,out IMessage responseMsg, out ITransportHeaders responseHeaders,out Stream responseStream)
{// will never be called for a server side transport sinkthrow new NotSupportedException();
}
public Stream GetResponseStream(IServerResponseChannelSinkStack sinkStack, object state,IMessage msg, ITransportHeaders headers)
{// it's not possible to directly access the streamreturn null;
}
Great! You have now finished implementing your own transport channel!
Wrapping the ChannelAs you’ve seen with the default .NET Remoting channels, you don’t have to manually createand register HttpClientChannel and HttpServerChannel but can instead use the combinationin the form of HttpChannel. This isn’t strictly needed for compatibility with the .NET Remotingframework, but it does provide more comfort for the developers using this channel. An additionalfeature you might want to implement is the default assignment of a formatter to this channel.I’m now going to show you how to do this to create an SmtpChannel class.
First, the combined channel has to extend BaseChannelWithProperties and implementIChannelSender and IChannelReceiver. Nevertheless, there won’t be too much logic in SmtpChannel,as it will delegate most of its work to either SMTPClientChannel or SMTPServerChannel.
To check if an application wants to act as a server for .NET Remoting requests via SMTP, youhave to introduce another attribute that can be used in the configuration file: isServer. Whenthis is set to “yes”, the SmtpChannel will create an SMTPServerChannel as well; otherwise it willonly create an SMTPClientChannel.
The SmtpChannel has to implement a different constructor that allows the framework topass both an IClientChannelSinkProvider and an IServerChannelSinkProvider object to it. Itwill then check whether either of these is null and create a default SOAP formatter in this case.
All other methods that have to be implemented to support the specified interfaces will justforward their calls to the respective client or server channel. This is shown in Listing 14-7.
Listing 14-7. The SmtpChannel
using System;using System.Collections;using System.Runtime.Remoting.Channels;using System.Runtime.Remoting;using System.Runtime.Remoting.Messaging;

CHAPTER 14 ■ DEVELOPING A TRANSPORT CHANNEL 463
namespace SmtpChannel{
public class SmtpChannel: BaseChannelWithProperties,IChannelSender, IChannelReceiver
{SMTPClientChannel _clientchannel;SMTPServerChannel _serverchannel;String _name;
public SmtpChannel (IDictionary properties,IClientChannelSinkProvider clientSinkProvider,IServerChannelSinkProvider serverSinkProvider)
{if (clientSinkProvider == null){
clientSinkProvider = new SoapClientFormatterSinkProvider();}
// create the client channel_clientchannel = new SMTPClientChannel(properties, clientSinkProvider);
if ((properties["isServer"] != null) &&((String) properties["isServer"] == "yes" ))
{if (serverSinkProvider == null){
serverSinkProvider = new SoapServerFormatterSinkProvider();}
// create the server channel_serverchannel = new SMTPServerChannel( properties,
serverSinkProvider);}
_name = (String) properties["name"];}
public IMessageSink CreateMessageSink(string url,object remoteChannelData, out string objectURI)
{return _clientchannel.CreateMessageSink(url,
remoteChannelData, out objectURI);}
public string Parse(string url, out string objectURI){
return _clientchannel.Parse(url, out objectURI);}
CHAPTER 14 ■ DEVELOPING A TRANSPORT CHANNEL464
public string ChannelName{
get{
return _name;}
}
public int ChannelPriority{
get{
return 0;}
}
public void StartListening(object data){
if (_serverchannel != null){
_serverchannel.StartListening(data);}
}
public void StopListening(object data){
if (_serverchannel != null){
_serverchannel.StopListening(data);}
}
public string[] GetUrlsForUri(string objectURI){
if (_serverchannel != null){
return _serverchannel.GetUrlsForUri(objectURI);}else{
return null;}
}
public object ChannelData{
get

CHAPTER 14 ■ DEVELOPING A TRANSPORT CHANNEL 465
{if (_serverchannel != null ){
return _serverchannel.ChannelData;}else{
return null;}
}}
}}
Using the SmtpChannelWhat you’ve seen previously constitutes a full-featured transport channel. It supports every.NET Remoting functionality: synchronous calls, asynchronous calls, and event notification. Inaddition, client-activated objects can be used with this channel. To use it on the server side,you can register it by implementing a configuration file like this:
<configuration><system.runtime.remoting><application><channels>
<channel name="smtp"type="SmtpChannel.SmtpChannel, SmtpChannel"senderEmail="server_1@localhost"smtpServer="localhost"pop3Server="localhost"pop3User="server_1"pop3Password="server_1"pop3PollInterval="1"isServer="yes" />
</channels>
<service><wellknown mode="Singleton"
type="Service.SomeSAO, Service"objectUri="SomeSAO.soap" />
</service></application>
</system.runtime.remoting></configuration>
CHAPTER 14 ■ DEVELOPING A TRANSPORT CHANNEL466
The corresponding client-side configuration file might look like this:
<configuration><system.runtime.remoting><application>
<channels><channel name="smtp"
type="SmtpChannel.SmtpChannel, SmtpChannel"senderEmail="client_1@localhost"smtpServer="localhost"pop3Server="localhost"pop3User="client_1"pop3Password="client_1"pop3PollInterval="1"isServer="yes" />
</channels>
<client><wellknown type="Service.SomeSAO, Service"
url="smtp:server_1@localhost/SomeSAO.soap" /></client>
<client url="smtp:server_2@localhost"><activated type="Service.SomeCAO, Service" />
</client>
</application></system.runtime.remoting>
</configuration>
In the source code download that accompanies this book online, you’ll find not only thecomplete implementation of this channel, but also a test environment consisting of three proj-ects (two servers and a client) that shows the following features using the SmtpChannel:
• Server-activated objects
• Client-activated objects
• Synchronous calls
• Asynchronous calls using a delegate
• Raising and handling events
• Passing references to CAOs between different applications
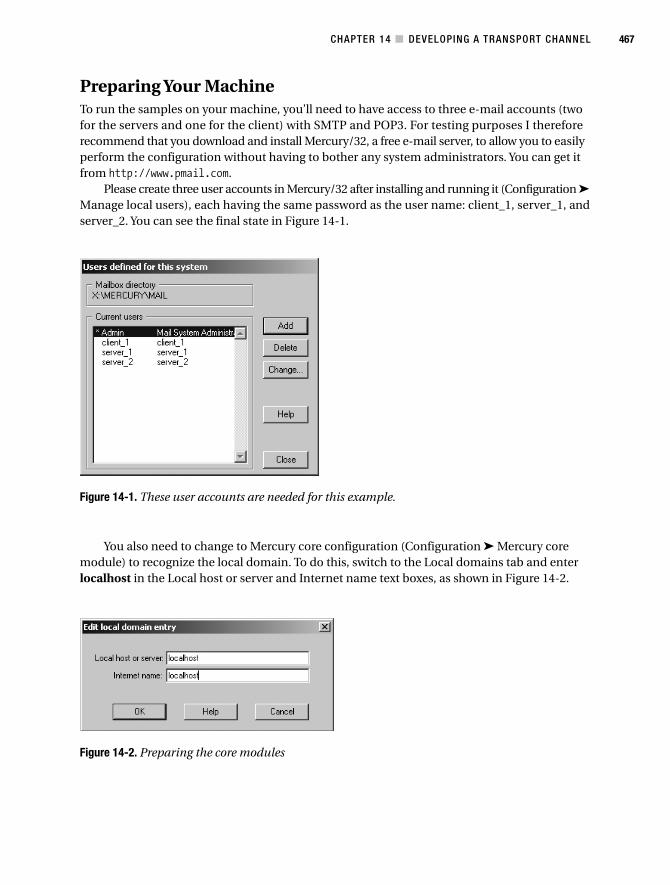
CHAPTER 14 ■ DEVELOPING A TRANSPORT CHANNEL 467
Figure 14-1. These user accounts are needed for this example.
Figure 14-2. Preparing the core modules
Preparing Your MachineTo run the samples on your machine, you’ll need to have access to three e-mail accounts (twofor the servers and one for the client) with SMTP and POP3. For testing purposes I thereforerecommend that you download and install Mercury/32, a free e-mail server, to allow you to easilyperform the configuration without having to bother any system administrators. You can get itfrom http://www.pmail.com.
Please create three user accounts in Mercury/32 after installing and running it (Configuration ➤Manage local users), each having the same password as the user name: client_1, server_1, andserver_2. You can see the final state in Figure 14-1.
You also need to change to Mercury core configuration (Configuration ➤ Mercury coremodule) to recognize the local domain. To do this, switch to the Local domains tab and enterlocalhost in the Local host or server and Internet name text boxes, as shown in Figure 14-2.
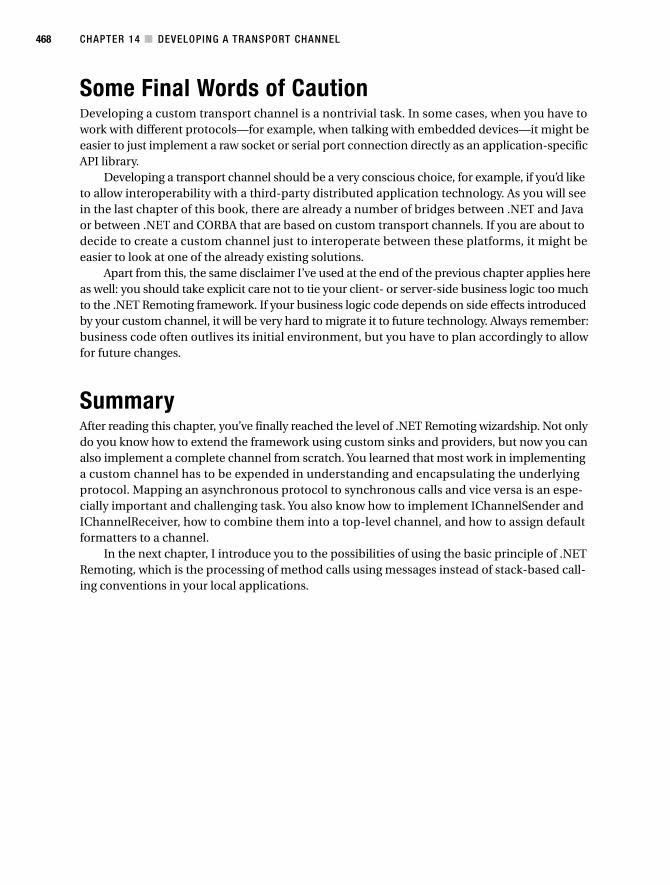
CHAPTER 14 ■ DEVELOPING A TRANSPORT CHANNEL468
Some Final Words of CautionDeveloping a custom transport channel is a nontrivial task. In some cases, when you have towork with different protocols—for example, when talking with embedded devices—it might beeasier to just implement a raw socket or serial port connection directly as an application-specificAPI library.
Developing a transport channel should be a very conscious choice, for example, if you’d liketo allow interoperability with a third-party distributed application technology. As you will seein the last chapter of this book, there are already a number of bridges between .NET and Javaor between .NET and CORBA that are based on custom transport channels. If you are about todecide to create a custom channel just to interoperate between these platforms, it might beeasier to look at one of the already existing solutions.
Apart from this, the same disclaimer I’ve used at the end of the previous chapter applies hereas well: you should take explicit care not to tie your client- or server-side business logic too muchto the .NET Remoting framework. If your business logic code depends on side effects introducedby your custom channel, it will be very hard to migrate it to future technology. Always remember:business code often outlives its initial environment, but you have to plan accordingly to allowfor future changes.
SummaryAfter reading this chapter, you’ve finally reached the level of .NET Remoting wizardship. Not onlydo you know how to extend the framework using custom sinks and providers, but now you canalso implement a complete channel from scratch. You learned that most work in implementinga custom channel has to be expended in understanding and encapsulating the underlyingprotocol. Mapping an asynchronous protocol to synchronous calls and vice versa is an espe-cially important and challenging task. You also know how to implement IChannelSender andIChannelReceiver, how to combine them into a top-level channel, and how to assign defaultformatters to a channel.
In the next chapter, I introduce you to the possibilities of using the basic principle of .NETRemoting, which is the processing of method calls using messages instead of stack-based call-ing conventions in your local applications.
469
C H A P T E R 1 5
■ ■ ■
Context Matters
This chapter is about message-based processing in local applications. Here you learn howyou can intercept calls to objects to route them through IMessageSinks. This routing allowsyou to create and maintain parts of your application’s business logic at the metadata level byusing attributes. You also discover why it might be a good idea to do so.
■Caution Everything in this chapter is 100 percent undocumented. Reliance on these techniques is notsupported by either Microsoft, the publisher, or the author of this book. Use at your own risk! If your computerwon’t work afterwards, your toaster blows up, or your car doesn’t start, I assume no liability whatsoever. You’renow about to enter the uncharted territories of .NET and you do so at your own risk. I can only provide someguidance.
Well, it’s great that you’re still with me after this introductory warning. So let’s start witha look at some common business applications. You will quite likely have some object modelthat holds local data before it’s committed to the database. Those classes will contain parts ofyour business logic. For example, assume that your application provides an instant way foremployees of your company to donate various amounts of their paychecks to charity organiza-tions. In this case, you might have a data object that looks like the one shown in Listing 15-1,which allows a user to set an organization’s name and the donation of a specified amount to it.
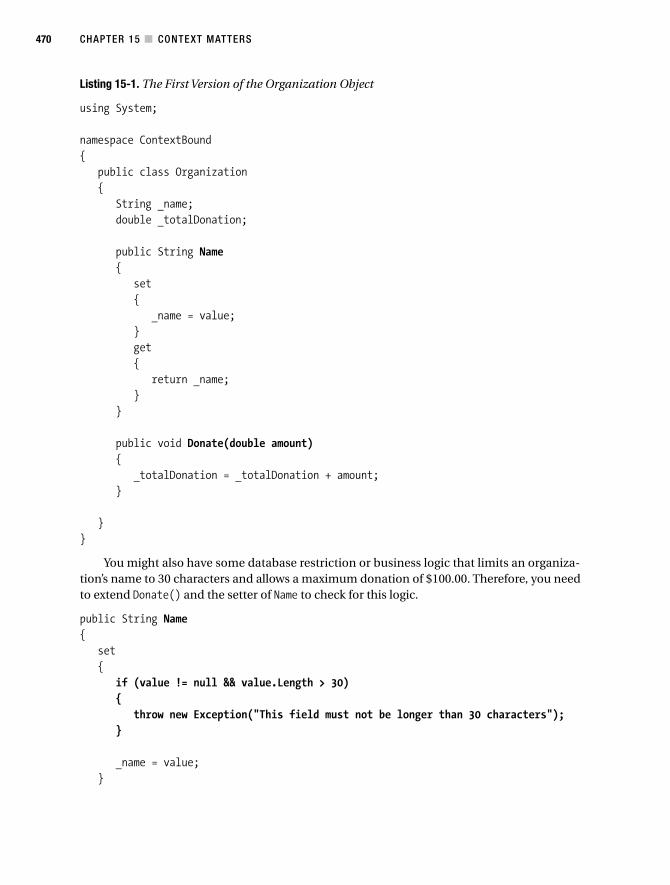
CHAPTER 15 ■ CONTEXT MATTERS470
Listing 15-1. The First Version of the Organization Object
using System;
namespace ContextBound{
public class Organization{
String _name;double _totalDonation;
public String Name{
set{
_name = value;}get{
return _name;}
}
public void Donate(double amount){
_totalDonation = _totalDonation + amount;}
}}
You might also have some database restriction or business logic that limits an organiza-tion’s name to 30 characters and allows a maximum donation of $100.00. Therefore, you needto extend Donate() and the setter of Name to check for this logic.
public String Name{
set{
if (value != null && value.Length > 30){
throw new Exception("This field must not be longer than 30 characters");}
_name = value;}

CHAPTER 15 ■ CONTEXT MATTERS 471
get{
return _name;}
}
public void Donate(double amount){
if (amount > 100){
throw new Exception("This parameter must not be greater than 100.");}_totalDonation = _totalDonation + amount;
}
You’re checking the business logic and your application works as expected. So far, so good.The problems only commence as soon as more developers start using your objects as the basefor their applications, because they don’t discover about those restrictions by reading the inter-face definition alone. As in most real-world applications, the business logic is in this case hiddeninside the implementation and is not part of the metadata level. There is no way for anotherdeveloper to tell that the maximum amount for a valid donation is $100.00 without looking atyour source code.
If you’re a well-informed developer, you already know that you can at least document thoseparameters using inline XML comments to automatically generate online documentation foryour classes—but you still have to document and implement the logic in two separate places.If you’ve never, ever changed any implementation detail without updating the inline documen-tation, you don’t need to read further—you’ve already solved the problem.
Working at the MetaData LevelIn most projects though (at least in some I’ve recently heard of), there is a direct proportionalitybetween days to deadline and quality of documentation. Somehow people tend to forget toupdate comments as soon as their boss is reminding them that they should have shipped ityesterday.
Wouldn’t it be great to just specify those checks using some source code attributes andhave some “black magic” happen between the client and your objects that takes care of check-ing the passed values against those attributes?
In a perfect world, these methods might simply look like this:
public String Name{
[Check(MaxLength=30)]set{
_name = value;}
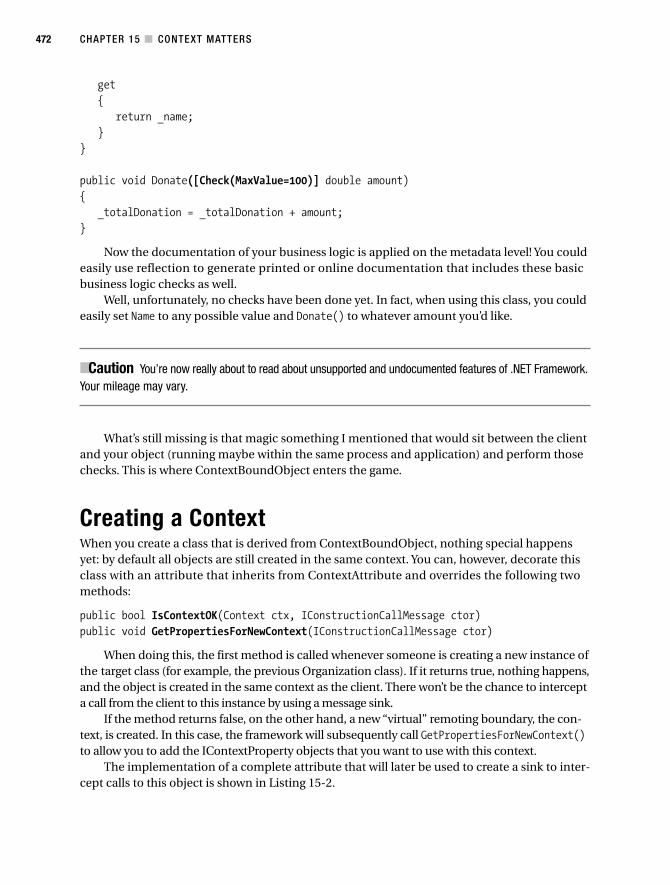
CHAPTER 15 ■ CONTEXT MATTERS472
get{
return _name;}
}
public void Donate([Check(MaxValue=100)] double amount){
_totalDonation = _totalDonation + amount;}
Now the documentation of your business logic is applied on the metadata level! You couldeasily use reflection to generate printed or online documentation that includes these basicbusiness logic checks as well.
Well, unfortunately, no checks have been done yet. In fact, when using this class, you couldeasily set Name to any possible value and Donate() to whatever amount you’d like.
■Caution You’re now really about to read about unsupported and undocumented features of .NET Framework.Your mileage may vary.
What’s still missing is that magic something I mentioned that would sit between the clientand your object (running maybe within the same process and application) and perform thosechecks. This is where ContextBoundObject enters the game.
Creating a ContextWhen you create a class that is derived from ContextBoundObject, nothing special happensyet: by default all objects are still created in the same context. You can, however, decorate thisclass with an attribute that inherits from ContextAttribute and overrides the following twomethods:
public bool IsContextOK(Context ctx, IConstructionCallMessage ctor)public void GetPropertiesForNewContext(IConstructionCallMessage ctor)
When doing this, the first method is called whenever someone is creating a new instance ofthe target class (for example, the previous Organization class). If it returns true, nothing happens,and the object is created in the same context as the client. There won’t be the chance to intercepta call from the client to this instance by using a message sink.
If the method returns false, on the other hand, a new “virtual” remoting boundary, the con-text, is created. In this case, the framework will subsequently call GetPropertiesForNewContext()to allow you to add the IContextProperty objects that you want to use with this context.
The implementation of a complete attribute that will later be used to create a sink to inter-cept calls to this object is shown in Listing 15-2.
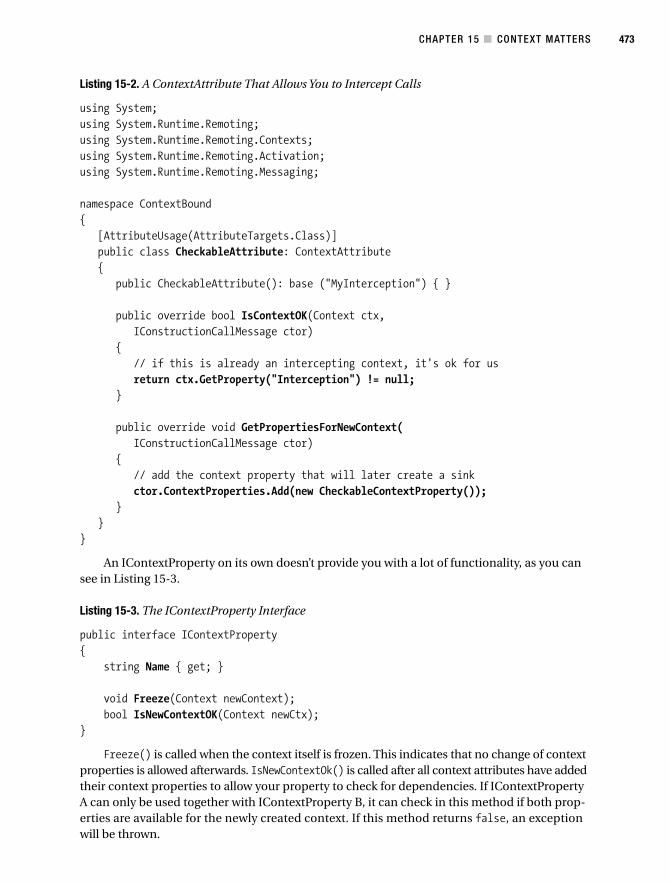
CHAPTER 15 ■ CONTEXT MATTERS 473
Listing 15-2. A ContextAttribute That Allows You to Intercept Calls
using System;using System.Runtime.Remoting;using System.Runtime.Remoting.Contexts;using System.Runtime.Remoting.Activation;using System.Runtime.Remoting.Messaging;
namespace ContextBound{
[AttributeUsage(AttributeTargets.Class)]public class CheckableAttribute: ContextAttribute{
public CheckableAttribute(): base ("MyInterception") { }
public override bool IsContextOK(Context ctx,IConstructionCallMessage ctor)
{// if this is already an intercepting context, it's ok for usreturn ctx.GetProperty("Interception") != null;
}
public override void GetPropertiesForNewContext(IConstructionCallMessage ctor)
{// add the context property that will later create a sinkctor.ContextProperties.Add(new CheckableContextProperty());
}}
}
An IContextProperty on its own doesn’t provide you with a lot of functionality, as you cansee in Listing 15-3.
Listing 15-3. The IContextProperty Interface
public interface IContextProperty{
string Name { get; }
void Freeze(Context newContext);bool IsNewContextOK(Context newCtx);
}
Freeze() is called when the context itself is frozen. This indicates that no change of contextproperties is allowed afterwards. IsNewContextOk() is called after all context attributes have addedtheir context properties to allow your property to check for dependencies. If IContextPropertyA can only be used together with IContextProperty B, it can check in this method if both prop-erties are available for the newly created context. If this method returns false, an exceptionwill be thrown.
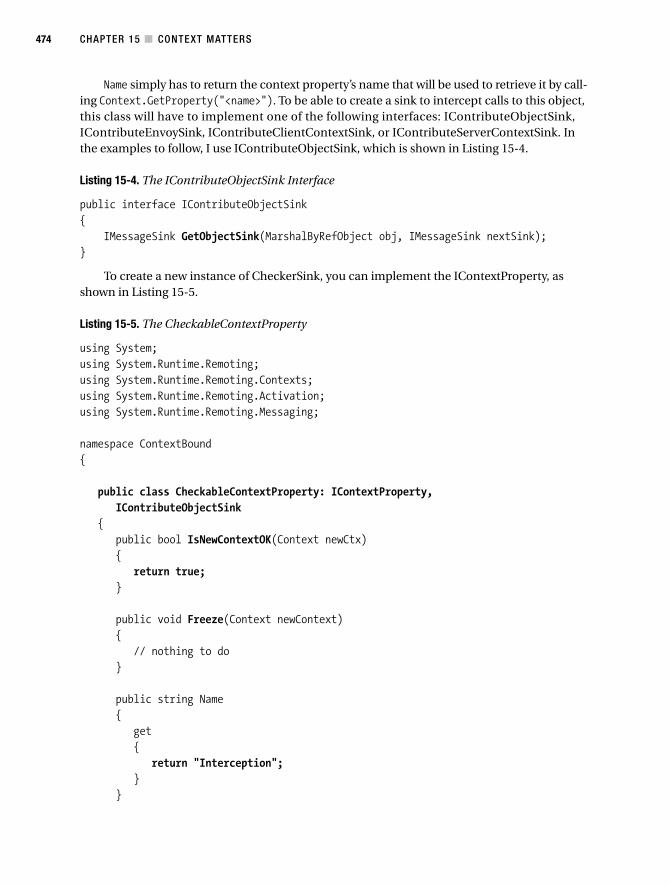
CHAPTER 15 ■ CONTEXT MATTERS474
Name simply has to return the context property’s name that will be used to retrieve it by call-ing Context.GetProperty("<name>"). To be able to create a sink to intercept calls to this object,this class will have to implement one of the following interfaces: IContributeObjectSink,IContributeEnvoySink, IContributeClientContextSink, or IContributeServerContextSink. Inthe examples to follow, I use IContributeObjectSink, which is shown in Listing 15-4.
Listing 15-4. The IContributeObjectSink Interface
public interface IContributeObjectSink{
IMessageSink GetObjectSink(MarshalByRefObject obj, IMessageSink nextSink);}
To create a new instance of CheckerSink, you can implement the IContextProperty, asshown in Listing 15-5.
Listing 15-5. The CheckableContextProperty
using System;using System.Runtime.Remoting;using System.Runtime.Remoting.Contexts;using System.Runtime.Remoting.Activation;using System.Runtime.Remoting.Messaging;
namespace ContextBound{
public class CheckableContextProperty: IContextProperty,IContributeObjectSink
{public bool IsNewContextOK(Context newCtx){
return true;}
public void Freeze(Context newContext){
// nothing to do}
public string Name{
get{
return "Interception";}
}
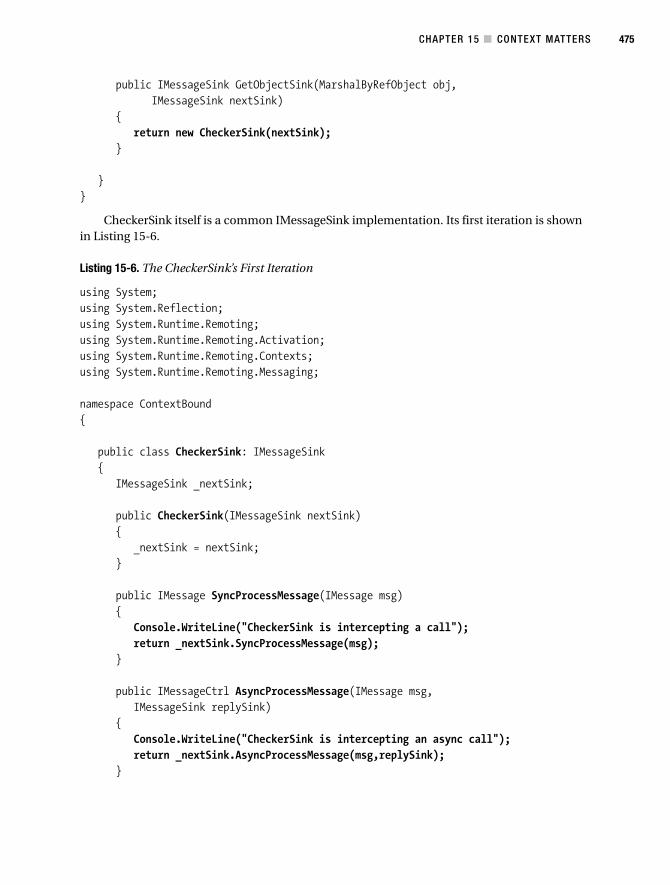
CHAPTER 15 ■ CONTEXT MATTERS 475
public IMessageSink GetObjectSink(MarshalByRefObject obj,IMessageSink nextSink)
{return new CheckerSink(nextSink);
}
}}
CheckerSink itself is a common IMessageSink implementation. Its first iteration is shownin Listing 15-6.
Listing 15-6. The CheckerSink’s First Iteration
using System;using System.Reflection;using System.Runtime.Remoting;using System.Runtime.Remoting.Activation;using System.Runtime.Remoting.Contexts;using System.Runtime.Remoting.Messaging;
namespace ContextBound{
public class CheckerSink: IMessageSink{
IMessageSink _nextSink;
public CheckerSink(IMessageSink nextSink){
_nextSink = nextSink;}
public IMessage SyncProcessMessage(IMessage msg){
Console.WriteLine("CheckerSink is intercepting a call");return _nextSink.SyncProcessMessage(msg);
}
public IMessageCtrl AsyncProcessMessage(IMessage msg,IMessageSink replySink)
{Console.WriteLine("CheckerSink is intercepting an async call");return _nextSink.AsyncProcessMessage(msg,replySink);
}
CHAPTER 15 ■ CONTEXT MATTERS476
publicIMessageSink NextSink{
get{
return _nextSink;}
}}
}
To enable this way of intercepting the Organization class shown at the beginning of thischapter, you have to mark it with [Checkable] and have it inherit from ContextBoundObject tocreate the context property.
The Organization class, which is shown in Listing 15-7, does not yet employ the use ofcustom attributes for checking the maximum amount of a single donation or the maximumlength of the organization’s name. It just demonstrates the basic principle of interception.
Listing 15-7. The Organization Is Now a ContextBoundObject
using System;
namespace ContextBound{
[Checkable]public class Organization: ContextBoundObject{
String _name;double _totalDonation;
public String Name{
set{
_name = value;}get{
return _name;}
}
public void Donate(double amount){
Organization x = new Organization();x.Name = "Hello World";_totalDonation = _totalDonation + amount;
}
}}
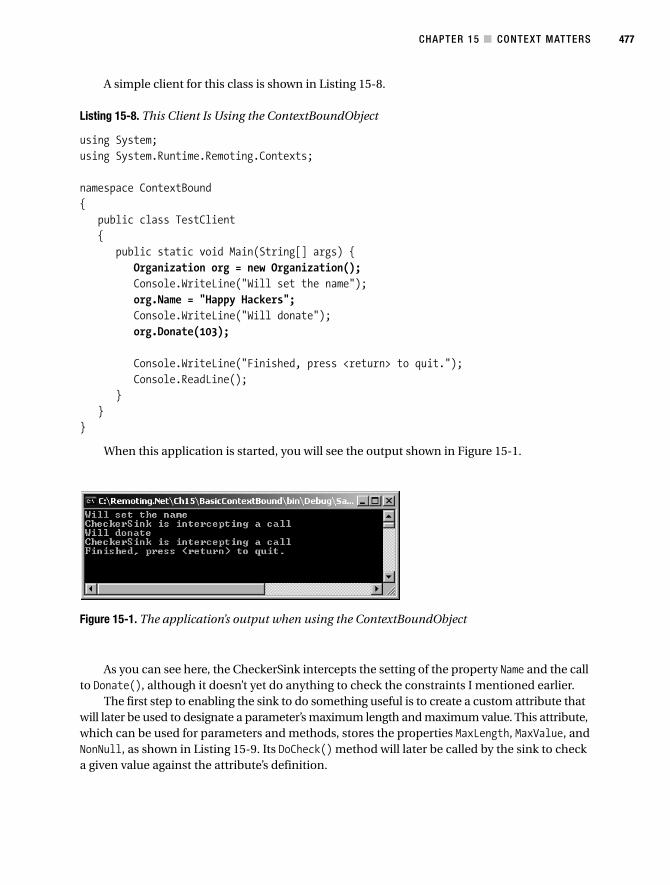
CHAPTER 15 ■ CONTEXT MATTERS 477
Figure 15-1. The application’s output when using the ContextBoundObject
A simple client for this class is shown in Listing 15-8.
Listing 15-8. This Client Is Using the ContextBoundObject
using System;using System.Runtime.Remoting.Contexts;
namespace ContextBound{
public class TestClient{
public static void Main(String[] args) {Organization org = new Organization();Console.WriteLine("Will set the name");org.Name = "Happy Hackers";Console.WriteLine("Will donate");org.Donate(103);
Console.WriteLine("Finished, press <return> to quit.");Console.ReadLine();
}}
}
When this application is started, you will see the output shown in Figure 15-1.
As you can see here, the CheckerSink intercepts the setting of the property Name and the callto Donate(), although it doesn’t yet do anything to check the constraints I mentioned earlier.
The first step to enabling the sink to do something useful is to create a custom attribute thatwill later be used to designate a parameter’s maximum length and maximum value. This attribute,which can be used for parameters and methods, stores the properties MaxLength, MaxValue, andNonNull, as shown in Listing 15-9. Its DoCheck() method will later be called by the sink to checka given value against the attribute’s definition.
CHAPTER 15 ■ CONTEXT MATTERS478
Listing 15-9. The CheckAttribute
using System;
namespace ContextBound{
[AttributeUsage (AttributeTargets.Parameter | AttributeTargets.Method)]public class CheckAttribute: Attribute{
private int _maxLength;private int _maxValue;private bool _nonNull;
public int MaxLength {get {
return _maxLength;}set {
_maxLength = value;}
}
public int MaxValue{
get{
return _maxValue;}set{
_maxValue = value;}
}
public bool NonNull{
get{
return _nonNull;}set{
_nonNull = value;}
}
CHAPTER 15 ■ CONTEXT MATTERS 479
public void DoCheck (Object val){
// check for NonNullif (_nonNull && val == null){
throw new Exception("This value must not be null");}
// check for MaxLengthif (_maxLength > 0 && val.ToString().Length > _maxLength){
throw new Exception("This value must not be longer than " +_maxLength + " characters");
}
// check for MaxValueif (_maxValue > 0){
if ((double) val > _maxValue){
throw new Exception("This value must not be higher than " +_maxValue );
}
}}
}}
To make use of this attribute in the Organization class, you have to mark the parameter toDonate() and the set method for the Name property, as shown here:
public String Name{
[Check(NonNull=true,MaxLength=30)]set{
_name = value;}get{
return _name;}
}
public void Donate([Check(NonNull=true,MaxValue=100)] double amount){
_totalDonation = _totalDonation + amount;}
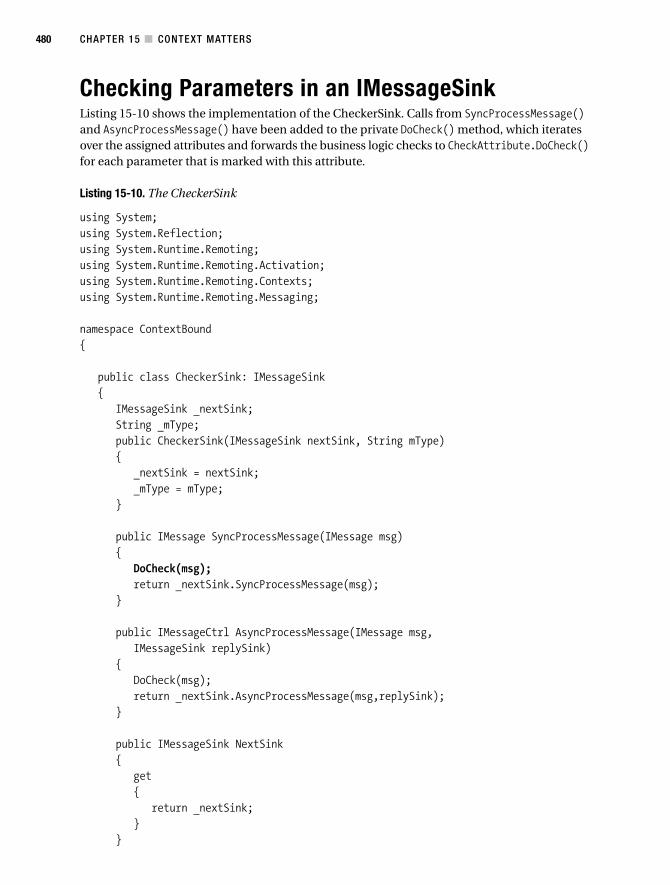
CHAPTER 15 ■ CONTEXT MATTERS480
Checking Parameters in an IMessageSinkListing 15-10 shows the implementation of the CheckerSink. Calls from SyncProcessMessage()and AsyncProcessMessage() have been added to the private DoCheck() method, which iteratesover the assigned attributes and forwards the business logic checks to CheckAttribute.DoCheck()for each parameter that is marked with this attribute.
Listing 15-10. The CheckerSink
using System;using System.Reflection;using System.Runtime.Remoting;using System.Runtime.Remoting.Activation;using System.Runtime.Remoting.Contexts;using System.Runtime.Remoting.Messaging;
namespace ContextBound{
public class CheckerSink: IMessageSink{
IMessageSink _nextSink;String _mType;public CheckerSink(IMessageSink nextSink, String mType){
_nextSink = nextSink;_mType = mType;
}
public IMessage SyncProcessMessage(IMessage msg){
DoCheck(msg);return _nextSink.SyncProcessMessage(msg);
}
public IMessageCtrl AsyncProcessMessage(IMessage msg,IMessageSink replySink)
{DoCheck(msg);return _nextSink.AsyncProcessMessage(msg,replySink);
}
public IMessageSink NextSink{
get{
return _nextSink;}
}
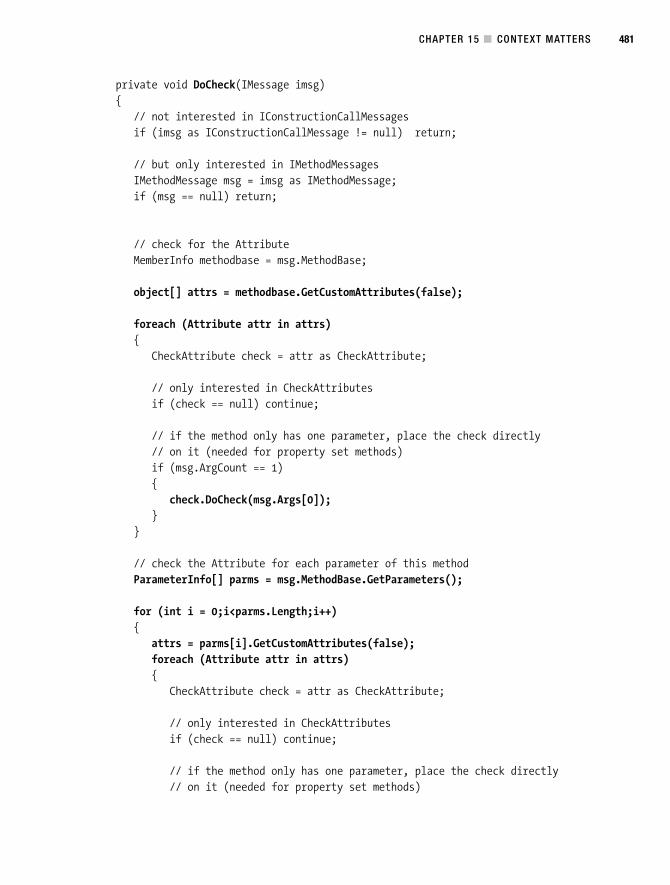
CHAPTER 15 ■ CONTEXT MATTERS 481
private void DoCheck(IMessage imsg){
// not interested in IConstructionCallMessagesif (imsg as IConstructionCallMessage != null) return;
// but only interested in IMethodMessagesIMethodMessage msg = imsg as IMethodMessage;if (msg == null) return;
// check for the AttributeMemberInfo methodbase = msg.MethodBase;
object[] attrs = methodbase.GetCustomAttributes(false);
foreach (Attribute attr in attrs){
CheckAttribute check = attr as CheckAttribute;
// only interested in CheckAttributesif (check == null) continue;
// if the method only has one parameter, place the check directly// on it (needed for property set methods)if (msg.ArgCount == 1){
check.DoCheck(msg.Args[0]);}
}
// check the Attribute for each parameter of this methodParameterInfo[] parms = msg.MethodBase.GetParameters();
for (int i = 0;i<parms.Length;i++){
attrs = parms[i].GetCustomAttributes(false);foreach (Attribute attr in attrs){
CheckAttribute check = attr as CheckAttribute;
// only interested in CheckAttributesif (check == null) continue;
// if the method only has one parameter, place the check directly// on it (needed for property set methods)
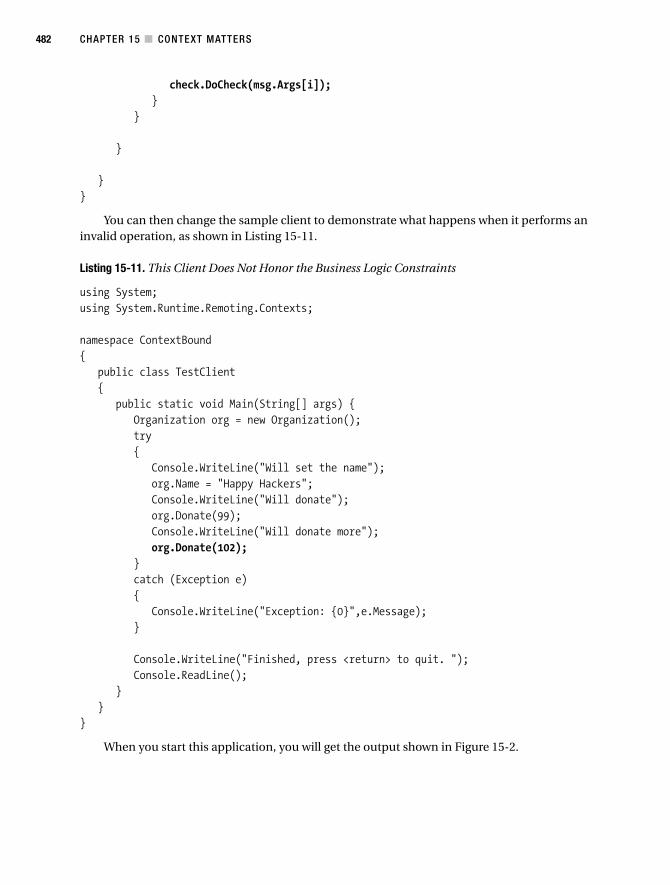
CHAPTER 15 ■ CONTEXT MATTERS482
check.DoCheck(msg.Args[i]);}
}
}
}}
You can then change the sample client to demonstrate what happens when it performs aninvalid operation, as shown in Listing 15-11.
Listing 15-11. This Client Does Not Honor the Business Logic Constraints
using System;using System.Runtime.Remoting.Contexts;
namespace ContextBound{
public class TestClient{
public static void Main(String[] args) {Organization org = new Organization();try{
Console.WriteLine("Will set the name");org.Name = "Happy Hackers";Console.WriteLine("Will donate");org.Donate(99);Console.WriteLine("Will donate more");org.Donate(102);
}catch (Exception e){
Console.WriteLine("Exception: {0}",e.Message);}
Console.WriteLine("Finished, press <return> to quit. ");Console.ReadLine();
}}
}
When you start this application, you will get the output shown in Figure 15-2.

CHAPTER 15 ■ CONTEXT MATTERS 483
Figure 15-2. The client’s illegal operation is prohibited by the CheckerSink.
Great! You are now checking your business logic constraints by using attributes that areassigned at the metadata level instead of checks that are hidden in your source code.
One interesting One interesting consideration that I have not yet mentioned is thefollowing: what would happen if the first Organization object instantiates another Organi-zation object and calls the Donate() method on the secondary object? Will this call also gothrough the message sink? In fact, in the current configuration it won’t. This example justprotects your class library from “outside” clients but doesn’t affect any calls inside this con-text. This is because the CheckableAttribute’s IsContextOK() only requests a new contextwhen it’s called from outside a checked context.
To make all calls to Organization (no matter what their origin) go through the CheckerSink,you’d have to change CheckableAttribute to return false from IsContextOK():
public override bool IsContextOK(Context ctx, IConstructionCallMessage ctor){
return false;}
This will request a new context for each and every instance of any class that is marked with[Checkable] and that inherits from ContextBoundObject.
SummaryIn this last chapter, I showed you some undocumented techniques to move constraints awayfrom the implementation up to the metadata level. When using this approach together withreflection on the types of your class library, you will be able to automatically generate docu-mentation that includes all those metadata-level checks. You learned about using differentcontexts in your local application and how to use IContextProperty and IContributeObjectSinkto intercept calls to your objects by using IMessageSink objects.
I just want to remind you that context sinks are a great technology, but unfortunately notyet officially supported or documented by Microsoft. If you use them, it will be at your own risk!If any problems occur when doing so, you will be on your own. But isn’t that the fate of anyonewho’s going to enter uncharted territory?
CHAPTER 15 ■ CONTEXT MATTERS484
ConclusionIn this book you learned .NET Remoting from the basics to very advanced topics. In the firstchapters, I introduced you to the various kinds of remote objects and how to create and registerthem. I covered the intricacies of client-activated objects and server-activated objects. You alsolearned about the various ways of generating the necessary metadata to allow the .NET Remotingframework to create transparent proxies. I showed you the deployment options for remot-ing servers that can be either managed applications (including console applications, Windowsservices, and Windows Form applications) and IIS. I then showed you more advanced topics suchas security, event handling, versioning, and lifetime management by using leases and sponsors.
In the second part of the book, I showed you how .NET Remoting works internally. You wereintroduced to proxies, messages, transport channels, formatters, message sinks, and channelsinks. After covering those architectural basics, I showed you how to leverage the .NET Remotingframework’s extensibility model by implementing your own sinks and sink providers. At the endof the second part, you finally learned how to implement a complete transport channel fromscratch and how to use ContextBoundObject to intercept message calls.
You are now well prepared for the development of distributed applications using the .NETFramework—so go ahead and do your stuff!
P A R T 3
■ ■ ■
Reference
487
A P P E N D I X A
■ ■ ■
.NET Remoting UsageReference
The core classes for .NET Remoting reside in the System.Runtime.Remoting namespace. Inthis appendix, you will find a reference of the types that are usually used when writing .NETRemoting applications and that were used in the first part of the book. I will not explain anyclasses, interfaces, and enumerations used for extending the .NET Remoting infrastructure inthis appendix. The reference for extensibility can be found in Appendix B, which presents thetypes you use for extending the .NET Remoting infrastructure.
Many entries are cross-referenced with relevant chapters as well as entries to the MSDNdocumentation where appropriate. MSDN documentation will include further details in manycases. I will also cover several classes from the following subnamespaces:
• System.Runtime.Remoting.Channels
• System.Runtime.Remoting.Lifetime
• System.Runtime.Remoting.Messaging
• System.Runtime.Remoting.Metadata
• System.Runtime.Remoting.Services
• System.Runtime.Serialization
But before starting with the types defined in these namespaces, I have to cover a handful oftypes defined in other namespaces, but used by the .NET Remoting infrastructure, which areused in the chapters throughout the book.
System TypesHere I’ll explain some types that are not defined in the Remoting namespace but are used by the.NET Remoting infrastructure. Often you won’t be using the types directly, but it’s important tohave a brief understanding of these types.
APPENDIX A ■ .NET REMOTING USAGE REFERENCE488
System.Activator ClassThe Activator class is primarily used for either creating instances of new objects locally orremotely or obtaining references to existing instances of remote objects. The CreateInstance()and CreateInstanceFrom() methods can be used for creating new instances of .NET-based types,whereas the CreateComInstanceFrom() method obtains a COM object name (in the format“library.classname”) as parameter for creating registered COM objects.
In the examples in this book, you also saw the GetObject() method used for retrievinga remote well-known object that already exists on a .NET Remoting server.
Usage example:
MyClass MyFirst = (MyClass)Activator.CreateInstance(typeof(MyClass));
ObjectHandle handle = Activator.CreateInstance("MyAssembly","MyNamespace.MyClass",new object[] {"First", 2});
MyClass MySecond = (MyClass)handle.Unwrap();
IRemoteComponent MyThird = (IRemoteComponent)Activator.GetObject(typeof(IRemoteComponent),"tcp://localhost:8080/MyRemote.rem");
The use of the Activator class is demonstrated in many of the chapters of the book, thefirst time being within the first .NET Remoting example, which appears in Chapter 2.
More information on MSDN:http://msdn.microsoft.com/library/en-us/cpref/html/frlrfsystemactivatorclasstopic.asp
System.MarshalByRefObject ClassThe MarshalByRefObject class usually is not used directly by the application programmer. Thisclass enables access to objects living in other application domains. Such objects can reside inapplication domains of the same or other processes on the same machine or in processes onremote machines.
Objects that need to be accessible remotely must be inherited from MarshalByRefObject.
Usage example:
public class MyClass : MarshalByRefObject, IRemoteComponent{public void Foo(){// do something here// can be called remotely because// MyClass inherits from MarshalByRefObject
}}
APPENDIX A ■ .NET REMOTING USAGE REFERENCE 489
As all remoteable objects have to be inherited from MarshalByRefObject, I am using thisclass as a base class throughout all the chapters of the book for such objects. The first occurrenceand explanation can be found in Chapter 2 when creating the first .NET Remoting example.
More information on MSDN:http://msdn.microsoft.com/library/en-us/cpref/html/frlrfsystemmarshalbyrefobjectclasstopic.asp
System.SerializableAttribute ClassApplied to any class, this attribute indicates that the class is serializable. For .NET Remoting,you need this each time you want to transport a class between the client and the server. Alsooften known as a marshal by value object, it is not accessed and executed on the remote serverthrough an object reference; rather it is serialized, sent across the wire, and deserialized at theother endpoint. Therefore, objects that need to be sent as messages between a .NET Remotingclient and a server have to have the SerializableAttribute applied.
Usage example:
[Serializable]public class Customer{public string Firstname;public string Lastname;public int Age;
[NonSerialized]public int InternalNumber;
public Customer(string first, string last, int age){// ...
}}
Usually the .NET Framework serializer serializes all public and private members of a class.If you don’t want specific members to be serialized, you can use the NonSerialized attribute forthose members.
I use this attribute for all classes that are exchanged between the client and the server asmessages. The first occurrence and explanation of this attribute can be found in Chapter 2 inthe first .NET Remoting example.
More information on MSDN:http://msdn.microsoft.com/library/en-us/cpref/html/frlrfsystemserializableattributeclasstopic.asp
APPENDIX A ■ .NET REMOTING USAGE REFERENCE490
System.Delegate ClassDelegates are safe references to either static or instance methods of classes. People programmingin C++ could image a delegate as a safe version of function pointers. Delegates are used in manycases when programming .NET-based applications. The most common usage scenario fordelegates is events. But in general, you can implement any function callback you need withdelegates.
Because delegates are classes too, they can be used as function parameters as well as classmembers. For using delegates, you first have to define the structure of the delegate, which ismade up of its name and the type of the return value, as well as the required parameters, includingtheir types.
Usage example:
public delegate string MyDelegateName(int x, int y);
class MyDelegateTest{
[STAThread]static void Main(string[] args){Console.WriteLine("Which delegate to use (1, 2): ");short sel = Int16.Parse(Console.ReadLine());if(sel == 1)DoActions(new MyDelegateName(MyFirstImplementation));
elseDoActions(new MyDelegateName(MySecondImplementation));
Console.ReadLine();}
static string MyFirstImplementation(int x, int y){return (x+y).ToString();
}
static string MySecondImplementation(int x, int y){return (x*y).ToString();
}
static void DoActions(MyDelegateName functionReference){for(int i=0; i < 10; i++)for(int j=0; j < 2*i; j++)Console.WriteLine("-) {0}", functionReference(i, j));
}}
APPENDIX A ■ .NET REMOTING USAGE REFERENCE 491
Delegates are used for the first time in Chapter 3 for implementing asynchronous calls. InChapter 7, you can see delegates used for implementing events.
More information on MSDN:http://msdn.microsoft.com/library/en-us/cpref/html/frlrfsystemdelegateclasstopic.asp
System.IAsyncResult InterfaceThe IAsyncResult interface represents the status of an asynchronous operation. It can be usedin conjunction with the BeginInvoke() and EndInvoke() methods of a delegate. The BeginInvoke()method starts the asynchronous execution of the delegate and allows the application to dosomething different instead of waiting for the function to be finished. As soon as the applicationrequires the results, it can call the delegate’s EndInvoke() method, passing the IAsyncResult asa parameter. In this case, the application waits for the delegate to be finished and gets the actualreturn value.
Usage example:
IAsyncResult result = functionReference.BeginInvoke(i, j, null, null);while(!result.IsCompleted){// wait for completion or do something else...
}string ret = functionReference.EndInvoke(result);
I use the IAsyncResult interface for the first time in Chapter 3 and then in Chapter 7 forimplementing an asynchronous method call in the examples.
More information on MSDN:http://msdn.microsoft.com/library/en-us/cpref/html/frlrfsystemiasyncresultclasstopic.asp
System.Runtime.RemotingMost of the time when writing .NET Remoting applications, you spend your time using classesdefined in the root namespace System.Runtime.Remoting. The most important class in here isdefinitely the RemotingConfiguration class, which offers you the possibility of configuring .NETRemoting services as well as clients.
Basic Infrastructure ClassesThe following classes are basic support classes that enable the .NET Remoting framework’score functionality.
ObjRef ClassAlthough not used directly, the ObjRef class is the secret behind accessing remote objects. It isthe representation of a reference to an object running in a different application domain either
APPENDIX A ■ .NET REMOTING USAGE REFERENCE492
on the same or on a remote machine. Of course, object references can be passed between mul-tiple instances so that any one of them can access the same object that is referenced throughthis class.
The ObjRef class is explained in detail in Chapter 3 when you encounter MarshalByRef aswell as the capability of creating a multiserver configuration.
More information on MSDN:http://msdn.microsoft.com/library/en-us/cpref/html/frlrfsystemruntimeremotingobjrefclasstopic.asp
ObjectHandle ClassAlthough I have not used this class directly in the examples, it is worth mentioning its existence.What the ObjRef class is for remote objects running in other application domains the ObjectHandleis for serialized classes passed between application domains. The object handle gives you thepossibility of passing serialized types through an indirection between application domains.
This level of indirection can help you improve performance because as long as you don’tcall its Unwrap method, the metadata of the serialized type is not loaded into the applicationdomain.
More information on MSDN:http://msdn.microsoft.com/library/en-us/cpref/html/frlrfsystemruntimeremotingobjecthandleclasstopic.asp
RemotingConfiguration ClassThe RemotingConfiguration class—as its name says—is the primary class for configuring .NETRemoting applications. You can use the class for registering your types either manually or throughconfiguration files. This class cannot be used for registering channels; in that case, you have touse the ChannelServices class, which will be explained later in this appendix.
Usage examples:
// configure an object published on the server as a SingletonRemotingConfiguration.RegisterWellKnownServiceType(
typeof(CustomerManager),"CustomerManager.soap",WellKnownObjectMode.Singleton);
// configure a remote object on the client residing under the following URLRemotingConfiguration.RegisterWellKnownClientType(
typeof(IRemoteComponent),"tcp://localhost:8080/MyRemote.rem");
// perform the configuration based on the contents of MyConfigFile.configRemotingConfiguration.Configure("MyConfigFile.config");
APPENDIX A ■ .NET REMOTING USAGE REFERENCE 493
You can see this class used for configuring .NET Remoting applications in almost everychapter in this book, starting with the first example in Chapter 2.
More information on MSDN:http://msdn.microsoft.com/library/en-us/cpref/html/frlrfsystemruntimeremotingremotingconfigurationclasstopic.asp
RemotingServices ClassThe RemotingServices class can be used for publishing remoted objects and proxies on a .NETRemoting server by calling static methods of this class. It can also be used to connect to a remoteobject by calling its Connect method, which basically does the same as the Activator.GetObjectmethod.
Usage examples:
// publish an existing object on the serverMyClass cls = new MyClass(DateTime.Now);RemotingServices.Marshal(cls,
" MyRemote.rem",typeof(IRemoteComponent));
// create and use the proxy on the clientIRemoteComponent c = (IRemoteComponent)RemotingServices.Connect(
typeof(IRemoteComponent),"tcp://localhost:8080/MyRemote.rem");
if(RemotingServices.IsObjectOutOfAppDomain(c)) {Console.WriteLine("What a surprise: object in another AppDomain!");
}
I use the RemotingServices class for the first time in Chapter 3 when publishing a cre-ated object. The intention is to enable passing parameters to the constructor, which is notpossible when configuring Singleton or SingleCall objects through the methods offered byRemotingConfiguration (in which case objects are created automatically by the runtime).
More information on MSDN:http://msdn.microsoft.com/library/en-us/cpref/html/frlrfsystemruntimeremotingremotingservicesclasstopic.asp
Configuration ClassesThe following classes are used to manually configure the .NET Remoting functionality at runtime.
TypeEntry ClassThe TypeEntry class is the general base class for various type configurations in the .NET Remotingruntime. Types that are configured for being available remotely or remote types used from withina client have to be configured by using the intended subclass of the TypeEntry class. Any typeentries can be configured through either configuration files or the RemotingConfiguration class.The specific subclasses are explained in the chapters referenced in the discussions of these sub-classes that follow.
APPENDIX A ■ .NET REMOTING USAGE REFERENCE494
In Chapter 4, I introduce the RemotingHelper class, which iterates through the configuredentries in the current configuration. It uses the client-side subclasses of the TypeEntry class fordoing so.
More information on MSDN:http://msdn.microsoft.com/library/en-us/cpref/html/frlrfsystemruntimeremotingtypeentryclasstopic.asp
ActivatedServiceTypeEntry ClassThe ActivatedServiceTypeEntry class is used for registering a class on a .NET Remoting servicethat is used as a client-activated object. In this case, object creation occurs when the client issending an activation request message. Registration occurs either through configuration filesor by calling the RemotingConfiguration.RegisterActivatedServiceType() method.
Usage example:
RemotingConfiguration.RegisterActivatedServiceType(new ActivatedServiceTypeEntry(typeof(IRemoteComponent)));
RemotingConfiguration.RegisterActivatedServiceType(typeof(IRemoteComponent));
Configuration example:
<configuration><system.runtime.remoting>
<application><service>
<activated type="MyNamespace.IRemoteComponent, MyAssemblyName" /></service>
</application></system.runtime.remoting>
</configuration>
I use the RegisterActivatedServiceType() method (and therefore configured an ActivatesServiceTypeEntry) for the first time in Chapter 3 when explaining the differencebetween server-activated and client-activated objects.
More information on MSDN:http://msdn.microsoft.com/library/en-us/cpref/html/frlrfsystemruntimeremotingactivatedservicetypeentryclasstopic.asp
ActivatedClientTypeEntry ClassThis class is the client’s counterpart to the ActivatedServiceTypeEntry configuration on the server.It holds all the configuration information for a remote client-activated object on the client.After this method has been called, you can use either the Activator.CreateInstance() methodor (when working with generated metadata and SoapSuds.exe) the new operator for creatinga new instance of the remote object.
APPENDIX A ■ .NET REMOTING USAGE REFERENCE 495
With the call to the new operator or the Activator.CreateInstance() method, the client sendsa creation message to the server that leads the server to create a new instance with the param-eters passed in the activation message. The server returns the object reference, and the runtimecreates the TransparentProxy on the client.
Usage examples:
RemotingConfiguration.RegisterActivatedClientType(typeof(MyClass), "tcp://localhost:8080/MyRemote.rem");
RemotingConfiguration.RegisterActivatedClientType(new ActivatedClientTypeEntry(typeof(MyClass),
"tcp://localhost:8080/MyRemote.rem"));
Configuration example:
<configuration><system.runtime.remoting>
<application><client url="http://localhost:8080" />
<activated type="MyNamespace.MyClass, MyAssemblyName" /></client>
</application></system.runtime.remoting>
</configuration>
I use this method together with the corresponding configuration on the server for the firsttime in Chapter 3 when explaining the difference between SAO und CAO.
More information on MSDN:http://msdn.microsoft.com/library/en-us/cpref/html/frlrfsystemruntimeremotingactivatedclienttypeentryclasstopic.asp
WellKnownServiceTypeEntry ClassThe WellKnownServiceTypeEntry class allows you to publish server-activated objects in Single-ton or SingleCall mode. In this case, the objects are created on the server and not througha creation message sent by the client, as is the case with activated types.
Usage examples:
RemotingConfiguration.RegisterWellKnownServiceType(typeof(MyClass),"MyRemoteObject.rem",WellKnownObjectMode.Singleton);
RemotingConfiguration.RegisterWellKnownServiceType(new WellKnownServiceTypeEntry(typeof(MyClass),
"MyRemoteObject.rem",WellKnownObjectMode.SingleCall));
APPENDIX A ■ .NET REMOTING USAGE REFERENCE496
Configuration example:
<configuration><system.runtime.remoting>
<application><service>
<wellknown type="MyNamespace.MyClass, MyAssembly"objectUri="MyRemoteObject.rem"mode="Singleton" />
</service></application>
</system.runtime.remoting></configuration>
You can see server-activated objects used for the first time in Chapter 2 in the first .NETRemoting example. In Chapter 3, you can find details about the differences between server-activated and client-activated objects.
More information on MSDN:http://msdn.microsoft.com/library/en-us/cpref/html/frlrfsystemruntimeremotingwellknownservicetypeentryclasstopic.asp
WellKnownClientTypeEntry ClassAs with the ActivatedClientTypeEntry class, the WellKnownClientTypeEntry class holds the con-figuration of a server-activated object used by the client application. Therefore, it is the client’scounterpart for the WellKnownServiceTypeEntry.
Usage examples:
RemotingConfiguration.RegisterWellKnownClientType(typeof(IRemoteComponent),"tcp://localhost:8080/MyRemoteObject.rem");
RemotingConfiguration.RegisterWellKnownClientType(new WellKnownClientTypeEntry(typeof(IRemoteComponent),
"tcp://localhost:8080/MyRemoteObject.rem"));
Configuration example:
<configuration><system.runtime.remoting>
<application><client>
<wellknowntype="MyNamespace.IRemoteComponent, MySharedAssembly"url="tcp://localhost:8080/RemoteType.rem" />
</client></application>
</system.runtime.remoting></configuration>
APPENDIX A ■ .NET REMOTING USAGE REFERENCE 497
In Chapters 2 and 3, I use this type of configuration for creating the first .NET Remotingexample as well as explaining the difference between server-activated and client-activated objects.
More information on MSDN:http://msdn.microsoft.com/library/en-us/cpref/html/frlrfsystemruntimeremotingwellknownclienttypeentryclasstopic.asp
WellKnownObjectMode EnumerationThis enumeration is used in conjunction with the RegisterWellKnownService type method forregistering-server activated objects in .NET Remoting server components. It allows you to selectthe mode of the server-activated object, which can be Singleton or SingleCall.
I explain the difference between Singleton and SingleCall objects in Chapter 3 when pre-senting the details about server-activated objects.
More information on MSDN:http://msdn.microsoft.com/library/en-us/cpref/html/frlrfsystemruntimeremotingwellknownobjectmodeclasstopic.asp
Exception ClassesThe .NET Framework includes three main exceptions to convey additional information aboutthe type of error.
RemotingException ClassThis exception is thrown by the infrastructure when something has been going wrong whenusing .NET Remoting. The exception inherits from System.Exception and therefore offers youquerying of the same types of information as a standard .NET exception.
More information on MSDN:http://msdn.microsoft.com/library/en-us/cpref/html/frlrfsystemruntimeremotingremotingexceptionclasstopic.asp
RemotingTimeoutException ClassThis exception inherits from the base class RemotingException and is thrown by the .NETRemoting infrastructure when the server (or the client in case of an event/callback) cannot bereached for a previously specified period of time. Timeouts can be specified through either thechannel configuration or the RemotingClientProxy class, which is the base class for proxiesgenerated via SoapSuds.exe.
More information on MSDN:http://msdn.microsoft.com/library/en-us/cpref/html/frlrfsystemruntimeremotingremotingtimeoutexceptionmemberstopic.asp
ServerException ClassThis exception is thrown by the infrastructure when the client connects to non–.NET-basedcomponents that are not able to throw exceptions on their own.
APPENDIX A ■ .NET REMOTING USAGE REFERENCE498
More information on MSDN:http://msdn.microsoft.com/library/en-us/cpref/html/frlrfsystemruntimeremotingserverexceptionmemberstopic.asp
General InterfacesThe following interfaces are parts of the internal processing of remoting interactions.
IChannelInfo InterfaceThis interface provides a basic contract for carrying channel-specific data with an object refer-ence (ObjRef) between the client and the server. This information is serialized with the ObjRefand transferred between the two actors so that the channel on the other side can read andleverage the information.
You can use this interface for extending the .NET Remoting infrastructure or readingchannel-specific data in your custom code. In your own code, you can use the channels regis-tered in your application domain to examine channel-specific data on the receiving side.
More information on MSDN:http://msdn.microsoft.com/library/en-us/cpref/html/frlrfsystemruntimeremotingichannelinfoclasstopic.asp
IEnvoyInfo InterfaceThis interface allows you to pass context information used by message sinks between the clientand the server. This information can be basically used for extending the .NET Remotinginfrastructure.
More information on MSDN:http://msdn.microsoft.com/library/en-us/cpref/html/frlrfsystemruntimeremotingiobjecthandleclasstopic.asp
IObjectHandle InterfaceThis is the base interface implemented by the ObjectHandle class referenced at the very begin-ning of this appendix. An ObjectHandle is a reference to serialized objects passed betweenapplication domains and allows you to avoid loading type information into an applicationdomain where it is not needed. For more information, take a look at the “ObjectHandle Class”section of this appendix.
More information on MSDN:http://msdn.microsoft.com/library/en-us/cpref/html/frlrfsystemruntimeremotingiobjecthandleclasstopic.asp
IRemotingTypeInfo InterfaceWhen passing a reference of a remote object to a client, the ObjRef carries some type informa-tion with it. This type information can be queried through its TypeInfo property, which returnsan object implementing this interface. You can do both querying the type name as well as askingfor possible type casts through the interface’s CanCastTo method.
APPENDIX A ■ .NET REMOTING USAGE REFERENCE 499
More information on MSDN:http://msdn.microsoft.com/library/en-us/cpref/html/frlrfsystemruntimeremotingiremotingtypeinfoclasstopic.asp
System.Runtime.Remoting.ChannelsIn this namespace, you can find the general interfaces as well as concrete implementations for.NET Remoting channels and message formatter classes. Channels are used for implementingthe details of the transport protocol employed for calling remote components. The .NETFramework 1.0 and 1.1 ship with two prebuilt channels, one channel for TCP and another one forHTTP. With .NET 2.0, the infrastructure includes an IPC channel for interprocess communication.
General Interfaces and ClassesIn this section, I have included the main interfaces and classes that are related to the system ofextensible channels in the .NET Remoting framework.
IChannel InterfaceThis interface specifies the basic contract that has to be implemented by all channel objects. It speci-fies that each channel has to support at least two properties, ChannelName and ChannelPriority.The ChannelName property specifies a unique name for the channel, while the ChannelPriorityproperty specifies which channel is given first chance to connect to a remote object. For serverobjects, it specifies the order in which channel data appears in the ObjRef passed to the client.Higher numbers indicate higher priority.
The IChannel interface also specifies that implementing classes must provide a Parse method.This method is used for parsing a complete URL and returning the URI for the current channelas well as the object’s URI as an out parameter.
Usually you do not use the interface on its own, except if you want to write code that isindependent of a specific channel implementation such as the HttpChannel. When implement-ing your own channel, you have to implement this interface.
Usage example:
// run through the configured channelsforeach(IChannel ch in ChannelServices.RegisteredChannels){Console.WriteLine("Channel: " + ch.ChannelName);if(ch is HttpClientChannel){BaseChannelWithProperties chp = (BaseChannelWithProperties)ch;foreach(string key in chp.Properties.Keys){Console.WriteLine("-) {0}={1}", key, chp.Properties[key]);
}}
}
APPENDIX A ■ .NET REMOTING USAGE REFERENCE500
As this is the only interface that is useful for using from within your application directly,I will not explain the other interfaces of this namespace here, but in Appendix B.
More information on MSDN:http://msdn.microsoft.com/library/en-us/cpref/html/frlrfsystemruntimeremotingchannelsichannelclasstopic.asp
ChannelServices ClassThe ChannelServices class allows you to configure .NET Remoting channels for your applicationdomain as well as enumerate registered channels and retrieve channel URIs. Each channelmust have a unique name within an application domain. This class is also used by theRemotingConfiguration class when reading information out of configuration files.
Usage examples:
Hashtable props = new Hashtable();props.Add("timeout", 20);props.Add("proxyPort", "8080");props.Add("proxyName", "myproxy");props.Add("name", "My first channel");props.Add("priority", 30);props.Add("useDefaultCredentials", "true");
HttpClientChannel channel = new HttpClientChannel(props, null);ChannelServices.RegisterChannel(channel);
Configuration example:
<configuration><system.runtime.remoting>
<application><client>
<wellknown type="RemoteType, RemoteAssembly"url="http://localhost:8080/MyRemoteObject.rem" />
</client><channels>
<channel ref="http" port="0" /></channels>
</application></system.runtime.remoting>
</configuration>
Channels are used in nearly all chapters throughout the book, either through configurationfiles or configuration in code. The first time you can see the use and explanation of channels isin Chapter 2, in the first .NET Remoting example. Configuration details can be found in Chapter 4.
According to configuration, you can either define channels within the <application>element or directly under <system.runtime.remoting>. When directly defining under<system.runtime.remoting>, channel templates, rather than channel instances, will be con-figured that can be referenced from within the <application> element using the ref attributewhen defining the application’s channel.
APPENDIX A ■ .NET REMOTING USAGE REFERENCE 501
More information on MSDN:http://msdn.microsoft.com/library/en-us/cpref/html/frlrfsystemruntimeremotingchannelschannelservicesclasstopic.asp
BinaryServerFormatterSinkProvider ClassThis class provides the server with the functionality of serializing the message into binary for-mat before sending it out through the channel and deserializing the incoming message beforeforwarding it to other channel sinks or the application. In terms of usage, you usually have toconfigure formatters if you want to configure one of the following properties for a sendingchannel:
• includeVersions: Specifies whether to include version information when sending serial-ized types across the wire.
• strictBinding: Specifies whether the exact version type is necessary for deserialization ornot. If not, a version of the deserialized type must be installed in the GAC.
• typeFilterLevel: This is by far the most necessary attribute. Here you can specify whichfunctionality will be permitted by the serializer during deserialization when receivinga serialized type. The property can be set to Low or Full, whereas Low restricts the typesaccepted by the deserializer (e.g., callbacks through delegates are not allowed with theLow setting). The default setting since .NET Framework 1.1 is Low.
Usage example:
BinaryServerFormatterSinkProvider sink1 = new BinaryServerFormatterSinkProvider();sink1.TypeFilterLevel = TypeFilterLevel.Full;
SoapServerFormatterSinkProvider sink2 = new SoapServerFormatterSinkProvider();sink2.TypeFilterLevel = TypeFilterLevel.Full;sink2.Next = sink1;
HttpServerChannel channel = new HttpServerChannel("MyChannel", 8080, sink2);ChannelServices.RegisterChannel(channel);
Configuration example:
<configuration><system.runtime.remoting><application><channels><channel ref="tcp" port="1234"><serverProviders><formatter ref="binary"
typeFilterLevel="Full" /><formatter ref="soap"
typeFilterLevel="Full" /></serverProviders>
</channel>
APPENDIX A ■ .NET REMOTING USAGE REFERENCE502
</channels><service><wellknown type="Server.ServerImpl, Server"
objectUri="MyServer.rem"mode="Singleton" />
</service></application>
</system.runtime.remoting></configuration>
This class is used for the first time in Chapter 4 when the configuration options for thetypeFilterLevel are explained.
More information on MSDN:http://msdn.microsoft.com/library/en-us/cpref/html/frlrfsystemruntimeremotingchannelsbinaryserverformattersinkproviderclasstopic.asp
SoapServerFormatterSinkProvider ClassThis class provides the server with the functionality of serializing the message into SOAPformat before sending it out through the channel and deserializing the incoming messagebefore forwarding it to other channel sinks or the application. In terms of usage, you usuallyhave to configure formatters if you want to configure one of the settings described in the“BinaryServerFormatterSinkProvider Class” section earlier.
I use this class for the first time in Chapter 4 when explaining the typeFilterLevel attribute,which has changed from .NET Framework version 1.0 to 1.1 for security reasons. Also, takea look at the usage example in the “BinaryServerFormatterSinkProvider Class” section, whereI also use the SoapServerFormatterSinkProvider class to configure the typeFilterLevel attribute.
More information on MSDN:http://msdn.microsoft.com/library/en-us/cpref/html/frlrfsystemruntimeremotingchannelssoapserverformattersinkproviderclasstopic.asp
BinaryClientFormatterSinkProvider ClassThis class is the opposite of the server’s BinaryServerFormatterSinkProvider class. It is doingthe deserialization and serialization of serializable types from and to binary format on theclient side.
The typeFilterLevel attribute cannot be set on this class. If you want to configure this optionfor the client application, you have to use the BinaryServerFormatterSinkProvider as explainedin Chapter 4 (within the serviceProviders section of the configuration files), or in the precedingtwo sections in this appendix.
More information on MSDN:http://msdn.microsoft.com/library/en-us/cpref/html/frlrfsystemruntimeremotingchannelsbinaryclientformattersinkproviderclasstopic.asp
APPENDIX A ■ .NET REMOTING USAGE REFERENCE 503
SoapClientFormatterSinkProvider ClassThis class is the opposite of the server’s BinaryServerFormatterSinkProvider class. It performsthe deserialization and serialization of serializable types from and to SOAP format on theclient side.
The typeFilterLevel attribute cannot be set on this class. If you want to configure this optionfor the client application, you have to use the SoapServerFormatterSinkProvider as explainedin Chapter 4 (within the serviceProviders section of the configuration files), or in the two preced-ing sections in this appendix.
More information on MSDN:http://msdn.microsoft.com/library/en-us/cpref/html/frlrfsystemruntimeremotingchannelssoapclientformattersinkproviderclasstopic.asp
BinaryClientFormatterSink ClassThe BinaryClientFormatterSink class is a default formatter provided by the .NET Remoting frame-work for formatting messages in a binary format before they are sent across the wire to the remoteserver object. Internally this formatter sink leverages the binary formatters provided in theSystem.Runtime.Serialization.Formatters namespace.
As the sink is created by its corresponding provider, the BinaryClientFormatterSinkProvider,which is also used in configuration files or code for configuring the formatter’s properties, youusually won’t use this class directly in your own code.
More information on MSDN:http://msdn.microsoft.com/library/en-us/cpref/html/frlrfsystemruntimeremotingchannelsbinaryclientformattersinkclasstopic.asp
BinaryServerFormatterSink ClassThe BinaryServerFormatterSink class receives messages in binary format sent from the clientand deserializes the binary stream back into its message format. Afterwards the message canbe processed by the other sinks in the chain.
As the sink is created by its corresponding provider, the BinaryServerFormatterSinkProvider,which is also used in configuration files or code for configuring the formatter’s properties, youusually won’t use this class directly in your own code.
More information on MSDN:http://msdn.microsoft.com/library/en-us/cpref/html/frlrfsystemruntimeremotingchannelsbinaryserverformattersinkclasstopic.asp
SoapClientFormatterSink ClassThe SoapClientFormatterSink class is a default formatter provided by the .NET Remotingframework for formatting messages in SOAP-based format before they are sent across the wireto the remote server object. Internally this formatter sink leverages the SOAP formatters providedin the System.Runtime.Serialization.Formatters namespace.
APPENDIX A ■ .NET REMOTING USAGE REFERENCE504
As the sink is created by its corresponding provider, the SoapClientFormatterSinkProvider,which is also used in configuration files or code for configuring the formatter’s properties, youusually won’t use this class directly in your own code.
More information on MSDN:http://msdn.microsoft.com/library/en-us/cpref/html/frlrfsystemruntimeremotingchannelssoapclientformattersinkclasstopic.asp
SoapServerFormatterSink ClassThe SoapServerFormatterSink Class receives messages in SOAP format sent from the client anddeserializes the SOAP structure back into its original message format. Afterwards the messagecan be processed by the other sinks in the chain.
As the sink is created by its corresponding provider, the SoapServerFormatterSinkProvider,which is also used in configuration files or code for configuring the formatter’s properties, youusually won’t use this class directly in your own code.
More information on MSDN:http://msdn.microsoft.com/library/en-us/cpref/html/frlrfsystemruntimeremotingchannelssoapserverformattersinkclasstopic.asp
System.Runtime.Remoting.Channels.HttpThis namespace includes client- and server-side channels for interactions via the HTTP protocol.
HttpChannel ClassThis class provides an implementation of a channel using the HTTP protocol that is able tosend as well as receive messages across the wire. Actually, it combines HttpClientChannel andthe HttpServerChannel in one implementation. By default, this channel uses the SOAP format-ter classes to transmit messages in SOAP format across the wire.
Usage example:
Hashtable props = new Hashtable();props.Add("name", "My first channel");props.Add("priority", 30);
HttpChannel channel = new HttpChannel(props, null, null);ChannelServices.RegisterChannel(channel);
Configuration example:
<configuration><system.runtime.remoting>
<application><client>
<wellknown type="MyNamespace.MyClass, MySharedAssembly"url="http://localhost:8080/MyRemoteObject.rem" />
APPENDIX A ■ .NET REMOTING USAGE REFERENCE 505
</client><channels>
<channel ref="http" port="0" /></channels>
</application></system.runtime.remoting>
</configuration>
On the client side, a port has to be configured when the client needs to receive callbacksfrom the server. In this case, you can also use the <serviceProviders> element to configureserver channels with typeFilterLevel.
I use this channel across multiple examples throughout the whole book. Details about thechannel and its configuration can be found in Chapter 4.
More information on MSDN:http://msdn.microsoft.com/library/en-us/cpref/html/frlrfsystemruntimeremotingchannelshttphttpchannelclasstopic.asp
HttpClientChannel ClassWhile the HttpChannel class implements both the sending and receiving part of a channel,the HttpClientChannel class only implements the client-side part of the channel. By default,all messages are passed through the SOAP formatter, which means that messages are transmittedvia SOAP/XML to the server.
Usage example:
HttpClientChannel channel = new HttpClientChannel("My Client Channel", null);ChannelServices.RegisterChannel(channel);
Configuration example:
<configuration><system.runtime.remoting>
<channelSinkProviders><channel type="System.Runtime.Remoting.Channels.Http.HttpChannel,
System.Runtime.Remoting" id="httpbinary" ><clientProviders>
<formatter type="System.Runtime.Remoting.Channels.BinaryClientFormatterSinkProvider,System.Runtime.Remoting" />
</clientProviders></channel>
</channels><application>
<channels><channel ref="httpbinary" />
</channels><client>
APPENDIX A ■ .NET REMOTING USAGE REFERENCE506
<wellknown url="http://localhost:80/MyRemoteObject.rem"type="MyNamespace.MyRemoteObject, SharedAssembly" />
</client></application>
</system.runtime.remoting></configuration>
The preceding configuration example demonstrates how the HTTP channel can be usedwith the binary formatter on the client side. On the server side, the same configuration wouldbe used with the <serverProviders> element instead of the <clientProviders> element.
More information on MSDN:http://msdn.microsoft.com/library/en-us/cpref/html/frlrfsystemruntimeremotingchannelshttphttpclientchannelclasstopic.asp
HttpServerChannel ClassWhile the HttpChannel class implements both the client and server part, this channel onlyimplements the server-side part of the channel. By default, the channel accepts messages inboth SOAP and binary format.
Configuration and usage is very similar to the HttpClientChannel. In configuration files,you use the <serverProviders> element instead of <clientProviders>.
More information on MSDN:http://msdn.microsoft.com/library/en-us/cpref/html/frlrfsystemruntimeremotingchannelshttphttpserverchannelclasstopic.asp
System.Runtime.Remoting.Channels.TcpThis namespace includes client- and server-side channels for interactions via a proprietaryTCP-based protocol.
TcpChannel ClassAs with the HttpChannel class, the TcpChannel class implements both the client- and theserver-channel part for transmitting messages across the wire using the TCP protocol. Therefore,it is a combination of the TcpClientChannel as well as the TcpServerChannel. By default, itaccepts and transmits messages in binary format.
Usage example:
TcpChannel channel = new TcpChannel(4711);ChannelServices.RegisterChannel(channel);
Configuration example:
<configuration><system.runtime.remoting><application><channels>
APPENDIX A ■ .NET REMOTING USAGE REFERENCE 507
<channel ref="tcp" port="1234"><serverProviders><formatter ref="binary" />
</serverProviders></channel>
</channels><service><wellknown type="Server.ServerImpl, Server"
objectUri="MyServer.rem" mode="Singleton" /></service>
</application></system.runtime.remoting>
</configuration>
For details about the TcpChannel class and its configuration options, take a closer look atthe descriptions in Chapter 4.
More information on MSDN:http://msdn.microsoft.com/library/en-us/cpref/html/frlrfsystemruntimeremotingchannelstcptcpchannelclasstopic.asp
TcpClientChannel ClassWhile the TcpChannel class implements both the client- and the server-side part of the channel,this implementation can be used on clients only. In configuration files, it is used together withthe <clientProviders> part for configuration of the message sinks and formatters of the channel.
Usage example:
TcpClientChannel channel = new TcpClientChannel("My Tcp Channel", null);ChannelServices.RegisterChannel(channel);
Configuration example:
<configuration><system.runtime.remoting><application name="FirstServer"><channels><channel ref="tcp" />
</channels><client><wellknown type="General.IRemoteFactory, General"
url="tcp://localhost:1234/MyServer.rem" /></client>
</application></system.runtime.remoting>
</configuration>
APPENDIX A ■ .NET REMOTING USAGE REFERENCE508
Configuration is similar to HttpClientChannel as well as TcpChannel in general. Therefore,for details, look at the corresponding sections in this appendix. For further details about channelconfiguration, take a closer look at Chapter 4.
More information on MSDN:http://msdn.microsoft.com/library/en-us/cpref/html/frlrfsystemruntimeremotingchannelstcptcpclientchannelclasstopic.asp
TcpServerChannel ClassWhereas the TcpClientChannel class implements the client-side channel, this class implementsthe server-side channel only. By default, it accepts messages in either SOAP or binary format.Configuration and usage is very similar to TcpChannel (and TcpClientChannel) except that youuse the <serverProviders> element in the configuration files when configuring formatters andmessage sinks for this channel.
More information on MSDN:http://msdn.microsoft.com/library/en-us/cpref/html/frlrfsystemruntimeremotingchannelstcptcpserverchannelclasstopic.asp
System.Runtime.Remoting.LifetimeThis namespace includes classes that are used to implement and customize the lease-basedlifetime management system.
ILease InterfaceThe ILease interface defines the lifetime lease object that is used by .NET Remoting LifetimeServices.The ILease interface allows you to define the properties that will be used by LifetimeServices forevaluating how long a server-side object will be kept alive.
It enables the server object to define several types of timeouts. Based on these timeout values,the lifetime service decides when the server-side object can be destroyed. For configuring thelifetime of a server object, you have to override the InitializeLifetimeService() method ofthe MarshalByRefObject class.
Usage example:
public override object InitializeLifetimeService(){
Console.WriteLine("MyRemoteObject.InitializeLifetimeService() called");ILease lease = (ILease)base.InitializeLifetimeService();if (lease.CurrentState == LeaseState.Initial){
lease.InitialLeaseTime = TimeSpan.FromMilliseconds(10);lease.SponsorshipTimeout = TimeSpan.FromMilliseconds(10);lease.RenewOnCallTime = TimeSpan.FromMilliseconds(10);
}return lease;
}
APPENDIX A ■ .NET REMOTING USAGE REFERENCE 509
Configuration example:
<configuration><system.runtime.remoting>
<application><lifetime
leaseTimeout="10M"renewOnCallTime="5M"leaseManagerPollTime="30S"
/></application>
</system.runtime.remoting></configuration>
I use the ILease interface the first time in Chapter 3 in the section “Managing Lifetime.”More details about lifetime management can be found at the very beginning of Chapter 7.Details about configuring lease times can be found in Chapter 4.
More information on MSDN:http://msdn.microsoft.com/library/en-us/cpref/html/frlrfsystemruntimeremotinglifetimeileaseclasstopic.asp
ISponsor InterfaceEvery object that wants to request a lease renewal for a server-side object must implement theISponsor interface. By implementing this interface, the object can become a sponsor by regis-tering itself with the lease manager. A sponsor can reside on the client or on the server or onany other machine too. The only requirement is that it is reachable by the .NET Remotinginfrastructure.
If the sponsor is used on the client, the client becomes a server itself as the .NET Remotinginfrastructure on the server-side object tries to contact the sponsor for asking whether or notthe TTL of the server object should be renewed after the lease time has expired.
Usage example:
// creation of a sponsor classpublic class MySponsor: MarshalByRefObject, ISponsor{
public bool doRenewal = true;
public TimeSpan Renewal(System.Runtime.Remoting.Lifetime.ILease lease){
Console.WriteLine("{0} SPONSOR: Renewal() called", DateTime.Now);
if (doRenewal){
Console.WriteLine("{0} SPONSOR: Will renew (10 secs)", DateTime.Now);return TimeSpan.FromSeconds(10);
}
APPENDIX A ■ .NET REMOTING USAGE REFERENCE510
else{
Console.WriteLine("{0} SPONSOR: Won’t renew further", DateTime.Now);return TimeSpan.Zero;
}}
}
public class MyApplication{public static void Main(string[] args){String filename = "client.exe.config";RemotingConfiguration.Configure(filename);
SomeCAO cao = new SomeCAO();ILease le = (ILease) cao.GetLifetimeService();MySponsor sponsor = new MySponsor();le.Register(sponsor);
// do something here ...
// unregister the lease at the endle.Unregister(sponsor);
}}
You can see the ISponsor interface used for the first time in Chapter 7 in the “ManagingLifetime” section.
More information on MSDN:http://msdn.microsoft.com/library/en-us/cpref/html/frlrfsystemruntimeremotinglifetimeisponsorclasstopic.asp
ClientSponsor ClassThe ClientSponsor class provides a default implementation for a client-side sponsor. It allowsyou to set the RenewalTime property from outside and can be registered with the lifetime servicesas sponsor.
I have not used the default implementation in this book, but more information on imple-menting the ISponsor interface on your own can be found in Chapter 7.
More information on MSDN:http://msdn.microsoft.com/library/en-us/cpref/html/frlrfsystemruntimeremotinglifetimeclientsponsorclasstopic.asp
APPENDIX A ■ .NET REMOTING USAGE REFERENCE 511
LifetimeServices ClassThis class enables you to control the lifetime infrastructure of .NET Remoting. Therefore, it givesyou access to an ILease object for configuring several timeout values or registering sponsors.
Usage examples:
// LifetimeServices and client-activated objectsILease le = (ILease) cao.GetLifetimeService();MySponsor sponsor = new MySponsor();le.Register(sponsor);
// LifetimeServices and server-activated objectsclass ServerExampleClass: MarshalByRefObject{
public override object InitializeLifetimeService(){
ILease tmp = (ILease) base.InitializeLifetimeService();if (tmp.CurrentState == LeaseState.Initial){
tmp.InitialLeaseTime = TimeSpan.FromSeconds(5);tmp.RenewOnCallTime = TimeSpan.FromSeconds(1);
}return tmp;
}}
The LifetimeServices is used for the first time in Chapter 3 when I discuss the fundamentalsabout lifetime. More details can be found in Chapter 7.
More information on MSDN:http://msdn.microsoft.com/library/en-us/cpref/html/frlrfsystemruntimeremotinglifetimelifetimeservicesclasstopic.asp
LeaseState EnumerationThe ILease interface has one property called CurrentState. This property enables the developerto query the current lease state of a server object. This state can be one of the following:
• Activate: Lease is activated and not expired
• Expired: Lease has expired and cannot be renewed
• Initial: Lease has been created but not yet activated
• Renewing: Lease has been expired and is seeking sponsorship
• Null: Lease is not initialized
More information on MSDN:http://msdn.microsoft.com/library/en-us/cpref/html/frlrfsystemruntimeremotinglifetimeleasestateclasstopic.asp
APPENDIX A ■ .NET REMOTING USAGE REFERENCE512
System.Runtime.Remoting.MessagingIn this namespace, you will find classes that are used for transmitting and controlling transmit-ted messages between remoting clients and servers. Basically, the .NET Remoting infrastructureuses messages for communication between the client and the server. These messages are eitherserialized binary or in SOAP format.
Within the messaging namespace are classes that allow you to send some additionalinformation in the message header (context) as well as control the way messages are sent andresponses are evaluated in .NET Remoting applications.
AsyncResult ClassThe AsyncResult class provides a default implementation of the IAsyncResult interface introducedin Chapters 3 and 7 in the sections “Asynchronous Calls” and “Remoting Events.” I always usethe IAsyncResult interface in this book’s examples, as I had no specific reason for using thisclass. The class provides two additional methods. They allow you to complete the method callexplicitly through the Complete() method and let you verify whether EndInvoke() has completedsuccessfully.
If you require one of these two methods, you can use the AsyncResult class instead of theinterface. If not, there is no reason for not using just the interface as done in the examples inthe book.
More information on MSDN:http://msdn.microsoft.com/library/en-us/cpref/html/frlrfsystemruntimeremotingmessagingasyncresultclasstopic.asp
CallContext ClassThe CallContext class allows you to carry additional properties within the message exchangedbetween the client and the server. Therefore, you can include some additional metadata that canbe used either by the server or by the client. This metadata has nothing to do with the actualbusiness logic but more with some infrastructural topics.
Typical examples are things like security-related information as authentication methodand encryption method. Another example is including some message IDs that can be used forimplementing something like long-running business transactions in your system.
Usage examples:
// define a context object in the shared assembly (must be serializable!)[Serializable]public class MyContextObject : ILogicalThreadAffinative{public DateTime RequestTime;public Guid ServerResponseGuid;
}
// example for using the context object in the client applicationpublic static void Main(string[] args)
APPENDIX A ■ .NET REMOTING USAGE REFERENCE 513
{HttpChannel channel = new HttpChannel();ChannelServices.RegisterChannel(channel);
ICustomerManager mgr = (ICustomerManager) Activator.GetObject(typeof(ICustomerManager),"http://localhost:1234/CustomerManager.soap");
Console.WriteLine("Client.Main(): Reference to CustomerManager acquired");
MyContextObject ctx = new MyContextObject();ctx.RequestTime = DateTime.Now;ctx.ServerResponseGuid = Guid.Empty;CallContext.SetData("MyContext", ctx);
Customer cust = mgr.GetCustomer(4711);
MyContextObject ret = (MyContextObject)CallContext.GetData("MyContext");Console.WriteLine("Metadata: {0}", ret.ServerResponseGuid.ToString());
}
// example for using the context object in the server applicationclass CustomerManager: MarshalByRefObject, ICustomerManager{public Customer GetCustomer(int id){Console.WriteLine("CustomerManager.getCustomer): Called");Customer tmp = new Customer();tmp.FirstName = "John";tmp.LastName = "Doe";tmp.DateOfBirth = new DateTime(1970,7,4);
object ctxData = CallContext.GetData("MyContext");if(ctxData != null){MyContextObject ctx = (MyContextObject)ctxData;Console.WriteLine("Request sent at {0}",
ctx.RequestTime.ToString("dd.MM.YYYY - hh.mm.ss.SS"));ctx.ServerResponseGuid = Guid.NewGuid();
}return tmp;
}}
I use CallContext for the first time in Chapter 9 when talking about contexts.
More information on MSDN:http://msdn.microsoft.com/library/en-us/cpref/html/frlrfsystemruntimeremotingmessagingcallcontextclasstopic.asp
APPENDIX A ■ .NET REMOTING USAGE REFERENCE514
LogicalCallContext ClassThe LogicalCallContext class is a special version of the CallContext class that is used during methodcalls to remote objects. The CallContext class itself is used for sharing data across method callsin a single logical thread but not across logical threads or across application domains. As soonas it comes to communication with other threads or remote application domains, the CallContextclass automatically creates a LogicalCallContext, which is used for transmitting data to the otherapplication domain.
This is done only if transmitted context objects implement the ILogicalThreadAffinativeinterface. In any other case, the context objects are kept for the logical thread only, and are nottransmitted to the other application domain.
You don’t use this object directly, as the CallContext object automatically creates theLogicalCallContext when transmitting context information to the other application domain.
More information on MSDN:http://msdn.microsoft.com/library/en-us/cpref/html/frlrfsystemruntimeremotingmessaginglogicalcallcontextclasstopic.asp
OneWayAttribute ClassThis special attribute allows you to mark a method of a .NET Remoting server as a one-waymethod. One-way methods do not have any return values, out values, or ref parameters. In thecase of remoting, the call message is sent by client objects without verifying any return valuesor success on calling the remote method.
Usage example:
public class BroadcastEventWrapper: MarshalByRefObject {// ...some other class members ...[OneWay]public void SampleOneWay (String msg) {
// Do something here without returning anything}
}
Details about the OneWayAttribute class and its advantages and disadvantages can befound in Chapter 7.
More information on MSDN:http://msdn.microsoft.com/library/en-us/cpref/html/frlrfsystemruntimeremotingmessagingonewayattributeclasstopic.asp
System.Runtime.Remoting.MetadataThe System.Runtime.Remoting.Metadata namespace includes classes and attributes forcontrolling the processing and serialization of objects and fields when using SOAP as yourmessage format. These classes can be used for specifying XML element and attribute namesfor serialization as well as controlling the SOAP header itself.
The attributes explained in this section and introduced in this namespace provide similarfunctionality to the attributes introduced with the XML serialization (System.Xml.Serialization),which is used for XML and Web Services.
The attributes introduced in this section are used for the first time in the book in Chapter 8.
APPENDIX A ■ .NET REMOTING USAGE REFERENCE 515
SoapAttribute ClassThe SoapAttribute class is not used directly on your serializable types. It provides the basefunctionality for all attributes explained in this section.
More information on MSDN:http://msdn.microsoft.com/library/en-us/cpref/html/frlrfsystemruntimeremotingmetadatasoapattributeclasstopic.asp
SoapTypeAttribute ClassThe SoapTypeAttribute class is the most important of all the attributes explained in this section.It can be applied to classes and structures only, and specifies general attributes of the type likethe XML root element name and, of course, the namespace that should be used for serialization.
Usage example:
[Serializable()][SoapTypeAttribute(XmlNamespace="MyXmlNamespace")]public class TestSimpleObject{
public int member1;
[SoapFieldAttribute(XmlElementName="MyXmlElement")]public string member2;
// a field that is not serialized[NonSerialized()]public string member3;
}
More information on MSDN:http://msdn.microsoft.com/library/en-us/cpref/html/frlrfsystemruntimeremotingmetadatasoaptypeattributeclasstopic.asp
SoapFieldAttribute ClassThis attribute can be applied on a field of a serializable type and controls serialization of thisfield. Serialization is performed by the SOAP formatter that evaluates this attribute and thenserializes the field according to the information in this attribute. If not present, it assumessome defaults like taking the fieldname for the name of the XML element serialized into theSOAP message.
More information on MSDN:http://msdn.microsoft.com/library/en-us/cpref/html/frlrfsystemruntimeremotingmetadatasoapfieldattributeclasstopic.asp
APPENDIX A ■ .NET REMOTING USAGE REFERENCE516
SoapMethodAttribute ClassOther than the attributes introduced until now in this section, this attribute is not applied toa serializable type but on a method that can be invoked remotely. The SoapSuds.exe tool usesthese attributes for the generation of appropriate client proxy classes. It controls the SOAPActionthat will be serialized into the SOAP header.
More information on MSDN:http://msdn.microsoft.com/library/en-us/cpref/html/frlrfsystemruntimeremotingmetadatasoapmethodattributeclasstopic.asp
SoapParameterAttribute ClassThis attribute can be used together with SoapMethodAttribute. While SoapMethodAttribute isapplied on the method itself, this attribute is applied on the method’s parameters and dictateshow parameters are serialized into the SOAP message (e.g., XML element names for parameters).
More information on MSDN:http://msdn.microsoft.com/library/en-us/cpref/html/frlrfsystemruntimeremotingmetadatasoapparameterattributeclasstopic.asp
SoapOption EnumerationThe SoapTypeAttribute class includes a property, SoapOptions, that can be set to one of thevalues defined in this enumeration. This attribute controls how type information is included inthe serialized SOAP message.
More information on MSDN:http://msdn.microsoft.com/library/en-us/cpref/html/frlrfsystemruntimeremotingmetadatasoapattributeclasstopic.asp
System.Runtime.Remoting.ServicesWithin the System.Runtime.Remoting.Services namespace you will find several classes thatprovide additional remoting services to the .NET Framework. Here you can find a class forinteroperating with Enterprise Services or the base class for proxies created via SoapSuds.exe.
By far the most important class is the TrackingServices class, which allows you to plug yourown components into the marshaling, unmarshaling, and disconnection processes of remoteobjects.
EnterpriseServicesHelper ClassThe EnterpriseServicesHelper class provides some APIs for communicating with unmanagedclasses outside your own application domain.
More information on MSDN:http://msdn.microsoft.com/library/en-us/cpref/html/frlrfsystemruntimeremotingservicesenterpriseserviceshelperclasstopic.asp
APPENDIX A ■ .NET REMOTING USAGE REFERENCE 517
RemotingClientProxy ClassThis class is the abstract base class for any client-side proxy for well-known objects generatedby the SoapSuds.exe utility. It defines a set of frequently used properties for SoapSuds-generatedproxies.
More information on MSDN:http://msdn.microsoft.com/library/en-us/cpref/html/frlrfsystemruntimeremotingservicesremotingclientproxyclasstopic.asp
ITrackingHandler InterfaceThe ITrackingHandler interface defines functionality that allows an object to be notified when the.NET Remoting infrastructure marshals, unmarshals, or disconnects an object from its proxy.
Interface definition:
public interface ITrackingHandler{void DisconnectedObject(object obj);void MarshaledObject(object obj, ObjRef or);void UnmarshaledObject(object obj, ObjRef or);}
The preceding interface defines three methods that have to be implemented by your owntracking handler class. This implementation has to be registered with the TrackingServices class,which is defined in the same namespace.
TrackingHandlers can be used when you need to be notified for one or more of these events.In this case, you can implement functionality such as deterministic resource management orobject pooling for remoting objects.
For example, if an object disconnects from its proxy, you can free unmanaged resources bycatching the DisconnectObject event and calling the Dispose() method of your wrapper classesfor the unmanaged resources to free them at once. You can also restore any resources when anobject gets marshaled again if you need them for subsequent processing immediately.
More information on MSDN:http://msdn.microsoft.com/library/en-us/cpref/html/frlrfsystemruntimeremotingservicesitrackinghandlerclasstopic.asp
TrackingServices ClassThe TrackingServices class provides the basic infrastructure for registering your own trackinghandlers. This enables you to catch the events explained in the description of the ITrackingHandlerinterface.
Tracking those events enables creation of mechanisms like object pooling or improvedresource management in terms of releasing resources on object disconnection and restoringthem when a new reference has been acquired (marshaling and unmarshaling).
APPENDIX A ■ .NET REMOTING USAGE REFERENCE518
Usage example:
// Part I:// create your own tracking handlerpublic class SampleTrackingHandler : ITrackingHandler{
public void MarshaledObject(object obj, ObjRef or){
// write logging information// restore other objects from a pool on the server side
}
public void UnmarshaledObject(object obj, ObjRef or){
// write logging information or}
public void DisconnectedObject(object obj){// write logging code or// release any resources not required when disconnected
}}
// Part II:// register your tracking handlerTrackingServices.RegisterTrackingHandler(objHandler) ;// ...// perform your operations here...// ...// unregister your handler if catching events not necessary anymoreTrackingServices.UnregisterTrackingHandler(objHandler) ;
More information on MSDN:http://msdn.microsoft.com/library/en-us/cpref/html/frlrfsystemruntimeremotingservicestrackingservicesclasstopic.asp
System.Runtime.SerializationThis namespace contains all types that are used by the generic .NET serializer for serializingand deserializing any types of objects. I have demonstrated some of the classes, interfaces, andenumerations for changing typeFilterLevel attribute on formatter sinks, as well as specificallyin the versioning chapter, for controlling the serialization and deserialization of types transmittedbetween the client and the server.
As the generic serializer could fill a book on its own, I will only explain the parts that I usein the samples in this book.
APPENDIX A ■ .NET REMOTING USAGE REFERENCE 519
ISerializable InterfaceUsually serialization is done by the .NET serialization runtime and formatters automatically afteran object has been marked with the [Serializable] attribute. In this case, the serializer implementsa default behavior for serializing and deserializing objects. If an object wants to override thisdefault behavior, it has to implement the ISerializable interface.
If an object implements ISerializable, the serialization runtime calls the interface’sGetObjectData() method for getting the serialized version of the object. When deserializingthe runtime, look for a special constructor in the class. Both the GetObjectData() method aswell as the special constructor get two objects as parameters—a SerializationInfo class as wellas a StreamingContext class, which are explained later in this section.
Usage example:
[Serializable]public class Customer: ISerializable {
public String FirstName;public String LastName;public DateTime DateOfBirth;public String Title;
public Customer (SerializationInfo info, StreamingContext context) {FirstName = info.GetString("FirstName");LastName = info.GetString("LastName");DateOfBirth = info.GetDateTime("DateOfBirth");try {
Title = info.GetString("Title");} catch (Exception e) {
Title = "n/a";}
}
public void GetObjectData(SerializationInfo info, StreamingContext context){
info.AddValue("FirstName",FirstName);info.AddValue("LastName",LastName);info.AddValue("DateOfBirth",DateOfBirth);info.AddValue("Title",Title);
}}
The preceding code is the sample code introduced in Chapter 8 for getting a serializabletype that continues working with older versions of its own. I also introduced the usage of theinterface for implementing advanced versioning concepts in Chapter 8 where the serializabletype doesn’t lose information when working with newer and older versions of its own.
More information on MSDN:http://msdn.microsoft.com/library/en-us/cpref/html/frlrfsystemruntimeserializationiserializableclasstopic.asp

APPENDIX A ■ .NET REMOTING USAGE REFERENCE520
SerializationInfo ClassThe SerializationInfo class holds the data that is serialized or that should be deserialized during theserialization process. In the preceding code example, SerializationInfo is used for writingthe customer’s data during the serialization process and reading the data during deserialization.
Usage example:
public void GetObjectData(SerializationInfo info, StreamingContext context){
info.AddValue("FirstName",FirstName);info.AddValue("LastName",LastName);info.AddValue("DateOfBirth",DateOfBirth);info.AddValue("Title",Title);
}}
You can see this class in Chapter 8, where it is used for implementing custom serializationlogic for versioning of the serialized types. An important fact is that you can also add subobjectsto SerializationInfo as long as they are serializable on their own. But also you have to know upfront what to serialize and what needs to be deserialized. The SerializationInfo doesn’t includefunctionality for iterating through all serialized members during deserialization. Therefore, ifyou want to dynamically add different data to SerializationInfo, you have to work with objectslike an ArrayList.
More information on MSDN:http://msdn.microsoft.com/library/en-us/cpref/html/frlrfsystemruntimeserializationserializationinfoclasstopic.asp
StreamingContext StructureThe second parameter of the GetObjectData() method and the special constructor used forcustom serialization logic is StreamingContext. This structure gives you some additional infor-mation about the serialization currently done like the source and the purpose for the seriali-zation. The purpose can be queried through the class’s Context property, which is of the typeStreamingContextStates.
The StreamingContextStates enumeration gives you information about the source ofserialization, for example, object cloning (Clone), file persistence (Persistence), and, of course,.NET Remoting.
More information on MSDN:http://msdn.microsoft.com/library/en-us/cpref/html/frlrfsystemruntimeserializationstreamingcontextclasstopic.asp
More information about the StreamingContextStates enumeration on MSDN:http://msdn.microsoft.com/library/en-us/cpref/html/frlrfsystemruntimeserializationstreamingcontextstatesclasstopic.asp

APPENDIX A ■ .NET REMOTING USAGE REFERENCE 521
SerializationException ClassThis exception is thrown when an error occurs during serialization or deserialization. Causesfor a serialization exception might be trying deserialize a stream that does contain wrong orincomplete data or data for the wrong version of the serialized type.
More information on MSDN:http://msdn.microsoft.com/library/en-us/cpref/html/frlrfsystemruntimeserializationserializationexceptionclasstopic.asp
System.Runtime.Serialization.FormattersThis namespace includes the necessary infrastructure for runtime formatting, which is inter-nally used by the built-in formatters for .NET Remoting.
SoapFault ClassThe SoapFault class represents an error that occurred when calling a remote method usingSOAP. This class is used for carrying error and status information within the SOAP message.Although I have not used the class within the book, it should be mentioned here because SOAPfaults are the standard for transferring error information when calling remote services viaSOAP. Therefore, they are important when it comes to Web Services, too.
More information on MSDN:http://msdn.microsoft.com/library/en-us/cpref/html/frlrfsystemruntimeserializationformatterssoapfaultclasstopic.asp
SoapMessage ClassThe SoapMessage class is a representation of the metadata transferred within the SOAP messagewhen calling a remote service/method via SOAP. It holds the method name as well as the namesand types of the parameters required during serialization and deserialization of SOAP RPC mes-sages. The corresponding counterpart for Web Services (which are usually not SOAP RPC) can befound in the System.Web.Services.Protocols namespace.
More information on MSDN:http://msdn.microsoft.com/library/en-us/cpref/html/frlrfsystemruntimeserializationformatterssoapmessageclasstopic.asp
TypeFilterLevel EnumerationThe TypeFilterLevel enumeration was introduced with .NET Framework 1.1 for security reasonsin the deserialization process. Theoretically, an attacker could leverage the process of dese-rialization. To avoid this possible security problem, TypeFilterLevel has been added to theserialization infrastructure.
With a TypeLevelFilter set to low, not all types will be deserialized by the serialization run-time. If some types such as delegate types are included in the messages transmitted betweenthe client and the server, a SerializationException will be thrown.
APPENDIX A ■ .NET REMOTING USAGE REFERENCE522
Usage example:
// configure the formatters for the channelBinaryServerFormatterSinkProvider formatterBin =
new BinaryServerFormatterSinkProvider();formatterBin.TypeFilterLevel = TypeFilterLevel.Full;
// register the channelsIDictionary dict = new Hashtable();dict.Add("port", "1234");
TcpChannel channel = new TcpChannel(dict, null, formatterBin);ChannelServices.RegisterChannel(channel);
// register the wellknown serviceRemotingConfiguration.RegisterWellKnownServiceType(typeof(ServerImpl),
Configuration example:
<configuration><system.runtime.remoting><application><channels><channel ref="tcp" port="1234"><serverProviders><formatter ref="binary"
typeFilterLevel="Low" /></serverProviders>
</channel></channels><service><wellknown type="Server.ServerImpl, Server"
objectUri="MyServer.rem"mode="Singleton" />
</service></application>
</system.runtime.remoting></configuration>
I introduce TypeFilterLevel in Chapter 4 in the discussion on configuring channels. Inconfiguration files, TypeFilterLevel is configured through the formatter sink providers withinthe <serverProviders> element of the corresponding channels.
APPENDIX A ■ .NET REMOTING USAGE REFERENCE 523
More information on MSDN:http://msdn.microsoft.com/library/en-us/cpref/html/frlrfsystemruntimeserializationformatterstypefilterlevelclasstopic.asp
SummaryIn this appendix, you’ve seen an overview of the most important classes you’ll encounter whenusing .NET Remoting. In the next appendix, this overview will be extended to cover the name-spaces, classes, and interfaces that are used to extend the remoting framework.

525
A P P E N D I X B
■ ■ ■
.NET Remoting ExtensibilityReference
In most cases, extending the .NET Remoting infrastructure means creating classes that imple-ment specific interfaces of the framework. Within this appendix, you’ll find a brief descriptionof the interfaces needed for extending the .NET Remoting framework with your own channelsand formatters, as well as message sinks. Some of the interfaces you’ll find in this appendix mighthave been described in the previous appendix, too, but from within another context.
The namespaces where you can find the interfaces described in this appendix are as follows:
• System.Runtime.Remoting.Messaging
• System.Runtime.Remoting.Activation
• System.Runtime.Remoting.Proxies
• System.Runtime.Remoting.Channels
You can find details about the interfaces and how to use them in the chapters of the secondpart of the book.
System.Runtime.Remoting.MessagingBasically, the .NET Remoting infrastructure uses messages for communicating with remoteobjects. Messages are used not only for calling remote objects, but also for activating themthrough so-called activation messages. A message carries all the information that is necessaryfor the remote object for appropriate processing. This means it consists of metadata like actionidentifiers as well as the actual user data. You can find all the interfaces for the basic messaginginfrastructure of the framework in this namespace.
IMessage InterfaceEach communication with remote objects is based on messages that are sent across the wire.The IMessage interface is the base interface for messages and therefore contains communica-tion data sent between two parties.
Basically, the IMessage interface defines a dictionary object containing the messageproperties only. Within one .NET Remoting object, the message is passed through a set of sinks
APPENDIX B ■ .NET REMOTING EXTENSIBIL ITY REFERENCE526
to the transport channel, which is responsible for transmitting the message across the wire tothe remote object. On the remote side, the object is passed through the receiving transportchannel as well as a set of sinks to the actual object processing the message.
Interface definition:
public interface IMessage{IDictionary Properties { get; }}
Basically, implementations or subtypes of this interface add additional properties thatallow easier access to the contents of the message as can be seen with the MethodCall classimplementation later in this chapter.
Chapter references:• Chapter 11: Inside the Framework
• Chapter 12: Creation of Sinks
• Chapter 13: Extending .NET Remoting
• Chapter 14: Developing a Transport Channel
• Chapter 15: Context Matters
More information on MSDN:http://msdn.microsoft.com/library/en-us/cpref/html/frlrfsystemruntimeremotingmessagingimessageclasstopic.asp
IMessageSink InterfaceAs mentioned previously, when a message is sent from an object to a remote object, it first flowsthrough a set of sinks in the local application domain before it is sent to the remote object viathe transport channel. On the remote object’s side, a receiving channel receives the object andpasses the message through its own chain of message sinks again before the last sink decodesthe message and transforms the message into a local method call to the actual remote object’smethod or property.
The IMessageSink interface defines the basic functionality for every message sink of theframework.
Interface definition:
public interface IMessageSink{IMessageCtrl AsyncProcessMessage(IMessage msg, IMessageSink replySink);IMessage SyncProcessMessage(IMessage msg);IMessageSink NextSink { get; }}
As you can see, IMessageSink defines one property and two methods. The property, NextSink,returns a reference to the next message sink in the chain of sinks, whereas the two methods areused for processing the messages (one for synchronous and the other one for asynchronousprocessing).
Chapter references:• Chapter 4: Configuration and Deployment
• Chapter 11: Inside the Framework
• Chapter 12: Creation of Sinks
• Chapter 13: Extending .NET Remoting
• Chapter 14: Developing a Transport Channel
• Chapter 15: Context Matters
More information on MSDN:http://msdn.microsoft.com/library/en-us/cpref/html/frlrfsystemruntimeremotingmessagingimessagesinkclasstopic.asp
IMethodMessage InterfaceWhereas the IMessage interface just defines the basic structure of any message sent across thewire, the IMethodMessage interface is an extension of the IMessage interface that definesadditional properties for messages encapsulating method-general properties. This informationis sent to and from remote methods.
Interface definition:
public interface IMethodMessage : IMessage{object GetArg(int argNum);string GetArgName(int index);int ArgCount { get; }object[] Args { get; }bool HasVarArgs { get; }LogicalCallContext LogicalCallContext { get; }MethodBase MethodBase { get; }string MethodName { get; }object MethodSignature { get; }string TypeName { get; }string Uri { get; }}
The interface defines methods and properties for resolving the cracking the method affectedby the call: arguments (count, name, and values), method signature information (target objecttype, method name, object URI), as well as the context for the message call.
Chapter reference:• Chapter 15: Context Matters
APPENDIX B ■ .NET REMOTING EXTENSIBIL ITY REFERENCE 527
More information on MSDN:http://msdn.microsoft.com/library/en-us/cpref/html/frlrfsystemruntimeremotingmessagingimethodmessageclasstopic.asp
IMethodCallMessage InterfaceWhile the IMethodMessage interface defines the basic structure for referencing methods ingeneral and is sent to and from remote methods, IMethodCallMessage is just used for callingonly remote messages.
Interface definition:
public interface IMethodCallMessage : IMethodMessage{object GetInArg(int argNum);string GetInArgName(int index);int InArgCount { get; }object[] InArgs { get; }}
As it is used for calling remote methods only, the interface defines additional propertiesfor input arguments, whereas the IMethodMessage interface’s properties are defined for inputas well as the output argument (that’s the big difference).
Chapter reference:• Chapter 13: Extending .NET Remoting
More information on MSDN:http://msdn.microsoft.com/library/en-us/cpref/html/frlrfsystemruntimeremotingmessagingimethodcallmessageclasstopic.asp
IMethodReturnMessage InterfaceWhereas IMethodCallMessage defines the message structure sent across the wire for callingremote methods, IMethodReturnMessage defines the message structure sent back as the resultof the remote message call from the server.
Interface definition:
public interface IMethodReturnMessage : IMethodMessage{object GetOutArg(int argNum);string GetOutArgName(int index);Exception Exception { get; }int OutArgCount { get; }object[] OutArgs { get; }object ReturnValue { get; }}
APPENDIX B ■ .NET REMOTING EXTENSIBIL ITY REFERENCE528
The IMethodReturnMessage interface is derived from IMethodMessage and provides addi-tional properties for retrieving exceptions and output arguments, as well as the return value ofthe method call. Again, the IMethodMessage interface’s properties are defined for input as wellas output arguments, whereas these properties are for output arguments (and return values) only.
More information on MSDN:http://msdn.microsoft.com/library/en-us/cpref/html/frlrfsystemruntimeremotingmessagingimethodreturnmessageclasstopic.asp
MethodCall ClassThe MethodCall class is an implementation of the IMethodCallMessage interface and thereforeprovides an implementation for calling methods on a remote object. This type is not intendedto be used directly in your application, therefore always use the interfaces described previouslyif you want to access details about method calls.
Chapter references:• Chapter 11: Inside the Framework
• Chapter 13: Extending .NET Remoting
More information on MSDN:http://msdn.microsoft.com/library/en-us/cpref/html/frlrfsystemruntimeremotingmessagingmethodcallclasstopic.asp
MethodResponse ClassThe MethodResponse class implements the IMethodResponseMessage interface and thereforeis the counterpart of the MethodCall class. An instance of this class is returned from the serveras a result of a remote method call.
Again, this class implements the interfaces described previously in this appendix and isnot intended to be used directly. Therefore, if you want to access details about the response ofa remote method call, use the IMethodResponseMessage interface.
More information on MSDN:http://msdn.microsoft.com/library/en-us/cpref/html/frlrfsystemruntimeremotingmessagingmethodresponseclasstopic.asp
System.Runtime.Remoting.ActivationIn the System.Runtime.Remoting.Activation namespace, you can find classes and interfacedefinitions that support activation of remote objects. Activation messages are only necessaryfor client-activated objects, as server-activated objects are created by the server itself.
Basically, the creation of remote objects is based on so-called construction call mes-sages. These messages are special implementations of IMethodCallMessage as well asIMethodResponseMessage.
APPENDIX B ■ .NET REMOTING EXTENSIBIL ITY REFERENCE 529
IConstructionCallMessage InterfaceThis interface defines the structure of the message sent for activating a client-activated objectof the server. Therefore, when the client calls Activator.CreateInstance() or uses the new oper-ator for creating a configured client-activated object, the .NET Remoting infrastructure createsa construction call message and sends this message to the server for retrieving, telling the serverto create a new instance as well as retrieving the reference to the newly created instance.
Interface definition:
public interface IConstructionCallMessage : IMethodCallMessage{Type ActivationType { get; }string ActivationTypeName { get; }IActivator Activator { get; set; }object[] CallSiteActivationAttributes { get; }IList ContextProperties { get; }}
The construction message contains the actual type of the remote object to be created andthe name of the type, as well as context information and activation attributes specified in theActivator.CreateInstance() method call on the client. The Activator property specifies aninstance of IActivator, which is responsible for the creation process.
Chapter reference:• Chapter 15: Context Matters
More information on MSDN:http://msdn.microsoft.com/library/en-us/cpref/html/frlrfsystemruntimeremotingactivationiconstructioncallmessageclasstopic.asp
IConstructionReturnMessage InterfaceThe IConstructionReturnMessage interface is an implementation of IMethodReturnMessageand provides the client with results of the activation of a client-activated object. Therefore, it isused by the infrastructure for checking the success of the creation process as well as retrievingcontext information created by the activator during the creation process.
IConstructionReturnMessage defines no additional properties or methods in the currentversion of the .NET Framework.
More information on MSDN:http://msdn.microsoft.com/library/en-us/cpref/html/frlrfsystemruntimeremotingactivationiconstructionreturnmessageclasstopic.asp
System.Runtime.Remoting.ProxiesThe System.Runtime.Remoting.Proxies namespace contains the classes for controlling andproviding proxy functionality to the .NET Remoting framework. The most important class withinthis namespace is the RealProxy class, which is the base class for all client-side proxies. You canuse this class for creating custom proxies, too.
APPENDIX B ■ .NET REMOTING EXTENSIBIL ITY REFERENCE530
RealProxy ClassRealProxy is an abstract base class for all client-side proxies. Actually, the client never uses RealProxydirectly; it always has access to a TransparentProxy. TransparentProxy gives the client the illusionof talking to the remote object directly. Actually, TransparentProxy forwards any method callsto a RealProxy instance.
RealProxy has the task of taking the method calls from TransparentProxy and forwardsthese method calls through the .NET Remoting infrastructure to the remote server object.
Chapter references:• Chapter 11: Inside the Framework
• Chapter 12: Creation of Sinks
• Chapter 13: Extending .NET Remoting
More information on MSDN:http://msdn.microsoft.com/library/en-us/cpref/html/frlrfsystemruntimeremotingproxiesrealproxyclasstopic.asp
ProxyAttribute ClassThis attribute indicates that an object type requires a custom proxy object inherited from theRealProxy class. Any object that requires a custom proxy needs to have this class-level attributeapplied.
Usually, you would have to provide your own implementation of this attribute. The attributeemploys a CreateProxy() method in which you can create, initialize, and return an instance ofyour custom proxy object.
More information on MSDN:http://msdn.microsoft.com/library/en-us/cpref/html/frlrfsystemruntimeremotingproxiesproxyattributeclasstopic.asp
System.Runtime.Remoting.ChannelsChannels and channel sinks are used as transport vehicles when a client calls methods ona remote object. The System.Runtime.Remoting.Channels namespace contains classes as wellas base interfaces for those classes as well as other classes in subnamespaces.
The most important classes are described in Appendix A. Here, I will focus on the interfacesthat are used for extending the .NET Remoting infrastructure. The interfaces in this namespaceare used for both creation of custom transport channels and extension of the framework bycreating custom sinks.
When a message is sent to a remote object, the message first flows through a chain of so-calledmessage sinks (remember the IMessageSink interface introduced in the previous section ofthis chapter). The sink chain must consist of one formatter sink that is a special sink that createsthe wire format of the message. Afterwards, some preprocessing sinks (like encryption or digitalsignatures) process the message before passing it on to the last sink in the chain, which must bethe transport channel sink itself.
APPENDIX B ■ .NET REMOTING EXTENSIBIL ITY REFERENCE 531
On the server, the processing occurs the other way around. The transport channel is thefirst sink that receives the message from the client. It then forwards the message to some preprocess-ing sinks (decryption, digital signature verification) as well as formatter sinks and other (custom)sinks before cracking the message into its parts and converting it to a method call on theserver’s object.
For both client- and server-side processing, as well as sending and receiving parts, you willfind the necessary interfaces for customizing this sink chain in the namespace.
IChannelSinkBase InterfaceIChannelSinkBase is the base interface for all types of sinks in the sink chain. It defines justa property bag for a channel sink. All the implementations extend the channel sink base struc-ture with their own properties (for indirectly accessing this property bag).
When extending the .NET Remoting infrastructure, you don’t use this interface, but theinterfaces described in the following parts of this section.
Chapter references:• Chapter 13: Extending .NET Remoting
• Chapter 14: Developing a Transport Channel
More information on MSDN:http://msdn.microsoft.com/library/en-us/cpref/html/frlrfsystemruntimeremotingchannelsichannelsinkbaseclasstopic.asp
IClientChannelSink InterfaceIClientChannelSink defines the basic functionality for client-side channel sinks and thereforedefines which functionality must be provided by a custom plug-in point within the client-sidemessage processing.
Interface definition:
public interface IClientChannelSink : IChannelSinkBase{void AsyncProcessRequest(IClientChannelSinkStack sinkStack,
IMessage msg, ITransportHeaders headers,Stream stream);
void AsyncProcessResponse(IClientResponseChannelSinkStack sinkStack,object state, ITransportHeaders headers,Stream stream);
Stream GetRequestStream(IMessage msg, ITransportHeaders headers);void ProcessMessage(IMessage msg, ITransportHeaders requestHeaders,
Stream requestStream,[out] ref ITransportHeaders responseHeaders,[out] ref Stream responseStream);
IClientChannelSink NextChannelSink { get; }}
APPENDIX B ■ .NET REMOTING EXTENSIBIL ITY REFERENCE532
The interface defines a property for linking the current sink to the next sink in the sink chain.The ProcessMessage() method is used for processing a message request and its response syn-chronously. This means that ProcessMessage() processes the request, calls the next sink in thechain (its ProcessMessage() method), and waits till the sink (or the remote object) has finishedprocessing.
For asynchronous calls, the interface defines a method for asynchronously processing therequests without waiting for the response and for asynchronously processing the response assoon as it is available. Through the GetRequestStream() method, the sink has direct access tothe stream onto which the provided message will be serialized.
Chapter references:• Chapter 11: Inside the Framework
• Chapter 12: Creation of Sinks
• Chapter 13: Extending .NET Remoting
• Chapter 14: Developing a Transport Channel
More information on MSDN:http://msdn.microsoft.com/library/en-us/cpref/html/frlrfsystemruntimeremotingchannelsiclientchannelsinkclasstopic.asp
IClientChannelSinkProvider InterfaceSink implementations are always connected to channels through sink providers. This can alsobe seen in configuration files where you always configure new sinks through the <provider> tagand specify corresponding sink provider classes.
A sink provider can be seen as the factory for a sink implementation itself. This means thesink provider is responsible for creating, initializing, and returning the actual channel sinkinstance.
Interface definition:
public interface IClientChannelSinkProvider{IClientChannelSink CreateSink(IChannelSender channel,
string url, object remoteChannelData);IClientChannelSinkProvider Next { get; set; }}
The interface defines one method for creating the actual sink as well as a property for settingand retrieving the next sink provider in the chain. This means the developer of a sink is respon-sible for calling the CreateSink() method of the next provider (if available) before returning itsown sink instance within the CreateSink() method implementation.
Chapter references:• Chapter 12: Creation of Sinks
• Chapter 13: Extending .NET Remoting
• Chapter 14: Developing a Transport Channel
APPENDIX B ■ .NET REMOTING EXTENSIBIL ITY REFERENCE 533
More information on MSDN:http://msdn.microsoft.com/library/en-us/cpref/html/frlrfsystemruntimeremotingchannelsiclientchannelsinkproviderclasstopic.asp
IClientFormatterSink InterfaceIClientFormatterSink is a special interface implementing the IMessageSink interface as well asthe IClientChannelSink interface. Formatters are special sinks in the sink chain responsible forformatting the message into its wire format before sending it across the wire.
The interface doesn’t define any additional methods. It just combines the interfacesIMessageSink and IClientChannelSink within one interface. The first sink on the client side mustbe an IClientFormatterSink or implement both the IMessageSink and the IClientChannelSinkinterfaces.
In configuration files, you usually use the <formatter> tag instead of the <provider> tag forspecifying a formatter in the sink chain.
Chapter reference:• Chapter 11: Inside the Framework
More information on MSDN:http://msdn.microsoft.com/library/en-us/cpref/html/frlrfsystemruntimeremotingchannelsiclientformattersinkclasstopic.asp
IClientFormatterSinkProvider InterfaceThis interface marks a sink provider as a provider used for creating formatter sink objects. Theinterface doesn’t add any methods to its base interface IClientChannelSinkProvider, it is justused as a marker for the .NET Remoting runtime.
The first sink provider in the chain must be a formatter sink provider. Use the <formatter>tag instead of the <provider> tag in the configuration file for specifying the client-side formatter.
Sink formatter implementations usually use the runtime serialization formatters(BinaryFormatter or SoapFormatter) specified in the System.Runtime.Serialization name-space as well as in the Formatters subnamespace.
More information on MSDN:http://msdn.microsoft.com/library/en-us/cpref/html/frlrfsystemruntimeremotingchannelsiclientformattersinkproviderclasstopic.asp
IServerChannelSink InterfaceWhereas the IClientChannelSink interface is used for creating sinks employed before a messageis sent across the wire to a remote object, you can use the IServerChannelSink interface for cre-ating sinks used when a remote object receives a message from a client. That said, this interfacedefines the functionality that has to be supported by server-side sink objects.
APPENDIX B ■ .NET REMOTING EXTENSIBIL ITY REFERENCE534
Interface definition:
public interface IServerChannelSink : IChannelSinkBase{void AsyncProcessResponse(IServerResponseChannelSinkStack sinkStack,
object state, IMessage msg,ITransportHeaders headers, Stream stream);
Stream GetResponseStream(IServerResponseChannelSinkStack sinkStack,object state, IMessage msg, ITransportHeaders headers);
ServerProcessing ProcessMessage(IServerChannelSinkStack sinkStack,IMessage requestMsg,ITransportHeaders requestHeaders,Stream requestStream,[out] ref IMessage responseMsg,[out] ref ITransportHeaders responseHeaders,[out] ref Stream responseStream);
IServerChannelSink NextChannelSink { get; }}
Although the interface is an extension of the IChannelSinkBase interface like its client-sidecounterpart, its structure is a little bit more complicated. Most importantly, it defines a methodfor synchronously processing incoming messages—the ProcessMessage() method.
For asynchronous messaging, it specifies the AsyncProcessResponse() method only as thelogic for message processing, and not waiting for any response is encapsulated within theProcessMessage() method itself.
Whereas the IClientChannelSink interface allows you to access the request stream, the serverchannel sink requires a method for retrieving the response stream into which the returned messageis going to be serialized. And last but not least, the concept for accessing the next sink in thechain through the NextChannelSink property is still the same as with client-side channel sinks.
Chapter references:• Chapter 11: Inside the Framework
• Chapter 12: Creation of Sinks
• Chapter 13: Extending .NET Remoting
• Chapter 14: Developing a Transport Channel
More information on MSDN:http://msdn.microsoft.com/library/en-us/cpref/html/frlrfsystemruntimeremotingchannelsiserverchannelsinkclasstopic.asp
IServerChannelSinkProvider InterfaceThe IServerChannelSinkProvider interface acts as a factory for creating server-side channelsinks. This concept is basically the same as with the client-side sink provider classes. In config-uration files, you don’t specify any server channel sink directly but rather its sink providers.
APPENDIX B ■ .NET REMOTING EXTENSIBIL ITY REFERENCE 535
Interface definition:
public interface IServerChannelSinkProvider{IServerChannelSink CreateSink(IChannelReceiver channel);void GetChannelData(IChannelDataStore channelData);IServerChannelSinkProvider Next { get; set; }}
Although fulfilling the same purpose for server sinks as IClientChannelSinkProvider forclient-side sinks, the interface is differently structured. Remember that the server side doesn’tneed the object URI because it is receiving messages only (sending processes will be donethrough the client sink infrastructure because that means the server plays the role of a clientwhen communicating with another server object). Also, it doesn’t need the possibility for spec-ifying additional data that will be sent to the remote channel (that is, the remoteChannelDataparameter in IClientChannelSinkProvider’s CreateSink() method).
Through the GetChannelData() method, the sink provider is able to access channel specificproperties of the receiving channel. The Next property is used by the infrastructure for setting thenext server sink provider in the chain and enables you to retrieve the next provider in your code.
Again, you are responsible for calling the CreateSink() method of the next channel sinkprovider before returning your own sink provider instance.
Chapter references:• Chapter 12: Creation of Sinks
• Chapter 13: Extending .NET Remoting
• Chapter 14: Developing a Transport Channel
More information on MSDN:http://msdn.microsoft.com/library/en-us/cpref/html/frlrfsystemruntimeremotingchannelsiserverchannelsinkproviderclasstopic.asp
ITransportHeaders InterfaceWhen discussing the IMessage interface, I told you that a message contains both metadata andthe actual user data. Whereas the user data is the part necessary for implementing the businesslogic, metadata can be used for some infrastructural additional information.
For example, if you are implementing an asynchronous encryption channel, informationabout the public key can be included in the transport headers collection. This information doesn’treally belong to the user data (e.g., invoice, order, or similar business messages), but it is usedby (your own) infrastructure for providing some basic services. Such information—calledmetadata—can be stored in the transport headers of a message.
The ITransportHeaders interface defines the basic functionality for transport header objects.It is just a collection of key-value pairs, as you can see in its interface definition.
APPENDIX B ■ .NET REMOTING EXTENSIBIL ITY REFERENCE536
Interface definition:
public interface ITransportHeaders{IEnumerator GetEnumerator();object this[object key] { get; set; }}
The interface defines a GetEnumerator() method, which returns an enumerator for iterat-ing the header properties as well as an indexer property for accessing the header propertiesdirectly by a key.
Chapter references:• Chapter 11: Inside the Framework
• Chapter 13: Extending .NET Remoting
• Chapter 14: Developing a Transport Channel
More information on MSDN:http://msdn.microsoft.com/library/en-us/cpref/html/frlrfsystemruntimeremotingchannelsitransportheadersclasstopic.asp
IChannel InterfaceThe IChannel interface defines the basic functionality of a transport channel. Transport chan-nels are used for crossing remoting boundaries, which can be contexts, AppDomains, andprocesses, as well as machines.
Channels implement the specifics of the transport protocol (e.g., TCP or HTTP) and canlisten on transport protocol ports as well as send messages through transport protocol streams.
That said, channels have to cover inbound as well as outbound communication with remoteobjects. They provide an extensibility point in the runtime for adding custom transport protocolsto the .NET Remoting infrastructure.
Interface definition:
public interface IChannel{string Parse(string url, [out] ref string objectURI);string ChannelName { get; }int ChannelPriority { get; }}
As you can see, each channel has to implement a method for parsing the remote object’s URLas well as provide properties for the channel’s name and its priority in the list of channels. Bothroles, the listening portion as well as the sending portion, are expressed through the subinterfacesIChannelReceiver and IChannelSender described in the next two sections of this appendix.
APPENDIX B ■ .NET REMOTING EXTENSIBIL ITY REFERENCE 537
Chapter references:• Chapter 4: Configuration and Deployment
• Chapter 12: Creation of Sinks
• Chapter 13: Extending .NET Remoting
• Chapter 14: Developing a Transport Channel
More information on MSDN:http://msdn.microsoft.com/library/en-us/cpref/html/frlrfsystemruntimeremotingchannelsichannelclasstopic.asp
IChannelReceiver InterfaceThe IChannelReceiver interface, an extension of the IChannel interface, defines the functionalitythat has to be provided for receiving channels. This means the receiver listens on a specifictransport protocol port and waits for incoming messages. Every time a message is received, ittakes the message and passes it on to the formatter, which deserializes the message and forwardsit to the next sink in the sink chain.
That said, IChannelReceiver always has to be the first part in the sink chain of a remotingapplication that is able to receive messages from remote objects.
Interface definition:
public interface IChannelReceiver : IChannel{string[] GetUrlsForUri(string objectURI);void StartListening(object data);void StopListening(object data);object ChannelData { get; }}
Usually, a receiving channel is used on the server side, waiting for incoming requests ofclients. If you keep configuration in mind, you are specifying an object URI only and not thewhole URL. Therefore, the receiving channel needs to provide functionality for creating the realURL out of the specified object URI, which is encapsulated in the GetUrlsForUri() method ofthe interface.
Furthermore, the channel knows how to start listening as well as stop listening on the trans-port protocols port, and therefore needs to provide functionality for doing so. The ChannelDataproperty provides access to additional channel properties.
Chapter references:• Chapter 4: Configuration and Deployment
• Chapter 12: Creation of Sinks
• Chapter 13: Extending .NET Remoting
• Chapter 14: Developing a Transport Channel
APPENDIX B ■ .NET REMOTING EXTENSIBIL ITY REFERENCE538
More information on MSDN:http://msdn.microsoft.com/library/en-us/cpref/html/frlrfsystemruntimeremotingchannelsichannelreceiverclasstopic.asp
IChannelSender InterfaceThe IChannelSender interface is the counterpart of the IChannelReceiver interface and specifiesfunctionality a channel has to support when sending messages to a remote remoting channel.
Interface definition:
public interface IChannelSender : IChannel{IMessageSink CreateMessageSink(string url,
object remoteChannelData,[out] ref string objectURI);
}
Whereas IChannelReceiver actually is responsible for listening on the transport protocolsport and receiving the messages through this port, the channel sender is just responsible forcreating a message sink that does the actual protocol handling.
This sink will be added to the sink chain of the infrastructure on the last position. This means,as the last sink, it is responsible for sending the message via the corresponding transport pro-tocol across the wire.
For example, both HttpClientChannel and TcpClientChannel are implementations of thisinterface but do not send the message across the wire themselves. They act as a factory for anHttpClientTransport sink and TcpClientTransportSink, respectively. Those sinks are actuallysending the message across the wire to the remote endpoint.
Chapter references:• Chapter 4: Configuration and Deployment
• Chapter 12: Creation of Sinks
• Chapter 13: Extending .NET Remoting
• Chapter 14: Developing a Transport Channel
More information on MSDN:http://msdn.microsoft.com/library/en-us/cpref/html/frlrfsystemruntimeremotingchannelsichannelsenderclasstopic.asp
BaseChannelObjectWithProperties ClassThis class provides a base implementation for channels and channel sinks that want to provideproperties. It implements all necessary interfaces for providing those properties in the form ofkey-value pairs and can be used as a base class for channels or channel sink objects.
The class does not implement any of the interfaces described previously. It only implementsIDictionary, IEnumerable, and ICollection. Therefore, the sink interfaces or channel interfacesmust be implemented manually. The class primarily handles the task of asking a channel for itsproperties.
APPENDIX B ■ .NET REMOTING EXTENSIBIL ITY REFERENCE 539
More information on MSDN:http://msdn.microsoft.com/library/en-us/cpref/html/frlrfsystemruntimeremotingchannelsbasechannelobjectwithpropertiesclasstopic.asp
BaseChannelWithProperties ClassThe BaseChannelWithProperties class can be used as a base class for implementing your ownchannels. It extends BaseChannelObjectWithProperties with the complex task of asking its channelsinks for their properties.
Still, this interface does not implement any of the channel-specific interfaces introducedin the previous parts of this appendix (e.g., IChannel, IChannelSender, or IChannelReceiver);therefore, you have to provide your own implementation of these interfaces.
Chapter references:• Chapter 13: Extending .NET Remoting
• Chapter 14: Developing a Transport Channel
More information on MSDN:http://msdn.microsoft.com/library/en-us/cpref/html/frlrfsystemruntimeremotingchannelsbasechannelwithpropertiesclasstopic.asp
BaseChannelSinkWithProperties ClassThis class is an extension of BaseChannelObjectWithProperties that can be used as a base classfor implementing your own channel sink provider. As it doesn’t implement any of the interfacesdescribed in the previous sections (e.g., IClientChannelSinkProvider) you have to implement theseinterfaces on your own.
Chapter references:• Chapter 13: Extending .NET Remoting
• Chapter 14: Developing a Transport Channel
More information on MSDN:http://msdn.microsoft.com/library/en-us/cpref/html/frlrfsystemruntimeremotingchannelsbasechannelsinkwithpropertiesclasstopic.asp
SummaryWith this appendix, you have received a collection of reference information that you will needwhen extending the .NET Remoting framework. I’ve included most interfaces and base classesyou’ll need to create your own message sinks, channel sinks, and transport channels.
In the next appendix, I’ve collected a series of links for .NET Remoting. You’ll find implemen-tations of all the interfaces described in this chapter.
APPENDIX B ■ .NET REMOTING EXTENSIBIL ITY REFERENCE540
541
A P P E N D I X C
■ ■ ■
.NET Remoting Links
This last appendix provides a list of useful links as well as short descriptions of the contentthat can be found on the target locations of those links. Most of the URLs listed here are linksto some technical articles and how-to articles as well as useful and interesting samples.
Ingo’s .NET Remoting FAQ CornerOn the homepage of thinktecture, you will find a separate .NET Remoting corner written byone of the authors of this book. Here he publishes technical articles as well as important linksto information, knowledge base articles, and other technical resources for .NET Remoting.A must-know for anyone who programs solutions based on .NET Remoting.
http://www.thinktecture.com/Resources/RemotingFAQ/default.html
MSDN and MSDN Magazine ArticlesIn the past three years, Microsoft has published a lot of in-depth information about .NETRemoting. Following is a rundown of some of the more informative ones.
“Improving Remoting Performance”This article is part of the Patterns & Practices book Improving .NET Application Performanceand Scalability (Microsoft Press, 2004). It presents concrete recommendations for when to useremoting and when not to use it, together with appropriate alternatives. The design guidelinesand coding techniques in this chapter provide performance solutions for activation, channels,formatters, and serialization.
http://msdn.microsoft.com/library/en-us/dnpag/html/scalenetchapt11.asp
“.NET Remoting Security”This article is part of the Patterns & Practices book Building Secure ASP.NET Applications (MicrosoftPress, 2004). It describes how to implement authentication, authorization, and secure commu-nication in distributed Web applications that use .NET Remoting.
http://msdn.microsoft.com/library/en-us/secmod/html/secmod11.asp
APPENDIX C ■ .NET REMOTING L INKS542
“Boundaries: Processes and Application Domains”As soon as you have to communicate between two assemblies loaded into different applicationdomains, you must use .NET Remoting. Application domains are a new concept introducedwith the .NET Framework for isolating .NET assemblies loaded into the same operating systemprocess.
ASP.NET, for example, uses this mechanism on IIS 5.x-based machines for isolating ASP.NETWeb applications, and SQL Server 2005 uses this mechanism for isolating assemblies installedin different databases. More information about application domains can be found here:
http://msdn.microsoft.com/library/en-us/cpguide/html/cpconboundariesprocessesapplicationdomainscontexts.asp
“.NET Remoting Architectural Assessment”Even if you know the technical details about .NET Remoting, finding the right architecture isnot very easy. This article is intended for anyone who wants to use .NET Remoting for buildingdistributed applications. It describes the capabilities of the technology on an architectural level,as well as some interesting implications when it comes to using the different features of theinfrastructure.
http://msdn.microsoft.com/library/en-us/dndotnet/html/dotnetremotearch.asp
“.NET Remoting Overview”The official tutorial for .NET Remoting consists of lots of technical articles from the very basicsto some advanced topics as well as a complete reference of the .NET Remoting infrastructure.
http://msdn.microsoft.com/library/en-us/cpguide/html/cpconnetremotingoverview.asp
“Building Secure ASP.NET Applications: Authentication,Authorization, and Secure Communication”The Microsoft Patterns & Practices team released a comprehensive guide for building secureASP.NET applications. It contains architectural as well as in-depth technical information fordesigning and writing secure ASP.NET Web applications. Although the guide focuses on Webapplications, it contains a separate chapter about .NET Remoting security, because .NETRemoting becomes important when the Web front end starts talking to remote back-endcomponents. This chapter can be found here:
http://msdn.microsoft.com/library/en-us/dnnetsec/html/SecNetch11.asp
“NET Remoting Authentication and Authorization Sample”Chapter 5 introduces a solution for implementing authentication and secure communicationusing .NET Remoting. In .NET 2.0, the infrastructure is included in the .NET Framework itself,but in .NET 1.x you have to use the security solution sample assemblies introduced in the follow-ing two MSDN articles. More information about using the solution can be found in Chapter 5.
http://msdn.microsoft.com/library/en-us/dndotnet/html/remsspi.asphttp://msdn.microsoft.com/library/en-us/dndotnet/html/remsec.asp
APPENDIX C ■ .NET REMOTING L INKS 543
“Managed Extensions for C++ and .NET Remoting Tutorial”If you are using Visual C++ and managed extensions for C++, this tutorial might be interestingfor you. It focuses on .NET Remoting when writing applications with managed C++.
http://msdn.microsoft.com/library/en-us/vcmex/html/vcgrfmanagedextensionsforcnetremotingtutorial.asp
“.NET Remoting Use-Cases and Best Practices” and “ASP.NETWeb Services or .NET Remoting: How to Choose”One of the most frequently asked questions is when to use .NET Remoting, especially when itcomes to the decision of whether to use Web Services or .NET Remoting, which proves hard formost people. Well, each of the technologies mentioned previously has its advantages and targetsspecific use cases. The following links provide you with information that helps you in yourdecision process:
http://www.thinktecture.com/Resources/RemotingFAQ/RemotingUseCases.htmlhttp://msdn.microsoft.com/library/en-us/dnbda/html/bdadotnetarch16.asp
“Remoting Examples”In the MSDN Resource Center, you will find lots of .NET Remoting samples. The following linkbrings up a page with some advanced .NET Remoting samples showing the internals of theinfrastructure.
http://msdn.microsoft.com/library/en-us/cpguide/html/cpconRemotingExamples.asp
“Secure Your .NET Remoting Traffic by Writing an AsymmetricEncryption Channel”Although the security solution mentioned previously provides you with a complete solutioncovering authentication and secure communication, this article of MSDN Magazine is interest-ing if you want to learn more about writing custom channel sinks as well as the classes of theSystem.Security.Cryptography namespace.
http://msdn.microsoft.com/msdnmag/issues/03/06/NETRemoting/
“Create a Custom Marshaling Implementation Using .NETRemoting and COM Interop”Several methods for customizing the presentation of native .NET and COM object types areavailable with the .NET Framework. Custom marshaling, which is one such technique, refersto the notion of specializing object type presentations. Elements of COM Interop permit thecustomizing of COM types, whereas .NET Remoting offers the developer the ability to tailornative .NET types. This article examines these techniques.
http://msdn.microsoft.com/msdnmag/issues/03/09/custommarshaling/
APPENDIX C ■ .NET REMOTING L INKS544
.NET Remoting InteroperabilityIn my opinion, the primary technology for interoperability should be Web Services. But sometimesWeb Services might not be an option, especially if you need tight coupling of applications basedon different platforms (although I would avoid tight coupling as it leads to increased effort whenone of the applications changes). In this case, you might be better off using a different technologythat provides you with the performance and possibilities needed in your special case. Some ofthe following solutions provide you with interoperability between .NET and other platformsbased on .NET Remoting.
.NET Remoting: CORBA InteroperabilityRemoting.Corba (pronounced remoting dot corba) is a project that aims to integrate CORBA/IIOP support into the .NET Remoting architecture. The goal is to allow .NET programmers touse C# and Visual Basic .NET to develop systems that interoperate with systems that supportthe Internet Inter-ORB Protocol (IIOP), including CORBA systems and various application serversand middleware technologies.
http://remoting-corba.sourceforge.net/
.NET Remoting: Java RMI BridgesInteroperability between Java and .NET becomes more and more important by now. Many largeenterprises using applications based on Java as well as .NET need to integrate those applications.Although Web Services should be the primary technology because it provides the foundationfor loose coupling (which makes the applications more independent of each other), in somecases you might need tight coupling (for performance reasons, stateful work, or similar things).
When it comes to interoperability with Java-based applications, you need to work witha so-called Java RMI to .NET Remoting bridge. Such bridges enable .NET-based applicationsusing Java applications published via Java RMI and vice versa. The most common bridges,J-Integra for .NET and JNBridge Pro, are available at the following URLs:
http://j-integra.intrinsyc.com/net/info/http://www.jnbridge.com/jnbpropg.htm
XML-RPC with .NET RemotingXML-RPC.NET is a library for implementing XML-RPC services and clients in the .NET environment.The library has been in development since March 2001 and is used in many open source andbusiness applications.
http://www.xml-rpc.net/
Custom .NET Remoting ChannelsOut-of-the-box, up to version 1.1 of the .NET Framework, .NET Remoting comes with two chan-nels: TcpChannel and HttpChannel. In version 2.0 of the .NET Framework, the IpcChannel willbe added. In many cases, other channels might be more appropriate than these two. Here youcan find a list of interesting channels as well as some hints for when it is useful to use them.
APPENDIX C ■ .NET REMOTING L INKS 545
Named Pipes Channel for .NET RemotingBoth TcpChannel and HttpChannel are optimized for communication between two machinesacross the network. If you just want to implement interprocess communication, they includeunnecessary overhead. For this purpose, named pipes are more appropriate. With .NET Frame-work 2.0, a new channel, IpcChannel, will be included in the .NET Remoting runtime (for moreinformation, see Chapter 4).
With .NET Framework 1.x, you have to use a custom implementation. Such an implemen-tation can be found at GotDotNet:
http://www.gotdotnet.com/Community/UserSamples/Details.aspx?SampleGuid=43a1ef11-c57c-45c7-a67f-ed68978f3d6d
TcpEx Channel for .NET RemotingThe TcpEx channel is a replacement for the built-in TCP remoting channel. It improves on thestandard TCP channel by allowing communication in both directions on a single TCP connection,instead of opening a second connection for events and callbacks.
http://www.gotdotnet.com/Community/UserSamples/Details.aspx?SampleGuid=3F46C102-9970-48B1-9225-8758C38905B1
Jabber ChannelThis channel allows you to transfer .NET Remoting messages via the Jabber instant messagingprotocol.
http://www.thinktecture.com/Resources/Software/opensourceremoting/JabberChannel.html
Remoting Channel Framework ExtensionImplementing new transport channels can be a heavy challenge. The Remoting ChannelFramework Extension introduced on GotDotNet provides you with some additional classesbased on the existing .NET Remoting infrastructure that makes development of transportchannels easier.
http://www.gotdotnet.com/Community/UserSamples/Details.aspx?SampleGuid=3c35d911-e138-4ce9-87bc-47f0525ca203
“Using MSMQ for Custom Remoting Channel”This article, found at the following Code Project page, describes the design and developmentof a custom channel for using MSMQ with .NET Remoting. The implementation provides youwith an MSMQ sender as well as receiver channel.
http://www.codeproject.com/csharp/msmqchannel.asp
APPENDIX C ■ .NET REMOTING L INKS546
“Using WSE-DIME for Remoting over Internet”DIME is a standard for transferring binary data together with a SOAP message between a WebService client and the Web Service itself. This article describes a design and implementation ofremoting over the Internet using the Advanced Web Services Enhancements—DIME technology.This solution allows the binary formatted Remoting messages that flow through the Web Serverto include uploading and downloading any types of the attachments.
http://www.codeproject.com/cs/webservices/remotingdime.asp
Interesting Technical ArticlesSome additional interesting articles can be found on the Web. The following text describes a fewof them that you may find especially interesting.
C# Corner: Remoting SectionThe C# Corner community is a member of the CodeWise community and offers lots of technicalarticles and samples. They also have a separate corner for .NET Remoting that contains articlesand samples specific to this topic.
http://www.c-sharpcorner.com/Remoting.asp
“Share the ClipBoard Using .NET Remoting”This article describes how to use .NET Remoting for sharing the clipboard of one computer withother computers.
http://www.codeproject.com/dotnet/clipsend.asp
“Chaining Channels in .NET Remoting”This article describes how to design and implement remoting over chained channels (standardand custom) using the logical URL address connectivity.
http://www.codeproject.com/csharp/chainingchannels.asp
“Applying Observer Pattern in .NET Remoting”Implementing an observer pattern in distributed applications can be quite challenging. But thisarticle gives you a very good overview of how to design and implement the observer pattern with.NET Remoting–based applications.
http://www.codeproject.com/csharp/c_sharp_remoting.asp
APPENDIX C ■ .NET REMOTING L INKS 547
“Aspect-Oriented Programming Enables Better CodeEncapsulation and Reuse” and “.NET Remoting Spied On”Method call interception is interesting when it comes to aspect-oriented programming whereyou add aspects to objects and methods by just using attributes. The attributes are used by aninfrastructure (framework, base components, for example, COM+) and lead to some infrastruc-tural tasks. The following two articles describe the possibilities offered by the .NET Remotinginfrastructure for method call interception, which is necessary for implementing this approach.
http://msdn.microsoft.com/msdnmag/issues/02/03/aop/http://www.codeproject.com/dotnet/remotespy.asp
“Persistent Events in Stateless Remoting Server”High availability in distributed applications usually requires you to implement stateless componentson the server. This article shows the usage of .NET events with stateless server components:
http://www.codeproject.com/csharp/persistentevents.asp
“Intrinsyc’s Ja.NET—Extending the Reach of .NET Remoting”Java RMI to .NET Remoting bridges enable interoperability between Java-based and .NET-basedapplications. This article describes how to use Ja.NET, a Java RMI to .NET Remoting bridge. Findthe link to the Ja.NET bridge earlier in this chapter in the section “.NET Remoting: Java RMI Bridges.”
http://www.devx.com/dotnet/Article/6973
“Implementing Object Pooling with .NET Remoting—Part I”This article shows an interesting way for implementing object pooling with custom resourcesand objects when using the .NET Remoting infrastructure together with the ITrackingHandlerinterface and tracking services.
http://www.devx.com/vb2themax/Article/19895/0/page/1
“.NET Remoting Versus Web Services”The decision for the technology in distributed application scenarios is not easy and gets evenharder with the number of possibilities for implementation. The most common frequently askedquestion, of course, is whether to use Web Services or .NET Remoting in distributed applications.This article might help you with your decision, but don’t forget about the articles mentionedearlier in this appendix.
http://www.developer.com/net/net/article.php/11087_2201701_1
“.NET Remoting Central”This provides a collection of links for samples and information about .NET Remoting.
http://www.dotnetpowered.com/remoting.aspx
APPENDIX C ■ .NET REMOTING L INKS548
“Output Caching for .NET Remoting”ASP.NET output caching can be used with not only ASP.NET pages, but also any other type ofapplication hosted in IIS, too. In this workspace, you can find a server-side channel sink thatprovides output caching of methods on remoted objects.
http://www.gotdotnet.com/Community/UserSamples/Details.aspx?SampleGuid=6a228851-5479-46bb-a972-6ad4b50d870e
“Abstract Client Formatter Sink”You may want to connect to more than one remote server over a TCP channel using a binaryformatter in one case and a SOAP formatter in the other case. This would not work with thenormal remoting system, but this project demonstrates a workaround. A document is includedwith the project explaining all of it better.
http://www.gotdotnet.com/Community/UserSamples/Details.aspx?SampleGuid=0c348249-7823-406b-9fa5-b633b8d1c579
Remoting ToolsApart from the articles and samples just discussed, a number of tools have been developed thatmay help you during debugging and troubleshooting.
Remoting Management ConsoleThe Remoting Management Console is a MMC snap-in that allows you to configure hostprocesses for publishing .NET Remoting components. Its user interface is similar to theconfiguration MMC for the COM+ catalog.
http://www.codeproject.com/csharp/remotingmanagementconsole.asp
Remoting ProbeThe Remoting Probe tool consists of a custom channel sink as well as an analyzer tool foranalyzing the communication details between remoting objects. The channel sink is responsi-ble for publishing communication steps to the analyzer tool, and the tool can be used forcreating reports about communication.
http://www.codeproject.com/csharp/remotingprobe.asp
■AACL (Access Control Lists), 75activated tag, client tag, 99activated tag, service tag, 97ActivatedClientTypeEntry class, 494–495ActivatedServiceTypeEntry class, 494Activation namespace, 529–530Activator class, 19, 488AddAuthenticationEntry method, 402, 407,
409AddRef method, 185AddValue method, 243, 261algorithms
symmetric encryption, 376anonymous access
ASP.NET application impersonatingclient, 183
IIS authentication modes, 133–134AOP (aspect-oriented programming)
links to web sites, 547application configuration files
creating console clients, 163application design/development
designing applications for staticscalability, 299
versioning, 256, 273application domains
cross-AppDomain remoting, 276links to web sites, 542serializable classes passed between, 492
Application General codecreating Windows Forms client, 167
application tag, 85, 165Application_StartUp event, 175appSettings tag, configuration tag, 165architecture
.NET Remoting, 10, 322links to web sites, 542sample remoting application, 14Service-Oriented Architecture, 279
Args property, messages, 327ASMX Web Services, 279ASP.NET based clients, 169, 170
aspect-oriented programming (AOP)links to web sites, 547
assemblies.NET Framework versioning, 228, 232client assembly, 14CLR locating, 227creating strongly named assembly, 226full assembly name, 225GAC, 227, 228general assembly, 14generated metadata assembly, 12private assemblies, 227server assembly, 14shared assemblies, 11, 67, 227
assemblyBinding tag, 241AssemblyKeyFile attribute, 227, 228AssemblyVersion attribute, 227, 237asymmetric encryption channel
links to web sites, 543asynchronous calls
client assembly, 53client-side sinks, 364, 459delegates, 51, 52mapping, 421server-side sinks, 366ways of executing methods, 46ways of executing methods in .NET, 51
asynchronous delegates, 434, 441asynchronous messaging, 338–348
generating requests, 342–344handling responses, 345–346IClientChannelSink processing,
340–342IMessageSink processing, 338–339mapping protocols to .NET Remoting,
440, 441server-side asynchronous processing,
347–348AsyncProcessMessage method
asynchronous IMessageSink processing,338
checking parameters in IMessageSink,480
Index
549
creating client-side sink and provider,451
IMessageSink, 328passing runtime information, 391, 393server-side asynchronous processing,
347AsyncProcessRequest method
asynchronous IClientChannelSinkprocessing, 340, 341
BinaryFormatter version mismatch, 411changing sinks programming model,
405client-side sinks, 364extending compression sinks, 371, 372generating asynchronous request, 342
AsyncProcessResponse methodasynchronous IClientChannelSink
processing, 340, 341client-side sinks, 364
creating, 453extending compression sinks, 372, 373generating asynchronous request, 343handling asynchronous response, 345,
346IServerChannelSink, 334, 535passing runtime information, 396server-side asynchronous processing,
347server-side sinks, 365, 367
creating, 458, 460, 461AsyncResponseHandler class, 451, 453AsyncResult class, 512attributes
activated tag, 97, 99channel tag, 89, 90custom attributes, 92formatter tag, 92lifetime tag, 88moving constraints to metadata level,
471OneWayAttribute, 514provider tag, 92ProxyAttribute, 531SoapAttribute, 515SoapFieldAttribute, 515SoapMethodAttribute, 516SoapParameterAttribute, 516SoapTypeAttribute, 515wellknown tag, 97
authenticationsee also securityanonymous access, 134
authentication level client and server,144
authentication with IIS, 133–136logon process, 137
basic authentication, 134brief description, 123changing default remoting behavior, 359changing sinks programming model,
409configuring authentication methods,
118deployment using IIS, 116deserialization of object security, 93digest authentication, 134encryption and IIS, 138forms authentication, 130identities, 130IIS authentication modes, 133links to web sites, 542Passport authentication, 130principals, 130remote objects, 135securing .NET Remoting, 123–160security with remoting in .NET 2.0, 154server accepting authenticated requests,
145unsafeAuthenticatedConnectionSharing
attribute, 90useAuthenticatedConnectionSharing
attribute, 90using a GenericIdentity, 130Windows authentication, 130, 134
enabling, 137authentication protocols, 124
Kerberos, 126NTLM authentication, 124security package negotiate, 128Security Support Provider Interface, 128
authenticationLevel propertyprovider tag, 144
authenticationMode property.NET Remoting v2.0, 159security with remoting in .NET 2.0, 151,
154authorization
see also securitybrief description, 123custom application authorization, 149GenericPrincipal, 130implementing authorization in server,
149IsInRole method, 133
■INDEX550
links to web sites, 542types, .NET Framework, 133WindowsPrincipal, 130
AutoLog property, 110
■Bbase objects, 11Base64 encoding, 439, 443BaseChannelObjectWithProperties class,
539BaseChannelSinkWithProperties class, 540
client-side sinks, 361BaseChannelWithProperties class, 540
default .NET Remoting channels, 462implementing client-side channels, 446
basic authentication, 134BeginInvoke method
asynchronous IMessageSink processing,338
concerns regarding SoapSuds, 287creating client-side sink and provider,
451IAsyncResult, 491Visual Studio 2002 behavior, 52when to use .NET Remoting, 281
behaviorschanging default remoting behavior, 359versioning behavior, 95
binary encoding via HTTP, 96binary formatter
links to web sites, 548BinaryClientFormatterSink class, 503BinaryClientFormatterSinkProvider class,
502BinaryFormatter class
avoiding version mismatch, 409–413for HTTP channel, switching to, 96scalable remoting rules, 280serializing messages through formatters,
329version incompatibility, 309–311when to use .NET Remoting, 278
BinaryServerFormatterSink class, 503server-side messaging, 336
BinaryServerFormatterSinkProvider class,501
configuring typeFilterLevel in code, 94binding
strictBinding attribute, 92versioning behavior, 95
bindingRedirect tagversioning CAOs, 242
bindTo attributechannel tag, 90
Break method, 304, 305breakpoints
debugging Windows service, 115manual breakpoints, 304
BroadcastEventWrapper class, 217, 219broadcasting
MSMQ, 284UDP broadcasts, 282
BroadcastMessage method, 215BuildFormatName method, 286business logic
checking parameters in IMessageSink,482
implementation level, 470moving constraints to metadata level, 472scenarios for .NET remoting, 4sinks, 419
ByRef objects, 13, 26ByValue objects, 13, 25
■CC# Corner web site, 546caching
cached credentials, 144designing applications for static
scalability, 299explicit caches, 301grouping data as static/dynamic, 300links to web sites, 548scalable remoting rules, 281
call valueauthenticationLevel property, 144
callbacksdeserialization of object security, 93encryption, 376receiving from server through delegates,
94scalable remoting rules, 281when to use .NET Remoting, 277, 278
CallContext class, 512accessing CallContext on server side, 211accessing directly in code, 212ILogicalThreadAffinative, 209LogicalCallContext, 514OOB (out-of-band) data, 209scope, 211security, 213storing LogSettings in CallContext, 210transferring runtime information,
209–213
■INDEX 551
CAO (client-activated objects)ActivatedServiceTypeEntry, 494C# code of client application, 84client-side output using, 37, 85client-side sinks, 352creating, 34
using factory design pattern, 38implementing server-side channels, 455,
457instantiating server-side CAO, 100ObjRef objects, 324, 325registering, 96scalable remoting rules, 281server-side output using, 38server-side sponsors, 207SoapSuds or Interfaces, conclusion,
287state, 34versioning, 240–242versioning with interfaces, 255when to use .NET Remoting, 277
CAS (code access security), 129certificates
encryption and IIS, 139chained channels, 546chains
see sinksChannel Framework Extension
links to web sites, 545channel sinks
BaseChannelSinkWithProperties, 540channelSinkProviders tag, 86encapsulating SMTP/POP3 protocol,
426extending compression sinks, 371IChannelSinkBase, 532IClientChannelSink, 532IClientChannelSinkProvider, 533IServerChannelSink, 534IServerChannelSinkProvider, 535scalable remoting rules, 281
channel tag, 89–91channel templates, 86configuration file using, 76, 82, 138implementing server-side channels, 453using the IPC channel, 105using the TCP channel, 154
ChannelData property, 457, 464, 538ChannelDataStore object, 455ChannelName property, 456, 463, 499ChannelPriority property, 456, 464, 499
channelsBaseChannelObjectWithProperties, 539BaseChannelSinkWithProperties, 540BaseChannelWithProperties, 540channel information for IIS, 118client-side sinks, 351CrossContextChannel, 336DispatchChannelSink, 336encryption, 375HTTP channel, 17HttpChannel, 504HttpClientChannel, 333, 505HttpServerChannel, 335, 506IChannel, 537IChannelInfo, 498IChannelSender, 539IChannelSinkBase, 532IClientChannelSink, 532IClientChannelSinkProvider, 533implementing client-side channels,
445–453implementing server-side channels,
453–462interprocess communication channel,
102IPC channel, 102IServerChannelSink, 534IServerChannelSinkProvider, 535Jabber channel, 545links to web sites, 544–546Named Pipe channel sample, 102registering default channels, 462SDLChannelSink, 335security with remoting in .NET 2.0, 151suppressChannelData attribute, 90TcpChannel, 506TcpClientChannel, 507TcpEx channel, 545TcpServerChannel, 508transport channels, 321wrapping transport channel, 462–465
Channels namespace, 499–504, 531–540channels tag, 89
ChannelServices, 500configuration files, 85, 86using SmtpChannel, 465, 466
Channels.Http namespace, 504–506Channels.Tcp namespace, 506–508ChannelServices class, 500character encoding, 424channelSinkProviders tag, 85, 86
■INDEX552
CheckableContextProperty class, 474CheckAndStartPolling method, 435CheckAttribute class, 478CheckerSink class, 475, 477, 483chunky interfaces, 278class library project, 228classes
identifying namespace, 186click event
creating Windows Forms client, 168client assembly
asynchronous calls, 53, 55multiserver configuration, 66non-wrapped proxy metadata, 72, 73one-way calls, 56output when removing OneWay
attribute, 58remoting application architecture, 14sample remoting application, 18, 21synchronous calls, 49, 50wrapped proxies, SoapSuds, 70
Client classfactory design pattern creating CAO, 41sample remoting application, 18server-activated objects, 27
client tag, 85, 98client-activated objects
see CAOclient-side channels
client-side sinks, 351IClientChannelSinkProvider, 533SMTPClientChannel, 445–453
client-side messaging, 331–333client-side proxies
RealProxy, 531client-side sinks, 350–353, 361–364
changing sinks programming model,408
compression sinks, 359, 362, 363configuration files, 369connection using/not using compared,
370creating encryption sinks, 380EncryptionClientSink, 380IClientChannelSink, 532IClientFormatterSink, 534IClientFormatterSinkProvider, 534implementing client-side channels,
449–453passing runtime information, 390, 392sink providers, 367
client-side sponsors, 197calling expired object’s method,
198–203scalable remoting rules, 281when to use .NET Remoting, 277, 278
client-side transport channel sinksencapsulating SMTP/POP3 protocol,
426client/server affinity
creating NLB clusters, 296ClientChannelSinkStack
handling asynchronous response, 345clientConnectionLimit attribute
channel tag, 90, 91ClientContextTerminatorSink
client-side messaging, 332dynamic sinks, 356
clientProviders tagchannel tag, 202client-side sinks, 400formatter tag, 96HttpClientChannel, 506provider tag, 143sink providers, 349
clientsActivatedClientTypeEntry, 494back-end-based client, 169–184
ASP.NET based clients, 169remoting components hosted in IIS,
172, 176security, 177
BinaryClientFormatterSink, 503BinaryClientFormatterSinkProvider, 502client for second server component, 175client-side sponsors, 196, 197configuring server objects in client
configuration, 165console client, 163–166end-user client security, 177HttpClientChannel, 505lifecycle management, versioned SAOs,
236, 237, 239notification of clients, 277remoting clients, 161–184remoting events, 214RemotingClientProxy, 517servers requiring different versions, 259,
260, 263, 267SoapClientFormatterSink, 503SoapClientFormatterSinkProvider, 503TcpClientChannel, 507
■INDEX 553
transfer runtime information withserver, 209–213
versioning with interfaces, 249, 251, 253,255
WellKnownClientTypeEntry, 496Windows Forms client, 167–169
ClientSponsor class, 510clipboard sharing
links to web sites, 546cloning
StreamingContext structure, 520CLR
locating assemblies, 227clusters
see also NLB clusterscaching, 299designing applications for static
scalability, 299IP addresses for, 291request distribution, 291scaling out remoting solutions, 290
code access security (CAS), 129codeBase
CLR resolving assembly references, 227COM
links to web sites, 543COM+, 6command-line tools, 226commands
SMTP Response code classes, 422Common Object Request Broker
Architecturesee CORBA
communicationinterprocess communication channel,
102Complete method
AsyncResult, 512compression sinks, 359–375
client-side sink chain, 359client-side sinks, 362, 363extending, 371–375server-side sink chain, 360
CompressionClientSink class, 360, 368CompressionClientSinkProvider class, 360,
367, 369CompressionHelper class, 363CompressionServerSink class, 360, 369CompressionServerSinkProvider class, 360,
368, 370CompressionSink assembly, 369
confidentiality, 124.config extension, 175configuration classes, 493–497
ActivatedClientTypeEntry, 494ActivatedServiceTypeEntry, 494multiserver configuration, 59RemotingConfiguration, 492–493TypeEntry, 493WellKnownClientTypeEntry, 496WellKnownObjectMode enumeration,
497WellKnownServiceTypeEntry, 495
configuration files, 76see also web.config fileapplication configuration files, 163BinaryFormatter version mismatch, 412changing base lifetime example, 188changing default lease time, 187changing sinks programming model,
402, 408, 409client-side sinks, 369
passing runtime information, 400Configure method, 76creating encryption sink providers, 386functionality, 76general configuration options, 85implementing client-side channels, 445main reason for using, 75naming conventions, 76problem with SoapSuds, 77
solution, 80protecting from users, 75remoting components hosted in IIS as
clients, 174server-side sinks, 370sink providers, 349standard configuration options, 85structure of file, 85tags
activated tag, 97, 99application tag, 85appSettings tag, 165assemblyBinding tag, 241bindingRedirect tag, 242channel tag, 89channels tag, 86, 89channelSinkProviders tag, 86client tag, 98clientProviders tag, 96configuration tag, 85debug tag, 86
■INDEX554
formatter tag, 92lifetime tag, 88provider tag, 92service tag, 96
troubleshooting, 305–309using in application, 76, 82using SmtpChannel, 465, 466wrapping transport channel, 462
configuration tag, 85Configure method
ASP.NET based clients, 171changing base lifetime example, 189configuration file settings, 305, 307creating Windows Forms client, 168remoting components hosted in IIS as
clients, 172, 174using configuration files, 76
Connect method, 493connection pooling, 90connectionGroupName attribute
channel tag, 90connections
clientConnectionLimit attribute, 90connectionGroupName attribute, 90connection using/not using sinks
compared, 370, 371NLB clusters, 292POP3Connection class, 428SmtpConnection class, 426, 438, 440TCP connections, 292unsafeAuthenticatedConnectionSharing
attribute, 90useAuthenticatedConnectionSharing
attribute, 90console applications
creating console clients, 163creating server for remoting clients, 161deploying server application, 108
console client implementationcreating console clients, 163
constraintsmoving constraints to metadata level, 471
ConstructionCall classproperties, 327
ConstructionCall messages, 326, 352ConstructionCallMessage, 240constructors
IConstructionCallMessage, 530IConstructionReturnMessage, 530
content replyPOP3 replies, 423
content-type headerBinaryFormatter version mismatch, 409
Context propertyStreamingContext structure, 520
ContextAttributeContextBoundObject, 472intercepting calls, 473
ContextBoundObject, 472, 476, 477contexts
CallContext, 512CheckableContextProperty, 474ClientContextTerminatorSink, 332CrossContextChannel, 336dynamic sinks, 356GetPropertiesForNewContext method,
472IContextProperty, 473IsContextOK method, 472, 483IsNewContextOK method, 473, 474LogicalCallContext, 514ServerContextTerminatorSink, 337StreamingContext structure, 520
CopyLocal property.NET Framework versioning, 229
CORBA (Common Object Request BrokerArchitecture)
introduction, 5lifetime management, 185links to web sites, 544
CreateInstance method, 488ActivatedClientTypeEntry, 494configuring server objects in client
configuration, 166IConstructionCallMessage, 530
CreateInstanceFrom method, 488CreateMessageSink method
client-side sinks, 352implementing client-side channels, 446,
448sinks using custom proxy, 414wrapping transport channel, 463
CreateProxy methoddeploying remote applications, 100ProxyAttribute, 531
CreateServerChannelSinkChain method,355
CreateServerObjectChain method, 337CreateSink method
client-side sinks, 352, 353creating client-side sink and provider,
449, 450
■INDEX 555
IClientChannelSinkProvider, 533IServerChannelSinkProvider, 536passing runtime information, 393, 399server-side sinks, 355
credentialscached credentials, 144useDefaultCredentials attribute, 90
cross-AppDomain remoting, 276cross-process on multiple machines in
LAN, 276cross-process on single machine, 276cross-process via WAN/Internet, 278CrossContextChannel
dynamic sinks, 356server-side messaging, 336
cryptographic processencryption helper, 379
CurrentPrincipal property.NET Remoting v2.0 based server, 156implementing authorization in server,
149CurrentState property
LeaseState enumeration, 511custom attributes, 92custom channels
links to web sites, 544–546custom exceptions, 288
troubleshooting using, 313–314custom marshaling
links to web sites, 543custom proxies
sinks using, 413–419Customer class, 15CustomerManager class, 209CustomerManager SAO
accessing, 97configuration files, 82server startup code, 82
CustomProxy class, 414
■Ddata
see also metadataChannelData property, 457, 464, 538ChannelDataStore object, 455GetChannelData method, 536GetObjectData method, 519grouping data as static/dynamic, 300MessageData objects, 323OOB (out-of-band) data, 209RemotingData property, 337
SetData method, 210SinkProviderData objects, 407suppressChannelData attribute, 90typed DataSets, 287User Datagram Protocol (UDP), 277
DATA command, SMTP, 423data object definition, 15data serialization, 12DCE (Distributed Computing
Environment), 5DCOM (Distributed Component Object
Model), 5, 185debug tag, 85, 86, 87, 308debugging
changing default remoting behavior, 359configuration file settings, 305–309IIS, 120, 303Just-In-Time debugging, 305manual breakpoints, 304remoting components hosted in IIS as
clients, 174, 175server applications, 303troubleshooting hints, 303–305Windows service, 113
in real runtime state, 114selecting type of program, 115setting breakpoints, 115
declarative security, 133DefaultLifeTimeSingleton, 188, 189, 191,
193DELE command, POP3, 424, 432Delegate class, 490–491delegate value
impersonationLevel property, 143, 147delegates, 51
asynchronous calls, 51, 52asynchronous delegates, 434, 441callbacks, 94classes and delegates, 490creating, 52declaration of, 51deserialization of object security, 93IAsyncResult, 491method signatures, 51remoting events, 218
one way methods/events, 222typeFilterLevel changing security, 312
DeleteMessage method, 432demilitarized zone (DMZ), 4, 317deployment, 108
using IIS, 116
■INDEX556
deserialization of objects, 93dictionary keys
corresponding message property, 327digest authentication, 134DIME
links to web sites, 546Disconnect method, 432DispatchChannelSink
server-side messaging, 336DispatchException method, 346displayName attribute
channel tag, 89client tag, 98wellknown tag, client tag, 99wellknown tag, service tag, 97
Dispose method, 517distributed applications
development of, 3transferring runtime information, 209when to use .NET Remoting, 275
Distributed Component Object Model(DCOM), 5, 185
Distributed Computing Environment(DCE), 5
distributed reference counting, 185distributed transactions, 280, 281DMZ (demilitarized zone), 4
troubleshooting client behind firewall,317
DoCheck method, 479, 480Donate method, 479, 483DumpMessageContents method, 417DumpObjectArray method, 418dynamic sinks, 356–357
client-side messaging, 332
■Ee-mail
checking for new mail, 433creating e-mail headers, 425mapping protocols to .NET Remoting,
438, 441Mercury/32 e-mail server, 467parsing e-mail address for incoming
request, 444parsing URL for e-mail address, 444POP3 protocol, 433protocols transferring e-mail, 422SMTP response codes, 422types of, 441
EJB (Enterprise Java Beans), 6
encodingbinary encoding via HTTP, 96character encoding, 424converting string to Base64 encoding,
439encryption
see also security.NET Remoting, 375–390.NET Remoting v2.0, 157asymmetric/symmetric combination,
375changing default remoting behavior, 359deserialization of object security, 93HTTP channel, 375HTTPS/SSL, 375IIS, 138, 375network sniffing encrypted traffic, 159network sniffing unencrypted versions,
157providers, 386–390security with remoting in .NET 2.0, 154sinks, 380–385SSL encryption, 139symmetric encryption, 376–380TCP channels, 375
encryption helpercryptographic process, 379symmetric encryption, 378
encryption property.0, 152EncryptionClientSink class, 380EncryptionClientSinkProvider class, 386,
387EncryptionServerSink class, 383EncryptionServerSinkProvider class, 388EndInvoke method, 491, 512Enterprise Java Beans (EJB), 6Enterprise Services, 280, 281EnterpriseServicesHelper class, 516ERR message, POP3, 423errors
Configure method, 88debug tag, 86impersonation error, 147SoapFault, 521
event handlingASP.NET based clients, 172encryption, 376intermediate wrapper, 218
event logsporting remoting server to Windows
services, 110
■INDEX 557
EventInitiatorremoting events, 221
EventLog viewerinstalling Windows service, 112
eventsone way events, 222, 224remoting events, 213–224scalable remoting rules, 281typeFilterLevel changing security, 311when to use .NET Remoting, 277, 278,
281exception classes, 497–498exceptions
BinaryFormatter version mismatch,409–413
typeFilterLevel changing security, 312
custom exceptions, 288expired TTL, 187extending compression sinks, 371handling asynchronous response, 346remoting events, 217RemotingException, 497
passing runtime information, 394RemotingTimeoutException, 497SerializationException, 309, 521ServerException, 497sinks using custom proxy, 415versioning serializable objects, 242,
243expired object’s method, 198ExtendedMBRObject class, 193, 194
server-side sponsors, 206
■Ffactory design pattern
creating CAOs using, 38, 39, 40, 41factory object
client-side output using, 42server-side output using, 43
filtersTypeFilterLevel enumeration, 521typeFilterLevel attribute, 92
fine-grained security, 280fingerprints
strong naming, 225firewalls, 317
lifetime management, 185formatter providers
channel tag, 91client-side sponsors, 202optional additional attributes, 92
formatter tagclientProviders tag
BinaryFormatter version mismatch,412
changing sinks programming model,402
configuration file using attributes, 96includeVersions attribute, 95sink providers, 350
IClientFormatterSink, 534IClientFormatterSinkProvider, 534serverProviders tag
attributes, 92strictBinding attribute, 95configuration file using attributes, 91,
94, 96typeFilterLevel attribute, 92
formattersbinary formatter, 548BinaryClientFormatterSink, 503BinaryClientFormatterSinkProvider, 502BinaryFormatter, 96, 278, 280
avoiding version mismatch, 409–413serializing messages through
formatters, 329version incompatibility, 309–311
BinaryServerFormatterSink, 336, 503BinaryServerFormatterSinkProvider, 501brief description, 321IClientFormatterSink, 328, 534IClientFormatterSinkProvider, 534messages, 328serializing message objects through,
329–330SOAP formatter, 504, 505, 548SoapClientFormatterSink, 333, 503SoapClientFormatterSinkProvider, 503SoapFormatter, 329SoapServerFormatterSink, 336, 504SoapServerFormatterSinkProvider, 502
Formatters namespace, 521–523FormsIdentity, 130FreeNamedDataSlot method, 212Freeze method, 473, 474full assembly name, 225Full value, typeFilterLevel attribute, 93
■GGAC (Global Assembly Cache), 89, 233,
227–229gacutil.exe, 228, 234, 235, 238garbage collection, 185
■INDEX558
general assemblysee also shared assembliesremoting application, 14, 20server-activated objects, 26
general.dll assembly, 47one-way calls, 56remoting events, 214versioning with interfaces, 253
generated metadata assembly, 12GenericIdentity, 130GenericPrincipal, 130Genuine Channels, 279GetAuthenticationEntry method, 403GetChannel method, 89GetChannelData method, 536GetChannelSinkProperties method, 135GetCleanAddress method, 445, 460GetCompressedStreamCopy method
client-side sinks, 363, 364extending compression sinks, 374server-side sinks, 367
GetCurrent method, 130GetDynamicSink method, 356GetEnumerator method, 537GetExceptionIfNecessary method, 410, 412GetLeaseInitial method, 186GetLifetimeService method, 197GetMessage method, 431GetObject method, 488
Connect method, 493creating proxies, 322deploying remote applications, 100metadata, configuration files, 77
GetObjectData methodcustom exceptions, 288, 290ISerializable, 519servers requiring different versions, 266StreamingContext structure, 520versioning serializable objects, 243, 245
GetPerson method, 258, 261, 268, 271GetPropertiesForNewContext method,
472GetRegisteredWellKnownClientTypes
method, 101GetRequestStream method, 533GetResponseStream method
creating server-side sinks, 458IServerChannelSink, 334server-side sinks, 365
getSAOVersion method, 236GetTransparentProxy method, 415
GetUncompressedStreamCopy methodclient-side sinks, 363, 364extending compression sinks, 372, 373server-side sinks, 366
GetURLBase method, 456GetUrlsForUri method
IChannelReceiver, 538implementing server-side channels, 457wrapping transport channel, 464
Global Assembly Cachesee GAC
Global.asax file, 171granularity, 280groups, 149
connectionGroupName attribute, 90
■HHandleAsyncResponsePop3Msg method,
441, 442, 453HandleIncomingMessage method, 441,
442, 459, 460HandleMessage method, 219HandleMessageDelegate method, 434HandleReturnMessage method, 323Hashtables, SMTPHelper class, 437headers
creating e-mail headers, 425ITransportHeaders, 536
HELO command, SMTP, 423helper classes
EnterpriseServicesHelper, 516SoapSuds or Interfaces, conclusion, 287
hookinglisten attribute, 90
HTTP channelsee also channel tagbinary encoding via HTTP, 96client for second server component, 176configuration information, 89deployment using IIS, 116encryption, 375multiserver configuration, 64referencing predefined channel, 89remoting components hosted in IIS as
clients, 174sample remoting application, 17, 19scalability features, 293security related properties, 90switching to BinaryFormatter for, 96
HTTP Content-Length header, 371HTTP KeepAlives, 280
■INDEX 559
Http namespace, 504–506HTTP proxies, 279, 297HTTP requests
extending compression sinks, 375TCP connections, 292
HTTP responsesextending compression sinks, 375
HttpApplication class, 171HttpChannel class, 504
registering default .NET Remotingchannels, 462
scalable remoting rules, 280when to use .NET Remoting, 278
HttpClientChannel class, 505client-side messaging, 333client-side sinks, 352IChannelSender, 539registering, 462
HttpServerChannel class, 506registering, 462server-side messaging, 333, 335server-side sinks, 354
HttpServerSocketHandler class, 333HttpServerTransportSink class, 335
■I/i parameter, 228, 234IAsyncResult interface, 491, 512IBroadcaster interface, 214, 215IChannel interface, 499, 537
client-side channels, 446, 447client-side sinks, 351server-side channels, 454
IChannelInfo interface, 498IChannelReceiver interface, 454IChannelSender interface, 446, 448, 539IChannelSinkBase interface, 458, 532IClientChannelSink interface, 328, 329,
360, 532asynchronous messaging, 340–342changing sinks programming model, 409client-side sink providers, 368client-side sinks, 361creating client-side sink and provider, 452interfaces for message sinks, 328passing runtime information, 392, 396sinks using custom proxy, 419
IClientChannelSinkProvider interface, 360,533
client-side sink providers, 368creating client-side sink and provider,
449
implementing client-side channels, 446passing runtime information, 392
IClientFormatterSink interface, 534formatters, 328
IClientFormatterSinkProvider interface, 534IClientResponseChannelSinkStack
interface, 341IConstructionCallMessage interface, 530IConstructionReturnMessage interface,
530IContextProperty interface, 473IContributeDynamicSink interface, 356IContributeObjectSink interface, 474ICustomerManager interface, 14, 15, 16,
18, 20identify value
impersonationLevel property, 143identities, 129, 130Identity objects, 323, 325IDictionary interface
client-side channels, 446server-side sinks, 354
IDynamicMessageSink interface, 356IDynamicProperty interface, 356, 357IEnvoyInfo interface, 498IIdentity interface, 129IIS (Internet Information Server)
ASP.NET application impersonatingclient, 183
ASP.NET based clients, 171authentication with IIS, 133, 134, 135client for second server component, 176configuration file debugging, 308debugging, 120debugging hints, 303deployment for anonymous use, 118deployment using, 116encryption, 138, 375end-user client for IIS hosted
component, 177intermediary Remoting server hosted in,
173membership in Windows groups, 149output window for IIS hosted server, 177preparing to use IIS as container, 117remoting components hosted as clients
in, 172, 176scalable remoting rules, 280security without IIS, 140server-side objects, 116troubleshooting using custom
exceptions, 313
■INDEX560
ILease interface, 186, 508client-side sponsors, 197CurrentState property, 511Register method, 197
ILogicalThreadAffinative interface, 209,514
IMessage interface, 525how messages work, 326passing runtime information, 390
IMessageSink interface, 328, 329, 526asynchronous messaging, 338–339AsyncProcessMessage method, 328client-side sinks, 353intercepting calls, 469interfaces for message sinks, 328NextSink property, 328passing runtime information, 390, 392proxies creating messages, 323server-side asynchronous processing,
347sinks using custom proxy, 419SyncProcessMessage method, 328
IMethodCallMessage interface, 528, 529IMethodMessage interface, 527IMethodResponseMessage interface, 529IMethodReturnMessage interface, 528imperative security checks, 133impersonate value
impersonationLevel property, 143, 147impersonation, 182
.NET 1.x and 2.0 differences, 152impersonation error, 147impersonationLevel property
.NET Remoting v2.0, 159provider tag, 143security with remoting in .NET 2.0, 151server accepting authenticated requests,
147, 148implementation of .NET Remoting
advantages of .NET Remoting, 9client implementation, 18server implementation, 15
In-Reply-To headercreating e-mail headers, 425mapping protocols to .NET Remoting,
441includeVersions attribute
BinaryServerFormatterSinkProvider, 501formatter tag, clientProviders tag, 95formatter tag, serverProviders tag, 92servers requiring different versions, 264versioning serializable objects, 242
Indigo, 257InfinitelyLivingSingleton, 188, 189, 191,
193InfinitelyLivingSingleton_LifeTime
property, 195, 196Ingo’s .NET Remoting FAQ corner, 541InitFields method, 323initialization vector (IV)
symmetric encryption, 378InitializeLifetimeService method
changing base lifetime, 188, 189, 191,193
changing lease time, 187, 188ExtendedMBRObject, 193, 194ILease, 186, 508lifetime management, 43server overriding, 46
InitialLeaseTime property, 186InitTypeCache method, 100installutil.exe, 109, 112, 113instances, .NET Framework, 30InstanceSponsor_Lifetime, 205InstanceSponsor_RenewOnCallTime, 205integrated security, 138integrity, 124interception
CheckerSink, 477ContextAttribute, 473IMessageSinks, 469Organization, 476
interface definitionsclient and server accessing DDL, 14generated metadata assembly, 12multiserver configuration, 62sample remoting application, 14
interfacesadvantages of .NET Remoting, 11chunky interfaces, 278client and server accessing, 14configuring server objects in client
configuration, 165deploying remote applications, 100extending .NET Remoting framework,
525IChannel, 499, 537IChannelInfo, 498IChannelSender, 539IChannelSinkBase, 532IClientChannelSink, 532IClientChannelSinkProvider, 533IClientFormatterSink, 534IClientFormatterSinkProvider, 534
■INDEX 561
IConstructionCallMessage, 530IConstructionReturnMessage, 530IEnvoyInfo, 498ILease, 508IMessage, 525IMessageSink, 526IMethodCallMessage, 528IMethodMessage, 527IMethodResponseMessage interface,
529IMethodReturnMessage, 528IObjectHandle, 498IRemotedType, 103IRemotingTypeInfo, 498ISerializable, 519IServerChannelSink, 534IServerChannelSinkProvider, 535ISponsor, 509ITrackingHandler, 517ITransportHeaders, 536message sinks, 328servers requiring different versions, 258shared assembly defining, 102shared interfaces, 11, 39SoapSuds or Interfaces, 286, 287versioning with, 246–256
interoperability, 544interprocess communication, 102Intrinsyc’s Ja.NET, 547Invoke method, proxies, 416, 419IObjectHandle interface, 498IP addresses
useIpAddress attribute, 90IPC channel, 102, 105, 106IPrincipal interface, 129IRemoteCustomerManager interface, 100IRemotedType interface, 103IRemoteFactory interface, 161, 198IRemoteObject interface, 63, 198IRemoteSecond interface, 161, 173IRemotingTypeInfo interface, 498IsContextOK method, 472, 483ISerializable interface, 12, 519
deserialization of object security, 93versioning serializable objects, 243, 244
IServerChannelSink interface, 360, 534creating server-side sinks, 458interfaces for message sinks, 328server-side asynchronous processing,
347server-side messaging, 334server-side sink providers, 368
server-side sinks, 364sinks using custom proxy, 419
IServerChannelSinkProvider interface, 360,535
passing runtime information, 398server-side sink providers, 369
IsInRole method, 133IsNewContextOK method, 473, 474ISponsor interface, 196, 200, 509isServer attribute
wrapping transport channel, 462ITrackingHandler interface, 517
links to web sites, 547ITransportHeaders interface, 536
extending compression sinks, 371mapping protocols to .NET Remoting,
438moving messages through transport
channels, 330IUSR_MACHINENAME
anonymous access, 134IWorkerObject interface, 63
■JJa.NET, 547Jabber channel, 545Java RMI (Java Remote Method Invocation)
introduction, 6lifetime management, 185links to web sites, 544
Just-In-Time debugging, 305
■KKDC (Key Distribution Center)
Kerberos authentication, 126KeepAlive method, 204, 206, 208KeepAlives
disabling, 293scalable remoting rules, 280TCP connections, 292
Kerberos, 126MSDN security samples, 144
key pairs, 226.NET Framework versioning, 228versioning with interfaces, 247
KeyGenerator applicationsymmetric encryption, 376, 378
■L/l parameter, 228, 235, 238language agnostic names, 149layers, 4
■INDEX562
Lease class, 186LeaseManager class
ISponsor, 196leaseManagerPollTime attribute, 187LeaseTimeAnalyzer method, 186lifetime management, 186server-side sponsors, 204sponsors, 196valid units of measurement, 187
leaseManagerPollTime attributeLeaseManager, 187lifetime tag, 88, 188
leases, 186, 187, 508LeaseSink, 337LeaseState enumeration, 511leaseTime attribute
lifetime tag, 88, 188LeaseTimeAnalyzer method, 186lifecycle management
versioned SAOs, 233, 234–239versioning CAOs, 240
lifetime managementsee also timeadvantages of .NET Remoting, 12changing base lifetime, 188, 189, 191, 193client calling timed-out CAO, 45, 46DefaultLifeTimeSingleton, 188distributed reference counting, 185garbage collection, 185GetLifetimeService method, 197InfinitelyLivingSingleton_LifeTime
property, 195InitializeLifetimeService method, 186InstanceSponsor_Lifetime, 205LeaseManager, 186leases, 186Lifetime namespace, 508–511Lifetime property, 195, 205lifetime tag, 85, 88
changing base lifetime, 188LifetimeServices class, 511managing object lifetime, 185nondefault lifetimes, 193, 194server-side sponsors, 203Singleton objects, 30sponsors, 43, 196–209sponsorship, 185TimeSpan properties, 186TTL (time-to-live), 185
links to web sites, 541–548LIST command, POP3, 424, 428listen attribute, channel tag, 90
listenersremoting events, 214
loadTypes attribute, debug tag, 87local storage, 299LocallyHandleMessageArrived method,
218logging, 209, 210LogicalCallContext class, 514LogicalCallContext property, 327
passing runtime information, 391, 393,397
logon process, 137, 138LongerLivingSingleton class, 188, 189, 191,
193properties, 195, 196
Low value, typeFilterLevel attribute, 93
■MmachineName attribute, 90, 317mail
see e-mailMAIL FROM command, SMTP, 423maintenance, 292major version, 225managed extensions, 543MapPath method, 172mapping protocols to .NET Remoting,
437–445marshal by value object, 489MarshalByRefObject class, 488–489
changing base lifetime, 188, 189, 191, 193changing lease time, 187deployment using IIS, 116ExtendedMBRObject, 193leases, 186nondefault lifetimes, 193, 194objects, 26, 34, 59, 93remoting events, 215sample remoting application, 13, 14, 16scalable remoting rules, 281server-side sponsors, 203sponsors, 185troubleshooting multihomed machines,
315, 316versioning with interfaces, 256
marshaling, 543Mercury/32 e-mail server, 467message confidentiality, 124message objects
passing runtime information, 390proxies, 322, 323serialization through formatters, 329–330
■INDEX 563

message queuing, 277message sinks, 328–329
brief description, 321creating proxies, 323how messages work, 326
Message-Id header, 425, 441MessageArrived event, 215, 222MessageArrivedLocally event, 218, 219MessageCount property, POP3, 430MessageData objects, 323MessageReceived method, 434, 441messages, 326–331
Args property, 327AsyncProcessMessage method, 328asynchronous messaging, 338–348brief description, 321BroadcastMessage method, 215client-side messaging, 331–333ConstructionCall messages, 326, 352ConstructionCallMessage, 240contents described, 327CreateMessageSink method, 352DeleteMessage method, 432DumpMessageContents method, 417formatters, 328GetMessage method, 431HandleIncomingMessage method, 441HandleMessage method, 219HandleMessageDelegate method, 434HandleReturnMessage method, 323how they work, 326IConstructionCallMessage, 530IConstructionReturnMessage, 530IDynamicMessageSink, 356IMessage, 525IMessageSink, 338–339, 526IMethodCallMessage, 528IMethodMessage, 527IMethodResponseMessage interface,
529IMethodReturnMessage, 528LocallyHandleMessageArrived method,
218MessageArrived event, 215, 222MessageArrivedLocally event, 218, 219MessageCount property, POP3, 430MessageData objects, 323MessageReceived method, 434, 441MethodName property, 327MethodSignature property, 327ProcessMessage method, 333ProcessMessageFinish method, 356
ProcessMessageStart method, 356properties and dictionary keys, 327proxies creating, 323SendMessage method, 440SendReplyMessage method, 440SendRequestMessage method, 440SendResponseMessage method,
440SerializeSoapMessage method, 330serializing messages through formatters,
329server-side messaging, 333–338sink processing, 531SoapMessage, 521SyncProcessMessage method, 323transport channels, 326
messages moving through, 330–331TypeName property, 327Uri property, 327WaitAndGetResponseMessage method,
441Messaging namespace, 512–514
extending .NET Remoting framework,525–529
metadata.NET Framework versioning example,
232.NET Remoting configuration files, 77CallContext, 512client-side sinks, 400CLR locating assemblies, 227generated metadata assembly, 12ITransportHeaders, 536lifecycle management, versioned SAOs,
236, 239moving constraints to, 471, 472non-wrapped proxy metadata, 72shared assemblies, SoapSuds, 68
Metadata namespace, 514–516method signatures
delegates, 51MethodCall class, 326, 327, 529MethodName property, 327MethodResponse class, 529methods
IMethodCallMessage, 528, 529IMethodMessage, 527IMethodResponseMessage interface,
529IMethodReturnMessage, 528MethodCall class, 327, 529MethodName property, 327
■INDEX564
MethodResponse class, 529MethodSignature property, 327one way methods, 222, 224SoapMethodAttribute, 516ways of executing in .NET, 46
asynchronous calls, 51ByValue objects, 25one-way calls, 55synchronous calls, 47
MethodSignature property, messagesdictionary key, data type & sample
value, 327Microsoft Management Console
installing Windows service, 111–112Microsoft Transaction Server (MTS), 6minor version, 225mobile objects, 3mode attribute
wellknown tag, service tag, 82, 97MSDN
links to web sites, 541–543MSDN security samples, 140
authentication level client and server,144
capabilities of security token, 143message protection, 144security sample client, 141server accepting authenticated requests,
145shared assemblies for .NET remoting,
140specifying security protocol, 143
MSMQ (Microsoft Message Queue)asynchronous communication, 421links to web sites, 545when to use .NET Remoting, 277, 283
MTS (Microsoft Transaction Server), 6multicasting
MSMQ, 284MulticastDelegate, 220UDP broadcasts, 282
multihomed machinestroubleshooting, 315–317
multiserver configuration, 59client assembly, 66examining, 60HTTP channel, 64multiserver/multiclient, 13ports, 64server assembly, 63, 64, 66shared assembly, 62UML diagram, 60
■Nname attribute, channel tag, 89name parameter
SMTPClientChannel, 446SMTPServerChannel, 454
Named Pipe channel sample, 102named pipes, 421, 545names
BuildFormatName method, 286ChannelName property, 456, 463, 499connectionGroupName attribute, 90displayName attribute, 89, 97, 99FreeNamedDataSlot method, 212machineName attribute, 90MethodName property, 327proxyName attribute, 90TypeName property, messages, 327
namespacessee System.Runtime namespaces
naming conventionsconfiguration files, 76language agnostic names, 149strong naming, 225strongly named assemblies, 226
.NET Frameworkauthorization check types, 133concerns regarding SoapSuds, 287identities, 129instance creation, 30principals, 129shared assemblies, 67versioning, 225–233Whidbey, 151
.NET Remotingadvantages of, 9architecture, 10, 322client for second server component, 175configuration files
see configuration filescreating remoting clients, 161cross-AppDomain remoting, 276cross-process on multiple machines in
LAN, 276cross-process on single machine, 276cross-process via WAN/Internet, 278deployment, 108
using IIS, 116Enterprise Services or, 280evolution of remoting, 4implementation, 9integrating in Windows services, 108interface definitions, 11
■INDEX 565
introduction, 7lifetime management, 12, 43mapping protocol to, 440, 437–445MSDN security samples, 140, 141multiserver/multiclient, 13object types, 13reasons for changing default remoting
behavior, 359remoting components hosted in IIS as
clients, 172, 176remoting events
see under eventssample .NET Remoting application,
13–22client assembly, 18, 21client implementation, 18data object definition, 15general assembly, 14, 20interface definitions, 14server assembly, 15, 21server implementation, 15
scalable remoting rules, 280scaling out remoting solutions, 290scenarios for .NET remoting, 3security
see securitySoapSuds vs. Interfaces, 286, 287transferring runtime information, 209types of remoting, 25, 26using the IPC channel, 102version 2.0 based client, 156version 2.0 based server, 156versioning, 233–245ways to run remote objects, 75web.config file and client configuration,
170when to use .NET Remoting, 275
.NET Remoting frameworkinterfaces for extending, 525links to web sites, 542nondefault lifetimes, 193, 194transport channels, 421
.NET Remoting links, 541–548custom channels, 544–546Ingo’s .NET Remoting FAQ corner, 541interoperability, 544MSDN, 541–543
.NET Remoting namespacessee under System.Runtime namespaces
network latency, 278Network Load Balancing
see NLB
network trafficencryption, 375
new operator, 495IConstructionCallMessage, 530
Next property, 536NextChannelSink property, 535NextSink property, 328, 527NLB (Network Load Balancing)
clusters, 291nodes, 292performance, 291scalable remoting rules, 280scaling out remoting solutions, 290when to use .NET Remoting, 277
NLB clustersconnections, 292creating, 293–299taking nodes online/offline, 299words of caution, 294
NLB Managercreating NLB clusters, 294
nodescreating NLB clusters, 295, 298designing applications for static
scalability, 299Network Load Balancing, 292taking nodes online/offline, 299
NONCENTLM authentication, 125
NonSerialized attribute, 489notification of events, 281notifications
clients located in same IP subnet, 282guaranteed asynchronous delivery of, 283MSMQ, 284other approaches, 286when to use .NET Remoting, 282
NT LAN manager (NTLM) authentication,124
MSDN security samples, 144
■Oobject pooling, 547object types, 13ObjectHandle class, 492objectUri attribute
wellknown tag, service tag, 82, 97ObjRef class, 491–492
MarshalByRefObjects object type, 13properties, 325proxies, 324remoting with MarshalByRefObject, 59
■INDEX566
observer pattern, 546OK message, POP3, 423one way methods/events, 222, 224one-way calls, 55, 56
ways of executing methods, 46OneWay attribute, 57, 58OneWayAttribute class, 514OnStart method, 108OnStop method, 108OOB (out-of-band) data, 209Organization class, 470, 476, 479, 483output caching, 548
■PpacketIntegrity value
authenticationLevel property, 144packetPrivacy value
authenticationLevel property, 144parameters
checking in an IMessageSink, 480i parameter, 228, 234l parameter, 228, 235, 238name parameter, 446, 454pop3Xyz parameters, 446, 454PropagateOutParameters method, 323replySink parameter, 338, 339senderEmail parameter, 446, 454smtpServer parameter, 446, 454SoapParameterAttribute, 516u parameter, 228
Parse method, 499implementing client-side channels, 447,
448implementing server-side channels,
456parseURL method, 450passing by reference, 13, 26passing by value, 13
see also serializable objectsPassportIdentity, 130patterns
factory design pattern, 38observer pattern, 546
per-host/object authentication model, 359performance
designing applications for staticscalability, 299
links to web sites, 541NLB clusters, 291
persistencelinks to web sites, 547StreamingContext structure, 520
Person class, 257, 258, 260, 261, 263, 264,266, 268, 270, 273
platform independence, 281platforms, 4pluggable sink architecture, 402Poll method, 434polling
checking for new mail, 433registering POP3 server, 435
pooling, 547POP3 protocol, 423–424
asynchronous communication, 421checking for new mail, 433encapsulating, 427POP3 replies, 423registering POP3 server, 435transferring e-mail, 422
POP3Connection class, 428POP3Msg class, 427, 443pop3Password parameter
SMTPClientChannel, 446SMTPServerChannel, 454
POP3Polling class, 433pop3PollInterval parameter
SMTPClientChannel, 446SMTPServerChannel, 454
POP3PollManager class, 436, 454pop3Server parameter
SMTPClientChannel, 446SMTPServerChannel, 454
pop3User parameterSMTPClientChannel, 446SMTPServerChannel, 454
port attribute, channel tag, 89, 200ports
channel information for IIS, 118configuration files, 82creating NLB clusters, 295multiserver configuration, 64proxyPort attribute, 90
principals.NET Framework, 129, 130application using, 130example with role permission check, 131role-based security, 129
priority attribute, channel tag, 89PriorityChangerSink class, 396PriorityChangerSinkProvider class, 398PriorityEmitterSink class, 393PriorityEmitterSinkProvider class, 395private assemblies
shared assemblies compared, 227
■INDEX 567
private queues, 284PrivateInvoke method
proxies creating messages, 323proxies returning values, 324
probingCLR resolving assembly references, 227
Processes dialog boxdebugging Windows service, 114
ProcessInboundStream methodcreating encryption sinks, 381, 382, 384encryption helper, 380symmetric encryption, 378
ProcessMessage methodBinaryFormatter version mismatch,
411changing sinks programming model,
406client-side messaging, 333client-side sinks, 363, 451compression sinks, 371, 373encryption sinks, 383IClientChannelSink, 533IServerChannelSink, 334, 535mapping protocols to .NET Remoting,
443moving messages through transport
channels, 330passing runtime information, 391, 397server-side asynchronous processing,
347server-side messaging, 334server-side sinks, 366, 458, 459
ProcessMessageFinish method, 356ProcessMessageStart method, 356ProcessOutboundStream method
creating encryption sinks, 381, 382, 384,385
encryption helper, 379symmetric encryption, 378
PropagateOutParameters method, 323protocols, 421–425
authentication protocols, 124, 128encapsulating, 426–445Kerberos, 126mapping to .NET Remoting, 437–445POP3 protocol, 423–424protocols transferring e-mail, 422SMTP protocol, 422–423SOAP, 7specifying MSDN security protocol, 143transport channels, 421User Datagram Protocol (UDP), 277
provider tagclientProviders tag
authenticationLevel property, 144BinaryFormatter version mismatch,
412changing sinks programming model,
402, 408client-side sinks, 400configuration file using attributes, 142impersonationLevel property, 143securityPackage property, 143
serverProviders tag, 91, 92, 146providers
see also sink providersBinaryServerFormatterSinkProvider, 94changing default remoting behavior, 359client-side sinks, 352CompressionClientSinkProvider, 360,
367, 369CompressionServerSinkProvider, 360,
368, 370encryption, 386–390EncryptionClientSinkProvider, 386, 387EncryptionServerSinkProvider, 388formatter providers, 91, 92, 202IClientChannelSinkProvider, 360, 533IClientFormatterSinkProvider, 534IServerChannelSinkProvider, 360, 535PriorityChangerSinkProvider, 398PriorityEmitterSinkProvider, 395sink chains, 350sink providers, 91SinkProviderData objects, 86, 407, 534SMTPClientTransportSinkProvider, 449SoapClientFormatterSinkProvider, 503SoapServerFormatterSinkProvider, 94,
502SSPI, 128UrlAuthenticationSinkProvider, 86, 407
proxies, 322–325brief description, 321client-side proxies, 531creating messages, 323creating proxies, 322creating Windows Forms client, 168CreateProxy method, 100, 531custom proxies, 413–419CustomProxy class, 414disconnecting an object from, 517GetTransparentProxy method, 415how they work, 322HTTP proxies, 279, 297
■INDEX568
lifetime management, 185non-wrapped proxy metadata, 72ObjRef, 324RealProxy, 531RemotingClientProxy, 517RemotingProxy objects, 322, 413returning values, 324ServerProxy property, 169sinks using custom proxy, 413–419SoapSuds generated nonwrapped
proxy’s source, 240TransparentProxy objects, 322when to use .NET Remoting, 279wrapped proxies, 68, 71
Proxies namespace, 530–531ProxyAttribute class, 531proxyName attribute, channel tag, 90proxyPort attribute, channel tag, 90published objects, 32, 33publisher policies
CLR resolving assembly references, 227
■Qqueues
private queues, 284QUIT command, 432, 423, 424
■RRBS (role-based security), 129RCPT TO command, SMTP, 423RealProxy class, 531
client-side sinks, 353creating proxies, 322proxies creating messages, 323proxies returning values, 324sinks using custom proxy, 413
ref attributechannel tag, 89formatter tag, 92provider tag, 92
refactoringremoting event handling, 217
referencedistributed reference counting, 185passing by reference, 13, 26
references to web sites, 541–548Register method, 197
RegisterActivatedServiceType method,494
RegisterAsyncResponseHandler method,441
RegisterChannel method, 415
registered sponsorsdeserialization of object security, 93
RegisterPolling methodimplementing client-side channels, 446,
447registering POP3 server, 435, 436
RegisterServer method, 444rejectRemoteRequests attribute, channel
tag, 91cross-process on single machine, 276
Release methodlifetime management, 185
remote componentsconfiguration file debugging, 307Windows services hosting, 110
remote objectsaccessing, 491authentication, 135brief description, 3client-side sponsors, 197MarshalByRefObject, 489registering, 99rejectRemoteRequests attribute, 91sponsors, 196
Remote Procedure Calls (RPC), 5remote sponsors, 203remote users
implementing authorization in server,149
remotingsee .NET Remoting
Remoting Channel Framework Extensionlinks to web sites, 545
remoting events, 213–224one way methods/events, 222, 224refactoring event handling, 217scalability, 213
Remoting Management Console (RMC)links to web sites, 548
Remoting namespacessee under System.Runtime
namespacesRemoting Probe tool
links to web sites, 548remoting server
porting to Windows services, 110RemotingClientProxy class, 517RemotingConfiguration class, 492–493
Configure method, 76RemotingData property, 337RemotingException class, 497
passing runtime information, 394
■INDEX 569
RemotingHelper class, 100classes used for configuration, 494client-side sponsors, 198configuring IRemoteCustomerManager,
101creating console clients, 164creating server for remoting clients, 161server-side objects for IIS, 116
RemotingProxy objectscreating proxies, 322sinks using custom proxy, 413
RemotingServices class, 493RemotingTimeoutException class, 497Renew method, 204Renewal method, 209RenewalTime property, 510RenewOnCall method, 337renewOnCallTime attribute, lifetime tag,
88, 188RenewOnCallTime property, 195
server-side sponsors, 205TimeSpan, 186
replySink parameterasynchronous IMessageSink processing,
338, 339request distribution
clusters, 291request-for-comment (RFC) documents, 422requests
AsyncProcessRequest method, 340asynchronous messaging generating,
342–344CORBA, 5creating server-side sinks, 459GetRequestStream method, 533HTTP requests, 292implementing server-side channels, 455,
457mapping protocols to .NET Remoting,
440NLB clusters, 292parsing e-mail address for incoming
request, 444rejectRemoteRequests attribute, 91RequestSent method, 437SendRequestMessage method, 451ServiceRequest method, 335sinks using custom proxy, 416
RequestSent methodmapping protocols to .NET Remoting,
440registering POP3 server, 437
response codes, 422ResponseReceived method
mapping protocols to .NET Remoting,441, 442
registering POP3 server, 437responses
AsyncProcessResponse method, 340AsyncResponseHandler class, 451asynchronous messaging handling, 345,
346creating e-mail headers, 425GetResponseStream method, 334HandleAsyncResponsePop3Msg
method, 441HTTP responses, 375IClientResponseChannelSinkStack, 341IMethodResponseMessage, 529mapping protocols to .NET Remoting,
440MethodResponse, 529RegisterAsyncResponseHandler
method, 441SendResponseMessage method, 440sinks using custom proxy, 416WaitAndGetResponseMessage method,
441responses hashtable, 437, 438, 440, 441RETR command, POP3, 424, 431return values
proxies, 324RFC (request-for-comment) documents,
422RMI (Remote Method Invocation)
see Java RMIrole-based security (RBS), 129root
virtual root, 117RPC (Remote Procedure Calls), 5RunInstallerAttribute, 110runtime information
passing, 390–401transferring client with server, 209–213
■SSAO (server-activated objects), 26
client-side sinks, 352configuration files, 82lifecycle management, 233, 234–239ObjRef objects, 325published objects, 32registering, 96, 99scalable remoting rules, 280
■INDEX570
server-side objects for IIS, 117server-side output using, 85SingleCall SAOs, 28, 277Singleton objects, 30SoapSuds or Interfaces, conclusion, 287versioning, 233–239versioning with interfaces, 246
scalabilitydesigning applications for static
scalability, 299HTTP channel, 293remoting events, 213scalable remoting rules, 280scaling out remoting solutions, 290when to use .NET Remoting, 275
scopeCallContext, 211
SDLChannelSinkserver-side messaging, 335
security, 123–160see also authentication; authorization;
encryptionAccess Control Lists, 75ASP.NET application impersonating
client, 182authentication with IIS, 133back-end-based client security, 177CallContext, 213, 512typeFilterLevel changing security, 311–313client security token
differences .NET 1.x and 2.0, 152creating back-end-based client, 177declarative security, 133demilitarized zone, 4deployment using IIS, 116deserialization of objects, 93encryption and IIS, 138end-user client security, 177fingerprints, 225HTTP channel attributes, 90imperative security checks, 133impersonation
differences .NET 1.x and 2.0, 152integrated security, 138key pairs, 226links to web sites, 541, 543major concepts, 123MSDN security, 140, 143new features also for v2.0, 140physical separation of layers, 4protecting configuration files from
users, 75
scalable remoting rules, 281security with remoting in .NET 2.0, 151,
155servers requiring different versions, 273transferring runtime information, 209trusted subsystem, 178Windows Forms client, 179, 181without IIS, 140
security mechanismscode access security (CAS), 129role-based security (RBS), 129, 133
security package negotiate (SPNEGO), 128Security Support Provider Interface
see SSPIsecurityPackage property, provider tag, 143SendCommand method
POP3 protocol, 429, 431SMTP protocol, 426
senderEmail parameterSMTPClientChannel, 446SMTPServerChannel, 454
SendMessage methodencapsulating SMTP protocol, 426, 427mapping protocols to .NET Remoting,
440SendReplyMessage method, 440SendRequestMessage method, 440
creating client-side sink and provider,451, 452
SendResponseMessage method, 440serializable objects
see also passing by valueByValue objects, 25passed between application domains,
492problem with SoapSuds, 77server-side asynchronous processing, 347versioning, 242–245
servers require different versions,256–273
SerializableAttribute class, 489serialization
advantages of .NET Remoting, 12BinaryClientFormatterSinkProvider, 502BinaryServerFormatterSinkProvider, 501brief description, 3concerns regarding SoapSuds, 286custom exceptions, 288deserialization of object security, 93ISerializable, 519message objects through formatters,
329–330
■INDEX 571

servers requiring different versions, 266,267
SoapClientFormatterSinkProvider, 503SoapFieldAttribute, 515SoapMessage, 521SoapMethodAttribute, 516SoapServerFormatterSinkProvider, 502SoapTypeAttribute, 515types of .NET Remoting, 25
Serialization namespacessee under System.Runtime namespaces
SerializationException class, 521BinaryFormatter version
incompatibility, 309SerializationInfo class, 520
custom exceptions, 289SerializeSoapMessage method, 330server applications
debugging hints, 303deploying server application, 108
server assemblymultiserver configuration, 63, 64, 66output independent of OneWay
attribute, 58output using asynchronous calls, 55output using synchronous calls, 51remoting application architecture, 14sample remoting application, 15, 21synchronous calls, 47wrapped proxies, SoapSuds, 68
server objectsconfiguring in client configuration, 165
server-activated objectssee SAO
server-side channels, 453–462server-side messaging, 333–338server-side sinks, 354–355, 364–367
compression sinks, 360configuration files, 370connection using/not using compared,
370EncryptionServerSink, 383implementing server-side channels,
458–462IServerChannelSink, 534IServerChannelSinkProvider, 535sink providers, 368
server-side sponsors, 203–209server-side transport channel sinks, 426ServerChannelSinkStack, 334, 460ServerContextTerminatorSink, 337
ServerException class, 497–498ServerObjectTerminatorSink, 337ServerProcessing property, 392, 398serverProviders tag
BinaryServerFormatterSinkProvider, 501channel tag, 91, 202formatter tag, 94, 95HttpServerChannel, 506server accepting authenticated requests,
146sink providers, 349
ServerProxy property, 169servers
BinaryServerFormatterSink, 503BinaryServerFormatterSinkProvider, 501client for second server component, 175console window for final server, 177creating server for remoting clients,
161–163HttpServerChannel, 506intermediary .NET Remoting server
hosted in IIS, 173lifecycle management, versioned SAOs,
237output window for IIS hosted server, 177registering POP3 server, 435remoting events, 214servers requiring different versions, 258,
260, 263, 264, 267, 268, 272SoapServerFormatterSink, 504SoapServerFormatterSinkProvider, 502TcpServerChannel, 508transfer runtime information with
client, 209–213versioning with interfaces, 247, 251, 252,
255servers hashtable, 437, 438, 441, 444ServerStartup class
published objects, 33sample remoting application, 16Singleton objects, 30
service installerWindows service installer, 109
service tag, 85, 96, 172Service-Oriented Architecture (SOA), 279,
281ServiceBase class, 108ServiceRequest method, 335services
see also Windows servicesActivatedServiceTypeEntry, 494
■INDEX572

ChannelServices, 500EnterpriseServicesHelper, 516LifetimeServices, 511RemotingServices class, 493TrackingServices, 517WellKnownServiceTypeEntry, 495
Services namespace, 516, 518session affinity
creating NLB clusters, 296Session Ticket (ST), 127SetAge method, 251, 252, 254SetData method, 210SetDefaultAuthenticationEntry method,
404, 407SetSinkProperties method, 405setValue method, 331shared assemblies, 67
see also general assembly.NET Framework versioning example,
229creating server for remoting clients, 161defining interfaces, 102GAC, 227interface definitions, .NET Remoting, 11MSDN security, 140multiserver configuration, 62private assemblies compared, 227servers requiring different versions, 260,
270shared base classes, 67shared implementation, 67SoapSuds metadata, 68versioning with interfaces, 246, 251, 253
shared base classes, 67shared implementation, 67shared interfaces, 11shared storage, 299signatures
delegates, 51fingerprints, 225symmetric encryption, 379versioning with interfaces, 253
Simple Object Access Protocolsee SOAP
SingleCall objectsclient output for, 29registering, 28scalable remoting rules, 280server output for, 30server-activated objects, 26, 28wellknown tag, service tag, 97
SingleCall SAOs, 277Singleton objects
allowing client access to, 83changing base lifetime example, 188,
189, 191, 193client output for, 31, 33configuration files, 82creating server for remoting clients, 163lifetime management, 30LifeTime property name extension, 195registering, 30RenewOnCallTime property name
extension, 195server output for, 32, 33server-activated objects, 26, 30SponsorshipTimeout property name
extension, 195threading, 32versioning with interfaces, 248, 256wellknown tag, service tag, 97
sink providers, 349–355, 367–369changing sinks programming model,
406channel tag, 91client-side sinks, 367reference for, 92server-side sinks, 368
SinkProviderData objects, 407sinks
BaseChannelObjectWithProperties, 539BaseChannelWithProperties, 540BinaryClientFormatterSink, 503BinaryClientFormatterSinkProvider, 502BinaryFormatter version
incompatibility, 310, 409–413BinaryServerFormatterSink, 336, 503BinaryServerFormatterSinkProvider, 94,
501business logic, 419changing default remoting behavior, 359changing programming model, 402–409channelSinkProviders tag, 86client-side sinks, 350–353, 361–364
implementing client-side channels,449–453
ClientContextTerminatorSink, 332compression sinks, 359–375creating proxies, 323CrossContextChannel, 336DispatchChannelSink, 336dynamic sinks, 332, 356–357
■INDEX 573
encryption, 380–385HttpServerTransportSink, 335IChannelSinkBase, 532IClientChannelSink, 532IClientChannelSinkProvider, 533IClientFormatterSink, 534IClientFormatterSinkProvider, 534IMessageSink, 526IServerChannelSink, 534IServerChannelSinkProvider, 535LeaseSink, 337message processing, 531message sinks, 321, 328–329passing runtime information, 390–401pluggable sink architecture, 402SDLChannelSink, 335server-side asynchronous processing,
347server-side sinks, 354–355, 364–367
implementing server-side channels,458–462
ServerContextTerminatorSink, 337ServerObjectTerminatorSink, 337sink chains, 349, 350, 455sink providers, 367–369SoapClientFormatterSink, 333, 503SoapClientFormatterSinkProvider, 503SoapServerFormatterSink, 336, 504SoapServerFormatterSinkProvider, 94,
502StackbuilderSink, 337transport channels, 419using custom proxy, 413–419
SMTP protocol, 422–423asynchronous communication, 421encapsulating, 426SMTP Response code classes, 422SOAP binding to, 424transferring e-mail, 422
SmtpChannel class, 465–467wrapping transport channel, 462–465
SMTPClientChannel class, 445–453SMTPServerChannel compared, 454wrapping transport channel, 462
SMTPClientTransportSink class, 450, 452SMTPClientTransportSinkProvider class,
449SmtpConnection class, 426, 438, 440SMTPHelper class, 437, 438smtpServer parameter
SMTPClientChannel, 446SMTPServerChannel, 454
SMTPServerChannel class, 453–462implementing server-side channels, 454,
455, 457parameters, 454SMTPClientChannel compared, 454wrapping transport channel, 462
SMTPServerTransportSink classcreating server-side sinks, 459, 461implementing server-side channels, 455,
456sn.exe
.NET Framework versioning example,228
key pairs, 226SOAP (Simple Object Access Protocol)
binding to SMTP, 424creating e-mail headers, 425introduction, 7moving messages through transport
channels, 330scalable remoting rules, 281serializing messages through formatters,
330when to use .NET Remoting, 279
SOAP formatterHttpChannel, 504HttpClientChannel, 505links to web sites, 548
SOAP Trace Utility, 157SoapAttribute class, 515SoapClientFormatterSink class, 503
client-side messaging, 333serializing messages through formatters,
330SoapClientFormatterSinkProvider class,
503SoapFault class, 521SoapFieldAttribute class, 515SoapFormatter class, 329SoapMessage class, 521SoapMethodAttribute class, 516SoapOption enumeration, 516SoapOptions property, 516SoapParameterAttribute class, 516SoapServerFormatterSink class, 504
server-side messaging, 336SoapServerFormatterSinkProvider class,
502configuring typeFilterLevel in code, 94
SoapSudscalling, 68client-side sinks, 400
■INDEX574
concerns regarding, 286creating CAOs, 34, 240generating SoapSuds wrapped proxy, 69generating source code with, 80interfaces or, 100, 286lifecycle management, versioned SAOs,
236, 239non-wrapped proxy metadata, 72problem with SoapSuds, 77–81RemotingClientProxy, 517SoapMethodAttribute, 516SoapSuds generated nonwrapped
proxy’s source, 240SoapSuds metadata, 82
shared assemblies, 68wrapped proxies, 68
client assembly, 70SoapTypeAttribute class, 515, 516SPNEGO (security package negotiate), 128sponsors
see also client-side sponsorsbasic sponsor example, 197typeFilterLevel changing security, 311client-side sponsors, 196, 197
calling expired object’s method,198–203
ClientSponsor, 510deserialization of object security, 93InstanceSponsor_Lifetime, 205InstanceSponsor_RenewOnCallTime, 205ISponsor, 196, 509LeaseManager, 196lifetime management, 43, 196–209LifetimeServices, 511MarshalByRefObject, 185registered sponsors, 93remote objects, 196remote sponsors, 203server-side sponsors, 203–209
sponsorshipTTL lifetime management, 185
sponsorshipTimeout attribute, lifetime tag,88
SponsorshipTimeout property, 186, 195SSL encryption, 139SSPI (Security Support Provider Interface),
128differences versions 1.x and 2.0, 152MSDN security samples, 140new features also for v2.0, 140
ST (Session Ticket)Kerberos authentication, 127
StackbuilderSink, 337StartListening method, 455, 457, 464STAT command, POP3, 424state
client-activated objects, 34creating server-side sinks, 459creating Windows Forms client, 169CurrentState property, 511LeaseState enumeration, 511links to web sites, 547scalable remoting rules, 281SingleCall objects, 28StreamingContextStates enumeration,
520static fields
scalable remoting rules, 281StopKeepAlive method, 206StopListening method, 464storage
shared and local storage, 299StreamingContext structure, 520StreamingContextStates enumeration, 520strictBinding attribute
BinaryServerFormatterSinkProvider, 501formatter tag, serverProviders tag, 92, 95
strong names/naming, 225.NET Framework versioning example,
228CLR resolving assembly references, 227creating strongly named assembly, 226fingerprints, 225GAC, 227gacutil.exe retrieving, 235versioning serializable objects, 242versioning with interfaces, 247, 248, 250
strongly named assembliesAssemblyKeyFile attribute, 227AssemblyVersion attribute, 227CLR locating, 227creating, 226lifecycle management, versioned SAOs,
234, 236source file attributes, 226
suppressChannelData attribute, channeltag, 90
symmetric encryption, 376–380synchronous calls, 46, 47
client assembly, 49client-side sinks, 363mapping, 421proxies creating messages, 323server-side sinks, 366
■INDEX 575
synchronous messaging, 441SyncProcessMessage method
handling asynchronous response, 346IMessageSink, 328
asynchronous processing, 338, 339checking parameters in, 480
passing runtime information, 390proxies creating messages, 323serializing messages through formatters,
329sinks using custom proxy, 415
system maintenance, 292System.Runtime namespaces
identifying for classes, 186Remoting, 491–499Remoting.Activation, 529–530Remoting.Channels, 499–504, 531–540Remoting.Channels.Http, 504–506Remoting.Channels.Tcp, 506–508Remoting.Lifetime, 508–511Remoting.Messaging, 512–514,
525–529Remoting.Metadata, 514–516Remoting.Proxies, 530–531Remoting.Services, 516–518Serialization, 518–521Serialization.Formatters, 521–523
■Ttags
see under configuration filesTCP channel attributes, 89TCP channels
see also channel tagcreating console clients, 164creating server for remoting clients, 163cross-process on single machine, 276encryption, 375versioning with interfaces, 248
TCP connectionsHTTP requests, 292NLB clusters, 291, 292troubleshooting client behind firewall,
317Tcp namespace, 506, 508TcpChannel class, 506TcpClientChannel class, 507, 539TcpEx channel, 545TcpServerChannel class, 508TGT (Ticket Granting Ticket)
Kerberos authentication, 126ThreadPriority, 392, 397
threadsasynchronous calls, 421changing default remoting behavior, 359ILogicalThreadAffinative interface, 209,
514mapping protocols to .NET Remoting,
440, 441passing runtime information, 391, 399,
401server-side sponsors, 206Singleton objects, 26, 32
threat modeling, 124time
see also lifetime managementInitialLeaseTime property, 186InstanceSponsor_RenewOnCallTime,
205Just-In-Time debugging, 305leaseManagerPollTime attribute, 88leaseTime attribute, 88LeaseTimeAnalyzer method, 186RemotingTimeoutException class, 497RenewalTime property, 510renewOnCallTime attribute, 88RenewOnCallTime property, 186runtime information, 209–213, 390–401sponsorshipTimeout attribute, 88SponsorShipTimeout property, 186
Title propertyversioning serializable objects, 243, 245
traceSOAP Trace Utility, 157
TrackingServices class, 516, 517, 547TransparentProxy objects
client-side sinks, 353creating proxies, 322, 323proxies creating messages, 323proxies returning values, 324RealProxy, 531remoting with MarshalByRefObject, 59
transport channels, 421–468brief description, 321client-side transport channel, 445–453encapsulating SMTP/POP3 protocol,
426how messages work, 326moving messages through, 330–331preparing to use, 467server-side transport channel, 453–462sinks, 419SMTPClientChannel, 445–453SMTPServerChannel, 453–462
■INDEX576
using SmtpChannel, 465words of caution when developing, 468wrapping transport channel, 462–465
transport headersITransportHeaders, 536TransportHeaders method, 443
troubleshooting, 303–318BinaryFormatter version
incompatibility, 309–311typeFilterLevel changing security,
311–313client behind firewalls, 317–317configuration files, 305–309debugging, 303–305multihomed machines, 315–317using custom exceptions, 313–314
trusted subsystem, 178try...catch blocks
one-way calls, client assembly, 56TTL (time-to-live)
changing default lease time, 187changing lease time on class by class
basis, 187expired TTL exception, 187lifetime management, 185sponsors, 196TimeSpan properties, 186
tutorialslinks to web sites, 543
type attributeactivated tag, client tag, 99activated tag, service tag, 97channel tag, 89configuration file debugging, 307, 308formatter tag, serverProviders tag, 92provider tag, serverProviders tag, 92wellknown tag, 83
client tag, 98, 99, 101service tag, 82, 97
typed DataSetsconcerns regarding SoapSuds, 287
TypeEntry class, 493, 494typeFilterLevel attribute
BinaryClientFormatterSinkProvider, 502BinaryServerFormatterSinkProvider, 501changing security restrictions with,
311–313formatter tag, 92, 93, 94
remoting events, 220setting to full, 249SoapClientFormatterSinkProvider, 503versioning with interfaces, 248
TypeFilterLevel enumeration, 521TypeName property, messages, 327types
ActivatedClientTypeEntry, 494ActivatedServiceTypeEntry, 494content-type header, 409GetRegisteredWellKnownClientTypes
method, 101InitTypeCache method, 100IRemotedType interface, 103IRemotingTypeInfo, 498loadTypes attribute, debug tag, 87object types, 13RegisterActivatedServiceType method,
494registering as remote, 99SoapTypeAttribute, 515TypeEntry, 493versioning behavior, 95WellKnownClientTypeEntry, 496WellKnownServiceTypeEntry, 495XmlTypeNamespace attribute, 241
■U/u parameter, 228UDDI (Universal Description, Discovery,
and Integration, 7UDP broadcasts, 282, 283UML diagram
multiserver configuration, 60Unicode, 424Unregister method
client-side sponsors, 200server-side sponsors, 204, 207
unsafeAuthenticatedConnectionSharingattribute
channel tag, 90Unwrap method, 492UploadPerson method, 259, 261, 268, 271Uri property, messages, 327URIs
GetUrlsForUri method, 538objectUri attribute, 97
url attribute, client tag, 83, 98, 99, 101url tag, clientProviders tag, 402, 406, 409UrlAuthenticationEntry class, 403, 406UrlAuthenticationSink class, 404UrlAuthenticationSinkProvider class, 407UrlAuthenticator class, 402, 403URLs
links to web sites, 541–548parsing for e-mail address, 444
■INDEX 577

useAuthenticatedConnectionSharingattribute
channel tag, 90useDefaultCredentials attribute, channel
tag, 90, 138useIpAddress attribute, channel tag, 90User Datagram Protocol (UDP), 277
■VValidationResult class, 20value
AddValue method, 243, 261ByValue objects, 13, 25marshal by value object, 489passing by value, 13return values, 324setValue method, 331
versioning.NET Framework, 225–233.NET Remoting, 233–245advanced concepts, 246application design, 273AssemblyVersion attribute, 227, 237client-activated objects, 240–242component compatibility, 225getSAOVersion method, 236includeVersions attribute, 92major/minor versions, 225serializable objects, 242–245
servers require different versions,256–273
server-activated objects, 233–239strong naming, 225versioning with interfaces, 246–256
versioning behavior, 95Virtual Directory Creation Wizard, 117virtual root, 117
■WWaitAndGetResponseMessage method,
441, 451waitingFor hashtable, 437, 438, 440, 441web application client
designer for creating back-end-basedclient, 170
web services.NET Remoting or, 279ASMX Web Services, 279introduction, 7links to web sites, 543, 547servers requiring different versions,
257
web site referenceslinks to web sites, 541–548
web.config file.NET Remoting client configuration, 170configuring ASP.NET client, 170deployment using IIS, 116lifecycle management, versioned SAOs,
235remoting components hosted in IIS as
clients, 172, 174wellknown tag, 76, 82
client tagattributes, 99configuration file using attributes, 83,
100, 120, 139service tag
anonymous deployment, 118attributes, 96configuration file using attributes, 98,
118lifecycle management, versioned
SAOs, 235, 238WellKnownClientTypeEntry class,
496–497WellKnownObjectMode enumeration, 497WellKnownServiceTypeEntry class,
495–496Whidbey, .NET Framework, 151Windows authentication
enabling, 137IIS authentication modes, 134
Windows event log, 110Windows Forms applications
Windows Forms client, 167–169security, 179, 181
Windows groups, IIS, 149Windows Management Instrumentation
(WMI)creating NLB clusters, 298
Windows Network Load Balancingsee NLB
Windows NT challenge/responsesee NTLM authentication
Windows servicesdebugging, 113deploying server application, 108hosting remote components, 110installing service using installutil.exe,
112integrating remoting in, 108porting to, 108security without IIS, 140
■INDEX578

service installer, 109starting from IDE, 111
WindowsIdentity, 130WindowsPrincipal, 130, 131wrapped proxies, 68, 69, 71wrapper classes
accessing CallContext directly in code, 212message contents, 327
WSE-DIMElinks to web sites, 546
■XX-Compress header, 372X-EncryptIV header, 380X-REMOTING
creating e-mail headers, 425mapping protocols to .NET Remoting,
443XML-RPC, 7, 544XmlNamespace attribute, 241XmlTypeNamespace attribute, 241
■INDEX 579