ADSL2+ Modem Routers
130
NETCOMM GATEWAY TM SERIES ADSL2+ Modem Routers USER GUIDE
-
Upload
khangminh22 -
Category
Documents
-
view
1 -
download
0
Transcript of ADSL2+ Modem Routers

NETCOMM GATEWAYTM SERIESADSL2+ Modem Routers
USER GUIDE

NB6, NB6W, NB6Plus4, NB6Plus4W, NB6Plus4Wn User Guide YML854Rev22 www.netcomm.com.au
Table of ContentsPreface ...................................................................................................................................................................................................... 4 NB6 Series Package Contents ............................................................................................................................................................... 5 Before You Use ......................................................................................................................................................................................... 7
Subscription for ADSL Service ............................................................................................................................................................... 7Chapter 1: Overview .................................................................................................................................................................................. 9
NB6 LED Indicators .......................................................................................................................................................................... 9NB6 Rear Panel ............................................................................................................................................................................. 10NB6W LED Indicators .................................................................................................................................................................... 11NB6W Rear Panel .......................................................................................................................................................................... 12NB6Plus4 LED Indicators ............................................................................................................................................................... 13NB6Plus4 Rear Panel ..................................................................................................................................................................... 14NB6Plus4W LED Indicators ............................................................................................................................................................ 15NB6Plus4W Rear Panel .................................................................................................................................................................. 16NB6Plus4Wn LED Indicators .......................................................................................................................................................... 17NB6Plus4Wn Rear Panel ................................................................................................................................................................ 18
Chapter 2: System Requirement and Installation ................................................................................................................................. 20System Requirement ............................................................................................................................................................................ 20Do I need a Micro Filter ........................................................................................................................................................................ 21Choosing a place for the ADSL Router ................................................................................................................................................. 22Connecting the ADSL Router ............................................................................................................................................................... 22USB Driver Installation .......................................................................................................................................................................... 23
For Windows ME ............................................................................................................................................................................ 23For Windows 2000 ......................................................................................................................................................................... 23For Windows XP/Vista/7................................................................................................................................................................. 24
Uninstalling the USB Driver .................................................................................................................................................................. 26For Windows ME ............................................................................................................................................................................ 26For Windows 2000 ......................................................................................................................................................................... 26For Windows XP/Vista/7................................................................................................................................................................. 27
Setting up TCP/IP ................................................................................................................................................................................ 28For Windows 98 ............................................................................................................................................................................. 28For Windows ME ............................................................................................................................................................................ 28For Windows NT ............................................................................................................................................................................ 29For Windows 2000 ......................................................................................................................................................................... 29For Mac OSX 10.4 ......................................................................................................................................................................... 29For Windows XP/Vista/7................................................................................................................................................................. 30
Renewing IP Address on Client PC ...................................................................................................................................................... 33For Windows 98/ME ...................................................................................................................................................................... 33For Windows NT/2000/XP/Vista/7 .................................................................................................................................................. 33
Chapter 3: Accessing the Internet .......................................................................................................................................................... 35PPP over ATM (PPPoA) Mode .............................................................................................................................................................. 36PPP over ATM (PPPoA) IP Extension Mode.......................................................................................................................................... 36PPP over Ethernet (PPPoE) Mode ........................................................................................................................................................ 36PPP over Ethernet (PPPoE) IP Extension Mode .................................................................................................................................... 37Numbered IP over ATM (IPoA) .............................................................................................................................................................. 37Numbered IP over ATM (IPoA)+NAT ..................................................................................................................................................... 38Unnumbered IP over ATM (IPoA) .......................................................................................................................................................... 39Unnumbered IP over ATM (IPoA)+NAT ................................................................................................................................................. 40Bridge Mode ........................................................................................................................................................................................ 41MER ................................................................................................................................................................................................. 42
Chapter 4: Web Configuration ................................................................................................................................................................ 44Using Web-Based Manager ................................................................................................................................................................. 44
Outline of Web Manager ................................................................................................................................................................. 44To Have the New Settings Take Effect ............................................................................................................................................ 44Language ....................................................................................................................................................................................... 44
Quick Start ........................................................................................................................................................................................... 45Connect to Internet ........................................................................................................................................................................ 45Quick Setup ................................................................................................................................................................................... 45Connection Type ............................................................................................................................................................................ 46PPP over ATM/ PPP over Ethernet ................................................................................................................................................. 46IP over ATM ................................................................................................................................................................................... 49Bridging ......................................................................................................................................................................................... 51
Status ................................................................................................................................................................................................. 53Overview ........................................................................................................................................................................................ 53ADSL Line ...................................................................................................................................................................................... 53Internet Connection ........................................................................................................................................................................ 55Traffic Statistics .............................................................................................................................................................................. 55DHCP Table ................................................................................................................................................................................... 55

YML854 Rev2 NB6, NB6W, NB6Plus4, NB6Plus4W, NB6Plus4Wn User Guidewww.netcomm.com.au 3
NetComm Gateway Series - ADSL2+ Modem Routers
Wireless Clients .............................................................................................................................................................................. 55Routing Table ................................................................................................................................................................................. 55ARP Table ..................................................................................................................................................................................... 55
Advanced Setup ................................................................................................................................................................................. 56Local Network – IP Address .......................................................................................................................................................... 56Local Network – DHCP Server ...................................................................................................................................................... 57Local Network – UPnP .................................................................................................................................................................. 58Local Network – IGMP Snooping .................................................................................................................................................. 59Internet – Connections .................................................................................................................................................................. 61Internet – DNS Server ................................................................................................................................................................... 64Internet – IGMP Proxy ................................................................................................................................................................... 64Internet – ADSL ............................................................................................................................................................................. 65IP Routing – Static Route .............................................................................................................................................................. 66IP Routing – Dynamic Routing ....................................................................................................................................................... 68Virtual Server – Port Forwarding .................................................................................................................................................... 68Virtual Server – Port Triggering ...................................................................................................................................................... 71Virtual Server – DMZ Host ............................................................................................................................................................. 72Virtual Server – Dynamic DNS ....................................................................................................................................................... 72Virtual Server – Static DNS ............................................................................................................................................................ 73NAT ALG ....................................................................................................................................................................................... 73Firewall .......................................................................................................................................................................................... 74Firewall – IP Filtering ...................................................................................................................................................................... 74Quality of Service .......................................................................................................................................................................... 77Quality of Service – Bridge QoS ..................................................................................................................................................... 77Quality of Service – IP QoS ............................................................................................................................................................ 78Port Mapping ................................................................................................................................................................................ 80
Wireless .............................................................................................................................................................................................. 82Basic ............................................................................................................................................................................................. 82Security ......................................................................................................................................................................................... 85Access Control .............................................................................................................................................................................. 91Repeater ....................................................................................................................................................................................... 92
Management ...................................................................................................................................................................................... 94Diagnostics ................................................................................................................................................................................... 94Management Accounts ................................................................................................................................................................. 95Management Control – From Remote ............................................................................................................................................ 96Management Control – From Local ............................................................................................................................................... 97Internet Time ................................................................................................................................................................................. 97System Log ................................................................................................................................................................................... 98Backup Config ............................................................................................................................................................................ 101Update Firmware ......................................................................................................................................................................... 102Reset Router ............................................................................................................................................................................... 102UPnP for XP ................................................................................................................................................................................ 102
Chapter 5: Troubleshooting ................................................................................................................................................................. 105Problems with LAN ........................................................................................................................................................................... 105Problems with WAN .......................................................................................................................................................................... 105Problems with Upgrading .................................................................................................................................................................. 106
Chapter 6: Glossary .............................................................................................................................................................................. 108Appendix A: Client Setup for 802.1x, WPA, and WPA-PSK ................................................................................................................ 111
Retreiving Client Certificate ............................................................................................................................................................... 111Enabling 802.1x Authentication and Security .................................................................................................................................... 113Enabling WPA Authentication and Security ........................................................................................................................................ 116Enabling WPA-PSK Authentication and Security ............................................................................................................................... 117
Appendix B: Establishing your wireless connection (For NB6W/Plus4W only) ................................................................................. 119Windows XP service pack 2 .............................................................................................................................................................. 119Mac OSX 10.4 .................................................................................................................................................................................. 120Windows Vista .................................................................................................................................................................................. 121Troubleshooting ................................................................................................................................................................................ 124
Appendix C: How to change Wireless Security on your NB6W/NB6Plus4W .................................................................................... 125WEP encryption ................................................................................................................................................................................ 125WPA encryption ................................................................................................................................................................................ 126
Appendix D: Legal and Regualtory Information .................................................................................................................................. 127Customer Information ....................................................................................................................................................................... 127Product Warranty .............................................................................................................................................................................. 127Limitations of Warranty ...................................................................................................................................................................... 128

NB6, NB6W, NB6Plus4, NB6Plus4W, NB6Plus4Wn User Guide YML854Rev24 www.netcomm.com.au
PrefaceThis manual provides information related to the installation, operation, and application of this device. The individual reading this manual is presumed to have a basic understanding of telecommunications terminology and concepts.
If you find the product to be broken or malfunctioning, please contact technical support for immediate service by email at [email protected]
For product update, new product release, manual revision, or software upgrades, please visit our website at www.netcommlimited.com
Important Safety InstructionsWith reference to unpacking, installation, use and maintenance of your electronic device, the following basic guidelines are recommended:
• Do not use or install this product near water, to avoid fire or shock hazard. For example, near a bathtub, kitchen sink or laundry tub, or near a swimming pool. Also, do not expose the equipment to rain or damp areas (e.g. a wet basement).
• Do not connect the power supply cord on elevated surfaces. Allow it to lie freely. There should be no obstructions in its path and no heavy items should be placed on the cord. In addition, do not walk on, step on or mistreat the cord.
• Use only the power cord and adapter that are shipped with this device.
• To safeguard the equipment against overheating, make sure that all openings in the unit that offer exposure to air are not blocked.
• Avoid using a telephone (other than a cordless type) during an electrical storm. There may be a remote risk of electric shock from lightening. Also, do not use the telephone to report a gas leak in the vicinity of the leak.
• Never install telephone wiring during stormy weather conditions.
WARNING • Disconnect the power line from the device before servicing.
CopyrightCopyright©2010 NetComm Limited. All rights reserved. The information contained herein is proprietary to NetComm Limited. No part of this document may be translated, transcribed, reproduced, in any form, or by any means without prior written consent of NetComm LimitedNOTE: This document is subject to change without notice.
Save Our EnvironmentWhen this equipment has reached the end of its useful life, it must be taken to a recycling centre and processed separate from domestic waste.
The cardboard box, the plastic contained in the packaging, and the parts that make up this router can be recycled in accordance with regionally established regulations. Never dispose of this electronic equipment along with your household waste. You may be subject to penalties or sanctions under the law. Instead, ask for disposal instructions from your municipal government.
Please be responsible and protect our environment.

YML854 Rev2 NB6, NB6W, NB6Plus4, NB6Plus4W, NB6Plus4Wn User Guidewww.netcomm.com.au 5
NetComm Gateway Series - ADSL2+ Modem Routers
NB6 Series Package ContentsYour Package contains the following items:
• One NB6, NB6W, NB6Plus4, NB6Plus4W or NB6Plus4Wn Router
• Telephone Cable (RJ-11)
• USB Cable (Not available for NB6Plus4 or NB6Plus4Wn)
• CAT-5 UTP Straight Ethernet Network Cable (RJ-45)
• Power Adaptor
• Driver and Manual CD
• One Quick Start Guide
If any of the above items are damaged or missing, please contact NetComm immediately.

Before You Use

YML854 Rev2 NB6, NB6W, NB6Plus4, NB6Plus4W, NB6Plus4Wn User Guidewww.netcomm.com.au 7
NetComm Gateway Series - ADSL2+ Modem Routers
Before You UseThank you for purchasing a NetComm ADSL2+ Modem Router. NetComm brings you the Next Generation of ADSL technology with ADSL2+*, which boosts ADSL’s performance, improves interoperability, and supports new applications, services and deployment conditions.
NetComm’s implementation of ADSL2+* ensures that your Router operates with existing ADSL services while delivering optimal performance in all modes of operation. Powered by the latest Broadcom ADSL2+* chipset, NetComm’s Router provides downstream data rates of up to 24Mbps in ADSL2+* mode ensuring that you can surf the net or down load your files quicker than ever before.
Security is a key issue with Broadband users and NetComm’s Routers do not leave you exposed. Your new Router has a built-in firewall to ensure your defences are rock-solid against hackers, unauthorised entries, probes and even Denial of Service attacks. What’s more, your Router is equipped with a VPN pass-through feature allowing you to use a standard VPN client for Point-to-Point communication even while your Firewall is active.
NetComm’s NB6 Series Routers deliver the connection versatility needed to cater for today’s ADSL users. Simply attach to a single PC using the Ethernet port (recommended) or USB port (not available for NB6Plus4 or NB6Plus4Wn). Alternatively, should you wish to share your Internet connection, the device is equipped with an in-built Router and one or four Ethernet ports for connection to a network. If you have the NB6W, NB6Plus4W or NB6Plus4Wn router you can also share your Internet connection wirelessly.
Added to this, the Router introduces a QoS (Quality of Service) feature that gives you control over which types of data are given priority by the Router.
* Your ISP must support and provide you with an ADSL-2 or ADSL-2+ service for these features to be available. This product will operate as a standard ADSL Router when an ADSL-2 service is not available.
This reference manual assumes that the reader has an installed Ethernet card in the computer to be connected and has basic to intermediate computer and Internet skills. However, basic Computer Networking, Internet, and Firewall technology information is available from the NetComm Web site. See www.netcomm.com.au.
Subscription for ADSL ServiceTo use the ADSL Router, you have to subscribe to an ADSL service from your broadband service provider. According to the service type you select, you may get various IP addresses:
Dynamic IP: If you apply for an on-demand connection, you will be given an Internet account with username and password. You will get a dynamic IP issued by your ISP, such as under PPPoA, PPPoE, or MER mode.
Static IP address: If you apply for full-time connectivity, you may get either one static IP address or a range of IP addresses from your ISP. The IP address varies according to different ADSL service provider, such as using IPoA or MER mode.

Overview

YML854 Rev2 NB6, NB6W, NB6Plus4, NB6Plus4W, NB6Plus4Wn User Guidewww.netcomm.com.au 9
NetComm Gateway Series - ADSL2+ Modem Routers
Overview
This chapter provides you with a description for the LEDs and connectors on the front and rear surface of the router. Please take a look at this information, before you use/install this router.
NB6 LED IndicatorsThe LED Indicators are located on the front of the unit, their meanings are as follows:
Function Color DefinitionPower Off Power is off.
Solid Green Power is on and the device operates normally.Solid Red Power on self-test in progress
The device enters the console mode of the boot loader.Power on self-test failure if the led always stays solid red.
Flash Red Firmware upgrades in progressADSL Off No ADSL signal is detected.
Slow Flash Green ADSL line is handshaking in progressFast Flash Green ADSL line is training in progressSolid Green ADSL line connection is up.
PPP Off No PPPoA or PPPoE connectionSolid Green At least one PPPoA or PPPoE connection is up. The users
can access the Internet now.Ethernet Off No Ethernet signal is detected.
Flash Green User data is going through Ethernet portSolid Green Ethernet interface is ready to work.
USB Off No USB signal is detected.Flash Green User data is going through USB portSolid Green USB interface is ready to work.

NB6, NB6W, NB6Plus4, NB6Plus4W, NB6Plus4Wn User Guide YML854Rev210 www.netcomm.com.au
NB6 Rear PanelThe following figure illustrates the rear panel of your ADSL Router:
Connector Description
Line RJ-11 connector (Telephone line)
USB USB connector
Reset Reset to factory defaults
Ethernet Ethernet RJ-45 connector
Power on/off switch
Power 12VDC Power connector
YML854 Rev2 NB6, NB6W, NB6Plus4, NB6Plus4W, NB6Plus4Wn User Guidewww.netcomm.com.au 11
NetComm Gateway Series - ADSL2+ Modem Routers
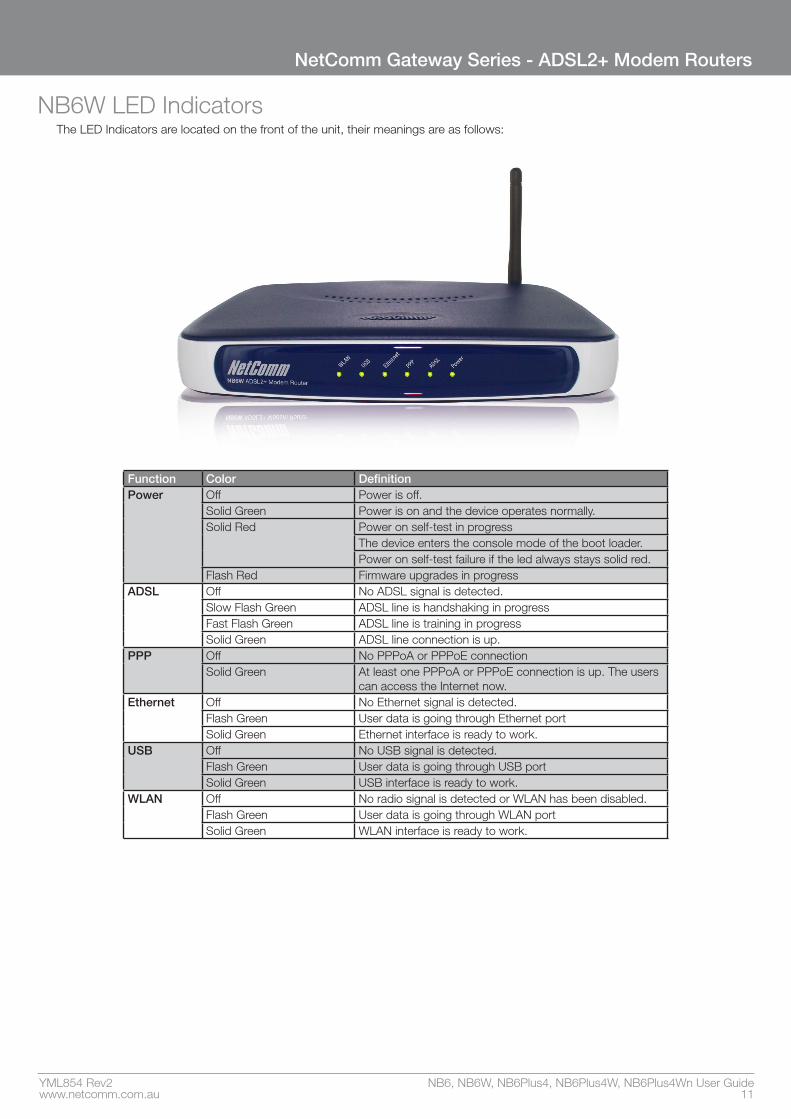
NB6W LED IndicatorsThe LED Indicators are located on the front of the unit, their meanings are as follows:
Function Color DefinitionPower Off Power is off.
Solid Green Power is on and the device operates normally.Solid Red Power on self-test in progress
The device enters the console mode of the boot loader.Power on self-test failure if the led always stays solid red.
Flash Red Firmware upgrades in progressADSL Off No ADSL signal is detected.
Slow Flash Green ADSL line is handshaking in progressFast Flash Green ADSL line is training in progressSolid Green ADSL line connection is up.
PPP Off No PPPoA or PPPoE connectionSolid Green At least one PPPoA or PPPoE connection is up. The users
can access the Internet now.Ethernet Off No Ethernet signal is detected.
Flash Green User data is going through Ethernet portSolid Green Ethernet interface is ready to work.
USB Off No USB signal is detected.Flash Green User data is going through USB portSolid Green USB interface is ready to work.
WLAN Off No radio signal is detected or WLAN has been disabled.Flash Green User data is going through WLAN portSolid Green WLAN interface is ready to work.

NB6, NB6W, NB6Plus4, NB6Plus4W, NB6Plus4Wn User Guide YML854Rev212 www.netcomm.com.au
NB6W Rear PanelThe following figure illustrates the rear panel of your ADSL Router:
Connector Description
Wireless antenna
Power 12VAC Power connector
Power on/off switch
Reset Reset to factory defaults
Ethernet Ethernet RJ-45 connector
USB USB connector
Line RJ-11 connector (Telephone line)

YML854 Rev2 NB6, NB6W, NB6Plus4, NB6Plus4W, NB6Plus4Wn User Guidewww.netcomm.com.au 13
NetComm Gateway Series - ADSL2+ Modem Routers
NB6Plus4 LED IndicatorsThe LED Indicators are located on the front of the unit, their meanings are as follows:
Function Color DefinitionPower Off Power is off.
Solid Green Power is on and the device operates normally.Solid Red Power on self-test in progress
The device enters the console mode of the boot loader.Power on self-test failure if the led always stays solid red.
Flash Red Firmware upgrades in progressADSL Off No ADSL signal is detected.
Slow Flash Green ADSL line is handshaking in progressFast Flash Green ADSL line is training in progressSolid Green ADSL line connection is up.
PPP Off No PPPoA or PPPoE connectionSolid Green At least one PPPoA or PPPoE connection is up. The users
can access the Internet now.Ethernet 1, 2, 3, 4
Off No Ethernet signal is detected.Flash Green User data is going through Ethernet portSolid Green Ethernet interface is ready to work.

NB6, NB6W, NB6Plus4, NB6Plus4W, NB6Plus4Wn User Guide YML854Rev214 www.netcomm.com.au
NB6Plus4 Rear PanelThe following figure illustrates the rear panel of your ADSL Router:
Connector Description
Reset Reset to factory defaults
Power 12VAC Power connector
Power on/off switch
Ethernet – 1, 2, 3, 4 Ethernet RJ-45 connector
Line RJ-11 connector (Telephone line)

YML854 Rev2 NB6, NB6W, NB6Plus4, NB6Plus4W, NB6Plus4Wn User Guidewww.netcomm.com.au 15
NetComm Gateway Series - ADSL2+ Modem Routers
NB6Plus4W LED IndicatorsThe LED Indicators are located on the front of the unit, their meanings are as follows:
Function Color DefinitionPower Off Power is off.
Solid Green Power is on and the device operates normally.Solid Red Power on self-test in progress
The device enters the console mode of the boot loader.Power on self-test failure if the led always stays solid red.
Flash Red Firmware upgrades in progressADSL Off No ADSL signal is detected.
Slow Flash Green ADSL line is handshaking in progressFast Flash Green ADSL line is training in progressSolid Green ADSL line connection is up.
PPP Off No PPPoA or PPPoE connectionSolid Green At least one PPPoA or PPPoE connection is up. The users
can access the Internet now.Ethernet 1, 2, 3, 4
Off No Ethernet signal is detected.Flash Green User data is going through Ethernet portSolid Green Ethernet interface is ready to work.
USB Off No USB signal is detected.Flash Green User data is going through USB portSolid Green USB interface is ready to work.
WLAN Off No radio signal is detected or WLAN has been disabled.Flash Green User data is going through WLAN portSolid Green WLAN interface is ready to work.

NB6, NB6W, NB6Plus4, NB6Plus4W, NB6Plus4Wn User Guide YML854Rev216 www.netcomm.com.au
NB6Plus4W Rear PanelThe following figure illustrates the rear panel of your ADSL Router:
Connector Description
Wireless antenna
Reset Reset to factory defaults
Power 12VDC Power connector
Power on/off switch
Ethernet – 1, 2, 3, 4 Ethernet RJ-45 connector
USB USB connector
Line RJ-11 connector (Telephone line)

YML854 Rev2 NB6, NB6W, NB6Plus4, NB6Plus4W, NB6Plus4Wn User Guidewww.netcomm.com.au 17
NetComm Gateway Series - ADSL2+ Modem Routers
NB6Plus4Wn LED IndicatorsThe LED Indicators are located on the front of the unit, their meanings are as follows:
Function Color Definition
Power Off Power is off.
Solid Green Power is on and the device operates normally.
Solid Red Power on self-test in progress
The device enters the console mode of the boot loader.
Power on self-test failure if the led always stays solid red.
Flash Red Firmware upgrades in progress
ADSL Off No ADSL signal is detected.
Slow Flash Green ADSL line is handshaking in progress
Fast Flash Green ADSL line is training in progress
Solid Green ADSL line connection is up.
PPP Off No PPPoA or PPPoE connection
Solid Green At least one PPPoA or PPPoE connection is up. The users can access the Internet now.
Ethernet
1, 2, 3, 4
Off No Ethernet signal is detected.
Flash Green User data is going through Ethernet port
Solid Green Ethernet interface is ready to work.
WLAN Off No radio signal is detected or WLAN has been disabled.
Flash Green User data is going through WLAN port
Solid Green WLAN interface is ready to work.
WPS Off WPS is off
Flash Green WPS is pushed and ready for wireless client to connect

NB6, NB6W, NB6Plus4, NB6Plus4W, NB6Plus4Wn User Guide YML854Rev218 www.netcomm.com.au
NB6Plus4Wn Rear PanelThe following figure illustrates the rear panel of your ADSL Router
Connector Description
Wireless antenna
Reset Reset to factory defaults
Power 12VDC Power connector
Power on/off switch
Ethernet – 1, 2, 3, 4 Ethernet RJ-45 connector
Line RJ-11 connector (Telephone line)
WPS Push button configuration for wireless connection

System Requirement and Installation

NB6, NB6W, NB6Plus4, NB6Plus4W, NB6Plus4Wn User Guide YML854Rev220 www.netcomm.com.au
System Requirement and InstallationSystem Requirements
Before continuing with the installation of your Router please confirm that you comply with the minimum system requirements.
• Pentium® MMX 233MHz
• A CD-ROM Drive
• Ethernet card installed with TCP/IP Protocol(required when connecting to the ETHERNET port of your ADSL Router)
• OS independent for Ethernet
• USB Port (required only if you are connecting to the USB Port of your ADSL Router, not applicable for NB6Plus4 or NB6Plus4Wn)
• Host Operating Systems support for USB:• Windows® 98 Second Edition and all later verisons
• Web Browser support:• Microsoft Internet Explorer 5.0 (or later versions)• Safari• Netscape® Navigator 4.0 (or later versions) • Most popular browsers
To access the ADSL Router via Ethernet (Recommended), the host computer must meet the following requirements:
• Equipped with an Ethernet network interface.
• Have TCP/IP installed.
• Allow the client PC to obtain an IP address automatically or set a fixed IP address.
• With a web browser installed.
The ADSL Router is configured with the default IP address of 192.168.1.1 and subnet mask of 255.255.255.0. Considering that the DHCP server is Enable by default, the DHCP clients should be able to access the ADSL Router, or the host PC should be assigned an IP address first for initial configuration.
You also can manage the ADSL Router through a web browser-based manager: ADSL ROUTER CONTROL PANEL. The ADSL Router manager uses the HTTP protocol via a web browser to allow you to set up and manage the device.
To configure the device via web browser, at least one properly-configured PC must be connected to the network (either connected directly or through an external hub/switch to the LAN port of the device).

YML854 Rev2 NB6, NB6W, NB6Plus4, NB6Plus4W, NB6Plus4Wn User Guidewww.netcomm.com.au 21
NetComm Gateway Series - ADSL2+ Modem Routers
Do I need a Micro filter? An ADSL Microfilter filters out ADSL signals to allow ADSL and regular Voice Calls to share a single telephone line.
Any equipment sharing your ADSL telephone line, other than an ADSL must be connected to a telephone jackpoint via a microfilter. Examples of such non-ADSL equipment that MUST connect through a microfilter are :
• Telephone Handset
• Fax Machine
• Foxtel digital set
• Back to base alarm
• Dial-up modem (non adsl)
• Caller display unit
• Other devices that have an integral router
Failure to connect ALL non-ADSL equipment via a microfilter may result in loss of the data link whenever a call is made or answered. In many cases the link will also be lost when a call is received even if it is not answered.
ADSL Splitter
TelephoneWall Socket
ADSL Jack
Phone Jack
Microfilter Phone Jack
Modem RouterNote: Model used in this
example is the NB6
Modem RouterNote: Model used in this
example is the NB6
TelephoneWall Socket
TelephoneWall Socket
Telephone
Telephone

NB6, NB6W, NB6Plus4, NB6Plus4W, NB6Plus4Wn User Guide YML854Rev222 www.netcomm.com.au
Choosing a place for the ADSL Router• Place the ADSL Router close to ADSL wall outlet and power outlet for the cable to reach it easily.
• Avoid placing the device in places where people may walk on the cables. Also keep it away from direct sunlight or heat sources.
• Place the device on a flat and stable stand.
Connecting the ADSL Router (Ethernet)Follow the steps below to connect the related devices.
• Connecting the ADSL line. Connect the Line port of the device to your ADSL wall outlet with RJ-11 cable.
• Please attach one end of the Ethernet cable with RJ-45 connector to the LAN port of your ADSL Router.
• Connect the other end of the cable to the Ethernet port of the client PC.
• Connect the supplied power adapter to the Power port of your ADSL Router, and plug the other end to a power outlet.
• Turn on the power switch.
ADSL Router
PowerEthernetLine ResetUSB
Ethernet Cable into the Ethernet Port (1, 2, 3 or 4 if using NB6Plus4, NB6Plus4W and NB6Plus4Wn) Use Ethernet Cables to connect
more PCs or Switches (NB6Plus4, NB6Plus4W and NB6Plus4Wn only)
Power Adapter into power Port
Power PointADSL Enabled Line
Computer with Network Card
Telephone Line Cable into line Port
* Model shown is NB6 may vary slightly from image

YML854 Rev2 NB6, NB6W, NB6Plus4, NB6Plus4W, NB6Plus4Wn User Guidewww.netcomm.com.au 23
NetComm Gateway Series - ADSL2+ Modem Routers
USB Driver Installation (USB is not available for NB6Plus4 or NB6Plus4Wn)
If the ADSL router is to be connected to a PC through the USB interface, you will need to install the USB drivers prior to plugging the USB cable to the PC. Refer to the relevant operating system below to install the USB drivers.
Note: Do not connect the USB cable until you are prompted to in the instructions below
For Windows ME
• Run the USB installation program from the CD provided in your router package.
• An InstallShield Wizard will appear. Please wait for a moment.
• When the welcome screen appears, click Next for the next step.
• When the complete window of the InstallShield Wizard appears, click Finish.
• Link your router and the PC with a USB cable.
• The system will detect the USB driver automatically. Then, the system will copy the proper files for the router. Note: If the USB device is not detected automatically, check the USB cable between the PC and the device. Besides, verify that the device is power on.
• When the file copying finished, the dialog above will close. Now the USB driver is installed properly. You can use the router.
For Windows 2000
• Run the USB installation program from the CD provided in your router package.
• An InstallShield Wizard will appear. Please wait for a moment.
• When the welcome screen appears, click Next for the next step.
• When the complete window of the InstallShield Wizard appears, click Finish.
• Link your router and the PC with a USB cable.
• The system will detect the USB driver automatically, and then copy the proper files for the router. Note: If the USB device is not detected automatically, check the USB cable between the PC and the device. Besides, make sure that the device is power on.
• When the file copying is finished, the dialog above will close. Now the USB driver is installed properly. You can use the router.
To make sure that your router is properly installed, please do the following steps.
1. Right-click on My Computer and press Properties.
2. On the Hardware tab, click Device Manager.
3. Confirm that the NetComm NB6 Series ADSL Router USB Remote NDIS Device is on the Network adapters list.

NB6, NB6W, NB6Plus4, NB6Plus4W, NB6Plus4Wn User Guide YML854Rev224 www.netcomm.com.au
For Windows XP/Vista/7
• Run the USB installation program from the CD provided in your router package.
• An InstallShield Wizard will appear. Please wait for a moment.
• (Vista only) When the User Account Control windows appears, click Continue
• When the welcome screen appears, click Next for the next step.
• When the finish installing message of InstallShield Wizard appears, click Finish.
• Link your router and the PC with a USB cable.
• The system will detect the USB driver automatically.Note: If the USB device is not detected, check the USB cable between the PC and the device. Also make sure that the device is power on.
• The system will then try to find the proper driver for your router and copy the files automatically.
• After the file copying finished, a completing message will appear.
• You can use your router now.

YML854 Rev2 NB6, NB6W, NB6Plus4, NB6Plus4W, NB6Plus4Wn User Guidewww.netcomm.com.au 25
NetComm Gateway Series - ADSL2+ Modem Routers
To make sure your router is properly installed, please do the following steps.
1. Right-click on My Computer and press Properties.
2. On the Hardware tab, click Device Manager.
3. Confirm that the NetComm NB6 ADSL Router USB Remote NDIS Device is on the Network adapters list.

NB6, NB6W, NB6Plus4, NB6Plus4W, NB6Plus4Wn User Guide YML854Rev226 www.netcomm.com.au
Uninstalling the USB Driver (USB is not available for NB6Plus4 or NB6Plus4Wn)For Windows ME
To uninstall the USB driver, please follow the procedure below.
• Unplug the USB cable between your router and your PC. Then click OK.
• Choose Settings –Control Panel from the Start menu. Choose Add/Remove Programs.
• A dialog appears to ask you to choose the program that you want to remove. Please select NetComm ADSL Router USB Driver and click Change/Remove.
• The InstallShield Wizard dialog will appear.
• When the Maintenance Complete screen appears, the USB driver is removed successfully. Click Finish
For Windows 2000
To uninstall the USB driver, please follow the procedure below.
• To safely unplug the USB cable from the USB port on your PC: 1. Go to the right lower corner for Unplug and Eject Hardware and left click on it.2. Click the dialog for Stop NetComm ADSL Router USB Remote NDIS Device.3. The Router is safely removed, click OK to continue.
• Choose Settings – Control Panel from the Start menu. Choose Add/Remove Programs.
• A dialog appears to ask you to choose the program that you want to remove. Please select NetComm ADSL Router USB Driver and click Change/Remove.
• A Confirm Uninstall dialog will show up, unplug your device from the USB port and click OK.
• The InstallShield Wizard will guide you till the USB driver is removed.
• When the Maintenance Complete screen appears, the USB driver is removed successfully. Click Finish.

YML854 Rev2 NB6, NB6W, NB6Plus4, NB6Plus4W, NB6Plus4Wn User Guidewww.netcomm.com.au 27
NetComm Gateway Series - ADSL2+ Modem Routers
For Windows XP/Vista/7
To uninstall the USB driver, please follow the procedure below.
• Unplug your USB cable between your router and your PC.
• Choose Control Panel from the Start menu. Choose Add or Remove Programs (Windows XP) or Programs and Features (Windows Vista/7).
• A dialog appears to ask you to choose the program that you want to remove. Please select NetComm NB6 Series ADSL Router USB Driver and click Change/Remove (Windows XP) or Uninstall (Windows Vista/7).
• (Vista only) When the User Account Control windows appears, click Continue
• The InstallShield Wizard dialog will appear.
• A dialog appears to confirm whether you want to remove the USB driver or not. Unplug the USB cable from your PC, and click Ok.
• When the Maintenance Complete screen appears, the USB driver is removed successfully. Click Finish.

NB6, NB6W, NB6Plus4, NB6Plus4W, NB6Plus4Wn User Guide YML854Rev228 www.netcomm.com.au
Setting up TCP/IPIn order to access the Internet through the ADSL Router, each host on your network must install/setup TCP/IP first. Please follow the steps below to set your network adapter.
If the TCP/IP protocol has not been installed yet, please follow the steps below for installation. In the following illustrations, we will set the PC to get an IP address automatically at the same time.
For Windows 98
1. Open the Start menu, point to Settings and click on Control Panel.
2. Double-click the Network icon.
3. The Network window appears. On the Configuration tab, check out the list of installed network components. Option 1: If there is no TCP/IP protocol, click Add. Option 2: If you have TCP/IP protocol, skip to Step 6.
4. Highlight Protocol and click Add.
5. Highlight Microsoft on the left side of the window, and select TCP/IP on the right side. Then click OK.
6. When returning to the Network window, highlight TCP/IP protocol for your NIC and click Properties.
7. On the IP Address tab: Enable Obtain an IP address automatically and click OK.
8. When returning to the Network window, click OK
9. Wait for Windows when copying files.
10. When prompted with System Settings Change dialog box, click Yes to restart your computer.
For Windows ME
1. Open the Start menu, point to Settings and click on Control Panel.
2. Double-click the Network icon.
3. The Network window appears. On the Configuration tab, check out the list of installed network components. Option 1: If there is no TCP/IP protocol, click Add. Option 2: If you have TCP/IP protocol, skip to Step 6.
4. Highlight Protocol and click Add.
5. Highlight Microsoft on the left side of the windows, and select TCP/IP on the right side. Then click OK.
6. While returning to Network window, highlight TCP/IP protocol for your NIC and click Properties.
7. On IP Address tab: Enable Obtain an IP address automatically and click OK.
8. While returning to the Network window, click OK.
9. Wait for Windows when copying files.
10. When prompted with the System Settings Change dialog box, click Yes to restart your computer.

YML854 Rev2 NB6, NB6W, NB6Plus4, NB6Plus4W, NB6Plus4Wn User Guidewww.netcomm.com.au 29
NetComm Gateway Series - ADSL2+ Modem Routers
For Windows NT
1. Click Start, point to Settings, and then click Control Panel.
2. Double-click the Network icon.
3. The Network window appears. On the Protocols tab, check out the list of installed network components.Option 1: If there is no TCP/IP Protocol, click Add.Option 2: If you have TCP/IP Protocol installed, skip to Step 7.
4. Highlight TCP/IP Protocol and click OK.
5. Insert the Windows NT CD into your CD-ROM drive and type the location of the CD. Then click Continue.
6. When returning to the Network window. Open the Protocols tab, then select TCP/IP Protocol and click Properties.
7. Enable Obtain an IP address from a DHCP server and click OK.
8. When prompted with the message below, click Yes to continue.
9. When returning to Network window, click Close.
10. When prompted with Network Settings Change dialog box, click Yes to restart your computer.
For Windows 2000
1. From the Start menu, point to Settings and then click Network and Dial-up Connections.
2. Right-click the Local Area Connection icon and then click Properties.
3. On the General tab, check out the list of installed network components.Option 1: If there is no TCP/IP Protocol, click Install. Option 2: If you have TCP/IP Protocol, skip to Step 6.
4. Highlight Protocol and then click Add.
5. Click Internet Protocol (TCP/IP) and then click OK.
6. When returning to the Local Area Connection Properties window, highlight Internet Protocol (TCP/IP) and then click Properties.
7. Under the General tab, enable Obtain an IP address automatically. Then click OK.
Mac OSX 10.4
1. Click the Apple icon and choose on “System Preferences”.
2. Click on “Network” icon.
3. Set “Location” to “Automatic and “Show” to “Built In Ethernet”.
4. Click on “TCP/IP” tab.
5. In the “Configure” option, choose “Use DHCP with automatic address”.
6. Click on “Apply Now”.

NB6, NB6W, NB6Plus4, NB6Plus4W, NB6Plus4Wn User Guide YML854Rev230 www.netcomm.com.au
For Windows XP/Vista/7
1. Open the Start menu, and select Control Panel.
2. Double click the Network Connection (Windows XP), View Network status and tasks and then Manage network connections (Windows Vista). or Network and sharing centre (Windows 7).

YML854 Rev2 NB6, NB6W, NB6Plus4, NB6Plus4W, NB6Plus4Wn User Guidewww.netcomm.com.au 31
NetComm Gateway Series - ADSL2+ Modem Routers
3. Right click Local Area Connection and then click Properties.
4. On the General tab, check out the list of installed network components.Option 1: If there is no TCP/IP Protocol, click Install.Option 2: If you have TCP/IP Protocol, skip to Step 7.
5. Highlight Protocol and then click Add.
NB6, NB6W, NB6Plus4, NB6Plus4W, NB6Plus4Wn User Guide YML854Rev232 www.netcomm.com.au
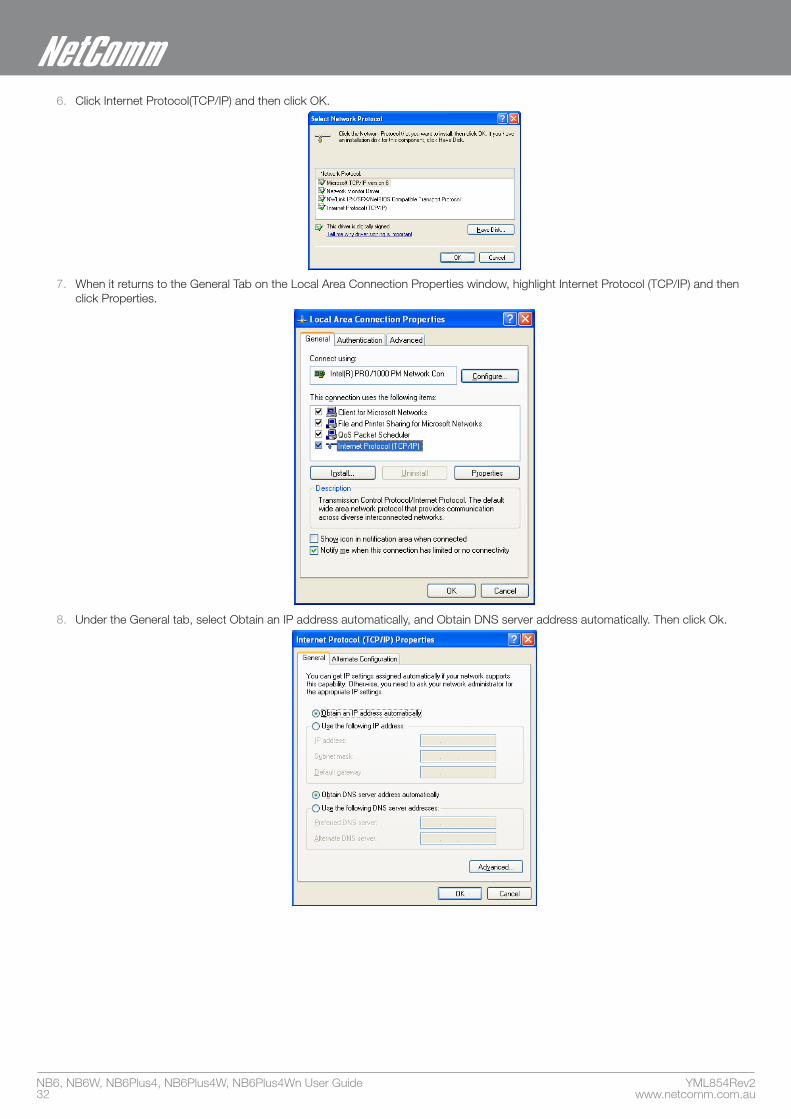
6. Click Internet Protocol(TCP/IP) and then click OK.
7. When it returns to the General Tab on the Local Area Connection Properties window, highlight Internet Protocol (TCP/IP) and then click Properties.
8. Under the General tab, select Obtain an IP address automatically, and Obtain DNS server address automatically. Then click Ok.

YML854 Rev2 NB6, NB6W, NB6Plus4, NB6Plus4W, NB6Plus4Wn User Guidewww.netcomm.com.au 33
NetComm Gateway Series - ADSL2+ Modem Routers
Renewing IP Address on Client PCAfter the ADSL Router gets on line, there is a chance that your PC does not renew its IP address and thus causes the PC not able to access the Internet. To solve this problem, please follow the procedures below to renew PC’s IP address.
For Windows 98/ME
1. Select Run from the Start menu.
2. Type winipcfg in the text box and click OK.
3. When the figure below appears, click Release to let go of the address and then click the Renew button to obtain a new IP address.
For Windows NT/2000/XP/Vista/7
1. Open the Start menu, and click Run.
2. Type cmd in the text box that appears and click OK. You will then see the command prompt window. (Windows Vista) Click Start and type ‘cmd’ in the text bar and press Enter.
(alternative method for opening the command prompt)
• From Start menu, point to Programs, select Accessories, and then click Command Prompt.
3. Type ipconfig at the command prompt window and press Enter to view the computer’s IP information from DHCP server.
4. If the computer is holding a current IP address, type ipconfig /release to let go of the address, then type ipconfig /renew to obtain a new one.

Accessing the Internet

YML854 Rev2 NB6, NB6W, NB6Plus4, NB6Plus4W, NB6Plus4Wn User Guidewww.netcomm.com.au 35
NetComm Gateway Series - ADSL2+ Modem Routers
Accessing the InternetNote: Not all connection options are available on all models in the series
This chapter aims to help you access the Internet in a quick and convenient way. If you need more detailed information for web configuration, please refer to the next chapter for the advanced configuration.
Before configuring the ADSL Router, you must decide whether to configure the ADSL Router as a bridge or as a router. This chapter presents some deployment examples for your reference. Each mode includes its general configuration procedures. For more detailed information about web configuration, refer to “Web Configuration”.
• PPP over ATM (PPPoA)
• PPPoA IP Extenstion
• PPP over Ethernet (PPPoE)
• PPPoE IP Extension
• Numbered IP over ATM (IPoA)
• Numbered IP over ATM (IPoA) + NAT
• Unnumbered IP over ATM (IPoA)
• Unnumbered IP over ATM (IPoA) + NAT
• Bridge Mode
• MER (Bridge Mode + NAT)
To ensure your PC accesses the Internet successfully, please check the following first.
• A network interface card is installed on your PC.
• The ADSL Router is solidly connected with your computer.
• The TCP/IP protocol has been installed and the IP address setting is to obtain IP address automatically.
When all above preparations are ready, you can open the Browser and type “192.168.1.1” into the URL box and type in username/password as admin and start to make the web configuration for different connection modes.
This chapter is going to introduce the function of each connection mode and the basic configuring steps that you have to do. If you do not follow the configuring steps for using these connection modes, you might get some connection problems and cannot connect to the Internet well.
PPP over ATM (PPPoA) ModeDescription:
In this deployment environment, the PPPoA session is between the ADSL WAN interface and BRAS. The ADSL Router gets a public IP address from BRAS when connecting to DSLAM. The multiple client PCs will get private IP address from the DHCP server enabled on private LAN. The enabled NAT mechanism will translate the IP information for clients to access the Internet.
Configuration:
1. Start your browser and type 192.168.1.1 as the address to access ADSL web-based manager.
2. Go to Quick Start – Quick Setup. Uncheck Auto Scan Internet Connection (PVC). Key in the VCI and VPI value, e.g.: • VPI – 8• VCI – 35
Click the Next button.
3. On the Configure Internet Connection – Connection Type page, select PPP over ATM (PPPoA) then click the Next button.
4. On the WAN IP Settings page, select Obtain an IP address automatically and check Enable NAT box. Click Next.
5. On the PPP Username and Password page, enter the PPP username and password that you got from your ISP. Select Always on or select Dial on Demand and key in the inactivity timeout value. (The default value is 20 minutes.) Then click Next.
6. On the Configure LAN side Settings page, key in the IP address and subnet mask for your LAN, e.g.: Primary IP address: 192.168.1.1
Subnet Mask: 255.255.255.0
Check DHCP Server on box. And key in the start and end IP address, e.g.: Start IP Address:192.168.1.2
End IP Address: 192.168.1.254
Then enter the leased time ( the default is 1 day), and click Next.
7. Check the network information on This Internet Connection -- Summary page. Make sure the settings match the information provided by your ISP. Click Finish.
NB6, NB6W, NB6Plus4, NB6Plus4W, NB6Plus4Wn User Guide YML854Rev236 www.netcomm.com.au
PPP over ATM (PPPoA) IP Extension ModeDescription:
In this deployment environment, the PPPoA session is between the ADSL WAN interface and BRAS. The ADSL Router acts as a bridge and receives a public IP address from BRAS for your computer. And only the one that bears the public IP address is allowed to access the Internet. Moreover, no NAT translation will be done at this case.
Configuration:
1. Start your browser and type 192.168.1.1 in the URL box to access ADSL web-based manager.
2. Go to Advanced – Internet – Connections. And click Add.
3. Key in the VCI and VPI value, e.g.: • VPI – 8• VCI – 35
Click the Next button.
4. On the Configure Internet Connection – Connection Type page, select PPP over ATM (PPPoA) then click the Next button.
5. On the WAN IP Settings page, select Obtain an IP address automatically, check PPP IP extension (and Enable NAT would become disabled automatically) then click Next.
6. On the PPP Username and Password page, enter the PPP username and password offered by your ISP. Select Always on, and then click Next.
7. Check the network information on This Internet Connection -- Summary page. Make sure the settings match the settings provided by the ISP. Click Apply.
8. Press Finish.
PPP over Ethernet (PPPoE) ModeDescription:
In this deployment environment, the PPPoE session is between the ADSL WAN interface and BRAS. The ADSL Router gets a public IP address from BRAS when connecting to DSLAM. The multiple client PCs will get private IP address from the DHCP server enabled on private LAN. The enabled NAT mechanism will translate the IP information for clients to access the Internet.
Configuration:
1. Start your browser and type 192.168.1.1 in the URL box to access ADSL web-based manager.
2. Go to Quick Start – Quick Setup. Uncheck Auto Scan Internet Connection (PVC). Key in the VCI and VPI value, e.g.: • VPI – 8• VCI – 35
Click the Next button.
3. On the Configure Internet Connection – Connection Type page, select PPP over Ethernet (PPPoE) then click the Next button.
4. On the WAN IP Settings page, select Obtain an IP address automatically and check Enable NAT box. Click Next.
5. On the PPP Username and Password page, enter the PPP username and password that you got from your ISP. Select Always on or select Dial on Demand and key in the inactivity timeout value. (The default value is 20 minutes.) Then click Next.
6. On the Configure LAN side Settings page, key in the IP address and subnet mask for your LAN, e.g.: Primary IP address: 192.168.1.1
Subnet Mask: 255.255.255.0
Check DHCP Server on box. And key in the start and end IP address, e.g.:Start IP Address:192.168.1.2
End IP Address: 192.168.1.254
Then enter the leased time ( the default is 1 day), and click Next.
7. Check the network information on This Internet Connection -- Summary page. Make sure the settings match the information provided by your ISP. Click Finish.

YML854 Rev2 NB6, NB6W, NB6Plus4, NB6Plus4W, NB6Plus4Wn User Guidewww.netcomm.com.au 37
NetComm Gateway Series - ADSL2+ Modem Routers
PPP over Ethernet (PPPoE) IP Extension ModeDescription:
In this deployment environment, the PPPoE session is between the ADSL WAN interface and BRAS. The ADSL Router acts as a bridge and gets a public IP address from BRAS for your computer. And only the one that got the public IP address is allowed to access into Internet. The real IP that you got is acquired from ISP. Moreover, no NAT translation will be done at this case.
Configuration:
1. Start your browser and type 192.168.1.1 in the URL box to access ADSL web-based manager.
2. Go to Advanced – Internet – Connections. And click Add.
3. Key in the VCI and VPI value, e.g.: • VPI – 8• VCI – 35
Click the Next button.
4. On the Configure Internet Connection – Connection Type page, select PPP over Ethernet (PPPoE) then click the Next button.
5. On the WAN IP Settings page, select Obtain an IP address automatically, check PPP IP extension (and Enable NAT would become disabled automatically) then click Next.
6. On the PPP Username and Password page, enter the PPP username and password offered by your ISP. Select Always on, and then click Next.
7. Check the network information on This Internet Connection -- Summary page. Make sure the settings match the settings provided by the ISP. Click Apply.
8. Press Finish.
Numbered IP over ATM (IPoA)Description:
If you apply for multiple IP addresses from your ISP, you can assign these public IP addresses to the ADSL Router and public server, e.g., Web or FTP server. Typically the first IP is network address, the second is used as router IP address and the last one is for subnet broadcasting. Other remaining IP addresses can be assigned to PCs on the LAN. The following example uses the LAN IP address ranging from 10.11.80.81 to 10.11.80.86 and the subnet mask for LAN is 255.255.255.248. The WAN IP address is 10.11.95.233, and the subnet mask for WAN is 255.255.255.248.
Configuration:
1. Start your browser and type 192.168.1.1 in the URL box to access ADSL web-based manager.
2. Go to Quick Start – Quick Setup. Uncheck Auto Scan Internet Connection (PVC). Key in the VCI and VPI value, e.g.: • VPI – 8• VCI – 35Click the Next button.
3. On the Configure Internet Connection – Connection Type page, select IP over ATM (IPoA) then click Next.
4. On the WAN IP Settings page, select Use the following IP address and Use the following DNS Server Address, then key in the information that your ISP offered, e.g.:
WAN IP Address: 10.11.95.233
WAN Subnet Mask: 255.255.255.248
Primary DNS server: 168.95.1.1
Secondary DNS server: 168.95.192.1
Uncheck Enable NAT and click Next.
5. On the Configure LAN side Settings page, key in the information for your LAN, e.g.,Primary IP Address: 192.168.1.1
Subnet mask: 255.255.255.0
Start IP Address: 192.168.1.2
End IP Address: 192.168.1.254
6. Check Configure the second IP Address and Subnet Mask for LAN Interface and enter the information needed. Secondary IP Address: 10.11.80.81
Subnet mask: 255.255.255.248
Click Next.
7. Check the network information on the Summary page. Make sure the settings match the settings provided by your ISP. Click Finish.
8. Refer to the TCP/IP properties, specify an IP Address, and fill in other information needed, e.g.:IP Address: 10.11.80.82
Subnet Mask: 255.255.255.248
Gateway: 10.11.80.81
Preferred DNS server: 168.95.1.19. Now the router is correctly configured. You can access the Internet.

NB6, NB6W, NB6Plus4, NB6Plus4W, NB6Plus4Wn User Guide YML854Rev238 www.netcomm.com.au
Numbered IP over ATM (IPoA)+NATDescription:
In this deployment environment, we make up a private IP network of 192.168.1.1. NAT function is enabled (on ADSL Router or use another NAT box connected to hub) to support multiple clients to access the Router and some public servers (WWW, FTP).
If you apply for multiple IP addresses from your ISP, you can assign these public IP addresses to the ADSL Router and public server, e.g., Web or FTP server. Typically the first IP is network address, the second is used as router IP address and the last one is subnet broadcasting. Other remaining IP addresses can be assigned to PCs on the LAN.
The following example uses the IP address ranging from 10.11.80.81 to 10.11.80.86 and the subnet mask is 255.255.255.248.
Configuration:
1. Start your browser and type 192.168.1.1 in the URL box to access ADSL web-based manager.
2. Go to Quick Start – Quick Setup. Uncheck Auto Scan Internet Connection (PVC). Key in the VCI and VPI value, e.g.: • VPI – 8• VCI – 35
Click the Next button.
3. On the Configure Internet Connection – Connection Type page, select IP over ATM (IPoA) then click Next.
4. On the WAN IP Settings page, select Use the following IP address and Use the following DNS Server Address, then key in the information that your ISP offered, e.g.:
WAN IP Address: 10.11.80.81
WAN Subnet Mask: 255.255.255.248
Primary DNS server: 168.95.1.1
Secondary DNS server: 168.95.192.1
5. Check the Enable NAT box. And click Next.
6. On the Configure LAN side Settings page, key in the information for your LAN, e.g.,Primary IP Address: 192.168.1.1
Subnet mask: 255.255.255.0
Start IP Address: 192.168.1.2
End IP Address: 192.168.1.254
7. Check the network information. Make sure the settings match the settings provided by ISP. Click Finish.
8. Now the router is correctly configured. You can access into Internet.

YML854 Rev2 NB6, NB6W, NB6Plus4, NB6Plus4W, NB6Plus4Wn User Guidewww.netcomm.com.au 39
NetComm Gateway Series - ADSL2+ Modem Routers
Unnumbered IP over ATM (IPoA)Description:
If you apply for multiple IP addresses from your ISP, you can assign these public IP addresses to the ADSL Router and public server, e.g., Web or FTP server. Typically the first IP is network address, the second is used as router IP address and the last one is subnet broadcasting. Other remaining IP addresses can be assigned to PCs on the LAN.
The following example uses the IP address ranging from 10.11.80.81 to 10.11.80.86 and the subnet mask is 255.255.255.248. In such circumstance, we do not assign any WAN IP.
Configuration:
1. Start your browser and type 192.168.1.1 in the URL box to access ADSL web-based manager.
2. Go to Quick Start – Quick Setup. Uncheck Auto Scan Internet Connection (PVC). Key in the VCI and VPI value, e.g.: • VPI – 8• VCI – 35
Click the Next button.
3. On the Configure Internet Connection – Connection Type page, select IP over ATM (IPoA) then click Next.
4. On the WAN IP Settings page, select None for WAN IP address settings. Then, select Use the following DNS Server Address and key in the information that your ISP offered, e.g.:
Primary DNS server: 168.95.1.1
Secondary DNS server: 168.95.192.1
Uncheck Enable NAT and click Next.
5. On the Configure LAN side Settings page, key in the information for your LAN, e.g.,Primary IP Address: 192.168.1.1
Subnet mask: 255.255.255.0
Start IP Address: 192.168.1.2
End IP Address: 192.168.1.254
6. Check Configure the second IP Address and Subnet Mask for LAN Interface and enter the information needed, e.g., Secondary IP Address: 10.11.80.81
Subnet mask: 255.255.255.248
Check DHCP Server Off and click Next.
7. Check the network information on the Summary page. Make sure the settings match the settings provided by your ISP. Click Finish.
8. Refer to the TCP/IP properties, specify an IP Address, and fill in other information needed, e.g.:IP Address: 10.11.80.82
Subnet Mask: 255.255.255.248
Gateway: 10.11.80.81
Preferred DNS server: 168.95.1.1
9. Now the router is correctly configured. You can access the Internet.

NB6, NB6W, NB6Plus4, NB6Plus4W, NB6Plus4Wn User Guide YML854Rev240 www.netcomm.com.au
Unnumbered IP over ATM (IPoA)+NATDescription:
If you apply for multiple IP addresses from your ISP, you can assign these public IP addresses to the ADSL Router and public server, e.g., Web or FTP server. Typically the first IP is network address, the second is used as router IP address and the last one is subnet broadcasting. Other remaining IP addresses can be assigned to PCs on the LAN.
The following example uses the IP address ranging from 10.11.80.81 to 10.11.80.86 and the subnet mask is 255.255.255.248. In such circumstance, we enable NAT function but not assign any WAN IP.
Configuration:
1. Start your browser and type 192.168.1.1 in the URL box to access ADSL web-based manager.
2. Go to Quick Start – Quick Setup. Uncheck Auto Scan Internet Connection (PVC). Key in the VCI and VPI value, e.g.: • VPI – 8• VCI – 35
Click the Next button.
3. On the Configure Internet Connection – Connection Type page, select IP over ATM (IPoA) then click Next.
4. On the WAN IP Settings page, select None for WAN IP address settings. Then, select Use the following DNS Server Address and key in the information that your ISP offered, e.g.:
Primary DNS server: 168.95.1.1
Secondary DNS server: 168.95.192.1
5. Check the Enable NAT box. And click Next.
6. On the Configure LAN side Settings page, key in the information for your LAN, e.g.,Primary IP Address: 192.168.1.1
Subnet mask: 255.255.255.0
Start IP Address: 192.168.1.2
End IP Address: 192.168.1.254
7. Check Configure the second IP Address and Subnet Mask for LAN Interface and enter the information needed, e.g.,Secondary IP Address: 10.11.80.81
Subnet mask: 255.255.255.248
Click Next.
8. Check the network information on the Summary page. Make sure the contents match the settings provided by your ISP. Click Finish.
9. Now the router is correctly configured. You can access the Internet.

YML854 Rev2 NB6, NB6W, NB6Plus4, NB6Plus4W, NB6Plus4Wn User Guidewww.netcomm.com.au 41
NetComm Gateway Series - ADSL2+ Modem Routers
Bridge ModeDescription:
In this example, the ADSL Router acts as a bridge which bridging the PC IP addresses from LAN to WAN. The PC IP address can be a static public address that is pre-assigned by the ISP or a dynamic public address that is assigned by the ISP DHCP server, or an IP address received from PPPoE software.
Therefore, it does not require a public IP address. It only has a default private IP address (192.168.1.1) for management purpose.
Configuration:
1. Choose a client PC and set the IP as 192.168.1.x (x is between 2 and 254) and the gateway as 192.168.1.1.
2. Start your browser and type 192.168.1.1 in the URL box to access ADSL web-based manager.
3. Go to Quick Start – Quick Setup. Uncheck Auto Scan Internet Connection (PVC). Key in the VCI and VPI value, e.g.,• VPI – 8• VCI – 35
Then click the Next button.
4. On the Configure Internet Connection – Connection Type page, select Bridging then click the Next button.
5. On the WAN IP Settings page, select None for WAN IP address settings.
6. On the Configure LAN side Settings page, enter the IP address and subnet mask for your LAN, e.g.: Primary IP address: 192.168.1.1
Subnet Mask: 255.255.255.0
Choose DHCP Server Off and click Next.
7. Check the network information on the Summary page. Make sure the contents match the settings provided by your ISP. Click Finish.
8. Refer to the TCP/IP properties, specify an IP Address, and fill in other information needed, e.g.:IP Address: 10.11.86.81
Subnet Mask: 255.255.255.248
Gateway: 10.11.86.1
Preferred DNS server: 168.95.1.1
9. Click OK. Now the router is correctly configured. You can access to the Internet.

NB6, NB6W, NB6Plus4, NB6Plus4W, NB6Plus4Wn User Guide YML854Rev242 www.netcomm.com.au
MERDescription:
In this deployment environment, we make up a private IP network of 192.168.1.1. NAT function is enabled to support multiple clients to access to Internet.
In this example, the ADSL Router acts as a NAT device which translates a private IP address into a public address. Therefore multiple users can share with one public IP address to access the Internet through this router. The public address can be a static public address that is pre-assigned by ISP or a dynamic public address that is assigned by the ISP DHCP server.
Configuration:
1. Start your browser and type 192.168.1.1 in the URL box to access ADSL web-based manager.
2. Go to Quick Start – Quick Setup. Uncheck Auto Scan Internet Connection (PVC). Key in the VCI and VPI value, e.g.,• VPI – 8• VCI – 35
Then click the Next button.
3. On the Configure Internet Connection – Connection Type page, select Bridging and then click the Next button.
4. On the WAN IP Settings page, select Obtain an IP address automatically; then, select Obtain DNS server address automatically.
5. Check Enable NAT. Then click Next.
6. On the Configure LAN side Settings page, key in the IP address and subnet mask for your LAN. Check DHCP Server On box, and enter the start and end points, e.g.:
Primary IP address:192.168.1.1
Subnet Mask:255.255.255.0
Start IP Address:192.168.1.2
End IP Address: 192.168.1.254
Then key in the leased time that you want. And click Next
7. Check the network information on the Summary page. Make sure the contents match the settings provided by your ISP. Click Finish.
8. Now the router is correctly configured. You can access the Internet.

Web Configuration

NB6, NB6W, NB6Plus4, NB6Plus4W, NB6Plus4Wn User Guide YML854Rev244 www.netcomm.com.au
Web ConfigurationNote: The following information may appear differently between each model. The information is the same, however the order of information
and some specifics can appear differently to what is shown below
Some users might want to set specific configuration for the router such as firewall, data transmission rate…, and so on. This chapter will provide you advanced information of the web pages for the router for your reference.
Using Web-Based ManagerAfter properly configuring your host PC, please proceed as follows:
1. Start your web browser, type 192.168.1.1, into the address bar and press enter.
2. After connecting to the device, you will be prompted to enter username and password. By default, both the username and the password are admin. An example under Windows XP is shown below.
If you login successfully, the main page will appear. From now on, the ADSL Router acts as a web server sending HTML pages/forms on your request. You can fill in these pages/forms and apply them to the ADSL Router.
Outline of Web Manager
The main screen will be shown as below.
Title: The title of this management interface.
Main Menu: Including Quick Start, Status, Advanced, Wireless (wireless models only), and Management.
Main Window: The current workspace of the web manager, containing configuration or status information.
Current Version: Here provides the version info for firmware, ADSL2+, and Wireless.
To Have the New Settings Take Effect
After selecting or adjusting the settings according to your needs, your customizations will need to be saved to the flash memory before you restart the router. And only after rebooting the router, your customizations may take effect.
Language
On the top to the right of this web page, it provides a drop-down menu for you to choose a proper language. (However, we only offer English at present.)

YML854 Rev2 NB6, NB6W, NB6Plus4, NB6Plus4W, NB6Plus4Wn User Guidewww.netcomm.com.au 45
NetComm Gateway Series - ADSL2+ Modem Routers
Quick StartThese pages under the Quick Start menu provide you with a quick way to set up the router. If you do not know much about the router, you can use the Quick Start pages to adjust basic settings to activate your router.
Connect to Internet
This is a quick way to connect to the Internet by using PPPoE interface, please click Connect to Internet to open the web page.
Enter the user name and password (that you get from the ISP) click Connect.
The system will connect automatically, and then you can access the Internet.
Quick Setup
The quick setup wizard will guide you to configure the ADSL router through some specific steps. Refer to the following pages for detailed information.
Auto Scan Internet Connection (PVC):
If your ADSL router does not have PVC configuration inside, you can check this box. Otherwise, please uncheck this box.
VPI (Virtual Path Identifier):
Identifies the virtual path between endpoints in an ATM network. The valid range is from 0 to 255. To enter the setting, please refer to the setting that the ISP offered. In Australia the default value is 8.
VCI (Virtual Channel Identifier):
Identifies the virtual channel endpoints in an ATM network. The valid range is from 32 to 65535 (1 to 31 is reserved for well-known protocols). To enter the setting, please refer to the setting that the ISP gave you. In Australia the default value is 35.
After entering the VPI/VCI value, please click Next for the following step.

NB6, NB6W, NB6Plus4, NB6Plus4W, NB6Plus4Wn User Guide YML854Rev246 www.netcomm.com.au
Connection Type
The system provides several protocols for you to choose. Your ISP will offer you the most suitable settings of the protocol. Before you set this page, please refer to the protocol that your ISP offered.
After clicking on the Next button from the VPI/VCI web page, the following screen will appear. Please choose the connection type and encapsulation mode that you want to use and click Next for next page.
For instance, PPP over Ethernet (PPPoE) is selected in this demonstrative figure.
Note: On some models there will be an option for EoA. EoA includes and is in place of PPPoE, IPoE and Bridge Mode.
PPP over ATM/ PPP over Ethernet
If the connection type you choose is PPP over ATM or PPP over Ethernet, please refer to the following information.
Choose PPPoA or PPPoE and click Next.
On this screen, you have to make the settings for WAN IP. To get the IP address automatically, click the Obtain an IP address automatically button. Or click Use the following IP address button and enter the IP address for WAN interface.
Check Enable NAT if you need.

YML854 Rev2 NB6, NB6W, NB6Plus4, NB6Plus4W, NB6Plus4Wn User Guidewww.netcomm.com.au 47
NetComm Gateway Series - ADSL2+ Modem Routers
MTU: It means the maximum size of the packet that can be transmitted in the network. A packet of data greater than the value set here will be divided into several packets for transmitting.
Type the value into the field of MTU. The default MTU value for PPPoE is 1492; while for PPPoA is 1500.
Click Next for the next procedure.
PPP Username & PPP Password:
Key in the username and password that you received from your ISP. (e.g., hpotter/hogwarts)
Always On:
Select this item to make the connection active all the time.
Dial on Demand:
Select this item to make a connection automatically while in demand. Enter the timeout to cut off the network connection if there is no activity for this router.
Manually Connect:
Select this item to make a connection by pressing the Connect hyperlink on the Advanced Setup- Internet-Connections web page.
On the Configure LAN side Settings page, you have to fill in the data requested.
Primary IP Address & Subnet Mask:
Key in the information that offered by your ISP for the LAN connection.
Configure the secondary IP Address and Subnet Mask:
Check this box to set up a secondary IP Address to connect to your router if they are not included in the range that DHCP server accepts. See the next figure for the secondary IP address and subnet mask.
Secondary IP Address & Subnet Mask:
Key in the second IP address and the subnet mask received from the ISP for your LAN connection.

NB6, NB6W, NB6Plus4, NB6Plus4W, NB6Plus4Wn User Guide YML854Rev248 www.netcomm.com.au
MTU: (refer to the WAN section) The default MTU value for LAN side Settings is 1500. You may modify it if necessary.
DHCP Server On: Check this item if DHCP service is needed on the LAN side. The router will assign an IP address and gateway address for each of your PCs.
Start IP Address & End IP Address: Enter the information needed.
Lease Time: Key in the duration for the time. The default is 1day.
DHCP Server Off: Check this item if DHCP service is not needed on the LAN.
On this web page, the primary IP address and subnet mask will be shown. You can modify them if needed.
Key in all the necessary settings and click Next.
You can check the contents on the Summary page.
If you find anything incorrect, click Back to modify the settings.
If everything is OK, click Finish to accept these settings.
Now, the system will reboot to activate the new settings that you have set in this section.
Please wait for 2 minutes before restarting the router.

YML854 Rev2 NB6, NB6W, NB6Plus4, NB6Plus4W, NB6Plus4Wn User Guidewww.netcomm.com.au 49
NetComm Gateway Series - ADSL2+ Modem Routers
IP over ATM
If the type you have to choose is IP over ATM, please refer to the following information.
IPoA is an alternative of LAN emulation. It allows TCP/IP network to access ATM network and uses ATM quality of service’s features.
Choose IPoA and click Next.
None: If it is not necessary to set the WAN IP address, please click this button.
Obtain an IP address automatically: Click this button to allow the system to get an IP address automatically.
WAN IP Address & WAN Subnet Mask: If you choose Use the following IP address, you have to enter the IP address and subnet mask information received from the ISP for the WAN interface.
Obtain DNS server address automatically: Only when you select Obtain an IP address automatically that this option is available. You may click this button to allow the system to get DNS server address automatically.
Use the following DNS server addresses: Select this item to set the DNS server addresses manually, type the information provided by your ISP in the following Primary DNS and Secondary DNS server entries, e.g. 168.95.1.1 and 168.95.192.1.
Click Enable NAT if you want.
After setting up the WAN IP and DNS server information, click Next to open the following page.
On the Configure LAN side Settings page, you have to fill in the data requested.

NB6, NB6W, NB6Plus4, NB6Plus4W, NB6Plus4Wn User Guide YML854Rev250 www.netcomm.com.au
Primary IP Address & Subnet Mask:Key in the information that offered by your ISP for the LAN connection, e.g., 192.168.1.1 for IP address and 255.255.255.0 for subnet mask.
MTU: (Please refer to the PPPoA/ PPPoE section.) The default MTU setting here is 1500. You may modify it if necessary.
Configure the secondary IP Address and Subnet Mask for LAN interface: Check this box to set up a secondary IP Address to connect to your router if they are not included in the range that DHCP server accepts. You have to key in the information received from your ISP for the LAN connection, e.g., the secondary IP is 10.11.80.81 and the mask is 255.255.255.248 in the example illustrated in the figure.
DHCP Server On: Check this item if DHCP service is needed on the LAN side. The router will assign IP address and gateway address for each of your PCs.
Start IP Address & End IP Address: Enter the information needed.
Lease Time: Key in the duration for the time. The default is 1day.
DHCP Server Off: Check this item if DHCP service is not needed on the LAN.
Key in all the necessary settings. Click Next for the coming page.
You can check the settings on the Summary page.
If you find anything incorrect, click Back to modify the settings.
If everything is OK, click Finish to accept these settings.
And the following page will appear.
Now, the system will reboot to activate the new settings that you have set in this section.
Please wait for 2 minutes before restarting the router.

YML854 Rev2 NB6, NB6W, NB6Plus4, NB6Plus4W, NB6Plus4Wn User Guidewww.netcomm.com.au 51
NetComm Gateway Series - ADSL2+ Modem Routers
Bridging
If the mode you choose is Bridging (or MER), please refer to the following information.
The bridging mode can configure your router to send and receive packets between LAN and WAN interfaces. The WAN interface is ATM PVC; the LAN interface can be Ethernet, USB, or Wireless.
Choose Bridging and click Next.
None: If it is not necessary to set the WAN IP address, please click this button.
Obtain an IP address automatically: Click this button to allow the system to get an IP address automatically.
WAN IP Address, WAN Subnet Mask, and Default Gateway: When choosing Use the following IP address, you have to key in the IP address, the subnet mask, and the default gateway provided by your ISP for the WAN interface.
If you choose to obtain the IP address automatically or use specific IP address, you have to decide whether to select Obtain DNS server address automatically or Use the following DNS server address and enter the information provided by you ISP.
The default setting is none, if selecting Obtain an IP address automatically or Use the following IP address, the DNS setting appears, shown as the figure below.
Check Enable NAT if necessary.
Press Next to continue.

NB6, NB6W, NB6Plus4, NB6Plus4W, NB6Plus4Wn User Guide YML854Rev252 www.netcomm.com.au
Primary IP Address & Subnet Mask: Key in the IP address and the subnet mask that provided by your ISP for LAN interface, e.g., 192.168.1.1 and 255.255.255.0, respectively.
MTU:Please refer to PPPoA/ PPPoE.
DHCP Server On: Check this item if DHCP service is needed on the LAN. The router will assign IP address and gateway address for each of your PCs. Enter the information for Start IP, End IP and Lease Time if you enable this function. The default value for lease time is one day.
DHCP Server Off: Check this item if DHCP service is not needed on the LAN; like our example.
You can check the settings on the Summary page now.
If you find anything incorrect, click Back to modify the settings.
If everything is OK, click Finish to accept these settings.
And the following page will appear.
Now, the system will reboot to activate the new settings that you have done in this section.
Please wait for 2 minutes before restarting the router.

YML854 Rev2 NB6, NB6W, NB6Plus4, NB6Plus4W, NB6Plus4Wn User Guidewww.netcomm.com.au 53
NetComm Gateway Series - ADSL2+ Modem Routers
StatusNote: These pages may differ in appearance between each model. The information is the same, however the order they appear can be different to what is shown below.
Overview
This page displays the current status for the ADSL connection, including the period of activating the router, ADSL speed, and the information about LAN IP address, default gateway, DNS server, firmware version, boot loader version, wireless driver version, wireless BSSID, and Ethernet MAC address. The system status will be different according to the settings that you configured in the web pages.
ADSL Line
This page shows all information for ADSL.
For knowing the quality of the ADSL connection, please click ADSL BER Test button to have advanced information.
Click More Information hyperlink to see more detailed information about ADSL Line Status.

NB6, NB6W, NB6Plus4, NB6Plus4W, NB6Plus4Wn User Guide YML854Rev254 www.netcomm.com.au
ADSL BER TestThis test determines the quality of the ADSL connection. It is done by transferring idle cells containing a known pattern and comparing the received data with this known pattern to check for errors.
After selecting the test duration time and click Start, the following dialog appears to tell you the test is running. You can stop the test by clicking Stop or close this dialog window by pressing Close.
When the test is over, the result will be shown on the following dialog window for your reference.
Click Close to close this window.

YML854 Rev2 NB6, NB6W, NB6Plus4, NB6Plus4W, NB6Plus4Wn User Guidewww.netcomm.com.au 55
NetComm Gateway Series - ADSL2+ Modem Routers
Internet Connection
This page displays the connection information for your router, such as the PVC name, VPI/VCI value, service category, protocol, invoking NAT and QoS or not, IP address, linking status, and so on.
Traffic Statistics
This table shows the records of data going through the LAN and WAN interface. For each interface, cumulative totals are displayed for Received and Transmitted.
You may click Reset to reset the amount.
DHCP Table
This table shows all DHCP clients who get their IP addresses from your ADSL Router. For each DHCP client, it shows the Host Name, MAC Address, IP Address and the Lease Time.
Wireless Clients (NB6W, NB6Plus4W and NB6Plus4Wn only)
This table shows the MAC address for all of the wireless LAN clients currently associated to your ADSL Router.
Routing Table
This table shows the routing rules that your router uses.
ARP Table
This table shows the IP address record for IP-to-Physical translation in your router.

NB6, NB6W, NB6Plus4, NB6Plus4W, NB6Plus4Wn User Guide YML854Rev256 www.netcomm.com.au
Advanced SetupNote: These pages may differ in appearance between each model. The information is the same, however the order they appear can be different to what is shown below.
Local Network – IP Address
This page is the same as you can see on the Configure LAN side Settings page while running the Quick Setup. It allows you to set IP Address and Subnet Mask values for LAN interface.
Primary IP Address: Key in the first IP address that you received from your ISP for the LAN connection.
Subnet Mask: Key in the subnet mask that you received from your ISP for the LAN connection.
Host Name:List the host name of this device.
Domain Name:List the name of the domain.
Configure the secondary IP Address and Subnet Mask: Check this box to enter another set of IP Address and Subnet Mask to connect to your router if they are not included in the range that DHCP server accepts.
After checking this box, the secondary IP address and subnet mask entries will show up, as shown below.
Secondary IP Address & Subnet Mask:Enter the information provided by your ISP for your LAN connection.
MTU: It means the maximum size of the packet that can be transmitted in the network. A packet of data greater than the number set here will be divided into several packets for transmitting. Type the value into the field of MTU. The default setting for LAN configuration is 1500.
Apply: Click this button to activate the settings listed above.

YML854 Rev2 NB6, NB6W, NB6Plus4, NB6Plus4W, NB6Plus4Wn User Guidewww.netcomm.com.au 57
NetComm Gateway Series - ADSL2+ Modem Routers
Local Network – DHCP Server
This allows you to set DHCP server on LAN interface.
DHCP Server On:Check this item if DHCP service is needed on the LAN. The router will assign IP address and gateway address for each of your PCs.
You have to key in Start IP Address, End IP Address, and Lease Time. The default lease time is 1day.
Relay On: Click this button to have a relay setting. And type the Server IP in the IP field.
When the DHCP server is served by another device rather than the router itself, you can relay to that specific server and enter the IP address of it, as 10.11.95.2 in our example.
Server and Relay Off: Check this item if DHCP service isn’t needed on the LAN.
Apply: Click this button to activate the settings listed above.
You can reserve one specific IP address for a certain PC for particular purpose. Simply add a mapping entry of MAC address & IP address for that PC by pressing the Reserved IP Address List button. The following window will appear.

NB6, NB6W, NB6Plus4, NB6Plus4W, NB6Plus4Wn User Guide YML854Rev258 www.netcomm.com.au
Click the Add button to open another dialog window, shown below. On PC’s MAC Address and Assigned IP Address boxes, please type the correct information according to your need and click Apply.
The information added will be shown on the window right away, as below. That is, the specified address will be reserved and not be assigned by DHCP for other computer(s).
You may click Add button to add another set or click Close to exit.
Local Network – UPnP
The UPnP is only available for Windows XP/Vista/7. If you are not a Windows XP/Vista/7 user, you may ignore this page.
Enabling the UPnP IGD and NAT traversal function allows the users to perform more applications behind NAT without additional configuration settings or ALG support on your ADSL Router.
You can enable the UPnP function through this web page by checking Enable UPnP and press Apply.
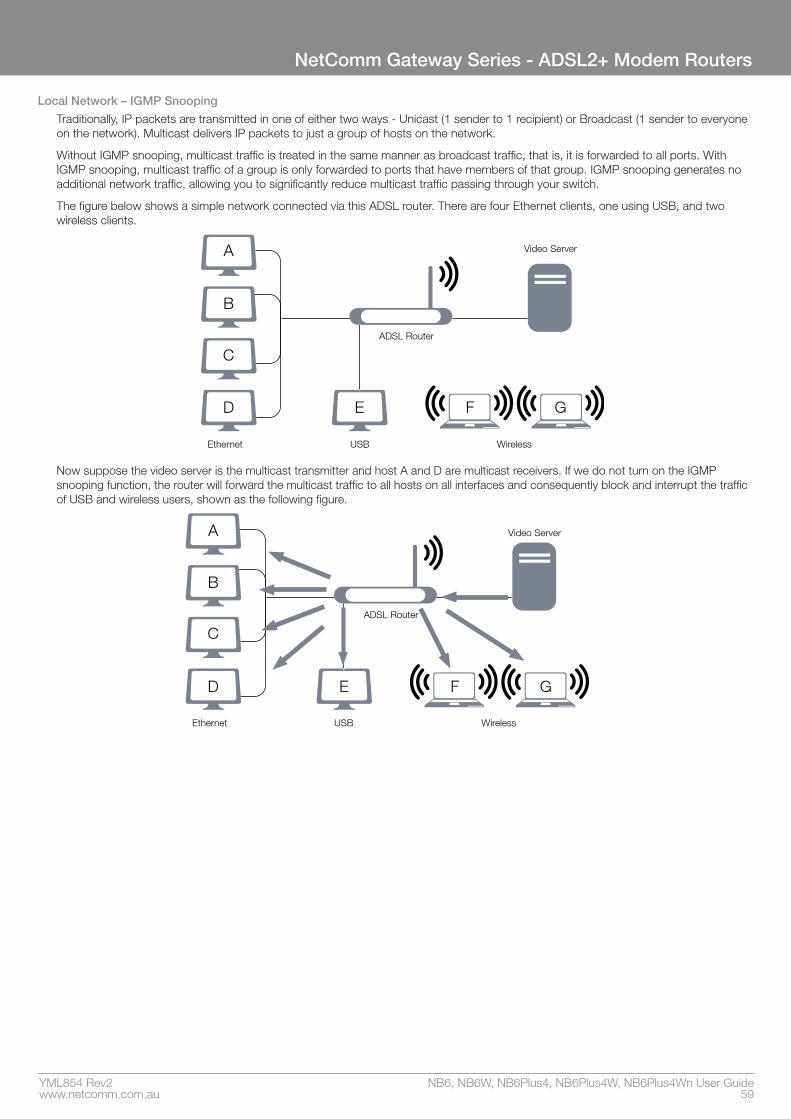
YML854 Rev2 NB6, NB6W, NB6Plus4, NB6Plus4W, NB6Plus4Wn User Guidewww.netcomm.com.au 59
NetComm Gateway Series - ADSL2+ Modem Routers
Local Network – IGMP Snooping
Traditionally, IP packets are transmitted in one of either two ways - Unicast (1 sender to 1 recipient) or Broadcast (1 sender to everyone on the network). Multicast delivers IP packets to just a group of hosts on the network.
Without IGMP snooping, multicast traffic is treated in the same manner as broadcast traffic, that is, it is forwarded to all ports. With IGMP snooping, multicast traffic of a group is only forwarded to ports that have members of that group. IGMP snooping generates no additional network traffic, allowing you to significantly reduce multicast traffic passing through your switch.
The figure below shows a simple network connected via this ADSL router. There are four Ethernet clients, one using USB, and two wireless clients.
A
B
C
D E F
ADSL Router
Ethernet WirelessUSB
Video Server
G
Now suppose the video server is the multicast transmitter and host A and D are multicast receivers. If we do not turn on the IGMP snooping function, the router will forward the multicast traffic to all hosts on all interfaces and consequently block and interrupt the traffic of USB and wireless users, shown as the following figure.
A
B
C
D E F
ADSL Router
Ethernet WirelessUSB
G
Video Server

NB6, NB6W, NB6Plus4, NB6Plus4W, NB6Plus4Wn User Guide YML854Rev260 www.netcomm.com.au
When IGMP snooping is invoked, it makes the system aware to establish the best path for multicast service to save LAN bandwidth. Refer the figure below, just as desired, only host A and D will actually receive multicast traffic when IGMP snooping is enabled.
A
B
C
D E F
ADSL Router
Video ServerIGMP Snooping Enabled
Ethernet WirelessUSB
G
While IGMP snooping is enabled, the IGMP packets will be monitored, the membership information will be recorded and processed, and the multicast traffic will only be forwarded to those LAN interfaces, such as Ethernet, Wireless, and USB, which are bonded to the subscribed multicast groups. Thus it helps to save the bandwidth and helps the devices to perform more effectively.
Check Enable IGMP Snooping and click Apply to invoke this function.
If the PVC you’re using is NAT enabled, remember to turn on the IGMP Proxy at the same time. Please refer to Internet – IGMP Proxy for more information.
Note that the IGMP proxy must be enabled first. If the IGMP Snooping function is not available as shown in the following figure, you have to enable the IGMP Proxy first.

YML854 Rev2 NB6, NB6W, NB6Plus4, NB6Plus4W, NB6Plus4Wn User Guidewww.netcomm.com.au 61
NetComm Gateway Series - ADSL2+ Modem Routers
Internet – Connections
To set WAN settings for each service, please open Advanced – Internet. This page allows you to edit, to remove, or to add WAN settings.
If you click the Connect hyperlink under the PVC Name item, the system will connect to WAN automatically. If the WAN connection is OK, you can check the detailed information directly.
You can add new PVC(s) by clicking the Add button, edit the settings for the present PVC by clicking in the Edit column, or delete the existing PVC by pressing icon.
Adding a New One
To add a new WAN connection, please click the Add button. The following screen appears.
VPI (Virtual Path Identifier):
Identifies the virtual path between endpoints in an ATM network. The valid range is from 0 to 255. Please refer to the value that your ISP provides.
VCI (Virtual Channel Identifier):
Identifies the virtual channel endpoints in an ATM network. The valid range is from 32 to 65535 (1 to 31 is reserved for well-known protocols). Please refer to the value that your ISP provides.
Service Category:
It decides the size and rate for the packets of the data in different service type. There are five categories provided here for your selection, shown as the drop-down menu below.
If you select UBR with PCR or CBR, you have to offer the value for the peak cell rate.
If you choose Non Realtime VBR, or Realtime VBR, you have to key in the value for the peak cell rate, sustainable cell rate, and maximum burst size.

NB6, NB6W, NB6Plus4, NB6Plus4W, NB6Plus4Wn User Guide YML854Rev262 www.netcomm.com.au
As you can see above, the range for Peak Cell Rate is from 1 to 2500; the value for Sustainable Cell Rate ranges from 1 to 2499 and must be smaller than Peak Cell Rate, and the range for Maximum Burst Size is from 1 to 1000000.
After pressing Next, you will see the web page below. Choose the protocol that you would like to use. (Here provides the example for PPPoA.)
Please refer to Quick Setup for more information if you don’t know how to set the configuration.
You can check Enable QoS to improve performance for selected applications. More detailed information for QoS will be introduced in later instruction.
If you choose PPPoE (or Bridging), you will see the option for 802.1Q VLAN Tagging.
802.1Q VLAN Tagging:
NOTE: This option is not available on the NB6
802.1Q-compliant switch ports can be configured to transmit tagged or untagged frames. A tag field containing VLAN (and/or 802.1p priority) information can be inserted into an Ethernet frame. If a port has an 802.1Q-compliant device attached (such as another switch), these tagged frames can carry VLAN membership information between switches, thus letting a VLAN span multiple switches. However, it is important for network administrators to ensure ports with non-802.1Q-compliant devices attached are configured to transmit untagged frames. Many NICs for PCs and printers are not 802.1Q-compliant. If they receive a tagged frame, they will not understand the VLAN tag and will drop the frame. Also, the maximum legal Ethernet frame size for tagged frames was increased in 802.1Q (and its companion, 802.3ac) from 1,518 to 1,522 bytes.
After checking Enable 802.1Q VLAN Tagging, you will have to enter a VLAN ID, as shown.
VLAN ID:
The VLAN Identifier is a 12 bit field. It uniquely identifies the VLAN to which the frame belongs to and can have a value between 0 and 4095.
Notice that 802.1Q VLAN Tagging function can only be invoked under PPPoE and Bridging Mode; the system will not provide this option while setting PPPoA or IPoA mode.
Click Next to continue.

YML854 Rev2 NB6, NB6W, NB6Plus4, NB6Plus4W, NB6Plus4Wn User Guidewww.netcomm.com.au 63
NetComm Gateway Series - ADSL2+ Modem Routers
The WAN IP settings page will differ slightly according to the protocol that you choose. This graphic is the one that you will see if you choose the PPPoE mode in the previous step. You can select Enable NAT or PPP IP extension according to your needs. And you can also change the MTU value.
Add Default Route:
Check this item to add a default route.
The next figure following the WAN IP Settings in the PPPoA/ PPPoE mode is shown at the right. You may refer to the Quick Setup section for further information.
If you choose IP over ATM from the Connection Type web page, you will get a web page as the figure.
You may refer to Quick Start – Connection Type – IPoA section for more information.
Add Default Route:
Check this item to add a default IPoA route onto the routing table.
After rebooting your router, the default route will be shown on the Routing Table under Status menu, you may check it.

NB6, NB6W, NB6Plus4, NB6Plus4W, NB6Plus4Wn User Guide YML854Rev264 www.netcomm.com.au
If you choose Bridging from the Connection Type web page, you will get a web page as below.
Please refer to Quick Setup for more information.
Internet – DNS Server
If Enable Automatic Assigned DNS checkbox is selected, this router will accept the first received DNS assignment from one of the PPPoA, PPPoE or MER/DHCP enabled PVC(s) during the connection establishment. If the checkbox is not selected, it is necessary for you to enter the primary and optional secondary DNS server IP addresses. Finish your setting and click the Apply button to save it and invoke it.
Enable Automatic Assigned DNS:
Check this box to enable this function, or uncheck this box to disable it. The default setting is checked. When this function is disabled, you have to offer the Primary DNS server and Secondary DNS server.
If you are satisfied with the settings, click Apply.
Internet – IGMP Proxy
The Internet Group Management Protocol (IGMP) is an Internet protocol that provides a way for an Internet computer to report its multicast group membership to adjacent routers.
F
ADSL Router
Telephone Line
IGMP Proxy
Ethernet
USB
Wireless
G
ISP BRAS
The hosts interact with the system through the exchange of IGMP messages. When you want to configure IGMP proxy, the system will interact with other routers through the exchange of IGMP messages. However, when acting as the proxy, the system performs the host portion of the IGMP task as follows:
• When being queried, the system will send membership reports to the group.
• When one of the hosts joins a multicast address group which none of other hosts belongs to, the system will send unsolicited membership reports to that group.
• When the last host in a particular multicast group leaves the group, the system will send a leave group membership report to the router’s group.

YML854 Rev2 NB6, NB6W, NB6Plus4, NB6Plus4W, NB6Plus4Wn User Guidewww.netcomm.com.au 65
NetComm Gateway Series - ADSL2+ Modem Routers
Internet Connection: This field displays the internet connection(s) that set in this router.
IGMP Proxy Enabled: Check this box to enable this function or uncheck this box to disable this function.
After finish the settings, click Apply.
To invoke the IGMP Snooping function, the IGMP Proxy must be enabled first.
Internet – ADSL
Enable ADSL Port:
Check this box to enable this function. It simply invokes the line mode that you choose here for the router.
Select the support of line modes:
There are several selections, and you may select them according to the line modes supported by your ISP and your needs.
Capability Enabled:
Two items are provided here for you to choose.
Bitswap:
It is a mandatory receiver initiated feature to maintain the operating conditions of the router during changing environment conditions. It reallocates the data bits and power among the allowed carriers without modification of the higher layer control parameters in the ATU. After a bit swapping reconfiguration, the total data rate and the data rate on each latency path is unchanged. Check this box to enable the function. If not, uncheck this box to close the function.
Seamless Rate Adaptation:
It enables the ADSL2/ ADSL2+ Router to change the data rate of the connection while in operation without any service interruption or bit errors. Check this box to enable the function. If not, uncheck this box to close the function.
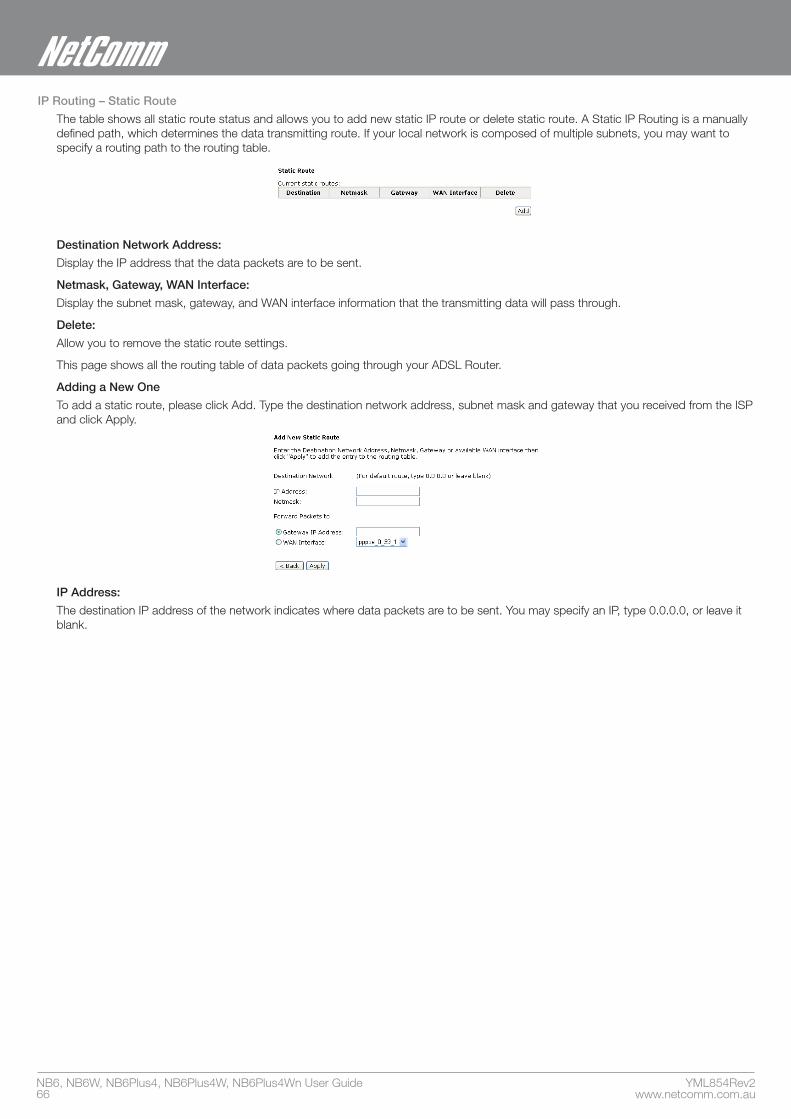
NB6, NB6W, NB6Plus4, NB6Plus4W, NB6Plus4Wn User Guide YML854Rev266 www.netcomm.com.au
IP Routing – Static Route
The table shows all static route status and allows you to add new static IP route or delete static route. A Static IP Routing is a manually defined path, which determines the data transmitting route. If your local network is composed of multiple subnets, you may want to specify a routing path to the routing table.
Destination Network Address:
Display the IP address that the data packets are to be sent.
Netmask, Gateway, WAN Interface:
Display the subnet mask, gateway, and WAN interface information that the transmitting data will pass through.
Delete:
Allow you to remove the static route settings.
This page shows all the routing table of data packets going through your ADSL Router.
Adding a New One
To add a static route, please click Add. Type the destination network address, subnet mask and gateway that you received from the ISP and click Apply.
IP Address:
The destination IP address of the network indicates where data packets are to be sent. You may specify an IP, type 0.0.0.0, or leave it blank.

YML854 Rev2 NB6, NB6W, NB6Plus4, NB6Plus4W, NB6Plus4Wn User Guidewww.netcomm.com.au 67
NetComm Gateway Series - ADSL2+ Modem Routers
Netmask:
Enter the subnet mask that you got from the ISP, type 0.0.0.0 or leave it blank.
Gateway IP Address:
Click this button to forward packets to the specific gateway. Key in the gateway IP address that you want to use.
WAN Interface:
Click this button to forward packets to a specific WAN interface. Choose one from the drop-down menu.
E.g., type 192.168.1.1 in the field of the gateway IP address and leave the destination network blank.
Click Apply to view the routing result.
Remove Static Route
If you don’t want the static route that you created, please click the icon in the Delete column from the table.
A dialog window will appear to confirm your action. Click OK to remove the static route, or click Cancel to keep the setting.
Example – Static Route
Here provides you an example of Static Route.
ADSL Router
Router B
10.1.1.1192.196.1.1192.196.1.x
192.168.1.254
192.168.10.1
192.168.10.x
For the LAN shown above, if the PC in the subnet of 192.168.1.x wants to access the PC in the subnet of 192.168.10.x, we can set a static route in the ADSL router, in which the destination is the PC in the subnet 192.168.10.x and the gateway is router B. The setting would be as follows:
Destination: 192.168.10.0Netmask: 255.255.255.0 (Standard Class C)Gateway: 192.168.1.254 (Router B)
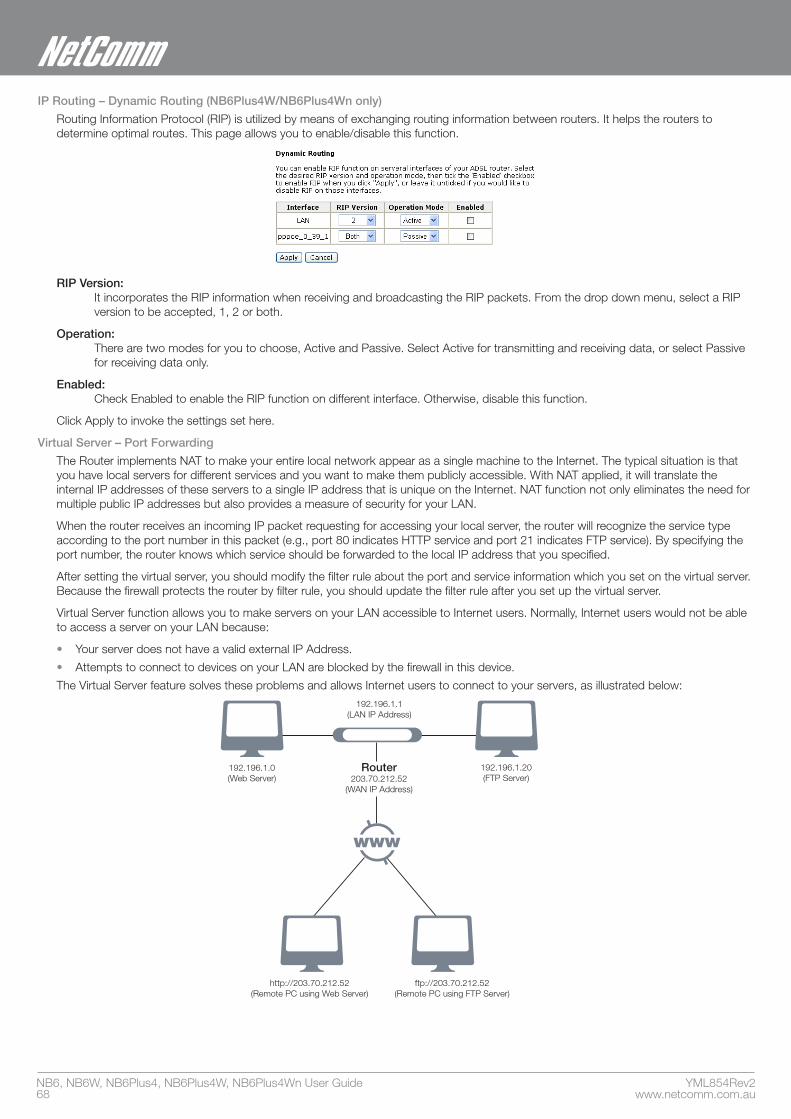
NB6, NB6W, NB6Plus4, NB6Plus4W, NB6Plus4Wn User Guide YML854Rev268 www.netcomm.com.au
IP Routing – Dynamic Routing (NB6Plus4W/NB6Plus4Wn only)
Routing Information Protocol (RIP) is utilized by means of exchanging routing information between routers. It helps the routers to determine optimal routes. This page allows you to enable/disable this function.
RIP Version: It incorporates the RIP information when receiving and broadcasting the RIP packets. From the drop down menu, select a RIP version to be accepted, 1, 2 or both.
Operation: There are two modes for you to choose, Active and Passive. Select Active for transmitting and receiving data, or select Passive for receiving data only.
Enabled: Check Enabled to enable the RIP function on different interface. Otherwise, disable this function.
Click Apply to invoke the settings set here.
Virtual Server – Port Forwarding
The Router implements NAT to make your entire local network appear as a single machine to the Internet. The typical situation is that you have local servers for different services and you want to make them publicly accessible. With NAT applied, it will translate the internal IP addresses of these servers to a single IP address that is unique on the Internet. NAT function not only eliminates the need for multiple public IP addresses but also provides a measure of security for your LAN.
When the router receives an incoming IP packet requesting for accessing your local server, the router will recognize the service type according to the port number in this packet (e.g., port 80 indicates HTTP service and port 21 indicates FTP service). By specifying the port number, the router knows which service should be forwarded to the local IP address that you specified.
After setting the virtual server, you should modify the filter rule about the port and service information which you set on the virtual server. Because the firewall protects the router by filter rule, you should update the filter rule after you set up the virtual server.
Virtual Server function allows you to make servers on your LAN accessible to Internet users. Normally, Internet users would not be able to access a server on your LAN because:
• Your server does not have a valid external IP Address.
• Attempts to connect to devices on your LAN are blocked by the firewall in this device.
The Virtual Server feature solves these problems and allows Internet users to connect to your servers, as illustrated below:
Router203.70.212.52
(WAN IP Address)
192.196.1.1(LAN IP Address)
192.196.1.0(Web Server)
192.196.1.20(FTP Server)
http://203.70.212.52(Remote PC using Web Server)
ftp://203.70.212.52(Remote PC using FTP Server)

YML854 Rev2 NB6, NB6W, NB6Plus4, NB6Plus4W, NB6Plus4Wn User Guidewww.netcomm.com.au 69
NetComm Gateway Series - ADSL2+ Modem Routers
IP Address seen by Internet Users
Once configured, anyone on the Internet can connect to your Virtual Servers.
Please note that, in the above picture, both Internet users are connecting to the same IP address, but using different protocols, such as Http://203.70.212.52 and Ftp://203.70.212.52.
To Internet users, all virtual servers on your LAN have the same IP Address. This IP Address is allocated by your ISP. This address should be static, rather than dynamic, to make it easier for Internet users to connect to your Servers. However, you can use Dynamic DNS feature to allow users to connect to your virtual servers by using a URL, instead of an IP address.
IP addresses can be automatically redirected to local servers configured with private IP addresses. In other words, depending on the requested service (TCP/UDP port number), the router redirects the external service request to the appropriate server (located at another internal IP address).
Add New Port Forwarding
To set a virtual server, please open the Virtual Server item from the Advanced setup menu.
To add a new Port Forwarding, please click Add from the Port Forwarding web page.
Pre-defined:
Choose one of the service types from the first drop-down list, such as Audio/Video, Games, and so on. In the second drop-down list, choose the name of the application that you want to use with the type that you select in the first list.
For example, if you choose Audio/Video in the first field, the corresponding contents of the second field would be like the drop-down list shown as the following figure.

NB6, NB6W, NB6Plus4, NB6Plus4W, NB6Plus4Wn User Guide YML854Rev270 www.netcomm.com.au
User defined:
Type a new service name for building a customized service for specific purpose.
There are three lines that you can enter settings into on this page. If you need more lines, just apply the settings and then add a new port forwarding rule.
From Internet Host IP Address: Select the initial place for port forwarding. If you choose SINGLE, a box will appear for you to fill in the IP address for the specific host. And, if you choose SUBNET, the boxes for IP address and Netmask will appear for you to fill in the IP address and subnet mask for the specific subnet.
Forward to Internal Host IP Address: Key in the address for the host used as the destination that information will be forwarded to.
For example, select the predefined application name Audio/Video – Media Player 7, set from ALL internet host IP addresses, and forward to 192.168.1.200. Click Apply. Be sure to reboot your router for these changes to take effect.
The result will be displayed as the following figure.
If you do not want the server that you created, check the Delete box of that application and click the Delete button to discard it.
Or if you want to add another one, click Add to add a new one.

YML854 Rev2 NB6, NB6W, NB6Plus4, NB6Plus4W, NB6Plus4Wn User Guidewww.netcomm.com.au 71
NetComm Gateway Series - ADSL2+ Modem Routers
Virtual Server – Port Triggering
When the router detects outbound traffic on a specific port, it will set up the port forwarding rules temporarily on the port ranges that you specify to allow inbound traffic. It is supposed to increase the support for Internet gaming, video conferencing, and Internet telephony due to the applications require multiple connection.
To add a new port triggering rule, click Add to open this web page. Then choose an application name from the Pre-defined list box.
The system provides 9 items for you to choose.
Or define by yourself by typing the name into the field of User defined.
Click Apply to complete the setting.
If you select AIM Talk, the result page will be like the demo figure below.
You may delete the application by checking the delete box and pressing Delete.

NB6, NB6W, NB6Plus4, NB6Plus4W, NB6Plus4Wn User Guide YML854Rev272 www.netcomm.com.au
Virtual Server – DMZ Host
In computer networks, a DMZ (demilitarized zone) is a computer host or small network inserted as a “neutral zone” between a company’s private network and the outside public network. It prevents outside users from getting direct access to a server that has company data. A DMZ is an optional and more secure approach to a firewall and effectively acts as a proxy server as well.
To close the function of DMZ Host, please click Discarded.
To activate a DMZ host, please click Forwarded to the DMZ host radio button, and enter the IP Address of DMZ host.
Click Apply.
Once this feature is enabled, you must specify an IP address. It allows unrestricted 2-way communication between the specified IP address and other Internet users or Servers.
• This allows almost any application to be used on the specified IP address.
• The specified IP address will receive all “Unknown” connections and data.
• The DMZ feature only works when the NAT function is enabled.
Virtual Server – Dynamic DNS
The Dynamic DNS (Domain Name System) combines both functions of DNS and DHCP to map a dynamic IP to a fixed domain name. This page allows you to access the virtual servers with a domain name and password.
Dynamic DNS:Select Enable to enable DDNS; select Disabled to disable this function.
Dynamic DNS Provider: Choose a provider (DynDNS.org, TZO.com, ChangeIP.com, or No-IP.com) from the drop-down list.
Internet Connection: Select the interface from the drop-down list that you want to use for connecting the Internet.
User Name / Password:Enter the user name and password that you registered with the provider.
HostName.DomainName: Key in the domain name or host name that you registered. You can use letters and dash for naming, yet other characters are not allowed to use for preventing from making troubles.
Status: It displays current status.
When the setting is finished, click Apply to invoke them, or click Cancel if you want to discard the settings.

YML854 Rev2 NB6, NB6W, NB6Plus4, NB6Plus4W, NB6Plus4Wn User Guidewww.netcomm.com.au 73
NetComm Gateway Series - ADSL2+ Modem Routers
Virtual Server – Static DNS
This page allows you to configure DNS mapping between Domain name and IP address for your local hosts. In case you want to access the local servers with domain names from the local network, you can configure the mapping information on the page.
Domain Name:Key in the domain name that you registered at the provider. You can use letters and dash for naming, yet other characters are not allowed to use for preventing from making troubles.
IP Address:Key in the IP address for the domain name to map.
Click Apply to upload your setting.
NAT ALG
Enable VPN ALGThe VPN ALG allows two or more simultaneous VPN connections through this router
Enable SIP ALGThe SIP ALG allow two or more simultaneous VoIP phone calls made by VoIP clients through this router

NB6, NB6W, NB6Plus4, NB6Plus4W, NB6Plus4Wn User Guide YML854Rev274 www.netcomm.com.au
Firewall
The firewall is a kind of software that interrupts the data between the Internet and your computer. It is the TCP/IP equivalent of a security gate at the entrance to your company. All data must pass through it, and the firewall (functions as a security guard) will allow only authorized data to be passed into the LAN.
What the firewall can do? It can:
• deny or permit any packet from passing through explicitly
• distinguish between various interfaces and match on the following fields: • source and destination IP address • port
To keep track of the performance of IP Filter, a logging device is used. The device supports logging of the TCP/UDP and IP packet headers and the first 129 bytes of the packet (including headers) whenever a packet is successfully passed through or blocked, and whenever a packet matches a rule being setup for suspicious packets.
An example for firewall setup:
Routerwith Firewall Protection
PC 1
PC 2
This picture shows the most common and easiest way to employ the firewall. Basically, you can install a packet-filtering router at the Internet gateway and then configures the filter rule in the router to block or filter protocols and addresses. The systems behind the router usually have a direct access to the Internet; however some dangerous services such as NIS and NFS are usually blocked.
For the security of your router, setting the firewall is an important issue.
Firewall – IP Filtering
This page allows you to specify the IP packet filtering rules to prevent the services accessed from the Internet hosts or limit the Internet access for local hosts.
Choose Disabled to disable the firewall function. Click Enabled to invoke the settings that you set in this web page.
To initiate the IP Filtering, please select the Enabled radio button and click Apply.

YML854 Rev2 NB6, NB6W, NB6Plus4, NB6Plus4W, NB6Plus4Wn User Guidewww.netcomm.com.au 75
NetComm Gateway Series - ADSL2+ Modem Routers
Select the direction to filter packets:
Inbound means the data is transferred from outside onto your computer. Outbound means the data is transferred from your computer onto outside through Internet. Please choose Outbound traffic or Inbound traffic as the direction for filtering packets.
To add a new Filtering rule, click Add.
This page provides some settings for you to adjust for adding a new outbound IP Filtering.
Allow Traffic:
Choose No to stop the data transmission, Yes to permit the data pass through.
Protocol:
Here provides several default policies for security levels for you to choose. If you don’t want to use the predefined setting, you can use User Defined to set a customized protocol according to the necessity.
When you choose User Defined setting, you have to enter a port number in the “as” field.
Source/Destination IP address:
To specify IP address to allow or deny data transmission, please pull down the drop-down menu to choose a proper one.
The setting All means that all the IP addressed in the network are allowed or denied to pass through in Internet.
If you choose Single, you will have to key in the specific IP address as the start/end point to let the router identify for granting or denying passing through.
If you choose Subnet, you will have to enter the specific IP address and netmask as the start/end point to let the router identify for granting or denying passing through.

NB6, NB6W, NB6Plus4, NB6Plus4W, NB6Plus4Wn User Guide YML854Rev276 www.netcomm.com.au
Port Range: The port range is from 0 to 65535. Please key in the start point and end point for the IP Filtering.
After finish the settings, click Apply.
Here provides an example shown in the right column. Select TCP as the Protocol type, and make the Source and Destination IP address to include All, then type 0 and 65535 as the start and end port.
A new IP filtering setting for Outbound traffic is created in the web page. To edit the setting, please click to get into the editing page. To delete the setting, click to erase it. To set another IP filtering, click Add again.
To add a new Inbound IP Filtering, click Inbound traffic in the item of Select the direction to filter packets on the IP Filtering page. Use the same way to add a new one as stated above.

YML854 Rev2 NB6, NB6W, NB6Plus4, NB6Plus4W, NB6Plus4Wn User Guidewww.netcomm.com.au 77
NetComm Gateway Series - ADSL2+ Modem Routers
Quality of Service QoS (Quality of Service) is an industry-wide initiative to provide preferential treatment to certain subsets of data, enabling that data to traverse the Internet or intranet with higher quality transmission service.
Quality of Service – Bridge QoS
To classify the upstream traffic by assigning the transmission priority for different users’ data, please use Bridge QoS to prioritize the data transmission.
The Bridge QoS allows you to set the settings based on layer two bridge packets.
Traffic Class Name:
Key in a name as the traffic class for identification.
802.1p Priority:
Each incoming packet will be mapped to a specific priority level, so that these levels may be acted on individually to deliver traffic differentiation. Please choose the number (from 0 to 7, low to high priority) for the 802.1p Priority.
Traffic Priority:
There are three options – Low, Medium, and High that you can choose.
IP Precedence:
The number you choose here decides the type of the IP address processed. No change is the default setting.

NB6, NB6W, NB6Plus4, NB6Plus4W, NB6Plus4Wn User Guide YML854Rev278 www.netcomm.com.au
IP type of Service:
The system provides some types of service for you to choose. The meaning of each type is the same as the denotation. The default one is No change.
If you set the LAN 802.1p Priority 0 as the traffic condition, choose Low traffic priority for this rule, and set IP Precedence, IP type of service, and WAN 802.1p as no change, after clicking Apply, you will get the result as the figure in the right column.
Thus when the users’ data matches the traffic condition, the transmission will get a low traffic priority.
You may check the Delete box and press Delete to discard it, or click Add to create more.
Quality of Service – IP QoS
To classify the upstream traffic by assigning the transmission priority of the data for different users, please use IP QoS to prioritize the data transmission.
The IP QoS allows you to set the settings based on layer three IP packets.
To add a new IP QoS setting, press Add in the page of Quality of Service – IP QoS, the below page will appear.
Traffic Class Name:
Type a name as the traffic class for identification.
LAN Ports which traffic come from:
The IP QoS rules will be applied on the LAN ports you checked here. The default setting includes all interfaces.
Protocol:
Choose a proper interface for this function. If you don’t know how to select, simply use the default one, TCP/UDP.
Source IP Address/ Subnet Mask/ Port:
Key in the source IP address (ex.: 192.168.1.0) and subnet mask (ex.: 255.255.255.0) for the application (ex.: FTP, HTTP, and so on) that you want to invoke the QoS traffic rule. You may simply enter the source port, ranging from 0 to 65535, as the traffic condition.

YML854 Rev2 NB6, NB6W, NB6Plus4, NB6Plus4W, NB6Plus4Wn User Guidewww.netcomm.com.au 79
NetComm Gateway Series - ADSL2+ Modem Routers
Destination IP/ Subnet Mask/ Port:
Enter the destination IP address (ex.: 168.95.1.88) and subnet mask (ex.:255.255.255.0) for the application that you want to invoke the QoS traffic rule. Or simply enter the destination port for the traffic condition; it ranges from 1 to 65535.
Traffic Priority/ IP Precedence/ IP type of Service/ WAN 802.1p:
Please refer to Bridge QoS.
After you click Apply, the new QoS setting will be shown below.
According to the example, we set four rules for IP QoS. In traffic A, we set 1-1024 as the destination port, and the traffic priority is low; in traffic B, the source port is from 201 to 8000, and the priority is medium; in traffic C, when the source IP is 192.168.1.0, subnet mask is 255.255.255.0, the traffic priority is high; in traffic D, when the traffic is heading to 168.95.1.88, the priority is high.
To delete the rules you set, simply click the check button below Delete item and click Delete button.
According to our example, the IP QoS configuration can be illustrated by the following figure.
Router
192.168.1.0 / 255.255.255.0
Port: 1-1024
Port: 201-8000
168.95.1.88
HIGH
MEDIUM
LOW
HIGH
While there are many PCs getting online, the PCs using port 201-8000 to access the internet will have medium traffic priority, the PCs carrying 192.168.1.x/ 255.255.255.0 as IP address will have high traffic priority. In addition, PCs heading to port 1-1024 will have a low priority, while the PCs accessing 168.95.1.88 will have a high priority.

NB6, NB6W, NB6Plus4, NB6Plus4W, NB6Plus4Wn User Guide YML854Rev280 www.netcomm.com.au
Port Mapping
This page allows you to configure various port mapping groups which contains specific Internet connections and LAN ports. The user data will be only transmitted and received among the interfaces in the group.
Virtual LAN Function on Ethernet:
If you click Disabled, the LAN ports for Ethernet ports will only be shown as an Ethernet interface.
After applying Enabled, the LAN ports will be viewed as four separated ports shown on the status chart as below.
Normally, this function only needed when more than two PVCs are available, for example, if we have two PVCs, one uses PPPoE and the other uses Bridge mode, we may want to group certain connection to a specific port, especially when some devices may consume higher bandwidth.
In our following demonstration, we have two PVCs; they are pppoe_0_35_1and br_0_35.
Click Add to create a new port mapping group.
Group Name:
Give a unique name here. The word length must not be over the length of the field. In our example, bridge.

YML854 Rev2 NB6, NB6W, NB6Plus4, NB6Plus4W, NB6Plus4Wn User Guidewww.netcomm.com.au 81
NetComm Gateway Series - ADSL2+ Modem Routers
Available Interfaces:
The available interfaces (such as Ethernet, USB, wireless, etc.) will be displayed in the left side box. When you choose it and click Add, it will be transferred into the Grouped Interfaces at the right side box. Yet, if you want to remove the interface from the current group, it will be returned back to the Default group (left side box) after you click Remove.
Now we are going to map USB, Wireless, and the first Ethernet port together with the bridge mode PVC. Click br_0_35 and press Add button, then use the same way to add USB, Wireless, and Ethernet1 to grouped interfaces. The four items are moved to the right box now.
When the setting is done, click Apply.
Now we can check the result of the port mapping configuration. We have a default group, in which PPPoE mode will be applied through Ethernet port 2, 3, and 4, and we have another group named bridge, in which the bridge mode will be applied on USB, Wireless, and Ethernet port1.
You may click to edit the created group, press to delete it, or click Add to create another group.
The following relationship figure illustrates the port mapping configuration.
Ethernet 1Ethernet 2Ethernet 3Ethernet 4
USB
Wireless
Modem Router
pppoe_0_35_1 br_0_35
Under this configuration, any devices that is connected to USB, Wireless, or Ethernet port 1 will connect to the internet through the bridge mode PVC br_0_35, while the PCs using Ethernet port 2, 3, and 4 will access the internet by the PPPoE connection pppoe_0_35_1.

NB6, NB6W, NB6Plus4, NB6Plus4W, NB6Plus4Wn User Guide YML854Rev282 www.netcomm.com.au
Wireless Note: These pages may differ in appearance between each model. The information is the same, however the order they appear can be different to what is shown below.
This page allows you to configure the router as an Access Point. You may setup the settings for security, access control, and repeater features for this device.
Basic– NB6W and NB6Plus4W only
To set the basic configuration for the wireless features, please open Basic page from the Wireless menu.
Enable Wireless Network:
Click this check box to enable the wireless network function.
Wireless Main Network Name (SSID):
The main SSID ‘Station Set Identifier’ for your wireless network; replace with name of your choice. All stations must be configured with the correct SSID to access the WLAN. If the SSID does not match with the wireless client, it will not be able to join the network. Min one character, max 32.
If you do not check “Hide Wireless Main Network” item, the router will periodically broadcasts its SSID to allow the wireless clients within the range to recognize its presence. This can create a security hole since any wireless clients which receives the broadcast may be able to gain unauthorised access to your network. Min one character, max 32.
Wireless Guest Network Name (SSID):
The Wireless Guest Network Name acts as a secondary SSID. It can be used to allow guests to access your wireless network, using different security settings to those used for the Wireless Main Network Name. If the SSID does not match with the wireless client, it will not be able to join the network.
If you do not check “Hide Wireless Main Network” item, the router will periodically broadcasts its SSID to allow the wireless clients within the range to recognize its presence. This can create a security hole since any wireless clients which receives the broadcast may be able to gain unauthorised access to your network. Min one character, max 32.
Transmission Mode:
It decides the mode of data transmission. Choose the one that you want to use from the drop-down menu. There are 802.11b only, 802.11g only and Mixed Mode provided here.
Channel:
The frequency in which the radio links are about to be established. Select one channel that you want from the drop down list.
As an administrator of network, one must search which channels are available and then assign one available channel as the communication channel. All the other clients that match the SSID and pass security authentication can access this device and will use the same channel that you set here.

YML854 Rev2 NB6, NB6W, NB6Plus4, NB6Plus4W, NB6Plus4Wn User Guidewww.netcomm.com.au 83
NetComm Gateway Series - ADSL2+ Modem Routers
Transmission Rate:
It decides the speed of data transmission. Choose any one of it by using the drop-down menu. This setting will change by the transmission mode that you set above. The transmission rate settings under 802.11b only include 1, 2, 5.5, 11Mbps and Auto. The transmission rates for 802.11g settings include 1, 2, 5.5, 6, 9, 11, 12, 18, 24, 36, 48, 54Mbps and Auto. As for mixed mode, only Auto is available.
Multicast Rate:
When the multicast transmitting traffics are large, the transmission will be delayed in some way. If you want to speed up the rate, modify from the drop-down list.
For example, you may select 802.11g only as the transmission mode, and select high multicast rate like 54 Mbps.
Turbo Mode:
When it is enabled, the data transmission will be faster for this router. Check Enabled to invoke this function for speeding up the transmission, or check Disabled to close this function.
Wireless User Isolation:
To allow communication between the wireless clients, please choose Off. To disallow the communication between the clients, please choose On.
Transmit Power:
The router will set different power output (by percentage) according to this selection.
Click Apply to invoke the settings
Basic– NB6Plus4Wn only
To set the basic configuration for the wireless features, please open the Basic page from the Wireless menu.
Wireless Interface
The number of the wireless interface. The NB6Plus4W supports up to four interfaces.
Network Name (SSID)
The system will detect the SSID of your router and it will be displayed in this field for your reference.
The SSID is the identification characters of a router. The default words will be shown on this page. If you do not check “Hidden SSID”, the router will periodically broadcast its SSID to allow wireless clients within range to recognize its presence. This can create a security hole since any wireless clients that receive the broadcast may be able to gain unauthorised access to your network.
Please note that if you want to communicate, all wireless clients should use the same SSID with the router or access point.
Hide Network
Check this box to hide the SSID of this AP (access point). Then other people in the area cannot find the SSID of this device.

NB6, NB6W, NB6Plus4, NB6Plus4W, NB6Plus4Wn User Guide YML854Rev284 www.netcomm.com.au
Transmission Mode:
This section configures the data transmission mode. If desired, you can choose from the drop down menu to limit the NB6Plus4Wn to certain Data modes.
802.11b/g/n or 802.11b/g mixed mode:
Channel Width
This is the range of frequencies that will be used.
Primary Channel
This selects the second channel to be used when the channel bandwidth is 40MHz.
Channel:
The frequency in which the radio links are about to be established. Select one channel that you want from the drop down list.
As an administrator of the network, one must search which channels are available and then assign one available channel as the communication channel. All the other clients that match the SSID and pass security authentication can access this device and will use the same channel that you set here.
Transmission Rate:
This section allows you to specify the data transmission rate. Make a selection by choosing an option from the drop-down menu.
802.11b only:
802.11g only:
802.11n only:

YML854 Rev2 NB6, NB6W, NB6Plus4, NB6Plus4W, NB6Plus4Wn User Guidewww.netcomm.com.au 85
NetComm Gateway Series - ADSL2+ Modem Routers
Multicast Rate:
When the multicast transmitting traffics are large, the transmission will be delayed in some way. If you want to speed up the rate, modify from the drop-down list.
For example, you may select 802.11g only as the transmission mode, and select high multicast rate like 54 Mbps.
Turbo Mode:
When it is enabled, the data transmission will be faster for this router. Check Enabled to invoke this function for speeding up the transmission, or check Disabled to close this function
Afterburner:
When it is enabled, the maximum data transmission will be faster for this router. Check Enabled to invoke this function for speeding up the transmission, or check Disabled to close this function.
Security
To configure security features for the Wireless interface, please open Security item from Wireless menu. This web page offers eight authentication protocols for you to secure your data while connecting to networks. There are nine selections including 64-bit and 128-bit WEP, 802.1X, WPA, WPA-PSK, WPA2, WPA2-PSK, mixed WPA2/WPA, and mixed WPA2/WPA-PSK. Different item leads to different web page settings. Please read the following information carefully.
Wireless Security:
The Disabled item offers you the less protection for wireless communication. If you choose Disabled, the Encryption Keys will not be shown on this page.

NB6, NB6W, NB6Plus4, NB6Plus4W, NB6Plus4Wn User Guide YML854Rev286 www.netcomm.com.au
There are nine wireless security modes for you to select.
For 64-bit WEP/128-bit WEP
Wireless Security:
By default a minimum level of wireless security has been enabled to help prevent against unwanted wireless users accessing the unit. The default level of wireless security that has been enabled is known as 64 bit Wired Equivalent Privacy or WEP for short. The default 64 bit Hexadecimal WEP key is: a1b2c3d4e5
Select the WEP mode for the security function; there are two options, 64-bit and 128-bit. Before being transmitted, the data will be encrypted using the encryption key. For example, if you set 64-bit in this field, then the receiving station must be set to use 64 Bit Encryption, and have the same Key value at the same time; otherwise, it will not be able to decrypt the data.
Authentication Type:
The ADSL Router supports two authentication types: Open System and Shared key. This should be considered with the WEP (Wired Equivalent Privacy) mechanism.
Open System means that it allows any client to authenticate and attempt to communicate with a bridge. The client can only communicate if its WEP keys match the router’s WEP keys.
Shared Key means that a bridge or router will send an unencrypted text string to any client attempting to communicate with the router. The client requesting authentication encrypts the text and sends back to the router. Both unencrypted and encrypted can be monitored, yet it leaves the bridge open to be attacked by any intruder if he calculates the WEP key by comparing the text strings. That is why shared key authentication can be less secure than open authentication.
Format:
Choose the form of encryption key. You have to select either Hexadecimal digits or ASCII characters and type the keys on the fields of Key 1 to Key 4.
Key 1 to 4: Fill out the WEP keys according to the key length. For 64-bit WEP mode, the content you can type is 5 characters or 10 hexadecimal digits. For 128-bit WEP mode, the content you can type is 13 characters or 26 hexadecimal digits.
Default Transmission Key: Select one of the network keys that you set on the Key boxes as the default one.
Click Apply for activation when the settings are done.

YML854 Rev2 NB6, NB6W, NB6Plus4, NB6Plus4W, NB6Plus4Wn User Guidewww.netcomm.com.au 87
NetComm Gateway Series - ADSL2+ Modem Routers
For 802.1X Wireless Network
When a wireless client requests to access a network, it is required to be authenticated by a central authentication server (RADIUS Server). Only an authenticated user can be granted by the network access and thereby those unauthorized will be blocked.
Wireless Security:
Choose 802.1x as the authentication protocol, your data transmission between the router and the clients will be protected with the settings that you set in this web page.
RADIUS Server IP Address: RADIUS Server is a protocol for carrying authentication, authorization, and configuration information between a Network Access Server which desires to authenticate its links and a shared Authentication Server. Please enter the IP Address for the RADIUS Server.
RADIUS UDP Port: Port 1812 is the reserved RADIUS- authentication port described in RFC 2138. Earlier AP (RADIUS clients) use port 1945. The default value will be shown on this box. You can keep and use it.
RADIUS Shared Secret: A shared secret is like a password, which is used between RADIUS Server and the specific AP (RADIUS client) to verify identity. Both RADIUS Server and the AP (RADIUS client) must use the same shared secret for successful communication. Enter the words for the share secret.
After finishing the settings, click Apply for activation.
802.1x environment Configuration
You will need the following components for establishing an 802.1x environment in your network.
• Windows 2000/2003/NT Server: RADIUS server equipped with “Internet Authentication Service”. Certificate Services installed.
• AP (Router): connected to Windows 2000 Advanced Server through the LAN port with DHCP server and 802.1x enabled.
• 802.1x client: a WLAN card supporting WEP.
• Authentication Mechanism.

NB6, NB6W, NB6Plus4, NB6Plus4W, NB6Plus4Wn User Guide YML854Rev288 www.netcomm.com.au
For WPA (Wi-Fi Protected Access)
The WPA (WiFi-Protected Access) authentication is suitable for enterprises. It must be used in conjunction with an authentication server such as RADIUS to provide centralized access control and management. It can provide stronger encryption and authentication solution than none WPA modes.
Data Encryption:
Select the data encryption method for the WPA mode. There are three types that you can choose, TKIP, AES, TKIP+AES.
TKIP (Temporary Key Integrity Protocol) takes the original master key only as a starting point and derives its encryption keys mathematically from this master key. Then it regularly changes and rotates the encryption keys so that the same encryption key will never be used twice.
AES (Advanced Encryption Standard) provides security between client workstations operating in ad hoc mode. It uses a mathematical ciphering algorithm that employs variable key sizes of 128, 192 or 256 bits.
TKIP+AES combine the features and functions of TKIP and AES.
WPA Group Rekey Interval: Enter the time for the WPA group rekey interval. The unit is second. With increasing rekey interval, user bandwidth requirement is reduced. On the other hand, the longer the rekey interval, the longer the delay for a new user to gain group access.
RADIUS Server IP Address, RADIUS UDP Port, and RADIUS Shared Secret: Please refer to the elucidation in the previous 802.1x section.
After finishing the settings, click Apply for activation.

YML854 Rev2 NB6, NB6W, NB6Plus4, NB6Plus4W, NB6Plus4Wn User Guidewww.netcomm.com.au 89
NetComm Gateway Series - ADSL2+ Modem Routers
For WPA-PSK; WPA2-PSK; Mixed WPA2/WPA-PSK
WPA-PSK (WPA-Pre-Shared Key) is useful for small places without authentication servers such as the network at home. It allows the use of manually-entered keys or passwords and is designed to be easily set up for home users.
Data Encryption: Select the encryption type for the WPA mode. There are three types that you can choose, TKIP, AES, TKIP+AES. (For more information please refer to WPA section.)
Format: Choose the form of encryption key. You have to select either Hexadecimal digits or ASCII characters and type the keys on the fields of Pre-Share Key.
Pre-Share Key: Please enter the key between 8 and 63 characters, or 64 hexadecimal digits. Only the devices with a matching key that you set here can join this network.
WPA Group Rekey Interval: Enter the time for the WAP group rekey interval. The unit is second. With increasing rekey interval, user bandwidth requirement is reduced.
After finished settings, click Apply for activation.

NB6, NB6W, NB6Plus4, NB6Plus4W, NB6Plus4Wn User Guide YML854Rev290 www.netcomm.com.au
For WPA-2; Mixed WPA2/WPA
Wireless Security:
The WPA2 is suitable for enterprises. It must be used in conjunction with an authentication server such as RADIUS to provide centralized access control and management. It can provide stronger encryption and authentication solution than other WPA mode.
Data Encryption:
Select the encryption type for the WPA2 mode. There are three types that you can choose, TKIP, AES, TKIP+AES. (For detailed information please refer to WPA section.)
WPA2 Pre-authentication:
The wireless client that has associated with one AP (router A) can do the authentication with another AP (router B) in advance. If the client roams to AP (B), it can associate with AP (B) quickly. Please click Enabled to activate this function.
Network Re-auth Interval:
When a wireless client has associated with the AP for a period of time longer than the setting here, it would be disconnected and the authentication will be executed again. The default value is 36000, you may modify it.
WPA Group Rekey Interval:
Enter the time for the WPA group rekey interval. The unit is second. With increasing rekey interval, user bandwidth requirement is reduced.
RADIUS Server IP Address, RADIUS UDP Port, and RADIUS Shared Secret:
Please refer to the elucidation in the previous 802.1x section.
When the settings are finished, click Apply for activation.
For Wi-Fi protected Setup (WPS) – (NB6Plus4Wn only)
Select Wireless Network:
Select the wireless network which you want to configure the security settings from the drop down list.
Wireless Security:
Instead of configuring wireless security settings manually, you can configure security settings for wireless main network via the external registrar. The settings from the external registrar will overwrite existing settings of wireless main network after you complete WPS setup procedures
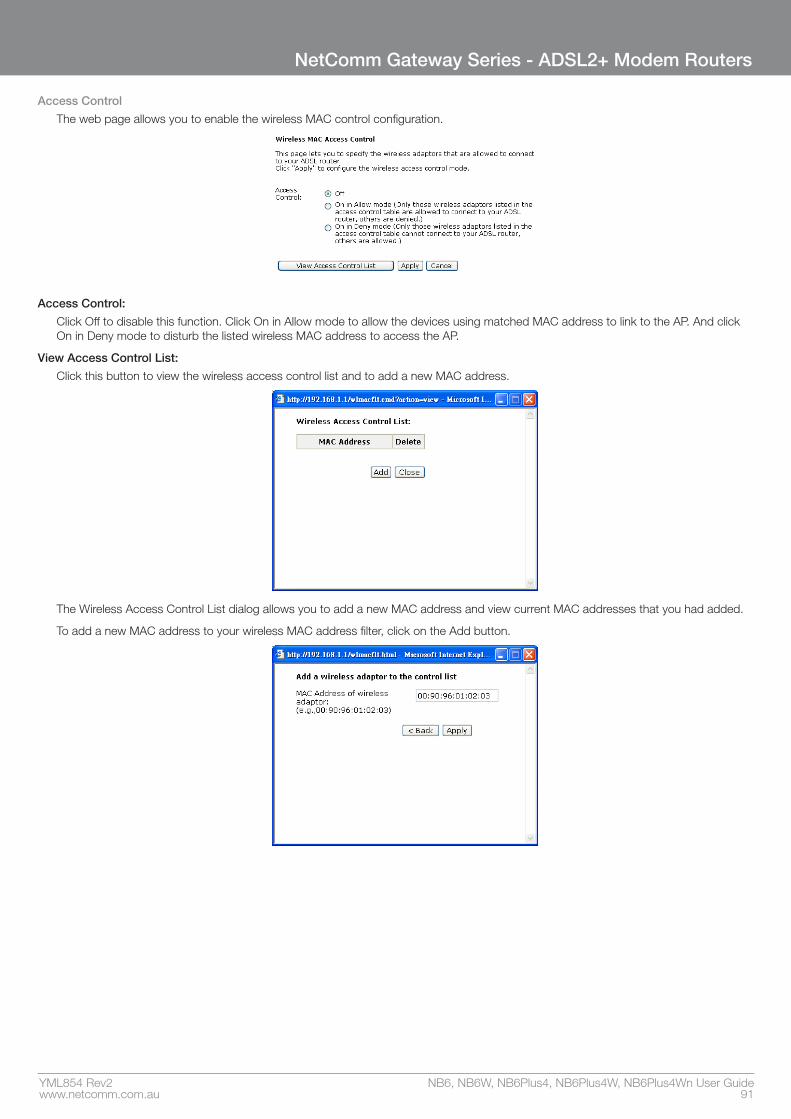
YML854 Rev2 NB6, NB6W, NB6Plus4, NB6Plus4W, NB6Plus4Wn User Guidewww.netcomm.com.au 91
NetComm Gateway Series - ADSL2+ Modem Routers
Access Control
The web page allows you to enable the wireless MAC control configuration.
Access Control:
Click Off to disable this function. Click On in Allow mode to allow the devices using matched MAC address to link to the AP. And click On in Deny mode to disturb the listed wireless MAC address to access the AP.
View Access Control List:
Click this button to view the wireless access control list and to add a new MAC address.
The Wireless Access Control List dialog allows you to add a new MAC address and view current MAC addresses that you had added.
To add a new MAC address to your wireless MAC address filter, click on the Add button.
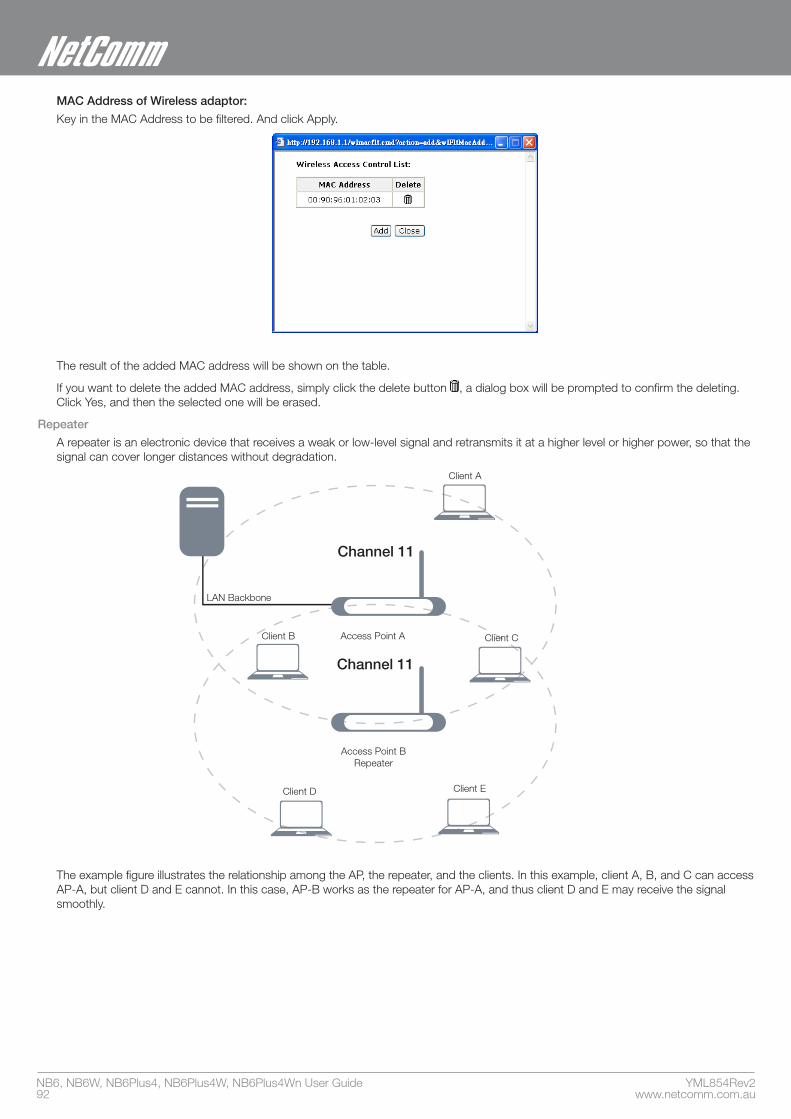
NB6, NB6W, NB6Plus4, NB6Plus4W, NB6Plus4Wn User Guide YML854Rev292 www.netcomm.com.au
MAC Address of Wireless adaptor:
Key in the MAC Address to be filtered. And click Apply.
The result of the added MAC address will be shown on the table.
If you want to delete the added MAC address, simply click the delete button , a dialog box will be prompted to confirm the deleting. Click Yes, and then the selected one will be erased.
Repeater
A repeater is an electronic device that receives a weak or low-level signal and retransmits it at a higher level or higher power, so that the signal can cover longer distances without degradation.
Client D
Access Point A
LAN Backbone
Access Point BRepeater
Client E
Client B Client C
Client A
Channel 11
Channel 11
The example figure illustrates the relationship among the AP, the repeater, and the clients. In this example, client A, B, and C can access AP-A, but client D and E cannot. In this case, AP-B works as the repeater for AP-A, and thus client D and E may receive the signal smoothly.
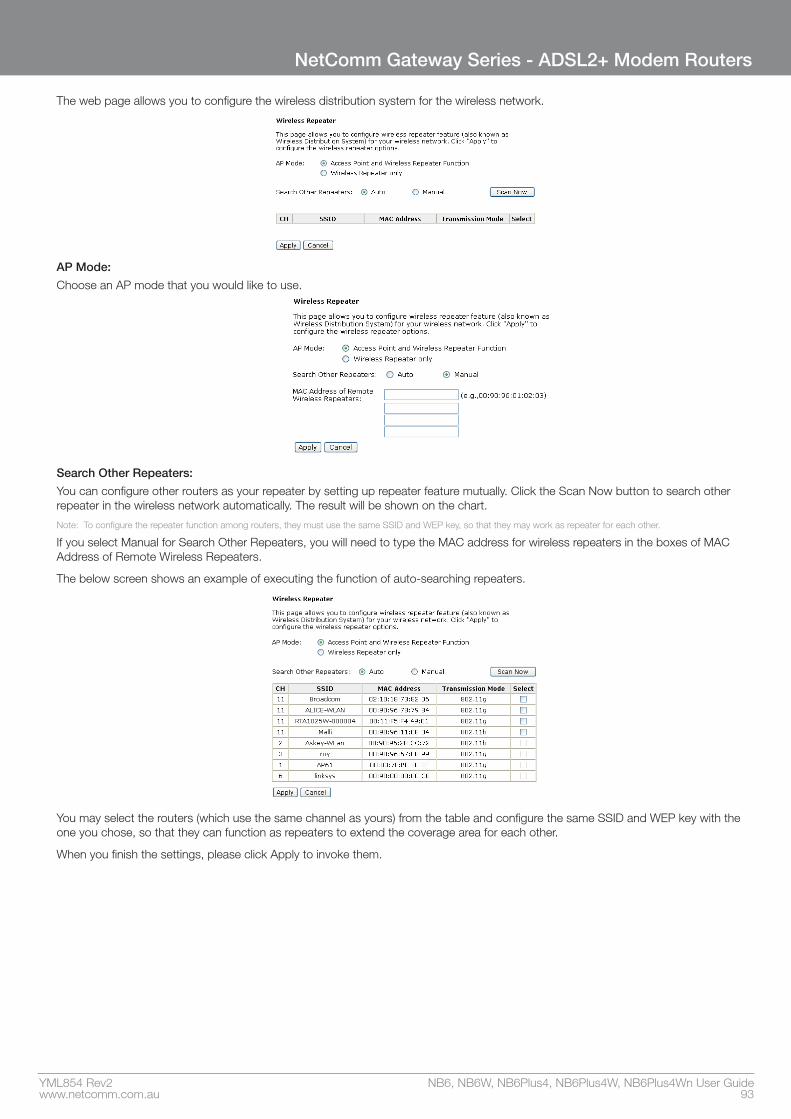
YML854 Rev2 NB6, NB6W, NB6Plus4, NB6Plus4W, NB6Plus4Wn User Guidewww.netcomm.com.au 93
NetComm Gateway Series - ADSL2+ Modem Routers
The web page allows you to configure the wireless distribution system for the wireless network.
AP Mode:
Choose an AP mode that you would like to use.
Search Other Repeaters:
You can configure other routers as your repeater by setting up repeater feature mutually. Click the Scan Now button to search other repeater in the wireless network automatically. The result will be shown on the chart.
Note: To configure the repeater function among routers, they must use the same SSID and WEP key, so that they may work as repeater for each other.
If you select Manual for Search Other Repeaters, you will need to type the MAC address for wireless repeaters in the boxes of MAC Address of Remote Wireless Repeaters.
The below screen shows an example of executing the function of auto-searching repeaters.
You may select the routers (which use the same channel as yours) from the table and configure the same SSID and WEP key with the one you chose, so that they can function as repeaters to extend the coverage area for each other.
When you finish the settings, please click Apply to invoke them.

NB6, NB6W, NB6Plus4, NB6Plus4W, NB6Plus4Wn User Guide YML854Rev294 www.netcomm.com.au
ManagementNote: These pages may differ in appearance between each model. The information is the same, however the order they appear can be different to what is shown below.
Diagnostics
To check the linking status for the network and your computer, a diagnostic test can guide you to detect the network problem. The testing items are listed and examined one by one. If the previous one is failed, than the items following that one will be failed, too. Use this diagnostic test to detect the connectivity mistakes whenever linking problem occurs.
Press Run Diagnostic Tests on the Diagnostic Tests page.
The Result would be shown on the same page.
For the item which passes through the diagnostics, a “PASS” will be displayed on the right side of that item.
If not, a “FAIL” will be presented there.
If there is no device using that port, a “DOWN” will be displayed.
Press the Help link to know what the result (Pass, Fail) represents for.

YML854 Rev2 NB6, NB6W, NB6Plus4, NB6Plus4W, NB6Plus4Wn User Guidewww.netcomm.com.au 95
NetComm Gateway Series - ADSL2+ Modem Routers
Take the Help link of ADSL Synchronization for example.
It not only explains the situation for Pass and Fail, but offers the troubleshooting procedures for you to follow.
Press Back to return.
Management Accounts
This page allows you to CHANGE the user name and password for accessing your ADSL Router.
For the Admin Account, the default setting for both username and password are admin. If you want to change the username and the password, please modify the User Name and New Password, and then retype the new password in the Confirm field for confirmation. Then click Apply.
To create a user account, you may setup a username and password under User Account on the same page.
Note that the new user can merely access the Quick Start and Status page.

NB6, NB6W, NB6Plus4, NB6Plus4W, NB6Plus4Wn User Guide YML854Rev296 www.netcomm.com.au
Management Control – From Remote
There are various interfaces for the remote access. Please choose from them if you want to enable the remote access control.
Note: NB6 supports Web Browser, Telnet, TFTP and Ping only
Select the Internet Connect:
Select one connection item from the drop-down list to enable the function.
Web Browser:
Check this box if you want to have remote control through HTTP. The default port number is 8080. Modify the port whenever you want.
Telnet:
Check this box if you want to have remote control through telnet.
FTP:
Choose this box if you want to have remote control through FTP.
TFTP:
Choose this box if you want to have remote control through TFTP.
Secure Shell (SSH):
Choose this box if you want to have remote control through SSH.
Ping:
Choose this box if you want to have remote control through ping command under DOS prompt.
Authorized Host IP Address List:
Decide whether all internet hosts can access your IAD or only authorized internet hosts can access. Click Apply to save your setting.

YML854 Rev2 NB6, NB6W, NB6Plus4, NB6Plus4W, NB6Plus4Wn User Guidewww.netcomm.com.au 97
NetComm Gateway Series - ADSL2+ Modem Routers
Management Control – From Local
You can allow local access to your router via the checked interfaces.
Note: NB6 supports Web Browser, Telnet, TFTP and Ping only
Authorized Host IP Address List:
Refer to Remote Management Control.
Click Apply to activate your settings or click Cancel to retain the original settings.
Internet Time
The router’s clock must synchronize with global Internet time. The time you set in the screen will be adapted to system log.
Update Now:
Click this button to refresh the current time.
Set Time by (Time Server/ Manual):
The default setting is Manual. Select this one, and set the start time by typing the date and the time manually to help the router perform tasks.
If you select Time Server, the system will set time via time server automatically.
Primary Time Server/ Secondary Time Server:
You may select the preferred time server from the drop-down list. The time will be adjusted by the time server.
Time Zone:
Choose the time zone of your location.
Apply:
Save the data on the screen and apply the data after restarting the router.
Cancel:
Discard the new configuration and reserve the original settings.

NB6, NB6W, NB6Plus4, NB6Plus4W, NB6Plus4Wn User Guide YML854Rev298 www.netcomm.com.au
System Log
As shown on the web page, you can view the system log and configure system log whenever you want.
To view the system log, you must configure system log first. Press Configure System Log to start.
Configuring System LogYou can enable or disable the log function, and choose log level, display level and proper mode as you like. Then click Apply to invoke the settings or press Cancel to discard them.
There are 8 types of log level and display level for you to choose.
Log Level: This function enables you to decide how detailed the messages will be stored. Set a proper level according to your needs. The default Log Level is Debugging.
The Debugging Level logs all messages to the file, while the Emergency Level logs fatal messages only. The lower the item is, the more detailed information it provides; i.e., debugging level stores the most detailed information.
Owing to the limitation of the storage on the ADSL router, the former information will be erased and replaced by the latest message automatically when the buffer is overflowed.
Display Level: For the convenience of the users, the display level can function as a filter. It decides the level for the messages to exhibit when the user wants to view the logs on the local side. For example, for a programmer or engineer, he/she may want to know about debugging or informational level message; for general users, they may only need or want to learn about error, critical, alert, or emergency messages only. The default Display Level is Error.
Therefore, when the log level is “Debugging” and the display level is “Error”, the CPE logs the most detailed message but shows error level data only.
Mode: You can choose where to store the logs; the options include Local, Remote and Both. Local means the CPE, i.e., the ADSL Router. Remote means the log server you specified to forward the log information to. The default mode is Local.
If you choose Remote or Both, you have to specify the Server IP Address and UDP Port, and all the events will be sent to the specified UDP port of the specified log server.
Note: Display Level only filters for the local side. All the messages will be displayed on the remote Log Server.
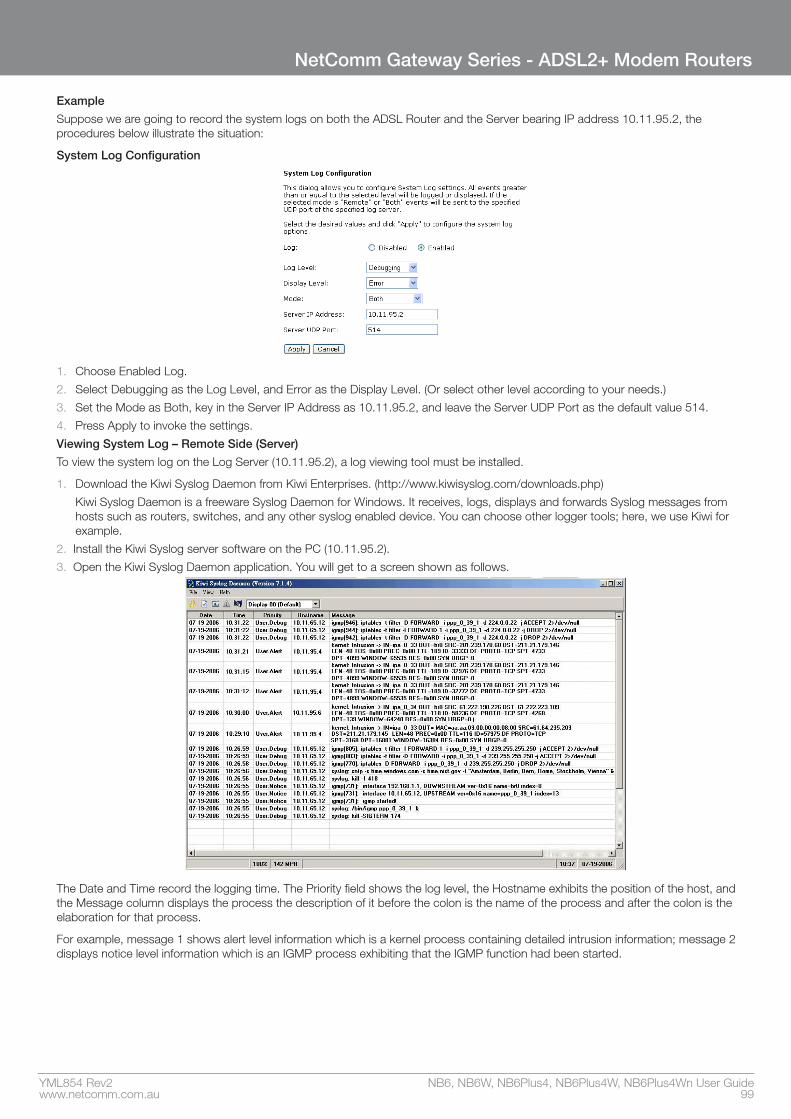
YML854 Rev2 NB6, NB6W, NB6Plus4, NB6Plus4W, NB6Plus4Wn User Guidewww.netcomm.com.au 99
NetComm Gateway Series - ADSL2+ Modem Routers
Example
Suppose we are going to record the system logs on both the ADSL Router and the Server bearing IP address 10.11.95.2, the procedures below illustrate the situation:
System Log Configuration
1. Choose Enabled Log.
2. Select Debugging as the Log Level, and Error as the Display Level. (Or select other level according to your needs.)
3. Set the Mode as Both, key in the Server IP Address as 10.11.95.2, and leave the Server UDP Port as the default value 514.
4. Press Apply to invoke the settings.
Viewing System Log – Remote Side (Server)
To view the system log on the Log Server (10.11.95.2), a log viewing tool must be installed.
1. Download the Kiwi Syslog Daemon from Kiwi Enterprises. (http://www.kiwisyslog.com/downloads.php)
Kiwi Syslog Daemon is a freeware Syslog Daemon for Windows. It receives, logs, displays and forwards Syslog messages from hosts such as routers, switches, and any other syslog enabled device. You can choose other logger tools; here, we use Kiwi for example.
2. Install the Kiwi Syslog server software on the PC (10.11.95.2).
3. Open the Kiwi Syslog Daemon application. You will get to a screen shown as follows.
The Date and Time record the logging time. The Priority field shows the log level, the Hostname exhibits the position of the host, and the Message column displays the process the description of it before the colon is the name of the process and after the colon is the elaboration for that process.
For example, message 1 shows alert level information which is a kernel process containing detailed intrusion information; message 2 displays notice level information which is an IGMP process exhibiting that the IGMP function had been started.

NB6, NB6W, NB6Plus4, NB6Plus4W, NB6Plus4Wn User Guide YML854Rev2100 www.netcomm.com.au
Viewing System Log – Local Side (ADSL Router)
For viewing the system log on local side, click the View System Log button on the webpage for system log configuration.
The system log record on the router will be displayed on a screen as shown above.
The Date/Time records the logging time, and the Facility field distinguishes different classes of system log message. The Severity field shows the log level, and the Message column displays the process and the description of it, the name of the process appears before the colon and the elaboration for that process after the colon.
For example, message 3 shows critical level information which is a pppd (PPP daemon) process showing that a valid IP address had been received from server, and connection is up; message 4 is a kernel process belonging to critical level information which reveals that the Ethernet 0 link is up.
You can press Refresh to update the log files or press Close to close the window.
Note that the earlier messages may be automatically replaced by the updated information when the buffer is overflowed on the router.

YML854 Rev2 NB6, NB6W, NB6Plus4, NB6Plus4W, NB6Plus4Wn User Guidewww.netcomm.com.au 101
NetComm Gateway Series - ADSL2+ Modem Routers
Backup Config
To backup your settings of the router, you can use Backup Config web page to save the configuration.
Click Backup button and the warning window will be prompted. Click OK to continue the backup procedure.
The system will ask your command about the next procedure. Click Save to backup.
You may change the file name and choose a place to save the backup file.
And when you want to restore the settings in the future, simply open Backup Config web page and use Browse button to locate the file.

NB6, NB6W, NB6Plus4, NB6Plus4W, NB6Plus4Wn User Guide YML854Rev2102 www.netcomm.com.au
After opening the backup file, click Restore.
Update Firmware
If you have to or want to update the firmware for this router, you can open the Update Firmware web page and choose the correct file by pressing Browse. Then click the Update Firmware button. The system will execute the update procedure automatically. When it is finished, the system will tell you the update is successfully.
Note: Latest firmware update can be find at www.netcomm.com.au.
Note: Router must not turn off during firmware updates.
Reset Router
To make the settings that you set for this router take effect, please open the Reset Router web page and click the Reboot button to invoke all settings.
You can restore your web pages with default settings. Simply check Reset to factory default settings and click Reboot.
UPnP for XP
Universal plug and play (UPnP) is architecture for pervasive peer to peer network connectivity of intelligent appliances and PCs of all form factors. It is designed to bring easy-to-use, flexible, standards-based connectivity to ad-hoc or unmanaged networks whether in the home, in a small business, public places, or attached to the Internet.
Only Windows XP supports UPnP function.
Please follow the steps below for installing UPnP components.
1. Click on the Start menu, point to Settings and click on Control Panel.
2. Select Add or Remove Programs > Add/Remove Windows Components to open Windows Components Wizard dialog box.

YML854 Rev2 NB6, NB6W, NB6Plus4, NB6Plus4W, NB6Plus4Wn User Guidewww.netcomm.com.au 103
NetComm Gateway Series - ADSL2+ Modem Routers
3. Select Networking Services and click Details. Click the UPNP User Interface check box.
4. Click OK. The system will install UPnP components automatically.
5. After finishing the installation, go to My Network Places. You will find an icon (e.g., Wireless ADSL2+ Router) for UPnP function.
6. Double click on the icon, and the ADSL router will open another web page via the port for UPnP function. The IE address will be
directed to the configuration main webpage as shown in the graphic.
7. Now, the NAT traversal function has already been provided. The ADSL router will create a new virtual server automatically when the router detects that some internet applications is running on the PC.

Troubleshooting
YML854 Rev2 NB6, NB6W, NB6Plus4, NB6Plus4W, NB6Plus4Wn User Guidewww.netcomm.com.au 105
NetComm Gateway Series - ADSL2+ Modem Routers
TroubleshootingIf the suggested solutions in this section do not resolve your issue, contact your system administrator or Internet service provider.
Problems with LANPCs on the LAN cannot get IP addresses from the ADSL Router.
The chances are that the interface used as DHCP server is modified and the client PCs do not renew IP addresses.
If your DHCP server is enabled on Private IP Address previously and you modify the interface to Public IP Address, the client PCs should renew IP addresses.
The PC on the LAN cannot access the Web page of the ADSL Router.
Check that your PC is on the same subnet with the ADSL Router.
Problems with WANYou cannot access the Internet.
• Check the physical connection between the ADSL Router and the LAN.
If the LAN LED on the front panel is off or keeps blinking, there may be problem on the cable connecting to the ADSL Router.
At the DOS prompt, ping the IP address of the ADSL Router, e.g., ping 192.168.1.1. If the following response occurs:Reply from 192.168.1.1: bytes=32 time=100ms TTL=253
Then the connection between the ADSL Router and the network is OK.
If you get a failed ping with the response of: Request timed out
Then the connection is fail. Check the cable between the ADSL Router and the network.
• Check the DNS setting of the ADSL Router.
At the DOS prompt, ping the IP addresses of the DNS provided by your ISP. For example, if your DNS IP is 168.95.1.1, then ping 168.95.1.1. If the following response occurs:
Reply from 168.95.1.1: bytes=32 time=100ms TTL=253
Then the connection to the DNS is OK.
If you get a failed ping with the response of:Request timed out
Then the DNS is not reachable. Check your DNS setting on the ADSL Router.

NB6, NB6W, NB6Plus4, NB6Plus4W, NB6Plus4Wn User Guide YML854Rev2106 www.netcomm.com.au
Problems with UpgradingThe following lists the error messages that you may see during upgrading and the action to take.
• Error message: All the ADSL LEDs light up and cannot light off as usual.
Possible cause: When users are executing firmware upgrade and saving settings to the router, the power for the router is lost for some unknown reasons, the normal web page for the router might be damaged. After power on your router, the LEDs might not work normally.
Action: Setup you PC with a static IP address, such as 192.168.1.2, and then access the router’s web page by entering http://192.168.1.1. Then update the firmware again.
• Error Message: Image uploading failed. The selected file contains an illegal image.
Possible cause: The firmware file format is invalid.
Action: Check to see whether the file format is correct; otherwise download a firmware file with correct format.
• Error Message: Image uploading failed. The system is out of memory.
Possible cause: It may be caused by the lack of memory.
Action: Reboot your ADSL Router and perform the upgrade task again.
• Error Message: Image uploading failed. No image file was selected.
Possible cause: You did not select a file correctly.
Action: Download a compatible firmware from the web.

Glossary

NB6, NB6W, NB6Plus4, NB6Plus4W, NB6Plus4Wn User Guide YML854Rev2108 www.netcomm.com.au
GlossaryARP (Address Resolution Protocol )
ARP is a TCP/IP protocol for mapping an IP address to a physical machine address that is recognized in the local network, such as an Ethernet address.
A host wishing to obtain a physical address broadcasts an ARP request onto the TCP/IP network. The host on the network that has the IP address in the request then replies with its physical hardware address.
Inverse ARP (In-ARP), on the other hand, is used by a host to discover its IP address. In this case, the host broadcasts its physical address and a RARP server replies with the host’s IP address.
DHCP (Dynamic Host Configuration Protocol)
When operates as a DHCP server, the ADSL Router assign IP addresses to the client PCs on the LAN. The client PCs “leases” these Private IP addresses for a user-defined amount of time. After the lease time expires, the private IP address is made available for assigning to other network devices.
The DHCP IP address can be a single, fixed public IP address, an ISP assigned public IP address, or a private IP address.
If you enable DHCP server on a private IP address, a public IP address will have to be assigned to the NAT IP address, and NAT has to be enabled so that the DHCP IP address can be translated into a public IP address. By this, the client PCs are able to access the Internet.
LAN (Local Area Network) & WAN (Wide Area Network)
A LAN is a computer network limited to the immediate area, usually the same building or floor of a building. A WAN, on the other hand, is an outside connection to another network or the Internet.
The Ethernet side of the ADSL Router is called the LAN port. It is a twisted-pair Ethernet 10Base-T interface. A hub can be connected to the LAN port. More than one computers, such as server or printer, can be connected through this hub to the ADSL Router and composes a LAN.
The DSL port of the ADSL Router composes the WAN interface, which supports PPP or RFC 1483 connecting to another remote DSL device.
NAT (Network Address Translation) IP Address
NAT is an Internet standard that translates a private IP within one network to a public IP address, either a static or dynamic one. NAT provides a type of firewall by hiding internal IP addresses. It also enables a company to use more internal IP addresses.
If the IP addresses given by your ISP are not enough for each PC on the LAN and the ADSL Router, you need to use NAT. With NAT, you make up a private IP network for the LAN and assign an IP address from that network to each PC. One of some public addresses is configured and mapped to a private workstation address when accesses are made through the gateway to a public network.
For example, the ADSL Router is assigned with the public IP address of 168.111.2.1. With NAT enabled, it creates a Virtual LAN. Each PC on the Virtual LAN is assigned with a private IP address with default value of 192.168.2.2 to 192.168.2.254. These PCs are not accessible by the outside world but they can communicate with the outside world through the public IP 168.111.2.1.

YML854 Rev2 NB6, NB6W, NB6Plus4, NB6Plus4W, NB6Plus4Wn User Guidewww.netcomm.com.au 109
NetComm Gateway Series - ADSL2+ Modem Routers
Private IP Address
Private IP addresses are also LAN IP addresses, but are considered “illegal” IP addresses to the Internet. They are private to an enterprise while still permitting full network layer connectivity between all hosts inside an enterprise as well as all public hosts of different enterprises.
The ADSL Router uses private IP addresses by assigning them to the LAN that cannot be directly accessed by the Internet or remote server. To access the Internet, private network should have an agent to translate the private IP address to public IP address.
Public IP Address
Public IP addresses are LAN IP addresses that can be considered “legal” for the Internet, because they can be recognized and accessed by any device on the other side of the DSL connection. In most cases they are allocated by your ISP.
If you are given a range of fixed IP addresses, then one can be assigned to the router and the others to network devices on the LAN, such as computer workstations, ftp servers, and web servers.
PVC (Permanent Virtual Circuit)
A PVC is a logical point-to-point circuit between customer sites. PVCs are low-delay circuits because routing decisions do not need to be made along the way. Permanent means that the circuit is preprogrammed by the carrier as a path through the network. It does not need to be set up or turned down for each session.
RIP (Routing Information Protocol)
RIP is a routing protocol that uses the distance-vector routing algorithms to calculate least-hops routes to a destination. It is used on the Internet and is common in the NetWare environment. It exchanges routing information with other routers. It includes V1, V2 and V1&V2, which controls the sending and receiving of RIP packets over Ethernet.
UDP (User Datagram Protocol)
UDP is a connectionless transport service that dispenses with the reliability services provided by TCP. UDP gives applications a direct interface with IP and the ability to address a particular application process running on a host via a port number without setting up a connection session.
Virtual Server
You can designate virtual servers, e.g., a FTP, web, telnet or mail server, on your local network and make them accessible to the outside world. A virtual server means that it is not a dedicated server -- that is, the entire computer is not dedicated to running on the public network but in the private network.
VPI (Virtual Path Identifier) & VCI (Virtual Channel Identifier)
A VPI is a 8-bit field while VCI is a 16-bit field in the ATM cell header. A VPI identifies a link formed by a virtual path and a VCI identifies a channel within a virtual path. In this way, the cells belonging to the same connection can be distinguished. A unique and separate VPI/VCI identifier is assigned in advance to indicate which type of cell is following, unassigned cells, physical layer OAM cells, metasignaling channel or a generic broadcast signaling channel. Your ISP should supply you with the values.

Appendix

YML854 Rev2 NB6, NB6W, NB6Plus4, NB6Plus4W, NB6Plus4Wn User Guidewww.netcomm.com.au 111
NetComm Gateway Series - ADSL2+ Modem Routers
Appendix A: Client Setup for 802.1x,WPA, and WPA-PSKRetreiving Client Certificate
• This step is only required if you intend to authenticate with EAP/TLS.
While there are many ways you may receive a certificate from your Certificate Authority, the example here is to show you how to retrieve your certificate from a Microsoft Certificate Services server via its easy web interface.
1. Please connect the client to a network that doesn’t require port authentictaion.
2. Open up Microsoft Explorer, connect to your CA via the url http://yourserver/certsrv (see your local administrator if it has been changed from the default).
For example, if the Microsoft Certificate Service server uses the IP address 192.168.0.2, then we have to key in http://192.168.0.2/certsrv on the url box.
3. You will be asked to log in, use your domain credentials. (e.g., ABC)

NB6, NB6W, NB6Plus4, NB6Plus4W, NB6Plus4Wn User Guide YML854Rev2112 www.netcomm.com.au
4. Make sure that Request a certificate is selected, and click Next.
5. Select User Certificate, then Next.
6. Click Submit.
7. You may retrieve your certificate by clicking Install this certificate.
8. You’ll receive a confirmation message about accepting the certificate, click Yes

YML854 Rev2 NB6, NB6W, NB6Plus4, NB6Plus4W, NB6Plus4Wn User Guidewww.netcomm.com.au 113
NetComm Gateway Series - ADSL2+ Modem Routers
Enabling 802.1x Authentication and Security
1. Click Run from the Start menu. Type services.msc and click OK.
2. Scroll to the bottom of the list. Double click on the Wireless Zero Configuration service and verify that it is set to Automatic and that it is Started. Click OK to continue.
3. Click the Start button, select Control Panel, then Network Connections.
4. Right click on your wireless network card and select Properties. Click on the Wireless Networks tab.
5. Click Add to continue.

NB6, NB6W, NB6Plus4, NB6Plus4W, NB6Plus4Wn User Guide YML854Rev2114 www.netcomm.com.au
6. Select the Association Tab, and enter the SSID of the AP. (e.g., Please)
7. Set Open as the Network Authentication from the drop down menu, and WEP for Data encryption.
8. Click OK, and then select the Authentication Tab.
9. Ensure that Enable network access control using IEEE 802.1X is selected, and Smart Card or other Certificate is selected from the
EAP type.
10. Click Properties under EAP type.
11. You can choose whether to use one of your certificates you have loaded on the computer, or use a smart card for access. In our example, Use a certificate on this computer option is chose and Use simple certificate selection (Recommended) is checked.
12. Check the Validate server certificate check box if server certificate validation is required.
13. In the Trusted Root Certification Authorities field, check the check box beside the name of the certificate authority from which the server certificate was downloaded. (e.g., NetComm.savd.tw)
Note that if you leave all check boxes unchecked, you will be prompted to accept a connection to the root certification authority during the authentication process.

YML854 Rev2 NB6, NB6W, NB6Plus4, NB6Plus4W, NB6Plus4Wn User Guidewww.netcomm.com.au 115
NetComm Gateway Series - ADSL2+ Modem Routers
14. Click OK twice to close the dialogs until return to Wireless Networks tab of wireless properties. Now we can see the wireless
network which we have just set up being displayed on the Prefered networks.
15. Click OK to save your settings. The configuration is complete

NB6, NB6W, NB6Plus4, NB6Plus4W, NB6Plus4Wn User Guide YML854Rev2116 www.netcomm.com.au
Enabling WPA Authentication and SecurityThe first four steps are the same as the setting for 802.1x authentication, please refer to the previous part.
5. Select the Association Tab, and enter the SSID of the AP. (e.g., Please)
6. Choose WPA from the drop down menu for the Network Authentication, and TKIP for Data encryption.
7. Click OK, and then select the Authentication Tab.
8. The Enable network access control using IEEE 802.1X is selected by default, and Protected EAP (PEAP) is selected from the EAP
type.
9. Click Properties under EAP type.

YML854 Rev2 NB6, NB6W, NB6Plus4, NB6Plus4W, NB6Plus4Wn User Guidewww.netcomm.com.au 117
NetComm Gateway Series - ADSL2+ Modem Routers
10. Choose Use a certificate on this computer option and select Use simple certificate selection (Recommended).
11. Check the Validate server certificate check box if server certificate validation is required
12. In the Trusted Root Certification Authorities field, check the check box beside the name of the certificate authority from which the server certificate was downloaded. (e.g., NetComm.savd.tw)
Note that if you leave all check boxes unchecked, you will be prompted to accept a connection to the root certification authority during the authentication process.
13. Click OK three times to close the dialogs and save all the settings until return to Network Connections.
14. Now the configuration for WPA authentication is completed. And you may start to use the wireless device.
Enabling WPA-PSK Authentication and Security
1. Click the Start button, select Control Panel, then Network Connections.
2. Right click on your wireless network card and select Properties. Click on the Wireless Networks tab.
3. Click Add to continue.

NB6, NB6W, NB6Plus4, NB6Plus4W, NB6Plus4Wn User Guide YML854Rev2118 www.netcomm.com.au
4. Select the Association Tab, and enter the SSID of the AP. (e.g., Please)
5. Choose WPA-PSK for the Network Authentication and TKIP for Data encryption.
6. Enter Network key twice to access the AP.
7. Click OK to save the settings and return to the Wireless Networks tab on Wireless Properties.
8. The Network with WPA-PSK authentication has been set up, and is displayed in the preferred networks field.
9. Now the configuration for WPA-PSK authentication is completed.

YML854 Rev2 NB6, NB6W, NB6Plus4, NB6Plus4W, NB6Plus4Wn User Guidewww.netcomm.com.au 119
NetComm Gateway Series - ADSL2+ Modem Routers
Appendix B: Establishing your wireless connection
(For NB6W/Plus4W/ Plus4Wn only)
The following examples use the default wireless configuration.
Windows XP service pack 2Follow these steps:
1. Open Network Connections (Start > Control Panel > Network Connections):
2. Right-click on your Wireless Network Connection and select View Available Wireless Networks:
3. Select the wireless network you want to connect to and click Connect:
4. Enter the network key (default network key is “A1B2C3D4E5”) and click Connect:
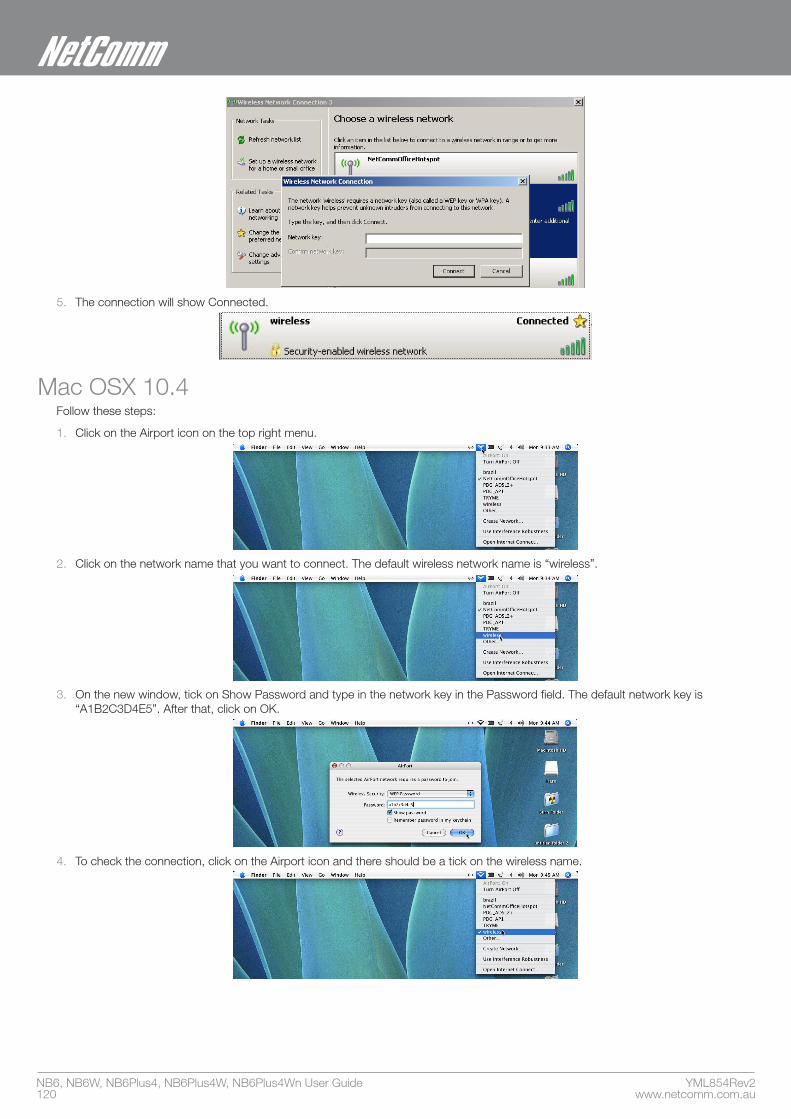
NB6, NB6W, NB6Plus4, NB6Plus4W, NB6Plus4Wn User Guide YML854Rev2120 www.netcomm.com.au
5. The connection will show Connected.
Mac OSX 10.4Follow these steps:
1. Click on the Airport icon on the top right menu.
2. Click on the network name that you want to connect. The default wireless network name is “wireless”.
3. On the new window, tick on Show Password and type in the network key in the Password field. The default network key is “A1B2C3D4E5”. After that, click on OK.
4. To check the connection, click on the Airport icon and there should be a tick on the wireless name.

YML854 Rev2 NB6, NB6W, NB6Plus4, NB6Plus4W, NB6Plus4Wn User Guidewww.netcomm.com.au 121
NetComm Gateway Series - ADSL2+ Modem Routers
Windows Vista Follow these steps:
1. Open Network and Sharing Center (Start > Control Panel > Network and Sharing center).
2. Click on “Connect to a network”.
3. Choose “Connect to the Internet” and click on “Next”.

NB6, NB6W, NB6Plus4, NB6Plus4W, NB6Plus4Wn User Guide YML854Rev2122 www.netcomm.com.au
4. Choose “Wireless”.
5. Click on the wireless network name. In this example, the wireless network name is “wireless” and click “Connect”. The default wireless network name is “wireless”. If you have not change the wireless network name, please click on “wireless”.
6. Tick on “Display Characters” and type in the network key. The default network key is “A1B2C3D4E5” and this example use the default key. Click “Next” after that.

YML854 Rev2 NB6, NB6W, NB6Plus4, NB6Plus4W, NB6Plus4Wn User Guidewww.netcomm.com.au 123
NetComm Gateway Series - ADSL2+ Modem Routers
7. Select the appropriate location. This will affect the firewall settings on the computer.
8. Tick on both “Save this network” and “Start this connection automatically” and click on “Next”.
9. Now the connection is ready.
Notes: For other operating system such as Windows 98SE, Windows ME and Windows 2000 or if you use the wireless adaptor utility to configure your wireless connection, please consult the wireless adaptor documentation respectively.

NB6, NB6W, NB6Plus4, NB6Plus4W, NB6Plus4Wn User Guide YML854Rev2124 www.netcomm.com.au
TroubleshootingWindows can not configure this wireless connection.
Enable Wireless Zero Configuration by following these steps:
1. Click on the Start Menu. Click on Run, type in “services.msc” (without the quotes). Press OK.
2. Scroll down to the bottom of the list, locate the service named Wireless Zero Configuration and double-click on it.
3. Change the Startup type to Automatic and check the “Service status”.
4. If the Status is Started, simply press the Apply button at the bottom of the window, and then press OK.
5. If the Status is Stopped, press the Start button. Wait until the service has started, then press the Apply button, and then press OK.
6. Close the Services window.
7. Click on the Start Menu. Click on Run, type in “ncpa.cpl” (without the quotes). Press OK.
8. Right-click on the Wireless Network Connection, choose Properties.
9. Click on the Wireless Networks tab at the top of the window.
10. Make sure the tick-box for Use Windows to configure my wireless network settings is TICKED. Then press OK.
Wireless drop outs and low signal quality.
There are a few things that can cause wireless drops out and low signal quality
1. Interference on the wireless signal from other wireless devices
2. Other wireless network that use the same channel.
3. Obstruction between the router and the wireless computer.
The first thing to do is to change the wireless channel. Please change the wireless channel and see if it improves the quality or reduce the drop outs. Please follow these steps to change the wireless channel:
1. Open http://192.168.1.1/ from internet explorer or any web browser.
2. At the login screen enter “admin” for both username and password. Then click on “Login” or “OK”.
3. Click on Wireless and then click on Configuration.
4. Change the channel from 6 to any number from 1 to 11.
5. Click on Save/Apply.

YML854 Rev2 NB6, NB6W, NB6Plus4, NB6Plus4W, NB6Plus4Wn User Guidewww.netcomm.com.au 125
NetComm Gateway Series - ADSL2+ Modem Routers
Appendix C: How to change Wireless Security on your NB6W/NB6Plus4W/NB6Plus4WnWEP encryption
The NB6W/NB6Plus4W/ NB6Plus4Wn has the WEP encryption enabled by default. To change the encryption key, please follow the following steps:
1. Connect the computer directly to the router using Ethernet cable.
2. Open the web configuration, http://192.168.1.1/ from your web browser i.e. Internet explorer, Firefox.
3. At the log in screen, enter the Username and password. The default Username is “admin” and the default Password is “admin”. Then click on “Login”.
4. Click on “Wireless” menu at the top
5. Click on “Security” on the left
6. Change “Key 1” from “a1b2c3d4e5” to the new encryption.
Please note that WEP Encryption key can only use numbers from 0 to 9 and letters from A to F. 64 bit Cipher needs 10 digits Encryption key and 128 bit Cipher needs 26 digits Encryption key.
7. Click on “Apply”Notes: After changing the security settings, you need to configure the wireless computer according to the new settings. Please refer to your Operating system manual for more information.

NB6, NB6W, NB6Plus4, NB6Plus4W, NB6Plus4Wn User Guide YML854Rev2126 www.netcomm.com.au
WPA encryptionWhen a more secure connection is needed, you can change the wireless security settings on the NB6W/NB6Plus4W and NB6Plus4Wn to WPA-PSK. Please follow the following steps:
1. Connect the computer directly to the router using Ethernet cable.
2. Open the web configuration, http://192.168.1.1/ from your web browser i.e. Internet explorer, Firefox.
3. At the log in screen, enter the Username and password. The default Username is “admin” and the default Password is “admin”. Then click on “Login”.
4. Click on “Wireless” menu at the top
5. Click on “Security” on the left
6. Change “Wireless Security” to “WPA-PSK” on the top menu
7. Enter the key in “Pre-Shared Key” field. The key needs to be more then 8 digits and less then 63 digits and it can be any combination of letters and numbers.
8. Change the WPA Group Rekey Interval to “3600”
9. Click on “Apply”Notes: After changing the security settings, you need to configure the wireless computer according to the new settings. Please refer to your Operating system manual for more information.

YML854 Rev2 NB6, NB6W, NB6Plus4, NB6Plus4W, NB6Plus4Wn User Guidewww.netcomm.com.au 127
NetComm Gateway Series - ADSL2+ Modem Routers
Appendix D: Legal & Regulatory InformationThis manual is copyright. Apart from any fair dealing for the purposes of private study, research, criticism or review, as permitted under the Copyright Act, no part may be reproduced, stored in a retrieval system or transmitted in any form, by any means, be it electronic, mechanical, recording or otherwise, without the prior written permission of NetComm Limited. NetComm Limited accepts no liability or responsibility, for consequences arising from the use of this product.
NetComm Limited reserves the right to change the specifications and operating details of this product without notice.
NetComm is a registered trademark of NetComm Limited.
All other trademarks are acknowledged the property of their respective owners.
Customer InformationACA (Australian Communications Authority) requires you to be aware of the following information and warnings:
(1) This unit shall be connected to the Telecommunication Network through a line cord which meets the requirements of the ACA TS008 Standard.
(2) This equipment has been tested and found to comply with the Standards for C-Tick and or A-Tick as set by the ACA . These standards are designed to provide reasonable protection against harmful interference in a residential installation. This equipment generates, uses, and can radiate radio noise and, if not installed and used in accordance with the in structions detailed within this manual, may cause interference to radio communications. However, there is no guarantee that interference will not occur with the installation of this product in your home or office. If this equipment does cause some degree of interference to radio or television reception, which can be determined by turning the equipment off and on, we encourage the user to try to correct the interference by one or more of the following measures:
• Change the direction or relocate the receiving antenna.
• Increase the separation between this equipment and the receiver.
• Connect the equipment to an alternate power outlet on a different power circuit from that to which the receiver/TV is connected.
• Consult an experienced radio/TV technician for help.
(3) The power supply that is provided with this unit is only intended for use with this product. Do not use this power supply with any other product or do not use any other power supply that is not approved for use with this product by NetComm. Failure to do so may cause damage to this product, fire or result in personal injury.
Product WarrantyThe warranty is granted on the following conditions:
1. This warranty extends to the original purchaser (you) and is not transferable;
2. This warranty shall not apply to software programs, batteries, power supplies, cables or other accessories supplied in or with the product;
3. The customer complies with all of the terms of any relevant agreement with NetComm and any other reasonable requirements of NetComm including producing such evidence of purchase as NetComm may require;
4. The cost of transporting product to and from NetComm’s nominated premises is your re spon si bility; and,
5. NetComm does not have any liability or responsibility under this warranty where any cost, loss, injury or damage of any kind, whether direct, indirect, consequential, incidental or otherwise arises out of events beyond NetComm’s reasonable control. This includes but is not limited to: acts of God, war, riot, embargoes, acts of civil or military authorities, fire, floods, electricity outages, lightning, power surges, or shortages of materials or labour.
6. The customer is responsible for the security of their computer and network at all times. Security features may be disabled within the factory default settings. NetComm recommends that you enable these features to enhance your security.
The warranty is automatically voided if:
1. You, or someone else, use the product, or attempts to use it, other than as specified by Net Comm;
2. The fault or defect in your product is the result of a voltage surge subjected to the product either by the way of power supply or communication line, whether caused by thunderstorm activity or any other cause(s);
3. The fault is the result of accidental damage or damage in transit, including but not limited to liquid spillage;
4. Your product has been used for any purposes other than that for which it is sold, or in any way other than in strict accordance with the user manual supplied;
5. Your product has been repaired or modified or attempted to be repaired or modified, other than by a qualified person at a service centre authorised by NetComm; and,
6. The serial number has been defaced or altered in any way or if the serial number plate has been removed.

NB6, NB6W, NB6Plus4, NB6Plus4W, NB6Plus4Wn User Guide YML854Rev2128 www.netcomm.com.au
Limitations of WarrantyThe Trade Practices Act 1974 and corresponding State and Territory Fair Trading Acts or legalisation of another Government (“the relevant acts”) in certain circumstances imply mandatory conditions and warranties which cannot be excluded. This warranty is in addition to and not in replacement for such conditions and warranties.
To the extent permitted by the Relevant Acts, in relation to your product and any other materials provided with the product (“the Goods”) the liability of NetComm under the Relevant Acts is limited at the option of NetComm to:
• Replacement of the Goods; or
• Repair of the Goods; or
• Payment of the cost of replacing the Goods; or
• Payment of the cost of having the Goods repaired.
All NetComm ACN 002 490 486 products have a standard 12 months warranty from date of purchase. However some products have an extended warranty option (refer to packaging). To be eligible for the extended warranty you must supply the requested warranty information to NetComm within 30 days of the original purchase by registering on-line via the NetComm web site at
www.netcomm.com.au

YML854 Rev2 NB6, NB6W, NB6Plus4, NB6Plus4W, NB6Plus4Wn User Guidewww.netcomm.com.au 129
NetComm Gateway Series - ADSL2+ Modem Routers

NB6, NB6W, NB6Plus4, NB6Plus4W, NB6Plus4Wn User Guide YML854Rev2130 www.netcomm.com.au
Product WarrantyNetComm products have a standard 12 months warranty from date of purchase. However some products have an extended warranty option, via registering your product online at the NetComm website www.netcommlimited.com.
Technical SupportIf you have any technical difficulties with your product, please refer to the support section of our website.
www.netcomm.com.au/supportNote: NetComm Technical Support for this product only covers the basic installation and features outlined in the Quick Start Guide. For further information regarding the advanced features of this product, please
refer to the configuring sections in the User Guide or contact a Network Specialist.
DYNALINK NZ 12c Tea Kea Place, Albany, Auckland, New Zealand P: 09 448 5548 F: 09 448 5549E: [email protected] W: www.dynalink.co.nz
Trademarks and registered trademarks are the property of NetComm Limited or their respective owners. Specifications are subject to change without notice. Images shown may vary slightly from the actual product.
NETCOMM LIMITED Head Office PO Box 1200, Lane Cove NSW 2066 AustraliaP: 02 9424 2070 F: 02 9424 2010 E: [email protected] W: www.netcommlimited.com.