Adobe® Illustrator® CS6 on Demand
545
-
Upload
khangminh22 -
Category
Documents
-
view
0 -
download
0
Transcript of Adobe® Illustrator® CS6 on Demand

ptg8126863
ptg8126863

ptg8126863
Adobe® Illustrator® CS6 on Demand
Copyright © 2012 by Perspection, Inc.All rights reserved. No part of this book shall be reproduced, stored in aretrieval system, or transmitted by any means, electronic, mechanical, photo-copying, recording, or otherwise, without written permission from the publish-er. No patent liability is assumed with respect to the use of the informationcontained herein. Although every precaution has been taken in the prepara-tion of this book, the publisher and author assume no responsibility for errorsor omissions. Nor is any liability assumed for damages resulting from the useof the information contained herein.
Library of Congress Cataloging-in-Publication Data is on file
ISBN-13: 978-0-7897-4935-2
ISBN-10: 0-7897-4935-1
Printed and bound in the United States of AmericaFirst Printing: May 2012
15 14 13 12 4 3 2 1
Que Publishing offers excellent discounts on this book when ordered in quantity for bulk purchases or special sales.
For information, please contact: U.S. Corporate and Government Sales
1-800-382-3419 or [email protected]
For sales outside the U.S., please contact: International Sales
1-317-428-3341 or [email protected]
TrademarksAll terms mentioned in this book that are known to be trademarks or servicemarks have been appropriately capitalized. Que cannot attest to the accuracyof this information. Use of a term in this book should not be regarded asaffecting the validity of any trademark or service mark.
Adobe, the Adobe logo, Acrobat, Bridge, Dreamweaver, Extension Manager,ExtendScript Toolkit, Flash, InDesign, Illustrator, PageMaker, Photoshop, andPhotoshop Elements are registered trademarks of Adobe System Incorporated.Apple, Mac OS, and Macintosh are trademarks of Apple Computer, Inc.Microsoft and the Microsoft Office logo are registered trademarks of MicrosoftCorporation in the United States and/or other countries.
Warning and DisclaimerEvery effort has been made to make this book as complete and as accurate aspossible, but no warranty or fitness is implied. The authors and the publishersshall have neither liability nor responsibility to any person or entity withrespect to any loss or damage arising from the information contained in thisbook.
PublisherPaul Boger
Associate PublisherGreg Wiegand
Acquisitions EditorLaura Norman
Managing EditorSteve Johnson
AuthorSteve Johnson
Technical EditorToni Bennett
Page LayoutBeth TeylerJames Teyler
Interior DesignersSteve JohnsonMarian Hartsough
IllustrationsJP Johnson
IndexerSharon Shock
ProofreaderBeth Teyler
Team CoordinatorCindy Teeters

ptg8126863
iii
Acknowledgments
a
aPerspection, Inc.Adobe Illustrator CS6 on Demand has been created by the professional trainers andwriters at Perspection, Inc. to the standards you’ve come to expect from Que pub-lishing. Together, we are pleased to present this training book.
Perspection, Inc. is a software training company committed to providing informationand training to help people use software more effectively in order to communicate,make decisions, and solve problems. Perspection writes and produces softwaretraining books, and develops multimedia and web-based training. Since 1991, wehave written more than 120 computer books, with several bestsellers to our credit,and sold over 5 million books.
This book incorporates Perspection’s training expertise to ensure that you’ll receivethe maximum return on your time. You’ll focus on the tasks and skills that increaseproductivity while working at your own pace and convenience.
We invite you to visit the Perspection web site at:
www.perspection.com
AcknowledgmentsThe task of creating any book requires the talents of many hard-working peoplepulling together to meet impossible deadlines and untold stresses. We’d like tothank the outstanding team responsible for making this book possible: the writer,Steve Johnson; the technical editor, Toni Bennett; the production editors, JamesTeyler and Beth Teyler; proofreader, Beth Teyler; and the indexer, Sharon Shock. We’dalso like to thank JP Johnson for his contribution of Illustrator artwork.
At Que publishing, we’d like to thank Greg Wiegand and Laura Norman for theopportunity to undertake this project, Cindy Teeters for administrative support, andSandra Schroeder for your production expertise and support.
Perspection
ptg8126863
iv
aa
About the AuthorSteve Johnson has written more than 70 books on a variety of computer software,including Adobe Photoshop CS5, Adobe Dreamweaver CS5, Adobe InDesign CS5,Adobe Illustrator CS5, Adobe Flash Professional CS5, Microsoft Windows 7,Microsoft Office 2010 and 2007, Microsoft Office 2008 for the Macintosh, and AppleMac OS X Lion. In 1991, after working for Apple Computer and Microsoft, Stevefounded Perspection, Inc., which writes and produces software training. When he isnot staying up late writing, he enjoys coaching baseball, playing golf, gardening,and spending time with his wife, Holly, and three children, JP, Brett, and Hannah.Steve and his family live in Northern California, but can also be found visiting fam-ily all over the western United States.

ptg8126863
Acknowledgments v
a
We Want to Hear from You!As the reader of this book, you are our most important critic and commentator. Wevalue your opinion and want to know what we’re doing right, what we could do bet-ter, what areas you’d like to see us publish in, and any other words of wisdom you’re willing to pass our way.
As an associate publisher for Que, I welcome your comments. You can email orwrite me directly to let me know what you did or didn’t like about this book—as wellas what we can do to make our books better.
Please note that I cannot help you with technical problems related to the topic of this book. We do have a User Services group, however, where I will forward spe-cific technical questions related to the book.
When you write, please be sure to include this book’s title and author as well asyour name, email address, and phone number. I will carefully review your com-ments and share them with the author and editors who worked on the book.
Email: [email protected]
Mail: Greg WiegandQue Publishing800 East 96th StreetIndianapolis, IN 46240 USA
For more information about this book or another Que title, visit our web site atwww.quepublishing.com. Type the ISBN (excluding hyphens) or the title of a book inthe Search field to find the page you’re looking for.

ptg8126863
This page intentionally left blank
ptg8126863
vii
Contents
c
cIntroduction xvii
Getting Started with Illustrator CS6 1
Installing Illustrator 2 New!
Getting Started 4 New!
Viewing the Illustrator Window 6 New!
Showing and Hiding Panels 8 New!
Working with Panels 10 New!
Using the Tools and Control Panel 12 New!
Opening a Document 14 New!
Opening a Document with Adobe Bridge 16Inserting Images in a Document 18Using the Status Bar 19Working with Document Windows 20Checking for Updates Online 22Getting Help While You Work 24Saving a Document 26 New!
Finishing Up 28
Creating and Viewing a Document 29
Creating a New Document 30Creating a New Document Using Presets 31Creating a New Document from a Template 32Setting Up a Document 34 New!
Using Multiple Artboards 36Working with Multiple Artboards 38Changing the Display View 40Changing the View with the Navigator Panel 42Customizing the Navigator Panel 44Changing the Screen Display Mode 45Changing the View with the Zoom Tool 46Viewing and Using Rulers 48
2
1
ptg8126863
viii
c
Using the Guides 50Using Smart Guides 52Using the Grid 54Moving Around with the Hand Tool 55Using Crop Marks 56Working with the Info Panel 58Using Undo and Redo 59Creating and Selecting Workspaces 60 New!
Working with Objects 63
Understanding Vector and Raster Graphics 64Understanding Paths 65Selecting a Drawing Mode 66Creating Pixel Aligned Objects 67Creating Rectangles and Ellipses 68 New!
Creating Polygons and Stars 70Creating Line Segments 71Creating Arcs and Spirals 72Creating Grids 74Using the Shape Builder Tool 76Creating Perspective Objects 78Working with Perspective Objects 80Customizing a Perspective Grid 81Understanding Selections 82Using the Selection Tool 83Using the Direct Selection Tool 84Using the Lasso Tool 85Using the Magic Wand Tool 86Selecting and Grouping Objects 88Selecting Similar Objects 90Saving and Editing Selections 92Moving Objects 93Duplicating Objects 94Aligning and Distributing Objects 96Transforming Objects 97Using the Free Transform Tool 98 New!
Rotating and Scaling Objects 100Reflecting and Shearing Objects 101Applying Multiple Transformations 102 New!
Reshaping Objects with Envelopes 104
3
ptg8126863
Contents ix
c
Working with Color 107
Changing Color Settings 108Changing Color Profiles 110Working with Color Modes 111Changing Color Modes 112Applying Colors 113 New!
Working with the Color Panel 114Working with the Swatches Panel 116 New!
Creating Groups in the Swatches Panel 118 New!
Working with Swatch Libraries 120 New!
Adding Colors Using the Kuler Panel 122Replacing Colors 124Inverting Colors 126Using the Color Guide Panel 127Applying Color with the Color Guide Panel 128Editing Colors with Live Color 130Proofing Colors on the Screen 132
Applying Fills, Strokes, and Gradients 135
Applying Fill and Stroke Colors 136Changing Stroke Attributes 138Changing Stroke Style 140Creating Variable Stroke Widths 142 New!
Using the Eyedropper Tool 144Creating Patterns for Fills 146 New!
Editing Patterns 148 New!
Using Patterns as Fills 149Blending Fill Colors 150Creating Blends Automatically 151Applying Blend Options 152Creating Blends with the Blend Tool 153Modifying Blend Objects 154Setting Transparency Options 155Controlling Transparency Effects 156Creating Transparency Masks 157Flattening Object Transparency 158 New!
Using the Transparency Grid 159Applying Gradients 160 New!
Using Gradients Libraries 162Creating Gradients 163
5
4
ptg8126863
x
c
Editing Gradients 164Using the Gradient Tool 165Creating a Gradient Mesh 166
Working with Points and Paths 169
Drawing with the Pen Tools 170Setting Anchor Point Preferences 172Moving Points and Segments 173Converting Points 174Adding and Deleting Anchor Points 176Aligning and Joining Anchor Points 178Reshaping Paths 180Erasing to Reshape Paths 182Smoothing Paths 183Simplifying Paths 184Dividing Paths 185Splitting Paths 186Merging Paths 188Working with Shape Mode 190Working with Pathfinder 191Creating a Compound Path 192Creating a Clipping Set 194Editing a Clipping Set 196
Working with Layers 199
Understanding the Layers Panel 200 New!
Setting Layers Panel Options 201Creating Layers 202 New!
Selecting Layers 204Deleting Layers 205Selecting Objects with Layers 206Arranging Layers and Objects 208Duplicating Layers and Objects 210Locking Layers and Objects 211Showing and Hiding Layers and Objects 212Merging Layers and Groups 213Moving Objects to a Layer 214 New!
Flattening Layers 216Locating Objects in the Layers Panel 217 New!
Creating a Template Layer 218Viewing Layers as Outlines 219
7
6
ptg8126863
Contents xi
c
Working with Type 221
Using Type Tools 222Creating Type 223Creating Type in a Text Box 224Creating Area Type 225Creating Path Type 226Modifying Type on a Path 228Importing Text 229Selecting Type 230Copying or Moving Type 232Working with Overflow Type 234Changing Fonts 236Changing Font Size 238Leading Type 239Kerning Type 240Tracking Type 241Scaling Type 242Rotating Type 243Formatting Type 244 New!
Anti-aliasing Type 245Aligning Paragraphs 246Indenting and Spacing Paragraphs 247Setting Tabs 248Working with Hyphenation 249Working with Type Styles 250Using Smart Punctuation 252Working with Glyphs 253Working with OpenType Fonts 254Working with Justification 255Wrapping Type Around an Object 256Creating Type Outlines 257
Working with Graphics 259
Opening Graphics 260Placing Graphics 261Placing Graphics from Adobe Bridge 262Linking Graphics 264Managing Linked Graphics 266Tracing Raster Graphics 268 New!
Adjusting Tracing Options 270 New!
9
8
ptg8126863
xii
c
Converting Tracing to Paths 272Applying Graphic Styles 273 New!
Creating Graphic Styles 274Editing Graphic Styles 276Applying Appearance Attributes 278Creating a Mosaic Graphic 280
Manipulating Artwork with Effects 281
Applying Illustrator Effects 282 New!
Applying the Convert to Shape Effect 284Applying the Scribble Effect 285Applying the Inner or Outer Glow Effect 286Applying the Drop Shadow Effect 287Applying 3D Effects 288Applying Warp Effects 290Applying Distort & Transform Effects 291Changing Raster Effects Settings 292Working with the Effect Gallery 294Applying Multiple Effects 296Controlling Effects Using Selections 297Using Blur Effects 298 New!
Viewing Various Effects 300
Drawing and Painting 303
Using the Pencil Tool 304Creating Live Paint Groups 306 New!
Setting Live Paint Bucket Tool Options 308Using the Live Paint Bucket Tool 310Using the Live Paint Selection Tool 312Modifying Live Paint Groups 314Selecting Gap Options 316Using the Brushes Panel 317Using the Paintbrush Tool 318Creating and Editing Scatter Brushes 320Creating and Editing Calligraphic Brushes 322Creating and Editing Art Brushes 324Creating and Editing Pattern Brushes 326Creating and Editing Bristle Brushes 328Working with Brushes 330Working with Liquify Tools 332
11
10
ptg8126863
Contents xiii
c
Using Symbols 333
Using the Symbols Panel 334Using Symbol Libraries 335Working with Symbols 336 New!
Duplicating and Editing Symbols 338 New!
Breaking Symbol Links 340Using the Symbol Sprayer Tool 342Setting Symbolism Tools Options 343Using the Symbol Shifter Tool 344Using the Symbol Scruncher Tool 345Using the Symbol Sizer Tool 346Using the Symbol Spinner Tool 347Using the Symbol Stainer Tool 348Using the Symbol Screener Tool 349Using the Symbol Styler Tool 350Expanding Symbol Instances 351Using 9-Slice Scaling for Symbols 352Aligning Symbols to the Pixel Grid 354Setting the Symbol Registration Point 355
Automating the Way You Work 357
Examining the Actions Panel 358Building a New Action 360Controlling the Playback of a Command 361Adding a Stop to an Action 362Inserting a Non-Recordable Command into an Action 363Adding a Command to an Action 364Deleting a Command from an Action 365Working with Batch File Processing 366Opening and Using Scripts 368 New!
Defining and Editing Data Variables 370Creating and Formatting a Data Graph 372Adding Graph Designs to a Graph 374Cleaning Up Unneeded Elements 375
Proofing and Printing Documents 377
Using Spell Check 378Using Custom Dictionaries 379Finding and Replacing Text and Elements 380
14
13
12

ptg8126863
xiv
c
Finding and Changing Fonts 382Printing a Document 384Printing with Presets 385Setting General Print Options 386Setting Marks and Bleed Options 388Setting Graphics Options 390Previewing Color Separations 391Setting Output Options 392Setting Advanced Options 394 New!
Setting Color Management Options 396Checking for Print Problems 397Inserting File Information 398Using the Document Info Panel 400
Exporting a Document 401
Exporting a Document 402Understanding Export File Formats 403Exporting as a Bitmap 404Exporting as a TIFF 405Exporting as a PNG or JPEG 406Exporting to Photoshop 408Exporting with Presets 409Exporting as a Flash Movie 410Saving as Adobe PDF 412Saving as an EPS 414Saving as a SVG 416 New!
Saving for HTML5 and CSS 418Saving as Adobe FXG 420Saving a Document for Microsoft Office 422Saving as a Template 423
Designing for the Web and Devices 425
Saving for the Web 426Working with Save For Web Options 428Working with Web File Formats 430Optimizing a JPEG Document 432Optimizing a GIF Document 434Optimizing a PNG-8 Document 436Optimizing a PNG-24 Document 438Optimizing an Image to File Size 439
16
15
ptg8126863
Contents xv
c
Slicing Images the Easy Way 440Working with Slices 442 New!
Adding HTML Text or an URL Link to a Slice 444Arranging Slices 446 New!
Combining or Dividing Slices 448Saving Slices for the Web 449Saving Selected Slices 450Previewing in a Browser 451 New!
Customizing the Way You Work 453
Setting General Preferences 454Changing Selection & Anchor Display Preferences 456Setting Type Preferences 458Changing Units Preferences 460Setting Slices Preferences 461 New!
Setting Dictionary & Hyphenation Preferences 462 New!
Selecting Plug-ins 463Selecting Scratch Disks 464Setting User Interface Preferences 465 New!
Setting File Handling & Clipboard Preferences 466 New!
Working with Appearance of Black Preferences 468Defining Keyboard Shortcuts 469 New!
Using Drawing Tablets 470
Working Together with Adobe Programs 471
Exploring Adobe Programs 472Exploring Adobe Bridge 473Getting Started with Adobe Bridge 474 New!
Getting Photos from a Digital Camera 475Working with Raw Images from a Digital Camera 476 New!
Modifying Images in Camera Raw 478 New!
Working with Images Using Adobe Bridge 480Setting Preferences in Adobe Bridge 482 New!
Applying Image Adjustments 484Creating a Web Photo Gallery 485Automating Tasks in Adobe Bridge 486Using Mini Bridge 487 New!
Working with Adobe Media Encoder 488 New!
Working with Adobe Extension Manager 490 New!
Scripting with Adobe ExtendScript Toolkit 491 New!
18
17

ptg8126863
xvi
c
New Features 493 New!
Adobe Certification 497Index 503
ptg8126863
xvii
Introduction
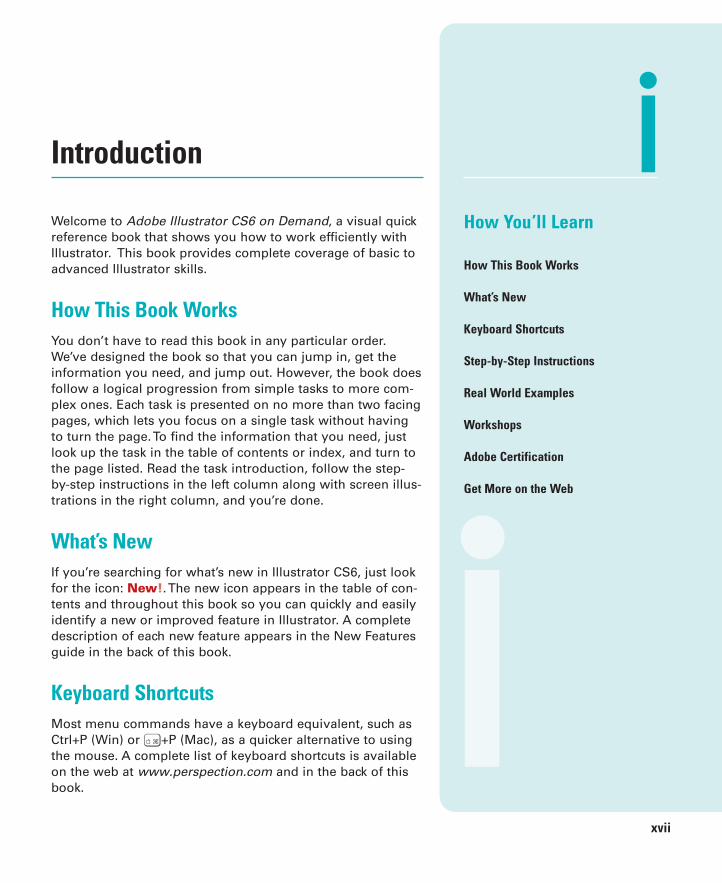
Welcome to Adobe Illustrator CS6 on Demand, a visual quickreference book that shows you how to work efficiently withIllustrator. This book provides complete coverage of basic toadvanced Illustrator skills.
How This Book WorksYou don’t have to read this book in any particular order.We’ve designed the book so that you can jump in, get theinformation you need, and jump out. However, the book doesfollow a logical progression from simple tasks to more com-plex ones. Each task is presented on no more than two facingpages, which lets you focus on a single task without havingto turn the page. To find the information that you need, justlook up the task in the table of contents or index, and turn tothe page listed. Read the task introduction, follow the step-by-step instructions in the left column along with screen illus-trations in the right column, and you’re done.
What’s NewIf you’re searching for what’s new in Illustrator CS6, just lookfor the icon: New!. The new icon appears in the table of con-tents and throughout this book so you can quickly and easilyidentify a new or improved feature in Illustrator. A completedescription of each new feature appears in the New Featuresguide in the back of this book.
Keyboard ShortcutsMost menu commands have a keyboard equivalent, such asCtrl+P (Win) or A+P (Mac), as a quicker alternative to usingthe mouse. A complete list of keyboard shortcuts is availableon the web at www.perspection.com and in the back of thisbook.
How You’ll Learn
How This Book Works
What’s New
Keyboard Shortcuts
Step-by-Step Instructions
Real World Examples
Workshops
Adobe Certification
Get More on the Web
ptg8126863
xviii
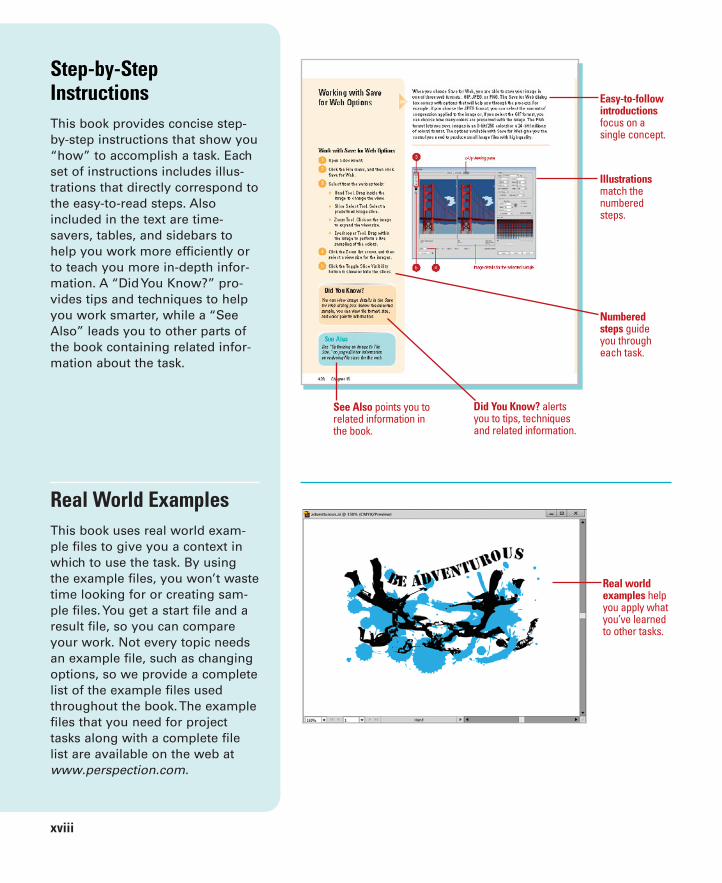
Step-by-StepInstructionsThis book provides concise step-by-step instructions that show you“how” to accomplish a task. Eachset of instructions includes illus-trations that directly correspond tothe easy-to-read steps. Alsoincluded in the text are time-savers, tables, and sidebars tohelp you work more efficiently orto teach you more in-depth infor-mation. A “Did You Know?” pro-vides tips and techniques to helpyou work smarter, while a “SeeAlso” leads you to other parts ofthe book containing related infor-mation about the task.
Real World ExamplesThis book uses real world exam-ple files to give you a context inwhich to use the task. By usingthe example files, you won’t wastetime looking for or creating sam-ple files. You get a start file and aresult file, so you can compareyour work. Not every topic needsan example file, such as changingoptions, so we provide a completelist of the example files usedthroughout the book. The examplefiles that you need for projecttasks along with a complete filelist are available on the web atwww.perspection.com.
Real worldexamples helpyou apply whatyou’ve learnedto other tasks.
Illustrationsmatch thenumberedsteps.
Numberedsteps guideyou througheach task.
Did You Know? alertsyou to tips, techniquesand related information.
See Also points you torelated information inthe book.
Easy-to-followintroductionsfocus on asingle concept.

ptg8126863
The Workshopswalk you throughin-depth projectsto help you putIllustrator towork.
Introduction xix
WorkshopsThis book shows you how to puttogether the individual step-by-step tasks into in-depth projectswith the Workshop. You start eachproject with a sample file, workthrough the steps, and then com-pare your results with a projectresults file at the end. The Work-shop projects and associated filesare available on the web atwww.perspection.com or atqueondemand.com.
Adobe CertificationThis book prepares you fully forthe Adobe Certified Expert (ACE)exam for Adobe Illustrator CS6.Each Adobe Certified Expert certifi-cation level has a set of objec-tives, which are organized intobroader skill sets. To prepare forthe certification exam, you shouldreview and perform each taskidentified with an ACE objective toconfirm that you can meet therequirements for the exam. Infor-mation about the ACE program isavailable in the back of this book.The Adobe Certified Expert objec-tives and the specific pages thatcover them are available on theweb at www.perspection.com.
ptg8126863
xx
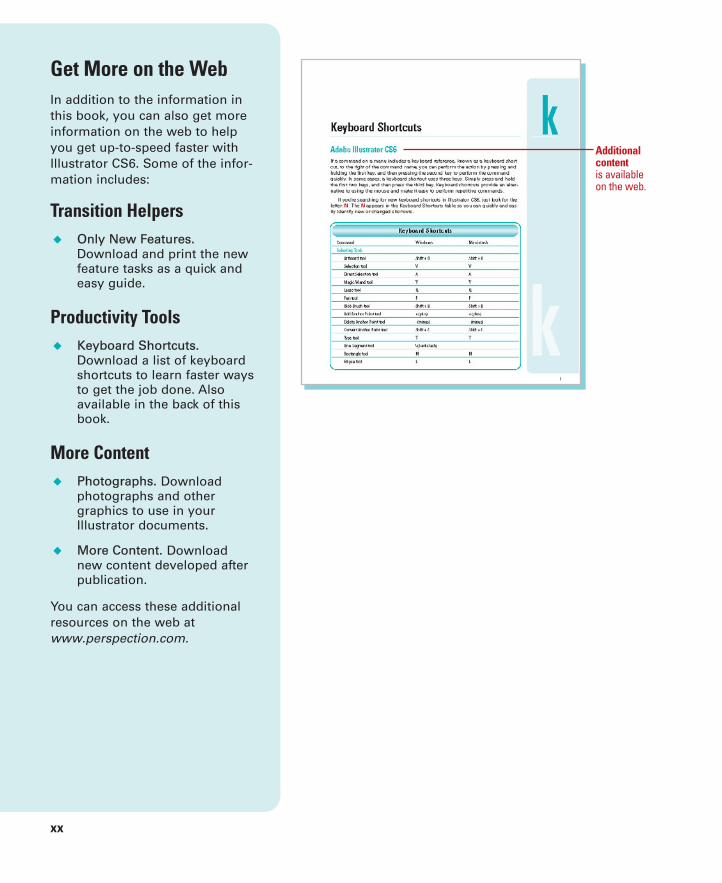
Get More on the WebIn addition to the information inthis book, you can also get moreinformation on the web to helpyou get up-to-speed faster withIllustrator CS6. Some of the infor-mation includes:
Transition Helpers◆ Only New Features.
Download and print the newfeature tasks as a quick andeasy guide.
Productivity Tools◆ Keyboard Shortcuts.
Download a list of keyboardshortcuts to learn faster waysto get the job done. Alsoavailable in the back of thisbook.
More Content◆ Photographs. Download
photographs and othergraphics to use in yourIllustrator documents.
◆ More Content. Downloadnew content developed afterpublication.
You can access these additionalresources on the web atwww.perspection.com.
Additionalcontent is availableon the web.
ptg8126863
Getting Started withIllustrator CS6
Introduction
Adobe Illustrator CS6 is a graphics design and drawing pro-gram that runs seamlessly on both Windows and Macintoshplatforms. Adobe Illustrator CS6 is a stand-alone program,but it’s also part of Adobe's Creative Suite of professionalprograms that work together to help you create designs inprint, on the web, or on mobile devices. Many of the CreativeSuite 6 programs also include additional Adobe programsand services—Bridge, Camera Raw plug-in, Media Encoder,Extension Manager, and ExtendScript Toolkit—to help youmanage and work with files.
Creative artists from Hollywood, brochure designers, aswell as casual users turn to Illustrator for its proven ability tocreate top-of-the-line vector artwork and complex graphicdesigns. Illustrator's ability to manipulate illustrations for usein books, brochures, multimedia presentations, or on theweb, has made Illustrator the undisputed leader in the graph-ics industry. When it comes to vector illustration, Illustrator isliterally the best software the computer industry has to offer.
With Illustrator, you can create anything from simpleicons to multilayered illustrations, as well as manipulate text.And Illustrator's ability to work with other programs allowsyou to import Excel data for graph building, export Illustratorfiles directly to Adobe InDesign and QuarkXPress, as well asopen layered Illustrator files in Photoshop, making it a snapto move back and forth between programs as you design. 1
1What You’ll Do
Install and Start Illustrator
View the Illustrator Window
Show and Hide Panels
Work with Panels
Use the Tools and Control Panel
Open a Document
Open a Document with Adobe Bridge
Insert Images in a Document
Work with Document Windows
Use the Status Bar
Check for Updates and Patches
Get Help While You Work
Save a Document
Finish Up
1
ptg8126863
2 Chapter 1
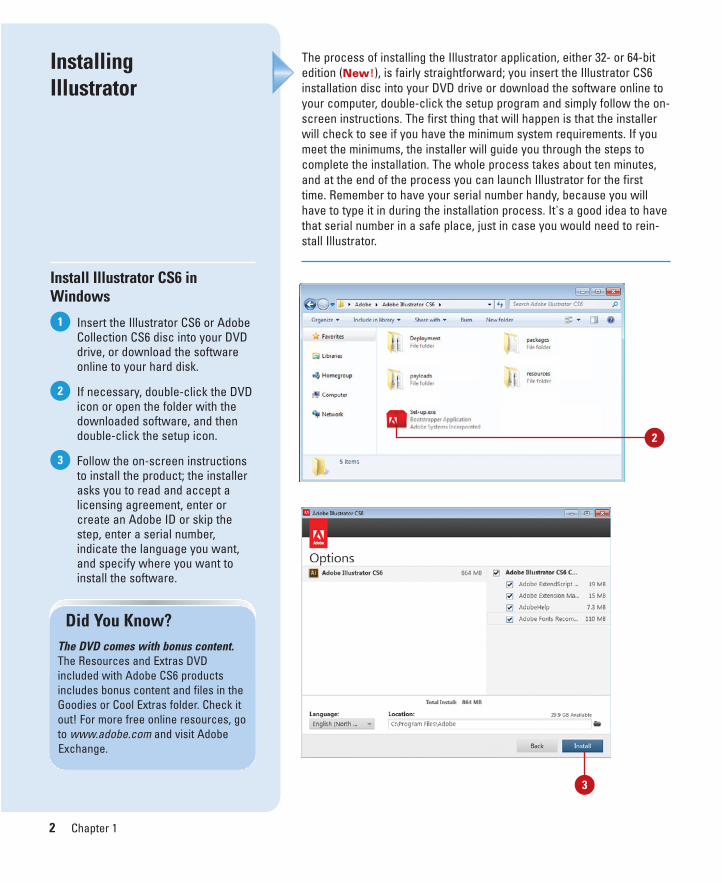
The process of installing the Illustrator application, either 32- or 64-bitedition (New!), is fairly straightforward; you insert the Illustrator CS6installation disc into your DVD drive or download the software online toyour computer, double-click the setup program and simply follow the on-screen instructions. The first thing that will happen is that the installerwill check to see if you have the minimum system requirements. If youmeet the minimums, the installer will guide you through the steps tocomplete the installation. The whole process takes about ten minutes,and at the end of the process you can launch Illustrator for the firsttime. Remember to have your serial number handy, because you willhave to type it in during the installation process. It's a good idea to havethat serial number in a safe place, just in case you would need to rein-stall Illustrator.
Installing Illustrator
Install Illustrator CS6 inWindows
Insert the Illustrator CS6 or AdobeCollection CS6 disc into your DVDdrive, or download the softwareonline to your hard disk.
If necessary, double-click the DVDicon or open the folder with thedownloaded software, and thendouble-click the setup icon.
Follow the on-screen instructionsto install the product; the installerasks you to read and accept alicensing agreement, enter orcreate an Adobe ID or skip thestep, enter a serial number,indicate the language you want,and specify where you want toinstall the software.
3
2
1
Did You Know?The DVD comes with bonus content.The Resources and Extras DVDincluded with Adobe CS6 productsincludes bonus content and files in theGoodies or Cool Extras folder. Check itout! For more free online resources, goto www.adobe.com and visit AdobeExchange.
2
3
ptg8126863
Chapter 1 Getting Started with Illustrator CS6 3
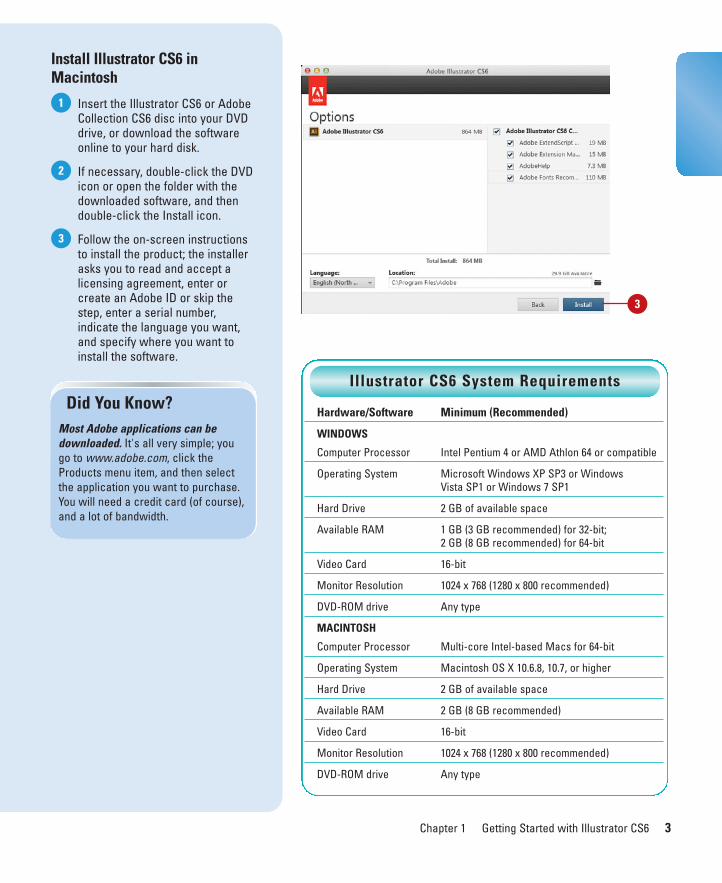
Install Illustrator CS6 inMacintosh
Insert the Illustrator CS6 or AdobeCollection CS6 disc into your DVDdrive, or download the softwareonline to your hard disk.
If necessary, double-click the DVDicon or open the folder with thedownloaded software, and thendouble-click the Install icon.
Follow the on-screen instructionsto install the product; the installerasks you to read and accept alicensing agreement, enter orcreate an Adobe ID or skip thestep, enter a serial number,indicate the language you want,and specify where you want toinstall the software.
3
2
1
Hardware/Software Minimum (Recommended)
WINDOWS
Computer Processor Intel Pentium 4 or AMD Athlon 64 or compatible
Operating System Microsoft Windows XP SP3 or Windows Vista SP1 or Windows 7 SP1
Hard Drive 2 GB of available space
Available RAM 1 GB (3 GB recommended) for 32-bit; 2 GB (8 GB recommended) for 64-bit
Video Card 16-bit
Monitor Resolution 1024 x 768 (1280 x 800 recommended)
DVD-ROM drive Any type
MACINTOSH
Computer Processor Multi-core Intel-based Macs for 64-bit
Operating System Macintosh OS X 10.6.8, 10.7, or higher
Hard Drive 2 GB of available space
Available RAM 2 GB (8 GB recommended)
Video Card 16-bit
Monitor Resolution 1024 x 768 (1280 x 800 recommended)
DVD-ROM drive Any type
Did You Know?Most Adobe applications can bedownloaded. It's all very simple; yougo to www.adobe.com, click theProducts menu item, and then selectthe application you want to purchase.You will need a credit card (of course),and a lot of bandwidth.
Illustrator CS6 System Requirements
3
ptg8126863
4 Chapter 1
You can start Illustrator in several ways, depending on the platform youare using. When you start Illustrator, the software displays theIllustrator window. After you launch Illustrator, the program checks forupdates to Illustrator and related CS6 software using the AdobeApplication Manager. If you want to access the Adobe ApplicationManager at any time, you can choose Updates from the Help menu.Once inside this dialog box, you can click on Preferences to set AdobeApplication Manager Preferences options. You can choose to be noti-fied of new updates on the menu bar and you can also choose to allowAdobe to verify the success or failure of an update by sending a failurestatus to you.
Getting Started
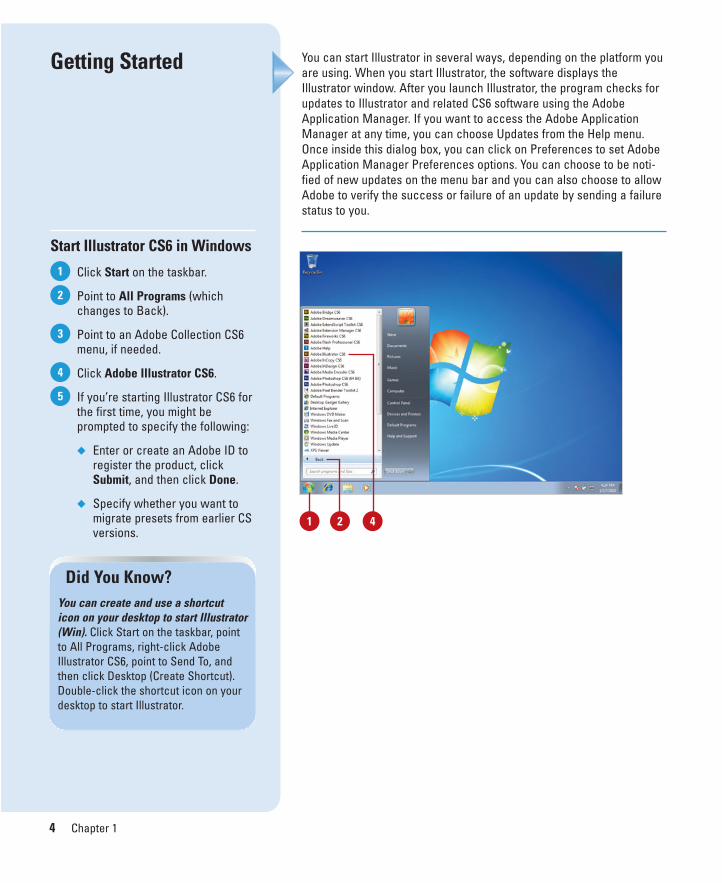
Start Illustrator CS6 in Windows
Click Start on the taskbar.
Point to All Programs (whichchanges to Back).
Point to an Adobe Collection CS6menu, if needed.
Click Adobe Illustrator CS6.
If you’re starting Illustrator CS6 forthe first time, you might beprompted to specify the following:
◆ Enter or create an Adobe ID toregister the product, clickSubmit, and then click Done.
◆ Specify whether you want tomigrate presets from earlier CSversions.
5
4
3
2
1
Did You Know?You can create and use a shortcuticon on your desktop to start Illustrator(Win). Click Start on the taskbar, pointto All Programs, right-click AdobeIllustrator CS6, point to Send To, andthen click Desktop (Create Shortcut).Double-click the shortcut icon on yourdesktop to start Illustrator.
1 2 4
ptg8126863
Chapter 1 Getting Started with Illustrator CS6 5
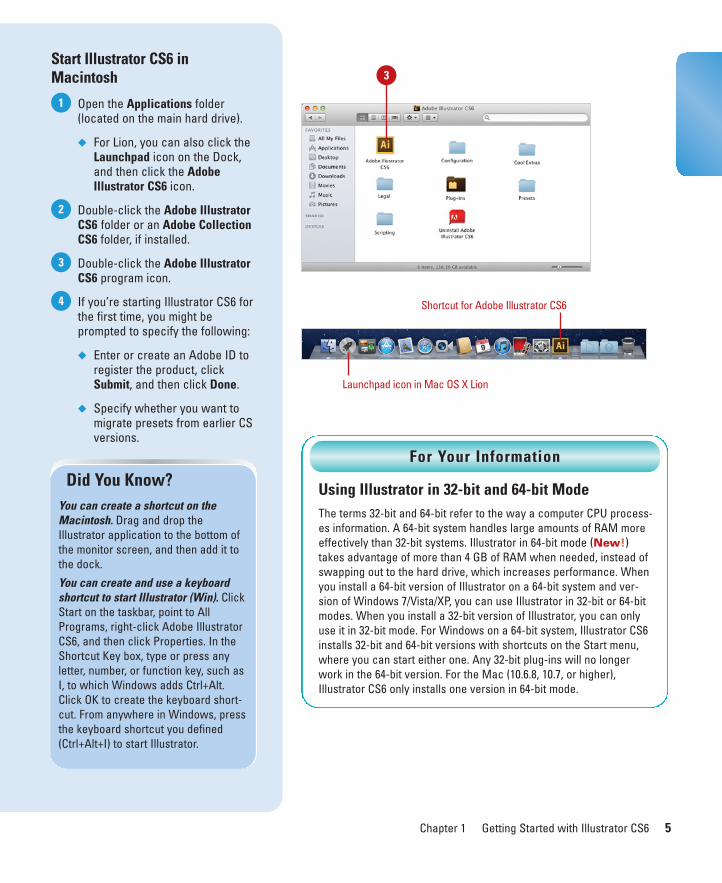
Start Illustrator CS6 inMacintosh
Open the Applications folder(located on the main hard drive).
◆ For Lion, you can also click theLaunchpad icon on the Dock,and then click the AdobeIllustrator CS6 icon.
Double-click the Adobe IllustratorCS6 folder or an Adobe CollectionCS6 folder, if installed.
Double-click the Adobe IllustratorCS6 program icon.
If you’re starting Illustrator CS6 forthe first time, you might beprompted to specify the following:
◆ Enter or create an Adobe ID toregister the product, clickSubmit, and then click Done.
◆ Specify whether you want tomigrate presets from earlier CSversions.
4
3
2
1
Did You Know?You can create a shortcut on theMacintosh. Drag and drop theIllustrator application to the bottom ofthe monitor screen, and then add it tothe dock.
You can create and use a keyboardshortcut to start Illustrator (Win). ClickStart on the taskbar, point to AllPrograms, right-click Adobe IllustratorCS6, and then click Properties. In theShortcut Key box, type or press anyletter, number, or function key, such asI, to which Windows adds Ctrl+Alt.Click OK to create the keyboard short-cut. From anywhere in Windows, pressthe keyboard shortcut you defined(Ctrl+Alt+I) to start Illustrator.
Shortcut for Adobe Illustrator CS6
3
Launchpad icon in Mac OS X Lion
Using Illustrator in 32-bit and 64-bit ModeThe terms 32-bit and 64-bit refer to the way a computer CPU process-es information. A 64-bit system handles large amounts of RAM moreeffectively than 32-bit systems. Illustrator in 64-bit mode (New!)takes advantage of more than 4 GB of RAM when needed, instead ofswapping out to the hard drive, which increases performance. Whenyou install a 64-bit version of Illustrator on a 64-bit system and ver-sion of Windows 7/Vista/XP, you can use Illustrator in 32-bit or 64-bitmodes. When you install a 32-bit version of Illustrator, you can onlyuse it in 32-bit mode. For Windows on a 64-bit system, Illustrator CS6installs 32-bit and 64-bit versions with shortcuts on the Start menu,where you can start either one. Any 32-bit plug-ins will no longerwork in the 64-bit version. For the Mac (10.6.8, 10.7, or higher),Illustrator CS6 only installs one version in 64-bit mode.
For Your Information
ptg8126863
6 Chapter 1
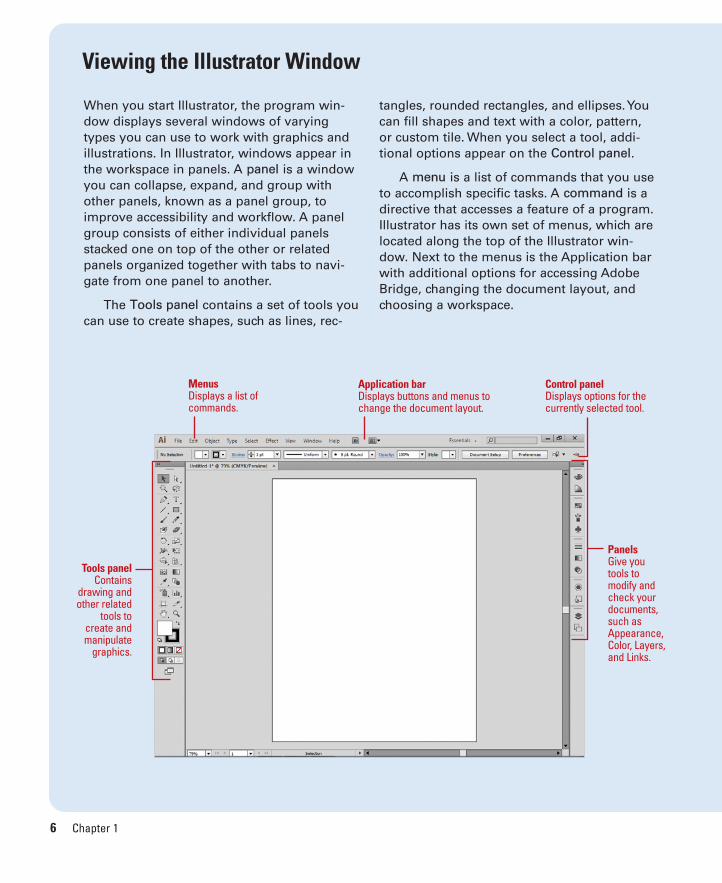
Viewing the Illustrator Window
When you start Illustrator, the program win-dow displays several windows of varyingtypes you can use to work with graphics andillustrations. In Illustrator, windows appear inthe workspace in panels. A panel is a windowyou can collapse, expand, and group withother panels, known as a panel group, toimprove accessibility and workflow. A panelgroup consists of either individual panelsstacked one on top of the other or relatedpanels organized together with tabs to navi-gate from one panel to another.
The Tools panel contains a set of tools youcan use to create shapes, such as lines, rec-
tangles, rounded rectangles, and ellipses. Youcan fill shapes and text with a color, pattern,or custom tile. When you select a tool, addi-tional options appear on the Control panel.
A menu is a list of commands that you useto accomplish specific tasks. A command is adirective that accesses a feature of a program.Illustrator has its own set of menus, which arelocated along the top of the Illustrator win-dow. Next to the menus is the Application barwith additional options for accessing AdobeBridge, changing the document layout, andchoosing a workspace.
Control panelDisplays options for thecurrently selected tool.
Panels Give youtools tomodify andcheck yourdocuments,such asAppearance,Color, Layers,and Links.
Tools panelContains
drawing andother related
tools tocreate andmanipulate
graphics.
Application barDisplays buttons and menus tochange the document layout.
MenusDisplays a list ofcommands.
ptg8126863
Chapter 1 Getting Started with Illustrator CS6 7
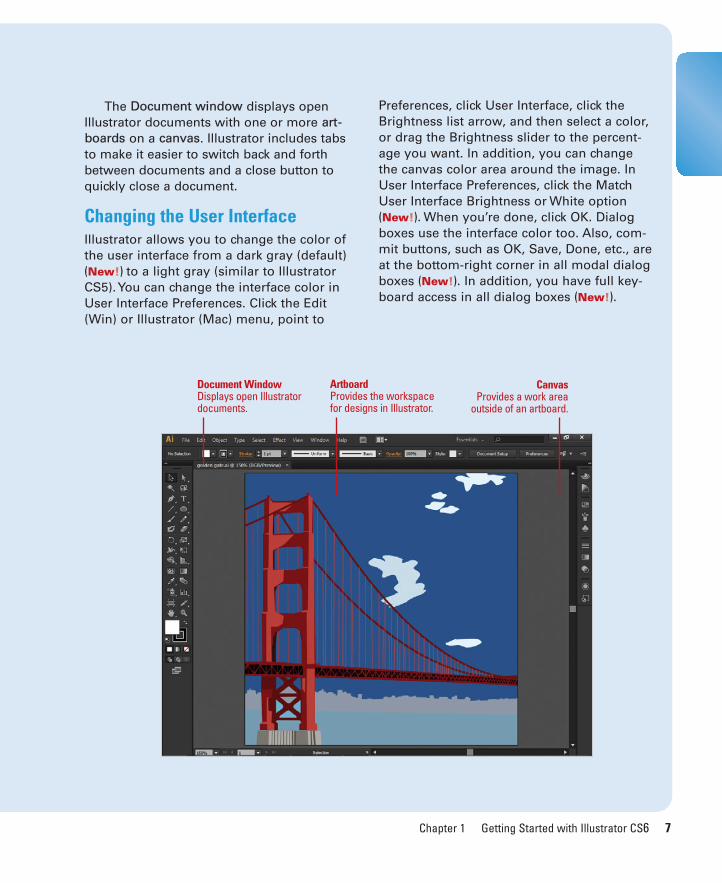
The Document window displays openIllustrator documents with one or more art-boards on a canvas. Illustrator includes tabsto make it easier to switch back and forthbetween documents and a close button toquickly close a document.
Changing the User InterfaceIllustrator allows you to change the color ofthe user interface from a dark gray (default)(New!) to a light gray (similar to IllustratorCS5). You can change the interface color inUser Interface Preferences. Click the Edit(Win) or Illustrator (Mac) menu, point to
Preferences, click User Interface, click theBrightness list arrow, and then select a color,or drag the Brightness slider to the percent-age you want. In addition, you can changethe canvas color area around the image. InUser Interface Preferences, click the MatchUser Interface Brightness or White option(New!). When you’re done, click OK. Dialogboxes use the interface color too. Also, com-mit buttons, such as OK, Save, Done, etc., areat the bottom-right corner in all modal dialogboxes (New!). In addition, you have full key-board access in all dialog boxes (New!).
CanvasProvides a work area
outside of an artboard.
Document WindowDisplays open Illustratordocuments.
ArtboardProvides the workspacefor designs in Illustrator.
ptg8126863
8 Chapter 1
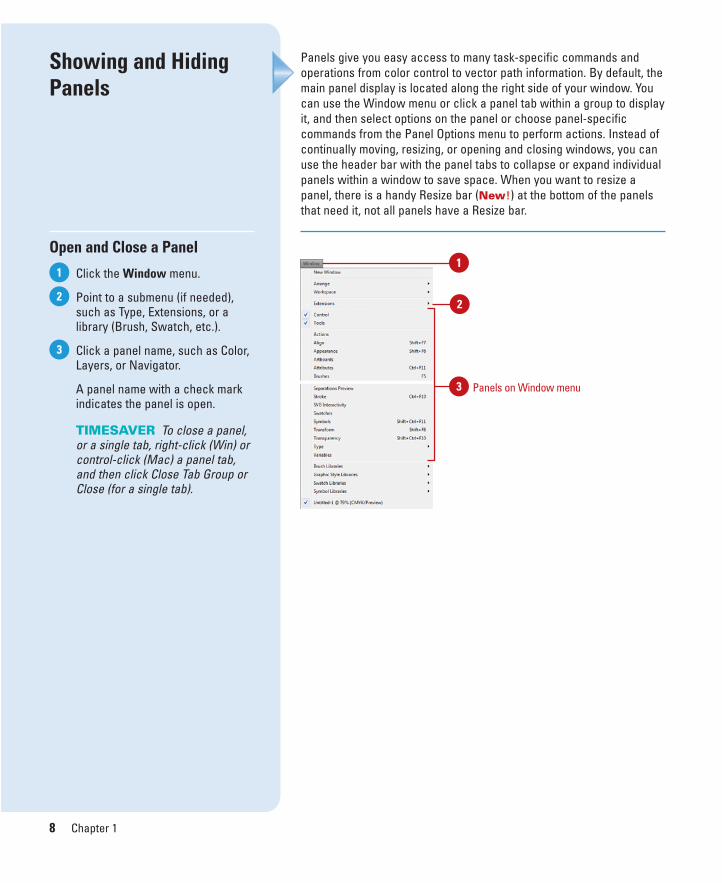
Panels on Window menu
1
Panels give you easy access to many task-specific commands andoperations from color control to vector path information. By default, themain panel display is located along the right side of your window. Youcan use the Window menu or click a panel tab within a group to displayit, and then select options on the panel or choose panel-specific commands from the Panel Options menu to perform actions. Instead ofcontinually moving, resizing, or opening and closing windows, you canuse the header bar with the panel tabs to collapse or expand individualpanels within a window to save space. When you want to resize apanel, there is a handy Resize bar (New!) at the bottom of the panelsthat need it, not all panels have a Resize bar.
Showing and HidingPanels
Open and Close a Panel
Click the Window menu.
Point to a submenu (if needed),such as Type, Extensions, or alibrary (Brush, Swatch, etc.).
Click a panel name, such as Color,Layers, or Navigator.
A panel name with a check markindicates the panel is open.
TIMESAVER To close a panel,or a single tab, right-click (Win) orcontrol-click (Mac) a panel tab,and then click Close Tab Group orClose (for a single tab).
3
2
1
2
3

ptg8126863
Chapter 1 Getting Started with Illustrator CS6 9
Collapse or Expand a Panel
To collapse or expand an openpanel, click the dark gray area ordouble-click a title tab on theheader bar of the panel.
If the panel is in icon mode, clickon the icon to expand or collapseit. To reduce the panel back toicon mode, click on the doubleright-facing arrows in the darkgray area. To expand from icons topanels, click on the double leftfacing arrows.
Resize a Panel
To resize a panel vertically orhorizontally, point to the middle ofthe resize bar, and then drag up ordown.
To resize a panel in to any size,point to a corner in the resize baror a corner with dots, and thendrag in any direction.
1
1
Expanded panels
1
Expandedpanels
Collapsedpanels
1
Resize corner with dots
Resize bar
Resized panel
ptg8126863
10 Chapter 1
Working with Panels
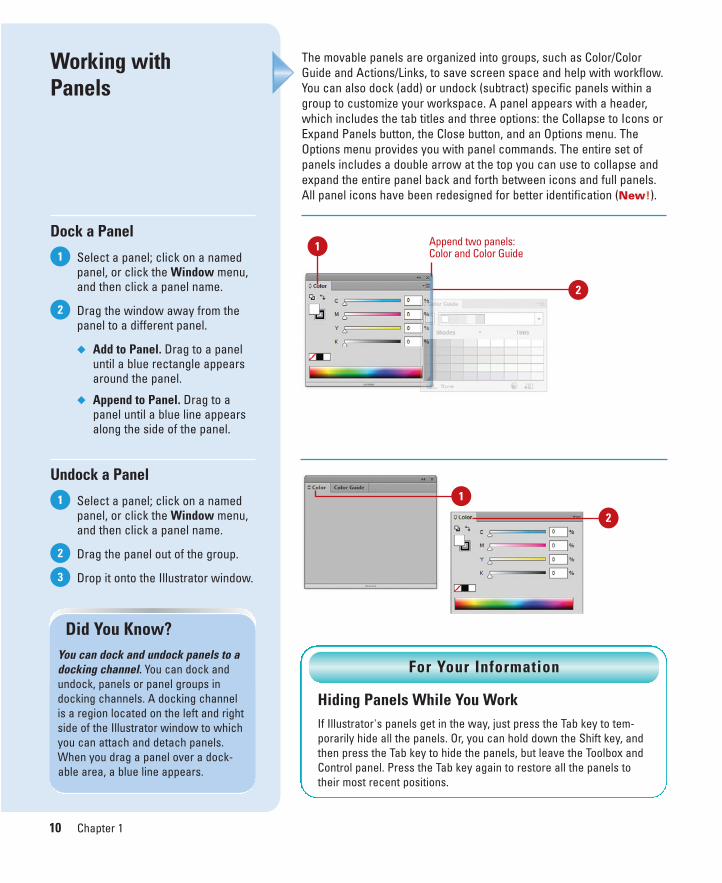
Dock a Panel
Select a panel; click on a namedpanel, or click the Window menu,and then click a panel name.
Drag the window away from thepanel to a different panel.
◆ Add to Panel. Drag to a paneluntil a blue rectangle appearsaround the panel.
◆ Append to Panel. Drag to apanel until a blue line appearsalong the side of the panel.
Undock a Panel
Select a panel; click on a namedpanel, or click the Window menu,and then click a panel name.
Drag the panel out of the group.
Drop it onto the Illustrator window.3
2
1
2
1
The movable panels are organized into groups, such as Color/ColorGuide and Actions/Links, to save screen space and help with workflow.You can also dock (add) or undock (subtract) specific panels within agroup to customize your workspace. A panel appears with a header,which includes the tab titles and three options: the Collapse to Icons orExpand Panels button, the Close button, and an Options menu. TheOptions menu provides you with panel commands. The entire set ofpanels includes a double arrow at the top you can use to collapse andexpand the entire panel back and forth between icons and full panels.All panel icons have been redesigned for better identification (New!).
2
Append two panels:Color and Color Guide1
2
Did You Know?You can dock and undock panels to adocking channel. You can dock andundock, panels or panel groups indocking channels. A docking channelis a region located on the left and rightside of the Illustrator window to whichyou can attach and detach panels.When you drag a panel over a dock-able area, a blue line appears.
Hiding Panels While You WorkIf Illustrator's panels get in the way, just press the Tab key to tem-porarily hide all the panels. Or, you can hold down the Shift key, andthen press the Tab key to hide the panels, but leave the Toolbox andControl panel. Press the Tab key again to restore all the panels totheir most recent positions.
For Your Information
1
ptg8126863
Chapter 1 Getting Started with Illustrator CS6 11
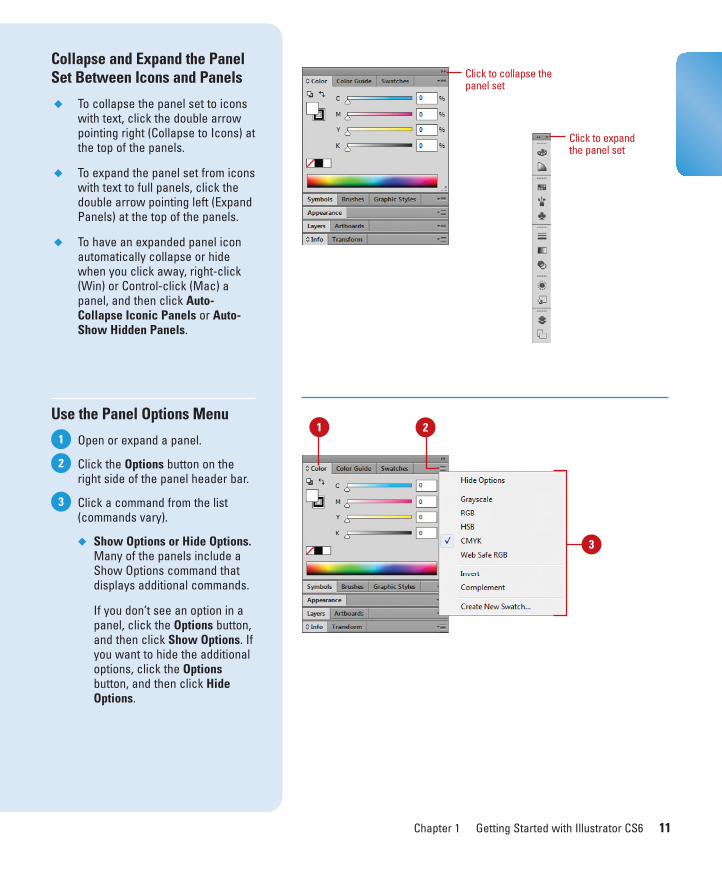
Collapse and Expand the PanelSet Between Icons and Panels
◆ To collapse the panel set to iconswith text, click the double arrowpointing right (Collapse to Icons) atthe top of the panels.
◆ To expand the panel set from iconswith text to full panels, click thedouble arrow pointing left (ExpandPanels) at the top of the panels.
◆ To have an expanded panel iconautomatically collapse or hidewhen you click away, right-click(Win) or Control-click (Mac) apanel, and then click Auto-Collapse Iconic Panels or Auto-Show Hidden Panels.
Use the Panel Options Menu
Open or expand a panel.
Click the Options button on theright side of the panel header bar.
Click a command from the list(commands vary).
◆ Show Options or Hide Options.Many of the panels include aShow Options command thatdisplays additional commands.
If you don’t see an option in apanel, click the Options button,and then click Show Options. Ifyou want to hide the additionaloptions, click the Optionsbutton, and then click HideOptions.
3
2
1
3
Click to collapse thepanel set
1
Click to expandthe panel set
2

ptg8126863
12 Chapter 1
Illustrator has an abundance of tools that givean Illustrator designer tremendous controlover any creative designing problems thatmay crop up. For example, the Illustrator tool-box contains a variety of different tools: selec-tion tools, painting or shape tools, type tools,and other tools dedicated to creating art-boards, working with slices and transformingand viewing illustrations. Add to that collec-tion, slicing, sampling, and viewing tools andyou have all the tools you need to do any job.
When you work on a document, it's impor-tant to know what tools are available, andhow they can help in achieving your designgoals. Illustrator likes to save space, so it con-solidates similar tools under one button. Toaccess multiple tools, click and hold on any
Tools panel button that contains a small blacktriangle, located in the lower right corner ofthe tool button. Take a moment to explore theIllustrator toolbox and get to know the tools.
The Illustrator Tools panel contains thetools needed to work through any Illustratorjob, but it's not necessary to click on a tool toaccess it. Simply using a letter of the alphabetcan access all of Illustrator's tools. For exam-ple, pressing the P key switches to the Pentool, and pressing the T key switches to theType tool. In addition, if a button has morethan one tool available, clicking the arrow onthe right side of the tool menu displays all thetools in a small panel for easy access. Whenyou display the small panel, you can click thearrow on the right edge to change the menu
Using the Tools and Control Panel
Tools panel

ptg8126863
Chapter 1 Getting Started with Illustrator CS6 13
to a panel, which stays open. You can click theClose button to dismiss it. You can refer toAdobe Illustrator CS6 Keyboard Shortcuts(available for download on the web atwww.perspection.com) for more informationon all the letter assignments for the varioustools. To really get efficient in Illustrator, youneed to learn to use both hands. Use onehand for your mouse or drawing tablet, andthe other on the keyboard to make quickchanges of tools and options. Think of playingIllustrator like playing a piano—you need touse both hands.
Using the Control PanelThe Control panel displays the options forthe currently selected tool. For most tools,your options include Selection, Fill Color,Stroke Color, Weight, and Width Profile,Brush Definition, Opacity, Graphic Stylepanel, Document Setup, Preferences, andSelect Similar Objects. The important thingto remember is that the Control panel is cus-tomized based on the tool you have selected;it has been redesigned and reorganized withmost controls appearing in the same placefor easier usage (New!).
Control panel
Tools panel
ptg8126863
14 Chapter 1
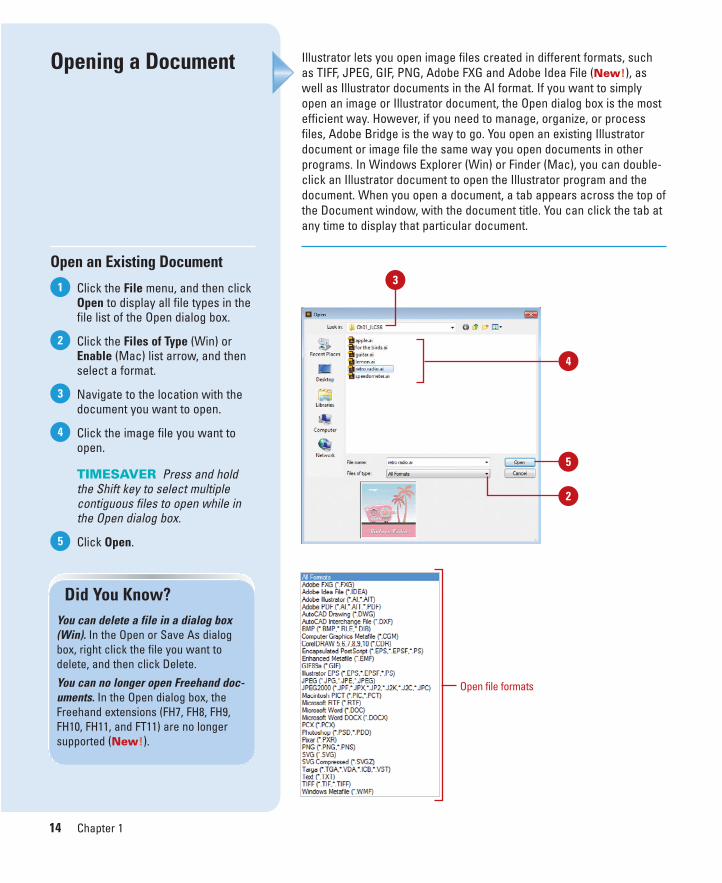
Illustrator lets you open image files created in different formats, suchas TIFF, JPEG, GIF, PNG, Adobe FXG and Adobe Idea File (New!), aswell as Illustrator documents in the AI format. If you want to simplyopen an image or Illustrator document, the Open dialog box is the mostefficient way. However, if you need to manage, organize, or processfiles, Adobe Bridge is the way to go. You open an existing Illustratordocument or image file the same way you open documents in otherprograms. In Windows Explorer (Win) or Finder (Mac), you can double-click an Illustrator document to open the Illustrator program and thedocument. When you open a document, a tab appears across the top ofthe Document window, with the document title. You can click the tab atany time to display that particular document.
Opening a Document
Open an Existing Document
Click the File menu, and then clickOpen to display all file types in thefile list of the Open dialog box.
Click the Files of Type (Win) orEnable (Mac) list arrow, and thenselect a format.
Navigate to the location with thedocument you want to open.
Click the image file you want toopen.
TIMESAVER Press and holdthe Shift key to select multiplecontiguous files to open while inthe Open dialog box.
Click Open. 5
4
3
2
1
5
4
3
Did You Know?You can delete a file in a dialog box(Win). In the Open or Save As dialogbox, right click the file you want todelete, and then click Delete.
You can no longer open Freehand doc-uments. In the Open dialog box, theFreehand extensions (FH7, FH8, FH9,FH10, FH11, and FT11) are no longersupported (New!).
Open file formats
2
ptg8126863
Chapter 1 Getting Started with Illustrator CS6 15
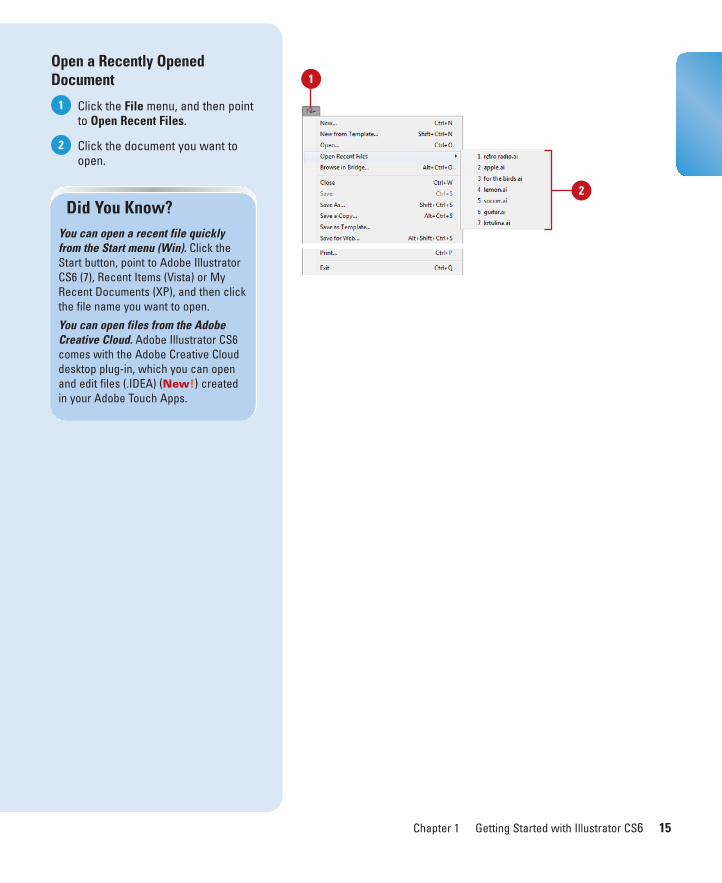
Open a Recently OpenedDocument
Click the File menu, and then pointto Open Recent Files.
Click the document you want toopen.
2
1
1
2
Did You Know?You can open a recent file quicklyfrom the Start menu (Win). Click theStart button, point to Adobe IllustratorCS6 (7), Recent Items (Vista) or MyRecent Documents (XP), and then clickthe file name you want to open.
You can open files from the AdobeCreative Cloud. Adobe Illustrator CS6comes with the Adobe Creative Clouddesktop plug-in, which you can openand edit files (.IDEA) (New!) createdin your Adobe Touch Apps.
ptg8126863
16 Chapter 1
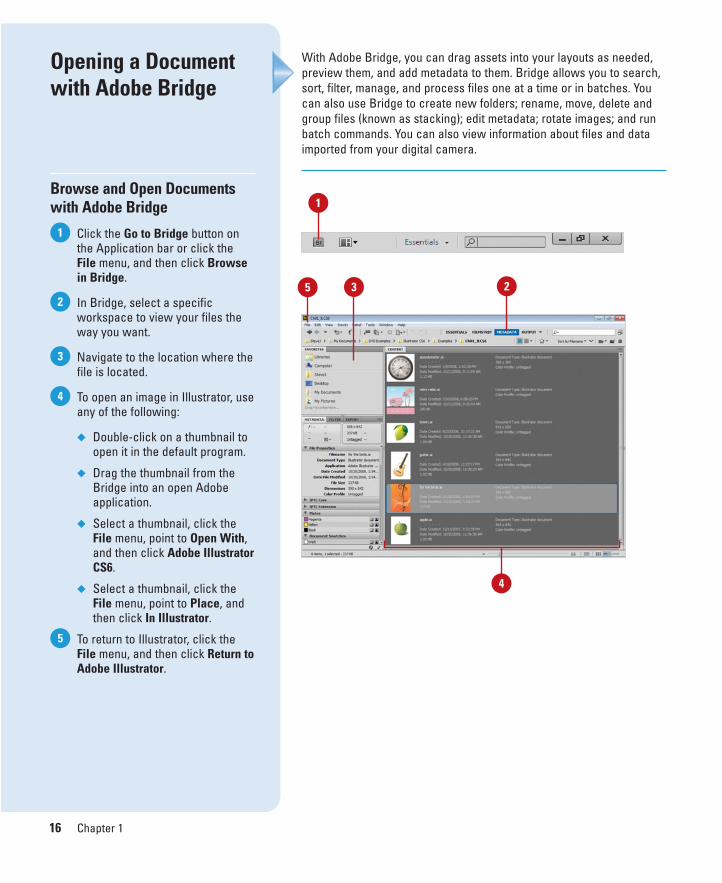
With Adobe Bridge, you can drag assets into your layouts as needed,preview them, and add metadata to them. Bridge allows you to search,sort, filter, manage, and process files one at a time or in batches. Youcan also use Bridge to create new folders; rename, move, delete andgroup files (known as stacking); edit metadata; rotate images; and runbatch commands. You can also view information about files and dataimported from your digital camera.
1
Opening a Documentwith Adobe Bridge
Browse and Open Documentswith Adobe Bridge
Click the Go to Bridge button onthe Application bar or click theFile menu, and then click Browsein Bridge.
In Bridge, select a specificworkspace to view your files theway you want.
Navigate to the location where thefile is located.
To open an image in Illustrator, useany of the following:
◆ Double-click on a thumbnail toopen it in the default program.
◆ Drag the thumbnail from theBridge into an open Adobeapplication.
◆ Select a thumbnail, click theFile menu, point to Open With,and then click Adobe IllustratorCS6.
◆ Select a thumbnail, click theFile menu, point to Place, andthen click In Illustrator.
To return to Illustrator, click theFile menu, and then click Return toAdobe Illustrator.
5
4
3
2
1
4
235

ptg8126863
Chapter 1 Getting Started with Illustrator CS6 17
Work with Files Using Bridge
Click the Go to Bridge button onthe Application bar or click theFile menu, and then click Browsein Bridge.
Click the Folders tab and choose afolder from the scrolling list.
Click the Favorites tab to choosefrom a listing of user-defineditems, such as Pictures.
To narrow down the list of imagesusing a filter, click the criteria youwant to use in the Filter panel.
Click an image within the previewwindow to select it.
Click the Preview tab to view alarger thumbnail of the selectedimage. Multiple images appearwhen you select them.
Drag the Zoom slider to increaseor decrease the thumbnail views.
Use the file management buttonsto rotate or delete images, orcreate a new folder.
Double-click on a thumbnail toopen it in the default program, ordrag the thumbnail from the Bridgeinto an open Adobe application.
9
8
7
6
5
4
3
2
1
Did You Know?You can reveal a document in AdobeBridge from Illustrator. Open a docu-ment in Illustrator, click the triangle tothe right of the Status Bar, and thenclick Reveal in Bridge.
7
3 2 8 5 6
1
View buttons94

ptg8126863
18 Chapter 1
You can use Illustrator's Place command to insert artwork into an opendocument. To increase your control of the new image information,Illustrator places the new image into a separate layer. Illustrator letsyou place files saved in Illustrator AI, Adobe PDF, Illustrator PSD, BMP,JPEG, EPS, PNG, TIFF, and TXT, DOC, or RTF formats to name a few.When you first place a vector-based image into Illustrator, you have theability to modify the width, height, and rotation while retaining the vec-tor format of the file.
Inserting Images in a Document
Insert an Image in a DocumentUsing the Place Command
Open an Illustrator document.
Click the File menu, and then clickPlace.
Navigate to the location with theimage, and then select the imageyou want to place into the activedocument.
Select any of the followingoptions:
◆ Link. Places a screen versionof the image and links thedocument to the image file.Deselect to embed a copy ofthe image in the document.
◆ Template. Places a dimmedversion of the image on atemplate layer.
◆ Replace. Replaces the currentimage.
Click Place.
If an additional dialog boxappears, specify the Place optionsthat you want, and then click OK.
Illustrator places the image in theactive layer, and then encloses itwithin a transformable boundingbox.
Control the shape by manipulatingthe corner and side nodes of thefreeform bounding box.
7
6
5
4
3
2
13
5
4
6
7
ptg8126863
Chapter 1 Getting Started with Illustrator CS6 19
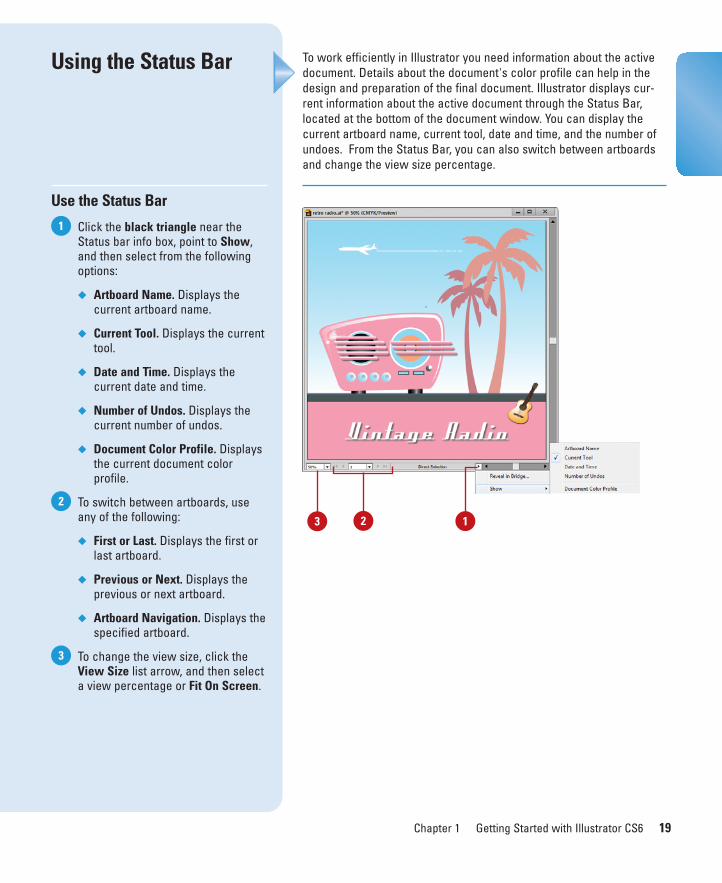
Using the Status Bar
Use the Status Bar
Click the black triangle near theStatus bar info box, point to Show,and then select from the followingoptions:
◆ Artboard Name. Displays thecurrent artboard name.
◆ Current Tool. Displays the currenttool.
◆ Date and Time. Displays thecurrent date and time.
◆ Number of Undos. Displays thecurrent number of undos.
◆ Document Color Profile. Displaysthe current document colorprofile.
To switch between artboards, useany of the following:
◆ First or Last. Displays the first orlast artboard.
◆ Previous or Next. Displays theprevious or next artboard.
◆ Artboard Navigation. Displays thespecified artboard.
To change the view size, click theView Size list arrow, and then selecta view percentage or Fit On Screen.
3
2
1
To work efficiently in Illustrator you need information about the activedocument. Details about the document's color profile can help in thedesign and preparation of the final document. Illustrator displays cur-rent information about the active document through the Status Bar,located at the bottom of the document window. You can display thecurrent artboard name, current tool, date and time, and the number ofundoes. From the Status Bar, you can also switch between artboardsand change the view size percentage.
123
ptg8126863
20 Chapter 1
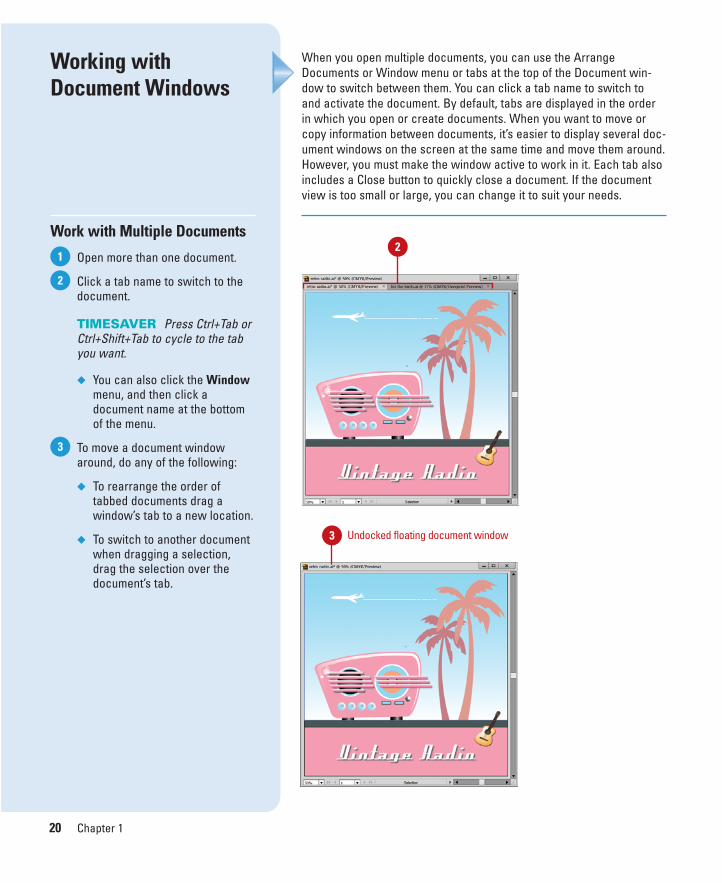
When you open multiple documents, you can use the ArrangeDocuments or Window menu or tabs at the top of the Document win-dow to switch between them. You can click a tab name to switch toand activate the document. By default, tabs are displayed in the orderin which you open or create documents. When you want to move orcopy information between documents, it’s easier to display several doc-ument windows on the screen at the same time and move them around.However, you must make the window active to work in it. Each tab alsoincludes a Close button to quickly close a document. If the documentview is too small or large, you can change it to suit your needs.
Working withDocument Windows
Work with Multiple Documents
Open more than one document.
Click a tab name to switch to thedocument.
TIMESAVER Press Ctrl+Tab orCtrl+Shift+Tab to cycle to the tabyou want.
◆ You can also click the Windowmenu, and then click adocument name at the bottomof the menu.
To move a document windowaround, do any of the following:
◆ To rearrange the order oftabbed documents drag awindow’s tab to a new location.
◆ To switch to another documentwhen dragging a selection,drag the selection over thedocument’s tab.
3
2
12
3 Undocked floating document window
ptg8126863
Chapter 1 Getting Started with Illustrator CS6 21
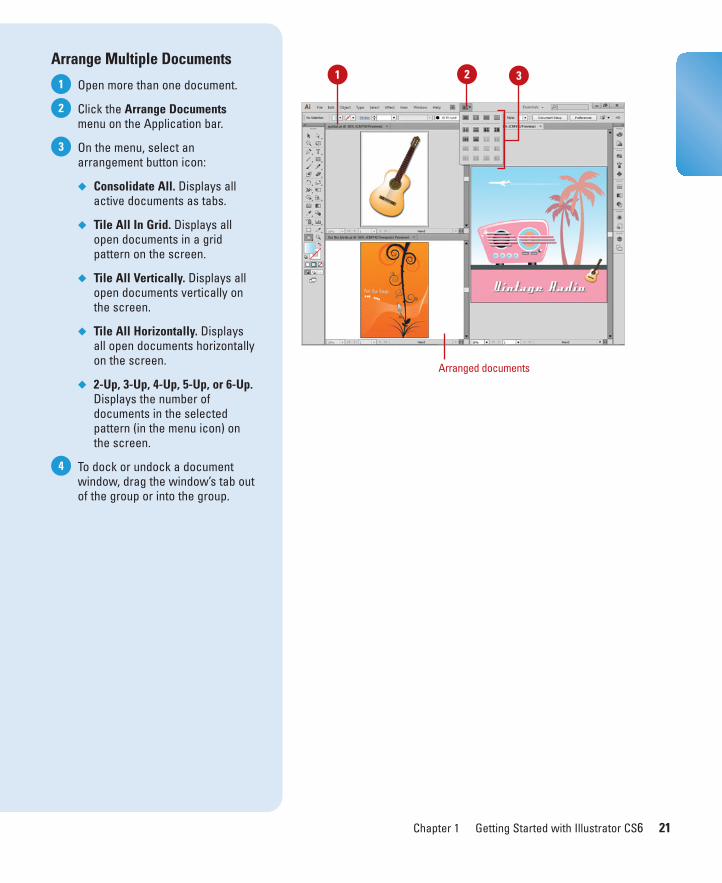
Arrange Multiple Documents
Open more than one document.
Click the Arrange Documentsmenu on the Application bar.
On the menu, select anarrangement button icon:
◆ Consolidate All. Displays allactive documents as tabs.
◆ Tile All In Grid. Displays allopen documents in a gridpattern on the screen.
◆ Tile All Vertically. Displays allopen documents vertically onthe screen.
◆ Tile All Horizontally. Displaysall open documents horizontallyon the screen.
◆ 2-Up, 3-Up, 4-Up, 5-Up, or 6-Up.Displays the number ofdocuments in the selectedpattern (in the menu icon) onthe screen.
To dock or undock a documentwindow, drag the window’s tab outof the group or into the group.
4
3
2
11
Arranged documents
32
ptg8126863
22 Chapter 1
As time passes, Illustrator—like any other program—will change.There are two types of changes to a program: updates and patches.Updates are improvements to a program such as a new feature, option,or command. Patches are software fixes for problems discovered afterthe public release of the program. The good news is that both updatesand patches are free, and once downloaded, are self-installing. Adobegives you two ways to check for changes. You can check manually bygoing to the Adobe web site, or automatically through the AdobeApplication Manager. The Adobe Application Manager Preferencesdialog box allows you to set update options for Illustrator and otherinstalled Adobe products, such as Bridge. You can also set an option tohave Adobe notify you of updates in the menu bar.
Checking for UpdatesOnline
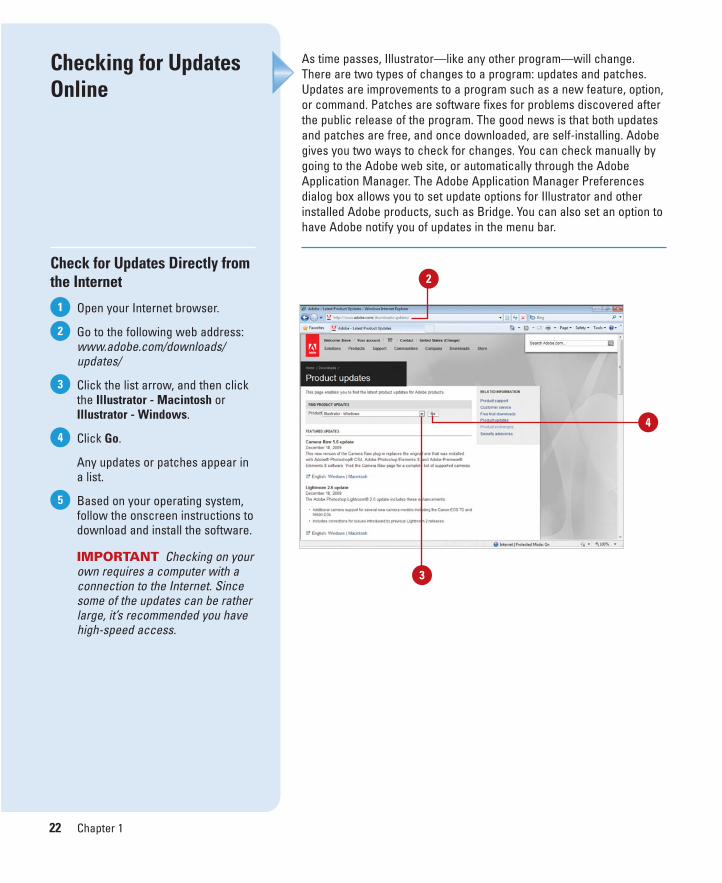
Check for Updates Directly fromthe Internet
Open your Internet browser.
Go to the following web address:www.adobe.com/downloads/updates/
Click the list arrow, and then clickthe Illustrator - Macintosh orIllustrator - Windows.
Click Go.
Any updates or patches appear ina list.
Based on your operating system,follow the onscreen instructions todownload and install the software.
IMPORTANT Checking on yourown requires a computer with aconnection to the Internet. Sincesome of the updates can be ratherlarge, it’s recommended you havehigh-speed access.
5
4
3
2
1
2
4
3
ptg8126863
Chapter 1 Getting Started with Illustrator CS6 23
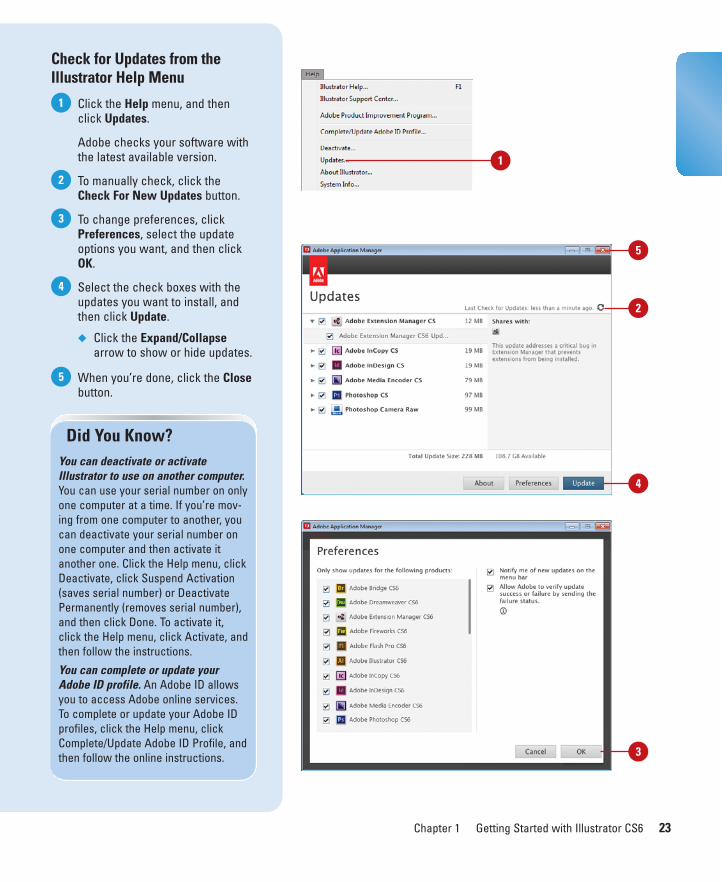
Check for Updates from theIllustrator Help Menu
Click the Help menu, and thenclick Updates.
Adobe checks your software withthe latest available version.
To manually check, click theCheck For New Updates button.
To change preferences, clickPreferences, select the updateoptions you want, and then clickOK.
Select the check boxes with theupdates you want to install, andthen click Update.
◆ Click the Expand/Collapsearrow to show or hide updates.
When you’re done, click the Closebutton.
5
4
3
2
1
Did You Know?You can deactivate or activateIllustrator to use on another computer.You can use your serial number on onlyone computer at a time. If you’re mov-ing from one computer to another, youcan deactivate your serial number onone computer and then activate itanother one. Click the Help menu, clickDeactivate, click Suspend Activation(saves serial number) or DeactivatePermanently (removes serial number),and then click Done. To activate it,click the Help menu, click Activate, andthen follow the instructions.
You can complete or update yourAdobe ID profile. An Adobe ID allowsyou to access Adobe online services.To complete or update your Adobe IDprofiles, click the Help menu, clickComplete/Update Adobe ID Profile, andthen follow the online instructions.
1
3
4
5
2

ptg8126863
24 Chapter 1
At some time, everyone has a question or two about using a program.When you start Illustrator Help, the Adobe Community Help windowopens, displaying help categories and topics. You can search producthelp from Local Help, Community Help, or Adobe.com by using key-words or phrases or browsing through a list of categories and topics tolocate specific information. Local Help accesses product help on yourlocal computer, Community Help accesses product help online, andAdobe.com accesses related help information on Adobe.com. Whenyou perform a search using keywords or phrases, a list of possibleanswers is shown from the search location with the most likelyresponses at the top. Along with help text, some help topics includelinks to text and video tutorials. In addition, comments and ratings fromusers are available to help guide you to an answer. You can add feed-back and suggestions by signing in to Adobe.com using an Adobe ID.
2
Getting Help WhileYou Work
Get Help Information
Click the Help menu, and thenclick Illustrator Help.
TIMESAVER Press F1 (Win) orA+/ (Mac).
The Adobe Community Helpwindow opens.
Click Help categories (plus signicons) until you display the topicyou want.
Click the topic you want.
Read the topic, and if you want,click any links to get informationon related topics or definitions.
When you’re done, click the Closebutton (Win) or click the AdobeHelp menu (Mac), and then clickQuit Adobe Help.
5
4
3
2
1
3
1
5
4
Click to collapse/expand panel
Click to open help in a PDF
ptg8126863
Chapter 1 Getting Started with Illustrator CS6 25
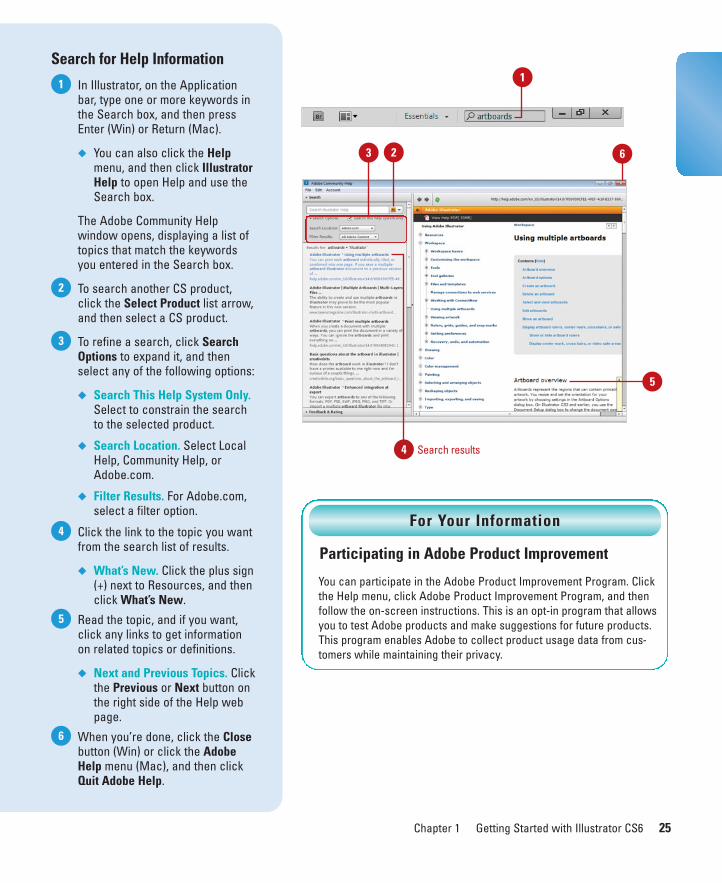
Search for Help Information
In Illustrator, on the Applicationbar, type one or more keywords inthe Search box, and then pressEnter (Win) or Return (Mac).
◆ You can also click the Helpmenu, and then click IllustratorHelp to open Help and use theSearch box.
The Adobe Community Helpwindow opens, displaying a list oftopics that match the keywordsyou entered in the Search box.
To search another CS product,click the Select Product list arrow,and then select a CS product.
To refine a search, click SearchOptions to expand it, and thenselect any of the following options:
◆ Search This Help System Only.Select to constrain the searchto the selected product.
◆ Search Location. Select LocalHelp, Community Help, orAdobe.com.
◆ Filter Results. For Adobe.com,select a filter option.
Click the link to the topic you wantfrom the search list of results.
◆ What’s New. Click the plus sign(+) next to Resources, and thenclick What’s New.
Read the topic, and if you want,click any links to get informationon related topics or definitions.
◆ Next and Previous Topics. Clickthe Previous or Next button onthe right side of the Help webpage.
When you’re done, click the Closebutton (Win) or click the AdobeHelp menu (Mac), and then clickQuit Adobe Help.
6
5
4
3
2
1
4
Participating in Adobe Product Improvement
You can participate in the Adobe Product Improvement Program. Clickthe Help menu, click Adobe Product Improvement Program, and thenfollow the on-screen instructions. This is an opt-in program that allowsyou to test Adobe products and make suggestions for future products.This program enables Adobe to collect product usage data from cus-tomers while maintaining their privacy.
For Your Information
623
5
Search results
1
ptg8126863
26 Chapter 1
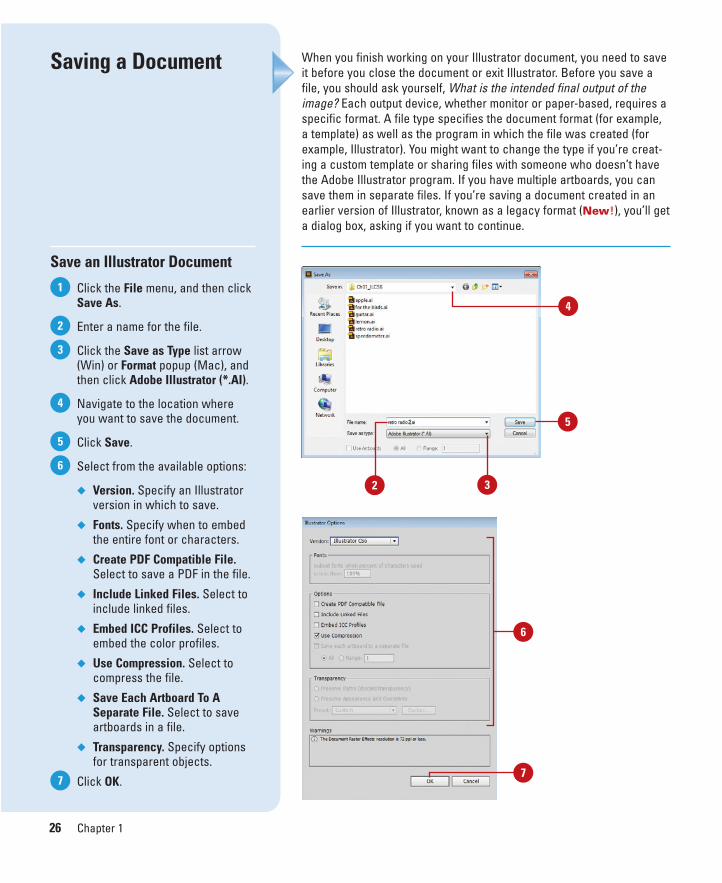
Saving a Document
Save an Illustrator Document
Click the File menu, and then clickSave As.
Enter a name for the file.
Click the Save as Type list arrow(Win) or Format popup (Mac), andthen click Adobe Illustrator (*.AI).
Navigate to the location whereyou want to save the document.
Click Save.
Select from the available options:
◆ Version. Specify an Illustratorversion in which to save.
◆ Fonts. Specify when to embedthe entire font or characters.
◆ Create PDF Compatible File.Select to save a PDF in the file.
◆ Include Linked Files. Select toinclude linked files.
◆ Embed ICC Profiles. Select toembed the color profiles.
◆ Use Compression. Select tocompress the file.
◆ Save Each Artboard To ASeparate File. Select to saveartboards in a file.
◆ Transparency. Specify optionsfor transparent objects.
Click OK.7
6
5
4
3
2
1
When you finish working on your Illustrator document, you need to saveit before you close the document or exit Illustrator. Before you save afile, you should ask yourself, What is the intended final output of theimage? Each output device, whether monitor or paper-based, requires aspecific format. A file type specifies the document format (for example,a template) as well as the program in which the file was created (forexample, Illustrator). You might want to change the type if you’re creat-ing a custom template or sharing files with someone who doesn’t havethe Adobe Illustrator program. If you have multiple artboards, you cansave them in separate files. If you’re saving a document created in anearlier version of Illustrator, known as a legacy format (New!), you’ll geta dialog box, asking if you want to continue.
32
5
6
7
4
ptg8126863
Chapter 1 Getting Started with Illustrator CS6 27
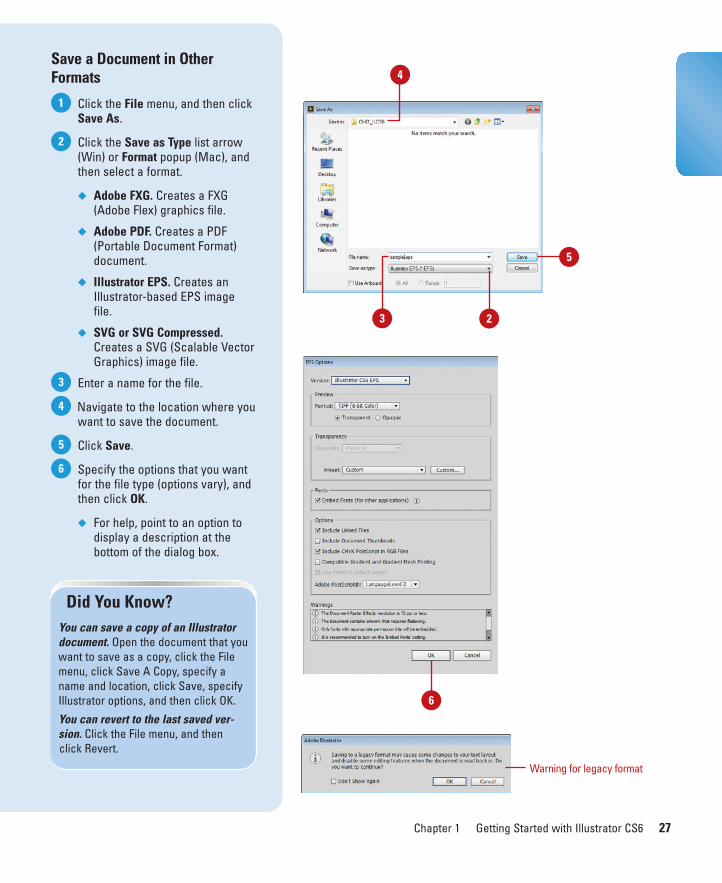
Save a Document in OtherFormats
Click the File menu, and then clickSave As.
Click the Save as Type list arrow(Win) or Format popup (Mac), andthen select a format.
◆ Adobe FXG. Creates a FXG(Adobe Flex) graphics file.
◆ Adobe PDF. Creates a PDF(Portable Document Format)document.
◆ Illustrator EPS. Creates anIllustrator-based EPS imagefile.
◆ SVG or SVG Compressed.Creates a SVG (Scalable VectorGraphics) image file.
Enter a name for the file.
Navigate to the location where youwant to save the document.
Click Save.
Specify the options that you wantfor the file type (options vary), andthen click OK.
◆ For help, point to an option todisplay a description at thebottom of the dialog box.
6
5
4
3
2
1
Did You Know?You can save a copy of an Illustratordocument. Open the document that youwant to save as a copy, click the Filemenu, click Save A Copy, specify aname and location, click Save, specifyIllustrator options, and then click OK.
You can revert to the last saved ver-sion. Click the File menu, and thenclick Revert.
2
4
5
3
6
Warning for legacy format
ptg8126863
28 Chapter 1
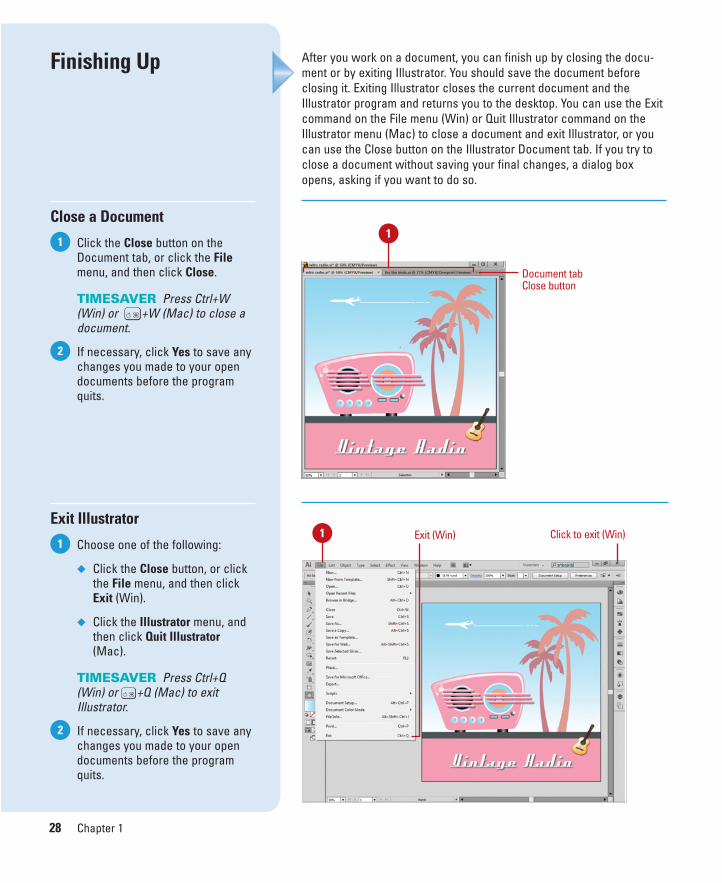
After you work on a document, you can finish up by closing the docu-ment or by exiting Illustrator. You should save the document beforeclosing it. Exiting Illustrator closes the current document and theIllustrator program and returns you to the desktop. You can use the Exitcommand on the File menu (Win) or Quit Illustrator command on theIllustrator menu (Mac) to close a document and exit Illustrator, or youcan use the Close button on the Illustrator Document tab. If you try toclose a document without saving your final changes, a dialog boxopens, asking if you want to do so.
Finishing Up
Close a Document
Click the Close button on theDocument tab, or click the Filemenu, and then click Close.
TIMESAVER Press Ctrl+W(Win) or A+W (Mac) to close adocument.
If necessary, click Yes to save anychanges you made to your opendocuments before the programquits.
Exit Illustrator
Choose one of the following:
◆ Click the Close button, or clickthe File menu, and then clickExit (Win).
◆ Click the Illustrator menu, andthen click Quit Illustrator(Mac).
TIMESAVER Press Ctrl+Q(Win) or A+Q (Mac) to exitIllustrator.
If necessary, click Yes to save anychanges you made to your opendocuments before the programquits.
2
1
2
11
1 Exit (Win) Click to exit (Win)
Document tabClose button

ptg8126863
Creating and Viewing aDocument
Introduction
You can either open an existing document or create a newone to work on in Illustrator. When you create a new docu-ment, you can create one from scratch or use one of thebuilt-in profiles, such as print, web, mobile, devices (iPad,iPhone, Xoom, Fire/Nook or Galaxy S), film, and video. Thebuilt-in profiles make it easy to create documents for specificpurposes without the hassle of specifying individual settings.However, if you know the individual settings you want, youcan create a new document from scratch.
At the same time you create a new document, you canalso create multiple artboards. Artboards are regions of adocument that contain printable artwork. Multiple artboardsare useful for creating documents with different sizes, creat-ing and organizing artwork elements in different placeswithin the same document, and creating multiple-page PDFs.
Having problems squinting at the small details of animage? Using the Navigator panel or Zoom tool is a greatway to get you focused where you need to be. Zooming intoa specific section of a document makes touching up the finedetails just that much easier.
Illustrator's navigation and measurement systems—rulers,grid, guides, smart guides—are more than just information;they represent control of the document and control of thecreative process. In addition, the Info panel gives you up-to-date information on the exact position of the cursor insidethe document, as well as detailed color information that canbe indispensable in preparing your designs. 2
2What You’ll Do
Create a New Document
Create a New Document UsingDocument Presets
Create a New Document from aTemplate
Set Up a Document
Use and Work with Multiple Artboards
Change the Display View
Change the View with the NavigatorPanel
Customize the Navigator Panel
Change the Screen Display Mode
Change the View with the Zoom Tool
View and Use Rulers
Use Guides and Smart Guides
Use the Grid
Move Around with the Hand Tool
Use Crop Marks
Work with the Info Panel
Use Undo and Redo
Create and Select Workspaces
29
ptg8126863
30 Chapter 2
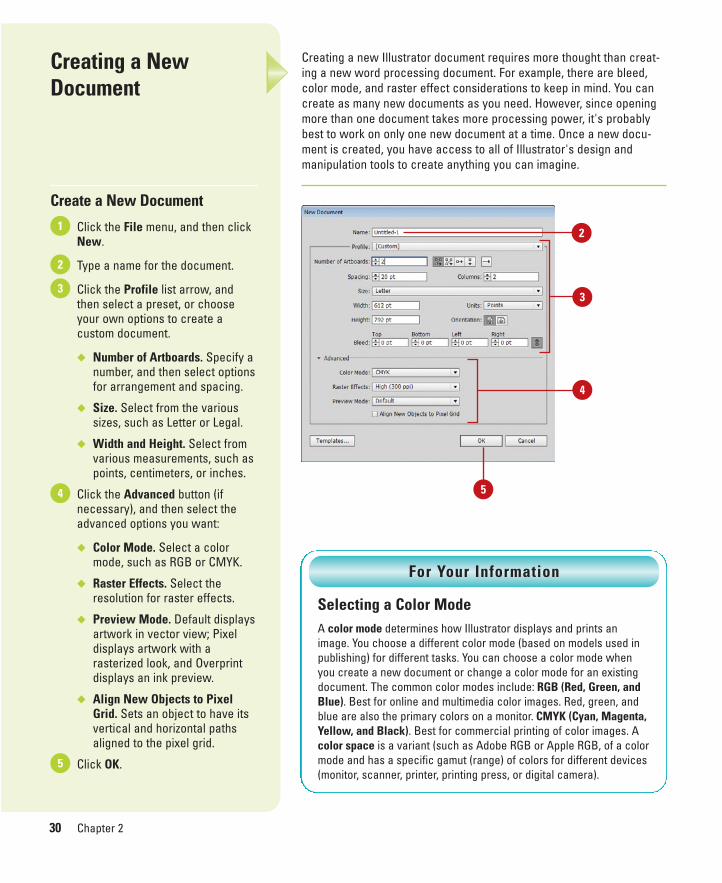
Creating a NewDocument
Create a New Document
Click the File menu, and then clickNew.
Type a name for the document.
Click the Profile list arrow, andthen select a preset, or chooseyour own options to create acustom document.
◆ Number of Artboards. Specify anumber, and then select optionsfor arrangement and spacing.
◆ Size. Select from the varioussizes, such as Letter or Legal.
◆ Width and Height. Select fromvarious measurements, such aspoints, centimeters, or inches.
Click the Advanced button (ifnecessary), and then select theadvanced options you want:
◆ Color Mode. Select a colormode, such as RGB or CMYK.
◆ Raster Effects. Select theresolution for raster effects.
◆ Preview Mode. Default displaysartwork in vector view; Pixeldisplays artwork with arasterized look, and Overprintdisplays an ink preview.
◆ Align New Objects to PixelGrid. Sets an object to have itsvertical and horizontal pathsaligned to the pixel grid.
Click OK.5
4
3
2
1
Creating a new Illustrator document requires more thought than creat-ing a new word processing document. For example, there are bleed,color mode, and raster effect considerations to keep in mind. You cancreate as many new documents as you need. However, since openingmore than one document takes more processing power, it's probablybest to work on only one new document at a time. Once a new docu-ment is created, you have access to all of Illustrator's design andmanipulation tools to create anything you can imagine.
3
Selecting a Color ModeA color mode determines how Illustrator displays and prints animage. You choose a different color mode (based on models used inpublishing) for different tasks. You can choose a color mode whenyou create a new document or change a color mode for an existingdocument. The common color modes include: RGB (Red, Green, andBlue). Best for online and multimedia color images. Red, green, andblue are also the primary colors on a monitor. CMYK (Cyan, Magenta,Yellow, and Black). Best for commercial printing of color images. Acolor space is a variant (such as Adobe RGB or Apple RGB, of a colormode and has a specific gamut (range) of colors for different devices(monitor, scanner, printer, printing press, or digital camera).
For Your Information
4
5
2
ptg8126863
Chapter 2 Creating and Viewing a Document 31
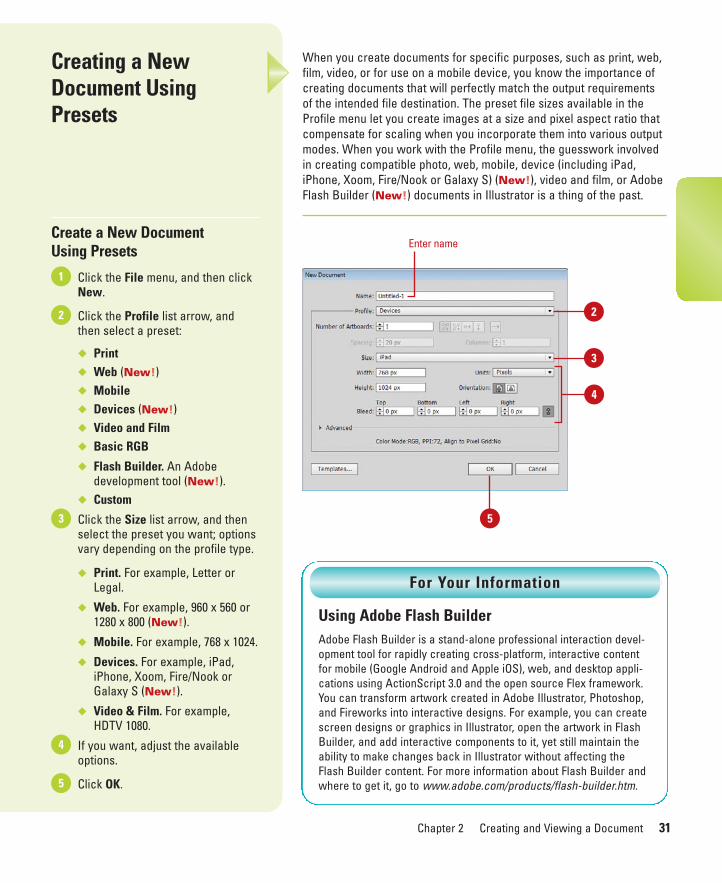
When you create documents for specific purposes, such as print, web,film, video, or for use on a mobile device, you know the importance ofcreating documents that will perfectly match the output requirementsof the intended file destination. The preset file sizes available in theProfile menu let you create images at a size and pixel aspect ratio thatcompensate for scaling when you incorporate them into various outputmodes. When you work with the Profile menu, the guesswork involvedin creating compatible photo, web, mobile, device (including iPad,iPhone, Xoom, Fire/Nook or Galaxy S) (New!), video and film, or AdobeFlash Builder (New!) documents in Illustrator is a thing of the past.
3
Creating a NewDocument UsingPresets
Create a New Document Using Presets
Click the File menu, and then clickNew.
Click the Profile list arrow, andthen select a preset:
◆ Print◆ Web (New!)◆ Mobile◆ Devices (New!)◆ Video and Film◆ Basic RGB
◆ Flash Builder. An Adobedevelopment tool (New!).
◆ Custom
Click the Size list arrow, and thenselect the preset you want; optionsvary depending on the profile type.
◆ Print. For example, Letter orLegal.
◆ Web. For example, 960 x 560 or1280 x 800 (New!).
◆ Mobile. For example, 768 x 1024.
◆ Devices. For example, iPad,iPhone, Xoom, Fire/Nook orGalaxy S (New!).
◆ Video & Film. For example,HDTV 1080.
If you want, adjust the availableoptions.
Click OK.5
4
3
2
1
Enter name
Using Adobe Flash BuilderAdobe Flash Builder is a stand-alone professional interaction devel-opment tool for rapidly creating cross-platform, interactive contentfor mobile (Google Android and Apple iOS), web, and desktop appli-cations using ActionScript 3.0 and the open source Flex framework.You can transform artwork created in Adobe Illustrator, Photoshop,and Fireworks into interactive designs. For example, you can createscreen designs or graphics in Illustrator, open the artwork in FlashBuilder, and add interactive components to it, yet still maintain theability to make changes back in Illustrator without affecting theFlash Builder content. For more information about Flash Builder andwhere to get it, go to www.adobe.com/products/flash-builder.htm.
For Your Information
5
4
2
ptg8126863
32 Chapter 2
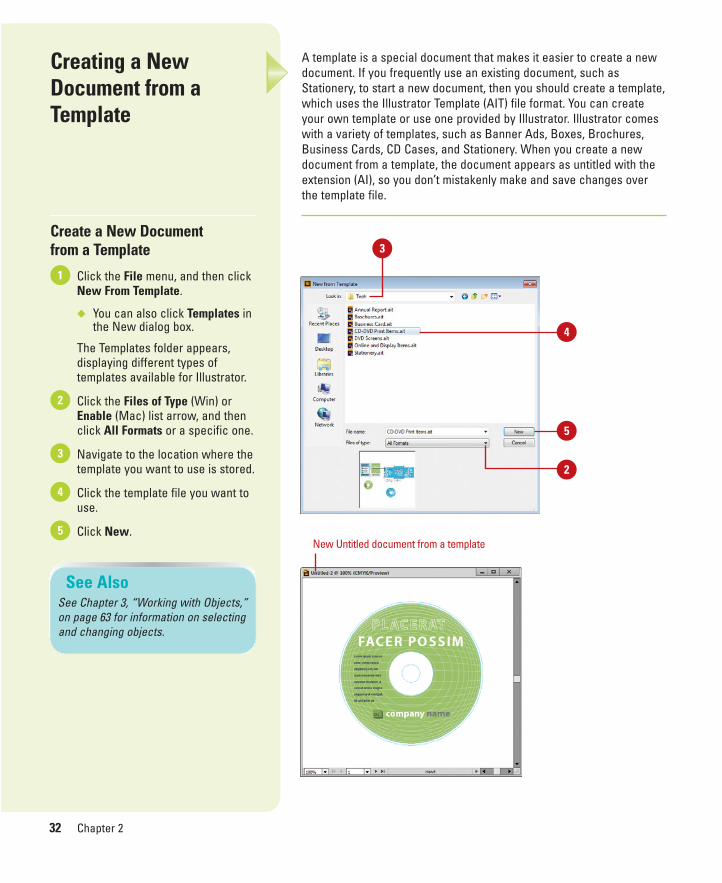
A template is a special document that makes it easier to create a newdocument. If you frequently use an existing document, such asStationery, to start a new document, then you should create a template,which uses the Illustrator Template (AIT) file format. You can createyour own template or use one provided by Illustrator. Illustrator comeswith a variety of templates, such as Banner Ads, Boxes, Brochures,Business Cards, CD Cases, and Stationery. When you create a newdocument from a template, the document appears as untitled with theextension (AI), so you don’t mistakenly make and save changes overthe template file.
Creating a NewDocument from aTemplate
Create a New Document from a Template
Click the File menu, and then clickNew From Template.
◆ You can also click Templates inthe New dialog box.
The Templates folder appears,displaying different types oftemplates available for Illustrator.
Click the Files of Type (Win) orEnable (Mac) list arrow, and thenclick All Formats or a specific one.
Navigate to the location where thetemplate you want to use is stored.
Click the template file you want touse.
Click New. 5
4
3
2
1
4
5
2
3
New Untitled document from a template
See AlsoSee Chapter 3, “Working with Objects,”on page 63 for information on selectingand changing objects.

ptg8126863
Chapter 2 Creating and Viewing a Document 33
Create a Template Document
Open a new or existing document.
Create a custom document.
Click the File menu, and then clickSave As Template.
The Templates folder appears,displaying different types oftemplates available for Illustrator.
Type a name for the new template.
Click the Save as Type (Win) orFormat (Mac) list arrow, and thenclick Illustrator Template (*.AIT), ifnecessary.
Navigate to the location whereyou want to store the template.
Click Save. 7
6
5
4
3
2
13 1 2
54
6
7
ptg8126863
34 Chapter 2
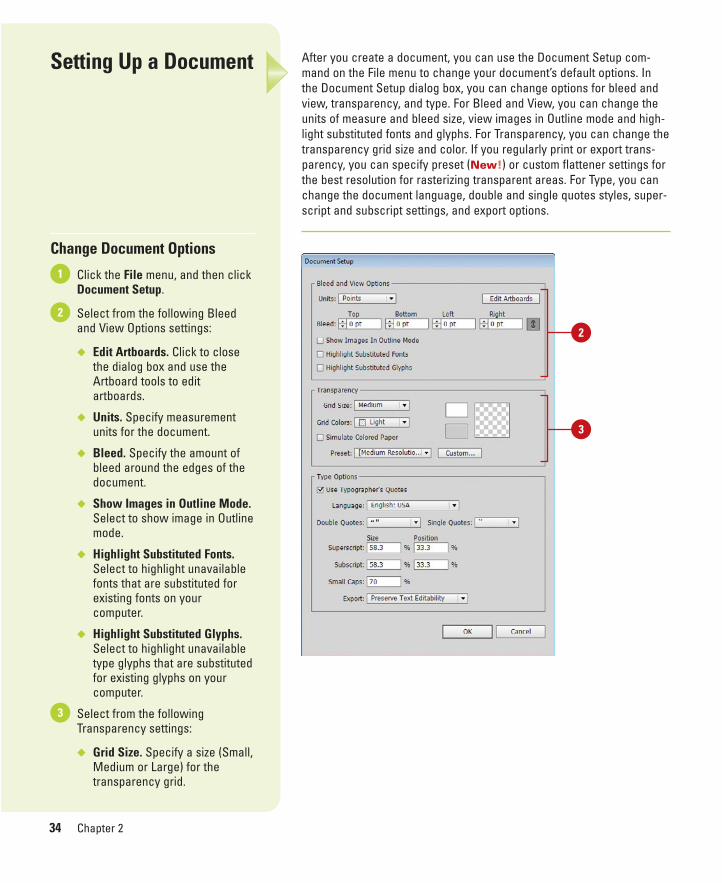
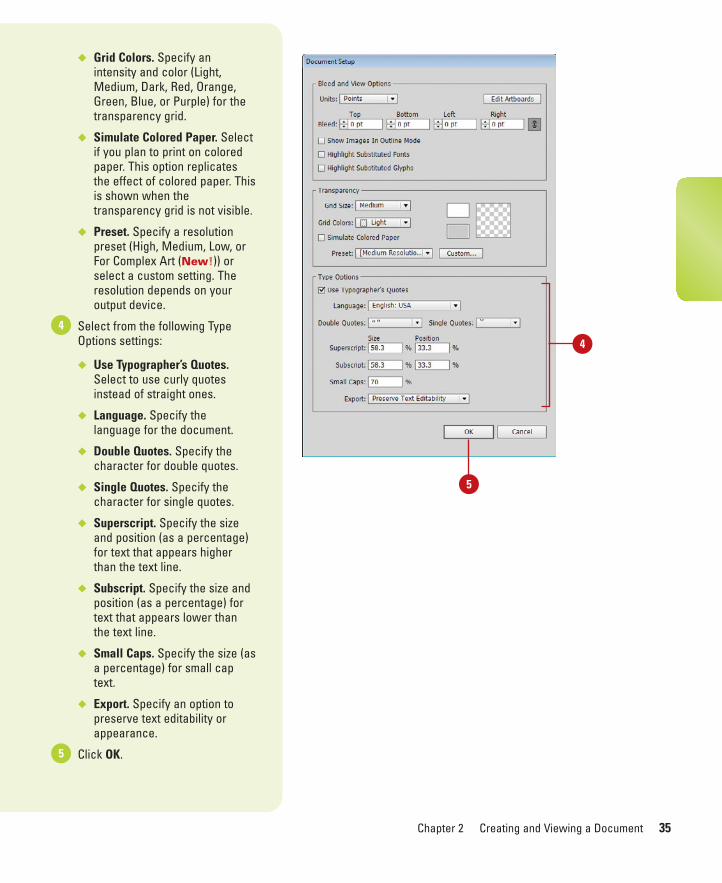
After you create a document, you can use the Document Setup com-mand on the File menu to change your document’s default options. Inthe Document Setup dialog box, you can change options for bleed andview, transparency, and type. For Bleed and View, you can change theunits of measure and bleed size, view images in Outline mode and high-light substituted fonts and glyphs. For Transparency, you can change thetransparency grid size and color. If you regularly print or export trans-parency, you can specify preset (New!) or custom flattener settings forthe best resolution for rasterizing transparent areas. For Type, you canchange the document language, double and single quotes styles, super-script and subscript settings, and export options.
Setting Up a Document
Change Document Options
Click the File menu, and then clickDocument Setup.
Select from the following Bleedand View Options settings:
◆ Edit Artboards. Click to closethe dialog box and use theArtboard tools to editartboards.
◆ Units. Specify measurementunits for the document.
◆ Bleed. Specify the amount ofbleed around the edges of thedocument.
◆ Show Images in Outline Mode.Select to show image in Outlinemode.
◆ Highlight Substituted Fonts.Select to highlight unavailablefonts that are substituted forexisting fonts on yourcomputer.
◆ Highlight Substituted Glyphs.Select to highlight unavailabletype glyphs that are substitutedfor existing glyphs on yourcomputer.
Select from the followingTransparency settings:
◆ Grid Size. Specify a size (Small,Medium or Large) for thetransparency grid.
3
2
1
2
3
ptg8126863
Chapter 2 Creating and Viewing a Document 35
◆ Grid Colors. Specify anintensity and color (Light,Medium, Dark, Red, Orange,Green, Blue, or Purple) for thetransparency grid.
◆ Simulate Colored Paper. Selectif you plan to print on coloredpaper. This option replicatesthe effect of colored paper. Thisis shown when thetransparency grid is not visible.
◆ Preset. Specify a resolutionpreset (High, Medium, Low, orFor Complex Art (New!)) orselect a custom setting. Theresolution depends on youroutput device.
Select from the following TypeOptions settings:
◆ Use Typographer’s Quotes.Select to use curly quotesinstead of straight ones.
◆ Language. Specify thelanguage for the document.
◆ Double Quotes. Specify thecharacter for double quotes.
◆ Single Quotes. Specify thecharacter for single quotes.
◆ Superscript. Specify the sizeand position (as a percentage)for text that appears higherthan the text line.
◆ Subscript. Specify the size andposition (as a percentage) fortext that appears lower thanthe text line.
◆ Small Caps. Specify the size (asa percentage) for small captext.
◆ Export. Specify an option topreserve text editability orappearance.
Click OK.5
4
4
5

ptg8126863
36 Chapter 2
Artboards are regions of a document that contain printable artwork. Youcan use artboards as crop areas for printing or placement. They areuseful for working with multiple artwork elements. You can create multi-ple artboards (1 to 100) at different sizes and position them anywhere onthe screen. You can create multiple artboards by using the New dialogbox, the Artboard tools in the Tools panel, or the Artboards panel.Multiple artboards are useful for creating documents at different sizes,creating and organizing artwork in different places within the same doc-ument, and creating multiple-page PDFs. You can also specify customnames for artboards, rearrange the artboard layout, reorder artboards,and duplicate artboards.
Using MultipleArtboards
Create an Artboard
Select the Artboard tool on theTools panel.
To use a preset dimension, clickthe Preset list arrow on the Controlpanel, and then select a preset.
Drag in the workspace (outside anartboard) to create an artboard.
◆ To create an artboard within anartboard, hold down Shift andthen drag.
To duplicate an existing artboard,click to select the artboard, clickthe New Artboard button on theControl or Artboards panel, andthen click to place it.
◆ To create multiple duplicates,Alt-click instead as many timesas you want.
◆ To open the Artboards panel,click the Window menu, andthen click Artboards.
Enter a name in the Name box onthe Control Panel.
To navigate between artboards,use the Navigation buttons on theStatus bar or on the Artboardspanel.
To exit the artboard editing mode,press Esc or click a different tool.
7
6
5
4
3
2
1
1
27
6 3
4 5 Artboards panel
Artboards panel button
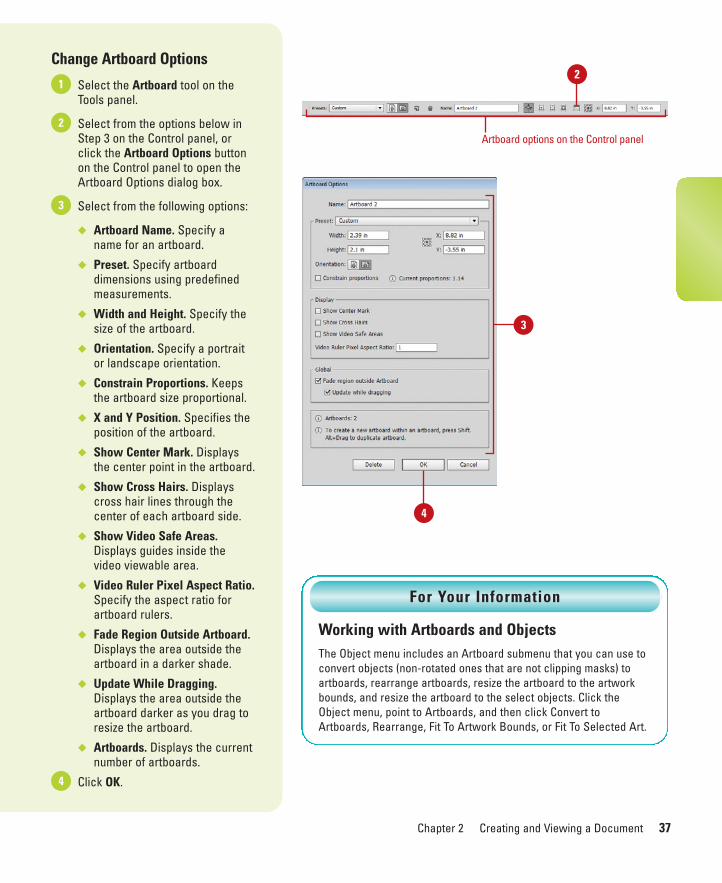
ptg8126863
Chapter 2 Creating and Viewing a Document 37
Change Artboard Options
Select the Artboard tool on theTools panel.
Select from the options below inStep 3 on the Control panel, orclick the Artboard Options buttonon the Control panel to open theArtboard Options dialog box.
Select from the following options:
◆ Artboard Name. Specify aname for an artboard.
◆ Preset. Specify artboarddimensions using predefinedmeasurements.
◆ Width and Height. Specify thesize of the artboard.
◆ Orientation. Specify a portraitor landscape orientation.
◆ Constrain Proportions. Keepsthe artboard size proportional.
◆ X and Y Position. Specifies theposition of the artboard.
◆ Show Center Mark. Displaysthe center point in the artboard.
◆ Show Cross Hairs. Displayscross hair lines through thecenter of each artboard side.
◆ Show Video Safe Areas.Displays guides inside thevideo viewable area.
◆ Video Ruler Pixel Aspect Ratio.Specify the aspect ratio forartboard rulers.
◆ Fade Region Outside Artboard.Displays the area outside theartboard in a darker shade.
◆ Update While Dragging.Displays the area outside theartboard darker as you drag toresize the artboard.
◆ Artboards. Displays the currentnumber of artboards.
Click OK.4
3
2
12
Artboard options on the Control panel
3
Working with Artboards and ObjectsThe Object menu includes an Artboard submenu that you can use toconvert objects (non-rotated ones that are not clipping masks) toartboards, rearrange artboards, resize the artboard to the artworkbounds, and resize the artboard to the select objects. Click theObject menu, point to Artboards, and then click Convert toArtboards, Rearrange, Fit To Artwork Bounds, or Fit To Selected Art.
For Your Information
4
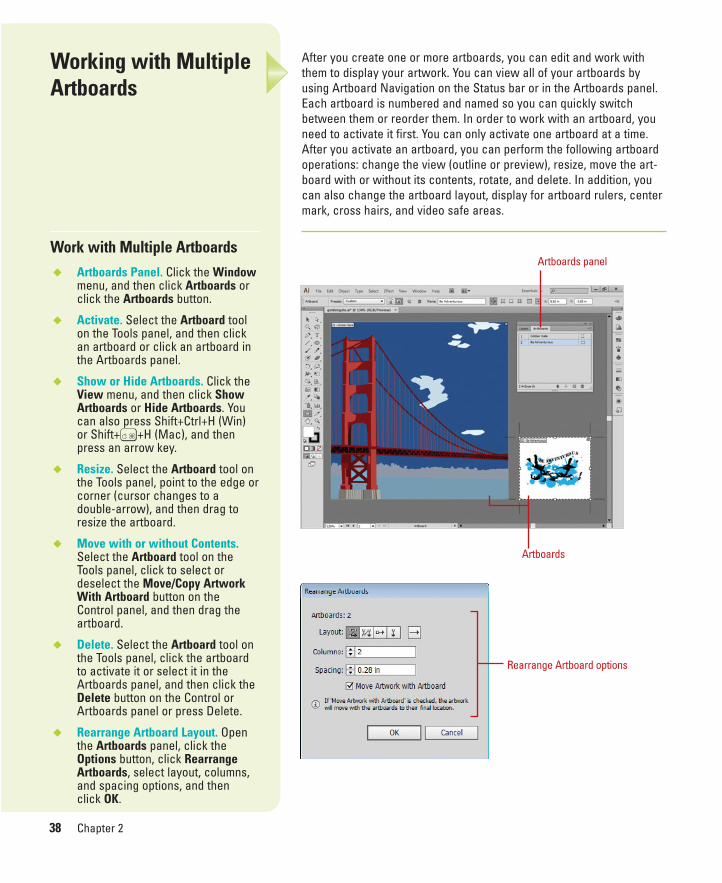
ptg8126863
38 Chapter 2
After you create one or more artboards, you can edit and work withthem to display your artwork. You can view all of your artboards byusing Artboard Navigation on the Status bar or in the Artboards panel.Each artboard is numbered and named so you can quickly switchbetween them or reorder them. In order to work with an artboard, youneed to activate it first. You can only activate one artboard at a time.After you activate an artboard, you can perform the following artboardoperations: change the view (outline or preview), resize, move the art-board with or without its contents, rotate, and delete. In addition, youcan also change the artboard layout, display for artboard rulers, centermark, cross hairs, and video safe areas.
Working with MultipleArtboards
Work with Multiple Artboards◆ Artboards Panel. Click the Window
menu, and then click Artboards orclick the Artboards button.
◆ Activate. Select the Artboard toolon the Tools panel, and then clickan artboard or click an artboard inthe Artboards panel.
◆ Show or Hide Artboards. Click theView menu, and then click ShowArtboards or Hide Artboards. Youcan also press Shift+Ctrl+H (Win)or Shift+A+H (Mac), and thenpress an arrow key.
◆ Resize. Select the Artboard tool onthe Tools panel, point to the edge orcorner (cursor changes to adouble-arrow), and then drag toresize the artboard.
◆ Move with or without Contents.Select the Artboard tool on theTools panel, click to select ordeselect the Move/Copy ArtworkWith Artboard button on theControl panel, and then drag theartboard.
◆ Delete. Select the Artboard tool onthe Tools panel, click the artboardto activate it or select it in theArtboards panel, and then click theDelete button on the Control orArtboards panel or press Delete.
◆ Rearrange Artboard Layout. Openthe Artboards panel, click theOptions button, click RearrangeArtboards, select layout, columns,and spacing options, and then click OK.
Artboards
Artboards panel
Rearrange Artboard options
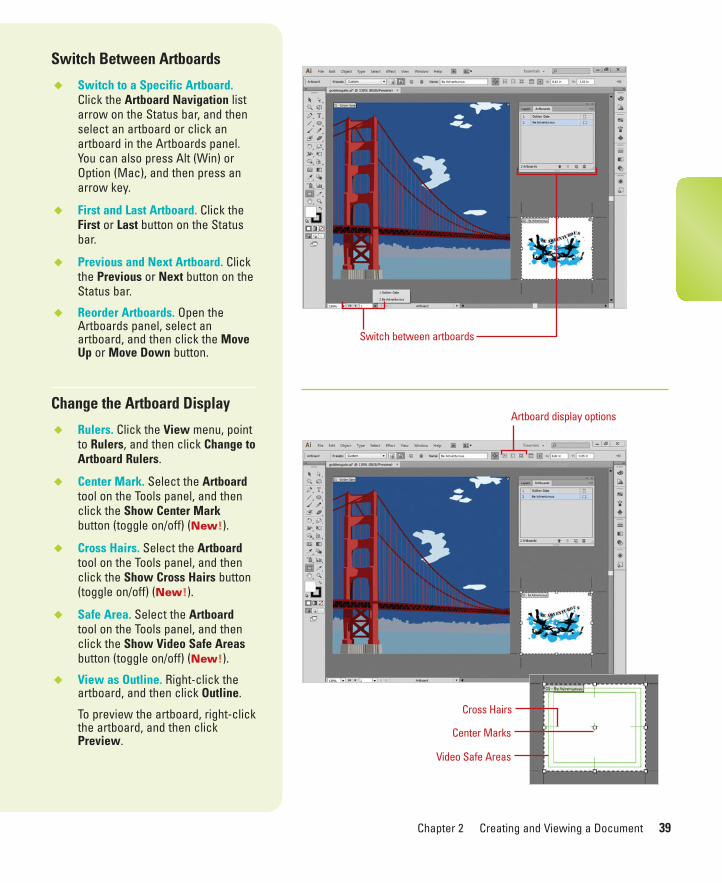
ptg8126863
Chapter 2 Creating and Viewing a Document 39
Switch Between Artboards
◆ Switch to a Specific Artboard.Click the Artboard Navigation listarrow on the Status bar, and thenselect an artboard or click anartboard in the Artboards panel.You can also press Alt (Win) orOption (Mac), and then press anarrow key.
◆ First and Last Artboard. Click theFirst or Last button on the Statusbar.
◆ Previous and Next Artboard. Clickthe Previous or Next button on theStatus bar.
◆ Reorder Artboards. Open theArtboards panel, select anartboard, and then click the MoveUp or Move Down button.
Change the Artboard Display
◆ Rulers. Click the View menu, pointto Rulers, and then click Change toArtboard Rulers.
◆ Center Mark. Select the Artboardtool on the Tools panel, and thenclick the Show Center Markbutton (toggle on/off) (New!).
◆ Cross Hairs. Select the Artboardtool on the Tools panel, and thenclick the Show Cross Hairs button(toggle on/off) (New!).
◆ Safe Area. Select the Artboardtool on the Tools panel, and thenclick the Show Video Safe Areasbutton (toggle on/off) (New!).
◆ View as Outline. Right-click theartboard, and then click Outline.
To preview the artboard, right-clickthe artboard, and then clickPreview.
Switch between artboards
Artboard display options
Cross Hairs
Video Safe Areas
Center Marks
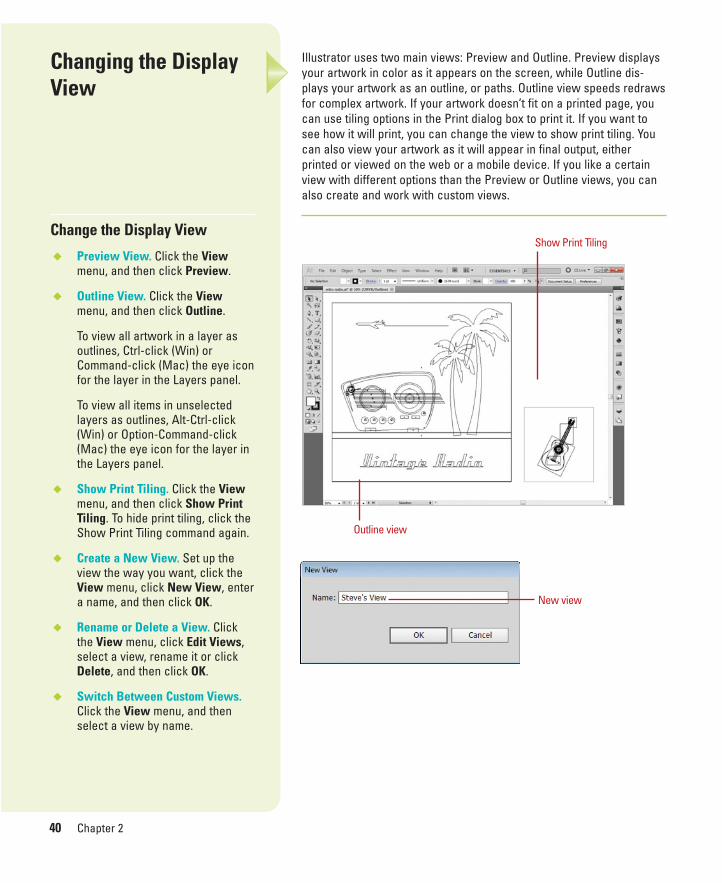
ptg8126863
40 Chapter 2
Illustrator uses two main views: Preview and Outline. Preview displaysyour artwork in color as it appears on the screen, while Outline dis-plays your artwork as an outline, or paths. Outline view speeds redrawsfor complex artwork. If your artwork doesn’t fit on a printed page, youcan use tiling options in the Print dialog box to print it. If you want tosee how it will print, you can change the view to show print tiling. Youcan also view your artwork as it will appear in final output, eitherprinted or viewed on the web or a mobile device. If you like a certainview with different options than the Preview or Outline views, you canalso create and work with custom views.
Changing the DisplayView
Change the Display View
◆ Preview View. Click the Viewmenu, and then click Preview.
◆ Outline View. Click the Viewmenu, and then click Outline.
To view all artwork in a layer asoutlines, Ctrl-click (Win) orCommand-click (Mac) the eye iconfor the layer in the Layers panel.
To view all items in unselectedlayers as outlines, Alt-Ctrl-click(Win) or Option-Command-click(Mac) the eye icon for the layer inthe Layers panel.
◆ Show Print Tiling. Click the Viewmenu, and then click Show PrintTiling. To hide print tiling, click theShow Print Tiling command again.
◆ Create a New View. Set up theview the way you want, click theView menu, click New View, entera name, and then click OK.
◆ Rename or Delete a View. Clickthe View menu, click Edit Views,select a view, rename it or clickDelete, and then click OK.
◆ Switch Between Custom Views.Click the View menu, and thenselect a view by name.
Outline view
Show Print Tiling
New view
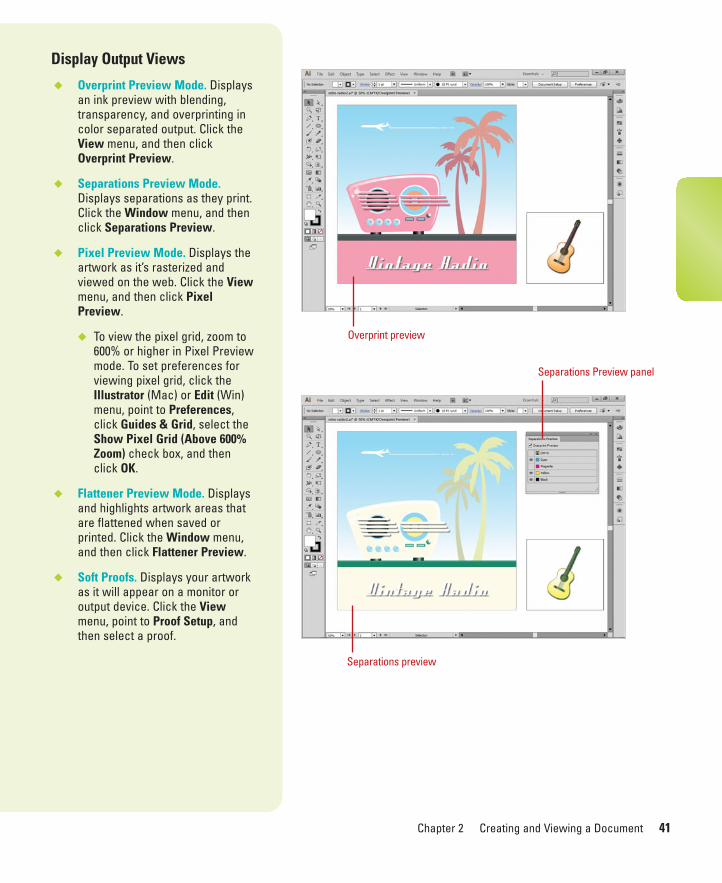
ptg8126863
Chapter 2 Creating and Viewing a Document 41
Display Output Views
◆ Overprint Preview Mode. Displaysan ink preview with blending,transparency, and overprinting incolor separated output. Click theView menu, and then clickOverprint Preview.
◆ Separations Preview Mode.Displays separations as they print.Click the Window menu, and thenclick Separations Preview.
◆ Pixel Preview Mode. Displays theartwork as it’s rasterized andviewed on the web. Click the Viewmenu, and then click PixelPreview.
◆ To view the pixel grid, zoom to600% or higher in Pixel Previewmode. To set preferences forviewing pixel grid, click theIllustrator (Mac) or Edit (Win)menu, point to Preferences,click Guides & Grid, select theShow Pixel Grid (Above 600%Zoom) check box, and thenclick OK.
◆ Flattener Preview Mode. Displaysand highlights artwork areas thatare flattened when saved orprinted. Click the Window menu,and then click Flattener Preview.
◆ Soft Proofs. Displays your artworkas it will appear on a monitor oroutput device. Click the Viewmenu, point to Proof Setup, andthen select a proof.
Overprint preview
Separations preview
Separations Preview panel
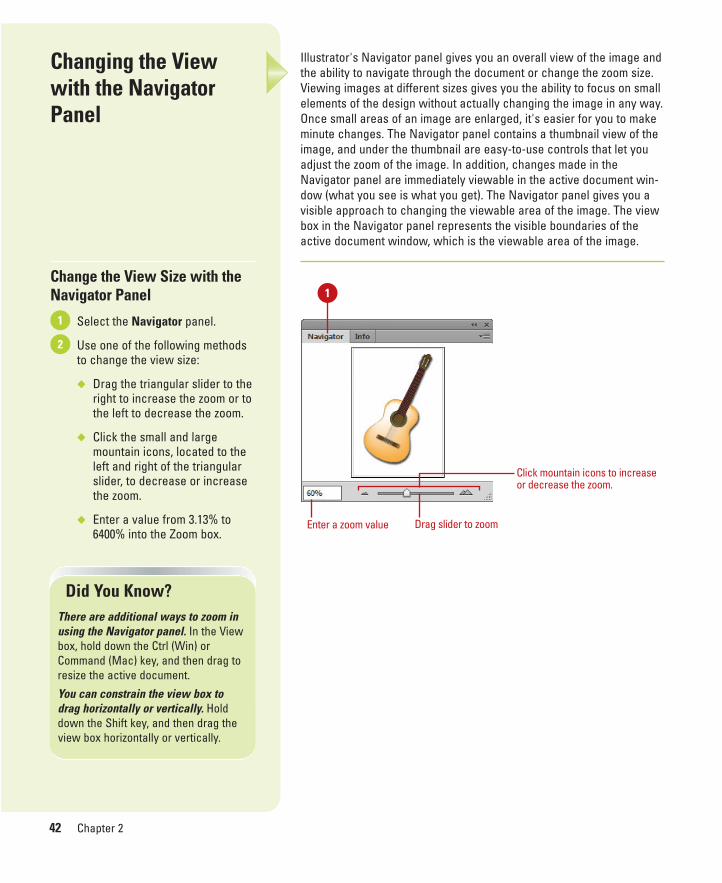
ptg8126863
42 Chapter 2
Illustrator's Navigator panel gives you an overall view of the image andthe ability to navigate through the document or change the zoom size.Viewing images at different sizes gives you the ability to focus on smallelements of the design without actually changing the image in any way.Once small areas of an image are enlarged, it's easier for you to makeminute changes. The Navigator panel contains a thumbnail view of theimage, and under the thumbnail are easy-to-use controls that let youadjust the zoom of the image. In addition, changes made in theNavigator panel are immediately viewable in the active document win-dow (what you see is what you get). The Navigator panel gives you avisible approach to changing the viewable area of the image. The viewbox in the Navigator panel represents the visible boundaries of theactive document window, which is the viewable area of the image.
Changing the Viewwith the NavigatorPanel
Change the View Size with theNavigator Panel
Select the Navigator panel.
Use one of the following methodsto change the view size:
◆ Drag the triangular slider to theright to increase the zoom or tothe left to decrease the zoom.
◆ Click the small and largemountain icons, located to theleft and right of the triangularslider, to decrease or increasethe zoom.
◆ Enter a value from 3.13% to6400% into the Zoom box.
2
1
1
Click mountain icons to increaseor decrease the zoom.
Drag slider to zoomEnter a zoom value
Did You Know?There are additional ways to zoom inusing the Navigator panel. In the Viewbox, hold down the Ctrl (Win) orCommand (Mac) key, and then drag toresize the active document.
You can constrain the view box todrag horizontally or vertically. Holddown the Shift key, and then drag theview box horizontally or vertically.
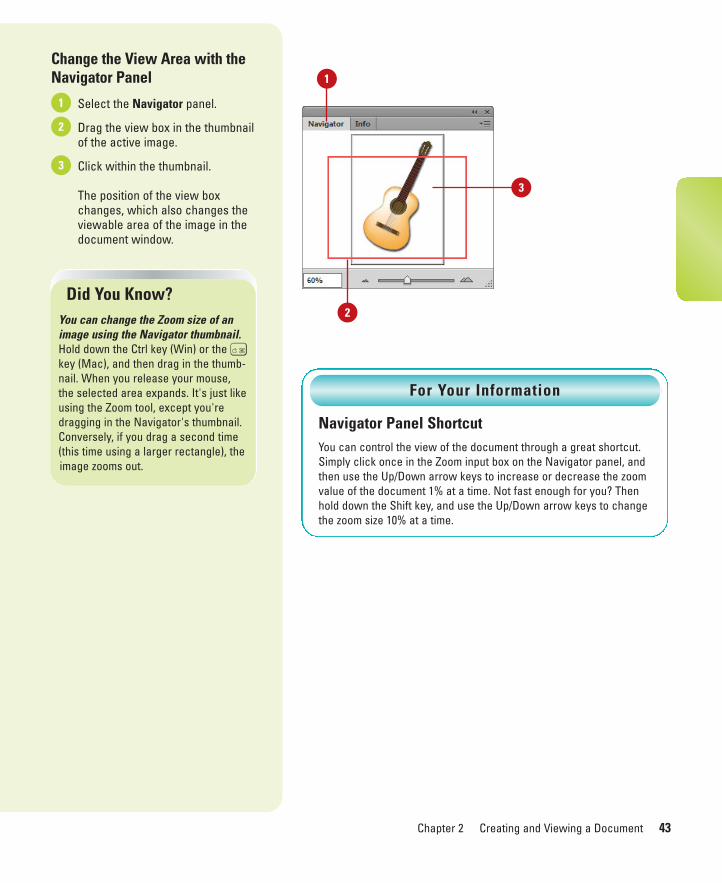
ptg8126863
Chapter 2 Creating and Viewing a Document 43
Change the View Area with theNavigator Panel
Select the Navigator panel.
Drag the view box in the thumbnailof the active image.
Click within the thumbnail.
The position of the view boxchanges, which also changes theviewable area of the image in thedocument window.
3
2
1
3
1
2Did You Know?
You can change the Zoom size of animage using the Navigator thumbnail.Hold down the Ctrl key (Win) or the Akey (Mac), and then drag in the thumb-nail. When you release your mouse,the selected area expands. It's just likeusing the Zoom tool, except you'redragging in the Navigator's thumbnail.Conversely, if you drag a second time(this time using a larger rectangle), theimage zooms out.
Navigator Panel ShortcutYou can control the view of the document through a great shortcut.Simply click once in the Zoom input box on the Navigator panel, andthen use the Up/Down arrow keys to increase or decrease the zoomvalue of the document 1% at a time. Not fast enough for you? Thenhold down the Shift key, and use the Up/Down arrow keys to changethe zoom size 10% at a time.
For Your Information
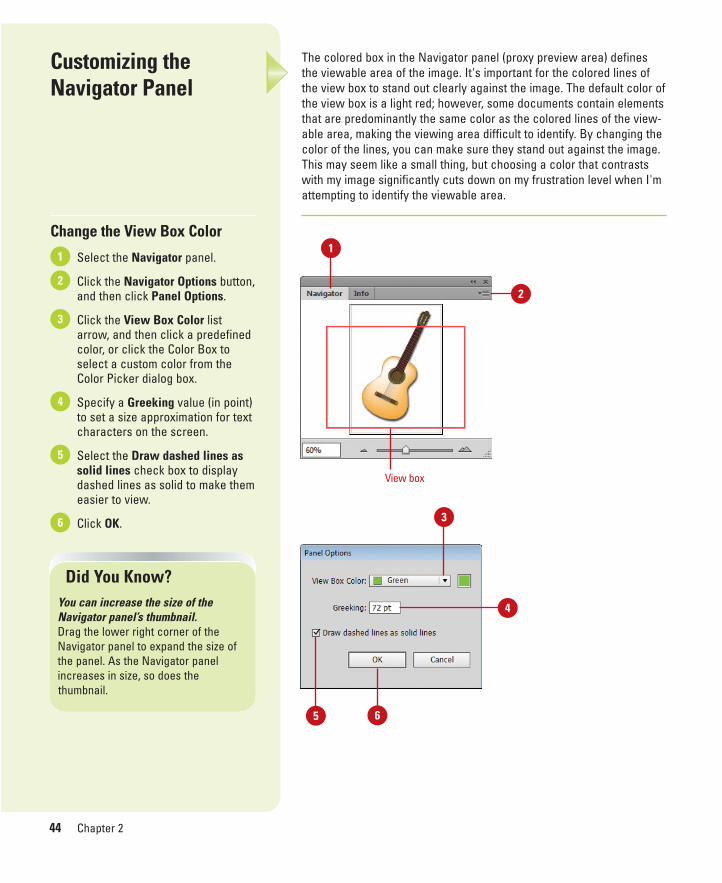
ptg8126863
44 Chapter 2
The colored box in the Navigator panel (proxy preview area) definesthe viewable area of the image. It's important for the colored lines ofthe view box to stand out clearly against the image. The default color ofthe view box is a light red; however, some documents contain elementsthat are predominantly the same color as the colored lines of the view-able area, making the viewing area difficult to identify. By changing thecolor of the lines, you can make sure they stand out against the image.This may seem like a small thing, but choosing a color that contrastswith my image significantly cuts down on my frustration level when I'mattempting to identify the viewable area.
Customizing theNavigator Panel
Change the View Box Color
Select the Navigator panel.
Click the Navigator Options button,and then click Panel Options.
Click the View Box Color listarrow, and then click a predefinedcolor, or click the Color Box toselect a custom color from theColor Picker dialog box.
Specify a Greeking value (in point)to set a size approximation for textcharacters on the screen.
Select the Draw dashed lines assolid lines check box to displaydashed lines as solid to make themeasier to view.
Click OK.6
5
4
3
2
1
View box
5
1
2
Did You Know?You can increase the size of theNavigator panel’s thumbnail. Drag the lower right corner of theNavigator panel to expand the size ofthe panel. As the Navigator panelincreases in size, so does the thumbnail.
3
6
4

ptg8126863
Chapter 2 Creating and Viewing a Document 45
In Illustrator, the Screen Display mode determines the background dis-played behind the active image. For example, you can choose a ScreenMode that hides all the panels, title bar, or menu bar. Since monitorbackgrounds, combined with Illustrator's panels, add distracting colorsto your workspace, changing the Screen Mode gives you a chance toisolate your image against a solid color background. Viewing yourimages against a gray background helps your eyes identify the true col-ors within an image.
Changing the ScreenDisplay Mode
Change the Screen Mode
Click Change Screen Mode buttonto toggle between screen modes,and then select the mode youwant:
◆ Normal Screen Mode. Displaysthe artwork in a standardwindow. All menus, panels, andscroll bars are visible.
◆ Full Screen Mode with MenuBar. Displays the artwork fullscreen. All menus, panels, andscroll bars are visible.
◆ Full Screen Mode. Displays theartwork full screen. No title bar,menus, or panels are visible.
TIMESAVER Press F to togglebetween the screen modes.
1
Full Screen Modewith Menu Bar
Full Screen Mode
1
Normal ScreenMode
Did You Know?You can temporarily hide all ofIllustrator's panels and Tools panel.Press the Tab key to hide the panels.Press the Tab key a second time to dis-play the hidden panels. Hold down theShift key, and then press the Tab key tohide the panels, but not the Tools andControl panels.

ptg8126863
46 Chapter 2
Working with the Zoom tool gives you one more way to control exactlywhat you see in Illustrator. Just like the Navigator panel, the Zoom tooldoes not change the active image, but allows you to view the image atdifferent magnifications. The Zoom tool is located towards the bottomof Illustrator's Tools panel, and resembles a magnifying glass. The max-imum magnification of an Illustrator document is 6400%, and the mini-mum size is 3.13%. Increasing the magnification of an image gives youcontrol over what you see and gives you control over how you work.Large documents are difficult to work with and difficult to view. Manylarge documents, when viewed at 100%, are larger than the maximumsize of the document window, requiring you to reduce the zoom in orderto view the entire image.
Changing the Viewwith the Zoom Tool
Zoom In the View of an Image
Select the Zoom tool on the Toolspanel.
Use one of the following methods:
◆ Click on the document.Theimage increases inmagnification centered on where you clicked.
◆ Drag to define an area with theZoom tool. The imageincreases in magnificationbased on the boundaries of thearea you dragged.
◆ Set a specific view size. Clickthe View Size on the Status bar,and then select a specificpercentage size magnification.
◆ Fit in Window. Click the Viewmenu, and then click Fit All InWindow or Fit Artboard InWindow.
2
1
1
2
Zoom in
Click and drag method

ptg8126863
Chapter 2 Creating and Viewing a Document 47
Zoom Out the View of an Image
Select the Zoom tool on the Toolspanel.
Hold down the Alt (Win) or Option(Mac) key, and then click on thescreen to reduce the zoom of theactive document.
The zoom reduction centers onwhere you click on the activedocument.
IMPORTANT The best way toreally see what the printed resultsof your artwork will look like is toview the image (even if it is too bigfor the screen) at 100%.
2
1
1
Did You Know?You can zoom in or out using shortcutkeys regardless of what tool you’re currently using. To zoom in, pressCtrl+Spacebar (Win) or A+Spacebar(Mac) and click or drag to define anarea. To zoom out, press Ctrl+Space-bar+Alt (Win) or A+Spacebar+Option(Mac) and click or drag to define anarea.
Zoom out
2
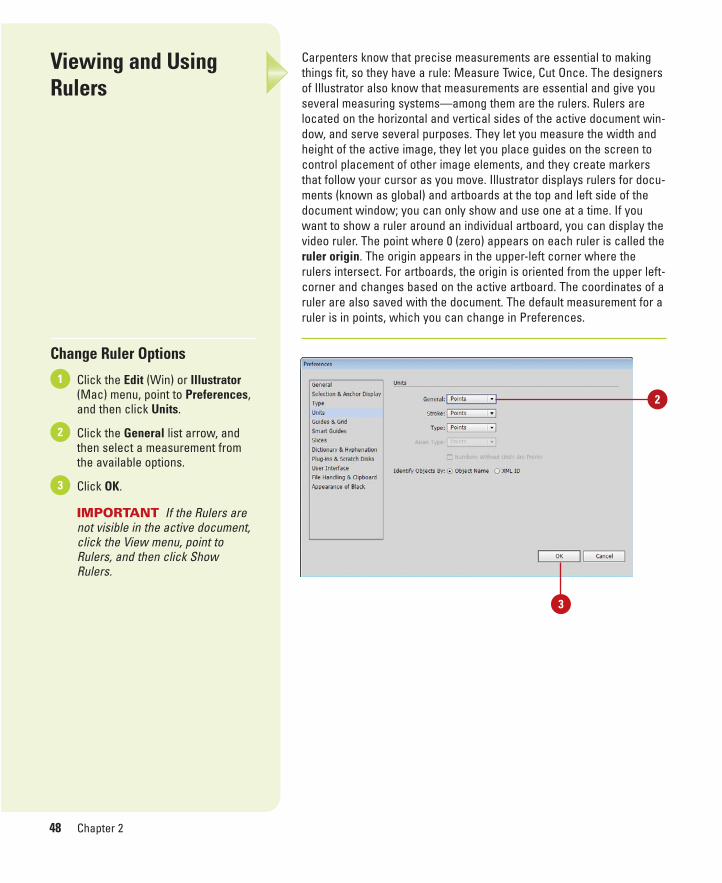
ptg8126863
48 Chapter 2
Carpenters know that precise measurements are essential to makingthings fit, so they have a rule: Measure Twice, Cut Once. The designersof Illustrator also know that measurements are essential and give youseveral measuring systems—among them are the rulers. Rulers arelocated on the horizontal and vertical sides of the active document win-dow, and serve several purposes. They let you measure the width andheight of the active image, they let you place guides on the screen tocontrol placement of other image elements, and they create markersthat follow your cursor as you move. Illustrator displays rulers for docu-ments (known as global) and artboards at the top and left side of thedocument window; you can only show and use one at a time. If youwant to show a ruler around an individual artboard, you can display thevideo ruler. The point where 0 (zero) appears on each ruler is called theruler origin. The origin appears in the upper-left corner where therulers intersect. For artboards, the origin is oriented from the upper left-corner and changes based on the active artboard. The coordinates of aruler are also saved with the document. The default measurement for aruler is in points, which you can change in Preferences.
Viewing and UsingRulers
Change Ruler Options
Click the Edit (Win) or Illustrator(Mac) menu, point to Preferences,and then click Units.
Click the General list arrow, andthen select a measurement fromthe available options.
Click OK.
IMPORTANT If the Rulers arenot visible in the active document,click the View menu, point toRulers, and then click ShowRulers.
3
2
1
2
3

ptg8126863
Chapter 2 Creating and Viewing a Document 49
Work with Rulers
◆ Show or Hide Rulers. Click theView menu, point to Rulers, andthen click Show Rulers or HideRulers.
TIMESAVER Press Ctrl+R(Win) or A+R (Mac).
◆ Change to Artboard Rulers orGlobal Rulers. Click the Viewmenu, point to Rulers, and thenclick Change to Artboard Rulers orChange to Global Rulers.
TIMESAVER Press Alt+Ctrl+R(Win) or Option+ A+R (Mac).
◆ Show or Hide Video Rulers. Clickthe View menu, point to Rulers,and then click Show Video Rulersor Hide Video Rulers.
◆ Change Measurement Units.Right-click (Win) or Option-click(Mac) a ruler, and then select aunit of measure.
◆ Change Ruler Origin. Point to theupper-left corner where the rulersintersect, and then drag thepointer to where you want the newruler origin.
◆ Reset Ruler Origin. Double-clickthe upper-left corner where therulers intersect.
Horizontal Ruler bar
Vertical Ruler bar
Did You Know?You can switch guides on the fly. Ifyou're dragging a vertical or horizontalguide onto the document window,when in fact you wanted the oppositeguide, press the Alt (Win) or Option(Mac) key, while still dragging theguide. Vertical guides become horizon-tal, and horizontal guides become vertical.
Ruler origin; intersection of rulers
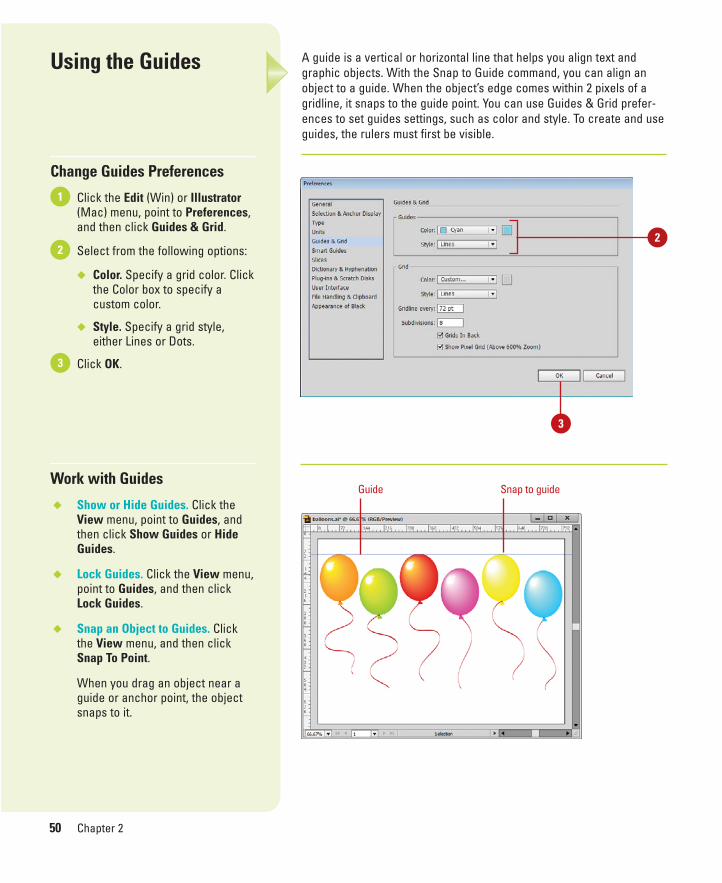
ptg8126863
50 Chapter 2
A guide is a vertical or horizontal line that helps you align text andgraphic objects. With the Snap to Guide command, you can align anobject to a guide. When the object’s edge comes within 2 pixels of agridline, it snaps to the guide point. You can use Guides & Grid prefer-ences to set guides settings, such as color and style. To create and useguides, the rulers must first be visible.
Using the Guides
Change Guides Preferences
Click the Edit (Win) or Illustrator(Mac) menu, point to Preferences,and then click Guides & Grid.
Select from the following options:
◆ Color. Specify a grid color. Clickthe Color box to specify acustom color.
◆ Style. Specify a grid style,either Lines or Dots.
Click OK.
Work with Guides
◆ Show or Hide Guides. Click theView menu, point to Guides, andthen click Show Guides or HideGuides.
◆ Lock Guides. Click the View menu,point to Guides, and then clickLock Guides.
◆ Snap an Object to Guides. Clickthe View menu, and then clickSnap To Point.
When you drag an object near aguide or anchor point, the objectsnaps to it.
3
2
1
Guide Snap to guide
2
3
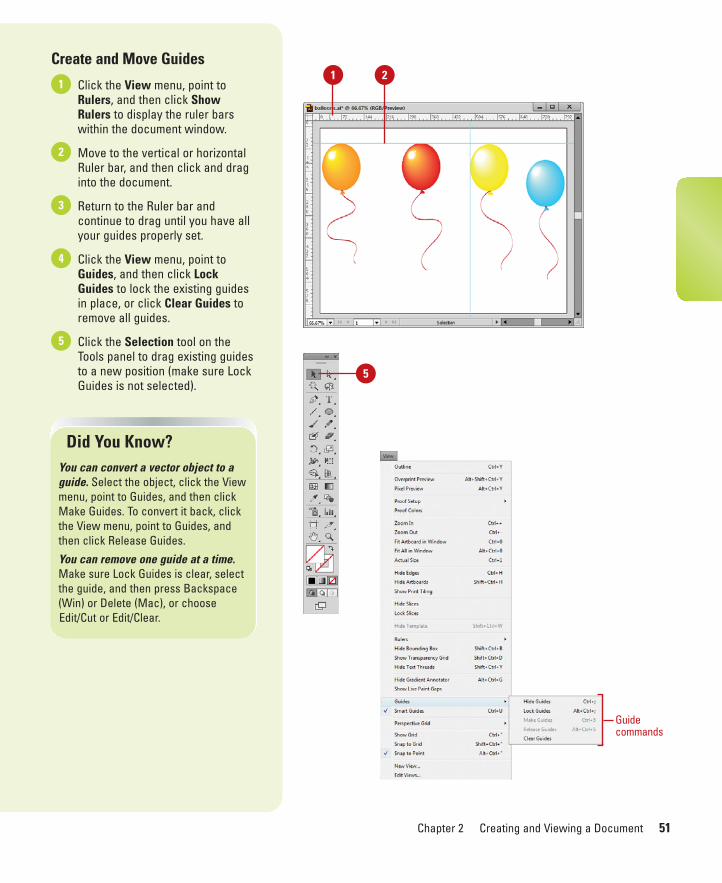
ptg8126863
Chapter 2 Creating and Viewing a Document 51
Create and Move Guides
Click the View menu, point toRulers, and then click ShowRulers to display the ruler barswithin the document window.
Move to the vertical or horizontalRuler bar, and then click and draginto the document.
Return to the Ruler bar andcontinue to drag until you have allyour guides properly set.
Click the View menu, point toGuides, and then click LockGuides to lock the existing guidesin place, or click Clear Guides toremove all guides.
Click the Selection tool on theTools panel to drag existing guidesto a new position (make sure LockGuides is not selected).
5
4
3
2
1
Did You Know?You can convert a vector object to aguide. Select the object, click the Viewmenu, point to Guides, and then clickMake Guides. To convert it back, clickthe View menu, point to Guides, andthen click Release Guides.
You can remove one guide at a time.Make sure Lock Guides is clear, selectthe guide, and then press Backspace(Win) or Delete (Mac), or chooseEdit/Cut or Edit/Clear.
21
5
Guidecommands

ptg8126863
52 Chapter 2
Using Smart Guides
Use Smart Guides
Open or create a multi-layereddocument.
To turn Smart Guides on and off,click the View menu, and thenclick Smart Guides.
TIMESAVER Press A+U(Mac) or Ctrl+U to show or hideSmart Guides.
Select the Selection or DirectSelection tool, and drag theobject.
◆ Press Ctrl (Win) or Command(Mac) to use the center point oredge of one object or artboard.
As you move the object, SmartGuides appear to help you alignthe objects.
Release the mouse and the guidesdisappear.
4
3
2
1
Illustrator gives you the ability to use Smart Guides to help alignshapes, slices, and selections as you draw. They appear automaticallyas you draw a shape or create a selection or slice, and then disappearafter the shape is drawn. They enable you to visually align one object toanother with a minimum of effort. Smart Guides also display alignmentand measurement information, such as distances between objects andangles of rotation, to make alignment even easier. Smart Guides areautomatically turned on by default. You can use Smart Guide prefer-ences to set color and information display options to customize yourSmart Guides.
3
4
Did You Know?You can snap symbol instances tosmart guides. In normal mode, you cansnap the contents of a symbolsinstance to smart guides (not to thebounding box like previous versions).Symbols instances now behave likegroups for snapping.

ptg8126863
Chapter 2 Creating and Viewing a Document 53
Change Smart GuidePreferences
Click the Edit (Win) or Illustrator(Mac) menu, point to Preferences,and then click Smart Guides.
Select from the following options:
◆ Color. Specify a guide color.
◆ Alignment Guides. Select todisplay guides along the centerand edges of objects, artboard,and bleeds.
◆ Anchor/Path Labels. Select todisplay path intersection andanchor point information.
◆ Object Highlighting. Select tohighlight objects below thepointer as you drag.
◆ Measurement Labels. Select todisplay tool or object locationinformation.
◆ Transform Tools. Select todisplay information when youscale, rotate, and shearobjects.
◆ Construction Guides. Select todisplay guides as you drawnew objects. Specify guideangles for anchor points.
◆ Snapping Tolerance. Specifyhow close the object must be(measured in number of points)before it snaps to the guide.
Click OK.3
2
1
2
3

ptg8126863
54 Chapter 2
A grid is a checkerboard display that you can use to help you align textand graphic objects. The grid appears behind your artwork, so it doesn’t get in the way. With the Snap to Grid command, you can alignan object to a grid line. When the object’s edge comes within 2 pixels ofa gridline, it snaps to the gridline point. You can use Guides & Grid pref-erences to set grid settings, such as color, style, and spacing.
Using the Grid
Change Grid Preferences
Click the Edit (Win) or Illustrator(Mac) menu, point to Preferences,and then click Guides & Grid.
Select from the following options:
◆ Color. Specify a grid color.
◆ Style. Specify a grid style, eitherLines or Dots.
◆ Gridline Every. Specify ameasurement for the interval ofgridlines (default 72 points).
◆ Subdivisions. Specify thenumber of grid subdivisions.
◆ Grids In Back. Select to displaygrids in back of your artwork.
◆ Show Pixel Grid (Above 600%Zoom). Select to display pixelgrids above 600% view.
Click OK.
Work with the Grid
◆ Show or Hide Grid. Click the Viewmenu, and then click Show Grid orHide Grid.
◆ Snap Object to Gridline. Click theView menu, and then click Snap ToGrid.
◆ If the current view is set to PixelPreview, the Snap To Gridcommand changes to Snap ToPixel.
When you drag an object near agridline, it snaps to the gridline.
3
2
1
Grid
2
3

ptg8126863
Chapter 2 Creating and Viewing a Document 55
One of those little used, but handy, tools is Illustrator's Hand tool. TheHand tool (so named because it resembles an open hand) lets youquickly move the active image within the document window withoutever using the scroll bars. For example, you've zoomed the imagebeyond the size that fits within the document window and you need tochange the visible portion of the document. It's a simple operation, buta handy one to know.
Moving Around withthe Hand Tool
Move an Element Around in the Document Window
Select the Hand tool on the Toolspanel.
Drag in the active document tomove the image.
2
1
1
2
Did You Know?You can quickly access the Hand toolwhenever you need it. Hold down theSpacebar to temporarily change to theHand tool. Drag in the active documentto the desired position, and thenrelease the Spacebar. You're instantlyreturned to the last-used tool. It’simportant to note that you cannot usethe Spacebar to access the Hand toolif you are currently using the Type tool.
You can move more quickly betweentools using Spring-loaded keys. Ratherthan go back to the Tools panel whenyou want to switch tools, just holddown the shortcut letter key for thenew tool, use the tool, and then let goof the shortcut key and you'll be backusing the first tool.

ptg8126863
56 Chapter 2
Crop marks (also known as trim marks) indicate where you want aprinter to cut the printed page. They are printed with black registrationlines so when separations are printed, the printer can align the pages.You can create and display multiple crop marks, which are also usefulfor trimming or aligning objects on an artboard or exporting them toanother program. You can create crop marks as noneditable live effectsor editable ones you can adjust and format. If you no longer need orwant crop marks, you can delete them. You can delete live effect cropmarks by selecting Crop Marks in the Appearance panel and using theDelete Selected Item button at the bottom of the panel. You can alsodelete editable crop marks by using the crop marks with the Selectiontool and pressing the Delete key. Crop marks do not replace trim markscreated with the Marks & Bleed options in the Print dialog box.
Using Crop Marks
Create and Delete Crop Marksas Live Effects Around an Object
Select one or more objects.
Click the Effect menu, and thenclick Crop Marks.
To delete crop marks, select CropMarks in the Appearance Panel,and then click the Delete SelectedItem button.
3
2
1
Did You Know?You can change the registration color.The registration color is used for cropmarks and other marks used by com-mercial printers to align printing plates.If you need to change the registrationcolor so it stands out from the colorsused in your document, you can clickthe Registration swatch in theSwatches panel, and then move theTint slider on the Color panel.
2 1Crop marks
3
Select “Crop Marks”

ptg8126863
Chapter 2 Creating and Viewing a Document 57
3 1Editable trim marksCreate and Delete Editable TrimMarks Around an Object
Select one or more objects.
Click the Object menu, and thenclick Create Trim Marks.
To adjust trim marks, select thetrim marks with the Selection toolon the Tools panel, and then dragan anchor point or segment.
To delete trim marks, select thetrim marks with the Selection toolon the Tools panel, and then pressDelete.
To change the color of trim marks,select the trim marks with theSelection tool on the Tools panel,and then change the stroke colorusing the Control, Color, or Toolspanel.
5
4
3
2
1
4
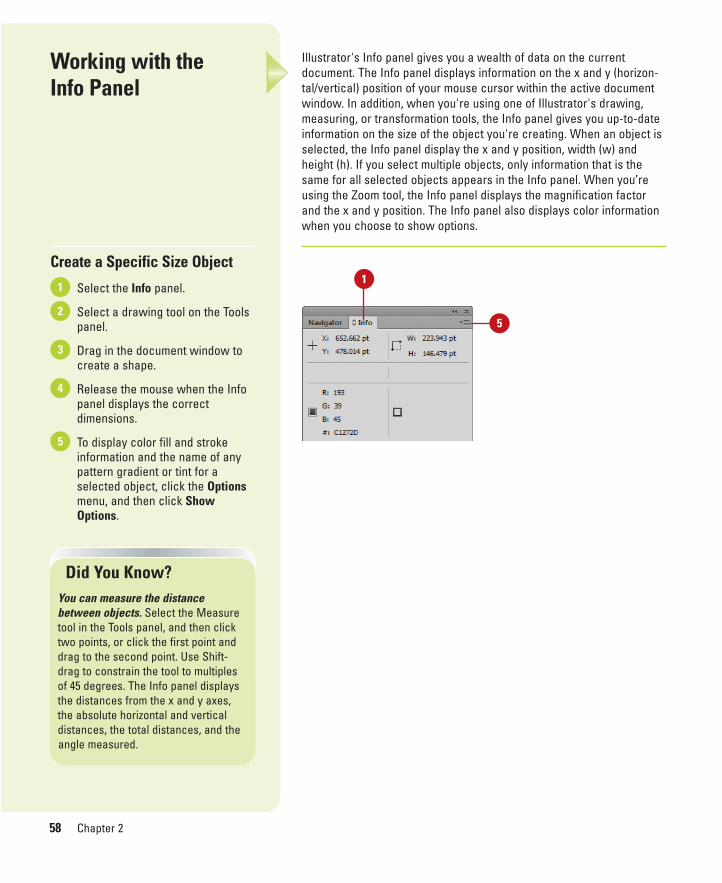
ptg8126863
58 Chapter 2
Illustrator's Info panel gives you a wealth of data on the current document. The Info panel displays information on the x and y (horizon-tal/vertical) position of your mouse cursor within the active documentwindow. In addition, when you're using one of Illustrator's drawing,measuring, or transformation tools, the Info panel gives you up-to-dateinformation on the size of the object you're creating. When an object isselected, the Info panel display the x and y position, width (w) andheight (h). If you select multiple objects, only information that is thesame for all selected objects appears in the Info panel. When you’reusing the Zoom tool, the Info panel displays the magnification factorand the x and y position. The Info panel also displays color informationwhen you choose to show options.
Working with theInfo Panel
Create a Specific Size Object
Select the Info panel.
Select a drawing tool on the Toolspanel.
Drag in the document window tocreate a shape.
Release the mouse when the Infopanel displays the correctdimensions.
To display color fill and strokeinformation and the name of anypattern gradient or tint for aselected object, click the Optionsmenu, and then click ShowOptions.
5
4
3
2
1
Did You Know?You can measure the distancebetween objects. Select the Measuretool in the Tools panel, and then clicktwo points, or click the first point anddrag to the second point. Use Shift-drag to constrain the tool to multiplesof 45 degrees. The Info panel displaysthe distances from the x and y axes,the absolute horizontal and verticaldistances, the total distances, and theangle measured.
1
5

ptg8126863
Chapter 2 Creating and Viewing a Document 59
Probably one of the greatest inventions of the computer industry is theability to Undo, and Redo. Now, if we could just figure out how to givereal life an undo feature… that would be something. Illustrator gives usthe ability to undo our past mistakes, and redo something we wishedwe had not undone.
Using Undo and Redo
Undo or Redo One Action at a Time
◆ Click the Edit menu, and then clickUndo to reverse your most recentaction, such as typing a word orformatting a paragraph.
TIMESAVER Press Ctrl+Z (Win)or A+Z (Mac) to undo.
◆ Click the Edit menu, and then clickRedo to restore the last action youreversed.
TIMESAVER Press Shift+Ctrl+Z(Win) or Shift+A+Z (Mac) to redoyour undo.
Click to Undo orRedo the previouscommand or action.

ptg8126863
60 Chapter 2
Creating and SelectingWorkspaces
Create a Workspace
Open and position the panels youwant to include in a panel set.
Click the Workspace menu on theApplication bar (the menu namedisplays the current workspace),and then click New Workspace.
◆ You can also click the Windowmenu, point to Workspace, andthen click New Workspace.
Type a name in the Name box.
Click OK.
The panel set and its location isnow saved.
Display a Workspace
Click the Workspace menu on theApplication bar (the menu namedisplays the current workspace),and then select a panel option:
◆ Custom panel name. Displays acustom panel layout that youcreated.
◆ Automation, Essentials, Layout(New!), Painting, Printing andProofing, Tracing (New!),Typography, or Web. Displayspanel layouts created by Adobefor specific uses in Illustrator.
1
4
3
2
1
As you work with Illustrator, you'll open, close, and move around win-dows and panels to meet your individual needs. After you customize theIllustrator workspace, you can save the location of windows and panelsas a workspace, which you can display by using the Workspace menuon the Application bar or the Workspaces submenu on the Windowmenu. You can create custom workspaces, or use one of the work-spaces provided by Illustrator, which are designed for space and work-flow efficiency. The built-in workspaces include Essentials, Automation,Layout (New!), Painting, Printing and Proofing, Tracing (New!),Typography, and Web. If you no longer use a custom workspace, youcan remove it at any time. You can also rename a custom workspace toimprove recognition.
3
1
Default workspaces
Custom workspace
4
2
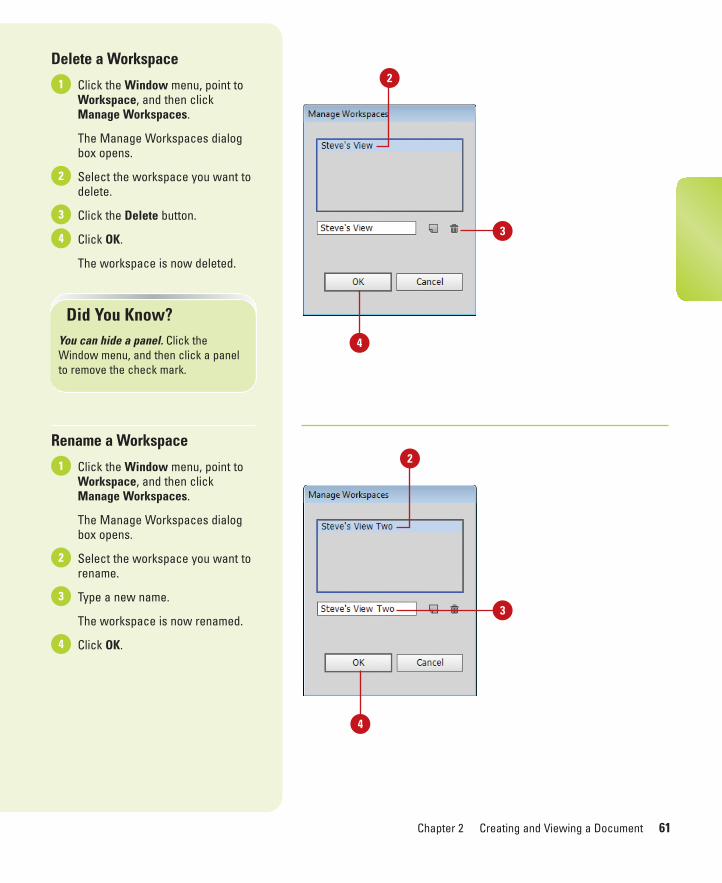
ptg8126863
Chapter 2 Creating and Viewing a Document 61
Delete a Workspace
Click the Window menu, point toWorkspace, and then clickManage Workspaces.
The Manage Workspaces dialogbox opens.
Select the workspace you want todelete.
Click the Delete button.
Click OK.
The workspace is now deleted.
Rename a Workspace
Click the Window menu, point toWorkspace, and then clickManage Workspaces.
The Manage Workspaces dialogbox opens.
Select the workspace you want torename.
Type a new name.
The workspace is now renamed.
Click OK.4
3
2
1
4
3
2
1
Did You Know?You can hide a panel. Click theWindow menu, and then click a panelto remove the check mark.
2
2
3
3
4
4

ptg8126863
This page intentionally left blank
ptg8126863
3
3What You’ll Do
63
Working with Objects
Introduction
Adobe Illustrator is an application that that provides tools youcan use to work with vector graphics, which include vectorshapes and vector objects. Vector graphics are created usingmathematical shapes, not pixels, and that's why vectorshapes are considered resolution-independent. When youdraw a vector object, you create one or more lines called apath. A path is made up of one or more curved or straight linesegments. The start and end points for a line segment isknown as an anchor point, which you can drag to change andmove.
Illustrator provides drawing tools on the Tools panel thatyou can use to create a variety of shapes, including rectan-gles, rounded rectangles, ellipses, polygons, stars, flares,lines, arcs, spirals, rectangle grids, and polar (circular) grids.After you draw an object, you can use Illustrator selectiontools to modify it. The two main selection tools are theSelection tool and the Direct Selection tool. The Selection toolallows you to select entire objects, while the Direct Selectiontool allows you to select paths and segments. In addition tothese tools, you can also use the Select menu. The Selectmenu provides a variety of powerful selection commands foryou to use in a document or artboard. For example, you canselect objects whose attributes (including Appearance,Blending Modes, Fill & Stroke, Opacity, and Stroke Color) aresimilar to the current or last selection.
After you select one or more objects, you can move,align, group, and transform them. The transformation toolsallow you to rotate, scale (resize), reflect (mirror image), orshear (slant) an object.
What You’ll Do
Understand Vector and Raster Images
Understand Paths
Select a Drawing Mode
Create Pixel Aligned Objects
Create Rectangles and Ellipses
Create Polygons and Stars
Create Line Segments
Create Arcs, Spirals, and Grids
Use the Shape Builder Tool
Create Perspective Objects
Use the Selection Tool
Use the Direct Selection Tool
Use the Lasso Tool
Use the Magic Wand Tool
Select and Group Objects
Save and Edit Selections
Move and Duplicate Objects
Align and Distribute Objects
Transform Objects
Rotate, Scale, Reflect, or Shear Objects
Apply Multiple Transformations
Reshape Objects with Envelopes
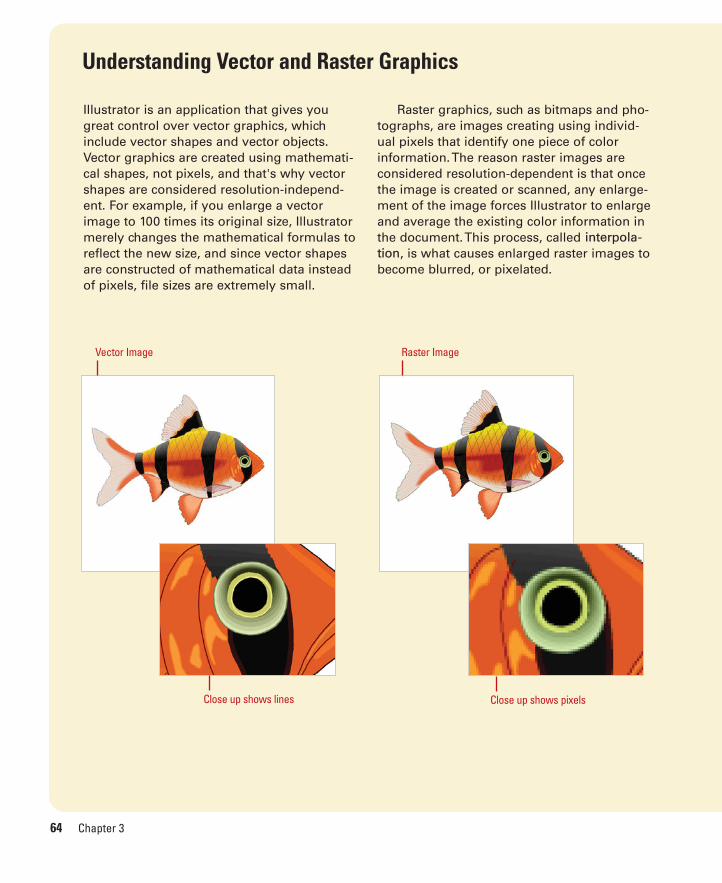
ptg8126863
64 Chapter 3
Illustrator is an application that gives yougreat control over vector graphics, whichinclude vector shapes and vector objects.Vector graphics are created using mathemati-cal shapes, not pixels, and that's why vectorshapes are considered resolution-independ-ent. For example, if you enlarge a vectorimage to 100 times its original size, Illustratormerely changes the mathematical formulas toreflect the new size, and since vector shapesare constructed of mathematical data insteadof pixels, file sizes are extremely small.
Raster graphics, such as bitmaps and pho-tographs, are images creating using individ-ual pixels that identify one piece of colorinformation. The reason raster images areconsidered resolution-dependent is that oncethe image is created or scanned, any enlarge-ment of the image forces Illustrator to enlargeand average the existing color information inthe document. This process, called interpola-tion, is what causes enlarged raster images tobecome blurred, or pixelated.
Understanding Vector and Raster Graphics
Raster ImageVector Image
Close up shows lines Close up shows pixels
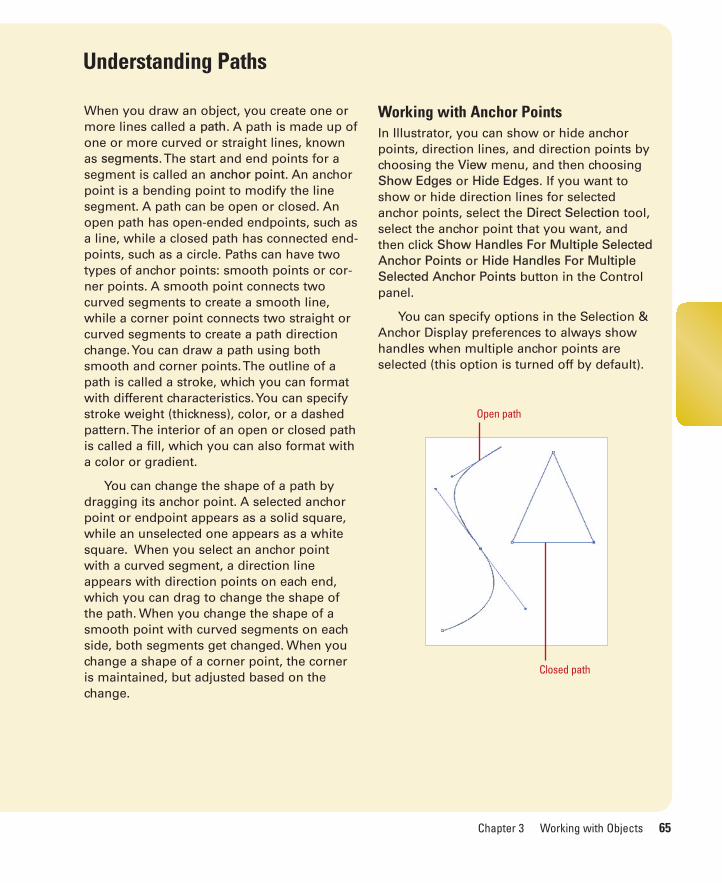
ptg8126863
Chapter 3 Working with Objects 65
When you draw an object, you create one ormore lines called a path. A path is made up ofone or more curved or straight lines, knownas segments. The start and end points for asegment is called an anchor point. An anchorpoint is a bending point to modify the linesegment. A path can be open or closed. Anopen path has open-ended endpoints, such asa line, while a closed path has connected end-points, such as a circle. Paths can have twotypes of anchor points: smooth points or cor-ner points. A smooth point connects twocurved segments to create a smooth line,while a corner point connects two straight orcurved segments to create a path directionchange. You can draw a path using bothsmooth and corner points. The outline of apath is called a stroke, which you can formatwith different characteristics. You can specifystroke weight (thickness), color, or a dashedpattern. The interior of an open or closed pathis called a fill, which you can also format witha color or gradient.
You can change the shape of a path bydragging its anchor point. A selected anchorpoint or endpoint appears as a solid square,while an unselected one appears as a whitesquare. When you select an anchor pointwith a curved segment, a direction lineappears with direction points on each end,which you can drag to change the shape ofthe path. When you change the shape of asmooth point with curved segments on eachside, both segments get changed. When youchange a shape of a corner point, the corneris maintained, but adjusted based on thechange.
Working with Anchor PointsIn Illustrator, you can show or hide anchorpoints, direction lines, and direction points bychoosing the View menu, and then choosingShow Edges or Hide Edges. If you want toshow or hide direction lines for selectedanchor points, select the Direct Selection tool,select the anchor point that you want, andthen click Show Handles For Multiple SelectedAnchor Points or Hide Handles For MultipleSelected Anchor Points button in the Controlpanel.
You can specify options in the Selection &Anchor Display preferences to always showhandles when multiple anchor points areselected (this option is turned off by default).
Understanding Paths
Closed path
Open path
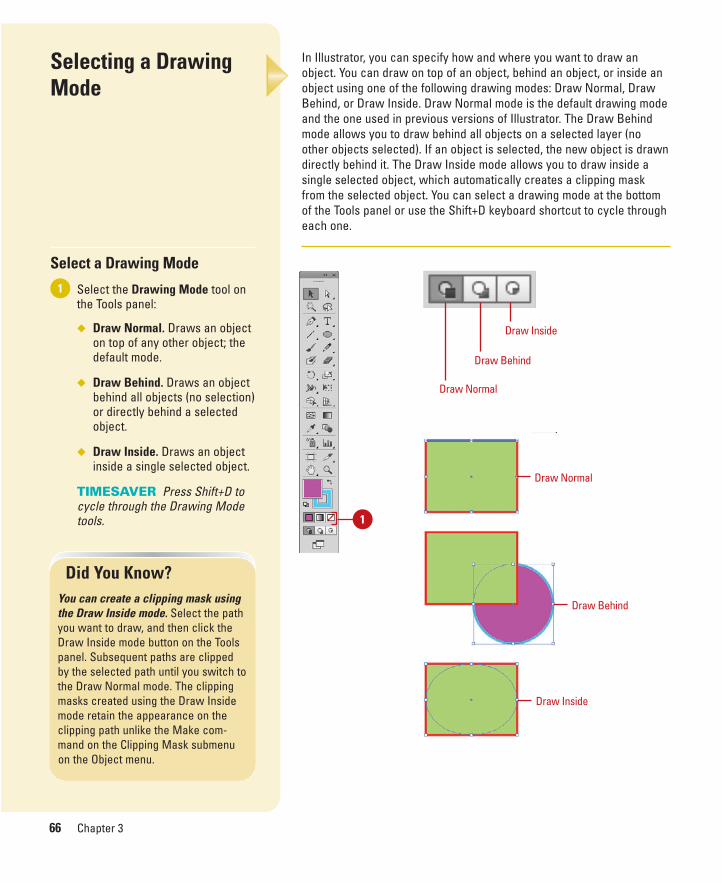
ptg8126863
66 Chapter 3
Selecting a DrawingMode
Select a Drawing Mode
Select the Drawing Mode tool onthe Tools panel:
◆ Draw Normal. Draws an objecton top of any other object; thedefault mode.
◆ Draw Behind. Draws an objectbehind all objects (no selection)or directly behind a selectedobject.
◆ Draw Inside. Draws an objectinside a single selected object.
TIMESAVER Press Shift+D tocycle through the Drawing Modetools.
1
In Illustrator, you can specify how and where you want to draw anobject. You can draw on top of an object, behind an object, or inside anobject using one of the following drawing modes: Draw Normal, DrawBehind, or Draw Inside. Draw Normal mode is the default drawing modeand the one used in previous versions of Illustrator. The Draw Behindmode allows you to draw behind all objects on a selected layer (noother objects selected). If an object is selected, the new object is drawndirectly behind it. The Draw Inside mode allows you to draw inside asingle selected object, which automatically creates a clipping maskfrom the selected object. You can select a drawing mode at the bottomof the Tools panel or use the Shift+D keyboard shortcut to cycle througheach one.
Did You Know?You can create a clipping mask usingthe Draw Inside mode. Select the pathyou want to draw, and then click theDraw Inside mode button on the Toolspanel. Subsequent paths are clippedby the selected path until you switch tothe Draw Normal mode. The clippingmasks created using the Draw Insidemode retain the appearance on theclipping path unlike the Make com-mand on the Clipping Mask submenuon the Object menu.
1
Draw Inside
Draw Behind
Draw Normal
Draw Normal
Draw Behind
Draw Inside
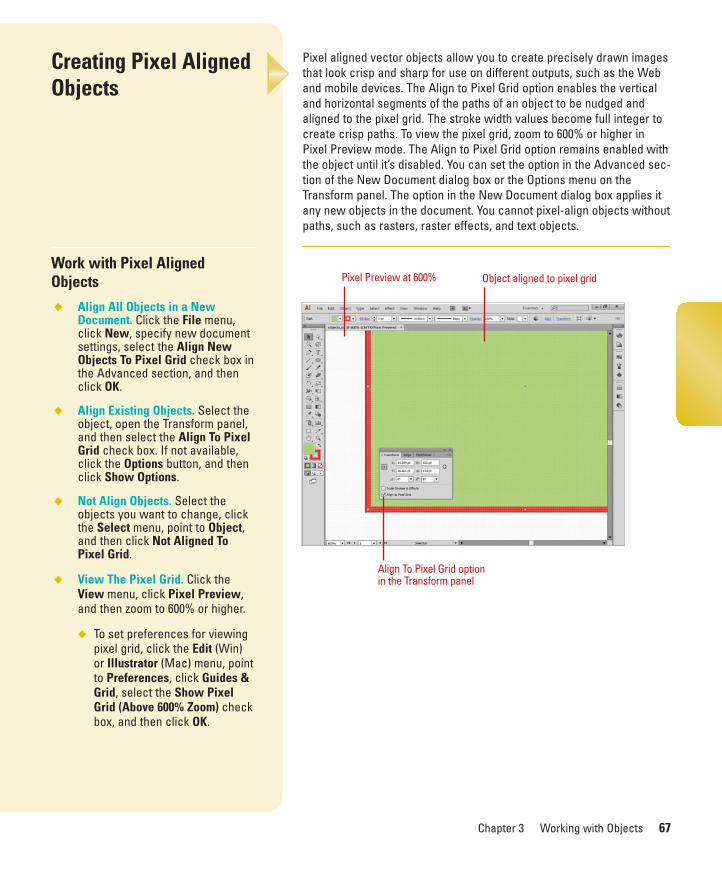
ptg8126863
Chapter 3 Working with Objects 67
Creating Pixel AlignedObjects
Work with Pixel AlignedObjects◆ Align All Objects in a New
Document. Click the File menu,click New, specify new documentsettings, select the Align NewObjects To Pixel Grid check box inthe Advanced section, and thenclick OK.
◆ Align Existing Objects. Select theobject, open the Transform panel,and then select the Align To PixelGrid check box. If not available,click the Options button, and thenclick Show Options.
◆ Not Align Objects. Select theobjects you want to change, clickthe Select menu, point to Object,and then click Not Aligned ToPixel Grid.
◆ View The Pixel Grid. Click theView menu, click Pixel Preview,and then zoom to 600% or higher.
◆ To set preferences for viewingpixel grid, click the Edit (Win)or Illustrator (Mac) menu, pointto Preferences, click Guides &Grid, select the Show PixelGrid (Above 600% Zoom) checkbox, and then click OK.
Pixel aligned vector objects allow you to create precisely drawn imagesthat look crisp and sharp for use on different outputs, such as the Weband mobile devices. The Align to Pixel Grid option enables the verticaland horizontal segments of the paths of an object to be nudged andaligned to the pixel grid. The stroke width values become full integer tocreate crisp paths. To view the pixel grid, zoom to 600% or higher inPixel Preview mode. The Align to Pixel Grid option remains enabled withthe object until it’s disabled. You can set the option in the Advanced sec-tion of the New Document dialog box or the Options menu on theTransform panel. The option in the New Document dialog box applies itany new objects in the document. You cannot pixel-align objects withoutpaths, such as rasters, raster effects, and text objects.
Align To Pixel Grid optionin the Transform panel
Pixel Preview at 600% Object aligned to pixel grid
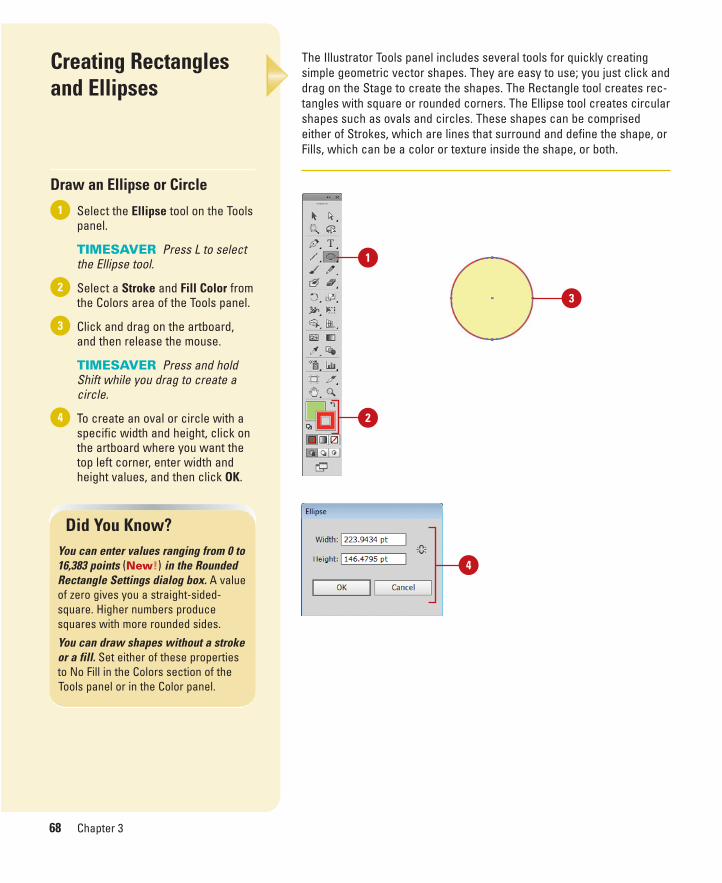
ptg8126863
68 Chapter 3
Creating Rectanglesand Ellipses
Draw an Ellipse or Circle
Select the Ellipse tool on the Toolspanel.
TIMESAVER Press L to selectthe Ellipse tool.
Select a Stroke and Fill Color fromthe Colors area of the Tools panel.
Click and drag on the artboard,and then release the mouse.
TIMESAVER Press and holdShift while you drag to create acircle.
To create an oval or circle with aspecific width and height, click onthe artboard where you want thetop left corner, enter width andheight values, and then click OK.
4
3
2
1
The Illustrator Tools panel includes several tools for quickly creatingsimple geometric vector shapes. They are easy to use; you just click anddrag on the Stage to create the shapes. The Rectangle tool creates rec-tangles with square or rounded corners. The Ellipse tool creates circularshapes such as ovals and circles. These shapes can be comprisedeither of Strokes, which are lines that surround and define the shape, orFills, which can be a color or texture inside the shape, or both.
Did You Know?You can enter values ranging from 0 to16,383 points (New!) in the RoundedRectangle Settings dialog box. A valueof zero gives you a straight-sided-square. Higher numbers producesquares with more rounded sides.
You can draw shapes without a strokeor a fill. Set either of these propertiesto No Fill in the Colors section of theTools panel or in the Color panel.
1
2
3
4

ptg8126863
Chapter 3 Working with Objects 69
Draw a Rectangle or RoundedRectangle
Click the Rectangle or RoundedRectangle tool on the Tools panel.
TIMESAVER Press M to selectthe Rectangle tool.
Select a Stroke and Fill color fromthe Colors area of the Tools panel.
Click and drag on the artboard,and then release the mouse.
TIMESAVER Press and holdShift while you drag to create asquare.
To create a square, rectangle, orrounded rectangle with a specificwidth and height, click on theartboard where you want the topleft corner, enter width and heightvalues, and then click OK.
4
3
2
1
Did You Know?You can change the corner radius for arounded rectangle. While you drag arounded rectangle, press the Up Arrowor Down Arrow key. To create squarecorners, press the Left Arrow key. Tocreate corners with maximum round-ness, press the Right Arrow key.
You can draw shapes with no strokeor fill. If you want to draw an oval or arectangle without a stroke or fill, youcan set either of these options to NoFill in the Colors area of the Tools panelor in the Color panel.
You can create a flare shape using theFlare tool. Select the Flare tool on theTools panel, click and drag on the art-board, and then release the mouse.
2
1
3
4
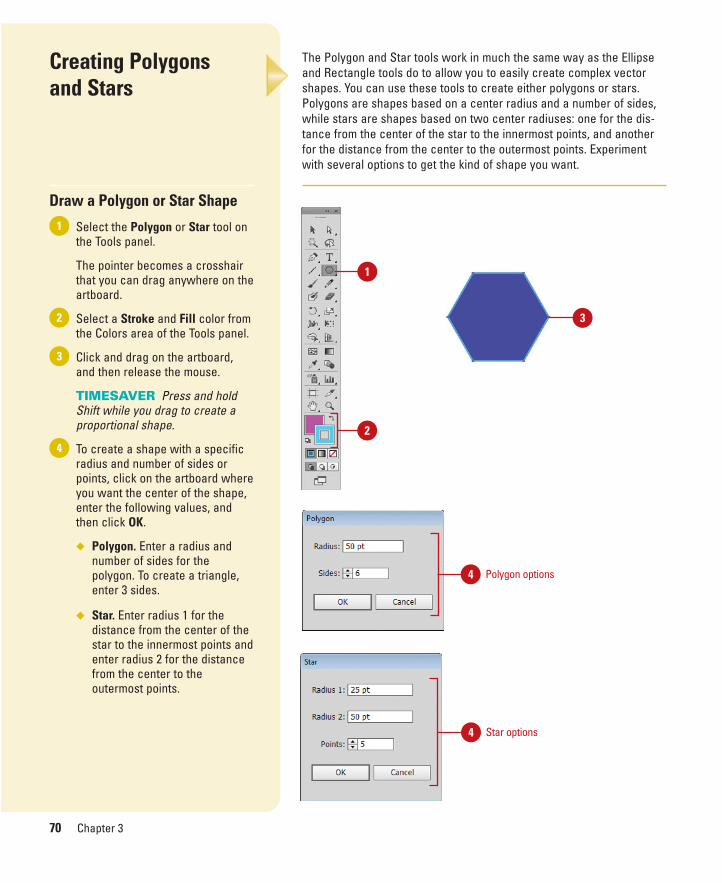
ptg8126863
70 Chapter 3
Creating Polygons and Stars
Draw a Polygon or Star Shape
Select the Polygon or Star tool onthe Tools panel.
The pointer becomes a crosshairthat you can drag anywhere on theartboard.
Select a Stroke and Fill color fromthe Colors area of the Tools panel.
Click and drag on the artboard,and then release the mouse.
TIMESAVER Press and holdShift while you drag to create aproportional shape.
To create a shape with a specificradius and number of sides orpoints, click on the artboard whereyou want the center of the shape,enter the following values, andthen click OK.
◆ Polygon. Enter a radius andnumber of sides for thepolygon. To create a triangle,enter 3 sides.
◆ Star. Enter radius 1 for thedistance from the center of thestar to the innermost points andenter radius 2 for the distancefrom the center to theoutermost points.
4
3
2
1
The Polygon and Star tools work in much the same way as the Ellipseand Rectangle tools do to allow you to easily create complex vectorshapes. You can use these tools to create either polygons or stars.Polygons are shapes based on a center radius and a number of sides,while stars are shapes based on two center radiuses: one for the dis-tance from the center of the star to the innermost points, and anotherfor the distance from the center to the outermost points. Experimentwith several options to get the kind of shape you want.
1
2
3
Polygon options4
Star options4

ptg8126863
Chapter 3 Working with Objects 71
Creating LineSegments
Draw a Line Segment
Click the Line Segment tool on theTools panel.
The pointer becomes a crosshairthat you can drag on the artboard.
TIMESAVER Press \ to selectthe Line tool.
Select a Stroke color from theColors area of the Tools panel.
Click and drag on the artboard,and then release the mouse whenthe line is the length you need.
TIMESAVER Hold down theShift key, and then drag to draw a45, 90, or 180 degree line.
To create a line with a specificlength and angle, click on theartboard where you want the lineto begin, enter length and anglevalues, select the Fill Line checkbox to fill the line with the currentfill color, and then click OK.
4
3
2
1
The Line Segment tool draws perfectly straight lines in any directionyou drag your mouse. In Illustrator, a line is called a stroke and there isa variety of thicknesses, styles, colors, and fills that can be applied to it.You can also create your own line style for specific types of dashed,dotted, or artistic lines. You can constrain the path a line draws to 45-degree angles or create closed shapes by intersecting the lines youdraw.
2
1
3
4

ptg8126863
72 Chapter 3
Creating Arcs andSpirals
Draw an Arc
Click the Arc tool on the Toolspanel.
The pointer becomes a crosshairthat you can drag on the artboard.
Select a Stroke color from theColors area of the Tools panel.
Click and drag on the artboard,and then release the mouse whenthe arc is the length you need.
To create an arc with specificsettings, click on the artboardwhere you want the arc to begin,enter x and y lengths, specify type(open or closed), arc direction(Base Along) and slope options,select the Fill Arc check box to fillthe arc with the current fill color,and then click OK.
4
3
2
1
The Arc and Spiral tools make it easy to create unique and interestingshapes. These tools draw curved lines to create an individual arc or aSpiral wind. An arc consists of an x and y axis length, open or closedpath, arc direction (known as the Base Along), arc slope, and arc fill(optional). A Spiral consists of a radius from the center to the outermostpoint in the Spiral, decay (the amount each wind decreases), number ofsegments for the spiral, and Spiral style. Each full wind of a Spiral con-sists of four segments.
2
1
3
4
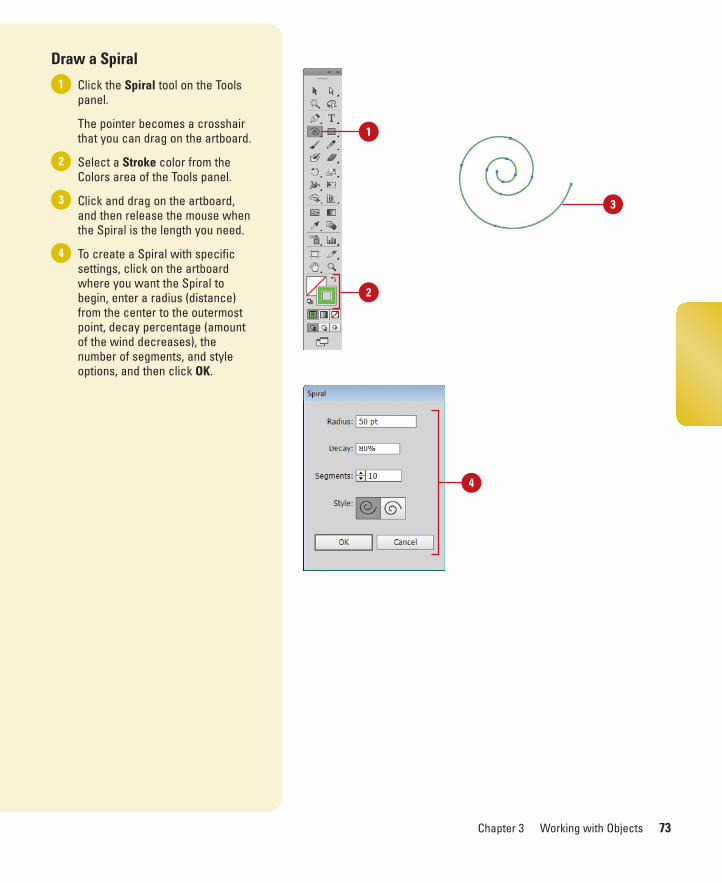
ptg8126863
Chapter 3 Working with Objects 73
Draw a Spiral
Click the Spiral tool on the Toolspanel.
The pointer becomes a crosshairthat you can drag on the artboard.
Select a Stroke color from theColors area of the Tools panel.
Click and drag on the artboard,and then release the mouse whenthe Spiral is the length you need.
To create a Spiral with specificsettings, click on the artboardwhere you want the Spiral tobegin, enter a radius (distance)from the center to the outermostpoint, decay percentage (amountof the wind decreases), thenumber of segments, and styleoptions, and then click OK.
4
3
2
1
2
1
3
4

ptg8126863
74 Chapter 3
Creating Grids
Draw Rectangle Grids
Click the Rectangle Grid tool onthe Tools panel.
The pointer becomes a crosshairthat you can drag on the artboard.
Select a Stroke color from theColors area of the Tools panel.
Click and drag on the artboard,and then release the mouse whenthe grid is the size you need.
To create a grid with specificsettings, click on the artboardwhere you want the grid referencepoint, enter a width and height forthe grid, specify the number ofhorizontal and vertical dividers,select the Use Outside RectangleAs Frame check box to replaceindividual segments with aseparate rectangle object, selectthe Fill Grid check box to fill thegrid with the current fill color, andthen click OK.
4
3
2
1
The grid tools on the Tools panel allow you to create a rectangular orcircular polar grid. The Rectangular Grid tool creates rectangular gridsof a specified size and number of horizontal and vertical dividers. ThePolar Grid tool creates concentric circles of a specified size and spe-cific number of concentric and radial dividers.
2
1
3
4
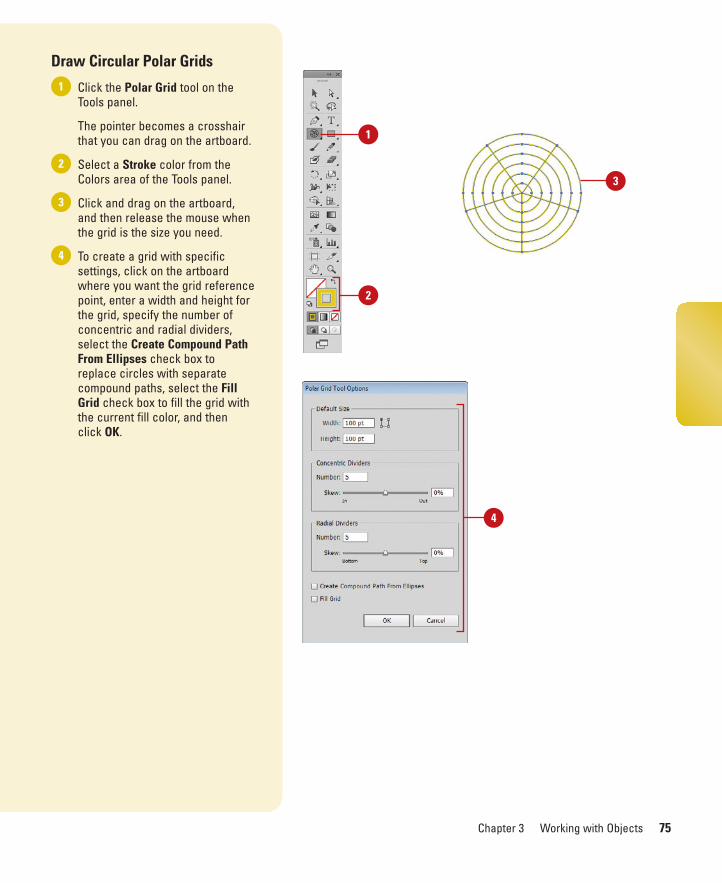
ptg8126863
Chapter 3 Working with Objects 75
Draw Circular Polar Grids
Click the Polar Grid tool on theTools panel.
The pointer becomes a crosshairthat you can drag on the artboard.
Select a Stroke color from theColors area of the Tools panel.
Click and drag on the artboard,and then release the mouse whenthe grid is the size you need.
To create a grid with specificsettings, click on the artboardwhere you want the grid referencepoint, enter a width and height forthe grid, specify the number ofconcentric and radial dividers,select the Create Compound PathFrom Ellipses check box toreplace circles with separatecompound paths, select the FillGrid check box to fill the grid withthe current fill color, and then click OK.
4
3
2
1
2
1
3
4
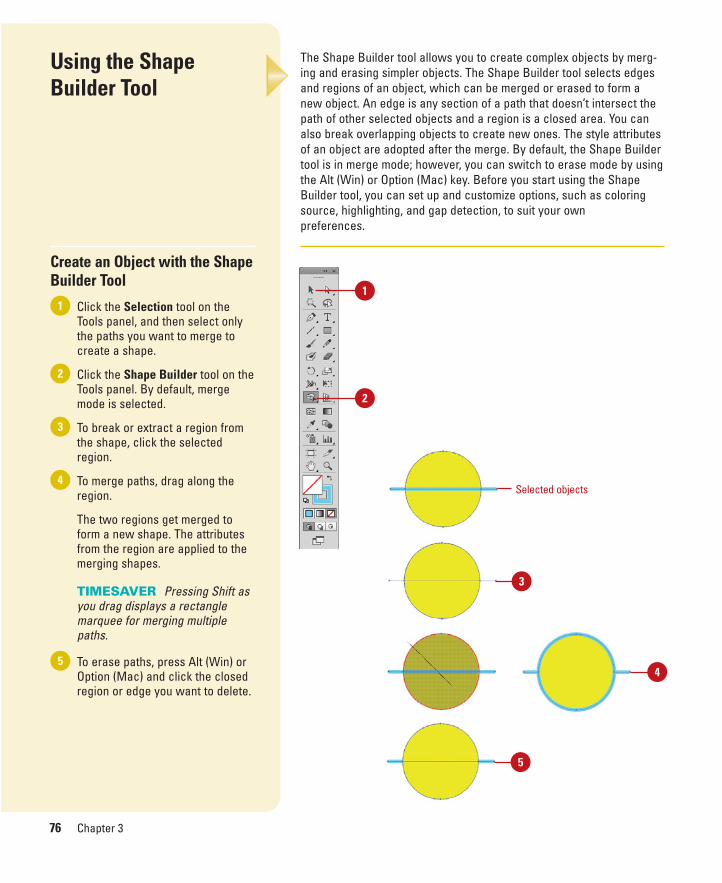
ptg8126863
76 Chapter 3
Using the ShapeBuilder Tool
Create an Object with the ShapeBuilder Tool
Click the Selection tool on theTools panel, and then select onlythe paths you want to merge tocreate a shape.
Click the Shape Builder tool on theTools panel. By default, mergemode is selected.
To break or extract a region fromthe shape, click the selectedregion.
To merge paths, drag along theregion.
The two regions get merged toform a new shape. The attributesfrom the region are applied to themerging shapes.
TIMESAVER Pressing Shift asyou drag displays a rectanglemarquee for merging multiplepaths.
To erase paths, press Alt (Win) orOption (Mac) and click the closedregion or edge you want to delete.
5
4
3
2
1
The Shape Builder tool allows you to create complex objects by merg-ing and erasing simpler objects. The Shape Builder tool selects edgesand regions of an object, which can be merged or erased to form anew object. An edge is any section of a path that doesn’t intersect thepath of other selected objects and a region is a closed area. You canalso break overlapping objects to create new ones. The style attributesof an object are adopted after the merge. By default, the Shape Buildertool is in merge mode; however, you can switch to erase mode by usingthe Alt (Win) or Option (Mac) key. Before you start using the ShapeBuilder tool, you can set up and customize options, such as coloringsource, highlighting, and gap detection, to suit your own preferences.
2
1
3
4
5
Selected objects
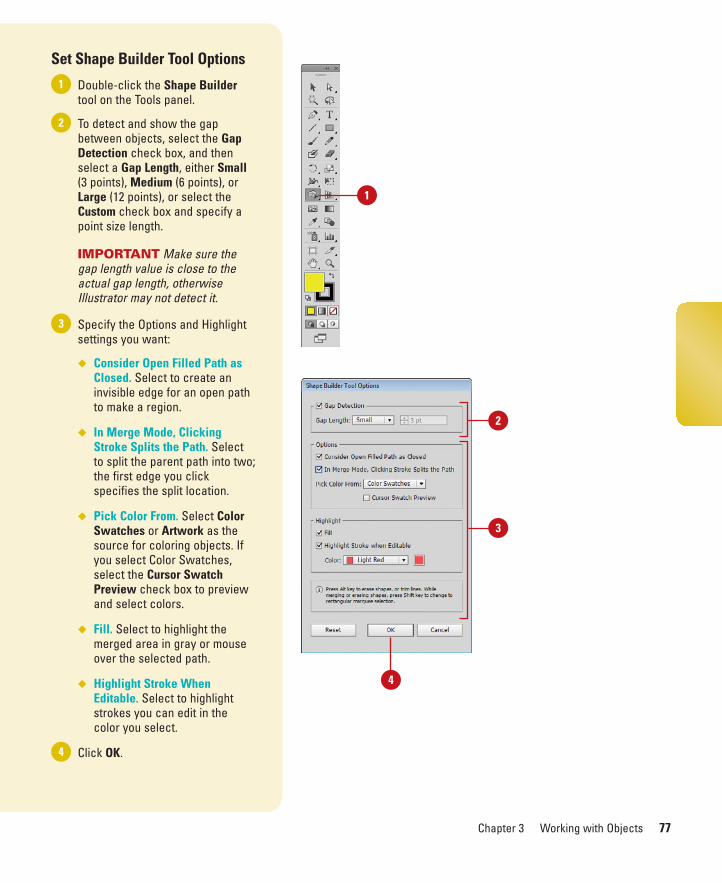
ptg8126863
Chapter 3 Working with Objects 77
Set Shape Builder Tool Options
Double-click the Shape Buildertool on the Tools panel.
To detect and show the gapbetween objects, select the GapDetection check box, and thenselect a Gap Length, either Small(3 points), Medium (6 points), orLarge (12 points), or select theCustom check box and specify apoint size length.
IMPORTANT Make sure thegap length value is close to theactual gap length, otherwiseIllustrator may not detect it.
Specify the Options and Highlightsettings you want:
◆ Consider Open Filled Path asClosed. Select to create aninvisible edge for an open pathto make a region.
◆ In Merge Mode, ClickingStroke Splits the Path. Selectto split the parent path into two;the first edge you clickspecifies the split location.
◆ Pick Color From. Select ColorSwatches or Artwork as thesource for coloring objects. Ifyou select Color Swatches,select the Cursor SwatchPreview check box to previewand select colors.
◆ Fill. Select to highlight themerged area in gray or mouseover the selected path.
◆ Highlight Stroke WhenEditable. Select to highlightstrokes you can edit in thecolor you select.
Click OK.4
3
2
1
1
3
4
2
ptg8126863
78 Chapter 3
Creating PerspectiveObjects
Draw Perspective Objects
Click the Perspective Grid tool onthe Tools panel.
◆ If the grid doesn’t appear, clickthe View menu, point toPerspective Grid, and thenclick Show Grid.
To select a perspective gridpreset, click the View menu, pointto Perspective Grid, point to aPoint Perspective (One, Two, orThree), and then select a preset.
To draw objects on the grid, doany of the following:
◆ Draw Perspective Objects.Select a Line tool (other thanthe Flare tool) or Rectangletool, and then drag to draw it.
◆ Attach Normal Objects. Selectthe plane to which you want touse, select the normal object,click the Object menu, point toPerspective, and then clickAttach to Active Plane.
◆ Release Perspective Objects.Select the attached object,click the Object menu, point toPerspective, and then clickRelease with Perspective.
◆ Move Plane to Match Objects.Select the existing object, clickthe Object menu, point toPerspective, and then clickMove Plane To Match Object.
3
2
1
The Perspective Grid tool allows you to display a perspective grid thatyou can use to draw shapes and create scenes with 1, 2, or 3-pointperspective. For example, you can create a row of trees down a streetto create perspective. The perspective grid provides presets with a 1, 2,or 3-point perspective to help you get started. You can change theviewing angle and distance along with widgets to control vanishingpoints, horizon height, ground level, and the origin. You can drawobjects directly on the perspective grid or attach existing ones to it. Ifyou want to match the depth or height of an existing perspectiveobject, you can use the Move Plane To Match Object command toadjust the grid, so you can draw or adjust another object to it.
21
3 Drawn perspective object
ptg8126863
Chapter 3 Working with Objects 79
Adjust the Perspective Grid
Click the Perspective Grid tool onthe Tools panel.
◆ If the grid doesn’t appear, clickthe View menu, point toPerspective Grid, and then clickShow Grid.
To select the active grid plane, clicka plane in the cube (Right, Left, orHorizontal) in the Plane SwitchingWidget. Click the area outside thecube to select no plane.
To adjust the perspective grid, dragthe left or right controls on the gridfor any of the following:
◆ Ground Level. Moves theperspective grid.
◆ Vanishing Points. Adjusts theperspective in or out.
◆ Horizon Height. Adjusts thehorizon line up or down.
◆ Extend the Grid. Extends orshortens the perspective grid.
◆ Grid Plane Controls. Adjust theRight, Horizontal, or Left.
◆ Grid Cell Size. Increases ordecreases the grid cell size.
◆ Origin. Adjusts the X and Ycoordinates of the grid plane.
To set perspective grid relatedoptions, click the View menu, pointto Perspective Grid, and then clickany of the following:
◆ Show/Hide Rulers. Shows orhides the ruler on the height line.
◆ Snap to Grid. Snaps an object toa perspective gridlines.
◆ Unlock/Lock Grid. Unlocks orlocks the perspective grid.
◆ Lock Station Point. Locks thestation point in place. When youmove one vanishing point, theother one moves in sync.
4
3
2
1
1 point perspective 2 point perspective
3 point perspective
21
Ground Level
Horizon Height
Vanishing Point
Grid Cell Size
Origin
Grid Plane Controls
Vertical Grid Extent
Vanishing Point
Extent of GridExtent of Grid
Horizon Level
Ground Level

ptg8126863
80 Chapter 3
Working withPerspective Objects
Modify Perspective Objects
Click the View menu, point toPerspective Grid, and then clickShow Grid.
Click the Perspective Selectiontool on the Tools panel.
To work with perspective objectson the grid, do any of the following:
◆ Move Perspective Objects.Select the object, and then dragit to another position or use theArrow keys. Press tilde (~) toconstrain the move to parallel.
◆ Move or Copy PerspectiveObjects and Grid Plane.Double-click a grid planecontrol, click the Move AllObjects or Copy All Objectsoption, click OK, and then dragthe grid plane control.
◆ Copy Perspective Objects.Select the object, and thenOption+drag (Mac) or Alt+drag(Win) it to another position.
◆ Resize Perspective Objects.Select the object, and then draga resize handle.
◆ Add Normal Objects. Select theactive plane, and then drag thenormal object to the plane.
◆ Add Text and Symbols. Selectan existing normal text orsymbol, and then drag it on theactive plane. To modify the textand symbols, use the Edit Text,Edit Perspective, and IsolateSelected Object buttons on theControl panel.
3
2
1
The Perspective Selection tool allows you to select, move, scale, copy,and transform objects in perspective. You can also add normal objects,text, and symbols to the perspective grid. When you move or change anormal object to the perspective grid, its appearance and scale changeto adhere to the grid. You can select perspective objects in the grid withthe Perspective Selection tool by clicking individual objects or dragginga selection marquee, just like normal objects.
Three perspective objects on the grid;they were moved, copied and resized.
3
2
ptg8126863
Chapter 3 Working with Objects 81
Customizing aPerspective Grid
Set Perspective Grid Options
Double-click the Perspective Gridtool on the Tools panel.
Select the Show Active PlaneWidget check box to display it.
Click the Widget Position listarrow, and then select a position.
Select the Anchor Point OfPerspective Artwork or theIntersection Of Gridlines checkboxes to specify the points whereyou want to temporarily hide theactive plane with the Shift key.
Click OK.
Create a Perspective Grid Preset
Click the View menu, point toPerspective Grid, and then clickDefine Grid to create a grid (steps3 thru 6) or manually create one.
Click the View menu, point toPerspective Grid, and then clickSave Grid As Preset.
Type a name for the preset.
Specify the perspective gridsettings you want.
Specify the grid color & opacitysettings you want.
Click OK.
To edit a grid preset, click the Editmenu, click Perspective GridPresets, select a preset, click Edit,make changes, and then click OK.
7
6
5
4
3
2
1
5
4
3
2
1
If you create your own perspective grid, you save it as a preset for uselater. You can create a perspective grid by using the Define Grid com-mand to set exacting measurements and options or by manually adjust-ing an existing grid, and then saving it as a preset, which you can editat any time. When you create or work with an existing perspective grid,you can set grid options to show or hide the active plane widget,change the widget position, and specify which points you want to useto temporarily hide the active plane with the Shift key.
5
4
5
2
4
3
3
6
ptg8126863
82 Chapter 3
When you create vector graphics in Illustrator,they are comprised of distinct segments thatcan be selected separately or as a whole witha variety of selection tools. The type of editingyou need to perform determines which toolyou use. For example, a simple rectangle iscomprised of four line segments that sur-round the contour of the shape and one fill inthe center. Each of these parts can be selectedas a group with the Selection tool or individu-ally with the Direct Selection tool. To select anobject using the fill, you need to deselect theObject Selection by Path Only check box inSelection & Anchor Display preferences. If anobject is behind another object, you can usethe keyboard shortcut A+click (Mac) orCtrl+click (Win) to select it. The pointerchanges to an arrow with a small caret on thefirst A/Ctrl+click; as you continue to click, theselection moves through the objects underthe pointer. To use this option, you need toselect the Control (Win) or Command (Mac)Click to Select Objects Behind check box inSelection & Anchor Display preferences.
In addition to the Selection and DirectSelection tools, you can also use the GroupSelection tool to select all the anchor pointson a single path. With the Group Selectiontool, click to select an object, click twice toselect the object’s group, and click three timesto select the group within the group (if avail-able). The Group Selection tool is useful forworking with multiple objects. If you want towork with an individual object without affect-ing other objects, it’s better to use IsolationMode.
The Lasso tool is a classic selection toolthat allows you to select path points and seg-ments by dragging a freeform marqueearound them.
The Magic Wand tool allows you to selectobjects of the same or a similar fill color,stroke color, stroke weight, opacity, or blend-ing mode.
Understanding Selections
Selection preferencesSelection tool
Lasso tool
Direct Selection tool
MagicWand
tool Group Selection tool
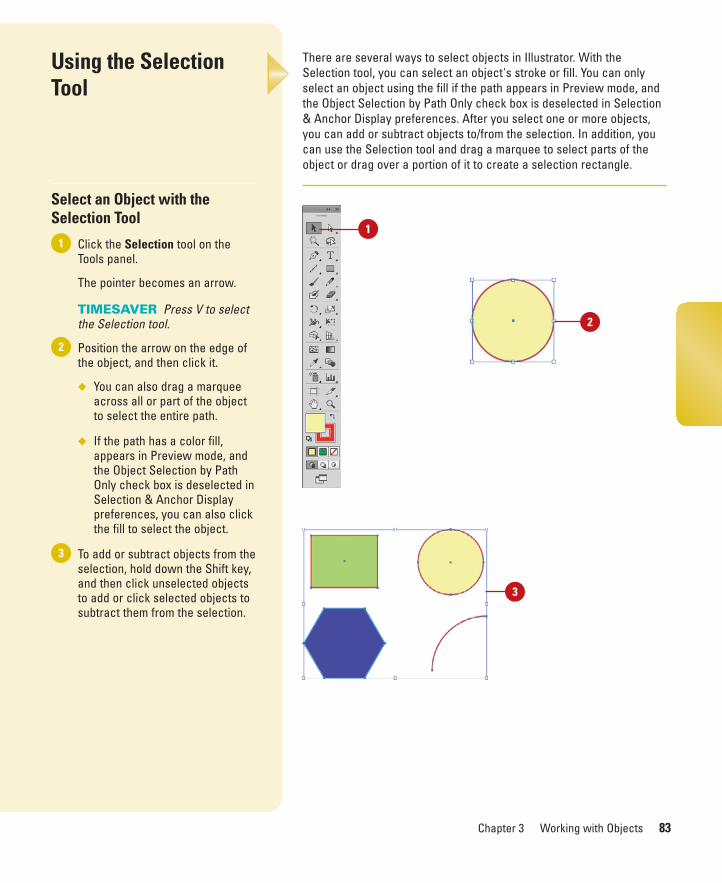
ptg8126863
Chapter 3 Working with Objects 83
Using the Selection Tool
Select an Object with theSelection Tool
Click the Selection tool on theTools panel.
The pointer becomes an arrow.
TIMESAVER Press V to selectthe Selection tool.
Position the arrow on the edge ofthe object, and then click it.
◆ You can also drag a marqueeacross all or part of the objectto select the entire path.
◆ If the path has a color fill,appears in Preview mode, andthe Object Selection by PathOnly check box is deselected inSelection & Anchor Displaypreferences, you can also clickthe fill to select the object.
To add or subtract objects from theselection, hold down the Shift key,and then click unselected objectsto add or click selected objects tosubtract them from the selection.
3
2
1
There are several ways to select objects in Illustrator. With theSelection tool, you can select an object's stroke or fill. You can onlyselect an object using the fill if the path appears in Preview mode, andthe Object Selection by Path Only check box is deselected in Selection& Anchor Display preferences. After you select one or more objects,you can add or subtract objects to/from the selection. In addition, youcan use the Selection tool and drag a marquee to select parts of theobject or drag over a portion of it to create a selection rectangle.
1
2
3
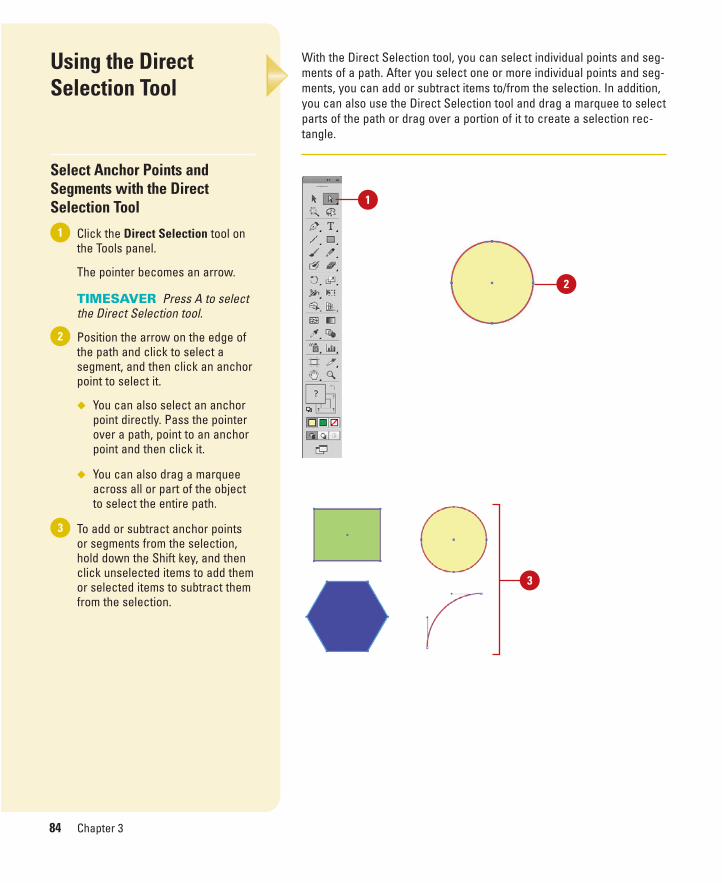
ptg8126863
84 Chapter 3
Using the DirectSelection Tool
Select Anchor Points andSegments with the DirectSelection Tool
Click the Direct Selection tool onthe Tools panel.
The pointer becomes an arrow.
TIMESAVER Press A to selectthe Direct Selection tool.
Position the arrow on the edge ofthe path and click to select asegment, and then click an anchorpoint to select it.
◆ You can also select an anchorpoint directly. Pass the pointerover a path, point to an anchorpoint and then click it.
◆ You can also drag a marqueeacross all or part of the objectto select the entire path.
To add or subtract anchor pointsor segments from the selection,hold down the Shift key, and thenclick unselected items to add themor selected items to subtract themfrom the selection.
3
2
1
With the Direct Selection tool, you can select individual points and seg-ments of a path. After you select one or more individual points and seg-ments, you can add or subtract items to/from the selection. In addition,you can also use the Direct Selection tool and drag a marquee to selectparts of the path or drag over a portion of it to create a selection rec-tangle.
1
2
3
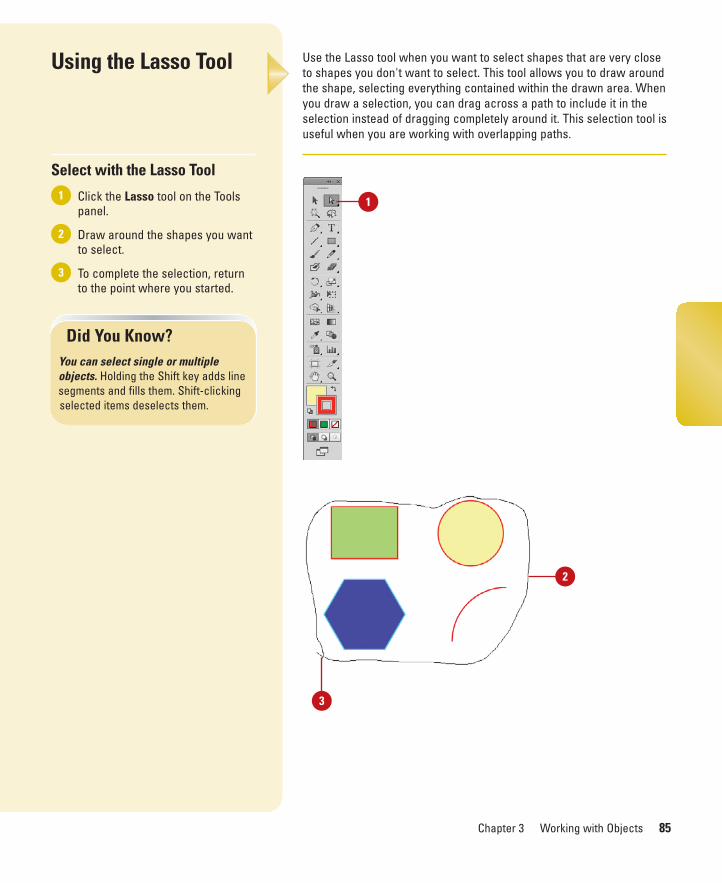
ptg8126863
Chapter 3 Working with Objects 85
Using the Lasso Tool
Select with the Lasso Tool
Click the Lasso tool on the Toolspanel.
Draw around the shapes you wantto select.
To complete the selection, returnto the point where you started.
3
2
1
Use the Lasso tool when you want to select shapes that are very closeto shapes you don't want to select. This tool allows you to draw aroundthe shape, selecting everything contained within the drawn area. Whenyou draw a selection, you can drag across a path to include it in theselection instead of dragging completely around it. This selection tool isuseful when you are working with overlapping paths.
Did You Know?You can select single or multipleobjects. Holding the Shift key adds linesegments and fills them. Shift-clickingselected items deselects them.
1
3
2
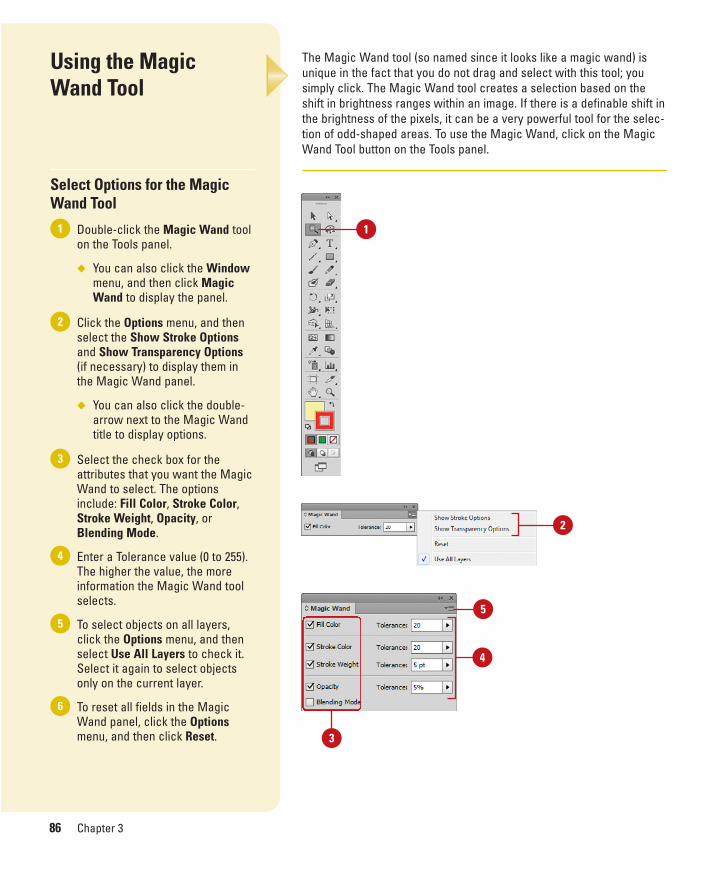
ptg8126863
86 Chapter 3
The Magic Wand tool (so named since it looks like a magic wand) isunique in the fact that you do not drag and select with this tool; yousimply click. The Magic Wand tool creates a selection based on theshift in brightness ranges within an image. If there is a definable shift inthe brightness of the pixels, it can be a very powerful tool for the selec-tion of odd-shaped areas. To use the Magic Wand, click on the MagicWand Tool button on the Tools panel.
Using the Magic Wand Tool
Select Options for the MagicWand Tool
Double-click the Magic Wand toolon the Tools panel.
◆ You can also click the Windowmenu, and then click MagicWand to display the panel.
Click the Options menu, and thenselect the Show Stroke Optionsand Show Transparency Options(if necessary) to display them inthe Magic Wand panel.
◆ You can also click the double-arrow next to the Magic Wandtitle to display options.
Select the check box for theattributes that you want the MagicWand to select. The optionsinclude: Fill Color, Stroke Color,Stroke Weight, Opacity, orBlending Mode.
Enter a Tolerance value (0 to 255).The higher the value, the moreinformation the Magic Wand toolselects.
To select objects on all layers,click the Options menu, and thenselect Use All Layers to check it.Select it again to select objectsonly on the current layer.
To reset all fields in the MagicWand panel, click the Optionsmenu, and then click Reset.
6
5
4
3
2
1 1
2
3
4
5

ptg8126863
Chapter 3 Working with Objects 87
Use the Magic Wand Tool
Select the Magic Wand tool on theTools panel.
Click an object area to make aselection.
Depending on the options youselected in the Magic Wand panel,other objects with the same orsimilar attributes (fill color, strokecolor, stroke weight, opacity, orblending mode) are selected.
To add to the selection, hold downthe Shift key, and then clickanother unselected object.
To subtract from the selection,hold down the Alt (Win) or Option(Mac) key, and then click aselected object.
3
2
11
2
3
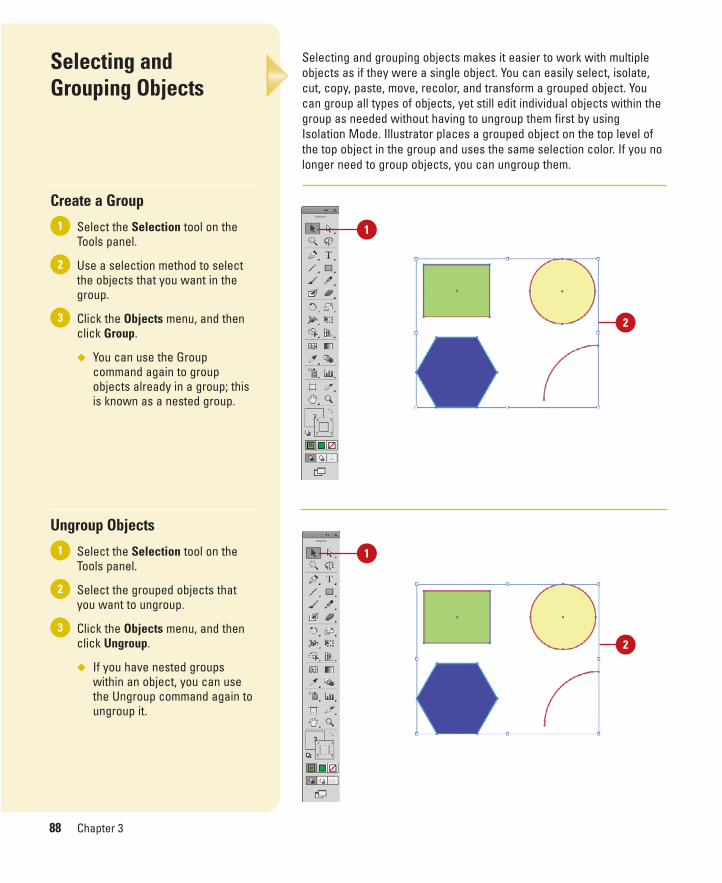
ptg8126863
88 Chapter 3
Selecting and grouping objects makes it easier to work with multipleobjects as if they were a single object. You can easily select, isolate,cut, copy, paste, move, recolor, and transform a grouped object. Youcan group all types of objects, yet still edit individual objects within thegroup as needed without having to ungroup them first by usingIsolation Mode. Illustrator places a grouped object on the top level ofthe top object in the group and uses the same selection color. If you nolonger need to group objects, you can ungroup them.
Selecting andGrouping Objects
Create a Group
Select the Selection tool on theTools panel.
Use a selection method to selectthe objects that you want in thegroup.
Click the Objects menu, and thenclick Group.
◆ You can use the Groupcommand again to groupobjects already in a group; thisis known as a nested group.
Ungroup Objects
Select the Selection tool on theTools panel.
Select the grouped objects thatyou want to ungroup.
Click the Objects menu, and thenclick Ungroup.
◆ If you have nested groupswithin an object, you can usethe Ungroup command again toungroup it.
3
2
1
3
2
1 1
2
1
2

ptg8126863
Chapter 3 Working with Objects 89
Use Isolation Mode to Workwith Groups
Select the Selection tool on theTools panel.
Double-click a grouped object.
◆ You need to click the IsolateSelected Object button on theControl panel or select theDouble-click to Isolate checkbox in General preferences.
A gray bar appears with the nameof the group at the top of thedocument window. All objectsoutside the group are dimmed outand uneditable. The words“Isolation Mode” also appear onthe Layers panel.
Edit individual objects or add newobjects to the group.
To exit Isolation Mode, click thegray bar.
4
3
2
11
2 3
4
Isolation Mode
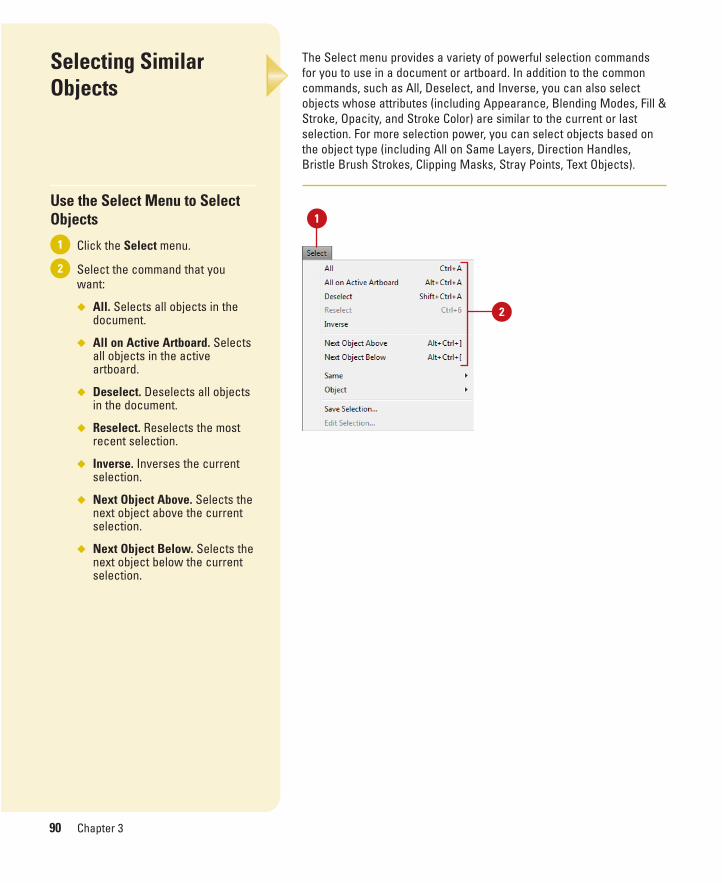
ptg8126863
90 Chapter 3
The Select menu provides a variety of powerful selection commandsfor you to use in a document or artboard. In addition to the commoncommands, such as All, Deselect, and Inverse, you can also selectobjects whose attributes (including Appearance, Blending Modes, Fill &Stroke, Opacity, and Stroke Color) are similar to the current or lastselection. For more selection power, you can select objects based onthe object type (including All on Same Layers, Direction Handles,Bristle Brush Strokes, Clipping Masks, Stray Points, Text Objects).
Selecting SimilarObjects
Use the Select Menu to SelectObjects
Click the Select menu.
Select the command that youwant:
◆ All. Selects all objects in thedocument.
◆ All on Active Artboard. Selectsall objects in the activeartboard.
◆ Deselect. Deselects all objectsin the document.
◆ Reselect. Reselects the mostrecent selection.
◆ Inverse. Inverses the currentselection.
◆ Next Object Above. Selects thenext object above the currentselection.
◆ Next Object Below. Selects thenext object below the currentselection.
2
1
1
2
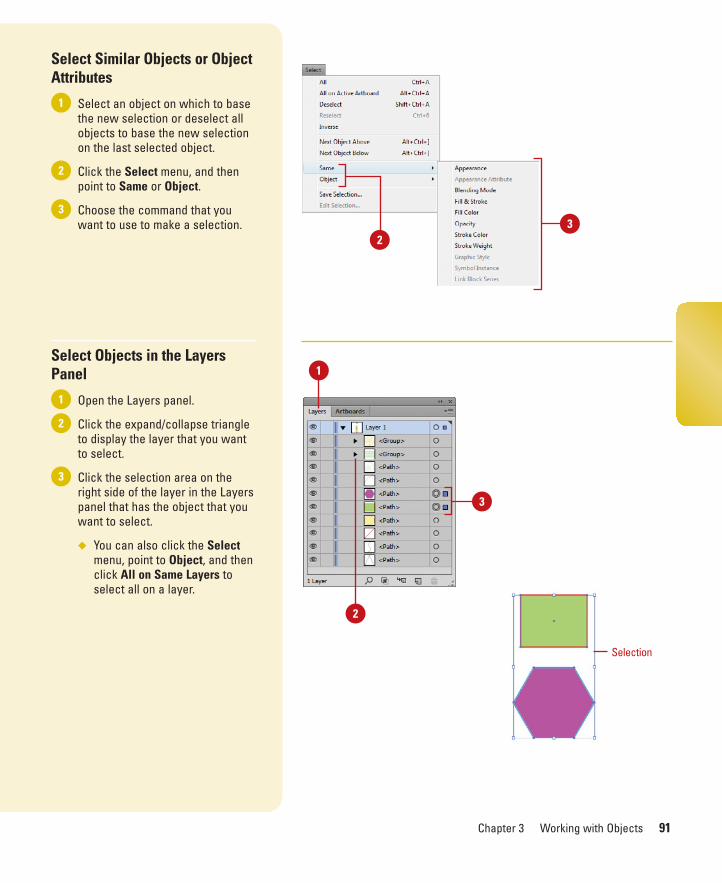
ptg8126863
Chapter 3 Working with Objects 91
Select Similar Objects or ObjectAttributes
Select an object on which to basethe new selection or deselect allobjects to base the new selectionon the last selected object.
Click the Select menu, and thenpoint to Same or Object.
Choose the command that youwant to use to make a selection.
Select Objects in the LayersPanel
Open the Layers panel.
Click the expand/collapse triangleto display the layer that you wantto select.
Click the selection area on theright side of the layer in the Layerspanel that has the object that youwant to select.
◆ You can also click the Selectmenu, point to Object, and thenclick All on Same Layers toselect all on a layer.
3
2
1
3
2
1
32
2
1
3
Selection
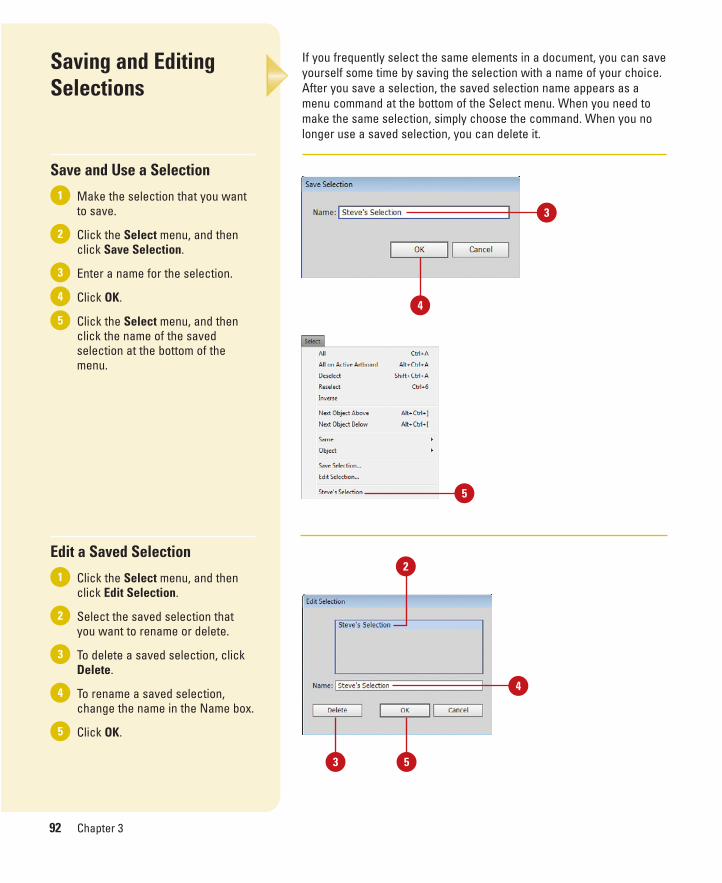
ptg8126863
92 Chapter 3
If you frequently select the same elements in a document, you can saveyourself some time by saving the selection with a name of your choice.After you save a selection, the saved selection name appears as amenu command at the bottom of the Select menu. When you need tomake the same selection, simply choose the command. When you nolonger use a saved selection, you can delete it.
Saving and EditingSelections
Save and Use a Selection
Make the selection that you wantto save.
Click the Select menu, and thenclick Save Selection.
Enter a name for the selection.
Click OK.
Click the Select menu, and thenclick the name of the savedselection at the bottom of themenu.
Edit a Saved Selection
Click the Select menu, and thenclick Edit Selection.
Select the saved selection thatyou want to rename or delete.
To delete a saved selection, clickDelete.
To rename a saved selection,change the name in the Name box.
Click OK.5
4
3
2
1
5
4
3
2
1
5
2
3
4
3 5
4
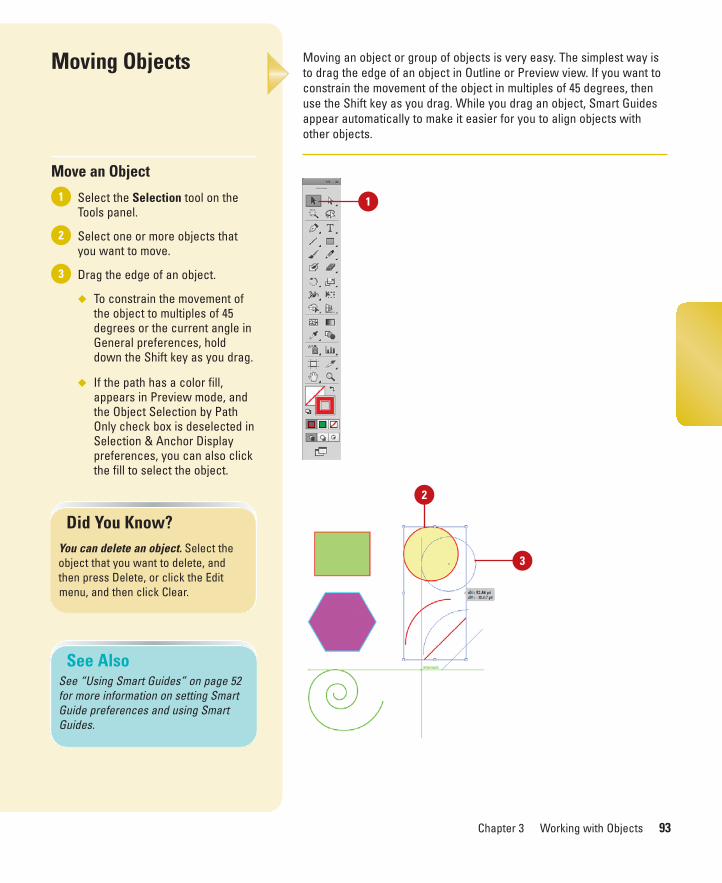
ptg8126863
Chapter 3 Working with Objects 93
Moving an object or group of objects is very easy. The simplest way isto drag the edge of an object in Outline or Preview view. If you want toconstrain the movement of the object in multiples of 45 degrees, thenuse the Shift key as you drag. While you drag an object, Smart Guidesappear automatically to make it easier for you to align objects withother objects.
Moving Objects
Move an Object
Select the Selection tool on theTools panel.
Select one or more objects thatyou want to move.
Drag the edge of an object.
◆ To constrain the movement ofthe object to multiples of 45degrees or the current angle inGeneral preferences, holddown the Shift key as you drag.
◆ If the path has a color fill,appears in Preview mode, andthe Object Selection by PathOnly check box is deselected inSelection & Anchor Displaypreferences, you can also clickthe fill to select the object.
3
2
1
See AlsoSee “Using Smart Guides” on page 52for more information on setting SmartGuide preferences and using SmartGuides.
Did You Know?You can delete an object. Select theobject that you want to delete, andthen press Delete, or click the Editmenu, and then click Clear.
1
2
3
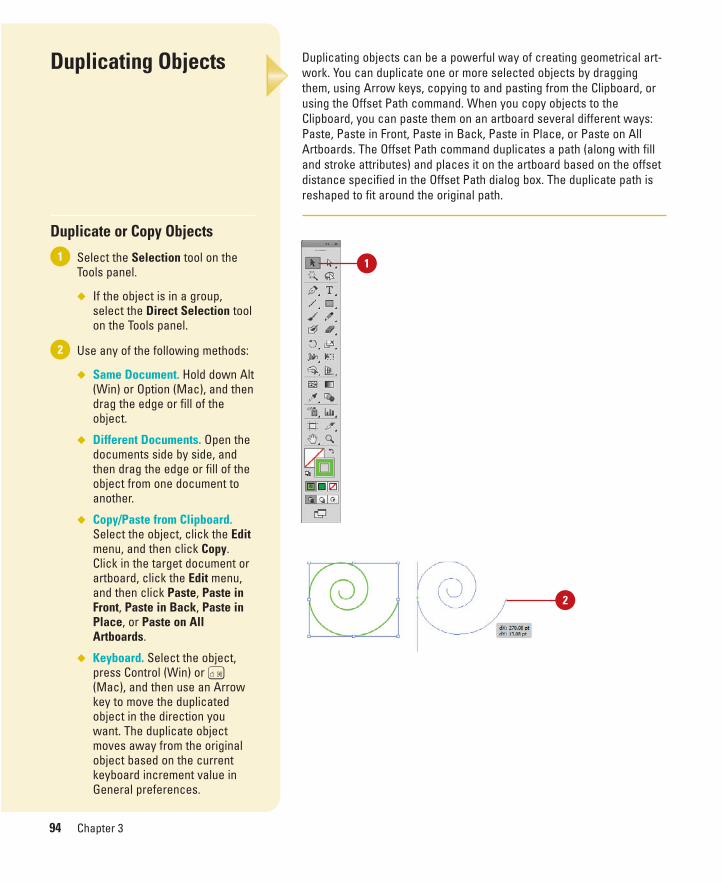
ptg8126863
94 Chapter 3
Duplicating objects can be a powerful way of creating geometrical art-work. You can duplicate one or more selected objects by draggingthem, using Arrow keys, copying to and pasting from the Clipboard, orusing the Offset Path command. When you copy objects to theClipboard, you can paste them on an artboard several different ways:Paste, Paste in Front, Paste in Back, Paste in Place, or Paste on AllArtboards. The Offset Path command duplicates a path (along with filland stroke attributes) and places it on the artboard based on the offsetdistance specified in the Offset Path dialog box. The duplicate path isreshaped to fit around the original path.
Duplicating Objects
Duplicate or Copy Objects
Select the Selection tool on theTools panel.
◆ If the object is in a group,select the Direct Selection toolon the Tools panel.
Use any of the following methods:
◆ Same Document. Hold down Alt(Win) or Option (Mac), and thendrag the edge or fill of theobject.
◆ Different Documents. Open thedocuments side by side, andthen drag the edge or fill of theobject from one document toanother.
◆ Copy/Paste from Clipboard.Select the object, click the Editmenu, and then click Copy.Click in the target document orartboard, click the Edit menu,and then click Paste, Paste inFront, Paste in Back, Paste inPlace, or Paste on AllArtboards.
◆ Keyboard. Select the object,press Control (Win) or A(Mac), and then use an Arrowkey to move the duplicatedobject in the direction youwant. The duplicate objectmoves away from the originalobject based on the currentkeyboard increment value inGeneral preferences.
2
1 1
2
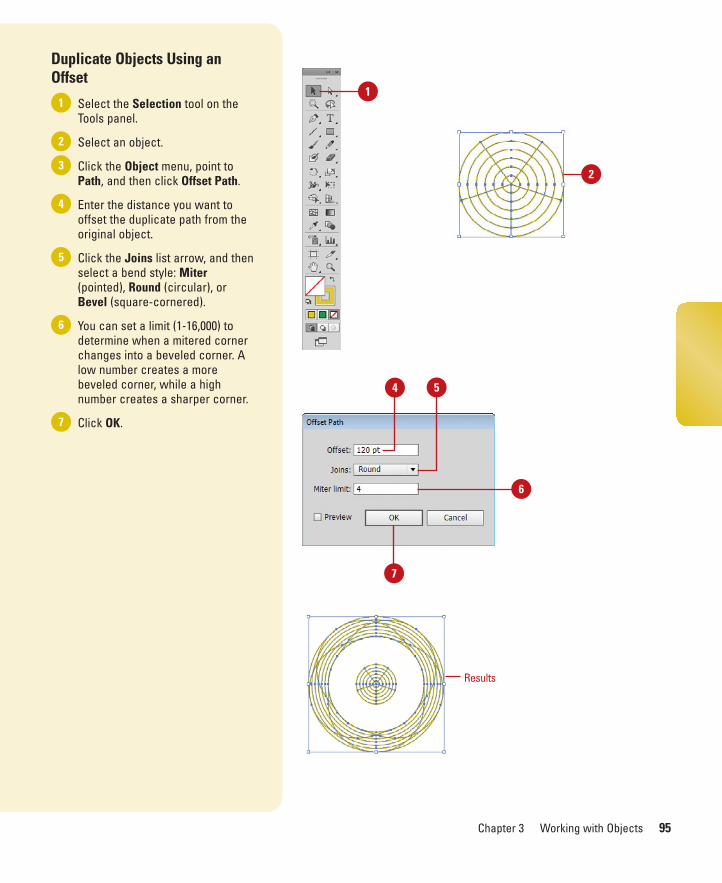
ptg8126863
Chapter 3 Working with Objects 95
Duplicate Objects Using anOffset
Select the Selection tool on theTools panel.
Select an object.
Click the Object menu, point toPath, and then click Offset Path.
Enter the distance you want tooffset the duplicate path from theoriginal object.
Click the Joins list arrow, and thenselect a bend style: Miter(pointed), Round (circular), orBevel (square-cornered).
You can set a limit (1-16,000) todetermine when a mitered cornerchanges into a beveled corner. Alow number creates a morebeveled corner, while a highnumber creates a sharper corner.
Click OK.7
6
5
4
3
2
11
2
4
Results
6
7
5
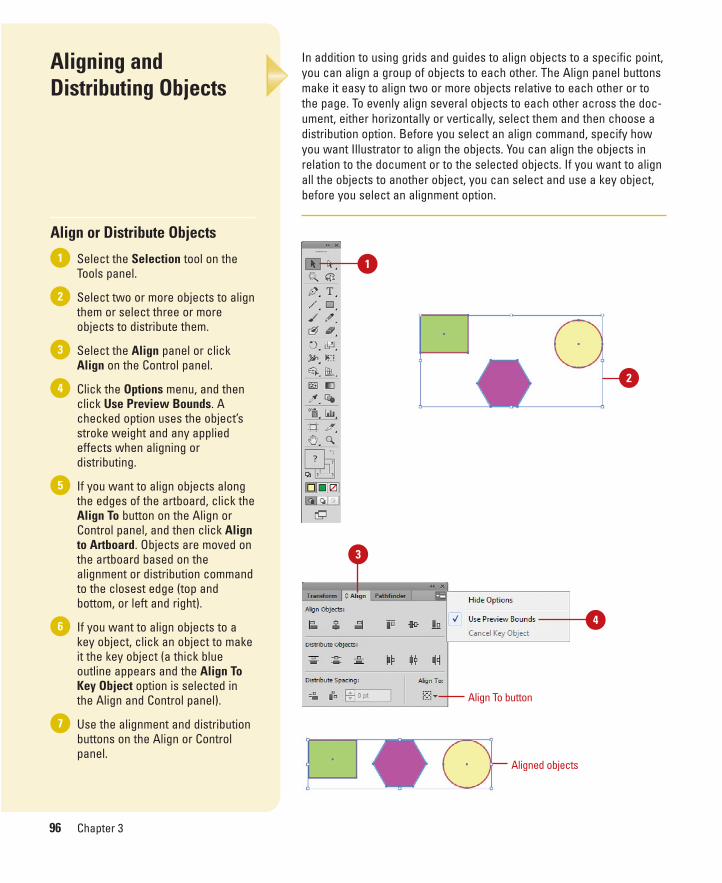
ptg8126863
96 Chapter 3
Aligning andDistributing Objects
Align or Distribute Objects
Select the Selection tool on theTools panel.
Select two or more objects to alignthem or select three or moreobjects to distribute them.
Select the Align panel or clickAlign on the Control panel.
Click the Options menu, and thenclick Use Preview Bounds. Achecked option uses the object’sstroke weight and any appliedeffects when aligning ordistributing.
If you want to align objects alongthe edges of the artboard, click theAlign To button on the Align orControl panel, and then click Alignto Artboard. Objects are moved onthe artboard based on thealignment or distribution commandto the closest edge (top andbottom, or left and right).
If you want to align objects to akey object, click an object to makeit the key object (a thick blueoutline appears and the Align ToKey Object option is selected inthe Align and Control panel).
Use the alignment and distributionbuttons on the Align or Controlpanel.
7
6
5
4
3
2
1
In addition to using grids and guides to align objects to a specific point,you can align a group of objects to each other. The Align panel buttonsmake it easy to align two or more objects relative to each other or tothe page. To evenly align several objects to each other across the doc-ument, either horizontally or vertically, select them and then choose adistribution option. Before you select an align command, specify howyou want Illustrator to align the objects. You can align the objects inrelation to the document or to the selected objects. If you want to alignall the objects to another object, you can select and use a key object,before you select an alignment option.
1
2
3
4
Aligned objects
Align To button
ptg8126863
Chapter 3 Working with Objects 97
Transforming Objects
Transform an Object with theBounding Box
Click the View menu, and thenclick Show Bounding Box todisplay it.
Select the Selection tool on theTools panel.
Select one or more objects totransform.
Use any of the following methods:
◆ Scale. Drag a corner handle toscale along two axes; drag aside handle to scale along oneaxis; Shift-drag to scaleproportionally; hold down Alt(Win) or Option (Mac), and thendrag to scale from the center.Also hold down Shift to scalefrom the center proportionally.
◆ Reflect. Drag a side handle allthe way across the object tothe other side.
◆ Rotate. Point slightly outside acorner handle (pointer changesto a double arrow), and thendrag in a circular motion.
To rotate an object 180degrees, drag a corner handlediagonally all the way acrossthe object.
To transform an object using exactvalues or percentages, select theTransform panel.
5
4
3
2
1
The easiest way to transform an object is to use the bounding box. Withthe bounding box, you can quickly scale (resize), reflect (mirror), androtate an object. However, you cannot copy an object or move the ref-erence point. As you drag to transform an object, you can use keyboardkeys to alter the results of a transformation. Experiment with the differ-ent options to create some new results.
2
3
Scale
Rotate
ptg8126863
98 Chapter 3
Using the FreeTransform Tool
Transform an Object with theFree Transform Tool
Select the Free Transform tool onthe Tools panel.
Select one or more objects totransform.
Use any of the following methods:
◆ Scale. Drag a corner handle toscale along two axes; drag aside handle to scale along oneaxis; Shift-drag to scaleproportionally; hold down Alt(Win) or Option (Mac), and thendrag to scale from the center.Also hold down Shift to scalefrom the center proportionally.
◆ Reflect. Drag a side handle allthe way across the object tothe other side.
◆ Rotate. Point slightly outside acorner handle (pointer changesto a double arrow), and thendrag in a circular motion. Torotate in 45 degree increments,Shift-drag.
To rotate an object 180degrees, drag a corner handlediagonally all the way acrossthe object.
◆ Shear. Drag a side handle andthen hold down Ctrl (Win) orA (Mac) as you continue todrag. To constrain themovement, also press Shift. Toshear from the center, alsopress Alt (Win) or Option (Mac).
3
2
1
The Free Transform tool allows you to rotate, scale (resize), reflect (mir-ror image), or shear (slant) an object. In addition, you can apply per-spective and distortion to an object. However, you cannot copy anobject or move the reference point. As you drag to transform an object,you can use keyboard keys to alter the results of a transformation. Tohelp you align the results the way you want, you can use Smart Guidesto make it easier.
1
2
ShearShear results

ptg8126863
Chapter 3 Working with Objects 99
◆ Perspective. Drag a sidehandle and then hold downCtrl+Alt+Shift (Win) orA+Option+Shift (Mac) as youcontinue to drag.
◆ Distort. Drag a corner handleand then hold down Ctrl (Win)or A (Mac) as you continue todrag.
To use Smart Guides as youtransform an object:
◆ Select the Transform Toolscheck box in Smart Guidespreferences.
◆ Click the View menu, and thenclick Smart Guides to displaythem.
◆ As you drag to transform anobject, smart guides appear inyour document, which you canuse to align the transformedobject.
To transform an object using exactvalues or percentages, select theTransform panel.
◆ X & Y Coordinates. Enter X andY values, which refer to theselected reference point; clicka white square to change it.
◆ Width (W) & Height (H). Enterwidth and height values. Usethe Lock icon to constrainproportions.
◆ Rotate Angle. Enter a rotateangle.
◆ Shear Angle. Enter a shearangle.
◆ Align to Pixel Grid. Select topixel-align individual object tothe pixel grid.
◆ Scale Strokes & Effects. Selectto scale strokes and effectsalong with objects (New!).
◆ Click the Options button toselect additional options.
5
4
Perspective
Perspectiveresults
4
5 Options button
ptg8126863
100 Chapter 3
Rotating and ScalingObjects
Rotate or Scale an Object
Select the Selection tool on theTools panel.
Select one or more objects totransform.
Select the Rotate or Scale tool onthe Tools panel.
To move the reference point, clicka new point.
Use the appropriate method:
◆ Rotate. Drag in a circularmotion. To rotate in 45 degreeincrements, Shift-drag.
◆ Scale. Drag away from ortoward the object. Shift-drag toscale proportionally; hold downAlt (Win) or Option (Mac), andthen drag to scale from thecenter. Also hold down Shift toscale from the centerproportionally.
◆ Scale and Flip. Drag across theentire object.
◆ Scale and Copy. Hold downAlt+Shift (Win) or Option+Shift(Mac), and then drag.
To rotate or scale an object usingexact values or percentages,select the Transform panel.
6
5
4
3
2
1
After you create an object, you can change its orientation by rotating itor change its size by scaling it. For a freeform rotation, when you wantto rotate the object in other than 90 or 180 degree increments, you canuse the Rotate tool. To resize an object, either smaller or larger, you canuse the Scale tool. With either tool, you can transform the object fromits center or the reference point. To rotate or scale an object usingexact values or percentages, use the Transform panel, which is avail-able on the Control panel or Window menu.
1
32
4
Scale flip5
ptg8126863
Chapter 3 Working with Objects 101
Reflecting andShearing Objects
Reflect or Shear an Object
Select the Selection tool on theTools panel.
Select one or more objects totransform.
Select the Reflect or Shear tool onthe Tools panel.
To move the reference point, clicka new point.
Use the appropriate method:
◆ Reflect. Click to establish areference point, and then clickagain to establish the axis ofreflection.
◆ Shear. Drag away from theobject.
To reflect or shear an object usingexact values or percentages,select the Transform panel.
6
5
4
3
2
1
The Reflect and Shear tools on the Tools panel allow you to be creativeas you transform an object. The Reflect tool creates a mirror image ofan object, while the Shear tool creates a slanted image of an object. Toreflect or shear an object using exact values or percentages, open theTransform panel, which is available on the Control panel or Windowmenu.
1
3
4
2
5 Reflect
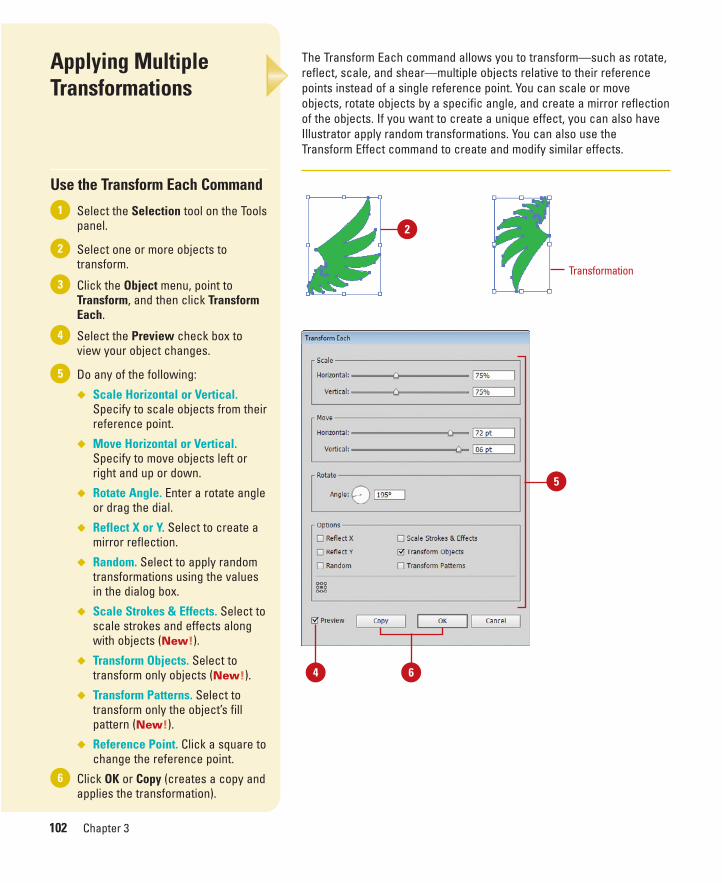
ptg8126863
102 Chapter 3
Applying MultipleTransformations
Use the Transform Each Command
Select the Selection tool on the Toolspanel.
Select one or more objects totransform.
Click the Object menu, point toTransform, and then click TransformEach.
Select the Preview check box toview your object changes.
Do any of the following:
◆ Scale Horizontal or Vertical.Specify to scale objects from theirreference point.
◆ Move Horizontal or Vertical.Specify to move objects left orright and up or down.
◆ Rotate Angle. Enter a rotate angleor drag the dial.
◆ Reflect X or Y. Select to create amirror reflection.
◆ Random. Select to apply randomtransformations using the valuesin the dialog box.
◆ Scale Strokes & Effects. Select toscale strokes and effects alongwith objects (New!).
◆ Transform Objects. Select totransform only objects (New!).
◆ Transform Patterns. Select totransform only the object’s fillpattern (New!).
◆ Reference Point. Click a square tochange the reference point.
Click OK or Copy (creates a copy andapplies the transformation).
6
5
4
3
2
1
The Transform Each command allows you to transform—such as rotate,reflect, scale, and shear—multiple objects relative to their referencepoints instead of a single reference point. You can scale or moveobjects, rotate objects by a specific angle, and create a mirror reflectionof the objects. If you want to create a unique effect, you can also haveIllustrator apply random transformations. You can also use theTransform Effect command to create and modify similar effects.
2
5
Transformation
64

ptg8126863
Chapter 3 Working with Objects 103
Use the Transform Effect
Select the Selection tool on theTools panel.
Select one or more objects totransform.
Click the Effect menu, point toDistort & Transform, and then clickTransform.
Select the Preview check box toview your object changes.
Do any of the following:
◆ Scale Horizontal or Vertical.Specify to scale objects fromtheir reference point.
◆ Move Horizontal or Vertical.Specify to move objects left orright and up or down.
◆ Rotate Angle. Enter a rotateangle or drag the dial.
◆ Reflect X or Y. Select to createa mirror reflection.
◆ Random. Select to applyrandom transformations usingthe values in the dialog box.
◆ Scale Strokes & Effects. Selectto scale strokes and effectsalong with objects (New!).
◆ Transform Objects. Select totransform only objects (New!).
◆ Transform Patterns. Select totransform only the object’s fillpattern (New!).
◆ Reference Point. Click a squareto change the reference point.
◆ Copies. Enter the number ofcopies you want.
Click OK.
To edit the transformation, selectthe object, and then clickTransform on the Appearancepanel.
7
6
5
4
3
2
1
Repeating a TransformationThe Transform Again command allows you to quickly repeat the lasttransformation with the last-used values on a selected object. To usethe command, transform and select an object or group, click theObject menu, point to Transform, and then click Transform Again orpress Ctrl+D (Win) or A+D (Mac).
For Your Information
2
Transformationeffect
5
64

ptg8126863
104 Chapter 3
Reshaping Objectswith Envelopes
Distort Objects with an Envelope
Select the Selection tool on theTools panel.
Select one or more objects toreshape.
Click the Object menu, point toEnvelope Distort, and then clickone of the following:
◆ Make With Warp. Uses apreset warp shape.
◆ Make with Mesh. Uses arectangle grid.
◆ Make With Top Object. Uses anobject as the shape of theenvelope. The object needs tobe at the top of the stackingorder.
Specify the options you want forthe envelope type; select thePreview check box to view yourchanges on the selected object.
Click OK.
Do any of the following:
◆ Reshape. Select the Selectionor Mesh tool, and then dragany anchor points.
◆ Delete Anchor Points. For amesh grid, select the Selectionor Mesh tool, select an anchorpoint, and then press Delete.
◆ Add Anchor Points. For meshgrid, select the Mesh tool, andthen click on the grid.
6
5
4
3
2
1
Envelopes are objects you can use to reshape other objects, exceptgraphs, guides, or linked objects. You can use one of the built-inenvelopes or create your own out of an existing object. The built-inenvelopes use warp shapes or a mesh grid as the object. After youapply an envelope, you can edit the original object or the envelope(anchor points), separately, using the Selection and Mesh tools on theTools panel. In addition, you can specify envelope options to determinehow objects are distorted to fit the envelope.
2
Mesh point
Mesh grid
1
4
5
6
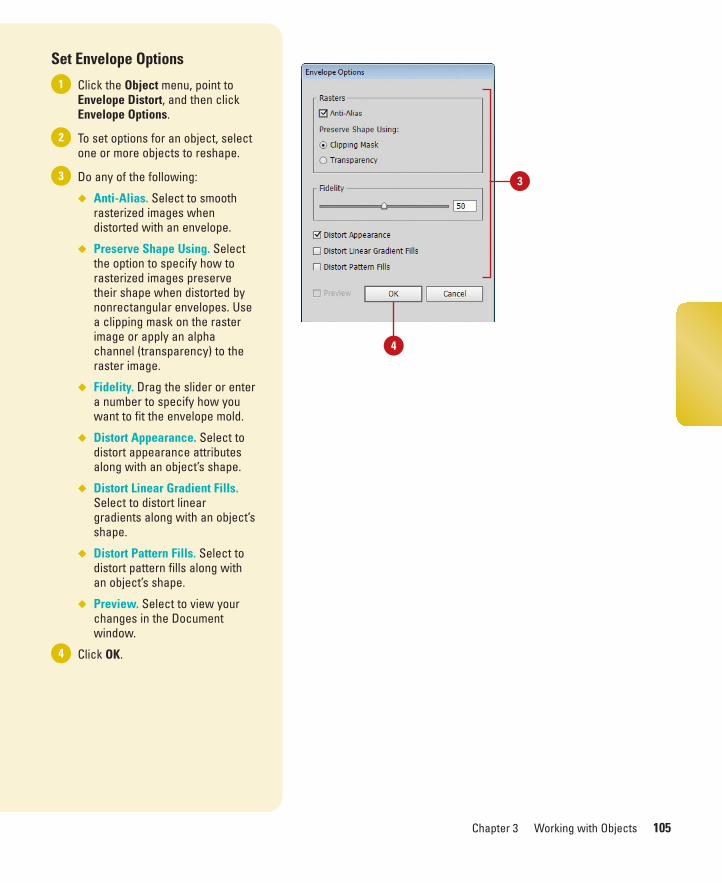
ptg8126863
Chapter 3 Working with Objects 105
Set Envelope Options
Click the Object menu, point toEnvelope Distort, and then clickEnvelope Options.
To set options for an object, selectone or more objects to reshape.
Do any of the following:
◆ Anti-Alias. Select to smoothrasterized images whendistorted with an envelope.
◆ Preserve Shape Using. Selectthe option to specify how torasterized images preservetheir shape when distorted bynonrectangular envelopes. Usea clipping mask on the rasterimage or apply an alphachannel (transparency) to theraster image.
◆ Fidelity. Drag the slider or entera number to specify how youwant to fit the envelope mold.
◆ Distort Appearance. Select todistort appearance attributesalong with an object’s shape.
◆ Distort Linear Gradient Fills.Select to distort lineargradients along with an object’sshape.
◆ Distort Pattern Fills. Select todistort pattern fills along withan object’s shape.
◆ Preview. Select to view yourchanges in the Documentwindow.
Click OK.4
3
2
1
3
4

ptg8126863
This page intentionally left blank
ptg8126863
Working with Color
Introduction
When you create or open a document, Illustrator creates orlooks for a color profile, which specifies color usage in thedocument. Color modes define the colors represented in theactive document. Although you can change the color mode ofa document, it is best to select the correct color mode whenyou create a document. Illustrator's main color modes areRGB (Red, Green, and Blue) for onscreen and web projectsand CMYK (Cyan, Magenta, Yellow, and Black) for commercialprinting projects.
Illustrator provides several panels (Tools, Color, Swatches,Color Guide, and Kuler) for you to use to work with color andapply color to one or more objects. For example, the Colorpanel lets you create colors using different sliders and spec-trum color selectors. Illustrator not only lets you select virtu-ally any colors you desire, it also lets you store those colorsfor future use in the Swatches panel. Along with the panels,Illustrator also provides the Live Color dialog box, which youcan use to change multiple colors in your artwork at the sametime by editing and applying color groups. This makes it easyto recolor your artwork.
As you start to use color in your document, it’s importantto view how your document will actually appear with yourcurrent color settings. With Illustrator, you can view a softproof on your screen to quickly see a simulation of how yourcolors will appear based on your output device. 4
4What You’ll Do
Change Color Settings
Change Color Profiles
Work with Color Modes
Change Color Modes
Apply Colors
Work with the Color Panel
Work with the Swatches Panel
Create Groups in the Swatches Panel
Work with Swatch Libraries
Add Colors Using the Kuler Panel
Replace or Invert Colors
Use the Color Guide Panel
Apply Color with the Color Guide Panel
Edit Colors with Live Color
Proof Colors on the Screen
107
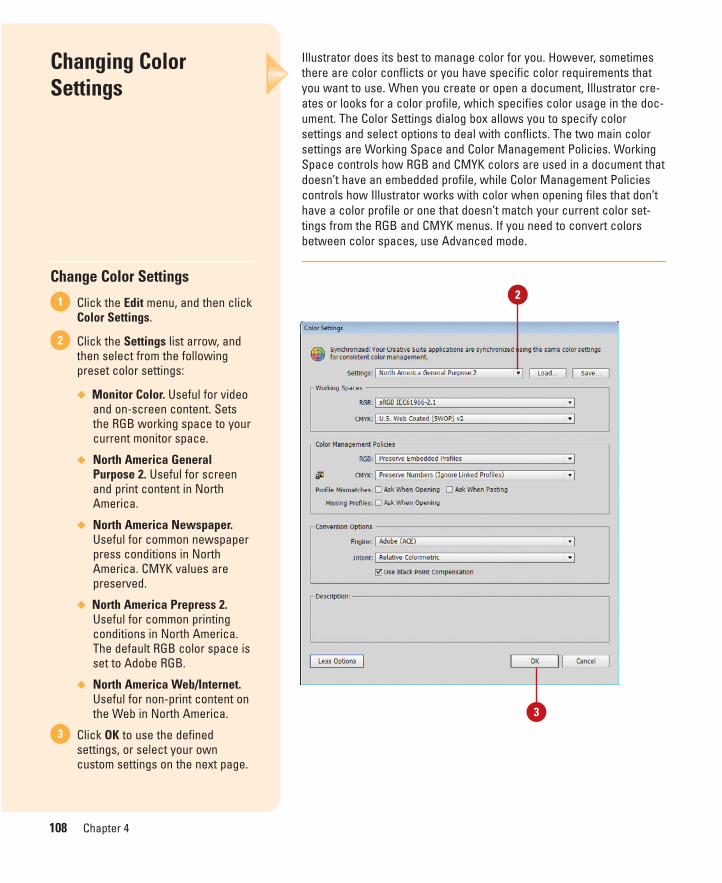
ptg8126863
108 Chapter 4
Illustrator does its best to manage color for you. However, sometimesthere are color conflicts or you have specific color requirements thatyou want to use. When you create or open a document, Illustrator cre-ates or looks for a color profile, which specifies color usage in the doc-ument. The Color Settings dialog box allows you to specify colorsettings and select options to deal with conflicts. The two main colorsettings are Working Space and Color Management Policies. WorkingSpace controls how RGB and CMYK colors are used in a document thatdoesn’t have an embedded profile, while Color Management Policiescontrols how Illustrator works with color when opening files that don’thave a color profile or one that doesn’t match your current color set-tings from the RGB and CMYK menus. If you need to convert colorsbetween color spaces, use Advanced mode.
Changing ColorSettings
Change Color Settings
Click the Edit menu, and then clickColor Settings.
Click the Settings list arrow, andthen select from the followingpreset color settings:
◆ Monitor Color. Useful for videoand on-screen content. Setsthe RGB working space to yourcurrent monitor space.
◆ North America GeneralPurpose 2. Useful for screenand print content in NorthAmerica.
◆ North America Newspaper.Useful for common newspaperpress conditions in NorthAmerica. CMYK values arepreserved.
◆ North America Prepress 2.Useful for common printingconditions in North America.The default RGB color space isset to Adobe RGB.
◆ North America Web/Internet.Useful for non-print content onthe Web in North America.
Click OK to use the definedsettings, or select your owncustom settings on the next page.
3
2
1 2
3

ptg8126863
Chapter 4 Working with Color 109
To create your own customsettings, select from the following:
◆ Working Spaces. Controls howRGB and CMYK colors are usedin a document that doesn’thave an embedded profile.
Select Monitor RGB foronscreen output; Adobe RGBfor photo inkjet printers(converts RGB images to CMYKimages); ProPhoto RGB forinkjet printers; and sRGBIEC61966-2.1 for web output.
◆ Color Management Policies.Controls how Illustrator workswith color when opening filesthat don’t have a color profileor one that doesn’t match yourcurrent color settings from theRGB and CMYK menus.
Select Off to prevent the use ofcolor management, PreserveNumbers to preserve thedocument color profile forCMYK documents, PreserveEmbedded Profiles to preservelinks to color profiles, orConvert to Working Space touse the working space color(useful for the web).
Select the appropriate checkboxes to choose if and whenIllustrator will warn you ofprofile mismatches (nowarning, when opening the file,or when pasting) or missingprofiles (when opening a file orno warning).
Click More Options to specifyConversion options that let youcontrol how Photoshop handlesthe color changes as the profileschange from one color space toanother. Click Less Options tocollapse the dialog box.
Click OK.6
5
4
Selecting Advanced Color OptionsIn the Color Settings dialog box, you can click the More Options but-ton to set advanced color conversion options. You can set optionsfor the color engine, rendering intent, and whether to use black pointcompensation. The color engine specifies the color management sys-tem you want to use. The rendering Intent defines how the selectedcolor profile is converted from one color space into another. The UseBlack Point Compensation check box maps the full color range of thesource to the full color range of the destination profile.
Synchronizing Color Settings Using BridgeIf you're using Adobe Creative Suite, you can use Adobe Bridge tosynchronize your color settings for all programs in the suite. Whenyou synchronize your color settings, you can avoid color profile con-flicts. In Adobe Bridge, click the Edit menu, and then click CreativeSuite Color Settings, select one of the settings, and then click Apply.
For Your Information
5 6
4

ptg8126863
110 Chapter 4
When you create or open a document, Illustrator creates or looks for acolor profile, which specifies color usage in the document. If a docu-ment’s profile doesn’t match the current working color space or ismissing an assigned color profile, you can use the Assign Profile dialogbox to change or remove a profile to avoid conflicts. When you changea color profile, color in your document may shift to match the new colorprofile.
Changing ColorProfiles
Change or Remove ColorProfiles
Click the Edit menu, and then clickAssign Profile.
Select one of the followingoptions:
◆ Don’t Color Manage ThisDocument. Select to remove acolor profile from yourdocument.
◆ Working RGB/CMYK. Selectwhen your document doesn’thave an assigned profile or itsprofile is different from thecurrent working space.
◆ Profile. Select to assign adifferent profile to yourdocument.
Click OK.3
2
1
3
2
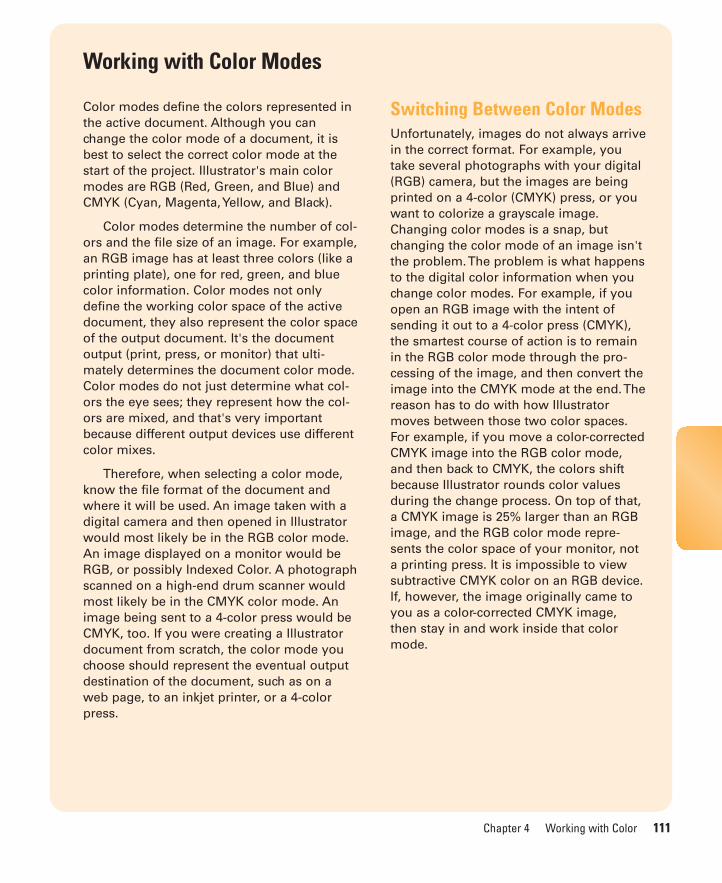
ptg8126863
Chapter 4 Working with Color 111
Color modes define the colors represented inthe active document. Although you canchange the color mode of a document, it isbest to select the correct color mode at thestart of the project. Illustrator's main colormodes are RGB (Red, Green, and Blue) andCMYK (Cyan, Magenta, Yellow, and Black).
Color modes determine the number of col-ors and the file size of an image. For example,an RGB image has at least three colors (like aprinting plate), one for red, green, and bluecolor information. Color modes not onlydefine the working color space of the activedocument, they also represent the color spaceof the output document. It's the documentoutput (print, press, or monitor) that ulti-mately determines the document color mode.Color modes do not just determine what col-ors the eye sees; they represent how the col-ors are mixed, and that's very importantbecause different output devices use differentcolor mixes.
Therefore, when selecting a color mode,know the file format of the document andwhere it will be used. An image taken with adigital camera and then opened in Illustratorwould most likely be in the RGB color mode.An image displayed on a monitor would beRGB, or possibly Indexed Color. A photographscanned on a high-end drum scanner wouldmost likely be in the CMYK color mode. Animage being sent to a 4-color press would beCMYK, too. If you were creating a Illustratordocument from scratch, the color mode youchoose should represent the eventual outputdestination of the document, such as on aweb page, to an inkjet printer, or a 4-colorpress.
Switching Between Color ModesUnfortunately, images do not always arrivein the correct format. For example, youtake several photographs with your digital(RGB) camera, but the images are beingprinted on a 4-color (CMYK) press, or youwant to colorize a grayscale image.Changing color modes is a snap, butchanging the color mode of an image isn'tthe problem. The problem is what happensto the digital color information when youchange color modes. For example, if youopen an RGB image with the intent ofsending it out to a 4-color press (CMYK),the smartest course of action is to remainin the RGB color mode through the pro-cessing of the image, and then convert theimage into the CMYK mode at the end. Thereason has to do with how Illustratormoves between those two color spaces.For example, if you move a color-correctedCMYK image into the RGB color mode,and then back to CMYK, the colors shiftbecause Illustrator rounds color valuesduring the change process. On top of that,a CMYK image is 25% larger than an RGBimage, and the RGB color mode repre-sents the color space of your monitor, nota printing press. It is impossible to viewsubtractive CMYK color on an RGB device.If, however, the image originally came toyou as a color-corrected CMYK image,then stay in and work inside that colormode.
Working with Color Modes
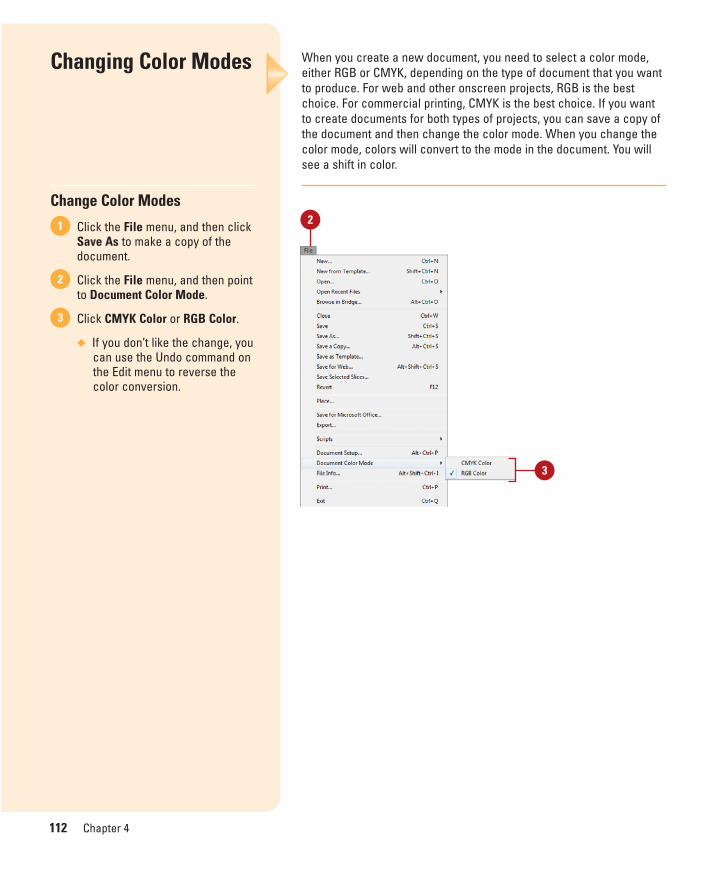
ptg8126863
112 Chapter 4
When you create a new document, you need to select a color mode,either RGB or CMYK, depending on the type of document that you wantto produce. For web and other onscreen projects, RGB is the bestchoice. For commercial printing, CMYK is the best choice. If you wantto create documents for both types of projects, you can save a copy ofthe document and then change the color mode. When you change thecolor mode, colors will convert to the mode in the document. You willsee a shift in color.
Changing Color Modes
Change Color Modes
Click the File menu, and then clickSave As to make a copy of thedocument.
Click the File menu, and then pointto Document Color Mode.
Click CMYK Color or RGB Color.
◆ If you don’t like the change, youcan use the Undo command onthe Edit menu to reverse thecolor conversion.
3
2
1 2
3

ptg8126863
Chapter 4 Working with Color 113
The Tools panel provides color boxes to make it easy for you to applyfill and stroke colors. The color box in the foreground is the Fill box andthe outlined box in the background is the Stroke box. When you selectan object, fill, or stroke, the color boxes (also known as thumbnails), onthe Tools panel display the current colors. To change the fill or strokecolor, select an object, fill or stroke, select the Fill or Stroke box, andthen select a color from the Color, Swatches, or Color Guide panel.
Applying Colors
Apply Colors to an Object, Fill or Stroke
Select an object, fill, or strokeusing the appropriate selectiontool.
Click the Fill or Stroke color boxon the Tools panel to choose thecolor's destination.
Click the Color button on the Toolspanel to apply a color or clickNone to apply no color.
Use any of the following to changethe active fill or stroke colors:
◆ Select the Swatches panel, andthen click a color swatch tochange the color.
◆ Select the Color panel, andthen specify a color using thecontrols.
◆ Select the Color Guide panel,and then click a color swatchto change the color.
◆ Double-click the Fill or Strokecolor box to open the ColorPicker dialog box, select acolor or enter color values, andthen click OK.
◆ To set default colors of blackand white, click the Default Filland Stroke icon on the Toolsand Color (New!) panels.
◆ To set switch the current filland stroke color, click theSwap Fill and Stroke icon onthe Tools and Color (New!)panels.
4
3
2
1
2
1
3
Color panel
Color Guide panel
Swatches panel
Stroke color
Default Fill and Stroke icon
Swap Fill and Stroke icon
Fill color
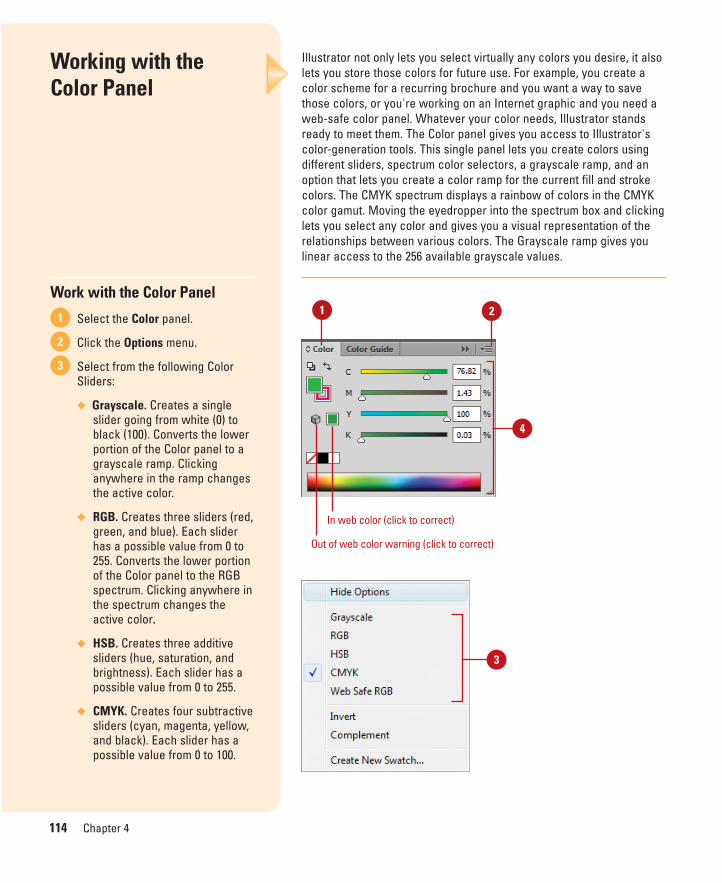
ptg8126863
114 Chapter 4
Illustrator not only lets you select virtually any colors you desire, it alsolets you store those colors for future use. For example, you create acolor scheme for a recurring brochure and you want a way to savethose colors, or you're working on an Internet graphic and you need aweb-safe color panel. Whatever your color needs, Illustrator standsready to meet them. The Color panel gives you access to Illustrator'scolor-generation tools. This single panel lets you create colors usingdifferent sliders, spectrum color selectors, a grayscale ramp, and anoption that lets you create a color ramp for the current fill and strokecolors. The CMYK spectrum displays a rainbow of colors in the CMYKcolor gamut. Moving the eyedropper into the spectrum box and clickinglets you select any color and gives you a visual representation of therelationships between various colors. The Grayscale ramp gives youlinear access to the 256 available grayscale values.
Working with theColor Panel
Work with the Color Panel
Select the Color panel.
Click the Options menu.
Select from the following ColorSliders:
◆ Grayscale. Creates a singleslider going from white (0) toblack (100). Converts the lowerportion of the Color panel to agrayscale ramp. Clickinganywhere in the ramp changesthe active color.
◆ RGB. Creates three sliders (red,green, and blue). Each sliderhas a possible value from 0 to255. Converts the lower portionof the Color panel to the RGBspectrum. Clicking anywhere inthe spectrum changes theactive color.
◆ HSB. Creates three additivesliders (hue, saturation, andbrightness). Each slider has apossible value from 0 to 255.
◆ CMYK. Creates four subtractivesliders (cyan, magenta, yellow,and black). Each slider has apossible value from 0 to 100.
3
2
1
3
1 2
In web color (click to correct)
Out of web color warning (click to correct)
4

ptg8126863
Chapter 4 Working with Color 115
Converts the lower portion ofthe Color panel to the CMYKspectrum. Clicking anywhere inthe spectrum changes theactive color.
◆ Web Safe RGB. Creates threesliders (red, green, and blue).Each slider has a possiblehexadecimal value from 00 to FF. Restricts the colorspectrum to only the 216 web-safe colors.
To change a color, click a colorbox, use a slider, enter specificcolor values, or click a color in thespectrum. The box with the reddiagonal line is the None color.
To change a color using the AdobeColor Picker, double-click a colorbox, select a color using the colorrange or color mode options, andthen click OK.
5
4
5
Select options or click the colorrange to select a color.
Cube indicates the color is not web-safe; click to select the closest webcolor. An alert triangle indicates thecolor is out-of-gamut (non-printable).
Understanding Colors
In Windows, you can use the Color dialog box, which displays basicand custom color squares and a color matrix with the full range ofcolors in the color spectrum, to help you select a color. You can enterRGB values for hue, saturation, and luminosity (also known as bright-ness) to specify a color. Hue is a pure color (one without tint orshade); the name of the color (red, green, etc.) is measured by itslocation on the color wheel. Saturation is a measure of how muchwhite is mixed in with the color. A fully saturated color has vividtones; a less saturated color is more of a washed-out pastel.Luminosity is a measure of how much black is mixed with the color. A very bright color contains little or no black. You can also changethe hue by moving the pointer in the color matrix box horizontally; youcan change the saturation by moving the pointer vertically, and theluminosity by adjusting the slider to the right of the color matrix box.On the Macintosh, you click one of the color modes and select acolor, using its controls. You can select RGB values by selecting thecolor sliders at the top of the dialog box, then choosing RGB Slidersfrom the pop-up menu, and dragging the Red, Green, and Blue slid-ers. Or, you can enter values (color numbers) to select a color. Youcan select hue, saturation, and brightness (or luminosity) values byselecting Color Sliders, choosing HSB Sliders, then dragging the sliders or entering your own values.
For Your Information
Did You Know?You can identify out-of-web colors. Ifan out of web warning icon (a cube)appears below the color boxes on theColor panel, it indicates that the cur-rent color is not web safe. Web safecolors are the 216 colors used by allbrowsers, regardless of the platform.Click the cube icon to shift it to theclosest web-safe color.
You can identify out-of-gamut colors. Ifan out-of-gamut warning icon (a trian-gle with an exclamation point) appearsbelow the color boxes on the Colorpanel, it indicates that the current RGBor HSB color doesn’t have a CMYKequivalent, which means you can’t useit on a commercial project.
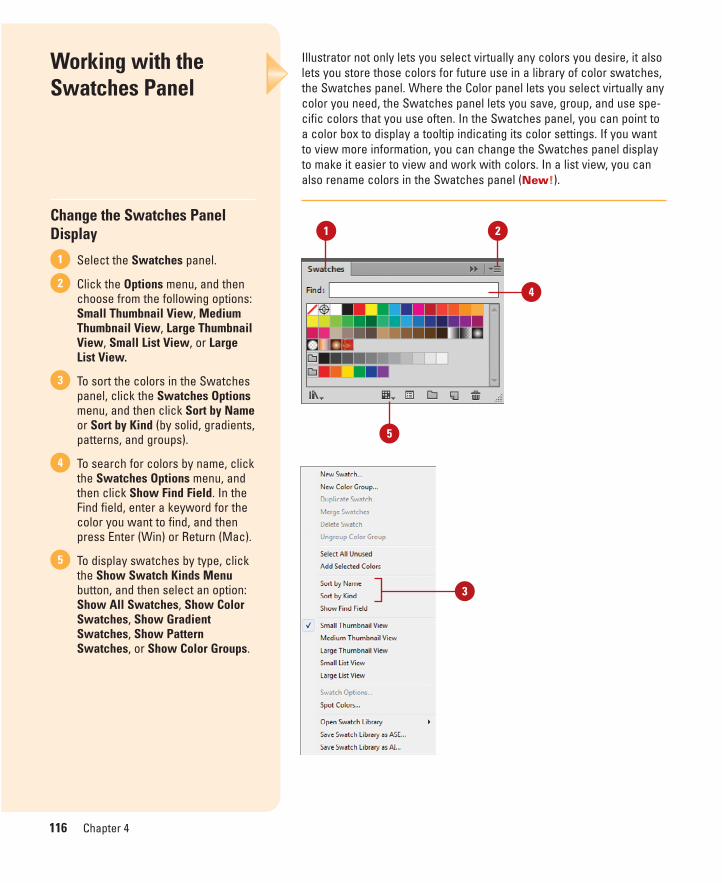
ptg8126863
116 Chapter 4
Illustrator not only lets you select virtually any colors you desire, it alsolets you store those colors for future use in a library of color swatches,the Swatches panel. Where the Color panel lets you select virtually anycolor you need, the Swatches panel lets you save, group, and use spe-cific colors that you use often. In the Swatches panel, you can point toa color box to display a tooltip indicating its color settings. If you wantto view more information, you can change the Swatches panel displayto make it easier to view and work with colors. In a list view, you canalso rename colors in the Swatches panel (New!).
Working with theSwatches Panel
Change the Swatches PanelDisplay
Select the Swatches panel.
Click the Options menu, and thenchoose from the following options:Small Thumbnail View, MediumThumbnail View, Large ThumbnailView, Small List View, or LargeList View.
To sort the colors in the Swatchespanel, click the Swatches Optionsmenu, and then click Sort by Nameor Sort by Kind (by solid, gradients,patterns, and groups).
To search for colors by name, clickthe Swatches Options menu, andthen click Show Find Field. In theFind field, enter a keyword for thecolor you want to find, and thenpress Enter (Win) or Return (Mac).
To display swatches by type, clickthe Show Swatch Kinds Menubutton, and then select an option:Show All Swatches, Show ColorSwatches, Show GradientSwatches, Show PatternSwatches, or Show Color Groups.
5
4
3
2
1
1 2
3
5
4
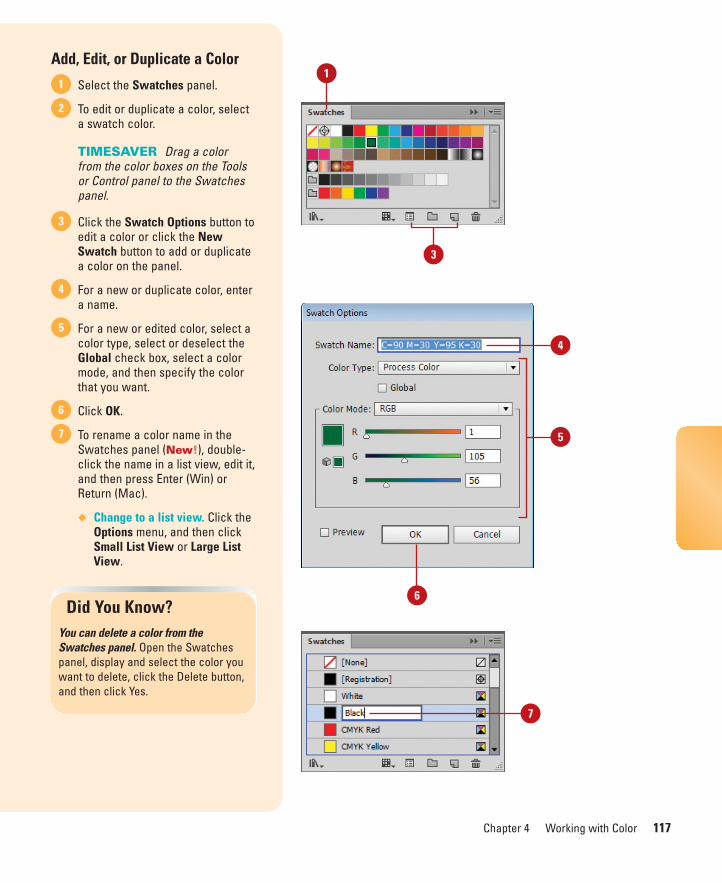
ptg8126863
Chapter 4 Working with Color 117
Add, Edit, or Duplicate a Color
Select the Swatches panel.
To edit or duplicate a color, selecta swatch color.
TIMESAVER Drag a color from the color boxes on the Toolsor Control panel to the Swatchespanel.
Click the Swatch Options button toedit a color or click the NewSwatch button to add or duplicatea color on the panel.
For a new or duplicate color, entera name.
For a new or edited color, select acolor type, select or deselect theGlobal check box, select a colormode, and then specify the colorthat you want.
Click OK.
To rename a color name in theSwatches panel (New!), double-click the name in a list view, edit it,and then press Enter (Win) orReturn (Mac).
◆ Change to a list view. Click theOptions menu, and then clickSmall List View or Large ListView.
7
6
5
4
3
2
11
5
3
Did You Know?You can delete a color from theSwatches panel. Open the Swatchespanel, display and select the color youwant to delete, click the Delete button,and then click Yes.
4
6
7

ptg8126863
118 Chapter 4
Where the Color panel lets you select virtually any color you need, theSwatches panel lets you save, group, and use specific colors that youuse often. In the Swatches panel, you can create color groups to keepcolors for a specific project together, which make it easier to find anduse. You can select colors in the Swatches panel or use the colors in aselected artwork (New!) to group together.
Creating Groups in theSwatches Panel
Create a Color Group
Select the Swatches panel.
Select the solid colors that youwant in the group.
Use Shift+click to selectcontiguous color boxes orCtrl+click (Win) or Command+click(Mac) to select noncontiguouscolor boxes.
Click the New Color Group button.
The Selected Swatches option isselected.
Enter a name.
Click OK.5
4
3
2
1 1
3
2
Did You Know?You can delete a color group from theSwatches panel. Open the Swatchespanel, display and select the colorgroup you want to delete, click theDelete button, and then click Yes.
4
5
Color group
Click to edit color group
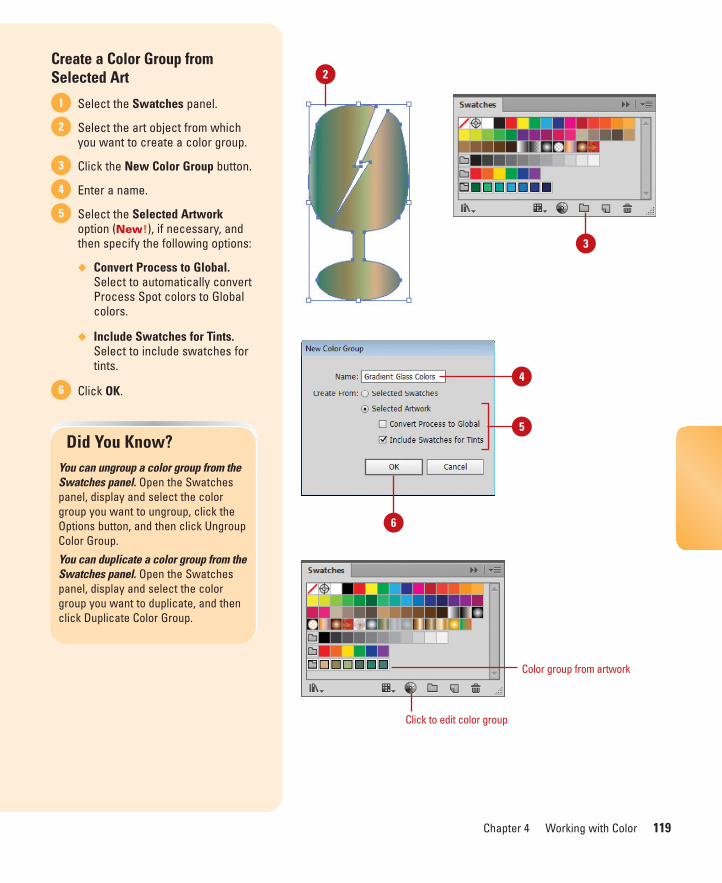
ptg8126863
Chapter 4 Working with Color 119
Create a Color Group fromSelected Art
Select the Swatches panel.
Select the art object from whichyou want to create a color group.
Click the New Color Group button.
Enter a name.
Select the Selected Artworkoption (New!), if necessary, andthen specify the following options:
◆ Convert Process to Global.Select to automatically convertProcess Spot colors to Globalcolors.
◆ Include Swatches for Tints.Select to include swatches fortints.
Click OK.6
5
4
3
2
1
Did You Know?You can ungroup a color group from theSwatches panel. Open the Swatchespanel, display and select the colorgroup you want to ungroup, click theOptions button, and then click UngroupColor Group.
You can duplicate a color group from theSwatches panel. Open the Swatchespanel, display and select the colorgroup you want to duplicate, and thenclick Duplicate Color Group.
4
6
5
Color group from artwork
Click to edit color group
2
3
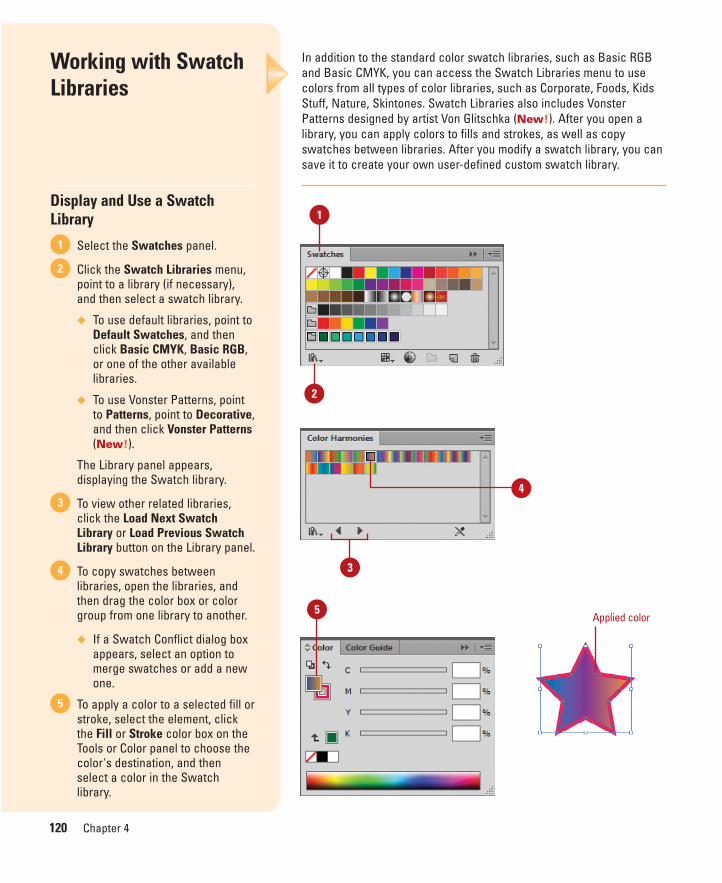
ptg8126863
120 Chapter 4
In addition to the standard color swatch libraries, such as Basic RGBand Basic CMYK, you can access the Swatch Libraries menu to usecolors from all types of color libraries, such as Corporate, Foods, KidsStuff, Nature, Skintones. Swatch Libraries also includes VonsterPatterns designed by artist Von Glitschka (New!). After you open alibrary, you can apply colors to fills and strokes, as well as copyswatches between libraries. After you modify a swatch library, you cansave it to create your own user-defined custom swatch library.
Working with SwatchLibraries
Display and Use a SwatchLibrary
Select the Swatches panel.
Click the Swatch Libraries menu,point to a library (if necessary),and then select a swatch library.
◆ To use default libraries, point toDefault Swatches, and thenclick Basic CMYK, Basic RGB,or one of the other availablelibraries.
◆ To use Vonster Patterns, pointto Patterns, point to Decorative,and then click Vonster Patterns(New!).
The Library panel appears,displaying the Swatch library.
To view other related libraries,click the Load Next SwatchLibrary or Load Previous SwatchLibrary button on the Library panel.
To copy swatches betweenlibraries, open the libraries, andthen drag the color box or colorgroup from one library to another.
◆ If a Swatch Conflict dialog boxappears, select an option tomerge swatches or add a newone.
To apply a color to a selected fill orstroke, select the element, clickthe Fill or Stroke color box on theTools or Color panel to choose thecolor's destination, and thenselect a color in the Swatchlibrary.
5
4
3
2
1
1
2
3
5Applied color
4
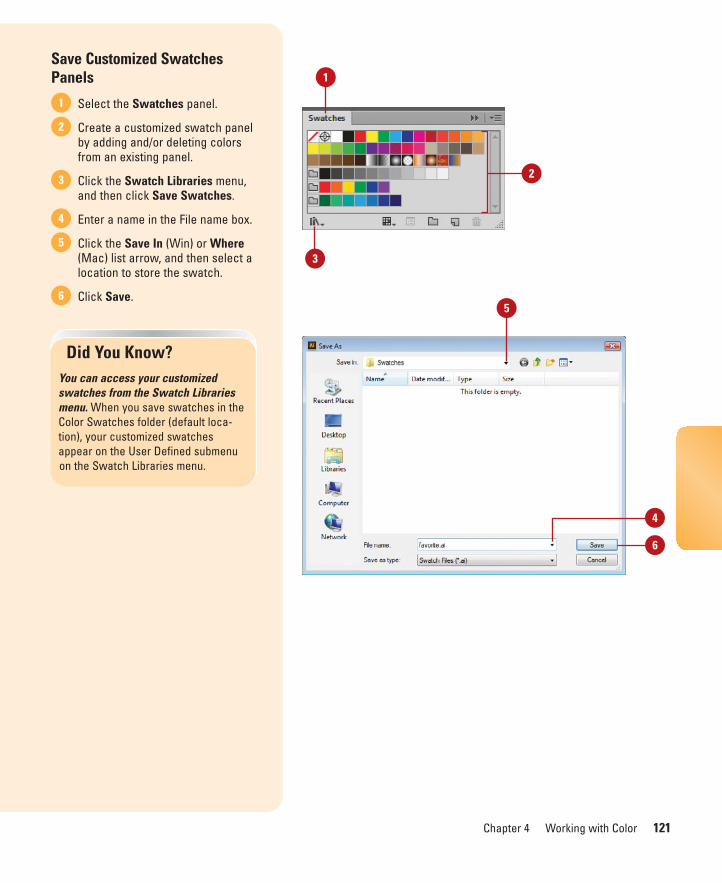
ptg8126863
Chapter 4 Working with Color 121
Save Customized SwatchesPanels
Select the Swatches panel.
Create a customized swatch panelby adding and/or deleting colorsfrom an existing panel.
Click the Swatch Libraries menu,and then click Save Swatches.
Enter a name in the File name box.
Click the Save In (Win) or Where(Mac) list arrow, and then select alocation to store the swatch.
Click Save.6
5
4
3
2
1
1
Did You Know?You can access your customizedswatches from the Swatch Librariesmenu. When you save swatches in theColor Swatches folder (default loca-tion), your customized swatchesappear on the User Defined submenuon the Swatch Libraries menu.
2
3
5
6
4

ptg8126863
122 Chapter 4
Adding Colors Using the Kuler Panel
Browse Themes
Click the Window menu, point toExtensions, and then click Kuler.
To search for a theme, click in theSearch box, enter the name of thetheme, a tag, or a creator, andthen press Enter (Win) or Return(Mac).
IMPORTANT In a search, useonly alphanumerical characters (Aa-Zz, 0-9).
To narrow down the browse list,click the popups, and then selectthe filter options you want. Someinclude Highest Rated, MostPopular, Newest.
◆ To save a search, click the firstpopup, click Custom, enter yoursearch criteria, and then clickSave.
To browse for a theme, click theView Previous Set of Themes orView Next Set of Themes button.
Select a theme in the panel. 5
4
3
2
1
The Kuler panel is an extension to Illustrator that allows you to usegroups of color, or themes in your projects. You can use the panel tobrowse thousands of color themes from the Kuler community. After youfind the theme you want, you can add it to the Swatches panel for usein your project. You can access the Kuler panel by using the Extensionssubmenu on the Window menu. The Kuler panel is also available inPhotoshop, InDesign, Flash, and Fireworks. In many of these programs,you can also create your own theme using complementary harmonyrules, share them with others in the Kuler community, and use them inIllustrator.
5
3
24
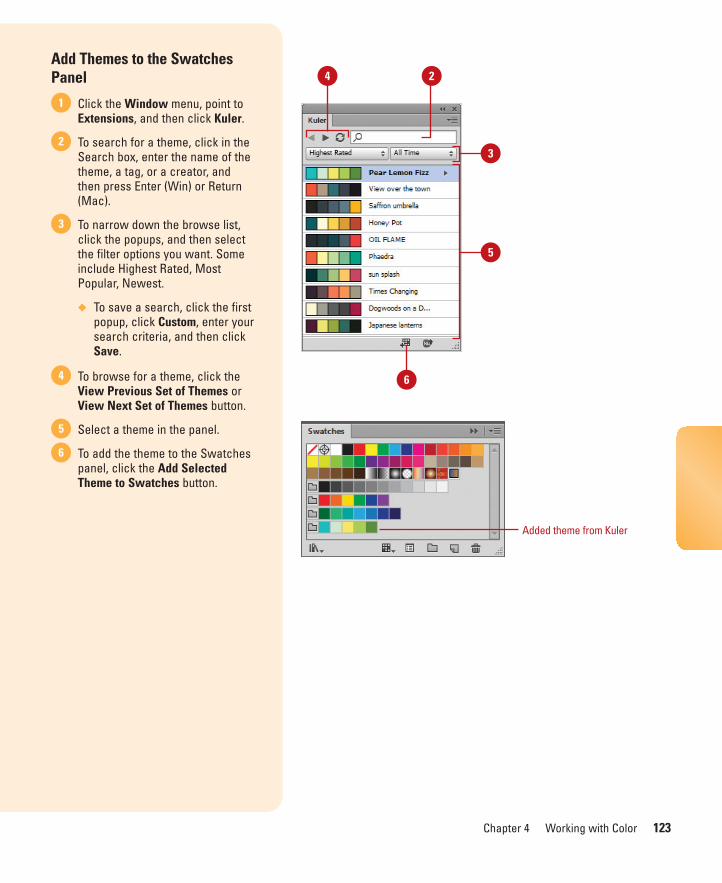
ptg8126863
Chapter 4 Working with Color 123
Add Themes to the SwatchesPanel
Click the Window menu, point toExtensions, and then click Kuler.
To search for a theme, click in theSearch box, enter the name of thetheme, a tag, or a creator, andthen press Enter (Win) or Return(Mac).
To narrow down the browse list,click the popups, and then selectthe filter options you want. Someinclude Highest Rated, MostPopular, Newest.
◆ To save a search, click the firstpopup, click Custom, enter yoursearch criteria, and then clickSave.
To browse for a theme, click theView Previous Set of Themes orView Next Set of Themes button.
Select a theme in the panel.
To add the theme to the Swatchespanel, click the Add SelectedTheme to Swatches button.
6
5
4
3
2
1
5
3
24
6
Added theme from Kuler
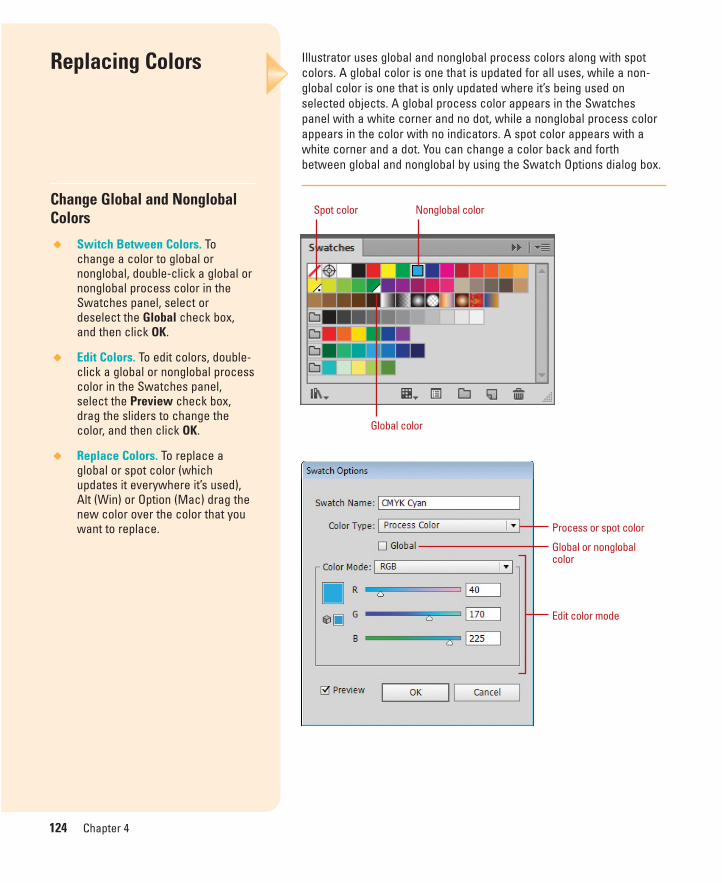
ptg8126863
124 Chapter 4
Illustrator uses global and nonglobal process colors along with spotcolors. A global color is one that is updated for all uses, while a non-global color is one that is only updated where it’s being used onselected objects. A global process color appears in the Swatchespanel with a white corner and no dot, while a nonglobal process colorappears in the color with no indicators. A spot color appears with awhite corner and a dot. You can change a color back and forthbetween global and nonglobal by using the Swatch Options dialog box.
Replacing Colors
Change Global and NonglobalColors
◆ Switch Between Colors. Tochange a color to global ornonglobal, double-click a global ornonglobal process color in theSwatches panel, select ordeselect the Global check box,and then click OK.
◆ Edit Colors. To edit colors, double-click a global or nonglobal processcolor in the Swatches panel,select the Preview check box,drag the sliders to change thecolor, and then click OK.
◆ Replace Colors. To replace aglobal or spot color (whichupdates it everywhere it’s used),Alt (Win) or Option (Mac) drag thenew color over the color that youwant to replace.
Nonglobal colorSpot color
Global color
Edit color mode
Process or spot color
Global or nonglobalcolor
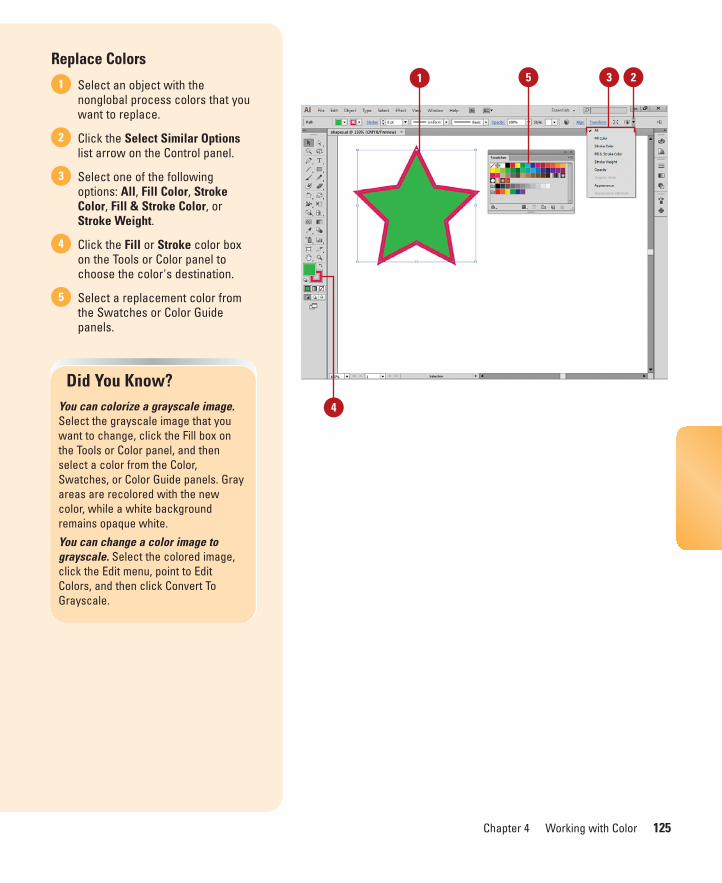
ptg8126863
Chapter 4 Working with Color 125
Replace Colors
Select an object with thenonglobal process colors that youwant to replace.
Click the Select Similar Optionslist arrow on the Control panel.
Select one of the followingoptions: All, Fill Color, StrokeColor, Fill & Stroke Color, orStroke Weight.
Click the Fill or Stroke color boxon the Tools or Color panel tochoose the color's destination.
Select a replacement color fromthe Swatches or Color Guidepanels.
5
4
3
2
1
Did You Know?You can colorize a grayscale image.Select the grayscale image that youwant to change, click the Fill box onthe Tools or Color panel, and thenselect a color from the Color,Swatches, or Color Guide panels. Grayareas are recolored with the newcolor, while a white backgroundremains opaque white.
You can change a color image tograyscale. Select the colored image,click the Edit menu, point to EditColors, and then click Convert ToGrayscale.
1 2
4
5 3
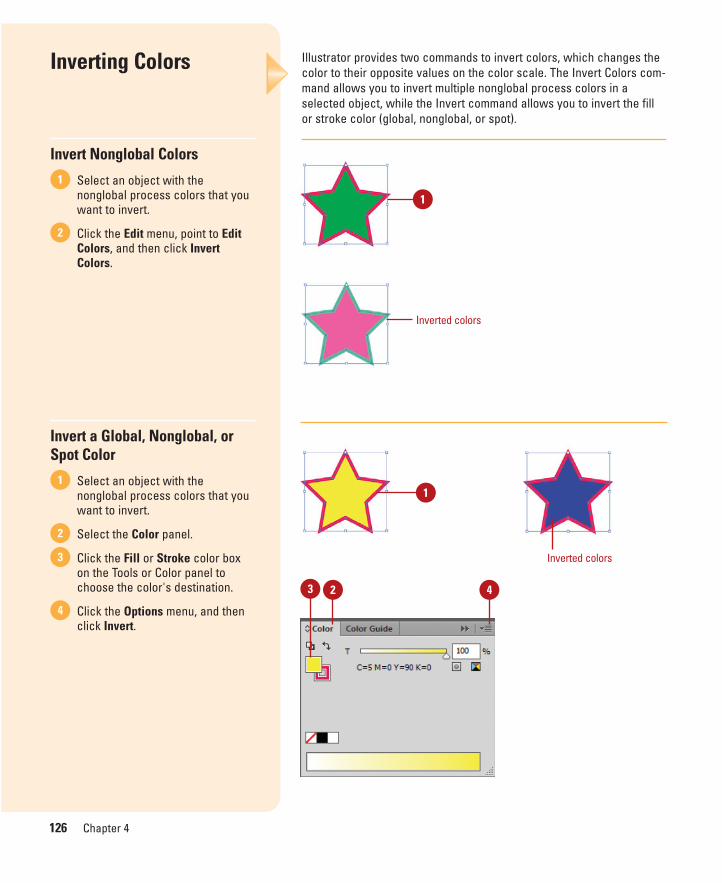
ptg8126863
126 Chapter 4
Illustrator provides two commands to invert colors, which changes thecolor to their opposite values on the color scale. The Invert Colors com-mand allows you to invert multiple nonglobal process colors in aselected object, while the Invert command allows you to invert the fillor stroke color (global, nonglobal, or spot).
Inverting Colors
Invert Nonglobal Colors
Select an object with thenonglobal process colors that youwant to invert.
Click the Edit menu, point to EditColors, and then click InvertColors.
Invert a Global, Nonglobal, orSpot Color
Select an object with thenonglobal process colors that youwant to invert.
Select the Color panel.
Click the Fill or Stroke color boxon the Tools or Color panel tochoose the color's destination.
Click the Options menu, and thenclick Invert.
4
3
2
1
2
1
1
Inverted colors
23 4
1
Inverted colors
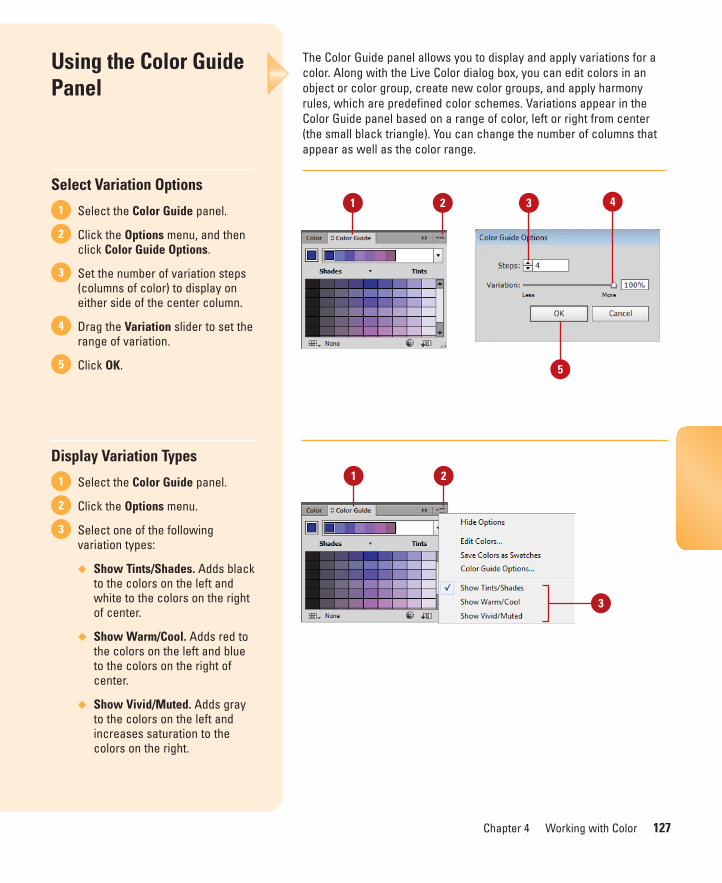
ptg8126863
Chapter 4 Working with Color 127
The Color Guide panel allows you to display and apply variations for acolor. Along with the Live Color dialog box, you can edit colors in anobject or color group, create new color groups, and apply harmonyrules, which are predefined color schemes. Variations appear in theColor Guide panel based on a range of color, left or right from center(the small black triangle). You can change the number of columns thatappear as well as the color range.
Using the Color GuidePanel
Select Variation Options
Select the Color Guide panel.
Click the Options menu, and thenclick Color Guide Options.
Set the number of variation steps(columns of color) to display oneither side of the center column.
Drag the Variation slider to set therange of variation.
Click OK.
Display Variation Types
Select the Color Guide panel.
Click the Options menu.
Select one of the followingvariation types:
◆ Show Tints/Shades. Adds blackto the colors on the left andwhite to the colors on the rightof center.
◆ Show Warm/Cool. Adds red tothe colors on the left and blueto the colors on the right ofcenter.
◆ Show Vivid/Muted. Adds grayto the colors on the left andincreases saturation to thecolors on the right.
3
2
1
5
4
3
2
1 1 2
1 2
3
5
43
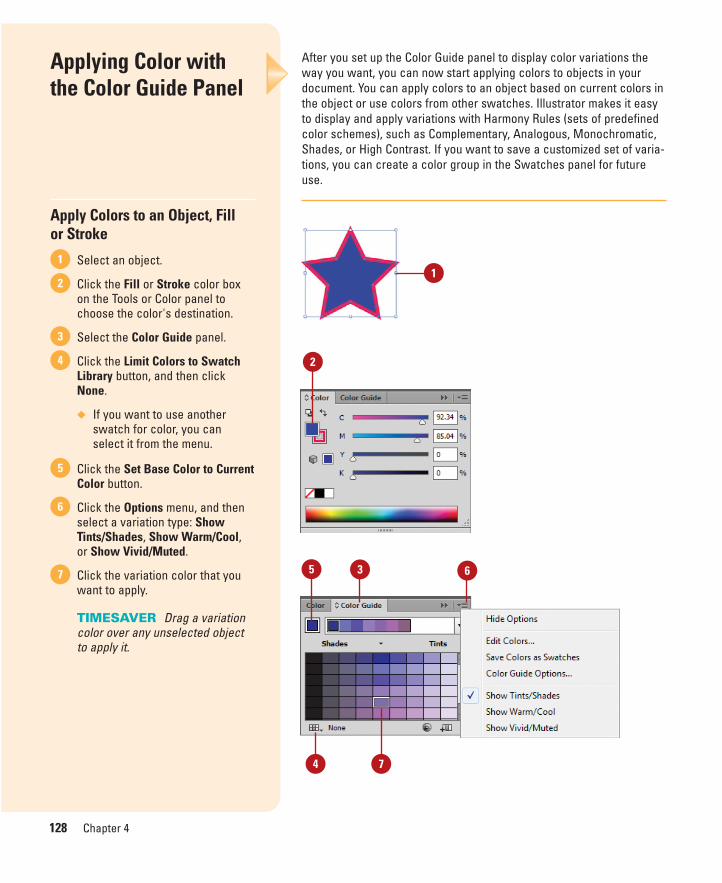
ptg8126863
128 Chapter 4
After you set up the Color Guide panel to display color variations theway you want, you can now start applying colors to objects in yourdocument. You can apply colors to an object based on current colors inthe object or use colors from other swatches. Illustrator makes it easyto display and apply variations with Harmony Rules (sets of predefinedcolor schemes), such as Complementary, Analogous, Monochromatic,Shades, or High Contrast. If you want to save a customized set of varia-tions, you can create a color group in the Swatches panel for futureuse.
Applying Color withthe Color Guide Panel
Apply Colors to an Object, Fill or Stroke
Select an object.
Click the Fill or Stroke color boxon the Tools or Color panel tochoose the color's destination.
Select the Color Guide panel.
Click the Limit Colors to SwatchLibrary button, and then clickNone.
◆ If you want to use anotherswatch for color, you canselect it from the menu.
Click the Set Base Color to CurrentColor button.
Click the Options menu, and thenselect a variation type: ShowTints/Shades, Show Warm/Cool,or Show Vivid/Muted.
Click the variation color that youwant to apply.
TIMESAVER Drag a variationcolor over any unselected objectto apply it.
7
6
5
4
3
2
1
2
3 6
4
5
7
1
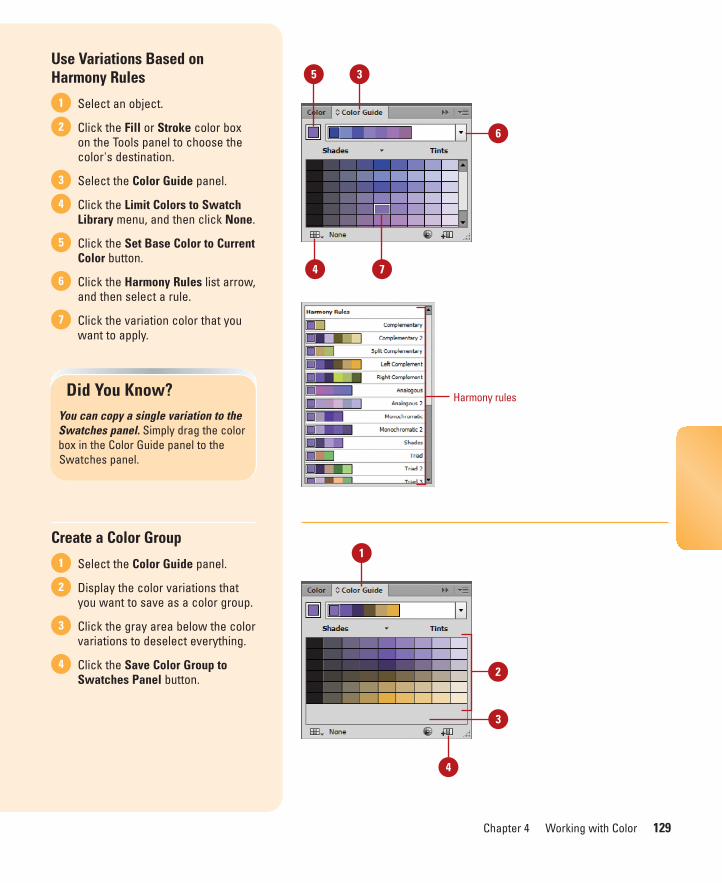
ptg8126863
Chapter 4 Working with Color 129
Use Variations Based onHarmony Rules
Select an object.
Click the Fill or Stroke color boxon the Tools panel to choose thecolor's destination.
Select the Color Guide panel.
Click the Limit Colors to SwatchLibrary menu, and then click None.
Click the Set Base Color to CurrentColor button.
Click the Harmony Rules list arrow,and then select a rule.
Click the variation color that youwant to apply.
Create a Color Group
Select the Color Guide panel.
Display the color variations thatyou want to save as a color group.
Click the gray area below the colorvariations to deselect everything.
Click the Save Color Group toSwatches Panel button.
4
3
2
1
7
6
5
4
3
2
1
Did You Know?You can copy a single variation to theSwatches panel. Simply drag the colorbox in the Color Guide panel to theSwatches panel.
35
4 7
6
1
2
3
4
Harmony rules
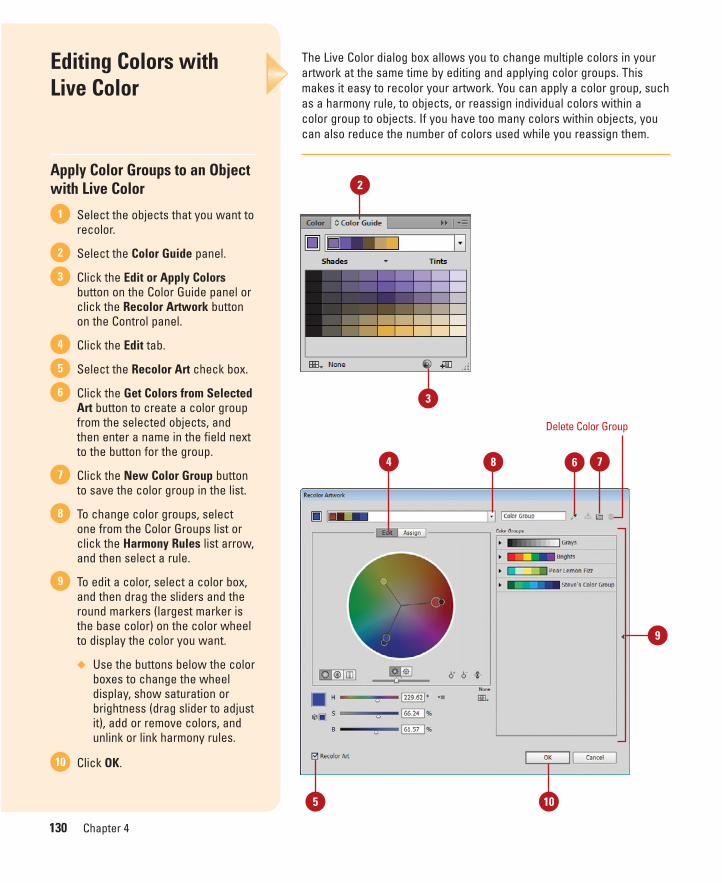
ptg8126863
130 Chapter 4
The Live Color dialog box allows you to change multiple colors in yourartwork at the same time by editing and applying color groups. Thismakes it easy to recolor your artwork. You can apply a color group, suchas a harmony rule, to objects, or reassign individual colors within acolor group to objects. If you have too many colors within objects, youcan also reduce the number of colors used while you reassign them.
Editing Colors withLive Color
Apply Color Groups to an Objectwith Live Color
Select the objects that you want torecolor.
Select the Color Guide panel.
Click the Edit or Apply Colorsbutton on the Color Guide panel orclick the Recolor Artwork buttonon the Control panel.
Click the Edit tab.
Select the Recolor Art check box.
Click the Get Colors from SelectedArt button to create a color groupfrom the selected objects, andthen enter a name in the field nextto the button for the group.
Click the New Color Group buttonto save the color group in the list.
To change color groups, selectone from the Color Groups list orclick the Harmony Rules list arrow,and then select a rule.
To edit a color, select a color box,and then drag the sliders and theround markers (largest marker isthe base color) on the color wheelto display the color you want.
◆ Use the buttons below the colorboxes to change the wheeldisplay, show saturation orbrightness (drag slider to adjustit), add or remove colors, andunlink or link harmony rules.
Click OK.10
9
8
7
6
5
4
3
2
1
3
2
4 7
5
9
10
68
Delete Color Group
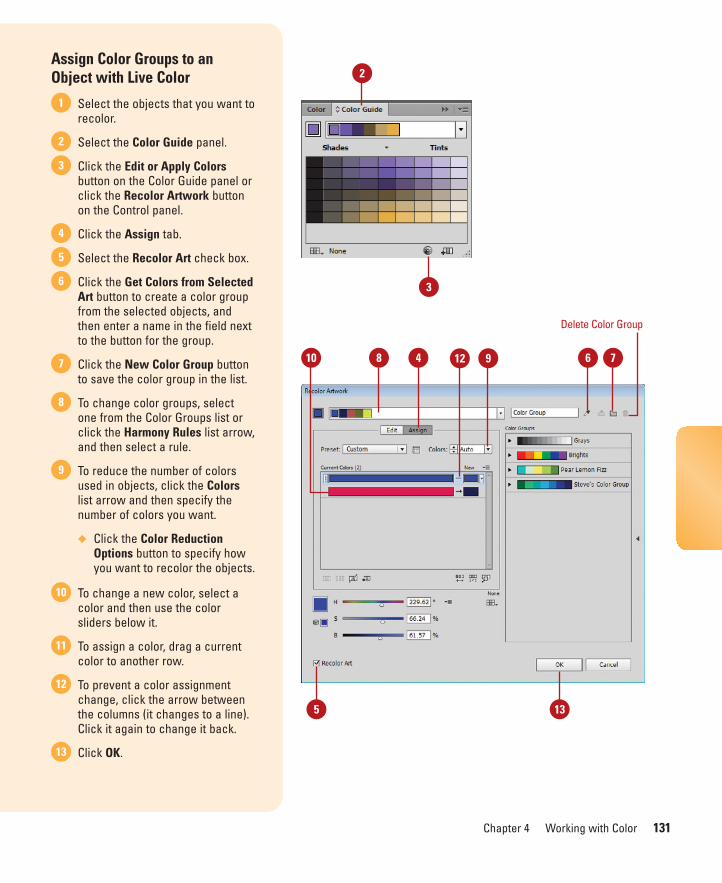
ptg8126863
Chapter 4 Working with Color 131
Assign Color Groups to anObject with Live Color
Select the objects that you want torecolor.
Select the Color Guide panel.
Click the Edit or Apply Colorsbutton on the Color Guide panel orclick the Recolor Artwork buttonon the Control panel.
Click the Assign tab.
Select the Recolor Art check box.
Click the Get Colors from SelectedArt button to create a color groupfrom the selected objects, andthen enter a name in the field nextto the button for the group.
Click the New Color Group buttonto save the color group in the list.
To change color groups, selectone from the Color Groups list orclick the Harmony Rules list arrow,and then select a rule.
To reduce the number of colorsused in objects, click the Colorslist arrow and then specify thenumber of colors you want.
◆ Click the Color ReductionOptions button to specify howyou want to recolor the objects.
To change a new color, select acolor and then use the colorsliders below it.
To assign a color, drag a currentcolor to another row.
To prevent a color assignmentchange, click the arrow betweenthe columns (it changes to a line).Click it again to change it back.
Click OK.13
12
11
10
9
8
7
6
5
4
3
2
1
2
3
5 13
9410 12 76
Delete Color Group
8
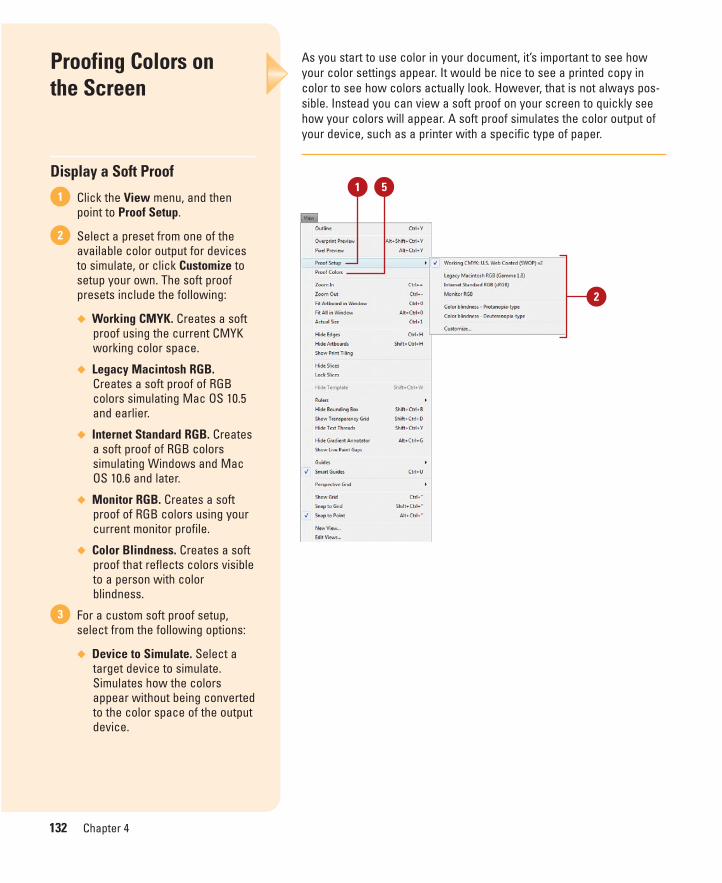
ptg8126863
132 Chapter 4
As you start to use color in your document, it’s important to see howyour color settings appear. It would be nice to see a printed copy incolor to see how colors actually look. However, that is not always pos-sible. Instead you can view a soft proof on your screen to quickly seehow your colors will appear. A soft proof simulates the color output ofyour device, such as a printer with a specific type of paper.
Proofing Colors on the Screen
Display a Soft Proof
Click the View menu, and thenpoint to Proof Setup.
Select a preset from one of theavailable color output for devicesto simulate, or click Customize tosetup your own. The soft proofpresets include the following:
◆ Working CMYK. Creates a softproof using the current CMYKworking color space.
◆ Legacy Macintosh RGB.Creates a soft proof of RGBcolors simulating Mac OS 10.5and earlier.
◆ Internet Standard RGB. Createsa soft proof of RGB colorssimulating Windows and MacOS 10.6 and later.
◆ Monitor RGB. Creates a softproof of RGB colors using yourcurrent monitor profile.
◆ Color Blindness. Creates a softproof that reflects colors visibleto a person with colorblindness.
For a custom soft proof setup,select from the following options:
◆ Device to Simulate. Select atarget device to simulate.Simulates how the colorsappear without being convertedto the color space of the outputdevice.
3
2
1
2
1 5

ptg8126863
Chapter 4 Working with Color 133
◆ Preserve CMYK or RGBNumbers. Select to use colorsas they are and not convertthem to the working colorspace. Deselect to use arendering intent option todisplay colors.
◆ Rendering Intent. Select anoption to display colors:Perceptual (for continuous-toneimages), Saturation (for vividgraphics), AbsoluteColorimetric (for colorpreservation) or RelativeColorimetric (for coloraccuracy).
◆ Simulate Paper Color. Select tosimulate the dingy white of realpaper.
◆ Simulate Black Ink. Select tosimulate dark gray for blackinstead of a solid black. Thisoption is grayed out if theSimulate Paper Color checkbox is selected.
Click OK.
Click the View menu, and thenclick Proof Colors.
5
4
3
4

ptg8126863
This page intentionally left blank
ptg8126863
Applying Fills, Strokes, andGradients
Introduction
The Stroke panel makes it easy to change stroke attributes,such as weight (width), position on the path, and its style. Theweight of a stroke refers to the thickness of the line. TheEyedropper tool on the Tools panel is another way you canquickly pick up an object’s color and stroke attributes andapply them to another object. Instead of using a solid coloras an object fill, you can create and use patterns. The processis very simple. In Illustrator, create a pattern using drawingtools, select and drag the object pattern to the Swatchespanel, and then give it a name.
A blend uses two or more objects to create a transitionalobject in between. If you’re just getting start with blends, theMake command on the Blend submenu is an easy way to cre-ate a blend. All you need to do is select the objects that youwant to use, and then choose the command. That’s it. If youwant a little more control over the way a blend turns out, youcan specify options in the Blend Options dialog box. If youwant to specify the locations where the blend takes place,you can use the Blend tool. Transparency, or the opacity levelof an object, is set in Illustrator by adjusting the Opacityoption in the Transparency or Control panels. Along with theOpacity option is the blending mode, which blends colorstogether for objects in a group as well as all the objectsbelow it.
A gradient is a smooth transition between two or morecolors in an object. You can apply one of Illustrator’s built-ingradients or create one of your own by using the Gradientpanel. There are two types of gradients: Radial (circular) andLinear (horizontal). With the Gradient tool, you can edit gradi-ent colors applied to the object by adding or changing colorstops, applying transparency, and changing gradient direc-tion (linear) or angle (radial). 5
5What You’ll Do
Apply Fill and Stroke Colors
Change Stroke Attributes and Style
Create Variable Stroke Widths
Use the Eyedropper Tool
Create, Edit, and Use Patterns as Fills
Blend Color Fills
Create Blends Automatically
Apply Blend Options
Create Blends with the Blend Tool
Modify Blend Objects
Set Transparency Options
Create Transparency Masks
Flatten Object Transparency
Control Transparency Effects
Use the Transparency Grid
Apply, Create, and Edit Gradients
Use Gradient Libraries
Use the Gradient Tool
Create a Gradient Mesh
135

ptg8126863
136 Chapter 5
Eyedroppertool
Color Picker dialog box
Color panel
Swatches panel
Stroke color
Fill color
The Tools panel provides color boxes to make it easy for you to applyfill and stroke colors. The color box in the foreground is the Fill box andthe outlined box in the background is the Stroke box. When you selectan object, fill, or stroke, the color boxes (also known as thumbnails), onthe Tools panel display the current colors. To change the fill or strokecolor, select an object, fill or stroke, select the Fill or Stroke box, andthen select a color from the Color, Swatches, or Color Guide panel, oruse the Eyedropper to apply a color from the active document.
Applying Fill andStroke Colors
Apply Colors to an Object, Fill orStroke
Select an object, fill, or strokeusing the appropriate selectiontool.
Click the Fill or Stroke color boxon the Tools or Color panel tochoose the color's destination.
Click the Color icon on the Toolspanel to apply a color or click theNone icon to apply no color.
Use any of the following methodsto change the active fill or strokecolors:
◆ Select the Swatches panel, andthen click a color swatch tochange the color.
◆ Select the Color panel, andthen specify a color using thecontrols.
◆ Select the Color Guide panel,and then click a color swatchto change the color.
◆ Select the Eyedropper tool onthe Tools panel, and then clickanywhere in the activedocument to change the color.
◆ Double-click the Fill or Strokecolor box to open the ColorPicker dialog box, select acolor or enter color values, andthen click OK.
4
3
2
1
None icon
Color icon
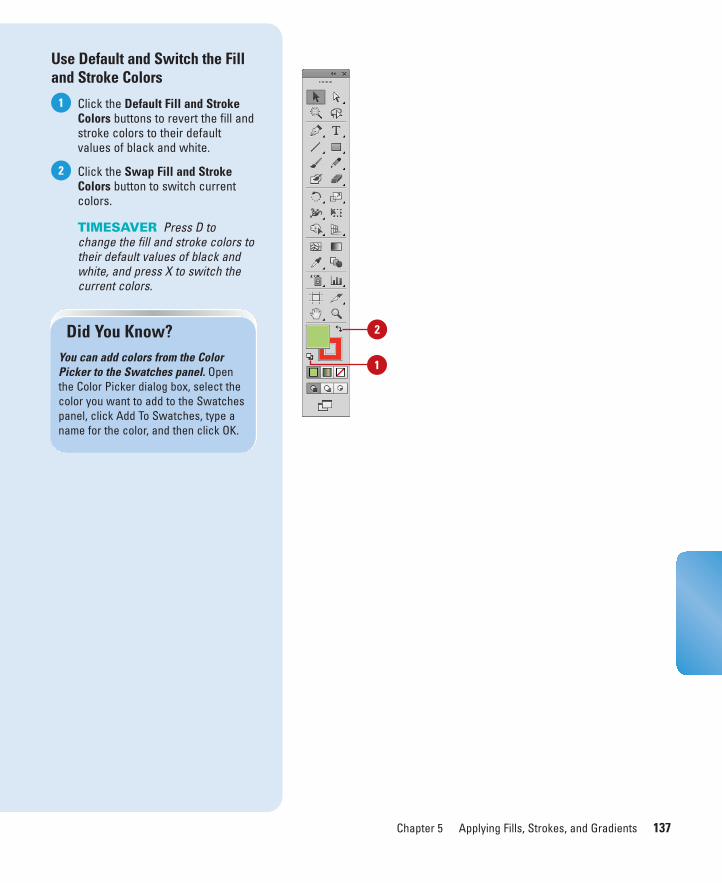
ptg8126863
Chapter 5 Applying Fills, Strokes, and Gradients 137
Use Default and Switch the Filland Stroke Colors
Click the Default Fill and StrokeColors buttons to revert the fill andstroke colors to their defaultvalues of black and white.
Click the Swap Fill and StrokeColors button to switch currentcolors.
TIMESAVER Press D tochange the fill and stroke colors totheir default values of black andwhite, and press X to switch thecurrent colors.
2
1
2
1
Did You Know?You can add colors from the ColorPicker to the Swatches panel. Openthe Color Picker dialog box, select thecolor you want to add to the Swatchespanel, click Add To Swatches, type aname for the color, and then click OK.

ptg8126863
138 Chapter 5
The Stroke panel makes it easy to change stroke attributes, such asweight (width), position on the path, and its style. The weight of astroke represents the thickness of the line. A weight smaller than .25may not print and a weight of 0 removes the stroke. In addition to thewidth of a stroke, you can also specify the position (known as align-ment) of the stroke on the path (either center, inside, or outside) andchange the caps or joins of a stroke to sharpen or round endpoints andcorners. A cap is the end of an open line, while a join is a corner.
Changing StrokeAttributes
Change the Weight of a Stroke
Select one or more objects.
Select the Stroke panel.
Specify or enter a weight in theStroke or Control panel.
◆ Click the up or down arrow, orShift+click to change theweight by a larger interval.
Change the Alignment of aStroke on the Path
Select one or more closed objects.
Select the Stroke panel.
Click one of the followingalignment buttons:
◆ Align Stroke to Center.
◆ Align Stroke to Inside.
◆ Align Stroke to Outside.
3
2
1
3
2
1 1 2 3
21 3
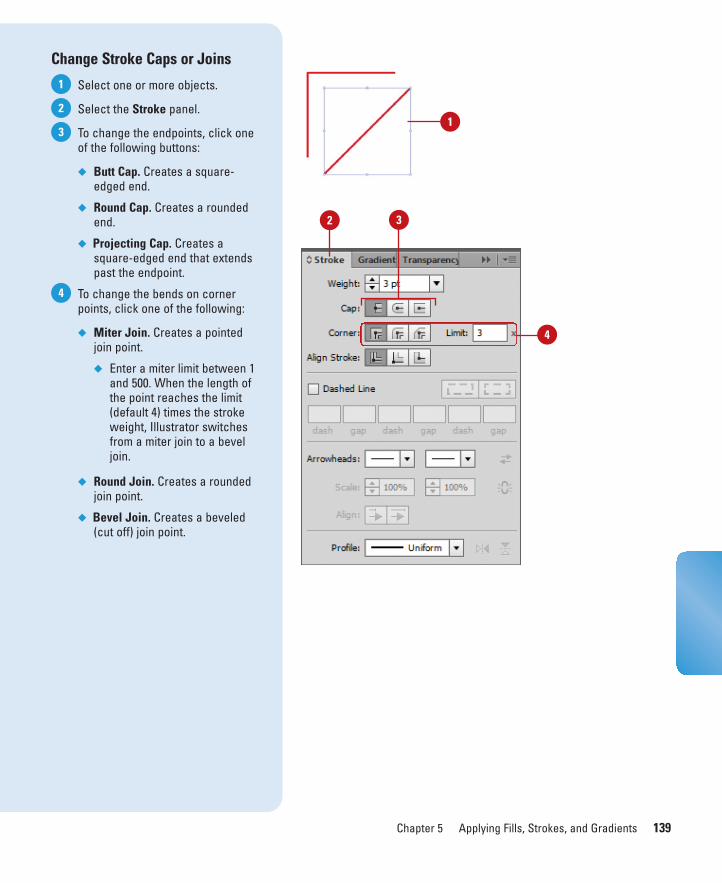
ptg8126863
Chapter 5 Applying Fills, Strokes, and Gradients 139
Change Stroke Caps or Joins
Select one or more objects.
Select the Stroke panel.
To change the endpoints, click oneof the following buttons:
◆ Butt Cap. Creates a square-edged end.
◆ Round Cap. Creates a roundedend.
◆ Projecting Cap. Creates asquare-edged end that extendspast the endpoint.
To change the bends on cornerpoints, click one of the following:
◆ Miter Join. Creates a pointedjoin point.
◆ Enter a miter limit between 1and 500. When the length ofthe point reaches the limit(default 4) times the strokeweight, Illustrator switchesfrom a miter join to a beveljoin.
◆ Round Join. Creates a roundedjoin point.
◆ Bevel Join. Creates a beveled(cut off) join point.
4
3
2
1
1
2
4
3

ptg8126863
140 Chapter 5
Style is what stands out on the page. You can change the stroke styleby applying dashes and arrowheads using the Stroke panel. When youcreate a dashed stroke, you can choose to align the dashes aroundcorners and at the end of open paths or preserve the dashes and gapsin the stroke. In addition to dashes, you can also add and define anarrowhead to a stroke. After you add an arrowhead to a stroke, you canadjust its alignment and scale.
Changing Stroke Style
Create a Dashed Stroke
Select one or more objects.
Select the Stroke panel.
Select the Dashed Line check box.
Click the Preserve Exact Dash andGap Lengths or Aligns Dashes toCorners and Path Ends, AdjustingLengths to Fit icon.
Enter a value in the first Dash box.
If you don’t enter any more values,the value in the first box is usedfor the rest of the boxes.
Enter a value in the first Gap box.
Fill in the remaining boxes.
◆ To create a dotted line, click theRound Cap button, enter a dashvalue of 0, and then enter a gapvalue greater than or equal tothe stroke weight.
Click one of the Cap buttons tosharpen or round endpoints.
8
7
6
5
4
3
2
1
5 6
1
23
7
8
4
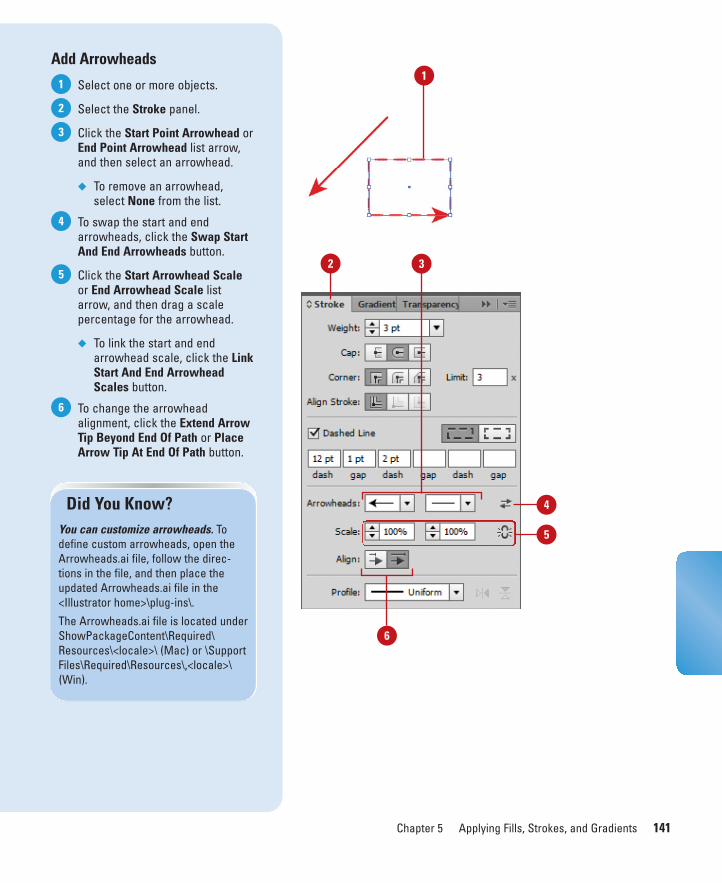
ptg8126863
Chapter 5 Applying Fills, Strokes, and Gradients 141
Add Arrowheads
Select one or more objects.
Select the Stroke panel.
Click the Start Point Arrowhead orEnd Point Arrowhead list arrow,and then select an arrowhead.
◆ To remove an arrowhead,select None from the list.
To swap the start and endarrowheads, click the Swap StartAnd End Arrowheads button.
Click the Start Arrowhead Scaleor End Arrowhead Scale listarrow, and then drag a scalepercentage for the arrowhead.
◆ To link the start and endarrowhead scale, click the LinkStart And End ArrowheadScales button.
To change the arrowheadalignment, click the Extend ArrowTip Beyond End Of Path or PlaceArrow Tip At End Of Path button.
6
5
4
3
2
1
Did You Know?You can customize arrowheads. Todefine custom arrowheads, open theArrowheads.ai file, follow the direc-tions in the file, and then place theupdated Arrowheads.ai file in the<Illustrator home>\plug-ins\.
The Arrowheads.ai file is located underShowPackageContent\Required\Resources\<locale>\ (Mac) or \SupportFiles\Required\Resources\,<locale>\(Win).
1
2
5
3
4
6
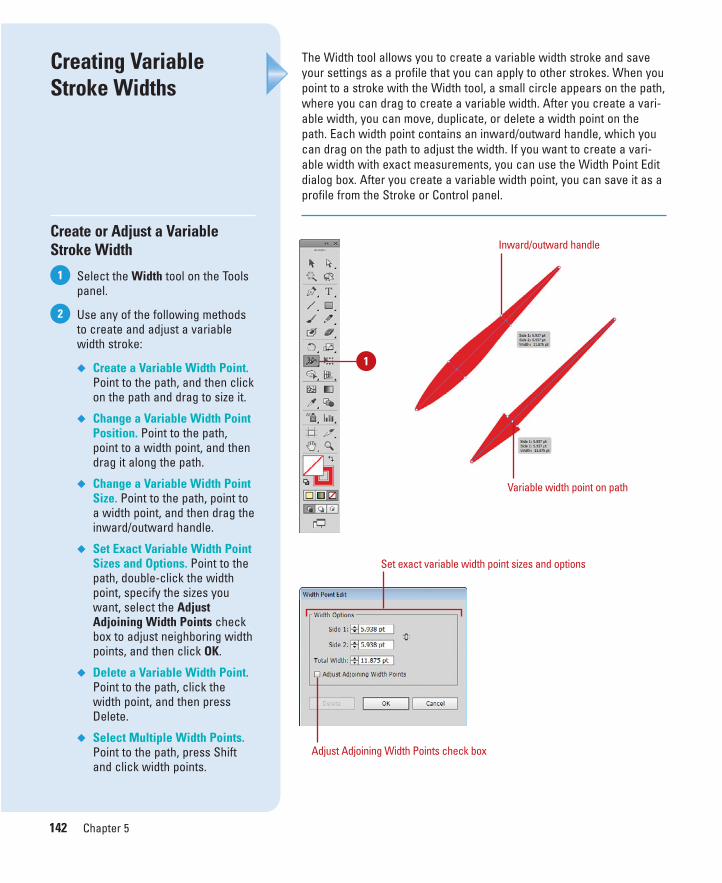
ptg8126863
142 Chapter 5
The Width tool allows you to create a variable width stroke and saveyour settings as a profile that you can apply to other strokes. When youpoint to a stroke with the Width tool, a small circle appears on the path,where you can drag to create a variable width. After you create a vari-able width, you can move, duplicate, or delete a width point on thepath. Each width point contains an inward/outward handle, which youcan drag on the path to adjust the width. If you want to create a vari-able width with exact measurements, you can use the Width Point Editdialog box. After you create a variable width point, you can save it as aprofile from the Stroke or Control panel.
Creating VariableStroke Widths
Create or Adjust a VariableStroke Width
Select the Width tool on the Toolspanel.
Use any of the following methodsto create and adjust a variablewidth stroke:
◆ Create a Variable Width Point.Point to the path, and then clickon the path and drag to size it.
◆ Change a Variable Width PointPosition. Point to the path,point to a width point, and thendrag it along the path.
◆ Change a Variable Width PointSize. Point to the path, point toa width point, and then drag theinward/outward handle.
◆ Set Exact Variable Width PointSizes and Options. Point to thepath, double-click the widthpoint, specify the sizes youwant, select the AdjustAdjoining Width Points checkbox to adjust neighboring widthpoints, and then click OK.
◆ Delete a Variable Width Point.Point to the path, click thewidth point, and then pressDelete.
◆ Select Multiple Width Points.Point to the path, press Shiftand click width points.
2
1
1
Set exact variable width point sizes and options
Adjust Adjoining Width Points check box
Variable width point on path
Inward/outward handle

ptg8126863
Chapter 5 Applying Fills, Strokes, and Gradients 143
Width Control Keyboard Shortcuts (Win/Mac)
Create non-uniform widths Alt/Option+drag
Create a copy of a width point Alt/Option+drag
Copy/move all points along the path Alt/Option+Shift+drag
Move multiple width points Shift+drag
Select multiple width points Shift+click
Delete selected width points Delete
Deselect a width point Esc
Width Tool Shortcuts
Create and Apply a Stroke Width Profile
Select the Width tool on the Toolspanel.
Select the Stroke panel.
Use any of the following methodsto create or adjust a variable widthstroke:
◆ Create a Width Profile. Createor select a variable strokewidth, click the Profile listarrow on the Stroke panel, clickthe Add To Profiles button, typea name, and then click OK.
◆ Apply a Width Profile. Select apath, click the Profile list arrowon the Stroke panel, and thenselect the width profile youwant.
◆ Remove a Width Profile. Selectthe variable stroke width youwant to remove, click theProfile list arrow on the Strokepanel, and then click Uniform.
◆ Flip a Width Profile. Click theProfile list arrow on the Strokepanel, select the profile youwant to flip, and then click theFlip Along or Flip Acrossbutton.
◆ Delete a Width Profile. Clickthe Profile list arrow on theStroke panel, select the profileyou want to delete, and thenclick the Delete Profile button,and then click Yes.
◆ Restore the Default WidthProfile Set. Click the Profile listarrow on the Stroke panel, clickthe Reset Profiles button, andthen click OK. This removes anycustom saved profiles.
3
2
1
1
Variable width stroke
2Profile list arrow
Add To Profiles,Delete Profile,Reset Profiles
Flip buttons

ptg8126863
144 Chapter 5
The Eyedropper tool on the Tools panel makes it easy to quickly pick upa color from one area of your artwork and apply it to another area.When you click an object with the Eyedropper tool, it picks up theobject’s color and stroke attributes and displays them in the Tools,Color, and Stroke panels. You can pick up attributes from any type ofobject, even a graphic image and the object doesn’t need to beselected. If an object is selected, the color and stroke attributes areapplied to the selected object. The Eyedropper tool also providesoptions for you to customize the attributes—such as Appearance,Transparency, Focal Fill and Focal Stroke, Character Style andParagraph Style—that you want to pick up with the tool.
Using the EyedropperTool
Apply Colors and Attributes withthe Eyedropper Tool
If you want to apply the pick upcolor and attributes to one or moreobjects, then select them.
Select the Eyedropper tool on theTools panel.
Click an object in any window thatcontains the color and attributesthat you want to pick up and apply.
◆ If you want to apply colorattributes from the currentlyselected object and apply themto another object you select,Alt+click (Win) or Option+click(Mac) the objects.
◆ To have the Eyedropper toolonly pick up an object’s colorand not other attributes, clickthe Fill or Stroke box on theTools or Color panel, and thenShift+click the color to bepicked up.
3
2
1
2
1 3
Applied color
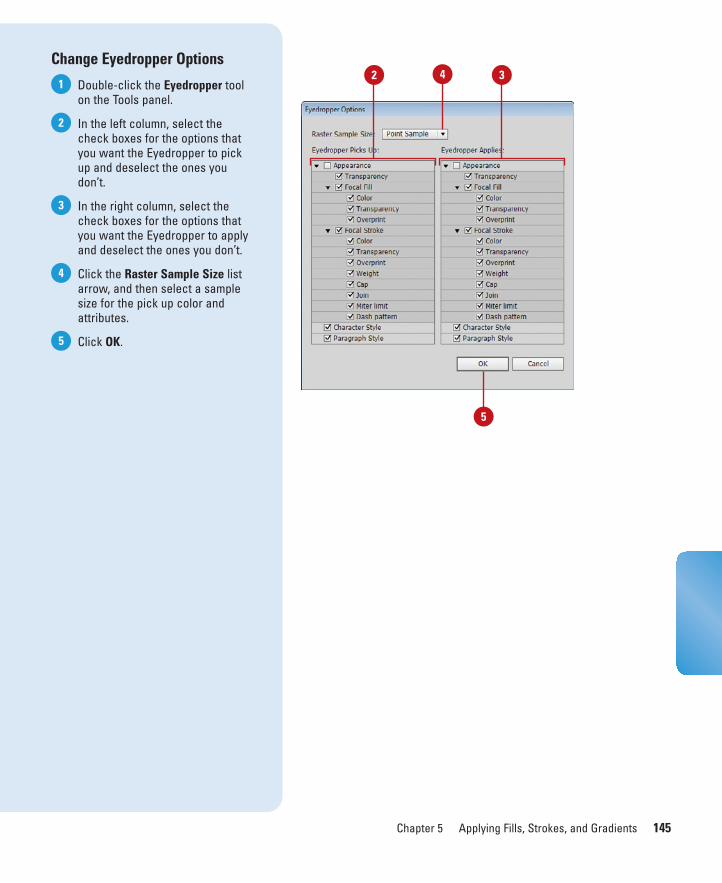
ptg8126863
Chapter 5 Applying Fills, Strokes, and Gradients 145
Change Eyedropper Options
Double-click the Eyedropper toolon the Tools panel.
In the left column, select thecheck boxes for the options thatyou want the Eyedropper to pickup and deselect the ones youdon’t.
In the right column, select thecheck boxes for the options thatyou want the Eyedropper to applyand deselect the ones you don’t.
Click the Raster Sample Size listarrow, and then select a samplesize for the pick up color andattributes.
Click OK.5
4
3
2
132
5
4

ptg8126863
146 Chapter 5
Instead of using solid color or gradients as object fills, you can createand use patterns. The process is very simple. In Illustrator, use existingartwork (nothing with a painted pattern) or create a pattern usingtools—such as Rectangle, Ellipse, Polygon, Arc, Spiral, Star, or Flare—on the Tools panel, and then drag it to the Swatches panel. If you wantto create a more complex pattern, you can make and edit patternsusing the Pattern Options panel (New!). The pattern consists of agroup of objects, which you can also edit using Isolation Mode.
Creating Patterns forFills
Create a Pattern for Fills
Use existing or draw objects to beused as a pattern.
Select the Selection tool on theTools panel.
Select all the objects.
Click the Object menu, point toPattern, and then click Make.
If prompted with an alert dialogbox, click OK.
The object is added to theSwatches panel, the PatternOptions panel opens, and thepattern appears in Isolation Mode.
Type a name for the pattern.
Click the Tile Type list arrow, andthen select a layout: Grid, Brick byRow, Brick by Column, Hex byColumn, or Hex by Row.
◆ Brick Offset. If you select oneof the brick title types, click theBrick Offset list arrow, andthen select an offset.
To adjust tiling manually, click thePattern Tile Tool button, and thendrag a white square handle toresize it.
Specify any of the followingoptions:
◆ Width and Height. If you wantan exact width and height,specify the values you want.
9
8
7
6
5
4
3
2
1
3
2
Pattern added to Swatches panel
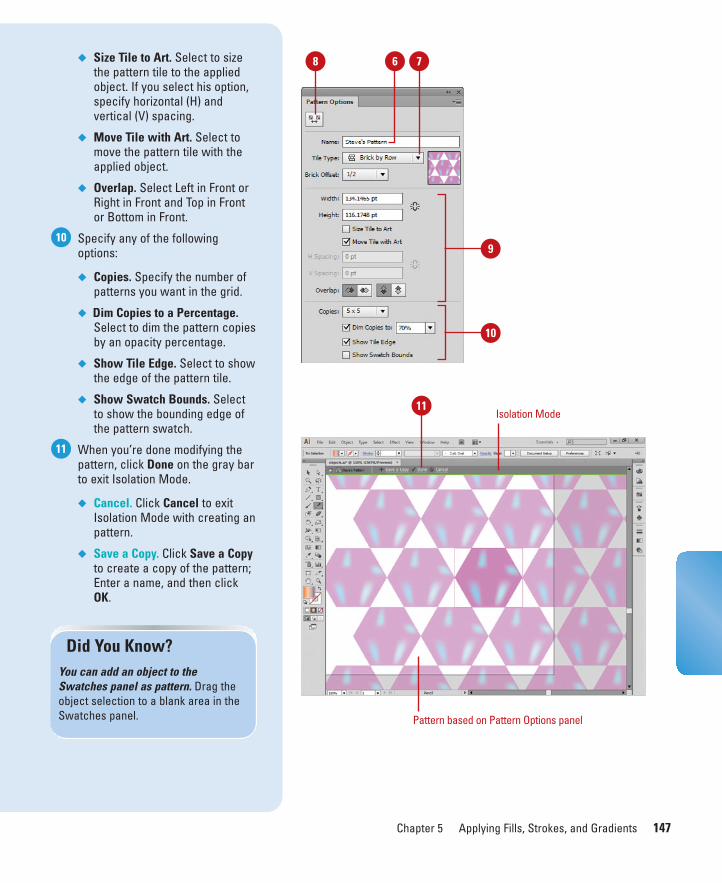
ptg8126863
Chapter 5 Applying Fills, Strokes, and Gradients 147
◆ Size Tile to Art. Select to sizethe pattern tile to the appliedobject. If you select his option,specify horizontal (H) andvertical (V) spacing.
◆ Move Tile with Art. Select tomove the pattern tile with theapplied object.
◆ Overlap. Select Left in Front orRight in Front and Top in Frontor Bottom in Front.
Specify any of the followingoptions:
◆ Copies. Specify the number ofpatterns you want in the grid.
◆ Dim Copies to a Percentage.Select to dim the pattern copiesby an opacity percentage.
◆ Show Tile Edge. Select to showthe edge of the pattern tile.
◆ Show Swatch Bounds. Selectto show the bounding edge ofthe pattern swatch.
When you’re done modifying thepattern, click Done on the gray barto exit Isolation Mode.
◆ Cancel. Click Cancel to exitIsolation Mode with creating anpattern.
◆ Save a Copy. Click Save a Copyto create a copy of the pattern;Enter a name, and then clickOK.
11
10
11Isolation Mode
Pattern based on Pattern Options panel
6
9
7
10
Did You Know?You can add an object to theSwatches panel as pattern. Drag theobject selection to a blank area in theSwatches panel.
8
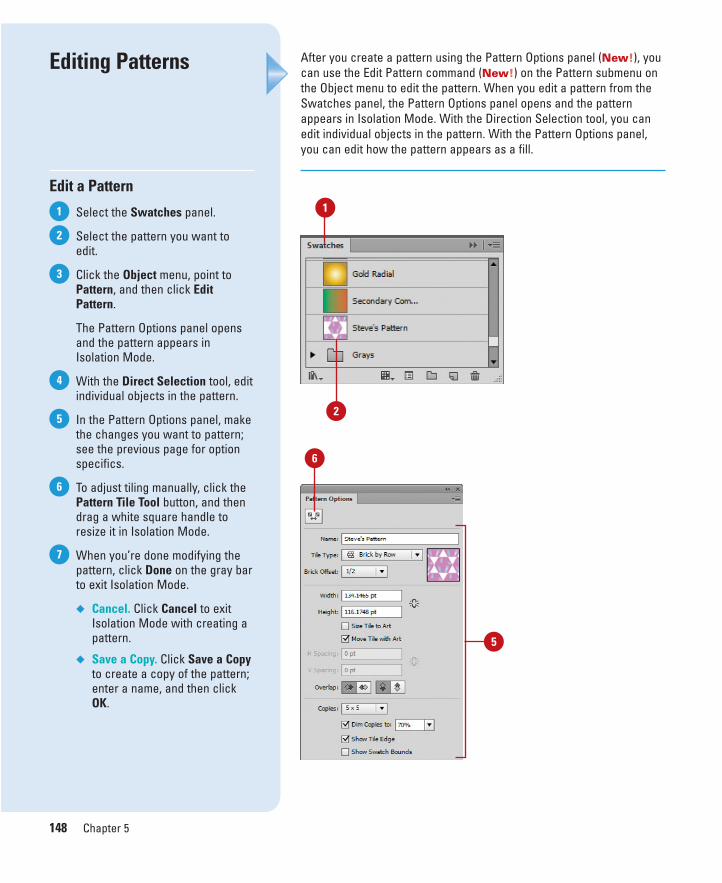
ptg8126863
148 Chapter 5
After you create a pattern using the Pattern Options panel (New!), youcan use the Edit Pattern command (New!) on the Pattern submenu onthe Object menu to edit the pattern. When you edit a pattern from theSwatches panel, the Pattern Options panel opens and the patternappears in Isolation Mode. With the Direction Selection tool, you canedit individual objects in the pattern. With the Pattern Options panel,you can edit how the pattern appears as a fill.
Editing Patterns
Edit a Pattern
Select the Swatches panel.
Select the pattern you want toedit.
Click the Object menu, point toPattern, and then click EditPattern.
The Pattern Options panel opensand the pattern appears inIsolation Mode.
With the Direct Selection tool, editindividual objects in the pattern.
In the Pattern Options panel, makethe changes you want to pattern;see the previous page for optionspecifics.
To adjust tiling manually, click thePattern Tile Tool button, and thendrag a white square handle toresize it in Isolation Mode.
When you’re done modifying thepattern, click Done on the gray barto exit Isolation Mode.
◆ Cancel. Click Cancel to exitIsolation Mode with creating apattern.
◆ Save a Copy. Click Save a Copyto create a copy of the pattern;enter a name, and then clickOK.
7
6
5
4
3
2
1 1
2
5
6
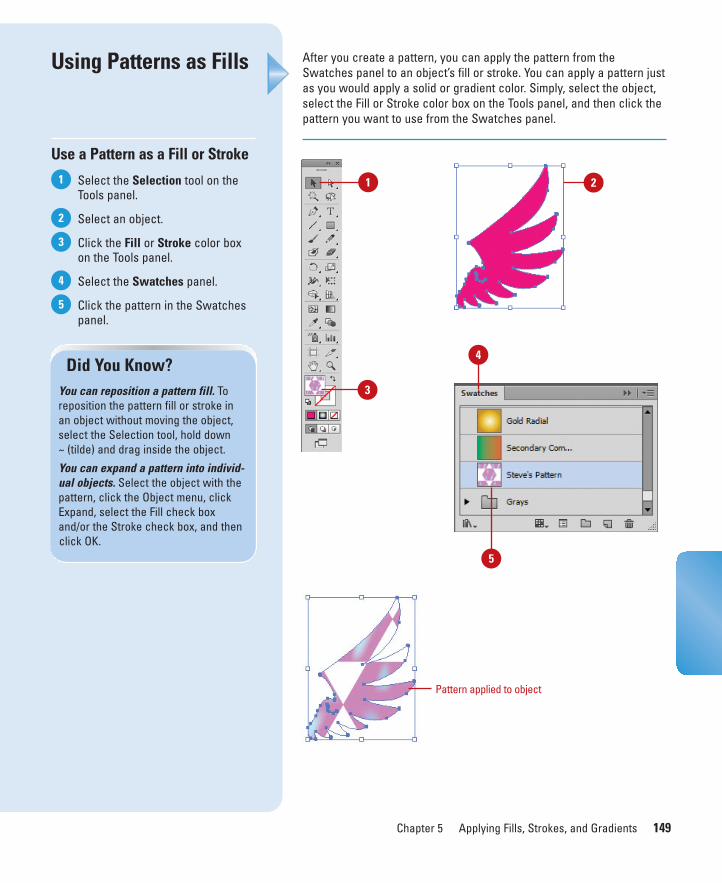
ptg8126863
Chapter 5 Applying Fills, Strokes, and Gradients 149
After you create a pattern, you can apply the pattern from theSwatches panel to an object’s fill or stroke. You can apply a pattern justas you would apply a solid or gradient color. Simply, select the object,select the Fill or Stroke color box on the Tools panel, and then click thepattern you want to use from the Swatches panel.
Using Patterns as Fills
Use a Pattern as a Fill or Stroke
Select the Selection tool on theTools panel.
Select an object.
Click the Fill or Stroke color boxon the Tools panel.
Select the Swatches panel.
Click the pattern in the Swatchespanel.
5
4
3
2
1 1
5
3
4
2
Pattern applied to object
Did You Know?You can reposition a pattern fill. Toreposition the pattern fill or stroke inan object without moving the object,select the Selection tool, hold down ~ (tilde) and drag inside the object.
You can expand a pattern into individ-ual objects. Select the object with thepattern, click the Object menu, clickExpand, select the Fill check boxand/or the Stroke check box, and thenclick OK.
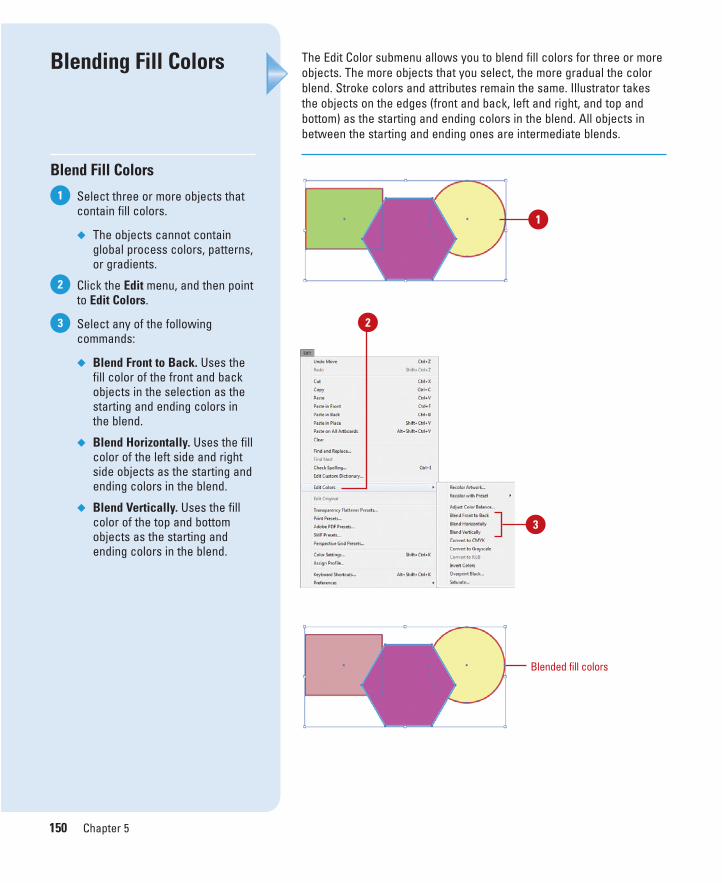
ptg8126863
150 Chapter 5
The Edit Color submenu allows you to blend fill colors for three or moreobjects. The more objects that you select, the more gradual the colorblend. Stroke colors and attributes remain the same. Illustrator takesthe objects on the edges (front and back, left and right, and top andbottom) as the starting and ending colors in the blend. All objects inbetween the starting and ending ones are intermediate blends.
Blending Fill Colors
Blend Fill Colors
Select three or more objects thatcontain fill colors.
◆ The objects cannot containglobal process colors, patterns,or gradients.
Click the Edit menu, and then pointto Edit Colors.
Select any of the followingcommands:
◆ Blend Front to Back. Uses thefill color of the front and backobjects in the selection as thestarting and ending colors inthe blend.
◆ Blend Horizontally. Uses the fillcolor of the left side and rightside objects as the starting andending colors in the blend.
◆ Blend Vertically. Uses the fillcolor of the top and bottomobjects as the starting andending colors in the blend.
3
2
1
1
2
3
Blended fill colors
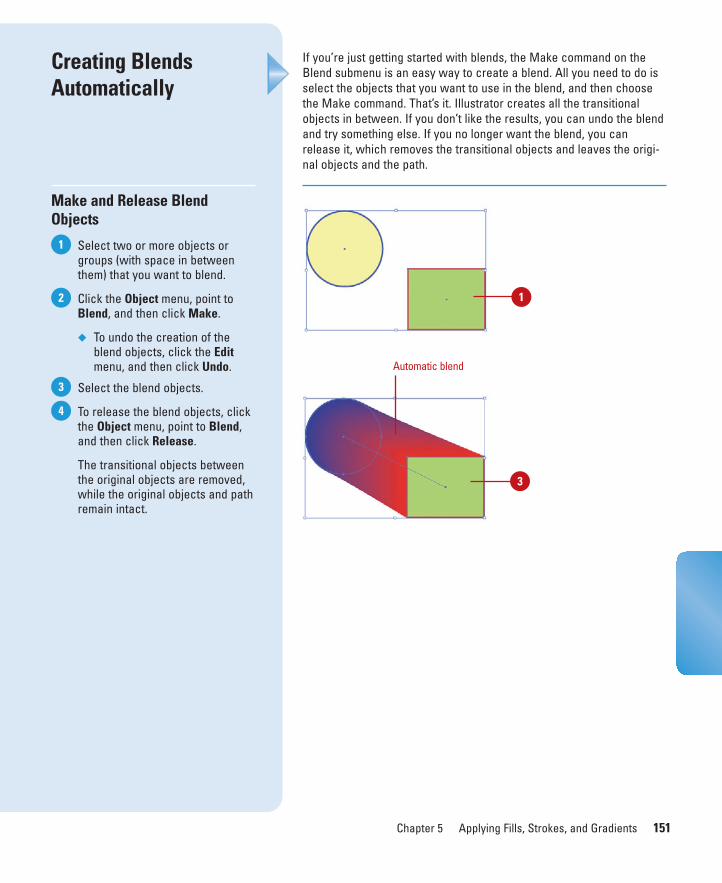
ptg8126863
Chapter 5 Applying Fills, Strokes, and Gradients 151
If you’re just getting started with blends, the Make command on theBlend submenu is an easy way to create a blend. All you need to do isselect the objects that you want to use in the blend, and then choosethe Make command. That’s it. Illustrator creates all the transitionalobjects in between. If you don’t like the results, you can undo the blendand try something else. If you no longer want the blend, you canrelease it, which removes the transitional objects and leaves the origi-nal objects and the path.
Creating BlendsAutomatically
Make and Release BlendObjects
Select two or more objects orgroups (with space in betweenthem) that you want to blend.
Click the Object menu, point toBlend, and then click Make.
◆ To undo the creation of theblend objects, click the Editmenu, and then click Undo.
Select the blend objects.
To release the blend objects, clickthe Object menu, point to Blend,and then click Release.
The transitional objects betweenthe original objects are removed,while the original objects and pathremain intact.
4
3
2
1
1
3
Automatic blend
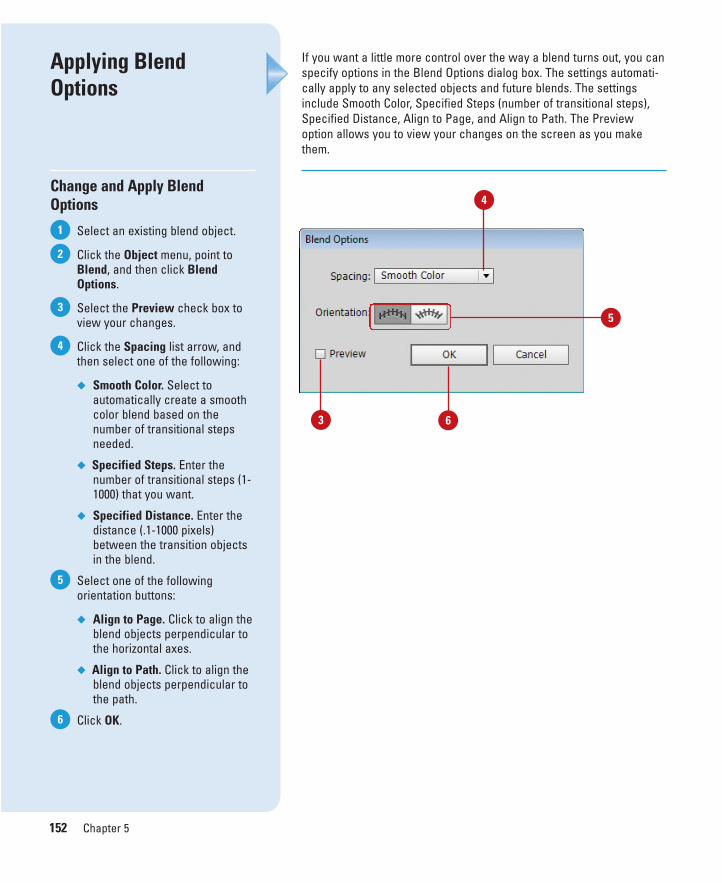
ptg8126863
152 Chapter 5
If you want a little more control over the way a blend turns out, you canspecify options in the Blend Options dialog box. The settings automati-cally apply to any selected objects and future blends. The settingsinclude Smooth Color, Specified Steps (number of transitional steps),Specified Distance, Align to Page, and Align to Path. The Previewoption allows you to view your changes on the screen as you makethem.
Applying BlendOptions
Change and Apply BlendOptions
Select an existing blend object.
Click the Object menu, point toBlend, and then click BlendOptions.
Select the Preview check box toview your changes.
Click the Spacing list arrow, andthen select one of the following:
◆ Smooth Color. Select toautomatically create a smoothcolor blend based on thenumber of transitional stepsneeded.
◆ Specified Steps. Enter thenumber of transitional steps (1-1000) that you want.
◆ Specified Distance. Enter thedistance (.1-1000 pixels)between the transition objectsin the blend.
Select one of the followingorientation buttons:
◆ Align to Page. Click to align theblend objects perpendicular tothe horizontal axes.
◆ Align to Path. Click to align theblend objects perpendicular tothe path.
Click OK.6
5
4
3
2
1
4
3 6
5

ptg8126863
Chapter 5 Applying Fills, Strokes, and Gradients 153
If you want to specify the locations where the blend takes place, youcan use the Blend tool on the Tools panel. The Blend tool allows you toselect the anchor points on the objects to determine the direction ofthe blend. For the best results and smoothest transitions, click anchorpoints on corresponding locations on the objects. If you’re not surewhich anchor points to use, you can also select an object’s fill to letIllustrator select the anchor point for you. Experiment with it to deter-mine what works best for you.
Creating Blends withthe Blend Tool
Create a Blend with the BlendTool
Select two or more objects orgroups (with space in betweenthem) that you want to blend.
Select the Blend tool on the Toolspanel.
Click the fill of the first object (notthe center point) to let Illustratordetermine an anchor point to use,or click the anchor point that youwant to use.
Click the fill or an anchor point onthe next object. If the path is open,click an endpoint.
For the best results and smoothesttransitions, click anchor points oncorresponding locations on theobjects.
Continue to click correspondinganchor points on the selectedobjects.
To release the blend objects,select the blend, click the Objectmenu, point to Blend, and thenclick Release.
6
5
4
3
2
1
2
1
43
Blend
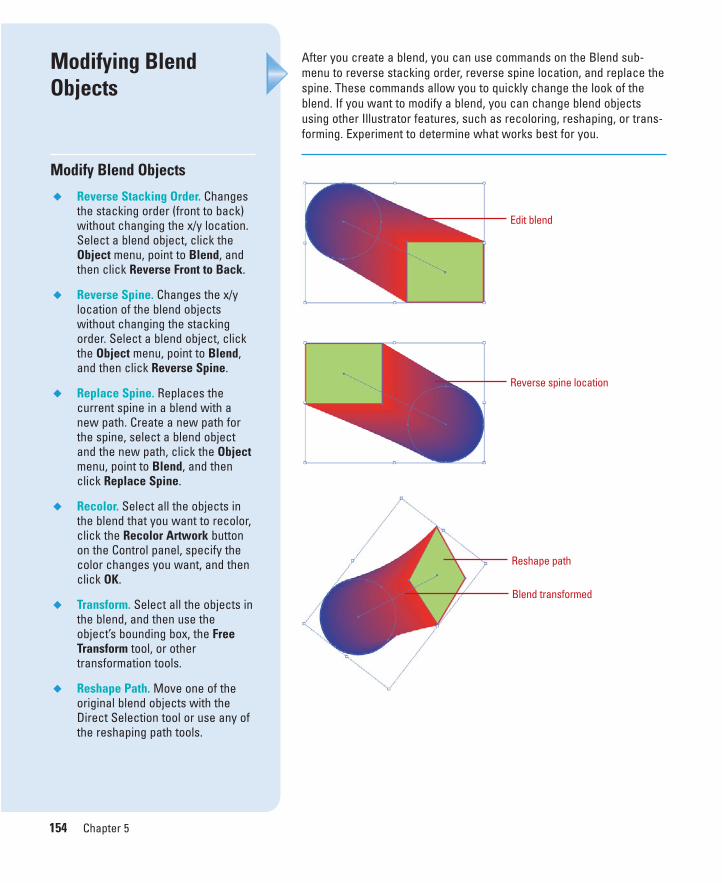
ptg8126863
154 Chapter 5
After you create a blend, you can use commands on the Blend sub-menu to reverse stacking order, reverse spine location, and replace thespine. These commands allow you to quickly change the look of theblend. If you want to modify a blend, you can change blend objectsusing other Illustrator features, such as recoloring, reshaping, or trans-forming. Experiment to determine what works best for you.
Modifying BlendObjects
Modify Blend Objects
◆ Reverse Stacking Order. Changesthe stacking order (front to back)without changing the x/y location.Select a blend object, click theObject menu, point to Blend, andthen click Reverse Front to Back.
◆ Reverse Spine. Changes the x/ylocation of the blend objectswithout changing the stackingorder. Select a blend object, clickthe Object menu, point to Blend,and then click Reverse Spine.
◆ Replace Spine. Replaces thecurrent spine in a blend with anew path. Create a new path forthe spine, select a blend objectand the new path, click the Objectmenu, point to Blend, and thenclick Replace Spine.
◆ Recolor. Select all the objects inthe blend that you want to recolor,click the Recolor Artwork buttonon the Control panel, specify thecolor changes you want, and thenclick OK.
◆ Transform. Select all the objects inthe blend, and then use theobject’s bounding box, the FreeTransform tool, or othertransformation tools.
◆ Reshape Path. Move one of theoriginal blend objects with theDirect Selection tool or use any ofthe reshaping path tools.
Edit blend
Reverse spine location
Reshape path
Blend transformed
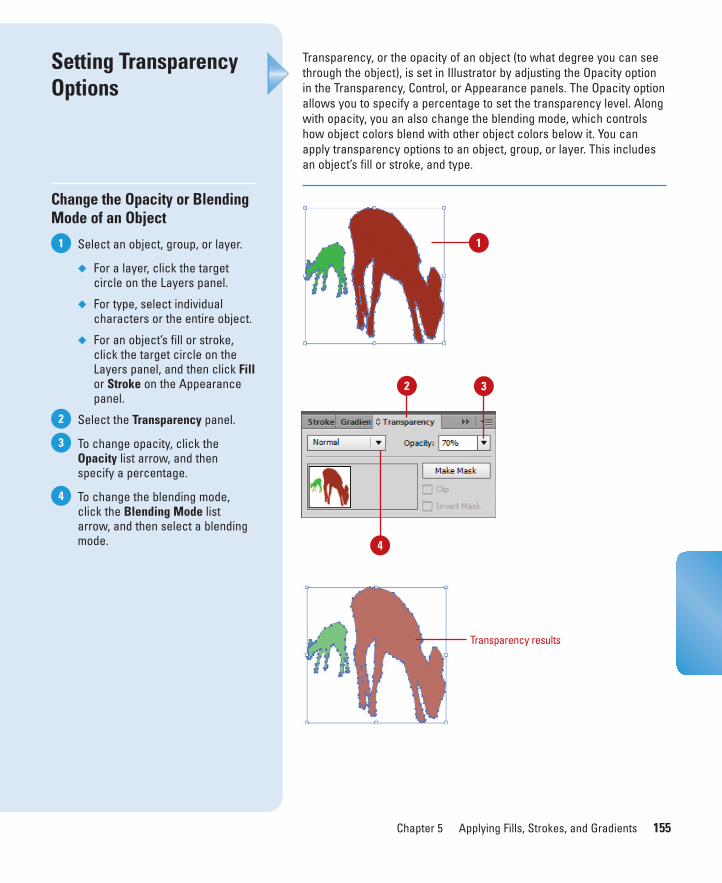
ptg8126863
Chapter 5 Applying Fills, Strokes, and Gradients 155
Transparency, or the opacity of an object (to what degree you can seethrough the object), is set in Illustrator by adjusting the Opacity optionin the Transparency, Control, or Appearance panels. The Opacity optionallows you to specify a percentage to set the transparency level. Alongwith opacity, you an also change the blending mode, which controlshow object colors blend with other object colors below it. You canapply transparency options to an object, group, or layer. This includesan object’s fill or stroke, and type.
Setting TransparencyOptions
Change the Opacity or BlendingMode of an Object
Select an object, group, or layer.
◆ For a layer, click the targetcircle on the Layers panel.
◆ For type, select individualcharacters or the entire object.
◆ For an object’s fill or stroke,click the target circle on theLayers panel, and then click Fillor Stroke on the Appearancepanel.
Select the Transparency panel.
To change opacity, click theOpacity list arrow, and thenspecify a percentage.
To change the blending mode,click the Blending Mode listarrow, and then select a blendingmode.
4
3
2
1 1
2 3
4
Transparency results
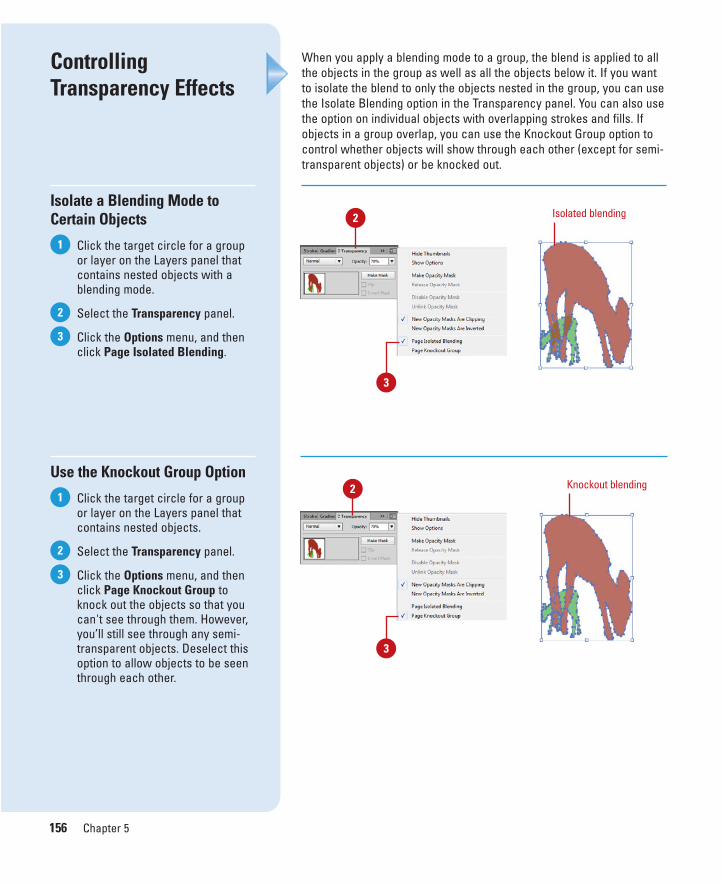
ptg8126863
156 Chapter 5
When you apply a blending mode to a group, the blend is applied to allthe objects in the group as well as all the objects below it. If you wantto isolate the blend to only the objects nested in the group, you can usethe Isolate Blending option in the Transparency panel. You can also usethe option on individual objects with overlapping strokes and fills. Ifobjects in a group overlap, you can use the Knockout Group option tocontrol whether objects will show through each other (except for semi-transparent objects) or be knocked out.
ControllingTransparency Effects
Isolate a Blending Mode toCertain Objects
Click the target circle for a groupor layer on the Layers panel thatcontains nested objects with ablending mode.
Select the Transparency panel.
Click the Options menu, and thenclick Page Isolated Blending.
Use the Knockout Group Option
Click the target circle for a groupor layer on the Layers panel thatcontains nested objects.
Select the Transparency panel.
Click the Options menu, and thenclick Page Knockout Group toknock out the objects so that youcan't see through them. However,you’ll still see through any semi-transparent objects. Deselect thisoption to allow objects to be seenthrough each other.
3
2
1
3
2
1
2
2
3
3
Isolated blending
Knockout blending
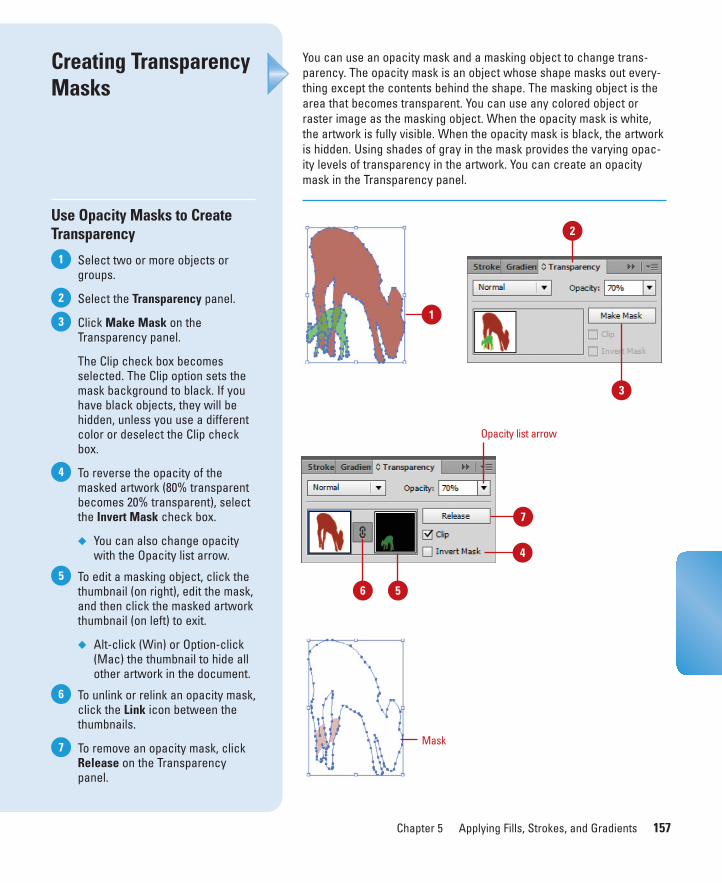
ptg8126863
Chapter 5 Applying Fills, Strokes, and Gradients 157
You can use an opacity mask and a masking object to change trans-parency. The opacity mask is an object whose shape masks out every-thing except the contents behind the shape. The masking object is thearea that becomes transparent. You can use any colored object orraster image as the masking object. When the opacity mask is white,the artwork is fully visible. When the opacity mask is black, the artworkis hidden. Using shades of gray in the mask provides the varying opac-ity levels of transparency in the artwork. You can create an opacitymask in the Transparency panel.
Creating TransparencyMasks
Use Opacity Masks to CreateTransparency
Select two or more objects orgroups.
Select the Transparency panel.
Click Make Mask on theTransparency panel.
The Clip check box becomesselected. The Clip option sets themask background to black. If youhave black objects, they will behidden, unless you use a differentcolor or deselect the Clip checkbox.
To reverse the opacity of themasked artwork (80% transparentbecomes 20% transparent), selectthe Invert Mask check box.
◆ You can also change opacitywith the Opacity list arrow.
To edit a masking object, click thethumbnail (on right), edit the mask,and then click the masked artworkthumbnail (on left) to exit.
◆ Alt-click (Win) or Option-click(Mac) the thumbnail to hide allother artwork in the document.
To unlink or relink an opacity mask,click the Link icon between thethumbnails.
To remove an opacity mask, clickRelease on the Transparencypanel.
7
6
5
4
3
2
1
2
3
6
1
7
4
5
Opacity list arrow
Mask
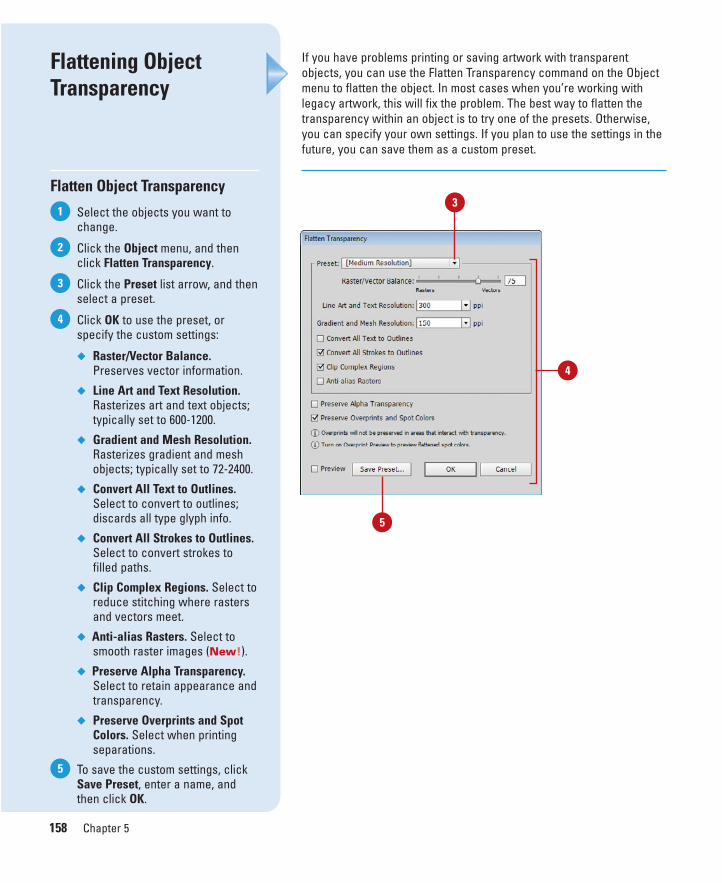
ptg8126863
158 Chapter 5
If you have problems printing or saving artwork with transparentobjects, you can use the Flatten Transparency command on the Objectmenu to flatten the object. In most cases when you’re working withlegacy artwork, this will fix the problem. The best way to flatten thetransparency within an object is to try one of the presets. Otherwise,you can specify your own settings. If you plan to use the settings in thefuture, you can save them as a custom preset.
Flattening ObjectTransparency
Flatten Object Transparency
Select the objects you want tochange.
Click the Object menu, and thenclick Flatten Transparency.
Click the Preset list arrow, and thenselect a preset.
Click OK to use the preset, orspecify the custom settings:
◆ Raster/Vector Balance.Preserves vector information.
◆ Line Art and Text Resolution.Rasterizes art and text objects;typically set to 600-1200.
◆ Gradient and Mesh Resolution.Rasterizes gradient and meshobjects; typically set to 72-2400.
◆ Convert All Text to Outlines.Select to convert to outlines;discards all type glyph info.
◆ Convert All Strokes to Outlines.Select to convert strokes tofilled paths.
◆ Clip Complex Regions. Select toreduce stitching where rastersand vectors meet.
◆ Anti-alias Rasters. Select tosmooth raster images (New!).
◆ Preserve Alpha Transparency.Select to retain appearance andtransparency.
◆ Preserve Overprints and SpotColors. Select when printingseparations.
To save the custom settings, clickSave Preset, enter a name, andthen click OK.
5
4
3
2
1
5
3
4
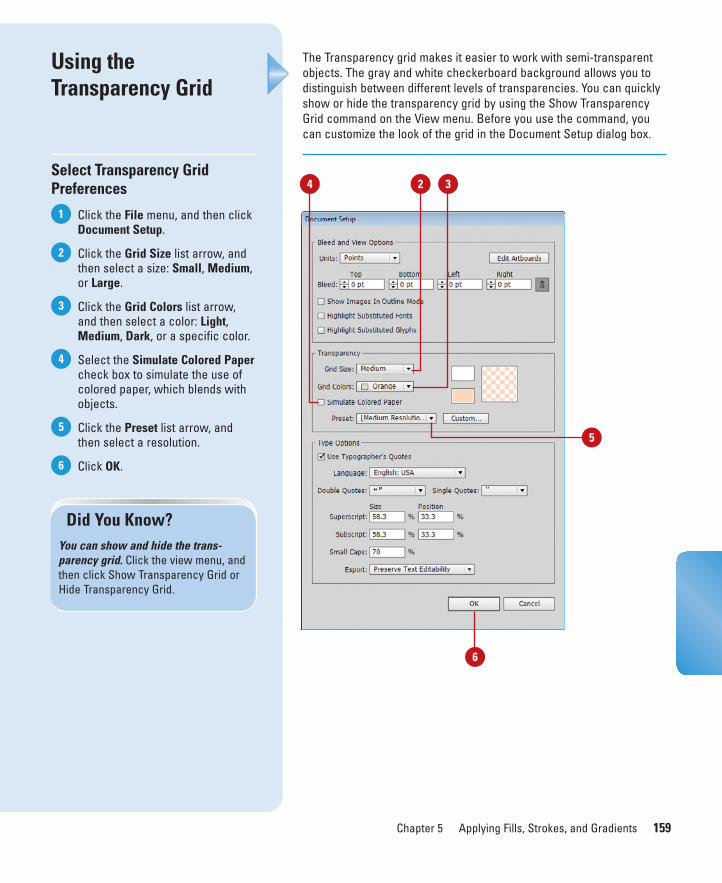
ptg8126863
Chapter 5 Applying Fills, Strokes, and Gradients 159
The Transparency grid makes it easier to work with semi-transparentobjects. The gray and white checkerboard background allows you todistinguish between different levels of transparencies. You can quicklyshow or hide the transparency grid by using the Show TransparencyGrid command on the View menu. Before you use the command, youcan customize the look of the grid in the Document Setup dialog box.
Using theTransparency Grid
Select Transparency GridPreferences
Click the File menu, and then clickDocument Setup.
Click the Grid Size list arrow, andthen select a size: Small, Medium,or Large.
Click the Grid Colors list arrow,and then select a color: Light,Medium, Dark, or a specific color.
Select the Simulate Colored Papercheck box to simulate the use ofcolored paper, which blends withobjects.
Click the Preset list arrow, andthen select a resolution.
Click OK.6
5
4
3
2
1
Did You Know?You can show and hide the trans-parency grid. Click the view menu, andthen click Show Transparency Grid orHide Transparency Grid.
2 34
6
5
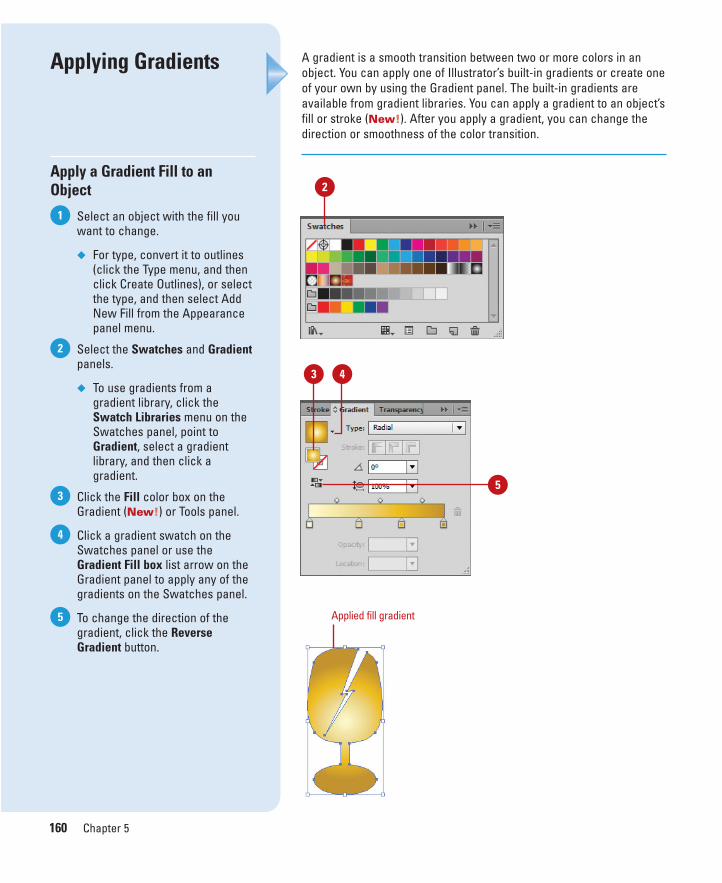
ptg8126863
160 Chapter 5
A gradient is a smooth transition between two or more colors in anobject. You can apply one of Illustrator’s built-in gradients or create oneof your own by using the Gradient panel. The built-in gradients areavailable from gradient libraries. You can apply a gradient to an object’sfill or stroke (New!). After you apply a gradient, you can change thedirection or smoothness of the color transition.
Applying Gradients
Apply a Gradient Fill to anObject
Select an object with the fill youwant to change.
◆ For type, convert it to outlines(click the Type menu, and thenclick Create Outlines), or selectthe type, and then select AddNew Fill from the Appearancepanel menu.
Select the Swatches and Gradientpanels.
◆ To use gradients from agradient library, click theSwatch Libraries menu on theSwatches panel, point toGradient, select a gradientlibrary, and then click agradient.
Click the Fill color box on theGradient (New!) or Tools panel.
Click a gradient swatch on theSwatches panel or use theGradient Fill box list arrow on theGradient panel to apply any of thegradients on the Swatches panel.
To change the direction of thegradient, click the ReverseGradient button.
5
4
3
2
1
2
Applied fill gradient
5
43
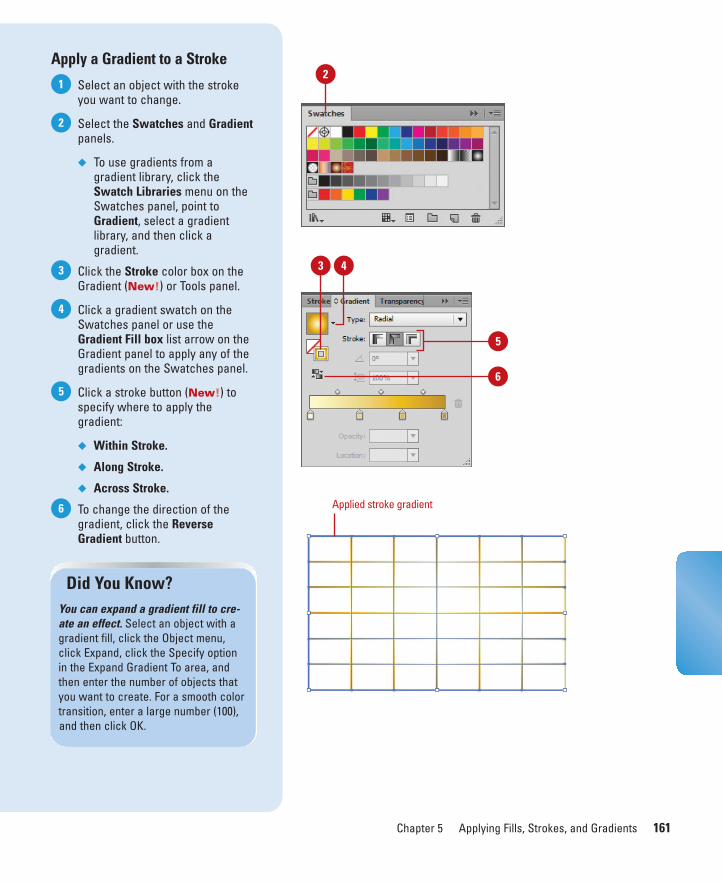
ptg8126863
Chapter 5 Applying Fills, Strokes, and Gradients 161
Apply a Gradient to a Stroke
Select an object with the strokeyou want to change.
Select the Swatches and Gradientpanels.
◆ To use gradients from agradient library, click theSwatch Libraries menu on theSwatches panel, point toGradient, select a gradientlibrary, and then click agradient.
Click the Stroke color box on theGradient (New!) or Tools panel.
Click a gradient swatch on theSwatches panel or use theGradient Fill box list arrow on theGradient panel to apply any of thegradients on the Swatches panel.
Click a stroke button (New!) tospecify where to apply thegradient:
◆ Within Stroke.
◆ Along Stroke.
◆ Across Stroke.
To change the direction of thegradient, click the ReverseGradient button.
6
5
4
3
2
1
Did You Know?You can expand a gradient fill to cre-ate an effect. Select an object with agradient fill, click the Object menu,click Expand, click the Specify optionin the Expand Gradient To area, andthen enter the number of objects thatyou want to create. For a smooth colortransition, enter a large number (100),and then click OK.
2
Applied stroke gradient
5
6
43
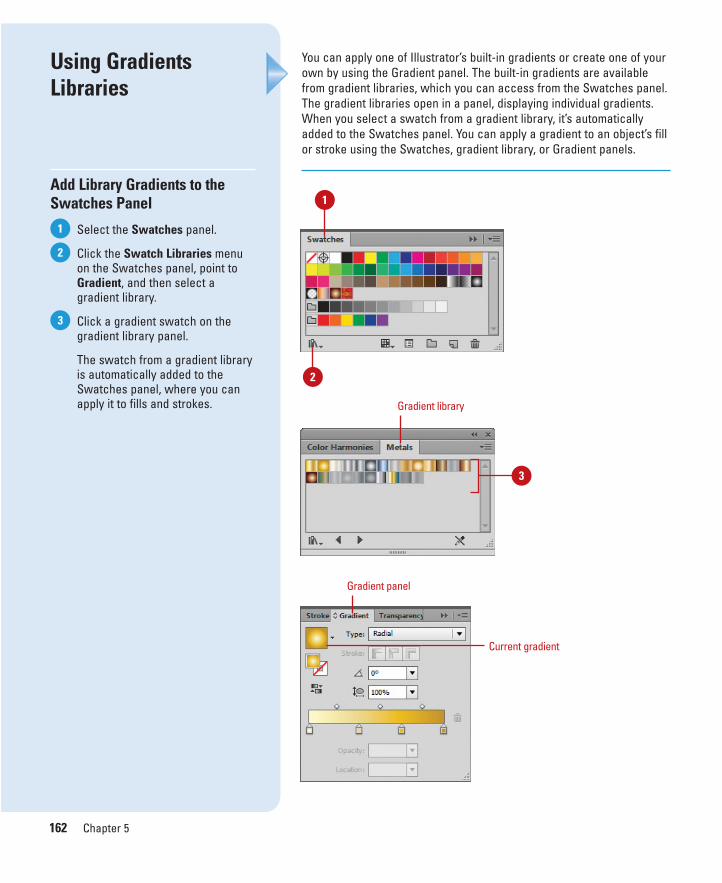
ptg8126863
162 Chapter 5
You can apply one of Illustrator’s built-in gradients or create one of yourown by using the Gradient panel. The built-in gradients are availablefrom gradient libraries, which you can access from the Swatches panel.The gradient libraries open in a panel, displaying individual gradients.When you select a swatch from a gradient library, it’s automaticallyadded to the Swatches panel. You can apply a gradient to an object’s fillor stroke using the Swatches, gradient library, or Gradient panels.
Using GradientsLibraries
Add Library Gradients to theSwatches Panel
Select the Swatches panel.
Click the Swatch Libraries menuon the Swatches panel, point toGradient, and then select agradient library.
Click a gradient swatch on thegradient library panel.
The swatch from a gradient libraryis automatically added to theSwatches panel, where you canapply it to fills and strokes.
3
2
1
1
2
Gradient library
3
Gradient panel
Current gradient
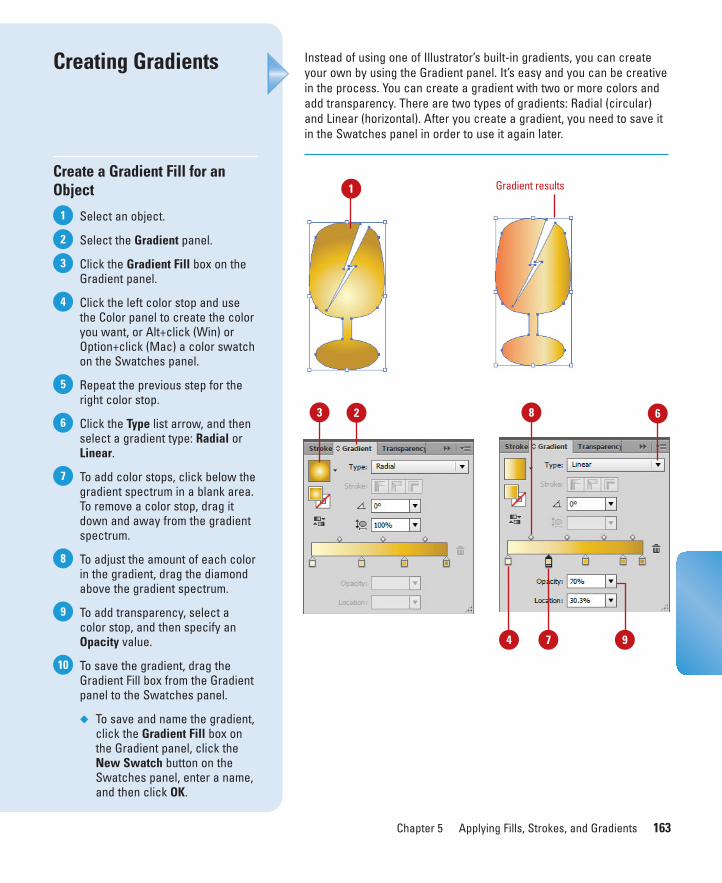
ptg8126863
Chapter 5 Applying Fills, Strokes, and Gradients 163
Instead of using one of Illustrator’s built-in gradients, you can createyour own by using the Gradient panel. It’s easy and you can be creativein the process. You can create a gradient with two or more colors andadd transparency. There are two types of gradients: Radial (circular)and Linear (horizontal). After you create a gradient, you need to save itin the Swatches panel in order to use it again later.
Creating Gradients
Create a Gradient Fill for anObject
Select an object.
Select the Gradient panel.
Click the Gradient Fill box on theGradient panel.
Click the left color stop and usethe Color panel to create the coloryou want, or Alt+click (Win) orOption+click (Mac) a color swatchon the Swatches panel.
Repeat the previous step for theright color stop.
Click the Type list arrow, and thenselect a gradient type: Radial orLinear.
To add color stops, click below thegradient spectrum in a blank area.To remove a color stop, drag itdown and away from the gradientspectrum.
To adjust the amount of each colorin the gradient, drag the diamondabove the gradient spectrum.
To add transparency, select acolor stop, and then specify anOpacity value.
To save the gradient, drag theGradient Fill box from the Gradientpanel to the Swatches panel.
◆ To save and name the gradient,click the Gradient Fill box onthe Gradient panel, click theNew Swatch button on theSwatches panel, enter a name,and then click OK.
10
9
8
7
6
5
4
3
2
1
Gradient results1
2 8
4 7 9
63
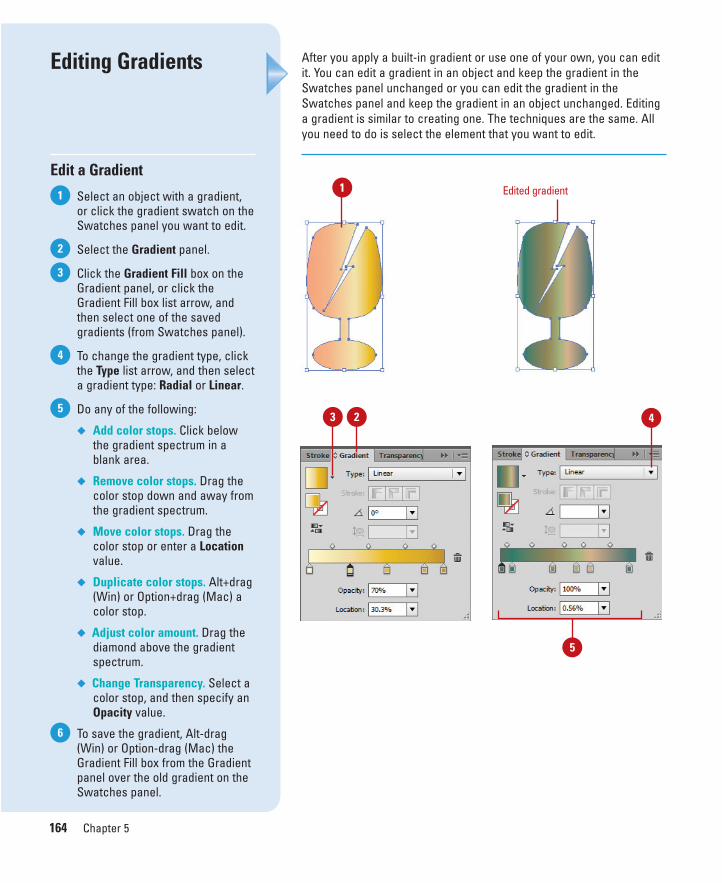
ptg8126863
164 Chapter 5
After you apply a built-in gradient or use one of your own, you can editit. You can edit a gradient in an object and keep the gradient in theSwatches panel unchanged or you can edit the gradient in theSwatches panel and keep the gradient in an object unchanged. Editinga gradient is similar to creating one. The techniques are the same. Allyou need to do is select the element that you want to edit.
Editing Gradients
Edit a Gradient
Select an object with a gradient,or click the gradient swatch on theSwatches panel you want to edit.
Select the Gradient panel.
Click the Gradient Fill box on theGradient panel, or click theGradient Fill box list arrow, andthen select one of the savedgradients (from Swatches panel).
To change the gradient type, clickthe Type list arrow, and then selecta gradient type: Radial or Linear.
Do any of the following:
◆ Add color stops. Click belowthe gradient spectrum in ablank area.
◆ Remove color stops. Drag thecolor stop down and away fromthe gradient spectrum.
◆ Move color stops. Drag thecolor stop or enter a Locationvalue.
◆ Duplicate color stops. Alt+drag(Win) or Option+drag (Mac) acolor stop.
◆ Adjust color amount. Drag thediamond above the gradientspectrum.
◆ Change Transparency. Select acolor stop, and then specify anOpacity value.
To save the gradient, Alt-drag(Win) or Option-drag (Mac) theGradient Fill box from the Gradientpanel over the old gradient on theSwatches panel.
6
5
4
3
2
11 Edited gradient
23 4
5
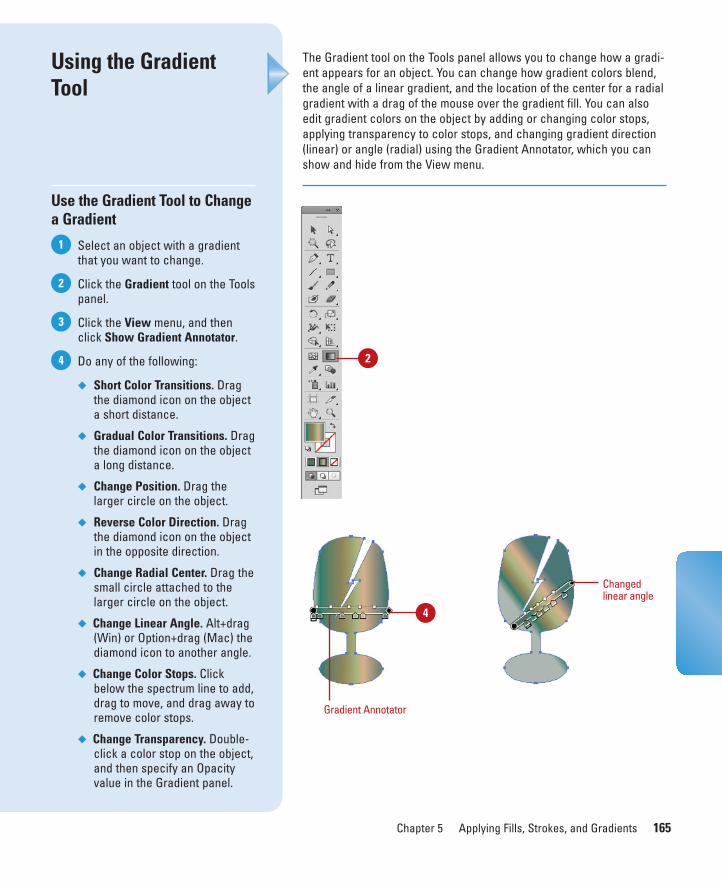
ptg8126863
Chapter 5 Applying Fills, Strokes, and Gradients 165
The Gradient tool on the Tools panel allows you to change how a gradi-ent appears for an object. You can change how gradient colors blend,the angle of a linear gradient, and the location of the center for a radialgradient with a drag of the mouse over the gradient fill. You can alsoedit gradient colors on the object by adding or changing color stops,applying transparency to color stops, and changing gradient direction(linear) or angle (radial) using the Gradient Annotator, which you canshow and hide from the View menu.
Using the GradientTool
Use the Gradient Tool to Changea Gradient
Select an object with a gradientthat you want to change.
Click the Gradient tool on the Toolspanel.
Click the View menu, and thenclick Show Gradient Annotator.
Do any of the following:
◆ Short Color Transitions. Dragthe diamond icon on the objecta short distance.
◆ Gradual Color Transitions. Dragthe diamond icon on the objecta long distance.
◆ Change Position. Drag thelarger circle on the object.
◆ Reverse Color Direction. Dragthe diamond icon on the objectin the opposite direction.
◆ Change Radial Center. Drag thesmall circle attached to thelarger circle on the object.
◆ Change Linear Angle. Alt+drag(Win) or Option+drag (Mac) thediamond icon to another angle.
◆ Change Color Stops. Clickbelow the spectrum line to add,drag to move, and drag away toremove color stops.
◆ Change Transparency. Double-click a color stop on the object,and then specify an Opacityvalue in the Gradient panel.
4
3
2
1
2
4
Changedlinear angle
Gradient Annotator

ptg8126863
166 Chapter 5
A mesh object is a multicolored gradient type object that allows colorsto flow in different directions and transitions from one point to another.A mesh object uses mesh lines (like a grid) to make it easier for you tomodify color flow, transitions, intensity, and opacity. The points in thegrid are called mesh points (diamonds). Mesh points are like anchorpoints, except you can assign color and transparency to them. Thearea between four mesh points is a mesh patch for which you canmodify the color and transparency. You can create two types of meshobjects: one with an irregular pattern of mesh points or one with a reg-ular pattern of mesh points.
Creating a GradientMesh
Create a Gradient Mesh
Select an object.
Do one of the following:
◆ Irregular Pattern. Select theMesh tool on the Tools panel,select a fill color for meshpoints, click to place the firstmesh point, and then continueto click to place other meshpoints.
◆ Regular Pattern. Click theObject menu, and then clickCreate Gradient Mesh. Set thenumber of rows and columns,select the highlight direction,enter a percentage of whitehighlight (100% = white, 0% =no white), and then click OK.
To edit a mesh object, select theMesh tool on the Tools panel, andthen do any of the following:
◆ Delete Mesh Point. Alt-click(Win) or Option-click (Mac) amesh point to delete it.
◆ Move Mesh Point. Drag tomove a mesh point. Shift-dragto keep the mesh point on amesh line.
◆ Add Mesh Point. Select a colorfor the new mesh point, andthen click to add a mesh point.
3
2
1
Mesh tool forirregular pattern
Dialog box forregular pattern
3
2
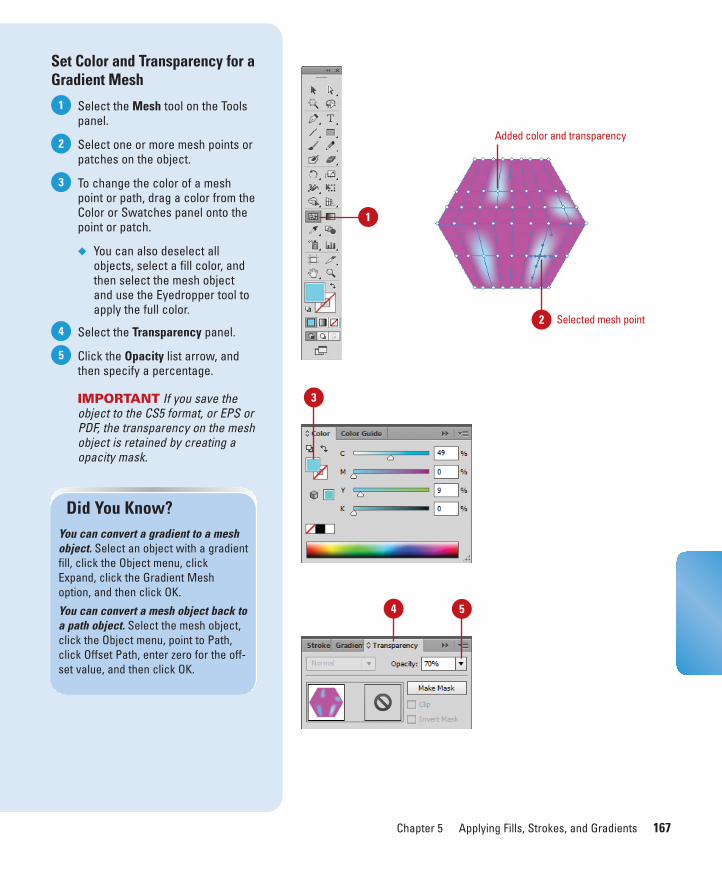
ptg8126863
Chapter 5 Applying Fills, Strokes, and Gradients 167
Set Color and Transparency for aGradient Mesh
Select the Mesh tool on the Toolspanel.
Select one or more mesh points orpatches on the object.
To change the color of a meshpoint or path, drag a color from theColor or Swatches panel onto thepoint or patch.
◆ You can also deselect allobjects, select a fill color, andthen select the mesh objectand use the Eyedropper tool toapply the full color.
Select the Transparency panel.
Click the Opacity list arrow, andthen specify a percentage.
IMPORTANT If you save theobject to the CS5 format, or EPS orPDF, the transparency on the meshobject is retained by creating aopacity mask.
5
4
3
2
1
Did You Know?You can convert a gradient to a meshobject. Select an object with a gradientfill, click the Object menu, clickExpand, click the Gradient Meshoption, and then click OK.
You can convert a mesh object back toa path object. Select the mesh object,click the Object menu, point to Path,click Offset Path, enter zero for the off-set value, and then click OK.
1
2 Selected mesh point
3
54
Added color and transparency

ptg8126863
This page intentionally left blank

ptg8126863
6
6What You’ll Do
169
Working with Points andPaths
Introduction
When you use Illustrator's vector drawing, or pen tools,Illustrator creates a path to store that information. Paths aredefined mathematically using anchor points and segments.Once created, they can be precisely modified to fit any designsituation.
Working with the various Pen tools, it's possible to createprecise paths, and even create complicated selections aroundvirtually any shape. Once the path is created, it's a simplematter to subtract anchor points, and add new or modifyexisting anchor points to produce complex paths. It's evenpossible to convert straight segments (the visible line thatconnects two anchor points together) into elegantly curvedsegments, or you can remove the curve from a segment witha single click.
Paths can be used to precisely guide a brush stroke, orthe interior of a path can be filled with any color, pattern, orgradient available in Illustrator using Stroke and Fill com-mands. Paths can even be used to create a clipping mask,which is an object whose shape masks out everything exceptthe contents behind the shape.
What You’ll Do
Draw with the Pen Tools
Set Anchor Point Preferences
Move Points and Segments
Convert Points
Add and Delete Anchor Points
Align and Join Anchor Points
Reshape Paths
Erase to Reshape Paths
Smooth Paths
Simplify Paths
Divide Paths
Split Paths
Merge Paths
Work with Shape Mode
Work with Pathfinder
Create a Compound Path
Create a Clipping Set
Edit a Clipping Set

ptg8126863
170 Chapter 6
When you work with Illustrator's Pen tool, you're creating a path. Thepath consists of curved and straight segments connected by anchorpoints. When you click with the Pen tool, you create corner points andstraight segments. When you drag with the Pen tool, you can createsmooth points and curve segments, which have direction handles you can use to change the curved segment. The shape of the curvesegment is defined by the length and direction of the direction handles.As you create drawings with the Pen tool, you can turn on SmartGuides to help you align the segments.
Drawing with thePen Tools
Draw a Polygon with the PenTool
Click the Fill box on the Toolspanel and then click the Color orNone to specify whether you wantto fill the object or not.
Select the Pen tool on the Toolspanel.
Click to create the first anchorpoint.
◆ To draw segments constrainedto 45 degrees, hold down Shiftwhile you click.
Click to create the second anchorpoint at another location.
A line segment appears betweenthe two anchor points.
Continue to add anchor points.
Do any of the following tocomplete the shape as a:
◆ Open Path. Click the Pen tool orany other tool on the Toolspanel, or Ctrl+click (Win) or A+click (Mac) outside thenew shape to deselect it.
◆ Closed Path. Point to thestarting anchor point, and thenclick it.
6
5
4
3
2
1
3 4
2
Pen tools
3 4
5
6
Closed path drawn
Open path drawn
1

ptg8126863
Chapter 6 Working with Points and Paths 171
Draw Curves with the Pen Tool
Click the Fill box on the Toolspanel and then click the Color orNone to specify whether you wantto fill the object or not.
Select the Pen tool on the Toolspanel.
Click and drag to create the firstanchor point.
As you drag, the direction handlesmove.
Release the mouse, and then moveto where you want the secondpoint.
Click and drag to create thesecond anchor point.
A curve segment appears betweenthe two anchor points. As youdrag, the direction handles move,which changes the the curvesegment.
The shape of the curve segment isdefined by the length and directionof the direction handles.
Continue to add anchor points anddirection handles.
Do any of the following tocomplete the shape as a:
◆ Open Path. Click the Pen tool orany other tool on the Toolspanel, or Ctrl+click (Win) or A+click (Mac) outside thenew shape to deselect it.
◆ Closed Path. Point to thestarting anchor point, and thenclick it.
7
6
5
4
3
2
13
4
Curved line segment drawn
3
5
S-Curve drawn
2
1
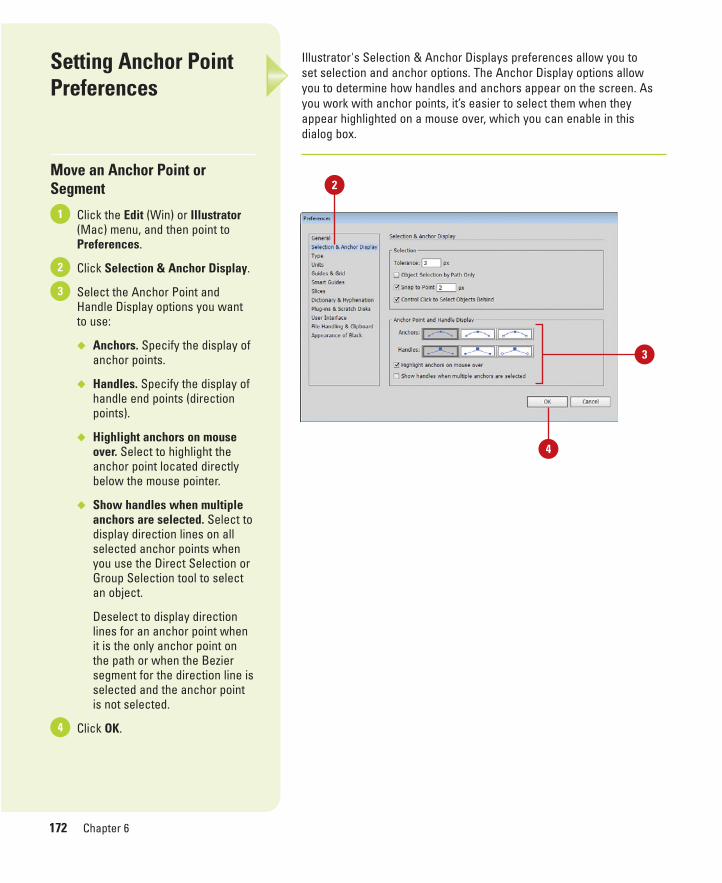
ptg8126863
172 Chapter 6
Illustrator's Selection & Anchor Displays preferences allow you to set selection and anchor options. The Anchor Display options allow you to determine how handles and anchors appear on the screen. Asyou work with anchor points, it’s easier to select them when theyappear highlighted on a mouse over, which you can enable in this dialog box.
Setting Anchor PointPreferences
Move an Anchor Point orSegment
Click the Edit (Win) or Illustrator(Mac) menu, and then point toPreferences.
Click Selection & Anchor Display.
Select the Anchor Point andHandle Display options you wantto use:
◆ Anchors. Specify the display ofanchor points.
◆ Handles. Specify the display ofhandle end points (directionpoints).
◆ Highlight anchors on mouseover. Select to highlight theanchor point located directlybelow the mouse pointer.
◆ Show handles when multipleanchors are selected. Select todisplay direction lines on allselected anchor points whenyou use the Direct Selection orGroup Selection tool to selectan object.
Deselect to display directionlines for an anchor point whenit is the only anchor point onthe path or when the Beziersegment for the direction line isselected and the anchor pointis not selected.
Click OK.4
3
2
1
3
4
2

ptg8126863
Chapter 6 Working with Points and Paths 173
It’s hard to draw a segment right the first time. Moving anchor pointsand segments is all part of the process of creating artwork. When youmove an anchor point, the segments that are connected to it change.When you move a straight segment, the anchor points on the segmentmove with it. When you move a curve segment, the curve changes, butthe connecting anchors remain the same. You can also change a curvesegment by adjusting a direction point on the direction handle.
Moving Points andSegments
Move an Anchor Point orSegment
Select the Direct Selection tool onthe Tools panel.
Click a blank area to deselect allpoints.
Drag an anchor point or drag themiddle of a segment.
◆ For a smaller move, click theanchor point or segment, andthen press an arrow key.
◆ To constrain the movement ofanchor points or segments to45 degrees, hold down Shiftwhile dragging.
To reshape a curve segment, clickan anchor point or a curvesegment, and then drag a directionpoint at the end of the directionhandle.
4
3
2
11
3
4
Did You Know?You can average the position ofanchor points. Select the anchorpoints you want with the DirectSelection tool, click the Object menu,point to Path, click Average, click theHorizontal (x axis), Vertical (y axis) orBoth option, and then click OK.
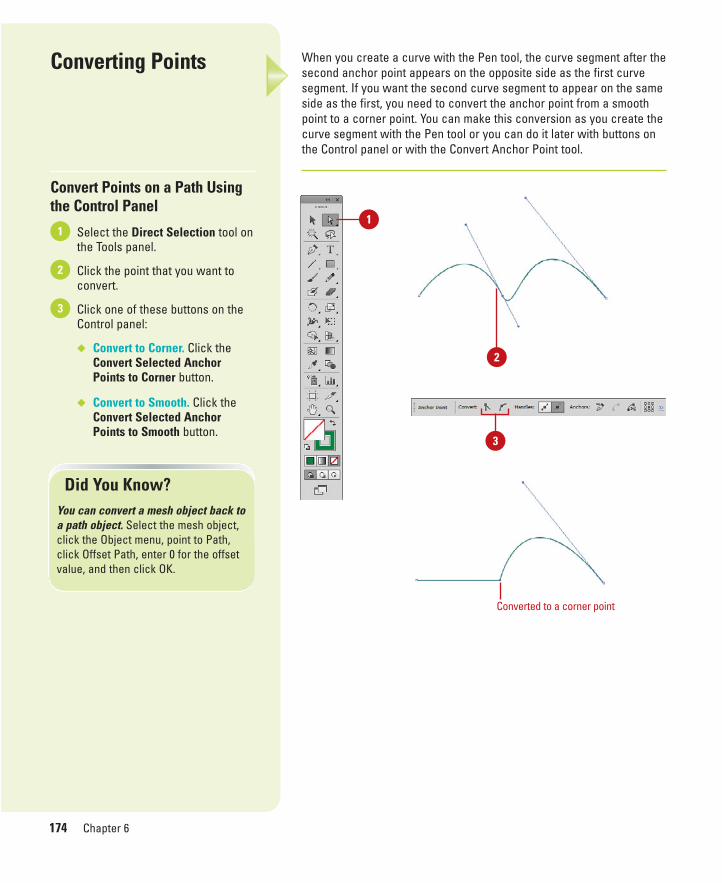
ptg8126863
174 Chapter 6
When you create a curve with the Pen tool, the curve segment after thesecond anchor point appears on the opposite side as the first curvesegment. If you want the second curve segment to appear on the sameside as the first, you need to convert the anchor point from a smoothpoint to a corner point. You can make this conversion as you create thecurve segment with the Pen tool or you can do it later with buttons onthe Control panel or with the Convert Anchor Point tool.
Converting Points
Convert Points on a Path Usingthe Control Panel
Select the Direct Selection tool onthe Tools panel.
Click the point that you want toconvert.
Click one of these buttons on theControl panel:
◆ Convert to Corner. Click theConvert Selected AnchorPoints to Corner button.
◆ Convert to Smooth. Click theConvert Selected AnchorPoints to Smooth button.
3
2
11
2
3
Converted to a corner point
Did You Know?You can convert a mesh object back toa path object. Select the mesh object,click the Object menu, point to Path,click Offset Path, enter 0 for the offsetvalue, and then click OK.
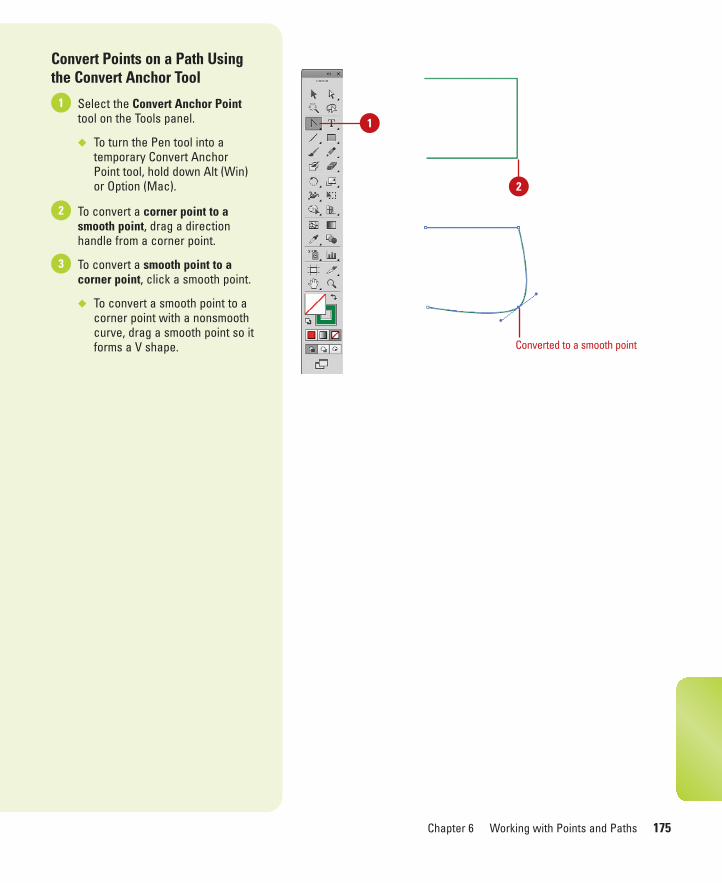
ptg8126863
Chapter 6 Working with Points and Paths 175
Convert Points on a Path Usingthe Convert Anchor Tool
Select the Convert Anchor Pointtool on the Tools panel.
◆ To turn the Pen tool into atemporary Convert AnchorPoint tool, hold down Alt (Win)or Option (Mac).
To convert a corner point to asmooth point, drag a directionhandle from a corner point.
To convert a smooth point to acorner point, click a smooth point.
◆ To convert a smooth point to acorner point with a nonsmoothcurve, drag a smooth point so itforms a V shape.
3
2
1
1
Converted to a smooth point
2
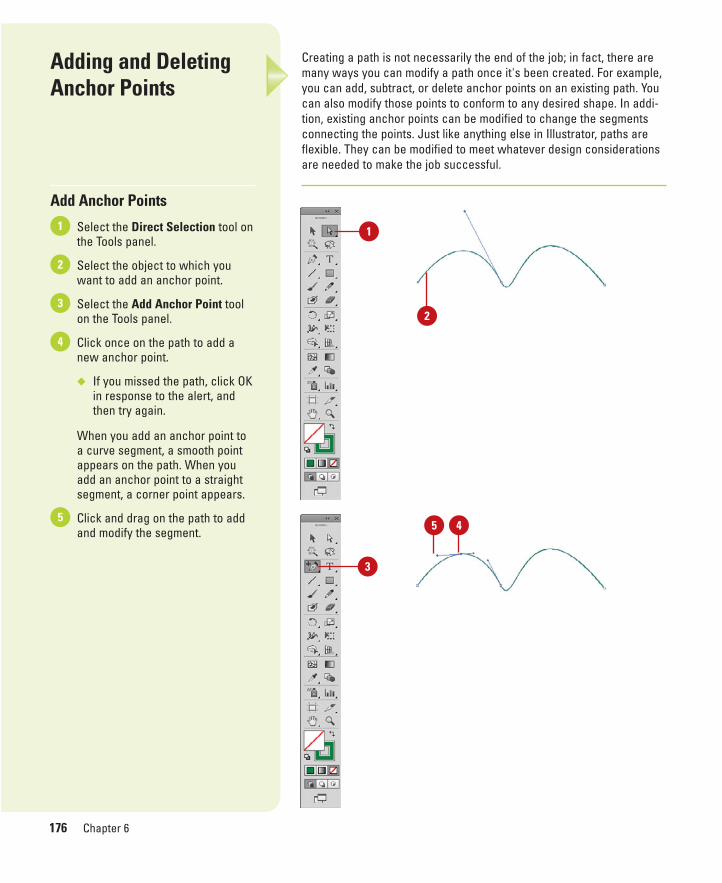
ptg8126863
176 Chapter 6
Creating a path is not necessarily the end of the job; in fact, there aremany ways you can modify a path once it's been created. For example,you can add, subtract, or delete anchor points on an existing path. Youcan also modify those points to conform to any desired shape. In addi-tion, existing anchor points can be modified to change the segmentsconnecting the points. Just like anything else in Illustrator, paths areflexible. They can be modified to meet whatever design considerationsare needed to make the job successful.
Adding and DeletingAnchor Points
Add Anchor Points
Select the Direct Selection tool onthe Tools panel.
Select the object to which youwant to add an anchor point.
Select the Add Anchor Point toolon the Tools panel.
Click once on the path to add anew anchor point.
◆ If you missed the path, click OKin response to the alert, andthen try again.
When you add an anchor point toa curve segment, a smooth pointappears on the path. When youadd an anchor point to a straightsegment, a corner point appears.
Click and drag on the path to addand modify the segment.
5
4
3
2
1 1
3
2
45

ptg8126863
Chapter 6 Working with Points and Paths 177
Add Anchor Points to an Open Path
Select the Pen tool on the Toolspanel.
Point to the endpoint to which youwant to add an anchor point.
A slash appears next to the Penpointer.
Click the endpoint to make it acorner point or drag it to make asmooth point.
Click once on the path to add anew anchor point.
Delete Anchor Points
Select the Direct Selection tool onthe Tools panel.
Select the object from which youwant to delete an anchor point.
Select the Delete Anchor Pointtool on the Tools panel.
Click once on an existing anchorpoint to remove it from the path.
The anchor points on either side ofthe deleted point are now used todefine the segment.
◆ You can also click a point withthe Direct Selection tool, andthen click the Remove SelectedAnchor Points button on theControl panel.
4
3
2
1
4
3
2
11
2
3
2
41
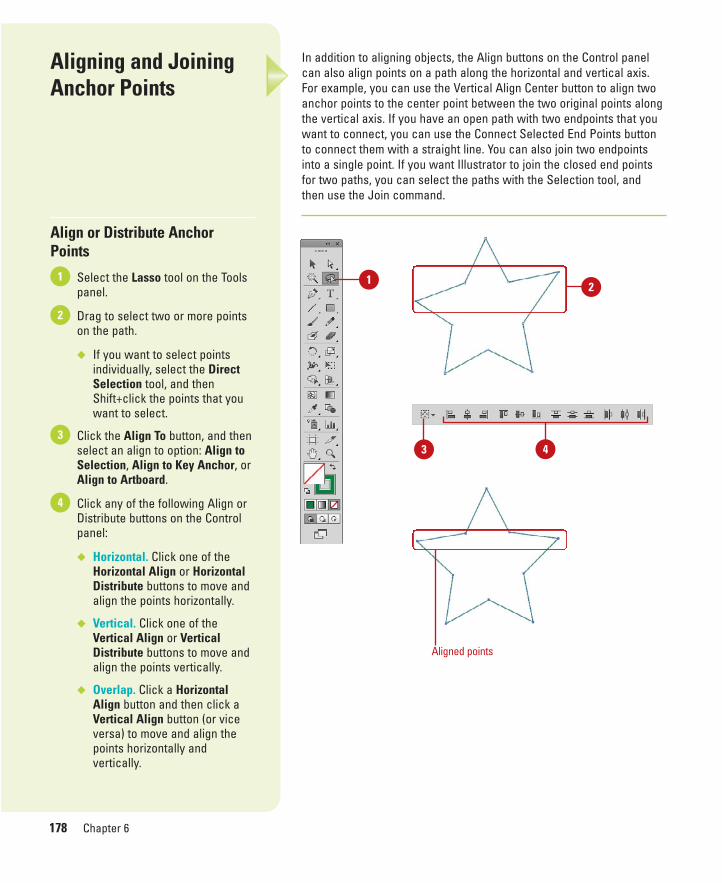
ptg8126863
178 Chapter 6
In addition to aligning objects, the Align buttons on the Control panelcan also align points on a path along the horizontal and vertical axis.For example, you can use the Vertical Align Center button to align twoanchor points to the center point between the two original points alongthe vertical axis. If you have an open path with two endpoints that youwant to connect, you can use the Connect Selected End Points buttonto connect them with a straight line. You can also join two endpointsinto a single point. If you want Illustrator to join the closed end pointsfor two paths, you can select the paths with the Selection tool, andthen use the Join command.
Aligning and Joining Anchor Points
Align or Distribute AnchorPoints
Select the Lasso tool on the Toolspanel.
Drag to select two or more pointson the path.
◆ If you want to select pointsindividually, select the DirectSelection tool, and thenShift+click the points that youwant to select.
Click the Align To button, and thenselect an align to option: Align toSelection, Align to Key Anchor, orAlign to Artboard.
Click any of the following Align orDistribute buttons on the Controlpanel:
◆ Horizontal. Click one of theHorizontal Align or HorizontalDistribute buttons to move andalign the points horizontally.
◆ Vertical. Click one of theVertical Align or VerticalDistribute buttons to move andalign the points vertically.
◆ Overlap. Click a HorizontalAlign button and then click aVertical Align button (or viceversa) to move and align thepoints horizontally andvertically.
4
3
2
1 1
4
Aligned points
2
3
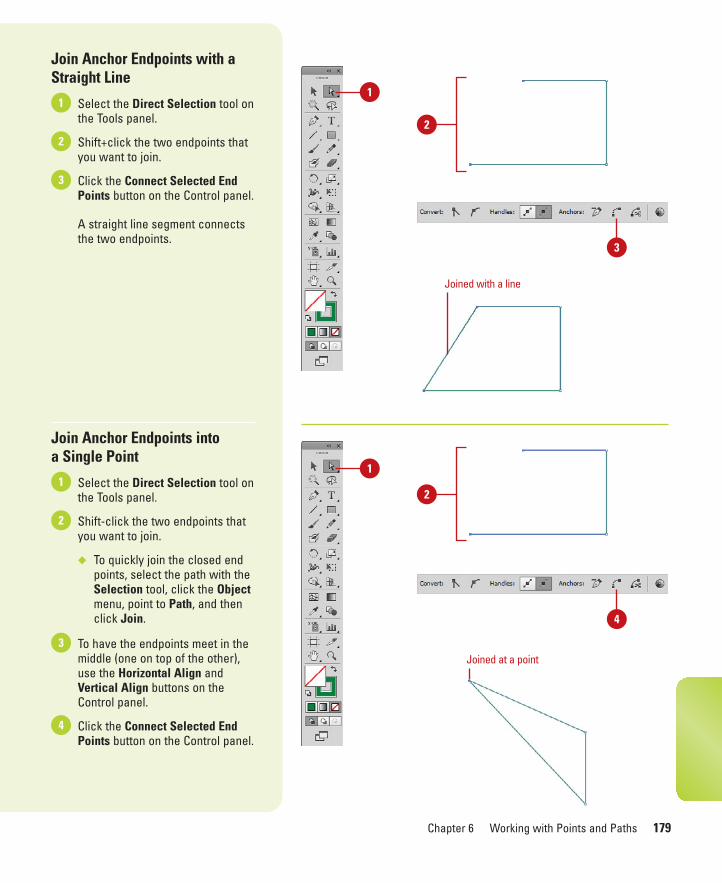
ptg8126863
Chapter 6 Working with Points and Paths 179
Join Anchor Endpoints with aStraight Line
Select the Direct Selection tool onthe Tools panel.
Shift+click the two endpoints thatyou want to join.
Click the Connect Selected EndPoints button on the Control panel.
A straight line segment connectsthe two endpoints.
Join Anchor Endpoints into a Single Point
Select the Direct Selection tool onthe Tools panel.
Shift-click the two endpoints thatyou want to join.
◆ To quickly join the closed endpoints, select the path with theSelection tool, click the Objectmenu, point to Path, and thenclick Join.
To have the endpoints meet in themiddle (one on top of the other),use the Horizontal Align andVertical Align buttons on theControl panel.
Click the Connect Selected EndPoints button on the Control panel.
4
3
2
1
3
2
11
3
2
Joined with a line
1
2
Joined at a point
4
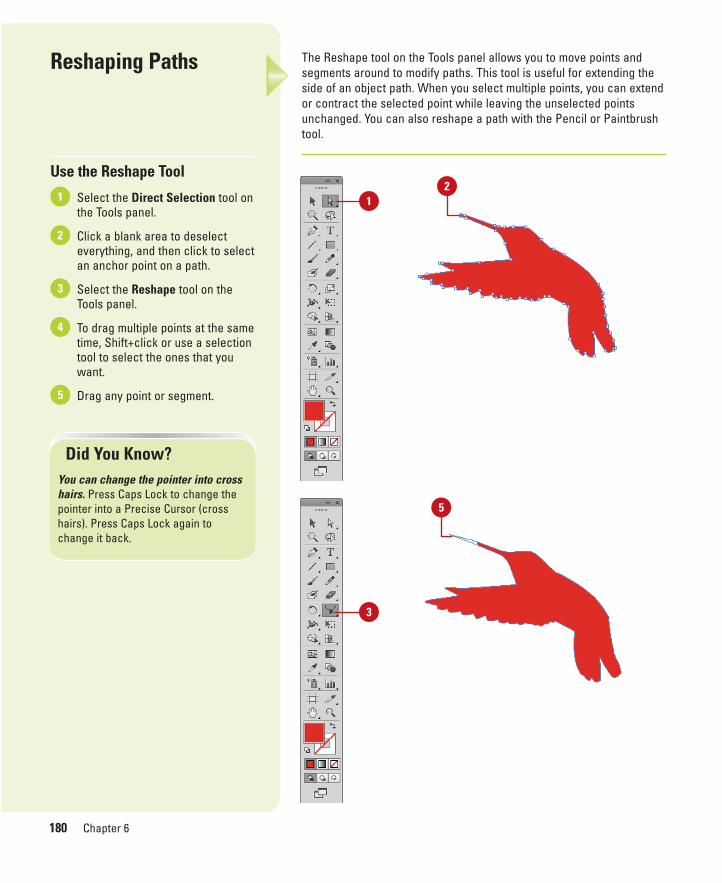
ptg8126863
180 Chapter 6
The Reshape tool on the Tools panel allows you to move points andsegments around to modify paths. This tool is useful for extending theside of an object path. When you select multiple points, you can extendor contract the selected point while leaving the unselected pointsunchanged. You can also reshape a path with the Pencil or Paintbrushtool.
Reshaping Paths
Use the Reshape Tool
Select the Direct Selection tool onthe Tools panel.
Click a blank area to deselecteverything, and then click to selectan anchor point on a path.
Select the Reshape tool on theTools panel.
To drag multiple points at the sametime, Shift+click or use a selectiontool to select the ones that youwant.
Drag any point or segment.5
4
3
2
1
Did You Know?You can change the pointer into crosshairs. Press Caps Lock to change thepointer into a Precise Cursor (crosshairs). Press Caps Lock again tochange it back.
1
32
2
5
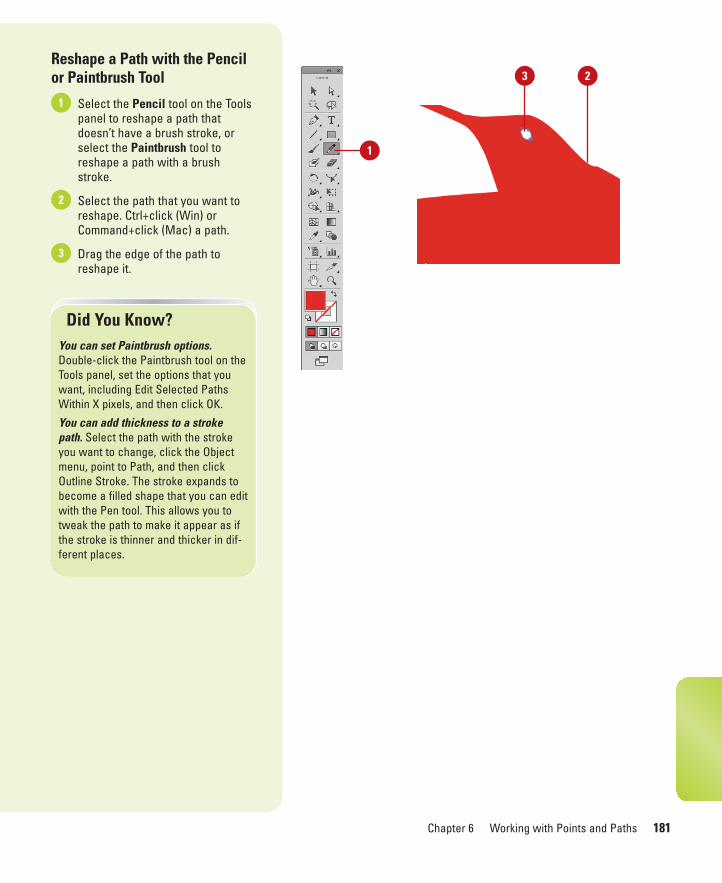
ptg8126863
Chapter 6 Working with Points and Paths 181
Reshape a Path with the Pencilor Paintbrush Tool
Select the Pencil tool on the Toolspanel to reshape a path thatdoesn’t have a brush stroke, orselect the Paintbrush tool toreshape a path with a brushstroke.
Select the path that you want toreshape. Ctrl+click (Win) orCommand+click (Mac) a path.
Drag the edge of the path toreshape it.
3
2
1
Did You Know?You can set Paintbrush options.Double-click the Paintbrush tool on theTools panel, set the options that youwant, including Edit Selected PathsWithin X pixels, and then click OK.
You can add thickness to a strokepath. Select the path with the strokeyou want to change, click the Objectmenu, point to Path, and then clickOutline Stroke. The stroke expands tobecome a filled shape that you can editwith the Pen tool. This allows you totweak the path to make it appear as ifthe stroke is thinner and thicker in dif-ferent places.
1
3 2
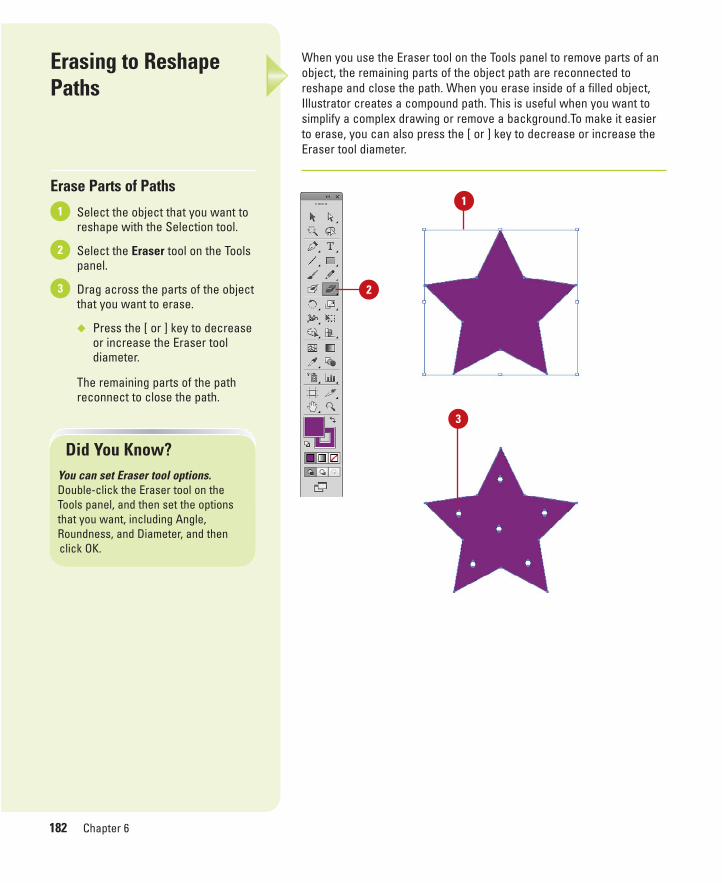
ptg8126863
182 Chapter 6
When you use the Eraser tool on the Tools panel to remove parts of anobject, the remaining parts of the object path are reconnected toreshape and close the path. When you erase inside of a filled object,Illustrator creates a compound path. This is useful when you want tosimplify a complex drawing or remove a background.To make it easierto erase, you can also press the [ or ] key to decrease or increase theEraser tool diameter.
Erasing to ReshapePaths
Erase Parts of Paths
Select the object that you want toreshape with the Selection tool.
Select the Eraser tool on the Toolspanel.
Drag across the parts of the objectthat you want to erase.
◆ Press the [ or ] key to decreaseor increase the Eraser tooldiameter.
The remaining parts of the pathreconnect to close the path.
3
2
1
Did You Know?You can set Eraser tool options.Double-click the Eraser tool on theTools panel, and then set the optionsthat you want, including Angle,Roundness, and Diameter, and thenclick OK.
2
1
3
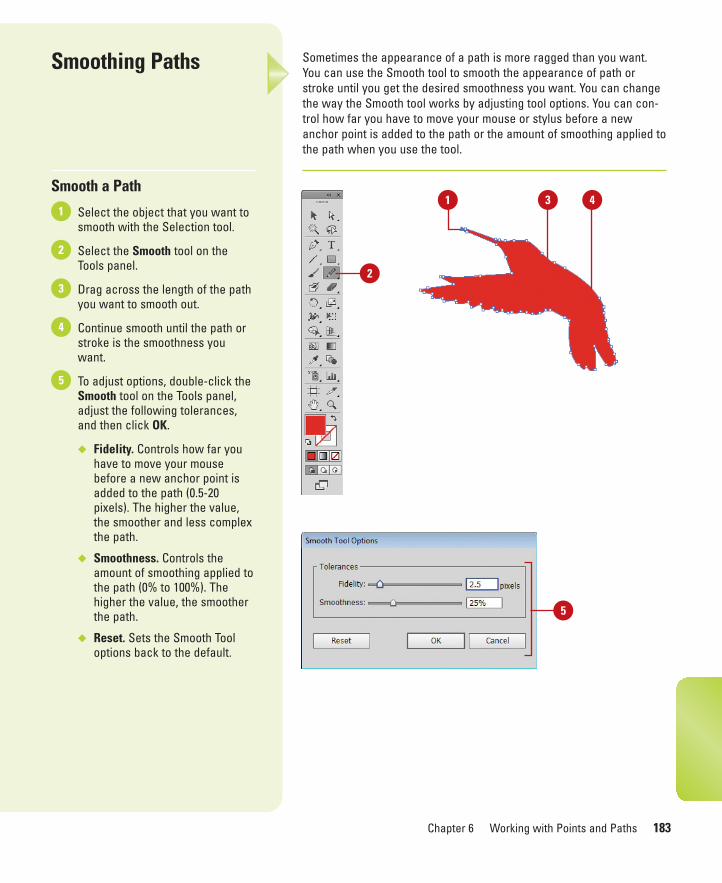
ptg8126863
Chapter 6 Working with Points and Paths 183
Sometimes the appearance of a path is more ragged than you want.You can use the Smooth tool to smooth the appearance of path orstroke until you get the desired smoothness you want. You can changethe way the Smooth tool works by adjusting tool options. You can con-trol how far you have to move your mouse or stylus before a newanchor point is added to the path or the amount of smoothing applied tothe path when you use the tool.
Smoothing Paths
Smooth a Path
Select the object that you want tosmooth with the Selection tool.
Select the Smooth tool on theTools panel.
Drag across the length of the pathyou want to smooth out.
Continue smooth until the path orstroke is the smoothness youwant.
To adjust options, double-click theSmooth tool on the Tools panel,adjust the following tolerances,and then click OK.
◆ Fidelity. Controls how far youhave to move your mousebefore a new anchor point isadded to the path (0.5-20pixels). The higher the value,the smoother and less complexthe path.
◆ Smoothness. Controls theamount of smoothing applied tothe path (0% to 100%). Thehigher the value, the smootherthe path.
◆ Reset. Sets the Smooth Tooloptions back to the default.
5
4
3
2
1
2
1 3 4
5
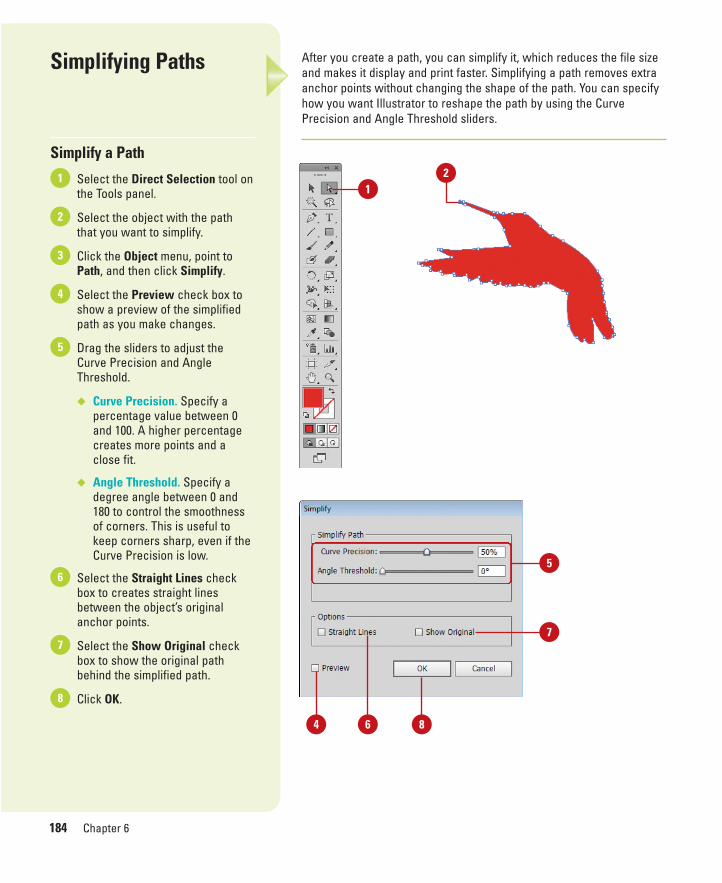
ptg8126863
184 Chapter 6
After you create a path, you can simplify it, which reduces the file sizeand makes it display and print faster. Simplifying a path removes extraanchor points without changing the shape of the path. You can specifyhow you want Illustrator to reshape the path by using the CurvePrecision and Angle Threshold sliders.
Simplifying Paths
Simplify a Path
Select the Direct Selection tool onthe Tools panel.
Select the object with the paththat you want to simplify.
Click the Object menu, point toPath, and then click Simplify.
Select the Preview check box toshow a preview of the simplifiedpath as you make changes.
Drag the sliders to adjust theCurve Precision and AngleThreshold.
◆ Curve Precision. Specify apercentage value between 0and 100. A higher percentagecreates more points and aclose fit.
◆ Angle Threshold. Specify adegree angle between 0 and180 to control the smoothnessof corners. This is useful tokeep corners sharp, even if theCurve Precision is low.
Select the Straight Lines checkbox to creates straight linesbetween the object’s originalanchor points.
Select the Show Original checkbox to show the original pathbehind the simplified path.
Click OK.8
7
6
5
4
3
2
11
2
84
5
7
6
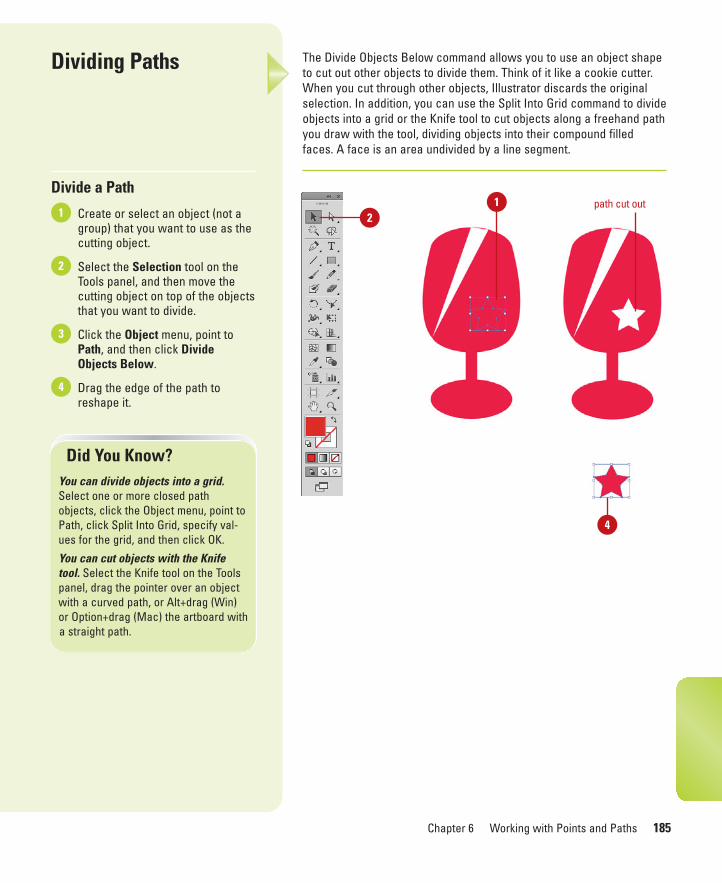
ptg8126863
Chapter 6 Working with Points and Paths 185
21
4
path cut out
The Divide Objects Below command allows you to use an object shapeto cut out other objects to divide them. Think of it like a cookie cutter.When you cut through other objects, Illustrator discards the originalselection. In addition, you can use the Split Into Grid command to divideobjects into a grid or the Knife tool to cut objects along a freehand pathyou draw with the tool, dividing objects into their compound filledfaces. A face is an area undivided by a line segment.
Dividing Paths
Divide a Path
Create or select an object (not agroup) that you want to use as thecutting object.
Select the Selection tool on theTools panel, and then move thecutting object on top of the objectsthat you want to divide.
Click the Object menu, point toPath, and then click DivideObjects Below.
Drag the edge of the path toreshape it.
4
3
2
1
Did You Know?You can divide objects into a grid.Select one or more closed pathobjects, click the Object menu, point toPath, click Split Into Grid, specify val-ues for the grid, and then click OK.
You can cut objects with the Knifetool. Select the Knife tool on the Toolspanel, drag the pointer over an objectwith a curved path, or Alt+drag (Win)or Option+drag (Mac) the artboard witha straight path.
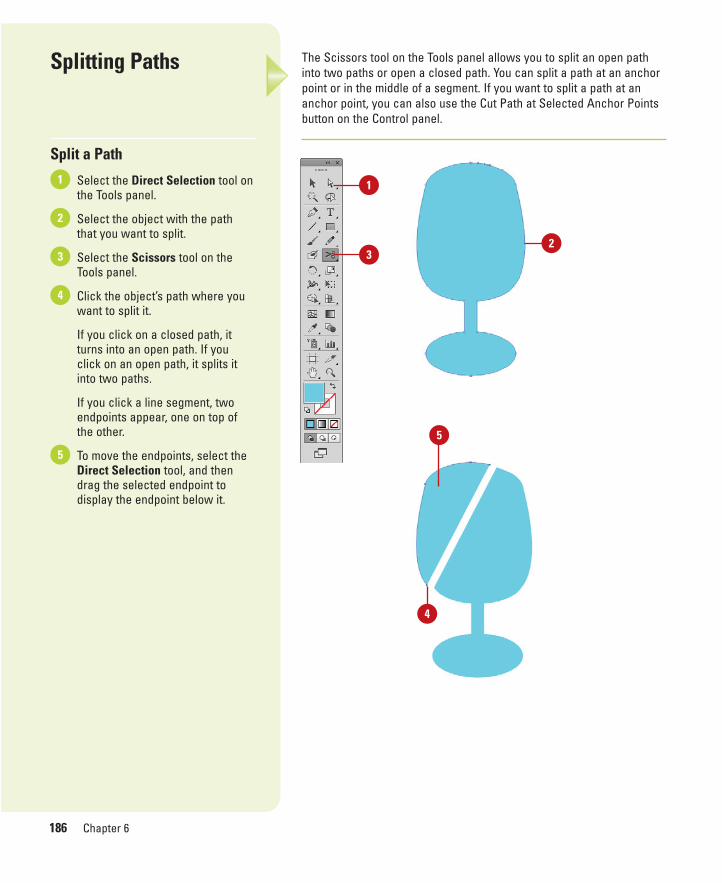
ptg8126863
186 Chapter 6
The Scissors tool on the Tools panel allows you to split an open pathinto two paths or open a closed path. You can split a path at an anchorpoint or in the middle of a segment. If you want to split a path at ananchor point, you can also use the Cut Path at Selected Anchor Pointsbutton on the Control panel.
Splitting Paths
Split a Path
Select the Direct Selection tool onthe Tools panel.
Select the object with the paththat you want to split.
Select the Scissors tool on theTools panel.
Click the object’s path where youwant to split it.
If you click on a closed path, itturns into an open path. If youclick on an open path, it splits itinto two paths.
If you click a line segment, twoendpoints appear, one on top ofthe other.
To move the endpoints, select theDirect Selection tool, and thendrag the selected endpoint todisplay the endpoint below it.
5
4
3
2
1 1
32
4
5

ptg8126863
Chapter 6 Working with Points and Paths 187
Split a Path Using the ControlPanel
Select the Direct Selection tool onthe Tools panel.
Select the object with the path,and then click the anchor pointthat you want to split.
Click the Cut Path at SelectedAnchor Points button on theControl panel.
A new anchor point appears ontop of the selected one.
To move the anchor point, drag theselected point to display the otheranchor point below it.
4
3
2
1
3
12 4
Did You Know?You can create new paths by an offsetamount. The Offset Path command cre-ate a new vector path that is scaled tobe larger or smaller than the originalwith affecting the original. If the path isopen, it creates a closed path, appear-ing on both the inside and outside ofthe original path, so you may need todelete the part of the path that is notneeded. Select the object, click theObject menu, point to Path, Offset Path,specify the offset and options, and thenclick OK.
See AlsoSee “Duplicating Objects” on page 94for more information on setting optionswith the Offset Path command.
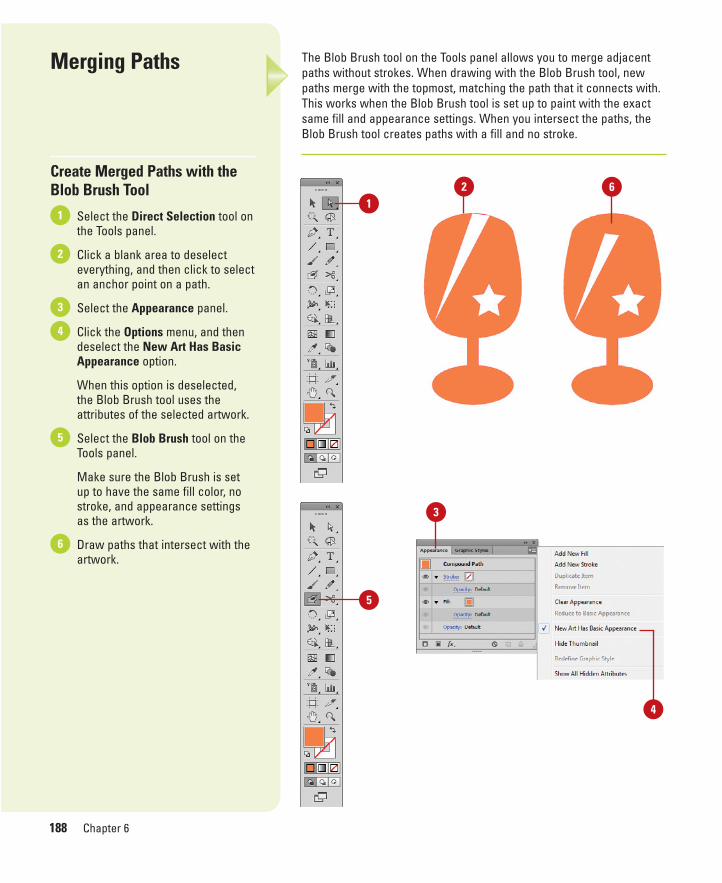
ptg8126863
188 Chapter 6
The Blob Brush tool on the Tools panel allows you to merge adjacentpaths without strokes. When drawing with the Blob Brush tool, newpaths merge with the topmost, matching the path that it connects with.This works when the Blob Brush tool is set up to paint with the exactsame fill and appearance settings. When you intersect the paths, theBlob Brush tool creates paths with a fill and no stroke.
Merging Paths
Create Merged Paths with theBlob Brush Tool
Select the Direct Selection tool onthe Tools panel.
Click a blank area to deselecteverything, and then click to selectan anchor point on a path.
Select the Appearance panel.
Click the Options menu, and thendeselect the New Art Has BasicAppearance option.
When this option is deselected,the Blob Brush tool uses theattributes of the selected artwork.
Select the Blob Brush tool on theTools panel.
Make sure the Blob Brush is setup to have the same fill color, nostroke, and appearance settingsas the artwork.
Draw paths that intersect with theartwork.
6
5
4
3
2
11
2
5
6
4
3
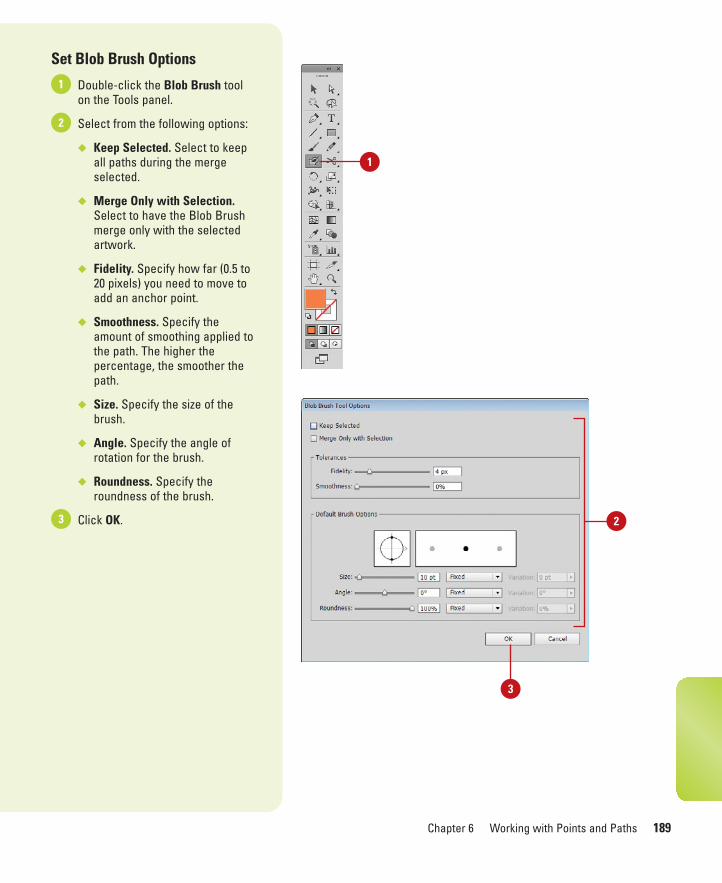
ptg8126863
Chapter 6 Working with Points and Paths 189
Set Blob Brush Options
Double-click the Blob Brush toolon the Tools panel.
Select from the following options:
◆ Keep Selected. Select to keepall paths during the mergeselected.
◆ Merge Only with Selection.Select to have the Blob Brushmerge only with the selectedartwork.
◆ Fidelity. Specify how far (0.5 to20 pixels) you need to move toadd an anchor point.
◆ Smoothness. Specify theamount of smoothing applied tothe path. The higher thepercentage, the smoother thepath.
◆ Size. Specify the size of thebrush.
◆ Angle. Specify the angle ofrotation for the brush.
◆ Roundness. Specify theroundness of the brush.
Click OK.3
2
1
1
2
3
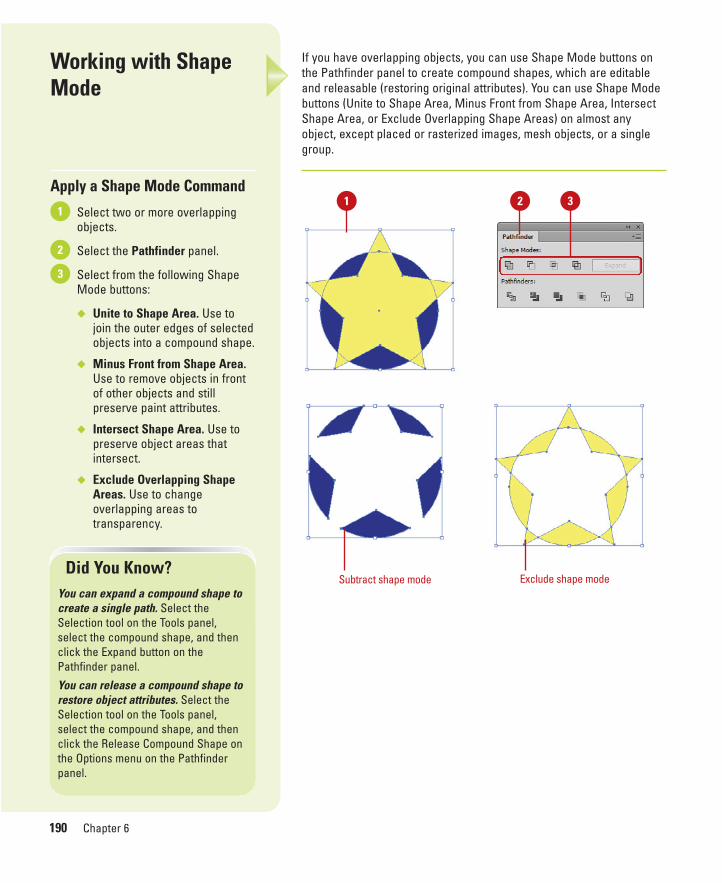
ptg8126863
190 Chapter 6
If you have overlapping objects, you can use Shape Mode buttons onthe Pathfinder panel to create compound shapes, which are editableand releasable (restoring original attributes). You can use Shape Modebuttons (Unite to Shape Area, Minus Front from Shape Area, IntersectShape Area, or Exclude Overlapping Shape Areas) on almost anyobject, except placed or rasterized images, mesh objects, or a singlegroup.
Working with ShapeMode
Apply a Shape Mode Command
Select two or more overlappingobjects.
Select the Pathfinder panel.
Select from the following ShapeMode buttons:
◆ Unite to Shape Area. Use tojoin the outer edges of selectedobjects into a compound shape.
◆ Minus Front from Shape Area.Use to remove objects in frontof other objects and stillpreserve paint attributes.
◆ Intersect Shape Area. Use topreserve object areas thatintersect.
◆ Exclude Overlapping ShapeAreas. Use to changeoverlapping areas totransparency.
3
2
1
Did You Know?You can expand a compound shape tocreate a single path. Select theSelection tool on the Tools panel,select the compound shape, and thenclick the Expand button on thePathfinder panel.
You can release a compound shape torestore object attributes. Select theSelection tool on the Tools panel,select the compound shape, and thenclick the Release Compound Shape onthe Options menu on the Pathfinderpanel.
1 2 3
Subtract shape mode Exclude shape mode
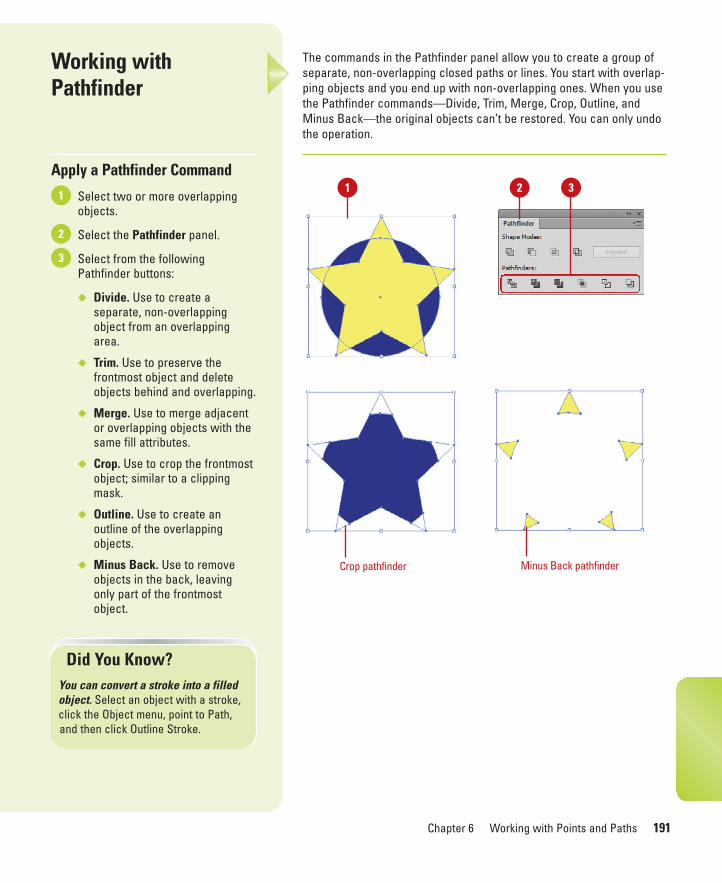
ptg8126863
Chapter 6 Working with Points and Paths 191
The commands in the Pathfinder panel allow you to create a group ofseparate, non-overlapping closed paths or lines. You start with overlap-ping objects and you end up with non-overlapping ones. When you usethe Pathfinder commands—Divide, Trim, Merge, Crop, Outline, andMinus Back—the original objects can’t be restored. You can only undothe operation.
Working withPathfinder
Apply a Pathfinder Command
Select two or more overlappingobjects.
Select the Pathfinder panel.
Select from the followingPathfinder buttons:
◆ Divide. Use to create aseparate, non-overlappingobject from an overlappingarea.
◆ Trim. Use to preserve thefrontmost object and deleteobjects behind and overlapping.
◆ Merge. Use to merge adjacentor overlapping objects with thesame fill attributes.
◆ Crop. Use to crop the frontmostobject; similar to a clippingmask.
◆ Outline. Use to create anoutline of the overlappingobjects.
◆ Minus Back. Use to removeobjects in the back, leavingonly part of the frontmostobject.
3
2
1
Did You Know?You can convert a stroke into a filledobject. Select an object with a stroke,click the Object menu, point to Path,and then click Outline Stroke.
1 2 3
Crop pathfinder Minus Back pathfinder
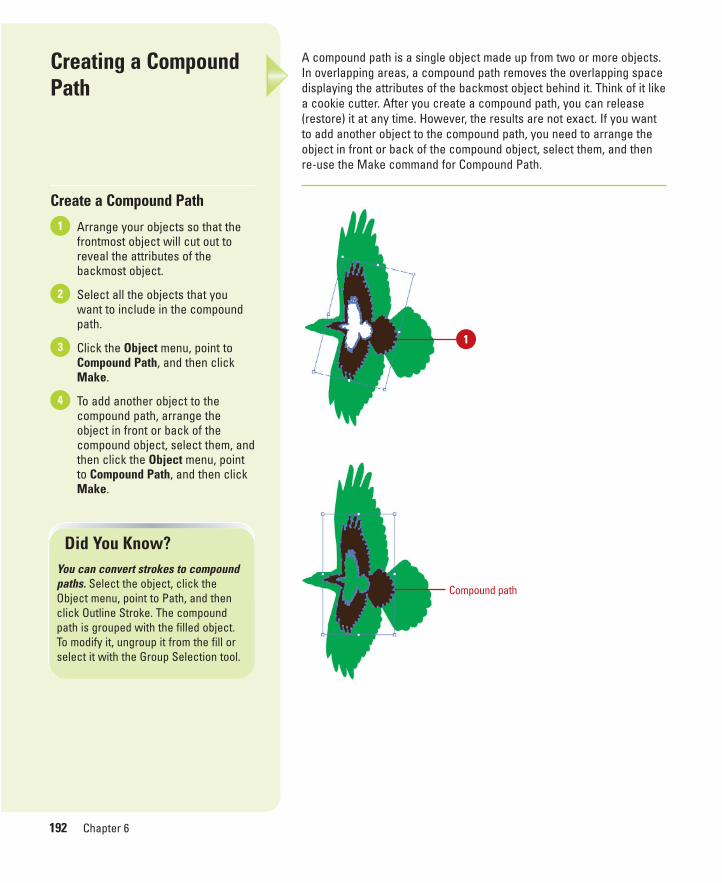
ptg8126863
192 Chapter 6
A compound path is a single object made up from two or more objects.In overlapping areas, a compound path removes the overlapping spacedisplaying the attributes of the backmost object behind it. Think of it likea cookie cutter. After you create a compound path, you can release(restore) it at any time. However, the results are not exact. If you wantto add another object to the compound path, you need to arrange theobject in front or back of the compound object, select them, and thenre-use the Make command for Compound Path.
Creating a CompoundPath
Create a Compound Path
Arrange your objects so that thefrontmost object will cut out toreveal the attributes of thebackmost object.
Select all the objects that youwant to include in the compoundpath.
Click the Object menu, point toCompound Path, and then clickMake.
To add another object to thecompound path, arrange theobject in front or back of thecompound object, select them, andthen click the Object menu, pointto Compound Path, and then clickMake.
4
3
2
1
1
Compound path
Did You Know?You can convert strokes to compoundpaths. Select the object, click theObject menu, point to Path, and thenclick Outline Stroke. The compoundpath is grouped with the filled object.To modify it, ungroup it from the fill orselect it with the Group Selection tool.
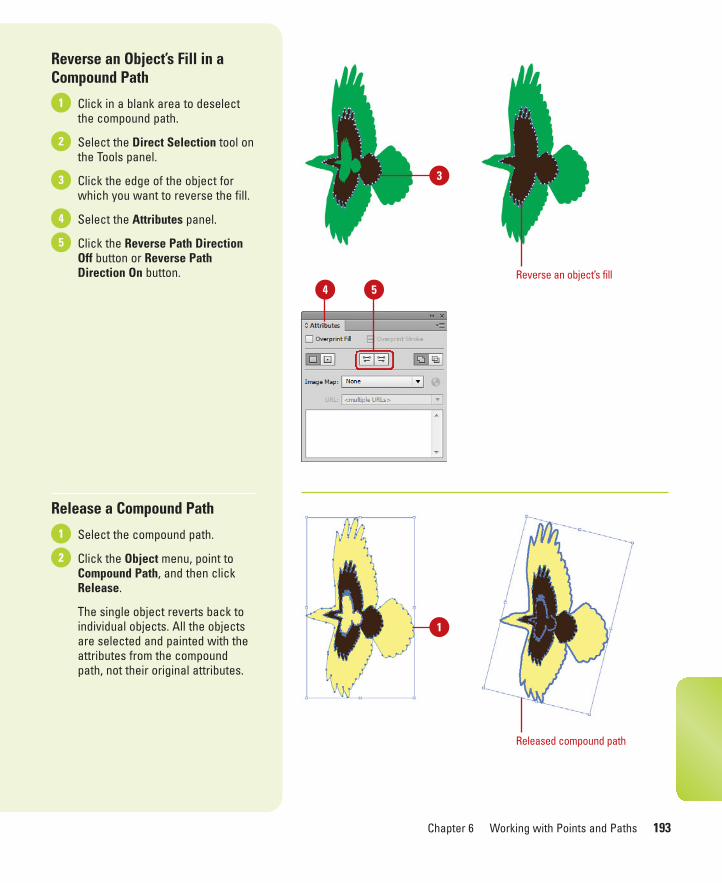
ptg8126863
Chapter 6 Working with Points and Paths 193
Reverse an Object’s Fill in aCompound Path
Click in a blank area to deselectthe compound path.
Select the Direct Selection tool onthe Tools panel.
Click the edge of the object forwhich you want to reverse the fill.
Select the Attributes panel.
Click the Reverse Path DirectionOff button or Reverse PathDirection On button.
Release a Compound Path
Select the compound path.
Click the Object menu, point toCompound Path, and then clickRelease.
The single object reverts back toindividual objects. All the objectsare selected and painted with theattributes from the compoundpath, not their original attributes.
2
1
5
4
3
2
1
4 5
3
Reverse an object’s fill
1
Released compound path
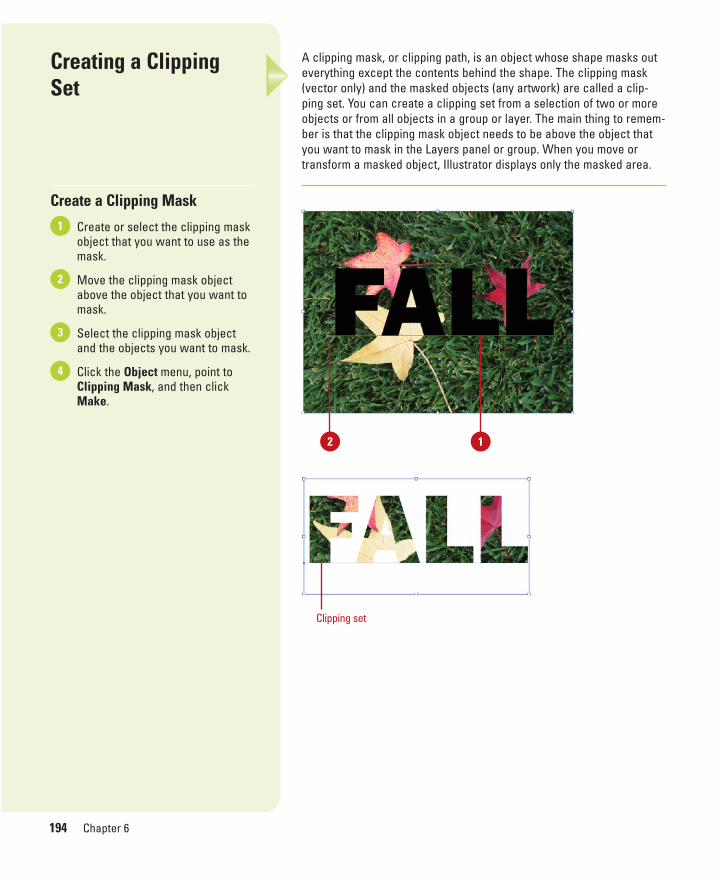
ptg8126863
194 Chapter 6
A clipping mask, or clipping path, is an object whose shape masks outeverything except the contents behind the shape. The clipping mask(vector only) and the masked objects (any artwork) are called a clip-ping set. You can create a clipping set from a selection of two or moreobjects or from all objects in a group or layer. The main thing to remem-ber is that the clipping mask object needs to be above the object thatyou want to mask in the Layers panel or group. When you move ortransform a masked object, Illustrator displays only the masked area.
Creating a Clipping Set
Create a Clipping Mask
Create or select the clipping maskobject that you want to use as themask.
Move the clipping mask objectabove the object that you want tomask.
Select the clipping mask objectand the objects you want to mask.
Click the Object menu, point toClipping Mask, and then clickMake.
4
3
2
1
2
Clipping set
1
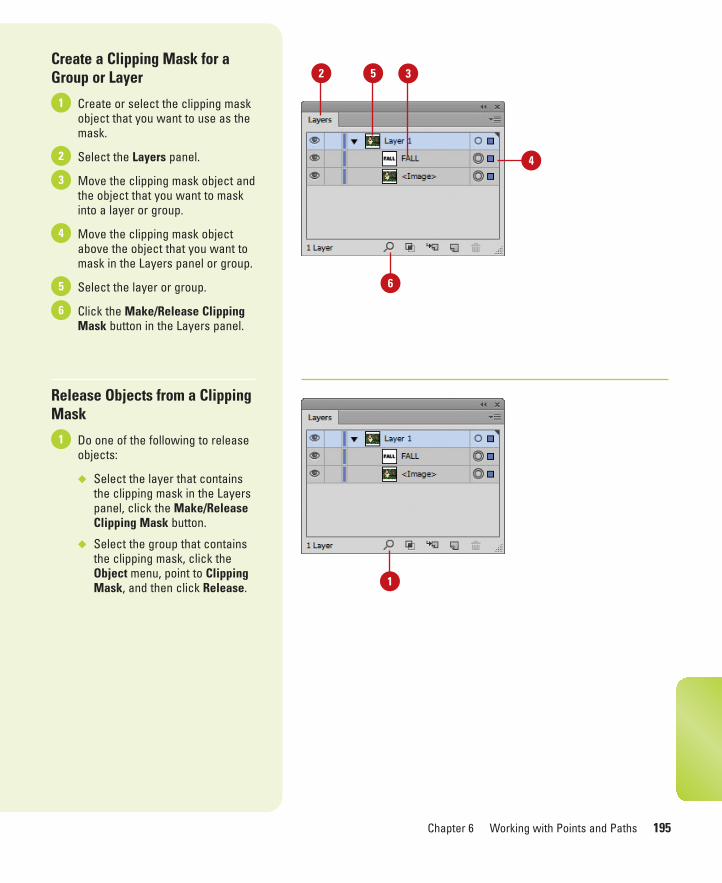
ptg8126863
Chapter 6 Working with Points and Paths 195
Create a Clipping Mask for aGroup or Layer
Create or select the clipping maskobject that you want to use as themask.
Select the Layers panel.
Move the clipping mask object andthe object that you want to maskinto a layer or group.
Move the clipping mask objectabove the object that you want tomask in the Layers panel or group.
Select the layer or group.
Click the Make/Release ClippingMask button in the Layers panel.
Release Objects from a ClippingMask
Do one of the following to releaseobjects:
◆ Select the layer that containsthe clipping mask in the Layerspanel, click the Make/ReleaseClipping Mask button.
◆ Select the group that containsthe clipping mask, click theObject menu, point to ClippingMask, and then click Release.
1
6
5
4
3
2
1
2 5 3
4
6
1

ptg8126863
196 Chapter 6
After you create a clipping set, you can edit the clipping mask or thepaths within the clipping set. At the same time you edit a clipping mask,you can add or remove an object from the masked artwork. You canalso view and edit the mask independently of all other objects inIsolation Mode. When you’re editing a clipping set, the main thing toremember is that the clipping mask object needs to be above the objectthat you want to mask in the Layers panel or group.
Editing a Clipping Set
Edit a Clipping Set
Do one of the following to selectthe clipping path or set:
◆ Select and target the clippingpath in the Layers panel.
◆ Select the clipping set, click theObject menu, point to ClippingMask, and then Edit Mask.
Do any of the following to edit theclipping mask:
◆ Select the Direct Selection toolon the Tools panel, and thendrag the object’s centerreference point to move it.
◆ Select the Direct Selection toolon the Tools panel, and thenreshape the clipping path.
◆ Apply a fill and stroke to aclipping path.
To add or remove an object fromthe masked artwork, drag theobject into or out of the group orlayer that contains the clippingpath.
3
2
12
1
3 Text and position change
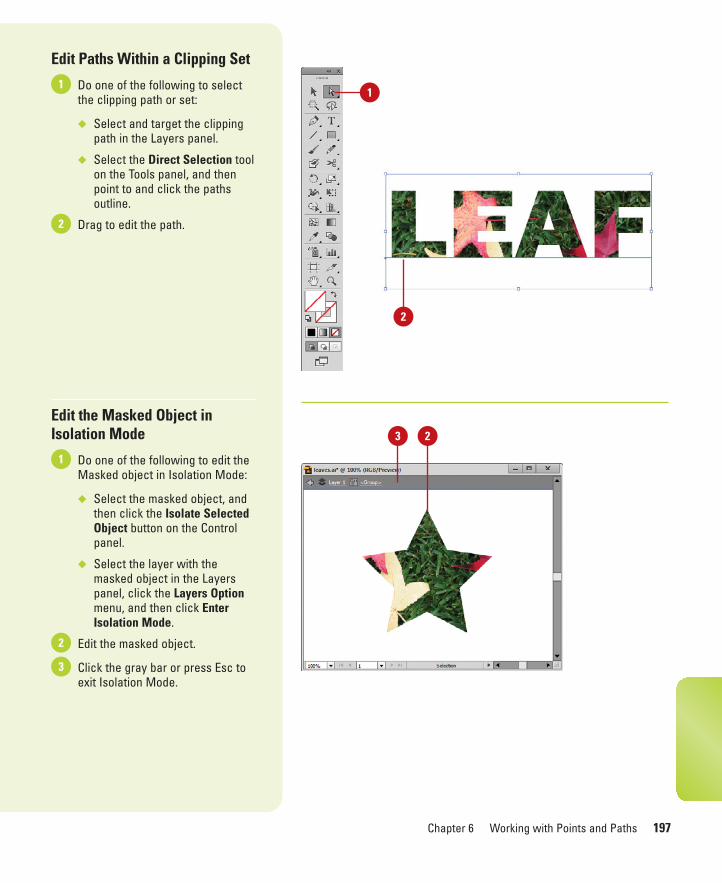
ptg8126863
Chapter 6 Working with Points and Paths 197
Edit Paths Within a Clipping Set
Do one of the following to selectthe clipping path or set:
◆ Select and target the clippingpath in the Layers panel.
◆ Select the Direct Selection toolon the Tools panel, and thenpoint to and click the pathsoutline.
Drag to edit the path.
Edit the Masked Object inIsolation Mode
Do one of the following to edit theMasked object in Isolation Mode:
◆ Select the masked object, andthen click the Isolate SelectedObject button on the Controlpanel.
◆ Select the layer with themasked object in the Layerspanel, click the Layers Optionmenu, and then click EnterIsolation Mode.
Edit the masked object.
Click the gray bar or press Esc toexit Isolation Mode.
3
2
1
2
11
2
3 2

ptg8126863
This page intentionally left blank
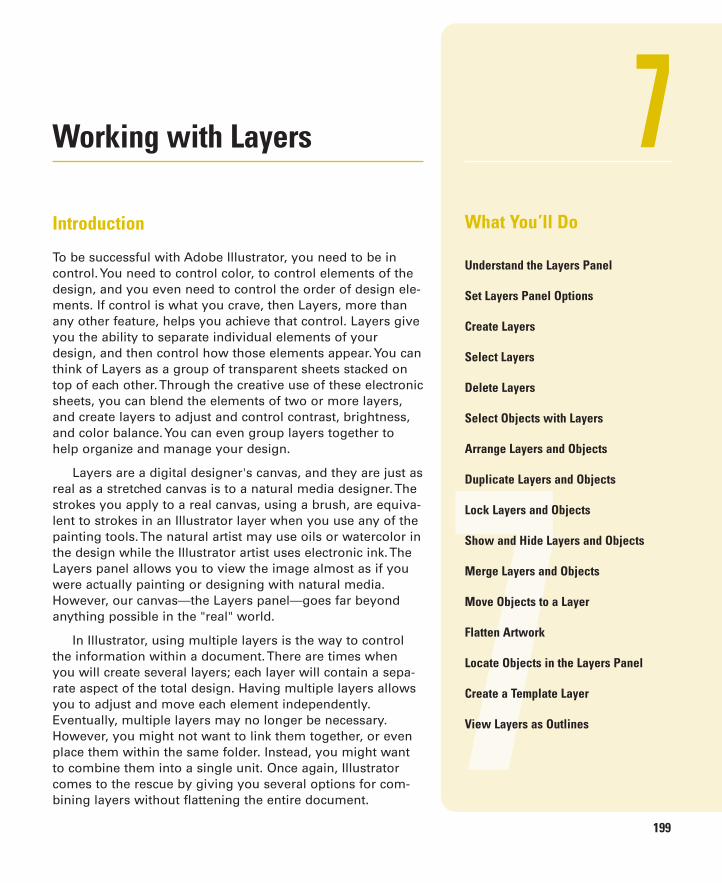
ptg8126863
Working with Layers
Introduction
To be successful with Adobe Illustrator, you need to be incontrol. You need to control color, to control elements of thedesign, and you even need to control the order of design ele-ments. If control is what you crave, then Layers, more thanany other feature, helps you achieve that control. Layers giveyou the ability to separate individual elements of yourdesign, and then control how those elements appear. You canthink of Layers as a group of transparent sheets stacked ontop of each other. Through the creative use of these electronicsheets, you can blend the elements of two or more layers,and create layers to adjust and control contrast, brightness,and color balance. You can even group layers together tohelp organize and manage your design.
Layers are a digital designer's canvas, and they are just asreal as a stretched canvas is to a natural media designer. Thestrokes you apply to a real canvas, using a brush, are equiva-lent to strokes in an Illustrator layer when you use any of thepainting tools. The natural artist may use oils or watercolor inthe design while the Illustrator artist uses electronic ink. TheLayers panel allows you to view the image almost as if youwere actually painting or designing with natural media.However, our canvas—the Layers panel—goes far beyondanything possible in the "real" world.
In Illustrator, using multiple layers is the way to controlthe information within a document. There are times whenyou will create several layers; each layer will contain a sepa-rate aspect of the total design. Having multiple layers allowsyou to adjust and move each element independently.Eventually, multiple layers may no longer be necessary.However, you might not want to link them together, or evenplace them within the same folder. Instead, you might wantto combine them into a single unit. Once again, Illustratorcomes to the rescue by giving you several options for com-bining layers without flattening the entire document.
7
7What You’ll Do
Understand the Layers Panel
Set Layers Panel Options
Create Layers
Select Layers
Delete Layers
Select Objects with Layers
Arrange Layers and Objects
Duplicate Layers and Objects
Lock Layers and Objects
Show and Hide Layers and Objects
Merge Layers and Objects
Move Objects to a Layer
Flatten Artwork
Locate Objects in the Layers Panel
Create a Template Layer
View Layers as Outlines
199
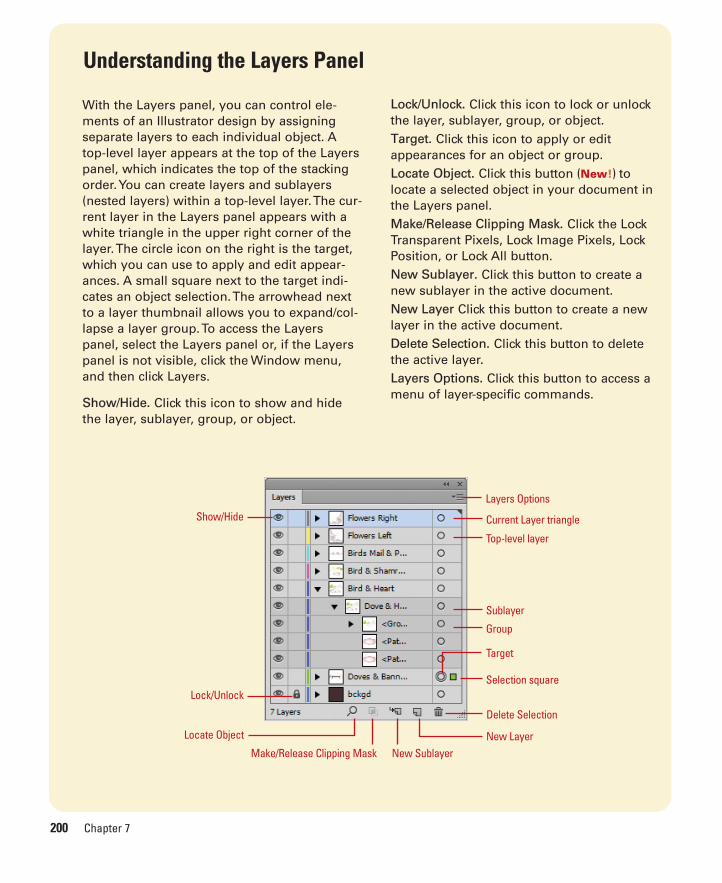
ptg8126863
200 Chapter 7
With the Layers panel, you can control ele-ments of an Illustrator design by assigningseparate layers to each individual object. Atop-level layer appears at the top of the Layerspanel, which indicates the top of the stackingorder. You can create layers and sublayers(nested layers) within a top-level layer. The cur-rent layer in the Layers panel appears with awhite triangle in the upper right corner of thelayer. The circle icon on the right is the target,which you can use to apply and edit appear-ances. A small square next to the target indi-cates an object selection. The arrowhead nextto a layer thumbnail allows you to expand/col-lapse a layer group. To access the Layerspanel, select the Layers panel or, if the Layerspanel is not visible, click the Window menu,and then click Layers.
Show/Hide. Click this icon to show and hidethe layer, sublayer, group, or object.
Lock/Unlock. Click this icon to lock or unlockthe layer, sublayer, group, or object.Target. Click this icon to apply or editappearances for an object or group.Locate Object. Click this button (New!) tolocate a selected object in your document inthe Layers panel.Make/Release Clipping Mask. Click the LockTransparent Pixels, Lock Image Pixels, LockPosition, or Lock All button.New Sublayer. Click this button to create anew sublayer in the active document.New Layer Click this button to create a newlayer in the active document.Delete Selection. Click this button to deletethe active layer.Layers Options. Click this button to access amenu of layer-specific commands.
Understanding the Layers Panel
Lock/Unlock
Show/Hide
Target
Top-level layer
Delete Selection
New LayerNew SublayerMake/Release Clipping Mask
Layers Options
Current Layer triangle
Sublayer
Group
Selection square
Locate Object

ptg8126863
Chapter 7 Working with Layers 201
Illustrator doesn't have a lot of options for controlling the Layers panelitself; in fact, there are only a few—changing the size of the layer rowand showing or hiding layers by type. You can choose to view the layerrow size in a small (12 pixels), medium (20 pixels), or large (32 pixels)size, or you can select a custom size. You can choose to show or hidethumbnails based on type, including Layers, Top Level Only, Groups,and Objects.
Setting Layers PanelOptions
Set Layers Panel Options
Select the Layers panel.
Click the Options menu, and thenclick Panel Options.
Deselect the Show Layers Onlycheck box to show all layers.Select it to show only top-levellayers and sublayers.
Click an option for Row Size:Small, Medium, Large, or Other,and then enter a size (12-100pixels).
Select the check boxes you wantfor Thumbnails: Layers, Top LevelOnly, Groups, and Objects.
Click OK.6
5
4
3
2
121
3
4
5
6
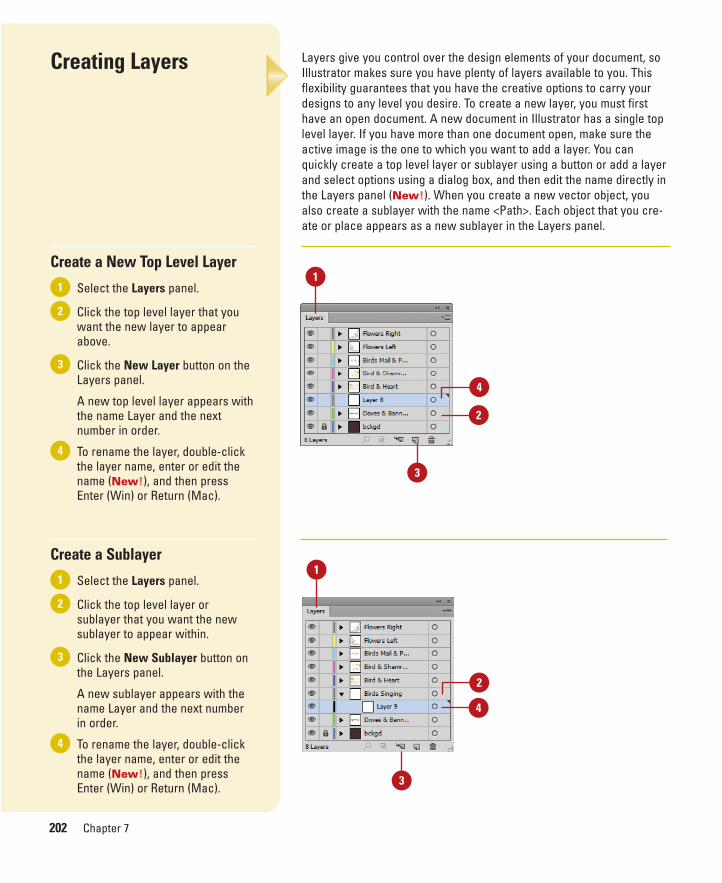
ptg8126863
202 Chapter 7
Layers give you control over the design elements of your document, soIllustrator makes sure you have plenty of layers available to you. Thisflexibility guarantees that you have the creative options to carry yourdesigns to any level you desire. To create a new layer, you must firsthave an open document. A new document in Illustrator has a single toplevel layer. If you have more than one document open, make sure theactive image is the one to which you want to add a layer. You canquickly create a top level layer or sublayer using a button or add a layerand select options using a dialog box, and then edit the name directly inthe Layers panel (New!). When you create a new vector object, youalso create a sublayer with the name <Path>. Each object that you cre-ate or place appears as a new sublayer in the Layers panel.
Creating Layers
Create a New Top Level Layer
Select the Layers panel.
Click the top level layer that youwant the new layer to appearabove.
Click the New Layer button on theLayers panel.
A new top level layer appears withthe name Layer and the nextnumber in order.
To rename the layer, double-clickthe layer name, enter or edit thename (New!), and then pressEnter (Win) or Return (Mac).
Create a Sublayer
Select the Layers panel.
Click the top level layer orsublayer that you want the newsublayer to appear within.
Click the New Sublayer button onthe Layers panel.
A new sublayer appears with thename Layer and the next numberin order.
To rename the layer, double-clickthe layer name, enter or edit thename (New!), and then pressEnter (Win) or Return (Mac).
4
3
2
1
4
3
2
11
1
2
4
4
2
3
3

ptg8126863
Chapter 7 Working with Layers 203
Create a New Top Level Layer orSublayer with Options
Select the Layers panel.
Click the top level layer that youwant the new layer to appearabove, or sublayer that you wantthe new sublayer to appear within.
Alt+click (Win) or Option+click(Mac) the New Layer or NewSublayer button on the Layerspanel.
The Layer Options dialog boxappears.
Enter a name for the layer orsublayer.
Click the Color list arrow, and thenselect a color.
Select the check boxes that youwant to apply to the layer orsublayer:
◆ Template. Select to make atemplate layer uneditable.
◆ Show. Select to show the layerin the Layers panel.
◆ Preview. Select to view thelayer in Preview view.
◆ Lock. Select to lock the layer.
◆ Print. Select to enable printingfor the layer. Nonprintablelayers appear in italics in theLayers panel.
◆ Dim Images to 50%. Select togray out images by thespecified percentage.
Click OK.7
6
5
4
3
2
1
1
5
2
6
3
New top layer
4
7
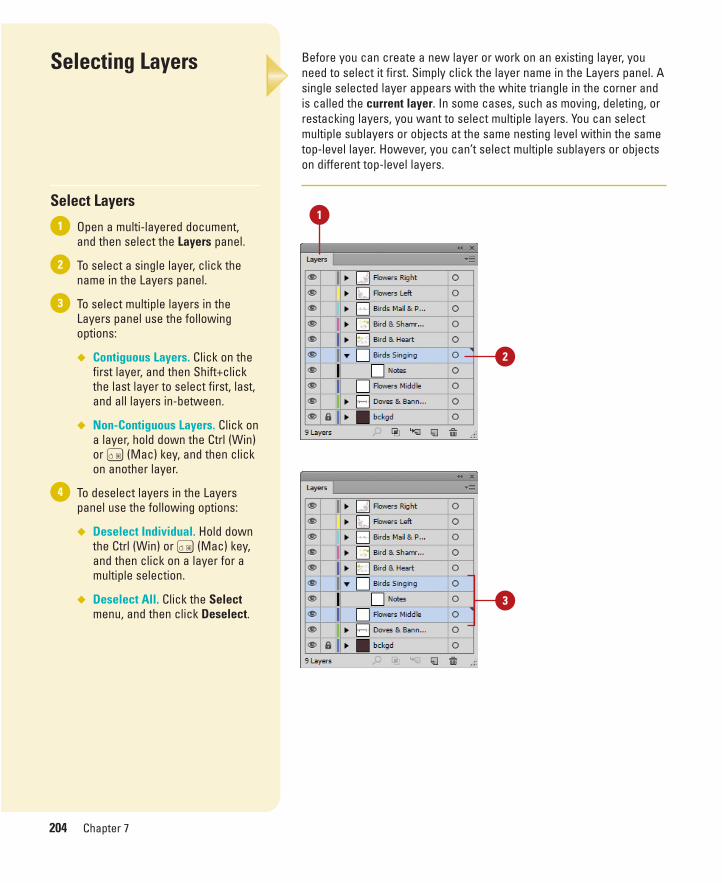
ptg8126863
204 Chapter 7
Before you can create a new layer or work on an existing layer, youneed to select it first. Simply click the layer name in the Layers panel. Asingle selected layer appears with the white triangle in the corner andis called the current layer. In some cases, such as moving, deleting, orrestacking layers, you want to select multiple layers. You can selectmultiple sublayers or objects at the same nesting level within the sametop-level layer. However, you can’t select multiple sublayers or objectson different top-level layers.
Selecting Layers
Select Layers
Open a multi-layered document,and then select the Layers panel.
To select a single layer, click thename in the Layers panel.
To select multiple layers in theLayers panel use the followingoptions:
◆ Contiguous Layers. Click on thefirst layer, and then Shift+clickthe last layer to select first, last,and all layers in-between.
◆ Non-Contiguous Layers. Click ona layer, hold down the Ctrl (Win)or A (Mac) key, and then clickon another layer.
To deselect layers in the Layerspanel use the following options:
◆ Deselect Individual. Hold downthe Ctrl (Win) or A (Mac) key,and then click on a layer for amultiple selection.
◆ Deselect All. Click the Selectmenu, and then click Deselect.
4
3
2
11
2
3
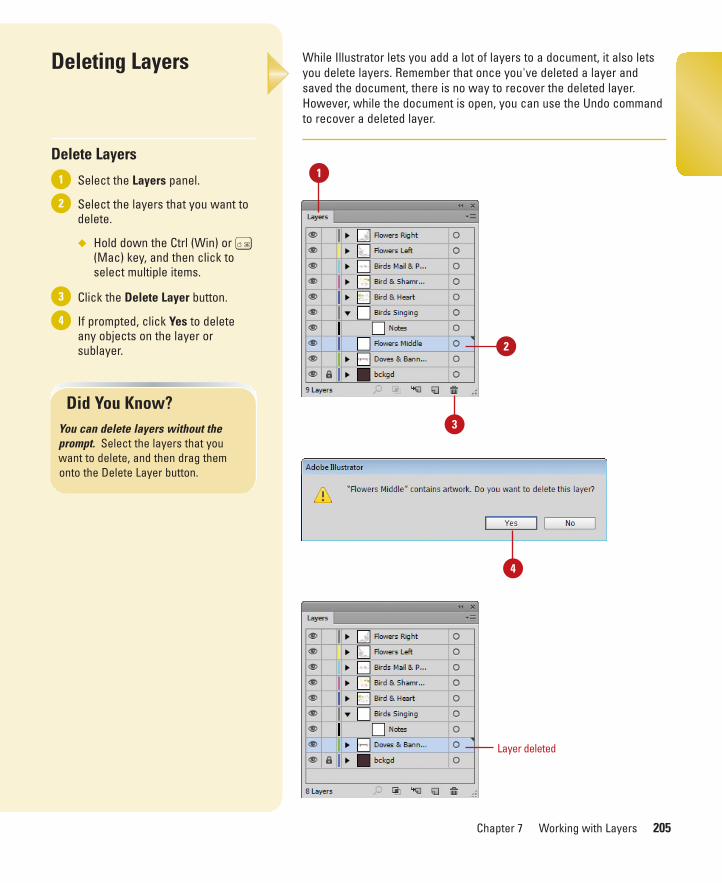
ptg8126863
Chapter 7 Working with Layers 205
While Illustrator lets you add a lot of layers to a document, it also letsyou delete layers. Remember that once you've deleted a layer andsaved the document, there is no way to recover the deleted layer.However, while the document is open, you can use the Undo commandto recover a deleted layer.
Deleting Layers
Delete Layers
Select the Layers panel.
Select the layers that you want todelete.
◆ Hold down the Ctrl (Win) or A(Mac) key, and then click toselect multiple items.
Click the Delete Layer button.
If prompted, click Yes to deleteany objects on the layer orsublayer.
4
3
2
1
Did You Know?You can delete layers without theprompt. Select the layers that youwant to delete, and then drag themonto the Delete Layer button.
1
2
Layer deleted
4
3
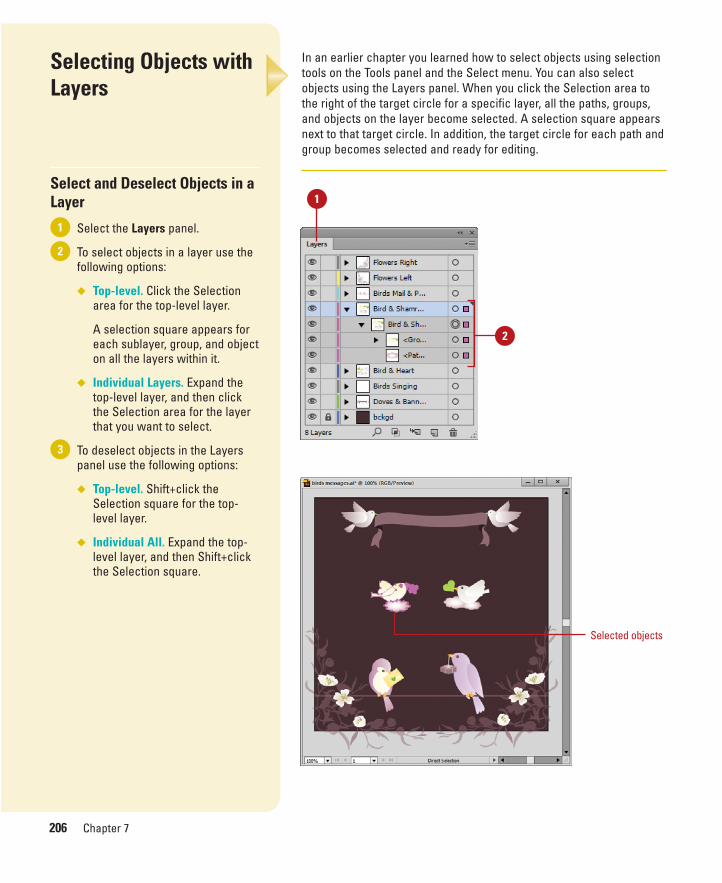
ptg8126863
206 Chapter 7
In an earlier chapter you learned how to select objects using selectiontools on the Tools panel and the Select menu. You can also selectobjects using the Layers panel. When you click the Selection area tothe right of the target circle for a specific layer, all the paths, groups,and objects on the layer become selected. A selection square appearsnext to that target circle. In addition, the target circle for each path andgroup becomes selected and ready for editing.
Selecting Objects withLayers
Select and Deselect Objects in aLayer
Select the Layers panel.
To select objects in a layer use thefollowing options:
◆ Top-level. Click the Selectionarea for the top-level layer.
A selection square appears foreach sublayer, group, and objecton all the layers within it.
◆ Individual Layers. Expand thetop-level layer, and then clickthe Selection area for the layerthat you want to select.
To deselect objects in the Layerspanel use the following options:
◆ Top-level. Shift+click theSelection square for the top-level layer.
◆ Individual All. Expand the top-level layer, and then Shift+clickthe Selection square.
3
2
1
1
2
Selected objects

ptg8126863
Chapter 7 Working with Layers 207
Select Multiple Objects onDifferent Layers
Select the Layers panel.
Expand the layers with the objectsthat you want to select in theLayers panel.
Click the selection area or targetcircle for the first object.
Shift+click the other individualgroup or object layers that youwant to include in the selection.
The layers don’t need to beadjacent to each other. They canbe anywhere in the Layers panel.
To deselect a group or objectlayer, Shift+click the Selectionsquare for the layer.
5
4
3
2
1
1
3
2
Selected objects
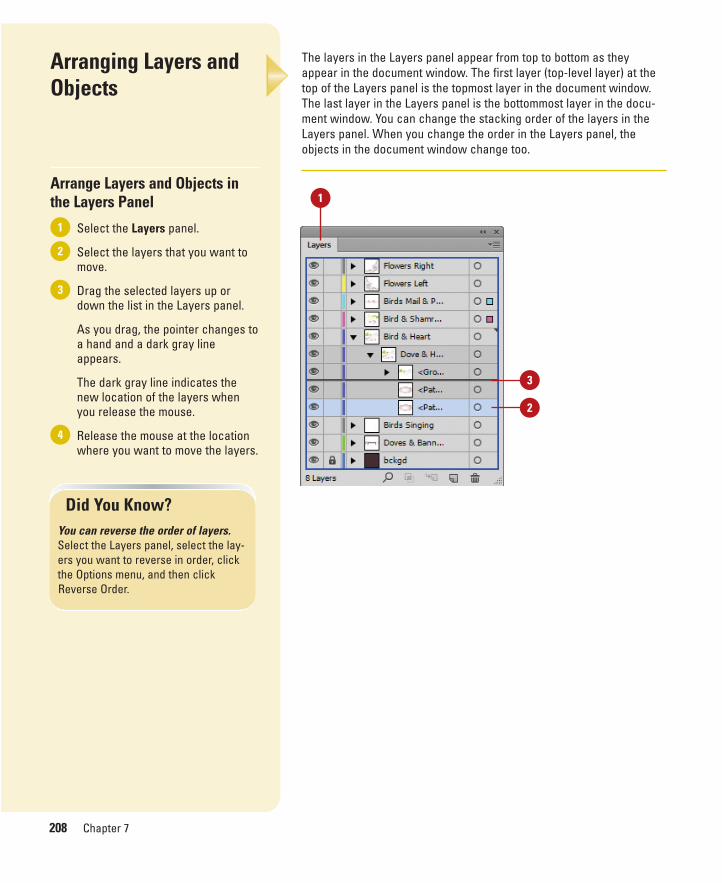
ptg8126863
208 Chapter 7
The layers in the Layers panel appear from top to bottom as theyappear in the document window. The first layer (top-level layer) at thetop of the Layers panel is the topmost layer in the document window.The last layer in the Layers panel is the bottommost layer in the docu-ment window. You can change the stacking order of the layers in theLayers panel. When you change the order in the Layers panel, theobjects in the document window change too.
Arranging Layers andObjects
Arrange Layers and Objects inthe Layers Panel
Select the Layers panel.
Select the layers that you want tomove.
Drag the selected layers up ordown the list in the Layers panel.
As you drag, the pointer changes toa hand and a dark gray lineappears.
The dark gray line indicates thenew location of the layers whenyou release the mouse.
Release the mouse at the locationwhere you want to move the layers.
4
3
2
1
1
2
3
Did You Know?You can reverse the order of layers.Select the Layers panel, select the lay-ers you want to reverse in order, clickthe Options menu, and then clickReverse Order.

ptg8126863
Chapter 7 Working with Layers 209
Arrange Objects and LayersUsing an Arrange Command
Select the Layers panel.
Select the layers that you want tomove.
Click the Object menu, and thenpoint to Arrange.
Click one of the followingcommands:
◆ Bring to Front. Moves theselected layers up to the toplevel.
◆ Bring Forward. Moves theselected layers up a level.
◆ Send Backward. Moves theselected layers down a level.
◆ Send to Back. Moves theselected layers down to the lastlevel.
◆ Send to Current Layer. Movesthe selected layers to thecurrent layer.
4
3
2
1
2
1
3
4
Moved forward

ptg8126863
210 Chapter 7
There are times when you will need a copy of a layer. Duplicating alayer is a simple process that creates a pixel-to-pixel copy of theselected layer. Once the copied layer is created, it becomes a separateimage within the document. You can then begin to make changes to thenew layer. Duplicating a layer gives you the ability to control each layerseparately and to apply nondestructive effects to your image by makingthem on a copy of the image instead of the original.
Duplicating Layers andObjects
Duplicate Objects and Layers inthe Layers Panel
Select the Layers panel.
Select the layers that you want toduplicate.
◆ Hold down the Ctrl (Win) or A(Mac) key, and then click toselect multiple items.
Click the Options menu, and thenclick Duplicate “Layer Name.”
3
2
1
Did You Know?You can duplicate a layer with theNew Layer button. Drag the layer overthe New Layer button and Illustratorcreates an exact copy of the layer andappends the word copy at the end ofthe original layer name.
You can duplicate a layer by dragginga Selection square. Drag+Alt (Win) orDrag+Option (Mac) the Selectionsquare up or down in the Layers panelto the location where you want toplace the duplicate layers.
Duplicated layer
1 3
2
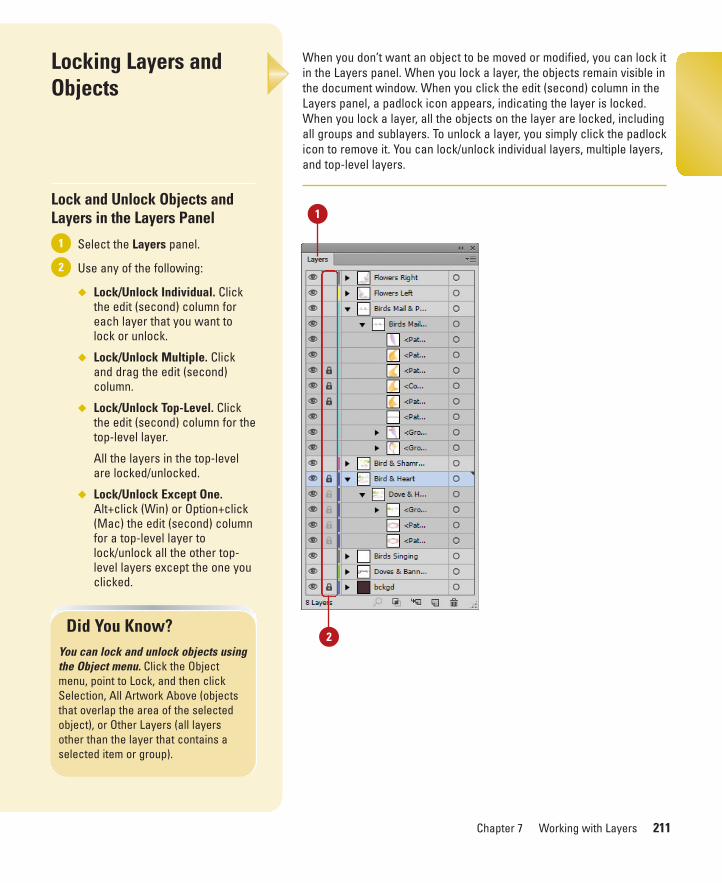
ptg8126863
Chapter 7 Working with Layers 211
When you don’t want an object to be moved or modified, you can lock itin the Layers panel. When you lock a layer, the objects remain visible inthe document window. When you click the edit (second) column in theLayers panel, a padlock icon appears, indicating the layer is locked.When you lock a layer, all the objects on the layer are locked, includingall groups and sublayers. To unlock a layer, you simply click the padlockicon to remove it. You can lock/unlock individual layers, multiple layers,and top-level layers.
Locking Layers andObjects
Lock and Unlock Objects andLayers in the Layers Panel
Select the Layers panel.
Use any of the following:
◆ Lock/Unlock Individual. Clickthe edit (second) column foreach layer that you want tolock or unlock.
◆ Lock/Unlock Multiple. Clickand drag the edit (second)column.
◆ Lock/Unlock Top-Level. Clickthe edit (second) column for thetop-level layer.
All the layers in the top-levelare locked/unlocked.
◆ Lock/Unlock Except One.Alt+click (Win) or Option+click(Mac) the edit (second) columnfor a top-level layer tolock/unlock all the other top-level layers except the one youclicked.
2
1
1
2Did You Know?
You can lock and unlock objects usingthe Object menu. Click the Objectmenu, point to Lock, and then clickSelection, All Artwork Above (objectsthat overlap the area of the selectedobject), or Other Layers (all layersother than the layer that contains aselected item or group).
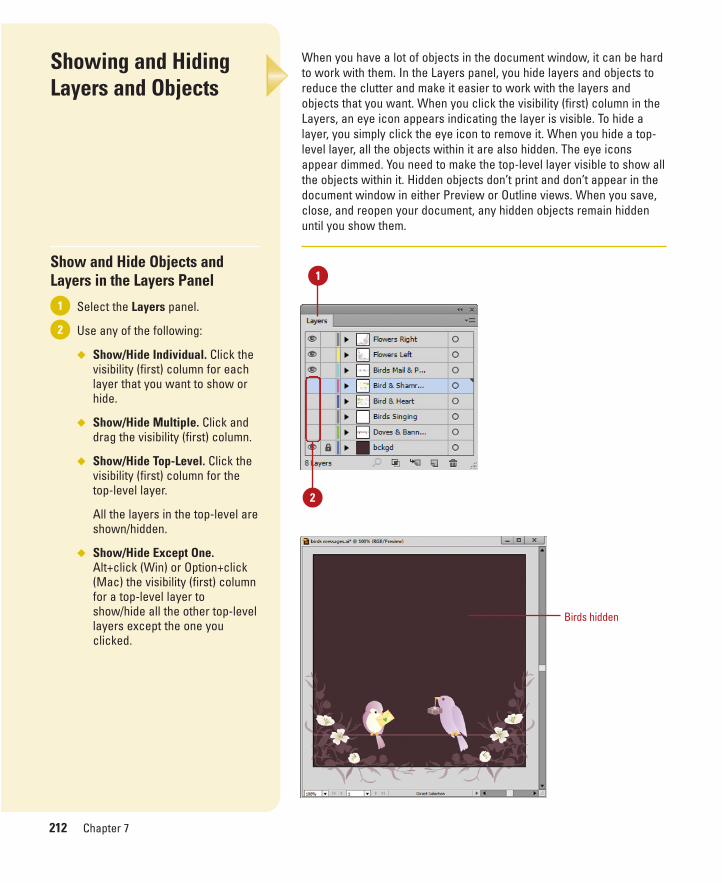
ptg8126863
212 Chapter 7
When you have a lot of objects in the document window, it can be hardto work with them. In the Layers panel, you hide layers and objects toreduce the clutter and make it easier to work with the layers andobjects that you want. When you click the visibility (first) column in theLayers, an eye icon appears indicating the layer is visible. To hide alayer, you simply click the eye icon to remove it. When you hide a top-level layer, all the objects within it are also hidden. The eye iconsappear dimmed. You need to make the top-level layer visible to show allthe objects within it. Hidden objects don’t print and don’t appear in thedocument window in either Preview or Outline views. When you save,close, and reopen your document, any hidden objects remain hiddenuntil you show them.
Showing and HidingLayers and Objects
Show and Hide Objects andLayers in the Layers Panel
Select the Layers panel.
Use any of the following:
◆ Show/Hide Individual. Click thevisibility (first) column for eachlayer that you want to show orhide.
◆ Show/Hide Multiple. Click anddrag the visibility (first) column.
◆ Show/Hide Top-Level. Click thevisibility (first) column for thetop-level layer.
All the layers in the top-level areshown/hidden.
◆ Show/Hide Except One.Alt+click (Win) or Option+click(Mac) the visibility (first) columnfor a top-level layer toshow/hide all the other top-levellayers except the one youclicked.
2
1
1
2
Birds hidden

ptg8126863
Chapter 7 Working with Layers 213
If you have objects on multiple layers and want to consolidate themonto one layer, you can merge them together. You can merge two ormore groups, or a combination of groups and sublayers (if they are bothin the same top-level layer). However, you can’t merge an object withanother object. If a layer is locked or hidden, you can still use them ina merge. Before you use the Merge Selected command, it’s a good ideato make a copy of your document as a backup to preserve a copy of theseparate layers.
Merging Layers andGroups
Merge Layers and Groups in theLayers Panel
Select the Layers panel.
Select two or more layers,sublayers, or groups that you wantto merge.
◆ Hold down the Ctrl (Win) or A(Mac) key, and then click toselect multiple items.
Click the last layer into which youwant to merge the selected layers.
Click the Options menu, and thenclick Merge Selected.
4
3
2
1
Merged layer
1 4
3
2
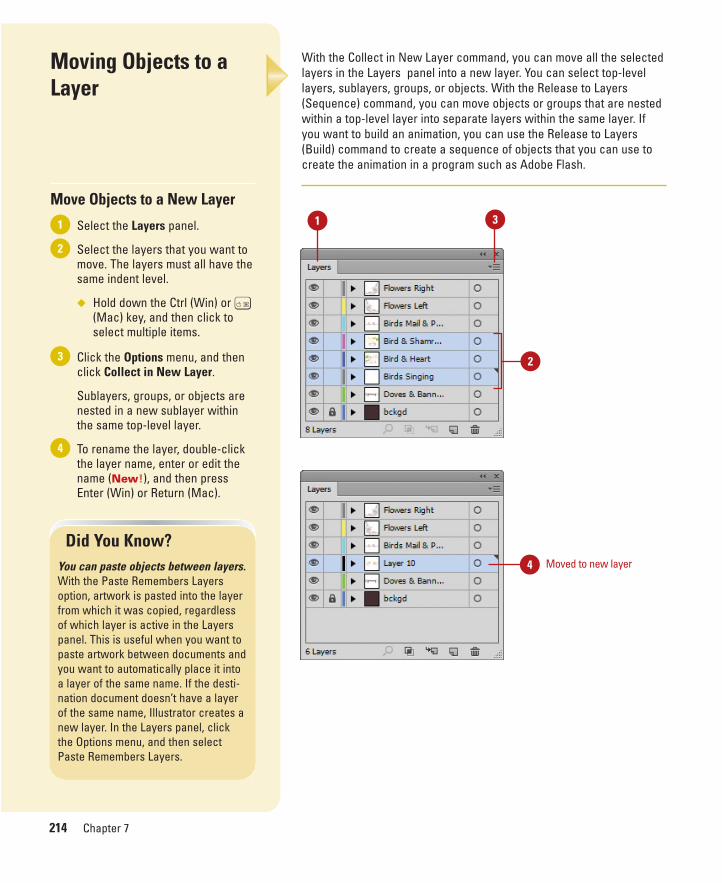
ptg8126863
214 Chapter 7
With the Collect in New Layer command, you can move all the selectedlayers in the Layers panel into a new layer. You can select top-levellayers, sublayers, groups, or objects. With the Release to Layers(Sequence) command, you can move objects or groups that are nestedwithin a top-level layer into separate layers within the same layer. Ifyou want to build an animation, you can use the Release to Layers(Build) command to create a sequence of objects that you can use tocreate the animation in a program such as Adobe Flash.
Moving Objects to aLayer
Move Objects to a New Layer
Select the Layers panel.
Select the layers that you want tomove. The layers must all have thesame indent level.
◆ Hold down the Ctrl (Win) or A(Mac) key, and then click toselect multiple items.
Click the Options menu, and thenclick Collect in New Layer.
Sublayers, groups, or objects arenested in a new sublayer withinthe same top-level layer.
To rename the layer, double-clickthe layer name, enter or edit thename (New!), and then pressEnter (Win) or Return (Mac).
4
3
2
1 1 3
2
4 Moved to new layer
Did You Know?You can paste objects between layers.With the Paste Remembers Layersoption, artwork is pasted into the layerfrom which it was copied, regardlessof which layer is active in the Layerspanel. This is useful when you want topaste artwork between documents andyou want to automatically place it intoa layer of the same name. If the desti-nation document doesn’t have a layerof the same name, Illustrator creates anew layer. In the Layers panel, clickthe Options menu, and then selectPaste Remembers Layers.
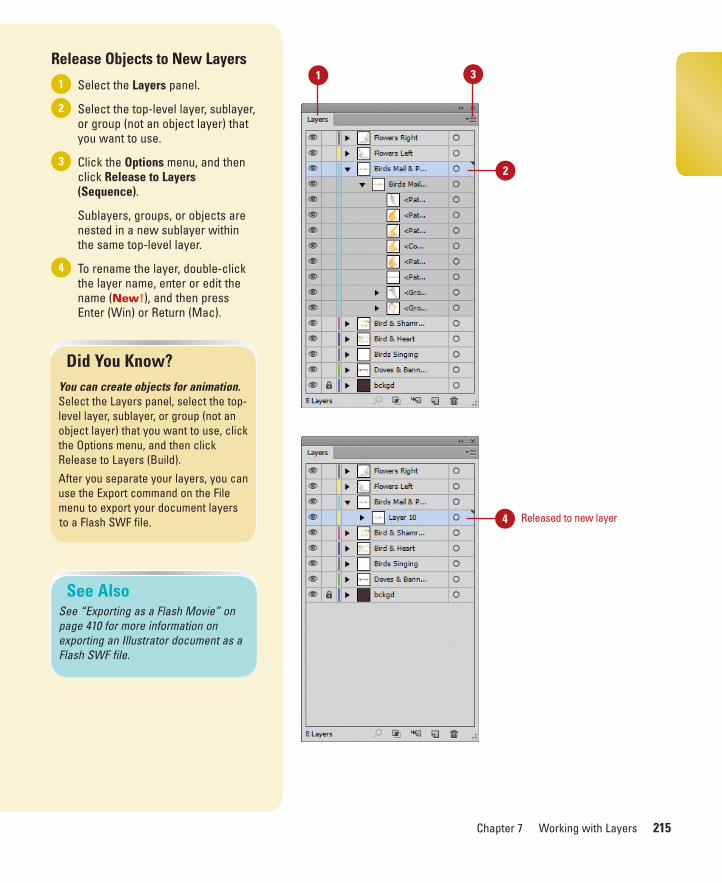
ptg8126863
Chapter 7 Working with Layers 215
Release Objects to New Layers
Select the Layers panel.
Select the top-level layer, sublayer,or group (not an object layer) thatyou want to use.
Click the Options menu, and thenclick Release to Layers(Sequence).
Sublayers, groups, or objects arenested in a new sublayer withinthe same top-level layer.
To rename the layer, double-clickthe layer name, enter or edit thename (New!), and then pressEnter (Win) or Return (Mac).
4
3
2
1
Did You Know?You can create objects for animation.Select the Layers panel, select the top-level layer, sublayer, or group (not anobject layer) that you want to use, clickthe Options menu, and then clickRelease to Layers (Build).
After you separate your layers, you canuse the Export command on the Filemenu to export your document layersto a Flash SWF file.
See AlsoSee “Exporting as a Flash Movie” onpage 410 for more information onexporting an Illustrator document as aFlash SWF file.
4 Released to new layer
2
1 3

ptg8126863
216 Chapter 7
The Flatten Artwork command allows you to flatten an entire documentinto one top-level layer with sublayers and groups nested within it.After you use the Flatten Artwork command, all objects remain editableand any appearances on layers are applied to all the objects in yourdocument.
Flattening Layers
Flatten Layers in the LayersPanel
Select the Layers panel.
Select the top-level layer or a layerwithin it that you want to use as anew main layer for the document.
Click the Options menu, and thenclick Flatten Artwork.
If any of the layers are hidden, analert appears, asking if you want todiscard the hidden layers.
If prompted, click Yes to discardthe hidden layers, or click No topreserve them.
4
3
2
1
1 3
2
Flattened layers

ptg8126863
Chapter 7 Working with Layers 217
When the Layers panel contains a lot of layers, groups, and objects, itcan be hard to find the one you want to work on, especially if the objectis in a collapsed layer. All you need to do is select the object in the doc-ument that you want to find and then click the Locate Object button(New!) on the Layers panel or choose the Locate Object command onthe Options menu.
Locating Objects in theLayers Panel
Locate an Object in the LayersPanel
Select the object that you want tofind in the document window.
Select the Layers panel.
Click the Locate Object button(New!) on the Layers panel.
◆ You can also click the Optionsmenu, and then click LocateObject.
This command changes toLocate Layer if the Show LayersOnly panel option is selected.
3
2
1
2
Located layer with object
1
3
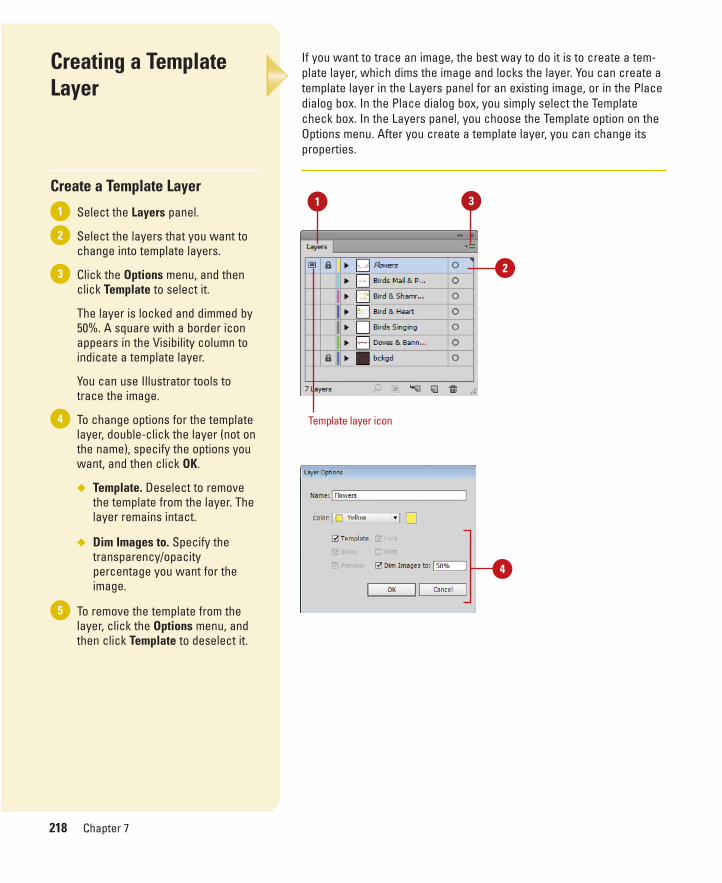
ptg8126863
218 Chapter 7
If you want to trace an image, the best way to do it is to create a tem-plate layer, which dims the image and locks the layer. You can create atemplate layer in the Layers panel for an existing image, or in the Placedialog box. In the Place dialog box, you simply select the Templatecheck box. In the Layers panel, you choose the Template option on theOptions menu. After you create a template layer, you can change itsproperties.
Creating a TemplateLayer
Create a Template Layer
Select the Layers panel.
Select the layers that you want tochange into template layers.
Click the Options menu, and thenclick Template to select it.
The layer is locked and dimmed by50%. A square with a border iconappears in the Visibility column toindicate a template layer.
You can use Illustrator tools totrace the image.
To change options for the templatelayer, double-click the layer (not onthe name), specify the options youwant, and then click OK.
◆ Template. Deselect to removethe template from the layer. Thelayer remains intact.
◆ Dim Images to. Specify thetransparency/opacitypercentage you want for theimage.
To remove the template from thelayer, click the Options menu, andthen click Template to deselect it.
5
4
3
2
11 3
4
Template layer icon
2
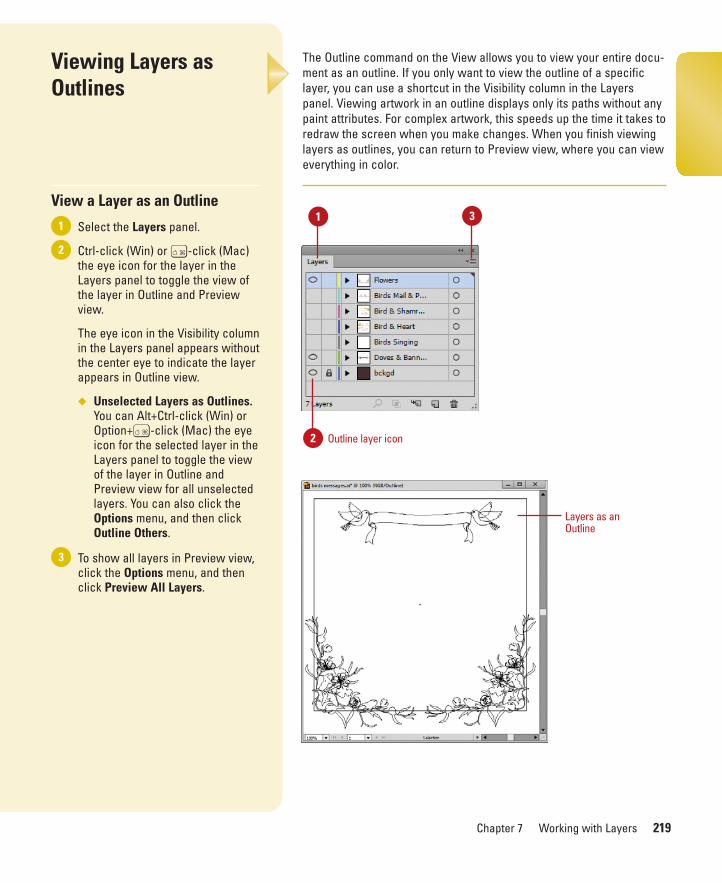
ptg8126863
Chapter 7 Working with Layers 219
The Outline command on the View allows you to view your entire docu-ment as an outline. If you only want to view the outline of a specificlayer, you can use a shortcut in the Visibility column in the Layerspanel. Viewing artwork in an outline displays only its paths without anypaint attributes. For complex artwork, this speeds up the time it takes toredraw the screen when you make changes. When you finish viewinglayers as outlines, you can return to Preview view, where you can vieweverything in color.
Viewing Layers asOutlines
View a Layer as an Outline
Select the Layers panel.
Ctrl-click (Win) or A-click (Mac)the eye icon for the layer in theLayers panel to toggle the view ofthe layer in Outline and Previewview.
The eye icon in the Visibility columnin the Layers panel appears withoutthe center eye to indicate the layerappears in Outline view.
◆ Unselected Layers as Outlines.You can Alt+Ctrl-click (Win) orOption+A-click (Mac) the eyeicon for the selected layer in theLayers panel to toggle the viewof the layer in Outline andPreview view for all unselectedlayers. You can also click theOptions menu, and then clickOutline Others.
To show all layers in Preview view,click the Options menu, and thenclick Preview All Layers.
3
2
11 3
Outline layer icon
Layers as anOutline
2

ptg8126863
This page intentionally left blank

ptg8126863
Working with Type
Introduction
Illustrator comes with 6 different type tools: Type, Area Type,Type on a Path, Vertical Type, Vertical Area Type, and VerticalType on a Path. Three of the tools are used for horizontal typeand the other three are used for vertical type. The functional-ity between the two types is the same; only the direction ofthe type differs.
Before you can work with type in Illustrator, you need toselect it. You can select the entire type object or the charac-ters in the type object. The Selection tool allows you to selectboth characters and their object, while the Direct Selectiontool allows you to select just the characters in the type objector both characters and their object. You can also use the typetools to select only the characters in the type object, not theobject itself. If you type, paste, or import more text than atype object can hold, an overflow symbol (a tiny red plussign in a square) appears on the edge of the type object. Youcan reshape the type object to display the text or create athread (link) to another type object. You can thread overflowtext from one type object to a new or existing type object.
Illustrator provides two panels to modify characters andparagraphs. With the Character panel, you can change thefont family (Arial or Times New Roman) and style (Italic, Bold,or Condensed), as well as change other type attributes, suchas size, kerning, scale, tracking, leading, and language. Withthe Paragraphs panel, you can change type alignment,indenting, and before and after spacing.
When integrating artwork and graphics with your type,you can wrap the text in a type object around another object,such as a graphic. Another type effect, Create Outlines,allows you to convert characters in a type object into a sepa-rate object with a path, which you can use as a mask object. 8
8What You’ll Do
Use Type Tools
Create Type
Create Area and Path Type
Modify Type on a Path
Import Text
Select Type
Copy or Move Type
Work with Overflow Type
Change Fonts and Font Size
Lead, Kern, and Track Type
Scale and Rotate Type
Format Type
Anti-alias Type
Align Paragraphs
Indent and Space Paragraphs
Set Tabs
Work with Hyphenation
Work with Type Styles
Use Smart Punctuation
Work with Glyphs and OpenType Fonts
Work with Justification
Wrap Type Around an Object
Create Type Outlines
221
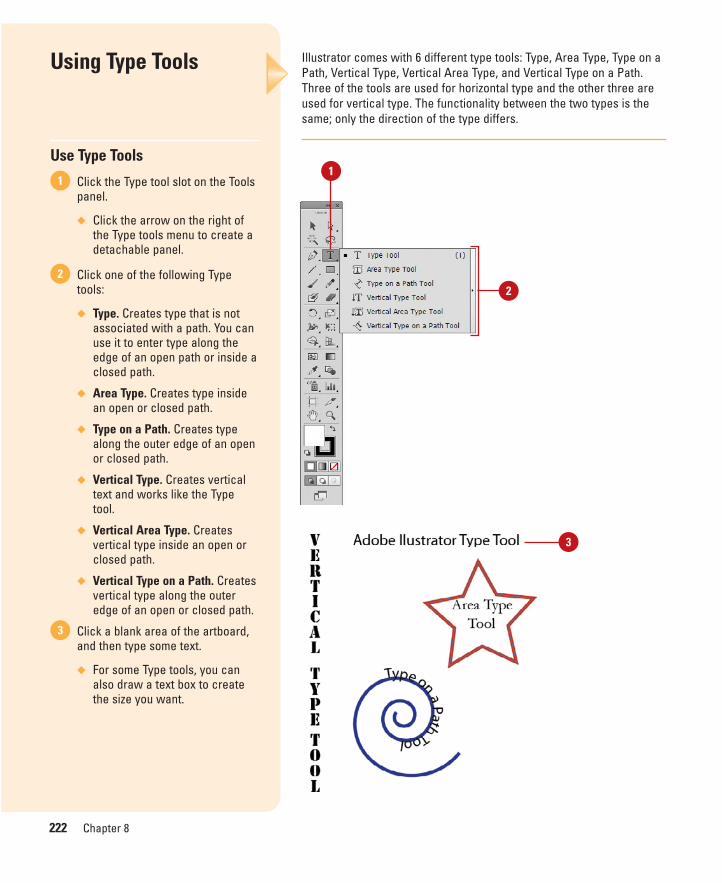
ptg8126863
222 Chapter 8
Illustrator comes with 6 different type tools: Type, Area Type, Type on aPath, Vertical Type, Vertical Area Type, and Vertical Type on a Path.Three of the tools are used for horizontal type and the other three areused for vertical type. The functionality between the two types is thesame; only the direction of the type differs.
Using Type Tools
Use Type Tools
Click the Type tool slot on the Toolspanel.
◆ Click the arrow on the right ofthe Type tools menu to create adetachable panel.
Click one of the following Typetools:
◆ Type. Creates type that is notassociated with a path. You canuse it to enter type along theedge of an open path or inside aclosed path.
◆ Area Type. Creates type insidean open or closed path.
◆ Type on a Path. Creates typealong the outer edge of an openor closed path.
◆ Vertical Type. Creates verticaltext and works like the Typetool.
◆ Vertical Area Type. Createsvertical type inside an open orclosed path.
◆ Vertical Type on a Path. Createsvertical type along the outeredge of an open or closed path.
Click a blank area of the artboard,and then type some text.
◆ For some Type tools, you canalso draw a text box to createthe size you want.
3
2
1
2
1
3
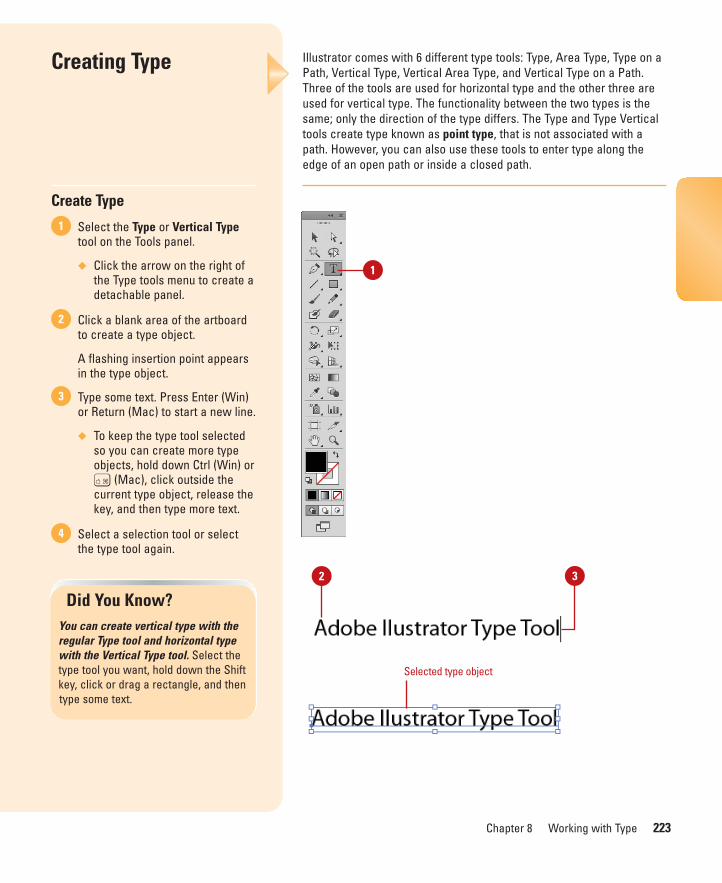
ptg8126863
Chapter 8 Working with Type 223
Illustrator comes with 6 different type tools: Type, Area Type, Type on aPath, Vertical Type, Vertical Area Type, and Vertical Type on a Path.Three of the tools are used for horizontal type and the other three areused for vertical type. The functionality between the two types is thesame; only the direction of the type differs. The Type and Type Verticaltools create type known as point type, that is not associated with apath. However, you can also use these tools to enter type along theedge of an open path or inside a closed path.
Creating Type
Create Type
Select the Type or Vertical Typetool on the Tools panel.
◆ Click the arrow on the right ofthe Type tools menu to create adetachable panel.
Click a blank area of the artboardto create a type object.
A flashing insertion point appearsin the type object.
Type some text. Press Enter (Win)or Return (Mac) to start a new line.
◆ To keep the type tool selectedso you can create more typeobjects, hold down Ctrl (Win) orA (Mac), click outside thecurrent type object, release thekey, and then type more text.
Select a selection tool or selectthe type tool again.
4
3
2
1
Did You Know?You can create vertical type with theregular Type tool and horizontal typewith the Vertical Type tool. Select thetype tool you want, hold down the Shiftkey, click or drag a rectangle, and thentype some text.
1
2 3
Selected type object

ptg8126863
224 Chapter 8
With the Type and Vertical Type tools, you can create a rectangle textbox any size that you want. When you type text in the type object, itautomatically wraps to the size of the box. If you type more text than thebox can hold, an overflow symbol (a tiny red plus sign in a square)appears on the edge of the rectangle box. You can reshape the typeobject to display the text or create a thread (link) to another type object.
Creating Type in a Text Box
Create Type in a Text Box
Select the Type or Vertical Typetool on the Tools panels.
◆ Click the arrow on the right ofthe Type tools menu to create adetachable panel (optional).
Drag to create a rectangle text boxthe size that you want.
A flashing insertion point appearsin the type object.
Type some text. The textautomatically wraps to the shape ofthe type object. Press Enter (Win)or Return (Mac) to start a new line.
◆ To keep the type tool selectedso you can create more typeobjects, hold down Ctrl (Win) orA (Mac), click outside thecurrent type object, release thekey, and then type more text.
◆ If the overflow symbol appears,deselect the type object, selectthe Direct Selection tool on theTools panel, and then drag acorner to reshape the typeobject.
Select a selection tool or select thetype tool again.
4
3
2
1
1
2
3
Selected type object
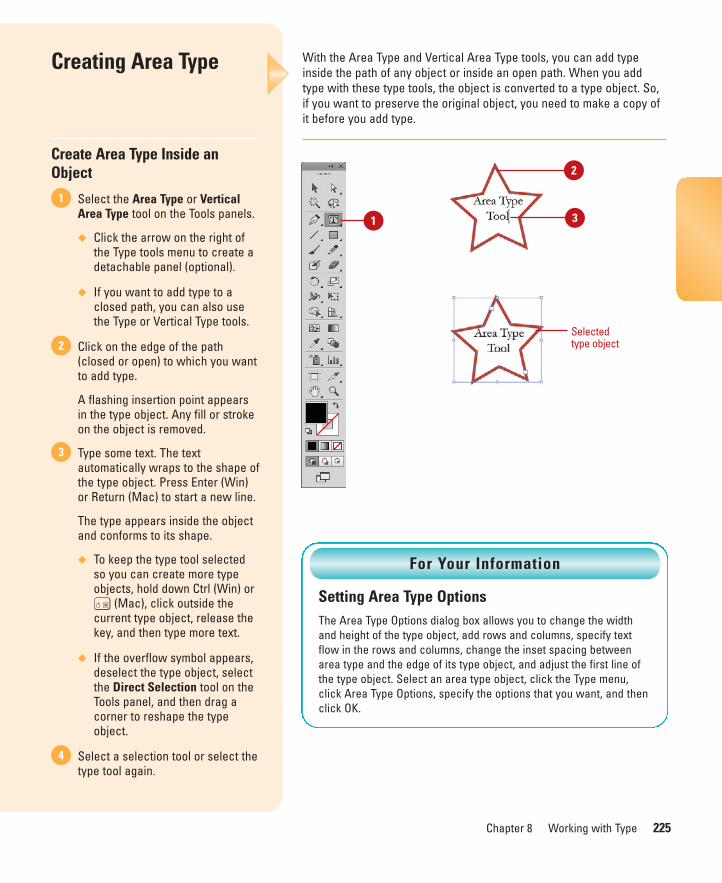
ptg8126863
Chapter 8 Working with Type 225
With the Area Type and Vertical Area Type tools, you can add typeinside the path of any object or inside an open path. When you addtype with these type tools, the object is converted to a type object. So,if you want to preserve the original object, you need to make a copy ofit before you add type.
Creating Area Type
Create Area Type Inside anObject
Select the Area Type or VerticalArea Type tool on the Tools panels.
◆ Click the arrow on the right ofthe Type tools menu to create adetachable panel (optional).
◆ If you want to add type to aclosed path, you can also usethe Type or Vertical Type tools.
Click on the edge of the path(closed or open) to which you wantto add type.
A flashing insertion point appearsin the type object. Any fill or strokeon the object is removed.
Type some text. The textautomatically wraps to the shape ofthe type object. Press Enter (Win)or Return (Mac) to start a new line.
The type appears inside the objectand conforms to its shape.
◆ To keep the type tool selectedso you can create more typeobjects, hold down Ctrl (Win) orA (Mac), click outside thecurrent type object, release thekey, and then type more text.
◆ If the overflow symbol appears,deselect the type object, selectthe Direct Selection tool on theTools panel, and then drag acorner to reshape the typeobject.
Select a selection tool or select thetype tool again.
4
3
2
1
Setting Area Type OptionsThe Area Type Options dialog box allows you to change the widthand height of the type object, add rows and columns, specify textflow in the rows and columns, change the inset spacing betweenarea type and the edge of its type object, and adjust the first line ofthe type object. Select an area type object, click the Type menu,click Area Type Options, specify the options that you want, and thenclick OK.
For Your Information
Selectedtype object
1 3
2
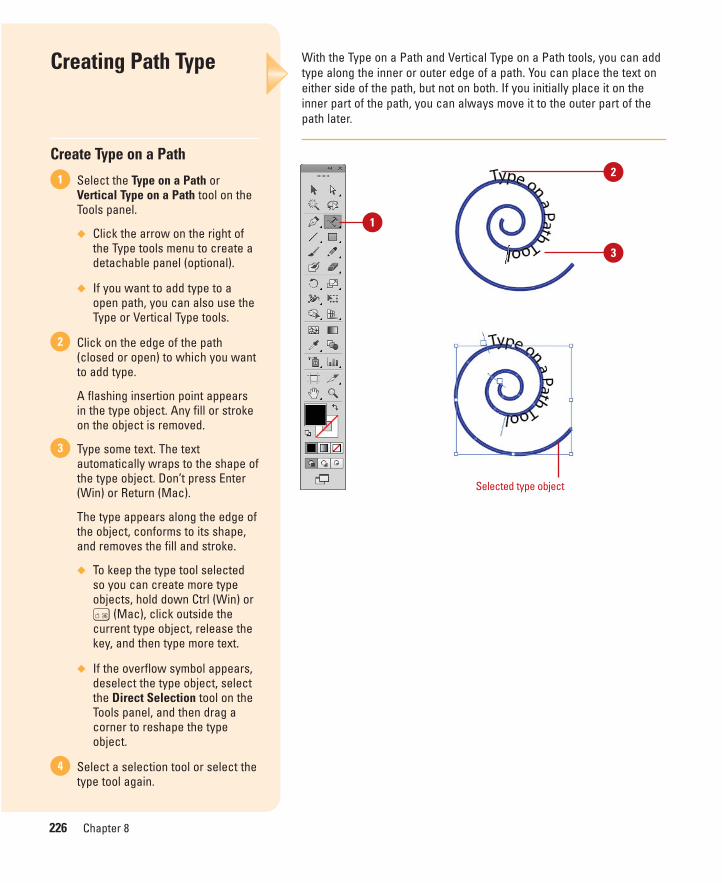
ptg8126863
226 Chapter 8
With the Type on a Path and Vertical Type on a Path tools, you can addtype along the inner or outer edge of a path. You can place the text oneither side of the path, but not on both. If you initially place it on theinner part of the path, you can always move it to the outer part of thepath later.
Creating Path Type
Create Type on a Path
Select the Type on a Path orVertical Type on a Path tool on theTools panel.
◆ Click the arrow on the right ofthe Type tools menu to create adetachable panel (optional).
◆ If you want to add type to aopen path, you can also use theType or Vertical Type tools.
Click on the edge of the path(closed or open) to which you wantto add type.
A flashing insertion point appearsin the type object. Any fill or strokeon the object is removed.
Type some text. The textautomatically wraps to the shape ofthe type object. Don’t press Enter(Win) or Return (Mac).
The type appears along the edge ofthe object, conforms to its shape,and removes the fill and stroke.
◆ To keep the type tool selectedso you can create more typeobjects, hold down Ctrl (Win) orA (Mac), click outside thecurrent type object, release thekey, and then type more text.
◆ If the overflow symbol appears,deselect the type object, selectthe Direct Selection tool on theTools panel, and then drag acorner to reshape the typeobject.
Select a selection tool or select thetype tool again.
4
3
2
1
1
2
3
Selected type object

ptg8126863
Chapter 8 Working with Type 227
Move Type on a Path
Select the Selection tool or DirectSelection tool on the Tools panel.
Click on the type.
Center, left, and right bracketsappear around the type.
Drag the bracket (not the square)to adjust the position of the typeon a path.
◆ Swap Sides. Drag the Centerbracket to the other side tochange the inner/outer positionof the type along the path.
◆ Left. Drag to position the leftside (or starting point) of thetype along the path.
◆ Center. Drag left or right toposition the type along thepath.
◆ Right. Drag to position the rightside (or ending point) of thetype along the path.
If the overflow symbol appears,deselect the type object, selectthe Direct Selection tool on theTools panel, and then drag acorner to reshape the typeobject.
Select a selection tool or selectthe type tool again.
4
3
2
1
Did You Know?You can change type case. To help youformat sentences correctly andchange capitalization, you can changetext case. Select the type that youwant to change, click the Type menu,point to Change Case, and then clickUPPERCASE, lowercase, Title Case, orSentence case.
Selected type object
1
32

ptg8126863
228 Chapter 8
After you create type on a path, you can change the alignment, shape,and orientation of the type with the Type on a Path dialog box. You canapply type effects, which include Rainbow, Skew, 3D Ribbon, Stair Step,or Gravity, as well as change alignment and spacing. You can even flipthe type on the path. Experiment with the effects and alignment optionsto create some unique type.
Modifying Type on aPath
Modify Type on a Path
Select the Selection tool or DirectSelection tool on the Tools panel.
Click on the type along the path.
Center, left, and right bracketsappear around the type.
Click the Type menu, point to Typeon a Path, and then click Type on aPath Options.
Select the Preview check box toview your changes in the documentwindow.
Click the Effect list arrow, and thenselect an effect: Rainbow, Skew,3D Ribbon, Stair Step, or Gravity.
◆ You can also select these effectoptions from the Type on a Pathsubmenu on the Type menu.
Click the Align to Path list arrow,and then select an alignmentoption: Baseline, Ascender,Descender, or Center.
Specify a spacing value (-36 to 36).The default is Auto.
Select or deselect the Flip checkbox to position the type.
Click OK.9
8
7
6
5
4
3
2
11
2
5 8
Type results
9
6
7
4
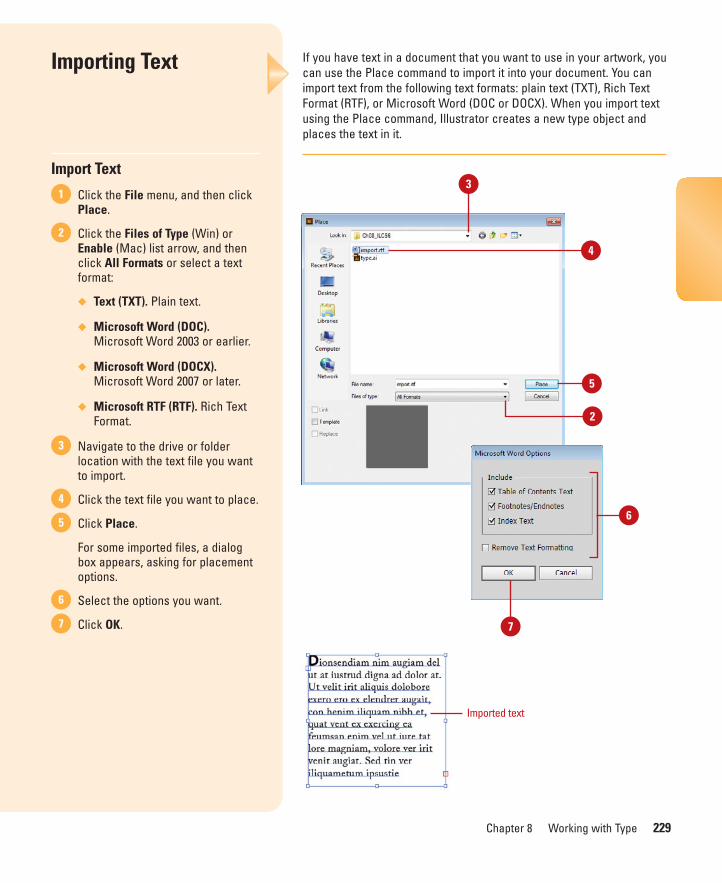
ptg8126863
Chapter 8 Working with Type 229
If you have text in a document that you want to use in your artwork, youcan use the Place command to import it into your document. You canimport text from the following text formats: plain text (TXT), Rich TextFormat (RTF), or Microsoft Word (DOC or DOCX). When you import textusing the Place command, Illustrator creates a new type object andplaces the text in it.
Importing Text
Import Text
Click the File menu, and then clickPlace.
Click the Files of Type (Win) orEnable (Mac) list arrow, and thenclick All Formats or select a textformat:
◆ Text (TXT). Plain text.
◆ Microsoft Word (DOC).Microsoft Word 2003 or earlier.
◆ Microsoft Word (DOCX).Microsoft Word 2007 or later.
◆ Microsoft RTF (RTF). Rich TextFormat.
Navigate to the drive or folderlocation with the text file you wantto import.
Click the text file you want to place.
Click Place.
For some imported files, a dialogbox appears, asking for placementoptions.
Select the options you want.
Click OK.7
6
5
4
3
2
1
Imported text
3
5
2
4
7
6
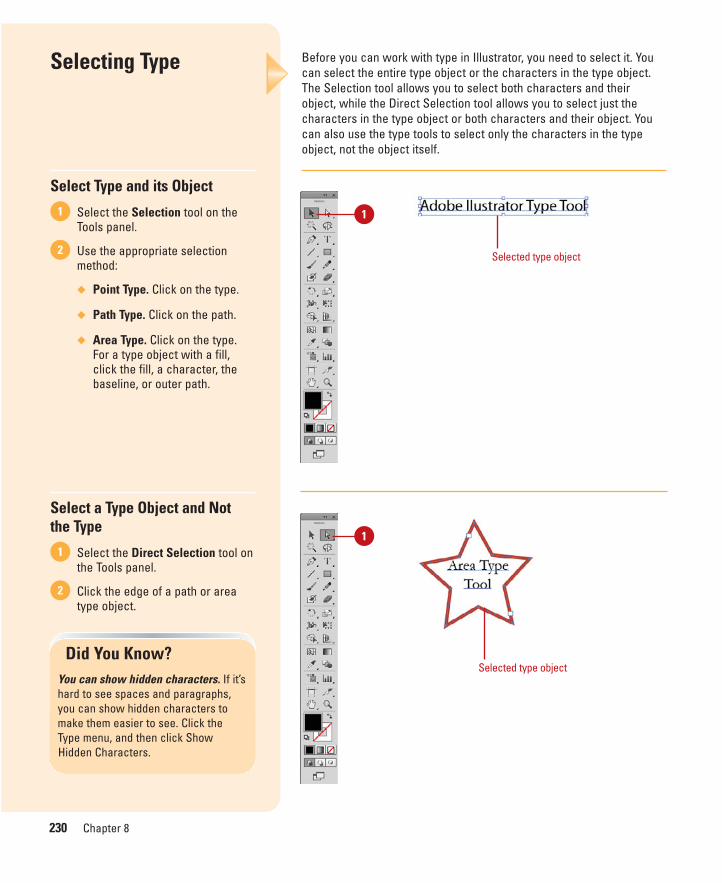
ptg8126863
230 Chapter 8
Before you can work with type in Illustrator, you need to select it. Youcan select the entire type object or the characters in the type object.The Selection tool allows you to select both characters and theirobject, while the Direct Selection tool allows you to select just thecharacters in the type object or both characters and their object. Youcan also use the type tools to select only the characters in the typeobject, not the object itself.
Selecting Type
Select Type and its Object
Select the Selection tool on theTools panel.
Use the appropriate selectionmethod:
◆ Point Type. Click on the type.
◆ Path Type. Click on the path.
◆ Area Type. Click on the type.For a type object with a fill,click the fill, a character, thebaseline, or outer path.
Select a Type Object and Not the Type
Select the Direct Selection tool onthe Tools panel.
Click the edge of a path or areatype object.
2
1
2
1
Did You Know?You can show hidden characters. If it’shard to see spaces and paragraphs,you can show hidden characters tomake them easier to see. Click theType menu, and then click ShowHidden Characters.
1
1
Selected type object
Selected type object
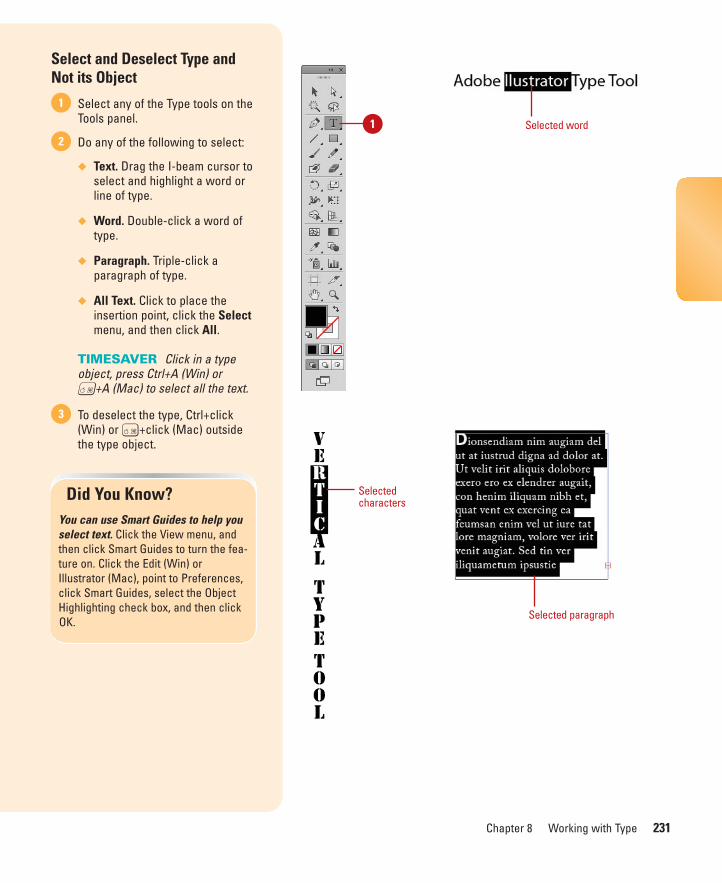
ptg8126863
Chapter 8 Working with Type 231
Select and Deselect Type andNot its Object
Select any of the Type tools on theTools panel.
Do any of the following to select:
◆ Text. Drag the I-beam cursor toselect and highlight a word orline of type.
◆ Word. Double-click a word oftype.
◆ Paragraph. Triple-click aparagraph of type.
◆ All Text. Click to place theinsertion point, click the Selectmenu, and then click All.
TIMESAVER Click in a typeobject, press Ctrl+A (Win) orA+A (Mac) to select all the text.
To deselect the type, Ctrl+click(Win) or A+click (Mac) outsidethe type object.
3
2
1
Did You Know?You can use Smart Guides to help youselect text. Click the View menu, andthen click Smart Guides to turn the fea-ture on. Click the Edit (Win) orIllustrator (Mac), point to Preferences,click Smart Guides, select the ObjectHighlighting check box, and then clickOK.
1 Selected word
Selected paragraph
Selectedcharacters

ptg8126863
232 Chapter 8
If you have text in a document that you want to use in your artwork, youcan copy and paste it into your Illustrator document. You can place thetext into an existing type object or have Illustrator create one for you. InIllustrator, you can copy type in a type object or copy individual charac-ters, and then paste them into another Illustrator artboard or document,or into another program, such as Flash, Photoshop, or a word process-ing program.
Copying or Moving Type
Copy or Move Text from AnotherProgram
Open the other program, such asMicrosoft Word.
Select the text that you want tocopy or move, and then usecommands to copy or cut (move)the text.
Switch back to Illustrator.
To place the text into an existingtype object, click in a type object toplace the insertion point.
Click the Edit menu, and then clickPaste.
TIMESAVER Ctrl+V (Win) orA+V (Mac).
5
4
3
2
1
1 24
Pasted text
Did You Know?You can delete empty type objectsfrom a document. Click the Objectmenu, point to Path, click Clean Up,select the Empty Text Paths check box,and then click OK.
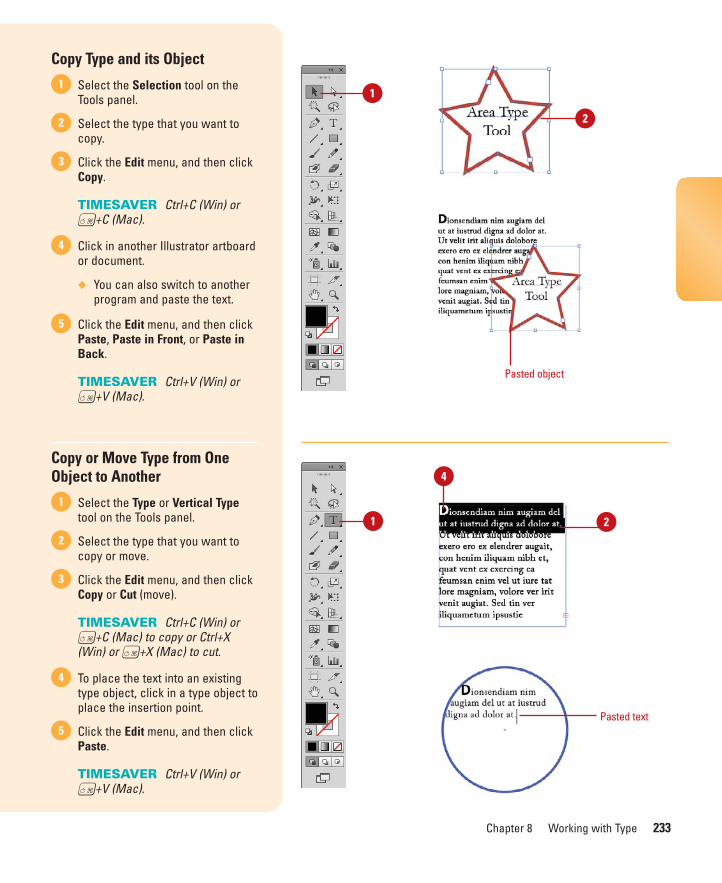
ptg8126863
Chapter 8 Working with Type 233
Copy Type and its Object
Select the Selection tool on theTools panel.
Select the type that you want tocopy.
Click the Edit menu, and then clickCopy.
TIMESAVER Ctrl+C (Win) orA+C (Mac).
Click in another Illustrator artboardor document.
◆ You can also switch to anotherprogram and paste the text.
Click the Edit menu, and then clickPaste, Paste in Front, or Paste inBack.
TIMESAVER Ctrl+V (Win) orA+V (Mac).
Copy or Move Type from OneObject to Another
Select the Type or Vertical Typetool on the Tools panel.
Select the type that you want tocopy or move.
Click the Edit menu, and then clickCopy or Cut (move).
TIMESAVER Ctrl+C (Win) orA+C (Mac) to copy or Ctrl+X(Win) or A+X (Mac) to cut.
To place the text into an existingtype object, click in a type object toplace the insertion point.
Click the Edit menu, and then clickPaste.
TIMESAVER Ctrl+V (Win) orA+V (Mac).
5
4
3
2
1
5
4
3
2
11
2
Pasted object
1 2
Pasted text
4

ptg8126863
234 Chapter 8
If you type, paste, or import more text than a type object can hold, anoverflow symbol (a tiny red plus sign in a square) appears on the edgeof the type object. You can reshape the type object to display the textor create a thread (link) to another type object. You can thread overflowtext from one type object to a new or existing type object. After youcreate a thread between two or more type objects, you can use theShow Text Threads command on the View menu to display the threadconnection. If you no longer want to want to thread two or more typeobjects, you can unthread or disconnect them. When you unthread typeobjects, the text in the type object remains in the first type object (itmay still overflow). When you disconnect type objects, the text in thetype objects remains where it is.
Working with OverflowType
Thread Overflow Type to AnotherObject and Show Text Threads
Select the Selection tool on theTools panel.
Select the type object with theoverflow type.
Click the Out Port icon on theselected object.
TIMESAVER Double-click anOut Port icon with the Selectiontool to create a linked copy of thetype object.
The pointer changes to the LoadedText pointer.
To create a new type object for theoverflow text, click a blank area ordrag to create a type object.
To use an existing type object,position the pointer over an existingtype object, and then click theobject’s path. A fill and stroke ofNone is applied to the path.
Overflow text from the first typeobject threads to the second typeobject.
To display a text thread betweentype objects, select a threaded typeobject, click the View menu, andthen click Show Text Threads.
5
4
3
2
11
2
3
4
Threadline
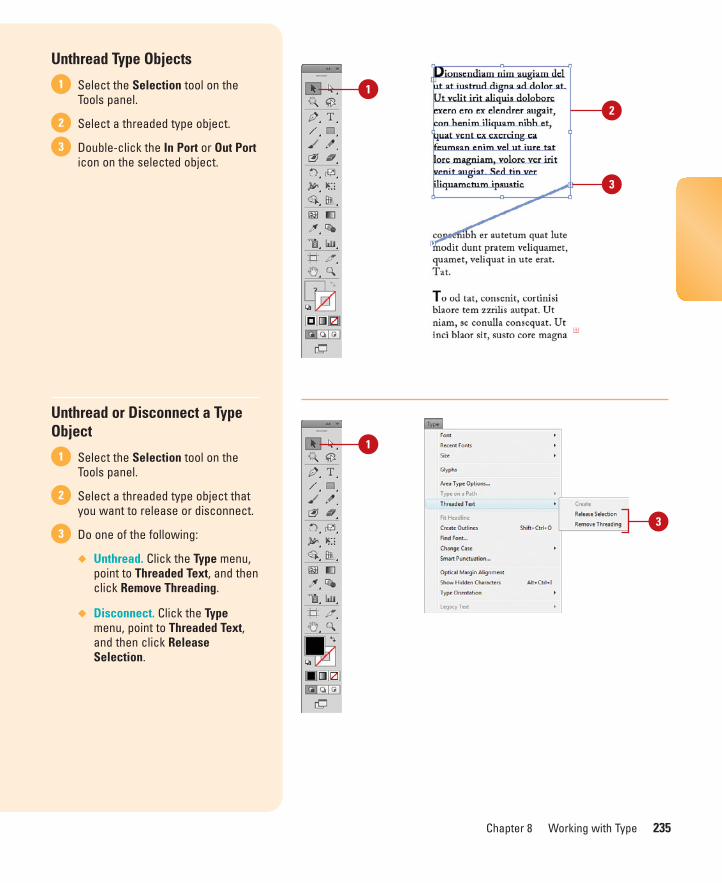
ptg8126863
Chapter 8 Working with Type 235
Unthread Type Objects
Select the Selection tool on theTools panel.
Select a threaded type object.
Double-click the In Port or Out Porticon on the selected object.
Unthread or Disconnect a TypeObject
Select the Selection tool on theTools panel.
Select a threaded type object thatyou want to release or disconnect.
Do one of the following:
◆ Unthread. Click the Type menu,point to Threaded Text, and thenclick Remove Threading.
◆ Disconnect. Click the Typemenu, point to Threaded Text,and then click ReleaseSelection.
3
2
1
3
2
1 1
2
3
1
3
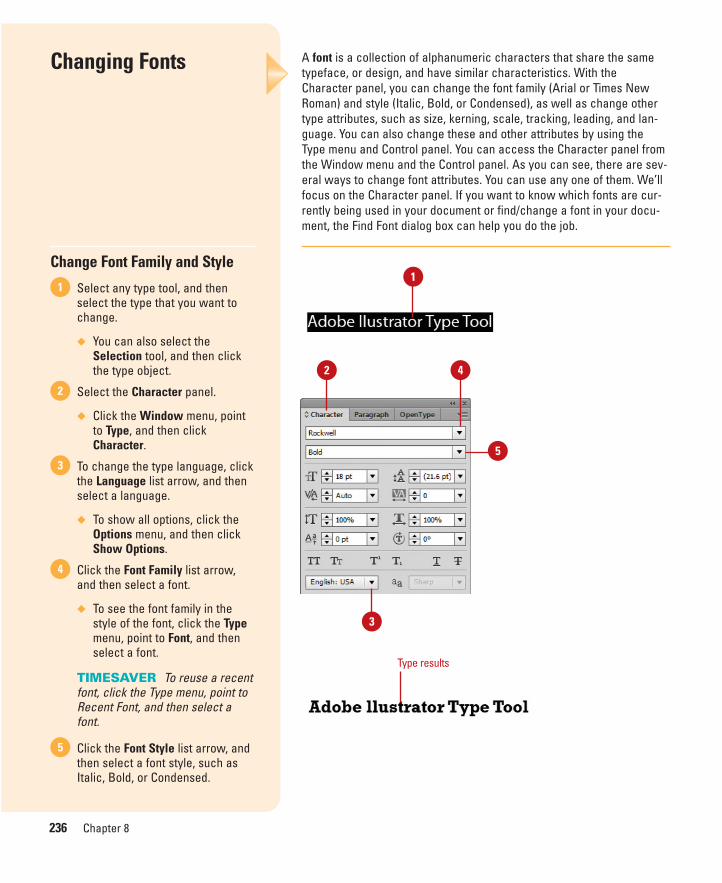
ptg8126863
236 Chapter 8
A font is a collection of alphanumeric characters that share the sametypeface, or design, and have similar characteristics. With theCharacter panel, you can change the font family (Arial or Times NewRoman) and style (Italic, Bold, or Condensed), as well as change othertype attributes, such as size, kerning, scale, tracking, leading, and lan-guage. You can also change these and other attributes by using theType menu and Control panel. You can access the Character panel fromthe Window menu and the Control panel. As you can see, there are sev-eral ways to change font attributes. You can use any one of them. We’llfocus on the Character panel. If you want to know which fonts are cur-rently being used in your document or find/change a font in your docu-ment, the Find Font dialog box can help you do the job.
Changing Fonts
Change Font Family and Style
Select any type tool, and thenselect the type that you want tochange.
◆ You can also select theSelection tool, and then clickthe type object.
Select the Character panel.
◆ Click the Window menu, pointto Type, and then clickCharacter.
To change the type language, clickthe Language list arrow, and thenselect a language.
◆ To show all options, click theOptions menu, and then clickShow Options.
Click the Font Family list arrow,and then select a font.
◆ To see the font family in thestyle of the font, click the Typemenu, point to Font, and thenselect a font.
TIMESAVER To reuse a recentfont, click the Type menu, point toRecent Font, and then select afont.
Click the Font Style list arrow, andthen select a font style, such asItalic, Bold, or Condensed.
5
4
3
2
11
2 4
5
Type results
3
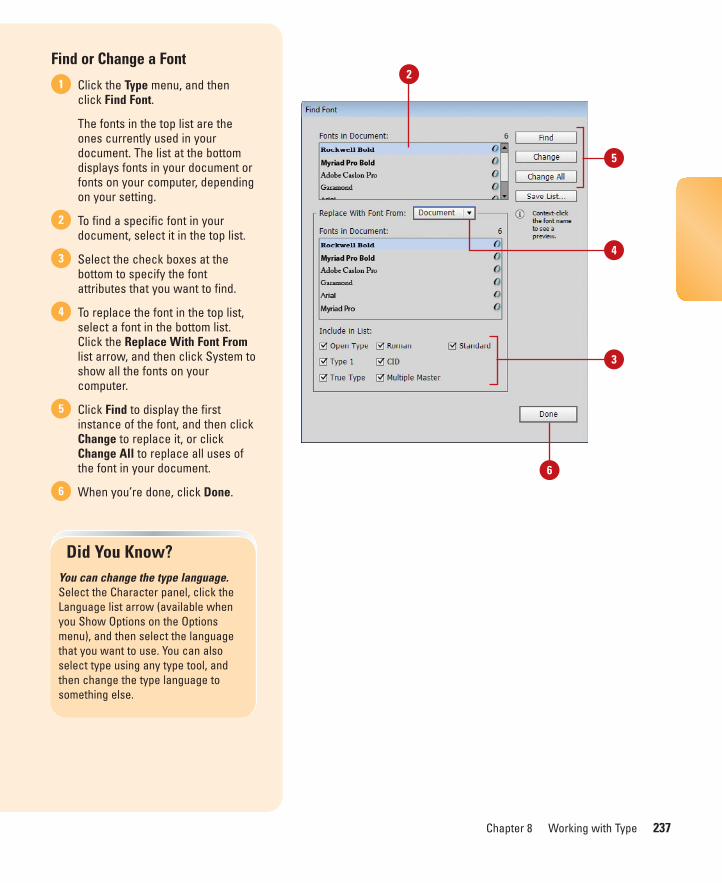
ptg8126863
Chapter 8 Working with Type 237
Find or Change a Font
Click the Type menu, and thenclick Find Font.
The fonts in the top list are theones currently used in yourdocument. The list at the bottomdisplays fonts in your document orfonts on your computer, dependingon your setting.
To find a specific font in yourdocument, select it in the top list.
Select the check boxes at thebottom to specify the fontattributes that you want to find.
To replace the font in the top list,select a font in the bottom list.Click the Replace With Font Fromlist arrow, and then click System toshow all the fonts on yourcomputer.
Click Find to display the firstinstance of the font, and then clickChange to replace it, or clickChange All to replace all uses ofthe font in your document.
When you’re done, click Done.6
5
4
3
2
1
Did You Know?You can change the type language.Select the Character panel, click theLanguage list arrow (available whenyou Show Options on the Optionsmenu), and then select the languagethat you want to use. You can alsoselect type using any type tool, andthen change the type language tosomething else.
3
2
4
5
6
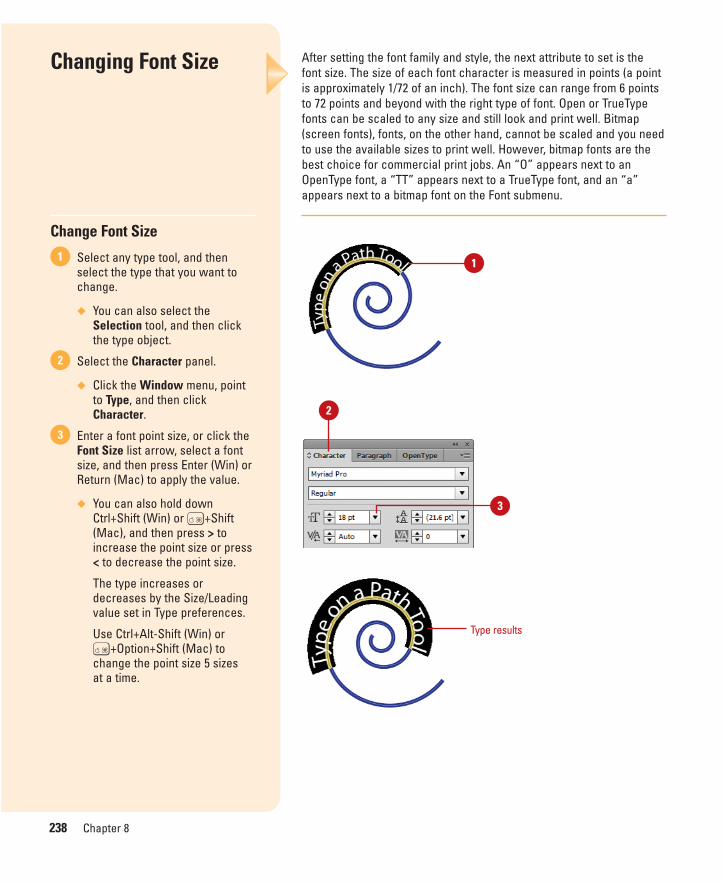
ptg8126863
238 Chapter 8
After setting the font family and style, the next attribute to set is thefont size. The size of each font character is measured in points (a pointis approximately 1/72 of an inch). The font size can range from 6 pointsto 72 points and beyond with the right type of font. Open or TrueTypefonts can be scaled to any size and still look and print well. Bitmap(screen fonts), fonts, on the other hand, cannot be scaled and you needto use the available sizes to print well. However, bitmap fonts are thebest choice for commercial print jobs. An “O” appears next to anOpenType font, a “TT” appears next to a TrueType font, and an “a”appears next to a bitmap font on the Font submenu.
Changing Font Size
Change Font Size
Select any type tool, and thenselect the type that you want tochange.
◆ You can also select theSelection tool, and then clickthe type object.
Select the Character panel.
◆ Click the Window menu, pointto Type, and then clickCharacter.
Enter a font point size, or click theFont Size list arrow, select a fontsize, and then press Enter (Win) orReturn (Mac) to apply the value.
◆ You can also hold downCtrl+Shift (Win) or A+Shift(Mac), and then press > toincrease the point size or press< to decrease the point size.
The type increases ordecreases by the Size/Leadingvalue set in Type preferences.
Use Ctrl+Alt-Shift (Win) orA+Option+Shift (Mac) tochange the point size 5 sizes at a time.
3
2
1 1
2
Type results
3
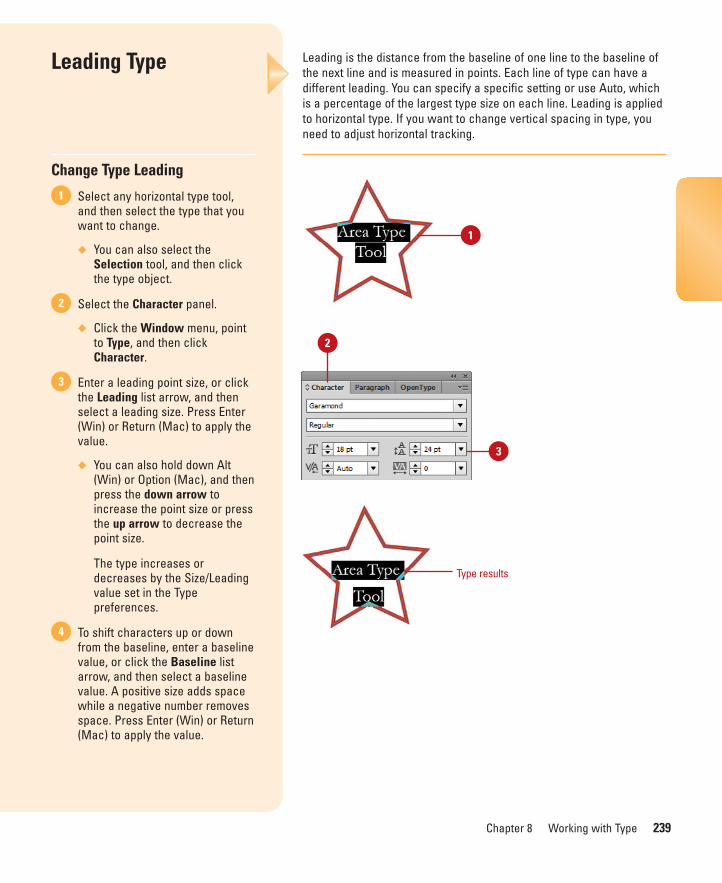
ptg8126863
Chapter 8 Working with Type 239
Leading is the distance from the baseline of one line to the baseline ofthe next line and is measured in points. Each line of type can have adifferent leading. You can specify a specific setting or use Auto, whichis a percentage of the largest type size on each line. Leading is appliedto horizontal type. If you want to change vertical spacing in type, youneed to adjust horizontal tracking.
Leading Type
Change Type Leading
Select any horizontal type tool,and then select the type that youwant to change.
◆ You can also select theSelection tool, and then clickthe type object.
Select the Character panel.
◆ Click the Window menu, pointto Type, and then clickCharacter.
Enter a leading point size, or clickthe Leading list arrow, and thenselect a leading size. Press Enter(Win) or Return (Mac) to apply thevalue.
◆ You can also hold down Alt(Win) or Option (Mac), and thenpress the down arrow toincrease the point size or pressthe up arrow to decrease thepoint size.
The type increases ordecreases by the Size/Leadingvalue set in the Typepreferences.
To shift characters up or downfrom the baseline, enter a baselinevalue, or click the Baseline listarrow, and then select a baselinevalue. A positive size adds spacewhile a negative number removesspace. Press Enter (Win) or Return(Mac) to apply the value.
4
3
2
1
1
2
Type results
3
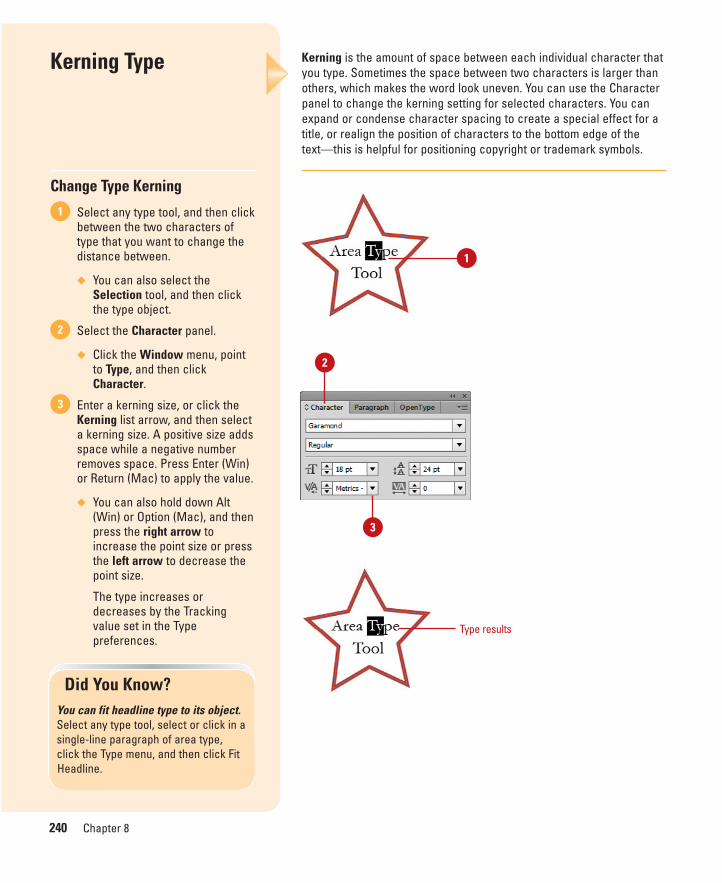
ptg8126863
240 Chapter 8
Kerning is the amount of space between each individual character thatyou type. Sometimes the space between two characters is larger thanothers, which makes the word look uneven. You can use the Characterpanel to change the kerning setting for selected characters. You canexpand or condense character spacing to create a special effect for atitle, or realign the position of characters to the bottom edge of thetext—this is helpful for positioning copyright or trademark symbols.
Kerning Type
Change Type Kerning
Select any type tool, and then clickbetween the two characters oftype that you want to change thedistance between.
◆ You can also select theSelection tool, and then clickthe type object.
Select the Character panel.
◆ Click the Window menu, pointto Type, and then clickCharacter.
Enter a kerning size, or click theKerning list arrow, and then selecta kerning size. A positive size addsspace while a negative numberremoves space. Press Enter (Win)or Return (Mac) to apply the value.
◆ You can also hold down Alt(Win) or Option (Mac), and thenpress the right arrow toincrease the point size or pressthe left arrow to decrease thepoint size.
The type increases ordecreases by the Trackingvalue set in the Typepreferences.
3
2
1
Did You Know?You can fit headline type to its object.Select any type tool, select or click in asingle-line paragraph of area type,click the Type menu, and then click FitHeadline.
1
2
3
Type results

ptg8126863
Chapter 8 Working with Type 241
Tracking is the adjustment of space between three or more characters.Typically, you’ll track a line of type or a few words, depending on thelength and design application. This is useful for creating specializedtype for a caption or short heading. To adjust space between two char-acters, kerning is the best choice. To adjust tracking between charac-ters, you need to select them first and then set the Tracking option in theCharacter panel.
Tracking Type
Change Type Tracking
Select any type tool, and thenselect the type that you want tochange.
◆ You can also select theSelection tool, and then clickthe type object.
Select the Character panel.
◆ Click the Window menu, pointto Type, and then clickCharacter.
Enter a tracking size, or click theTracking list arrow, and thenselect a tracking size. A positivesize adds space while a negativenumber removes space. PressEnter (Win) or Return (Mac) toapply the value.
◆ You can also hold down Alt(Win) or Option (Mac), and thenpress the right arrow toincrease the point size or pressthe left arrow to decrease thepoint size.
The type increases ordecreases by the Trackingvalue set in the Typepreferences.
3
2
1 1
2
Type results
3

ptg8126863
242 Chapter 8
Scaling allows you to make type wider or narrower for horizontal typeand taller or shorter for vertical type. You can use the Horizontal Scaleand Vertical Scale options in the Character panel to modify type. If thescaling doesn’t look quite right, you can always use the Undo commandto reverse it.
Scaling Type
Change Type ScalingHorizontally or Vertically
Select any type tool, and thenselect the type that you want tochange.
◆ You can also select theSelection tool, and then clickthe type object.
Select the Character panel.
◆ Click the Window menu, pointto Type, and then clickCharacter.
◆ To show all options, click theOptions menu, and then clickShow Options.
Enter a horizontal or verticalpercentage, or click the HorizontalScale or Vertical Scale list arrow,and then select a percentage.Press Enter (Win) or Return (Mac)to apply the value. Other ways ofscaling text include:
◆ To scale a type object, selectthe object, double-click theScale tool on the Tools panel,select the Non-Uniform option,specify a Horizontal andVertical percentage, and thenclick OK.
◆ To scale a type object, selectthe object, select the FreeTransform tool on the Toolspanel, and then drag a sidehandle on the bounding box.
3
2
1
1
2
3
Type results
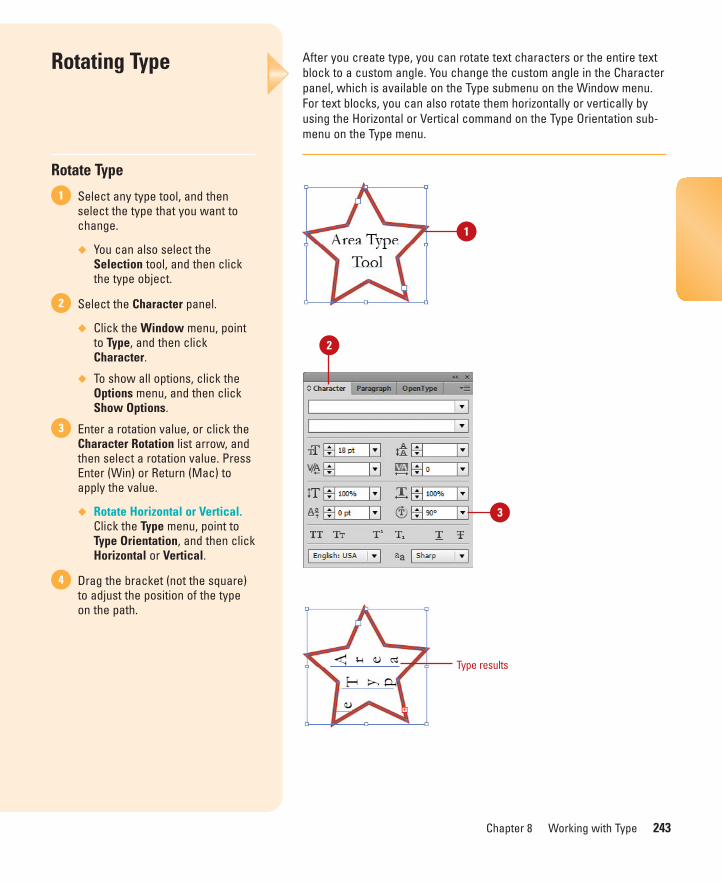
ptg8126863
Chapter 8 Working with Type 243
After you create type, you can rotate text characters or the entire textblock to a custom angle. You change the custom angle in the Characterpanel, which is available on the Type submenu on the Window menu.For text blocks, you can also rotate them horizontally or vertically byusing the Horizontal or Vertical command on the Type Orientation sub-menu on the Type menu.
Rotating Type
Rotate Type
Select any type tool, and thenselect the type that you want tochange.
◆ You can also select theSelection tool, and then clickthe type object.
Select the Character panel.
◆ Click the Window menu, pointto Type, and then clickCharacter.
◆ To show all options, click theOptions menu, and then clickShow Options.
Enter a rotation value, or click theCharacter Rotation list arrow, andthen select a rotation value. PressEnter (Win) or Return (Mac) toapply the value.
◆ Rotate Horizontal or Vertical.Click the Type menu, point toType Orientation, and then clickHorizontal or Vertical.
Drag the bracket (not the square)to adjust the position of the typeon the path.
4
3
2
1
1
2
3
Type results
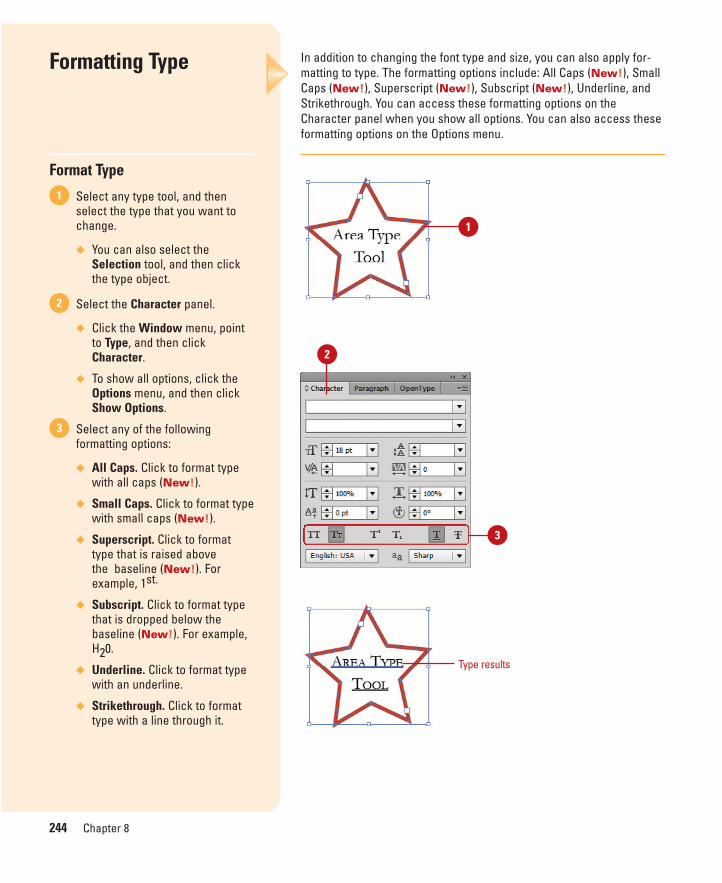
ptg8126863
244 Chapter 8
In addition to changing the font type and size, you can also apply for-matting to type. The formatting options include: All Caps (New!), SmallCaps (New!), Superscript (New!), Subscript (New!), Underline, andStrikethrough. You can access these formatting options on theCharacter panel when you show all options. You can also access theseformatting options on the Options menu.
Formatting Type
Format Type
Select any type tool, and thenselect the type that you want tochange.
◆ You can also select theSelection tool, and then clickthe type object.
Select the Character panel.
◆ Click the Window menu, pointto Type, and then clickCharacter.
◆ To show all options, click theOptions menu, and then clickShow Options.
Select any of the followingformatting options:
◆ All Caps. Click to format typewith all caps (New!).
◆ Small Caps. Click to format typewith small caps (New!).
◆ Superscript. Click to formattype that is raised above the baseline (New!). Forexample, 1st.
◆ Subscript. Click to format typethat is dropped below thebaseline (New!). For example,H20.
◆ Underline. Click to format typewith an underline.
◆ Strikethrough. Click to formattype with a line through it.
3
2
1
1
Type results
2
3

ptg8126863
Chapter 8 Working with Type 245
Anti-aliasing affects the pixels on the edge of text by allowing them toblend in with the background. It is a crucial feature when working withtext as it makes it appear smoother and more integrated. The drawbackwith anti-aliasing is that at smaller font sizes the text can appear blurry.To avoid this problem, use sans serif text, such as Helvetica or Arial,and don’t use bold and italic. You apply anti-aliasing to text boxesinstead of individual characters. The anti-aliasing settings are savedalong with the document and supported for PDF, AIT, and EPS formats.
Anti-aliasing Type
Set a Text Box to Anti-Alias Text
Select any type tool, and thenselect the type that you want tochange.
◆ You can also select theSelection tool, and then clickthe type object.
Select the Character panel.
◆ Click the Window menu, pointto Type, and then clickCharacter.
◆ To show all options, click theOptions menu, and then clickShow Options.
Click the Anti-Alias list arrow, andthen select one of the following:None, Sharp, Crisp, or Strong.
3
2
12
3
Anti-alias textat small sizes
Alias text produces crispfonts at small sizes.
Alias text
Anti-aliasing blends the edgepixels with the background.Did You Know?
You can set anti-aliasing optionswhen you export text to graphic for-mats. When you export text to BMP,PNG, Targa, JPEG, or TIFF formats, youcan set the following anti-aliasingoptions: None, Art Optimized, or TypeOptimized. These options are alsoavailable in the Save For Web dialog box.

ptg8126863
246 Chapter 8
When you press the Enter (Win) or Return (Mac) in a type object,Illustrator creates a paragraph. You can use the Paragraph panel toalign and indent paragraphs in your document. At the top of theParagraph panel is a set of buttons that you can use to align text in oneor more paragraphs. The panel includes the typical options to align:left, center, right and justify. However, it also includes options to justifywith only the last line aligned left, center, or right.
Aligning Paragraphs
Align Paragraphs
Select any type tool, and then clickin a paragraph or select multipleparagraphs that you want to align.
◆ You can also select theSelection tool, and then clickthe paragraph.
Select the Paragraph panel.
◆ Click the Window menu, pointto Type, and then clickParagraph.
Use any of the following alignmentbuttons on the panel:
◆ Align Left, Align Center, orAlign Right. Click these buttonsto align paragraph type left,center, or right.
◆ Justify Left, Center, or Right.Click these buttons to justify theparagraph text with only thelast line aligned left, center, orright.
◆ Justify. Click to justify all lines.
3
2
12
3
Center aligned Justified
Right alignedLeft aligned
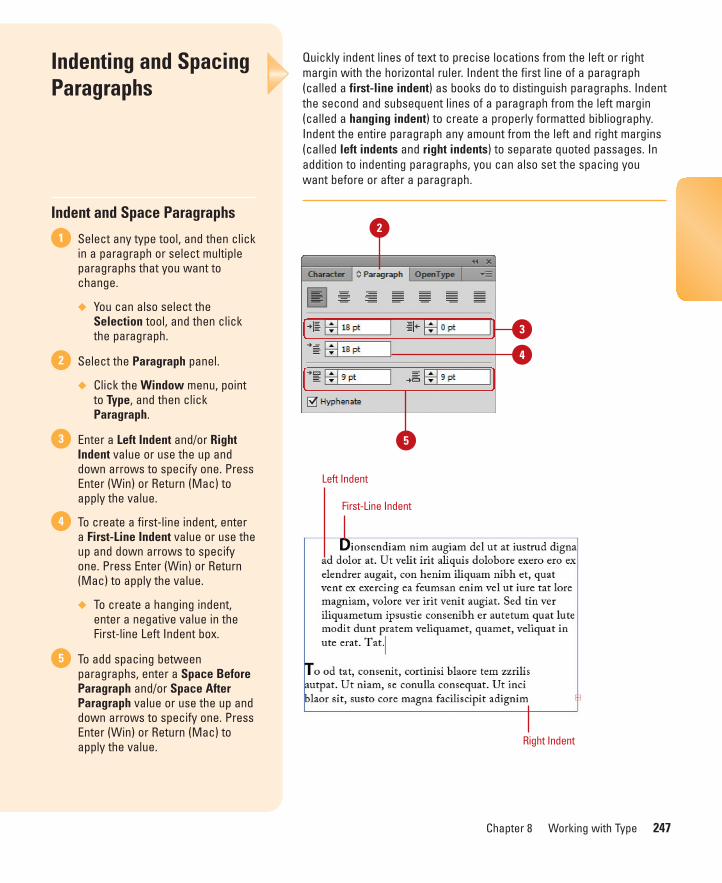
ptg8126863
Chapter 8 Working with Type 247
Quickly indent lines of text to precise locations from the left or rightmargin with the horizontal ruler. Indent the first line of a paragraph(called a first-line indent) as books do to distinguish paragraphs. Indentthe second and subsequent lines of a paragraph from the left margin(called a hanging indent) to create a properly formatted bibliography.Indent the entire paragraph any amount from the left and right margins(called left indents and right indents) to separate quoted passages. Inaddition to indenting paragraphs, you can also set the spacing youwant before or after a paragraph.
Indenting and SpacingParagraphs
Indent and Space Paragraphs
Select any type tool, and then clickin a paragraph or select multipleparagraphs that you want tochange.
◆ You can also select theSelection tool, and then clickthe paragraph.
Select the Paragraph panel.
◆ Click the Window menu, pointto Type, and then clickParagraph.
Enter a Left Indent and/or RightIndent value or use the up anddown arrows to specify one. PressEnter (Win) or Return (Mac) toapply the value.
To create a first-line indent, entera First-Line Indent value or use theup and down arrows to specifyone. Press Enter (Win) or Return(Mac) to apply the value.
◆ To create a hanging indent,enter a negative value in theFirst-line Left Indent box.
To add spacing betweenparagraphs, enter a Space BeforeParagraph and/or Space AfterParagraph value or use the up anddown arrows to specify one. PressEnter (Win) or Return (Mac) toapply the value.
5
4
3
2
12
3
4
First-Line Indent
Left Indent
Right Indent
5
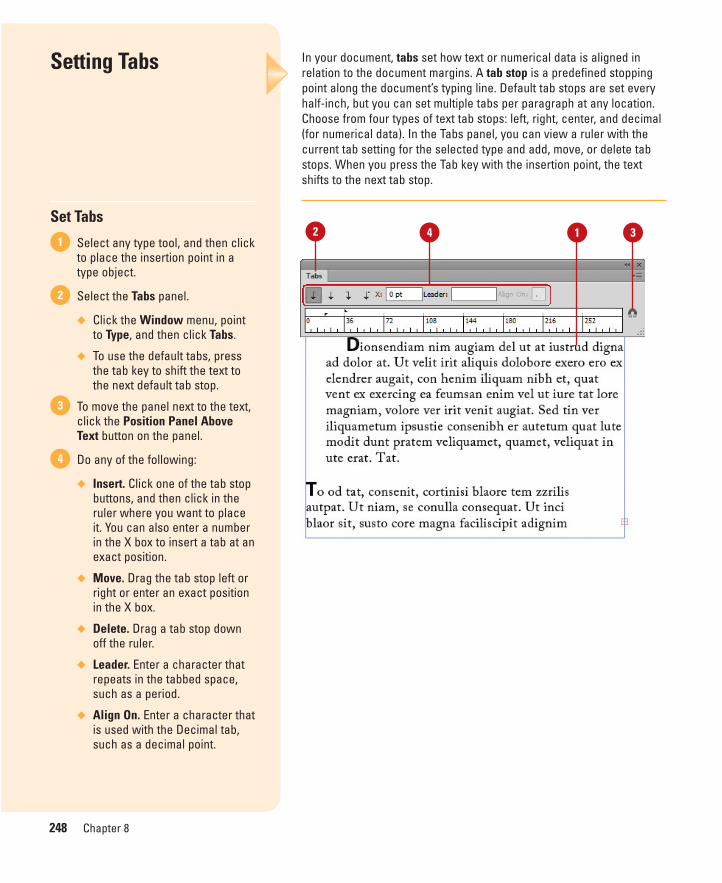
ptg8126863
In your document, tabs set how text or numerical data is aligned inrelation to the document margins. A tab stop is a predefined stoppingpoint along the document’s typing line. Default tab stops are set everyhalf-inch, but you can set multiple tabs per paragraph at any location.Choose from four types of text tab stops: left, right, center, and decimal(for numerical data). In the Tabs panel, you can view a ruler with thecurrent tab setting for the selected type and add, move, or delete tabstops. When you press the Tab key with the insertion point, the textshifts to the next tab stop.
248 Chapter 8
Setting Tabs
Set Tabs
Select any type tool, and then clickto place the insertion point in atype object.
Select the Tabs panel.
◆ Click the Window menu, pointto Type, and then click Tabs.
◆ To use the default tabs, pressthe tab key to shift the text tothe next default tab stop.
To move the panel next to the text,click the Position Panel AboveText button on the panel.
Do any of the following:
◆ Insert. Click one of the tab stopbuttons, and then click in theruler where you want to placeit. You can also enter a numberin the X box to insert a tab at anexact position.
◆ Move. Drag the tab stop left orright or enter an exact positionin the X box.
◆ Delete. Drag a tab stop downoff the ruler.
◆ Leader. Enter a character thatrepeats in the tabbed space,such as a period.
◆ Align On. Enter a character thatis used with the Decimal tab,such as a decimal point.
4
3
2
12 34 1
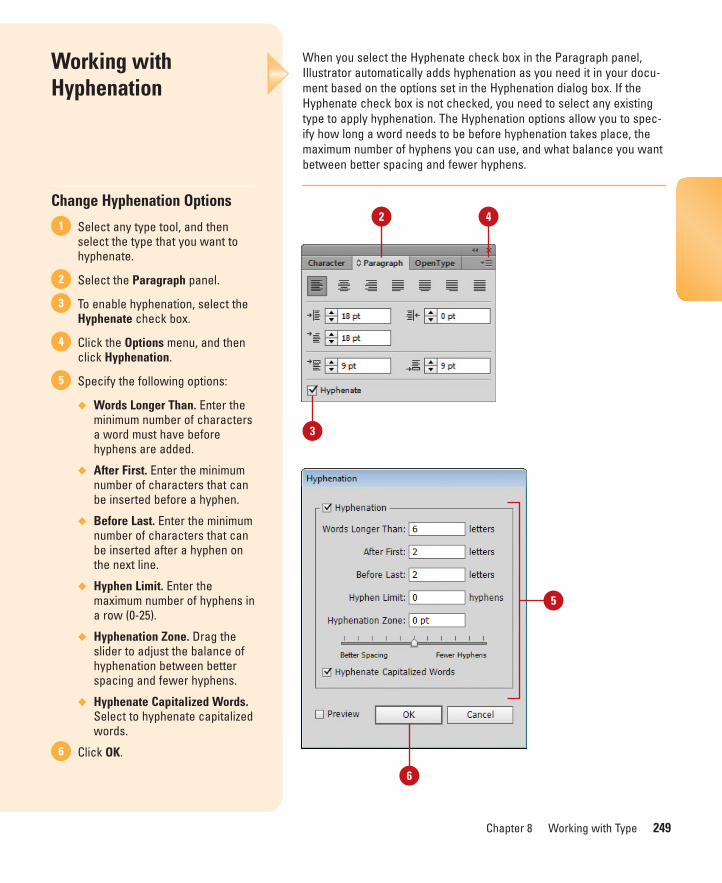
ptg8126863
Chapter 8 Working with Type 249
When you select the Hyphenate check box in the Paragraph panel,Illustrator automatically adds hyphenation as you need it in your docu-ment based on the options set in the Hyphenation dialog box. If theHyphenate check box is not checked, you need to select any existingtype to apply hyphenation. The Hyphenation options allow you to spec-ify how long a word needs to be before hyphenation takes place, themaximum number of hyphens you can use, and what balance you wantbetween better spacing and fewer hyphens.
Working withHyphenation
Change Hyphenation Options
Select any type tool, and thenselect the type that you want tohyphenate.
Select the Paragraph panel.
To enable hyphenation, select theHyphenate check box.
Click the Options menu, and thenclick Hyphenation.
Specify the following options:
◆ Words Longer Than. Enter theminimum number of charactersa word must have beforehyphens are added.
◆ After First. Enter the minimumnumber of characters that canbe inserted before a hyphen.
◆ Before Last. Enter the minimumnumber of characters that canbe inserted after a hyphen onthe next line.
◆ Hyphen Limit. Enter themaximum number of hyphens ina row (0-25).
◆ Hyphenation Zone. Drag theslider to adjust the balance ofhyphenation between betterspacing and fewer hyphens.
◆ Hyphenate Capitalized Words.Select to hyphenate capitalizedwords.
Click OK.6
5
4
3
2
12 4
3
6
5
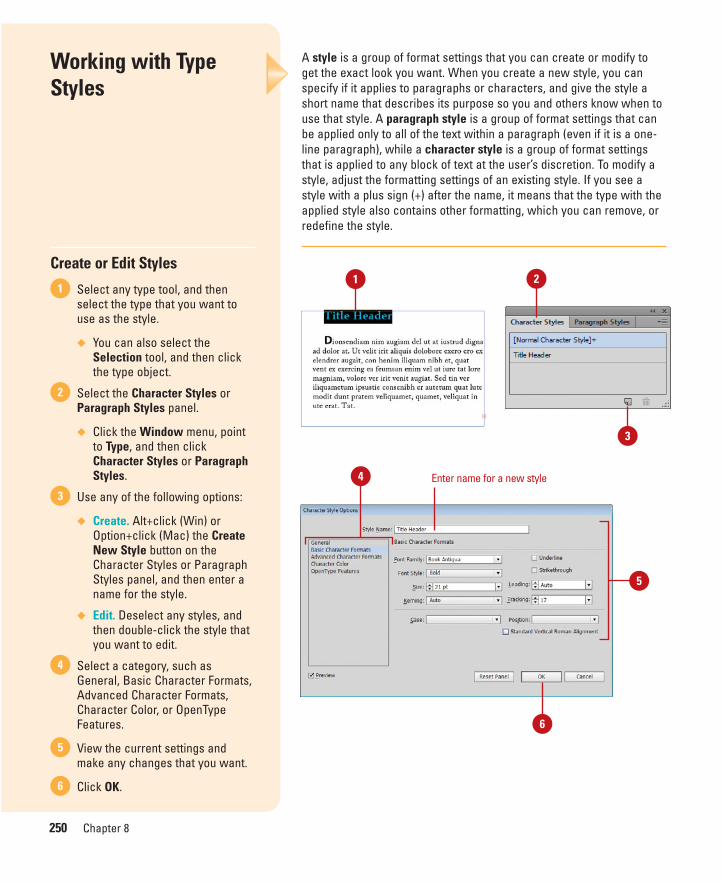
ptg8126863
250 Chapter 8
A style is a group of format settings that you can create or modify toget the exact look you want. When you create a new style, you canspecify if it applies to paragraphs or characters, and give the style ashort name that describes its purpose so you and others know when touse that style. A paragraph style is a group of format settings that canbe applied only to all of the text within a paragraph (even if it is a one-line paragraph), while a character style is a group of format settingsthat is applied to any block of text at the user’s discretion. To modify astyle, adjust the formatting settings of an existing style. If you see astyle with a plus sign (+) after the name, it means that the type with theapplied style also contains other formatting, which you can remove, orredefine the style.
Working with TypeStyles
Create or Edit Styles
Select any type tool, and thenselect the type that you want touse as the style.
◆ You can also select theSelection tool, and then clickthe type object.
Select the Character Styles orParagraph Styles panel.
◆ Click the Window menu, pointto Type, and then clickCharacter Styles or ParagraphStyles.
Use any of the following options:
◆ Create. Alt+click (Win) orOption+click (Mac) the CreateNew Style button on theCharacter Styles or ParagraphStyles panel, and then enter aname for the style.
◆ Edit. Deselect any styles, andthen double-click the style thatyou want to edit.
Select a category, such asGeneral, Basic Character Formats,Advanced Character Formats,Character Color, or OpenTypeFeatures.
View the current settings andmake any changes that you want.
Click OK.6
5
4
3
2
11 2
3
Enter name for a new style4
5
6
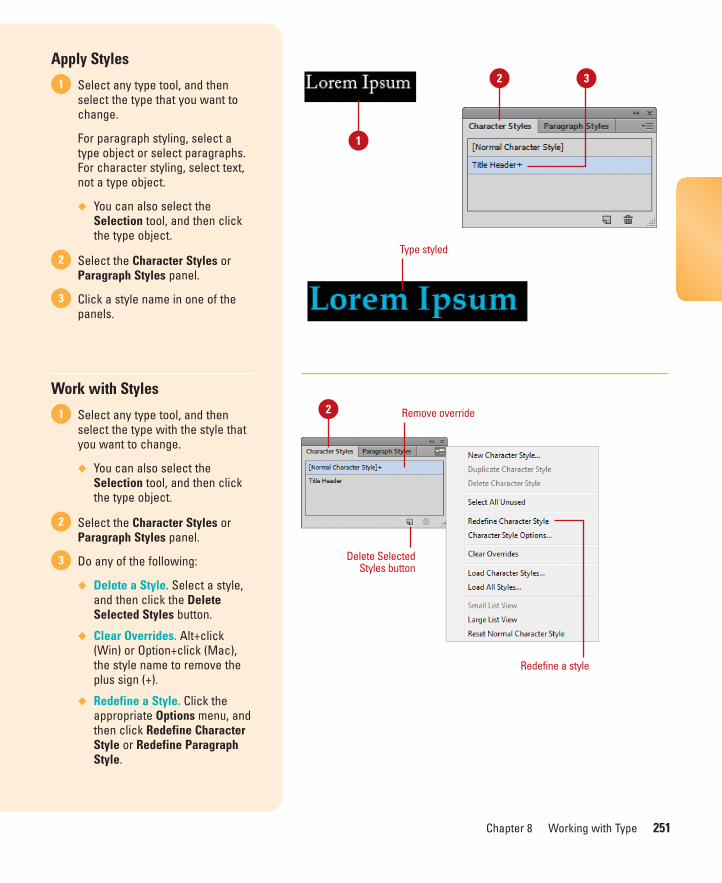
ptg8126863
Chapter 8 Working with Type 251
Apply Styles
Select any type tool, and thenselect the type that you want tochange.
For paragraph styling, select atype object or select paragraphs.For character styling, select text,not a type object.
◆ You can also select theSelection tool, and then clickthe type object.
Select the Character Styles orParagraph Styles panel.
Click a style name in one of thepanels.
Work with Styles
Select any type tool, and thenselect the type with the style thatyou want to change.
◆ You can also select theSelection tool, and then clickthe type object.
Select the Character Styles orParagraph Styles panel.
Do any of the following:
◆ Delete a Style. Select a style,and then click the DeleteSelected Styles button.
◆ Clear Overrides. Alt+click (Win) or Option+click (Mac),the style name to remove theplus sign (+).
◆ Redefine a Style. Click theappropriate Options menu, andthen click Redefine CharacterStyle or Redefine ParagraphStyle.
3
2
1
3
2
1 2 3
1
Type styled
Remove override2
Delete SelectedStyles button
Redefine a style
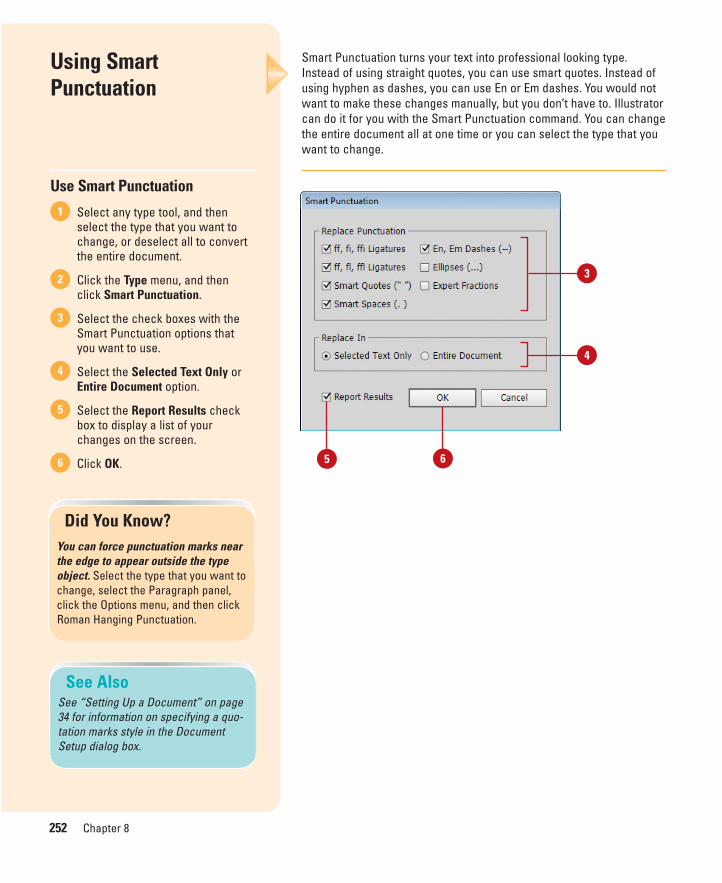
ptg8126863
252 Chapter 8
Smart Punctuation turns your text into professional looking type.Instead of using straight quotes, you can use smart quotes. Instead ofusing hyphen as dashes, you can use En or Em dashes. You would notwant to make these changes manually, but you don’t have to. Illustratorcan do it for you with the Smart Punctuation command. You can changethe entire document all at one time or you can select the type that youwant to change.
Using SmartPunctuation
Use Smart Punctuation
Select any type tool, and thenselect the type that you want tochange, or deselect all to convertthe entire document.
Click the Type menu, and thenclick Smart Punctuation.
Select the check boxes with theSmart Punctuation options thatyou want to use.
Select the Selected Text Only orEntire Document option.
Select the Report Results checkbox to display a list of yourchanges on the screen.
Click OK.6
5
4
3
2
1
See AlsoSee “Setting Up a Document” on page34 for information on specifying a quo-tation marks style in the DocumentSetup dialog box.
Did You Know?You can force punctuation marks nearthe edge to appear outside the typeobject. Select the type that you want tochange, select the Paragraph panel,click the Options menu, and then clickRoman Hanging Punctuation.
3
4
5 6
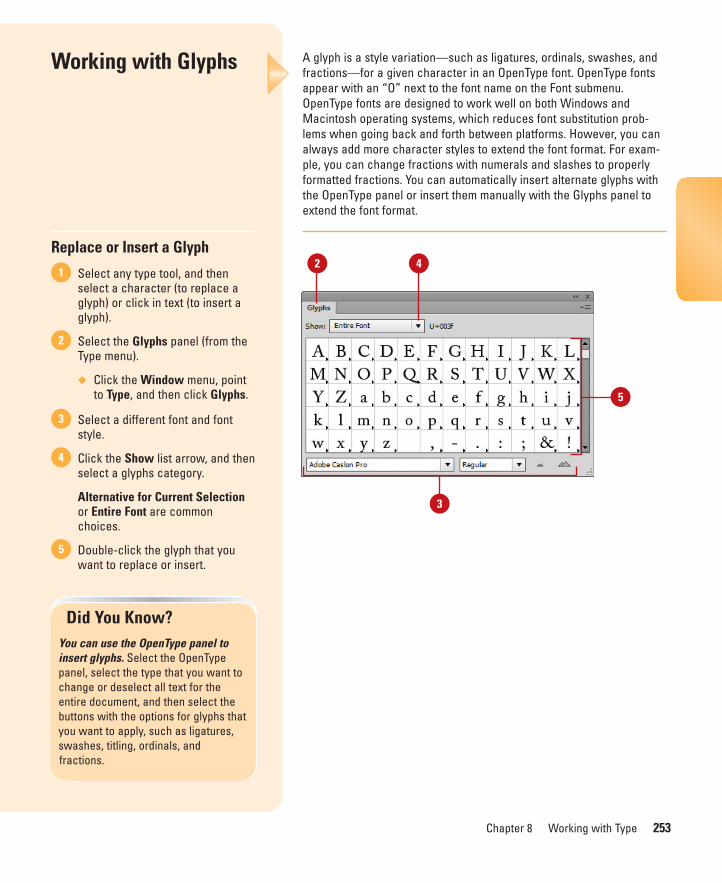
ptg8126863
Chapter 8 Working with Type 253
A glyph is a style variation—such as ligatures, ordinals, swashes, andfractions—for a given character in an OpenType font. OpenType fontsappear with an “O” next to the font name on the Font submenu.OpenType fonts are designed to work well on both Windows andMacintosh operating systems, which reduces font substitution prob-lems when going back and forth between platforms. However, you canalways add more character styles to extend the font format. For exam-ple, you can change fractions with numerals and slashes to properlyformatted fractions. You can automatically insert alternate glyphs withthe OpenType panel or insert them manually with the Glyphs panel toextend the font format.
Working with Glyphs
Replace or Insert a Glyph
Select any type tool, and thenselect a character (to replace aglyph) or click in text (to insert aglyph).
Select the Glyphs panel (from theType menu).
◆ Click the Window menu, pointto Type, and then click Glyphs.
Select a different font and fontstyle.
Click the Show list arrow, and thenselect a glyphs category.
Alternative for Current Selectionor Entire Font are commonchoices.
Double-click the glyph that youwant to replace or insert.
5
4
3
2
1
Did You Know?You can use the OpenType panel toinsert glyphs. Select the OpenTypepanel, select the type that you want tochange or deselect all text for theentire document, and then select thebuttons with the options for glyphs thatyou want to apply, such as ligatures,swashes, titling, ordinals, and fractions.
2 4
5
3
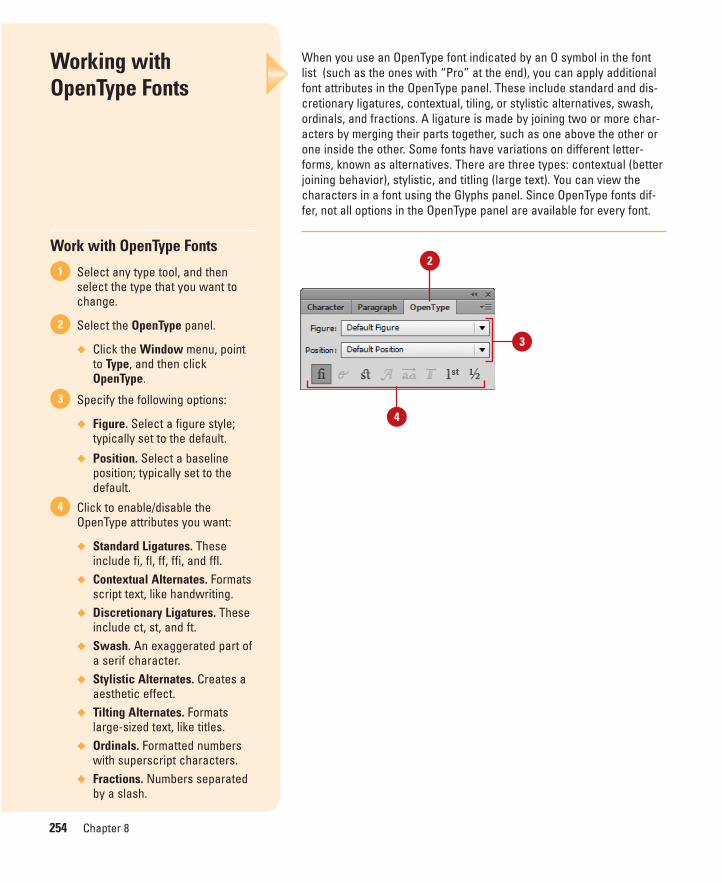
ptg8126863
254 Chapter 8
When you use an OpenType font indicated by an O symbol in the fontlist (such as the ones with “Pro” at the end), you can apply additionalfont attributes in the OpenType panel. These include standard and dis-cretionary ligatures, contextual, tiling, or stylistic alternatives, swash,ordinals, and fractions. A ligature is made by joining two or more char-acters by merging their parts together, such as one above the other orone inside the other. Some fonts have variations on different letter-forms, known as alternatives. There are three types: contextual (betterjoining behavior), stylistic, and titling (large text). You can view thecharacters in a font using the Glyphs panel. Since OpenType fonts dif-fer, not all options in the OpenType panel are available for every font.
Working withOpenType Fonts
Work with OpenType Fonts
Select any type tool, and thenselect the type that you want tochange.
Select the OpenType panel.
◆ Click the Window menu, pointto Type, and then clickOpenType.
Specify the following options:
◆ Figure. Select a figure style;typically set to the default.
◆ Position. Select a baselineposition; typically set to thedefault.
Click to enable/disable theOpenType attributes you want:
◆ Standard Ligatures. Theseinclude fi, fl, ff, ffi, and ffl.
◆ Contextual Alternates. Formatsscript text, like handwriting.
◆ Discretionary Ligatures. Theseinclude ct, st, and ft.
◆ Swash. An exaggerated part ofa serif character.
◆ Stylistic Alternates. Creates aaesthetic effect.
◆ Tilting Alternates. Formatslarge-sized text, like titles.
◆ Ordinals. Formatted numberswith superscript characters.
◆ Fractions. Numbers separatedby a slash.
4
3
2
12
3
4
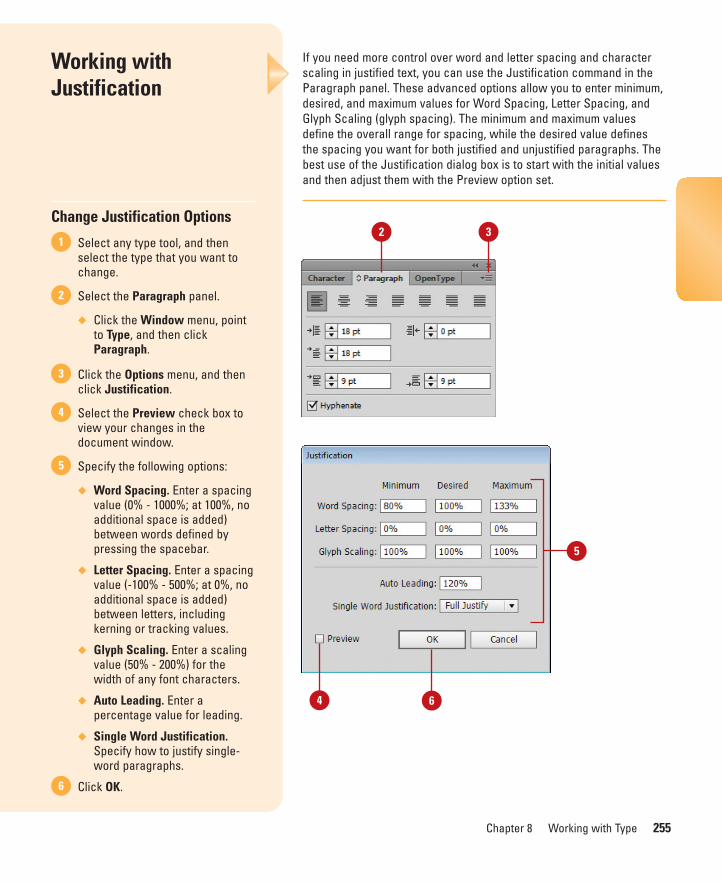
ptg8126863
Chapter 8 Working with Type 255
If you need more control over word and letter spacing and characterscaling in justified text, you can use the Justification command in theParagraph panel. These advanced options allow you to enter minimum,desired, and maximum values for Word Spacing, Letter Spacing, andGlyph Scaling (glyph spacing). The minimum and maximum valuesdefine the overall range for spacing, while the desired value definesthe spacing you want for both justified and unjustified paragraphs. Thebest use of the Justification dialog box is to start with the initial valuesand then adjust them with the Preview option set.
Working withJustification
Change Justification Options
Select any type tool, and thenselect the type that you want tochange.
Select the Paragraph panel.
◆ Click the Window menu, pointto Type, and then clickParagraph.
Click the Options menu, and thenclick Justification.
Select the Preview check box toview your changes in thedocument window.
Specify the following options:
◆ Word Spacing. Enter a spacingvalue (0% - 1000%; at 100%, noadditional space is added)between words defined bypressing the spacebar.
◆ Letter Spacing. Enter a spacingvalue (-100% - 500%; at 0%, noadditional space is added)between letters, includingkerning or tracking values.
◆ Glyph Scaling. Enter a scalingvalue (50% - 200%) for thewidth of any font characters.
◆ Auto Leading. Enter apercentage value for leading.
◆ Single Word Justification.Specify how to justify single-word paragraphs.
Click OK.6
5
4
3
2
12 3
5
64
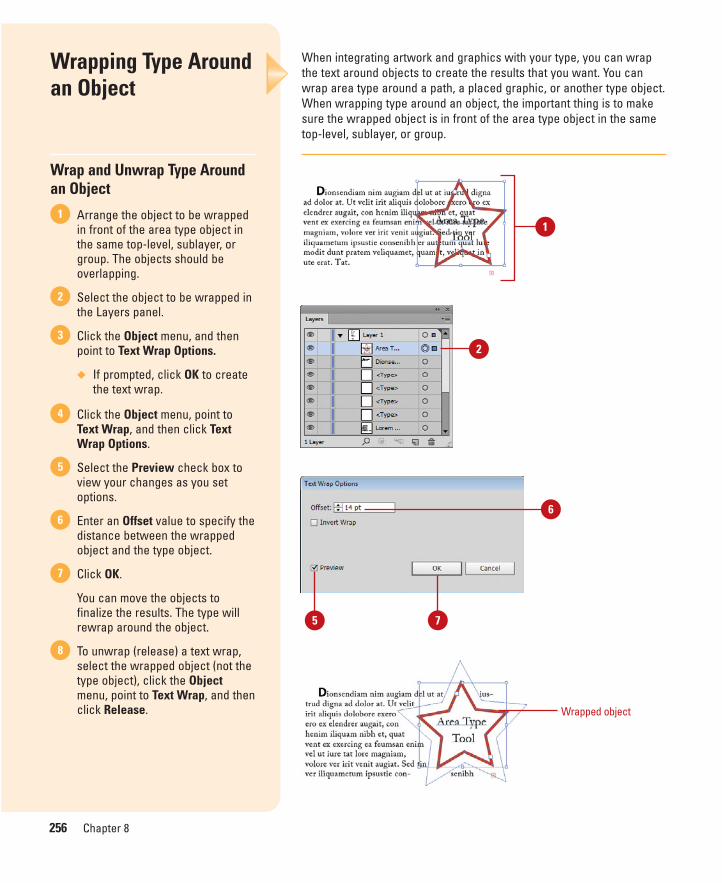
ptg8126863
256 Chapter 8
When integrating artwork and graphics with your type, you can wrapthe text around objects to create the results that you want. You canwrap area type around a path, a placed graphic, or another type object.When wrapping type around an object, the important thing is to makesure the wrapped object is in front of the area type object in the sametop-level, sublayer, or group.
Wrapping Type Aroundan Object
Wrap and Unwrap Type Aroundan Object
Arrange the object to be wrappedin front of the area type object inthe same top-level, sublayer, orgroup. The objects should beoverlapping.
Select the object to be wrapped inthe Layers panel.
Click the Object menu, and thenpoint to Text Wrap Options.
◆ If prompted, click OK to createthe text wrap.
Click the Object menu, point toText Wrap, and then click TextWrap Options.
Select the Preview check box toview your changes as you setoptions.
Enter an Offset value to specify thedistance between the wrappedobject and the type object.
Click OK.
You can move the objects tofinalize the results. The type willrewrap around the object.
To unwrap (release) a text wrap,select the wrapped object (not thetype object), click the Objectmenu, point to Text Wrap, and thenclick Release.
8
7
6
5
4
3
2
11
2
Wrapped object
5 7
6
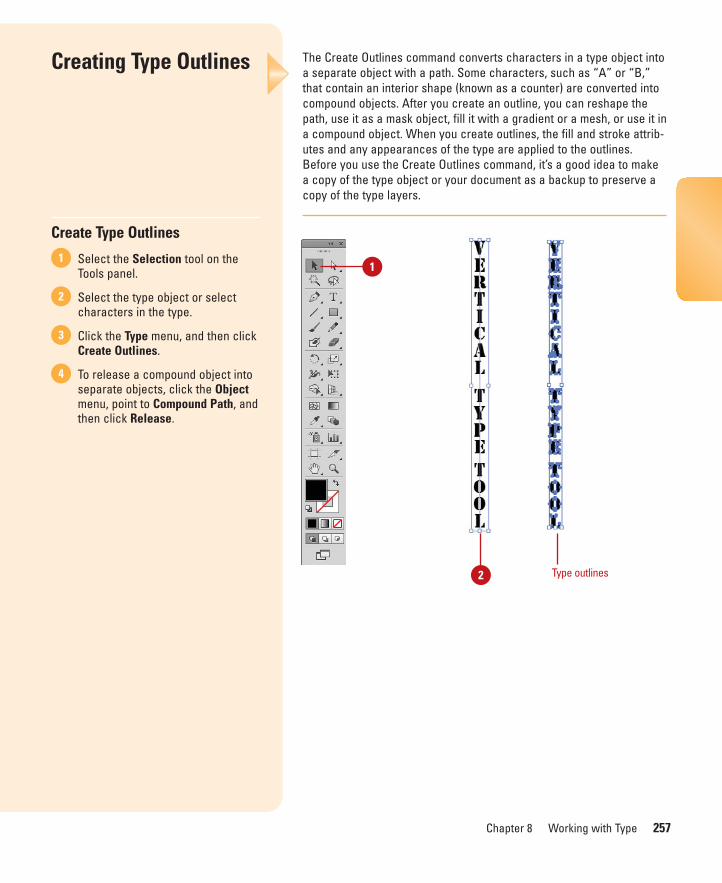
ptg8126863
Chapter 8 Working with Type 257
The Create Outlines command converts characters in a type object intoa separate object with a path. Some characters, such as “A” or “B,”that contain an interior shape (known as a counter) are converted intocompound objects. After you create an outline, you can reshape thepath, use it as a mask object, fill it with a gradient or a mesh, or use it ina compound object. When you create outlines, the fill and stroke attrib-utes and any appearances of the type are applied to the outlines.Before you use the Create Outlines command, it’s a good idea to makea copy of the type object or your document as a backup to preserve acopy of the type layers.
Creating Type Outlines
Create Type Outlines
Select the Selection tool on theTools panel.
Select the type object or selectcharacters in the type.
Click the Type menu, and then clickCreate Outlines.
To release a compound object intoseparate objects, click the Objectmenu, point to Compound Path, andthen click Release.
4
3
2
11
2 Type outlines

ptg8126863
This page intentionally left blank
ptg8126863
Working with Graphics
Introduction
In addition to opening Illustrator documents, you can alsoopen graphic files created in different formats, such as TIFF,JPEG, GIF, and PNG. You open a graphic file the same wayyou open documents in Illustrator. You can also useIllustrator's Place command to insert artwork. Illustrator letsyou place graphic files saved in Photoshop PSD, BMP, JPEG,EPS, and PNG formats, to name a few.
With Illustrator's Place command, you can link or embedan image into your document. Embedding inserts a copy ofone document in another. When data is embedded, you canedit it using the menus and toolbars of the program in whichit was created. Linking displays information stored in onedocument in another. After you link or embed a graphicimage file into an Illustrator document, you can use the Linkspanel in Illustrator to manage and work with the files. TheLinks panel displays a list of all the linked or embedded filesin your document.
If you have a raster graphic, such as a JPEG, TIFF, or PSDfile, in your document, you can use tracing options to convertthe graphic into editable vector artwork. You can set optionsto create a close simulation of the graphic or a more artisticrendering of it and then fine-tune your results.
The Graphic Styles panel allows you to create, save, andapply graphics styles. A graphic style is a collection of attrib-utes that can be applied to a layer, sublayer, group, or object.The Appearance panel allows you to apply and manage mul-tiple attributes of an object. You can apply fills, strokes, opac-ity, blending mode, effects, and other attributes to objects,layers, groups, or graphic styles. The panel makes it easy toapply, edit, duplicate, restack, or remove attributes. 9
9What You’ll Do
Open Graphics
Place Graphics
Place Graphics from Adobe Bridge
Link Graphics
Manage Linked Graphics
Trace Raster Graphics
Adjust Tracing Options
Convert Tracing to Paths
Apply Graphic Styles
Create Graphic Styles
Edit Graphic Styles
Apply Appearance Attributes
Create a Mosaic Graphic
259
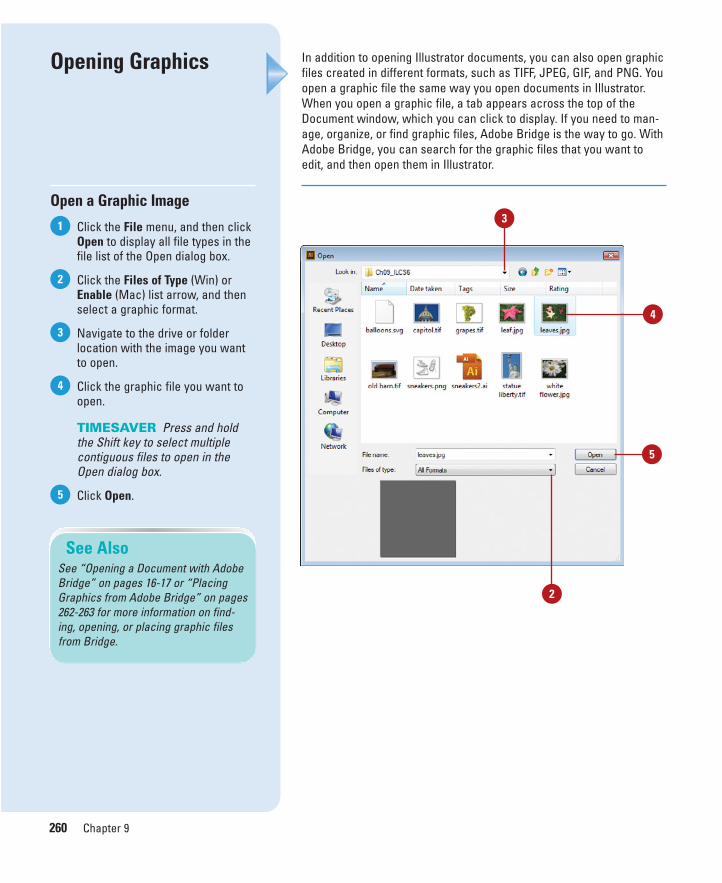
ptg8126863
260 Chapter 9
In addition to opening Illustrator documents, you can also open graphicfiles created in different formats, such as TIFF, JPEG, GIF, and PNG. Youopen a graphic file the same way you open documents in Illustrator.When you open a graphic file, a tab appears across the top of theDocument window, which you can click to display. If you need to man-age, organize, or find graphic files, Adobe Bridge is the way to go. WithAdobe Bridge, you can search for the graphic files that you want toedit, and then open them in Illustrator.
Opening Graphics
Open a Graphic Image
Click the File menu, and then clickOpen to display all file types in thefile list of the Open dialog box.
Click the Files of Type (Win) orEnable (Mac) list arrow, and thenselect a graphic format.
Navigate to the drive or folderlocation with the image you wantto open.
Click the graphic file you want toopen.
TIMESAVER Press and holdthe Shift key to select multiplecontiguous files to open in theOpen dialog box.
Click Open. 5
4
3
2
1
See AlsoSee “Opening a Document with AdobeBridge” on pages 16-17 or “PlacingGraphics from Adobe Bridge” on pages262-263 for more information on find-ing, opening, or placing graphic filesfrom Bridge.
3
4
5
2
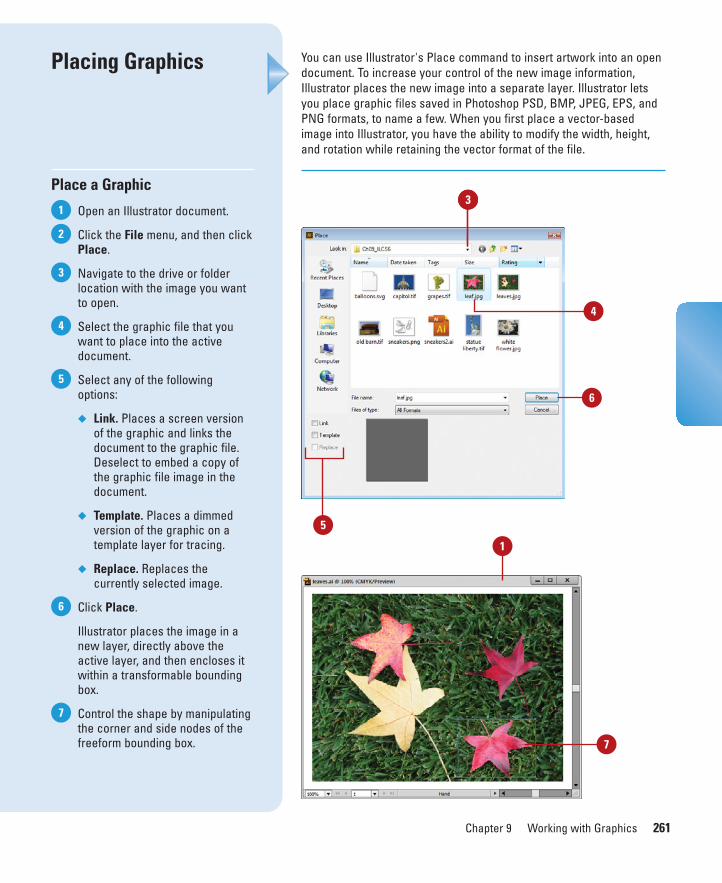
ptg8126863
Chapter 9 Working with Graphics 261
You can use Illustrator's Place command to insert artwork into an opendocument. To increase your control of the new image information,Illustrator places the new image into a separate layer. Illustrator letsyou place graphic files saved in Photoshop PSD, BMP, JPEG, EPS, andPNG formats, to name a few. When you first place a vector-basedimage into Illustrator, you have the ability to modify the width, height,and rotation while retaining the vector format of the file.
Placing Graphics
Place a Graphic
Open an Illustrator document.
Click the File menu, and then clickPlace.
Navigate to the drive or folderlocation with the image you wantto open.
Select the graphic file that youwant to place into the activedocument.
Select any of the followingoptions:
◆ Link. Places a screen versionof the graphic and links thedocument to the graphic file.Deselect to embed a copy ofthe graphic file image in thedocument.
◆ Template. Places a dimmedversion of the graphic on atemplate layer for tracing.
◆ Replace. Replaces thecurrently selected image.
Click Place.
Illustrator places the image in anew layer, directly above theactive layer, and then encloses itwithin a transformable boundingbox.
Control the shape by manipulatingthe corner and side nodes of thefreeform bounding box.
7
6
5
4
3
2
1
4
6
5
3
1
7
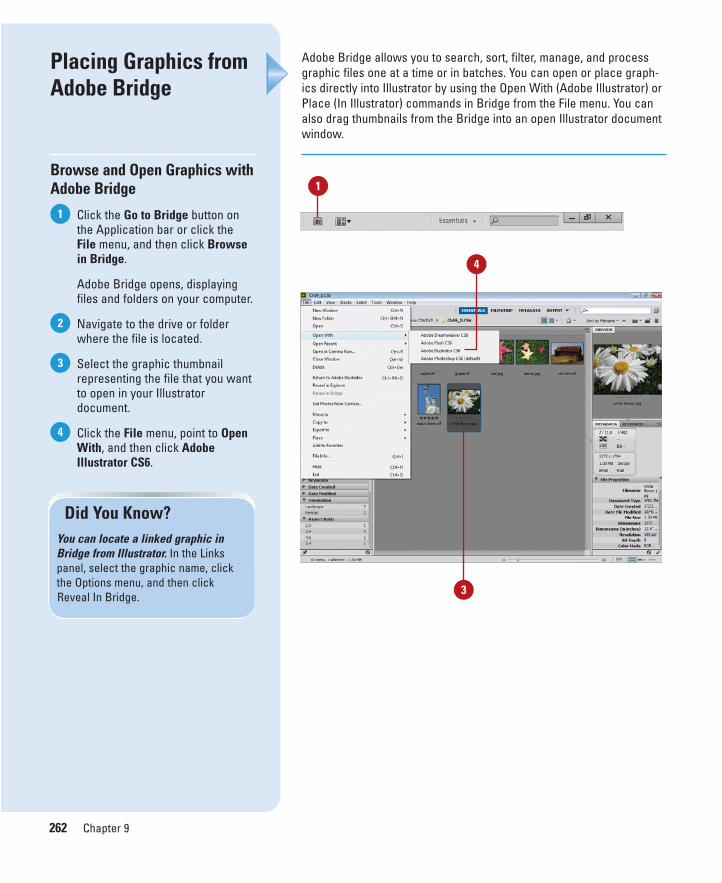
ptg8126863
262 Chapter 9
Adobe Bridge allows you to search, sort, filter, manage, and processgraphic files one at a time or in batches. You can open or place graph-ics directly into Illustrator by using the Open With (Adobe Illustrator) orPlace (In Illustrator) commands in Bridge from the File menu. You canalso drag thumbnails from the Bridge into an open Illustrator documentwindow.
Placing Graphics fromAdobe Bridge
Browse and Open Graphics withAdobe Bridge
Click the Go to Bridge button onthe Application bar or click theFile menu, and then click Browsein Bridge.
Adobe Bridge opens, displayingfiles and folders on your computer.
Navigate to the drive or folderwhere the file is located.
Select the graphic thumbnailrepresenting the file that you wantto open in your Illustratordocument.
Click the File menu, point to OpenWith, and then click AdobeIllustrator CS6.
4
3
2
1
Did You Know?You can locate a linked graphic inBridge from Illustrator. In the Linkspanel, select the graphic name, clickthe Options menu, and then clickReveal In Bridge.
1
4
3

ptg8126863
Chapter 9 Working with Graphics 263
Place Graphics with AdobeBridge
Click the Go to Bridge button onthe Application bar or click theFile menu, and then click Browsein Bridge.
Adobe Bridge opens, displayingfiles and folders on your computer.
Navigate to the drive or folderwhere the file is located.
Select the graphic thumbnail thatrepresents the file you want toplace in your Illustrator document.
Click the File menu, point to Place,and then click In Illustrator.
◆ Drag to Illustrator. Drag thegraphic from Bridge to theIllustrator icon on the taskbar(Win) or Dock (Mac), hold for amoment to display Illustrator,release the mouse to place thegraphic image.
4
3
2
1
Did You Know?You can drag-and-drop Photoshop ele-ments into Illustrator. In Photoshop,select all or part of an image or a layer,select the Move tool, and then drag theselection or layer into an Illustrator art-board to place an embedded copy of itin your document.
You can change XMP data for agraphic. Click the Go to Bridge buttonon the Application bar, locate andselect the image you want, select theMetadata panel, click the Edit buttonfor a data item, enter data, and thenclick the Apply button (check mark) atthe bottom of the panel.
1
3
4

ptg8126863
264 Chapter 9
With Illustrator's Place command, you can link or embed an image intoyour document. Embedding inserts a copy of one document intoanother. When data is embedded, you can edit it using the menus andtoolbars of the program in which it was created (that is, the source pro-gram). Linking displays information stored in one document (the sourcefile) in another (the destination file). You can edit the linked object fromeither file, although changes are stored in the source file. If you breakthe link between a linked object and its source file, the object becomesembedded. As you work with linked or embedded files in the Layerspanel, a linked image appears as <Linked File>, while an embeddedimage appears as an image object.
Linking Graphics
Link to a Graphic
Open an Illustrator document.
Click the File menu, and then clickPlace.
Select the graphic file that youwant to place into the activedocument.
Select the Link check box.
◆ To embed a copy of the graphicfile image in the document,deselect the Link check box.
Click Place.
Illustrator places the image in anew layer, directly above theactive layer, and then encloses itwithin a transformable boundingbox.
5
4
3
2
1
See AlsoSee “Setting File Handling & ClipboardPreferences” on pages 466-467 forinformation on setting linking options.
4
3
5
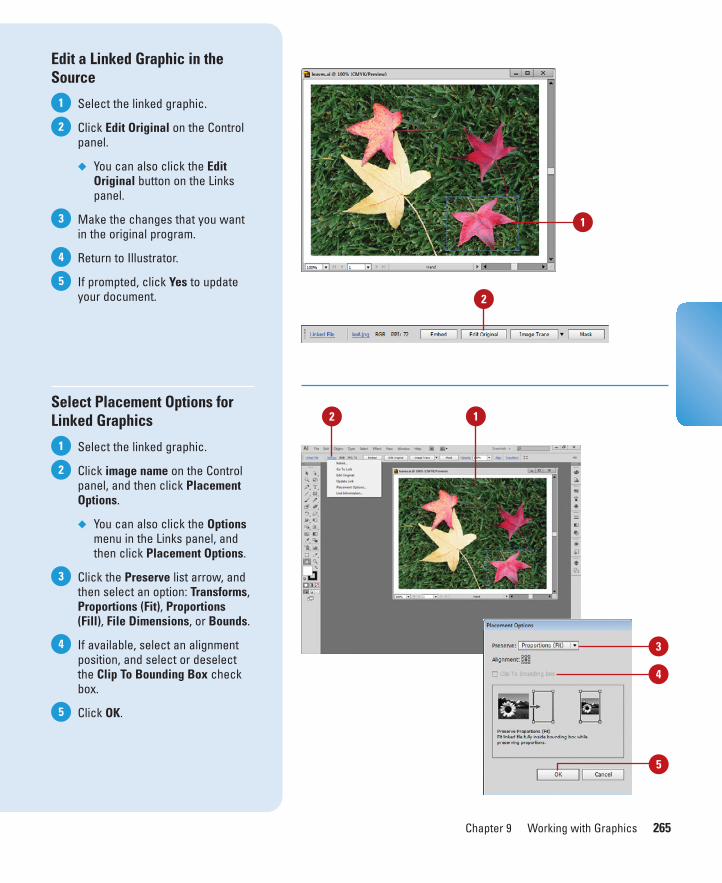
ptg8126863
Chapter 9 Working with Graphics 265
Edit a Linked Graphic in theSource
Select the linked graphic.
Click Edit Original on the Controlpanel.
◆ You can also click the EditOriginal button on the Linkspanel.
Make the changes that you wantin the original program.
Return to Illustrator.
If prompted, click Yes to updateyour document.
Select Placement Options forLinked Graphics
Select the linked graphic.
Click image name on the Controlpanel, and then click PlacementOptions.
◆ You can also click the Optionsmenu in the Links panel, andthen click Placement Options.
Click the Preserve list arrow, andthen select an option: Transforms,Proportions (Fit), Proportions(Fill), File Dimensions, or Bounds.
If available, select an alignmentposition, and select or deselectthe Clip To Bounding Box checkbox.
Click OK.5
4
3
2
1
5
4
3
2
1
1
2
2 1
3
4
5
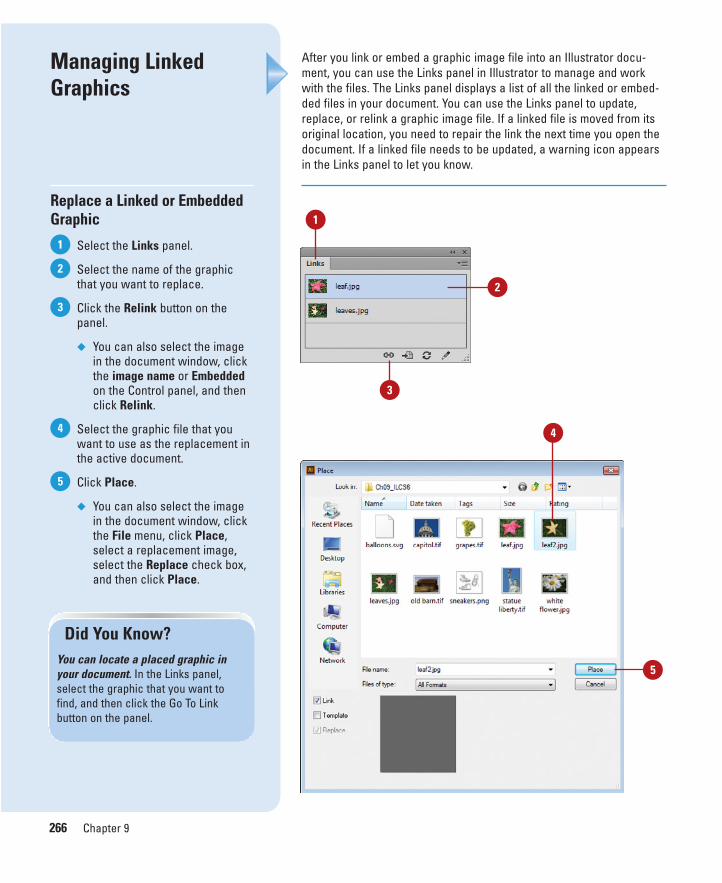
ptg8126863
266 Chapter 9
After you link or embed a graphic image file into an Illustrator docu-ment, you can use the Links panel in Illustrator to manage and workwith the files. The Links panel displays a list of all the linked or embed-ded files in your document. You can use the Links panel to update,replace, or relink a graphic image file. If a linked file is moved from itsoriginal location, you need to repair the link the next time you open thedocument. If a linked file needs to be updated, a warning icon appearsin the Links panel to let you know.
Managing LinkedGraphics
Replace a Linked or EmbeddedGraphic
Select the Links panel.
Select the name of the graphicthat you want to replace.
Click the Relink button on thepanel.
◆ You can also select the imagein the document window, clickthe image name or Embeddedon the Control panel, and thenclick Relink.
Select the graphic file that youwant to use as the replacement inthe active document.
Click Place.
◆ You can also select the imagein the document window, clickthe File menu, click Place,select a replacement image,select the Replace check box,and then click Place.
5
4
3
2
1
Did You Know?You can locate a placed graphic inyour document. In the Links panel,select the graphic that you want tofind, and then click the Go To Link button on the panel.
2
1
3
4
5
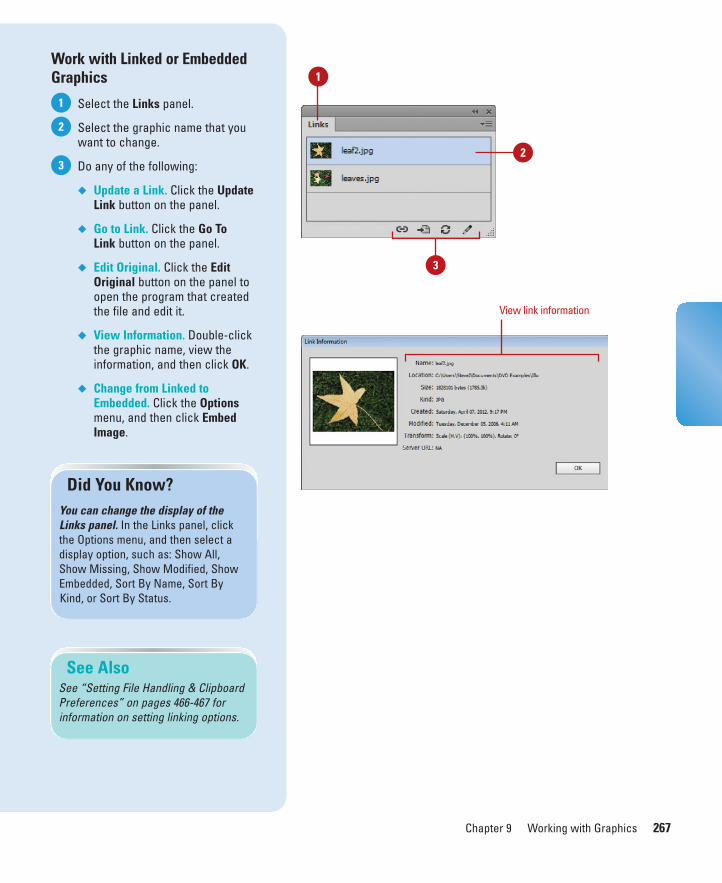
ptg8126863
Chapter 9 Working with Graphics 267
Work with Linked or EmbeddedGraphics
Select the Links panel.
Select the graphic name that youwant to change.
Do any of the following:
◆ Update a Link. Click the UpdateLink button on the panel.
◆ Go to Link. Click the Go ToLink button on the panel.
◆ Edit Original. Click the EditOriginal button on the panel toopen the program that createdthe file and edit it.
◆ View Information. Double-clickthe graphic name, view theinformation, and then click OK.
◆ Change from Linked toEmbedded. Click the Optionsmenu, and then click EmbedImage.
3
2
1
See AlsoSee “Setting File Handling & ClipboardPreferences” on pages 466-467 forinformation on setting linking options.
Did You Know?You can change the display of theLinks panel. In the Links panel, clickthe Options menu, and then select adisplay option, such as: Show All,Show Missing, Show Modified, ShowEmbedded, Sort By Name, Sort ByKind, or Sort By Status.
1
2
View link information
3
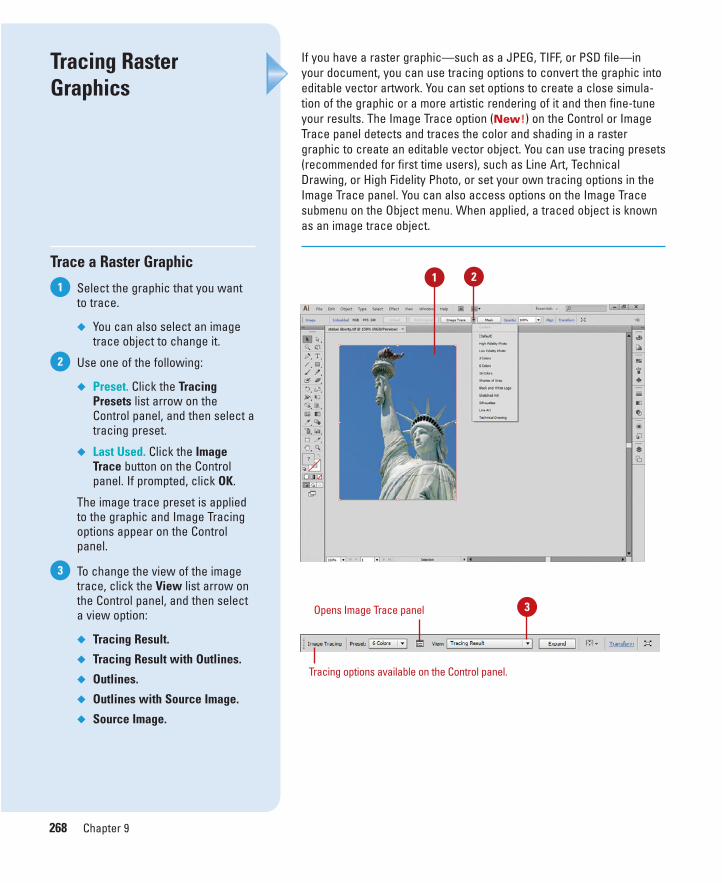
ptg8126863
268 Chapter 9
If you have a raster graphic—such as a JPEG, TIFF, or PSD file—inyour document, you can use tracing options to convert the graphic intoeditable vector artwork. You can set options to create a close simula-tion of the graphic or a more artistic rendering of it and then fine-tuneyour results. The Image Trace option (New!) on the Control or ImageTrace panel detects and traces the color and shading in a rastergraphic to create an editable vector object. You can use tracing presets(recommended for first time users), such as Line Art, TechnicalDrawing, or High Fidelity Photo, or set your own tracing options in theImage Trace panel. You can also access options on the Image Tracesubmenu on the Object menu. When applied, a traced object is knownas an image trace object.
Tracing RasterGraphics
Trace a Raster Graphic
Select the graphic that you wantto trace.
◆ You can also select an imagetrace object to change it.
Use one of the following:
◆ Preset. Click the TracingPresets list arrow on theControl panel, and then select atracing preset.
◆ Last Used. Click the ImageTrace button on the Controlpanel. If prompted, click OK.
The image trace preset is appliedto the graphic and Image Tracingoptions appear on the Controlpanel.
To change the view of the imagetrace, click the View list arrow onthe Control panel, and then selecta view option:
◆ Tracing Result.
◆ Tracing Result with Outlines.
◆ Outlines.
◆ Outlines with Source Image.
◆ Source Image.
3
2
11 2
Tracing options available on the Control panel.
3Opens Image Trace panel
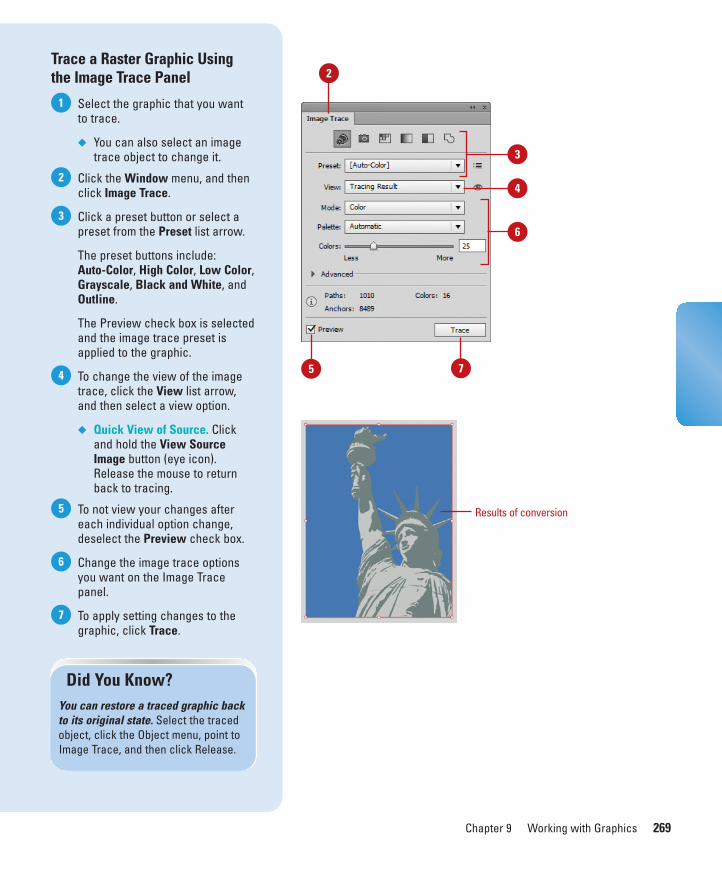
ptg8126863
Chapter 9 Working with Graphics 269
Trace a Raster Graphic Usingthe Image Trace Panel
Select the graphic that you wantto trace.
◆ You can also select an imagetrace object to change it.
Click the Window menu, and thenclick Image Trace.
Click a preset button or select apreset from the Preset list arrow.
The preset buttons include: Auto-Color, High Color, Low Color,Grayscale, Black and White, andOutline.
The Preview check box is selectedand the image trace preset isapplied to the graphic.
To change the view of the imagetrace, click the View list arrow,and then select a view option.
◆ Quick View of Source. Clickand hold the View SourceImage button (eye icon).Release the mouse to returnback to tracing.
To not view your changes aftereach individual option change,deselect the Preview check box.
Change the image trace optionsyou want on the Image Tracepanel.
To apply setting changes to thegraphic, click Trace.
7
6
5
4
3
2
1
Did You Know?You can restore a traced graphic backto its original state. Select the tracedobject, click the Object menu, point toImage Trace, and then click Release.
2
75
6
3
4
Results of conversion
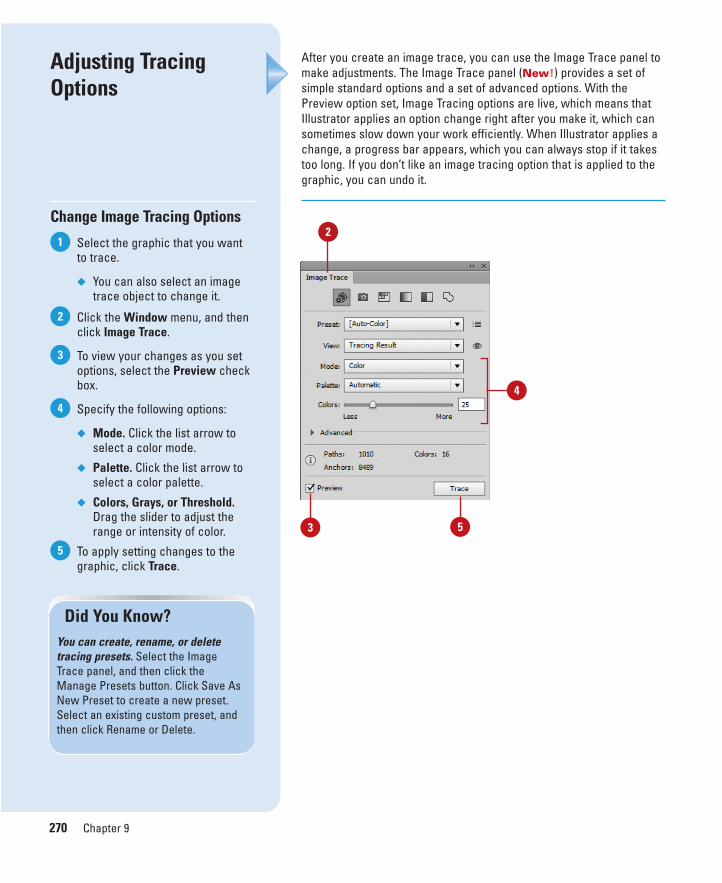
ptg8126863
270 Chapter 9
After you create an image trace, you can use the Image Trace panel tomake adjustments. The Image Trace panel (New!) provides a set ofsimple standard options and a set of advanced options. With thePreview option set, Image Tracing options are live, which means thatIllustrator applies an option change right after you make it, which cansometimes slow down your work efficiently. When Illustrator applies achange, a progress bar appears, which you can always stop if it takestoo long. If you don’t like an image tracing option that is applied to thegraphic, you can undo it.
Adjusting TracingOptions
Change Image Tracing Options
Select the graphic that you wantto trace.
◆ You can also select an imagetrace object to change it.
Click the Window menu, and thenclick Image Trace.
To view your changes as you setoptions, select the Preview checkbox.
Specify the following options:
◆ Mode. Click the list arrow toselect a color mode.
◆ Palette. Click the list arrow toselect a color palette.
◆ Colors, Grays, or Threshold.Drag the slider to adjust therange or intensity of color.
To apply setting changes to thegraphic, click Trace.
5
4
3
2
1
Did You Know?You can create, rename, or deletetracing presets. Select the ImageTrace panel, and then click theManage Presets button. Click Save AsNew Preset to create a new preset.Select an existing custom preset, andthen click Rename or Delete.
2
53
4
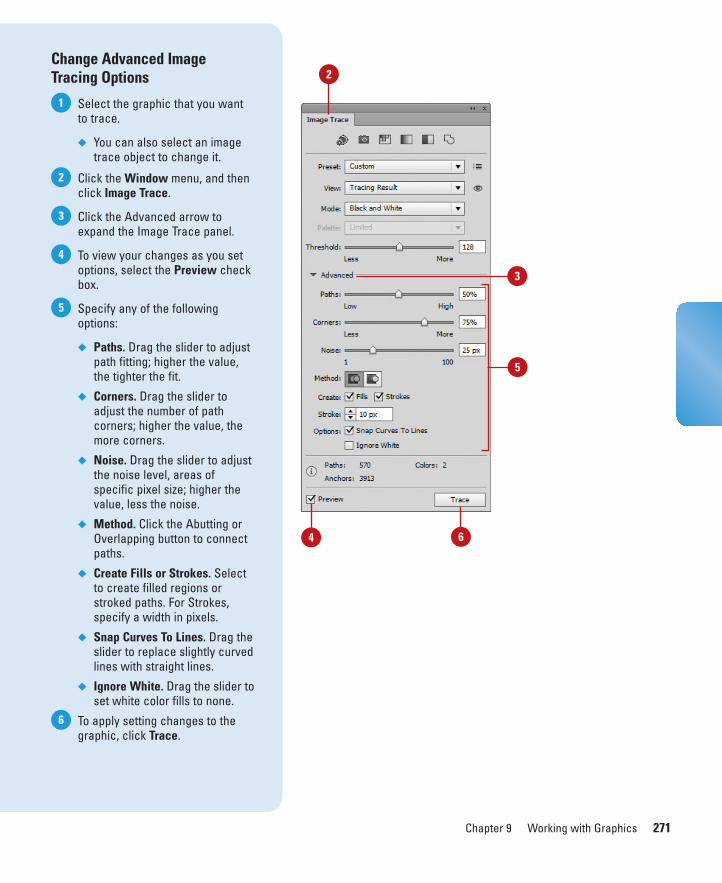
ptg8126863
Chapter 9 Working with Graphics 271
Change Advanced ImageTracing Options
Select the graphic that you wantto trace.
◆ You can also select an imagetrace object to change it.
Click the Window menu, and thenclick Image Trace.
Click the Advanced arrow toexpand the Image Trace panel.
To view your changes as you setoptions, select the Preview checkbox.
Specify any of the followingoptions:
◆ Paths. Drag the slider to adjustpath fitting; higher the value,the tighter the fit.
◆ Corners. Drag the slider toadjust the number of pathcorners; higher the value, themore corners.
◆ Noise. Drag the slider to adjustthe noise level, areas ofspecific pixel size; higher thevalue, less the noise.
◆ Method. Click the Abutting orOverlapping button to connectpaths.
◆ Create Fills or Strokes. Selectto create filled regions orstroked paths. For Strokes,specify a width in pixels.
◆ Snap Curves To Lines. Drag theslider to replace slightly curvedlines with straight lines.
◆ Ignore White. Drag the slider toset white color fills to none.
To apply setting changes to thegraphic, click Trace.
6
5
4
3
2
1
2
64
5
3
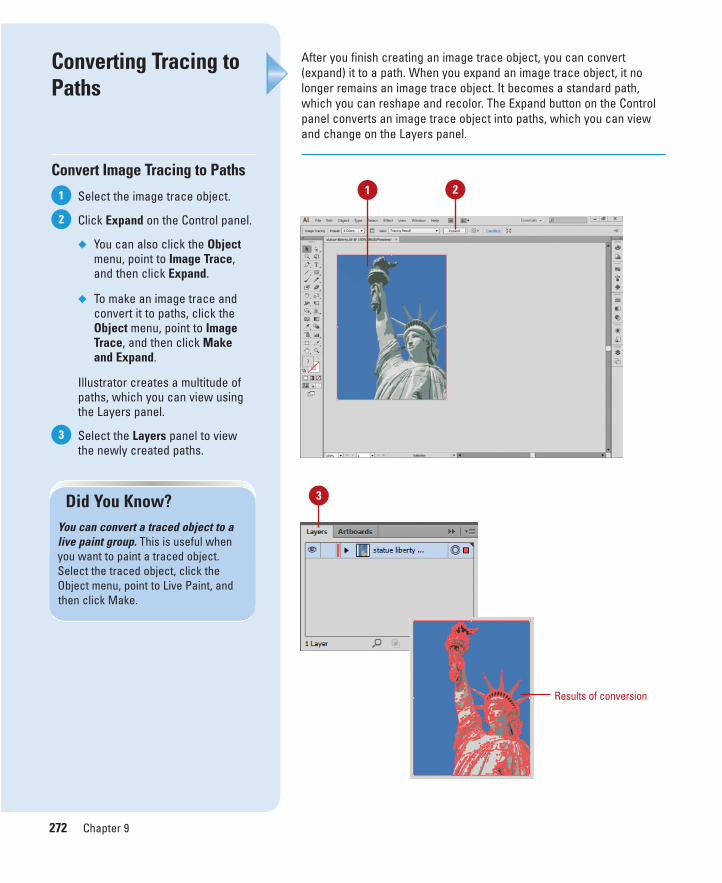
ptg8126863
272 Chapter 9
After you finish creating an image trace object, you can convert(expand) it to a path. When you expand an image trace object, it nolonger remains an image trace object. It becomes a standard path,which you can reshape and recolor. The Expand button on the Controlpanel converts an image trace object into paths, which you can viewand change on the Layers panel.
Converting Tracing toPaths
Convert Image Tracing to Paths
Select the image trace object.
Click Expand on the Control panel.
◆ You can also click the Objectmenu, point to Image Trace,and then click Expand.
◆ To make an image trace andconvert it to paths, click theObject menu, point to ImageTrace, and then click Make and Expand.
Illustrator creates a multitude ofpaths, which you can view usingthe Layers panel.
Select the Layers panel to viewthe newly created paths.
3
2
1
Did You Know?You can convert a traced object to alive paint group. This is useful whenyou want to paint a traced object.Select the traced object, click theObject menu, point to Live Paint, andthen click Make.
3
21
Results of conversion
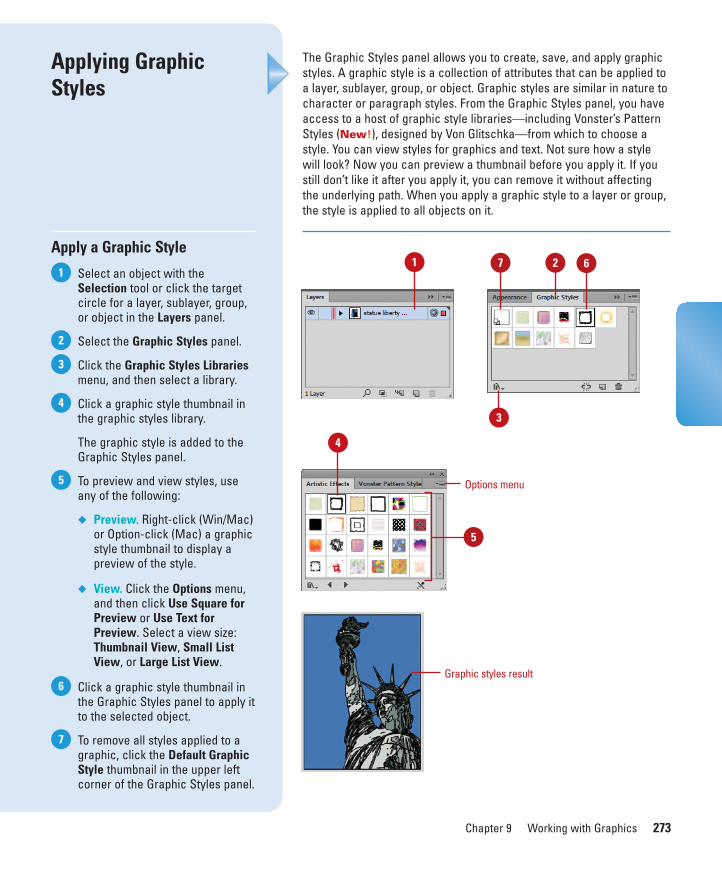
ptg8126863
Chapter 9 Working with Graphics 273
The Graphic Styles panel allows you to create, save, and apply graphicstyles. A graphic style is a collection of attributes that can be applied toa layer, sublayer, group, or object. Graphic styles are similar in nature tocharacter or paragraph styles. From the Graphic Styles panel, you haveaccess to a host of graphic style libraries—including Vonster’s PatternStyles (New!), designed by Von Glitschka—from which to choose astyle. You can view styles for graphics and text. Not sure how a stylewill look? Now you can preview a thumbnail before you apply it. If youstill don’t like it after you apply it, you can remove it without affectingthe underlying path. When you apply a graphic style to a layer or group,the style is applied to all objects on it.
Applying GraphicStyles
Apply a Graphic Style
Select an object with theSelection tool or click the targetcircle for a layer, sublayer, group,or object in the Layers panel.
Select the Graphic Styles panel.
Click the Graphic Styles Librariesmenu, and then select a library.
Click a graphic style thumbnail inthe graphic styles library.
The graphic style is added to theGraphic Styles panel.
To preview and view styles, useany of the following:
◆ Preview. Right-click (Win/Mac)or Option-click (Mac) a graphicstyle thumbnail to display apreview of the style.
◆ View. Click the Options menu,and then click Use Square forPreview or Use Text forPreview. Select a view size:Thumbnail View, Small ListView, or Large List View.
Click a graphic style thumbnail inthe Graphic Styles panel to apply itto the selected object.
To remove all styles applied to agraphic, click the Default GraphicStyle thumbnail in the upper leftcorner of the Graphic Styles panel.
7
6
5
4
3
2
1
Graphic styles result
5
2 67
Options menu
1
3
4
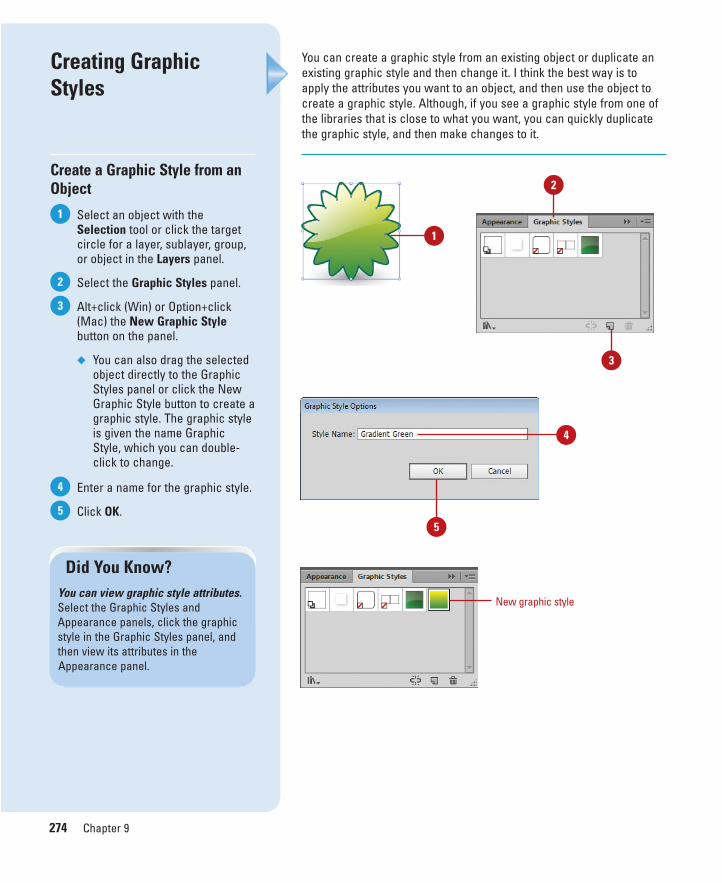
ptg8126863
274 Chapter 9
You can create a graphic style from an existing object or duplicate anexisting graphic style and then change it. I think the best way is toapply the attributes you want to an object, and then use the object tocreate a graphic style. Although, if you see a graphic style from one ofthe libraries that is close to what you want, you can quickly duplicatethe graphic style, and then make changes to it.
Creating GraphicStyles
Create a Graphic Style from anObject
Select an object with theSelection tool or click the targetcircle for a layer, sublayer, group,or object in the Layers panel.
Select the Graphic Styles panel.
Alt+click (Win) or Option+click(Mac) the New Graphic Stylebutton on the panel.
◆ You can also drag the selectedobject directly to the GraphicStyles panel or click the NewGraphic Style button to create agraphic style. The graphic styleis given the name GraphicStyle, which you can double-click to change.
Enter a name for the graphic style.
Click OK.5
4
3
2
1
1
2
3
New graphic style
4
5
Did You Know?You can view graphic style attributes.Select the Graphic Styles andAppearance panels, click the graphicstyle in the Graphic Styles panel, andthen view its attributes in theAppearance panel.
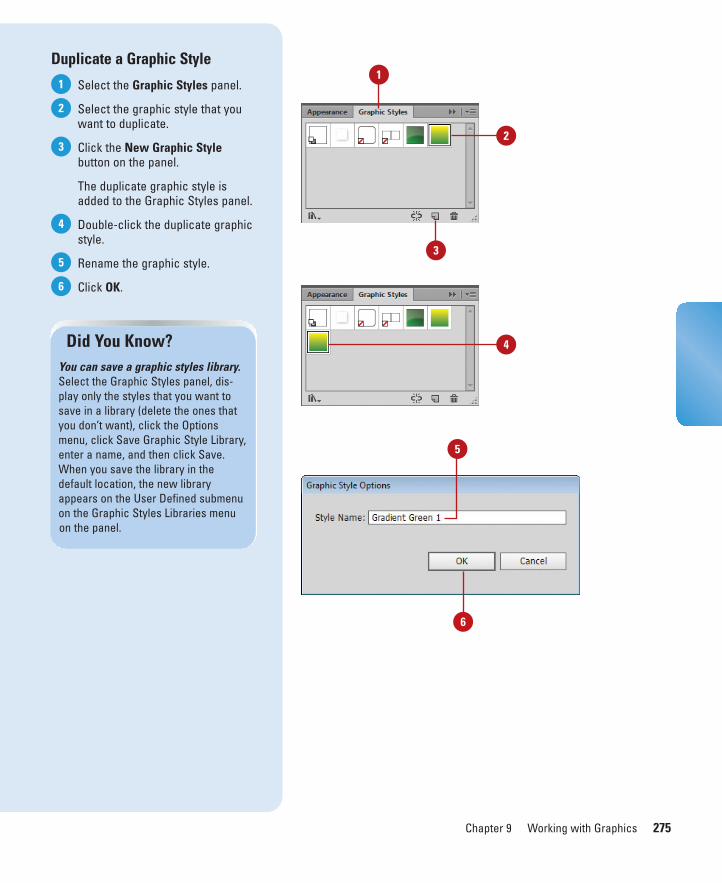
ptg8126863
Chapter 9 Working with Graphics 275
Duplicate a Graphic Style
Select the Graphic Styles panel.
Select the graphic style that youwant to duplicate.
Click the New Graphic Stylebutton on the panel.
The duplicate graphic style isadded to the Graphic Styles panel.
Double-click the duplicate graphicstyle.
Rename the graphic style.
Click OK.6
5
4
3
2
1
Did You Know?You can save a graphic styles library.Select the Graphic Styles panel, dis-play only the styles that you want tosave in a library (delete the ones thatyou don’t want), click the Optionsmenu, click Save Graphic Style Library,enter a name, and then click Save.When you save the library in thedefault location, the new libraryappears on the User Defined submenuon the Graphic Styles Libraries menuon the panel.
1
2
4
3
5
6
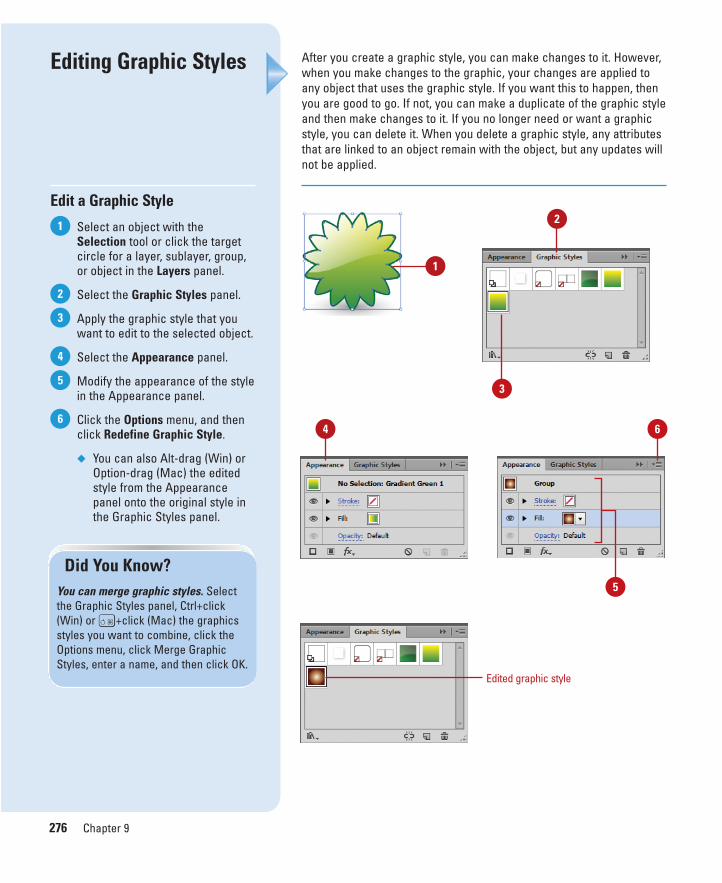
ptg8126863
276 Chapter 9
After you create a graphic style, you can make changes to it. However,when you make changes to the graphic, your changes are applied toany object that uses the graphic style. If you want this to happen, thenyou are good to go. If not, you can make a duplicate of the graphic styleand then make changes to it. If you no longer need or want a graphicstyle, you can delete it. When you delete a graphic style, any attributesthat are linked to an object remain with the object, but any updates willnot be applied.
Editing Graphic Styles
Edit a Graphic Style
Select an object with theSelection tool or click the targetcircle for a layer, sublayer, group,or object in the Layers panel.
Select the Graphic Styles panel.
Apply the graphic style that youwant to edit to the selected object.
Select the Appearance panel.
Modify the appearance of the stylein the Appearance panel.
Click the Options menu, and thenclick Redefine Graphic Style.
◆ You can also Alt-drag (Win) orOption-drag (Mac) the editedstyle from the Appearancepanel onto the original style inthe Graphic Styles panel.
6
5
4
3
2
1
Did You Know?You can merge graphic styles. Selectthe Graphic Styles panel, Ctrl+click(Win) or A+click (Mac) the graphicsstyles you want to combine, click theOptions menu, click Merge GraphicStyles, enter a name, and then click OK.
4
2
Edited graphic style
3
1
6
5
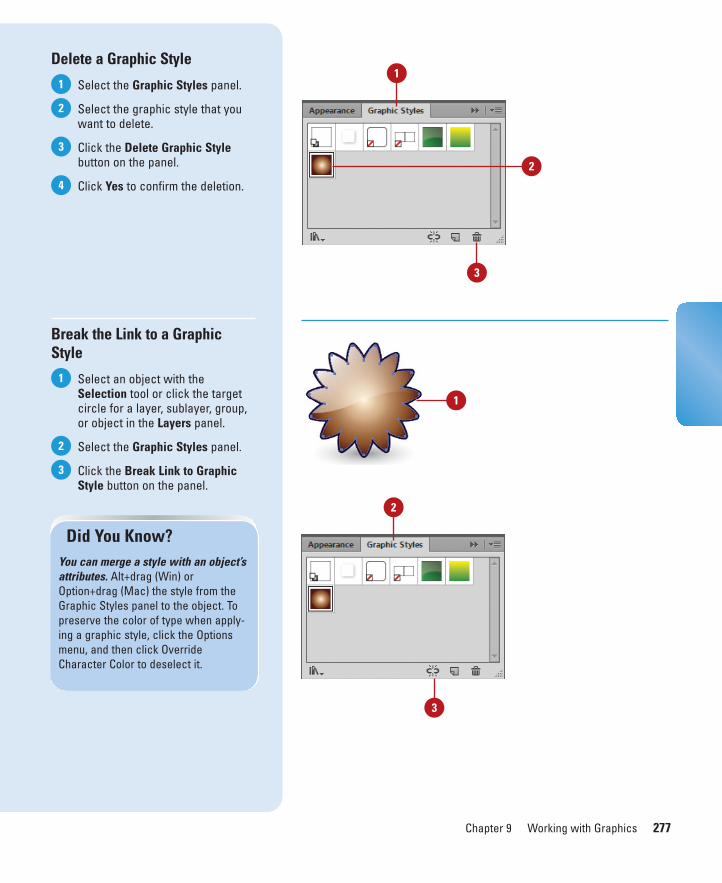
ptg8126863
Chapter 9 Working with Graphics 277
Delete a Graphic Style
Select the Graphic Styles panel.
Select the graphic style that youwant to delete.
Click the Delete Graphic Stylebutton on the panel.
Click Yes to confirm the deletion.
Break the Link to a GraphicStyle
Select an object with theSelection tool or click the targetcircle for a layer, sublayer, group,or object in the Layers panel.
Select the Graphic Styles panel.
Click the Break Link to GraphicStyle button on the panel.
3
2
1
4
3
2
11
2
3
3
2
1
Did You Know?You can merge a style with an object’sattributes. Alt+drag (Win) orOption+drag (Mac) the style from theGraphic Styles panel to the object. Topreserve the color of type when apply-ing a graphic style, click the Optionsmenu, and then click OverrideCharacter Color to deselect it.
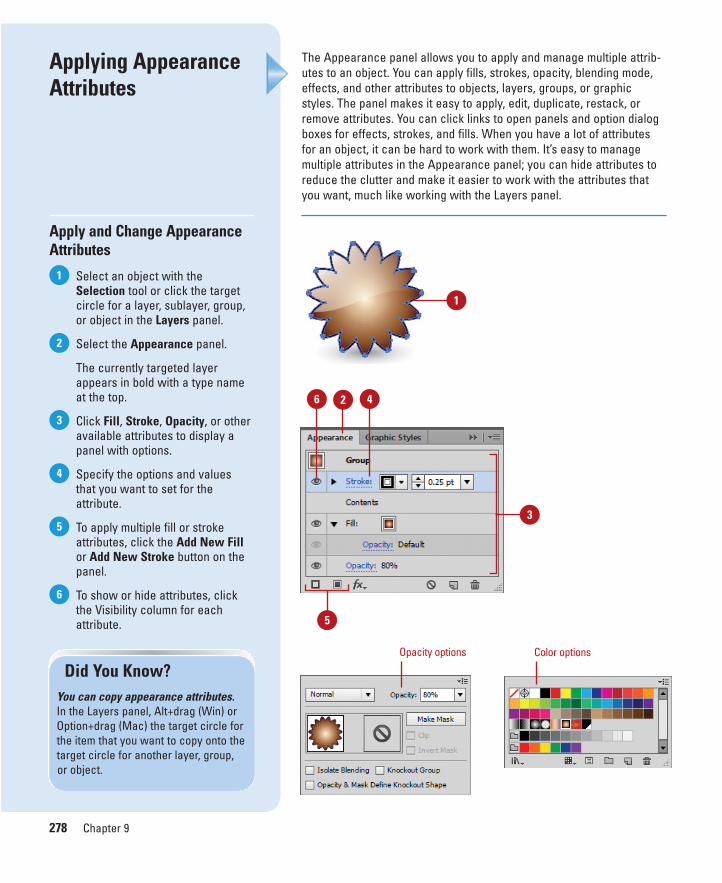
ptg8126863
278 Chapter 9
The Appearance panel allows you to apply and manage multiple attrib-utes to an object. You can apply fills, strokes, opacity, blending mode,effects, and other attributes to objects, layers, groups, or graphicstyles. The panel makes it easy to apply, edit, duplicate, restack, orremove attributes. You can click links to open panels and option dialogboxes for effects, strokes, and fills. When you have a lot of attributesfor an object, it can be hard to work with them. It’s easy to managemultiple attributes in the Appearance panel; you can hide attributes toreduce the clutter and make it easier to work with the attributes thatyou want, much like working with the Layers panel.
Applying AppearanceAttributes
Apply and Change AppearanceAttributes
Select an object with theSelection tool or click the targetcircle for a layer, sublayer, group,or object in the Layers panel.
Select the Appearance panel.
The currently targeted layerappears in bold with a type nameat the top.
Click Fill, Stroke, Opacity, or otheravailable attributes to display apanel with options.
Specify the options and valuesthat you want to set for theattribute.
To apply multiple fill or strokeattributes, click the Add New Fillor Add New Stroke button on thepanel.
To show or hide attributes, clickthe Visibility column for eachattribute.
6
5
4
3
2
1
Did You Know?You can copy appearance attributes.In the Layers panel, Alt+drag (Win) orOption+drag (Mac) the target circle forthe item that you want to copy onto thetarget circle for another layer, group,or object.
6
3
2
5
4
Opacity options Color options
1
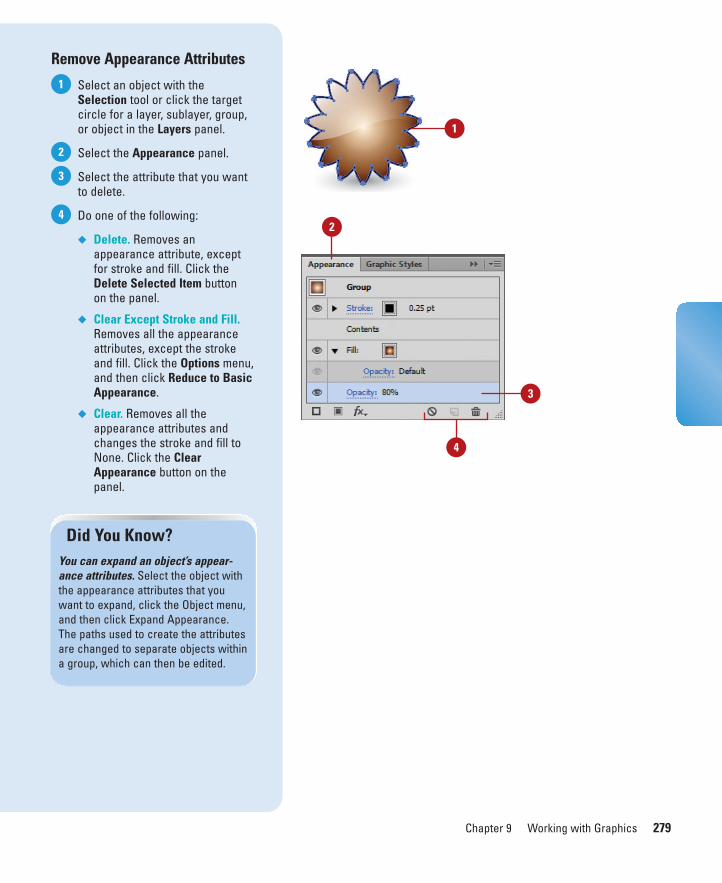
ptg8126863
Chapter 9 Working with Graphics 279
Remove Appearance Attributes
Select an object with theSelection tool or click the targetcircle for a layer, sublayer, group,or object in the Layers panel.
Select the Appearance panel.
Select the attribute that you wantto delete.
Do one of the following:
◆ Delete. Removes anappearance attribute, exceptfor stroke and fill. Click theDelete Selected Item button on the panel.
◆ Clear Except Stroke and Fill.Removes all the appearanceattributes, except the strokeand fill. Click the Options menu,and then click Reduce to BasicAppearance.
◆ Clear. Removes all theappearance attributes andchanges the stroke and fill toNone. Click the ClearAppearance button on thepanel.
4
3
2
1
Did You Know?You can expand an object’s appear-ance attributes. Select the object withthe appearance attributes that youwant to expand, click the Object menu,and then click Expand Appearance.The paths used to create the attributesare changed to separate objects withina group, which can then be edited.
2
3
4
1
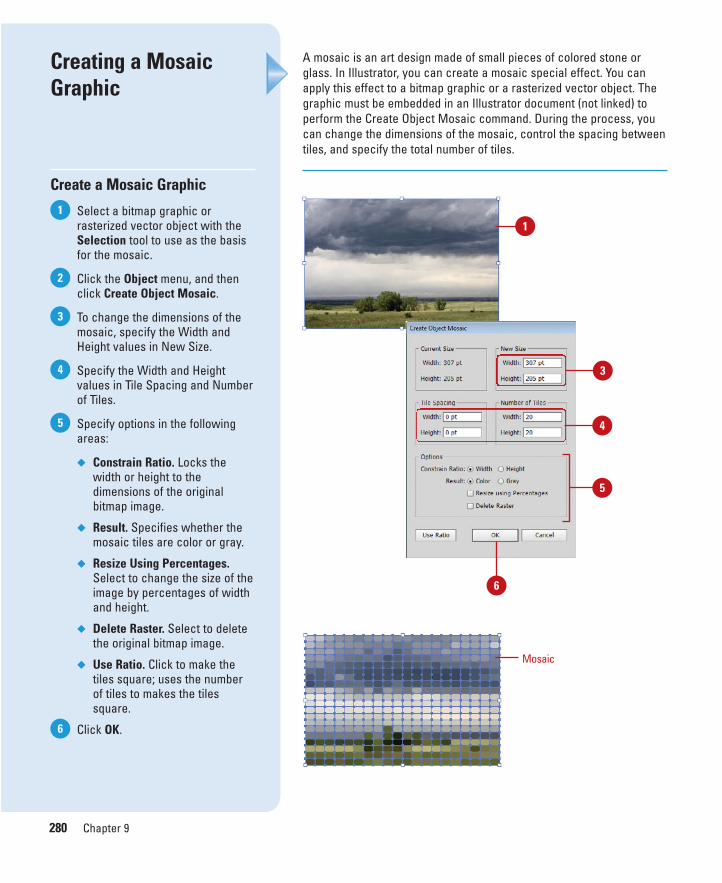
ptg8126863
280 Chapter 9
A mosaic is an art design made of small pieces of colored stone orglass. In Illustrator, you can create a mosaic special effect. You canapply this effect to a bitmap graphic or a rasterized vector object. Thegraphic must be embedded in an Illustrator document (not linked) toperform the Create Object Mosaic command. During the process, youcan change the dimensions of the mosaic, control the spacing betweentiles, and specify the total number of tiles.
Creating a MosaicGraphic
Create a Mosaic Graphic
Select a bitmap graphic orrasterized vector object with theSelection tool to use as the basisfor the mosaic.
Click the Object menu, and thenclick Create Object Mosaic.
To change the dimensions of themosaic, specify the Width andHeight values in New Size.
Specify the Width and Heightvalues in Tile Spacing and Numberof Tiles.
Specify options in the followingareas:
◆ Constrain Ratio. Locks thewidth or height to thedimensions of the originalbitmap image.
◆ Result. Specifies whether themosaic tiles are color or gray.
◆ Resize Using Percentages.Select to change the size of theimage by percentages of widthand height.
◆ Delete Raster. Select to deletethe original bitmap image.
◆ Use Ratio. Click to make thetiles square; uses the numberof tiles to makes the tilessquare.
Click OK.6
5
4
3
2
1
5
1
Mosaic
3
4
6

ptg8126863
Manipulating Artwork with Effects
Introduction
Adobe Illustrator effects are a designer's dream come true.With effects you can turn an image into an oil painting or awatercolor; you can even change night into day. Illustrator’sEffect menu includes over 100 highly creative effects fromIllustrator and Photoshop, which can be applied once, reap-plied, or combined with other filters to create any effect yourimagination can dream up.
The potential combination of effects and images literallyruns into the millions. This means that effects are truly anundiscovered territory. As a matter of fact, the PhotoshopEffect Gallery lets you view the effects of one or more filterson the active document. This level of power gives you unbe-lievable creative control over your images.
Take a moment to view some of the various effects thatIllustrator offers. Because there are over 100 effects available,we can't show you all of them, but we think you'll enjoyviewing the selection at the end of the chapter. 10
10What You’ll Do
Apply Illustrator Effects
Apply the Convert to Shape Effect
Apply the Scribble Effect
Apply the Inner or Outer Glow Effect
Apply the Drop Shadow Effect
Apply 3D Effects
Apply Warp Effects
Apply Distort & Transform Effects
Change Raster Effect Settings
Work with the Effect Gallery
Apply Multiple Effects
Control Effects Using Selections
Use Blur Effects
View Various Effects
281
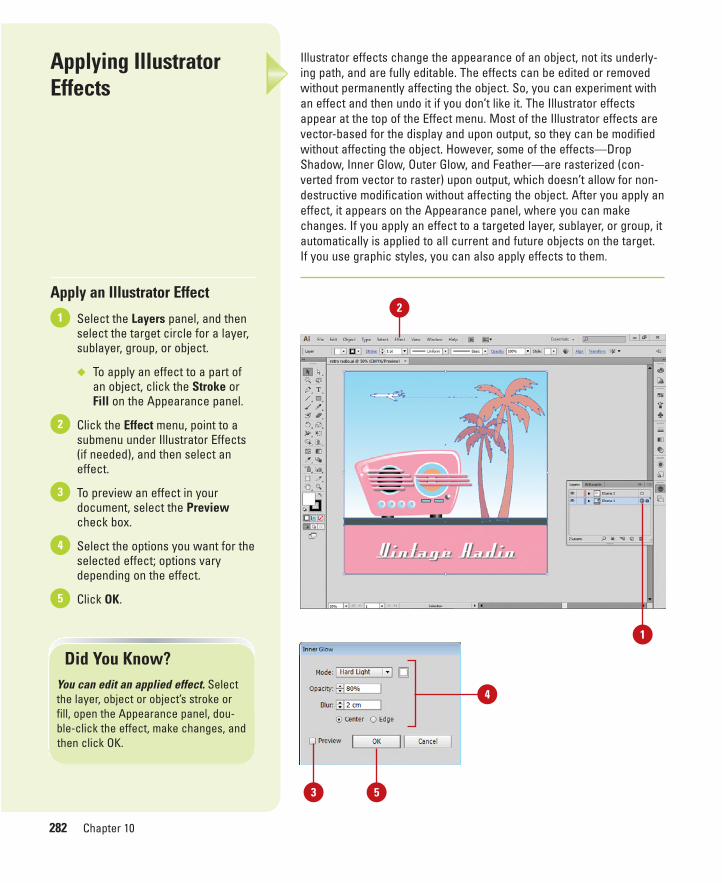
ptg8126863
282 Chapter 10
Illustrator effects change the appearance of an object, not its underly-ing path, and are fully editable. The effects can be edited or removedwithout permanently affecting the object. So, you can experiment withan effect and then undo it if you don’t like it. The Illustrator effectsappear at the top of the Effect menu. Most of the Illustrator effects arevector-based for the display and upon output, so they can be modifiedwithout affecting the object. However, some of the effects—DropShadow, Inner Glow, Outer Glow, and Feather—are rasterized (con-verted from vector to raster) upon output, which doesn’t allow for non-destructive modification without affecting the object. After you apply aneffect, it appears on the Appearance panel, where you can makechanges. If you apply an effect to a targeted layer, sublayer, or group, itautomatically is applied to all current and future objects on the target.If you use graphic styles, you can also apply effects to them.
Applying IllustratorEffects
Apply an Illustrator Effect
Select the Layers panel, and thenselect the target circle for a layer,sublayer, group, or object.
◆ To apply an effect to a part ofan object, click the Stroke orFill on the Appearance panel.
Click the Effect menu, point to asubmenu under Illustrator Effects(if needed), and then select aneffect.
To preview an effect in yourdocument, select the Previewcheck box.
Select the options you want for theselected effect; options varydepending on the effect.
Click OK.5
4
3
2
1
Did You Know?You can edit an applied effect. Selectthe layer, object or object’s stroke orfill, open the Appearance panel, dou-ble-click the effect, make changes, andthen click OK.
2
1
3 5
4
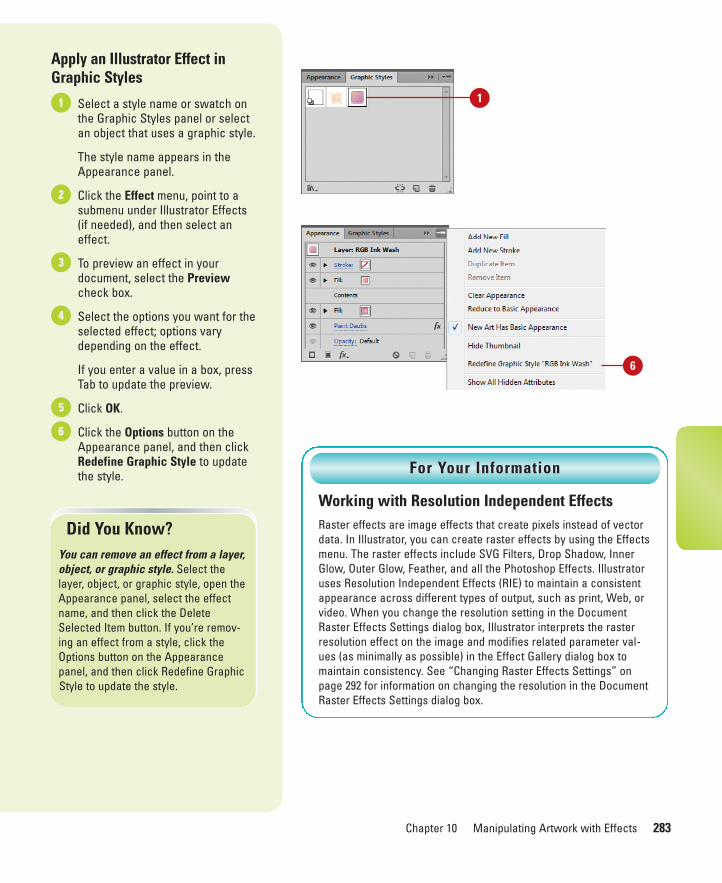
ptg8126863
Chapter 10 Manipulating Artwork with Effects 283
Apply an Illustrator Effect inGraphic Styles
Select a style name or swatch onthe Graphic Styles panel or selectan object that uses a graphic style.
The style name appears in theAppearance panel.
Click the Effect menu, point to asubmenu under Illustrator Effects(if needed), and then select aneffect.
To preview an effect in yourdocument, select the Previewcheck box.
Select the options you want for theselected effect; options varydepending on the effect.
If you enter a value in a box, pressTab to update the preview.
Click OK.
Click the Options button on theAppearance panel, and then clickRedefine Graphic Style to updatethe style.
6
5
4
3
2
1
Did You Know?You can remove an effect from a layer,object, or graphic style. Select thelayer, object, or graphic style, open theAppearance panel, select the effectname, and then click the DeleteSelected Item button. If you’re remov-ing an effect from a style, click theOptions button on the Appearancepanel, and then click Redefine GraphicStyle to update the style.
Working with Resolution Independent EffectsRaster effects are image effects that create pixels instead of vectordata. In Illustrator, you can create raster effects by using the Effectsmenu. The raster effects include SVG Filters, Drop Shadow, InnerGlow, Outer Glow, Feather, and all the Photoshop Effects. Illustratoruses Resolution Independent Effects (RIE) to maintain a consistentappearance across different types of output, such as print, Web, orvideo. When you change the resolution setting in the DocumentRaster Effects Settings dialog box, Illustrator interprets the rasterresolution effect on the image and modifies related parameter val-ues (as minimally as possible) in the Effect Gallery dialog box tomaintain consistency. See “Changing Raster Effects Settings” onpage 292 for information on changing the resolution in the DocumentRaster Effects Settings dialog box.
For Your Information
1
6

ptg8126863
284 Chapter 10
With the Illustrator Convert to Shape effect, you can change an object’soutline to a rectangle, rounded rectangle, or ellipse without changingthe actual underlying path. In the Shape Options dialog box, you canspecify the width and height of the converted shape. The size can be set to an absolute value or a relative one based on the originalobject.
Applying the Convertto Shape Effect
Apply the Convert to ShapeEffect
Select the Layers panel, and thenselect the target circle for a layer,sublayer, group, or object.
Click the Effect menu, point toConvert to Shape, and then clickRectangle, Rounded Rectangle, orEllipse.
To preview an effect in yourdocument, select the Previewcheck box.
Click the Absolute or Relativeoption, and then enter values forwidth and height.
For the Relative option, if you wantthe shape to be larger or smallerthan the actual path, enter apositive or negative value.
For a Rounded Rectangle shape,enter a Corner Radius value.
Click OK.6
5
4
3
2
1
Did You Know?You can round off sharp corners with-out converting the shape. Select theshape, click the Effect menu, point toStylize, and then click Round Corners.
Selection
Convert results
4
5
1
3 6

ptg8126863
Chapter 10 Manipulating Artwork with Effects 285
If you want to make an object’s fill look as though it was drawn with apen or pencil, the Illustrator Scribble effect is the one for you. In theScribble Options dialog box, you can use one of the many presets tocreate the look you want. It makes the job easy. The presets includeChildlike, Dense, Loose, Moire, Sharp, Sketch, Snarl, Swash, Tight, andZig-zag. After you select a preset (even if it’s just the Default), you canadjust individual settings to customize the Scribble effect. As you makechanges, you can preview the results in your document.
Applying the ScribbleEffect
Apply the Scribble Effect
Select the Layers panel, and thenselect the target circle for a layer,sublayer, group, or object.
Click the Effect menu, point toStylize, and then click Scribble.
To preview an effect in yourdocument, select the Previewcheck box.
Select from the following options:
◆ Settings. Click the Settings listarrow to select a preset for theScribble effect.
◆ Angle. Enter an Angle value orrotate the dial to change theangle of the sketch lines.
◆ Path Overlap. Drag the PathOverlap slider toward Outsideto have the sketch lines extendbeyond the edge of the path, ortoward Inside to have thesketch lines stay inside thepath along with the degree ofrandom variation.
◆ Line Options. Change theStroke Width for the lines, theCurviness for the lines (anglesharply or loosely) along withthe degree of random variation,and the Spacing for the lines(tight or loose) along with thedegree of random variation.
Click OK.5
4
3
2
1
1
Scribble results
53
4
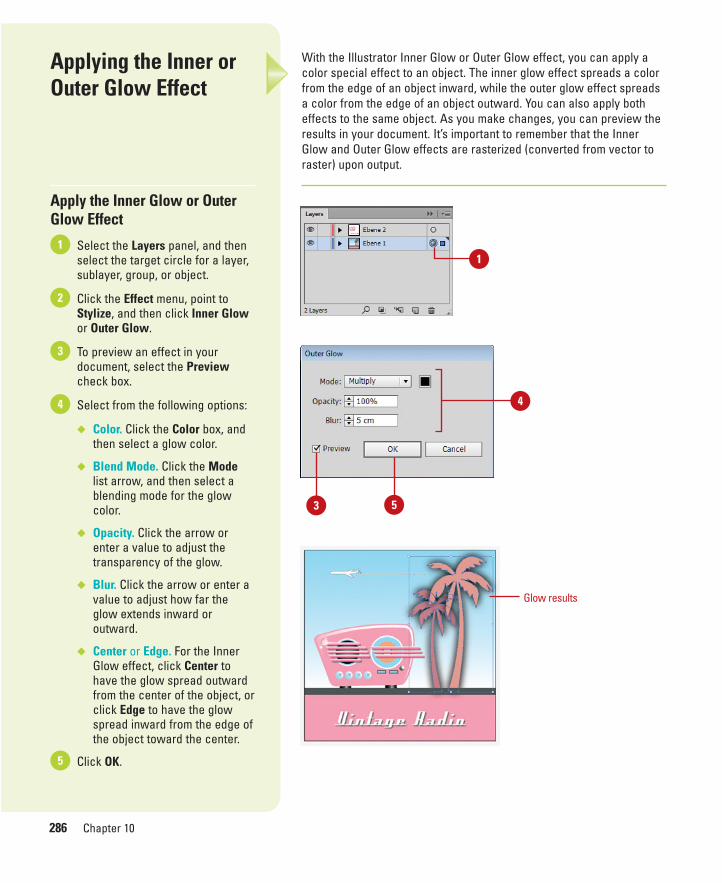
ptg8126863
286 Chapter 10
With the Illustrator Inner Glow or Outer Glow effect, you can apply acolor special effect to an object. The inner glow effect spreads a colorfrom the edge of an object inward, while the outer glow effect spreadsa color from the edge of an object outward. You can also apply botheffects to the same object. As you make changes, you can preview theresults in your document. It’s important to remember that the InnerGlow and Outer Glow effects are rasterized (converted from vector toraster) upon output.
Applying the Inner orOuter Glow Effect
Apply the Inner Glow or OuterGlow Effect
Select the Layers panel, and thenselect the target circle for a layer,sublayer, group, or object.
Click the Effect menu, point toStylize, and then click Inner Glowor Outer Glow.
To preview an effect in yourdocument, select the Previewcheck box.
Select from the following options:
◆ Color. Click the Color box, andthen select a glow color.
◆ Blend Mode. Click the Modelist arrow, and then select ablending mode for the glowcolor.
◆ Opacity. Click the arrow orenter a value to adjust thetransparency of the glow.
◆ Blur. Click the arrow or enter avalue to adjust how far theglow extends inward oroutward.
◆ Center or Edge. For the InnerGlow effect, click Center tohave the glow spread outwardfrom the center of the object, orclick Edge to have the glowspread inward from the edge ofthe object toward the center.
Click OK.5
4
3
2
1
4
Glow results
1
3 5
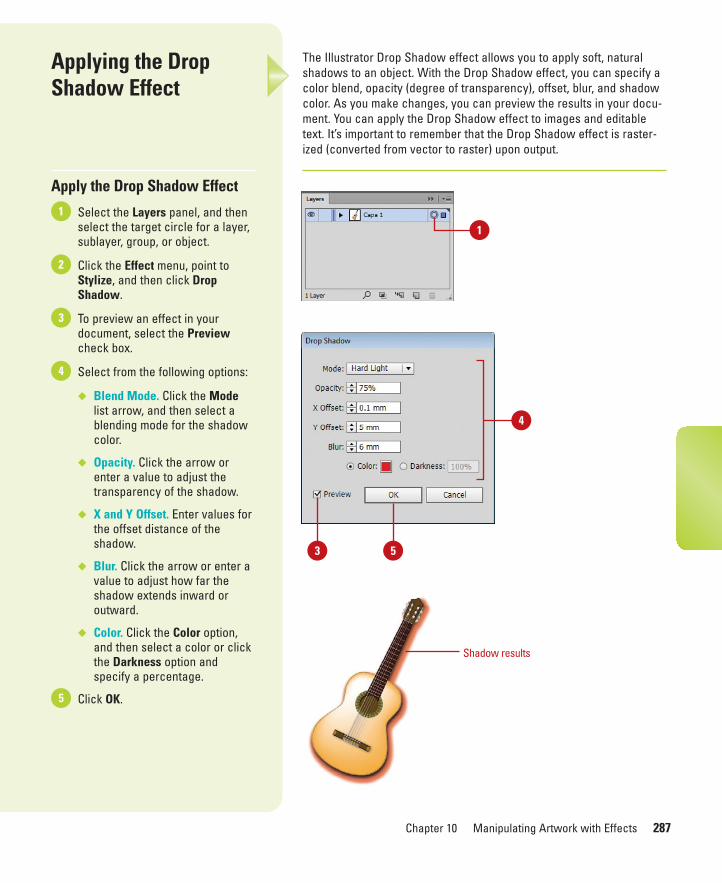
ptg8126863
Chapter 10 Manipulating Artwork with Effects 287
The Illustrator Drop Shadow effect allows you to apply soft, naturalshadows to an object. With the Drop Shadow effect, you can specify acolor blend, opacity (degree of transparency), offset, blur, and shadowcolor. As you make changes, you can preview the results in your docu-ment. You can apply the Drop Shadow effect to images and editabletext. It’s important to remember that the Drop Shadow effect is raster-ized (converted from vector to raster) upon output.
Applying the DropShadow Effect
Apply the Drop Shadow Effect
Select the Layers panel, and thenselect the target circle for a layer,sublayer, group, or object.
Click the Effect menu, point toStylize, and then click DropShadow.
To preview an effect in yourdocument, select the Previewcheck box.
Select from the following options:
◆ Blend Mode. Click the Modelist arrow, and then select ablending mode for the shadowcolor.
◆ Opacity. Click the arrow orenter a value to adjust thetransparency of the shadow.
◆ X and Y Offset. Enter values forthe offset distance of theshadow.
◆ Blur. Click the arrow or enter avalue to adjust how far theshadow extends inward oroutward.
◆ Color. Click the Color option,and then select a color or clickthe Darkness option andspecify a percentage.
Click OK.5
4
3
2
1
Shadow results
4
1
3 5
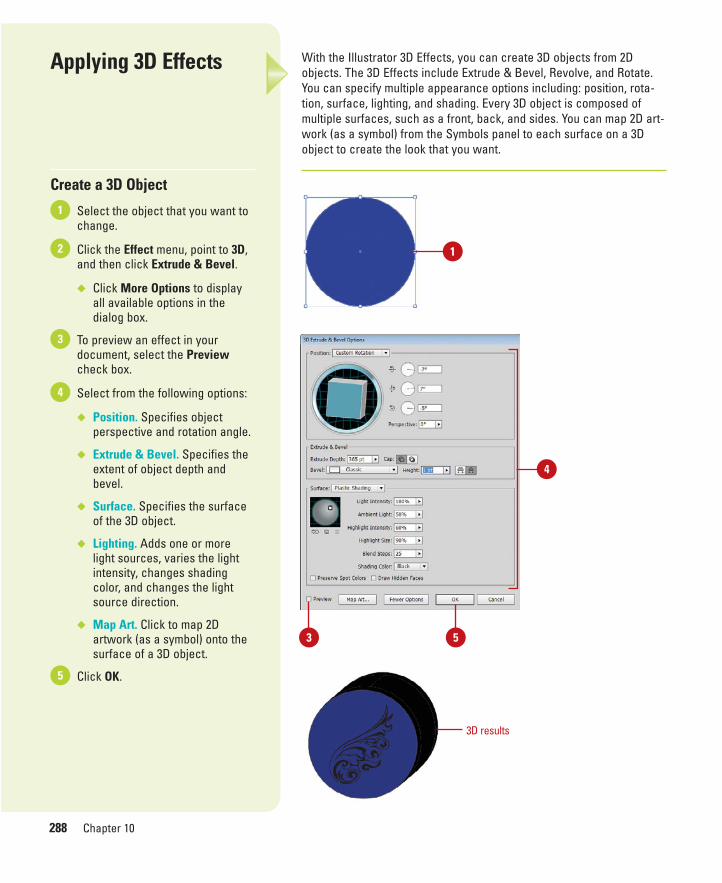
ptg8126863
288 Chapter 10
With the Illustrator 3D Effects, you can create 3D objects from 2Dobjects. The 3D Effects include Extrude & Bevel, Revolve, and Rotate.You can specify multiple appearance options including: position, rota-tion, surface, lighting, and shading. Every 3D object is composed ofmultiple surfaces, such as a front, back, and sides. You can map 2D art-work (as a symbol) from the Symbols panel to each surface on a 3Dobject to create the look that you want.
Applying 3D Effects
Create a 3D Object
Select the object that you want tochange.
Click the Effect menu, point to 3D,and then click Extrude & Bevel.
◆ Click More Options to displayall available options in thedialog box.
To preview an effect in yourdocument, select the Previewcheck box.
Select from the following options:
◆ Position. Specifies objectperspective and rotation angle.
◆ Extrude & Bevel. Specifies theextent of object depth andbevel.
◆ Surface. Specifies the surfaceof the 3D object.
◆ Lighting. Adds one or morelight sources, varies the lightintensity, changes shadingcolor, and changes the lightsource direction.
◆ Map Art. Click to map 2Dartwork (as a symbol) onto thesurface of a 3D object.
Click OK.5
4
3
2
1
3D results
1
4
53
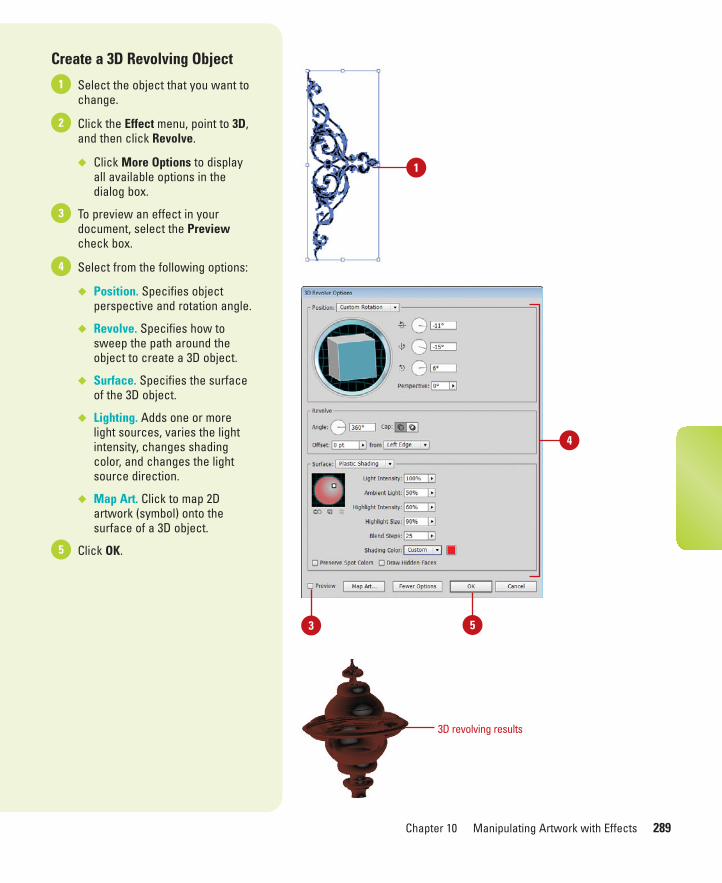
ptg8126863
Chapter 10 Manipulating Artwork with Effects 289
Create a 3D Revolving Object
Select the object that you want tochange.
Click the Effect menu, point to 3D,and then click Revolve.
◆ Click More Options to displayall available options in thedialog box.
To preview an effect in yourdocument, select the Previewcheck box.
Select from the following options:
◆ Position. Specifies objectperspective and rotation angle.
◆ Revolve. Specifies how tosweep the path around theobject to create a 3D object.
◆ Surface. Specifies the surfaceof the 3D object.
◆ Lighting. Adds one or morelight sources, varies the lightintensity, changes shadingcolor, and changes the lightsource direction.
◆ Map Art. Click to map 2Dartwork (symbol) onto thesurface of a 3D object.
Click OK.5
4
3
2
1
1
3D revolving results
3 5
4

ptg8126863
290 Chapter 10
The Illustrator Warp effects allow you to apply different types of distor-tion effects. You can specify how much bend and distortion, either hori-zontal or vertical, takes place in the warp effect. You can apply a widevariety of warp effects, including Arc, Arch, Bulge, Shell, Flag, Wave,Fish, Rise, Fisheye, Inflate, Squeeze, or Twist. As you make changes,you can preview the results in your document. You can apply the warpeffects to images and editable text.
Applying Warp Effects
Apply a Warp Effect
Select the Layers panel, and thenselect the target circle for a layer,sublayer, group, or object.
Click the Effect menu, point toWarp, and then select a warpcommand.
To preview an effect in yourdocument, select the Previewcheck box.
Select from the following options:
◆ Style. Click the Style list arrow,to change the warp effect.
◆ Direction. Click the Horizontalor Vertical option to specify aneffect direction.
◆ Bend. Drag the Bend slider orenter a value to adjust thebending for the warp effect.
◆ Distortion. Drag the Horizontalor Vertical slider or enter avalue to adjust the distortiondirection for the warp effect.
Click OK.5
4
3
2
1
Selection
Twist warp results
3 5
4
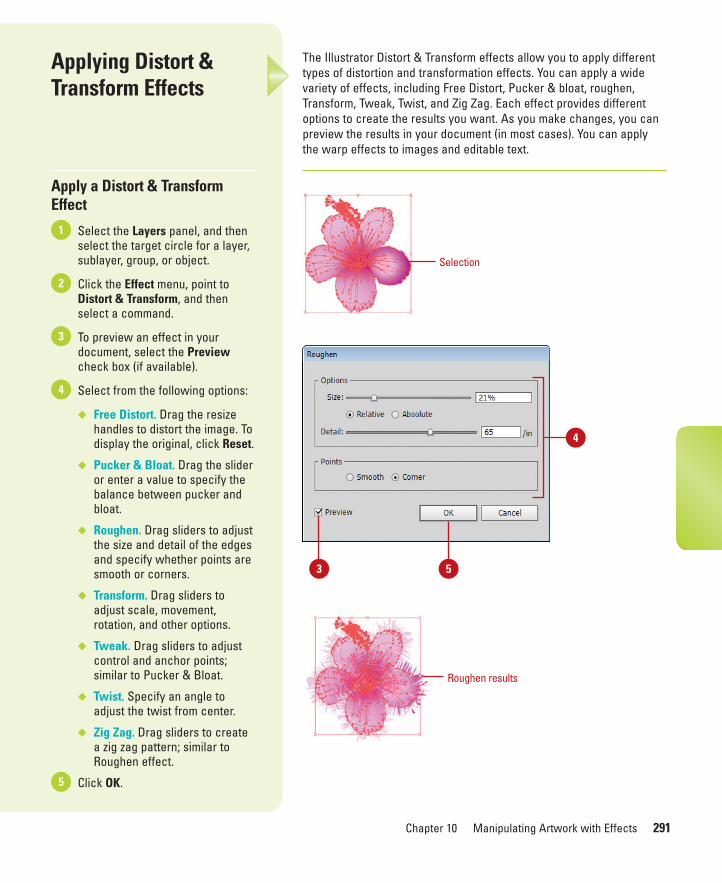
ptg8126863
Chapter 10 Manipulating Artwork with Effects 291
The Illustrator Distort & Transform effects allow you to apply differenttypes of distortion and transformation effects. You can apply a widevariety of effects, including Free Distort, Pucker & bloat, roughen,Transform, Tweak, Twist, and Zig Zag. Each effect provides differentoptions to create the results you want. As you make changes, you canpreview the results in your document (in most cases). You can applythe warp effects to images and editable text.
Applying Distort &Transform Effects
Apply a Distort & TransformEffect
Select the Layers panel, and thenselect the target circle for a layer,sublayer, group, or object.
Click the Effect menu, point toDistort & Transform, and thenselect a command.
To preview an effect in yourdocument, select the Previewcheck box (if available).
Select from the following options:
◆ Free Distort. Drag the resizehandles to distort the image. Todisplay the original, click Reset.
◆ Pucker & Bloat. Drag the slideror enter a value to specify thebalance between pucker andbloat.
◆ Roughen. Drag sliders to adjustthe size and detail of the edgesand specify whether points aresmooth or corners.
◆ Transform. Drag sliders toadjust scale, movement,rotation, and other options.
◆ Tweak. Drag sliders to adjustcontrol and anchor points;similar to Pucker & Bloat.
◆ Twist. Specify an angle toadjust the twist from center.
◆ Zig Zag. Drag sliders to createa zig zag pattern; similar toRoughen effect.
Click OK.5
4
3
2
1
Selection
Roughen results
3 5
4
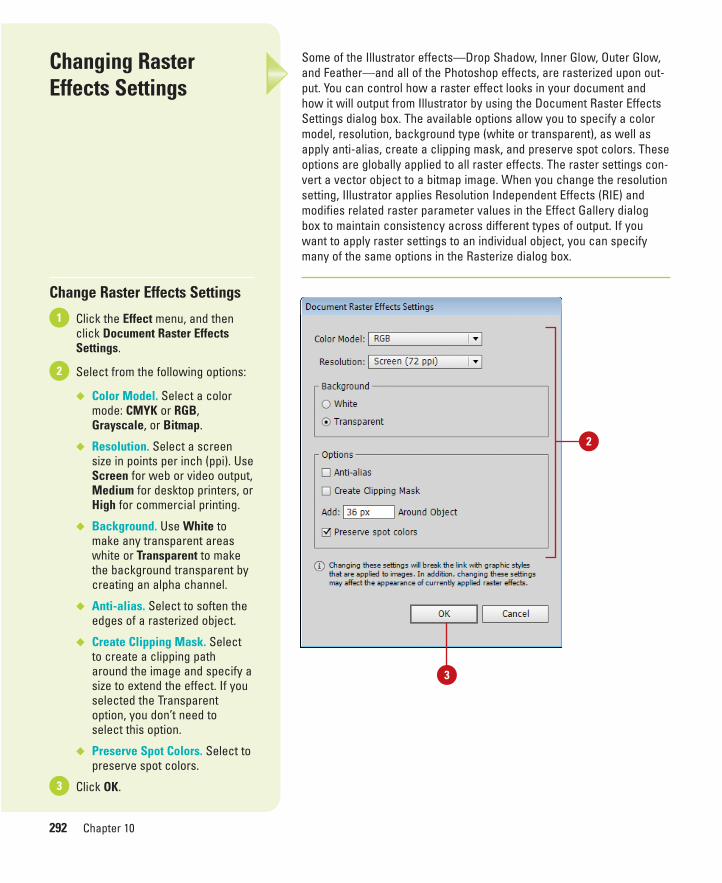
ptg8126863
292 Chapter 10
Some of the Illustrator effects—Drop Shadow, Inner Glow, Outer Glow,and Feather—and all of the Photoshop effects, are rasterized upon out-put. You can control how a raster effect looks in your document andhow it will output from Illustrator by using the Document Raster EffectsSettings dialog box. The available options allow you to specify a colormodel, resolution, background type (white or transparent), as well asapply anti-alias, create a clipping mask, and preserve spot colors. Theseoptions are globally applied to all raster effects. The raster settings con-vert a vector object to a bitmap image. When you change the resolutionsetting, Illustrator applies Resolution Independent Effects (RIE) andmodifies related raster parameter values in the Effect Gallery dialogbox to maintain consistency across different types of output. If youwant to apply raster settings to an individual object, you can specifymany of the same options in the Rasterize dialog box.
Changing RasterEffects Settings
Change Raster Effects Settings
Click the Effect menu, and thenclick Document Raster EffectsSettings.
Select from the following options:
◆ Color Model. Select a colormode: CMYK or RGB,Grayscale, or Bitmap.
◆ Resolution. Select a screensize in points per inch (ppi). UseScreen for web or video output,Medium for desktop printers, orHigh for commercial printing.
◆ Background. Use White tomake any transparent areaswhite or Transparent to makethe background transparent bycreating an alpha channel.
◆ Anti-alias. Select to soften theedges of a rasterized object.
◆ Create Clipping Mask. Selectto create a clipping patharound the image and specify asize to extend the effect. If youselected the Transparentoption, you don’t need to select this option.
◆ Preserve Spot Colors. Select topreserve spot colors.
Click OK.3
2
1
3
2
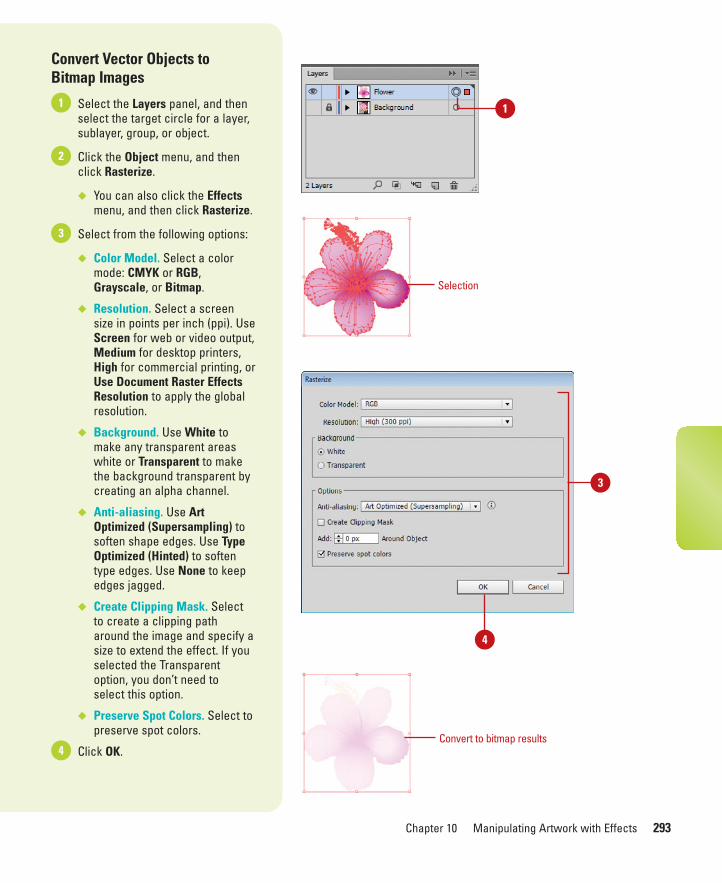
ptg8126863
Chapter 10 Manipulating Artwork with Effects 293
Convert Vector Objects toBitmap Images
Select the Layers panel, and thenselect the target circle for a layer,sublayer, group, or object.
Click the Object menu, and thenclick Rasterize.
◆ You can also click the Effectsmenu, and then click Rasterize.
Select from the following options:
◆ Color Model. Select a colormode: CMYK or RGB,Grayscale, or Bitmap.
◆ Resolution. Select a screensize in points per inch (ppi). UseScreen for web or video output,Medium for desktop printers,High for commercial printing, orUse Document Raster EffectsResolution to apply the globalresolution.
◆ Background. Use White tomake any transparent areaswhite or Transparent to makethe background transparent bycreating an alpha channel.
◆ Anti-aliasing. Use ArtOptimized (Supersampling) tosoften shape edges. Use TypeOptimized (Hinted) to softentype edges. Use None to keepedges jagged.
◆ Create Clipping Mask. Selectto create a clipping patharound the image and specify asize to extend the effect. If youselected the Transparentoption, you don’t need to select this option.
◆ Preserve Spot Colors. Select topreserve spot colors.
Click OK.4
3
2
1
Selection
Convert to bitmap results
1
4
3
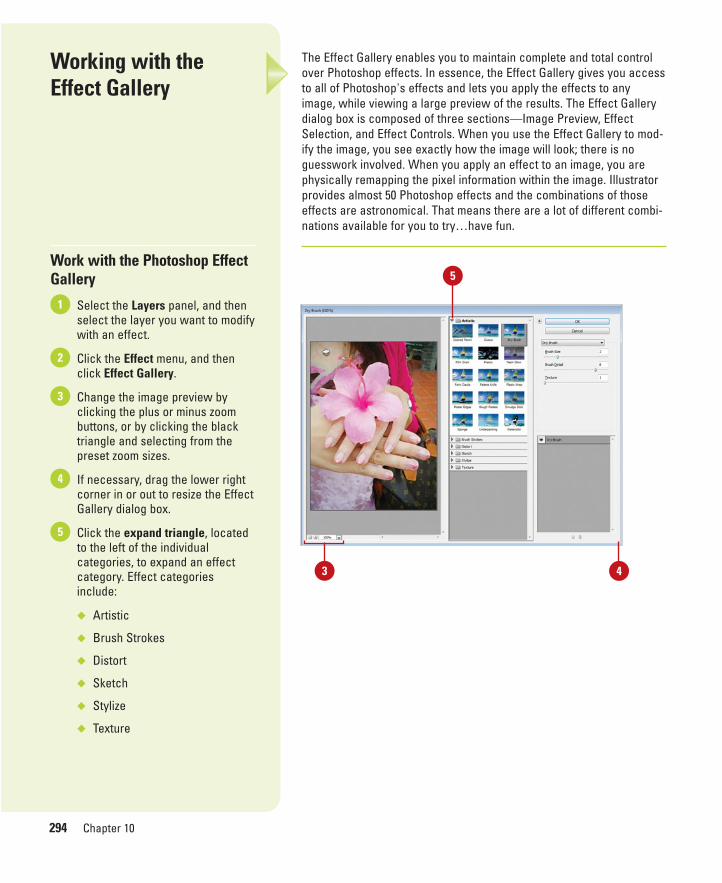
ptg8126863
294 Chapter 10
The Effect Gallery enables you to maintain complete and total controlover Photoshop effects. In essence, the Effect Gallery gives you accessto all of Photoshop's effects and lets you apply the effects to anyimage, while viewing a large preview of the results. The Effect Gallerydialog box is composed of three sections—Image Preview, EffectSelection, and Effect Controls. When you use the Effect Gallery to mod-ify the image, you see exactly how the image will look; there is noguesswork involved. When you apply an effect to an image, you arephysically remapping the pixel information within the image. Illustratorprovides almost 50 Photoshop effects and the combinations of thoseeffects are astronomical. That means there are a lot of different combi-nations available for you to try…have fun.
Working with the Effect Gallery
Work with the Photoshop EffectGallery
Select the Layers panel, and thenselect the layer you want to modifywith an effect.
Click the Effect menu, and thenclick Effect Gallery.
Change the image preview byclicking the plus or minus zoombuttons, or by clicking the blacktriangle and selecting from thepreset zoom sizes.
If necessary, drag the lower rightcorner in or out to resize the EffectGallery dialog box.
Click the expand triangle, locatedto the left of the individualcategories, to expand an effectcategory. Effect categoriesinclude:
◆ Artistic
◆ Brush Strokes
◆ Distort
◆ Sketch
◆ Stylize
◆ Texture
5
4
3
2
1
43
5
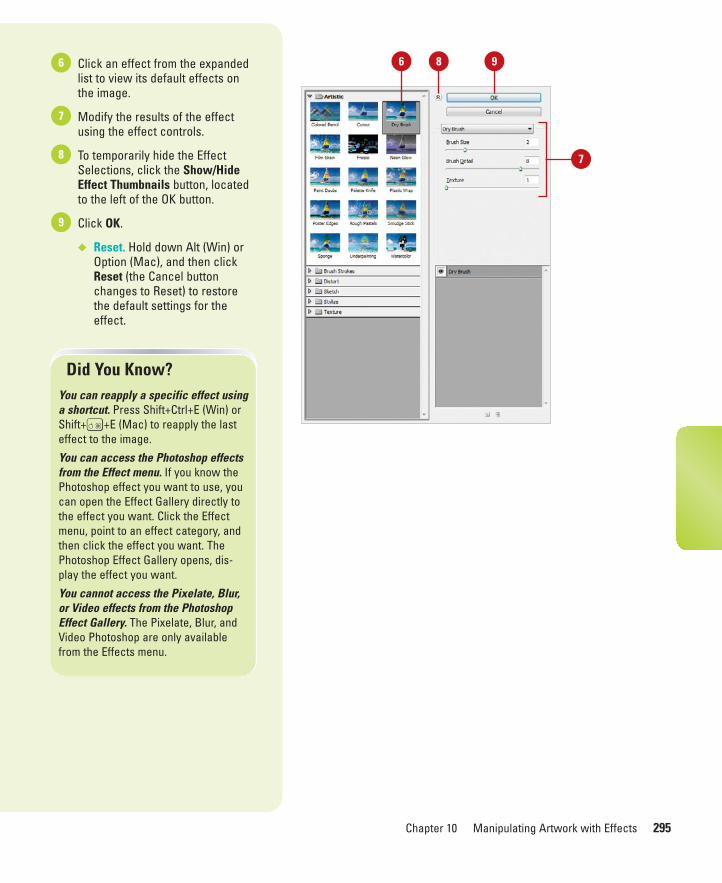
ptg8126863
Chapter 10 Manipulating Artwork with Effects 295
Click an effect from the expandedlist to view its default effects onthe image.
Modify the results of the effectusing the effect controls.
To temporarily hide the EffectSelections, click the Show/HideEffect Thumbnails button, locatedto the left of the OK button.
Click OK.
◆ Reset. Hold down Alt (Win) orOption (Mac), and then clickReset (the Cancel buttonchanges to Reset) to restorethe default settings for theeffect.
9
8
7
6 9
7
Did You Know?You can reapply a specific effect usinga shortcut. Press Shift+Ctrl+E (Win) orShift+A+E (Mac) to reapply the lasteffect to the image.
You can access the Photoshop effectsfrom the Effect menu. If you know thePhotoshop effect you want to use, youcan open the Effect Gallery directly tothe effect you want. Click the Effectmenu, point to an effect category, andthen click the effect you want. ThePhotoshop Effect Gallery opens, dis-play the effect you want.
You cannot access the Pixelate, Blur,or Video effects from the PhotoshopEffect Gallery. The Pixelate, Blur, andVideo Photoshop are only availablefrom the Effects menu.
6 8

ptg8126863
296 Chapter 10
With Photoshop's Effect Gallery you can preview, apply, show, or hideonly one individual effect at a time. If you want to apply multiplePhotoshop effects, you have to use the Effect Gallery multiple times.After you apply multiple effect, you can use the Visibility icon in theAppearance panel to show or hide any of the individual effects. Theorder of the effects influences their impact on the image, so when youuse more than one effect, try dragging the effect up or down in thestack to see the different possibilities.
Applying MultipleEffects
Apply Multiple Effects
Select the Layers panel, and thenselect the layer you want to modifywith an effect.
Click the Effect menu, and thenclick Effect Gallery.
Select the effect you want.
Adjust the effect as necessary.
Click OK.
To apply another effect to thelayer, repeat steps 2 thru 5.
Select the Appearance panel.
To change the effect’s influence onthe image, drag an effect toanother position in the stack.
To temporarily show or hide theeffect on the image, click theShow/Hide button in the Visibilitycolumn on the panel.
To delete a selected effect, selectit, and then click the Delete buttonon the panel.
To edit an effect, click the effectname in the Appearance panel.
The Effect Gallery opens, whereyou can make changes.
11
10
9
8
7
6
5
4
3
2
13
4
7
5
9 1011
8
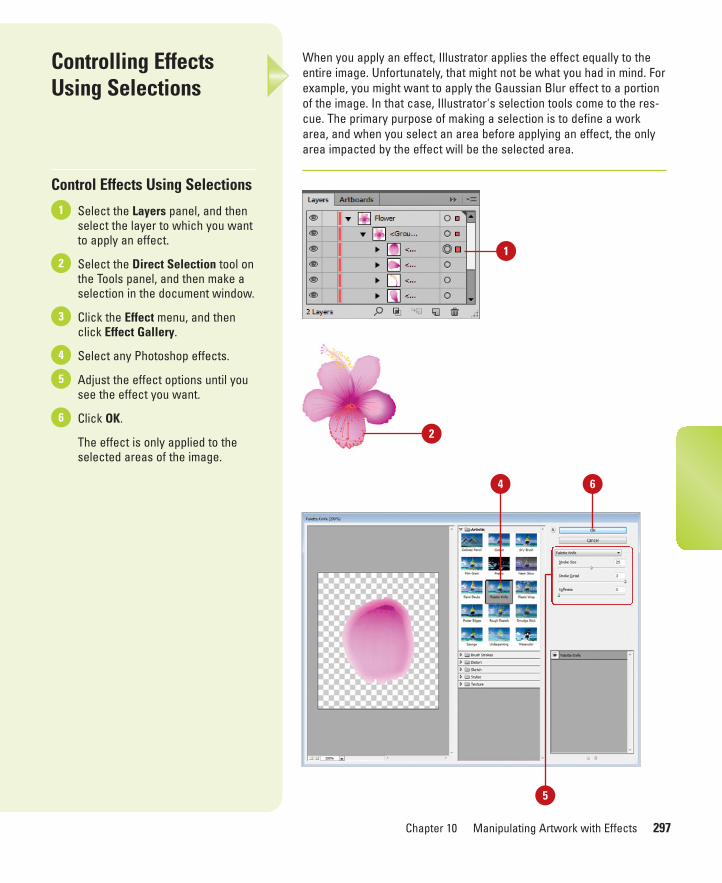
ptg8126863
Chapter 10 Manipulating Artwork with Effects 297
When you apply an effect, Illustrator applies the effect equally to theentire image. Unfortunately, that might not be what you had in mind. Forexample, you might want to apply the Gaussian Blur effect to a portionof the image. In that case, Illustrator's selection tools come to the res-cue. The primary purpose of making a selection is to define a workarea, and when you select an area before applying an effect, the onlyarea impacted by the effect will be the selected area.
Controlling EffectsUsing Selections
Control Effects Using Selections
Select the Layers panel, and thenselect the layer to which you wantto apply an effect.
Select the Direct Selection tool onthe Tools panel, and then make aselection in the document window.
Click the Effect menu, and thenclick Effect Gallery.
Select any Photoshop effects.
Adjust the effect options until yousee the effect you want.
Click OK.
The effect is only applied to theselected areas of the image.
6
5
4
3
2
1
2
1
4 6
5
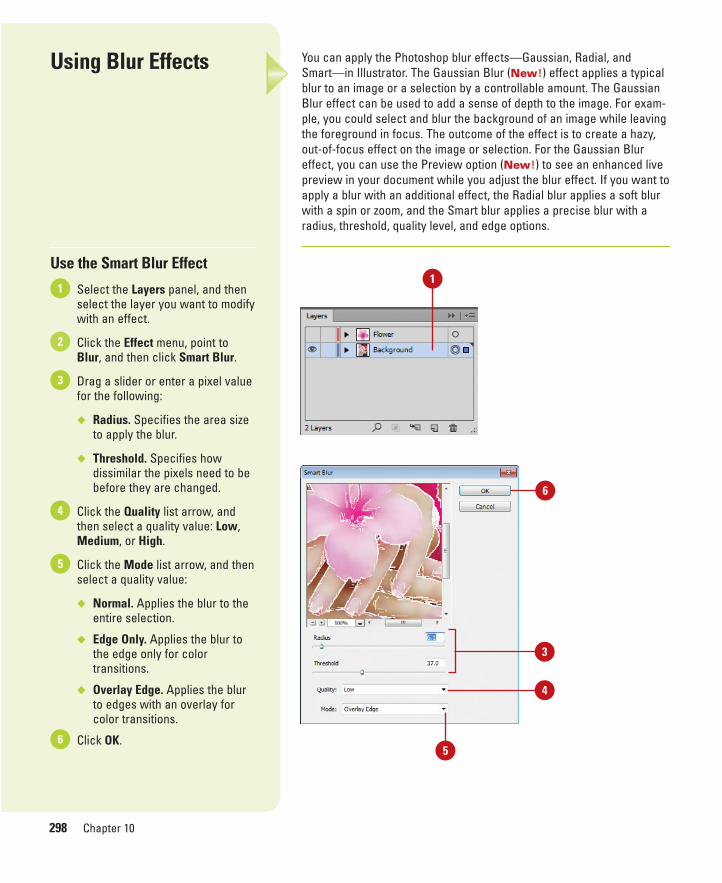
ptg8126863
298 Chapter 10
Using Blur Effects
Use the Smart Blur Effect
Select the Layers panel, and thenselect the layer you want to modifywith an effect.
Click the Effect menu, point toBlur, and then click Smart Blur.
Drag a slider or enter a pixel valuefor the following:
◆ Radius. Specifies the area sizeto apply the blur.
◆ Threshold. Specifies howdissimilar the pixels need to bebefore they are changed.
Click the Quality list arrow, andthen select a quality value: Low,Medium, or High.
Click the Mode list arrow, and thenselect a quality value:
◆ Normal. Applies the blur to theentire selection.
◆ Edge Only. Applies the blur tothe edge only for colortransitions.
◆ Overlay Edge. Applies the blurto edges with an overlay forcolor transitions.
Click OK.6
5
4
3
2
1
You can apply the Photoshop blur effects—Gaussian, Radial, andSmart—in Illustrator. The Gaussian Blur (New!) effect applies a typicalblur to an image or a selection by a controllable amount. The GaussianBlur effect can be used to add a sense of depth to the image. For exam-ple, you could select and blur the background of an image while leavingthe foreground in focus. The outcome of the effect is to create a hazy,out-of-focus effect on the image or selection. For the Gaussian Blureffect, you can use the Preview option (New!) to see an enhanced livepreview in your document while you adjust the blur effect. If you want toapply a blur with an additional effect, the Radial blur applies a soft blurwith a spin or zoom, and the Smart blur applies a precise blur with aradius, threshold, quality level, and edge options.
1
6
3
4
5
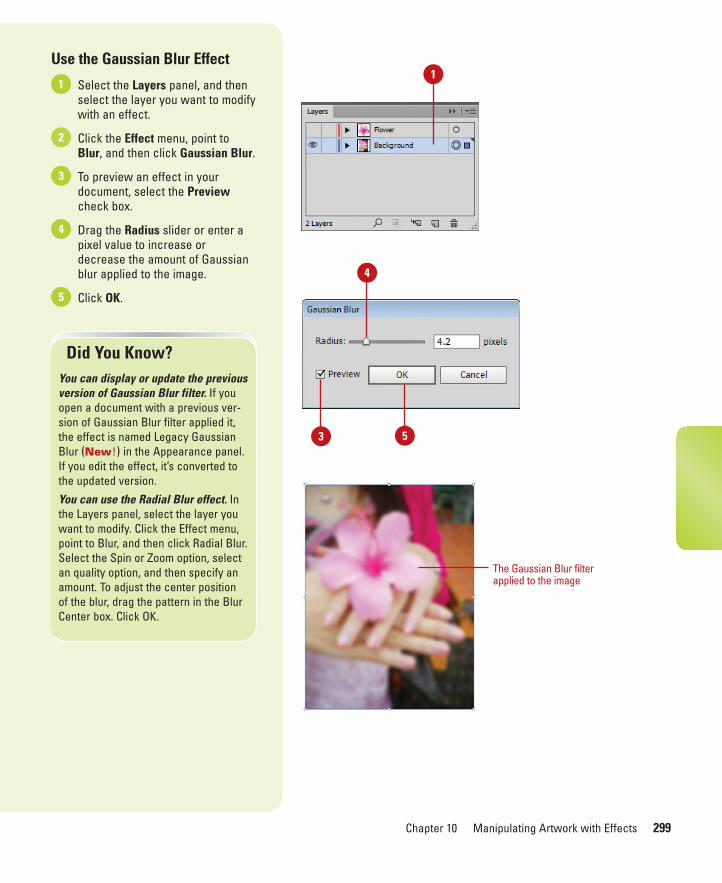
ptg8126863
Chapter 10 Manipulating Artwork with Effects 299
Use the Gaussian Blur Effect
Select the Layers panel, and thenselect the layer you want to modifywith an effect.
Click the Effect menu, point toBlur, and then click Gaussian Blur.
To preview an effect in yourdocument, select the Previewcheck box.
Drag the Radius slider or enter apixel value to increase ordecrease the amount of Gaussianblur applied to the image.
Click OK.5
4
3
2
11
Did You Know?You can display or update the previousversion of Gaussian Blur filter. If youopen a document with a previous ver-sion of Gaussian Blur filter applied it,the effect is named Legacy GaussianBlur (New!) in the Appearance panel.If you edit the effect, it’s converted tothe updated version.
You can use the Radial Blur effect. Inthe Layers panel, select the layer youwant to modify. Click the Effect menu,point to Blur, and then click Radial Blur.Select the Spin or Zoom option, selectan quality option, and then specify anamount. To adjust the center positionof the blur, drag the pattern in the BlurCenter box. Click OK.
4
3 5
The Gaussian Blur filterapplied to the image
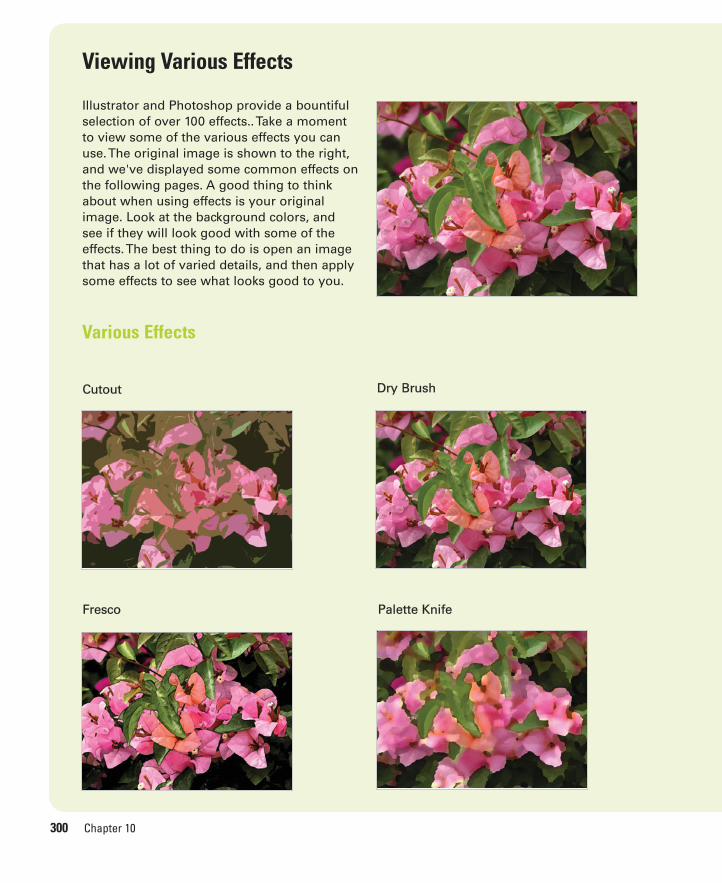
ptg8126863
300 Chapter 10
Viewing Various Effects
Illustrator and Photoshop provide a bountifulselection of over 100 effects.. Take a momentto view some of the various effects you canuse. The original image is shown to the right,and we've displayed some common effects onthe following pages. A good thing to thinkabout when using effects is your originalimage. Look at the background colors, andsee if they will look good with some of theeffects. The best thing to do is open an imagethat has a lot of varied details, and then applysome effects to see what looks good to you.
Various Effects
Fresco
Cutout Dry Brush
Palette Knife
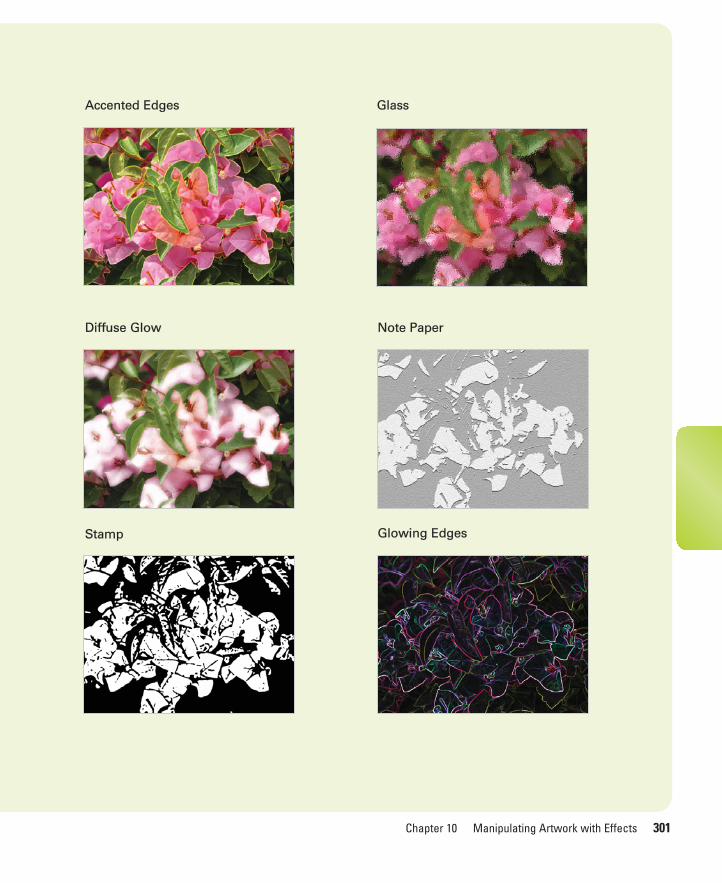
ptg8126863
Chapter 10 Manipulating Artwork with Effects 301
Accented Edges Glass
Diffuse Glow Note Paper
Stamp Glowing Edges
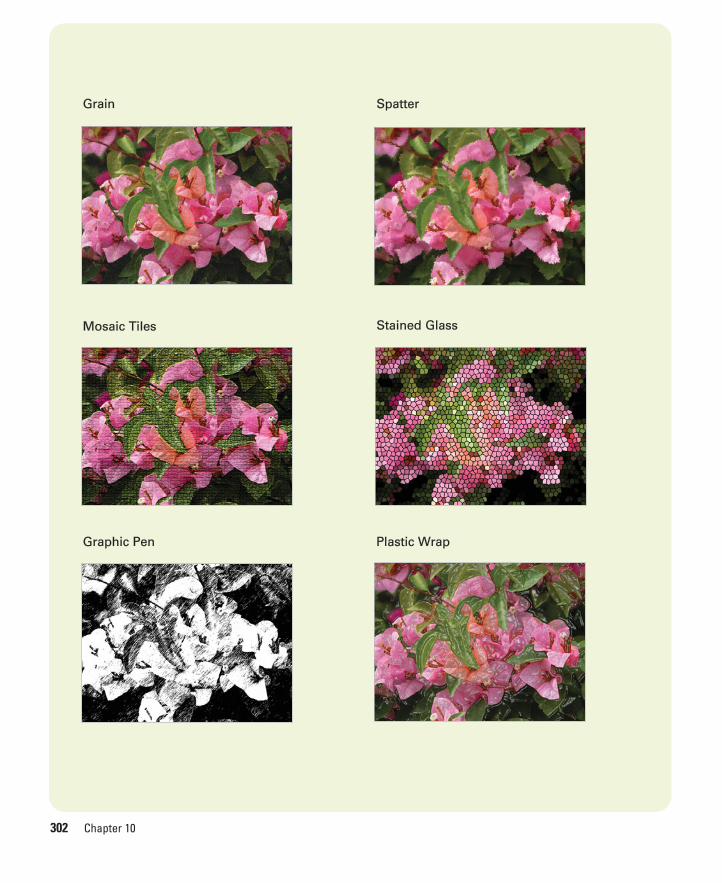
ptg8126863
302 Chapter 10
Plastic WrapGraphic Pen
Stained GlassMosaic Tiles
SpatterGrain
ptg8126863
11
11What You’ll Do
303
Drawing and Painting
Introduction
After you create a path using the Pencil tool or other drawingtool, you can use the Live Paint command or the Live PaintBucket tool to convert the paths into a Live Paint Group thatyou can paint. Before you start using the Live Paint Buckettool, it’s important to select the painting options that youwant to use beforehand.
With the Live Paint Bucket tool, you can recolor a LivePaint Group. When you click an area formed by intersectinglines in a Live Paint Group, the Live Paint Bucket tool appliesfill and stroke paint attributes. When you apply fill or strokeattributes, you’re actually recoloring faces (fills) and edges(strokes) and not the path itself. With the Live Paint Selectiontool, you can select faces (fills) and edges (strokes) in a LivePaint Group. Before you start using the Live Paint Selectiontool, it’s important to choose the selection options that youwant to use beforehand. If you create a gap in a closed pathin a Live Paint Group, the face (fill) of the object disappears.With the Gap Options dialog box, you can specify gap detec-tion options to avoid this problem.
The Brushes panel allows you to draw with differentbrush tips, creating freestyle lines, shapes, patterns, and tex-tures. There are five main categories of brushes: Scatter,Calligraphic, Art, Pattern, and Bristle. You can use brushesthat come built-in with Illustrator in Brush libraries or youcan create your own. Illustrator's paintbrush tool wasdesigned to reproduce the visual effect of applying paint toan artboard. When you use a stylus and a pressure-sensitivedrawing tablet, the Paintbrush tool is pressure-sensitive, too.You select brushes from the Brushes panel or other Brushlibraries to use with the Paintbrush tool.
What You’ll Do
Use the Pencil Tool
Create Live Paint Groups
Set Live Paint Bucket Tool Options
Use the Live Paint Bucket Tool
Use the Live Paint Selection Tool
Modify Live Paint Groups
Set Gap Options
Use the Brushes Panel
Use the Paintbrush Tool
Create and Edit Scatter Brushes
Create and Edit Calligraphic Brushes
Create and Edit Art Brushes
Create and Edit Pattern Brushes
Create and Edit Bristle Brushes
Work with Brushes
Work with Liquify Tools

ptg8126863
304 Chapter 11
The Pencil tool is exactly what its name implies…a pencil. If you like todraw freehand or sketch objects, especially with a drawing tablet, thePencil tool is right for you. You can use the Pencil tool in several ways.You can draw new line segments to create a path, reshape a path, oradd to a path. You can customize the way the Pencil tool works by set-ting preferences in the Pencil Tool Preferences dialog box.
Using the Pencil Tool
Use the Pencil Tool
Select the Pencil tool on the Toolspanel.
Select a stroke color and weightand a fill of None on the Tools andStroke panels.
Click the View menu, and thenclick Pixel Preview to view thedrawing with attributes or clickOutline to view the drawing aslines (wireframe).
Use any of the following methods:
◆ New Path. Drag in a blank areato create an open or closedpath. To create a closed path,hold down Alt (Win) or Option(Mac) while you finish drawing.
◆ Reshape Path. Drag along theedge of a selected open orclosed path.
◆ Add to Path. Drag from anendpoint of an open path.
4
3
2
1
Did You Know?You can erase all or part of a path withthe Path Eraser tool. Select the PathEraser tool (same slot as the Penciltool), and then drag along the path thatyou want to erase.
1
2
4
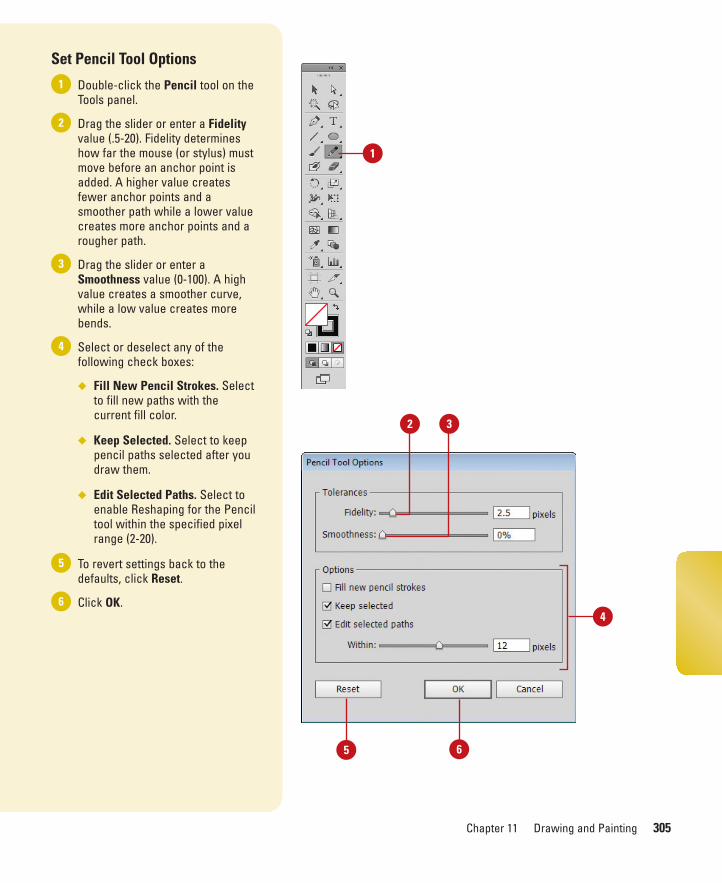
ptg8126863
Chapter 11 Drawing and Painting 305
Set Pencil Tool Options
Double-click the Pencil tool on theTools panel.
Drag the slider or enter a Fidelityvalue (.5-20). Fidelity determineshow far the mouse (or stylus) mustmove before an anchor point isadded. A higher value createsfewer anchor points and asmoother path while a lower valuecreates more anchor points and arougher path.
Drag the slider or enter aSmoothness value (0-100). A highvalue creates a smoother curve,while a low value creates morebends.
Select or deselect any of thefollowing check boxes:
◆ Fill New Pencil Strokes. Selectto fill new paths with thecurrent fill color.
◆ Keep Selected. Select to keeppencil paths selected after youdraw them.
◆ Edit Selected Paths. Select toenable Reshaping for the Penciltool within the specified pixelrange (2-20).
To revert settings back to thedefaults, click Reset.
Click OK.6
5
4
3
2
1
1
2
4
65
3

ptg8126863
306 Chapter 11
Live Paint allows you to fill open or closed paths by creating Live PaintGroups. After you create a path using the Pencil tool or other drawingtool, you can use the Live Paint command or the Live Paint Bucket toolto convert the paths into a Live Paint Group that you can paint. You canalso convert a traced object from a raster graphic into a Live PaintGroup, and then paint it. The Live Paint Bucket tool allows you to clickan area formed by intersecting lines to apply fill (known as face) andstroke (known as edges) attributes. As you reshape the Live Paintobjects, the paint attributes also change.
Creating Live PaintGroups
Create Live Paint Groups
Create a drawing using any of thedrawing tools or use the Live Tracecommand to create a path from araster graphic.
For the best results, use a drawingwith multiple intersecting lines thatyou can fill.
◆ To create a Live Paint Groupfrom type, click the Type menu,and then click Create Outlinesto create path outlines.
◆ To create a Live Paint Groupfrom a symbol or blend, clickthe Object menu, and then clickExpand to create paths.
Select all the paths using selectiontools on the Tools panel.
Click the Object menu, point toLive Paint, and then click Make.
◆ You can also click the LivePaint Bucket tool on the Toolspanel, and then click theselected paths.
The paths are nested together intoa Live Paint Group, which appearsin the Layers panel.
3
2
1
1
2
Live Paint Group

ptg8126863
Chapter 11 Drawing and Painting 307
Convert a Traced Object to aLive Paint Group
Open or place a raster graphic inan Illustrator document.
Select the graphic that you wantto trace.
◆ You can also select an ImageTrace object to change it.
Click the Image Trace button(New!) on the Control panel. Ifprompted, click OK.
Select all the paths using selectiontools on the Tools panel.
Click the Expand button on theControl panel.
Click the Object menu, point toLive Paint, and then click Make.
◆ You can also click the LivePaint Bucket tool on the Toolspanel, and then click theselected paths.
The paths are nested together intoa Live Paint Group, which appearsin the Layers panel.
6
5
4
3
2
1
1
4
3
Live Paint Group
5

ptg8126863
308 Chapter 11
With the Live Paint Bucket tool on the Tools panel, you can recolor fillsand strokes in a Live Paint Group. Before you start using the Live PaintBucket tool, it’s important to select the painting options that you wantto use beforehand. You can quickly set Live Paint Bucket tool optionsby double-clicking the tool on the Tools panel. In the Live Paint BucketOptions dialog box, you set options to paint fills and/or paint strokes ina Live Paint Group. To make it easier to paint fills and strokes, you canalso select the Cursor Swatch Preview option to display a color stripabove the Live Paint Bucket pointer with the current or last color usedalong with two adjacent colors. In addition, you can specify a highlightcolor to make it easier to identify fill and stroke areas.
Setting Live PaintBucket Tool Options
Select Options for Paint Fills orStrokes with the Live PaintBucket Tool
Double-click the Live Paint Buckettool on the Tools panel.
Select the Paint Fills check box topaint fills with the Live PaintBucket tool.
Select the Paint Strokes checkbox to paint strokes with the LivePaint Bucket tool.
Click OK.
◆ If only Paint Fills or PaintStrokes is selected, you canShift-click with the Live PaintBucket tool to switch betweenpainting fills and applyingstroke colors and weight.
4
3
2
1
1
32
4
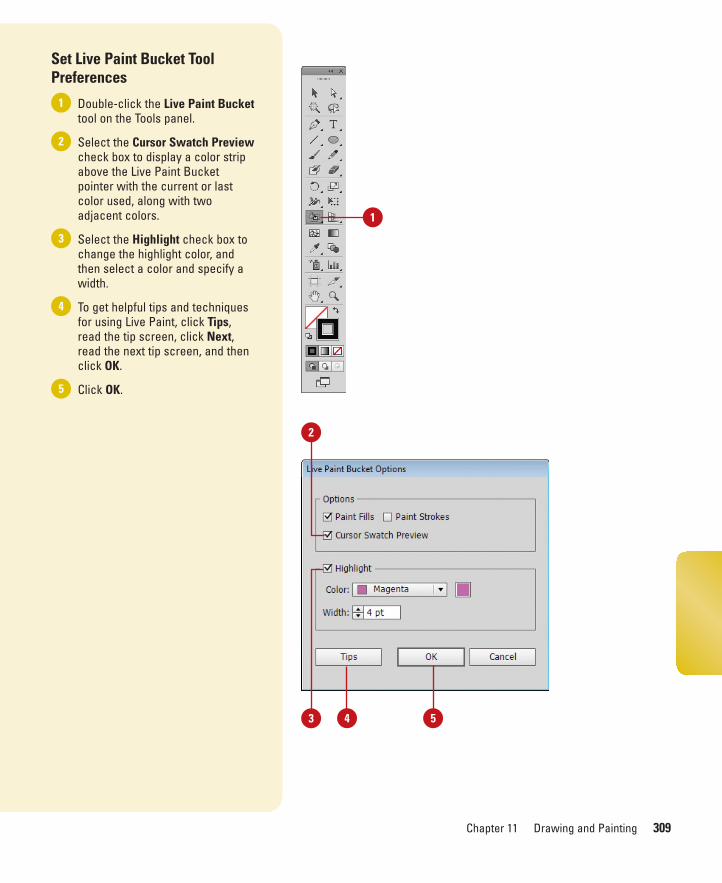
ptg8126863
Chapter 11 Drawing and Painting 309
Set Live Paint Bucket ToolPreferences
Double-click the Live Paint Buckettool on the Tools panel.
Select the Cursor Swatch Previewcheck box to display a color stripabove the Live Paint Bucketpointer with the current or lastcolor used, along with twoadjacent colors.
Select the Highlight check box tochange the highlight color, andthen select a color and specify awidth.
To get helpful tips and techniquesfor using Live Paint, click Tips,read the tip screen, click Next,read the next tip screen, and thenclick OK.
Click OK.5
4
3
2
1
1
2
3 4 5

ptg8126863
310 Chapter 11
With the Live Paint Bucket tool on the Tools panel, you can recolor aLive Paint Group. When you click an area formed by intersecting linesin a Live Paint Group, the Live Paint Bucket tool applies fill and strokepaint attributes. When you apply fill or stroke attributes, you’re actuallyrecoloring faces (fills) and edges (strokes) and not the path itself. Eachedge can have a different color (even None) and weight. You can cus-tomize the way the Live Paint Bucket tool works by setting preferencesin the Live Paint Bucket Options dialog box.
Using the Live PaintBucket Tool
Fill Faces with the Live PaintBucket Tool
Select the Live Paint Bucket toolon the Tools panel.
◆ Make sure the Paint Fillsoption is set in the Live PaintBucket Options dialog box.Double-click the Live PaintBucket tool.
◆ If only Paint Fills or PaintStrokes is selected in Options,you can Shift-click with theLive Paint Bucket tool to switchbetween painting fills andapplying stroke colors andweight.
Display a Live Paint Group object.
Select a fill color on the Swatches,Tools, or Control panels to use withthe Live Paint Bucket tool.
◆ If the Cursor Swatch Previewappears above the pointer, youcan press the left or right arrowkeys to select or display thenext or previous color from theSwatches panel.
Point to the face that you want tofill. The face becomes highlighted.
Click an individual face or dragmultiple faces.
5
4
3
2
1
1
3
2
4
5

ptg8126863
Chapter 11 Drawing and Painting 311
Change Stroke Edges with theLive Paint Bucket Tool
Select the Live Paint Bucket toolon the Tools panel.
◆ Make sure the Paint Strokesoption is set in the Live PaintBucket Options dialog box.Double-click the Live PaintBucket tool.
◆ If only Paint Fills or PaintStrokes is selected in Options,you can Shift-click with the LivePaint Bucket tool to switchbetween painting fills andapplying stroke colors andweight.
Display a Live Paint Group object.
Select a stroke color, weight, orother attributes on the Strokes,Tools, or Control panels to use withthe Live Paint Bucket tool.
◆ To remove colors from strokeedges, select None.
Point to the edge that you want tochange. The edge becomeshighlighted.
Click an individual edge or dragmultiple edges.
◆ Double-click an edge to applythe current stroke attributes toall contiguous edges that havethe same color and weight.
◆ Triple-click an edge to applythe current stroke color andattributes to all edges that havethe same attributes.
5
4
3
2
1
1
3
2
4
5
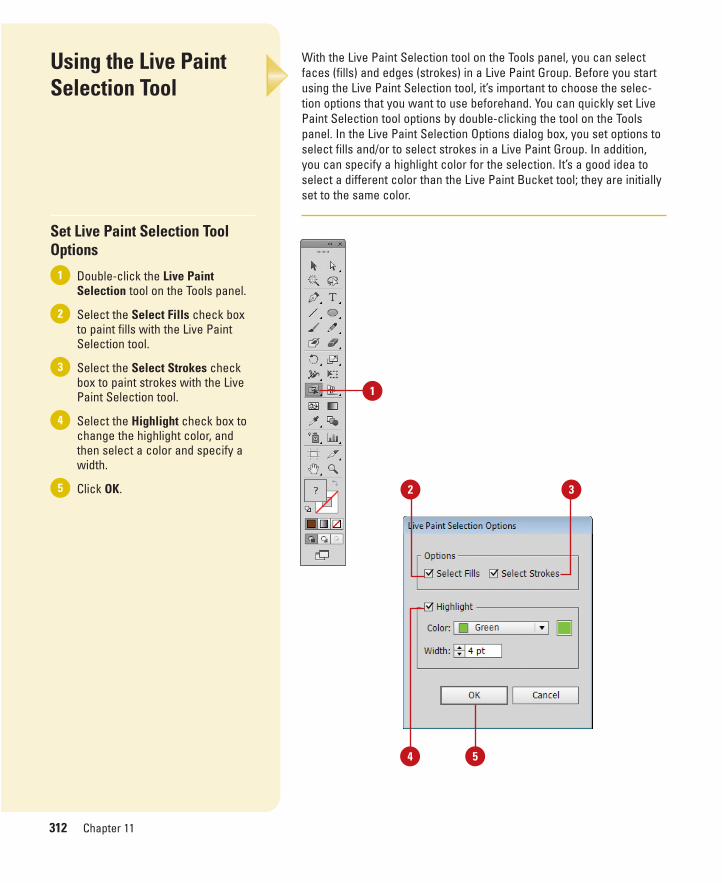
ptg8126863
312 Chapter 11
With the Live Paint Selection tool on the Tools panel, you can selectfaces (fills) and edges (strokes) in a Live Paint Group. Before you startusing the Live Paint Selection tool, it’s important to choose the selec-tion options that you want to use beforehand. You can quickly set LivePaint Selection tool options by double-clicking the tool on the Toolspanel. In the Live Paint Selection Options dialog box, you set options toselect fills and/or to select strokes in a Live Paint Group. In addition,you can specify a highlight color for the selection. It’s a good idea toselect a different color than the Live Paint Bucket tool; they are initiallyset to the same color.
Using the Live PaintSelection Tool
Set Live Paint Selection ToolOptions
Double-click the Live PaintSelection tool on the Tools panel.
Select the Select Fills check boxto paint fills with the Live PaintSelection tool.
Select the Select Strokes checkbox to paint strokes with the LivePaint Selection tool.
Select the Highlight check box tochange the highlight color, andthen select a color and specify awidth.
Click OK.5
4
3
2
1
1
2 3
4 5
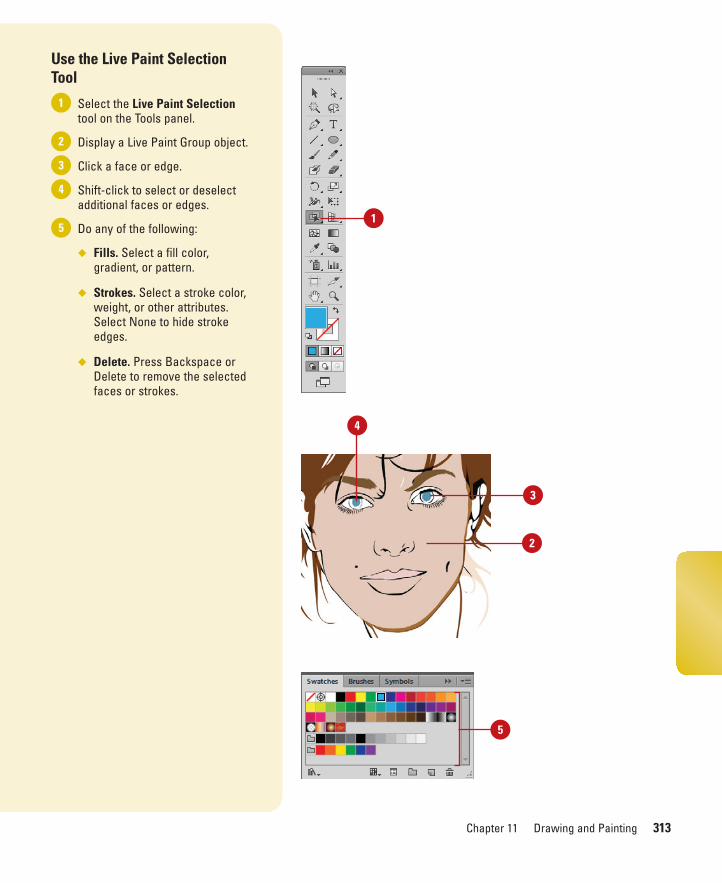
ptg8126863
Chapter 11 Drawing and Painting 313
Use the Live Paint SelectionTool
Select the Live Paint Selectiontool on the Tools panel.
Display a Live Paint Group object.
Click a face or edge.
Shift-click to select or deselectadditional faces or edges.
Do any of the following:
◆ Fills. Select a fill color,gradient, or pattern.
◆ Strokes. Select a stroke color,weight, or other attributes.Select None to hide strokeedges.
◆ Delete. Press Backspace orDelete to remove the selectedfaces or strokes.
5
4
3
2
1
1
2
3
4
5
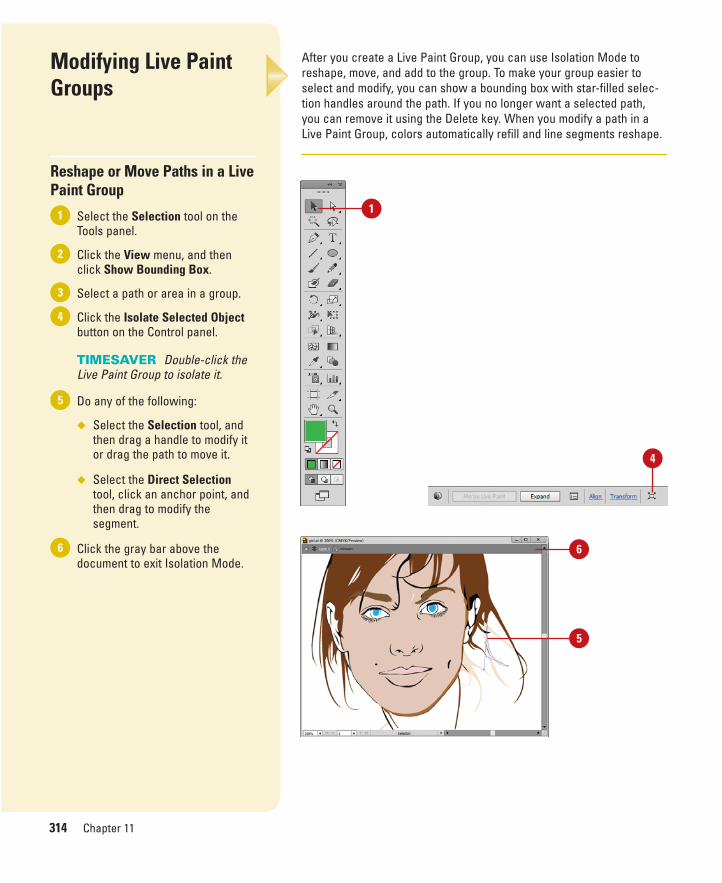
ptg8126863
314 Chapter 11
After you create a Live Paint Group, you can use Isolation Mode toreshape, move, and add to the group. To make your group easier toselect and modify, you can show a bounding box with star-filled selec-tion handles around the path. If you no longer want a selected path,you can remove it using the Delete key. When you modify a path in aLive Paint Group, colors automatically refill and line segments reshape.
Modifying Live PaintGroups
Reshape or Move Paths in a LivePaint Group
Select the Selection tool on theTools panel.
Click the View menu, and thenclick Show Bounding Box.
Select a path or area in a group.
Click the Isolate Selected Objectbutton on the Control panel.
TIMESAVER Double-click theLive Paint Group to isolate it.
Do any of the following:
◆ Select the Selection tool, andthen drag a handle to modify itor drag the path to move it.
◆ Select the Direct Selectiontool, click an anchor point, andthen drag to modify thesegment.
Click the gray bar above thedocument to exit Isolation Mode.
6
5
4
3
2
1 1
6
5
4

ptg8126863
Chapter 11 Drawing and Painting 315
Add Paths to a Live Paint Group
Select the Selection tool on theTools panel.
Click the View menu, and thenclick Show Bounding Box.
Select a path or area in a group.
Click the Isolate Selected Objectbutton on the Control panel.
TIMESAVER Double-click theLive Paint Group to isolate it.
Draw the path that you want toadd to the group using drawingtools on the Tools panel.
Click the gray bar above thedocument to exit Isolation Mode.
◆ You can also draw a path on alayer, select the new path andthe Live Paint Group, and thenclick Merge Live Paint on theControl panel.
6
5
4
3
2
1
Did You Know?You can expand a Live Paint Group.Select the Live Paint Group, and thenclick Expand on the Control panel.Now, you can edit individual compo-nents of the Live Paint Group path.
You can release a Live Paint Group.Select the Live Paint Group, click theObject menu, point to Live Paint, andthen click Release. Now, you can editindividual components of the Live PaintGroup path.
1
5
4
6

ptg8126863
316 Chapter 11
If you create a gap in a closed path in a Live Paint Group, the face (fill)of the object disappears. With the Gap Options dialog box, you canspecify gap detection options to avoid this problem. You can select apredefined gap size or enter one of your own along with a gap previewcolor.
Setting Gap Options
Set Gap Options
Select the Direct Selection tool onthe Tools panel.
Select a Live Paint Group.
Click the Gap Options button onthe Control panel.
Select the Preview check box toview your changes as you setoptions.
Select the Gap Detection checkbox to enable the feature.
Click the Paint Stops At list arrow,and then select a gap option.
◆ Select the Custom check box tospecify a custom size.
Click the Gap Preview Color listarrow, and then select a color.
Click the Close gaps with pathsbutton to apply these settings tothe document.
Click OK.9
8
7
6
5
4
3
2
1
3
5 6
1
4 9
8
7
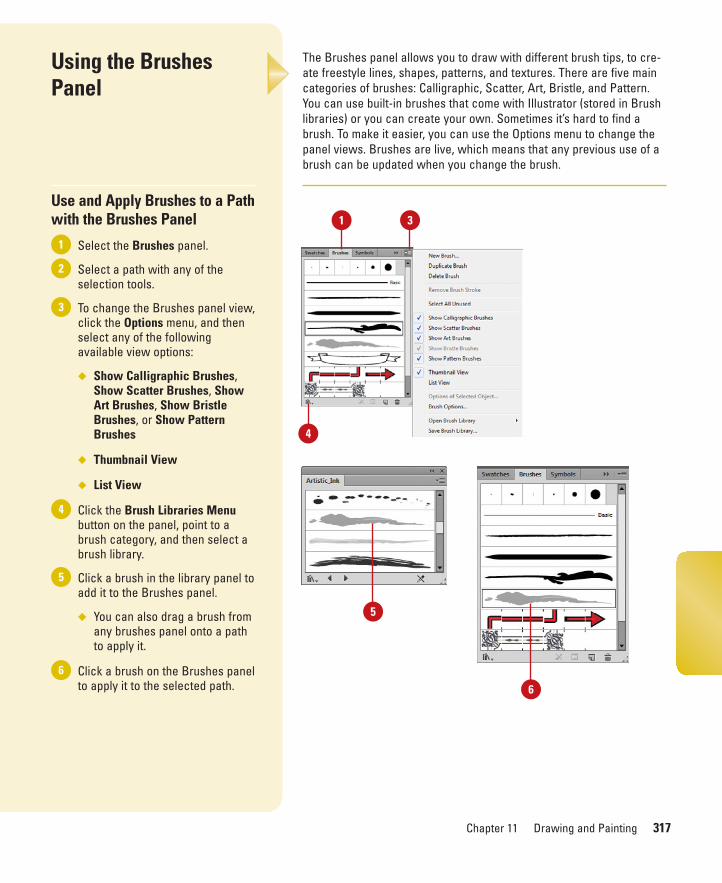
ptg8126863
Chapter 11 Drawing and Painting 317
The Brushes panel allows you to draw with different brush tips, to cre-ate freestyle lines, shapes, patterns, and textures. There are five maincategories of brushes: Calligraphic, Scatter, Art, Bristle, and Pattern.You can use built-in brushes that come with Illustrator (stored in Brushlibraries) or you can create your own. Sometimes it’s hard to find abrush. To make it easier, you can use the Options menu to change thepanel views. Brushes are live, which means that any previous use of abrush can be updated when you change the brush.
Using the BrushesPanel
Use and Apply Brushes to a Pathwith the Brushes Panel
Select the Brushes panel.
Select a path with any of theselection tools.
To change the Brushes panel view,click the Options menu, and thenselect any of the followingavailable view options:
◆ Show Calligraphic Brushes,Show Scatter Brushes, ShowArt Brushes, Show BristleBrushes, or Show PatternBrushes
◆ Thumbnail View
◆ List View
Click the Brush Libraries Menubutton on the panel, point to abrush category, and then select abrush library.
Click a brush in the library panel toadd it to the Brushes panel.
◆ You can also drag a brush fromany brushes panel onto a pathto apply it.
Click a brush on the Brushes panelto apply it to the selected path.
6
5
4
3
2
1
1 3
4
5
6
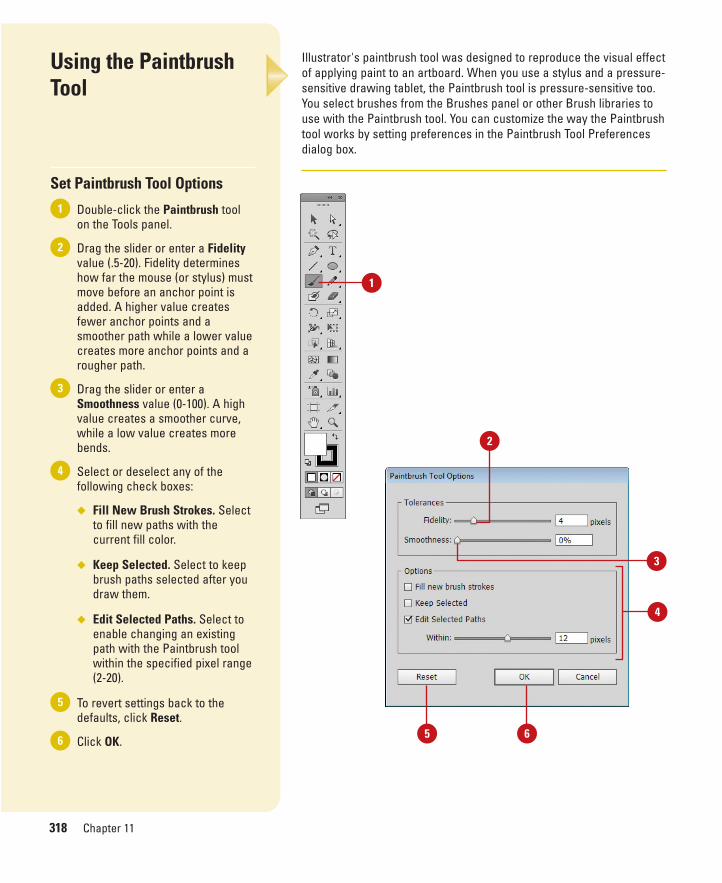
ptg8126863
318 Chapter 11
Illustrator's paintbrush tool was designed to reproduce the visual effectof applying paint to an artboard. When you use a stylus and a pressure-sensitive drawing tablet, the Paintbrush tool is pressure-sensitive too.You select brushes from the Brushes panel or other Brush libraries touse with the Paintbrush tool. You can customize the way the Paintbrushtool works by setting preferences in the Paintbrush Tool Preferencesdialog box.
Using the PaintbrushTool
Set Paintbrush Tool Options
Double-click the Paintbrush toolon the Tools panel.
Drag the slider or enter a Fidelityvalue (.5-20). Fidelity determineshow far the mouse (or stylus) mustmove before an anchor point isadded. A higher value createsfewer anchor points and asmoother path while a lower valuecreates more anchor points and arougher path.
Drag the slider or enter aSmoothness value (0-100). A highvalue creates a smoother curve,while a low value creates morebends.
Select or deselect any of thefollowing check boxes:
◆ Fill New Brush Strokes. Selectto fill new paths with thecurrent fill color.
◆ Keep Selected. Select to keepbrush paths selected after youdraw them.
◆ Edit Selected Paths. Select toenable changing an existingpath with the Paintbrush toolwithin the specified pixel range(2-20).
To revert settings back to thedefaults, click Reset.
Click OK.6
5
4
3
2
1
1
4
3
5 6
2

ptg8126863
Chapter 11 Drawing and Painting 319
Use the Paintbrush Tool
Select the Paintbrush tool on theTools panel.
Select None for the fill color.
Select the Brushes panel.
Select a brush on the panel.
◆ You can also click the Brush listarrow on the Control panel, andthen select a brush.
Do any of the following:
◆ Open Path. Drag to draw a paththat doesn’t connect.
◆ Closed Path. Drag to draw apath, and then Alt+drag (Win)or Option+drag (Mac) to close it.
5
4
3
2
1
1
2 3
4
5
Brush drawing

ptg8126863
320 Chapter 11
Scatter brushes disperse copies of an object along a path. You create ascatter brush from a path, compound path, type character, or type out-line. When you use a scatter brush, the brush is applied using a fixed orrandom method along a path. You use a similar method to create andedit a Scatter brush. You use the Scatter Brush Options dialog box toset the options that you want.
Creating and EditingScatter Brushes
Create or Edit a Scatter Brush
Select the Brushes panel.
Do one of the following:
◆ Create. Select one or moreobjects, click the New Brushbutton on the panel, click theScatter Brush option, and thenclick OK. Enter a name for thebrush.
◆ Edit. Deselect any brushes, andthen double-click a Scatterbrush.
Specify the following options:
◆ Size. Determines the size of thescatter objects.
◆ Spacing. Determines thespacing between the scatterobjects.
◆ Scatter. Determines thedistance between the path andthe objects.
◆ Rotation. Specifies the rotationrange relative to the page orpath.
For the Size, Spacing, Scatter, andRotation options, click the listarrow, and then select one of thefollowing options:
◆ Fixed. Enter a single fixedvalue.
◆ Random. Drag sliders or enter arange for variable value.
4
3
2
1Selection for creating a brush
1
2
Creates a new brush

ptg8126863
Chapter 11 Drawing and Painting 321
◆ Pressure, Stylus Wheel, Tilt,Bearing, or Rotation. Dragsliders or enter values whenusing a drawing tablet.
Click the Method list arrow, andthen select an option:
◆ None. Retains colors from theBrushes panel.
◆ Tints. Changes black areas inthe brush stroke to the currentstroke color.
◆ Tints and Shades. Changescolors in the brush stroke totints of the current stroke color.
◆ Hue Shift. Change the currentstroke color to the Key colorand change other colors to huecolors. Select the Key colorthat you want.
Click OK.
If the brush is being used, an alertappears.
Click Apply to Strokes to apply themodified brush option to existingstrokes or Leave Strokes to applythe modified brush only to newstrokes.
7
6
5
4 3
Scatter brush
Brush name
5 6
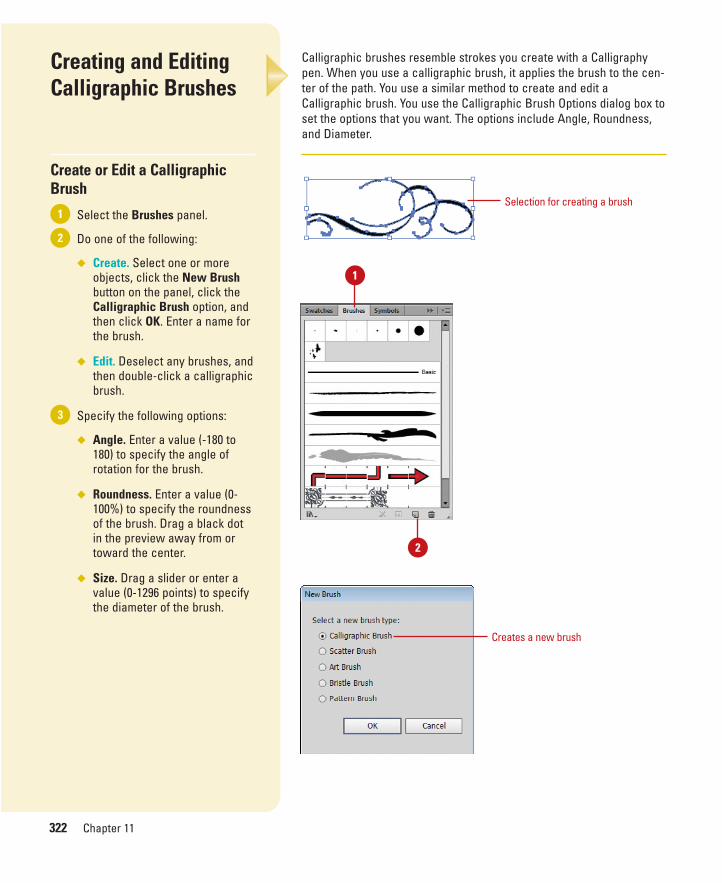
ptg8126863
322 Chapter 11
Calligraphic brushes resemble strokes you create with a Calligraphypen. When you use a calligraphic brush, it applies the brush to the cen-ter of the path. You use a similar method to create and edit aCalligraphic brush. You use the Calligraphic Brush Options dialog box toset the options that you want. The options include Angle, Roundness,and Diameter.
Creating and EditingCalligraphic Brushes
Create or Edit a CalligraphicBrush
Select the Brushes panel.
Do one of the following:
◆ Create. Select one or moreobjects, click the New Brushbutton on the panel, click theCalligraphic Brush option, andthen click OK. Enter a name forthe brush.
◆ Edit. Deselect any brushes, andthen double-click a calligraphicbrush.
Specify the following options:
◆ Angle. Enter a value (-180 to180) to specify the angle ofrotation for the brush.
◆ Roundness. Enter a value (0-100%) to specify the roundnessof the brush. Drag a black dotin the preview away from ortoward the center.
◆ Size. Drag a slider or enter avalue (0-1296 points) to specifythe diameter of the brush.
3
2
1Selection for creating a brush
1
2
Creates a new brush

ptg8126863
Chapter 11 Drawing and Painting 323
For the Angle, Roundness, andSize options, click the list arrow,and then select one of thefollowing options:
◆ Fixed. Enter a single fixedvalue.
◆ Random. Drag sliders or enter arange for a variable value.
◆ Pressure, Stylus Wheel, Tilt,Bearing, or Rotation. Dragsliders or enter values if usinga drawing tablet.
Click OK.
If the brush is being used, an alertappears.
Click Apply to Strokes to apply themodified brush option to existingstrokes or Leave Strokes to applythe modified brush only to newstrokes.
6
5
4 Brush name
3 5
Calligraphic brush
4
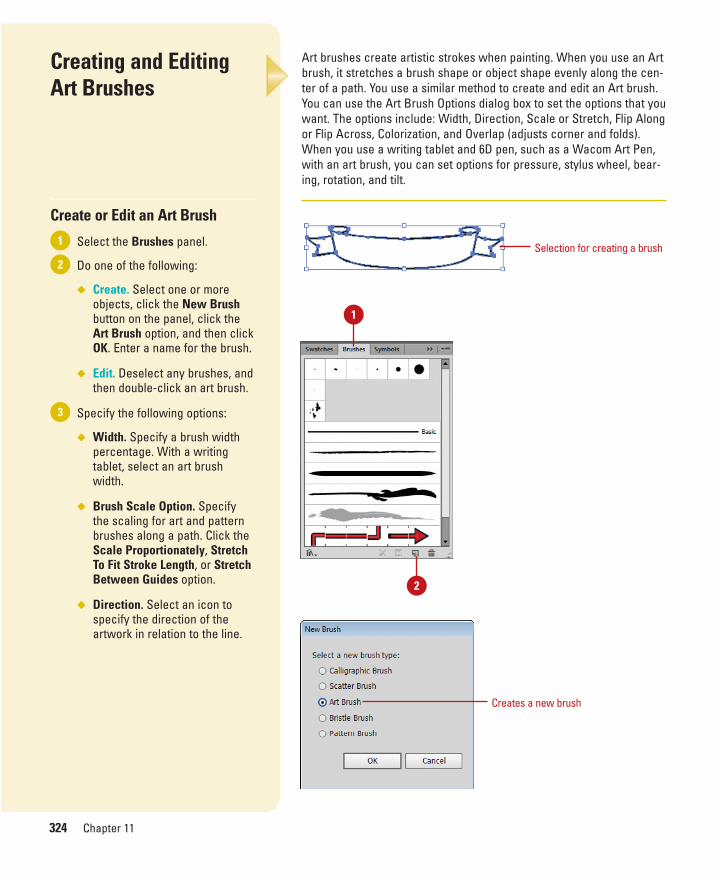
ptg8126863
324 Chapter 11
Art brushes create artistic strokes when painting. When you use an Artbrush, it stretches a brush shape or object shape evenly along the cen-ter of a path. You use a similar method to create and edit an Art brush.You can use the Art Brush Options dialog box to set the options that youwant. The options include: Width, Direction, Scale or Stretch, Flip Alongor Flip Across, Colorization, and Overlap (adjusts corner and folds).When you use a writing tablet and 6D pen, such as a Wacom Art Pen,with an art brush, you can set options for pressure, stylus wheel, bear-ing, rotation, and tilt.
Creating and EditingArt Brushes
Create or Edit an Art Brush
Select the Brushes panel.
Do one of the following:
◆ Create. Select one or moreobjects, click the New Brushbutton on the panel, click theArt Brush option, and then clickOK. Enter a name for the brush.
◆ Edit. Deselect any brushes, andthen double-click an art brush.
Specify the following options:
◆ Width. Specify a brush widthpercentage. With a writingtablet, select an art brushwidth.
◆ Brush Scale Option. Specifythe scaling for art and patternbrushes along a path. Click theScale Proportionately, StretchTo Fit Stroke Length, or StretchBetween Guides option.
◆ Direction. Select an icon tospecify the direction of theartwork in relation to the line.
3
2
1Selection for creating a brush
1
2
Creates a new brush
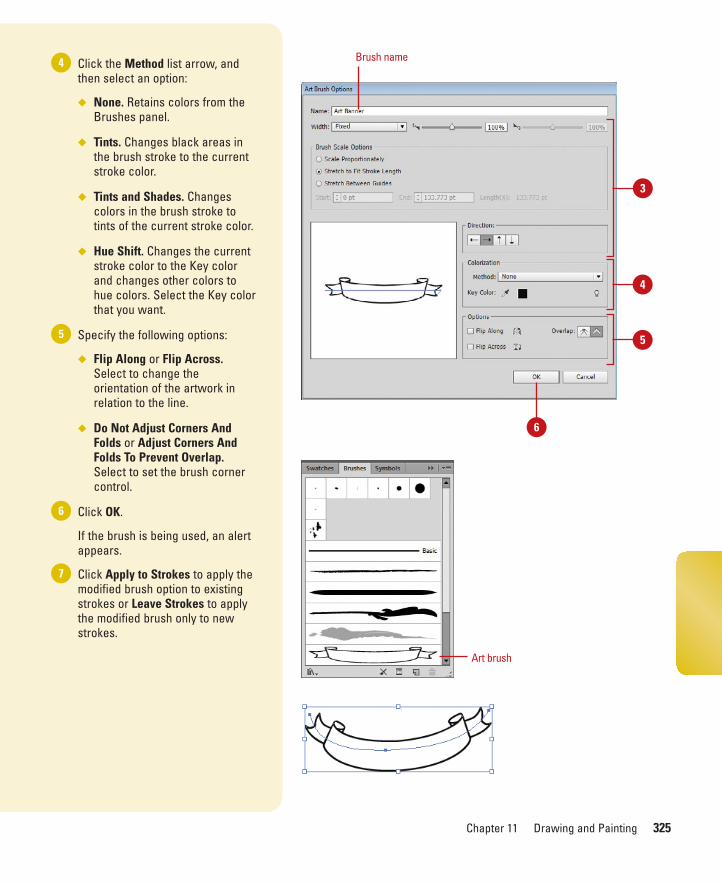
ptg8126863
Chapter 11 Drawing and Painting 325
Click the Method list arrow, andthen select an option:
◆ None. Retains colors from theBrushes panel.
◆ Tints. Changes black areas inthe brush stroke to the currentstroke color.
◆ Tints and Shades. Changescolors in the brush stroke totints of the current stroke color.
◆ Hue Shift. Changes the currentstroke color to the Key colorand changes other colors tohue colors. Select the Key colorthat you want.
Specify the following options:
◆ Flip Along or Flip Across.Select to change theorientation of the artwork inrelation to the line.
◆ Do Not Adjust Corners AndFolds or Adjust Corners AndFolds To Prevent Overlap.Select to set the brush cornercontrol.
Click OK.
If the brush is being used, an alertappears.
Click Apply to Strokes to apply themodified brush option to existingstrokes or Leave Strokes to applythe modified brush only to newstrokes.
7
6
5
4
Art brush
Brush name
4
6
3
5
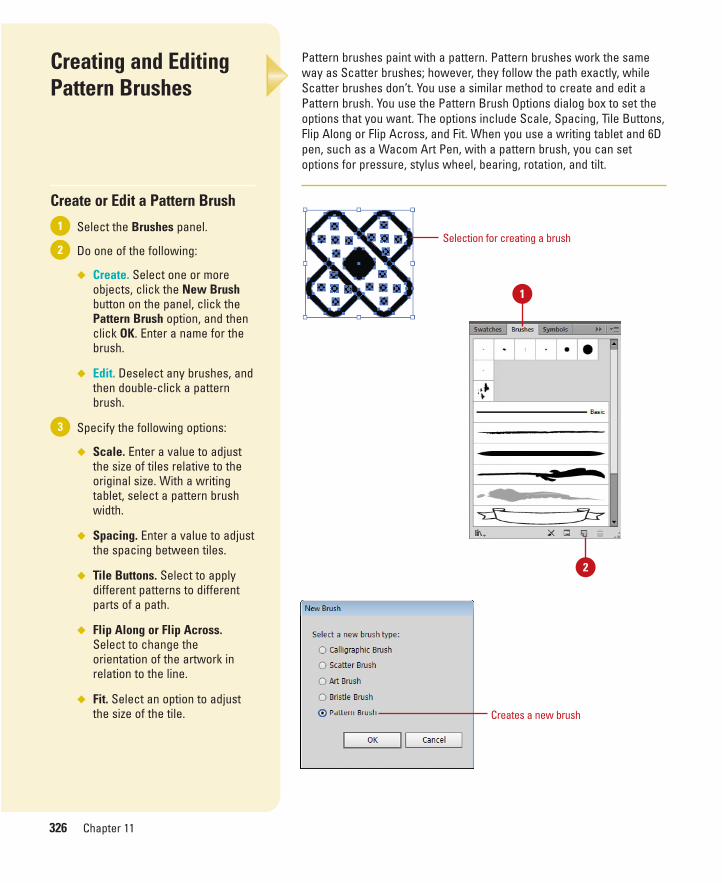
ptg8126863
326 Chapter 11
Pattern brushes paint with a pattern. Pattern brushes work the sameway as Scatter brushes; however, they follow the path exactly, whileScatter brushes don’t. You use a similar method to create and edit aPattern brush. You use the Pattern Brush Options dialog box to set theoptions that you want. The options include Scale, Spacing, Tile Buttons,Flip Along or Flip Across, and Fit. When you use a writing tablet and 6Dpen, such as a Wacom Art Pen, with a pattern brush, you can setoptions for pressure, stylus wheel, bearing, rotation, and tilt.
Creating and EditingPattern Brushes
Create or Edit a Pattern Brush
Select the Brushes panel.
Do one of the following:
◆ Create. Select one or moreobjects, click the New Brushbutton on the panel, click thePattern Brush option, and thenclick OK. Enter a name for thebrush.
◆ Edit. Deselect any brushes, andthen double-click a patternbrush.
Specify the following options:
◆ Scale. Enter a value to adjustthe size of tiles relative to theoriginal size. With a writingtablet, select a pattern brushwidth.
◆ Spacing. Enter a value to adjustthe spacing between tiles.
◆ Tile Buttons. Select to applydifferent patterns to differentparts of a path.
◆ Flip Along or Flip Across.Select to change theorientation of the artwork inrelation to the line.
◆ Fit. Select an option to adjustthe size of the tile.
3
2
1Selection for creating a brush
1
2
Creates a new brush
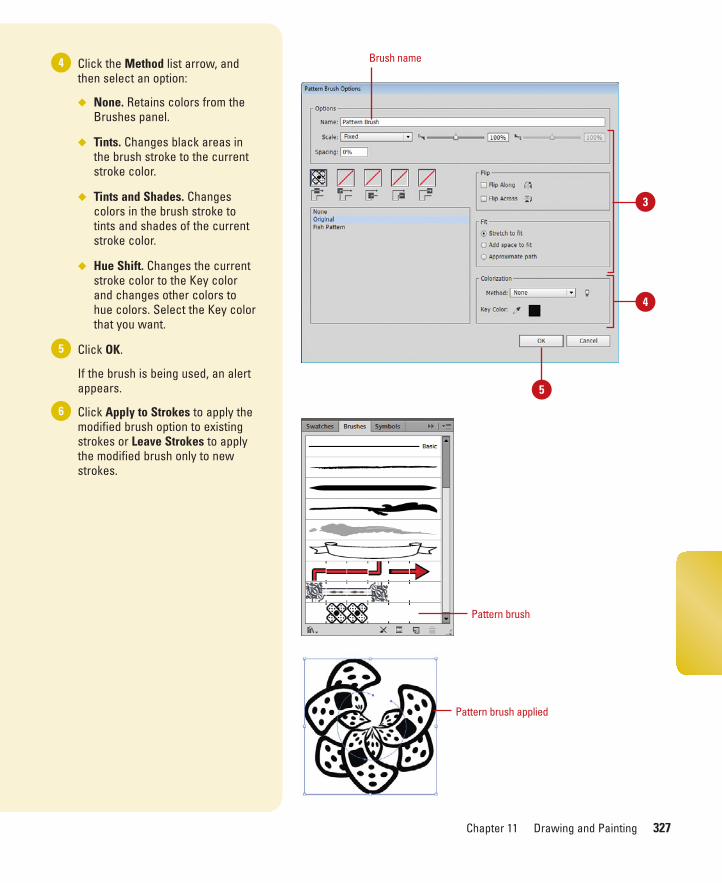
ptg8126863
Chapter 11 Drawing and Painting 327
Click the Method list arrow, andthen select an option:
◆ None. Retains colors from theBrushes panel.
◆ Tints. Changes black areas inthe brush stroke to the currentstroke color.
◆ Tints and Shades. Changescolors in the brush stroke totints and shades of the currentstroke color.
◆ Hue Shift. Changes the currentstroke color to the Key colorand changes other colors tohue colors. Select the Key colorthat you want.
Click OK.
If the brush is being used, an alertappears.
Click Apply to Strokes to apply themodified brush option to existingstrokes or Leave Strokes to applythe modified brush only to newstrokes.
6
5
4 Brush name
4
3
Pattern brush applied
Pattern brush
5
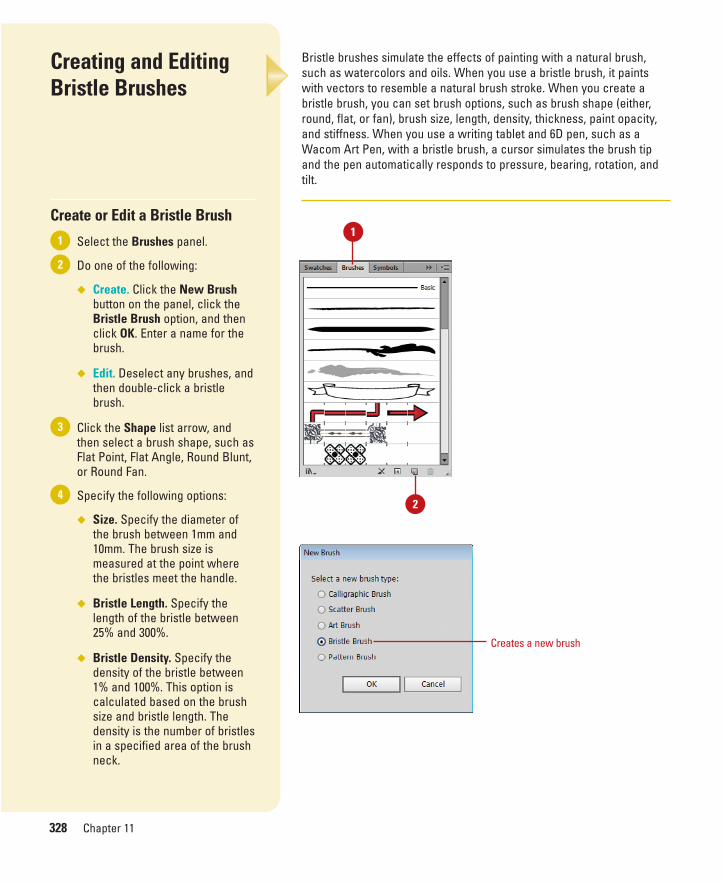
ptg8126863
328 Chapter 11
Bristle brushes simulate the effects of painting with a natural brush,such as watercolors and oils. When you use a bristle brush, it paintswith vectors to resemble a natural brush stroke. When you create abristle brush, you can set brush options, such as brush shape (either,round, flat, or fan), brush size, length, density, thickness, paint opacity,and stiffness. When you use a writing tablet and 6D pen, such as aWacom Art Pen, with a bristle brush, a cursor simulates the brush tipand the pen automatically responds to pressure, bearing, rotation, andtilt.
Creating and EditingBristle Brushes
Create or Edit a Bristle Brush
Select the Brushes panel.
Do one of the following:
◆ Create. Click the New Brushbutton on the panel, click theBristle Brush option, and thenclick OK. Enter a name for thebrush.
◆ Edit. Deselect any brushes, andthen double-click a bristlebrush.
Click the Shape list arrow, andthen select a brush shape, such asFlat Point, Flat Angle, Round Blunt,or Round Fan.
Specify the following options:
◆ Size. Specify the diameter ofthe brush between 1mm and10mm. The brush size ismeasured at the point wherethe bristles meet the handle.
◆ Bristle Length. Specify thelength of the bristle between25% and 300%.
◆ Bristle Density. Specify thedensity of the bristle between1% and 100%. This option iscalculated based on the brushsize and bristle length. Thedensity is the number of bristlesin a specified area of the brushneck.
4
3
2
1
2
1
Creates a new brush
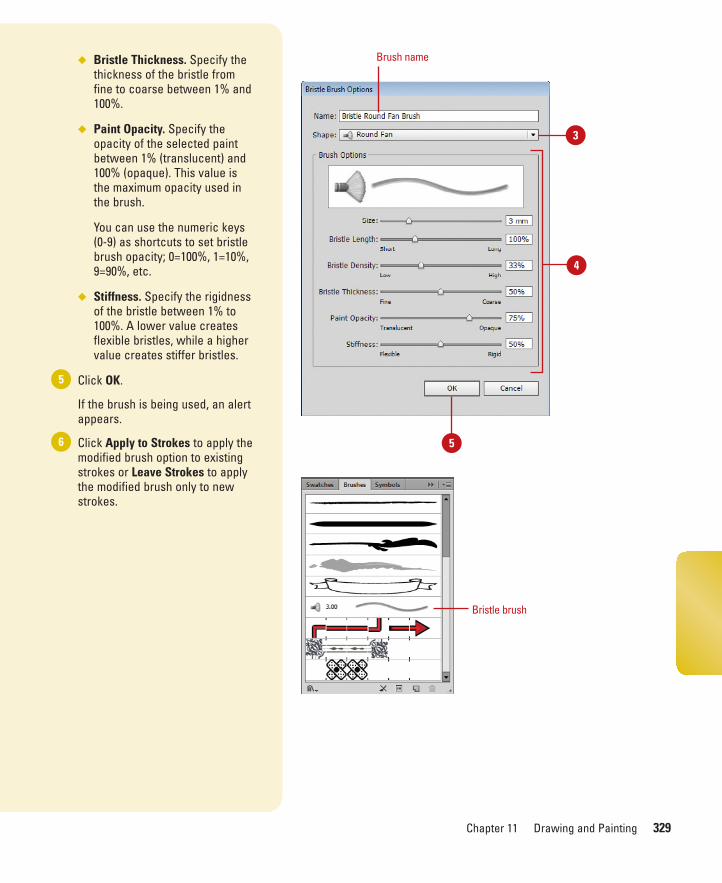
ptg8126863
Chapter 11 Drawing and Painting 329
◆ Bristle Thickness. Specify thethickness of the bristle fromfine to coarse between 1% and100%.
◆ Paint Opacity. Specify theopacity of the selected paintbetween 1% (translucent) and100% (opaque). This value isthe maximum opacity used inthe brush.
You can use the numeric keys(0-9) as shortcuts to set bristlebrush opacity; 0=100%, 1=10%,9=90%, etc.
◆ Stiffness. Specify the rigidnessof the bristle between 1% to100%. A lower value createsflexible bristles, while a highervalue creates stiffer bristles.
Click OK.
If the brush is being used, an alertappears.
Click Apply to Strokes to apply themodified brush option to existingstrokes or Leave Strokes to applythe modified brush only to newstrokes.
6
5
4
Brush name
Bristle brush
5
3

ptg8126863
330 Chapter 11
As you create and edit brushes in the Brushes panel or add them intothe Brushes panel from other brush libraries, it’s important to save themin a brush library if you want to use them again in the future. You cancreate your own brush libraries by using the Save Brushes commandon the Options menu. The Save Brushes command saves all thebrushes currently in the Brushes panel, so you need to delete the onesthat you don’t want in the library. In addition to deleting brushes in theBrushes panel, you can also remove brush strokes from objects.
Working with Brushes
Remove Brush Strokes andDelete Brushes
Select the Brushes panel.
Do any of the following:
◆ Delete from Object. Select theobjects with brushes that youwant to remove, and then clickthe Remove Brush Strokebutton on the panel.
◆ Delete from Brushes Panel.Deselect all objects, select thebrush you want to delete, andthen click the Delete Brushbutton on the panel. Click Yesto confirm the deletion.
If the brush is currently beingused in objects, click ExpandStrokes to convert the brush topaths or click Remove Strokesto remove them from theobjects.
2
1
Did You Know?You can convert brush strokes intooutlined paths. Select the brushedpath, click the Object menu, and thenclick Expand Appearance. Now, youcan edit individual components of thebrushed path.
1
Remove BrushStroke button
Delete Brush button
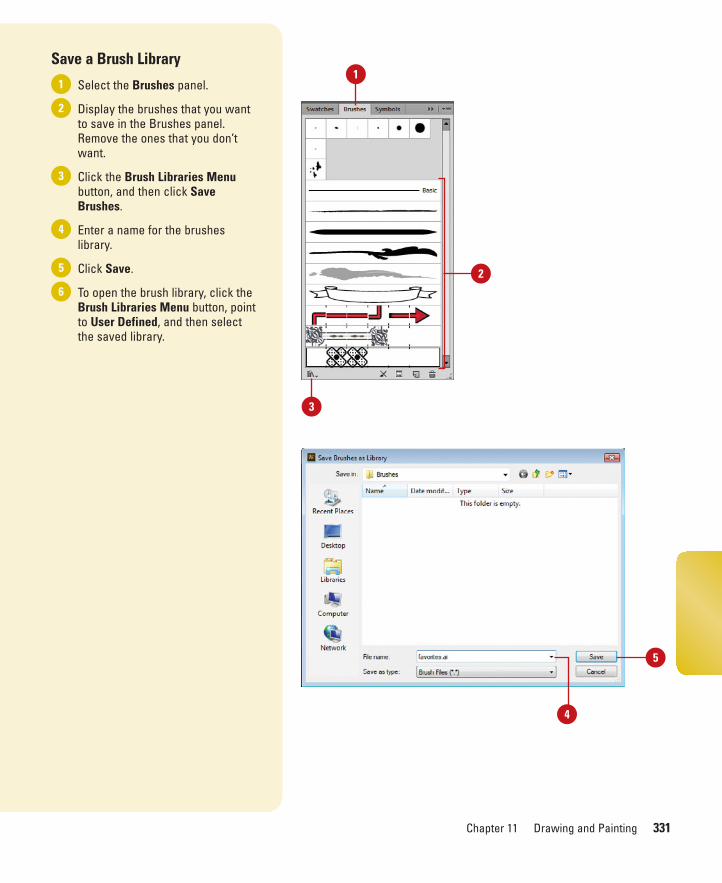
ptg8126863
Chapter 11 Drawing and Painting 331
Save a Brush Library
Select the Brushes panel.
Display the brushes that you wantto save in the Brushes panel.Remove the ones that you don’twant.
Click the Brush Libraries Menubutton, and then click SaveBrushes.
Enter a name for the brusheslibrary.
Click Save.
To open the brush library, click theBrush Libraries Menu button, pointto User Defined, and then selectthe saved library.
6
5
4
3
2
11
2
3
5
4
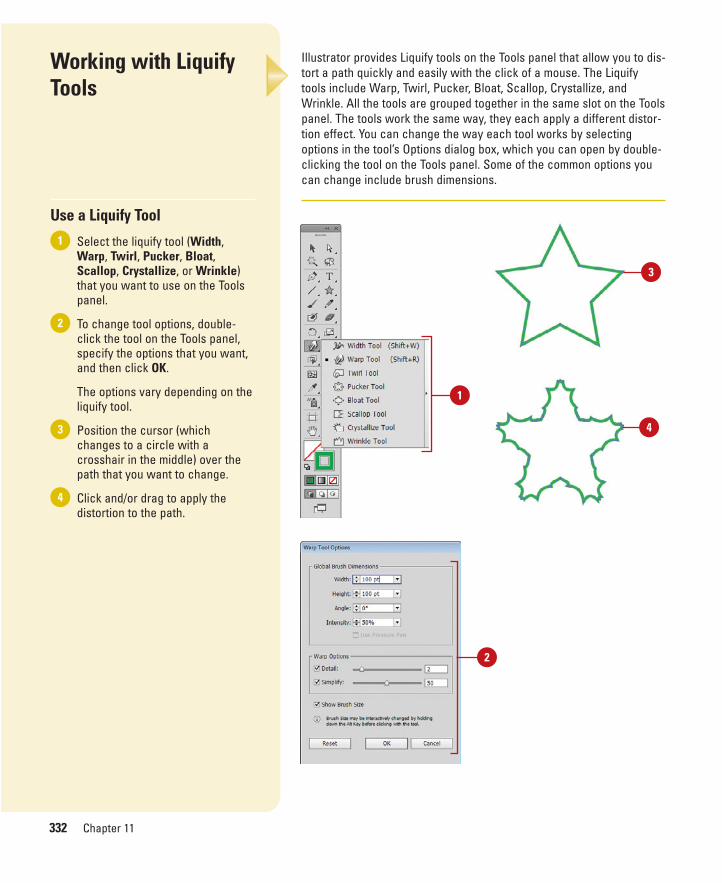
ptg8126863
332 Chapter 11
Illustrator provides Liquify tools on the Tools panel that allow you to dis-tort a path quickly and easily with the click of a mouse. The Liquifytools include Warp, Twirl, Pucker, Bloat, Scallop, Crystallize, andWrinkle. All the tools are grouped together in the same slot on the Toolspanel. The tools work the same way, they each apply a different distor-tion effect. You can change the way each tool works by selectingoptions in the tool’s Options dialog box, which you can open by double-clicking the tool on the Tools panel. Some of the common options youcan change include brush dimensions.
Working with LiquifyTools
Use a Liquify Tool
Select the liquify tool (Width,Warp, Twirl, Pucker, Bloat,Scallop, Crystallize, or Wrinkle)that you want to use on the Toolspanel.
To change tool options, double-click the tool on the Tools panel,specify the options that you want,and then click OK.
The options vary depending on theliquify tool.
Position the cursor (whichchanges to a circle with acrosshair in the middle) over thepath that you want to change.
Click and/or drag to apply thedistortion to the path.
4
3
2
1
1
4
3
2

ptg8126863
Using Symbols
Introduction
If you use the same object in multiple places in a document,you can use the Symbols panel to store and use it as aninstance. A symbol is stored once and used multiple times asan instance, which speeds up printing and reduces the size ofyour document. Each instance is linked to the original sym-bol. When you break the link between a symbol and aninstance, the instance is converted back to a normal object.
You can place instances one at a time or create a collec-tion of instances with the Symbol Sprayer tool, known as asymbol set. This allows you to quickly create artistic designswithout a lot of experience.
With the Symbols panel, you can create, edit, rename,duplicate, and delete symbols. You can create your own sym-bol from a selected object or you can use the ones providedby Illustrator. Illustrator gives you access to almost 30 differ-ent symbol libraries, which include Arrows, Artistic Textures,Flowers, Fashion, Maps, and Nature to name a few.
The Symbol Sprayer allows you to create a symbol set.After you create a symbol set, you can use one of 7 othersymbolism tools to modify it. The symbolism tools include:Symbol Shifter (to shift direction and bring forward or sendbackward), Symbol Scruncher (to move instances closer orfarther apart), Symbol Sizer (to increase or decrease size),Symbol Spinner (to change the orientation), Symbol Stainer(to increase or decrease the transparency), Symbol Screener(to recolor with tints), and Symbol Styler (to apply a graphicstyle). With the Expand command, you can break the linkbetween an instance and the original symbol or break apart asymbol set. 12
12What You’ll Do
Use the Symbols Panel
Use Symbol Libraries
Work with Symbols
Duplicate and Edit Symbols
Break Symbol Links
Use the Sprayer Tool
Set Symbolism Tools Options
Use the Symbol Shifter Tool
Use the Symbol Scruncher Tool
Use the Symbol Sizer Tool
Use the Symbol Spinner Tool
Use the Symbol Stainer Tool
Use the Symbol Screener Tool
Use the Symbol Styler Tool
Expand Symbol Instances
Use 9-Slice Scaling for Symbols
Align Symbols to the Pixel Grid
Set the Symbol Registration Point
333
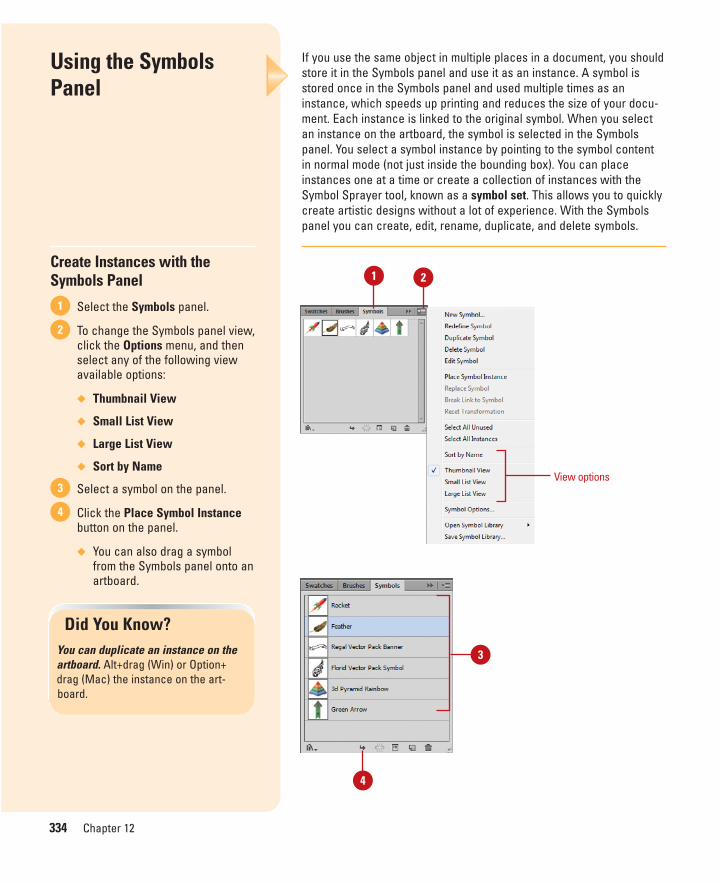
ptg8126863
334 Chapter 12
If you use the same object in multiple places in a document, you shouldstore it in the Symbols panel and use it as an instance. A symbol isstored once in the Symbols panel and used multiple times as aninstance, which speeds up printing and reduces the size of your docu-ment. Each instance is linked to the original symbol. When you selectan instance on the artboard, the symbol is selected in the Symbolspanel. You select a symbol instance by pointing to the symbol contentin normal mode (not just inside the bounding box). You can placeinstances one at a time or create a collection of instances with theSymbol Sprayer tool, known as a symbol set. This allows you to quicklycreate artistic designs without a lot of experience. With the Symbolspanel you can create, edit, rename, duplicate, and delete symbols.
Using the SymbolsPanel
Create Instances with theSymbols Panel
Select the Symbols panel.
To change the Symbols panel view,click the Options menu, and thenselect any of the following viewavailable options:
◆ Thumbnail View
◆ Small List View
◆ Large List View
◆ Sort by Name
Select a symbol on the panel.
Click the Place Symbol Instancebutton on the panel.
◆ You can also drag a symbolfrom the Symbols panel onto anartboard.
4
3
2
1
Did You Know?You can duplicate an instance on theartboard. Alt+drag (Win) or Option+drag (Mac) the instance on the art-board.
1 2
View options
3
4

ptg8126863
Chapter 12 Using Symbols 335
Instead of creating your own symbols, you can use the ones providedby Illustrator. Illustrator gives you access to almost 30 different symbollibraries, which include Arrows, Artistic Textures, Flowers, Fashion,Maps, and Nature, to name a few. When you open a symbol libraryfrom the Symbols panel, a new panel appears, displaying the librarysymbols. Instead of opening each library separately, you can use theLoad Previous Symbol Library or Load Next Symbol Library buttons onthe panel to quickly view libraries to find the symbols you want. Whenyou click a library symbol, it’s added to the Symbols panel.
Using Symbol Libraries
Use Symbol Libraries
Select the Symbols panel.
Select a path with any of theselection tools.
Click the Symbol Libraries Menubutton on the panel, and thenselect a symbol library.
Click the Load Previous SymbolLibrary or Load Next SymbolLibrary button to view otherlibraries.
Click a symbol in the library panelto add it to the Symbols panel.
Select a symbol on the Symbolspanel.
Click the Place Symbol Instancebutton on the panel.
◆ You can also drag a symbolfrom the Symbols panel or anysymbols library onto anartboard.
7
6
5
4
3
2
1
Did You Know?You can arrange symbols on theSymbols panel. In the Symbols panel,you can drag a symbol to a new spot.
3
4
6
1 5
7
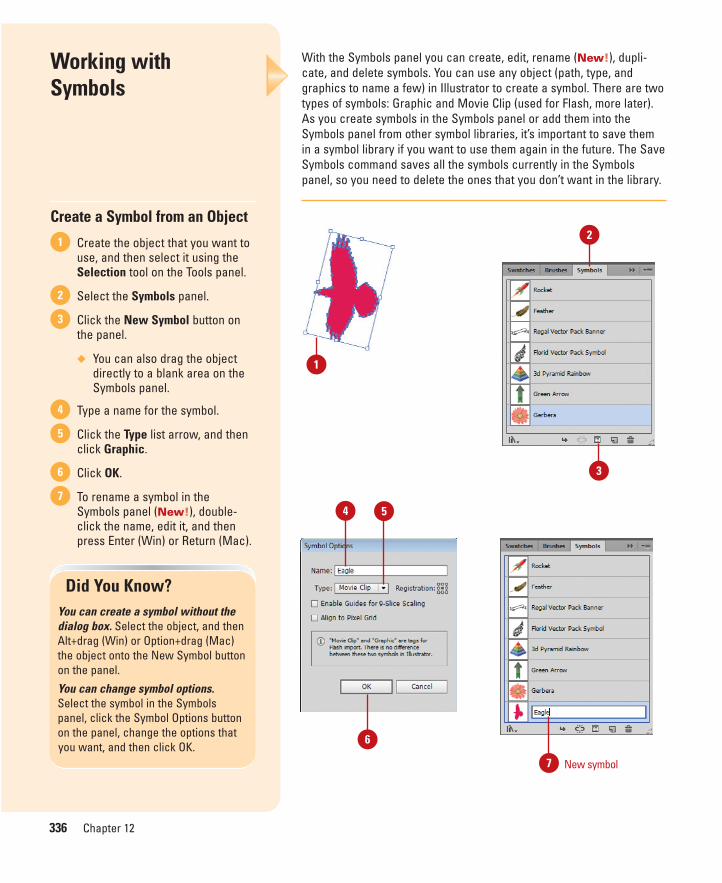
ptg8126863
336 Chapter 12
With the Symbols panel you can create, edit, rename (New!), dupli-cate, and delete symbols. You can use any object (path, type, andgraphics to name a few) in Illustrator to create a symbol. There are twotypes of symbols: Graphic and Movie Clip (used for Flash, more later).As you create symbols in the Symbols panel or add them into theSymbols panel from other symbol libraries, it’s important to save themin a symbol library if you want to use them again in the future. The SaveSymbols command saves all the symbols currently in the Symbolspanel, so you need to delete the ones that you don’t want in the library.
Working with Symbols
Create a Symbol from an Object
Create the object that you want touse, and then select it using theSelection tool on the Tools panel.
Select the Symbols panel.
Click the New Symbol button onthe panel.
◆ You can also drag the objectdirectly to a blank area on theSymbols panel.
Type a name for the symbol.
Click the Type list arrow, and thenclick Graphic.
Click OK.
To rename a symbol in theSymbols panel (New!), double-click the name, edit it, and thenpress Enter (Win) or Return (Mac).
7
6
5
4
3
2
1
Did You Know?You can create a symbol without thedialog box. Select the object, and thenAlt+drag (Win) or Option+drag (Mac)the object onto the New Symbol buttonon the panel.
You can change symbol options.Select the symbol in the Symbolspanel, click the Symbol Options buttonon the panel, change the options thatyou want, and then click OK.
New symbol
54
1
3
2
6
7

ptg8126863
Chapter 12 Using Symbols 337
Delete Symbols
Select the Symbols panel.
Select the symbols that you wantto delete.
Click the Delete Symbol button onthe panel.
◆ You can also drag a symbolover the Delete Symbol buttonto delete it.
If there are no instances of thedeleted symbol, click Yes toconfirm the deletion. If there areinstances, click Expand Instancesto convert the instance to paths orclick Delete Instances to removethem.
Save and Create a SymbolsLibrary
Select the Symbols panel.
Display the symbols that you wantto save in the Symbols panel.Remove the ones that you don’twant.
Click the Symbol Libraries Menubutton, and then click SaveSymbols.
Enter a name for the symbolslibrary.
Click Save.
To open the symbol library, clickthe Symbol Libraries Menu button,point to User Defined, and thenselect the saved library.
6
5
4
3
2
1
4
3
2
11
2
3
1
2
3
4
5
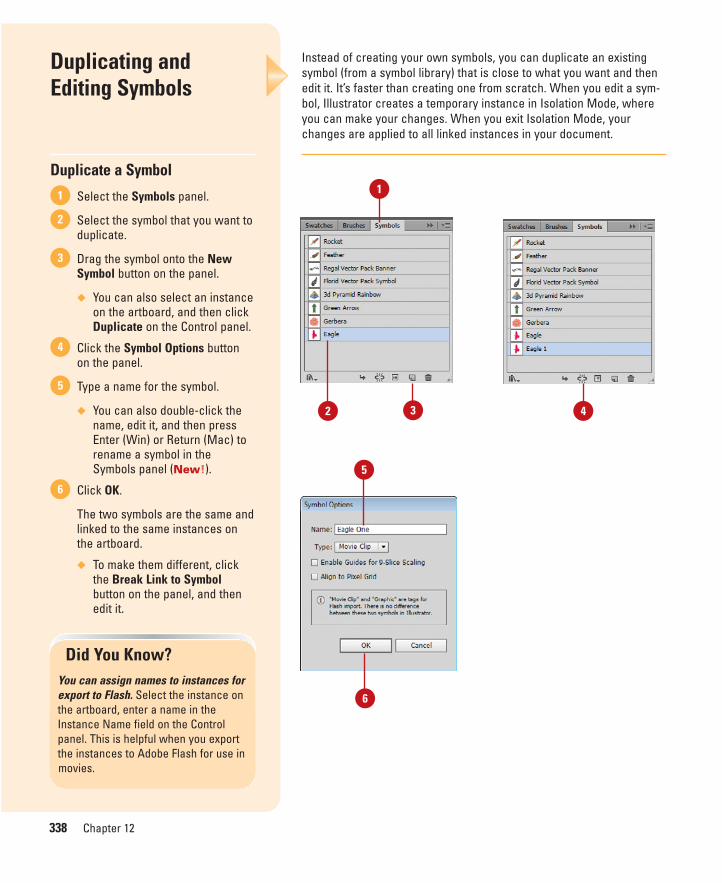
ptg8126863
338 Chapter 12
Instead of creating your own symbols, you can duplicate an existingsymbol (from a symbol library) that is close to what you want and thenedit it. It’s faster than creating one from scratch. When you edit a sym-bol, Illustrator creates a temporary instance in Isolation Mode, whereyou can make your changes. When you exit Isolation Mode, yourchanges are applied to all linked instances in your document.
Duplicating andEditing Symbols
Duplicate a Symbol
Select the Symbols panel.
Select the symbol that you want toduplicate.
Drag the symbol onto the NewSymbol button on the panel.
◆ You can also select an instanceon the artboard, and then clickDuplicate on the Control panel.
Click the Symbol Options buttonon the panel.
Type a name for the symbol.
◆ You can also double-click thename, edit it, and then pressEnter (Win) or Return (Mac) torename a symbol in theSymbols panel (New!).
Click OK.
The two symbols are the same andlinked to the same instances onthe artboard.
◆ To make them different, clickthe Break Link to Symbolbutton on the panel, and thenedit it.
6
5
4
3
2
1
Did You Know?You can assign names to instances forexport to Flash. Select the instance onthe artboard, enter a name in theInstance Name field on the Controlpanel. This is helpful when you exportthe instances to Adobe Flash for use inmovies.
1
5
6
2 3 4
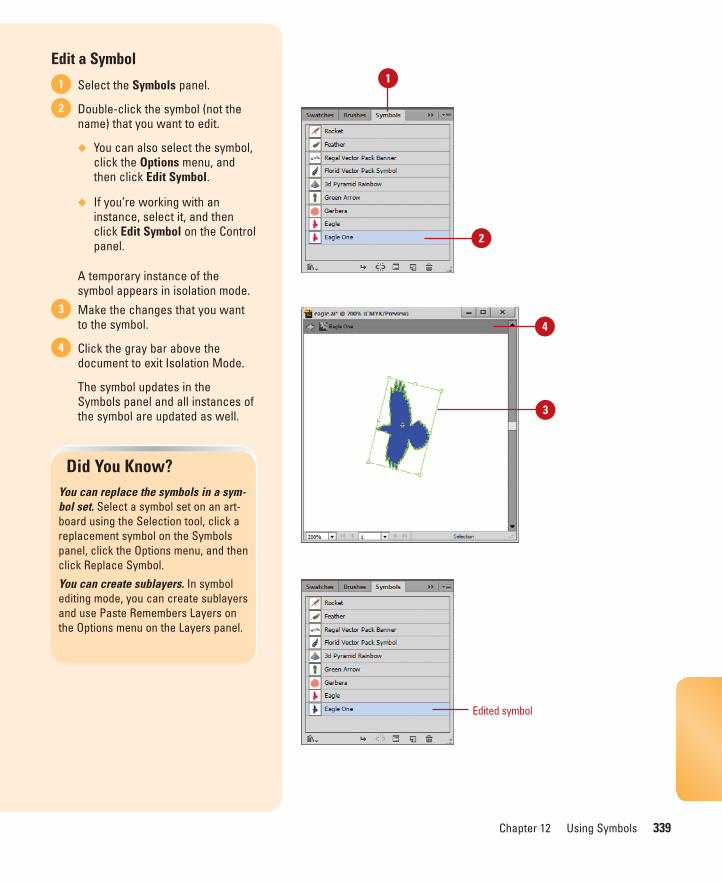
ptg8126863
Chapter 12 Using Symbols 339
Edit a Symbol
Select the Symbols panel.
Double-click the symbol (not thename) that you want to edit.
◆ You can also select the symbol,click the Options menu, andthen click Edit Symbol.
◆ If you’re working with aninstance, select it, and thenclick Edit Symbol on the Controlpanel.
A temporary instance of thesymbol appears in isolation mode.Make the changes that you wantto the symbol.
Click the gray bar above thedocument to exit Isolation Mode.
The symbol updates in theSymbols panel and all instances ofthe symbol are updated as well.
4
3
2
1
Did You Know?You can replace the symbols in a sym-bol set. Select a symbol set on an art-board using the Selection tool, click areplacement symbol on the Symbolspanel, click the Options menu, and thenclick Replace Symbol.
You can create sublayers. In symbolediting mode, you can create sublayersand use Paste Remembers Layers onthe Options menu on the Layers panel.
1
2
Edited symbol
4
3
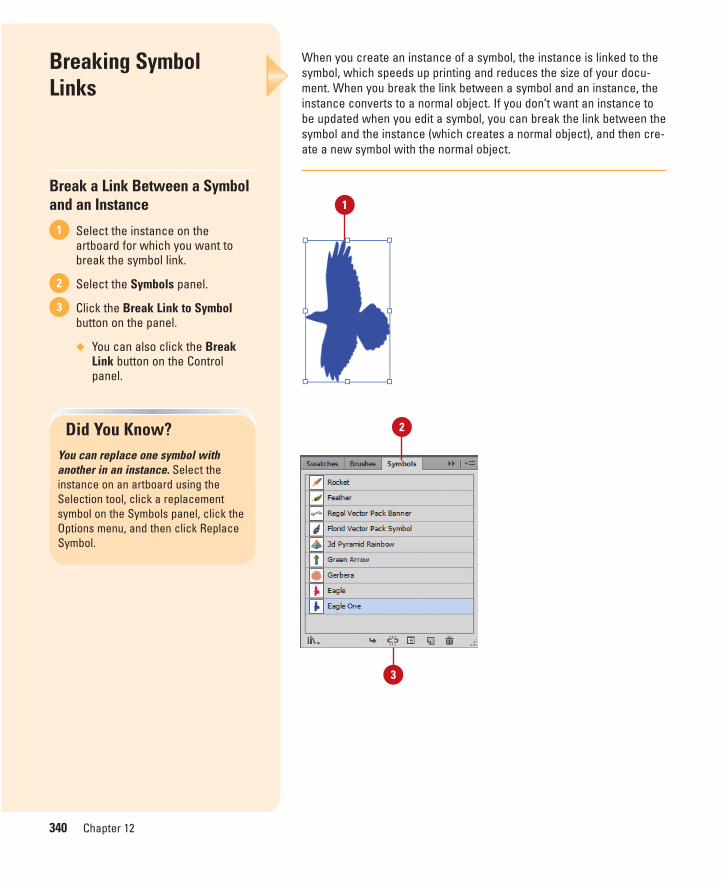
ptg8126863
340 Chapter 12
When you create an instance of a symbol, the instance is linked to thesymbol, which speeds up printing and reduces the size of your docu-ment. When you break the link between a symbol and an instance, theinstance converts to a normal object. If you don’t want an instance tobe updated when you edit a symbol, you can break the link between thesymbol and the instance (which creates a normal object), and then cre-ate a new symbol with the normal object.
Breaking Symbol Links
Break a Link Between a Symboland an Instance
Select the instance on theartboard for which you want tobreak the symbol link.
Select the Symbols panel.
Click the Break Link to Symbolbutton on the panel.
◆ You can also click the BreakLink button on the Controlpanel.
3
2
1
Did You Know?You can replace one symbol withanother in an instance. Select theinstance on an artboard using theSelection tool, click a replacementsymbol on the Symbols panel, click theOptions menu, and then click ReplaceSymbol.
1
2
3
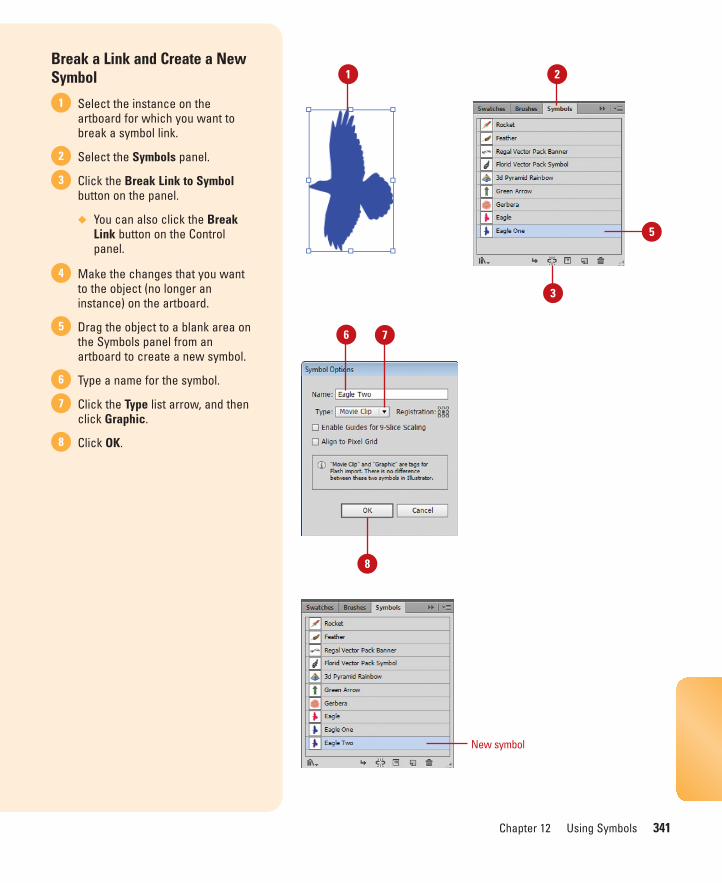
ptg8126863
Chapter 12 Using Symbols 341
Break a Link and Create a NewSymbol
Select the instance on theartboard for which you want tobreak a symbol link.
Select the Symbols panel.
Click the Break Link to Symbolbutton on the panel.
◆ You can also click the BreakLink button on the Controlpanel.
Make the changes that you wantto the object (no longer aninstance) on the artboard.
Drag the object to a blank area onthe Symbols panel from anartboard to create a new symbol.
Type a name for the symbol.
Click the Type list arrow, and thenclick Graphic.
Click OK.8
7
6
5
4
3
2
1
2
3
5
New symbol
76
1
8
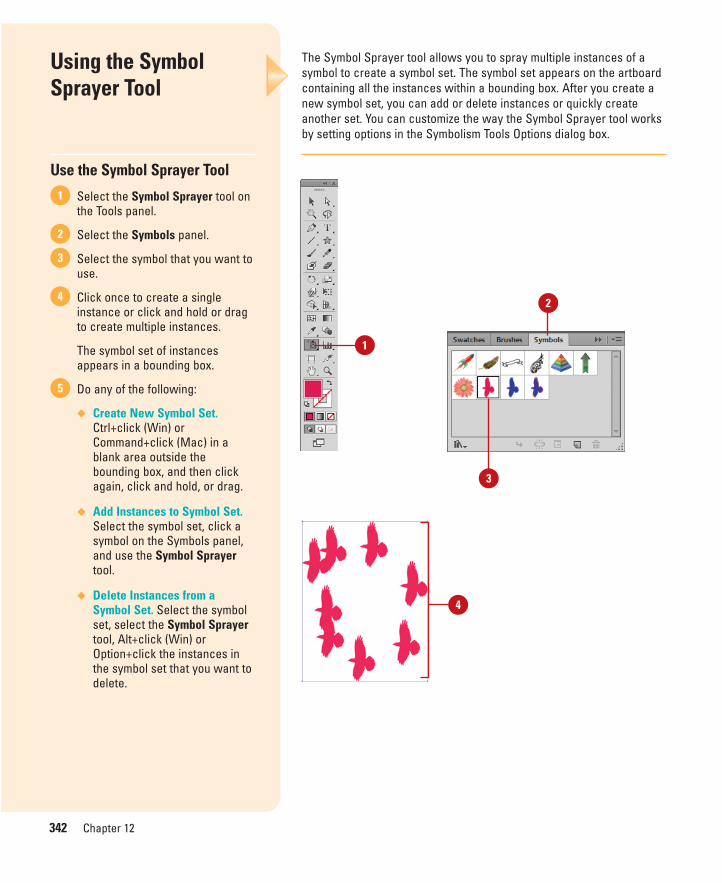
ptg8126863
342 Chapter 12
The Symbol Sprayer tool allows you to spray multiple instances of asymbol to create a symbol set. The symbol set appears on the artboardcontaining all the instances within a bounding box. After you create anew symbol set, you can add or delete instances or quickly createanother set. You can customize the way the Symbol Sprayer tool worksby setting options in the Symbolism Tools Options dialog box.
Using the SymbolSprayer Tool
Use the Symbol Sprayer Tool
Select the Symbol Sprayer tool onthe Tools panel.
Select the Symbols panel.
Select the symbol that you want touse.
Click once to create a singleinstance or click and hold or dragto create multiple instances.
The symbol set of instancesappears in a bounding box.
Do any of the following:
◆ Create New Symbol Set.Ctrl+click (Win) orCommand+click (Mac) in ablank area outside thebounding box, and then clickagain, click and hold, or drag.
◆ Add Instances to Symbol Set.Select the symbol set, click asymbol on the Symbols panel,and use the Symbol Sprayertool.
◆ Delete Instances from aSymbol Set. Select the symbolset, select the Symbol Sprayertool, Alt+click (Win) orOption+click the instances inthe symbol set that you want todelete.
5
4
3
2
1
1
2
4
3
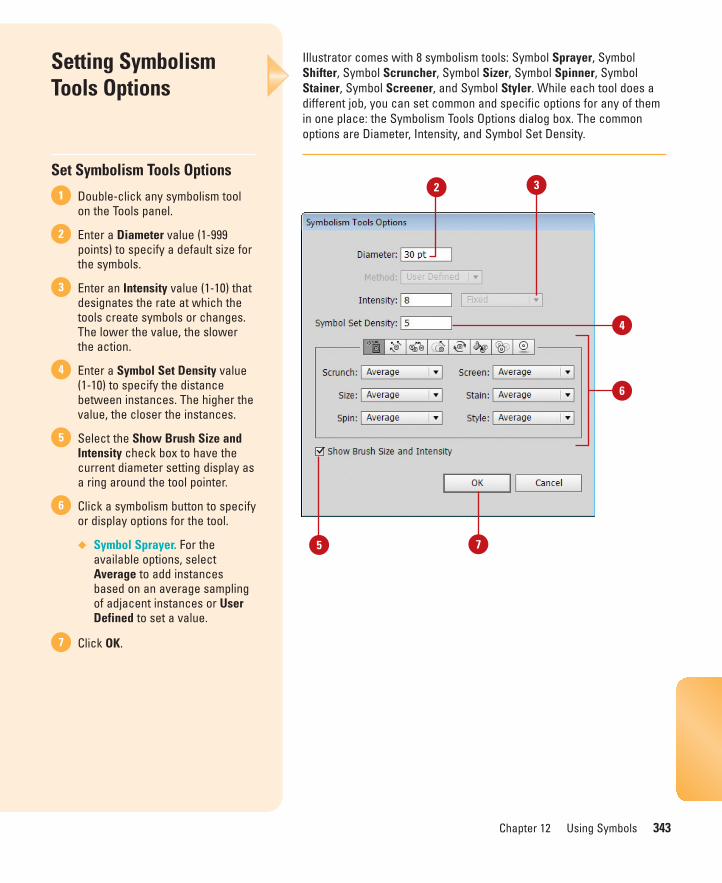
ptg8126863
Chapter 12 Using Symbols 343
Illustrator comes with 8 symbolism tools: Symbol Sprayer, SymbolShifter, Symbol Scruncher, Symbol Sizer, Symbol Spinner, SymbolStainer, Symbol Screener, and Symbol Styler. While each tool does adifferent job, you can set common and specific options for any of themin one place: the Symbolism Tools Options dialog box. The commonoptions are Diameter, Intensity, and Symbol Set Density.
Setting SymbolismTools Options
Set Symbolism Tools Options
Double-click any symbolism toolon the Tools panel.
Enter a Diameter value (1-999points) to specify a default size forthe symbols.
Enter an Intensity value (1-10) thatdesignates the rate at which thetools create symbols or changes.The lower the value, the slowerthe action.
Enter a Symbol Set Density value(1-10) to specify the distancebetween instances. The higher thevalue, the closer the instances.
Select the Show Brush Size andIntensity check box to have thecurrent diameter setting display asa ring around the tool pointer.
Click a symbolism button to specifyor display options for the tool.
◆ Symbol Sprayer. For theavailable options, selectAverage to add instancesbased on an average samplingof adjacent instances or UserDefined to set a value.
Click OK.7
6
5
4
3
2
132
5 7
6
4

ptg8126863
344 Chapter 12
The Symbol Shifter tool allows you to modify the attributes of an exist-ing symbol set. You can shift the direction of instances or change thestacking order (bring forward or send backward) of instances. You canset either of these with a click of the mouse. You can customize theway the Symbol Shifter tool works by setting options in the SymbolismTools Options dialog box.
Using the SymbolShifter Tool
Use the Symbol Shifter Tool
Select the symbol set that youwant to use.
Select the Symbol Shifter tool onthe Tools panel.
Drag in the symbol set to shift theinstances in the direction youwant.
Do any of the following to shift theposition of an instance:
◆ Bring Forward. Shift+click aninstance.
◆ Send Backward. Alt+Shift+click(Win) or Option+Shift+click(Mac) an instance.
4
3
2
1
Did You Know?You can set Symbol Shifter options.Double-click the Symbol Shifter tool onthe Tools panel, specify the options youwant (see page 343 for details), andthen click OK.
2
1
3
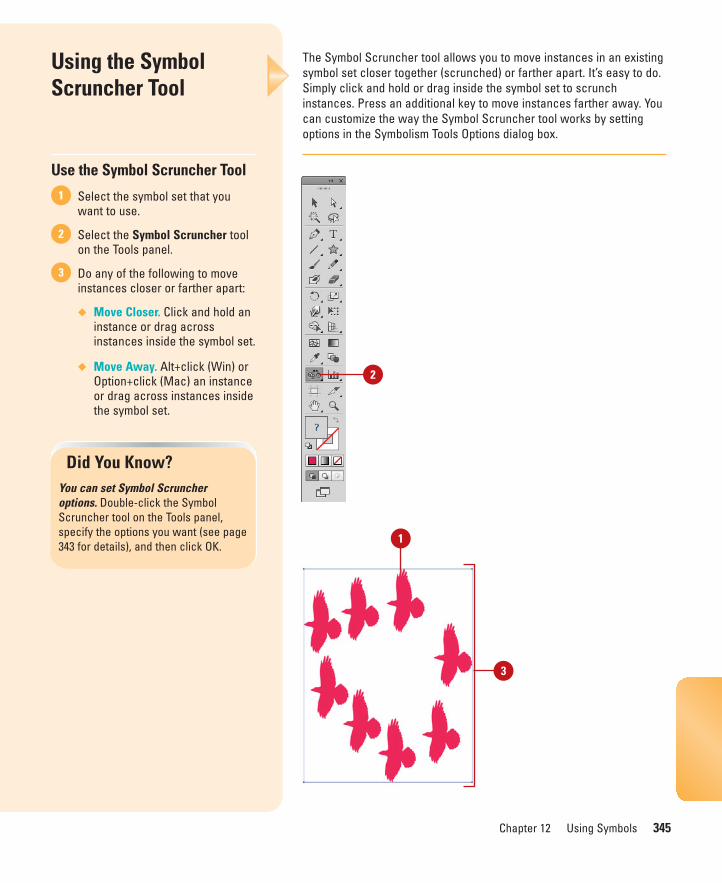
ptg8126863
Chapter 12 Using Symbols 345
The Symbol Scruncher tool allows you to move instances in an existingsymbol set closer together (scrunched) or farther apart. It’s easy to do.Simply click and hold or drag inside the symbol set to scrunchinstances. Press an additional key to move instances farther away. Youcan customize the way the Symbol Scruncher tool works by settingoptions in the Symbolism Tools Options dialog box.
Using the SymbolScruncher Tool
Use the Symbol Scruncher Tool
Select the symbol set that youwant to use.
Select the Symbol Scruncher toolon the Tools panel.
Do any of the following to moveinstances closer or farther apart:
◆ Move Closer. Click and hold aninstance or drag acrossinstances inside the symbol set.
◆ Move Away. Alt+click (Win) orOption+click (Mac) an instanceor drag across instances insidethe symbol set.
3
2
1
Did You Know?You can set Symbol Scruncheroptions. Double-click the SymbolScruncher tool on the Tools panel,specify the options you want (see page343 for details), and then click OK.
3
1
2
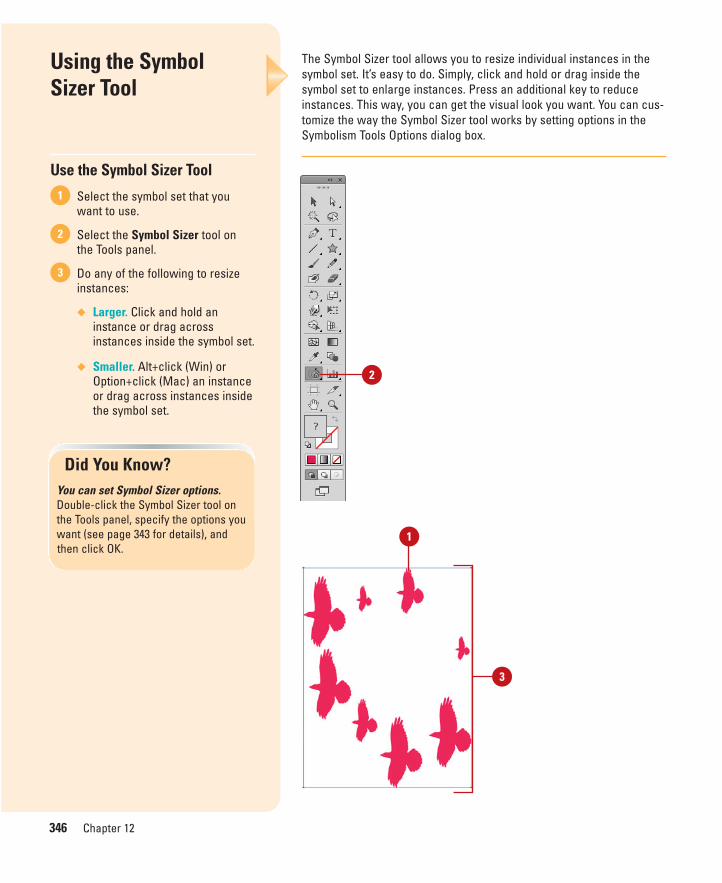
ptg8126863
346 Chapter 12
The Symbol Sizer tool allows you to resize individual instances in thesymbol set. It’s easy to do. Simply, click and hold or drag inside thesymbol set to enlarge instances. Press an additional key to reduceinstances. This way, you can get the visual look you want. You can cus-tomize the way the Symbol Sizer tool works by setting options in theSymbolism Tools Options dialog box.
Using the Symbol Sizer Tool
Use the Symbol Sizer Tool
Select the symbol set that youwant to use.
Select the Symbol Sizer tool onthe Tools panel.
Do any of the following to resizeinstances:
◆ Larger. Click and hold aninstance or drag acrossinstances inside the symbol set.
◆ Smaller. Alt+click (Win) orOption+click (Mac) an instanceor drag across instances insidethe symbol set.
3
2
1
Did You Know?You can set Symbol Sizer options.Double-click the Symbol Sizer tool onthe Tools panel, specify the options youwant (see page 343 for details), andthen click OK.
2
1
3
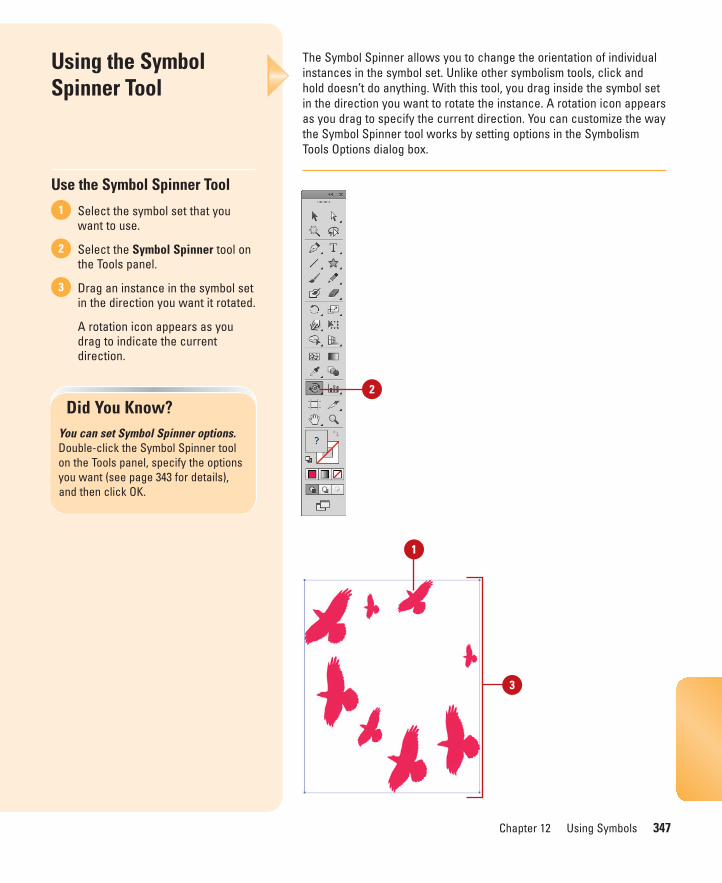
ptg8126863
Chapter 12 Using Symbols 347
The Symbol Spinner allows you to change the orientation of individualinstances in the symbol set. Unlike other symbolism tools, click andhold doesn’t do anything. With this tool, you drag inside the symbol setin the direction you want to rotate the instance. A rotation icon appearsas you drag to specify the current direction. You can customize the waythe Symbol Spinner tool works by setting options in the SymbolismTools Options dialog box.
Using the Symbol Spinner Tool
Use the Symbol Spinner Tool
Select the symbol set that youwant to use.
Select the Symbol Spinner tool onthe Tools panel.
Drag an instance in the symbol setin the direction you want it rotated.
A rotation icon appears as youdrag to indicate the currentdirection.
3
2
1
Did You Know?You can set Symbol Spinner options.Double-click the Symbol Spinner toolon the Tools panel, specify the optionsyou want (see page 343 for details),and then click OK.
3
1
2
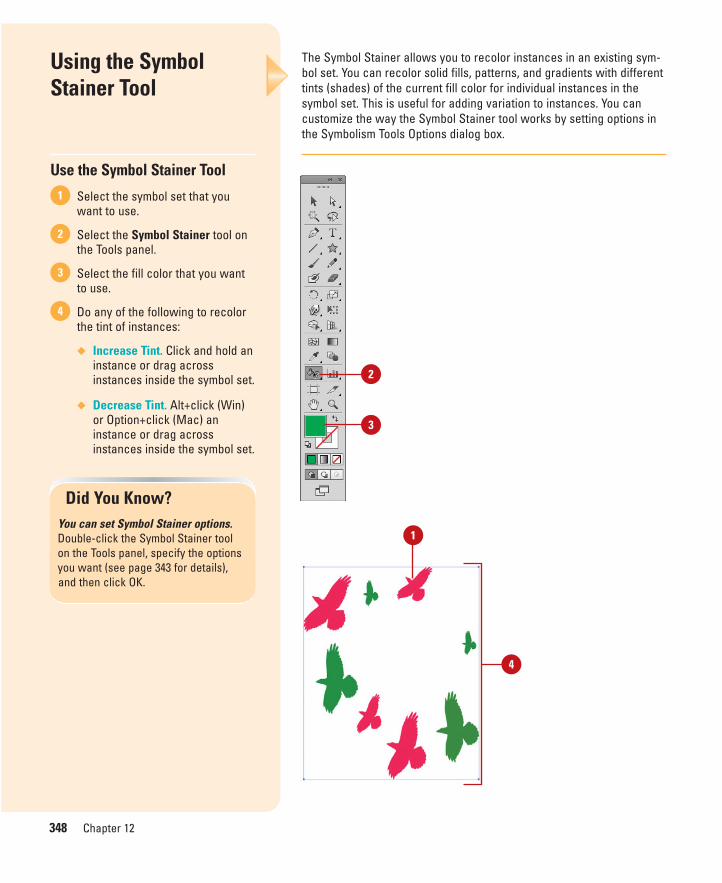
ptg8126863
348 Chapter 12
The Symbol Stainer allows you to recolor instances in an existing sym-bol set. You can recolor solid fills, patterns, and gradients with differenttints (shades) of the current fill color for individual instances in thesymbol set. This is useful for adding variation to instances. You cancustomize the way the Symbol Stainer tool works by setting options inthe Symbolism Tools Options dialog box.
Using the Symbol Stainer Tool
Use the Symbol Stainer Tool
Select the symbol set that youwant to use.
Select the Symbol Stainer tool onthe Tools panel.
Select the fill color that you wantto use.
Do any of the following to recolorthe tint of instances:
◆ Increase Tint. Click and hold aninstance or drag acrossinstances inside the symbol set.
◆ Decrease Tint. Alt+click (Win)or Option+click (Mac) aninstance or drag acrossinstances inside the symbol set.
4
3
2
1
Did You Know?You can set Symbol Stainer options.Double-click the Symbol Stainer toolon the Tools panel, specify the optionsyou want (see page 343 for details),and then click OK.
2
3
1
4
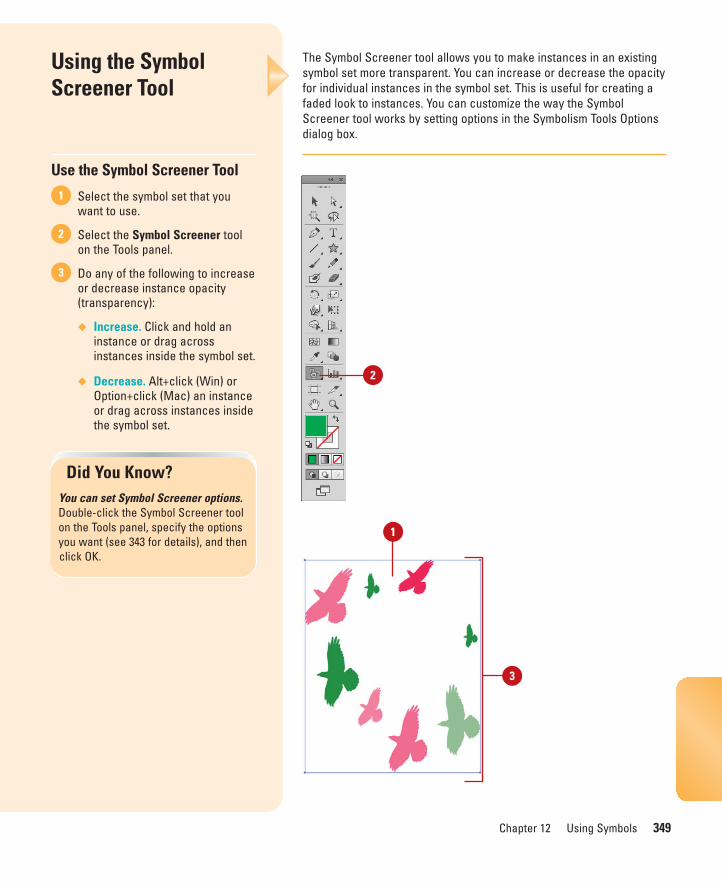
ptg8126863
Chapter 12 Using Symbols 349
The Symbol Screener tool allows you to make instances in an existingsymbol set more transparent. You can increase or decrease the opacityfor individual instances in the symbol set. This is useful for creating afaded look to instances. You can customize the way the SymbolScreener tool works by setting options in the Symbolism Tools Optionsdialog box.
Using the Symbol Screener Tool
Use the Symbol Screener Tool
Select the symbol set that youwant to use.
Select the Symbol Screener toolon the Tools panel.
Do any of the following to increaseor decrease instance opacity(transparency):
◆ Increase. Click and hold aninstance or drag acrossinstances inside the symbol set.
◆ Decrease. Alt+click (Win) orOption+click (Mac) an instanceor drag across instances insidethe symbol set.
3
2
1
Did You Know?You can set Symbol Screener options.Double-click the Symbol Screener toolon the Tools panel, specify the optionsyou want (see 343 for details), and thenclick OK.
3
1
2

ptg8126863
350 Chapter 12
The Symbol Styler tool allows you to apply the currently selectedgraphic style on the Graphic Styles panel to instances in an existingsymbol set. It’s easy to do. Simply click and hold or drag instancesinside the symbol set to apply the graphic style. The longer you holddown the mouse, the greater the intensity of the applied style. You cancustomize the way the Symbol Styler tool works by setting options inthe Symbolism Tools Options dialog box.
Using the Symbol Styler Tool
Use the Symbol Styler Tool
Select the symbol set that youwant to use.
Select the Symbol Styler tool onthe Tools panel.
Select the Graphic Styles panel.
Select the graphic style that youwant to apply to instances in theselected symbol set.
Do any of the following to apply orremove a graphic style:
◆ Apply Style. Click and hold aninstance or drag acrossinstances inside the symbol set.
The longer you hold down themouse, the greater the intensityof the applied style.
◆ Decrease Style Intensity.Alt+click (Win) or Option+click(Mac) an instance or dragacross instances inside thesymbol set.
5
4
3
2
1
Did You Know?You can set Symbol Styler options.Double-click the Symbol Styler tool onthe Tools panel, specify the options youwant (see page 343 for details), andthen click OK.
2
4
3
1
5

ptg8126863
Chapter 12 Using Symbols 351
With the Expand command, you can break the link between an instanceand the original symbol or break apart a symbol set. When you breakthe link between an instance and a symbol, the individual pathsbecome nested in a group. When you break apart a symbol set, theindividual instances are nested in a group, but the links to the originalsymbol are maintained.
Expanding SymbolInstances
Expand an Instance or a Symbol Set
Select the instances or symbol setthat you want to expand.
Click the Object menu, and thenclick Expand or ExpandAppearance (if the instancecontains an effect).
Select the Object and Fill checkboxes.
Click OK.4
3
2
1
1
4
3

ptg8126863
352 Chapter 12
How do you scale objects without distorting them? In the past, youwould scale an object equally in height and width. For many objects,this method of scaling doesn’t work very well. In Illustrator, a methodcalled 9-slice scaling is used. A symbol is visually divided into nineareas, or slices, with a grid overlay (dotted lines called slide guides).The 9-slice scaling grid is visible only in isolation mode. Each area ofthe grid is scaled separately (except the corners), which provides moreaccurate results. The slide guides are set at 25% of the symbol’s heightand width by default. Before you can scale a symbol, you need toenable 9-slice scaling. You can use 9-slice scaling for symbols withrotation, shear, and other complex transformations.
Using 9-Slice Scalingfor Symbols
9-Slice Scale a Symbol
Select the Symbols panel.
Select the symbol on the artboardor in the Symbols panel using theSelection tool on the Tools panel.
Click the New Symbol button onthe panel.
Type a name for the symbol.
Click the Type list arrow, and thenclick Graphic or Movie Clip.
Select the Enable Guides for 9-Slice Scaling check box.
Click OK.7
6
5
4
3
2
1
54
6
1
2
3
Did You Know?You can reset any transformation tosymbols. Select the symbol, and thenclick the Reset button on the Controlpanel or click the Options menu in theSymbols panel, and then click ResetTransformation.
7
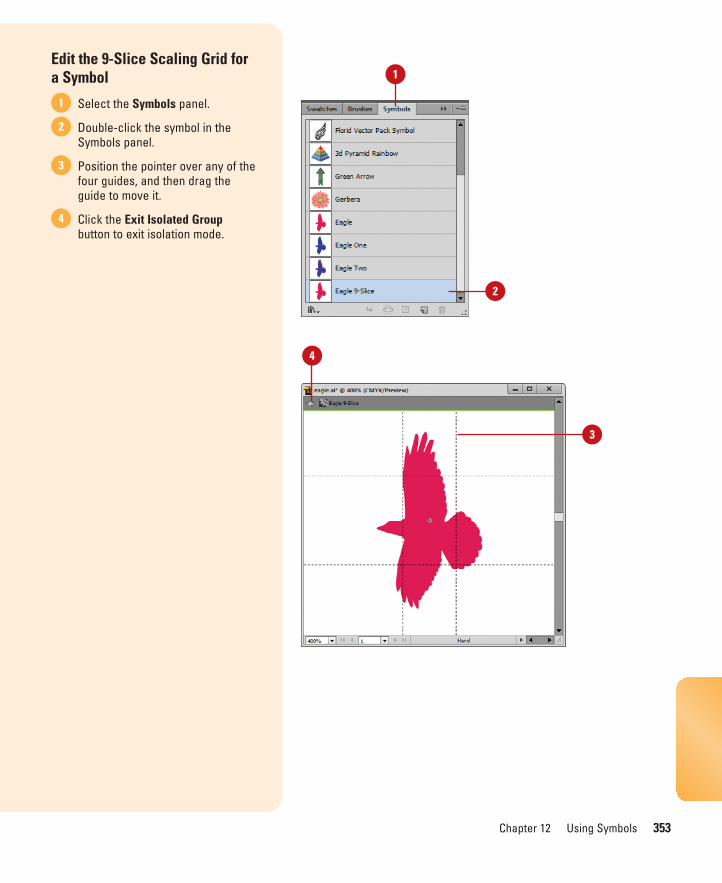
ptg8126863
Chapter 12 Using Symbols 353
Edit the 9-Slice Scaling Grid fora Symbol
Select the Symbols panel.
Double-click the symbol in theSymbols panel.
Position the pointer over any of thefour guides, and then drag theguide to move it.
Click the Exit Isolated Groupbutton to exit isolation mode.
4
3
2
1
1
2
4
3
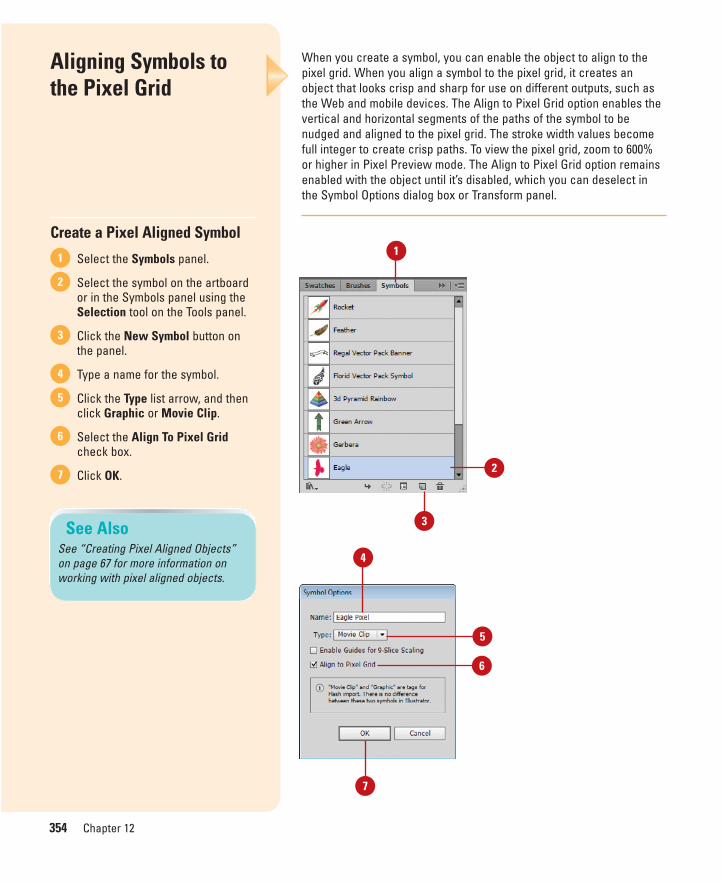
ptg8126863
354 Chapter 12
When you create a symbol, you can enable the object to align to thepixel grid. When you align a symbol to the pixel grid, it creates anobject that looks crisp and sharp for use on different outputs, such asthe Web and mobile devices. The Align to Pixel Grid option enables thevertical and horizontal segments of the paths of the symbol to benudged and aligned to the pixel grid. The stroke width values becomefull integer to create crisp paths. To view the pixel grid, zoom to 600%or higher in Pixel Preview mode. The Align to Pixel Grid option remainsenabled with the object until it’s disabled, which you can deselect inthe Symbol Options dialog box or Transform panel.
Aligning Symbols tothe Pixel Grid
Create a Pixel Aligned Symbol
Select the Symbols panel.
Select the symbol on the artboardor in the Symbols panel using theSelection tool on the Tools panel.
Click the New Symbol button onthe panel.
Type a name for the symbol.
Click the Type list arrow, and thenclick Graphic or Movie Clip.
Select the Align To Pixel Gridcheck box.
Click OK.7
6
5
4
3
2
1
4
1
2
3See AlsoSee “Creating Pixel Aligned Objects”on page 67 for more information onworking with pixel aligned objects.
7
6
5
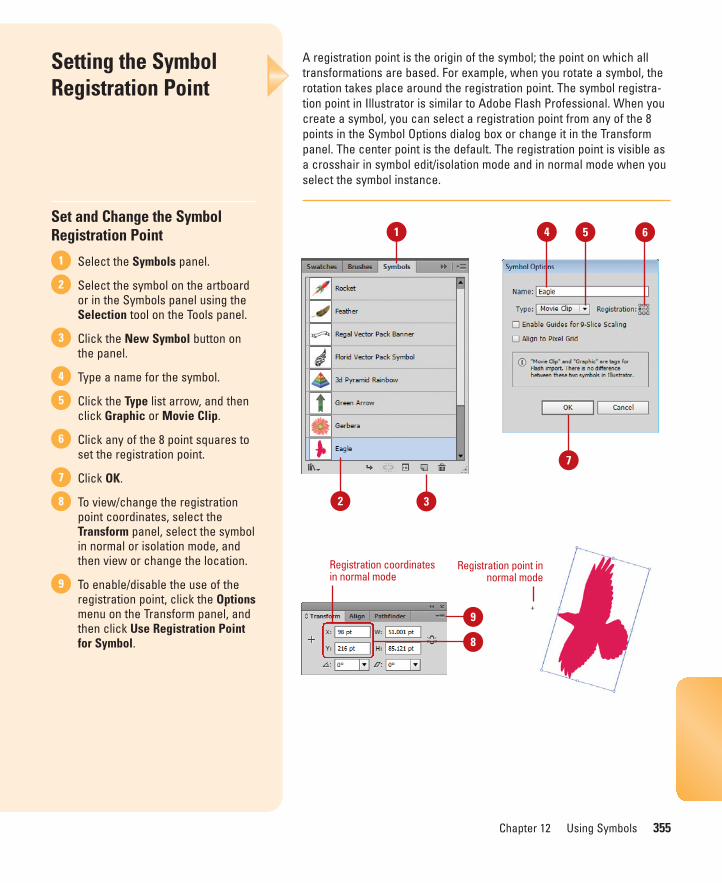
ptg8126863
Chapter 12 Using Symbols 355
A registration point is the origin of the symbol; the point on which alltransformations are based. For example, when you rotate a symbol, therotation takes place around the registration point. The symbol registra-tion point in Illustrator is similar to Adobe Flash Professional. When youcreate a symbol, you can select a registration point from any of the 8points in the Symbol Options dialog box or change it in the Transformpanel. The center point is the default. The registration point is visible asa crosshair in symbol edit/isolation mode and in normal mode when youselect the symbol instance.
Setting the SymbolRegistration Point
Set and Change the SymbolRegistration Point
Select the Symbols panel.
Select the symbol on the artboardor in the Symbols panel using theSelection tool on the Tools panel.
Click the New Symbol button onthe panel.
Type a name for the symbol.
Click the Type list arrow, and thenclick Graphic or Movie Clip.
Click any of the 8 point squares toset the registration point.
Click OK.
To view/change the registrationpoint coordinates, select theTransform panel, select the symbolin normal or isolation mode, andthen view or change the location.
To enable/disable the use of theregistration point, click the Optionsmenu on the Transform panel, andthen click Use Registration Pointfor Symbol.
9
8
7
6
5
4
3
2
1
54 6
Registration coordinatesin normal mode
Registration point innormal mode
9
8
1
32
7

ptg8126863
This page intentionally left blank

ptg8126863
Automating the Way YouWork
Introduction
Actions are similar to recording information on a tape; theyrecord Illustrator commands and, like a tape recorder, can beplayed back at any time. Actions can be applied to any num-ber of images. You can modify existing actions, and savethem into a user-defined set. It's even possible to save themand send them to another Illustrator user. This chapter is ded-icated to all the Illustrator users who are tired of doing some-thing over and over again. If you have ever considered usingactions as a part of your design workflow, then you're in for awonderful journey of discovery.
A script is a series of commands that instructs Illustratorto perform a set of specified actions. These actions can besimple, affecting only a single object, or more complex,affecting many objects. Scripts are useful for repetitive tasksand can be used as a creative tool to streamline tasks thatare time consuming and boring. You can use one ofIllustrator’s built-in scripts, such as ExportDocsAsFlash orImageTracing, or create one of your own. 13
13What You’ll Do
Examine the Actions Panel
Build a New Action
Record an Action
Control the Playback of a Command
Add a Stop to an Action
Insert a Non-Recordable Command intoan Action
Add a Command to an Action
Delete a Command from an Action
Work with Batch File Processing
Open and Use Scripts
Create and Edit Data Variables
Create and Format a Data Graph
Add Graph Designs to Graphs
Clean Up Unneeded Elements
357

ptg8126863
358 Chapter 13
The Actions panel is where you create, save, modify, and store all ofyour actions. The analogy of a tape recorder is often used in describingthe Actions panel, and it's actually a good way to think of actions. Theaction itself is a recording, and the Actions panel is the tape recorder.When you begin an action, the panel records each step in the process,saves them, and then lets you play them back on another image. Inorder to record and play actions, you need to understand how to usethe Actions panel.
Examining the Actions Panel
Examine the Actions Panel
Select the Actions panel.
Check the toggle box to toggle anaction on or off.
Click the dialog box to toggle thedialog function on or off.
Click the expand triangle toexpand or contract an action orset.
Click the Options menu to accessall of the Actions panel options.
5
4
3
2
12
3
1
Did You Know?You can convert your Actions into single-click buttons. Click the Optionsmenu on the Actions panel, and thenclick Button Mode. When the Actionspanel is in Button Mode, you cannotaccess or edit the steps in the individ-ual actions. To access the standardActions panel, click the Options menuon the Actions panel, and then clickButton Mode to uncheck the option.
4
5
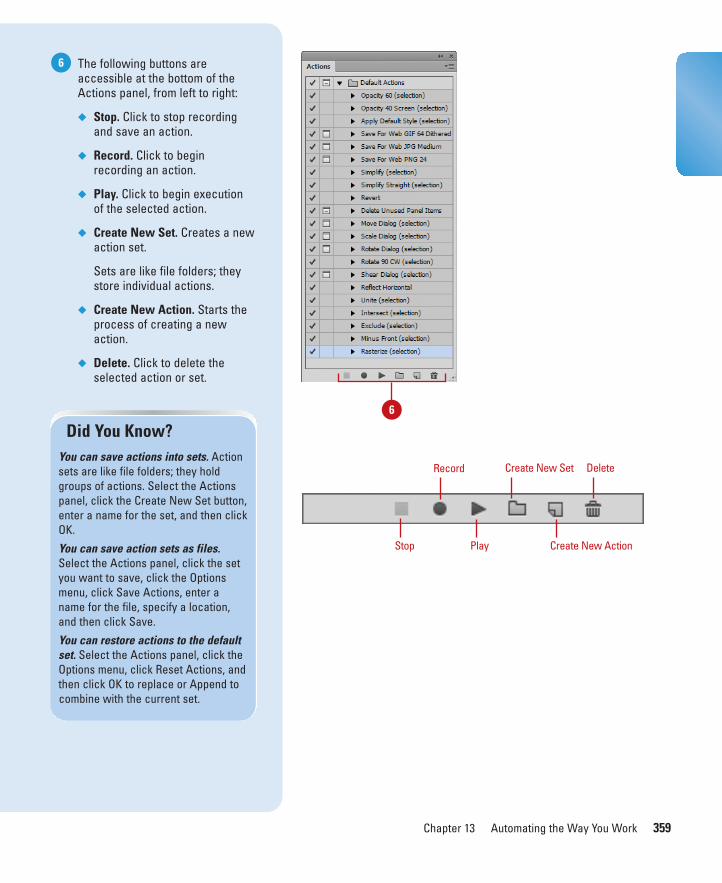
ptg8126863
Chapter 13 Automating the Way You Work 359
The following buttons areaccessible at the bottom of theActions panel, from left to right:
◆ Stop. Click to stop recordingand save an action.
◆ Record. Click to beginrecording an action.
◆ Play. Click to begin executionof the selected action.
◆ Create New Set. Creates a newaction set.
Sets are like file folders; theystore individual actions.
◆ Create New Action. Starts theprocess of creating a newaction.
◆ Delete. Click to delete theselected action or set.
6
6
Stop
Record
Play
Create New Set Delete
Create New Action
Did You Know?You can save actions into sets. Actionsets are like file folders; they holdgroups of actions. Select the Actionspanel, click the Create New Set button,enter a name for the set, and then clickOK.
You can save action sets as files.Select the Actions panel, click the setyou want to save, click the Optionsmenu, click Save Actions, enter aname for the file, specify a location,and then click Save.
You can restore actions to the defaultset. Select the Actions panel, click theOptions menu, click Reset Actions, andthen click OK to replace or Append tocombine with the current set.
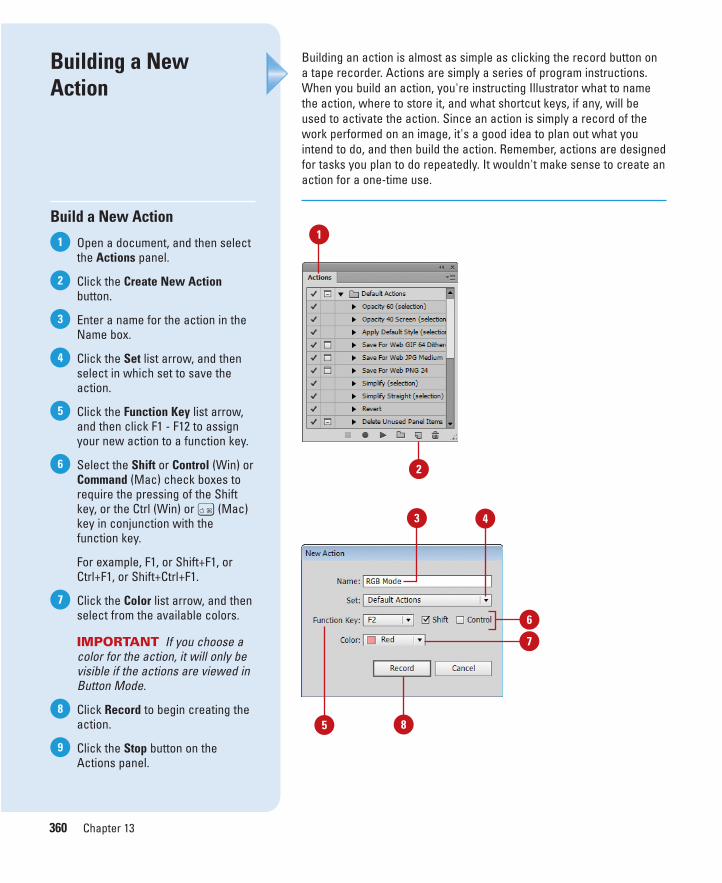
ptg8126863
360 Chapter 13
Building a New Action
Build a New Action
Open a document, and then selectthe Actions panel.
Click the Create New Actionbutton.
Enter a name for the action in theName box.
Click the Set list arrow, and thenselect in which set to save theaction.
Click the Function Key list arrow,and then click F1 - F12 to assignyour new action to a function key.
Select the Shift or Control (Win) orCommand (Mac) check boxes torequire the pressing of the Shiftkey, or the Ctrl (Win) or A (Mac)key in conjunction with thefunction key.
For example, F1, or Shift+F1, orCtrl+F1, or Shift+Ctrl+F1.
Click the Color list arrow, and thenselect from the available colors.
IMPORTANT If you choose acolor for the action, it will only bevisible if the actions are viewed inButton Mode.
Click Record to begin creating theaction.
Click the Stop button on theActions panel.
9
8
7
6
5
4
3
2
1
Building an action is almost as simple as clicking the record button ona tape recorder. Actions are simply a series of program instructions.When you build an action, you're instructing Illustrator what to namethe action, where to store it, and what shortcut keys, if any, will beused to activate the action. Since an action is simply a record of thework performed on an image, it's a good idea to plan out what youintend to do, and then build the action. Remember, actions are designedfor tasks you plan to do repeatedly. It wouldn't make sense to create anaction for a one-time use.
1
2
5
3
6
4
8
7
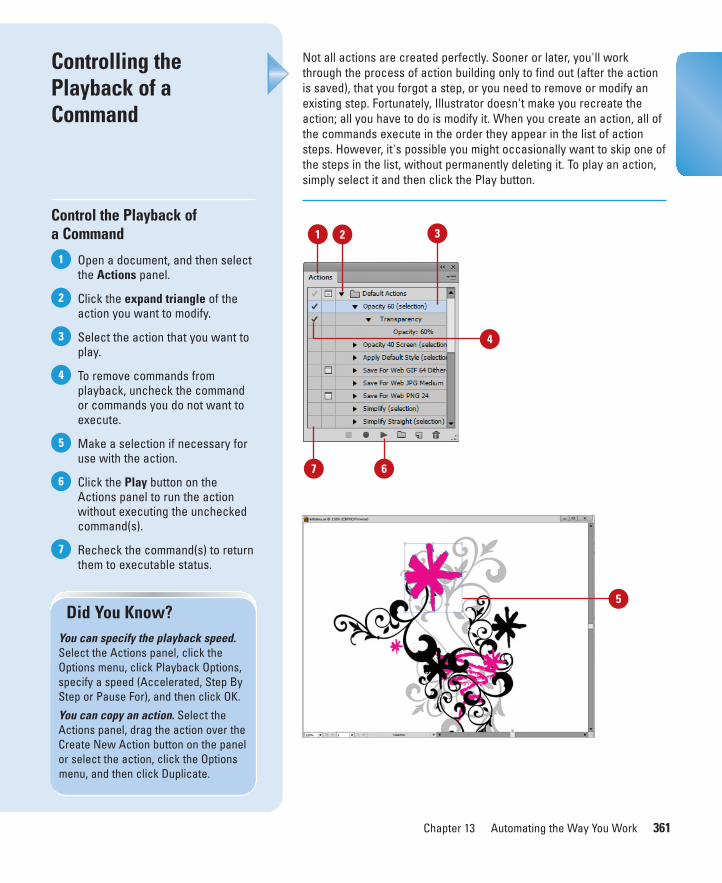
ptg8126863
Chapter 13 Automating the Way You Work 361
Not all actions are created perfectly. Sooner or later, you'll workthrough the process of action building only to find out (after the actionis saved), that you forgot a step, or you need to remove or modify anexisting step. Fortunately, Illustrator doesn't make you recreate theaction; all you have to do is modify it. When you create an action, all ofthe commands execute in the order they appear in the list of actionsteps. However, it's possible you might occasionally want to skip one ofthe steps in the list, without permanently deleting it. To play an action,simply select it and then click the Play button.
Controlling thePlayback of aCommand
Control the Playback of a Command
Open a document, and then selectthe Actions panel.
Click the expand triangle of theaction you want to modify.
Select the action that you want toplay.
To remove commands fromplayback, uncheck the commandor commands you do not want toexecute.
Make a selection if necessary foruse with the action.
Click the Play button on theActions panel to run the actionwithout executing the uncheckedcommand(s).
Recheck the command(s) to returnthem to executable status.
7
6
5
4
3
2
1
5Did You Know?
You can specify the playback speed.Select the Actions panel, click theOptions menu, click Playback Options,specify a speed (Accelerated, Step ByStep or Pause For), and then click OK.
You can copy an action. Select theActions panel, drag the action over theCreate New Action button on the panelor select the action, click the Optionsmenu, and then click Duplicate.
7
1
4
2 3
6

ptg8126863
362 Chapter 13
There are times when you want to make changes to individual files dur-ing the playback of an action. For example, you want to create anaction to transform artwork using the Rotate, Scale, and Shear com-mands, yet the rotation, scale, and shear settings are not always thesame. If the settings you want to use for the action are not the sameevery time or there is a potential problem, you can insert a stop thatallows you to specify the settings you want, and then have the actioncontinue on its way to complete the rest of the steps or stop it alltogether. This provides you with the automation you want with the flexi-bility to specify the settings you want.
Adding a Stop to an Action
Add a Stop to an Action
Open a document, and then selectthe Actions panel.
Click the expand triangle of theaction you want to modify.
Click the command directly abovewhere you want to place theaction.
Click the Options menu, and thenclick Insert Stop.
Enter a message associated withthe purpose of the stop action.
Select the Allow Continue checkbox to add a Continue button to thestop alert box.
Click OK.
Click the Play button on theActions panel to run the action.
8
7
6
5
4
3
2
1
3
8
6
2
Did You Know?You can run an action inside anaction. Select the Actions panel, clickthe command directly above whereyou want to insert the run step foranother action, click the Record but-ton, click the action to be added, clickthe Play button to record the secondaction into the first action, and thenclick Stop.
1 4
7
5

ptg8126863
Chapter 13 Automating the Way You Work 363
When you create an action, not all commands and tools can berecorded, such as Selection, Pen, Paintbrush, Pencil, Pencil, Gradient,Mesh, Eyedropper, Live Paint Bucket, and Scissors tools or Effects andView menu commands. However, you can insert many non-recordablecommands into an action by using an Insert Menu Item command. TheInsert Menu Item command can be used when recording an action orafter it has been recorded. Inserted commands do not execute until theaction is played, so the file remains unchanged when the command isinserted. This gives you the ability to experiment with different non-recordable commands without the risk of damaging a valuable image.
Inserting a Non-Recordable Commandinto an Action
Insert a Non-RecordableCommand into an Action
Open a document, and then selectthe Actions panel.
Click an action, and then click theexpand triangle.
Click the name of the action toinsert the item at the end of theaction, or click a specific actionstep to insert the item after theselected step.
Click the Options menu, and thenclick Insert Menu Item.
Select a command from theavailable options (the command isselected by clicking and selectingan item from Illustrator's drop-down menu system).
Click OK.
The non-recordable command isadded to the action steps.
IMPORTANT When you usethe Insert Menu Item command fora command that opens a dialogbox, you cannot disable the modalcontrol in the Actions panel.
6
5
4
3
2
1
1
3
2
6
4
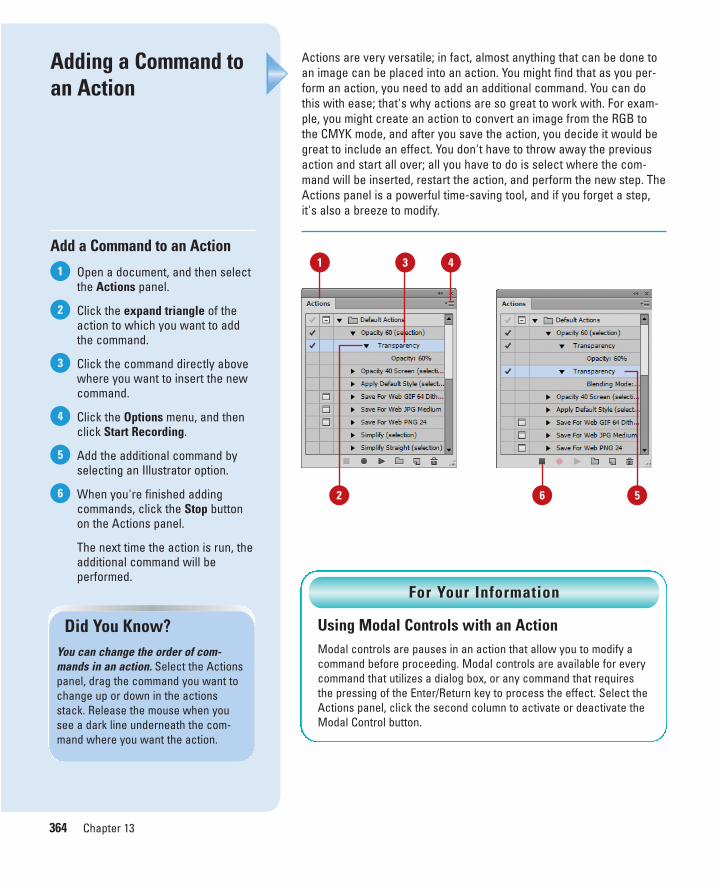
ptg8126863
364 Chapter 13
Actions are very versatile; in fact, almost anything that can be done toan image can be placed into an action. You might find that as you per-form an action, you need to add an additional command. You can dothis with ease; that's why actions are so great to work with. For exam-ple, you might create an action to convert an image from the RGB tothe CMYK mode, and after you save the action, you decide it would begreat to include an effect. You don't have to throw away the previousaction and start all over; all you have to do is select where the com-mand will be inserted, restart the action, and perform the new step. TheActions panel is a powerful time-saving tool, and if you forget a step,it's also a breeze to modify.
Adding a Command toan Action
Add a Command to an Action
Open a document, and then selectthe Actions panel.
Click the expand triangle of theaction to which you want to addthe command.
Click the command directly abovewhere you want to insert the newcommand.
Click the Options menu, and thenclick Start Recording.
Add the additional command byselecting an Illustrator option.
When you're finished addingcommands, click the Stop buttonon the Actions panel.
The next time the action is run, theadditional command will beperformed.
6
5
4
3
2
1
2
1
Did You Know?You can change the order of com-mands in an action. Select the Actionspanel, drag the command you want tochange up or down in the actionsstack. Release the mouse when yousee a dark line underneath the com-mand where you want the action.
Using Modal Controls with an ActionModal controls are pauses in an action that allow you to modify acommand before proceeding. Modal controls are available for everycommand that utilizes a dialog box, or any command that requiresthe pressing of the Enter/Return key to process the effect. Select theActions panel, click the second column to activate or deactivate theModal Control button.
For Your Information
6 5
43
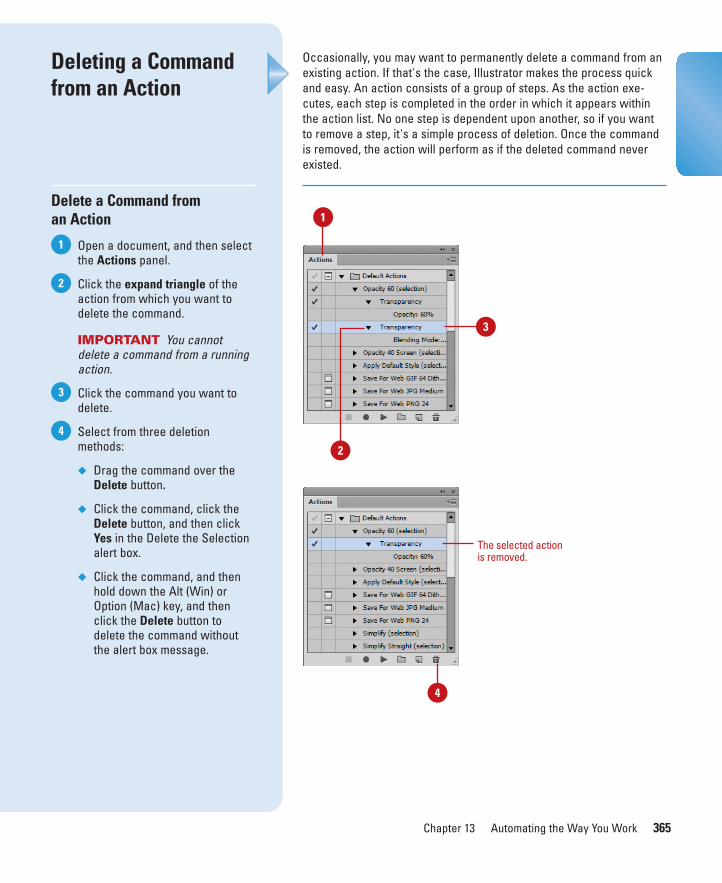
ptg8126863
Chapter 13 Automating the Way You Work 365
Occasionally, you may want to permanently delete a command from anexisting action. If that's the case, Illustrator makes the process quickand easy. An action consists of a group of steps. As the action exe-cutes, each step is completed in the order in which it appears withinthe action list. No one step is dependent upon another, so if you wantto remove a step, it's a simple process of deletion. Once the commandis removed, the action will perform as if the deleted command neverexisted.
Deleting a Commandfrom an Action
Delete a Command from an Action
Open a document, and then selectthe Actions panel.
Click the expand triangle of theaction from which you want todelete the command.
IMPORTANT You cannotdelete a command from a runningaction.
Click the command you want todelete.
Select from three deletionmethods:
◆ Drag the command over theDelete button.
◆ Click the command, click theDelete button, and then clickYes in the Delete the Selectionalert box.
◆ Click the command, and thenhold down the Alt (Win) orOption (Mac) key, and thenclick the Delete button todelete the command withoutthe alert box message.
4
3
2
1
3
1
4
The selected actionis removed.
2

ptg8126863
366 Chapter 13
There is nothing more exciting than working on a new creative project,and watching your designs come to life. Conversely, there is nothingmore tiresome than having to apply a new creative concept or correc-tion individually to many additional images. For example, you just spentthree hours coming up with a procedure to apply color and blendingmodifications to one of the company's logos. The photo logo looksgreat; however, you now have to apply color and blending modifica-tions to all of the company's logos. You could create an action, but youwould still have to open each image and apply the action individually.The solution is to batch process the images after you have created theaction. Batch file processing lets you apply an action to an entire folderof files, and all you have to do is click a button. Now, what could besimpler than that?
Working with BatchFile Processing
Work with Batch FileProcessing
Create a new folder, and thenmove all the images into the folder.
IMPORTANT These files mustbe Illustrator files. There shouldnot be any other files, such as textfiles, inside this folder.
Create a second folder to hold themodified images (optional).
Select the Actions panel.
Click the Options menu, and thenclick Batch.
Select from the following Playoptions:
◆ Click the Set list arrow, andthen select the Set containingthe Action you want to apply tothe images.
◆ Click the Action list arrow, andthen select the correct Action.
Click the Source list arrow, andthen select an image source fromthe following: Folder or Data Sets.
6
5
4
3
2
1
6
5
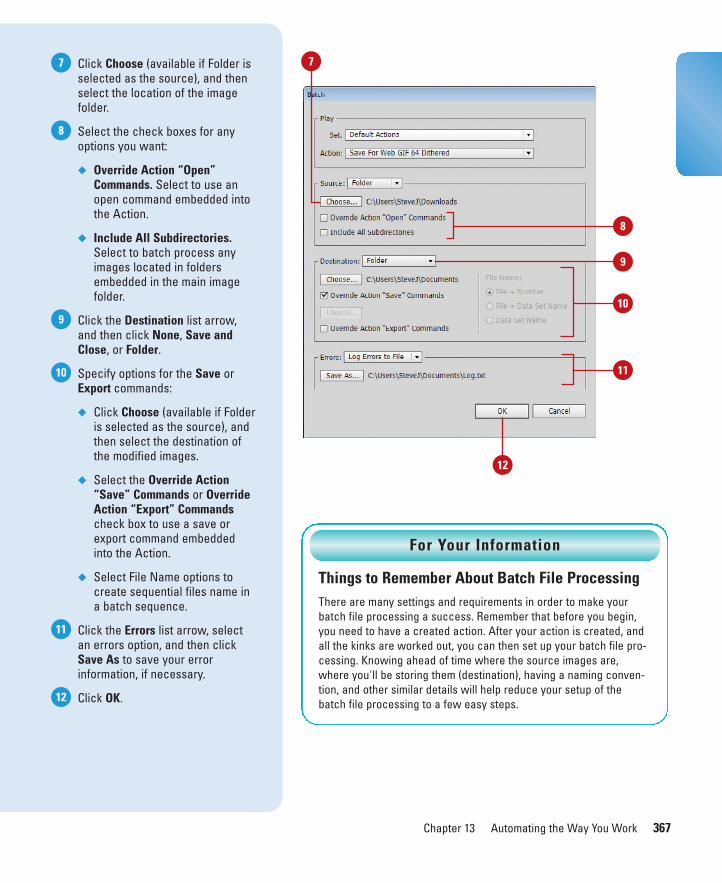
ptg8126863
Chapter 13 Automating the Way You Work 367
Click Choose (available if Folder isselected as the source), and thenselect the location of the imagefolder.
Select the check boxes for anyoptions you want:
◆ Override Action “Open”Commands. Select to use anopen command embedded intothe Action.
◆ Include All Subdirectories.Select to batch process anyimages located in foldersembedded in the main imagefolder.
Click the Destination list arrow,and then click None, Save andClose, or Folder.
Specify options for the Save orExport commands:
◆ Click Choose (available if Folderis selected as the source), andthen select the destination ofthe modified images.
◆ Select the Override Action“Save” Commands or OverrideAction “Export” Commandscheck box to use a save orexport command embeddedinto the Action.
◆ Select File Name options tocreate sequential files name ina batch sequence.
Click the Errors list arrow, selectan errors option, and then clickSave As to save your errorinformation, if necessary.
Click OK.12
11
10
9
8
7
8
9
10
11
Things to Remember About Batch File ProcessingThere are many settings and requirements in order to make yourbatch file processing a success. Remember that before you begin,you need to have a created action. After your action is created, andall the kinks are worked out, you can then set up your batch file pro-cessing. Knowing ahead of time where the source images are,where you'll be storing them (destination), having a naming conven-tion, and other similar details will help reduce your setup of thebatch file processing to a few easy steps.
For Your Information
12
7
ptg8126863
368 Chapter 13
A script is a series of commands that instructs Illustrator to perform aset of specified actions. These actions can be simple, affecting only asingle object, or more complex, affecting many objects. The actionscan call not only Illustrator, but also invoke other applications. Scriptsare useful for repetitive tasks and can be used as a creative tool tostreamline tasks that are time consuming and boring. A scripting lan-guage lets you ask a question (an event), and use the answer to thatquestion to perform any commands (an action) that are available inIllustrator. You can use one of Illustrator’s built-in scripts, such asExportDocsAsFlash, ImageTracing (New!), or SaveDocsAs PDF, or cre-ate one of your own. To create your own scripts you need a workingknowledge of a scripting language like JavaScript, and either a script-editing application or a simple text editor, such as Notepad (Win),TextEdit (Mac) BBEdit or even Microsoft Word. The languages you canuse to perform scripting are varied and include Visual Basic,AppleScript, and JavaScript, to name a few. As a matter of fact, theScripts Events Manager lets you set JavaScript and Illustrator Actionsto run automatically when a specified Illustrator event occurs.
Opening and UsingScripts
Use Built-in Scripts
Click the File menu, and then pointto Scripts.
Select one of the following built-inscripts:
◆ ExportDocsAsFlash.
◆ Flex Skins. Then select CreateFlex 3 Skin or Export Flex 3Skin.
◆ ImageTracing. (New!)
◆ SaveDocsAsPDF.
◆ SaveDocsAsSVG.
2
1
1
2
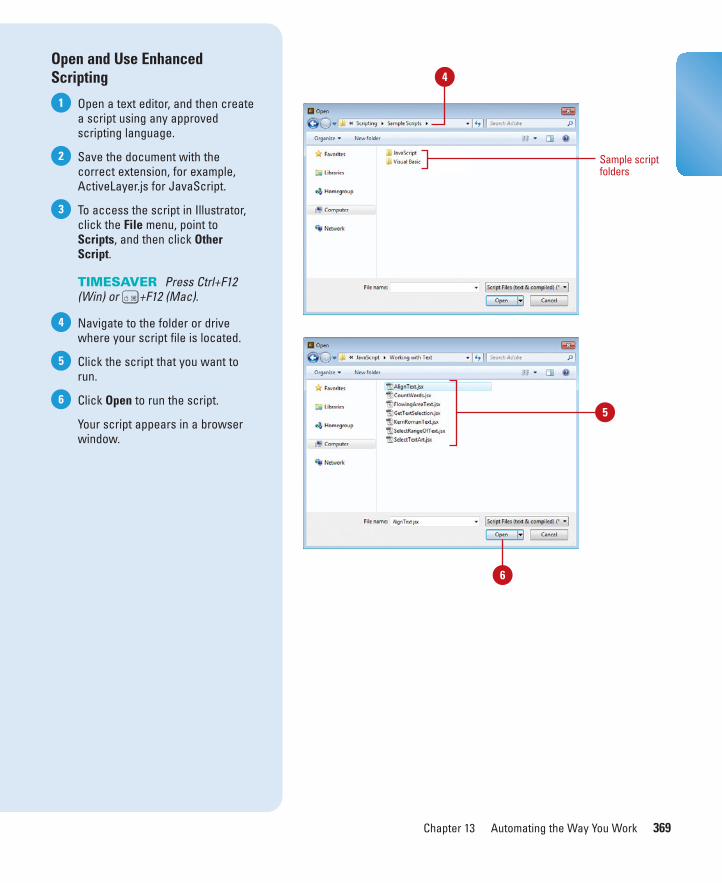
ptg8126863
Chapter 13 Automating the Way You Work 369
Open and Use EnhancedScripting
Open a text editor, and then createa script using any approvedscripting language.
Save the document with thecorrect extension, for example,ActiveLayer.js for JavaScript.
To access the script in Illustrator,click the File menu, point toScripts, and then click OtherScript.
TIMESAVER Press Ctrl+F12(Win) or A+F12 (Mac).
Navigate to the folder or drivewhere your script file is located.
Click the script that you want torun.
Click Open to run the script.
Your script appears in a browserwindow.
6
5
4
3
2
1
4
Sample scriptfolders
6
5

ptg8126863
370 Chapter 13
When you work with objects in Illustrator, you can define variables todrive them in a template document. Data-driven objects make it possi-ble to create multiple versions of an object quickly and precisely. Forexample, you need to produce several web banners using the sametemplate. Instead of creating each banner, one at a time, you can usedata-driven graphics to generate web banners using variables and datasets. Any artwork can be converted into a template for data-drivengraphics by defining variables for objects in the image. A data set is acollection of variables and associated data. You can switch betweendata sets to upload different data into your template. You can work withvariables and data sets in the Variables panel. The left column displaysthe variable name and the right column displays the bound object nameas shown in the Layers panel. There are four types of variables: GraphData, Linked File, Text String, and Visibility.
Defining and EditingData Variables
Create Data Variables
Select the Variables panel.
Select from the available options:
◆ Variable. Click the NewVariable button. To bind it to anobject, select the object andvariable, and then click theMake Object Dynamic or MakeVisibility Dynamic button.
◆ Graph Data. Select the graphobject, and then click the MakeObject Dynamic button.
◆ Linked File. Select the linkedfile, and then click the MakeObject Dynamic button.
◆ Text String. Select the textobject, and then click the MakeObject Dynamic button.
◆ Visibility. Select the object thatyou want to show or hide, andthen click the Make VisibilityDynamic button.
To delete a variable, select it, clickthe Delete Variable button, andthen click Yes or No for alloccurrences.
3
2
1Text Variable
1
Variable
2 3
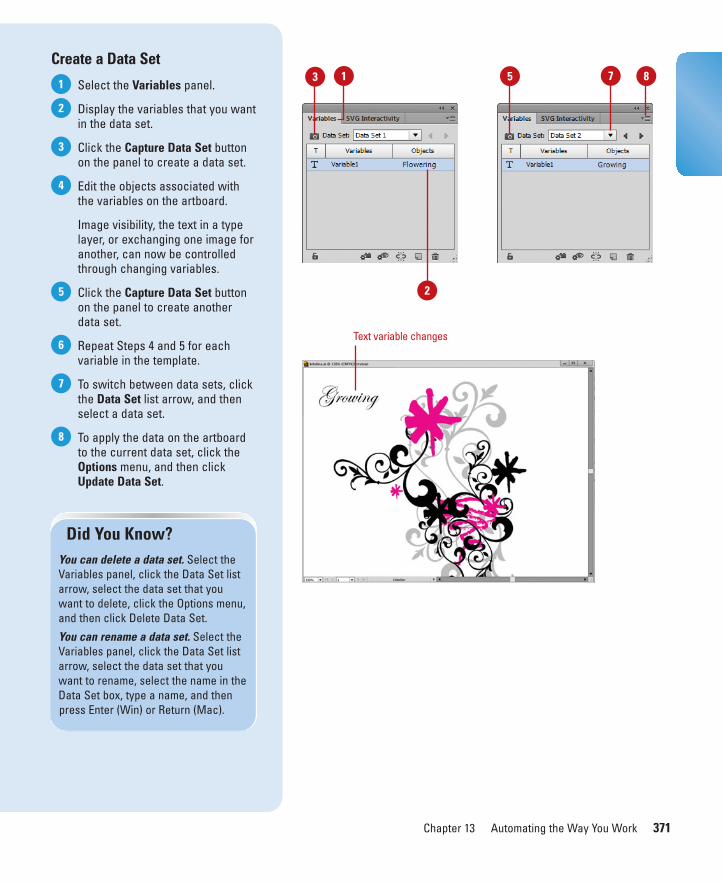
ptg8126863
Chapter 13 Automating the Way You Work 371
Create a Data Set
Select the Variables panel.
Display the variables that you wantin the data set.
Click the Capture Data Set buttonon the panel to create a data set.
Edit the objects associated withthe variables on the artboard.
Image visibility, the text in a typelayer, or exchanging one image foranother, can now be controlledthrough changing variables.
Click the Capture Data Set buttonon the panel to create anotherdata set.
Repeat Steps 4 and 5 for eachvariable in the template.
To switch between data sets, clickthe Data Set list arrow, and thenselect a data set.
To apply the data on the artboardto the current data set, click theOptions menu, and then clickUpdate Data Set.
8
7
6
5
4
3
2
1
Did You Know?You can delete a data set. Select theVariables panel, click the Data Set listarrow, select the data set that youwant to delete, click the Options menu,and then click Delete Data Set.
You can rename a data set. Select theVariables panel, click the Data Set listarrow, select the data set that youwant to rename, select the name in theData Set box, type a name, and thenpress Enter (Win) or Return (Mac).
3 1 5 7
Text variable changes
2
8
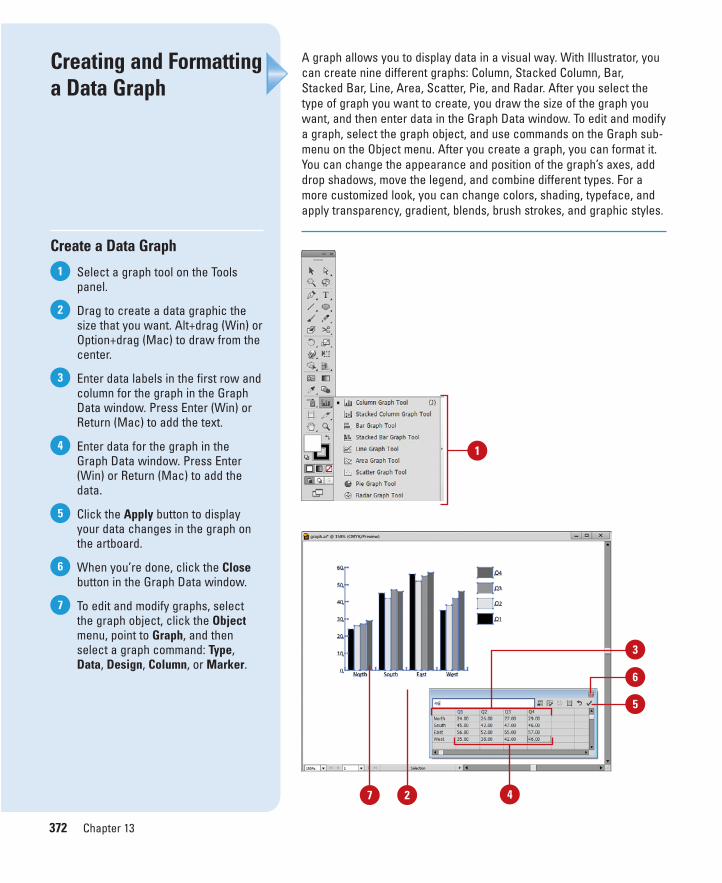
ptg8126863
372 Chapter 13
A graph allows you to display data in a visual way. With Illustrator, youcan create nine different graphs: Column, Stacked Column, Bar,Stacked Bar, Line, Area, Scatter, Pie, and Radar. After you select thetype of graph you want to create, you draw the size of the graph youwant, and then enter data in the Graph Data window. To edit and modifya graph, select the graph object, and use commands on the Graph sub-menu on the Object menu. After you create a graph, you can format it.You can change the appearance and position of the graph’s axes, adddrop shadows, move the legend, and combine different types. For amore customized look, you can change colors, shading, typeface, andapply transparency, gradient, blends, brush strokes, and graphic styles.
Creating and Formattinga Data Graph
Create a Data Graph
Select a graph tool on the Toolspanel.
Drag to create a data graphic thesize that you want. Alt+drag (Win) orOption+drag (Mac) to draw from thecenter.
Enter data labels in the first row andcolumn for the graph in the GraphData window. Press Enter (Win) orReturn (Mac) to add the text.
Enter data for the graph in theGraph Data window. Press Enter(Win) or Return (Mac) to add thedata.
Click the Apply button to displayyour data changes in the graph onthe artboard.
When you’re done, click the Closebutton in the Graph Data window.
To edit and modify graphs, selectthe graph object, click the Objectmenu, point to Graph, and thenselect a graph command: Type,Data, Design, Column, or Marker.
7
6
5
4
3
2
1
1
2
5
6
3
47
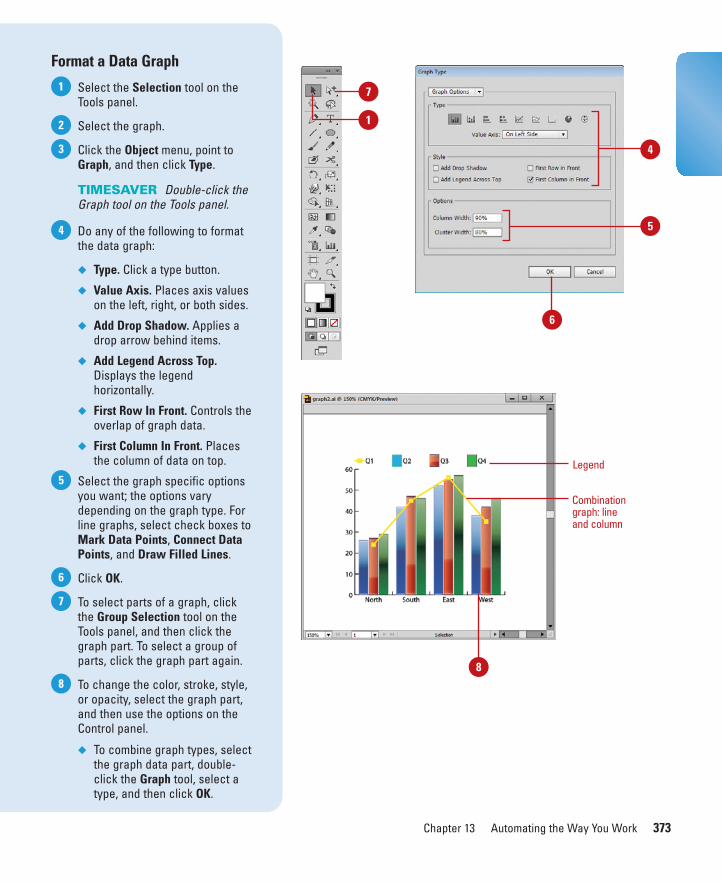
ptg8126863
Chapter 13 Automating the Way You Work 373
Format a Data Graph
Select the Selection tool on theTools panel.
Select the graph.
Click the Object menu, point toGraph, and then click Type.
TIMESAVER Double-click theGraph tool on the Tools panel.
Do any of the following to formatthe data graph:
◆ Type. Click a type button.
◆ Value Axis. Places axis valueson the left, right, or both sides.
◆ Add Drop Shadow. Applies adrop arrow behind items.
◆ Add Legend Across Top.Displays the legendhorizontally.
◆ First Row In Front. Controls theoverlap of graph data.
◆ First Column In Front. Placesthe column of data on top.
Select the graph specific optionsyou want; the options varydepending on the graph type. Forline graphs, select check boxes toMark Data Points, Connect DataPoints, and Draw Filled Lines.
Click OK.
To select parts of a graph, clickthe Group Selection tool on theTools panel, and then click thegraph part. To select a group ofparts, click the graph part again.
To change the color, stroke, style,or opacity, select the graph part,and then use the options on theControl panel.
◆ To combine graph types, selectthe graph data part, double-click the Graph tool, select atype, and then click OK.
8
7
6
5
4
3
2
1 7
4
5
Combinationgraph: lineand column
Legend
1
8
6
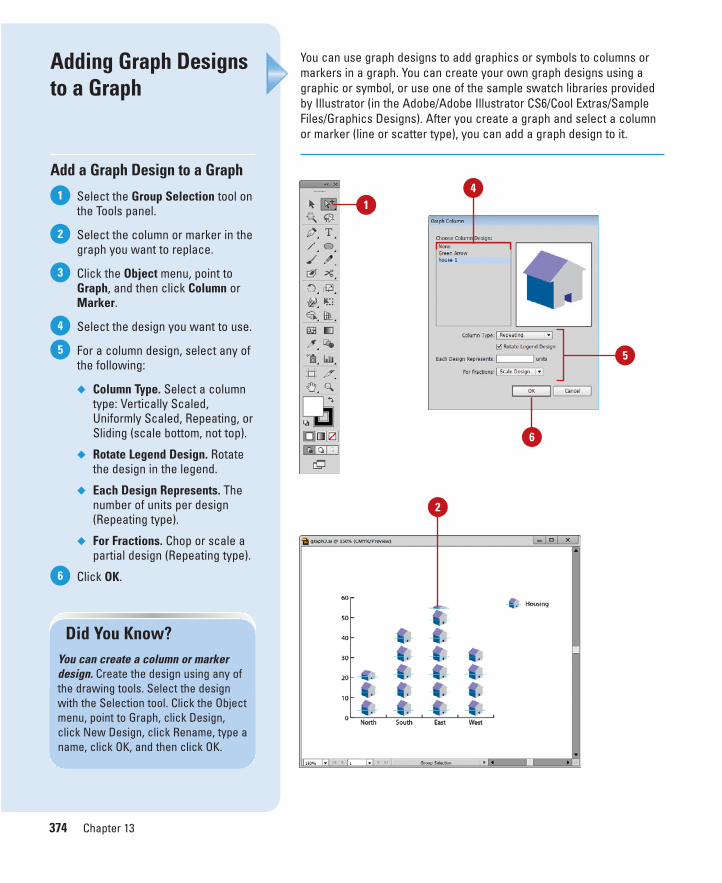
ptg8126863
374 Chapter 13
You can use graph designs to add graphics or symbols to columns ormarkers in a graph. You can create your own graph designs using agraphic or symbol, or use one of the sample swatch libraries providedby Illustrator (in the Adobe/Adobe Illustrator CS6/Cool Extras/SampleFiles/Graphics Designs). After you create a graph and select a columnor marker (line or scatter type), you can add a graph design to it.
Adding Graph Designsto a Graph
Add a Graph Design to a Graph
Select the Group Selection tool onthe Tools panel.
Select the column or marker in thegraph you want to replace.
Click the Object menu, point toGraph, and then click Column orMarker.
Select the design you want to use.
For a column design, select any ofthe following:
◆ Column Type. Select a columntype: Vertically Scaled,Uniformly Scaled, Repeating, orSliding (scale bottom, not top).
◆ Rotate Legend Design. Rotatethe design in the legend.
◆ Each Design Represents. Thenumber of units per design(Repeating type).
◆ For Fractions. Chop or scale apartial design (Repeating type).
Click OK.6
5
4
3
2
1
Did You Know?You can create a column or markerdesign. Create the design using any ofthe drawing tools. Select the designwith the Selection tool. Click the Objectmenu, point to Graph, click Design,click New Design, click Rename, type aname, click OK, and then click OK.
14
2
6
5
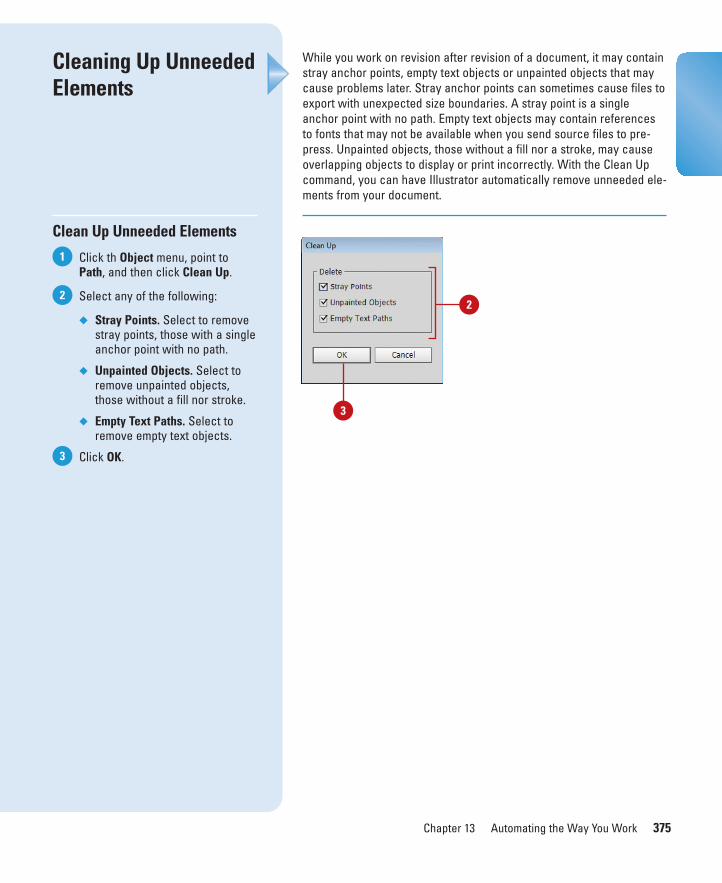
ptg8126863
Chapter 13 Automating the Way You Work 375
While you work on revision after revision of a document, it may containstray anchor points, empty text objects or unpainted objects that maycause problems later. Stray anchor points can sometimes cause files toexport with unexpected size boundaries. A stray point is a singleanchor point with no path. Empty text objects may contain referencesto fonts that may not be available when you send source files to pre-press. Unpainted objects, those without a fill nor a stroke, may causeoverlapping objects to display or print incorrectly. With the Clean Upcommand, you can have Illustrator automatically remove unneeded ele-ments from your document.
Cleaning Up UnneededElements
Clean Up Unneeded Elements
Click th Object menu, point toPath, and then click Clean Up.
Select any of the following:
◆ Stray Points. Select to removestray points, those with a singleanchor point with no path.
◆ Unpainted Objects. Select toremove unpainted objects,those without a fill nor stroke.
◆ Empty Text Paths. Select toremove empty text objects.
Click OK.3
2
1
2
3

ptg8126863
This page intentionally left blank

ptg8126863
Proofing and PrintingDocuments
Introduction
The Print command is probably the most used of allIllustrator's print options. The Print command is a portal toother menus that let you control specific printing functions,such as crop marks and bleeds, output ink, graphics, andcolor management. Color separations divide artwork intofour plates by color, known as process colors. Each plate rep-resents a CMYK (Cyan, Magenta, Yellow, and Black) color. TheSeparations Preview panel allows you to preview color sepa-rations on your screen. You can preview spot color objectsand check for rich black areas and overprinting. If you fre-quently use custom settings to send an Illustrator documentto a local printer or commercial printer for printing, you cansave time by creating a preset. Before you print your docu-ment, it’s important to check the Summary category in thePrint dialog box. The summary information is good to have ifyou’re having problems printing your job at a commercialprinter.
When you save a document, you have the ability to savemore than just Illustrator information. You can save copy-right, camera, and even image category information. Thisdata is saved with the file as metadata in the XMP format(Extensible Metadata Platform) in Illustrator files, and can berecognized and accessed by any application, such as AdobeBridge, that reads XMP metadata. The Document Info panelallows you to view information about a selected object or theentire document. You can display information about graphicstyles, brushes, spot colors, patterns, gradients, fonts, linkedimages, and embedded images by using the Options menu. 14
14What You’ll Do
Use Spell Check
Use the Custom Dictionary
Find and Replace Text and Elements
Find and Change Fonts
Print a Document
Print with Presets
Set General Print Options
Set Marks and Bleed Options
Set Graphics Options
Preview Color Separations
Set Output Options
Set Advanced Options
Set Color Management Options
Check for Print Problems
Insert File Information
Use the Document Info Panel
377

ptg8126863
378 Chapter 14
There's nothing more embarrassing than creating a document that con-tains misspelled words. Although you wouldn't use Illustrator if all youneeded to do was create a text document, Illustrator includes a fullyfunctional spell checking system, which at least lets you make sure allof your words are spelled correctly.
Using Spell Check
Use Spell Check
Open a document that containsone or more Type objects.
Click the Edit menu, and then clickCheck Spelling.
Click Start.
When Illustrator encounters aword not in its dictionary, itdisplays that word in the Word NotFound box, and allows you tochoose one of the followingoptions:
◆ Ignore. Ignore this word onetime.
◆ Ignore All. Ignore all instancesof this word.
◆ Change. Change the word,based on the selectedsuggestion.
◆ Change All. Change alloccurrences of the word,based on the selectedsuggestion.
◆ Add. Add the word toIllustrator's dictionary.
Illustrator continues to highlightmisspelled words until thedocument is completely scanned.
To specify additional find andignore options, click the Optionsarrow.
When you’re finished, click Done.6
5
4
3
2
1
Highlighted word identified by spell checker.
1
4
5
3
6
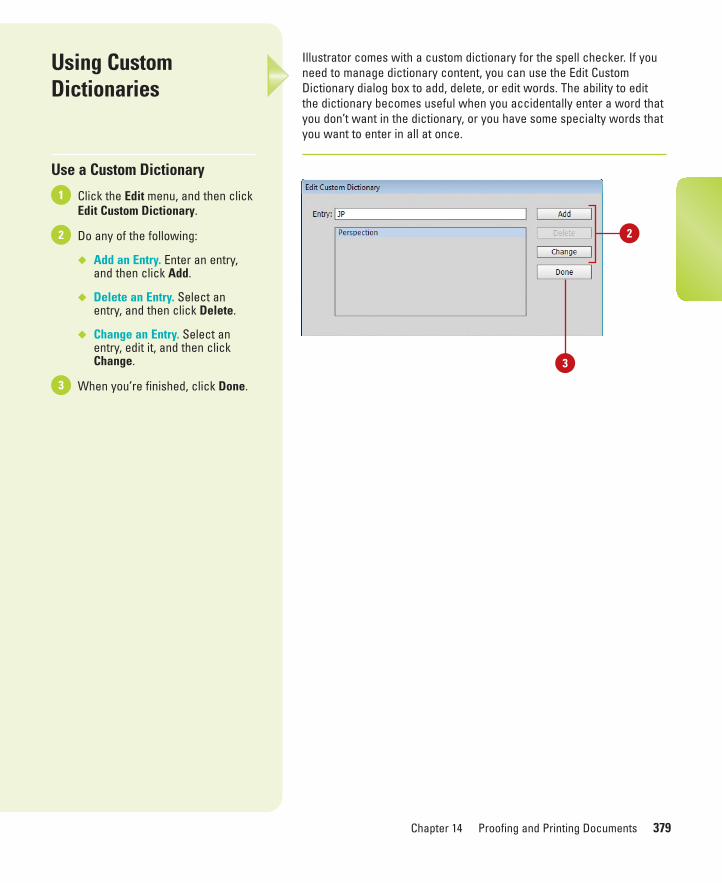
ptg8126863
Chapter 14 Proofing and Printing Documents 379
Illustrator comes with a custom dictionary for the spell checker. If youneed to manage dictionary content, you can use the Edit CustomDictionary dialog box to add, delete, or edit words. The ability to editthe dictionary becomes useful when you accidentally enter a word thatyou don’t want in the dictionary, or you have some specialty words thatyou want to enter in all at once.
Using CustomDictionaries
Use a Custom Dictionary
Click the Edit menu, and then clickEdit Custom Dictionary.
Do any of the following:
◆ Add an Entry. Enter an entry,and then click Add.
◆ Delete an Entry. Select anentry, and then click Delete.
◆ Change an Entry. Select anentry, edit it, and then clickChange.
When you’re finished, click Done.3
2
1
2
3
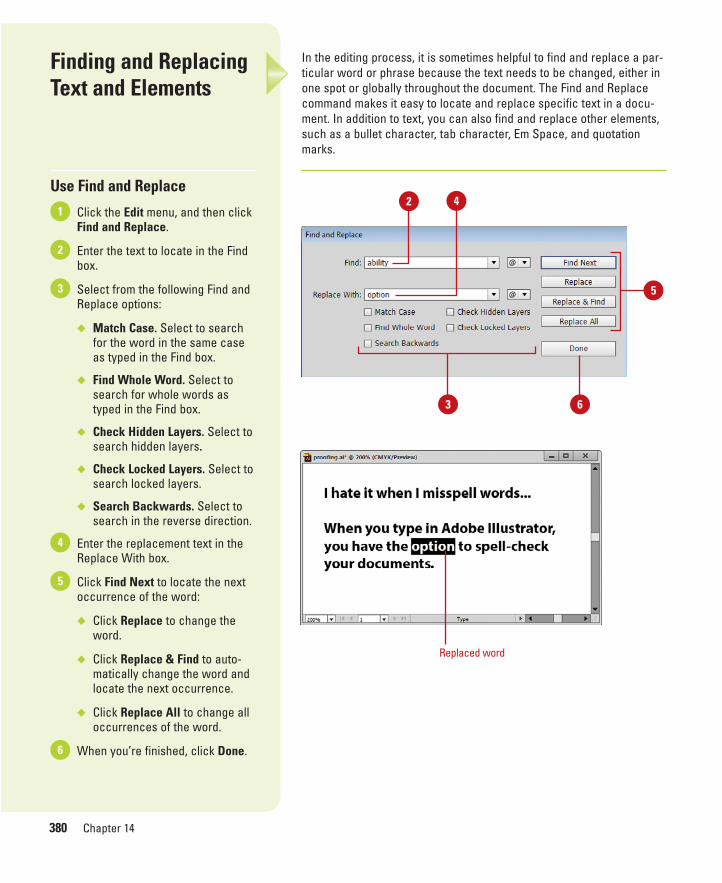
ptg8126863
380 Chapter 14
Finding and ReplacingText and Elements
Use Find and Replace
Click the Edit menu, and then clickFind and Replace.
Enter the text to locate in the Findbox.
Select from the following Find andReplace options:
◆ Match Case. Select to searchfor the word in the same caseas typed in the Find box.
◆ Find Whole Word. Select tosearch for whole words astyped in the Find box.
◆ Check Hidden Layers. Select tosearch hidden layers.
◆ Check Locked Layers. Select tosearch locked layers.
◆ Search Backwards. Select tosearch in the reverse direction.
Enter the replacement text in theReplace With box.
Click Find Next to locate the nextoccurrence of the word:
◆ Click Replace to change theword.
◆ Click Replace & Find to auto-matically change the word andlocate the next occurrence.
◆ Click Replace All to change alloccurrences of the word.
When you’re finished, click Done.6
5
4
3
2
12 4
5
In the editing process, it is sometimes helpful to find and replace a par-ticular word or phrase because the text needs to be changed, either inone spot or globally throughout the document. The Find and Replacecommand makes it easy to locate and replace specific text in a docu-ment. In addition to text, you can also find and replace other elements,such as a bullet character, tab character, Em Space, and quotationmarks.
Replaced word
3 6
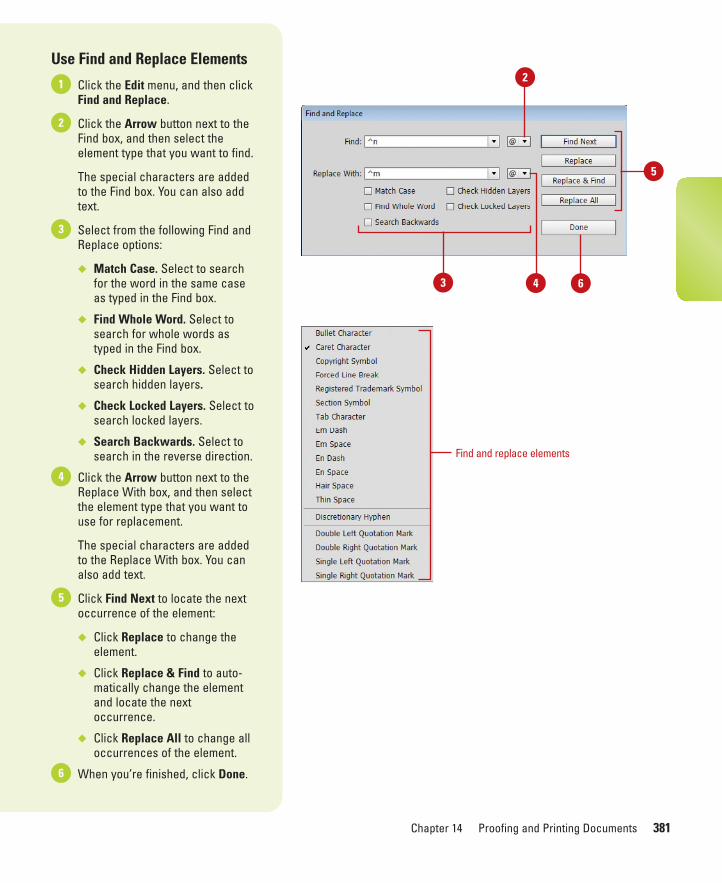
ptg8126863
Chapter 14 Proofing and Printing Documents 381
Use Find and Replace Elements
Click the Edit menu, and then clickFind and Replace.
Click the Arrow button next to theFind box, and then select theelement type that you want to find.
The special characters are addedto the Find box. You can also addtext.
Select from the following Find andReplace options:
◆ Match Case. Select to searchfor the word in the same caseas typed in the Find box.
◆ Find Whole Word. Select tosearch for whole words astyped in the Find box.
◆ Check Hidden Layers. Select tosearch hidden layers.
◆ Check Locked Layers. Select tosearch locked layers.
◆ Search Backwards. Select tosearch in the reverse direction.
Click the Arrow button next to theReplace With box, and then selectthe element type that you want touse for replacement.
The special characters are addedto the Replace With box. You canalso add text.
Click Find Next to locate the nextoccurrence of the element:
◆ Click Replace to change theelement.
◆ Click Replace & Find to auto-matically change the elementand locate the nextoccurrence.
◆ Click Replace All to change alloccurrences of the element.
When you’re finished, click Done.6
5
4
3
2
1
Find and replace elements
2
5
3 64

ptg8126863
382 Chapter 14
Finding and ChangingFonts
Find or Change a Font
Click the Type menu, and thenclick Find Font.
The fonts in the top list are theones currently used in yourdocument. The list at the bottomdisplays fonts in your document oron your computer, depending onyour setting.
To find a specific font, select it inthe top list.
Select the check boxes at thebottom to specify the fontattributes that you want to find.
To replace the font in the top list,select a font in the bottom list.Click the Replace With Font Fromlist arrow, and then click System toshow all the fonts on yourcomputer.
Click Find to display the firstinstance of the font, and then clickChange to replace it, or clickChange All to replace all uses ofthe font in your document.
When you’re done, click Done.6
5
4
3
2
1
Say you create some artwork using a certain font. After the customeror client reviews, they ask you to change it. Instead of manually chang-ing each use of the font, you can use the Find Font command to quicklyfind and change every instance of the font in your document. If you’renot sure what fonts are used in your document, the Find Font dialog boxgives you a list. If there are paragraphs with inconsistent use of capi-talization in your document, you can also use change case options tofix them.
5
2
6
4
3
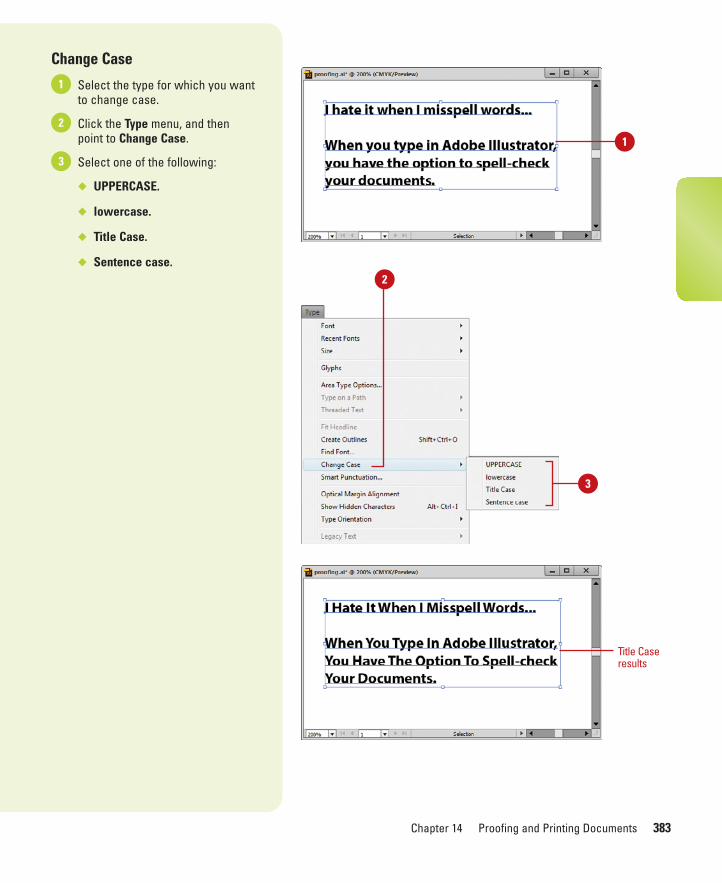
ptg8126863
Chapter 14 Proofing and Printing Documents 383
Change Case
Select the type for which you wantto change case.
Click the Type menu, and thenpoint to Change Case.
Select one of the following:
◆ UPPERCASE.
◆ lowercase.
◆ Title Case.
◆ Sentence case.
3
2
1
1
3
2
Title Caseresults
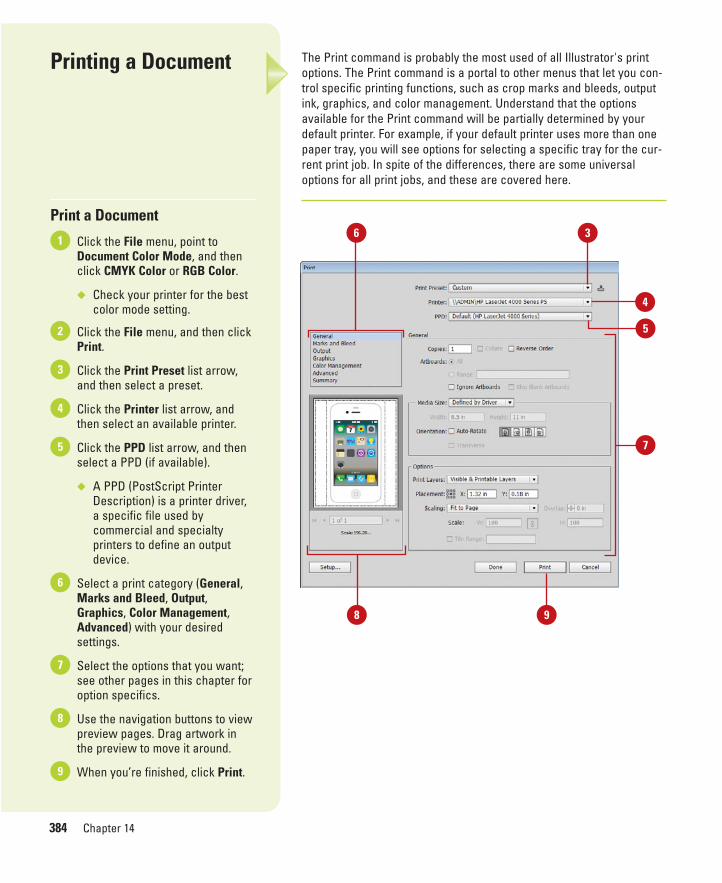
ptg8126863
384 Chapter 14
Printing a Document
Print a Document
Click the File menu, point toDocument Color Mode, and thenclick CMYK Color or RGB Color.
◆ Check your printer for the bestcolor mode setting.
Click the File menu, and then clickPrint.
Click the Print Preset list arrow,and then select a preset.
Click the Printer list arrow, andthen select an available printer.
Click the PPD list arrow, and thenselect a PPD (if available).
◆ A PPD (PostScript PrinterDescription) is a printer driver,a specific file used bycommercial and specialtyprinters to define an outputdevice.
Select a print category (General,Marks and Bleed, Output,Graphics, Color Management,Advanced) with your desiredsettings.
Select the options that you want;see other pages in this chapter foroption specifics.
Use the navigation buttons to viewpreview pages. Drag artwork inthe preview to move it around.
When you’re finished, click Print.9
8
7
6
5
4
3
2
1
The Print command is probably the most used of all Illustrator's printoptions. The Print command is a portal to other menus that let you con-trol specific printing functions, such as crop marks and bleeds, outputink, graphics, and color management. Understand that the optionsavailable for the Print command will be partially determined by yourdefault printer. For example, if your default printer uses more than onepaper tray, you will see options for selecting a specific tray for the cur-rent print job. In spite of the differences, there are some universaloptions for all print jobs, and these are covered here.
7
3
4
5
6
98
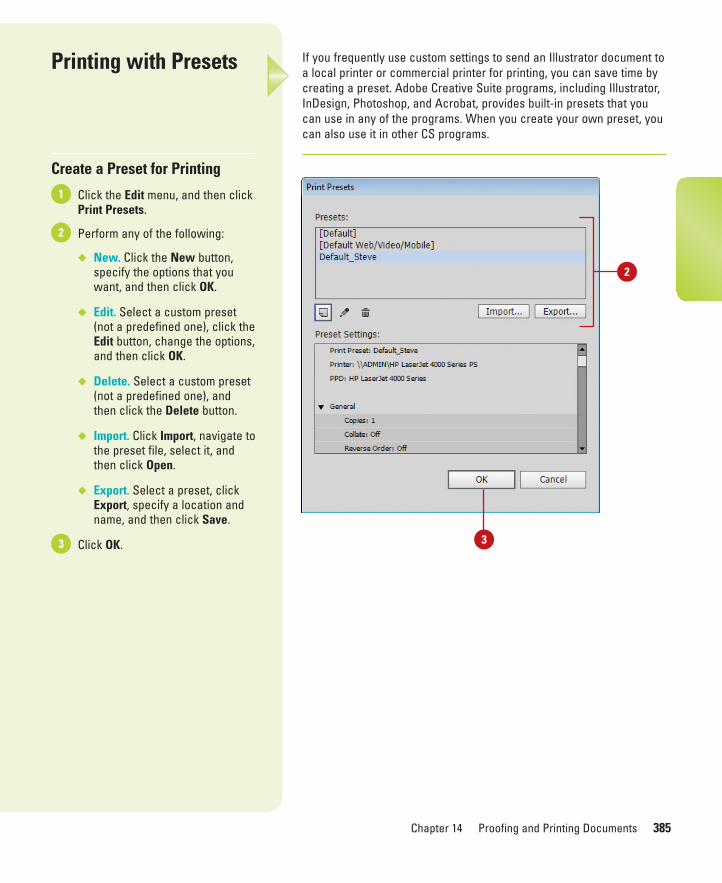
ptg8126863
Chapter 14 Proofing and Printing Documents 385
Printing with Presets
Create a Preset for Printing
Click the Edit menu, and then clickPrint Presets.
Perform any of the following:
◆ New. Click the New button,specify the options that youwant, and then click OK.
◆ Edit. Select a custom preset(not a predefined one), click theEdit button, change the options,and then click OK.
◆ Delete. Select a custom preset(not a predefined one), andthen click the Delete button.
◆ Import. Click Import, navigate tothe preset file, select it, andthen click Open.
◆ Export. Select a preset, clickExport, specify a location andname, and then click Save.
Click OK.3
2
1
If you frequently use custom settings to send an Illustrator document toa local printer or commercial printer for printing, you can save time bycreating a preset. Adobe Creative Suite programs, including Illustrator,InDesign, Photoshop, and Acrobat, provides built-in presets that youcan use in any of the programs. When you create your own preset, youcan also use it in other CS programs.
2
3
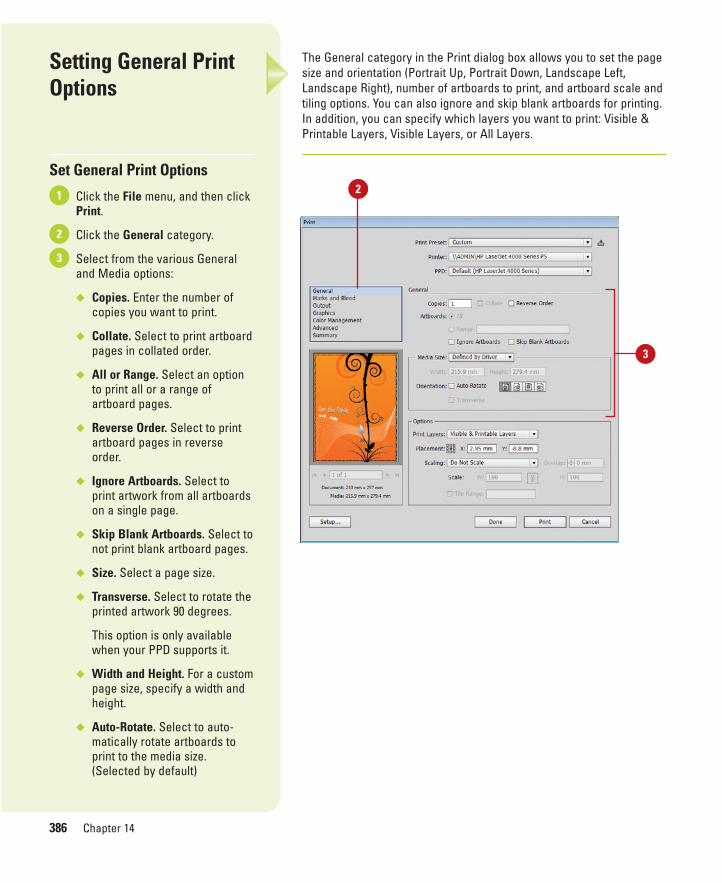
ptg8126863
386 Chapter 14
Setting General PrintOptions
Set General Print Options
Click the File menu, and then clickPrint.
Click the General category.
Select from the various Generaland Media options:
◆ Copies. Enter the number ofcopies you want to print.
◆ Collate. Select to print artboardpages in collated order.
◆ All or Range. Select an optionto print all or a range ofartboard pages.
◆ Reverse Order. Select to printartboard pages in reverseorder.
◆ Ignore Artboards. Select toprint artwork from all artboardson a single page.
◆ Skip Blank Artboards. Select tonot print blank artboard pages.
◆ Size. Select a page size.
◆ Transverse. Select to rotate theprinted artwork 90 degrees.
This option is only availablewhen your PPD supports it.
◆ Width and Height. For a custompage size, specify a width andheight.
◆ Auto-Rotate. Select to auto-matically rotate artboards toprint to the media size.(Selected by default)
3
2
1
The General category in the Print dialog box allows you to set the pagesize and orientation (Portrait Up, Portrait Down, Landscape Left,Landscape Right), number of artboards to print, and artboard scale andtiling options. You can also ignore and skip blank artboards for printing.In addition, you can specify which layers you want to print: Visible &Printable Layers, Visible Layers, or All Layers.
3
2
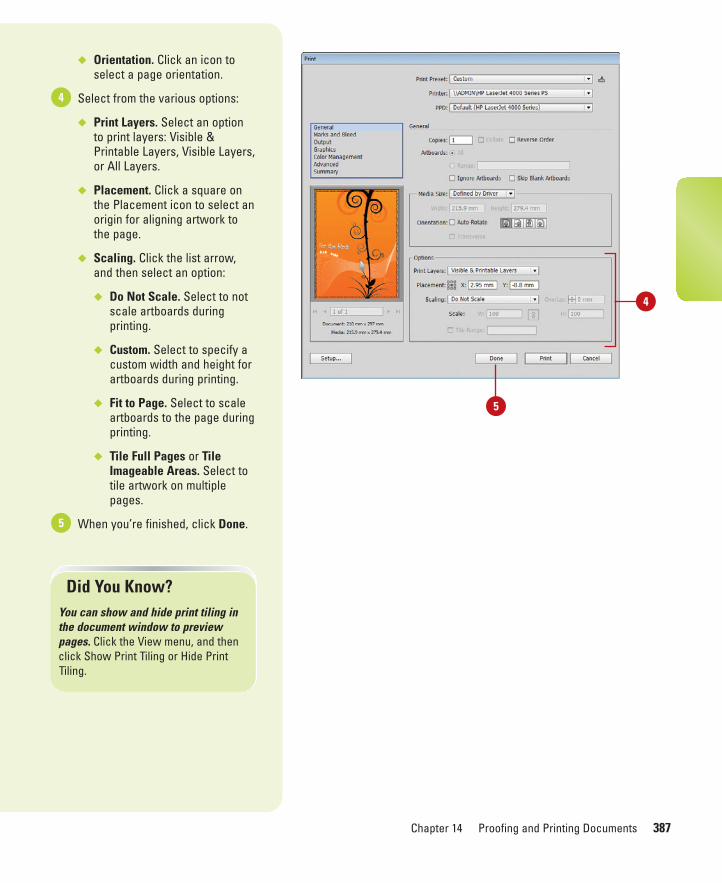
ptg8126863
Chapter 14 Proofing and Printing Documents 387
◆ Orientation. Click an icon toselect a page orientation.
Select from the various options:
◆ Print Layers. Select an optionto print layers: Visible &Printable Layers, Visible Layers,or All Layers.
◆ Placement. Click a square onthe Placement icon to select anorigin for aligning artwork tothe page.
◆ Scaling. Click the list arrow,and then select an option:
◆ Do Not Scale. Select to notscale artboards duringprinting.
◆ Custom. Select to specify acustom width and height forartboards during printing.
◆ Fit to Page. Select to scaleartboards to the page duringprinting.
◆ Tile Full Pages or TileImageable Areas. Select totile artwork on multiplepages.
When you’re finished, click Done.5
4
Did You Know?You can show and hide print tiling inthe document window to previewpages. Click the View menu, and thenclick Show Print Tiling or Hide PrintTiling.
4
5
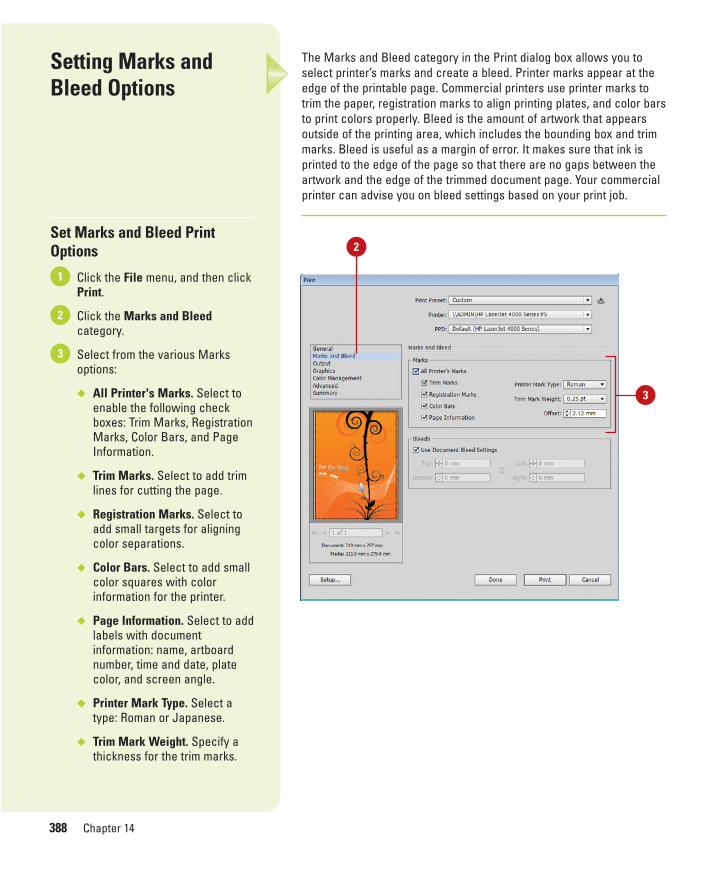
ptg8126863
388 Chapter 14
Setting Marks andBleed Options
Set Marks and Bleed PrintOptions
Click the File menu, and then clickPrint.
Click the Marks and Bleedcategory.
Select from the various Marksoptions:
◆ All Printer's Marks. Select toenable the following checkboxes: Trim Marks, RegistrationMarks, Color Bars, and PageInformation.
◆ Trim Marks. Select to add trimlines for cutting the page.
◆ Registration Marks. Select toadd small targets for aligningcolor separations.
◆ Color Bars. Select to add smallcolor squares with colorinformation for the printer.
◆ Page Information. Select to addlabels with documentinformation: name, artboardnumber, time and date, platecolor, and screen angle.
◆ Printer Mark Type. Select atype: Roman or Japanese.
◆ Trim Mark Weight. Specify athickness for the trim marks.
3
2
1
The Marks and Bleed category in the Print dialog box allows you toselect printer’s marks and create a bleed. Printer marks appear at theedge of the printable page. Commercial printers use printer marks totrim the paper, registration marks to align printing plates, and color barsto print colors properly. Bleed is the amount of artwork that appearsoutside of the printing area, which includes the bounding box and trimmarks. Bleed is useful as a margin of error. It makes sure that ink isprinted to the edge of the page so that there are no gaps between theartwork and the edge of the trimmed document page. Your commercialprinter can advise you on bleed settings based on your print job.
2
3

ptg8126863
Chapter 14 Proofing and Printing Documents 389
◆ Offset. Specify an offset value(0-72 points) for the distancebetween trim marks and thebounding box.
Enter an offset value to makesure that any printer’s markswill not be overlapped by thebleed.
Select from the various Bleedsoptions:
◆ Use Document Bleed Settings.Select to use bleed settingsdefined in the New Documentdialog box.
◆ Top, Left, Bottom, and Right.Enter values to define the bleedarea.
Your commercial printer canadvise you on bleed settingsbased on your print job.
When you’re finished, click Done.5
4
4
5

ptg8126863
390 Chapter 14
Setting Graphics Options
Set Graphics Print Options
Click the File menu, and then clickPrint.
Click the Graphics category.
Select from the various Graphicsoptions:
◆ Flatness (Paths). Select theAutomatic check box to use asetting supplied by Illustrator.
If you have problems printing adocument, adjust the Flatnesslevel, and then reprint it.
◆ Download (Fonts). Select adownload option: None, Subset(only characters, or glyphs,used), or Complete (all fontsused).
◆ PostScript (Options). Choosefrom Language Level 2 orLanguage Level 3. Level 3delivers the best speed andquality if you are printing to aPostScript 3 device.
◆ Data Format (Options). ChooseASCII or Binary to determinehow the data is sent to theprinter.
◆ Compatible Gradient andGradient Mesh Printing. Selectonly if you're having problemsprinting gradients or gradientmeshes.
When you’re finished, click Done.4
3
2
1
The Graphics category in the Print dialog box allows you to set printingoptions for paths, fonts, PostScript files, gradients, meshes, and blends.The Flatness option (under Paths) controls how well objects in yourdocument print on a PostScript printer. The Automatic setting is recom-mended. If a document has problems printing, adjust the Flatness level.When you include type in your document, the fonts that you use in yourdocument need to be downloaded to your printer.
2
3
4
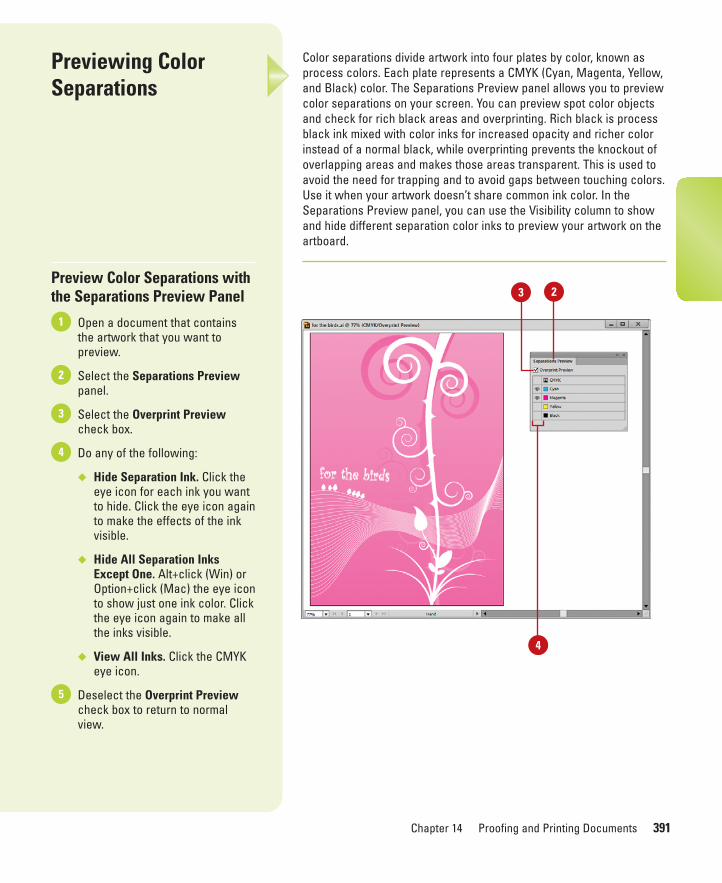
ptg8126863
Chapter 14 Proofing and Printing Documents 391
Previewing ColorSeparations
Preview Color Separations withthe Separations Preview Panel
Open a document that containsthe artwork that you want topreview.
Select the Separations Previewpanel.
Select the Overprint Previewcheck box.
Do any of the following:
◆ Hide Separation Ink. Click theeye icon for each ink you wantto hide. Click the eye icon againto make the effects of the inkvisible.
◆ Hide All Separation InksExcept One. Alt+click (Win) orOption+click (Mac) the eye iconto show just one ink color. Clickthe eye icon again to make allthe inks visible.
◆ View All Inks. Click the CMYKeye icon.
Deselect the Overprint Previewcheck box to return to normalview.
5
4
3
2
1
Color separations divide artwork into four plates by color, known asprocess colors. Each plate represents a CMYK (Cyan, Magenta, Yellow,and Black) color. The Separations Preview panel allows you to previewcolor separations on your screen. You can preview spot color objectsand check for rich black areas and overprinting. Rich black is processblack ink mixed with color inks for increased opacity and richer colorinstead of a normal black, while overprinting prevents the knockout ofoverlapping areas and makes those areas transparent. This is used toavoid the need for trapping and to avoid gaps between touching colors.Use it when your artwork doesn’t share common ink color. In theSeparations Preview panel, you can use the Visibility column to showand hide different separation color inks to preview your artwork on theartboard.
23
4
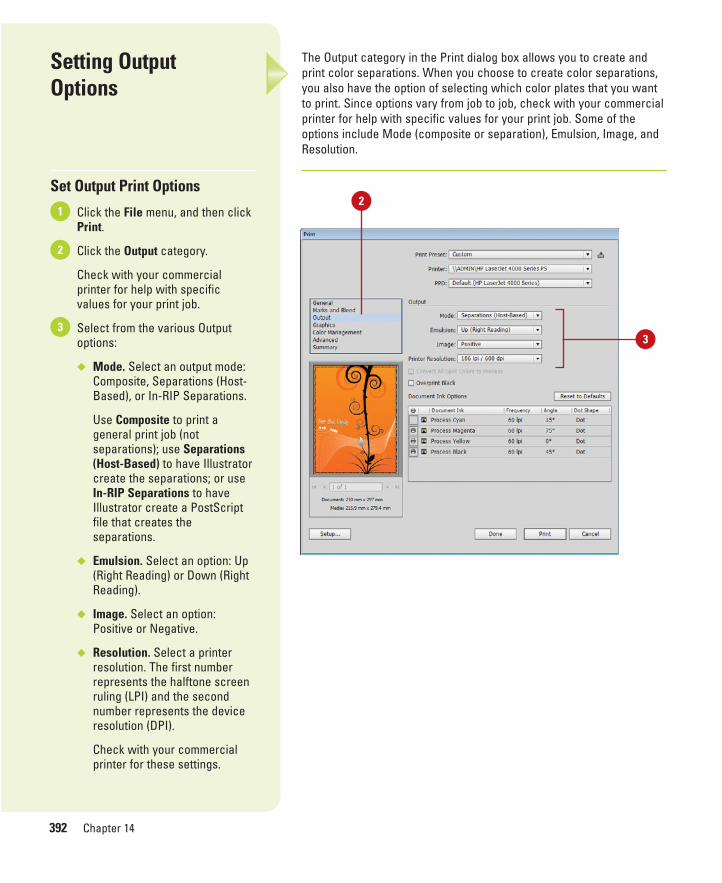
ptg8126863
392 Chapter 14
Setting Output Options
Set Output Print Options
Click the File menu, and then clickPrint.
Click the Output category.
Check with your commercialprinter for help with specificvalues for your print job.
Select from the various Outputoptions:
◆ Mode. Select an output mode:Composite, Separations (Host-Based), or In-RIP Separations.
Use Composite to print ageneral print job (notseparations); use Separations(Host-Based) to have Illustratorcreate the separations; or useIn-RIP Separations to haveIllustrator create a PostScriptfile that creates theseparations.
◆ Emulsion. Select an option: Up(Right Reading) or Down (RightReading).
◆ Image. Select an option:Positive or Negative.
◆ Resolution. Select a printerresolution. The first numberrepresents the halftone screenruling (LPI) and the secondnumber represents the deviceresolution (DPI).
Check with your commercialprinter for these settings.
3
2
1
The Output category in the Print dialog box allows you to create andprint color separations. When you choose to create color separations,you also have the option of selecting which color plates that you wantto print. Since options vary from job to job, check with your commercialprinter for help with specific values for your print job. Some of theoptions include Mode (composite or separation), Emulsion, Image, andResolution.
2
3
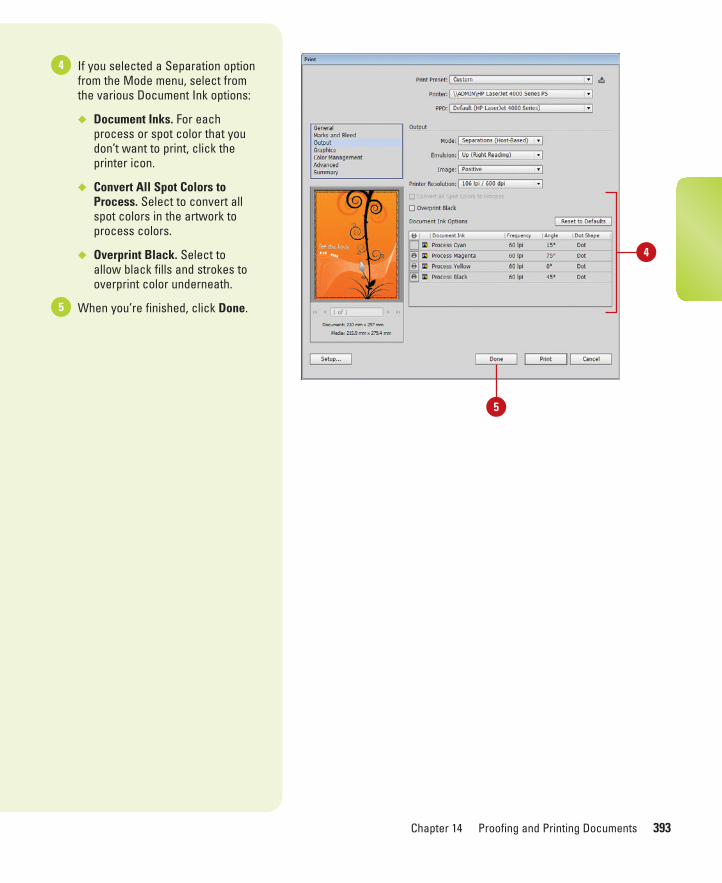
ptg8126863
Chapter 14 Proofing and Printing Documents 393
If you selected a Separation optionfrom the Mode menu, select fromthe various Document Ink options:
◆ Document Inks. For eachprocess or spot color that youdon’t want to print, click theprinter icon.
◆ Convert All Spot Colors toProcess. Select to convert allspot colors in the artwork toprocess colors.
◆ Overprint Black. Select toallow black fills and strokes tooverprint color underneath.
When you’re finished, click Done.5
4
4
5
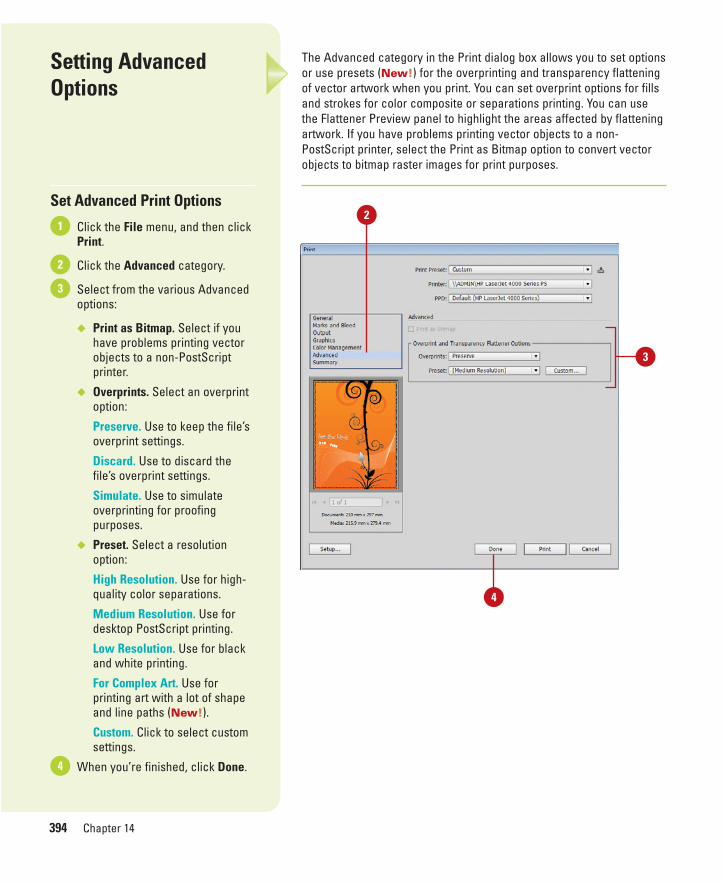
ptg8126863
394 Chapter 14
Setting AdvancedOptions
Set Advanced Print Options
Click the File menu, and then clickPrint.
Click the Advanced category.
Select from the various Advancedoptions:
◆ Print as Bitmap. Select if youhave problems printing vectorobjects to a non-PostScriptprinter.
◆ Overprints. Select an overprintoption:
Preserve. Use to keep the file’soverprint settings.
Discard. Use to discard thefile’s overprint settings.
Simulate. Use to simulateoverprinting for proofingpurposes.
◆ Preset. Select a resolutionoption:
High Resolution. Use for high-quality color separations.
Medium Resolution. Use fordesktop PostScript printing.
Low Resolution. Use for blackand white printing.
For Complex Art. Use forprinting art with a lot of shapeand line paths (New!).
Custom. Click to select customsettings.
When you’re finished, click Done.4
3
2
1
The Advanced category in the Print dialog box allows you to set optionsor use presets (New!) for the overprinting and transparency flatteningof vector artwork when you print. You can set overprint options for fillsand strokes for color composite or separations printing. You can usethe Flattener Preview panel to highlight the areas affected by flatteningartwork. If you have problems printing vector objects to a non-PostScript printer, select the Print as Bitmap option to convert vectorobjects to bitmap raster images for print purposes.
3
2
4
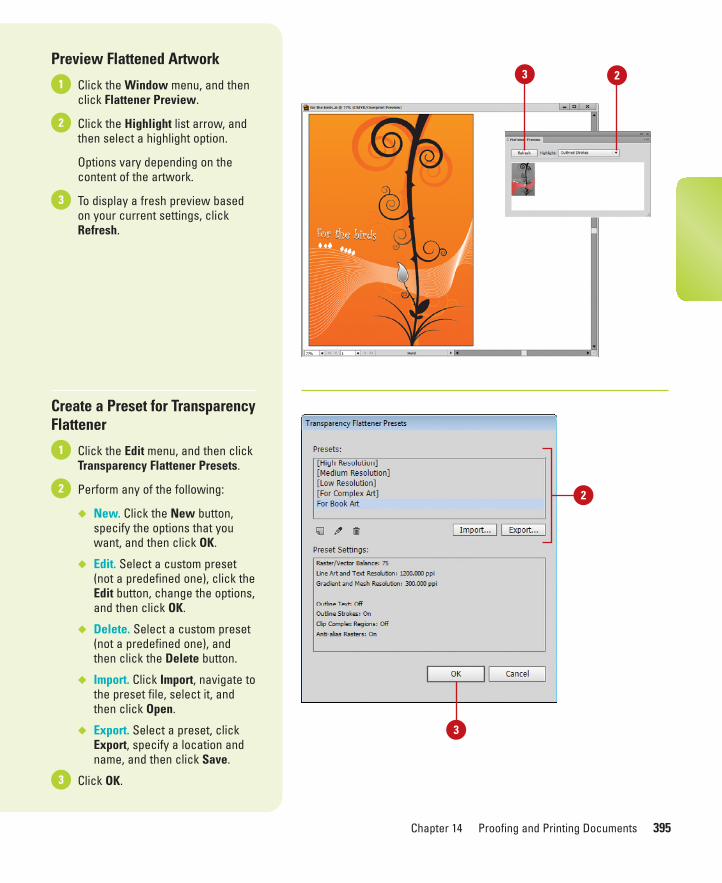
ptg8126863
Chapter 14 Proofing and Printing Documents 395
Preview Flattened Artwork
Click the Window menu, and thenclick Flattener Preview.
Click the Highlight list arrow, andthen select a highlight option.
Options vary depending on thecontent of the artwork.
To display a fresh preview basedon your current settings, clickRefresh.
Create a Preset for TransparencyFlattener
Click the Edit menu, and then clickTransparency Flattener Presets.
Perform any of the following:
◆ New. Click the New button,specify the options that youwant, and then click OK.
◆ Edit. Select a custom preset(not a predefined one), click theEdit button, change the options,and then click OK.
◆ Delete. Select a custom preset(not a predefined one), andthen click the Delete button.
◆ Import. Click Import, navigate tothe preset file, select it, andthen click Open.
◆ Export. Select a preset, clickExport, specify a location andname, and then click Save.
Click OK.3
2
1
3
2
1
2
23
3
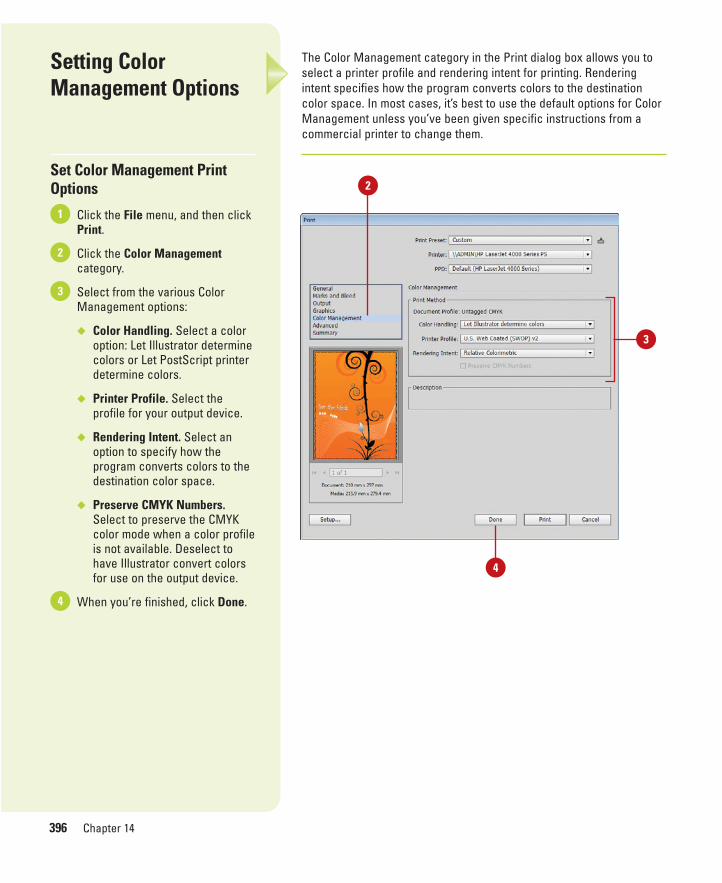
ptg8126863
396 Chapter 14
Setting ColorManagement Options
Set Color Management PrintOptions
Click the File menu, and then clickPrint.
Click the Color Managementcategory.
Select from the various ColorManagement options:
◆ Color Handling. Select a coloroption: Let Illustrator determinecolors or Let PostScript printerdetermine colors.
◆ Printer Profile. Select theprofile for your output device.
◆ Rendering Intent. Select anoption to specify how theprogram converts colors to thedestination color space.
◆ Preserve CMYK Numbers.Select to preserve the CMYKcolor mode when a color profileis not available. Deselect tohave Illustrator convert colorsfor use on the output device.
When you’re finished, click Done.4
3
2
1
The Color Management category in the Print dialog box allows you toselect a printer profile and rendering intent for printing. Renderingintent specifies how the program converts colors to the destinationcolor space. In most cases, it’s best to use the default options for ColorManagement unless you’ve been given specific instructions from acommercial printer to change them.
3
2
4
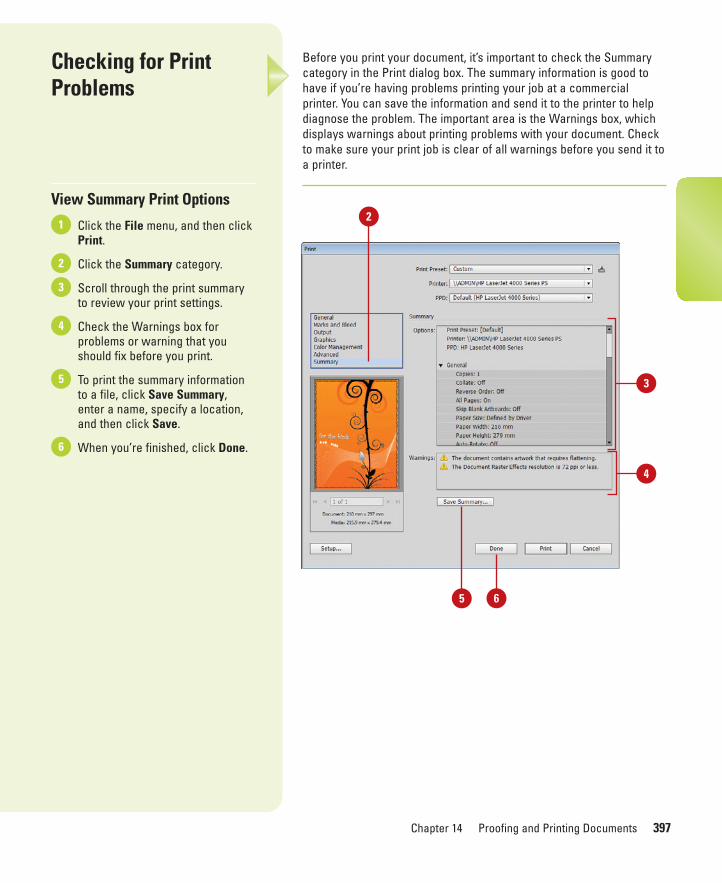
ptg8126863
Chapter 14 Proofing and Printing Documents 397
Checking for PrintProblems
View Summary Print Options
Click the File menu, and then clickPrint.
Click the Summary category.
Scroll through the print summaryto review your print settings.
Check the Warnings box forproblems or warning that youshould fix before you print.
To print the summary informationto a file, click Save Summary,enter a name, specify a location,and then click Save.
When you’re finished, click Done.6
5
4
3
2
1
Before you print your document, it’s important to check the Summarycategory in the Print dialog box. The summary information is good tohave if you’re having problems printing your job at a commercialprinter. You can save the information and send it to the printer to helpdiagnose the problem. The important area is the Warnings box, whichdisplays warnings about printing problems with your document. Checkto make sure your print job is clear of all warnings before you send it toa printer.
5
4
3
2
6
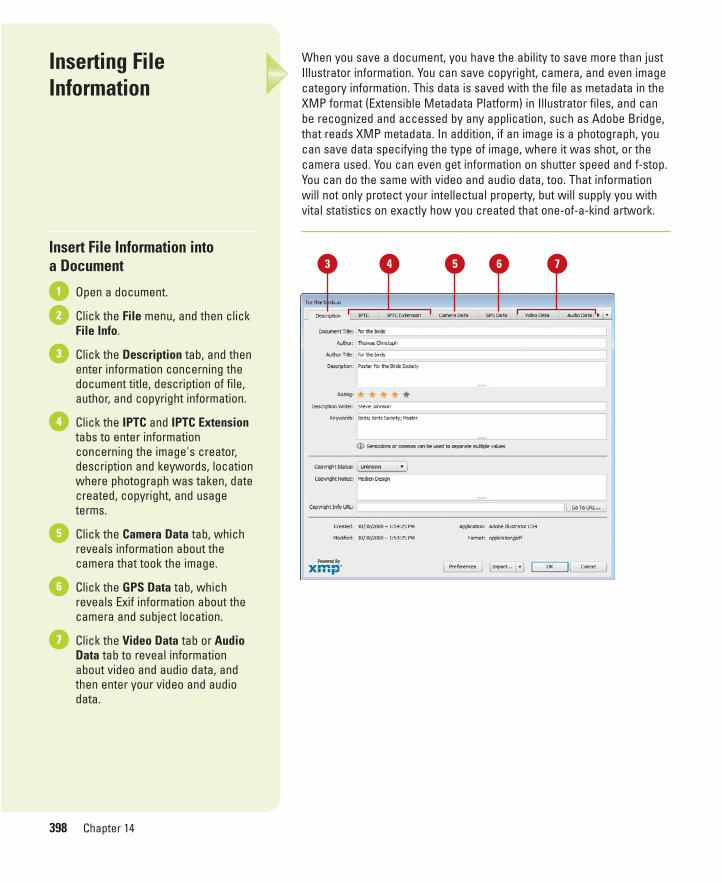
ptg8126863
398 Chapter 14
When you save a document, you have the ability to save more than justIllustrator information. You can save copyright, camera, and even imagecategory information. This data is saved with the file as metadata in theXMP format (Extensible Metadata Platform) in Illustrator files, and canbe recognized and accessed by any application, such as Adobe Bridge,that reads XMP metadata. In addition, if an image is a photograph, youcan save data specifying the type of image, where it was shot, or thecamera used. You can even get information on shutter speed and f-stop.You can do the same with video and audio data, too. That informationwill not only protect your intellectual property, but will supply you withvital statistics on exactly how you created that one-of-a-kind artwork.
Inserting FileInformation
Insert File Information into a Document
Open a document.
Click the File menu, and then clickFile Info.
Click the Description tab, and thenenter information concerning thedocument title, description of file,author, and copyright information.
Click the IPTC and IPTC Extensiontabs to enter informationconcerning the image's creator,description and keywords, locationwhere photograph was taken, datecreated, copyright, and usageterms.
Click the Camera Data tab, whichreveals information about thecamera that took the image.
Click the GPS Data tab, whichreveals Exif information about thecamera and subject location.
Click the Video Data tab or AudioData tab to reveal informationabout video and audio data, andthen enter your video and audiodata.
7
6
5
4
3
2
1
3 4 5 76

ptg8126863
Chapter 14 Proofing and Printing Documents 399
Click the Mobile SWF tab, andthen enter the file information fora mobile SWF document.
Click the Categories tab, and thenenter category keywords forsearch purposes.
Click the Origin tab, and thenenter data pertaining to the originof the image.
Click the DICOM tab, and thenenter data pertaining to the DigitalImaging and Communications inMedicine options (patient name,ID, etc.).
Click the History tab to viewhistorical information about theactive document, such as dateslast opened and saved, and a listof image adjustments.
Click the Advanced tab to view additional information on the active document, such as EXIF,and PDF document properties.
Click OK.14
13
12
11
10
9
8
Did You Know?You can add metadata to files saved inthe PSD, PDF, EPS, PNG, GIF, JPEG,and TIFF formats. The information isembedded in the file using XMP(Extensible Metadata Platform). Thisallows metadata to be exchangedbetween Adobe applications andacross operating systems.
You can use the XMP SoftwareDevelopment Kit to customize the creation, processing, and interchangeof metadata. You can also use the XMPkit to add fields to the File Info dialogbox. For information on XMP and theXMP SDK, check the Adobe SolutionsNetwork.
8 9
14
10 11 12 13
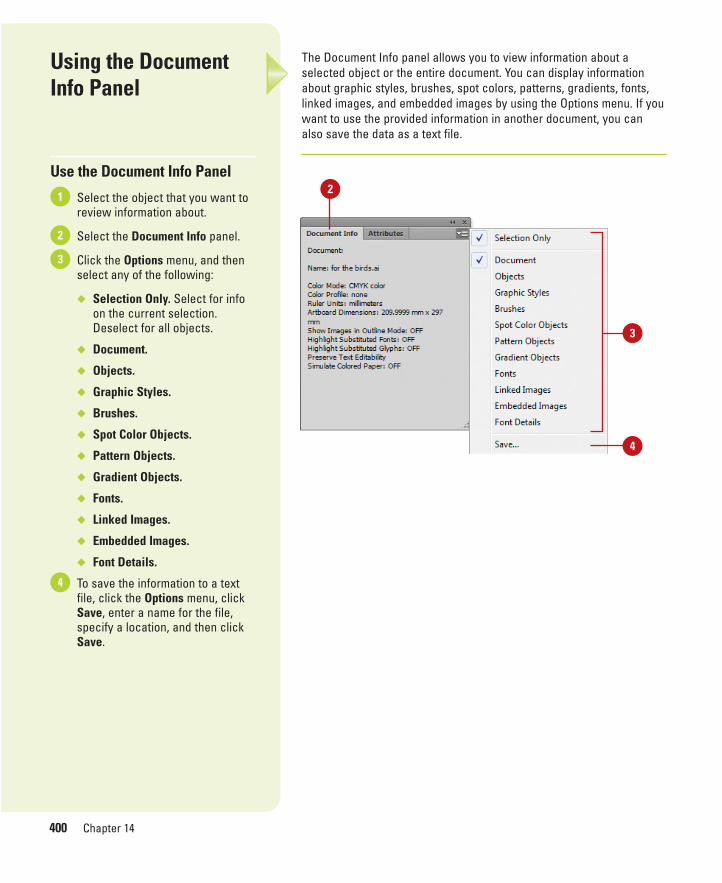
ptg8126863
400 Chapter 14
The Document Info panel allows you to view information about aselected object or the entire document. You can display informationabout graphic styles, brushes, spot colors, patterns, gradients, fonts,linked images, and embedded images by using the Options menu. If youwant to use the provided information in another document, you canalso save the data as a text file.
Using the DocumentInfo Panel
Use the Document Info Panel
Select the object that you want toreview information about.
Select the Document Info panel.
Click the Options menu, and thenselect any of the following:
◆ Selection Only. Select for infoon the current selection.Deselect for all objects.
◆ Document.
◆ Objects.
◆ Graphic Styles.
◆ Brushes.
◆ Spot Color Objects.
◆ Pattern Objects.
◆ Gradient Objects.
◆ Fonts.
◆ Linked Images.
◆ Embedded Images.
◆ Font Details.
To save the information to a textfile, click the Options menu, clickSave, enter a name for the file,specify a location, and then clickSave.
4
3
2
12
3
4
ptg8126863
Exporting a Document
Introduction
After you finish creating your document in Illustrator, you cansave or export your artwork in another file format for use inother programs. There are five file formats to which you cansave your artwork, which include AI (Adobe Illustrator),Adobe PDF (Portable Document Format), EPS (EncapsulatedPostScript), FXG (Adobe Flex/Flash Builder), and SVG(Scalable Vector Graphics). These file formats are native toIllustrator, which means they preserve Illustrator content,including multiple artboards, when you re-open them.
If you want to save your artwork in another file format,you need to export it. Illustrator allows you to export yourartwork in 13 different file formats, including Flash,Photoshop, Bitmap, JPEG, and PNG. When you export fromIllustrator, your content is altered using the Options dialogbox for the specific file format. If you want to use anIllustrator document in a Microsoft Office program, you needto save the document as a PNG (Portable Network Graphics)image with the Save for Microsoft Office command.
If you frequently create the same kind of document, thenyou should create a template. A template is a special docu-ment that makes it easier to reuse frequently used material inorder to create a new document. An Illustrator Template fileuses the (AIT) file format instead of the normal (AI) documentfile format. 15
15What You’ll Do
Export a Document
Understand Export File Formats
Export as a Bitmap
Export as a TIFF
Export as a PNG or JPEG
Export to Photoshop
Export with Presets
Export as a Flash Movie
Save as Adobe PDF
Save as an EPS
Save as SVG
Save for HTML5 and CSS
Save as Adobe FXG
Save for Microsoft Office
Save as a Template
401

ptg8126863
402 Chapter 15
Exporting a Document
Export a Document
Click the File menu, and then clickExport.
Enter a name for the file in the FileName (Win) or Save As (Mac) box.
Click the Save as Type list arrow(Win) or Format popup (Mac), andthen select a file format.
See the list on the next page formore information about all the fileformats.
Navigate to the location whereyou want to save the document.
To preserve artboards, select theUse Artboards check box (ifavailable), and then select the Allor Range option. If you selectedthe Range option, enter a range.
Click Save.
For some formats, an Optionsdialog box appears, prompting youfor additional settings.
If prompted, specify the optionsthat you want, and then click OK.
◆ For help, point to an option todisplay a description at thebottom of the Options dialogbox.
7
6
5
4
3
2
1
After you finish creating your document in Illustrator, you can export itfor use in other programs. If you have a document with text, you canexport it to a text document, which you can open in a word processingprogram. If you have a document with artwork, you can export it as aPSD file (for use in Photoshop) or a JPEG file (for use on the web). Seethe list on the next page for more information about all the file formats.If you have multiple artboards in a document, many file formats pre-serve them or create multiple page documents during export.
2
3
4
5
6
Export file formats
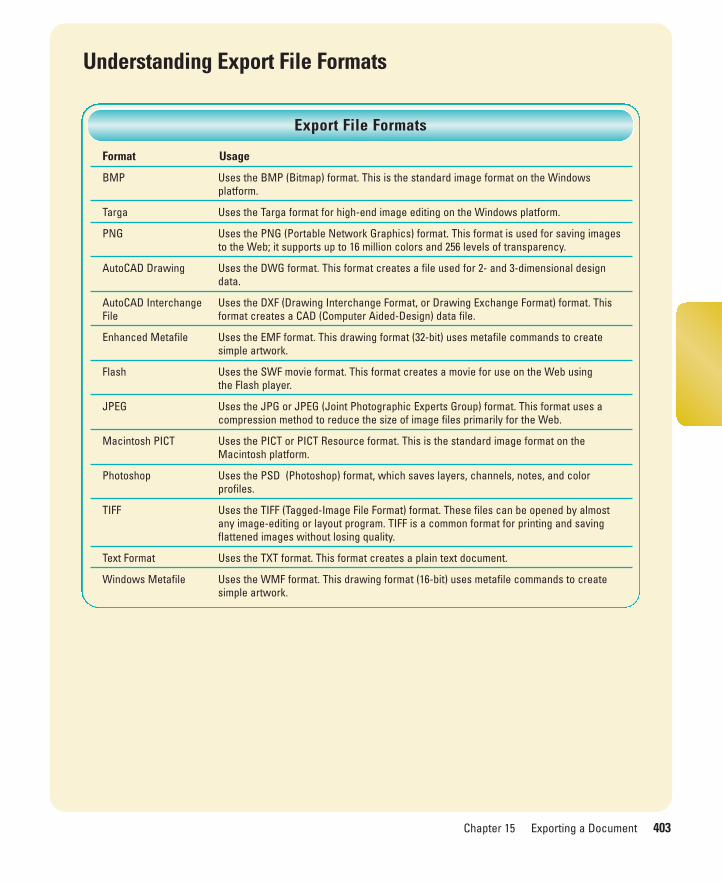
ptg8126863
Chapter 15 Exporting a Document 403
Understanding Export File Formats
Format Usage
BMP Uses the BMP (Bitmap) format. This is the standard image format on the Windows platform.
Targa Uses the Targa format for high-end image editing on the Windows platform.
PNG Uses the PNG (Portable Network Graphics) format. This format is used for saving images to the Web; it supports up to 16 million colors and 256 levels of transparency.
AutoCAD Drawing Uses the DWG format. This format creates a file used for 2- and 3-dimensional design data.
AutoCAD Interchange Uses the DXF (Drawing Interchange Format, or Drawing Exchange Format) format. This File format creates a CAD (Computer Aided-Design) data file.
Enhanced Metafile Uses the EMF format. This drawing format (32-bit) uses metafile commands to create simple artwork.
Flash Uses the SWF movie format. This format creates a movie for use on the Web using the Flash player.
JPEG Uses the JPG or JPEG (Joint Photographic Experts Group) format. This format uses acompression method to reduce the size of image files primarily for the Web.
Macintosh PICT Uses the PICT or PICT Resource format. This is the standard image format on the Macintosh platform.
Photoshop Uses the PSD (Photoshop) format, which saves layers, channels, notes, and color profiles.
TIFF Uses the TIFF (Tagged-Image File Format) format. These files can be opened by almost any image-editing or layout program. TIFF is a common format for printing and saving flattened images without losing quality.
Text Format Uses the TXT format. This format creates a plain text document.
Windows Metafile Uses the WMF format. This drawing format (16-bit) uses metafile commands to create simple artwork.
Export File Formats
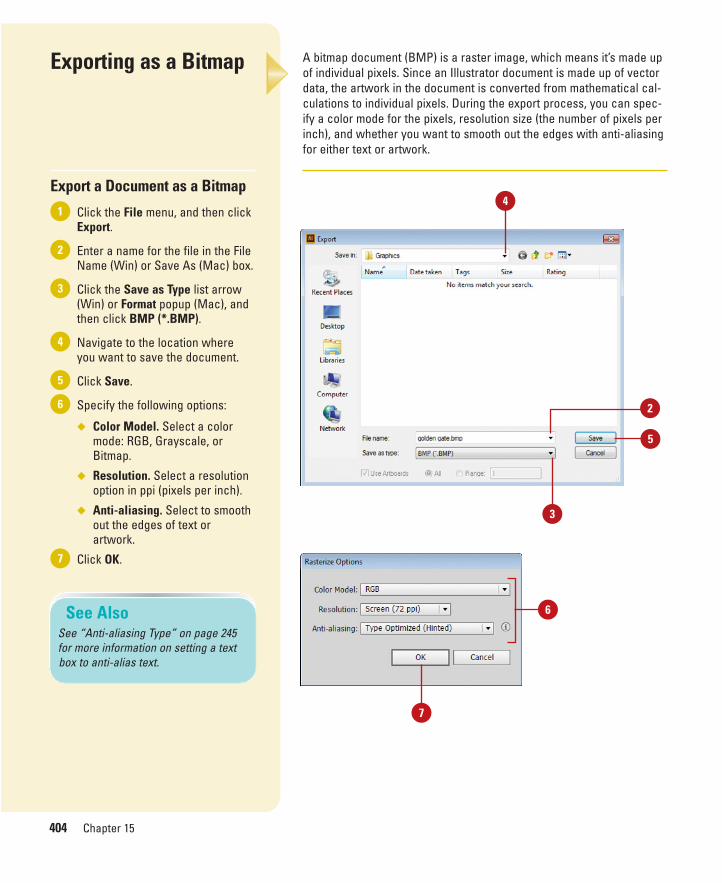
ptg8126863
404 Chapter 15
Exporting as a Bitmap
Export a Document as a Bitmap
Click the File menu, and then clickExport.
Enter a name for the file in the FileName (Win) or Save As (Mac) box.
Click the Save as Type list arrow(Win) or Format popup (Mac), andthen click BMP (*.BMP).
Navigate to the location whereyou want to save the document.
Click Save.
Specify the following options:
◆ Color Model. Select a colormode: RGB, Grayscale, orBitmap.
◆ Resolution. Select a resolutionoption in ppi (pixels per inch).
◆ Anti-aliasing. Select to smoothout the edges of text orartwork.
Click OK.7
6
5
4
3
2
1
A bitmap document (BMP) is a raster image, which means it’s made upof individual pixels. Since an Illustrator document is made up of vectordata, the artwork in the document is converted from mathematical cal-culations to individual pixels. During the export process, you can spec-ify a color mode for the pixels, resolution size (the number of pixels perinch), and whether you want to smooth out the edges with anti-aliasingfor either text or artwork.
4
3
2
5
See AlsoSee “Anti-aliasing Type” on page 245for more information on setting a textbox to anti-alias text.
7
6

ptg8126863
Chapter 15 Exporting a Document 405
Exporting as a TIFF
Export a Document as a TIFF
Click the File menu, and then clickExport.
Enter a name for the file in the FileName (Win) or Save As (Mac) box.
Click the Save as Type list arrow(Win) or Format popup (Mac), andthen click TIFF (*.TIF).
Navigate to the location whereyou want to save the document.
To preserve artboards, select theUse Artboards check box (ifavailable), and then select the Allor Range option. If you selectedthe Range option, enter a range.
Click Save.
Specify the following options:
◆ Color Model. Select a colormode: RGB, CMYK, orGrayscale.
◆ Resolution. Select a resolutionoption in ppi (pixels per inch).
◆ Anti-aliasing. Select to smoothout the edges of text orartwork.
◆ LZW Compression. Select tocompress the image.
◆ Embed ICC Profile. Select toattach the color profile of thedocument to the image.
Click OK.8
7
6
5
4
3
2
1
TIFF (Tagged-Image File Format) files can be opened by almost anyimage-editing or layout program. TIFF is a common format for printingand saving flattened images without losing quality. During the export,you can specify a color mode for the pixels, resolution size (the numberof pixels per inch), and whether you want to smooth out the edges withthe Anti-alias option for text or artwork, compress the image with theLZW compression method, and embed the color profile in the image. Ifyou have multiple artboards in a document, they are preserved.
6
2
5 3
8
7
4

ptg8126863
406 Chapter 15
Exporting as a PNG or JPEG
Export a Document as a PNG
Click the File menu, and then clickExport.
Enter a name for the file in the FileName (Win) or Save As (Mac) box.
Click the Save as Type list arrow(Win) or Format popup (Mac), andthen click PNG (*.PNG).
Navigate to the location whereyou want to save the document.
To preserve artboards, select theUse Artboards check box (ifavailable), and then select the Allor Range option. If you selectedthe Range option, enter a range.
Click Save.
Specify the following options:
◆ Resolution. Select a resolutionoption in ppi (pixels per inch).
◆ Anti-aliasing. Select to smoothout the edges of text orartwork.
◆ Interlaced. Select to load/display the image from top tobottom.
Click the Background Color listarrow, and then specify an option:Transparent, Black, White, or acustom color.
Click OK.9
8
7
6
5
4
3
2
1
If you have an image that you want to post on the web, you can exportit as a PNG (Portable Network Graphic) or JPEG (Joint PhotographicExperts Group) file. PNG and JPEG are a compressed format with rela-tively high quality, so it’s a common file format for the web. The Exportcommand for PNG and JPEG give you options to specify image resolu-tion and use anti-alias to smooth jagged edges for text and images. ForPNG, you can also set options to use a transparent background. ForJPEG, you can also set options to specify the color model, quality, andcompression as well as embed an ICC color profile.
4
3
2
6
9
8
7
5

ptg8126863
Chapter 15 Exporting a Document 407
Export a Document as a JPEG
Click the File menu, and then clickExport.
Enter a name for the file in the FileName (Win) or Save As (Mac) box.
Click the Save as Type list arrow(Win) or Format popup (Mac), andthen click PNG (*.PNG).
Navigate to the location whereyou want to save the document.
To preserve artboards, select theUse Artboards check box (ifavailable), and then select the Allor Range option. If you selectedthe Range option, enter a range.
Click Save.
Specify the following options:
◆ Color Model. Select a colormode: RGB, CMYK, orGrayscale.
◆ Quality. Select a balancebetween file size and quality.
Specify the following options:
◆ Compression Method. Select amethod: Standard (used bymost browsers), Optimized forcolor and size, and Progressivedisplay for a series of scans.
◆ Resolution. Select a resolutionoption in ppi (pixels per inch).
◆ Anti-aliasing. Select to smoothout the edges of text orartwork.
◆ Imagemap. Select to generatecode for image maps.
Select the Embed ICC Profilecheck box to attach the colorprofile of the document to theimage.
Click OK.10
9
8
7
6
5
4
3
2
14
3
2
6
109
7
8
5

ptg8126863
408 Chapter 15
Exporting toPhotoshop
Export a Document as aPhotoshop File
Click the File menu, and then clickExport.
Enter a name for the file in the FileName (Win) or Save As (Mac) box.
Click the Save as Type list arrow(Win) or Format popup (Mac), andthen click Photoshop (*.PSD).
Navigate to the location whereyou want to save the document.
Click Save.
Click the Color Model list arrow,and then select a color mode:RGB, CMYK or Grayscale.
Click the Resolution list arrow, andthen select a resolution option.
Specify the following options:
◆ Flat Image. Select to flattenimage to one layer.
◆ Write Layers. Select topreserve layers and maximumeditability for objects and text.
◆ Anti-aliasing. Select to smoothout the edges of the image.
◆ Embed ICC Profile. Select toattach the color profile of thedocument to the image.
Click OK.9
8
7
6
5
4
3
2
1
Adobe Photoshop is a graphics and image editing program. When youexport artwork to Photoshop, Illustrator converts objects into pixels andpreserves layers and transparency. Other conversions include remov-ing strokes and effects from text and changing opacity masks to layermasks. During the export process, you can specify a color mode for thepixels, resolution size (the number of pixels per inch), and whether youwant to flatten or preserve layers, smooth out the edges with the Anti-aliasing option, and embed the color profile in the image. In addition toexporting, you can also copy and paste objects into Photoshop, whichautomatically creates Smart Objects that you can re-edit in Illustrator.
4
5
2
3
9
6
7
8

ptg8126863
Chapter 15 Exporting a Document 409
Exporting with Presets
Create a Preset for Adobe PDFor Flash SWF
Click the Edit menu, and then clickAdobe PDF Presets or SWFPresets.
Perform any of the following:
◆ New. Click the New button,specify the options that youwant, and then click OK.
◆ Edit. Select a custom preset(not a predefined one), click theEdit button, change the options,and then click OK.
◆ Delete. Select a custom preset(not a predefined one), andthen click the Delete button.
◆ Import. Click Import, navigate tothe preset file, select it, andthen click Open.
◆ Export. Select a preset, clickExport, specify a location andname, and then click Save.
For PDF files, the preset issaved with the .joboptionsextension.
Click OK.3
2
1
If you frequently use custom settings to export an Illustrator documentto an Adobe PDF or Flash SWF file, you can save time by creating apreset. Adobe Creative Suite programs, including Illustrator, InDesign,Photoshop, and Acrobat, provide built-in presets that you can use inany of the programs. When you create your own preset, you can alsouse it in other CS programs. The process for creating a preset for anAdobe PDF or Flash SWF is similar; just the settings are different.
PDF2
SWF2
3
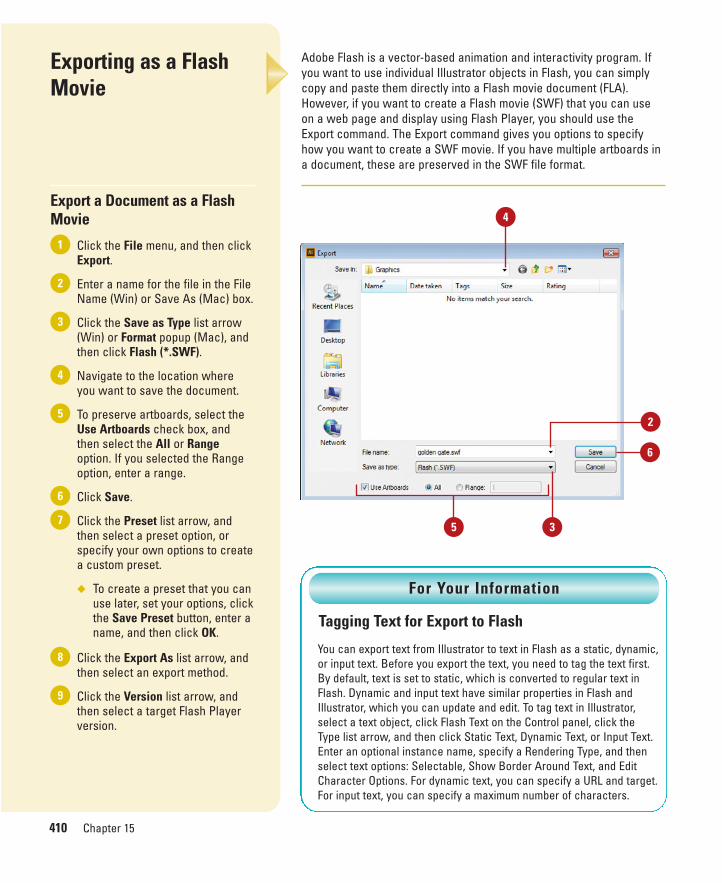
ptg8126863
410 Chapter 15
Exporting as a FlashMovie
Export a Document as a FlashMovie
Click the File menu, and then clickExport.
Enter a name for the file in the FileName (Win) or Save As (Mac) box.
Click the Save as Type list arrow(Win) or Format popup (Mac), andthen click Flash (*.SWF).
Navigate to the location whereyou want to save the document.
To preserve artboards, select theUse Artboards check box, andthen select the All or Rangeoption. If you selected the Rangeoption, enter a range.
Click Save.
Click the Preset list arrow, andthen select a preset option, orspecify your own options to createa custom preset.
◆ To create a preset that you canuse later, set your options, clickthe Save Preset button, enter aname, and then click OK.
Click the Export As list arrow, andthen select an export method.
Click the Version list arrow, andthen select a target Flash Playerversion.
9
8
7
6
5
4
3
2
1
Adobe Flash is a vector-based animation and interactivity program. Ifyou want to use individual Illustrator objects in Flash, you can simplycopy and paste them directly into a Flash movie document (FLA).However, if you want to create a Flash movie (SWF) that you can useon a web page and display using Flash Player, you should use theExport command. The Export command gives you options to specifyhow you want to create a SWF movie. If you have multiple artboards ina document, these are preserved in the SWF file format.
4
6
5 3
2
Tagging Text for Export to Flash
You can export text from Illustrator to text in Flash as a static, dynamic,or input text. Before you export the text, you need to tag the text first.By default, text is set to static, which is converted to regular text inFlash. Dynamic and input text have similar properties in Flash andIllustrator, which you can update and edit. To tag text in Illustrator,select a text object, click Flash Text on the Control panel, click theType list arrow, and then click Static Text, Dynamic Text, or Input Text.Enter an optional instance name, specify a Rendering Type, and thenselect text options: Selectable, Show Border Around Text, and EditCharacter Options. For dynamic text, you can specify a URL and target.For input text, you can specify a maximum number of characters.
For Your Information

ptg8126863
Chapter 15 Exporting a Document 411
Specify the following options:
◆ Clip to Artboard Size. Select toexport only objects within anartboard.
◆ Preserve Appearance. Select toflatten artwork to a single layer.
◆ Compress File. Select tocompress the SWF file.
◆ Include Unused Symbols.Select to export all unusedsymbols.
◆ Export Text as Outlines. Selectto convert type to vector paths.
◆ Ignore Kerning Information forText. Select to export textwithout kerning.
◆ Include Metadata. Select toexport metadata with the file.
◆ Protect from Import. Select toprevent changes to the SWF.
◆ Password. Select to protect thefile with a password.
◆ Curve Quality. Select a numberfor Bezier curve accuracy. Thehigher the number, the moreaccurate.
◆ Background Color. Specify abackground color for the file.
◆ Local Playback Security.Specify whether you want toaccess only local file ornetwork files.
To set image compression andquality or animation frame ratesand layer order options, clickAdvanced.
Click OK.12
11
10
11
12
7
10
9
8
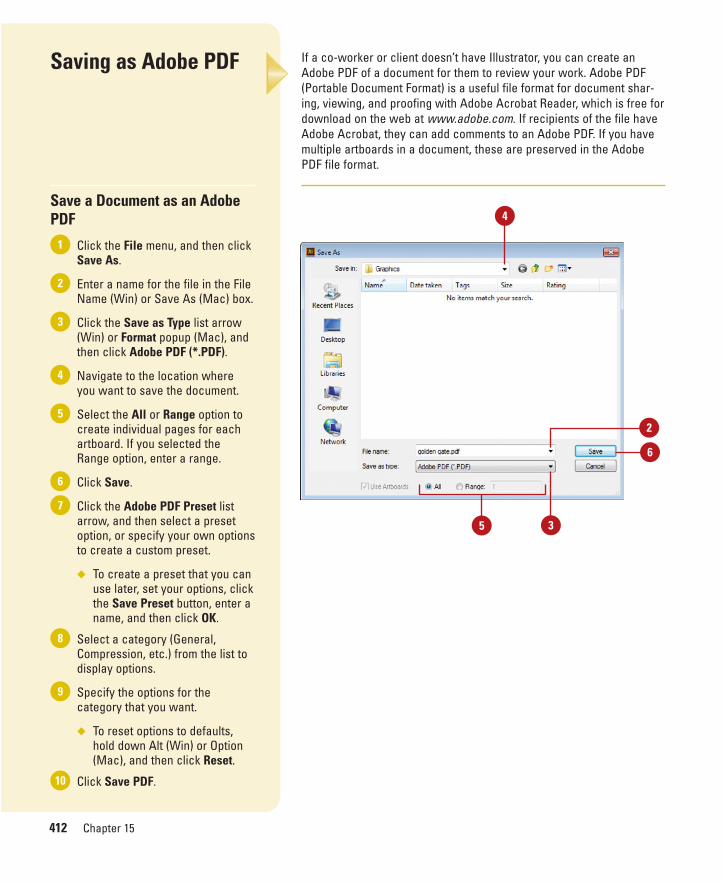
ptg8126863
412 Chapter 15
Saving as Adobe PDF
Save a Document as an AdobePDF
Click the File menu, and then clickSave As.
Enter a name for the file in the FileName (Win) or Save As (Mac) box.
Click the Save as Type list arrow(Win) or Format popup (Mac), andthen click Adobe PDF (*.PDF).
Navigate to the location whereyou want to save the document.
Select the All or Range option tocreate individual pages for eachartboard. If you selected theRange option, enter a range.
Click Save.
Click the Adobe PDF Preset listarrow, and then select a presetoption, or specify your own optionsto create a custom preset.
◆ To create a preset that you canuse later, set your options, clickthe Save Preset button, enter aname, and then click OK.
Select a category (General,Compression, etc.) from the list todisplay options.
Specify the options for thecategory that you want.
◆ To reset options to defaults,hold down Alt (Win) or Option(Mac), and then click Reset.
Click Save PDF.10
9
8
7
6
5
4
3
2
1
If a co-worker or client doesn’t have Illustrator, you can create anAdobe PDF of a document for them to review your work. Adobe PDF(Portable Document Format) is a useful file format for document shar-ing, viewing, and proofing with Adobe Acrobat Reader, which is free fordownload on the web at www.adobe.com. If recipients of the file haveAdobe Acrobat, they can add comments to an Adobe PDF. If you havemultiple artboards in a document, these are preserved in the AdobePDF file format.
4
2
6
5 3
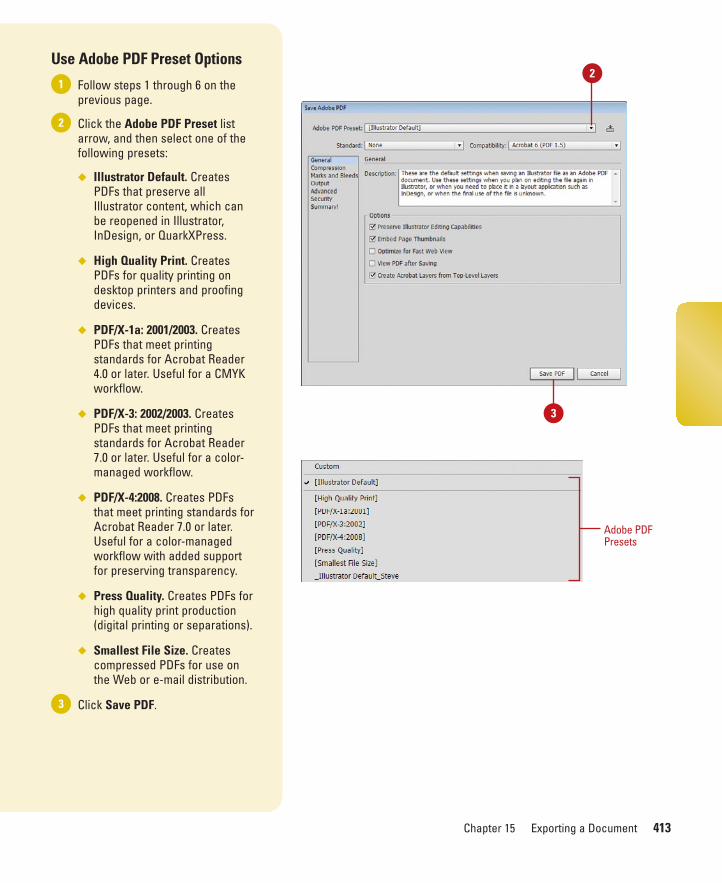
ptg8126863
Chapter 15 Exporting a Document 413
Use Adobe PDF Preset Options
Follow steps 1 through 6 on theprevious page.
Click the Adobe PDF Preset listarrow, and then select one of thefollowing presets:
◆ Illustrator Default. CreatesPDFs that preserve allIllustrator content, which canbe reopened in Illustrator,InDesign, or QuarkXPress.
◆ High Quality Print. CreatesPDFs for quality printing ondesktop printers and proofingdevices.
◆ PDF/X-1a: 2001/2003. CreatesPDFs that meet printingstandards for Acrobat Reader4.0 or later. Useful for a CMYKworkflow.
◆ PDF/X-3: 2002/2003. CreatesPDFs that meet printingstandards for Acrobat Reader7.0 or later. Useful for a color-managed workflow.
◆ PDF/X-4:2008. Creates PDFsthat meet printing standards forAcrobat Reader 7.0 or later.Useful for a color-managedworkflow with added supportfor preserving transparency.
◆ Press Quality. Creates PDFs forhigh quality print production(digital printing or separations).
◆ Smallest File Size. Createscompressed PDFs for use onthe Web or e-mail distribution.
Click Save PDF.3
2
1
Adobe PDFPresets
2
3
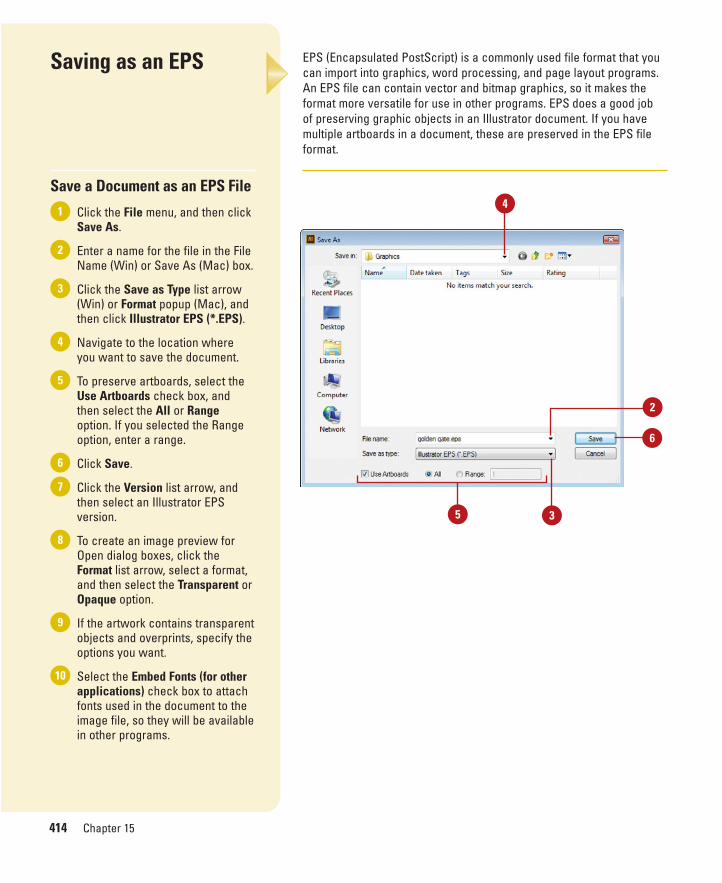
ptg8126863
414 Chapter 15
Saving as an EPS
Save a Document as an EPS File
Click the File menu, and then clickSave As.
Enter a name for the file in the FileName (Win) or Save As (Mac) box.
Click the Save as Type list arrow(Win) or Format popup (Mac), andthen click Illustrator EPS (*.EPS).
Navigate to the location whereyou want to save the document.
To preserve artboards, select theUse Artboards check box, andthen select the All or Rangeoption. If you selected the Rangeoption, enter a range.
Click Save.
Click the Version list arrow, andthen select an Illustrator EPSversion.
To create an image preview forOpen dialog boxes, click theFormat list arrow, select a format,and then select the Transparent orOpaque option.
If the artwork contains transparentobjects and overprints, specify theoptions you want.
Select the Embed Fonts (for otherapplications) check box to attachfonts used in the document to theimage file, so they will be availablein other programs.
10
9
8
7
6
5
4
3
2
1
EPS (Encapsulated PostScript) is a commonly used file format that youcan import into graphics, word processing, and page layout programs.An EPS file can contain vector and bitmap graphics, so it makes theformat more versatile for use in other programs. EPS does a good job of preserving graphic objects in an Illustrator document. If you havemultiple artboards in a document, these are preserved in the EPS fileformat.
4
35
6
2
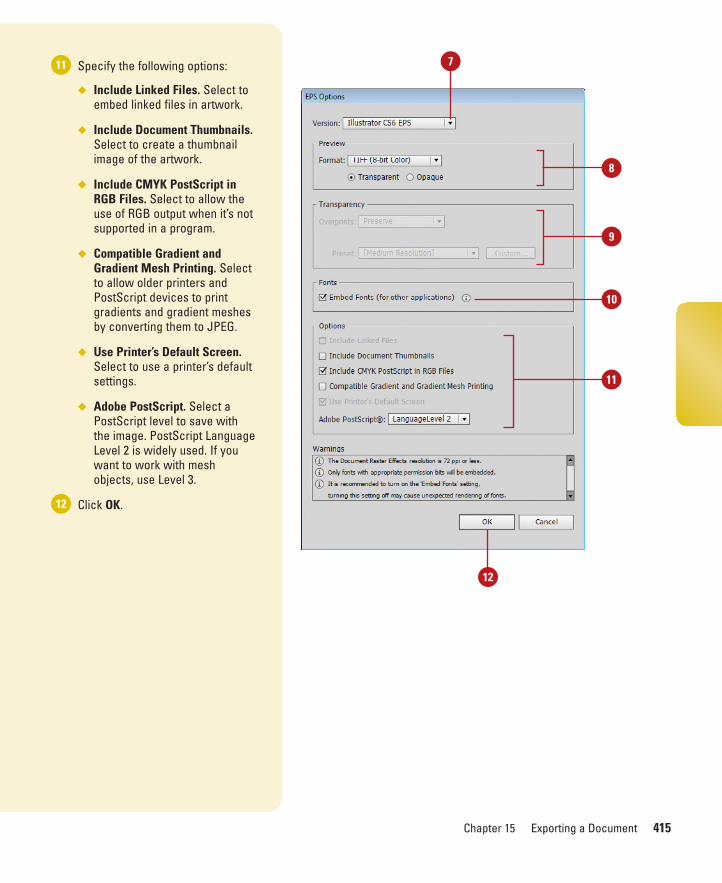
ptg8126863
Chapter 15 Exporting a Document 415
Specify the following options:
◆ Include Linked Files. Select toembed linked files in artwork.
◆ Include Document Thumbnails.Select to create a thumbnailimage of the artwork.
◆ Include CMYK PostScript inRGB Files. Select to allow theuse of RGB output when it’s notsupported in a program.
◆ Compatible Gradient andGradient Mesh Printing. Selectto allow older printers andPostScript devices to printgradients and gradient meshesby converting them to JPEG.
◆ Use Printer’s Default Screen.Select to use a printer’s defaultsettings.
◆ Adobe PostScript. Select aPostScript level to save withthe image. PostScript LanguageLevel 2 is widely used. If youwant to work with meshobjects, use Level 3.
Click OK.12
11
11
8
7
10
9
12
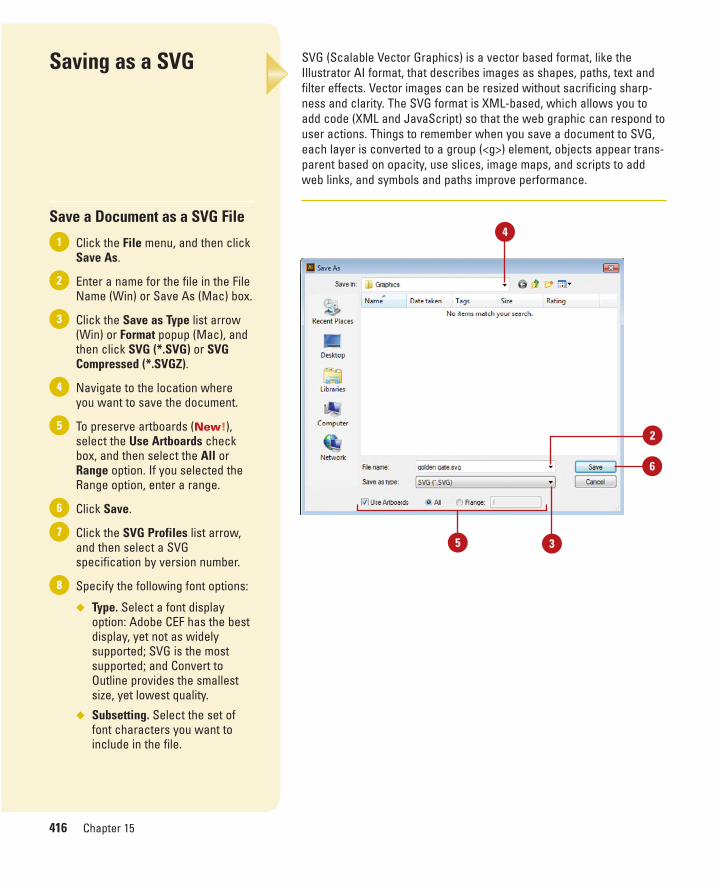
ptg8126863
416 Chapter 15
Saving as a SVG
Save a Document as a SVG File
Click the File menu, and then clickSave As.
Enter a name for the file in the FileName (Win) or Save As (Mac) box.
Click the Save as Type list arrow(Win) or Format popup (Mac), andthen click SVG (*.SVG) or SVGCompressed (*.SVGZ).
Navigate to the location whereyou want to save the document.
To preserve artboards (New!),select the Use Artboards checkbox, and then select the All orRange option. If you selected theRange option, enter a range.
Click Save.
Click the SVG Profiles list arrow,and then select a SVGspecification by version number.
Specify the following font options:
◆ Type. Select a font displayoption: Adobe CEF has the bestdisplay, yet not as widelysupported; SVG is the mostsupported; and Convert toOutline provides the smallestsize, yet lowest quality.
◆ Subsetting. Select the set offont characters you want toinclude in the file.
8
7
6
5
4
3
2
1
SVG (Scalable Vector Graphics) is a vector based format, like theIllustrator AI format, that describes images as shapes, paths, text andfilter effects. Vector images can be resized without sacrificing sharp-ness and clarity. The SVG format is XML-based, which allows you toadd code (XML and JavaScript) so that the web graphic can respond touser actions. Things to remember when you save a document to SVG,each layer is converted to a group (<g>) element, objects appear trans-parent based on opacity, use slices, image maps, and scripts to addweb links, and symbols and paths improve performance.
4
35
6
2
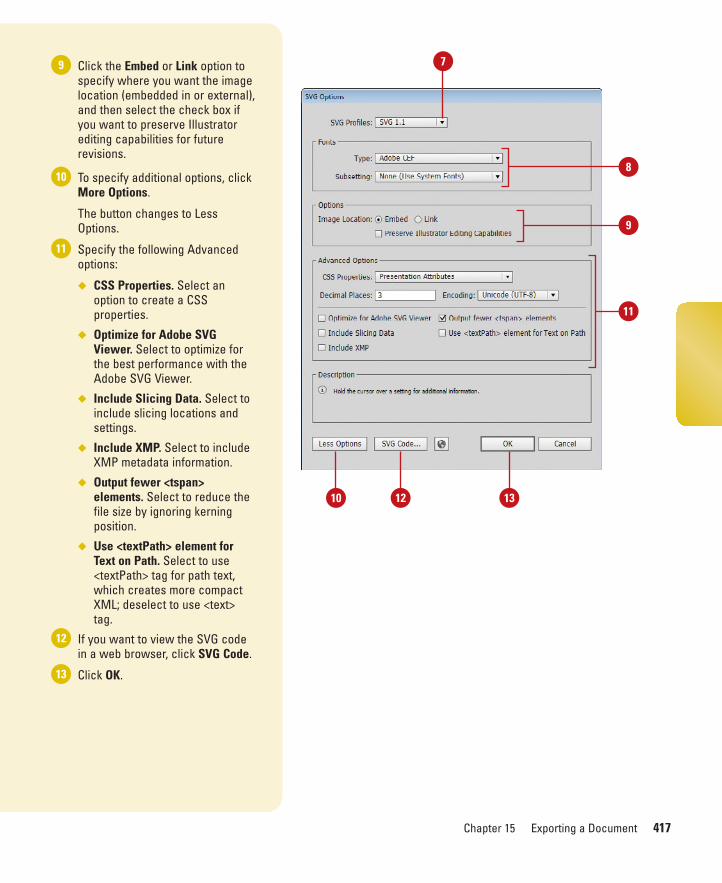
ptg8126863
Chapter 15 Exporting a Document 417
Click the Embed or Link option tospecify where you want the imagelocation (embedded in or external),and then select the check box ifyou want to preserve Illustratorediting capabilities for futurerevisions.
To specify additional options, clickMore Options.
The button changes to LessOptions.
Specify the following Advancedoptions:
◆ CSS Properties. Select anoption to create a CSSproperties.
◆ Optimize for Adobe SVGViewer. Select to optimize forthe best performance with theAdobe SVG Viewer.
◆ Include Slicing Data. Select toinclude slicing locations andsettings.
◆ Include XMP. Select to includeXMP metadata information.
◆ Output fewer <tspan>elements. Select to reduce thefile size by ignoring kerningposition.
◆ Use <textPath> element forText on Path. Select to use<textPath> tag for path text,which creates more compactXML; deselect to use <text>tag.
If you want to view the SVG codein a web browser, click SVG Code.
Click OK.13
12
11
10
9
1310
7
8
9
11
12
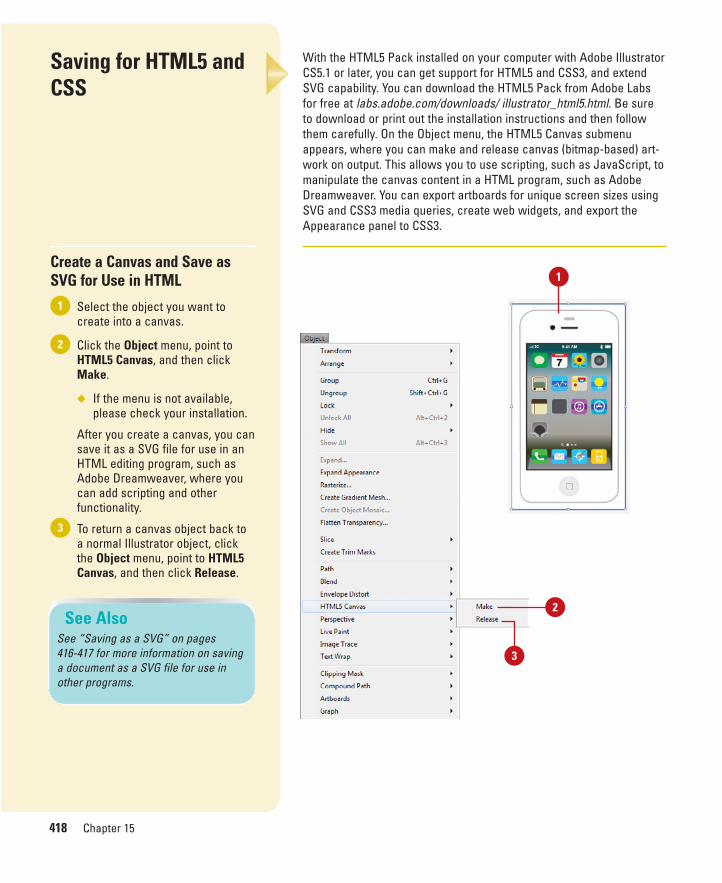
ptg8126863
418 Chapter 15
Saving for HTML5 andCSS
Create a Canvas and Save asSVG for Use in HTML
Select the object you want tocreate into a canvas.
Click the Object menu, point toHTML5 Canvas, and then clickMake.
◆ If the menu is not available,please check your installation.
After you create a canvas, you cansave it as a SVG file for use in anHTML editing program, such asAdobe Dreamweaver, where youcan add scripting and otherfunctionality.
To return a canvas object back toa normal Illustrator object, clickthe Object menu, point to HTML5Canvas, and then click Release.
3
2
1
With the HTML5 Pack installed on your computer with Adobe IllustratorCS5.1 or later, you can get support for HTML5 and CSS3, and extendSVG capability. You can download the HTML5 Pack from Adobe Labsfor free at labs.adobe.com/downloads/ illustrator_html5.html. Be sureto download or print out the installation instructions and then followthem carefully. On the Object menu, the HTML5 Canvas submenuappears, where you can make and release canvas (bitmap-based) art-work on output. This allows you to use scripting, such as JavaScript, tomanipulate the canvas content in a HTML program, such as AdobeDreamweaver. You can export artboards for unique screen sizes usingSVG and CSS3 media queries, create web widgets, and export theAppearance panel to CSS3.
See AlsoSee “Saving as a SVG” on pages 416-417 for more information on savinga document as a SVG file for use inother programs.
1
2
3

ptg8126863
Chapter 15 Exporting a Document 419
Save as a CSS File
Select the object with theappearance you want to save as aCSS file.
Select the Appearance panel.
To set CSS preferences for theexported CSS file, click theOptions menu, click CSS ExportPreferences, specify the optionsyou want, and then click OK.
◆ CSS Units. Select the Pixels orPoints option.
◆ Object Appearance. Selectcheck boxes for Include Fill,Include Stroke, or IncludeOpacity.
◆ Position and Size. Select checkboxes for Include AbsolutePosition or IncludeDimensions.
Click the Options menu, and thenclick Export Selected as CSS.
Enter a name for the file in the FileName (Win) or Save As (Mac) box.
The format is set to CSS (*.css).
Navigate to the location whereyou want to save the document.
Click Save.7
6
5
4
3
2
1
6
7
5
4
3
2
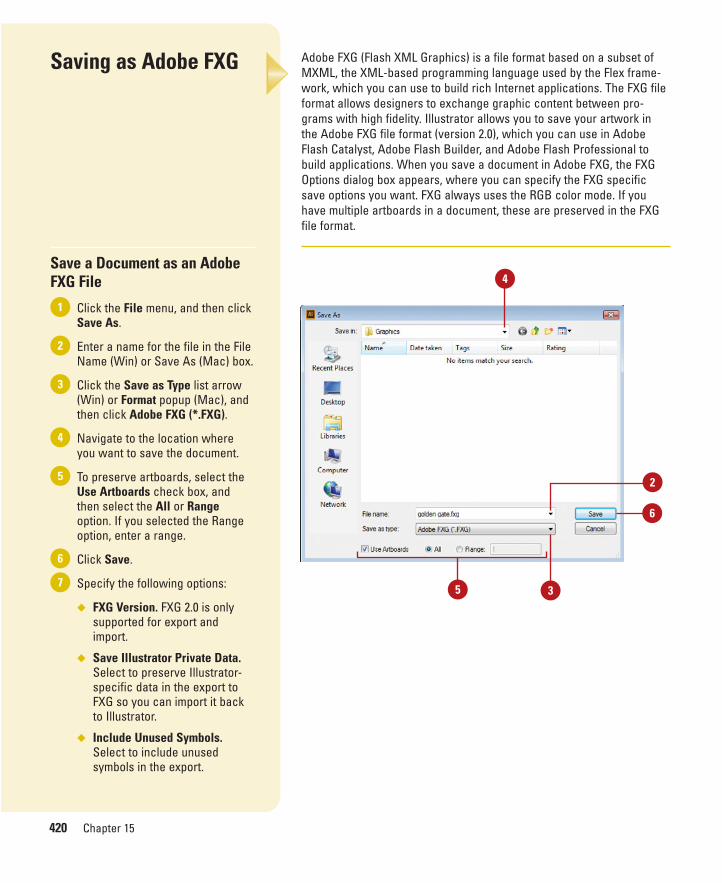
ptg8126863
420 Chapter 15
Saving as Adobe FXG
Save a Document as an Adobe FXG File
Click the File menu, and then clickSave As.
Enter a name for the file in the FileName (Win) or Save As (Mac) box.
Click the Save as Type list arrow(Win) or Format popup (Mac), andthen click Adobe FXG (*.FXG).
Navigate to the location whereyou want to save the document.
To preserve artboards, select theUse Artboards check box, andthen select the All or Rangeoption. If you selected the Rangeoption, enter a range.
Click Save.
Specify the following options:
◆ FXG Version. FXG 2.0 is onlysupported for export andimport.
◆ Save Illustrator Private Data.Select to preserve Illustrator-specific data in the export toFXG so you can import it backto Illustrator.
◆ Include Unused Symbols.Select to include unusedsymbols in the export.
7
6
5
4
3
2
1
Adobe FXG (Flash XML Graphics) is a file format based on a subset ofMXML, the XML-based programming language used by the Flex frame-work, which you can use to build rich Internet applications. The FXG fileformat allows designers to exchange graphic content between pro-grams with high fidelity. Illustrator allows you to save your artwork inthe Adobe FXG file format (version 2.0), which you can use in AdobeFlash Catalyst, Adobe Flash Builder, and Adobe Flash Professional tobuild applications. When you save a document in Adobe FXG, the FXGOptions dialog box appears, where you can specify the FXG specificsave options you want. FXG always uses the RGB color mode. If youhave multiple artboards in a document, these are preserved in the FXGfile format.
4
35
6
2
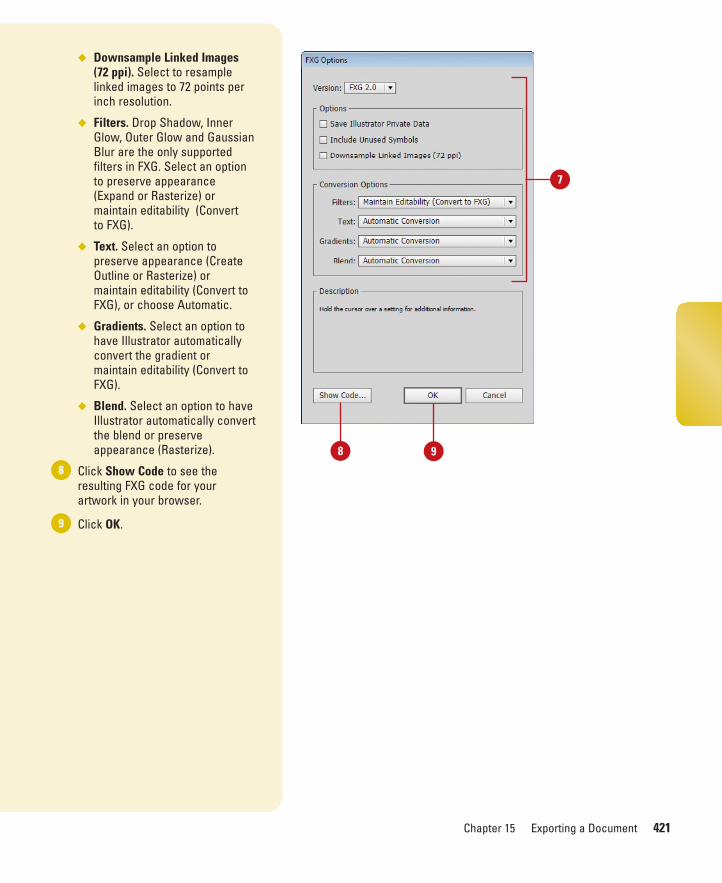
ptg8126863
Chapter 15 Exporting a Document 421
◆ Downsample Linked Images(72 ppi). Select to resamplelinked images to 72 points perinch resolution.
◆ Filters. Drop Shadow, InnerGlow, Outer Glow and GaussianBlur are the only supportedfilters in FXG. Select an optionto preserve appearance(Expand or Rasterize) ormaintain editability (Convert to FXG).
◆ Text. Select an option topreserve appearance (CreateOutline or Rasterize) ormaintain editability (Convert toFXG), or choose Automatic.
◆ Gradients. Select an option tohave Illustrator automaticallyconvert the gradient ormaintain editability (Convert toFXG).
◆ Blend. Select an option to haveIllustrator automatically convertthe blend or preserveappearance (Rasterize).
Click Show Code to see theresulting FXG code for yourartwork in your browser.
Click OK.9
8
98
7
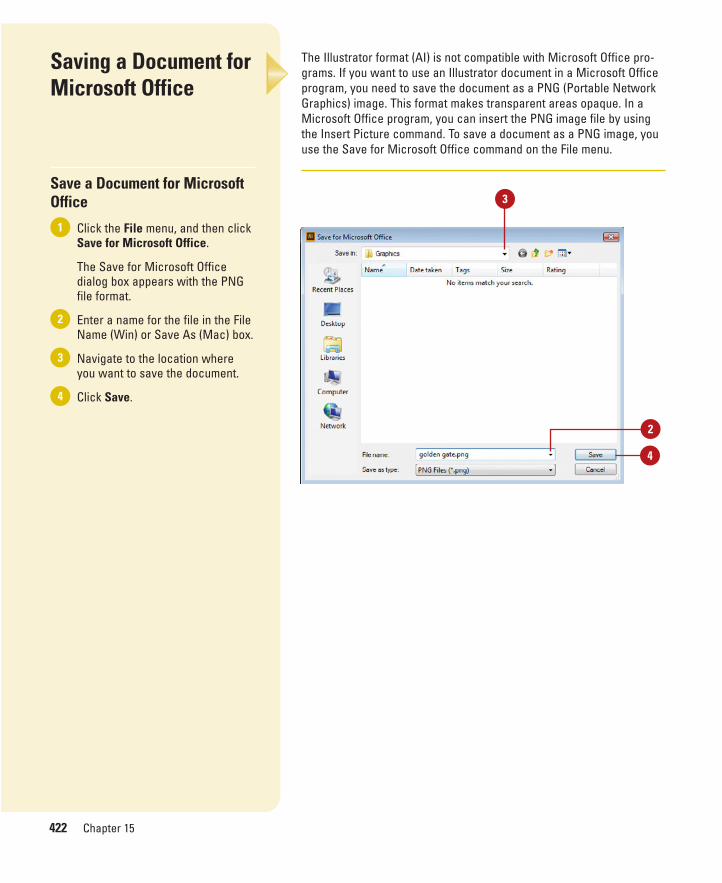
ptg8126863
422 Chapter 15
Saving a Document forMicrosoft Office
Save a Document for MicrosoftOffice
Click the File menu, and then clickSave for Microsoft Office.
The Save for Microsoft Officedialog box appears with the PNGfile format.
Enter a name for the file in the FileName (Win) or Save As (Mac) box.
Navigate to the location whereyou want to save the document.
Click Save.4
3
2
1
The Illustrator format (AI) is not compatible with Microsoft Office pro-grams. If you want to use an Illustrator document in a Microsoft Officeprogram, you need to save the document as a PNG (Portable NetworkGraphics) image. This format makes transparent areas opaque. In aMicrosoft Office program, you can insert the PNG image file by usingthe Insert Picture command. To save a document as a PNG image, youuse the Save for Microsoft Office command on the File menu.
3
2
4
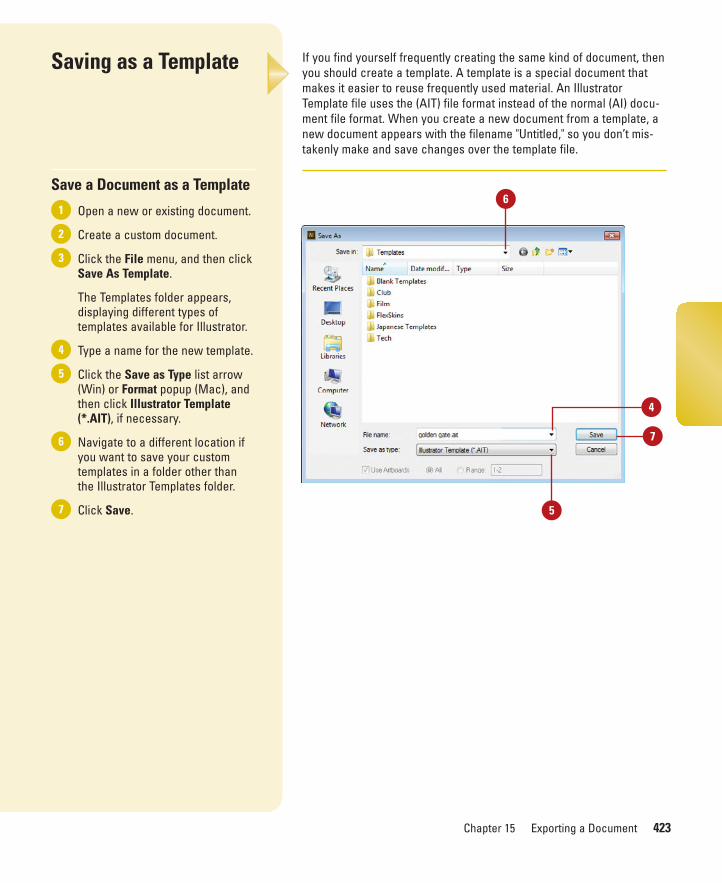
ptg8126863
Chapter 15 Exporting a Document 423
Saving as a Template
Save a Document as a Template
Open a new or existing document.
Create a custom document.
Click the File menu, and then clickSave As Template.
The Templates folder appears,displaying different types oftemplates available for Illustrator.
Type a name for the new template.
Click the Save as Type list arrow(Win) or Format popup (Mac), andthen click Illustrator Template(*.AIT), if necessary.
Navigate to a different location ifyou want to save your customtemplates in a folder other thanthe Illustrator Templates folder.
Click Save. 7
6
5
4
3
2
1
If you find yourself frequently creating the same kind of document, thenyou should create a template. A template is a special document thatmakes it easier to reuse frequently used material. An IllustratorTemplate file uses the (AIT) file format instead of the normal (AI) docu-ment file format. When you create a new document from a template, anew document appears with the filename "Untitled," so you don’t mis-takenly make and save changes over the template file.
5
6
7
4

ptg8126863
This page intentionally left blank
ptg8126863
Designing for the Web
Introduction
If you need to manipulate a photographic image to place iton the web, there's not a better program on the market thanAdobe Illustrator that will do the job for you. Illustrator usesvarious document formats, such as JPEG, GIF, PNG, SWF(Flash movie), and SVG, to save images for the web. Forexample, the JPEG format is used primarily for compressingphotographic images, while the GIF format is used for com-pressing clip art and text. Each format is designed to serve apurpose, and knowing when to use a specific format will helpyou design fast-loading, dynamic web documents.
However, saving files in a specific file format is not theonly way Illustrator helps you create web-friendly images;you can also slice images. When you slice an image, you'recutting the image into several pieces. Since the Internet han-dles smaller packets of information more efficiently than onelarge piece, slicing an image makes the whole graphic loadfaster, and Illustrator helps you slice images with ease.
16
16What You’ll Do
Save for the Web
Work with Save for Web Options
Work with Web File Formats
Optimize a JPEG Document
Optimize a GIF Document
Optimize a PNG-8 Document
Optimize a PNG-24 Document
Optimize an Image to File Size
Slice Images the Easy Way
Work with Slices
Add HTML Text or an URL to a Slice
Arrange Slices
Combine or Divide Slices
Save Slices for the Web
Save Selected Slices
Preview in a Browser
425
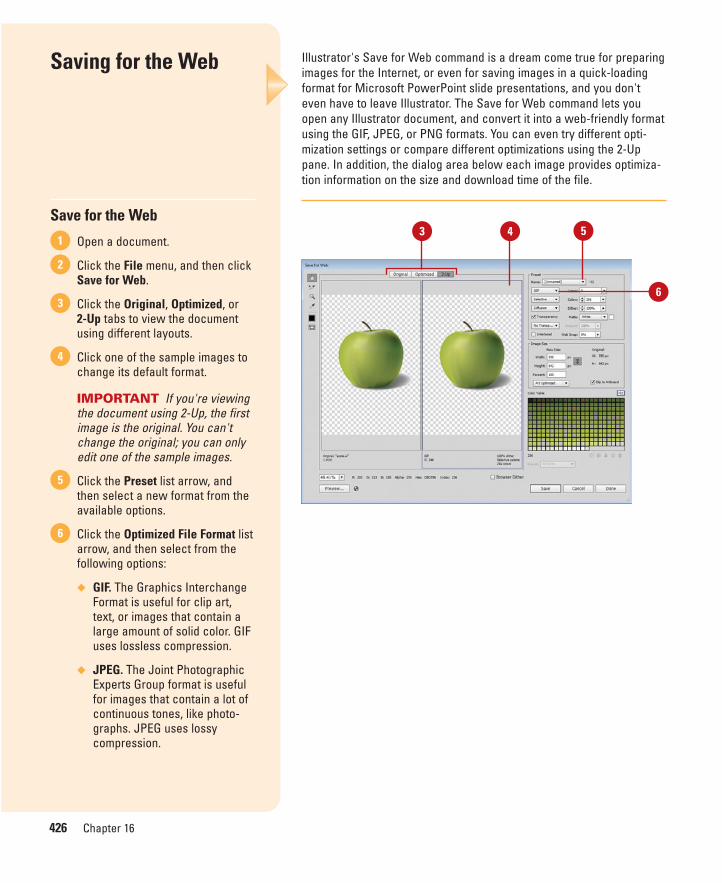
ptg8126863
426 Chapter 16
Illustrator's Save for Web command is a dream come true for preparingimages for the Internet, or even for saving images in a quick-loadingformat for Microsoft PowerPoint slide presentations, and you don'teven have to leave Illustrator. The Save for Web command lets youopen any Illustrator document, and convert it into a web-friendly formatusing the GIF, JPEG, or PNG formats. You can even try different opti-mization settings or compare different optimizations using the 2-Uppane. In addition, the dialog area below each image provides optimiza-tion information on the size and download time of the file.
Saving for the Web
Save for the Web
Open a document.
Click the File menu, and then clickSave for Web.
Click the Original, Optimized, or 2-Up tabs to view the documentusing different layouts.
Click one of the sample images tochange its default format.
IMPORTANT If you're viewingthe document using 2-Up, the firstimage is the original. You can'tchange the original; you can onlyedit one of the sample images.
Click the Preset list arrow, andthen select a new format from theavailable options.
Click the Optimized File Format listarrow, and then select from thefollowing options:
◆ GIF. The Graphics InterchangeFormat is useful for clip art,text, or images that contain alarge amount of solid color. GIFuses lossless compression.
◆ JPEG. The Joint PhotographicExperts Group format is usefulfor images that contain a lot ofcontinuous tones, like photo-graphs. JPEG uses lossycompression.
6
5
4
3
2
13 4 5
6
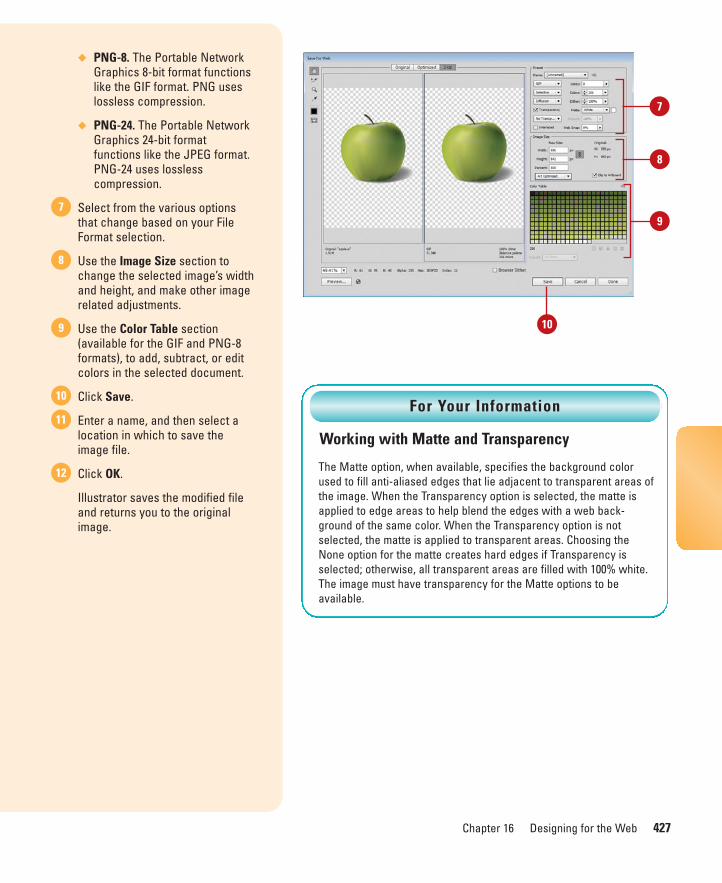
ptg8126863
Chapter 16 Designing for the Web 427
◆ PNG-8. The Portable NetworkGraphics 8-bit format functionslike the GIF format. PNG useslossless compression.
◆ PNG-24. The Portable NetworkGraphics 24-bit formatfunctions like the JPEG format.PNG-24 uses losslesscompression.
Select from the various optionsthat change based on your FileFormat selection.
Use the Image Size section tochange the selected image’s widthand height, and make other imagerelated adjustments.
Use the Color Table section(available for the GIF and PNG-8formats), to add, subtract, or editcolors in the selected document.
Click Save.
Enter a name, and then select alocation in which to save theimage file.
Click OK.
Illustrator saves the modified fileand returns you to the originalimage.
12
11
10
9
8
7
Working with Matte and Transparency
The Matte option, when available, specifies the background colorused to fill anti-aliased edges that lie adjacent to transparent areas ofthe image. When the Transparency option is selected, the matte isapplied to edge areas to help blend the edges with a web back-ground of the same color. When the Transparency option is notselected, the matte is applied to transparent areas. Choosing theNone option for the matte creates hard edges if Transparency isselected; otherwise, all transparent areas are filled with 100% white.The image must have transparency for the Matte options to be available.
For Your Information
10
7
8
9
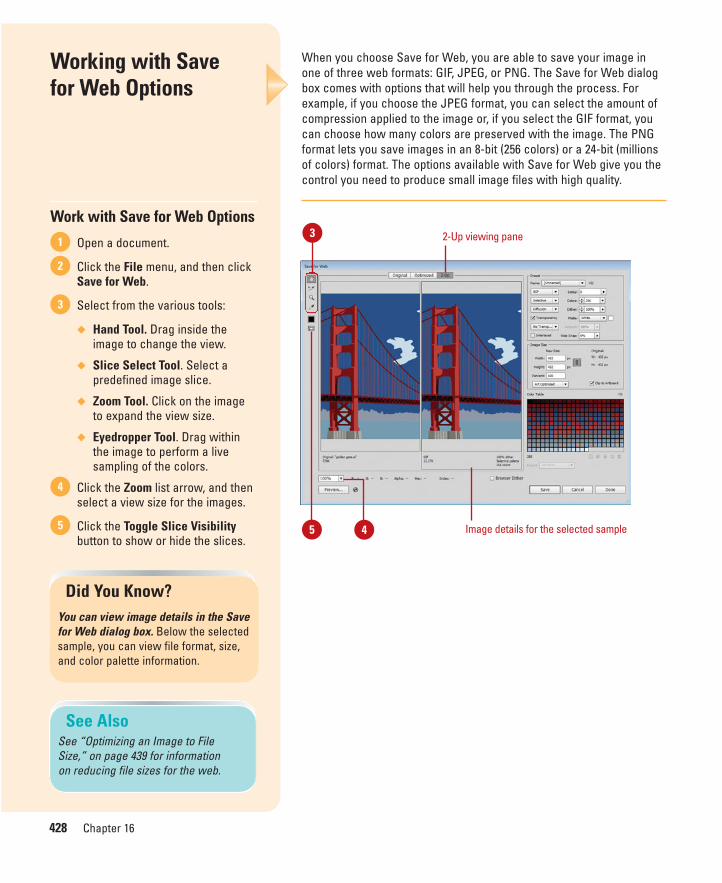
ptg8126863
428 Chapter 16
When you choose Save for Web, you are able to save your image inone of three web formats: GIF, JPEG, or PNG. The Save for Web dialogbox comes with options that will help you through the process. Forexample, if you choose the JPEG format, you can select the amount ofcompression applied to the image or, if you select the GIF format, youcan choose how many colors are preserved with the image. The PNGformat lets you save images in an 8-bit (256 colors) or a 24-bit (millionsof colors) format. The options available with Save for Web give you thecontrol you need to produce small image files with high quality.
Working with Save for Web Options
Work with Save for Web Options
Open a document.
Click the File menu, and then clickSave for Web.
Select from the various tools:
◆ Hand Tool. Drag inside theimage to change the view.
◆ Slice Select Tool. Select apredefined image slice.
◆ Zoom Tool. Click on the imageto expand the view size.
◆ Eyedropper Tool. Drag withinthe image to perform a livesampling of the colors.
Click the Zoom list arrow, and thenselect a view size for the images.
Click the Toggle Slice Visibilitybutton to show or hide the slices.
5
4
3
2
13
45
See AlsoSee “Optimizing an Image to File Size,” on page 439 for information on reducing file sizes for the web.
Did You Know?You can view image details in the Savefor Web dialog box. Below the selectedsample, you can view file format, size,and color palette information.
Image details for the selected sample
2-Up viewing pane

ptg8126863
Chapter 16 Designing for the Web 429
Select from the various optionsthat change based on your FileFormat selection.
Use the Image Size section tochange the selected image’s widthand height, and make other imagerelated adjustments.
◆ Width and Height. Specify anew image width and height;click the Lock icon to retainoriginal proportions.
◆ Percent. Specify a resizepercentage.
◆ Anti-aliasing. Select to smoothout the edges of text orartwork.
◆ Clip to Artboard. Select to setthe clipping boundary to theartboard rather than thesmallest enclosed box orclipping box.
Use the Color Table section(available for the GIF and PNG-8formats) to add, subtract, or editcolors in the selected document.
◆ Color Palette Menu. Click themenu to add or remove colors,select colors, sort colors, loador save a color table.
Click the Preview in DefaultBrowser button to preview theimage in your default webbrowser.
◆ Click the Select Browser Menubutton to choose a browser oredit the browser list.
Click Save.10
9
8
7
6
10
6
7
8
9
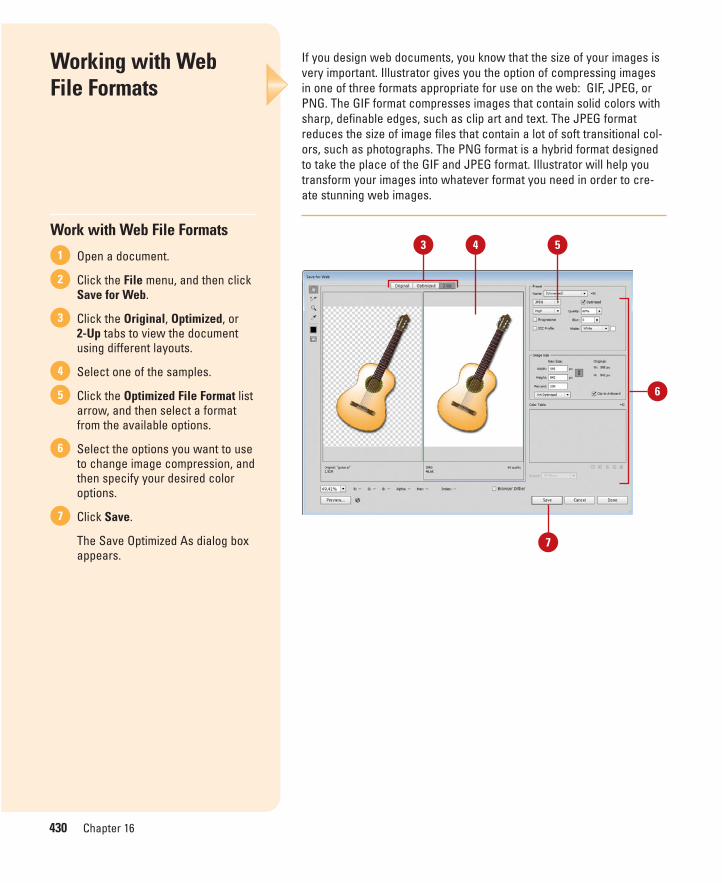
ptg8126863
430 Chapter 16
If you design web documents, you know that the size of your images isvery important. Illustrator gives you the option of compressing imagesin one of three formats appropriate for use on the web: GIF, JPEG, orPNG. The GIF format compresses images that contain solid colors withsharp, definable edges, such as clip art and text. The JPEG formatreduces the size of image files that contain a lot of soft transitional col-ors, such as photographs. The PNG format is a hybrid format designedto take the place of the GIF and JPEG format. Illustrator will help youtransform your images into whatever format you need in order to cre-ate stunning web images.
Working with Web File Formats
Work with Web File Formats
Open a document.
Click the File menu, and then clickSave for Web.
Click the Original, Optimized, or 2-Up tabs to view the documentusing different layouts.
Select one of the samples.
Click the Optimized File Format listarrow, and then select a formatfrom the available options.
Select the options you want to useto change image compression, andthen specify your desired coloroptions.
Click Save.
The Save Optimized As dialog boxappears.
7
6
5
4
3
2
143
6
5
7
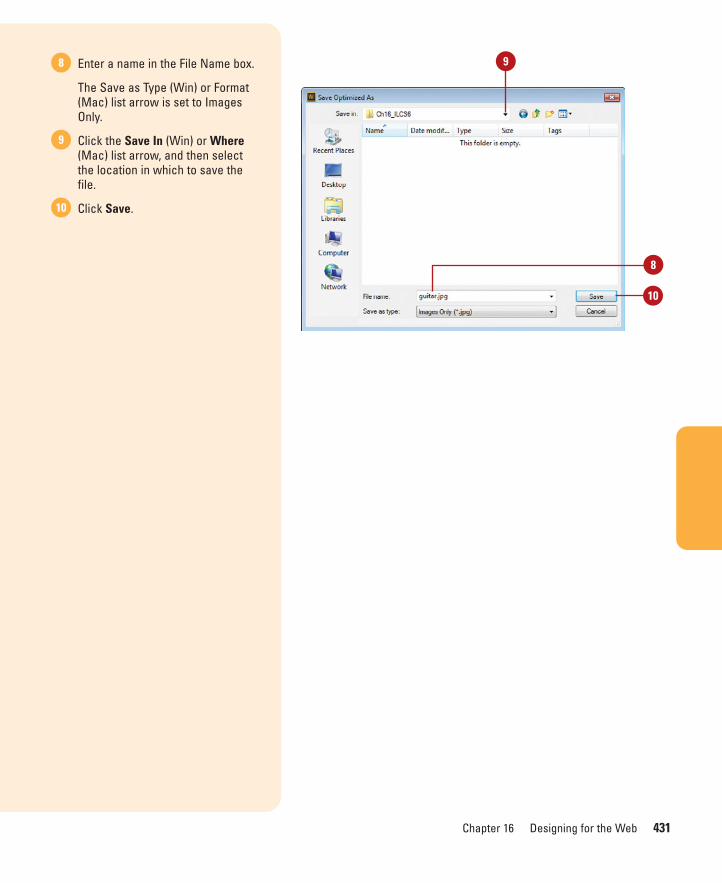
ptg8126863
Chapter 16 Designing for the Web 431
Enter a name in the File Name box.
The Save as Type (Win) or Format(Mac) list arrow is set to ImagesOnly.
Click the Save In (Win) or Where(Mac) list arrow, and then selectthe location in which to save thefile.
Click Save. 10
9
8 9
10
8
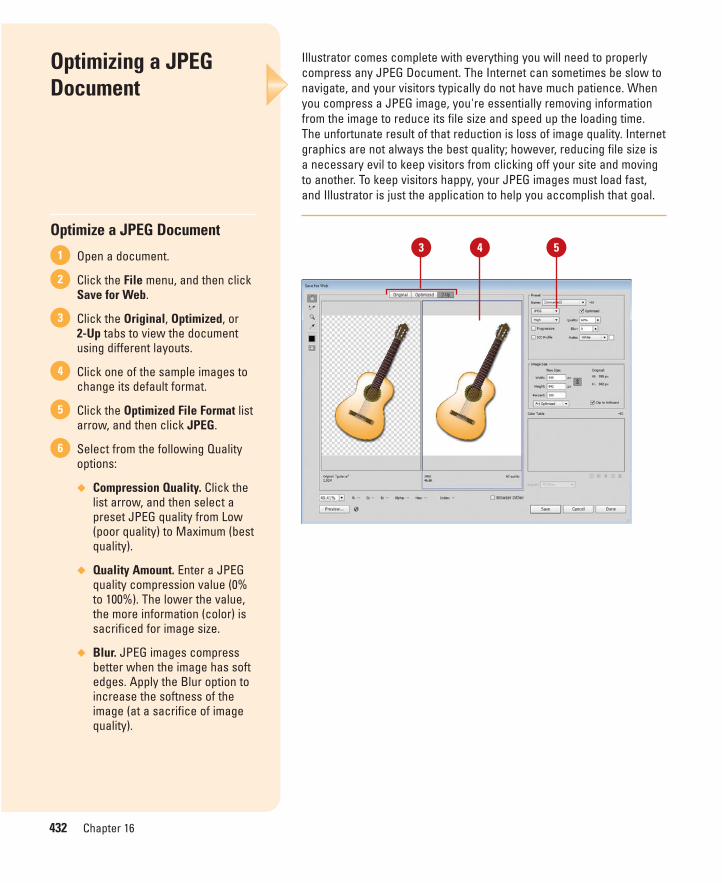
ptg8126863
432 Chapter 16
Illustrator comes complete with everything you will need to properlycompress any JPEG Document. The Internet can sometimes be slow tonavigate, and your visitors typically do not have much patience. Whenyou compress a JPEG image, you're essentially removing informationfrom the image to reduce its file size and speed up the loading time.The unfortunate result of that reduction is loss of image quality. Internetgraphics are not always the best quality; however, reducing file size isa necessary evil to keep visitors from clicking off your site and movingto another. To keep visitors happy, your JPEG images must load fast,and Illustrator is just the application to help you accomplish that goal.
Optimizing a JPEGDocument
Optimize a JPEG Document
Open a document.
Click the File menu, and then clickSave for Web.
Click the Original, Optimized, or 2-Up tabs to view the documentusing different layouts.
Click one of the sample images tochange its default format.
Click the Optimized File Format listarrow, and then click JPEG.
Select from the following Qualityoptions:
◆ Compression Quality. Click thelist arrow, and then select apreset JPEG quality from Low(poor quality) to Maximum (bestquality).
◆ Quality Amount. Enter a JPEGquality compression value (0%to 100%). The lower the value,the more information (color) issacrificed for image size.
◆ Blur. JPEG images compressbetter when the image has softedges. Apply the Blur option toincrease the softness of theimage (at a sacrifice of imagequality).
6
5
4
3
2
143 5

ptg8126863
Chapter 16 Designing for the Web 433
Click the Matte list arrow, and thenselect from the available options.
JPEG images do not supporttransparency. If your imagecontains transparent areas, usethe Matte option to fill them inusing a specific color.
Select the Optimized check box tofurther compress the image. Thisis not supported by all browsers.
Select from the following options:
◆ Progressive. Select the checkbox to load a JPEG in threeprogressive scans. Notsupported by all browsers.
◆ ICC Profile. Select the checkbox to embed an ICC colorprofile into the JPEG image.This increases file size buthelps maintain colorconsistency between monitorsand operating systems.
Click Save to save the currentimage, and then save it using theSave Optimized As dialog box.
10
9
8
7
9
10
6
8
7
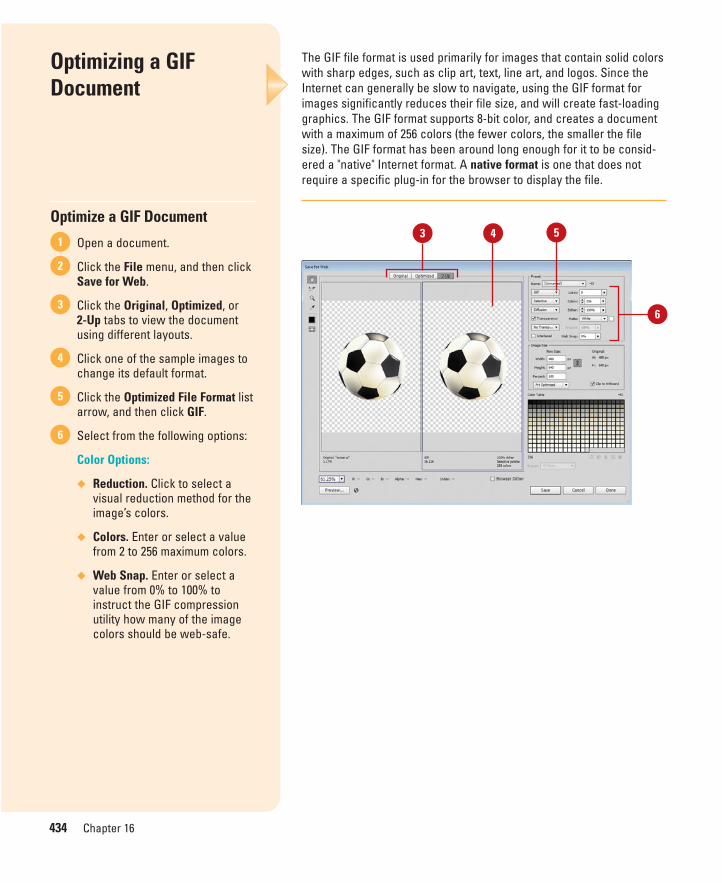
ptg8126863
434 Chapter 16
The GIF file format is used primarily for images that contain solid colorswith sharp edges, such as clip art, text, line art, and logos. Since theInternet can generally be slow to navigate, using the GIF format forimages significantly reduces their file size, and will create fast-loadinggraphics. The GIF format supports 8-bit color, and creates a documentwith a maximum of 256 colors (the fewer colors, the smaller the filesize). The GIF format has been around long enough for it to be consid-ered a "native" Internet format. A native format is one that does notrequire a specific plug-in for the browser to display the file.
Optimizing a GIFDocument
Optimize a GIF Document
Open a document.
Click the File menu, and then clickSave for Web.
Click the Original, Optimized, or 2-Up tabs to view the documentusing different layouts.
Click one of the sample images tochange its default format.
Click the Optimized File Format listarrow, and then click GIF.
Select from the following options:
Color Options:
◆ Reduction. Click to select avisual reduction method for theimage’s colors.
◆ Colors. Enter or select a valuefrom 2 to 256 maximum colors.
◆ Web Snap. Enter or select avalue from 0% to 100% toinstruct the GIF compressionutility how many of the imagecolors should be web-safe.
6
5
4
3
2
13 4
6
5
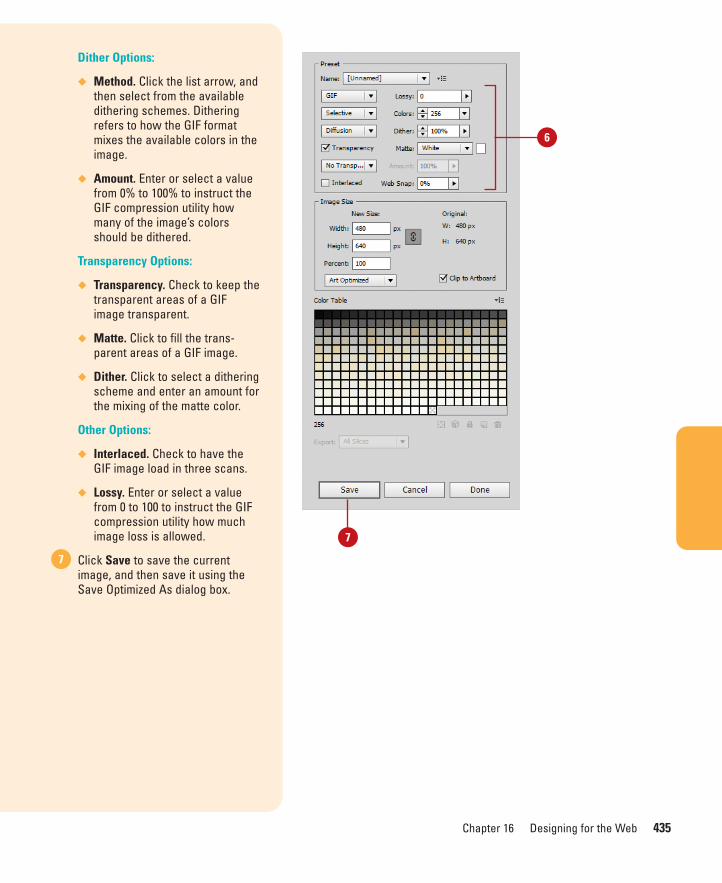
ptg8126863
Chapter 16 Designing for the Web 435
Dither Options:
◆ Method. Click the list arrow, andthen select from the availabledithering schemes. Ditheringrefers to how the GIF formatmixes the available colors in theimage.
◆ Amount. Enter or select a valuefrom 0% to 100% to instruct theGIF compression utility howmany of the image’s colorsshould be dithered.
Transparency Options:
◆ Transparency. Check to keep thetransparent areas of a GIFimage transparent.
◆ Matte. Click to fill the trans-parent areas of a GIF image.
◆ Dither. Click to select a ditheringscheme and enter an amount forthe mixing of the matte color.
Other Options:
◆ Interlaced. Check to have theGIF image load in three scans.
◆ Lossy. Enter or select a valuefrom 0 to 100 to instruct the GIFcompression utility how muchimage loss is allowed.
Click Save to save the currentimage, and then save it using theSave Optimized As dialog box.
7
7
6
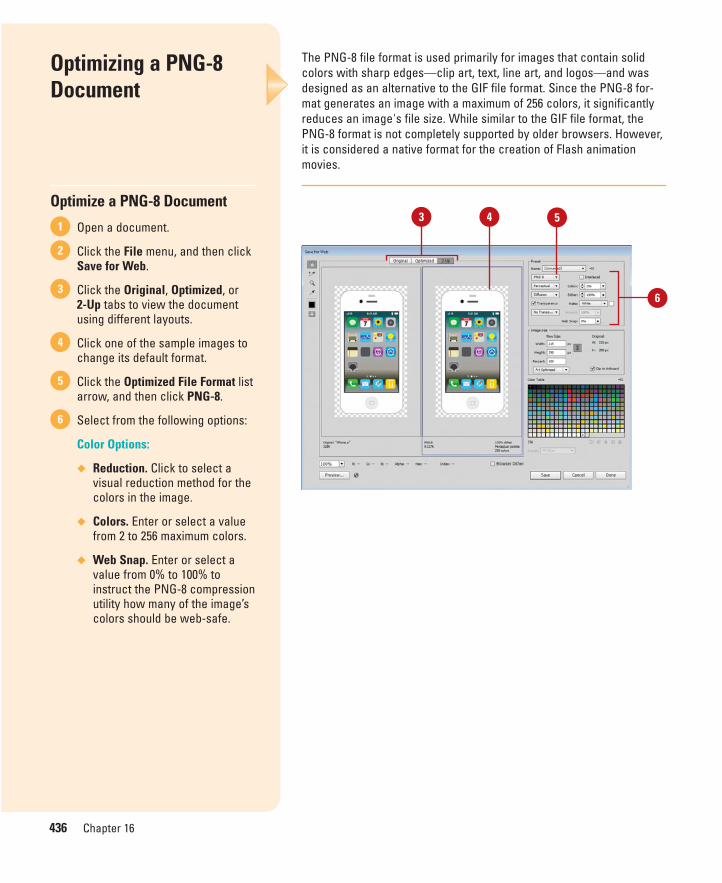
ptg8126863
436 Chapter 16
The PNG-8 file format is used primarily for images that contain solidcolors with sharp edges—clip art, text, line art, and logos—and wasdesigned as an alternative to the GIF file format. Since the PNG-8 for-mat generates an image with a maximum of 256 colors, it significantlyreduces an image's file size. While similar to the GIF file format, thePNG-8 format is not completely supported by older browsers. However,it is considered a native format for the creation of Flash animationmovies.
Optimizing a PNG-8Document
Optimize a PNG-8 Document
Open a document.
Click the File menu, and then clickSave for Web.
Click the Original, Optimized, or 2-Up tabs to view the documentusing different layouts.
Click one of the sample images tochange its default format.
Click the Optimized File Format listarrow, and then click PNG-8.
Select from the following options:
Color Options:
◆ Reduction. Click to select avisual reduction method for thecolors in the image.
◆ Colors. Enter or select a valuefrom 2 to 256 maximum colors.
◆ Web Snap. Enter or select avalue from 0% to 100% toinstruct the PNG-8 compressionutility how many of the image’scolors should be web-safe.
6
5
4
3
2
13 4
6
5
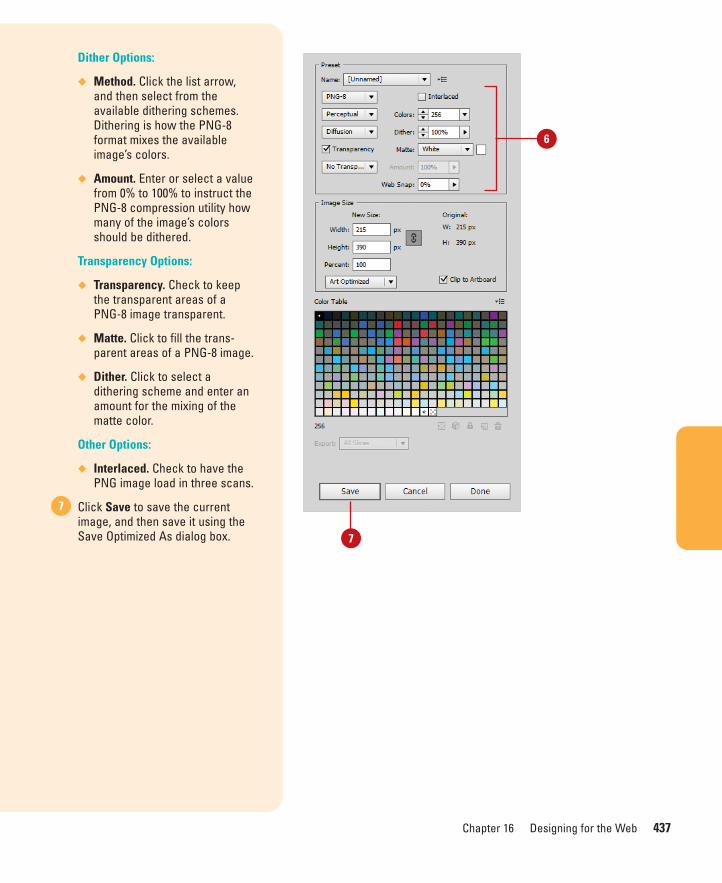
ptg8126863
Chapter 16 Designing for the Web 437
Dither Options:
◆ Method. Click the list arrow,and then select from theavailable dithering schemes.Dithering is how the PNG-8format mixes the availableimage’s colors.
◆ Amount. Enter or select a valuefrom 0% to 100% to instruct thePNG-8 compression utility howmany of the image’s colorsshould be dithered.
Transparency Options:
◆ Transparency. Check to keepthe transparent areas of aPNG-8 image transparent.
◆ Matte. Click to fill the trans-parent areas of a PNG-8 image.
◆ Dither. Click to select adithering scheme and enter anamount for the mixing of thematte color.
Other Options:
◆ Interlaced. Check to have thePNG image load in three scans.
Click Save to save the currentimage, and then save it using theSave Optimized As dialog box.
7
7
6

ptg8126863
438 Chapter 16
The PNG-24 file format is used primarily for images that contain lots ofcolors with soft transitional edges, such as photographs, and wasdesigned as an alternative to the JPEG file format. The PNG-24 formatgenerates an image with millions of colors, and still manages to reducethe size of a file. While similar to the JPEG file format, the PNG-24 useslossless compression, and does not compress files as small as theJPEG format. So for the time being, most designers are still using theJPEG format for creating faster-loading web graphics.
Optimizing a PNG-24Document
Optimize a PNG-24 Document
Open a document.
Click the File menu, and then clickSave for Web.
Click the Original, Optimized, or 2-Up tabs to view the documentusing different layouts.
Click one of the sample images tochange its default format.
Click the Optimized File Format listarrow, and then click PNG-24.
Select from the following options:
Transparency Options:
◆ Transparency. Check to keepthe transparent areas of aPNG-24 image transparent.
◆ Matte. Click to fill the trans-parent areas of a PNG-24image.
Other Options:
◆ Interlaced. Check to have thePNG-24 image load in threescans.
Click Save to save the currentimage, and then save it using theSave Optimized As dialog box.
7
6
5
4
3
2
13 4
6
5
7

ptg8126863
Chapter 16 Designing for the Web 439
The Save for Web dialog box has many options to help you create theexact image you need—including helping you compress an imagedown to a specific file size. For example, you've just created an imageyou want to display on the web, but the maximum file size you can useis 35 KB. You could experiment with compression options in the Savefor Web settings, or you could use the Optimize to File Size option.
Optimizing an Image to File Size
Optimize an Image to File Size
Open a document.
Click the File menu, and then clickSave for Web.
Click the 2-Up tab, and then selectthe sample image to the right.
Click the Optimize Menu button,and then click Optimize To FileSize.
Enter a file size in the Desired FileSize data box.
Click the Current Settings optionor the Auto Select GIF/JPEGoption to let Illustrator choosebetween the GIF or JPEG format.
Click the following Use options:
◆ Current Slice
◆ Each Slice
◆ Total of All Slices
Click OK.
Illustrator compresses theselected sample.
Click Save to save the compressedimage.
9
8
7
6
5
4
3
2
13 4
5
9
8
6
7

ptg8126863
440 Chapter 16
Illustrator allows you to slice a document into smaller pieces. You mightwant to slice an image to create interactive links; however, the bestreason is speed. You gain speed by compressing individual slices toreduce the image size. You can draw directly on an image to create auser-defined slice using the Slice tool. When you create a slice,Illustrator also creates auto slices, which fill the space in the imagethat is not defined by user defined slices. There are two types of auto-matic slices: auto slices and subslices. Subslices show overlappinguser-defined slices. User-defined slices are identified by a solid blueline, while auto slices are identified by dotted red lines. The slices alsoare numbered from left to right and top to bottom. If you want to makechanges to the slice, you need to select it first. When you edit or movethe layer contents, the slice automatically changes.
Slicing Images theEasy Way
Create a User Slice with theSlice Tool
Open a document.
Select the Slice tool on the Toolspanel.
IMPORTANT To make slicing alittle easier, drag a few guidesfrom the Ruler bar to help guideyour slicing tool.
Drag and release the slice tool inthe document to create arectangular or square slice.
◆ To constrain the slice to asquare, hold down Shift as youdrag.
Continue to drag and release untilyou have the image correctlysliced.
4
3
2
1
2
User slice
4
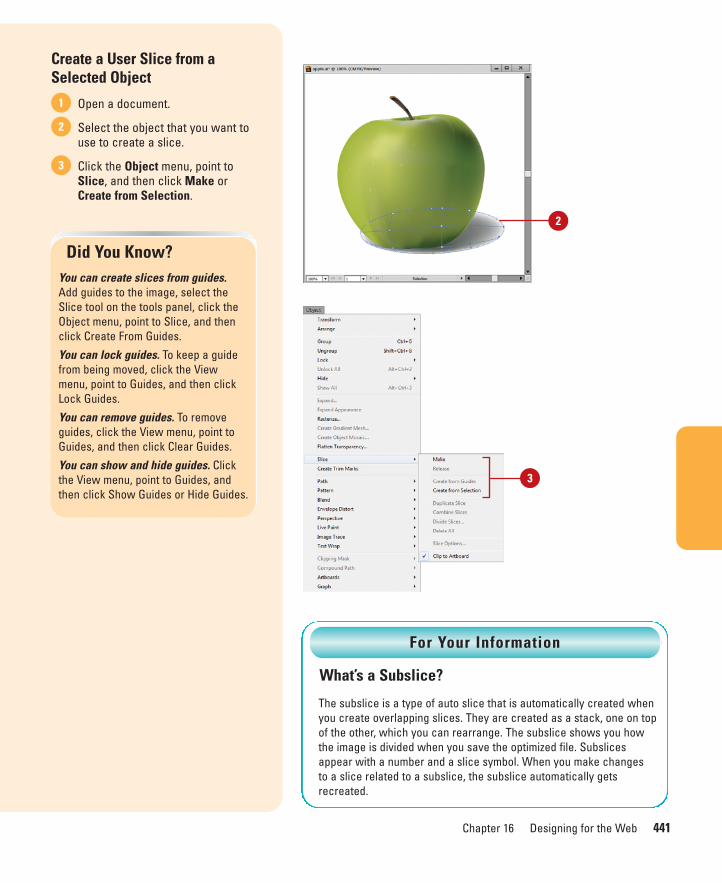
ptg8126863
Chapter 16 Designing for the Web 441
Create a User Slice from aSelected Object
Open a document.
Select the object that you want touse to create a slice.
Click the Object menu, point toSlice, and then click Make orCreate from Selection.
3
2
1
Did You Know?You can create slices from guides.Add guides to the image, select theSlice tool on the tools panel, click theObject menu, point to Slice, and thenclick Create From Guides.
You can lock guides. To keep a guidefrom being moved, click the Viewmenu, point to Guides, and then clickLock Guides.
You can remove guides. To removeguides, click the View menu, point toGuides, and then click Clear Guides.
You can show and hide guides. Clickthe View menu, point to Guides, andthen click Show Guides or Hide Guides.
What’s a Subslice?
The subslice is a type of auto slice that is automatically created whenyou create overlapping slices. They are created as a stack, one on topof the other, which you can rearrange. The subslice shows you howthe image is divided when you save the optimized file. Subslicesappear with a number and a slice symbol. When you make changes to a slice related to a subslice, the subslice automatically gets recreated.
For Your Information
2
3
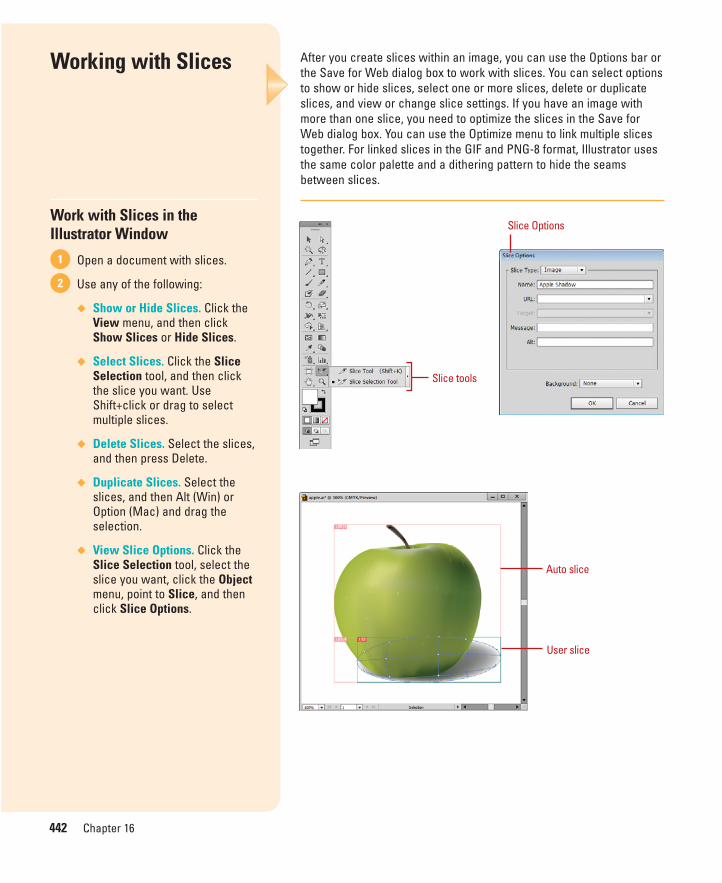
ptg8126863
442 Chapter 16
After you create slices within an image, you can use the Options bar orthe Save for Web dialog box to work with slices. You can select optionsto show or hide slices, select one or more slices, delete or duplicateslices, and view or change slice settings. If you have an image withmore than one slice, you need to optimize the slices in the Save forWeb dialog box. You can use the Optimize menu to link multiple slicestogether. For linked slices in the GIF and PNG-8 format, Illustrator usesthe same color palette and a dithering pattern to hide the seamsbetween slices.
Working with Slices
Work with Slices in theIllustrator Window
Open a document with slices.
Use any of the following:
◆ Show or Hide Slices. Click theView menu, and then clickShow Slices or Hide Slices.
◆ Select Slices. Click the SliceSelection tool, and then clickthe slice you want. UseShift+click or drag to selectmultiple slices.
◆ Delete Slices. Select the slices,and then press Delete.
◆ Duplicate Slices. Select theslices, and then Alt (Win) orOption (Mac) and drag theselection.
◆ View Slice Options. Click theSlice Selection tool, select theslice you want, click the Objectmenu, point to Slice, and thenclick Slice Options.
2
1
Slice tools
Auto slice
User slice
Slice Options
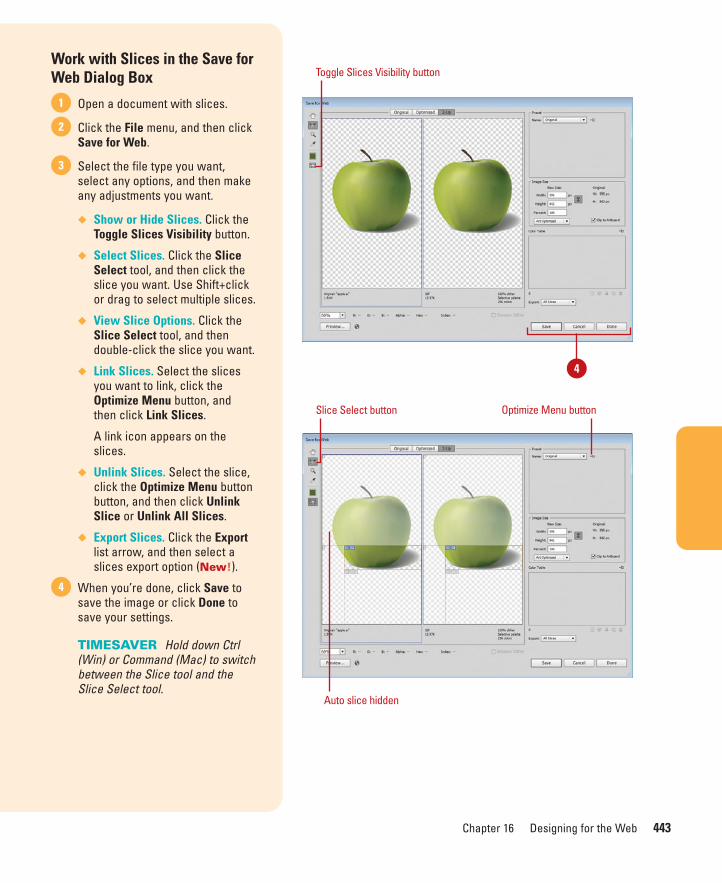
ptg8126863
Chapter 16 Designing for the Web 443
Work with Slices in the Save forWeb Dialog Box
Open a document with slices.
Click the File menu, and then clickSave for Web.
Select the file type you want,select any options, and then makeany adjustments you want.
◆ Show or Hide Slices. Click theToggle Slices Visibility button.
◆ Select Slices. Click the SliceSelect tool, and then click theslice you want. Use Shift+clickor drag to select multiple slices.
◆ View Slice Options. Click theSlice Select tool, and thendouble-click the slice you want.
◆ Link Slices. Select the slicesyou want to link, click theOptimize Menu button, andthen click Link Slices.
A link icon appears on theslices.
◆ Unlink Slices. Select the slice,click the Optimize Menu buttonbutton, and then click UnlinkSlice or Unlink All Slices.
◆ Export Slices. Click the Exportlist arrow, and then select aslices export option (New!).
When you’re done, click Save tosave the image or click Done tosave your settings.
TIMESAVER Hold down Ctrl(Win) or Command (Mac) to switchbetween the Slice tool and theSlice Select tool.
4
3
2
1
Toggle Slices Visibility button
Slice Select button Optimize Menu button
4
Auto slice hidden
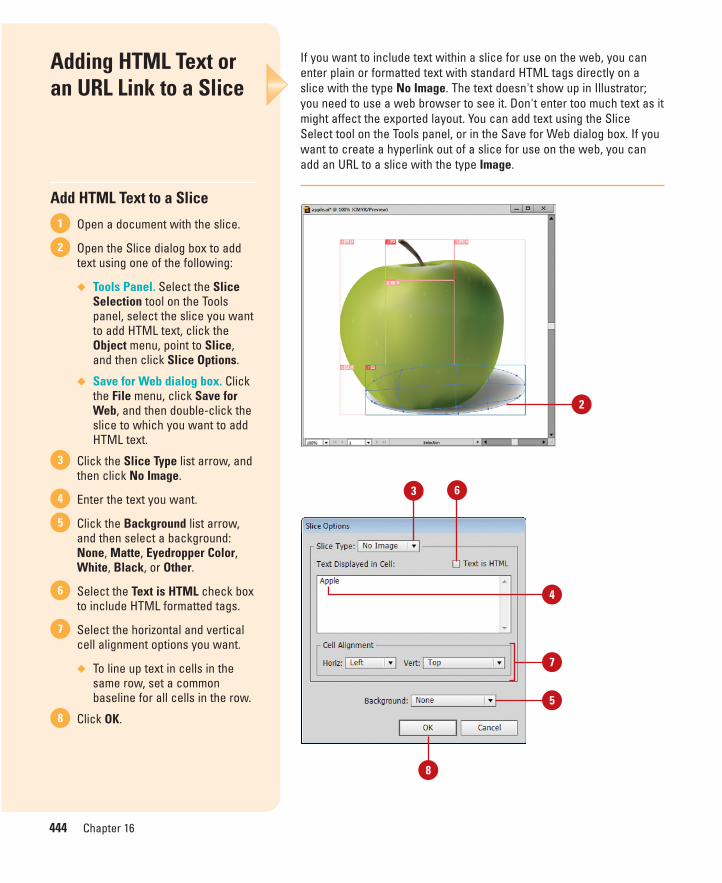
ptg8126863
444 Chapter 16
If you want to include text within a slice for use on the web, you canenter plain or formatted text with standard HTML tags directly on aslice with the type No Image. The text doesn't show up in Illustrator;you need to use a web browser to see it. Don't enter too much text as itmight affect the exported layout. You can add text using the SliceSelect tool on the Tools panel, or in the Save for Web dialog box. If youwant to create a hyperlink out of a slice for use on the web, you canadd an URL to a slice with the type Image.
Adding HTML Text oran URL Link to a Slice
Add HTML Text to a Slice
Open a document with the slice.
Open the Slice dialog box to addtext using one of the following:
◆ Tools Panel. Select the SliceSelection tool on the Toolspanel, select the slice you wantto add HTML text, click theObject menu, point to Slice,and then click Slice Options.
◆ Save for Web dialog box. Clickthe File menu, click Save forWeb, and then double-click theslice to which you want to addHTML text.
Click the Slice Type list arrow, andthen click No Image.
Enter the text you want.
Click the Background list arrow,and then select a background:None, Matte, Eyedropper Color,White, Black, or Other.
Select the Text is HTML check boxto include HTML formatted tags.
Select the horizontal and verticalcell alignment options you want.
◆ To line up text in cells in thesame row, set a commonbaseline for all cells in the row.
Click OK.8
7
6
5
4
3
2
1
3
4
8
6
7
5
2
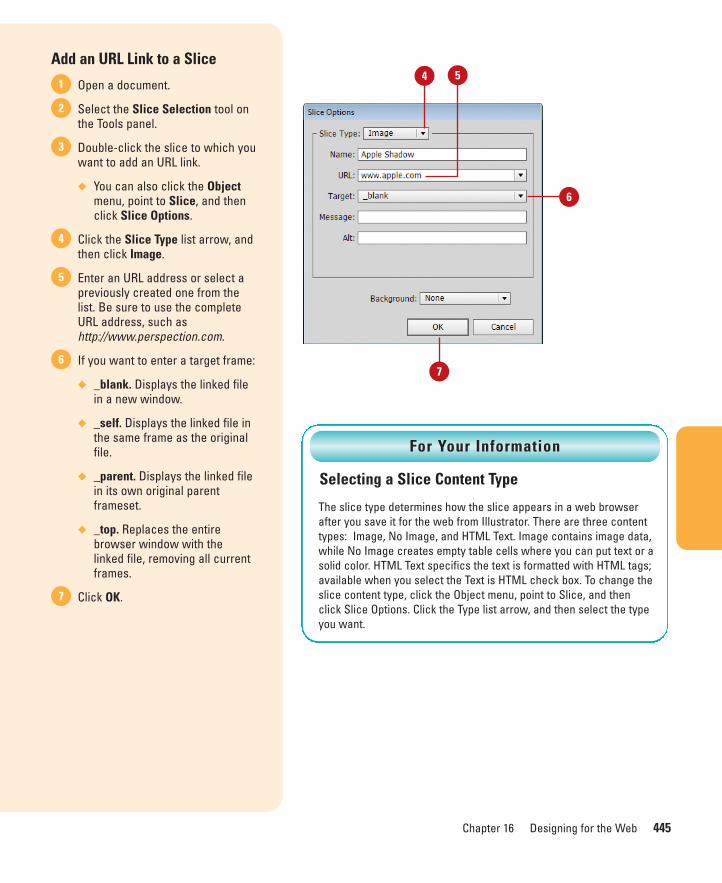
ptg8126863
Chapter 16 Designing for the Web 445
Add an URL Link to a Slice
Open a document.
Select the Slice Selection tool onthe Tools panel.
Double-click the slice to which youwant to add an URL link.
◆ You can also click the Objectmenu, point to Slice, and thenclick Slice Options.
Click the Slice Type list arrow, andthen click Image.
Enter an URL address or select apreviously created one from thelist. Be sure to use the completeURL address, such ashttp://www.perspection.com.
If you want to enter a target frame:
◆ _blank. Displays the linked filein a new window.
◆ _self. Displays the linked file inthe same frame as the originalfile.
◆ _parent. Displays the linked filein its own original parentframeset.
◆ _top. Replaces the entirebrowser window with thelinked file, removing all currentframes.
Click OK.7
6
5
4
3
2
14 5
Selecting a Slice Content Type
The slice type determines how the slice appears in a web browserafter you save it for the web from Illustrator. There are three contenttypes: Image, No Image, and HTML Text. Image contains image data,while No Image creates empty table cells where you can put text or asolid color. HTML Text specifics the text is formatted with HTML tags;available when you select the Text is HTML check box. To change theslice content type, click the Object menu, point to Slice, and thenclick Slice Options. Click the Type list arrow, and then select the typeyou want.
For Your Information
6
7
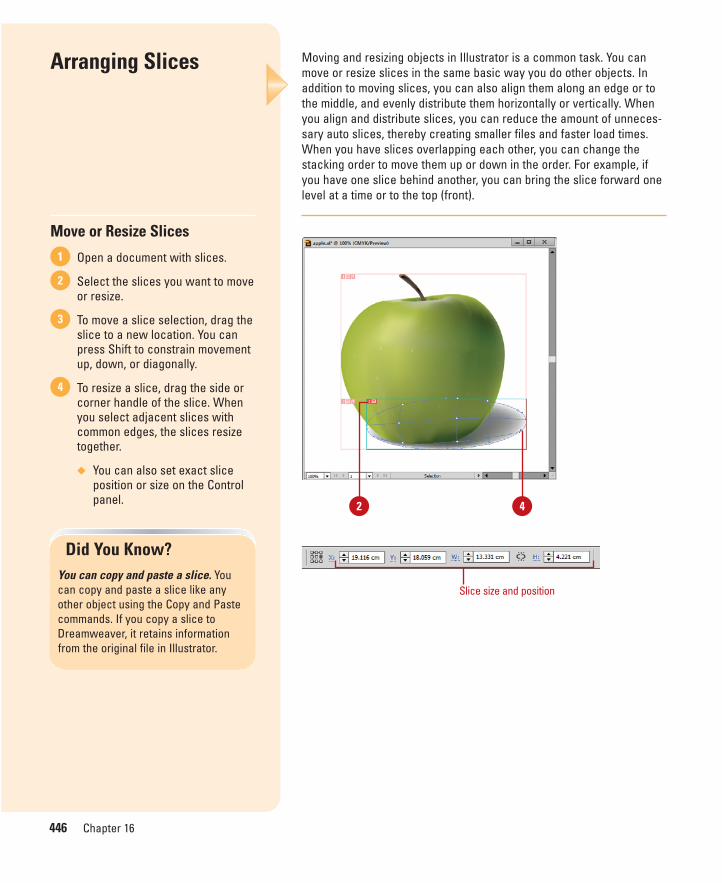
ptg8126863
446 Chapter 16
Moving and resizing objects in Illustrator is a common task. You canmove or resize slices in the same basic way you do other objects. Inaddition to moving slices, you can also align them along an edge or tothe middle, and evenly distribute them horizontally or vertically. Whenyou align and distribute slices, you can reduce the amount of unneces-sary auto slices, thereby creating smaller files and faster load times.When you have slices overlapping each other, you can change thestacking order to move them up or down in the order. For example, ifyou have one slice behind another, you can bring the slice forward onelevel at a time or to the top (front).
Arranging Slices
Move or Resize Slices
Open a document with slices.
Select the slices you want to moveor resize.
To move a slice selection, drag theslice to a new location. You canpress Shift to constrain movementup, down, or diagonally.
To resize a slice, drag the side orcorner handle of the slice. Whenyou select adjacent slices withcommon edges, the slices resizetogether.
◆ You can also set exact sliceposition or size on the Controlpanel.
4
3
2
1
2
Did You Know?You can copy and paste a slice. Youcan copy and paste a slice like anyother object using the Copy and Pastecommands. If you copy a slice toDreamweaver, it retains informationfrom the original file in Illustrator.
4
Slice size and position
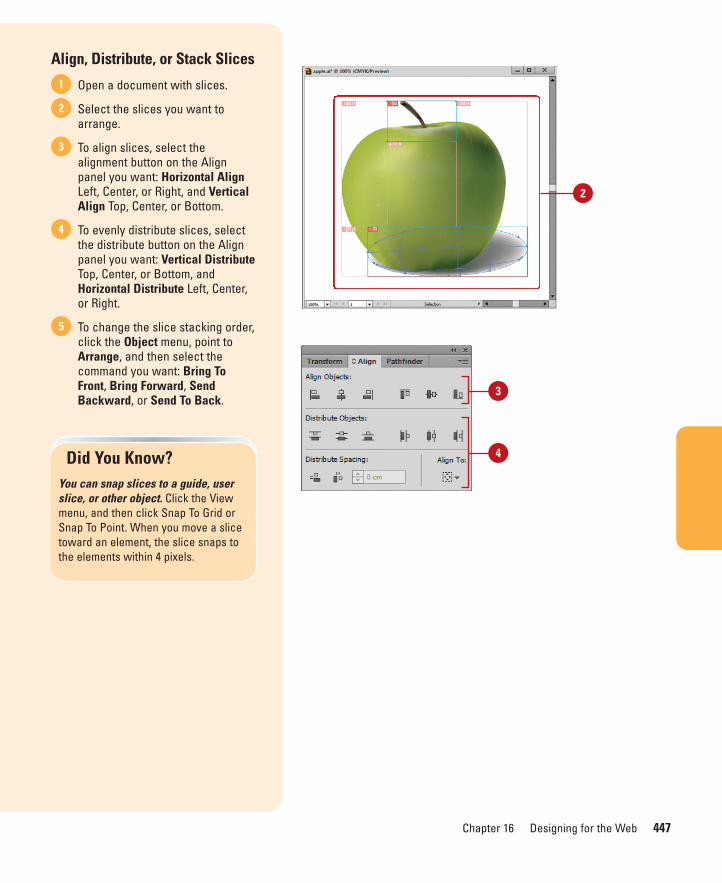
ptg8126863
Chapter 16 Designing for the Web 447
Align, Distribute, or Stack Slices
Open a document with slices.
Select the slices you want toarrange.
To align slices, select thealignment button on the Alignpanel you want: Horizontal AlignLeft, Center, or Right, and VerticalAlign Top, Center, or Bottom.
To evenly distribute slices, selectthe distribute button on the Alignpanel you want: Vertical DistributeTop, Center, or Bottom, andHorizontal Distribute Left, Center,or Right.
To change the slice stacking order,click the Object menu, point toArrange, and then select thecommand you want: Bring ToFront, Bring Forward, SendBackward, or Send To Back.
5
4
3
2
1
2
Did You Know?You can snap slices to a guide, userslice, or other object. Click the Viewmenu, and then click Snap To Grid orSnap To Point. When you move a slicetoward an element, the slice snaps tothe elements within 4 pixels.
3
4
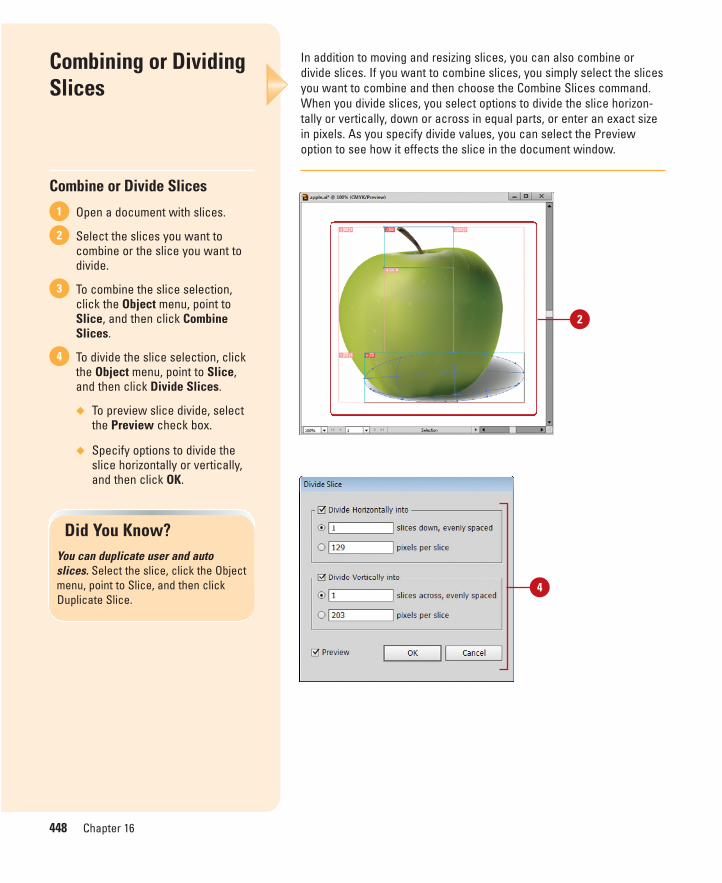
ptg8126863
448 Chapter 16
In addition to moving and resizing slices, you can also combine ordivide slices. If you want to combine slices, you simply select the slicesyou want to combine and then choose the Combine Slices command.When you divide slices, you select options to divide the slice horizon-tally or vertically, down or across in equal parts, or enter an exact sizein pixels. As you specify divide values, you can select the Previewoption to see how it effects the slice in the document window.
Combining or DividingSlices
Combine or Divide Slices
Open a document with slices.
Select the slices you want tocombine or the slice you want todivide.
To combine the slice selection,click the Object menu, point toSlice, and then click CombineSlices.
To divide the slice selection, clickthe Object menu, point to Slice,and then click Divide Slices.
◆ To preview slice divide, selectthe Preview check box.
◆ Specify options to divide theslice horizontally or vertically,and then click OK.
4
3
2
1
Did You Know?You can duplicate user and autoslices. Select the slice, click the Objectmenu, point to Slice, and then clickDuplicate Slice.
2
4
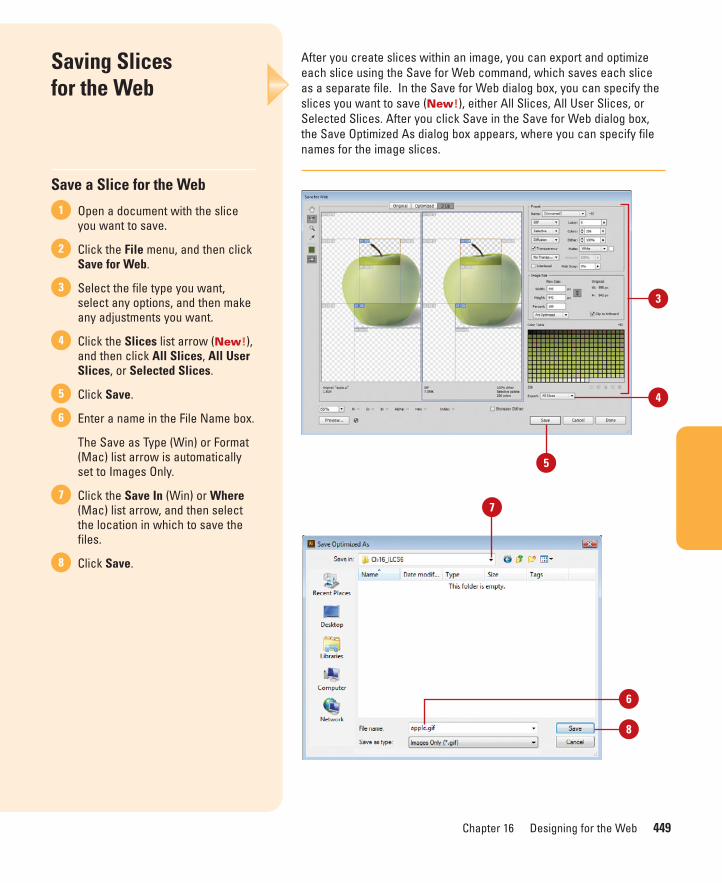
ptg8126863
Chapter 16 Designing for the Web 449
After you create slices within an image, you can export and optimizeeach slice using the Save for Web command, which saves each sliceas a separate file. In the Save for Web dialog box, you can specify theslices you want to save (New!), either All Slices, All User Slices, orSelected Slices. After you click Save in the Save for Web dialog box,the Save Optimized As dialog box appears, where you can specify filenames for the image slices.
Saving Slices for the Web
Save a Slice for the Web
Open a document with the sliceyou want to save.
Click the File menu, and then clickSave for Web.
Select the file type you want,select any options, and then makeany adjustments you want.
Click the Slices list arrow (New!),and then click All Slices, All UserSlices, or Selected Slices.
Click Save.
Enter a name in the File Name box.
The Save as Type (Win) or Format(Mac) list arrow is automaticallyset to Images Only.
Click the Save In (Win) or Where(Mac) list arrow, and then selectthe location in which to save thefiles.
Click Save.8
7
6
5
4
3
2
1
3
4
5
8
6
7
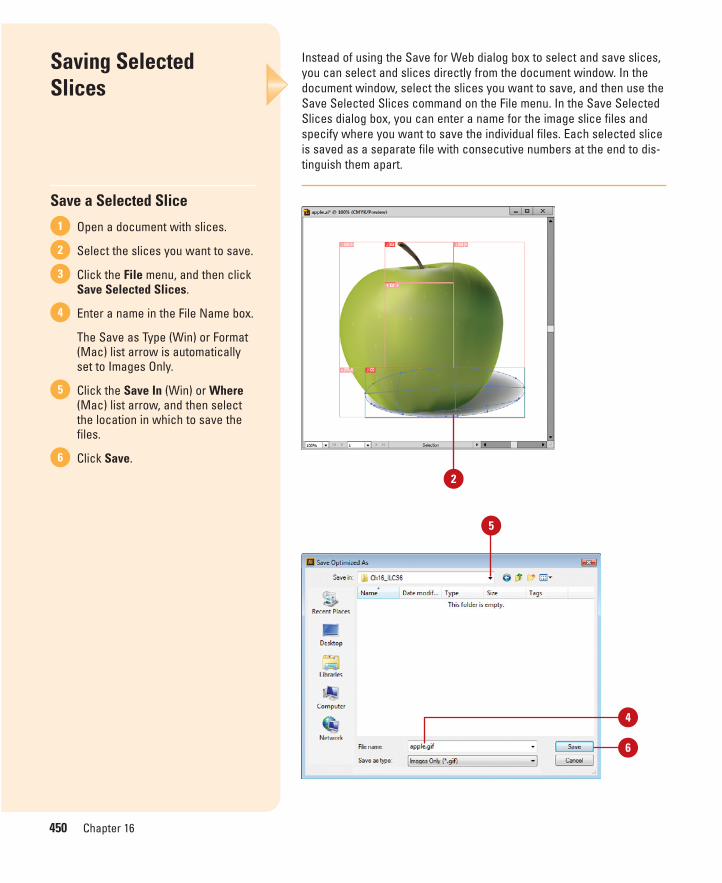
ptg8126863
450 Chapter 16
Instead of using the Save for Web dialog box to select and save slices,you can select and slices directly from the document window. In thedocument window, select the slices you want to save, and then use theSave Selected Slices command on the File menu. In the Save SelectedSlices dialog box, you can enter a name for the image slice files andspecify where you want to save the individual files. Each selected sliceis saved as a separate file with consecutive numbers at the end to dis-tinguish them apart.
Saving Selected Slices
Save a Selected Slice
Open a document with slices.
Select the slices you want to save.
Click the File menu, and then clickSave Selected Slices.
Enter a name in the File Name box.
The Save as Type (Win) or Format(Mac) list arrow is automaticallyset to Images Only.
Click the Save In (Win) or Where(Mac) list arrow, and then selectthe location in which to save thefiles.
Click Save.6
5
4
3
2
1
2
6
4
5

ptg8126863
Chapter 16 Designing for the Web 451
While you’re working with images in the Save for Web dialog box, youcan preview them in your web browser to see how they will look on theweb. If you want to use your default browser, you can click the Previewbutton to quickly see your results. If you want to preview it in otherbrowsers, you can add them to your browser list. Illustrator makes iteasy to find all the browsers installed on your computer. In theBrowsers dialog box, simply click Find All and Illustrator does the rest.If you want to see see how a browser dithers your image, you canselect the Browser Dither option (New!).
Previewing in aBrowser
Preview in a Browser
Open a document.
Click the File menu, and then clickSave for Web.
Specify the settings you want forthe image that you want topreview.
To view how a browser dithers theimage, click the Browser Dithercheck box (New!).
To add a browser to the list ofavailable ones or set a newdefault, click the Select BrowserMenu button, and then select fromthe following options:
◆ Other. Click to select thebrowser you want to use.
◆ Edit List. Click to find, add,remove, or set as default.
◆ Add. Add a browser.
◆ Remove. Removes theselected browser.
◆ Set As Default. Set theselected browser as thedefault.
◆ Find All. Finds all browserson your computer.
Click Preview to open the image inyour default browser.
◆ When you’re done, close yourbrowser.
Click Done.7
6
5
4
3
2
1
3
7
5 Edit List options
46 5

ptg8126863
This page intentionally left blank

ptg8126863
Customizing the Way You Work
Introduction
No description of Adobe Illustrator would be complete with-out that well-known, but little utilized area called Preferences.Illustrator preferences serve several purposes. They help cus-tomize the program to your particular designing style, andthey help you utilize available computer resources toincrease the overall performance of the program.
As you use Illustrator, you'll come to realize the impor-tance of working with units and rulers. Precision is the nameof the game when you are working with images. What aboutthe color of your guides, grids, and slices? No big deal, yousay. Well, if you've ever tried viewing a blue guide againstpredominantly blue artwork, you know exactly why guidecolor is important. By working through preferences, such asDisplay Performance and Scratch Disks, speed increases ofup to 20% can be achieved.
In addition, customizing the program helps make youmore comfortable, and studies show that the more comfort-able you are as a designer, the better your designs. Plus,being comfortable allows you to work faster, and that meansyou'll accomplish more in the same amount of time. Whatdoes setting up preferences do for you? They make Illustratorrun faster, you work more efficiently, and your designs arebetter. That's a pretty good combination. Illustrator doesn'tgive you Preferences to confuse you, but to give you choices,and those choices give you control. 17
17What You’ll Do
Set General Preferences
Change Selection & Anchor DisplayPreferences
Set Type Preferences
Change Units & Display PerformancePreferences
Set Slices and Hyphenation Preferences
Select Plug-Ins
Select Scratch Disks
Set User Interface Preferences
Set File Handling & ClipboardPreferences
Work with Appearance of BlackPreferences
Define Shortcut Keys
Use Drawing Tablets
453
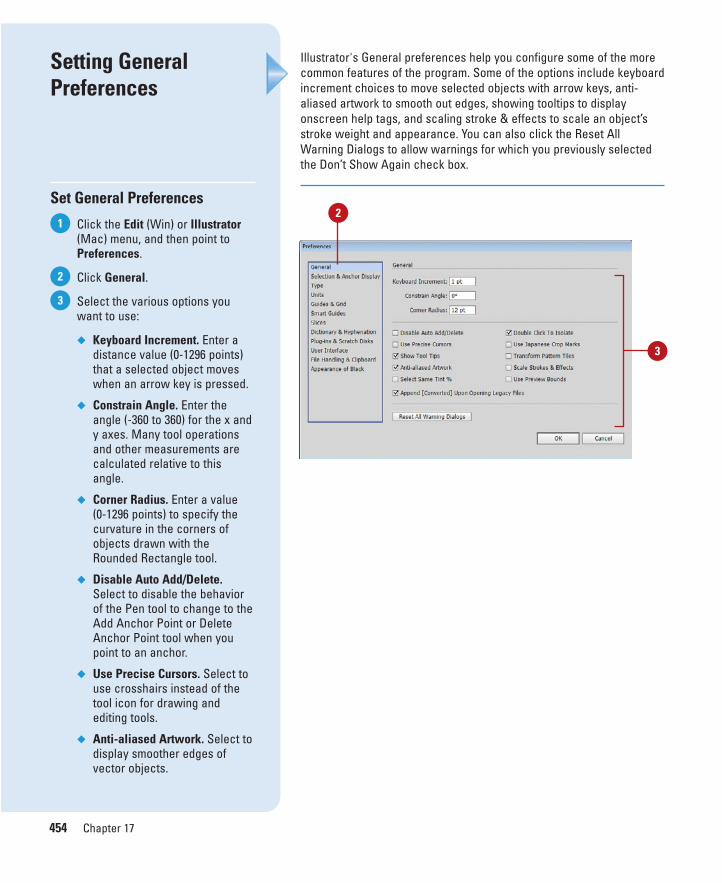
ptg8126863
454 Chapter 17
Illustrator's General preferences help you configure some of the morecommon features of the program. Some of the options include keyboardincrement choices to move selected objects with arrow keys, anti-aliased artwork to smooth out edges, showing tooltips to displayonscreen help tags, and scaling stroke & effects to scale an object’sstroke weight and appearance. You can also click the Reset AllWarning Dialogs to allow warnings for which you previously selectedthe Don’t Show Again check box.
Setting GeneralPreferences
Set General Preferences
Click the Edit (Win) or Illustrator(Mac) menu, and then point toPreferences.
Click General.
Select the various options youwant to use:
◆ Keyboard Increment. Enter adistance value (0-1296 points)that a selected object moveswhen an arrow key is pressed.
◆ Constrain Angle. Enter theangle (-360 to 360) for the x andy axes. Many tool operationsand other measurements arecalculated relative to thisangle.
◆ Corner Radius. Enter a value (0-1296 points) to specify thecurvature in the corners ofobjects drawn with theRounded Rectangle tool.
◆ Disable Auto Add/Delete.Select to disable the behaviorof the Pen tool to change to theAdd Anchor Point or DeleteAnchor Point tool when youpoint to an anchor.
◆ Use Precise Cursors. Select touse crosshairs instead of thetool icon for drawing andediting tools.
◆ Anti-aliased Artwork. Select todisplay smoother edges ofvector objects.
3
2
1
3
2
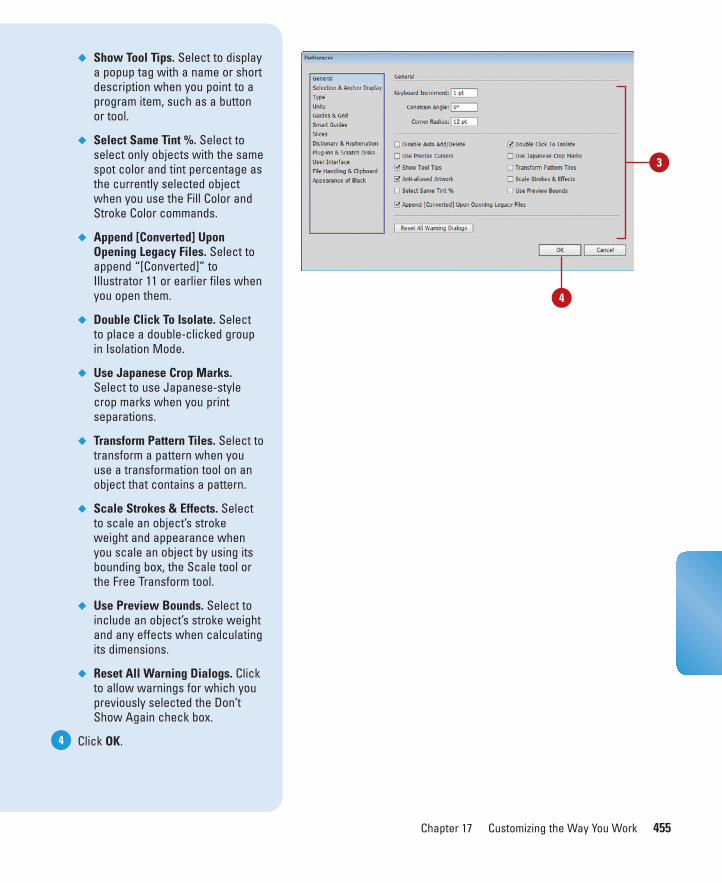
ptg8126863
Chapter 17 Customizing the Way You Work 455
◆ Show Tool Tips. Select to displaya popup tag with a name or shortdescription when you point to aprogram item, such as a buttonor tool.
◆ Select Same Tint %. Select toselect only objects with the samespot color and tint percentage asthe currently selected objectwhen you use the Fill Color andStroke Color commands.
◆ Append [Converted] UponOpening Legacy Files. Select toappend “[Converted]” toIllustrator 11 or earlier files whenyou open them.
◆ Double Click To Isolate. Selectto place a double-clicked groupin Isolation Mode.
◆ Use Japanese Crop Marks.Select to use Japanese-stylecrop marks when you printseparations.
◆ Transform Pattern Tiles. Select totransform a pattern when youuse a transformation tool on anobject that contains a pattern.
◆ Scale Strokes & Effects. Selectto scale an object’s strokeweight and appearance whenyou scale an object by using itsbounding box, the Scale tool orthe Free Transform tool.
◆ Use Preview Bounds. Select toinclude an object’s stroke weightand any effects when calculatingits dimensions.
◆ Reset All Warning Dialogs. Clickto allow warnings for which youpreviously selected the Don’tShow Again check box.
Click OK. 4
3
4
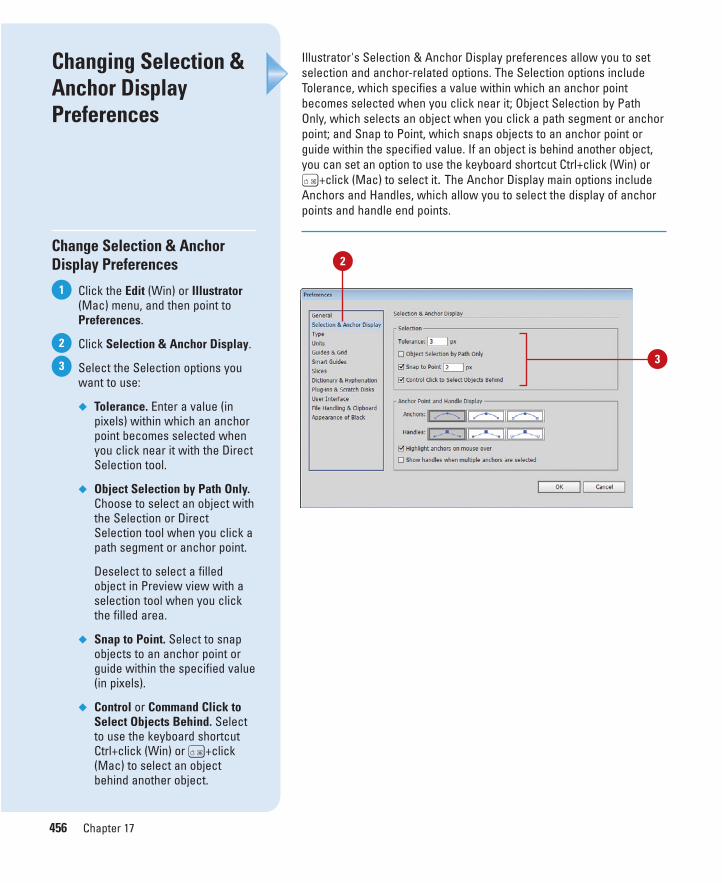
ptg8126863
456 Chapter 17
Illustrator's Selection & Anchor Display preferences allow you to setselection and anchor-related options. The Selection options includeTolerance, which specifies a value within which an anchor pointbecomes selected when you click near it; Object Selection by PathOnly, which selects an object when you click a path segment or anchorpoint; and Snap to Point, which snaps objects to an anchor point orguide within the specified value. If an object is behind another object,you can set an option to use the keyboard shortcut Ctrl+click (Win) orA+click (Mac) to select it. The Anchor Display main options includeAnchors and Handles, which allow you to select the display of anchorpoints and handle end points.
Changing Selection &Anchor DisplayPreferences
Change Selection & AnchorDisplay Preferences
Click the Edit (Win) or Illustrator(Mac) menu, and then point toPreferences.
Click Selection & Anchor Display.
Select the Selection options youwant to use:
◆ Tolerance. Enter a value (inpixels) within which an anchorpoint becomes selected whenyou click near it with the DirectSelection tool.
◆ Object Selection by Path Only.Choose to select an object withthe Selection or DirectSelection tool when you click apath segment or anchor point.
Deselect to select a filledobject in Preview view with aselection tool when you clickthe filled area.
◆ Snap to Point. Select to snapobjects to an anchor point orguide within the specified value(in pixels).
◆ Control or Command Click toSelect Objects Behind. Selectto use the keyboard shortcutCtrl+click (Win) or A+click(Mac) to select an objectbehind another object.
3
2
1
3
2
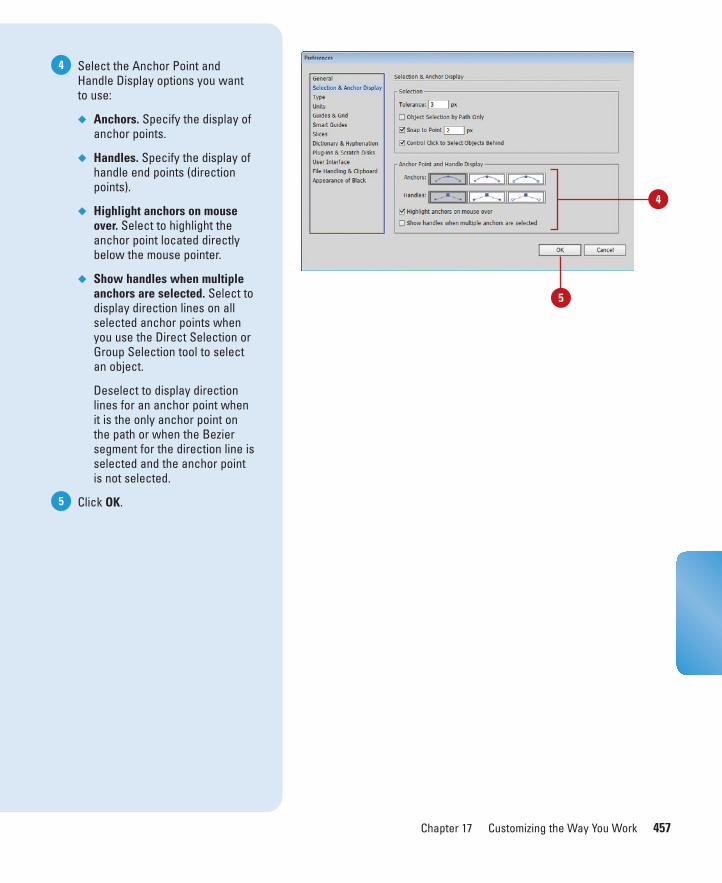
ptg8126863
Chapter 17 Customizing the Way You Work 457
Select the Anchor Point andHandle Display options you wantto use:
◆ Anchors. Specify the display ofanchor points.
◆ Handles. Specify the display ofhandle end points (directionpoints).
◆ Highlight anchors on mouseover. Select to highlight theanchor point located directlybelow the mouse pointer.
◆ Show handles when multipleanchors are selected. Select todisplay direction lines on allselected anchor points whenyou use the Direct Selection orGroup Selection tool to selectan object.
Deselect to display directionlines for an anchor point whenit is the only anchor point onthe path or when the Beziersegment for the direction line isselected and the anchor pointis not selected.
Click OK.5
4
4
5
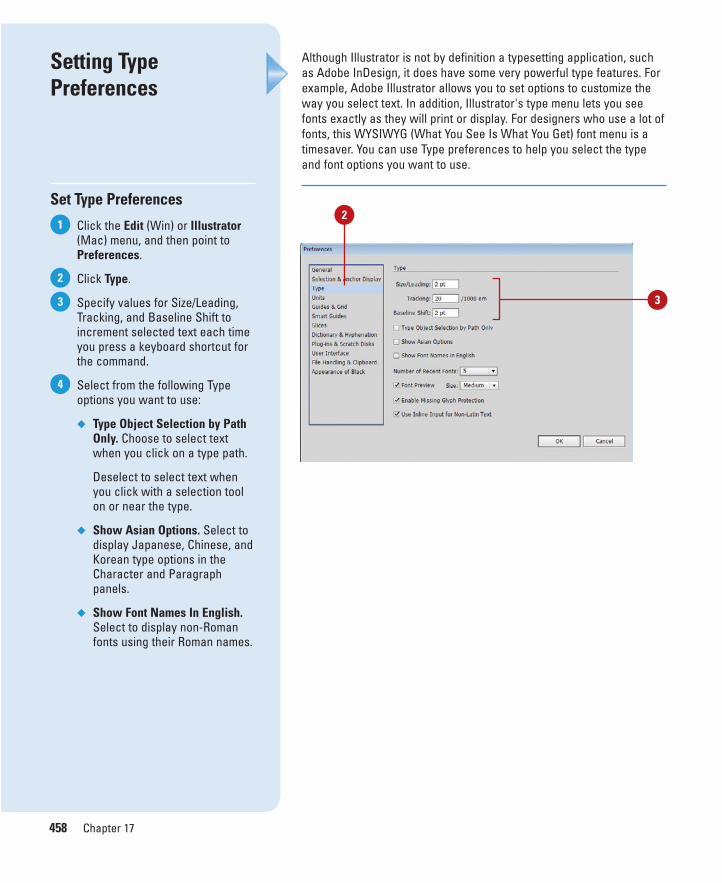
ptg8126863
458 Chapter 17
Although Illustrator is not by definition a typesetting application, suchas Adobe InDesign, it does have some very powerful type features. Forexample, Adobe Illustrator allows you to set options to customize theway you select text. In addition, Illustrator's type menu lets you seefonts exactly as they will print or display. For designers who use a lot offonts, this WYSIWYG (What You See Is What You Get) font menu is atimesaver. You can use Type preferences to help you select the typeand font options you want to use.
Setting TypePreferences
Set Type Preferences
Click the Edit (Win) or Illustrator(Mac) menu, and then point toPreferences.
Click Type.
Specify values for Size/Leading,Tracking, and Baseline Shift toincrement selected text each timeyou press a keyboard shortcut forthe command.
Select from the following Typeoptions you want to use:
◆ Type Object Selection by PathOnly. Choose to select textwhen you click on a type path.
Deselect to select text whenyou click with a selection toolon or near the type.
◆ Show Asian Options. Select todisplay Japanese, Chinese, andKorean type options in theCharacter and Paragraphpanels.
◆ Show Font Names In English.Select to display non-Romanfonts using their Roman names.
4
3
2
1
3
2
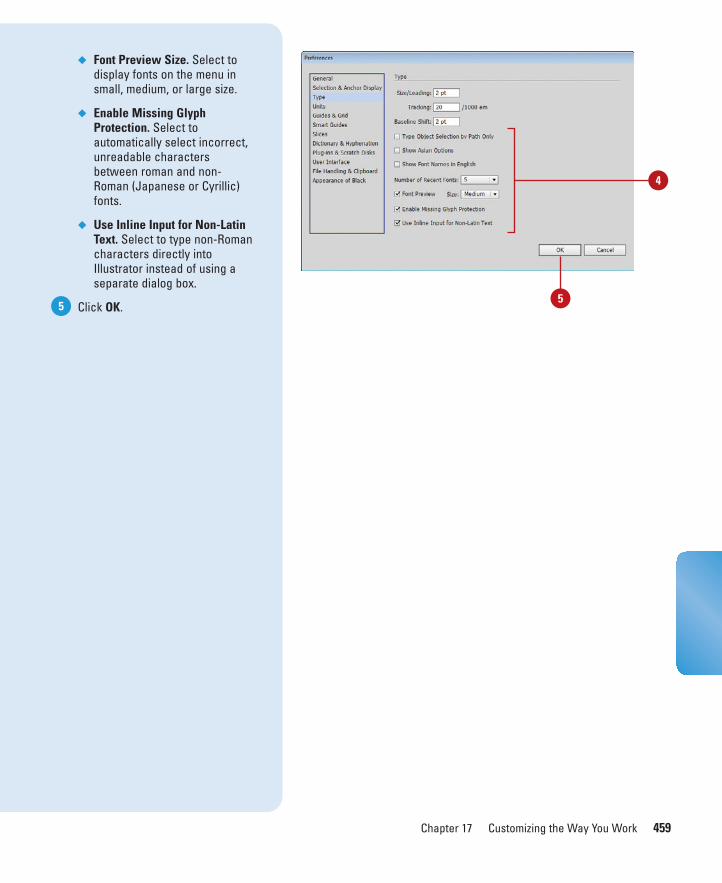
ptg8126863
Chapter 17 Customizing the Way You Work 459
◆ Font Preview Size. Select todisplay fonts on the menu insmall, medium, or large size.
◆ Enable Missing GlyphProtection. Select toautomatically select incorrect,unreadable charactersbetween roman and non-Roman (Japanese or Cyrillic)fonts.
◆ Use Inline Input for Non-LatinText. Select to type non-Romancharacters directly intoIllustrator instead of using aseparate dialog box.
Click OK.5
4
5

ptg8126863
460 Chapter 17
Changing UnitsPreferences
Change Units Preferences
Click the Edit (Win) or Illustrator(Mac) menu, and then point toPreferences.
Click Units.
Select from the following Unitsoptions you want to use:
◆ General. Select a unit ofmeasure for rulers, dialogboxes, and Transform, Control,and Info panels.
◆ Stroke. Select a unit ofmeasure for the Strokes paneland Stroke Weight field on theControl panel.
◆ Type. Select a unit of measurefor the Character andParagraph panels.
◆ Asian Type. Select a unit ofmeasure for Asian type.
◆ Numbers Without Units ArePoints. Select to not convertpoints to picas when Picas isset as the General unit.
◆ Identify Objects By. Fordynamic objects, select anoption to assign variables to theObject Name or an XML ID.
Click OK.4
3
2
1
While changing the measurable units and rulers do not affect outputquality, they do help to measure information in a document consistentwith the specific output device. In Units preferences, you can set unitsof measure for general, stroke, and type-related features. The Generaloption (Units) sets a unit of measure for rulers, dialog boxes, andTransform, Control, and Info panels.
3
4
2
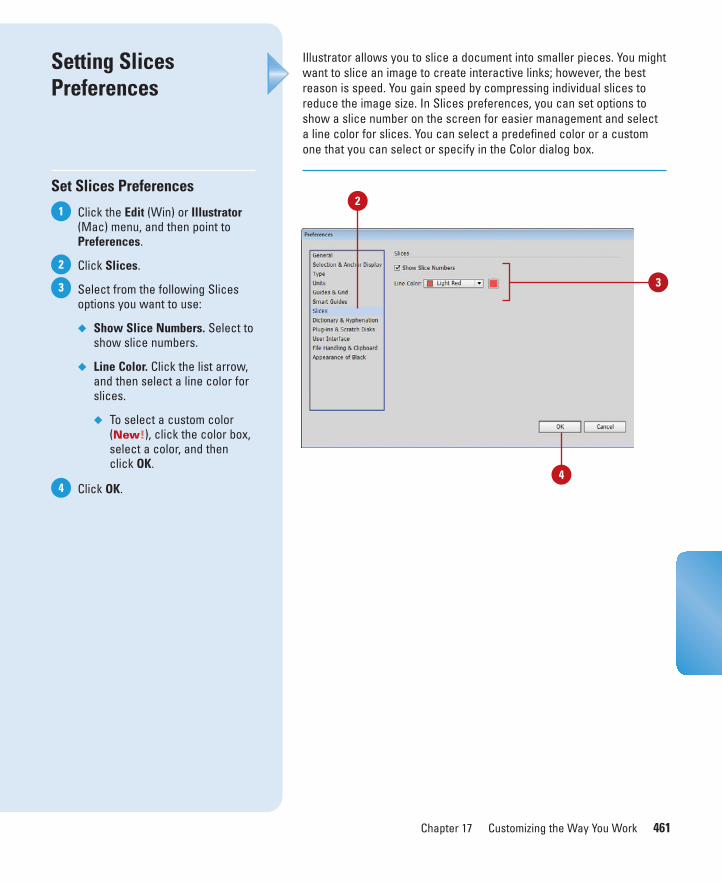
ptg8126863
Chapter 17 Customizing the Way You Work 461
Setting Slices Preferences
Set Slices Preferences
Click the Edit (Win) or Illustrator(Mac) menu, and then point toPreferences.
Click Slices.
Select from the following Slicesoptions you want to use:
◆ Show Slice Numbers. Select toshow slice numbers.
◆ Line Color. Click the list arrow,and then select a line color forslices.
◆ To select a custom color(New!), click the color box,select a color, and then click OK.
Click OK.4
3
2
1
Illustrator allows you to slice a document into smaller pieces. You mightwant to slice an image to create interactive links; however, the bestreason is speed. You gain speed by compressing individual slices toreduce the image size. In Slices preferences, you can set options toshow a slice number on the screen for easier management and selecta line color for slices. You can select a predefined color or a customone that you can select or specify in the Color dialog box.
3
4
2
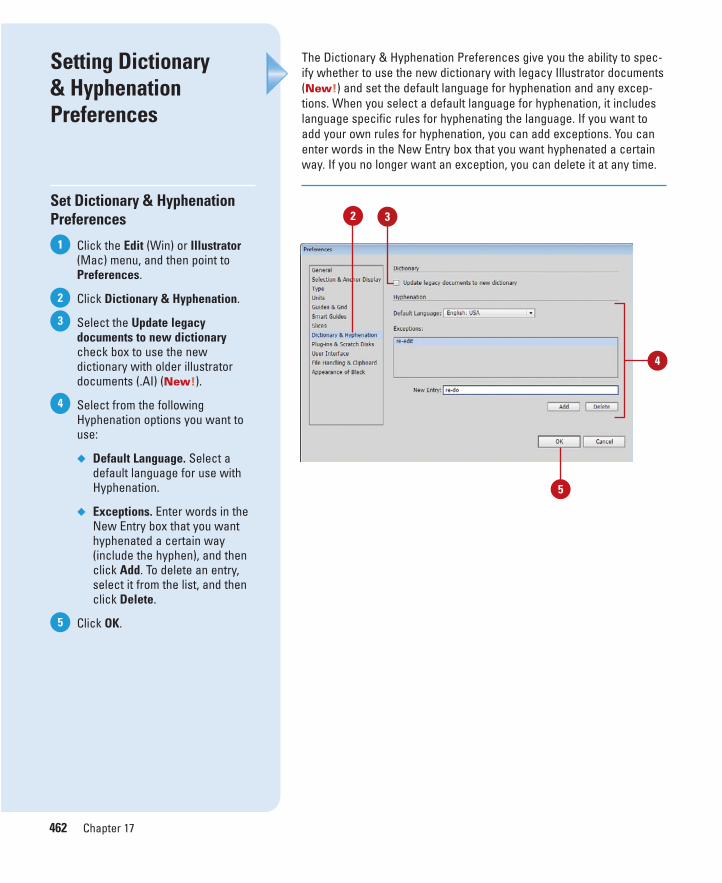
ptg8126863
462 Chapter 17
Setting Dictionary & HyphenationPreferences
Set Dictionary & HyphenationPreferences
Click the Edit (Win) or Illustrator(Mac) menu, and then point toPreferences.
Click Dictionary & Hyphenation.
Select the Update legacydocuments to new dictionarycheck box to use the newdictionary with older illustratordocuments (.AI) (New!).
Select from the followingHyphenation options you want touse:
◆ Default Language. Select adefault language for use withHyphenation.
◆ Exceptions. Enter words in theNew Entry box that you wanthyphenated a certain way(include the hyphen), and thenclick Add. To delete an entry,select it from the list, and thenclick Delete.
Click OK.5
4
3
2
1
The Dictionary & Hyphenation Preferences give you the ability to spec-ify whether to use the new dictionary with legacy Illustrator documents(New!) and set the default language for hyphenation and any excep-tions. When you select a default language for hyphenation, it includeslanguage specific rules for hyphenating the language. If you want toadd your own rules for hyphenation, you can add exceptions. You canenter words in the New Entry box that you want hyphenated a certainway. If you no longer want an exception, you can delete it at any time.
4
3
5
2

ptg8126863
Chapter 17 Customizing the Way You Work 463
The Plug-ins preferences give you the ability to organize your plug-insby saving them in one or more folders. These additional folders are typ-ically used to hold third-party plug-ins. When selected, plug-ins con-tained within the folder will be available in Illustrator. Organizing yourplug-ins into folders helps keep your projects focused and reduces theclutter of plug-ins when you want to select them. If you’re not surewhat plug-ins are installed you can view a list using System Info.
Selecting Plug-Ins
Select Plug-Ins Preferences
Click the Edit (Win) or Illustrator(Mac) menu, and then point toPreferences.
Click Plug-ins & Scratch Disks.
Select the Additional Plug-insFolder check box if you haveadditional plug-ins stored outsidethe default Illustrator plug-insfolder.
If you change the location of youradditional plug-ins folder, you canalways click Choose and navigateto it.
Click OK.
Display Plug-Ins
Click the Help menu, and thenclick System Info.
Scroll down the list until you cansee the plug-ins.
Click OK.3
2
1
5
4
3
2
1
5
3 4
2
3
2
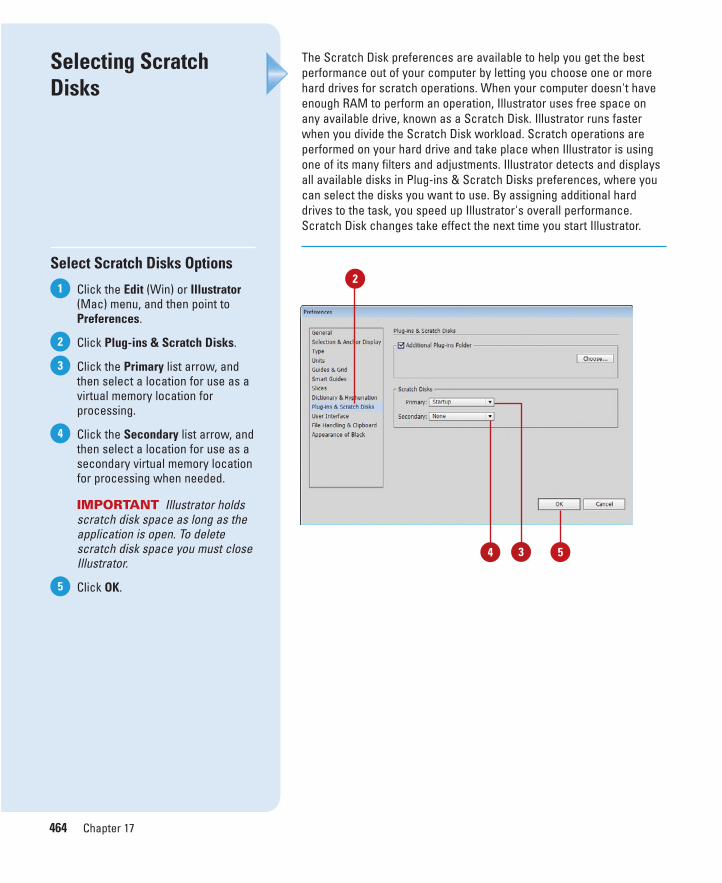
ptg8126863
464 Chapter 17
Selecting ScratchDisks
Select Scratch Disks Options
Click the Edit (Win) or Illustrator(Mac) menu, and then point toPreferences.
Click Plug-ins & Scratch Disks.
Click the Primary list arrow, andthen select a location for use as avirtual memory location forprocessing.
Click the Secondary list arrow, andthen select a location for use as asecondary virtual memory locationfor processing when needed.
IMPORTANT Illustrator holdsscratch disk space as long as theapplication is open. To deletescratch disk space you must closeIllustrator.
Click OK.5
4
3
2
1
The Scratch Disk preferences are available to help you get the bestperformance out of your computer by letting you choose one or morehard drives for scratch operations. When your computer doesn't haveenough RAM to perform an operation, Illustrator uses free space onany available drive, known as a Scratch Disk. Illustrator runs fasterwhen you divide the Scratch Disk workload. Scratch operations areperformed on your hard drive and take place when Illustrator is usingone of its many filters and adjustments. Illustrator detects and displaysall available disks in Plug-ins & Scratch Disks preferences, where youcan select the disks you want to use. By assigning additional harddrives to the task, you speed up Illustrator's overall performance.Scratch Disk changes take effect the next time you start Illustrator.
4 3 5
2
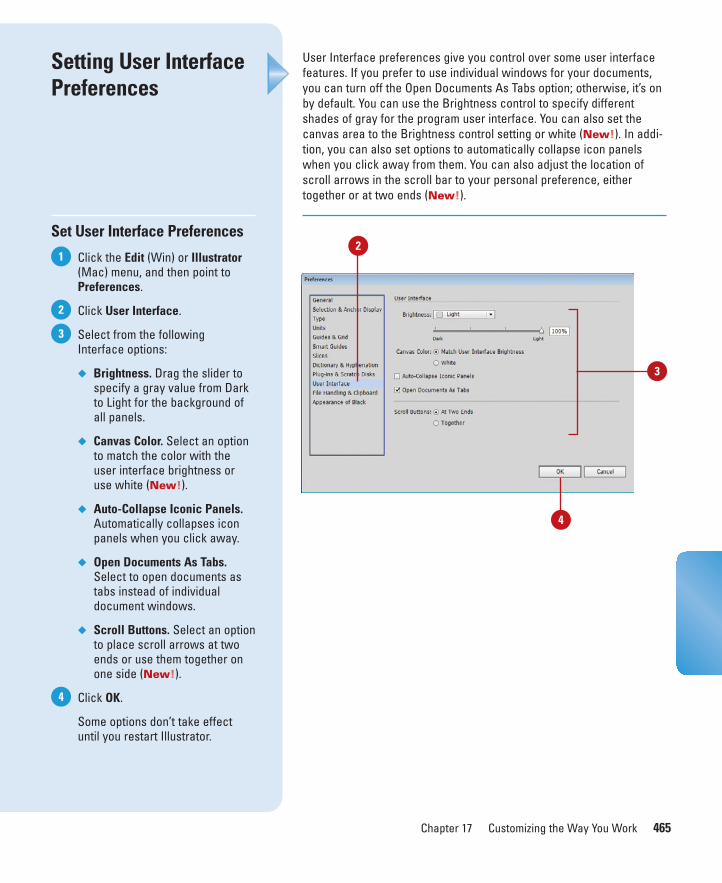
ptg8126863
Chapter 17 Customizing the Way You Work 465
User Interface preferences give you control over some user interfacefeatures. If you prefer to use individual windows for your documents,you can turn off the Open Documents As Tabs option; otherwise, it’s onby default. You can use the Brightness control to specify differentshades of gray for the program user interface. You can also set thecanvas area to the Brightness control setting or white (New!). In addi-tion, you can also set options to automatically collapse icon panelswhen you click away from them. You can also adjust the location ofscroll arrows in the scroll bar to your personal preference, eithertogether or at two ends (New!).
Setting User InterfacePreferences
Set User Interface Preferences
Click the Edit (Win) or Illustrator(Mac) menu, and then point toPreferences.
Click User Interface.
Select from the followingInterface options:
◆ Brightness. Drag the slider tospecify a gray value from Darkto Light for the background ofall panels.
◆ Canvas Color. Select an optionto match the color with theuser interface brightness oruse white (New!).
◆ Auto-Collapse Iconic Panels.Automatically collapses iconpanels when you click away.
◆ Open Documents As Tabs.Select to open documents astabs instead of individualdocument windows.
◆ Scroll Buttons. Select an optionto place scroll arrows at twoends or use them together onone side (New!).
Click OK.
Some options don’t take effectuntil you restart Illustrator.
4
3
2
1
3
4
2
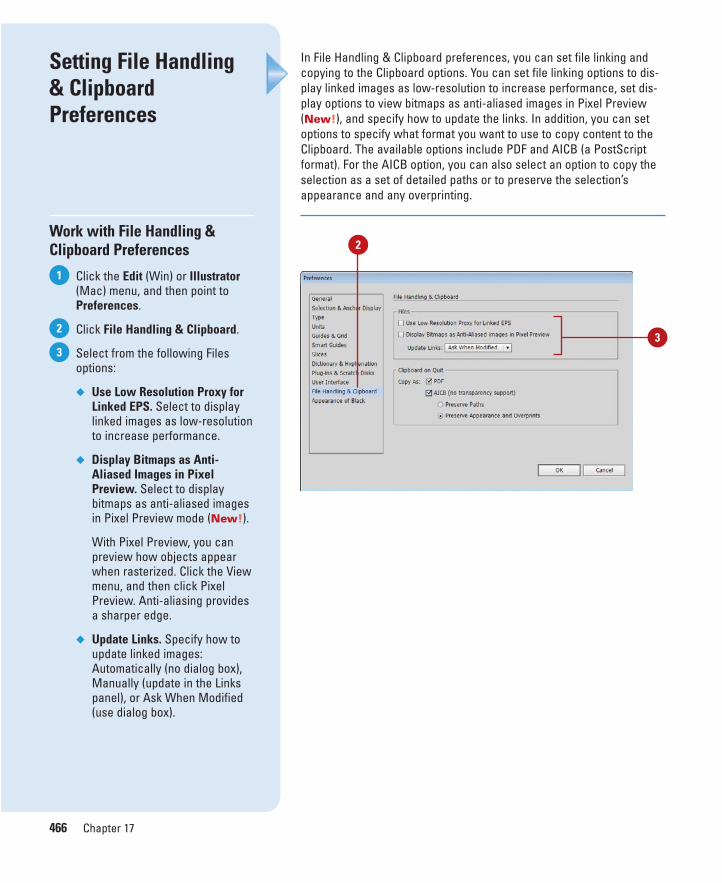
ptg8126863
466 Chapter 17
In File Handling & Clipboard preferences, you can set file linking andcopying to the Clipboard options. You can set file linking options to dis-play linked images as low-resolution to increase performance, set dis-play options to view bitmaps as anti-aliased images in Pixel Preview(New!), and specify how to update the links. In addition, you can setoptions to specify what format you want to use to copy content to theClipboard. The available options include PDF and AICB (a PostScriptformat). For the AICB option, you can also select an option to copy theselection as a set of detailed paths or to preserve the selection’sappearance and any overprinting.
Setting File Handling& ClipboardPreferences
Work with File Handling &Clipboard Preferences
Click the Edit (Win) or Illustrator(Mac) menu, and then point toPreferences.
Click File Handling & Clipboard.
Select from the following Filesoptions:
◆ Use Low Resolution Proxy forLinked EPS. Select to displaylinked images as low-resolutionto increase performance.
◆ Display Bitmaps as Anti-Aliased Images in PixelPreview. Select to displaybitmaps as anti-aliased imagesin Pixel Preview mode (New!).
With Pixel Preview, you canpreview how objects appearwhen rasterized. Click the Viewmenu, and then click PixelPreview. Anti-aliasing providesa sharper edge.
◆ Update Links. Specify how toupdate linked images:Automatically (no dialog box),Manually (update in the Linkspanel), or Ask When Modified(use dialog box).
3
2
1
3
2
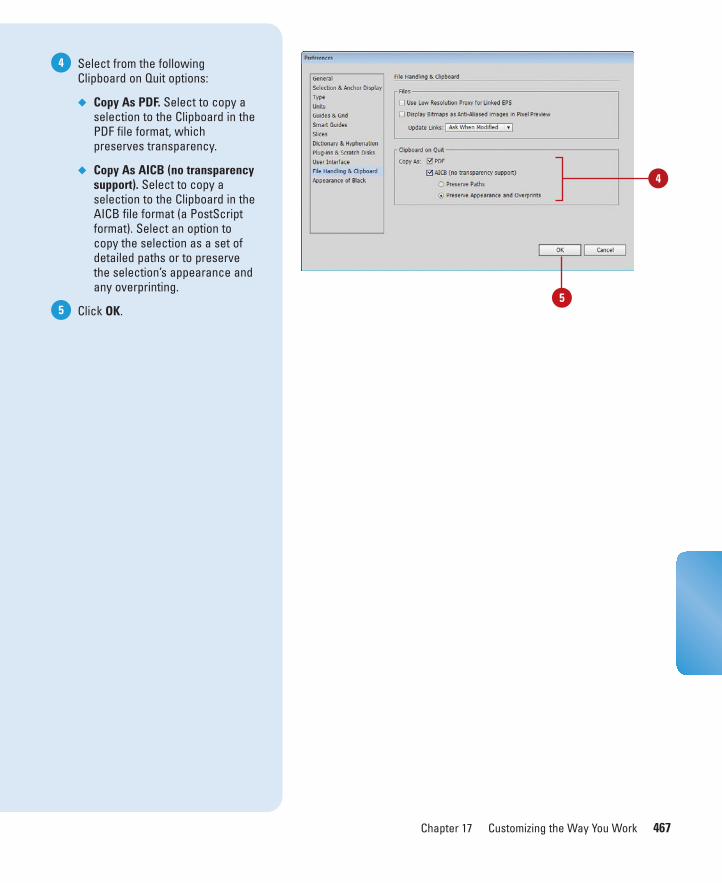
ptg8126863
Chapter 17 Customizing the Way You Work 467
Select from the followingClipboard on Quit options:
◆ Copy As PDF. Select to copy aselection to the Clipboard in thePDF file format, whichpreserves transparency.
◆ Copy As AICB (no transparencysupport). Select to copy aselection to the Clipboard in theAICB file format (a PostScriptformat). Select an option tocopy the selection as a set ofdetailed paths or to preservethe selection’s appearance andany overprinting.
Click OK.5
4
4
5

ptg8126863
468 Chapter 17
If a printer uses a combination of CMYK inks instead of the actual 100Kblack tone to create a rich black look, you can set options in theAppearance of Black preferences to specify how you want to createthe appearance of black in your documents. There are two availableoptions to determine the appearance of black in your document: onefor On Screen and another one for Printing/Exporting. Each of theoptions allows you to specify how you want to work with the appear-ance of black (true black or rich black) in your documents.
Working withAppearance of BlackPreferences
Work with Appearance of BlackPreferences
Click the Edit (Win) or Illustrator(Mac) menu, and then point toPreferences.
Click Appearance of Black.
Select from the followingAppearance of Black options:
◆ On Screen. Select Display AllBlacks Accurately to displayblacks based on actual CMYKcolor values or select DisplayAll Blacks as Rich Black todisplay all blacks as rich blacks(a mix of CMYK values).
◆ Printing / Exporting. SelectOutput All Blacks Accuratelyto print blacks using actualCMYK color values on RGB andgrayscale devices, or selectOutput All Blacks as RichBlack to print blacks as richblacks (a mix of CMYK values)on RGB devices.
Click OK.4
3
2
1
3
4
2

ptg8126863
Chapter 17 Customizing the Way You Work 469
A wise man once wrote "time is money," and Illustrator is a program thatcan consume a lot of time. That's why the Illustrator application useskeyboard shortcuts. Keyboard Shortcuts, as their name implies, let youperform tasks in a shorter period of time. For example, if you want toopen a new document in Illustrator, you can click the File menu, andthen click New, or you can abandon the mouse and press Ctrl+N (Win)or A+N (Mac) to use shortcut keys. Using shortcut keys reduces theuse of the mouse and speeds up operations. In fact, studies haveshown, it can save 1 hour out of every 8 in a work day. Illustrator raisesthe bar by not only giving you hundreds of possible shortcut keys, whichyou can search for (New!), but also allowing you to define your own.
Defining Shortcut Keys
Create a Keyboard Shortcut
Click the Edit menu, and then clickKeyboard Shortcuts.
Click the list arrow, and then clickMenu Commands or Tools.
To search for a command orshortcut, enter a phrase in theSearch box (New!). The resultsappear as you type.
◆ Match Case. Select to viewexact results (New!).
Select an item from the list.
Use the keyboard to create thenew shortcut. For example, pressCtrl+N (Win) or A+N (Mac).
To work with the shortcut, do anyof the following:
◆ Undo. Click to undo shortcut.
◆ Clear. Click to clear theselected shortcut.
◆ Go To Conflict. Click to displaythe shortcut conflict.
To work with a keyset file, do anyof the following:
◆ Save. Click to save the customkeyset file.
◆ Delete. Click to delete theselected custom keyset.
Click OK
Specify a keyset file name, andthen click OK.
9
8
7
6
5
4
3
2
17
4
6
2
3
8

ptg8126863
470 Chapter 17
Using Drawing Tablets
When you design on a computer, you're leav-ing the natural world of oil, watercolor, andcanvas, for the electronic world of computermonitors and pixels (don't worry, it's a rela-tively painless transition). Without a doubt,there are many differences between tradi-tional and digital design; however, it's notnecessary to abandon all aspects of the natu-ral media world. For example, the computermouse has always been a problem withdesigners who miss the feel and control of abrush in their hands. Fortunately, technologycame to the rescue years ago, with the inven-tion of the drawing tablet. Drawing tabletscombine a drawing surface and a brush-likedrawing tool in the form of a pen. A designerpicks up the pen and moves it across thedrawing tablet surface. In turn, the drawingtablet interprets those movements as brushstrokes. Not only does Illustrator fully support
drawing tablet technology, it also interpretsthe particular drawing style of the designer.For example, pushing harder with the brushagainst the drawing tablet instructs Illustratorto create a wider stroke, or to apply morecolor. Drawing tablets have helped to trans-late the control of working with real artbrushes on canvas, into the world of the digi-tal designer. Of all the manufacturers, Wacomstands out as the leader in drawing tablettechnology. Wacom returns the feel of design-ing with a brush to the digital designer'sworld, and the software required to power thetablet works seamlessly with Illustrator andthe Windows or Macintosh operating sys-tems. To check out which tablet might be rightfor your needs, point your browser towww.wacom.com and check out the availableoptions.
Drawing pen
Wacom tablet
ptg8126863
Working Together withAdobe Programs
Introduction
Adobe programs are designed to work together so you canfocus on what you need to do, rather than on how to do it. Infact, the Adobe programs share tools and features for yourmost common tasks so you can work uninterrupted andmove seamlessly from one program to another. AdobeCreative Suite is an integrated collection of programs thatwork together to help you create designs in print, on theweb, or on mobile devices. When you install Adobe CreativeSuite or a stand-alone Adobe program, you also get addi-tional Adobe programs and services—Bridge, Camera Rawplug-in, Media Encoder, Extension Manager, and ExtendScriptToolkit—to help you perform specific jobs, such as locating,downloading, and modifying images for projects, managingfiles and program extensions, testing files for differentmobile devices, and creating scripts.
Adobe Bridge is a program that lets you view, open, mod-ify, and manage images located on your computer from anyAdobe Creative Suite program. Adobe Bridge is literally theglue that binds Adobe Creative Suite programs together intoone cohesive unit with shared tools. Bridge allows you tosearch, sort, filter, manage, and process image files one at atime or in batches. You can also use Bridge to do the follow-ing: create new folders; rename, move, delete and groupfiles; edit metadata; rotate images; create web galleries andcontact sheets; and run batch commands. You can alsoimport files from your digital camera and view file informa-tion and metadata. 18
18What You’ll Do
Explore Adobe Programs
Explore Adobe Bridge
Get Started with Adobe Bridge
Get Photos from a Digital Camera
Work with Raw Images from a Digital Camera
Modify Images in Camera Raw
Work with Images Using Adobe Bridge
Set Preferences in Adobe Bridge
Apply Image Adjustments
Create a Web Photo Gallery
Automate Tasks in Adobe Bridge
Use Mini Bridge
Work with Adobe Media Encoder
Work with Adobe Extension Manager
Script with Adobe ExtendScript Toolkit
471
ptg8126863
472 Chapter 18
Adobe Creative SuiteAdobe Creative Suite is an integrated collec-tion of programs that work together to helpyou create designs in print, on the web, or onmobile devices. Adobe's Creative Suite comesin different editions with different combina-tions of Adobe programs. The main programsfor print design include InDesign and AcrobatProfessional; for graphic design the programsinclude Photoshop, Illustrator, and Fireworks;for video and sound design the programsinclude Premiere Professional, After EffectsProfessional, Encore, and Soundbooth; andfor web design the programs include FlashProfessional, Dreamweaver, Fireworks, andContribute.
Working Together with AdobeProgramsWhen you install Adobe Creative Suite or astand-alone Adobe program, you also getadditional Adobe programs—Bridge, CameraRaw plug-in, Media Encoder, ExtensionManager, and ExtendScript Toolkit—to helpyou perform specific jobs such as managingfiles and program extensions and testing filesfor mobile devices.
Adobe BridgeAdobe Bridge is a file management/batchingprogram that manages and processes imageswhile you work. To use Bridge, click Browse inBridge on the File menu or the Go to Bridgebutton on the Applications bar within anAdobe CS product or from the desktop usethe Start menu (Win) or the App folder (Mac).
Camera Raw Plug-InThe Camera Raw plug-in—available in AdobeBridge, Adobe Photoshop, and other Adobe
programs—allows you to open and processwith fine control RAW image formats (notprocessed, also known as digital negatives)produced by digital cameras. Raw image for-mats are intended to capture as closely aspossible the characteristics of the picture.DNG (Digital NeGative) is a raw formatdeveloped by Adobe.
Adobe Media EncoderAdobe Media Encoder allows you to encodeand compress video and audio files and con-vert them to distribution formats: F4V, FLV,H.264, and MP3. You can select a format andpreset for systems—such as high-definition(HD), desktops, and the web (Flash, Vimeo,and YouTube)—and devices—such as AppleTV, iPad, iPhone, and Android. The presetsinclude: size, bitrate (data rate), and framesper second (fps) rate.
Adobe Extension ManagerAdobe Extension Manager allows you toinstall and delete added program functional-ity, known as extensions, to many Adobeprograms. The Extension Manager is auto-matically installed when you install InDesign,Flash Professional, Dreamweaver, orFireworks. You can use the ExtensionManager to access the Adobe Exchange site,where you can locate, research, and down-load many different types of extensions foruse in Adobe programs.
Adobe ExtendScript ToolkitAdobe ExtendScript Toolkit allows you to cre-ate, edit, and debug an extended version ofJavaScript, called ExtendScript, to be usedfor scripting Adobe programs. If you performthe same set of tasks on a regular basis, youcan use scripting as a powerful tool to makea lengthy set of tasks simple.
Exploring Adobe Programs
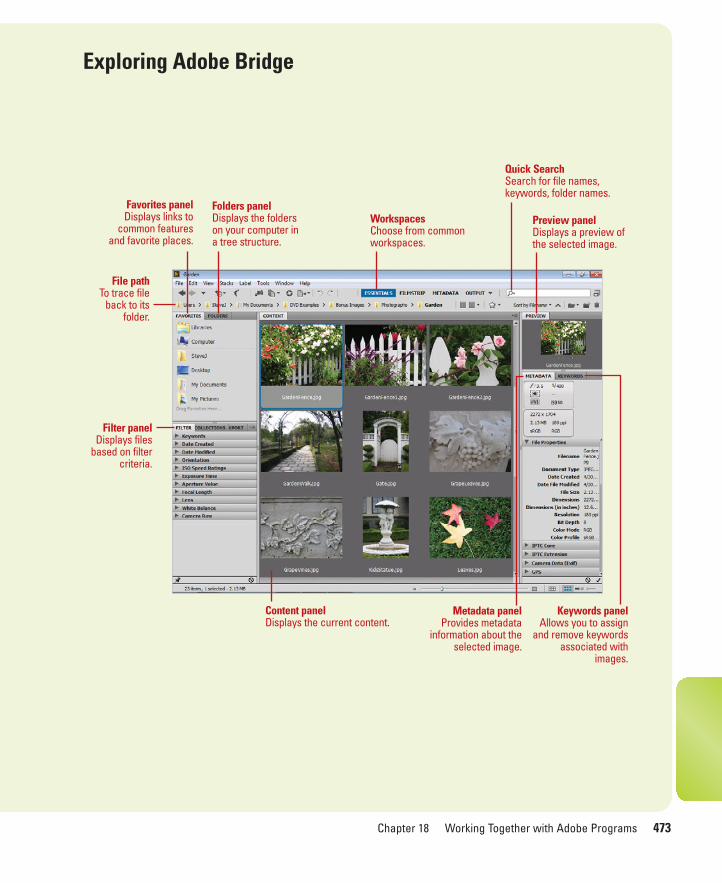
ptg8126863
Chapter 18 Working Together with Adobe Programs 473
Exploring Adobe Bridge
Folders panelDisplays the folderson your computer ina tree structure.
Keywords panelAllows you to assign
and remove keywordsassociated with
images.
Filter panelDisplays files
based on filtercriteria.
Favorites panelDisplays links to
common featuresand favorite places.
Metadata panelProvides metadata
information about theselected image.
Preview panelDisplays a preview ofthe selected image.
Content panelDisplays the current content.
Workspaces Choose from commonworkspaces.
Quick Search Search for file names,keywords, folder names.
File path To trace file
back to itsfolder.
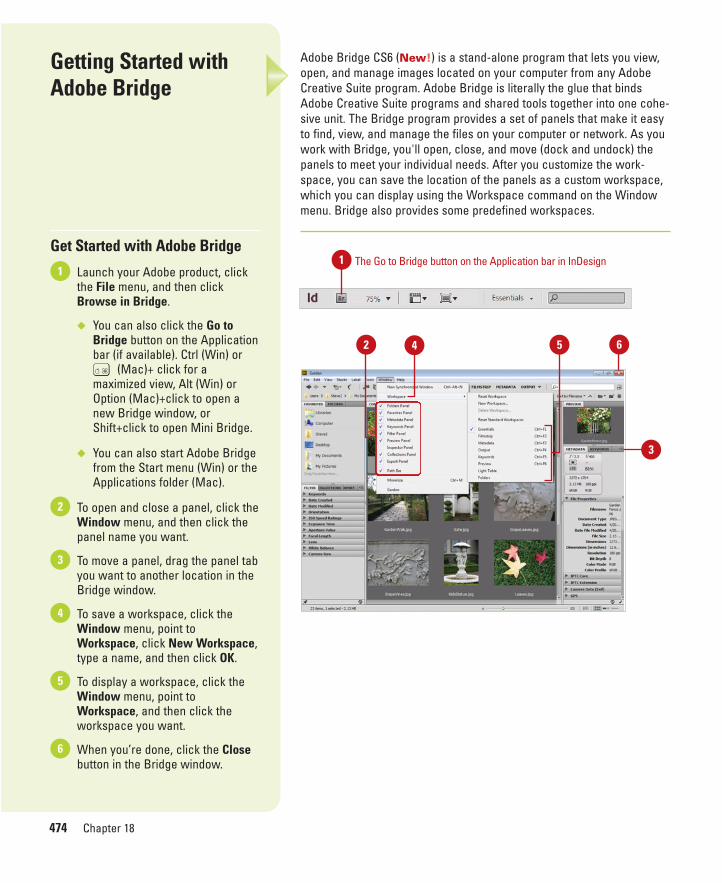
ptg8126863
474 Chapter 18
Adobe Bridge CS6 (New!) is a stand-alone program that lets you view,open, and manage images located on your computer from any AdobeCreative Suite program. Adobe Bridge is literally the glue that bindsAdobe Creative Suite programs and shared tools together into one cohe-sive unit. The Bridge program provides a set of panels that make it easyto find, view, and manage the files on your computer or network. As youwork with Bridge, you'll open, close, and move (dock and undock) thepanels to meet your individual needs. After you customize the work-space, you can save the location of the panels as a custom workspace,which you can display using the Workspace command on the Windowmenu. Bridge also provides some predefined workspaces.
Getting Started withAdobe Bridge
Get Started with Adobe Bridge
Launch your Adobe product, clickthe File menu, and then clickBrowse in Bridge.
◆ You can also click the Go toBridge button on the Applicationbar (if available). Ctrl (Win) orA (Mac)+ click for amaximized view, Alt (Win) orOption (Mac)+click to open anew Bridge window, orShift+click to open Mini Bridge.
◆ You can also start Adobe Bridgefrom the Start menu (Win) or theApplications folder (Mac).
To open and close a panel, click theWindow menu, and then click thepanel name you want.
To move a panel, drag the panel tabyou want to another location in theBridge window.
To save a workspace, click theWindow menu, point toWorkspace, click New Workspace,type a name, and then click OK.
To display a workspace, click theWindow menu, point toWorkspace, and then click theworkspace you want.
When you’re done, click the Closebutton in the Bridge window.
6
5
4
3
2
11 The Go to Bridge button on the Application bar in InDesign
642
3
5
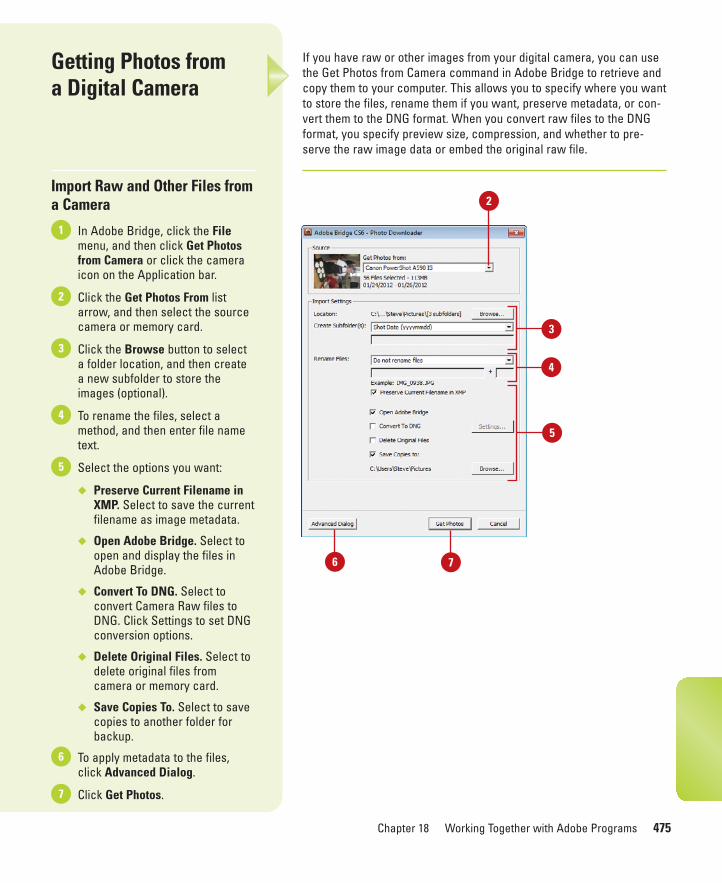
ptg8126863
Chapter 18 Working Together with Adobe Programs 475
Getting Photos from a Digital Camera
Import Raw and Other Files froma Camera
In Adobe Bridge, click the Filemenu, and then click Get Photosfrom Camera or click the cameraicon on the Application bar.
Click the Get Photos From listarrow, and then select the sourcecamera or memory card.
Click the Browse button to selecta folder location, and then createa new subfolder to store theimages (optional).
To rename the files, select amethod, and then enter file nametext.
Select the options you want:
◆ Preserve Current Filename inXMP. Select to save the currentfilename as image metadata.
◆ Open Adobe Bridge. Select toopen and display the files inAdobe Bridge.
◆ Convert To DNG. Select toconvert Camera Raw files toDNG. Click Settings to set DNGconversion options.
◆ Delete Original Files. Select todelete original files fromcamera or memory card.
◆ Save Copies To. Select to savecopies to another folder forbackup.
To apply metadata to the files,click Advanced Dialog.
Click Get Photos.7
6
5
4
3
2
1
If you have raw or other images from your digital camera, you can usethe Get Photos from Camera command in Adobe Bridge to retrieve andcopy them to your computer. This allows you to specify where you wantto store the files, rename them if you want, preserve metadata, or con-vert them to the DNG format. When you convert raw files to the DNGformat, you specify preview size, compression, and whether to pre-serve the raw image data or embed the original raw file.
6
2
3
7
4
5
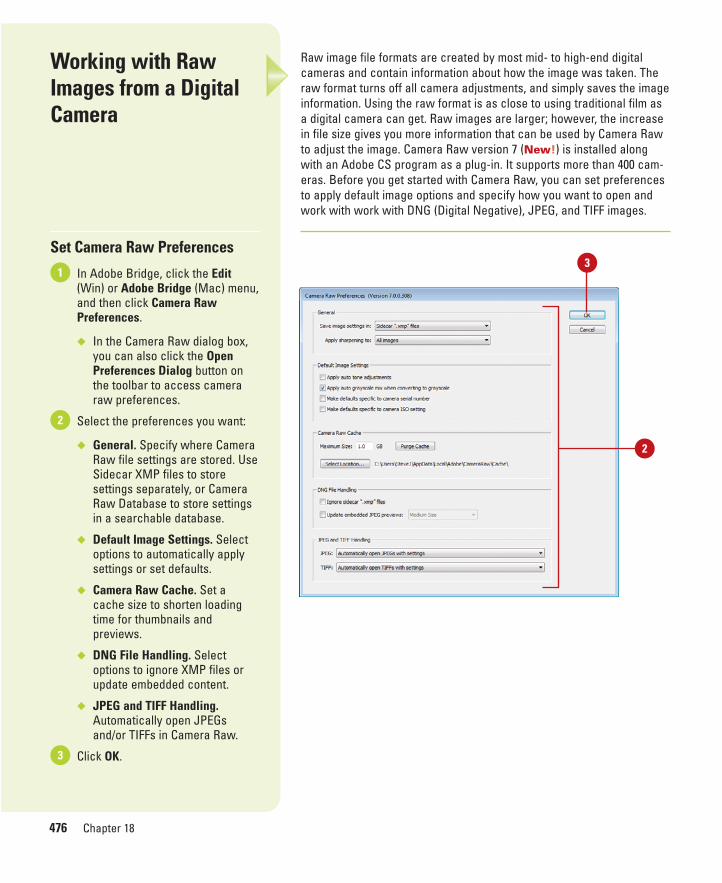
ptg8126863
476 Chapter 18
Working with RawImages from a DigitalCamera
Set Camera Raw Preferences
In Adobe Bridge, click the Edit(Win) or Adobe Bridge (Mac) menu,and then click Camera RawPreferences.
◆ In the Camera Raw dialog box,you can also click the OpenPreferences Dialog button onthe toolbar to access cameraraw preferences.
Select the preferences you want:
◆ General. Specify where CameraRaw file settings are stored. UseSidecar XMP files to storesettings separately, or CameraRaw Database to store settingsin a searchable database.
◆ Default Image Settings. Selectoptions to automatically applysettings or set defaults.
◆ Camera Raw Cache. Set acache size to shorten loadingtime for thumbnails andpreviews.
◆ DNG File Handling. Selectoptions to ignore XMP files orupdate embedded content.
◆ JPEG and TIFF Handling.Automatically open JPEGsand/or TIFFs in Camera Raw.
Click OK.3
2
13
2
Raw image file formats are created by most mid- to high-end digitalcameras and contain information about how the image was taken. Theraw format turns off all camera adjustments, and simply saves the imageinformation. Using the raw format is as close to using traditional film asa digital camera can get. Raw images are larger; however, the increasein file size gives you more information that can be used by Camera Rawto adjust the image. Camera Raw version 7 (New!) is installed alongwith an Adobe CS program as a plug-in. It supports more than 400 cam-eras. Before you get started with Camera Raw, you can set preferencesto apply default image options and specify how you want to open andwork with work with DNG (Digital Negative), JPEG, and TIFF images.
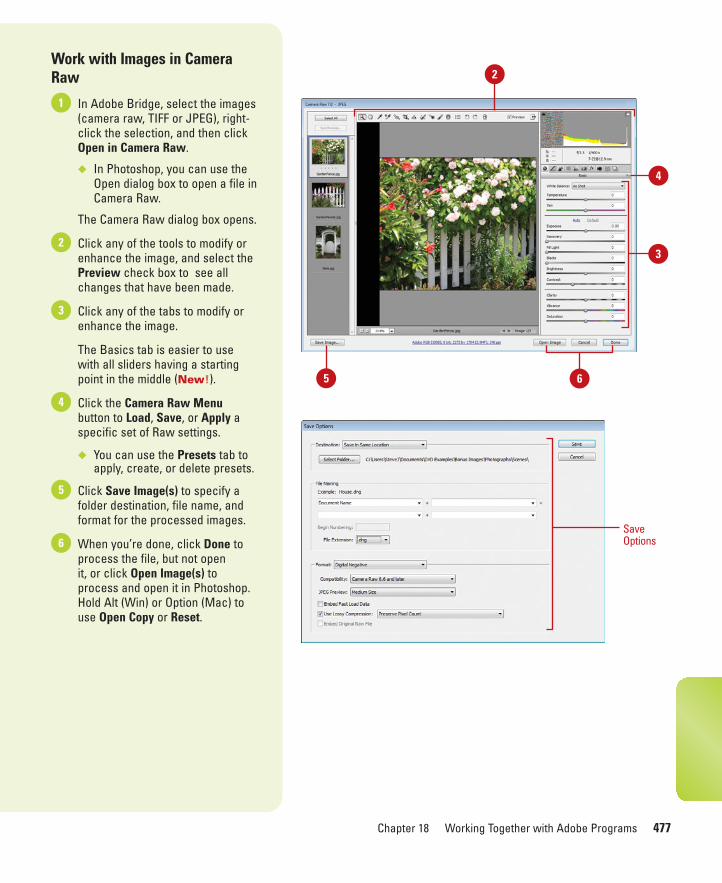
ptg8126863
Chapter 18 Working Together with Adobe Programs 477
SaveOptions
Work with Images in CameraRaw
In Adobe Bridge, select the images(camera raw, TIFF or JPEG), right-click the selection, and then clickOpen in Camera Raw.
◆ In Photoshop, you can use theOpen dialog box to open a file inCamera Raw.
The Camera Raw dialog box opens.
Click any of the tools to modify orenhance the image, and select thePreview check box to see allchanges that have been made.
Click any of the tabs to modify orenhance the image.
The Basics tab is easier to usewith all sliders having a startingpoint in the middle (New!).
Click the Camera Raw Menubutton to Load, Save, or Apply aspecific set of Raw settings.
◆ You can use the Presets tab toapply, create, or delete presets.
Click Save Image(s) to specify afolder destination, file name, andformat for the processed images.
When you’re done, click Done toprocess the file, but not open it, or click Open Image(s) toprocess and open it in Photoshop.Hold Alt (Win) or Option (Mac) touse Open Copy or Reset.
6
5
4
3
2
1
4
2
65
3
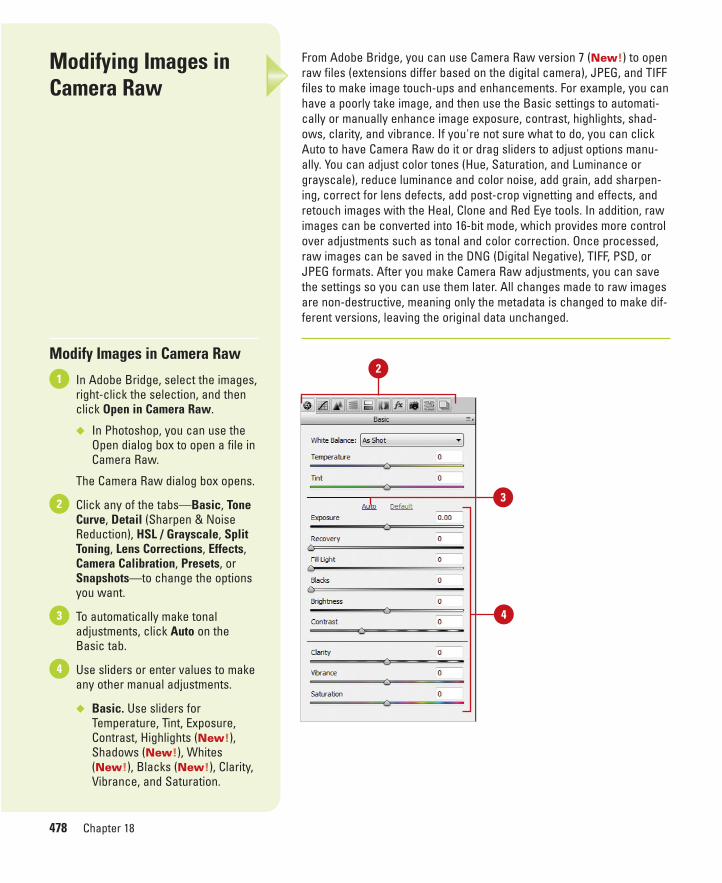
ptg8126863
478 Chapter 18
Modifying Images inCamera Raw
Modify Images in Camera Raw
In Adobe Bridge, select the images,right-click the selection, and thenclick Open in Camera Raw.
◆ In Photoshop, you can use theOpen dialog box to open a file inCamera Raw.
The Camera Raw dialog box opens.
Click any of the tabs—Basic, ToneCurve, Detail (Sharpen & NoiseReduction), HSL / Grayscale, SplitToning, Lens Corrections, Effects,Camera Calibration, Presets, orSnapshots—to change the optionsyou want.
To automatically make tonaladjustments, click Auto on theBasic tab.
Use sliders or enter values to makeany other manual adjustments.
◆ Basic. Use sliders forTemperature, Tint, Exposure,Contrast, Highlights (New!),Shadows (New!), Whites(New!), Blacks (New!), Clarity,Vibrance, and Saturation.
4
3
2
1
From Adobe Bridge, you can use Camera Raw version 7 (New!) to openraw files (extensions differ based on the digital camera), JPEG, and TIFFfiles to make image touch-ups and enhancements. For example, you canhave a poorly take image, and then use the Basic settings to automati-cally or manually enhance image exposure, contrast, highlights, shad-ows, clarity, and vibrance. If you're not sure what to do, you can clickAuto to have Camera Raw do it or drag sliders to adjust options manu-ally. You can adjust color tones (Hue, Saturation, and Luminance orgrayscale), reduce luminance and color noise, add grain, add sharpen-ing, correct for lens defects, add post-crop vignetting and effects, andretouch images with the Heal, Clone and Red Eye tools. In addition, rawimages can be converted into 16-bit mode, which provides more controlover adjustments such as tonal and color correction. Once processed,raw images can be saved in the DNG (Digital Negative), TIFF, PSD, orJPEG formats. After you make Camera Raw adjustments, you can savethe settings so you can use them later. All changes made to raw imagesare non-destructive, meaning only the metadata is changed to make dif-ferent versions, leaving the original data unchanged.
2
3
4
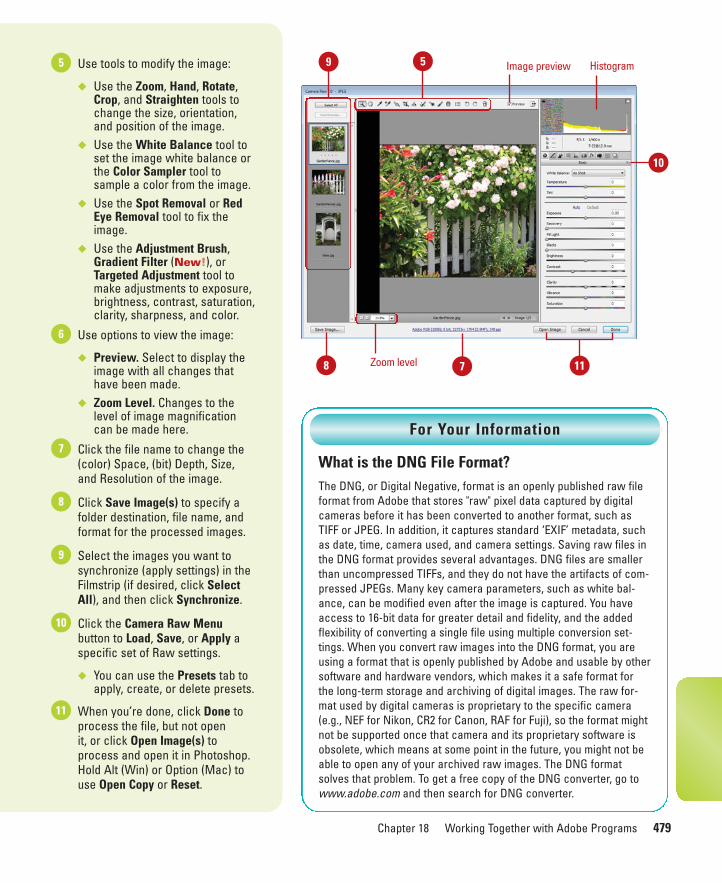
ptg8126863
Chapter 18 Working Together with Adobe Programs 479
Use tools to modify the image:
◆ Use the Zoom, Hand, Rotate,Crop, and Straighten tools tochange the size, orientation,and position of the image.
◆ Use the White Balance tool toset the image white balance orthe Color Sampler tool tosample a color from the image.
◆ Use the Spot Removal or RedEye Removal tool to fix theimage.
◆ Use the Adjustment Brush,Gradient Filter (New!), orTargeted Adjustment tool tomake adjustments to exposure,brightness, contrast, saturation,clarity, sharpness, and color.
Use options to view the image:
◆ Preview. Select to display theimage with all changes thathave been made.
◆ Zoom Level. Changes to thelevel of image magnificationcan be made here.
Click the file name to change the(color) Space, (bit) Depth, Size,and Resolution of the image.
Click Save Image(s) to specify afolder destination, file name, andformat for the processed images.
Select the images you want tosynchronize (apply settings) in theFilmstrip (if desired, click SelectAll), and then click Synchronize.
Click the Camera Raw Menubutton to Load, Save, or Apply aspecific set of Raw settings.
◆ You can use the Presets tab toapply, create, or delete presets.
When you’re done, click Done toprocess the file, but not open it, or click Open Image(s) toprocess and open it in Photoshop.Hold Alt (Win) or Option (Mac) touse Open Copy or Reset.
11
10
9
8
7
6
5
Zoom level
Histogram
10
9 5 Image preview
118 7
What is the DNG File Format?The DNG, or Digital Negative, format is an openly published raw fileformat from Adobe that stores "raw" pixel data captured by digitalcameras before it has been converted to another format, such asTIFF or JPEG. In addition, it captures standard ‘EXIF’ metadata, suchas date, time, camera used, and camera settings. Saving raw files inthe DNG format provides several advantages. DNG files are smallerthan uncompressed TIFFs, and they do not have the artifacts of com-pressed JPEGs. Many key camera parameters, such as white bal-ance, can be modified even after the image is captured. You haveaccess to 16-bit data for greater detail and fidelity, and the addedflexibility of converting a single file using multiple conversion set-tings. When you convert raw images into the DNG format, you areusing a format that is openly published by Adobe and usable by othersoftware and hardware vendors, which makes it a safe format forthe long-term storage and archiving of digital images. The raw for-mat used by digital cameras is proprietary to the specific camera(e.g., NEF for Nikon, CR2 for Canon, RAF for Fuji), so the format mightnot be supported once that camera and its proprietary software isobsolete, which means at some point in the future, you might not beable to open any of your archived raw images. The DNG formatsolves that problem. To get a free copy of the DNG converter, go towww.adobe.com and then search for DNG converter.
For Your Information

ptg8126863
480 Chapter 18
With Adobe Bridge, you can drag assets into your layouts as needed,preview them, and add metadata to them. Bridge allows you to search,sort, filter, manage, and process image files one at a time or in batches.You can also use Bridge to create new folders; rename, move, deleteand group files (known as stacking); edit metadata; rotate images; andrun batch commands. You can also view information about files anddata imported from your digital camera.
234
7
Working with ImagesUsing Adobe Bridge
Work with Images Using Bridge
Launch your Adobe product, clickthe File menu, and then clickBrowse in Bridge, or click theLaunch Bridge button (if available).
Click the Folder path, and thenselect a folder.
Click the Folders tab and choose afolder from the scrolling list.
Click the Favorites tab to choosefrom a listing of user-defined items,such as Pictures.
Click an image within the previewwindow to select it.
Click the Metadata tab to viewimage information, including dateand time the image was shot, andaperture, shutter speed, and f-stop.
Click the IPTC Core or IPTCExtension arrow to add user-defined metadata, such as creatorand copyright information, orcaptions.
Click the Preview tab to view alarger thumbnail of the selectedimage. Multiple images appearwhen you select them.
◆ Click the image in the Previewtab to display a Loupe tool forzooming. Drag magnified box tochange positions. Click it todeactivate the tool.
Drag the Zoom slider to increase ordecrease the thumbnail views.
9
8
7
6
5
4
3
2
1 85
9Label
6
Rating

ptg8126863
Chapter 18 Working Together with Adobe Programs 481
Click the preview buttons to selecta different view of the workspaceyou have chosen. If you want toview your images in filmstrip ormetadata focus mode, choose thatworkspace from the Windowmenu.
◆ View Content as Thumbnails.Default view. Displays theimages as thumbnails with thefile name underneath.
◆ View Content as Details.Displays a thumbnail of eachimage with selected detailsabout the image such as datecreated, document type,resolution.
◆ View Content as List. Displaysa small thumbnail of eachimage with metadatainformation details, such asdate created and file size.
Use the file management buttonsto sort, open or delete images, orcreate a new folder.
To narrow down the list of imagesusing a filter, click the criteria youwant to use in the Filter panel.
To add a label or rating to images,select the ones you want, click theLabel menu, and then select thelabel or rating you want.
To group related images as astacked group, select the images,click the Stacks menu, and thenclick Group as Stack.
◆ Use the Stacks menu toungroup, open, expand, orcollapse stacks.
Double-click on a thumbnail toopen it in the default program, ordrag the thumbnail from Bridgeinto an open Adobe application.
15
14
13
12
11
10
1012 Zoom slider
15
11
What is Metadata?Metadata is information about an image file, such as its author,copyright, creation date, size, version, color space, resolution, andsearchable keywords. This data is stored in the file or in a separatefile known as a sidecar file, using a standard format calledExtensible Metadata Platform (XMP). Bridge uses XMP files to helpyou organize and search for files on your computer. Metadata is alsostored in other formats, such as EXIF (digital camera data), IPTC(photographer and image data), GPS (global positioning systemdata), and TIFF, which are all synchronized with XMP.
For Your Information
14
13 Rotate buttons
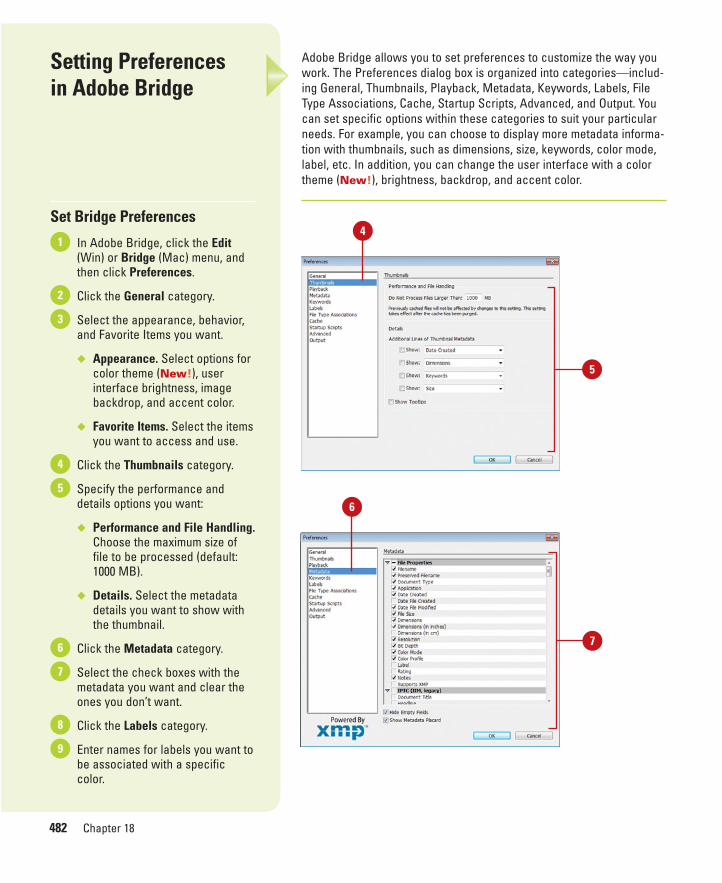
ptg8126863
482 Chapter 18
Setting Preferences in Adobe Bridge
Set Bridge Preferences
In Adobe Bridge, click the Edit(Win) or Bridge (Mac) menu, andthen click Preferences.
Click the General category.
Select the appearance, behavior,and Favorite Items you want.
◆ Appearance. Select options forcolor theme (New!), userinterface brightness, imagebackdrop, and accent color.
◆ Favorite Items. Select the itemsyou want to access and use.
Click the Thumbnails category.
Specify the performance anddetails options you want:
◆ Performance and File Handling.Choose the maximum size offile to be processed (default:1000 MB).
◆ Details. Select the metadatadetails you want to show withthe thumbnail.
Click the Metadata category.
Select the check boxes with themetadata you want and clear theones you don’t want.
Click the Labels category.
Enter names for labels you want tobe associated with a specificcolor.
9
8
7
6
5
4
3
2
1
Adobe Bridge allows you to set preferences to customize the way youwork. The Preferences dialog box is organized into categories—includ-ing General, Thumbnails, Playback, Metadata, Keywords, Labels, FileType Associations, Cache, Startup Scripts, Advanced, and Output. Youcan set specific options within these categories to suit your particularneeds. For example, you can choose to display more metadata informa-tion with thumbnails, such as dimensions, size, keywords, color mode,label, etc. In addition, you can change the user interface with a colortheme (New!), brightness, backdrop, and accent color.
4
5
6
7
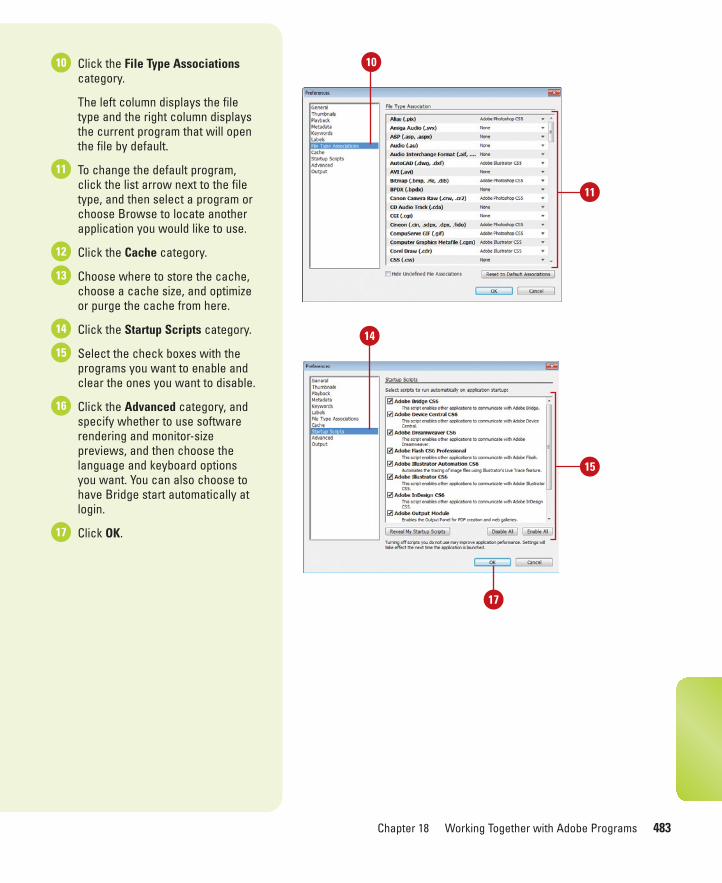
ptg8126863
Chapter 18 Working Together with Adobe Programs 483
10
11
14
15
17
Click the File Type Associationscategory.
The left column displays the filetype and the right column displaysthe current program that will openthe file by default.
To change the default program,click the list arrow next to the filetype, and then select a program orchoose Browse to locate anotherapplication you would like to use.
Click the Cache category.
Choose where to store the cache,choose a cache size, and optimizeor purge the cache from here.
Click the Startup Scripts category.
Select the check boxes with theprograms you want to enable andclear the ones you want to disable.
Click the Advanced category, andspecify whether to use softwarerendering and monitor-sizepreviews, and then choose thelanguage and keyboard optionsyou want. You can also choose tohave Bridge start automatically atlogin.
Click OK.17
16
15
14
13
12
11
10

ptg8126863
484 Chapter 18
Adobe Bridge makes it easy to make adjustments to one image inCamera Raw and then apply those adjustments to other images directlyfrom Bridge without going back into Camera Raw. For instance, youmay be correcting the white balance for an image and have many otherimages that were shot at the same time, under the same lighting condi-tions. You can use the initial settings to correct the rest of your imagesright from Bridge. You can also make a preset from your favorite adjust-ments, which will then be available as a develop setting within Bridge.
Applying ImageAdjustments
Modify Images in Adobe Bridge
In Adobe Bridge, display andselect the images that you want toadjust.
Use any of the following methodsto modify an image:
◆ Apply a Preset Adjustment.Click the Edit menu, point toDevelop Settings, and thenselect a preset adjustment.
◆ Copy and Paste Settings. Clickthe Edit menu, point to DevelopSettings, and then click CopySettings. Select the image(s) towhich you want to apply thesettings. Click the Edit menu,point to Develop Settings, andthen click Paste Settings.Select the options to apply, andthen click OK.
◆ Apply the Most RecentAdjustment. Click the Editmenu, point to DevelopSettings, and then clickPrevious Conversion.
2
1
Did You Know?You can use Photoshop automationcommands in Adobe Bridge. You canuse the Batch or Image Processorcommands on the Tools menu underPhotoshop in Bridge to automate theprocessing of your camera's raw files.
1
Paste Settings
2
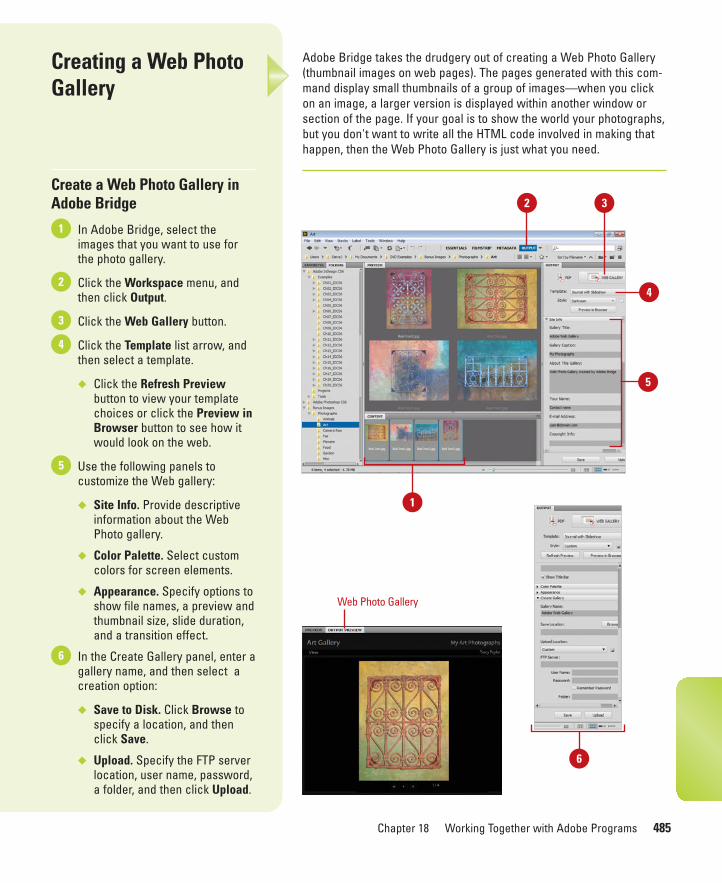
ptg8126863
Chapter 18 Working Together with Adobe Programs 485
Adobe Bridge takes the drudgery out of creating a Web Photo Gallery(thumbnail images on web pages). The pages generated with this com-mand display small thumbnails of a group of images—when you clickon an image, a larger version is displayed within another window orsection of the page. If your goal is to show the world your photographs,but you don't want to write all the HTML code involved in making thathappen, then the Web Photo Gallery is just what you need.
Creating a Web PhotoGallery
Create a Web Photo Gallery inAdobe Bridge
In Adobe Bridge, select theimages that you want to use forthe photo gallery.
Click the Workspace menu, andthen click Output.
Click the Web Gallery button.
Click the Template list arrow, andthen select a template.
◆ Click the Refresh Previewbutton to view your templatechoices or click the Preview inBrowser button to see how itwould look on the web.
Use the following panels tocustomize the Web gallery:
◆ Site Info. Provide descriptiveinformation about the WebPhoto gallery.
◆ Color Palette. Select customcolors for screen elements.
◆ Appearance. Specify options toshow file names, a preview andthumbnail size, slide duration,and a transition effect.
In the Create Gallery panel, enter agallery name, and then select acreation option:
◆ Save to Disk. Click Browse tospecify a location, and thenclick Save.
◆ Upload. Specify the FTP serverlocation, user name, password,a folder, and then click Upload.
6
5
4
3
2
1
2
5
3
1
4
6
Web Photo Gallery
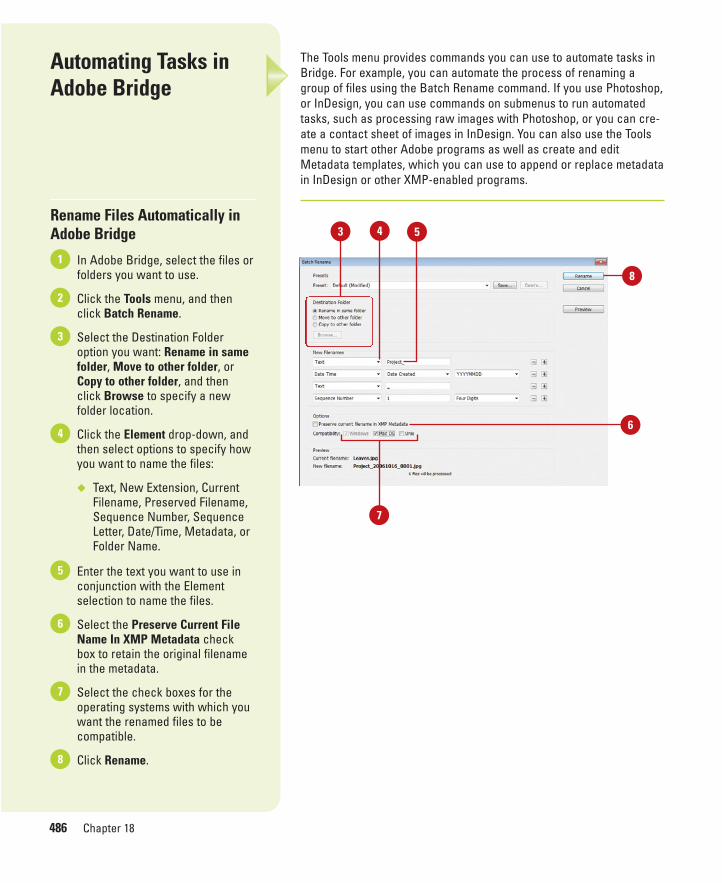
ptg8126863
486 Chapter 18
The Tools menu provides commands you can use to automate tasks inBridge. For example, you can automate the process of renaming agroup of files using the Batch Rename command. If you use Photoshop,or InDesign, you can use commands on submenus to run automatedtasks, such as processing raw images with Photoshop, or you can cre-ate a contact sheet of images in InDesign. You can also use the Toolsmenu to start other Adobe programs as well as create and editMetadata templates, which you can use to append or replace metadatain InDesign or other XMP-enabled programs.
Automating Tasks inAdobe Bridge
Rename Files Automatically inAdobe Bridge
In Adobe Bridge, select the files orfolders you want to use.
Click the Tools menu, and thenclick Batch Rename.
Select the Destination Folderoption you want: Rename in samefolder, Move to other folder, orCopy to other folder, and thenclick Browse to specify a newfolder location.
Click the Element drop-down, andthen select options to specify howyou want to name the files:
◆ Text, New Extension, CurrentFilename, Preserved Filename,Sequence Number, SequenceLetter, Date/Time, Metadata, orFolder Name.
Enter the text you want to use inconjunction with the Elementselection to name the files.
Select the Preserve Current FileName In XMP Metadata checkbox to retain the original filenamein the metadata.
Select the check boxes for theoperating systems with which youwant the renamed files to becompatible.
Click Rename.8
7
6
5
4
3
2
1
7
3 5
8
4
6

ptg8126863
Chapter 18 Working Together with Adobe Programs 487
Adobe Mini Bridge is a condensed version of Adobe Bridge available ina panel within an Adobe CS program (Photoshop, InDesign, andInCopy). Mini Bridge allows you to directly access graphics within a CSprogram, where you can drag and drop them in a document. WithinMini Bridge, you can navigate to different locations on your computer,search, sort, filter, and preview content as well as access AdobeBridge. In Photoshop, the Mini Bridge panel appears in film strip mode(New!), like in Lightroom.
Using Mini Bridge
Use Mini Bridge
Launch your Adobe product, andthen start Mini Bridge:
◆ Photoshop. Click the File menu,and then click Browse in MiniBridge or click the Windowmenu, point to Extensions, andthen click Mini Bridge.
◆ InDesign/InCopy. Shift+click theGo to Bridge button on theApplication bar.
If prompted, click Launch Bridge.
Mini Bridge opens in the panel.
Use the Path or Path button and theNavigation pod to locate thegraphics you want to view.
Use the buttons (View, Sort, andFilter) on the Tool bar to show,select, sort, and filter files.
To preview files, click the Viewbutton, and then click an option:
◆ Slideshow. Displays a slideshow of the viewed files.
◆ Review Mode. Displays a fullscreen preview of the viewedfiles.
◆ Full Screen Preview. Displays afull screen preview. You can alsopress the Spacebar.
4
3
2
11 The Go to Bridge button on the Application bar
2
Filter button
4
Navigation pod
3
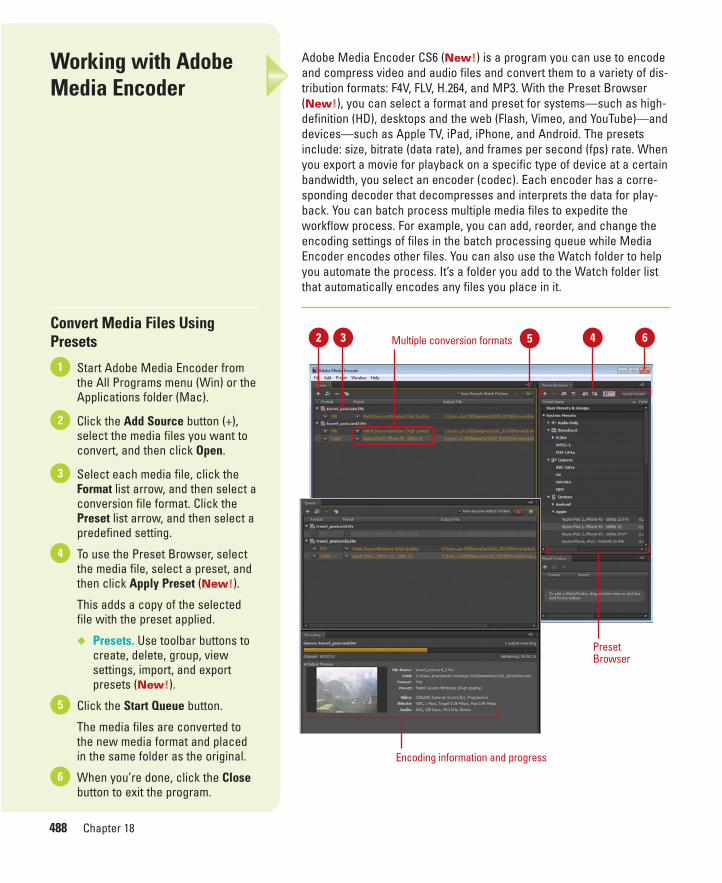
ptg8126863
488 Chapter 18
Adobe Media Encoder CS6 (New!) is a program you can use to encodeand compress video and audio files and convert them to a variety of dis-tribution formats: F4V, FLV, H.264, and MP3. With the Preset Browser(New!), you can select a format and preset for systems—such as high-definition (HD), desktops and the web (Flash, Vimeo, and YouTube)—anddevices—such as Apple TV, iPad, iPhone, and Android. The presetsinclude: size, bitrate (data rate), and frames per second (fps) rate. Whenyou export a movie for playback on a specific type of device at a certainbandwidth, you select an encoder (codec). Each encoder has a corre-sponding decoder that decompresses and interprets the data for play-back. You can batch process multiple media files to expedite theworkflow process. For example, you can add, reorder, and change theencoding settings of files in the batch processing queue while MediaEncoder encodes other files. You can also use the Watch folder to helpyou automate the process. It’s a folder you add to the Watch folder listthat automatically encodes any files you place in it.
Working with AdobeMedia Encoder
Convert Media Files UsingPresets
Start Adobe Media Encoder fromthe All Programs menu (Win) or theApplications folder (Mac).
Click the Add Source button (+),select the media files you want toconvert, and then click Open.
Select each media file, click theFormat list arrow, and then select aconversion file format. Click thePreset list arrow, and then select apredefined setting.
To use the Preset Browser, selectthe media file, select a preset, andthen click Apply Preset (New!).
This adds a copy of the selectedfile with the preset applied.
◆ Presets. Use toolbar buttons tocreate, delete, group, viewsettings, import, and exportpresets (New!).
Click the Start Queue button.
The media files are converted tothe new media format and placedin the same folder as the original.
When you’re done, click the Closebutton to exit the program.
6
5
4
3
2
1
532 6
Encoding information and progress
PresetBrowser
Multiple conversion formats 4
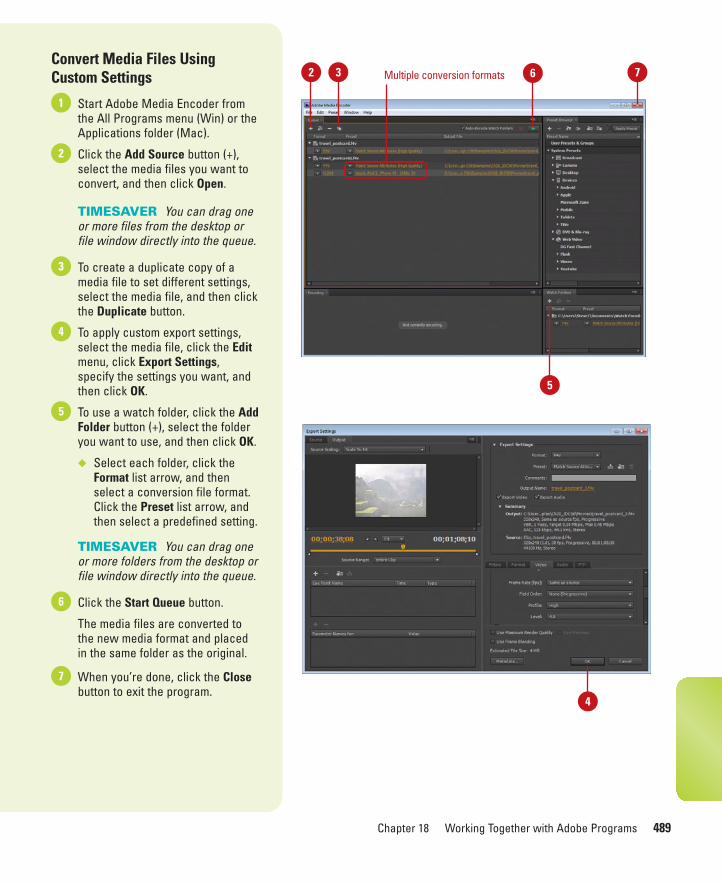
ptg8126863
Chapter 18 Working Together with Adobe Programs 489
Convert Media Files UsingCustom Settings
Start Adobe Media Encoder fromthe All Programs menu (Win) or theApplications folder (Mac).
Click the Add Source button (+),select the media files you want toconvert, and then click Open.
TIMESAVER You can drag oneor more files from the desktop orfile window directly into the queue.
To create a duplicate copy of amedia file to set different settings,select the media file, and then clickthe Duplicate button.
To apply custom export settings,select the media file, click the Editmenu, click Export Settings,specify the settings you want, andthen click OK.
To use a watch folder, click the AddFolder button (+), select the folderyou want to use, and then click OK.
◆ Select each folder, click theFormat list arrow, and thenselect a conversion file format.Click the Preset list arrow, andthen select a predefined setting.
TIMESAVER You can drag oneor more folders from the desktop orfile window directly into the queue.
Click the Start Queue button.
The media files are converted tothe new media format and placedin the same folder as the original.
When you’re done, click the Closebutton to exit the program.
7
6
5
4
3
2
1
632 7Multiple conversion formats
5
4
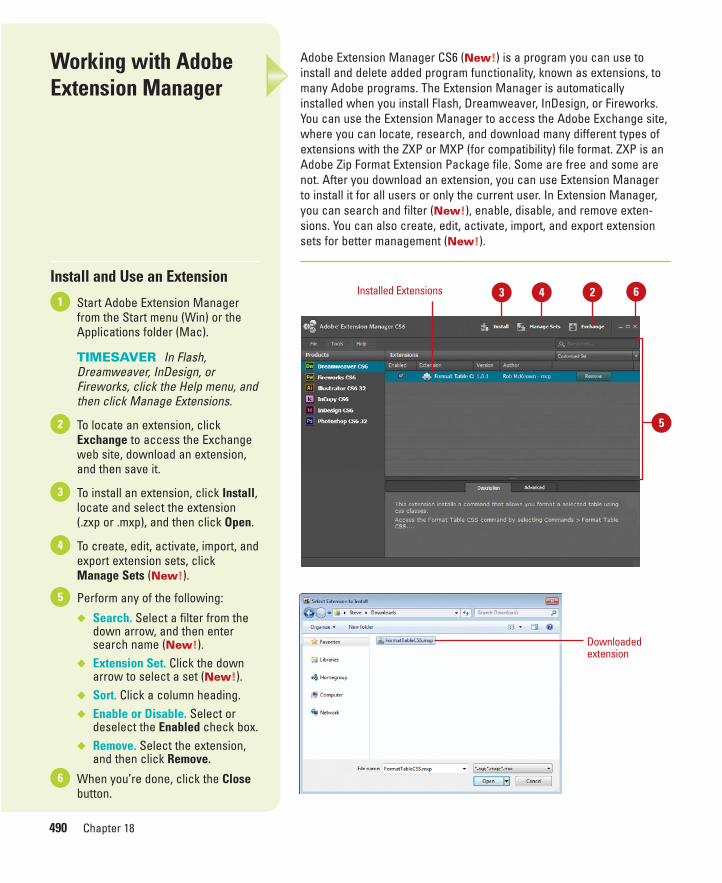
ptg8126863
490 Chapter 18
Adobe Extension Manager CS6 (New!) is a program you can use toinstall and delete added program functionality, known as extensions, tomany Adobe programs. The Extension Manager is automaticallyinstalled when you install Flash, Dreamweaver, InDesign, or Fireworks.You can use the Extension Manager to access the Adobe Exchange site,where you can locate, research, and download many different types ofextensions with the ZXP or MXP (for compatibility) file format. ZXP is anAdobe Zip Format Extension Package file. Some are free and some arenot. After you download an extension, you can use Extension Managerto install it for all users or only the current user. In Extension Manager,you can search and filter (New!), enable, disable, and remove exten-sions. You can also create, edit, activate, import, and export extensionsets for better management (New!).
Working with Adobe Extension Manager
Install and Use an Extension
Start Adobe Extension Managerfrom the Start menu (Win) or theApplications folder (Mac).
TIMESAVER In Flash,Dreamweaver, InDesign, orFireworks, click the Help menu, andthen click Manage Extensions.
To locate an extension, clickExchange to access the Exchangeweb site, download an extension,and then save it.
To install an extension, click Install,locate and select the extension(.zxp or .mxp), and then click Open.
To create, edit, activate, import, andexport extension sets, clickManage Sets (New!).
Perform any of the following:
◆ Search. Select a filter from thedown arrow, and then entersearch name (New!).
◆ Extension Set. Click the downarrow to select a set (New!).
◆ Sort. Click a column heading.◆ Enable or Disable. Select or
deselect the Enabled check box.◆ Remove. Select the extension,
and then click Remove.
When you’re done, click the Closebutton.
6
5
4
3
2
1
Downloadedextension
3
5
4 6Installed Extensions 2
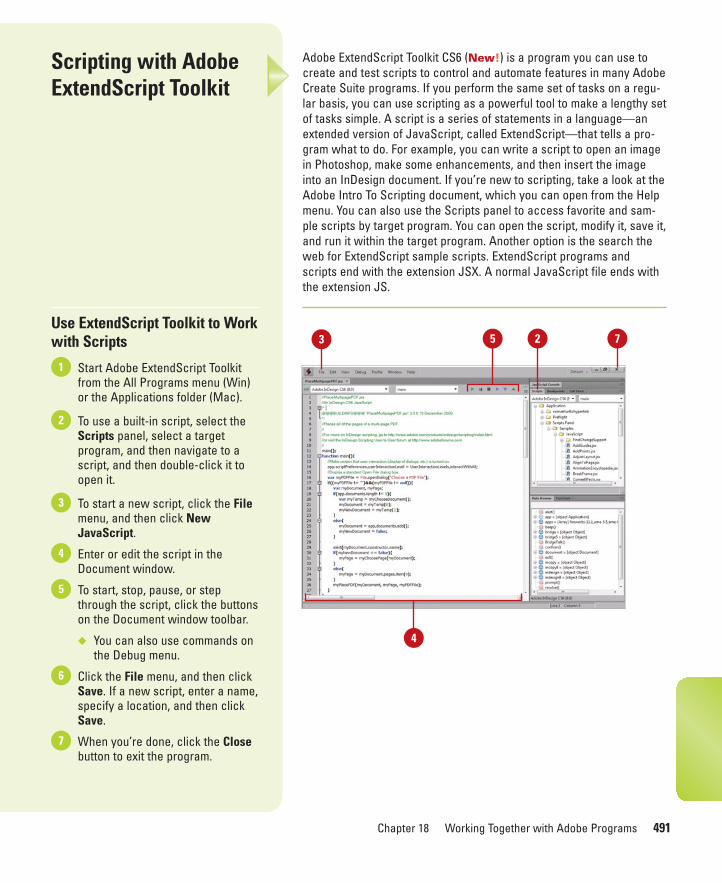
ptg8126863
Chapter 18 Working Together with Adobe Programs 491
Adobe ExtendScript Toolkit CS6 (New!) is a program you can use tocreate and test scripts to control and automate features in many AdobeCreate Suite programs. If you perform the same set of tasks on a regu-lar basis, you can use scripting as a powerful tool to make a lengthy setof tasks simple. A script is a series of statements in a language—anextended version of JavaScript, called ExtendScript—that tells a pro-gram what to do. For example, you can write a script to open an imagein Photoshop, make some enhancements, and then insert the imageinto an InDesign document. If you’re new to scripting, take a look at theAdobe Intro To Scripting document, which you can open from the Helpmenu. You can also use the Scripts panel to access favorite and sam-ple scripts by target program. You can open the script, modify it, save it,and run it within the target program. Another option is the search theweb for ExtendScript sample scripts. ExtendScript programs andscripts end with the extension JSX. A normal JavaScript file ends withthe extension JS.
Scripting with AdobeExtendScript Toolkit
Use ExtendScript Toolkit to Workwith Scripts
Start Adobe ExtendScript Toolkitfrom the All Programs menu (Win)or the Applications folder (Mac).
To use a built-in script, select theScripts panel, select a targetprogram, and then navigate to ascript, and then double-click it toopen it.
To start a new script, click the Filemenu, and then click NewJavaScript.
Enter or edit the script in theDocument window.
To start, stop, pause, or stepthrough the script, click the buttonson the Document window toolbar.
◆ You can also use commands onthe Debug menu.
Click the File menu, and then clickSave. If a new script, enter a name,specify a location, and then clickSave.
When you’re done, click the Closebutton to exit the program.
7
6
5
4
3
2
1
25
4
3 7

ptg8126863
This page intentionally left blank
ptg8126863
493
New! Features
n
nAdobe Illustrator CS6Adobe Illustrator CS6 means superior results faster, with new features and enhance-ments that help you create and manage your images more easily and efficiently. Theindispensable new and improved features help graphic web designers, photogra-phers, and video professionals create the highest quality images, with the control,flexibility, and capabilities that you expect from the professional standard in desktopdigital imaging.
Each new release of Illustrator brings with it new features, improvements, andadded sophistication. This edition is aimed at the web designer, interactive mediaprofessional, or subject matter expert developing multimedia content, and the appli-cation developer.
Only New FeaturesIf you’re already familiar with Illustrator CS5, you can access and download all thetasks in this book with Adobe Illustrator CS6 New Features to help make your transi-tion to the new version simple and smooth. The Illustrator CS6 New Features as wellas other Illustrator CS5 to Illustrator CS6 transition helpers are available on the webat www.perspection.com.
What’s NewIf you’re searching for what’s new in Illustrator CS6, just look for the icon: New!. Thenew icon appears in the table of contents and throughout this book, so you canquickly and easily identify a new or improved feature in Illustrator CS6. The follow-ing is a brief description of each new feature and its location in this book.
Illustrator CS6◆ 64-bit now available (p. 2-3, 5) All features have been enabled to work in 64-bit
to provide faster processing, quicker application of effects, and a smootherworkflow. 32-bit plug-ins don’t work in the 64-bit version of Illustrator. Windowsusers can choose between the 32-bit and 64-bit versions, while Mac users usethe 64-bit version exclusively.
ptg8126863
494
n
◆ User Interface redesigned (p. 6-7, 465-466) The user interface has beenredesigned with the ability to choose a different interface color by selectingfrom a range of tonal values between light and dark themes. Four presets areavailable with custom values as an option. You can also choose to use white fora canvas color or to match the canvas color to the interface brightness, andadjust the location of scroll arrows.
◆ Dialog Box redesign (p. 6-7) Dialog boxes use the interface color. Commitbuttons, such as OK, Cancel, etc., are at the bottom-right corner in all modaldialog boxes. In addition, you have full keyboard access in all dialog boxes.
◆ Panels redesign (p. 8-11) There are new icon designs for all panels, giving theprogram a completely new look. There is a Resize bar at the bottom of somepanels to make it easier to resize them.
◆ Control panel redesign (p. 13) The Control Panel icons have been reorganizedand de-cluttered. For consistency, most controls now appear in the same placeon the panel as you change from one object type to another.
◆ Open Adobe Idea File (p. 14-15) Adobe Illustrator CS6 comes with the AdobeCreative Cloud desktop plug-in, which you can open and edit files (.IDEA)created in your Adobe Touch Apps.
◆ Saving legacy documents (p. 26-27) When you save a document created in anearlier version of Illustrator, known as a legacy format, you get a dialog box,asking if you want to continue.
◆ Document Profile changes (p. 31) The Basic CMYK profile has been removed.The Web profile has new sizes: 960 x 560 pixels and 1280 x 800 pixels. TheMobile and Devices profile has been replaced with the Devices profile, whichprovides templates for the iPad, iPhone, Xoom, Fire/Nook tablets, and Galaxy Sphones. The Flash Catalyst profile has been changed to use Flash Builder.
◆ New Document Setup Preset (p. 34-35) For Complex Art is a new DocumentSetup preset available with the High, Medium, Low, and Custom options.
◆ Artboard display buttons (p. 38-39) You can access artboard buttons on theControl panel, instead of using list arrows.
◆ Workspaces (p. 60-61) The Workspaces menu adds built-in workspaces forLayout and Tracing, which goes along with the Image Trace feature.
◆ Maximum size for Rounded Rectangle (p. 68) The maximum value for theRounded Rectangle shape is 16,383 points.
◆ Scale Strokes & Effects option (p. 98-99, 102-103) The check box option hasbeen added to the Transform panel and the Transform and Transform Eachdialog box. The option is still available on the Options menu.
◆ Transform options (p. 102-103) Check box options for Transform Objects andTransform Patterns have been added to the Transform and Transform Eachdialog boxes. Select options to transform only objects or the object’s pattern.
◆ Fill and Stroke Color options (p. 113) The Default Fill and Stroke and Swap Filland Stroke icons are available on the Color panel.
◆ Inline name editing (p. 116-117, 202, 214-215, 336, 338) You can edit the namesof layers, swatches, symbols and other content directly in panels. Double-clickthe item name in a list view to select and edit the name in the panel.
ptg8126863
New Features 495
◆ Color groups (p. 118-119) You can use colors in selected artwork to create acolor group.
◆ Vonster patterns and styles (p. 120, 273) Swatch Libraries and Graphic StylesLibraries include Vonster patterns and styles designed by artist Von Glitschka.
◆ Pattern creation (p. 146--148) With the Pattern Options panel, you create, edit,and save pattern designs. In Pattern Editing mode (within the Pattern Optionspanel), you can create and edit patterns interactively and view your changes onthe artboard as you design.
◆ Anti-alias rasters (p. 158) The anti-alias option has been added to the FlattenTransparency dialog box.
◆ Gradient on stroke (p. 160-161) You can apply a gradient directly to a strokewithout needing to expand the stroke and then fill it with a gradient. You havethree types of gradient strokes: Within Stroke (gradient fills the stroke), Along(gradient follows path), and Across (gradient crosses path).
◆ Locate Object (p. 200, 217) The Layers panel button allows you to jump to thelayer on which your selected object is located. The option is still available on theOptions menu.
◆ Formatting type (p. 244) The Character panel includes formatting options: AllCaps, Small Caps, Superscript, and Subscript. The formatting options are stillavailable on the Options menu.
◆ Image Trace (p. 268-271, 307, 368) Live Trace has been replaced with ImageTrace. This upgraded tracing tool produces tracings with less paths and anchorpoints, as well as better color recognition than Live Trace. Use the Image Tracepanel options to choose from new presets and make modifications. You canalso use the ImageTracing script to perform batch processing.
◆ Gaussian Blur (p. 298-299) The Gaussian Blur filter has been upgraded with alive preview and better performance. Older versions of the blur filter effect aretitled “Legacy Gaussian Blur” in the Appearance panel. If you edit the effect, it’sconverted to the new filter version.
◆ For Complex Art print option (p. 394) The print option is available as a presetfor printing artwork with complex shapes and lines.
◆ Preserve artboards with SVG (p. 416-417) When you save a document as aSVG, you can preserve artboards within the file.
◆ Save Slices (p. 443, 449) In the Save for Web dialog box, you can specify theslices you want to save.
◆ Browser Dither (p. 451) In the Save for Web dialog box, you can select theBrowser Dither option to view how a browser dithers your image.
◆ Slices preferences (p. 461) In the Slices Preferences dialog box, you can selecta custom color from a Color box.
◆ Dictionary preferences (p. 462) In the Dictionary & Hyphenation Preferencesdialog box, you can select an option to update legacy documents to the newdictionary.
◆ File preferences (p. 466) In the File Handling & Clipboard Preferences dialogbox, you can select an option to display bitmaps as anti-aliased images in pixelpreview.
n
ptg8126863
496
◆ Keyboard shortcuts (p. 469) In the Keyboard Shortcuts dialog box, you cansearch for a command or shortcut.
◆ Adobe Bridge (p. 474, 482-483) Adobe Bridge CS6 allows you to manageimages and work with metadata. You can change the user interface with a colortheme, brightness, backdrop, and accent color.
◆ Camera Raw 7.0 (p. 476-479) You can recover more highlights than ever beforeand have access to a wider dynamic range. The Basics tab is easier to use withall sliders having a starting point in the middle. The plug-in supports more than400 camera models.
◆ Mini Bridge (p. 478) The Mini Bridge panel appears in film strip mode, like inLightroom.
◆ Adobe Media Encoder (p. 488-489) Adobe Media Encoder CS6 allows you torender and export video files.
◆ Adobe Extension Manager (p. 490) Adobe Extension Manager CS6 allows youto create, edit, activate, import, and export extension sets.
◆ Adobe ExtendScript Toolkit (p. 491) Adobe ExtendScript Toolkit CS6 allows youto create and test scripts to control and automate features in many AdobeCreate Suite programs.
What Happen To ...◆ CS Live The CS Live menu command has been removed. This also includes the
Share My Screen commands on the File menu.
◆ Device Central command The Device Central command on the File menu hasbeen removed. The Save for Web & Devices commands has been changed toSave for Web. The Devices portion of the feature has been removed.
◆ Scripts The FreehandToAI script on the Scripts submenu on the File menu hasremoved. The LiveTrace script has been replaced by the ImageTrace command.
◆ Workspaces The Like Freehand, Live InDesign, and Like Photoshopworkspaces have been removed from the Workspaces menu.
◆ Unsharp Mask The Unsharp Mask Photoshop Effect on the Effect menu hasbeen removed.
◆ Flash Text The Flash Text has been removed. This includes the Flash Text paneland the Flash Dynamic Text and Flash Input Text commands on the Objectsubmenu on the Select menu.
◆ Tracing Presets command The Tracing Presets command on the Edit menu hasbeen removed. The functionality has been incorporated into the Image Tracefeature.
◆ WBMP File Format The WBMP file format has been removed from the Save forWeb dialog box.
◆ SWF and SVG File Format The SWF and SVG file formats have been removedfrom the Save for Web dialog box; however, they are still available in the SaveAs dialog box.n

ptg8126863
497
Adobe Certification
c
cAbout the Adobe Certified Expert (ACE) ProgramThe Adobe Certified Expert (ACE) program is for graphic designers, web designers,systems integrators, value-added resellers, developers, and business professionalsseeking official recognition of their expertise on Adobe products.
What Is an ACE?An Adobe Certified Expert is an individual who has passed an Adobe Product Profi-ciency Exam for a specific Adobe software product. Adobe Certified Experts are eli-gible to promote themselves to clients or employers as highly skilled, expert-levelusers of Adobe software. ACE certification is a recognized worldwide standard forexcellence in Adobe software knowledge. There are three levels of ACE certification:Single product certification, Specialist certification, and Master certification. Tobecome an ACE, you must pass one or more product-specific proficiency exams andsign the ACE program agreement. When you become an ACE, you enjoy these spe-cial benefits:
◆ Professional recognition
◆ An ACE program certificate
◆ Use of the Adobe Certified Expert program logo
What Does This Logo Mean?It means this book will prepare you fully for the Adobe Certified Expert exam forAdobe Illustrator CS6. The certification exam has a set of objectives, which areorganized into broader skill sets. The Adobe Certified Expert objectives and the spe-cific pages throughout this book that cover the objectives are available on the webat www.perspection.com.
IL 3.1
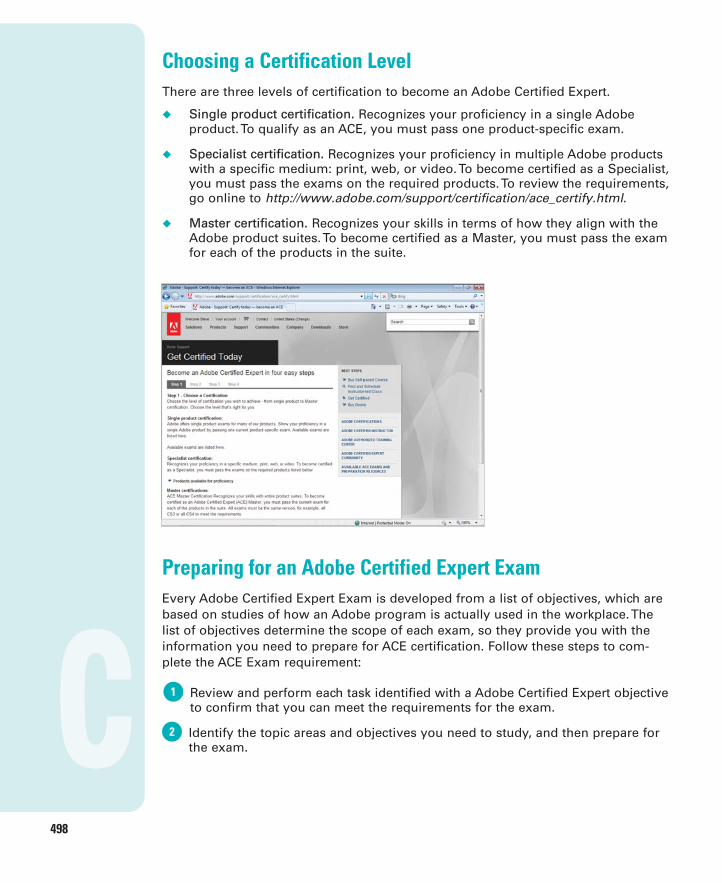
ptg8126863
498
c
Choosing a Certification LevelThere are three levels of certification to become an Adobe Certified Expert.
◆ Single product certification. Recognizes your proficiency in a single Adobeproduct. To qualify as an ACE, you must pass one product-specific exam.
◆ Specialist certification. Recognizes your proficiency in multiple Adobe productswith a specific medium: print, web, or video. To become certified as a Specialist,you must pass the exams on the required products. To review the requirements,go online to http://www.adobe.com/support/certification/ace_certify.html.
◆ Master certification. Recognizes your skills in terms of how they align with theAdobe product suites. To become certified as a Master, you must pass the examfor each of the products in the suite.
Preparing for an Adobe Certified Expert ExamEvery Adobe Certified Expert Exam is developed from a list of objectives, which arebased on studies of how an Adobe program is actually used in the workplace. Thelist of objectives determine the scope of each exam, so they provide you with theinformation you need to prepare for ACE certification. Follow these steps to com-plete the ACE Exam requirement:
Review and perform each task identified with a Adobe Certified Expert objectiveto confirm that you can meet the requirements for the exam.
Identify the topic areas and objectives you need to study, and then prepare forthe exam.
2
1
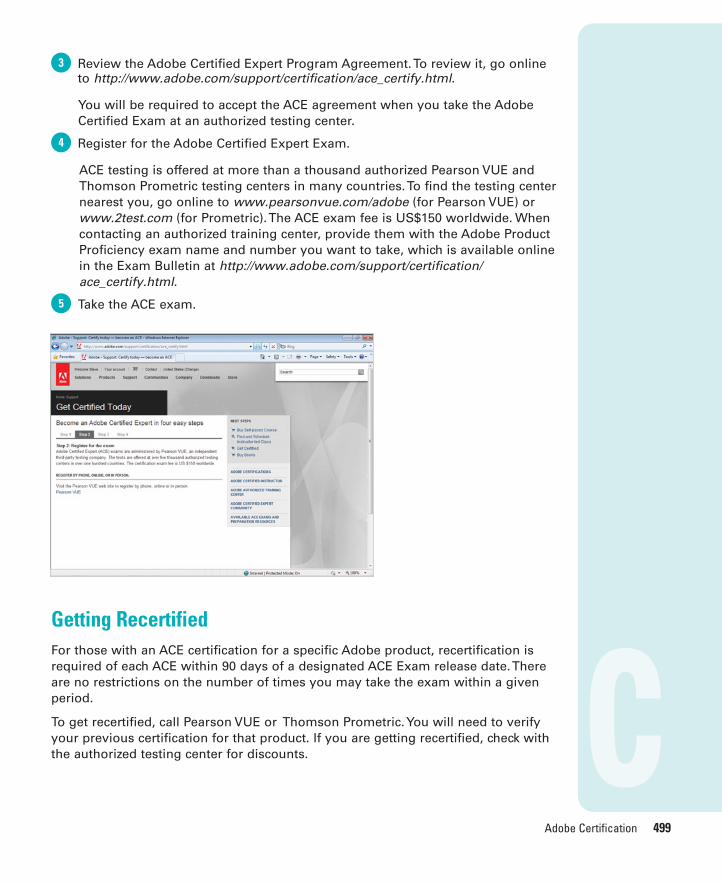
ptg8126863
Adobe Certification 499
c
Review the Adobe Certified Expert Program Agreement. To review it, go onlineto http://www.adobe.com/support/certification/ace_certify.html.
You will be required to accept the ACE agreement when you take the AdobeCertified Exam at an authorized testing center.
Register for the Adobe Certified Expert Exam.
ACE testing is offered at more than a thousand authorized Pearson VUE andThomson Prometric testing centers in many countries. To find the testing centernearest you, go online to www.pearsonvue.com/adobe (for Pearson VUE) orwww.2test.com (for Prometric). The ACE exam fee is US$150 worldwide. Whencontacting an authorized training center, provide them with the Adobe ProductProficiency exam name and number you want to take, which is available onlinein the Exam Bulletin at http://www.adobe.com/support/certification/ ace_certify.html.
Take the ACE exam.
Getting RecertifiedFor those with an ACE certification for a specific Adobe product, recertification isrequired of each ACE within 90 days of a designated ACE Exam release date. Thereare no restrictions on the number of times you may take the exam within a givenperiod.
To get recertified, call Pearson VUE or Thomson Prometric. You will need to verifyyour previous certification for that product. If you are getting recertified, check withthe authorized testing center for discounts.
5
4
3

ptg8126863
500
c
Taking an Adobe Certified Expert ExamThe Adobe Certified Expert exams are computer-delivered, closed-book tests con-sisting of 60 to 90 multiple-choice questions. Each exam is approximately one totwo hours long. A 15-minute tutorial will precede the test to familiarize you with thefunction of the Windows-based driver. The exams are currently available worldwidein English only. They are administered by Pearson VUE and Thomson Prometric,independent third-party testing companies.
Exam ResultsAt the end of the exam, a score report appears indicating whether you passed or failedthe exam. Diagnostic information is included in your exam report. When you passthe exam, your score is electronically reported to Adobe. You will then be sent anACE Welcome Kit and access to the ACE program logo in four to six weeks. You arealso placed on the Adobe certification mailing list to receive special Adobeannouncements and information about promotions and events that take placethroughout the year.
When you pass the exam, you can get program information, check and update yourprofile, or download ACE program logos for your promotional materials online at:
http://www.adobe.com/support/certification/community.html
Getting More InformationTo learn more about the Adobe Certified Expert program, read a list of frequently asked questions, and locate the nearest testing center, go online to:
http://www.adobe.com/support/certification/ace.html

ptg8126863
Adobe Certification 501
c
To learn more about other Adobe certification programs, go online to:
http://www.adobe.com/support/certification

ptg8126863
This page intentionally left blank
ptg8126863
503
Index
Aaccented edges effects, 301actions
Actions panel, 358–359adding commands to, 364adding stops to, 362batch file processing, 366–367building new, 360built-in scripts, 368controlling playback of, 361deleting commands from, 365inserting a non-recordable command in
an Action, 363order of commands in, changing, 364recording, 360running actions within actions, 360saving
as files, 359into sets, 359
scripts, 368–369activation, 2active documents, 21active windows, 20Adobe.com, 450Adobe Bridge
automating tasks in, 486browsing documents with, 16Camera Raw feature, 476–479color settings, 109components of, 473description of, 472editing images in, 484Get Photos from Camera command, 475opening documents with, 16–17, 474placing graphics from, 262–263preferences, setting, 482–483revealing documents in, 16
Web Photo Gallery creation, 485working with images using, 17, 480–481
Adobe Creative Cloud, 15Adobe Dreamweaver, 418Adobe ExtendScript Toolkit, 472, 491Adobe Extension Manager, 472, 490Adobe Flash Builder, 31Adobe Flex File, saving documents as,
420-421Adobe Idea File (IDEA), 14-15Adobe Media Encoder, 488-489Adobe Mini Bridge, 487Adobe PDF Presets command (Edit menu),
409Adobe Product Improvement Program, 25Adobe Studio Exchange, 2Adobe SVG Viewer, 418-419Adobe Updater, 23Adobe Web site
Adobe Studio Exchange, 2Community Help, 24
advanced print options, 394–395Advanced tab (File Info dialog box), 399alignment
anchor points, 178–179objects, 96paragraphs, 246pixel grid, 67slices, 447stroke, 138
All Objects command (Select menu), 90All Objects in Active Artboard command
(Select menu), 90anchor points
adding new, 176–177alignment, 178–179average, 173Convert Anchor Point tool, 175
ptg8126863
504
anchor points (continued)converting, 174–175deleting, 177direction lines, 172endpoints, 179highlighting, 172moving, 172–173paths and, 65preferences, 172selecting with Direct Selection tool, 84showing and hiding, 65smooth points, converting to corner
points, 174anchors, 457Android (Media Encoder), 488-489anti-aliasing, 245, 454Appearance of Black preferences, 468Appearance panel, 278–279
exporting as CSS3 file, 418-419Apple devices (Media Encoder), 488-489Arc tool, 72arcs, drawing, 72area graphs, 372-373Area Type tool, 222, 225arranging
documents, 20layers, 208–209slices, 446–447
arrowheads, stroke, 140-141art brushes, 324–325Artboard tool
artboard creation, 36Artboard Options button, 37multiple artboards, 38
artboardswithin artboards, 36aspect ratio, 37centerpoints, 37deleting, 38display options, 39duplicating, 36exiting editing mode, 36landscape/portrait orientation, 37moving, 38multiple, working with, 38navigating within, 36presets, 36previewing, 38
resizing, 38rotating, 38size, 37switching between, 19, 39video safe areas, 37X and Y positioning, 37
artwork, inserting in documents, 18Assign Profile command (Edit menu), 110attributes
appearance, 278–279stroke, 138–141
Audio Data tab (File Info dialog box), 398auto slices, 440AutoCAD File format, 403
Bbar graphs, 372-373batch file processing, 366–367Batch Rename command, 486bend styles, 95bevel bend style, 95bevel joins, 139bitmap, exporting documents as, 404black appearance options, 468bleed
bleed print option, 389document creation, 34
Blend command (Objects menu), 151–152Blend tool, 153blends
blending fill colors, 150changing and applying blend options,
152creating automatically, 151creating with Blend tool, 153making and releasing blend objects, 151objects, modifying, 154opacity, 155transformation, 154transparency settings, 156
Bloat tool, 332Blob Brush tool
brush options, setting, 189merging paths with, 188
blur effects, 298-299BMP format, 403bold font, 236
ptg8126863
Index 505
Bounding Box command (View menu),314–315
Bridge (Adobe)automating tasks in, 486browsing documents with, 16Camera Raw feature, 476–479color settings, 109components of, 473description of, 472editing images in, 484Get Photos from Camera command, 475Mini Bridge, 487opening documents with, 16–17, 474placing graphics from, 262–263preferences, setting, 482–483revealing documents in, 16Web Photo Gallery creation, 485working with images using, 17, 480–481
Bristle brushes, 328-329creating and editing, 328-329
Browse in Bridge command (File menu),16–17, 262–263
browserpreview in (Save for Web), 451
brushesart, 324–325Blob Brush tool, 189Bristle, 328-329Brushes panel, 317calligraphic, 322–323deleting, 330library, saving, 331Paintbrush tool, 318–319pattern, 326–327scatter, 320–321strokes, removing, 330
Brushes panel, 317built-in scripts, actions, 368
Ccalligraphic brushes, 322–323Camera Data tab (File Info dialog box), 398Camera Raw feature, 472, 476–479canvas (user interface), 465canvas (Object menu)
HTML5 Canvas (HTML5 Pack), 418
caps, 139case, text, 383Categories tab (File Info dialog box), 398center mark, 39centerpoints, 37Character panel, 238-245
formatting type, 244Character Styles panel, 250-251Check Spelling command (Edit menu), 378circles, drawing, 68clean up unneeded elements, 375clearing
guides, 51objects, 93
clipping maskscreating, 194creating for groups or layers, 195editing, 196masked object, editing in Isolation
Mode, 197release objects from, 195
clipping sets, 197Close button, 28Close command (File menu), 28closed paths, 65closing
documents, 28Illustrator, 28panels, 8-9
CMYK (Cyan, Magenta, Yellow and Black)color mode, 30, 111, 115
collapsing panels, 8-9Color Guide panel
applying color with, 128–129color groups, 129harmony rules, variations based on, 129variation options, selecting, 127variation types, displaying, 127
color management print options, 396color modes. See also colors
changing, 112CMYK, 30, 111, 115document creation, 30Grayscale, 30, 114RGB, 30, 111, 114switching between, 111working with, 111
ptg8126863
506
Color panelColor sliders, 114working with, 114–115
colored paper simulation, 35colors. See also Color Guide panel; color
modes; Swatches panelapplying to objects, fills, or stroke, 113,
136-137applying with Eyedropper tool, 144–145Color Guide Panel, 127–129Color panel, 114–115color profiles, changing or removing, 109color settings, changing, 108–109converting to grayscale, 125crop mark registration color, 56-57gamut warning icon, 115global, 124–126grayscale images, 125grid colors transparency settings, 35grids, 54group, creating, 118-119guides, 50, 53hue, 115inverting, 126Kuler panel, 122–123Live Color feature, 130–131luminosity, 115nonglobal, 124–126proofing, 132-133replacing, 124–125saturation, 115selecting, 115soft proof, 132-133Swatches panel, 116–121themes, 122–123ungroup, 119view box color, 44Web-safe, 115
column graphs, 372-373combining
slices, 448commands
adding to actions, 364basic description of, 6-7deleting from actions, 365Panel Options menu, 11
Community Help site, 24compound paths
creating, 192releasing, 193reversing object's fill in, 193
condensed font, 236Constrain Angle general preference, 454Control panel
anchor points, converting, 175basic description of, 13splitting paths using, 186-187tools in, 6-7
Convert Anchor Point tool, 175Convert to Shape command (Effect menu),
284convert to shape effects, 284converting anchor points, 174–175Copy command (Edit menu), 233copying text, 232–233corner points, 174Corner Radius general preference, 454Create New Action button (Actions panel),
359Create New Set button (Actions panel), 359crop marks
creating, 56-57deleting, 56general preferences, 455registration color, 56trim marks, editable, 57
cross hairs, 39Crystallize tool, 332CSS (Cascading Style Sheets)
exporting as CSS3 file, 418-419setting properties, for SVG, 417
cursor preferences, 454curved segments, 173curves, drawing, 171custom dictionaries, spell checking, 379Cut command (Edit menu), 233cutout effects, 300
Ddashed stroke, 140data graphs, 372-373data sets
creating, 370–371deleting, 370–371renaming, 371

ptg8126863
Index 507
data variables, 370–371deactivate Illustrator, 22Delete button (Actions panel), 359deleting
anchor points, 177artboards, 38brushes, 330commands from actions, 365crop marks, 56-57data sets, 370–371files, 14graphic styles, 277layers, 205objects, 93selections, 92slices, 442symbols, 337workspaces, 61
Description tab (File Info dialog box), 398Deselect command (Select menu), 90dialogs
Reset All Warning Dialogs, 455DICOM tab (File Info dialog box), 399dictionary preferences, 462dictionaries, spell checking, 379diffuse glow effects, 301Direct Selection tool
anchor points, adding new, 176anchor points or segments, moving, 173deleting anchor points using, 177end points, connecting, 179selecting anchor points and segments
with, 84showing/hiding direction lines, 65understanding selections, 82
direction linesanchor points, 172showing and hiding, 65
Distort & Transform command (Effectmenu), 102, 291
distributingobjects, 96slices, 447
dithering, 435dividing
paths, 185slices, 448
drawing mode, 66
behind, 66normal, 66inside, 66
DOC format, 229docking
documents, 21panels, 10
Document Color Mode command (Filemenu), 112, 384
Document Info panel, 400Document Setup command (File menu), 34,
159Document window, 6-7documents
active, 21arranging, 20bleed and view options settings, 34browsing with Adobe Bridge, 16closing, 28color modes, 30creating
from scratch, 30from templates, 32–33using presets, 31
docking/undocking, 21exporting
as bitmap, 404Export command, 402export file formats, 403as Flash Movie, 410–411to Photoshop, 408with presets, 409as TIFF format, 405
file information, inserting, 398–399finding and replacing text and elements
in, 380–381grid pattern, 21inserting images in, 18language settings, 35linking, 18measurement units, 34opening
with Adobe Bridge, 16–17existing documents, 14recently opened, 15
printing, 384revealing in Adobe Bridge, 16rulers, 48–49

ptg8126863
508
documents (continued)saving, 26–27
as Adobe Flex File, 420-421as EPS format, 414–415as FXG format, 420-421as Microsoft Office, 422as PDF format, 412–413as SVG format, 416-418as template, 423for the Web, 426–427
setting up, 34–35spell checking, 378–379switching between, 20tabbed, 20templates, 18transparency settings, 34–35type options settings, 35view size, 19viewing information in, 19views, 40–43windows, 20–21working with multiple, 20–21
DOCX format, 229double quotes, 35drawing
arcs, 72circles, 68curves, 171ellipses, 68line segments, 71with Pencil tool, 304–305polygons, 70, 170rectangle grids, 74rectangles, 69spirals, 72–73stars, 70
drawing tablets, 470drop shadow effects, 287duplicating
artboards, 36color in Swatches panel, 117graphic styles, 275layers, 210objects, 94–95slices, 442, 448symbols, 338
EEdit Colors command (Edit menu), 126, 150Edit Custom Dictionary command (Edit
menu), 379Edit menu commands
Adobe PDF Presets, 409Assign Profile, 110Check Spelling, 378Color Settings, 108Copy, 233Cut, 233Edit Colors, 126, 150Edit Custom Dictionary, 379Find and Replace, 380–381Paste, 232–233Paste in Back, 233Paste in Front, 233Print Presets, 385Redo, 59Transparency Flattener Presets, 395Undo, 59
Edit Selection command (Select menu), 92Edit View command (View menu), 40editing
blend objects, 154clipping masks, 196color in Swatches panel, 117colors with Live Color, 130–131gradients, 164graphic styles, 276images in Adobe Bridge, 484paths within clipping sets, 197patterns, 148selections, 92symbols, 339
Effect menu commandsConvert to Shape, 284Crop Marks, 56Distort & Transform, 102Effect Gallery, 294–297Stylize, 285
effectsaccented edges, 301applying multiple, 296blur, 298-299controlling with selections, 297convert to shape, 284
ptg8126863
Index 509
cutout, 300diffuse glow, 301distort, 291drop shadow, 287dry brush, 300Fresco, 300gaussian blur, 298-299glass, 301glowing edges, 301grain, 302graphic pen, 302Illustrator, 282–283inner glow, 286–287mosaic tiles, 302note paper, 301outer glow, 286–287panel knife, 300Photoshop Effect Gallery, 294–295plastic wrap, 302previewing, 282raster graphics, 292scribble, 285spatter, 302stained glass, 302stamp, 301text, 228transform, 2913D, 288–289vector objects, 293warp, 290
Ellipse tool, 68ellipses, drawing, 68embedded graphics, 266–267endpoints, 179Enhanced Metafile format, 403Envelopes, reshaping with, 104-105EPS format, 27, 399, 414–415Eraser tool, 182erasing path parts, 182exiting Illustrator, 28Expand button (Pathfinder panel), 190Expand command (Objects menu), 160-161expanding
gradients, 160-161panels, 8-9patterns, 149
ExportDocsAsFlash, script, 368–369
exportingdocuments
as bitmap, 404as CSS3, 418-419Export command, 402as Flash Movie, 410–411as JPEG, 406-407to Photoshop, 408as PNG, 406-407with presets, 409as TIFF format, 405
export file formats, 403ExtendScript Toolkit, 472, 491Extension Manager (Adobe), 472, 490Extensions command (Window menu),
122–123Eyedropper tool
applying colors and attributes with,144–145
color attributes, changing, 145Save for Web tool, 428-429
Ffamilies, font, 236File Handling & Clipboard preferences,
466-467File Info command (File menu), 398file information, inserting into documents,
398–399File menu commands
Browse in Bridge, 16–17, 262–263Close command, 28Device Center, 41Document Color Mode, 112, 384Document Setup, 34, 159File Info, 398New, 30–31New From Template, 32Open, 14, 260Open Recent, 15Open With, 262Place, 18, 261, 264, 266Print, 384, 386Return to Adobe Illustrator, 16Revert, 26Save, 26Save a Copy, 27Save As, 27, 33

ptg8126863
510
File menu commands (continued)Save for Web, 426–429, 430-431Scripts, 368–369
filesdeleting, 14formats (Save for Web), 426-431images, optimizing to file size (Save for
Web), 439saving actions as, 359
fillsapplying color to, 113, 128, 136-137blending fill colors, 150patterns as, 146–149
Find and Replace command (Edit menu),380–381
Find Font command, 382Fire/Nook device, 31Fit All In Window command (View menu),
46Fit Artboard In Window command (View
menu), 46Flare tool, 69Flash Builder, 31Flash format, SWF, 403, 410-411Flash Movie, exporting documents as,
410–411Flash (Media Encoder), 488-489Flattener Preview command (Window
menu), 41, 395flattening layers, 216flattening object transparency, 158fonts
bold, 236condensed, 236families and styles, 236Find Font command, 382finding, 237italic, 236OpenType fonts, 254replacing, 237reusing recent, 236size, 238
formatting type, 244Freehand format, 14Free Transform tool, 98–99Fresco effects, 300full screen mode, 45FXG format, 27, 420-421
Ggamut warning icon, 115Galaxy S device, 31Gap options, 316gaussian blur effects, 298-299General preferences, 454Get Photos from Camera command
(Adobe), 475GIF documents, optimizing, 434–435GIF format, 399glass effects, 301global colors, 124–126glowing edges effects, 301glyphs, 253Go to Bridge button, 16–17GPS Data tab (File Info dialog box), 398Gradient tool, 165gradients
applying to objects, 160-161creating, 163editing, 164expanding, 160-161fill, 160Gradient Annotator, 165Gradient tool, 165libraries, using, 162linear type, 163mesh, 104-105, 166-167radial type, 163stroke, 161
grain effects, 302graphic pen effects, 302graphics
embedded, 266–267linked, 266–267linking, 264–265mosaic, 280opening graphic images, 260placing, 261–263print options, 390raster
interpolation and, 64tracing, 268–272understanding raster graphics, 64
stylesapplying, 273breaking links to, 277
ptg8126863
Index 511
creating, 274deleting, 277duplicating, 275editing, 276
graphs, 372-373add designs, 374create and format, 372-373
Grayscale color mode, 30, 114grayscale images, 125grid colors transparency settings, 35grid patterns, 21Grid, Perspective
adjusting, 79copying, 80customizing, 81drawing, 78moving, 80objects, adding, 80resizing, 80text, adding, 80
grid, pixel aligned, 67grid size transparency setting, 34grids. See also guides
color, 54displaying in back of artwork, 54Polar Grid tool, 75preferences, 54Rectangle Grid tool, 74showing and hiding, 54Snap to Grid command, 54styles, 54subdivisions, 54Transparency, 159
Group command (Objects menu), 88Group Selection tool, 82grouping objects, 88–89groups
creating clipping masks for, 195colors, creating in the Swatches panel,
118-119guides. See also grids
clearing, 51color, 50converting vector objects to, 51creating, 51locking, 50preferences, 50ruler, 49
showing and hiding, 50smart guides
object transformation, 99preferences, 53turning on/off, 52working with, 52–53
snap to point, 50style, 50switching, 51
HHand tool
moving elements around with, 55quick access to, 55Save for Web tool, 428-429
handles, 457hanging indents, 247hardware, Illustrator system
requirements, 3Help menu commands
Adobe Product Improvement Program,25
Illustrator Help, 24–25Updates, 23
help optionsCommunity Help site, 24searching topics, 25
Hide Edges command (View menu), 65Hide Panels command (Window menu), 20hiding
anchor points, 65direction lines, 65grids, 54guides, 50layers, 212panels, 10, 45rulers, 49slices, 442–443Transparency grid, 159
highlighting anchor points, 172histograms, 479History tab (File Info dialog box), 399HSB color slider (Color panel), 114HTML text, adding to slices, 444HTML5 Pack, 418-419
exporting as CSS3, 419saving as SVG, 418

ptg8126863
512
hue, 115hyphenation, 249, 462hyphenation preferences, 462
Iicons, collapsing and expanding panel sets
between icons and panels, 11Illustrator Help command (Help menu),
24–25Illustrator tab (File Info dialog box), 399images
inserting in documents, 18replacing, 18working with images using Bridge, 17
ImageTracing, script, 368–369image tracing options, 268-271Image Trace panel, 268-271importing text, 229indentation
hanging indents, 247paragraphs, 247
Info panelcolor fill and stroke information, 58uses for, 58
inner glow effects, 286–287iPad device, 31
Media Encoder, 488-489IPTC tab (File Info dialog box), 398IPTC Extension tab (File Info dialog box),
398iPhone device, 31
Media Encoder, 488-489installing Illustrator
in Macintosh, 3in Windows, 2
Internet, checking for updates from, 22interpolation, 64Inverse command (Select menu), 90inverting colors, 126IPTC tab (File Info dialog box), 398Isolation Mode, 197italic font, 236
JJavaScript, 416-418joining anchor endpoints, 179joins, 139
JPEG documents, optimizing, 432–433JPEG format, 399, 403
exporting as, 406-407justification options, 255
Kkerning type, 240Keyboard Increment general preference,
454keyboard shortcuts, 469Knife tool, 185Knockout Group option, 156Kuler panel, 122–123
Llandscape/portrait orientation, 37language settings, document creation, 35Lasso tool
selecting objects with, 85understanding selections, 82
layers. See also Layers panelarranging, 208–209creating clipping masks for, 195creating top level layers, 202–203deleting, 205deselecting, 204duplicating, 210flattening, 216hiding, 212locking, 211merging, 213moving, 208–209moving objects to, 214–215naming, 203outlines, viewing, 219Paste Remembers Layers, 214releasing objects to, 215reverse order, 208selecting, 204selecting objects with, 206–207showing and hiding, 212sublayers, 202–203template, creating, 218
Layers panel. See also layersaccessing, 200components of, 200locating objects in, 217

ptg8126863
Index 513
options, setting, 201layouts, workspace, 60leading text, 239libraries
brushes, saving, 331gradients, 162
ligature, 255line graphs, 372-373Line Segment tool, 71line segments, drawing, 71linear gradient type, 163linked graphics, 266–267linking
documents, 18graphics, 264–265slices, 443
Liquify tools, 335Live Color feature
applying color groups to objects with,130–131
editing colors with, 130–131Live Paint Bucket tool
paint fills, 310preferences, setting, 309selecting options to paint fills or strokes
with, 308stroke edges, changing, 311
Live Paint Groupsadding paths to, 315converting traced objects to, 307creating, 306–307Gap options, 316reshaping or moving paths in, 314–315
Live Paint Selection tool, 312–313locking, 211guides, 50layers, 213
lossy compression, 435lowercase text, 383luminosity, 115
MMacintosh
Illustrator system requirements, 3installing Illustrator in, 3starting Illustrator in, 5
Macintosh PICT format, 403
Magic Wand toolselecting objects with, 86–87understanding selections, 82
marks print options, 388–389Measure tool, 58measurement
distance between objects, measuring, 58measurement units, document creation,
34Media Encoder, 488-489menus, 6-7merging
layers, 213paths, 188–189
mesh, 104-105, 166-167 metadata, 398-399Microsoft Office, saving documents as, 422Mini Bridge, 487miter bend style, 95miter joins, 139Mobile SWF tab (File Info dialog box), 398mode, drawing, 66mosaic tiles effects, 280, 302Move tool, 52moving
anchor points, 172–173artboards, 38document elements with Hand tool, 55layers, 208–209objects, 93objects to layers, 214–215segments, 172–173slices, 446text, 227, 232–233between tools, 55
Nnaming
layers, 203selections, 92workspaces, 60
navigationartboards, 39within artboards, 36
Navigator panelcustomizing, 44view area, 43

ptg8126863
514
Navigator panel (continued)view box color, 44view size, 42
New command (File menu), 30–31New From Template command (File menu),
32New View command (View menu), 40Next Object Above command (Select
menu), 90Next Object Below command (Select
menu), 909-slice scaling, 352-353nonglobal colors, 124–126non-recordable command in an Action, 363normal screen mode, 45note paper effects, 301
Oobjects
alignment, 96applying color to, 113, 128, 136-137clearing, 93deleting, 93distributing, 96duplicating, 94–95grouping, 88–89measuring distance between, 58moving, 93moving to layers, 214–215Perspective Grid
adjusting, 79copying, 80customizing, 81drawing, 78moving, 80objects, adding, 80resizing, 80text, adding, 80
pixel grid, aligned, 67reflecting, 97, 101rotating, 97–98, 100scaling, 97, 100selecting
with Lasso tool, 85with Magic Wand tool, 86–87similar objects, 90–91using Direction Selection tool, 84
using Select menu, 90–91using Selection tool, 83
Shape Builder tool, 76-77transforming, 97–99
Objects menu commandsBlend, 151–152Clipping Mask, 194Compound Path, 192Expand, 160-161Group, 88Text Wrap, 256Transform, 102Ungroup, 88
offsetting paths, 95, 187opacity, blends, 155opacity mask, transparency, 157Open command (File menu), 14, 260open paths, 65, 177Open Recent command (File menu), 15OpenType fonts, 254Open With command (File menu), 262opening
documentswith Adobe Bridge, 16–17existing documents, 14recently opened, 15
graphic images, 260panels, 8-9
optimizingimages to file size (Save for Web), 439
Origin tab (File Info dialog box), 399outer flow effects, 286–287Outline view, 40–41outlines, 257outlines, viewing layers as, 219output print options, 392–393overflow, text, 234–235Overprint Preview command (View menu),
41, 391
PPaintbrush tool, 181painting
art brushes, 324–325Brushes panel, 317calligraphic brushes, 322–323Live Paint Bucket tool, 308–311
ptg8126863
Index 515
Live Paint Groupsadding paths to, 315converting traced objects to, 307creating, 306–307Gap options, 316reshaping or moving paths in,
314–315Live Paint Selection tool, 312–313
Paintbrush tool, 318–319pattern brushes, 326–327scatter brushes, 320–321
panel knife effects, 300Panel Options menu, 8-11panels
adding, 10closing, 8-9collapsing, 8-9, 11displaying hidden, 45docking/undocking, 10expanding, 8-9, 11hiding, 10, 45opening, 8-9Panel Options menu, 11resizing, 8-9sets, collapsing and expanding between
icons and panels, 11subtracting, 10
paragraphsalignment, 246indentation, 247spacing, 247
Paragraph panel, 246-247, 249Paragraph Styles panel, 250-251Paste command (Edit menu), 232–233Paste in Back command (Edit menu), 233Paste in Front command (Edit menu), 233Pathfinder commands, 191Pathfinder panel, 190-191paths
anchor points and, 65clean up unneeded elements, 375clipping mask, 194–197closed, 65compound, 192–193convert mesh object to, 174convert strokes to compound, 192dividing, 185erasing parts of, 182, 304
join, 179merging, 188–189offsetting, 95, 187open, 65, 177outline stroke, 181reshaping, 180–181segments and, 65Shape Mode command, 190shape of, changing, 65simplify, 184smoothing, 183splitting, 186–187splitting into grid, 187
pattern brushes, 326–327patterns
applying to objects, 149creating, 146-147editing, 148expanding, 149as fills, 149as strokes, 149
PDF format, 27 saving as, 399, 412–413SaveDocsAsPDF, script, 368–369
Pen toolanchor points, adding, 177drawing curves with, 171drawing polygons with, 170
Pencil toolpreferences, 305reshaping paths with, 181working with, 304–305
Perspective Gridadjusting, 79copying, 80customizing, 81drawing, 78moving, 80objects, adding, 80resizing, 80text, adding, 80
Photoshop Effect Gallery, 294–295Photoshop, exporting to, 408Photoshop format, 403pie graphs, 372-373pixel grid, align, 30, 67, 354Pixel Preview command (View menu), 41

ptg8126863
516
pixels, 37Place command (File menu), 18, 261, 264,
266placing graphics, 261–263plastic wrap effects, 302Play button (Actions panel), 359playback, action, 361plug-in preferences, 463PNG format, 399, 403
exporting as, 406-407PNG-8 document, 436–437PNG-24 document, 438point type, 223point/pica size, 48points, anchor
adding new, 176–177alignment, 178–179average, 173Convert Anchor Point tool, 175converting, 174–175deleting, 177direction lines, 172endpoints, 179highlighting, 172moving, 172–173paths and, 65preferences, 172selecting with Direct Selection tool, 84showing and hiding, 65smooth points, converting to corner
points, 174Polar Grid tool, 75Polygon tool, 70polygons, drawing, 70, 170portrait/landscape orientation, 37preferences
Adobe Bridge, 482–483anchor points, 172Appearance of Black, 468cursor, 454dictionary, 462File Handling & Clipboard, 466-467General, 454grids, 54guide, 50hyphenation, 462keyboard shortcut, 469Live Paint Bucket tool, 309
Pencil tool, 305plug-in, 463ruler, 48Scratch Disk, 464Selection & Anchor Display, 456–457slices, 461smart guides, 53text, 458–459Transparency grid, 159type, 458–459Units Performance, 460updates, 22user interface, 465
presetsartboard, 36creating new documents using, 31exporting with, 409list of, 31printing with, 385, 394
Preview in browser (Save for Web), 451Preview view, 40–41Preview View command (View menu), 304previewing
artboards, 38color separations, 391effects, 282Save for Web, 451
Print command (File menu), 384, 386Print Presets command (Edit menu), 385printing
advanced print options, 394–395bleed options, 389color management settings, 396color separations, previewing, 391documents, 384general print options, 386–387graphics print options, 390marks options, 388–389number of copies, specifying, 387output options, setting, 392–393Overprint preview, 391overprints, 394presets, 394with presets, 385Print command, 384print problems, checking for, 397print tiling, 387reverse order, 386

ptg8126863
Index 517
Separations preview, 391summary print options, 397
Product Improvement Program (Adobe), 25Proof Colors command (View menu),
132-133Proof Setup command (View menu), 41proofing colors, 132-133PSD format, 399Pucker tool, 332punctuation, 252
QQuit Illustrator command (Illustrator menu),
28quotes, 35
Rradar graphs, 372-373Radial Blur, 298-299radial gradient type, 163raster graphics
effects, 283, 292interpolation and, 64Resolution Independent Effects (RIE), 283tracing, 268–272understanding raster graphics, 64
Record button (Actions panel), 359recording actions, 360Rectangle Grid tool, 74Rectangle tool, 69Redo command (Edit menu), 59Reflect tool, 101reflecting objects, 97, 101registration, 4–5registration point, 355releasing
compound paths, 193objects from clipping masks, 195objects to layers, 215
renamingdata sets, 371selections, 92workspaces, 61
rendering intent color management printoption, 396
replacingcolors, 124–125
fonts, 237images, 18
Reselect command (Select menu), 90Reset All Warning Dialogs, 455Reshape tool, 180reshaping objects, with Envelopes, 104-105reshaping paths, 180–181resizing
artboards, 38slices, 446
Resolution Independent Effects (RIE), 283resolution preset transparency setting, 35Return to Adobe Illustrator command (File
menu), 16reverse order printing, 386Revert command (File menu), 26revolving 3D effects, 289RGB (Red, Green, Blue) color mode, 30, 111,
114Rotate tool, 100rotating
artboards, 38objects, 97–98, 100text, 243
round bend style, 95round joins, 139Rounded Rectangle tool, 69RTF format, 229rulers
artboard display options, 39, 49displaying, 48–49document, 48–49guides
alignment, 53changing, 49clearing, 51color, 50converting vector objects to, 51creating, 51locking, 50preferences, 50ruler, 49showing and hiding, 50smart guides, 52–53snap to point, 50style, 50switching, 51
hiding, 49
ptg8126863
518
rulers (continued)origin, changing, 49preferences, 48
Ssafe area, artboard display options, 39Same command (Select menu), 91saturation, color, 115Save a Copy command (File menu), 27Save As command (File menu), 27, 33Save command (File menu), 26SaveDocsAsPDF, script, 368–369SaveDocsAsSVG, script, 368–369Save for Web command (File menu),
426–429as GIF format, 426-427, 434-435as JPEG format, 426-427, 432-433as PNG-8 format, 426-427, 436-437as PNG-24 format, 426-427, 438
Save Selection command (Select menu), 82Save Workspace command (Workspace
menu), 60saving
actionsas files, 359into sets, 359
brush library, 331documents, 26–27
as Adobe Flex File, 420-421as EPS format, 414–415as FXG format, 420-421as Microsoft Office, 422as PDF format, 412–413as SVG format, 416-418as template, 423for the Web, 426–427
selections, 82slices for Web, 449slices (from selection) for Web, 450symbols, 337
Scale Strokes & Effects option, 455Scale tool, 100scaling
9-slice scaling, 352-353objects, 97, 100type, 242
Scallop tool, 332
scatter brushes, 320–321scatter graphs, 372-373Scissor tool, 186Scratch Disk preferences, 464screen modes, 45scribble effects, 285scripts, actions, 368–369searching
fonts, 237for help information, 25
segmentscurve, 173moving, 172–173paths and, 65selecting with Direct Selection tool, 84
Select menu commands, 90–91Edit Selection, 82Same command, 91Save Selection, 82
Selection & Anchor Display preferences,456–457
Selection tool. See also selectionsaligning and distributing objects using,
96duplicating objects with, 94–95moving objects with, 93reflecting or shearing objects, 101rotating and scale objects with, 100selecting objects with, 83transforming objects with, 97understanding selections, 82
selections. See also Selection toolanchor points, 84controlling effects using, 297deleting, 82editing, 82examples of, 82inverting color of, 90layers, 204naming, 82renaming, 82reselecting, 90saving, 82selecting next object above/below
current, 90slices, 442–443type, 230–231understanding selections, 82

ptg8126863
Index 519
sentence case, 383Separations Preview command (Window
menu), 41Shape Mode command (Pathfinder panel),
190Shape Builder tool, 76-77Shear tool, 101shortcuts
starting Illustrator, 4–5tool, 13
Show Bounding Box command (Viewmenu), 97
Show Edges command (View menu), 65Show Panels command (Window menu), 20Show Print Tiling command (View menu),
40Show Text Threads command (View menu),
234Show Transparency Grid command (View
menu), 159simplify paths, 184single quotes, 35size
artboard, 37font, 238views, 42
Slice tool, 440Slice Selection tool, 442Slice Select tool (Save for Web), 428-429,
443slices
alignment, 447arranging, 446–447auto, 440combining, 448deleting, 442distributing, 447dividing, 448duplicating, 442, 448hiding, 442–443HTML text, adding, 444images, optimizing to file size, 439linking, 443moving, 446preferences, 461resizing, 446saving for Web, 449, 450selecting, 442–443showing, 442–443
stacking, 447subslices, 441unlinking, 443URL links, adding, 445user, 440viewing slice options, 442–443working with, 443
Smart Blur, 298-299smart guides
object transformation, 99preferences, 53turning on/off, 52working with, 52–53
Smart Punctuation, 252smooth paths, 183smooth points, converting to corner points,
174Snap to Grid command, 54Snap to Point command, 50, 456soft proof colors, 132-133software, Illustrator system requirements, 3spacing paragraphs, 247spatter effects, 302spell checking, 378–379Spiral tool, 72–73spirals, drawing, 72–73splitting paths, 186–187stacked bar graphs, 372-373stacked column graphs, 372-373stacking slices, 447stained glass effects, 302stamp effects, 301Star tool, 70stars, drawing, 70Start menu, opening documents using, 15starting Illustrator
in Macintosh, 5shortcuts, 4–5in Windows, 4
status bar, 19Stop button (Actions panel), 359stops, adding to actions, 362stroke
alignment, 138applying color to, 113, 128, 136-137arrowheads, 140-141attributes, changing, 138–141caps or joins, changing, 139
ptg8126863
520
stroke (continued)dashed, 140patterns as, 146–149weight of, changing, 138widths, variable, 142-143
stylesfont, 236graphic
applying, 273breaking links to, 277creating, 274deleting, 277duplicating, 275editing, 276
grids, 54guides, 50type, 250–251
Stylize command (Effect menu), 285sublayers, 202–203subscript text, 35subslices, 441subtracting panels, 10summary print options, 397superscript text, 35SVG format, 27
HTML5 Pack, 418saving as, 416-417SaveDocsAsSVG, script, 368–369
Swatches Librarycopying swatches between libraries, 120customized swatch panels, saving, 121displaying, 120gradient library, 160, 162
Swatches panelcreating color groups in, 117deleting colors from, 116display of, changing, 116editing or duplicating color in, 117groups, creating, 118-119sorting colors in, 116swatches, displaying by type, 116Swatches Library, 120–121
SWF format, Flash, 403, 410-411symbols
9-slice scaling, 352-353creating, 336deleting, 337
duplicating, 338editing, 339links, breaking, 340–341pixel grid, align, 354registration point, 355saving, 337sets, expanding instances of, 351Symbol Libraries, 335Symbol Screener tool, 349Symbol Scruncher tool, 345Symbol Shifter tool, 344Symbol Sizer tool, 346Symbol Spinner tool, 347Symbol Sprayer tool, 342Symbol Strainer tool, 348Symbol Styler tool, 350symbolism tool options, setting, 343Symbols panel, 334
Symbol Libraries, 335Symbol Screener tool, 349Symbol Scruncher tool, 345Symbol Shifter tool, 344Symbol Sizer tool, 346Symbol Spinner tool, 347Symbol Sprayer tool, 342Symbol Strainer tool, 348Symbol Styler tool, 350system requirements, 3
Ttab stops, 248tabbed documents, 20tabs, 248Tabs panel, 248Targa format, 403templates
creating documents from, 32–33document, 18, 32–33saving documents as, 423
template layer, creating, 218text
anti-aliasing, 236, 245case, 383clean up unneeded elements, 375copying, 232–233effects, 228fonts, 236–238
ptg8126863
Index 521
glyphs, 253hyphenation, 249importing, 229justification, 255kerning, 240leading, 239moving, 227, 232–233outlines, 257overflow, 234–235paragraphs, 246–247preferences, 458–459rotating, 243scaling, 242selecting, 230–231spacing, 255styles, 250–251subscript, 35superscript, 35tabs, 248threads, 234–235tracking, 241typing new, 223–224wrapping, 256
Text Format, 403Text Wrap command (Objects menu), 256themes, color, 122–123threads, text, 234–2353D effects, 288–289thumbnail views, 43TIFF format, 399, 403, 405Tolerance selection option, 456tool tips, 455tools
accessing in Tools panel, 12accessing multiple, 12Control panel, 6-7moving between, 55shortcuts to, 13
Tools panelaccessing tools in, 12contents of, 6-7
tracing raster graphics, 268–270tracking type, 241transformations
applying multiple, 102–103blends, 154Distort & Transform command, 102
repeating, 102Transform Each command, 102
transforming objects, 97–99Transparency Flattener Presets command
(Edit menu), 395Transparency grid, 159transparency settings
blends, 156colored paper simulation, 35controlling transparency effects, 156document creation, 34–35flattening object transparency, 158grid colors, 35grid size, 34opacity mask, 157resolution preset, 35
trim marks, editable, 57turning on/off smart guides, 52TXT format, 229type
anti-aliasing, 236, 245Area Type tool, 225copying, 232–233deleting empty text paths, 232fonts, 236–238justification, 255kerning, 240leading, 239moving, 232–233OpenType fonts, 254outlines, 257overflow, 234–235paragraphs, 246–247preferences, 458–459rotating, 243scaling, 242selecting, 230–231spacing, 255styles, 250–251threads, 234–235tracking value, 241Type on a Path tool, 226Vertical Area Type tool, 225Vertical Type on a Path tool, 226Vertical Type tool, 223wrapping, 256
Type on a Path tool, 222, 226Type tool, 222-223

ptg8126863
522
typographer's quotes, 35Twirl tool, 332
UUndo command (Edit menu), 59undocking
documents, 21panels, 10
Ungroup command (Objects menu), 88ungroup, color group, 119Units Performance preferences, 460Updater (Adobe), 23updates
checking for, 22–23preferences, 22
Updates command (Help menu), 23updating, from previous versions, 2uppercase text, 383URL links, adding to slices, 445user interface
changing, 6-7preferences, 6-7, 465
user slices, 440
Vvariables, data
creating, 370–371deleting, 370–371renaming, 371
variable stroke widths, 142-143vector objects
converting to guide, 51effects, 293understanding vector graphics, 64
Vertical Area Type tool, 222, 225Vertical Type on a Path tool, 222, 226Vertical Type tool, 222, 223Video Data tab (File Info dialog box), 398video safe areas, artboards, 37View menu commands
Bounding Box, 314–315Edit View, 40Fit All In Window, 46Fit Artboard In Window, 46Hide Edges, 65New View, 40Overprint Preview, 41
Pixel Preview, 41Preview View, 304Proof Colors, 132-133Proof Setup, 41Rulers, 48Show Bounding Box, 97Show Edges, 65Show Print Tiling, 40Show Text Threads, 234Show Transparency Grid, 159Smart Guides, 52Soft Proof, 132-133
view size, documents, 19views
box color, 44changing, with Zoom tool, 46–47display view, changing, 40–41document, 40–43fit in window, 46Outline, 40–41Preview, 40–41ruler options, 48size, 42thumbnail, 43
Vimeo (Media Encoder), 488-489
WWarp effect, 290Warp tool, 332Web
browser preview in (Save for Web), 451file formats, 430–431GIF files, optimizing, 426-427, 434–435images, optimizing to file size, 439JPEG files, optimizing, 426-427, 432–433PNG-8 files, optimizing, 426-427, 436–437PNG-24 files, optimizing, 426-427, 438saving documents for, 426–427saving slices for, 449
Web-safe color, 115Window menu
Extensions, 122–123Flattener Preview, 41panel display, 8–10
Window menu commandsFlattener Preview, 395Hide Panels, 20
ptg8126863
Index 523
Separations preview, 41Show Panels, 20
WindowsIllustrator system requirements, 3installing Illustrator in, 2starting Illustrator in, 4
windowsactive, 20document, 20–21
Windows Metafile format, 403Workspace menu commands, 60workspaces
creating, 60deleting, 61displaying, 60layouts, 60naming, 60renaming, 61
wrapping text, 256Wrinkle tool, 332
XX and Y positioning, 37XMP metadata, 398-399XMP Software Development Kit, 399Xoom device, 31
YYouTube (Media Encoder), 488-489
Zzoom
in/out, 47using Navigator thumbnail, 43view size, 42
Zoom toolchanging view with, 46–47Save For Web tool, 394

ptg8126863
Ready to start using the skills you just learned? The Online Workshop is a great place to get started. The Workshop is filled with projects that will help you use Adobe Illustrator CS6 in the real world.
Each project in the Workshop takes you step-by-step from beginning to end to make sure you get just the result you’re looking for. Not only will you put individual step-by-step tasks
into projects, but you’ll also reinforce the skills you learned so you’ll know how and when to incorporate the tasks into your work.
Bonus Online ContentTo access the Online Workshop and bonus content, follow these simple steps:
1. Go to queondemand.com/register and sign in or create an account.
2. To register this product to your account, enter 9780789749352 into the box, and click Submit.
3. Answer challenge question to show proof of purchase.
4. On the Registered Products area of your account page, you will now see an “Access Bonus Content” link—click that link to be taken to the page with the bonus material for this title.
5. You may return to the bonus material at any time by clicking on this link, which appears in your account. (Must be logged in to view.)
Also available at www.perspection.com
HERE ARE SOME OF THE WORKSHOPS YOU’LL FIND:
Illustrator CS6 ProjectsIllustrator allows you to use professional tools and your own creativity to create artwork that you can use on the web, in on-screen presentations and in commercial printing. The projects in Illustrator CS6 focus on learning techniques that you can use in everyday life.
The projects include
• Creatingandusingmultipleartboards
• Tracingandrecoloringartwork
• Creatingstylized3Dtype
• Creatingandusingbristlebrushes
• Exportingtootherformats
• Preparingforaprinter
Online Workshop