Admin Tools User's Guide - Akeeba Backup
181
Admin Tools User's Guide Nicholas K. Dionysopoulos
-
Upload
khangminh22 -
Category
Documents
-
view
3 -
download
0
Transcript of Admin Tools User's Guide - Akeeba Backup

Admin Tools User's GuideNicholas K. Dionysopoulos
Admin Tools User's GuideNicholas K. DionysopoulosCopyright © 2010-2021 Akeeba Ltd
Abstract
This book covers the use of the Admin Tools site security component, module and plugin bundle for Joomla!™ -powered web sites. Both the free Admin Tools Core and the subscription-based Admin Tools Professional editionsare completely covered.
Permission is granted to copy, distribute and/or modify this document under the terms of the GNU Free Documentation License, Version 1.3or any later version published by the Free Software Foundation; with no Invariant Sections, no Front-Cover Texts, and no Back-Cover Texts.A copy of the license is included in the appendix entitled "The GNU Free Documentation License".
Table of Contents1. Getting Started .......................................................................................................................... 1
1. What is Admin Tools? ....................................................................................................... 11.1. Disclaimer ............................................................................................................. 11.2. The philosophy ....................................................................................................... 2
2. Server environment requirements ......................................................................................... 23. Installing Admin Tools ....................................................................................................... 3
3.1. Installing or manually updating the extension ............................................................... 33.1.1. Install from URL .......................................................................................... 33.1.2. Upload and install. ........................................................................................ 43.1.3. Manual installation ....................................................................................... 53.1.4. Troubleshooting the installation ....................................................................... 53.1.5. The installation / update broke my site! ............................................................ 7
4. Upgrading from Core to Professional .................................................................................... 85. Automatic updates ............................................................................................................. 8
5.1. Troubleshooting the update ..................................................................................... 105.1.1. Addressing server issues .............................................................................. 105.1.2. Check the validity of your Download ID ......................................................... 11
5.1.2.1. Check your subscription status ............................................................ 115.1.2.2. Multiple Professional edition Akeeba extensions with different DownloadIDs ............................................................................................................ 115.1.2.3. Entering or changing your Download ID after an update is available ........... 12
5.1.3. Updates are showing after installing the latest version ........................................ 135.1.4. Updates not showing despite having an older version ........................................ 13
5.1.4.1. Check the update site ........................................................................ 135.1.4.2. Refresh the update cache ................................................................... 14
5.1.5. Miscellaneous troubleshooting and information ................................................ 155.1.5.1. The update fails to download .............................................................. 155.1.5.2. Updating with a third party service fails ............................................... 155.1.5.3. Manual update ................................................................................. 155.1.5.4. Update installation problems ............................................................... 15
6. Entering your Download ID ............................................................................................... 157. Requesting support and reporting bugs ................................................................................ 188. Uninstalling Admin Tools ................................................................................................. 199. Quick Setup .................................................................................................................... 20
2. Using Admin Tools .................................................................................................................. 221. The Control Panel ............................................................................................................ 222. The component Options .................................................................................................... 223. Fixing the permissions of files and directories ....................................................................... 27
3.1. Configuring the permissions of files and directories ..................................................... 294. Emergency Off-Line Mode ................................................................................................ 305. Protect your administrator back-end with a password ............................................................. 326. The .htaccess maker ......................................................................................................... 33
6.1. Basic Security ....................................................................................................... 366.2. Server protection ................................................................................................... 43
6.2.1. How to determine which exceptions are required .............................................. 466.3. Custom .htaccess rules ............................................................................................ 516.4. Optimisation and utility .......................................................................................... 526.5. System configuration .............................................................................................. 58
7. The NginX configuration maker ......................................................................................... 597.1. Basic Security ....................................................................................................... 617.2. Server protection ................................................................................................... 63
7.2.1. How to determine which exceptions are required .............................................. 667.3. The Kitchen Sink (Expert Settings) .......................................................................... 677.4. Optimisation and utility .......................................................................................... 697.5. System configuration .............................................................................................. 75
iii

Admin Tools User's Guide
8. The web.config maker ...................................................................................................... 778.1. Basic Security ....................................................................................................... 798.2. Server protection ................................................................................................... 81
8.2.1. How to determine which exceptions are required .............................................. 848.3. Optimisation and utility .......................................................................................... 858.4. System configuration .............................................................................................. 91
9. Web Application Firewall .................................................................................................. 919.1. Configure ............................................................................................................. 92
9.1.1. Basic Features ............................................................................................ 939.1.2. Request Filtering ......................................................................................... 979.1.3. Hardening Options ..................................................................................... 1009.1.4. Cloaking .................................................................................................. 1059.1.5. Project Honeypot ....................................................................................... 1079.1.6. Exceptions ............................................................................................... 1089.1.7. Auto-ban .................................................................................................. 1109.1.8. Logging & reporting .................................................................................. 1119.1.9. Customisation ........................................................................................... 1149.1.10. Troubleshooting (I got locked out of my site) ............................................... 115
9.2. WAF Exceptions ................................................................................................. 1169.3. WAF Deny List ................................................................................................... 1189.4. Administrator Exclusive Allow IP List .................................................................... 1209.5. Site IP Disallow List ............................................................................................ 1229.6. Anti-spam Bad Words .......................................................................................... 1249.7. Blocked Requests Log .......................................................................................... 125
9.7.1. List of blocking reasons ............................................................................. 1259.8. Auto IP Blocking Administration ............................................................................ 1279.9. Auto IP Blocking History ...................................................................................... 1289.10. Email templates ................................................................................................. 128
10. Database tools .............................................................................................................. 13011. The PHP File Scanner ................................................................................................... 132
11.1. How does it work and what should I know? ............................................................ 13211.2. Configuration .................................................................................................... 13411.3. Scanning and administering scans ......................................................................... 13511.4. Reading the reports ............................................................................................ 13611.5. Automating the scans (CRON jobs) ....................................................................... 13811.6. Automating the scans (front-end scheduling URL) ................................................... 139
12. SEO and Link Tools ..................................................................................................... 14113. URL Redirection .......................................................................................................... 14214. Cleaning your temporary files directory ............................................................................ 14515. Protecting Admin Tools with a password .......................................................................... 14616. Import and Exporting Settings ........................................................................................ 14717. Access Control ............................................................................................................. 14818. The "System - Admin Tools" plugin ................................................................................ 14919. Rescue Mode ............................................................................................................... 15120. Troubleshooting guide ................................................................................................... 154
20.1. ........................................................................................................................ 15420.2. Administrator password protection issues ............................................................... 15420.3. New Super Users are blocked and deactivated after login .......................................... 15520.4. Can not create or edit Managers, Administrators, Super Administrators using AdminTools (403 error thrown) ............................................................................................. 15620.5. Locked out of my site after applying a .htaccess using Admin Tools' .htaccess Maker ...... 15620.6. Admin Tools' Web Application Firewall (WAF) locked you out of your site .................. 15620.7. My components, modules or templates stopped working after using AdminTools .htaccess Maker and how to determine and apply exceptions ..................................... 15920.8. I created a .htaccess file on my main site and I can't access my other domains on thesame account ............................................................................................................. 16020.9. The administrator secret URL parameter is not working ............................................ 16120.10. There are too many security exceptions. Should I be worried? .................................. 161
iv
Admin Tools User's Guide
A. GNU General Public License version 3 ..................................................................................... 162B. GNU Free Documentation License ........................................................................................... 171
v

Chapter 1. Getting Started
1. What is Admin Tools?Admin Tools is a security component, i.e. a software solution which will help you tighten the security of yourJoomla! site. Moreover, it has several features which will help you enhance the performance of your site and makeyour life administering the site a bit easier.
Admin Tools is written with Joomla! best practices in mind. It uses a native Joomla! plugin to apply its securityand performance enhancing feature. It does not touch Joomla's core files ("core hacks").
Admin Tools comes in two editions, the free of charge Core edition and the subscription-only Professional edition.The Core edition only has basic utilitarian features. The security features can only be found in the Professionaledition.
A summary of the features of Admin Tools and how they relate to each edition can be found on our site [https://www.akeeba.com/products/admin-tools.html].
1.1. Disclaimer
Security applications —like Admin Tools— are designed to help you enhance your site's security, not make itinvulnerable against all hacking attempts. Whereas it will make it harder for a potential attacker to figure outinformation pertaining your site and will give them a hard time attacking your site, there is nothing that can stop adetermined attacker with plenty of resources from hacking your site. For instance, if you have an outdated Joomla!installation or a vulnerable component installed on your site there is nothing —and, let us stress that, NOTHING— which can stop a hacker from successfully attacking your site.
We are aware that some developers may market their products as a "complete protection" for your site, whichsimply is technically impossible. If such a magic solution existed would they be selling it for a few dozen dollarsa years to everyone or for millions of dollars per year to high profile targets (large corporations and governmentagencies)? Exactly.
Security software is like a bulletproof vest. You don't wear it for total invincibility against all attacks (a lucky shotin an area not covered by it, a high power, penetrating round and an explosion can still kill you). You are wearingit because what is most likely to get you is what the vest can stop.
In the end of the day you are ultimately responsible for the security of your site, employing a holistic approach tosecurity including sane personal security practices. Installing and configuring Admin Tools is meant to be part ofyour security regimen. At the very least you are expected to take frequent backups, stored in safe locations outsideof your server, apply security-conscious password management, maintain a secure working environment (as in:if your computer is full of malware your site is as good as hacked no matter if you use Admin Tools or not) andkeep an eye for any abnormal behaviour on your site.
Finally, we are legally obliged to draw your attention to the warranty and liability waiver Sections 15 through 17of the software's license, copied here for your convenience:
15. Disclaimer of Warranty.
THERE IS NO WARRANTY FOR THE PROGRAM, TO THE EXTENT PERMITTED BY APPLICABLELAW. EXCEPT WHEN OTHERWISE STATED IN WRITING THE COPYRIGHT HOLDERS AND/OROTHER PARTIES PROVIDE THE PROGRAM “AS IS” WITHOUT WARRANTY OF ANY KIND, EITHEREXPRESSED OR IMPLIED, INCLUDING, BUT NOT LIMITED TO, THE IMPLIED WARRANTIES OFMERCHANTABILITY AND FITNESS FOR A PARTICULAR PURPOSE. THE ENTIRE RISK AS TO THEQUALITY AND PERFORMANCE OF THE PROGRAM IS WITH YOU. SHOULD THE PROGRAM PROVEDEFECTIVE, YOU ASSUME THE COST OF ALL NECESSARY SERVICING, REPAIR OR CORRECTION.
1
Getting Started
16. Limitation of Liability.
IN NO EVENT UNLESS REQUIRED BY APPLICABLE LAW OR AGREED TO IN WRITING WILL ANYCOPYRIGHT HOLDER, OR ANY OTHER PARTY WHO MODIFIES AND/OR CONVEYS THE PROGRAMAS PERMITTED ABOVE, BE LIABLE TO YOU FOR DAMAGES, INCLUDING ANY GENERAL, SPECIAL,INCIDENTAL OR CONSEQUENTIAL DAMAGES ARISING OUT OF THE USE OR INABILITY TO USETHE PROGRAM (INCLUDING BUT NOT LIMITED TO LOSS OF DATA OR DATA BEING RENDEREDINACCURATE OR LOSSES SUSTAINED BY YOU OR THIRD PARTIES OR A FAILURE OF THEPROGRAM TO OPERATE WITH ANY OTHER PROGRAMS), EVEN IF SUCH HOLDER OR OTHERPARTY HAS BEEN ADVISED OF THE POSSIBILITY OF SUCH DAMAGES.
17. Interpretation of Sections 15 and 16.
If the disclaimer of warranty and limitation of liability provided above cannot be given local legal effect accordingto their terms, reviewing courts shall apply local law that most closely approximates an absolute waiver of all civilliability in connection with the Program, unless a warranty or assumption of liability accompanies a copy of theProgram in return for a fee.
1.2. The philosophy
Admin Tools is a tool which helps you tighten the security of your site. Admin Tools, like every security software,is not something that you install and immediately become invulnerable to hackers. This is not something particularto Admin Tools. All firewalls, Internet security, antivirus and other security software are just tools. If someonehad a magic solution that makes sites or computers invulnerable to hackers they would be billionaires: every majorcorporation and government in the world would like to have such a solution.
Admin Tools is a very capable security solution which can protect you against many different types of commonattacks. However, there are some limits to what it can do. You cannot install an old version of Admin Tools on anobsolete version of Joomla! we have stopped supporting and expect that site to be impregnable by hackers. Oldversions of Joomla! may have security issues which, from the point of view of a web application firewall, look likelegitimate requests. These attacks cannot be addressed unless the vulnerable Joomla! core or third party extensioncode itself is updated. That is why we will only officially provide support to the latest and the previous Joomla!version family. There's no point trying to secure an out of date site.
Finally, please keep in mind that your site evolves over time. You may have to adjust your Admin Tools settingsover time. Sometimes updating a third party extension will break something because its author is doing somethingill-advised that Admin Tools protects you against (yes, some developers manage to make their software behavein the same way malware does, mainly because they are unaware of those malicious patterns). Sometimes youmay install something new which needs a few adjustments in the protection to make it work. This is all normal.Security is something you do, not something you install and forget about it.
2. Server environment requirementsIn order to work, Admin Tools requires the following server software environment:
• Joomla!™ and PHP version compatibilities are detailed in our Compatibility page [https://www.akeeba.com/compatibility.html].
• MySQL 5.0.42 or later. MySQL 5.6 or later recommended. MySQL 4.x is not supported.
• For the PHP File Change Scanner feature: Minimum 24Mb of PHP memory_limit (sufficient only for smallerweb sites, without many plug-ins and modules running). More is better. 32Mb to 64Mb recommended foroptimal performance on large sites. 128Mb is recommended for sites containing deep-nested directories withthousands of files.
• The cURL PHP module must be installed for Joomla! to be able to find and install updates.
2

Getting Started
As far as the browser is concerned, you can use any modern version (i.e. published within the last year) of MicrosoftEdge, Safari, Opera, Firefox or Google Chrome. We no longer support Internet Explorer; our software will displayincorrectly or not work at all on this old, buggy and obsolete browser.
In any case, you must make sure that Javascript is enabled on your browser. If you are using AVG antivirus,please disable its Link Checker feature (and reboot your computer) as it is known to cause problems with severalJavascript-based web applications.
You are very strongly advised to disable Internet firewalls, antivirus applications and browser extensions whichinterfere with the site's loading such as script blockers (such as NoScript) and ad blockers (such as AdBlockPlus)only for the domains of your sites. Remember that these applications and browser extensions are designed toprotect you against third party sites. As a result they are very aggressive and WILL break your own sites. We can'tdo anything about it: your computer and your browser are under your control alone.
3. Installing Admin ToolsInstalling Admin Tools is no different than installing any other Joomla!™ extension on your site. You can readthe complete instructions for installing Joomla!™ extensions on the official help page [https://docs.joomla.org/Installing_an_extension]. Throughout this chapter we assume that you are familiar with these instructions and wewill try not to duplicate them.
3.1. Installing or manually updating the extensionJust like with most Joomla! extensions there are two ways to install or manually update Admin Tools on your site:
• Install from URL. This works only with the Professional release of our component. It is the easiest and fastestone, if your server supports it. Most servers do support this method.
• Upload and install. That's the typical extension installation method for Joomla! extensions. It rarely fails.
Please note that installing and updating Admin Tools (and almost all Joomla! extensions) is actually the samething. If you want to update Admin Tools please remember that you MUST NOT uninstall it before installing thenew version! When you uninstall Admin Tools you will lose all your settings. This is definitely something youdo not want to happen! Instead, simply install the new version on top of the old one. Joomla! will figure out thatyou are doing an update and will treat it as such, automatically.
Tip
If you find that after installing or updating Admin Tools it is missing some features or doesn't work,please try installing the same version a second time, without uninstalling the component. The reason isthat very few times the Joomla! extensions installer infrastructure gets confused and fails to copy somefiles or entire folders. By repeating the installation you force it to copy the missing files and folders,solving the problem.
3.1.1. Install from URL
The easiest way to install Admin Tools Professional is using the Install from URL feature in Joomla!.
Important
This Joomla! feature requires that your server supports fopen() URL wrappers (allow_url_fopenis set to 1 in your server's php.ini file) or has the PHP cURL extension enabled. Moreover, if yourserver has a firewall, it has to allow TCP connections over ports 80 and 443 to www.akeeba.com andcdn.akeeba.com. If you don't see any updates or if they fail to download please ask your host tocheck that these conditions are met. If they are met but you still do not see the updates please file a bugreport in the official Joomla! forum [http://forum.joomla.org/]. In the meantime you can use the manualupdate methods discussed further below this page.
3
Getting Started
First, go to our site's download page for Admin Tools [https://www.akeeba.com/download/admintools.html].Make sure you are logged in. If not, log in now. These instructions won't work if you are not logged in! Click onthe All Files button of the version you want to install. Please note that the latest released version is always listedfirst on the page. On that page you will find both Admin Tools Core and Professional. Next to the Professionaledition's Download Now button you will see the Direct Install Link link. Right click on it and select Copy linkaddress or whatever your browser calls this.
Now go to your site's administator page and click on Extensions, Manage. Click on the Install from URL tab. Clearthe contents of the Install URL field and paste the URL you copied from our site's download page. Then click onthe Install button. Joomla! will download and install the software.
If Joomla! cannot download the package, please use one of the methods described in this section of thedocumentation. If, however you get an error about copying files, folder not found or a cryptic "-1" error pleasefollow our installation troubleshooting instructions [https://www.akeeba.com/documentation/troubleshooter/abinstallation.html].
3.1.2. Upload and install.
You can download the latest installation packages our site's download page for Admin Tools [https://www.akeeba.com/download/admintools.html]. Please note that the latest version is always on top. If youhave an older version of Joomla! or PHP please consult our Compatibility page [https://www.akeeba.com/compatibility.html] to find the version of Admin Tools compatible with your Joomla! and PHP versions. In eithercase click on the version you want to download and install.
If you are not a subscriber, click on the Admin Tools Core to download the ZIP installation package of the freeof charge version.
If you are a subscriber to the Professional release, please make sure that you have logged in first. You should thensee an item on this page reading Admin Tools Professional. If you do not see it, please log out and log back in.Click on the Professional item to download the ZIP installation package.
All Admin Tools installation packages contain the component and all of its associated extensions. Installing itwill install all of these items automatically. It can also be used to upgrade Admin Tools; just install it withoutuninstalling the previous release.
In any case, do not extract the ZIP files yet!
Warning
Attention Mac OS X users! Safari, the default web server provided to you by Apple, is automaticallyextracting the ZIP file into a directory and removes the ZIP file. In order to install the extension throughJoomla!'s extensions installer you must select that directory, right-click on it and select Compress to get aZIP file of its contents. This behaviour was changed in Mac OS X Mountain Lion, but people upgradingfrom older versions of Mac OS X (Mac OS X Lion and earlier) will witness the old, automatic ZIPextraction, behaviour.
Log in to your site's administrator section. Click on Extensions, Manage link on the top menu. Please click onthe Upload Package File tab. Drag and drop the installation ZIP file you had previously downloaded to start theupload and the installation. After a short while, Joomla!™ will tell you that the component has been installed.
Warning
Admin Tools is a big extension (over 2Mb for the Professional release). Some servers do not allow youto upload files that big. If this is the case you can try the Manual installation or ask your host to followour installation troubleshooting instructions [https://www.akeeba.com/documentation/troubleshooter/abinstallation.html] under "You get an error about the package not being uploaded to the server".
If you have WAMPServer (or any other prepackaged local server), please note that its defaultconfiguration does not allow files over 2Mb to be uploaded. To work around that you will need to modify
4
Getting Started
your php.ini and restart the server. On WAMPserver left-click on the WAMP icon (the green W), clickon PHP, php.ini. Find the line beginning with upload_max_filesize. Change it so that it reads:
upload_max_filesize = 6M
Save this file. Now, left-click on the WAMP icon, click on Apache, Service, Restart Service and youcan now install the component. Editing the php.ini file should also work on all other servers, localand live alike.
If the installation did not work, please take a look at our installation troubleshooting instructions [https://www.akeeba.com/documentation/troubleshooter/abinstallation.html] or try the manual installation describedbelow.
3.1.3. Manual installation
This method can no longer be supported for technical reasons which have to do with the way Joomla! works wheninstalling extensions of the type "package".
Warning
DO NOT UNZIP THE PACKAGE AND TRY TO INSTALL THE EXTENSIONS MANUALLY!This will very likely make your site fail with an error. When you are installing the package extensionJoomla! makes a few checks to make sure that your server meets the minimum requirements. Moreover,the installation order in the package matters. It is designed to make sure that failure to install one of theincluded extensions will minimize the chance of a cascading effect which breaks your site.
3.1.4. Troubleshooting the installation
Please note that extensions installation is performed by Joomla itself, not code that we have written ourselves.If you have a problem installing a Joomla extension of ours the root cause is in Joomla! and the way some ofits functions work. While we don't offer support for generic installation issues, this page is meant to serve as acollection of the troubleshooting steps we'd follow on any site when any extension doesn't install correctly.
You get an error about the package not being uploaded to the server
The installation packages of our extensions are rather big. Many server have a maximum file upload size or amaximum POST request size which is too small – typically around 2MB – for our software to install. The bestsolution is to ask your host to set the following in the server's php.ini:
upload_max_filesize = 10Mpost_max_size = 10M
On most hosts you can place these lines in a file called .user.ini (not the leading dot) or php.ini in yoursite's administrator directory.
If this is not possible, there's a good chance that the following lines in your .htaccess file may work on mostservers:
php_value upload_max_filesize 10Mphp_value post_max_size 10M
There is also another alternative, but it won't work on all hosts: installation by URL. Please go to the Downloadsection of our site and select the software and version you want to download. Click on View All files. Next tothe "Download now" button for the installation package you will see a link called "DirectLink". Right click on itand select "Copy link address" (the exact phrase depends on the browser, but it should have to do about copyingthe link or its address / URL / location).
Now go to your site's back-end, Extensions, Extensions Manager and find the Install from URL tab. Replace thecontents of the "Install URL" field with the contents of your clipboard (the DirectLink URL you copied above)and click on the "Install" button next to this textbox. As long as your server supports installing extensions fromURL the installation should go through.
5

Getting Started
If this still doesn't help please read on for further troubleshooting tips
"Install path does not exist"
Joomla! requires the PHP Gzip and ZIP extensions to be installed. If either is not installed or if it's blocked thenJoomla! will be unable to install extensions. Unfortunately, a cascade of unhandled errors inside Joomla! itselfwill cause it to come up with the unhelpful and disorienting "Install path does not exist" error message.
Solution: ask your host to enabled the GZip and ZIP extensions in PHP. Furthermore, ask them to makesure that they are not blocking the functionality of these extensions e.g. by using disable_functions ordisable_classes in their php.ini file.
Please note that we routinely see hosts disabling functions zip_open, gzuncompress, gzdeflate andgzdecode for ostensible "security reasons". First of all Joomla! WILL NOT work properly when any of thesefunctions is unavailable. Moreover and despite what your host tells you, disabling this functions does not increaseyour site's security in any conceivable way. If your host denies to unblock these functions please take your site toa different host that understands how server security really works.
"Unable to write entry" or "Unable to create destination" error
This error message comes from Joomla! and it means that there is a file or directory permissions issue.Unfortunately this message is very non-specific and provides no useful information for troubleshooting. This issomething we reported to Joomla in September 2017 and was ostensibly fixed but internal issues in the way theextensions installer work still prevent the correct path from being shown.
In the meantime, all you can do is ask your host to make sure that all folders and files on your site are writeableby the user under which your site runs. This is not something you or us can do. Please do ask your host.
If this doesn't help it might mean that you have reached the file system capacity of your server. Please note thatyour account on the server might have several limits:
• Maximum total size of files and database data. This is the most common limit, e.g. your host telling you thatyou can use 10G of space in total. Please remember that this includes your database data. Moreover, keep inmind that "unlimited" is a marketing term, not reality. Usually you get up to a certain size limit and you haveto ask for more, explaining why.
• Maximum number of files. This is usually NOT advertised. Many hosts will only allow you up to a maximumnumber of files, e.g. 100,000. If you try to exceed that count the file is not created / replaced, as if the permissionswere not adequate to write to it. Please note that most times the host engineers will call it "inode count" becausethat's technically what they are limiting on your hosting user account. A file can consume one or more inodes,each inode essentially being the smallest chunk of contiguous disk space that can be allocated to a file (that'snot very accurate but it's a well enough description to understand what an inode is).
• The physical disk size. All the aforementioned limits are great, but you cannot create files beyond the physicalcapacity of the disks on your server. Most modern hosts use virtualized, network attached storage to provideever-expanding capacity on demand. However, some cheaper hosts and dedicated servers still have regular disksattached with finite storage limits.
• Also remember that your hosting control panel does not report the limit information in real time. You may havealready exceeded your limits but your control panel not having been updated with this information.
If you are not sure about these limits please ask your host.
Upgrading from Core to Professional
In some cases we have seen that Joomla failed to copy all of the necessary files when upgrading from a Core toa Professional release or when installing a major update that spans major versions (e.g. 1.x to 2.y). If you believethis has happened to you please install our software twice in a row, without uninstalling it before or in betweenthe subsequent installations.
6
Getting Started
Check your Joomla! and PHP version
We publish the compatibility of our software with Joomla! and PHP versions in the Compatibility page on oursite. You can find a link on this page at the bottom of every page of our site.
Please remember that the PHP version your site is using may be different than the PHP version your host reportsin their hosting control panel. If unsure, please refer to Joomla's System Information page. If you need to upgradeyour PHP version please consult your host. The exact method to do that varies by host.
Checking your temporary directory
First, we will have to make sure that you are using a valid temporary directory. Many sites are configured to usethe system-wide (/tmp) directory or an invalid directory, causing installation problems.
You can change your temporary directory from your site's Global Configuration page. You need to enter thefull filesystem path to Joomla's tmp folder. This is typically something like /home/mysite/public_html/tmp. If unsure please ask your host. This information is not visible from within your site's administrator usingany Joomla-provided feature and there is no way for us to know it.
Enable FTP
On shared hosts which are using PHP as an Apache module you have to enable Joomla!'s FTP layer. OtherwiseJoomla! won't be able to write the files to its directories and installation will fail. If you are unsure whether thisis the case please ask your host.
If you need to enable the FTP layer here's how to do it:
1. Go to Site (or System, in Joomla 4), Global Configuration menu item.
2. Click on the Server tab
3. Set Enable FTP to Yes
4. In the FTP Host try using 127.0.0.1 or localhost or the FTP hostname assigned by your host
5. In the FTP Username and FTP Password fields provide the FTP username and password assigned by your host
6. In the FTP Root you have to type in the FTP path to your site's root. Here is the easy way to find it usingFileZilla [http://filezilla-project.org/download.php]:
Connect to your site using FileZilla. Navigate inside the folder Joomla! is installed in. Usually it's a directorynamed public_html, htdocs, www or something similar. If unsure don't ask us, ask your host. Now, onthe right-hand pane you will find the FTP path. Most likely it will look something like /public_html. Copythis and paste it into the FTP Root text box in your Joomla!'s Global Configuration page.
7. Save your Global Configuration. If you got everything correctly, you should see a message that yourconfiguration was saved. If you see an error message please seek assistance on the Joomla! Forum [http://forum.joomla.org].
Still problems?
If you still can't install our software and you are receiving messages regarding unwritable directories, inability tomove files or other similar file system related error messages you can ask for our support but you already readwhat we're going to try. At best you can expect us to find out the most likely root cause and tell you what youhave to ask your host to do to fix it.
3.1.5. The installation / update broke my site!
Some users have reported that after they have installed or updated Admin Tools, they were no longer able toaccess parts of their site, especially the back-end. This is an indication of a failed or partial installation. Shouldthis happen, use your FTP client to remove the following directories (some of them may not be present on yoursite; this is normal):
7
Getting Started
administrator/component/com_admintoolscomponent/com_admintoolsmedia/com_admintoolsplugins/system/admintools
This will do the trick! You will now be able to access your site's administrator page again and retry installingAdmin Tools without uninstalling it first. Remember, uninstalling Admin Tools will remove your settings; youdo not want that to happen!
Note
If you get a username and password dialog from your browser (not Joomla!) OR a server error whenyou access your site's backend (administrator) URL, try deleting the .htaccess and .htpasswd filesinside your site's administrator folder.
In some cases Joomla! forgets to install files for the FOF 3 library used by most of our components (AkeebaBackup, Admin Tools, Akeeba Ticket System and others). This could mean that even removing the directoriesabove you could still be unable to access your site. If this happens, try the following solution:
1. Delete the folder libraries/fof40 from your site. ATTENTION! Do NOT remove the libraries/fof folder, it'ssomething entirely different and you will break your site if you remove that folder instead!
2. Go to our Download page [https://www.akeeba.com/download.html] and download the latest version of FOF.This downloads a file named something like lib_fof40-1.2.3.zip on your computer.
3. Extract (unzip) the file you downloaded. You see a fof directory being extracted.
4. Rename to fof directory to fof40
5. Upload the fof40 directory into your site's libraries directory.
6. You now have a libraries/fof40 directory and you can log in to your site's backend.
7. Reinstall our extension twice in a row
4. Upgrading from Core to ProfessionalUpgrading from Admin Tools Core to Admin Tools Professional is by no means different than installing thecomponent. You do not have to uninstall the previous version; in fact, you MUST NOT do that. Simply followthe installation instructions to install Admin Tools Professional over the existing Admin Tools Core installation.That's all! All your settings are preserved.
Important
When upgrading from Core to Professional you usually have to install the Professional package twice,without uninstalling anything in between. Sometimes Joomla! does not copy some of the files and foldersthe first time you install it. However, if you install the package again (without uninstalling your existingcopy of Admin Tools) Joomla! copies all of the necessary files and performs the upgrade correctly.
5. Automatic updatesAdmin Tools can be updated just like any other Joomla! extension, using the Joomla! extensions update feature.Please note that Joomla! is fully responsible for discovering available updates and installing them on your site.Akeeba Ltd does not have any control of the update process.
Note
This Joomla! feature requires that your server supports fopen() URL wrappers (allow_url_fopenis set to 1 in your server's php.ini file) or has the PHP cURL extension enabled. Moreover, if yourserver has a firewall, it has to allow TCP connections over ports 80 and 443 to www.akeeba.com and
8

Getting Started
cdn.akeeba.com. If you don't see any updates or if they fail to download please ask your host tocheck that these conditions are met. If they are met but you still do not see the updates please file a bugreport in the official Joomla! forum [http://forum.joomla.org/]. In the meantime you can use the manualupdate methods discussed further below this page.
Warning
Admin Tools Professional needs you to set up the Download ID before you can install the updates. Pleaseconsult the Entering your Download ID documentation section for more information.
You can access the extensions update feature in different ways depending on your Joomla version:
• Joomla 3: From the icon your Joomla! administrator control panel page. You will find the icon in the left-handsidebar, under the Maintenance header. When there are updates found for any of your extensions you will see theUpdates are available message. Clicking on it will get you to the Update page of Joomla! Extensions Manager.
• Joomla 3 (alternate method): From the top menu of your Joomla! administrator click on Extensions, Manager.From that page click on the Update tab found in the left-hand sidebar. Clicking on it will get you to the Updatepage of Joomla! Extensions Manager.
• Joomla 4: From the icon your Joomla! administrator control panel page. By default you will find the icon inthe right-hand modules area, under the Update Checks header. When there are updates found for any of yourextensions you will see the Updates are available message. Clicking on it will get you to the Update page ofJoomla! Extensions Manager.
• Joomla 4 (alternate method): From the sidebar of your Joomla! administrator click on System. On the new pagefind the Update area towards the bottom of the middle column and click the Extensions link. This takes you tothe Update page of Joomla! Extensions Manager.
If you do not see the updates try clicking on the Find Updates button in the toolbar. If you do not see the updatesstill you may want to wait up to 24 hours before retrying. This has to do with the way the update CDN works andhow Joomla! caches the update information.
If there is an update available for Admin Tools tick the box to the left of its row and then click on the Updatebutton in the toolbar. Joomla! will now download and install the update.
If Joomla! cannot download the package, please use one of the manual update methods described below. If,however you get an error about copying files, folder not found or a cryptic "-1" error please follow our installationtroubleshooting instructions [https://www.akeeba.com/documentation/troubleshooter/abinstallation.html].
If you get a white page while installing the update please try either the Built-in method (described above) or themanual update method (described below).
Updating manuallyAs noted in the installation section, installing and updating Admin Tools is actually the same thing. If the automaticupdate using Joomla!'s extensions update feature does not work, please install the update manually following theinstructions in the installation section of this documentation.
Important
When installing an update manually you MUST NOT uninstall your existing version of Admin Tools.Uninstalling Admin Tools will always remove all your settings. You do not want that to happen!
Sometimes Joomla! may forget to copy some files when updating extensions. If you find Admin Tools suddenlynot working or if you get a warning that your installation is corrupt you need to download the latest version's ZIPfile and install it twice on your site, without uninstalling it before or in-between these installations. This will mostcertainly fix this issue.
If the error occurs again after a while, without you updating our software, please contact your host. Somehosts will delete or rename files automatically and without any confirmation as part of a (broken and unfit for
9
Getting Started
purpose) "malware scanner / antivirus". Unfortunately, these scanners return a lot of false positives -innocent filesmistakenly marked as malicious- but rename / delete them nonetheless, breaking software installed on the server.If you are on such a host we very strongly recommend that you move to a decent host, run by people who actuallyknow what they are doing. It will be far less headache for you and would actually improve your site's security.
5.1. Troubleshooting the updateLike most Joomla extensions, our software relies on Joomla's built-in extensions updater. In simple terms, codewritten by the Joomla project, shipped with Joomla itself and running on your site is responsible for retrievinginformation about the latest available versions, determining whether an update is available, downloading the updatepackage and installing it on your site. Akeeba Ltd has no control over that code.
Despite this not being our code, we do understand that our clients do come across problems with updates and needour help. The way the Joomla built-in extensions updater is written makes it prone to some easily preventable,common errors. Its error reporting ranges from unhelpful to non-existent. In an effort to help you, we've compiledand condensed all the troubleshooting we've done for years on our sites and our clients' sites.
We do understand that the instructions in this section are convoluted and complicated. We are afraid that this isthe simplest form they can be reduced to. We'd like to assure you that they do not reflect on the quality of softwarewe can produce. These instructions are necessitated by and reflect the way Joomla itself works.
If you were using our software between 2009 and 2016 you might remember that we were using our own code,Akeeba Live Update, to find, download and install updates to our software. It was a much better solution and mucheasier to troubleshoot; it would tell you exactly what to fix and ask you to click a button to let it verify the fix.Unfortunately, the Joomla Extensions Directory (JED) made it impossible to use ouw own updater code, even asan alternative to the Joomla built-in extensions updater, in 2016. Doing otherwise is a violation of JED's terms ofservice and would result in all of our extensions being unlisted. That's why we are now using the Joomla built-inextensions updater even though we know it's nowhere near as good as what we used to have. Sorry, folks.
5.1.1. Addressing server issues
In some cases you will see that Joomla cannot retrieve the latest version information or update packagefor our software, reporting it cannot connect to cdn.akeeba.com (extensions released after August 2020) orcdn.akeebabackup.com (extensions released before August 2020). Related to that, Joomla may report thatit's unable to download the Professional edition's update package, saying it's unable to connect to our sitewww.akeeba.com (extensions released after August 2020) or www.akeebabackup.com (extensions released beforeAugust 2020). This can mean a few different things which all have to do with how your host is set up.
Our CND and our site are accessible over HTTPS and use a valid, signed TLS certificate. At the time of thiswriting the TLS certificates are issued by Let's Encrypt and Amazon Web Services. The TLS certificates usedfor HTTPS on our CDN and site use the recommended SHA-256 hashing algorithm and the servers only supportmodern versions of the TLS protocol (at the time of this writing it's TLS 1.2 and later). If your host has an out ofdate Certification Authority cache or compiled PHP against an old TLS library which does not support modernversions of TLS your site will be unable to connect to our servers.
If this is not the case, please be aware that some hosts run a proxy server or a firewall which can either preventor cache outgoing connections in front of their servers. Depending on how this is implemented it can cause twodistinct types of problems.
The first problem is that your site might be unable to connect to our CDN and our server to retrieve the latestversion information and the update package itself respectively. If this happens you need to ask your host to allowconnections to TCP/IP port 443 (HTTPS) for www.akeeba.com and cdn.akeeba.com. If they ask you for an IPaddress please ask them to resolve these domain names from their server. The latter is a Content Delivery network(CDN) with hundreds of servers, powered by Amazon CloudFront, meaning that its IP address depends on whereyou are accessing it from.
The second problem is that when Joomla tries to retrieve the latest version information or an update file fromour servers your host's proxy gets in the way and returns information it has cached. We explicitly ask for thatinformation not to be cached, using standard HTTP headers, but some hosts choose to ignore web standards and
10

Getting Started
do their own thing. Also worth noting is that your host should not interfering with HTTPS (encrypted) traffic, soall the more reason to be worried about their implementation in this case. Unfortunately, we have caught a fewhosts doing that over the years.
None of these issues can be addressed by you or us. You will need to contact your host about them. Before youassume any of these issues are in play and if you are using the Professional edition of our software please do checkthat your Download ID is valid first.
5.1.2. Check the validity of your Download ID
Note
The information in this section only applies to the Professional edition. If you are using the Core editionyou can skip over it.
If you are using the Professional version of our software we need to verify that you have an activesubscription that gives you access to downloads of the software you are trying to update. We do that bymeans of a Download ID which has the format 0123456789abcdef0123456789abcdef (Main Download ID) or12345:0123456789abcdef0123456789abcdef (Add-on Download ID). In and by itself the Download ID does notcarry any information about your subscription status. It is an identifier linked to your account on our site.
First, you need to check that you are using a valid Download ID. Do not assume that your Download ID is enteredat all, or that it is valid. This kind of false assumption accounts for half of the update issues we are asked to helpour clients with. Always check on our site. Log into our site and go to Add-on Download IDs from the top menu.Copy the Download ID and paste it to our extension's Options page in the Download ID box, under the Update tab.
If you had to enter or change the Download ID but Joomla was already reporting an updated version you needto follow the instructions in the Entering or changing your Download ID after an update is available section.Otherwise installing the update will NOT work at all due to the way Joomla caches update information in itsdatabase.
5.1.2.1. Check your subscription status
As noted above, the Download ID itself does not carry any information about whether you are allowed to downloadan update. This check is done on our server when it receives the Download ID along with Joomla's request todownload an update. The check performed is simple: do you have an active subscription which gives you accessto the software you are trying to download?
Do not assume that your subscription is active. It is possible that you missed an email warning you about thesubscription expiring and a manual action to renew it being required on your part. This may even happen whenyou have a recurring subscription if our reseller, Paddle, cannot automatically charge your credit card / PayPalaccount for any reason. Or you may have simply let your manually renewing subscription lapsed or canceled yourrecurring subscription.
Always log into our site and go to the My Subscriptions page to check your subscription status. If your subscriptionhas expired you can renew it. Once the payment is complete and accepted by our reseller you will be able todownload the updates within the next 20' or less (typically: within seconds).
5.1.2.2. Multiple Professional edition Akeeba extensions with differentDownload IDs
It's possible that you have more than one of our Professional extensions but you want to use different DownloadIDs for each one of them. For example, if each extension was bought by a different company working on your siteor if you are trying to migrate to a new user account on our site.
In this case you need to unpublish the following plugins on your site:
• Installer - Akeeba Backup Professional
• Installer - Akeeba Ticket System Professional
11
Getting Started
• Installer - Admin Tools Professional
Do remember to check the Download IDs for each and every of our extensions.
5.1.2.3. Entering or changing your Download ID after an update is available
If you had to enter or change a Download ID after Joomla finds an update for it you will need to jump through afew hoops. This happens because of the way Joomla caches update information and some design choices in theJoomla extensions updater which prevent it from working smoothly in this case.
Please follow all of the steps below in the exact order presented from a single browser tab without having anyother tabs or windows to your site open. Please follow all of the steps even if you think that something is redundantor repetitive; it's not and there is a reason we tell you to do it. We understand that the process outlined below isgruelling. Unfortunately it is necessary because of how Joomla itself works. This code is NOT under our control. Ifit was our code you wouldn't have to do anything at all; we know how to write software with better UX than this...
For Joomla 3:
1. Go to the backend of your site
2. Go to our software's main page e.g. click on Components and then on Akeeba Backup or Admin Tools orAkeeba Ticket System Professional depending on which of our software you have.
3. Click on Options in the top right corner. This opens Joomla's com_config component showing the settings forour software.
4. Clear your Download ID.
5. Click on Save & Close.
6. Click on Options in the top right corner again.
7. Enter your Download ID.
8. Click on Save & Close.
9. If you have more than one Professional version of our software installed repeat the process from the beginninguntil here for each one of: Akeeba Backup Professional, Admin Tools Professional, Akeeba Ticket SystemProfessional.
10.Go to Extensions, Manage, Update.
11.Click on Clear Cache.
12.Go to System, Clear Cache
13.From the dropdown select Administrator
14.Click on Clear All even if the list is empty. Joomla has a hidden query cache which screws up updates if youdon't clear it.
15.Go to Extensions, Manage, Update.
16.Click on Clear Cache again.
17.Click on Find Updates.
18.You should now be able to perform the updates to our software
For Joomla 4:
1. Go to the backend of your site.
2. Go to the System menu item, find the Update section and click on Update Sites.
12
Getting Started
3. Click on the update site for our software, e.g. Akeeba Backup Professional, Akeeba Ticket System Professionalor Admin Tools Professional depending on which of our software you have.
4. Enter your Download ID in the Download Key box.
5. Click on Save & Close.
6. If you have more than one Professional version of our software installed repeat the process from the beginninguntil here for each one of: Akeeba Backup Professional, Admin Tools Professional, Akeeba Ticket SystemProfessional.
7. Go to the System menu item, find the Update section and click on Extensions.
8. Click on Clear Cache.
9. Go to the System menu item, find the Maintenance area, click the Clear Cache link.
10.Click on the Delete All button even if the list is empty.
11.Go to the System menu item, find the Update area, click the Extensions link.
12.Click on the Clear Cache button in the toolbar again.
13.Click on the Find Update button.
14.You should now be able to perform the updates to our software
5.1.3. Updates are showing after installing the latest version
Sometimes you might see that Joomla reports that the version you have installed or even a previous version isavailable as an update. This can mean three things:
• Joomla's update cache is stuck. See the information on resetting Joomla's update cache.
• You have a server issue connecting to our CDN. See the information on addressing server issues.
• You have found a bug in Joomla's built-in extensions updater. You need to contact the Joomla! forum [https://forum.joomla.org]. Unfortunately there is nothing we can do about Joomla core bugs.
5.1.4. Updates not showing despite having an older version
Sometimes you may see that Joomla refuses to report the availability of a new version of our software. This canmean three things:
• The update site for our software is disabled. See the information on checking the update site.
• Joomla's update cache is stuck. See the information on resetting Joomla's update cache.
• You have a server issue connecting to our CDN. See the information on addressing server issues.
• You have found a bug in Joomla's built-in extensions updater. You need to contact the Joomla! forum [https://forum.joomla.org]. Unfortunately there is nothing we can do about Joomla core bugs.
5.1.4.1. Check the update site
First we are going to check if the Update Site is disabled. Go to the backend of your site. On Joomla 3 go to theExtensions, Manage, Update Sites menu item. On Joomla 4 go to the System menu item, find the Update areaand click on the Update Sites link.
On that page you will see a list of the update sites for the extensions you have installed on your site. If you seeour software in that list – you may have to search for it – make sure it's published, i.e. there's a green checkmarkin the Status column. If it's not already published publish it now. If you had to publish the Update Site you alsoneed to follow the instructions under Refresh the update cache for your updates to work.
13

Getting Started
If our software does not appear on that list you will need to click on Rebuild. Watch out! Using Rebuild removes allDownload IDs and Download Keys from all installed extensions on your site and will cause extension installationto fail. You will also need to follow the instructions under Check the validity of your Download ID for yourupdates to work.
5.1.4.2. Refresh the update cache
Joomla does not download the latest version information every time you ask it to tell you if there's a new versionavailable for an extension. This would be too slow and bog down the servers of the third party developers providingthis update information. Instead, it caches the updates for 1 to 24 hours (configurable), with the default being 6hours. In very rare cases this updates cache may get “stuck” beyond this time limit and needs to be manuallyrefreshed.
First try the normal way to get the update cache refreshed. Please follow all of the steps below in the exact orderpresented from a single browser tab without having any other tabs or windows to your site open. Please follow allof the steps even if you think that something is redundant; it's not and there is a reason we tell you to do it.
On Joomla 3:
1. Go to the backend of your site.
2. Go to the Extensions, Manage, Update menu item.
3. Click on the Clear Cache button in the toolbar.
4. Click on the Find Update button.
On Joomla 4:
1. Go to the backend of your site.
2. Go to the System menu item, find the Update area, click the Extensions link.
3. Click on the Clear Cache button in the toolbar.
4. Click on the Find Update button.
This will tell Joomla to get the up-to-date information about available versions for all extensions installed on yourcomputer. If you do not see anything changing to the better you have hit a rare issue which involves another Joomlacache that is invisible even to the Super Users: the Joomla database query cache. Please follow all of the stepsbelow in the exact order presented from a single browser tab without having any other tabs or windows to yoursite open. Please follow all of the steps even if you think that something is redundant or repetitive; it's not andthere is a reason we tell you to do it.
On Joomla 3:
1. Go to the backend of your site.
2. Go to the Extensions, Manage, Update menu item.
3. Click on the Clear Cache button in the toolbar.
4. Go to the System, Clear Cache menu item.
5. From the dropdown select Administrator.
6. Click on the Delete All button even if the list is empty.
7. Go to the Extensions, Manage, Update menu item.
8. Click on the Clear Cache button in the toolbar again.
9. Click on the Find Update button.
14
Getting Started
On Joomla 4:
1. Go to the backend of your site.
2. Go to the System menu item, find the Update area, click the Extensions link.
3. Click on the Clear Cache button in the toolbar.
4. Go to the System menu item, find the Maintenance area, click the Clear Cache link.
5. Click on the Delete All button even if the list is empty.
6. Go to the System menu item, find the Update area, click the Extensions link.
7. Click on the Clear Cache button in the toolbar again.
8. Click on the Find Update button.
If you still cannot retrieve updates for our software you need to check if you have a server issue. If that's not thecase you need to check the update site since it might have been automatically unpublished by Joomla.
5.1.5. Miscellaneous troubleshooting and information
5.1.5.1. The update fails to download
If you are trying to update a Professional edition please check your Download ID. Typically you will get an errormessage telling you that an error 403 or 500 was received when trying to download the update package. Whetheryou see that message or a generic download failure message depends on the version of Joomla you have installedon your site.
If this doesn't help you need to check if you have a server issue.
5.1.5.2. Updating with a third party service fails
Typically, third party site management services ask Joomla to provide the update information and install updateon your behalf. Therefore the troubleshooting information in this section would solve both in-site and remote (viaa service) extension updates.
If you can install an update by logging into your site's backend but NOT through a service you need to contactthe third party site management service and report this issue. Unfortunately we cannot help with it. Third partyservices DO NOT ask us for permissions to implement an updater for our software.
5.1.5.3. Manual update
As noted earlier in the documentation, a manual update is the same as installing the extension. Download the latestversion from our site and install it on your site without uninstalling our extension.
5.1.5.4. Update installation problems
If your update does download but fails to install try the manual update method (installing the new version on topof the old one). If that fails, too, you should follow the instructions on the installation troubleshooting section youcan read earlier in this documentation.
6. Entering your Download IDNote
If you are using Admin Tools Core, the free of charge edition of Admin Tools, you do not need to and mustnot enter a Download ID. The Download ID is only required for the for-a-fee Admin Tools Professionaledition.
15
Getting Started
Admin Tools Professional is the for-a-fee edition of Admin Tools with additional features. Downloading it,either for installation from scratch or as an update to an already installed but older version on your site, requiresconfirming that you have an active subscription which gives you access to Admin Tools Professional downloads.When you download the installation ZIP file from our site this means that you need to log in to our site first.However, when downloading updates through Joomla you really don't want to and usually cannot be asked tolog in to our site.
Using your Download IDs on your clients' sitesOur software license allows you to use your Download IDs on the sites of your clients. However, you must tellyour clients that:
• Downloads and support for the software covered by the Download ID is provided by you, not Akeeba Ltd.
• If they want to receive support and / or downloads directly from Akeeba Ltd they need to purchase a qualifyingsubscription on our site. In this case they do not qualify for the renewal discount.
• They are not allowed to use the Download ID on any other site or use the Download ID to download the softwarefor any reason other than updating or reinstalling the covered software on the same site the Download ID wasentered in. In other words, they cannot use the Download ID to install or update our software on any other site.
If you are no longer administering a site where you have entered a Download ID you must revoke or regeneratethat Download ID. You need to do the same if you believe that your Download ID is being used by third partiesin an unauthorized manner. Please note that unauthorized use of Download IDs could have consequences on yoursubscription with us.
Finding your Download IDDownload IDs come in two flavors, your main Download ID and Add-on Download IDs.
You can find your main Download ID in the My Subscriptions [https://www.akeeba.com/my-subscriptions.html]page of our site. We recommend using this Download ID only on your own site(s). This Download ID cannot berevoked, it can only be regenerated. If it's regenerated you will need to enter the new Download ID on all of yoursites which can be a significant hassle.
You can generate an unlimited number of Add-on Download IDs without additional charge in the Add-onDownload IDs [https://www.akeeba.com/download/add-on-dlid.html] page. Unlike the main Download ID youcan revoke (disable) any Add-on Download ID at any time. As long as you only use one Add-on Download IDper site revoking or regenerating it will not affect the other sites' ability to download and install updates.
Entering your Download ID on a newly installed copyof Admin ToolsIf you just installed Admin Tools on your site go to Components, Admin Tools. You will be shown a messageat the top of the page that you need to enter your Download ID. The message includes a link to a page on oursite where you can find and copy your main Download ID. After entering either your main Download ID (NOTrecommended) or an Add-on Download ID (recommended) click on the Apply button to save it.
If Admin Tools or Joomla! was already showing you that an update for Admin Tools is available please followthe steps under "Further steps if a download was available before entering a new Download ID" below.
Enter or view your Download ID on Joomla 3If your site is built on Joomla! 3 go to Components, Admin Tools and click on the Options button in the toolbar.
Click on the Live Update tab.
Enter your main or Add-on Download ID in the Download ID are and click on Save & Close on the toolbar.
16
Getting Started
If Admin Tools or Joomla! was already showing you that an update for Admin Tools is available please followthe steps under "Further steps if a download was available before entering a new Download ID" below.
Enter or view your Download ID on Joomla 4If your site is built on Joomla! 4 DO NOT use the Options method above. It will not work. Joomla! 4 providesa centralised download key management interface.
From the main administrator page of your site click on System on the sidebar.
Click on the Update Sites link towards the bottom of the middle column on the System page.
Find the Admin Tools Professional entry on the list and click on it to open the edit page.
Enter your main or Add-on Download ID in the Download Key area. Click on the Save & Close button on thetoolbar to apply the Download ID.
If Admin Tools or Joomla! was already showing you that an update for Admin Tools is available please followthe steps under "Further steps if a download was available before entering a new Download ID" below.
Further steps if a download was available beforeentering a new Download IDJoomla applies the Download ID when it is looking for updates, not when it tries to download updates. This isa weird implementation detail that dates back to design decisions made before Joomla 1.6 was released, back in2009. Unfortunately, this means that entering a new Download ID after Joomla shows that updates are availabledoes NOT apply the new Download ID immediately and causes updates to fail. You need to follow all of the stepsoutlined below, in this specific order, without doing anything else on your site's administrator area in between tolet Joomla see the new Download ID. Please do not file support tickets or bug reports about this with us; extensionupdates are managed by Joomla core code and we have no influence over it.
• Go to Joomla's extension update page.
On Joomla 3: From the top menu of your Joomla! administrator click on Extensions, Manager. From that pageclick on the Update tab found in the left-hand sidebar.
On Joomla 4: From the sidebar of your Joomla! administrator click on System. On the new page find the Updatearea towards the bottom of the middle column and click the Extensions link.
• Click on the Clear Cache button in the toolbar.
• Next up, we need to clear the Joomla administrator cache. This is required because Joomla caches the databasequeries which retrieve the Download ID in its administrator cache. If you do not clear the cache it won't seethe new Download ID.
On Joomla 3: From the top menu of your Joomla administrator click on System, Clear Cache. In the drop-downmenu above the list choose Administrator (by default the other option, Site, is selected). Click on Delete Allin the toolbar.
On Joomla 4: From the sidebar of your Joomla! administrator click on System. On the new page find theMaintenance area towards the top of the left column and click the Clear Cache link. Unfortunately, Joomla 4makes it impossible to easily select just the administrator cache so we'll be deleting all cached content. Clickon Delete All in the toolbar.
• Go back to to Joomla's extension update page.
On Joomla 3: From the top menu of your Joomla! administrator click on Extensions, Manager. From that pageclick on the Update tab found in the left-hand sidebar.
17
Getting Started
On Joomla 4: From the sidebar of your Joomla! administrator click on System. On the new page find the Updatearea towards the bottom of the middle column and click the Extensions link.
• Click on the Clear Cache button in the toolbar again, even if you don't see any update items. The page shouldbe empty. If it's not empty repeat all of these instructions from the beginning. Sometimes Joomla does not clearthe cache when you tell it to so you need to do this entire weird dance all over again. Sorry, it's not somethingthat has to do with us, it's a core Joomla code issue.
• Click on the Find Updates button in the toolbar again.
• You should now see the update to our software and be able to install it.
Troubleshooting updates to the Professional releaseIf you still cannot install our software please check that the Download ID is entered correctly. If it's not enteredcorrectly enter the correct Download ID and follow all of these instructions again.
If the Download ID is entered correctly but it's not active in the Add-on Download IDs page you will need toenable it. After enabling it you will be able to download and install the update without having to follow theseinstructions again.
If the Download ID is correct please make sure that you have an active qualifying subscription on our site. Ifyour subscription has expired you need to purchase a renewal on our site. Once the renewal is active you will beable to download and install the update without having to follow these instructions again, as long as you have notchanged your Download ID.
If you still cannot download updates despite having the correct Download ID and an active subscription try waitingfor 24 to 48 hours. In very rare cases Joomla's update cache gets stuck despite following the instructions aboveand you just need to wait until Joomla decides it has to reload it.
If the updates are still not downloading please make sure that you are using a version of Joomla and PHP that issupported by the new version of our software. If you are not sure please consult our Compatibility page [https://www.akeeba.com/compatibility.html].
If you've followed all these troubleshooting steps and the update is not downloading at all you need to contact yourhost and ask them to allow traffic to www.akeeba.com and cdn.akeeba.com over port TCP 443 (HTTPS), makesure that the PHP cURL module is installed and activated on the version of PHP your site is using and that finallythe libcurl and libssl system libraries the cURL module is compiled against are up-to-date versions. If your hostcannot help you with any of these requests (despite this being literally what you are paying them to do) you caninstall updates manually. Kindly note that Akeeba Ltd is not responsible for your hosting environment and thatthe requirements for downloading updates from our site are met by server software released roughly 5 years ago.If your host cannot provide 5 year old software and open ports in their firewall you should probably be migratingyour site to a more up-to-date, competent host.
7. Requesting support and reporting bugsSupport can be provided only to subscribers and only through our site's Support section. If you already have anactive subscription which gives you access to the support for Admin Tools you can request support for it throughour site. You will need to log in to our site and go to Support, Admin Tools and click on the New Ticket button.If you can't see the button please make sure you have an active subscription that gives you access to Admin Toolssupport. If you do and still don't see the button please use the Contact Us page to let us know of the ticket systemproblem and remember to tell us your username.
If you want to report a bug, please use the Contact Us page of our site. You don't need to be a subscriber to report abug. Please note that unsolicited support requests sent through the Contact Us page will not be addressed. An issueis not a bug unless it can be reliably reproduced on multiple sites. Please make sure you include clear instructionson reproducing the issue. If the issue cannot be reproduced it's not a bug report, it's a support request.
18

Getting Started
Important
Support cannot be provided over Twitter, Facebook, email, Skype, telephone, the official Joomla! forum,our Contact Us page or any other method except the Support section on our site. We also cannot take bugreports over any other medium except the Contact Us page and the Support section on our site. Supportis not provided to non-subscribers; if you are using the Core version you can request support from otherusers in the official Joomla! forum or any other Joomla!-related forum in your country/region. We haveto impose those restrictions in support to ensure a high level of service and quality. Thank you for yourunderstanding.
8. Uninstalling Admin ToolsAdmin Tools can be uninstalled just like any other Joomla extension.
Warning
Uninstalling Admin Tools will delete your settings and any logged blocked requests. This process isIRREVERSIBLE. If you lose your settings by uninstalling Admin Tools we cannot help you retrievethem, they are gone forever.
Uninstalling Admin Tools will NOT remove any .htaccess, web.config or nginx.conf you have createdwith the respective .htaccess Maker, web.config Maker or Nginx Conf Maker feature. It will also notremote any .htaccess and .htpasswd files created with the Password Protect Administrator Directoryfeature. It will not change the permissions of files and folders you have applied or undo any changes youmade to your Temp and Logs folders using Admin Tools. These are things that can be modified externallyto Admin Tools after any changes you've applied using Admin Tools itself. Therefore we are not rollingback these changes out of an abundance of caution and to prevent your sites becoming broken.
First, go the extensions manager page.
• Joomla 3: From the top menu of your Joomla! administrator click on Extensions, Manage. From the left-handsidebar choose Manage.
• Joomla 4: From the sidebar of your Joomla! administrator click on System. On the new page find the Managearea towards the top of the middle column and click the Extensions link.
In the Search box type Admin Tools package. It will show you a single item called "Admin Tools package" whoseType is Package.
Important
Only ever try to uninstall the Package type extension. DO NOT try to uninstall the component, its pluginsor module individually. It will leave stuff behind.
Select the item's checkbox and click on the Uninstall button in the toolbar. The extension and all its dependencieswill be automatically uninstalled.
Information about FOFAll of our software, as well as some third party software, installs our FOF framework version 3 or 4. This isautomatically removed when the last extension to use it is being uninstalled.
Please DO NOT try to uninstall the file_fof30 or file_fof40 File type extension manually. Joomla will let you dothat even when it's not safe, meaning that your site may become inaccessible.
Furthermore, please note that Joomla 3 (but NOT Joomla 4) comes with a similarly named FOF extension of theLibrary type installed. This is an ancient (last updated April 2015), no longer supported version (2.4.3) of our FOFframework that's bundled with Joomla itself. It is NOT part of Akeeba software. Moreover, it cannot be uninstalled- it's a protected extension. Please do not ask us for assistance about this extension, it's part of Joomla itself.
19
Getting Started
Finally, if you had a really old version of our software installed you might find an extension named F0F (ef zeroef). That was an updated version of FOF 2.x, named in a way that does not conflict with Joomla's copy of FOF 2(it's complicated...). We have not used this framework since mid-2015 so you should be able to safely remove itas long as no third party extension still uses it. Since it's been so many years since we last updated it or used it inour software we will no longer answer inquiries about it. Thank you for your understanding.
9. Quick SetupImportant
This section applies only to Admin Tools Professional and refers only to its security features
Tip
You can quickly apply all of the following settings by using the Quick Setup Wizard page of AdminTools. A prominent link to that page will appear at the top of your site's administrator section (as astandard Joomla! error message) until you run the wizard or manually configure Admin Tools throughthe Configure WAF and .htaccess Maker / NginX Conf Maker / web.config Maker pages or import aconfiguration from the Import Settings page.
If you have already configured Admin Tools you will NOT see the Quick Setup Wizard button any more.
While the Quick Setup documentation section and the Quick Setup Wizard feature will help you to getstarted with basic protection for your site it is very strongly advisable that you read the documentation inits entirety. It will help you understand the different ways Admin Tools protects your site and the impacteach option may have to your site's operation.
Warning
If you have already configured Admin Tools and wish to change its configuration you are NOT supposedto use the Quick Setup Wizard. In fact, this is not supported and will provide no support if you chooseto do that. Instead go to Admin Tools, Web Application Firewall, Configure WAF to configure theJoomla! system plugin protection settings or Admin Tools and .htaccess Maker (or Nginx Conf Maker;or web.config Maker depending on your web server) to configure the server-level protection settings.
The fundamental functionality of Admin Tools Professional is to allow you to secure your site. However, settingup your site's security does require some tweaking, as each site is has different structure and needs than the next.When you first install Admin Tools Professional you may feel a bit overwhelmed by the abundance of securityoptions. Well, the good news is that setting it up is not even half as hard as it looks! In this tutorial we will gothrough the basic security configuration and point you to what you want to do next.
Go to the back-end of your site and click on Components, Admin Tools, Web Application Firewall, ConfigureWAF and set the following optional settings:
1. Administrator secret URL parameter If you enter "foobar" (without the quotes) in here, then you mustaccess your site's backend as http://www.example.com/administrator?foobar i.e. append aquestionmark and the secret word. If you skip the ?foobar part, you can't even see the login page. If you do notwant to enable this feature please delete its contents and leave this field blank.
Important notes: This field will contain either your existing Administrator secret URL parameter (if you havealready configured one) or a new, random one if there is no Administrator secret URL parameter already set upon your site. Do keep in mind that if you have disabled the Administrator secret URL parameter and you runthe Quick Setup Wizard again (NOT RECOMMENDED AND NOT SUPPORTED!) a NEW, COMPLETELYRANDOM value will be shown in this field.
2. Enter your email address in Email this address on successful back-end login and Email this address on failedback-end login. Admin Tools will be sending you an email whenever anyone tries to log in to your site's back-end as a Super Administrator. The minute you receive an email which wasn't triggered by a trusted person, you
20

Getting Started
know you have to get your site off-line a.s.a.p. Do note that this is a very useful feature! It will send you anemail even in the unlikely case that someone, for example, hacks your Wi-Fi, steals your login cookie and thenuses your own Wi-Fi connection and login cookie to log in to your site.
3. Set Hide/customise generator meta tag to Yes and enter something obscure in the Generator tag. I usuallyjokingly set "Drumlapress" in there, mudding the waters as to which CMS I'm really using. Be creative! This isa low-priority thing to do, but stops "dork scanning" attacks. What I mean is that normally Joomla! spits out itsname in the (hidden) generator meta tag on every HTML page on your site. An attacker looks for "dorks" (sitesto exploit) by searching for "Joomla! 1.5" on Google. This feature removes that generator tag and you're notsusceptible to this kind of attack.
4. Optional but highly recommended, go to http://www.projecthoneypot.org/httpbl_configure.php and openyourself a Project Honeypot account. After your registration, visit that URL again and you'll see somethingcalled "HTTP:BL key". Copy it and paste it into Admin Tools' Project Honeypot HTTP:BL Key field. Alsoset Enable HTTP:BL filtering to Yes. Why? Project Honeypot analyses data from a vast number of sites andpositively identifies IPs currently used by hackers and spammers. This Admin Tools feature integrates withProject Honeypot, examining your visitors' IP addresses. If they are in the black list (known hacker or spammer)they will be blocked from accessing Joomla!.
5. Optional, but highly recommended, enable the IP blocking of repeat offenders. This feature blocks IPs gettingrepeatedly their requests blocked, i.e. we have strong reasons to suspect they are hackers. Please note thatyou may not want to enable this feature until you are sure everything is working smoothly, so that you don'taccidentally block yourself out of your site. If that does happen, please take a look at https://www.akeeba.com/documentation/troubleshooter/atwafissues.html
If you are using the Apache web server another thing to do is to go to Components, Admin Tools, .htaccess Makerand click on Save and Create .htaccess. If you get a blank page or 500 Internal Server Error on your site, use yourFTP client to delete the .htaccess file (if it's not visible, just upload an empty text file named .htaccess),go back to .htaccess Maker, try disabling some option and repeat the whole process until your site loads correctly.For more information, take a look at https://www.akeeba.com/documentation/troubleshooter/athtaccess500.html
If you are using the NginX web server you should go to to Components, Admin Tools, NginX Configuration Makerand follow the instructions on the page to create a security and performance optimised site configuration file.
If you are using the Microsoft IIS web server you should go to to Components, Admin Tools, web.config Maker andfollow the instructions on the page to create a security and performance optimised site configuration (web.config)file.
After applying all of the above protections, it is very likely that some of your site's functionality is no longerworking. This is normal. The default settings are very restrictive by design. On each page with a problem,first try applying the step by step process outlined in https://www.akeeba.com/documentation/troubleshooter/athtaccessexceptions.html
If you get stuck somewhere, feel free to file a support ticket (if you are a subscriber). We are here to help!
21
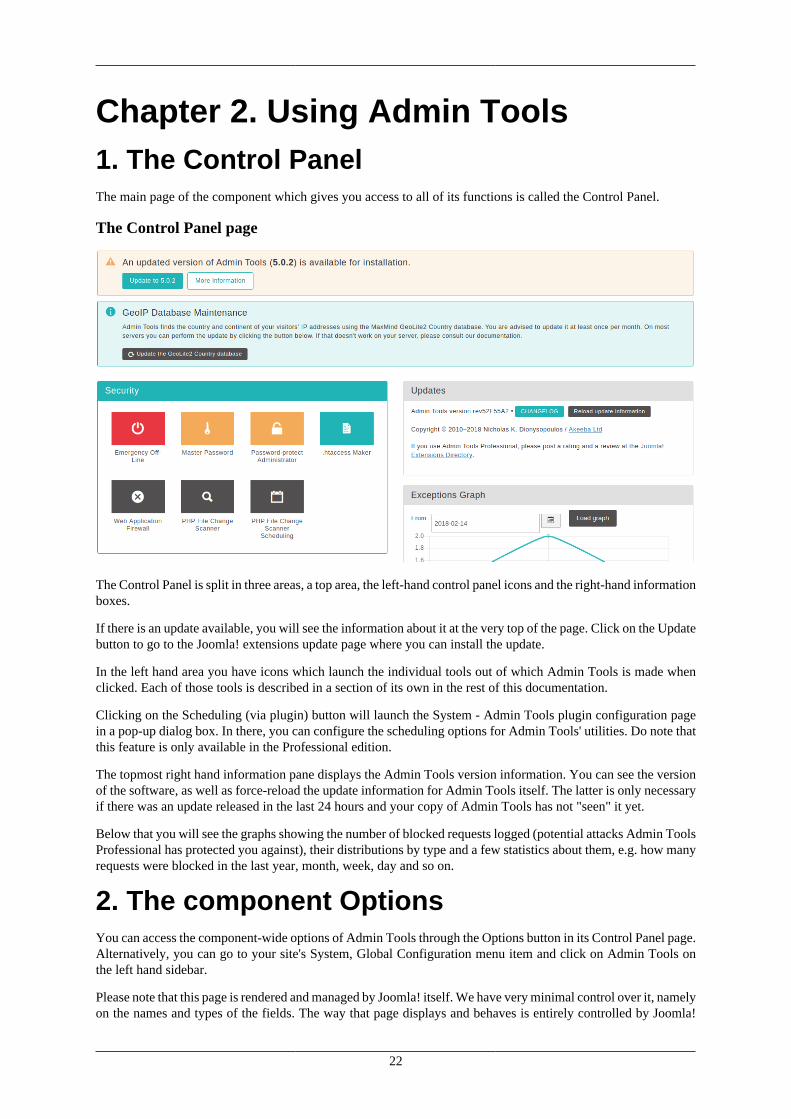
Chapter 2. Using Admin Tools1. The Control PanelThe main page of the component which gives you access to all of its functions is called the Control Panel.
The Control Panel page
The Control Panel is split in three areas, a top area, the left-hand control panel icons and the right-hand informationboxes.
If there is an update available, you will see the information about it at the very top of the page. Click on the Updatebutton to go to the Joomla! extensions update page where you can install the update.
In the left hand area you have icons which launch the individual tools out of which Admin Tools is made whenclicked. Each of those tools is described in a section of its own in the rest of this documentation.
Clicking on the Scheduling (via plugin) button will launch the System - Admin Tools plugin configuration pagein a pop-up dialog box. In there, you can configure the scheduling options for Admin Tools' utilities. Do note thatthis feature is only available in the Professional edition.
The topmost right hand information pane displays the Admin Tools version information. You can see the versionof the software, as well as force-reload the update information for Admin Tools itself. The latter is only necessaryif there was an update released in the last 24 hours and your copy of Admin Tools has not "seen" it yet.
Below that you will see the graphs showing the number of blocked requests logged (potential attacks Admin ToolsProfessional has protected you against), their distributions by type and a few statistics about them, e.g. how manyrequests were blocked in the last year, month, week, day and so on.
2. The component OptionsYou can access the component-wide options of Admin Tools through the Options button in its Control Panel page.Alternatively, you can go to your site's System, Global Configuration menu item and click on Admin Tools onthe left hand sidebar.
Please note that this page is rendered and managed by Joomla! itself. We have very minimal control over it, namelyon the names and types of the fields. The way that page displays and behaves is entirely controlled by Joomla!
22
Using Admin Tools
and your backend template. If you have observed a display or behavior issue the chances are we cannot help yousince we cannot (and must not!) modify core Joomla! code. Such bugs should be reported to Joomla! instead.
The page has several tabs, documented below.
File Scanner
Configure how the PHP File Change Scanner works . This option only makes sense in the Professional editionwhich has the PHP File Change Scanner feature.
Log Level The detail of the log file kept while scanning your site. Set to Warnings on production sites,Debug when you need to file a support request. The log file is saved in your site's logs folder,as configured in Joomla's Global Configuration.
MinimumRequest Time
The minimum amount of time each request to the PHP File Change Scanner will take. Increasethis if your server throws an error because requests are coming in too frequent or you otherwisehit CPU / resource limits.
The minimum request time is mostly useful in the case of steps (bursts of PHP File ChangeScanner activity) cut short. This can happen, for example, before scanning very big .php filesand while listing the contents of directories with more than a hundred files. In these casesthe work on the step may be cut off less than 0.1 seconds into the step in some cases. Thedifference between the time elapse and the minimum request time will be used as idle time,reducing the rate in which requests to the PHP File Change Scanner hit your server. Thisis useful in preventing AJAX Error messages on servers which apply request limiting (mostshared hosting environments).
Recommended values are 2.0 to 7.0. Some high-end servers may be able to use a value of0.0 which makes scanning faster.
Maximum WorkTime
The maximum amount of time consumed scanning your site in each request to the PHP FileChange Scanner. The difference between the maximum work time and the minimum requesttime is idle time. Therefore setting this value lower than the minimum request time will createan idle period where the PHP File Change Scanner does nothing, therefore reducing CPU /resource usage and spacing out the requests to the server.
Recommended values are 3.0 to 7.0.
Work Time Bias A value between 50 and 100 which affects how aggressively the PHP File Change Scannerwill predict if it's about to hit the Maximum Work Time limit. 50 is most aggressive and willresult in scanning taking about half of Maximum Work Time in most requests to the PHP FileChange Scanner. 100 is the least aggressive but in this case the PHP File Change Scannermight overshoot the Maximum Work Time.
Recommended value: 75
You can use the combination of the minimum / maximum / bias values to work around AJAXError messages. Here are some useful combinations:
Min 0.0 / Max 10.0 / Bias 80. Very fast scanning on beefy servers without resource limitations.Scanning is mostly split in 8 to 10 second steps (bursts of activity). There is no waiting timebetween successive steps. Recommended for dedicated servers.
Min 2.0 / Max 5.0 / Bias 75. The default settings, medium scanning speed. Scanning is splitin roughly 3 to 5 seconds steps. Successive steps will be spaced at least 2 seconds apart.Recommended for most users.
Min 7.0 / Max 5.0 / Bias 50. Slow scanning speed. Scanning is split in 2.5 to 5 second stepsfollowed by 2 to 4.5 seconds idle time to reduce CPU and resource usage per steps. Successive
23

Using Admin Tools
steps will be spaced at least 7 seconds apart. Recommended if you get AJAX Error messagesevery time you try to scan your site.
Min 7.0 / Max 2.0 / Bias 50. Glacial scanning speed. Scanning is split in 1 to 2 second stepsfollowed by 5 to 6 seconds idle time to reduce CPU and resource usage per steps. Successivesteps will be spaced at least 7 seconds apart. Only recommended if the 7/5/50 settings stillresult in AJAX Error messages.
Max. number ofFolders per batch
The maximum number of folders to list in a directory at once. If the PHP File Change Scannerdetects more than this number of folders it will immediately stop the work, regardless of theMaximum Work Time, and enter into idle mode until the Minimum Request Time is reached.This prevents PHP timing out when listing the contents of massive folders, with hundreds offolders contained directly inside them.
Please note that the time to list the contents of a folder is exponentially proportional to thenumber of files and folders contained in them -- in computer speak, it's O(N^2). In simpleterms, listing the contents of a folder with 1000 contained folders and files will take 100 timeslonger than doing so for a folder with 100 contained folders and files. This is a limitationof how Operating Sytems and their filesystem drivers work. It's nothing us, Joomla or PHPitself can do about. You are strongly advised to exclude massive folders and take steps toprevent having folders with thousands of directly contained files and folders. It's best to nestyour folders deeply.
Max. number ofFile per batch
Similar to the previous setting, but applies to contained files instead of folders.
Excluded folders Folders to exclude from the scan. One item per line. Wildcard characters (like ? and *) areNOT allowed.
Give the folder names relative to your site's root folder. For example, enter administrator/components/com_example. Do not enter something like /var/www/mysite/administrator/components/com_example.
Excluded files PHP files to exclude from the scan. One item per line. Wildcard characters (like ? and *) areNOT allowed.
Give the file names relative to your site's root folder. For example, enter administrator/components/com_example/foo.php. Do not enter something like /var/www/mysite/administrator/components/com_example/foo.php.
Extensions toscan
Comma-separated list of file extensions to scan. Do not include the leading dot. Please onlyenter extensions of text files containing PHP code; any other file types will most likely resultin false positives.
Default setting: php, phps, phtml, php3, inc
Large filethreshold
The PHP File Change Scanner will immediately stop work right before scanning file whichare at least this many bytes big. This prevents an accidental PHP timeout when scanning reallybig files at the tail end of the allotted Maximum Work Time.
Recommended value: 525288 (that's 512KB expressed in bytes)
Calculate diffswhen scanning
When this option is enabled, Admin Tools will calculate a "diff" for each modified filedetected by the PHP File Scanner feature. The "diff" is a compact summary of the differencesbetween the original and the current file. In order for this to be possible, Admin Tools has tokeep a copy of each and every .php file on your site inside the database. Be advised that thisconsumes a lot of database space, about 20M for a relatively low to medium complexity site.
This option is generally discouraged unless you are trying to figure out why a particular setof files keeps changing all the time.
24
Using Admin Tools
Do not reportfiles with a zeroThreat Score
STRONGLY NOT RECOMMENDED. When this option is enabled any new or modifiedfile with a zero threat score will not be reported.
We do not recommend turning on this option. It does not make the scan faster, it does notreduce the database storage significantly but it does have an impact on the security threatswhich will be reported. It is conceivable that a malicious file may have a zero threat scoreif its payload is written in a very sneaky way which makes it look like a legitimate, if a bitmessy and naively coded, file. This kind of underhanded hacks will not be reported when thisoption is enabled. When this option is disabled they WILL be reported. A human operator mayquickly spot a file that shouldn't have changed / be created at all and get rightfully alarmed.Therefore we recommend that you never enable this option. Its only reason of existence isdebugging and troubleshooting conducted by the developers of Admin Tools.
Oversize filethreshold
Files over this size in bytes will not have their Threat Score evaluated. The will still be reportedas New or Changed if applicable, but their threat score will be zero.
The idea is that legitimate .php files containing executable code are rarely if ever bigger thanone or two Megabytes. Files bigger than that are typically log files with a .php extension anda die statement on top to make them inaccessible over the web. Scanning this kind of non-executable files can result in scan failures or false positives. It's best to report them with a zerothreat score instead. Better yet, try to exclude log files with .php extension in the ExcludedFiles setting above.
Recommended value: 5242880 (that 5MB in bytes).
Send results tothis email
When you make a scan from the site's frontend or through the CLI script the scan resultswill be automatically sent to this email address. If you leave it blank no email will be sentin this case.
Email only onactionable items
When enabled (default) the PHP File Change Scanner will send you an email with thescan results summary only when actionable items (added, modified or suspicious files) aredetected. If nothing has changed you will get no email. Please remember that being sent anemail requires setting up the Send results to this email option above.
BackendOptions which define how the backend of the component works.
Show graphs andstatistics
Display graphs and statistics about blocked requests (Professional release only). This is usefulvisualisation to see the rate at which your site is being attacked. Lack of attacks does not meanthat your site is at risk! Quite the contrary, it means that at this time period hackers have notbeen trying to attack your site.
Long ConfigureWAF page
When this option is disabled (default) the Configure WAF page will be shown using tabs.When this option is enabled the Configure WAF page will be shown in the old format: onelong page. We generally recommend the tabbed version as it's easier to manage.
Automaticallyreorder the plugin
The System - Admin Tools plugin needs to be ordered as the first published plugin to workcorrectly. When you visit Admin Tools in the backend the plugin is automatically reorderedto be the first one. In some rare cases other plugins need to be published first, for examplealternative mail handlers such as CMandrill. In this case set this option to No.
WARNING! If you set this option to No it's up to you to reorder the plugin. If a vulnerableplugin is published before the System - Admin Tools plugin your site can be hacked. AdminTools will be unable to protect you in this case since it will not be running before thevulnerable code, therefore unable to detect the attack. Do not set this option to No unless youare absolutely sure you understand the risks.
Warn aboutmanual edits
When this is enabled Admin Tools will check whether a file generated by .htaccess Maker,Nginx Conf Maker or web.config Maker has been modified outside of Admin Tools whenever
25

Using Admin Tools
on serverconfigurationfiles
you visit Admin Tools' main page in the backend of your site. This is done by comparing thechecksum of the file with the one stored in your site's database when the file was generated.If the two checksums are different you will be asked whether you want to regenerate the fileor ignore any such changes. The latter option changes this setting, "Warn about manual editson server configuration files", to No.
We strongly recommend NOT changing generated files by hand. Instead, put any custom codein the provided areas for putting custom directives at the top or bottom of the file. In any othercases your manual changes will be overwritten every time you use Admin Tools' .htaccessMaker, Nginx Conf Maker or web.config Maker on your site.
FrontendThis allows you to schedule the PHP File Change Scanner by accessing a special frontend URL.
Enable frontendscheduling
When enabled it allows you to the PHP File Change Scanner without logging in to thebackend. This option is NOT required for using the CLI script.
Secret Word Required to authorize a remote PHP File Change Scanner execution. Also protects that featureagainst Denial of Service attacks by requiring you to pass this secret word in the front-endPHP File Change Scanner URL.
Please note that if you use any character other than a-z, A-Z and 0-9 you MUST NOT use thesecret word verbatim in the front-end URL. Instead, you have to URL-encode it. The PHP FileChange Scanner Scheduling page does that automatically for you. Just go to Components,Admin Tools, click PHP File Change Scanner Scheduling, scroll all the way down and useone of the tabs to get the URL or command line you need to use with the secret word properlyencoded in the URL.
For security reasons, you must use a complex enough secret word. Admin Tools enforcesthat by disabling the front-end scanner feature if you are using a Secret Word with a lowcomplexity. We strongly recommend using a "secret word" consisting of at least 16 random,mixed case alphanumeric characters. It should not be a dictionary word or based off adictionary word. One good resource for truly random secret words is Random.org's passwordgenerator [https://www.random.org/passwords/?num=1&len=24&format=html&rnd=new].
Note
Why is this field not a password field? The Secret word is transmitted in the clearwhen you load the page and is also visible when you view the source of the pageor right click on the field and choose Inspect Element. In other words, as long assomeone has access to the component configuration page they can trivially find outthe secret word. Not to mention that the secret work is also plainly visible in the PHPFile Change Scanner Scheduling page. Always use HTTPS with a commerciallysigned SSL certificate when configuring or scanning your site.
Timezone foremails
All dates and times in the emails sent by Admin Tools to warn you about potential securityissues will be expressed in the selected timezone. use the option Server Timezone to let AdminTools use the Server Timezone setting in your site's System, Global Configuration page.
Default: GMT
UpdatesConfigure how updates to the component work
Download ID If and only if you are using the Professional release you have to specify your DownloadID for the live update feature to work properly. You can get your Download ID by visiting
26
Using Admin Tools
www.akeeba.com and clicking My Subscriptions. Your Download ID is printed below the listof subscriptions. Filling in this field is required so that only users with a valid Professionalsubscription can download update packages, just as you'd expect from any commercialsoftware.
Note
Users of Admin Tools Core do not need to supply this information.
Enableanonymous PHP,MySQL andJoomla! versionreporting
Help us improve our software by anonymously and automatically reporting your PHP,MySQL and Joomla! versions. This information will help us decide which versions ofJoomla!, PHP and MySQL to support in future versions.
Note: we do NOT collect your site name, IP address or any other directly or indirectly uniqueidentifying information.
Permissions
This is the standard Joomla! ACL permissions setup tab. Admin Tools fully supports supports Joomla! ACLs.
3. Fixing the permissions of files anddirectoriesAs any web site administrator knows, file and directories permissions are the first gatekeeper on the way to havinga site hacked. Having 0777 permissions lying around is a big mistake and could prove fatal to your site. For moreinformation, read my blog post [http://www.dionysopoulos.me/blog/777-the-number-of-the-beast]. Ideally, youshould only have 0755 permissions for your directories and 0644 for your files.
On other occasions, we have all run across a misconfigured server which gives newly created files and directoriesimpractical permissions, like 0600. This has the immediate effect that newly uploaded or created files are notaccessible from the web. Fixing those permissions is a tedious process, hunting down the files with FTP andchanging their permissions manually. Ever so often this becomes so tedious that we are tempted to just give 0777permissions to everything and get done with it. Big, fatal mistake.
The solution to those permissions problems is the Fix permissions tool of Admin Tools. Its mission is as simpleas it gets: it will give all your directories 0755 permissions and all of your files 0644 permissions. Obviously, thisonly has effect on Linux, Mac OS X, Solaris and other hosts based of UNIX-derivative Operating Systems, i.e.everything except servers running on Windows. If you are on a shared host you will most likely want to enableJoomla!'s FTP layer in your site's Global Configuration. Admin Tools will detect that and when it runs across afile or directory whose permissions can't be changed by PHP will use FTP to perform this task.
Note
You can customize the permissions per folder and file using the Permissions Configuration page.
Warning
It is possible that —if you select the wrong kind of permissions in the Permissions Configuration page—you will be locked out of your site and will not be able to access it over FTP or your hosting panel's filemanager. If this happens, please contact your host and ask them to fix the permissions of your site.
When you click on the Fix Permissions tool you are going to see the "Fixing Permissions..." pop-up window witha progress bar filling up as Admin Tools is changing the permissions of all your directories and files.
27

Using Admin Tools
Fixing permissions
When it's over the progress bar will fill up and the title of the page changes to "Finished fixing permissions":
Finishing fixing permissions
Just click on the Back button to return the the Control Panel page.
No permissions have been changed on my site. Why?It's a matter of ownership. If you are on a host which doesn't use suPHP, your files and directories are owned by adifferent user than the one the web server is running under. All you have to do is go to the Global Configurationpage of your site, enter your FTP details and enable Joomla!'s FTP option. Admin Tools will pick it up next timeyou try to fix permissions and automatically use the FTP mode whenever it can't change permissions directly.
I can see a lot of JFTP error messages in redbackground during that process. What's wrong?Admin Tools, as explained in the above paragraph, tries to use the FTP mode whenever it can't change thepermissions directly. In order for this trick to work, your FTP server must support the CHMOD command. Not all
28

Using Admin Tools
servers do, though, especially those running on Windows where there is no notion of permissions. If you get thislong list of JFTP Bad Response messages, please ask your host whether their FTP server supports the CHMODcommand.
Finally, some hosts place directories inside your web root which are not meant to be directly accessible to you, i.e.a cgi-bin or a stats directory. You can't change the permissions of those directories due to their ownership(they are usually owned by a reserved system user or the root user) and will cause a few JFTP error messages tobe spat out. This is normal and you shouldn't worry about that.
3.1. Configuring the permissions of files anddirectoriesBy default, Admin Tools will apply 0755 permissions to all of your directories and 0644 permissions to all of yourfiles. However, this isn't always desirable. Sometimes you want to make configuration files read-only (0400 orsimilar permissions) or give a directory wide-open (0777) permissions. While this is not recommended, it may bethe only option on some shared hosts for several extensions to work. Most notably, some extensions need to beable to append to files —e.g. Akeeba Backup needs to append to its log and backup archives— which is impossibleto do over FTP and, therefore, requires wider permissions. Since Admin Tools 1.0.b1 you can do that using thePermissions Configuration button in the component's control panel.
Configuring the permissions
When you launch this feature you see a page split in three sections.
The top section, titled Default permissions, allows you to configure the permissions which will be applied ifnothing different is configured. Use the drop-down lists to select the default permissions for directories and files(the default setting is 755 and 644 respectively), then use the Save default permissions button to apply the setting.
The middle section shows the path to the currently selected directory and allows you to quickly navigate throughthe folders by clicking on their names.
The bottom section is split in two panes, Folders and Files. Each pane lists the folders and files inside the currentdirectory. Clicking on the name of a folder will navigate inside that folder. There are three columns next to eachfolder. The first displays the current owner (user:group format). The second displays the current permissions ofthat directory in the file system. The final column contains is a drop down list. The default setting, represented bydashes, means that there is no specific preference for this folder/file and the default permissions will be appliedto it. If you select a customized permissions setting remember to click the Save custom permissions button beforenavigating to another folder or returning to the control page, otherwise your settings will be lost.
Important
None of these customized permission settings are applied immediately. You will need to launch the FixPermissions feature for them to be applied. Click on the Back button to return to the Control Panel pagewhere you can find this button.
Alternatively, you can click on the Fix and Apply Permissions button to immediately save and apply all custompermissions you see on this page. If you don't see the permission changing, please take a look at the previoussection of this user's guide for more information on what you have to do.
29
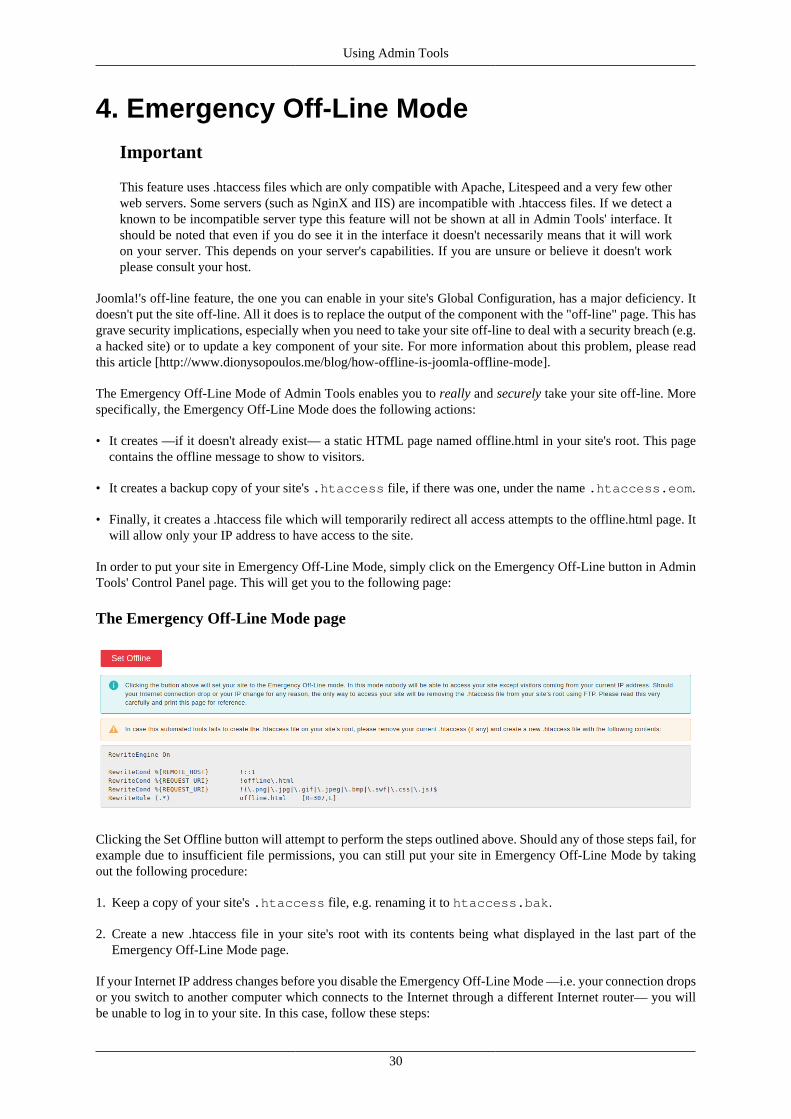
Using Admin Tools
4. Emergency Off-Line ModeImportant
This feature uses .htaccess files which are only compatible with Apache, Litespeed and a very few otherweb servers. Some servers (such as NginX and IIS) are incompatible with .htaccess files. If we detect aknown to be incompatible server type this feature will not be shown at all in Admin Tools' interface. Itshould be noted that even if you do see it in the interface it doesn't necessarily means that it will workon your server. This depends on your server's capabilities. If you are unsure or believe it doesn't workplease consult your host.
Joomla!'s off-line feature, the one you can enable in your site's Global Configuration, has a major deficiency. Itdoesn't put the site off-line. All it does is to replace the output of the component with the "off-line" page. This hasgrave security implications, especially when you need to take your site off-line to deal with a security breach (e.g.a hacked site) or to update a key component of your site. For more information about this problem, please readthis article [http://www.dionysopoulos.me/blog/how-offline-is-joomla-offline-mode].
The Emergency Off-Line Mode of Admin Tools enables you to really and securely take your site off-line. Morespecifically, the Emergency Off-Line Mode does the following actions:
• It creates —if it doesn't already exist— a static HTML page named offline.html in your site's root. This pagecontains the offline message to show to visitors.
• It creates a backup copy of your site's .htaccess file, if there was one, under the name .htaccess.eom.
• Finally, it creates a .htaccess file which will temporarily redirect all access attempts to the offline.html page. Itwill allow only your IP address to have access to the site.
In order to put your site in Emergency Off-Line Mode, simply click on the Emergency Off-Line button in AdminTools' Control Panel page. This will get you to the following page:
The Emergency Off-Line Mode page
Clicking the Set Offline button will attempt to perform the steps outlined above. Should any of those steps fail, forexample due to insufficient file permissions, you can still put your site in Emergency Off-Line Mode by takingout the following procedure:
1. Keep a copy of your site's .htaccess file, e.g. renaming it to htaccess.bak.
2. Create a new .htaccess file in your site's root with its contents being what displayed in the last part of theEmergency Off-Line Mode page.
If your Internet IP address changes before you disable the Emergency Off-Line Mode —i.e. your connection dropsor you switch to another computer which connects to the Internet through a different Internet router— you willbe unable to log in to your site. In this case, follow these steps:
30
Using Admin Tools
1. Using an FTP application of your liking remove the .htaccess file, or upload a blank .htaccess file overwritingthe old one.
2. Go to your site's administrator back-end and relaunch Admin Tools' Emergency Off-Line mode. Clickingon the Set Offline button will create a new .htaccess file with your current IP address. Your backup.htaccess.eom file will not be overwritten.
If you want to set your site back on-line, just visit the Emergency Off-Line page and click on the Set Online button.This will replace the off-line .htaccess file with the contents of the .htaccess.eom backup file and removethe backup file. If this doesn't work, follow this manual procedure:
1. Using an FTP application of your liking remove the .htaccess file, or upload a blank .htaccess file overwritingthe old one.
2. Rename the .htaccess.eom backup file back to .htaccess
Will I be able to use FTP or my host's control panel filemanagement when I enable this feature?Of course! This feature only protects web (HTTP/HTTPS) access. It can't and won't touch FTP access or yourhosting control panel's file management.
Should I always use the emergency off-line modeinstead of Joomla!'s off-line feature?The short answer is, simply, no. There are many cases where using Joomla!'s off-line feature is more convenient,i.e. when you want to simply make your site's content unavailable to random web visitors and search engines whilebuilding a new site. The only cases when you should use the Emergency Off-Line Mode are:
• If you believe that your site has been compromised (hacked). The Emergency Off-Line will make it impossiblefor the hacker to access your site while you are working to restore it.
• When updating key components of your site and don't want to risk a user following a direct link to screw upthe process.
In all other cases it's more convenient and sufficient to go to your site's Global Configuration and enable the off-line feature of Joomla! itself.
The offline.html page Admin Tools creates is horrid.Can I change it?Thank you for noticing that! Of course you can change it. Simply upload an offline.html of your liking to yoursite's root. You can link to JPG, GIF, PNG, BMP, SWF, CSS and JS files —on the same or a different server—from inside the HTML of this file. Do not try to link to other file types, it will not work.
Won't the redirection to offline.html screw up my SEOranking?No. The redirection to offline.html is made using the 307 HTTP status code which tells search engines thatthis redirection is temporary, they should not index the page now, but come back later when the problem willhave been restored.
Help! I have been locked out of my site! Fix it!Read a few paragraphs above. You just have to remove a file using FTP.
31

Using Admin Tools
The redirection doesn't work! I test it from my PC and Ican still see my site.First, I have to ask the obvious question: did you really read the description of this feature? You are supposed tobe able to see your site only from your PC. If you want to test that this feature really works please try accessingyour site from another computer, connected to the Internet from a different router. One good idea is to use yourcellphone, as long as it connects to the Internet over 3G, not over WiFi. If you did that and still don't see theredirection happening, make sure that your server supports .htaccess files and that it has mod_rewrite enabled.Some servers, like IIS, do not support .htaccess files at all. If this is the case, consult your host about takingyour site completely off-line.
Help! As soon as I clicked on "Put Offline" I got awhite page or Internal Server Error 500 page.Don't panic! You have an old version of Apache —1.3 or 2.0— which doesn't support one feature used in the.htaccess file generated by Admin Tools. You can easily work around this issue by editing the .htaccessfile in your site's root, using an FTP application. Replace [R=307,L] in the last line with [R,L] (that is, removethe =307 part) and save back the file. That's all.
My Internet connection drops all of the time. Will Iget continuously locked out of my site if I use thisfeature?It depends. If you have a static IP address, no, you will never get locked out. If you have a dynamic IP address,I don't know. When I used to have a dynamic IP address I observed that my IP address wouldn't change if myconnection dropped for less than 1-2 minutes. It all depends on how your ISP assigns IP addresses to its clients.The only way to find out is the hard way: trial and error.
5. Protect your administrator back-end with apassword
Important
This feature uses .htaccess files which are only compatible with Apache, Litespeed and a very few otherweb servers. Some servers (such as NginX and IIS) are incompatible with .htaccess files. If we detect aknown to be incompatible server type this feature will not be shown at all in Admin Tools' interface. Itshould be noted that even if you do see it in the interface it doesn't necessarily means that it will workon your server. This depends on your server's capabilities. If you are unsure or believe it doesn't workplease consult your host.
The Password-protect Administrator tool of Admin Tools is designed to add an extra level of protection toyour site's administrator back-end, asking for a username and password before accessing the administrator loginpage or any other file inside the administrator directory of your site. It does so by using Apache .htaccessand .htpasswd files, so it won't work on IIS hosts.
Important
Some prepackaged server bundles, such as Zend Server CE, and some live hosts do not allowusing .htaccess files to password-protect a directory. If it is a local server, edit your httpd.conf file (forZend Server CE this is located in C:\Program Files\Zend\Apache2\conf or C:\ProgramFiles (x86)\Zend\Apache2\conf) and modify all AllowOverride lines to read:
32

Using Admin Tools
AllowOverride All
If you are on a live host, please consult your host about the possibility of them allowing you to use thisfeature on your site.
Password-protect Administrator
If you are on a server running on Windows™, you are receiving a warning at the top of the page stating that thepassword will be stored to disk unencrypted. This is done due to the lack of the system-wide crypt function on theWindows platform, which causes Apache to understand password only if they are unencrypted or encrypted witha non-standard encryption scheme which does not exist in PHP.
Warning
If you password your administrator directory on a Linux system and then restore your site on a Windowsserver (typical live to local site restoration) you will be receiving a blank page or an Internal Server 500when accessing the site. This is normal and expected. All you have to do is to remove the .htaccessand .htpasswd files from your administrator directory after restoring the site.
In order to apply the password protection, simply enter a desired username and password and click on thePassword-protect button. After a few seconds your browser will ask you to supply the username and passwordyou just specified. This will also happen each and every time anybody tries to access the administrator back-endof your site. In other words, you have to share the username and password with all back-end users of your site.
If you wish to remove the password protection you can either remove both the .htaccess and .htpasswdfiles from your administrator directory, or click on the Remove Password Protection button.
6. The .htaccess makerNote
This feature is only available in the Professional release
Warning
This feature is only available on servers running the Apache web server. If your server is using IIS orNginX the button to launch this feature will not be shown. If you are using Lighttpd, Litespeed or anyother server software you will see a button to launch this feature but this feature may not have any effect.If unsure please consult with your host about their server's support of .htaccess files.
One of the most important aspects of managing a web site hosted on an Apache server is being able to fine-tune your .htaccess file. This file is responsible for many web server level tweaks, such as enabling the use ofsearch engine friendly (SEF) URLs, blocking access to system files which should not be accessible from the web,redirecting between pages based on custom criteria and even optimising the performance of your site. On the
33

Using Admin Tools
downside, learning how to tweak all those settings is akin to learning a foreign language. The .htaccess Maker toolof Admin Tools is designed to help you create such a file by utilizing a point-and-click interface.
Important
Some prepackaged server bundles, such as Zend Server CE, and some live hosts do not allowusing .htaccess files to override server settings. If it is a local server, edit your httpd.conf file (forZend Server CE this is located in C:\Program Files\Zend\Apache2\conf or C:\ProgramFiles (x86)\Zend\Apache2\conf) and modify all AllowOverride lines to read:
AllowOverride All
If you are on a live host, please consult your host about the possibility of them allowing you to use thisfeature on your site.
Tip
If you ever want to revert to a "safe default", just set all of the options on this page to "Off" and clickon "Save and create .htaccess". This will create a .htaccess file which is essentially the same as theone shipped with Joomla! (htaccess.txt).
The top part of the .htaccess maker page contains the standard toolbar buttons you'd expect:
The .htaccess Maker's toolbar
• Save without creating .htaccess saves the changes you have made in this page's options without actually creatingthe customized .htaccess file. This should be used when you have not decided on some options yet, or ifyou want to preview the generated .htaccess file before writing it to disk.
• Save and create .htaccess is the logical next step to the previous button. It not only saves the changes you made,but also creates and writes the new .htaccess file to the disk. If you already had a .htaccess file on yoursite, it will be renamed to .htaccess.admintools before the new file is written to disk.
• Preview pops up a dialog where you can see how the generated .htaccess file will look like without writingit to disk. This dialog shows the saved configuration. If you have modified any settings they will not be reflectedin there until you click either of the previous two buttons.
• The Back button takes you back to the Control Panel page.
Below the toolbar there are five panes with different options, described below. Before you do that, please readand understand the following warning. Support requests which indicate that you have not read it will be repliedwith a link back to this page.
Warning
Depending on your web server settings, some of these options may be incompatible with your site. Inthis case you will get a blank page or an Internal Server Error 500 error page when trying to access any
34

Using Admin Tools
part of your site. If this happens, you have to remove the .htaccess file from your site's root directoryusing an FTP application or the File Manager feature of your hosting control panel. Since Admin Tools1.2, your old .htaccess file is saved as .htaccess.admintools. You can rename that file backto .htaccess to revert to the last known good state. If you are unsure how this works, please consultyour host before trying to create a new .htaccess file using this tool.
Some prepackaged server environments, like WAMPserver, do not enable Apache's mod_rewrite moduleby default, which will always result in an Internal Server Error upon applying the .htaccess file. In thiscase you are strongly suggested to enable it. On WAMPserver you can click on its tray icon, go to Apache,Modules and make sure rewrite_module is checked. On other server environments you have to edit yourhttpd.conf file and make sure that the LoadModule mod_rewrite line is not commented out (there is nohash sign in front of it). Once you do either of these changes, you must restart your server for the changeto become effective.
We strongly suggest that you begin by setting all options to No and then enable them one by one, creatinga new .htaccess file after you have enabled each one of them. If you bump into a blank or error page youwill know that the last option you tried is incompatible with your host. In that case, remove the .htaccessfile, set the option to No and continue with the next one. Unfortunately, there is no other way than trialand error to deduce which options may be incompatible with your server.
Other important things you can add to your .htaccess
Some things cannot be added as features to the .htaccess Maker because the interface would become truly unwieldy.However, there are tools which can generate rather compact .htaccess rules which you can add to .htaccess Maker,in the Custom .htaccess rules at the top of the file section. Here we'd like to point you to some of them.
Content security policy (CSP)
It mitigates the risk of cross-site scripting and other content-injection attacks. You can read more aboutit on the dedicated site for this feature [http://content-security-policy.com/]. There is a simple tool [http://cspisawesome.com/] which allows you to generate the required .htaccess code for the CSP feature according toyour preferences. Keep in mind that when you restrict the scripts' origin you should keep in mind that severalextensions (including many templates) will load their scripts off a third party CDN which must be explicitlyallowed or your site will no longer work!
Custom error documents
Most hosting control panels allow you to specify custom HTML pages for common server error pages. The mostimportant ones are for errors 403 (Access Forbidden), 404 (Not Found) and 500 (Internal Server Error). It's alwaysa good idea showing a nicely designed page instead of the default, text-only, ugly page of Apache for these errormessages!
35
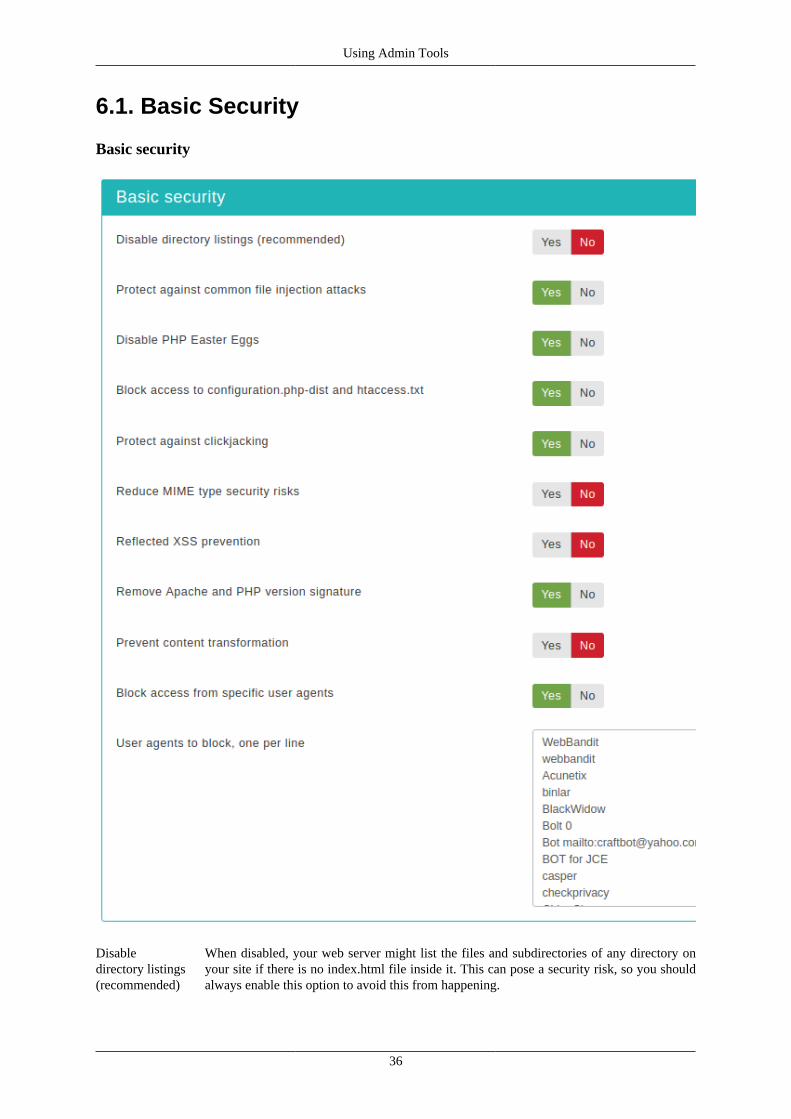
Using Admin Tools
6.1. Basic Security
Basic security
Disabledirectory listings(recommended)
When disabled, your web server might list the files and subdirectories of any directory onyour site if there is no index.html file inside it. This can pose a security risk, so you shouldalways enable this option to avoid this from happening.
36
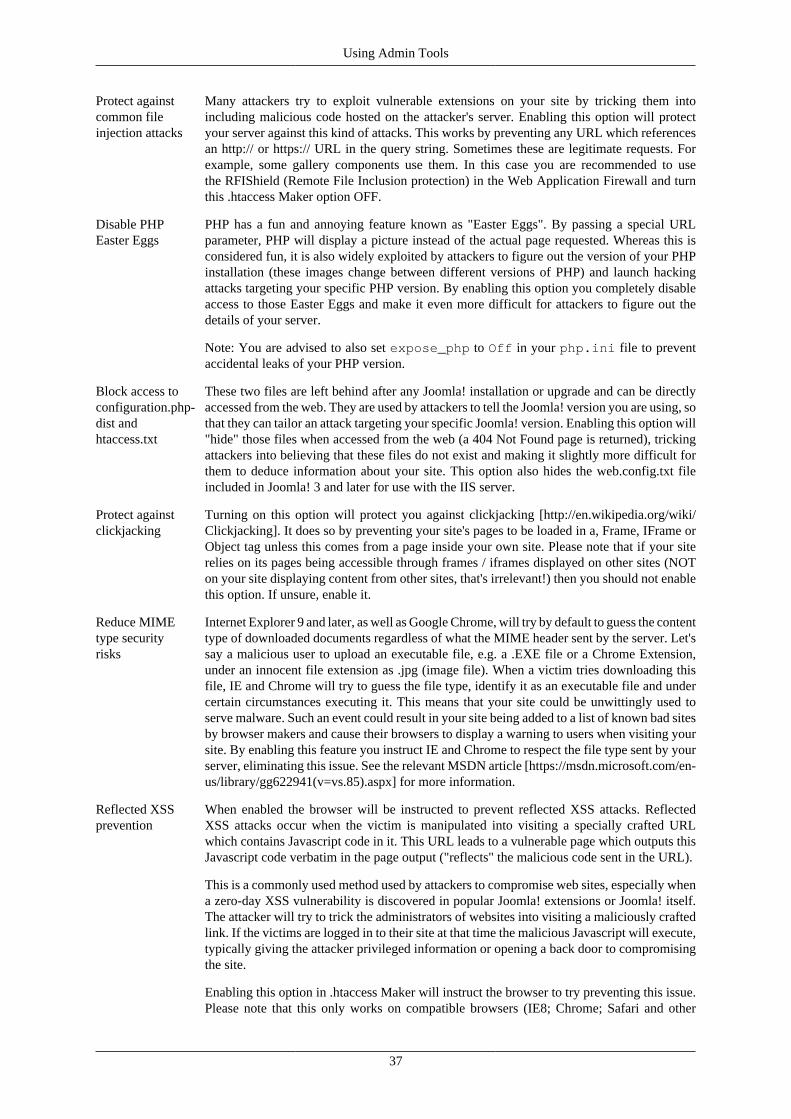
Using Admin Tools
Protect againstcommon fileinjection attacks
Many attackers try to exploit vulnerable extensions on your site by tricking them intoincluding malicious code hosted on the attacker's server. Enabling this option will protectyour server against this kind of attacks. This works by preventing any URL which referencesan http:// or https:// URL in the query string. Sometimes these are legitimate requests. Forexample, some gallery components use them. In this case you are recommended to usethe RFIShield (Remote File Inclusion protection) in the Web Application Firewall and turnthis .htaccess Maker option OFF.
Disable PHPEaster Eggs
PHP has a fun and annoying feature known as "Easter Eggs". By passing a special URLparameter, PHP will display a picture instead of the actual page requested. Whereas this isconsidered fun, it is also widely exploited by attackers to figure out the version of your PHPinstallation (these images change between different versions of PHP) and launch hackingattacks targeting your specific PHP version. By enabling this option you completely disableaccess to those Easter Eggs and make it even more difficult for attackers to figure out thedetails of your server.
Note: You are advised to also set expose_php to Off in your php.ini file to preventaccidental leaks of your PHP version.
Block access toconfiguration.php-dist andhtaccess.txt
These two files are left behind after any Joomla! installation or upgrade and can be directlyaccessed from the web. They are used by attackers to tell the Joomla! version you are using, sothat they can tailor an attack targeting your specific Joomla! version. Enabling this option will"hide" those files when accessed from the web (a 404 Not Found page is returned), trickingattackers into believing that these files do not exist and making it slightly more difficult forthem to deduce information about your site. This option also hides the web.config.txt fileincluded in Joomla! 3 and later for use with the IIS server.
Protect againstclickjacking
Turning on this option will protect you against clickjacking [http://en.wikipedia.org/wiki/Clickjacking]. It does so by preventing your site's pages to be loaded in a, Frame, IFrame orObject tag unless this comes from a page inside your own site. Please note that if your siterelies on its pages being accessible through frames / iframes displayed on other sites (NOTon your site displaying content from other sites, that's irrelevant!) then you should not enablethis option. If unsure, enable it.
Reduce MIMEtype securityrisks
Internet Explorer 9 and later, as well as Google Chrome, will try by default to guess the contenttype of downloaded documents regardless of what the MIME header sent by the server. Let'ssay a malicious user to upload an executable file, e.g. a .EXE file or a Chrome Extension,under an innocent file extension as .jpg (image file). When a victim tries downloading thisfile, IE and Chrome will try to guess the file type, identify it as an executable file and undercertain circumstances executing it. This means that your site could be unwittingly used toserve malware. Such an event could result in your site being added to a list of known bad sitesby browser makers and cause their browsers to display a warning to users when visiting yoursite. By enabling this feature you instruct IE and Chrome to respect the file type sent by yourserver, eliminating this issue. See the relevant MSDN article [https://msdn.microsoft.com/en-us/library/gg622941(v=vs.85).aspx] for more information.
Reflected XSSprevention
When enabled the browser will be instructed to prevent reflected XSS attacks. ReflectedXSS attacks occur when the victim is manipulated into visiting a specially crafted URLwhich contains Javascript code in it. This URL leads to a vulnerable page which outputs thisJavascript code verbatim in the page output ("reflects" the malicious code sent in the URL).
This is a commonly used method used by attackers to compromise web sites, especially whena zero-day XSS vulnerability is discovered in popular Joomla! extensions or Joomla! itself.The attacker will try to trick the administrators of websites into visiting a maliciously craftedlink. If the victims are logged in to their site at that time the malicious Javascript will execute,typically giving the attacker privileged information or opening a back door to compromisingthe site.
Enabling this option in .htaccess Maker will instruct the browser to try preventing this issue.Please note that this only works on compatible browsers (IE8; Chrome; Safari and other
37

Using Admin Tools
WebKit browsers) and only applies to reflected XSS attacks. Stored XSS attacks, where themalicious Javscript is stored in the database, is NOT prevented. You should consider thisprotection a safety belt. Not wearing a safety belt in the event of an accident pretty muchguarantees serious injury or death. Wearing a safety belt minimises the possibility of injury ordeath but does not always prevent it. This option is your safety belt against the most commontype of XSS attacks. You should use it but don't expect it to stop everything thrown your way.Always keep your software up-to-date, especially when a security release is published!
For more information please consult the relevant MSDN article [http://blogs.msdn.com/b/ie/archive/2008/07/02/ie8-security-part-iv-the-xss-filter.aspx].
Neutralise SVGscript execution
Send a custom Content Security Policy HTTP header for SVG files which prevents scriptsinside them from executing. Doing so will also disable most SVG animations and remove allinteractive features from all SVG files.
This option only needs to be enabled if your site is configured in such a way that it allowsuntrusted users to upload unsanitized SVG files to your site. By default, Joomla does NOTpermit this. You'd have to configure it to do so yourself, using the Media Manager's optionspage and / or a third party extension.
We do not recommend using this option as it can cause unexpected issues when your content,your template or a third party extension on your site relies on SVG animations or SVGinteractivity. This can be anything from custom animation, to fancy graphics-heavy forms,to interactive charts and graphs.
Instead, we recommend using sanitized SVG file uploads. This allows untrusted sources tosubmit SVG files and have their scripts removed. It also allows trusted sources (Super Users)to use FTP or SFTP to upload SVGs with JavaScript which can function correctly on yoursite. Our lead developer has already written a plugin for Joomla 3.9 and later which does that[https://github.com/nikosdion/joomlasvg] and has already submitted a code path to Joomlasince June 2020 which is still pending approval from the Joomla Production Leadership.Unfortunately, due to the Terms of Service of the Joomla Extensions Directory we cannotinclude this code in Admin Tools itself. The reasoning is explained in the plugin's page (seelink above).
Remove Apacheand PHP versionsignature
By default Apache and PHP will output HTTP headers advertising their existence and theirversion numbers. If you are always using the latest and greatest versions this may not bea problem, but the chances are that your host is using an older version of both software.Giving away the version numbers of the server software in every request makes it trivial for anattacker to obtain information about your site which will help them to launch a tailored attack,targeting known security issues in the versions of Apache and PHP you're using. Enabling thisoption will mitigate this issue. Please note that this is SECURITY THROUGH OBSCURITYwhich is NEVER, EVER an adequate means of protection. It's just a speed bump in the wayof an attacker, not a roadblock.
You are strongly advised to keep your server software up-to-date. If you're not managing yourown server, e.g. you're using a shared host, we very strongly recommend choosing a hostingservice which follows this rule. As a simple test, if your server is not currently using one of thePHP versions published in the top right corner of http://php.net (or at most one version earlier,i.e. the third number of the version on your server is one less than the one listed on php.net)the chances are that your server is using outdated, vulnerable server software. Remember thatoutdated versions of PHP and Apache, even with some security patches backported, CANNOT be secure. There's a good reason new software versions are published regularly. Forexample a popular but tragically ancient version of PHP is PHP 5.3.3. It has a MAJOR issueregarding bcrypt encryption, fixed in 5.3.10 and NOT backported by any vendor to an earlierversion of PHP. As a result using PHP 5.3.3 makes your site's passwords insecure.
Prevent contenttransformation
Enabling this feature instructs proxy servers and caches to not convert your content. Forexample, certain proxy servers (typically found in mobile networks, businesses and ISPs in
38

Using Admin Tools
congested areas) will attempt to scale and aggressively compress images, CSS and Javascriptto save bandwidth. This can lead to several issues, from displayed images being a bit off toyour site breaking down because the compressed CSS/JS introduced errors preventing thebrowser from parsing it correctly. With this feature enabled the cache and proxy servers willbe instructed to not do that by setting an HTTP header. If they respect the HTTP header (theyshould, it's a web standard) such issues are prevented.
For more information please consult the formal web standard document RFC 2616, section14.9.5 [https://tools.ietf.org/html/rfc2616#section-14.9.5]
Block accessfrom specificuser agents
When enabled, it will block any site access attempt if the remote program sends one of theuser agent strings in the User agents to block, one per line option. This feature is designed toprotect your site against common bandwidth-hogging download bots and otherwise legitimatetools which are more usually used for hacking sites than their benign intended functionality.
User agents toblock, one perline
The user agent strings to block from accessing your site. You don't have to enter the whole UAstring, just a part of it. The default setting includes several usual suspects. Separate multipleentries by a single newline character (that is a single press of the ENTER key). Do note thatsome server with mod_security or mod_evasive installed will throw an "Access forbidden"message if you try to save the configuration settings when this field contains the word "WGet".If you come across this issue it is not a bug with Admin Tools or Joomla!, it is a server-levelprotection feature kicking in. Just avoid including the word Wget and you should be out ofharm's way.
Default list of user agents to block
The following is the default list of user agents to block, as of Admin Tools 3. It is very thorough and seems to bereducing the number of attacks enormously. If you are upgrading from an earlier version you might want to tryit out. Just copy it and paste it in the User agents to block, one per line are in the .htaccess Maker configuration.Remember to enable the Block access from specific user agents to enable the feature and then click on Save andcreate .htaccess to generate the .htaccess file which applies this setting on your site.
WebBanditwebbanditAcunetixbinlarBlackWidowBolt 0Bot mailto:[email protected] for JCEcaspercheckprivacyChinaClawclshttpcmsworldmapcomodoCustoDefault Browser 0diavolDIIbotDISCodotbotDownload DemoneCatchEirGrabberEmailCollectorEmailSiphonEmailWolfExpress WebPictures
39

Using Admin Tools
extractExtractorProEyeNetIEfeedfinderFHscanFlashGetflickyGetRightGetWeb!Go-Ahead-Got-ItGo!ZillagrabGrabNetGrafulaharvestHMViewia_archiverImage StripperImage SuckerInterGETInternet NinjaInternetSeer.comjakartaJavaJetCarJOC Web SpiderkmccrewlarbinLeechFTPlibwwwMass DownloaderMaxthon$microsoft.urlMIDown toolminerMister PiXNEWTMSFrontPageNavroadNearSiteNet VampireNetAntsNetSpiderNetZIPnutchOctopusOffline ExplorerOffline NavigatorPageGrabberPapa FotopavukpcBrowserPeoplePalplanetworkpsbotpurebotpycurlRealDownload
40
Using Admin Tools
ReGetRippers 0SeaMonkey$sitecheck.internetseer.comSiteSnaggerskygridSmartDownloadsuckerSuperBotSuperHTTPSurfbottAkeOutTeleport ProToata dragostea mea pentru diavolaturnitvikspiderVoidEYEWeb Image CollectorWeb SuckerWebAutoWebCopierWebFetchWebGo ISWebLeacherWebReaperWebSaugerWebsite eXtractorWebsite QuesterWebStripperWebWhackerWebZIPWgetWidowWWW-MechanizeWWWOFFLEXaldon WebSpiderYandexZeuszmeuCazoodleBotdiscobotecxiGT::WWWheritrixHTTP::LiteHTTrackia_archiverid-searchid-search.orgIDBotIndy LibraryIRLbotISC Systems iRc Search 2.1LinksManager.com_botlinkwalkerlwp-trivialMFC_Tear_SampleMicrosoft URL Control
41

Using Admin Tools
Missigua Locatorpanscient.comPECL::HTTPPHPCrawlPleaseCrawlSBIderSnoopySteelerURI::FetchurllibWeb SuckerwebaltaWebCollageWells Search IIWEP SearchzermeloZyBorgIndy Librarylibwww-perlGo!ZillaTurnitinBotsqlmap
42
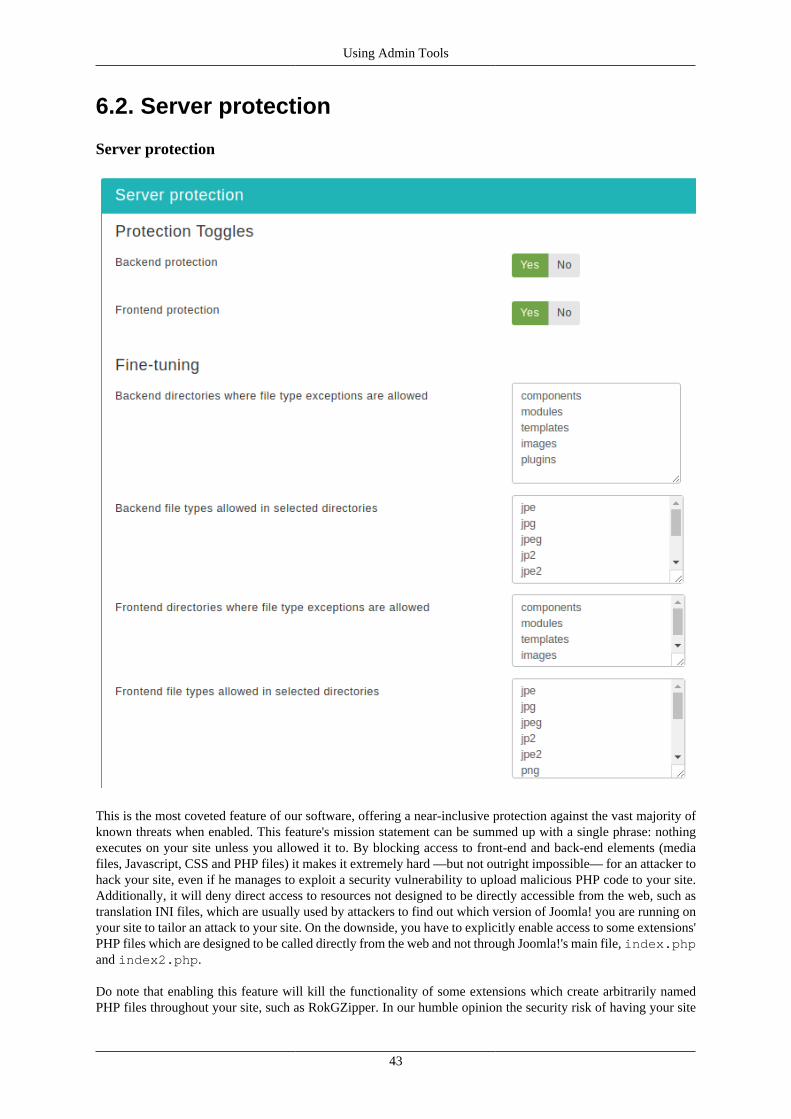
Using Admin Tools
6.2. Server protection
Server protection
This is the most coveted feature of our software, offering a near-inclusive protection against the vast majority ofknown threats when enabled. This feature's mission statement can be summed up with a single phrase: nothingexecutes on your site unless you allowed it to. By blocking access to front-end and back-end elements (mediafiles, Javascript, CSS and PHP files) it makes it extremely hard —but not outright impossible— for an attacker tohack your site, even if he manages to exploit a security vulnerability to upload malicious PHP code to your site.Additionally, it will deny direct access to resources not designed to be directly accessible from the web, such astranslation INI files, which are usually used by attackers to find out which version of Joomla! you are running onyour site to tailor an attack to your site. On the downside, you have to explicitly enable access to some extensions'PHP files which are designed to be called directly from the web and not through Joomla!'s main file, index.phpand index2.php.
Do note that enabling this feature will kill the functionality of some extensions which create arbitrarily namedPHP files throughout your site, such as RokGZipper. In our humble opinion the security risk of having your site
43
Using Admin Tools
unprotected outweighs the benefits of such solutions by a dramatic factor. As a result, we strongly suggest disablingRokGZipper and other similar software using similarly questionable security practices.
There are three sections of configuration settings controlling the functionality of the Server Protection feature.The first one is the Protection Toggles which allows you to enable or disable the four main aspects of protection:
Back-endprotection
Disables direct access to most back-end resources, except those in the exceptions lists. Itis generally recommended to turn it on to enhance the protection of your site, unless youhave enabled the administrator password protection feature. In the latter case this option isredundant and we recommend turning it off.
Front-endprotection
Disables direct access to most front-end resources, except those in the exceptions lists. It isgenerally recommended to turn it on to enhance the protection of your site.
Enabling this feature will prevent web access to all folders in your site's root, not just Joomla'sfolders (such as components). If you need to enable direct access to a folder you will needto place it in one of the front-end directory exception lists in the Fine-tuning or Exceptionssection.
The next section is called Fine-tuning and contains the necessary options to tweak the protection's behaviourto suit your site. Before describing what each option does, a small explanation of how the protection works isin order. The protection code in the generated .htaccess file blocks direct web access to all files. Joomla!'sstandard "entry point" or "main" file, index.php, is automatically exempt from this rule. However, your sitealso contains images, media, CSS and Javascript files inside certain directories. For each of the back-end andfront-end protection we need a set of directories where such files are allowed and the file extensions of those files.These are what those options are all about. The default settings contain the most common file types you'd expectto find on a site and the standard Joomla! directories where they should be located. You only have to tweak themif you want to add more file extensions or have such static files in locations other than the default.
Back-enddirectorieswhere file typeexceptions areallowed
This is a list of back-end directories (that is, subdirectories of your site's administratordirectory) where you expect media files to be present. Place one directory on each line.Subdirectories of those directories are automatically added to the exceptions list withouthaving to explicitly list them here.
Back-end filetypes allowedin selecteddirectories
The extensions of back-end files which allowed to pass through the server protection filter,as long as the files with those extensions are in the list above. Place one file extension perline, without the dot. For example, if you want to allow access to all PDF files you have totype in "pdf" (without the quotes) on a new line of this list. Do note that file extensions arecase-sensitive. This means that PDF, Pdf, pdf and pDF are four different file extensions as faras your web server is concerned. As a rule of thumb, type in the extensions in lowercase andmake sure that the extensions of the files you upload are also in lowercase.
Front-enddirectorieswhere file typeexceptions areallowed
This is a list of front-end directories (that is, directories in your site's root) where you expectmedia files to be present. Place one directory on each line. Subdirectories of those directoriesare automatically added to the exceptions list without having to explicitly list them here.
Use this to allow access to specific types static media files inside specific directories. This isthe least permissive exception to front-end blocking. Use this for folders which have a mixof public and private content, as long as the private content is NOT of an allowed file type(see below).
Front-end filetypes allowedin selecteddirectories
The extensions of front-end files which allowed to pass through the server protection filter,as long as the files with those extensions are in the list above. Place one file extension perline, without the dot. For example, if you want to allow access to all PDF files you have totype in "pdf" (without the quotes) on a new line of this list. Do note that file extensions arecase-sensitive. This means that PDF, Pdf, pdf and pDF are four different file extensions as faras your web server is concerned. As a rule of thumb, type in the extensions in lowercase andmake sure that the extensions of the files you upload are also in lowercase.
44
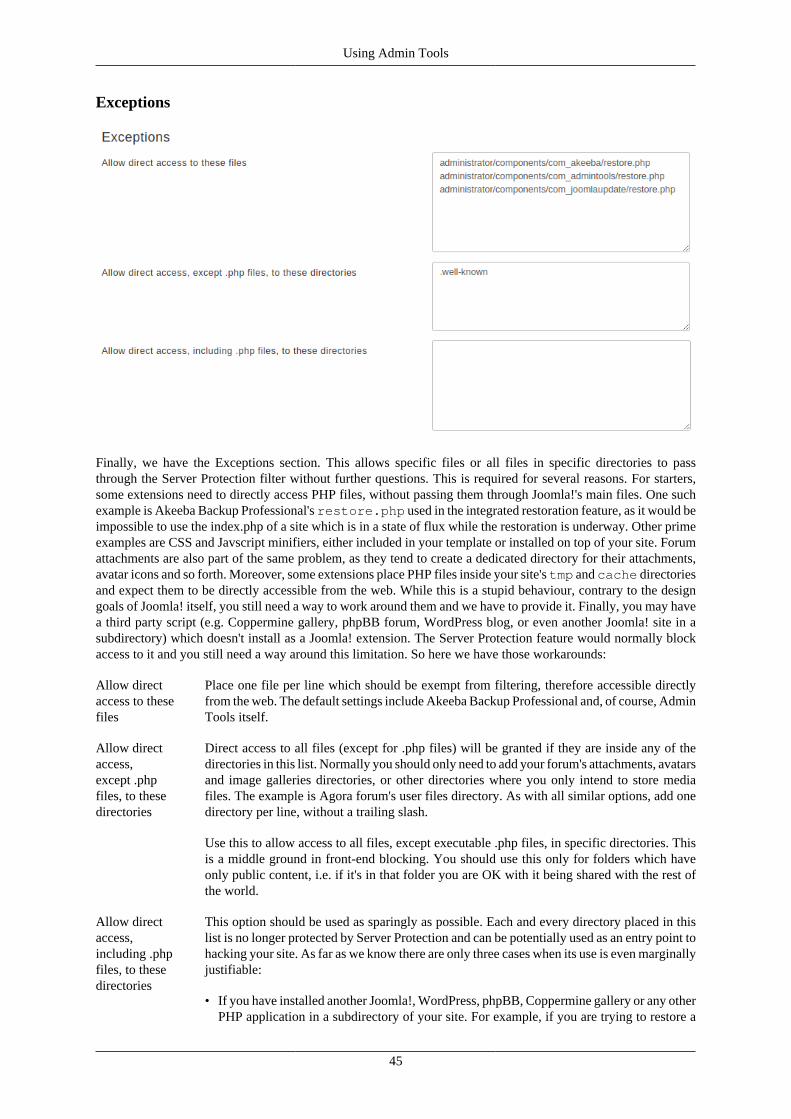
Using Admin Tools
Exceptions
Finally, we have the Exceptions section. This allows specific files or all files in specific directories to passthrough the Server Protection filter without further questions. This is required for several reasons. For starters,some extensions need to directly access PHP files, without passing them through Joomla!'s main files. One suchexample is Akeeba Backup Professional's restore.php used in the integrated restoration feature, as it would beimpossible to use the index.php of a site which is in a state of flux while the restoration is underway. Other primeexamples are CSS and Javscript minifiers, either included in your template or installed on top of your site. Forumattachments are also part of the same problem, as they tend to create a dedicated directory for their attachments,avatar icons and so forth. Moreover, some extensions place PHP files inside your site's tmp and cache directoriesand expect them to be directly accessible from the web. While this is a stupid behaviour, contrary to the designgoals of Joomla! itself, you still need a way to work around them and we have to provide it. Finally, you may havea third party script (e.g. Coppermine gallery, phpBB forum, WordPress blog, or even another Joomla! site in asubdirectory) which doesn't install as a Joomla! extension. The Server Protection feature would normally blockaccess to it and you still need a way around this limitation. So here we have those workarounds:
Allow directaccess to thesefiles
Place one file per line which should be exempt from filtering, therefore accessible directlyfrom the web. The default settings include Akeeba Backup Professional and, of course, AdminTools itself.
Allow directaccess,except .phpfiles, to thesedirectories
Direct access to all files (except for .php files) will be granted if they are inside any of thedirectories in this list. Normally you should only need to add your forum's attachments, avatarsand image galleries directories, or other directories where you only intend to store mediafiles. The example is Agora forum's user files directory. As with all similar options, add onedirectory per line, without a trailing slash.
Use this to allow access to all files, except executable .php files, in specific directories. Thisis a middle ground in front-end blocking. You should use this only for folders which haveonly public content, i.e. if it's in that folder you are OK with it being shared with the rest ofthe world.
Allow directaccess,including .phpfiles, to thesedirectories
This option should be used as sparingly as possible. Each and every directory placed in thislist is no longer protected by Server Protection and can be potentially used as an entry point tohacking your site. As far as we know there are only three cases when its use is even marginallyjustifiable:
• If you have installed another Joomla!, WordPress, phpBB, Coppermine gallery or any otherPHP application in a subdirectory of your site. For example, if you are trying to restore a
45
Using Admin Tools
copy of your site inside a directory named test in your site's root you have to add testto this list. This is the one and only usage scenario which doesn't compromise your site'ssecurity.
• Some templates and template frameworks may wrap their CSS and Javscript inside PHPfiles in order to deliver them compressed to your browser. While this is a valid technique,it's possible that the list of PHP files is too big to track down and include in the first listof the Exceptions section. In this case you may consider putting the template subdirectorycontaining those files in this list.
• Some extensions do something silly: they place files inside your site's tmp or cachedirectories and expect them to be directly accessible from the web. This is plainwrong because these directories are designed to be protected system directories wheredirect access should not be allowed, most notably because they might contain sensitiveinformation. However, if you have such extensions —most notably certain Javascript andCSS minifiers— you need a way to allow direct access to those directories.
If you decide that convenience is better than security we can't stop you. Add tmp and cacheto this list and wish for the best. You are opening a security hole on your site and you doit at your own risk and potential peril.
Use this to allow full access to specific folders, as if the front-end protection does not exist.This is EXTREMELY dangerous! It's best to use the Allow direct access to these files featureif possible, allowing access only to very specific .php files.
Remember that an attacker who has found an upload vulnerability on your site can uploada malicious script inside one of these folders and use it to hack you. These folders are bareand unprotected. That's why we very strongly advise against using this feature unless it'sabsolutely necessary - keeping in mind that you are, at the same time, leaving a hole in yoursecurity defences. Holes in defences is what gets sites hacked.
In order to figure out which custom exceptions you need to add on your site, take a look at the How to determinewhich exceptions are required section.
Warning
Windows users beware! Do not use Windows' path separator (the backslash - \) to separate directories!We are talking about directories as they appear in URLs, so you should always use the URL path separator(forward slash - /) in those settings. In other words some/long/path is correct, some\long\pathis WRONG.
6.2.1. How to determine which exceptions are required
After applying the Server Protection settings you may notice that some aspects of your site no longer work properlyor at all. This could be something obviously throwing an error; files being inaccessible with a 403 or 404 errormessage; or something more subtle, as if CSS and JavaScript no longer load. These are probably caused bythe Server Protection settings disallowing access to files. We can find which files need to be accessed and addexceptions to them to restore the functionality of your site.
Tip
There is no valid reason for software integrated with Joomla! to require such exceptions for .php filesanymore. Since early 2013 Joomla! has shipped with com_ajax, a built-in method to access dynamiccontent without needing direct access to arbitrarily named .php files. Developers who have not caught upto this technology after so many years are less likely to follow security best practices. Moreover, most ofthese directly accessible .php files do not load Joomla!, therefore they do not load Admin Tools, meaningthat you are no longer protected by Admin Tools' Web Application Firewall if malicious requests arebeing sent to those files. As a result, adding extensions for their software's .php files to be accessibledirectly from the web can compromise your site's security.
46
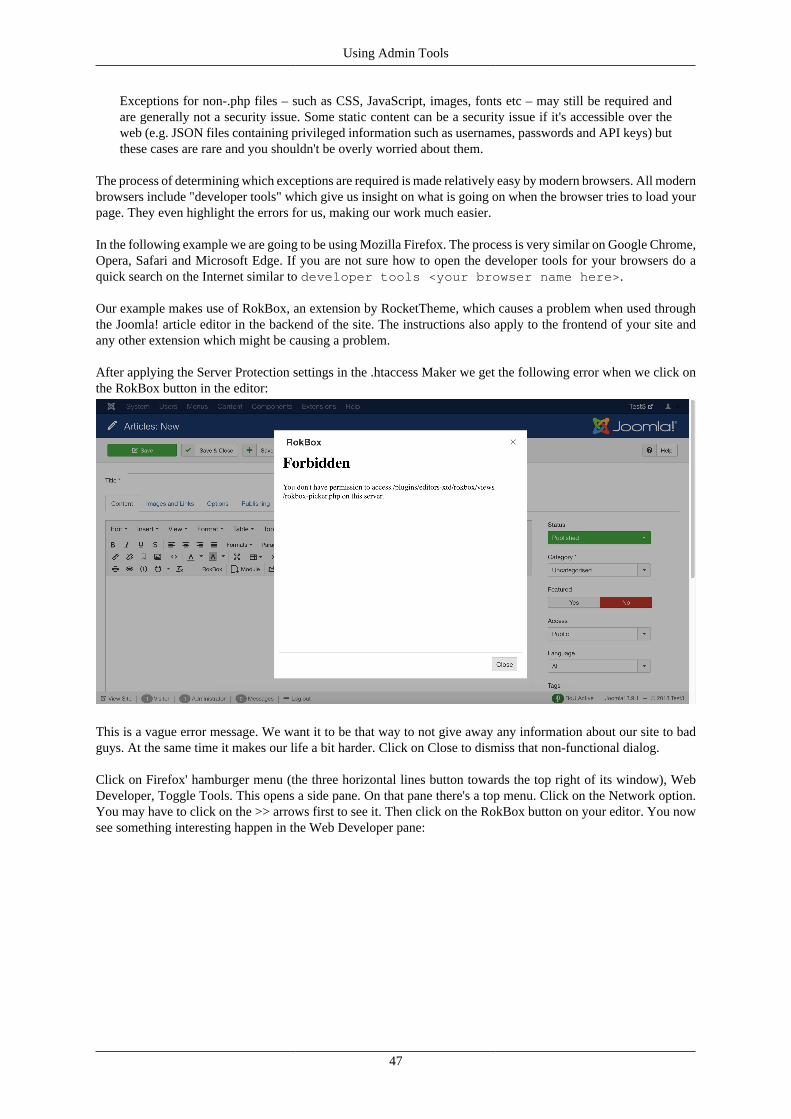
Using Admin Tools
Exceptions for non-.php files – such as CSS, JavaScript, images, fonts etc – may still be required andare generally not a security issue. Some static content can be a security issue if it's accessible over theweb (e.g. JSON files containing privileged information such as usernames, passwords and API keys) butthese cases are rare and you shouldn't be overly worried about them.
The process of determining which exceptions are required is made relatively easy by modern browsers. All modernbrowsers include "developer tools" which give us insight on what is going on when the browser tries to load yourpage. They even highlight the errors for us, making our work much easier.
In the following example we are going to be using Mozilla Firefox. The process is very similar on Google Chrome,Opera, Safari and Microsoft Edge. If you are not sure how to open the developer tools for your browsers do aquick search on the Internet similar to developer tools <your browser name here>.
Our example makes use of RokBox, an extension by RocketTheme, which causes a problem when used throughthe Joomla! article editor in the backend of the site. The instructions also apply to the frontend of your site andany other extension which might be causing a problem.
After applying the Server Protection settings in the .htaccess Maker we get the following error when we click onthe RokBox button in the editor:
This is a vague error message. We want it to be that way to not give away any information about our site to badguys. At the same time it makes our life a bit harder. Click on Close to dismiss that non-functional dialog.
Click on Firefox' hamburger menu (the three horizontal lines button towards the top right of its window), WebDeveloper, Toggle Tools. This opens a side pane. On that pane there's a top menu. Click on the Network option.You may have to click on the >> arrows first to see it. Then click on the RokBox button on your editor. You nowsee something interesting happen in the Web Developer pane:
47

Using Admin Tools
The pane shows the request made to your server and its error status 403 highlighted. 403 means access forbidden,404 means not found. The former is an error code we definitely expect as the result of applying Server Protection.The latter can either mean that the file is genuinely not there or that Server Protection is preventing access to it. Ifyou get a 404 always check if the file exists first. Since we have a 403 here we know it's a Server Protection issue.
Click on the line with the error code. You will see some details open below the list. Click on the Headers tabon top of those details. You see a lot of information but what is interesting to us is the Request URL. It tells uswhich URL the browser tried to access and failed to do so. However, it's truncated and doesn't help us any. Soright click on it and choose Copy.
Now open a plain text editor application such as Notepad on Windows, TextEdit on macOS, gEdit or Kate onLinux and paste in the URL you copied.
48
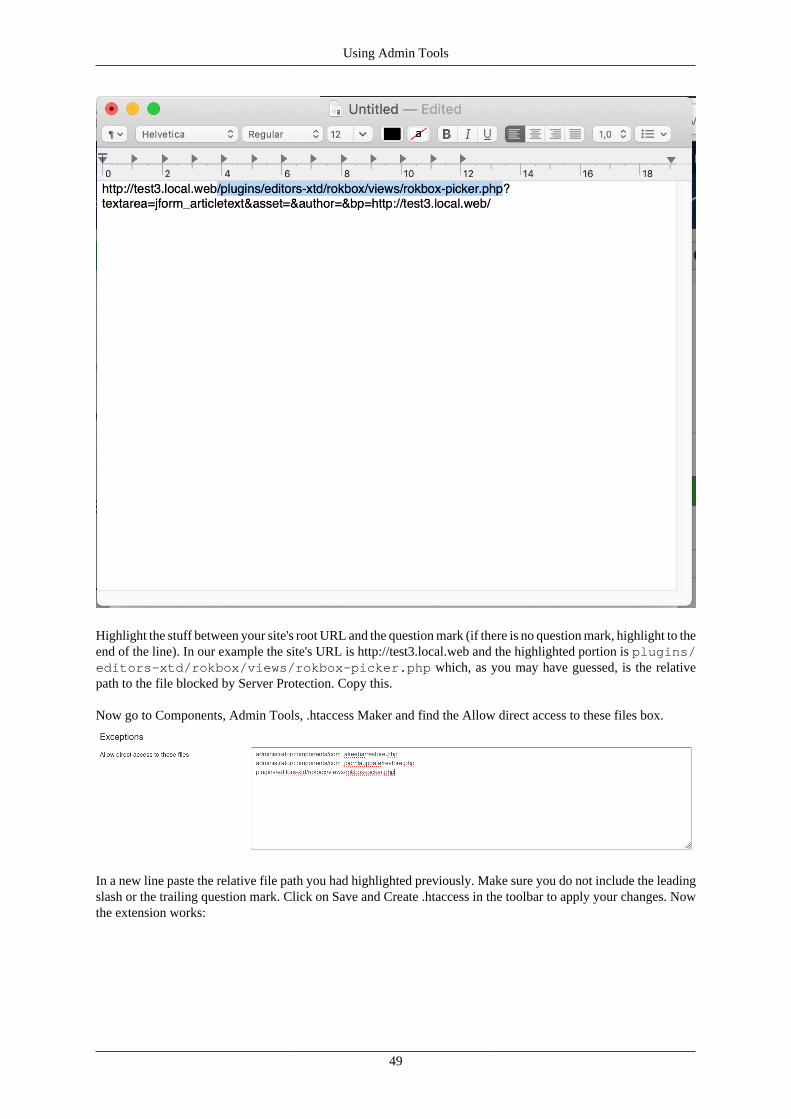
Using Admin Tools
Highlight the stuff between your site's root URL and the question mark (if there is no question mark, highlight to theend of the line). In our example the site's URL is http://test3.local.web and the highlighted portion is plugins/editors-xtd/rokbox/views/rokbox-picker.php which, as you may have guessed, is the relativepath to the file blocked by Server Protection. Copy this.
Now go to Components, Admin Tools, .htaccess Maker and find the Allow direct access to these files box.
In a new line paste the relative file path you had highlighted previously. Make sure you do not include the leadingslash or the trailing question mark. Click on Save and Create .htaccess in the toolbar to apply your changes. Nowthe extension works:
49

Using Admin Tools
In case you see plenty of files or files with random and changing names; oryou see files in the cache, tmp and logs folders
Sometimes the above method will show a long list of files; or files with random names; or files whose nameschange on every page or request. Typically, you see that they are all located in the same few folders. There aretwo different things you can do.
If the files you see do not have a .php extension the the easy way is to add the path to the folder to the Allowdirect access, except .php files, to these directories list. For example, if all files are in the foobar/assets/static folder you need to add foobar/assets/static to the Allow direct access, except .php files, tothese directories list.
The drawback to that is that all files without a .php extension in this folder and its subfolders will be accessibleover the web. This might be a security risk if the same folder contains files with privileged information. You canmitigate that risk by adding an exception in a harder, but more secure, way. You'd need to add the folder's path tothe Backend directories where file type exceptions are allowed or Frontend directories where file type exceptionsare allowed lists in the .htaccess Maker. If the folder's relative path starts with administrator/ add it to thefirst list (backend) after removing the administrator/ prefix.
For example, if the files are in the administrator/components/com_example/media folder you needto add components/com_example/media to the Backend directories where file type exceptions are allowedlist. Conversely, if the files are in the foobar/assets folder you need to add foobar/assets to the Frontenddirectories where file type exceptions are allowed list.
Please note that in this case (hard way) if the file extension is not in the Backend file types allowed in selecteddirectories or Frontend file types allowed in selected directories lists you will need to add the file extension, withoutthe dot, in those lists as well. Keep in mind that capitalization matters. For example, the extensions png, PNG andPng are different and have to be listed separately.
If the files you see have a .php extension things are easier but also more nuanced. You can always add the pathto the folder in the Allow direct access, including .php files, to these directories list. This is potentially insecure.It allows direct web access to all files in that folder and all of its subdirectories, bypassing Joomla! and AdminTools entirely. If there are files with privileged information they will be accessible to everyone. If the .php fileshave a security issue in them you will get hacked. This is why we DO NOT advise you to do that.
What we do advise you to do is contact the developer of the offending extension and ask them to fix their code toalways go through Joomla's index.php files (e.g. using com_ajax). If they decline to do that you should consider
50
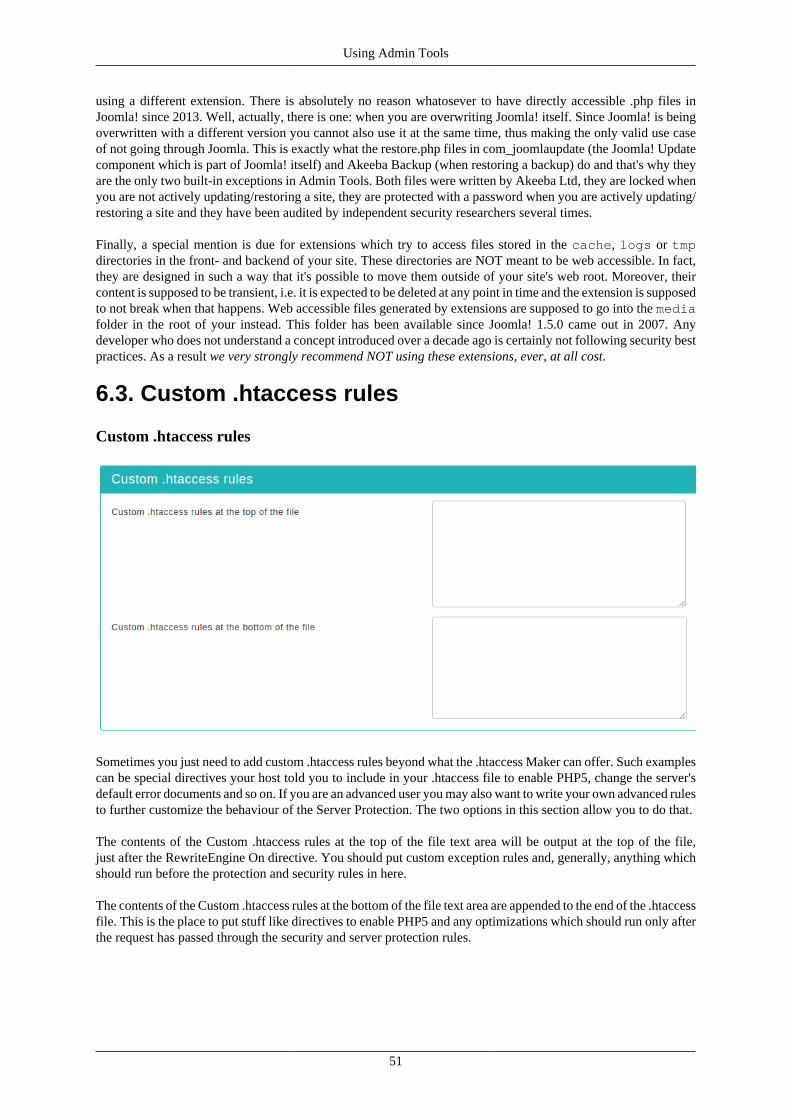
Using Admin Tools
using a different extension. There is absolutely no reason whatosever to have directly accessible .php files inJoomla! since 2013. Well, actually, there is one: when you are overwriting Joomla! itself. Since Joomla! is beingoverwritten with a different version you cannot also use it at the same time, thus making the only valid use caseof not going through Joomla. This is exactly what the restore.php files in com_joomlaupdate (the Joomla! Updatecomponent which is part of Joomla! itself) and Akeeba Backup (when restoring a backup) do and that's why theyare the only two built-in exceptions in Admin Tools. Both files were written by Akeeba Ltd, they are locked whenyou are not actively updating/restoring a site, they are protected with a password when you are actively updating/restoring a site and they have been audited by independent security researchers several times.
Finally, a special mention is due for extensions which try to access files stored in the cache, logs or tmpdirectories in the front- and backend of your site. These directories are NOT meant to be web accessible. In fact,they are designed in such a way that it's possible to move them outside of your site's web root. Moreover, theircontent is supposed to be transient, i.e. it is expected to be deleted at any point in time and the extension is supposedto not break when that happens. Web accessible files generated by extensions are supposed to go into the mediafolder in the root of your instead. This folder has been available since Joomla! 1.5.0 came out in 2007. Anydeveloper who does not understand a concept introduced over a decade ago is certainly not following security bestpractices. As a result we very strongly recommend NOT using these extensions, ever, at all cost.
6.3. Custom .htaccess rules
Custom .htaccess rules
Sometimes you just need to add custom .htaccess rules beyond what the .htaccess Maker can offer. Such examplescan be special directives your host told you to include in your .htaccess file to enable PHP5, change the server'sdefault error documents and so on. If you are an advanced user you may also want to write your own advanced rulesto further customize the behaviour of the Server Protection. The two options in this section allow you to do that.
The contents of the Custom .htaccess rules at the top of the file text area will be output at the top of the file,just after the RewriteEngine On directive. You should put custom exception rules and, generally, anything whichshould run before the protection and security rules in here.
The contents of the Custom .htaccess rules at the bottom of the file text area are appended to the end of the .htaccessfile. This is the place to put stuff like directives to enable PHP5 and any optimizations which should run only afterthe request has passed through the security and server protection rules.
51

Using Admin Tools
6.4. Optimisation and utility
Optimisation and utility
This section contains directives which are of utilitarian value and bound to save you some time:
Force index.phpparsing beforeindex.html
Some servers attempt to serve index.html before index.php. This has the implication thattrying to access your site's root, e.g. http://www.example.com, will attempt to servean index.html first. If this file doesn't exist, it will try to serve index.php. However, all of ourJoomla! sites only have the index.php, so this checking slows them down unnecessarily oneach page request. This rule works around this problem. Do note that some servers do notallow this and will result in a blank page or Internal Server Error page.
52
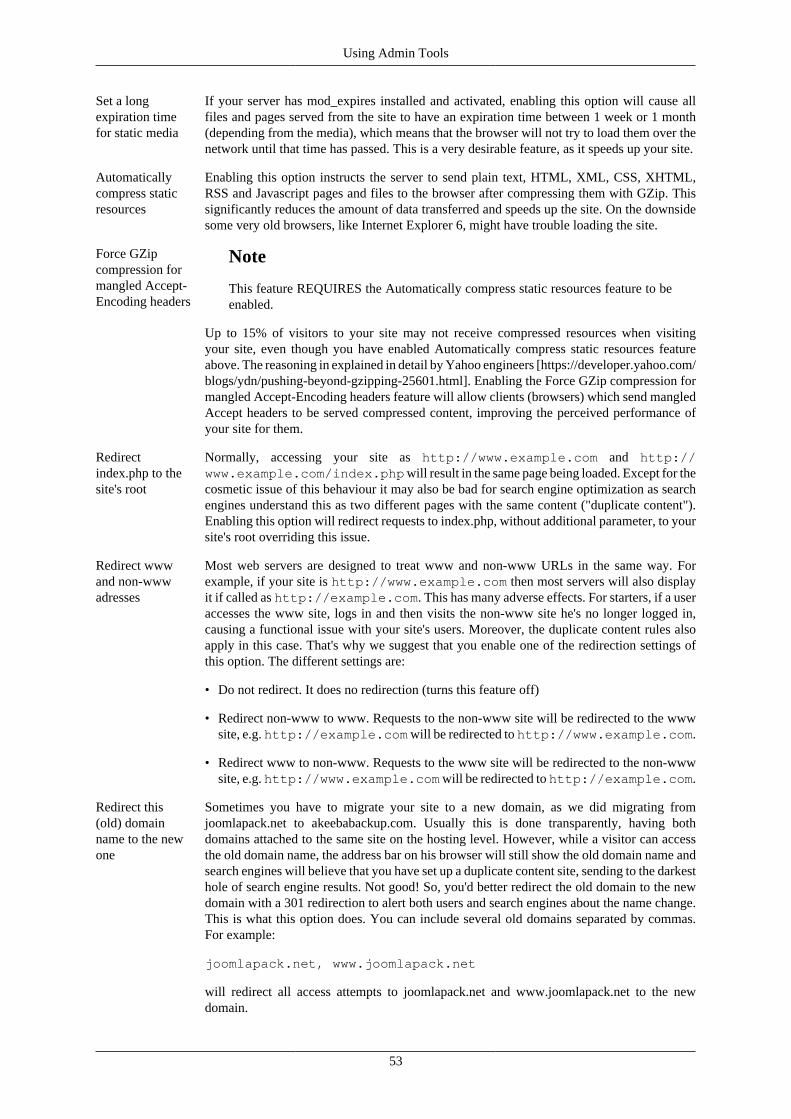
Using Admin Tools
Set a longexpiration timefor static media
If your server has mod_expires installed and activated, enabling this option will cause allfiles and pages served from the site to have an expiration time between 1 week or 1 month(depending from the media), which means that the browser will not try to load them over thenetwork until that time has passed. This is a very desirable feature, as it speeds up your site.
Automaticallycompress staticresources
Enabling this option instructs the server to send plain text, HTML, XML, CSS, XHTML,RSS and Javascript pages and files to the browser after compressing them with GZip. Thissignificantly reduces the amount of data transferred and speeds up the site. On the downsidesome very old browsers, like Internet Explorer 6, might have trouble loading the site.
Force GZipcompression formangled Accept-Encoding headers
Note
This feature REQUIRES the Automatically compress static resources feature to beenabled.
Up to 15% of visitors to your site may not receive compressed resources when visitingyour site, even though you have enabled Automatically compress static resources featureabove. The reasoning in explained in detail by Yahoo engineers [https://developer.yahoo.com/blogs/ydn/pushing-beyond-gzipping-25601.html]. Enabling the Force GZip compression formangled Accept-Encoding headers feature will allow clients (browsers) which send mangledAccept headers to be served compressed content, improving the perceived performance ofyour site for them.
Redirectindex.php to thesite's root
Normally, accessing your site as http://www.example.com and http://www.example.com/index.php will result in the same page being loaded. Except for thecosmetic issue of this behaviour it may also be bad for search engine optimization as searchengines understand this as two different pages with the same content ("duplicate content").Enabling this option will redirect requests to index.php, without additional parameter, to yoursite's root overriding this issue.
Redirect wwwand non-wwwadresses
Most web servers are designed to treat www and non-www URLs in the same way. Forexample, if your site is http://www.example.com then most servers will also displayit if called as http://example.com. This has many adverse effects. For starters, if a useraccesses the www site, logs in and then visits the non-www site he's no longer logged in,causing a functional issue with your site's users. Moreover, the duplicate content rules alsoapply in this case. That's why we suggest that you enable one of the redirection settings ofthis option. The different settings are:
• Do not redirect. It does no redirection (turns this feature off)
• Redirect non-www to www. Requests to the non-www site will be redirected to the wwwsite, e.g. http://example.com will be redirected to http://www.example.com.
• Redirect www to non-www. Requests to the www site will be redirected to the non-wwwsite, e.g. http://www.example.com will be redirected to http://example.com.
Redirect this(old) domainname to the newone
Sometimes you have to migrate your site to a new domain, as we did migrating fromjoomlapack.net to akeebabackup.com. Usually this is done transparently, having bothdomains attached to the same site on the hosting level. However, while a visitor can accessthe old domain name, the address bar on his browser will still show the old domain name andsearch engines will believe that you have set up a duplicate content site, sending to the darkesthole of search engine results. Not good! So, you'd better redirect the old domain to the newdomain with a 301 redirection to alert both users and search engines about the name change.This is what this option does. You can include several old domains separated by commas.For example:
joomlapack.net, www.joomlapack.net
will redirect all access attempts to joomlapack.net and www.joomlapack.net to the newdomain.
53

Using Admin Tools
Force HTTPS forthese URLs (donot include thedomain name)
Under regular circumstances Joomla! should be able to automatically redirect certain menuitems to a secure (HTTPS) address. However, this is not possible if the HTTPS domain nameand the HTTP domain name are not the same, as is casual with many shared hosts. SinceAdmin Tools supports custom HTTPS domain names you can use this feature to make up forthe lack of functionality in Joomla! itself. Use one URL per site and do not include http:// andyour domain name. For example, if you want to redirect http://www.example.com/eshop.html to https://www.example.com/eshop.html you have to entereshop.html in a new line of this field. Easy, isn't it?
HSTS Header(for HTTPS-onlysites)
Assuming that you have a site which is only supposed to be accessed over HTTPS, yourvisitor's web browser has no idea that the site should not be ever accessed over HTTP. Joomla!offers a Global Configuration setting to force SSL throughout the entire site, but this is merelya workaround: if it sees a request coming through HTTP it will forward it to HTTPS. Thereare two privacy implications for your users:
• If you have not enabled the SSL option in Global Configuration a man-in-the-middle attackknown as "SSL Stripping" is possible. In this case the user will access your site over plainHTTP without having any idea that they should be using HTTPS instead.
• Even if Joomla! forwards your user to HTTPS the unencrypted (HTTP) request can still belogged by an attacker. With a moderate amount of sophistication on the part of the attacker(basically, some $200 hardware an widely available information) they can efficientlyeavesdrop at the very least the URLs visited by your user –undetected but to the mostvigilant geeks among your users– and probably infer information about them.
The HSTS header can fix SSL Stripping attacks by instructing the browser to always useHTTPS for this website, even if the protocol used in a URL is HTTP. The browser, havingseen this header, will always use HTTPS for your site. An SSL Stripping and other man-in-the-middle attacks are possible only if your user visits your site for the first time in a hostileenvironment. This is usually not the case, therefore the HSTS header can provide real benefitsto the privacy of your users.
For more information on what the HSTS header is and how it can protect your sitevisitors' privacy you can read the Wikipedia entry on HSTS [http://en.wikipedia.org/wiki/HTTP_Strict_Transport_Security].
Important
Since Admin Tools 4.0.0 enabling HSTS will also have the following side effectswhich are designed to prevent unsafe HTTP redirections and cookie leaking:
• If your site is accessed over HTTP there will be a redirection to the HTTPSdomain name, as configured in the .htaccess Maker. In previous versions no suchredirection took place.
• non-www to www redirection and vice versa will always redirect requests to theHTTPS version of the domain name, even if you access it over http. In previousversions we were always using plain HTTP.
• Old to new domain redirection will always redirect to the HTTPS domain name,as configured in the .htaccess Maker. In previous versions all redirections weremade to the HTTP domain name, as configured in the .htaccess Maker.
• The HSTS header is only sent over HTTPS requests, not over HTTP requests, perHSTS header best practices. Previously it was send over HTTP requests whichis not advisable.
Most sites will not notice any difference. If you have a strange setup with differentHTTP domain names assigned to the same site but only one HTTPS domain (e.g.
54

Using Admin Tools
a shared SSL setup) you may experience redirection issues. In this case we adviseyou to disable HSTS. Instead, add the following directive in the "Custom .htaccessrules at the bottom of the file" area:
Header always set Strict-Transport-Security "max-age=31536000"
Disable HTTPmethods TRACEand TRACK(protect againstXST)
Enabling this option will prevent remote clients from using the HTTP methods TRACEand TRACK to connect to your site. These can be used by hackers to perform privilegeescalation attacks known as Cross Site Tracing (XST) [https://www.owasp.org/index.php/Cross_Site_Tracing]. To the best of our knowledge there are no side-effects to enabling thisfeature.
Enable Cross-Origin ResourceSharing (CORS)
By default a third party site cannot load content from your site using an AJAX request sinceyour content is in a different domain than the site hosting the Javascript performing therequest. Using CORS you can circumvent this problem, allowing third party sites' Javascriptto load content from your site. When you enable this option the proper Access-Control-Allow-Origin and Timing-Allow-Origin HTTP headers will be set for all requests. For moreinformation on CORS please consult the Enable CORS [http://enable-cors.org/] site.
Set the UTF-8character set asthe default
Some servers use the legacy ISO-8859-1 character set as the default when serving content.While Joomla! pages will appear correctly –Joomla! sends a content encoding header– othercontent such as JSON data, CSV exports and Admin Tools' messages to blocked users mayappear incorrectly if they're using international characters. If you're unsure, try enabling thisoption.
Send ETag Your web server sends an ETag header with each static file it serves. Browsers will ask theserver in subsequent requests whether the file has a different ETag. If not, they will servethe same file therefore reducing the amount of data they need to transfer from the server(and making the site load faster). By default ETags are calculated based on the file size, lastmodified date and the inode number. The latter depends on the location of the file inside thefilesystem of the server.
When you have a site hosted on a single server this is great. If your static files are, however,hosted on a server farm this may not be a good idea. The reason is that every static file isstored on different server and while the file size and last modified date might be the same theinode number will differ, therefore causing the browser to perform unnecessary file transfers.This is where this option comes in handy.
Important
Do NOT change this option if your site is hosted on just one server. If you are not sureor have no idea what that means then your site is hosted on just one server and youMUST NOT change this option. Please bear in mind that site speed analysers likeYSlow are designed for gigantic sites running off hundreds or thousands of servers.Their site speed checklists DO NOT work well with the vast majority of sites you areworking on, i.e. very small sites running off a single server. Treat these checklistsas suggestions: you need to exercise common sense, not blindly follow them. If youdisable ETags on a small site you are more likely to do harm than good!
The available options are:
• Server default. Use whatever setting the server administrator has chosen. If you are notperfectly sure you know what you're doing choose this option.
• Full. Send ETags based on file size, last modification date/time and inode number.
• Size and Time. Send ETags based on file size and last modification date/time only.
• Size only. Send ETags based on file size only.
55
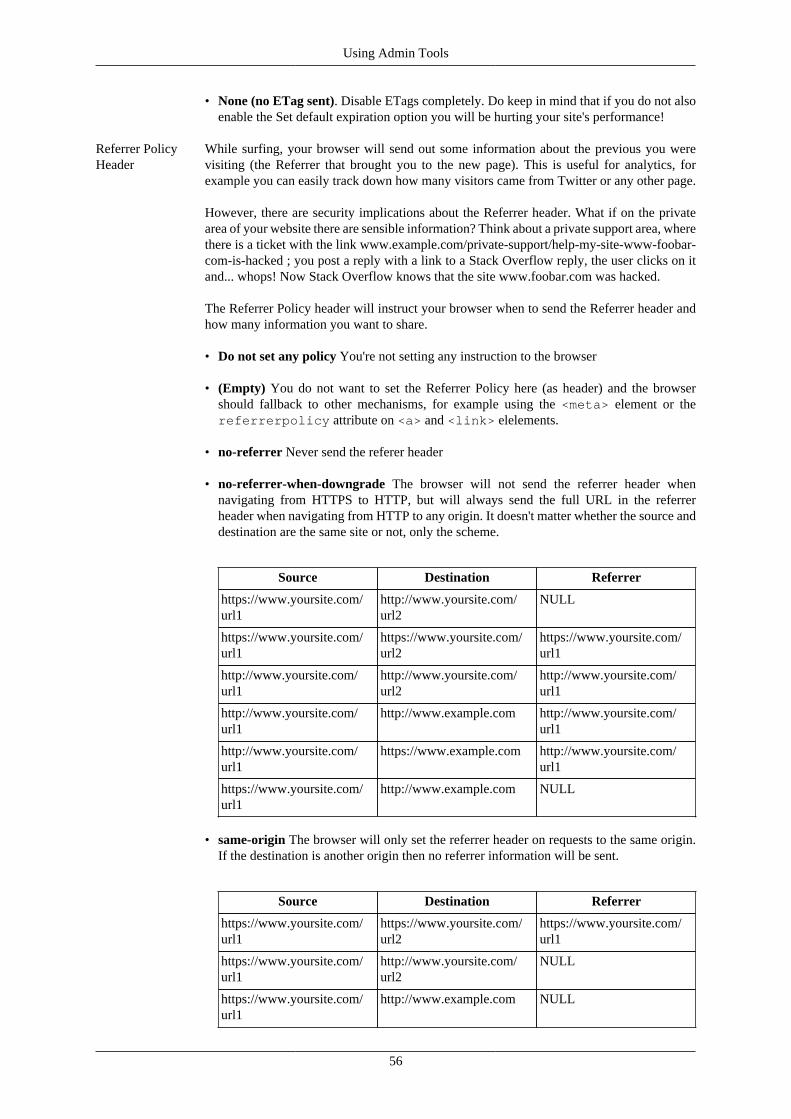
Using Admin Tools
• None (no ETag sent). Disable ETags completely. Do keep in mind that if you do not alsoenable the Set default expiration option you will be hurting your site's performance!
Referrer PolicyHeader
While surfing, your browser will send out some information about the previous you werevisiting (the Referrer that brought you to the new page). This is useful for analytics, forexample you can easily track down how many visitors came from Twitter or any other page.
However, there are security implications about the Referrer header. What if on the privatearea of your website there are sensible information? Think about a private support area, wherethere is a ticket with the link www.example.com/private-support/help-my-site-www-foobar-com-is-hacked ; you post a reply with a link to a Stack Overflow reply, the user clicks on itand... whops! Now Stack Overflow knows that the site www.foobar.com was hacked.
The Referrer Policy header will instruct your browser when to send the Referrer header andhow many information you want to share.
• Do not set any policy You're not setting any instruction to the browser
• (Empty) You do not want to set the Referrer Policy here (as header) and the browsershould fallback to other mechanisms, for example using the <meta> element or thereferrerpolicy attribute on <a> and <link> elelements.
• no-referrer Never send the referer header
• no-referrer-when-downgrade The browser will not send the referrer header whennavigating from HTTPS to HTTP, but will always send the full URL in the referrerheader when navigating from HTTP to any origin. It doesn't matter whether the source anddestination are the same site or not, only the scheme.
Source Destination Referrer
https://www.yoursite.com/url1
http://www.yoursite.com/url2
NULL
https://www.yoursite.com/url1
https://www.yoursite.com/url2
https://www.yoursite.com/url1
http://www.yoursite.com/url1
http://www.yoursite.com/url2
http://www.yoursite.com/url1
http://www.yoursite.com/url1
http://www.example.com http://www.yoursite.com/url1
http://www.yoursite.com/url1
https://www.example.com http://www.yoursite.com/url1
https://www.yoursite.com/url1
http://www.example.com NULL
• same-origin The browser will only set the referrer header on requests to the same origin.If the destination is another origin then no referrer information will be sent.
Source Destination Referrer
https://www.yoursite.com/url1
https://www.yoursite.com/url2
https://www.yoursite.com/url1
https://www.yoursite.com/url1
http://www.yoursite.com/url2
NULL
https://www.yoursite.com/url1
http://www.example.com NULL
56
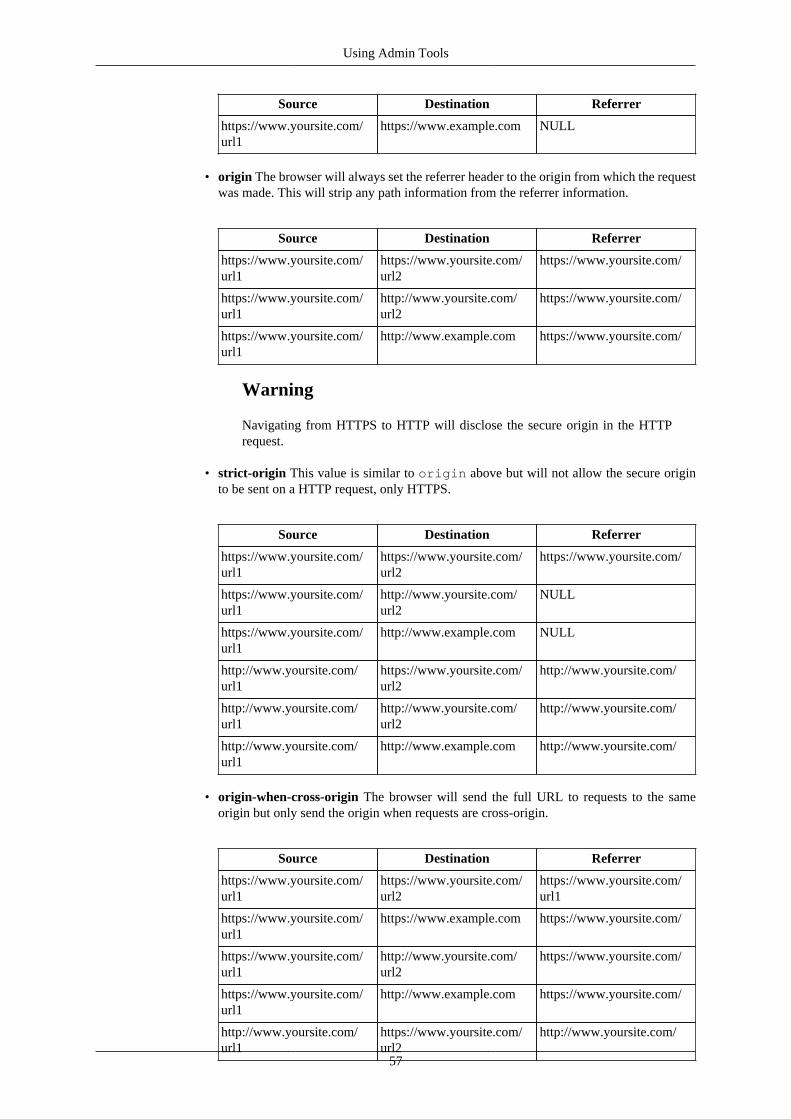
Using Admin Tools
Source Destination Referrer
https://www.yoursite.com/url1
https://www.example.com NULL
• origin The browser will always set the referrer header to the origin from which the requestwas made. This will strip any path information from the referrer information.
Source Destination Referrer
https://www.yoursite.com/url1
https://www.yoursite.com/url2
https://www.yoursite.com/
https://www.yoursite.com/url1
http://www.yoursite.com/url2
https://www.yoursite.com/
https://www.yoursite.com/url1
http://www.example.com https://www.yoursite.com/
Warning
Navigating from HTTPS to HTTP will disclose the secure origin in the HTTPrequest.
• strict-origin This value is similar to origin above but will not allow the secure originto be sent on a HTTP request, only HTTPS.
Source Destination Referrer
https://www.yoursite.com/url1
https://www.yoursite.com/url2
https://www.yoursite.com/
https://www.yoursite.com/url1
http://www.yoursite.com/url2
NULL
https://www.yoursite.com/url1
http://www.example.com NULL
http://www.yoursite.com/url1
https://www.yoursite.com/url2
http://www.yoursite.com/
http://www.yoursite.com/url1
http://www.yoursite.com/url2
http://www.yoursite.com/
http://www.yoursite.com/url1
http://www.example.com http://www.yoursite.com/
• origin-when-cross-origin The browser will send the full URL to requests to the sameorigin but only send the origin when requests are cross-origin.
Source Destination Referrer
https://www.yoursite.com/url1
https://www.yoursite.com/url2
https://www.yoursite.com/url1
https://www.yoursite.com/url1
https://www.example.com https://www.yoursite.com/
https://www.yoursite.com/url1
http://www.yoursite.com/url2
https://www.yoursite.com/
https://www.yoursite.com/url1
http://www.example.com https://www.yoursite.com/
http://www.yoursite.com/url1
https://www.yoursite.com/url2
http://www.yoursite.com/
57

Using Admin Tools
Warning
Navigating from HTTPS to HTTP will disclose the secure URL or origin in theHTTP request.
• strict-origin-when-cross-origin Similar to origin-when-cross-origin above butwill not allow any information to be sent when a scheme downgrade happens (the user isnavigating from HTTPS to HTTP).
Source Destination Referrer
https://www.yoursite.com/url1
https://www.yoursite.com/url2
https://www.yoursite.com/url1
https://www.yoursite.com/url1
https://www.example.com https://www.yoursite.com/
https://www.yoursite.com/url1
http://www.yoursite.com/url2
NULL
https://www.yoursite.com/url1
http://www.example.com NULL
• unsafe-url The browser will always send the full URL with any request to any origin.
6.5. System configuration
Warning
If you backup and restore your site on a new host you MUST change these configuration parameters toreflect your new server configuration manually. In fact, you must remove your .htaccess file, change thisparameters and then let Admin Tools create a new .htaccess file before you can use your site's front-end.
System configuration
This final section contains all the options which let the .htaccess maker know some of the most basic informationpertaining your site and which are used to create the rules for some of the options in the previous section.
Host name forHTTPS requests(without https://)
Enter the site's domain name for secure (HTTPS) connections. By default, Admin Toolsassumes it is the same as your site's domain, but you have to verify it as it may be different onsome hosts, especially on shared hosts. Do not use the https:// prefix, just the domain name andpath to your site. For example, if the address is https://www.example.com/joomlathen type in www.example.com/joomla.
58
Using Admin Tools
Host name forHTTP requests(without http://)
Enter the site's domain name for regular (HTTP) connections. By default, Admin Toolsassumes it is the same as the address you are connected to right now, but you have to verifyit. Do not use the http:// prefix, just the domain name and path to your site. For example,if the address to your site's root is http://www.example.com/joomla then type inwww.example.com/joomla.
Follow Symlinks Joomla! normally does not create symlinks and does not need symlinks. At the same time,hackers who have infiltrated a site do use symlinks to get read access to files that are normallyoutside the reach of the web site they have hacked. This is why this option exists. You canset it to:
• Default. It's up to your host to determine if symlinks will be followed. Use this if the otheroptions cause problems to your site.
• Yes, always. This is the insecure option. If you use it keep in mind that in the event of ahack all world-readable files on the server may be compromised. Really, it's a BAD idea.Worse than bad, it's a horrible idea. Don't use it.
• Only if owner matches. That's the safe approach to enabling symlinks. They will befollowed only if the owner of the symlink matches the owner of the file/directory it links to.
If you have no idea what that means, first try setting this option to "Only if owner matches".If this results in a blank page or an Internal Server Error 500 then set this to "Default". Formore information please consult Apache's documentation or Joomla!'s htaccess.txt file.
Base directory ofyour site
This is the directory where your site is installed. For example, if it is installed in a directorynamed joomla and you access it on a URL similar to http://www.example.com/joomla you have to type in /joomla in here. If your site is installed on the root of yourdomain, please use a single forward slash for this field: /
7. The NginX configuration makerNote
This feature is only available in the Professional release
Warning
This feature is only available on servers running the NginX web server. If your server is using Apacheor IIS the button to launch this feature will not be shown. If the server type cannot be detected you willsee this feature but you should consult with your host whether it will have any effect and how to use it..
One of the most important aspects of managing a web site hosted on an NginX server is being able to fine-tuneyour site configuration file. This file is responsible for many web server level tweaks, such as enabling the useof search engine friendly (SEF) URLs, blocking access to system files which should not be accessible from theweb, redirecting between pages based on custom criteria and even optimising the performance of your site. On thedownside, learning how to tweak all those settings is akin to learning a foreign language. The NginX ConfigurationMaker tool of Admin Tools is designed to help you create the part of such a file used for security and performanceoptimisation by utilizing a point-and-click interface.
Tip
If you ever want to revert to a "safe default", just set all of the options on this page to "Off" and click on"Save and create nginx.conf". This will create an empty nginx.conf file.
One very important aspect of NginX is that, unlike Apache, the site configuration file is not magically loaded onevery request. When using this feature you will have to do two things:
59
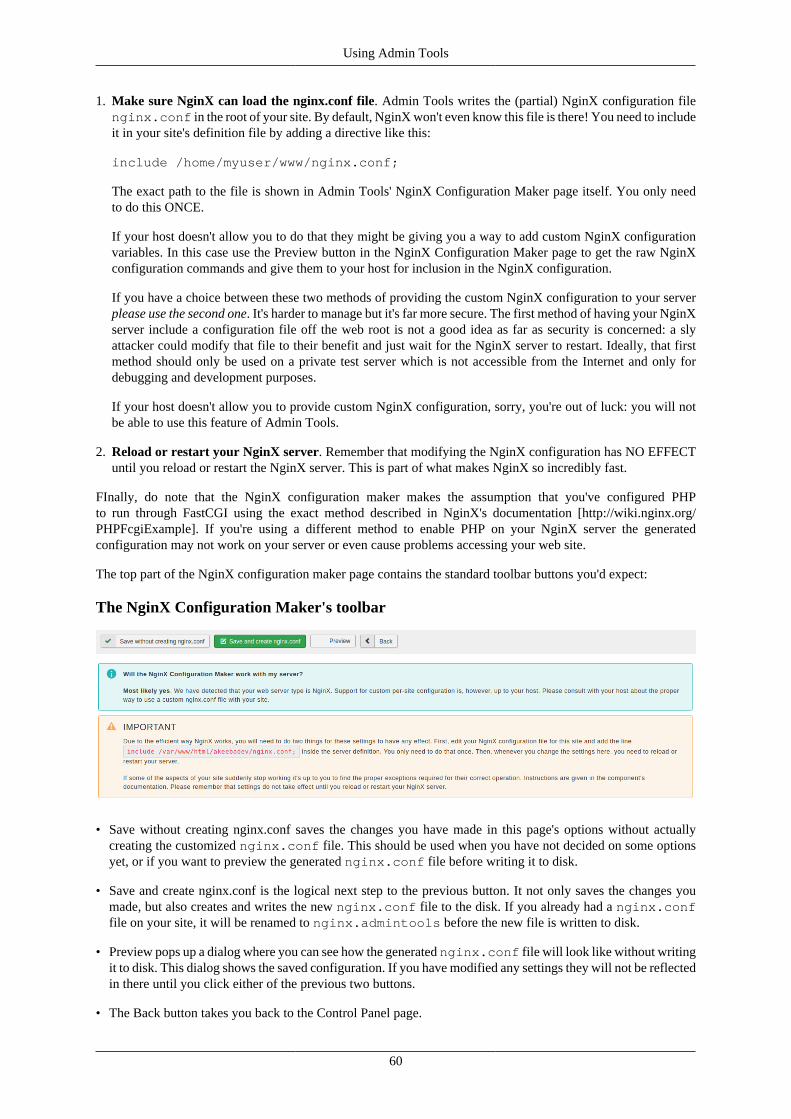
Using Admin Tools
1. Make sure NginX can load the nginx.conf file. Admin Tools writes the (partial) NginX configuration filenginx.conf in the root of your site. By default, NginX won't even know this file is there! You need to includeit in your site's definition file by adding a directive like this:
include /home/myuser/www/nginx.conf;
The exact path to the file is shown in Admin Tools' NginX Configuration Maker page itself. You only needto do this ONCE.
If your host doesn't allow you to do that they might be giving you a way to add custom NginX configurationvariables. In this case use the Preview button in the NginX Configuration Maker page to get the raw NginXconfiguration commands and give them to your host for inclusion in the NginX configuration.
If you have a choice between these two methods of providing the custom NginX configuration to your serverplease use the second one. It's harder to manage but it's far more secure. The first method of having your NginXserver include a configuration file off the web root is not a good idea as far as security is concerned: a slyattacker could modify that file to their benefit and just wait for the NginX server to restart. Ideally, that firstmethod should only be used on a private test server which is not accessible from the Internet and only fordebugging and development purposes.
If your host doesn't allow you to provide custom NginX configuration, sorry, you're out of luck: you will notbe able to use this feature of Admin Tools.
2. Reload or restart your NginX server. Remember that modifying the NginX configuration has NO EFFECTuntil you reload or restart the NginX server. This is part of what makes NginX so incredibly fast.
FInally, do note that the NginX configuration maker makes the assumption that you've configured PHPto run through FastCGI using the exact method described in NginX's documentation [http://wiki.nginx.org/PHPFcgiExample]. If you're using a different method to enable PHP on your NginX server the generatedconfiguration may not work on your server or even cause problems accessing your web site.
The top part of the NginX configuration maker page contains the standard toolbar buttons you'd expect:
The NginX Configuration Maker's toolbar
• Save without creating nginx.conf saves the changes you have made in this page's options without actuallycreating the customized nginx.conf file. This should be used when you have not decided on some optionsyet, or if you want to preview the generated nginx.conf file before writing it to disk.
• Save and create nginx.conf is the logical next step to the previous button. It not only saves the changes youmade, but also creates and writes the new nginx.conf file to the disk. If you already had a nginx.conffile on your site, it will be renamed to nginx.admintools before the new file is written to disk.
• Preview pops up a dialog where you can see how the generated nginx.conf file will look like without writingit to disk. This dialog shows the saved configuration. If you have modified any settings they will not be reflectedin there until you click either of the previous two buttons.
• The Back button takes you back to the Control Panel page.
60

Using Admin Tools
Below the toolbar there are five panes with different options, described below. Before you do that, please readand understand the following warning. Support requests which indicate that you have not read it will be repliedwith a link back to this page.
Warning
Depending on your web server settings, some of these options may be incompatible with your site. Inthis case you will get a blank page or an Internal Server Error 500 error page when trying to access anypart of your site. If this happens, you have to remove the contents of nginx.conf file from your site'sroot directory using an FTP application or the File Manager feature of your hosting control panel ORremove all custom configuration from your NginX site configuration file (depending on which methodyou chose). Then you MUST reload or restart NginX for the changes to take effect.
We strongly suggest that you begin by setting all options to No and then enable them one by one, creatinga new configuration (and reloading your NginX server) after you have enabled each one of them. If youbump into a blank or error page you will know that the last option you tried is incompatible with your host.Unfortunately, there is no other way than trial and error to deduce which options may be incompatiblewith your server.
7.1. Basic Security
Basic security
Disabledirectory listings(recommended)
When disabled, your web server might list the files and subdirectories of any directory onyour site if there is no index.html file inside it. This can pose a security risk, so you shouldalways enable this option to avoid this from happening.
61

Using Admin Tools
Protect againstcommon fileinjection attacks
Many attackers try to exploit vulnerable extensions on your site by tricking them intoincluding malicious code hosted on the attacker's server. Enabling this option will protectyour server against this kind of attacks. This works by preventing any URL which referencesan http:// or https:// URL in the query string. Sometimes these are legitimate requests. Forexample, some gallery components use them. In this case you are recommended to use theRFIShield (Remote File Inclusion protection) in the Web Application Firewall and turn thisNginX Configuration Maker option OFF.
Disable PHPEaster Eggs
PHP has a fun and annoying feature known as "Easter Eggs". By passing a special URLparameter, PHP will display a picture instead of the actual page requested. Whereas this isconsidered fun, it is also widely exploited by attackers to figure out the version of your PHPinstallation (these images change between different versions of PHP) and launch hackingattacks targeting your specific PHP version. By enabling this option you completely disableaccess to those Easter Eggs and make it even more difficult for attackers to figure out thedetails of your server.
Note: You are advised to also set expose_php to Off in your php.ini file to preventaccidental leaks of your PHP version.
Block access toconfiguration.php-dist andhtaccess.txt
These two files are left behind after any Joomla! installation or upgrade and can be directlyaccessed from the web. They are used by attackers to tell the Joomla! version you are using, sothat they can tailor an attack targeting your specific Joomla! version. Enabling this option will"hide" those files when accessed from the web (a 404 Not Found page is returned), trickingattackers into believing that these files do not exist and making it slightly more difficult forthem to deduce information about your site. This option also hides the web.config.txt fileincluded in Joomla! 3 and later for use with the IIS server.
Protect againstclickjacking
Turning on this option will protect you against clickjacking [http://en.wikipedia.org/wiki/Clickjacking]. It does so by preventing your site's pages to be loaded in a, Frame, IFrame orObject tag unless this comes from a page inside your own site. Please note that if your siterelies on its pages being accessible through frames / iframes displayed on other sites (NOTon your site displaying content from other sites, that's irrelevant!) then you should not enablethis option. If unsure, enable it.
Block accessfrom specificuser agents
When enabled, it will block any site access attempt if the remote program sends one of theuser agent strings in the User agents to block, one per line option. This feature is designed toprotect your site against common bandwidth-hogging download bots and otherwise legitimatetools which are more usually used for hacking sites than their benign intended functionality.
User agents toblock, one perline
The user agent strings to block from accessing your site. You don't have to enter the whole UAstring, just a part of it. The default setting includes several usual suspects. Separate multipleentries by a single newline character (that is a single press of the ENTER key). Do note thatsome server with mod_security or mod_evasive installed will throw an "Access forbidden"message if you try to save the configuration settings when this field contains the word "WGet".If you come across this issue it is not a bug with Admin Tools or Joomla!, it is a server-levelprotection feature kicking in. Just avoid including the word Wget and you should be out ofharm's way.
Block commonexploits
Enabling this option will include a set of options recommended by Joomla! to protect against(obsolete) common exploits which no longer have any effect on Joomla! 2.5 and later. It'sstill a good idea to enable this option.
Enable SEFURLs
Enabling this option will allow your site to use SEF (a.k.a. "beautiful") URLs, with or withoutindex.php in them. You are recommended to leave this option turned on unless you have acustom URL forwarding setup already in place.
62

Using Admin Tools
7.2. Server protection
Server protection
This is the most coveted feature of our software, offering a near-inclusive protection against the vast majority ofknown threats when enabled. This feature's mission statement can be summed up with a single phrase: nothingexecutes on your site unless you allowed it to. By blocking access to front-end and back-end elements (mediafiles, Javascript, CSS and PHP files) it makes it extremely hard —but not outright impossible— for an attacker tohack your site, even if he manages to exploit a security vulnerability to upload malicious PHP code to your site.Additionally, it will deny direct access to resources not designed to be directly accessible from the web, such astranslation INI files, which are usually used by attackers to find out which version of Joomla! you are running onyour site to tailor an attack to your site. On the downside, you have to explicitly enable access to some extensions'PHP files which are designed to be called directly from the web and not through Joomla!'s main file, index.php.
Do note that enabling this feature will kill the functionality of some extensions which create arbitrarily namedPHP files throughout your site, such as RokGZipper. In our humble opinion the security risk of having your siteunprotected outweighs the benefits of such solutions by a dramatic factor. As a result, we strongly suggest disablingRokGZipper and other similar software using similarly questionable security practices.
63
Using Admin Tools
There are three sections of configuration settings controlling the functionality of the Server Protection feature.The first one is the Protection Toggles which allows you to enable or disable the four main aspects of protection:
Back-endprotection
Disables direct access to most back-end resources, except those in the exceptions lists. Itis generally recommended to turn it on to enhance the protection of your site, unless youhave enabled the administrator password protection feature. In the latter case this option isredundant and we recommend turning it off.
Front-endprotection
Disables direct access to most front-end resources, except those in the exceptions lists. It isgenerally recommended to turn it on to enhance the protection of your site.
The next section is called Fine-tuning and contains the necessary options to tweak the protection's behaviour to suityour site. Before describing what each option does, a small explanation of how the protection works is in order.The protection code in the generated nginx.conf file blocks direct web access to all files. Joomla!'s standard"entry point" or "main" files, index.php and index2.php, are automatically exempt from this rule. However,your site also contains images, media, CSS and Javascript files inside certain directories. For each of the back-endand front-end protection we need a set of directories where such files are allowed and the file extensions of thosefiles. These are what those options are all about. The default settings contain the most common file types you'dexpect to find on a site and the standard Joomla! directories where they should be located. You only have to tweakthem if you want to add more file extensions or have such static files in locations other than the default.
Back-enddirectorieswhere file typeexceptions areallowed
This is a list of back-end directories (that is, subdirectories of your site's administratordirectory) where you expect media files to be present. Place one directory on each line.Subdirectories of those directories are automatically added to the exceptions list withouthaving to explicitly list them here.
Back-end filetypes allowedin selecteddirectories
The extensions of back-end files which allowed to pass through the server protection filter,as long as the files with those extensions are in the list above. Place one file extension perline, without the dot. For example, if you want to allow access to all PDF files you have totype in "pdf" (without the quotes) on a new line of this list. Do note that file extensions arecase-sensitive. This means that PDF, Pdf, pdf and pDF are four different file extensions as faras your web server is concerned. As a rule of thumb, type in the extensions in lowercase andmake sure that the extensions of the files you upload are also in lowercase.
Front-enddirectorieswhere file typeexceptions areallowed
This is a list of front-end directories (that is, directories in your site's root) where you expectmedia files to be present. Place one directory on each line. Subdirectories of those directoriesare automatically added to the exceptions list without having to explicitly list them here.
Front-end filetypes allowedin selecteddirectories
The extensions of front-end files which allowed to pass through the server protection filter,as long as the files with those extensions are in the list above. Place one file extension perline, without the dot. For example, if you want to allow access to all PDF files you have totype in "pdf" (without the quotes) on a new line of this list. Do note that file extensions arecase-sensitive. This means that PDF, Pdf, pdf and pDF are four different file extensions as faras your web server is concerned. As a rule of thumb, type in the extensions in lowercase andmake sure that the extensions of the files you upload are also in lowercase.
64
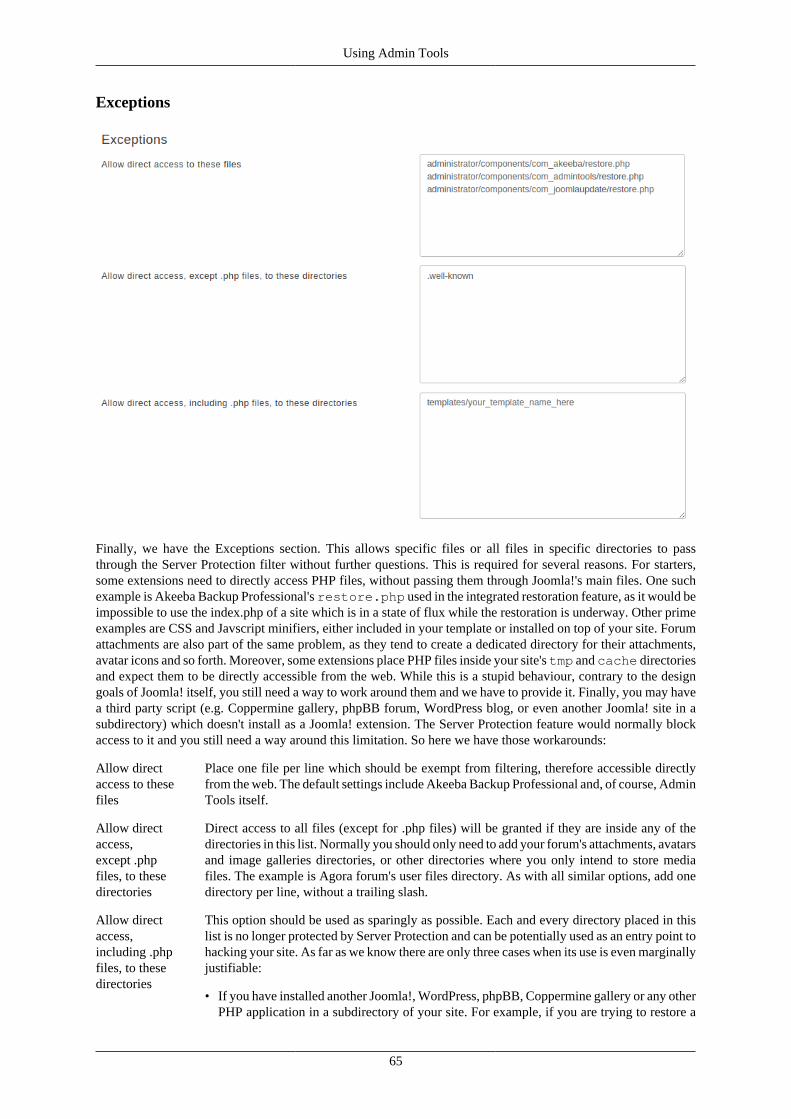
Using Admin Tools
Exceptions
Finally, we have the Exceptions section. This allows specific files or all files in specific directories to passthrough the Server Protection filter without further questions. This is required for several reasons. For starters,some extensions need to directly access PHP files, without passing them through Joomla!'s main files. One suchexample is Akeeba Backup Professional's restore.php used in the integrated restoration feature, as it would beimpossible to use the index.php of a site which is in a state of flux while the restoration is underway. Other primeexamples are CSS and Javscript minifiers, either included in your template or installed on top of your site. Forumattachments are also part of the same problem, as they tend to create a dedicated directory for their attachments,avatar icons and so forth. Moreover, some extensions place PHP files inside your site's tmp and cache directoriesand expect them to be directly accessible from the web. While this is a stupid behaviour, contrary to the designgoals of Joomla! itself, you still need a way to work around them and we have to provide it. Finally, you may havea third party script (e.g. Coppermine gallery, phpBB forum, WordPress blog, or even another Joomla! site in asubdirectory) which doesn't install as a Joomla! extension. The Server Protection feature would normally blockaccess to it and you still need a way around this limitation. So here we have those workarounds:
Allow directaccess to thesefiles
Place one file per line which should be exempt from filtering, therefore accessible directlyfrom the web. The default settings include Akeeba Backup Professional and, of course, AdminTools itself.
Allow directaccess,except .phpfiles, to thesedirectories
Direct access to all files (except for .php files) will be granted if they are inside any of thedirectories in this list. Normally you should only need to add your forum's attachments, avatarsand image galleries directories, or other directories where you only intend to store mediafiles. The example is Agora forum's user files directory. As with all similar options, add onedirectory per line, without a trailing slash.
Allow directaccess,including .phpfiles, to thesedirectories
This option should be used as sparingly as possible. Each and every directory placed in thislist is no longer protected by Server Protection and can be potentially used as an entry point tohacking your site. As far as we know there are only three cases when its use is even marginallyjustifiable:
• If you have installed another Joomla!, WordPress, phpBB, Coppermine gallery or any otherPHP application in a subdirectory of your site. For example, if you are trying to restore a
65
Using Admin Tools
copy of your site inside a directory named test in your site's root you have to add testto this list. This is the one and only usage scenario which doesn't compromise your site'ssecurity.
• Some templates and template frameworks may wrap their CSS and Javscript inside PHPfiles in order to deliver them compressed to your browser. While this is a valid technique,it's possible that the list of PHP files is too big to track down and include in the first listof the Exceptions section. In this case you may consider putting the template subdirectorycontaining those files in this list.
• Some extensions do something silly: they place files inside your site's tmp or cachedirectories and expect them to be directly accessible from the web. This is plainwrong because these directories are designed to be protected system directories wheredirect access should not be allowed, most notably because they might contain sensitiveinformation. However, if you have such extensions —most notably certain Javascript andCSS minifiers— you need a way to allow direct access to those directories.
If you decide that convenience is better than security we can't stop you. Add tmp and cacheto this list and wish for the best. You are opening a security hole on your site and you doit at your own risk and potential peril.
While it might seem very tempting to put several Joomla! system directories in here, likecomponents and templates, don't. That's right. Do not do that. It is like using a tactical weaponto kill a mosquito in the same room as you. The mosquito will hardly ever survive, but youwill go down with it. Or, in computing terms, you allow potential hackers to use any securityvulnerabilities you haven't had the chance to fix yet in order to upload and execute maliciouscode. You killed the mosquito (the access problems you had with an extension) but youaccidentally helped to take down your site. Ouch! Even if the chance of this happening isabout one in ten thousand, are you willing to take that risk on your own site?
In order to figure out which custom exceptions you need to add on your site, take a look at the How to determinewhich exceptions are required section.
Warning
Windows users beware! Do not use Windows' path separator (the backslash - \) to separate directories!We are talking about directories as they appear in URLs, so you should always use the URL path separator(forward slash - /) in those settings. In other words some/long/path is correct, some\long\pathis WRONG.
7.2.1. How to determine which exceptions are required
Please refer to the section on determining exceptions under the .htaccess Maker documentation. The exact sameprocess applies. The only difference is that you enter the exceptions in the NginX Conf Maker instead ofthe .htaccess Maker and you need to restart / reload NginX after adding the exceptions.
66
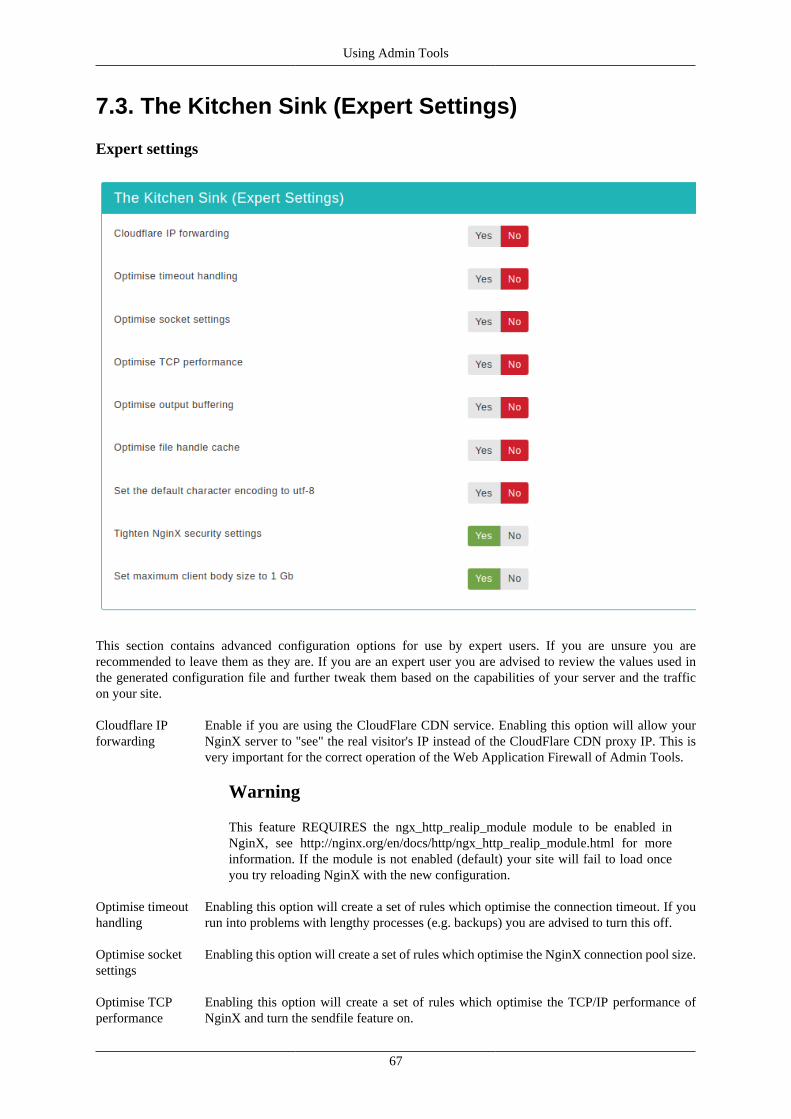
Using Admin Tools
7.3. The Kitchen Sink (Expert Settings)
Expert settings
This section contains advanced configuration options for use by expert users. If you are unsure you arerecommended to leave them as they are. If you are an expert user you are advised to review the values used inthe generated configuration file and further tweak them based on the capabilities of your server and the trafficon your site.
Cloudflare IPforwarding
Enable if you are using the CloudFlare CDN service. Enabling this option will allow yourNginX server to "see" the real visitor's IP instead of the CloudFlare CDN proxy IP. This isvery important for the correct operation of the Web Application Firewall of Admin Tools.
Warning
This feature REQUIRES the ngx_http_realip_module module to be enabled inNginX, see http://nginx.org/en/docs/http/ngx_http_realip_module.html for moreinformation. If the module is not enabled (default) your site will fail to load onceyou try reloading NginX with the new configuration.
Optimise timeouthandling
Enabling this option will create a set of rules which optimise the connection timeout. If yourun into problems with lengthy processes (e.g. backups) you are advised to turn this off.
Optimise socketsettings
Enabling this option will create a set of rules which optimise the NginX connection pool size.
Optimise TCPperformance
Enabling this option will create a set of rules which optimise the TCP/IP performance ofNginX and turn the sendfile feature on.
67
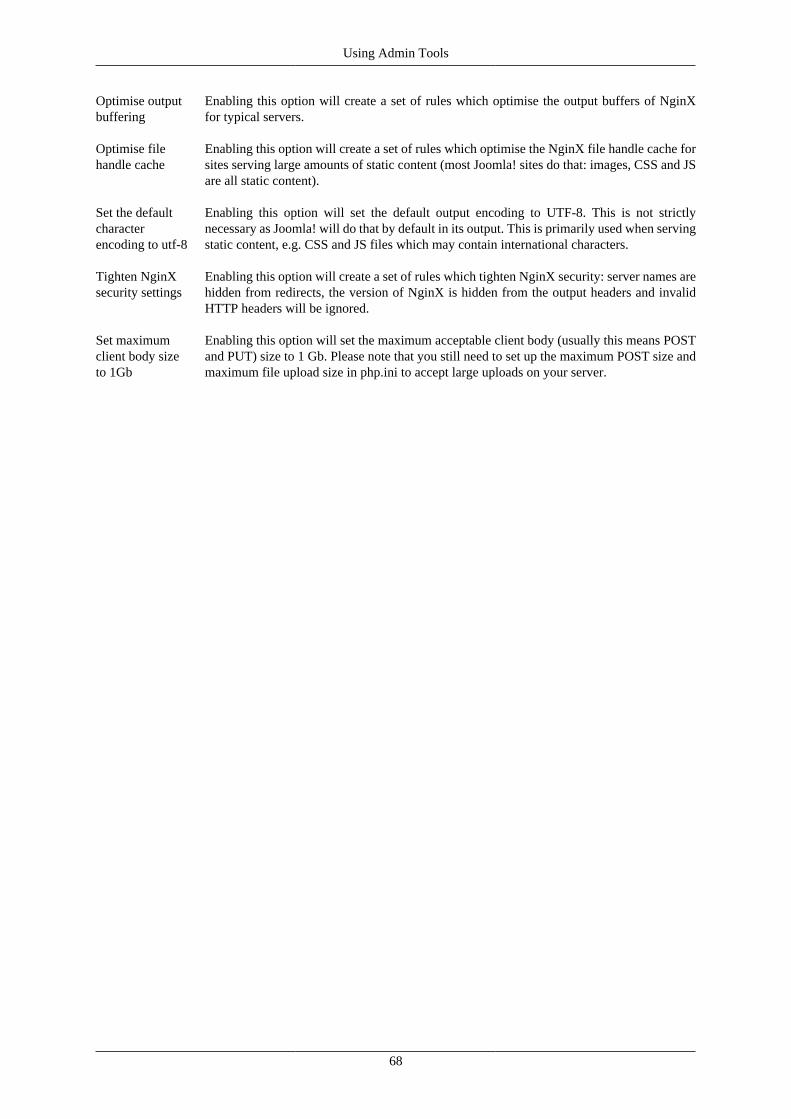
Using Admin Tools
Optimise outputbuffering
Enabling this option will create a set of rules which optimise the output buffers of NginXfor typical servers.
Optimise filehandle cache
Enabling this option will create a set of rules which optimise the NginX file handle cache forsites serving large amounts of static content (most Joomla! sites do that: images, CSS and JSare all static content).
Set the defaultcharacterencoding to utf-8
Enabling this option will set the default output encoding to UTF-8. This is not strictlynecessary as Joomla! will do that by default in its output. This is primarily used when servingstatic content, e.g. CSS and JS files which may contain international characters.
Tighten NginXsecurity settings
Enabling this option will create a set of rules which tighten NginX security: server names arehidden from redirects, the version of NginX is hidden from the output headers and invalidHTTP headers will be ignored.
Set maximumclient body sizeto 1Gb
Enabling this option will set the maximum acceptable client body (usually this means POSTand PUT) size to 1 Gb. Please note that you still need to set up the maximum POST size andmaximum file upload size in php.ini to accept large uploads on your server.
68

Using Admin Tools
7.4. Optimisation and utility
Optimisation and utility
This section contains directives which are of utilitarian value and bound to save you some time:
Force index.phpparsing beforeindex.html
Some servers attempt to serve index.html before index.php. This has the implication thattrying to access your site's root, e.g. http://www.example.com, will attempt to servean index.html first. If this file doesn't exist, it will try to serve index.php. However, all of ourJoomla! sites only have the index.php, so this checking slows them down unnecessarily oneach page request. This rule works around this problem. Do note that some servers do notallow this and will result in a blank page or Internal Server Error page.
Set defaultexpiration time to1 hour
If your server has mod_expires installed and activated, enabling this option will cause all filesand pages served from the site to have an expiration time of 1 hour, which means that thebrowser will not try to load them over the network before one hour elapses. This is a verydesirable feature, as it speeds up your site. Note: some files types have a higher expirationtime of 1 week or 1 month.
69
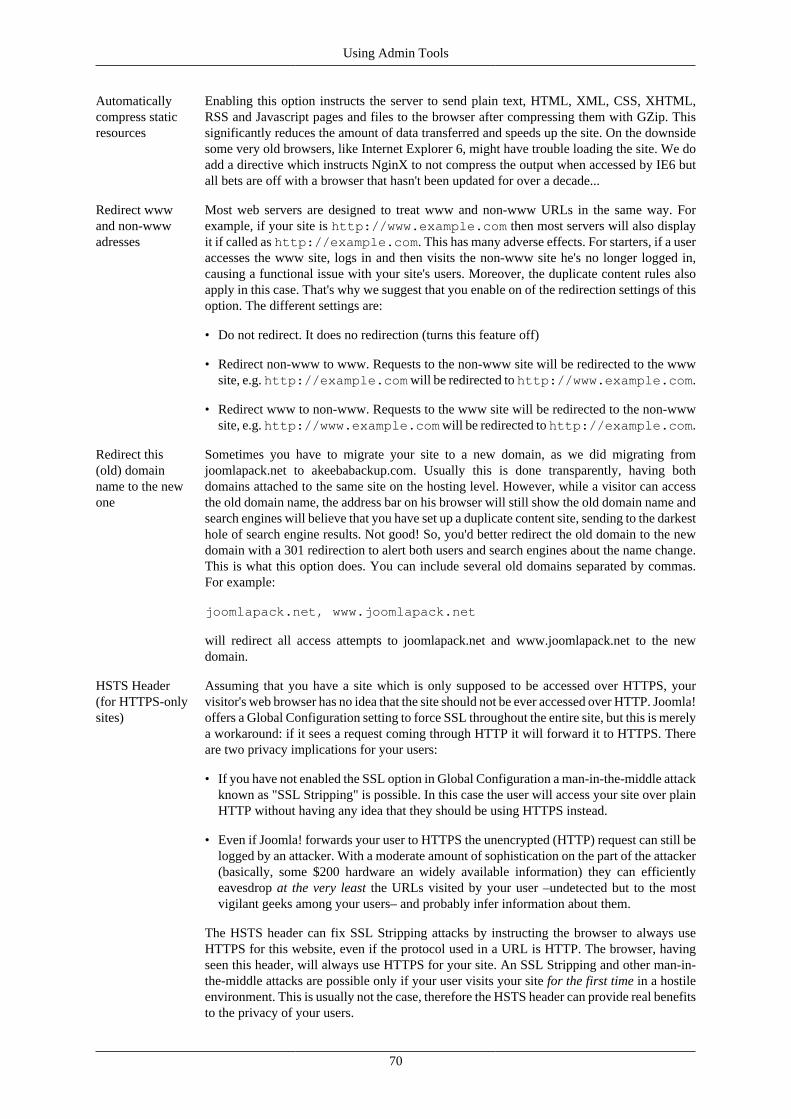
Using Admin Tools
Automaticallycompress staticresources
Enabling this option instructs the server to send plain text, HTML, XML, CSS, XHTML,RSS and Javascript pages and files to the browser after compressing them with GZip. Thissignificantly reduces the amount of data transferred and speeds up the site. On the downsidesome very old browsers, like Internet Explorer 6, might have trouble loading the site. We doadd a directive which instructs NginX to not compress the output when accessed by IE6 butall bets are off with a browser that hasn't been updated for over a decade...
Redirect wwwand non-wwwadresses
Most web servers are designed to treat www and non-www URLs in the same way. Forexample, if your site is http://www.example.com then most servers will also displayit if called as http://example.com. This has many adverse effects. For starters, if a useraccesses the www site, logs in and then visits the non-www site he's no longer logged in,causing a functional issue with your site's users. Moreover, the duplicate content rules alsoapply in this case. That's why we suggest that you enable on of the redirection settings of thisoption. The different settings are:
• Do not redirect. It does no redirection (turns this feature off)
• Redirect non-www to www. Requests to the non-www site will be redirected to the wwwsite, e.g. http://example.com will be redirected to http://www.example.com.
• Redirect www to non-www. Requests to the www site will be redirected to the non-wwwsite, e.g. http://www.example.com will be redirected to http://example.com.
Redirect this(old) domainname to the newone
Sometimes you have to migrate your site to a new domain, as we did migrating fromjoomlapack.net to akeebabackup.com. Usually this is done transparently, having bothdomains attached to the same site on the hosting level. However, while a visitor can accessthe old domain name, the address bar on his browser will still show the old domain name andsearch engines will believe that you have set up a duplicate content site, sending to the darkesthole of search engine results. Not good! So, you'd better redirect the old domain to the newdomain with a 301 redirection to alert both users and search engines about the name change.This is what this option does. You can include several old domains separated by commas.For example:
joomlapack.net, www.joomlapack.net
will redirect all access attempts to joomlapack.net and www.joomlapack.net to the newdomain.
HSTS Header(for HTTPS-onlysites)
Assuming that you have a site which is only supposed to be accessed over HTTPS, yourvisitor's web browser has no idea that the site should not be ever accessed over HTTP. Joomla!offers a Global Configuration setting to force SSL throughout the entire site, but this is merelya workaround: if it sees a request coming through HTTP it will forward it to HTTPS. Thereare two privacy implications for your users:
• If you have not enabled the SSL option in Global Configuration a man-in-the-middle attackknown as "SSL Stripping" is possible. In this case the user will access your site over plainHTTP without having any idea that they should be using HTTPS instead.
• Even if Joomla! forwards your user to HTTPS the unencrypted (HTTP) request can still belogged by an attacker. With a moderate amount of sophistication on the part of the attacker(basically, some $200 hardware an widely available information) they can efficientlyeavesdrop at the very least the URLs visited by your user –undetected but to the mostvigilant geeks among your users– and probably infer information about them.
The HSTS header can fix SSL Stripping attacks by instructing the browser to always useHTTPS for this website, even if the protocol used in a URL is HTTP. The browser, havingseen this header, will always use HTTPS for your site. An SSL Stripping and other man-in-the-middle attacks are possible only if your user visits your site for the first time in a hostileenvironment. This is usually not the case, therefore the HSTS header can provide real benefitsto the privacy of your users.
70
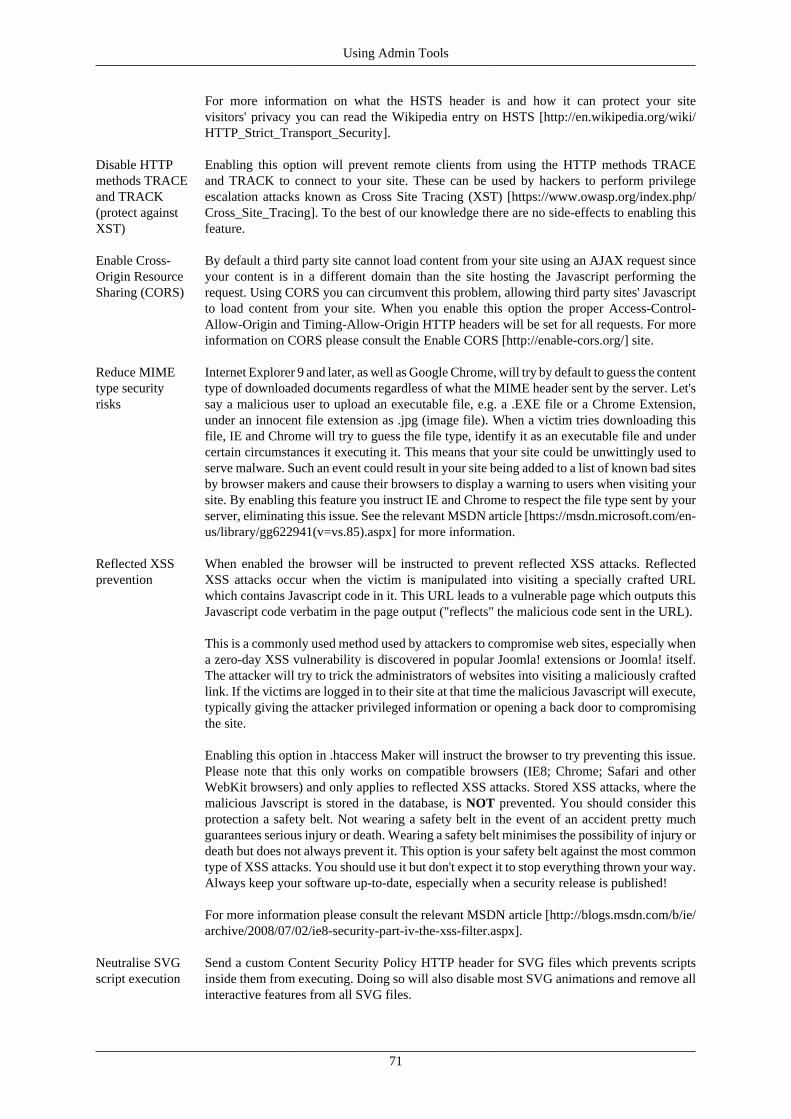
Using Admin Tools
For more information on what the HSTS header is and how it can protect your sitevisitors' privacy you can read the Wikipedia entry on HSTS [http://en.wikipedia.org/wiki/HTTP_Strict_Transport_Security].
Disable HTTPmethods TRACEand TRACK(protect againstXST)
Enabling this option will prevent remote clients from using the HTTP methods TRACEand TRACK to connect to your site. These can be used by hackers to perform privilegeescalation attacks known as Cross Site Tracing (XST) [https://www.owasp.org/index.php/Cross_Site_Tracing]. To the best of our knowledge there are no side-effects to enabling thisfeature.
Enable Cross-Origin ResourceSharing (CORS)
By default a third party site cannot load content from your site using an AJAX request sinceyour content is in a different domain than the site hosting the Javascript performing therequest. Using CORS you can circumvent this problem, allowing third party sites' Javascriptto load content from your site. When you enable this option the proper Access-Control-Allow-Origin and Timing-Allow-Origin HTTP headers will be set for all requests. For moreinformation on CORS please consult the Enable CORS [http://enable-cors.org/] site.
Reduce MIMEtype securityrisks
Internet Explorer 9 and later, as well as Google Chrome, will try by default to guess the contenttype of downloaded documents regardless of what the MIME header sent by the server. Let'ssay a malicious user to upload an executable file, e.g. a .EXE file or a Chrome Extension,under an innocent file extension as .jpg (image file). When a victim tries downloading thisfile, IE and Chrome will try to guess the file type, identify it as an executable file and undercertain circumstances it executing it. This means that your site could be unwittingly used toserve malware. Such an event could result in your site being added to a list of known bad sitesby browser makers and cause their browsers to display a warning to users when visiting yoursite. By enabling this feature you instruct IE and Chrome to respect the file type sent by yourserver, eliminating this issue. See the relevant MSDN article [https://msdn.microsoft.com/en-us/library/gg622941(v=vs.85).aspx] for more information.
Reflected XSSprevention
When enabled the browser will be instructed to prevent reflected XSS attacks. ReflectedXSS attacks occur when the victim is manipulated into visiting a specially crafted URLwhich contains Javascript code in it. This URL leads to a vulnerable page which outputs thisJavascript code verbatim in the page output ("reflects" the malicious code sent in the URL).
This is a commonly used method used by attackers to compromise web sites, especially whena zero-day XSS vulnerability is discovered in popular Joomla! extensions or Joomla! itself.The attacker will try to trick the administrators of websites into visiting a maliciously craftedlink. If the victims are logged in to their site at that time the malicious Javascript will execute,typically giving the attacker privileged information or opening a back door to compromisingthe site.
Enabling this option in .htaccess Maker will instruct the browser to try preventing this issue.Please note that this only works on compatible browsers (IE8; Chrome; Safari and otherWebKit browsers) and only applies to reflected XSS attacks. Stored XSS attacks, where themalicious Javscript is stored in the database, is NOT prevented. You should consider thisprotection a safety belt. Not wearing a safety belt in the event of an accident pretty muchguarantees serious injury or death. Wearing a safety belt minimises the possibility of injury ordeath but does not always prevent it. This option is your safety belt against the most commontype of XSS attacks. You should use it but don't expect it to stop everything thrown your way.Always keep your software up-to-date, especially when a security release is published!
For more information please consult the relevant MSDN article [http://blogs.msdn.com/b/ie/archive/2008/07/02/ie8-security-part-iv-the-xss-filter.aspx].
Neutralise SVGscript execution
Send a custom Content Security Policy HTTP header for SVG files which prevents scriptsinside them from executing. Doing so will also disable most SVG animations and remove allinteractive features from all SVG files.
71

Using Admin Tools
This option only needs to be enabled if your site is configured in such a way that it allowsuntrusted users to upload unsanitized SVG files to your site. By default, Joomla does NOTpermit this. You'd have to configure it to do so yourself, using the Media Manager's optionspage and / or a third party extension.
We do not recommend using this option as it can cause unexpected issues when your content,your template or a third party extension on your site relies on SVG animations or SVGinteractivity. This can be anything from custom animation, to fancy graphics-heavy forms,to interactive charts and graphs.
Warning
Because of the way NginX works, enabling this option removes all other customHTTP headers for SVG files. This includes the HSTS header and the prevent contenttransformation header. This can cause unexpected security issues. For this reason wevery strongly recommend AGAINST using this option on NginX servers.
We recommend using sanitized SVG file uploads instead of this option. Sanitized SVGuploads allow untrusted sources to submit SVG files and have their scripts removed. It alsoallows trusted sources (Super Users) to use FTP or SFTP to upload SVGs with JavaScriptwhich can function correctly on your site. Our lead developer has already written a pluginfor Joomla 3.9 and later which does that [https://github.com/nikosdion/joomlasvg] and hasalready submitted a code path to Joomla since June 2020 which is still pending approval fromthe Joomla Production Leadership. Unfortunately, due to the Terms of Service of the JoomlaExtensions Directory we cannot include this code in Admin Tools itself. The reasoning isexplained in the plugin's page (see link above).
Prevent contenttransformation
Enabling this feature instructs proxy servers and caches to not convert your content. Forexample, certain proxy servers (typically found in mobile networks, businesses and ISPs incongested areas) will attempt to scale and aggressively compress images, CSS and Javascriptto save bandwidth. This can lead to several issues, from displayed images being a bit off toyour site breaking down because the compressed CSS/JS introduced errors preventing thebrowser from parsing it correctly. With this feature enabled the cache and proxy servers willbe instructed to not do that by setting an HTTP header. If they respect the HTTP header (theyshould, it's a web standard) such issues are prevented.
For more information please consult the formal web standard document RFC 2616, section14.9.5 [https://tools.ietf.org/html/rfc2616#section-14.9.5]
Send ETag Your web server sends an ETag header with each static file it serves. Browsers will ask theserver in subsequent requests whether the file has a different ETag. If not, they will servethe same file therefore reducing the amount of data they need to transfer from the server(and making the site load faster). By default ETags are calculated based on the file size, lastmodified date and the inode number. The latter depends on the location of the file inside thefilesystem of the server.
When you have a site hosted on a single server this is great. If your static files are, however,hosted on a server farm this may not be a good idea. The reason is that every static file isstored on different server and while the file size and last modified date might be the same theinode number will differ, therefore causing the browser to perform unnecessary file transfers.This is where this option comes in handy.
Important
Do NOT change this option if your site is hosted on just one server. If you are not sureor have no idea what that means then your site is hosted on just one server and youMUST NOT change this option. Please bear in mind that site speed analysers likeYSlow are designed for gigantic sites running off hundreds or thousands of servers.
72

Using Admin Tools
Their site speed checklists DO NOT work well with the vast majority of sites you areworking on, i.e. very small sites running off a single server. Treat these checklistsas suggestions: you need to exercise common sense, not blindly follow them. If youdisable ETags on a small site you are more likely to do harm than good!
The available options are:
• Server default. Use whatever setting the server administrator has chosen. If you are notperfectly sure you know what you're doing choose this option.
• Full. Send ETags based on file size, last modification date/time and inode number.
• None (no ETag sent). Disable ETags completely. Do keep in mind that if you do not alsoenable the Set default expiration option you will be hurting your site's performance!
Note
The lack of other options is intentional and has to do with an NginX limitation.NginX, unlike Apache, only offers a binary switch for ETags: you either send themor you don't.
Referrer PolicyHeader
While surfing, your browser will send out some information about the previous you werevisiting (the Referrer that brought you to the new page). This is useful for analytics, forexample you can easily track down how many visitors came from Twitter or any other page.
However, there are security implications about the Referrer header. What if on the privatearea of your website there are sensible information? Think about a private support area, wherethere is a ticket with the link www.example.com/private-support/help-my-site-www-foobar-com-is-hacked ; you post a reply with a link to a Stack Overflow reply, the user clicks on itand... whops! Now Stack Overflow knows that the site www.foobar.com was hacked.
The Referrer Policy header will instruct your browser when to send the Referrer header andhow many information you want to share.
• Do not set any policy You're not setting any instruction to the browser
• (Empty) You do not want to set the Referrer Policy here (as header) and the browsershould fallback to other mechanisms, for example using the <meta> element or thereferrerpolicy attribute on <a> and <link> elelements.
• no-referrer Never send the referer header
• no-referrer-when-downgrade The browser will not send the referrer header whennavigating from HTTPS to HTTP, but will always send the full URL in the referrerheader when navigating from HTTP to any origin. It doesn't matter whether the source anddestination are the same site or not, only the scheme.
Source Destination Referrer
https://www.yoursite.com/url1
http://www.yoursite.com/url2
NULL
https://www.yoursite.com/url1
https://www.yoursite.com/url2
https://www.yoursite.com/url1
http://www.yoursite.com/url1
http://www.yoursite.com/url2
http://www.yoursite.com/url1
http://www.yoursite.com/url1
http://www.example.com http://www.yoursite.com/url1
http://www.yoursite.com/url1
https://www.example.com http://www.yoursite.com/url1
73

Using Admin Tools
Source Destination Referrer
https://www.yoursite.com/url1
http://www.example.com NULL
• same-origin The browser will only set the referrer header on requests to the same origin.If the destination is another origin then no referrer information will be sent.
Source Destination Referrer
https://www.yoursite.com/url1
https://www.yoursite.com/url2
https://www.yoursite.com/url1
https://www.yoursite.com/url1
http://www.yoursite.com/url2
NULL
https://www.yoursite.com/url1
http://www.example.com NULL
https://www.yoursite.com/url1
https://www.example.com NULL
• origin The browser will always set the referrer header to the origin from which the requestwas made. This will strip any path information from the referrer information.
Source Destination Referrer
https://www.yoursite.com/url1
https://www.yoursite.com/url2
https://www.yoursite.com/
https://www.yoursite.com/url1
http://www.yoursite.com/url2
https://www.yoursite.com/
https://www.yoursite.com/url1
http://www.example.com https://www.yoursite.com/
Warning
Navigating from HTTPS to HTTP will disclose the secure origin in the HTTPrequest.
• strict-origin This value is similar to origin above but will not allow the secure originto be sent on a HTTP request, only HTTPS.
Source Destination Referrer
https://www.yoursite.com/url1
https://www.yoursite.com/url2
https://www.yoursite.com/
https://www.yoursite.com/url1
http://www.yoursite.com/url2
NULL
https://www.yoursite.com/url1
http://www.example.com NULL
http://www.yoursite.com/url1
https://www.yoursite.com/url2
http://www.yoursite.com/
http://www.yoursite.com/url1
http://www.yoursite.com/url2
http://www.yoursite.com/
http://www.yoursite.com/url1
http://www.example.com http://www.yoursite.com/
• origin-when-cross-origin The browser will send the full URL to requests to the sameorigin but only send the origin when requests are cross-origin.74
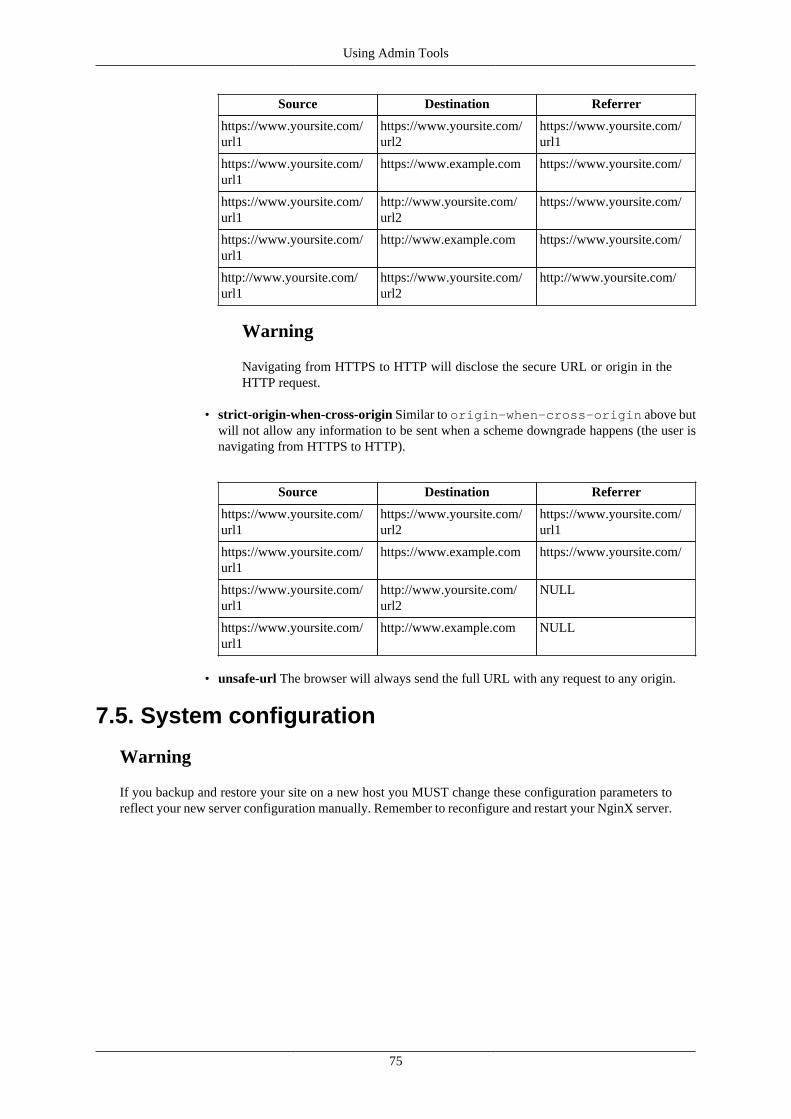
Using Admin Tools
Source Destination Referrer
https://www.yoursite.com/url1
https://www.yoursite.com/url2
https://www.yoursite.com/url1
https://www.yoursite.com/url1
https://www.example.com https://www.yoursite.com/
https://www.yoursite.com/url1
http://www.yoursite.com/url2
https://www.yoursite.com/
https://www.yoursite.com/url1
http://www.example.com https://www.yoursite.com/
http://www.yoursite.com/url1
https://www.yoursite.com/url2
http://www.yoursite.com/
Warning
Navigating from HTTPS to HTTP will disclose the secure URL or origin in theHTTP request.
• strict-origin-when-cross-origin Similar to origin-when-cross-origin above butwill not allow any information to be sent when a scheme downgrade happens (the user isnavigating from HTTPS to HTTP).
Source Destination Referrer
https://www.yoursite.com/url1
https://www.yoursite.com/url2
https://www.yoursite.com/url1
https://www.yoursite.com/url1
https://www.example.com https://www.yoursite.com/
https://www.yoursite.com/url1
http://www.yoursite.com/url2
NULL
https://www.yoursite.com/url1
http://www.example.com NULL
• unsafe-url The browser will always send the full URL with any request to any origin.
7.5. System configuration
Warning
If you backup and restore your site on a new host you MUST change these configuration parameters toreflect your new server configuration manually. Remember to reconfigure and restart your NginX server.
75
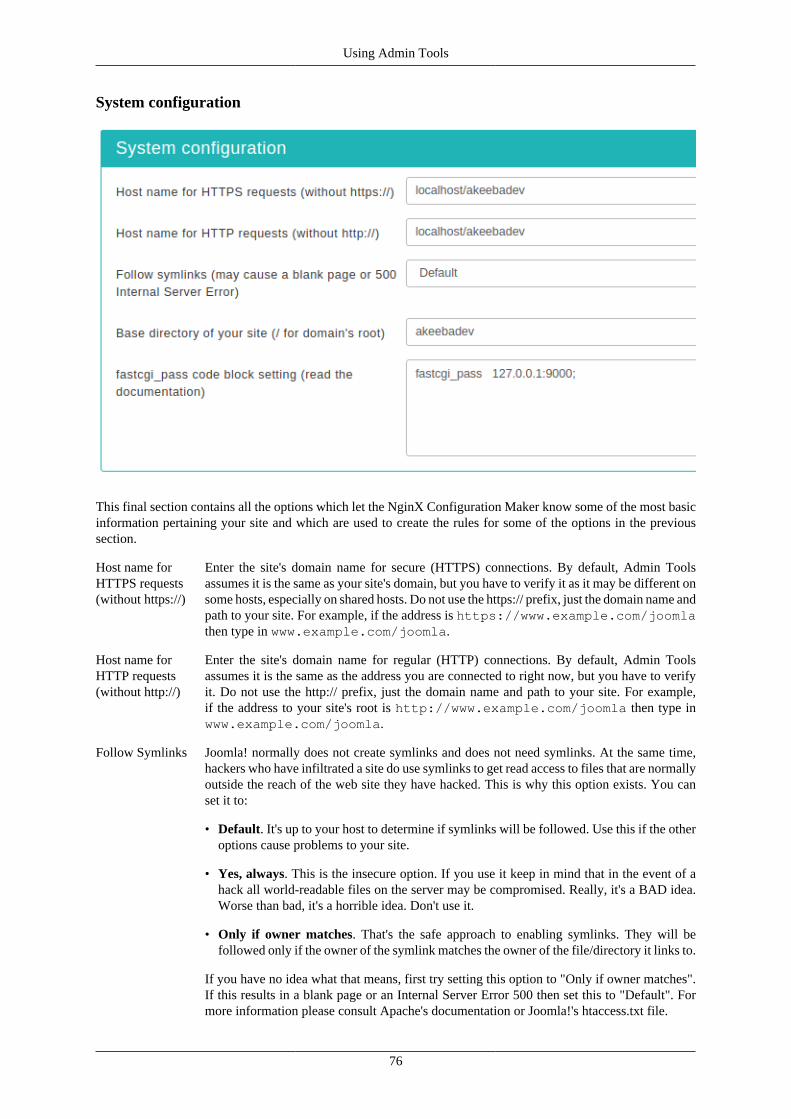
Using Admin Tools
System configuration
This final section contains all the options which let the NginX Configuration Maker know some of the most basicinformation pertaining your site and which are used to create the rules for some of the options in the previoussection.
Host name forHTTPS requests(without https://)
Enter the site's domain name for secure (HTTPS) connections. By default, Admin Toolsassumes it is the same as your site's domain, but you have to verify it as it may be different onsome hosts, especially on shared hosts. Do not use the https:// prefix, just the domain name andpath to your site. For example, if the address is https://www.example.com/joomlathen type in www.example.com/joomla.
Host name forHTTP requests(without http://)
Enter the site's domain name for regular (HTTP) connections. By default, Admin Toolsassumes it is the same as the address you are connected to right now, but you have to verifyit. Do not use the http:// prefix, just the domain name and path to your site. For example,if the address to your site's root is http://www.example.com/joomla then type inwww.example.com/joomla.
Follow Symlinks Joomla! normally does not create symlinks and does not need symlinks. At the same time,hackers who have infiltrated a site do use symlinks to get read access to files that are normallyoutside the reach of the web site they have hacked. This is why this option exists. You canset it to:
• Default. It's up to your host to determine if symlinks will be followed. Use this if the otheroptions cause problems to your site.
• Yes, always. This is the insecure option. If you use it keep in mind that in the event of ahack all world-readable files on the server may be compromised. Really, it's a BAD idea.Worse than bad, it's a horrible idea. Don't use it.
• Only if owner matches. That's the safe approach to enabling symlinks. They will befollowed only if the owner of the symlink matches the owner of the file/directory it links to.
If you have no idea what that means, first try setting this option to "Only if owner matches".If this results in a blank page or an Internal Server Error 500 then set this to "Default". Formore information please consult Apache's documentation or Joomla!'s htaccess.txt file.
76
Using Admin Tools
Base directory ofyour site
This is the directory where your site is installed. For example, if it is installed in a directorynamed joomla and you access it on a URL similar to http://www.example.com/joomla you have to type in /joomla in here. If your site is installed on the root of yourdomain, please use a single forward slash for this field: /
fastcgi_passcode blocksetting (read thedocumentation)
Please enter the value of the fastcgi_pass code block required by your server setup to executePHP files, i.e. a fastcg_pass to the listening FastCGI Process Manager of PHP. This is usuallyfastcgi_pass 127.0.0.1:9000; on most servers. If you are not sure ask your hostor, if you are your own host, examine the configuration files of NginX. You will probablysee a block like this:
location ~ .php$ { try_files $uri =404; fastcgi_pass 127.0.0.1:9000; fastcgi_index index.php; include /Applications/MNPP/conf/nginx/fastcgi_params;}
The value you are looking for is everything between the two curly braces. In the exampleabove:
try_files $uri =404;fastcgi_pass 127.0.0.1:9000;fastcgi_index index.php;include /Applications/MNPP/conf/nginx/fastcgi_params;
Important
For security reasons the bare minimum you should use is something like:
try_files $uri =404;fastcgi_split_path_info ^(.+\.php)(/.+)$;fastcgi_pass 127.0.0.1:9000;
The first two lines are extremely important. Theyprotect you against a well-documented arbitrary codeexecution vulnerability [https://nealpoole.com/blog/2011/04/setting-up-php-fastcgi-and-nginx-dont-trust-the-tutorials-check-your-configuration/].
8. The web.config makerNote
This feature is only available in the Professional release
Warning
This feature is only available on servers running the Microsoft IIS web server. If your server is usingApache or NginX the button to launch this feature will not be shown. If the server type cannot be detectedyou will see this feature but you should consult with your host whether it will have any effect on yourserver.
One of the most important aspects of managing a web site hosted on an IIS server is being able to fine-tune yoursite configuration file, web.config. This file is responsible for many web server level tweaks, such as enabling theuse of search engine friendly (SEF) URLs, blocking access to system files which should not be accessible fromthe web, redirecting between pages based on custom criteria and even optimising the performance of your site.On the downside, learning how to tweak all those settings is akin to learning a foreign language. The web.configMaker tool of Admin Tools is designed to help you create the part of such a file used for security and performanceoptimisation by utilizing a point-and-click interface.
77

Using Admin Tools
Tip
If you ever want to revert to a "safe default", just set all of the options on this page to "Off" and clickon "Save and create web.config". This will create a web.config file that's practically the same as theweb.config.txt file shipped with Joomla! itself.
Important
This feature relies on Microsoft's URL Rewrite 2.0 module for Microsoft IIS. This is the same optionalIIS module required by the web.config shipped with Joomla! to use SEF URLs without index.php inthem. If you cannot use Joomla!'s web.config after renaming the web.config.txt file to web.config thenyou will NOT be able to use our web.config Maker feature. If this is the case please contact your hostand ask them to install and enable the URL Rewrite 2.0 module for IIS.
Warning
This feature, like Joomla!'s SEF URLs, require IIS 7 or later. If you have an older version of IIS such asIIS 6 you will NOT be able to use this feature. Unfortunately IIS 6 and lower lack the necessary featuresto create a security tightening web.config file.
The top part of the web.config maker page contains the standard toolbar buttons you'd expect:
The web.config Maker's toolbar
• Save without creating web.config saves the changes you have made in this page's options without actuallycreating the customized web.config file. This should be used when you have not decided on some optionsyet, or if you want to preview the generated web.config file before writing it to disk.
• Save and create web.config is the logical next step to the previous button. It not only saves the changes youmade, but also creates and writes the new web.config file to the disk. If you already had a web.configfile on your site, it will be renamed to web.config.admintools before the new file is written to disk.
• Preview pops up a dialog where you can see how the generated web.config file will look like without writingit to disk. This dialog shows the saved configuration. If you have modified any settings they will not be reflectedin there until you click either of the previous two buttons.
• The Back button takes you back to the Control Panel page.
Below the toolbar there are five panes with different options, described below. Before you do that, please readand understand the following warning. Support requests which indicate that you have not read it will be repliedwith a link back to this page.
Warning
Depending on your web server settings, some of these options may be incompatible with your site. Inthis case you will get a blank page or an Internal Server Error 500 error page when trying to access anypart of your site. If this happens, you have to remove the contents of web.config file from your site'sroot directory using an FTP application or the File Manager feature of your hosting control panel.
78
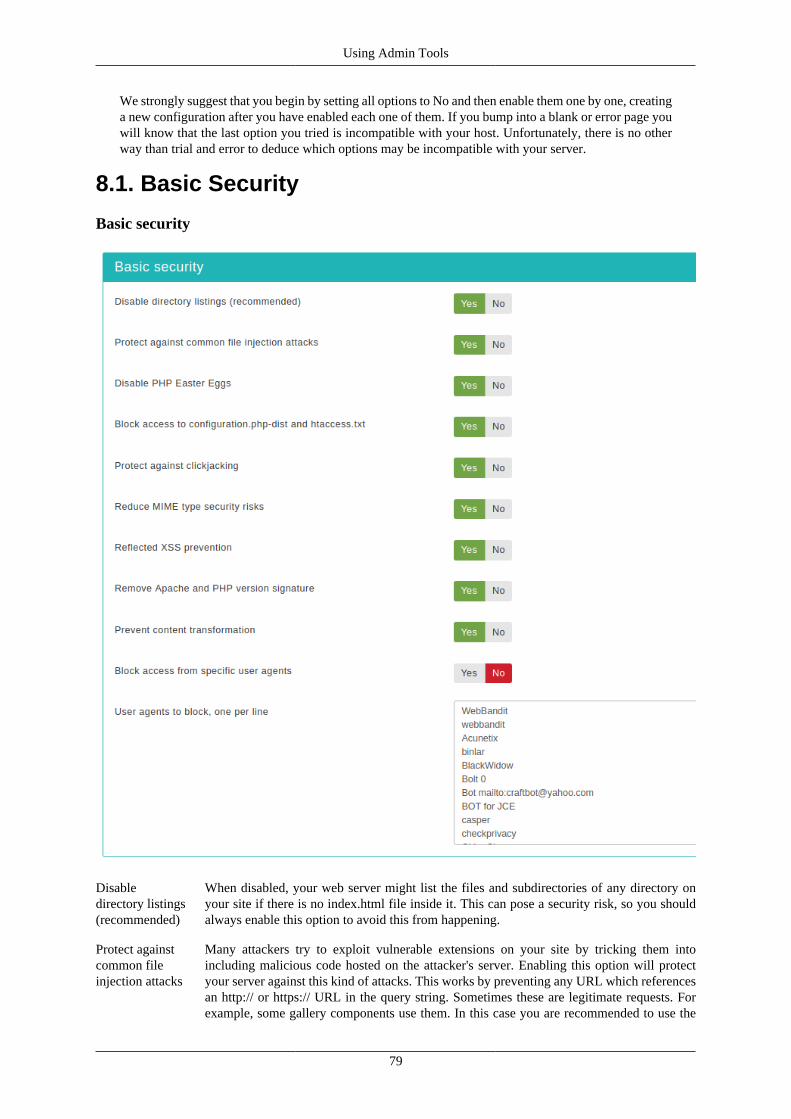
Using Admin Tools
We strongly suggest that you begin by setting all options to No and then enable them one by one, creatinga new configuration after you have enabled each one of them. If you bump into a blank or error page youwill know that the last option you tried is incompatible with your host. Unfortunately, there is no otherway than trial and error to deduce which options may be incompatible with your server.
8.1. Basic Security
Basic security
Disabledirectory listings(recommended)
When disabled, your web server might list the files and subdirectories of any directory onyour site if there is no index.html file inside it. This can pose a security risk, so you shouldalways enable this option to avoid this from happening.
Protect againstcommon fileinjection attacks
Many attackers try to exploit vulnerable extensions on your site by tricking them intoincluding malicious code hosted on the attacker's server. Enabling this option will protectyour server against this kind of attacks. This works by preventing any URL which referencesan http:// or https:// URL in the query string. Sometimes these are legitimate requests. Forexample, some gallery components use them. In this case you are recommended to use the
79

Using Admin Tools
RFIShield (Remote File Inclusion protection) in the Web Application Firewall and turn thisweb.config Maker option OFF.
Disable PHPEaster Eggs
PHP has a fun and annoying feature known as "Easter Eggs". By passing a special URLparameter, PHP will display a picture instead of the actual page requested. Whereas this isconsidered fun, it is also widely exploited by attackers to figure out the version of your PHPinstallation (these images change between different versions of PHP) and launch hackingattacks targeting your specific PHP version. By enabling this option you completely disableaccess to those Easter Eggs and make it even more difficult for attackers to figure out thedetails of your server.
Note: You are advised to also set expose_php to Off in your php.ini file to preventaccidental leaks of your PHP version.
Block access toconfiguration.php-dist andhtaccess.txt
These two files are left behind after any Joomla! installation or upgrade and can be directlyaccessed from the web. They are used by attackers to tell the Joomla! version you are using, sothat they can tailor an attack targeting your specific Joomla! version. Enabling this option will"hide" those files when accessed from the web (a 404 Not Found page is returned), trickingattackers into believing that these files do not exist and making it slightly more difficult forthem to deduce information about your site. This option also hides the web.config.txt fileincluded in Joomla! 3 and later for use with the IIS server.
Protect againstclickjacking
Turning on this option will protect you against clickjacking [http://en.wikipedia.org/wiki/Clickjacking]. It does so by preventing your site's pages to be loaded in a, Frame, IFrame orObject tag unless this comes from a page inside your own site. Please note that if your siterelies on its pages being accessible through frames / iframes displayed on other sites (NOTon your site displaying content from other sites, that's irrelevant!) then you should not enablethis option. If unsure, enable it.
Block accessfrom specificuser agents
When enabled, it will block any site access attempt if the remote program sends one of theuser agent strings in the User agents to block, one per line option. This feature is designed toprotect your site against common bandwidth-hogging download bots and otherwise legitimatetools which are more usually used for hacking sites than their benign intended functionality.
User agents toblock, one perline
The user agent strings to block from accessing your site. You don't have to enter the whole UAstring, just a part of it. The default setting includes several usual suspects. Separate multipleentries by a single newline character (that is a single press of the ENTER key). Do note thatsome server with mod_security or mod_evasive installed will throw an "Access forbidden"message if you try to save the configuration settings when this field contains the word "WGet".If you come across this issue it is not a bug with Admin Tools or Joomla!, it is a server-levelprotection feature kicking in. Just avoid including the word Wget and you should be out ofharm's way.
Block commonexploits
Enabling this option will include a set of options recommended by Joomla! to protect against(obsolete) common exploits which no longer have any effect on Joomla! 2.5 and later. It'sstill a good idea to enable this option.
80

Using Admin Tools
8.2. Server protection
Server protection
This is the most coveted feature of our software, offering a near-inclusive protection against the vast majority ofknown threats when enabled. This feature's mission statement can be summed up with a single phrase: nothingexecutes on your site unless you allowed it to. By blocking access to front-end and back-end elements (mediafiles, Javascript, CSS and PHP files) it makes it extremely hard —but not outright impossible— for an attacker tohack your site, even if he manages to exploit a security vulnerability to upload malicious PHP code to your site.Additionally, it will deny direct access to resources not designed to be directly accessible from the web, such astranslation INI files, which are usually used by attackers to find out which version of Joomla! you are running onyour site to tailor an attack to your site. On the downside, you have to explicitly enable access to some extensions'PHP files which are designed to be called directly from the web and not through Joomla!'s main file, index.php.
Do note that enabling this feature will kill the functionality of some extensions which create arbitrarily namedPHP files throughout your site, such as RokGZipper. In our humble opinion the security risk of having your siteunprotected outweighs the benefits of such solutions by a dramatic factor. As a result, we strongly suggest disablingRokGZipper and other similar software using similarly questionable security practices.
There are three sections of configuration settings controlling the functionality of the Server Protection feature.The first one is the Protection Toggles which allows you to enable or disable the four main aspects of protection:
81

Using Admin Tools
Back-endprotection
Disables direct access to most back-end resources, except those in the exceptions lists. Itis generally recommended to turn it on to enhance the protection of your site, unless youhave enabled the administrator password protection feature. In the latter case this option isredundant and we recommend turning it off.
Front-endprotection
Disables direct access to most front-end resources, except those in the exceptions lists. It isgenerally recommended to turn it on to enhance the protection of your site.
The next section is called Fine-tuning and contains the necessary options to tweak the protection's behaviour to suityour site. Before describing what each option does, a small explanation of how the protection works is in order.The protection code in the generated web.config file blocks direct web access to all files. Joomla!'s standard"entry point" or "main" files, index.php and index2.php, are automatically exempt from this rule. However,your site also contains images, media, CSS and Javascript files inside certain directories. For each of the back-endand front-end protection we need a set of directories where such files are allowed and the file extensions of thosefiles. These are what those options are all about. The default settings contain the most common file types you'dexpect to find on a site and the standard Joomla! directories where they should be located. You only have to tweakthem if you want to add more file extensions or have such static files in locations other than the default.
Back-enddirectorieswhere file typeexceptions areallowed
This is a list of back-end directories (that is, subdirectories of your site's administratordirectory) where you expect media files to be present. Place one directory on each line.Subdirectories of those directories are automatically added to the exceptions list withouthaving to explicitly list them here.
Back-end filetypes allowedin selecteddirectories
The extensions of back-end files which allowed to pass through the server protection filter,as long as the files with those extensions are in the list above. Place one file extension perline, without the dot. For example, if you want to allow access to all PDF files you have totype in "pdf" (without the quotes) on a new line of this list. Do note that file extensions arecase-sensitive. This means that PDF, Pdf, pdf and pDF are four different file extensions as faras your web server is concerned. As a rule of thumb, type in the extensions in lowercase andmake sure that the extensions of the files you upload are also in lowercase.
Front-enddirectorieswhere file typeexceptions areallowed
This is a list of front-end directories (that is, directories in your site's root) where you expectmedia files to be present. Place one directory on each line. Subdirectories of those directoriesare automatically added to the exceptions list without having to explicitly list them here.
Front-end filetypes allowedin selecteddirectories
The extensions of front-end files which allowed to pass through the server protection filter,as long as the files with those extensions are in the list above. Place one file extension perline, without the dot. For example, if you want to allow access to all PDF files you have totype in "pdf" (without the quotes) on a new line of this list. Do note that file extensions arecase-sensitive. This means that PDF, Pdf, pdf and pDF are four different file extensions as faras your web server is concerned. As a rule of thumb, type in the extensions in lowercase andmake sure that the extensions of the files you upload are also in lowercase.
82
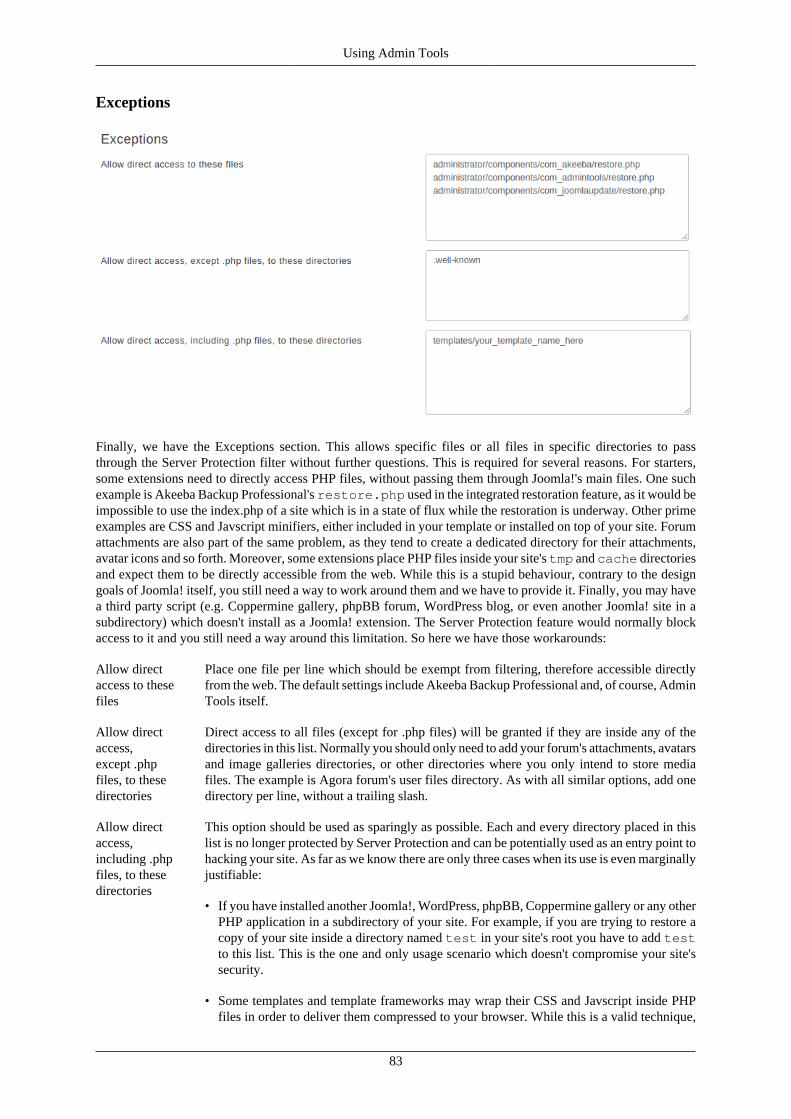
Using Admin Tools
Exceptions
Finally, we have the Exceptions section. This allows specific files or all files in specific directories to passthrough the Server Protection filter without further questions. This is required for several reasons. For starters,some extensions need to directly access PHP files, without passing them through Joomla!'s main files. One suchexample is Akeeba Backup Professional's restore.php used in the integrated restoration feature, as it would beimpossible to use the index.php of a site which is in a state of flux while the restoration is underway. Other primeexamples are CSS and Javscript minifiers, either included in your template or installed on top of your site. Forumattachments are also part of the same problem, as they tend to create a dedicated directory for their attachments,avatar icons and so forth. Moreover, some extensions place PHP files inside your site's tmp and cache directoriesand expect them to be directly accessible from the web. While this is a stupid behaviour, contrary to the designgoals of Joomla! itself, you still need a way to work around them and we have to provide it. Finally, you may havea third party script (e.g. Coppermine gallery, phpBB forum, WordPress blog, or even another Joomla! site in asubdirectory) which doesn't install as a Joomla! extension. The Server Protection feature would normally blockaccess to it and you still need a way around this limitation. So here we have those workarounds:
Allow directaccess to thesefiles
Place one file per line which should be exempt from filtering, therefore accessible directlyfrom the web. The default settings include Akeeba Backup Professional and, of course, AdminTools itself.
Allow directaccess,except .phpfiles, to thesedirectories
Direct access to all files (except for .php files) will be granted if they are inside any of thedirectories in this list. Normally you should only need to add your forum's attachments, avatarsand image galleries directories, or other directories where you only intend to store mediafiles. The example is Agora forum's user files directory. As with all similar options, add onedirectory per line, without a trailing slash.
Allow directaccess,including .phpfiles, to thesedirectories
This option should be used as sparingly as possible. Each and every directory placed in thislist is no longer protected by Server Protection and can be potentially used as an entry point tohacking your site. As far as we know there are only three cases when its use is even marginallyjustifiable:
• If you have installed another Joomla!, WordPress, phpBB, Coppermine gallery or any otherPHP application in a subdirectory of your site. For example, if you are trying to restore acopy of your site inside a directory named test in your site's root you have to add testto this list. This is the one and only usage scenario which doesn't compromise your site'ssecurity.
• Some templates and template frameworks may wrap their CSS and Javscript inside PHPfiles in order to deliver them compressed to your browser. While this is a valid technique,
83

Using Admin Tools
it's possible that the list of PHP files is too big to track down and include in the first listof the Exceptions section. In this case you may consider putting the template subdirectorycontaining those files in this list.
• Some extensions do something silly: they place files inside your site's tmp or cachedirectories and expect them to be directly accessible from the web. This is plainwrong because these directories are designed to be protected system directories wheredirect access should not be allowed, most notably because they might contain sensitiveinformation. However, if you have such extensions —most notably certain Javascript andCSS minifiers— you need a way to allow direct access to those directories.
If you decide that convenience is better than security we can't stop you. Add tmp and cacheto this list and wish for the best. You are opening a security hole on your site and you doit at your own risk and potential peril.
While it might seem very tempting to put several Joomla! system directories in here, likecomponents and templates, don't. That's right. Do not do that. It is like using a tactical weaponto kill a mosquito in the same room as you. The mosquito will hardly ever survive, but youwill go down with it. Or, in computing terms, you allow potential hackers to use any securityvulnerabilities you haven't had the chance to fix yet in order to upload and execute maliciouscode. You killed the mosquito (the access problems you had with an extension) but youaccidentally helped to take down your site. Ouch! Even if the chance of this happening isabout one in ten thousand, are you willing to take that risk on your own site?
In order to figure out which custom exceptions you need to add on your site, take a look at the How to determinewhich exceptions are required section.
Warning
Windows users beware! Do not use Windows' path separator (the backslash - \) to separate directories!We are talking about directories as they appear in URLs, so you should always use the URL path separator(forward slash - /) in those settings. In other words some/long/path is correct, some\long\pathis WRONG.
8.2.1. How to determine which exceptions are required
Please refer to the section on determining exceptions under the .htaccess Maker documentation. The exactsame process applies. The only difference is that you enter the exceptions in the web.config Maker instead ofthe .htaccess Maker.
84
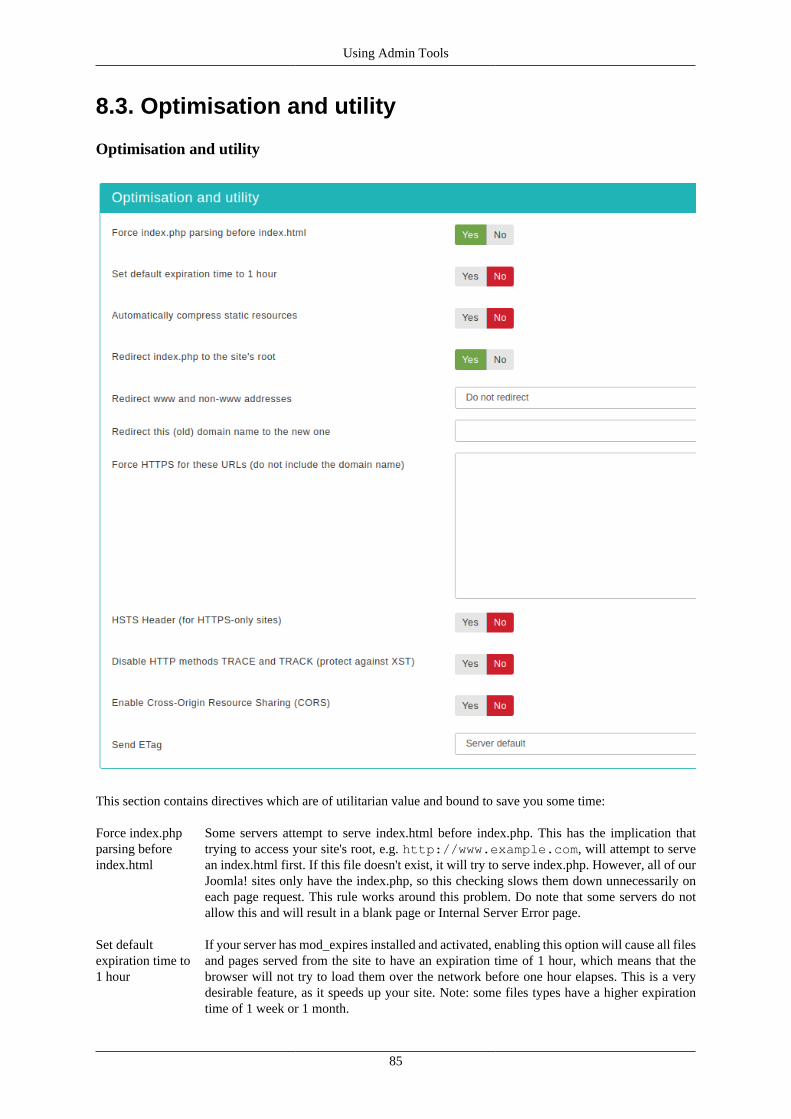
Using Admin Tools
8.3. Optimisation and utility
Optimisation and utility
This section contains directives which are of utilitarian value and bound to save you some time:
Force index.phpparsing beforeindex.html
Some servers attempt to serve index.html before index.php. This has the implication thattrying to access your site's root, e.g. http://www.example.com, will attempt to servean index.html first. If this file doesn't exist, it will try to serve index.php. However, all of ourJoomla! sites only have the index.php, so this checking slows them down unnecessarily oneach page request. This rule works around this problem. Do note that some servers do notallow this and will result in a blank page or Internal Server Error page.
Set defaultexpiration time to1 hour
If your server has mod_expires installed and activated, enabling this option will cause all filesand pages served from the site to have an expiration time of 1 hour, which means that thebrowser will not try to load them over the network before one hour elapses. This is a verydesirable feature, as it speeds up your site. Note: some files types have a higher expirationtime of 1 week or 1 month.
85
Using Admin Tools
Automaticallycompress staticresources
Enabling this option instructs the server to send plain text, HTML, XML, CSS, XHTML,RSS and Javascript pages and files to the browser after compressing them with GZip. Thissignificantly reduces the amount of data transferred and speeds up the site. On the downsidesome very old browsers, like Internet Explorer 6, might have trouble loading the site. We doadd a directive which instructs NginX to not compress the output when accessed by IE6 butall bets are off with a browser that hasn't been updated for over a decade...
Redirect wwwand non-wwwadresses
Most web servers are designed to treat www and non-www URLs in the same way. Forexample, if your site is http://www.example.com then most servers will also displayit if called as http://example.com. This has many adverse effects. For starters, if a useraccesses the www site, logs in and then visits the non-www site he's no longer logged in,causing a functional issue with your site's users. Moreover, the duplicate content rules alsoapply in this case. That's why we suggest that you enable on of the redirection settings of thisoption. The different settings are:
• Do not redirect. It does no redirection (turns this feature off)
• Redirect non-www to www. Requests to the non-www site will be redirected to the wwwsite, e.g. http://example.com will be redirected to http://www.example.com.
• Redirect www to non-www. Requests to the www site will be redirected to the non-wwwsite, e.g. http://www.example.com will be redirected to http://example.com.
Redirect this(old) domainname to the newone
Sometimes you have to migrate your site to a new domain, as we did migrating fromjoomlapack.net to akeebabackup.com. Usually this is done transparently, having bothdomains attached to the same site on the hosting level. However, while a visitor can accessthe old domain name, the address bar on his browser will still show the old domain name andsearch engines will believe that you have set up a duplicate content site, sending to the darkesthole of search engine results. Not good! So, you'd better redirect the old domain to the newdomain with a 301 redirection to alert both users and search engines about the name change.This is what this option does. You can include several old domains separated by commas.For example:
joomlapack.net, www.joomlapack.net
will redirect all access attempts to joomlapack.net and www.joomlapack.net to the newdomain.
HSTS Header(for HTTP-onlysites)
Assuming that you have a site which is only supposed to be accessed over HTTPS, yourvisitor's web browser has no idea that the site should not be ever accessed over HTTP. Joomla!offers a Global Configuration setting to force SSL throughout the entire site, but this is merelya workaround: if it sees a request coming through HTTP it will forward it to HTTPS. Thereare two privacy implications for your users:
• If you have not enabled the SSL option in Global Configuration a man-in-the-middle attackknown as "SSL Stripping" is possible. In this case the user will access your site over plainHTTP without having any idea that they should be using HTTPS instead.
• Even if Joomla! forwards your user to HTTPS the unencrypted (HTTP) request can still belogged by an attacker. With a moderate amount of sophistication on the part of the attacker(basically, some $200 hardware an widely available information) they can efficientlyeavesdrop at the very least the URLs visited by your user –undetected but to the mostvigilant geeks among your users– and probably infer information about them.
The HSTS header can fix SSL Stripping attacks by instructing the browser to always useHTTPS for this website, even if the protocol used in a URL is HTTP. The browser, havingseen this header, will always use HTTPS for your site. An SSL Stripping and other man-in-the-middle attacks are possible only if your user visits your site for the first time in a hostileenvironment. This is usually not the case, therefore the HSTS header can provide real benefitsto the privacy of your users.
86

Using Admin Tools
For more information on what the HSTS header is and how it can protect your sitevisitors' privacy you can read the Wikipedia entry on HSTS [http://en.wikipedia.org/wiki/HTTP_Strict_Transport_Security].
Disable HTTPmethods TRACEand TRACK(protect againstXST)
Enabling this option will prevent remote clients from using the HTTP methods TRACEand TRACK to connect to your site. These can be used by hackers to perform privilegeescalation attacks known as Cross Site Tracing (XST) [https://www.owasp.org/index.php/Cross_Site_Tracing]. To the best of our knowledge there are no side-effects to enabling thisfeature.
Enable Cross-Origin ResourceSharing (CORS)
By default a third party site cannot load content from your site using an AJAX request sinceyour content is in a different domain than the site hosting the Javascript performing therequest. Using CORS you can circumvent this problem, allowing third party sites' Javascriptto load content from your site. When you enable this option the proper Access-Control-Allow-Origin and Timing-Allow-Origin HTTP headers will be set for all requests. For moreinformation on CORS please consult the Enable CORS [http://enable-cors.org/] site.
Reduce MIMEtype securityrisks
Internet Explorer 9 and later, as well as Google Chrome, will try by default to guess the contenttype of downloaded documents regardless of what the MIME header sent by the server. Let'ssay a malicious user to upload an executable file, e.g. a .EXE file or a Chrome Extension,under an innocent file extension as .jpg (image file). When a victim tries downloading thisfile, IE and Chrome will try to guess the file type, identify it as an executable file and undercertain circumstances it executing it. This means that your site could be unwittingly used toserve malware. Such an event could result in your site being added to a list of known bad sitesby browser makers and cause their browsers to display a warning to users when visiting yoursite. By enabling this feature you instruct IE and Chrome to respect the file type sent by yourserver, eliminating this issue. See the relevant MSDN article [https://msdn.microsoft.com/en-us/library/gg622941(v=vs.85).aspx] for more information.
Reflected XSSprevention
When enabled the browser will be instructed to prevent reflected XSS attacks. ReflectedXSS attacks occur when the victim is manipulated into visiting a specially crafted URLwhich contains Javascript code in it. This URL leads to a vulnerable page which outputs thisJavascript code verbatim in the page output ("reflects" the malicious code sent in the URL).
This is a commonly used method used by attackers to compromise web sites, especially whena zero-day XSS vulnerability is discovered in popular Joomla! extensions or Joomla! itself.The attacker will try to trick the administrators of websites into visiting a maliciously craftedlink. If the victims are logged in to their site at that time the malicious Javascript will execute,typically giving the attacker privileged information or opening a back door to compromisingthe site.
Enabling this option in .htaccess Maker will instruct the browser to try preventing this issue.Please note that this only works on compatible browsers (IE8; Chrome; Safari and otherWebKit browsers) and only applies to reflected XSS attacks. Stored XSS attacks, where themalicious Javscript is stored in the database, is NOT prevented. You should consider thisprotection a safety belt. Not wearing a safety belt in the event of an accident pretty muchguarantees serious injury or death. Wearing a safety belt minimises the possibility of injury ordeath but does not always prevent it. This option is your safety belt against the most commontype of XSS attacks. You should use it but don't expect it to stop everything thrown your way.Always keep your software up-to-date, especially when a security release is published!
For more information please consult the relevant MSDN article [http://blogs.msdn.com/b/ie/archive/2008/07/02/ie8-security-part-iv-the-xss-filter.aspx].
Prevent contenttransformation
Enabling this feature instructs proxy servers and caches to not convert your content. Forexample, certain proxy servers (typically found in mobile networks, businesses and ISPs incongested areas) will attempt to scale and aggressively compress images, CSS and Javascriptto save bandwidth. This can lead to several issues, from displayed images being a bit off to
87

Using Admin Tools
your site breaking down because the compressed CSS/JS introduced errors preventing thebrowser from parsing it correctly. With this feature enabled the cache and proxy servers willbe instructed to not do that by setting an HTTP header. If they respect the HTTP header (theyshould, it's a web standard) such issues are prevented.
For more information please consult the formal web standard document RFC 2616, section14.9.5 [https://tools.ietf.org/html/rfc2616#section-14.9.5]
Send ETag Your web server sends an ETag header with each static file it serves. Browsers will ask theserver in subsequent requests whether the file has a different ETag. If not, they will servethe same file therefore reducing the amount of data they need to transfer from the server(and making the site load faster). By default ETags are calculated based on the file size, lastmodified date and the inode number. The latter depends on the location of the file inside thefilesystem of the server.
When you have a site hosted on a single server this is great. If your static files are, however,hosted on a server farm this may not be a good idea. The reason is that every static file isstored on different server and while the file size and last modified date might be the same theinode number will differ, therefore causing the browser to perform unnecessary file transfers.This is where this option comes in handy.
Important
Do NOT change this option if your site is hosted on just one server. If you are not sureor have no idea what that means then your site is hosted on just one server and youMUST NOT change this option. Please bear in mind that site speed analysers likeYSlow are designed for gigantic sites running off hundreds or thousands of servers.Their site speed checklists DO NOT work well with the vast majority of sites you areworking on, i.e. very small sites running off a single server. Treat these checklistsas suggestions: you need to exercise common sense, not blindly follow them. If youdisable ETags on a small site you are more likely to do harm than good!
The available options are:
• Server default. Use whatever setting the server administrator has chosen. If you are notperfectly sure you know what you're doing choose this option.
• None (no ETag sent). Disable ETags completely. Do keep in mind that if you do not alsoenable the Set default expiration option you will be hurting your site's performance!
Note
The lack of other options is intentional and has to do with an IIS limitation. IIS, unlikeApache, only offers a binary switch for ETags: you either send them or you don't.
Referrer PolicyHeader
While surfing, your browser will send out some information about the previous you werevisiting (the Referrer that brought you to the new page). This is useful for analytics, forexample you can easily track down how many visitors came from Twitter or any other page.
However, there are security implications about the Referrer header. What if on the privatearea of your website there are sensible information? Think about a private support area, wherethere is a ticket with the link www.example.com/private-support/help-my-site-www-foobar-com-is-hacked ; you post a reply with a link to a Stack Overflow reply, the user clicks on itand... whops! Now Stack Overflow knows that the site www.foobar.com was hacked.
The Referrer Policy header will instruct your browser when to send the Referrer header andhow many information you want to share.
• Do not set any policy You're not setting any instruction to the browser
88
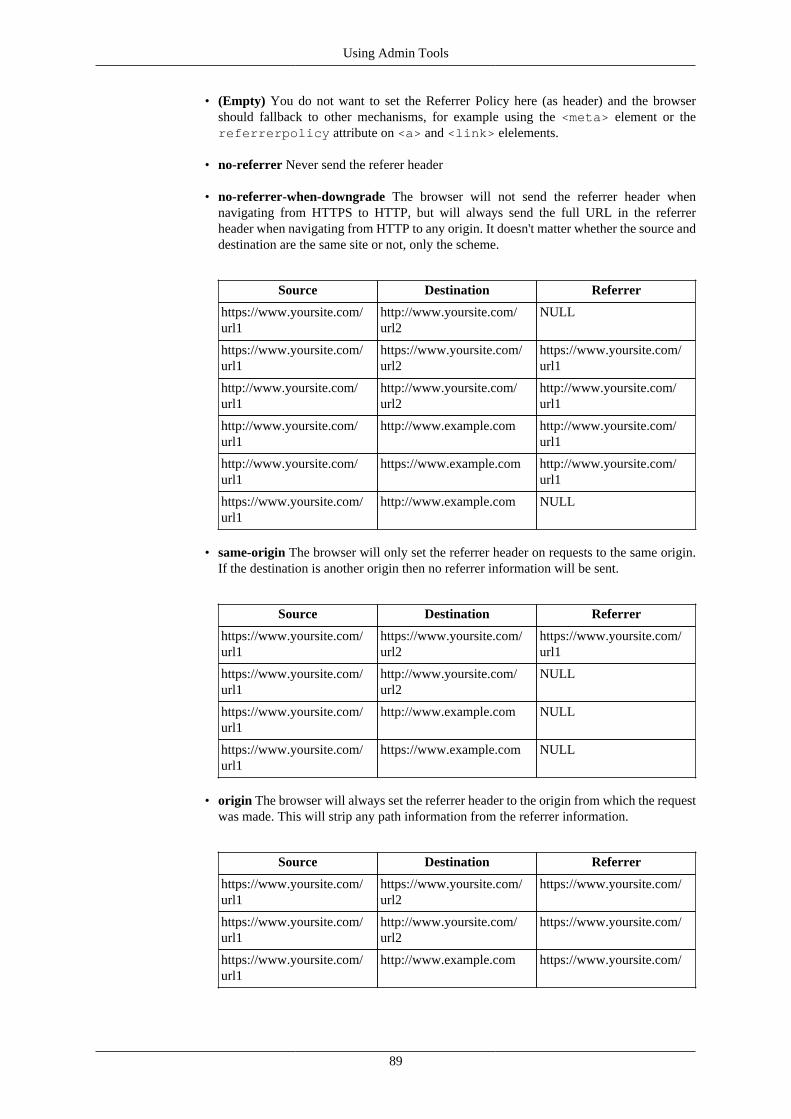
Using Admin Tools
• (Empty) You do not want to set the Referrer Policy here (as header) and the browsershould fallback to other mechanisms, for example using the <meta> element or thereferrerpolicy attribute on <a> and <link> elelements.
• no-referrer Never send the referer header
• no-referrer-when-downgrade The browser will not send the referrer header whennavigating from HTTPS to HTTP, but will always send the full URL in the referrerheader when navigating from HTTP to any origin. It doesn't matter whether the source anddestination are the same site or not, only the scheme.
Source Destination Referrer
https://www.yoursite.com/url1
http://www.yoursite.com/url2
NULL
https://www.yoursite.com/url1
https://www.yoursite.com/url2
https://www.yoursite.com/url1
http://www.yoursite.com/url1
http://www.yoursite.com/url2
http://www.yoursite.com/url1
http://www.yoursite.com/url1
http://www.example.com http://www.yoursite.com/url1
http://www.yoursite.com/url1
https://www.example.com http://www.yoursite.com/url1
https://www.yoursite.com/url1
http://www.example.com NULL
• same-origin The browser will only set the referrer header on requests to the same origin.If the destination is another origin then no referrer information will be sent.
Source Destination Referrer
https://www.yoursite.com/url1
https://www.yoursite.com/url2
https://www.yoursite.com/url1
https://www.yoursite.com/url1
http://www.yoursite.com/url2
NULL
https://www.yoursite.com/url1
http://www.example.com NULL
https://www.yoursite.com/url1
https://www.example.com NULL
• origin The browser will always set the referrer header to the origin from which the requestwas made. This will strip any path information from the referrer information.
Source Destination Referrer
https://www.yoursite.com/url1
https://www.yoursite.com/url2
https://www.yoursite.com/
https://www.yoursite.com/url1
http://www.yoursite.com/url2
https://www.yoursite.com/
https://www.yoursite.com/url1
http://www.example.com https://www.yoursite.com/
89
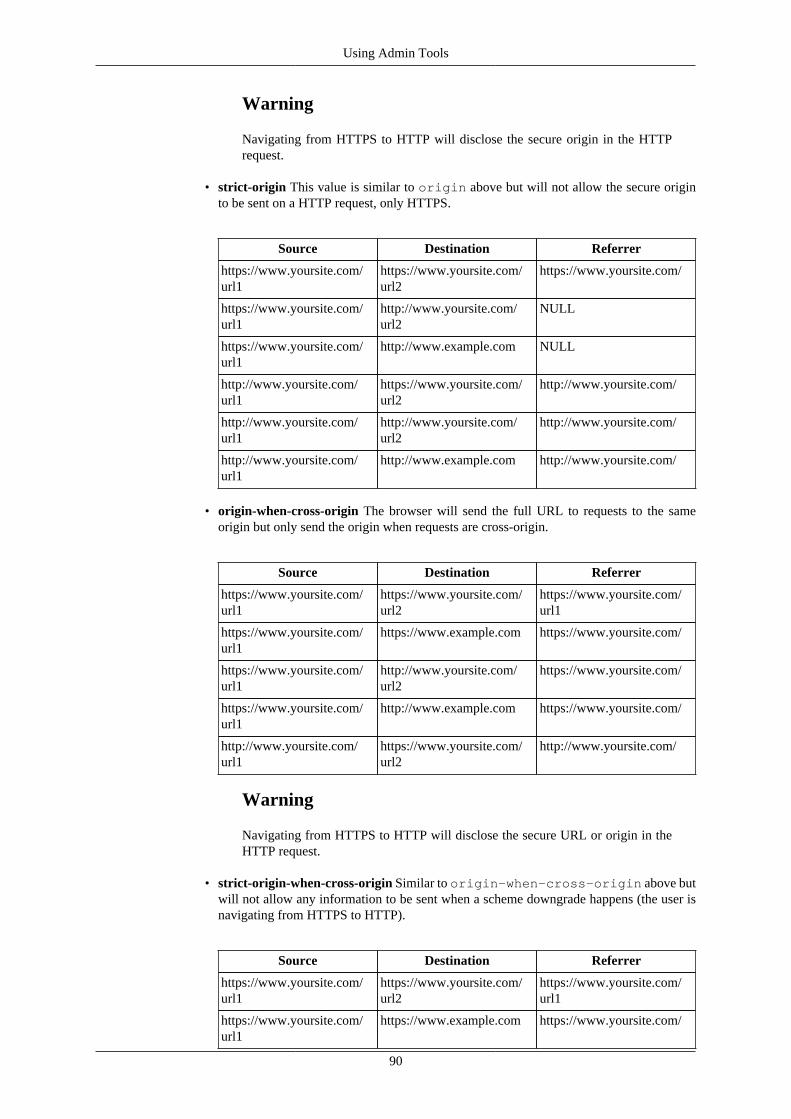
Using Admin Tools
Warning
Navigating from HTTPS to HTTP will disclose the secure origin in the HTTPrequest.
• strict-origin This value is similar to origin above but will not allow the secure originto be sent on a HTTP request, only HTTPS.
Source Destination Referrer
https://www.yoursite.com/url1
https://www.yoursite.com/url2
https://www.yoursite.com/
https://www.yoursite.com/url1
http://www.yoursite.com/url2
NULL
https://www.yoursite.com/url1
http://www.example.com NULL
http://www.yoursite.com/url1
https://www.yoursite.com/url2
http://www.yoursite.com/
http://www.yoursite.com/url1
http://www.yoursite.com/url2
http://www.yoursite.com/
http://www.yoursite.com/url1
http://www.example.com http://www.yoursite.com/
• origin-when-cross-origin The browser will send the full URL to requests to the sameorigin but only send the origin when requests are cross-origin.
Source Destination Referrer
https://www.yoursite.com/url1
https://www.yoursite.com/url2
https://www.yoursite.com/url1
https://www.yoursite.com/url1
https://www.example.com https://www.yoursite.com/
https://www.yoursite.com/url1
http://www.yoursite.com/url2
https://www.yoursite.com/
https://www.yoursite.com/url1
http://www.example.com https://www.yoursite.com/
http://www.yoursite.com/url1
https://www.yoursite.com/url2
http://www.yoursite.com/
Warning
Navigating from HTTPS to HTTP will disclose the secure URL or origin in theHTTP request.
• strict-origin-when-cross-origin Similar to origin-when-cross-origin above butwill not allow any information to be sent when a scheme downgrade happens (the user isnavigating from HTTPS to HTTP).
Source Destination Referrer
https://www.yoursite.com/url1
https://www.yoursite.com/url2
https://www.yoursite.com/url1
https://www.yoursite.com/url1
https://www.example.com https://www.yoursite.com/
90

Using Admin Tools
Source Destination Referrer
https://www.yoursite.com/url1
http://www.yoursite.com/url2
NULL
https://www.yoursite.com/url1
http://www.example.com NULL
• unsafe-url The browser will always send the full URL with any request to any origin.
8.4. System configuration
Warning
If you backup and restore your site on a new host you MUST change these configuration parameters toreflect your new server configuration manually.
System Configuration
This final section contains all the options which let the NginX Configuration Maker know some of the most basicinformation pertaining your site and which are used to create the rules for some of the options in the previoussection.
Host name forHTTPS requests(without https://)
Enter the site's domain name for secure (HTTPS) connections. By default, Admin Toolsassumes it is the same as your site's domain, but you have to verify it as it may be different onsome hosts, especially on shared hosts. Do not use the https:// prefix, just the domain name andpath to your site. For example, if the address is https://www.example.com/joomlathen type in www.example.com/joomla.
Host name forHTTP requests(without http://)
Enter the site's domain name for regular (HTTP) connections. By default, Admin Toolsassumes it is the same as the address you are connected to right now, but you have to verifyit. Do not use the http:// prefix, just the domain name and path to your site. For example,if the address to your site's root is http://www.example.com/joomla then type inwww.example.com/joomla.
Base directory ofyour site
This is the directory where your site is installed. For example, if it is installed in a directorynamed joomla and you access it on a URL similar to http://www.example.com/joomla you have to type in /joomla in here. If your site is installed on the root of yourdomain, please use a single forward slash for this field: /
9. Web Application FirewallNote
This feature is only available in the Professional release
91
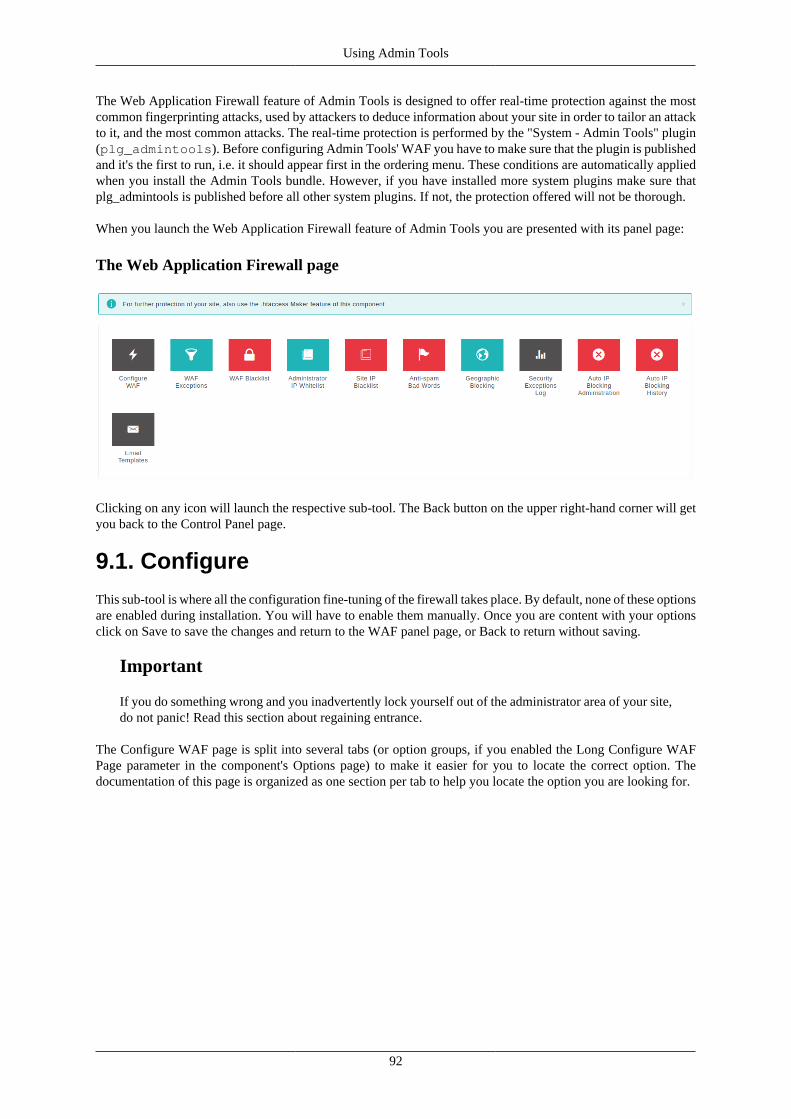
Using Admin Tools
The Web Application Firewall feature of Admin Tools is designed to offer real-time protection against the mostcommon fingerprinting attacks, used by attackers to deduce information about your site in order to tailor an attackto it, and the most common attacks. The real-time protection is performed by the "System - Admin Tools" plugin(plg_admintools). Before configuring Admin Tools' WAF you have to make sure that the plugin is publishedand it's the first to run, i.e. it should appear first in the ordering menu. These conditions are automatically appliedwhen you install the Admin Tools bundle. However, if you have installed more system plugins make sure thatplg_admintools is published before all other system plugins. If not, the protection offered will not be thorough.
When you launch the Web Application Firewall feature of Admin Tools you are presented with its panel page:
The Web Application Firewall page
Clicking on any icon will launch the respective sub-tool. The Back button on the upper right-hand corner will getyou back to the Control Panel page.
9.1. Configure
This sub-tool is where all the configuration fine-tuning of the firewall takes place. By default, none of these optionsare enabled during installation. You will have to enable them manually. Once you are content with your optionsclick on Save to save the changes and return to the WAF panel page, or Back to return without saving.
Important
If you do something wrong and you inadvertently lock yourself out of the administrator area of your site,do not panic! Read this section about regaining entrance.
The Configure WAF page is split into several tabs (or option groups, if you enabled the Long Configure WAFPage parameter in the component's Options page) to make it easier for you to locate the correct option. Thedocumentation of this page is organized as one section per tab to help you locate the option you are looking for.
92

Using Admin Tools
9.1.1. Basic Features
WAF: Basic Features
The Basic Features section contains the very basic options which allow you to control who can access your site.
Enable IPworkarounds
When this option is disabled (default on new installations) Admin Tools will get the visitor'sIP only from the REMOTE_ADDR environment variable sent by your server to PHP. This isthe most secure option but may cause a problem on certain sites which have a load balancer,reverse proxy, cache or CDN in front of the web server. In these cases the REMOTE_ADDRcontains the IP address of the load balancer, reverse proxy, cache or CDN in front of the webserver, NOT the IP address of the visitor. As a result all attacks will appear to be coming fromthe same IP address. Automatically or manually blocking this IP will disable your site foreveryone. Moreover, features like Administrator Exclusive Allow IP List, IP Disallow Listand so on will not work properly or at all.
On these setups Admin Tools you can set the Enable IP Workarounds option to Yes. This wayAdmin Tools can use the X-Forwarded-For HTTP header which is sent by the load balancer,reverse proxy, cache or CDN in front of the web server instead of REMOTE_ADDR. ThisHTTP header contains the real IP address of the visitor and Admin Tools' IP-based featureswill work properly.
This option must NOT be enabled on sites which are NOT behind a load balancer, reverseproxy, cache or CDN. If you do that then an attacker can send a X-Forwarded-For HTTPheader to mask their IP address or perform a targeted denial of service attack.
93

Using Admin Tools
If you are unsure about your setup there is a failsafe ways to figure out if you need to enablethis feature. First, set it to No. Then wait until there is an attack on your site. Did your sitebecome inaccessible for everyone after the last time Admin Tools detected an attack? Do youalways see the same IP or variations of the same in the Blocked Requests Log? If the answerto both questions is "yes" then you must set the "Enable IP workarounds" option to Yes.
Allowadministratoraccess only to IPsin the ExclusiveAllow IP List
When enabled, only IPs in the Exclusive Allow IP List (see the following sections of thisdocumentation about configuring it) will be allowed to access the administrator area of thesite. All other attempts to access the administrator pages will be redirected to the site's homepage. Be careful when using this feature! If you haven't added your own IP to the ExclusiveAllow IP List you will get locked out of your administrator area!
Please look into the Exclusive Allow IP List documentation section for more information.
Important
IPs added to the Administrator Exclusive Allow IP List are fully vetted as far asAdmin Tools is concerned. This means that no security measure will be appliedagainst them. Please place only very well trusted IPs in this list! If an attack islaunched from this IP, it will not be blocked by Admin Tools!
Disallow siteaccess to IPs inthe IP DisallowList
When enabled, if the visitor's IP is in the IP Disallow List (see the following sections of thisdocumentation about configuring it) they will immediately get a 403 Forbidden error messageupon trying to access your site.
Administratorsecret URLparameter
Normally, you can access your site's administrator area using a URL similar to http://www.example.com/administrator. Potential hackers already know that and willtry to access your site's administrator area the same way. From that point they can try tobrute force their way in (guess your username and password) or simply use the fact thatan administrator area exists to deduce that your site is running Joomla! and attack it. Byentering a word here, you are required to include it as a URL parameter in order to accessyour administrator area. For instance, if you enter the word test here you will only be able toaccess your site's administrator area with a URL similar to http://www.example.com/administrator?test . All other attempts to access the administrator area will beredirected to the site's home page. If you do not wish to use this feature, leave this field blank.
Important
The secret URL parameter must start with a letter. If it starts with a number, youwill immediately get a "Illegal variable _files or _env or _get or _post or _cookieor _server or _session or globals passed to script" error when trying to access yoursite's administrator back-end. It should also contain only lowercase and uppercaseASCII characters and numbers (a-z, A-Z, 0-9), dashes and underscores in order toensure the widest compatibility with all possible browser and server combinations.
Any other characters you use (such as: punctuation; special characters; Latin letterswith accents or diacritics; Greek, Cyrillic, Chinese, Japanese and other ethnic scriptcharacters)will have to be URL-encoded. This makes it difficult and tricky to use,hence our recommendation not to use it.
Moreover note that some extended Unicode characters such as certain TraditionalChinese characters and Emoji cannot be used. They will be either rejected by theserver or trigger a server protection which will lock you out from your site at thehosting level (you'll have to contact your host to unblock you).
Finally note that on most servers this is case sensitive, i.e. abc, ABC and Abc arethree different secret words.
94
Using Admin Tools
Tip
Some servers do not work with http://www.example.com/administrator?test due to their configuration. You may want totry using http://www.example.com/administrator/?test (add aslash right before the question mark) or http://www.example.com/administrator/index.php?test (add /index.php right before the questionmark). One of them is bound to work on your server. Unfortunately, there is no wayto know which ones will work on your server except for trying them out. The firstone (http://www.example.com/administrator?test) works on 95%of servers and that's what we recommend trying out first.
Defendagainst plugindeactivation
When enabled, Admin Tools will prevent back-end users from trying to disable (unpublish)the plugin. This means that you will also be unable to unpublish the plugin until you disablethis option!
Changeadministratorlogin directory to
THIS FEATURE IS PROVIDED WITHOUT SUPPORT. We had completely removed thisfeature in version 3.5.0. It was only restored at the insistence of some clients. Since we cannotguarantee its correct operation, we offer no support for it. Please note that many servers areseverely misconfigured and will not process the redirection to /administrator correctly. Thismay cause this feature to perform erratically or even prevent you from logging in to yoursite. Use at your own risk and keep in mind that NO SUPPORT will be provided for it. Werecommend using Administrator Directory Password Protection instead. It's more secure anddoesn't cause the problems the "Change administrator login directory" feature does.
As explained in the option above, you can normally access your site's administrator area usinga URL similar to http://www.example.com/administrator which is known tohackers with potentially negative consequences. This Admin Tools feature allows you to"cloak" the administrator login URL.
It's easier to explain this with an example. Let's say you use the setting foobar in this AdminTools option. When someone who is not already logged in to the administrator back-endtries to access http://www.example.com/administrator they will be redirectedto the home page of your site and a blocked request will be logged. When they try to accesshttp://www.example.com/foobar they will see the administrator login page.
A few important notices regarding this feature:
• It REQUIRES Search Engine Friendly URLs and Use URL Rewriting to be set to Yes inyour Joomla! Global Configuration page.
• You MUST NOT have any menu item with an alias which is the same as this option. If youdo you will lose access to that menu item from the front-end of your site.
• This setting works by setting a session variable. After the first time you visit thecloaked login URL (e.g. http://www.example.com/foobar) you will thenbe able to access the regular administrator URL (http://www.example.com/administrator) until your back-end session expires. Session expiration is controlledby the Session Lifetime value you have set in your Joomla! Global Configuration page.This behaviour is not a bug, it is how it is intended to function.
• By using this option you are NOT renaming the administrator directory. Doing so is notsupported by Joomla! and its extensions and would lead to grave issues with your site. Thisfeature is a URL manipulation trick, a sort of smoke and mirrors to confuse hackers tryingto brute force your administrator login. Even though it's a trick it is a very effective oneindeed!
• You CAN combine it with the Administrator secret URL parameter feature. In this case youneed to access the login page as http://www.example.com/foobar?test where
95
Using Admin Tools
"foobar" is the setting of Change administrator login directory to and "test" is the settingof Administrator secret URL parameter.
Unlike using the Administrator secret URL parameter on its own you MUST NOT put aslash or /index.php before the question mark even if your server required it before enablingthe change administrator login directory option. Remember that what you are accessing isnot a real directory on your server, it is merely a URL manipulation trick.
• You CAN combine it with the Password-protect Administrator feature (assuming that youare using Apache or another server compatible with .htaccess and .htpasswd files). Infact, we suggest that you enable all three administrator login protection features on yoursite: password-protect administrator, secret URL parameter and change administrator logindirectory. Combined with two-factor authentication (either Admin Tools' or the one shippedwith Joomla! 3.2) you will have a quintuple protection before anyone can access youradministrator area. That's paranoia level protection.
Away Schedule By default, Joomla! allows users with back-end access to log in to the site any time of theday. On smaller sites which have only a handful, or even just one, administrators on the samezone this means that someone can try to log in with a stolen username / password while youare fast asleep and unable to respond to the unexpected login. This where the Away Schedulecomes into play. If a user with back-end login privileges tries to log in to the front- or back-end of your sute between the "from" and "to" hour of the day they will be denied login.Moreover, if someone tries to access the administrator login page during that time they willbe redirected to the front-end of the site – even if the have used the correct Administratorsecret URL parameter.
Please note that this feature does not affect your regular users logging in to the front-end ofyour site. It only prevents users belonging to a group with the Admin Login privilege. Youcan check which groups have that privilege by clicking on the System, Global Configurationmenu of your site and visiting the Permissions tab.
The From and To time has to to be entered in 24-hour format with trailing zeros, e.g. 09:15for a quarter past 9 a.m. and 21:30 for half past 9 p.m. The time is entered in your server'stimezone which may be different than the timezone you live in. For your convenience, theserver's time at the time of the page load (in 24 hour format) is shown to you right belowthe Away Schedule.
96

Using Admin Tools
9.1.2. Request Filtering
WAF: Request Filtering
The Request Filtering section contains the options which are the heart and soul of the Web Application Firewall.Admin Tools will monitor incoming requests and their variables, filter them using these options and decide whichrequests seem to be nefarious, blocking them.
SQLiShieldprotection againstSQL injectionattacks
When enabled, Admin Tools will try to detect common SQL injection attacks against yoursite and block them.
But what is a SQLi attack? A few Joomla extension developers are hobbyists, withoutexperience and / or security training; or mistakes do happen, as Joomla itself has foundout the hard way. One of the common mistakes they do is to make assumptions about thenature or the content of user-submitted data, interpolating them into database queries as-is.Database queries are also called SQL queries (SQL, pronounced "sequel", is the shorthand forStructured Query Language, the programming language the database queries are written in).An attacker can exploit this mistake by sending data which have the effect of terminating thedeveloper's database query and starting a new one which either dumps privileged data -suchas usernames and passwords- or modifies data into the database - such as adding a new SuperUser under the control of the attacker. This class of attacks is called an SQL Injection, orSQLi for short, since the attacker "injects" his own code into a SQL query running on the site.
Malicious UserAgent block(MUAShield)
Many hackers will try to access your site using a browser configured to send malicious PHPcode in its user agent string (a small piece of text used to describe the browser to your server).The idea is that buggy log processing software will parse it and allow the hacker to gaincontrol of your website. When enabled, this feature allows Admin Tools to detect such attacksand block the request.
Remote FileInclusion block(RFIShield)
Some hackers will try to force a vulnerable extension into loading PHP code directly fromtheir server. This is done by passing an http(s):// or ftp:// URL in their request, pointing to
97

Using Admin Tools
their malicious site. When this option is enabled, Admin Tools will look for such cases, try tofetch the remote URL and scan its contents. If it is found to contain PHP code, it will blockthe request.
Important
If your site starts throwing white pages when submitting a URL in your site'sfront-end, please disable this option. The white page means that your server is notsusceptible to this kind of attack and doesn't properly advertise this to Admin Toolswhen requested. In this case, Admin Tools crashes while trying to scan the contentsof the remote location, causing the white page error. Disabling this option in sucha case poses no security risk.
Remote PHPprotocol block(PHPShield)
Some hackers will try to read the files of your site using the php:// wrapper and some advancedPHP filters. When this option is enabled, Admin Tools will block every request that containsthe php:// string.
Direct FileInclusion shield(DFIShield)
Some hackers try to trick vulnerable components into loading arbitrary files. Dependingon the vulnerable component, the file will either be output verbatim or parsed as a PHPfile. This allows attackers to disclose sensitive information about your site or run maliciouscode uploaded to your site through another vulnerable vector, e.g. an unfiltered upload ofexecutable PHP code. When this option is enabled, Admin Tools will search the requestparameters for anything which looks like a file path. If one is found, it will be scanned. If itis found to contain PHP code, the request will be rejected.
Important
This feature does NOT prevent dumping of non-PHP files, e.g. the /etc/passwdfile of Linux servers.
Uploads scanner(UploadShield)
When this option is enabled, Admin Tools will proactively scan all files which are uploadedthrough Joomla!. If any of these files is found to contain even a single line of PHP code,the request is blocked. This can prevent some kinds of very tricky attacks, like uploadingmalicious PHP code wrapped inside avatar images. Do note that not all servers support thisfeature. If the uploaded files directory is blocked by open_basedir restrictions, no scanningwill take place. If unsure, ask your host if they have put open_basedir restrictions which blockaccess to the PHP uploads directory. If they answer affirmatively, this Admin Tools featurewill not work unless this restriction is lifted.
Warning
NOT ALL COMPONENTS ALLOW ADMIN TOOLS TO SCAN THEIRUPLOADS! Some components do not use Joomla!'s index.php entry point file.Instead, they use their own. Since these uploads do not pass through the Joomla!application, Admin Tools' code doesn't run and these uploaded files are not scanned.In this case, if that component is found vulnerable, your site will still be at risk.We suggest avoiding such components. How can you tell? It's simple. If you usethe front-end protection feature of .htaccess / NginX Configuration Maker and youhad to add an exception for a component, it doesn't use Joomla!'s index.php and ispotentially vulnerable to this kind of code upload attacks.
Note
As of Joomla! 3.4.1, our UploadShield code is included in Joomla! itself and isalways enabled. As a result we recommend that our clients keep this feature turnedoff on Joomla! 3.4.1 and later.
PHP sessiondata poisoning
Prevents malicious input data which can be used to trick PHP's internal session handler intoexecuting arbitrary code when it's restoring the user session.
98
Using Admin Tools
protection(SessionShield)
The PHP session unserializer has a major bug which makes it misinterpret stored session dataif they contain specific character combinations, overwriting the legitimate session data withthe attacker-defined contents. Combined with some other features of PHP this can lead tothe execution of arbitrary PHP code. In short, attackers can send malicious data in onepage load and get arbitrary code to execute in the next page load. This feature of AdminTools detects and blocks this kind of malicious data. CAUTION: It may block some legitimaterequests as well.
Warning
This attack vector is NOT unique to Joomla!. It is a low level PHP bug / vulnerabilitywhich was fixed only in PHP 5.5.4 and later versions. Furthermore, default PHPsettings even in newer versions of PHP use the old, vulnerable setting, putting allsites using session data at risk! We VERY STRONGLY recommend that all ourclients use PHP 5.5.4 or later and edit their php.ini to modify this line:
session.serialize_handler = php
to
session.serialize_handler = php_serialize
This is the ONLY guaranteed way to fix this low level PHP vulnerability across allpossible attack vectors, including those yet undiscovered.
Anti-spamfiltering based onBad Words list
When enabled, all requests containing at least one word in the Bad Words list (configuredseparately, see the next sessions) will be blocked. By default the Bad Words list is empty; youhave to configure it to match your site's needs. One good idea is to include pharmaceutical,luxury watches and shoes brand names, as this makes up the majority of comment and contactspam received on web sites.
99
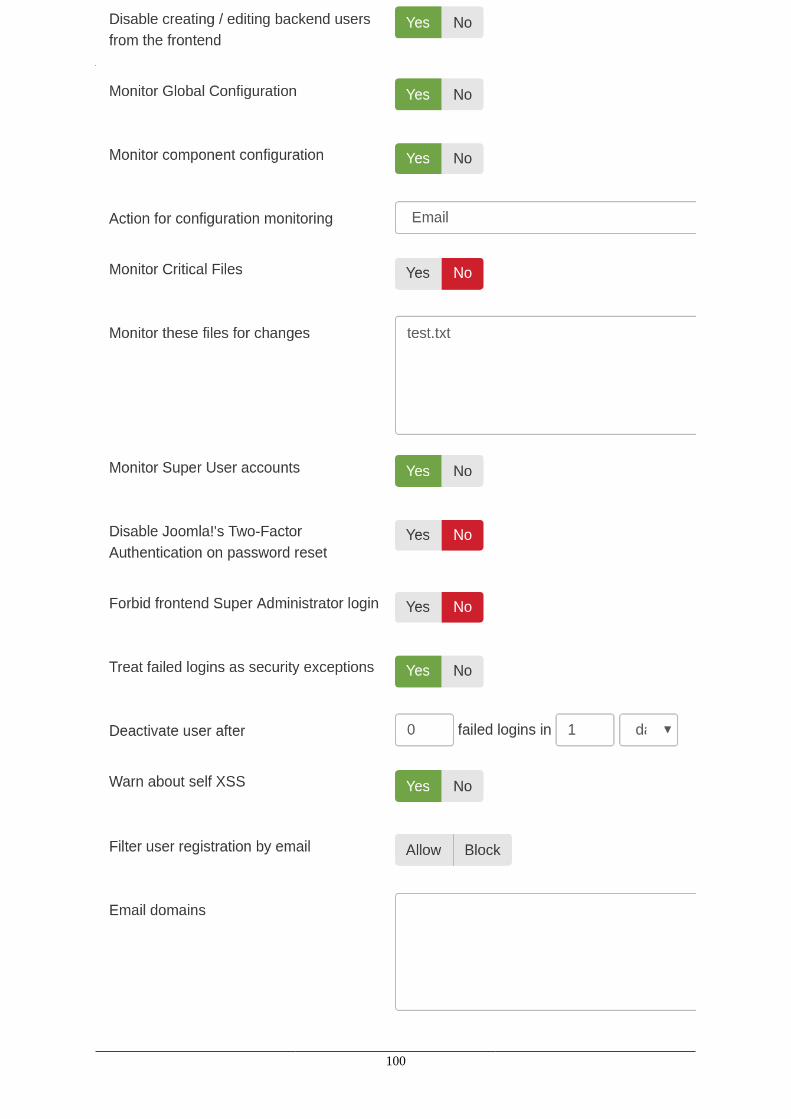
Using Admin Tools
9.1.3. Hardening Options
WAF: Hardening Options
100

Using Admin Tools
With the Hardening Options section you are able to harden the way some basic Joomla! features work. These areadvanced settings, so please make sure you understand what each option does before you enable it.
Warn about useof well-knownpasswords
When this option is enabled, Admin Tools will connect to the Have I Been Pwned database[https://haveibeenpwned.com/API/v2#PwnedPasswords] and check if the hash of the currentpassword is known. If a match is found, the user will be blocked from using an insecurepassword.
Wait, are you sharing my password? Is that servicesecure?
First of all, we do not share your password. We're only sending a fraction (only first5 chars) of the hash of your password. This method is called k-anonymity [https://en.wikipedia.org/wiki/K-anonymity] and it's a very secure way to share sensitivedate anonymously. So, don't worry, your password is secure, if you want to readthe whole details of this implementation, you can take a look at this page [https://www.troyhunt.com/ive-just-launched-pwned-passwords-version-2/].
Regarding the external service, it is powered by two well known figures: Troy Hunt(a security research) and CloudFlare (leader in Content Deliver System services).
User groups tocheck for well-known passwords
Most likely you want to enable this feature only for specific groups: Admin Tools will checkfor well-known passwords only users belonging to those groups (default to Super Users)
Disable editingbackend users'properties
When enabled, trying to modify the settings of an existing or create a new Manager,Administrator or Super User will fail.
Disable creating /editing backendusers from thefrontend
You should normally be unable to create a new user with administrative backend loginprivileges from the public frontend. When this option is enabled it will treat attempts to createthis kind of accounts as hacking attempts and block them from executing. This addresses someof the most notorious zero day attacks in Joomla! which took place between 2015 and 2016and we recommend having it turned on at all times. If you need to disable it we STRONGLYrecommend rethinking whatever leads you to disable this setting because it's creating a gapingsecurity hole on your site.
Monitor GlobalConfiguration
When this is enabled and someone tries to change the Global Configuration of Joomla!,either from the back-end or the front-end, you will either be notified or they will get blocked(depending on your settings below). This feature is designed to protect you against slyhackers or malicious administrators who subtly change your site's configuration for nefariouspurposes, e.g. by elevating the global privileges of user groups.
Monitorcomponentconfiguration
When this is enabled and someone tries to change the configuration of any core Joomla! orthird party component (what you see when you click Options in a component's toolbar) fromthe back-end of your site you will either be notified or they will get blocked (depending onyour settings below). This feature is designed to protect you against sly hackers or maliciousadministrators who subtly change your components' configuration for nefarious purposes, e.g.by elevating the privileges of user groups with regards to a particular component.
Action forconfigurationmonitoring
This option works in conjunction with the two above. You define what do you want to dowhen either global or component configuration is enabled and a change is detected in theconfiguration.
• Email will simply send a warning email to the email addresses you've configured to receiveemails for blocked requests and only if you have configured such email addresses. Thechanges in configuration will go through. This is the recommended setting for most sites.
• Block will treat any such changes as a reason to block the request. The changes inconfiguration will NOT go through. This setting should only be used on "locked down"
101
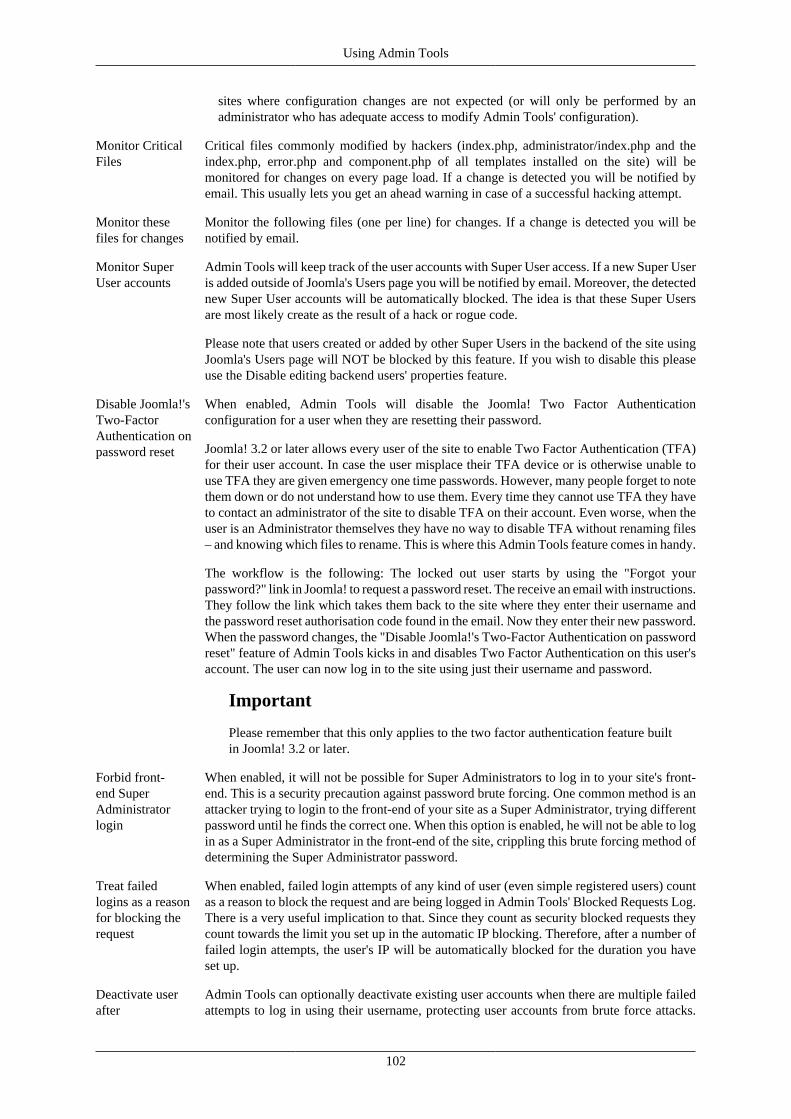
Using Admin Tools
sites where configuration changes are not expected (or will only be performed by anadministrator who has adequate access to modify Admin Tools' configuration).
Monitor CriticalFiles
Critical files commonly modified by hackers (index.php, administrator/index.php and theindex.php, error.php and component.php of all templates installed on the site) will bemonitored for changes on every page load. If a change is detected you will be notified byemail. This usually lets you get an ahead warning in case of a successful hacking attempt.
Monitor thesefiles for changes
Monitor the following files (one per line) for changes. If a change is detected you will benotified by email.
Monitor SuperUser accounts
Admin Tools will keep track of the user accounts with Super User access. If a new Super Useris added outside of Joomla's Users page you will be notified by email. Moreover, the detectednew Super User accounts will be automatically blocked. The idea is that these Super Usersare most likely create as the result of a hack or rogue code.
Please note that users created or added by other Super Users in the backend of the site usingJoomla's Users page will NOT be blocked by this feature. If you wish to disable this pleaseuse the Disable editing backend users' properties feature.
Disable Joomla!'sTwo-FactorAuthentication onpassword reset
When enabled, Admin Tools will disable the Joomla! Two Factor Authenticationconfiguration for a user when they are resetting their password.
Joomla! 3.2 or later allows every user of the site to enable Two Factor Authentication (TFA)for their user account. In case the user misplace their TFA device or is otherwise unable touse TFA they are given emergency one time passwords. However, many people forget to notethem down or do not understand how to use them. Every time they cannot use TFA they haveto contact an administrator of the site to disable TFA on their account. Even worse, when theuser is an Administrator themselves they have no way to disable TFA without renaming files– and knowing which files to rename. This is where this Admin Tools feature comes in handy.
The workflow is the following: The locked out user starts by using the "Forgot yourpassword?" link in Joomla! to request a password reset. The receive an email with instructions.They follow the link which takes them back to the site where they enter their username andthe password reset authorisation code found in the email. Now they enter their new password.When the password changes, the "Disable Joomla!'s Two-Factor Authentication on passwordreset" feature of Admin Tools kicks in and disables Two Factor Authentication on this user'saccount. The user can now log in to the site using just their username and password.
Important
Please remember that this only applies to the two factor authentication feature builtin Joomla! 3.2 or later.
Forbid front-end SuperAdministratorlogin
When enabled, it will not be possible for Super Administrators to log in to your site's front-end. This is a security precaution against password brute forcing. One common method is anattacker trying to login to the front-end of your site as a Super Administrator, trying differentpassword until he finds the correct one. When this option is enabled, he will not be able to login as a Super Administrator in the front-end of the site, crippling this brute forcing method ofdetermining the Super Administrator password.
Treat failedlogins as a reasonfor blocking therequest
When enabled, failed login attempts of any kind of user (even simple registered users) countas a reason to block the request and are being logged in Admin Tools' Blocked Requests Log.There is a very useful implication to that. Since they count as security blocked requests theycount towards the limit you set up in the automatic IP blocking. Therefore, after a number offailed login attempts, the user's IP will be automatically blocked for the duration you haveset up.
Deactivate userafter
Admin Tools can optionally deactivate existing user accounts when there are multiple failedattempts to log in using their username, protecting user accounts from brute force attacks.
102

Using Admin Tools
In here you can specify the number of failed logins and the time period these have to occurbefore the user is deactivated, e.g. 3 failed logins in 1 minute.
In order for this feature to work you must have enabled the Treat failed logins as a reasonfor blocking the request option above and NOT include Login failure in the Do not logthese reasons option in the Logging And Reporting area of this configuration page.
The behaviour of this feature depends on the user registration setup of your site, as defined inUsers, User Manager, Options in your site's back-end. When Allow User Registration is setto No this Admin Tools feature does not do anything at all! When Allow User Registrationis set to Yes there are three possible behaviours depending on the setting of the New UserAccount Activation option:
• Self: The user is deactivated and an activation email is sent to them by Admin Toolsusing the User re-activation email template.
• Admin: The user is deactivated and an activation email is sent to all of your site's SuperUsers by Admin Tools using the User re-activation email template.
• None: This Admin Tools feature does absolutely nothing at all. The user is not deactivated.
Warn about selfXSS
Display a message in browser console to warn the user to avoid running any command insideit. This can lead to hacking yourself (a.k.a. Self XSS attacks [https://en.wikipedia.org/wiki/Self-XSS]) and steal your account data.
Filter userregistration byemail
Admin Tools can block user registration based on the email domain they are using (listed inthe field below):
• Allow Will allow registration only if the email domain is contained inside the list. A typicaluse case is to allow registration only from site company addresses or student of a campus
• Block Registration will be blocked if the user tries to use a domain contain in the list. Thisis usually useful if you want to block people from using temporary or disposable emailaccounts.
Email domains Enter one domain for each line, leave empty to disable the filter during user registration
Below that you will find the Forgotten backend users section. This feature lets you automatically block or force apassword reset for users with backend access who have not logged into the site for a very long time. This featurewas inspired by a tweet by Jeff Atwood [https://twitter.com/codinghorror/status/1084583084035661826?s=21](of DIscourse fame) and our observations by logging into real world sites when our clients request us to do so.
The idea is that privileged user accounts who have not logged into the site for a very long time are probably leftover user accounts the site owner forgot to disable when the person stopped having a reason to log into the site'sadministrator backend. The password of the forgotten user account may have been compromised in the meantime.For example, the user may have reused their password on a different site which got hacked; or they may hadused an easy to guess password. If Two Factor Authentication isn't enabled on the account, an attacker who hassuccessfully compromised the password could now log into your site. Since they are using a legitimate user accountthey do not get their request blocked and they have full access to your site with everything that entails about yoursite's integrity.
This Admin Tools feature is designed to prevent this kind of awkward situation. If a user with backend accesshas not logged in for the configured time period (default: 90 days) they will either be completely blocked fromaccessing the site or they will be forced to reset their password (default and recommended action). In the first caseonly another Super User can unblock them, by editing their user account. In the latter case the user will try to log inand Joomla! will immediately force them to reset their password. Password reset requires providing informationsent by email. This way an attacker cannot use a compromised password; they cannot read the email sent to thelegitimate account holder's email address, therefore they cannot reset the password and log into your site.
For even better protection of your site we recommend that you take two more optional steps. Make sure thatall privileged users have Two Factor Authentication set up on their user account. Joomla has Two Factor
103
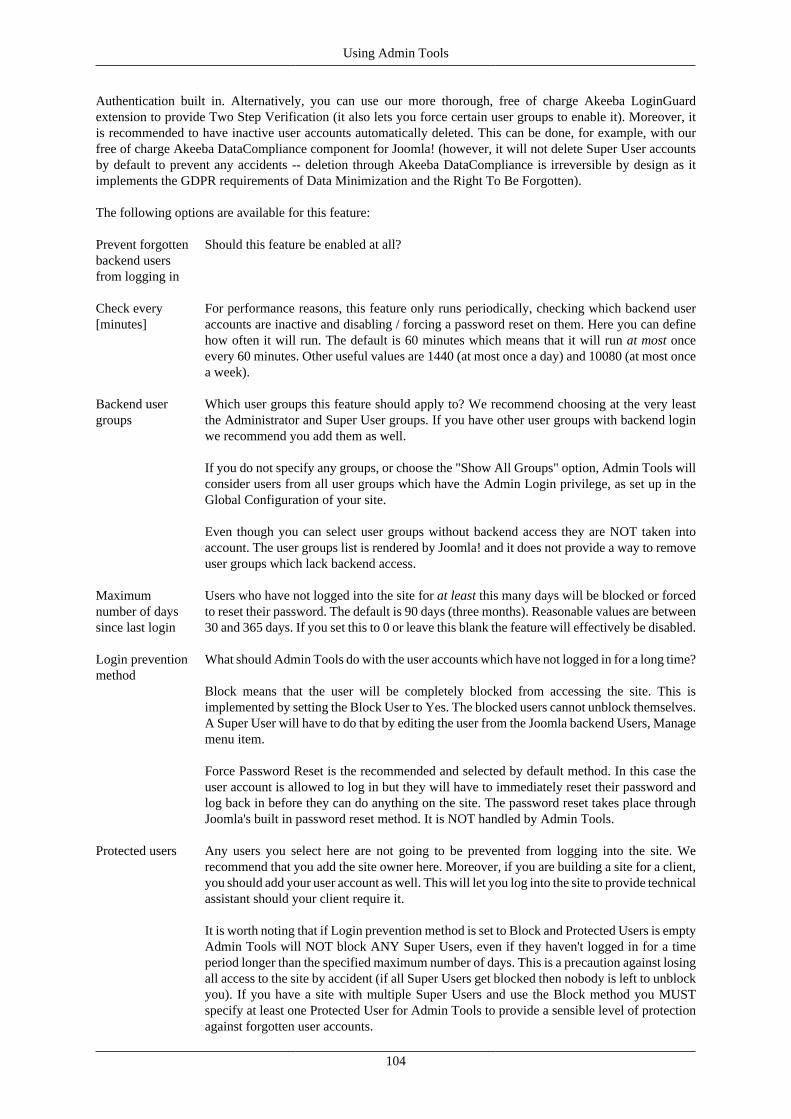
Using Admin Tools
Authentication built in. Alternatively, you can use our more thorough, free of charge Akeeba LoginGuardextension to provide Two Step Verification (it also lets you force certain user groups to enable it). Moreover, itis recommended to have inactive user accounts automatically deleted. This can be done, for example, with ourfree of charge Akeeba DataCompliance component for Joomla! (however, it will not delete Super User accountsby default to prevent any accidents -- deletion through Akeeba DataCompliance is irreversible by design as itimplements the GDPR requirements of Data Minimization and the Right To Be Forgotten).
The following options are available for this feature:
Prevent forgottenbackend usersfrom logging in
Should this feature be enabled at all?
Check every[minutes]
For performance reasons, this feature only runs periodically, checking which backend useraccounts are inactive and disabling / forcing a password reset on them. Here you can definehow often it will run. The default is 60 minutes which means that it will run at most onceevery 60 minutes. Other useful values are 1440 (at most once a day) and 10080 (at most oncea week).
Backend usergroups
Which user groups this feature should apply to? We recommend choosing at the very leastthe Administrator and Super User groups. If you have other user groups with backend loginwe recommend you add them as well.
If you do not specify any groups, or choose the "Show All Groups" option, Admin Tools willconsider users from all user groups which have the Admin Login privilege, as set up in theGlobal Configuration of your site.
Even though you can select user groups without backend access they are NOT taken intoaccount. The user groups list is rendered by Joomla! and it does not provide a way to removeuser groups which lack backend access.
Maximumnumber of dayssince last login
Users who have not logged into the site for at least this many days will be blocked or forcedto reset their password. The default is 90 days (three months). Reasonable values are between30 and 365 days. If you set this to 0 or leave this blank the feature will effectively be disabled.
Login preventionmethod
What should Admin Tools do with the user accounts which have not logged in for a long time?
Block means that the user will be completely blocked from accessing the site. This isimplemented by setting the Block User to Yes. The blocked users cannot unblock themselves.A Super User will have to do that by editing the user from the Joomla backend Users, Managemenu item.
Force Password Reset is the recommended and selected by default method. In this case theuser account is allowed to log in but they will have to immediately reset their password andlog back in before they can do anything on the site. The password reset takes place throughJoomla's built in password reset method. It is NOT handled by Admin Tools.
Protected users Any users you select here are not going to be prevented from logging into the site. Werecommend that you add the site owner here. Moreover, if you are building a site for a client,you should add your user account as well. This will let you log into the site to provide technicalassistant should your client require it.
It is worth noting that if Login prevention method is set to Block and Protected Users is emptyAdmin Tools will NOT block ANY Super Users, even if they haven't logged in for a timeperiod longer than the specified maximum number of days. This is a precaution against losingall access to the site by accident (if all Super Users get blocked then nobody is left to unblockyou). If you have a site with multiple Super Users and use the Block method you MUSTspecify at least one Protected User for Admin Tools to provide a sensible level of protectionagainst forgotten user accounts.
104
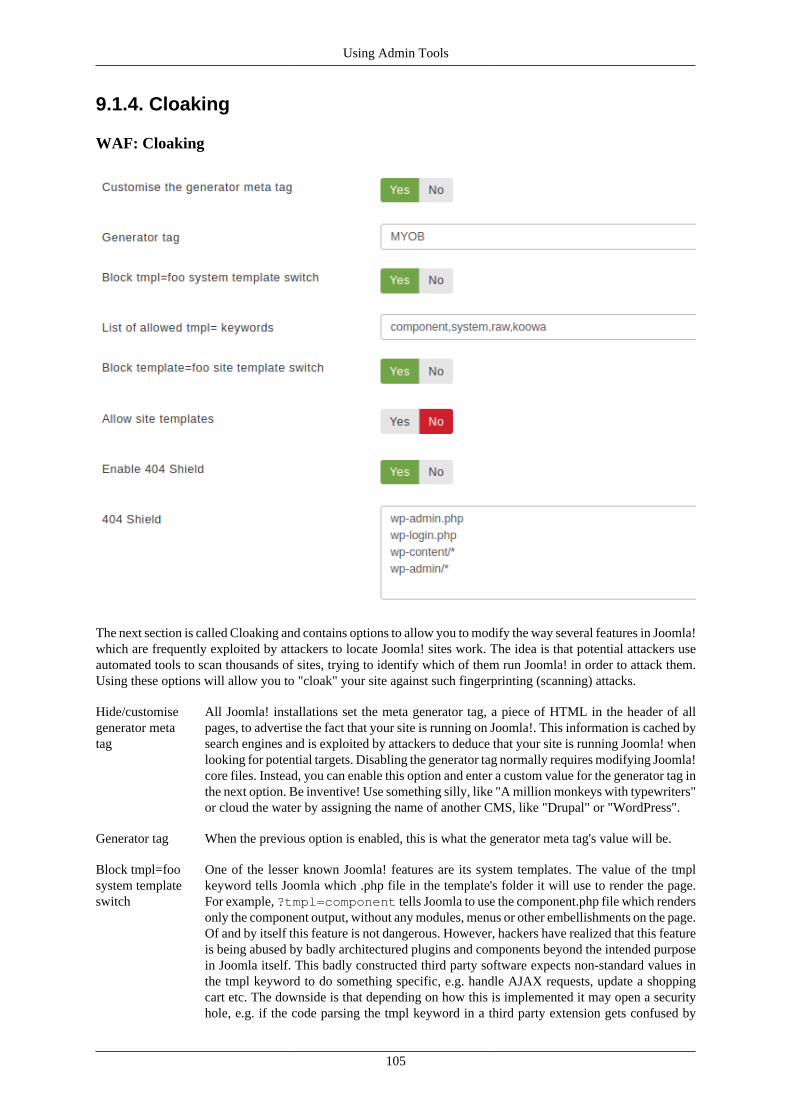
Using Admin Tools
9.1.4. Cloaking
WAF: Cloaking
The next section is called Cloaking and contains options to allow you to modify the way several features in Joomla!which are frequently exploited by attackers to locate Joomla! sites work. The idea is that potential attackers useautomated tools to scan thousands of sites, trying to identify which of them run Joomla! in order to attack them.Using these options will allow you to "cloak" your site against such fingerprinting (scanning) attacks.
Hide/customisegenerator metatag
All Joomla! installations set the meta generator tag, a piece of HTML in the header of allpages, to advertise the fact that your site is running on Joomla!. This information is cached bysearch engines and is exploited by attackers to deduce that your site is running Joomla! whenlooking for potential targets. Disabling the generator tag normally requires modifying Joomla!core files. Instead, you can enable this option and enter a custom value for the generator tag inthe next option. Be inventive! Use something silly, like "A million monkeys with typewriters"or cloud the water by assigning the name of another CMS, like "Drupal" or "WordPress".
Generator tag When the previous option is enabled, this is what the generator meta tag's value will be.
Block tmpl=foosystem templateswitch
One of the lesser known Joomla! features are its system templates. The value of the tmplkeyword tells Joomla which .php file in the template's folder it will use to render the page.For example, ?tmpl=component tells Joomla to use the component.php file which rendersonly the component output, without any modules, menus or other embellishments on the page.Of and by itself this feature is not dangerous. However, hackers have realized that this featureis being abused by badly architectured plugins and components beyond the intended purposein Joomla itself. This badly constructed third party software expects non-standard values inthe tmpl keyword to do something specific, e.g. handle AJAX requests, update a shoppingcart etc. The downside is that depending on how this is implemented it may open a securityhole, e.g. if the code parsing the tmpl keyword in a third party extension gets confused by
105

Using Admin Tools
certain types of data and executes arbitrary code or does something unintended. For this reasonAdmin Tools has the Block tmpl=foo system template switch feature which will block anyrequest that does not have one of the expected tmpl keywords for your site.
List of allowedtmpl= keywords
The list of tmpl keywords which should be allowed of your site, as a comma separated list.At the very least you MUST include system and component, otherwise Joomla! will not workproperly. Default value: component,system,raw,koowa,cartupdate
The component, system and raw keywords are defined and used by Joomla itself.tmpl=component tells Joomla to only show the component output, without any modules,menus or other embellishments – however, the template's CSS files are loaded. tmpl=raw has asimilar effect to tmpl=component, without loading the template's CSS files at all. tmpl=systemis used for displaying error pages. Your site will NOT work properly if you remove any ofthese keywords from the list of allowed tmpl keywords.
Note
The koowa keyword is only required when you run components based onNooku Framework a.k.a. Koowa, for example DOCman. According to the Koowadevelopers' email we received on January 2015 there are two reasons for the use ofthe koowa keyword:
• The modals which contain full page JavaScript "applications", like the multi fileuploader, was breaking on some templates out there because they do weird stuffin their JavaScript. No matter the precautions taken by Koowa there is at leastone template out there removing the JavaScript files from the page output becausethey "looked like JavaScript".
• Frontend edit forms. The Koowa developers also had a lot of problems by usingtmpl=component or the normal template in frontend forms. Templates re-defineBootstrap rules, use Bootstrap 3, add weird JavaScript to "enhance" the page thathas no job in the component output and so on.
So, basically, they added the custom "koowa" tmpl keyword to work aroundrestrictions imposed by templates. The correct solution would be usingtmpl=raw&format=raw but they decided otherwise. Therefore we include thiskeyword by default. If you are not using any extension powered by Koowa you areadvised to remove that keyword from your site.
Note
The cartupdate keyword is currently only used by VirtueMart. For some strangereason its developer does not want to use format=raw for cart updates even thoughthis is the recommended, tried and tested way to do this since Joomla! 1.5. Havinghad the past experience of trying to discuss best practices with him to no avail wedecided to add this keyword by default without even contacting him to propose analternative. If you are not using VirtueMart please remove this keyword from yoursite.
Blocktemplate=foo sitetemplate switch
Another Joomla! hidden feature is the ability to switch between installed templates by passinga special URL parameter called "template". Enabling this option will turn off this hiddenJoomla! feature.
Allow sitetemplates
Enabling this option partially overrides the previous option (the blocking of template=fooin the URL). If the template= URL query parameter specifies the name of a template whichexists in your template directory, then it will be allowed without the request being blocked.
106

Using Admin Tools
Important
If you are using the "Send this page by email" icon in your articles and/or multipletemplates on your site, you MUST enable this option.
You MUST enable this option if you want your site visitors to be able to use Joomla!'scom_mailto component, i.e. the "Send this page by email" icon in your articles.
Moreover, you must use it on sites which are using more than one template at the same time.What we mean by that is that you can go to Joomla!'s back-end, go to Extensions, Templatesand assign any of the installed templates to any number of menu items. When you do that,several components need to append template=yourDefaultTemplateName to the URL.This would cause your site to block the request. By enabling this option you prevent theserequests from being accidentally blocked.
Enable 404Shield
Whether the 404 Shield feature should be enabled or not.
404Shield This feature 404 will block irregular "Page not found" requests which typically indicate thatyour site is being targeted by an automatic vulnerability scanner or hacking tool. For example,someone trying to access the folder wp-admin on your Joomla site is irregular since thatfolder is the administration area of WordPress. Since your site is running Joomla it meansthat the request to your site was very likely malicious, e.g. an automated tool (bot) tryingto guess your access credentials by trying various common combinations of usernames andpasswords. In this light, the request has to be blocked.
The default list of URLs to be blocked by 404Shield consists of known WordPress-only paths.That's because we know that these URLs cannot be found on a Joomla site and are typicallyused by automated hacking tools, therefore minimising the possibility of false positives. Youcan always add more if you want to.
9.1.5. Project Honeypot
WAF: Project Honeypot
Project Honeypot allows you to integrate with Project Honeypot's spam fighting services. Project Honeypot is acollective effort to detect spammers, email harversters and crackers. Its HTTP:BL service allows participants toquery the IP addresses of their visitors and figure out if it is a malicious user behind it. If you enable this feature,Admin Tools will check the IP address of each visitor and, if it is a malicious user, it will block him. You havethe following options:
107
Using Admin Tools
Enable HTTP:BLfiltering
Turns the entire feature on and off
Project HoneypotHTTP:BL key
Enter your HTTP:BL key. You can sign up for Project Honeypot and get your key at http://www.projecthoneypot.org/httpbl_configure.php.
Minimum ThreatRating to block(0-255, default25)
Project Honeypot uses a logarithmic "threat rating" to rank the possibility of a specific IP beinga spammer. This options defines the minimum threat level an IP must have before it's blocked.A value of 25 means that this IP has submitted 100 spam messages on Project Honeypot'sspam catching honeypots and is usually a safe indication that it belongs to a spammer. Donote that the rating is logarithmic. A value of 50 means 1,000 spam messages and a value of75 means one million spam messages. Do not set it to values over 50, as you will most likelynever block any spammer at all.
Maximum ageof acceptedHTTP:BL results
Project Honeypot reports when was the last time this IP was caught sending spam messages.The older this is (the higher the age is), the less likely is that this IP is still used by a spammer.You can chose here what will be the maximum reported age that will be blocked. The defaultvalue of 30 means that IPs which have submitted a spam message in the last 30 days willbe blocked.
Also blocksuspiciousIPs, not justconfirmedspammers
Sometimes Project Honeypot is not sure if an IP belongs to a spammer or it's a hapless chapwho clicked on the wrong link. In this case the IP is marked as "suspicious". The defaultbehaviour is to not block these IPs. However, if you are receiving a lot of spam it's a good ideato enable this feature and block even "suspicious" IPs. Ultimately, some unfortunate userswill be inadvertently blocked, so use this option with caution!
9.1.6. Exceptions
WAF: Exceptions
Sometimes you do not want to block certain IPs or domain names. For example, you don't want to block GoogleBot, MSN (Bing) Bot and so on. You can easily add Exceptions from blocking. You can set the following optionsto prevent Admin Tools from blocking certain IPs and domain names:
Never blockthese IPs
Enter a comma-separated list of IPs which should never be automatically blocked. Forexample, such a list can be 127.0.0.1, 123.124.125.126 Moreover, since AdminTools 2.2.a3 you can use IP ranges (e.g. 127.0.0.1-127.0.0.10), implied IP rangenotation (127.0.0. for the entire 127.0.0.1 to 127.0.0.255 block) and CIDR block notation(e.g. 127.0.0.0/8) on top of plain old IP addresses.
This field fully supports both IPv4 and IPv6 addresses.
You may enter a dynamic IP domain name prefixed by the at-sign (for IPv4) or hash-sign (for IPv6). This only applies if you are using a dynamic IP address domainprovider (e.g. DynDNS). For example, if you are using DynDNS and your dynamicIP address domain name is example.dyndns.info and resolves to an IPv4 address youcan enter @example.dyndns.info to always allow your dynamic IPv4 address.Conversely, if your dynamic hostanem resolves to an IPv6 address you can enter#example.dyndns.info to always allow your dynamic IPv4 address. Be careful to enterthe correct domain name or you may have a delay of up to 30" processing blocked requests.
108
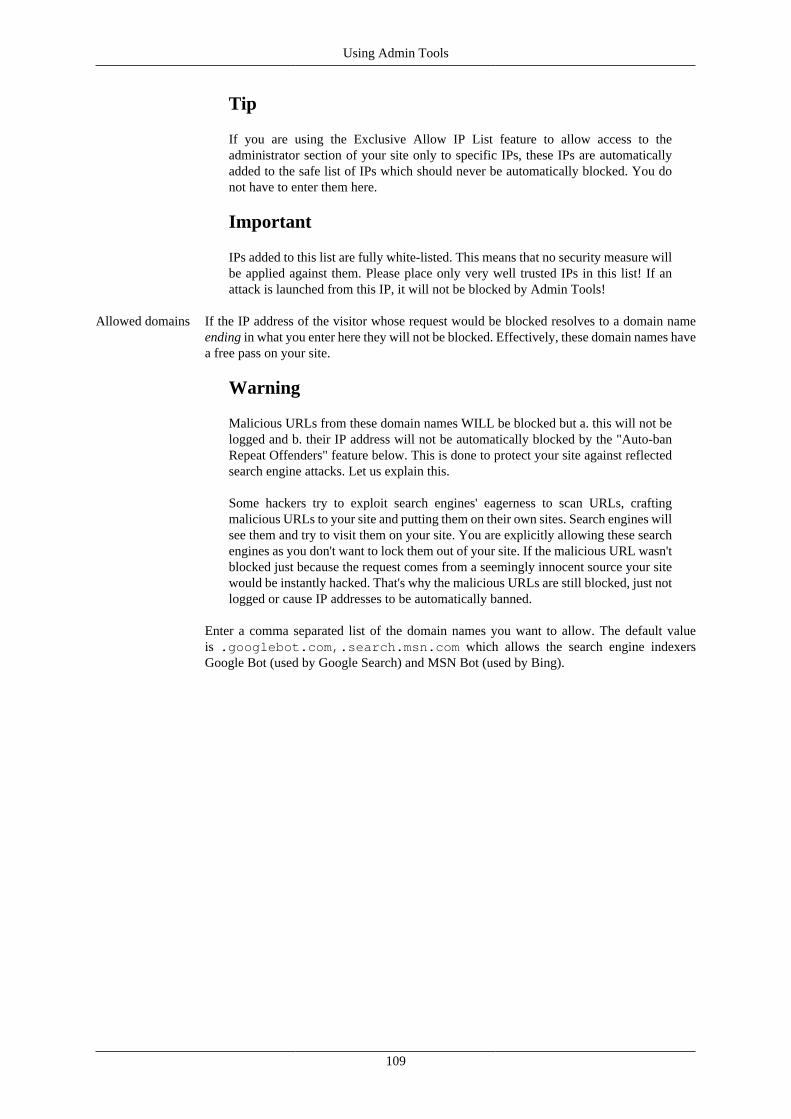
Using Admin Tools
Tip
If you are using the Exclusive Allow IP List feature to allow access to theadministrator section of your site only to specific IPs, these IPs are automaticallyadded to the safe list of IPs which should never be automatically blocked. You donot have to enter them here.
Important
IPs added to this list are fully white-listed. This means that no security measure willbe applied against them. Please place only very well trusted IPs in this list! If anattack is launched from this IP, it will not be blocked by Admin Tools!
Allowed domains If the IP address of the visitor whose request would be blocked resolves to a domain nameending in what you enter here they will not be blocked. Effectively, these domain names havea free pass on your site.
Warning
Malicious URLs from these domain names WILL be blocked but a. this will not belogged and b. their IP address will not be automatically blocked by the "Auto-banRepeat Offenders" feature below. This is done to protect your site against reflectedsearch engine attacks. Let us explain this.
Some hackers try to exploit search engines' eagerness to scan URLs, craftingmalicious URLs to your site and putting them on their own sites. Search engines willsee them and try to visit them on your site. You are explicitly allowing these searchengines as you don't want to lock them out of your site. If the malicious URL wasn'tblocked just because the request comes from a seemingly innocent source your sitewould be instantly hacked. That's why the malicious URLs are still blocked, just notlogged or cause IP addresses to be automatically banned.
Enter a comma separated list of the domain names you want to allow. The default valueis .googlebot.com,.search.msn.com which allows the search engine indexersGoogle Bot (used by Google Search) and MSN Bot (used by Bing).
109
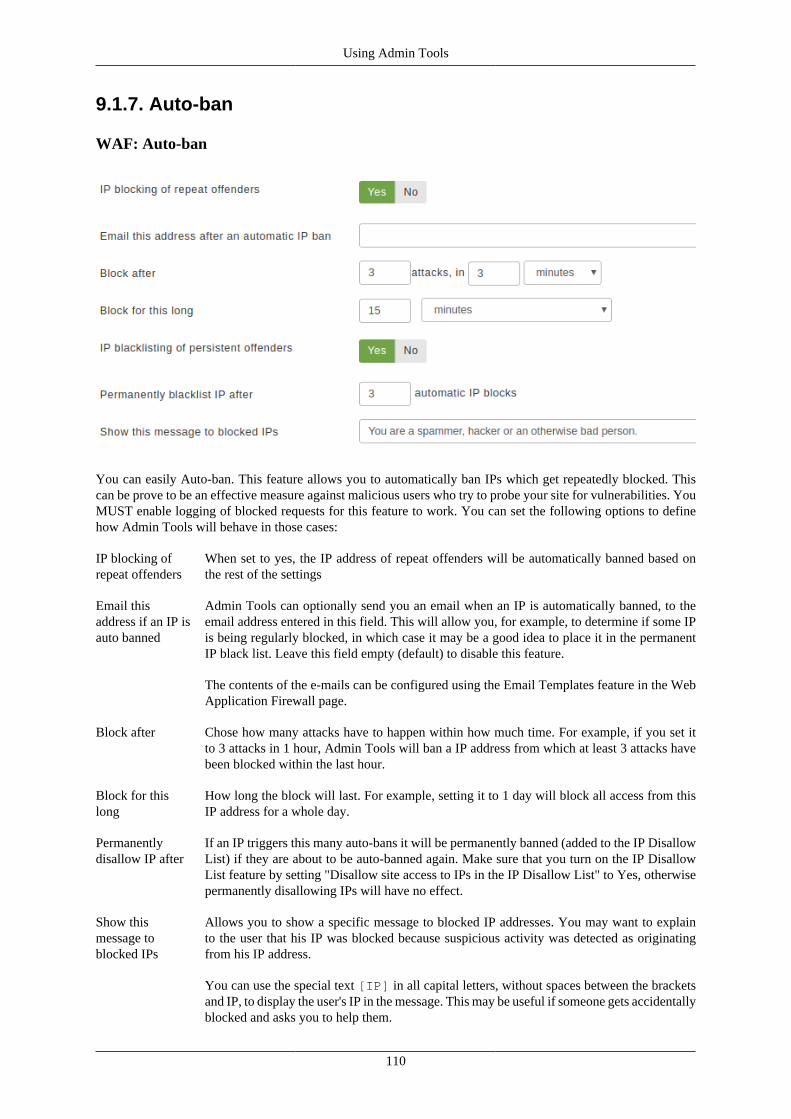
Using Admin Tools
9.1.7. Auto-ban
WAF: Auto-ban
You can easily Auto-ban. This feature allows you to automatically ban IPs which get repeatedly blocked. Thiscan be prove to be an effective measure against malicious users who try to probe your site for vulnerabilities. YouMUST enable logging of blocked requests for this feature to work. You can set the following options to definehow Admin Tools will behave in those cases:
IP blocking ofrepeat offenders
When set to yes, the IP address of repeat offenders will be automatically banned based onthe rest of the settings
Email thisaddress if an IP isauto banned
Admin Tools can optionally send you an email when an IP is automatically banned, to theemail address entered in this field. This will allow you, for example, to determine if some IPis being regularly blocked, in which case it may be a good idea to place it in the permanentIP black list. Leave this field empty (default) to disable this feature.
The contents of the e-mails can be configured using the Email Templates feature in the WebApplication Firewall page.
Block after Chose how many attacks have to happen within how much time. For example, if you set itto 3 attacks in 1 hour, Admin Tools will ban a IP address from which at least 3 attacks havebeen blocked within the last hour.
Block for thislong
How long the block will last. For example, setting it to 1 day will block all access from thisIP address for a whole day.
Permanentlydisallow IP after
If an IP triggers this many auto-bans it will be permanently banned (added to the IP DisallowList) if they are about to be auto-banned again. Make sure that you turn on the IP DisallowList feature by setting "Disallow site access to IPs in the IP Disallow List" to Yes, otherwisepermanently disallowing IPs will have no effect.
Show thismessage toblocked IPs
Allows you to show a specific message to blocked IP addresses. You may want to explainto the user that his IP was blocked because suspicious activity was detected as originatingfrom his IP address.
You can use the special text [IP] in all capital letters, without spaces between the bracketsand IP, to display the user's IP in the message. This may be useful if someone gets accidentallyblocked and asks you to help them.
110
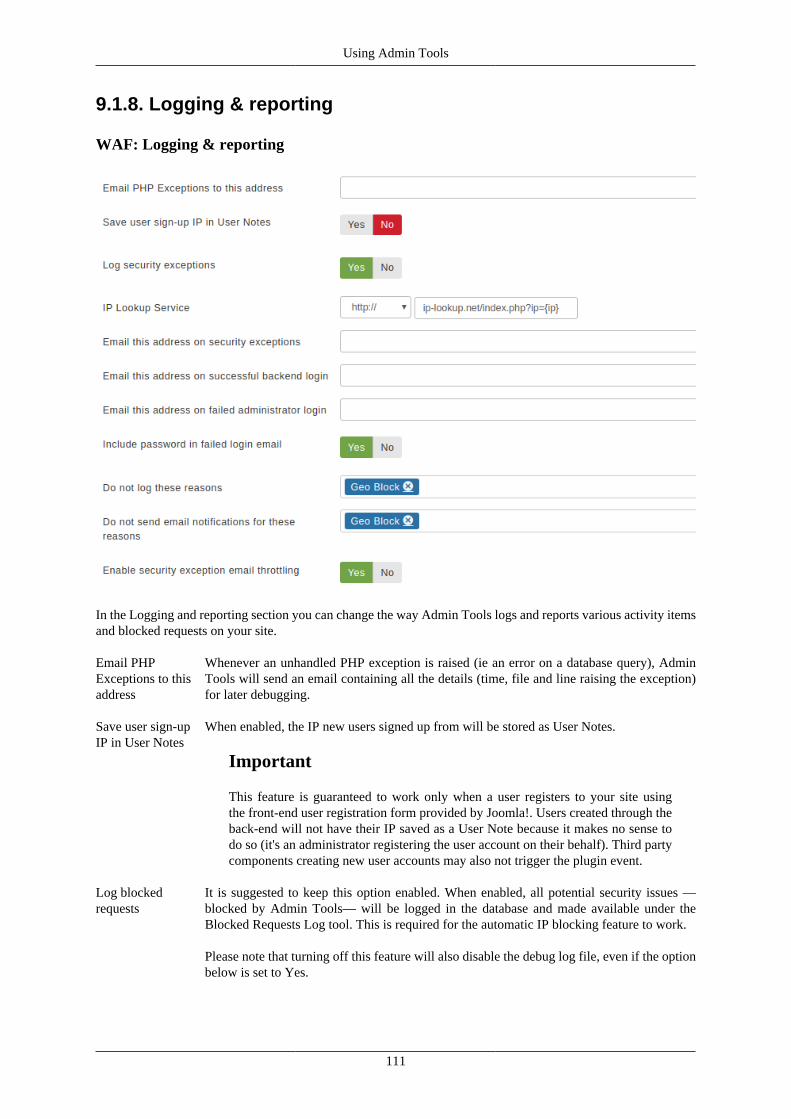
Using Admin Tools
9.1.8. Logging & reporting
WAF: Logging & reporting
In the Logging and reporting section you can change the way Admin Tools logs and reports various activity itemsand blocked requests on your site.
Email PHPExceptions to thisaddress
Whenever an unhandled PHP exception is raised (ie an error on a database query), AdminTools will send an email containing all the details (time, file and line raising the exception)for later debugging.
Save user sign-upIP in User Notes
When enabled, the IP new users signed up from will be stored as User Notes.
Important
This feature is guaranteed to work only when a user registers to your site usingthe front-end user registration form provided by Joomla!. Users created through theback-end will not have their IP saved as a User Note because it makes no sense todo so (it's an administrator registering the user account on their behalf). Third partycomponents creating new user accounts may also not trigger the plugin event.
Log blockedrequests
It is suggested to keep this option enabled. When enabled, all potential security issues —blocked by Admin Tools— will be logged in the database and made available under theBlocked Requests Log tool. This is required for the automatic IP blocking feature to work.
Please note that turning off this feature will also disable the debug log file, even if the optionbelow is set to Yes.
111

Using Admin Tools
Important
When this option is turned off the automatic IP blocking of repeat offenders,automatic adding of IPs to the IP Disallow List and most email notification featureswill be deactivated.
Keep a debug logfile
It is suggested to keep this option disabled unless you are troubleshooting.
When enabled, Admin Tools will create a file named admintools_breaches.php inyour site's administrator/logs directory (or wherever you have configured your logsdirectory to be). This contains all the information sent in the request that Admin Toolsblocked. This may include sensitive information such as usernames, passwords and personallyidentifiable information. For this reason you must only enable this feature for a limited amountof time when troubleshooting. We may ask you to do this, and send us a copy of the log file,if you ask us for support.
When you disable that option, the existing log files will be removed once you visit AdminTools' Control Panel page again.
Do note that your logs directory MUST be writable for the log file to be generated.
Important
Some servers use automated file scanners which will mistakenly flag Admin Tools'log file as a security threat. Because of that they might issue an automated warningto you that your site is hacked, rename / delete the file or prevent web access toyour site (put it offline). This is a mistake and does not reflect the truth. Our log filedoes have an executable extension (.php) and does contain the signatures of hackingattempts (the hacking attempts it stopped from hacking your site!) BUT the hackingattempts signature themselves are NOT executable. In fact, the only reason this isa .php file is so that we can put a PHP die() statement at the top of the file to preventit from being executable over the web. This information is also printed at the top ofthe file, in its header. If your host is giving you grief about the log file please showthem this documentation page or ask them to actually review the file and read itsheader. If they still insist that they have to block your site please go to a differenthost that understands how PHP works and, by extent, is a much safer choice. In themeantime, just disable the Keep a debug log file option.
Important
By default the Joomla! log directory is readable over the web. We VERYSTRONGLY advise you to either choose a log directory outside your web root orprotect this directory against web access. The former can be performed through yoursite's Global Configuration page; please consult Joomla!'s documentation. The lattercan be achieved through the directory password protection feature of your hostingcontrol panel or by adding a .htaccess file (Apache web server) or web.config file(Microsoft Internet Information Services -IIS- server). If you are using a differentserver, such as NginX, the only way to protect the logs directory against unauthorisedweb access is using a directory outside your web server's root. Please consult yourhost if you are not sure how you can do this.
IP LookupService
Admin Tools will provide you with a link to look up the owner of an IP address in the emailsit sends you, as well as the Blocked Requests Log and Auto IP Blocking Administrator pages.By default, it uses the ip-lookup.net service. This option allows you to use a different IPlookup service if you so wish.
112
Using Admin Tools
Enter the URL of the IP lookup service you want to use in this text box. The {ip} part ofthe URL will be replaced with the IP address to look up. For example, the default URL (forip-lookup.net) is http://ip-lookup.net/index.php?ip={ip}
Email thisaddress onblocked request
Enter one or more email addresses (separated by commas) which will get notified whenevera request is blocked on your site. For example [email protected] for one recipientonly or [email protected], [email protected], [email protected] formultiple recipients. The email addresses need not be in the same domain name and don't evenneed to be users of the site itself. Any email address will do.
A "blocked request" is anything which triggers the Web Application Firewall and causes it toblock an incoming request to serve a page. This is useful to get an ahead warning in the eventof a bot trying to perform a series of attacks on your site.
The contents of the e-mails can be configured using the Email Templates feature in the WebApplication Firewall page.
Email thisaddress onsuccessful back-end login
Enter an email address which will get notified whenever someone successfully logs in toyour site's administrator back-end. If you do not wish to use this feature, leave this fieldblank. If you enter an email address, every time someone logs in to the administrator areaan email will be sent out to this email address stating the username and site name. If youwant to send a notification to multiple email addresses separate them with commas, [email protected], [email protected]. The email addresses do not need to be inthe same domain and they don't even have to be linked to users of your site.
This allows you to get instant notification of unexpected administrator area logins which area tell-tale sign of a hacked site. In that unlikely event, immediately log in to your site's back-end area, go to Extensions, Admin Tools and click on the Emergency Off-Line Mode button.This will cut off the attacker's access to the entirety of your site and gives you ample time toupgrade your site and its extensions, as well as change the password (and maybe the username)of the compromised Super Administrator account. For maximum security, after taking yoursite back on-line, log out, clear your browser's cookies and cache and log in again.
The contents of the e-mails can be configured using the Email Templates feature in the WebApplication Firewall page.
Email thisaddress on failedadministratorlogin
Enter an email address which will get notified whenever someone tries to log in to your site'sadministrator back-end but is denied access. If you do not wish to use this feature, leave thisfield blank. If you enter an email address, every time someone unsuccessfully tries to log in tothe administrator area an email will be sent out to this email address stating the username andsite name. If you want to send a notification to multiple email addresses separate them withcommas, e.g. [email protected], [email protected]. The email addresses do notneed to be in the same domain and they don't even have to be linked to users of your site.
This allows you to get instant notification of unexpected administrator area login attemptswhich are a tell-tale sign of a hacked site. In that unlikely event, immediately log in to yoursite's back-end area, go to Extensions, Admin Tools and click on the Emergency Off-LineMode button. This will cut off the attacker's access to the entirety of your site and gives youample time to upgrade your site and its extensions, as well as change the password (and maybethe username) of a potentially compromised Super Administrator account. For maximumsecurity, after taking your site back on-line, log out, clear your browser's cookies and cacheand log in again.
The contents of the e-mails can be configured using the Email Templates feature in the WebApplication Firewall page.
Include passwordin failed loginemail
Should the incorrect password be included in the mail you receive when someone triggers afailed login? This only applies when Treat failed logins as a reason for blocking the requestis enabled.
113
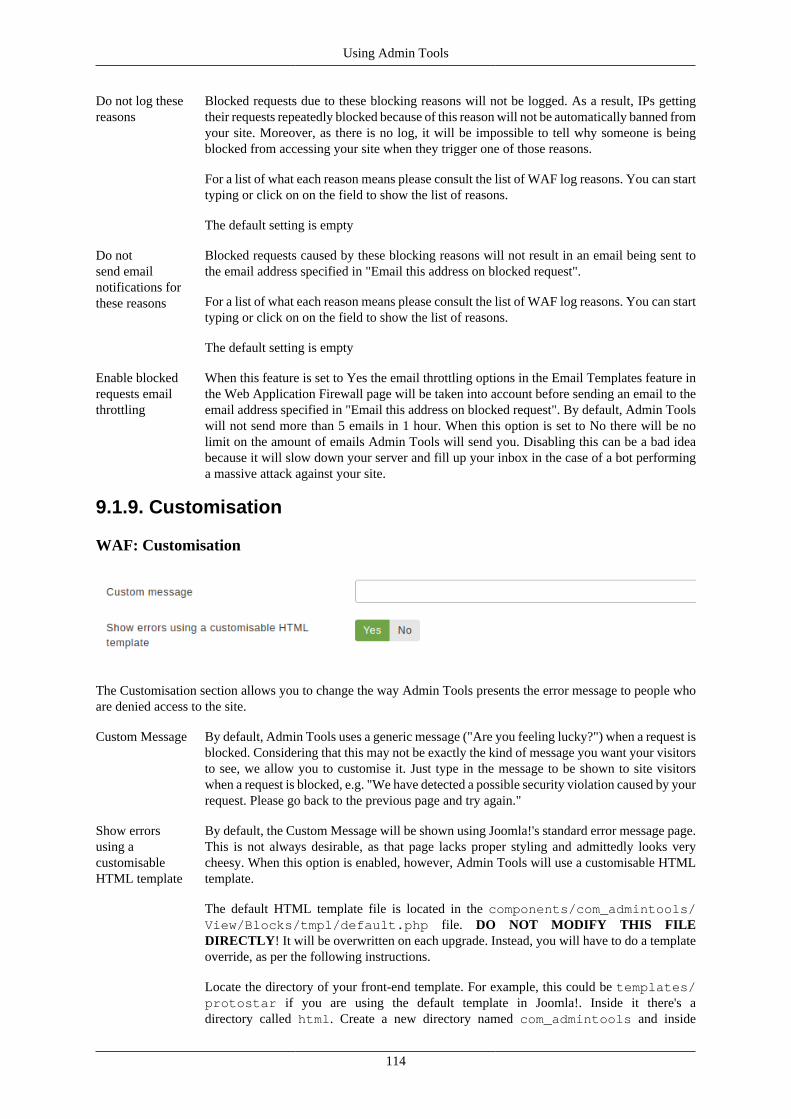
Using Admin Tools
Do not log thesereasons
Blocked requests due to these blocking reasons will not be logged. As a result, IPs gettingtheir requests repeatedly blocked because of this reason will not be automatically banned fromyour site. Moreover, as there is no log, it will be impossible to tell why someone is beingblocked from accessing your site when they trigger one of those reasons.
For a list of what each reason means please consult the list of WAF log reasons. You can starttyping or click on on the field to show the list of reasons.
The default setting is empty
Do notsend emailnotifications forthese reasons
Blocked requests caused by these blocking reasons will not result in an email being sent tothe email address specified in "Email this address on blocked request".
For a list of what each reason means please consult the list of WAF log reasons. You can starttyping or click on on the field to show the list of reasons.
The default setting is empty
Enable blockedrequests emailthrottling
When this feature is set to Yes the email throttling options in the Email Templates feature inthe Web Application Firewall page will be taken into account before sending an email to theemail address specified in "Email this address on blocked request". By default, Admin Toolswill not send more than 5 emails in 1 hour. When this option is set to No there will be nolimit on the amount of emails Admin Tools will send you. Disabling this can be a bad ideabecause it will slow down your server and fill up your inbox in the case of a bot performinga massive attack against your site.
9.1.9. Customisation
WAF: Customisation
The Customisation section allows you to change the way Admin Tools presents the error message to people whoare denied access to the site.
Custom Message By default, Admin Tools uses a generic message ("Are you feeling lucky?") when a request isblocked. Considering that this may not be exactly the kind of message you want your visitorsto see, we allow you to customise it. Just type in the message to be shown to site visitorswhen a request is blocked, e.g. "We have detected a possible security violation caused by yourrequest. Please go back to the previous page and try again."
Show errorsusing acustomisableHTML template
By default, the Custom Message will be shown using Joomla!'s standard error message page.This is not always desirable, as that page lacks proper styling and admittedly looks verycheesy. When this option is enabled, however, Admin Tools will use a customisable HTMLtemplate.
The default HTML template file is located in the components/com_admintools/View/Blocks/tmpl/default.php file. DO NOT MODIFY THIS FILEDIRECTLY! It will be overwritten on each upgrade. Instead, you will have to do a templateoverride, as per the following instructions.
Locate the directory of your front-end template. For example, this could be templates/protostar if you are using the default template in Joomla!. Inside it there's adirectory called html. Create a new directory named com_admintools and inside
114
Using Admin Tools
it yet another new directory called Blocks. In our example, you should now havea directory templates/protostar/html/com_admintools/Blocks. Copy thedefault.php file from components/com_admintools/View/Blocks/tmplto templates/protostar/html/com_admintools/Blocks. Edit that file andcustomise it to your heart's desire. Do note that unlike other Joomla! template files this is afull HTML page, including the opening and closing <html> tags.
For more information regarding template overrides, please consult Joomla!'s documentationwiki page [http://docs.joomla.org/How_to_override_the_output_from_the_Joomla!_core] onthe subject.
Sendtroubleshootingemail onadministrativefunctions
Some Admin Tools administrative functions have the potential to make your site behavein a way you didn't expect or even lock you out of your site. This can happen because ofa misunderstanding of what a security feature does, a misconfiguration or –more rearely–a browser or server mangling the configuration you are submitting to Admin Tools. Weunderstand that this leads to frustration and occasional panic as you have no idea whathappened and how to fix it.
For this reason Admin Tools will automatically send you an email with troubleshootinginstructions every time you take any administrative action which might result in gettinglocked out of your site or your site not working properly. These actions include applyingthe initial configuration with the Quick Setup Wizard, changing the Web ApplicationFirewall configuration, applying administrator password protection or saving a new .htaccess,web.config or NginX configuration file through the relevant Admin Tools features.
The email explains what change took place and includes links to our troubleshooterdocumentation which can help you get your site back to a working state. Moreover, it has areminder about getting support from us if all else fails.
The email is sent only to the email address recorded on the user account logged into Joomlawho initiated this change. It is not sent to other Super Users, Administrators or, in general,any other email address. Also note that if you have set Receive system email to No in yourJoomla! user profile you will not receive this email.
This option can be used to turn off this feature for all administrator users with access to AdminTools, regardless of their Receive system email status. We recommend leaving this optionenabled unless you are absolutely sure you know what you're doing and you're confident youcan find your way to the troubleshooter documentation on your own.
9.1.10. Troubleshooting (I got locked out of my site)
It's possible to accidentally lock yourself out of the administrator area, especially when using the Exclusive AllowIP List or IP Disallow List options of the Web Application Firewall. The easiest way to work around this issue isusing an FTP application or your hosting control panel's File Manager to rename a file.
Go inside the plugins/system/admintools/admintools directory on your site. You will see a filenamed main.php. Rename it to main-disable.php. This will turn disable the Web Application Firewallfrom executing and you can access your site's back-end again. After you have fixed the cause of your issueremember to rename main-disable.php back to main.php, otherwise your site will remain unprotected!
115
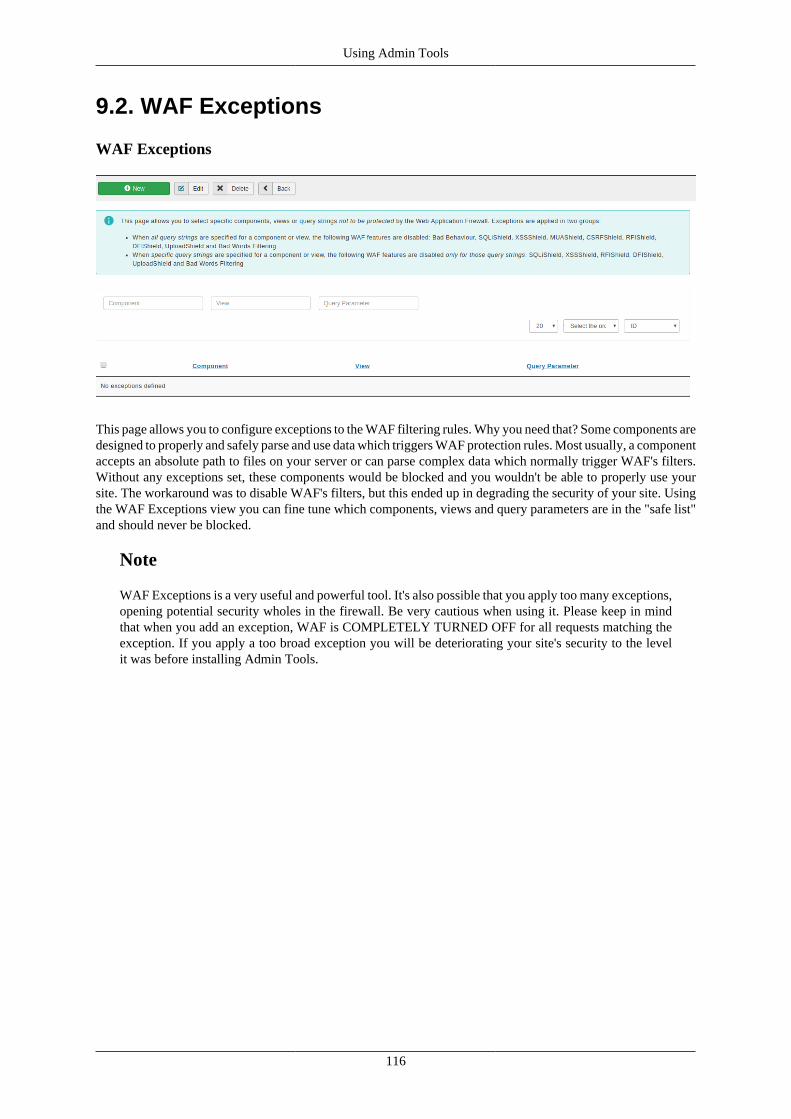
Using Admin Tools
9.2. WAF Exceptions
WAF Exceptions
This page allows you to configure exceptions to the WAF filtering rules. Why you need that? Some components aredesigned to properly and safely parse and use data which triggers WAF protection rules. Most usually, a componentaccepts an absolute path to files on your server or can parse complex data which normally trigger WAF's filters.Without any exceptions set, these components would be blocked and you wouldn't be able to properly use yoursite. The workaround was to disable WAF's filters, but this ended up in degrading the security of your site. Usingthe WAF Exceptions view you can fine tune which components, views and query parameters are in the "safe list"and should never be blocked.
Note
WAF Exceptions is a very useful and powerful tool. It's also possible that you apply too many exceptions,opening potential security wholes in the firewall. Be very cautious when using it. Please keep in mindthat when you add an exception, WAF is COMPLETELY TURNED OFF for all requests matching theexception. If you apply a too broad exception you will be deteriorating your site's security to the levelit was before installing Admin Tools.
116
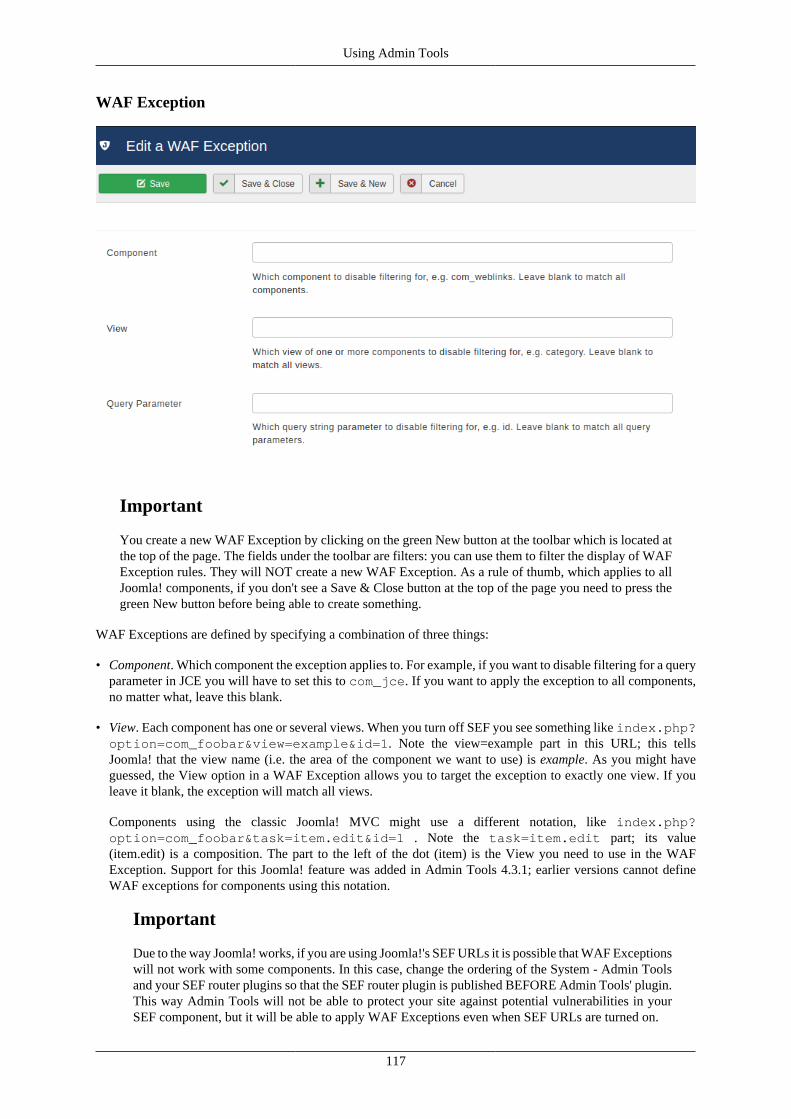
Using Admin Tools
WAF Exception
Important
You create a new WAF Exception by clicking on the green New button at the toolbar which is located atthe top of the page. The fields under the toolbar are filters: you can use them to filter the display of WAFException rules. They will NOT create a new WAF Exception. As a rule of thumb, which applies to allJoomla! components, if you don't see a Save & Close button at the top of the page you need to press thegreen New button before being able to create something.
WAF Exceptions are defined by specifying a combination of three things:
• Component. Which component the exception applies to. For example, if you want to disable filtering for a queryparameter in JCE you will have to set this to com_jce. If you want to apply the exception to all components,no matter what, leave this blank.
• View. Each component has one or several views. When you turn off SEF you see something like index.php?option=com_foobar&view=example&id=1. Note the view=example part in this URL; this tellsJoomla! that the view name (i.e. the area of the component we want to use) is example. As you might haveguessed, the View option in a WAF Exception allows you to target the exception to exactly one view. If youleave it blank, the exception will match all views.
Components using the classic Joomla! MVC might use a different notation, like index.php?option=com_foobar&task=item.edit&id=1 . Note the task=item.edit part; its value(item.edit) is a composition. The part to the left of the dot (item) is the View you need to use in the WAFException. Support for this Joomla! feature was added in Admin Tools 4.3.1; earlier versions cannot defineWAF exceptions for components using this notation.
Important
Due to the way Joomla! works, if you are using Joomla!'s SEF URLs it is possible that WAF Exceptionswill not work with some components. In this case, change the ordering of the System - Admin Toolsand your SEF router plugins so that the SEF router plugin is published BEFORE Admin Tools' plugin.This way Admin Tools will not be able to protect your site against potential vulnerabilities in yourSEF component, but it will be able to apply WAF Exceptions even when SEF URLs are turned on.
117

Using Admin Tools
• Query Parameter. Everything after the question mark in a non-SEF URL is called the URL query. You willsee a lot of key/value pairs, like id=1, category=1:test and so on. The word at the left hand side of theequals sign is called the Query Parameter. The same-named parameter in WAF Exceptions allows you to targeta very specific query parameter. If you leave it blank, all query parameters will be matched.
Warning
You can not leave all three options blank. That would match all components, all views and all querystrings or, in other words, EVERY PAGE you access. This would imply that WAF would be effectivelyturned off. Admin Tools detects an attempt to do that and won't allow you to perform such a change.
Understanding WAF exceptions
The best way to understand WAF exceptions is by some practical examples.
Whole-component exception. Set component to com_jce, leave view and query parameter empty. This tellsWAF that if it sees a request for JCE's utility component (com_jce) is should turn off WAF no matter which viewor which query parameters are set. Essentially, WAF is turned off for the entire JCE component.
Excepting a single component's view. Let's say we want to disable WAF for all front-end logins to avoid acomplex password throwing a 403 error to our users. Front-end logins are handled by com_user's login view. Sojust set component to com_user, view to login and leave the query parameter blank. WAF is now disabledfor the login/logout page of your site.
Excepting a query parameter of a specific component and view. Let's say we have a com_foobar componentwhose test view accepts a pass parameter. Strong passwords may accidentally trigger WAF. Just create a newexception where component is com_foobar, view is test and query parameter is pass. WAF will not dealwith that specific query parameter on that specific component and view, but will be triggered by unsafe contentpassed in any other query parameter on that particular view.
Excepting a query parameter across all components and views. Let's say that you see a lot of 403s in your sitebecause various components use a password query parameter to accept passwords and, as we mentioned above,complex passwords can trigger WAF. Instead of hunting down all the views across all components, you can simplyleave component and view empty and set the query parameter to password. From now on, when WAF seesa password parameter coming into Joomla! it will not try to apply its protection filters against it. If other queryparameters come in with the user request they will be filtered and, if they contain unsafe content, the request willstill be blocked.
9.3. WAF Deny ListSometimes vulnerabilities in older versions of Joomla! and its extensions do not rely on maliciously crafted databut holes in the validation of perfectly normal, innocent-looking data. For example, a well-known e-commerceextension for Joomla! had a vulnerability in 2014 which would allow an attacker to create a Super Administratoraccount by passing an undocumented (and unfiltered) parameter in the new client account creation form. The onlyway to protect against this kind of attacks is being able to block requests which contain the sort of key-value pairsinvolved in these vulnerabilities. This can be accomplished with the WAF Deny List.
Important
You create a new WAF Deny List rule by clicking on the green New button at the toolbar which is locatedat the top of the page. The fields under the toolbar are filters: you can use them to filter the display ofWAF Deny List rules. They will NOT create a new WAF Deny List rule. As a rule of thumb, whichapplies to all Joomla! components, if you don't see a Save & Close button at the top of the page you needto press the green New button before being able to create something.
WAF Deny List rules are defined by specifying a combination of a few things.
In order to better explain this, please consider the sample URL http://www.example.com/index.php?option=com_example&view=foo&task=bar&badidea=oops Let's consider that we want to block the
118
Using Admin Tools
badidea=oops, badidea=oops1 and so on because if the value of the "badidea" parameter begins with "oops" thecomponent com_example will do something dangerous, e.g. give the attacker access to all our data.
• Enabled. If you want to temporarily disable a deny list rule when troubleshooting your site you can simplyset the Enabled field to No.
• Application. Joomla! has two applications, the public frontend (the site your visitors see) and the administratorbackend (where you manage your site). By default, WAF Deny List rules apply only to the frontend of yoursite. You can choose to apply them in the backend of your site as well, or both.
• Verb. The HTTP verb applicable to the request. The most common are GET (access a URL) and POST (submita form). If you're not sure leave the empty option (three dashes) to have the rule apply to all verbs.
• Component. The component which will be filtered. This is required. In a non-SEF Joomla! URL this is thevalue of the option query parameter (and before the first ampersand following it, if any). For example, in thesample URL this is com_example
• View. The view of the component which will be filtered. If left blank the rule will apply to all views of thecomponent specified in the rule. In a non-SEF Joomla! URL this is the value of the view query parameter (andbefore the first ampersand following it, if any). For example, in the sample URL this is foo
Components using the classic Joomla! MVC might use a different notation, like index.php?option=com_foobar&task=foo.bar&badidea=oops instead of the example URL we noted before.Note the task=foo.bar part; its value (foo.bar) is a composition. The part to the left of the dot (item) is theView and the value to the right is the Task.
• Task. The task of the component which will be filtered. If left blank the rule will apply to all tasks of thecomponent and view specified in the rule. In a non-SEF Joomla! URL this is the value of the task queryparameter (and before the first ampersand following it, if any). For example, in the sample URL this is bar
The note about components using the classic Joomla! MVC applies here as well. If the task has a dot in it thenthe part to the left of the dot MUST be placed in the View field and the part to the right of the dot MUST beplaced in the Task field.
• Query Parameter. Here you can specify the name of the query parameter which will be blocked. This is thename of the parameter after the ampersand and before the equals sign. In our sample URL it is badidea Youhave three ways to define it:
• Exact. What you enter is the exact name of the query parameter. If you enter badidea the rule will filterbadidea but not badidea1, badideamister or thisisabadidea.
• Partial. What you enter is part of the name of the query parameter. If you enter badidea the rule will filterbadidea, badidea1, badideamister and thisisabadidea.
• Regular Expression. What you enter is a Regular Expression. For example, if you enter /idea$/ the rulewill filter badidea and thisisabadidea but NOT badidea1 or badideamister.
• RegEx for query content. Enter a regular expression which will be used to match the value of the queryparameter, i.e. what follows the equals sign after the query parameter name and before the first ampersand afterit. In our example we'd need to use /^oops/ to filter all values beginning with "oops". If you leave it emptythan any value will be matched by this rule.
Warning
It is a very bad idea using a Query Parameter which contains the text option, view, task and Itemid asthese are Joomla! reserved keywords. If you create such a rule we can't guarantee what the results willbe. You have been warned!
Warning
When using Partial and Regular Expression matches be very careful not to filter innocent queryparameters. For example, a partial match on id will also block Itemid which is a reserved Joomla! keyword
119
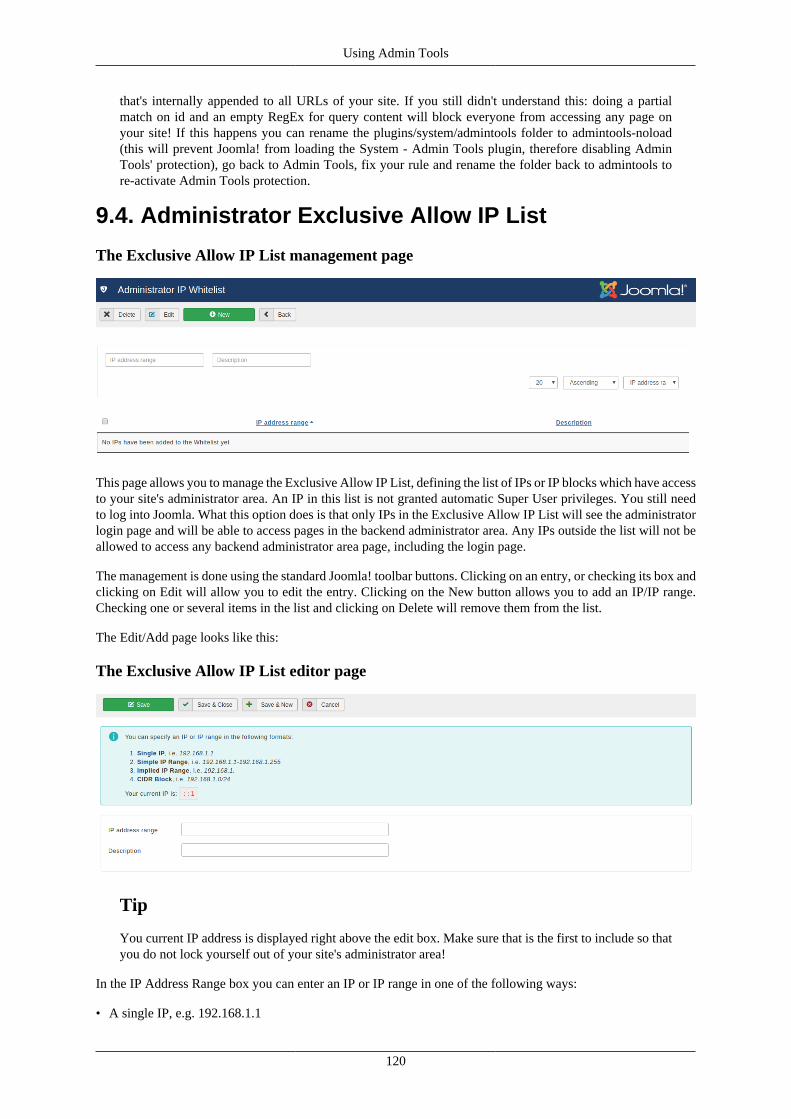
Using Admin Tools
that's internally appended to all URLs of your site. If you still didn't understand this: doing a partialmatch on id and an empty RegEx for query content will block everyone from accessing any page onyour site! If this happens you can rename the plugins/system/admintools folder to admintools-noload(this will prevent Joomla! from loading the System - Admin Tools plugin, therefore disabling AdminTools' protection), go back to Admin Tools, fix your rule and rename the folder back to admintools tore-activate Admin Tools protection.
9.4. Administrator Exclusive Allow IP List
The Exclusive Allow IP List management page
This page allows you to manage the Exclusive Allow IP List, defining the list of IPs or IP blocks which have accessto your site's administrator area. An IP in this list is not granted automatic Super User privileges. You still needto log into Joomla. What this option does is that only IPs in the Exclusive Allow IP List will see the administratorlogin page and will be able to access pages in the backend administrator area. Any IPs outside the list will not beallowed to access any backend administrator area page, including the login page.
The management is done using the standard Joomla! toolbar buttons. Clicking on an entry, or checking its box andclicking on Edit will allow you to edit the entry. Clicking on the New button allows you to add an IP/IP range.Checking one or several items in the list and clicking on Delete will remove them from the list.
The Edit/Add page looks like this:
The Exclusive Allow IP List editor page
Tip
You current IP address is displayed right above the edit box. Make sure that is the first to include so thatyou do not lock yourself out of your site's administrator area!
In the IP Address Range box you can enter an IP or IP range in one of the following ways:
• A single IP, e.g. 192.168.1.1
120

Using Admin Tools
• A human readable block of IPs, e.g. 192.168.1.1-192.168.1.10
• An implied IP range, e.g. 192.168.1. for all IPs between 192.168.1.1 and 192.168.1.255, or 192.168. for all IPsbetween 192.168.0.1 through 192.168.255.255.
• A CIDR block [http://en.wikipedia.org/wiki/Classless_Inter-Domain_Routing], e.g. 192.168.1.1/8. If you don'tknow what this is, forget about it as you don't need it.
• A Subnet Mask [http://en.wikipedia.org/wiki/Subnetwork] notation, e.g. 192.168.1.1/255.255.255.0
• A dynamic IPv4 domain name prefixed by the at-sign. This only applies if you are using a dynamic IP addressdomain provider (e.g. DynDNS). For example, if you are using DynDNS and your dynamic IP address domainname is example.dyndns.info and resolves to an IPv4 address you can enter @example.dyndns.info toallow your dynamic IPv4 address. Be careful to enter the correct domain name or you may have a delay of up to30" processing backend login requests and blocked requests. Please note that using the at-sign method ONLYworks with IPv4 addresses. This is a limitation of PHP itself.
• A dynamic IPv6 domain name prefixed by the hash-sign. This only applies if you are using a dynamic IP addressdomain provider (e.g. DynDNS). For example, if you are using DynDNS and your dynamic IP address domainname is example.dyndns.info and resolves to an IPv6 address you can enter #example.dyndns.info toallow your dynamic IPv6 address. Be careful to enter the correct domain name or you may have a delay of upto 30" processing backend login requests and blocked requests. Please note that using the hash-sign methodONLY works with IPv6 addresses. This is a limitation of PHP itself.
Do note that Admin Tools supports IPv4 and IPv6 (if your server supports IPv6) for any form of IP you enteryourself (single IP, human readable block, implied IP range, CIDR block and subnet mask notation).
Please pay attention to the differences between the at-sign and hash-sign notations' meanings. @something is IPv4(e.g. 192.168.1.4) whereas #something is IPv6 (e.g. ffff::5678:90ab). Do not use the at-sign for domains resolvingto an IPv6 address or the hash-sign for domains resolving to an IPv4 address. Mixing this up can lead to long delaysin page loads and / or being unable to access your site. Please keep in mind that the two different methods arerequired due to the way PHP works. They cannot be merged into a single method because that would considerablyslow down every page load of your site.
Tip
You can use the Save & New to quickly add multiple entries without having to go back to theadministration page and click on New all the time.
Notes about using Dynamic IP Address Domain Names
Ideally, you should only use this feature if the IP address you are using to connect to the Internet never, everchanges. This is called a "static IP address" and it's usually an optional, extra cost, feature with most Internetservice providers. Please note that having a dynamic DNS service, such as those provided by Dyn.com, is theexact opposite from having a static IP address: dynamic DNS services frequently update a domain name to pointto your ever changing IP address.
While Admin Tools makes it possible to use a dynamic DNS for allowing access by IP address it may beproblematic for two reasons. First, it's terrible for performance as a DNS resolution must be done for every pageload of your site where the list of allowed IP addresses must be read. This is any attempt to access the administratorlogin page while logged out of the administrator and every time a request is blocked. If your server does not cacheIP resolution locally this can slow your site down considerably.
Furthermore, all dynamic IP providers have a default timeout for the dynamic DNS entries varying from 1 minuteto 1 hour. If your IP changes within that period your server might be "blind" to the change. The same thing canhappen if your dynamic IP updater (typically running in your router or NAS firmware) fails to update the dynamicDNS provider with your new IP address. At best this will be an inconvenience because you cannot access yoursite's administration until your dynamic DNS provider is updater and your server "sees" the new IP address for
121

Using Admin Tools
that DNS entry. At worst, this can be initiated by a targeted attack to lock you out of your site while the attackerexploits a different path to gain access to your site, leaving you helpless.
Finally, bear in mind that you should never use this feature if you expect to have to access your administratorarea from an Internet connection with an unpredictable IP such as a public WiFi hotspot, a satellite Internetconnection (e.g. those used in ships, airplanes and remote research stations) or a mobile broadband connection(including mobile-network-assisted Internet routers, even if your ISP is assigning a static IP address to yourmain, wired, Internet connection). DO NOT, EVER, ALLOW THE IP ADDRESS OF A PUBLIC, SHAREDCONNECTION! YOU WILL GET HACKED!
For the observant reader, we listed mobile broadband connections together with shared connections. This is notan oversight. Mobile Internet connections tend to recycle IP addresses far faster than their fixed (landline, fiber,cable, ...) counterparts. This is largely because of the ephemeral nature of the connection and the frequent hoppingbetween areas of coverage and areas of non-coverage. Because of the fast rate of IP address recycling, using themfor allowing ranges from very impractical to potentially dangerous (e.g. if an advanced attacker uses a maliciousfemptocell to launch a man-in-the-middle attack).
9.5. Site IP Disallow List
The IP Disallow List management page
This page allows you to manage the IP Disallow List, defining the list of IPs or IP blocks which do not haveaccess to your site. The management is done using the standard Joomla! toolbar buttons. Clicking on an entry, orchecking its box and clicking on Edit will allow you to edit the entry. Clicking on the New button allows you toadd an IP/IP range. Checking one or several items in the list and clicking on Delete will remove them from the list.
Do not overdo it with disallowing IP addresses!
Contrary to popular belief, you should not manually disallow every single IP which appears to be attacking yoursite. This will have unintended consequences which work against your site and offer no additional protection.
First of all, not all detected attacks are actual attacks. Keep in mind that Admin Tools' Web Application Firewall,like every other WAF solution out there, is using a set of rules to determine the probability of a request beingpart of an attack and block it if it crosses a certain threshold. This means that there are a few cases of legitimaterequests being mistakenly treated as attacks (false positives). This can happen when, for example, a user's browserkeeps inserting the wrong password in the login form and the user not noticing and keep retrying to log in untilthey get blocked. You don't want to permanently disallow access to that client of yours, now, do you?
Furthermore and most importantly the IP an attack to your site seems to come from is most likely not the IP addressof the attacker himself. Even a semi-decent, wanna-be hacker would never use his home's Internet connection tolaunch an attack. That would be the equivalent of a burglar leaving his driver's license in the house he robbed.Instead, hackers use hacked devices (from a PC to a smart lightbulb and everything in between) of innocent peopleto launch their attacks from. Therefore the IPs you see attacking you and are tempted to block are innocent people.These are your potential clients. You don't want to block them.
Moreover, IPs are seldom static. They are dynamic. Most ISPs own a bunch of IP addresses. When your routerconnects to the Internet it is assigned a random address from that bunch. Many ISPs push that further, allocating
122

Using Admin Tools
an IP address for a short time period (usually 1 to 12 hours) and assign you a different, random IP when thatallocation expires. This is done for several performance and business reasons, but what you should remember isthat the IP that attacks you today will most likely be assigned tomorrow to your potential client. You do not wantto block them!
Finally, there's the performance aspect of IP blocking. Every time someone connects to your site, on every singlepage load, Admin Tools has to check their IP address against each and every entry of the disallow list. Every entryof the disallow list adds a bit of processing time on every page load. In most cases 50 to 100 blocked IPs will nothave a severe impact on your page loading speed. Anything above that threshold has a measurable impact on yoursite's performance. Your site loads slower for everybody. Search engines pick that up and penalize your slow siteby burying it dozens of spots lower in search rankings.
Essentially, the more disallowed IPs you add the more potential clients you lose.
This leaves us with the question of why this feature exists and how you should deal with disallowing IP addresses.
There is a small, but large enough to be annoying, percentage of attacks originating from wanna-be hackers whouse the same IP address to attack you over and over again. Usually they're running a dumb script with no errorhandling. Therefore even when Admin Tools blocks them automatically they keep trying and trying. The bestthing you can do is, of course, disallow their IP. Luckily, Admin Tools can do that for you! Just make sure thatyou enable the automatic IP banning and the permanent IP banning of repeat offenders in the Configure WAFpage. Admin Tools will first issue a temporary ban against IPs which seem to be attacking your site. If they arepersistent it will add them to the IP Disallow List. This automatic management yields the best results for bothperformance and security.
So why do we have the IP Disallow List feature, again? Mostly to manage the automatically disallowed IPaddresses and to allow power users to add their own IPs which they do not want to access the site for reasonsbeyond security. So do yourself a favor and do not manually disallow IP addresses! Managing disallowed IPsmanually is a Terribly Bad Idea.
Using the Site IP Disallow List
The Edit/Add page looks like this:
The IP Disallow List editor page
Tip
You current IP address is displayed right above the edit box. Make sure that you do not include it so thatyou do not lock yourself out of your site's administrator area!
In the IP Address Range box you can enter an IP or IP range in one of the following ways:
• A single IP, e.g. 192.168.1.1
123
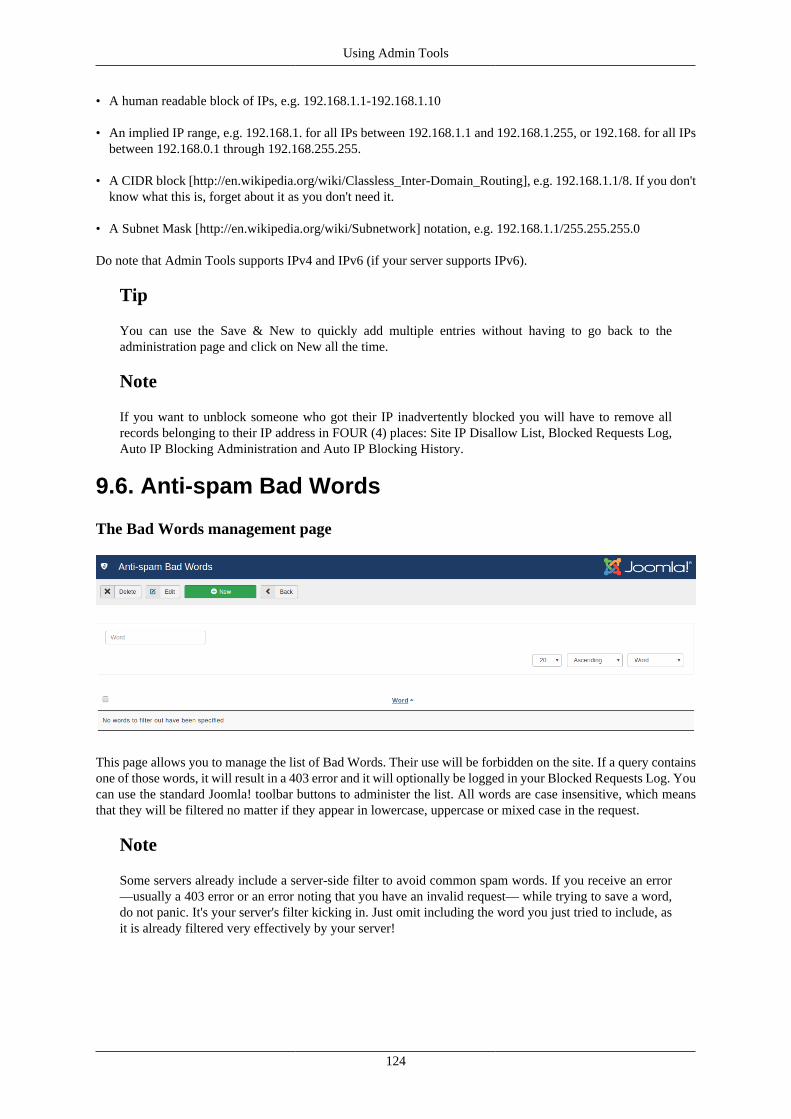
Using Admin Tools
• A human readable block of IPs, e.g. 192.168.1.1-192.168.1.10
• An implied IP range, e.g. 192.168.1. for all IPs between 192.168.1.1 and 192.168.1.255, or 192.168. for all IPsbetween 192.168.0.1 through 192.168.255.255.
• A CIDR block [http://en.wikipedia.org/wiki/Classless_Inter-Domain_Routing], e.g. 192.168.1.1/8. If you don'tknow what this is, forget about it as you don't need it.
• A Subnet Mask [http://en.wikipedia.org/wiki/Subnetwork] notation, e.g. 192.168.1.1/255.255.255.0
Do note that Admin Tools supports IPv4 and IPv6 (if your server supports IPv6).
Tip
You can use the Save & New to quickly add multiple entries without having to go back to theadministration page and click on New all the time.
Note
If you want to unblock someone who got their IP inadvertently blocked you will have to remove allrecords belonging to their IP address in FOUR (4) places: Site IP Disallow List, Blocked Requests Log,Auto IP Blocking Administration and Auto IP Blocking History.
9.6. Anti-spam Bad Words
The Bad Words management page
This page allows you to manage the list of Bad Words. Their use will be forbidden on the site. If a query containsone of those words, it will result in a 403 error and it will optionally be logged in your Blocked Requests Log. Youcan use the standard Joomla! toolbar buttons to administer the list. All words are case insensitive, which meansthat they will be filtered no matter if they appear in lowercase, uppercase or mixed case in the request.
Note
Some servers already include a server-side filter to avoid common spam words. If you receive an error—usually a 403 error or an error noting that you have an invalid request— while trying to save a word,do not panic. It's your server's filter kicking in. Just omit including the word you just tried to include, asit is already filtered very effectively by your server!
124
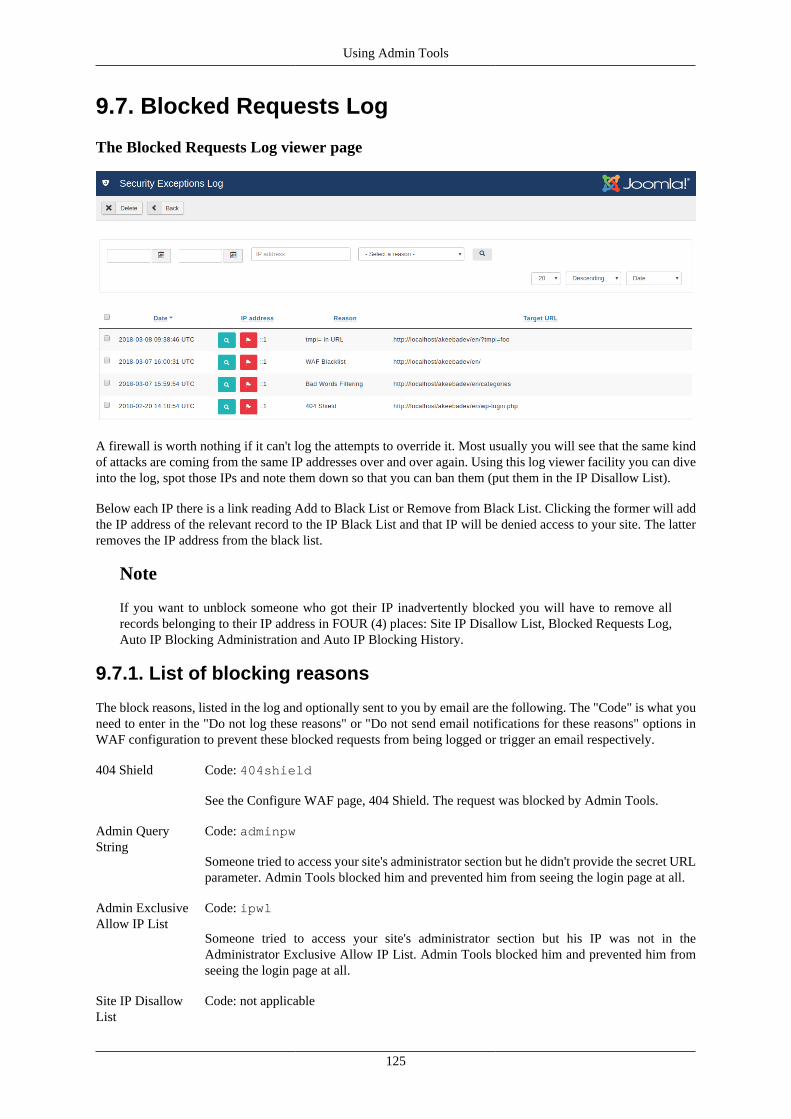
Using Admin Tools
9.7. Blocked Requests Log
The Blocked Requests Log viewer page
A firewall is worth nothing if it can't log the attempts to override it. Most usually you will see that the same kindof attacks are coming from the same IP addresses over and over again. Using this log viewer facility you can diveinto the log, spot those IPs and note them down so that you can ban them (put them in the IP Disallow List).
Below each IP there is a link reading Add to Black List or Remove from Black List. Clicking the former will addthe IP address of the relevant record to the IP Black List and that IP will be denied access to your site. The latterremoves the IP address from the black list.
Note
If you want to unblock someone who got their IP inadvertently blocked you will have to remove allrecords belonging to their IP address in FOUR (4) places: Site IP Disallow List, Blocked Requests Log,Auto IP Blocking Administration and Auto IP Blocking History.
9.7.1. List of blocking reasons
The block reasons, listed in the log and optionally sent to you by email are the following. The "Code" is what youneed to enter in the "Do not log these reasons" or "Do not send email notifications for these reasons" options inWAF configuration to prevent these blocked requests from being logged or trigger an email respectively.
404 Shield Code: 404shield
See the Configure WAF page, 404 Shield. The request was blocked by Admin Tools.
Admin QueryString
Code: adminpw
Someone tried to access your site's administrator section but he didn't provide the secret URLparameter. Admin Tools blocked him and prevented him from seeing the login page at all.
Admin ExclusiveAllow IP List
Code: ipwl
Someone tried to access your site's administrator section but his IP was not in theAdministrator Exclusive Allow IP List. Admin Tools blocked him and prevented him fromseeing the login page at all.
Site IP DisallowList
Code: not applicable
125

Using Admin Tools
Someone tried accessing the front- or back-end of your site but his IP is in the IP DisallowList. Admin Tools blocked him and didn't allow him to see the content of your site.
SQLi Shield Code: sqlishield
See the Configure WAF page, SQLiShield protection against SQL injection attacks. The attackwas blocked by Admin Tools.
Bad WordsFiltering
Code: antispam
The request contains one of the Bad Words you have defined and was blocked by AdminTools.
tp=1 in URL Code: not applicable
Only for Joomla! 1.5, see the respective option in the Configure WAF page. The attack wasblocked by Admin Tools.
tmpl= in URL Code: tmpl
See the Configure WAF page, Block tmpl=foo system template switch. The attack wasblocked by Admin Tools.
template= inURL
Code: template
See the Configure WAF page, Block template=foo site template switch. The attack wasblocked by Admin Tools.
MUA Shield Code: muashield
See the Configure WAF page, Malicious User Agent block (MUAShield). The attack wasblocked by Admin Tools.
Bad Behaviour Code: not applicable
See the Configure WAF page, Bad Behaviour integration. The attack was blocked by AdminTools. NO LONGER PRESENT SINCE ADMIN TOOLS 2.5.3
RFIShield Code: rfishield
See the Configure WAF page, Remote File Inclusion block (RFIShield). The attack was blockedby Admin Tools.
DFIShield Code: dfishield
See the Configure WAF page, Direct File Inclusion shield (DFIShield). The attack was blockedby Admin Tools.
UploadShield Code: uploadshield
See the Configure WAF page, Uploads scanner (UploadShield). The attack was blocked byAdmin Tools.
XSSShield Code: xssshield
(Only on older sites) Cross Site Scripting block (XSSShield). The attack was blocked by AdminTools. This has been removed in Admin Tools 3.6.7 as it was throwing too many false positives(legitimate requests being blocked).
Spammer (viaHTTP:BL)
Code: httpbl
126
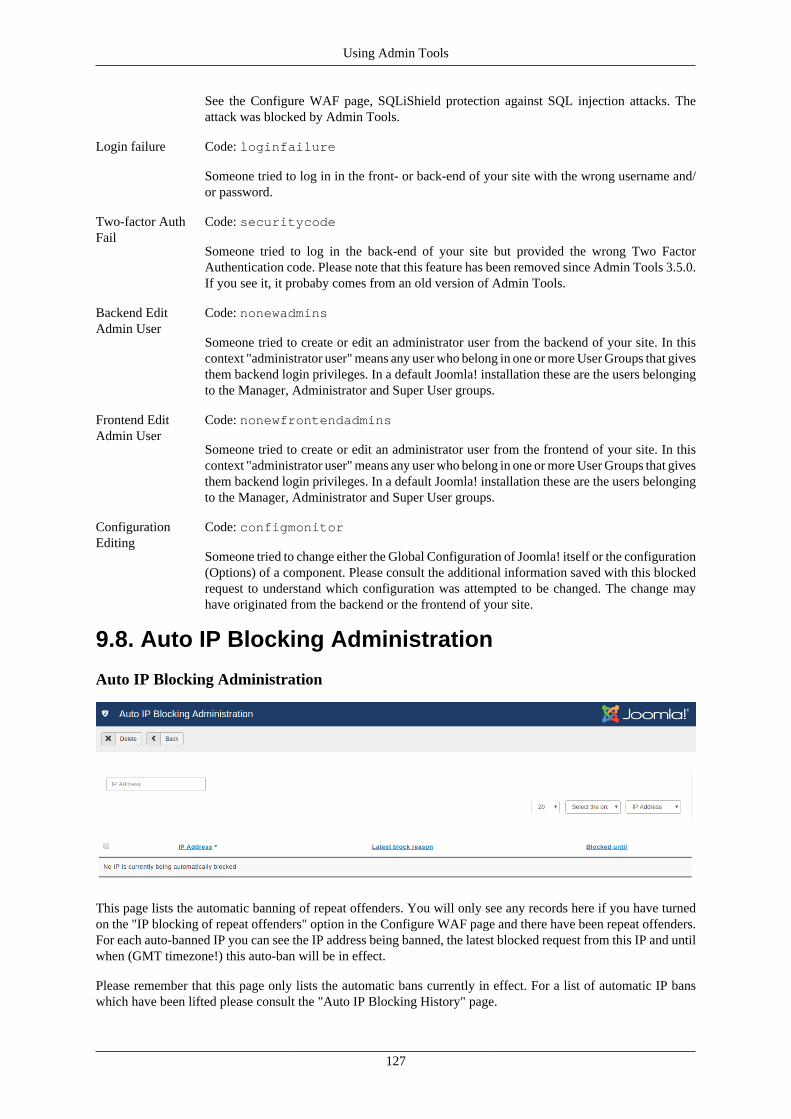
Using Admin Tools
See the Configure WAF page, SQLiShield protection against SQL injection attacks. Theattack was blocked by Admin Tools.
Login failure Code: loginfailure
Someone tried to log in in the front- or back-end of your site with the wrong username and/or password.
Two-factor AuthFail
Code: securitycode
Someone tried to log in the back-end of your site but provided the wrong Two FactorAuthentication code. Please note that this feature has been removed since Admin Tools 3.5.0.If you see it, it probaby comes from an old version of Admin Tools.
Backend EditAdmin User
Code: nonewadmins
Someone tried to create or edit an administrator user from the backend of your site. In thiscontext "administrator user" means any user who belong in one or more User Groups that givesthem backend login privileges. In a default Joomla! installation these are the users belongingto the Manager, Administrator and Super User groups.
Frontend EditAdmin User
Code: nonewfrontendadmins
Someone tried to create or edit an administrator user from the frontend of your site. In thiscontext "administrator user" means any user who belong in one or more User Groups that givesthem backend login privileges. In a default Joomla! installation these are the users belongingto the Manager, Administrator and Super User groups.
ConfigurationEditing
Code: configmonitor
Someone tried to change either the Global Configuration of Joomla! itself or the configuration(Options) of a component. Please consult the additional information saved with this blockedrequest to understand which configuration was attempted to be changed. The change mayhave originated from the backend or the frontend of your site.
9.8. Auto IP Blocking Administration
Auto IP Blocking Administration
This page lists the automatic banning of repeat offenders. You will only see any records here if you have turnedon the "IP blocking of repeat offenders" option in the Configure WAF page and there have been repeat offenders.For each auto-banned IP you can see the IP address being banned, the latest blocked request from this IP and untilwhen (GMT timezone!) this auto-ban will be in effect.
Please remember that this page only lists the automatic bans currently in effect. For a list of automatic IP banswhich have been lifted please consult the "Auto IP Blocking History" page.
127
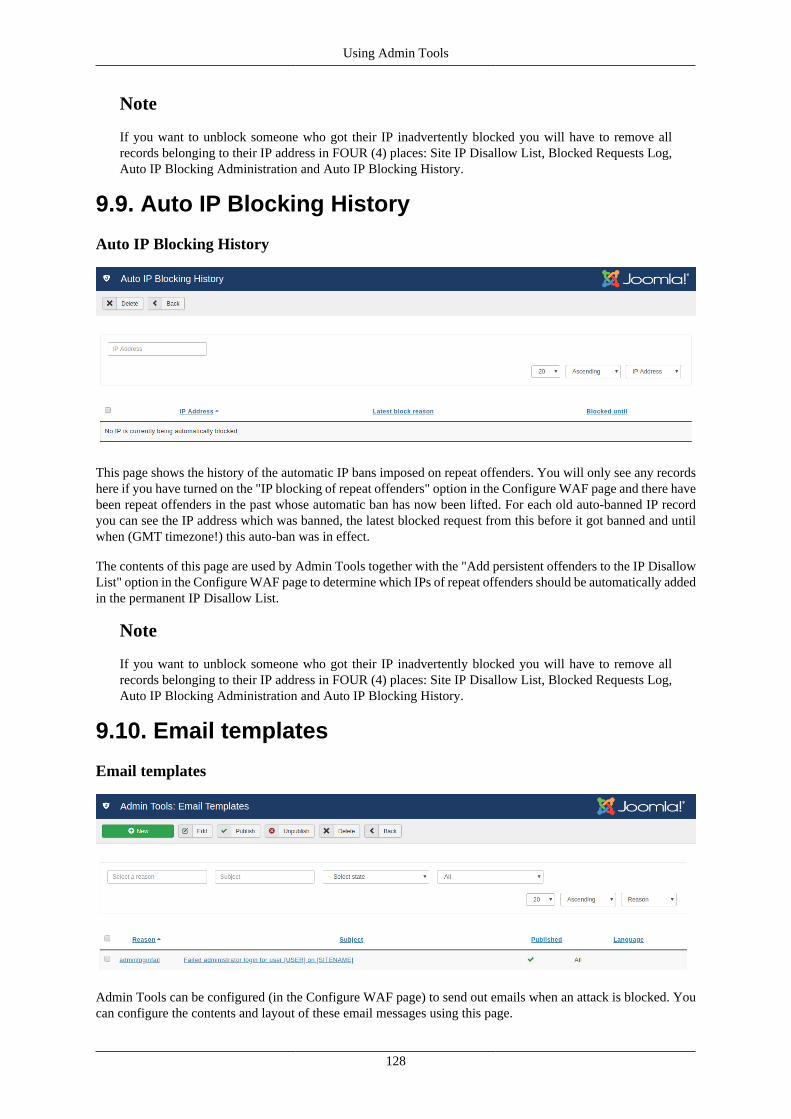
Using Admin Tools
Note
If you want to unblock someone who got their IP inadvertently blocked you will have to remove allrecords belonging to their IP address in FOUR (4) places: Site IP Disallow List, Blocked Requests Log,Auto IP Blocking Administration and Auto IP Blocking History.
9.9. Auto IP Blocking History
Auto IP Blocking History
This page shows the history of the automatic IP bans imposed on repeat offenders. You will only see any recordshere if you have turned on the "IP blocking of repeat offenders" option in the Configure WAF page and there havebeen repeat offenders in the past whose automatic ban has now been lifted. For each old auto-banned IP recordyou can see the IP address which was banned, the latest blocked request from this before it got banned and untilwhen (GMT timezone!) this auto-ban was in effect.
The contents of this page are used by Admin Tools together with the "Add persistent offenders to the IP DisallowList" option in the Configure WAF page to determine which IPs of repeat offenders should be automatically addedin the permanent IP Disallow List.
Note
If you want to unblock someone who got their IP inadvertently blocked you will have to remove allrecords belonging to their IP address in FOUR (4) places: Site IP Disallow List, Blocked Requests Log,Auto IP Blocking Administration and Auto IP Blocking History.
9.10. Email templates
Email templates
Admin Tools can be configured (in the Configure WAF page) to send out emails when an attack is blocked. Youcan configure the contents and layout of these email messages using this page.
128

Using Admin Tools
Editing an email template
Each email template consists of the following elements:
Reason The kind of attack this email template applies to. If no specific email template is found, AdminTools will use the one with its reason set to "All".
Subject The subject line of the email message you will be receiving. You can use certain variables(see below).
Published Only the email templates with Published set to Yes will be taken into account.
Language Select the language of the email template. If an email template is not found for the currentlyactive site's language when an email is about to be sent out Admin Tools will use the one withits language set to "All". If such a template is not found, Admin Tools will look for a templatewith its language set to "English (United Kingdom)".
Frequency limit When the "Enable blocked requests email throttling" option is enabled in the Configure WAFpage these options will define the maximum number of emails you are going to receive. Youcan set the number of emails and the amount of time. For example setting 5 emails in 1 hourmeans that if 5 emails for this Reason have been sent in the last 1 hour Admin Tools will notsend out any more emails about it.
Body The body text of the email message. You can use full HTML and certain variables (see below).
The variables you can use are enclosed in square brackets and are always in uppercase. The available variables are:
• [IP] Blocked IP address
• [LOOKUP] Direct link to the ip lookup service
• [REASON] The detected kind of the attack
• [DATE] Date and time of the attack
• [URL] Attacked URL. THIS IS POTENTIALLY UNSAFE. You are advised to NOT include this in your emailsto avoid attackers triggering Cross Site Scripting (XSS) attacks.
• [USER] Username of the attacker (if the user is logged in)
129
Using Admin Tools
• [COUNTRY] -- This item is no longer available and should not be used
• [CONTINENT] -- This item is no longer available and should not be used
• [UA] User agent of the attacker. THIS IS POTENTIALLY UNSAFE. You are advised to NOT include this inyour emails to avoid attackers triggering Cross Site Scripting (XSS) attacks.
• [SITENAME] The name of your site.
10. Database toolsWarning
These features are only available on sites using the MySQL database server.
Do note that these tools can be both found in Admin Tools' Control Panel page since Admin Tools 1.0 Stable.Previous versions used to have them in a separate page.
The database is the most important part of our websites. It holds all the data and most configuration options, i.e.everything which makes our site what it is. However, since data is being written to and deleted from the database,the database table are becoming slow or even corrupted. It's the same thing as what happens with hard drives. Onetable notorious for becoming very fragmented too fast is the sessions table. In fact, every time a guest user visitsyour site or a user logs in and logs out from your site this table starts becoming bloated until, one day, nobody canlog in to your site, not even yourself. This is a very common issue, especially on high-traffic sites.
On a hard drive you know that you can always defragment it and run chkdisk or fsck (depending on your OperatingSystem). For databases you have to go through a tedious process using a database administration tool, such asphpMyAdmin, to repair and optimize each and every table. Admin Tool's Database Tools are here to automatethis tedious process for you!
There are three tools available:
• Repair & Optimise Tables will run the repair and optimisation process on all of your site's tables. If the processhangs for a long time after the first time you use it, run it again. The usual problem is that the Joomla! sessionstable is so bloated that PHP times out waiting for your database server to optimise this table.
• Purge Sessions will purge (completely empty) and optimize only the sessions table. Doing so will log everybodyout of the site, including yourself. Use this option sparingly and only when you observe severe problem whenusers are trying to log into the site.
• Change Database Collation will let you change the character encoding for your database data. See theInformation on Database Collation below for details.
A cut-down version of the optimisation process, addressing only the sessions table, can be scheduled to run on atimely basis by using the parameters of the "System - Admin Tools" plugin of the Professional release.
Information on Database Collation
What is the collation and why you need to change it?
Joomla! stores all your data, including your articles, tags and third party extensions' data, in the database. Thedatabase needs to know what the raw binary data represents in order to do basic operations such as searching forinformation, ordering information and so on. This is called the collation of the database.
Joomla! is optimally designed to use the UTF-8 character set with a "generic" (multilingual) collation. In short, theUTF-8 character set allows you to store the characters of most written languages on the planet. Technically, UTF-8is an encoding format for Unicode, the universal character representation format supported by all modern softwareand operating systems. UTF-8 can store each character in one to three bytes. For instance English characters
130
Using Admin Tools
are typically stored using one byte, Greek and Cyrillic characters using two bytes each, Simplified Chinese andJapanese Hiragana and Katakana characters with three bytes. Most database servers are configured to use UTF-8by default and Joomla! will work trouble-free on them.
However, some database servers are configured to use a different collation, latin1_swedish_ci. This may soundstrange, but it's the default setting of MySQL. Basically, some server administrators were too lazy to change asingle line in a single configuration file before putting the server on-line. This could lead to problems runningJoomla!, e.g. accented or non-latin characters (Cyrillic, Greek, Hindu, ...) could end up as garbled text or questionmarks. The solution to this problem is using the Change Database Collation feature of Admin Tools to changethe collation of your database to UTF-8.
Different UTF-8 collations, multibyte characters (Emoji, Chinese, ...) andsecurity
The default UTF-8 collation used by Joomla! can only store characters consisting of up to three bytes each. Thismeans that some characters cannot be represented at all. The most frequently used 4-byte characters are Emoji (thefaces and symbols you get on your iPhone!), and some of the less often used Traditional Chinese and JapaneseKanji characters.
At the time of this writing (May 2016) Joomla! only supports 4-byte characters in Joomla! 3.5.0 and later. Earlierversions do not. If you try to enter a 4-byte character, e.g. an Emoji, all text following this character will be silentlylost. This is both a nuisance and a security issue. Since the text following a 4-byte character is lost you can end upwith corrupt HTML. This corruption takes place after the data has been sanitised by Joomla!'s code, essentiallytricking Joomla! into inserting invalid and possibly dangerous data into the database. While no exploit is knownat the time of this writing this issue is very similar to a WordPress security flaw affecting all WordPress releasesup to and including 4.2.0. Therefore we consider the lack of 4-byte character support as a POTENTIAL securityissue. Please note that this is a POTENTIAL and UNPROVEN security issue. There may actually not be a securityissue at all. But since the possibility exists we provide you with a way to work around it.
Using the Change Database Collation change your database's collation to UTF-8 Multibyte. This uses theutf8mb4_general_ci collation which tells MySQL to add support for 4-byte characters. On top of that, the System- Admin Tools plugin tells Joomla!'s database driver to add support for 4-byte characters.
Warning
If you enable the UTF-8 Multibyte collation you MUST have the System - Admin Tools plugin enabled.Otherwise the 4-byte characters (e.g. Emoji) will be saved and displayed as a series of four question marks,like this: ???? This will no longer be necessary if Joomla! itself adds support for multibyte charactersanytime in the future.
Things to keep in mind when changing the collation
Always take a backup BEFORE changing the collation. This process actively modifies all your database content.Such an operation has an inherent risk, in that MySQL may corrupt your data in the process. While rare, it's notunheard of. A fresh, locally kept, tested backup is the only thing standing between you and a catastrophic failure.
Though not strictly necessary, we've found that on some servers you MAY have to use the Repair & Optimisefeature in Admin Tools right after changing the database collation. This is especially true if you have tables withseveral thousands of rows or more.
Depending on your database server privileges and the nature of the extensions you have installed you MAY haveto repeat the change collation process after installing new extensions or updating existing ones. How can youknow? It's simple. If you get funny looking characters, truncated text or question marks instead of text you knowyou need to redo the Change Database Collation process.
Also note that changing the collation MAY result in a blank page if you have too many and / or too big tables.This is simply PHP timing out while MySQL processes large sets of data. Don't panic. Repeating the process afew more times will eventually let it complete successfully.
131
Using Admin Tools
11. The PHP File ScannerNote
This feature is only available in the distributed-for-a-fee Professional release of our software.
We have introduced a very powerful feature in Admin Tools Professional 2.2.a1 called PHP File Change Scanner.This feature can be used to perform a security scan of the PHP files included inside your site's root directory, aswell as detect any modified or added files in subsequent runs. The file scanning engine is built on top of AkeebaEngine, the engine powering our acclaimed Akeeba Backup site backup software, ensuring rock solid operation.Each scanned file also comes with a preliminary automatic security assessment ("threat score") which can giveyou a quick idea of how possible it is that the file in question could be suspicious.
The PHP File Change Scanner doesn't stop at scanning. Coupled with an array of handy features such as the abilityto produce DIFF's (a synopsis of how modified files differ from the previous known copy), print and export thescan reports as well as the interactive report viewer which allows you to peek at the contents of each file, thisfeature can allow power users to detect and eliminate hacks much faster than using a purely manual method. Youcan also automate the run of the scanner engine using a standard CRON job (available for Joomla! 1.7 and lateronly), making sure that you always know what's going on with your site.
Warning
Only files with a lowercase .php extension are scanned. Non-PHP files or PHP files whose extension isdifferent (e.g. .PHP in capitals, .php4, .php5, .php.inc, .inc, .phps and so on) will not be scanned. Theidea of this feature is to scan only PHP files, because the modification or addition thereof could signifya potential problem or hack of your site. We only use the lowercase .php extension because this is theextension of virtually all PHP files and the other extensions are host-specific and not universal enoughto guarantee that they do contain PHP code.
Moreover, not all hacking scripts are written in PHP. Some of them may be written in PERL, Python,Ruby, shell scripting or they could be executable binaries. Some hackers may also place infected PDFs,PNGs, Word documents etc which will infect your computer if you open them. None of those files willbe scanned by Admin Tools's PHP File Change Scanner.
11.1. How does it work and what should I know?The PHP File Change Scanner is a hybrid between a backup engine and a file scanner. It works by "sweeping"your Joomla! site for PHP files and comparing them to their last known state in the database. It will then reportany changes, i.e. files which have been modified or added since the previous scan. The following paragraphs willexplain how some aspects of the file scanning and reporting engine work.
Scope of the scan. Only files inside your Joomla! site's root are scanned. If you have placed PHP files outside ofyour site's root, they will not be scanned. Moreover, any readable directory under your site's root will be scanned,even if it does not belong to the current Joomla installation. For example, if you have additional sites or subdomainsstored in subdirectories of your site's root, they will be scanned nonetheless.
Only PHP files are scanned. Only files with a lowercase .php extension are scanned. Non-PHP files or PHPfiles whose extension is different (e.g. .PHP in capitals, .php4, .php5, .php.inc, .inc, .phps and so on) will not bescanned. The idea of this feature is to scan only PHP files, because the modification or addition thereof couldsignify a potential problem or hack of your site. We only use the lowercase .php extension because this is theextension of virtually all PHP files and the other extensions are host-specific and not universal enough to guaranteethat they do contain PHP code.
Directories automatically skipped. Admin Tools Professional will automatically skip scanning the followingdirectories: tmp, cache, administrator/cache, log. These files contain temporary files, logs disguisedas PHP files or cache files disguised as PHP files. The contents of neither of those directories is supposed to bedirectly accessible over the web – and that's why Joomla! allows you to relocate them to off-site locations. If yourun across an extension which references files in those directories from a frontend or backend page, uninstall it
132
Using Admin Tools
a.s.a.p. as this is a sign of a developer not knowing what he's doing. Would you trust that developer with yoursite? I wouldn't.
Note
Regarding the tmp and log directories, Admin Tools Professional will actually take a look at your GlobalConfiguration settings and exclude the directory for temp-files and directory for log files specified inthere. Usually these are the tmp and log directories respectively, hence the reference to those directoriesin the paragraph above.
File comparison terms. In order to determine if a file is modified, Admin Tools will compare its size, lastmodification time and md5 sum. If any of these do not match the previous scan's results, the file is consideredmodified. If there is no record of that file in a previous scan, the file is considered as new.
When a file change is detected. A file change is detected only if the file is added or modified since the immediatelyprevious scan. This means that if you scan now, modify a PHP file and scan again, it will show up as modified. Ifyou perform a third scan right after the second one, the file will NOT be reported as changed. This is normal! Thefile was changed between the first and second scan, but not between the second and third scan.
Threat score calculation. Whenever Admin Tools Professional encounters a new or modified file, it calculatesa "threat score". This is a weighed sum of potential security "red flags". Essentially, Admin Tools Professionalruns a few heuristics against the PHP file in question, looking for code patterns which are commonly (but NOTNECESSARILY) used in hacking scripts and hacked files. Each of those patterns is assigned a "weight". Theweight is multiplied by the number of occurrences of the pattern to give a score. The sum of these scores is whatwe call a "threat score". How to interpret it: the higher the threat score, the more probable it is that this couldbe a nefarious file and its contents should be manually assessed. Please note that a high threat score does notnecessarily mean that the file is hacked or a hacking script. Likewise, a low but non-zero threat score (1-10) doesnot necessarily mean that the file in question is necessarily safe. Please take a look at the next few sections formore information.
Removing old scans has some consequences. When you remove an old scan, Admin Tools also removes allassociated file alert records. If you have defined some files with a non-zero Threat Score as "Marked Safe" in thisscan's report, then this information is lost when you delete this scan. As a result, subsequent scans will, again,report the file as "Suspicious".
Heavy database usage. In order for this feature to work, Admin Tools Professional needs to perform very heavyuse of your database. There will be at least one database query for each and every PHP file on your site. Anaverage site contains about 3,000 such files. Moreover, there will be one database query for each and every newor modified file.
Heavy resource usage. Scanning your site is a very CPU and memory intensive procedure. Admin ToolsProfessional has to scan your entire site, find the PHP files, read them, calculate an MD5 sum (very CPU andmemory intensive process!), read data from the database, compare it with those in memory, write data to thedatabase and repeat that for each file. This does put a very big strain on your server, similar to what you get whenyou're backing up your site.
Requirement for a writable temp-file directory. In order for this feature to work, we need to keep a temporaryfile in your site's temp-files directory (configurable in the Global Configuration page, usually it's tmp under yoursite's root). For this to be possible, your tmp directory has to be writable. Depending on your file ownership andpermissions, your tmp directory may be unwritable. In this case, you have to perform a trick to make it writablewithout compromising the security of your site. First, give that directory 0777 permissions. Then, upload (usingFTP) a .htaccess file in your temp-files directory with the following contents:
<IfModule !mod_authz_core.c>Order deny,allowDeny from all</IfModule><IfModule mod_authz_core.c><RequireAll>
133

Using Admin Tools
Require all denied</RequireAll></IfModule>
Give the .htaccess file you just uploaded 0444 permissions.
Remember to use Admin Tools' Permissions Configuration to set up the permissions of the directory to 777,otherwise the folder will become unwritable as soon as you use Admin Tools' Fix Permissions feature. The trickoutlined above makes the temporary directory world-writable (anyone with access to the server can write to it).This is normally unsafe. However, it is unsafe only if anyone could access the files in that directory over theweb, essentaily being able to execute arbitrary PHP code. By uploading the .htaccess we mentioned, you madethe directory inaccessible from the web. This means that a potential attacker could write arbitrary PHP files inthis directory, but not execute them, therefore no longer posing a security risk. By changing the permissions ofthe .htaccess file to 0444 we made it read-only, so that a potential attacker can not override it, unless he has FTPaccess to your site (in which case your site is already hacked, so you shouldn't worry about the temp-files directoryany more...).
Using with Akeeba Backup 3.3.6 or earlier. Akeeba Backup 3.0.a1 up to and including 3.3.6 would use yoursite's temp-files directory to store its temporary "memory" files (later versions use the backup output directory,which is a different directory). Admin Tools' PHP File Change Scanner feature is based on Akeeba Engine, thesame engine used by Akeeba Backup, and also uses the site's temp-files directory to store its own "memory" files.However, the names of the temporary "memory" files of both Akeeba Backup and Admin Tools are the same.This means that if both a backup and a PHP file scan operation are running at the same time, both of them couldcrash or there could be other, unknown consequences. The solution is simple: do not run both a scan and a backupat the same time. Run first one of them, e.g. the backup, wait for it to complete, then launch the other one, e.g. thescan. If you have Akeeba Backup 3.3.7 or later this should not be a problem and you could run both a backup anda scan operation at the same time, albeit this is not recommended due to server resource usage concerns.
Potential problems. As stated above, the file scan operation is very database, CPU and memory intensive. Thiscan cause failure of the scan process due to one of several reasons, especially on lower-end hosts (usually: cheapor low quality shared hosts):
• Memory exhaustion. Getting an out-of-memory error is not at all unlikely. We strongly recommend having atthe very least 32Mb of available PHP memory. We recommend 64Mb to 128Mb for trouble-free operation. Ifyou only have 16Mb or less of available PHP memory, the scan will most likely fail.
• Exhausting your MySQL query limit. Some hosts have a limit on how many queries you can run per minute orper hour. Because the file scan is very database-intensive, you may exhaust this limit, causing the scan to crash.
• MySQL server has gone away. Likewise, some hosts have set up MySQL (the database server) to forciblyclose the connection if it doesn't receive data for a short time period, usually anything between 0.5 and 3 seconds.This could cause the infamous "MySQL server has gone away" error message, killing your scan.
• Timeout. Calculating MD5 and diffs for large files is a very time consuming process. It is possible that PHPtimes out during that operation, especially on slow, low-end hosts.
• Hitting the CPU usage limit. Many hosts enforce a CPU usage limit. Given that the file scan is a very CPU-intensive process, it is possible that you hit that limit. What usually happens is that the host kills the scriptcausing the "excessive" CPU usage (our file scan operation).
All of the above manifest themselves as a 500 Internal Server Error message or a never ending scan processwhen trying to scan your site. Unfortunately, these are all server limitations and we can not work around them,while maintaining the usefulness of the PHP File Change Scanner feature. If you hit on those limitations, ourrecommendation is to switch to a more performant / higher-quality host.
11.2. ConfigurationYou can configure the PHP File Change Scanner from the standard Joomla! component Options page. Just go toyour site's back-end and click on Components, Admin Tools. Then click on the Options button to open the Optionspage. The settings for the file scanner can be be found in the File Scanner tab.
134
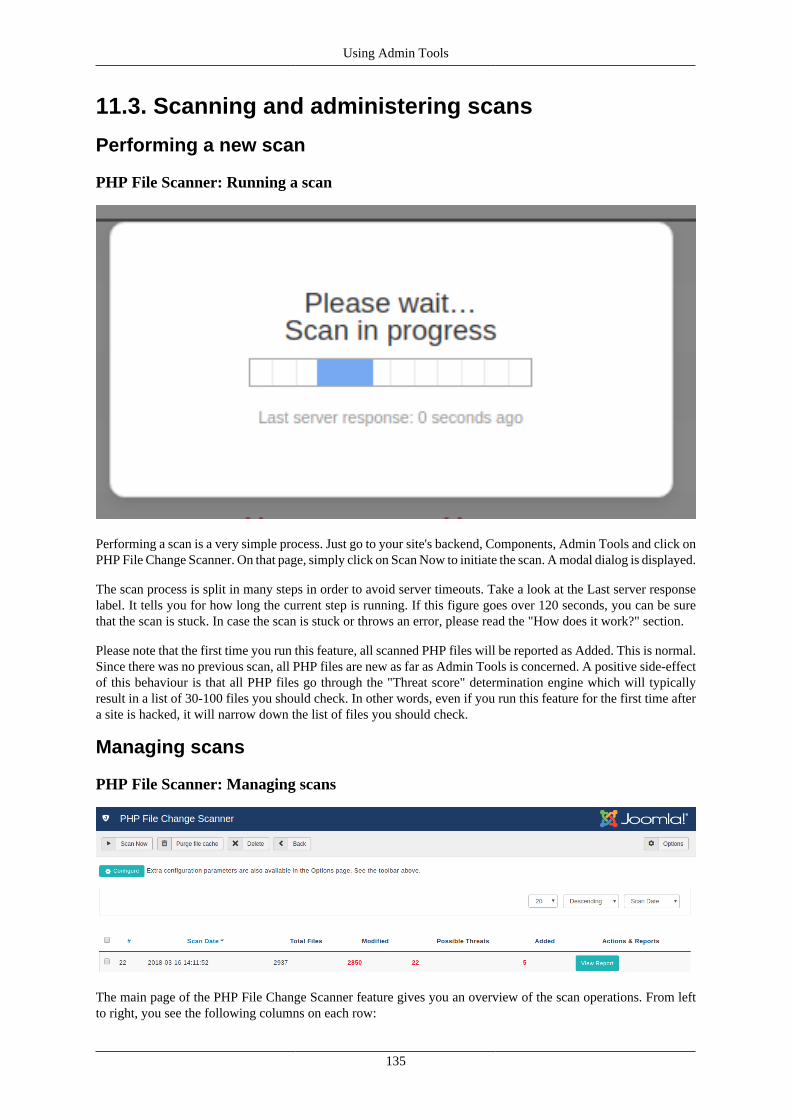
Using Admin Tools
11.3. Scanning and administering scans
Performing a new scan
PHP File Scanner: Running a scan
Performing a scan is a very simple process. Just go to your site's backend, Components, Admin Tools and click onPHP File Change Scanner. On that page, simply click on Scan Now to initiate the scan. A modal dialog is displayed.
The scan process is split in many steps in order to avoid server timeouts. Take a look at the Last server responselabel. It tells you for how long the current step is running. If this figure goes over 120 seconds, you can be surethat the scan is stuck. In case the scan is stuck or throws an error, please read the "How does it work?" section.
Please note that the first time you run this feature, all scanned PHP files will be reported as Added. This is normal.Since there was no previous scan, all PHP files are new as far as Admin Tools is concerned. A positive side-effectof this behaviour is that all PHP files go through the "Threat score" determination engine which will typicallyresult in a list of 30-100 files you should check. In other words, even if you run this feature for the first time aftera site is hacked, it will narrow down the list of files you should check.
Managing scans
PHP File Scanner: Managing scans
The main page of the PHP File Change Scanner feature gives you an overview of the scan operations. From leftto right, you see the following columns on each row:
135
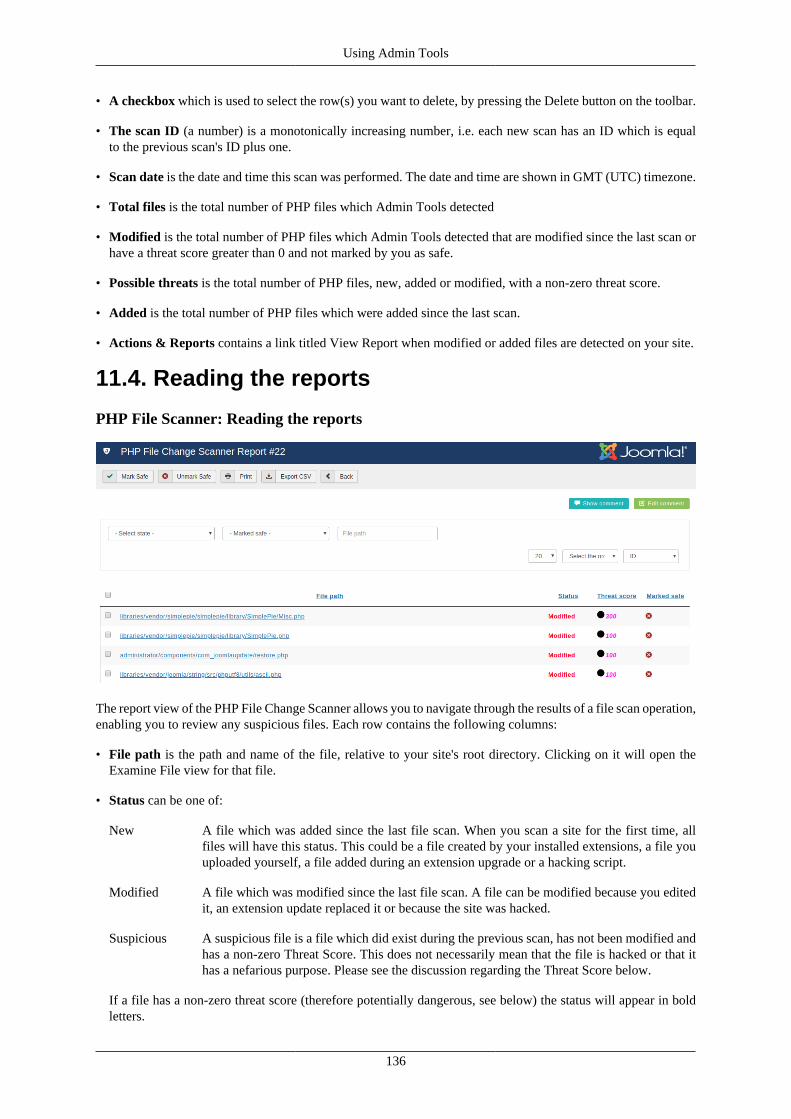
Using Admin Tools
• A checkbox which is used to select the row(s) you want to delete, by pressing the Delete button on the toolbar.
• The scan ID (a number) is a monotonically increasing number, i.e. each new scan has an ID which is equalto the previous scan's ID plus one.
• Scan date is the date and time this scan was performed. The date and time are shown in GMT (UTC) timezone.
• Total files is the total number of PHP files which Admin Tools detected
• Modified is the total number of PHP files which Admin Tools detected that are modified since the last scan orhave a threat score greater than 0 and not marked by you as safe.
• Possible threats is the total number of PHP files, new, added or modified, with a non-zero threat score.
• Added is the total number of PHP files which were added since the last scan.
• Actions & Reports contains a link titled View Report when modified or added files are detected on your site.
11.4. Reading the reports
PHP File Scanner: Reading the reports
The report view of the PHP File Change Scanner allows you to navigate through the results of a file scan operation,enabling you to review any suspicious files. Each row contains the following columns:
• File path is the path and name of the file, relative to your site's root directory. Clicking on it will open theExamine File view for that file.
• Status can be one of:
New A file which was added since the last file scan. When you scan a site for the first time, allfiles will have this status. This could be a file created by your installed extensions, a file youuploaded yourself, a file added during an extension upgrade or a hacking script.
Modified A file which was modified since the last file scan. A file can be modified because you editedit, an extension update replaced it or because the site was hacked.
Suspicious A suspicious file is a file which did exist during the previous scan, has not been modified andhas a non-zero Threat Score. This does not necessarily mean that the file is hacked or that ithas a nefarious purpose. Please see the discussion regarding the Threat Score below.
If a file has a non-zero threat score (therefore potentially dangerous, see below) the status will appear in boldletters.
136
Using Admin Tools
• Threat Score. The higher this number is, the most likely it is that the file is hacked or nefarious. Please notethat a high threat score does not necessarily mean that the file is hacked or a hacking script. Likewise, a low butnon-zero threat score (1-10) does not necessarily mean that the file in question is necessarily safe. The numberis merely A PROBABILITY INDICATOR. Admin Tools prefers to err on the side of caution. This means thatfalse positives (high threat scores for perfectly safe, not hacked files) are all too common. For instance, AdminTools' own file, Akeeba Backup Professional's files, several Joomla! core files, several Akeeba Subscriptionsplugins and several K2 files have high Threat Scores. None of these files is hacked or nefarious. In order tounderstand why that happens, let's take a look at what the Threat Score is and how it's calculated.
Whenever Admin Tools Professional encounters a new or modified file, it calculates a "threat score". This isa weighed sum of potential security "red flags". Essentially, Admin Tools Professional runs a few heuristicsagainst the PHP file in question, looking for code patterns which are commonly (but NOT NECESSARILY)used in hacking scripts and hacked files. Each of those patterns is assigned a "weight". The weight is multipliedby the number of occurrences of the pattern to give a score. The sum of these scores is what we call a "threatscore". How to interpret it: the higher the threat score, the more probable it is that this could be a nefarious fileand its contents should be manually assessed.
The first thing you should do is to compare the file you have with the same file from afresh installation of Joomla! and the extension this file belongs to. For example, let's say thatyou get a high threat score for the administrator/components/com_k2/lib/elfinder/elFinderVolumeDriver.class.php file. From the file path you can understand that it's part of theK2 component. Install a new Joomla! site on a local server and install K2 on it. Find the administrator/components/com_k2/lib/elfinder/elFinderVolumeDriver.class.php file on the new siteand compare it with the one from your regular site you are using the PHP file comparison on. A very handytool to compare files is WinMerge [http://winmerge.org/]. If you're not on Windows or Linux (the platformssupported by WinMerge) you can search for graphical diff or file comparison tools for your platform. I havemy favourites for Mac OS X, but since they're all commercial I'd rather not suggest any of them. In any case, ifthe files match then the file is safe. In this case you can click on the icon in the Marked Safe column so that itturns into a green checkmark. When you do that, future scans will not report the file unless it is changed.
Tip
A quick way to see if a file is compromised is to quickly scan its top and bottom 20 lines. The vastmajority of hacking scripts adds the hack code either at the top or at the bottom of the file. If nosuspicious code is seen in there, your file is most likely safe. If you want to be certain beyond a shredof doubt use the full file comparison method I described above.
Tip
It's a good idea to filter the list by threat score. Just click on the Threat Score header twice. This willplace the highest rated files (therefore more likely to be malicious) at the top of the list.
• Marked Safe. All files with a non-zero threat score will appear on each and every scan as Suspicious. Obviously,you don't want to go through the tedious task of manually verifying files as described above for each and everyscan. Marking a file as safe tells Admin Tools that this particular file, in its current state, is not suspicious andshould not be reported again as suspicious unless it's modified. Unmarking the file (default) will report this fileas suspicious during the next scan.
Tip
If someone hacks your site, he could run a scan, mark the hacked files as safe and then run yet anotherscan in an attempt to hide his tracks. If in doubt, just delete all of the scans and run a new scan. Thiseffectively resets the "Marked Safe" status of all files and will reassess the threat score of all files onyour site, just like the very first scan you did on that site.
You can print the report by clicking on the Print button on the toolbar. The Print button will print out all of the fileson the report, not just the ones you currently see on your screen. It is advisable to print out the result in landscape(not portrait) orientation. Moreover, the Export CSV button will export the entire report in a comma separated
137
Using Admin Tools
values (CSV) file which you can them import in Microsoft Office Excel, Apple Numbers, OpenOffice.org/LibreOffice Calc, Google Docs spreadsheet or any other desktop or on-line spreadsheet application.
The button Mark All as Safe will mark all files with a non-zero threat score on the current report as Safe. It isadvisable to do that only in the following case. Take a new scan, make sure it has no new or suspicious files. Runany updates on your site. Take a new scan; the update files appear as new, modified and / or suspicious. Use theMark All as Safe button to mark these files as Safe. These files were installed during the update and are trusted(as far as you can trust the developers which supplied them). Please note that if you do NOT trust the source of aparticular update you should not use this button. A good reason to not necessarily trust the update is if the softwareyou are updating has recently (e.g. in the last 12 months) been taken over by a new developer. There are manycases where legitimate software was bought out by shady people who waited for a few months before ultimatelypublishing an update with malware hidden in it. Therefore we strongly recommend that you exercise abundantcaution with code coming from a new developer who has recently taken over established, legitimate software.
The Examine File view
When you click on a file name, the Examine File view opens. In this view you can view detailed informationabout the file, as well as the file itself.
In the File Information pane you can see the generic file information you would see in the Report view.
Below that you can find the Current file source pane. Please note that this pane shows you the contents of the fileas it is right now. This may or may not be equal to the contents of the file which was scanned. If the fie has sincebeen deleted, you will see an empty pane.
If you have enabled the diff feature in the component's configuration page and this is a Modified file, you willalso see the Diff to the previous version pane. On this pane you will see the consolidated differences between thescanned file and its previous state.
11.5. Automating the scans (CRON jobs)
Tip
Consult the PHP File Change Scanner Scheduling page for detailed information, tailored to your site,without having to read this documentation page.
When you install Admin Tools, it copied a file named admintools-filescanner.php into your site's clidirectory. When you run it, it will execute a new scan. If you have access to the command-line version of PHP(most hosts do), you can use that script to schedule your file scans.
In order to schedule a file scan, you will have to use the following command line to your host's CRON interface:
/usr/local/bin/php /home/USER/webroot/cli/admintools-filescanner.php
where /usr/local/bin/php is the path to your PHP CLI executable and /home/USER/webroot is theabsolute path to your web site's root. You can get this information from your host.
Special considerations:
• Most hosts do not impose a time limit on scripts running from the command-line. If your host does and the limitis less than the required time to scan your site, the scan will fail.
• This script is not meant to run from a web interface. If your host only provides access to the CGI or FastCGIPHP binaries, this script will not work with them. The solution to this issue is tied to the time constraint above.
• Some servers do not fully support this scan method. The usual symptoms will be a scan which starts but isintermittently or consistently aborted in mid-process without any further error messages and no indication of
138
Using Admin Tools
something going wrong. In such a case, trying running the scan from the back-end of your site will workproperly. If you witness similar symptoms, you can most likely not automate your site's scan.
11.6. Automating the scans (front-end schedulingURL)
Tip
Consult the PHP File Change Scanner Scheduling page for detailed information, tailored to your site,without having to read this documentation page.
The front-end scheduling URL feature is intended to let you perform an unattended, scheduled scan of your site.This is not the recommended method to do it, though. You should only use this method if the regular commandline CRON jobs are not supported by your server.
The front-end backup URL performs a single scan step and sends a redirection (HTTP 302) header to force theclient to advance to the next page, which performs the next step and so forth. You will only see a message uponcompletion, should it be successful or not. There are a few limitations, though:
• It is not designed to be run from a normal web browser, but from an unattended cron script, utilizing wgetor cron as a means of accessing the function.
• The script is not capable of showing progress messages.
• Normal web browsers tend to be "impatient". If a web page returns a bunch of redirection headers, the webbrowser thinks that the web server has had some sort of malfunction and stop loading the page. It will alsoshow some kind of "destination unreachable" message. Remember, these browsers are meant to be used on webpages which are supposed to show some content to a human. This behaviour is normal. Most browsers will quitafter they encounter the twentieth page redirect response, which is bound to happen. Do not come to tell us thatFirefox, Internet Explorer, Chrome, Safari, Opera or another browser doesn't work with the front-end backupfeature. It was NOT meant to work by the browser's design.
• Command line utilities, by default, will also give up loading a page after it has been redirected a number oftimes. For example, wget gives up after 20 redirects, curl does so after 50 redirects. Since Admin Tools redirectsonce for every of the several dozens of scan steps it is advisable to configure your command line utility with alarge number of redirects; about 10000 should be more than enough for virtually all sites.
Tip
Do you want to automate your scans despite your host not supporting CRON? Webcron.org [http://webcron.org/] fully supports Admin Tools' front-end scan scheduling feature and is dirt cheap - you needto spend about 1 Euro for a year of daily site scan runs. Just make sure you set up your Webcron CRONjob time limit to be at least 10% more than the time it takes for Admin Tools to perform a scan of your site.
Before beginning to use this feature, you must set up Admin Tools to support the front-end scan scheduling option.First, go to Admin Tools' main page and click on the Options button. Find the option titled Enable front-endscheduling and set it to Yes. Below it, you will find the option named Secret key. In that box you have to enter apassword which will allow your CRON job to convince Admin Tools that it has the right to request a backup tobe taken. Think of it as the password required to enter the VIP area of a night club. After you're done, click theSave button on top to save the settings and close the dialog.
Tip
Try entering a complex password here. Do note that special characters and non-latin letters need to be"URL escaped" (written as something like %20, i.e. percent sign followed by two hexadecimal digits) inthe scheduling URL. The easiest way to get the correct URL is using the PHP File Scanner Schedulingbutton in Admin Tools' main page.
139
Using Admin Tools
Most hosts offer a CPanel of some kind. There has to be a section for something like "CRON Jobs", "scheduledtasks" and the like. The help screen in there describes how to set up a scheduled job. One missing part for youwould be the command to issue. Simply putting the URL in there is not going to work.
Warning
If your host only supports entering a URL in their "CRON" feature, this will most likely not work withAdmin Tools. There is no workaround. It is a hard limitation imposed by your host. We would like to helpyou, but we can't. As always, the only barrier to the different ways we can help you is server configuration.You can, however, use a third party service such as WebCron.org.
If you are on a UNIX-style OS host (usually, a Linux host) you most probably have access to a command lineutility called wget. It's almost trivial to use:
wget --max-redirect=10000 "http://www.yoursite.com/index.php?option=com_admintools&
view=filescanner&key=YourSecretKey"
Of course, the line breaks are included for formatting clarity only. You should not have a line break in yourcommand line!
Important
Do not miss the --max-redirect=10000 part of the wget command! If you fail to include it, the backupwill not work with wget complaining that the maximum number of redirections has been reached. Thisis normal behavior, it is not a bug.
Important
YourSecretKey must be URL-encoded. You can use an online tool like http://www.url-encode-decode.com or simply consult the PHP File Change Scanner Scheduling page.
Warning
Do not forget to surround the URL in double quotes. If you don't the scan will fail to execute! The reasonis that the ampersand is also used to separate multiple commands in a single command line. If you don'tuse the double quotes at the start and end of the scheduling URL, your host will think that you tried torun multiple commands and load your site's homepage instead of the front-end scheduling URL.
If you're unsure, check with your host. Sometimes you have to get from them the full path to wget in order forCRON to work, thus turning the above command line to something like:
/usr/bin/wget --max-redirect=10000 "http://www.yoursite.com/index.php?option=com_admintools&
view=filescanner&key=YourSecretKey"
Contact your host; they usually have a nifty help page for all this stuff. Read also the section on CRON jobs below.
wget is multi-platform command line utility program which is not included with all operating systems.If your system does not include the wget command, it can be downloaded at this address: http://wget.addictivecode.org/FrequentlyAskedQuestions#download. The wget homepage is here: http://www.gnu.org/software/wget/wget.html. Please note that the option --max-redirect is available on wget version 1.11 andabove.
Important
Using a web browser (Internet Explorer, Google Chrome, ...) or wget version 1.10 and earlier will mostprobably result into an error message concerning the maximum redirections limit being exceeded. This
140

Using Admin Tools
is not a bug. Most network software will stop dealing with a web site after it has redirected the requestmore than 20 times. This is a safety feature to avoid consuming network resources on misconfigured websites which have entered an infinite redirection loop. Admin Tools uses redirections creatively, to forcethe continuation of the scan process without the need for client-side scripting. It is possible, dependingon site size, Admin Tools configuration and server setup, that it will exceed the limit of 20 redirectionswhile performing a site scan operation.
Warning
The ampersands above should be written as a single ampersand, not as an HTML entity (&). Failureto do so will result in a 403: Forbidden error message and no backup will occur. This is not a bug, it'sthe way wget works.
12. SEO and Link ToolsThis section of Admin Tools includes useful tools to improve your site's SEO and handle your site's links. The listof features in this section is going to expand over time.
Link migration
SEO and Link Tools: Link migration
When you move your site across hosts, you may end up with broken intra-site links. Most of the times, this iscaused by either putting absolute links or moving the site into a different directory name than it used to be.
In the first case, let's say you move your site from www.example.com to www.example.org. If you copiedlinks from your browser's address bar and pasted them into your content or menus you're stuck with a bunch of linksreferencing the www.example.com domain name, i.e. http://www.example.com/somepage.html.Finding and changing those links is a mighty task, especially if you have thousands of content items.
In the latter case, which is the most common, the typical scenario goes like this. You develop your site locally,accessing it as http://localhost/mysite. Then you move your site to a live server with an addresslike http://www.example.com. Suddenly, all of your links and images are broken! Why? All WYSIWYGJoomla! editors create relative URLs. For example, linking to images/stories/image.jpg creates a linklike /mysite/images/stories/image.jpg in your content's HTML source code. If you take a good lookat this URL, you'll immediately notice the /mysite prefix. This works perfectly on your local server, as your site isinside the /mysite directory of your web root, but breaks on the live site as you are restoring to the web root itself!Again, finding all those references and changing them is a mighty task.
Might task it isn't anymore! Admin Tools Link Migration feature comes to your rescue. First, set the Enable linkmigration option to Yes in order to enable the feature. In the Old locations text area you will have to enter thedomain names or subdirectories where your site used to live, one on each line. For example, if your site was hosted
141
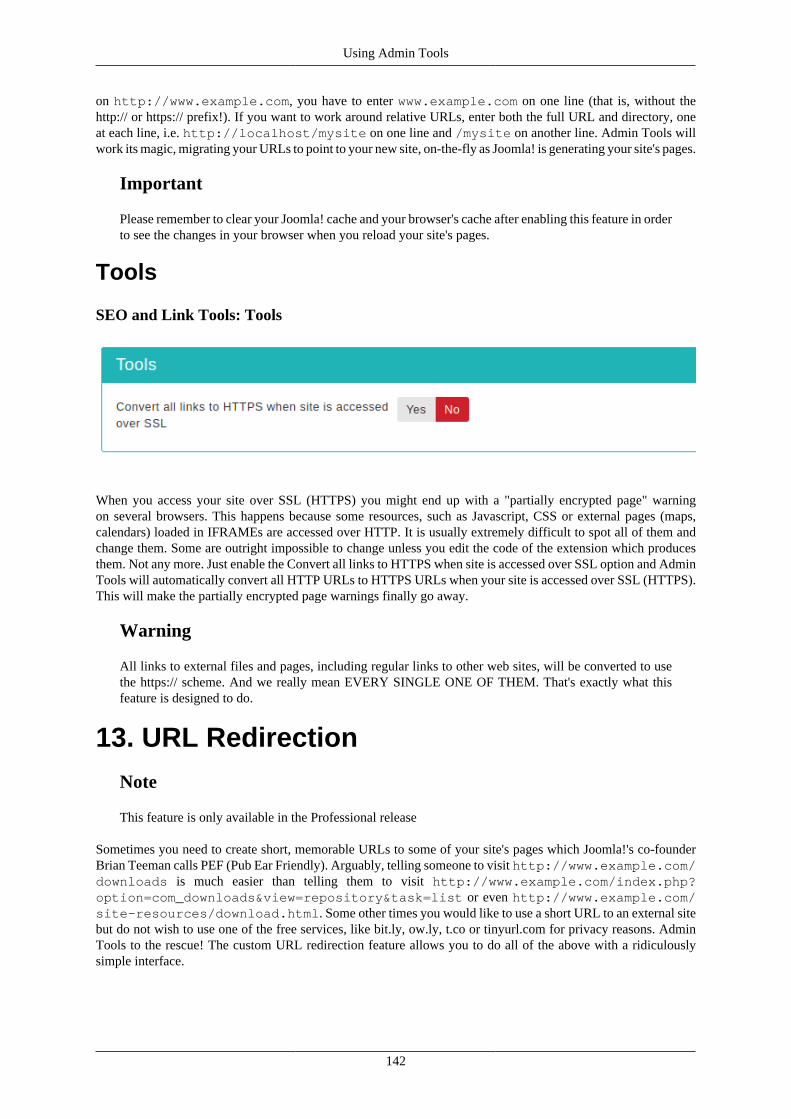
Using Admin Tools
on http://www.example.com, you have to enter www.example.com on one line (that is, without thehttp:// or https:// prefix!). If you want to work around relative URLs, enter both the full URL and directory, oneat each line, i.e. http://localhost/mysite on one line and /mysite on another line. Admin Tools willwork its magic, migrating your URLs to point to your new site, on-the-fly as Joomla! is generating your site's pages.
Important
Please remember to clear your Joomla! cache and your browser's cache after enabling this feature in orderto see the changes in your browser when you reload your site's pages.
Tools
SEO and Link Tools: Tools
When you access your site over SSL (HTTPS) you might end up with a "partially encrypted page" warningon several browsers. This happens because some resources, such as Javascript, CSS or external pages (maps,calendars) loaded in IFRAMEs are accessed over HTTP. It is usually extremely difficult to spot all of them andchange them. Some are outright impossible to change unless you edit the code of the extension which producesthem. Not any more. Just enable the Convert all links to HTTPS when site is accessed over SSL option and AdminTools will automatically convert all HTTP URLs to HTTPS URLs when your site is accessed over SSL (HTTPS).This will make the partially encrypted page warnings finally go away.
Warning
All links to external files and pages, including regular links to other web sites, will be converted to usethe https:// scheme. And we really mean EVERY SINGLE ONE OF THEM. That's exactly what thisfeature is designed to do.
13. URL RedirectionNote
This feature is only available in the Professional release
Sometimes you need to create short, memorable URLs to some of your site's pages which Joomla!'s co-founderBrian Teeman calls PEF (Pub Ear Friendly). Arguably, telling someone to visit http://www.example.com/downloads is much easier than telling them to visit http://www.example.com/index.php?option=com_downloads&view=repository&task=list or even http://www.example.com/site-resources/download.html. Some other times you would like to use a short URL to an external sitebut do not wish to use one of the free services, like bit.ly, ow.ly, t.co or tinyurl.com for privacy reasons. AdminTools to the rescue! The custom URL redirection feature allows you to do all of the above with a ridiculouslysimple interface.
142

Using Admin Tools
The URL Redirection management page
The main administration page shows you a list of the custom URL redirections defined on your sites. Each entryconsists of the following information:
• The ordering handle. When you order the display by Ordering (ascending or descending) you can drag itemsusing this handle to reorder them. URL Redirections are evaluated respecting this order.
• The left hand checkbox. The toolbar operations will apply only to the checked items.
• Visiting this. The relative path on your site which triggers the redirection. This URL must not be valid when theURL Redirection feature is disabled. For example, if your site is accessible at http://www.example.com/joomla and this field reads search/google, then all requests to http://www.example.com/joomla/search/google will be redirected to the Existing URL with a 301 (Permanently Moved) HTTPstatus code, to keep search engines happy. Clicking on the displayed value will open the Edit/Add page so thatyou can edit the entry.
• Takes you there. The URL where your visitors will be taken to. This URL must be valid even when the URLRedirection feature is not enabled. It is existing content and you're about to create a new URL which will takeyour visitors to it. It can be a relative URL in your own site or an absolute URL to a different site. Clicking onit will open it in a new window so that you can preview the results.
• Keep URL Parameters. If it's set to None any URL parameters sent by your visitors when they access the Visitingthis URL will be discarded. If it's set to Override All then their URL parameters will override any and all URLparameters in the Takes you there URL. If it's set to Add new then their URL parameters will only be appliedif and only if they do not already exist in the Takes you there URL.
• Published. When unpublished, the redirection will not take place. Useful to temporarily take down a redirectionwithout deleting it.
When adding a new entry or editing an existing entry, the following page appears:
143

Using Admin Tools
The URL Redirection editor page
There are three fields to edit:
Visiting this A relative path which triggers the redirection.
For example, if your site is accessible as http://www.example.com/joomla, enteringgoogle in this field will cause the URL http://www.example.com/joomla/google to redirect to the the URL you entered in the Existing URL field above. You canuse subdirectories in your path, e.g. search/external/google.
Since Admin Tools 3.3.0 you can redirect internal URLs, which contain index.php.For example you can use index.php?option=com_foobar&view=abc toredirect this URL to somewhere else. Pitfalls: you must NOT put your site'sURL in front of index.php. Moreover, if someone uses the URL index.php?option=com_foobar&view=abc&something=else (additional parameters) orindex.php?view=abc&option=com_foobar (different parameter order) to accessyour site the URL redirection will NOT take place.
If you want to allow additional parameters in an internal URL you can use the formindex.php?option=com_foobar&view=abc% (note the percent sign at the end) toallow any URL beginning with this text to be redirected. The pitfall is that if you usethe format above the URL index.php?option=com_foobar&view=abcdef willalso be redirected which may not be what you want. In this case you may want to tryindex.php?option=com_foobar&view=abc&% to redirect only URLs which haveview=abc followed by other parameters. You can even place one or more % anywhere in theURL to redirect, for example index.php?option=com_foobar&view=abc&task=%&% to redirect URLs of the com_foobar component, abc view and any task followed by zeroor more parameters.
Note that in an effort to make what you need to enter here more obvious your site's URL isalready present in front of the field. This is a reminder that you must NOT type your site'sURL. If your site is accessible from multiple URLs, e.g. http://www.example.com, https://www.example.com and https://example.com, the redirection applies on all site URLs eventhough they are not all printed out on this form. This is not a bug, it's the expected behavior.Joomla only reports the current URL your site uses, not all possible ones. The redirectionapplies to your Joomla installation, not a specific domain, subdomain or site URL.
144
Using Admin Tools
Takes you here An existing URL on your site, or a link to an external page.
When using a URL in your own site you should provide a relative URL, i.e. you shouldnot include the URL to your site's root. Use the relative path instead. For example, puttingindex.php?option=com_frontpage is sufficient to display the front-end component.You can use either an index.php URL or a SEF URL (as long as you have SEF URLs turnedon in your Global Configuration!).
The biggest strength of this feature is the ability to enter external links. For instance you canenter http://www.google.com to redirect your visitors to Google's search page. Usingthis powerful feature allows you to run your private URL shortening service on your owndomain.
Keep URLParameters
When set to None any query string parameters in the URL typed in by your visitor (i.e.anything after the question mark) will be ignored.
When set to Override All any query string parameters in the URL typed in by your visitorwill override any parameters in the Existing URL, or added to it if they didn't exist in thefirst place.
When set to Add New any query string parameters in the URL typed in by your visitor whichdo not exist in the Existing URL will be added to it. Existing query parameters will not beoverridden.
If you are trying to redirect a non-SEF URL (a URL with index.php inside it), e.g. index.php?option=com_foobar&something=123, you will very likely need to set this option to eitherNone or Add New. If you fail to do that you might end up with a redirection loop. This isnot a bug, it's perfectly reasonable. When you allow Overide All and try to redirect fromone component (option=com_something) to another (option=com_another) the redirectionURL will have its option parameter (com_another) overridden with the old option parameter(com_something). Since you are trying to redirect com_something you end up in a redirectionloop which will cause the browser to complain.
Published When unpublished, the redirection will not take place. Useful to temporarily take down aredirection without deleting it.
Tip
If you want to make a simple redirection set Existing URL to the URL you are redirecting to, New URLto the URL you are redirecting from and Keep URL Parameters to None.
Use the Save button to save the changes and go back to the administration page, Save & New to save the changesand start entering the information for a new redirection, Apply to save the changes and return to this editor pageand Cancel to discard all changes and return th the administration page.
14. Cleaning your temporary files directoryYour Temporary Files directory (called Temp-directory in your site's Global Configuration page) is the directorywhere Joomla! and its extensions put all transient files when installing software or performing other kinds of filemanipulation activities. One problem with that directory is that sometimes files can get stuck in it, for exampleafter a failed update. This not only causes a space problem —as these files take up valuable disk space— butcan also compromise your site's security as these files may contain potentially sensitive information, or may beexecutable PHP files. While the latter issue can be usually worked around by using the front-end protection modein the .htaccess Maker feature of Admin Tools Professional, the proper solution is to periodically clean the contentsof that directory.
Admin Tools Core and Admin Tools Professional include the Clean Temp-directory feature which will do that foryou with a single click! More specifically, it will automatically remove all files and directories from your Temp-directory except index.html and .htaccess, if any of those files exists.
145
Using Admin Tools
Important
Admin Tools asks Joomla! to tell it where the temporary directory is located and then asks Joomla! todelete its contents. This has a couple of pitfalls:
• Your temporary directory is what you have configured in your site's Global Configuration page, in theTemp-directory option. If you see something like tmp or /tmp in there please note that it is NOT thesame as the directory inside your site named tmp. The directory inside your site is a full path whichusually looks like /home/myuser/public_html/tmp.
• If your temporary directory is outside your site's root or contains double dots (e.g. ../tmp) Joomla!will REFUSE to delete its contents. This is not a bug in Admin Tools, it's how Joomla! itself is designedto work.
• Being able to delete the contents of the directory depends largely on its permissions. If Joomla! doesn'thave browse permissions to this directory it can create temporary files just fine and delete them whenit still knows their name (right after creating them), but not when Admin Tools asks it to delete thecontents of the temp-directory. The reason is quite technical: Joomla! can't list the contents of thedirectory, therefore it can't know which files / folders it contains and as a result doesn't know what ithas to delete. This is how filesystems work, not a bug in Admin Tools.
• On some servers you may need to use Joomla!'s FTP layer to delete the contents of the temp-directory.We consider this a major indicator of a critically bad server security model. If you are hosted on sucha server we strongly advise you to move to a different host or, at the very least, express your concernsto your host. Each site should run under its own user and never, ever, require the FTP layer.
15. Protecting Admin Tools with a passwordWarning
THIS IS NOT A SECURITY FEATURE. THE MASTER PASSWORD IS STOREDUNENCRYPTED IN THE SITE'S DATABASE. We consider this feature as a simple way foryou to prevent your clients from modifying configuration parameters that could break their own site.THIS FEATURE IS NOT DESIGNED TO PREVENT A MALICIOUS AND/OR KNOWLEDGABLEPERSON FROM ACCESSING ADMIN TOOLS.
Sometimes you are not the sole administrator of a website, for example when there is a large administrative teamor when you build the website for a client. In such cases you do not need everyone with back-end access to beable to modify Admin Tool's settings. Instead of giving you the traditional "all or nothing" access control imposedby Joomla! user groups, Admin Tools allows you to control access to any or all of its features using a "masterpassword". The idea is that before any user is able to use one of the protected features, he has to supply the "masterpassword" in Admin Tools' control panel page.
146
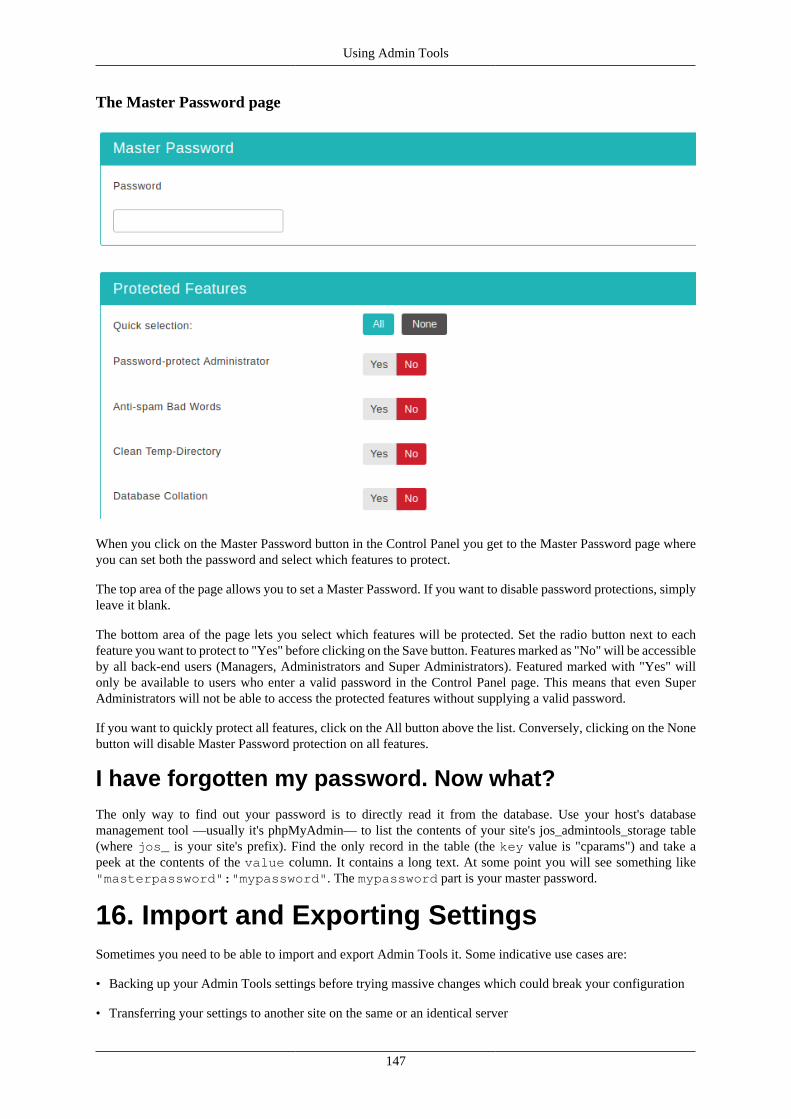
Using Admin Tools
The Master Password page
When you click on the Master Password button in the Control Panel you get to the Master Password page whereyou can set both the password and select which features to protect.
The top area of the page allows you to set a Master Password. If you want to disable password protections, simplyleave it blank.
The bottom area of the page lets you select which features will be protected. Set the radio button next to eachfeature you want to protect to "Yes" before clicking on the Save button. Features marked as "No" will be accessibleby all back-end users (Managers, Administrators and Super Administrators). Featured marked with "Yes" willonly be available to users who enter a valid password in the Control Panel page. This means that even SuperAdministrators will not be able to access the protected features without supplying a valid password.
If you want to quickly protect all features, click on the All button above the list. Conversely, clicking on the Nonebutton will disable Master Password protection on all features.
I have forgotten my password. Now what?The only way to find out your password is to directly read it from the database. Use your host's databasemanagement tool —usually it's phpMyAdmin— to list the contents of your site's jos_admintools_storage table(where jos_ is your site's prefix). Find the only record in the table (the key value is "cparams") and take apeek at the contents of the value column. It contains a long text. At some point you will see something like"masterpassword":"mypassword". The mypassword part is your master password.
16. Import and Exporting SettingsSometimes you need to be able to import and export Admin Tools it. Some indicative use cases are:
• Backing up your Admin Tools settings before trying massive changes which could break your configuration
• Transferring your settings to another site on the same or an identical server
147
Using Admin Tools
• Copying the IP white- and black-lists or email templates
Since Admin Tools 3.1.0 you can do that through the Export Settings and Import Settings pages of the component.
Warning
Exporting and importing very large datasets (more than a thousand rows) IS NOT RECOMMENDED andCAN LEAD TO TIMEOUT ERRORS. This is a limitation of PHP, namely the memory_limit (maximummemory usage limit) and max_execution_time (maximum time to execute the page) imposed by yourserver's php.ini. Besides, it is a very bad idea having so many IP white-/black-list and/or emailtemplate rows as your site's performance would become extremely bad. If you find yourself putting morethan 100 records into these features you are doing something really wrong.
Exporting SettingsIn this page you can choose which settings you want to export. The available options are:
WAFconfiguration
This includes all settings in the Configure WAF, .htaccess Maker and NginX ConfigurationMaker pages
IP Disallow List The permanently disallowed IP addresses from the IP Disallow List page
Exclusive AllowIP List
The allowed administrator IP addresses from the Exclusive Allow IP List page
Email templates All email templates from the Email Templates page
After selecting what you want to export click on the Export settings button in the toolbar. Your browser willdownload a JSON file with all of the selected configuration settings.
Importing SettingsChoose the exported JSON file and click on the Import settings button in the toolbar. The imported settings willoverwrite your existing settings.
17. Access ControlJoomla! 1.6 and later comes with a very powerful and somewhat complex ACL system on its own. Admin Toolsis designed to make full use of it. In order to access the ACL setup, go to Components, Admin Tools and click onthe Options button in the toolbar. Then, click on the Permissions tab. Each group can be setup with the followingprivileges:
Configure (theone on top)
Allows access to Component Parameters button. This is a core Joomla! privilege.
AccessComponent
Self explanatory. If a user doesn't have this privilege, he won't be able to access thecomponent! This is a core Joomla! privilege.
Utility The user can use the utility features of Admin Tools. The features affected are: cleaning thetemporary directory, component access (Control Panel), Emergency Off-Line Mode, fixingand configuring permissions, URL redirections, SEO and link tools.
Maintenance The user can use the database maintenance features of Admin Tools. The features affectedare: session cleanup and table optimization.
Security The user can use the security features of Admin Tools. The features affected are: accesscontrol, administrator password protection, Web Application Firewall setup and associatedtools (anti-spam bad words filtering, IP white and black list, log view), .htaccess Maker andMaster Password.
148
Using Admin Tools
We won't go into more details regarding the ACL setup on Joomla! 1.6 and later. If you want more informationabout how the ACL system works in Joomla! 1.6 and later please consult its documentation or ask on the Joomla!forums.
18. The "System - Admin Tools" pluginNote
The scheduling features of this plugin are only available in the Professional release. The Core releasedoes need the plugin to be enabled for the SEO and Link Tools features to work.
The "System - Admin Tools" plugin implements all of the features of Admin Tools that run automatically. Thisincludes the Web Application Firewall and the URL redirections as well as scheduled tasks such as scheduledtable maintenance or periodic import of settings from a master server.
You can access the plugin's configuration parameters by going to your site administrator backend, Extensions,Manage Plugins. Find the item System - Admin Tools on the list and click on it. The standard Joomla! plug-inconfiguration page opens.
On the right-hand side of the administrator area you can find the standard Joomla! controls. First, make sure thatEnabled is set to Yes. Then, in order for the plugin to be published in the correct order, select 0 - First from theOrder drop-down list.
Rescue ModeThe Rescue Mode allows Super Users of the site to quickly unblock themselves if their IP address is accidentallyblocked.
Rescue URL(Joomla! 3.6 orlater only)
When enabled (default) the Rescue Mode feature is enabled, allowing Super Users withblocked IPs to request a temporary Rescue URL which lets them log into the site and lift theblock. We recommend leaving this feature enabled unless you know what you are doing. Seethe Rescue Mode section for more information.
Important
You will only receive the email to activate Rescue Mode if your IP is being blockedby Admin Tools. If your IP is NOT blocked by Admin Tools you will NOT receiveany email. This is by design. It doesn't make sense to temporarily unblock yourselfwith Rescue Mode when you are not blocked!
Rescue duration(minutes)
How long is the Rescue Mode active. This controls two things:
1. The maximum amount of time between requesting a Rescue URL and visiting it.
2. The maximum amount of time between visiting the Rescue URL and the end of RescueMode.
We recommend leaving this setting to 15 minutes. Lower values tend to be very impractical.
Blocked requests reportingThe following options determine how Admin Tools handles and reports blocked requests.
Email language Admin Tools will send you emails to notify you of blocked requests when you enter an emailaddress in WAF Configuration. By default, the current user's language (or your site's defaultlanguage, if no user is currently logged in) is being loaded, which means that these emailswill be sent out in this language. If you have a multilingual website it means that you mayreceive an email in any language available in your site. This can lead to confusion and makesit nigh impossible to set up any email filters. Therefore we give you this option. You can enter
149
Using Admin Tools
the language tag of the language in which you wish those blocked requests emails to be sent.For example, typing en-GB in this field will cause all emails to be sent out in English. If leftblank (default) the current language loaded by Joomla! will be used.
Maximum blockrequests logentries
Specify the maximum number of entries to keep in the blocked requests log. Excess recordswill be deleted. Use 0 to turn off this feature and keep all blocked requests log entries(recommended).
Note
If you have thousands of old entries it will take a while for Admin Tools to removeall of the old entries. Old records are deleted in 100 record batches on each pageload for performance reasons.
Scheduled maintenanceThe System - Admin Tools plugin allows you to automate some basic maintenance of your site.
Enable SessionOptimizer
When enabled, the Session Optimizer will be scheduled to run automatically. This featurewill repair and optimize Joomla!'s sessions table.
Run every Xminutes
How often to run the Session Optimizer feature, in minutes
Enable SessionCleaner
When enabled, the Session Cleaner will be scheduled to run automatically. This featurewill purge (completely empty) and optimize Joomla!'s sessions table. Watch out! This willautomatically log all users out of your site! You should only use it on sites where you don'texpect to have logged in users at all, e.g. a company presentation site.
Run every Xminutes
How often to run the Session Cleaner feature, in minutes
Enable CacheCleaner
When enabled, the Cache Cleaner will be scheduled to run automatically. This feature willtry to purge (completely empty) Joomla!'s cache. This is not possible on occasions, especiallyif you are using a cache adapter which doesn't support purging.
Run every Xminutes
How often to run the Cache Cleaner feature, in minutes
Enable CacheAuto-expiration
When enabled, the Cache Auto-expiration will be scheduled to run automatically. This featurewill try to expire and delete stale items in Joomla!'s cache. Unlike the Joomla! built-in feature,it will try to run this operation across all caches. This is not possible on occasions, especiallyif you are using a cache adapter which doesn't support automatic expiration control.
Run every Xminutes
How often to run the Cache Auto-expiration feature, in minutes
Delete inactiveusers
When this option is enabled, the Admin Tools plugin will automatically delete inactive users,i.e. users who registered on the site but never logged in. On each page load, up to five inactiveusers will be deleted, to avoid slowing down your site. There are four different options:
Never Disables this feature
Only if theyhaven't activatedtheir account
Users who have never activated their account will be removed. If theyhave activated their account they will not be removed.
Only if theyactivated, butnever logged in
Users who have activated their account but never logged in will beremoved. If they haven't activated their account yet, they will not beremoved.
150

Using Admin Tools
Activated or not,as long as theyhaven't logged in
Any user who hasn't logged in for the number of days specified in thenext option will be removed from the site, no matter if he has activatedhis account or not.
Delete after thismany days
How many days must elapse between the registration date of an inactive user and its deletion.For example, if this option is set to 7 then if a user registers on your site on the 1st of themonth and has not logged in at least once by the eighth of the month, his user account willbe removed.
All scheduling and expiration options are assessed on a best-effort bases. This means that they will try to run everyX minutes, but only as long as there is enough visitor traffic on your site to trigger them. In any other case theywill defer their execution for when there is visitor traffic.
Automatic settings import (“Sync server”)Some larger / busier web agencies tend to have dozens to hundreds of sites which use roughly the same mix ofextensions. In these cases a small tweak in the Admin Tools setup of one site usually has to be propagated to everyother site in their portfolio. This can be a tedious process.
Admin Tools gives you the option to have a “sync server” of shorts. The idea is that you will have a JSON filewith Admin Tools settings in a URL that's publicly accessible. Every so often your sites will check out this URLand import the settings. This URL could be on your web server, a Dropbox account, an S3 bucket and so on.
The JSON file in that URL can be generated by going to Admin Tools' Import/Export Settings page. The ideais that you modify the configuration of one site and export its settings in a JSON file. You can edit that file ifnecessary. Then upload it to where it can be found using the public URL you've configured on all other sites. Waitfor the requisite number of hours to pass and now all your sites have been synced to those settings.
The relevant settings for each site are:
Automatic importURL
URL pointing to Admin Tools JSON settings that should be imported.
Automatic importfrequency (hours)
How often (in hours) to read the remote URL and import its contents into the Admin Toolsinstallation
19. Rescue ModeOverviewSometimes an overzealous Admin Tools configuration can result in accidentally blocking yourself, a Super User,from the site. Normally that would require you to rename the main.php file of Admin Tools' system plugin tounblock yourself. This can be rather daunting for novice site administrators.
The Rescue URL feature works around that problem in a secure and elegant manner. First you visit a special URL,including your Super User email address. An email is sent to you with a "magic" link called the Rescue URL.Clicking on that link lets you log in to your site's administrator area without Admin Tools' protections getting inyour way. You can then unblock yourself and / or modify the Admin Tools configuration which caused your IPaddress to be blocked in the first place.
How to use the Rescue Mode
Important
Rescue Mode is only available on sites running Joomla! 3.6.0 and later and Admin Tools 4.3.0 or later.Also note that if you are not the only Super User on your site, or if you used another company / freelancerto build your site, it's possible that they have turned off Rescue Mode. If these instructions don't workyou should assume Rescue Mode is not available or disabled on your site.
151

Using Admin Tools
Assuming that your site's URL is http://www.example.com and your Super User email address [email protected] you need to visit the following URL to request a Rescue URL to be sent to you:
http://www.example.com/administrator/[email protected]
You will see the message "Check your email for Rescue URL information" printed on your screen.
Check your email. You will receive an email from your site with a Rescue URL.
Important
You will only receive the email to activate Rescue Mode if your IP is being blocked by Admin Tools. Ifyour IP is NOT blocked by Admin Tools you will NOT receive any email. This is by design. It doesn'tmake sense to temporarily unblock yourself with Rescue Mode when you are not blocked!
The Rescue URL looks like this:
http://www.example.com/administrator/index.php?admintools_rescue_token=4vJPFH8pkpFdVkjz0Ej7VUi6gUt39lmkMS36sjmQV6hCTZZ36b2snqWVY6PrxqHdvyb4B3DI8VSUyLbMuYcgNrrZ0WPgDDPB
Do note that the part after admintools_rescue_token is very long and completely random. Also note that it's onlyvalid for use from the SAME browser and IP address that you requested a Rescue URL to be sent to you. The linkis only valid for a short period of time (default: 15 minutes). All of that is done for security reasons!
Visit the Rescue URL either by clicking on it or by copying it and pasting it to your browser's address bar. If allgoes well you will see your site's administrator backend login page or the Joomla! administrator control panel.If you see the login page just log in with the Super User account which corresponds to the email you used whenrequesting a Rescue URL to be sent to you.
Tip
If you were logged in as a different Super User account you will still be blocked. You will need to repeatthis process using the email address of the Super User account you were logged in with on your site.Alternatively, use your browser's Private Browsing mode to request and visit the Rescue URL.
Now you can go to Components, Admin Tools and unblock yourself. Remember that you have a limited periodof time (default: 15 minutes) for security reasons!
Tip
Don't know how to unblock yourself? No problem! Going to Components, Admin Tools you'll see amessage with a link to step by step instructions.
Rescue Mode and securityRescue Mode was designed with security in mind. There's no point having a security extension if there's an easybackdoor to it! We have ensured security by taking several measures.
First and foremost, the Rescue Mode only applies to the administrator backend. The frontend of your site is notaffected. This means that nobody can abuse it to subvert Admin Tools' protection of your public site.
When you are requesting a Rescue URL you must be already blocked from accessing the backend of the siteand know the Super User's email address. If your backend login page is protected by a .htaccess password (a.k.a.Administrator Password Protection) you will need to supply that before the request has any effect.
A very long (96 random alphanumeric character), single use, limited validity time (default: 15 minutes) token isgenerated when you make the request. This has about 160 bits of randomness which means that there are more than1,460,000,000,000,000,000,000,000,000,000,000,000,000,000,000,000 possible combinations. This is practicallyimpossible to guess. Moreover, it's stored hashed using the same technology as your Joomla Super User password
152
Using Admin Tools
to prevent side-channel attacks, i.e. an attacker using a possible vulnerability in any part of your site / server toperform an unauthorized read of database information.
The token itself can only be used by the same browser and IP address that requested the Rescue URL. This meansthat phishing attacks wouldn't work. An attacker cannot fool you into opening a backdoor to your site for them.In fact, a potential attacker would need full access to your email to pull of an attack. Of course if they have fullaccess to your email account they can do far more dangerous things, like having your hosting company hand overcontrol of the domain to them, i.e. you'd be thoroughly hacked. Therefore the email portion of Rescue Mode doesnot constitute a viable attack vector.
When you visit the Rescue URL the token is immediately invalidated (it cannot be used again) and data is writtento your session. This data is what acts as a temporary key to disable Admin Tools' protections only for you andonly for the site's administrator. Furthermore you MUST log in, or already be logged in, with the same Super Useras the one whose email you used when requesting a Rescue URL. If you try to log in with a different user theRescue Mode is immediately canceled.
The Rescue Mode only temporarily disables Admin Tools' security checks. It does not remove Joomla's ownsecurity checks or any third party extensions. Therefore if you are using Two Factor Authentication / Two StepAuthentication to verify your login it will still be required for you to log in to your site. This means that even in theunlikely event of you being fully compromised (including control of your email account AND your Super Userusername and password) the attacker would still be stumped by Two Factor Authentication.
Furthermore, the Rescue Mode is only active for a limited amount of time (default: 15 minutes) since you accessthe Rescue URL. This means that even if you use a loaner computer you won't end up with a browser that has abackdoor to your site's login page. We also include a button in the Admin Tools control panel page to immediatelyend Rescue Mode -even if it's not expired- for additional control and security.
Finally, Rescue Mode is opt-out. This means that you can disable it by editing the System - Admin Tools pluginoptions and setting the Rescue URL option to No.
Discoverability and message customizationFeatures like this are useless if they are simply buried in the documentation. Admin Tools displays informationabout the Rescue URL in three places, as long as you have not modified the default options.
First on all, when a blocked request is raised the visitors see a message informing them they did something theyshouldn't have done. You can customize this in the Configure WAF page, Customisation tab, Custom Messageoption. If that option is left blank the default message generated by Admin Tools contains information aboutunblocking yourself.
The second place where this is displayed is the message shown to blocked IPs. You can customize that in theConfigure WAF page, Auto-ban Repeat Offenders tab, Show This Message To Blocked IPs option. If you leave thisblank or if you use the default message ("You are a spammer, hacker or an otherwise bad person.") the informationabout unblocking yourself will be appended to the end of the message.
Moreover, Admin Tools will automatically append the information about unblocking yourself to the defaultcontent of the blocked request and IP auto-ban emails (i.e. reasons all and ipautoban) shipped with AdminTools. You can customize these emails from the Web Application Firewall, Email Templates page.
If you customize these messages and / or emails you can instruct Admin Tools to include the default Rescue URLinformation by adding the code [RESCUEINFO] in all caps, including the brackets, anywhere in the two messagesor the body of the email templates. The rescue info typically reads something like:
If you are the administrator of this site and have blocked yourself on accident please visit https://www.example.com/administrator/[email protected] where [email protected] the email address of your (Super User) account.
You can customize this information message by creating a standard Joomla! languageoverride [https://docs.joomla.org/J3.x:Language_Overrides_in_Joomla] for the translation stringADMINTOOLS_BLOCKED_MESSAGE_RESCUEINFO.
153
Using Admin Tools
Important
For security reasons, we strongly recommend that you change the Custom message and Show ThisMessage To Blocked IPs messages described above to NOT include any reference to Admin Tools and /or the procedure to unblock yourself. You MUST NOT tell the world how you are protecting your site.Not disclosing this information is yet another hurdle for a potential attacker, making it less likely thatthey will spend time to attack your site.
20. Troubleshooting guideIf you can not find something in our user's guide and you are a subscriber, please post to our support ticket system.Please indicate that you have read this page and the documentation (mention which parts of the documentationyou read trying to find the information) in your post. Thank you.
20.1.
20.2. Administrator password protection issues
Help! I am locked out of my site's administrator area!
This feature works by placing two file, .htaccess and .htpasswd inside your site's administratordirectory. If you forget the username/password you used for this feature and you are locked out of your site, pleasefollow this procedure:
1. Using your favourite FTP, FTPS or SFTP application, e.g. FileZilla or CyberDuck, log into your site and gointo your site's root
2. Go inside the administrator directory
Warning
DO NOT SKIP THIS STEP or you will be removing the wrong file, causing a big problem on yoursite (especially if you're using SEF URLs).
3. Remove both the .htaccess and .htpasswd files. If you do not see those files, create two empty text filesin your computer, rename them to .htaccess and .htpasswd and upload them.
I enabled this feature and now the front-end of my site asks mefor a username and password?!
This is not a bug in Admin Tools, but a problem with one of the extensions (components, modules or plugins)you are using.
More specifically, Joomla! extensions are not supposed to load anything from the administrator area of your sitein the front-end. However, some badly written extensions try to access static media files (CSS, Javascript, images)from directories inside the administrator directory. On notorious example is the Zoo CCK extension. Since all ofthe contents of your administrator directory are protected with a username/password, your browser will promptyou for one as soon as it is instructed to download a file from that protected directory or any of its subdirectories.
There are two workarounds:
1. Disable the administrator password protection. This degrades your site's security but is the easiest and mostimmediate change.
2. Consult the developer of the offending extension and explain to him that loading files from the administratorarea of the component in the front-end of the site is insecure and he has to resolve this issue. Hopefully,developers will realize that this practice is unsafe and fix their software.
154

Using Admin Tools
500 Internal Server Error when enabling this feature
If after applying the password protection you immediately receive a blank page or an Internal Server Error 500instead of a password prompt, your server is not compatible with the password protection scheme. In this case,the only way to gain access to your site's administrator back-end is to remove the .htaccess and .htpasswdfiles from your administrator directory using an FTP application or the File Manager in your site's hosting controlpanel. If in doubt, consult your host about how you can do that before trying to apply the password protection. Ifthose files do not show up in your FTP client, please create two blank files with those names and upload them toyour site, overwriting the existing (but invisible) ones. This will remove the password protection so that you canregain entrance to your administrator back-end.
404 Not Found error page or Joomla error page when enablingthis feature
Ask your host to disable Apache custom error pages for HTTP status codes 401 and 403.
But why does this happen? (Optional, detailed information; you don't have to read the next paragraphs).
When you enable password protection all you're doing is create a .htaccess file. This tells Apache, your web server,that the administrator directory is password protected. The next time your browser tries to access anything in thatdirectory it has to send an HTTP Basic Authentication header that contains your username and password. If itdoesn't Apache returns an HTTP 401 status which, in turn, instructs the browser to ask you for the username andpassword (and then store it in its authentication cache for the browsing session). This is how your browser knowsit needs to ask you for a username and password.
However, HTTP 401 is technically an HTTP error status. Apache has a feature called custom error pages.Depending on the HTTP error status returned (all 4xx and 5xx codes) you can configure Apache to return a staticHTML page with custom content to the browser when it sends the error code. This holds true even for the 401status described above. The real cause of the problem you are facing is that the configured custom error pagedoes not exist. This causes Apache to internally report the file as missing. This breaks the authentication flow andwould normally trigger a 404 Not Found error page.
If that wasn't bad enough, Joomla is always configured to catch all missing files and try to figure out if it shouldtry and serve a Joomla page instead. This is required for the correct operation of search engine friendly URLs. So,Joomla sees the missing file error. Not knowing what to do with it, it tries to route it through com_content (the built-in Articles component). Hard as it may try, it can't find an article category which matches the URL. This causesJoomla to throw an error. This is what ends up being displayed as the 404 or Joomla error page you are receiving.
When you disable custom error pages for the 401 error code you let Apache communicate that status directly tothe browser without Joomla interfering. This lets the password protection work properly. FYI, the aforementionederror will also take place if you use your hosting control panel's directory password protection feature. It is notcaused by Admin Tools. It is caused entirely by your server's configuration. Also note that most hosts do let youdefine and reset custom error pages through the hosting control panel.
20.3. New Super Users are blocked and deactivatedafter loginThis happens when you add a new Super User and you manually deactivated Admin Tools. This means that AdminTools has no records about you creating the Super User, so it thinks it's a malicious user.
Before continuing, let's solve the root cause of this issue. Most likely you got a 403 error creating a new SuperUser and as temporary solution you manually disabled Admin Tools. Please check this page of the troubleshooterto find the correct solution for this problem.
Then enable Super User monitor feature and get inside the profile of the user that was disabled. Save it withoutchanging anything. In this way Admin Tools should record the new Super User being a legit one. Try again tologin with the user that was previously blocked; you should be able to use it, now.
155

Using Admin Tools
20.4. Can not create or edit Managers, Administrators,Super Administrators using Admin Tools (403 errorthrown)Admin Tools Professional contains a feature called Web Application Firewall, or WAF for short. One ofthe security features applied by WAF is to block editing or adding Managers, Administrators and SuperAdministrators.
Please go to Components, Admin Tools and click on the Web Application Firewall button. In the new page, clickon WAF Configuration. Find the Disable editing backend users' properties option and set it to No. Now you cancreate and edit all users on your site. For security reasons, remember to re-enable this option after you're doneadding/editing users!
20.5. Locked out of my site after applying a .htaccessusing Admin Tools' .htaccess MakerSometimes, when you apply a .htaccess file on your site, you get a blank page or an Internal Server 500 errormessage when trying to access your site's front- or back-end. Working around this is simple:
1. Using your favourite FTP application, e.g. FileZilla or CyberDuck, go to your site's web root
2. Find the .htaccess file and rename it to htaccess.bak. If you do not see the .htaccess file listedthere, create a blank text file on your local machine, rename it to .htaccess and upload it to your site. Itwill overwrite the existing one.
3. Log back in to your site's back-end, go to Components, Admin Tools, .htaccess Maker, disable some optionsand then click on Save and apply .htaccess.
4. If this produces the same error, repeat this procedure. Do note that different servers support different featuresof our .htaccess Maker. There is no way to know beforehand. Making the perfect .htaccess for your site is atrial-and-error process.
Important
If you are on GoDaddy, please note that changes on .htaccess files (or removing them completely) takeanywhere between 10-30 minutes to become effective.
20.6. Admin Tools' Web Application Firewall (WAF)locked you out of your siteIt's easy to be overzealous and apply very strict security settings for the Web Application Firewall of Admin Tools.An overzealous configuration, a misbehaving third party extension or a misconfigured server can cause you to beaccidentally locked out of your own site. Here we'll see how to fix that.
Step 1. Regain access to your site's administrator
There are two ways to regain access to your site, Rescue Mode and FTP.
Using the Rescue Mode to regain access to your site's administrator
Important
Note that if you are not the only Super User on your site, or if you used another company / freelancer tobuild your site, it's possible that they have turned off Rescue Mode. If these instructions don't work youshould assume Rescue Mode is not available or disabled on your site.
156
Using Admin Tools
Assuming that your site's URL is http://www.example.com and your Super User email address [email protected] you need to visit the following URL to request a Rescue URL to be sent to you:
http://www.example.com/administrator/[email protected]
You will see the message "Check your email for Rescue URL information" printed on your screen.
Check your email. You will receive an email from your site with a Rescue URL. The Rescue URL looks like this:
http://www.example.com/administrator/index.php?admintools_rescue_token=4vJPFH8pkpFdVkjz0Ej7VUi6gUt39lmkMS36sjmQV6hCTZZ36b2snqWVY6PrxqHdvyb4B3DI8VSUyLbMuYcgNrrZ0WPgDDPB
Do note that the part after admintools_rescue_token is very long and completely random. Also note that it's onlyvalid for use from the SAME browser and IP address that you requested a Rescue URL to be sent to you. The linkis only valid for a short period of time (default: 15 minutes). All of that is done for security reasons!
Visit the Rescue URL either by clicking on it or by copying it and pasting it to your browser's address bar. If allgoes well you will see your site's administrator backend login page or the Joomla! administrator control panel.If you see the login page just log in with the Super User account which corresponds to the email you used whenrequesting a Rescue URL to be sent to you.
Tip
If you were logged in as a different Super User account you will still be blocked. You will need to repeatthis process using the email address of the Super User account you were logged in with on your site.Alternatively, use your browser's Private Browsing mode to request and visit the Rescue URL.
Now you can go to Components, Admin Tools and unblock yourself. Remember that you have a limited periodof time (default: 15 minutes) for security reasons!
Using FTP to regain access to your site's administrator
The failsafe way to regain access to your site's administrator backend is using an FTP application or your hostingcontrol panel's File Manager to rename a file.
Go inside the plugins/system/admintools/admintools directory on your site (on older versions ofAdmin Tools: plugins/system/admintools). You will see a file named main.php. Rename it to main-disable.php. This will turn disable the Web Application Firewall from executing and you can access yoursite's back-end again.
After you have fixed the cause of your issue remember to rename main-disable.php back to main.php,otherwise your site will remain unprotected!
If you are still blocked
There are two cases where the Rescue URL feature, or renaming the Admin Tools system plugin's file, will nothelp you. These are the two cases where Admin Tools has created a server configuration file, meaning that youare blocked by your server, not Admin Tools.
The first case is the Administrator password protection feature. Please delete the files named .htaccess and.htpasswd from your site's administrator directory.
The other case is when you've used the .htaccess Maker feature of Admin Tools. In this case there's a .htaccessfile in your site's root. You may want to replace its contents with the default Joomla! .htaccess file content [https://raw.githubusercontent.com/joomla/joomla-cms/staging/htaccess.txt].
In both cases you should not that the files have names beginning with a dot. That makes them hidden. You willneed to enable the display of hidden files to edit / delete those files. If you are unsure how to do that please ask
157
Using Admin Tools
your host and tell them that you need to edit/delete hidden files. Usually they will point out an option in theirhosting control panel's file manager.
If you are still blocked your issue is unfortunately unrelated to Admin Tools. Do you have another security pluginon your site? If you do, check its settings. If not, check with your host. More often than not, hosts have their ownserver security systems which can block you out of your site. If you are unconvinced follow the the instructionsunder "Using FTP..." above. Doing that you prevent Joomla! from loading Admin Tools' code at all. If you canreproduce your issue when Joomla! cannot load Admin Tools' code you can be certain that your issue is completelyunrelated to Admin Tools. Code which isn't loaded cannot run. Code which doesn't run cannot affect your site.
Step 2. Unblock yourself
In most cases the easiest way to unblock yourself is simply going to Components, Admin Tools and click the bigUnblock My IP button. If this doesn't work, or the button is not visible, follow the instructions below.
Do remember to end the Rescue Mode or renamed back main.php after you're done unblocking yourself!
Automatically banned IP address
Go to Web Application Firewall and click the Exceptions Log button. Delete all records with your own IP address.Then, go back to Web Application Firewall and click on the Auto IP Blocking Administration button. Select therecord showing your IP address and click on the Delete button to delete the block.
Tip
Don't know what your IP address is? Just visit whatismyipaddress.com [http://whatismyipaddress.com]to find out!
If this problem keeps happening without you doing anything and the IP blocked is NOT the same as the onereported by whatismyipaddress.com [http://whatismyipaddress.com] you will have to do one more thing. Go toComponents, Admin Tools, Web Application Firewall and click on the WAF Configuration button. In the first tabset Enable IP workarounds to Yes, no matter what the automatically detected recommendation is.
If that was not the case, you have two options. The first is to troubleshoot the reason of the ban. Go toComponents, Admin Tools, Web Application Firewall, Security Exceptions Log and check the Reason andTarget URL for the entries which have your IP address in the IP address field. Find the reason in the "List ofblocking reasons" documentation page [https://www.akeeba.com/documentation/admin-tools/waf-log.html#waf-log-reasons] to find out why you're being blocked. If you are not sure what that means, please file a support ticket[https://www.akeeba.com/support/admin-tools.html] remembering to copy the information from the SecurityExceptions Log. Kindly note that you need to have an active subscription to receive support.
The second option at your disposal is adding your IP address to either of the IP whitelists, as follows.
The first approach is to add your IP address to the Administrator IP Whitelist. Using this option will limit accessto the administrator section of your site only to the IPs listed in the whitelist. We strongly recommend you to notuse it unless you and all of your back-end users have static IP addresses. In all other cases you may get blocked outof your site. Go to Components, Admin Tools, Web Application Firewall and click the Administrator IP Whitelistbutton. Add your own IP address.
The second approach is to use the Safe IP List. All IPs in that list will not be automatically banned. In order todo that, go to Components, Admin Tools, Web Application Firewall and click on the WAF Configuration button.Inside the Auto-ban Repeat Offenders area find the Never block these IPs field. This is a comma-separated list.Add the IPs you want to never be automatically blocked separated by commas on that list.
Administrator IP Exclusive Allow List
If you have enabled the administrator exclusive allow IP list you have to make sure that your IP address is includedin the exclusive allow list to be able to access your site. Go to Components, Admin Tools, Web ApplicationFirewall and click the Administrator IP Exclusive Allow List button. Add your own IP address.
158
Using Admin Tools
Warning
Don't use the Administrator IP Exclusive Allow List if your ISP assigns an IP address dynamically. Thisis the default unless you are paying them extra for a "static IP".
IP Deny List
If you have enabled the IP Deny List you have to make sure that your IP address is not included in the blacklistin order to be able to access your site. Go to Components, Admin Tools, Web Application Firewall and click theSite IP Deny List button. Remove your own IP address.
Administrator Secret URL parameter
If you have forgotten your Administrator Secret URL parameter go to Components, Admin Tools, WebApplication Firewall, Configure WAF, click on the Basic Protection Features tab and find the Administrator secretURL parameter option. Change or remove all of the text in that box to reset or unset, respectively, this feature.
20.7. My components, modules or templates stoppedworking after using Admin Tools .htaccess Maker andhow to determine and apply exceptionsWhen you use our .htaccess Maker, it writes a .htaccess file which -by default- applies extremely tight securitysettings. The immediate result is that some third party extensions which use potentially unsafe practices no longerwork properly or at all. Don't fear! Fixing them is very easy, carrying out the steps in the following step-by-stepguide.
Determining which exceptions are required takes only a few minutes of your time. On the upside, once youdetermine them on one site you can reuse them on all sites having that extension installed. You will quickly endup with your "master" exceptions list which you'll be able to apply to all of your sites without a second thought.
In the following example we are going to use Google Chrome to detect access issues on a site. Similar tools arebuilt-in in other major browsers.
Our first test case will be a site with the great CssJsCompress JS/CSS minifier plugin installed. The first indicationthat something went awry is that our site looks like all the CSS is gone.
In order to figure out what is going wrong, we have to find out which of the files referenced by the page arethrowing a 404 error (this means that they are filtered out by Server Protection), their naming pattern and location.Provided that you are using Chrome open up the Developer Tools pane by typing CTRL-SHIFT-J (or CMD-OPTION-I on a Mac) while viewing that broken page. Click on the Network tab, then reload the page (e.g. usingCTRL-R or CMD-R). The page reloads and a list of files the browser tried to access appears.
The lower part of the window is the console. It kindly informs us that two files, js.php and css.php, failed to loadwith a status of 404. Now let's take a look where they are coming from. Click on the js.php link in the console.The top part of the window changes to display some debugging info about that file.
The interesting part is the request URL: http://localhost/demo/plugins/system/CssJsCompress/js.php?js=0e5799f64bd805d46c20200986c626e4.js. As you guessed, thepart after the question mark is a URL parameter and can be removed. We're left with http://localhost/demo/plugins/system/CssJsCompress/js.php, but we know that http://localhost/demo is our site'sbase URL. Remove it and you're left with plugins/system/CssJsCompress/js.php. Bullseye! Is thereany change that this file can have a variable name? Nope. Does the file exist in our file system? Yes. This meansthat this is the exact file we need to put in our Allow direct access to these files list. Doing the exact same processfor the css.php ends up with yet another file we have to exclude: plugins/system/CssJsCompress/css.php. Note the capitalization, OK? Copying and pasting those files in that exceptions option and regeneratingthe .htaccess file allows our site to load properly.
159

Using Admin Tools
That said, sometimes you will see something like a long list of hard to guess filenames like js-abc123456789fed0.php and so on. If the file extension is anything but .php you can add the extension to thefront-end or back-end allowed file types list and the directory in the respective list of directories where file typeexceptions are allowed. If the culprits are PHP files, you have two options: stop using that extension or add thedirectory in the "Allow direct access, including .php files, to these directories" list.
How about another example?
The previous example was dead easy to spot as the page looked like a big ugly mess which immediately madeus figure out where the culprit is. This is not always the case. Sometimes a feature of an extension stops workingwith seemingly no explanation. In this test case we'll be using UddeIM. That was a real-world issue I had to dealwith and this is the story of how I solved it.
After installing the Server Protection users started complaining that they could not send me messages throughUddeIM any more. At first I couldn't understand why, because I could use it without any problem at all. Then,I decided to create a simple unprivileged registered user with the intention to send a message to myself in orderto test that. Then, I spotted the problem.
Tip
When trying to figure out an issue affecting your users but not yourself, always try using a user withthe same attributes as an afflicted user. Ideally, log in with the reporting user's account —with theirpermission, as you have to change their password— to witness the issue yourself. I got that piece ofexperience this the hard way.
There was a broken image icon next to the Security Code. This is where a CAPTCHA should display - but onlyfor Registered users. Why doesn't it get displayed? Time to use the Developer Tools in the browser.
There is a captcha15.php file not loading. Right. Where is it located? Clicking on the filename in the consoleallows us to figure it out.
So there it is! components/com_uddeim/captcha15.php. Add it to the Allow direct access to these filesexceptions list, generate a new .htaccess and that's it.
20.8. I created a .htaccess file on my main site and Ican't access my other domains on the same accountSymptoms: You are running several Joomla (and/or non-Joomla) domains on a VPS installation or a single hostingaccount using add-on domains. The main domain is a Joomla site that utilises Admin Tools and the .htaccessMaker functionality. You are unable to access other domains except your main site.
.htaccess settings are propagated by default to the children directories. Let us give an example. Let's say that youhave a main site called www.example.com and its files are inside public_html. Let's also assume that you haveanother domain called www.foobar.com whose files are stored inside public_html/foobar. What happens when youlaunch foobar.com is that Apache looks for a .htaccess in the parent directory (public_html), applies its settings,then looks for a .htaccess file inside public_html/foobar and append its settings to the ones it has already read fromthe previous file. It will then process the combined rules and decide what to do with the request.
Since the .htaccess file generated by .htaccess Maker forbids access to random-named directories and index.htmlfiles, access to the directories of your other domains is forbidden, thus you get a 403 error. Don't worry, thereis a workaround!
First, determine the names of the directories where your other domains' files are stored. Let's say the are called"foobar" and "foobaz" so that I can provide an example. Go to your main site's back-end, Components, AdminTools, .htaccess Maker. Expand the System Protection tab. Inside the "Allow direct access, including .php files,to these directories" text area enter the names of the directories, one directory per line, e.g. foobar foobaz Thenclick on Save and Create .htaccess. This will allow you to access your other domains. Do note that at this point,your other domains -if they are Joomla!-powered- are not protected by Admin Tools' .htaccess Maker. Just installAdmin Tools Professional on each one of them and use the .htaccess Maker to create .htaccess files on each one.
160
Using Admin Tools
If this doesn't work or if it works erratically (e.g. the other domains display as if their CSS is missing) pleasecreate a .htaccess file inside each of their directories with just the following line inside it: RewriteEngine OffThis will work independently of whether you used the previous method, i.e. adding exceptions for the domains'directories, as it will simply turn off Apache's mod_rewrite engine. That engine what the secure .htaccess generatedby Admin Tools' .htaccess Maker is using to protect your site. It will also kill off SEF URLs (they also depend onthe rewrite engine) on non-static sites, e.g. Joomla! or WordPress ones.
20.9. The administrator secret URL parameter is notworkingYour IP is in the Administrator IP Whitelist or you in the Do not block these IPs field in the Configure WAF page.As per the documentation of Admin Tools, this causes all security checks (including the administrator secret key)to be ignored for this IP address. Essentially, you have told Admin Tools to not perform any security check ATALL for these IP addresses. Since the administrator secret URL parameter is a security check, when Admin Toolssees that your IP is in the list of "safe" IP addresses, it doesn't perform the check. As a result, you can access youradministrator login page with an invalid or no secret URL key.
Please read the documentation of the component very carefully, especially if the last time you read it was over3 months ago.
20.10. There are too many security exceptions. ShouldI be worried?No, you shouldn't be worried. You are not "under attack" or a "target" of any malicious user. Let Admin Toolsdo its job. The fact that you see too many security exceptions means that Admin Tools is already handlign thesituation for you.
So what is going on? What you are experiencing is most likely a high number of automated attacks. Some commontypes of attacks are the following:
Probes. There are software tools which try to detect whether a site is vulnerable to a number of known attacksin older versions of software. These tools are normally used by security researchers and companies you hire toassess the security of your site. Sometimes they are also used for nefarious purposes. Just because your site isbeing scanned for vulnerabilities does not mean it has one, though! Think of it as a locksmith or a burglar testingthe security of your door's lock.
Brute force. Another common attack tries to guess the password for a Super User. Typically, the attacker will tryusing very common username/password combinations such as admin/admin or admin/password and so on.
Blind attacks. Unskilled, wanna-be hackers (commonly called "script kiddies" or "skiddies") will try blindly usingsome very old attacks they found on the Internet against any site they see in front of them. While this sounds scary,this is rather dumb as the attacks they try are known for years and are, therefore caught very easily. Moreover, theydon't even check that they have the right version of Joomla! or even the right CMS. We routinely see attacks on oursite targeting the obsolete Joomla! 1.5 (retired in 2011) and WordPress (which we never used on our site's domain).
In all of these cases Admin Tools does its job well. It will intercept the attack and ban the IP of the attacker if theyare repeatedly causing security exceptions. The attacker will eventually give up on your site and simply move onto the next target in their list.
So don't worry too much about it, Admin Tools has your back!
161
Appendix A. GNU General PublicLicense version 3Version 3, 29 June 2007
Copyright © 2007 Free Software Foundation, Inc. http://fsf.org/
Everyone is permitted to copy and distribute verbatim copies of this license document, but changing it is notallowed.
PreambleThe GNU General Public License is a free, copyleft license for software and other kinds of works.
The licenses for most software and other practical works are designed to take away your freedom to share andchange the works. By contrast, the GNU General Public License is intended to guarantee your freedom to shareand change all versions of a program—to make sure it remains free software for all its users. We, the Free SoftwareFoundation, use the GNU General Public License for most of our software; it applies also to any other workreleased this way by its authors. You can apply it to your programs, too.
When we speak of free software, we are referring to freedom, not price. Our General Public Licenses are designedto make sure that you have the freedom to distribute copies of free software (and charge for them if you wish),that you receive source code or can get it if you want it, that you can change the software or use pieces of it innew free programs, and that you know you can do these things.
To protect your rights, we need to prevent others from denying you these rights or asking you to surrender therights. Therefore, you have certain responsibilities if you distribute copies of the software, or if you modify it:responsibilities to respect the freedom of others.
For example, if you distribute copies of such a program, whether gratis or for a fee, you must pass on to therecipients the same freedoms that you received. You must make sure that they, too, receive or can get the sourcecode. And you must show them these terms so they know their rights.
Developers that use the GNU GPL protect your rights with two steps: (1) assert copyright on the software, and (2)offer you this License giving you legal permission to copy, distribute and/or modify it.
For the developers' and authors' protection, the GPL clearly explains that there is no warranty for this free software.For both users' and authors' sake, the GPL requires that modified versions be marked as changed, so that theirproblems will not be attributed erroneously to authors of previous versions.
Some devices are designed to deny users access to install or run modified versions of the software inside them,although the manufacturer can do so. This is fundamentally incompatible with the aim of protecting users' freedomto change the software. The systematic pattern of such abuse occurs in the area of products for individuals to use,which is precisely where it is most unacceptable. Therefore, we have designed this version of the GPL to prohibitthe practice for those products. If such problems arise substantially in other domains, we stand ready to extendthis provision to those domains in future versions of the GPL, as needed to protect the freedom of users.
Finally, every program is threatened constantly by software patents. States should not allow patents to restrictdevelopment and use of software on general-purpose computers, but in those that do, we wish to avoid the specialdanger that patents applied to a free program could make it effectively proprietary. To prevent this, the GPL assuresthat patents cannot be used to render the program non-free.
The precise terms and conditions for copying, distribution and modification follow.
162
GNU General PublicLicense version 3
TERMS AND CONDITIONS
0. Definitions.“This License” refers to version 3 of the GNU General Public License.
“Copyright” also means copyright-like laws that apply to other kinds of works, such as semiconductor masks.
“The Program” refers to any copyrightable work licensed under this License. Each licensee is addressed as “you”.“Licensees” and “recipients” may be individuals or organizations.
To “modify” a work means to copy from or adapt all or part of the work in a fashion requiring copyright permission,other than the making of an exact copy. The resulting work is called a “modified version” of the earlier work ora work “based on” the earlier work.
A “covered work” means either the unmodified Program or a work based on the Program.
To “propagate” a work means to do anything with it that, without permission, would make you directly orsecondarily liable for infringement under applicable copyright law, except executing it on a computer or modifyinga private copy. Propagation includes copying, distribution (with or without modification), making available to thepublic, and in some countries other activities as well.
To “convey” a work means any kind of propagation that enables other parties to make or receive copies. Mereinteraction with a user through a computer network, with no transfer of a copy, is not conveying.
An interactive user interface displays “Appropriate Legal Notices” to the extent that it includes a convenient andprominently visible feature that (1) displays an appropriate copyright notice, and (2) tells the user that there isno warranty for the work (except to the extent that warranties are provided), that licensees may convey the workunder this License, and how to view a copy of this License. If the interface presents a list of user commands oroptions, such as a menu, a prominent item in the list meets this criterion.
1. Source Code.The “source code” for a work means the preferred form of the work for making modifications to it. “Object code”means any non-source form of a work.
A “Standard Interface” means an interface that either is an official standard defined by a recognized standardsbody, or, in the case of interfaces specified for a particular programming language, one that is widely used amongdevelopers working in that language.
The “System Libraries” of an executable work include anything, other than the work as a whole, that (a) is includedin the normal form of packaging a Major Component, but which is not part of that Major Component, and (b)serves only to enable use of the work with that Major Component, or to implement a Standard Interface for whichan implementation is available to the public in source code form. A “Major Component”, in this context, means amajor essential component (kernel, window system, and so on) of the specific operating system (if any) on whichthe executable work runs, or a compiler used to produce the work, or an object code interpreter used to run it.
The “Corresponding Source” for a work in object code form means all the source code needed to generate, install,and (for an executable work) run the object code and to modify the work, including scripts to control thoseactivities. However, it does not include the work's System Libraries, or general-purpose tools or generally availablefree programs which are used unmodified in performing those activities but which are not part of the work. Forexample, Corresponding Source includes interface definition files associated with source files for the work, andthe source code for shared libraries and dynamically linked subprograms that the work is specifically designedto require, such as by intimate data communication or control flow between those subprograms and other partsof the work.
The Corresponding Source need not include anything that users can regenerate automatically from other parts ofthe Corresponding Source.
163
GNU General PublicLicense version 3
The Corresponding Source for a work in source code form is that same work.
2. Basic Permissions.All rights granted under this License are granted for the term of copyright on the Program, and are irrevocableprovided the stated conditions are met. This License explicitly affirms your unlimited permission to run theunmodified Program. The output from running a covered work is covered by this License only if the output, givenits content, constitutes a covered work. This License acknowledges your rights of fair use or other equivalent, asprovided by copyright law.
You may make, run and propagate covered works that you do not convey, without conditions so long as yourlicense otherwise remains in force. You may convey covered works to others for the sole purpose of having themmake modifications exclusively for you, or provide you with facilities for running those works, provided that youcomply with the terms of this License in conveying all material for which you do not control copyright. Thosethus making or running the covered works for you must do so exclusively on your behalf, under your direction andcontrol, on terms that prohibit them from making any copies of your copyrighted material outside their relationshipwith you.
Conveying under any other circumstances is permitted solely under the conditions stated below. Sublicensing isnot allowed; section 10 makes it unnecessary.
3. Protecting Users' Legal Rights From Anti-Circumvention Law.No covered work shall be deemed part of an effective technological measure under any applicable law fulfillingobligations under article 11 of the WIPO copyright treaty adopted on 20 December 1996, or similar lawsprohibiting or restricting circumvention of such measures.
When you convey a covered work, you waive any legal power to forbid circumvention of technological measuresto the extent such circumvention is effected by exercising rights under this License with respect to the coveredwork, and you disclaim any intention to limit operation or modification of the work as a means of enforcing,against the work's users, your or third parties' legal rights to forbid circumvention of technological measures.
4. Conveying Verbatim Copies.You may convey verbatim copies of the Program's source code as you receive it, in any medium, provided thatyou conspicuously and appropriately publish on each copy an appropriate copyright notice; keep intact all noticesstating that this License and any non-permissive terms added in accord with section 7 apply to the code; keep intactall notices of the absence of any warranty; and give all recipients a copy of this License along with the Program.
You may charge any price or no price for each copy that you convey, and you may offer support or warrantyprotection for a fee.
5. Conveying Modified Source Versions.You may convey a work based on the Program, or the modifications to produce it from the Program, in the formof source code under the terms of section 4, provided that you also meet all of these conditions:
a. The work must carry prominent notices stating that you modified it, and giving a relevant date.
b. The work must carry prominent notices stating that it is released under this License and any conditions addedunder section 7. This requirement modifies the requirement in section 4 to “keep intact all notices”.
c. You must license the entire work, as a whole, under this License to anyone who comes into possession of acopy. This License will therefore apply, along with any applicable section 7 additional terms, to the whole ofthe work, and all its parts, regardless of how they are packaged. This License gives no permission to licensethe work in any other way, but it does not invalidate such permission if you have separately received it.
164

GNU General PublicLicense version 3
d. If the work has interactive user interfaces, each must display Appropriate Legal Notices; however, if theProgram has interactive interfaces that do not display Appropriate Legal Notices, your work need not makethem do so.
A compilation of a covered work with other separate and independent works, which are not by their natureextensions of the covered work, and which are not combined with it such as to form a larger program, in or on avolume of a storage or distribution medium, is called an “aggregate” if the compilation and its resulting copyrightare not used to limit the access or legal rights of the compilation's users beyond what the individual works permit.Inclusion of a covered work in an aggregate does not cause this License to apply to the other parts of the aggregate.
6. Conveying Non-Source Forms.You may convey a covered work in object code form under the terms of sections 4 and 5, provided that you alsoconvey the machine-readable Corresponding Source under the terms of this License, in one of these ways:
a. Convey the object code in, or embodied in, a physical product (including a physical distribution medium),accompanied by the Corresponding Source fixed on a durable physical medium customarily used for softwareinterchange.
b. Convey the object code in, or embodied in, a physical product (including a physical distribution medium),accompanied by a written offer, valid for at least three years and valid for as long as you offer spare parts orcustomer support for that product model, to give anyone who possesses the object code either (1) a copy of theCorresponding Source for all the software in the product that is covered by this License, on a durable physicalmedium customarily used for software interchange, for a price no more than your reasonable cost of physicallyperforming this conveying of source, or (2) access to copy the Corresponding Source from a network serverat no charge.
c. Convey individual copies of the object code with a copy of the written offer to provide the CorrespondingSource. This alternative is allowed only occasionally and noncommercially, and only if you received the objectcode with such an offer, in accord with subsection 6b.
d. Convey the object code by offering access from a designated place (gratis or for a charge), and offer equivalentaccess to the Corresponding Source in the same way through the same place at no further charge. You need notrequire recipients to copy the Corresponding Source along with the object code. If the place to copy the objectcode is a network server, the Corresponding Source may be on a different server (operated by you or a thirdparty) that supports equivalent copying facilities, provided you maintain clear directions next to the object codesaying where to find the Corresponding Source. Regardless of what server hosts the Corresponding Source,you remain obligated to ensure that it is available for as long as needed to satisfy these requirements.
e. Convey the object code using peer-to-peer transmission, provided you inform other peers where the object codeand Corresponding Source of the work are being offered to the general public at no charge under subsection 6d.
A separable portion of the object code, whose source code is excluded from the Corresponding Source as a SystemLibrary, need not be included in conveying the object code work.
A “User Product” is either (1) a “consumer product”, which means any tangible personal property which isnormally used for personal, family, or household purposes, or (2) anything designed or sold for incorporation intoa dwelling. In determining whether a product is a consumer product, doubtful cases shall be resolved in favor ofcoverage. For a particular product received by a particular user, “normally used” refers to a typical or commonuse of that class of product, regardless of the status of the particular user or of the way in which the particularuser actually uses, or expects or is expected to use, the product. A product is a consumer product regardless ofwhether the product has substantial commercial, industrial or non-consumer uses, unless such uses represent theonly significant mode of use of the product.
“Installation Information” for a User Product means any methods, procedures, authorization keys, or otherinformation required to install and execute modified versions of a covered work in that User Product froma modified version of its Corresponding Source. The information must suffice to ensure that the continuedfunctioning of the modified object code is in no case prevented or interfered with solely because modificationhas been made.
165
GNU General PublicLicense version 3
If you convey an object code work under this section in, or with, or specifically for use in, a User Product, andthe conveying occurs as part of a transaction in which the right of possession and use of the User Product istransferred to the recipient in perpetuity or for a fixed term (regardless of how the transaction is characterized),the Corresponding Source conveyed under this section must be accompanied by the Installation Information. Butthis requirement does not apply if neither you nor any third party retains the ability to install modified object codeon the User Product (for example, the work has been installed in ROM).
The requirement to provide Installation Information does not include a requirement to continue to provide supportservice, warranty, or updates for a work that has been modified or installed by the recipient, or for the UserProduct in which it has been modified or installed. Access to a network may be denied when the modification itselfmaterially and adversely affects the operation of the network or violates the rules and protocols for communicationacross the network.
Corresponding Source conveyed, and Installation Information provided, in accord with this section must be in aformat that is publicly documented (and with an implementation available to the public in source code form), andmust require no special password or key for unpacking, reading or copying.
7. Additional Terms.“Additional permissions” are terms that supplement the terms of this License by making exceptions from one ormore of its conditions. Additional permissions that are applicable to the entire Program shall be treated as thoughthey were included in this License, to the extent that they are valid under applicable law. If additional permissionsapply only to part of the Program, that part may be used separately under those permissions, but the entire Programremains governed by this License without regard to the additional permissions.
When you convey a copy of a covered work, you may at your option remove any additional permissions from thatcopy, or from any part of it. (Additional permissions may be written to require their own removal in certain caseswhen you modify the work.) You may place additional permissions on material, added by you to a covered work,for which you have or can give appropriate copyright permission.
Notwithstanding any other provision of this License, for material you add to a covered work, you may (if authorizedby the copyright holders of that material) supplement the terms of this License with terms:
a. Disclaiming warranty or limiting liability differently from the terms of sections 15 and 16 of this License; or
b. Requiring preservation of specified reasonable legal notices or author attributions in that material or in theAppropriate Legal Notices displayed by works containing it; or
c. Prohibiting misrepresentation of the origin of that material, or requiring that modified versions of such materialbe marked in reasonable ways as different from the original version; or
d. Limiting the use for publicity purposes of names of licensors or authors of the material; or
e. Declining to grant rights under trademark law for use of some trade names, trademarks, or service marks; or
f. Requiring indemnification of licensors and authors of that material by anyone who conveys the material (ormodified versions of it) with contractual assumptions of liability to the recipient, for any liability that thesecontractual assumptions directly impose on those licensors and authors.
All other non-permissive additional terms are considered “further restrictions” within the meaning of section10. If the Program as you received it, or any part of it, contains a notice stating that it is governed by thisLicense along with a term that is a further restriction, you may remove that term. If a license document containsa further restriction but permits relicensing or conveying under this License, you may add to a covered workmaterial governed by the terms of that license document, provided that the further restriction does not survivesuch relicensing or conveying.
If you add terms to a covered work in accord with this section, you must place, in the relevant source files, astatement of the additional terms that apply to those files, or a notice indicating where to find the applicable terms.
Additional terms, permissive or non-permissive, may be stated in the form of a separately written license, or statedas exceptions; the above requirements apply either way.
166
GNU General PublicLicense version 3
8. Termination.You may not propagate or modify a covered work except as expressly provided under this License. Any attemptotherwise to propagate or modify it is void, and will automatically terminate your rights under this License(including any patent licenses granted under the third paragraph of section 11).
However, if you cease all violation of this License, then your license from a particular copyright holder is reinstated(a) provisionally, unless and until the copyright holder explicitly and finally terminates your license, and (b)permanently, if the copyright holder fails to notify you of the violation by some reasonable means prior to 60days after the cessation.
Moreover, your license from a particular copyright holder is reinstated permanently if the copyright holder notifiesyou of the violation by some reasonable means, this is the first time you have received notice of violation of thisLicense (for any work) from that copyright holder, and you cure the violation prior to 30 days after your receiptof the notice.
Termination of your rights under this section does not terminate the licenses of parties who have received copiesor rights from you under this License. If your rights have been terminated and not permanently reinstated, you donot qualify to receive new licenses for the same material under section 10.
9. Acceptance Not Required for HavingCopies.You are not required to accept this License in order to receive or run a copy of the Program. Ancillary propagationof a covered work occurring solely as a consequence of using peer-to-peer transmission to receive a copy likewisedoes not require acceptance. However, nothing other than this License grants you permission to propagate ormodify any covered work. These actions infringe copyright if you do not accept this License. Therefore, bymodifying or propagating a covered work, you indicate your acceptance of this License to do so.
10. Automatic Licensing of DownstreamRecipients.Each time you convey a covered work, the recipient automatically receives a license from the original licensors,to run, modify and propagate that work, subject to this License. You are not responsible for enforcing complianceby third parties with this License.
An “entity transaction” is a transaction transferring control of an organization, or substantially all assets of one,or subdividing an organization, or merging organizations. If propagation of a covered work results from an entitytransaction, each party to that transaction who receives a copy of the work also receives whatever licenses to thework the party's predecessor in interest had or could give under the previous paragraph, plus a right to possessionof the Corresponding Source of the work from the predecessor in interest, if the predecessor has it or can get itwith reasonable efforts.
You may not impose any further restrictions on the exercise of the rights granted or affirmed under this License.For example, you may not impose a license fee, royalty, or other charge for exercise of rights granted under thisLicense, and you may not initiate litigation (including a cross-claim or counterclaim in a lawsuit) alleging that anypatent claim is infringed by making, using, selling, offering for sale, or importing the Program or any portion of it.
11. Patents.A “contributor” is a copyright holder who authorizes use under this License of the Program or a work on whichthe Program is based. The work thus licensed is called the contributor's “contributor version”.
A contributor's “essential patent claims” are all patent claims owned or controlled by the contributor, whetheralready acquired or hereafter acquired, that would be infringed by some manner, permitted by this License, of
167
GNU General PublicLicense version 3
making, using, or selling its contributor version, but do not include claims that would be infringed only as aconsequence of further modification of the contributor version. For purposes of this definition, “control” includesthe right to grant patent sublicenses in a manner consistent with the requirements of this License.
Each contributor grants you a non-exclusive, worldwide, royalty-free patent license under the contributor'sessential patent claims, to make, use, sell, offer for sale, import and otherwise run, modify and propagate thecontents of its contributor version.
In the following three paragraphs, a “patent license” is any express agreement or commitment, howeverdenominated, not to enforce a patent (such as an express permission to practice a patent or covenant not to sue forpatent infringement). To “grant” such a patent license to a party means to make such an agreement or commitmentnot to enforce a patent against the party.
If you convey a covered work, knowingly relying on a patent license, and the Corresponding Source of the workis not available for anyone to copy, free of charge and under the terms of this License, through a publicly availablenetwork server or other readily accessible means, then you must either (1) cause the Corresponding Source to beso available, or (2) arrange to deprive yourself of the benefit of the patent license for this particular work, or (3)arrange, in a manner consistent with the requirements of this License, to extend the patent license to downstreamrecipients. “Knowingly relying” means you have actual knowledge that, but for the patent license, your conveyingthe covered work in a country, or your recipient's use of the covered work in a country, would infringe one ormore identifiable patents in that country that you have reason to believe are valid.
If, pursuant to or in connection with a single transaction or arrangement, you convey, or propagate by procuringconveyance of, a covered work, and grant a patent license to some of the parties receiving the covered workauthorizing them to use, propagate, modify or convey a specific copy of the covered work, then the patent licenseyou grant is automatically extended to all recipients of the covered work and works based on it.
A patent license is “discriminatory” if it does not include within the scope of its coverage, prohibits the exercise of,or is conditioned on the non-exercise of one or more of the rights that are specifically granted under this License.You may not convey a covered work if you are a party to an arrangement with a third party that is in the businessof distributing software, under which you make payment to the third party based on the extent of your activity ofconveying the work, and under which the third party grants, to any of the parties who would receive the coveredwork from you, a discriminatory patent license (a) in connection with copies of the covered work conveyed by you(or copies made from those copies), or (b) primarily for and in connection with specific products or compilationsthat contain the covered work, unless you entered into that arrangement, or that patent license was granted, priorto 28 March 2007.
Nothing in this License shall be construed as excluding or limiting any implied license or other defenses toinfringement that may otherwise be available to you under applicable patent law.
12. No Surrender of Others' Freedom.If conditions are imposed on you (whether by court order, agreement or otherwise) that contradict the conditionsof this License, they do not excuse you from the conditions of this License. If you cannot convey a covered workso as to satisfy simultaneously your obligations under this License and any other pertinent obligations, then as aconsequence you may not convey it at all. For example, if you agree to terms that obligate you to collect a royaltyfor further conveying from those to whom you convey the Program, the only way you could satisfy both thoseterms and this License would be to refrain entirely from conveying the Program.
13. Use with the GNU Affero General PublicLicense.Notwithstanding any other provision of this License, you have permission to link or combine any covered workwith a work licensed under version 3 of the GNU Affero General Public License into a single combined work,and to convey the resulting work. The terms of this License will continue to apply to the part which is the coveredwork, but the special requirements of the GNU Affero General Public License, section 13, concerning interactionthrough a network will apply to the combination as such.
168
GNU General PublicLicense version 3
14. Revised Versions of this License.The Free Software Foundation may publish revised and/or new versions of the GNU General Public License fromtime to time. Such new versions will be similar in spirit to the present version, but may differ in detail to addressnew problems or concerns.
Each version is given a distinguishing version number. If the Program specifies that a certain numbered versionof the GNU General Public License “or any later version” applies to it, you have the option of following the termsand conditions either of that numbered version or of any later version published by the Free Software Foundation.If the Program does not specify a version number of the GNU General Public License, you may choose any versionever published by the Free Software Foundation.
If the Program specifies that a proxy can decide which future versions of the GNU General Public License can beused, that proxy's public statement of acceptance of a version permanently authorizes you to choose that versionfor the Program.
Later license versions may give you additional or different permissions. However, no additional obligations areimposed on any author or copyright holder as a result of your choosing to follow a later version.
15. Disclaimer of Warranty.THERE IS NO WARRANTY FOR THE PROGRAM, TO THE EXTENT PERMITTED BY APPLICABLELAW. EXCEPT WHEN OTHERWISE STATED IN WRITING THE COPYRIGHT HOLDERS AND/OROTHER PARTIES PROVIDE THE PROGRAM “AS IS” WITHOUT WARRANTY OF ANY KIND, EITHEREXPRESSED OR IMPLIED, INCLUDING, BUT NOT LIMITED TO, THE IMPLIED WARRANTIES OFMERCHANTABILITY AND FITNESS FOR A PARTICULAR PURPOSE. THE ENTIRE RISK AS TO THEQUALITY AND PERFORMANCE OF THE PROGRAM IS WITH YOU. SHOULD THE PROGRAM PROVEDEFECTIVE, YOU ASSUME THE COST OF ALL NECESSARY SERVICING, REPAIR OR CORRECTION.
16. Limitation of Liability.IN NO EVENT UNLESS REQUIRED BY APPLICABLE LAW OR AGREED TO IN WRITING WILL ANYCOPYRIGHT HOLDER, OR ANY OTHER PARTY WHO MODIFIES AND/OR CONVEYS THE PROGRAMAS PERMITTED ABOVE, BE LIABLE TO YOU FOR DAMAGES, INCLUDING ANY GENERAL, SPECIAL,INCIDENTAL OR CONSEQUENTIAL DAMAGES ARISING OUT OF THE USE OR INABILITY TO USETHE PROGRAM (INCLUDING BUT NOT LIMITED TO LOSS OF DATA OR DATA BEING RENDEREDINACCURATE OR LOSSES SUSTAINED BY YOU OR THIRD PARTIES OR A FAILURE OF THEPROGRAM TO OPERATE WITH ANY OTHER PROGRAMS), EVEN IF SUCH HOLDER OR OTHERPARTY HAS BEEN ADVISED OF THE POSSIBILITY OF SUCH DAMAGES.
17. Interpretation of Sections 15 and 16.If the disclaimer of warranty and limitation of liability provided above cannot be given local legal effect accordingto their terms, reviewing courts shall apply local law that most closely approximates an absolute waiver of all civilliability in connection with the Program, unless a warranty or assumption of liability accompanies a copy of theProgram in return for a fee.
END OF TERMS AND CONDITIONS
How to Apply These Terms to Your NewProgramsIf you develop a new program, and you want it to be of the greatest possible use to the public, the best way toachieve this is to make it free software which everyone can redistribute and change under these terms.
169
GNU General PublicLicense version 3
To do so, attach the following notices to the program. It is safest to attach them to the start of each source fileto most effectively state the exclusion of warranty; and each file should have at least the “copyright” line and apointer to where the full notice is found.
one line to give the program's name and a brief idea of what it does.Copyright (C) year name of author
This program is free software: you can redistribute it and/or modifyit under the terms of the GNU General Public License as published bythe Free Software Foundation, either version 3 of the License, or(at your option) any later version.
This program is distributed in the hope that it will be useful,but WITHOUT ANY WARRANTY; without even the implied warranty ofMERCHANTABILITY or FITNESS FOR A PARTICULAR PURPOSE. See theGNU General Public License for more details.
You should have received a copy of the GNU General Public Licensealong with this program. If not, see http://www.gnu.org/licenses/.
Also add information on how to contact you by electronic and paper mail.
If the program does terminal interaction, make it output a short notice like this when it starts in an interactive mode:
program Copyright (C) year name of authorThis program comes with ABSOLUTELY NO WARRANTY; for details type 'show w'.This is free software, and you are welcome to redistribute itunder certain conditions; type 'show c' for details.
The hypothetical commands 'show w' and 'show c' should show the appropriate parts of the General PublicLicense. Of course, your program's commands might be different; for a GUI interface, you would use an “aboutbox”.
You should also get your employer (if you work as a programmer) or school, if any, to sign a “copyright disclaimer”for the program, if necessary. For more information on this, and how to apply and follow the GNU GPL, see http://www.gnu.org/licenses/.
The GNU General Public License does not permit incorporating your program into proprietary programs. If yourprogram is a subroutine library, you may consider it more useful to permit linking proprietary applications withthe library. If this is what you want to do, use the GNU Lesser General Public License instead of this License. Butfirst, please read http://www.gnu.org/philosophy/why-not-lgpl.html.
170

Appendix B. GNU FreeDocumentation LicenseVersion 1.3, 3 November 2008
Copyright © 2000, 2001, 2002, 2007, 2008 Free Software Foundation, Inc. [http://www.fsf.org/]
Everyone is permitted to copy and distribute verbatim copies of this license document, but changing it is notallowed.
0. PREAMBLEThe purpose of this License is to make a manual, textbook, or other functional and useful document “free” in thesense of freedom: to assure everyone the effective freedom to copy and redistribute it, with or without modifyingit, either commercially or noncommercially. Secondarily, this License preserves for the author and publisher away to get credit for their work, while not being considered responsible for modifications made by others.
This License is a kind of “copyleft”, which means that derivative works of the document must themselves befree in the same sense. It complements the GNU General Public License, which is a copyleft license designedfor free software.
We have designed this License in order to use it for manuals for free software, because free software needs freedocumentation: a free program should come with manuals providing the same freedoms that the software does.But this License is not limited to software manuals; it can be used for any textual work, regardless of subject matteror whether it is published as a printed book. We recommend this License principally for works whose purposeis instruction or reference.
1. APPLICABILITY AND DEFINITIONSThis License applies to any manual or other work, in any medium, that contains a notice placed by the copyrightholder saying it can be distributed under the terms of this License. Such a notice grants a world-wide, royalty-freelicense, unlimited in duration, to use that work under the conditions stated herein. The “Document”, below, refersto any such manual or work. Any member of the public is a licensee, and is addressed as “you”. You accept thelicense if you copy, modify or distribute the work in a way requiring permission under copyright law.
A “Modified Version” of the Document means any work containing the Document or a portion of it, either copiedverbatim, or with modifications and/or translated into another language.
A “Secondary Section” is a named appendix or a front-matter section of the Document that deals exclusively withthe relationship of the publishers or authors of the Document to the Document’s overall subject (or to relatedmatters) and contains nothing that could fall directly within that overall subject. (Thus, if the Document is in parta textbook of mathematics, a Secondary Section may not explain any mathematics.) The relationship could be amatter of historical connection with the subject or with related matters, or of legal, commercial, philosophical,ethical or political position regarding them.
The “Invariant Sections” are certain Secondary Sections whose titles are designated, as being those of InvariantSections, in the notice that says that the Document is released under this License. If a section does not fit theabove definition of Secondary then it is not allowed to be designated as Invariant. The Document may containzero Invariant Sections. If the Document does not identify any Invariant Sections then there are none.
The “Cover Texts” are certain short passages of text that are listed, as Front-Cover Texts or Back-Cover Texts,in the notice that says that the Document is released under this License. A Front-Cover Text may be at most 5words, and a Back-Cover Text may be at most 25 words.
A “Transparent” copy of the Document means a machine-readable copy, represented in a format whosespecification is available to the general public, that is suitable for revising the document straightforwardly with
171
GNU Free Documentation License
generic text editors or (for images composed of pixels) generic paint programs or (for drawings) some widelyavailable drawing editor, and that is suitable for input to text formatters or for automatic translation to a varietyof formats suitable for input to text formatters. A copy made in an otherwise Transparent file format whosemarkup, or absence of markup, has been arranged to thwart or discourage subsequent modification by readers isnot Transparent. An image format is not Transparent if used for any substantial amount of text. A copy that isnot “Transparent” is called “Opaque”.
Examples of suitable formats for Transparent copies include plain ASCII without markup, Texinfo input format,LaTeX input format, SGML or XML using a publicly available DTD, and standard-conforming simple HTML,PostScript or PDF designed for human modification. Examples of transparent image formats include PNG, XCFand JPG. Opaque formats include proprietary formats that can be read and edited only by proprietary wordprocessors, SGML or XML for which the DTD and/or processing tools are not generally available, and themachine-generated HTML, PostScript or PDF produced by some word processors for output purposes only.
The “Title Page” means, for a printed book, the title page itself, plus such following pages as are needed to hold,legibly, the material this License requires to appear in the title page. For works in formats which do not have anytitle page as such, “Title Page” means the text near the most prominent appearance of the work’s title, precedingthe beginning of the body of the text.
The “publisher” means any person or entity that distributes copies of the Document to the public.
A section “Entitled XYZ” means a named subunit of the Document whose title either is precisely XYZ or containsXYZ in parentheses following text that translates XYZ in another language. (Here XYZ stands for a specificsection name mentioned below, such as “Acknowledgements”, “Dedications”, “Endorsements”, or “History”.) To“Preserve the Title” of such a section when you modify the Document means that it remains a section “EntitledXYZ” according to this definition.
The Document may include Warranty Disclaimers next to the notice which states that this License applies to theDocument. These Warranty Disclaimers are considered to be included by reference in this License, but only asregards disclaiming warranties: any other implication that these Warranty Disclaimers may have is void and hasno effect on the meaning of this License.
2. VERBATIM COPYINGYou may copy and distribute the Document in any medium, either commercially or noncommercially, providedthat this License, the copyright notices, and the license notice saying this License applies to the Document arereproduced in all copies, and that you add no other conditions whatsoever to those of this License. You may notuse technical measures to obstruct or control the reading or further copying of the copies you make or distribute.However, you may accept compensation in exchange for copies. If you distribute a large enough number of copiesyou must also follow the conditions in section 3.
You may also lend copies, under the same conditions stated above, and you may publicly display copies.
3. COPYING IN QUANTITYIf you publish printed copies (or copies in media that commonly have printed covers) of the Document, numberingmore than 100, and the Document’s license notice requires Cover Texts, you must enclose the copies in coversthat carry, clearly and legibly, all these Cover Texts: Front-Cover Texts on the front cover, and Back-Cover Textson the back cover. Both covers must also clearly and legibly identify you as the publisher of these copies. Thefront cover must present the full title with all words of the title equally prominent and visible. You may add othermaterial on the covers in addition. Copying with changes limited to the covers, as long as they preserve the titleof the Document and satisfy these conditions, can be treated as verbatim copying in other respects.
If the required texts for either cover are too voluminous to fit legibly, you should put the first ones listed (as manyas fit reasonably) on the actual cover, and continue the rest onto adjacent pages.
If you publish or distribute Opaque copies of the Document numbering more than 100, you must either includea machine-readable Transparent copy along with each Opaque copy, or state in or with each Opaque copy a
172

GNU Free Documentation License
computer-network location from which the general network-using public has access to download using public-standard network protocols a complete Transparent copy of the Document, free of added material. If you use thelatter option, you must take reasonably prudent steps, when you begin distribution of Opaque copies in quantity, toensure that this Transparent copy will remain thus accessible at the stated location until at least one year after thelast time you distribute an Opaque copy (directly or through your agents or retailers) of that edition to the public.
It is requested, but not required, that you contact the authors of the Document well before redistributing any largenumber of copies, to give them a chance to provide you with an updated version of the Document.
4. MODIFICATIONSYou may copy and distribute a Modified Version of the Document under the conditions of sections 2 and 3 above,provided that you release the Modified Version under precisely this License, with the Modified Version filling therole of the Document, thus licensing distribution and modification of the Modified Version to whoever possessesa copy of it. In addition, you must do these things in the Modified Version:
A. Use in the Title Page (and on the covers, if any) a title distinct from that of the Document, and from those ofprevious versions (which should, if there were any, be listed in the History section of the Document). You mayuse the same title as a previous version if the original publisher of that version gives permission.
B. List on the Title Page, as authors, one or more persons or entities responsible for authorship of the modificationsin the Modified Version, together with at least five of the principal authors of the Document (all of its principalauthors, if it has fewer than five), unless they release you from this requirement.
C. State on the Title page the name of the publisher of the Modified Version, as the publisher.
D. Preserve all the copyright notices of the Document.
E. Add an appropriate copyright notice for your modifications adjacent to the other copyright notices.
F. Include, immediately after the copyright notices, a license notice giving the public permission to use theModified Version under the terms of this License, in the form shown in the Addendum below.
G. Preserve in that license notice the full lists of Invariant Sections and required Cover Texts given in theDocument’s license notice.
H. Include an unaltered copy of this License.
I. Preserve the section Entitled “History”, Preserve its Title, and add to it an item stating at least the title, year,new authors, and publisher of the Modified Version as given on the Title Page. If there is no section Entitled“History” in the Document, create one stating the title, year, authors, and publisher of the Document as givenon its Title Page, then add an item describing the Modified Version as stated in the previous sentence.
J. Preserve the network location, if any, given in the Document for public access to a Transparent copy of theDocument, and likewise the network locations given in the Document for previous versions it was based on.These may be placed in the “History” section. You may omit a network location for a work that was published atleast four years before the Document itself, or if the original publisher of the version it refers to gives permission.
K. For any section Entitled “Acknowledgements” or “Dedications”, Preserve the Title of the section, and preservein the section all the substance and tone of each of the contributor acknowledgements and/or dedications giventherein.
L. Preserve all the Invariant Sections of the Document, unaltered in their text and in their titles. Section numbersor the equivalent are not considered part of the section titles.
M.Delete any section Entitled “Endorsements”. Such a section may not be included in the Modified Version.
N. Do not retitle any existing section to be Entitled “Endorsements” or to conflict in title with any Invariant Section.
O. Preserve any Warranty Disclaimers.
173
GNU Free Documentation License
If the Modified Version includes new front-matter sections or appendices that qualify as Secondary Sections andcontain no material copied from the Document, you may at your option designate some or all of these sectionsas invariant. To do this, add their titles to the list of Invariant Sections in the Modified Version’s license notice.These titles must be distinct from any other section titles.
You may add a section Entitled “Endorsements”, provided it contains nothing but endorsements of your ModifiedVersion by various parties — for example, statements of peer review or that the text has been approved by anorganization as the authoritative definition of a standard.
You may add a passage of up to five words as a Front-Cover Text, and a passage of up to 25 words as a Back-CoverText, to the end of the list of Cover Texts in the Modified Version. Only one passage of Front-Cover Text and oneof Back-Cover Text may be added by (or through arrangements made by) any one entity. If the Document alreadyincludes a cover text for the same cover, previously added by you or by arrangement made by the same entity youare acting on behalf of, you may not add another; but you may replace the old one, on explicit permission fromthe previous publisher that added the old one.
The author(s) and publisher(s) of the Document do not by this License give permission to use their names forpublicity for or to assert or imply endorsement of any Modified Version.
5. COMBINING DOCUMENTSYou may combine the Document with other documents released under this License, under the terms defined insection 4 above for modified versions, provided that you include in the combination all of the Invariant Sectionsof all of the original documents, unmodified, and list them all as Invariant Sections of your combined work in itslicense notice, and that you preserve all their Warranty Disclaimers.
The combined work need only contain one copy of this License, and multiple identical Invariant Sections may bereplaced with a single copy. If there are multiple Invariant Sections with the same name but different contents,make the title of each such section unique by adding at the end of it, in parentheses, the name of the original authoror publisher of that section if known, or else a unique number. Make the same adjustment to the section titles inthe list of Invariant Sections in the license notice of the combined work.
In the combination, you must combine any sections Entitled “History” in the various original documents, formingone section Entitled “History”; likewise combine any sections Entitled “Acknowledgements”, and any sectionsEntitled “Dedications”. You must delete all sections Entitled “Endorsements”.
6. COLLECTIONS OF DOCUMENTSYou may make a collection consisting of the Document and other documents released under this License, andreplace the individual copies of this License in the various documents with a single copy that is included in thecollection, provided that you follow the rules of this License for verbatim copying of each of the documents inall other respects.
You may extract a single document from such a collection, and distribute it individually under this License,provided you insert a copy of this License into the extracted document, and follow this License in all other respectsregarding verbatim copying of that document.
7. AGGREGATION WITH INDEPENDENT WORKSA compilation of the Document or its derivatives with other separate and independent documents or works, inor on a volume of a storage or distribution medium, is called an “aggregate” if the copyright resulting from thecompilation is not used to limit the legal rights of the compilation’s users beyond what the individual works permit.When the Document is included in an aggregate, this License does not apply to the other works in the aggregatewhich are not themselves derivative works of the Document.
If the Cover Text requirement of section 3 is applicable to these copies of the Document, then if the Documentis less than one half of the entire aggregate, the Document’s Cover Texts may be placed on covers that bracketthe Document within the aggregate, or the electronic equivalent of covers if the Document is in electronic form.Otherwise they must appear on printed covers that bracket the whole aggregate.
174
GNU Free Documentation License
8. TRANSLATIONTranslation is considered a kind of modification, so you may distribute translations of the Document under theterms of section 4. Replacing Invariant Sections with translations requires special permission from their copyrightholders, but you may include translations of some or all Invariant Sections in addition to the original versions ofthese Invariant Sections. You may include a translation of this License, and all the license notices in the Document,and any Warranty Disclaimers, provided that you also include the original English version of this License andthe original versions of those notices and disclaimers. In case of a disagreement between the translation and theoriginal version of this License or a notice or disclaimer, the original version will prevail.
If a section in the Document is Entitled “Acknowledgements”, “Dedications”, or “History”, the requirement(section 4) to Preserve its Title (section 1) will typically require changing the actual title.
9. TERMINATIONYou may not copy, modify, sublicense, or distribute the Document except as expressly provided under this License.Any attempt otherwise to copy, modify, sublicense, or distribute it is void, and will automatically terminate yourrights under this License.
However, if you cease all violation of this License, then your license from a particular copyright holder is reinstated(a) provisionally, unless and until the copyright holder explicitly and finally terminates your license, and (b)permanently, if the copyright holder fails to notify you of the violation by some reasonable means prior to 60days after the cessation.
Moreover, your license from a particular copyright holder is reinstated permanently if the copyright holder notifiesyou of the violation by some reasonable means, this is the first time you have received notice of violation of thisLicense (for any work) from that copyright holder, and you cure the violation prior to 30 days after your receiptof the notice.
Termination of your rights under this section does not terminate the licenses of parties who have received copiesor rights from you under this License. If your rights have been terminated and not permanently reinstated, receiptof a copy of some or all of the same material does not give you any rights to use it.
10. FUTURE REVISIONS OF THIS LICENSEThe Free Software Foundation may publish new, revised versions of the GNU Free Documentation License fromtime to time. Such new versions will be similar in spirit to the present version, but may differ in detail to addressnew problems or concerns. See Copyleft [http://www.gnu.org/copyleft/].
Each version of the License is given a distinguishing version number. If the Document specifies that a particularnumbered version of this License “or any later version” applies to it, you have the option of following the termsand conditions either of that specified version or of any later version that has been published (not as a draft) by theFree Software Foundation. If the Document does not specify a version number of this License, you may chooseany version ever published (not as a draft) by the Free Software Foundation. If the Document specifies that a proxycan decide which future versions of this License can be used, that proxy’s public statement of acceptance of aversion permanently authorizes you to choose that version for the Document.
11. RELICENSING“Massive Multiauthor Collaboration Site” (or “MMC Site”) means any World Wide Web server that publishescopyrightable works and also provides prominent facilities for anybody to edit those works. A public wiki thatanybody can edit is an example of such a server. A “Massive Multiauthor Collaboration” (or “MMC”) containedin the site means any set of copyrightable works thus published on the MMC site.
“CC-BY-SA” means the Creative Commons Attribution-Share Alike 3.0 license published by Creative CommonsCorporation, a not-for-profit corporation with a principal place of business in San Francisco, California, as wellas future copyleft versions of that license published by that same organization.
175

GNU Free Documentation License
“Incorporate” means to publish or republish a Document, in whole or in part, as part of another Document.
An MMC is “eligible for relicensing” if it is licensed under this License, and if all works that were first publishedunder this License somewhere other than this MMC, and subsequently incorporated in whole or in part into theMMC, (1) had no cover texts or invariant sections, and (2) were thus incorporated prior to November 1, 2008.
The operator of an MMC Site may republish an MMC contained in the site under CC-BY-SA on the same site atany time before August 1, 2009, provided the MMC is eligible for relicensing.
ADDENDUM: How to use this License for yourdocumentsTo use this License in a document you have written, include a copy of the License in the document and put thefollowing copyright and license notices just after the title page:
Copyright © YEAR YOUR NAME
Permission is granted to copy, distribute and/or modify this document under theterms of the GNU Free Documentation License, Version 1.3 or any later versionpublished by the Free Software Foundation; with no Invariant Sections, noFront-Cover Texts, and no Back-Cover Texts. A copy of the license is included inthe section entitled “GNU Free Documentation License”.
If you have Invariant Sections, Front-Cover Texts and Back-Cover Texts, replace the “with… Texts.” line withthis:
with the Invariant Sections being LIST THEIR TITLES, with the Front-Cover Textsbeing LIST, and with the Back-Cover Texts being LIST.
If you have Invariant Sections without Cover Texts, or some other combination of the three, merge those twoalternatives to suit the situation.
If your document contains nontrivial examples of program code, we recommend releasing these examples inparallel under your choice of free software license, such as the GNU General Public License, to permit their usein free software.
176