Adam Equipment AQT SERIES
16
Adam Equipment AQT SERIES (P.N. 4328, Rev. B3, January 2008) © Adam Equipment Company 2005
-
Upload
khangminh22 -
Category
Documents
-
view
1 -
download
0
Transcript of Adam Equipment AQT SERIES

Adam Equipment
AQT SERIES (P.N. 4328, Rev. B3, January 2008)
© Adam Equipment Company 2005

CONTENTS
1.0 INTRODUCTION............................................................................................................2 2.0 SPECIFICATIONS .........................................................................................................3 3.0 SAFETY PRECAUTIONS ..............................................................................................4 4.0 PARTS DESCRIPTION..................................................................................................5 5.0 PREPARATION .............................................................................................................6
5.1 SETTING UP THE BALANCE ....................................................................................6 5.2 INSTALLING BATTERIES AND POWER...................................................................6
6.0 WEIGHING ....................................................................................................................7 6.1 BEFORE WEIGHING .................................................................................................7 6.2 WEIGHING PROCEDURES.......................................................................................7
7.0 SETTING OF FUNCTIONS............................................................................................8 7.1 ENTER FUNCTION SETTING MODE........................................................................8 7.2 SELECTION OF AUTO SHUT OFF MODE................................................................8 7.2 SELECTION OF AUTO BACKLIGHT MODE .............................................................8 7.3 UNITS SELECTION (FOR AQT 200 ONLY) ..............................................................9
8.0 CALIBRATION .............................................................................................................10 8.1 AUTO CALIBRATION (FOR AQT 200 ONLY)..........................................................10
9.0 ERROR MESSAGES ...................................................................................................11 10.0 REPLACEMENT PARTS AND ACCESSORIES.............................................................12 11.0 SERVICE INFORMATION..............................................................................................12
© Adam Equipment Company 2005

1.0 INTRODUCTION
The AQT series includes an economical range of balances tailored for varied weighing applications. The main features are as follows.
• Runs using battery or AC Adapter supplied as standard • Auto power off to save the battery • Low battery indicator • Net weight/stability indication • Auto zero tracking • Various weighing units available • Integral security bracket • Spirit level for balancing • Large LCD (6 digits 15 mm high) • Auto backlight • Draft shield as standard on all models • Large stainless steel weighing pan • Auto calibration using the keypad
© Adam Equipment Company 2005

2.0 SPECIFICATIONS
© Adam Equipment Company 2005
Model # AQT-200 AQT- 250 AQT-600 AQT-1500 AQT-2600 AQT-2000 AQT-5000 Maximum Capacity 200g 250g 600g 1500g
2600g 2000g 5000g
Readability 0.01g 0.1g 0.1g 0.1g 0.1g 1g 1g Resolution 1:20,000 1:2500 1:6000 1:15,000 1:26000 1:2000 1:5000 Repeatability (Std Dev) 0.02g 0.1g 0.1g 0.2g
0.2g 1g 1g
Linearity ± 0.02g 0.1g 0.1g 0.2g 0.2g 1g 1g Units of Measure
g/ct./ oz/ dwt/ tLT/ tLS/ tLH
g / ct. / oz. / dwt kg / g / lb /oz
Stabilisation Time 3 seconds 2 seconds 3 seconds 2 seconds
Operating Temperature
0ºC to 40ºC 32ºF to 104ºF
Power Supply 12VAC @ 150mA adapter or 6x AA batteries
Calibration Push button calibration using external mass Calibration Mass 200g 250g 600g 1500g 2000g 2000g 5000g
Display 6 digit LCD, 15mm digits, with backlight Draught shield (w x d x h)
180 x 158 x 82mm (7.1" x 6.2" x 3.2")
Balance Housing ABS Plastic
Pan Size 130mm diameter (5.1” diameter) Overall Dimensions (w x d x h)
195 x 240 x 70mm (7.7" x 9.4" x 2.8")
without breeze shield Net Weight 1.2 kg. (2.6 lb) Features Low battery, Stable and Zero indications

3.0 SAFETY PRECAUTIONS
All safety messages are identified by the following words "WARNING" and "CAUTION". These words mean the following:
WARNING Important information to alert you to a situation that might cause serious injury and damage to your property if instructions are not followed.
CAUTION Important information that tells how to prevent damage to equipment.
When using the balance, following safety precautions should always be followed WARNING
Use the AC adapter designed by the manufacturer for the balance. Other adapters may cause damage to the balance. CAUTION
• Avoid installing the balance in direct sunlight- this may cause poor performance or malfunctions.
• Do not mix different type of batteries. Replace all the batteries at the same time.
• If the balance is not to be used for a long period of time, remove all batteries from the battery compartment to avoid leakage which may cause damage to the instrument.
• Avoid overloading or dropping material onto the platform as that could damage the balance.
• Do not spill liquids on the balance as it is not water-resistant. Liquids
may damage the case and if it gets inside the balance it may cause damage to the electronics.
© Adam Equipment Company 2005
• Material that has a static electric charge could influence the weighing. Discharge the static electricity of the samples, if possible.
Another solution to the problem is to wipe both sides of the pan and the top of the case with an anti-static agent.
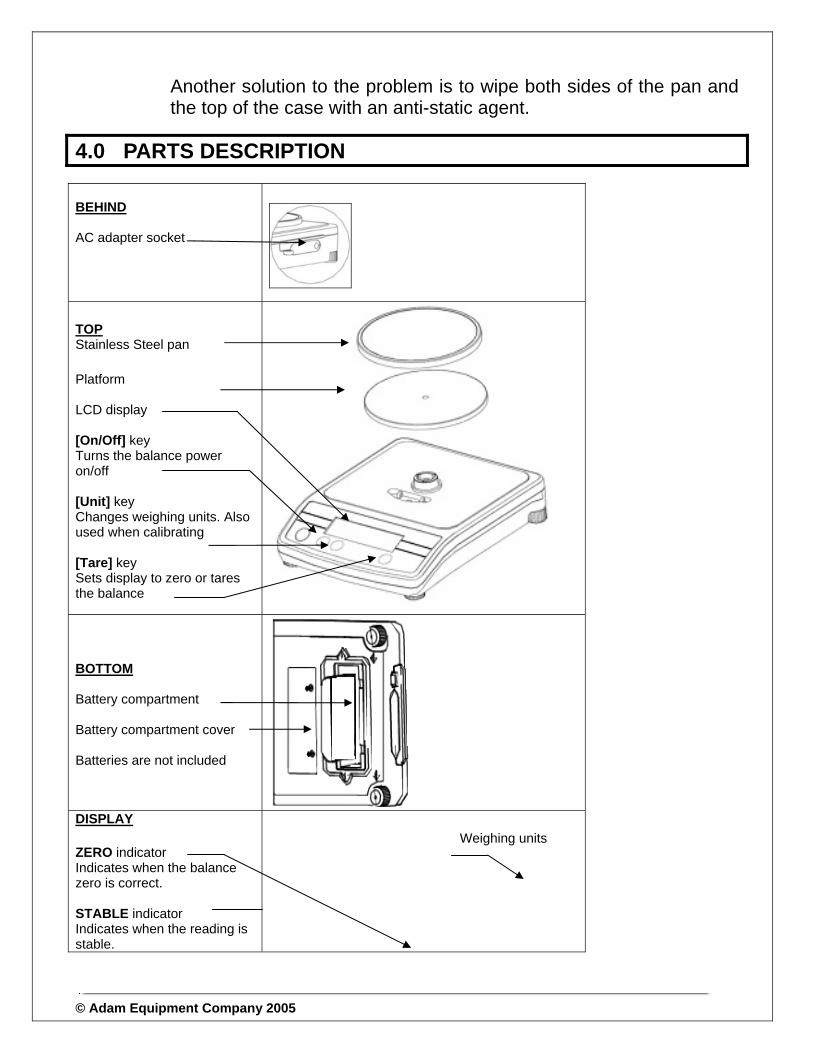
4.0 PARTS DESCRIPTION
BEHIND AC adapter socket
TOP Stainless Steel pan Platform LCD display [On/Off] key Turns the balance power on/off [Unit] key Changes weighing units. Also used when calibrating [Tare] key Sets display to zero or tares the balance BOTTOM Battery compartment Battery compartment cover Batteries are not included
DISPLAY ZERO indicator Indicates when the balance zero is correct. STABLE indicator Indicates when the reading is stable.
Weighing units
© Adam Equipment Company 2005

Low battery indicator
5.0 PREPARATION
5.1 SETTING UP THE BALANCE
CAUTION • Avoid installing the balance in direct sunlight that may cause poor
performance or malfunctions. • Place the balance on a firm weighing table so that the balance is
levelled. The balance will not perform accurately when it is not levelled.
• Level by adjusting the feet to centre the bubble in the spirit level. • Remove the shipping protection screw and round cover as shown
below using the Allen key supplied in the box. (It is advisable to keep the shipping protection screw and the round cover along with the packing box for using during shipping to another location in future).
Shipping protection screw Round cover around the screw
• Place the platform (comes separately packed) in the receptacles on the top cover. Place the stainless steel pan. (See the diagram on page 5).
• Do not press with excessive force as it could damage the load cell inside.
• Place the balance on a firm and flat surface for accurate weighing.
5.2 INSTALLING BATTERIES AND POWER
© Adam Equipment Company 2005
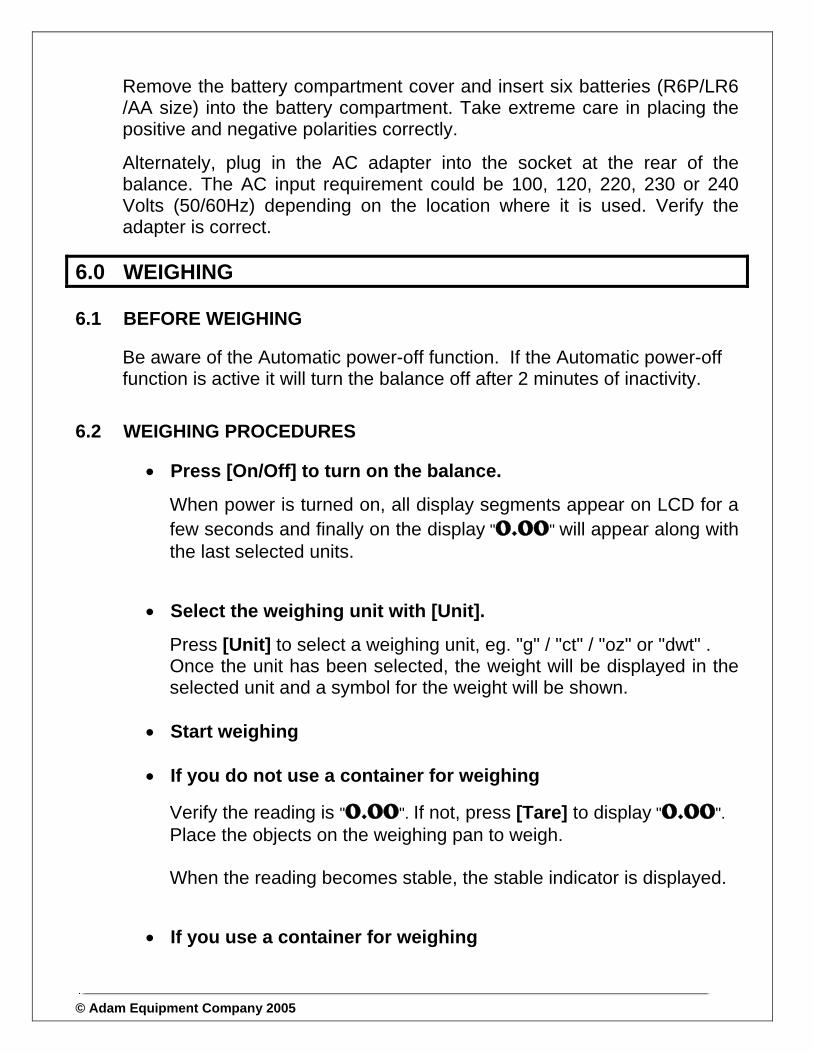
Remove the battery compartment cover and insert six batteries (R6P/LR6 /AA size) into the battery compartment. Take extreme care in placing the positive and negative polarities correctly.
Alternately, plug in the AC adapter into the socket at the rear of the balance. The AC input requirement could be 100, 120, 220, 230 or 240 Volts (50/60Hz) depending on the location where it is used. Verify the
t. adapter is correc
6.0 WEIGHING
6.1 BEFORE WEIGHING
Be aware of the Automatic power-off function. If the Automatic power-off function is active it will turn the balance off after 2 minutes of inactivity.
6.2 WEIGHING PROCEDURES
• Press [On/Off] to turn on the balance.
When power is turned on, all display segments appear on LCD for a few seconds and finally on the display "0.00" will appear along with the last selected units.
• Select the weighing unit with [Unit].
Press [Unit] to select a weighing unit, eg. "g" / "ct" / "oz" or "dwt" . Once the unit has been selected, the weight will be displayed in the selected unit and a symbol for the weight will be shown.
• Start weighing
• If you do not use a container for weighing
Verify the reading is "0.00". If not, press [Tare] to display "0.00". Place the objects on the weighing pan to weigh. When the reading becomes stable, the stable indicator is displayed.
© Adam Equipment Company 2005
• If you use a container for weighing

Place an empty container on the pan. Wait for the stability indicator to be displayed and press [Tare]. Place the objects to be weighed in the container. When the reading becomes stable, the stable indicator is displayed. Only the net weight is displayed.
7.0 SETTING OF FUNCTIONS
7.1 ENTER FUNCTION SETTING MODE
• Press [On/Off] to turn the power off.
• Press [Tare] first, then press [On/Off], while keeping [Tare] pressed. The display will show "A-On" or "A-OFF".
7.2 SELECTION OF AUTO SHUT OFF MODE
• When the display shows "A-On" or "A-OFF" press [Unit] to select auto shut off setting mode.
• Press [Tare] to choose "On" or "OFF" mode,
"A-On" means auto shut off function is active. "A-OFF" means this function is inactive.
• Turn off the power and then turn it on again to enter the normal weighing mode. The delay time will be about 2 minutes.
7.2 SELECTION OF AUTO BACKLIGHT MODE
• Next press [Unit] to enter the backlight setting mode. The display will show "L-On" or "L-OFF".
© Adam Equipment Company 2005
• Press [Tare] to choose "On" or "OFF" mode,

"L-On" means auto backlight function is active. "L-OFF" means this function is inactive, i.e. backlight is shut off.
• Turn off the power and then turn it on again to enter the normal weighing mode.
7.3 UNITS SELECTION (FOR AQT 200 ONLY)
• Next press [Unit] to enter the units selection mode, the display will show "On ct".
• Press [Tare] to select On or OFF.
On means this weighing unit is enabled,
OFF means this unit is disabled.
• Press [Unit] to go to the next weighing unit. The following weighing units can be selected in sequence.
ct – oz – dwt – tL.H – tL.S – tL.T (Note: g is always activated)
• Turn the balance off and back to on again to return to normal operation.
© Adam Equipment Company 2005
NOTE: It is recommended that the balance is used in a location with sufficient light so that the backlight function can be turned off to maximise the battery life.

8.0 CALIBRATION
• Calibration may be required when the balance is initially installed or if the balance is moved from a location.
• With time and use, mechanical deviations may occur. Therefore calibrate the balance whenever the best accuracy is required or when any deviation is observed during weighing a test weight.
• Before calibrating it is necessary to have the proper calibration weights. The weights should be known to an accuracy that is appropriate for the balance being calibrated, for example, OIML Class M1 type or ASTM E617 Class 4. If you do not have proper weights do not attempt calibration.
Model AQT-200 AQT- 250 AQT-600 AQT-1500 AQT-2600 AQT-2000 AQT-5000 Calibration Weight
100g Or
8.1 AUTO CALIBRATION (FOR AQT 200 ONLY)
• Before entering calibration mode, press [On/Off] to turn the power on for 1 minute.
Enter calibration mode
• Press [On/Off] to turn the power off. • Press [Unit] first and then press [On/Off], while keeping the [Unit]
key pressed. The display will show the A/D value. Then press [Unit] and the display will show the last calibration value used, press [Tare] to choose either 100g or 200g.
Calibration • Wait for the stable indicator to be displayed, • Press [Unit] - the display will show “L 100" or “L 200”, with the "L"
flashing. Place the appropriate weight on the platform. A beep will be heard after a few seconds and the display will show the weights value.
• Press [On/Off], to turn off the power. • Press [On/Off] to turn on the power again. Place maximum weight
(200g) on the platform to verify weighing is correct. If not, repeat the calibration.
© Adam Equipment Company 2005
200g
200g Or
250g
500g Or
600g
1000g Or
1500g
1000g Or
2000g
1000g Or
2000g
2000g Or
5000g

8.2 AUTO CALIBRATION FOR ALL OTHER MODELS
• Before entering calibration mode, press [On/Off] to turn the power on for 1 minute.
Enter calibration mode
• Press [On/Off] to turn the power off.
• Press [Unit] first and then press [On/Off], while keeping the [Unit] key pressed. The display will show the last calibration value used (For example, “ L – 1000”), press [Tare] to choose between the two calibration weight values. When you have made your selection press [Unit] and the display will show the A/D value.
Calibration
• Wait for the stable indicator to be displayed,
• Press [Unit] -the display will show "00SAVE". After 2 seconds, the display will return to A/D value.
• Place the required weight on the platform. This is the weight that you selected as your calibration weight value earlier.
• After the stable indicator is displayed press [Unit]
• The display will show "00SAVE". The calibration in complete now.
• Press [On/Off] to turn the power off. Press [On/Off] to turn on the power again,
• Place full weight (eg.2000g for AQT2000) on the platform to verify weighing is correct. If not, repeat the calibration procedure.
9.0 ERROR MESSAGES
EEEEHI Overload
EEEELO A/D value too low
Low battery
© Adam Equipment Company 2005

Note: Calibration may be required before weighing. Read section 8.0 on "CALIBRATION" first and if necessary calibrate your balance for accurate weighing.
10.0 REPLACEMENT PARTS AND ACCESSORIES If you need to order any spare parts and accessories, contact your supplier or Adam Equipment. A partial list of such items is as follows-
• Power Supply Adapter • In use cover
• Stainless Steel Pan
11.0 SERVICE INFORMATION
This manual covers the details of operation. If you have a problem with the scale that is not directly addressed by this manual then contact your supplier for assistance. In order to provide further assistance, the supplier will need the following information which should be kept ready:
© Adam Equipment Company 2005
A. Details of your company -Name of your company: -Contact person’s name: -Contact telephone, e-mail, fax or any other methods: B. Details of the unit purchased (This part of information should always be available for any future
correspondence. We suggest you to fill in this form as soon as the unit is received and keep a print-out in your record for ready reference.)
Model name of the scale:
Serial number of the unit:
Software revision number (Displayed when power is first turned on):
Date of Purchase:
Name of the supplier and place:
C. Brief description of the problem Include any recent history of the unit. For example:
-Has it been working since it’s delivered -Has it been in contact with water -Damaged from a fire -Electrical Storms in the area -Dropped on the floor, etc.
WARRANTY INFORMATION
Adam Equipment offers Limited Warranty (Parts and Labour) for the components failed due to defects in materials or workmanship. Warranty starts from the date of delivery. During the warranty period, should any repairs be necessary, the purchaser must inform its supplier or Adam Equipment Company. The company or its authorised Technician reserves the right to repair or replace the components at any of its workshops depending on the severity of the problems. However, any freight involved in sending the faulty units or parts to the service centre should be borne by the purchaser. The warranty will cease to operate if the equipment is not returned in the original packaging and with correct documentation for a claim to be processed. All claims are at the sole discretion of Adam Equipment. This warranty does not cover equipment where defects or poor performance is due to misuse, accidental damage, exposure to radioactive or corrosive materials, negligence, faulty installation, unauthorised modifications or attempted repair or failure to observe the requirements and recommendations as given in this User Manual. Repairs carried out under the warranty does not extend the warranty period. Components removed during the warranty repairs become the company property. The statutory right of the purchaser is not affected by this warranty. The terms of this warranty is governed by the UK law. For complete details on Warranty Information, see the terms and conditions of sale available on our web-site.
© Adam Equipment Company 2005

Manufacturer’s Declaration of Conformity
This product has been manufactured in accordance with the harmonised European standards, following the provisions of the below stated directives:
Electro Magnetic Compatibility Directive 89/336/EEC
Low Voltage Directive 73/23/EEC
Adam Equipment Co. Ltd.
Bond Avenue, Denbigh East Milton Keynes, MK1 1SW
United Kingdom
FCC COMPLIANCE
This equipment has been tested and found to comply with the limits for a Class A digital device, pursuant to Part 15 of the FCC Rules. These limits are designed to provide reasonable protection against harmful interference when the equipment is operated in a commercial environment. The equipment generates, uses, and can radiate radio frequency energy and, if not installed and used in accordance with the instruction manual, may cause harmful interference to radio communications. Operation of this equipment in a residential area is likely to cause harmful interference in which case the user will be required to correct the interference at his own expense. Shielded interconnect cables must be employed with this equipment to insure compliance with the pertinent RF emission limits governing this device. Changes or modifications not expressly approved by Adam Equipment could void the user's authority to operate the equipment.
WEEE COMPLIANCE
Any Electrical or Electronic Equipment (EEE) component or assembly of parts intended to be incorporated into EEE devices as defined by European Directive 2002/95/EEC must be recycled or disposed using techniques that do not introduce hazardous substances harmful to our health or the environment as listed in Directive 2002/95/EC or amending legislation. Battery disposal in Landfill Sites is more regulated since July 2002 by regulation 9 of the Landfill (England and Wales) Regulations 2002 and Hazardous Waste Regulations 2005. Battery recycling has become topical and the Waste Electrical and Electronic Equipment (WEEE) Regulations are set to impose targets for recycling.
© Adam Equipment Company 2005

ADAM EQUIPMENT is an ISO 9001:2000 certified global company with more than 35 years experience in the production and sale of electronic weighing equipment. Adam products are predominantly designed for the Laboratory, Educational, Medical, retail and Industrial Segments. The product range can be described as follows:
-Analytical and Precision Balances -Compact and Portable Balances -High Capacity Balances -Moisture analysers / balances -Mechanical Scales -Counting Scales -Digital Weighing/Check-weighing Scales -High performance Platform Scales -Crane scales -Medical Scales -Retail Scales for Price computing
For a complete listing of all Adam products visit our website at www.adamequipment.com
© Copyright by Adam Equipment Co. Ltd. All rights reserved. No part of this publication may be reprinted or translated in any form or by any means without the prior permission of Adam
Equipment.
Adam Equipment reserves the right to make changes to the technology, features, specifications and design of the equipment without notice.
All information contained within this publication is to the best of our knowledge timely, complete and accurate when issued. However, we are not responsible for misinterpretations which may
result from the reading of this material.
The latest version of this publication can be found on our Website.
www.adamequipment.com
© Adam Equipment Company 2005