
Acquisitions Module Guide 4 2 A5
53
acquisitions module guide
-
Upload
unitechpng -
Category
Documents
-
view
4 -
download
0
Transcript of Acquisitions Module Guide 4 2 A5

acquisitions
module guide

Adlib Information SystemsCopyright © 2009 Adlib Information Systems B.V.® All rights reserved. Adlib® is a product of Adlib Information Systems B.V.®
The information in this document is subject to change without notice and should not be construed as a commitmentby Adlib Information Systems. Adlib assumes no responsibility for any errors that may appear in this document. The software described in this document is fur-nished under a licence and may be used or copied only in

accordance with the terms of such a licence. While making every effort to ensure the accuracy of this document, products are continually being improved.
As a result of continuous improvements, later versions of the products may vary from those described here. Under no circumstances may this document be regarded as a part of any contractual obligation to supply software, or as a definitive product description.

Contents1. Introduction 1
1.1. What is Adlib? 11.2. About this user guide 2
2. Purpose and integration 52.1. Purpose and functionality of the module 52.2. From Acquisitions module 3.5 to 4.2 52.3. Relations 7
3. Filling the secondary files 93.1. Persons and institutions (suppliers) 93.2. Cost centres 133.3. Payment history 163.4. Currencies 173.5. Letters 183.6. Requesters 193.7. Languages 22
4. Processing orders 254.1. General procedure 254.2. Entering order details 264.3. Receipt and payment of an order 314.4. Cancelling an order 32
5. Printing letters 355.1. Batch printing of letters 355.2. Printing a letter for a specific order 365.3. Word templates, plain text and e-mailing 36
Index 39

1. Introduction
1.1. What is Adlib?Adlib is not only the name of our company but we also use it to denote our computer programs, with which you are able to manage large quantities of information in a structured manner.There is a difference between the Adlib software (programs) and the applications. The software contains allcode that deals with reading and writing in databases, andall accompanying functionality, and is executed in files with the extension .exe and/or .dll (and some peripheral functionality in bin files). This software has been designed especially for the management of data from libraries, museums, archives and similar institutions.The Adlib applications consist of databases and user interfaces (tab sheets with fields, for instance) – reallyonly a collection of data – of which the software creates a usable program. This structure makes it possible for you to install new software regularly, which contains new functionality, while nothing changes in your application (which you may have customized yourself). That is why your software can be upgraded regularly to a new version number (e.g. 6.5) when you install a new release, whilst your application version always remains the same (e.g. Museum Plus 3.4).
Adlib is structured much like a card tray, with related data (e.g. from a magazine) being stored together. In Adlib however, the equivalents of cards are called records. A collection of records is referred to as a database rather than a card tray, and a subset (partial collection) of a database a dataset. In an application youcan fill or edit such a database or dataset. Data is entered and per subject presented on forms on tab sheets (screens), but is part of one and the same record.
1

So called indexes are used so that data can be retrieved as quickly as possible; indexes are alphabetical or numerical lists of terms with a link to the record in which such a term occurs. You can search and sort, display, print and/or store the results in different ways.
Adlib has an exceptionally flexible structure. With the so called Adlib tools, the system can easily be adapted to meet customers’ wishes and requirements. For example, customers can themselves choose what data is to be stored, and how the data is to be displayed. You can also choose for which data indexes are to be made, and in what way these indexes are to be made accessible. (There are separate manuals for the tools available.)
When you buy Adlib software, you’ll also get one or more applications, depending on your licence. An application issometimes subdivided into various modules, each of which represents a separate aspect of the activities in your library. Adlib Library is released as a standardized application. Each application minimally contains a module to describe materials from the catalogue and search for those descriptions. Extra modules may have been added, forinstance for extensive serials management, and a module that visitors to the library can use to search the catalogue, and/or a module to register acquisitions.These and similar modules are extra, and have to be purchased separately from the catalogue module.
1.2. About this user guideIn this manual we assume you are familiar with the Adlib software. If you are not, we advise you to read the general Adlib User Guide for information about the functionality of the Adlib software, such as searching, using menus, entering data, and editing and printing.The module guide before you describes some specific aspects of the Acquistions module for Adlib Library, that
2

Adlib Acquisitions Module Guide Introduction
need further explanation. See the contextual help in the application itself (F1), for a description of the fields; a number of fields though, will also be discussed in this guide.Although the Acquisitions module can be used as a stand-alone application too, in this manual we assume that you use the module as a component of the integrated Library application.This manual was written for application version 4.2 or higher. However, since small variations may exist in and between application versions, it is possible that for example the fields and/or screen tabs discussed here are not present in your application, or that fields are located on a different tab. For application version 3.5 orolder we refer you to the Acquisitions module guide 3.5.
3
Introduction Adlib Acquisitions Module Guide
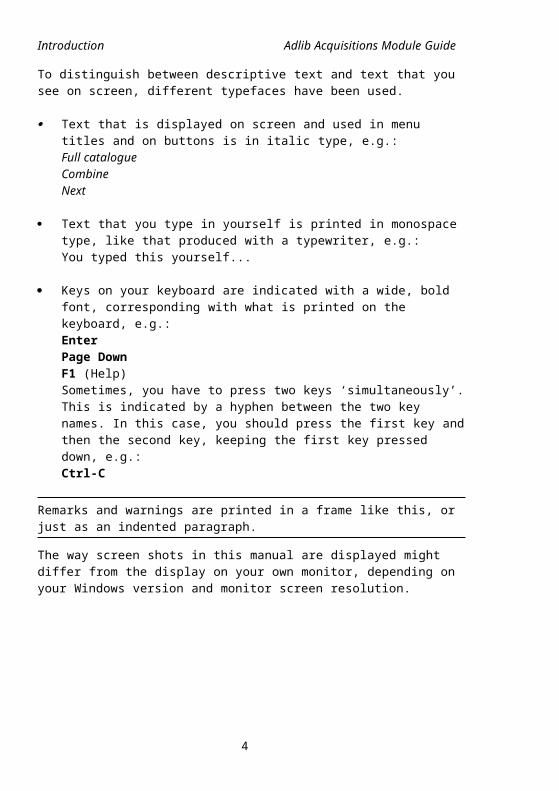
To distinguish between descriptive text and text that you see on screen, different typefaces have been used.
Text that is displayed on screen and used in menu titles and on buttons is in italic type, e.g.:Full catalogueCombineNext
Text that you type in yourself is printed in monospace type, like that produced with a typewriter, e.g.:You typed this yourself...
Keys on your keyboard are indicated with a wide, bold font, corresponding with what is printed on the keyboard, e.g.:EnterPage DownF1 (Help)Sometimes, you have to press two keys ‘simultaneously’.This is indicated by a hyphen between the two key names. In this case, you should press the first key andthen the second key, keeping the first key pressed down, e.g.: Ctrl-C
Remarks and warnings are printed in a frame like this, or just as an indented paragraph.
The way screen shots in this manual are displayed might differ from the display on your own monitor, depending on your Windows version and monitor screen resolution.
4

2. Purpose and integration
2.1. Purpose and functionality of the moduleWith the Acquisitions module you can expand your Library application to register and manage orders of catalogue items. It concerns orders for books, serials or audio-visual materials.
The Acquistions module allows you to easily manage the entire ordering process:
creation and printing of orders; allocation of item costs to cost centre fund accounts; checking-in of received items; chasing of late deliveries; cancellation of orders and printing of cancellation
letters; recording of payments; management of cost centre fund accounts.
And of course, in this module you can use all functionality that is available to you in every Adlib application, for instance for advanced searching via the search language, or for printing with the Print wizard.
2.2. From Acquisitions module 3.5 to 4.2With the transfer to version 4.2, Adlib Acquisitions 3.5 has received a significant upgrade, of which the most important aspects are the following:
From now on, every item to be ordered will get its own record in the new ORDITEMS database. Your order record (in the ORDERS database), which may contain multiple items as you would expect, can usually still be enteredin the same way as was previously the case (see the paragraph beneath this list for more information). When
5

you save the order record, Adlib will automatically create a linked record in ORDITEMS. An ORDITEMS record is linked to ORDERS via the read-only field Item ID (previously called Order line); everything that you enterinto an order line in the order record, will be writtento the relevant item record, and vice versa – via zooming in on the linked field, you can view the item record.
Previously, it was not possible to enter more than three cost centre allocations per order line; now that number is unlimited. In order lines in the order record, only one cost centre allocation will still be visible and editable though. You have to open the linked item record in a zoom screen from within the order record, to be able to insert or edit multiple occurrences of the cost centre allocations.
From version 4.2 of the Acquisition module, letters to suppliers and requesters of orders will be printed to MS Word templates by default, which allows you to proferssionally design your written communication. However, per supplier or requester you may indicate instead that all communication has to take place via e-mail. In this case, letters to be printed won’t actually be printed yet sent by e-mail. Moreover, letters to suppliers will automatically be created in the language of the supplier.
The address and personal details of requesters of orders can be registered more extensively.
The program code of several adapls has been reviewed thoroughly, especially that of ordcalc.ada (the adapl which manages all procedures and calculations during the registering and processing of an order), and many bugs have been fixed.
More about orders and order linesOrder records, which may contain multiple order lines, were always stored in their entirety in the ORDERS
6

Adlib Acquisitions Module Guide Filling the secondary files
database. To allow for a variable number of cost centre allocations per ordered item in version 4.2 of the Acquisitions module, a structural change has been implemented: a new ORDITEMS database has been added, whichstores each order line (an item to be ordered) in its own record. For you as user, this new database and the structural change will usually be as good as invisible: this is because there’s no access to the new database in the database menu in this application (Step 1 of the Search wizard), and the structural change will only manifest itself if you want to enter more than one cost centre allocation for an order line (more about this later).
In the background, Adlib manages everything. To start with, you can still register an order with one or more order lines in the same way as you always did, provided you enter only one cost centre allocation per order line.When you save the order record, the order lines will automatically be numbered uniquely in the Item ID field, and Adlib creates an ORDITEMS record using this number as a unique identifier. All data entered by you in this orderline, will then be written to the new record. This item record will only be linked once: this means that you cannot lookup or link existing item records when you create an order line.In the order record in display mode, you can open the itemrecord of the order line in a zoom screen. To do this, click the underlined number in the Item ID field. Working from within the Orders data source*, in this zoom screen inedit mode you can apply all changes which would also be allowed in the order line in the order record, plus that here multiple cost centre allocations can be inserted (as new field group occurrences) and edited. As soon as you close this zoom screen and save it, all data from this item record is retrieved again and displayed in the order record: however, of the cost centre allocations you will only see the first occurrence.
If you remove an order line from an order record, or remove an entire order record, the relevant linked item
7

Purpose and integration Adlib Acquisitions Module Guide
records will automatically be deleted as well. Previously used item ids will never be assigned again.
* A data source in an Adlib application is a reference to a database or dataset. The available data sources in an application are displayed in Step 1 of the Search wizard, where you’ll also find some specific print procedures.
2.3. RelationsThe Acquisitions module is one of the integrated modular components of the Adlib Library application. Aside from the catalogue management offered by the main application, you may also use modules for serials management, loans andthe public access catalogue. These modules and applications are linked on database level. This means for example that your data-entry in Acquisitions is validated against the thesaurus in your application, where necessary, and that existing titles, suppliers and requesters can be retrieved quickly by means of diverse characteristics.
The main databases in this module are the ORDERS file (in your application, this database is represented by the Orders, Orders receipts and payment and Cancel orders data sources) and ORDITEMS (for ordered items). These files are supported by a number of supplementary files containing data on suppliers, cost centres, currencies, standard letters, language-specific texts and requesters. Those secondary files are shared with the other modules through links, so that you only need to enter personal details or other shared data once in the integrated application. These links operate as follows:
The ORDERS and ORDITEMS databases are linked to the catalogue via the Title field. This means that for an order, you can search the catalogue for the desired title, through this field; and if that title has not yet been registered there, then you can create a new catalogue record instantly. This way, you can access bibliographic data of registered catalogue titles in
8

Adlib Acquisitions Module Guide Filling the secondary files
all modules: a title needs to be registered only once.Via the Order line field, an ordered item in ORDITEMS is linked to a full order in ORDERS.
The Requester data source represents the same database as the Borrowers and Readers data sources in the Loans and Serials modules, respectively. Therefore, a name and its details, which have been registered in this database, can be retrieved in all modules quickly. Thisway, requesters can be notified of the arrival of itemsthey ordered, for example.
The secondary files Persons and institutions (suppliers), Cost centres, Payment history, Currencies, Letters, Requesters and Languages are shared with the Serials module. This means that you need to register suppliers, cost centres, currencies and letters only once, to be able to use them anywhere in Adlib.
9

3. Filling the secondary filesAfter installing the Acquisitions module into your Libraryapplication, and before you start registering orders, you must first fill the secondary files (Persons and institutions upto and including Languages, except Payment history) as much asyou can with standard data from your order administration,if that hasn’t been done already.
Figure 3.1: Fill the secondary files (Persons and institutions up to Languages) before you start registering orders.
11

3.1. Persons and institutions (suppliers)In this file you create records with supplier details. These are the same suppliers as used in the Serials module. A name record in the Persons and institutions data source which is also used in catalogue management, is recognized as a supplier by the Acquisitions module if youselect the supplier domain from the Name type drop-down list.Before you enter new suppliers, first check if the supplier isn’t already known in the database.
Figure 3.2: Make this name record a supplier.
If you are going to register a supplier in Persons and institutions (suppliers), then in the new record first select supplier in the Name type drop-down list on the Name information tab. After making that choice and leaving the field, a number of default values is automatically enteredon the Supplier details tab (so that you don’t have to do thatmanually anymore):
Delivery time The delivery time indicates the standard delivery term of the supplier in days. This is used to calculate the standard expectation date of orders, which is also used for claims. This date can still be changed manually during ordering, if necessary. For a name of the supplier type, a delivery time is automatically entered for you. The default delivery time value is retrieved from seracq#.txt files, line
12

Adlib Acquisitions Module Guide Filling the secondary files
number 26. If you wish to get a default delivery time different from 30 days, you may adjust this number in said text files.But you can adjust the entered delivery time manually (in the field) as well, of course. The other fields offer the same flexibility.
Language and Letters
In the Language field, you can indicate inwhich language the letters to the supplierare to be written. The language not only specifies the language in which the headings for fields (e.g. Title:, and Our reference:) will be printed, but also determines which (translations of) letter templates Adlib will suggest to use for this supplier. The Language in which the supplier needs to be contacted, is set to the current interface language of your Adlib application, direcly after selecting the supplier name type. This is a linked field to the Languages database, which means thatyou can only pick languages for which a Languages record exists; although you may create a new Languages record for a new language instantly. That record must hold translations of field labels which can be used in letters to suppliers. So it is important that a fully translated record is, or will be present in the Languages database, for the language of a supplier.
The names of the letter templates in the Letters from within Adlib Acquisitions box are automatically put together for you by adding the supplier language to a default partial name in English. If you select another language and leave the Language field, Adlib will ask you if you’d like Adlib to automatically re-adjust the names
13

Filling the secondary files Adlib Acquisitions Module Guide
of the letter templates to be used. ChooseYes if you use the default templates present in your Adlib application: each language has its own templates because thefixed texts in it are in a different language. Only if you’ve created your own templates with entirely different names, which is allowed too, you probably don’t want your manually entered letter templatenames to be replaced by default names, if you happen to change the supplier language. Then choose No if Adlib asks fora confirmation of the replacement.Note that the standard templates can be found in the Adlib folder \Worddoc\templates.You may adjust their fixed texts and layout to your liking. Do make sure that you leave the special codes in the templates intact. Remember to save any adjusted templates with the .dot extension.
14

Adlib Acquisitions Module Guide Filling the secondary files
Figure 3.3: Automatically filled in supplier details.
Processing of lettersIn the Letters from within Adlib Acquisitions field group you can indicate which letters are to be used for this supplier. When letters are printed (via Step 1 of the Search wizard) thesupplier name is used to retrieve the appropriate letter body texts, with which subsequently a document will be created or printed directly.
The Method field in the Processing of letters to suppliers box is setto Print to documents by default. This means that the above entered templates will be used, and that the letters will be created in MS Word, from where you can print them. If you don’t want or can’t print letters via Word templates, then move the Word templates to another folder. Adlib won’t be able to find the templates, and will search the Letters database for records with the names of the letter templates you entered or agreed with. By means of the fixed texts in those records, letters will be printed to the printer directly.
15

Filling the secondary files Adlib Acquisitions Module Guide
The other processing option is Send by e-mail. You can only set this option if you provide an e-mail address for the supplier on the Name information tab. Another requisite is that your sender address and the name of your SMTP server must have been set in line numbers 278, respectively 192, in adlib#.txt files. A copy of every e-mail is sent to your sender e-mail address, so that you have proof of sending the e-mail. Records from the Letters database provide the fixed texts in the e-mail letters: these records have the same names as the letter templates listed for the supplier. So check and customize all Letters records with the template names used by you, before you start e-mailingletters. Note that if you do not use the default template names, you must create Letters records with your custom names, if you want to be able to e-mail letters (or if youwant to be able to print without Word templates).
If you enter a valid e-mail address in the E-mail field, then after saving the record, mailto: is automatically placed in front of it, and the address will be underlined.If you then click the address, your e-mail program will beopened and you can immediately write and send an e-mail.
Other fieldsThe remaining fields on the Supplier details tab allow you to enter more details about the supplier:
Customer number In this field you can enter a number/code given to you by this supplier.
Discount % Discount stands for the standard discount rate you get from the supplier. This percentage is taken into account when ordering material from this supplier, but can then still be adjusted manually.
Currency Here, enter the currency to be used for the supplier, for example euros. These currencies have been, or should be, registered in the Currencies file. In the
16

Adlib Acquisitions Module Guide Filling the secondary files
current field, press Shift+F4 to search that database, or to create a currency in there. If you leave this field empty,a default value will be filled in when you save the record.
3.2. Cost centresThe Cost centres data source contains the name of, and budgetary totals for a specific cost centre. A cost centremay be a department, or it can be used to control the budget for one specific material. This file is shared withthe Serials module.
Figure 3.4: In Cost centres you manage your budgets.
If you have filled in the Assigned budget and save the record,Adlib will calculate the amounts for Working budget and Balance. The Working budget is equal to the Assigned budget plusany Previous balance. The Balance is equal to the Working budget minus the Commitments minus the Expenditure.After booking amounts to this cost centre in serials or order records, the Expenditure and the Balance will be updated here automatically. Commitments are only created from within the Acquisitions module. If you place an order
17

Filling the secondary files Adlib Acquisitions Module Guide
and know (approximately) what it is going to cost, this will be booked as a commitment and processed in the balance. On the Cost centre tab you’ll find the following fields:
Cost centre code Enter the cost centre code here. You can enter any combination of letters, numbers and separators. This is a mandatory field, since it is used as the key for linking to this cost centrefrom within orders and serials. The code must be unique.
Is part of, Consists of
If your cost centres have a hierarchical structure, then you can use these fields. Do note that each cost centre still has its own indepen-dent budget, and that no amounts are passed on along the hierarchy.
Cost centre name Enter the full cost centre name here.
Description Enter any additional information about the cost centre here.
Assignment date When you assign a new budget, enter thedate on which you assign it here. If you leave this field blank when assigning a new budget, Adlib will automatically enter the current date when the record is saved.If you are only correcting an existing budget, by increasing or decreasing it,then leave the assignment date as it is!
Assigned budget Enter the budget assigned for the new year in Assigned budget. Enter a new Assignment date as well. Adlib will updatethe Working budget and Balance fields as follows, when you save the record: the Working budget will be equal to the
18

Adlib Acquisitions Module Guide Filling the secondary files
Previous balance plus the Assigned budget plus the Commitments, and the Balance will be equal to the new Working budget minus the Commitments and Expenditure. Then, Expenditure will be cleared.To perform a budget clear down e.g. at year end, at least enter the assignmentdate and the desired new budget (in theplace of the previous Assigned budget). If, in your institution, the remaining budget of last year can be transferred to the following year, then manually fill in the remaining Balance amount in Previous balance, when assigning a new budget: the Previous balance plus the new Assigned budget plus any remaining Commitments results in the new Working budget on saving of the record. Commit-ments remain as they are.However, if you wish to charge the Commitments to last years budget when assigning a new budget, and you do wantto transfer the remaining budget, then add those commitments to the Balance of last year and enter that amount into the Previous balance field; then clear theCommitments field before you save the record. If, on the other hand, it is not possible to transfer a remaining budgetto the following year, then leave Previous balance at zero.So, on saving the record, Adlib will first calculate the new Working budget, and then the new Balance by subtracting expenditures and any commitments from the Working budget.
Previous balance You have to fill in this field manuallywhen clearing down a budget, if you
19

Filling the secondary files Adlib Acquisitions Module Guide
want the remaining budget of last year to be added to the Working budget of nextyear. If you copy the amount from the Budget field, then you must empty the Commitments field. On the other hand, ifyou want to carry forward the Commitments to the next year, then only deduct Expenditure from the last Working budget, and enter that in Previous balance.
Working budget,Budget
These fields are automatically updated by Adlib. The Working budget is equal to the Assigned budget if the remaining budget of last year is not carried overto the new year. The Budget is the Working budget minus Expenditure minus Commitments.
Commitments This field contains the amount reservedfor ordered titles, which has not been paid yet. It is updated automatically, but you may also update this field manually to make corrections, etc. Withevery automatical update of the Commitments, the Balance will be updated automatically as well.
Expenditure This field contains the amount paid this year on orders and serials, for this cost centre. This field is updatedautomatically when you book a payment, as is the Balance. However, you may alsoedit this field manually, for instance to make corrections.
Notes Here you can enter any other details about this cost centre.
20
Adlib Acquisitions Module Guide Filling the secondary files
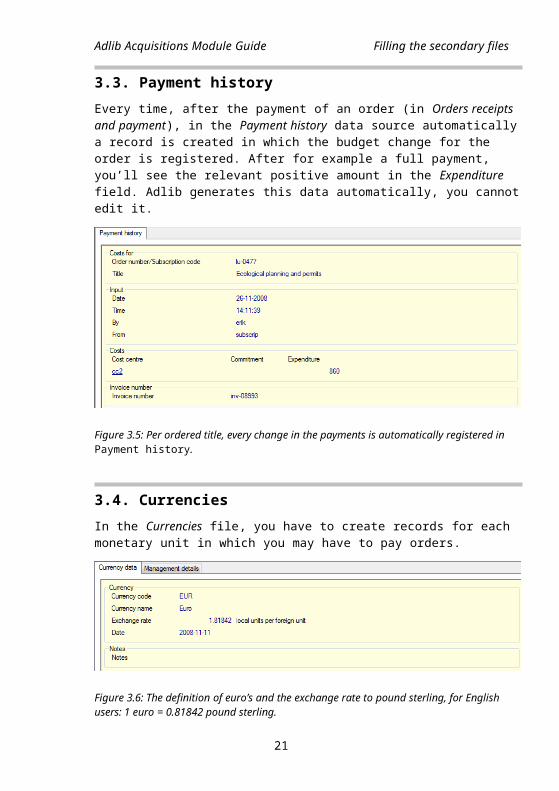
3.3. Payment historyEvery time, after the payment of an order (in Orders receipts and payment), in the Payment history data source automaticallya record is created in which the budget change for the order is registered. After for example a full payment, you’ll see the relevant positive amount in the Expenditure field. Adlib generates this data automatically, you cannotedit it.
Figure 3.5: Per ordered title, every change in the payments is automatically registered in Payment history.
3.4. CurrenciesIn the Currencies file, you have to create records for each monetary unit in which you may have to pay orders.
Figure 3.6: The definition of euro’s and the exchange rate to pound sterling, for English users: 1 euro = 0.81842 pound sterling.
21

Filling the secondary files Adlib Acquisitions Module Guide
On the Currency data tab of a currency record, fill in the standard monetary unit code for the currency, the full name, the exchange rate to your own currency, and the dateon which that exchange rate was set.The exchange rate has to be set, so that the accounting ofthe cost centres can be done in one and the same currency (your own currency).
The Currencies file is shared with the Serials module.
Currency code Enter the standard (and unique) currencycode for this monetary unit. Examples of these codes are: EUR, USD, GBP. For a full list see: http://www.iso.org/iso/en/prods-services/popstds/currencycodeslist.html
Currency name Enter the full name of this currency.
Exchange rate The number you enter here, is what this currency costs in your local currency. For example: if your local currency is the pound sterling and here you describethe euro, then for the exchange rate enter, say 0.67790. In other words, 1 euro will cost you 0.67790 pounds sterling. This exchange rate is used to convert prices in foreign currencies to your owncurrency so to enable Adlib to update the cost centre budgets. It is recommended to update the exchange rate regularly.
Date Enter the date belonging to this exchange rate. If you leave this field empty, Adlib will automatically enter the current date.
Notes Here you can enter any additional information on this currency.
22

Adlib Acquisitions Module Guide Filling the secondary files
3.5. LettersIn the Letters file you can store body texts of letters. These can be used by Adlib later on, when printing letters, if you choose not to use the present Word templates. These letter texts will also be used if you send letters by e-mail.In the Persons and institutions file, you specify per supplier which letter must be used for which type of action. Adlib automatically enters the names of templates and letter texts present by default. To have all print possibilities available it is important that the name of the letter refers to both a letter record and a letter template. By default, this is already the case.The Letters file contains a number of standard letters (which you may edit to your liking), but you can also write your own letters from scratch or create a letter specific to an individual supplier.
This file is shared with the Serials module. Yet only the standard letters of which the name starts with “order” areused by the Acquisitions module. Adlib will merge the specific data (personal or company names, title of the ordered publication, etc.) with the body text when the letter is printed.
Figure 3.7: An example of an order claim letter.
Translations of labels that Adlib uses in letters (e.g. the Number label), can be managed in the Languages data source.
23

Filling the secondary files Adlib Acquisitions Module Guide
3.6. RequestersThe Requesters data source represents the same database (theBORROWER database) as the Borrower data source (in the Loans module) and Readers (in the Serials module). Personaldetails registered here, are shared between these modules.In the Acquisitions module, this data is used when printing order notification letters for the requester of an order.
The Personal details tabName is a read-only field which is put together by Adlib,using the data in other fields, at the moment you save a requester record. The composition is as follows: the preference is the format Surname, Initials Insertion, so for instance Winkel, R. van. If no initials are available anda first name is, then it becomes Surname, First name Insertion, so for example Winkel, Rupert van. If no first nameis available either, then this requester is probably an institution and the Surname suffices as Name.
Figure 3.8: An example of a filled in Personal details screen tab.
24

Adlib Acquisitions Module Guide Filling the secondary files
Class/department The Class/department is the place where arequester can be found daily.
Borrower category The Borrower category is only relevant to borrowers, not to requesters.
Image In the Image field you may link a photo of the requester to this record.
ID number, ID type In ID-number you can enter a passport or other identification number, like that of a driving license or public transportation card for instance, should it be required. In ID type you then enter passport or driving license.
25

Filling the secondary files Adlib Acquisitions Module Guide
The Addresses tab
Figure 3.9: An example of a filled in Addresses screen tab.
In Address type you indicate whether the address is “home” or“workplace”. If it is a postal address as well (either with or without a P.O.Box number), then mark the Postal address checkbox. In Address, just enter the street name or “P.O.Box”. So, in House number a P.O.Box number may be entered as well. In some countries, on letters the house number must be printed in front of the street name and/or the postcode in front of the city name. Mark the relevant checkboxes if this is the case. You may provide multiple addresses by repeating the field group.
In the repeated field group Telephone you can enter multiple telephone numbers, and not necessarily just of telephones. In Telephone type you specify which device is linked to the number: you may choose from “landline”, “mobile phone” and “fax”.
26

Adlib Acquisitions Module Guide Filling the secondary files
If you enter a valid e-mail address in the E-mail address field, then after saving the record, mailto: is automatically placed in front of it, and the address will be underlined. If you then click the address, your e-mail program will be opened and you can immediately write and send an e-mail.
The Letters tabOn the Letters tab you can link two types of letters to thisuser. This tab is used in both the Acquisitions and the Loans module, but in the Acquisitions module only the Ordernotification letter is relevant. So for this requester you set how he or she should receive order notifications and which template/letter record should be used. The Method setting also applies to reminders (in the Loansmodule) in case this requester is a borrower as well. (Fore-mailing, an e-mail address should be registered. And your sender address and the name of your SMTP server must have been set in line numbers 278, respectively 192, in adlib#.txt files.)
Figure 3.10: The standard letters linked to this requester.
If you leave fields empty, then on storage of the record those fields will automatically be filled with names of applicable standard letters.
27

Filling the secondary files Adlib Acquisitions Module Guide
3.7. LanguagesThe Languages data source contains one or more language records (one record per language), each with a list of terms in that language: these terms are used as labels forvariable data in to be printed letters in that language. So you only need records for the languages in which you want to be able to print letters.
A letter to a supplier will be printed in the correct language automatically if in the Persons and institutions data source with the particulars of that supplier, you indicated which language record (in the Language field) must be used for the letters. The fixed texts in the letters are located in letter templates and letter records; each of these has already been written in one language. You’ve probably already linked the proper letters to each supplier, meaning: you linked English letter templates/records to suppliers in England and other English speaking countries, and e.g. Spanish letters for your Spanish or selected South American suppliers.
28

Adlib Acquisitions Module Guide Filling the secondary files
Figure 3.11: The Dutch language record of translations of labels which are used in letters.
29

4. Processing orders
4.1. General procedureAfter filling the secondary files (which you do before youfirst start working with the Acquisitions module), you canbegin processing orders:
1. Enter one or more orders, in the Orders data source. An order may contain multiple order lines. Do not simply enter titles manually for the items you wish to order: first check via Shift+F4 whether the title is already present in the catalogue, and then choose that one. This way, you avoid the creation of duplicate records in the catalogue.
2. After one or more orders have been entered, an order letter can be printed for each order. You can print letters from Step 1 in the Search wizard.
3. When ordered items arrive, you check them in and pay for them. You do this via the Orders receipts and payment option. You can then also print notification letters for requesters.
4. If an item fails to arrive by the date it is expected, you can print a claim letter for it, again via Step 1 in the Search wizard.
5. If an ordered item is not deliverable, you can cancel the order via the Cancel orders option in the Search wizard. Also if you just change your mind about an order, then you can cancel it and print a cancellation letter for it.
31

4.2. Entering order detailsOpen a new record in the Orders file and fill it in as completely as possible.
Figure 4.12: An example of a filled in order record.
Order number Here you can enter the order number. If you leave the field blank, Adlib will automatically assign an order number when the record is saved. In that case, Adlib will use the date notation: yyyymmdd, followed by a hyphen and a serial number. (For each new order, thisnumber is incremented by 1 and each day begins with 1). Thus, the order number 19970703-3 will be the number of the third order that was entered on the
32

Processing orders Adlib Acquisitions Module Guide
third of July 1997. The order number is assigned when the record is saved.
Date Adlib will automatically enter the current date, unless you select another date.
Supplier Enter the name of an existing or new supplier. This field is linked to Persons and institutions. This is a mandatory field.
Discount After filling in and leaving the Supplier field, some supplier specific details are merged in, amongst which the discount which you usually receive from this supplier, if applicable. The discount is shown in the Discount field, but you are free to adjust the percentage: the new discount will then only apply to this order, and nothing changes in the supplier record. If the supplier record contains a standard discount rate, but no discount is appropriate or available for this order,then just enter 0.
Status The status of each order line is automatically kept up-to-date by Adlib. After the initial saving of an order record, the status of every order line becomes: will be ordered. After you print anorder letter for this order, the status becomes: on order. After registration of the arrival of an item, the status of the relevant order line changes to: received. The status after cancelling is: cancelled.
Item ID After saving a new order record, an itemID appears in every order line. This is the unique identifier of the linked itemrecord which is displayed in the current
33Nov-2233

Adlib Acquisitions Module Guide Processing orders
order line. In display mode, click the underlined number to open the linked record in a zoom screen. That is necessary if you wish to enter multiple cost centre allocations: this is becausein the order record itself you can enteronly one cost centre allocation per order line.
Title Type the first characters of the title that you want to order, and search the catalogue for the full title via Shift+F4, or enter a new title if that title has not been registered in the catalogue yet; new titles are always added to the catalogue, to a dataset of your choice.
Title (not in catalogue)
An item to be ordered may have a title which already appears in your catalogue or should be registered in there now. Inthat case, fill in the Title field, which is linked to the catalogue.If, on the other hand, you order an itemof which the title does not appear in the catalogue and shouldn’t be registered in there either anytime soon,then fill in the Title (not in catalogue) field, not the Title field: this title will only be saved in the current item record, not in the catalogue.
Quantity Enter the number of copies of the title that you want to order. If you leave thefield empty, Adlib will enter 1.
Unit price Enter the price per copy. Use a decimal point, and do not fill in a currency symbol.
Extra Enter any additional costs for the ordered title, such as shipping costs,
34

Processing orders Adlib Acquisitions Module Guide
postage & packing, etc. Use a decimal point, and do not fill in a currency symbol.
Currency Enter the currency code for the monetaryunit used in Unit price and Extra. The default currency is the value contained in the supplier record. Press Shift+F4 to choose from available currency codes.
Allocation Use the Allocation field to provide a percentage, if you want to charge the costs of an order line to a cost centre.In this field, your input will be checked. For example, in a new order record you are not allowed to enter a percentage other than 100, because the sum of all entered cost centre allocations must always be 100: in a neworder record you can enter only one costcentre allocation per order line.If you want to enter more than one cost centre allocation, you can leave the first allocation in the order line emptyinitially or fill in a percentage of 100. Open, after saving the new order record, the equally new linked item record (by clicking its Item ID), put it in edit mode, add new cost centre occurrences and fill the allocations properly. The record can be saved if thesum of the percentages is 100. After saving, all commitments on the cost centres and the balances will be recalculated. In the order record you will still only see the first field group occurrence of the cost centre allocations, this time with a percentagedifferent from 100 which you entered in the item record. You cannot change this number here, because that would change
35Nov-2235
Adlib Acquisitions Module Guide Processing orders
the sum as well: the allocations can only be changed in the item record.
Cost centre Enter a cost centre code. Press Shift+F4to choose from available cost centre codes. Only in the item record you can enter more than one cost centre. Multiple costcentre allocations allow for the possibility to divide one purchase between a number of cost centres which each have their own budget. The balances and commitments of the relevant cost centres are automatically updated by Adlib when the record is saved.
Requester Here you can enter the name of the person requesting the title. Press Shift+F4 to choose from available names.
The file you choose a name from is shared with the Loans and Serials modules.
Requester notified on Here, Adlib will automatically enter thedate the requester is notified as soon as a notification letter has been printed (after receipt of the ordered items). So you don’t need to fill in this field yourself.If this field contains a date, then to Adlib it means that a notification letter has been sent, so it won’t be printed again.
Due date On printing of the order letter, Adlib will calculate the date the item is ex-pected using the print date and the supplier delivery period. You can changethis date manually, before or after
36

Processing orders Adlib Acquisitions Module Guide
printing the order letter.
Claim letter sent on In this field, Adlib will automatically enter the date on which the last claim letter was printed (via Print claim letters).
Cancelled on Here, Adlib will automatically enter thedate the cancellation letter was printed. Clear this field if you want toprint the letter again via Print cancellationletters in Step 1 of the Search wizard.
Note Here you can enter any remarks about thecancellation of the order.
Message to supplier Enter any notes for or messages to the supplier here. This text will be printedin the order letter.
Notes Enter any additional remarks about the order as a whole or about parts of the order.
Order letter printed on
This field contains the print date of the order letter and is automatically updated by Adlib. This date can be changed manually. If you clear this field you can print this order again by selecting the Print orders option in Step 1 of the Search wizard (see chapter 5.). As long as no order letter has been printed for an order, the order has the will be ordered status; as soon as an order letter has been printed, the status changes to on order. The Status is indica-ted above the title. This status is alsoshown in the catalogue and in the publiccatalogue.
37Nov-2237
Adlib Acquisitions Module Guide Processing orders
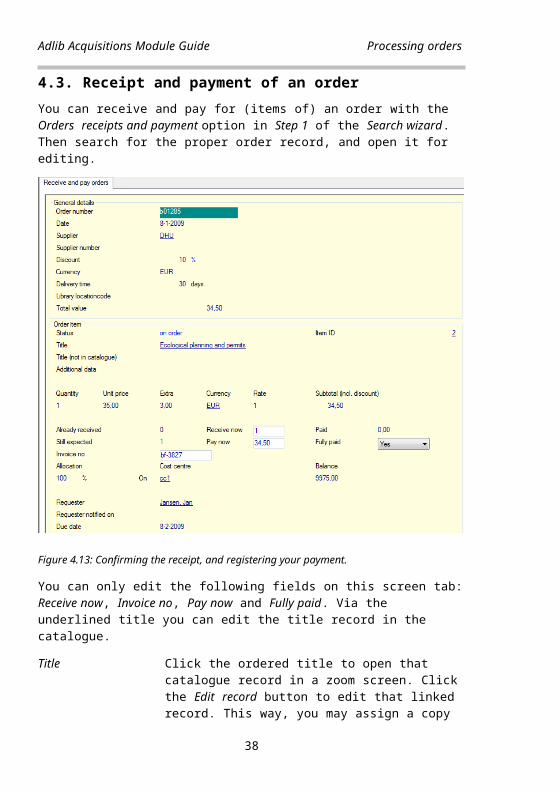
4.3. Receipt and payment of an orderYou can receive and pay for (items of) an order with the Orders receipts and payment option in Step 1 of the Search wizard. Then search for the proper order record, and open it for editing.
Figure 4.13: Confirming the receipt, and registering your payment.
You can only edit the following fields on this screen tab:Receive now, Invoice no, Pay now and Fully paid. Via the underlined title you can edit the title record in the catalogue.
Title Click the ordered title to open that catalogue record in a zoom screen. Clickthe Edit record button to edit that linked record. This way, you may assign a copy
38

Processing orders Adlib Acquisitions Module Guide
number to the received item immediately (although you can also do that from the catalogue, at a later time).
Receive now Enter the number of copies you have received. The number of copies entered here cannot be higher than the number ofcopies ordered. If the amount received is less than the amount ordered, Adlib will calculate how many copies you can still expect.
When you have received the expected number of items and saved the record, Adlib will change the order status of the item to received. This status is not shown in the catalogue or public access catalogue.
Pay now Enter the amount you paid for this orderitem. Use a decimal point (when you havean English Windows version), and do not fill in a currency symbol.
Fully paid You have to let Adlib know if this titleis fully paid for. This is because the price calculated originally may be different from the price actually invoiced, for example, if the exchange rate was slightly out or if the price has gone up. If the invoiced amount is different than what you paid, while it was still a full payment, then any remaining amount is deducted from the commitments in the cost centre(s).No means that you haven’t paid yet or only partially.
Adlib will automatically update the balances and commitments of relevant cost centres when the record is saved.
39Nov-2239

Adlib Acquisitions Module Guide Processing orders
Invoice number Here you can enter the invoice number. This number is included in the payment history, together with the payment and the current date. This way you can always check past financial transactionsfor this order.
4.4. Cancelling an orderIf you cancel an ordered item, you cannot undo the cancellation. The only solution is to order the item again.
To cancel an order, first select the Cancel orders option in Step 1 of the Search wizard. Then search for the desired record and open it for editing. Finally, in the order lineyou wish to cancel, set the Cancelled? field to Yes and save the record.
40

Processing orders Adlib Acquisitions Module Guide
Figure 4.14: Cancelling an order.
Cancelled? To cancel an already placed order, select Yes here. The bookings to the cost centres will be undone. If you have cancelled an order, you can print a cancellation letter. You can use the option in the Search wizard if you want to print all cancellationletters at once, but you can also print only this cancellation: you cando this by looking up the relevant record in the Orders data source and displaying it, and then print it to the Cancellation letter output format.
On Here, the date on which you actually print the cancellation letter will automatically be filled in later. You
41Nov-2241

Adlib Acquisitions Module Guide Processing orders
can clear this field if you want to print this letter again via Step 1 in the Search wizard. You can also enter a date manually, then no cancellation letter will be printed for the item. This option allows you to make cancellations by telephone.
After you have saved the record, the cancelled item is given the order status cancelled. Adlib will automatically update the balances and commitments of the relevant cost centres.
You can print cancellation letters for all cancellations at once, from Step 1 in the Search wizard (see chapter 5.).
42

5. Printing lettersThere are two ways to print letters:
via the four Print options in Step 1 of the Search wizard: for each letter type, Adlib will automatically search for records for which this letter indeed has to be printed. The relevant records will then be grouped per supplier and printed in batch.
via the Print wizard: it’s also possible to print a letterfor one or more specific orders, claims, cancellations or notifications. For this, you must mark the records of the concerning orders in the Orders data source, and print them with the desired output format through the Print wizard.
5.1. Batch printing of lettersIn Step 1 of the Search wizard you can print four types of letters:
After your choice of a letter type, Adlib will automatically search the Orders data source looking for records which still need to be printed. Dependent on the letter type, the content of one or more check fields in each record determines whether it must be printed. It concerns the following fields:
Order letters are printed for records in which the print date (in the Order letter printed on field) is not filled in or when the print date is the current date (e.g. when printing letters again on the same day aftera printer failure). After printing, the Order letter printed
43

on field in the relevant records is automatically updated with the date of today.
Claim letters are only printed for ordered items that still haven’t been received while the Due date has passed. Moreover, the Claim letter sent on field must be empty, or it must contain the current date or a date older than a week. In all other cases no claim letter will be printed for a record.
Cancellation letters are printed when the Cancelled? field has been set to Yes, and the On date field is still empty.
A notification letter (to inform the requester) will beprinted for an ordered item when the order status (in the Status field) of an item is received whilst the Requester notified on field is empty and the Requester field has been filled in.
5.2. Printing a letter for a specific orderIf you want to print a letter for a specific order, then do this via the Print wizard. This may be useful when you need an express delivery, for example.
1. In the Orders database, first search for the desired record (or multiple records) and open it in display mode or mark the records in the brief display.
2. Click the Print button and choose the option Create a reportwith a predefined output format.
3. Choose a letter type from the list and finish the printprocedure.
Note that a letter for a record can only be printed if thecontents of the check field is applicable to this letter type (see the previous paragraph).
44

Processing orders Adlib Acquisitions Module Guide
5.3. Word templates, plain text and e-mailingAll letters,order notifications for requesters and all other letters to suppliers, are printed to Word templates by default. If Adlib can’t find a set template, the letterrecord (plain text) with the same name will be used instead.
Per requester (in the data source Requesters), on the Letters tab, you can find the name of the letter which serves as order notification. The default name in there is the name of the Word template as well as the name of the letter record (plain text) to be used alternatively. This name will be set dependent on the current interface language when opening a new record. If you’ve made a template with a different name, or wish to use a template in another language, then enter that name in the Order notification field.If, on the same tab, you set Method to E-mailing, plain textfrom the letter record will be used for the e-mail.
The letters used by the Acquisitions module for written communication with a supplier, are registered in the supplier record on the Supplier details tab, and only concern the General order, General cancellation, and General claim. By default, names of letters are filled in in the language ofthe supplier.If, on the same tab, you set the Method to Send by e-mail, plain text from the letter record will be used for the e-mail.
You will only be able to e-mail if you provide an e-mail address for the requester or supplier, and if your sender address and the name of your SMTP server have been set in line numbers 278, respectively 192, in adlib#.txt files. If e-mailing fails, Adlib tries to print to Word templates, and if that fails too, plain text letters will be printed.
45Nov-2245

Index
AAcquisitions 3.5..........5Acquisitions 4.2..........5Acquisitions module.......5addresses................21Adlibintroduction.............1
Allocation...............29applications..............1assigned budget..........14Assigned budget..........15Assignment date..........15
Bbalance..................14bibliographic data........8bin.......................1Borrower category........20Borrower database........19Borrowers.................8budget...................13Budget...................16budget clear down........15budgetary totals.........13
Ccancellation letters.....35cancelledorder status............34
Cancelled on.............30Cancelled?...............33cancelling an order......32catalogue.................8
47

Claim letter sent on.....30claim letters............35Class/department.........20commitments..............14Commitments..............16Consists of..............14Cost centre..............29cost centre allocations6, 29Cost centre code.........14Cost centre name.........14cost centres.........13, 34Currencies file..........17Currency.............13, 28Currency code............18Currency name............18Customer number..........13
Ddata source...............7databaseintroduction.............1
datasetintroduction.............1
Delivery time............10Description..............15Discount.................27Discount %...............13Due date.................30
Ee-mail....................6e-mail address.......13, 21e-mailing....13, 18, 22, 36entry of datasupplier.................9
Exchange rate............18exe.......................1expenditure..............14
48

Processing orders Adlib Acquisitions Module Guide
Expenditure..............16Extra....................28
Fformintroduction.............1
Fully paid...............32
IID number................20Image....................20indexintroduction.............1
Invoice number...........32Is part of...............14Item ID............5, 6, 27item record...............7
LLanguage.................11Languages database11, 19, 22letter records...........36letter templates.........11letters...6, 11, 12, 22, 36Letters file.............18
Mmethod...................22Method...................12modules...................2monetary unit............17monetary unit code.......17
Nnotification letter......36notification letters.....19
49Nov-2249

Adlib Acquisitions Module Guide
Oordercancelling..............33paying for..............31payment of..............31receipt of..............31received................31
Order letter printed on. .30order letters............35Order line................5order lines...............6Order notification.......22Order number.............26order record..............5order statuson order................30
ordered item..............5ORDERS....................5ORDERS database........6, 7Orders receipts and payment16ORDITEMS..................5ORDITEMS database......6, 7
PPay now..................32Payment history..........16personal details.........19plain text...............36postal address...........21Previous balance.........16print options............35Print to documents.......12Print wizard.............35printing in batch........35printing letters.........35printing per record......36Processing of letters....12processing orders........25
50

Processing orders Adlib Acquisitions Module Guide
QQuantity.................28
RReaders...................8Receive now..............32receiveditem....................31order...................31
recordintroduction.............1
removal...................7Requester................29Requester data source.....8Requester notified on....30Requesters file..........19
Ssecondary files.....7, 8, 9Send by e-mail...........12SMTP.............12, 22, 37software...............1, 2standard data.............9standard letters.........18Status...................27Supplier.................27supplier domain..........10supplier language........11suppliers.................6
Ttemplates........11, 12, 36Title................27, 31Title (not in catalogue).28translations.............19
51Nov-2251

Adlib Acquisitions Module Guide
UUnit price...............28
Vversion numbers...........1
Wwill be orderedorder status............30
Word templates 6, 11, 18, 36working budget...........14Working budget...........16
52