
receive dental services each year, and a large part of them are ...
Upload
independentCategory
view
1download
0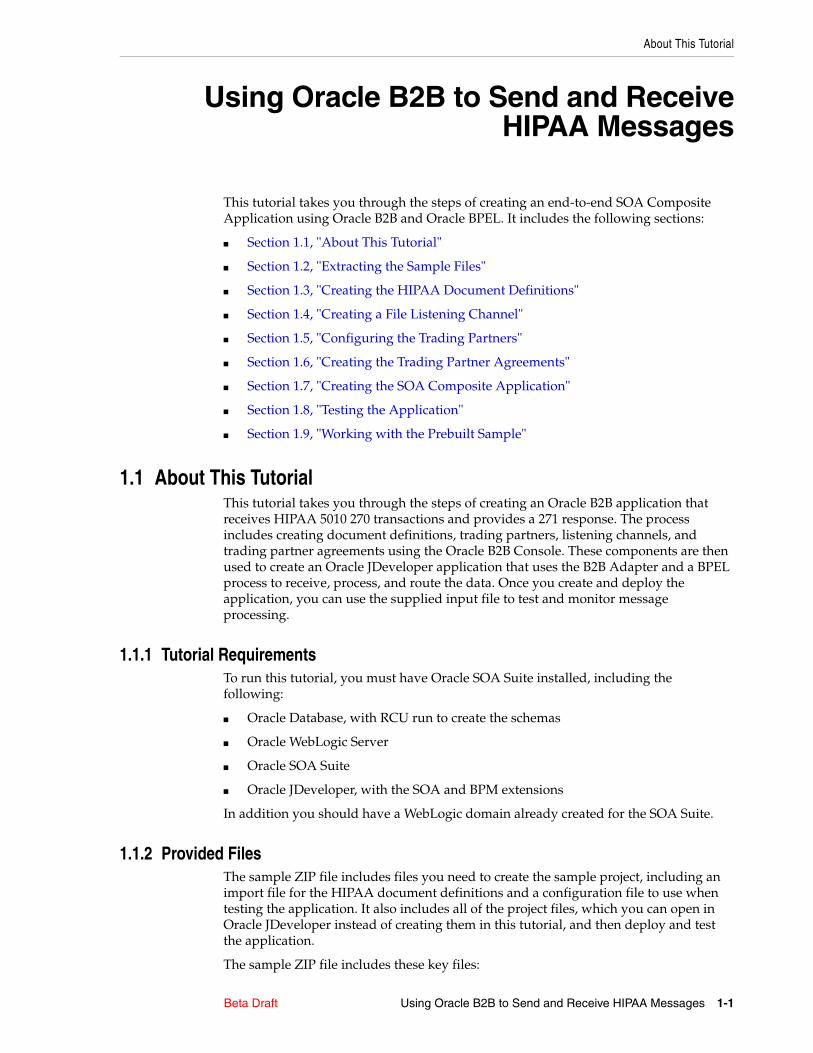
About This Tutorial
Beta Draft Using Oracle B2B to Send and Receive HIPAA Messages 1-1
1Using Oracle B2B to Send and ReceiveHIPAA Messages
This tutorial takes you through the steps of creating an end-to-end SOA Composite Application using Oracle B2B and Oracle BPEL. It includes the following sections:
■ Section 1.1, "About This Tutorial"
■ Section 1.2, "Extracting the Sample Files"
■ Section 1.3, "Creating the HIPAA Document Definitions"
■ Section 1.4, "Creating a File Listening Channel"
■ Section 1.5, "Configuring the Trading Partners"
■ Section 1.6, "Creating the Trading Partner Agreements"
■ Section 1.7, "Creating the SOA Composite Application"
■ Section 1.8, "Testing the Application"
■ Section 1.9, "Working with the Prebuilt Sample"
1.1 About This TutorialThis tutorial takes you through the steps of creating an Oracle B2B application that receives HIPAA 5010 270 transactions and provides a 271 response. The process includes creating document definitions, trading partners, listening channels, and trading partner agreements using the Oracle B2B Console. These components are then used to create an Oracle JDeveloper application that uses the B2B Adapter and a BPEL process to receive, process, and route the data. Once you create and deploy the application, you can use the supplied input file to test and monitor message processing.
1.1.1 Tutorial RequirementsTo run this tutorial, you must have Oracle SOA Suite installed, including the following:
■ Oracle Database, with RCU run to create the schemas
■ Oracle WebLogic Server
■ Oracle SOA Suite
■ Oracle JDeveloper, with the SOA and BPM extensions
In addition you should have a WebLogic domain already created for the SOA Suite.
1.1.2 Provided FilesThe sample ZIP file includes files you need to create the sample project, including an import file for the HIPAA document definitions and a configuration file to use when testing the application. It also includes all of the project files, which you can open in Oracle JDeveloper instead of creating them in this tutorial, and then deploy and test the application.
The sample ZIP file includes these key files:

Extracting the Sample Files
1-2 Oracle SOA Suite for healthcare intergration - Sample Scenario Beta Draft
■ /artifacts/sample/composite/hcfp-104-HIPAA-SOA_270_271.zip: A prebuilt SOA composite project, based on the instructions in this tutorial.
■ /artifacts/sample/b2b/hcfp-104-HIPAA-Composite_270_271.zip: A prebuilt Oracle B2B configuration, based on the instructions in this tutorial.
■ /artifacts/input/270.dat: A sample input file for you to use when testing the application.
■ /artifacts/input/271.xml: A sample output file for you to compare results.
■ /artifacts/schema/5010_270_X279.ecs: The document definition file for the HIPAA 270 message.
■ /artifacts/schema/5010_270_X279.xsd: The XML schema definition file for the HIPAA 270 message.
■ /artifacts/schema/5010_271_X279.ecs: The document definition file for the HIPAA 271 response.
■ /artifacts/schema/5010_271_X279.xsd: The XML schema definition for the HIPAA 271 response.
1.2 Extracting the Sample FilesBefore you begin, download and extract the sample file, hcfp-104-HIPAA-Composite_270_271.zip. Note the path to which you extract the file; you will need to reference it in some of the following procedures.
1.3 Creating the HIPAA Document DefinitionsThe first step in creating the Oracle B2B application is creating the document definitions that describe the HIPAA message structure. You create the definitions using the sample ECS and XSD files provided in the sample ZIP file. These files define the structure of the message.
1.3.1 Creating the HIPAA 270 Transaction Document DefinitionThis process creates the document definition files to exchange HIPAA 5010 270 transactions, which includes specifying a protocol version, document type, and the schema and definition files.
These tasks are all performed from the Oracle B2B Console. To log on to the console, open a Web browser and enter the following URL:
http://<hostname>:<port>/b2bconsole
Where <hostname> is the name of the computer on which WebLogic Server is installed, and <port> is the port number on which WebLogic Server is listening.
Task 1 Create the HIPAA Document Protocol Version1. On the Oracle B2B Console, click Administration, and then click the Document
tab.
2. In the Document Protocol list, click EDI_X12.
The Document Protocol Name page appears.

Creating the HIPAA Document Definitions
Beta Draft Using Oracle B2B to Send and Receive HIPAA Messages 1-3
Figure 1–1 Document Protocol Page
3. Click Add Document (the plus icon).
The Document Protocol Version page appears.
4. In the Version Name field, enter 5010X279.
Figure 1–2 Document Protocol Version Page
5. Click Save and then click OK on the confirmation dialog that appears.
Task 2 Create the HIPAA 270 Document Type1. Under Document Protocols > EDI_X12 in the navigation pane on the left, select
5010X279.
2. Click Add Document (the plus icon).
The Document Type page appears.
3. In the Document Type Name field, enter 270.
4. In the Functional Group Identifier Code field, enter HS.
Creating the HIPAA Document Definitions
1-4 Oracle SOA Suite for healthcare intergration - Sample Scenario Beta Draft
Figure 1–3 Document Type Page (270)
5. Click Save and then click OK on the confirmation dialog that appears.
Task 3 Create the HIPAA 270 Document Definition1. Under Document Protocols > EDI_X12 > 5010X279 in the navigation pane on the
left, select 270.
2. Click Add Document (the plus icon).
The Document Definition page appears.
3. In the Documentation Definition Name field, enter 5010_270_X279-def.
4. In the Definition field, browse to the location where you extracted the sample ZIP file, and then to /artifacts/schema. Select 5010_270_X279.xsd.
5. In the Transaction Set ecs File field, browse to the location where you extracted the sample ZIP file, and then to /artifacts/schema. Select 5010_270_X279.ecs.
Note: This value is the value of the first field in the GS segment of the 270 message. HS indicates Eligibility, Coverage, or Benefit Inquiry, or Transaction Set 270.

Creating the HIPAA Document Definitions
Beta Draft Using Oracle B2B to Send and Receive HIPAA Messages 1-5
Figure 1–4 Document Definition Page (270)
6. Click Save and then click OK on the confirmation dialog that appears.
1.3.2 Creating the HIPAA 271 Transaction Document DefinitionThis process creates the document definition files to exchange HIPAA 5010 271 transactions. For this step, you will use the document protocol you created previously (5010X279).
Task 1 Create the HIPAA 271 Document Type1. Under Document Protocols > EDI_X12 in the navigation pane on the left, select
5010X279.
2. Click Add Document (the plus icon).
The Document Type page appears.
3. In the Document Type Name field, enter 271.
4. In the Functional Group Identifier Code field, enter HB.
Figure 1–5 Document Type Page (271)
Creating a File Listening Channel
1-6 Oracle SOA Suite for healthcare intergration - Sample Scenario Beta Draft
5. Click Save and then click OK on the confirmation dialog that appears.
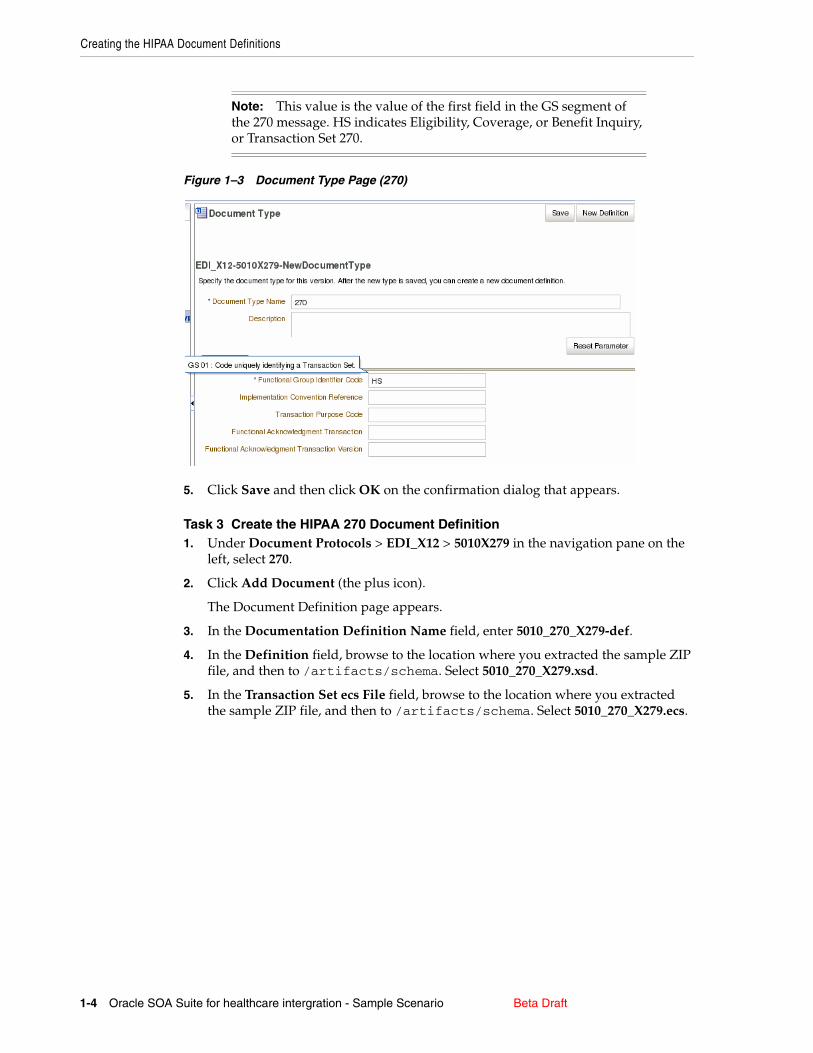
Task 2 Create the HIPAA 271 Document Definition1. Under Document Protocols > EDI_X12 > 5010X279 in the navigation pane on the
left, select 271.
2. Click Add Document (the plus icon).
The Document Definition page appears.
3. In the Documentation Definition Name field, enter 5010_271_X279-def.
4. In the Definition field, browse to the location where you extracted the sample ZIP file, and then to /artifacts/schema. Select 5010_271_X279.xsd.
5. In the Transaction Set ecs File field, browse to the location where you extracted the sample ZIP file, and then to /artifacts/schema. Select 5010_271_X279.ecs.
Figure 1–6 Document Definition Page (271)
6. Click Save and then click OK on the confirmation dialog that appears.
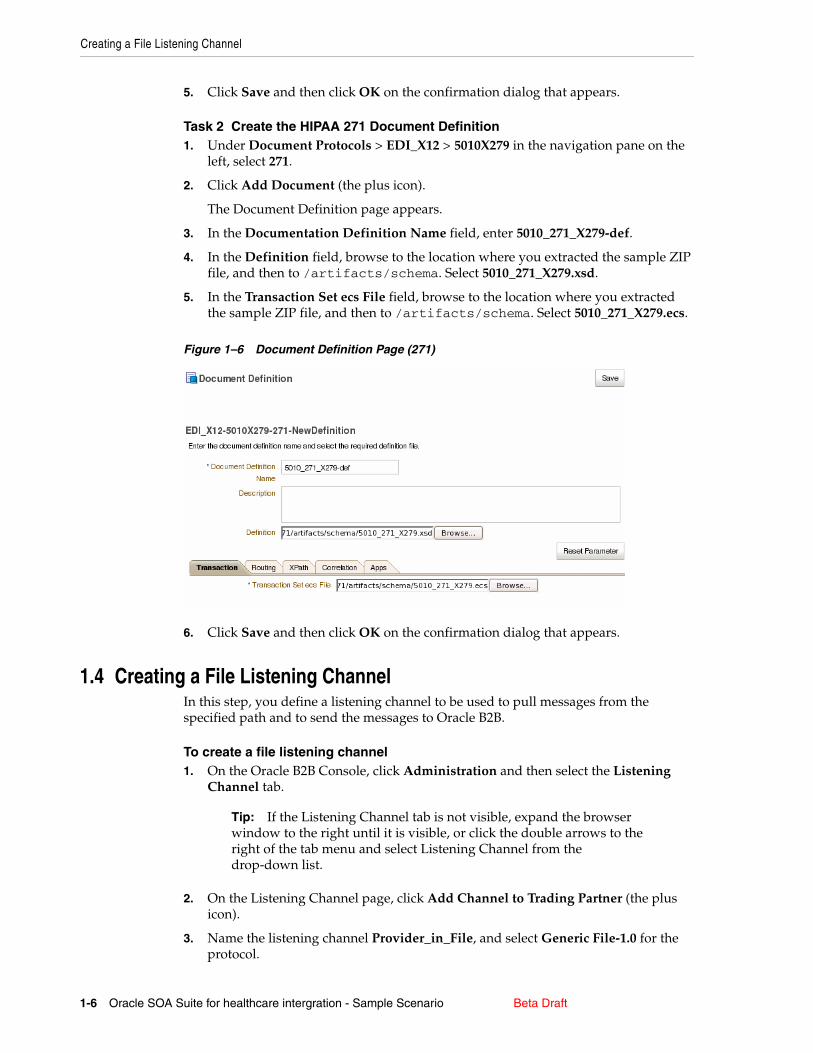
1.4 Creating a File Listening ChannelIn this step, you define a listening channel to be used to pull messages from the specified path and to send the messages to Oracle B2B.
To create a file listening channel1. On the Oracle B2B Console, click Administration and then select the Listening
Channel tab.
2. On the Listening Channel page, click Add Channel to Trading Partner (the plus icon).
3. Name the listening channel Provider_in_File, and select Generic File-1.0 for the protocol.
Tip: If the Listening Channel tab is not visible, expand the browser window to the right until it is visible, or click the double arrows to the right of the tab menu and select Listening Channel from the drop-down list.
Configuring the Trading Partners
Beta Draft Using Oracle B2B to Send and Receive HIPAA Messages 1-7
4. Scroll down to the Transport Protocol Parameters tab under Channel Details. In the Folder name field, enter /tmp/Provider_in. This is the location where you want the input file to reside.
Figure 1–7 Listening Channel Page
5. Click Save and then click OK on the confirmation dialog that appears.
6. In your file system, create the folder /tmp/Provider_in.
1.5 Configuring the Trading PartnersIn this step, you create a new trading partner that initiates the messages and sends them to the default trading partner, which you configure to be the trading partner that responds to the transaction. The Payer is the host trading partner, and the Provider is the remote trading partner. This step is performed on the Oracle B2B Console.
Task 1 Configure the Default Trading Partner1. On the Oracle B2B Console, click Partners.
The Partners page appears.

Configuring the Trading Partners
1-8 Oracle SOA Suite for healthcare intergration - Sample Scenario Beta Draft
Figure 1–8 Trading Partners Page
2. In the Partner list on the left, select MyCompany and then click Edit Trading Partner (the pencil icon).
3. On the Trading Partner Name and Icon dialog, change the name of the trading partner from MyCompany to Payer and then click OK.
4. Click OK on the confirmation dialog that appears.
5. On the Profile tab of the Partners page, add the identifiers listed in the following table. To add an identifier, click Add Identifier (the plus sign to the right of the Identifiers section), select the identifier from the drop-down list in the Name field, and enter the value.
Table 1–1 Payer Partner Identifiers
Identifier Value
EDI Interchange ID Qualifier ZZ
EDI Interchange ID HIS
EDI Group ID HIS
Configuring the Trading Partners
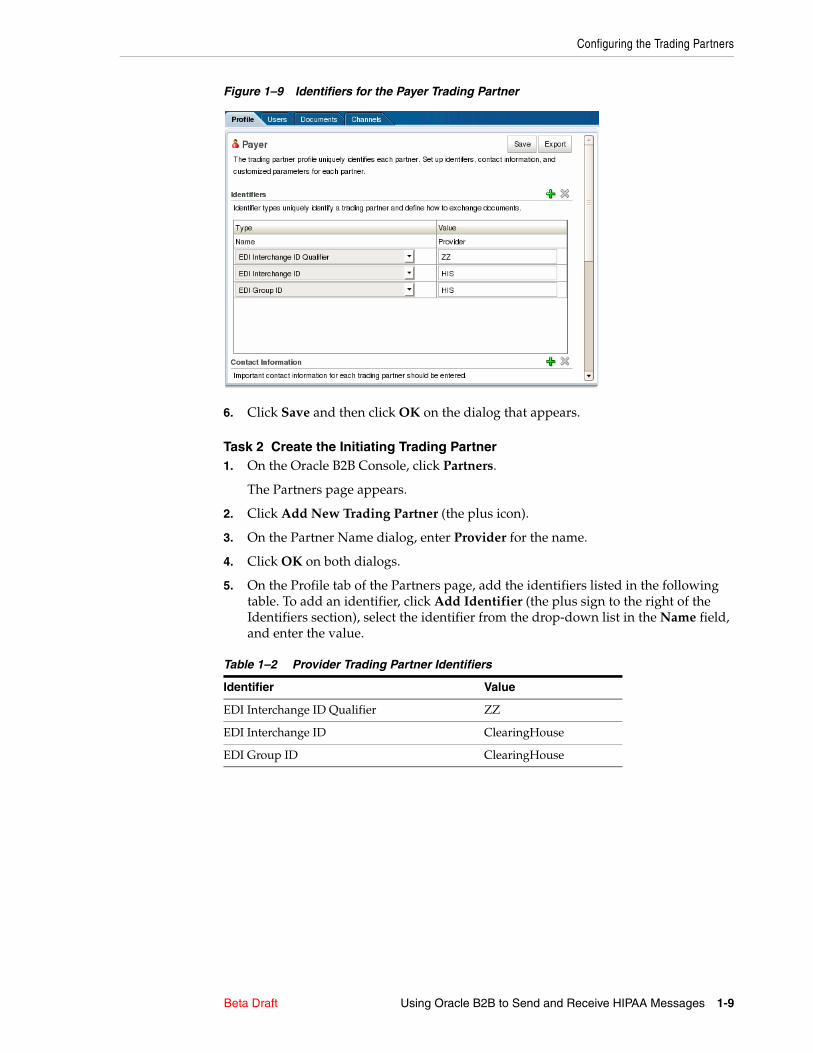
Beta Draft Using Oracle B2B to Send and Receive HIPAA Messages 1-9
Figure 1–9 Identifiers for the Payer Trading Partner
6. Click Save and then click OK on the dialog that appears.
Task 2 Create the Initiating Trading Partner1. On the Oracle B2B Console, click Partners.
The Partners page appears.
2. Click Add New Trading Partner (the plus icon).
3. On the Partner Name dialog, enter Provider for the name.
4. Click OK on both dialogs.
5. On the Profile tab of the Partners page, add the identifiers listed in the following table. To add an identifier, click Add Identifier (the plus sign to the right of the Identifiers section), select the identifier from the drop-down list in the Name field, and enter the value.
Table 1–2 Provider Trading Partner Identifiers
Identifier Value
EDI Interchange ID Qualifier ZZ
EDI Interchange ID ClearingHouse
EDI Group ID ClearingHouse

Configuring the Trading Partners
1-10 Oracle SOA Suite for healthcare intergration - Sample Scenario Beta Draft
Figure 1–10 Identifiers for the Provider Trading Partner
6. Click Save and then click OK on the dialog that appears.
Task 3 Add a Channel to the Provider Trading Partner1. Complete Task 4, "Add Document Definitions to the Initiator Trading Partner".
2. On the Provider Partner page, select the Channels tab.
3. Click Add Channel to Trading Partner (the plus sign next to Channel).
4. In the new row that appears, enter Out_To_Provider for the name and select Generic File-1.0 for the Protocol.
5. Scroll down to the Folder name field on the Transport Protocol Parameters tab, and enter /tmp/Provider_out. This is where output files will be written.
Figure 1–11 Provider Trading Partner Channel Tab
Creating the Trading Partner Agreements
Beta Draft Using Oracle B2B to Send and Receive HIPAA Messages 1-11
6. Click Save and then click OK on the dialog that appears.
7. Create the folder/tmp/Provider_out in your file system.
Task 4 Add Document Definitions to the Initiator Trading Partner1. Complete Task 2, "Create the Initiating Trading Partner".
2. On the Provider Partner page, select the Documents tab.
3. Click Add Document Definition (the plus sign next to Documents).
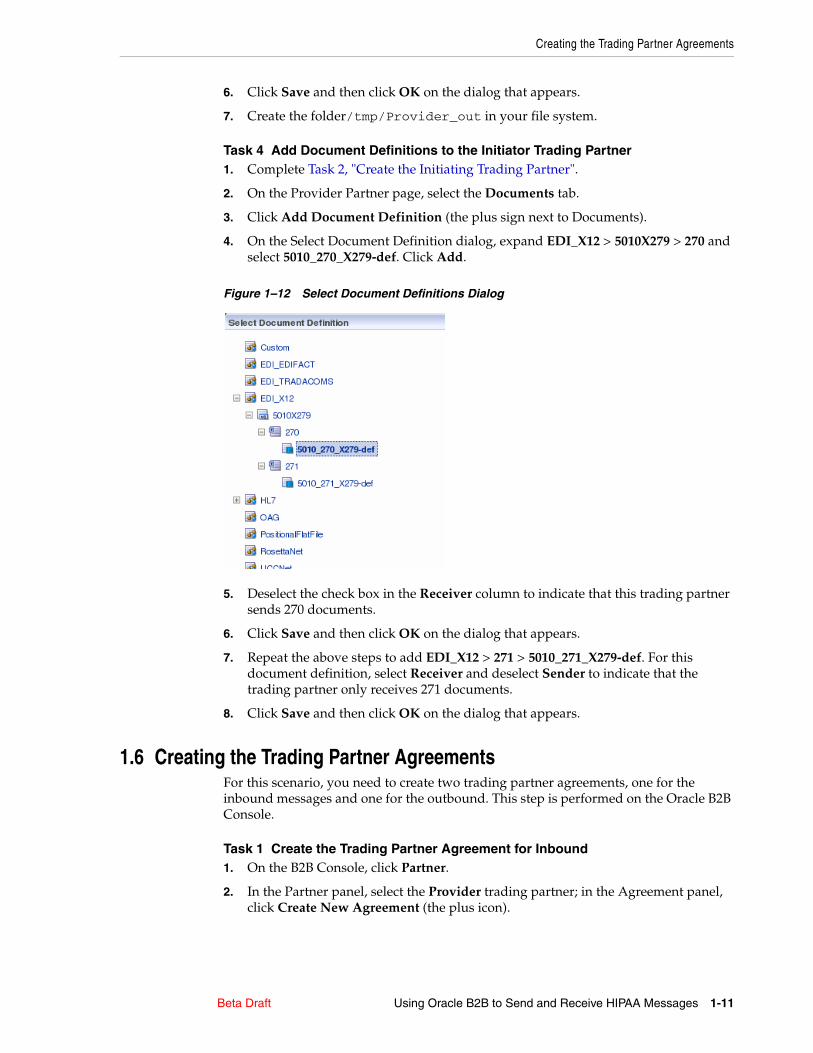
4. On the Select Document Definition dialog, expand EDI_X12 > 5010X279 > 270 and select 5010_270_X279-def. Click Add.
Figure 1–12 Select Document Definitions Dialog
5. Deselect the check box in the Receiver column to indicate that this trading partner sends 270 documents.
6. Click Save and then click OK on the dialog that appears.
7. Repeat the above steps to add EDI_X12 > 271 > 5010_271_X279-def. For this document definition, select Receiver and deselect Sender to indicate that the trading partner only receives 271 documents.
8. Click Save and then click OK on the dialog that appears.
1.6 Creating the Trading Partner AgreementsFor this scenario, you need to create two trading partner agreements, one for the inbound messages and one for the outbound. This step is performed on the Oracle B2B Console.
Task 1 Create the Trading Partner Agreement for Inbound1. On the B2B Console, click Partner.
2. In the Partner panel, select the Provider trading partner; in the Agreement panel, click Create New Agreement (the plus icon).

Creating the Trading Partner Agreements
1-12 Oracle SOA Suite for healthcare intergration - Sample Scenario Beta Draft
Figure 1–13 Adding a New Agreement
3. On the Agreement page, click Select Document Definition.
The Select Document Definition dialog appears.
Figure 1–14 Select Document Definition
4. Select the partner Payer <---- Provider with the document definition EDI_X12-5010X279-270-5010_270_X279-def. Click OK.
5. Under Agreement Parameters, deselect Functional Ack.
6. In the Agreement page, scroll down to the Payer section and click Add Identifier (the plus icon).
The Select Identification dialog appears.
Creating the Trading Partner Agreements
Beta Draft Using Oracle B2B to Send and Receive HIPAA Messages 1-13
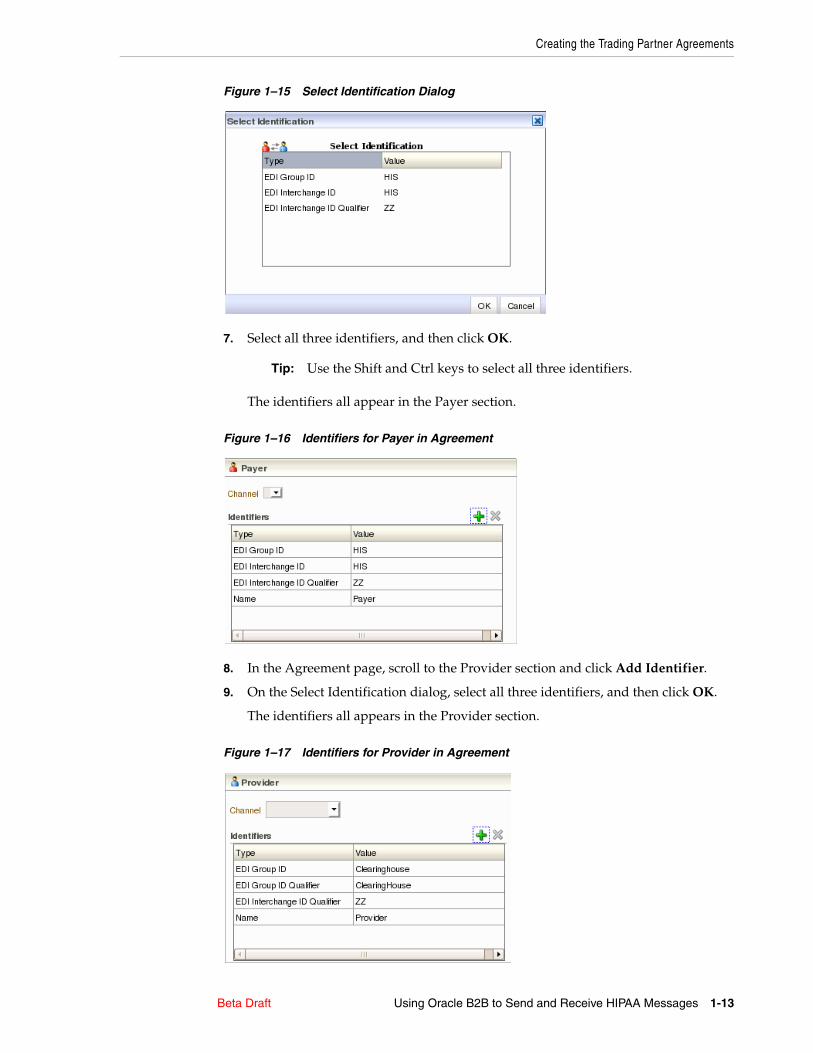
Figure 1–15 Select Identification Dialog
7. Select all three identifiers, and then click OK.
The identifiers all appear in the Payer section.
Figure 1–16 Identifiers for Payer in Agreement
8. In the Agreement page, scroll to the Provider section and click Add Identifier.
9. On the Select Identification dialog, select all three identifiers, and then click OK.
The identifiers all appears in the Provider section.
Figure 1–17 Identifiers for Provider in Agreement
Tip: Use the Shift and Ctrl keys to select all three identifiers.

Creating the Trading Partner Agreements
1-14 Oracle SOA Suite for healthcare intergration - Sample Scenario Beta Draft
10. Click Save and then click OK on the dialog that appears.
11. Click Validate to make sure the agreement is valid, and then click OK on the confirmation dialog.
12. Click Deploy to deploy the agreement, and then click OK on the confirmation dialog.
Task 2 Create the Trading Partner Agreement for Outbound1. On the B2B Console, click Partners.
2. In the Partner panel, select the Provider trading partner; in the Agreement panel, click Create New Agreement (the plus icon).
3. On the Agreement page, click Select Document Definition.
The Select Document Definition dialog appears.
Figure 1–18 Select Document Definition
4. Select the partner Payer -----> Provider with the document definition EDI_X12-5010X279-271-5010_271_X279-def. Click OK.
5. Under Agreement Parameters, deselect Functional Ack.
6. Scroll down to the Payer section and click Add Identifier (the plus icon).
The Select Identification dialog appears.
Figure 1–19 Select Identification Dialog
Creating the Trading Partner Agreements
Beta Draft Using Oracle B2B to Send and Receive HIPAA Messages 1-15
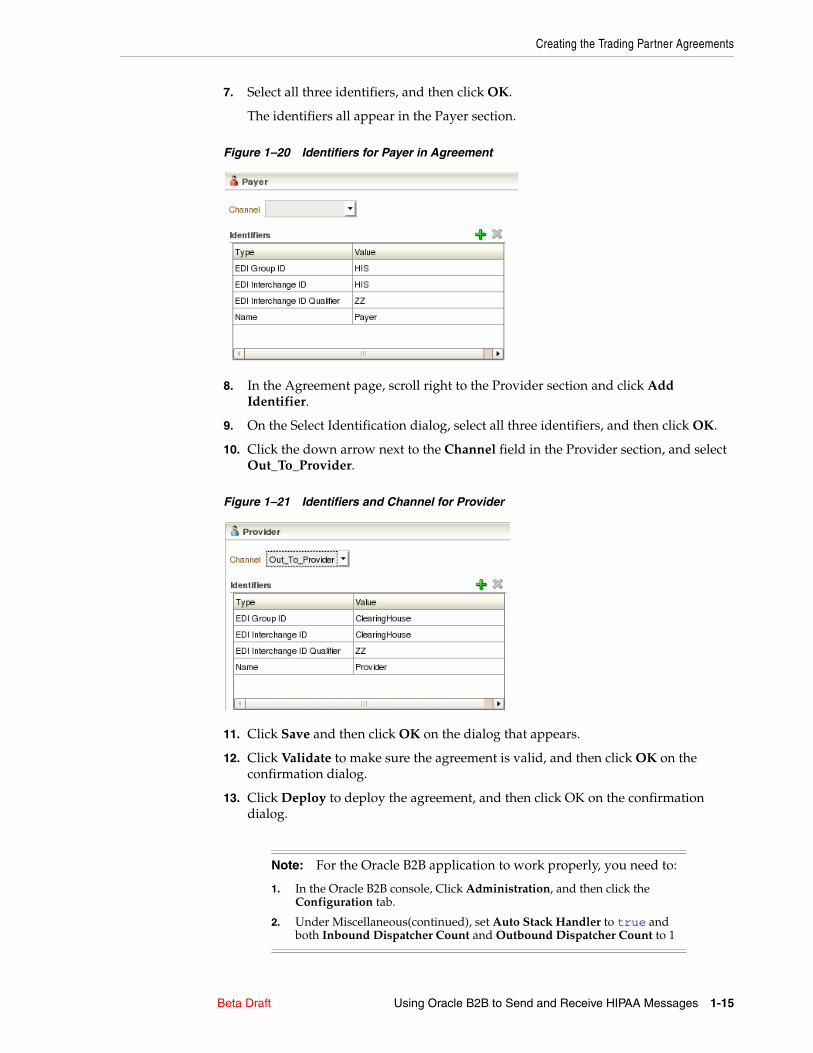
7. Select all three identifiers, and then click OK.
The identifiers all appear in the Payer section.
Figure 1–20 Identifiers for Payer in Agreement
8. In the Agreement page, scroll right to the Provider section and click Add Identifier.
9. On the Select Identification dialog, select all three identifiers, and then click OK.
10. Click the down arrow next to the Channel field in the Provider section, and select Out_To_Provider.
Figure 1–21 Identifiers and Channel for Provider
11. Click Save and then click OK on the dialog that appears.
12. Click Validate to make sure the agreement is valid, and then click OK on the confirmation dialog.
13. Click Deploy to deploy the agreement, and then click OK on the confirmation dialog.
Note: For the Oracle B2B application to work properly, you need to:
1. In the Oracle B2B console, Click Administration, and then click the Configuration tab.
2. Under Miscellaneous(continued), set Auto Stack Handler to true and both Inbound Dispatcher Count and Outbound Dispatcher Count to 1
Creating the SOA Composite Application
1-16 Oracle SOA Suite for healthcare intergration - Sample Scenario Beta Draft
1.7 Creating the SOA Composite ApplicationThe following procedures describe how to create the SOA application and project, and include creating a receiving B2B service, a sending B2B service, and an Oracle BPEL process to transfer the data. These procedures are performed using Oracle JDeveloper.
This process includes the following tasks:
■ Task 1, "Create the SOA Application and Project"
■ Task 2, "Create and Configure a Oracle B2B Adapter for the Source"
■ Task 3, "Create and Configure the Oracle B2B Adapter for the Target"
■ Task 4, "Create a BPEL Process"
■ Task 5, "Link the Partner Links to the Activities"
■ Task 6, "Create Global Variables"
■ Task 7, "Configure the Assign Activity"
■ Task 9, "Deploy the Composite Application"
Task 1 Create the SOA Application and ProjectIn Oracle JDeveloper, the processing logic is defined in a project, and projects are contained in applications. In this step, you create a SOA application and project.
1. Launch Oracle JDeveloper by running the jdev executable file.
2. Do one of the following:
■ If there are no existing applications, click New Application.
■ If there are existing applications, click in the existing application name in the Application Navigator toolbar, and select New Application.
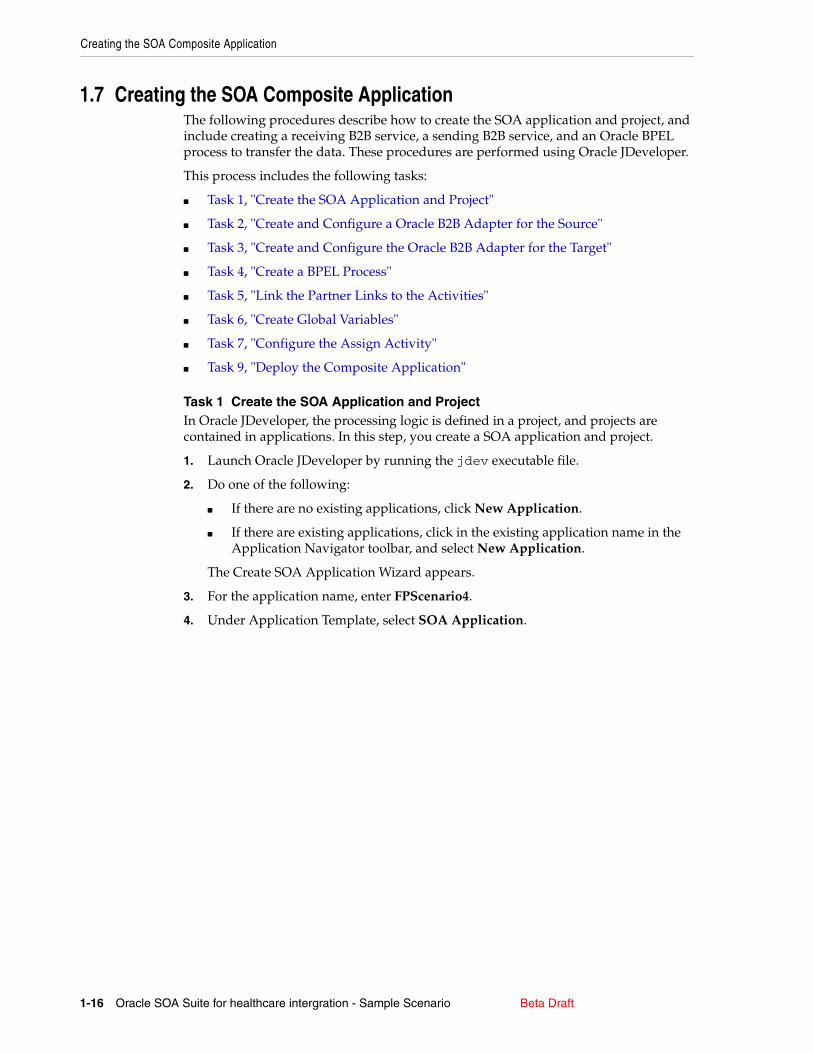
The Create SOA Application Wizard appears.
3. For the application name, enter FPScenario4.
4. Under Application Template, select SOA Application.
Creating the SOA Composite Application
Beta Draft Using Oracle B2B to Send and Receive HIPAA Messages 1-17
Figure 1–22 Create SOA Application Wizard - Name Your Application
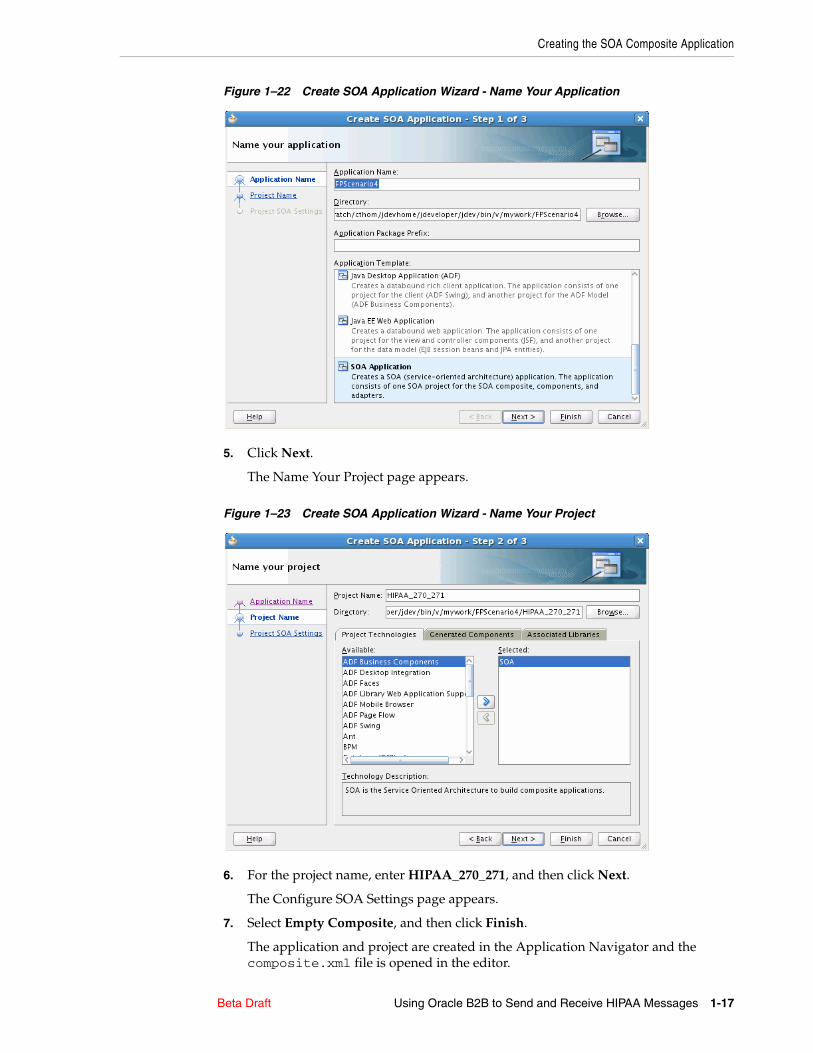
5. Click Next.
The Name Your Project page appears.
Figure 1–23 Create SOA Application Wizard - Name Your Project
6. For the project name, enter HIPAA_270_271, and then click Next.
The Configure SOA Settings page appears.
7. Select Empty Composite, and then click Finish.
The application and project are created in the Application Navigator and the composite.xml file is opened in the editor.
Creating the SOA Composite Application
1-18 Oracle SOA Suite for healthcare intergration - Sample Scenario Beta Draft
8. Click Save All.
Task 2 Create and Configure a Oracle B2B Adapter for the SourceThe receiving Oracle B2B adapter created in this step receives messages from the source system.
1. From the Components Palette on the right, scroll down to B2B and drag it to the Exposed Services lane in the composite to create a receiving endpoint.
The B2B Configuration Wizard appears.
2. On the Welcome page, click Next.
The Service Name page appears.
3. For the service name, enter Receive_270. Click Next.
The B2B Integration Type page appears.
4. Leave Default selected, and then click Next.
The Application Server Connection page appears.
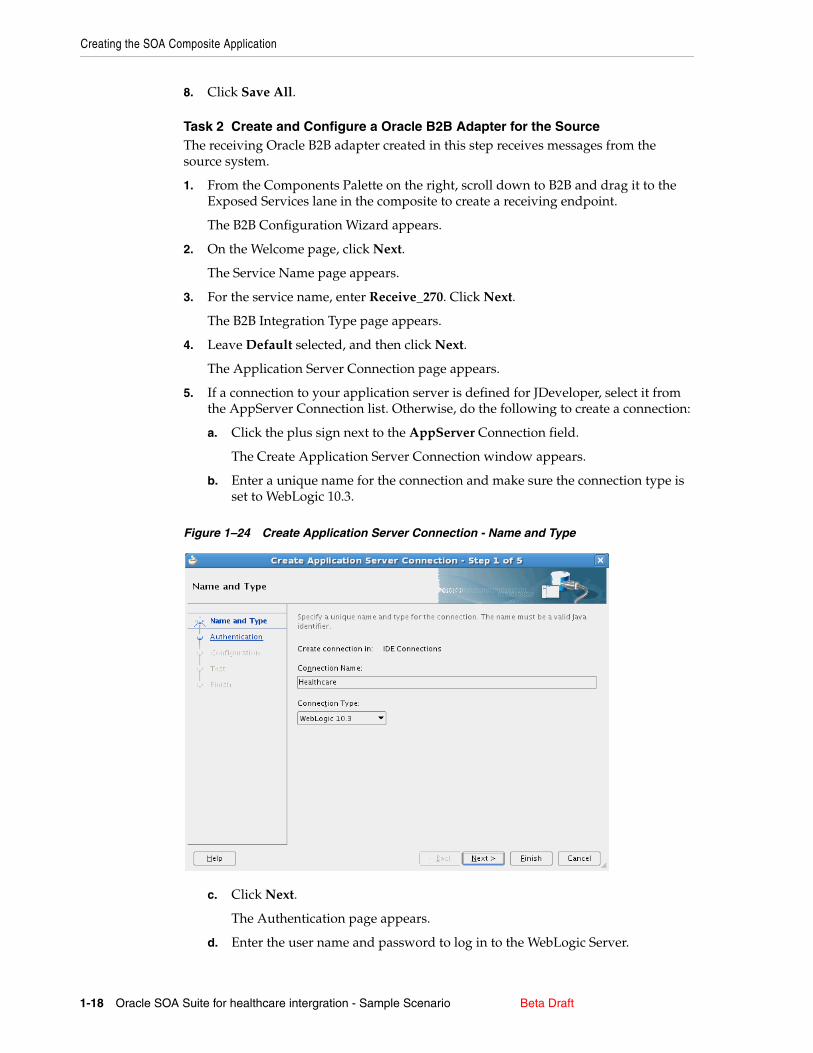
5. If a connection to your application server is defined for JDeveloper, select it from the AppServer Connection list. Otherwise, do the following to create a connection:
a. Click the plus sign next to the AppServer Connection field.
The Create Application Server Connection window appears.
b. Enter a unique name for the connection and make sure the connection type is set to WebLogic 10.3.
Figure 1–24 Create Application Server Connection - Name and Type
c. Click Next.
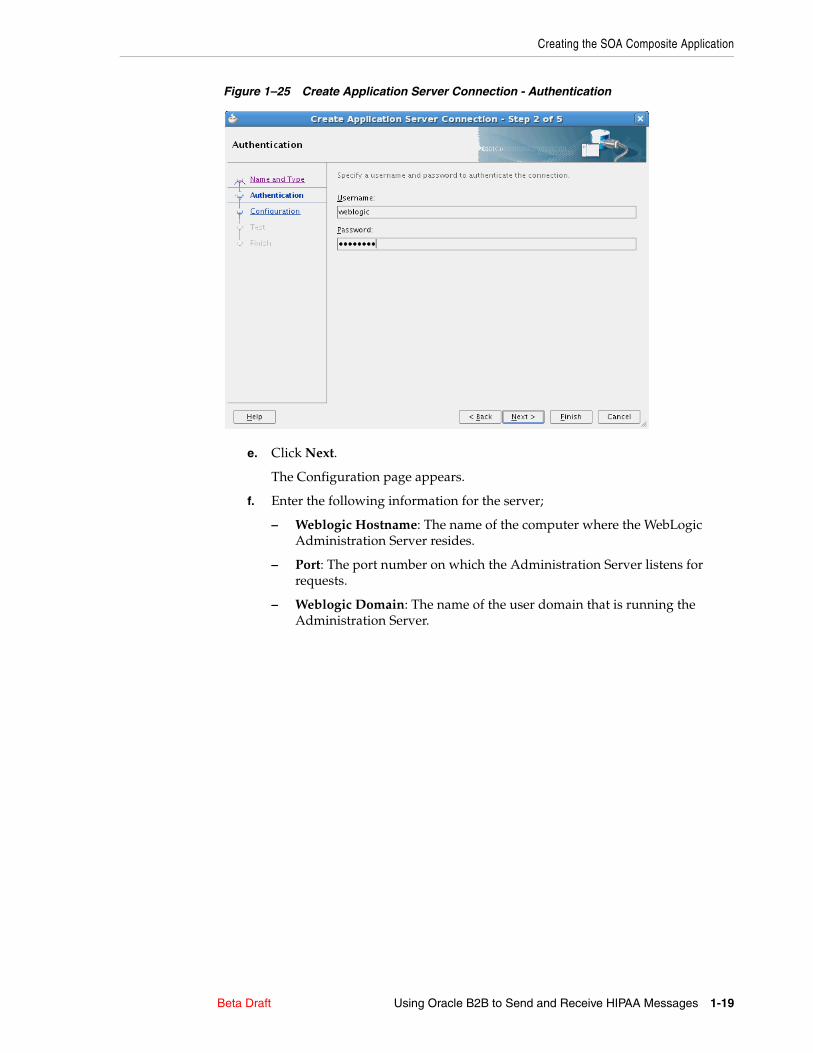
The Authentication page appears.
d. Enter the user name and password to log in to the WebLogic Server.
Creating the SOA Composite Application
Beta Draft Using Oracle B2B to Send and Receive HIPAA Messages 1-19
Figure 1–25 Create Application Server Connection - Authentication
e. Click Next.
The Configuration page appears.
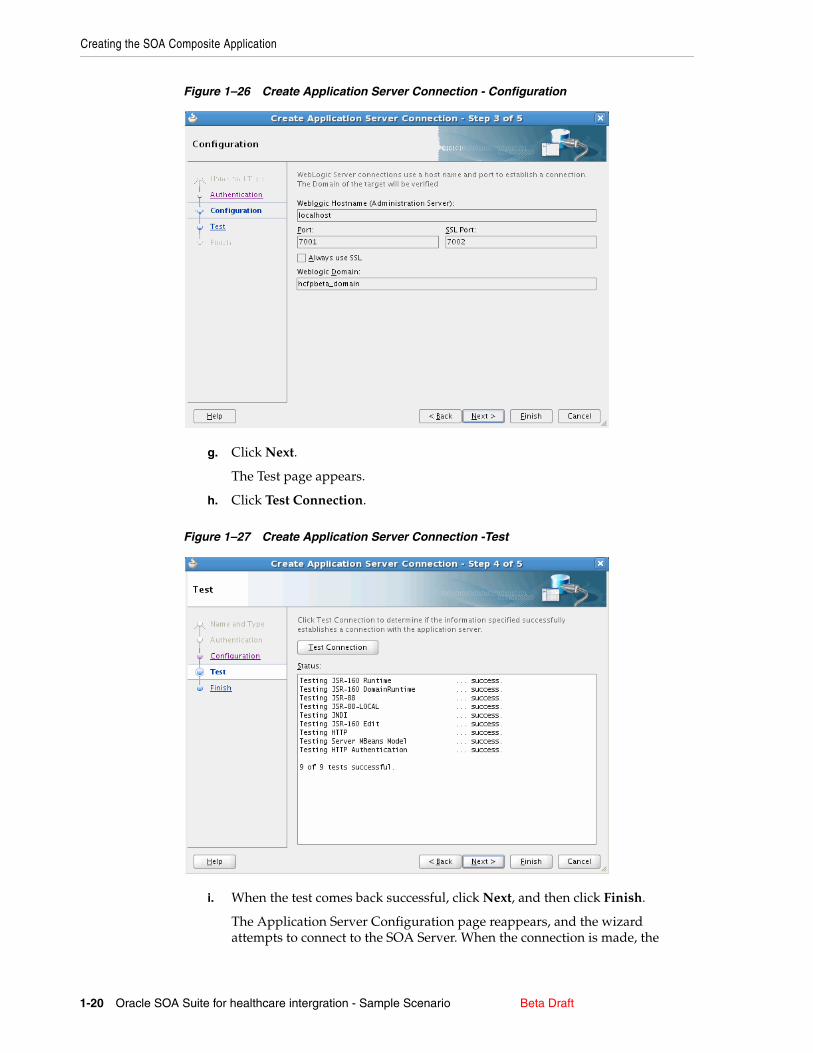
f. Enter the following information for the server;
– Weblogic Hostname: The name of the computer where the WebLogic Administration Server resides.
– Port: The port number on which the Administration Server listens for requests.
– Weblogic Domain: The name of the user domain that is running the Administration Server.
Creating the SOA Composite Application
1-20 Oracle SOA Suite for healthcare intergration - Sample Scenario Beta Draft
Figure 1–26 Create Application Server Connection - Configuration
g. Click Next.
The Test page appears.
h. Click Test Connection.
Figure 1–27 Create Application Server Connection -Test
i. When the test comes back successful, click Next, and then click Finish.
The Application Server Configuration page reappears, and the wizard attempts to connect to the SOA Server. When the connection is made, the
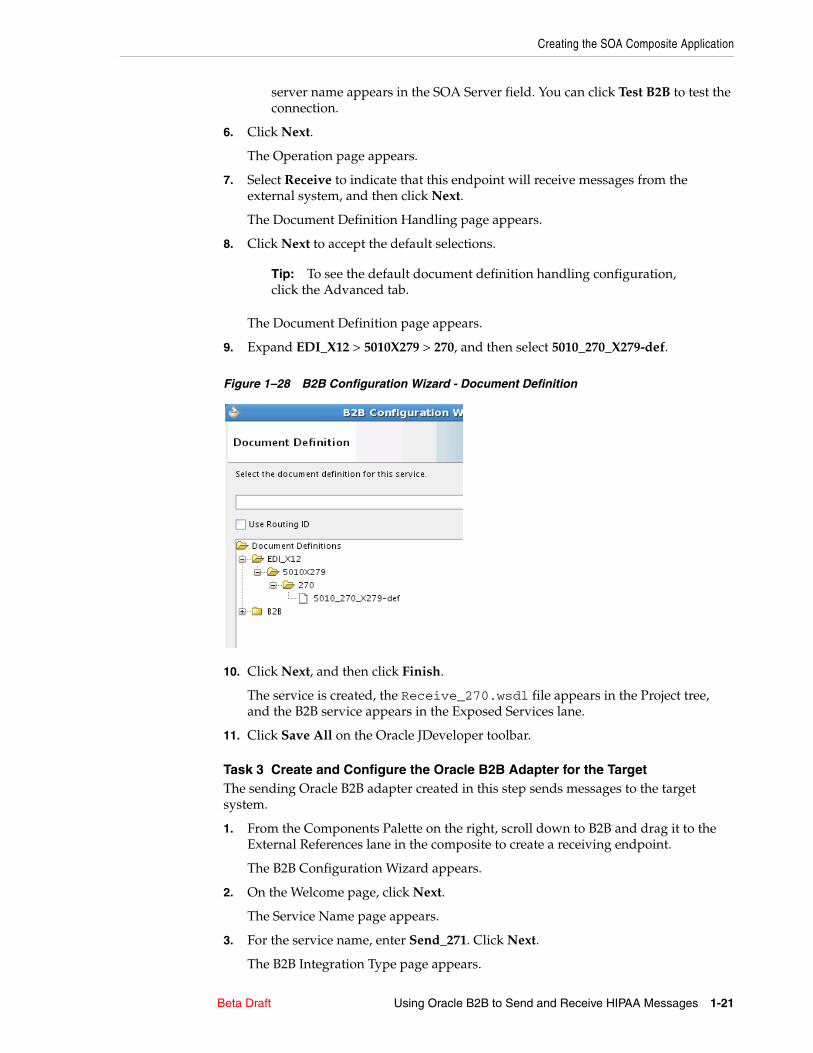
Creating the SOA Composite Application
Beta Draft Using Oracle B2B to Send and Receive HIPAA Messages 1-21
server name appears in the SOA Server field. You can click Test B2B to test the connection.
6. Click Next.
The Operation page appears.
7. Select Receive to indicate that this endpoint will receive messages from the external system, and then click Next.
The Document Definition Handling page appears.
8. Click Next to accept the default selections.
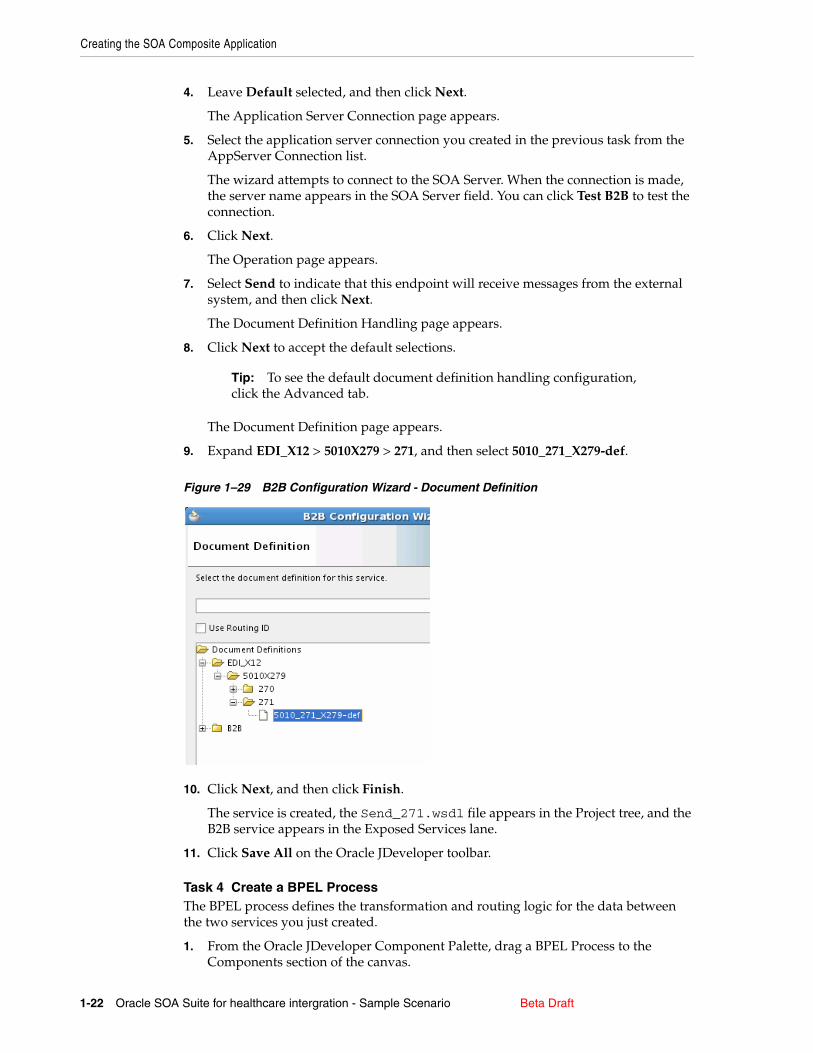
The Document Definition page appears.
9. Expand EDI_X12 > 5010X279 > 270, and then select 5010_270_X279-def.
Figure 1–28 B2B Configuration Wizard - Document Definition
10. Click Next, and then click Finish.
The service is created, the Receive_270.wsdl file appears in the Project tree, and the B2B service appears in the Exposed Services lane.
11. Click Save All on the Oracle JDeveloper toolbar.
Task 3 Create and Configure the Oracle B2B Adapter for the TargetThe sending Oracle B2B adapter created in this step sends messages to the target system.
1. From the Components Palette on the right, scroll down to B2B and drag it to the External References lane in the composite to create a receiving endpoint.
The B2B Configuration Wizard appears.
2. On the Welcome page, click Next.
The Service Name page appears.
3. For the service name, enter Send_271. Click Next.
The B2B Integration Type page appears.
Tip: To see the default document definition handling configuration, click the Advanced tab.
Creating the SOA Composite Application
1-22 Oracle SOA Suite for healthcare intergration - Sample Scenario Beta Draft
4. Leave Default selected, and then click Next.
The Application Server Connection page appears.
5. Select the application server connection you created in the previous task from the AppServer Connection list.
The wizard attempts to connect to the SOA Server. When the connection is made, the server name appears in the SOA Server field. You can click Test B2B to test the connection.
6. Click Next.
The Operation page appears.
7. Select Send to indicate that this endpoint will receive messages from the external system, and then click Next.
The Document Definition Handling page appears.
8. Click Next to accept the default selections.
The Document Definition page appears.
9. Expand EDI_X12 > 5010X279 > 271, and then select 5010_271_X279-def.
Figure 1–29 B2B Configuration Wizard - Document Definition
10. Click Next, and then click Finish.
The service is created, the Send_271.wsdl file appears in the Project tree, and the B2B service appears in the Exposed Services lane.
11. Click Save All on the Oracle JDeveloper toolbar.
Task 4 Create a BPEL ProcessThe BPEL process defines the transformation and routing logic for the data between the two services you just created.
1. From the Oracle JDeveloper Component Palette, drag a BPEL Process to the Components section of the canvas.
Tip: To see the default document definition handling configuration, click the Advanced tab.

Creating the SOA Composite Application
Beta Draft Using Oracle B2B to Send and Receive HIPAA Messages 1-23
The Create BPEL Process Wizard appears.
2. In the Template field, select Define Service Later, and then click OK.
Figure 1–30 Create BPEL Process Wizard
The BPEL files appear in the project tree, and the BPEL component appears in the canvas.
3. Drag a connector from the Receive_270 service to the BPEL component.
4. Drag a connect from the BPEL component to the Send_271 service.
The composite should appear similar to the following image.
Figure 1–31 BPEL Process Composite
5. Double click the BPEL component to open it in the BPEL Editor.
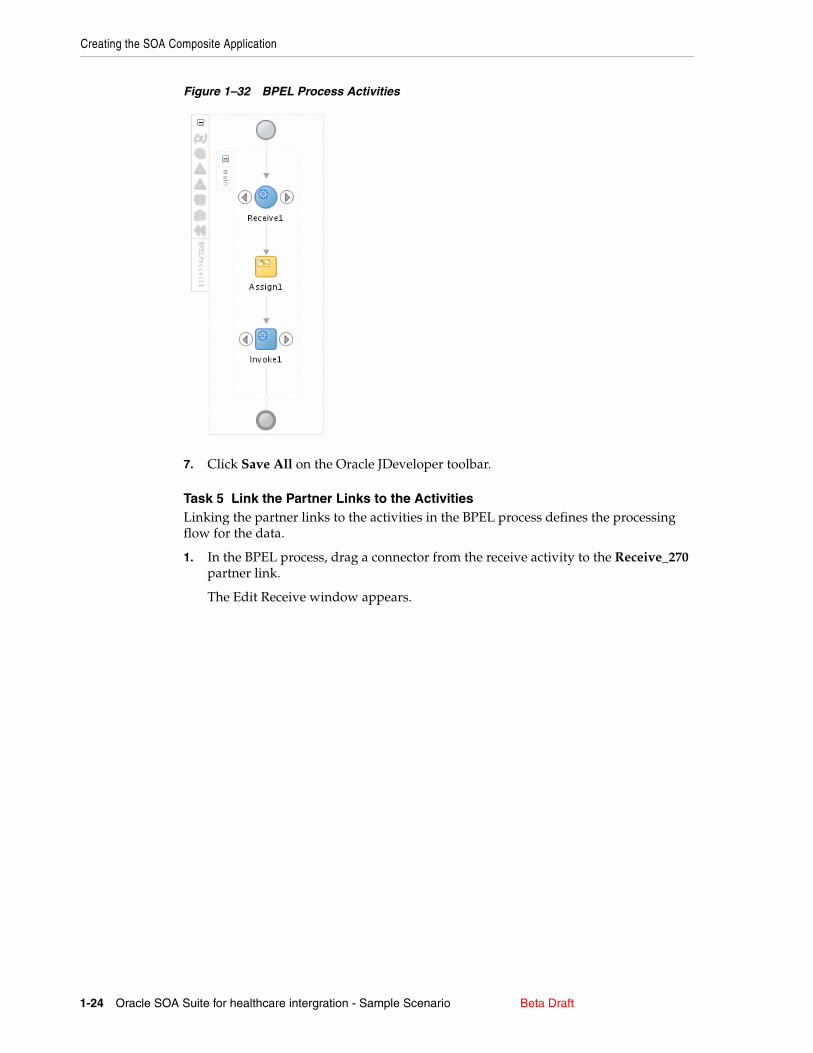
6. From the Component Palette, drag the following activities to the BPEL process in the order given:
■ Receive
■ Assign
■ Invoke
Creating the SOA Composite Application
1-24 Oracle SOA Suite for healthcare intergration - Sample Scenario Beta Draft
Figure 1–32 BPEL Process Activities
7. Click Save All on the Oracle JDeveloper toolbar.
Task 5 Link the Partner Links to the ActivitiesLinking the partner links to the activities in the BPEL process defines the processing flow for the data.
1. In the BPEL process, drag a connector from the receive activity to the Receive_270 partner link.
The Edit Receive window appears.
Creating the SOA Composite Application
Beta Draft Using Oracle B2B to Send and Receive HIPAA Messages 1-25
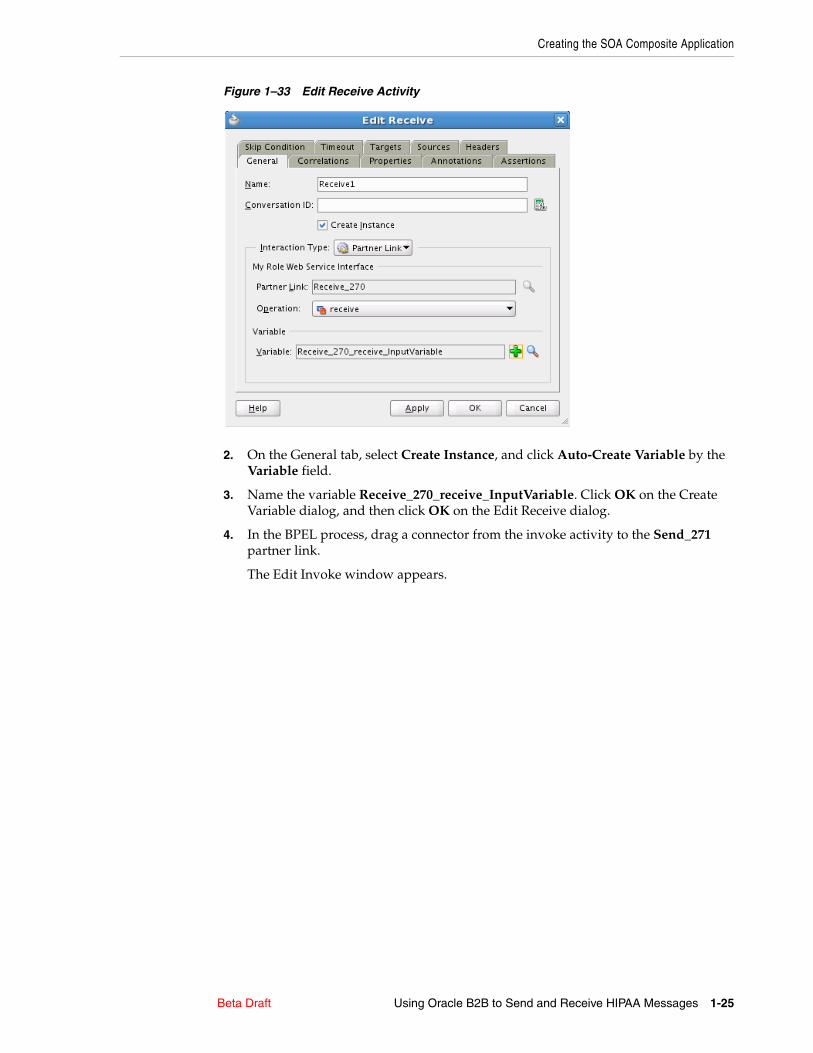
Figure 1–33 Edit Receive Activity
2. On the General tab, select Create Instance, and click Auto-Create Variable by the Variable field.
3. Name the variable Receive_270_receive_InputVariable. Click OK on the Create Variable dialog, and then click OK on the Edit Receive dialog.
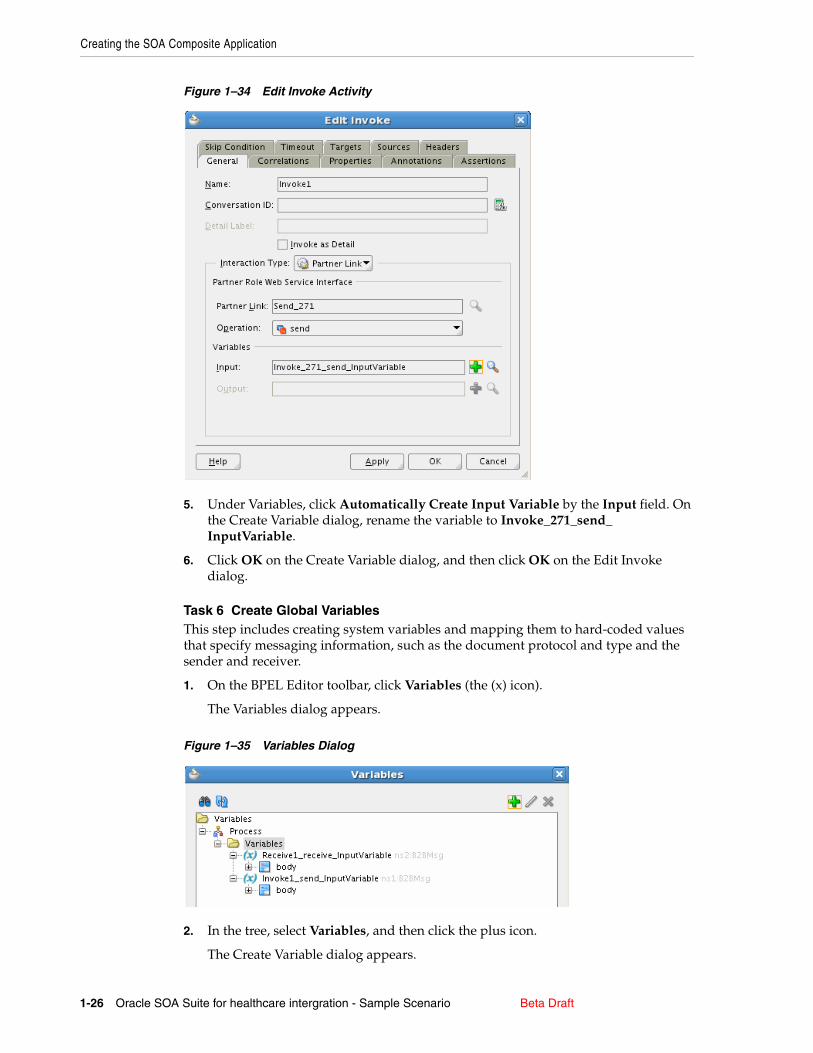
4. In the BPEL process, drag a connector from the invoke activity to the Send_271 partner link.
The Edit Invoke window appears.
Creating the SOA Composite Application
1-26 Oracle SOA Suite for healthcare intergration - Sample Scenario Beta Draft
Figure 1–34 Edit Invoke Activity
5. Under Variables, click Automatically Create Input Variable by the Input field. On the Create Variable dialog, rename the variable to Invoke_271_send_InputVariable.
6. Click OK on the Create Variable dialog, and then click OK on the Edit Invoke dialog.
Task 6 Create Global VariablesThis step includes creating system variables and mapping them to hard-coded values that specify messaging information, such as the document protocol and type and the sender and receiver.
1. On the BPEL Editor toolbar, click Variables (the (x) icon).
The Variables dialog appears.
Figure 1–35 Variables Dialog
2. In the tree, select Variables, and then click the plus icon.
The Create Variable dialog appears.
Creating the SOA Composite Application
Beta Draft Using Oracle B2B to Send and Receive HIPAA Messages 1-27
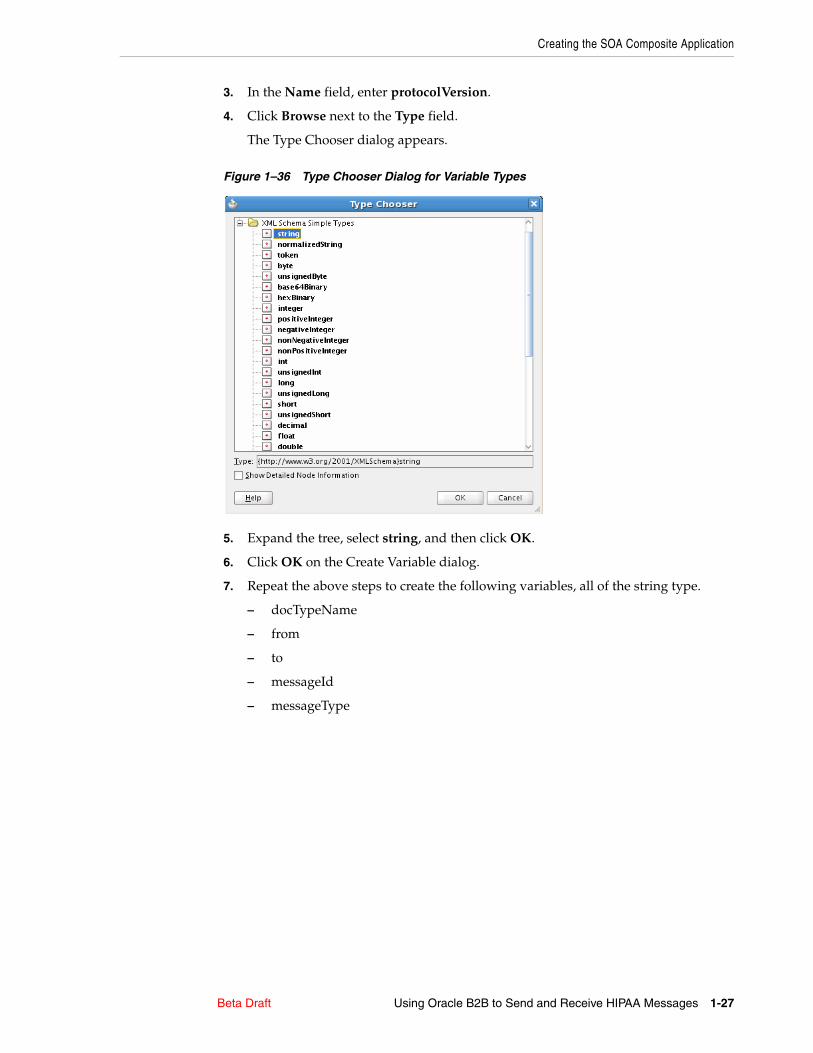
3. In the Name field, enter protocolVersion.
4. Click Browse next to the Type field.
The Type Chooser dialog appears.
Figure 1–36 Type Chooser Dialog for Variable Types
5. Expand the tree, select string, and then click OK.
6. Click OK on the Create Variable dialog.
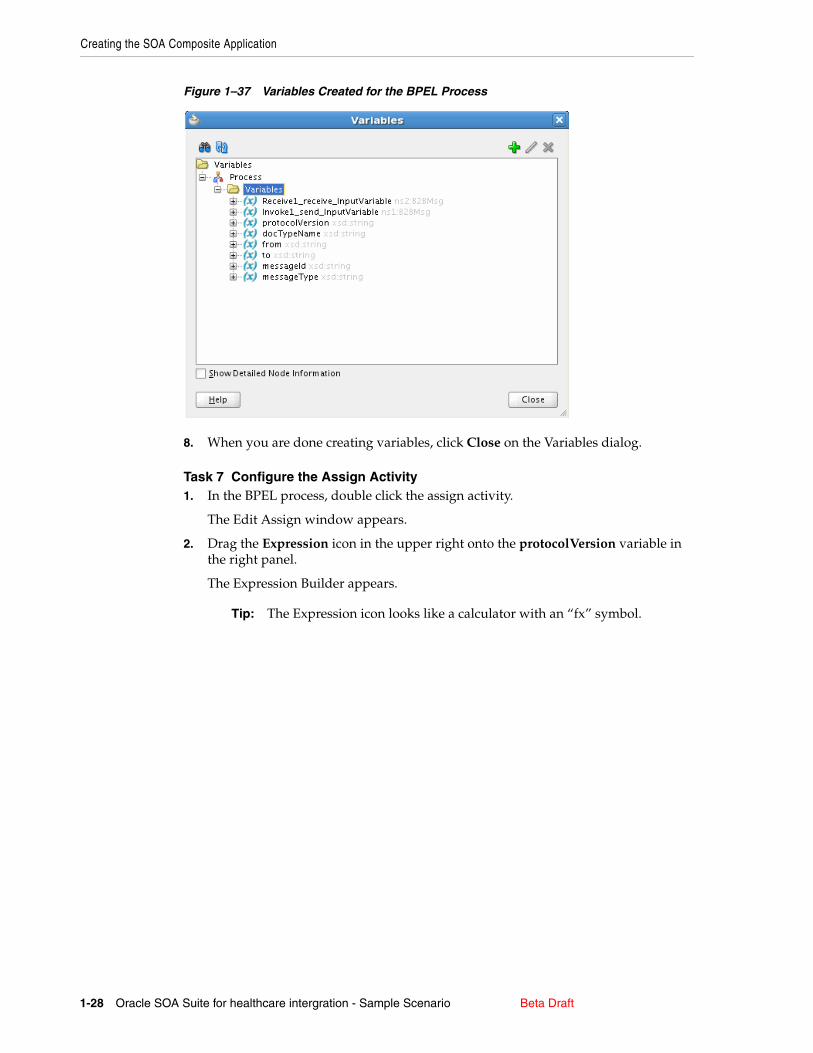
7. Repeat the above steps to create the following variables, all of the string type.
– docTypeName
– from
– to
– messageId
– messageType
Creating the SOA Composite Application
1-28 Oracle SOA Suite for healthcare intergration - Sample Scenario Beta Draft
Figure 1–37 Variables Created for the BPEL Process
8. When you are done creating variables, click Close on the Variables dialog.
Task 7 Configure the Assign Activity1. In the BPEL process, double click the assign activity.
The Edit Assign window appears.
2. Drag the Expression icon in the upper right onto the protocolVersion variable in the right panel.
The Expression Builder appears.
Tip: The Expression icon looks like a calculator with an “fx” symbol.
Creating the SOA Composite Application
Beta Draft Using Oracle B2B to Send and Receive HIPAA Messages 1-29
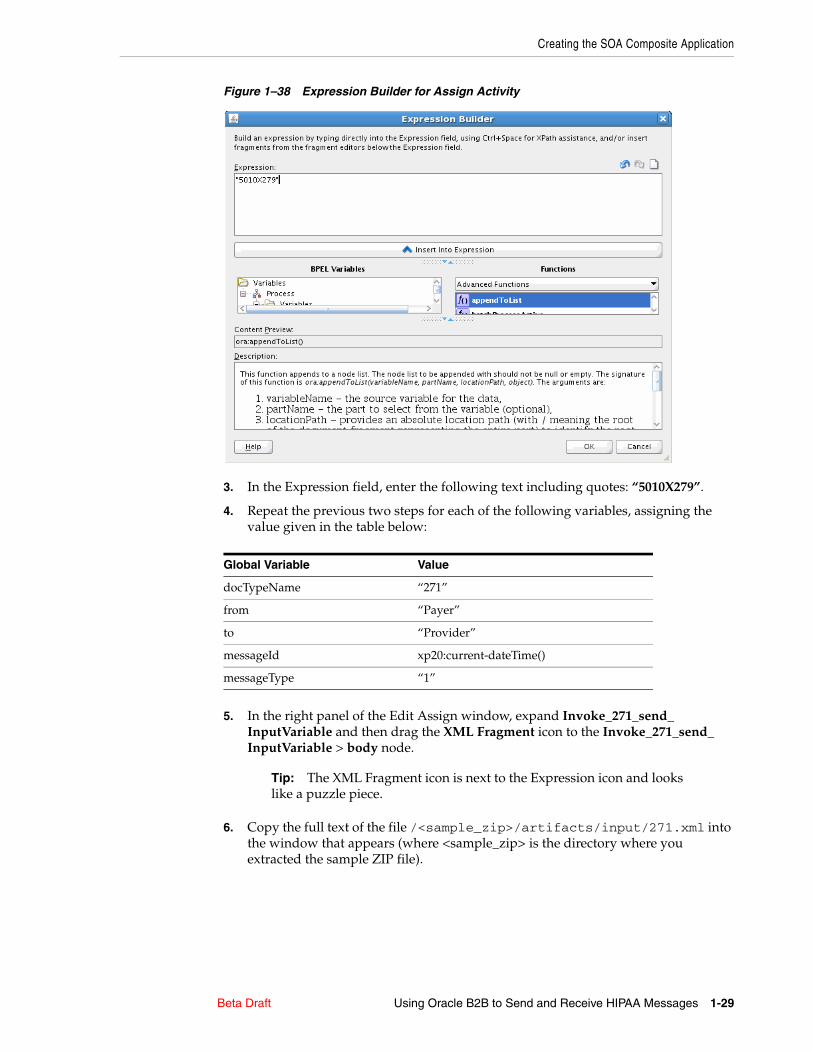
Figure 1–38 Expression Builder for Assign Activity
3. In the Expression field, enter the following text including quotes: “5010X279”.
4. Repeat the previous two steps for each of the following variables, assigning the value given in the table below:
5. In the right panel of the Edit Assign window, expand Invoke_271_send_InputVariable and then drag the XML Fragment icon to the Invoke_271_send_InputVariable > body node.
6. Copy the full text of the file /<sample_zip>/artifacts/input/271.xml into the window that appears (where <sample_zip> is the directory where you extracted the sample ZIP file).
Global Variable Value
docTypeName “271”
from “Payer”
to “Provider”
messageId xp20:current-dateTime()
messageType “1”
Tip: The XML Fragment icon is next to the Expression icon and looks like a puzzle piece.
Creating the SOA Composite Application
1-30 Oracle SOA Suite for healthcare intergration - Sample Scenario Beta Draft
7. On both sides of the Edit Assign window, expand Invoke_271_send_InputVariable > body > ns4:Transaction-271 : Transaction-271, and drag a connector from ns4:Segment-ST : Segment-ST on the left to ns4:Segment-ST : Segment-ST on the right.
8. Click OK, and then click OK on the Edit Assign dialog.
9. On the Oracle JDeveloper toolbar, click Save All.
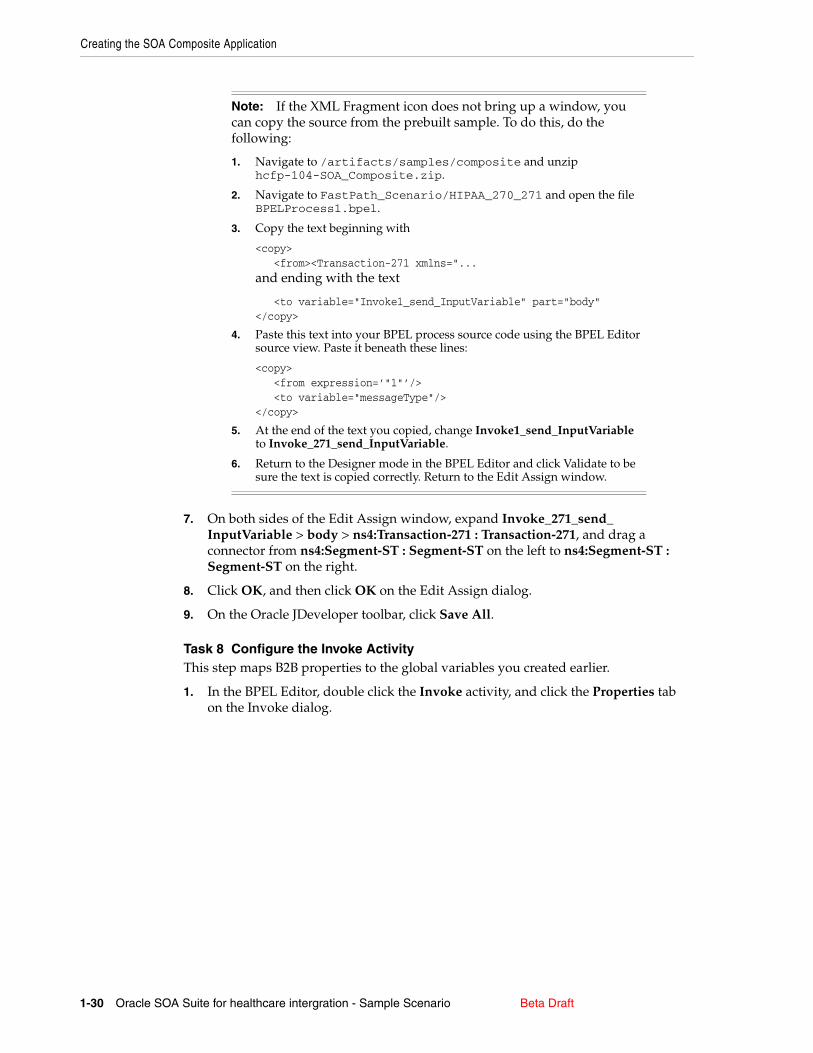
Task 8 Configure the Invoke ActivityThis step maps B2B properties to the global variables you created earlier.
1. In the BPEL Editor, double click the Invoke activity, and click the Properties tab on the Invoke dialog.
Note: If the XML Fragment icon does not bring up a window, you can copy the source from the prebuilt sample. To do this, do the following:
1. Navigate to /artifacts/samples/composite and unzip hcfp-104-SOA_Composite.zip.
2. Navigate to FastPath_Scenario/HIPAA_270_271 and open the file BPELProcess1.bpel.
3. Copy the text beginning with
<copy> <from><Transaction-271 xmlns="...and ending with the text
<to variable="Invoke1_send_InputVariable" part="body"</copy>
4. Paste this text into your BPEL process source code using the BPEL Editor source view. Paste it beneath these lines:
<copy> <from expression=’"1"’/> <to variable="messageType"/></copy>
5. At the end of the text you copied, change Invoke1_send_InputVariable to Invoke_271_send_InputVariable.
6. Return to the Designer mode in the BPEL Editor and click Validate to be sure the text is copied correctly. Return to the Edit Assign window.
Creating the SOA Composite Application
Beta Draft Using Oracle B2B to Send and Receive HIPAA Messages 1-31
Figure 1–39 Invoke Dialog, Properties Tab
2. In the Properties list, select b2b.toTradingPartnerId.
3. Double click inside the Value field, and then click the ellipsis button that appears in the field.
The Adapter Property Value dialog appears.
4. Select Variable, and then click the Browse icon.
The Variable XPath Builder appears.

Creating the SOA Composite Application
1-32 Oracle SOA Suite for healthcare intergration - Sample Scenario Beta Draft
Figure 1–40 Variable XPath Builder Dialog
5. In the Variables list, select to, and then click OK.
The value you selected appears on the Adapter Property Value dialog.
Figure 1–41 Adapter Property Value
6. Click OK on the Adapter Property Value dialog.
The variable information appears in the b2b.toTradingPartnerId row.
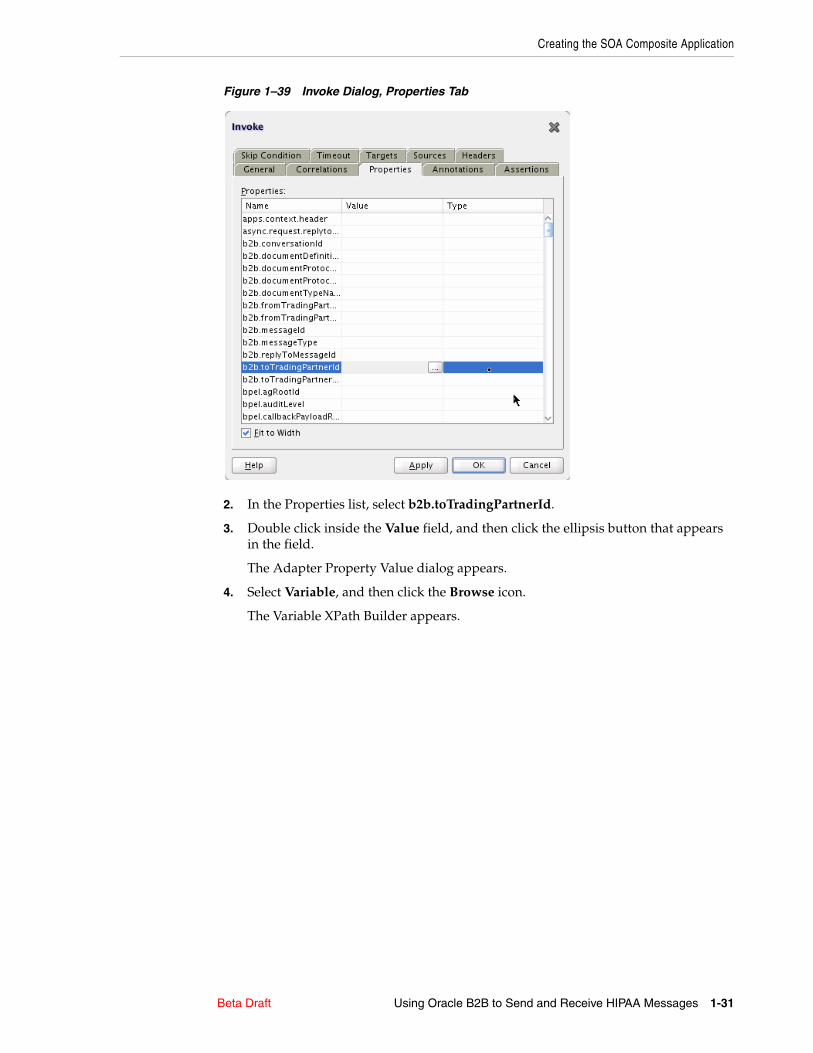
7. Repeat the above steps to configure the properties listed in the following table with the values given.
Table 1–3 B2B Property Values for the Invoke Activity
Property Variable to Select for Value
b2b.messageType messageType
b2b.messageId messageId
b2b.fromTradingPartnerId from
b2b.documentTypeName docTypeName
b2b.documentProtocolVersion protocolVersion
Testing the Application
Beta Draft Using Oracle B2B to Send and Receive HIPAA Messages 1-33
The properties on the Invoke dialog should look similar to the following figure.
Figure 1–42 Completed Property Values for the Invoke Activity
8. Click OK, and then click Save All on the Oracle JDeveloper toolbar.
Task 9 Deploy the Composite ApplicationOnce you have completed creating and configuring the project components, you can deploy the application to the WebLogic server.
1. In the Application Navigator panel, right-click HIPAA_270_271, point to Deploy, and then click HIPAA_270_271.
The Deploy HIPAA_270_271 dialog appears.
2. Select Deploy to Application Server, and then click Next.
3. On the Deploy Configuration page, click Next.
4. On the Select Server page, select the server connection you defined in Task 2, and then click Finish.
The HIPAA application is deployed to the WebLogic server. Any messages generated during deployment appear in the lower section of the Oracle JDeveloper window.
1.8 Testing the ApplicationA sample input file is provided so you can test your application and verify that it is working correctly. All you need to do is copy the input file to the directory you specified earlier, and the application will pick it up and process it.
Testing the application consists of two steps: Testing the application and verifying the data.
1. Navigate to the location where you extracted the sample ZIP file, and then to /artifacts/input.
2. Copy the 270.dat file to /tmp/Provider_in.
The file should disappear quickly, indicating that it has been picked up by your application.
3. To verify the message processing in the B2B Console, do the following:
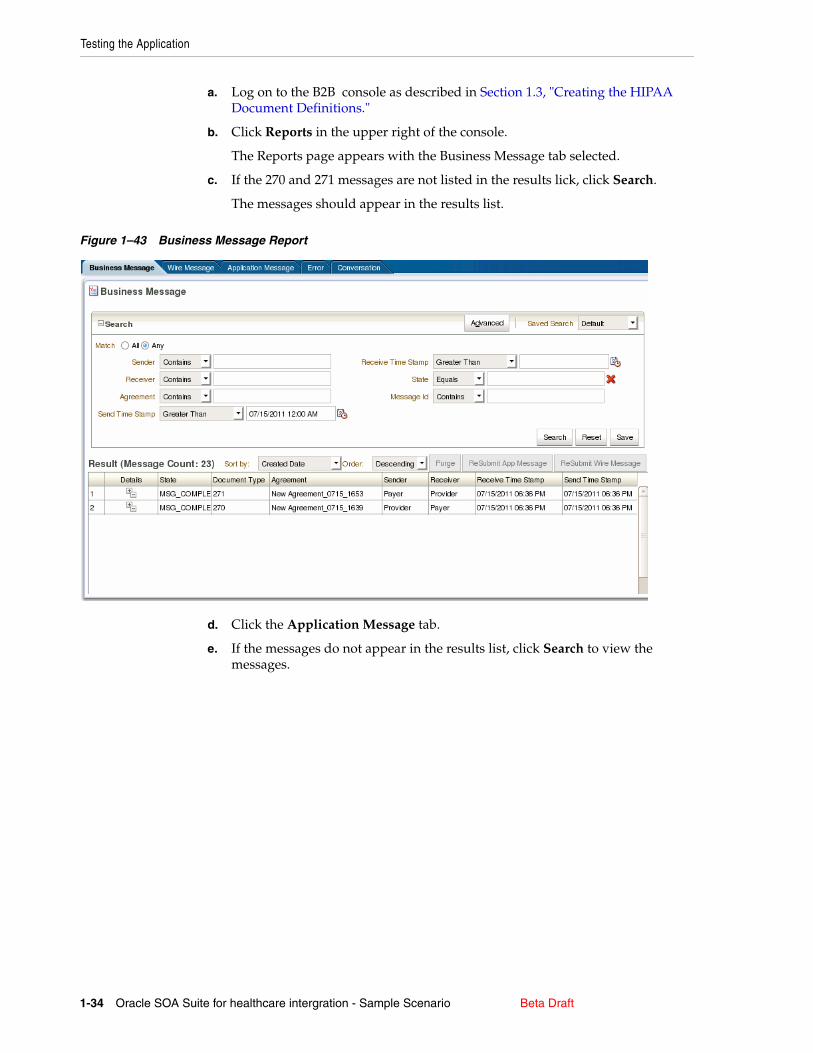
Testing the Application
1-34 Oracle SOA Suite for healthcare intergration - Sample Scenario Beta Draft
a. Log on to the B2B console as described in Section 1.3, "Creating the HIPAA Document Definitions."
b. Click Reports in the upper right of the console.
The Reports page appears with the Business Message tab selected.
c. If the 270 and 271 messages are not listed in the results lick, click Search.
The messages should appear in the results list.
Figure 1–43 Business Message Report
d. Click the Application Message tab.
e. If the messages do not appear in the results list, click Search to view the messages.

Working with the Prebuilt Sample
Beta Draft Using Oracle B2B to Send and Receive HIPAA Messages 1-35
Figure 1–44 Application Message Report
f. Click on the Details icon for a message to view additional information.
4. To verify the message processing in Oracle Enterprise Manager, do the following:
a. Launch a web browser and log in to the console. The URL is http://<hostname>:<port>/em, where <hostname> is the name of the computer on which WebLogic Server is installed, and <port> is the port number on which WebLogic Server is listening.
b. In the navigation tree on the left, expand SOA > <domain> > default, and then select HIPAA_270_271 (where <domain> is the name of your WebLogic domain).
The Dashboard page appears, where you can view information about the HIPAA_270_271 composite.
1.9 Working with the Prebuilt SampleThe sample ZIP file includes the B2B components and the Oracle JDeveloper project that are described in the previous procedures. You can import the B2B components, and deploy the Oracle JDeveloper project and test it without going through the steps of creating the project.
1. Navigate to the location where you extracted the sample ZIP file, and then to /artifacts/samples/composite.
2. Extract the hcfp-104-SOA_Composite.zip file.
3. Log on to the B2B Console.
4. Click Administration, and then click the Configuration tab.
5. Under Miscellaneous(continued), set Auto Stack Handler to true and both Inbound Dispatcher Count and Outbound Dispatcher Count to 1.
6. Click the Import/Export tab.
Working with the Prebuilt Sample
1-36 Oracle SOA Suite for healthcare intergration - Sample Scenario Beta Draft
7. Click Browse under Import, and then navigate to /artifacts/samples/b2b and select hcfp-104-HIPAA-Composite_270_271.zip.
8. Click Import.
9. When the import is complete, click the Listening Channels tab.
10. For each channel, click the Channel Attributes subtab, and select Enable. Click Save.
11. Click Partners, and then select the Payer partner.
12. For each agreement, select the agreement and then click Deploy.
13. Launch Oracle JDeveloper.
14. Click File > Open, and navigate to the directory where you extracted the sample ZIP file and then to /artifacts/samples/composite/FastPath_Scenario. Select FastPath_Scenario.jws.
15. Deploy the project, as described in Task 9, "Deploy the Composite Application".
16. Test the application, as described in Section 1.8, "Testing the Application".
Copyright © 2022 FDOKUMEN