A guide to owning and running a small boat for sea angling
140
Neville Merritt Updated and released as an e-book 2009 Angling Boats A guide to owning and running a small boat for sea angling
-
Upload
khangminh22 -
Category
Documents
-
view
4 -
download
0
Transcript of A guide to owning and running a small boat for sea angling

Neville Merritt
Updated and released as an e-book 2009
Angling Boats
A guide to owning and running a
small boat for sea angling

Acknowledgements
I started writing this book feeling slightly fraudulent, as there are many far more expert
seafarers than I – after boating for over thirty years, I am still learning a lot. What I have
written in this book has been learned from the many people who have helped me over the years, plus a little from my own trial and
error. So the least I can do is to acknowledge who has taught me.
I would like to thank the writers of the many
books and boating articles I have read; those that patiently taught me on boating, navigation and VHF courses; the many
acquaintances at the waterside who freely gave advice to a complete stranger; my
friends on various web angling forums and my father who passed on to me his love of the sea. And above all, I would like to thank my
wife and children, who let me disappear
whenever the tides and wind are right…
Angling Boats
A Guide to
Owning and Running a
Small Boat for Sea Angling
First published in 2006 by
ARFORD BOOKS Apple Tree, Arford Road, Headley
Bordon, Hampshire GU35 8BT
Tel: 01428 713019
Second Edition published 2009
Copyright Neville Merritt 2009
The right of Neville Merritt to be identified as the Author of the Work has been
asserted by him in accordance with the
Copyright, Designs and Patents Act 1988
All rights reserved. No part of this
publication may be reproduced, stored in a retrieval system, or transmitted, in any
form or by any means, without the prior
written permission of the publisher, nor be otherwise circulated in any form.
This ebook is supplied for the sole use of the purchaser and may be viewed in
electronic form, and one printed copy may
be produced for the sole use of the purchaser. An electronic copy may be made
for security backup purposes.
ISBN 10 : 0-9553242-1-1
ISBN 13 : 978-0-9553242-1-5
Cover Design and Photography
Neville Merritt Text Diagrams
Neville Merritt
Text Illustrations Ian Tyrrell

Contents
Introduction 5
Why Buy a Boat 6
Boats to Choose From 8
Where to Keep Your Boat 18
Equipment and Safety 20
Launching and Recovering 29
Boat Handling - Under Way 33
Boat Handling – Mooring 35
Boat Handling - At Sea 42
Fishing Marks 49
Tides 52
Weather Forecasts 54
Basic Navigation 58
Anchoring 70
VHF Radios 80
Ropes and Knots 83
Looking After Yourself 90
If Things Go Wrong 95
Basic Maintenance and DIY 107
Quick Test 119
The End 121
Appendices

Angling Boats 5
Introduction
I decided to write this book because I came across many questions
on web forums asking for help on the basics of owning a boat. I
realised that I had asked the same questions once, and it took
years to find all the answers. There are many people willing to
help, and there are countless books and magazines, but I have
never come across a book as an introduction to boats written with anglers in mind. This is it.
The first edition was published in 2006 in a traditional book format,
and the print run sold out within two years. Since then I have
constantly been asked where copies can be bought, and I am still
seeing those questions being asked on web forums. I decided to
update the book as some regulations have changed, and publish as
an e-book, which will hopefully reach more people.
The sea is a resource we must all be able to share. Angling is not
the only water sport – there are yachts, dinghies, powerboats, jet-
skis, windsurfers and more. Other boaters may not understand
what we, as anglers, do – nor do all anglers understand the
intricacies of other water sports. So please be tolerant of other
boats and leave room for others to enjoy the water, and hope they do the same for you.
As a knowledgeable boat owner, you will be part of the community
that shares a deep respect for the sea, and you will find a
tremendous camaraderie among boat owners. Any of us may need
help at any time, and it is more common for someone to go out of their way to help than pass on by.
This book was written as a “get you started” guide, so it provides
the basic information you need to have on a range of topics. Many
specialist books have been written on each area covered. Once you
have a general grasp of what to do with your boat, and if you want
to explore areas such as navigation, there are plenty more sources
on the web, in magazines, books, videos and courses. I hope you will want to find out more.
Above all, have fun and be safe. Happy boating and tight lines.
Neville Merritt 2009

Angling Boats 6
Why Buy a Boat
You will hear these sooner or later:
“A boat is a hole in the water into which you pour money”
“Owning a boat is like standing in a cold shower tearing up ten pound notes”
Joking apart, why do you want to own a boat? It would be a good
idea to be sure you know why you are doing it, because believe
me, it is going to cost a lot of time and money. This is not an
attempt to put you off, but plenty of boat salesmen have earned
good commissions on boats used just a few times before they are sold on.
So let’s have a look at a few reasons to buy a small fishing boat, and perhaps dispel a few myths before it is too late.
1. I would save on charter boat fees. Wrong. Have a look at
the annual costs of running a boat, divide by the number of
outings you usually have and I think you’ll see that running
your own boat is no bargain. There are compensations, or
nobody would do it, but don’t believe it is a cheap option.
2. I can fish more often. This depends. If you leave you boat in
the water and you can easily fit in some short trips, you may
well get more fishing in. But running a fishing boat takes time,
and chances are your spare time will be taken up by
maintenance and general fiddling. Also, there is more to a
fishing trip by boat than jumping in and driving off. You have to
prepare for each trip, and clean up and tidy down afterwards. If
you have to trail your boat and launch every time, then you
need to include the launch and recovery times as well. It all adds up!
3. I like boat fishing, so owning a boat seems logical. As I
mentioned before, there is a lot more to running a boat than
fishing from it. Try turning that statement around and it would
make more sense – “I like boats so fishing from it seems logical”.
The message is – make sure you like boating! You will have to put
a lot of time, money and effort into running your own boat safely
and reliably, so there has to be an incentive. If you have, or
develop an interest in boats, then there is no problem – it will be a
labour of love. You won’t mind going down to the marina in a
howling gale just to make sure everything is OK. You won’t mind
scraping off the antifouling in April while your mates are out after
the plaice. And you won’t mind taking the family for a spin round
the harbour when you are sure the bass are under those terns
diving over the sand-bar. You won’t mind because you enjoy boats
as much as fishing.

Angling Boats 7
Having established that you really do want to run a boat of your
own, it would be wise to have a look at all the costs involved before
you stump up the money for the boat itself. Obviously I don’t know
how large a boat you are thinking of, or what the costs are in your
part of the world, so I cannot list the actual costs. What I will do
however is provide a checklist of the items and services that you
will have to invest in both up front and on an ongoing basis. Use
this checklist to cost up various options before you start – and add
a bit more for contingencies. It would be a huge disappointment if
you invested in a boat then realised you could not meet all the
other costs involved. And don’t think you can sell a boat just like a
car – it often takes months for a second-hand boat to find a buyer, particularly out of season.
Items Cost
Boat Purchase cost
Trailer and lock
Engine
Spare engine
Navigation and Electronics if not already fitted:
Compass
Fishfinder
VHF Radio and aerial
GPS
Charts
Anchor and rope
Flares
Lifejackets
Second fuel tank and battery
Fenders and mooring ropes
Other bits: buckets, pump if not already fitted,
seats, rod holders etc.
Total
Annual Costs:
Annual Engine Service
Trailer brakes and bearing service
Storage or marina fees
Insurance
Replace flares every 3 years
Total

Angling Boats 8
Boats to Choose From
There are hundreds of different types of boat, to suit different uses,
lifestyles and pockets. You can of course fish from any boat as long
as it is in the right spot, but some boats are more suitable as a
dedicated fishing platform than others. In this section we will
ignore all the boats not intended primarily for fishing and
concentrate on the different hull, layout and engine choices to
choose from. If you intend to fish from a boat that will have other
uses, such as a family power boat or sailing cruiser, then you need
to choose a boat to suit those uses – but there are horses for
courses and your family sailing cruiser may not be the best boat for a wrecking trip!
The size of a boat is usually referred to by length, until you get to
large commercial vessels where they are referred to by tonnage.
The smallest boat you can reasonably fish from is about four
metres in length, and you would need to keep within a couple of
miles of the shore. At five metres you can start to get more
adventurous, and friends of mine with seven and eight metre boats
are regularly going to wrecks thirty miles off shore and more. But
size comes with a price. A seven metre boat is not just a bit more
than a six metre boat – it can be more than 50% more expensive
because as length increases, so does width, depth, thickness of
hull, fittings and so on. So size is one decision you will have to
make, and that will in turn determine where it is practical to keep
it. Up to six metres is launchable from a good slipway, so you could
keep it ashore. Above that length you will have to consider marina
fees or moorings and keep the boat in the water. Also, length of
boat usually determines the marina or mooring fees which are
calculated by boat length per year. We will cover storage later on.
Types of Boat
Having decided on an approximate length of boat you will now be
faced with an array of choices of hull shape and internal layout.
Let’s look at the hull shape first. This starts simply then gets a bit
more complex. Basically there are two families of hull – slow and
fast. The slow hulls are hull shapes that sit “in” the water and the
engine pushes the boat through it. Fast boats have planing hulls
which are designed to rise up and skim along the surface at speed,
and these come in a variety of styles. The following are the general hull shapes you will come across.
Displacement
The traditional boat shape that has been unchanged for hundreds
of years is referred to as displacement – named because it
displaces water as it pushes through it. This is an excellent hull for
low speed, economical use with good sea-keeping qualities and a

Angling Boats 9
stable platform at anchor. The only problem is that there will
always be an upper limit of speed – which is proportional to the
length of the hull, but we won’t go into that here. If you want to
spend as little as possible on boat and engine, this is the hull for
you, but don’t expect to get anywhere fast. A small displacement
fishing boat will reach around 10 knots at the most, which means it
will take you a lot longer to reach your fishing grounds than a
planing boat – but you will use much less fuel and you will have a
pleasant ride. Thousands of displacement boats are available, and
have only become less popular recently because people want to get
out to the fishing grounds fast – which in some over-fished areas is becoming further and further offshore.
Semi Displacement
This is a development of the displacement hull where some clever
naval architects have designed a hull shape like a traditional boat
which behaves like a true displacement hull at low speed, but with
sufficient engine power can be persuaded to plane, giving higher
cruising and top speeds but not as high as the true planing hulls. It
is a good compromise for the traditionalist who wants a bit more top speed. Note the almost flat bottom towards the stern.
Shallow Vee
This refers to the slab-sided, almost flat bottomed hulls you will
find on most boats designed for inland use on rivers and canals.
They allow for plenty of room inside, but are top-heavy and can be
downright dangerous in anything but a gentle wave. These hulls
are not recommended for sea fishing boats unless you are confining your adventures to estuaries, harbours and very calm days.
Deep Vee
This is a common style of high speed hull and if you look under a
typical speedboat you will see what I mean. The hull, conceived by
Ray Hunt in 1963, is designed to slide over rather than through the
water, which reduces the water resistance and allows higher
Semi
Displacement
Hull

Angling Boats 10
speeds to be reached. When you first start off there is a lot of fuss
and bother as the engines strain to push the boat “onto the plane”,
but once there (at around ten knots in my seven metre Trophy)
you quickly pick up speed and fly off. Planing hulls can be designed
to reach very high speeds on expensive powerboats but typically on
a fishing boat you can expect to find ones that cruise at 20 to 25
knots with top speeds of 30 to 40 knots.
That speed comes at a price – as the engines needed to push the
hull onto the plane and maintain those high speeds are not likely to
be small, and big engines drink fuel. The other disadvantage is in
the ride comfort. On a smooth sea, the high speed runs can be
exhilarating, but in a short choppy sea where the boat is constantly
crashing into waves that can be very uncomfortable indeed. A lot
depends on weight, and boat length ratio to wave length, but
believe me, pushing a light eighteen foot planing hull into a fresh
breeze will shake your fillings out. Larger, heavier boats will still
crash around a bit but their weight will tend to smooth the bumps
and you will find the ride more comfortable. In heavier weather
however, you will not be able to plane and your speed will be
severely restricted, unlike the displacement hulls which just keep
on going. This is worth considering when the wind is rising, you
have a 20 mile trip home and you need to cross the sandbar at the harbour entrance by dusk!
Cathedral hull
Also referred to as “dory” hulls, this shape looks like a cross
between a boat and a catamaran, as the front half of the hull
becomes two mini planing hulls. This has the advantage of keeping
the boat shape fairly square, increasing the internal useable space
without losing out on performance. You usually find these hulls only
on boats less than twenty feet long, and they can slam a bit in
choppy seas. However there is a good choice of small boats with
these hulls which make roomy fishing platforms with a good turn of
speed. The downside? They are just plain ugly and look like mobile baths, but that is just a personal opinion.
Deep Vee Hull

Angling Boats 11
Catamaran
Originally catamaran hulls were confined to yachts where two
narrow hulls allowed for greater speed and stability. There are now
some catamaran or “cat” hulls for fishing boats, that take the form
of two planing hulls joined together to form a wide, stable platform.
They are usually only available for larger boats of eight metres and
above, as the working deck space has to sit above the hulls rather
than in them, but they have enormous fishing space and can be
quite fast. The downside is the ugliness again ,and also that
marinas usually charge extra because of the sideways space they take up.
Rigid Inflatables or RIBs.
Much favoured by divers, RIBs are made with a bottom of a rigid
planing hull surrounded by an inflatable tube, which makes then
fast, low enough to get in and out of – and very wet. They are easy
to launch and manoeuvre, but the lack of a “side” which makes
them excellent dive boats does not help much for fishing boats. I
would also worry about the many sharp items of fishing equipment
damaging the inflatable membrane, but if you are after a multi-
purpose boat it could be worth considering. I know a number of
keen bass anglers fish from RIBs right under the cliffs on the South
Coast, as they can get in where conventional boats would have a
problem.
Catamaran

Angling Boats 12
Engines
Like hulls, this is worth a book by itself so I will keep it very simple
and point out the choices. There are three main fuel types: petrol,
in two- or four-stroke versions, and diesel. Petrol has two very
important disadvantages – you pay road tax on all petrol even for
marine use so it is more expensive than the “red” diesel currently
available for non-road users which has different tax arrangements;
and it is explosive. Many fire-related marine disasters have had
something to do with petrol igniting, so you have to be very
careful. At sea you are a long way away from the fire service!
So why would you bother with petrol? Fortunately there are
compensations – petrol engines are much lighter and cheaper so if
your fuel consumption will not be very high, the purchase price
plus running costs for petrol may well be cheaper than the diesel
option. However you need to balance that with the higher
complexity of a petrol engine with its dependence on electrics,
which has more things to go wrong. Being lighter they are also less
ruggedly built and tend to have a shorter life. If money was no
object most people would go for diesel, and when you come to sell
your petrol-engined boat on the second-hand market you will see
what I mean. There are some LPG conversions available for petrol,
but like road users there are relatively few filling points and you
have all the disadvantages of the petrol engine apart from the fuel costs.
There are three main categories of engine style. First and most
commonly used in smaller boats is the outboard, many are two-
stroke but four stroke petrol models are becoming a lot more
common. They are light, relatively cheap and easy to get at for
installation and maintenance. They are also easy to steal and that
is the biggest liability – even engines bolted to the transom have been cut out with chainsaws and never seen again.
Rigid
Inflatable (RIB)

Angling Boats 13
Inboard engines are mounted inboard, obviously, and drive the
boat via a propeller shaft and external propeller. Having the engine
inboard towards the centre of the boat helps to centralise and
stabilise the weight distribution and means that if anything goes
wrong at sea the engine is a lot easier to get at than an outboard
hanging off the stern. The only real disadvantage of an inboard set-
up is the fact that the propeller is fixed in a fairly inaccessible part
of the boat – right underneath, which will be the first part to bang
a rock if you misjudge the depth, and if you pick up a plastic bag
around it, it will usually involve a swim to clear it. The propeller is
highly vulnerable when launching from a slipway so if you plan to
trail your boat, then an inboard set-up may not be the best.
Inboard powered boats are steered with a rudder, unlike either the
outboard or the final style we will look at; the out-drive.
The out-drive is a cross between the first two. The engine is often
the same as the inboard, but mounted right next to the stern and
fixed directly to an out-drive leg, which is like the bottom half of an
outboard motor but contains only the gearbox, steering and
propeller. Like an outboard, it can be lifted up when the need arises
but is rather vulnerable to the elements as it is a complex piece of
machinery, left in the water for months on end. It is mainly used
for fast hulls and suits some boat layouts very well as the engine
casing is out of the way against the stern making more room in the centre of the boat.
The final question on engines is – how many. Two is better than
one from a safety point of view, and there are many twin outboard,
out-drive and inboard boats around. But two engines means higher
costs – both to buy and to maintain, and with the increased
reliability of modern engines, having two is not as essential as it
once was. Many angling boats have a smaller outboard as a backup
engine but there are considerations. You have to take account of
where you would keep it when it is not being used, you would need
a fairly large auxiliary engine to get you home if there was a
problem, and being petrol driven, you are back with the old petrol
problems again. In addition, a petrol-engined outboard that is
rarely used is not a device I would like to rely on in an emergency.
However, it is better to have some form of reserve power than
nothing at all, particularly if your main engine in a petrol-powered outboard.
Internal Layout
If this was a book about family cruisers this would be a long
section. As it is a book for anglers, I will keep it to the essentials –
you can have a look at all the options on the market for yourself. I
will briefly explain the different types of internal layout, give you a few questions to think about and leave it at that.
If you want no-frills boating, go for an open boat. This is basically a
hull, an engine and nothing else. This style is usually only for
displacement boats under six metres but if you want any personal protection you’ll have to wear it.

Angling Boats 14
Going up a notch you can go for a boat with some basic protection.
A small cabin, with either an open back or a bulkhead is usually
called a cuddy if there are no berths or other facilities in it, and for
smaller boats this will provide useful weather protection and
storage for little extra weight or expense. There is another style of
protection much used in warmer climates and now appearing in
Europe and that is the centre console style. This is common on fast
open boats up to around seven metres long, and is a control
platform with steering, instruments and a windscreen, with
something for the helmsman to perch on. This is a more
comfortable arrangement for a fast boat if you want access all around. This is also the usual layout for RIBs and dories.
You may also come across the term “Walkaround” style, usually
associated with boats built in the USA. These are mainly designed
for water sports where access to deck space is more important
than cabin space. These designs make excellent angling platforms,
with wide, safe side decks which are gained at the minor expense
of slightly narrower helm positions or cabin. Most models have
open tops with a hard sun shelter as an option. Some have cuddy
options for the Canadian market, which are more suited to our European weather conditions.
The next step up is to have a cabin, and then perhaps a cabin with
a separate wheelhouse. The more cabin you have, the less fishing
space you will be left with, but on a long trip where you might want
to brew up, change into dry clothes, go to the toilet without an
audience, get out of the cold wind or even sleep, a wheelhouse and
cabin can be great. Cabins can be basic affairs or very luxurious,
and it is amazing what miracles can be worked on tiny spaces, and
we have the huge cruiser market to thank for that. The French
have a category of boat called a Promenade-a-Peche, which is a
comfortable mini cruiser designed for the angler to fish from, and very nice they are too.
Centre Console
Dory

Angling Boats 15
Boatbuilding Materials
I expect almost all the boats you will be looking at will be fibreglass
(also referred to as Glass Reinforced Plastic or GRP), but it is worth
mentioning a few others as the choices may come up. Almost all
small boats are now built from fibreglass because production costs
are low and maintenance is easy. However the life expectancy of a
fibreglass hull in water is not infinite, as fibreglass is to varying
degrees porous, and water can seep into the hull and expand,
causing a nasty condition called osmosis. This is far less common with modern methods and chemicals, but older boats bay suffer.
Osmosis is treatable at a price, but it involves some serious digging
and re-skinning the hull with a lot of expensive labour. Watch for
this on boats that have been kept afloat. There is a preventative
measure which is to treat the hull with epoxy, either before it first
goes in the water or later on. When my boat had to have the entire
hull treated for osmosis, I had the fresh fibreglass covered with an
epoxy coat before repainting and going back in the water. I can
rest easy knowing she will not get osmosis again, and if I ever sell
her, having an epoxy treatment will be a significant selling
advantage. Other problems with fibreglass are dulling of the finish
over time, which can be corrected with polish and elbow grease,
and sometimes crazing of the gel-coat caused by bumps, twists
and strains. These and chips or scratches can be easily repaired in warm weather with readily available gel-coat repair kits.
The most common alternative hull and cabin material is the
traditional wooden construction. Hulls can be clinker or carvel
planked, or what is known as hard chine made of slabs of marine-
grade plywood. The hull is usually described by the type of wood. A
clinker larch on oak hull would be a planked hull, the planks
overlapping rather than smooth, with the planks made of larch and
the ribs and frames made of oak. Wood is a lovely traditional
material but don’t underestimate the amount of maintenance required. It seriously is a lot.
Metal is another material – smaller boats are available in
aluminium, larger ones in steel. Both are reasonably easy to
maintain. The only other material you may come across is ferro-
cement. It is unlikely you will find a ferro-cement boat under nine
metres long as they are made of exactly what it says, cement
plastered over a ferrous or steel frame. This is a good method of
boat-building for one-off, large hulls and many ferro-cement hulls
are home-built as with care they are relatively easy to construct.
That could be the downside as you have no real guarantee of the
build quality for a home-made boat of that size. Unless it is a real
bargain I would not really recommend it.
Where to Buy a Boat
If you decide to go ahead and buy your own boat, take your time
and have a good look at what is available. You can buy new, from a
dealer or manufacturer, or second hand. Dealers and
manufacturers usually have demonstration boats to look at, but

Angling Boats 16
this is the most expensive option – boats lose value quickly.
However, new boats can be customised, and you can be sure there
is nothing wrong with them – or if there is, you will have a
warranty to cover it. New boats are advertised in boating and
angling magazines, and there are boat shows where you can go and compare brands.
The largest boat show is the London Boat Show held every January,
formerly at Earls court but currently held in the Docklands area.
This is an expensive exhibition, so the smaller manufacturers tend
not to exhibit there. The second largest boat show in the UK is the
Southampton boat show. Most of the boats are exhibited outdoors
or on a temporary marina, so if you go, take a jacket! It is probably
the best show for choosing a new angling boat, as most of the
manufacturers will be represented. There are other, smaller shows
around the country and there are also highly organised Boat
Jumbles selling new and second-hand equipment, often selling small boats as well.
One thing to watch with a new boat is the total cost. The advertised
cost will be for the basic boat, which may or may not include a
starter pack of equipment. There is often an additional, and
significant, delivery cost and preparation cost, plus antifouling if
you are intending to keep the boat afloat. Unless you are buying a
demonstration boat, you will probably have to wait some time for
delivery – a few weeks for a small boat, and up to a year for a
larger boat from a small manufacturer. Even factory-built boats
take time to arrive because many mass-produced boats are manufactured overseas.
Second-hand small boats are advertised in local Trader magazines,
angling magazines and in clubs. Larger boats tend to be sold
through specialist brokers, in the same way as estate agents sell
houses. They have offices in marinas and seaside towns, and
advertise in boating magazines. There are an increasing number of
London Boat
Show

Angling Boats 17
web sites dedicated to selling second-hand boats which are a good
resource for browsing. Even e-Bay has boats for sale, some of
them perfectly acceptable, others highly dubious.
Remember that boats spend much of their time idle, and the rest in
one of the most hostile environments on the planet. This means
they deteriorate, and unless you know what to look for you should
enlist the help of an experienced friend. If you are planning to
spend thousands of pounds it is well worth having a professional
survey – just as you would when buying a car or house. You can
probably recoup the cost of the survey through negotiating the
price based on the surveyor’s findings.

Angling Boats 18
Where to Keep Your Boat
After the purchase costs of a boat, storage costs can be the highest
financial outlay every year, and where you store your boat can have a great influence on the frequency you use it.
On a Trailer
Most small boats are kept on a trailer, because their size means
they can be kept in an area the size of a large car in a driveway,
garden or compound. This has a great advantage in terms of cost
and choice of fishing places, but there are downsides. Boats out of
the water look surprisingly large, so if you are planning to move a
boat into your driveway make sure you have the full agreement
and understanding of family and neighbours. Some local planning restrictions may apply to the storage of trailers on your property.
Boats on trailers are very mobile – both for you and for people that
may want to remove it without your permission. Also, boats on
land are easier to pilfer from so make sure valuables are removed,
the engine has a high security lock and the trailer is securely
immobilised. If you are not keeping the trailer on your own
property, make sure there is adequate security in the compound, and that your insurance covers the storage area you have chosen.
Marina Berth
This is probably the most expensive but also the most convenient
place to keep your boat. You can keep her afloat, walk right up to
her on a pontoon, load her up easily, untie and off you go. When
you come back, there are usually extra facilities like a fresh water
hose for cleaning, electricity, toilets, showers, shop and a bar. Most
good marinas offer parking and 24 hour security surveillance. All
this comes at a price, and the demand for marina berths
particularly in the South makes this option very expensive, and to
keep revenues up many marinas have a minimum charge based on
size.
It is worth mentioning a few things to check when you are
considering a marina. Once you have a marina berth, you are
limiting your fishing to an area within cruising distance from the
marina. How long will it take to get from the marina to the fishing
ground? As a car travels many times faster than a boat, it is worth
finding a marina near a fishing ground even if it is a longer drive to get to the marina.
Although your boat will be afloat all the time in a marina, don’t
assume you can get in and out of the marina all the time. Because

Angling Boats 19
of the tide, and because many marinas are situated in estuaries,
there may be a lock or a cill to block the water in to keep the
moored boats afloat all the time. A lock allows access at other
times, but can be very crowded with long queues at popular times.
With a tidal cill, if you are outside when the cill comes up, you stay outside!
Some marinas are more fisherman friendly than others, and it all
depends on the commercial management and target “customers”.
Some marinas are home to expensive cruising and racing yachts,
or large power cruisers. Even if you can get an affordable berth in
such places, you may find you do not have common interests with
other berth holders. In the marina I use, there is a pontoon
dedicated to smaller boats and there is quite a camaraderie among
follow angling-boat owners, which adds to the pleasure of coming
and going from the berth. A quick look at other boats in the marina
will give you a good idea how welcome a box of fish on the pontoon would be.
Dry Berthing
A popular method of storing small power boats in some marinas is
a so-called Dry Berth, which involves storing the boat ashore (in
some cases even under cover), and the launching and recovery is
done by the marina. All you need to do is phone the marina
beforehand, and when you arrive your boat will be floating in the
marina. When you come back, you leave it afloat and the marina
staff will lift it out and put it into storage. A typical Dry Berth
contract will provide 12 months storage and up to 12 launches, you
can pay for more as required. This is good for summer anglers, and
is cheaper than a standard marina berth for similar facilities. You
also save on anti-fouling, which will not be necessary if the boat is
kept ashore. The disadvantage is having to pre-book the launch,
which you may forget, or change you mind at the last minute if the
weather deteriorates. A short two-hour evening trip after work
counts as a full launch, so you could easily use up the standard
contract launches very quickly.
Swinging Mooring
Some harbours and rivers offer what is called “swinging moorings”,
where you rent a mooring buoy and tie your boat up to it so it
swings around the buoy with the tide. In more restricted sites,
piling berths offer a similar arrangement but the boat is tied fore
and aft to two fixed posts. Either way, it is a reasonably economical
way to keep the boat afloat. There are several disadvantages
however. This type of mooring is the least secure, and insurance
premiums will be higher as pilfering and accidental damage from
passing boats is more likely. You will also need some means of
getting to your boat, so unless there is a local water taxi service
you will have to either take a dinghy with you or keep it ashore somewhere nearby, adding to the cost and preparations for a trip.

Angling Boats 20
Equipment and Safety
Boats need many items of equipment to make sure you can
operate them, stay safe, be comfortable and fish effectively. You
can spend many happy hours buying and fitting bits and pieces to a
boat, and for many, this is all part of the hobby. Boat shows and
boat jumbles are a magnet to boat owners – not just for the boats
to dream over, but for all the bits and pieces available that are just
clamouring for a home on your boat. Most people serving in a yacht
chandlers are highly experienced and a mine of information. If you
tell them what you need they will be happy to advise the correct
size or specification of items so that you buy something suited to
your size of boat. There are also plenty on on-line stores if local choices are limited.
Safety Regulations
The rules governing the use of pleasure boats at sea are not as
obvious, or as rigorously enforced as the rules governing the use of
cars on land, but nevertheless they do exist and you need to be
aware of the requirements. So far, there are no agencies other
than local harbour authorities and police enforcing these rules in
UK waters but if you were involved in an incident and a subsequent
investigation found you had not abided by regulations, you could
be liable for prosecution or a legal claim.
In 2002 some new regulations came into force which directly
affected pleasure boat users. These regulations are part of Chapter
Five of the International Convention for the Safety of Life at Sea,
which is known as SOLAS V. A leaflet describing the requirements
is available from the Maritime and Coastguard Agency. A summary of the requirements are as follows:
Weather: check forecasts before you go out
Tides: check they fit in with what you are planning to do
Your boat: consider whether your boat is suitable for the
proposed trip and that you have sufficient safety equipment and fuel with you
Your crew: take into account their experience and physical
ability
Navigational dangers: make sure you acquaint yourself
with navigational dangers by studying the charts and local almanacs

Angling Boats 21
Contingency plan: always have one should anything go
wrong, such as being able to navigate by compass if your
GPS fails
Information ashore: make sure someone ashore knows
where you are going and when you are expected back, so they can raise the alarm if you do not return as expected
Radar reflector: you are obliged to fit one “if practicable”
Life Saving Signals: you must have access to an
illustrated table of the recognised life saving signals such as
the one in the Appendices, and study it before you get into
trouble. This also includes the signals between the casualty
and the rescue vessel or aircraft which are not the same as distress signals.
Assistance to other craft: you must inform the
Coastguard and any other vessels in the vicinity if you
encounter anything that could cause a serious hazard to
navigation, and you must respond to a distress signal and help anyone or any boat as best you can
Misuse of Distress Signals: Regulation V/35 prohibits the
misuse of distress signals, so don’t set off flares for fun even in harbour
The following sections cover the basic essentials you need to have
on board for safety and navigation. How far you go beyond that is limited only by your budget and interest.
Safety and Essential Equipment
The RYA, RNLI and Coastguard Services can provide excellent
guidance on safety equipment to be carried by private boats, so I
will not try and compete with their extensive knowledge and
experience. However this book would not be complete without a
summary of safety essentials. These are not listed in order of priority – you need all of them.
1. Personal Flotation Devices. You must carry some form of
flotation assistance for everyone on your boat. Preferably, this
would be automatically inflating life jackets that can be worn
unobtrusively at all times. I like the “braces” style, you can slip
them on and wear them all day without any inconvenience. The
advantage of a life jacket is it will keep you floating the right
way up for many hours, even if you are unconscious. A
buoyancy aid is a very second best, as it will only help you stay
afloat rather than keeping you afloat, and even sport ones can
be bulky. Buoyancy aids are best kept for rivers and estuaries, and should never be relied on for your personal safety at sea.
2. Secondary Flotation Devices. You should also carry a lifebelt
or flotation cushion designed for the job. You never know when
you might need it, either for a crew member who goes over the
side and needs extra help, or for the assistance of someone

Angling Boats 22
else already in the water. In addition to the life belt, you also
need a floating throwing line. These are usually orange in
colour, with a knot or handle at the end. Both the life belt and
throwing rope need to be kept readily accessible – and
untangled – because when it is needed, it will be needed in an emergency, when seconds save lives.
3. Distress Signals. There are several ways of summoning help if
disaster strikes, and you must be acquainted with all of them.
All boats should carry a set of distress flares and smoke signals
of a type appropriate to the area you fish – you can buy inshore
packs, coastal packs and offshore packs in handy watertight
containers. They will have expiry dates marked on them, and
when that date comes, replace them with new ones. Old flares
often fail to ignite or can ignite in a dangerous way, so don’t
risk it. The Coastguard can dispose of your old flares safely.
Don’t be tempted to set old ones off on Firework Night, as out-
of-date flares can backfire dangerously. I have experience of
this – a magnesium flare rocket was fired on the 5th of
November, the parachute failed to open and it come straight
down still blazing – right into a neighbour’s garden. Luckily no
damage was done but it was a salutary lesson. Other forms of
distress signal include flames and smoke. If you have room to
carry a galvanised metal bucket, you can create an impressive
smoke signal by burning oil soaked rags in it – useful as a last resort maybe but not one to be relied upon!
4. VHF Radio. Your radio will be a useful means of
communication with other boats and the Coastguard, but as an
item of safety equipment it has no equal. All boats should carry
a VHF set, preferably a fixed set run from the boat electrics and
a second, hand-held set as a backup. All VHF sets must be
licensed to the boat, which if done on-line is free. All operators
must be qualified, or supervised by a qualified operator. This
means taking some training, sitting a short operator’s
examination and obtaining a VHF Short Range Certificate (SRC)
Certificate.
Digital Selective Calling (DSC) radios are now standard, and
are worth installing correctly. DSC radios have many
advantages over earlier VHF sets including being able to signal
specific boats like a telephone, but their main safety advantage
is that they can be connected to a GPS so that the current
position of the set can be broadcast automatically – a great
safety asset in an emergency. DSC sets have a red “panic
button” which transmits an emergency message identifying the
vessel and position, which is often the most difficult (and
important) bit to get right when communicating verbally in an emergency.
5. Powerful torch. You may not plan to be out at night but if you end up that way, you’ll need a torch.
6. Tools and repair “bits”. You could easily go over the top with
tools and repair materials. In an emergency, there are limited
repairs you can do yourself when at sea, but if you can do some
minor repairs you might prevents a situation developing into

Angling Boats 23
something worse, or you might be able to keep fishing instead
of abandoning a day. Buy a large plastic food-saver type box
with a tightly fitting lid, and keep the following items on board.
Spray any metal tools with WD-40 even if they claim to be stainless.
Heavy duty pliers
Long-nose pliers
Large screwdrivers
(cross-head and Phillips)
Electrical screwdriver
Tube of caulk
Adjustable spanner
Plug spanner (for petrol engines)
Shackle key
Assortment of strong twine
Stainless wire
Appropriate fuses and spare bulbs
Assortment of electrical cable of the type used in your boats
wiring loom
Stainless screws, nuts, washers and bolts
Tin of WD-40
Electrical tape
Electrical connectors
3. Bilge pump and bailer. Your boat may already be fitted with a
pump to remove water from inside, if not you must fit one. If it
is electrically powered then it is advisable to have a manual
pump as well, in case flooding damages the electrical circuits. If
you leave your boat afloat, fit a float switch to start the pump if
the water level rises inside the boat, this can deal with
rainwater flooding or minor leaks that could sink a boat over
time. In addition, you should also carry strong plastic buckets.
These have many uses, particularly on an angling boat, and will
be invaluable if you have to chuck water over the side in a hurry.
4. Mobile Phone. I hesitated in including this, as it implies that it
can be used in place of your VHF for emergencies. Although a
mobile phone can be used to reach the coastguard on 999, you
may not be in an area with good signal coverage. More
importantly however, the coastguard cannot obtain a directional
position fix on a phone, which means that if you are not sure

Angling Boats 24
exactly where you are, they cannot locate you. There was a
tragedy near Morecambe where a father and son were able to
contact the coastguard by phone, but because of the fog, their
position could not be fixed. Both were drowned. Having said
that, I would still ensure I had a mobile phone with me, just in
case there were transmission problems on VHF. You never
know.
5. Anchor. Unless you plan to fish only on the drift, you will have
an anchor on board anyway, and you will take this aspect of
your boat’s equipment more seriously than the average
speedboat owner. Anchors are essential safety items as well, as
they can prevent you getting into serious problems if your
engine fails close to rocks, sandbanks or busy shipping
channels. There are several different types of anchor available,
all with their own advantages, so the choice is yours. I would
recommend carrying a spare, in case the first does not hold in
an emergency, and also in case you lose one while fishing.
Carrying a spare means you can carry on fishing. See the
section on Anchoring for more information on anchors and anchor rope.
6. Rope. In a list of safety equipment, rope is for repairs, towing
or tying to a rescue boat. Your anchor rope will make a good
tow rope, so make sure it can be used in that way by being
quickly unshackled from the anchor chain. Your mooring ropes,
if they are of a sensible length, will also serve as emergency ropes for a variety of purposes.
7. Secondary means of propulsion. Depending on the size of
your boat, this could be a paddle, oars, small outboard or
second engine. This is not always practical, and there are many
commercial boats relying on a single engine. However, it is
always preferable to have a backup, particularly if you are
relying on a petrol engine or outboard as these are more prone to failure than a marine diesel engine.
8. Navigation lights. If you intend to fish at night or into winter
evenings, you must equip your boat with navigation lights
according to the Rules of the Road. (see section on Navigation
Lights). Even if you do not plan to be out late, a problem may
delay your return and you must show navigation lights so other
boats can see you and avoid a collision. If you do not fit
permanent navigation lights, you can buy battery powered
emergency navigation lights for small boats from a good yacht
chandlers. For small motor boats and dinghies under 7 metres
in length and a maximum speed of 7 knots, the minimum is a
white light visible all the way round, mounted on a short mast.
Motor boats under 50 metres in length must show a white light
visible from ahead (steaming light), a white light visible from
astern (stern light), and a green starboard light visible from
ahead and a red port light visible from ahead. Boats under 12
metres in length can combine the forward and stern white lights
into a single white light visible all round. Boats at anchor must
show a single white light visible all round.
9. Anchor Ball. All boats at anchor must show during daylight
hours a black ball hoisted in the forward rigging, or on a pole

Angling Boats 25
Tips:
Keep a notebook or loose-leaf plastic wallet containing details of marks,
contact numbers, articles from magazines, printouts from web sites, minimum
fish sizes etc. Keep your notebook, pencil, rubber, charts, tidal atlas and
equipment instruction books in a splash-proof satchel of the type commonly
given away at conferences. That way everything is to hand and you are less likely to forget odds and ends when you go fishing.
over the front part of the boat. A spherical ball is bulky to stow,
so a convenient alternative is two flat black disks that can be
slotted together when in use to appear as a ball, and can be stored flat.
10. Horn. This is used for signalling your intentions, such as
turning to port or starboard, and also for attracting attention in
an emergency. If you do not have an electric horn fitted to your
boat, you can buy an air-canister horn (as used at football
matches) very cheaply at a yacht chandlers. If you do not use
air horns regularly, check them because they can leak, and an
empty air canister will not make a noise just when you may need it.
Navigation Equipment
There are some navigation items I would consider essential, some
desirable and some are luxury items. However it does depend
where you are fishing – a radar set for example would be a luxury item in Southampton Water but essential for mid-channel wrecking.
Essential
1. Compass. Every boat must have a compass, properly
adjusted for the boat’s own magnetic influences, and you
need to know how to use it. By far the best way to learn
how to use a compass is to attend a navigation course such
as those run by the RYA.
2. Detailed charts of the areas you will be travelling and
fishing in. On the same navigation courses, you will learn
how to read these maps of the sea, and understand the
information they contain. Admiralty charts are the best, and
they also produce Leisure editions for non-commercial users.
3. Echo sounder/fish-finder. Knowing the depth of water is
vital, both for fishing and for safety. As you are running a
boat primarily for fishing, a good fish-finder will be high on
your shopping list anyway, for identifying good fish-holding
features. As a safety aid it is invaluable, for warning you of
dangerously shallow water, and for confirming your
estimated position. If you think you are in a position which
according to your chart has 20 metres of water but your
echo sounder shows significantly different, you know you will have to re-check your position.

Angling Boats 26
Highly Desirable
1. A GPS set is very useful, but not essential. In fact, it is a
good idea to get used to navigating without a GPS, firstly
because you would look very stupid if it failed and you were
lost despite having a compass and charts on board, and
secondly because a GPS only takes account of positions and
directions. It does not take account of wind and tide, both of
which are very influential and for effective navigation,
particularly over long distances, you need to understand and
make allowances for their effects. Modern GPS sets are
amazingly accurate and relatively cheap compared to their
predecessors. For identification of positions and basic
directional navigation, a hand held set is quite adequate. A
fixed set will have a larger screen and a useful tracking
facility, which allows you to back-track over marks you may
have spotted on the fish-finder, or to replicate effective
drifts.
2. Tidal Atlas. For the price (currently less than £10), this
little booklet should be in every skipper’s navigation bag.
Tidal Atlases are published by the same Admiralty
publications body as Admiralty Charts, and are available
from good yacht chandlers. They show tidal currents in
terms of direction and relative strength for every hour of the
tide, and make it very easy to plan where to fish to take
advantage of tide strength and direction over marks. For
navigation purposes, it is a much easier way of estimating
the effect of tidal currents on your boat’s progress through
the water than working it out from the tables printed on
Admiralty charts.
Luxury Items
1. Chart Plotter. I see a lot of these fitted in small boats, and
there is no denying that they combine chart information and
GPS positions in a very visual and easy to use way. But
again, they should never take the place of compass, chart
and GPS because if you rely on them and they fail, you are
in trouble. It also tempts you to jump in, switch on and go,
without taking the trouble to learn the basics of navigation
and seamanship. You need those basics to get the most out of advanced navigation equipment like a chart plotter.
2. Radar. These are now available in small sizes suitable for
small boats, and no longer drain batteries as quickly as the
old sets used to. Invaluable for long distance work, and
where you are likely to be near busy shipping lanes, for the
small boat operator they are useful but not really essential.
If you do decide to install a set, don’t underestimate the
amount of time you need to spend learning to operate them.
A course on electronic navigation equipment is well worth the investment.

Angling Boats 27
Other Equipment
You will doubtless make your own list of items that you feel you
need for your boat, and that list will grow with each visit to a yacht
chandler or boat show. Here is a list of items that I would
recommend you start with for a five metre outboard powered fishing boat, and you can add to it as you wish.
1. Mooring ropes. These are useful for tying up alongside a
jetty, and for manoeuvring a boat onto a trailer. There are
many different types of rope, but the best for mooring ropes
are braided, which feel soft, and made of nylon or polyester.
Don’t skimp on the length, you may have to tie up to a
bollard some distance away so make sure you have at least three ropes of 10 metres each, or more for a larger boat.
2. Fenders. These hang over the side to protect your boat
from banging against a harbour wall or another boat. You
should have at least three each side, with fender eyes
screwed to you boat at strategic points to tie them on to if
your boat does not have safety rails in convenient places.
Fenders are not usually supplied with ropes so you need a
short rope of a suitable diameter so you can tie the fender
to your boat, and adjust the height to suit whatever you are bumping against.
3. Boat hook. Useful for hooking up ropes, mooring buoys,
lost odds and ends, and hooking on or fending off as you manoeuvre alongside a jetty or another boat.
4. Spare fuel can (full). Self explanatory, unless you have a
very large built-in fuel tank with an external fuel gauge. It is
a good idea to have a spare can of the same capacity as
your main fuel tank, so if you inadvertently allow it to run
dry, you will probably have enough in your second can to get back home.
5. Second battery. Batteries can and do run flat, particularly
if you operate a lot of equipment and lights from your main
battery. You will not be able to start a large outboard or an
inboard without a well charged battery, so it is highly
advisable to have two batteries, one for engine starting and
the other for operating what is called the “domestic”
system. These can be switched so the engine battery is
isolated while fishing, and both charged while under way.
6. Storage. This all depends on your boat design, but all the
equipment listed so far that is not screwed to the boat,
needs to be kept somewhere. Storage bays and seat lockers
are invaluable, but if you do not have these, then invest in
plastic storage boxes with lids. If you holiday in the USA,
buy a couple of the large, chest-style cool boxes from a
supermarket. They are ideal for storage as well as keeping
bait and fish fresh. They are much cheaper in the USA
compared to here and can easily be checked in with your
luggage on the way home. You should also fit hooks, racks
and holders to keep things like rods, gaffs, landing net,

Angling Boats 28
Tip:
Don’t bother with those blue plastic freezer blocks for your cool-box. Firstly get
a big cool-box (for all those fish), and almost fill two or three two-litre drink
bottles with water. Freeze them solid and use them instead of freezer blocks –
they will last all day and keep your catch as fresh as the commercial fishermen do – on ice.
boathook, paddle etc. from rolling about. Plenty of rings
fixed to the boat and some elasticated luggage hooks (with
plastic hooks) makes it a lot easier to keep things together.
If you don’t, then the first few waves will make a complete
mess in your boat and the next few could flip them over the side.
7. Bait cutting board. It is worth making up something
specifically for managing bait on board, as a small boat
tossing about at sea is no place for a loose board, knives
and bits of bait. Boats designed for angling sometimes have
storage boxes with lids made of cutting board material,
which are ideal. Alternatively you could fix a section of
plastic chopping board to the boat transom, or make up a
detachable one to fix to the gunwales. A secure place to
hold the bait cutting knife makes sure it doesn’t get lost or inadvertently cause someone some harm.
8. Rod holders. These are well worth fitting, and adjustable
ones can hold rods for transport as well as holding rods
while fishing. If you are fishing alone with several rods or
trolling, these are essential. It is advisable to secure the rod
with a lanyard even if there is a locking device, as a large
fish or a snagged line while the boat is moving could snap
the rod holder before the line breaks. A lanyard will stop you losing the rod as well.
9. Grab handles. The old seafaring adage “one hand for the
ship and one for yourself” is true enough. When you move
around in the boat, whether you are under way or fishing,
you are on a very unstable platform and it is all too easy to
fall and hurt yourself, or worse, fall over the side. If your
boat is not fitted with enough hand-holds, buy some handles
or handrails from a yacht chandlers and fit them yourself.
Use through-bolts, not screws, and pad the underside of the
fibreglass with a plate of plywood to spread the load. You
don’t want the handrail pulling off just when you have
grabbed it to save yourself.

Angling Boats 29
Tip:
Trailers differ in style and price, and if you plan to launch regularly from
slipways it is worth investing in the type of trailer that has a rear section that
swings or swivels, to help align the boat onto the trailer when recovering. This
type of trailer can also save your trailer wheel bearings as they can allow the
boat to slide off more easily, so you do not have to reverse so far into the water.
Launching and Recovering
If you trail your boat, then the ease of getting it in and out of the
water can make the difference between a fun day and a miserable
one. Here are a few tips to help. The description is based on a
typical 5 metre outboard powered angling boat, if you have
anything significantly different then not all the details will apply.
The Launch Site
If you can, find a wide, concrete slipway that is neither too steep or
too shallow, in a location sheltered from wind and tidal currents,
accessible at all states of the tide, wide enough for several boats,
ample parking nearby and near good fishing marks. If one exists in
the UK with all those features I am not aware of it. Usually there is
a compromise somewhere, so it is a good idea to research your
launch site at high tide and low tide before you use it. A chat with
someone already using the slipway will give you a lot of vital
information. Make sure your towing vehicle has enough traction to
pull a loaded trailer back up the ramp, and that there is enough
slipway under the water to support your trailer when immersed.
Some have a nasty “trailer-trap” of a sharp drop-off just out of
sight, and if your trailer wheels go over the edge, getting the trailer back again could be a challenge.
Some slipways end in shingle or “hard”, which sometimes is not, or
at least some of it may be soft. Check it out before driving your car down, even a 4x4 will get bogged in loose shingle.
Launching
As most ramps are wide enough for only one trailer at a time, it is
polite to get in and out as quickly as possible to let others launch
as well. When you arrive, do a quick recce and check with other
slipway users to see if there is any useful news, like an unexpected
obstruction or loose shingle swept across the concrete by a storm.
You may also need to pay any fees due, which may include both
slipway fees and harbour dues. Park up in a position where you can
reverse down the slipway, but out of the way from other users. You

Angling Boats 30
can now remove the trailer lighting board, load straps and other
ties, and get everything ready. Ensure drain plugs are securely in.
It is worth making your own checklist to make sure you do not forget something vital, like connecting the fuel line to the outboard!
This pause for preparation has another vital function. The trailer
wheel hubs will be hot from the journey, and if they are dipped in
cold water the sudden temperature change will cause the hubs to
suck water past the bearing seals and into the bearings. The only
way to avoid this is to fit “bearing savers” which create a
permanent pressure on the bearing grease so they do not suck in
water. The disadvantage of these is that there is a tendency for
grease to be forced out if the seals are anything but perfect, and if
you have a braked trailer this can wreck the brake pads. Avoid the
so-called “sealed for life” bearings, these are very expensive to
replace and as they cannot be disassembled for maintenance they can fail without warning.
Slipways can be slimy, covered in shingle and fairly steep. Your car
brakes and wheel grip may not be sufficient to hold everything
steady if you stop on the slope, so it is a very good idea to have a
couple of sturdy wooden blocks handy, to use as chocks under the
wheels. Use oak or a similar hardwood for strength, drill a hole
through them and attach a short length of floating rope, preferably
of a bright colour. This makes it safer to pull away from under the
wheels, and colourful rope will help you remember to pick them up
afterwards. Floating rope will help you find them if they end up in muddy water!
Before reversing into the water, make sure the boat will not slide of
the trailer before you intend it to, and have a rope tied ready to the
bow to secure the boat as soon as it in the water. Have someone
hold the rope and watch behind you to make sure the slipway is
clear. Reversing a trailer is often thought to be difficult but it need
not be. The trick is not to think about it. Your elongated “vehicle”
has a hinge in the middle, it is pushing instead of pulling, and
steers from the back. You can try and work out which direction to
steer but it is much easier with the following method. Start off with
the boat and car aligned straight, and keeping your eyes on the
boat, either directly or via the mirrors, reverse very slowly in the
direction you want to go. If the back of the boat wanders to the
side, very gently turn the steering wheel. If that makes it worse,
turn it gently the other way. You will very quickly work out which
way to turn the steering wheel to make the trailer go where you want it to.
Reverse down the ramp as far as necessary to either slide or float
the boat off, preferably without putting your trailer wheel bearings
under water, and definitely without getting your car wet. Have your
assistant pull the boat away from the slipway and either beach it or
tie up to something to allow others to use the slipway, while the
car and trailer is parked and secured. Always have someone by the
boat as a rising tide or wash from a passing ship could easily float
it away. Conversely a dropping tide can leave it stranded and
impossible to move until the water returns.
Moving off is simple if the beach shelves steeply and there are no
cross-winds or currents. However if there is a cross-wind or current

Angling Boats 31
you will need to reverse out promptly otherwise you will be swept,
probably sideways, into the beach or slipway. The trick is to get
everything prepared, then make the final move as one slick
operation. Firstly get someone aboard and while the boat is
steadied, put the engine down, if there is enough water to do this,
and start the engine. Make sure it is running smoothly and check
cooling water is circulating and coming out of the indicator tube.
Get everyone else aboard except the person holding the boat, and
align the boat at 900 to the shore with an oar or boathook. The
assistant now needs to scramble in (waders and a boarding ladder
come in useful here unless they are athletic and enjoy being wet),
while you reverse directly and purposefully away. Keep the oar or
boathook handy because if the engine cuts or the propeller fouls a
rope at this point, you can get quickly and safely back again to sort
the problem out. Be very careful of underwater obstructions,
because the first part of your boat to meet them will be your
revolving propeller, and the engine is designed to kick up to minimise impact damage only when going ahead.
Returning and Recovering the Boat
After your trip, the recovery sequence is almost exactly the reverse
of the launch sequence. Gently nose your boat ashore if the beach
is soft, or tie up nearby if there is a jetty available. Stop the
engine, get everyone out and tilt the engine to keep the propeller
out of harms way when you put the boat on the trailer. Reverse the
car and trailer down the slipway and guide the boat onto the
trailer. On a steep ramp you may be able to float the boat on all
the way, otherwise you will have to use the trailer winch. If there is
a cross-wind or current pushing the boat out of alignment, getting
the thin point of the keel onto the trailer rollers can be very tricky.
If you keep two of your mooring ropes tied one at each side of the
stern, you can use two helpers to keep the boat aligned by pulling
on the ropes. In muddy water you may not be able to see whether
the boat is aligned correctly over the trailer rollers, so drive slowly
forward a few feet, if the boat is not on properly go back and try
again. Don’t drive too far up the ramp when doing this as the boat
may be touching some part of the trailer that will cause damage if the full weight of the boat rests on it.
Once you are sure the boat is on, secure the boat to make sure it
will not slip off the back of the trailer and drive up the ramp to a
clear space where you can get everything ready for the road. Open
drain plugs, tidy loose items away and secure everything with ties
and ropes. Make sure you fit an additional brace to keep the
outboard motor propped up, on some models a simple wooden
block will do the job, as the boat bouncing on a trailer can easily
dislodge or break the standard outboard motor tilt clips.

Angling Boats 32
Tip:
There are two modifications worth making to your trailer. The first is to fit two
vertical metal rods sticking up above the trailer wheel axle, wide enough to
clear the sides of the boat and high enough to see above water when you are
guiding the boat onto the trailer. If you can, make these rods sturdy enough so
they can hold the boat aligned correctly above the trailer once the boat is
between them. This saves a lot of trouble when you have a difficult cross-wind or current to contend with.
The second tip is to fit a sturdy flat board to your trailer drawbar using
galvanised U-bolts, so you can walk along the trailer from the shore to the
boat, to make adjustments or connect the winch hook. This is much easier
than stumbling through the water, potentially tripping over bits of submerged
trailer. Cover to top of the board with some form of non-slip surface so you are
less likely to fall off it.

Angling Boats 33
Boat Handling - Under Way
This may seem strange, but making a boat go where you want it to
on the water is not a simple as steering it like a car. It does not
have wheels that grip a road, or rails to run on. It floats on a
moving substance, and is under the influence of wind and wave
without anything to hold it firmly in position or even facing in any
particular direction. Knowing what your boat will do when you
move off, steer it, or stop will make the difference between staying in control – or not.
A light boat, particularly one with very little hull surface under the
waterline, will be very difficult to steer at very low speeds. All boats
need some forward movement to create the turning effect caused
by movement of the rudder or outboard. You will need to
experiment to find the minimum speed that you can maintain and
still steer the boat.
The tide or current will affect your boat’s movement over the sea-
bed, because the boat is suspended in a body of water which itself
is moving bodily over the ground. You need to take account of this,
particularly when travelling across a river or harbour mouth, as you
will in effect slide sideways from your intended path. At least this is
reasonably predictable and you can allow for it, unlike the wind which has an annoying tendency to gust.
Wind causes more bumps and scrapes when boat handling that any
other influence. Light boats, particularly those with a shallow draft
and a sharply raked bow are very prone to being pushed by the
wind, and instead of being a neat sideways push, the wind will vary
in strength, catch you out with sudden gusts, and also try and
swivel the boat around the part most deeply set in the water.
Knowing what your boat will do when the wind blows is more than
half the problem solved. When you know what the boat will do you can anticipate it and even use it to your advantage.
It is a good idea to take a new boat off to a quiet spot in a harbour
or estuary and experiment with slow speeds, putting the engine in
neutral, watching what happens when the wind catches the bows
from either side, and generally becoming familiar with the way the
boat behaves. Many outboard and out-drive powered boats will
tend to drift stern to wind, because the leg will create more drag
than any other part of the hull. When you stop the boat for drift
fishing for example, it is useful to know this in advance because
you can head the boat away from the wind as you cut the engine,
which means you can start drift fishing immediately without lines tangling as the boat turns.
Another effect worth knowing about is the torque created by the
rotation of the propeller. This applies to all propellers except duo-
props. The rotation of a normal propeller “winds” the stern
sideways as well as pushing the water behind it. This torque has

Angling Boats 34
little effect when cruising, but makes quite a difference to slow
speed handling. When turning sharply at any speed you will notice
that the boats turns more sharply in one direction than the other.
Remember which way is the tighter turn and allow for it when
making turns in one direction or another. If your boat is fitted with
two engines, with propellers rotating in opposite directions, the
torque effect on one propeller is cancelled by the other so the boat
will handle more evenly when under power from both engines.
When torque is needed, it can be brought into play by manoeuvring
with one engine or another. A twin-engined boat in the hands of a skilled helmsman can be made to do some remarkable things!
The torque effect can help you in some very tight places. If you
need to turn the boat round in a very narrow channel such as in a
marina, you can use the torque to push the stern sideways. If you
put the engine in gear and blip the throttle with the helm hard
over, the stern will make a distinctive lateral movement before
there is any significant forward movement. If you turn the helm
hard over in the other direction and blip the throttle in reverse, you
will cancel the forward movement and kick the stern in the same
direction as before. By repeating this several times, you can turn a
boat around in its own length – very useful where there is no room
for a three point turn!

Angling Boats 35
Boat Handling – Mooring
You may be keeping your boat in a marina, or you may only
occasionally moor alongside a pontoon or harbour wall. Either way,
you need to know how to do this properly to make sure your boat
is secure and will not swing about causing damage to your boat or
others.
This section covers the ropes and methods used for approaching
and leaving the pontoon. Types of ropes available, and instructions
on how to tie the knots mentioned are contained in the section on Ropes and Knots.
Ropes and Cleats
Your boat needs to have at least five tying up points, regardless of
size: one at the bows, one at each stern quarter, and one either
side amidships. There is a reason for having all these, as you will
see later. The most common form of securing point is a cleat, and
you should fit the largest you can, within reason. You will probably
need to tie several ropes onto a single cleat sooner or later, which
is next to impossible on an undersized cleat. Your bow cleat should
be particularly large, and most new boats are supplied with
pathetically small ones. The bow cleat takes a lot of strain, as it
acts as a mooring point, anchoring point and possibly a tow point.
All cleats must be through-bolted with a strengthening pad
underneath to spread the load.
If your mooring point is inboard from the gunwales you will
probably have fairleads to guide the ropes over the side. These are
not necessary if the cleat is fitted right at the edge of the deck. Often you will find fairleads at the bows only.
Ropes for tying up are referred to as mooring warps or dock lines.
The most suitable material is nylon or polyester; braided is nicer to
handle but more expensive than three strand. You need at least
three mooring warps, preferably more, and at least two of them
should be double the length of your boat. This is because you may
need to double up on a rope to create a slip rope, or you may need
to allow for the tide to drop if you are not tied up to a floating pontoon.
To secure your boat to a pontoon, you need a line from the bows to
a point forward of the boat, a line from the stern to a point astern
of the boat, and lines called “springs” from the points where you
moored the bow and stern lines to points at the opposite ends of
the boat, for example the bow or fore spring will be connected from
the bow to a point on the pontoon amidships or astern. These

Angling Boats 36
springs create a triangulation effect which as we know from our
maths lessons is the most stable shape, and will prevent your boat
swinging backwards and forwards, in and out.
Another line, called a “breast rope” is useful, which leads from the
point amidships of your boat to a point on the pontoon directly
opposite. This keeps the boat in close to the pontoon but as it is
short and at 900 to the boat and pontoon, it does not allow for any
boat movement as the tide changes or the boat load changes as
people get in and out, so make sure it is not so tight it strains the cleat.
Knowing which knots to use is important because you want your
boat to be secure, but it must also be possible to untie a knot
easily even after you have pulled it very tight. If you have cleats on
your boat and ashore, the best way is the “figure of eight” the rope
over the cleat two or three times, and then put another turn on but
this time tucking the free end (tail) under the final loop. With
practice you can do this by twisting your wrist on the final loop and the tail will be neatly secured.
If you are tying up to a bollard, ring or post, the best knot to use is
a round turn and two half hitches. The round turn takes much of
the strain, leaving the two half hitches to secure the rope. This
means the hitches are less likely to tighten up under load so they
can be more easily untied. See the section on Ropes and Knots for
more details.
Once the boat is secure, the final check is to adjust the fenders
that protect your boat from rubbing on the hard pontoon or jetty
wall. A clove hitch is the best knot to attach the fender tail rope to
a handrail, as that is easily adjusted for height. It is a good idea to
leave some fenders out on the other side of the boat, as it is
common practice in busy harbours for other boats to tie up
alongside your own if they is no room directly alongside the
1. Bow Line 4. Breast line
2. Stern Line 5. Bow (fore) spring
3. Stern (aft) spring
Mooring
Lines

Angling Boats 37
Tip:
Splice or tie a loop at one end of each mooring warp, and make the size of the
loop fairly generous. This makes it much easier to slip the line over a bollard
and quickly get a secure point ashore when you are coming alongside. You can
concentrate on tidying up your mooring once you are connected with dry land.
Large loops can slip off however, so if you are using it to tie up for any length
of time, use the loop to create a noose, or if the mooring point ashore is a cleat
with a hole in the middle, run the line through the hole first then loop back
over the cleat.
pontoon. Tidy the ropes and coil loose ends neatly – it not only looks good, it will prevent someone tripping on them.
Moving Off
If you had the harbour to yourself, there was no wind, there was
no tide and there were plenty of helpers on board and on shore,
leaving the pontoon would be so easy. Untie, push off and away
you go. Unfortunately, that happy state rarely occurs so you will
have to know a few tricks so you can slip neatly away without embarrassing bumps and scrapes.
The first step before moving off is to remove your springs and the
breast line. That is referred to a “singling up”, leaving a single line
fore and aft. With no contrary wind and tides, you can usually hold
a light boat in place with a boathook, untie the mooring lines, push
the boat away from the pontoon and motor slowly away. If you
turn the wheel sharply, as you will probably have to, to clear other
vessels, watch the stern as it will probably swing wide and knock
the pontoon. This is where the fenders and boathook come in handy again.
If you have a strong wind or tide to contend with, moving away will
be more difficult as the natural forces will be trying to push your
boat somewhere else. With care however, these forces can be used to help rather than hinder.
Moving Off - 1

Angling Boats 38
If tide or wind are pushing from ahead, remove the stern line first,
motor gently ahead to slacken the bow line and keep the boat
under control, then remove the bow line before moving away. If
you don’t have a helper ashore, run the bow line round the bollard
and back to the boat so you can untie one end and pull the line
back round the bollard with the other, without leaving the boat. If
the wind or tide are pushing from astern, do exactly the same but with the stern line.
If you have very little room between your boat and others tied up,
moving away can be tricky because wind or tide can push your
boat into others before you can move away, and sometimes there
is so little room the turning circle of your boat may be too large for
the space available. This is where another little trick using the mooring lines comes in.
If the wind or current are pushing the boat from ahead, untie all
mooring lines except the bow line. The bow line should be attached
to a bollard well forward of the bows if that is possible. It will also
help if you run the bow line round the bollard and back to the boat,
but secure it with a figure of eight around a cleat as it will be put
under more than usual strain with this manoeuvre and you need to
be able to release it afterwards.
Your boat will now be lying to a single mooring point, and kept in
position against the pontoon by the strength of the current or wind.
To move out, under perfect control, put the engine in reverse at
tick-over speed, and gently turn the wheel away from the pontoon.
You may need to experiment with the engine revs and the amount
of wheel movement, but make every adjustment very gradual. You
should be able to swing the entire boat out from the pontoon like a
giant pendulum. When the boat is clear of other boats, put the
engine in neutral, quickly untie the bow line and pull it back into
the boat, and reverse gently away from the pontoon. Once fully
clear you can put the engine in forward gear, straighten up and
Moving Off - 2

Angling Boats 39
away you go. This will look very impressive to the casual bystander.
If your boat is being pushed from wind or tide from astern, carry
out exactly the same pendulum manoeuvre, but this time securing
from the stern to a point behind the boat, but this time you will be
moving out forwards. You can also use this method when there is
no tide but a strong wind is pushing you back against the pontoon.
Coming Alongside
Coming alongside a pontoon is made more difficult because often
you will not have much time to check out wind, tide, mooring
points and other boats’ activities, so you will have to make some
quick checks and quick decisions. Before you get near the pontoon,
put fenders out on both sides, secure a mooring line on the
forward, stern and mid-ships cleats and have the lines coiled neatly where they will not get tangled or trodden on.
It is important to stay in complete control of the boat, so you don’t
have to rush anything. One sure way of keeping control is to head
the boat into the wind or current. That way the forward movement
of the boat will be balanced by the pressure of wind and current,
and if they can be made equal, the boat can be held in a stable
position. If you have the wind or current behind you and you are
moving forwards, you will end up going twice as fast as you meant to and probably end up hitting something expensive.
If you have plenty of room on the pontoon, come towards it at your
slowest speed that still gives you control, against the direction of
wind or tide, at an angle of about 450 or less to the pontoon. At the
last minute, turn your wheel to straighten up and put the engine in
reverse to stop the boat. This is where knowledge of your boat
handling characteristics will make this last bit easier. A boat is not
on wheels or rails, so it has a tendency to slide sideways. The
rotation of the propeller drives the boat forwards, but the rotation
Moving Off From
a Congested
Mooring

Angling Boats 40
also creates a slight sideways kick, more noticeable when the
throttle is given a burst, and the direction of the kick will depend
on whether the propeller is rotating clockwise or anticlockwise.
You can use this to good effect when you are coming alongside to
nudge the stern in towards the pontoon, without driving the bows
out away from it. You will need to experiment with forward and
reverse bursts, and a port or starboard helm, but once you know
which one to use it is very helpful. On my boat for example, I know
that when coming alongside with a pontoon on the port side, by
turning the wheel towards the pontoon as I give the engine a burst
of reverse to stop the boat, the stern swings neatly in to straighten the boat up against the pontoon.
Once you are alongside, the boat must be quickly secured so it
does not drift away from the pontoon – which it would quickly do.
If you have enough help available, get a line ashore and secured at
the bows and stern, and adjust the lines and add springs later. If
you are on your own, or the conditions are particularly difficult,
having a line secured at one end of the boat does not really solve
the problem, particularly if the current or wind catches the boat
and swings it out from the pontoon. In these circumstances, I like
to get a breast rope secured first – it may not look too neat but it
keeps the boat in one place and it cannot swing out from the
pontoon. You can add and adjust lines at your leisure once you are securely joined on to the shore.
There are two more techniques that will help you come alongside
when conditions are crowded or currents are strong. The first of these is called the “ferry boat glide”.
If you are coming alongside a pontoon where the tide is
exceptionally strong and there is little room for error on the
pontoon, such as where there are other boats moored ahead and
astern of your chosen spot, motor gently up heading into the
current approaching your mooring position by steering close but
perfectly parallel to the pontoon. When you are exactly opposite
your berth, reduce the engine throttle so that you only just have
Coming
Alongside

Angling Boats 41
Tip:
Keep looking around you, particularly when going astern. I have seen some
very expensive boats reverse right into other boats because the helmsman
was more worried about avoiding something in front of him.
enough forward momentum to remain stationery, held there by the
current. By moving your wheel fractionally towards the pontoon
you will be able to move sideways into your berth. Be ready to
reduce speed further as you move between other boats as the
current is likely to be weaker at that point. You can use the same
method for coming up to a mooring buoy – align yourself alongside
it then just slide the boat sideways to allow someone to catch it from the bows.
This takes a bit of practice, but again, if you know what your boat
does when you turn the wheel or increase engine revolutions, you
can use it to your advantage when manoeuvring. Take time to
practice in a harbour, estuary or marina, it will be well worth it
when you have to come alongside a busy pontoon with a gawping audience on the shore!
The second technique involves mooring a boat alongside a pontoon
with a single rope. This can be used as part of a more complex
manoeuvre, or as a temporary hold. If you attach a bow spring
only, you can hold a boat against the pontoon by going ahead very
gently and turning the wheel away from the pontoon. The spring
will hold the bows against the pontoon, the engine will hold the
stern in. Again, you will have to work out how much engine and
how much wheel is needed for your particular boat, but I have seen
this method used as a regular way of making a temporary mooring
by the ferry operators who travel the fiords in Norway like a water-
bus, stopping every mile or two to pick up drop off passengers
from isolated communities. A single mooring line with a large loop
makes coming alongside a quick and secure process.
Ferry Boat Glide

Angling Boats 42
Boat Handling - At Sea
One you are under way and ready to take to open water, there is
another complication that Nature will put in your way – waves.
Waves are not as simple as they seem from the shore, and need a bit of understanding to make boat handling easier.
Waves
Waves have a height, measured from peak to trough. They also
have a length, from peak to peak. A wave with a long wavelength
compared to the height is called a swell, and a short wavelength
creates what is referred to as a “short” sea. A swell, even a large
one, can make for a smooth ride but a short sea can be very
uncomfortable indeed as the boats bows will dig in or slam against the side of the wave.
Normal waves are created by and pushed by the wind, and the
effect is to make the slope on the side the wind is blowing from
more gentle, and the slope on the side the wind is blowing to, more
steep. This can catch you out, because if you are heading out to
sea with a strong wind blowing from astern, you may think the sea
is quite manageable. When you turn and head back, you will find a
very different situation as you are now heading into the steep side
of the wave and you may have to slow down considerably to make safe headway
Waves advance along the open sea in the direction the wind is
blowing, in rows at right angles to the direction of the wind. When
they reach shallow water, or where the wind changes direction
around a headland, waves can also change direction. When they
meet an obstruction such as the shore, they will bounce off at an
angle. In enclosed waters near shore and around islands, waves
can be going in many directions at once, and as they intersect, the surface of the water becomes very confused and choppy.
A wave moves along the surface of the water but the water itself
does not move along – in fact the particles of water make a circle
on the vertical plane. If you float on the water without wind and
tide you just move up and down – waves in open water will only
move you as you slide down the side of a wave. As soon as a wave
reaches a depth of water shallower than that required for the free rotation of the water particles, the wave will break at the top.
That is why you will see shallow water shown up by waves breaking
over them, even though there may still be water covering the
bottom. Small waves will only break in very shallow water, larger
waves will break in proportionately deeper water. This is not to be
confused with waves breaking caused by very strong winds – refer

Angling Boats 43
to the section on the Beaufort Scale for indicators of wind strength.
Waves also change their form when the wind blows across a body
of moving water, such as a tidal current. Wind blowing in the same
direction as the tidal current will tend the flatten the waves, wind
blowing against the tidal current will make the waves steeper. This
can create a potentially dangerous situation for a small boat, where
you may be fishing in a gentle wave with wind over tide, but as the
tide turns and becomes wind against tide, the waves can become
very nasty within minutes – particularly in areas where the tide runs hard.
If you get caught out and have to head for home facing into a
steep sea, the wave height and steep angle can be very
uncomfortable or even dangerous, forcing you to slow down
considerably. In these circumstances it is safer to travel at an angle
to the waves rather than straight into them, which means you will
not be going up and down such a steep gradient and the boat will
roll gently over the wave crest rather than crashing up and down.
To maintain a general direction into the waves you will need to zig-
zag, adding to your distance travelled but it is likely you can
maintain a higher speed to compensate. In extreme situations
when you meet large breaking waves, these must be faced head-on to reduce the risk of the wave rolling the boat over sideways.
Rules of the Road
Road users have the Highway Code to prevent vehicles bumping
into each other. On the sea, there are similar rules called,
strangely, “Rules of the Road”. The full Rules covering all types of
vessel are somewhat lengthy and expressed in legal terminology,
so for the purposes of small boat users I will summarise the
relevant rules here. As there are no roads or white lines, most of
the rules concern collision avoidance by making sure everyone understands who gives way to who.
As a general rule, covering all situations, make sure the vessel you
are avoiding knows what you are doing by making your own
movements obvious. Do not make gentle turns just enough to
avoid the other vessel – that could cause them to think you have
not altered course and they may make an unpredictable move as a
result. Make your turns obvious enough to be recognised, so everyone knows your intentions.
1. Don’t expect much larger vessels to treat your small boat as an
equal. There are rules that allow them right of way where their
movements may be restricted by their draft and the depth of
water, and in any case a large vessel under way physically
cannot manoeuvre as nimbly as a small boat. Keep well out of
their way, you can easily see them coming and in any case they
are likely to create a large wash, particularly close to the vessel.
2. Power vessels give way to vessels under sail.

Angling Boats 44
3. All vessels must maintain a safe speed when navigating past other vessels
4. All vessels must maintain a good lookout for other vessels
The following rules assume two power vessels, or sailing vessels
under power, are involved.
5. Head to Head: if two vessels are approaching head to head,
both vessels alter course to starboard so they pass port to port. Note this is the opposite of what you do on UK roads.
6. When proceeding up a narrow channel or entering harbour,
keep to the starboard side in anticipation of vessels coming the
other way.
7. If vessels are approaching each other at an angle and likely to
collide, the vessel with the other vessel on her starboard side
must give way by turning to starboard, which means the
vessels pass port side to port side (the same as if they had met
head to head).
8. Overtaking vessels must keep clear of vessels they are overtaking.
The International Rules of the Road are available on the web in full
– they also cover lights, sound signals, and action in times of low
visibility. Just search for “Rules of the Road” – for example the US
Coast Guard Navigation Centre has a good site.
Navigation Lights
There are many rules covering different types of vessel under way,
working and anchored at night. If you travel at night in busy
shipping areas or among working craft, you need to familiarise
yourself with the full light recognition system, and you can buy
useful recognition cards at good yacht chandlers. The following
lights cover the type of small craft and pleasure vessels you are
most likely to come across. Larger ships tend to be fairly obvious
because of all the other lights showing from working lamps, deck lights and portholes.
Tip:
If a vessel is approaching at an angle, you may wonder whether it will pass
clear or not. An easy way to check is to watch the bearing between the two
boats. If the other vessel appears to be in the same place on your windscreen
for a while, it is on the same bearing and you are on a collision course. This
method works regardless of angle or speed. If the other vessel is moving
across your windscreen in any direction, you will not collide as long as both vessels maintain speed and course.

Angling Boats 45
Under 7 metres in length: Power driven craft less
than 7 metres in length with a maximum speed of 7
knots may show a single white light visible all round.
Vessels at anchor also show a single white light visible all round.
Under 12 metres in length: Power driven vessels
up to 12 metres in length must show a red port light
and a green starboard light, each showing in an arc
of 112.50 from the centre line. These lights can be
combined into a single unit on the bows or mast, or
mounted one on each side of the vessel. A single
white light must be visible all round. This is useful as
the single white light can also be used as an anchor light if it is wired and switched separately.
Under 20 metres in length: Power driven vessels
up to 20metres in length must show a separate white
masthead light facing forward over an arc of 2250, and a white stern light visible over an arc of 1350.
Sailing Vessels: Vessels under sail must show the
same lights as a power driven vessel under 20metres
in length with the exception of the masthead light. If
a sailing vessel is under power it must display the equivalent lights for a power vessel.
Vessels over 50metres in length: Large vessels
under power over 50 metres in length must show two
white forward facing masthead lights, a higher one
towards the middle or stern, and a lower one towards the bows.

Angling Boats 46
Man Overboard and Picking Up
Losing someone over the side is nearly as frightening as falling
over the side yourself, and it is absolutely essential that the person
is picked up from the water as quickly as possible, even in warm
weather, as shock and hypothermia can quickly set in. Knowing
what to do in these circumstances can save a life, and it is well
worth practicing recovering something thrown over the side. The
same techniques can be applied to recovering anything, even a much loved hat blown overboard!
If you are cruising along and suddenly you lose something or
someone, it is tempting to try and stop and reverse back – in fact
this is not what you should do. If you were travelling at speed you
could swamp, lose control, or waste valuable time. If you have lost
a person, the first thing to do is to throw something floating,
preferably a lifebelt, into the water to both mark the position and
to provide some assistance to the casualty.
Instead of attempting to stop, you need to quickly and safely turn
and travel back up the same track as you were on when the
accident happened. This is not a “U” turn, which would put you on
a parallel track away from the item or person to be picked up. The
manoeuvre to follow is known as the Williamson Turn, which
follows a track like a “P” and puts you back on the same track that
you were originally travelling on. To do this turn, it is useful to
know which is your tightest turning circle (see section Boat Handling – Under Way, explaining propeller torque).
As soon as you know you need to turn, reduce speed and turn 600
in your tightest turn direction, then as soon as the heading has
reached 600 from the original heading, immediately turn the wheel
in the opposite direction. As the boat will have slowed during these
turns, the second turn, although it is against the torque direction, it
will still be quite tight as the propeller speed will have reduced.
This manoeuvre follows a tight “P” and takes you right back to the
casualty.
It is a good idea to practice this with a couple of fenders tied to a
bucket thrown over the side. The fenders will be visible, and the
bucket will act as a sea-anchor and keep the fenders from being blown around.
Once you have come back to the casualty or object in the water,
you need to get it into the boat, and this is surprisingly difficult.
Williamson Turn

Angling Boats 47
As you get close, objects in the water can disappear from the
helmsman’s view as the line of sight is obstructed by the bows, so
it is easy to run past or even run over the object unless a helper
keeps watch and provides directions from a different vantage point.
Before coming alongside the object, take account of the wind
direction and position the boat so it will not drift over the object as
soon as the engine is put in neutral. If it is a person in the water
and the boat is very light, this can be highly dangerous – again, get
to know your boat and how it behaves in these circumstances
before you have to do this sort of thing for real.
Getting a waterlogged person back on board, particularly an adult
who may by now be weak or in shock, can be very tricky. If you
have a bathing platform, try and roll them onto this first. If you
have a boarding ladder that extends well into the water, you may
be able to help the person on board that way. Rescue craft use a
sheet of strong web mesh attached on one side to the gunwhales,
with the other side stiffened with a pole and attached with ropes to
form a sort of loose cradle. The net is lowered into the water and
the casualty can be “floated” into the cradle. The casualty is then
lifted by pulling the ropes attached to the opposite side of the
cradle, and rolled into the boat. This technique is not easy, even
with a trained crew and a low RIB rescue craft.
In the absence of a recovery cradle, which you are unlikely to have
to hand, make a loop of rope and pass it to the casualty and get
them to slip it over their head and under their arms like a sling. As
soon as they have done that, cross the ropes – this gives them a
sense of security and something to hang on to. Another loop of
rope lowered into the water can act as a step, or they may be able
to use the outboard or out-drive leg as a step, but make absolutely
sure the engine is out of gear and preferably stopped. You will now
have a race against shock and hypothermia on your hands - it is
therefore much better to take every precaution against falling over the side in the first place.
Staying Safely on Board
When under way in a small open boat, waves or unexpected wash
from can cause sudden changes in direction, particularly if the boat
is fast and light. If the helmsman or passengers are not holding on
or the movement is particularly violent, they can be thrown against
the side of the boat or even flipped out completely. It is very
advisable for all crew members to have lifelines and use them.
Lifejackets can be purchased with integral harnesses, which have a
large stainless steel D ring on the front. Webbing life lines can be
purchased with strong snap hooks at each end. One end should
always be connected to the D ring, the other can be attached to
any strong part of the boat that is convenient. Even if you are
thrown about by the sudden motion, at least you will still be in the boat.
If the helmsman is thrown out of his seat it is important that the
boat stops rather than continuing at speed with nobody in control.
Most petrol-engined boats are supplied with a “kill cord” which is a

Angling Boats 48
switch attached to a cord, usually red, which has a strap or loop to
attach to the helmsman. If the helmsman is thrown from his seat,
the cord trips the switch and the engine cuts. Although this
prevents a boat from running out of control, the sudden
deceleration from high speed will throw everyone forwards. The
following wake will catch up with the stern and can force water up
into the engine and over the stern into the cockpit, so it is not a
situation that can be taken lightly. Take care at all times, as even safety precautions can have secondary dangers for the unwary.

Angling Boats 49
Fishing Marks
You have your boat, it is in the water, you know how to handle it -
now you want to fish! But unlike rivers and lakes where clues to
fish-holding spots are often very visible, in the sea that is rarely
the case. Looking out from a beach or harbour, you see an expanse
of blue with not a feature on it, but under the surface there are
hundreds of square metres of barren sea-bed, and other spots where feeding fish are concentrated. So how do you find them?
Sources of Information
This is a book about boats, not about angling so I am assuming
you know what species you are looking for, their feeding habits and
the type of underwater structure they like to make their home. The
challenge you now have is relating the type of sea-bed features
that your target fish are likely to inhabit, with the big expanse of blue in front of you. Where do you start?
First of all, you need to decide what to look for. If you are after
wreck and reef fish such as pollack and conger, you need to find
the location of a wreck or an area where rocks extend above the
sea-bed. If you are after fish that frequent fast-moving water over
sand-banks such as bass and turbot, you will need to find areas of
smooth undulating bottom in a good tide run. If you are after
general bottom fishing, then finding holes, gullies, broken rocks or
banks in areas of otherwise smooth bottom will tend to concentrate
fish. Fish need to eat, breed and survive and as they are in
evolutionary terms not very advanced creatures, they have little
time for much else. So the ground they inhabit must provide food,
shelter from predators or a place to spawn and those basic drivers will dictate which fish turn up where.
One option is to motor about on the sea looking at your fish-finder
until something interesting appears on the screen. Don’t discount
this method, as this may be a way of finding that secret mark
nobody else knows about, but it is probably not the most productive way to start.
One of the best sources of information is from other anglers that
you meet in local angling shops, angling clubs or around launch
sites and marinas. Making friends, sharing information, being
prepared to give as much as take, respecting other’s privacy and
not being too pushy will mean that sooner or later you will be
pointed in the right direction. You may not be given specific
coordinates for a mark, but you may be able to pick up tips about
general areas within which you can explore and find your own
marks.
Your large scale Admiralty charts will be vital in your search for
marks. Yachting charts have little detail of the bottom, but
Admiralty charts are created for commercial users and contain a
great deal of information about the undulations of the bottom, the

Angling Boats 50
location of wrecks, and what are referred to as “obstructions”.
These latter features are shown on charts so trawlers can avoid
them, and they are usually well scattered areas of wreck or some
unknown object that has been reported by a commercial fisherman.
A study of the chart will show banks, gullies, holes and wrecks –
which is exactly what you are looking for. Unfortunately it does not
tell you which ones hold the most fish, so you will have to combine
this information with some other research – which may include going out there and having a look.
Reefs are more difficult to find as they are not specifically marked.
However, if you cast your mind back to your school geography
lessons you can spot some clues on the land. Hills and reefs have
something in common – they are often formed in the same way.
They can be areas of harder rock that have eroded more slowly
than the surrounding landscape, or they could have been formed
by the “folding” of the layers of rock as the Earth’s crust moved
over millions of years. The rock that forms the seaside landscape is
usually the same as the rock under the sea at that point, and an
area of hill running down to the sea could extend under the sea in
the form of an area of reef. It may not, of course, but it is worth checking.
Another very useful source of information on the location and
description of wrecks and well-populated reefs are books and web
sites created by, and for scuba divers. As divers like to share
information (unlike anglers who fear commercial fishermen raiding
the marks), the wreck locations are freely available and there are
usually very good descriptions of the size and state of the wreck,
orientation and accessibility. If you arrive at a mark and find divers
present, move on to another mark and come back when they have
finished. Dives do not last very long, and take place when tides are
slack – which is usually a poor time for fishing, so give them some space in return for the information you have borrowed.
You may be lucky enough to come across a book with a guide to
fishing in your area, with some indication of good marks. Sea
angling magazines also have regional guides from time to time, so
it is worth keeping an eye on the newsagent’s shelves for useful issues.
The final source of information on marks needs a bit of careful
handling – other boats fishing. Anglers, and particularly charter
boat skippers, can be very possessive about their marks although
there are no ownership rights on any particular piece of seabed. A
good mark is often shown up by a number of boats fishing in close
proximity, and if you come up slowly and fish nearby without
crowding other boats, it is unlikely anyone will mind. Where boats
are well spread out, it probably means this is a good general
fishing area – you can check the bottom with your fish-finder. If
they are in a line, they may be fishing a bank – in which case go to the end of the line or fish in a gap between boats.
If you see a single boat fishing, this may be someone who has a
special mark, or an idiot who doesn’t know what he is doing. It is
hard to tell the difference from a distance, so in case it is the
former, you need to be somewhat diplomatic in your approach. One
way to infuriate a professional charter skipper is to approach his

Angling Boats 51
boat closely, press the “Mark” button on your GPS, and fish away,
or return later. There is nothing he can do about it, but it won’t
make you popular and you don’t want to make enemies in the
small world of boat angling. However, there is a way of using
another boats position to find a good mark. If you see a boat
fishing, pass well clear but mark the position on your GPS and
make a note of the other boat’s position relative to your own at
that point. It might be 200 metres North of where you marked the
position. When you return later to the marked position, travel 200
metres North and you will be where the other boat was fishing. You
can then motor around slowly checking the fish-finder to see if there was a particular sea-bed feature that was the mark.
However you find your fishing marks, the location is not the only
piece of information you need. Some marks fish better at different
stages of the tide, at different seasons of the year, or for different
species. You can only gain that information from someone who is
prepared to share it with you, or by trying your marks at different times, different dates and with different methods.
Your first year of fishing will involve a lot of learning and probably
not a great deal of catching. But take courage, as what you have
learned will help you fish better next year, and next year, and the
next year. Keep a careful record of where you fished, tide, date,
weather, fish caught and other observations – it will form a very
useful record to look back on in future years. There is a catch record template included in the Appendices of this book.

Angling Boats 52
Tides
Most of us learned a little about tides at school, and what we
learned suddenly becomes very relevant when we go to sea. If you
were a beach angler, or even just a holidaymaker, you will have
been familiar with the ebb and flow of the tides as they come in
and go out. Less obvious to those on land is the fact that the water
does not just go up and down, it flows around the coast and
creates currents which change direction and speed as well as
causing the sea level to rise and fall. There are usually two high
tides each day, and the tide times advance each day which is why
you need to refer to tide tables to find out the times of high and
low water on specific days.
The movement of a large body of water on the Earth’s surface is
caused by the gravitational pull of the Moon. High tide occurs when
the position on the Earth’s surface is nearest the moon. The Moon
takes 28 days to go round the earth, so in one revolution of the
earth the moon has moved on by one twenty-eighth of a day and
the original point has to move a further twenty-eighth of a
revolution to be closest to the moon again. One twenty-eighth of
24 hours is 51.4 minutes, which means that in theory, high tide is
51.4 minutes later each day. There are a number of terrestrial
factors which modify this theoretical period between high tides, so
tide tables will not always show an exact 51 minutes difference
from day to day, but it will be close enough as a general rule. This
means the time of high water advances approximately one hour each day.
The tidal range is the vertical distance between high water and low
water. A neap tide is a tide with a narrow range, which is a low
high water and a high low water. A spring tide is the opposite, with
a high, high water and a low, low water, resulting in a large tidal
range. Heights of tides are important for navigation and angling,
because the tide range may determine whether you can navigate a
shallow channel at low tide, and the tidal strength will affect the behaviour and location of fish.

Angling Boats 53
Tip:
You will notice that spring tides tend to coincide with high water at the same
time in a particular location, which makes it easy to predict tidal strength. For
example, in Portsmouth, high tides at midday are always higher, or springs; high tides in the early morning and late evening are always lower, or neaps.
Tides vary in height and strength of current according to the lunar
calendar, and the pattern is generally cyclical with the tidal range
increasing daily until a there are a series of spring tides, then
reducing daily until neaps are reached. Tide times are published in
tide tables, which can be purchased cheaply in angling shops and chandlers, or are available in local newspapers or on the web.
A good table will also show heights as well as times of high and low
tides. Tide times are different for each point around the coast,
because the tide “flows” along the shore and high water will occur
at different times in different locations. These tidal differences are
constant, so for example high water at Langstone Harbour will
always be the same number of minutes earlier than high water
Portsmouth, regardless of the time of the tide. These tidal
differences are published in Almanacs and tide tables, and to obtain
the exact time of tides for your chosen place, you will have to refer
to the tide table of the nearest published port and make an adjustment based on the published differences.
There are some oddities in tidal behaviour caused by the
geography of the land. As the tidal currents move towards Britain,
the flow divides around the land and runs down the coast on the
east side and the west. The currents meet along the south coast,
but because the coast of Britain is not symmetrical, the high tide
times do not exactly meet at the same time. This results in the
phenomenon of a double high water or a high water stand such as those around Christchurch and Southampton.
Other tidal irregularities are less easy to predict and are caused by
the weather. A prolonged onshore wind can “push” the water and
increase the height of the tide. Atmospheric pressure variations can
also play a part. This means the time and heights of high and low
water in published tables can be significantly different from reality,
varying from a few minutes up to a hour and more.

Angling Boats 54
Weather Forecasts
The weather can make the difference between a safe enjoyable day
out and a frightening, dangerous and uncomfortable experience.
The weather can change faster than a small boat as sea can return
to the safety of harbour, so it is essential that you know what the
weather conditions are at sea before you set out, and how the weather is expected to change while you are out there.
If you were not taught about the weather at school, or have
forgotten the significant details, there are many books on the
subject and some excellent resources on-line. The UK
Meteorological Office has a learning resource centre for different
ability levels and much of the information available is centred
around understanding the day to day weather changes, and how to
interpret forecasts and weather charts. This is exactly what is needed to be able to plan a safe trip to sea in a small boat.
The most important weather element to predict is the wind
strength and direction. The second most important is visibility –
both affect your safety at sea. Other factors like sunshine,
temperature and rain will affect your comfort levels and therefore
need to be anticipated so you can prepare accordingly and still enjoy your day.
The United Kingdom has notoriously changeable weather, and this
is caused by its position on the earth. There are competing
influences on the country, from cool air from the north, warm air
from the south, wet air from the west and dry air from the east.
The prevailing or most common air stream is warm damp air from
the south west. At any time, one influence can become more
dominant and deflect the other air streams away, which means long term forecasts are rarely accurate.
Despite huge advances in the understanding of weather and the
technology for capturing and analysing information, even short
term forecasts are not completely accurate so before any trip you
need to keep an eye on the developing weather trends, read the
latest forecasts before you set out, and keep an eye on the weather
while you are fishing. If you have any concerns about the weather,
don’t take chances – stay close to shore so if the weather deteriorates you can quickly reach shelter and safety.
Most weather forecasts are provided for people based on land, so
there tends to be more predictions of sunshine or rain. Less
attention is paid to wind strength and direction unless it is very
strong, so for the level of detail the boat owner needs a more specialist weather forecast is required.

Angling Boats 55
Shipping Forecast
The UK Meteorological Office provides two forecasts for boat
operators: firstly the Shipping Forecast, updated twice a day
covering large areas of sea up to hundreds of miles across, from
Spain to Iceland. A second forecast, of more relevance to boat
anglers, is the Inshore Waters Forecast, again issued twice a day
covering areas up to twelve miles from the coast. In addition there
are reports from coastal stations of the actual conditions at the
time. Both are available from the Met Office web site or by
premium rate phone services. The Shipping Forecast is also
broadcast on BBC Radio 4 Long Wave.
The Shipping Forecast is announced in a structured manner and
needs interpretation to understand what is meant. Each area of sea
described has a name, and each area is described separately or
several areas may be grouped together. There is a map of these
areas on the Met Office web site.
At the start of the announcement there will be warnings of any gale
force winds (Beaufort Scale Force 8 or above) that are in force or
imminent. The announcer will describe the general trends, then expected weather for each area as follows:
---------------------------------------------------------------------------
“THIS IS THE SHIPPING FORECAST ISSUED BY THE MET OFFICE,
ON BEHALF OF THE MARITIME AND COASTGUARD AGENCY, AT
1725 ON FRIDAY 07 OCTOBER 2005
THERE ARE WARNINGS OF GALES IN VIKING NORTH UTSIRE
SOUTH UTSIRE MALIN HEBRIDES BAILEY FAIR ISLE FAEROES AND
SOUTHEAST ICELAND
THE GENERAL SYNOPSIS AT 1300
FRONTAL TROUGH FAEROES TO SHANNON EXPECTED VIKING TO
FITZROY BY 1300 TOMORROW. RIDGE OF HIGH PRESSURE FISHER
TO BISCAY GRADUALLY DECLINING
THE AREA FORECASTS FOR THE NEXT 24 HOURS
VIKING NORTH UTSIRE SOUTH UTSIRE
SOUTH OR SOUTHEAST 7 OR GALE 8, OCCASIONALLY SEVERE
GALE 9 IN VIKING AND NORTH UTSIRE FOR A TIME, VEERING
WEST 4 IN VIKING LATER. RAIN LATER. MODERATE OR POOR……..”
etc.
---------------------------------------------------------------------------
This might sound like a code, but it is fairly easy to interpret.
Wind Speeds are given according to the Beaufort Scale (see table
in the Appendices)
Wind Direction refers to the direction the wind is blowing from.

Angling Boats 56
Veering means a changing to the direction of the wind clockwise, e.g. South to West.
Backing means a changing to the direction of the wind
anticlockwise, e.g. South to East.
Imminent means in the next six hours
Soon means in the next six to twelve hours
Later means after twelve hours
The final description in each area refers to visibility, as follows:
Fog - Visibility less than 1,000 metres
Poor - Visibility between 1,000 metres and 2 nautical miles
Moderate - Visibility between 2 and 5 nautical miles
Good - Visibility more than 5 nautical miles
A more detailed glossary is provided on the Met Office web site.
Inshore Waters Forecast
The Inshore Waters Forecast is also divided up into areas, this time
according to parts of the coast between specific landmarks. The
weather description is less cryptic than the Shipping Forecast, and
includes the Sea State which is of great interest to anglers who plan to spend hours at anchor. An example follows:
---------------------------------------------------------------------------
Issued by the Met Office at 1700 UTC on Friday 07 October.
Inshore Waters Forecast to 12 miles offshore from 1700 UTC to 1700 UTC.
From Cape Wrath to Rattray Head including Orkney.
24 hour forecast:
Wind: south 5 to 7, occasionally gale 8 in north at first, veering
southwest 4 or 5, increasing 6 in west later.
Weather: rain spreading from west, then showers later.
Visibility: moderate or poor becoming good.
Sea State: moderate or rough.
Outlook for the following 24 hours:
Wind: southwest 5 or 6 backing south 6 to gale 8, perhaps severe
gale 9 in north later.
Weather: showers then rain.
Visibility: good becoming moderate. Sea State: moderate building rough.
After the full UK coastline is covered, there is a general long term forecast, such as:

Angling Boats 57
Tip:
Do a web search for local web-cams and weather stations to get up to the
minute weather statistics over the web. For example, Hayling Island has a web
cam pointing at the shore at www.hayling.co.uk/surfcam . There is a weather
station transmitting live weather and sea state statistics from the approaches
to Chichester Harbour entrance at www.chimet.co.uk
Outlook for all UK Inshore Waters for following 3 days:
Gale or severe gale southwest winds off west and north Scotland
moving away on Sunday night with strong southerly winds
elsewhere moderating on Monday. Fresh or strong southerly winds during Tuesday and Wednesday.
--------------------------------------------------------------------------
Even if you have no knowledge or interest in the weather, you are
obliged by SOLAS V regulations to check the weather forecasts
before a trip and get regular updates if you are out for any length
of time. Checking and understanding the Met Office Inshore Waters and Shipping Forecast is the very minimum you should do.

Angling Boats 58
Basic Navigation
Understanding Charts
Charts are essential for any fishing trip – they are your map of the
sea for guiding you out and back, without which you might feel
overwhelmed by the expanse of grey-green around you! Charts
also show useful fishing marks such as underwater obstructions and wrecks; banks, hollows, overfalls and other fishy areas.
The only charts worth considering for anglers are the detailed
Admiralty charts published by the UK Hydrographic Office. There
are “Small Boat” Leisure editions which are smaller and have less
detail, but are quite handy to have in the boat. Portfolio Editions
are several charts of an area, printed on the same size paper and
supplied in a plastic pouch. Don’t be tempted by charts from other
publishers, these are usually for yachtsmen, not anglers, and
although they are perfectly adequate for navigation they do not carry enough sea-bed information for our needs.
Charts quickly go out of date as buoys are moved or the sea-bed
re-surveyed. These changes are published as “Notices to Mariners”
on the UKHO web site so you can annotate your charts with the
updated information, or you can take your charts to an authorised distributor of charts to be updated for a fee.
Charts can be supplied flat or folded, and will look like any other
map, except that the area with all the detail is the sea, and the
area with very little detail is the land. There are usually useful
notes dotted around in areas of land, or on the back. There will
also be several 3600 compass graduations showing true north (always at the top) and magnetic variation.
There are graduations marked along the top and bottom of the
chart which are the degrees of longitude, and graduations marked
along both sides which are the points of latitude. One minute of
latitude is always equal to one nautical mile – that saves you looking for a scale.
Refer to the chart key to understand the symbols – with Admiralty
charts this is supplied in a separate booklet. Some are self
explanatory, like “Wk” indicating a wreck. Some are more
mystifying, such as a buoy with a name and something like
“Fl(2)G.10s” which in fact describes the light flashing sequence for that particular buoy at night.
Depths are marked in three ways: by colour, by lines, which are
like above-water contour lines only in reverse, and by numbers.
Areas covered at high water and exposed at low water are also
shown, with the drying height shown as a number with a line under
it. The “Charted Depth” is the depth at the lowest point of the
lowest tide – you need to allow for the additional depth of water if the tide is at any other stage.

Angling Boats 59
Dotted around the sea you will also see letters in diamonds –
purple in the case of Admiralty Leisure Editions. These will refer to
a table somewhere else on the chart, and show the speed and
direction of tidal flow at that point on the chart, at high water, and for each hour of the six hours before and six hours after.
Even if you have a chart-plotter with electronic charts, I strongly
recommend you carry paper charts as well. These are essential if
your plotter fails, and are also useful for planning at home, and to
give a wider view of your fishing area than you can see on a tiny screen.
Buoys and Marks
The sea does not have clearly marked routes like roads on land,
nor are all dangers visible on the surface. Various marks are put in
or on the sea to indicate safe areas and danger areas. At one time
there were many different systems around the World, so in 1979, a
body called International Association of Lighthouse Authorities
(IALA) was formed to unify the different buoyage systems in use.
They were nearly successful, except we now have two similar
systems, IALA 'A' used in the UK and Europe; and IALA 'B' used in
North and South America, Japan and the Philippines. This section will concentrate on the European IALA ‘A’ system.
Do not tie up to a buoy in order to fish – it is illegal and highly
dangerous, both to yourself and for others who depend on a clear
sight of the buoy for safe navigation.
Buoys and marks are an invaluable navigational asset, but their
presence or absence from their expected place cannot be
guaranteed. Anchored buoys can drag their moorings in a storm,
be sunk in a collision with a large ship, or be removed for
maintenance. You are always advised to check with some other
indicator as well, such as your depth on the fish-finder or bearings from a fixed landmark.
Lateral
Marks

Angling Boats 60
On leaving your launch site or marina for the very first time, it is
very likely that buoys or posts called Lateral Marks are the first
navigation objects you will see. These are used to mark the
navigable channel, and are aligned in the ‘A’ system to be on the
Port or Starboard hand as you are approaching a port. The
historical reason for this was because for a vessel making for a safe
harbour in heavy weather, it was one less thing to worry about –
the red markers would always be left to port and green to
starboard. On leaving the port after a storm, it would be less
stressful so the helmsman would have time to work out that red on
the port side coming in meant leave red on the starboard side
when going out, and that is how you use the Lateral Marks in the UK today.
Lateral Marks may be buoys or posts. The distinguishing features
are that the port hand marks are red in colour and are square or
have a square shape on top; starboard hand marks are conical or
have a conical mark on top. The shape is important, as a buoy in
poor repair, or covered in weed or bird droppings may not be easily
identifiable by colour but it will have a distinctively different shape.
At night they may have lights as well – red for port and green for
starboard. The sequence of flashes (referred to as rhythm) will vary and will be identified on the relevant chart.
Some objects that could be hazardous to shipping are marked with
a buoy or post with black and red bands, and two black balls on
top. This could be a wreck or rock that lies just below the surface.
Not all dangerous areas are marked in this way, usually only those
very close to regularly used shipping channels. Keep well clear of
these marks, but unless there are other marks you can pass on any side.
Conversely, areas of safe water not otherwise marked as channels
are indicated with posts or buoys coloured with red and white
vertical bands, with a red ball on top.
Isolated
Danger
Marks

Angling Boats 61
Tip:
Buoys are not always what they seem. The stripes on posts can be misleading
if seen at low tide where a large, dark section is exposed. Cormorants sitting
on top of a post will make the top mark appear different. Bird guano will
obscure the colour of poorly maintained marks. Take a good look just to make sure.
Another common buoy or mark, usually found close to a busy
harbour or estuary, are the “special” marks. These are always
yellow, and could mean many things, but they are not of
navigational significance. They could be temporary, indicating a
turning point for a yacht race, they could mark the position of a
regularly dived wreck, or they could be where they are for a host of
other reasons. Sometimes they are marked on the charts, but not always.
Safe
Water
Marks
Special
Marks

Angling Boats 62
One of the most important sets of marks to learn, and in some
respects these are probably the most complicated, are the Cardinal
Marks. These may appear singly, in pairs, or all four and show the
position of a point of danger relative to the buoy, that is, the
danger zone will be North, South, East or West of the buoy
depending on the colour sequence and orientation of the triangular
top marks. The diagram below shows where the danger area is relative to each type of Cardinal Mark.
For example, if you are travelling from East to West and you see a
buoy in front of you coloured black on top and yellow below, with
two triangles on top each pointing upwards, this would be a North
Cardinal Mark indicating a danger zone to the south of it. In this
case you would alter course to starboard to go to the north of the
North Cardinal Mark and stay well clear of the danger. Always
check other marks around and make sure by avoiding one danger you are not putting yourself into another.
Latitude and Longitude
If you are heading out from the harbour, and heading for a fishing
mark you have been told of, you have probably already come
across the terms Latitude and Longitude. However, there is a little
more to it than was covered in your school geography lessons, so
we will go over the basics and the important parts that relate to coastal navigation.
Latitude
Your position north or south of the equator is expressed in degrees
of latitude, with the equator as zero degrees latitude. Positions
above the equator are referred to as degrees north and positions
below the equator are known as degrees south. Lines of latitude
are equally spaced, and one degree of latitude is always 60 nautical miles at any point on the globe.
Cardinal
Marks

Angling Boats 63
Longitude
A line drawn from the north pole to the south pole through
Greenwich is the line of zero degrees longitude, or The Prime
Meridian. Positions to the east of it are expressed as degrees east
and positions west of it are degrees west. Lines of longitude radiate
from the north and south poles, so the distance between them is
widest at the equator and get closer together the further north or
south you go. One degree of longitude is therefore not a constant distance.
Describing a position in latitude and longitude
One degree of latitude or longitude is divided into 60 minutes, and
one minute of latitude or longitude is divided into 60 seconds. These are mathematical seconds and have nothing to do with time.
There are several different ways of expressing a position, but the
convention used for maritime navigation – and most importantly,
the position you would describe to the coastguard in the event of
an emergency, is in degrees, minutes and decimal minutes. For
example, the wreck of the tug Blazer lies off the Scilly Isles in the position:
49o 45’ 330N 06o 19’ 400W
When describing this position, you would say:
“Forty nine degrees, forty five decimal three three zero
minutes north; zero six degrees nineteen decimal four zero
zero minutes west.”
You can see that if one degree of latitude is 60 nautical miles, with
60 minutes to a degree and three decimal places, the position
described in that way would be accurate to plus or minus 1.85 metres!
Chart Datums
Historically, different countries have used different points of
reference to map lines of latitude and longitude, which means the
position described above could only be found if you knew which
reference point, or datum, the position was relative to. In the UK

Angling Boats 64
most maps and charts are in Ordnance Survey (OS) datum and in
order to match your GPS unit to OS maps you would have to set it
to OS datum. In order to rationalise these different datums, a
world geodetic survey was published in 1984 and it is now possible
to produce maps and charts of the earth's surface to one common
datum, called WGS84. Many countries are in the process of
converting their country's maps and charts to WGS84 datum, and
the UK Admiralty are converting UK maritime charts from the OS datum.
It is therefore essential to know which datum your paper charts
and GPS unit are using, because confusing the two could make a
difference of several hundred metres – enough to put you well
clear of the fishing mark you are looking for, or worse, you could
track right into a rock or sandbank that you thought you had
positioned yourself well clear of. As long as you know the datum
your position is taken from, and you set that datum when you
enter the position on your GPS, when you change the datum
setting on your GPS it will automatically convert stored positions to
the required datum. There are also web sites that have datum
conversion tools if you are planning your trip away from your GPS unit.
Your compass and north
True north is at the top of your chart, and is the most northerly
point on the earth’s surface. Magnetic north is not exactly true
north, and to complicate matters, it is constantly moving and is
different in different parts of the world. The difference between
magnetic north and true north is called Magnetic Variation. Your
chart will indicate the magnetic variation for the area in question,
and you will have to adjust that figure for the difference between to date the variation figure was given and the current date.
If that doesn’t sound complicated enough, there is another factor
that affects where your magnetic compass will point. That is the
influence other metallic objects in your boat will have on the
magnetic compass. The difference can be considerable, and is likely
to be different depending on which direction your boat is heading. This is called Magnetic Deviation.
Each boat will have a different magnetic deviation because the
metallic objects on boat are likely to be placed differently. This
means you will need to know the magnetic deviation for each
course direction. Working this out is called “swinging the compass”.
Electronic compasses also suffer from deviation as they have a
magnetic sender unit, but their electronic wizardry makes swinging
the compass easy, and the compensation for deviation is applied automatically.
Swinging a traditional compass is more tedious, and involves
heading in known directions on all major points of the compass – at
least eight, and recording the difference between the known
direction and the course indicated on the compass. These
differences are then plotted graphically, and a smooth line drawn
joining up these points so the deviation on courses in between
those you have plotted can be estimated reasonably accurately.

Angling Boats 65
This magnetic variation reference card is an important asset in traditional chart-based navigation.
With the widespread use of GPS for navigation, it would be very
easy to dismiss all of this and just punch in the destination and
press the “Go To” button, and the unit will display the bearing and
your course. As long as these two are kept nearly the same you will
get there. However, navigating a long distance, a complex course
along the coast, or getting home after your GPS has failed will
involve traditional navigational skills where an understanding of your compass, variation and deviation will be essential.
Compasses, Courses and Bearings
There are three purposes of a compass on board a small boat: to
show orientation, or which way your boat is pointing; to show the
direction of the course you are taking (which may not be the same
thing); and to indicate the bearing or direction, of an object from
your boat.
To provide this information, there are three type of compass that
you may have on board. The minimum you must have for any form
of navigation is the steering compass. This is fitted permanently to
the boat, oriented so that there is a fixed line on the glass to show
the direction your boat is heading and is used to steer a course.
These compasses can be traditional magnetic card types, with a
rotating, graduated card in some form of dampening liquid, or an
electronic compass with a digital display fed from a remote directional sensor.
You may also have a hand-bearing compass. This is designed to
read bearings from a remote landmark by aligning sights, much
like a rifle, on the mark and reading off the bearing. Again, these
can be rotating cards or electronic. The third type of compass is not
really a compass at all, but as your GPS will display your most
recent course track in terms of a heading, it can be included here.
In addition, your GPS will provide a bearing from your present
position to the destination waypoint, and will also show the track from the origin of the course to the destination.
It is important to understand the difference between the boat’s
heading and the boat’s course or track, particularly if you are using
both a GPS and a steering compass. The GPS will take no account
of the movement of water – at all times, it is fixing positions based
on the absolute position relative to the sea-bed, or what is called
“over the ground”. The course or track that is displayed is
calculated by the GPS by comparing the previous position with the
current position. If the boat is drifting with no power, swinging
around with the wind, the track of the boat over the ground will be
displayed as a course, regardless of which direction the boat is
heading.
Similarly, if the boat is kept on a constant heading according to the
steering compass, but wind or tide is exerting a significant
sideways force, the actual course over the ground will not be the

Angling Boats 66
same as the heading, as the boat will tend to “crab” at an angle to
the heading, according to the strength of wind or tide. The
significance of this effect will depend on the distance you are
travelling, the speed of the boat and strength of wind and tide. For
most small, fast boats heading for inshore marks this tends to be
ignored. For a slow boat heading for a mid-channel wreck with a
strong tide running, it is an important consideration in navigation.
Plotting Your Course
If you have a GPS or chartplotter, it is too tempting to key in your
destination, read off the bearing displayed and head for it. I am
sure that is exactly how many boat owners navigate, and I am also
sure you will too, but don’t let that be the only way you navigate.
You could have mistyped the coordinates, there could be dangerous
shoals or rocks in your path, or your GPS could fail. You need to
know the basics of navigation to get the best out of a GPS, and to
help you out in case you can’t rely on it for any reason. If you have
an interest in the subject, evening classes or a short course are
very enjoyable and will add to your skills. If you just want the
basics, here is a short guide but I strongly recommend you read up on the subject from books readily available from yacht chandlers.
The inside of a small boat at sea is probably the worst possible
place to be plotting a course. You need a large flat surface, good
light, dryness and no movement to make you feel queasy with
prolonged studying. Hardly the description of the inside of a small
angling boat! Instead, start your trip early by doing the planning and course plotting at home – it all adds to the fun anyway.
To plan your trip, you will need some very basic tools: a large scale
chart or charts covering your planned route, a soft pencil, a soft
rubber, and either a set of parallel rules (available from a yacht
chandlers), or you can make do with a normal ruler and a set-
square. You will also need tidal information for the date of your
trip, and preferably a tidal atlas covering the route as well.
The first task is to adjust the direction of magnetic north on your
chart for variation. As described earlier, variation is the difference
between magnetic north and true north, and is changing year by
year. Your chart will have a date, and the annual change, marked
on it, usually in the printed compass rose itself. For example, if
your chart date (which is the date printed on it, not the date you
bought it) is six years old and the change in variation is 10 minutes
Tip:
Paper charts in an open boat, or even one with a cuddy, are vulnerable to
water damage. You can buy plastic chart pockets, but these usually fit only the
smaller folio-scaled charts. To water-proof a chart, paint it with a water-
repellent liquid of the type used to treat brick walls. A small can will cover
more charts than you will ever need, and can be bought cheaply from a DIY store.

Angling Boats 67
per year east, that means reduce the variation by 60 seconds or
one degree to align with your boats compass which will be reading
the magnetic north of today. If your chart date is recent and the
change in variation is small, you can ignore this for short journeys as the difference it makes will be marginal anyway.
Let us assume you want to know what course to steer to get from
your launch site to a fishing mark you have been told of, which is
approximately five miles out to sea. Firstly, identify your
destination by reading off the latitude (along the horizontal scale)
and the longitude (along the vertical scale). Using your ruler and
setsquare you will be able to mark a pencil cross where the fishing mark is located.
Next, draw a line from your launch site to the mark, and provided
that route does not take you into a danger spot like a rock or sand-
bank, that is your intended track. The angle of that track from
magnetic north is the course you would steer if there was no wind
and no tide to push you in a different direction. You can find out
the course to steer by drawing a line exactly parallel with your
course, through the nearest compass rose on the chart. This is
where parallel rules come in handy, to “step” a parallel line from your course line to the compass mark.
You now need to take account of wind and tide, which a GPS will
not do. Unless the forces of wind and tide are directly in front of or
behind you, they will keep pushing you boat off the intended track.
Your GPS will keep modifying your intended course to keep you
headed towards the destination mark, but your actual course over
the ground will not be the planned track. If you do not have a GPS
and follow a compass course, you will miss the destination entirely.
This can be very
dangerous if there are
rocks just down-tide of
your planned course as in
the illustration above,
because if you follow the
exact compass course or
the bearings given by the
GPS, you will end up right
among the rocks instead of
on the safe course
between the launch site and the mark.
To allow for tidal drift, you
need to calculate the
length of time you will be
travelling, and the distance and direction you will travel in that time
pushed by the tide. The direction and speed of the expected tide at
the time you will be travelling can be calculated from tide tables for
the date of your trip, together with the table provided on the chart,
or from the tidal atlas. The easiest way to calculate the course you
need to steer to compensate for the effect of the tide flow is to
draw a line on the chart, of a length that is scaled to the chart
representing the distance you would drift in the time you are travelling on that course, and the angle of the line is the angle of
Course
following GPS

Angling Boats 68
the tidal current. Draw the
line pointing up-tide of the
mark, then draw a line
joining the “start” end of
your line of drift, to the
start point of the course.
This line is the course you
must steer, but the line
directly from the start
point to the mark is the
actual track of your boat.
Here is a simple worked example.
Your boat travels at 10 knots
You wish to travel from the launch site to the mark, a distance of five nautical miles.
Therefore you will be travelling for 30 minutes
The tide is running at 1 knot from west to east.
In thirty minutes you will drift half a nautical mile
You must steer a constant course to point A, to end up on
your mark at point B
Remember to adjust the magnetic course calculated
with your chart according to the deviation card for your boat’s compass on that heading.[
Whether you chose to
plan every trip like this,
or to go on to study
coastal navigation in
more detail, is up to you.
This is only a very basic
introduction but it is
important that you are at
least aware of the effects
of wind and tide on
courses suggested to you
by your GPS. You can
then make allowances for
drift to ensure you reach
your mark safely and do
not inadvertently end up in danger.
Course
Following
Compass
Course
Allowing for Tidal
Current

Angling Boats 69
Bearings, Fixes and Marks
If all your marks are based on GPS co-ordinates you may never
need to worry about taking bearings, but it is worth knowing about
in case you are told of a mark based on bearings, or in case you
need to describe your position according to bearings in an
emergency. Before the days of GPS, taking bearings on distant
objects to confirm or “fix” your position was an essential part of
navigation. This is a simple description of how it is done.
A hand-bearing compass is used to aim at a fixed object, which has
to be one that has a confirmed position on your chart, and the
bearing displayed on the compass is recorded. You may need to do
this several times and take an average if the boat is moving about.
If you draw a line on your chart on the reciprocal angle, i.e. the
bearing you recorded plus 1800, your position is somewhere along
it. If you do exactly the same with another object, preferably one
about 900 to the first one, the point at which these two lines intersect is where you are, in theory.
In practice, because boats wobble about, compasses swing, pencil
lines are thick and rulers can slip, it probably is not. To obtain a
more accurate fix, you need to take a third bearing of another
object and draw a third line. In theory again, this line should go
through the intersection of the first two. In practice, it will create a
little triangle, and you are somewhere inside of it. If your triangle is
fairly small, that is probably good enough. If it is big, you had better start again.
Bearing
Fix

Angling Boats 70
Anchoring
Most books on sailing and powerboats cover anchoring, but assume
that you are anchoring in a sheltered bay for the night. Anchoring
for a boat angler is a very different matter – the water will be
deeper, the tide will run harder and the anchor has to be set as accurately as possible to ensure you are among the fish.
Anchor, Rope and Chain
The job of the anchor is to grip the sea-bed, and not move until
you want to. The job of the rope is to connect your boat to the
anchor, so the anchor can do its job best. As with most things in a boat, there are plenty of choices which can confuse the beginner.
Starting with anchors, there are several different types, with
varieties of each type according to manufacturer. Most will be
made of steel or cast iron, heavily galvanised to protect against
rust. Some super-yachts have stainless steel anchors, and
aluminium anchors are available for certain limited conditions, but these are unlikely to be suitable, or affordable, for the boat angler.
Each anchor has advantages and disadvantages, and many anglers
swear by one or another. The choice will be dictated by your needs
or preference. The weight of anchor to buy can also be a worry, so
I would recommend that once you have selected a style of anchor,
you ask someone knowledgeable in a yacht chandlers, and tell
them the length and weight of your boat and the type of anchoring
you intend to do. Anchors are sized by weight, and the only
disadvantage of having one heavier than needed is the effort
required to raise it. One lighter than it should be may not hold you
firmly in position – which is what you need it to do. A typical 5 Different types of anchor are as follows:
Fisherman. This is the “traditional”
anchor, used for centuries and still in
widespread use. They usually have a
folding “stock” which has to be pegged
in place to ensure the flukes dig in the
seabed. This makes them more
cumbersome to use, and the protruding
fluke and stoke are prone to tangling
with the anchor chain. Fisherman
anchors will not “self-stow” on a bow
roller because of the protruding stock.
You need a slightly heavier fisherman
anchor to give the same holding power
as other styles, which is a consideration when hauling up from a great depth.

Angling Boats 71
Danforth. Good general purpose
designs, and fold flat when not in use.
Some people think they do not hold as
well in some types of sea bed, but in
my experience they work as well as any
other style. They cannot be rigged to
trip with a cord as they are designed to
hinge and dig into the seabed from
either side. Be careful when handling
as fingers can be pinched between the
stock and flukes. They can usually be
persuaded to self-stow on a bow roller
but need additional fastening due to
the lack of an “elbow”.
CQR or Plough. As the name suggests
these have a plough shaped head
which may be fixed or hinged. They
hold well in most sea beds and also
nestle conveniently if you chose to stow
you anchor permanently on a bow
roller. If you do not, they are less
convenient to store in the boat as they do not fold flat.
Bruce. This is a modern design with
exceptional holding power for their
weight. Like the plough anchor, unless
they are stowed on a bow roller they
are not very convenient to store as they do not fold flat.
Grapnel. These are available in smaller
sizes at very low cost but are not as
effective as the other styles except for
rocky areas. Shop-bought ones have
folding flukes which make them easy to
store but have a habit of folding when
in use as well. Home-made grapnel
anchors made of rebar (steel bar used
to reinforce construction concrete) are
probably the best option in very rocky
and snaggy areas as the prongs will
bend to allow a snagged anchor to be
retrieved, and are cheap to replace if
that fails.

Angling Boats 72
Tip:
Rig your anchor to self-trip (i.e. release) if it becomes snagged when
retrieving. The following method is possible on all types of anchor except
Danforth. Firstly, attach the end of the chain to the crown of the anchor
instead of the usual fixing point. There will usually be a convenient eye
provided on plough and Bruce anchors for this purpose. Find a point on the
chain about two links longer that the full length of the stock and eye, and tie
the link to the anchor eye with a few turns of light cord. This cord should be
strong enough to hold the boat under normal circumstances, but break if the
pull exceeds the normal holding strain. If the anchor snags, keep pulling and
when the cord breaks, you will be pulling the anchor out backwards and away from the obstruction that snagged it.
All anchors need some additional weight to ensure the pull from the
boat is as horizontal as possible, which is what makes them dig in.
You need to fix a length of chain, of a thickness proportional to the
size of anchor and rope, between the anchor and the main rope.
This also prevents the rough seabed chaffing the anchor rope.
Rope, chain and anchor need to be joined together with good
shackles, greased, screwed tight and secured (or “moused”) with
cord or preferably stainless wire to prevent them working undone.
As a general guide, the length of chain needs to be at least the
length of your boat, more if you feel able to haul up the extra
weight. Chain is sized according to the diameter of the metal making up the link.
Anchor rope needs to be of sufficient strength and thickness to hold
the boat in rough weather, and of sufficient length so that you can
let the anchor rope out a length of at least three times and
preferably five times the depth of water you are in. In very deep
water, you will not need so much rope because the much higher
force of tide on the full length or rope will make the anchor dig in more rather than less.
Don’t be tempted to go for thin rope even if it is strong enough,
because when hauling by hand a thicker rope is easier to manage.
Anchor rope needs to be stretchy to absorb shocks, and non-
floating so it helps set the anchor and stay out of the way of
propellers at slack tide. Nylon is the best anchor rope, although it is
not the cheapest type of rope available. Polyester is an alternative.
Three-strand is perfectly adequate, although multi-plait versions
are available. The size of a rope is described by the diameter in millimetres.
If you cannot rig your anchor to self-trip and you are fishing an
area with a snaggy bottom, it is wise to buoy the anchor. This
means attaching a small marker float to the crown of the anchor
with a line of sufficient strength to recover the anchor. This line can
be much thinner than the main anchor rope as it will not be needed
to hold the weight of the boat. If the anchor snags, you can pull the
anchor out from the snag backwards with the buoy line.

Angling Boats 73
Dropping Anchor
If you are anchoring on a general mark, such as a large area of
broken ground, then the positioning of your boat at anchor need
not be too exact. When you decide to anchor, put the engine in
neutral, let the boat come to a halt in the water, unfasten the
anchor and pay it out gently – don’t throw all the chain and rope
out in a heap, or it may tangle on the way down. Make sure the
free end is tied to something so that you do not inadvertently pay it all out and lose the lot.
When you feel the anchor touch the bottom, continue to feed rope
out as the boat settles back with the wind and tide until a sufficient
length of rope has been paid out. With experience, you will know
when that is by the angle of the rope as it leaves the boat. You can
never put out too much rope, but you can put out too little. If there
is not enough rope, the angle of pull on the anchor will cause it
break out rather than dig in.
When you think you have enough rope out, make a few turns
around your forward bollard or cleat, then finish off with a figure of
eight. It is not necessary to tie a knot – in fact it is better not to in
case you have to make a fast move such as when you find yourself
in the path of a fast-approaching ship! Before you switch off the
engine and start fishing, make sure the anchor has started to grip
the seabed. If you are near other boats, you can easily tell if you
are dragging backwards. To make sure you are not, take hold of
the anchor rope. In a running tide, it will be tight as a bar and
there will be no other feel other than the “tingling” of the water
running past. If the anchor is dragging, you will feel the rope pull
and slacken, and you may even feel the rumble of the anchor slipping over the seabed.
There are a number of reasons for dragging. It may be there is not
enough rope out, so try letting out more and see if the anchor
grips. The anchor chain may have become tangled around the
other parts of the anchor, which is a more common occurrence with
fisherman anchors. Danforth anchors sometimes get a rock wedged
between the flukes preventing it digging in, or a pebble can jam
the stock preventing it swivelling correctly and digging in. If the
anchor does not set correctly even after letting more rope out, the
only solution is to pull it in and start again. Some sea-beds are
very difficult to anchor on – in areas of hard, flat rock the only
solution is to allow the anchor to drag on a very long rope until the flukes catch on a ledge or crevice.
Once the anchor has set, ensure that the anchor rope is secured
over the bows. Never anchor by the stern or side, this is highly
dangerous and can result in swamping or capsizing. You can now
stop the engine, and start fishing! If you have a GPS and you are
concerned about dragging, you can set the Anchor Watch feature.
This sounds an alarm if you position changes more than a pre-set
distance. Don’t set this too short, otherwise it will sound the alarm
as the boat swings naturally with the tide – set it to just over twice
the length of your anchor rope, then it will not sound even if the
tide changes direction. It is highly advisable to set this alarm when
night fishing, as it is more difficult to sense anchor drag if you

Angling Boats 74
cannot see other objects to keep a visual reference of your position.
If you need to fish over a precise spot such a reef, wreck or bank,
your anchoring position needs to be carefully calculated so that the
effects of wind and tide do not push you off the intended position.
Your tidal atlas will give you an idea of the strength and direction of
the tide, and a quick look around will show you which way the wind
is blowing. Both of these forces will dictate where the boat settles
after the anchor digs in. An experienced skipper can probably
estimate where to drop an anchor with a fair degree of accuracy.
With the help of a GPS, you can be fairly accurate too.
If you want to fish directly over a reef, firstly locate the reef using
GPS and fish-finder. Set the GPS option to “track”, and mark the
position of the fishing point if the coordinates are not already
entered. Put the engine in neutral, and allow the boat to drift.
Depending on the type of boat, the effect of wind may be more
than the effect of tide. You will be able to see the drift on the GPS
screen. Let the boat drift for the length of time it would take to
drop and set the anchor, and make a note of the length of drift
during that time.
Now put the engine in gear, and motor gently back up the track,
and keep going for an equal distance. Continue on for the length of
rope you are going to pay out, then make a slight adjustment for
the effects of wind if that is necessary – more so for light boats in a
cross-wind. The effects of tide will be more significant than the
effects of wind once you are anchored, because of the force of the
tide on all the anchor rope. Put the engine in neutral, mark the
position on the GPS again and anchor as described above. Your
anchor will hit the seabed after you have drifted back slightly, and
the boat will settle at the end of the rope you have paid out.
If you have estimated all the distances and bearings correctly, you
will end up just up-tide of your mark. Have a look at the GPS plot
screen and see. If you are off-target, then note the relative position
of the intended mark with your current position, and try again –
Anchoring:
1

Angling Boats 75
this time anchoring in a position offset from your original anchoring
position by the same distance and bearing as your original error –
this second attempt should put you spot on the mark. This might
seem like a lot of trouble, but a mark like a wreck will hold fish in a
very localised position – miss it by a few metres and you will miss a lot of fish.
Hauling the Anchor Up
When you are ready to move to another mark, or head back home,
you will need to haul the anchor in. Firstly, reel in all your lines,
remove weights and secure hooks so they do not fly about. Put
rods in rod holders or secure them with elastic cords out of the
way. Start your engine, and let it warm up on tick-over while you
sort out the anchor.
If the tide is slack and the anchor is light this may be simple
enough if a little tedious – you can just haul it up. Keep the rope
tidy, and don’t let the coils stray and tangle – if you suddenly let go
of the anchor you don’t want to find yourself following it into the
depths with a loop around your foot. Some boats have a purpose-
built anchor rope locker, or you may coil your rope into a plastic
bin. If the anchor locker is fiddly to stow rope in as you haul, fit a
large hook such as a life-buoy holder on a rail nearby and loop the
rope over the hook as you pull it in. This keeps it tidy until you can tuck it in the locker.
If the tide is running, you will be surprised how difficult it is to pull
the anchor up by hand. One way is to have the helmsman motor
very slowly up tide as a crew member pulls in the rope. This must
be done very carefully to ensure the boat does not run over the
rope and tangle the propeller. As the boat goes over the anchor
and the rope is vertical to the sea-bed, the anchor will break out of
its hold and the boat can be allowed to drift as the rest of the anchor rope is recovered.

Angling Boats 76
Alternatively, if your wallet can stretch to it or the size of the boat
justifies it, you can fit an anchor winch. Manual winches may be
adequate for yachts anchoring in shallow bays, but they are not
really suitable for deep water anchoring. An electric winch is
required, and these run to several hundreds of pounds, plus
electrics and fitting costs. Most pleasure-boat winches are designed
to pull the anchor up but are not strong enough to pull the boat
along. You will need to motor ahead gently as the winch hauls the anchor up.
Another method uses a large float and a stainless steel ring called
an Alderney Ring. There is a branded version on the market called
an Anka-Yanka. This method uses the force of the tide and the
movement of the boat to lift the anchor, but it should only be used
when you have plenty of boat handling experience because it is
easy to make a mistake and tangle your propeller. However, when you feel ready for it here is how to do it.
You need a buoy, a large balloon fender or similar of sufficient size
to float your entire anchor and chain. These are readily available
from yacht chandlers, or cheaper ones can be bought from
commercial fishing gear suppliers. You also require a large stainless
steel ring of at least 15cm diameter, attached to the buoy with a
shackle. To raise the anchor, you pass the anchor line through the
ring and let the ring run freely up and down the anchor rope. Some
rings are available with a gap and two smaller rings welded either
side which makes it is easy to clip the ring to the rope without
having to thread the rope through the ring. You could use a loop of
rope or a large snap ring but these may not run as freely as a large steel ring.
Throw the buoy into the water, then motor up-tide at an angle of
about 300 to the direction of the anchor rope. As you motor
forwards, the rope will slacken and make a loop, with the buoy
slipping along the rope keeping the apex of the loop on the surface.
Keep your eyes on the buoy, and make sure you are not running
over the anchor rope. If you lose sight of it, slip into neutral, drop
back and try again. You may need to take a wider angle to clear
Alderney Ring
And Buoy

Angling Boats 77
Tip:
When you drop anchor, put your buoy and ring on the anchor rope, fix some
form of stopper on the rope to prevent the buoy siding up the rope towards
the boat (a 30cm length of broom handle clove-hitched to the anchor rope will
do), then let out a few more metres of rope. This has three advantages – the
buoy is not banging on the boat all day; you are ready to start the engines and
immediately up-anchor in case you have to move in a hurry, and also the
helmsman will be able to see the buoy at all times making it easier to avoid
running over the anchor rope.
the rope. As you pass the point where the anchor is on the sea-
bed, steer slightly back towards the original line of the anchor to
follow a shallow arc around the anchor. Keep going up-tide, and the anchor will be pulled up to the buoy.
If the buoy sinks, it was too small! When you think the chain has
reached the ring, give a burst of throttle to pull the chain through
the ring, and put the engine in neutral. You can now pull the
anchor back to the boat very easily, as the weight of anchor and
chain is being carried by the buoy. The full sequence is illustrated on the following page.
Once you have recovered the rope, chain, buoy and anchor make
everything secure – particularly the anchor, as you don’t want that
to drop while you are travelling along.

Angling Boats 78
Alderney Ring Sequence

Angling Boats 79
Recovering a Snagged Anchor
Sometimes, recovering an anchor does not go according to plan. It
may have a fluke caught under a rock, a piece of wreckage or a
stray submerged rope. If you have not rigged the anchor to self-
trip when pulled hard, or you have put too strong a tie on the self-
trip and you cannot break it, your anchor will remain stuck fast. All
is not lost however, and there is a way of recovering a plough,
Danforth or Bruce anchor if you have some extra rope and chain.
This method will not work for a fisherman anchor because of the projecting stock.
Make a loop of a length of chain, a length of about two metres will
be sufficient, and take it round the anchor rope and attach both
ends of the chain to another length of rope, which is at least twice
the depth of water. Pull the anchor rope as tight as possible, the let
the chain loop slide down the anchor rope, remembering to tie the
free end of the second rope to a strong cleat in the boat. The
weight of the chain should take the rope right down the shank of
the anchor and settle around the crown. Now tie a buoy to the free
end of the anchor line, cast it adrift, and motor up-tide of the
anchor. Your chain loop should pull the anchor out from under the
snag, which means you can pull it up and recover the anchor, both ropes and the buoy.
If you have a fisherman anchor, or do not have the necessary rope
and chain on board, you may be able to free the anchor if the snag
is not hard on the sea-bed, such as a ground rope for a string of
pots. If you pull the anchor as tight as possible, let it drop back
again, then immediately pull it up you might make it fall free of the
snag. Alternatively, you could ask for help from a larger vessel who
may be able to pull the anchor out from the snag by brute force, although the anchor may end up bent or the rope break.
If all these attempts fail, your only choice is to recover the buoy
and abandon the anchor, or to leave the anchor buoyed and
persuade members of a friendly diving club to recover it for you.

Angling Boats 80
VHF Radios
Your VHF radio is one of the most important items in your boat,
both for safety and to communicate with other anglers while you
are at sea. If you own a boat with a VHF set you must pass an
operator’s examination and hold a VHF operator’s certificate before
you can use it. This section is not a substitute for a course, but it
will give you some basic guidelines in preparation for owning and operating a VHF set.
Types of VHF Radio
VHF stands for “Very High Frequency”, and for UK marine use
covers the frequencies between 156Mhz and 162MHz. Sets are
available for permanent fixing in a boat, and portable handheld
units are available which perform similar functions and have the advantage that they can be carried from boat to boat.
Fixed sets require a power supply from the boat battery, and also
need a separate, external aerial. This means the power can be
greater, and sets can usually be switched between low power (1
Watt) and high power (25 Watts) depending on the distance over
which you want to transmit your message. Messages transmitted
by VHF travel in straight lines, so the range is limited not only by
the power of the transmitter, but also the height of the transmitting
and receiving aerials relative to the curvature of the earth. The
range of a VHF set is approximately one mile per output watt, assuming a direct line of sight.
To maximise the range, it is best to have your VHF aerial mounted
as high as possible on the boat. Aerials for power boats are usually
at least 2 metres long, made of fibreglass and mounted on a
hinged bracket. Longer ones are available, and you can gain extra
height by mounting them on a mast or radar arch on the
wheelhouse roof.
Unlike a telephone, the VHF radio channels are open to anyone to
listen to, so your conversations are not private. A technology called
Digital Selective Calling (DSC) has been introduced since the earlier
sets were manufactured and now all new fixed sets support DSC. If
your set has DSC, you can obtain a Maritime Mobile Service
Identity (MMSI) number which is unique to your craft. Having MMSI
numbers means you can alert the vessel you are calling by
transmitting their specific number, much like dialling a phone
number. Once they have received the alert, the conversation will still be on the open channels.
A significant advantage of the DSC sets is that you can link them to
your GPS unit with a data cable so the VHF set always has a record
of your current position. There are a series of standards defined by the National Marine Electronics Association (NMEA) to exchange
data between pieces of navigational equipment, and the
instructions in the relevant manuals will refer to a NMEA cable. It is

Angling Boats 81
a very simple job to connect a GPS and VHF set – there are only
two or three wires that have to be connected and the manuals will
show which ones.
A DSC VHF radio will have an emergency button, usually protected
by a cover, which when activated will automatically send a distress
signal with your MMSI number and your exact position. The
Coastguard will know which vessel has that number, so they will
know that you are in trouble, where you are and which boat you
are in without any further communication. They will also transmit
an acknowledgement to the call so you will know they have heard
your distress message. This is a huge advantage over the old
method of relying on a person to listen for faint distress messages on Channel 16!
Hand-held VHF radios have their own short aerials attached, and
have inbuilt rechargeable batteries. This means their power and
range is much more limited, and the transmission power is usually
only 5 Watts. They are useful for inshore work and as a back-up for
the fixed set in case you lose power or the main aerial, but they
should not be relied on as your only VHF set if you are going
several miles offshore.
Licensing
If you use a VHF set, you must either hold a current operator’s
licence or be supervised by someone who has one. This is because
there are strict rules and protocol for using the VHF channels to
prevent confusion or obstruction of other users. VHF channels are
used by the Coastguard, search and rescue teams, port operations
and ship to ship communication by the professionals as well as
anglers and yachtsmen. Courses are run by the RYA and
independent organisations around the country. The final
examination is part theory, part practical where you demonstrate
that you know what you are doing with a VHF set and can use it
effectively in both normal use and emergency situations.
A licence is also required for the boat itself. It can be applied for
and changes notified on-line with OFCOM. All you have to do is
ensure your set is installed and operating correctly, and you
maintain the correct ownership and use information on the central
database. You can request and be allocated a MMSI number if you
have a fixed DSC set, and all vessels will be allocated a Call Sign.
This Call Sign is a series of letters and numbers unique to the
vessel, for example “MJXP6” which stays with the vessel for its
entire life. You can use either the Call Sign or the name of your vessel to identify yourself when transmitting as message.
VHF Channels
The marine VHF frequencies are divided up into channels, and each
channel is numbered and allocated to a specific purpose. Your VHF
set will be pre-tuned to these channels so you can select them with

Angling Boats 82
one of the controls on your set. You can download the current
channel allocation from a number of sites on the Web. VHF
channels are mostly "Simplex", which means only one transmission
can be heard at a time. If you are transmitting, you will not be able
to hear any other vessel transmitting. This means you have to
"take turns" to speak, which is why you say "Over" at the end of
your transmission, letting the other party know that you have
finished and it is their turn to speak. The transmission power is also
significant - a high power transmission will drown a nearby low
power transmission, so if you are transmitting to a nearby vessel,
use the low power setting. This combination of power and simplex
can cause a problem on a channel. If there is a fault on a set or the
transmit button is jammed in the on position, the set can transmit
"carrier" which will prevent any other person from using that
channel. It is also difficult for the Coastguard to alert the vessel
causing the problem because of the simplex channel, so it is
important that all users of VHF make sure the channel is clear after they have used it.
One channel is reserved exclusively as a calling channel and for
distress calls – Channel 16. There is usually a button on the radio
that allows you to hop directly to that channel. There may be
another button that allows you to listen to both Channel 16 and
other channels by scanning rapidly between them. All vessels with
a VHF radio are obliged to monitor Channel 16. To call another
vessel, you first call them on Channel 16, then when they
acknowledge, the person called nominates a working channel and you both switch to that channel to continue the conversation.
Channel 67 is reserved as a working channel for the Coastguard.
You first call them on Channel 16, then they will ask you to transfer
to Channel 67. Other channels are used for safety information, port
operations and ship to ship. There are also channels allocated for
marina use – your chart, marina information and sometimes a sign
on a post will tell you on which channel to call a marina as you
arrive.
In the event of a Mayday call or similar emergency, all other users
must stay clear of Channel 16 until the Coastguard have completed
the Mayday co-ordination or transferred to another channel such as
Channel 67. The Coastguard will broadcast the instruction
“Seelance Mayday” which effectively means keep off Channel 16 unless you are part of rescue co-ordination.
If you have a DSC set it may sound an alarm tone, which either
means someone who knows your MMSI number is calling you, or
the Coastguard has a safety information broadcast. Sometimes this
is a routine weather update; sometimes it can be a special
message such as warning of a missing buoy, drifting wreckage or a large vessel manoeuvring.
More information on VHF channels and how to use them will be
provided on your VHF course. Don’t be tempted to skip the course,
it is well worth the little time it takes and knowledge of VHF procedures could save your life or that of others.

Angling Boats 83
Ropes and Knots
Ropes and knots almost symbolise boating – the special names for
marine ropes and knots are often used to caricature life at sea. It
need not be so mysterious however, as you only really need to
know a few knots and the main types of man-made rope available.
Rope
The ropes that are used for normal applications on small power
boats are listed in the table overleaf. There are different materials
for different uses. You will find marine ropes are almost exclusively
man-made; natural fibres such as sisal and hemp are used only on
traditional craft and for decoration. Ropes for sailing boat
applications are not included here – you will discover a great
variety in your yacht chandlers. Have a look in the off-cut bins, you
can usually find reasonably-prices hanks of a useful length for small boats.
All ropes will unravel if cut. To prevent this, they are cut at the
chandlers with a hot knife. If you want to trim a man-made fibre
rope yourself, cut the rope with a sharp knife and before it
unravels, melt the end with a flame or soldering iron. Wet your fingers and mould the end into a neat shape while it is still pliant.
Marine Ropes
Supplied By
The Metre

Angling Boats 84
Type Characteristics Uses
3-strand Nylon Sinks. A high stretch characteristic makes this line exceptionally good at absorbing shock loads. Easy to splice with soft eyes or thimbles. Excellent abrasion resistance. Very good UV resistance. Not very acid-proof. Tends to go stiff when wet, particularly in the larger 3-strand sizes.
Ideal for anchor warps and mooring lines
3-strand Polyester
Sinks. Even when wet it retains full strength and remains easy to handle. Good abrasion resistance. Easy to splice with soft eyes or thimbles. Flexible and soft to handle. Nearly as strong as nylon, but not so much stretch. It can be braided or pre-stretched to give very low stretch. Excellent UV resistance. Very good chemical resistance.
Can be used for anchor warps, mooring warps, lanyards, fenders and fender lines
Double-braided Dockline
Designed specifically for mooring lines, more strength than 3 strand mooring lines. Shock absorbing braided nylon core, abrasion resistant polyester cover. Stronger than 3-strand ropes, easy to handle and splice.
Specially designed for mooring lines
Multiplait Nylon Sinks. Very flexible making it easy to stow in the chain locker without kinking. Provides elasticity with flexibility. Absorbs high shock loads and is easily spliced.
Specially designed for anchor warps, mooring warps and mooring risers.
Polypropylene Floats. Not so strong as nylon or polyester. Stretch is between nylon and polyester, depending on type. Excellent chemical resistance. Not very resistance to UV. Satisfactory wear resistance, depending on type.
Because it is stiff, not particularly easy to tie and floats, it is best to use this type only for a floating rescue line.
Polyethylene Floats. Similar properties to monofilament polypropylene
Used mainly in the fishing industry. Useful for cheap pot-lines but requires leaded inserts to ensure it sinks.

Angling Boats 85
Knots
A good knowledge of a few key knots is essential if you use a boat.
If you do not tie a knot correctly, the rope could easily come
undone, or jam, at an awkward moment. Depending on circumstances this could be embarrassing or downright dangerous.
You only need to know a few knots, and these are easy to tie. If
you use the correct knots you will not only make boating safer and
easier for yourself, you will show other, more knowledgeable
boaters that you are one of the boating fraternity and not just an angler on a boat!
Clove Hitch
The clove hitch is used to tie a rope to a post or rail. It is a useful
knot for this purpose as the rope under load can be let in and out
under control by untying only the first part of the hitch. It is used for tying fender ropes to rails, and mooring lines to posts.
1. Pass the rope round the post and pass the tail over the standing rope.
2. Continue round the post and tuck the tail through the loop created in the first pass.
3. Adjust both ropes before tightening up.

Angling Boats 86
Round Turn and Two Half Hitches
The round turn and two half hitches is a good knot for tying a rope
to a ring or post when it is expected to take a heavy strain. The
round turn helps secure the rope and takes some of the strain
before the hitches take it, which means the hitches do not tighten
as much as they would without the round turns, and are consequently easier to untie after the load is released.
1. Make two turns around a ring or post.
2. Tie one half hitch by passing the tail around the standing rope and through the loop.
3. Make a second half hitch by repeating this, then pull tight.

Angling Boats 87
Bowline
A bowline loop cannot slip, so it is a good loop to use if you need to
keep a loop of a fixed size, such as on the end of a mooring line or
a safely line around a person. It does become very tight after a load is applied to it, but it can be undone by twisting the knot.
1. Make a small loop with the rope.
2. Twist this loop around and pull a small section of the standing part of the rope through the loop.
3. pass the tail through the loop.
4. Pull the standing part of the rope to pull the tail through the loop, leaving the free end outside the loop. Tighten and snug the knot down.

Angling Boats 88
Cleat Hitch
A cleat is a very useful fixing point, but you need to know how to
tie a rope to it. It is very good for taking considerable strain from the rope and remaining very easy to untie.
.
3. Secure the tail with a final turn, tucking the tail under the final turn.
2. Take the tail around the two ends of the cleat in a figure of eight pattern several times.
1. Adjust the length of rope to be fastened, and take a turn around the outside of the cleat.

Angling Boats 89
Double Sheet Bend
A sheet bend is used to tie two ropes together, and works just as
well for two ropes of differing types or thickness. It looks very
simple but it is much more secure than a reef or granny knot, neither of which are of much use on a power boat.
1. Make a loop at the end of the first rope – the thicker if they are not of the same thickness.
2. Take the second rope end, and thread it through the loop you have just made.
3. Pass the second rope around the back of the loop and round to the front, and tuck the tail under the second rope and over the loop of the first rope.
4. Pass the tail round the back of the loop and back under the second rope to form a double sheet bend.

Angling Boats 90
Looking After Yourself
The safety and comfort of you and your crew are just as important
as the boat itself - it is no use having the perfect boat but finding
you are cold and miserable. A few precautions can help you enjoy your trips to the full.
Clothing
This might seem obvious, but make sure you are dressed
appropriately for the season. The temperature at sea can be
surprisingly cold even in summer, so make sure you take plenty of
additional layers to add - or take off. In winter, thermal underwear
and thermal socks are the norm: there is no point being a fashion
victim and suffering from the cold. A t-shirt, thick shirt, sweatshirt,
fleece and snug gives you plenty of combinations to cover the full range of UK temperatures!
Waterproof over-jacket and trousers are essential. Even in dry
weather, over-trousers keep your legs dry from splashes, and free
from fish or bait slime. Heavy duty yachting clothing is a better
investment than camping and hiking gear - it is designed for the
environment you will be fishing in, and will be warm, waterproof
and hard-wearing. I like bib-and-brace style trousers, these keep you warmer and dryer than waist trousers.
In the colder seasons from autumn to spring, I recommend a
flotation suit. These are available as one-piece or two piece suits,
and include insulation and buoyancy to help you maintain body
Flotation
Suit

Angling Boats 91
temperature and stay afloat in cold water. The buoyancy is not a
substitute for a life-jacket, as the suit will not keep an unconscious
person is the same position as a life-jacket would. The insulating
properties make winter fishing much more comfortable, and would
be a life-saver if you were unfortunate enough to end up in the
water as they will inhibit the effects of hypothermia for many
minutes.
Footwear is also important. Your feet must have a secure grip on a
wet, sloping deck and yachting shoes or boots are the best.
Whatever the temptation on a sunny day, I would advise against
going barefoot or even wearing sandals - there are many hard objects on a boat to stub toes or worse.
A hat is also advisable - a cap in summer to protect the scalp from
sun; a waterproof hat or hood for rainy weather and a fleece
beanie for colder days. Gloves for very cold days will make fishing
bearable; either neoprene gloves with flip-off fingers or mittens
which can be removed easily are the best - you will need to switch
from having fingers free for knotting or baiting, to keeping hands warm while waiting for a bite.
Sun Protection
In recent years there has been a significantly increased awareness
of the dangers of exposing our skin to the harmful effects of the
sun. On open water, those effects are increased because of the
length of exposure in an un-shaded boat cockpit, and the reflection
of the sun’s rays from the water adds to the effects of the sun
directly. It is easy to underestimate the strength of the sun
because the air temperature at sea in a gentle breeze will be
comfortably low even in peak summer months.
Your skin can be damaged in any month of the year, and a sunny
day as early as April and as late as October can result in sunburn if
precautions are not taken. Sunburn can not only be painful, the
damage to skin is cannot be repaired and is a common cause of
skin cancer.
A good sun protection lotion should be on your boat at all times,
not just for yourself but also for guests who may not realise how
severe the sun can be. All exposed skin should be liberally
smothered with a high factor, waterproof sun cream of at least
Factor 30 and preferably more. In the sunniest months, total sun
block on the nose, cheekbones and forehead is standard practice
with race yacht crews and there is every reason to follow their
example. There are some good sport-branded sun lotions designed
for men so there is no reason any more to think sun protection is for pansies.
Sunglasses are a must in all seasons. In summer, glare from the
water can be very strong and you must protect your eyes with
good quality glasses. In winter, the sun can be very low in the sky
and you may have to steer into the glare. Finding your way home

Angling Boats 92
up a narrow channel heading west on a dry winter evening can be nearly impossible without good sunglasses.
Sea Sickness Some people are lucky and are never affected, some are never able
to set foot in a boat without feeling queasy, but most people are
susceptible from time to time. There is no guaranteed quick cure,
but there are plenty of medications ranging from prescription to
quirky.
There are Dramamine patches which are available either on
prescription or over the counter in some countries. There are a
number of brands of travel sickness tablets available, Stugeron and
Kwells being very popular. You may have to try different ones to
find one that works for you. Whatever the medication, follow the
instructions carefully and if it says take them before travelling, do
so because they are preventative drugs, not cures. If you feel sick,
it is too late.
Sea-Bands and similar devices use pressure points on the wrist or
electrical pulses to suppress sea-sickness. They seem strange but
plenty swear by them, and they do not have side-effects. Long
term they are much cheaper than drugs although they might seem
expensive initially.
You can also take precautions in advance to prevent seasickness. If
you go to sea with a hangover, or have a few too many the night
before, you are far more likely to feel sick. Tiredness, stress and
unfamiliar diet can also bring it on. Make sure you feel fresh and at
your best physically before you go and you stand the best choice of
enjoying the day. Your body will get used to the motion of the sea -
a few trips on a calm sea before going out in a Force 4 will give you
a better chance of seeing the rougher trip through.
If you think you may be queasy, avoid the cabin and stay out in
the fresh air where you can keep an eye on the horizon. Make up
traces before you go, so you do not have to spend time peering
down at knots - if you get in a tangle, cut the line and tie on a new
rig rather than risk feeling sick. Keep drinking water, and eating
non-greasy food like biscuits and bread will help keep your stomach in order.
Other tricks I have heard of, but cannot vouch for, are eating
ginger biscuits, drinking cider and sticking plaster behind the ears.
Stugeron, Sea-Bands and avoiding tiredness work best for me, but
everyone is different. The best tip is to go fishing a lot and get used to the motion - a good tip for two reasons!
Food and Drink If you plan to be out even for a short time, be sure to take plenty
to drink, particularly in hot weather. In cold weather take a

Angling Boats 93
thermos of hot drink as well, if you do not have cooking facilities on
board. The more expensive stainless steel unbreakable flasks are
worth the money – traditional glass-lined vacuum flasks have a
short life in a boat at sea. Despite the temptations, it is best to
avoid alcohol at sea. You will need sound judgement at all times,
and many of the people who drown from falling from boats had
been drinking beforehand. It is not worth the risk.
If you have a boat with a cabin or enclosed wheelhouse, you may
want to install cooking facilities even if you just want to boil a
kettle. There are two types of stove suitable for a small boat – gas
powered or liquid fuelled. Both are dangerous to have in a boat if
the correct precautions are not taken. If you are buying a stove,
make sure it is designed for use in a boat – it will have features to
prevent spillage, and will be made of rust-resistant materials.
Cheap camping stoves are not suitable.
Stoves must be fitted so they cannot fall from their position, and
have rails called “fiddles” to prevent kettles and saucepans sliding
off as the boat heels. If the heat generated by the stove is likely to
damage the area above and near it, the area must be protected
with insulated, flame-proof sheeting which is available from the more specialised yacht chandlers.
Classic pressurised paraffin stoves are favoured by traditionalists,
but these are fiddly to operate and personally I don’t feel
comfortable near pressurised fuel and a naked flame. A better
choice is the un-pressurised liquid fuel stove such as those
manufactured by Origo. These have a non-spill fuel reservoir
underneath; you simply fill the reservoir with methylated spirits or
de-natured alcohol, and light it. These stoves are surprisingly
effective for such a simple design, and are one of the safest types.
The only real danger is in re-filling. Make sure the flame is out and
there are no sparks or hot-spots before you open the stove to re-
fill. If the bottle of meths caught fire in your hands you would be very badly injured.
An alternative fuel is gas. The problem with gas in a boat is that it
is heavier than air, therefore leaked gas will sink to the bottom of
the boat rather than drifting away, and lie there as an invisible
explosive cloud waiting for a spark to ignite it. This risk can be
minimised by making a fully enclosed gas cabinet with a drain-hole
over the side so leaked gas will drain into the atmosphere instead
of the bilges. Make sure gas cocks are switched off when the stove
is not in use to prevent leakage from pipes and burners. If you take
Tip:
Have a look round your supermarket for food items that can be kept without
the need for a fridge, and can make a filling meal with simple heating. Cuppa-
soups are good; instant cappuccino coffee saves taking milk; tins of beans and
sausages, stews, “big” soups, chilli and tinned pasta in sauces are all useful. If
your cooking can extend to a five minute simmer, there are packs of dried
pasta complete with sauce available. The ubiquitous Pot Noodles are every
angler’s standby. Processed foods have a high salt content so make sure you have plenty to drink with you.

Angling Boats 94
these precautions, gas stoves are safe enough and you can enjoy hot food on your trips.

Angling Boats 95
Tip:
Weevers are the only fish commonly caught in UK waters that have stinging
spines. They frequent shallow, sandy bottoms and are often caught by anglers
targeting flatfish. A sting is very painful, but not life threatening unless there
are other complications. One way to prevent the poison spreading and causing
increased pain is to apply the hottest water the patient can stand on the place
of the sting. This causes the poison to gel and prevents it from spreading
within the body. Beach Life Guards carry thermos flasks of hot water for this purpose.
If Things Go Wrong
If you take all the sensible precautions, you can have many
pleasant days fishing from your boat in safety. But however careful
you are, sometimes something may go wrong. At sea, you are a
long way from assistance even if you are only a few hundred yards
from shore – unlike on land, you cannot start walking for help. You
need to be prepared for emergencies that may occur despite your
best preparations. This means not only having the correct
equipment on board, but also knowing what to do, and what not to
do. Even if nothing untoward ever happens to you, you will be in a very good position to help someone else in difficulties.
Medical Emergencies
Medical emergencies can be the result of illness, such as a heart
attack, or injury caused by falling, a knife cut or even a bite from
an angry conger eel. There is no substitute for a course in First Aid,
this can give you the confidence to deal with most situations until
more expert help arrives.
A first aid pack should always be carried, and the contents need to
be geared to the likely needs at sea. Plasters, wound flushing
sachets and antiseptic will help with the less critical cuts and
abrasions. You should also pack bandage and wound pads in case
of more serious injury. Bandages can also be used to make
makeshift splints in case you have to stabilise someone with a broken bone in a moving boat.
Serious bleeding, broken bones, concussion and hypothermia are
far more serious and help must be requested through the
Coastguard. If the problem is life threatening, do not hesitate to
send out a Mayday. The Coastguard will tell you what to do and
send assistance. If it is serious but not life threatening, use “Pan
Pan” as your emergency alert and the coastguard will connect you
with a hospital doctor who will talk you through what you need to
do, and help will be sent if it is needed quicker than you can make the journey back to an accessible landing place.

Angling Boats 96
There are many good first aid booklets available, and even if you
have taken a course on first aid it will be useful to have on board in
case you are the one in trouble, or in case you need to remind
yourself of the correct action to take in the turmoil of a sudden medical emergency.
Man Overboard
Falling overboard is one of the most common causes of death for
leisure boaters – and is far more common than going into the water
as a result of sinking or capsize. Sudden immersion has serious
consequences for the human body even in summer, because the
water temperature is much lower than air temperature and body
temperature. Most people are aware of the dangers of
hyperthermia, which is the result of prolonged lowering of the body
temperature resulting in drowsiness and loss of consciousness.
Fewer people are aware of the danger of Cold Water Shock, which is a much quicker killer.
When someone falls into cold water – and the water temperature
around the UK in June can be only 100C - they will experience
rapid, shallow breathing with increased heartbeat and blood
pressure. This involuntary reaction is very dangerous because it
can cause the person to inhale water and drown, even though they
may be very fit and excellent swimmers. Fortunately this effect
only lasts a few minutes, so make sure if you fall in you stay still and calm for two or three minutes before trying to swim.
The boat-handling and recovery aspect of a man-overboard
incident has been covered in earlier sections. Once you have the
casualty back on board, make sure they are kept warm. This is
where a survival bag can be vital. When the body temperature
drops to 350C the casualty develops hypothermia, and below 300C
it can be fatal. If practical, remove wet clothing and cover the
casualty with blankets and a survival bag. If the casualty is
unconscious, loosen clothing around the neck and chest and place
him in the recovery position with the head lower than the body. If
you have any concerns about the medical condition of the casualty,
call the Coastguard, and most definitely do so if they are unconscious.
Secondary drowning can occur after the casualty is recovered, and
even up to several hours afterwards. This is caused by the lungs or
throat swelling up or going into spasm as a result of irritation and
thus preventing air from reaching the lungs. Even if the casualty
appears to be recovering well, keep a close eye on them and if they
complain of shortness of breath, coughing or chest pain get medical help immediately.

Angling Boats 97
Breakdown
There can be many reasons for losing motive power – engine
failure, fuel, gearbox, propeller or coolant problems. As the sea is a
cold and lonely place, and wind and tide may be taking you into
danger, you need to know what to do to minimise the dangers and make sure you get under way again or get home safely.
If you have a sudden loss of power or the engine stops, it is
tempting to immediately look for the problem. There is something
else you must do first - take stock of where you are and how much
sea room you have. Assess the tide, wind, depth of water and
other boat traffic and decide whether you can afford to drift for a
few minutes or you need to anchor. If you are in a main shipping
lane on no account must you anchor – unless you think you can
resolve the problem very quickly you must call the Coastguard on
Channel 16 and when asked to, switch to Channel 67 and explain
the situation to them. They can then decide whether to send help,
divert a port operations vessel or warn other shipping using the channel.
If you think you have room to drift for a while, keep a good lookout
all the time, or better still, allocate one of your crew to lookout
duties. You can drift upon a string of lobster pots very suddenly
and you would not want a tangle with a pot rope to add to your problems.
If you are likely to drift onto rocks or banks, or into a shipping
channel, and if the water is shallow enough it is better to drop
anchor while you try and fix the problem or wait for help. Make
sure the water you are in is not too shallow – if the tide drops and
you are in very shallow water, other boats will not be able to get
near to tow you. Do not be tempted to head for a beach thinking it
is a place of safety – it is not. Even gentle waves will pound your
boat on the sand or shingle, and if there are rocks, groyns or other
objects the hull can be quickly holed. Even if you were able to
beach without damage or broaching in the surf, you will probably
not be in a very good position to receive further help. The boat
could not be recovered unless there was a slipway leading to the
beach, and it would not be easy for another boat to tow your boat
off the beach. Unless you are in such a bad situation that you need
to save lives and are prepared to allow your boat to become an insurance “total loss”, avoid beaches!
Tip:
There are a growing number of marine breakdown services operating around
areas of high marine leisure activity, particularly along the South Coast. These
operate in a similar way to the AA or RAC, where for an annual subscription
you can call on the services of an engineer in a fast RIB to come to your aid.
Depending on distance and other calls you may have to wait some time so
make sure you can anchor. Many also offer the services of a diver to untangle
ropes from propellers, although for safety reasons this would only be possible in sheltered water.
Angling Boats 98
An engine breakdown is not a justification for a Mayday unless your
boat and crew is in imminent and serious danger, such as a
breakdown where you could quickly be swept onto dangerous
rocks. By all means alert the Coastguard, they will be happy to
monitor the situation and alert other nearby boats that could provide help or a tow.
A common cause of breakdown, particularly near major ports and
densely populated areas, is the good old plastic bag. These float
just below the surface, and bin liners and fertiliser sacks are big
enough to envelope the propeller of even the larger fishing boats
you are likely to be operating. The first symptom of a large bag
pick-up is often a sudden reduction in power – although the engine
revolutions may still be high, the propeller can no longer push the
water as it was designed to do. This in itself is irritating, but there
may be a more serious underlying problem.
On outboard and out-drive legs, the cooling water pick-up point is
on the leg just in front of the propeller – just where a bag may
wrap itself. This can block the intake ports and starve the engine of
cooling water. Water pumps are not designed to run dry, and even
a few seconds of running with no water in the cooling system can
wreck the pump. If you suspect a bag is the culprit, stop the engine
immediately and lift the leg to clear the obstruction. Never lift an
out-drive leg with the engine running – this will damage the drive system.
Modern marine engines are very complex, but also very
sophisticated. This means they are less likely to go wrong, but
when they do, it often requires more knowledge or parts than the
average amateur mechanic is likely to have to hand. There are
some basic items that can get you out of trouble however –
spanners, screwdrivers and pliers to tighten fastenings that have
become loose; tape and wire to hold things together and repair
split pipes; WD 40 to spray on dampened electrics; fine emery
paper to clean electrical contacts and a set of fuses to replace blown ones.
There are some good day or evening courses available, usually in
or near coastal towns, that will teach you basic “get you home”
mechanical and electrical repairs for most types of marine engine.
A little bit of knowledge is invaluable, but will never teach you all
you need to know – experience teaches you more. Here are a few
of my own experiences that show that you cannot anticipate everything:
The engine on a petrol out-drive suddenly cut after I ran
through the wake of a passing boat. The sudden jolt had
knocked off the plastic plug holding all the wiring to the
back of the ignition switch. That took some finding.
One morning, all the instruments were reading back to
front – high was low and low was high. This even defeated
the electrician from the boatyard. It turned out to be the
main wiring loom plug above the engine – a couple of poor
contacts caused strange things to happen.

Angling Boats 99
Returning from a trip one day the engine suddenly raced,
as if the propeller had fallen off – but it was still there. At
low speeds the engine worked perfectly, at higher revs the
engine would race again. The propeller had a shock-
absorbing rubber sleeve bonded between the hub and the
blades. The bonding had come loose, which meant there
was only enough grip to drive the propeller at low speeds.
On a friend’s boat, a passing vessel sent a wash towards
the stern and the outboard cut. We tried everything to get
it started to no avail, and were fortunate enough to receive
a tow back to the slipway. Next morning the engine started first time, and has run perfectly ever since.
Auxiliary Engines
The decision to fit a second means of propulsion is a sensible one,
but it is easy to fit a small outboard engine and assume you are
covered. It is worth thinking carefully about what to take – or even
whether to take one at all. The purpose of an auxiliary engine is to
get you to safety if your main engine fails. If it can’t do that, there is little point having one.
If you have an outboard, a smaller outboard can be carried on the
transom and used in an emergency. Make sure the small outboard
has enough power to move the boat at a useful speed – if it will
only move the boat at three knots it is unlikely to get you home
from a distant mark, especially if the weather is against you. Also
make sure you have an adequate fuel supply for the auxiliary. The
reason for the main engine failure could be fuel problems, so the back-up engine should have its own fuel.
If you have an inboard or out-drive, the auxiliary will have to be
mounted on a bracket. If it is not kept on the bracket, make sure it
is possible to fit it on the bracket at sea in a good wave – if you can’t easily do that, you may as well leave it at home.
Having had experience of underpowered auxiliary engines, my own
preference is to fit twin outboards rather than one large one and
one small. This is a more expensive option but it is the safest: I
replaced a 50HP outboard with two 30HP units. This had two fuel supplies and two batteries giving complete peace of mind.
Moving to diesel power made me completely re-think the question
of an auxiliary engine. Modern marine diesels are much more
reliable than petrol engines in a marine environment. Many
commercial vessels have single diesel engines without an
alternative means of propulsion, but the crews would always have
some mechanical knowledge to resolve minor problems at sea. If a
second engine is impractical, I would recommend attending a diesel
engine trouble-shooting course and subscribing to a marine
breakdown service such as Sea Start. The choice is yours, but
make sure you weigh up the options and risks before you decide
whether or not to invest in a second engine.

Angling Boats 100
Towing
You may need to be towed, or you may be in a position to offer
another boat a tow, so some knowledge in this area will be useful.
There are two ways of towing depending on the weather and the
amount of manoeuvrability required: the traditional “pull”, or tying up alongside and travelling as one unit.
The traditional tow suits any weather conditions and is the easiest,
but does not offer much if any control if the towed boat has to be
taken back to a jetty in a crowded harbour. To prepare for a tow,
make sure both parties know what is planned by discussing it on
the radio. The anchor rope makes a good tow rope as it is strong
and long – mooring warps are not usually long enough.
The towing points on both boats must be substantial – they will be
put through significant stress so they must be securely fastened to
a strong point in the boat. If you are worried about this, make a
“cradle” by fastening a rope linking up several mooring points on
the boat to spread the load or act as a backup in case the first
point breaks. You can even put the rope right around the
wheelhouse or cuddy, but be careful not to prevent doors from opening.
Once the tow has been passed, keep the line taught and in sight to
prevent loose line sinking and fouling a propeller. The best
approach is for the end of the rope to be secured to the towed boat
first, then put a single turn of the rope around a cleat in the towing
boat. As the boat moves ahead, let some line out and when there is
a safe gap between the two boats, gradually increase the tension
so they tow does not “snatch”. Let some more line slip out, take a
second turn round the cleat then as the towed boat starts to follow
you can secure the end. In very bad weather, if the rope is being
jerked badly to the point where it may break or pull the tow points
out, you can tie a heavy weight such as an anchor to the centre of
the tow line to act as a shock absorber. This is easier said than done in heavy weather.
A Tow
From an Inshore
Rescue Boat

Angling Boats 101
Keep an eye on the towed boat and ensure the speed is not
causing it to yaw from side to side – boats are designed to be
pushed by a propeller and do not usually take kindly to being pulled from the front.
In very calm waters, and particularly if you want to take the towed
boat alongside a jetty or pontoon, the two boats need to be tied
together side by side. First put out plenty of fenders to prevent
damage, then fasten two ropes to attach bow to bow and stern to
stern, and another, substantial rope from the bow of the towing
boat to the stern of the towed boat. This is the rope that will take
most of the strain of the tow. Roped together like this, both boats
can be manoeuvred as one, albeit rather clumsily, but at least you
will be able to bring both alongside a pontoon even in a crowded harbour or marina.
Swamping or Flooding
The boat’s hull is designed to keep water out, but sometimes water
gets in: either over the top from a large breaking wave, through
integrity failure in the hull – which means something that is
supposed to be watertight turns out not to be watertight - or through hull damage.
To avoid sinking, you must firstly prevent more water coming in,
then get the water that is in the boat out of it. Correct action taken
quickly can prevent the situation becoming worse and potentially
disastrous.
If you have taken water over the side as a result of a passing boat
wash, or you ended up broadside or stern to a steep wave, you will
need to prevent more water coming aboard by turning the boat
towards the waves. If your crew are able, they need to start bailing
immediately because the additional weight of water will lower the
freeboard and make further water ingress more likely. Having
stabilised the boat against the waves, you can concentrate on bailing.
All boats should have electric bilge pumps, and a manual pump as
a backup is recommended. A huge wave dumping a foot of water in
the cockpit will take any pump a while to deal with, and the fastest
way to get the water out is with a trusty bucket. Two or three men
bailing with buckets can remove a lot of water very quickly.
Once the water is under control you need to assess the damage. If
you are lucky the worst may be a fright and a soaking. You may
Tip:
The law of Salvage still applies today. If you accept help from another boat,
and particularly if that help prevents the total loss of your boat, the rescuing
boat can claim Salvage Rights equivalent to a significant proportion of the
value of your boat. If possible when accepting help, agree terms before the rescue work starts. It is difficult to negotiate afterwards.

Angling Boats 102
also have suffered water damage to battery and electrics – a spray
with WD-40 may resolve the problem, but if not you may need to
summon help if you are left without engine power.
Water ingress through hull damage or a component failure is more
dangerous because it will be more difficult to prevent more water
coming in – it may end up as a race between water coming in and
the speed at which you can bail it out. Common integrity problems
are caused by structural failure – gaps opening up between hull
and outboard well; through-hull mountings such as sea-cocks and
speedo impellor failing; and rubber gaiters on out-drive legs
splitting. Some outboard powered boats have an access hatch in
the outboard well. I have known of more than one near-sinking
caused by these giving way and this results in a huge hole opening
up – even though this is usually above water level, the slop of
waves into the well drives a large quantity of water into the hole and as the boat becomes heavier and settles, more comes in.
If at all possible, try and stop or slow down the leak by jamming
anything suitable over the hole. If the hole is on the inside and well
below the water line, the water will be under pressure and trying to
push your repairs away. If the problem is a missing hatch, try and
cover the hole from above so the water pressure helps seal the
gap. Use whatever you can, you can always repair and replace
when you get home – but your first objective is to get home.
If you think there is a possibility you cannot contain the leak, call
the Coastguard immediately and tell them what is going on. If you
lose your electrics and VHF later on at least they will know where
you are and what is happening. They would prefer to have help
standing by or on its way to you, and that could save valuable time if the situation became worse.
A common way of rescuing a small boat that is sinking is to tie it
securely alongside a much larger boat. A fishing boat may be
diverted to your assistance, so be ready with fenders and strong
ropes securely fastened to bow, stern and mid-ships. If you can
pass a strong rope right round the hull amidships, that will give a
very strong securing point that could keep the boat afloat if it was tied to a larger vessel.
As with every emergency, prevention is better than cure so check
through-hull mountings, joins and exposed hatches, and repair or replace if you have any doubts at all.
Grounding
Running aground can be either embarrassing or dangerous,
depending where you do it and what you run on to. Most
experienced sailors have run aground many times, and most
groundings are the result of human error – missing a channel
marker and sheer lack of attention are the two most common
causes.
The type of hull and engine configuration will make it either easier
or more difficult to get out of trouble. Having run aground, the first

Angling Boats 103
thing you need to do is get off and floating again, which might not
be as easy as you would like. On outboard and out-drive powered
boats, the first part of your boat to touch bottom is that highly
vulnerable propeller, so as you ground your engine will probably
stop as well. Do not try and re-start it until you are sure you have
enough water under you again, and if you were heading into the
shallows when you grounded, or wind is blowing you further onto
shallow water, you will have to find some way of getting off before starting up.
By lifting the engine or leg, you will reduce the draft of the boat
and you will be able to float clear, but do not do that unless you
are sure the boat will drift clear rather that drift further into shallow
water. Leave it down – at least it will hold you in place while you
work out what to do. If you think you will drift off, raise the engine
and help the boat along by poling with a boathook. While the
engine is up, check the propeller. If it appears undamaged, lower
the engine and try re-starting. Do not try and start the engine with
the propeller raised – on an out-drive this will damage the
transmission and on an outboard it may result in the water pump being damaged through dry-running.
If the engine races, you may have broken the cotter pin that holds
the propeller in place. This is designed to break before the propeller
is damaged, so provided you have a spare, the necessary tools and
long arms you may be able to replace it. If the blades are bent, you
will still be able to make progress but keep the speeds low as the
vibration from unbalanced blades can damage bearings in the
transmission.
If the wind is blowing you further onto the shallows, by raising the
engine all you will do is allow the wind to push you into even
shallower water. You will need to find some other means of getting
off. If the tide is dropping, you will have to act quickly or you will
be left high and dry until the tide rises again, which can be up to
twelve hours later – or weeks later, if you ran aground on the top of a Spring tide!
A quick way of pulling a boat off is by pulling against an anchor.
The best anchor to use is your lightest spare anchor, with only rope
attached, not chain. You will be pulling at a low angle so chain is
not needed. Stand somewhere on the boat with plenty of space,
coil down some rope so it will run out freely, and throw the anchor
as far as you can into deeper water. The best way of doing this is
to stand on the bows, and swing the anchor like a giant pendulum
to build up some momentum, then give it a mighty heave. Pull on
the rope to bed the anchor, then raise your engine. This should
leave the boat clear of the bottom and you can pull the boat out to
deeper water. You may have to repeat this performance if you were
not able to throw the anchor far enough to take you into deeper
water.
If the tide is rising, you only need to wait a while and you will float
free, but if the wind is blowing you onto the obstruction, carry out
the anchoring throw as described above to hold the boat in position
and prevent it from being driven onto the bank or rock as the tide
rises.

Angling Boats 104
If you are unlucky enough to ground on a bank in open water
where there are waves, you need to get yourself off as quickly as
possible to prevent serious structural damage caused by the wave
action lifting the hull and dropping it onto the hard bottom. Plenty
of vessels have grounded on exposed banks without serious
damage, only to be pounded to destruction by wave action. The
only action you can take is the same as described above, but if that
proves difficult and your position is exposed, then you must alert
the Coastguard as soon as possible because you will need the
assistance of the rescue services.
Be wary of asking other vessels to come to your aid – if they draw
as much water as your boat, they are in danger of ending up in the
same situation as you are. Unless there is serious and imminent
danger to life, it is better to wait for a more suitable craft with an
experienced crew to come to your aid.
If you have grounded and managed to get yourself free, you need
to inspect the underside of the boat before heading out to sea. If
the incident happened on the way out, then you must resist the
temptation to carry on because you may have damaged the
engine, propeller, hull or fittings. Only when you are sure there is no risk of engine failure or leaks should you proceed out to sea.
Getting Lost
It is very easy to jump in a boat and head out to sea, it is less easy
to find your way back in again, or find your way into a different
landing place, even with the help of modern, low cost electronic
navigation aids. If you have not set navigational waypoints all the
way back to your landing site but instead relied on memory and
recognition to find your way back, you may be surprised how
different the land looks from a different direction, with a different light angle and perhaps a different height of water.
The main reason for this is because land viewed from the sea
appears as a solid unbroken line – you cannot easily discern
headlands, bays, harbour estuaries and landmarks from a short
distance out to sea, whereas from above, such as on a hill or cliff
top, and particularly from a chart, these features are strikingly
obvious.
If you are heading out from a launch ramp or harbour and are
planning to return to the same point, first mark the launch point on
your GPS with the “Mark” feature – this is more reliable and
accurate than working it out from your chart. As you go out to sea,
also mark additional waypoints in the same way, particularly if your
route from the launch point to your fishing mark is not a straight
line. As a minimum, mark a waypoint at a point in the sea where
there are no danger areas such as rocks or headlands between that
point and your fishing marks, and where you can easily find your
way back to the launch site even in poor visibility. Keep looking
around and back as you head out to sea, and try and remember
the look of the land so you recognise it on your return journey.

Angling Boats 105
If you are intending to travel to a different point of landing, do not
rely just on a chart and a GPS to find your way. Refer to a book
known as a “Pilot” which will describe safe approaches, local
hazards and other useful information for areas you will be visiting.
The Pilots are available from local yacht chandlers and are intended
for cruising yachts, and cover either localised areas or much wider
cruising grounds. These are good investments, as they are written
by boat owners for boat owners and will contain all the useful and
essential information you will need in order to find your way around
unfamiliar areas safely.
If you genuinely become lost, do not motor around hoping you will
find your way home. You will be in danger of running out of fuel, or
hitting unexpected rocks or shoals. Call the Coastguard, they may
be able to get at least one bearing on your radio transmission, or
don’t be embarrassed to call another boat and ask them.
Fog
Fog, or other precipitation like torrential rain or snow, can limit
visibility to a dangerous degree. You may know where you are, you
may be able to track your course and steer entirely by GPS, but if
you cannot see more than a few metres you can easily miss a
narrow harbour entrance, or see another vessel too late to take sufficient avoiding action.
If the visibility is too poor for safe navigation, do not risk your boat
and crew, it is better to delay your start than be run down by a
large ship. However, poor visibility can come upon you unexpectedly, so you may have to find your way home.
If you know where you are and can navigate by GPS, then the only
additional precaution you can take is to have very good lookouts
posted outside the cabin – they will need to spot the faintest
glimmer of boat and shore through the fog, and even a clean
window will inhibit this. If the journey is lengthy, it is a very good
idea to swap lookout duties around so concentration does not flag.
Your safety is entirely dependent on the lookout spotting pot floats, floating obstructions, rocks and other vessels before you hit them.
Keep speeds low enough for the visibility, if the fog is very thick
then it is better to get home at a crawl than go too fast to avoid something that suddenly appears out of the fog.
If you do not have GPS or are not confident of finding your way
home, then as long as you are not in a dangerous position such as
a shipping lane, it would be prudent to anchor and wait for
conditions to improve. If you decide to wait, make sure someone
on shore knows what you are doing so they do not worry about your non-arrival and alert rescue services.

Angling Boats 106
Night
If you plan to be out at night, then night travel does not need to be
in this section. However, you may find yourself travelling at night
as a result of delays from other causes, and if you are unfamiliar with navigating at night this can be a very unsettling experience.
In some ways, night navigation is easier – lighted buoys are
recognisable from their flashes at a great distance, which is not
possible in daylight. Other vessels are also highly visible, and it is
easier to determine their direction of travel from their lights than it would be from a vague shape in daylight.
In other ways it is more tricky – you cannot see floating
obstructions or pot markers, and the mass of lights in a busy
shipping area can be bewildering for the novice night-time
navigator. It is also difficult to see an unlit shore, so familiar landmarks cannot be used as a point of reference.
When under way at night, you must have the correct navigation
lights. For low speed powered vessels under 7 metres in length a
single white visible from all directions is all that is needed, so even
if you do not intend to travel at night you should fit such a light
just in case. The same light is used for vessels at anchor, so if you
decide to sit the night out at anchor, the same light will serve you
in good stead.
You may not be able to judge the height of incoming waves, so you
are more likely to be taken by surprise if you encounter a rogue
wave or a ship’s wake. If anyone goes over the side at night, it will
be far more difficult to find and recover them, so if you can
persuade your crew to use lifelines you can be more sure of their
safety.
You will not see unlit obstructions easily, so keep the speed down
and keep a good lookout. A well-prepared night passage can be
quite a thrill, so being caught out at night need not be too bad if
you make your way back carefully and take all reasonable
precautions to stay safe.
Tip:
Maintaining good night vision is essential, and the only way to do this is to
keep all lights on board as low as possible. One glimpse at a bright light can
reduce your night vision for up to thirty minutes. Internal lights are available
with alternative red and white switches – at least one of these in the
wheelhouse or cuddy switched to red will mean you can illuminate charts and
instruments without blinding yourself when you look back out to sea.

Angling Boats 107
Basic Maintenance and DIY
There are many books on boat maintenance and repair, so this
section will cover only the basics for anglers who may be new to
boat ownership. Wooden boats require a great deal of dedication
and skill to maintain, which is outside the scope of this book. In
this section we will cover the basic day to day maintenance and simple repairs on GRP boats, engines and trailers.
Cleaning Fibreglass boats
A brand new fibreglass boat looks as though it will never become
dirty. A few months and a few fishing trips later it might not look so
pristine. New boats will have a smooth shiny gel coat, with
probably a couple of coats of polish on top. Dirt can be easily hosed
off with fresh water. You should hose your boat down with fresh
water after every salt water trip, as salt crystals are sharp and can
scratch the gel coat and polycarbonate windows. Salt is highly
corrosive, and even stainless steel will rust eventually. It is best to flush salt from all parts of the boat to prevent damage.
As the original polish wears off and sunlight and abrasion start to
work on the gel coat, the microscopic porosity of the gel coat
surface traps dirty marks and is more difficult to keep clean.
Surfaces with non-slip markings such as decks are particularly
prone to marking. Any household detergent cleaning liquids can be
used, and common household bleach is particularly good for grubby
decks, although not so good for the environment. Pour neat bleach
on the deck, and give it a scrub to spread it out and work it in a
bit. Leave it for fifteen minutes, give it another scrub and rinse off.
A pressure washer is good for rinsing but you don't really need it, it just makes it quicker.
If marks still remain, you can remove them with fibreglass cutting
compound such as Faraclas, available in different grades. This is a
mild abrasive that actually cuts into the surface, so any stains
embedded in the gel coat are removed. This also restores the shine
to the gel coat, but does involve a lot of elbow grease. Once the
surface shine is restored, you must seal the surface with one or
preferably two coats of polish. This helps retain the shine and
repels dirt from becoming engrained. For large areas it is worth
investing in an electric polisher with removable mop heads for
cutting and polishing. Older boats will need an annual all-over
polish to maintain their appearance and an electric polisher will be invaluable.
Stainless rails need a rinse, and every now and again a polish with
a metal polish will maintain the shine. Glass and polycarbonate
windows need a good flush with water – don’t wipe dried salt from
a polycarbonate window as this may scratch it. To make it easier to

Angling Boats 108
see out of wet windows, you can apply a special window polish
such as Raine-X that coats the window surface, inside or out, with
a chemical that repels water. Drops form into beads that quickly
run off, preventing fogging on the inside and making it easier to see out of windows that are not cleared by a wiper blade.
Antifouling
If you keep your boat afloat, the hull surface and parts of the
engine that are permanently under water will soon attract weed
growth, particularly near the surface where the penetration of
sunlight is at its maximum. Weed growth is unsightly and will slow
the boat down significantly. Heavy growth can even block cooling water inlets for the engine.
To prevent weed growth, you need to paint the underwater part of
the hull with an antifouling paint, obtainable from yacht chandlers.
This paint is expensive compared to normal yacht paint. There are
several different types of antifouling, designed for different uses –
slow sailing boats, fast racing yachts and power boats, fresh water,
sea water and warm water. The manufacturers produce
comprehensive guides to help you chose the right type of
antifouling paint, and calculate how much you will need. If you are
applying antifouling for the first time, it must be applied over a suitable primer.
Antifouling is an unpleasant substance that inhibits weed growth,
and slowly leaches away under water providing a constant surface
of fresh paint. After a season, the paint will need renewing and is usually done as part of an annual out-of-water refit.
Provided the paint is sound, all that is needed is a rub down with
wet-and-dry paper used wet, then after a rinse with fresh water,
the new antifouling can be applied over the old. If you are using
the same antifouling for the new coat as you did for the old, there
will be no problems. If you are planning to use a different type,
check for compatibility as some types cannot be applied over
others. If the two are not compatible, you will have to strip off the old coat, re-prime and paint as for new antifouling.
Standard paint brushes or small rollers can be used. Antifouling
paint is thick and heavy, so a narrow roller is easier to manage. If
you buy cheap rollers from a DIY store, you can afford to throw the
roller away rather than clean it. Cheap brushes are not worth
buying as they have a tendency to shed hairs which are very
annoying to have to remove from wet paint. Masking tape can be
used to help create a nice sharp line on the waterline.
Antifouling paint is nasty stuff, so wear protective clothing: eye
protection, overalls, a breathing mask and gloves are essential.
Take care not to create dust, and dispose of flaked paint and
contaminated materials safely. A special thinners is required to
clean brushes and rollers, so remember to buy some at the same time as buying the antifouling paint.

Angling Boats 109
As the boat will be on a trailer or blocks when you apply the paint,
there will be patches of hull under the blocks or props. Do not try
and remove the props, this is highly dangerous and could cause the
boat to topple. Instead, pour a small quantity of paint into a jam
jar with a lid, and leave this and a small paintbrush with the yard
staff who will be re-launching the boat. They can paint the patches
when the boat is in slings ready to go back in – this is common practice in well-run boatyards.
If you have an out-drive leg, you will have to buy a special
antifouling paint designed specifically for these surfaces. Standard
antifouling paint will cause problems with the metals of outdrive
legs and propellers. The original high gloss finish needs to be
rubbed down to create a key for the paint, which may seem a pity
– but nobody will notice. If you want to preserve decals or
graphics, these can be masked with tape before painting. Be
careful not to paint over grease nipples, electrical earth connections, hydraulic rams or sacrificial anodes.
Electrolysis
Electrolysis is a confusing and misused term in the boating world.
It is loosely applied to the corrosion processes, referring to the
degradation of an electrolyte that occurs as a result of passing
electrical current through it. The confusion in terms is usually
between electrolytic corrosion and galvanic corrosion. Galvanic
corrosion is caused by an electric current generated by two
different metals in a conducting medium such as seawater. The
results of each type of corrosion can be similar and can occur at an
alarming rate.
Whenever different metals are placed in a conductive liquid you
create a form of battery. If you connect these pieces of metal
together, current will flow. The current will be removing metal from
one of the metal pieces, which is the "electrolysis". If one of the
pieces is a metal part of your boat or engine, it will be damaged.
To protect valuable metals parts, a block of zinc called a sacrificial
anode is bolted to key metal components such as the out-drive leg.
Zinc is used because it has a higher voltage in the water so the
current will be more inclined to flow from it than from your out-
drive leg. If you keep your boat in the water, it is essential that
these anodes are replaced regularly (every year or two), as they
corrode away. They must never be painted over, and the electrical
contact between the anode and the metal parts they are intended
to protect must be good. Parts commonly protected in this way are
the out-drive leg, which may have several custom-shaped anodes; trim tabs, prop shaft and metal rudder.

Angling Boats 110
Fibreglass Repairs
Fibreglass boats can take quite a pounding before suffering serious
damage, but even a minor bump or scrape can cause an unsightly
scratch or chip. If the scratch does not go deep enough to expose
the fibreglass matting, then it is only cosmetic damage. Deeper
scrapes must be repaired to ensure that water does not creep into the matting and create wet spots in the hull.
Minor scratches can usually be polished out very easily. If they
cannot be removed with rubbing compound, use a very fine wet
and dry paper used wet – 1000 or 1200 grade – and finish with
rubbing compound. This will cut into the gel coat so be careful not
to sand too much away.
Deeper chips and scrapes can be repaired with a gel-coat repair kit
available from good yacht chandlers. White is the most popular
colour, but other pigments can be found if you have a coloured
hull. This might sound odd but there are many colours of white so
your repair might not be a perfect match, but it will be close
enough for most people. For underwater repairs use an epoxy gel-coat repair kit.
To repair a gel-coat chip, chose a dry, warm day and thoroughly
clean the hole and surrounding area. Don’t be afraid of gouging the
area with a sharp knife – it is better to have a larger hole to fill that
have unsightly dirt marks embedded in the repair. Mix a small
quantity of gel-coat and hardener in a non-metallic pot. The ratios
are usually easy to calculate by squeezing equal lengths of paste
from the two tubes – the difference in the diameters of the tubes
are calculated to give the correct ratio. If the day is cool, you can
speed up the setting process by using slightly more hardener – you
are more likely to need this if the repair site is very small, as the
setting is achieved by a chemical reaction causing heat. A larger
quantity has a smaller surface area to volume ratio so it will retain heat and set more readily.
Mix the paste very thoroughly and apply with a plastic spatula. If
the hole is large or on a steeply sloping surface it may “slump” – if
that happens you can stick some tape over the wet paste to hold it
in place while it sets. Apply enough paste to bring the surface
slightly proud of the surrounding surface so you can sand it back
perfectly level. If this is difficult on a large repair, you may need to
apply a second layer after the first has hardened. Try to keep the
fill even and without swirls or air bubbles that might be exposed
when you sand the surface back.
Allow the repair to harden – this will take between ten minutes and
half an hour depending on the temperature and your mix ratio. It
will reach full strength a few hours later, but it is easier to sand
once it has hardened but not reached full strength. Carefully sand
the surface down using progressively finer wet-and-dry paper used
wet, and bring the final surface back to a shine with rubbing
compound. Finish off with a couple of coats of polish – with care you can repair even the ugliest gashes to look like new.

Angling Boats 111
More serious repairs are outside the scope of this section but well
within the capabilities of most DIY-ers. Holes can be repaired,
modifications made or even complete replacement sections can be
created using resin and fibreglass matting available from specialist
suppliers. These suppliers can also provide free instruction sheets,
and specialist books are available covering fibreglass repair and
boat manufacture.
Osmosis and Other Water Damage
Osmosis is the term given to fibreglass hull damage caused by
water getting into the fibreglass matting and causing the layers to
bubble or separate. This weakens the hull and must be repaired.
Severe osmosis can be seen as a bubbling effect on the hull, but
early warning can be given by periodically checking the hull with a
moisture meter. Dampness in the fibreglass will show up on the
moisture meter, which indicates that water is in the hull and will potentially cause the matting to blister or separate.
The only cure for osmosis is to thoroughly dry the hull, cut back the
surface are re-build the surface layers. This can involve leaving the
hull in a shed with electric heaters for several weeks. The surface
layers are cut off, and any blistered matting cut right back. The hull
surface is then covered in resin applied like plastering, and sanded
down. Having invested in this amount of work it is worth going a
step further and applying several layers of epoxy. This will
completely seal the hull and prevent further occurrences of osmosis.
External osmosis damage to the hull usually only occurs in boats
kept afloat for long periods. The same effect can occur on boats
kept ashore if they are not drained properly – only on the inside of the hull rather than the outside.
A more common problem for small boats kept ashore is damage
caused by water getting into places where it is not meant to be,
and soaking into internal structures. Most boats have reinforcing
strips of wood or foam in the hull which are fibreglassed over
during construction. The transom will also have a heavy slab of
plywood built into its core. Some boats also have false floors, with
the gap between the hull and floor filled with foam. If water gets
into foam, wood or voids it is very difficult to remove. Wet wood
tends to expand and this can split the fibreglass making the
problem worse. The only cure is to cut the damage out completely,
working from inside the boat, replace the wood and re-laminate
fibreglass over the top. This is a major job, but mostly in terms of
labour. If you are prepared to do this type of repair yourself it need
not be too expensive, although it will be very messy. Unless
internal foam within large voids contributes to the structural
strength of the hull, it is better replaced with a buoyant filling that
does not become waterlogged. Children’s play-pit balls, or small
plastic bottles with sealed caps are commonly used.
Prevention is better than cure so make sure the open parts of the
boat are covered by a tonneau cover or tarpaulin, and any water is

Angling Boats 112
free to drain quickly away. If you store your boat with drain plugs
out, remember where you put them and make sure you replace
them before launching.
Engines
All engines need regular servicing to ensure they are reliable and
get you home safely. You should also carry out regular
maintenance checks in between services to ensure they are kept in
the best possible condition.
Outboard Engines:
Store upright, not tilted, so water drains away and does not
collect and corrode the vulnerable alloys.
Wash the outside of the engine with fresh water after every sea trip.
Flush the engine cooling system with fresh water. You can
buy hose adaptors called mufflers which connect a garden
hose to the water intake of the engine. Turn the water
supply on before you start the engine, and run the engine
gently for a minute or two to flush sea water out of the
cooling system. Never run an engine without a water supply
even for a few seconds – a water pump impeller depends on
water for lubrication and will rip itself to shreds if it runs dry.
Ensure the oil reservoir is kept topped up on two-stroke
engines, and check the oil level on four-stroke engines before every trip.
Check fuel lines for damage, including the primer bulb if
fitted, and replace if they are perished or worn. The smallest
hole can prevent the low pressure fuel pump from drawing sufficient fuel to run the engine.
Visually check the engine for oil leaks and damage. Paint
chips can be touched in with car paint. Damaged propellers
can be repaired by specialists surprisingly easily. Make sure
access panels and covers are secure and fitted correctly, as they are expensive to replace if they fall off at sea!
Inboard:
Allow the engine to idle for a few minutes before switching off – this allows it to cool down slowly.
Check engine oil, hydraulic steering oil and if fitted, coolant levels and top up if necessary.
Check visually for oil and coolant leaks.
Check fuel trap bottles for contamination with dirt or water
– drain off if necessary.

Angling Boats 113
Drain any water from the bilges under the engine, and
sponge dry. Water can splash the starter motor and
alternator when under way, quickly damaging them.
Check battery connections for tightness, and ensure they have a covering of petroleum jelly to prevent corrosion.
Check drive belt tensions and adjust if necessary.
Leave the battery master switch and any sea-cocks set to the off position.
Trailers
Trailers have a very hard life and are particularly vulnerable if they
are dipped in sea water to launch the boat. After every launch and
recovery, they must be rinsed thoroughly with fresh water, hosing into the brake drums and down any open tubes.
All grease points on the bearings, brake cables and hitch must be
greased with a powerful grease gun using a waterproof grease
designed for trailer bearings – any other type may not provide
adequate protection or lubrication. Make sure Bowden cables are
free to slide and are not sticking. If they require lubrication and are
not provided with grease nipples, remove one end and temporarily
fasten it to something solid facing upwards. Make a funnel around
the open end with modelling clay, and pour oil down it until oil
comes out of the other end. Make sure the oil does not get into the
brake drums. This operation may take some time as the oil seeps through the cable.
It is worth spraying the hitch with WD40, as this has the most
exposed moving parts. Check visually for jammed or damaged
rollers, and damage to the galvanised surface that could rust.
Rollers need to be in good condition and free rolling to make
launching and recovery easy and prevent risk of damage to the
boat. It is better to replace a roller than have to repair the hull after a roller cracks and the hull is gouged.
If you have a winch, check the condition of the strap or wire. Any
fraying could result in sudden breakage which could send your boat
crashing down the slipway. Damaged straps and wire must be
replaced. Also check the pawls and securing hooks, as a failure
here could also give you serious problems in mid-launch.
Trailer tyres need looking after in the same way as your car tyres.
Keep them pumped up to the correct pressure, and replace them if
there is side wall damage or insufficient tread. Towing a trailer in
an un-roadworthy condition is a motoring offence carrying heavy
penalties, and an accident caused by a trailer failure at speed could be extremely serious.

Angling Boats 114
Adding and Replacing Fittings
If you are lucky enough to buy a new boat, it will be supplied with
standard fittings already properly mounted in place. However,
sooner or later you will want to fit additional items like rod holders,
fender eyes, rails and so on. If your boat is second-hand, you may need to replace damaged items and add your own.
Adding fittings to boats is very straightforward for anyone with
basic DIY ability, but it is not exactly the same as working on a car
or a house. The marine environment is far more corrosive to
fastenings and seawater can cause damage if not kept out, so
additional care has to be taken. Fitting items to fibreglass, steel
and wooden structures requires a similar approach.
If you are removing a fitting to replace it, you will find it has either
been screwed directly to the fibreglass with a self-tapping screw, or
bolted through the fibreglass with a washer and nut on the other
side. After removing the fastenings and the fitting, you will
probably find some encrusted white rubbery material underneath,
which must be cleaned off. If the old holes are not in the correct
place for your new fitting, the screw holes must be thoroughly cleaned out and filled with gel-coat repair paste before proceeding.
To add a new fitting, firstly think carefully about the location. You
cannot fix directly to the skin of the hull, as drilling a hole through
could cause a leak. You can add fittings to the hull if a wooden pad
has been glassed onto the hull, and this is common practice for the
transom and strengthening ribs inside the hull. You can safely drill
through gunwhales and internal mouldings as long as there is no danger of leaks.
The thickness of the fibreglass and the strength required for the
fitting will determine whether you screw or bolt to the fibreglass.
Mooring cleats, rail mountings and grab handles must always be
through-bolted, preferably with an additional wooden or stainless
steel pad sandwiched under the nuts on the other side to spread
the load. If there is a thick wooden pad under the fibreglass, other
fittings can be fixed with screws driven into the wood. If there is
only thin fibreglass to fix to, short self-tapping screws can be used but do not use them on anything that is expected to take a load.
The type of screws to use is very important. Marine grade stainless
steel must be used – even stainless steel used in external fittings in
the construction industry are not of sufficient corrosion resistance
to stand up to prolonged exposure to salt water. Brass screws can
be used on wooden boats, but they are not tough enough to be
driven into fibreglass.
When drilling holes for fixing screws to fibreglass, make the holes
smaller than the external thread size, but larger than you would for
normal wood screws. This is because fibreglass does not have the
same “give” as wood, and if the screw is too tight you may not be
able to screw it in, or worse, you could easily break it off in the
hole if you apply too much turning force. However, as fibreglass is
so much stronger than wood, you do not need such a deep grip of
the screw threads to make a strong fastening. It is worth drilling

Angling Boats 115
the very top of the hole over-size to prevent the gel coat from chipping as the screw is run in.
When fitting any item to the external parts of a boat, you must
prevent water seeping under the fitting and into the screw holes.
This is particularly important on wooden boats, or if you are drilling
into the internal woodwork of a fibreglass boat. When you fix the
item to the boat, smear a layer of waterproof sealing compound
under the item so it seals up the gap between the boat and the
item you are fixing. There are several different types of sealant
available from yacht chandlers, depending on the type of
application. Silicone sealants are best avoided because they can
come unstuck when they set, allowing water to seep in. They also
fill the pores of the gel-coat making it impossible for any future
sealant to fully bond to the surface. If you must use silicone,
tighten up partially, allow the silicone to set, then tighten fully on
the pad of silicone. Alternative sealants are more forgiving and the non-setting types give lasting protection.
Boat Electrics
Your boat will probably have some basic electrical circuits already
installed, with a battery, isolating switch, fuse panel and charging
circuit. If not, then I recommend you read up on marine electrics
before fitting any electrical items yourself. There are some very
good books on the subject available from specialist bookshops and
the larger yacht chandlers. This section covers the maintenance of
your boat electrics, and the fitting of additional electrical items to
an existing circuit. I am assuming your boat has a 12 volt system.
There are 24 volt systems in common use but these are usually found on larger craft.
Battery
Batteries have different characteristics depending on their intended
use, and good marine batteries have a different internal
construction from cheap car batteries. A boat battery will have long
periods with no use, then deep loads as it is used to start a heavy
engine. It also has to cope with more vibration. If you shop around,
a marine battery need not cost significantly more than a good car
battery, and it will last considerably longer as it is designed for the use you are going to give it.
Marine batteries should give several years of trouble-free use
provided they are cared for. Try and keep them fully charged, and
if you are going to leave the boat for several months, it is better to
remove the battery and keep it at home so you can give a top-up
charge with a mains battery charger every three months. Marine
batteries thrive on use, and one used and charged regularly will
remain in good condition. Never leave a battery in a discharged state.
The only maintenance they need is an occasional check to ensure
the liquid in the cells (electrolyte) is at the correct level, and if it is
low, it needs to be topped up with distilled water. Make sure the

Angling Boats 116
battery is well secured, otherwise they will slide around with the
motion of the boat which could strain the terminal posts, and
banging can damage the internal plates. Battery terminal
connectors need to be tight, but do not strain the post by excessive
leverage with a spanner. When the connections are secure, wipe
over the metal parts of the connections with ordinary petroleum
jelly – this will prevent corrosion. A poor battery connection can
give a very accurate impersonation of a flat battery, so if you think
the battery should be fully charged but it fails to deliver the power
you need, check the connections carefully first.
I prefer to have two batteries, particularly if I am planning to use
electrics a lot during a trip – bait well, aerators, lights, pumps and
radio all add to the load and it would not be good to find they had
drained your battery when you come to start again. You can fit two
batteries in parallel, with an isolating switch so you can use one
battery for “domestic” – a term given to the lights, pumps and
other non-engine related electrics - and preserve the other battery
for engine starting. You can charge both batteries from the engine
while it is running. You must use a specialist marine battery switch
however, to ensure the switch is adequate for the heavy loads. For
more information on wiring up a dual battery set-up, refer to a
marine electrics book on the subject. Some examples are provided in the Appendices.
Adding Electrical Items
If you want to add additional electrical items such as lights or
electronic navigation aids, you can mount the items as described
the previous section on Adding and Replacing Fittings, and wire the electrics as follows.
Firstly, read the installation instructions if supplied, very carefully.
This will usually give instructions on where to site the unit, and
what power supply is required. You need to be careful where you
route signal cables such as a VHF aerial cable or fish-finder
transducer cable to avoid interference from other electrical currents.
You will find that most electrical items will be mounted in or near
the steering position or cuddy, and the battery is usually at the
stern near the engine. If one is not already installed, you will need
to fit a distribution panel at a central point near the instruments,
and run a heavy duty positive and negative cable back to the
battery to avoid having to run separate wires to the battery for
each item. The negative cable runs from the negative battery
terminal to a metal bar called a “bus-bar” fitted usually behind the
Tips:
Keep a number of spare fuses in a plastic film canister or similar plastic pot
with a lid, and attach the canister firmly to a position close to the fuse panel. If you have to change a fuse in a hurry, they will be close at hand.
Label the positive wires coming into the fuse panel so they are easily identified.
Use a waterproof marker on a label that will not come off, or use wire marker
sleeves you can purchase from electrical specialists.

Angling Boats 117
steering console, which has a number of contacts on it to which
you can connect the negative wires from all the nearby electrical
items. The positive cable runs from the battery isolating switch to a
fuse panel mounted near the negative bus-bar. The fuse panel will
have one connection for the heavy duty positive cable, which is
linked to a number of fuses, and on the other side of each fuse will
be a separate connection point for the positive cable from each
electrical item you wish to connect. The fuse needs to be rated
according to the specification in the instructions that are supplied
with your electrical items.
The wires you use must be rated for the appropriate amperage for
the required load on a 12 volt system. Household wiring must
never be used. Auto cable can be used for boats usually kept
ashore, but it is preferable for boats kept afloat to use marine
grade cable. This has an additional coating of tin over the copper wire to inhibit corrosion of the copper at the connection points.
To calculate the size of cable you need, use the simple formula
Watts = Amps X Volts
The easy way to remember is “WAVe” – even easier as you are working on a boat!
You know the voltage: it is 12. The wattage of the unit will be on the specification, so by inverting the formula you get
Watts/Volts = Amps
The fuse needs to be slightly higher than the calculated amperage,
and you can afford to make the wire capable of handling a much
higher load. If there is a long run of wire, the wire itself will cause a
resistance so it needs to be thicker to compensate. If you are in
any doubt about what size of wire to use, ask for advice or refer to
specialist books such as those listed in the Appendices.
Connectors must be marine grade connectors, and I prefer the
crimp type with a spade end or eye depending on what it is to be
connected to. Try and avoid connecting lengths of cable together,
particularly where they may get wet. This can lead to corrosion and
breakage. If you have to make a connection, use a crimp, and coat
the crimp with a generous layer of silicone sealant. You can make a
neat job of this by sliding a short length of larger tube over the
wire before you make the connection, then slide it back and pump
silicone sealant into the gap inside the outer tube. This will create an air and waterproof seal.
Take particular care where you route cables, particularly through
the cockpit. It is a good idea to thread the two heavy duty cables
through a length of plastic conduit of the type available from a DIY
store, and fix the conduit under the cockpit floor or under the
gunwhales. Keep your wires tidy with plenty of cable ties, or the
spiral wrapping used to make wiring looms. The result not only
looks very professional, it prevents tangles and protects the wires from being snagged and damaged by other things.

Angling Boats 118
Mounting a Fish-Finder Transducer
A fish-finder works by sending pulses through the water and
measuring the time and strength of the return signal. The unit that
sends these signals is the transducer, which must be mounted
either in the water or on the inside face of a fibreglass hull, with no
air space or bubbles between the face of the transducer and the
water. The transducer must be mounted where the face of the
transducer is on a horizontal plane, where no turbulence and
bubbles in the water will pass in front of it. All of this will be
described in detail in the fish-finder installation manual.
The position giving the best signal will be a transom mount, using
the brackets supplied. If you chose to do this, make sure you use
marine-grade screws, and a caulk sealant designed for underwater
use. Route the cable up the transom to a point well above the
waterline before drilling a hole and threading the cable through.
The cable will have a connector for the unit already fitted, so you
will have to drill a hole large enough to accommodate the
connector. This will be larger than the hole required for the wire, so
fill the gap with caulk sealant and cover the outside with a plate
designed for the purpose – if one was not supplied with the fish-finder, they can be obtained from the larger yacht chandlers.
Alternatively, you can mount the transducer inside the hull, but
only if you can find a suitable position. The transducer must be in a
safe place where it will not be damaged by your fishing activities,
where it can be mounted flat, and where it will shoot through solid
fibreglass without the signal being obstructed by foam cores,
wooden stringers or external turbulence. The mounting will require
permanent fixing so you will need to test it before committing to a
position, because if you fit it in the wrong place it will be very
difficult to move. To create a trial mounting, make a “pond” of
vegetable oil where you want to mount the transducer, using a
quantity of modelling clay such as Plasticene for the walls of the
pond, just large enough to accommodate the transducer. Place the
transducer in the pond, and the oil will fill the gap between the
transducer face and the hull, allowing the signal to pass through.
Ask a willing crew member to hold it in place while you test the
signal in the water, both at rest and under way, or if the crew
proves unwilling or unreliable, make a sandbag by filling a strong
plastic bag with damp sand and wedge the transducer in place with that.
One you have decided on the position for the transducer, clean
away the Plasticene and oil, and thoroughly de-grease the inner
hull surface and transducer face. There are two alternative means
of fixing the transducer face to the inside of the hull – you can
either use epoxy adhesive such as Araldite, or silicone sealant. In
either case, use a generous quantity to make sure there are no
gaps or air bubbles under the face of the transducer. If you are
mixing adhesive, do it carefully so there are no air bubbles. Place a
large blob of adhesive on the inner hull and press the transducer
face down onto the blob, pushing down and making sure the
transducer face is well seated in the adhesive. Wedge the transducer in place until it sets.

Angling Boats 119
Quick Test
Are you ready to go to sea, master of your own vessel? Try these
questions to see how well you do. Making the wrong choice at sea would have more serious consequences.
1. You are cruising along and suddenly notice a semi-submerged
object right in front of you. It is too late to stop, do you turn to port or starboard?
2. You see a patch of broken water in your course. What should you do?
3. A power boat appears to be crossing your path from starboard
to port. The angle at which it is approaching does not appear to
change, so you are on a collision course. What should you do?
4. A boat under sail appears to be crossing your path, this time
from port to starboard. The angle at which it is approaching
does not appear to change, so again you are on a collision course. What should you do?
5. You are on a heading of 2700 and this buoy is in front of you.
Which side of it should you go?
6. A power boat is coming up a narrow channel towards you. What should you do?
7. You decide to anchor in a spot where the water is 20 metres
deep. How much rope and chain should you let out to ensure the anchor holds securely?
8. You are out at night and these lights are in front of you. What
do you think it is?
9. The inshore waters forecast issued by the Met Office gives visibility as “Poor”. Is it safe to go to sea in this?
10. You see a large floating object near a busy channel, which
might be a shipping container. Which VHF Channel should you
use to call the Coastguard in a non-emergency situation such as
this, to advise them?
11. You are heading home, into the setting sun. The channel
markers are visible but you cannot determine the colours because of the light. Which side should you pass this one?

Angling Boats 120
Quiz Answers
1. You could turn either way, but if your boat has a single
propeller, the turning circle will be tighter in one direction than
another. It is better to know which way your own boat turns
more responsively, and always turn in that direction to respond to an emergency.
2. Broken water could indicate either a shoal or over-falls. If it is a
shoal, you risk running aground. If you know it is over-falls,
and the height of the waves are not a threat to your safety, you
can proceed through them. If you are uncertain, alter course to
avoid broken water and watch the depth on your fish-finder closely.
3. You must alter course to starboard. Make an obvious alteration so the other vessel can see you have altered course.
4. You must alter course to port, as a sailing vessel has right of
way over a power vessel unless the vessel under power is
constrained by depth. It is safer and more courteous to pass behind the sailing vessel.
5. You are heading west and this is the Cardinal Buoy marking the
south point of a submerged object such as a wreck, rock or
shallows. You should alter course to port and leave the buoy to
starboard.
6. Both you and the other vessel must alter course if necessary to
pass to starboard, leaving the other vessel on the port side of your own vessel.
7. You will need between 3 and 5 times the depth of water, so pay out at least 60 metres and up to 100 metres of anchor rope.
8. This is a very large vessel heading towards you and on your
port side. If you alter course to starboard you will safely avoid it.
9. “Poor” visibility is between 1,000 metres and two nautical
miles, so this is perfectly safe for collision prevention. You may
not be able to see land however, so make sure you have
adequate navigational skills.
10. Always call Coastguard on Channel 16. They will probably ask
you to go to Channel 67 and stand by, but do not call them initially on Channel 67.
11. This is the starboard channel marker, because the object on top
of the post is triangular. Leave it on your starboard side and
pass to port.

Angling Boats 121
The End
To quote Winston Churchill, “This is not the end. It is not even the beginning of the end. But it is the end of the beginning.”
I hope this book has been useful. Without writing a whole book on
each chapter, I cannot possibly cover all there is to know on each
of the subjects. However, I have tried to provide enough
information to help you get started safely, and you will be able to
learn more from books, magazines, web sites, people you meet
and your own experiences on the water. So hopefully this is not the
end of a short book on boats, it is the end of the start of many years of enjoyable boating for you.
If you would like to comment on any aspect of this book, ask
questions or just share your own experiences, I would be delighted
to hear from you. Just send me an email addressed to
[email protected] I’m always keen to learn more about boats, fishing and the sea.

Angling Boats A1
Appendices
The following sections contain general notes for reference.
There is also a set of Distress Cards which can be printed off, laminated and kept on your boat.
Finally there are a series of templates for you to copy and use to keep your own records.

Angling Boats A2
Useful Resources
Web Sites
These were correct at time of publication. Site addresses may have
changed since then – if you find a “Page Not Found” message, go
to the relevant Home Page on the URL provided, or do a Google
search.
Subject Description Web Site
Charts The UK Hydrographic
Office, publishers of
Admiralty charts
www.ukho.gov.uk
SOLAS V Brochure containing
safety regulations
applying to pleasure
boat users
www.mcga.gov.uk
Met Office Weather forecasts, and
weather reference
www.metoffice.co.uk
Wrecks A comprehensive wreck
site for divers and
historians
www.wrecksite.eu
Tides Free tide tables www.ukho.gov.uk/easytide
Sea Angling Angling Forums www.anglersnet.co.uk
www.worldseafishing.com
Sea Fishing
News
UK news and catch
reports updated
monthly
www.harvey-mayson.co.uk/seaangling
Slipways Comprehensive guide to
boat launching locations
www.boatlaunch.co.uk
Boat
Jumbles
Boat jumble sales by
date and location
throughout the UK
www.boatjumbleassociation.co.uk
RYA Site containing general
boating news, advice,
courses and
qualifications
www.rya.org.uk
HM
Coastguard
Marine safety
information
www.mcga.gov.uk

Angling Boats A3
Subject Description Web Site
Lifeboats News and sea safety
guides
www.rnli.org.uk
Boats for
Sale
Boats, engines and bits
for sale
www.boatsandoutboards.co.uk
Commercial
fishing boats
and
equipment
Database of second
hand boats and
equipment, and many
useful links
www.findafishingboat.co.uk
Sea
Fisheries
Committees
There are different SFC
for each area of the
coastline around the UK.
Not all have web sites.
Those that do publish
local by-laws and
minimum fish sizes
Sussex: www.sussex-sfc.gov.uk
Southern: www.southernsfc.org.uk
North Eastern: www.neseafish.gov.uk
Eastern: www.esfjc.co.uk
North Western and North Wales:
www.nwnwsfc.org
South Wales: www.swsfc.org.uk
Northumberland: www.nsfc.co.uk
Fisheries
Regulations
Marine Fisheries Agency www.mfa.gov.uk
Promoting
Fish
Information and recipes www.seafish.co.uk

Angling Boats A4
Books
There is a vast selection of books available, most of them excellent,
although some are written for the more experienced boat owner.
Here is just a small selection of books that will expand on the subjects covered in this book.
Title Author
Powerboat Handbook Paul Glatzel
Understanding the Rule of the Road Paul Boissier
First Aid Collins Gem
Simple GPS Navigation Mik Chinery
Admiralty Tidal Stream Atlas (various
editions and regions)
Admiralty Charts and Publications
Boat Safety Handbook RYA Publications
Knot Know-how Steve Judkins and Tim Davison
VHF Radio RYA Publications
The 12 Volt Bible Miner Brotherton (revised by Ed
Sherman)
Weather at Sea David Houghton
Where to Launch Around the Coast Diana van der Klught
Outboard Troubleshooter Peter White
Marine Diesel Engines Nigel Calder
Boat-owners Mechanical and Electrical
Manual
Nigel Calder
Electrics Afloat Alastair Garrod

Angling Boats A5
Magazines
There is a good choice of magazines for a wide range of water
sports, and it is noticeable that there is more choice in newsagents
nearer the coast or larger navigable rivers. Monthly magazines of interest to owners of angling boats include:
Motor Boat Monthly
Practical Boat Owner (mainly for sailing boats but has useful DIY features)
Boat Mart
Buy a Boat for under £20,000
Boats and Planes For Sale

Angling Boats A6
Beaufort Wind Scale
Francis Beaufort was born in 1774 in County Meath, Ireland and
began his nautical career at 13 as a cabin boy in the Navy. By the
age of 22 Beaufort had risen to the position of lieutenant. Whilst on
a patrol in 1812, he was injured in action. Unable to continue in
active service he was given the position of Hydrographer.
Beaufort invented the Beaufort Scale in 1806 for his own use, and
the Royal Navy adopted his method in 1838. Although over the
next hundred years the Beaufort Scale was slightly modified, it is
still based around his original concept. Many maritime weather
forecasts refer to Beaufort wind speeds, although land-based
forecasts usually describe wind speeds in knots or miles/kilometres
per hour. Neither are particularly useful unless you know what the
effect is, so the Beaufort Wind Scale is an excellent visual reference for wind speeds and its likely effect on the waters you want to fish.
Beaufort Force
Windspeed Knots
Description Sea Condition
0 0 Calm Sea like a mirror
1 1 - 3 Light Air Ripples but without foam crests
2 4 - 6 Light Breeze Small wavelets. Crests do not break
3 7 - 10 Gentle Breeze Large wavelets. Perhaps scattered white horses
4 11 - 16 Moderate Breeze Small waves. Fairly frequent white horses.
5 17 - 21 Fresh Breeze Moderate waves, many white horses
6 22 - 27 Strong Breeze Large waves begin to form; white foam crests, probably spray
7 28 - 33 Near Gale Sea heaps up and white foam blown in streaks along the direction of the wind
8 34 - 40 Gale Moderately high waves, crests begin to break into spindrift
9 41 - 47 Strong Gale High waves. Dense foam along the direction of the wind. Crests of waves begin to roll over. Spray may affect visibility
10 48 - 55 Storm Very high waves with long overhanging crests. The surface of the sea takes a white appearance. The tumbling of the sea becomes heavy and shock like. Visibility affected
11 56 - 63 Violent Storm Exceptionally high waves. The sea is completely covered with long white patches of foam lying in the direction of the wind. Visibility affected
12 64+ Hurricane The air is filled with foam and spray. Sea completely white with driving spray. Visibility very seriously affected.

Angling Boats A7
Marine Terminology
Word Meaning
Abeam Alongside and usually parallel to the boat.
Aft At the back (of the boat)
Air draft Distance between the waterline and the highest part of the boat
Antifouling Paint used to prevent weed and animal growth on the underwater area of a boat kept afloat.
Beach (verb) Drive a boat onto a shelving beach from the sea
Beam Width of a boat - or -"On the Port/Starboard beam" means at 90 degrees to the direction of travel on the left or right hand side
Bilges Inside bottom of the boat, usually the under-floor area
Bitt Small post, often with a horizontal bar running through it, on a boat or on shore, to which mooring ropes are secured
Boom Wooden or metal bar to hold the bottom of a sail
Broach Turn over or take a wave over the side as a result of the boat being at right angles to a large wave
Buoy Floating marker or floating mooring point
Bow(s) The front of the boat
Cable Anchor rope or anchor chain
Cable A historical unit of measure – 100 fathoms or 200 yards
Can Slang for buoy (often used in racing)
Cill Some marinas have a gate which swings up to dam the water in the marina when the tide drops. This gate is called a cill.
Coaming Upper edge or rim of the cockpit, usually of a sailing vessel.
Courtesy Flag National maritime flag of the country you are visiting, flown from the crosstrees of a mast.
Crosstrees The short horizontal projections part way up a mast.
Dhan Buoy Small marker buoy with a mast for greater visibility
Dolphin Concrete, steel, wood or stone structure like a mini tower, used as a navigation marker
Draft Distance between the waterline and the lowest point of the keel
Dry-Berthing A marina berth where the boat is kept ashore and put in the water when the boat is required for use.
Ensign National maritime flag, which may be different from the national flag. Flown at the stern to indicate nationality
Fairlead Rope guides, usually on the edge of the deck
Fiddles Ridges or rails around the edge or across tables and worktops to prevent objects sliding off.

Angling Boats A8
Word Meaning
Force (wind) Wind speed according to the Beaufort Scale
Gunwhales Pronounced "gunnals", the upper edge of the hull or side walls of the deck.
Halliard Rope used to raise a sail or a flag
Heel over To tilt sideways at an angle, caused by wind, wave action or a heavy weight on one side of the boat
Helm Steering position or to steer
Holding pontoon A pontoon with limited waiting time, such as a pontoon to tie up against when waiting to enter a marina
Kedge A secondary anchor
Keel The lowest part of the underside of the boat
Keel-band A metal band screwed to the bottom of the keel to protect it from scrapes
Lazarette Engine bay or similar large under-floor area on larger boats
Leading marks Posts, signs or symbols used to guide ships along safe channels by visually aligning two or more marks
Lee (in the/under the)
The position where you are sheltered from the wind such as by a headland, or a larger boat
Lee (shore) Conversely, this is the shore that wind is blowing onto.
Locker Cupboard or fitted box with a lid.
Log Instrument to show the distance the boat has travelled or its speed
Mayday Distress call
Moor Tie a boat up alongside.
Navigable Where a boat may progress without danger of grounding
Painter Mooring rope of a dinghy
Phonetic Alphabet
The alphabet using words for clarity rather than letters A - Alpha, B - Bravo etc.
Piles Posts, often arranged in pairs so boats can tie up to then from the bows and the stern. Used mainly in narrow estuaries and harbours. Also used as navigation markers, although they are usually then called posts!
Pintles Hinge part of a rudder, which is a metal peg attached to the stern of the boat
Port The left hand side of the boat or on the left hand side of the boat (red). This was once called "larboard".
Rowlocks (pronounced "rollocks") The fork shaped devices used to hold oars in position on the gunwhales
Running rigging Ropes used to raise and control sails and spars
Sea-cock A tap or valve controlling water coming into or going out of the boat through the hull, such as for a toilet or bait-well
Sea Room Unobstructed space around a boat to allow it to complete the desired manoeuvre
Shackle D shaped screw connector, such as to attach an anchor to chain and
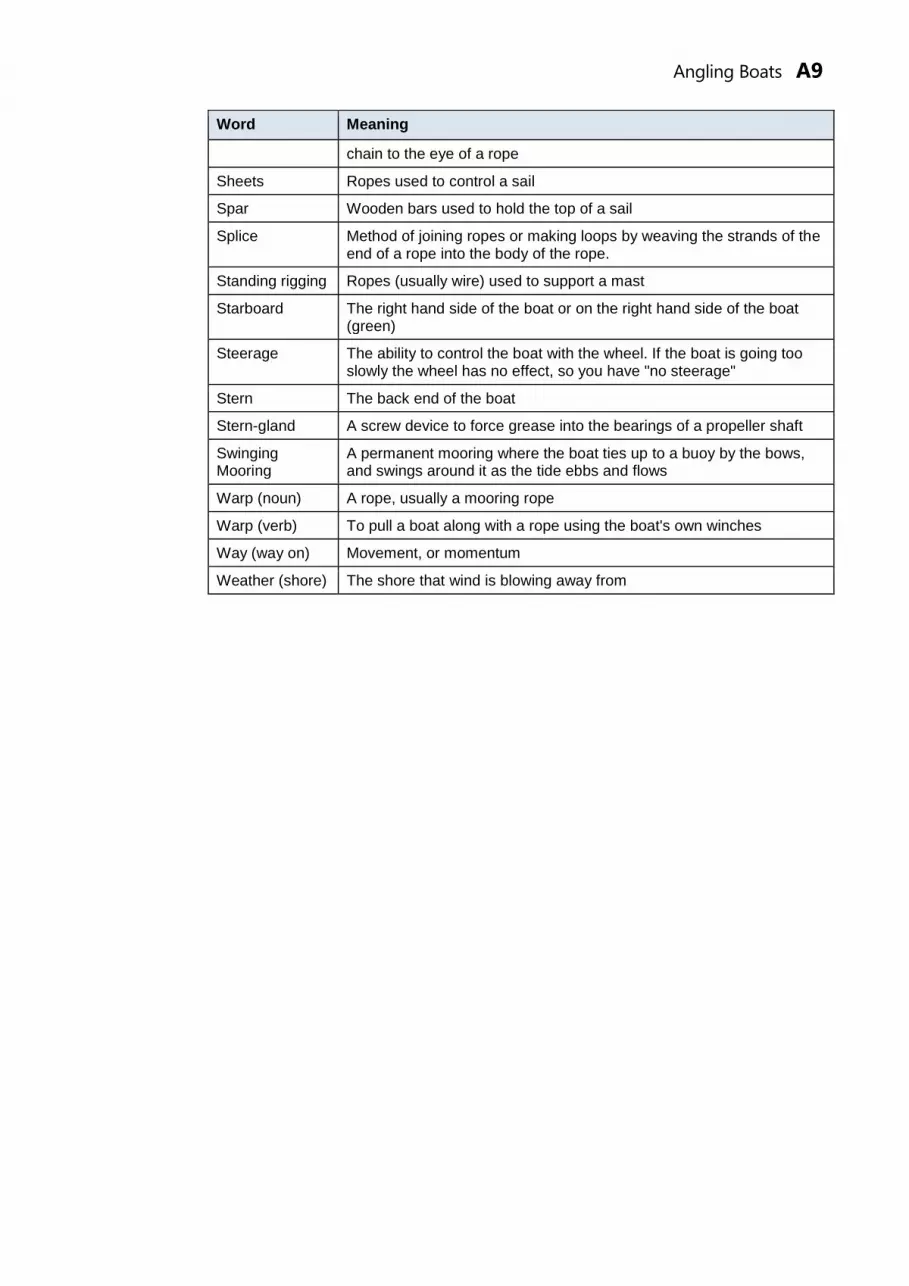
Angling Boats A9
Word Meaning
chain to the eye of a rope
Sheets Ropes used to control a sail
Spar Wooden bars used to hold the top of a sail
Splice Method of joining ropes or making loops by weaving the strands of the end of a rope into the body of the rope.
Standing rigging Ropes (usually wire) used to support a mast
Starboard The right hand side of the boat or on the right hand side of the boat (green)
Steerage The ability to control the boat with the wheel. If the boat is going too slowly the wheel has no effect, so you have "no steerage"
Stern The back end of the boat
Stern-gland A screw device to force grease into the bearings of a propeller shaft
Swinging Mooring
A permanent mooring where the boat ties up to a buoy by the bows, and swings around it as the tide ebbs and flows
Warp (noun) A rope, usually a mooring rope
Warp (verb) To pull a boat along with a rope using the boat's own winches
Way (way on) Movement, or momentum
Weather (shore) The shore that wind is blowing away from

Angling Boats A10
Speed and Distance
Conversion
Speed
1 knot = 1.15 mph = 1.85 kph
1 mph = 0.87 knots = 1.61 mph
1 kph = 0.54 knots = 0.62 mph
Distance
1 yard = 3 feet = .9144 metres
1 fathom = 6 feet = 1.828 metres
1 cable = 200 yards = 182.88 metres
1 nautical mile = 2,025.4 yards = 1.852 kilometres
1 nautical mile = 1.151 land miles
1 nautical mile = 1 minute of latitude

Angling Boats A11
Distress Cards
Copy the following cards in colour and have them laminated in your
local print services shop. Keep them on board, preferably stuck
somewhere very obvious – it might not be you that has to deal with
the emergency.


DISTRESS CALL on CH 16
Boat Name
Call Sign
Switch your VHF to Channel 16 at High Power, with dual-watch/Scan off, and check no-one is transmitting. Press the transmit button; say slowly and clearly:
• MAYDAY MAYDAY MAYDAY• This is………………………………boat name, repeat three times
• MAYDAY, this is ………………... boat name, once
• My position is ………………….....latitude and longitude; or give true
bearing and distance from a known point. Repeat position if time allows
• State nature of distress and type of assistance required:vessel or person in grave danger e.g. sinking, fire, man overboard etc.
• State number of people on board
…………………………………………..• I request immediate assistance• OVERA MAYDAY signal imposes a general radio silence for all other vessels,and should be cancelled immediately the situation permits.
A lfaB ravoC harlieD eltaE choF oxtrotG olfH otelI ndiaJ ulietK iloL imaM ike
N ovember O scar P apa Q uebec R omeo S ierra T ango U niform V ictor W hiskey X -ray Y ankee Z ulu

Forms and Records
Boat Equipment Register
Copy the following pages and use them to record details of your
boat and equipment. This will be invaluable in the event of an insurance claim or theft.
N = Purchased new
S = Purchased second-hand
Boat Maintenance Log
Copy the following page and use it to record details of work carried out on your boat
Fishing Log
Catch reports, marks, bait, tide, weather
Fishing Marks
Location and notes

Boat Inventory
Item Make Model Serial No. Date Purchased
N/S Price Paid
Hull
Engine 1
Engine 2
Trailer
GPS
Chart-plotter
Fish-finder
Fixed VHF
Handheld VHF

Boat Inventory
Item Make Model Serial No. Date Purchased
N/S Price Paid

Boat Maintenance Log
Date Work Done Parts Fitted Cost

Fishing Log
Date Weather Tide & Sea Conditions.
Marks Catch
Species No./Weight Bait/Method

Fishing Marks
Name/Number Description Latitude Longitude Comment

About the Author
Neville Merritt was brought up near the Blackwater estuary, and was boating before he could walk, and he took up
fishing very soon after. Neville caught his first real fish using a toy rod, and
boats and fishing have been his passion ever since.
When he was a teenager, his father
bought a Norwegian fishing boat in which they both learnt a great deal
about boats and the sea. Neville bought his own boat as soon as he could afford one, and has owned boats ever since.
He lives in Hampshire with his very understanding family, and fishes from
his boat whenever he can off the Hampshire and Sussex coasts. Neville is
also a keen fly and coarse fisherman.
Web site: www.boat-angling.co.uk
Twitter: @boatangling