DIY Boat Magazine Issue 2 2004.pdf
65
DIY boat owner 2004-2 (www.diy-boat.com) 1-888-658-2628 1 CONTENTS 2004-2 DIY boat owner 2004-2 www.diy-boat.com 1-888-658-2628 Columns 7 SCUTTLEBUTT What Electrolysis Is, Is Not: Debunking the myth that corrosion to underwater metals is caused by electrolysis. By Patricia Kearns 18 DIESEL FAQ Solutions to diesel engine questions submitted to DIY's Technical Helpline. By Bob Smith 21 ELECTRICAL Is Your Boat Ignition Protected?: All electrical components exposed to a potentially explosive environment must be ignition protected. At risk of an explosion and/or fire are older boats with electrical devices added by previous owners and newer boats with replacement and add-on parts. Here's how to explosion-proof your boat and minimize that risk. By Susan Canfield 30 POWERBOAT RIGGING STEERING REFIT: Replacing worn-out mechanical steering with a new hydraulic sys- tem is well within the scope of the experi- enced DIYer but it does require a combination of diligence and a willingness to endure some snakelike physical maneuvers in the small, dark places in your boat. By Peter Caplan 42 SAILBOAT RIGGING Pole Choices for Downwind Sailing: With the proper equipment combinations, flying a head- sail attached to a whisker pole makes for fast, fun, downwind sailing. Here's how to select, install and set the pole. 56 DIY PROJECTS Filling a Grease Gun; Help for Mildewed Cushions; Stern Flagpole Holder 64 VIEW FROM THE STERN Is Bigger Better?: It's popular belief that trad- ing up is a good thing. Before you do, here are a few variables to consider. By Roger Marshall 2 CURRENTS Letters, News, Wanted 8 TALKBACK Q&A Questions from DIY Readers 10 DIY TECHNICAL HELPLINE – IT’S FREE Technical help with your subscription. See insert on page 33 or log onto DIY ONLINE at www.diy-boat.com 13 TECH TIPS Departments NMEA Data Out from PC Data In to PC Signal Grou nd DPDT Switch NMEA 0183 A NMEA 0183 B 3 - TxD RS-232 Serial Port B A A A Radar B A AutoPilot + DC - DC GPS A 5 - Gnd 2 - RxD DB9F Antenna 14 KEEPING THE LID ON Stress cracks along the hull-to-deck joint and inte- rior leaks are the first signs of a problem. Here is a review of the most common hull-to-deck joint configurations and how a professional shop per- forms repairs and rectifies leaks. By Nick Bailey 24 WATERMARKS Learn how water gets in, the damage it causes and what you can do to prevent it. By Pat Kearns 28 MAKING THE GPS CONNECTION The first step in operating charting software is to ensure the "talker" speaks the same language as the "listener." Here's a look at the common mis- takes in connecting a GPS to a computer and some troubleshooting tips. By David Anderson 37 Boat Licensing, Registration & Titling Made Simple -- the DIY way Can you document, register, register and title or license your boat yourself? What follows is the short course in “how to” from a professional regis- tration and documentation agent. By Janet Ross 46 A STRONG CASE FOR TREATED SEWAGE Did you know that it's legal to discharge treated waste in many coastal waters? If a head refit is in your future, there are some alternatives to a waste holding tank. By Peggie Hall 49 PROJECT BOAT A cockpit redesign and some repairs convert an aging cuddy equipped for Great Lakes fishing to a comfortable and stylish, compact “camper” cruiser. 58 PAINLESS DOCKING Mastering close quarters maneuvering of a twin- engine boat requires an understanding of the shopping cart effect and prop walk and the proper use of rudder, throttle and gears. Follow these tips from a pro to hone your docking skills. By Peter P. Pisciotta WIN 3M 4000UV ADHESIVE SEALANT FREE TECHNICAL HELP WITH YOUR SUBSCRIPTION. To subscribe call 1-888-658-BOAT or log onto DIY ONLINE at www.diy-boat.com 14 28 42 49 Log onto www.diy-boat.com: •DIY Back Issues •1995-2003 Index •DIY EZINE
-
Upload
khangminh22 -
Category
Documents
-
view
1 -
download
0
Transcript of DIY Boat Magazine Issue 2 2004.pdf

DIY boat owner 2004-2(www.diy-boat.com) 1-888-658-2628 1
CONTENTS 2004-2DIY boat owner 2004-2www.diy-boat.com 1-888-658-2628
Columns
7 SCUTTLEBUTTWhat Electrolysis Is, Is Not: Debunking themyth that corrosion to underwater metals iscaused by electrolysis. By Patricia Kearns
18 DIESEL FAQSolutions to diesel engine questions submittedto DIY's Technical Helpline. By Bob Smith
21 ELECTRICALIs Your Boat Ignition Protected?: All electricalcomponents exposed to a potentially explosiveenvironment must be ignition protected. At riskof an explosion and/or fire are older boats withelectrical devices added by previous ownersand newer boats with replacement and add-onparts. Here's how to explosion-proof your boatand minimize that risk. By Susan Canfield
30 POWERBOAT RIGGINGSTEERING REFIT: Replacing worn-outmechanical steering with a new hydraulic sys-tem is well within the scope of the experi-enced DIYer but it does require a combinationof diligence and a willingness to endure somesnakelike physical maneuvers in the small,dark places in your boat. By Peter Caplan
42 SAILBOAT RIGGINGPole Choices for Downwind Sailing: With theproper equipment combinations, flying a head-sail attached to a whisker pole makes for fast,fun, downwind sailing. Here's how to select,install and set the pole.
56 DIY PROJECTSFilling a Grease Gun; Help for MildewedCushions; Stern Flagpole Holder
64 VIEW FROM THE STERN
Is Bigger Better?: It's popular belief that trad-ing up is a good thing. Before you do, here area few variables to consider. By Roger Marshall
2 CURRENTSLetters, News, Wanted
8 TALKBACK Q&AQuestions from DIY Readers
10 DIY TECHNICALHELPLINE – IT’S FREE
Technical help with your subscription. Seeinsert on page 33 or log onto DIY ONLINE atwww.diy-boat.com
13 TECH TIPS
Departments
NMEA Data Out from PC
Data
In to
PC
Sign
al G
rou n
d
DPDTSwitch
NMEA 0183 A
NMEA 0183 B
3 - TxD
RS-232Serial Port
B
AA
ARadar
B
A
AutoPilot
+ D
C
- DC
GPS
A
5 - Gnd2 - RxDDB
9F
Antenna
14KEEPING THE LID ONStress cracks along the hull-to-deck joint and inte-rior leaks are the first signs of a problem. Here is areview of the most common hull-to-deck jointconfigurations and how a professional shop per-forms repairs and rectifies leaks. By Nick Bailey
24 WATERMARKSLearn how water gets in, the damage it causesand what you can do to prevent it. By Pat Kearns
28MAKING THE GPSCONNECTION The first step in operating charting software is toensure the "talker" speaks the same language asthe "listener." Here's a look at the common mis-takes in connecting a GPS to a computer andsome troubleshooting tips. By David Anderson
37 Boat Licensing,Registration & Titling MadeSimple -- the DIY wayCan you document, register, register and title orlicense your boat yourself? What follows is theshort course in “how to” from a professional regis-tration and documentation agent. By Janet Ross
46A STRONG CASEFOR TREATED SEWAGEDid you know that it's legal to discharge treatedwaste in many coastal waters? If a head refit is inyour future, there are some alternatives to a wasteholding tank. By Peggie Hall
49PROJECT BOATA cockpit redesign and some repairs convert anaging cuddy equipped for Great Lakes fishing to acomfortable and stylish, compact “camper” cruiser.
58PAINLESS DOCKING Mastering close quarters maneuvering of a twin-engine boat requires an understanding of theshopping cart effect and prop walk and the properuse of rudder, throttle and gears. Follow these tipsfrom a pro to hone your docking skills. By Peter P.Pisciotta
WIN 3M 4000UV ADHESIVE SEALANT
FREE TECHNICAL HELP WITH YOUR SUBSCRIPTION. To subscribe call 1-888-658-BOAT or log onto DIY ONLINE at www.diy-boat.com
14
28
42
49
Log onto www.diy-boat.com:•DIY Back Issues •1995-2003 Index•DIY EZINE

operator to visually see that the rawwater is pumping. The open hose allowsair to break the siphon when the engineis shut off. A siphon break should bemounted well above the waterline, 15-1/2" (40cm) minimum, after the heatexchanger and before the exhaust riser.It cannot be used before the raw waterpump (suction side), as it will draw airin. A typical installation is shown in DIY2004-#1 issue or can be seen on theVetus web site (www.vetus.com) under"Exhaust Systems."
Desulphating BatteriesDo you have an opinion on a 12-voltelectronic device known as a BatteryDeSulphator? Bill Smith, Prince Rupert, BritishColumbia
John Payne replies: There are other sim-ilar devices on the market. Such deviceswork by generating and directing a pulseof the required resonant frequency(3.26 megahertz pulse) onto the bat-tery to break down the lead sulfate crys-tals. The risk is that this higher voltageand current spike can affect the elec-tronics. There's plenty of anecdotal infor-mation on these devices but no proventests and trials to validate their effec-tiveness. There are a few types ofdevices like these and they seem to begetting cheaper. As for risks, they candamage electronics’ power supplies orother electrical equipment. Batterychargers use equalization to achieve thesame results. I guess battery desulfa-tors do work to a degree but smartchargers with equalization are doing thesame thing.
DIY boat owner 2004-2(www.diy-boat.com) 1-888-658-26282
DIY DeliversCustomer service is often talked
about but you deliver the goods. Isailed on merchant ships as an engi-neer and owned a marina in theFlorida Keys, so I'm looking forward toa long relationship with your excellentpublication. Reagan Tucker, San Antonio, Texas
Congratulations on a great maga-zine. I can't understand why a sub-scription to your magazine isn't manda-tory before owning a boat!Marc Faubert, "Serrano II," Gatineau, Quebec
I have been a DIY subscriber for oneyear. The articles are extremely wellwritten and helpful in maintaining myMaxum 2800SCR. The excellent colorphotographs and the specificity of cor-recting a problem, install an accesso-ry or select an antifouling paint are alla tremendous benefit to boat owners.You and your staff are to be compli-mented on a job well done. Alan W. Gorenstein, Vienna, Virginia
Thank you for your prompt attentionto my phone call and subscriptionrenewal. I'm delighted to be a sub-scriber and a beneficiary of the knowl-edge and wisdom found in the pagesof DIY magazine and in the respons-es from your technical staff when amessage requesting help is submittedto the Technical Helpline. Paul D. Bohac, Panama City, Florida
I am very impressed with the rapidresponse by DIY. It confirms that cus-tomer service still exists in good com-panies.Jack Bokkers, "Andrew James," Oshawa, Ontario
Anti-Siphon for Gen-SetThe exhaust sys-tems article in DYI2004-#1 has mequestioning theinstallation of myOnan generator. Itmounts completelybelow the water-line, including riserand water pumpand recently rawwater appeared in
the cylinder and oil. There was noantifreeze in the oil so this is not a headgasket issue. Your article mentions thata siphon break would help. If I install asiphon break, does it go between thestrainer and water pump or between thepump and riser? The Vetus ad in thisissue features a siphon break with anoverflow port. This complicates theinstallation with another thru-hull. I'malso concerned that the little two-cylin-der Kabota 6.5kW genset water pumpwill not pump water through an addi-tional 10' (3m) or so of hose with asiphon break.
Will Heyer of Vetus replies: "If a gen-erator or any engine is near or belowthe waterline a siphon break is neces-sary to prevent raw water from siphon-ing into the exhaust system and into acylinder. Vetus makes two types. AirVent V has a one-way valve that allowsair in when the engine is shutdown thusbreaking the water column and pre-venting raw water from siphoning intothe exhaust. This doesn't require anoverboard vent. Vetus Air Vent V has asmall hose fitting 3/16" (5mm) ID thatis routed overboard. This allows the
CD Lost in ActionI previously purchased your 1995-2001 Hands-OnBoater CD-ROM and have found it to be the mostcomprehensive source of information available tothe new (or old) boat owner as myself. Unfortunately,it was lost or destroyed in a recent move. Can youreplace this valuable reference tool for me. Todd C. Bradley, Ypsilanti, Michigan
DIY replies: Purchase of a Hands-On Boater CD-ROM includes an upgrade for just US$20/CDN$25plus shipping. We gladly send Todd the current ver-sion, 1995-2003.
CurrentsEdited by Jan Mundy
"Life may not be the party we hoped for but
while we are here we might as well
go boating!"

DIY boat owner 2004-2(www.diy-boat.com) 1-888-658-2628 3
USCG Shift to LED According to an article published in Boating IndustryInternational magazine, a U.S. Coast Guard regulation hastaken effect officially endorsing the use of LED (light emitting
diode) lighting tech-nology for privateaids to navigation.The new regulationmeans that, for thefirst time, individuals,corporations and alllevels of governmentwill be allowed touse approved LEDbased marine light-ing for their marinenavigational aids. Inthe U.S., these aidsaccount for morethan half of all aidsto navigation regis-tered, according to aspokesperson forCarmanah Tech-nologies Inc., a
Canadian LED manufacturer that supplies the Coast Guard.Compared to tungsten incandescent bulbs, LEDs burn 20times longer and use up to 90% less electricity, Carmanahsaid. Previous regulations specified the use of tungsten incan-descent bulbs.
Technical Help: Trailer Brake Bleed Valves
I have a tandem axle Load Rite boat trailer (26T8000TG2)with 12" (30.4cm) surge brakes. Could you tell me what sizebrake bleed valve I need? I damaged one trying to loosen it tobleed the brakes. The auto parts store has several types avail-able (I didn't remove one from the boat). Any ideas? I calledLoad Rite and they don't sell any parts over the counter andwould not give me any part numbers or size information.They would only sell me an entire wheel brake set-up. Jerry Uber, "At Ease," Aberdeen Proving Ground, Maryland
Jerry sent his question to our Technical Helpline and ashe is a subscriber, he qualifies for free technical help. DIYcontacted Load Rite on Jerry’s behalf and though it wasa struggle getting the information from the company, weeventually received this response: "The valve isn't avail-able by itself, you need a complete assembly that holdsthe bleeder valve. If it's the right side valve the Load Ritepart is 6015.11, left side is 6015.12. Expect to pay about$100 for the assembly." When you're in need of techni-cal assistance with your boat or looking to source replace-ment parts, DIY can help. To subscribe, call 1-888-658-BOAT or log onto www.diy-boat.com. If you are a currentsubscriber send questions to [email protected].
LED inserts from OGM (www.orca-green.com) replace bulbs for Aqua Signal25 series and some Perko housings. Thefirm also offers waterproof anchor andnavigation lights as shown above.

The standard also makes clear whattank materials are accepted for use aspotable water tanks in boats. Aluminumis not one of them. The standardrequires that “Materials in contact withpotable water shall be non-toxic andcorrosion resistant. Acceptable mate-rials include: copper alloys (includingbronze or brass); AISI Type 300 series,stainless steel; nickel-copper alloy;glass-lined metal and plastic and rub-ber materials that comply with appli-cable National Sanitation FoundationStandards and/or requirements of theFood & Drug Administration for potablewater.” The chlorination process is forsanitizing a system, not for stored water.The system (including tanks) should bethoroughly flushed using the followingmethod and in the order given:
1. Flush entire system thoroughly byallowing potable water to flowthrough it.
2. Drain system completely.3. Fill entire system with a chlorine
solution having a strength of at least100 parts per million, and allow tostand for one hour. Shorter periodsrequire greater concentrations ofchlorine solution.
4. Drain chlorine solution from entiresystem.
5. Flush entire system thoroughly withpotable water.
6. Fill system with potable water.
This process deals only with chlori-nated water used to sanitize a system,not that which is stored and used aspotable water. Short periods of chlo-rine exposures will not corrode a tankif the tank is flushed thoroughly afterthe sanitizing process.
DIY boat owner 2004-2(www.diy-boat.com) 1-888-658-26284
Aluminum and ChlorineDon't Mix?Treating water with chlorine is goodpractice in areas where the water maybe suspect but, if used in combinationwith normal tap water that has con-centrations of chlorine, it's an invitationto disaster for those with aluminumpotable water tanks. This is contrary toyour mention in DIY 2003-#3 issueregarding ABYC standards for treatingpotable water. Chlorine is highly corro-sive to aluminum and will not onlyblacken the metal (one indication ofdamage) but also cause pitting corro-sion and can eventually weaken thetank to the point that it will leak orstructurally fail. When treated correctlyaluminum tanks should last for manyyears. The one shown in the photobelow did not and it was because it wasunnecessarily zapped with chlorine. Forboat owners who have aluminumpotable water tanks who experience amoldy and/or sweet taste, especiallyafter a long period of non use, run achlorine or vinegar solution through justthe water hoses and let it sit for a cou-ple of hours, then fully flush the sys-tem. Clear plastic water hoses facilitatemold growth because they admit light.Better quality hose has an inner corethat blocks light. -- Butler Smythe, "Caerulean," Annapolis,Maryland
DIY replies: The process of sanitizinga water system is one provided by theU.S. Food and Drug Administration.
Review or print a copy of the complete 1995-2003
Editorial Index by logging onto DIY ONLINE at
www.diy-boat.comand click on “Archives.”
Or call us toll-free at 888-658-BOAT (2628) and we’ll snail mail a copy.
DIY EDITORIAL INDEX
CURRENTS
A chlorine damaged aluminum potablewater tank on a boat that always filled upwith treated "city" water yet routinelyadded extra chlorine. Removal of tanks isnot always easy as shown in this photo.

DIY boat owner 2004-2(www.diy-boat.com) 1-888-658-2628 5
Force 10 Burner Shortage Force 10 plans to discontinue its 10004 heater by the endof this year. The manufacturer in Portugal that makes the d/kburners has ceased business. Stock of 94405 and 94305burners are also permanently out of stock, though parts suchas spindles, prickers etc. are still available. Next year, the com-pany will integrate the SIG Marine diesel stoves and heaters intothe Force 10 line.
REPLACING A WATER PUMP Annoying, irritating and loud best described this boat's fac-tory equipped 12-volt pressure water pump, which servesour potable water needs and our freshwater flush head.
The pump whined like afreight train or so it seemedand the pump’s running fora nighttime head flushwould wake the sleeping.Even though the pumpwas buried deep in a lock-er, our dock neighborswould ask what was mak-ing such a racket onboard.Finally, we replaced it witha Flojet Sensor VSD, a vari-able speed, demandpump. (Refer to DIY 2001-#4 issue for additionalproduct and installationdetails.)
It's a quiet pump, muchlike a four-stroke outboardcompared to a thunderingtwo-stroke. Now flushingthe head is louder than thepump. As a bonus, thispump ramps up to meetthe water demand so wecan now shower and dodishes concurrently. (Theoriginal pump would roarfor up to five minutes torefill the hot water tank.)Installation took about onehour, once we assembledall materials and tools.
Step 1Remove the old pump. Note theoriginal off spec wiring connector.
Step 2New pump installed andhoses attached.
Step 3Wires connected with marine grade butt connectors then cov-ered with heat shrink tubing. Mounting holes for old water pumpfilled with 3M 4200 sealant. It's not pretty, but surely watertight.

DIY boat owner 2004-2(www.diy-boat.com) 1-888-658-26286
MORGAN OWNERSWANTED DIY reader Art Surowiec has some con-cerns about the centerboard on hisMorgan 30 and would like to corre-spond with other Morgan 30 owners.Send emails to [email protected].
Offshore Tune-up Peter Pisciotta, a professional captain,DIY contributor and founder of SeaSkillsPersonal School of Seamanship, nowoffers SeaSkills Offshore Classroom, aunique five-day training that includes 200offshore miles along the rugged and sce-nic Pacific Coast for up to six participants."Crew" receive in-depth training in weath-er forecasting, yacht systems, diesel main-tenance and navigation from a team ofthree experts. The class is rigorous butcomfortable: the 61' (18.5m) luxurytrawler yacht has three guest staterooms,provisions are top quality, and there isplenty of personal time to explore stopsin Monterey, Santa Cruz and Half MoonBay. It's a great way for couples and indi-viduals to hone their cruising skills ordecide if cruising is right for them. Foradditional information, log ontowww.seaskills.com/OffshoreClassroom.html or phone Peter at 415/402-0473.
Anti-Skid Deck ProductsIn DIY 2002-#4 issue, the articletitled "Getting A Good Grip," by NickBailey, shows a photo on page 16 of
CURRENTS
a stipple type, random non-skid fin-ish. I would like to know the manu-facturer so I can purchase some. Martin Robinson, "San Martin,"Southampton, New York
Nick Bailey replies: This photo showsa 1987 C&C 37C cabin trunk. It's agelcoat antiskid so strictly speakingyou can't buy it. It's created fromscratch if you plan to work in gelcoatas a medium. It's a close-up photo but,to get an idea of the scale, note thescrew head in the dodger fitting (topleft-hand corner), which is about 0.25"across and it's in the background. Inother words, the antiskid is finer thanit looks. This pattern was originally cre-ated on the male tooling for the deckplug by applying paint mixed with anaggregate non-skid additive. This styleis quite difficult to replicate in gelcoatoutside of the mold. However, it is nottoo difficult to reproduce a similar styleif applying a painted antiskid. All themajor paint manufacturers sell specialnon-skid additives designed to bemixed with or applied to polyurethanepaint, e.g., Interlux 2398 or US PaintsAwlgrip Griptex.
Refer to the article titled "Non-SkidDeck Coverings," in DIY 2000-#4 issue(also on the MRT “Marine Painting &Refinishing” CD-ROM) for completeddetails on refinishing a fiberglass deckwith polyurethane paint, whichincludes applying an aggregate typenon-skid additive.
“It's in the details.”
Installing heads on #2 engine — she didall the torque work while I read the book!Mike Wolfe,"River Queen," Stockton,California
Publisher & Editor: Jan MundyVP Sales & Marketing: Steve KalmanDesigner: Joe VanVeenenIllustrator: SachaWebmaster: Jeff KalmanCirculation: Britton HardyCopy Editing: Patricia KearnsTechnical Advisor: Recreational MarineExperts Cover design: Joe VanVeenenContributors: Steve Auger, Nick Bailey,Bob Smith, Susan Canfield, Peter Caplan,Roger Marshall, John Payne, Peter Pisciotta DIY boat owner™ and The MarineMaintenance Magazine™ are registeredtrademarks of JM Publishing. DIY boatowner is published quarterly by JMPublishing. ISSN 1201-5598While all precautions have been taken toensure accuracy and safety in the execu-tion of articles, plans and illustrations inthis magazine, the publisher accepts noresponsibility for accidents, materiallosses or injuries resulting from the useof information supplied in these articles,plans or illustrations. All rights reserved.No part of this magazine may be reprint-ed or used without the express writtenconsent of the publisher.

trolysis. Some of what you readwill amaze and entertain you.Don’t believe everything youread.
Everett Collier, in his book,"The Boatowner’s Guide ToCorrosion," defines electrolysisas follows. ”The process thattakes place in a conductingsolution when an electric cur-rent is passed through it…thesechanges in the conductive solu-tion -– the electrolyte -– consti-tute the process of electrolysis.Note that this process is some-thing that happens to the elec-trolyte. The term is improperlyused as a synonym for corro-sion.”
What you see is corrosion orsome form of it when you aredealing with a shaft that hassheared from crevice corrosion;a prop that has been eatenaway by galvanic activity; awood thru-hull fitting backingblock that has become “hairy”as its fibers separate from straycurrent corrosion or an engineseawater pump that looks likeit’s covered with fuzzy white orgray “snow.” None of it is elec-trolysis. All of it is corrosion.Much of it happens because theparts affected are touched byan electrolyte, in this case waterthat is undergoing the processof electrolysis. That chewed upzinc? Thank heaven for it. It’sdoing its job, dying to protect
other more valuable metals on your boat. Don’t worry about “electrolysis.” Worry about corrosion and
what causes it.
About the author: Besides being DIY's proof editor and a regularcontributor, Patricia Kearns formerly was assistant technical direc-tor of ABYC. She is a NAMS certified marine surveyor and oper-ates Recreational Marine Experts Group, a marine surveying andconsulting firm based in Naples, Florida.
Story and photos by Pat Kearns
“Lectrolisis!” Few words spo-ken or written about boat con-dition generate more misun-derstanding, myth and mystery,and sometimes, fear than elec-trolysis as it relates to the obser-vations of corrosion on a boat.
One of the most stunningmoments in my educationalexperiences as a marine sur-veyor was when I heard a cor-rosion expert of no dispute, EdMcClave, tell the class thatelectrolysis is not somethingthat happens to boats. What!The class was incredulous andmany of its participants pipedup with vigorous objections tothe statement. It had been pro-nounced that metals don'tdecay from electrolysis. Theprocess of electrolysis is some-thing that happens to and inwater (or other aqueous fluids).
Nowadays, from my ownexperience in the yard as amarine surveyor, I'm only mild-ly amused at the "expert" whoappears at the haulout areawhen one of my customer'sboats is lifted out for a bottominspection. This “expert”observes that the zinc anodesare wasted and that, perhaps,a propeller is looking a bitragged around the edges.Shortly follows the forebodingpronouncement, of course, inplain hearing distance of all thenervous parties to the event (boat owner, broker, buyer), “Thatboat’s got 'lectrolysis.”
Several kinds of corrosion affect boats. We have crevice,stray current, galvanic, poultice, biological and exfoliation toname just a few. What’s missing? Electrolysis. There is nosuch thing as electrolysis corrosion. Search the Internet usingthe google.com search engine and you'll come up with noless than 15,000 references to marine corrosion and elec-
DIY boat owner 2004-2(www.diy-boat.com) 1-888-658-2628 7
ScuttlebuttScuttlebutt
What Electrolysis Is, Is Not Debunking the myth that corrosion to underwater metals is caused by electrolysis.

DIY boat owner 2004-2(www.diy-boat.com) 1-888-658-26288
Outboard Duty Cycles
Q: I understand that outboard motorshave a life expectancy of about 1,000hours of operation and the manufactur-ers typically count 100 to 150 hours ofuse per year as normal. How many hoursof continuous non-stop use would bedetrimental for outboards? Dave Underwood, Fort Erie, Ontario
A: The amount of time an engine canbe run continuously is called "duty cycle."Although outboard motors are designedfor pleasure craft use, there are extremedemands connected with the load car-ried and power required and, therefore,these engines have a much shorter dutycycle than an automobile engine. Mostmarine engine manufacturers recommenda duty cycle of 75% throttle (or 3/4 ofthe maximum rpm) for a maximum ofthree hours. Under no circumstances isthe engine designed to run at wide openthrottle for longer than a minute or twoor you can expect engine damage tooccur. After a run of three hours (or more),it would be advisable to allow the engineto idle for a few minutes before shutdownto allow the different alloy temperaturesto stabilize. This is a must with tur-bocharged engines.— Steve Auger
What Won't Catch Bass
Q: We are new to sailing. When weput our 30’ (9.1m) O'Day away last fall,we unintentionally pulled the outhaul lineinto the Isomat boom. What is the eas-iest way to retrieve the line? Lynn Graves via email
A: The most common method for“fishing” the outhaul through the boomis to first remove the outhaul line com-pletely if it's not already out. Buy, rent orborrow an electrician's "fish." This toolconsists of a stiff wire wound onto aclosed plastic reel. You can get one atmost well-equipped hardware stores orimprovise one from wire that is flexibleenough to bend around fittings but stiffenough to push without piling up insidethe boom. Tie a light line around the end
outer skin. Water has seeped into thecore, which is probably 1-1/2" (38mm)thick, at a poorly sealed fastener. Becausethe transom is completely encapsulatedwith fiberglass, it's difficult to dry out. Tospeed up the drying process the onlymethod is to expose the plywood core tothe air. This means peeling back the glassskin (the inside skin is easiest) and expos-ing the damp plywood. After the core hasdried, the glass skin is relaminated.
Another less invasive but slower tech-nique is to aerate the core by drillingmany holes into the damp area of thetransom core with a .125" bit. This isdone from the inside. Space the holes 1"or 2" (25mm or 50mm) apart and drillas deeply as possible into the core with-out penetrating the outer glass skin. Whiledrying, keep the boat in a warm dryindoor location. Once dry, seal the per-forations on the inside skin with thick-ened epoxy or polyester resin or lay overglass cloth. What will happen if youignore the damp spot on the transom?Nothing much for quite a long time.Damp plywood will eventually rot, weak-ening the transom structure. — Nick Bailey
Wiring Battery Direct
Q: We purchased a 36' (10.9m) 1978Niagara Nautilus pilothouse sailboat. Arefrigeration system with a compressorwas wired directly to the house batterywith no breaker. Shouldn't this circuit berun through the boat's electrical distribu-tion panel?Allen Rice, "Hot Fudge," Muskegon,Michigan
A: Absolutely. In general, any equip-ment should connect to the main elec-
of the fish wire and push the wire carry-ing the spare line (messenger) into theboom through either the outhaul entry orexit fitting. Push the messenger all theway to the other end of the boom withthe fish. Make a hooked tool from a pieceof wire (coat hanger works) and use thisto reach through the outhaul fitting, snag-ging the messenger and pulling a loop ofit out through the outhaul fitting. Makesure the line is slack at the free end. Thismay take some fiddling. Cut the loop tofree the messenger from the fish tool andsecurely tie the line to anything on theboom. Now extract the wire fish. Securelytie (and tape for good measure) one endof the messenger to the outhaul line,making sure you've got the outhaul head-ed in the right direction, and then gentlypull the outhaul line through the boom.Don't haul too hard or the messenger maypull off and you'll have to start over. If ithangs up partway through, roll or shakethe boom to free it. When you get to theend fitting, use the hooked tool to helpfinagle the outhaul line back through thefitting. When the outhaul line is suc-cessfully fished back through, remove thestring and make sure you tie a knot inthe free end of the outhaul.— Nick Bailey
Sound Fix for a Wet Transom
Q: My 1990 Cadorette 210 was sand-blasted last fall and now (6 months later),the majority of the hull is dry. The onlyexception is the area surrounding wherethe trim tabs were mounted and whichI removed before sandblasting. This areais still wet. While hand drying the areausing a hair dryer, I noticed some waterdripping out of the portside mountingholes. What would be the best course ofaction to get this area dry quickly? Scott Hartill, "Misty's Lair," Keswick, Ontario
A: Water dripping out of the transomat the fastener holes is coming from theplywood core of the transom, not the
Talkback Q&AHelpline [email protected]

DIY boat owner 2004-2(www.diy-boat.com) 1-888-658-2628 9
trical panel and be provided with its owndedicated circuit breaker. An exceptionto this rule would be a bilge pump but,wired direct to a battery, the circuit stillmust have overcurrent protection (fuseor breaker) to protect the wire.— John Payne
Barrier LoreQ: Though my 1979 Trojan F-30shows no evidence of blistering at thistime, when is a barrier coat needed andhow long will it last?John Weathers, "Voyager," Stafford, Virginia
A: There is no absolute answer to yourquestion. Barrier coatings are designed toprevent blisters but the occurrence of blis-tering is unpredictable and subject to manyvariables. Chances are that, if your boat hasbeen in the same geographic area with thesame haulout schedule for many years andhas suffered no blistering, it is not likely toanytime soon. Take the boat to a fresh waterlake in Georgia and leave it in the water for20 months straight and it might suddenlydevelop a blister problem. Some of the vari-ables that affect a particular boat’s procliv-
three years, there's been a problem withair getting into the fuel system intermit-tently on one motor. The engine runs fineat spring start and for about a month andthen air gets into the system during anovernight or even after a one-hour shut-down. The motor starts with a secondperson turning the key while I pump theCat pump on the engine mounted sec-ondary fuel filter. Once the motor starts,it runs fine and at the specified 2,800rpm. The primary Racor fuel filter hasbeen checked out for leaks and the motorand all fuel lines show no signs of dieselfuel leaking. Where can the air be comingfrom on this beast?Doug Moore, "Retriever," Solomons Island, Maryland
A: As the fuel moves from the tanksto the engine, air is being drawn (sucked)in. This is the primary fuel systembecause it's under a vacuum. Usually,leaks in the primary sector of the fueldelivery system don't show the typicalindications, such as fuel dripping or spot-ting. As the vacuum increases, so doesthe chance of having an air leak. In thespring, you are likely operating with full
ity for blistering include the quality controlson construction and materials at the timethe boat was built, such as the length oftime the boat has continuously been in thewater and water temperature and salinitycontent. The next time you haul out havea surveyor inspect the hull bottom and checkthe moisture levels with a moisture meterafter the boat has been out of the water forawhile. High relative (relative to the nor-mally dry hull topsides) readings may giveearly warning of a potential for hydrolysis ofthe resin and the resulting blisters. In thatcase, you can dry the boat out and apply abarrier coating before the blisters have achance to start. A barrier coat applied to adry hull helps prevent blisters by prevent-ing water migration into the laminate. Likean insurance policy, it's never a bad ideabut you might not ever actually need it. — Nick Bailey
Fuel/Air DieselDiagnostics
Q: I have a 42' (12.8m) 1989 Jerseysportfisherman with twin Caterpillar3208TA, 375 hp diesels. For the past

DIY boat owner 2004-2(www.diy-boat.com) 1-888-658-262810
fuel tanks and clean Racor fuel/water sep-arator filters. It requires less suction todraw fuel with no filter restriction and theadded hydrostatic push of the full fuelweight. As fuel burns off, the vacuumgoes up. If the fuel is dirty, solid particlesbecome lodged in the filter element andmore suction draws in more air. It's impor-tant to study the amount of air trappedin the Racor when this occurs. If the filterhas no air, we can conclude that the prob-lem is not on the tank to the filter inletside of the system and concentrate onthe filter and beyond towards the engine.Troubleshooting is made easier with acrossover line between the two enginesand filters that allows you to shut off thefilter supplying the problem engine andrun both engines on the other filter. Also,study the condition and tightness of theflexible fuel supply line running to theengine. This is a very common area foran air leak to occur. Cat engines returnhigh volumes of fuel back to the tank.When the engine starts, following a prob-lem, there is plenty of fuel being deliv-ered to allow the air being sucked in forreturn to the tank. This allows the engineto operate without shutting down but usu-ally causes hunting (fluctuating rpms)when you slow down, or even a knock-ing sound. To isolate this problem, sin-gle out as much of the system as possi-ble, eliminating bad fittings or connec-tions that admit air. — Bob Smith
Grounding Outdrives
Q: I have an old OMC sterndrive witha rubber transom boot sealed to the hullwith an aluminum ring. I have stainlesssteel screws through the aluminum into
sleeves?Don Siddall, "Blue Blazer," Toronto, Ontario
A: The stem of a C&C 35 is strongenough for the addition of a U-bolt, either5/16" or 3/8" (8mm or 9mm) for use asan anchor rode attachment provided adecent sized backing plate is used on theinside. A large single eyebolt would evendo the trick. However, when it comes tocarrying the vertical loads of an anchorplatform bashing through waves whilecarrying 30lb to 70lb (13.6kg to 31.7kg)of anchors, the U-bolt might prove to bea bit skimpy. I would suggest a customfabricated stainless steel V-shaped brack-et that wraps around the stem and fas-tens with several bolts into the hull onboth sides just aft of the stem. This brack-et would have a heavy eye welded ontothe front to accept the fork and clevis pin(3/8" or 1/2"/9mm or 12mm) at the bot-tom end of the platform support bar ortube. The real stress factor that comesinto play here is not the dead weight ofthe loaded platform but the constantlychanging dynamic loads as the wholemass pulls multiple G's leaping througha steep chop. A single U-bolt or heavyeyebolt might work loose and is likely toeventually elongate the bolt hole in thestem causing leaks or worse. A proper
the hull that are causing the aluminumto corrode. Would using another type ofscrew stop the corrosion? Bill Gallant, Ipswich, Massachusetts
A: The reason your aluminum ring iscorroding is because your sacrificial anodesare not doing the job of protecting the alu-minum components of your drive boot.Replace one of the stainless screws witha small stainless-steel bolt and attach aground wire to the bolt on the inside of thetransom with a stainless nut. Attach theother end of this wire to battery ground.Your aluminum ring will now be protect-ed by the sacrificial anodes. A hull poten-tial test will confirm this diagnosis and therepair. (Refer to DIY 2003-#2 issue forhow to test your boat's grounding system.) — Steve Auger
Bow Refit for C&C 35
Q: I want to install a U-bolt to the stemof my C&C 35 Mk I above the waterlinethat will connect a support for the anchorplatform/roller (side load on bolts) andalso become an anchoring point for theanchor rode (loaded straight out) toreduce the amount of anchor linerequired. I need advice on the reason-ableness of doing this; size and type ofU-bolt; installation process, given theneed for keeping it waterproof, not weak-ening the stem and ensuring the U-boltwon't pull out or distort the holes whenunder load, perhaps using stainless-steel
Talkback Q&AHelpline [email protected]
FREE HELPLINEIf you hit a snag... DIY can HELP!!!
When you subscribe to DIY boat owner Magazine or subscribe toDIY EZINE (the web version)
To subscribe go to (www.diy-boat.com) and click “Shop Online” or call toll free: 1-888-658-2628
Technical HELPLINE WHAT'S HUNTING?
According to Bob Smith, DIY's dieselengine advisor, hunting is a term usedto describe the action of the injectionpump governor when it cannot find afirm idle speed. You could probablybetter envision it as a rolling variance ofspeed. It is even sometimes called agallop (like a horse).
-
Joe
Van
Vee
nan

anchor platform support is similar to a bobstay under thebowsprit of a cutter rig and can also provide the necessary ver-tical support for a very useful addition to the standing rigging:a second (outer) forestay, assuming the anchor platform itselfis strong enough to carry the side loads. This is the perfectplace for a lightweight reaching sail (maybe with a Code Zerostyle furler). Above the waterline on the C&C 35 Mk I, theinstallation is through solid glass so no stainless sleeves areneeded. Caulk all the thru bolts thoroughly with 3M 5200,use a large backing plate with Nylock nuts and there shouldbe no problems.— Nick Bailey
Painting a Metal Bracket
Q: I have a truss style outboard bracket (galvanized steel Ithink) on my 1981 Campion Alert. What is the best Interluxsolution (or other) for repainting this bracket? I run and moormy boat in saltwater year-round. Jerry Perry, Ahousaht, British Columbia
A: DIY contacted Interlux on Jerry's behalf and received thisprompt response from Jim Seidel. “Use a magnet to test thesurface: galvanized metal attracts the magnet and aluminumwon't. The coating system would be similar for galvanized oraluminum. Galvanized has kind of an oily feel to it so the bestsuggestion is to thoroughly clean the surface first with InterluxFiberglass Solvent Wash 202. Sand with coarse emery clothand then wipe off the sanding residue. Alternatively, have itsandblasted. This works well for prep but requires coating with-in a couple of hours of blasting to prevent flash rusting, if it'sgalvanized, or oxidation building up on the aluminum.Immediately apply one thin coat of Viny-Lux Primewash 353/355thinned 30% with 355 thinner. Wait about an hour and apply4 to 5 coats of Interprotect 2000E. If it's galvanized, use thesame antifouling paint you are using for the bottom. If it's alu-minum use Trilux 33 (U.S. only) or Tri-Lux II (available inCanada)."
Removing Bonded Thru-hulls
Q: A recent survey suggested that I replace two thru-hull fit-tings because they are "badly pitted." They are also firmly attachedto the boat. I have tried the Don Casey method of using a boltthrough the fitting to a block on the outside, putting on the nut andpulling the fitting out. I tightened the bolt as tight as I dared. Noluck. Is there a Plan B? It's on a 1975 fiberglass boat, which issolid glass, not cored.Mark Carlson, "Goda Tider," Ashland, Wisconsin
A: This is a routine problem. A well-bedded thru-hull willalways put up stiff resistance to removal. There are a few differ-ent ways to remove a solidly adhered thru-hull. If it's a mush-room style thru-hull (with an external flange), use a grinder witha very coarse disc to carefully buzz away the outer flange. Trynot to abrade the hull too much while doing this and wear eye pro-tection. Next, go inside the boat and knock the remaining stub
DIY boat owner 2004-2(www.diy-boat.com) 1-888-658-2628 11
loose with sideways blows from a heavymallet or dead blow hammer. Anothertechnique used, with or without theremoval of the outer flange, is to cutthrough the wall of the thru-hull from out-side the boat using a saber saw (fast) orhacksaw (slow) and then knocking the twopieces loose individually. Cutting or grind-ing may not be required. Sometimes allthat's required to break the sealant grip isa series of heavy blows (using a heavy mal-let or dead blow hammer) delivered on thetop of the thru-hull from inside the boat.There are various combinations of cuttingand smacking and I wouldn't worry toomuch about hurting the solid glass layup ofthe hull at the thru-hull. Solid glass is toughand resilient. When it comes to thru-hullremoval (especially if the old thru-hull isto be discarded), brute force is usuallycalled for. You should also expect to replaceany old backing blocks as well. These willusually need to be ground or chiseled awayfrom the hull.— Nick Bailey
Running Racing Fuel
Q: I have two 700 cc, two-stroke PolarisWaverunners. Can I run them with racingfuel (110-plus Octane)? Also, is there anyfuel system cleaner that I can run throughthe system like STP gas treatment? Theengines are oil injected, no pre mixing.Mark Cavanaugh, Eastlake, Ohio
A: You can run racing fuel in two-strokeengines that are designed for that type offuel. Your PWCs are designed to run onautomotive grade fuel. There will not beany advantage in using racing fuel in thesestock engines and may even cause majorengine damage as the ignition timing andfuel metering are not correct for race fuel.Any name brand fuel system cleaner willwork on these engines; however, if youadd fuel stabilizer each time you fuel theboat and during storage, a fuel systemcleaner should not be required.— Steve Auger

Developed for boaters by boaters, an insurance policy from BoatU.S. provides peace-of-mind coverage you won’t find with other companies.
It’s worry-free waters ahead with the insurance specialists at BoatU.S. behind you.
Ahhhh ...The Open Water Ahead and
BoatU.S. Insurance Behind You.
Call or log-on for a fast, free quote today!1-800-283-2883
or apply online at BoatUS.com/insurancePolicies subject to limits and exclusions
• Low-Cost Policies—for all boats, Yacht to PWC. PLUS discounts for USCG, USPS and other approved boating safety courses—up to 30% • Customized policies for Anglers featuring fishing equipment coverage
• 24-Hour Claims Service from Boating Experts • Acclaimed Damage Avoidance Program—featuring boat and life- saving tips taken from our insurance case files

DIY boat owner 2004-2(www.diy-boat.com) 1-888-658-2628 13
WHAT'S THAT METAL To determine if a tank is made of alu-minum or stainless steel, scrape the sur-face with a nail. If it scratches easily, it'saluminum.
LEAD ACID SPLASH SAFETYWhen working with lead acid batterieskeep a spray bottle of strong baking sodasolution near the batteries to neutralizethe acid if a splash should occur on skin,clothing or any nearby equipment. Alan Porter, "Te Tiaroa," Victoria, British Columbia
SIMPLE RESTRAINTInstall shock cordhangers to secure-ly hold hatch topsor locker and com-panionway doorsin the open posi-tion.
PAINT AROUND CORNERS Trying to reach those far away cornersand impossible angles while painting the
engine com-partment ina small boatis easy if youuse longhandled bar-becue bast-ing brushes,
which have a 45° angle on the brushend. You can find these brushes at pop-ular hardware stores. Bert Small, "Sea Eagle," Salt Spring Island,British Columbia
MANUALS FOR OLDIES Owner, parts and technical manuals forearly BMW, Chris-Craft, Crusader,Cummins, Elco, Faryman, Gray Marine,Hino, Lathrop, Palmer, PCM, Universaland dozens of other gasoline and dieselinboard engines can be purchased atmarineengine.com. Prices range fromUS$18 to US$300.
STUFFING BOX BANDAGE You can temporarily stem the flow of asevere shaft stuffing box leak by goingoverboard while the boat is on the hookor grounded at low tide. Take an elastic
tension bandage and wind it around andaround the shaft and stern tube (pre-suming that it sticks out a little) to stanchthe incoming flow while making repairs. Hal Roth, "Whisper," St. Michaels,Maryland, republished from the book,"How To Sail Around the World."
REFLECTIVE IDEAStrips of self-adhesive 3M ScotchliteReflective Material SOLAS Grade 3150Ataped to spinnaker pole ends, deck hard-ware, the dinghy and especially safetygear provides high nighttime visibility foreasy locating.
BECAUSE HEAT RISES The most efficient passive ventilation sys-tem in a boat's cabin is to mount twovents: the intake vent as low as possible,the exhaust vent high on the cabintop.
RECYCLED ROPE TIES Before tossing out worn out braided line,remove the inner core, cut it into lengthsas needed and seal the ends, then useas sail ties, etc.
NOT JUST FOR COWS Normally used to treat cows udders, BagBalm, available at farm supply stores,makes a good grease to lubricate turn-buckle screws.
ANODE DO TOUCH A sacrificial anode may look okay but
when touched, itturns to powder.Do touch whenchecking anodecondition.
HANDS FREE OIL CHANGING Changing oil on my boat's twin OMC 5Lengines involved unscrewing the filtercartridge with one hand and with thesame hand holding a plastic bag to col-lect the oil spill, usually unsuccessfully.I purchased an OMC remote mountingkit, mounted the filters upside down onthe transom and connected the supplied
hoses to the engines. To change oil, Inow drill holes in the top (which really isthe bottom) of each filter using a cord-less drill and the oil drains into theengine sumps, which is easily pumpedout into containers and given to themarina for disposal. Dennis Williamson, Kingston, Ontario
ROLL-UPSWhen storingbiminis, cockpitenclosures, con-vertible tops andcurtains withplastic windows,lay a towel or
sheet between the layers and only roll.Never fold plastic windows.
FRESHEST AIDWhen you leave the boat, even for a fewdays, pump a white vinegar and watersolution through the potable water andwaste holding systems. Be sure to flushthe former with freshwater upon yourreturn to remove any vinegar residue.
PIPE CALIPER When you need to know the diameter ofa shaft, pulpit tubing or any other roundmetal and you don't have calibers, lay apipe wrench over the tube until it justtouches, then measure between the jawsand you have the diameter.
Tech TIP
TECH TIPS WANTEDDo you have a boat-tested tip or tech-nique? Send us a photo (if available) anda description, your name, boat name andhomeport and mail to:
DIY TECH TIPS P.O. Box 22473 Alexandria, VA 22304
Or Email to [email protected]
Reader tips are not tested by DIY, but wewon’t publish anything we feel mightharm you or your boat.

KEEPING
The hull-to-deck joint fastens the deck the hull. Unfortunately,not all joints are engineered for enduring watertightness. Stresscracks along the joint and interior leaks are the first signs of aproblem. Here is a review of the most common hull-to-deck jointconfigurations and how a professional shop performs repairs andrectifies leaks.
DIY boat owner 2004-2(www.diy-boat.com) 1-888-658-262814
By Nick Bailey
In the beginning and for a long timethereafter boats were just open hullsmade from pieces of trees and maybeanimal hides or large plant fibers. Laterdecks were invented because evenVikings get tired of being wet and cold.The hull-to-deck joint has been impor-tant ever since.
On a wooden boat, the hull-to-deckjoint or sheer clamp is just one of themany places where individual parts arecarefully fitted and fastened together.These days, however, most of our boatsare built of glass fiber and resin, thatrevolutionary “frozen snot” that thefamous designer Francis Herreshofffound so utterly unappealing. Comparedto wood construction, molded plasticboats have only a few large parts thatneed to be bolted, screwed or rivetedtogether. This trend towards minimalmechanical assembly and automationin the boat building process means thatsoon your favorite boat builder will bepopping out one-piece hull-to-deck unitsout of a high tech mold like many plas-tic bathtub toys. Some smaller high-volume boats are already built this way.In the meantime, attaching the hull tothe deck remains the last bastion ofmechanical assembly when creating aboat's outer shell.
A good hull-to-deck joint should bestrong, waterproof and from the boatbuilder’s point of view, efficient toassemble. They are not always designedto be taken apart again. Unfortunately,this can complicate collision repair workand make rectifying leaks more diffi-cult. The good news is some of themost difficult joint styles to service are
also the least likely to leak and viceversa.
Joint Style: ShoeboxIf you own a small to medium sizepowerboat the "shoebox" joint is themost likely method used to join the hulland deck. The inside diameter of thedeck’s vertical perimeter flange is slight-ly larger than the outside diameter ofthe top of the hull. During assembly thedeck is slipped over top of the hull sothe deck flange overlaps, much like thelid of a shoebox (Figure 1). This jointstyle is usually close to deck level on a
small boat or part way down the hullon a larger boat where what mayappear to be the upper part of the hullside is actually part of the deck mold-ing. The two halves are often securedtemporarily with pop rivets and thenthru-bolted or screwed together. Thisstyle of hull-to-deck joint often provides
a base for installing a rubrail. The fas-teners that secure the hull and decktogether may also serve to fasten therubrail.
The shoebox joint naturally resistsrainwater leaks but needs to be sealedagainst plunging into waves or, if usedon a sailboat, against immersion whenthe boat is heeled. Builders seal thejoint in different ways. Sometimes, theonly seal is an external bead of siliconealong the edges of the rubrail. Otherbuilders apply bedding compound tothe overlapping area of the joint.Depending on the adhesive strength ofthe sealant, this method helps bond thehull and deck together. Some boatbuilders now use high-strengthmethacrylate adhesive to bond the joint.The inside of the joint is overlappedwith a fiberglass secondary bond(Figure 2) on better-built boats (readmore expensive). A completely bonded
P R O S E R I E S
Deck
Sealant
Hull
Sealant
Thru-BoltFasteners
OptionalRubrail Insert
Rubrail
Details of the shoebox joint including fas-teners and rubrail style vary according toboat size, manufacturer, boat model, etc.
Shoebox style hull-to-deck joint on aSearay 480. Solid PVC rubrail overlapsjoint.
Poorly fitted shoebox style joint at bowon cuddy cruiser is only visible fromunderneath the PVC rubrail. Filling the1/2"- (12mm-) wide gap with 3M 5200sealant will prevent water leaking intointerior when bow is buried in rough seas.
The Lid On
FIGURE 1

DIY boat owner 2004-2(www.diy-boat.com) 1-888-658-2628 15
joint is usually immune to leaks fromabove or below and the bond can bestrong enough to make mechanical fas-teners redundant
Shoebox Failure Modesand Repairs On a mechanically fastened hull-to-deckjoint, the forces a boat hull is subjectedto can loosen the fasteners and enlargethe fastener holes and in some casescreate gaps between the hull and deckwhere the original fit wasn’t the best.Leaks are the usual result but, in rarecases where a boat has taken a pound-ing, the deck can pop loose from thehull. More common is damage result-ing from collisions with docks, pilingsand other boats. The first victim of acollision is the rubrail and if the impactis severe enough, broken fiberglass atthe joint can be expected.
The damaged portion of the rubrail isremoved before inspection or repair ofthe joint. Most aluminum or plasticrubrails consist of a rigid extruded alu-minum or semi-rigid vinyl rail with aflexible vinyl insert. The one-piece insertruns from a transom corner forwardaround the bow and aft to the oppositetransom corner. The rail itself is usuallydiscontinuous and comes in 12' (3.6m)sections. If the damage is localized, onlyone rail section may require replacing.Damage to the insert, however, requiresreplacing the entire one-piece length.
The insert is held in place by an innerlip that slips into a recess in the rubrailand is usually easily removed by unfas-tening the retainer clip at the transom
end and then peeling the insert out ofthe rail. The damaged rubrail sectionitself is now unfastened for access tothe hull-to-deck joint. This may involvedrilling out pop rivets and/or unfasten-ing bolts. If the rubrail and hull-to-deckjoint are thru-bolted, you will needaccess to the nuts on the inside of theboat. Boat builders like to hide unsight-ly fasteners behind interior fittings likelockers and/or fiberglass liner moldingsor soft hull and deck liner materials likecarpet, “bunny fur” or vinyl. Lockers canbe removed or access holes cut; gluedhull liners are peeled back and thenreinstalled or patched and plugged asneatly as possible when the job is fin-ished.
Once the rubrail is off the joint, it'sclosely inspected for damage. A crackedor broken joint is prepped for glassrepairs by first separating the deck andhull with wedges. Grinding and lami-nate renewal are then carried out sep-
arately on the deck and hull portions,followed by gelcoat repairs. The joint isthen clamped back together with lotsof polyurethane sealant (3M 5200 oran equivalent) and refastened alongwith a new rubrail piece if required.
Most bonded hull-to-deck joints,whether glued or glassed, should beimmune from leaks unless the joint hasbeen damaged. However, any rubrailfasteners that penetrate the joint mightleak. In this case, the rubrail insert ispeeled back and the suspect fastenercaulked with polyurethane sealant. Itusually takes a good whack to disturbthis style of joint.
Pop Rivet (for assembly only)
Deck
Optional Sealant
Thru Boltfor Rubrail
OptionalRubrail Insert
Rubrail
FiberglassSecondary Bond
Most hull-to-deck joint damage is due tostorms or collisions.
Similar to the joint shown in Figure 1, thisshoebox joint is secured and reinforcedby fiberglass secondary bond on theinside. In this case, the pop rivets aremeant to locate and temporarily hold thejoint during assembly and contribute littleto the ultimate strength of the joint.
Look for the hull-to-deck joint under therubrail. Here black vinyl rubrail insert ispeeled back to expose the rubrail fasten-ers (pop rivets).
(top) The glass repair on this runabout iscomplete and the hull-to-deck joint isready for bedding and fastening.Wedges separate the hull and deck toallow glass repairs to the hull and deckportions individually. (bottom) Hull-to-deck joint is sealed with lots of 3M 5200and fastened this time with thru-boltsinstead of pop rivets.
TIPBuyer Beware the Band-Aid Repair
A common quick fix for a leaking hull-to-deck joint is to run a thin bead ofsealant along either side of the rubrailor toerail where they meet the hull anddeck. It's a temporary fix and a goodtelltale of a leaking joint.
FIGURE 2M
eli
ssa
Pa
tan
e

DIY boat owner 2004-2(www.diy-boat.com) 1-888-658-262816
Some bonded hull-to-deck jointsmight have a few layers of glass fiberoverlapping the joint on the inside as asecondary bond. It may not be possi-ble or desirable to separate the hull anddeck for individual glass repair. The jointis treated as a single skin laminaterepair and reglassed from inside andoutside. The exposed outside part ofthe repair requires the usual sanding,filling, fairing and high-quality gelcoatrefinishing whereas the new work insidemay be hidden after reinstalling theliner. Nonetheless, care must taken tomake sure the inside repair is not con-spicuously lumpy.
Special repair problems arise whena methacrylate joint has debonded butthe hull and deck remain intact. OldLaser sailing dinghies are famous forthis. Short of removing the deck andstarting over, the best repair procedure
is to rout out the old adhesive with arotary tool using a fine bit or manuallysanding inside the gap with coarse gritpaper. Methacrylate adhesive is theninjected into the gap and clamping pres-sure immediately applied in the repairarea. Methacrylate cures very quicklyso a large repair area may require ateam effort. If rebonding with adhesiveis not practical, one option is to prepgrind the joint area on the inside of thehull and apply a new fiberglass sec-ondary bond to overlap the joint. Thisconverts the joint from glued to glassed,presuming enough of the damaged areais accessible inside.
Joint Style: Flange The second type, the flanged hull-to-deck joint, is most often used on sail-boats. The two most common types arethe inside flange (Figure 3) and outsideflange (Figure 4). Either style workswell with an aluminum or wood (usu-ally teak) toerail. These hull-to-deckjoints are usually mechanically fastenedwith thru-bolts that, in most cases, alsopass through the toerail. A variation ofthe outside flange is used when thedesigner decides to have the hull-to-deck joint partway up the hull sideinstead of at the sheer line. In this case,the joint is often hidden by a largerubrail (Figure 5). Various sealants, frompolyurethane to gray butyl tape, areused between the hull and deck at theflange overlap as well as at the thru-bolts. Sealant is also applied under thetoerail. As with the shoebox joint, high-end boats often have a fiberglass sec-ondary bond on the inside of the joint.
Flange Failure Mods The inside flange style is more aes-thetically attractive than the outsideflange but fasteners terminate insidethe boat. This means any leaks at the
fasteners and water ends up inside. Theoutside flange has its fasteners outsidethe boat, which allows easier accessand it may reduce leaks. Regardless,in the event of sealant problems, eitherjoint style can leak into the boat ifimmersed during the dynamics of raildown, upwind sailing. As with the shoe-box joint, a fiberglass secondary bondcapping the joint on the inside not onlyreinforces the joint but also greatlyreduces the likelihood of leaks into thecabin.
If hit hard enough both flanged typescan be damaged but the outside flangestyle is also vulnerable to getting hungup on docks and pilings on a falling tideor during storms or when wakes frompassing boats “rock the boat.” It's notuncommon to see an outside flange suf-fer from minor stress cracking along thedeck edge due to normal flexing par-ticularly if there is any loaded sailinghardware mounted outboard on theflange. This includes slotted toerails car-rying the genoa sheet blocks or evenstanchions mounted on the toerail.
Optional Aluminum Toerail
Core
INTERIOR
Thru-Bolt
Sealant Deck
Hull
Hull Flange
The inside flange the most common hull-to-deck joint sail-boat style.
Optional Aluminum Toerail
Core
INTERIORThru-Bolt
Sealant Deck
Hull
The inside flange the most common hull-to-deck joint sailboatstyle.
TIPJoint Maintenance
This photo shows a shoebox type hull-to-deck joint on a new 22' (6.7m) cuddy cabincruiser. Note the lack of sealant coveringthe joint and fasteners, which could lead towater leaks, as well as multiple drilled holesfor self-tapping screws. When purchasinga new or used boat, or if your existing boatis more than 10 years old, remove an arm'slength of rail section and inspect the joint.If recaulking is needed, use wedges to holdthe rail off the hull/deck joint, remove anyresidual sealant and apply a generousamount of 3M 5200 or 3M 4200 (or equiv-alent) to clean, dry surfaces.
Teak Toerail
Large Vinyl Rubrail
Sealant< or >
Hull Molding
Through Bolt
Deck Molding
InteriorExterior
Glass Secondary Bond(optional)
A variant of the outside flange with thejoint well below the sheer. Note how therubrail hides the joint.
FIGURE 3 FIGURE 4
FIGURE 5
Me
liss
a P
ata
ne

DIY boat owner 2004-2(www.diy-boat.com) 1-888-658-2628 17
Hairline stress cracks do become an issue when they enlargeand weaken the laminate.
Glass joint repairs follow the general principles outlinedabove but are complicated by the presence of toerails orrubrails as well as the usual problems of access to the fas-teners in the case of the inside flange. [Ed: Refer to articlesin DIY 2003-#2 and 2003-#3 issues for more detailedinformation on collision and toerail repair.]
Butyl Joint Maintenance Most hull-to-deck joints never need maintenance, just repairsafter leaks are detected or the joint is damaged . Older C&Csailboats and other makes that used rubbery gray butyl tapeas a hull-to-deck sealant (Figure 6) will require occasional
attention. This type of sealant has the consistency of chew-ing gum and remains pliable and sticky indefinitely. It hasa habit of slowly squeezing out or creeping under load. Toavoid a hull-to-deck joint that leaks like a sieve, the fasten-ers need tightening occasionally. This is not a difficult jobprovided the fasteners are accessible and, on boats of thistype, they usually are. Two people are required to do thejob. One must be on deck with a screwdriver to hold thebolt and prevent it from turning. The other person is belowwith a 7/16" socket that fits the UNC 1/4 / 20 bolts typi-cally used in hull-to-deck joints plus a short drive extension.The nut is the only thing tightened. If the bolt is allowed toturn, it can break the seal at the threads and begin leaking.While tightening, one eye is kept on the edge of the butylprotruding from the underside of the hull-to-deck joint.Starting at one end and working towards the other, each nutis tightened until the hull and deck begin to clamp togetherand the butyl begins to squeeze out of the joint. At this point,tightening stops and the team moves to the next fastener.Don’t tighten beyond what is required to reclamp the butylotherwise it's possible to squeeze too much sealant out ofthe joint and increase the likelihood of leaks. If a leak doesoccur at a specific fastener, it's removed, caulked thorough-ly with a polyurethane sealant and then reinstalled and tight-ened as outlined above.
In some cases, the butyl sealant may already be squeezed
out from the joint. If leaks are persistent, the hull-to-deckjoint must be unfastened, wedged apart and fresh butyl tapeapplied to the hull flange above and below the vinyl rubrailthat is usually fitted between the hull and deck. The fas-teners are then tightened again until the butyl begins tosqueeze out.
About the author: Nick Bailey is DIY Magazine's repair specialistwho has spent 26 years in the boat repair business and is serv-ice manager of Bristol Marine in Mississauga, Ontario.
Aluminum Toerail
Butyl Sealant
Butyl Sealant
Thru-Bolt
Sealant Reservoirs
Vinyl Rubrail
Hull
Hull Flange
The classic C&C Yachts version of the inside flange hull-to-deck joint. This one needs occasional maintenance to avoidleaks.
Hull and deck areundergoing recon-struction in closeproximity to thedeck flange on aDufour 38.
Hull flange recon-struction on a J-35.The deck flange inthis case is relative-ly undamaged andrequires little in wayof repairs.
FIGURE 6

DIY boat owner 2004-2(www.diy-boat.com) 1-888-658-262818
Edited by Jan Mundy
Q: I just bought a used sailboat witha Perkins Prima M50. I'm having trou-ble finding a parts dealer here in theNorth East (New York).Jim Westpfahl, Lindenhurst, New York
A: Perkins has an extensive list ofdealers throughout the world.Unfortunately, not all of the dealersstock parts for all engines marinized bythe company over the years. The mas-ter dealer for Perkins in the northeastis: W.A. Kraft, 199 Wildwood Avenue,Woburn, MA 01888-2024, Tel:888/925-7238.
Q: My boat's Bukh DV20 continual-ly emits steam through its exhaust. Ihave replaced the thermostat andcleaned out almost everything in thecooling system that is accessible andyet it still steams. There is no evidenceof water in the engine oil, the enginetemperature is normal and the exhaustwater approximates the suggestedamount according to Bukh specifica-tions. What's next? Ian Dwight Phillips, "Spectre," NSW,Australia
A: I know it's difficult to believe thatthings are normal whilst a cloud ofsteam follows your boat. If the gaugesconfirm all to be normal and the engineexhaust emitted out the thru-hull is coolto the touch, this should put your mindat ease. So, what creates this cloud ofsteam? If your engine has a cast metal
exhaust elbow or riser, it might havecorroded from the inside, creating a
restriction tothe water nor-mally blendedinto the ex-haust at theelbow’s end.As the rustworsens, theelbow devel-ops a crack,thus allowinga fine, high-p r e s s u r einjection ofcooling waterinto the hotgases. Thiswater curtaineffect pro-duces steam,
or as most victims call it "white smoke."If the piping is fabricated, not cast, thepoint of injection should be examinedfor size and condition. Remove theexhaust hose at the point of exit fromthe engine and check for rust or arestricted elbow. By the way, if it's acast iron riser check it soon. If it letsgo, water will flood the cylinders.
Q: We have a problem starting ourFord Lehman when the engine is coldor has been idle for more than 24hours. Compression is at 390 on allcylinders. The starter was overhauled.We installed a new mechanical liftpump, have a Racor fuel/water sepa-rating filter as the primary filter andAlgae-X. Timing and valves are as perspecs and there are no fuel leaks.Batteries are new and we inspected,
cleaned and tightened all cables andterminals. If the engine has not beenstarted for a week or more and I plugin the block heater for 80 minutes, theengine starts immediately without theuse of the cold start button and with aminimal amount of blue smoke. Also,the engine starts immediately whenusing the cold start, no matter how longit has been since the last start, one dayor one week, no matter. I'm reluctantto use the cold start, especially duringthe summer in a crowded anchorage,due to the huge cloud of smoke creat-ed by the use of the cold start button.My mechanic and I tried all the sug-gestions as per the Ford Lehman man-ual, including: installing an electric fuelpump on a trial basis to see if thiswould solve the problem; checking thecable stop lever system and advancingthe timing to 23 btdc but there's nochange in the hard starting. Is this aninherent problem with these engines? Joe Larche, "Chez Nous," Campbell River,British Columbia
A: Having built and supplied over20,000 Ford Lehmans, I can assureyou that hard start after a few days ofidle time is not a common problem.There is something wrong when thissituation persists. Reset the timing to20° before you do anything else. Now,I know this might sound stupid, but I
D I E S E L
DIESEL FAQBob Smith, DIY's diesel advisor, owner of American DieselCorporation and formerly with Lehman Power Corp., providessolutions to a questions submitted to DIY's Technical Helpline.
Perkins PartsWanted
Steaming Bukh
Hard Starting FordLehman
Cutaway of an exhaustelbow. In saltwater, castiron elbows can rustthrough the inner wall.
Lar
ry B
lais

want you to remove the remote stop cable and then put thelever all the way aft to the full run position. Now, try to startthe engine. When the engine has been sitting and wouldlikely be hard to start, check the secondary fuel filter bleedscrews for air. If none found, check the injection pump bleedscrews for air. If none found, disconnect whatever is con-nected to the stop lever on the injection pump. This might bea rod from the electric stop solenoid or a remote cable attach-ment. With the stop lever free from its external control, slidethe lever all the way aft (towards the flywheel). With thestop arm all the way aft, open the throttle wide (all the wayforward). Now, push in the little rubber booted button in thecenter of the stop lever until it clicks. Reduce the throttle tonormal start position and start the engine.
HOW DID IT WORK?Joe replies: We did as you suggested but the engine crankedrepeatedly, same as before, before starting. One thing is dif-ferent. Now, we now have a large fuel oil slick as well as alarge cloud of blue smoke when it finally does fire up. Why,if I plug in the block heater for 80 minutes or so, does theengine fire up at once?
Bob replies: From everything you're telling me, the effectsare those of low compression. Fuel is being injected but willnot fire, resulting in blue smoke and fuel on the water.Running the block heater enlarges the aluminum pistons,raising the compression so it starts. Is the cranking speedtoo low? This can cause the same low compression.Unfortunately, none of the Ford manuals show what crank-ing speed to expect. The compression standard called for is360 lb at 215 rpm. Glazed cylinder walls may also be thecause. Many Lehman owners overfilled the crankcases byfilling to the mark on the dipstick instead of filling to 12quarts (11L) with a filter and remarking the stick. The mostcommon Lehman engines to experience this glaze were the1968 to 1971 2704E models, 363 cubic-inch displace-ment with dry liners. The liners are hard and the rings don'tseat. If the cold compression is great, there is just an out-side chance that someone has messed with the fuel cali-bration of the injection pump. I saw this only once in 40years. They broke the seal on the pump (just forward of theslotted oil fill plug) and then turned the screw. This calibra-tion is meant to be done only on a machine, not in the field.If you know that this has been done, let me know.
Q: I am running a 1979 Perkins 6/354 diesel that leavesa slight smog behind the vessel when running at cruise. Ihave been told that, if I run the engine on stove or furnace oil,this smog will disappear due to a hotter burn from higheroctane. My inquiries of many local sources yielded answersin the range of confirmation to total disaster. Can I get youfolks to weigh in on the subject? Ron MacLeod via email
19
Cleaner Running
DIY boat owner 2004-2(www.diy-boat.com) 1-888-658-2628

A: Putting my experience hat in the ring compels me tosay that what you were told is wrong. Normally, the No. 2motor fuel your Perkins diesel engine likes is cracked morefinely than No. 2 heating oil would be. Knowing your fuelsupplier and what he offers is very important. Amoco suppliesthe cleanest running fuel you can buy in the U.S. Cetanenot octane is the measure of fuel heat. Sulfur content of thefuel is a very important factor. If you have clean, fresh fueland add Marvel Mystery Oil at a rate of 1 quart per 100gallons (946ml per 378L) of fuel, your chances of a smoothand clean running engine are good. There is a time wheninjectors and injection pumps will need service. Also, a pro-peller that is too large for the power of the engine will causesmoking. This is identified when the engine will not reachthe 2,700-rpm rated at wide-open throttle underway. Highengine hours and infrequent cleaning of the injectors areother considerations.
Q: We are looking at a 1989 35ft Chien Hwa trawler witha single Perkins 135 (4,160 hours). The motor will not revabove 1,200 rpm. We are being told it's a fuel problem.Change the filters; polish the fuel and all will be well. Whatelse could also cause a low revving condition? Bill Restivo, Kinmount, Ontario
A:You need to conduct a series of checks to diagnose theproblem. Is the 1,200 rpm underway running with wide-
open throttle? Is shifter inneutral? If not, have youtried disconnecting thethrottle cable from theinjection pump lever andthen operating it by hand?With the throttle full open,will the engine turn about2,900 rpm? Does theengine start and run well?Does it blow black smokeafter you get to 1,200 rpmand throttle is traveled fur-ther forward? When werethe propeller and bottomlast cleaned? Could bottom
fouling be holding down the engine? What did the engineturn previously and has the boat speed changed dramati-cally? Is it possible that the propeller has been damaged?Has the alternator been changed recently without recali-brating the tachometer? Has the engine ever stopped run-ning? You will note that I have not gone to the obvious con-clusion of dirty fuel filters. This is because I assume that arestriction of fuel flow, which will starve the engine of fuelneeded to make horsepower, would have been the first thingyou checked and that your normal maintenance routinewould have dictated doing so. The primary and secondary fil-ters should have been changed first thing.
DIY boat owner 2004-2(www.diy-boat.com) 1-888-658-262820
Why Low Engine Revs
Check primary and secondaryfuel filters first when engine isfuel starved.

DIY boat owner 2004-2(www.diy-boat.com) 1-888-658-2628 21
By Susan Canfield
Anytime you have gasoline onboard aboat, there’s an inherent risk of explo-sion and/or flash fire occurring if gaso-line vapors are present and there is asource of ignition such as a spark.
That’s why U.S. federal law requiresbuilders of gasoline-powered boats toinstall ignition protected electrical com-ponents in these potentially explosiveenvironments.
Ignition protected components aredesigned and constructed so they won’tignite a flammable hydrocarbon mix-ture — gasoline, propane (LPG) or CNGand oxygen — under normal operatingconditions. Ignition protection of elec-trical components is achieved usingseals, flame arrestors and/or potting(encapsulation) to prevent sparks from
escaping when the equipment is oper-ating. To be able to label their electri-cal products as “ignition protected,”manufacturers must obtain independ-ent third-party certification in accor-dance with specified Society of
Automotive Engineers (SAEJ1171), UnderwritersLaboratories (UL 1500) orUnited States Coast Guard(USCG) test procedures.
While it’s generally safeto presume that a new boatfrom a reputable builder hasbeen constructed in com-pliance with federal law andthat installed electrical com-ponents exposed to a poten-tially explosive environmentare ignition protected asrequired, that status caneasily be compromised by
aftermarket modifications to the boat’sstructure or equipment. Your awarenessof the risk of explosion and/or fire andthe knowledge of the what’s requiredto minimize that risk are essential tothe continued safe operation of yourboat.
Onboard InspectionIf your boat has a gasoline fueledinboard engine (propulsion or genera-tor) or a permanently installed fuel tank,include ignition protection on yourannual fuel system checklist. While thefederal law is intended to apply solelyto boat builders (new boats), compli-ance has been a key factor in prevent-ing explosions and fires triggered by thedeadly combination of explosive vaporsand an ignition source. Even though thelaw does not apply to the individual
boat owner, you would be, quite liter-ally, playing with fire to compromise thebuilt in safety features by cheaping outwith non-complying equipment whencarrying out routine maintenance pro-cedures and doing your own repairs.ABYC standards, which equal and/orexceed the federal requirement but arenot enforceable as law, do not makethis distinction and are intended toapply to builders, repairers and boatersservicing or maintaining a boat. (Boatswith diesel engines are not exempt ifan ignition source, LPG for example, islocated in the engine compartment.)Start by identifying the potential sourcesof a gasoline fuel leak. These includepiping connections at fuel fill fittings,tanks, tank vent fittings and engines,as well as any other connections thatmay be found in between.
Next, evaluate the degree to whichelectrical components are isolated fromthe potential sources of a fuel leak youhave identified. Fuel vapors are heav-ier than air and will tend to settle in lowareas. If not isolated from potential fuelsources by bulkheads, decks or specialenclosures, electrical components mustbe ignition protected. The only permit-ted exception to this requirement is forcomponents installed at least 2' (61cm)away from a gasoline fuel source incompartments that are open to theatmosphere. A compartment is con-sidered “open to the atmosphere” if ithas an unobstructed opening of at least15 sq. in. (97 sq. cm), to the environ-ment outside the boat, for every squarefoot (square .09m) of compartment vol-ume.
Isolating Fuel SourcesIsolation bulkheads must effectivelyclose off one space from another. Theymust be closely fitted to the top, sidesand bottom of the space being closedoff. By law, isolation bulkheads mustbe water resistant (and vapor tight) forat least one-third of their height, or 12"(30cm), whichever is less. For exam-ple, if the total height of a bulkhead is30" (76cm), then its water-resistantheight must be at least 10" (25cm). Ifa bulkhead is 60" (1.5m) high, itswater-resistant height must be at least12" (30cm).
Any openings below the water-resist-ant height of an isolation bulkhead for
E L E C T R I C A L
Is Your Boat IgnitionProtected?All electrical components exposed to a potentially explosive environment must be ignition protected. At risk of an explosionand/or fire are older boats with electrical devices added by previ-ous owners and newer boats with replacement and add-on parts.Here's how to explosion-proof your boat and minimize that risk.
Sealed
PluggedDrain
Not More Than1/4" Annular Space
Bulkhead ExtendsFull Width
Bulk
head
Ext
ends
Full
Heig
ht
Max
imum
Hei
ght
Of B
ulkh
ead
1/3
Max
imum
Heig
ht
12"
Wat
er R
esis
tant
Hei
ght
Electrical ComponentsThis Side of Bulkhead
Water Resistant HeightUse 1/3 Maximum Height
As It Is Less Than 12"
Fuel Source This SideOf Bulkhead
Isolation bulkheads must be water resist-ant (and vapor tight) for at least one-thirdof their height, or 12" (30cm), whicheveris less. Openings above the water-resistantheight of an isolation bulkhead must nothave more than a 1/4" (6mm) wide spacearound whatever passes through the bulk-head, e.g., wiring, piping, etc.
ABYC
Ele
ctric
al C
ompl
ianc
e G
uide
line
FIGURE 1

DIY boat owner 2004-2(www.diy-boat.com) 1-888-658-262822
wiring, piping, controls, doors, hatches, access panels, ordrains, must be sealed or have a fitting to minimize seep-age. There should be no limber holes. By law, the maximumseepage permitted for all bulkhead openings and edges maynot exceed 1/4 ounce or about 2 tsp (7ml) of water per hour.
Per USCG policy, “Any hole installed for drainage in anisolation bulkhead must be fitted with a plug or sealing devicethat is intended to be in place when the boat is being used.The plug or sealing device must be attached to the drain fit-ting or bulkhead near the drain hole so that it will not belost. It must be understood that when this drain hole is open,the isolation integrity of the bulkhead has been breachedcausing a potentially hazardous condition. It is the respon-sibility of the boat manufacturer to make this intent knownto the consumer via means such as labeling, information ina boat owner's manual, etc.”
Openings above the water-resistant height of an isolationbulkhead should not have more than a 1/4" (6mm) widespace around whatever passes through the bulkhead, e.g.,wiring, piping, etc. Openings in bulkheads around enginesand their exhaust systems require special attention since
they must also be sealed to prevent the passage of carbonmonoxide gas. Figure 1 depicts many of the attributes of anisolation bulkhead.
An electrical component can also be isolated from a poten-tial gasoline fuel source by a deck located between the two,or by means of an enclosure. If the electrical component isinstalled below the fuel source, the isolation deck or enclo-sure must be water (and vapor) tight. If the component islocated above the fuel source, then there must be a deck orenclosure to provide isolation, but it need not be water orvapor tight.
As you evaluate your boat’s isolation bulkheads, floorsand enclosures, pay particular attention to any aftermarket
modifications to these structures that may have compro-mised their ability to isolate electrical components frompotential fuel sources. Figures 2, 3 and 4 illustrate the useof isolation bulkheads, decks and enclosures.
Checks and TestsOnce you have determined which electrical components onyour boat are not isolated from potential fuel sources, verifythat those components are ignition protected. Photos on theopposite page show typical “ignition protected” labeling ofelectrical components. If you can’t find a similar label on anelectrical component, or verify its ignition protected statusby reading the owners manual or by calling the manufac-turer, the only safe assumption is that it is not. To minimize
ELECTRICAL
COST FACTORSAn automotive alternator, distributor or starter sells for half the priceor less of an equivalent marine ignition-protected unit. The cost of arebuilt starter that is ignition protected but not certified to that protec-tion can shave $100 off the bill. You'll save a bundle purchasing a house-hold air conditioner versus a marine one. Valid considerations for surebut what could happen if that non-ignition-protected starter attached toa gasoline engine should spark? Or a non-ignition-protected air con-ditioner was placed with the lead-acid (hydrogen gas) battery that pow-ers the bow thruster or windlass in the same locker? How about thebudget RV water heater to replace the rusted one in your gasoline enginespace? Don’t be tempted to take the risk. The extra cost of the protectionprovided by certified marine ignition-protected equipment is a best buyin boating. There are many reasons for the higher price of marine igni-tion-protected electrical components. Production runs are small com-pared to automotive. Manufacturers must shell out additional fees forextensive UL and SAE testing and certification. Additionally, ignition-protected units are periodically pulled off production lines and tested toinsure they meet standards. — Jan Mundy
Instrument PanelMay Be An IgnitionSource Unless It IsIgnition-ProtectedFuel Connection Is
A Fuel Source
2'
2'
15 Sq Inches Open Area ForEach Cubic Foot Of Open Space InWhich The Ignition Source Is Located
Ignition-Protected Pump -Below Fuel Source
Ignition-Protected Engine
IgnitionProtectedBlower
FuelTank
Gasoline Tank
Ignition - ProtectedComponents - NoSeparation FromFuel Sources
Openings - Annular SpaceNot More Than 1/4 In.
Pump - Ignition ProtectionNot Required
Water-Tight Bulkhead to 1/3 HeightOr 12 Inches Whichever Is Less
Spaces Requiring Ignition-Protected Equipment
Ignition-Protected Engineand Components
Trim Motor
FuelTank
Spaces Requiring Ignition-Protected Equipment Ignition-Protected Engine and Components
Ignition-Protected ComponentsNot Required - Enclosure ProvidedSealed Wireway
Fuel Tank
The switches in the dashboard are within 2’ (61cm) of both the fuel fill fit-ting in the foredeck and fuel hose connection at the fuel tank. Since both ofthese connections are potential sources of a fuel leak, all dashboardswitches must be ignition protected.
An enclosure is provided to isolate electrical components at thehelm; they need not be ignition protected. However, the bilgepump, blower and engine electrical components must be ignitionprotected.
Electrical components in the engine compartment require ignition protec-tion, however, given the isolation bulkhead forward of the engine, the bilgepump need not be.
ABYC
Ele
ctric
al C
ompl
ianc
e G
uide
line
FIGURE 2
FIGURE 3
FIGURE 4
ABYC
Ele
ctric
al C
ompl
ianc
e G
uide
line,

DIY boat owner 2004-2(www.diy-boat.com) 1-888-658-2628 23
the risk of explosion,any component not incompliance with thelaw should be replaced.Electrical componentsproduced for the auto-motive and recreation-al vehicle (RV) markets
are typically not ignition protected, e.g., starters, alterna-tors, fuel pumps, distributors, water pumps and waterheaters, to name a few. Since many of these products arealso marketed to boaters, it’s truly a case of buyer beware.
Gas HazardsWhen combined with oxygen, both propane and CNG canalso explode if ignited. Boats with LPG or CNG piping con-nections belowdecks (other than at an appliance located in
an accommodation space) are very likely operat-ing at increased risk. Should vapor leak from oneof these connections, a non-ignition protected elec-trical component or internal combustion enginelocated in the same compartment could potential-ly trigger an explosion. Boat owners should refer tothe appropriate ABYC standard for further guidancein correcting such a situation. Gasoline containersand reserve LPG or CNG cylinders also pose a sig-nificant hazard belowdecks if not stowed in anappropriately vented enclosure or locker that meetsor exceeds ABYC standards.
About the author: Susan Canfield is a marine surveyor inAnnapolis, Maryland. A frequent DIY contributor, she alsoteaches “Surveying Fiberglass Boats” at WoodenBoatSchool in Brooklin, Maine.
(left) This high amperage circuit breaker is igni-tion protected as it conforms to SAE J117.(right) This water pump’s label states that itcomplies with USCG and InternationalStandards Organization (ISO) regulations formarine ignition protection. (bottom) The manu-facturer’s label says this marine water heater isignition protected. Information on the specifictesting criteria met will likely be found in theaccompanying owner's manual.

M A I N T E N A N C E
DIY boat owner 2004-2(www.diy-boat.com) 1-888-658-262824
Story and photos by Pat Kearns
“Keep the boat off the rocks. Keep thewater out of the boat. Everything else canbe fixed.” I don't know the source of thisquoted intelligence but can attribute it toa very wise and realistic creator. Keepingwater out of the boat is a more compli-cated process than most boaters antici-pate. Unlike bilgewater, which is easy toremove with pumps when it does get in,water that migrates into other areas of aboat's structure is not as simple a matter.Let’s explore some of the most commonproblems that involve water that gets inand doesn’t go out, a.k.a. “moisture intru-sion.” Nice, seemingly innocuous wordsfor a nasty and potentially expensive prob-lem that’s better prevented.
“It’s an all fiberglass boat.” That's afamous assumption that can really biteyou in the wallet. Relatively few boats areall fiberglass. Most boats comprise othermaterials such as plywood, balsa coreand wood in some form wrapped in fiber-glass. These materials add strength andstiffness and reinforce the fiberglass pan-els. This construction is known as fiber-glass reinforced plastic (FRP), a layeredstructure with laminations of multiplematerials and/or the inclusion of a coresandwiched between two layers (skins)of fiberglass. What you see is fiberglassor gelcoat, the pigmented resin outer skin.What you have is a composite compo-nent of the deck, hull, rudder (in sailboats),stringers, transom and engine bearers.
Boat builders wrap wood in fiberglassto achieve a desired or necessary thick-ness for strength and/or compressionresistance. In a powerboat transom, forinstance, where a stern drive or outboardmotor is installed, a fiberglass lay-up alonewould have to be so thick that weight andcost would be prohibitive. So, builders useother materials to reinforce the panel; typ-
ically, by laminating a core of plywood tostiffen the panel without adding the unde-sirable weight. It’s a good manufacturingcompromise, provided the wood remainstotally sealed inside the fiberglass. Thereinlies the rub. When (and it will happen)the inevitable wear caused by vibrationand movement from normal operatingdynamics results in the composite lami-nate working, water will seek its oppor-tunity to invade the structure. The dynam-ic of normal boating activity stresses thepart, which, over time, begins to separateand that separation, at any point, providestiny, sometimes microscopic paths forwater to get into the structure. That’swhere “moisture intrusion” comes onscene. On new boats, there is a muchmore conscientious effort on the part ofthe best boat builders to seal every pos-sible pathway where moisture can enter acomposite structure but the normal oscil-lation dynamic that every boat undergoeseventually works to separate and unseal aFRP laminate sandwich with wood as thefilling. Metals that travel though a wetlaminate can also be affected by insidi-ous, trapped moisture. A classic exampleof this is on a sailboat where stainless-steel chainplates pass through a coreddeck. That flat stainless bar can look likeSwiss cheese where crevice corrosion haseaten the metal away. More masts havetoppled because of this kind of corrosionthan have been lost to the forces of nature.
The real trick for the boat owner is tobe aware of the potential for moistureintrusion, be vigilant in the quest for symp-toms of a problem and diligent in doingthe necessary preventive maintenance tolimit the potential for damage. Make surethat the water that comes around goesaway “like water off a duck’s back” withlittle or no chance of seeping and creeping
into the tiny cracks and crevices arounda stern drive’s transom assembly, a cleator a hatch on deck, a chainplate’s (sail-boat) passage through the deck, at thehawse hole for the anchor rode, the wind-lass installation, into a fiberglass ruddermolding via the rudder post, to cite just afew of the places water can migrate whereit’s not wanted. How does the water getin? It all starts with a hole. Holes inten-tionally made for fittings and equipmentare the primary potential sources of water
WATERMARKS
Finding and Keeping the Water Out Water, when trapped, becomes a foul enemy in boats. It eventuallybreaks down fiberglass laminates, rots or delaminates wood, eatsaway at critical metal fittings — all circumstances that can lead tofailures that break both the boat and the bank. Learn how watergets in, the damage it causes and what you can do to prevent it.
The air-conditioner compressor conden-sate collection pan didn't drain properlyand trapped water overflowed and soakedthe carpet (under the fire extinguisher).Boat owner was unable to determine thesource of the water.
Water leaks at portlights have traveled towet the headliner as seen by the unattrac-tive staining.
Condensate drain for this refrigerator wasplugged and water had been leaking ontoto plywood cabin sole beneath carpet.Flooring and plywood subfloor have bothdelaminated.

DIY boat owner 2004-2(www.diy-boat.com) 1-888-658-2628 25
ingress, especially if the boat builder was not obsessive abouttaking those extra steps to seal the openings to prevent waterfrom migrating into the core. [Ed: DIY recommends the recaulk-ing of all deck and hull hardware minimum every 10 years andto sample fittings on just purchased new and used boats tocheck sealant condition.]
Hull SurveyCored hulls are vulnerable to damage from moisture intrusionat any point where the hull has been penetrated. Thru-hull fit-tings, bolts for a strut, swim platform mountings, stern drive, trim
tabs, senders and transduc-ers, any hardware thatresults in an opening, all influ-ence the watertight integrityof the hull. Before you buyany boat with a cored hull,find out how the builder dealswith the hull penetrations. Ifit’s a used boat, your survey-or should know its vulnera-bilities and take a close lookat the areas around hull pen-etrations for evidence ofdelamination. A moisturemeter comes in handy here.[Ed: For complete details on
how to repair delaminated cored hulls, refer to DIY 2000-#3issue.]
Transom FlawsPlywood remains the reinforcement material of choice for com-posite transoms on stern drive and outboard-powered boats.Plywood encapsulated in a FRP sandwich gives the boat builder
the thickness, stiff-ness and compres-sive strength need-ed to withstand theload demand fromthe engines. Boatowners must beaware that suchloads create con-stant stress on thestructure. Stressdevelops pathwaysfor moisture to workits way around andbehind machineryand hardwaremountings and into
the core. The problem is easy to identify and the fix is prettystraightforward, albeit expensive. [Ed: Step-by-step details ontransom core replacement appear in DIY 1998-#4 issue.]
Prevention is the key to avoiding core damage. As with anyhardware that penetrates an opening in the hull, these instal-
This US$300 Overseas GRP 33diagnostic tool is a boat owner'sbest friend. Use it to check thecondition of your FRP deck andhull a few times a year.
Swim ladder mounting on FRP platform on afour-year-old boat. View is of underside at lad-der mounting bolts. Water has worked its wayinto the cored area of the platform molding.Trapped water has corroded all of the laddermounting hardware.

DIY boat owner 2004-2(www.diy-boat.com) 1-888-658-262826
lations must be periodically removed,rebed and reset in place to assure water-tight integrity. Even the smallest of cracksaround a stern drive’s transom assemblycan be a riverbed for water migration.The potential for damage to a transom isnot limited to boats with outboards andstern drives. Bolts used to mount swimplatforms, ladders, trim tabs, etc. are alsopoints of entry for water. Not all waterthat makes its way into a transom comesfrom seawater, either. Bilgewater canmigrate into the transom structure wherethe ends of longitudinal stringers butt tothe inside of the transom. That wateroften makes its way through poorly sealedlimber holes in the stringers. It migratesaft through stringers and makes tracksthrough the inner FRP skin of the tran-som and into the core.
Stringers and Mounts Encapsulated wood inside FRP stringersand engine bearers is another area thatrequires regular monitoring to ensure that
the hull’s skeleton remains strong andthat the engine(s) are properly support-ed. Water generally enters this structurethrough unsealed limber holes. Theseholes are intended to drain bilgewateraccumulations to the main bilge for pick-up and discharge by the bilge pump(s).The problem comes when bilgewater lev-els are consistently high, keeping waterin the holes instead of passing throughthem. Those limber holes should besealed but often the wood inside the FRPlapping to the hull is exposed. Anotherplace of water intrusion is the enginemounts themselves and/or the bracketmountings to which the mounts are fas-tened and which are subsequently fas-tened to the bearers. Corroded enginemount bolts (where the bolts passthrough the bearers) are a good indica-tion that water has invaded the bearer.In this case, the bolts should be removedand inspected immediately. Rottedstringers are usually a huge surprise to aboater who thinks he owns a healthyfiberglass boat.
Rudder (in sailboats)BlowoutThe sailboat rudder molding sustains con-stant stress under the high loading ofsteering the boat. Its support usually pass-es through and/or into the molding at thetop, sometimes with support at the bot-tom of the rudder blade as well as withlong keeled designs. In any case, the sealat the top penetration of the rudderpostis at risk for water intrusion. The prob-lem does not rest with the water goingin if it goes out but rather with water that
becomes trapped within the moldingwhere it can attack the molding, sepa-rating the laminate and corrode the metalstructural braces, including the rudder-stock. In cold climates, water-soaked rud-ders swell as the water freezes andexpands, forcing the laminate apart, acondition that is visually evidenced by
M A I N T E N A N C E
Leaky chainplate (water staining visible atbase of chainplate gusset) allowed waterto pool and migrate to locker joinery,which is now ruined.
Anchor rode leading to rope locker in fore-peak. Opening is not sealed and woodcore is wet. It's not too late for this situa-tion to be addressed proactively.
Rust is weeping from the fasteners thatattach the rubrail on the outside of thishull. Rail has started to rot, plywood deckat shear is also wet, and backing plateand bolt are corroding.
Bolt penetrating deck has created a pathfor water. Rust staining tells the tale.
Core is soaked and the swelling and work-ing of the structure under the outboardmotor load has caused the structure toseparate as seen by the crack along thetop of the transom cutout. This transomneeds a complete rebuild.
Torquing engine mount bracket bolts at thebearers resulted in compressing the bear-ers as well as the need for continual enginerealignment. The more the bearers werecompressed, the more water that intruded.Encapsulated wood was completely rotted.
Aft portion of FRP keel is a hollow cavity filledwith foam but not sealed at the top inside thehull. Over the years, bilgewater saturated thefoam, which triggered delamination of the lami-nate. It was only noticed when water trickledout after dinging the keel at the lowest spot.

DIY boat owner 2004-2(www.diy-boat.com) 1-888-658-2628 27
cracks and/or large bulges in the outerskin and water leaking at the base of themolding where cracks have opened underpressure. When that water appears blackor brown, you also face the likelihood ofcorrosion of the internal metal supportand/or rudderstock. The fix? Rebuild orreplace the molding. Just as importantis to make sure the rudderstock, oftenstainless steel, is intact. Stainless steelsuffers crevice corrosion when deprivedof oxygen and water in a rudder moldingis the ideal environment for this type ofcorrosion to thrive. [Ed: Three issues ofDIY contain information on rudder repair:2000-#3, 2001-#3, 2002-#3.]
DeckBoat builders carefully mold a deck to bewatertight and then, in the process of fit-ting out the boat, put zillions of holes in itto install cleats, windlasses, sailboatstanding and running rigging hardware,rail and lifeline stanchions, deck fittingsfor tanks and a whole boatload of otheraccessories necessary to fit the boat forduty. Conscientious builders take specialprecautions to seal the areas where they
M A I N T E N A N C E
Plywood core can be seen at the hawse-hole opening under the windlass gypsy.Plywood is not sealed and will eventuallybe subjected to water intrusion and, ulti-mately, rot. Highly loaded windlassmounting surface will likely suffer as well.
install deck fittings, particularly those thatcan expect high loading. In these areas,the wood core, usually plywood or balsa,is removed and the laminate reinforcedwith solid resin, fiberglass or other formof a seal so that no core is exposed. If thatis not done, then every penetration is apotential point of water intrusion.
Monitoring the situation is relativelyeasy with a moisture meter. Routinemetering can be an excellent investmentin preserving the structural integrity of acomposite FRP deck molding. [Ed: Onolder boats without the core properlysealed at deck hardware or when addingnew fittings, always prep the deck byremoving the core underlying the fittingand filling with solid epoxy resin. This isknown as "potting" and is outlined in DIY2000-#3 issue.]
Once you hear that telltale dull thudheard under the face of a hammer used inpercussion sounding or, worse yet, yousee water squishing out from under a deckfitting or a nasty brown goo oozing froma sailboat chainplate bolt, it's too late forprevention. Watch for the formation oftiny, hairline cracks at the bases of deckfittings and hatches. These cracks arescreaming to you that the deck is flexingbeneath them and that you must takeaction now. If the fittings are moving andthe moving is causing the cracks, thenwater is finding its way into the FRP sub-strate.
Most boaters worry a great deal aboutkeeping big water out of the boat, the kindof water that leads to sinking, the wavethat overtakes them in rough seas, hur-ricane driven rains and other dramaticevents. Truth be told, on a day-to-daybasis, there is more to worry about, in
terms of damage to the boat and itsvalue, from the water that gets into thosetiny, almost invisible cracks and crevicesthat develop as a boat ages. Sooner orlater, extensive water damage occursunless you are fastidious about the proac-tive maintenance that can deter or deferthe unrelenting quest of water to find apath into a fiberglass laminate.Fortunately, most damage can be pre-vented and, if it hasn’t been, “everythingcan be fixed.”
About the author: Patricia Kearns formerlywas assistant technical director of ABYC.She is a NAMS certified marine surveyorand operates Recreational Marine ExpertsGroup, a marine surveying and consultingfirm based in Naples, Florida. She also isDIY's copy and technical editor.
Bolts penetrating foredeck at the windlassinstallation have been leaking, resulting inwet core and corroded bolts.
Brown ooze seeping out of the laminateindicates advanced stages of delamina-tion.
�

DIY boat owner 2004-2(www.diy-boat.com) 1-888-658-262828
By David Anderson
Wouldn't it be great if you simply con-nected the blue and green wires fromyour GPS to the blue and green wires inthe serial interface cable and then youturned on the computer to see your boat'scourse plotted on the correct computerchart? In most cases, getting a GPS to"talk" to a computer is fairly simple.Problems arise because of the way GPSmanufacturers interpret the voluntaryNMEA 0183 standards or because of themyriad types of computers and the waytheir serial (Com) ports are configured.
The first step is to set up the GPS cor-rectly and then establish which wires areused to transmit data. Next, determinewhich wires in the serial interface cableare used to receive data. The GPS man-ual and the instructions for the naviga-tion software cable interfacing will guideyou. If you need more help, a phone callor visit to the manufacturer’s web sitewill usually clarify things. Figure 1 illus-trates a simplified GPS hookup with anoptional switch for sending informationto an autopilot.
Most GPS units have I/O terminals anda cable for connecting to other devices.To transmit information from the GPS tothe computer, connect the GPS signalground wire (SG) to the serial port groundwire (NMEA B line). Next connect the
GPS transmit data (TXD) tothe serial port receive wire(NMEA A line). If you intendto upload data, such as way-points and routes, from thenavigation software to theGPS, you will need to connect the GPSreceive data (RXD) wire to the serial trans-mit wire. Not all navigation programs orGPS units allow data uploading. Thesewires are identified by color code in theuser's guide.
Opto IsolationNavigation and electronic charting pro-grams have a serial interface cable. Mostmanufacturers include the cable with thesoftware, though some charge extra forit. Software companies also offer (for anadditional charge) an optional opto-iso-lated cable, which I highly recommend.
An opto-isolated NMEA cable providesa communications link that has no elec-trical connections between the GPS andthe communications port. Isolation is animportant consideration in systems usingdifferent power sources, systems withnoisy signals or systems that operate atdifferent ground potentials. In a data log-ging or acquisition system, an opto-iso-lated NMEA cable protects against groundloops between the system controller andmonitoring devices. Ground loops createoffset voltages that result in reducing thesystem's noise immunity. A non-isolatedpath allows RF noise and voltage spikesto appear on the controller’s data lines.When this happens the likelihood of dataerrors and system faults increases. Anopto-isolated cable insures against theseproblems while providing optically iso-lated signal paths for data (Figure 2).
An opto-isolated NMEA cable providesoptimum performance and protection foryour computer workstation. The cable
also ensures theproper perform-ance of your
autopilot or other NMEA 0183 instru-ments that receive data from your com-puter. Many opto-isolated cables do notinclude a plug to fit your GPS unit, sincethe GPS manufacturer usually suppliesthis plug.
Check to ensure that your GPS unit isset up to transmit the NMEA 0183 stan-dard sentence of RMC or GLL, VTG andDTG. Your GPS operating manual pro-vides instructions on how to do this. Thenavigation software program looks for thecorrect NMEA sentences on a Com port.
PC IssuesIf you are using one of the serial ports for amouse and the other for a modem or, ifyour notebook has only one serial port andit's already being used, then you haveanother problem but one that’s easilysolved. A serial port PC card can add anextra port and an A-B switch will allowyou to use a serial port for the GPS ormodem.
Most Windows-compatible computershave at least one connector for receivingand sending information in a serial mode(one character after another) to externaldevices, such as a modem or a GPS. Theconnector is usually called Com 1 (shortfor communications port No. 1). If your
E L E C T R O N I C S
MAKING THE GPS CONNECTIONThe first step in operating charting software is to ensurethe "talker" speaks the same language as the "listener."Here's a look at the common mistakes in connecting a GPS to a computer and some troubleshooting tips.
THE SERIALINTERFACE
To connect a GPS Receiver to a PC, the inter-nal transistor transistor togic (TTL) signallevels of the receiver for which the standardlevels are 0 volts (space) and 5 volts (mark),must be converted to the RS-232 signal lev-els used by the serial interface. The standardvoltage levels for data signals are +5 to +25 volts (space) and -5 to -25 volts (mark).
789
4 13 2
6
Viewed from front
5
RxD
TxD
Gnd
DB-9F Connector connects toRS-232 Serial Port
NM
EA
Dat
a O
ut f
rom
PC
NM
EA
018
3 A
- D
ata
In t
o P
C (T
xD)
NM
EA
018
3 B
- S
igna
l Gro
und
Upload
RxD
AutoPilot
AutoPilot
Optional Switch
GPS
DB9F
Dav
id A
nd
ers
on
Simplified GPS hook up with autopilot.
FIGURE 1
FIGURE 2 O p t o - i s o l a t e dNMEA GPS cable.

DIY boat owner 2004-2(www.diy-boat.com) 1-888-658-2628 29
computer has only USAB ports, you willhave to obtain a USB to serial port con-nector.
Before you can use GPS data in yournavigation and charting program, the cablefrom the GPS must be plugged into anunused serial port. If you only have oneCom port on your laptop and if you're usingit for an external mouse connection, thenyou will need to either forego use of theexternal mouse or install a Com port PCcard to obtain a Com port for the GPS con-nection.
Internal fax modem cards can also inter-fere with the Com 1 connector. The faxmodem may have been set up to use Com1. Your choices are to set it up for Com 2or reconfigure your computer so that theserial connector on the back is Com 2.The manual should explain how to do this.In some cases, you can solve the problemby removing the PC card modem fromyour computer when you want to receive
GPS data.Figure 3 illustrates a system block dia-
gram that allows for NMEA information tobe sent to both a radar and an autopilot.
Using a MultiplexerIf you want to import additional data intoyour computer, such as wind data anddepth readings, you'll need either addi-tional Com ports on your computer or,more realistically, a multiplexer.
A NMEA 0183 serial multiplexer cancombine up to four NMEA-0183 listenerchannels into a single RS-232C outputfor connection to a computer's Com port.This will have complete Opto-isolation (inaccordance with NMEA requirements).
Installation and wiring a multiplexer isquite simple (refer to Figure 4). Simplyconnect the multiplexer output terminalto your Com port and connect all theinputs to the multiplexer's terminal strip.The module can be mounted to any con-venient surface with all connections madevia a terminal strip. The unit is fully auto-matic once power is applied. If more thanfour inputs are required, then additionalmultiplexers can be ganged together.
The multiplexer reads and stores theincoming data from each instrument with-out user interaction. Whenever a com-plete message is received, the multiplex-er automatically dumps it to the RS 232Coutput even while it's still reading theinputs. Therefore, complete messages aredumped as soon as they are receivedwithout any loss of input data. A NMEA0183 "talker" port is also included to allow
Troubleshooting: When your SetupDoesn't Work
If you think your navigation program is setup correctly to receive and display GPS data,but still don’t see a boat icon on your screenyou can test the Com port to find out if GPSdata is being received by your computer. Dothis by using Hyper Terminal in Windows 9x.1 From the Start button menu, select
Programs, then Accessories. 2 Double click on the Hyper Terminal. 3 Enter a name, such as GPS Test. 4 When the phone-number window opens,
select Direct to Com 1 in the "ConnectUsing" box and click on OK. If you are usinga different Com port, select Direct to Com(port number you are using, i.e., 2, 3 or 4.).
5 In the Port Settings window, select 4800bits per second and click on OK. Themajority of GPS units use 4800 but thereare some newer GPS units that can alsouse 9600. Check your GPS manual to besure. The other default settings are cor-rect and there is no need to change them.
6 If everything is set correctly, the GPS islocked on and the selected Com port isokay, you will see GPS data being dis-played in the HyperTerminal window. Thismeans the problem lies in the ElectronicCharting software settings. If you can't fixthe problem, a call to the company's techsupport should get you on track.
7 If no data is displayed, check to ensurethat the GPS is working and set up totransmit the NMEA data. Recheck all thewire connections. Each GPS manufactur-er uses different color wires for sendingout and receiving data. Check your GPSmanual to ensure that you are connectingthe correct color wires to the correspon-ding wires on the cable that came withyour navigation program. If everything isset up and wired correctly, your Com portmay be out or disabled.
NMEA Data Out from PC
Data
In to
PC
Sign
al G
roun
d
DPDTSwitch
NMEA 0183 A
NMEA 0183 B
3 - TxD
RS-232Serial Port
B
AA
ARadar
B
A
AutoPilot
+ D
C
- DC
GPS
A
5 - Gnd2 - RxDDB
9F
Antenna
TLKA and TLKB are used to transmit data fromthe computer to the Autopilot, Radar, or to
upload / download waypoints from the GPS.
In 1B
In 1A
In 2B
In 2A
In 3A
In 4A
Com
In 3B
In 4B
RxD
Shield
TLKB
TLKA
TxD
Gnd
+12V
GPS
FluxgateCompass
Radar
Depth
DB
9FTo ComputerSerial Port
the computer to request specific messagesfrom instruments with multiple messagetypes such as GPS receivers. Multiplexerscome with complete connecting instruc-tions and can be purchased from thecompany that provides the charting soft-ware.About the author: A professional engineerwith an extensive knowledge of boat sys-tems, David Anderson has more than 40years of sailing experience. He operatesStand Sure Marine (www.standsuremarine.com) offering specialty sailboat hardwareand designs and installs electrical systems,electronic navigation and communications. D
avid
An
de
rso
nFIGURE 3
Multiplexer GPS hook-up.
FIGURE 4

DIY boat owner 2004-2(www.diy-boat.com) 1-888-658-262830
P O W E R B O A TR I G G I N G
By Peter Caplan
A boat's steering system winds up inthe out-of-sight-out-of-mind categorywhen it comes to maintenance untilresponding to stiffness and play in thesystem, the symptoms of wear, forcesan inspection of the installation. A dualsteering station set-up aggravates thesituation, as the wheel in use must notonly turn the rudders, it must also turnthe wheel at the other steering positionvia another cable, compounding thestiffening effect. This was the case withUK boat owner Alan Hanson’s 30-plusyear old 42' (12.8m) Sealion. Steeringwas a matter of first overcoming 50° orso of free-play in the wheel before thewheel would turn the rudders and thewheel at the other station. Although thesystem still did the job, steering theboat on long passages was a tiring exer-cise. Eventually, with a system replace-ment imminent, the obvious choice ofnew equipment was a hydraulic sys-tem. The light action and reliability ofmodern hydraulic steering systemsmake them the norm on nearly all larg-er power yachts. [Ed: If you are stick-ing with a mechanical steering system,refer to DIY 2004-#1 issue for step-by-step details on installing a newmechanical (cable) steering system.]
There are several manufacturers ofreliable marine steering systems andthe boat owner settled on TeleflexSeaStar, a system that's installed asoriginal equipment on many productionboats, such as Boston Whaler, Carver,Cruisers, Grady White, Hatteras,SeaRay and Viking. No matter whichsystem you select, the installation ofhydraulic steering is pretty well identi-cal whatever the make.
PreplanningDuring extreme system demands in roughseas, rudders generate high forces thatfeed back through the system to the rud-der actuator, in this case, the steering cylin-der or ram. This is why it's vital that all thesystem components be bolted to a sup-port structure that is strong enough to takethe strain. On many boats, the originalmount will be adequate but, if additionalsections are needed to support the newsystem, these must be equally as strongas the original structure.
On the Sealion, there is a substantialaluminum mounting frame extendingacross the lazarette. It needed only a cou-ple of solid aluminum spacers fitted tobring the new hydraulic cylinder up to thesame height as the old mechanical steer-ing connections.
The installation of the hydraulic steer-ing is very simple but the routing of thecables throughout the boat complicates it.This is a simple process when a boat isbeing built and the equipment can be fit-ted before the deck is set down onto thehull.
For a retrofit, the cables have to bepassed through, around and behind all thefurnishings and fittings. Tying messengerlines to the old steering cables before theyare withdrawn can help draw the newcables back through the boat to the variousconnection points.
Piping ChoicesHydraulic steering suppliers offer a choiceof materials for the piping (hydraulic lines),which includes plastic, copper or made-uphydraulic piping (hose). The Teleflex SeaStarsystem specifies either 3/8" (9mm) copper,which can be purchased in rolls from naturalgas suppliers, or hydraulic piping with
swaged end fittings for quick assembly. Theydon't recommend plastic piping for this sys-tem, as the burst limit for plastic is not suf-ficiently above the maximum pressure reliefvalve settings on the helm pumps.
The choice of whether to use copper orhydraulic piping is then a matter of eithercost or convenience. Copper piping is afraction of the price of swaged hydraulichoses but is more difficult to route throughthe boat as every curve and bend mustbe formed as it passes through. It's pos-sible and, with care, offers a significantcost saving. The flexibility of 3/8" (9mm)copper makes is relatively easy to install.It's essential that copper be securely sup-ported throughout through the boat to pre-vent vibration, which causes work hard-ening and fractures. This need for supportcan sometimes cause problems whereaccess to various compartments is severe-ly restricted.
On a boat with unrestricted access, prop-erly installed and adequately supported cop-per piping that is not subject to corrosionfrom saltwater exposure lasts just as longas hose.
For this installation, hydraulic hose waschosen for ease of installation and a longlife with no worries of the effects of vibra-tion on the piping. Many hydraulic steeringsystem suppliers can supply hydraulic pip-ing but a look in the local Yellow Pages willproduce a list of hydraulic equipment spe-cialists who can make up the necessarylines. Prices vary between suppliers so it'sa good idea to shop for the best price.
When using copper tubing, you can buycoils of sufficient length to complete thejob. When using hydraulic hose, eachhose must be ordered to the correct lengthso that the end fittings can be swaged on.This is the only critical part of the instal-lation but is easy to achieve by running
Steering RefitReplacing worn-out mechanical steering with a new hydraulic sys-tem is well within the scope of the experienced DIYer but it doesrequire a combination of diligence and a willingness to endure somesnakelike physical maneuvers in the small, dark places in your boat.
All the parts necessary to install a dual sta-tion hydraulic steering system can be pur-chased for less than US$1,400. Completingthe job took two days of actual work but wasspread over several weekends, which includ-ed planning and allowed time for ordering andreceiving the piping. While no two boats arethe same, the work involved and the problemsencountered are typical of most boats as wellas different makes of hydraulic steering sys-tems. While hydraulic piping makes the rout-ing job very much simpler, using copper tubereduces the overall cost.
DIY BILL

DIY boat owner 2004-2(www.diy-boat.com) 1-888-658-2628 31
POWERBOAT - RIGGING
The lower helm posi-tion, with fascia panelsremoved, reveals bothends of the originalsteering rack.
Remove the wheel hubcover by undoing the
securing screws.
This exposes the wheelsecuring nut, which isundone with a largewrench.
Remove the wheel bygently rocking it back
and forth to free it fromthe taper on the shaft.
The steering shaft is heldin place by a wire circlip.Pry this off using the tipof a screwdriver blade(or split ring pliers).
The nylon bearing blockis now free to pull out,
leaving the steeringassembly loose behind
the fascia panel.
stiff cable through the boat to each connection position andthen carefully measuring each length. It was at this stage that weran our messenger strings to allow easy threading of the newpiping through the boat as each length of measuring cable waswithdrawn. The big advantage of hydraulic hose is the ease ofconnection once everything is fitted and the piping is run.Hydraulic fittings, unlike compression joints, use a cone andseat connection that only needs connecting and tightening tomake a perfect joint. It's virtually impossible to overtighten orspoil a hydraulic connection, whereas compression joints areall too easily over tightened and damaged by inexperiencedinstallers.
Removing The Old Steering

DIY boat owner 2004-2(www.diy-boat.com) 1-888-658-262832
POWERBOAT - RIGGING
The original push-pullmechanical steering used onthis boat is probably com-mon to boats of this era andquality.
Remove and discard themounting bracket that held theouter cables along with thecable end fittings attached tothe rudder arm. The eye towhich the fittings are attachedis left in place, as it may be
suitable for the later attachment of the new hydraulic steeringcylinder.
This provided the length required for the balance pipingbetween the two pumps. The same procedure was followedfrom the helm pumps to tee connectors where the two sys-tems meet. More electrical cable was drawn from the tee con-nectors to the lazarette. Each of these cables was formed intosweeping radiused bends to emulate the run of the piping andthen marked with masking tape and cut, leaving extra length toallow for error; slightly longer piping can be hidden out of sight;piping that is too short is absolutely useless.
Installing the Hydraulic Steering Calculate the position for the cylinder by measuring the totallength of movement of the shaft within the ram and then mov-ing it to its mid point and measuring from the eye on the end ofthe shaft to the center of the mounting base on the cylinder.
As each length ofcable is withdrawnwith another mes-senger lineattached, its lengthis carefully meas-ured and recordedfor later ordering ofthe made up piping.
With all cableends disconnectedthe old cables arewithdrawn fromthe boat. At thisstep, tie draw-strings (messengerlines) to the endsof the old cables toassist with thread-ing the new piping.As we wereinstalling hydraulic
hose, rather than copper tubing, it's now necessary to determinepipe lengths. Using the messenger lines, we pulled spare electricalcable through the boat between the upper and lower helm pumps.
The first step of thedismantling processat the rudders is todisconnect the endsof the cables fromthe fork connection on one of the rudder arms. These are clampedinto position with a nut and bolt through a slot in the side of thecable end fitting. Once the nut is undone and the bolt removed thecable end slides out of the fitting. Note the heavy-duty construc-tion of all fittings in this system, one reason it lasted so long.
Next, dismantlethe mountingbracket holdingthe outer cable.This consists of adouble cuparrangement thatallows the outercable to pivotslightly as the rud-ders are turned. Aspring keeps thewhole assembly
under tension to prevent vibration. Undoing the four machinescrews and lifting off the top section accomplish removal.
The steeringmounting assemblyis held on with fournuts and studsbehind the fascia.Once these areremoved, the wholeassembly slidesout. This leaves thesteering rack looseon the end of thecable inside thefascia panel where
it remains until disconnecting the other end of the cable from therudder arm. Follow the same procedure at the upper steering posi-tion before proceeding to disconnect from the rudders.
The original steeringsystem still in place inthe lazarette shows thesize of the push-pullcables and the sturdyalloy mounting framethat connects bothrudder tubes and pro-vides a solid mount forthe cable ends.
Once the uppermost cable hasbeen removed, the lower cable isdealt with in the same manner.

DIY boat owner 2004-2(www.diy-boat.com) 1-888-658-2628 33
POWERBOAT - RIGGING
Transfer this figure to themounting frame in thelazarette and measure fromthe rudder pivot point alongthe mounting frame to givethe position for mounting the cylinder.
Calculate the position forthe cylinder by measuring thetotal length of movement ofthe shaft within the ram andthen moving it to its mid point
The installationbegins with markingthe hole for thelower helm pump inthe front fasciapanel and thencarefully cutting itout with a jigsaw.
Use the templatesupplied with thekit to mark theholes for the helmpump mountingstuds.
Carefully drill theholes, taking care tokeep the drill squareas the bit passesthrough the fascia.This was critical dueto the close proximi-ty of the originalmounting holes.
Apply a coat of var-nish to seal the cutedge to preventmoisture intrusionthat can rot thewood. Allow to dryprior to fitting thepump.
Follow the sameprocedure at theupper commandbridge steeringposition where thehelm mounts on afiberglass panel.
Before mounting thehelm pumps, installthe necessary fit-tings after firstremoving the pro-tective plugs.
The only modification requiredto the mounting frame was tofabricate two 1/2"- (12mm-)thick aluminum spacers to raisethe cylinder up by 1" (25mm)and back far enough to align itwith the eye on the rudder arm.A piece of alloy from a localscrap yard was used.
Apply liquid threadsealant to both lockand seal thethreads. Don't usetape as stray endscan get into the sys-tem and block thevalves.
There are twomain connections,port and starboard,and one balancepipe fitting in eachhelm. The upperhelm pump (left)has the balance fit-ting in the bottomand the lower pump (right) in the upper fitting. Note also the differ-ent oil filler caps. The upper helm pump has a vented knurled capfor easy removal for system top up. The lower helm has a semi-per-manent cap that needs a screwdriver to open. Once the system isfilled, this cap should not be opened otherwise oil pours out.
When all fittings areinstalled, the pumpsare ready for mount-ing and securingwith nuts and studsbehind the fascias.
Moving back into thelazarette, mark the position formounting the steering cylinderonto the original frame.

DIY boat owner 2004-2(www.diy-boat.com) 1-888-658-262834
POWERBOAT - RIGGING
Once the athwartship position of the cylinder had been final-ized, the next point to check is the distance (shown as A-B inthe illustration above) from the rudder pivot point along the rud-der arm for attachment of the cylinder shaft end. This is impor-tant as it decides the number of turns on the wheel and the cor-rect loading on the cylinder. If the turning radius is too small,there will be fewer turns on the wheel but the amount of forcerequired to turn the rudders may exceed the designed limits. Ifit's too large, the rudders may not turn to the required 35° ineach direction. In this case, the heavy-duty eye on the rudderarm was within 1/4" (6mm) of the required position, which wasconsidered close enough. The kit comes with detailed instruc-tions and clear diagrams to assist with correct installation and,in this case, most of the measurements were so close to thoseof the original steering that little modification was necessary.
A
Tiller Steering Arm
B
After cutting theplates to size, theywere drilled, etchprimed and epoxycoated to protectfrom corrosion.
The spacing plates and cylinderare placed in position and thefastening holes in the mountingframe are marked.
The fastening holes are thendrilled into the mountingframe. Only two of the cylinderbolts pass right through themounting frame. The other twopass through the spacers thatoverhang the mounting frame.
and measuring from the eye on the end of the shaft to thecenter of the mounting base on the cylinder. Transfer thisfigure to the mounting frame in the lazarette and measure
DIY EZINE www.diy-boat.com
Now you can access DIY Boat Owner Magazines anytime, anywhere.
You can read, print or search the current issue plus 7 most recent back issues of DIY, then receive 3 more issues for a total of 11 issues per year! Subscribers to the EZINE also qualify for DIY's FREE Technical Assistance.
Try Before you Buy - Log onto www.diy-boat.com and click on "Free Trial" to view 1 issue.
To subscribe to DIY EZINE, follow the instructions online or call 1-888-658-BOAT.
No more storage • Searchable • Instant access anywhere
11Issues
The Portable Solution

DIY boat owner 2004-2(www.diy-boat.com) 1-888-658-2628 35
POWERBOAT - RIGGING
from the rudder pivot point along the mounting frame to givethe position for mounting the cylinder.
Filling And Bleeding The SystemBleeding a dual station system is accomplished in two phas-es, beginning at the lower helm position. It's most impor-tant to ensure that the section of the system to be bled iscompletely filled with oil before starting the bleeding process.The system comes complete with a tube and fitting those
For additional security, holesare drilled and bolts attachedto either end of the spacers.
Finally, the eye connectionbetween the rudder arm andcylinder rod is firmly tightened.A Nyloc locking nut preventsloosening under vibration.
Piping soon appears throughthe access hatch in the headcabinet, ready for connectingto the tees.
Once connected the piping isrouted across the lazarette for-ward bulkhead and held tem-porarily with plastic cableclips.
Connect the pipingto the upper helmpump from insidethe wheelhouse.The lower pumpconnects in thesame way.
Once the equip-ment and pipinginstallation is com-plete, replace allplastic cable clipswith proper stain-less steel P-clips fit-ted with anti-chafegrommets.
Reinstall steeringwheels before beginningthe bleeding process.Once air bubbles havestopped coming out ofthe helm pump (thismay take some time),turn the wheel clock-wise until the steeringrod on the cylinder isfully extended one way.
Fit and tighten the tee con-nectors behind the head cabi-net.
Piping was originally routedacross the transom but, forsafety, we reversed the bleedvalves on top of the cylinderso that the piping would clearthe steering cross bar andavoid the possibility of chafe.
Now route the pipingusing the messenger lines that were prepared earlier and makethis a very quick and simple operation. The two pipes from thecylinder in the lazarette are the first to be run.
Once all holes are drilled, thecylinder is bolted firmly intoposition. We used Allen Headmachine screws because theywere onboard.

DIY boat owner 2004-2(www.diy-boat.com) 1-888-658-262836
POWERBOAT - RIGGING screws into the filler hole. The tube is connected to the oilcontainer so that oil can run into system while air vents upthe tube and into the container.
Fit and tighten the filler cap on the lower helm pump and fol-low exactly the same process with the upper helm. It wasfound, in practice, that small amounts of air remained trappedwithin the system after the bleeding was complete but whenleft for a couple of days the air found its way into the helmpumps. To purge the lower pump, slacken the filler cap andallow the air to escape under pressure from the oil in the upperhelm. Simply topping up the system purged the upper helm.
Performance ComparisonIt was interesting to note the difference in steering powerbetween the hydraulic system and the old manual steering.While testing the system with the wheel hard over, we man-aged to bend the rudder stops that, for 30 years, had beenmore than adequate for use with the manual system. Thismeant beefing up the stops with additional angle sections.
The difference in steering performance is marked. There isnow no play at all in the steering compared with 50° of freeplay on the old system. More noticeably, the steering is nolonger a muscle straining exercise. In fact, the action is so lightnow that it's easy to steer with one finger. The owner's onlycomment on the subject was “wish I’d done it years ago!”
About the author: Peter Caplen is a mechanical engineer andBritish technical writer with nearly 30 years experience in build-ing, maintaining and renovating mainly powerboats.
Connect the bleedtube (supplied)onto the bleedvalve at the endwhere the rod isextended and thebleed valveopened. Turn thewheel in the oppo-site direction toforce air out of thesystem. It's vital tokeep the helm
pump constantly topped up with oil from the container through-out the process to prevent air entering the helm.
Once the oil is freeof air bubbles,close the bleedvalve and tighten.Bleed the otherside of the systemin the same way.

DIY boat owner 2004-2(www.diy-boat.com) 1-888-658-2628 37
Story and photos by Janet Ross
Documentation, registration, titling,licensing — all terms related to themethods available to you when youown a boat (in the U.S. or Canada) andyou want to (must) assure all the godsof boat ownership that the boat is,indeed, yours, albeit often with an own-ership interest shared by a bank. Theseterms also provide the bases for lawenforcement officer’s identification ofrecreational boats. You can document,register, register and title or license yourboat yourself, it’s only a matter of howmuch time you want to spend withforms and protocols. (Boats that areregistered or documented in a foreigncountry are beyond the scope of thisarticle.)
You bought it. You own it. Now, proveit. Navigating the required course forregistration or documentation can becomplex and time consuming but youcan do it yourself. In both the U.S. andCanada, you must register or documentyour recreational boat, either federallyor in a local jurisdiction. One or theother is mandated for all recreationalboats navigating U.S. or Canadianwaters.
Making Your BoatLegally Yours The United States Code Of FederalRegulations (CFR) prescribes require-ments for “numbering” boats (and forreporting accidents). The law appliesto any and every boat equipped withpropulsion machinery of any type usedon waters subject to U.S. jurisdiction.There is a lot more in the reading of thelaw but, in the interest of keeping thingsbrief, we are going to deal only with the
immediately relevant basics. The lawdoes have some exceptions that areclearly identified within the language ofthe law. Exempted from the law arepowered tenders (less than 10hp) ofproperly numbered boats (motherships). These tenders must display the“mother” boat’s number followed bythe suffix “I.” Boats used exclusively forracing are also exempted.
Boat owners in the U.S. can get num-bers for their boats from the state oftheir principal use (state registrationand/or titling) or from the U.S. federalgovernment (documentation). Eachstate agrees to honor the numberingsystem of other states so, when a boatfrom one state is in temporary use inanother, the states recognize those num-bers and/or certificates issued by theU.S. government (USCG OfficialNumber). That’s a relief. Register yourboat in your home state and it’s legalin all states (at least, temporarily). Thereare important limits to “temporary” andyou should review the laws of the rel-evant states whose waters you use.Your registration (numbering) certificateor document must be onboard for sur-render at any time to any law enforce-ment officer for inspection on request. Astate registered boat bears state num-
bering in alpha and numeric charac-ters, usually showing the state abbre-viation as the first two characters in theseries. These numbers are displayed onboth sides of the boat's bow. A boat thatis registered with the federal govern-ment is said to be “documented.” Sucha boat is listed with the National Vessel
Boat Licensing,Registration & Titling Made Simple
Can you document, register, register and title or license yourboat yourself? What follows is the short course in “how to” froma professional registration and documentation agent.
L I C E N S I N G
Examples of illegal identification numbers:(top) Numbers should be on the boat struc-ture; (second from top) Okay for a regis-tered (state) boat only as missing the hail-ing port; (second from bottom) Lacks a hail-ing port required for a USCG documentedboat; (bottom) Haven't a clue as neitherstate nor documented be.
"If you are taking your trawler, cruiser
or sailboat to Bermuda or offshore to foreign waters like theBahamas or Mexico,
documentation is your best bet…"
– the DIY way

Documentation Center (NVDC) of theU.S. Coast Guard (USCG), a registra-tion agency of the federal government,instead of a state agency. Many stateshave established provisions for titling aboat along with registration but bothtitle and non-title states require regis-tration. USCG documentation may bean acceptable form of registration insome states. Always check your state’sposition before you presume anything.
There is a hitch among all theseknots: a documented boat is not exemptfrom applicable state registration laws.Even if your boat is federally docu-mented, the state of “principal use” mayalso have a claim to recording your boatownership. Some states require a form
of registration (but not titling) for docu-mented boats. You have to check withyour state boating authority to find outwhat’s required.
In Canada, the requirements are sim-ilar, but the nomenclature is different andall forms of registration or licensing arenational (not provincial). The CanadaShipping Act effective February 2000, islaw in transition but is the current statusquo. In Canada, unless a boat is alreadyregistered in a foreign country, you mustregister any pleasure boat over 15 grosstons and, in most cases, registration is aprivilege accorded only to Canadian citi-zens. Registration provides legal title andallows for a boat name and official num-ber. It also provides for using the boat assecurity for a marine mortgage. Once allrequirements are met, a Canadian regis-tered boat receives a Certificate OfRegistry, which must be carried onboardat all times. If your boat is less than 15gross tons, you can register it but it's notmandatory. You have the option of licens-ing the boat. If you do register, you maynot later license the boat.
For those boats less than 15 gross tons(13,607kg), whose owners chose not toregister under the Canada Shipping Act,there is a Small Vessel License requiredfor any small boat with a motor greaterthan 9.9hp, including personal water-craft. You don’t have to be a Canadian
citizen or even live in Canada to get yourboat licensed but the boat must be prin-cipally used in Canadian waters.
Title and Register orDocument?Documentation in the U.S. is patternedafter the British (and Canadian) systemof registering yachts, with the primarypurpose of establishing an internation-ally recognized maritime title and reg-istry for the boat. If you have a 23' (7m)sailboat with an outboard engine or youtow water skiers behind your runaboutand you use your boat on a lake inGeorgia, documentation is probably notfor you. Registering the boat with thestate of Georgia will probably be quitesufficient. If you are taking your trawler,cruiser or sailboat to Bermuda or off-shore to foreign waters like theBahamas or Mexico, documentation isyour best bet for lots of reasons, not theleast of which is that your boatbecomes a vessel of the U.S. (orCanada) and the document becomesthe boat’s equivalent of a passport. Thatstatus does carry with it one caveat. Intimes of war, your boat could bepressed into U.S. military service assome were during World War II to patrolthe U.S. coast keeping watch forGerman submarines. There are still liv-ing boat owners who are enormously
DIY boat owner 2004-2(www.diy-boat.com) 1-888-658-262838
Examples of proper identification: (top)Name and hailing port that comply withUSCG documentation marking requirements;(middle) Properly displayed number for astate registered boat; (bottom) Registrationnumbers on flybridge meets requirement thatstate numbers be on the forward half of theboat.
L I C E N S I N G
U.S. State Registration U.S.C.G. Documentation C anadian Registration Canadian Licensing
Yes Yes Yes Yes
Follow state guidelinesoften found on stategovernment web sites orcall your state boatingauthority.
Go to www.uscg.mil/hq/g-m/vdoc/nvdc.htm .
Go towww.tc.gc.ca/marinesafety.Follow the links. Shipregistration hotline: 1-877-242-8770.
Go towww.tc.gc.ca/marinesafety .Follow the links.
One stop; usually sameday results. Much likeregistering a car.
Many forms; time consuming;lots of steps and hoops.
Many forms; timeconsuming; lots of steps andhoops.
Simpler than shipregistration.
State registration and/ortitle fees plus taxes, ifapplicable.
As little as $92 (DIY); otherfees apply for mortgages andcomplicated transfers,abstracts, etc.
Government establishedfees.
Government establishedfees.
Numbers on the bow. No exterior numbering. No exterior numbering. Numbers on the bow.
Not required. Required to be marked on thestern.
Required to be marked onthe stern.
Not required.
Not required. Required to marked on thestern.
Required to be marked onthe stern.
Not required.
Can be recorded in stateswith titling provisions.
First Preferred Ship’sMortgage
Allows the boat to besecured by a mortgage.
No provision forsecuring a mortgage.
Simple; cheap; usuallycan be completed in oneday.
Perfect chain of ownership;preferred mortgage recording;international recognition.
Reserves a name; providestitle; enables a marinemortgage to be secured.
Simple process.
Sometimes lacksprovision for recordingliens; not internationallyrecognized; requiresdisplay of numbers.
A lengthy, complex process;no local assistance; relativelycostly.
Mandatory for boats over 15tons.
Mandatory for boats 15tons or less.
May require multiple statesearches to locate priorowners.
Absolute. Absolute.
DIY?Looking forhelp?
Process
Cost
MarkingHailing Port
Name
Liens
Pros
Cons
Ownership
Taxes Pay them. Pay them. VAT VAT
May require multiple provincialsearches to locate priorowners.

DIY boat owner 2004-2(www.diy-boat.com) 1-888-658-2628 39
L I C E N S I N G
proud of their boat’s participation in thedefense of U.S. shores in the 1940s.
Aside from the remote possibility ofbeing impressed into the U.S. Navy,being a documented boat carries withit only benefits and prestige. Manybanks and marine lenders require thata boat on which they lend purchasemoney be documented in order that thefunding underwriter can rest assuredthat its interest is recorded as “preferredmortgage.” A boat that has been con-tinuously documented since new,regardless of the number of owners,carries with it a perfect chain of own-ership in its Abstract of Title. States canalso record liens on a boat’s title butnon-title states have no instrument forproviding this safeguard and a singleboat may have been titled/registered inmany states by multiple owners. Findingout whether thereis any monetaryencumbrance onsuch a boat is a
daunting task. When purchasing a boat that will
have a mortgage you may find thatdepending on the size of the boat and/orthe loan, the U.S. lender wants a FirstPreferred Ship’s Mortgage placedagainst the boat to secure its loan.When purchasing a documented boat,the first thing you should do is requestan Abstract of Title from the CoastGuard. In addition to showing the chainof ownership, it shows any liens thathave been placed on the boat and ifand when they were satisfied. TheUSCG doesn't allow transfer of owner-ship without satisfaction of any out-standing liens or statement from theleinholder that transfer of ownership isallowed.
Records of Choice Documentation in the U.S. and regis-tration in Canada both carry the bene-fit of being the records of choice formaritime lenders to secure their finan-cial interests in a pleasure boat andboth countries provide for recordingthese loans on the document or certifi-cate of registry.
There is also the vanity benefit of nothaving to display numbers on the boathull. Boats in national registries are eas-ier to trace when stolen. When voyaging
to faraway places,the U.S. document-ed boat andCanadian registered
boat are received as vessels of theirrespective homelands, a not so smallmatter of prestige and security in inter-national waters.
Due Process
Whether a boat is documented or stateregistered, the forms and protocols forcreating or transferring ownership canbe complicated and intimidating. It’sdefinitely a test of tolerance for thebureaucratic process. The USCG has awebsite for the NVDC that explains theforms, the cost and instructions forcompleting the paperwork. To do-it-yourself USCG documentation, go towww.uscg.mil/hq/g-m/vdoc/nvdc.htm.Individual states have boating author-ities that handle such matters. All theforms necessary for the Canadian equiv-alent are available at www.tc.gc.ca/marinesafety. Just follow the links. BothU.S. and Canadian processes requirecertain boat measurements. While theyappear to be related to the weight ordisplacement of the boat, they are not.These special measurements, in bothcountries, relate to the volume in eithergross or net tonnage, a calculation onlyobtainable by an approved tonnagemeasurer unless the simplified self-measurement method is used, whichis approved in both countries. Thesemeasurement requirements are veryoften misunderstood but they are veryimportant in qualifying a boat for U.S.documentation or Canadian registration.Both countries require periodic renewalsof their respective documents or certifi-cates and each notifies the holder of thepaperwork of expiration dates and renew-al requirements.
Hmm, I'd like to see a ruling on this for adocumented "mother" boat and tender.
Form legalese can be somewhat confusing for the DIYer.
Now that’s a stern!

DIY boat owner 2004-2(www.diy-boat.com) 1-888-658-262840
Ownership IssuesOnly U.S. citizens or a U.S. corporationwith no alien directors can own a docu-mented boat. Anyone who can demon-strate a state’s ownership prerequisitescan register and title a boat. In Canada,you must be a “qualified person,” e.g. aCanadian citizen or corporation to regis-ter a boat with the registry.
Naming the BoatName your boat anything you want but,before you christen that new boat, thinkabout how the name is going to soundon the VHF radio when you identify your-self for all to hear. Many an eavesdrop-per on the radio has been royally enter-tained by marine telephone operators’translation of what they heard as a boatname. Canadian boat owners mustreserve a name for their boat. No tworegistered boats can bear the same name.One way to skirt this issue is to add aRoman numeral after the name to cre-ate a name different from the one alreadyreserved. Canada has some strict guide-lines on reserving names and will notallow a name that is likely to offend thepublic or one that is likely to hurtCanada’s reputation. Pretty subjective but
something to consider.
A Numbers GameThe USCG official number stays withthe boat forever. If a boat is deleted fromdocumentation and then later is redoc-umented, it retains the original number.The official number assigned to docu-mented boats, preceded with the abbre-viation "NO" must be marked in block-type Arabic numerals at least 3" (7.6cm)on some clearly visible interior structur-al part of the hull. The number must bepermanently affixed so that alteration,removal or replacement would be obvi-ous and cause noticeable scarring ordamage to the surrounding area.
The name and hailing port of a recre-ational boat must be also be marked.These two identifiers must appeartogether on some clearly visible exteri-or part of the hull. On recreational boats,this means the stern. All markings mustbe clearly legible letters of the Latinalphabet or Arabic or Roman numerals,at least 4" (10cm) high and made bymeans and materials that result indurable markings. The hailing port mustinclude both a place and state abbrevi-ation, territory or possession of the U.S.Boat owners often are confused by theterms “hailing port” and “home port.”For example: the USCG documentation
office headquarters is located in FallingWaters, WV. Falling Waters, WV, is the“home port” designation and it doesn’tgo on the stern of the boat. It's the“home” of USCG documentation serv-ices. “Hailing port" is the place namewhere the boat owner lives and, if theboat lives there, too, fine. That’s the"port" marked on the boat's stern.
A state registration number stays withthe boat as long as it stays in the samestate. When ownership changesbetween parties from the same state,only the name on the registration (andtitle, if applicable) changes. If a boat ismoved to another state and registeredin that state, the new numbers reflectthat the requirements of the new stateregistration are met.
The corresponding numbering prac-tices in Canada parallel U.S. practices.A boat operating under a Small VesselLicense must be marked with the let-ter-number combination on the bow. Aregistered boat bears its name and portof registry on the stern.
Who's in ChargeBoat owners can DIY or hire experiencedagents to process the paperwork for U.S.documentation. Agents at the NVDC will
L I C E N S I N G
Questionable whether the lettering for thename meets the legibility requirements forUSCG documented boat.
Much too pretty for numbers this one's aUSCG documented yacht.
Canvas stern extension is presumablydesigned to deter waterfowl from nestingon swim platform but Inspector Clouseaumight think it was concealing a boat's reg-istered name.
Want to do your own lien search on a usedboat? MarineLiens.com offers a centralposting and searching facility in eight lan-guages. You can search a boat by hull num-ber, state or country registration number,or name and hailing port and country ofregistry. If the boat is found in the database,there is a fee of US$20 to view its lien sta-tus. If searching results in no matches, thenthe boat in question has no presently reg-istered liens at marineliens.com.
Lien Search
Not compliant with USCG requirements for documented boats and numbers can be eas-ily removed without leaving a trace. Better to etch numbers into an interior structure.

help the taxpaying consumer process documentation but theirtime is limited and, with a huge backlog of applications, thesecivil servants are constantly asked to do more with less.Throughout the country, professional documentation agentswork at documenting boats for boat owners or boat bro-kers/dealers. Some lenders have preferred agents that theyuse. The American Vessel Documentation Association (AVDA)was formed in 1995 and is a professional organization thatcertifies its members to their expertise in handling boat doc-umentation and interacting with the USCG at the NVDC.
Fees for professional documentation services are reason-able and include all the form filings. If you value your time,you'll want to consider having a professional handle thisprocess. At the very least, discuss the options with a profes-sional documentation agent. It costs nothing to ask questionsso that you can make an informed decision about who willhandle the registration and/or documentation of your boat.Bear in mind that most lenders of boat purchase moneyrequire that an independent documentation agent handledocumentation and the first preferred ship’s mortgage. (Thisis the same protective stance the home mortgage lenderstake as well as the lenders who make automobile financingpossible.) It’s simply a matter of the lender’s comfort in assur-ing that its interest is promptly and properly secured. It’s acost of doing business.
Where Has My Delaware Gone? Before you rush to register or document your boat in the no-sales-tax states of Alaska, Delaware, Nebraska, New Hampshireor Oregon, know this. A documented boat is not exempt fromapplicable state and/or federal taxes. States that have salesand/or use taxes have become very savvy about collecting taxesdue on boats using their waters. If your boat is used primarilyin a state that has sales and/or use tax, pay the tax promptly.Seemingly, clever evasion tactics will only delay the inevitableand the fines and interest for failure to pay will make the painof compliance even more agonizing. A boat in Maryland with aNebraska hailing port or registration number, berthed in a yeararound slip or on a mooring, will attract the attention of moti-vated tax collectors. In times passed, Delaware hailing portmarkings for boats owned by closely held Delaware corpora-tions, residing in post office boxes established solely for creat-ing a residency, were a fact of the boating life. Things are chang-ing as the tax revenue base has become so valued by the indi-vidual states that having a no-tax state hailing port is only ashort lived degree of separation from the tax collector.
Wise WordsWhether you DIY it or not, don’t wait until the last minute toset your course on U.S. documentation or Canadian registra-tion. These processes take time and diligent effort to completesuccessfully.
Author: Janet Ross heads up the yacht documentation divisionof a marine service company in Naples, Florida. DIY readers canpick her brain at [email protected].
DIY boat owner 2004-2(www.diy-boat.com) 1-888-658-2628 41
�

DIY boat owner 2004-2(www.diy-boat.com) 1-888-658-262842
pole is the best choice if you want to setvarious sizes of furling or hanked head-sails. When flying a cruising spinnaker,may be better to use a fixed rather thana telescoping whisker pole, as the lattermay not be able to withstand the extraloading if the length required is egual orclose to the fully extended pole. (Note: Aspinnaker pole is too short to double asa whisker pole as it's made to the “J”measurement (forestay to mast).Therefore, a “J” length pole will only workwith non-overlapping headsails.)
Pole Sizing Pole length and diameter is relative to boatlength, headsail size (100% jib, 130%genoa, etc.) and type of sailing planned(coastal versus offshore). Forespar(www.forespar.com), the world's largestmanufacturer of whisker and spinnaker
poles, publishes pole size selection chartsbased on over 40 years of experienceequipping boats with whisker poles. Beforeselecting a pole, you'll need to first deter-mine the length of the largest sail, meas-ured across the foot from tack to clew.This equates to the overall pole lengthneeded for that sail. Telescoping polesrequire little extra length added for tubeoverlap. Running a genoa in medium toheavy air with the pole fully extended isgood cause for breakage. Boats with abowsprit require a pole one size larger forstrength and the added length. Ditto ifyou plan to sail offshore.
System Components Once you have determined the correctsize pole, you'll need to select the com-ponent hardware to complete the instal-lation. If your mast, at the forward cen-terline is equipped with a T-track, either
DIY boat owner 2004-2(www.diy-boat.com) 1-888-658-2628
By Jan Mundy
When sailing downwind, your headsailchoices are a spinnaker, asymmetrical"cruising" spinnaker or genoa or jib. Manysailors shun spinnakers, as they requireadditional hardware and lines and a skilledcrew. In this instance, your options are acruising spinnaker or headsail and, witheither sail, using a whisker pole to extendthe clew outboard to windward will cap-ture more air, increase boat speed andmaximize downwind performance. In slop-py seas, light winds or sailing dead down-wind, a headsail or cruising spinnakertends to yaw and spill air when set with-out a whisker pole. Attach a whisker poleand you gain control of the clew so, withadjustments in trim, you keep the sail filledwith air. If you like to sail dead downwind,wing-on-wing, with the mainsail andgenoa on opposite sides, adding a whiskerpole acts like a boom to control the footand shape of the genoa.
Whisker poles are made of aluminumand/or carbon fiber and come as eitherfixed tubes or with two or three telescop-ing sections. As pole length is based onthe foot length of the sail, a telescoping
R I G G I N GS A I L B O A T
Pole Choices For Downwind Sailing
With the proper equipmentcombinations, flying a head-sail attached to a whisker polemakes for fast, fun, downwindsailing. Here's how to select,install and set the pole.
Fore
spar
Catalina 30 sailing wing-on-wing with telescoping whisker pole.
Telescoping pole with piston ends and external triggers.
Heavy-duty telescoping whisker pole for a larger boat has jaw outboard end and socketinboard end. This pole features Forespar's patented Line Control. Simply uncleat the externalline to adjust pole length.
Measure the headsail from tack to clew toobtain pole length.
TackClew
"J" Measurement
150%#1 Genoa
Pole Measurement
100% Working Jib
Joe
VanV
eene
n

1-1/4" or 1-1/2" (31mm or 38mm) wide, you're all set. If not,consider adding a track. A track with a sliding car allows adjust-ment of the inboard height of the pole to suit different wind con-ditions, especially on boats larger than 25' (7.6m). This systemmay require a pole lift and downhaul blocks to control the mastcar movement and position on the mast track. If this systemdoesn't fit your budget, plan on purchasing a fixed padeye, prefer-ably two, for mounting on the mast centerline. Additional padeyesfacilitate setting headsails with different clew heights, mount-ed at the proper mast height as needed (see below). Alwaysmount the pad eyes on the forward centerline of the mast sothe pole can be set port or starboard on the same mast eye.
Will the pole be stored on deck or on the mast? There arechocks sold for deck mounting of fixed length and telescopingpoles and storage cars (upper end) and chocks (lower end) forvertical mast mounting and storage. This last option requirespurchasing deck chocks as well for safety. Underway in severe
weather, the pole adds weight andwindage aloft and vibrates. Anotherchoice is to mount the pole on V-shaped brackets on stanchions. Thisoption is fine on calm waters, lightwind conditions and up to 3-1/2"-(9cm-) diameter poles. Any boatgoing offshore, or using larger poles
should have deck chocks securelymounted on deck to stow the polein adverse conditions. Always stow
twist-lock telescoping poles in acockpit locker or in the cabin away fromsaltwater.
DIY boat owner 2004-2(www.diy-boat.com) 1-888-658-2628 43
Combination pole with inner tube made of lightweight carbon andan aluminum outer tube is noticeably lighter in weight than an allaluminum pole when compared to an all carbon pole. Note wherethe topping lift attaches to the outboard end of the pole and poleend clips over genoa sheet so it slides freely and with the jaw facingdown.
All carbon pole is 50% lighter than aluminum one.
Sample mast attachments: (top) Non-adjustable padeye for small day cruis-ers; (middle) Sliding ring car allowseasy vertical adjustment but no mast
storage for the pole; (bottom)Toggle car accommodates a
socket pole end and providesunfettered vertical and
horizontal movementas well as secure stor-age on the mast.
Fore
spar

DIY boat owner 2004-2(www.diy-boat.com) 1-888-658-262844
End fittings are sold with poles. Foresparends are constructed of fiberglass nylonfilled (same as Marelon plumbing fittings)and come in two styles: jaw (a.k.a. pis-ton or latch) with external trip lines orinternal trigger, and socket. Obviously, afixed eye or sliding ring car on the masttakes a jaw end; a sliding toggle mast carcouples to a socket. Outboard ends arealways jaw fittings as they hook over jibsheets.
Set UpInstall the mast attachment hardware.A fixed padeye mounts on the mast ata height that allows the pole to be setlevel with the headsail's clew. (Refer toDIY 1998-#1 issue for details oninstalling hardware on aluminummasts.) Install one pad eye at the prop-er height for each headsail size andclew height set. Here is the distinctadvantage of using a sliding car on atrack. Once installed, a track/car combois quickly adjusted to set level with anyheadsail.
Whisker poles sold for boats 22'(6.7m) and larger require a topping lift.This line attaches to the outboard endof the pole and helps keep it level andsupported when hoisted. Use a sparejib or staysail halyard for the toppinglift. Spinnaker halyards can be used butonly for short periods. As this halyardusually exits above the headstay, itchafes severely when used extensively.It's best to rig a dedicated topping liftif you plan to do a lot of downwind sail-ing. A downhaul line is rarely neededand moving sheet leads as far forwardas possible usually solves upward lift-ing of the pole. You may also requirelonger jib sheets, snap shackles, camcleats, additional control lines, fastenersand additional jib sheet leads, all ofwhich can greatly increase the refitcosts.
How to FlyTo rig a whisker pole, attach the pole tothe mast with the jaws always facingdown. Unfurl or hoist the sail, clip theother pole end over the sheet at the clewso it slides freely. Never attach the poleend to the clew of the sail or a knottedline. Follow these steps in reverse fortakedown. Never attempt to extend orretract a telescoping whisker pole underload. Always furl or depower the head-sail before hoisting or taking down awhisker pole.
Keep the pole horizontal by adjustingthe topping lift. Should the pole wantto “sky,” (be lifted up by the sail in apuff) move genoa leads farther forward,which changes the sheet angle to thepole and eliminates the need for adownhaul line. A notched toerail makesthis simple. Boats without this setupmay need to extend the genoa track fur-ther forward. Another option is to attacha jib sheet lead block to a removabledeck padeye. If it's necessary to rig atemporary downhaul, use the lazy sheetand run to a cam or jam cleat. Don'tcleat it off, just use the cleat to turn thesheet aft (like a turning block) and pullit in. This pulls the pole down as wellas helping to keep it forward. In strongor gusty winds, using a downhaulimproperly can break a pole. As windconditions change, adjust the toppinglift, sheet lead, and downhaul, if used,to reposition the pole. Always keep thepole off the forestay and shrouds; crankin the sheet to pull back the pole butnot so far back as to pull it against a for-ward lower or cap shroud.
To tack downwind you need to jibe (orgybe). There are two ways to do this:the dip-pole jibe or simply furl the sailand take down the pole. Then reset onthe opposite side and unfurl the sail. Thisis the safest way to jibe a whisker poleas, unlike a spinnaker, both the sail andpole are trying to move through the fore-triangle at the same time. This makesfor some pretty tricky sail and pole han-dling and requires good practice. Theformer demands that you have a masttrack and car. Suppose you are sailingwith the wind blowing from the starboardside and want to do a dip pole jibe. The
SAILBOAT RIGGING
Pole storage options:(left) Deck chocks for
storing fixed or telescoping length
poles; (bottom left)Fittings for vertical
mast storage includemast car,storage car,
track, pole lift anddownhaul line
controls and chock.(bottom right)
Stanchion chocksmount to lifelines for
storage of poles up to3-1/2" (9cm)
diameter in calmconditions.
(top) Jaw or piston or latch end. (bottom)Socket end slips into sliding toggle mast car.
TIP: No Forestay Rest Don't let a whisker pole rest against the
forestay or shrouds. Aluminum polesmay dent or bend and carbon fiber poleswill break from side loading if laidagainst a stay.
TIP: Clean Soak Never oil or spray lubricant on an alu-
minum twist-lock telescoping pole or endfittings. This voids the three-year warranty ifit's a Forespar pole. If a pole becomes diffi-cult to open, usually from oxidation or saltbuild-up, soak the pole in a tube (a rain gut-ter works) filled with white vinegar for a fewdays. This dissolves the salt without harm-ing any internal components. If a pole endbecomes stiff to operate, immerse it in abucket of white vinegar. Then rinse withfreshwater. All end fittings are shipped dry(no lubricants) and should never be oiled orlubricated with anything. Keep them cleanand they will function as designed for years.

helmsperson heads the boat dead downwind then steers justslightly by the lee, while the boom is pulled to center and thenhanded across to the starboard side and trimmed. When theskipper gives the jibe command, unhook the pole’s outboardend and raise the inboard end of the pole so the outboard endclears the forestay, pulpit and lifelines and is free of the sail.Release the sheet and furl or tack the sail, swing the poleunder the forestay (be carefull not to tangle the sheet aroundthe pole), hook the pole over the windward sheet then trimthe sheet and adjust the topping lift. Who handles what tasksdepends on the number of crew onboard. Jibing a pole takesplanning and practice to perfect and is best rehearsed in lightwinds. Again, the best and safest method is to drop or furlthe sail and reset.
DIY boat owner 2004-2(www.diy-boat.com) 1-888-658-2628 45
SAMPLE POLE PACKAGES
Estimated prices listed are in U.S. funds and may vary with suppliers.
Up to 22' (6.7m) with Genoa 1 6'-12' (1.8m-3.6m) whisker pole $3321 mast pad eye $302 stanchion mount chocks $70
Up to 28' 8.5m) with Working Headsail (100% jib)1 8'-14' (2.4m-4.8m) whisker pole $7051 car for vertical storage on mast $2851 vertical pole storage car $1061 6' (1.8m) T-track with end stops $1152 deck chocks (price varies with pole ends) $100Options: 2 stanchion mount chocks $701 mast ring car (no vertical storage) $83
Up to 35' (10.6m) with Genoa 1 13'-24' (4m-7.3m) 50/50 combo whisker pole $1,6201 car $2851 12' (3.6m) T-track with end stops $2102 deck chocks (price varies with pole ends) $1001 vertical pole storage car $114Options: 2 stanchion mount chocks $801 carbon fiber whisker pole $1,915
Note: Forespar recommends fixed length poles for heavy offshore use(long distance cruising) or on boats 50' (15m) and longer.

P L U M B I N G
DIY boat owner 2004-2(www.diy-boat.com) 1-888-658-262846
By Peggie "Headmistress" Hall
Most boat owners know that it’s illegalto flush a toilet directly overboard in allU.S. waters and that it’s been the law ofthe land for 25 years, since the effectivedate of the Federal Water Pollution Act(Clean Water Act) of 1977. The sewageholding tank, the simplest MSD (marinesanitation device) is not the only optionfor compliance with the law againstdumping sewage into the water, eventhough that’s how most boats areequipped from the factory. Illegal to flushthe toilet directly overboard doesn't meanthe same thing as “no discharge." Thereare many waters in which boaters canlegally discharge properly treated wastefrom a U.S. Coast Guard (USCG) certi-fied Type I MSD, which is legal on boatsup to 65’ (20m) or Type II MSD on larg-er boats.
So much misinformation and outrightmumbo-jumbo about Type I MSDs isbeing circulated by environmental extrem-ists and the politicians who pander tothem that, even boaters who are awarethat these MSDs exist, they are unwill-ing to install them, afraid that, after mak-ing the investment in equipment andinstallation for these currently legaldevices, they will be banned.Manufacturer’s of Type I MSDs havestruggled to counteract the tall tales thatthe Type I treatment system is harmfulto the environment, costs too much, takesup too much space, is complicated tooperate and maintain or consumes toomuch power. Boat owners have been ledto believe that holding tanks are the onlyaffordable, practical and environmental-ly responsible way to manage onboardwaste.
In fact, just the opposite is true. Asewage holding tank is complicated and,all too often, an ineffective way to manageonboard sewage. Holding tanks are theonly option for boats on waters that have
been declared “no discharge.” “No dis-charge” waters encompass 90% areinland waters including all of the GreatLakes, all non-navigable inland lakes andmunicipal reservoir impoundments onnavigable rivers. The relatively few "no-discharge" zones in coastal waters includea few harbors between Rhode Island andthe Florida Keys on the East Coast andDestin Harbor in the Gulf of Mexico.While most of the waters of SouthernCalifornia are “no discharge" north ofSanta Barbara, only a small harbor offSan Francisco Bay and one marina in theSeattle area are “no discharge” zonesalong the rest of the entire west coast. Inall other coastal waters, and most navi-gable inland waters, the discharge oftreated waste from a Type I or II MSD islegal.
Holding TankAlternativesA treatment device is not a toilet andadding a treatment system does notrequire replacing a toilet. Type I and IIMSDs are separate devices where wastefrom the toilet flushes to be treated anddischarged overboard (or into a tank forpump out later if you are boating in a “nodischarge” zone). Type 1 systems include:Raritan Lectra/San, which doesn't requirethe use of any toxic chemicals and GrocoThermoPure, which uses heat to kill100% of the bacteria. It requires 120-volt AC power and treats waste that’sbatch fed from a holding tank. It can bean excellent solution for large yachtsalready equipped with large holding tanks.Galley Maid and Microphor also makeboth Type I and Type II MSDs. Otheroptions are composting heads fromAirHead, SunMar and others.
The list price of these units may shockyou, but only until you compare pricesfrom the discount retailers to the cost ofinstalling and maintaining a holding tank.
The average cost, presuming that you willinstall it yourself, for the materials to installa quality holding tank is US$400 toUS$600. [Ed: refer to DIY 1997-#2issue or the MRT "Plumbing 101" CD-ROM for installation instructions.] To thatmust be added the ongoing cost of odorcontrol products, pumpouts and period-ic replacement of sewage hoses, bring-ing the actual cost of installing and usinga Lectra/San [Ed: refer to DIY 2002-#1issue for a sample installation], purchasedat discount price, to just about breakevenwith that of a holding tank in only a cou-ple of years. While federal law requiresthat Type I MSDs reduce bacteria count toless than 1,000 per milliliter (ml), thebacteria count in the discharge from aLectra/San is less than 10 per 100 ml,making it one of the world's most envi-ronmentally friendly sewage treatmentdevices.
Grounds for TreatmentNow that you know that there are alter-natives to holding tanks, let’s debunk thearguments against them in favor of “nodischarge.” The following is from a pressrelease issued by New York state datedOctober 2003 announcing that a 135-mile (217km) section of the HudsonRiver had been declared “no discharge”and is typical of “no discharge” propa-
A STRONG CASE For Treated Sewage Did you know that it's legal to discharge treated waste in manycoastal waters? If a head refit is in your future, there are somealternatives to a waste holding tank.
Lectra-San creates its own form of chlo-rine (hypochlorous acid) by charging theions in saltwater with electrical current.Its power consumption of 1.7 amp hoursper flush appears a bit extreme at firstuntil you take into account that the aver-age adult uses the toilet only five or sixtimes a day. Presuming that, the averagedaily power consumption for two adultsaverages 17 to 20 amp hours per day, it’swell within the capability of most housebattery banks.

DIY boat owner 2004-2(www.diy-boat.com) 1-888-658-2628 47
ganda. "Treated wastes often contain microorganisms, nutri-ents and/or chemical additives such as chlorine, formaldehydeor phenyls, that can degrade water quality in areas of the riverwhere they are discharged. Among the potential effects fromthese waste discharges is nutrient loading, which can depleteoxygen levels in the water (hxpoxia) and significantly damagefish and other aquatic life. In addition, the release of toxic mate-rials and pathogens also can harm marine and estuarine lifeand potentially spread diseases such as hepatitis to humanswho come in contact with contaminated waters."
Let’s challenge this argument one point at time. We’ve alreadyestablished that there are several devices that treat boater gen-erated sewage, some of which do not contain or require theuse of any chemical additives. As for nutrient loading and poten-tial damage to fish and other aquatic life, the following studyillustrates what biological oxygen demand (B.O.D.) representsin the context of the marine environment: B.O.D. 5 results froma boat's holding tank contents is approximately 4,000 to 5,000milligram per liter (mg/L). B.O.D. 5 results from untreated wasteis approximately 1,000 to 4000 mg/L. B.O.D. 5 results from12 oak leaves per 250 ml of water is 2,241 mg/L. B.O.D. 5results from Lectra/San treated waste is approximately 300 to1,200 mg/L. B.O.D. 5 results from municipal treatment isapproximately (no national standards) 50 to 700 mg/L. Thesefigures indicate that the discharge from a Lectra/San has aB.O.D. impact of no more than four oak leaves landing in thewater. It has never been established that treated particulatefrom boats has ever caused oxygen depletion. An independentstudy done by the University of Sydney, Australia, to determinethe effectiveness of the Lectra/San’s ability to destroy the hep-
ThermoPure uses AC power from a boat's generator or shore-power to supply heat to eliminate bacteria, rather than chemi-cals or additives, or water. After the warm-up period, the systemruns on DC power. Peak load treatment capacity with 65F(18C) flush water is 46 gallons (174L) per eight-hour day.During this time, the maximum AC power consumed is 12kWh,14.7 amp hours on the DC side.

atitis A virus (HAV), concludes, “This system is effective andwill remove 78% to 98% of viruses from fecal material. AsHAV is one of the most difficult viruses to destroy by chemicalsterilization, a higher rate of removal for other enteric virusescan be expected when using this device. The system will pro-vide an effective viral barrier protecting any direct users of recre-ational water as well as shellfish farmers and shellfish con-sumers.”
Treatment DisparityNow you know that Type I and II MSDs can reduce bacterialevels to less than 10 fecal coliform per 100 milliliters of water.What you may not know is that this is 20 times better thanthe standard for municipal treatment plants, which is wherethe contents from most marine pumpout facilities ends up.More concerning is that, even where there are pumpout facil-ities, a number of studies have shown that some boat ownerseither choose to, or are forced to, due to limitations of acces-sibility to and operating hours of pumpout facilities, dump theirtanks illegally. Furthermore, the active ingredients in manyholding tank products are the very chemicals the “no discharge”advocates want to keep out of the water; namely, formalde-hyde, gluteraldehyde and quaternary ammonium compounds.The raw sewage and chemical holding tank products in justone illegally dumped holding tank has more negative impacton the environment than a 1,000 boats discharging treatedwaste from a Type I or II MSD in the same area.
The bottom line: if you have a choice, you can choose treat-ment.
About the author: Peggie Hall is an independent consultant andboating industry expert in marine sanitation and is often referredto as the "Headmistress.” Her book “Get Rid of Boat Odors! – AGuide to Marine Sanitation Systems and Other Sources ofAggravation and Odor,” (Seaworthy Publications,http://www.seaworthy.com/html/get_rid_of_ boat_odors.html) isthe first book ever written devoted entirely to that subject.
DIY boat owner 2004-2(www.diy-boat.com) 1-888-658-262848
AirHead from EOSDesign separatesthe liquid from thesolids without usingelectricity. A 12-voltDC fan operatescontinuous in thevent line and con-sumes about50mA. Peat mossis added to thelower tank todecompose thesolid waste. DIYreader Bob Hays
installed an AirHead onboard "Manx," a 35' (10.6m) catamaranand had this to say about the product: "There is virtually nohead odor and power consumption is easily handled by our solarpanels. You must dump the liquid daily or have it plumbed intoa holding tank or order another liquid holding tank. We feel theentire process is much simpler than dealing with holding tanksand pump-outs."
�

DIY boat owner 2004-2(www.diy-boat.com) 1-888-658-2628 49
Story and photos by Jan Mundy
Chipped gelcoat, cracked fiberglass, weathered teak, bro-ken plastic fittings, deck leaks and corroded hardware, allcombined to create the classic effect of wear and tear onFreeport, our 1990 22' (6.7m) trailerable cuddy cabin boat.Equipped with two livewells, one large fish box, rod hold-ers and downriggers, this boat is rigged for fishing on theGreat Lakes. Since our interest had shifted to camping afloat,this fishboat sorely lacked the amenities needed to satisfyour new priorities. Storage for camping gear, more comfort-able helm seating, extra seats for guests, a canvas enclo-sure, docking lights, etc. were on the list. While the boatwas laid up for repairs, it made good sense to tackle therefit at the same time.
Optimism is a necessary quality when tackling a boat refit,as what began as a month-long project, evolved into a two-year undertaking. Simple repairs grew into major recon-struction, nuisance items needing repair had been overlookedin the planning and mismatched replacement parts requiredreworking installations, plus my work as editor of DIY andfamily commitments, all contributed to postponing launchday. Taking measurements, drafting a new cockpit layoutand producing cardboard mock-ups consumed the first fewweeks. Next was to compile a two-page list of materials,replacement parts and new gear to order and jobs to do.Then came the budget. Comparable boats on various usedboat websites were selling for US$13,500 to US$16,000.Knowing that whatever we added to the boat would returnto us tenfold in cruising enjoyment and certainly double itsresale value, the budget was capped at US$5,000.
From the Keel Up Initial inspection of the hull revealed a few areas of spidercracking below the waterline just aft of the bow on bothsides, likely the result of hull panel flexing when bouncingoff waves. There were also stress cracks emanating fromcleats, rod holders and fasteners. Replacing the original bimi-ni with a T-top a few years ago, which now was being trad-ed in for a custom-made camper top with standing head-room, left plenty of drilled holes to fill in the cabin sides.Now was a good time to probe a suspicious pinhole crackand spongy laminate the size of a quarter on the helm bulk-head, an area that I had been purposely ignoring for toomany years. All but one of the drains leading out the tran-som from the livewells and fishbox were removed and thenthe fiberglass laminate was patched from both the insideand outside. These drains were installed below the water-line and, having no seacocks, were always a concern.
After completing the filling, fairing and two gelcoat appli-
cations, the hull was compounded to remove oxidationbuildup, then glazed with 3M Finesse-it II and waxed. Thefinal result was a satisfying mirror shine. (Follow the steps forgelcoat restoration in DIY 2002-#1 issue to obtain a simi-lar finish.) This job was completed during the first year (theeternal optimist) and a year later, before the launch, the hull,which had retained its awesome gloss, only required a washand wax. Replacing outdated vinyl graphics with contem-porary styled graphics, as documented in DIY 2003-#4issue, completed the hull mods.
Removing 3' (91cm) of vinyl rubrail exposed a bare,sealant-less joint. Since the rail's rope insert was badly frayed(a cosmetic condition), this was the time to remove it andthat allowed access to fasteners holding the rubrail to thehull-deck joint. Working in arm's length sections, the railwas unscrewed, held off the hull with wood wedges whilethe mating surfaces were wiped clean with solvent and 3M
Fresh LookA complete cockpit redesign and some repairsconvert an aging cuddy equipped for GreatLakes fishing to a comfortable and stylish, com-pact "camper" cruiser.
(1,2,3,4) Teak trim in cockpit of 1990's walkaround cuddy cruiseradds character but demands frequent maintenance. Note polyethyl-ene lids over floor-mounted livewell. Bracket for removable table isshown on the right in photo 2. (5a) Huge, ungasketed fish box instern and one of two (5b) floor-mounted livewells would always fillwith seawater when backing up. (6) Helm console shows defunctkey ignition on the left and rotomolded bucket seat.
PROJECT BOAT
1
4
3
2
5a
65b

DIY boat owner 2004-2(www.diy-boat.com) 1-888-658-262850
(15) No sealant was applied by the manufacturer under this rubrail.(16) Rubrail was pulled down, mating surfaces solvent cleaned,caulked and refastened (17). On a summer day, you must work quickly when using the 3M Fast Cure version to prevent the sealant fromsetting up before completing the job. (18) Spilled sealant is easily removed with BoatLife Release adhesive and sealant remover.
PROJECT BOAT
(7,8) Repairing dings, fractures and cracks onthe hull and deck and filling drilled holesfrom previously installed equipment and thenapplying two coats of color-matched gelcoat(9,10,11), took a month of weekends tocomplete. (12) Livewell drains at the sternwere plugged then filled. Complete details ofthis repair appear in DIY 2003-#4 issue.(13) Bimini top hardware (this boat's secondtop) was mounted on cabin sides. Fastenerholes, visible just below the windshield by thecompanionway, are from the adjustable trackfrom original convertible top. All hardware wasremoved and holes were filled and finishedwith color-matched gelcoat.
(14) A small pinprick at thebottom of the helm consolerevealed delaminated fiberglass, resulting in ahuge hole to fill.
(19) Supplied template helps to properlyposition docking lights just back from thebow so they point straight ahead with thecenterline of the light housing parallel to thewater. (20) A 1/32" (.7mm) pilot hole isdrilled to be sure there is adequate clearanceinside the hull for the light housing. (21) Tocut, drill a 3/8" (9mm) hole within the drawnline, insert the jigsaw blade and cut. (22)Heat shrink over crimped terminals providesa waterproof connection. (23) Mounting thedocking light. (24) The compact, Paneltronicswaterproof circuit panel for docking lights,washdown and one spare is now locatedwhere the keyed ignition had previously been.
7 8 9
10 11 12
13
14
15 16 17
18
19 20 21
22 23 24

DIY boat owner 2004-2(www.diy-boat.com) 1-888-658-2628 51
4200 applied liberally. While doing this,a huge gap was discovered in the deck-to-hull joint at the bow. Here the deckoverlapped the hull by about 1"(25mm). Filling with 3M 5200 wouldmake it watertight. Finally, we resealedthe rubrail and installed a more durablevinyl insert.
Light the WayTrailering a boat means that you're like-ly to find yourself idling up to a launchramp at any time of night. Most rampsare poorly lit as are some approachchannels. Many upscale boats comewith docking lights, which seems to bea worthy safety feature and a great con-venience. Could they be installed in ourboat? Docking lights mount flush withthe hull so they require sufficient spacebetween the hull and liner for the lighthousing and access to route the wires.Aqua Signal's 85101 fit the bill, need-ing just 3-1/2" (9cm) clearance behindthe light. Installation was easy. Findingthe correct placement on the hull wasmore difficult and the instructionsweren't clear on the procedure.
Dismantling the interior panelsallowed easy access to wires for rout-ing back to the Paneltronics waterproofpanel mounted at the helm. The totalrun was 12' (3.6m), so allowing for avoltage drop of 3% (I consider dockinglights "critical" equipment), ABYC rec-ommendations required 14 AWG.
A Teak AlternativeTeak trim surrounded Freeport's cockpitinterior in a style typical of older boats.Sideboards, aft locker doors, rod supportsand the companionway were all teak. It'sa very functional wood that rarely rotsand is pleasing to the eye when main-tained on a frequent basis. Sporadic appli-cations of teak coatings over the years,which peeled and gradually turned thewood black or gray, were followed byattempts to rescue the coating and aneven worse looking finish resulted. EitherI scraped, sanded, and pledged to main-tain the teak or I replaced it all with KingStarBoard, which is the more expensiveoption, but well worth it in my opinion.Besides, I've built many items ofStarBoard and felt confident this was aneasy task.
StarBoard cuts, routers and drills justlike wood, using common woodworking
tools. Small pieces are cut on a bandsawor with a jigsaw with a 10 teeth per inch(TPI) blade. To cut large pieces, I use acircular saw with a sharp panel blade,and 80 TPI. Using the proper saw bladeproduces a clean edge that's ready forshaping. This is done on a router with acarbide, double-fluked bit with a bearing.Drill fastener holes, install and the job'sfinished. No maintenance, no wear.Sideboards were made of StarBoard AS,the same product as the original exceptthe surface has a skid-resistant, texturedpattern. Mounting a toe kick along the
(25) Teak trim removed from stern lockerreveals poor fitting to the adjacent bulk-head; the entire filler piece was replacedwith StarBoard. (26) Original trim servedas patterns for new pieces. Here fastenerholes are transferred from sideboardpieces onto 1/2" (12mm) StarBoard AS.(27) Rod holder dimensions are trans-ferred onto 3/4" (19mm) StarBoard.Offsets from stern locker (28) are markedonto 1/2" (12mm) StarBoard. (29)Cutting StarBoard with circular saw fittedwith panel blade. (30) All edges areroutered to remove the cut sharp edge;note bearing (31) on router bit. Holes forfasteners (32) are predrilled into rod hold-ers to exactly match original piece. In thebackground is cleat stock made of Star-Board epoxy glued after flame treating toreinforce the 1/2” (12mm) thick anti-skidStarBoard sideboard (should have used3/4” (19mm).
25 26
27
32
29
28
30
31
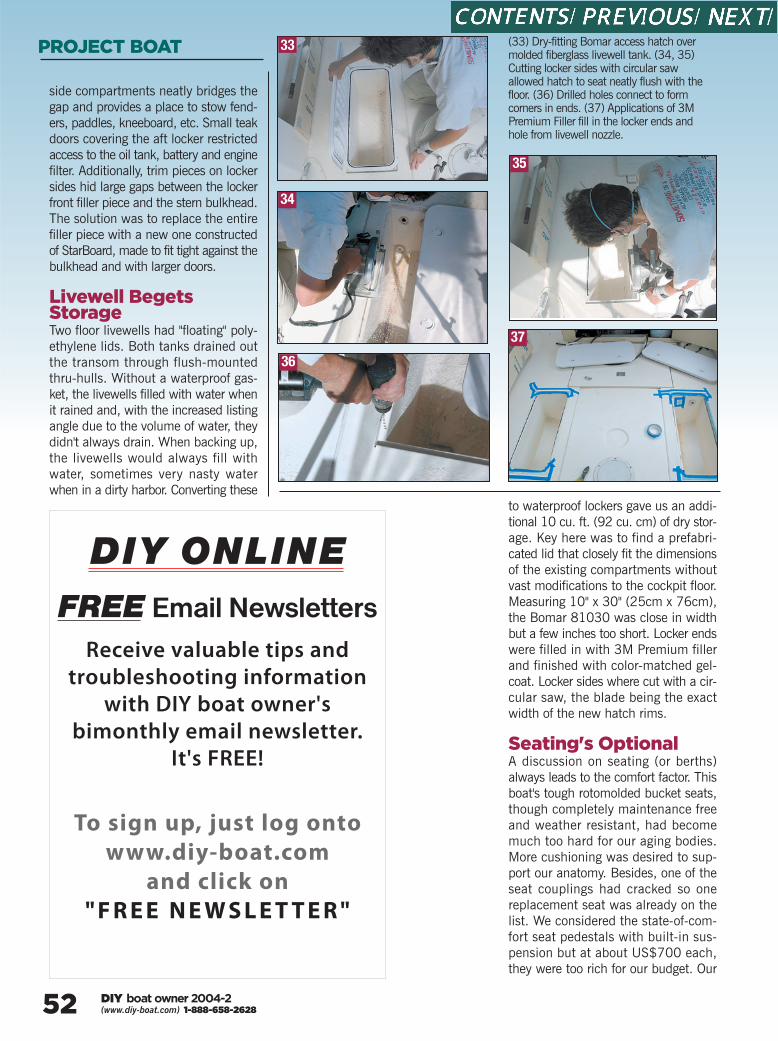
DIY boat owner 2004-2(www.diy-boat.com) 1-888-658-262852
to waterproof lockers gave us an addi-tional 10 cu. ft. (92 cu. cm) of dry stor-age. Key here was to find a prefabri-cated lid that closely fit the dimensionsof the existing compartments withoutvast modifications to the cockpit floor.Measuring 10" x 30" (25cm x 76cm),the Bomar 81030 was close in widthbut a few inches too short. Locker endswere filled in with 3M Premium fillerand finished with color-matched gel-coat. Locker sides where cut with a cir-cular saw, the blade being the exactwidth of the new hatch rims.
Seating's OptionalA discussion on seating (or berths)always leads to the comfort factor. Thisboat's tough rotomolded bucket seats,though completely maintenance freeand weather resistant, had becomemuch too hard for our aging bodies.More cushioning was desired to sup-port our anatomy. Besides, one of theseat couplings had cracked so onereplacement seat was already on thelist. We considered the state-of-com-fort seat pedestals with built-in sus-pension but at about US$700 each,they were too rich for our budget. Our
side compartments neatly bridges thegap and provides a place to stow fend-ers, paddles, kneeboard, etc. Small teakdoors covering the aft locker restrictedaccess to the oil tank, battery and enginefilter. Additionally, trim pieces on lockersides hid large gaps between the lockerfront filler piece and the stern bulkhead.The solution was to replace the entirefiller piece with a new one constructedof StarBoard, made to fit tight against thebulkhead and with larger doors.
Livewell BegetsStorageTwo floor livewells had "floating" poly-ethylene lids. Both tanks drained outthe transom through flush-mountedthru-hulls. Without a waterproof gas-ket, the livewells filled with water whenit rained and, with the increased listingangle due to the volume of water, theydidn't always drain. When backing up,the livewells would always fill withwater, sometimes very nasty waterwhen in a dirty harbor. Converting these
PROJECT BOAT (33) Dry-fitting Bomar access hatch overmolded fiberglass livewell tank. (34, 35)Cutting locker sides with circular sawallowed hatch to seat neatly flush with thefloor. (36) Drilled holes connect to form corners in ends. (37) Applications of 3MPremium Filler fill in the locker ends and hole from livewell nozzle.
33
34
35
37
36
DIY ONLINEFREE Email Newsletters
Receive valuable tips and troubleshooting information
with DIY boat owner's bimonthly email newsletter.
It's FREE!
To sign up, just log onto www.diy-boat.com
and click on" F R E E N E W S L E T T E R "

research led us to decide on two Garelick contoured cap-tain's chairs mounted with Garelick's seat suspension unitand slide system. Fortunately, the new pedestals had thesame mounting footprint as the old and using toggle boltanchors facilitated mounting without removing a floor section.
If we wanted to have guests onboard, we needed addi-tional seating. I designed a stern seat that fastens to the tran-som locker bulkhead using pull-apart hinges. This allows theseat to fold down or completely detach for unfettered accessto the aft locker for battery and engine service and to thestorage locker.
Cockpit TrimWe had a portable 12-volt powered washdown pump, thekind with a pickup tube that hangs over the side and a wiringharness with alligator clips that connects to the battery. Itlasted three years before it expired. A washdown pump isone of those nice to have luxuries and the Flojet Quad II fitnicely in the aft port locker. One livewell thru-hull wasreserved for the washdown intake. This required removingthe plastic thru-hull and replacing it with a bronze thru-hulland ball valve. Reinforced hose was routed down to the newthru-hull and to the fixed washdown panel to which wewould attach a hose when needed. Wires passed under-neath the cockpit to the new panel at the helm and a neg-ative bus bar. This task was simplified by using the mes-senger line we had installed years ago. I used 14 AWG tocomply with ABYC guidelines for voltage drop and wire lengthfrom the pump to the panel.
The wide, flat stern deck provided a stable platform whenusing the stern ladder or performing visual checks on theoutboard but its glossy and slippery, waxed finish was asafety hazard for our dogs and us. For a better grip, a pieceof synthetic non-skid, leftover from another project boat,was epoxy glued to the deck.
Now was a good time to replace all the nuisance itemsthat either never worked or had broken soon after installing.Included on my list was the outboard bracket that required
DIY boat owner 2004-2(www.diy-boat.com) 1-888-658-2628 53
(38) Flojet Quad 11washdown pump kit(model 4325-143L)includes a pressurenozzle, inline strainerand various hose ports.(39) Pump outlet hoseconnects directly to an
outlet. To use, screw on a garden hose and wash away the dirt. (40)Water supply for washdown pump comes from an existing thru-hullfitting upgraded with a bronze thru-hull and ball valve. Note: Visibleon both sides are laminates of 6 oz. fiberglass cloth and epoxy resinlaid down to reinforce original livewell drain holes on inside of stern.
38 39
40
(continues on page 56)

DIY boat owner 2004-2(www.diy-boat.com) 1-888-658-262854
(41) New seat base fits the original hole patternand installs easily with toggle bolt anchors. (42)Garelick seat suspension unit fastens to the seatbase then to the slide. (43) Seat suspension isadjustable from soft to firm by pulling the quickrelease pin and moving the rubber shock . (44)Sewing stern cushion seat and seat back, andbow seat using my Sailrite LSZ-1 sewingmachine. This tough and durable machine sewsas well as any industrial machine.
(45,46) Epoxy resin, thickened to a mayon-naise consistency, is spread over one-half ofthe stern deck using a notched trowel andthen the synthetic non-skid is laid over androlled out to remove air bubbles. (47,48)Procedure is repeated for the second half.Working in smaller sections allows plenty oftime to work the surface and clean up any(49) excess before the epoxy kicks off.
41 42
43
44
45
49
47
48
46

DIY boat owner 2004-2(www.diy-boat.com) 1-888-658-2628 55
(50) No more rubber drain plugs with this permanent bronzeplug. (51) A lift-and-hold assistant for the heavy hatch over thefish box, now dry storage locker. (52) StarBoard companionwaydoors and hatch trim replace teak. (53) Rebuilt stern featuresremovable custom stern seat made of 3/4" (19mm) StarBoard,two larger access ports with the washdown housed behind theport one, watertight floor lockers, and maximum width aft lockerdoors for easy reach to batteries and oil tank. StarBoard skid-resistant sideboards on port (54) and starboard (55) provide anexcellent gripping surface for your feet. Note toe kick in photos.
50 51
52
53
54
55

DIY boat owner 2004-2(www.diy-boat.com) 1-888-658-262856
(56,57,58,59) It's the finishing details that make a qualitytop: Screened aft curtains with double pull zippers so you can
open up as needed or completely remove and roll up; zippers that all start at the sameplace; "beartails" (60) to cover up the "ratholes" where zippers collide and secured witha dome. (61, 62) Pull the Dot dome fasteners were strategically placed at high stresspoints along the perimeter where the cover fastens to the deck. These domes hold sosecurely they are actually difficult to unfasten. The canvas maker tapped each Pull theDot with a dot on the outside (61 ) to mark the lifting point, which is directly acrossfrom the flat spot on the dome as shown in photo 62. Just pull up at the dot to detach;push down at the back and roll to fasten.
a line to hold the spring lever in the upposition; the all-round white light thatblinded us at the helm at night; a cor-roded 12-volt plug; a cheap plasticholder for the fire extinguisher; a hornthat never sounded called for an all-stainless one; broken plastic drink hold-ers; cracked in-line fuse holder for VHFradio; corroded cam lock on the com-panionway hatch lid; and finding a bet-ter solution to the rubber drain plug.Unable to locate a bronze plug with athreaded insert, I modified a B4 Playplug given to me as a sample manyyears ago. This bronze drain plug (seephoto on page 55) has a sensor thatdetects water and sounds a horn if oneshould forget to screw in the insert (nearsinkings occur often due to forgottendrain plugs). I liked the plug design butdidn't want the electrical component soI cut the wires to the sensor andinstalled the plug with 3M 4200. A gashatch lift was installed to support theheavy fish box lid and a gasket sealedfor dry storage. Both much too smalland difficult to unscrew ports that pro-vided access to small stern compart-ments were replaced with larger, bet-ter sealed and easier to remove lockingdeckplates (refer to DIY 2003-#2 issuefor installation details). Dams made ofStarBoard were mounted vertically with3M 4200 to prevent water from theself-draining cockpit from entering thebattery and oil tank compartments. Thiscompleted the cockpit renovations.
Under the Big TopAccommodations were slight on ourcompact cuddy and the best way toextend living quarters was to enclosethe cockpit. We presented the task ofbuilding our new canvas to BarryParker of Custom Covers (Tel:705/887-3557). Our criteria requiredthat the cockpit be completely enclosedyet the enclosure had to provide accessto stern cleats, swim platform andengine and a walkthrough to the bow;that the enclosure provide a minimum6' (1.8m) of headroom throughout thefull length of the cockpit with sufficientheight at the helm so the driver couldstand up and drive. Finally, the front
panel must open and be screened. Thistop became Barry's worst nightmare buthis finished product is stunning and with-out compromise. It’s different, it servesthe purpose and it’s exactly what wewanted. Made of Marilux, a coatedacrylic from Germany, it's completelywaterproof yet breathes, preventing thebuild-up of mold and mildew. Easilyremoved by one person, the entire coverfalls back and leans against the self-sup-
PROJECT BOAT
porting main frame to stow in a boot.To some boaters, these amenities
might appear to be the barest of com-forts but having running water, com-fortable seating, docking lights, a drycockpit and room for friends (and dogs)makes a huge difference to this com-pact cruiser. All added for a fraction ofthe price of a new boat. �
56
59
60
57
62
61
(continued from page 53)
58

The following summarizes the cost of converting our 22'(6.7m) walkaround fishing boat to a cruising "camper."There are still some items to complete and they are includ-ed below along with estimates. My original budget wasexceeded largely due to cost of the seating upgrade. Prices are in U.S. dollars.
Aqua Signal docking lights, pair $180Custom canvas camper top $3200 Fabric and cushion for stern and bow seats $60Ongaro 10036 Horn $292 tubes 3M 4200 $221 tube 3M 5200 $112 Garelick Captain's Chairs $4602 Garelick seat suspension units $1992 Garelick Millenium 2000 seat slide system $1802 Garelick pedestal bases, 14" high $110Garelick stainless steel outboard motor bracket $1602 Bomar access hatches, 10" x 30" $1881 Bomar 8" deckplate $34 1 Armstrong 8" compression deck plate $30 1/2 sheet, 1/4" StarBoard in Sanshade $451-1/2 sheets, 1/2" Starboard in Sanshade $378 1/2" sheet StarBoard non-skid in Sanshade $1501 3/4" Bronze thru-hull $1413/4" Bronze ball valve $22 Perko navigation light $22SSI fire extinguisher holder $10Flojet Quad II washdown pump $188Taco flexible vinyl rubrail insert V12-0003 70' $64Paneltronics 9960011 Waterproof panel $100Fiberglass supplies: 1 can each color-matched $70brushable and sprayable gelcoat, MEKP Polyester hardener, Duratec Clear Hi-GlossMiscellaneous Sandpaper, solvent, fasteners, $150masking tape, hinges, 14' gasket, 1 roll 3M VHB, wire-reinforced hose, gas hatch lift, 12 toggle bolt anchors, TBS nonskid
Total $6076Remaining Jobs to Complete:•Install replacement outboard bracket. Existing bracketwas installed with everlasting 3M 5200. (I'll document itsremoval in an upcoming issue.)•Rebed stanchion bases •Sew stern seat cushion and bow cushion•Install Perko 1637 reduced glare bow light •Sew canvas storage bags and install in interior •Upgrade interior lighting•Make a StarBoard boarding ladder •Sandblast and paint trailer (estimate US$500), replacebunk carpet, add skid-resistant step pads. •Epoxy glue nonskid on the foredeck
DIY boat owner 2004-2(www.diy-boat.com) 1-888-658-2628 57
DIY BILL
What can you do @DIY ONLINE?www.diy-boat.com
Free NewsletterSign up for a bi-monthly dose of more maintenance tips and projects
Shop OnlineThe place to purchase the current issue, back issues, MRT CD-ROMs, Hands-On Boater CD-ROM, and renew your DIY Subscription
Subscriber ServicesClick here to notify DIY of an address change, a missing copy, or for a subscription expire inquiry
Technical HelplineWhen you need help with a problem, click here to reach our Technical Helpline. For subscribers only!
ArchivesAn editorial index of all DIY articles from 1995 to the current issue!
DIY EZINEThe 7 most recent issues of DIY - All Online! No more storage, searchable, and accessable from any port.

DIY boat owner 2004-2(www.diy-boat.com) 1-888-658-262858
I recently watched an older coupleapproach a side tie at a yacht club float-ing guest dock. They were aboard a 45'(13.7m) twin-screw trawler yacht with15 knots of wind setting them off thedock. In the clubhouse, overlooking theguest dock, several barstools turned tosee how this vessel would negotiate thelocally known adverse conditions. Tocompound matters, there was onlyabout 55' (16.7m) between two previ-ously docked boats.
The landing was uneventful. The vis-iting yacht tucked her bow near the for-ward vessel and rotated her stern towardthe dock, coming to a halt just as thefenders touched the dock. Around thebar, a few compliments were mutteredabout the maneuverability of twinscrews. The fact of the matter is itlooked easy because the helmspersonknew what tools were available andused them well.
There are only three directional con-trols on any boat: rudders, gearshiftsand throttles. Okay, some boats havethrusters, but maneuvering with thesewas covered in DIY 2003-#4 issue.Twin screw boats, while more maneu-verable, are inherently more complicat-ed than single engine boats becausethere are more controls: the singleengine has but three possible gear set-tings (forward, neutral, reverse) where-as a twin has nine. Add throttles andhelm and the permutations are endless.It's little wonder conventional wisdomteaches leaving the rudder centered andnot touching it at all (more on this later).
Three Turning Toolsfor Twins The rudder is the one the operatorknows best because it's the only toolwith no other purpose but turning.
Because most docking can be accom-plished without rudder action and therudder can add a confusing dynamic,many people chose to center the rud-ders and leave them alone but there aretimes when rudder action is needed inclose quarters.
Twin engines are offset from center.If you put the right engine in forward,the bow will veer to the left. This isknown as the shopping cart effect. Pushon the right side and the front of the cartwill veer to the left, pull on the right andthe cart veers to the right. “Pull” on theright gearshift lever (put it in reverse)and the bow veers to the right (actually,as we’ll see soon, the stern actually veersto the left). Putting one shift lever in for-ward and the other in reverse (“splittingthe gears”) makes the boat spin.
Exercise: Stand at the helm and imag-ine a shopping cart. Physically rotateyour shoulders to decide which gear toplace in forward or reverse.
Prop walk is virtually unknown tomost twin-screw operators and is themost difficult to master. When a pro-peller spins in water, it has a tendency tocreep sideways in the direction it's spin-ning. If it's spinning toward the right(clockwise), it will “walk” toward theright (Figure 1). Most modern twin-screw installations have counter-rotat-ing propellers, with the right engine turn-
ing right and the left engine turning left(Figure 2). Prop walk is most noticeablewhen in reverse. If the left engine is inreverse, the propeller is turning to theright (clockwise) and it will “walk” tothe right carrying the stern with it towardstarboard (Figure 3).
Exercise: In an open area on a calmday, steer your boat in a straight linetoward a good reference point (perpen-dicular to a long pier works well). When
PAINLESS DOCKINGMastering close quarters maneuvering of a twin-engine boatrequires an understanding of the shopping cart effect and propwalk and the proper use of rudder, throttle and gears. Followthese tips from a pro to hone your docking skills.
Story and Illustrations by Peter P. Pisciotta
B O A T H A N D L I N G
Figure 1

DIY boat owner 2004-2(www.diy-boat.com) 1-888-658-2628 59
you are within a couple boat lengths ofthe target, put one engine in reverse,the other in neutral. As the boat slowsyou will see it turn, mostly from the“shopping cart” effect, but as it comes toa complete stop you will notice a con-siderable increase in rotation. This isdue to prop walk.
That’s your entire toolbox. There areno other tools, except spring lines ordragging an anchor like the big shipsoccasionally do but that is an article foranother time and not very useful in themiddle of a fairway.
Physics of BoatHandlingThere are two basic principles govern-ing how a boat moves in close quarters:pivot point and wind lock.
A boat rotates around a point rough-ly one-third length aft of the bow. This isknown as the pivot point. When the boatis turning, as it would be when
approaching a slip, aligning the bowresults in a missed landing (Figure 4).Left adrift, a boat will lie almost per-pendicular to the wind, not bow-to. Ifthere is wind forward of the beam, thebow will increasingly struggle as you turninto it, a condition known as wind lock.Wind also affects the stern if you turnthe other direction. Turning the bow intothe wind is usually easier. This is impor-tant not only in docking but also in mak-ing an emergency U-turn in a narrowfairway (Figure 5). While there are moreeffects, knowing these two principles willhelp you make more successful maneu-vers, especially in unfamiliar situations.
Task Tools Rather than try to describe and resolveall the infinitely possible scenarios, Iteach what the military calls "situation-al awareness." You decide what youneed the boat to do (slow down, speedup, rotate the stern in, creep sideways,etc.) and then you use the appropriatetool to accomplish that task.
Close quarters scenario #1 is toapproach a side-tie between two otherboats. The goal is to “slide” the boat intothe side-tie. By approaching at an angle,you'll be able to land between two boats(Figure 6). Here's how.
Step 1 The approach. Approach atslow (idle) speed at a 30° to 40° angle.Decide where you want the bow to ulti-mately end up and aim directly for thispoint (a common mistake is aiming toofar aft). Keep pace slow by alternatingone engine then the other in gear insteadof both.
Step 2 Begin the turn at about one-half boat length away from the dock.Putting the outboard engine (the one fur-thest from the dock) in reverse will simul-
taneously slow the boat and start swing-ing the stern toward the dock due toprop walk and shopping cart effect.
Step 3 Stop the boat and finish turn.As soon as forward progress halts, putthe engine in neutral. If everything hasgone well, the boat will still be rotatingand will finish the turn. If it's rotatingtoo fast, put the inboard engine inreverse momentarily to induce oppositeprop walk and slow rotation.
Close quarters scenario #2 is aU-turn in a narrow fairway. The dock-master has assigned you a guest slipbut, as you head down a narrow fair-way, you find the slip is occupied. Youmust turnaround and exit (Figure 7).
Step 1 Decide the direction of yourturn. Usually, this decision is based onwhere the wind is coming from. Alwayswork into the wind whenever possible.
Step 2 Slow the boat and start the
B O A T H A N D L I N G
Figure 3
Figure 2
Figure 4
Figure 5
Figure 6
Figure 7
TIP: Stern Action All close quarters handling tools (rud-
ders, props) are located at the stern ofthe boat so you have more control overthe stern than the bow. If you watchskilled operators carefully, they get theirbow placed somewhere then rotate thestern as needed.

DIY boat owner 2004-2(www.diy-boat.com) 1-888-658-262860
turn. Rather than put both engines inreverse to stop the boat then start theturn, why not accomplish both taskssimultaneously? Accomplish this byplacing just one engine in reverse. Propwalk and shopping cart effect start theturn while slowing the boat. A port-turnis initiated by placing the port engine inreverse. Adjust rpm if necessary to con-trol pace.
Step 3 As soon as your boat stops,split the gears to induce maximum turn-ing momentum. As the turn is almostcomplete, start driving out of the turnby putting the reverse gear in neutral.
Close quarters scenario #3 iscoming into a slip. Key to managingadverse wind or current is to keep theboat moving forward throughout themaneuver. Many operators try to makea 90° turn in front of their slip and headstraight into their berth. This can bechallenging because the timing must beprecise and the boat's momentum is lost
during the turn and this is when windcan take over. This approach needs along, carved turn into the slip, with thehelmsperson making small adjustmentsthroughout (Figure 8).
Step 1 is to plan the approach. Starta wide radius turn early enough so thatyou end up about 10' (3m) in front ofthe slip. Use the two engines inde-pendently: the outboard engine in for-ward increases turn and speed; theinboard engine in reverse slows the boatand increases turn etc.
Step 2 Align the boat’s pivot pointwith the centerline of the slip. As younear the slip, increase rotation and slowthe boat but try to keep it moving for-ward if possible. It may be necessary tosplit the gears to increase rotation.
Step 3 Drive the boat into the slip.Rather than putting both gears in for-ward, use the two gears independentlyto adjust alignment.
Gaining More ControlSometimes wind or current over-
whelm boats in close quarters. Thereare two options for counteracting thewind’s influence on control. First, youcan move on, looking for a side tie,anchor out or try the next marina. It'syour responsibility to dock safely. If youare not confident you can execute apainless landing, come up with a PlanB. Your other option is to magnify theeffect of your maneuvering tools byusing (adding) helm (rudder) or increas-ing throttle (speed). Increasing rpm haspronounced effects on prop walk. If thehelm is hard over, adding rpm greatlyincreases turning momentum. Maxi-mum turn is induced when the gearsare split with the helm hard over andrpm is increased. Be careful. It's easyto get confused! Use this tool very care-fully. Many novices forget to recenterthe helm so, when the gear is put inforward, an undesired turn is induced.
To offset the effects of wind and/orcurrent, you do not need to go fasterbut you do need to keep the boat mov-ing. You need to practice building andmanaging momentum, including theturning momentum that forces yourboat to slide into a berth while offset-ting adverse wind. Adding rudder and/or
B O A T H A N D L I N G
increasing rpm both work well butrequire a cautious hand that comeswith practice.
Effects are magnified by increasingrpm and/or turning the rudder(s).Practice when conditions are light soyou can feel effects and then slowlyfind increasingly complex situationswhere you can test your skills withoutan audience. By viewing this as yourentire toolbox, you will become morecomfortable approaching challengingsituations.
About the author: Peter P. Pisciotta,founder of The Trawler Institute, is a USCG100-ton licensed vessel operator and theowner of SeaSkills Personal School ofSeamanship (www.SeaSkills.com), whichoffers yacht delivery endorsed byNordhavn, West Marine and WillardMarine, new boatowner training, boat han-dling and boat docking instruction andspouse/crew instruction.
Figure 8
�
If you would like to share one of your ownboat-tested projects, send your articles to DIYPROJECTS via mail or e-mail. Include a briefexplanation and photos and/or sketches (don’tworry, we’ll redraw the art). Also, pleaseinclude your mailing address and a daytimephone number or email address. If we publishyour project, we’ll send you between $25 and$150, depending on the published length.
MAIL:P.O. Box 22473, A lexandr ia , VA 22304
Email : in fo@diy-boat . com
PROJECTS WANTED

DIY boat owner 2004-2(www.diy-boat.com) 1-888-658-2628 61
Story and Photos by Peter Caplan
A small grease gun can be an idealaddition to the boat toolbox. Inside thegun, the grease is pressurized by astrong spring inside the pump body.Pumping the operating handle allowsgrease into the nozzle and further pres-surizes it to overcome the resistance ofthe tiny valve inside the grease nipple.
The seemingly simple job of filling agrease gun or remote stern gland greas-er causes incredible difficulties for manyboat owners. When performed correct-ly it's clean and uncomplicated but it'seasy to get into a terrible mess tryingto stuff handfuls of grease into the endof the gun and then packing it toremove the trapped air. Here is an eas-ier way.
To fill the gun, the plunger is first pulledout to the locked position. The lockingmethod varies among makes of greaseguns so check how it's done before start-ing.
Small grease guns like this are oftenlocked open by pulling the plunger fullyout and turning it 90°.
With the plunger locked the nozzle endcan now be unscrewed. The plunger isthen slowly released and any grease with-
in the body pushed out. This can be putback into the tin of grease to use again.
Small tins of grease have a flat disc insidewith a hole in the center. This is providedto ease gun filling.
The end of the grease gun body with thenozzle end removed is placed onto thedisc and pushed down while at the sametime pulling up on the pressurizingplunger of the gun. The combined effort ofpressing the gun down and lifting thepressurizing plunger up forms a partialvacuum and forces grease into the gun’sbody with little or no trapped air ensuringthe body is almost totally filled withgrease.
With the gun full of grease and the pres-surizing lever fully out it's again lockedinto the open position. Screw the nozzleback on and then release the pressurizinglever.
If there is air in the nipple, open it now tofree trapped air. If there is no air to bleed,pump the handle a few times to start thegrease flow and the gun is ready for use.
Fill remote stern greasers by removing thetop cap and unscrewing the body fromthe base. (OK, I admit this is the greasegun body but the principle’s identical!)
Simply push the body down on the disc inthe tin until it's totally filled with grease.When full, the body is refitted to the base,the pressurizing screw in the top cap isunscrewed and the cap refitted ready foruse. In either case, there is little wastedgrease and very little mess. Famous lastwords!
P R O J E C T S
FILLING A GREASE GUN What is a simple task can be a total mess for the uninitiated.

I'm frugal (themate calls mecheap). I could notbring myself to tossthe cushions andbuy new ones. Itook the cushionshome and removedthe foam from thefabric covers. Thesewere shipped to the
dry cleaners and came back clean and odorless. The foamwas a different story. I mixed up a solution of laundry deter-gent with a small amount of bleach, set the foam out in theback yard and soaked it with the cleaning solution. Like awine maker stomping grapes, I proceeded to march aroundthe top of each cushion to make sure lots of the good stuff gotinside and it did. In fact, the second hardest part of the proj-ect was getting the cleaning solution out of the foam. I rinsedand marched and rinsed and marched. The neighbors, whoare not nautical, thought I had gone off the deep end. Onlyanother frugal sailor could understand why I would go tosuch lengths to save a few cushions. It took all afternoonbefore the water coming out of the foam was finally clearbut it was worth it. The foam sparkled and even smellednice. The next day was hot with no rain, a perfect day fordrying our newly cleaned foam. Then I encountered the hard-est problem. The foam would not dry. We were blessed withhot rainless days but a week in the sun still did not dry theinnermost foam. Clearly, this was not going to work.
An answer came from an unexpected corner of our backyard. The top of our central air conditioner compressor pro-duces a lot of hot air. I suspended one of the foam mat-tresses about 4" (10cm) over the compressor on a metalgrate (part of a collapsible dog kennel) so that the hot airwould blow the foam dry. Since the foam was open cell, Ihoped that the hot air would permeate the foam and dry it.It did. It took a full day but it worked. Putting the foam backinto the fabric covers was not as difficult as I thought it wouldbe. The open cell foam compressed easily and with a bit ofeffort I was able to work it all back in again. To keep thecushions smelling sweet, I placed a fabric softener sheetbetween the foam and fabric.
Our foam cushions gave us good service for the next twoyears. Then, while pondering my to-do list, I rememberedthe fabric softener sheets I had placed in the cushions. Itwas time to replace them. As I thought about it though, Irealized there was probably a better way to go: closed-cellfoam.
Most interior cushions on boats are made with open-cellfoam because it's inexpensive, easy to work with and arguablyoffers the best in comfort. Closed-cell foam is considerablymore expensive, especially in large sheets, and is stiffer andharder to work with. Advantages of closed-cell foam are thatit doesn't absorb water so the inside cannot mildew and itfloats. I figured if I was unlucky enough to hit somethingbig, closed-cell foam would be a useful item to temporarilyplug a breach in the hull and, if the boat did sink and thelife raft malfunctioned, I could float to safety on the foam.
MISSION POSSIBLE: Help for Mildewed Cushions
Sooner or later, this happens to all cruisers. We leave a portor hatch open in the rain or a big wave dunks us. Our cush-ions get soaked. Not the cockpit cushions, which can takeabuse, but interior cushions. If ignored, they soon mildewand add to those odors that cause the mate to threatenmutiny.
I learned the hard way. It was a hot, windless summerday onboard Raven and all the ports and hatches were openwhen we were hit by the mountainous wake of a large cabincruiser. Our bow scooped up water that cascaded into thevee-berth like Niagara Falls, soaking the interior cushions.After yelling the appropriate admonition at the stern of theperpetrator, we hauled out the cushions to air dry on deck.By the end of the day they seemed to have dried, at leastthe fabric was dry. So, we stowed them back in the vee-berth. In a few weeks we noticed that our boat a particu-larly foul odor emanating from the vee-berth, rather thanthe head, which is the usual situation. It had been longenough since our dunking that we didn't immediately connectthe dots. We knew something was terribly wrong after anattempt to sleep on the cushions. Investigation revealed thatthe inner foam was still damp and badly mildewed.
DIY boat owner 2004-2(www.diy-boat.com) 1-888-658-262862
PROJECTS
Pat K
earn
s

"Fuzzy math," exclaimed the mate, but she was secretly con-sidering the prospect of a new interior design with new cush-ions and gave the project a green light.
I found the foam available in large sheets (mattress size)and several thicknesses, up to 3" (7.6cm), from DefenderIndustries (www.defender.com). It was expensive, so, overthe next year, whenever we had a little extra money, wereplaced the open-cell foam with closed-cell foam. I usedthe old foam as a pattern. Closed cell foam is hard to cutbut a sharp bread knife will do it. [Ed: This is a great job foran electric carving knife.] It's also hard to work into the fab-ric covers and, in some cases, the foam had to be insertedin pieces rather than one large sheet [Ed: Wrap foam in light-weight plastic and it slides easily into the fabric.] Also put-ting small pieces of open-cell foam in corners helps to soft-en them. I have heard that because closed-cell foam is stifferthan open-cell foam, one can get by with thinner cushions butI kept the thickness the same to use the old covers (muchto the dismay of the mate) and to insure that they fit thespaces properly. Now, all of the foam on the boat is closedcell. I find I sleep much better on the closed-cell foambecause it's firmer and supports my back better. [Ed: Testthe foam before buying as some will find this foam too firm.One way to get the best of both worlds is to use the eggcrate type foam mattress toppers found in bedding stores tosupplement the thinner closed-cell foam. Cut them to fit.]
Just a few days ago I saw my friend and his wife sittingon a neighboring boat, looking forlorn and obviously notspeaking. Although we hadn't had much rain that summer,the hatch had been left open on the one night that it didrain. "It was only open a little," explained my friend, hold-ing up a thumb and forefinger to indicate about 3" (7.6cm)but the cushions in the main saloon were soaked. "Even hadpuddles on them," lamented my friend's wife. They asked ifI had any advice. I think I told them more than they wantedto know.
— Charles F. Bahn, "Raven", Bethesda, Maryland
STERN FLAGPOLE HOLDER A standard wallflagpole holder,available at hard-ware stores, makesa practical flagpolefastener for yourboat. I used a wood-en drapery rod forthe staff, sized at thebottom to fit theholder and bought a
finial at a lumberyard to fin-ish the top. Both receivedmultiple coats of marine var-nish. The setscrew holds thepole securely in place; add
two stainless-steel screw eyes for the flag.
— Bert Small, "Sea Eagle," Salt Spring Island, British Columbia
DIY boat owner 2004-2(www.diy-boat.com) 1-888-658-2628 63

DIY boat owner 2004-2(www.diy-boat.com) 1-888-658-262864
There is a school of sailing that suggests that you should notgo to sea in a boat with less than 1' (30cm) of waterline forevery year of your age. That means thatas you get older, you should get a larg-er boat. As I age with grace, I heartilysubscribe to this school of thought,although I am breaking that rule to sailon a 56-footer (17-meter) for theBermuda Race this year. This isbecause the owner has also offered totake my eldest son on his first offshorerace. In my opinion, a boat is not worthsailing unless it's large enough to hold atleast one bottle of rum, several bottlesof tonic, a few limes and a couple oflarge glasses. If you own on a boat thatgets saltwater into your drink, definite-ly find a larger boat.
Having said that, I have to admit thatthere is a lot to be said for smaller boats in certain situations.If you want to explore some of shallow coves and inlets ofChesapeake Bay, Florida Keys or San Francisco Bay, a biggerboat can inhibit your exploration of the best kept secrets ofthese waters. Bigger generally means a deeper keel, morebeam and a longer boat with more sail area. In this case, asmaller boat enables you to go to more interesting places andhave fun on the water. That’s what it’s all about. If you arehaving fun on the water, enjoy whatever boat you are aboard.Worrying about the mortgage payments on a larger boat willdetract from your enjoyment of being afloat.
On the plus side, larger boats have it better in every areaexcept cost. They handle rough weather better, have a longerrange, better creature comforts and can offer a more hedo-nistic sailing experience. However, you can figure that for everyfoot (30cm) of length, the bills go up exponentially!
As an example of larger being better when sailing long dis-tances, I remember an experience I had on a transatlanticrace. We were 11 days into the trip from New York toFalmouth, England, and were about a 1,000 nautical milesfrom land on a 100' (30.4m) sloop in 30 to 35 knots of windwhen we overtook a First 33 that had left Bermuda 10 daysbefore. We carried a full mainsail and a headsail with just tworolls on the headstay. Our boat speed was around 12 to 14knots. The smaller boat was under a working jib with tworeefs in the main and pounding along, throwing spray every-where. They expected to make Falmouth in another 10 to 15
days, while we arrived just six days later. Just after we arriveda big storm hit and I wondered how the two men on that First33 had fared. In this case, bigger was unquestionably better.
How should you decide what is best for you? Take a lookat the type of sailing that you do now. Do you putter in andout of coves and harbors or do you spend time crossing expans-es of an ocean? Do you sail for an afternoon and go ashorefor the night? Do you sleep aboard with your family? Do yourace regularly?
Sailing overnight requires that a boat have, at least, enoughbunks for the crew, unless you’re sailing solo. It also requiresthat the boat have a head and somewhere to wash the dish-es, unless you are a diehard supporter of the local Pizza Hut.At a minimum, a boat that has these amenities is usually 22'to 24' (6.7m to 7.3m) in overall length, be it power or sail.However, there is no way that I would sail a 22-footer acrossan ocean, although more intrepid sailors than I have done it.
If you sail with your family, you will probably find that yourboat size increases at approximately the same rate as yourfamily increases. One child usually results in a 3' (91cm) larg-er boat, two children begets a 4' to 6' (1.2m to 1.82m)increase in boat size and so on. When your kids grow up andget families of their own, boat size shrinks accordingly. I knowof a retired couple who’ve adopted the Florida lifestyle andnow own a 20' fishing boat to take the grandchildren fishing.They owned a 50' (15m) before the kids left home.
So is bigger better? Only you can decide. But take my wordfor this. The average boat owner considers a boat of around40' (12m) as large as he or she wants to own unless theyplan on living aboard or crossing oceans. After that, boat sizeshrinks until, as I said before, you are back to a runabout andteaching your grandchildren how to bait a hook.
About the author: Roger Marshall is a boat designer and author of12 books on sailing and yacht design. He has a boat design com-pany in Rhode Island and is the vice-president of Boating WritersInternational.
View from thethe SternnSIs Bigger Better?It's popular belief that trading up is a good thing. Before you do, here are a few variables to consider.
By Roger Marshall

Marine Equipment InstallationsHere’s how to choose, install and operate equip-ment for your boat includ-ing: air conditioning and heating systems, audio systems, bow thrusters, davits, lightning protec-tion, propane systems,
refrigeration, windlasses and more.
Fiberglass Boat RepairHow to survey, repair and prevent cosmetic and structural damage in fiberglass hulls, decks and transoms. Includes the step-by-step repair
of minor cracks and gouges, large holes, water-soaked decks, delaminated hulls and proper installation of hardware.
Nautical NecessitiesFrom cleaning to fuel filter-ing to waterproofing charts, you’ll find ideas and inspi-ration in this compilation of tips to do-it-yourself boat maintenance, repair and
troubleshooting. Divided into 20 categories to make look up easy.
Better Boats More than 200 do-it-yourself projects. Practical solutions to deck and cockpit refitting, inte-rior renovations, rigging upgrades, space-saving
equipment storage, safety add-ons and other nifty items to customize your boat.
Sailboat RiggingA practical guide to deck layouts, equipment repairs, performance upgrades, rig tuning, sail controls and steering systems.
Building With Starboard22 Projects and Fabrication Techniques: The ideal choice for replacing wood compo-nents onboard – won’t delaminate, rot or splinter and requires no paint.
Plumbing 101A boat owner’s guide to the inspection, mainte-nance, repair, trouble-shooting and upgrading of onboard plumbing systems.
DIY MechanicGasoline and diesel engine service. How to maintain, troubleshoot and repair outboard engines, stern-drives and diesel inboards.
AC/DC Electrical SystemsA guide to expanding, upgrading, surveying and troublshooting your boat’s AC and DC electrical system. All articles follow ABYC Standards.
Painting & RefinishingThe complete guide to painting and refinishing hulls, topsides and decks with marine coatings.
Launch & Haulout How to prepare your boat for spring launch and win-ter storage. Includes lay-up checklists, maintenance and lubrication guides, engine servicing, haulout guidelines, easy-to-build storage covers and more.
Technical CD-ROM Library for Boat Owners
MRT SeriesCDs contain articles from past issues of DIY Boat Owner Magazine
To order call 1-888-658-BOAT or Shop Online at www.diy-boat.com
$19.95each
$19.95each
1995 – 2007 52 Issues of DIY:
A technical reference library for powerboat-ers and sailboaters. The editorial archives of DIY from 1995 to 2007, organized by
year and issue from cover to cover.
$99.95MRT BOX SET
12 of the MRT Series in a custom vinyl case. Power version has Powerboat Rigging and
Sail version has Sailboat Rigging.
$119.95 (Specify power or sail)
Electronics Connection
Provides the information you need to consider when pur-chasing, installing, operat-
ing, and troubleshooting marine electronics for most any layout or equipment and budget in a step-by-step approach. $19.95
Powerboat RiggingFrom gauges to propellers to steer-ing systems, here’s everything you need to know to maintain and repair your boat and trailer, improve boat handling and perfor-
mance, and find solutions to common servicing problems.
UPDATED
UPDATED
UPDATED
NEW
UPDATED
NEW