A Cutting-Edge Gambit against the Queen's Indian
175
-
Upload
independent -
Category
Documents
-
view
1 -
download
0
Transcript of A Cutting-Edge Gambit against the Queen's Indian


A Cutting-Edge Gambit against the Queen's Indian

Imre Hera & Ufuk Tuncer
A Cutting-Edge Gainbit against the Queen's Indian
Hit the Nimzowitsch Variation with 6.d5 !
The Pawn Sacrifice 1.d4 ltJf6 2.c4 e6 3.lt:Jf3 b6 4.g3 .ia6 S.'iYc2 cS 6.dS
New In Chess 2 0 1 4

For my grandmothers.
For grandmaster and Olympic Champion Gyula Sax,
Hungary's greatest attacking virtuoso ever.
Imre Hera
©New In Chess 20 1 4
Published by New In Chess, Alkmaar, The Netherlands
www.newinchess.com
All rights reserved. No part of this book may be reproduced, stored in a retrieval
system or transmitted in any form or by any means, electronic, mechanical,
photocopying, recording or otherwise, without the prior written permission from
the publisher.
All photos: New In Chess archives, except photo page 13: Daniel de Mol archive
Cover design: Angelo Spiler
Supervisor: Peter Boel
Proofreading: Rene Olthof
Production: Anton Schermer
Have you found any errors in this book?
Please send your remarks to [email protected]. We will collect all relevant
corrections on the Errata page of our website www.newinchess.com and implement
them in a possible next edition.
ISBN: 9 7 8-90-5 69 1 -49 7-4
4

Contents
Explanation of Symbols ......................................... 6 Foreword by Alexey Shirov . . . . . . . . . . . . . . . . . . . . . . . . . . . . . . . . . ..... 7 Introduction ................................................. 9 Reader's Guide .............................................. 10
Part I -Black Declines ................................... 11
Chapter 1: Benoni-Style ..................................... 1 2 Chapter 2: Minor 6 th Moves for Black . . . . . . . .. . . . . . .. . . . . . .. . . . 2 7 Chapter 3: Minor 7th Moves for Black .......................... 38
Part II-Black Accepts with 6 ... cxdS 7.exdS .tb7 8 . .tg2 �xdS ... 49
Chapter 4: 9. tl:ic3 - Other Bishop Moves . . . . . . . . . . . . . . . . . . . . . . . . 5 0 Chapter 5: 9 .tl:ic3 �c6 - The Main Line ......................... 64
Part III - Black Accepts with 6 ... cxdS 7.exdS .tb7 8 . .tg2 tlJxdS . . . 75
Chapter 6: 9. 0-0 �e7 10 . .l:!d1 - Minor Lines for Black. ............. 7 6 Chapter 7: 10 . .l:Idl �c8 - Side Moves .......................... 9 6 Chapter 8: 1 O . .l:Idl �c8 l l.a3 - Minor Lines ................... 103 Chapter 9: 1 O.�dl �c8 l l.a3 - Main Moves ................... 108 Chapter 10: 10 . .l:Id1 tl:ic6 - Minor Lines ....................... 1 3 3 Chapter 11: 10 . .l:Idl tl:ic6 - Main Line 1 1.�fS .................. 141
Index of Variations . . . . . . . . . . . . . . . . . . . . . . . . . . . . . . . . . . . . . . . . . . 1 6 7 Index of Names ... .. ...... .. .. ... .. ... .. . .. .. . .. .. . . . .. . . .. .... .. 17 0
Game List . . . . . . . . . . . . . . . . . . . . . . . . . . . . . . . . . . . . . . . . . . . . . . . . . . . . . . 172 Biography of the Authors ..................................... 1 7 3 Bibliography ............................................... 1 7 4
s

Explanation of Symbols
� White stands slightly better
The chess board + Black stands slightly better
with its coordinates: ± White stands better
+ Black stands better
8 +- White has a decisive advantage
7 -+ Black has a decisive advantage
6 = balanced position
5 00 unclear position
4 � compensation for the material
3 > strong (sufficient)
2 < weak (insufficient)
� better is
� weaker is a b c d e f g h
good move
!! excellent move
bad move
?? blunder D White to move interesting move !? • Black to move w King ?! dubious move
'liH Queen D only move
g: Rook /::,. with the idea
� Bishop -> attack ttJ Knight t initiative
tt lead in development
� counterplay
# mate
corr. correspondence
6

Foreword by Alexey Shirov
There is no doubt that nowadays the opening constitutes the main part of a chess game. To play well one sometimes needs to know the opening so deeply that the ideas -and motifs of the middlegame and endgame have to be learned automatically. But the question is: how to study, and, even more difficult, how to PLAY openings properly?
Most of the chess players I met in my life use two methods - either they trust grandmaster practice and grandmasters' recommendations (mostly superficial ones) from books and magazines, or they follow the engines' analyses. Sometimes they combine these two methods but still they don't do a lot of thinking about the opening themselves. There are very many lines in chess and there is little time to investigate everything.
Only very few are still able to keep investigating what is not yet investigated in chess and make real further steps in opening theory. For this you need a real devotion to the subject and you have to do very, very accurate work on each idea that comes to your (and not only the computer's) mind.
Normally such work is done by the world top players and those who help them to prepare for the top events. But no books are written about this. Players have to keep their secrets.
In my opinion, the job done by Imre Hera and Ufuk Tuncer is exactly of this kind, but contrary to what is habitual in today's chess, their findings are no secret anymore! I remember studying this fascinating line of the Queen's Indian during the Candidates' matches in Elista back in 2007 (my game against Aronian is mentioned by Imre and Ufuk) . I had a lot of interesting ideas and finally . . . abandoned the line a few months later because I thought that Black had a safe and easy way of getting good play. Now I can see that had I dug in deeper in those days, I would possibly have been happier with the outcome.
Of course, nobody claims that the moves 5 .Vlic2 and 6 .d5 ! win the game by force. But this book shows exactly why the line is so attractive for white players. Fascinating chess, great complexity, chances to create fantastic attacking possibilities. This is exactly what we love chess for. And those who play the Queen's Indian with black can know what they should be afraid of and try to find their answer, in order to make it even more interesting!
This is not only a book on a single variation of the Queen's Indian, it's a book on Modern Chess.
Alexey Shirov Riga.January 20 1 4
7

Introduction
I got really enthusiastic when I was offered the opportunity to write an opening book for New In Chess. After many years of active play now there was a chance to create something of lasting value for a larger audience. Having played lots of games in the 4 .g3 line of the Queen's Indian Defence on both sides of the board, my focus of interest fell on a particular variation where White sacrifices a pawn early. For the past seven years this fresh idea has attracted the attention of top players and of many amateur players as well. Although I recommend it mostly for White, I am also giving many examples how to equalize with black in other main lines.
Many contemporary repertoire books and DVDs try to satisfy the reader's expectations by giving model games where the other side defends poorly, they omit the best counter-moves or simply assign a ';:!;' to completely equal positions. Some authors may even be reluctant to reveal novelties before they had the chance to play them in their own games. Not so in this book! I am always searching the truth and I am convinced that many sidelines with a bad reputation are actually quite playable. As Anatoly Karpov once put it, preparing for one of his matches with Kasparov : 'When we are White, everything seems to be equal, while with black we always fail to find balanced positions.' I am sure that many competitors have faced such dilemma during their preparations. Although this book was written mainly for white players, we have also given many examples of how to equalize other main lines with black.
We seize the opportunity to thank all friends and colleagues who helped us: GM Ivan Farago (Olympic silver medalist) , GM Robert Markus, GM Laszlo Gonda (winner of the Open Hungarian Championship in 20 1 3 ) , GM Miguel Llanes Hurtado and GM Denes Boros (U 1 6 Youth Olympic winner) .
We also mention authors of Yearbook Surveys on the same topic, in chronological order these are : Steve Giddins , Alexey Kuzmin, Emil Anka and Tibor Karolyi.
We would also like to express our grateful acknowledgements to the editorial team of New in Chess, especially to Mr. Peter Boel, who has given us fantastic support, significantly facilitating our work, and to the specialists working effectively in the background. Without their contribution this book would hardly have been possible.
The prolific collaboration with my friend Ufuk Tuncer, a very experienced author of several Yearbook Surveys with New In Chess and second of many strong grandmasters, helped me a lot to complete this project successfully. We invested hundreds of hours to make real quality and hope that you will enjoy it!
Imre Hera Budapest, December 201 3
9

A C u t t i n g - Edge G a m b i t a g a i n s t the Q ueen 's I n d i an
Reader's Guide
We have spiced the following 1 1 theoretical chapters with complete practical games wherever it was possible. First we deal with early deviations, in order to build a solid foundation for what follows. Later the main lines are introduced, but do not neglect the first chapters, where some amazing discoveries are waiting too! From conversations with tournament players we learned that they largely prefer useful material (speak: analysis) to reading a 'novel' . For this reason many paragraphs of pure and 'undisturbed' analysis alternate with segments of verbal entertainment.
There are some crucial factors distinguishing our book from others. Most important of all, this is not a repertoire book for either side. For example, in Chapters 5 and 8 players with the black pieces can find many opportunities to equalize. On the other hand we worked out countless eye-catching novelties for White, in many cases suggesting even two promising alternatives in order to get a better feeling for the type of positions. It is recommended to study the model games carefully because of their instructive middle- and endgames.
On as yet little-explored territory we invested 9 tough months of work. We are really delighted with the outcome and we do hope that it will cause overall satisfaction with the reader as well. Let's not forget our motto: 'We have nothing to hide ! ' The material i s up to date until the end of December, 20 1 3 .
Please fasten your virtual seatbelts and enter the world of magic. Only, our performance is more than an illusion! We wish you a lot of fun and success. Let's have fire on the board'
1 0

Part I - Black Decl ines
1 .d4 tt:Jf6 2.c4 e6 3.tt:Jf3 b6 4.g3 �a6 5.'li'c2 c5 6.d5
We have separated the very early deviations into three different chapters. They appear basically quite rarely in everyday practice. However, a few of them contain lots of tricks, so White has to be careful with the move order as well, otherwise Black might equalize easily.
This part contains the following chapters:
Chapter 1: Benoni-Style Chapter 2: Minor 6th Moves for Black Chapter 3: Minor 7th Moves for Black
1 1

A Cu t t i n g -Edge Gam b i t a g a i n s t t he Qu een's I nd i an - Pa r t I
Chapter 1
Benoni-Style
1 .d4 tl:lf6 2.c4 e6 3.tl:lf3 b6 4.g3 -2.aG 5.'t!Hc2 cs 6.d5
These types of lines can be expected from positional players or from players who prefer to avoid big theoretical battles. The common feature is the structure. Many of the positions remind us of the Benoni Defence. We will discuss the clumsy 6 . . . 't!He7 , the strange-looking 6 . . . .2.d6 and finally the main line 6 . . . exdS .
1 .d4 tl:lf6 2.c4 e6 3.tl:lf3 b6 4.g3 .2.a6
Black chooses to put his bishop here in order to develop with tempo. The other idea is that he does not want to challenge the fianchettoed white bishop on the long diagonal, since White would
1 2
be able to close the latter with the temporary pawn sacrifice d4-d5 . For example : 4 . . . .2.b7 S . .2.g2 .2.e7 6 . 0-0 0-0 7 .dS exdS 8 .tl:lh4 is a very sharp line, where Black has to be up to date! One of the most famous games is Kasparov-Marjanovic, Malta (ol) 1 980 .
5.'t!Hc2 This move was first played in 1 9 S 2 by Luiz Gentil jr. It does not only defend the c4-pawn, but also supports White's occupation of the centre by e2-e4. I remember when I started to study the Nimzo-Indian, the general opinion on Alekhine's 4 .'t!Hc2 was quite bad at first, since it was against the classical principles which stated that the development of the light pieces shall enjoy priority.

However, life has proved that the legendary World Champion's move has remained one of the most popular and reliable continuations and it works very well here too.
Alexander Alekhine
There are many other main moves here, such as S .b 3 , S .�a4, S .�b3 or s .tl:lbd2 . A) On the most popular move S .b3 ,
s .. . Jib4+ 6.Jid2 Si.e7 is the classical reaction. Black intends to block the long diagonal with the pawn chain after . . . c7-c6 followed by . . . d7-dS , meanwhile also attacking the c4-pawn, for example 7.Si.g2 c6 ;
B) We were surprised to see that the unusual s .'li'a4 actually has the longest history (Grunfeld-Nimzowitsch , Breslau 1 92S ) ! Though the queen is misplaced here, it makes the forthcoming development easier ( tll b 1 -c3 is not immediately possible after S .�c2 ) . S ... Si.b7 6 .Si.g2 c s This i s the most common reply for Black and after 7 .dxcS we think that both recaptures are well playable for him;
C hap t e r I: Benon i - S tyl e
C) S .'li'b3 i s rather more part of 'modern' fashion, since it was first tested in 1 98 1 . S ... tllc6 is the most common reply. 6.tllbd2 tllaS 7.'li'c3 cS 8.dxcS bxcS 9.e4 The arising position is already very original, however, Black has just enough time to regroup his badly-placed pieces. 9 ... Si.b7 1 0.eS tlle4 1 1 .tllxe4 Si.xe4 1 2.Si.g2 .i.e7 1 3 .0-0 0-0 with more or less level chances ;
D) The natural S.tllbd2 occurred already in Pirc-Nimzowitsch, Bled 1 93 1 . S ... Jib4 Probably the safest reply. Attacking the centre with S . . . cS leads to really messy positions: 6 . e4 cxd4 7 .es tllg4 8 .h3 tllh6 9.Jl.g2 tllc6 1 0 .0-0 tllfs oo. 6.'li'c2 Jib? 7 .Jl.g2 Jl.e4 8 .'li'b3 Si.xd2 + 9 .Jl.xd2 0-0 1 0.0-0 d6 Here the play will be quite uneventful. Black has strong control on the important light squares and in such half-open positions, White's bishop pair does not have much added value.
5 ... c5 Black immediately tries to use the fact that White's centre has become weaker, and pushing the cl-pawn to dS also looks risky at first glance . . .
A ) S . . . Si.b4+ first occurred in Portisch-Bronstein, Las Palmas 1972 . Since then, a lot of top players have adopted this idea in order to avoid the sharpest variations. 6.Jl.d2 .i.e7
13

A C u tt i n g - Edge Gam b i t a g a i ns t t he Queen ' s I n d i an - Par t I
6 . . . £.xd2 + 7 .l2Jbxd2 dS 8 . .2.g2 0-0 9.0-0 t2Jbd7 was seen in Giri-Carlsen, Biel 20 1 2 . Here we found 1 O .b4 to be the most ambitious continuation. White has a comfortable space advantage, he is already prepared for . . . c7 -c5 and his fianchetto bishop is more powerful than the light-squared bishop on a6 . A good example is Iotov-Mladenov, Sofia 2009. 7.e4 d5 8.cxd5 exd5 9.e5 .2.xfl 1 O.@xfl l2Je4 is a big sideline, about which we could have long discussions. Generally, we do truly think that White has at least some small advantage thanks to the advanced e-pawn, which makes the black kingside weaker;
B) S . . . dS is quite harmless: 6 .cxdS exdS 7 .£.g2 £.d6 8 .t2Jc3 0-0 9.0-0 c6 1 O .tLleS £.b7 l l .e41 with a nice initiative, Markos-Ostrovskiy, Pardubice 2 0 0 7 ; C ) We believe that 5 ... t2Jc6 i s less ef
fective here than versus S .'lWb3 . It was first tried by Kachiani-Gersinska against Viktor Kortchnoi in 1 999 and later Carlsen also adopted it against Aronian in 2006 . After 6.£.g2 t2Jb4 7.�b3 d5 8 .cxdS �xdS 9.'ii'dl ! l:!.d8 1 0.0-0 White was completely fine in El GindyRizouk, Tripoli 2009; D) The modest S ... c6 hands the centre
to White: 6.e4 dS 7.cxdS £.xfl 8.@xfl cxdS 9.es l2Je4 1 o.t2Jbd2 t2Jxd2+ 1 1 .£.xd2 £.e7 12.'it>g2 l2Jd7 1 3 .Ifacl 0-0 14.h4 with lasting pressure. S.IvanovCramling, Stockholm 20 1 0/ 1 1 .
E) S ... bs is a rather typical reply to S .b3 which can hardly be called a developing move. Later the b3-pawn might become a target for Black's a-pawn after . . . a7 -a5 -a4: 6.cxbS £.xbS 7 .t2Jc3 £.b4 8.£.g2 .2.c6 9.0-0 o-o 1 0 . .2.gs h6 1 1 .�xf6 �xf6 1 2.lHdlt
1 4
White has a comfortable position with a big lead in development, however, it was not enough to win in the end in Beliavsky-Sax, Murska Subota 2 0 0 7 ;
F) S . . . .2. b 7 6 . .2.g2 jLb4+ 7.£.d2 .2.xd2+ 8.�xd2 ! Although we lose a tempo, our knight will be much more useful on c3 than on d2 . By the way, this position will more likely arise in the order 4 . . . £.b7 s .£.g2 £.b4+ 6 .£.d2 £.xd2+. 8 ... 0-0 9 .t2Jc3 and now:
F l ) After the aggressive 9 ... t2Je4 there is an exciting, quite forced line: 1 o.'ii'd3 t2Jxc3
1 1 .tLlgS ! t2Je40 1 2 .�xe4 jLxe4 1 3 .'ii'xe4 'ii'xgS 1 4.'ii'xa8 tlJc6 1 5 .�b7 t2Jxd4 1 6 .lld l �e5 1 7.e3 t2Jc2+ 1 8 .@e2± ended in White's favour in the classic battle Euwe-Capablanca, Amsterdam 1 93 1 ;
F2 ) 9 . . . ds 1 0 .cxdS exdS 1 1 .0-0 t2Jbd7 1 2.tLleS We prefer such positions with white especially, as his fianchett-

oed bishop seems to be much stronger than its opponent and he can easily advance on the queenside. 1 2 . . . 'i¥e7 1 3 .tLld3 .l:lfd8 14 . .i::rac l ;l; Hera-Sax, Hungary 20 1 3 ;
F3 ) 9 ... d6 1 0.ds es 1 1 .0-0 as 1 2 .e4 In spite of the bad-looking lightsquared bishop, White's space advantage ensures him good prospects. 1 2 ... tt:Jbd7 1 3 .tLlel Ue8 I 4.b3 tt:Jcs 1 s .tt:Jc2;t .
This all happened in a game SasikiranAndreikin, Moscow 2 0 1 0. It is clear that White has easy play here, while Black can only react to his opponent's plans.
6.d5! . . . However, we do not care' The fine recognition that this move is playable was already made in 1 9 6 7 , in a game Grigorian-Keres, from the USSR Spartakiad. It is always very useful to study ' old' games by classical players, when computers did not yet exist , but the players had so many great ideas' 6.�g2? ! Attention please ! This move order is inaccurate. Indeed it would avoid the lines we discuss in the first three chapters, but it also allows Black another option, which equalizes immediately: 6 ... tL:lc6! White is forced to take on cS and the character of the opening will be completely different.
C hap t e r 1 : Ben on i - S tyl e
6 ... exd5 A) 6 ... 'i¥e7
The idea of this move is to provoke White to take on e6 or to force the trading of the queens with . . . 'ij'e4 after . . . exdS . A l ) 7.dxe6?! would support Black's
plans: 7 . . . 'i¥xe6 ! Ould Ahmed-0. Ronat, email 2 0 1 1 ;
A2) 7.�gS ! ? is an interesting idea, in accordance with the sharp playing style we advocate in this variation. 7 ... exdS 7 . . . h6 8 .�xf6 'iYxf6 9 .tLlc3 �b7 1 O .�g2± . 8.tLlc3!N The most logical move. We do not care about the pawns, as usual. After 8. cxdS 7 ! 'ij' e4 ! 9. 'iV xe4+ tL:lxe4 1 0. tL:lc3 tL:lxg S 1 1 . tL:lxg S �e 7 =
Black managed to exchange the queens and got an equal position in Alvarez Ibarra-Sanz Perez, Zornotza 2 0 09 . 8 ... �xc4 8 . . . �b7 9.cxdS h6 1 0 .�xf6 'i¥xf6 l l .�g2i . 9 .b3 d4 1 0.�xf6 gxf6 A sad recapture. 1 1 .bxc4 dxc3 1 2.�h3 ! tt:Jc6 1 3 .'i¥xc3 hS 1 3 . . . tt:Jes 1 4.0-0±. 1 4.e3 White enjoys full compensation for the pawn; Black faces serious problems finding a safe place for his king;
A3) 7.�g2N exdS 7 . . . �b7 8 .tLlh4 exdS 9.tLlc3± . 8.cxdS d6 9 .tt:Jc3 g6 The only option to continue his development. 1 O.�gS This unpleasant pin will cause Black big problems.
A3 l ) I O ... tt:Jbd7? 1 1 .�a4! The most energetic reply to make use of the fact
1 5

A C u t t i n g -E dge Gamb i t a g a i n s t t he Qu een ' s I nd i an - Pa r t I
that the a6-bishop is left unprotected. 1 1 . ..�b7 1 2.tllbS '\tld8 Moving the king to such an unfortunate square is not likely to bring anything good in the future. 1 3 .tlld2 a6
Analysis diagram
l 4.tllxd6! A pretty sacrifice, which is indeed the best way to punish Black. 14 ... '/Wxd6 1 S .tllc4 '1Wc7 1 5 . . . '1Wb8 l 6 .tllxb6 �e7 1 7 .tlixa8± . The following moves are quite forced : 1 6.d6 �xd6 1 7.�xb7 bS 1 8.�xf6+ tlixf6 1 9 .'/Wdl '1Wxb7 20.'/Wxd6+ tlld7 2 1 .0-0-0! A generous continuation. We give another piece in order to accelerate the attack. 2 1 ...bxc4 2 2. '1Wf6+ r:J;;c7 2 3 ..ihd7+! This last tactical blow crowns the concept . 2 3 . . . <;t>xd7 24.I'.tdl + @e8 24 . . . i;.i;ic7 2 5 .'/Wd6+ @cs 26 .l:!.ds+- and the king is finally cornered. 2S .'1Wxh8+ rtJe7 26.'1Wxh7± White has a healthy extra pawn;
A32) 1 0 ... �g7 1 1 .'1Wa4+ rtJf8 After 1 1 . . .bS 1 2 .tllxbS 0-0 1 3 .tllc3 it is hard to see how Black will prove his compensation for the pawn. 1 2.0-0 h6 1 3 .�d2 rtJg8 Black has to go for artificial castling, which takes a lot of time. 1 4JHel rtJh7 l S .e4 tLlg4Trying to neutralize White's plan, otherwise e4-e5 would follow. 1 6.�f4 gs 1 6 . . . tlies 1 7 .tllxeS .2.xeS 1 8 . .2.xeS dxeS 1 9.l:!.ad 1 i with huge pressure.
1 6
Analysis d iagram
1 7 .�xd6 ! Th.is charming trick leads to a much better endgame for White. 1 7 ... '/Wxd6 18 .eS tlixeS 1 9.tLlxeS �xeS 20.'1We4+ <;t>g7 2 1 .'IWxeS+ '/WxeS 22.SxeS tlld7 23 .!'!.e7 l:Iad8 24.Sdl ± The strong passed d-pawn and his active pieces ensure White a big advantage.
B) 6 ... �d6
Analysis d iagram
In the style of the 'Snake-Benoni' , however the manoeuvre with . . . .2.c7-.2.a5 is unachievable in this position. We give two options for White just to show how flexible his position is:
B l ) 7.e4 The most aggressive handling of the position, occupying the centre immediately. 7 ... 0-0 8 . .2.d3 ! White continues his development, utilizing the fianchetto square for his king. 8 .e S ? ! would be too greedy, viz. 8 . . . .2.xeS ! 9 .tlixeS exdSg?. 8 . . . exdS 9.exdS .l::re8+ 1 0.r:J;;fl

Analysis d iagram
White can calmly make such an extravagant decision since the centre is closed. Now:
B 1 1 ) 1 O ••• bS A logical try to break out. 1 1 .cxbS �b7 It seems that Black has speculated well , as he will take our favourite central outpost, which means that the posi tion becomes open . 1 2 .�gS ! The precursor of a wellplanned attack. 1 2 ... h6 1 2 . . . �xdS does not hold out much hope either : 1 3 .�xh7 + @h8 l 4.tt:Jbd2 g6 (in case of 1 4 . . . �e7 1 5 .�xf6 �xf6 , 1 6 .V4¥fs transfers the queen with tempo : 1 6 . . . �e6 ( 1 6 . . . �xb2 1 7 .V4¥xd5 ! �xal 1 8 .V4¥h5 ! and Black is close to getting mated) 1 7 .V4¥h5 d5 1 8 .h4� and the enemy king is in big trouble) 1 5 .h4! (the point of White 's whole idea) 1 5 . . . \t>xh7 1 6 .hS �g7 1 7 .hxg6 with a decisive attack. 1 3 .�xf6 i¥xf6 1 4.�g2 �xdS 1 S .tLld2 Black has solved the problem of his fianchetto bishop, on the other hand he is still unable to bring the knight into the game. The only thing we shall do is trade off the strong black dS-bishop in order to dominate on the light squares entirely : 1 S ••• �es 1 6.I:thel d6 1 7.�h7+ Wh8 1 8.�e4± and White has a big positional advantage; Bl 2 ) 10 . . . �fS 1 1 .tLlc3 d6 On 1 1 . . . g6
l 2 .h4 ! is a very ordinary way to attack
C hapter 1 : Benon i - S tyl e
the fianchetto set-up: 1 2 . . . �g7 1 3 .hS d6 ( 1 3 . . . tLixhS allows White to continue in style:
Analysis d iagram
1 4 . .l:rxhS ! gxhS 1 5 .�xh7 + Wf8 ( 1 5 . . . @h8 1 6 .V4¥f5 ) 16 .tbe4 with an enormous attack) l 4 .hxg6 hxg 6 ( 1 4 . . . fxg6 1 5 .�f4 and Black is simply lacking good moves) 1 5 .�g2 tt:Jbd7 l 6 .�h6�. 1 2 . ..t>g2 tt:Jbd7 1 3.h4! Again the same idea, as White can castle by hand. 1 3 ... h6 1 3 . . . tLleS 1 4.tLlxeS dxeS 1 5 .�gS h6 1 6 .�ae l (White can afford to leave the bishop hanging) l 6 . . . g6 1 7 .�xf6 i¥xf6 1 8 .hS gs 1 9 .�h7 + �g7 20 .tbe4± with an obvious positional advantage. 1 4.�f4 tt:Jes 1 S .tt:JxeS dxeS 1 6.�gS !± Black is completely passive and still faces a crushing attack. Better go on a holiday'
Bl) It is also possible to continue in a more positional way : 7.�g2 exdS 7 . . . 0-0 8 .dxe6 dxe6 (8 . . . fxe6? loses material by force due to 9.tLlgS tbc6 1 0 .�xc6 dxc6 1 1 .tLlxe6±) 9.tbh4 tt:Jbd7 1 o.i¥a4! 'i¥c8 l l .�xa8 �xa8 1 2 .0-0 �b7 1 3 . .l:rd l ;\; and Black has some compensation for the exchange thanks to the strong bishop on the long diagonal, but White's chances are clearly preferable. 8.cxdS 0-0 9.�gS There is nothing wrong with the natural 9.0-0 l':t.e8 1 0 . .l:re l �f8 1 1 .h3 d6
1 7

A C u t t i n g - E dge Gam b i t a g a i n s t t he Qu een 's I n d i a n - Port I
( 1 1 . . . g6 1 2 .e4 d6 l 3 .tLlc3;\;) 1 2 .e4 tLlbd7 1 3 .�f4;\;. Black is still far from the ideal Benoni set-up. He has no direct play on the queenside, so we can patiently improve our position. 9 ... h6 9 . . . �e7 1 O .tLlc3 d6 1 1 . 0-0 tLlbd7 1 2 .ld:fe l bS l 3 .a3;\;.
Analysis d iagram
1 O.h4! A very aesthetic move, using the fact that the rook is still on the h-file. 1 0 ... �b7 1 0 . . . .l:i:e8 l 1 .tLlc3 �f8 1 2 .�fS d6 1 3 .�xf6 �xf6 1 4.�xf6 gxf6 1 S .�h3;\; . 1 1 .tLlc3 tLla6 1 2.0-0-0 and White had a strong initiative on the kingside in Efremov-Shitrit , email 2008 .
7.cxd5 g6 This is the most natural and most challenging set-up by far. The naive 7 . . . tLlxdS ? loses quite quickly: 8 .�e4+ tLle7 9.�xa8 tLlec6 (Black wants to capture the queen, but it costs him too many pieces) 1 O .e3 bS l l . a4 �c8 1 2 . axbS �b7 1 3 .'i¥xb7 �xb7 1 4.bxc6 tLlxc6 1 5 .�a6 �b6 1 6 . 0-0+- and White 's task was easy in D. Rombaldoni-Ider, France 2009.
8.tLlc3 �g7 9.�g2 0-0 1 0.0-0 d6 We have reached the first critical point. There are a couple of options to choose from, such as: 1 1 .l::re l , l l .�f4 and l l .a4.
1 1 . .l:ie1 !
1 8
This is the most accurate move, preparing e2-e4 and then a breakthrough in the centre with e4-e5 . A) 1 1 .�f4 .l:l:e8 1 2.Zifel bS 1 3 .a4
1 3 .a3 ' is precise here. 1 3 ... b4 14.tLlbS �xbS 1 5 .axbS occurred in RaykhmanKearns, Internet 20 1 2 . Black could have continued more strongly: 1 5 . . . tLle4!N with the idea of . . . tLld7 ;
B) We don't like l l . a4 in view of the knight transfer to b4. For instance: 1 1 . . . .l:!.e8 1 2 .ld.e l �b7 1 3 .tLld2 tLla6 1 4.tLlc4 tLlb4 1 5 .�d l �a6 1 6 .tLlbS �xbS 1 7 . axbS tLle4 with a doubleedged position, Khoroslev-Kotsur, Russia 2009. The diagram position is the main branching point. Black's alternatives are: l 1 . . . .!:l:e8 , l 1 . . .tLlbd7 , and the most common move 1 1 . . .bS .
11 ... b5 A) 1 I .. . .!:i.e8 1 2.e4 tLlbd7 1 3 .�f4 �e7
14.eS !
Analysis d iagram

A well-known breakthrough from the Benoni. White has to react immediately, otherwise Black gets time to organize his pieces and control the important eS -square. 14 ... tllxeSN Swapping with the knight was rather advisable. If 1 4 . . . dxe5 1 5 .d6 1N (if we say 'a ' , we shall say 'b ' too - or in the current situation, rather 'e ' and 'd ' . 1 5 .tllxe5 ? ! lets the advantage slip: 1 5 . . . tllxe5 1 6 .�xe5 �d7oo in Leitao-J. Pereira , Internet 2008) 1 5 . . . �xd6 ( 1 5 . . . �f8 l 6 .tllxe5 tllxe5 1 7 .�xe5 l:rad8 l 8 .�a4±) l 6 .tllxe5 tllxe5 1 7 Jhe5± and loss of material is inevitable. 1 S.�xeS dxeS 1 6.�a4 �c8 1 7.d6! Proceeding energetically in the same manner, gaining a few tempi. At first glance it seems that 1 7 .tllxe5 might be good enough, but after 1 7 . . . �d7 1 8 .�a6 tllg4! 1 9 .d6 �xd6 2 0 .tllxg4 �xg4 2 l .�xa8 .l::i'.xa8!?:? Black manages to get nice compensation for the exchange. 1 7 ... �xd6 1 8.tllxeS .ld.b8 1 9.tllbs �e7 1 9 . . . �f8 20 .�xa7 (although an open position usually suits the pair of bishops better, White's attractive knights make it favourable for him) 20 . . . �g4 2 1 .tllc7 (one of the two rooks will be captured anyway) 2 1 . . . .l:rxe5 2 2 .. lhe5 tlld7 23 . .l:.e4 �f5 24.lie2 �g4 2 5 .�d2± and the rook has danced away successfully. 20.tllxa7 White has regained the pawn, and in addition he remains active. 20 ... �fS 2 1 .tllac6 bS 22.�aS .llb7 23 . .tl.adl b4 24.tlld3± The queenside pawns are already very weak, in addition the black pieces are completely passive;
B) 1 1 . . .tllbd7 1 2 .�f4 Without . . . b6-b5 White can force the black queen to e 7 , which is very helpful as our rook is already on the same file. 1 2 ... �e7 1 3 .h3 !
C hap ter 1 : B en on i - S tyl e
Analysis d iagram
A very important prophylaxis! We should prevent the knight manoeuvre via g4 in order to be able to continue our central break e4-e5 . Here we analyse: B l ) 1 3 . . . b 5 and B2) l 3 . . . tllh5 . B 1 ) 1 3 ... bS As usual, this advance on
the queenside must be met with a 'red light': 14.a3 tllhs 1 4 . . ..l:He8 1 5 .e4 tllh5 l 6 .�g5 �f6 1 7 .�e3;l;. White's camp is much better organized and he can slowly prepare to improve his position with tlld2 , 'it>h2 followed by f2-f4 , while it i s hard to see what Black will do with his pieces. Another threat might be �fl , forcing Black to push . . . c5 -c4 and then White would be able to occupy the important d4-square. l S .�gS f6 1 5 . . . �f6N 1 6 .�xf6 tllhxf6 1 7 .e4;l; tlle 5 ? ! 1 8 .tllxe5 dxe5 1 9:�fl c4 20 . a4 b4 2 l .tllb5i . l 6.�d2 fs
Analysis d iagram
1 9

A C u t t i n g - Edge Gamb i t a g a i n s t t h e Qu een 's I nd i an - Pa rt I
1 7 .e4!N We found this advance to be the most logical. 1 7 . 'liV c 1 was played in Vitiugov-Emelin, St Petersburg 2 0 0 S , where after 1 7 . . . c4 unnecessary complications arose. 1 7 ... f4 Perhaps White overestimated this move in the abovementioned game. 1 8.g4 tbhf6 1 9 .es ! We can deal this standard blow before Black closes the position. 1 9 ... tbxeS 1 9 . . . dxeS 20 .�xf4 tbe8 2 1 .�gS 'liVf7 2 2 .�e3 with a huge advantage . 20.tbxeS dxe5 2 1 .�xf4 tbxg4 22.d6+White wins material and there is also no harmony among the black pieces;
B2) 1 3 ... tbhS Black tries to get rid of the annoying bishop, but we always have a pleasant tempo gain as a reply: 1 4.�gs
Analysis d iagram
B2 1 ) 1 4 ... f6 1 5 .�d2 fS 1 6 .e4!N The same idea as above. 1 6 .'iiVa4 was played in Le Quang-Nguyen Anh Dung, Ho Chi Minh City 20 1 0 . 1 6 ... f4 1 6 . . . fxe4 1 7 .tbxe4 tbeS 1 8 .tbxeS �xeS 1 9.f4 �d4+ 20 .@h2 'iiVd8 2 1 .�c3 �xc3 2 2 .'iYxc3 t . The structure might be similar to some lines from the fianchetto variation of the King's Indian Defence. Black's king is much weaker, while the white pieces have reached the best places. A manoeuvre like tbe4-gS-e6 might be killing. 1 7 .g4 tbhf6 1 8 .eS ! Before the position gets completely
20
blocked, we break through. 1 8 ... tbxeS 1 9.tbxeS dxe5 20.�xf4 tbxg4 The best is still ahead: 2 1 .d6 'ii'xd6 22.�xa8 lha8 23 .�adl 'ii'f8 23 . . . 'ii'c6 24.tbdS . 24.�g3 After avoiding a lot of traps, White has a satisfactory material advantage;
B22) 14 ... �f6 1 5 .�xf6 !N The example given below illustrates well why we exchange here instead on g7 . Black's f6-knight will obstruct the . . . f7 -fS push later. If 1 S .�h6 �g7 ( 1 S . . . J;.l.fe8 1 6 .e3 �g7 ( 1 6 . . . tbeS ! ? - it is always useful to exchange as many pieces as possible, when one suffers from lack of space : 1 7 .tbxeS �xeS 1 8 .g4 �g7 1 9.�xg7 tbxg7 20 .e4 'ii'f6 2 1 .'ii'd2 hS 2 2 .gS 'ii'd4 2 3 .'ii'f4t . However, the black knight on g7 is still a bit buried) 1 7 .�xg7 �xg7 ( 1 7 . . . tbxg7 1 8 . e4t) 1 8 .a4 tbhf6 1 9.tbd2t. We follow the game Aguiar Garcia-Picas Nebril, email 20 1 0 and we can notice that White still has a comfortable position with many possible plans, like e4/f4 or tbc3 -bS . Black can only wait until the reaper arrives . . . ) 1 6 .�xg7 tbxg7 1 7 .e4 tbeS l 8 .tbd2 g S 1 � . This is the big difference compared to our main line. The knight protects the 'hole ' on fS from g7 and Black plans to attack with . . . f7 -fS soon. 1 5 ... tt:Jhxf6 1 6.e4 tbe5 1 6 . . JHe8 1 7 .a4t . 1 7.tbd2 !t It is essential to keep the knight. In case of the swap on eS , Black takes back with the pawn and later he will be able to transfer his cavalry to d6 just in time. Now the aggressive . . . g6-gS would be less fortunate, because we could try to jump towards fS with tbd l -e3 . Otherwise our plan is, naturally, f2-f4.
1 1 . . .bS is an ambitious reply which caused us a lot of headaches.

1 2.e4 1 2 .a3 ! ? is also an interesting option. It might transpose to a well-known main line. We have done a lot of analysis here too, however we believe that 1 2 . e4 is easier to play.
1 2 ... b4 If 1 2 ... ttJbd7 1 3.�.f4 and now 1 3 ... ttJeS?! 1 3 . . . b4 1 4.tba4! leads to the main line; 1 3 . . . 1i'b6 1 4.a4±. 14.�fl !N We found out that this is a more direct way to fight for the initiative. The advance 1 4.eS was a bit premature: 1 4 . . . dxeS 1 S .tbxeS tbxeS 1 6 .�xeS �xeS 1 7 . .l::t.xeS tbd6 1 8 .J;iae 1 �c8 1 9.�c l ;\; was played in Margvelashvili-Jurnabayev, Puerto Madryn 2009, where White kept some positional plus. See Game 1 . 14 ... 'iYb6 1 4 . . . c4 1 5 .b4. 1S .a4 b4 1 6.tbbs Putting the knight on bS is less frightening now due to the following concrete counter: 1 6 ... �cS 1 7 .as 'iYbs
Analysis d iagram
C hap ter 1 : B en on i - S tyle
The time has come for a little tactic : 1 8.tbxd6 ! tbxd6 1 9 .es One of the two knights will have to be returned. 1 9 ... b3 Otherwise the cS-pawn would be hanging after the knight on d7 falls . 20.°i¥d2 ttJfs 2 1 .e6 °i¥b4 2 1 .. .'llb'b7 22.exd7 �xd7 23.�eS �xeS 24..!hest Black's b3-pawn is quite isolated from its mates. The dark squares around his king are also weak. 22.exd7 �xd7 23.°i¥b4 cxb4 24.tbes �ads 2S .�adl and White has an obvious edge thanks to his strong cl-pawn.
1 3.tba4!N A dynamic reply. White plays against the weak d6- and cS-pawns. He just has to bring the c 1 -bishop into play and the action can start' 1 3 .tLlb l tbbd7 1 4.�f4 was played in Z. Almasi-Cao, Nyiregyhaza ch-HUN 2008 , but instead of the game move we believe that Black could have strengthened his play with 1 4 . . . °i¥b6oo.
1 3 ... ttJbd 7 1 4.�f4 �b8! At first glance it is difficult to understand the necessity of this move. The point is that the queen is not unprotected on b8 and what is more essential, he has . . . b4-b3 if White tries to undermine the queenside pawns with a2-a3 . 1 4 ... 1i'c7 ( 1 4 . . . tLlb6 1 S .a 3 t) would mean stepping into two pins at the same time: 1 S .a3 ! and now:
Analysis diagram
2 1

A Cu t t i n g -Edg e Gamb i t a g a i n s t t h e Qu een ' s I n d i an - Part I
A) 1 S ... b3!? 1 6 .'iVxb3 tl:ig4 1 7.�fl ! Without the light-squared bishop, Black fails to get enough compensation. 1 7 ... �ab8 1 8.�c2 �xfl 1 9.ltxfl tl:igeS 20.tt:ld2 with a healthy pawn up ;
B) 1 S .. Jfab8 would be logical, but now Black gets under attack via the centre: 1 6.eS tl:ixdS 1 7.exd6 'iVcS 1 8.�es t and White has a strong initiative thanks to his active pieces;
C) 1 S ... bxa3 1 6.lha3 tl:ihS Trying to harass the annoying bishop, on the other hand it helps White to a new option: 1 7.�d2 I:l.ab8 1 7 . . . tl:ib6 1 8 .tl:ic3 . 1 8.b4!± .
15.eS! Continuing the original plan. 1 5 . a 3 ? ! b3 1 6 .'iYd l l:!.e8 1 7 . tl:ic3 tl:ig4+±.
15 ... tt:Jxd5 1 6 . .laad1 �b7 1 7.exd6 1 7 .'iVb3 might also be worth a try. Black will have to find a few accurate moves to hold the balance.
1 7 ... tl:ixf 4 1 8.gxf4 White can allow himself to have an ugly structure, because in exchange he gets huge activity topped with a strong passer.
1 8 ... 'iVc8 1 9.b3 So far the play has been more or less forced. It is necessary to block the cS -pawn on the weak square, while we also make way for the knight via b2 .
22
1 9 . . Jlb8 1 9 . . . �f6 20 .tl:ib2;!;.
20 . .l:!.e7 �f6
21 .tl:ieS! This could be a shocking reply during a practical game!
21 ... tt:JxeS 22.�xb 7 tl:if3+ A neat counter, but in fact any other move would lose instantly.
23.�xf3 �xb7 24.�xb7 �xb7 25.d7! 'iVf3
White has successfully kept his strong d-pawn, but now Black is trying for some counterplay, using the fact that the white king has become much weaker.
26 . .l:!:d3 Ufuk's cold-blooded discovery is great for avoiding the perpetual.
26 ... '/!Ug4+ 2 6 . . . 'iVxf4 gives nothing special for Black : 2 7 .tl:ixcS �h4 ( 2 7 . . . �eS 28 .h3 ±) 28 .'iVd2 'iYg4+ 29 .'\£?fl �d8 3 0 .'iVe3 t . One 'swallow' (i.e. the queen on g4) does not make a summer.
27.�f1 'iVxf4 28. WU xc5 'iVxh2 Black is eagerly grabbing pawns, but the one on d7 will be decisive. In the event of 28 . . . l::td8 29 .'iYc4! 'iYxh2 3 0 .'iYdS ! White has effectively avoided the possible checks, and now the threats are tl:icS-b 7 or .t!.f3 .
29 . .l:!:e3!

Avoiding checks from e4 and preparing the penetration to e8 .
29 ... �h 1 + 30.\t>e2 '1Wa8 This is the only way to defend against White's intended move.
31 .�xb4 The pawn number has been equalized.
31 ... 'IW c6 32.tt:JcS Finally the knight is j oining our guard.
32 ... l:i'.d8 On 3 2 . . .hS 3 3 .t2le4! forces the bishop to leave one of the important diagonals: 3 3 . . . �d8 34.'1Wd6 'IWbs + 3 5 . .l:ld3 and Black remains completely passive.
33.tt:Jb7! This little trick increases our chances.
33 ... .l:lf8 34.I:!:d3t It will be very difficult for Black to avoid the promotion of the d-pawn.
Game 1
Margvelashvili, Giorgi Jwnabayev, Rinat Porto Madryn Wch-jr 2009 ( 1 2)
1 .d4 tt:Jf6 2.c4 e6 3.tt:Jf3 b6 4.g3 �a6 5.'1Wc2 c5 6.d5 exd5 7.cxd5 g6 8.�g2 �g7 9.0-0 0-0 1 O.tt:Jc3 d6 1 1 .Iie1 b5 1 2.e4 tt:Jbd7 1 3.�f4 tt:Je8?!
A logical retreat, defending the d6-pawn and getting better prepared against White's central advance.
Chapte r I: Benoni-S tyl e
For the more dynamic I 3 . . . b4 1 4 .t2la4 '1Wb8 1 5 .eS;l; see our analysis section above.
1 4.eS Consistent, but not the strongest, which is 1 4.�fl ! ± . Both sides forgot about the vulnerable queenside. As we demonstrated on page 2 1 , Black can hardly get out of this surprising pin.
1 4 ... dxeS
15.tt:JxeS ?! This was the moment when White should stop to evaluate the consequences of the possible recaptures. 1 S .�xeS ! Although the position has just become opened, it should be recognized that a successfully-executed manoeuvre of the knight to c6 has more value here. 1 S ... tt:JxeS 1 6.ttJxeS t2ld6 1 6 . . . �xeS 1 7 .l'heS;l; would transpose to the game. 1 7.t2lc6
Analysis d iagram
23

A Cu t t i n g - E dge Gam b i t a g a i n s t t he Queen 's I n d i an - Par t I
It is already quite visible that the black queen will always be missed, whatever side it goes to: A) 1 7 ... �f6 1 8.ltfl ! Poking the en
emy queenside, like previously. Black is practically helpless against the threat of a2-a4. 1 8 ... a:fe8 1 8 . . . b4 also solves nothing: 1 9 .ltxa6 bxc3 20 .bxc3 �xc3 2 1 ..l:l.ac l 'if'xc2 2 2 . .l::!.xc2± and the cS -pawn will fall next. 1 9.ld.xe8+ lhe8 20.a4 b4 2 1 .ltxa6 bxc3 2 2.�xc3 �xc3 23 .bxc3 �xc3 24.l:lcl with a pleasant initiative;
B) 1 7 ... �b 6 and now: B l ) 1 8 .tbe4 tbxe4 1 9..lhe4 �b7 Try
ing to avoid d5 -d6 . In the event of 1 9 . . . .a:ae8 20 .lhe8 l:rxe8 2 1 .d6 ltc8 2 2 .tbe7 + Wh8 2 3 . tbxc8 J::i'.xc8 24.d? .i;:[d8 (it may seem that Black is able to hold the position more or less easily) 2 5 .�e 2 1 ltd4 (after 2 5 . . . ltf6 2 6 .�e8 + �g7 2 7 .ltds the f7 -pawn drops off) 2 6 .�e8+ Wg7 2 7 . .!:f.e l 'if'f6 2 8 .J::le2 c4 29 .ltc6! a6 3 0 .ltb? ± there will be a persistent massage by the bishop on the queenside, while Black remains passive. 20.Uael c4 2 1 .a4 a6 22 . .ld.e7 ltxc6 23.dxc6 .l:lad8
Analysis d iagram
24.b4! A little paradox: White creates a passer for the opponent, on the other hand this move gives support to the promotion of the c-pawn. 24 ... cxb3
24
Practically forced, otherwise a4-a5 followed by c6-c7 would come. 25 .�xb3 a:d2 26.a'. 1 e2 �xe2 2 7 .J::l.xe2 t and White is clearly better thanks to his strong pawn;
B2) 1 8.�cl is another worthy option, in order to later harass the enemy blockade by �c l -f4. 1 8 ... ltb7 1 9.�f4 tbc4
Analysis diagram
20.tbe4! Finally the knight occupies the centre. Though two pieces are hanging at the same time, our assault on the black king is more important. 20 ... ltxc6 2 1 .dxc6 �xb2 2 1 . . .'if'xc6 loses material immediately: 2 2 .tbd2 �d6 2 3 .�xd6 tbxd6 24.ltxa8 l:txa8 25 . .llad l ! and White is an exchange up. 22 . .l::t.adl ! and now: B2 1 ) 22 .. . &rae8 23 .tLlgS +- , all the
white pieces are excellently posted, the attack will be overwhelming;
B22) 2 2 . . . �eS 23 .tbf6+ ; B 2 3 ) 2 2 . . . l:iad8 2 3 .l:txd8 �xd8
24.tLlxc S . 1 5 ... <1Jxe5?!
The last two moves were too stereotyped. 1 5 . . . ltxeS ! 1 6.ltxeS b4 This intermediate reply makes a big difference, as now the knight will go to a less attractive place instead of to the centre. 1 7.tbdl 1 7 .tba4 tLlxeS 1 8 . .r.lxeS l::rc 8 = .

1 7 ... tllxe5 1 8.l:!.xe5 'iV d6 Suddenly all the black pieces are revived. 1 9 . .l:!.el tllf6 20.a3 jLbs 2 1 .tlle3 a5 with roughly equal chances.
1 6.jLxeS jLxe5 1 7 . .l::!.xeS:t tlld6 1 8.J::tae1 !?
A very natural continuation. However, the aggressive, deep positional sacrifice 1 8 .tlle4! tllc4 (middlegames like the one after l 8 . . . tllxe4 l 9 .VWxe4 b4 20 .l/We3 l/Wd6 2 1 ..l:!.c l c4 22 .h4:t are usually in White's favour) 1 9.f4 would be more annoying for Black : 1 9 ... jLcs 1 9 . . . tllxeS 20 .fxeS . Let's summarize: we have strong connected central pawns and control of the weak f6-square for the exchange. Besides, the cS-pawn is also hanging. 2 0 . . . c4 2 l .tllf6+ �g7 2 2 .°iVd2gg with wonderful play. There are many possibilities to strengthen our attack with l:f.fl or tllg4. 20.tllxc5 .ifs Black has managed to tr an sf er his bishop to the defence, avoiding the white knight's return to e4. But it costs him a pawn. 2 I .'li'f2 tllxe5 22.fxesgg
Analysis diagram
White has built up a very solid position, the enemy rooks have too little space to be effective.
1 8 ... �cS?! Rushing to find a better place for the bishop.
C hapte r 1 : Benon i - S tyl e
I t would still have been better to improve the minor piece with the more ambitious 1 8 ... b4! . Now: 1 9.tlle4! Reacting bravely just like before. If 1 9 .tlld l .l:!.c8 (the negligent 1 9 . . . VWaS meets with 20 .h4 ' ) 2 0 .h4 �bS 2 l .tlle3 (2 1 .hS 'iVf6) 2 l . . . c4 2 2 .hS c3� Black has appropriate counterplay. 1 9 ... tllc4 20.f4 tllxe5 2 1 .fxe5 We reach a structure similar to the above-mentioned line. 2 1 ...c4 22 .tllf6+ Wg7 23 .VWcl lacs 24.tllg4gg and Black has to defend very accurately.
1 9.VWc1 ! �ts 20.VWf4 'li'd7 2 0 . . . b4 is less effective here, in view of 2 1 .tlld l :t and after tlle3 the fS-bishop will be hanging.
21 .�f1 ! 2 l .lae7 would be premature due to 2 l . . . �ae8 ! .
21 ... b4 22.�e7
:e:• • ·�
• •
• � •
22 ... k!.aeS?? A terrible blunder, losing his self-control under pressure. The simple 22 . .. 'li'd8 ! would have kept the balance : 2 3 .tlldl Presumably Black missed the nice tactic 2 3 .tlla4 �e6 ! and now 24.VWf6 �xdS 2 5 .tllxcS tllfS 2 6 .tlld 7 0 tllxe7 2 7 . .l::!.xe7 �e6 (27 . . . .l:!.e8? 2 8 .l::!.xe8 + 'li'xe8 2 9 .VWd6) 2 8 .tllxf8 VWxf8 29 .b3= . 23 ... a5 It is hard to improve White's position. 24.U7e5 .!:ta7 2 5 .tlle 3 ! ? 2 5 .h4 f6
25

A Cu t t i n g - Edge Gam b i t a g a i n s t t he Qu een's I n d i a n - Par t I
2 6 .l:l'.Se2 . 2S ... f6 26 . .l:.xfs gxfS 2 7.tLlxfS tl'ixfS 2 8.'iYxfS .k:!.e7 29 .l:Ie6 .k:!.xe6 30.'i¥xe6+'?? There is good compensation for the exchange, but it 's unlikely to be enough for victory.
23.J:i'.xd7 !:i.xe1 Now this capture does not come with check since the bishop is on fl .
24.Wg2 bxc3 25.bxc3 �xd7 26.'i¥xd6 �f5 27.�b5±
Easier was 2 7 .'iYxcS i::!.d8 2 8 .c4+- . 27 ... c4
2 7 . . . Ik8 2 8 .'1Wa6.
28.�c6? It is very difficult to understand this decision. What was wrong with 2 8 .�xc4 .lac8 (28 . . . i::!.fe8 29 .h3) 29 .'i¥a6+- ?
28 ... Ire2?
Conclusion
Returning the favour. He should start with 2 8 . . . hS ! (28 . . . �e4+ 29 .Wh3 ) , avoiding the trick that occurred in the game: 29 .'i¥f6 (29 .h4 �e4+ 30 . f3 .I:!.e2+) 29 . . . I:(e2 (preparing the penetration by . . . .l::!.f8-b8-b2) 3 0 .g4 (30 .d6 l:i'.e6 3 l .'i¥d4 I:(d8) 3 0 . . . hxg4oo.
29.Wf3! Walking out of danger, the king is safe again.
29 ... l:ixa2 30.g4 �c2 31 .h4 3 l .�f4 �d3 (3 1 . . .l:ta3 3 2 .'iVxc4) 3 2 .d6+-.
31 ... h5 3 1 . . .�d l + 3 2 .'.t>g3 �d2 3 3 .'1Wf4 �d3 + 34.Wh2± Irxc3 ? 3 5 .hS .
32.gxh5 �d1 + 33.Wg3 �xh5 34.�f6 .i'.;Id2 35.d6 lld3+ 36.'.t>f4 a5 37.d7 a4 38.Vie7 �d1 39.@g5 @g7 40.�f6+ @h7 41 .'i¥e7 @g7 42.�e4 .l:!.d2 43.�xg6
43 .�f6+ Wh7 (43 . . . @g8 44.@h6) 44.�xg6+ would have finished the battle more quickly.
43 ... .l:id5+ 44.�f5 J::i'.g8 45.�f6+ @f8+ 46.@f4 J::i'.xf5+ 47.Vixf5 We7 48.Vie5+ Wxd7 49.'if'd5+
1 -0
The reason why we began our book with this chapter was to make the reader aware of t11e fact that despite our great efforts (kindly offering a pawn in the opening) , there are a couple of options for Black to refuse the sacrifice and try to play within more strategic , though still also dynamic structures.
However, as the given examples show, we should not be afraid of positional play, because with a well-conceived plan it will be feasible to break into Black's camp with e4-e5 . If this is prevented, White can build up his position slowly, as we have demonstrated. The dS -pawn ensures us a pleasant space advantage and we can create pressure on both sides, whereas Black has to divide his attention between both sides.
26

Chapter 2
Minor 6th Moves for Black
1 .d4 tbf6 2.c4 e6 3.tbf3 b6 4.g3 �a6 S.�c2 cS 6.dS
In this chapter, we examine three deviations on move 6 . Here Black keeps the ten -sion by delaying the swap on dS . His main problem is that he has to give up his control of the central squares, which White can take an advantage of by occupying them with his pawns. We have hardly found any illustrative games with these variations, however we have worked out many nice and powerful novelties here.
The following deviations will be discussed : 6 . . . d6 ? ' , 6 . . . g6N and 6 . . . bS .
1 .d4 tbf6 2.c4 e6 3.tbf3 b6 4.g3 �a6 S.'i¥c2 cs 6.dS bS
A) With 6 ... d6?! Black aims to close the centre, but this move weakens the e6-square: 7.dxe6 fXe6 8.�h3 ! �c8 8 . . . �b7 is a tricky move, hoping that White will be greedy: 9 .tbc3 ! (grabbing the pawn prematurely with 9 .�xe6? runs into 9 . . . 'i¥e7 and White is forced to surrender the nice lightsq uared bishop, otherwise the f3 -knight falls : 1 O .�dS tbxdS 1 1 .cxdS �xdS�) 9 . . . 'i¥e7 (in case of 9 . . . �xf3 1 O .exf3 tbc6 1 1 .0-0 tbd4 1 2 .'i¥d3 eS l 3 . f4± White's powerful infantrymen will dominate) 1 0 .0-0 tbc6 1 1 .l:!.d l ±
with a huge superiority. Our next move will likely be tbgS , getting ready to sacrifice the rook after . . . tbd4. 9.0-0 tbc6
Analysis d iagram
1 O.J:[dl !N Obviously the rook stands well on the half-open file. It is not easy
27

A Cu t t i n g -Edg e Gam b i t a g a i n s t t he Qu een ' s I n d i an - Pa rt I
to see any concrete threats, but everything will become clear soon. In a game of exactly 40 years ago between two strong players, White continued developing his pieces with 1 0. ttJc3 . However, in such a half-closed position, he should act more directly in order to fight for an opening advantage. After 1 O . . . .ie7 l l .tLle4 ttJxe4 1 2 .VWxe4 dS 1 3 .'1Wd3 0-0 1 4 . .if4 .if6 l S .l:tad l eS ! <=t Black got good counterplay in Zilberstein-Vaganian, Tbilisi 1 9 7 3 .
A 1 ) After 1 O ••• eS Black's pawn structure looks like an Emmental cheese: 1 1 ..ig2 i!t.b8 1 2.ttJc3 .ie7 1 3 .jlgs 0-0 l 4.jlxf6 Taking control of the weakened dS-square. 14 ... jlxf6 1 4 . . Jhf6 l S .ttJgS .ifs 1 6 .'1Wa4± . 1 S .V£1d3± White has a very pleasant position. Black's position is full of weaknesses - the only attractive move would be . . . tLlc6-d4, when we would simply react with tLldl followed by el-e3 . Instead White can go for the c6-knight, which is the only enemy piece tl1at could be activated soon, with l S .tLlgS , and now l S . . . .ixgS 1 6 . .ixc6 \t>h8 1 7 .'1Wd3 �e7 1 8 . .ie4 g6 1 9 ."i!Vcl (hurrying with 1 9 .ttJbS ?! allows 1 9 . . . a6 ' l O .tLlxd6 .ie6!oo) 1 9 . . . �e6 l0 .b3 VWe8 l l .ktdl VWf7 22 .e3 witl1 a stable positional edge.
Al) 1 0 ... �e? 1 1 .ttJgS es l 1 . . .tLld4 l l.lhd4! cxd4 1 3 .tLlxe6 he6 1 4.he6±.
Analysis d iagram
28
1 2.ttJe6! ! This deep positional sacrifice is the point of 1 0 .l:td 1 ! . White gives an exchange in order to prevent Black castling. 1 2 ... �xe6 1 2 . . . ttJd4 1 3 .�xd4! is j ust a transposition. 1 3 .�xe6 ttJd4 l 4.l:\.xd4 cxd4 l 4 . . . exd4 l S .e3 dS ( otl1-erwise the white pieces just rush out) 1 6 .cxdS ttJxdS ( l 6 . . . '1Wd6 does not help either: 1 7 .e4 VWes l 8 .f3± and White has stabilized the centre successfully) 1 7 .VWfs ttJf6 1 8 .exd4 cxd4 1 9 .ttJdl, Black faces a dangerous attack. 1 S .e3
Analysis d iagram
Al l ) 1 S ... dxe3 1 6 . .ixe3 �f8 1 7 .ttJc3 VWe8 The position remains more or less closed, but the black pieces are still awfully placed. 1 8.J;:i.dl VWg6 1 9.VWa4
Analysis d iagram
1 9 ... hS In the event of 1 9 . . . tLlg4 lO . .idS .ld.e8 l 1 .VWxa7 White can 'eat' the complete queenside : l 1 . . .VWhS 2 2 .h4 gS l 3 .�c6 gxh4 24 . .ixe8 VWxe8

2 S .tlJdS wins easily. 20.h3 Preparing against . . . tlJg4 and . . . hS -h4. 20 ... 'li'e8 20 . . . tt:Jg4 2 1 .'li'c6 �b8 2 2 .'li'f3 + tt:Jf6 2 3 .h4± . 2 1 .'li'a6 g6 22.tt:Jds+- Black will have to give back the a8-rook, otherwise the queenside pawns will fall;
A22) 1 S ... tt:Jd7 1 6.'li'fs .if6 1 7.exd4 exd4 1 8 .tlJa3--+;
A23) lS ... dS Creating the possibility of . . . 'i¥d6 to chase away the annoying bishop. 1 6.exd4 'li'd6 1 7.�fs exd4 1 7 . . . dxc4? ! leads to a forced win for White : 1 8 .dxeS �d l + 1 9 .@gl 'li'xc l 20 .exf6 .ixf6 2 1 ."iY'e4 (the black king is almost completely 'naked' ) 2 1 . . . a'.d8 22 . .ixc4+ .ie7 23 .'i¥c6+ @f8 24.°i¥e6 and the 'dancing queen' will deliver mate. 1 8.cxdS 1 8 . .if4 ! ? 'iYcS 1 9 .cxdS l:Id8 2 0 .tlJdl±. 1 8 . . . g6 1 8 . . . �b4 1 9 .tlJdl .l:id8 20 .a3+-. 1 9 .'li'd3± and the dS-pawn is taboo because of'i\Ybs . B) Surprisingly, my invention 6 ... g6N
has not occurred in practice so far. 7 .e4 The simple 7 . .ig2 exdS 8 .cxdS transposes to Chapter 3 . 7 ... .ig7 7 . . . exdS ' 8 . es . 8.tlJc3 and now: B l ) 8 ... o-o 9.es tt:Jg4 I O • .ig2! 1 0 . .igs
gives Black reasonable counterplay after 1 0 . . .f6�. 10 ... exdS 1 0 . . . tlJxeS ? would help White speed up his development: 1 1 .tlJxeS Les 1 2 . .ih6 .ixc4 1 3 .0-0-0 .id4 l 4 . .ixf8 'li'xf8 1 S .dxe6 tbc6 1 6 .exd7 (devastating) 1 6 . . . tlJb4 1 7 .°i¥e4 .l::!.d8 1 8 . .l:!.he 1 ± with a reassuring material advantage. 1 1 .tlJxdS tlJc6 1 1 . . .tlJxeS 1 2 .tlJxeS .ixeS 1 3 . .ih6 l':!.e8 1 4.0-0-0 tlJc6 1 S . .l:!.he l .ib7 1 6 .f4t and White has a strong initiative for the pawn thanks to his superior pieces. 1 2.�gS °i¥b8 1 3 .0-0-0 .ib7 1 3 . . . tt:Jb4 runs into l 4.'li'e4! , involving the queen into the attack : 1 4 . . . tlJxfl 1 S .tlJe7+ @h8 1 6.'li'h4--+ and it is getting really hot for Black.
Ch apter 2 : Mino r 6th Moves for B l a ck
Analysis d iagram
1 4.h3 ! Trying to provoke exchanges on eS , and then the c6-knight will not be annoying anymore. 1 4 ... tt:JgxeS l S .tt'ixeS tlJxeS l S . . . 'li'xeS 1 6 .�f4. 1 6.I;';l.he 1 'it>h8 1 7 .h4 t and White has great play for the pawn;
Bl) 8 ... exdS 9.eS A typical reaction, which we may know from other openings (for example the Queen's Gambit Accepted) . 9 ... 0-0 9 . . . tlJg4 1 0. tlJxdS 0 -0 ( 1 0 . . . tbxeS ? 1 1 . tlJxeS .ixeS 1 2 .'li'el would simply lose material) 1 1 .�gS 'li'e8 1 2 .0-0-0 transposes to the line with 9 . . . 0-0 .
Analysis diagram
1 0 . .igS ! After the greedy 1 0 .exf6 'li'xf6 1 1 .�el .ixc4 1 2 .0-0 �xe2 1 3 .'i¥xe2 '1Wc6 Black gets reasonable compensation for the piece. 1 0 ... 'Ii' e8 1 1 .0-0-0 White is already quite clearly ahead in development. Now Black has two options available: 1 1 . . . tlJe4 and 1 1 . . . tlJg4.
29

A Cu t t i n g - Edge Gam b i t a g a i n s t t he Q u een's I n d i a n - Par t I
B 2 l ) 1 1 . .. tlle4 1 2 .tllxd5 tllxg5 1 3 .tllxg5 and now: B2 l l ) 1 3 ... '?Wxe5 1 4.f4 �e8 1 5 .h4!
White starts the usual attack against the fianchetto structure. 1 5 ... h6 With 1 5 . . . �b7 1 6 .h5 �xd5 1 7 .cxd5 Black manages to get rid of the most active white piece, however he still suffers from an old/new problem - the undeveloped queenside: 1 7 . . . h6 1 8 .hxg6 ! hxg5 ( 1 8 . . . fxg 6 1 9 .d6) 1 9 .d6+- . There is no satisfactory defensive resource, White is just winning. 16 .�d3 ! A smooth continuation. l 6 .tlle4 is also good. 1 6 ... '?Wd8 1 6 . . . hxg5 1 7 .hxg5 +- . 1 7 .�xg6 fxg6 1 8.J::rde 1 ! +- The attack is like an overwhelming storm.
B2 1 2) 1 3 ... tllc6 1 4.f4! 1 4.tlle4 looks more obvious, but later Black will have some tricks, which make White's task less easy : 1 4 . . . �xe5 1 5 .f4 �f5 1 6 .h4 (threatening with �fl -h3) l 6 . . . laae8 l 7 .�d3 .
Analysis diagram
It seems that the queen is almost caught, but Black's bravery can still pay o ff: 1 7 . . . tllb4 1 1 l 8 .tll ef6+ '?Wxf6 1 9 .tllxf6+ �xf6 2 0 .�b3 �b7 2 1 .�hfl �d4gg. Though there are only two minor pieces for the queen, the game is far from over: 2 2 .a3 tllxd3 + 2 3 .&rxd3 lie2 24.l:!:xd4 (it was unavoidable to give the exchange in order to get rid of the most
30
annoying black piece) 24 . . . cxd4 2 5 .�d3 .l:[fe8 2 6 .�xd4 �g2 27 .�g l d5gg with reasonable compensation. 14 ... tlld4 1 4 . . . �d8 l 5 .tlle4± .
Analysis d iagram
1 5 . .!:!.xd4! A fine positional sacrifice, based on the passivity of Black's pieces. White will take full control over the weak d6- and f 6-squares and later he can calmly continue his attack against the king. 1 5 ... cxd4 1 6.tlle4 '?Wd8 1 7 .tlld6 l:b8 1 7 . . . f6 1 8 .h4! fxe5 1 9 .h5 with a breakthrough attack. 1 8 .h4 £.b7 1 9.�g2± The black rooks are worth almost nothing as the position remains closed. White continues his attacking plans with h4-h5 .
B22) 1 I ...tllg4 1 2.tllxd5 tllc6 The only move to get out of trouble. After 1 2 . . . tllxe5 1 3 .tllxe5 '?Wxe5 1 4.f4 �e8 1 5 .�g2 +- Black completely collapses.
Analysis d iagram

B 2 2 1 ) 1 3 .�h3 ! ? The most obvious move, which we would probably play instantly in a blitz game. On the other hand, we will see that in a few surprising lines, even though White has a material advantage, there may still be some technical difficulties : 1 3 ... tt:JgxeS 1 3 . . . hS allows White to play for mate : 1 4 .�xg4 hxg4 1 5 .tbf6 + �xf6 1 6 .�xf6 tlJb4 1 7 .�d2+- . 14 . .!:l.hel d6 1 5 .tlJxeS dxeS So far the line was pretty forced. 1 6 .�a4! Again, greediness would lead nowhere : 1 6 .tbc ? ? ! tlJb4 !<=% .
Analysis d iagram
1 6 ... tllaS The retreat l 6 . . . �b7 allows White to simplify the position with a nice trick: 1 7 .�d7 ! Vi'xd7 1 8 .tDe7+ 'll\Vxe7 l 9 .�xe7 tbxe7 20 .'i¥d7 �a6 1 (20 . . . �f3 2 l .Vi'xe7 �xd l 22 . .l:i.xd l ±) 2 l .�xe7 �xc4 and Black has two bishops and two pawns for the queen, which makes the realization of the advantage far from easy. 1 7 . 'll\Vxe8 .l!!.axe8 1 8 .tbc7 f6 1 9 .�d2 �xc4 20 .tllxe8 l:he8 2 1 .b3 �f7 After 2 1 . . .tlJxb3+ 22 . axb3 �xb3 23 .�c3 �xd l 24 .�xd l White still has enough pawns and good winning chances. 22.�c3± The white rook will irresistibly arrive on d7 , while the aS -knight is also a pretty problematic piece for Black;
Chap ter 2 : Mino r 6th Moves fo r B l a ck
B222) The very interesting option 1 3 .h3 !? rivals with l 3 .�h3 , though it may be hardly understandable at first glance. The aim is to force the trade of a pair of knights on es . so that later . . . tbc6-b4 is unlikely to occur : 1 3 . . . tt:JgxeS 1 4.tlJxeS tt:JxeS 1 5 .h4 White can calmly continue his attack, since his dS -knight controls the position very well. 1 5 ... �b7 16 .�g2 �xdS Black takes our beauty, but it will be very well replaced by the bishop, which will play an important part in our attack against the king. 1 7 .�xdS tllc6 1 8 .l:i:he 1 Vi' c8 1 9 .a3 Prophylaxis against . . . tt:Jb4. 1 9 ... tlJd4 20.'ll\Vd3 l::!.b8 2 1 .�f4 A sudden surprise: the rook is caught on b8. 2 1 ...bS 22.�xb8 bxc4 23 .Vi'xc4 "Yi'xb8 24.tl'.d2± with a satisfactory material advantage. The white king is more or less safe.
6 . . . bS is the most logical way to undermine White's advanced centre. The structure is pretty similar to that in the Blumenfeld Gambit.
7.e4! Instead of taking a pawn, White prefers to sacrifice one. The fight for occupation of the central squares and for a lead in development is more glorious. On 7 .cxbS , 7 . . . �xbS? ! helps White to an important tempo (7 . . . �b7 ! ?N is our contribution to this line. The structure is actually very similar to the Blumenfeld Gambit : 8 .dxe6 fxe6 9 .�g2 a6�) : 8 .tDc3 �c4 9 . e4 �xfl 1 0 .Wxfl . Things are already fine for us. Black faces serious problems in the centre. 1 0 . . . d6 l l .dxe6 fxe6 1 2 .'lWb3 °iYd7 1 3 .eS tbg4 1 4.exd6 �xd6 1 5 .tlJgS and White crushed his opponent in Pashikian-Erturan, Dresden 2 0 0 7 .
7 ... bxc4
3 1

A C u t t i n g - Edge Gam b i t a g a i n s t t he Queen 's I n d i a n - Par t I
8.tllc3!N A valuable improvement , which matches perfectly with our previous move. 8.ltxc4 is a strange decision. The bishop is normally fianchettoed. 8 ... exd5 9.exd5 .i.xc4 1 0.'i¥xc4 Now 1 0 . . . 'iY e 7 +? is only a check. After 1 1 .'it>d l 'i¥d6 1 2 .tllc3 .i.e7 1 3 .lle l 'it>f8 1 4.itf4+- White was simply winning in Gellrich-Janusch, Germany Oberliga 1 998/99 . 1 0 ... lte7N would have been better, Black should finish developing his pieces: 1 1 .0-0 0-0 1 2.itf4 d6 1 3 .tllc3 tllbd7=.
8 ... �e7 The obvious continuation. We also checked the following alternatives :
A) 8 ... exd5 9.e5 ! d4 9 . . . tllg8 1 O .tllxdS tllc6 1 1 .ltxc4±. 10.exf6 'i¥xf6
Analysis d iagram
1 1 .�g2! Time is more important than material. 1 1 . . . dxc3 1 2 .0-0 tbc6
32
1 3 . .ti.el + lte7 1 4.bxc3 1 4.�gS is also good, viz. 1 4 . . . 'i¥g6 1 5 .'i¥xc3 f6 1 6 . .l:.ad 1 ! (the last inactive piece j oins the attack) 1 6 . . . 0-0 ( 1 6 . . .fxgS 1 7 .tlleS) 1 7 .�f4 and Black's position falls apart. The d7-pawn is hanging and another serious threat is tllf3 -h4-f5 and/or taking on c6 and e 7 . 1 4 . . . h6 1 5 . .i.f4 0-0 16 .tt:leS Black is unable to avoid losing material . 1 6 . . . llad8? 1 7 .tbg4 'iY g6 1 8.'i¥xg6 fxg6 1 9.�xc6+- ; B) 8 ... d6?!N would be an unfortunate
try here: 9.dxe6 Naturally we cannot allow Black to close the position. 9 ... fxe6 1 O .tt:lgS An immediate assault against the new weakness. 1 0 ... eS 1 O . . . �e7 1 1 .�h3 �c8 1 2 .'i¥a4+ �d7 1 3 .tt:lbS+-. 1 1 .tLldS ! tt:lxd5 1 2.exdS There is a big hole on e6 , which White controls with two pieces already. 1 2 ... ltcs 1 2 . . . tbd7 1 3 .lth3 . 1 3 .ltxc4± The h7-pawn is hanging and the other threat is �bS followed by tlle6 .
9.dG! Proceeding very directly without giving Black time to castle. 9 .�g2 is less effective : 9 . . . �b7 1 0 . 0-0 exdS ( 1 0 . . . tlla6 1 l .a3 0-0 1 2 .tbeS) 1 1 .eS ! (the position after 1 1 .exdS d6 1 2 .tlld2 0-0 1 3 .tllxc4 tllbd7 might remind us of a rejected Benko Gambit. 1 4.i::i'.e l �a6 1 5 .b3 tt:lg4� and all the black pieces are pretty active) 1 1 . . .tlle4D 1 2 .tllxe4 dxe4 1 3 .tlld2 (White compensates for the gambit pawns with dynamic piece play, and the enemy structure is also a bit ugly) 1 3 . . . tllc6 1 4.�xe4! tt:ld4 (it was quite obvious that White would sooner or later take back the missing material, so Black does not waste any time and uses the chance to improve his knight) 1 5 .'tWxc4 �xe4 1 6 .tllxe4 0-0 and Black has reasonable counterplay.

Now we will analyse both the passive retreat 9 . . . jlfg and the seemingly criti-cal 9 . . . jlxd6.
9 ... jlxd6 9 ... �f8 is just ugly. After I O.es all the lines look very tragic for Black:
A) 1 o ... tt:Jds 1 1 .tllxds exds 1 2.tllgs tllc6 1 3.'iffs f6
Analysis d iagram
A) 1 4.e6! The decisive move . 1 4 ... jlxd6 1 5 .'ifxdS fxgS 1 6.jlh3! A cold-blooded reaction. We still have time to take the piece back, it is more urgent to strengthen our attack. 16 ... jlcs 1 7.'ifxd6 After 1 7 . 0-0 tlld4 l 8 . exd 7 + jlxd7 1 9 .r!e l + jle7 2 0 .jlxd 7 + 'ifxd7 2 1 .'i¥xa8 + Wf7 2 2 . 'iV e4 - White is an exchange up and has good hopes to convert it into a win. 1 7 ... WHe7 1 8.'iYdS Of course we do not trade our most valuable attacking piece. 1 8 ... tllb4 1 8 . . . jlb7 1 9 .jlxg5 ! dxe6 2 0 .jlxe6 tllb4 2 l .Vi'xc4! Vi'xg5 2 2 .0-0-. Notwithstanding Black's material plus, his pieces are totally uncoordinated and the 'naked' king in the middle will be unable to find any shelter. 1 9 .Vi'xa8 �d3+ 20 .Wfl 0-0 2 1 .Wgl ± The king is safe and we have an extra rook . . . 2 1 . .. d6 2 1 . . .tllxf2 22 .jlg2 . 22.jle3 tllxf2 After the direct 2 2 . . . jlb7 23 .Vi'xa7 things will be the same. 2 3 .jlxf2 �b 7 24.'ifxa7
C hap t er 2: Mino r 6 t h Moves for B l a ck
24 .Vi'xf8 + Wxf8 2 5 . .i::!.e l . 24 . . . Vi'f6 25 . .!lfl 'iVf3 26.'ifxb7 'iVxb7 27 .�g2± As the Hungarian proverb says: 'Many geese overpower a pig.'
B) In case of 1 O ••• jlb7 1 1 .�g2 tlldS 1 2 .0-0 Black's position is already screaming for surgery:
B l ) 1 2 ... �b6 1 3 .I[d l ± and Black is doomed to complete passivity;
B2) 1 2 ... f6 1 3 .tllh4 fxeS 14.tllxdS exdS 1 4 . . . jlxd5 changes nothing: 1 5 .jlxd5 exdS 1 6 .tllg6 ! .
Analysis diagram
1 5 .tllg6 ! This flashy sacrifice wins in style. 1 5 ... .S:g8 Keeping the rook leads to even bigger problems. 1 6 .tllxeS jlxd6 1 7.'li'xh7+- ;
B3) 1 2 ... tllc6 1 3 .tllxdS exdS 1 4.b3 ± The enemy kingside pieces will remain disconnected for a good while.
1 0.e5 jlb7 1 0 ... �xeS 1 1 .tllxeS �b7 1 2 .f3 dS 1 2 . . . 0-0 1 3 .jlg2 d6 1 4.tllxc4 tllc6 1 5 .0-0 d5 1 6 .tlla3±. Black gets three pawns and a relatively strong centre for the bishop, but this is hardly enough. 1 3 .�g2 tllbd7 l 3 . . . tllc6 l 4 .tllxc6 jlxc6 1 5 .0-0 0-0 1 6 .tlld l , evacuating the knight away from the . . . d5 -d4 tempo, so White is now ready to break the enemy chain with b2-b3 . 1 4.tllxd7 �xd7 1 5 .f4± and we doubt that Black has enough compensation.
33

A C u t t i n g -E dge Gamb i t a g a i n s t t he Qu een's I nd i an - Par t I
The following moves are basically forced.
1 1 .exfG �xf3 l 1 . . .�xf6 steps into 1 2 .tLle4 '?Wxf3 1 3 .<1Jxd6+ and the white tornado takes them all : 1 3 . . . @e7 1 4.<1Jxb7 '?Wxh l 1 S .tLlxcS± .
1 2.fxg7 �g8 1 3.�xh7 We7
1 4.�e2!! It is worth remembering this spectacular move, which is the key to the whole variation.
1 4 ... �xe2 1 4 . . . �xh l ? allows White to finish the game in style : 1 5 .�gS + f6 1 6 .�xf6+ Wxf6 1 7 .�h6+ WfS (if the king goes back, it will be mated in two) 1 8 .g4+ WeS 1 9 .0-0-0 .
Analysis diagram
This should be a picture from what lots of players imagine to be an ideal game. White is a bishop and a rook down, but
34
the black king has been driven to the middle. Mate in four is inevitable.
15.<1Je4! The knight jumps like a tiger to catch its vulnerable prey, the king on e7 .
15 .. .fG 1 5 ... �es
Analysis d iagram
It looks like White missed this subtle move, which combines attack with defence. 1 6 .�f4! The show must go on ' Another nice diversion attempt. Now:
A) 1 6 ... f6 1 7.�xe5 fxe5 1 8.'it>xe2 d5 1 9.�h4+ Wf7 The king cannot run away because of tLlf6 . 20.tLlgS+ @e7 2 1 .'ii'h6 �d7 22.f4! White opens the f-file, his 'pocket knife ' . 22 ... <1Jc6 In case of 2 2 . . . exf4 the rook will obviously take the shorter route to the black king with 2 3 . .ld.ae l ! , and now 23 . . . <1Jc6 24.�d2 eS 2 5 .gxf4 e4 2 6 .fS wins. 23.fxe5 lZJxeS 24.Il.hfl �d6 24 . . . d4 2 5 . .ld.ae l .l::i.ae8 2 6 .�f6 + @d6 2 7 .<1Je4+ @ds 2 8 .�f4+- as Black is helpless against the threat tLlf6 . 25 . .llf8 ! Using the fact that the back rank is less solidly controlled. 25 ... <1Jg4 26.<1Je4+! �c6 26 . . . dxe4 27 . .i::i.d l + 'itic6 2 8 .�h8 amounts to the same. 2 7.'i!Kh8 ! White has far from run out of tricks. 2 7 ... dxe4 28 . .l:!.dl 'ii'xg7 29.'ii'xg7 i:ixg7 30 . .l:!.xa8 tLlxh2 3 1 Jks+± with a promising material advantage;

B) 16 ... ltxf4 is met with 1 7.'i¥h4+ ; C) 1 6 ... ltf3 1 7.ltxe5 ltxe4 1 8.'i¥h4+
�e8 1 9.'i¥xe4 The material balance has been restored and the remaining g7 -pawn is the key tool for victory. 1 9 ... dS 20.'i¥h7 Again calling for the 'Waltzer' . 20 ... �e7 2 1 .'i¥h4+ 1 1 .0-0 tbd7 22 .ltf4 should be good enough too. 2 1 ...�eS 22.ltf6 'iVaS+ 23.�fl tbd7 24.l::!.e 1 ± The end is near for Black.
1 6.'MVh6 ! White still does not hurry to win back the material.
1 6 ... ites
1 7.ltf4 The white pieces come out one by one like ghosts from a bottle.
1 7 ... d5 Alternatives :
A) 1 7 ... .illxb2 1 8.�xe2 and now: A l ) 1 8 ... dS 1 9.ltd6+ 'iti>f7 1 9 . . . 'it>d7
10 .l::l'.ab l dxe4 1 1 . .l:!.hd l +-. 20.ltfS ! We can use the same motif. There is a mate threat with 'MVhS , Black has to give the exchange. 20 ... .l:i:xfS 2 1 .gxfS'iV + 'iVxfS 22.'i¥h7+ 'i¥g7 23 .tbd6+ @f8 24.'i¥xg7+ �xg7 25 .tt:Jes+ Luckily White is able to catch the a8-rook, so he will have enough of a material advantage. 25 ... �g6 26.tbc7 tbc6 2 7.tbxaS tbd4+ 2s.�d2 c3+ 29.Wd3+- ;
Al) 1 8 ... tbc6
C hapte r l : Minor 6 t h Moves fo r B l a ck
Analysis d iagram
1 9 . .Shdl ! ! Another grandiose move. White leaves the rook hanging. Giving mate is again more important . 1 9 . .l:!.ad 1 ? ! would give Black good hopes after 1 9 . . . d5 .
Al l ) 1 9 . . . tbd4+ 20 . .l:!'.xd4 ! ltxd4 2 1 .Rd 1 Thanks to Black's complete passivity, White is able to make a few more quiet moves. 2 1 ...dS 22.l:.xd4 The last piece that took part in the defence is eliminated. 22 ... cxd4 23 .'i¥xf6+ �d7 24.'tlff7+ �c6 2 5 .Vlfxe6+ 'ittbs 26.tbd6+ Fortunately White still has enough material to conclude his attack. 26 ... Wa4 2 7.'tlfxdS+- The black king is trapped;
All) On 1 9 ... dS , 20.I!.ab l makes the difference! 20 ... .l:.!.bS 2 1 .Wfl +- with a kind of zugzwang position;
A 2 3 ) 1 9 . . . ltxal 20.ltd6+ 'iti>f7 2 1 .ltfS In the worst case it 's mate in seven. 2 1 ...l:.xfS 22.tbd6+ We7
Analysis d iagram
3 5

A C u t t i n g - Edge Gam b i t a g a i n s t the Queen's Ind i an - Pa r t I
23 .g8tll+ ! A smart finish. This is a good example that illustrates why it is better to switch off the function ' always promote to queen' in ChessBase : 2 3 .g8�?? would even lose due to 23 . . . tlld4+. 23 .. Jhg8 24.�h7+ and mate next.
B) 1 7 ... 'iit>f7 1 8.£.xe5 fxe5
Analysis diagram
B l ) 1 9.f4! ! and now: B 1 1 ) 1 9 .. Jhg7 20 .'iit>xe2 tllc6
20 . . . dS 2 1 .fxeS dxe4 2 2 .i::t.ad l and the rooks will twinkle at the black pieces from the two open files. 2 1 . .l:'iafl ! tlld4+ 22.Wdl �h8 23 .fxe5+ tllf5 24.°i¥d2 We7 25 .'iit>c l +- White's position is stable while the black king is still in the thick of the battle;
B l 2) 1 9 ... tllc6 20.f5 ! Only forward! 20 ... exf5 2 1 .tlld6+ 'iit>e7 22.tllxf5+ @£7 23 .tlld6+ We7 24.tlle4! The knight is a tricky piece. 24 . . . 'ii'a5+ 2 5 .Wxe2 tlld4+ 26.'iit>fl Wd8 2 7 . .l:Ihdl +- ;
B l 3 ) 1 9 ... £.f3 20.tlld6+ We7 2 1 .fxe5 'ii'a5+ Creating an escape route for the king. 22.'iit>fl 'iit>d8 This march was urgent, because otherwise 'ii' gS would come again, with mate. 23.°i¥h8 'iit>c7 24.'ii'xg8+-
B2) We analysed another entertaining variation: 1 9.tllg5+ We7 20.'iit>xe2 tllc6 2 1 . 'iit>fl A useful prophylaxis before we continue the attack. 2 1 . .. tt:'id4 22.tt:'ie4 There is no good way out for the black monarch . 22 . . . d5 After 2 2 . . . d6
36
2 3 .°i¥f6+ <;t>d7 24.'ii'fl+ Wc6 2 5 .tllf6 wins the exchange. 2 3.°i¥f6+ 'iit>d7 24.tllxc5+ Wc6
Analysis d iagram
2S .'ii'xe5 ! ! This wonderful tactical solution leads to a direct win. 25 ... @xc5 2 5 . . . �e7 2 6 .'ii'xd4 �xcS 2 7 .'ii'f6± . 26.b4+ The point. Now:
B2 1 ) 26 ... 'iit>c6 2 7.'ii'xd4 'ii'e7 28 . .l:Iel .!:l.xg7 29.'iit>g2± ;
B22) 2 6 ... cxb3 i s met by 2 7.ld:c l + tllc2 28.axb3+-;
B 2 3 ) 26 . . . Wxb4 2 7.'ii'xd4 Wb5 28.Wg2 It is always pleasant when we can permit ourselves to play such silent moves. 28 ... 'ii'e7 29.Iihcl 'ii'xg7 Black finally manages to eliminate the dangerous pawn, but we have reckoned with it. 30 . .l:Iab 1 + Charge! 30 ... Wc6
Analysis diagram
Covered by the pawns, the king is only seemingly safe. 3 1 .Ihc4+ ! The vandal rooks destroy Black's hopes again. 3 1 . .. dxc4 32.'ii'xc4+ Wd6 3 3 .°i¥d3+

<;t>es 34 . .a'.bs+ �f6 3 5.'iYd4+ It is very rare when one piece manages to pursue a king all over the board. 35 ... Wg6 36.'iYe4+ <;t>f6 3 7.'iYf4++- Black loses his queen and the game too.
1 8.�xeS fxe5 1 9.'iYfG+ 'it>d7 20.'iYf7+
2 0 .Wxe2 'iYe70 2 1 .tLlxcS + �e8 (2 1 . . .'it'xcS 2 2 .'iYf7 +) 2 2 .Vi'xe6 'iYxe6 23 .tLlxe6 'iit>d7 24.tLlgS and White keeps a healthy extra pawn.
20 ... WcG 21 .'iYxeG+ �c7 22.tLlfG 22.tLlxcS is also promising. The point is a pretty little combination: 22 ... tLlc6 2 3 .�xe2 tLld4+ 24.'iit>d2 tbxe6 24 . . . 'iYgS + ? runs into 2 S .f4 ! exf4 26 .'iYd7+ 'iit>b6 27 .'iYd6+ tbc6 2 8 .tLle6 'iYe7 29 .'iYxe7 tbxe7 3 0 .gxf4+-. 25.tl'ixe6+ 'ot>d6 26.tt:Jxd8 �axd8 2 7.b3 The rook endgame contains lots of instructive points. 27 .. Jhg7 28.bxc4 Sf7! With this precise defence Black might manage to hold. 29.'iit>e2 .l:l.df8 30.l:l'.hfl d4 3 1 .l:l'.ab 1 .Sf3 32.llb3 e4� As happens sometimes, a number of extra pawns in a rook endgame is not decisive.
22 ... ld.xg7 23.ttJxdS+ The greedy 2 3 .tLle8+ �b7 24.tbxg7 leads to some complications: 24 . . . �d3 2 S .'i¥f7+ 'iYd7 (25 . . . '>t>b6 26 .tLle6) 2 6 .'i¥xd7+ lLixd7 2 7 .h4 .l:rg8 28 .tLle6. Here Black has some counter-resources: 28 . . . '>t>c6 29 . 0-0-0 �fs 3 0 .lLlgS e4.
Conclusion
C hap ter 2 : Mino r 6 t h Moves for B l a ck
Though White has a material plus, the black pawns may still cause him some headaches.
23 ... '>t>b7 24.Wxe2 ttJc6 25.'>t>f1 'iYf8 After the tricky 2 5 . . . Dh8 it would be easy to go wrong :
A) 2 6 .Wg2? is too naive, since it is met by the strong 2 6 . . . tLld4! 2 7 .'iYxeS 1:'1e8 28 .'iYf4 (28 .'i¥d6 'iYhS) 28 . . . l::rf8 29 .'il'e4 Se8 with compensation;
B) 2 6 .h4! 'iYf8 (26 . . . �hS 2 7 .tLle3) 27 .tbe3 'iYf3 (27 . . . .l:!.xg 3 ? 28 .'i¥d7 +) 28 .'il'ds l:.xf3 29 .�xf3 l:.xf3 30 .tl'ixc4 l:lf4 3 l .b3 Sh8 3 2 .hS and White keeps a healthy extra pawn.
26.tLlc3 The e4-square is also an ideal post.
26 ... lld8 26 .. Jlf7 runs into 27 .tLle4; and if 2 6 . . . 'fW f3 , 2 7 . 'iY dS def ends everything.
27.@g2
White has an extra pawn and his king is finally in safety.
Finally, it is becoming clear why these sidelines are not popular. Black hands over most of the central squares in a very early phase of the opening, which definitely goes against the old principles. These variations allow White to organize some fireworks: sacrificing an exchange on d4 against 6 . . . d6 , in the other deviations temporarily giving one or even two pawns to seize the initiative.
Our main line is practically forced, offering a great opportunity for the kind reader to create a miniature or win a brilliancy prize.
3 7

A C u t t i ng - Edge Gambi t aga i n s t t he Qu een ' s I n d i an - Part I
Chapter 3
M inor 7th Moves for Black
1 .d4 tLlfG 2.c4 e6 3.tLlf3 b6 4.g3 �a6 5.V.Wc2 c5 6.d5 exd5 7.cxd5
We continue with lines where the pawn sacrifice is still ignored in most cases. This chapter describes how White should react when Black puts his bishop on e7 in order to accelerate his development . It strengthens the defence of the d6-pawn, however the bishop will be very passive on e7 .
Certain specific variations require more aggressive and direct handling , while in our main line, we will see that White enjoys a long-lasting space advantage.
We will analyse 7 . . . �b7 , 7 . . . bS and finally the most obvious move 7 . . . �e7 .
1 .d4 tLlfG 2.c4 e6 3.tLlf3 b 6 4.g3 �a6 5.V.Wc2 c5 6.d5 exd5 7.cxd5 �e7
A) 7 . . . �b7 is the only way to prepare the pawn grab, since the too greedy 7 . . . tLlxdS ?? instantly loses a piece after 8 .V.We4+. 8.�g2! When you study an opening it is always very interesting to follow how the theory has been improved. This position was first seen in Fuhrmann-Daring, Germany Bundesliga 1 994/9 5 , but since then 1 1 years passed until it was seriously introduced into tournament practice! This must be
3 8
the reason why we were unable to find any details about the text move in opening books on the Queen's Indian. So then we decided to hunt for some new ideas in this ' field of gold ' . We wish you a lot of fun! It might also be interesting to try the adventurous 8 .e4! ? : 8 . . . V.We7 9 .�d3 (it looks strange tl1at White can permit himself such a move after he has just vacated a square for his bishop on g2 , but practice has showed iliat iliings are much more complicated. Anyway, being railier 'old-fashioned' we iliink that ilie

bishop has to be put on the fianchetto square in most cases, so we prefer 8 .�g2 . In this line, however, 9 .�g2 allows the trade of queens, which is definitely not what we wish for: 9 . . . �xe4+ 1 O .�xe4+ tllxe4 1 1 .0-0 �xdS 1 2 . .l:!.e l �e7 1 3 . tllh4 tllf6 1 4.tllfs tllc6 1 S . tllxg 7 + @d8 +2 and White still has to prove his compensation for the pawn, Crawley-Kohlweyer, Groningen 1 988) 9 . . . tllxdS 1 O . a3 tllc6 1 1 . 0 -0 tllc7 1 2 . tllc3 (so far the moves were pretty forced, but now it starts to become visible that Black will have to spend more time on finishing the development of his kingside pieces) 1 2 . . . tlle6 1 3 .�e3 � d8 1 4.�ad l �e7 1 S .�c4 0-0oo with a very rich position for both sides, Mamedyarov-Gelfand, Wijk aan Zee 2006 . Now Black declines the pawn : 8 . . . d6 9 .0-0 Still tempting Black to finally take the dS-pawn. Just in case, we have also checked the possibilities where Black changes his mind and decides to grab the dS-pawn after all.
A 1 ) 9 ... tllxdS? is equal to committing suicide: 1 0.tllgS ! �e7 1 1 .ildl There is no good option available for retreating the knight, because of the annoying check from a4. l 1 . .. h6 After l l . . . tllf6 , 1 2 .�a4+ is killing. 1 2 . .l:i:xdS ! Seizing the initiative by a remarkable sacrifice. 1 2 ... hxgS 1 3 .kxgS 'i¥d7 1 4.tllc3± with a strong edge;
A2) 9 ... �xd5 With the insertion of . . . d7 -d6 , this version seems really slow. 1 O.e4 �c6 1 1 .eS Black is still uncastled, so let 's go! 1 1 ...dxeS 1 2.tllxeS �xg2 1 3 .'i¥a4+! An important intermediate move, which White must have seen before playing e4-eS . 1 3 ... tllbd7 It looks like Black manages to extort a few ex -changes and after that will finally be able to finish his development by castling.
C hapte r 3 : Mino r 7 t h Moves fo r B l a ck
Analysis diagram
1 4 . .bi:e l ! The point of White's play. His rook twinkles naughtily at the black king: 1 4 ... bS! 1 4 . . . �e7 1 S .@xg2 and it will be impossible for Black to castle; 1 4 . . . �e4? loses to 1 S .tllc6 . 1 5 .'i¥xb5 �e4 1 6.tllc6! Simplifying to a favourable endgame by force. 1 6 . . . 'i¥b6 1 7.�xb6 axb6 1 8.tllc3 �d6 1 9.tllxe4 White has a very pleasant initiative.
A3) 9 ... �e7 1 O.tllc3 0-0 1 l .e4 This continuation suits our preferred set-up best. l l .tllh4 is a more direct way to attack Black immediately. l 1 . . . g 6 ! ? l 2 .e4 tlla6 1 3 .f4! ? tllb4 1 4.�d l c4+2 occurred in Groth-Skorna, email 2006 , where Black managed to get some counterplay. 1 1 ... tllbd7 1 2.�f4
Analysis diagram
White finishes his development and already provokes Black.
A3 l ) 1 2 ... tllhS hardly bothers us: 1 3 .�e3 a6 l 4.a4 Stopping Black's only
39

A C u t t i n g - Edge Gamb i t a g a i n s t the Queen 's In dian - Par t I
chance on the queenside. 1 4 ... l:lb8 1 S .tlld2 It is time to start the usual tlld2-c4 manoeuvre. 1 S ... tllhf6 1 6.h3 .ic8 1 7.tllc4 White has achieved everything he wanted, while Black is still completely passive. 1 7 ... tlleS 1 7 . . . 'it' cl 1 8 .f4. 1 8.<i:lxeS dxeS 1 9.Ufdl ;\::
Analysis d iagram
With a comfortable position in Mikheev-U raev, Kazan 2 0 1 2 .
A3 2) 1 2 ... a6 1 3 .a4 tl'ig4 l 3 . . . �e8 l 4.h3 . 14.h3 tl'igeS 1 S.tlld2 As often, when we have a space advantage we do not exchange pieces. Black's central knight will drift away soon, our next moves will be .if4-e3 followed by f2-f4. l S ... bS This position was reached in A. Toth-Ly, Canberra 20 1 0 . Instead of the game move White should have thankfully taken the pawn. 1 5 . . . �c8 is a bit slow due to the immediate action 1 6 .�xe5 tl'ixe5 1 7 .f 4. 1 6.axbSN axbS 1 7 . .l:!.xa8 'it'xa8 1 8 .tl'ixbS l:rb8 1 9.I:rc1 ± and Black's compensation looks insufficient.
B) 7 ... bS is a more dynamic approach, which may remind us of the Benko Gambit. On the other hand, here Black strikes only empty air with his pawn, meanwhile limiting the strength of his own light-squared bishop. 8.�g2 d6 9.0-0 and now:
B l ) 9 ... .ie7
40
Analysis d iagram
1 O.b4! Behind this extraordinary move lies a fine positional concept : White wants to blow up Black's structure in order to gain the d4-square for the knight. 1 0 ... cxb4 1 O . . . tl'ibd7 1 1 .bxcS dxc5 (if 1 1 . . .tl'ixcS 1 2 .�a3 .l:!.c8 l 3 .tlld4±, the hole on c6 will be fatal for Black) l 2 .e4±, White's superiority in the centre is beyond doubt, Evseev-Zatsurdaev, S t Petersburg 2 0 0 7 . 1 1 .tl'id4 0-0 l l . . .tl'ibd7 1 2 .'it'c6 'it'c8 1 3 .tl'ifs ± . 1 2.a3 ! A temporary pawn sacrifice. If Black accepts, the white pieces will rush out into play. 1 2 ... �b7 1 3 .e4;\:: White controls the whole board, whereas on account of the weak c6-square Black will be hard-put to finish his development;
B2) 9 ... tl'ibd7 1 0 . .!'1dl Removing the rook from the a6-fl diagonal and preparing to support the central attack. 1 O ... �e7 1 1 .e4 'i¥b6 There is no time for 1 1 . . . 0-0 due to the aggressive 1 2 .e 5 1 •
Analysis d iagram

1 2 .a4! Switching to the wing, making the c4-square available for the knight. 1 2 ... b4 1 2 . . . bxa4 would allow the following sudden strike: 1 3 .es ' dxeS 1 4.l2Jc3 ! ( 1 4.d6 .2.xd6 1 5 .tLlxeS is also good) 1 4 . . . 0 -0 ( 1 4 . . . .2.d6 1 5 .'iVxa4 .2.b7 l 6 .tLld2+- as after tLlc4 Black will be in real trouble) 1 S .d6 ' .2.xd6 1 6 .l2Jxa4 'iYb8 1 7 .tLlgS± and White wins material. 1 3 .tLlbd2 0-0 1 4.l2Jc4 White has managed to create a perfect place for the knight. 1 4 ... b3 ! It is obvious that Black suffers from some serious positional drawbacks, so he has to try and create some chaos. This is a method that Iossif Dorfman propagates in his book The Methodologi; of Chess. If you want to know more about this topic, we can heartily recommend this book. 1 5 .'i¥c3 'i¥b8 1 6.t2Jfd2 tlJg4 The b3 -pawn will fall anyway, but Black has at least some play for it , while the structure looks pretty similar to the Benko Gambit. 1 7 .tlJxb3 �f6 1 8. 'iV c2 �xc4 1 9.'i¥xc4 tlJdeS 20.'i¥c2 c4 2 1 .tlJd4 tlJd3 22.tlJc6± White is a healthy pawn up. Later he will be able to push back the annoying black cavalry.
8.t2Jc3 0-0 9 . .2.g2 d6 1 0.0-0
We arrive at the first main point, where the variations branch. Black has three significant alternatives here : 1 0 . . . b S , 1 0 . . . l::i'.e8 and 1 0 . . . t2Jbd 7 .
Chap ter 3 : Mino r 7 t h Moves f o r B l a ck
lossif Dorfman
1 0 ... t2Jbd7 A) On 10 ... bS 1 1 .a3 ! is the best way
to hold Black back on the queenside, preparing the cunning b2-b4 at the same time. 1 1 . .. tLlbd7 l l . . . b4? is too aggressive : l 2 . axb4 cxb4. So far the game Benes-Ambroz, Prague 1 98 1 , but here we failed to find anything against the simple 1 3 .tLla2!N when Black can hardly hold his only outpost on b4. 1 3 . . . 'iYb6 (if 1 3 . . . .2.b7 1 4.l2Jxb4 iY'b6 1 S .�a4±. White keeps his dS -pawn, and he will try to occupy the c6-square with the knight later. And 1 4 . . . tlJxdS I
fails to 1 5 .tlJxdS .2.xdS 1 6 .tLlgs +-) 14 . .2.e3 'iYb7 1 5 .tLld4 tLlg4 1 6 . .2.d2 �f 6 1 7 . � e4+- , Black loses the pawn and the game. 1 2.b4! l:.lc8
Analysis d iagram
41

A C u t t i ng - Edge Gamb i t a g a i n s t t he Queen 's I n d i an - Part I
A l ) 1 3 . .l:i.dl occurred in two games, but after 1 3 ... �b7 14.bxc5 Black can strengthen his play with 14 .. .lhcSN ( 1 4 . . . tllxcS ? ! l S .tlld4 a6 l 6 .tllc6± Caspi-Ertan, Gaziantep l008) 1 5 .�e3 .!.l:c8 1 6.�b2 a6 , preparing against the tllf3 -d4-c6 manoeuvre just in time; 1 7.�d4;t. So why should we give Black time for this? Is Ild 1 actually necessary?
A l ) 1 3 .bxcS ! is a much more challenging move which immediately forces Black to make a critical decision: how to take back the pawn?
Al l ) 1 3 ... dxc5 14.�f4 �e8 1 5 .ld'.fdl 1 5 .d6 ! ? also comes into consideration: 1 5 ... tllhS 16 .d6 �f6 1 7.�e3 �xc3 Sadly Black has to give his bishop in order to be able to bring back the knight from hS . 1 8. �xc3 The pair of bishops and the strong d6-outpost ensure White a serious positional advantage;
Al) If 1 3 .. ..lhcS the d4-square becomes free for our knight, so it will be able to start on the route to c6 . 14.tlld4 and now: 14 ... tllg4 1 4 . . . �b7 l 5 .�b3 tllb6 1 6 .tllc6± ; 1 4 . . . tt:Jes 1 5 .�b3 �d7 l 6 .tllc6 . 1 5 .tllc6 The knight has finally reached its ideal square. 1 5 . . . �e8 1 6.�d2 �f6 Or 1 6 . . . tllb6 1 7 . .l:!.ac l tllc4 1 8 .�f4 tllge5 1 9 . a4 !+- and Black is on his last legs. 1 7 ..lhcl tllb6 1 8.�b3 White has escaped from the pins just in time. 1 8 ... tllc4 1 9 .�f4 g5
Analysis d iagram
42
20.tlle4! gxf4 2 1 .h3 !± There is no harmony among the enemy pieces.
B) The tricky 10 ... l:le8 has not occurred in practice yet, though it looks natural. Now we are unable to transpose to our main line with al-a4, because Black would simply play . . . �a6-b7 , clearing the route for his knight, which could then nestle on the weakened b4-square via a6. 1 1 ..a'.el b5 l 1 . . .tllbd7 1 2 .a4 leads to the main line. 1 2.e4 1 l .a3 ! ? is less useful than earlier, but still playable : 1 2 . . . tllbd7 1 3 .�f4 �b6 1 4.e4 tllg4 (an effective manoeuvre to stop White's central break, improving the knight as well) l 5 .�h3 tllgeS 1 6.tllxeS tllxeS 1 7 .�xeS dxeS l 8.�d7 Iied8 1 9 .�c6 with some advantage, though it seems difficult to break into Black's camp.
Analysis d iagram
B 1 ) 1 2 ... b4 1 3 .tlld l ! This is far from an attractive place for the knight, but the most practical here. It can join the battle later via e 3 . 1 3 ... �f8 l 3 . . . tllbd7 1 4.a3 ' . 14.�gS ! White first creates a pin before he starts to blow up the enemy queenside pawns. This is necessary, as otherwise Black could push . . . b4-b3 , using the fact that the cl-queen is overloaded. l 4.b3 I 7 , fixing the pawns, is another good option; 1 4 . . . tllbd7 1 5 .a3 . B l l ) 14 ... tllbd7 1 5 .a3 ! This is the
right time for playing on the other wing

too. 1 5 ... °iYcS 1 5 . . . b3 loses a pawn due to the pin : l 6 .°iYxb3 h6 1 7 .jlxf6 tLixf6 l 8 .°iYc2 g6 l 9 .tLlc3 .a:b8 2 0 . e S ± . 16.b3! Freeing the bl-square for the knight, which supports the blocking plans. 1 6 ... c4 The only way to make a mess of it . If 1 6 . . . h6 1 7 ,jld2 . 1 7 .axb4 cxb3 1 8.°iYb l ! White must keep his important central pawn, while the one on b3 remains our victim. 1 8 .. . °iYc2 18 . . . h6 1 9 .jld2 'li'c2 20 .'li'xc2 bxc2 2 1 . .l::l.xa6 cxd 1 VW 2 2 . .l:.xd 1 �xe4 23 .jle l ± .
Analysis diagram
There is a big difference in the strength of the pieces. White will benefit from the weak light squares in Black's camp. 1 9.tLle3 Finally the knight is playing a role again . 1 9 . . . 'iYxb l 1 9 . . . 'i¥d3 (20 .jlxf6 tLlxf6 2 1 .�b2 jlc8 (the greedy 2 1 . . .tLlxe4? would just lose material after 2 2 .jlf1 ) 2 2 .tLld2 'iYbS 23 .'i\:Yxb3 ± with a healthy pawn up. 20.l:':i:exb 1 jld3 2 1 .i:i.xb3 jlxe4 Black puts his hopes on the proverb: 'Less pieces, less problems.' 22.jlxf6 jlxf3 2 2 . . . tLlxf6 23 .tLld4±. 23 .jld4 jlxg2 24.@xg2 a6 25 . .t!.c3± The difference between the white and black pieces is again telling. We can use the weak c6-square to attack both pawns;
B 1 2) 14 ... jlbs 1 5 .a3 ! Massaging the black pawn structure before the chain gets formed with . . . a7 -aS :
Chap ter 3 : Minor 7 t h Moves fo r B la ck
B l 2 1 ) 1 5 . . . ttJbd7 1 6 .axb4 cxb4 1 7 .ttJd4 'i¥b6 1 8.ttJxb5 'VixbS 1 9 .tlle3 .Uac8 20.'iYbl with pressure on both sides;
B l 22) 1 5 ... bxa3 1 6.tLlc3! Returning the knight to a more natural place with tempo. 1 6 ... axb2 1 7.'i¥xb2 jld3 1 8.e5 Again a devastating invasion from the centre. 1 8 ... dxe5 1 9.0ixe5±;
B 1 23 ) 15 ... ttJa6 1 6.a4 jld7 1 7.b3 t and White's advantage i s beyond doubt.
B2) 1 2 ... ttJbd7 1 3 .jlfl ! Immediately pointing out the drawback of the last move. The bS -pawn is weak and in addition the bishop has become passive on a 6 . 1 3 .. . 'i¥b6 1 4.'i¥e2 ! White strengthens the pressure on the fl -a6 diagonal, making use of the fact that the enemy bishop is pinned. It becomes difficult to maintain the bS -pawn in a satisfactory way. 1 4.a4! ? also looks interesting. However, here the lines are pretty complex and lead to an objectively less convincing plus. After the queen move we have :
B2 1 ) 1 4 ... jlfs 1 5 .a4 b4 1 6 .'fl!Vxa6 bxc3 i 7.bxc3;!;, the two bishops dominate the board;
B22) 14 ... c4 1 5 .a4 b4 1 6.ttJb5 with a positional edge;
B23) 14 .. JhbS? 1 5 .a4± ; B24) 1 4 ... jldS ! 1 5 .tLld2
Analysis d iagram
43

A C u t t i n g -Edg e Gam b i t a g a i n s t t he Qu een ' s I nd i an - Part I
Everything is protected, so now Black is forced to react in some way on the queenside. After the impatient 1 S . a4, the line 1 S . . . b4 1 6 .'¥Wxa6 '¥Wxa6 1 7 .�xa6 bxc3 1 8 . bxc3 �as g? would show the difference with line B2 1 ) 1 4 . . . �f8 . B24 l ) 1 5 ... c4 1 6.a4 b4 1 6 . . . 'VWaS
Analysis d iagram
1 7 .axbS ! This interesting sacrifice des troys Black 's position : 1 7 . . . 'VWxa l l 8 .tllxc4! (proceeding with a finesse. The a6-bishop simply cannot run away) 1 8 . . . �xbS 1 9 .tllxbS !:!.xe4 2 0 .�e3 '¥Wa4 2 l .tllbxd6 with wonderful play. 1 7 .<1Jb5 �xb5 1 8 .axb5 '¥Wxb5 1 9 .'¥Wxc4;l;: The light squares (a6 , c6) remain weak and Black has just given his bishop;
B242) 1 5 ... b4 1 6 .'¥Wxa6 bxc3 1 7.bxc3 <1Jxd5 1 7 . . . '¥Wxa6 1 8 .�xa6 �as l 9 .�b2 laab8 20 .laab l tllxdS is a nice concept, but it is hardly a real salve for the wounds: 2 1 . exdS gxe 1 + 2 2 ..lhe l l:!.xb2 2 3 .l:!.e8+ <1Jf8 24.tlle4i and White has a good initiative. 1 8.'¥Wa4 '¥Wc7 1 9.tllf3 tll5b6 20.'¥Wc2 llb8 20 ... <1Je5 2 1 .<1Jxe5 dxe5 22.a4 2 1 .a4:;l; The black pieces remain very ugly compared to the white bishops, which will be a big power;
B243) 1 5 ... Ub8 1 6.a4 '¥Wa5 1 7.<1Jb3 b4 A desperate bid for complications.
44
1 7 . . . '¥Wb4 leads to a forced line : 1 8 .axbS �xbS 1 9 .tllxbS .l:Ixe4 20 .�e3 '¥Wxb3 2 l .tllxd6± with a decisive material advantage. 1 8.<1Jxa5 �xe2 1 9 . .Sxe2 bxc3 20.<1Jc6 cxb2 2 1 .�xb2 l::Ib7 22.f3±
1 1 .a4
As the knight already stands on d7 , we can make this space-gaining move. Black has two evident options to consider: l 1 . . .�b7 or l l . . . .l:f.e8 .
1 1 ... �ea 1 1 ... �b7 1 2.e4 a6 1 3 .tlld2N A typical manoeuvre in the Benoni, so why should we avoid adopting it? 1 3 .lid 1 lle8 1 4.�f4 £.f8 1 S .tlld2;1;: was played in Shankland-M. Arnold, Philadelphia 2 0 1 0 , and here again we can question the necessity of White's rook move. 1 3 ... '¥Wc7 14.<1Jc4 Black has connected his rooks with principled moves, but his further options are quite limited. 14 ... <1Je5 1 4 .. JHe8 1 S .f4 �f8 1 6 .b3 (the c I -bishop will be ideally placed also on the other long diagonal) 1 6 . . . l:tab8 1 7 .�b2 �a8 1 8 .h3 and White has an edge. 1 5 .<1Jxe5 dxe5 1 6.b3 c4 Normally this is the traditional counterplan in the Benoni. However, in the current situation it rather disintegrates Black's pawn structure. With 1 6 . . . tlle8 1 7 .�b2 tlld6 Black at least organizes his pieces a bit better,

but that's all ( 1 7 . . . g6 1 8 .tbd l tbg7 - a fianchetto knight? ! Too perverse to be good. . . l 9 .tbe3 fs 2 0 .tbc4 �f6 2 l . f4+- and Black is unable to hold the centre) : 1 8 .tt:Jd 1 i .
Analysis diagram
The position is still pretty rich with ideas for White. For instance: ti:Jd l -e3 , f2-f4, �g2-h3 , Ma l -c l and sometimes also a4-a5 . 1 7.ti:Jdl l::!.fc8 1 7 . . . bS 1 8 .bxc4 'YWxc4 ( 1 8 . . . bxc4 1 9 .tbe3±) 1 9 .'YWxc4 bxc4 20 . .l::!.b l ±, Black's pawns on c4 and es will be real targets. 1 8.'YWxc4 �xc4 1 9.bxc4 �xc4 20.tbe3± The passer on dS is one of the reasons why we can safely claim that White has a serious advantage. In addition, both the b6- and the eS-pawn are vulnerable.
1 2 . .l:!.e1
At this stage we should take into account the ambitious novelty l 2 . . .tbg4 and the modest 1 2 . . . �f8 .
C hap t e r 3 : M in o r 7 t h Moves for B l a ck
1 2 ... �fS 1 2 .. .tbg4N It is quite obvious that Black has to do something with his pieces before White occupies most of the central squares. 1 3 .kf4 �f8 Regrouping the knight with 1 3 . . . ttJf8 looks good, but it is far from effective: 1 4.h3 tbf6 1 5 .e4 tbg6 l 6 .ke3 tbd7 1 7 .ti:Jd2 and Black is running out of useful places for his pieces: 1 7 . . . hS (at least a try for some action on the kingside) 1 8 .f4 h4 1 9 .g4 �f6 2 0 .ti:JbS ! (limiting the power of the bishop. The seemingly obvious 2 0. tbf3 would be premature due to the strong 2 0 . . . kd41 2 l . tbxd4 cxd4 22 .�xd4 tbxf4�) 20 . . . �xbS 2 1 .axbS kd4 (otherwise there is no fantasy in Black's position. If 2 2 .�xd4 cxd4 2 3 .J::l.fl ± the d4-pawn remains ' for lunch' ) 14.tbbs ti:JdeS l S .tbxeS Unfortunately it is impossible to refrain from exchanging now. l S ... tbxeS 1 6.kd2
Analysis diagram
The bishop has done its j ob, so now it vacates the f 4-square for the later pawn advance :
A) 1 6 ... gS !? 1 7.�e4 tbg6 1 8.�a3 !;1; With this aesthetic move White brings his rook into play. He has strong control over the entire board and the black kingside is also far from secure;
B) 1 6 ... �xbS 1 7.axbS g6 1 7 . . . 'YWd7 1 8 . f4 tbg6 1 9 .'YWc4± . 1 8 .f4 tbg4
45

A Cu t t i ng - Edge Gam b i t a g a i n s t t he Qu een 's I nd i an - Par t I
1 9 .e4± Black is caught in total passivity again;
C) 1 6 ... 'it'd? 1 7.f4 tl:lg4 1 8.e4 iil.b7 1 8 . . . iil.xbS 1 9 .axbS 'it'xbS ?! is too risky: 20 .h3 tlJf6 2 1 .eS (everything by force) 2 1 . . .tlJd? 2 2 .e6 tt:Jf6 23 .iil.fl (the queen is almost caught) 23 . . . c4 24.iil.xc4 'it'cS + 2S .iil.e3± and Black's pieces remind one of a furniture warehouse. 1 9.'it'd3t and White enjoys a pleasant space advantage.
1 3.e4
1 3 ... 'it'c7 Once more we check the appealing 1 3 .. . tlJg4: 1 4.tiJbS An ideal opportunity to wrap that bishop up before it becomes really annoying. At the same time we create pressure on d6. Black can scarcely react better than with . . . iil.a6-b7 and chasing the outpost by . . . a 7 -a6 : 1 4 .. . iil.b? 1 5 .�gs 'it'b8 1 S . . . tt:Jgf6 - it is never too late to change your mind . . . l 6 . .if4 'it'b8 ( 1 6 . . . tlJeS 1 7 .tlJxeS dxeS 1 8 . .igS±) 1 7 .tlJa3 (White retreats his knight before it gets harassed by . . . a7 -a6 . It heads for a more secure place) 1 7 . . . a6 (from here on, the bl-bishop becomes really and almost permanently passive) 1 8 .tlJc4 tt:Jhs ( 1 8 . . . 'it'c7 1 9 . e S ) 1 9 . .id2 . We have won a tempo with the bishop again. Generally, our plan is the same: h2-h3 , .id2-c3 , tt:Jf3 -d2 and
46
later f2-f4. 1 6.h3 tt:JgeS 1 7.tlJd2 Naturally, the concept is similar: we want to keep the pieces. 1 7 ... a6 1 8.tl:la3 tt:Jg6 An awkward reaction, since after .ie3 the advance f2 -f4 will come anyway. 1 9 . .ie3 t
Analysis diagram
White enjoys a comfortable space advantage. He can still calmly improve his position, while Black is simply unable to create any counterplay on the queenside. Even when the knight is on c4, he still has to think twice before pushing . . . b6-b5 in view oftlJaS .
1 4.tt:Jb5! .ixb5 14 ... 'it'bS hardly changes anything : 1 S . .id2 Also possible is 1 S . .if4! ? .ib7 1 6 .tlJa3 'it'c7 1 7 .tlJc4 l2Jg4 1 8 . .ih3 tlJgeS 1 9 .tlJfxeS tlJxeS 20 . .ixeSt with an obvious advantage thanks to the strong passed d-pawn, which is supported by active pieces. 1 S .. . �b 7 1 6.tl:la3t White can calmly prepare a break in the centre with .ic3 , tlJc4.
1 5.axb5 The a7 -pawn will be a long-term weakness. White can also transfer the knight to c4 without any problem before he plays f2-f4. Then the position will be completely awkward for Black.
1 5 ... g6 1 6.b3 .ig7 H . .ib2 And White has a big advantage - see the game below.

Black is practically helpless against tllf3-d2 followed by the advance f2-f4.
Ashwin, Jayaram Dj avadov, Ramil Baku 2008 (3)
Game 2
1 .d4 tllf6 2.c4 e6 3 .tllf3 b6 4.g3 �a6 5.'i¥c2 c5 6.d5 exd5 7.cxd5 �e7 8.tllc3 0-0 9.�g2 d6 1 0.0-0 tllbd7 1 1 .a4 l:i'.e8 1 2.J:le1 �f8 1 3.e4 Wic7
Black should have recognized the importance of fighting for the centre with 1 3 . . . tllg4; see the analysis part.
1 4.tllb5! Trading off the knight for the bishop is the right concept, as after this exchange White exerts additional pressure on the a-file.
1 4 ... �xb5 1 5.axb5 g6 1 6.b3
C hap ter 3 : Mino r 7 t h Moves fo r B l a ck
1 6 .h3 1 7 deserves attention: 1 6 . . . �g7 1 7 .�f4 (finishing development by connecting the rooks) 1 7 . . . tllhS 1 8 . �e3 . Now the chief threat is tlld4, utilizing the pin on the queen : l 8 . . . 'i¥b7 ( 1 8 . . . 'i¥d8 l 9 .l:Ia4) l 9 .tlld2±.
16 . . . �g7 1 7.�b2 ld.ac8 1 8.tlld2± Remarkably, although the game has only just left the opening stage and Black has not made any big mistakes, his position already looks very awkward.
1 8 ... g5? Out of inertia Black tries to hinder White's central advance with f2-f4 by radical means. The calm l 8 . . . .l::!.e7 might have been slightly more advisable, though White is evidently better after 1 9 .tllc4 tlle8 20 .�xg7 tllxg7 2 1 .f4 tllf6 2 2 .eS tllfe8 23 .g4.
1 9.tllc4+- tllg4 Temporarily neutralizing the lethal threat of tlle3 -fS .
20.�xg7 �xg7 21 .'i¥c3+ Improving the queen while provoking further weaknesses.
21 .. .f6 2 l . . .'it>g8 22 . f4.
22.f4
Black's light-squared bishop is clearly missed in his position. In addition, the g4-knight is also completely misplaced.
22 ... gxf4 Opening the g-file will only be more dangerous for Black.
47

A C u t t i ng - E dge Gamb i t a g a i n s t the Queen 's I nd i an - Part I
23.gxf4 .l:Ig8 24.�f3 tt:Jh6 In the event of 24 . . . @h8 2 5 .h3 c1:Jh6 2 6 .�hS+- almost captures the knight.
25.�hS tt:Jf7 26.@h1 Step by step - White's play is easy and logical.
26 ... tt:JfS 27.�h3
Conclusion
Although he doesn't have any material advantage, the engines give at least +6 .00 for White.
27 ... l:IeS 28.l:Ig1 + @h8 29.�xgS+ �xg8 30Jlg1 +
3 0 .�e6 tt:Jxe6 3 l . dxe6 was a bit smarter.
30 ... @hS 31 .�fS Black is close to being in zugzwang.
31 ... �e7 32.i:!.g3 .l:Ib8 Instead of a move.
33.!ih3 tt:Jd8 34.tt:Jxd6! This little tactic crowns White's great concept .
34 ... �xd6 35.�xh7 �xf4 36.�g6+ @g7 37.�hS+ 1 -0
We can see why the variation with 7 . . . il.e7 is quite unpopular. It allows Black to castle more quickly, but the bishop stands evidently worse there than on the long diagonal, which we saw in the previous chapter.
White's strategy can be divided into two main parts : 1 ) If Black comes forward with . . . b6-b 5 , we react with a2-a3 and
later b2-b4 (as we have seen, in certain specific cases this also works immediately) . This might be shocking for the opponent, who will more likely expect White to attack in the centre. However, we have already noticed that this a3 /b4 queenside advance corresponds perfectly with our intentions of occupying the central squares.
2) In case of the natural development with . . . c1:Jb8-d7 , White fixes the queenside by inserting a2-a4, so that later he will be able to enjoy the arising comfortable positions with a space advantage. Generally his further aim is to prepare an advance on the kingside by tt:Jf3-d2 and f2-f4, and eventually break through with e4-e5 .
48

Part I I - Black Accepts with 8 . . . i..xd5
1 .d4 tt:Jf6 2.c4 e6 3 .tt:Jf3 b6 4.g3 �a6 5.'i¥c2 c5 6.d5 exd5 7.cxd5 �b7 8.�g2 �xd5
In the ' childhood' of the opening (around 2006) this capture was much more popular. After a few years, theory had improved and reached the conclusion that i t is clearly better to take the pawn with the knight. The reason is pretty obvious : Black loses an important tempo if he takes with the bishop.
You can find a good overview of this line in a Survey in Yearbook 82 by Steve Giddins. Let us quote him for an illustration of the general attitude at that time: 'Capturing with the bishop has proved overwhelmingly the most popular choice.'
Although the bishop capture is considered rather bad nowadays, we can still find a few grandmasters (for example Granda Zuniga in 2 0 1 1 ) who have kept using it in recent years.
This part contains the following chapters:
Chapter 4: 9. tbc3 - Other Bishop Moves Chapter S : 9 .tbc3 �c6 - The Main Line
49

A Cu t t i n g -E dge Gamb i t a g a i n s t t he Queen 's I nd i an - Pa rt I I
Chapter 4
9.ttJc3 - Other Bishop Moves
1 .d4 tt::lf6 2.c4 e6 3.tt::lf3 b6 4.g3 -2.aG 5.V/Vc2 c5 6.d5 exd5 7.cxd5 .2.b7 8 . .2.g2 .2.xd5 9.tt:Jc3
First we discus the minor bishop moves after 8 . . . -2.xdS 9. tt::lc3 . Black is facing a difficult decision. If he goes back to b7 , this evidently means a loss of tempo, and moreover his bishop will still be unprotected. However, the remaining alternatives involve giving up the control of the long diagonal, which also hardly looks promising.
We will deal with 9 . . . .2.e6 ?! , 9 . . . .2.xf3 and the more common 9 . . . .2.b7 .
1 .d4 tt:Jf6 2.c4 e6 3.tt:Jf3 b6 4.g3 .2.a6 5.V/Vc2 c5 6.d5 exd5 7.cxd5 .2.b7 8 . .2.g2 .2.xd5 9.tt:Jc3 .2.b7
Black tries to save his bishop, but it will remain unprotected on b 7 .
A) 9 . .. .2.e6?! Leaving the long diagonal allows White to gain an edge instantly. 1 O.tt::le5 and now:
A 1 ) 1 O ... d5 1 1 . .£.g5 White piles up the pressure on dS , setting up another pin. 1 1 ... Jl.e7 1 1 . . . .2.d6 simply allows White to take everything off: l 2 . .2.xf6 ! V/Vxf6 1 3 .tt::lxdS -2.xdS ( 1 3 . . . 'W'xeS 1 4.tt::lc3 and the a8-rook will be a prey for the fianchetto bishop: 1 4 . . . -2.fs
s o
1 5 .'W'd2 0 -0 1 6 . .l:;l.d l ±) 1 4.V/Va4+ 'it'f8 1 5 . .2.xdS -2.xeS 1 6 . .£.xa8 .2.xb2 1 7 .l:!:d l ± . 1 2.V/Va4+ Certainly we cannot let our opponent calmly castle.
A 1 1 ) In case of 1 2 ... Jl.d7 1 3 .tt::lxd7 V/Vxd7 1 4.V/Vb3 the g2-bishop will be a real 'big boss' in the game and Black is unable to hold his central pawn any longer: 14 . . . c4 1 4 . . . tt::lc6 1 S .-2.xf6 -2.xf 6 1 6 .tt::lxdS . 1 5 .V/Vb5 White is ready to exchange the queens in order to further weaken the dS -pawn. 1 5 ... 0-0 1 6.Jl.xf6 V/Vxb5 1 7 .tt::lxb5 Jl.xf6 1 8.Jl.xd5 ! Simplifying to a favourable endgame. 1 8 .0-0-0? ' allows Black to bring out his

remammg pieces: l 8 . . . tt::lc6 1 9 .tt::lc7 �ac8 20 .tt::lxd5 t . 18 . . . i.xb2 19 . .!:l.bl c3 20.i.xa8 c2 2 1 .0-0 cxb l 'l!U 22.llxbl i.eS 23.tt::lxa7± White has a healthy extra pawn and good winning chances;
A I 2) 1 2 ... WfS 1 3 . .i:idl 1 3 . 0-0-0 is also possible. 1 3 ... tt::lbd7
Analysis d iagram
1 4.tt::lc6!N We are devotees of the bishop pair and in an open position it is very logical to go for it. With 1 4. tt::lxd5 tt::lxd5 1 5 .llxd5 �xd5 1 6 .tt::lxd7 + White also managed to gain a sound advantage after 1 6 . . . Wg 8 1 7 .�xd5 �xg5 l 8 .�xa8 'l!Uxa8 1 9 .0 -0± in Kazhgaleev-Z. Almasi, Corsica rapid 2006 . 1 4 ... 'l!Ues 1 S .tt::lxe7 1 5 .tt::lb5 ! ? . 1 S ... 'l!Uxe7 1 6.tt::lxdS i.xdS 1 7.i.xdS± It is a dream to be White here, with such superior bishops.
A2) 1 0 ... tt::la6
Analysis diagram
C hap ter 4: 9 . tLlc3 - O t her B i s hop Moves
This is a tricky try, speculating on White's greediness.
A2 l ) 1 1 .i.gS? ! i.e7 1 2.0-0-0? was too optimistic in Meins-Miezis, Bad Zwischenahn 20 1 3 . After the strong 1 2 ... tt::lb4!N (instead of the game move 1 2 . . . 0-0) 1 3 .'iWd2 .Uc8 1 4.a3 h6!+ sud-denly Black could have gained the initiative;
A22) In case of 1 1 .i.xa8?! 'l!Uxa8 1 2.f3 i.e7 1 3 .0-0 0-0 Black might harbour hopes for serious compensation;
A23) Our improvement is the natural 1 1 .0-0 !N Jd.c8 1 2 .'l!Ua4 tt::lb4 1 2 . . . tt::lb8 1 3 .f4! . Again it is more practical to go forward than to grab a pawn. l 3 . . . �d6 1 4 .tt::lb5± . 1 3 .a3 i.d6 If 1 3 . . . tt::lbd5 1 4.tt::lxd5 tt::lxd5 1 5 .Sd l ± Black still has not solved his developing problems and the white pieces are attacking. 1 4.�f4 i.xeS 1 4 . . . tt::l bd5 1 5 . tt::lxf7 1 - with this little combination the black bastion is destroyed. 1 S .�xeS l2Jc6 1 6.i.d6 The messenger with the bad news has arrived: 'Do not flee, Your Majesty, please spend some more time with us i ' 1 6 ... tt:Jgs 1 6 . . . tt::la5 1 7 .l:!.ad l ± . 1 7 .f4 tt::lge7 1 8.�xc6 ! The reason why we can give up our favourite bishop is the fact that we are able to convert the positional advantage into a material one. 1 8 ... dxc6 1 8 . . Jhc6 1 9 .�xe? 'l!Uxe7 . The two dangerous white bishops have disappeared and it seems that Black can breathe again. . . or . . . ? 20 .f5 +- . What a pity! 1 9 .Sadl 0-0 20.e4± Black has no way to get away. 20 ... i.h3 2 1 . 'l!Uxa7 J:;[e8 22.�eS +-
B) Black can also trade off the attacked bishop for the knight with 9 ... i.xf3?! 1 0.�xf3 tbc6 1 1 .'l!Ua4 and now:
B 1 ) 1 1 . .. 'l!Ucs is a quite ugly way to protect the knight.
5 1

A C u t t i n g - Edge Gamb i t a g a i n s t the Qu een's I n d i a n - Pa r t I I
Analysis d iagram
1 2.g4!?N 1 2 .�g5 !#..e7 1 3 .0-0 0-0 1 4.l;iad 1 with perfect compensation for the pawn in Pushkov-Nazaryev, Gagra 2008 ; if 1 2 .�f4N �e7 1 3 .0-0 0-0 1 4 .l:Ifd l t . 1 2 . . . h6 1 2 . . . �d6 1 3 .g5 tbg8 l 4.tbb5t . 1 3 .h4 tbd4! The only way for Black to get some play; if l 3 . . . b5 1 4.'i¥f4±. 1 4 . .£.g2 bS ! A good practical decision. 1 S .tbxbS tbxbS 1 6.'iixbS Mb8 1 7.'i¥d3 In this open position the white bishops are much more useful than the !#..+lb. 1 7 ... dS Now an extraordinary line wins material by force : 1 8 .gS hxgS 1 9.hxgS .l:!.xhl + 20 . .£.xhl 'i¥g4 2 1 .'it>fl 'i¥h4 22.�xdS tbxdS 23 .'iixdS 'iih3+ 24.'i¥g2 'iixg2+ 24 . . . 'i¥d7 2 5 .�e3 .i::l:xb2 26 .'i¥a8+ and Black has to give the a7 -pawn, while his king remains weak too. 2S.Wxg2 In this endgame White is a healthy pawn up with good winning chances. He plays b2-b3 next, no matter how Black reacts;
B2) 1 I .. . .llc8 1 2 . .£.f4 �e7 1 3.0-0-0 In the current situation we can calmly castle queenside. The natural 1 3 . .l':rd 1 ! ? also comes into serious consideration, viz. 1 3 . . . 0 -0 1 4.0 -0 h6 ( 1 4 . . . .l:re8 1 5 . .l:Id2 �fs 1 6 .�g2�) 1 5 .!#..g2 tbh5 ( 1 5 . . . a5 1 6 . .i.::!.d2±) 1 6 .�e3t . The difference in coordination between the white and the black pieces is quite spectacular. White dominates the whole board. 1 3 ... 0-0 14.Wbl and now:
52
Analysis diagram
B2 1 ) 1 4 ... bS 1 5 .ttJxbS 'i¥b6 16 .tbd6t with an initiative in Nisipeanu-Baklan, Predeal 2006 ;
B22 ) Although the active 1 4 ... tbd4 immediately loses an exchange, Black has some tricks here as well. 1 s . .£.b7 bS 1 6.'iYxa7 1 6 .tbxb5 is also very promising. Though it gives the material back, White will keep a strong edge, e.g. 1 6 . . . 'i¥b6 1 7 .!#..xc8 tbxb5 1 8 .'i¥a6 tbc3 + l 9 .Wc2 tbxd l 20 .I:rxd l 'i¥b4 2 1 .f3 t . 1 6 ... b4 1 7.tba4 .llc7? 1 7 . . . tbe6 1 was more resistant. 1 8.e3 tbe6 19 . .£.xc7 'i¥xc7 20.'i¥b6 +- , Vallejo PonsMacieja , Turin ol 2006 (Game 3 ) ;
B23) 1 4 ... °iYeS 1 S .g4! White uses the same advancing plan as before to gain the important d5 -square. 1 S ... dS 1 6.gS tbe4 Black gives the pawn back in order to ease the pressure. 1 7 .tbxe4 dxe4 1 8 .'i¥xe4 tbd4 1 9.�g4 'i¥c6 20.'i¥xc6 l::!.xc6 2 1 .e3 tbe6
Analysis diagram

22.�g3 !N It is possible to keep the bishop on the board thanks to the very bad coordination of the black pieces. After 2 2 .�xe6 .&!.xe6 23 . .&!.d7;\; White managed to transpose into a better endgame in Tkachiev-A. Sokolov, Besancon 2006 , but we think our move is even better. 22 . . . tl:lxgS 2 2 . . . �xgS would lose material: 2 3 .�f3 l::i.cc8 24.�b7 1::lcd8 2 5 .�d6 J:l'.fe8 2 6 .�c6± . 23.l:!.d7 f5 ! 23 . . . �f6 24..!ha7 and there is still a big problem on the enemy back rank. 24.�e2 �f6 25 .�c4+ Now the bishop has also found its best square. 25 ... 'it>h8 26.l:rxa7 tl:le4 Black has managed to get some play, but the difference of strength between the rooks ensures White a long-lasting advantage. 2 7 . .&tdl �cc8 28.�e6 l:tcd8 29 . .!:i:.xd8 Sxd8 30.�xfS JJ'.dl + 3 1 .'it>c2 a'.d2+ 32.'it>b3 tl:lxg3 3 3 .laa8+ .ti.d8 34 . .Sxd8+ �xd8 3 5 .hxg3 In the arising endgame White has a good chance to convert his material advantage. Both Black's bishop and king are very passive. 35 . . . g6 36 .�d3 'it>g7 3 7.'it>c4 h5 38 .'it>d5+-
1 0.e4 At this s tage we will examine 1 O . . . tl:lc6 ?I and the safer 1 O . . . �e7 .
1 0 ... �e7 The move 1 O • • • tl:lc6?! helps only White. It is more urgent to solve the development problems on the other wing. 1 1 .0-0 tl:lb4 Proceeding with the initiated plan, however this is too adventurous. 1 1 . . .�e7 1 2 .eS tl:lb4 ( 1 2 . . . tl:lg4 1 3 .'Mi'fs hs 1 1 . .&!.d 1 ±) 1 3 .'it'fs g6 ( 1 3 . . . tl:lfdS does not help either due to 1 4 .tl:lgS �xgS 1 5 .�xgs�) . Here White could have continued with the more ambitious 1 4.VWh3 !N (instead of 1 4.'i+'b l tl:lg4 1 5 . .l1e l c4D 1 6 . .l1e4!� Kostic-Nikolac, Germany Landesliga 2 0 0 0 / 0 1 ) , for example : 1 4 . . . tl:lg8
C hap t e r 4-: 9 . CLJc3 - O t he r B i s hop Moves
( 1 4- . . . tl:lfdS 1 5 .�h6) 1 5 . .l::!.d l c4 1 6 .tl:lbs tl:ld3 1 1 .tl:ld2 +- .
A) 1 2 .'i+'a4 �c6? ! 1 2 . . . c4- would hardly cause a big headache either: 1 3 .tl:leS a6 1 4.a3 bS 1 5 .'i+'d l tl:lc6
Analysis d iagram
l 6 .tl:lxf7 1 'it>xf7 1 7 .es tl:lxeS 1 8 .�xb7 and Black's fortress is completely destroyed. 1 3 .'i+'d l �b7 1 4.a3 tl:lc6 1 5 .eS+- Salvador-Santagati , St Eufemia d' Aspromonte 2 0 1 0 ;
B) The natural 1 2.�dl ! ?N comes into consideration too : 1 2 . . . dS 1 2 . . . c4 1 3 .tl:lh4- tl:ld3 1 4-.eS ! (time to open up the position, as long as the black king is still in the middle) 1 4-. . . �xg2 1 5 .tl:lxg2 tl:lg8 1 6 .tl:lf4-, getting rid of Black's only annoying piece. Black's other pieces are still on the back rank. Further comment is unnecessary. 1 3 .eS It's quite instructive to see how quickly White can generate a dangerous attack here. 1 3 ... <1:le4 14.a3 ! Forcing the trade of the knights. 1 4 . . . tl:lxc3 1 5 .bxc3 tl:lc6 1 6.e6! White takes advantage of the fact that the black king is still in the middle and places a 'bomb ' . 1 6 .. . fxe6 1 6 . . . f6 1 7 .tl:lh4- g6 1 8 . tl:lfS ! ( a very nice move, preventing Black from closing the position) 1 8 . . . �c7 ( 1 8 . . . tl:le7 l 9 .tl:lxe7 �xe7 20 .�a4-+ Wf8 2 1 .�h6+ Wg8 22 .c4-� ; White virtually has an extra rook) 1 9 . e7 gxfS 20 .exf8'i¥+ nxf8 2 1 ..l:Ie l ++- .
5 3

A Cu t t i n g - Edge Gam b i t a g a i n s t t he Qu een 's I n d i an - Pa rt I I
1 7 .tt:Jgs '(j'd6 1 1 . . . �f6 1 s . .£.h3 . 1 8 . .S:e 1 e5 1 9 .c4� The black king will face some hot issues.
1 1 .0-0 As a Hungarian proverb says: 'Go slowly, and you will go further.' It would be premature to rush things with 1 1 .eS tlJdS ! 1 2 .'(j'e4 tl'ib4! 1 3 .'(j'xb7 tl'i8c6. The queen is suddenly captured and there is also another serious threat with . . . tl'ic2. 1 4.e6 fxe6 1 5 .tt:Jes !lbs 1 6.tl'ixc6 dxc6 1 7.£.xc6+? 1 7 .'(j'xa7 would still have been a draw: 1 7 . . . .!:1a8 1 8 .�b7 .l:tb8 1 9 .�a7 = . 1 7 . . . ..tif7 1 8. � d 7 White has managed to save his queen after all, but he has not been able to regain the material, and eventually this cost him the game. 1 8 ... tl'ic2++ Leon Hoyos-Kraai, Beijing rapid 2008 .
1 1 ... 0-0 1 2.�d 1 Here Black basically has a choice between two moves: l 2 . . . tl'ie8 and l 2 . . . tl'ic6 .
1 2 ... tl'ic6 1 2 ... tl'ie8 1 3 .eS £.c6
Analysis diagram
l 4.tl'ie4!N I found this to be the most natural handling of the position. As always, the knight stands perfectly in the centre and it adds force to White's attacking plans against the h7 -square with tl'ig5 . It is quite typical in many kinds of positions that without a knight
54
on f 6 the black king's position becomes much weaker. The strange l 4.a3 was played in a correspondence game a couple of years ago. Why 'strange' ? Because I feel that there should be more concrete moves in tl1e current position and the text doesn't suit our attacking style. The engines surprisingly support this idea, but it does not gain our approval. The intention behind it may be to avoid the . . . tl'ia6-b4 manoeuvre and to prepare some spacewinning advances, for example 1 4 . . . tl'ic7 1 5 .b4 a5 l 6 .bxc5 bxc5 1 7 . .£.e3 §?, as occurred in Kosebay-Granski , email 20 l 0 . 1 4 . . . h6
Analysis diagram
The only way to fight on. 1 5 .g4! The key move of my plan. Black has weakened his kingside, so there is a new target on h6. It was shocking to see that the computer still suggests some pawn pushes on the queenside. This shows that the 'silicon-heart' is fortunately still far removed from human thinking. 1 5 . . . tl'ia6 We are already on the 1 5 th move, and finally the time has come for developing the b8-knight. It is regrettable that after waiting so long , it can only occupy a square on the very edge of the board . . . After 1 5 . . . tl'ic 7 the knight would need only one tempo to reach e6 , defending everything in time.

However, it is our turn and this is the advantage of being White: 1 6 .gS hS ( 1 6 . . . �xe4 1 7 .VWxe4±)
Analysis diagram
1 7. tllf 6 + ! . A genuine blitz move. The black knight has left its king alone, which has driven the water to our mill. 1 7 . . . gxf6 1 8 . gxf6 .txf6 1 9 .VWfs ! � with a huge attack. 1 6.gS I f we d o not prefer great complications, we might opt for 1 6 .a3 tllac7 1 7 .gS hS 1 8 .tllh4 tlle6 1 9 . .te3 � with pleasant compensation. 1 6 . . . tllb4 1 7.'iWbl .txe4 1 7 . . . c4 seems brave : 1 8 .gxh6 tlld3 1 9 .tlld41 (surprisingly, the obvious I 9 .hxg 7 is less forceful , viz. 1 9 . . . tllxg? 20 .tlld4 .txe4 2 1 ..txe4 tllxeS oo) 1 9 . . . g6 ( 1 9 . . . fs 20 .VWc2 1 ) 20 . .l::txd3 ! (eliminating the annoying outpost) 2 0 . . . cxd3 2 1 .�xd3 .txe4 (2 1 . . .i:!c8 2 2 .�g3) n . .txe4 .l:!.c8 23 .'iWg3 Wh8 24 . .te3 tllc7 2 S .l::!.d l �e8 2 6 .h4 and White has a strong attack. 1 8.VWxe4 dS! 1 9.'iWg4! Black has closed the centre for a while, but White still has a lot of attacking opportunities. 1 9 ... hS This is the only way to stabilize the kingside. If 1 9 . . . VW c8 20 .�g3 (no trading on our 'market' 1 ) 20 . . . h S 2 1 .a3 tllc6 22 . .th3 ! (moving the bishop to the well-known 'reserve' diagonal) 2 2 . . . 'iWd8 2 3 .g6 (23 .e6 tllc7 24.exf? + Ihf7 2S . .tf4 is also promising) 23 . . . tllc? 24 . .tfs fxg6 2S .'iWxg6 i:lxfS 26 .'iWxfS with a material advan-
C hap ter 4: 9 . tZ:lc3 - O t her B i s hop Moves
tage. 20.VWxhs g6 2 1 .'il'h6 Of course, if we are so close, there's no point in turning back! 2 1 . .. tllg7 2 1 . . . VW c8 22 . .th3 Wia6 2 3 . .td2 VWe2 2 4 . .tg2+- . 22.tllh4 A multifunctional move : the knight supports the attack, furthermore prevents Black from playing . . . tllfS and also opens the diagonal for the bishop.
A) 22 . . . 'if cs 23 .a3 tllc6 24.l:td3 'i!'g4
Analysis diagram
2S .h3 ! ! Resolves the pin without any fear of losing material. 2S . . . 'if e2 26 . .txdS ! The fianchettoed bishop is always our ' jolly joker ' . 26 . . . tllxeS With 2 6 . . . �xd3 2 7 .tllxg6 'iWd l + 28 .<it>h2 'iWhS Black avoids getting mated, but White will regain the sacrificed pieces : 2 9 .tllxf8 .l::!.xf8 3 0 .'MfxhS tllxhS 3 1 ..txc6+-. 2 7.�f4 'i!'xb2 28 . .Uadl ! Tempting Black to take the rook. 28 . . . .l::(adS 29 . .txeS 'ifxeS 30.tt:'ixg6 'MfxgS+ 3 1 .'i!'xgS .txgS 32 .tllxfS+- ;
B) 22 . . . c40
Analysis d iagram
S S

A Cu t t i ng - Edge Gamb i t a g a i n s t t he Queen's I nd i an - Pa rt I I
Black prepares a better placing for the knight, which is quite out of play. 23.b3 We will not sit and watch how Black builds an outpost on d3 . 23 ... Ii:c8 2 3 . . . ttJc2 24 .�xdS ; 2 3 . . . c3 24 .a3 ; 2 3 . . . ttJd3 ? 24.e6 ! tbxe6 2 5 .ttJxg6 fxg6 2 6 .bxc4! dxc4 27 .�b2+-. 24.�h3 ! 24.e6 is also an interesting move, based on the opening of the long diagonal. There are many complicated and entertaining lines, which we could describe on several more pages. Black must find a couple of only moves, but in the end he can get enough compensation. 24 ... ttJd3 If 24 . . . .l:Ic6 2 5 .bxc4 and the rook is overloaded. 2S.e6 l::tc6 The rook will play its part in the defence, on the other hand it will be the target of some nice tricks. 26.ttJfS ! Acquiring the fS-square for the bishop, which will be able to attack both the weak black king and the strong knight on d3 . 26 ... ttJ:xf5 2 7 .�xf5 :
B l ) 2 7 ... ttJe5 28.�f4 The last soldier is involved in the attack. 28 ... 'iYc7 2 8 . . . ttJf3+ 29 .@h l 'iYe8 (29 . . . �xgS 3 0 .�xgS 'iYxgS (30 . . . ttJxgS 3 1 ..l:!.g l ) 3 1 .�xgS ttJxgS 3 2 .e7 (White always wins a piece here) 3 2 . . . gxfS ( 32 . . . .l:!.e8 3 3 .�d7) 3 3 . exf8'iY + �xf8 34 . .l:!.xdS +-)
Analysis diagram
3 0 .�d4 ! ! An eye-popping solution, which ends the game in style. Against
56
the threat of 3 1 .�eS followed by �h4 Black is quite helpless. 3 0 . . . �d6 (30 . . . ttJxd4 3 1 ..2.eS) 3 l ..2.xd6 .l:!.xd6 3 2 .Iif4+-.
Analysis d iagram
29.�fl ! This is the safest place for the king to hide from future checks.
B l 1 ) 29 ... �d6 3 0 .lhd5 ! gxf5 3 1 .J:te 1 ttJg4 3 2 .�xd6 tLlxh6 33 .�xc7± The bishop will dominate in the endgame;
B l 2) 29 ... gxf5 instantly loses material after 30 . .2.xe5 'iYxe5 3 1 .exf7 + Sxf7 32.'iYxc6 Wixh2 33 .Wb"xd5± ;
B l 3 ) 29 ... fxe6 hardly poses any bigger problems : 30 .�xe5 'iYxe5 3 1 .'iYxg6+ 'iYg7 3 2.�xe6+ Wh8 3 3 .Wlh5 + 'iYh7 34.'iYxh 7 + 'it>xh7 35 .�xd5+- and almost all of the black pawns have fallen;
B l 4) 29 . . Jhe6! 30 .�xe6 fxe6 3 1 .J:td4 White is an exchange up with good hopes to convert it. We wanted to avoid giving long and detailed lines, but we guess that in this particular situation it was necessary to analyse until this nice ending. 3 l .�g 3 ! ? is also tricky. 3 1 . .. cxb 3 If 3 1 . . . .l::!.fS 3 2 . .l:i.e 1 .2.xg 5 3 3 .�xeS WlxeS 3 4 .'iYxg6 + 'iYg7 35 . .l:i.xe6±. 32 • .l:tcl ! .2.c5 3 3 .f:id2! The rook keeps an eye on the second rank, while Black still suffers from the pin on the knight.

B2) 2 7 ... gxfS
Analysis diagram
28.g6 ! ! This beautiful move is the fruit of White's attacking attempts. The greedy 2 8 . exf7 + ? l:rxf7 2 9 .VWxc6 .i1lxg5� gives Black chances to survive again. 2 8 . . . fxg6 2 9.VWxg6+ Wh8 30.°iVh6+! 3 0 .l:!.xd3? ? would be too early due to the pinning 30 . . . .l:f.g8 3 1 . .ld.h3+ �h4. 30 ... WgS 3 1 ..ilxd3 ! In poker terms: we are going all in! 3 1 ...cxd3 32.VWg6+ Wh8
Analysis d iagram
3 3 .Whl ! This quiet move decides the game. Black simply does not have enough time to organize any acceptable defence. Such positions and moves really prove that chess is an art. White wins in all lines :
B2 l ) 3 3 ...l::!:xe6 34.�b2+ ! Weaving a mating net is always nobler than taking material. 34 . . . d4 3 5 .VWhs + Wg7
Chapter 4 : 9 . t2Jc3 - O t her B i s hop Moves
36.Jlgl + Wf6 3 7.°iVg6+ @es 3 8.l:Ie l + Wd6 39.'i¥xe6+ Wc7 40.�xe7++- As ABBA sang : 'The winner takes it all ' ;
B 2 2 ) 3 3 . . . l:Ixc l + 34Jhc l .igs 35 .�gl d2 36.°iVhs++- and fortunately everything comes with check;
B23 ) 3 3 ... d4 34.°iVhS+! Driving the king to the g-file, and also making the necessary f2 -f3 possible. 34 . . . Wg7 34 ... @gs 3S .�h6 3S . .if4 �ds+ 36.f3
Analysis diagram
A fantastic sight : there is no way out for the black king! 36 ... 'i¥xe6 3 7 . .tl.gl + 'i¥g6 3 8 .�h6 Wf7 3 9 ..l:hg6 l:Ixg6 40.°iVxfS+ '.af6 41 .°iVh7+ White gains back more than enough material. The rest is very simple. 41 ...WeS 42.�xfS Wxf8 43.°iVxd3+-
1 3.e5 tt:Jea
There were 4 games with this diagram position and amazingly Black lost only one of them. This statistic stimulated us to look for something better.
5 7

A C u t t i n g -Edge Gam b i t a g a i n s t t he Qu een ' s I nd i an - Par t I I
1 3 ... tllb4?N is a seemingly good alternative, which makes the dS-square available for the f6-knight. 1 4.�fS tllfdS 1 4 . . . g6 1 5 .'iYh3+- .
Analysis d iagram
1 S .�h6 ! ! A shocking move, and the forerunner of White's attack. This wonderful idea is based on the fact that the bl-square is usually the weakest point in Black's fortress, since the f6-knight has disappeared. 1 S ... gxh6 1 6.tllh4 Now we can see the sense of the diversion of the gl-pawn: it will be impossible to defend the weakened black kingside. 1 6 . . . tllxc3 With l 6 . . . �xh4 l l .�e4 tllf6 an 'old' problem returns: the bl -bishop is again unprotected: 1 8 .�xbl .l:t:b8 1 9 .�g2+- and the f6-knight remains for dessert. 1 7 .�xb7 �xh4 1 l . . . tllcdS 1 8 . .l:t:xdS tllxdS 1 9 .�xd5+- . 1 8 .bxc3 'iYgs 1 9.�e4 dS 20.exd6 l::tae8 Despite all Black's attempts, even bringing the rook to the defence with tempo, there are still two pieces hanging. 2 1 . �xh4 �xh4 22.gxh4 White has settled for a winning endgame. His strong cl-pawn now decides. 22.. . .ttbs 23 .d7 .l:tfd8 24.�c8 tllc6 2S.l::td3 l1Je7 26.ki:el This move arrives at the best moment: Black has no time to eliminate the bishop. 26 ... 'it>f8 27 .�de3 l:i'.bxc8 28.dxc8�+-
14.�f5!N
58
We think that this move is the most ambitious in the current position and the best chance for White to seize the initiative.
A) 1 4.�e3 was played in a French Championship game between two well-known grandmasters and although the game ended in a draw, White obtained comfortable compensation: 1 4 ... tllc7 1 S .l1d2 �e8 16 .Sadl l:i'.d8 1 7.tlle4� Tkachiev-A. Sokolov, Aix-les-Bains 2 0 0 1 ;
B) 1 4.tlldS tllc7 1 4 . . . tllb4 was played in Parligras-Khukhashvili , Kavala 2001 . After 1 S .tllxb4 !N cxb4 1 6 .tllgS �xgS l l .�xbl rib8 1 8 .�g2 i White could have enjoyed wonderful strategic compensation. 1 S .tllxe7 + �xe7 1 6.tllgS g6
Analysis diagram
White has already achieved two main goals : he has weakened the black king and conquered the important bishop. 1 7.�a4! A nice way to bring the queen closer to the attack. 1 7 ... Wg7 1 l . . . tlle6 1 may have been a stronger way to defend: 1 8 .'iYh4 hS 1 9 .tllxe6 �xh4 20 .gxh4 fxe6 ! (it is very difficult to find against such moves over the board. If 20 . . . dxe6 2 1 . .lldl) 2 1 ..l::rxdl .l::rad8 ! (the point of the concept) 2 2 .lixbl �dl + 23 .�fl tllxeS� and Black's active play gives him enough compensation for the piece. 1 8 .�f4� and White had enough

compensation for the pawn in S . Savchenko-K. Nikolaidis, Corfu 2 0 0 7 .
1 4 . .. 'tWcS 1 4 . . . tl:ic7 ? would be too slow now in view of 1 5 .tl:ig5 �xg5 1 6 .�xg5 �c8 l 7 .�e4±.
1 5.tl:id5 This jump to the centre just presents itself as soon as the queen has left the el -bishop. There is not much wrong with taking the pawn back with 1 S .J:!xd7, but then after few accurate moves Black will be able to hold : 1 5 ... tl:ic7 1 5 . . . tl:ib8 ? 1 1 6 .e6 ! (of course we did not overlook our rook) l 6 . . . tl:ixd7 1 7 . exd7 '1Wc7 l 8 .dxe8'tW .l:rfxe8 l 9 .�f4 'MUc8 20 .'MUc2 Despite the material balance, White's minor pieces are dominating. 1 6.�gS tl:ib8 ! This ugly move is the only way for Black to survive. It leads to some simplifications. 1 6 . . . h6? is a serious mistake, which gives us a great opportunity for a nice sacrifice : 1 7 .�xh6 ' 1
Analysis d iagram
1 7 . . . tl:ie6 ( 1 7 . . . gxh6 ? ? 1 8 .tl:ig5 hxg5 1 9 .�e4 with mate in two) 1 8 .l:i.ad 1 ! gxh6 l 9 .tl:ie4 tl:ig7 2 0 .'MUh3 and White will round off his crushing attack. 1 7 .�xe 7 'i¥xd7 1 8 .'i¥xd7 tl:ixd7 1 9.l:tdl �c6 20.�xf8 tl:ixf8 The endgame is only a tad better for us.
1 5 .. .f6
C hap t e r 4: 9 . iZl c 3 - O t her B i s hop Moves
Apparently this is the only playable reply. 1 S . . . �d8 It is a pity that there is no 9th rank, where the bishop could hide, although we already enjoy this view very much. 1 6 .�f4 d6 1 7 .'i¥xc8 llxc8 1 8 .exd6 tl:if6 1 9.tLle3± Black is completely passive, while we already have a strong pawn on d6.
1 6.exf6 The positional 1 6 .'MUd3 ! ? can also be mentioned: 1 6 . . .fxe5 ( 1 6 . . . l:i.f7 1 7 .exf6 �xf 6 1 8 .�f4�) 1 7 . tl:ixe5 �d8 1 8 .jif4 tl:ixe5 1 9 .�xe5 d6 20 .�f4� and we guess that no black player would want to show this picture of the back rank to anyone.
1 6 ... jixf6
1 7.tl:ixb6! ! An amazing sacrifice' The knight makes place for the queen or the bishop and also vacates the d-file for the rook. The attack comes like an overwhelming storm!
1 7 ... axb6 1 7 . . . tl:ie7 1 8 .�xf6 tl:ixf6 1 9 .tl:ixc8 l:i.axc8 20 .b3;\;. The pawn on d7 is still a weakness and the bishops can be really annoying in such an open position.
1 8.tl:ig5 Now Black has to play a couple of only moves.
1 8 ... 96
59

A C u t t i n g -Edg e Gam b i t a g a i n s t t he Qu een 's I n d i an - Part I I
1 8 . . . �xgS? ? would be a terrible blunder, because after 1 9 .�dS + it's just mate.
1 9.'YWdS+ �h8 1 9 . . . �g? 20 .'YWxd7+ .
20.tt:Jf7+ .ld.xf7 21 .'YWxf7 tt:Je70 Protecting the d7-pawn and, what is more important : preventing the mate on f8 .
22.�xb 7 'iVxb 7 23.�h6
23 .. . 'YWca This is the only move which holds the position. Black is close to being in zugzwang.
24.�ac1 At first glance 24.�f8 looks promising, but we failed to find any forced win after 24 . . . 'YWd8 2 S .l:!.d2 ( 2S . .l::!.d3 d6 2 6 .�e l tlJfS 2 7 .l:!.a3 would be very attractive, but Black is still able to defend with 2 7 . . . .2.eS) 2 5 . . . d6 2 6 . .l:le l tt:Jfs 2 7 .l::!.e6 �gs 28 .l::Id l �h6 29 .�xh6 tt:Jxh6.
24 ... �da 2s.b4! White wants to open the position for the rooks.
25 ... d6 As long as the pawn is not protected, the knight is unable to leave e7 . I f 2 5 . . . cxb4 26 .�f4! . The bishop has done its work, now we transfer it to another diagonal to support the penetration plans on the seventh rank. 2 6 . . . dS
60
2 7 .�c7 ! 'YWc8 (2 7 . . . 'YWd7 2 8 . .ld.e l ) 28 .1:!.xdS !± . It is impossible to take the rook because of the usual mate on f8 .
26.bxc5 bxc5 27 . .ld.xc5 tt:Jg8 The only option to get rid of the dangerous piece on h6.
28.�e3 'YW e 7 28 . . . �g7 29 .�bS °'fHf6 3 0 .°'fHb3 ±.
29.°'fHdS Black's king is still weak, so naturally we avoid trading queens.
29 ... 'fHdS 29 .. Jha2? is not tricky enough due to 30 .�c8 .t'ta4 3 1 .�b 1 +- .
30Jk2 White keeps good winning chances with his remaining a-pawn. Black cannot easily activate his minor pieces, he has to take care of the back rank and the returning mate threats with °'fHf7-f8 .
Vallejo Pons, Francisco Madeja, Bartlomiej Turin ol 2006 ( 1 1 )
Game 3
1 .d4 tt:Jf6 2.tt:Jf3 e6 3.c4 b6 4.g3 �a6 5.°'fHc2 �b7 6.�g2 c5 7.d5 exd5 8.cxd5 �xd5 9.tt:Jc3 �xf3 1 0.�xf3 tt:Jc6 1 1 .°'fHa4 .!::!.ca 1 2.�f4 �e7 1 3.0-0-0 0-0 1 4.@b1
Though the c-pawn is missing, the white king is more or less safe, while the two bishops are the real rulers of the position.
1 4 ... tt:Jd4! A good rejoinder. Black prefers to sacrifice an exchange to get some play. For 1 4 . . . °'fHe8 1 S .g11 we recommend to study the game Tkachiev-A. Sokolov, Besancon 2006 (see page 5 3 ) , which was played just two months later.
1 5.�b7

1 5 ... b5 Proceeding according to the original plan. 1 5 ... d6 !? was also interesting : 1 6 . .itxc8 �xc8
A) 1 7.f3 and now: A 1 ) 1 7 ... d5 (hoping to create some
serious threat on the h7-b l diagonal) 1 8 . .!:;[.d3 ! The first of a few extraordinary moves. 1 8 ... �fS 1 8 . . . a6 is a bit slow in view of 1 9 .�eS bS 20 .'W'd l 'W'fs 2 1 . .itxf6 ! �xf6 2 2 . g4 'W'e6 2 3 . e 3 ± . 1 9 . .i:[dl b5 20.�xa7 .l:l.e8 2 1 .�e3 ! It seems that White 's medication is rolled out . . . 2 1 ... tllc6 22.�b7 tLlb4 23 .'W'xbS c4 23 . . . tt:Jxd3 24.l:f.xd3 ! c4? 2 5 .lLlxdS .
Analysis diagram
24.tLle4! This fantastic move enhances this spectacular position still more. 24 ... J::i.a8 25 .Rd4 Such a big crowd and such confusion in the centre are rarely seen! 25 . . . �g6 26.a3 ! dxe4 2 7.f4+-;
C hap t e r 4: 9 . tZlc 3 - O t her B i s hop Moves
A2) 1 7 ... a6 ! 1 8.�c4 1 8 .ld'.xd4 bS 1 9 .'W'd l cxd4 20 .�xd4 'W'e6 2 1 .l:ld l dS - White's better structure is probably not enough for an advantage. 1 8 ... bs 1 9 .tLldS ! Offence is the best form of defence! 1 9 . 'lW d3 would give good counterchances to Black: 1 9 . . . b4 20 .tLle4 dS 2 1 .tLlxcS (2 1 .tLlgS h6 2 2 .h4 tLlc6�) 2 1 . . .�xcS 2 2 .�eS tLle6 2 3 .�xf6 gxf6 24.�xdSoo. 19 ... .l:l.e8 20.tLlxe7+ 20 .tLlxf6+? ! �xf6 2 1 .'W'dS tLlxe2 22 .�xd6 �d4 2 3 .f4 'W'd7� and the d6-bishop is pinned almost forever. 20 . . . .l::!.xe7 2 1 .�d3 tLld5 ! 22 .e4 2 2 .�xd6? l:.e3 . 22 ... tLlxf4 2 3 .gxf4 �h3� White has a minimal plus in material, but the d4-outpost compensates well for it .
B) 1 7.e3 ! It seems logical to drive off the most annoying enemy piece, but things are not that easy. 1 7 ... �fS+ 1 8.@cl b5 ! A great diversion, using the fact that the c3 -knight is a bit overloaded. 1 9.tLlxbS tlle2+ 20.�d2
Analysis d iagram
Tu-Whool We won't get bored again. 20 ... tllxf4 2 1 .�xf4 �d5+ 2 l . . .'W'xf4 2 2 .exf4 (without queens, there's a chill-out) 22 . . . l:rb8 23 . .l::!.he l ! (an important intermediate move again) 23 . . . �f8 24.a4 a6 2 5 .tLlc7 Jd.xb2+ 26 .�c3 �xf2 27 . .l::i.d2±. 22.@e2 �xa2 2 3 .tt:Jxd6 �xd6 24.�xd6 'W'xb2+
6 1

A C u t t i ng -Edge Gam b i t a g a i n s t the Qu een ' s I nd i an - Part I I
25 . .l::rd2 Things have become more clear. White has kept his material advantage , while his king will be safe again. 25 ... �bS + 26.�d3 c4 2 7.�b l �cs 2 7 . . . �hs + 2 8 .f3 . 2 8 . .l:.d4 g6 29.�c2 l::rc8 30 . .b!.c l The position may still look a bit unsafe, but White has nothing to worry about. 30 ... 'li'hs + 3 0 . . . c3 3 1 .@fl ± . 3 1 .@fl "YIVh3 + 3 1 . . . �xh2 ? ? 3 2 .l:.h4. 3 2.@gl tl:lg4 33 .f3 tl:lxe3 34.�d2+- and suddenly Black will have problems on the back rank.
1 6.�xa7 In the event of 1 6 .tl:lxbS ! ? Black escapes from losing an exchange by the following trick: l 6 . . . �b6 1 7 .�xc8 tl:lxbS l 8 .�a6 tl:lc3 + l 9 .'it>c2 tl:lxd l 2 0 .l'hd l �b4 2 1 .f3 t . Anyway, we are pretty convinced that this continuation offers a bigger advantage for White.
1 6 ... b4 1 7.tl:la4
1 7 ... .!:Ic7? A tempting, but harmless move. 1 7 ... tl:le6! was much stronger: A) 1 8 .jlxc8 �xc8 1 9 .jld6 jlxd6
20 . .l:.xd6 tl:le4 2 1 ..l::!.hdl ! Giving back the material is the correct decision. If 2 1 .1:1.dS �c6 ! 22 .'lWxd7 'lWa8 23 .tl:lb6 �a6 and Black survives thanks to a fantasy variation: 24.lieS b3 ' 2 5 .axb3 �xe2g?. 2 1 ...tllxd6 22.Rxd6 h6 23.f4;!; Black is still under pressure;
62
Francisco Vallejo Pons
B) 1 8 .�eS l:tc7 1 9 .�xc7 'lWxc7 20.�a6 l:tb8 2 i .jlds 2 i .jlf3 c4. 21 ... tl:lg4 Surprisingly, the defence of the fl-pawn is a serious problem for White, for example: 22.l:thfl 2 2 . l:i'.dfl tl:lf6 ; 2 2 .:&rd2 tl:lxf2 2 3 . .l:Ic l 'it'es . 22 ... tl:lxh2 23.Shl tl:lg4 24.'lWd3 g6 2S .jlxe6 dxe6 26.�d7 'iVb7g? Certainly White is still an exchange up, but after the manoeuvre . . . tl:lg4-f6-d5 it is not easy to see how he can break into the enemy camp.
1 8.e3 tt:Je6 1 9.�xc7 'lWxc7 This pin cannot be maintained for long.
20.'it'bG 'it'e5 21 .'it'aG! A subtle triangulation. White wants to finally take his queen back, while she also moves out of the possible pin by . . . .!';Ib8 .
21 ... dS 22.f4! Again the strongest reply. Otherwise Black would create some play.
22 ... 'Mixe3 23 . .l:'.:l.he1 'it'f3 24.�d3 'lWh5 25.1:.eS
All the pieces arrive with tempo. 25 ... 'Mih3 26.�xd5 I:i:d8 27.tt:JbG
27 . fS was another option, for example 2 7 . . . tbc7 2 8 . .!:l.xe7 tlJcxdS 29 .'it'c2+-.

Chapter 4 : 9 . �c3 - O t her B i s hop Moves
27 ... �fS 28 ... c4
• •
In the event of 2 8 . . . tl:ixdS , 29 .tl:ixdS �xe6 3 0 .tl:ie7+ �xe7 3 1 .'i¥xd8+ wins nicely.
•
• �
29.�e2 tt:Jxd5 30.l:re5 tt:Jc3+ 31 .bxc3 J::!.xd1 + 32.'iVxd 1 bxc3 33.tl:id5 'iVxh2 34.tt:Jxc3 '%Vx93 35 . .l:i.eS! '%¥96+
35 . . . 'iYxc3 3 6 .I:l.xf8+ .
•w 36.�c1 �f6 37.@c2 '%¥96+ 38.Wc1 �f6 39.<;t>c2 h5
28.i::t'.xe6! 39 . . . '%Vg6+ 40.tl:ie4. White crowns his performance with a small sacrifice.
40.'iVxh5 'iVxf4 41 .:.i.xfS+ <;t>xf8 42.'Vi'h8+ 1 -0
Conclusion The bishop moves outlined in this chapter have three different purposes:
9 . . . �bl keeps the control on the long diagonal and also leaves the c6-square for the knight. The drawback of this move is that the bishop's protection is still not solved.
9 . . . �e6 solves this and also leaves the c6-square for the knight, but on the other hand it gives up the control of the long diagonal and we can effectively make use of this.
With 9 . . . �xf3 Black wants to speed up his development, but after this exchange the dS-square becomes a real weakness in his camp, which White usually occupies with his knight.
In our opinion the reason why 8 . . . �xdS has gone out of fashion recently is the fact that White has a durable initiative after it . Since Black plays with his bishop four times( ! ) during the first nine moves, we should not be surprised by this.
63

A C u t t i n g -E dge Gamb i t a g a i n s t t he Queen's I nd i an - Pa r t I I
Chapter 5
9.tt:Jc3 �c6 - The Main Line
1 .d4 ttJfS 2.c4 es 3.ttJf3 bS 4.g3 gas 5.WUc2 c5 S.d5 exd5 7.cxd5 gb7 a.gg2 gxd5 9.ttJc3 gcs
We focus on this bishop retreat, as it is the most frequently used continuation in the position by far. The other deviations were given in the previous chapter.
Obviously, also here White continues with 1 0 .e4. After this, we analyse the slow 1 O . . . d6 7 ! and the developing move 1 O . . . ge7 .
1 .d4 ttJfS 2.c4 e s 3.ttJf3 bS 4.g3 gas 5.'i¥c2 c5 S.d5 exd5 7.cxd5 gb7 a.gg2 gxd5 9.ttJc3 gcs 1 0.e4 ge7
1 0 ... d6? ! This reaction is definitely very slow. The too greedy 1 0 . . . tbxe4? is a serious mistake, which invites quick punishment: l l .tbxe4 'i¥e7 l 2 .tbd2 d5 1 3 .0-0 dxe4 l 4.tbxe4+- and the game could end as a miniature. 1 1 .gf4 Now Black has two knight moves to consider: 1 1 . . .tbbd ? ? ! , 1 1 . . .tbhs and 1 1 . . .ge? : A) 1 I . ..4Jbd7?! looks logical, but is
hardly enough to stop the advance e4-e5 after 1 2 .0-0-0:
A l ) 12 . . . ge7 1 3 . .ld.xd6! White sacrifices the exchange to keep the enemy
64
king in the centre. 1 3 ... gxd6 14.gxd6� Black's king remains in tl1e middle of a 'pool' filled with 'white sharks' , Rodshtein-Landenbergue, Heraklio 2007 ;
Al) 12 . . . 'i¥c7 1 3 .eS ! tbxe5 1 4.ttJxeS gxg2
Analysis diagram

Here we found an important intermediate move : 1 5 .VWa4+!N 1 5 .l:Ihe l was less strong, though after 1 5 . . . 0-0-0 1 6 .tLlb5 VWb7 1 7 .tLlc4± White still kept the initiative and eventually won in two games. 1 5 ... �d8 1 6.tLlbS+- There is no good way out for the queen;
A3) 1 2 ... 'iWb8 does not help either: 1 3 .es ! tLlhS 1 4.�he 1 The king is caught in the crossfire. 1 4 ... tt:Jxf4 1 5 .gxf4 d5 1 6.tLlxdS+- and Black's position was completely crushed in Pantaleoni-Grooten , Porto Mannu 2007 . B ) 1 1 ...tLlhS 1 2.0-0-0! I t i s not nec
essary to waste time by moving the bishop back. 1 2 ... tt:Jxf4 1 3 .gxf4 �e7 1 3 . . . 'iWf6 1 4.'iWdl±. 1 4.eS 0-0 1 5 .h4!
Analysis d iagram
The right way to close in on the opponent's king. Black is already in serious trouble :
B l ) 1 5 ... f6 1 6.tLldS ! The best way to benefit from the weak light squares in Black 's camp. After 1 6 .exf6 �xf6 1 7 .tLlg5 g6 1 8 .tLld5 ( 1 8 .tLlxh 7 ! would have decided the game even a bit more quickly) l 8 . . . 'iWc8 1 9 .h5 �xg5 20 .fxg5 'iWe8 2 1 .�de 1 Black ceased resistance in D. Berczes-B. Szabo, Zalakaros 20 1 0 . 1 6 ... fxeS 1 7 .tt:Jgs �xg5 1 8.hxgS +and Black did not have to suffer for long in Roktim-Bakre, Atul 2006 ;
C hapte r S : 9 . <Zlc3 �c6 - T he Ma i n L i n e
Bl) 1 5 ... 'iWc7 16 .ti:JgS g6 1 7.ti:JdS !N After 1 7 .�d5 dxe5 1 8 .tLlxh7 ! @xh7 1 9 .hS Wg7 20 .hxg6 fxg6 2 1 .I;(dg l VW d 6 ? 2 2 . fxe5 Black resigned in Tregubov-Greet , FU.gen 2 0 0 6 . But White can continue more aggressively, because Black is simply unable to do anything against the upcoming invasion. 1 7 ... �xd5 1 8.�xdS tLlc6
Analysis d iagram
1 9.tLlxh7! The nicest way, finishing the attack in style. 1 9 ... �xh7 20.hS @g7 2 1 .hxg6 !:1.h8 22.gxf7 +- Mate is inevitable;
B3) 15 ... g6 1 6 .fS 1 6 .h5 was also good. 1 6 ... tLld7 1 7.hS+- with a crush-ing attack in Rodriguez AmezquetaMarquez Abreu, email 2 0 0 7 ;
B4) Black could try to stop the king side attack with 1 5 ... h6N
Analysis d iagram
1 6.ti:JgS ! This effective sacrifice opens the black kingside, giving two pieces in one move. 16 ... �xgS 1 6 . . . g6 1 7 .tLle6 ! .
65

A Cu t t i n 9 - Ed9e Gamb i t a 9 a i n s t the Queen 's I nd i an - Par t I I
White i s not upset by the rejection of his sacrifice, but puts his knight on off er for a second time. 1 7 . . . 'i¥c8 ( 1 7 . . . fxe6 1 8 .'i¥xg6+ Wh8 1 9 .'i¥xh6+ <it>g8 20 .�xc6 is almost mate) l 8 .tLlxf8 (enough generosity) 1 8 . . . Wxf8 ( l 8 . . . ilxg2 l 9 .tLlxg6) l 9 . exd6 ilf6 20 .tLldS+- with a huge material advantage. 1 7 .hxgS ilxg2 1 8 . .t!.hgl �c6 1 9.gxh6 The black king doesn't have a prayer.
C) 1 1 . .. �e7 1 2.0-0-0 'i¥c7
Analysis d iagram
1 3 .eS A natural reaction. Of course White has to open the position while the black king is still in the middle. There was also an opportunity to play a quite surprising move: 1 3 .tlJbS ' ?N. The knight diverts the bishop from the long diagonal . 1 3 . . . ilxbS 1 4 . e S �c6 ( 1 4 . . . dxeS 1 5 .tLlxeS) 1 5 . exd6 'i¥b7 l 6 .dxe7 tLlbd7 1 7 .'i¥c3+- and Black will not be able to solve the problems around his king. 1 3 ... dxeS 1 4.ilxeS �b 7 1 S .ilxf6 ilxf6 1 6 . .Uhe 1 + @f8 1 7 . .l:rd6 tlJa6 1 8 .�fs+- After a few more moves Black had to resign in Sundararajan-Shetty, Calicut 2 0 0 7 .
After 1 O . . . ile7 , White has a pleasant choice between 1 1 . 0-0 and l l .ilf4.
1 1 .�f4 This move keeps both castling options open, depending on Black's reaction.
66
We believe 1 1 .0-0 is easier, safer, and likely to ensure a bigger advantage. From the leading grandmasters, Yakovenko and P.H. Nielsen have also used it.
White has two basic plans: either he charges forward with tLlh4 followed by f2-f4, or he can choose the more positional �d 1 . Here Black has two sensible continuations : l l . . .d6 and 1 1 . . . 0 -0 :
A) 1 1 ... d6 Preventing e4-e5 always takes extra time, so here we can switch to our second alternative: 1 2.tLlh4 g6 It's a 'pity' that Black is unable to castle. There are always threats he has to deal with first. If 1 2 . . . 0-0 1 3 .tlJfS J:[e8 l 4.ilf4t the position looks wonderful and the d6-pawn is under serious pressure. 1 3 .�gS 0-0 1 4.lladl �c7 1 4 . . . tLlg4 1 S .ilxe7 'i¥xe7 1 6 .°iVd2t ilb7 1 7 .J:[fe 1 ! - it is advisable to delay the capture on d6. There is a nice trick White can use in order to hinder Black's queenside development: 1 7 . . . tLlc6
Analysis diagram
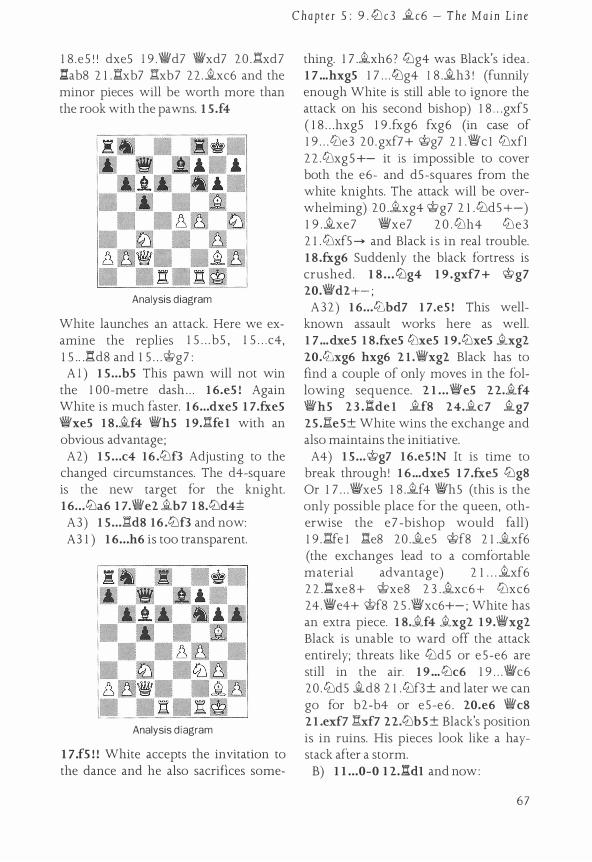
1 8 .eS ! ' dxeS 1 9 .1'//id7 1'//ixd7 20 . .l:lxd7 .l:!.ab8 2 1 .l::ixb7 .l:lxb7 22 .Axc6 and the minor pieces will be worth more than the rook with the pawns. 1 5 .f4
Analysis diagram
White launches an attack. Here we examine the replies 1 S . . . bS , 1 S . . . c4, 1 5 . . J�d8 and 1 5 . . . Wg7 : A l ) 1 5 ... bS This pawn will not win
the 1 00-metre dash . . . 1 6.eS ! Again White is much faster. 1 6 ... dxeS 1 7 .fx.eS �xeS 1 8 .�f4 �hS 1 9.l:ife l with an obvious advantage ; A2) 1 5 ... c4 16 .tt::lf3 Adjusting to the
changed circumstances. The d4-square is the new target for the knight. 1 6 ... tt::la6 1 7.�e2 �b7 1 8.tt::ld4;!:; A3) 1 5 ... .l:td8 16 .tt::lf3 and now: A3 1 ) 1 6 ... h6 is too transparent.
Analysis diagram
1 7 .fS ! ! White accepts the invitation to the dance and he also sacrifices some-
C hapter 5 : 9 . <i:lc3 �c6 - T he Ma i n L in e
thing. 1 7 .Axh6 ? tt::lg4 was Black's idea . 1 7 ... hxgS 1 7 . . .tbg4 1 8 .Ah3 ! (funnily enough White is still able to ignore the attack on his second bishop) 1 8 . . . gxfS ( 1 8 . . . hxgS 1 9 .fxg6 fxg6 (in case of 1 9 . . . tt::le3 20 .gxf?+ Wg7 2 1 .'iYc l tt::lxfl 2 2 .tt::lxgS +- it is impossible to cover both the e6- and dS -squares from the white knights. The attack will be overwhelming) 20 .Axg4 Wg7 2 1 .tt::lds+-) 1 9 .Axe7 1'//ixe7 2 0 .tt::lh4 tt::le3 2 1 .tt::lxfs� and Black i s in real trouble. 1 8 .fx.g6 Suddenly the black fortress is crushed. 1 8 .. . tt:Jg4 1 9 .gxf7+ Wg7 20.�d2+- ;
A32) 1 6 ... tt::lbd7 1 7.eS ! This wellknown assault works here as well. 1 7 ... dxeS 1 8.fx.eS tlJxeS 1 9 .tt::lxeS Axg2 20.tt::lxg6 hxg6 2 I .1'//ixg2 Black has to find a couple of only moves in the following sequence. 2 1 . .. 'iV es 22.jLf4 �hs 2 3 . .l:i.de l jLfs 24.jLc7 jLg7 25 .If.eS± White wins the exchange and also maintains the initiative.
A4) 1 5 ... Wg7 1 6.eS !N It is time to break through! 1 6 ... dxeS 1 7 .fx.eS tt::lg8 Or 1 7 . . . 1'//ixeS 1 8 .Af4 1'//ihs (this is the only possible place for the queen, otherwise the e 7 -bishop would fall) 1 9 . .l:tfe l Re8 20 .Aes Wf8 2 1 .Axf6 (the exchanges lead to a comfortable material advantage) 2 1 . . . Axf6 2 2 .I:.xe8+ Wxe8 2 3 .Axc6 + tt::lxc6 24.1'//ie4+ @f8 2 5 .'iYxc6+- ; White has an extra piece. 1 8.Af4 Axg2 1 9.1'//ixg2 Black is unable to ward off the attack entirely; threats like tt::ldS or e5 -e6 are still in the air. 1 9 ... tt::lc6 1 9 . . . 1'//ic6 2 0 . tt::ldS Ad8 2 1 . tt::lf3 ± and later we can go for b2-b4 or e5-e6 . 20.e6 �c8 2 1 .exf? .tlxf7 22.tLlbS± Black's position is in ruins. His pieces look like a haystack after a storm.
B) 1 1 ... 0-0 1 2 . .i:!.dl and now:
67

A C u t ti ng -Edge Gamb i t a g a i n s t the Qu een 's I nd i an - Par t I I
B l ) 1 2 ... tt:Ja6 1 3.a3 ! A good prophylaxis, holding off the a6-knight. White has time for such moves thanks to the misplaced black pieces. 1 3 ... tt:Jc7 1 3 . . . �c8 1 4.eS tt:Je8 1 5 .tt:Jdst with a strong initiative in Yakovenko-Khamrakulov, Heraklio 2007 . 1 4.tLlh4! A multifunctional move. The knight goes to f5 and there is also an immediate threat of winning a piece with e4-e5 . 14 ... tt:Je6 l 4 . . . g6 7 1 5 .es �xg2 l 6 .exf6±. 1 s.tt:JfS �d4 The only way to ease the pressure. 1 6.tLlxd4 cxd4 1 7 . .!lxd4;\;
Analysis diagram
White has a clear positional advantage thanks to his better pawn structure. 1 7 ... i.cs 1 8 .l:Id2 aS? Black wanted to do something against the queenside advance in Guramishvili-Arabidze, Tbilisi 2009 . However, both players forgot about the previous plan: 1 9.eSN i.xg2 20.�xg2± and White occupies almost all the central squares;
B2) 1 2 ... �e8 1 3 .i.e3 tLlc7 1 4.J::id2 t and White had built up a very nice position in Zatonskih-N. Sammalvuo, Stockholm 2008 ;
B3) 1 2 ... h6 occurred in VuilleumierShanava, Dresden 2007 . Instead of the game move 1 3 . tt:Jh 4 we would prefer the direct 1 3 .tLleSN d6 ( 1 3 . . . i.b7 1 4.�b3) 1 4.tt:Jc4 tt:Je8 1 5 .�f4t and Black is doomed to complete passivity;
68
B4) 1 2... � c7 Here we think the direct 1 3 .eS !N is much more effective. White gains space and forces the f6-knight to a much worse place, while not allowing Black to put up a solid defence with . . . d7-d6 . 1 3 .�f4 was seen in SwapnilLalith, New Delhi 2009 , but now Black could have fought harder after 1 3 . . . d6 !N. 1 3 ... �e8 1 4.a3 ! Preparing queenside play and preventing the manoeuvre . . . tt:Jb8-a6-b4. 1 4 ... �c8 1 4 . . . �b7
Analysis d iagram
1 5 . ttJdS ! . This move is often a prefect way to make Black cool down just when he thinks that he's going to be fine. 1 5 . . . �xdS ( 1 5 . . . i.d8 1 6 .tLlg S ±) 1 6 .i:;[xdS tLlc6 ( 1 6 . . . �xd5 7 never works due to 1 7 .tLlgS) 1 7 .�gS ± and White has great pressure. 1 5 .i.gS �d8 1 6.i.e3;\; As long as most of Black's pieces stay on the back rank, he cannot hope for anything promising.
Back to l l .i.f4.

We will analyse 1 1 . . .tlla6 , 1 1 . . .tllh5 and 1 1 . . . 0-0 .
11 ... 0-0 A) 1 1 ... tlla6 The idea behind this
ugly move is to transfer the knight to e6. 1 2 . .ld.dl ! tllc7 1 3 .0-0 It is also possible to immediately go for Black's throat with 1 3 .tlle 5 N �b7 1 4 . tllc4 0-0 1 5 .0-0 �a6 1 6 .�a4t with domination over the entire board. 1 3 ... 0-0 Here White again missed the opportunity to play 1 4.tlleS !N 1 4 .h3 � c8 (but 1 4 . . . tlle6 could have posed more difficulties) 1 5 .Yfe l lle8 1 6 .�xc7 �xc7 1 7 .e5 tllh5 1 8 .tlld5;!; was played in Wirig-Kniest , Pardubice 2 0 0 7 . 1 4 ... �b7 1 S .�a4± White will win back the gambit pawn, keeping an amazing amount of pressure;
B) 1 1 . . . tllhs 1 2 .�e3 d6 1 2 . . . 0 -0 1 3 . 0-0-0 'iVc7 l 4 .e5 (White gains more space and puts the h5 -knight out of play) 1 4 . . . g6 (after 1 4 . . . 'iVb7 the same trick works as before : 1 5 .tlld5 ' ) 1 5 . tlld5 �xd5 1 6 . Yxd5 � F. AtakisiHiltunen, email 2008 . White can continue his attacking plans on the kingside without great difficulties. 1 3 .0-0-0 We believe that this is the most dynamic continuation. If the reader prefers to put the king in a safer place, he might also consider 1 3 .Yd l ! ?N tlld7 1 4.0-0 'iVc7 ( 1 4 . . . 0 - 0 ? 1 5 . e 5 1 ) 1 5 .tlld5 �xd5 1 6 .lhd5 tllhf6 1 7 .Ydd 1 1;!; . White has several attacking ideas with tllh4 or tlld4 and later f2-f4 . For the moment, the rook is better on d l than on d2 , because it leaves a square for the bishop in case Black hits it with . . . tllg4. After queenside castling we have :
B 1 ) 1 3 ... ti:Jd7 1 4.g4! Chasing away the knight is very practical as White will be able to occupy the f4-square with the bishop. 1 4 ... tllhf6 I S .gs tllg4
C hap ter 5 : 9 . tll c 3 �c6 - T he Ma in L in c
1 6 .�f4 VWc7 1 7.tlldS ! Such moves, which increase the power of many pieces in one go, are usually good. 1 7 ... �xdS 1 8.exdS Though the weakness of the d5 -square has disappeared, White now possesses the open e-file and there is also a 'hidden' weakness on c6 for Black. 1 8 ... lld8 After 1 8 . . . 0-0 Black may have feared the following line: 1 9 .h3 ! tllge5 2 0 .tllxe5 tllxe5 2 1 .�xe5 dxe5 22 .d6 �xg5 + 2 3 .�b l and White wins the exchange. His strong passer only increases his winning chances. 1 9.tlld4! t
• £::,
• Analysis diagram
This great move was seen in Gormally-Gordon, Swansea 2 0 0 6 . The knight can appear both on c6 and on f5 , while Black's position remains passive. See Game 4 below for further analyses;
Bl) 1 3 .. . �c7? !
Analysis diagram
69
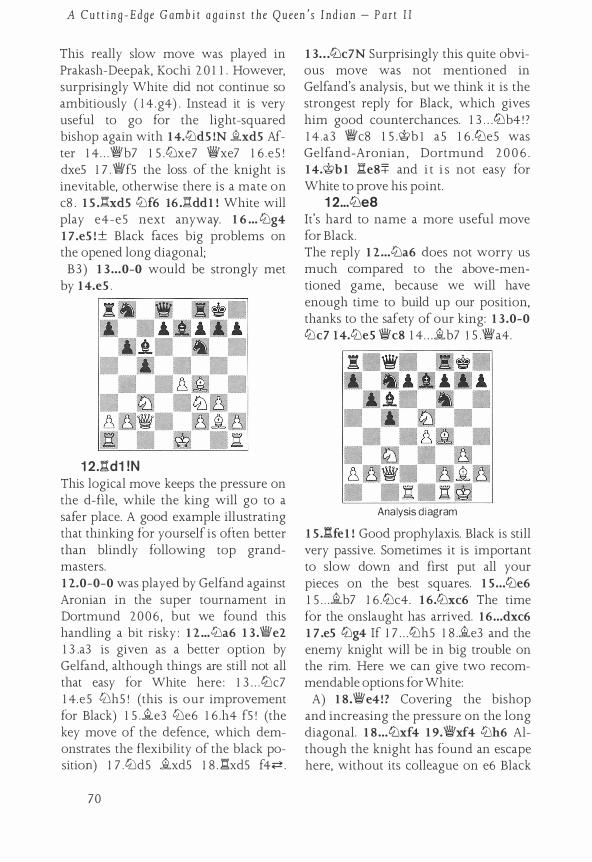
A Cu t t i n g -E dge Gamb i t a g a i n s t t he Queen 's I n d i an - Par t I I
This really slow move was played in Prakash-Deepak, Kochi 2 0 1 1 . However, surprisingly White did not continue so ambitiously ( 1 4 .g4) . Instead it is very useful to go for the light-squared bishop again with 1 4.tlJdS !N jixdS After 1 4 . . . 'iWb7 1 5 .tLlxe7 'i4Yxe7 1 6 .eS ! dxeS 1 7 .'iWfS the loss of the knight is inevitable, otherwise there is a mate on c8 . l S .l:!'.xdS tlJf6 16 . .Uddl ! White will play e4-e5 next anyway. l 6 ... tLlg4 1 7 .es !± Black faces big pro bl ems on the opened long diagonal;
B3 ) 1 3 ... 0-0 would be strongly met by 1 4.eS .
1 2 . .a:d1 !N This logical move keeps the pressure on the d-file, while the king will go to a safer place. A good example illustrating that thinking for yourself is often better than blindly following top grandmasters. 1 2.0-0-0 was played by Gelfand against Aronian in the super tournament in Dortmund 2006 , but we found this handling a bit risky : l 2 ... tlJa6 1 3 .'iWel 1 3 .a3 is given as a better option by Gelfand, although things are still not all that easy for White here : 1 3 . . . tlJc7 1 4.eS tlJhS ! (this is our improvement for Black) 1 S .jie3 tlJe6 1 6 .h4 f5 ! (the key move of the defence, which demonstrates the flexibility of the black position) 1 7 .tLldS jixdS 1 8 . .l:i.xdS f4+:t.
70
1 3 . . . tllc?N Surprisingly this quite obvious move was not mentioned in Gelfand's analysis , but we think it is the strongest reply for Black, which gives him good counterchances. 1 3 . . . tlJb4 ! ? 1 4 .a3 'iWc8 1 5 .@b l aS 1 6 .tlJeS was Gelfand-Aronian , Dortmund 2 0 0 6 . 1 4.'it>bl .l:!.e8+ and i t i s not easy for White to prove his point.
1 2 ... tt:JeS It's hard to name a more useful move for Black. The reply l 2 ... tlJa6 does not worry us much compared to the above-mentioned game, because we will have enough time to build up our position, thanks to the safety of our king: 1 3 .0-0 tLlc7 14.tlJeS 'iWc8 1 4 . . . jib7 1 S .'iWa4.
Analysis d iagram
l S . .l:Ifel ! Good prophylaxis. Black is still very passive. Sometimes it is important to slow down and first put all your pieces on the best squares. 1 S ••• t2Je6 1 5 . . . jib7 1 6 .tlJc4. 1 6.t2Jxc6 The time for the onslaught has arrived. l 6 ... dxc6 1 7 .es tllg4 If 1 7 . . . tlJhS 1 8 .jie3 and the enemy knight will be in big trouble on the rim. Here we can give two recommendable options for White:
A) l 8.'iWe4!? Covering the bishop and increasing the pressure on the long diagonal. 1 8 ... tt:Jxf4 1 9.'iWxf4 tlJh6 Although the knight has found an escape here, without its colleague on e6 Black

cannot hold the c6-pawn anymore. 20.'{We4 tl:lfS ! 2 1 .'{Wxc6 2 1 .�h3 ? ! looks good, but 2 1 . . . g6 still holds. 2 1 .. . �xc6 22.�xc6 Iiad8 23 .tl:ldst with a very pleasant endgame;
B) 1 8 .tl:le2 tl:lxf4 If 1 8 . . . gS 1 9 .�c 1 tl:lxeS 20 .f4�; even though Black has won two pawns, his weak kingside and the white bishop pair give White really good hope for a strong attack. 1 9.tl:lxf4 Now we can see the benefit of 1 S . .l:!.fe 1 : the eS -pawn is protected. White enjoys pleasant play.
1 3.0-0 The king is much safer on g 1 .
1 3 ... tt:Jc7 1 4.�d2
A calm move to strengthen the pressure on the d-file.
1 4 ... J::i.eS If 1 4 . . . tl:le6 1 5 .�e3 . Black has abandoned the control of the dS-square and he can never be sure which knight will j ump into the centre. After 1 S . . . '{We8 1 6 .tl:lds d6 1 7 .'i¥d3t: White has decent compensation. The pawn on d6 remains weak. In addition the undeveloped black pieces on the queenside remain a problem.
1 5.tt:Je5 tt:Je6 1 S . . . �f6 l 6 .tl:lc4 tl:le6 1 7 .�e3 would be just a transposition.
1 6.�e3 �f6 With l 6 . . .f6 Black can try to get rid of the strong central knight, but at the
Chap ter S : 9 . tLlc 3 .£.c6 - The Ma i n L i ne
same time he has to say goodbye to his light-squared bishop, which is not the best news after he has weakened the a2-g8 diagonal : 1 7 .tl:lxc6 tl:lxc6 1 8 .'Mld l tl:led4 ( 1 8 . . . tl:leS 1 9 .�h3 ±) 1 9 .tl:le2 tllxe2 + 20 .'!Wxe2t: . White's bishops dominate very strongly and the black king seems pretty vulnerable.
1 7.tt:Jc4 We can see that each move by Black is associated with the weakening of a square : now the hole on d6 will be our destination. Black can choose between 1 7 . . . �d4 and 1 7 . . . tl:ld4.
1 7 ... tt:Jd4 1 7 .. . �d4 1 8 .tl:ld6 J::tf8 1 9.tl:lds Such a · crowd in the centre i s rarely seen. 1 9 ... tlla6 20.tl:lfs Finally our knights have reached their best squares, causing serious problems for Black. 20 ... l:te8 20 . . . �xe3 2 1 .tl:lde7+ �h8 22 .tl:lxc6 '!Wc7 2 3 .fxe3 dxc6 24.'!Wa4±.
Analysis d iagram
We spent a lot of time searching for the most effective move here. The position is rich with possibilities. For example, there is the option to transfer the queen to g4 via d 1 . The two most annoying pieces are the black bishops. They are the soul of Black's position - without them Black would be quickly crushed. 2 l .b4! ! White opens a new front and tries to undermine both bishops.
7 1

A Cu t t i n g -Edge Gam b i t a g a i n s t t he Queen 's I nd i an - Par t I I
A) 2 1 ...tl:iac7 22.a4! White wants to corner the black bishop with b4-b5 , using the tl:id6 fork later. Also interesting is 22 . .itxd4 1 ? cxd4 2 3 .�c l (threatening to take on cl and win the bishop with b4-b5 ) 2 3 . . . g6 (23 . . . b5 24.f4) 24.tl:id6 �f8 2 5 .tl:ixc7 V/J/xcl 26 .e5t . All pieces take part in the action, strengthening the pressure. 22 ... g6 22 . . J�b8 ? 1 2 3 .tl:ixc7 �xcl 24 . .itxd4 cxd4 2 5 .b 5 .ita8 26 .V/J/xcl tl:ixc7 27 .l:Ixd4± would be strategically losing for Black. 23 .tl:id6 It is also possible to take back the pawn immediately : 2 3 .tl:ixc7 V/J/xcl 24.tl:ixd4 cxd4 2 5 . .itxd4 tl:ixd4 26 .l::!.xd4 V/J/e5 27 .llfd l t, and White has a pleasant position thanks to his better pawn structure and active rooks. 23 ... RfS 24 . .ith6gg Black is completely passive. In the meantime, he has to take care of many threats. Almost all the white pieces are ideally placed, and we might improve the fl -rook in the near future;
B) 2 1 . .. .ites 22.V/J/dl ! Cool preparation. White transfers his queen to the kingside. Black is quite helpless against the plan V/J/g4, f2-f4. 22 ... cxb4 22 . . . tl:ixb4 23 .f4. 23.�g4 'itih8 24.f4 �c3 It seems Black manages to slow down White's attack. 2S.tl:ixc3 bxc3 26 . .itd4! With this nice move White maintains the initiative. 26 ... f6 27.ilxc3- After e4-e5 the position will be blown open;
C) 2 1 .. . .itxe3 22.fxe3 ! The pawn stops up the hole on d4 and opens the f-file for the rook. 22 ... .itbs After 22 . . . tl:ixb4 23 .�b2 Black is unable to defend against all the threats: 2 3 . . . laf8 (23 . . . 'itih8 24.a3 tl:ia6 2 5 .tl:id6) 24.a3 tl:ia6 25 .tl:idel+ winning the piece. 23.�f3! The right square, avoiding the . . . tl:ib4-d3 fork after �b2 . 23 ... tl:ixb4 24.�2 Black either loses a piece or faces a mating attack. 24 ... ilc6 24 . . . l::!.f8 2 5 .a3 .
72
Analysis d iagram
2S .tl:ih6 + ! This powerful sacrifice blows away the black king's position. 2S ... gxh6 26.tllf6++- ;
D) 2 1 ...Rb8 22.a3 Stabilizing the queenside. 22 ... tl:iac7 23 .ilxd4 cxd4 24.tl:id6 Rf8 2S .f4 and White has strong pressure;
E) 2 1 . . .ilxdS ? 2 2 .exdS tllxb4 2 3 .�c4 and the b4-knight will be captured with a2-a3 .
1 8 . .itxd4 �xd4 In case of 1 8 . . . cxd4 1 9 .tl:ie2 itb5 White's big strategic advantage is beyond doubt, so Black tries to create some complications. There is not enough time to finish his development: I 9 . . . tl:ia6 20 .tl:ixd4 .itxd4 (20 . . . �c7 2 I .tl:if5±) 2 I .J::rxd4 �b5 22 .e5 :cl:c8 23 . .itd5±. White enjoys a huge positional advantage thanks to his better pieces and better pawn structure. 20.eS dS 20 . . . tl:ic6 2 l .exf6+-.
Analysis diagram

2 1 .tlld6 ! ! Crushing Black's fighting chances . 2 1 . . . d3 2 2 . .t:!.xd3 �xd3 2 3 .'l!Vxd3 .llxeS 2 3 . . . �xeS 24 .tllxe8+- . 24.�xdS �e 7 On 24 . . . 'l!Vxd6 2 5 .�xf7 + +- wins the queen. 25.f4! The nice point of the sacrifice. 2 5 .�xa8 ? 'l!Vxd6 2 6 .'iYxd6 �xd6 2 7 .lid 1 �f8 would be only equal. 25 ... �xdS 26.'l!VxdS± White wins at least a pawn.
1 9.tlldG For such a stallion the great Tigran Petrosian used to sacrifice a rook1
1 9 ... �eG If 1 9 . . . .l:!.f8 20 . .!::i:fd l g6 2 1 .tlle2 �g7 22 .f4t. After e4-e5 the g7-bishop will be enclosed and exchanging the lightsquared bishops will create an old/new weakness in Black's camp : the d7 -pawn.
20.tllfS Chasing the bishop away.
20 ... �xc3 After 20 . . . �f6 2 l . f4 Black faces the same problems as before.
21 .'l!Vxc3 �f8 2 l . . . �f6 22 .'iWd3 g6 2 3 .tlle3 and the upcoming attack with f4-f5 will be overwhelming.
22.l:!:fd1 t With a very comfortable position. As previously, White's plan is to play f2 -f4 and then e4-e5 .
Gormally, Daniel Gordon, Stephen Swansea ch-GBR 2006 ( 1 1 )
Game 4
1 .d4 tllf6 2.c4 e6 3.tllf3 b6 4.g3 �a6 5.'l!Vc2 �b7 6.�g2 c5 7.d5 exd5 8.cxd5 �xd5 9.tllc3 �c6 1 0.e4 d6 1 1 .�f4 tllh5 1 2.�e3 tlld 7 1 3.0-0-0 �e7
C hapte r 5 : 9 . ctJc3 �c6 - T he Ma in L i n e
1 4.g4! White seizes the initiative before Black can calmly castle.
Daniel Gormally
14 ... tllhfG 1 5.gS tllg4 1 6.�f4 'l!Vc7 1 7.tlld5 �xd5 1 8.exdS!
Uncovering a hidden weakness in Black's camp : the c6-square. The great chess fighter and experienced author, Jacob Aagaard, has written an excellent book on this topic called Positional Play.
1 8 ... l:!:d8 1 8 . . . 0 - 0 ? ! runs into l 9 .h3 tllge5 20 .tllxeS tt:Jxe5 2 1 .�xeS dxe5 22 .d6 ! .
1 9.tt:Jd4! 0-0 20.tt:JcG l:i.de8 21 .�e4!
Proceeding ambitiously, weakening the black kingside.
21 ... gG 22.h4 f5
73

A Cu t t i n g -E dge Gamb i t a g a i n s t t he Qu een 's I nd i an - Pa r t I I
The only real try for a counter. However, obviously White will not react.
23.�g2 �d8 24.'>t>b1 ttJge5 25.h5 Ii.f7 26.hxg6
Pinning with 26 . .l:i.de 1 was also strong. 26 ... ttJxg6
Ugly, but necessary. Opening the h-file with 2 6 . . . hxg6 ? would be equal to committing suicide in view of 2 7 .'iVc3 l::rh7 28 . .l::!.xh7 @xh7 29 .'i¥h3 + +- .
27.�c1 f4 2 7 . . . bS might have been more successful: 2 8 .�h3 Ii.ef8 29 . f4 (although there is nothing concrete for White, Black can hardly make a move) 29 . . . tbb8 3 0 .�g2 .l:le8 3 1 ..l:lh6 �e7 3 2 .'iVe2 and the active white pieces press heavily on Black.
28.�e4 ttJdf8
29.b3! White does not worry, he finds another way to activate his bishop.
29 ... �xgS 30 . .l:i.dg1 �f6 31 .�xg6+ Maybe the game notation was wrong. 3 l .�xg6 hxg6 3 2 .l:i'.xg6+ wins easily.
31 ... tbxg6
Conclusion
With 3 l . . . hxg6 3 2 .�xg6 �g7 Black could still have put up a fight.
32.�xg6 hxg6 33.'i¥xg6+ �g7 34.�b2 Iae5
In the event of 34 . . . 'i¥d7 , 3 5 .'iVh7+ �f8 3 6 .'i¥h8 + ! �xh8 3 7 .Ii.xh8 + would finish the game in style.
35.ttJxeS dxe5 36 . .l:.g1 'iVe7 37.d6 'i¥e8
38.l:rg5 A fme manoeuvre, introducing the finale.
38 ... 'iYbS 39 . .IixeS iVf1 + 40.�c1 The bishop is useful not only for the attack.
40 ... 'iVd1 41 .lie7 4 1 .�e8+ was more convincing : 4 l . . .Ii.f8 42 .'iVe6+ �h8 43 .'iVh3+ @g8 44.d7 .
41 ...'iYdS 42Jlxf4 'iVd1 + 43.�c1 Wd5 44.I:re8+ I:rts 45.'i¥e6+ iVxe6 46.�xe6 �f6 47..2.h6 .l:!.f7 48 . .l:i.e8+
48 .d7 was a little quicker. 48 ... @h7 49.�f4 @g6 50.@c2 �h4 51 .�e3 .l:!.d7 52 . .l:!.e4 �f6 53.�f4 @f5 54.@d3 �h4 55.�h2 �f6 56.�g3 1 -0
The 8 . . . �xdS capture is a more or less forgotten sideline, as Black wastes many tempi with his bishop at an early stage of the game. As we have seen, Black often has problems with the unprotected bishop on b7 . He has to solve these problems in order to be able to castle. Anyway, putting the bishop on a protected square with 9 . . . �c6 helps White to accelerate his development. He gets many opportunities for nice breakthroughs in the centre eitl1er with his e-pawn or with his strong knights.
74

Part I l l - Black Accepts with 8 . . . t2Jxd5
1 .d4 tllf6 2.c4 e6 3.tllf3 b6 4.g3 �a6 5.�c2 cs 6 .d5 exd5 7.cxd5 �b7 8.�g2 tllxd5
After we have carefully discussed the early sidelines, where Black rejected the pawn sacrifice, we are now getting closer to the sharper, more topical variations.
This part contains the following chapters :
Chapter 6: 9 . 0-0 �e7 1 O .�d l - Minor Lines for Black Chapter ?: 1 0 . .l:!.d l 'llVc8 - Side Moves Chapter 8 : 1 0 . .l:!.d 1 'llV c8 1 l .a3 - Minor Lines Chapter 9: 1 O . .l:!.d l 'YWc8 l l .a3 - Main Moves Chapter 1 0: 1 0 . .l:!.d 1 tllc6 - Minor Lines Chapter 1 1 : 1 O . .l:!.d l tllc6 - Main Line 1 1 .'liVfS
7 5

A C u t t i n g - Edge Gamb i t a g a i n s t t h e Qu een's I nd i an - Pa rt I I I
Chapter s
9.0-0 ile7 10.gd1 - Minor Lines for Black
In this chapter we will deal with a few minor lines as a little warm-up. First we give two interesting alternatives for White on moves 9 and 1 0 . The main alternatives on Black's 1 0th move are 1 0 . . . tt:lc6 and 1 0 . . . 'it'c8 . But in this chapter we will first examine what other moves Black can play. We will deal with the adventurous 1 O . . . tt:lb4? 1 and with the more common 1 O . . . tt:lc7 .
1 .d4 tt:lf6 2.c4 e6 3.tt:lf3 b6 4.g3 .2.a6 5.'it'c2 c5 6.d5 exd5 7.cxd5 -2.b 7 8 . .2.g2 tt:Jxd5
Before we go on with the main move 9 . 0-0 , we shall stop for a while, as White has a very naughty option here : Kazhgaleev's invention 9.iVb3 contains a lot of poison. White tries to utilize the
76
'X-factor' of the h l -a8 and a2-g8 diagonals. Black definitely has to retreat with his knight, but anyway, 1 O .tt:le5 comes next. It is worth mentioning that all the first games with this line were won by White in under 20 moves!
A) 9 ... tt:lc7 1 0.tt:le5 d5 1 1 .tt:lc3 .2.d6 The reply l l . . . .2.e7 l 2 . .2.f4 0 -0 1 3 . 0-0-0 c4 generates further exchanges, resulting in a drawish endgame: 1 4. tt:lxc4 dxc4 1 5 . .l::!.xd8 .2.xd8 1 6 . .2.xb7 cxb3 1 7 . .2.xc7 bxa2 1 8 .tt:lxa2 .2.xc7 1 9 .�xa8 tt:ld7= Gordon-Miroshnichenko, Dresden 2 0 0 7 . 1 2 .tt:lxf7 Wxf7 1 3 .tt:lxd5 Wf8 1 4 .�g5 iVd7 1 5 .�dl !N With the experience from the previous line, we discovered that White should delay castling. On 1 5 . 0-0-0 tt:lb5 !N might be a crucial im-

Chap ter 6 : 9 . 0 - 0 .1le 7 1 O . .i:Id 1 - Mino r L i nes fo r B l a ck
provement ( 1 5 . . . tL'ic6 ? 1 6 .�f3 + @e8 1 7 .�e4+ tL'ie6 1 8 .tL'ic7 + ! �xc7 l 9 .�xe6 + Jle7 20 .Jlxc6+ led to a great victory by the young Dutch player in Ris-Spraggett, Gibraltar 2007) l 6 .e3 c4! 1 7 .�xc4 ( 1 7 .�c2 c3) 1 7 . . . �c6 1 8 .�xc6 .1lxc6 and Black is fine. 1 5 ... tL'ie6 1 6.tL'ic7! The resulting variations are very entertaining :
A l ) 1 6 . . . tLld4 1 7 . .!:lxd4 .1lxg2 1 S .tLle6+ @es 1 9 .tL'ixg7+ WfS 20.tL'ie6+ WeS 2 1 .lld2 Jlxhl 22.tLldS!
Analysis diagram
Though he is a rook and a bishop up, Black is helpless against .l:!.xd6 . 22 ... tL'ic6 2 3 .l::!.xd6 UxdS 24 . .l:!xd7 @xd7 25 .�f7++- White will have too many pawns on the kingside;
Al) 1 6 . . . �xc7 1 7 .�xe6 .1lxg2 1 S . .a'.xd6 Jlxh l 1 9 .�fs + WgS 20.�dS+ �xdS 2 1 .�e6+! This is an important intermediate move. 2 1 . . . WfS 22.JlxdS ttJc6 23 .Jlc7 .l:!.eS 24.Jld6+ ttJe7 25 .�fS+ WgS 26.Jlxe7 llxe7 27 .�cs++-
B) 9 ... ttJf6 Clearly the safest reply. 1 O.tiJeS dS 1 1 .tLlc3 il.e7 l l . . . tLlbd7 1 2 .Jlf4 c4 l 3 .Wla4 ( 1 3 .'i¥c2 Jlb4 1 4.0-0 Jlxc3 1 5 .�xc3 tLlc5 with a draw in Slugin-Grigoriants, Moscow 2008) l 3 . . . a6 was Miroshnichenko-A. Shneider, Evpatoria 2007 . Now White should have proceeded with l 4.tLlxd7N
'i¥xd7 1 5 .�xd7 + 'it>xd7 1 6 .0-0-0�. 1 2.�a4+ ttJbd7 Black equalizes convincingly with this move order. 1 3.ttJc6 i.xc6 14 .'i¥xc6 .!:!.cs 1 5 .�a4 d4 1 6 .tLlbS 0-0 1 7 .0-0 1 7 .tLlxa7 is strongly met by 1 7 . . . lla8 ! . 1 7 ... tLleS 1 S.�xa7 tL'ic6 1 9.'iib7 The Russian grandmaster decides not to take any risk: 1 9 .�a4 �d7 2 0 .tL'ia3 'iie6 2 l .�c4 �f5 gives Black counterchances. 1 9 . . . ttJaS 20.�a7 ttJc6 2 1 .�b7 ttJaS 22.'ii'a7 ttJc6 23 .'iib7 and the game ended in a draw by repetition, Kramnik-Leko, Dortmund 2008 .
9.0-0 .1le7 1 0.lld1 There are two interesting alternatives.
A) Grandmaster Pantsulaia's move 1 O.tLleS was introduced into tournament practice in 2007 , when he employed it against R. Ibrahimov. A year later a few top players picked it up -however, mainly in blitz games.
Analysis d iagram
1 O .. . 'iic7 is a logical reply, and probably the only acceptable one as well: 1 1 .'iie4 White increases the pressure on the long diagonal. A big motley is forming in the centre. 1 1 ...ttJc6! Peter Leko's witty invention seems to solve Black's opening problems immediately. 1 2.'iVxdS 1 2 .tLlxf7 ! ? tLlf6 1 3 .Jlf40 tL'ixe4 1 4.Jlxc7 Wxf7 1 5 .Jlxe4 .l::!.ac8+±. 12 . . . tlJdS 1 3 .'i¥xd7 + 'iYxd7 l 4.tLlxd7
77

A C u t t i n g -Edge G a m b i t a g a i n s t t h e Qu een ' s I nd i an - Pa rt I I I
�xg2 1 4 . . . @xd7 1 5 . .l:ld l + Wc8 1 6 .�h3 + tlle6 1 7 .tllc3 .l:ld8 1 8 .�f4 �c6 Karjakin-Leko, Moscow (blitz) 2008 . 1 S .'it>xg2 @xd7 1 6.:a:d 1 + 'it>c6 1 7 .tllc3 Ite8= and it was already Black who could start playing for a win in Nakamura-Baklan , Austria 2008/09 ;
B ) 1 0.'iYe4!? Another very interesting discovery by the Georgian grandmaster. It is essential to have a look at a few games , as the given examples will show that Black can easily make a mistake:
Analysis d iagram
B 1 ) 1 O ••• .ic6 1 1 .tlleS tllf6 l 2.tllxc6 tllxc6 1 3 .'iYa4 White has lost a few tempi , but he has gained his opponent's important bishop. 1 3 ... 0-0 1 4 . .l:!.dl tlld4! This is the key move of the variation. 1 S .tllc3 1 5 .�xa87 ! 'iYxa8 1 6 .tllc3 bS 1 7 .'iYa6 l:Xb8+. 1 5 ... bs 16 .'iYa6 b4 1 7 .tlldS tllxdS 1 8 . .ixdS :a'.b8 1 9 .�f4 'iYb6 20.'iYc4 d6 2 1 .e3 tllbS= Black equalized comfortably in AronianAnand, Morelia/Linares 2008 ;
Bl ) 1 O • • • tlla6 was Karjakin's choice against Svidler in 2008 , but it is far from attractive to the eye. l I .tllh4 g6?! 1 1 . . . 0-0 is more resistant. 1 2 .tllfS �f6 1 3 .'iYc4! tllac7 1 4.l:rd l �a6 l S .'iYg4 was played in Adhiban-Miedema, Amsterdam 20 1 1 . Black should have continued with 1 5 . . . 'iYe8 1 6 . .ixdS �xe2 1 7 .�f3 �xd l 1 8 .�xd l dSoo.
78
Analysis d iagram
1 2 .tllfS ! ! Riazantsev's spectacular sacrifice has shaken the foundations of this line. 1 2 ... gxfS 1 3 .'iYeS 0-0 14.'iYxfS .l:!.e8 1 S.tllc3 tllac7 l 6 . .ie4 and White built up a crushing attack in Riazantsev-Karjakin, Poikovsky 20 1 O ;
B 3 ) I t is important to note that the natural 1 O ••• 'iYc7? loses almost instantly now : l l .tllh4 0-0 1 2 .tllfS .if6 1 3 .l:rd 1 ± Pantsulaia-Sakelsek, Istanbul 2007 .
Back to the main move 1 0 .l:i.d 1 .
In this chapter we will deal with a few minor lines : the adventurous 1 O . . . tllb4? ! , the inferior 1 0 . . . 0-0 and the more common 1 0 . . . tllc 7 .
1 0 ... tllc7 A useful retreat. From c7 the knight controls many important squares (bS , dS , e6) , plus it can be quickly transferred to the kingside via e6 .

Chap t er 6 : 9 . 0 - 0 Jlc7 1 0 . ..t:rd l - Mino r L i n es fo r B l a ck
A) 1 O • • • tlJf6 1 1 .tlJc3 0-0 1 2.e4 tlJc6 1 3 .es tt:Jes 14.'iVfs transposes exactly to the line treated in Chapter I I ;
B) 1 O ••• ttJb4?! 'Do not make a lot of moves with the same piece in the opening! ' , the old rule says. Black is trying to get out of the imminent pin with tempo and also fishing for later threats with . . . ttJb4-c2 . 1 1 .'iVfs Probably the most aggressive reply. However, it is worth mentioning that the game Tkachiev-Karpov, Ajaccio (blitz) also went favourably for White after l l .�b3 . Here we will analyse l l . . . g6 and the novelty 1 1 . . . dS :
B l ) 1 1 ...g6 1 2.�f4 0-0 1 2 . . . tlJc2 ?? 1 3 .tlJeS .
Analysis diagram
B 1 1 ) 1 3 .a3 ! ?N We found this move more to the point, practically forcing the enemy knight back to an unfortunate square. 1 3 ... ttJ4a6 On 1 3 . . . tlJ4c6 the same reply would come. The seemingly ambitious 1 3 . . . tlJc2 causes problems only for Black: 1 4.l:[a2 tlJd4 (otherwise the knight would be captured : 1 4 . . . �f6 7 1 5 . e 3 ) 1 5 .tlJxd4 �xg2 l 6 .@xg2 cxd4 1 7 .'ii'xd4± . A very similar pawn structure has arisen as in the game Leko-Bacrot, but here the white pieces obviously dominate. 1 4.'i¥h6 �c6 Black has to defend the bishop
somehow due to the usual threat of tlJgS . If 1 4 . . . 'ii'c8 1 5 .tlJc3 tbc7 1 6 .�f4 tbe6 1 7 .�d6 �xd6 1 8 .l:rxd6 with an initiative. 1 5 .tlJc3 �f6 1 5 . . . tlJc7 1 6 .b4. 1 6.tt:Jgs �xgS 1 7 .�xgS f6 1 8 .�f4 �xg2 1 9.'it>xg2;!; White has satisfactory compensation for the pawn. His pieces stand clearly better and there is great pressure along the d-file, while the black king has already become weak too.
B 1 2) 1 3 .tlJc3 �f6 1 4.a3 and now: B 1 2 1 ) 1 4 ... tlJc2 1 5.l1bl
Analysis diagram
Here the lines branch as follows : B 1 2 1 1 ) 1 5 ... tt:Jd4 1 6.tlJxd4 �xg2
Analysis d iagram
Who would guess that White has plenty of promising continuations here ? 1 7.tlJfS ! 1 7 .tlJdbS �b7 was played in Aupi Royo-Lumley, e-mail 2008 . White can possibly go for winning the ex-
79

A C u t t i n g - Edge G a m b i t a g a i n s t t h e Qu ee n ' s I nd i an - Par t I I I
change: l 8 .tt:lc7 ! 7 tt:lc6 l 9 .tt:lxa8 �xa8 20 .tLldS ;l; . 1 7 ... �c6 l 7 . . . �b7 is given by Karolyi in his Survey in Yearbook 8 6 : I 8 .tt:lh6+ @h8 1 9 .tt:lbs±. 1 s .tt:lh6+ �h8 1 8 . . . Wg7 1 9 .tt:lds �xdS 20 . .l:ixdS tt:lc6 2 l .t2lg4-; the cooperation of queen and knight is always dangerous, especially around the enemy king. 1 9.tLldS �xd5 20.!4xd5 'Ji/ie7 Black has to waste a lot of time on protecting everything before he can start to develop his queenside pieces. If 2 0 . . . tt:lc6? 2 l ..l:ixd7 ! . 2 1 .b4! Strongly directing events by opening the position in front of the queenside pieces . 2 1 ... �g7 2 1 . . . cxb4 22 .i;:rxb4! - it is worth remembering that the rook can move laterally too. 22.bxcS 'lWxe2 If 22 . . . tt:lc6 2 3 . '%¥ e3 . Since he has created overall pressure, White can afford trading his most valuable piece, because this supports the penetration to d7 . 23 .�d2 'Jilie6 After 2 3 . . . tt:lc6 24.1:!.e l the queen is offside: 24 . . . 'JilibS 2 5 .a4± . 24 . .l::!.d6 'Ji/ia2 25 .l::!.c l ! White prepares the trade of the fianchetto bishop, the last piece defending the enemy kingside. 25 .. . tt:lc6 2 5 . . . bxcS 2 6 .�c3 �xc3 2 7 .1:!.xc3 'Ji/ia l + 2 8 . .l:.c l 'Ji/ig7 29 .l:!.xcS± . 26.�c3i
Analysis d iagram
Black has big problems on the kingside, and, moreover, has some weak pawns
80
on the seventh rank . 26 .. . �xc3 26 . . . tlae8 2 7 .�xc6 ! �xc3 (27 . . . dxc6 ? 2 8 .'iWf6 ! with a prodigious finish) 28 .I:!.xc3 Ii.e l + 29 .Wg2 'iVdS + 30 .l:l.f3 'i¥xc6 3 1 .tt:lxf7 ++- . A few more moves, until the king walks out of the pin by h2-h4 and Wg2-h2, and the game is over. 2 7.J::[xc3 'Ji/ial + 2 7 . . . f6 28 .tt:lg4± . 28.l::!.c l 'i¥g7 29 . .!:rxd7 <1.Jes 29 . . . gs 3 0 .'lWd6+- . 30 . .l::!.ds f6 3 1 .<1.Jg4t White's major pieces are much more active than Black's;
B 1 2 1 2) 1 5 ... t2lxa3?
Ana lysis d iagram
This is too greedy, and it gets punished in a nice way: 1 6.t2le4! Perhaps Black had missed this nice intermediate move. 1 6 ... �xe4 1 7.'Ji/ixe4 tt:lxb l 1 8 .'Ji/ixa8 <1.Jc6 1 9.'Jilixd8 llxd8 20.�gs+- and in the end the knight was simply captured on b 1 . This illustrative line occurred in Beliavsky-Rotstein, Austria Bundesliga 2007 /08 - see Game S ;
B l 2 1 3 ) After the inferior 1 5 ... 'Ji/ie7 16 .<1.Jds �xd5 1 7.a'.xdS± White's advantage is obvious.
B l 22) Karolyi mentions 1 4 ... tt:l4a6 ! ? as a possible option for Black. We have analysed i t further : 1 5 .'Ji/ih6 �g7 1 6.'Jilih3 White weakens the black fortress. 1 6 ... hS Preparing for tLlgS . If l 6 . . . �c6 1 7 .tt:lgS h6 l 8 .�xc6 tt:lxc6 1 9 .tt:lge4i. 1 7.�gs 'Ji/ie8 1 8 .'Jilih4 f6

Chap t e r 6 : 9 . 0 - 0 .if..e 7 1 O . l:i:d 1 - Minor L ines for B l a ck
Against il.e7 . 1 9.Jie3 CiJc7 20.'i!ic4+ with wonderful play for the gambit pawn. The white queen has made a nice run across the board. Now:
B 1 2 2 1 ) 20 ... d5 ? ! 2 1 .CiJxd5 ! CiJxd5 22.tlxd5t ;
B l 222) 20 ... 'i!if7 would step into another little trick as well: 2 1 .'ilixf7+ .l:l:xf7 22.CiJe5 ! Unprotected pieces often provide a basis for tactical solutions. 22 ... Jl.xg2 23.CiJxf7 with a material advantage;
B l 223) 20 ... Wh8 2 1 .Ud6 B2) With 1 1 ...d5N Black tries to gain
some activity. 1 2.a3 and now: B2 l ) 1 2 ... Jl.cs 1 3 .'i!ie5 CiJc2
Analysis d iagram
1 4.'ii'xg7 ! As many times earlier in this book, we are careless with our material. It is more important to prevent Black's castling. 1 4 . . . Jif6 1 5 . 'ii'h6 CiJxa 1 1 6.CiJg5 Giving power to two pieces at once. 1 6 ... Jib7 l 6 . . . Jl.e6 1 7 .CiJc3 il.xc3 1 8 .CiJxe6 fxe6 1 9 .'ii'xe6+ 'ii'e7 20 .°iWxdS+-. 1 7.CiJc3 There are too many white pieces in the attack. It would be a miracle if Black could hold the position. 1 7 ... �xc3 1 8 .bxc3 'ii'e7 1 9.CiJe4! A clinical finish. The knight is willing to jump forward to the weak dark squares. 1 9 ... dxe4 20.�g5+- ;
B22 ) 1 2 . . . g6 1 3 .'ilie5 f6 1 4.°iWf4 CiJ4a6 1 5 .CiJc3 CiJc7 1 6.'ii'h6g? The black
king is successfully cut off, and White enjoys wonderful compensation;
B 2 3 ) 1 2 . . . CiJ4c6 1 3 . .l::rxd5 'ilic8 1 4.'i!ixc8+ �xc8 1 5 .CiJc3t White is clearly leading in development.
B3) 1 1 ...0-0 1 2.CiJg5 �xg5 1 3 .£.xg5 'ii'c8 1 4.�xb7 'ii'xb7 1 5 .CiJc3;!; is given by Tibor Karolyi in Yearbook 98 .
C) The move 1 0 ... 0-0? seems to be very natural, however it is also pretty naive. Our last move, 1 O . .l:id l , was more than just a developing one , it also set a quite naughty trap. 1 1 .°iWe4! Using the fact that the bl -bishop is unprotected. 1 1 ... CiJa6 With 1 1 . . .fS 1 2 . 'ii' c4 bS Black keeps his minor pieces, but his pawn structure is definitely blown apart: 1 3 .�xbS CiJb6 1 4.CiJc3 CiJa6 1 S. CiJeS ± with a clear edge, Gutierrez Delgado-Gongora Reyes, Havana 2 0 1 1 . 1 2.llxd5
Analysis diagram
C l ) 1 2 . . . .itxd5 1 3 .°iWxd5 CiJb4 1 4.'i!idl .itf6 On 1 4 . . . dS , 1 5 .a3N, chasing the knight would presumably have been an easier way to win some more material quickly (the solid 1 5 .e3 �d6 1 6 .Jid2 CiJc6 1 7 .CiJc3 ktad8 1 8 .'ii'a4± was also good, Cheng-Kostin, Vancouver 2008 ) : 1 5 . . . CiJc6 1 6 .CiJe l and Black's dS -pawn simply falls : 1 6 . . . �f6 1 7 .'ii'xdS 'ii'xdS 1 8 .JixdS l::tad8 1 9 .e4 CiJe7 20 .Jib3+-. 1 5 .CiJc3 d5 1 6.CiJe l !
8 1

A C u t t i n g -Edge G amb i t a g a i n s t the Queen ' s I n d i an - Pa r t I I I
This solid option is the simplest way to put an end to the dynamism in the centre. l 6 .a3 d4 causes unnecessary complications. 1 6 ... d4 1 7 .tllb5 Now Black has to give more material. 1 7 ... .l:!.c8 1 8.tllxa7 k'i.c7 1 9 .tllb5 Ile? 20.�f4 �d7 2 1 .a4 .l:!.fe8 22.�f3 +- with a decisive material advantage in HeraPieniazek, Polish Ekstraliga 20 1 3 ;
C2) 1 2 ... tllb4 1 3 .tllc3 .l:!.e8 1 4.�c4 �a6 1 5 .�f4 tllxd5 16 .tllxd5 White has a pleasant material advantage. 1 6 ... d6 1 7.e3 �b7 1 8.tlld2+- What follows is just a matter of technique, Melkumyan-Klimciauskas, Kerner 2007 .
1 1 .tllc3
White just finishes his development, while Black still has to solve the problem with his fianchetto bishop before he castles. Black has a lot of options here : l 1 . . .Wlc8 , l 1 . . .tllc6 , l 1 . . .tlle6 ? ' and 1 l . . . a6 ! 7 .
1 1 ... aG!? This surprising move was played in a game between two top grandmasters last year. Black wants to cover the b5 -square in order to relieve his knight on c7 . The pawn also makes space for the rook, which might protect the often problematic bishop from a 7 .
First let's examine Black's alternatives on move 1 1 .
82
A) 1 1 ...0-0? falls into the usual trap: 1 2 .tllgS �xg5 1 3 .�xb7 �xc l 1 4.!!axe 1 , with a winning advantage for White, was seen in ScepanovicPantovic, Belgrade 2008 ;
B ) 1 1 . . . tlle6?! Normally, such a move can hardly pose problems, if White does not potter around. 1 2.�f5 !N An energetic reaction. The main idea behind it is that if Black develops the knight to c6, we can set up a double attack by tlle 5 . With 1 2 .b3 �f6 1 3 .�b2 a6 1 4.i:::td6 .l:!.a7 1 S .k'i.ad l @? White managed to get nice play, though the position was less clear in Koch-Vetter, email 20 1 0 .
B l ) 1 2 ... g6 1 3 .�h3 tllc6 1 3 . . . 0-0 1 4.tlleS ! - on this occasion Black gets under serious pressure by the white knights and he will have some problems on the h l -a8 diagonal as well: 1 4 . . . 'i¥c8 1 5 .�xb7 Wlxb7 1 6 .tlldS±. 1 4.tlle5 tllxe5 1 5 .�xb7 .Ub8 1 6.�d5i White threatens f2-f4, catching the knight, so Black does not have enough time to castle again;
B2) 1 2 ... 0-0 1 3 .tllg5 g6 1 4.tllxe6 fxe6
Analysis diagram
1 5 .�xf8 + ! ! The point of the whole plan. White sacrifices his queen, for which he obtains many pieces. 1 5 .. . Wxf8 1 S . . . �xf8 l 6 .�xb7 l2Jc6
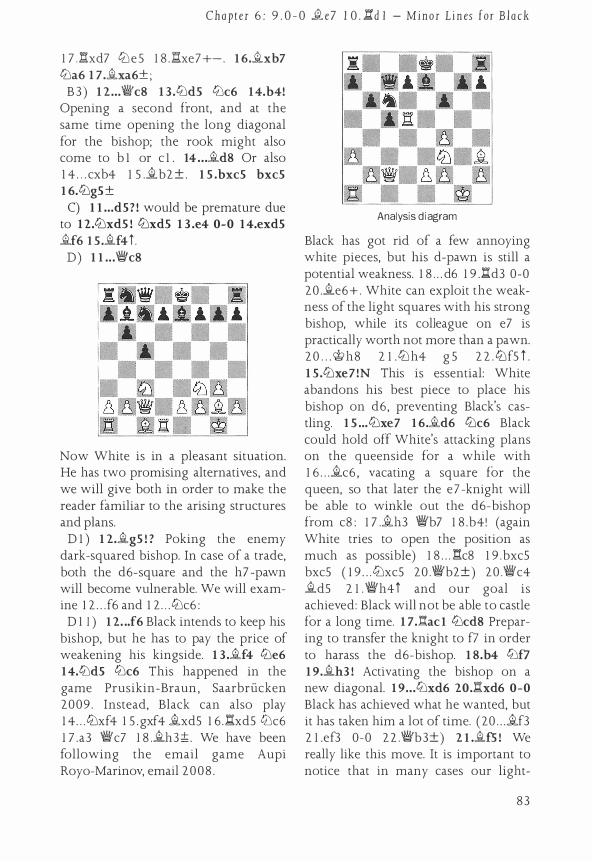
Chap t e r 6 : 9 . 0 - 0 .Q e 7 1 0 . 1:1.'d l - Minor L i n es for B l a ck
1 7 . .i:rxd7 tt:leS 1 8 .J::txe7+-. 1 6.�xb7 tt:la6 1 7.�xa6± ;
B3 ) 1 2 ... iVcs 1 3 .tt:lds tt:lc6 1 4.b4! Opening a second front, and at the same time opening the long diagonal for the bishop; the rook might also come to b 1 or c 1 . 14 ... �dS Or also l 4 . . . cxb4 1 5 .�b2 ± . 1 S .bxcS bxcS 1 6.tt:lgs± C) 1 1 ...dS? ! would be premature due
to 1 2.tt:lxdS ! tt:lxdS 1 3 .e4 0-0 1 4.exdS �f6 1 5 .�f4i .
D) 1 1 .. .'iYcS
Now White is in a pleasant situation. He has two promising alternatives, and we will give both in order to make the reader familiar to the arising structures and plans.
D l ) 1 2.�gS ! ? Poking the enemy dark-squared bishop. In case of a trade, both the d6-square and the h7 -pawn will become vulnerable. We will examine l 2 . . .f6 and l 2 . . . tt:lc6 :
D 1 1 ) 1 2 . .. f6 Black intends to keep his bishop, but he has to pay the price of weakening his kingside. 1 3 .�f4 tt:le6 1 4.tlldS tt:lc6 This happened in the game Prusikin-Braun , Saarbrucken 2009 . Instead, Black can also play 1 4 . . . tt:lxf4 1 5 .gxf4 �xd5 1 6 .J::txdS tt:lc6 1 7 .a3 'i¥c7 1 8 .�h3;l; . We have been following the email game Aupi Royo-Marinov, email 2008 .
.1•
Analysis d iagram
Black has got rid of a few annoying white pieces, but his d-pawn is still a potential weakness. l 8 . . . d6 1 9 .l::!.d3 0-0 20 .�e6 + . White can exploit the weakness of the light squares with his strong bishop, while its colleague on e7 is practically worth not more than a pawn. 2 0 . . . @h8 2 1 .tt:lh4 g S 2 2 .tt:lfs i . 1 5 .tt:lxe7!N This is essential: White abandons his best piece to place his bishop on d6, preventing Black's castling. 1 S ... tt:lxe7 1 6.�d6 tt:lc6 Black could hold off White's attacking plans on the queenside for a while with l 6 . . . �c6 , vacating a square for the queen, so that later the e l -knight will be able to winkle out the d6-bishop from c8 : 1 7 .�h3 'i¥b7 1 8 .b4! (again White tries to open the position as much as possible) l 8 . . . .l:rc8 1 9 .bxcS bxcS ( 1 9 . . . tt:lxcS 20 .'i¥b2±) 20 .'i¥c4 �dS 2 1 . 'i¥h4 i and our goal is achieved: Black will not be able to castle for a long time. 1 7 . .1:1.ac l tt:lcd8 Preparing to transfer the knight to f7 in order to harass the d6-bishop. 1 8.b4 tt:lf7 1 9.�h3 ! Activating the bishop on a new diagonal. 1 9 .. . tt:lxd6 20.l:txd6 0-0 Black has achieved what he wanted, but it has taken him a lot of time. (20 . . . �f3 2 1 .ef3 0-0 22 .'i¥b3±) 2 1 .�fS ! We really like this move. It is important to notice that in many cases our light-
83

A C u t ti ng - Edge G a m b i t a g a i ns t t h e Qu een 's I nd i an - Par t I I I
squared bishop might b e very dangerous on the b l -h7 diagonal.
D l l l ) 2 1 ...g6?
Analysis d iagram
Instead of solving the problems, this is just pouring oil into the fire : 22.kxg6 ! The simplest method to eliminate everything around the black king. 22 ... hxg6 23 .l:txe6! nf7 After 2 3 . . . dxe6 24.'iVxg6+ <it>h8 2 5 . .a'.c4, eventually the mate would be unavoidable. 24 . .l:!.d6 kxf3 25.exf3 �g7 26.bxcS± with a decisive material advantage;
D 1 1 2) 2 1 . . . '>t>h8 2 2 .�xh7 kxf3 23.exf3 fS ! The last chance to create some complications. 24.kxfS tlld4
Analysis d iagram
25.kxd7 The easiest way, transposing to a favourable endgame. 2 5 .nxd4 ! 7 is also interesting : 2 5 . . . cxd4 2 6 .'iVd2 'iVd8 2 7 .�b l (a battery on the b l -h7 diagonal would be killing. It i s not pos-
84
sible to take on f3 due to £.e4) 2 7 . . . .l:Ic8 28 . .l::i.xc8 'li'xc8 29 .'iVd3 'iVc l + 3 0 .Wg2 'iVh6 3 l .'iYxd4:t. We have got enough pawns for the exchange and the black queen is practically glued to the king. 25 ... tllxc2 26.kxc8 .I:l:axc8 2 7Jhc2 cxb4 28.�b2 .l'ac4 29.f4 White is a pawn up and has good chances in the endgame.
D 1 2) 1 2...tllc6 occurred in KanepShishkov, Rakvere 2009 . We found the following immediate improvement on that game : 1 3 .kxe7N Eliminating the e7 -bishop often means that the d6-square will become weak. 13 . . . tllxe7 1 4 . .l'ad6 tlle6 1 4 . . . 0-0 1 5 . .l:!.ad 1 leads to the same position. 1 S . .l:l:adl kc6 Protecting d7 and hoping for some counter along the diagonal. If 1 5 . . . 0-0 1 6 .e3 (it is less urgent to grab the pawn) 1 6 . . . nd8 1 7 .tlle5 £.xg2 1 8 . �xg2t White has a strong edge. 1 6.tlle4! A knight in the centre is always a great sight. 1 6 ... 0-0 1 7 .tllfgS tllg6 1 8 .tllxe6 fxe6 1 8 . . . dxe 6 ? ? 1 9 . lhc6 'iVxc6 20 .tbf6 + . 1 9.tllgst with a good initiative. Both the black kingside and the d7 -pawn are quite vulnerable.
D2) 1 2.�f4 is the crucial move. D2 l ) Surprisingly, the natural
1 2 ... 0-0? ! would be premature : 1 3 .kxc7 'iVxc7
Analysis d iagram

Chap ter 6 : 9 . 0 -0 �e7 1 0 . 1:rd l - Mino r L i nes fo r B l a c k
l 4.4Jg5 ! A nice trick based on a diversion. As we have seen, the knight can often be a dangerous animal. 14 ... g6 1 4 . . . .ixg5 ? 1 5 .4Jb5 �c8 1 6 .4Jd6+-. 1 5 .4Jb5 'YWcs 1 6.4Jd6 .ixd6 1 7.l:hd6 �xg2 1 8 .@xg2 'YWb 7+ 1 9 .f3 4Jc6 20.4Je4 Targeting the big hole on f6 , which means trouble for the black king. 20 .. . 4Jd4 2 I .4Jf6+ @g7 22.'YWc4 Black's rooks are completely doomed to stay on the back rank, while White can double on the d-file without problems. For instance 22 . . . 4Jf5 is useless due to the strong 23 .�c3 '± , and 2 2 . . . �b8 runs into 2 3 .I:!'.xd4 @xf6 24.�d5 ;
D22) 1 2 ... 4Je6
Analysis d iagram
At this stage we will give two appealing lines for the sake of a wider overview: 1 3 . .id6 and l 3 . 4Jd5 ! ? . D22 1 ) After 1 3 . .id6 there can follow: D22 1 1 ) 1 3 ... 4Jc6?! This seemingly
evident move runs into concrete punishment. 14.�xe7 4Jxe7 This recapture leaves the d6-square entirely weak. Trying to mess things up with 1 4 . . . 4Jcd4 will be punished as well: 1 5 .'YWd2 @xe7 ( 1 5 . . . 4Jxf3 + 1 6 . .ixf3 .ixf3 1 7 . exf3 @xe7 1 8 .�d6+ @d8 1 9 .b4- and sad days are ahead for the enemy king) 1 6 .4Jxd4 4Jxd4 1 7 .e3 ( 1 7 .4Jd5+ 1 ? is also good: 1 7 . . . @f8 1 8 .e3 4Je6 1 9 . f4 .ic6 20 .b4t) 1 7 . . . .ixg2 ( 1 7 . . . 4Jf3 + 1 8 . .ixf3 .ixf3 1 9 .'YWd6+ @d8
Analysis d iagram
20 .4Jd5 ! . A devastating assault. In the event of 20 . . . ld.e8 , 2 l .'YWf4! would be very strong : 2 1 . . . .ixd l 2 2 .'YWg5+ f6 23 .�xg7 'YWc6 24.�xd l -) 1 8 .exd4 .ib7 l 9 .dxc5 °i¥c6 (we do not have to worry about the long diagonal, as the black king is much more vulnerable) 20 .k!.e l + ! @f8 2 l .4Je4 bxc5 22 .�ac l ± . 1 5 .4Jb5 0-0 1 6.tlld6 'YWc7 1 7.4Jxb7 It seems that Black is completely lost, but he still has a last trick: 1 7 ... d5D 1 8.e4 'YWxb7 1 9.exd5 tllxd5 20.4Jg5 White wins the exchange anyway. 20 ... 4Jxg5 2 l .�xd5 'YWc8 22 .f4 4Je6 2 3 .�xa8 'i¥xa8 24.�d7± Some technical difficulties might occur, as the black knight can return to d4, blocking our rooks and slightly harassing our fortress. On the other hand, White will retrieve control of the long diagonal by � g2 , and may later charge forward with f4-f5 -f6 ;
D 2 2 1 2) 1 3 . . . �xd6 1 4.lhd6 0-0 1 5 .lladl �xf3 Surprisingly, this logical continuation was not mentioned in Karolyi's article in Yearbook 98 , even though a game had been played with it already a year before. 1 5 . . . l:le8 1 6 .e3 lle7 1 7 .4Jh4;!; goes Karolyi's analysis. We think that his evaluation is too modest, as Black is close to collapsing : 1 7 . . . .ixg2 1 8 .4Jf5 .l:!.e8 1 9 .@xg2± . 1 6.�xf3 4Jd4 1 7.'i¥e4 4Jbc6 We also checked the natural 1 7 . . . 4Jxf3 +
85

A C u t t i n g - E dge G a m b i t a g a i n s t the Qu een 's I nd i an - Par t I I I
l 8 .'YWxf3 tllc6 . Now White can proceed dynamically: 1 9 .1/WdS ! .i'ab8 20 .tlle4 with a strong initiative.
Analysis d i agram
1 8.�g2 ! Being allowed to save the superior fianchetto bishop is always a big bonus. In Rusev-Kopasov, Alhena 20 1 0 , White chose the more aggressive 1 8 .�g4 fs 1 9 .1/Wds + @h8 20 .�hs tlle7 2 l .'Yi'c4, but after 2 l . . . f4 Black could have fought on. 1 8 ... 'i.¥c7 1 9 .'i.¥f4 tlle6 20.'i.¥g4 t Evidently White has wonderful play for the gambit pawn.
D222) 1 3 .tlld5 ! ? In this line we will be able to familiarize the reader with several special structures and ideas. As soon as the ' sentinel' leaves c7 , White will frequently be able to promptly occupy the important central square with his knight. 1 3 ... �xd5 14 . .l:.xd5 tllc6 After 1 4 . . . 0-0 1 5 .:c!'.ad l 1'.id8 1 6 .tlleS dark clouds are gathering . . . l 6 . . . tllc6
Analysis d i agram
86
1 7 . tllxf7 ! . With this spectacular blow Black's fortress is taken apart. 1 7 . . . @xf7 1 8 .'Yi'xh7 �f6 1 9 .�f3 ! (everybody is on board for the attack) l 9 . . . tllxf4 20 .gxf4 d6 2 l .!:i.g5 1 (an eye-catching continuation) 2 1 . . . Iah8 ? ? (2 1 . . . dS would have given some chances to fight on a bit: 2 2 .�g4 'i.¥b8 23 .�hS+ @e7 24.e4�) 22 .�hs+ @e6 23 .'Yi'fs + @e7 24.l:'!xg7+ ! , with a spectacular finish in the game Iturrizaga Bonelli -N.V Pedersen, Balaguer 2 0 0 9. 1 5 . 'iV e4 ! Coming closer to the action. Now:
D222 1 ) 1 5 ... 0-0 1 6 . .!:i.adl D222 1 1 ) 1 6 ... �f6 1 7.e3!N
Analysis d iagram
It turns out to be necessary to take control of the d4-square, avoiding counterplay. 1 7 . .!:ixd7 tllcd4 1 8 . .l:rdS tllxf4oo was played in Le Quang-Bitoon, Ho Chi Minh City 20 1 1 . It is hard to draw an exact conclusion from this position.
D222 1 1 1 ) 1 7 ... .a:es 1 8.'i.¥c4 �xb2 1 8 . . . k!.d8 1 9 .tllgS tllxgS 2 0 .�xgS �xgS 2 1 .llxgS 'i.¥c7 2 2 .'i¥c3 - after the black minor pieces have been eliminated, the kingside becomes vulnerable again. 1 9.lllg5 Threatening tllxf7 , so the text practically forces an exchange, after which Black's key defensive piece, the e6-knight, will finally disappear. 1 9 ... tllxg5 1 9 . . . �f6 20 .tlle4. 20.�xg5 h6 2 1 .�f4 lle7 22.�h3� Difficult times are awaiting Black;

Chap t e r 6 : 9 . 0 - 0 �el 1 0 . .bi'.d l - Mino r L ine s for B l a ck
D 22 2 1 1 2) 1 7 ... .txb 2 could pose the critical question which needs to be an
swered first. 1 8.tlJg5 tbxg5 19 . .txg5 Black temporarily has two extra pawns, but he is w1able to fight against the strong bishop. Play might continue : 1 9 ... h6 1 9 . . . 'l!Ue8 20 .'l.Wc2 .tes 2 1 .l::rxd7± . 20 . .tf4 l:re8 2 1 .'l.Wa4 Ile7 22 . .th3t
Analysis d iagram
White will take on d7 , and in the meantime the black pieces on the queenside remain paralysed;
D222 1 1 3 ) 1 7 . . . llds 1 8.tlJg5 There is no concrete threat, but we will remove Black's defending minor pieces. 1 8 ... tbxg5 l 8 . . . g6 l 9 .h4. 1 9 . .txg5 .txg5 20.llxg5 White has kept the pressure even after a few exchanges. 20 ... i¥c7 After 20 . . . h6 2 1 .�gdS Black has got rid of the dangerous rook, but his situation is still awkward: 2 1 . . . &i:e8 22 .'l.Wf4 l::e7 23 . .th3±. As usual, the d7 -pawn remains weak.
Analysis d iagram
2 1 .iVfS ! A multi-functional move. Compared to line D222 l l l , now we are unable to attack the g7-square directly from c3 , so we choose another route. The target for the queen is the f6-square. The black king cannot step out of the pin with . . . �h8 because f7 would hang.
D22 2 1 1 3 1 ) 2 1 ...h6 looks like a solution to the main problems on the kingside, but 22 • .tds ! is a powerful reply, bringing on the bishop with tempo, while the rook is taboo due to a mate in two : 22 ... d6 2 3.!Ig4 tbe5 24.l::th4 .t!.ac8 25.f4 Fortunately this move is available, to kick the knight out of the centre. 2S .•• 'l.Wd7! Another energetic reply, which forces the queen to a less attractive square. 26.iVhS tbc6
Analysis diagram
Seemingly the black king is more or less safe, but there is still an option for White to continue his attack: 27 .i¥g6! The fruit of the harmony among the white pieces. Each move flows naturally from the other, and now we can benefit from the fact that the rook stands on h4. 2 7 ... �fS Walking out of the pins . . . 28.i¥h7 . . . but leaving a penetration square for us. 28 ... tbe7 Only this retreat avoids immediate capitulation . 29.'l.Whs+ tlJgS Not such a remarkable history for this knight: from es to g8 . . .
8 7

A C u t t i n g -Edge G a m b i t a g a i n s t the Queen 's I nd i an - Par t I I I
30.fS ! The f-pawn i s our main weapon for bombing Black 's camp here. 30 ... '(WxfS Otherwise fS -f6 or a'.g4 would come. 3 1 .:a'.f4 '(Wg6 32.�xf7± with a decisive material advantage;
D 2 2 2 1 1 3 2 ) 2 1 ...d6 22 .'(Wf6 g6 23.llgdS The rook has done its work, so we gang up on the cl-pawn again. 2 3 .h4 .!:!.ac8 24.�xc6 'ii'xc6 2 5 .l:!.gdS� is also not bad. 23 ... tt:les
Analysis diagram
24.h3 ! A very important prophylaxis , controlling the g4-square and preparing f2-f4. 24 ... �acS Having no better options, the rook leaves the dangerous long diagonal. 25.:a'.xd6 Uxd6 26 . .l::rxd6 .!:!'.es 2 7.�ds '(We? 2S.'(Wxe7 l:rxe7 Black managed to trade most of the attacking pieces thanks to the luft on g7 . 29.f4 Here we can understand the necessity of 24.h3 as the black knight is unable to go to g4. 29 ... tt:ld? 30.e4 It is a bit unfortunate that the earlier . . . g 7 -g6 has solved Black's problems on the back rank in advance. On the other hand, we can also happily notice that . . . tt:lf6 is impossible. 30 ... @g? 3 1 .eS White's pawn chain is very nice and also practical for gaining more space. 3 1 ... tt:JfS This the only route to activate the knight. 32 .@fl tt:le6 An interesting moment: according to the principles, a bishop is better than a knight in an endgame with pawns on both wings.
88
3 3.�xe6 However, White can permit himself to give his bishop as both his rook and his king will be more active in the resulting position. 3 3 ... .!:.xe6 34.Sd7 a6 3 5 .@f3t
Analysis d iagram
Black is still quite passive. The advanced e-pawn with an effective support ensures good hopes for White. A perfect illustration of how preparation works among elite grandmasters nowadays: from the opening till the endgame.
D222 1 2) 1 6 ... .l:i.dS? ! , defending the pawn, runs into a tactical blow: 1 7 .tt:leS and now 1 7 ... tt:lxf4 1 7 . . . tt:lxeS 1 8 .�xeS± ; 1 7 . . . d6 1 8 .tt:lxf? ! - now it is palpably visible that the rook is sorely missed on f8 : 1 8 . . . @xf7 1 9 . '(Wxh7 -�-.
1 S.'(Wxf4! Since the f7-pawn has been left almost to its own resources , it is evident that White should recapture like this. At the same time, the queen also opens the way for our strong lightsquared bishop. 1 S ... tt:lxeS 1 9 .�xeS �f6 20.:i:Ifs .!lbs It seems as if Black will be OK, however we can blow up his kingside with the following sacrifice: 2 1 ..i'.:[xf6 ! gxf6 22 . .l:Id6 Again it is quite obvious that the value of two passive black rooks is far from being ten points. 22 ... .lleS 2 2 . . . '(Wc7 2 3 .�e4. 23 . .l:txf6-+ White's attack is crushing.
D 2 2 2 2 ) 1 5 . . . tt:Jxf4 1 6 .gxf4 0-0 1 6 . . . '(Wc7 1 7 .tt:lgs g6 1 8 .I:!.ad l a'.d8

Chap ter 6 : 9 . 0 - 0 .£e7 1 0 . £'.d l - Minor L ine s fo r B l a ck
1 9 .fs-. 1 7 .�h3 t White will grab the pawn, keeping strong pressure; D2223 ) 1 5 ... tllb4
Analysis diagram
However, it seems that Black is able to prepare . . . d7 -dS , which would even come with tempo. 1 6.llxd7 ! ! A shocking sacrifice. This was the idea of 1 5 .�e4 ! . 1 6 ... 'it>xd7 1 7.a3 ! ! Although White is a rook down, he makes a hugely paradoxical move, forcing further exchanges. The idea behind it is the fact that the bishop cannot be taken on eS later. Besides, there will be an additional option to give check from a4. After the greedy 1 7 . tlle S + 'it>e8 1 8 .�xa8 �xa8 1 9 .�xa8 tllxf4 20 .gxf4 f 6 the resulting endgame would be only equal. 1 7 ... tllc6 1 8 .tlle5 + tllxe5 1 9 .�xe5;!; Black is unable to avoid White's taking back the a8-rook. The pair of bishops will be very effective again in the endgame.
E) 1 1 ... tllc6 1 2.tlle5 Making good use of the pin on the long diagonal. 1 2. � fS would be less effective here : l 2 . . . �c8 1 3 .lllgS �xgS 1 4.�xgS dS ! and Black gives back the pawn to achieve an equal endgame.
E l ) 1 2 ... �cs 1 3 .�f5 tllxe5 1 4.�xe5 tlle6 1 5 .tlld5 So far the moves were more or less forced. Now:
E 1 1 ) 1 5 ... �xd5? is apparently a logical and necessary decision, but after it
Black will face concrete problems : 1 6.�xd5 �f6 Otherwise White would first take on e6 , then on g7 . 1 7.�e4 .a'.b8 1 8.�f4 A sudden shock: the rook is caught on b8 1 1 8 ... �xb2 1 9.Ilab l �f6 20.�d6 There is nothing wrong with the simple 2 0 .�xb8 �xb8 2 l .�c4±. 20 ... �e7 2 1 .�xbS 'IWxb8 22.�c4 �cs 23 .�b5 tlld4
Analysis diagram
This was Pashikian-Van Wely, Dresden Ech 2007 , where later on White went wrong and Black survived. 24.a4!N Castling is a mission impossible for Black, and furthermore, his nicely placed d4-knight will likely be smoked out with e2-e3 very soon;
E 1 2) Keeping the bishop pair on the board with 1 5 ... �d8 would have been better, as the black camp looks to be solid enough. So here White switches to a positional plan : 16 .b3 0-0 1 7.�b2 �c6 1 8 .J:facl
Analysis diagram
89

A C u tt i n g - Edge G a m b i t a g a i n s t the Queen 's I n d i an - Par t I I I
After a couple of healthy moves, all the white pieces have reached their ideal places. 1 8 ... f6 Covering the a 1 -h8 diagonal, but also weakening the black kingside. If 1 8 . . . aS 1 9 .ge4 ! with pressure against the king. As we will see in a couple of cases , our light-squared bishop can be very useful on the b l -h7 or h3-c8 diagonals. l 9 . . . a4 ( 1 9 .. .f6 ? stumbles into an overwhelming attack after 2 0 .°iWhS g 6 2 l .gxg6 ! hxg6 22 .°iWxg6+ tbg7 2 3 . .i:rc4+-) 20 .b4g? and White keeps pressing. 1 9.°'iVfS and now : 1 9 . . . as l 9 . . . g 6 2 0 .°iWd 3 g? ; 1 9 . . . °iWb? 20 .h4 J:i. f7 2 1 .hSi . 20.h4g? White controls the whole board; the black king is in increasing danger of coming under a vicious attack. It is difficult to see how Black can break out of this complete passivity. El) 1 2 ... tlld4? ! fails due to a nice se
ries of sacrifices : 1 3 .!2.'.xd4! cxd4 1 4.gxb7 dxc3 1 5 .'i¥xc3 l:Ib8
Analysis d iagram
1 6.gc6 ! ! An entertaining move which puts the crown on the whole variation. 1 6 ... dxc6 1 6 . . . gf6 1 7 .gxd7+ °iWxd7 1 8 .tbxd7 gxc3 1 9 .tbxb8± with a healthy extra pawn; 1 6 . . . 0-0 1 7 .tbxd7 . 1 7.'i¥xc6+ A funny situation has arisen: even though White has only two remaining active pieces and he is also a complete rook down, he now wins in a
90
couple of moves. 1 7 ... 'it>f8 1 8.tbd? + Wg8 1 9.tbxb8 'l!Vxb8 20.gf4+-
1 2.ge3!N Our invention is based on the fact that the b6-pawn has become weak. White also prepares the breaking move b2-b4.
A) 1 2.ltf4!? occurred in TopalovNisipeanu, Bucharest 20 1 2 (Game 6) . Now Black could have strengthened his play with l 2 ... tbe6 !N. However, after 1 3 . .itd6 White would still have kept hopes for good compensation;
B) 1 2.�fS 0-0 So far Arnaudov-Suba, Arvier 2 0 1 0. Here White missed the chance to fight for an advantage with 1 3 .tLlgS !N g6 1 4.'l/Vh3 ltxgS 1 5 . .itxb? &I.a? 1 6 . .itxgS 'iVxgS 1 7 . .itg2 g?. The black pieces on the queenside are in each other's way, while White can improve his position with e2-e3 , .l:!.d l -d2, l::(a 1 -d 1 , creating serious pressure on the d-file.
1 2 ... tt:Je6 It took us a lot of time to find the most accurate continuation. We tried a couple of moves before we came to the clear final conclusion: White has to carry on with his plan on the queenside. 1 2 ... .Sa? 1 3 .b4 tlle6 Clearly inferior is 1 3 . . . 0 -0? ! 1 4.bxcS bxcS l 5 .tba4 and the cS-pawn falls. 1 4.bxcS .itxcS If 1 4 . . . bxcS 1 5 . .l:Iac l 0-0 1 6 .tba4 Black

Chap ter 6 : 9 . 0 - 0 fl.el 1 0 . l:d l - Mino r L ine s fo r B l a ck
cannot defend the cS -pawn in an acceptable way: 1 6 . . . �xf3 1 7 .exf3 Sc7 1 8 .f4 tllc6 1 9 . tLl b6 with huge pressure. 1 5 . 'iVd2! 0-0 1 6.tlla4§'? White has compensation for the pawn, as the black pieces on the queenside are still clumsy.
1 3.l:rab1 ! An exceptional situation: instead of going for action in the centre or on the d-file, White prepares an onrush against the weak b6-pawn.
A) The immediate 1 3 .b4 fails in view of 1 3 ... cxb4 1 4.tlla4 tllc5 ! 1 5 .tllxc5 bxc5 1 6.�xc5 'iVc7 1 7.l!facl 'iVxc5 1 8.'i¥xc5 �xc5 1 9.�xc5 0-0 20.&t.c7 �c6= when Black easily survives in the endgame;
B) After the standard 1 3 .tlld5 gxd5 14.l:'!xd5 tllc6 Black seems to have enough resources to organize a stable position: 1 5 .tlle5 1 5 .a3 0-0 1 6 . .!':rad l .!':ra7 1 7 .tlld2 tllcd4 1 8 .'i¥d3 tllc7�. 15 ... <1Jxe5 1 6.l:Ixe5 .l:!.a7 1 7.Sh5 g6 1 8.J::ld5 0-0 1 9 . .l:Iadl Ue8oo
1 3 ... 0-0 Hurrying with his development. 1 3 ... tllc6 allows 1 4.tlle5 , for example: A) 14 ... tllcd4 1 5 .�xd4 tllxd4
i & i • •
• • •
Analysis diagram
1 6.J:!.xd4! A thematic sacrifice in these lines. 1 6 . . . cxd4 1 7.gxb7 dxc3 1 7 . . . a'.b8 ? 1 8 .�dS . 1 8 .gxa8 'i¥xa8
1 9 .'iVxc3i and the black king is still leashed to the middle ;
B) 1 4 ... tt:lxe5 1 5 .�xb7 .ti.a? 1 6.�g2;:!; Black can hardly fight for the important dS-square without his light-squared bishop.
1 4.b4!
This is the right time for the advance on the queenside.
1 4 ... �c7 A) 14 ... l:!:a7 1 5 .bxc5 bxc5 1 6.h4! A
subtle quiet move which prepares tllgS . 1 6 ... h6 l 6 . . . tllc6 always allows the unpleasant 1 7. tlldS . 1 7. 'iVfS i Since the pawn is on h6 , it becomes more difficult to chase the white queen by . . . . g7-g6 . White has full control of the board. All of his pieces are very active;
B) 14 ... cxb4 1 5 .tlla4 gc5 1 5 . . . tllcS l 6 .1:rxb4 tt:lxa4 1 7 . .l:!.xa4± White's powerful piece play ensures him a good edge, Black's queenside remains passive. 1 6 .<1Jxc5 bxc5 1 7 .tllg5 <1Jxg5 1 8.gxb7 .l:!.a7 1 9.llxb4! The point of the whole line. 1 9 ... cxb4 20.�xa7;:\; There is a huge difference between the bishops and the knights. White can grab back the minus pawn at leisure.
1 5.bxc5 �xc5 1 6.�xc5 �xc5 1 6 . . . bxcS ? ? would be a terrible blunder due to 1 7 .l!lxb 7 ! 'i¥xb7 1 8 .tllg5+-.
1 7.�b2 b5 1 8.a4 ilc6 1 9.axb5 axb5 20.tllxb5;:!;
9 1

A C u t t i n g -Edge G a m b i t a g a i n s t the Queen ' s Ind i an - Par t I I I
White has a positional advantage thanks to his better pawn structure and wellplaced pieces.
Beliavsky, Alexander Rotstein, Arkadij
Game s
Austria Bundesliga 2007 /08 (8 . 1 )
1 .d4 ttJfG 2.c4 e6 3.ttJf3 b6 4.g3 �a6 5.�c2 �b7 6.�g2 c5 7.d5 exd5 8.cxd5 ttJxd5 9.0-0 Jl.e7 1 0.l::!.d1 ttJb4 1 1 .�f5 g6
Just chasing the queen to a better place, while creating several weaknesses.
1 2.'iVf4 0-0 1 3.ttJc3 As we discussed earlier, 1 3 .a3 ! ? also comes into serious consideration.
1 3 ... �f6 1 4.a3! ttJc2 l 4 . . . tLl4a6 1 S .�h6 il.g7 l 6 .'iVh3 ;!; is also preferable for White.
1 5 . .tlb1
92
1 5 ... ttJxa3?? 'All that glitters is not gold.' This blunder costs Black the game already. 1 S . . . tLld4 was logical. However, after l 6 .tLlxd4 il.xg2 1 7 .ttJfs ! White is clearly better;
1 6.ttJe4!± Beliavsky is too experienced to miss a chance like this.
1 6 ... Jl.xe4 1 7.'iVxe4 ttJxb1 1 8.'iVxaB ttJcG 1 9.�xdB r:!'.xd8 20.�gS
White's calculation was correct, the b I -knight will be a prey for the rook.
20 ... Jl.xgS 20 . . . 'it>g7 2 l .�xf6+ Wxf6 22 .I!.xb l dS 2 3 .l:[d l ±.
21 .ttJxgS ttJd4 22.il.f1 h6 23.e3 ttJb3
23 . . . tLlc2 24.tLlf3 tLlb4 2 5 .l::!.xb l dS 26 .tLleS± .
24.ttJf3 24.tLlxf7 ! was not only nicer, but probably stronger too : 24 . . . 'it>xf7 2 S .il.c4+ 'it>f6 26 . .ixb3+- .
24 ... ds 2s.nxb1 The rest is simple technique for Beliavsky.
25 ... WfB 26 . .l:i.d1 we7 27.ttJeS 'it>e6 28.f 4 .l::!:d6 29.e4 ttJa5 30.exdS+ l:!.xd5 31 . .a'.e1 'it>f6 32.ttJg4+ Wg7 33.l:.e7 ttJcG 34.l:!.c7 h5 35.ttJe3 Sd6 36.�c4 ttJd8 37 . .l:l.xa7 nd2 38.b3 h4 39.gxh4 i;Id4 40.fS J::re4 41 .'it>f2

Chap t er 6 : 9 . 0 - 0 .fie7 1 0 . l:Id l - Mino r L ine s for B lack
gxf5 42 . .i::!.d7 tlle6 43.tllxfS+ @g6 44.�d3 !if4+ 45.<;t>g3 �b4 46.tlle3+ @g7 47.�c4 1 -0
Top alov, Veselin Nisipeanu, Liviu-Dieter Bucharest 2 0 1 2 (5)
Game 6
1 .d4 tllf6 2.c4 e6 3.tllf3 b6 4.g3 �a6 5.�c2 �b7 6.�g2 cs 7.d5 exd5 8.cxd5 tt:Jxd5 9.0-0 �e 7 1 0.�d1 tt:Jc7 1 1 .tllc3 a6!? 1 2.�f4!?
1 2.£.e3 ! Once more we would like to emphasize our improvement with the following extraordinary plan: 1 2 ... tlle6 1 3 .l::tab l ! 0-0 1 4.b4 cxb4 1 S .tlla4gg .
1 2 ... 0-0 This natural handling gives White the possibility to go for the light-squared bishop. 1 2 ... tlle6 would have retained Black's light-squared bishop : 1 3 .�d6 Now we can notice the returning motif: White builds a comfortable blockade on d6, making the d7-pawn backward. 1 3 ... tllc6 14.e3 l:t'.a7 ! In view of what we have seen in the previous example, it is advisable for Black to protect the bl-bishop. The obvious 1 4 . . . 0-0 allows the energetic 1 5 .tlleS ! �xd6 ( 1 5 . . . tllb4 1 6 .�fs £.xg2 1 7 .'lt>xg2;!;) 1 6 .nxd6 tllxeS ( 1 6 . . . �b8 7 loses to 1 7 .l:lxd7 ! ) 1 7 .�xb7 and White grabs the
fianchetto bishop, after which he will have total control of the dS -square: 1 7 . . . l:!.a7 ( 1 7 . . . �c7 1 8 .�xa8 �xd6 1 9 .l:rd l �b8 20 .�e4gg) l 8 .�g2gg with pleasant play. 1 S .Sd2 �xd6 1 6 . .l:Ixd6 and now:
Analysis d iagram
A) 1 6 .. . 'i¥e 7 1 7.�d2 1 7 . .i::l.ad l ! ? might work as well: 1 7 . . . tllcd4 l 8 .exd4 �xd6 1 9 .dS tlld4 2 0 .tllxd4 cxd4 2 l .�e4+ �e7 2 2 .�xd4 0-0 2 3 .�xb6 �fa80 24.a4gg. White has good play for the exchange due to the misplacement of the black rooks. 1 7 ... 0-0 1 8 .tlldS 'i¥d8 1 9.�adl ;i; There is great pressure on the cl-file;
B) 1 6 ... 0-0 1 7.l::tadl £.as Despite the superior white pieces, the enemy camp seems to be hardly accessible. However, we still prefer White.
1 3.e3 Surprisingly, Topalov proceeds in a positional way, which is rather alien to his
93

A C u t ti ng - Edge G am b i t a g a i n s t the Qu een ' s Ind i an - Par t I I I
nature and also to the character of the position. The dynamic 1 3 .tt::lgS ! would have been much better: 1 3 ... �xgS 1 4.�xb7 �a7 1 5 .�xgS 'IWxgS 1 6.�e4:t If Black now makes a pawn move instead of playing l 6 . . . 'IWh6 , .l::!.d6 would be immediately available.
1 3 .. Jla7 1 4J!(d2 tt::le6 1 5.l::rad1 ?! White throws away the initiative. He should have taken the last chance to play 1 5 .�d6 , for example : 1 5 ... �xd6 1 6 . .tl.xd6 'IWf6 ! . This is an extra option compared to the line after 1 3 . . . tt::le6 . 1 7. 'iY d 1 1 7 . tt::lds �xdS 1 8 . .l:.xdS tt::lc6 l 9 .�d2 tt::le7 20 . .a'.d6 tt::lc8 ! (an unusual but profitable knight manoeuvre) 2 1 .l:i'.d3 bS 22 .e4 c4�. 1 7 ... bs 1 8.J:l:cl l 8 . e4 b4 1 9 .eS �xf3 20 .exf6 �xd l 2 l .fxg7 �xg7 2 2 .tt::lxd l �. 1 8 ... �c6 1 9 .b3� In our opinion, White can still hope for an advantage.
1 5 ... tt::lxf4 Finally the nice bishop is eliminated.
1 6.exf4 'iWc8?! Moving out of the pin. Avoiding tt::leS by 1 6 ... �f6 would have been more militant: l 7 .�b3 �c6� or 1 7 .tt::leS �xg2 1 8 .�xg2 jixeS 1 9 .fxeS tt::lc6 20 .�e4 �e8 2 l .f4 tt::ld4 22 .tt::le2 d6= and finally Black is able to solve the problem of his backward pawn.
H.h4!? 1 7.tt::leS also comes into serious consideration: 1 7 ... jixg2 1 8.@xg2 d6 1 8 . . . bS 1 9 .tt::lds jid8 20 .tt::lf3:t . 1 9.tt::lc4 'IWb7+ 20.�e4 Trading queens under good conditions. 20 ... 'IWxe4+ 2 1 .tt::lxe4 tt::lc6 In case of 2 1 . . . bS 2 2 .tt::lcxd6 l':rc7 2 3 .tt::lfS c4 24.tt::lc3:t White has a favourable position thanks to his active pieces and strong pressure on the d-file. 22.tt::lxb6 tt::ld4 23 .tt::lds Il'.ds 23 . . . �d8 24.b4± . 24.tt::lec3 :t
94
1 7 ... d6
1 8.a3?! This is not very aggressive. 1 8 .tt::lgS ! was the way to create a fixed weakness on the kingside: 1 8 . . . �xgS ( 1 8 . . . g6 1 9 .tt::lge4:t) 1 9 .hxgS tt::lc6 20 .tt::ldS:t and the h7 -pawn will be very vulnerable.
1 8 ... tt::lcG? Allowing the white knight into the centre is always risky. It was better to secure the kingdom first : 1 8 . . . h6 ! 1 9 . .!:[e l �a8 20 .tt::ldS �xdS 2 1 ..l:[xdS tt::lc6 22 .'IWd3 � and White has strong major pieces, but Black is still a pawn up;
1 9.tt::ldS:t �d8 20.tt::le3 The knight is heading towards the dangerous square fS .
20 ... �f6 Giving the pawn back for some play. 20 . . . �e7 2 1 .tt::lfs h6 22 .tt::lxd6 �xd6 23 . .l:!.xd6t .
21 .�xd6± After retrieving the material White preserves the initiative.
21 ... tt::ld4 22.tt::lxd4 jixd4 2 2 . . .jixg2 7 is strongly met by 2 3 .tt::ldfS ! �a8 24 .l::rxf6 1 gxf6 25 .�c3+- ;
23.�xb7 r!xb7 24.tt::lfS 'i¥b8 25.l/We4!?
Unnecessarily complicating things.

Chap ter 6 : 9 . 0 - 0 .9..e 7 1 0 . .Ud l - Minor L i n es fo r B l a ck
The solid 25 .J:l'.d5 would have posed bigger problems: 25 . . . �f6 26 .h5± and Black finds himself close to being in a positional zugzwang.
25 ... gG
26.tlle7+!? An interesting decision by the Bulgarian ex-World Champion. White is ready to sacrifice an exchange for some edge. Playing simply with 26 .tllxd4 would have ensured him a comfortable endgame: 26 . . . VWxd6 2 7 .'i¥xb7 b5 28 .'iWc6 .i::rd8 29 .'W'xd6 l:f.xd6 3 0 .'it>fl cxd4 3 l .'it>e2t .
26 ... @g7 27 . .a'.1 xd4 cxd4 28.'ii'xd4+g? f6D 29.tllcG 'iWc8 30.@h2
A practical waiting move, White ensures the safety of his king.
30 ... .a'.c7 31 .'W'dS It is quite difficult to evaluate such a position correctly, especially when the players are close to the time control.
Conclusion
The extravagant 3 I . tlld8 ! ? deserved attention : 3 I . . . .Se7 3 2 .'i¥xb6 .l::l.fe8 3 3 .'W'd4 'i¥f5 34 . .a'.xa6oo. White already has three pawns, but it's still not sure whether this will be enough to win.
31 ... .SeS 3 I . . . @h8 ! ? - hiding the king from possible checks is often useful: 3 2. b4 b5 3 3 .tlld4 l:i:e7 34 .tlle6 .l::l.fe8 3 5 .tllc5g?.
32.tlld4 .lke7 3 2 . . . 'it>h8 ! ? was still possible, because 3 3 .Ihf6 (3 3 . f5g?) runs into 3 3 . . . .l::l.d7 34 . .l::!.d6 �xd6 3 5 .'iWxd6 'iWc5 .
33.fS!
• .l
33 ... 'iWc1 ??
•
Black could have fought on after 3 3 . . . .l::!.e5 34.'ii'f3 gxf5 3 5 . .l:ixb6t.
34.tlleG+ 34.'W'f3 was stronger: 34 . . . .l::l.f7 3 5 .tlle6+ 'it>g8 3 6.fxg6 hxg6 3 7 .'iWd3+-.
34 ... @hS 35.'iWd4 VWc2 36.'ii'xfG+ �g8 37.fxgG 'ii'xg6
3 7 . . . hxg6 3 8 .tlld4 'ii'e4 3 9 .'iWxg6+. 38.'iWxgG+ hxg6 39.tllf4 l:r.g7 40 . .l:ixbG as 1 -0
The minor lines discussed in this chapter barely cause problems for White. 1 O . . . tllc7 is clearly the most resistant variation, though we believe that we worked out sufficiently convincing routes for the white side. Other deviations seem worse for Black, as there White can seize the initiative almost instantly.
95

A C u t t i n g - Edge G a m b i t a g a i n s t the Qu een ' s I nd i an - Pa r t I I I
Chapter 7
10 . .Md1 �cs - Side Moves
1 .d4 tl'if6 2.c4 e6 3.tl'if3 b6 4.g3 �a6 5.�c2 c5 6.d5 �b7 7.�g2 exd5 8.cxd5 tt:Jxd5 9.0-0 �e7 1 0.l::f.d 1 �cs
This strange-looking move introduces one of the two very main lines. It was first employed by Armenian grandmaster Arman Pashikian at the World Youth Championship against Maxim Rodshtein in 2006 . The idea behind it is to protect the often problematic fianchetto bishop, meanwhile moving away from the 'eyes' of the white rook on d 1 .
Before going deeper into the details we would like to mention White's main possibilities. Our brief selection gives a wider overview of the possible variations, also showing some lines where Black can equalize. So our analysis may also be useful for those who play the Queen's Indian with black.
Although this chapter was written mainly for black players , we are sure that it contains several useful ideas for those interested in playing this line with white.
We will investigate the harmless 1 1 .�fS , the dissolute 1 1 .tl'ih4, the tempting l 1 . e4 and finally the interesting 1 1 .�gS .
1 .d4 tl'if6 2.c4 e6 3 .tl'if3 b6 4.g3 �a6 5 .�c2 c5 6.d5 �b7 7.�g2 exd5 8.cxd5 tt:Jxd5 9.0-0 �e7 1 0.:Rd1 �c8 1 1 .�g5
Aronian's invention, which he tried against Carlsen at the Corns tournament in 2 0 0 7 , won the approval of many
96
players for a while - basically until 2009 . Let's first examine White's other options.
A) 1 1 .�fS is still the second-most common continuation, though we hardly understand why, as the queen

just steps into a discovered attack after any move by the black d-pawn . 1 1 . .. tlJf6 12 .tt:Jc3 o-o 1 3 .i.gs 1 3 .e4 d6 shows the main defect of the variation from White's point of view: in most cases Black does not manage to trade the queens so easily. After 1 4.'lWxc8 .l::txc8 1 5 .tlJh4 tt:Je8 1 6 . tlJf5 i.f8 1 7 .i.f4 tbc6= White gets the pawn back, but that's all for us. 1 3 ... h6 With 1 3 . . . d6 1 4.'ii'xc8 J!l.xc8 1 5 .tLlb5 i.c6 l 6 .tbxd6 i.xd6 1 7 .i.xf6 i.f8 l 8 .i.c3 b5 = White also failed to get any advantage in Sargissian-Leko, Yerevan rapid 2 0 0 8 . 1 4.i.xf6 i.xf6 1 S .e4 d6 ! 1 6.�xc8 �xc8= and Black had successfully solved the opening problems in Paragua-So, Manila 2008 ;
B ) 1 1 .tlJh4 i s a romantic move, which had its best days in 2007 and 2008 . Since then it has completely gone out of fashion. 1 1 ... i.xh4 1 2.J;l.xdS �e7 1 3 .tlJc3
Analysis diagram
1 3 ... tbc6 ! Calmly rejecting the tempting material gain. Indeed, it would be very dangerous to take the rook; instead, waiting while developing further is a good decision. White does not have a really useful option here. 1 4.�e4 This continuation was criticized by GM Krasenkow in ChessBase Magazine 1 1 8 . Instead he suggests the following line:
Chap t e r 7 : 1 0 . ri'.d l iWc8 - S i d e Moves
1 4.i.f4 tt:Jb4 1 5 .Vi'f5 tbxd5 1 6 .tbxd5 i.xd5 1 7 .i.xd5 0 -0 1 8 .l'.:rd l d6 1 9 . 'lW e4. However, after 1 9 . . . l:le8 White had nothing better than forcing a draw with 20 .�f3 J!l.f8 2 l .�e4 l:re8 22 .�f3 .l:i.f8 2 3 .'ii'e4 with a draw by repetition in Gelfand-Carlsen, Monaco (blind) 2007 . 1 4 ... 0-0 1 5 .I:l.hs This is the point of the whole variation. 1 S ... g6 1 6 . .b!:h3 The best way for Black to handle this position was showed by Jan Timman in a game between two legendary players: 1 6 .. . d6 1 7 .tt:Jds .b!:e8 1 8 .b4 �d7 1 9 .i.b2
Analysis d iagram
1 9 ... tlJd4!? Black starts to force exchanges and after these simplifications White does not have any chance for a win. 20.i.xd4 cxd4 2 1 .tLlxe7+ lhe7 22 .�xb7 �xb 7 2 3 .�xb 7 ti'.xb 7 24.Sh4 �e8= and soon the game was drawn, Beliavsky-Timman, Bazna 2 0 0 8 ;
C ) 1 1 .e4 This straightforward move has been hallmarked even by Carlsen. However, we also have to mention that nobody has tested it since 2008 .
C 1 ) 1 1 ...tLlb4 i s a seemingly aggressive but rather unfortunate reply. The knight will not be strong on b4: 1 2.�c3 It is a bit difficult to understand White's decision. In our opinion, 1 2 .�c4N is the ideal place for the queen: 1 2 . . . 0-0 1 3 .a3 tlJ4c6 1 4.�f4�.
9 7
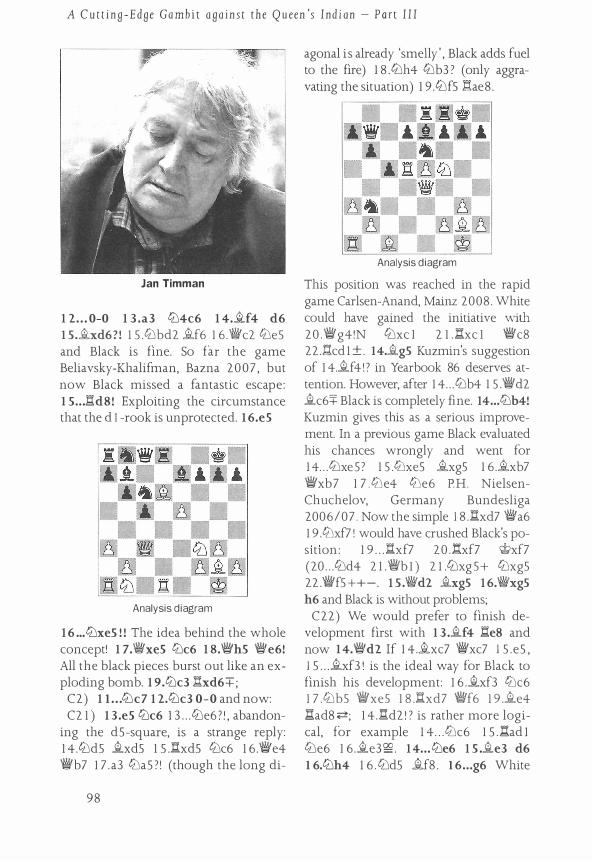
A C u t t i n g -Edge Gambi t aga i n s t the Qu een 's Ind i an - Part I I I
Jan Timman
1 2 . . . 0-0 1 3 .a3 tl'i4c6 1 4.�f4 d6 1 s.�xd6?! 1 5 .tl'ibd2 �f6 l 6 .�c2 tl'ie5 and Black is fine. So far the game Beliavsky-Khalifman, Bazna 2007 , but now Black missed a fantastic escape: 1 S .. . .Sd8 ! Exploiting the circumstance that the d I -rook is unprotected. 1 6.eS
Analysis diagram
1 6 ... tl'ixeS ! ! The idea behind the whole concept! 1 7.'{iVxeS tl'ic6 1 8.'iYhS 'iYe6! All the black pieces burst out like an exploding bomb. 1 9.tl'ic3 J:l.xd6:+;
C2) 1 l . . . tl'ic7 1 2.tl'ic3 0-0 and now: C2 1 ) 1 3 .es tl'ic6 1 3 . . . tl'ie6 7 1 , abandon
ing the d5-square, is a strange reply: 1 4.tl'id5 �xd5 1 5 . .Sxd5 tl'ic6 1 6 .�e4 �b7 l 7 .a3 tl'ia5 ? ! (though the long di-
98
agonal is already 'smelly ' , Black adds fuel to the fire) 1 8 .tl'ih4 tl'ib3 ? (only aggravating the situation) 1 9 .tl'if5 liae8 .
Analysis diagram
This position was reached in the rapid game Carlsen-Anand, Mainz 2008 . White could have gained the initiative with 20 .�g4!N tl'ixc l 2 1 .l:rxc l 'W'c8 22 . .a:cd l ±. 14.�gS Kuzmi.n's suggestion of l 4.�f4 ! ? in Yearbook 86 deserves attention. However, after 1 4 . . . tl'ib4 1 5 .�d2 �c6+ Black is completely fine. 14 ... tl'ib4! Kuzmin gives this as a serious improvement. In a previous game Black evaluated his chances wrongly and went for 1 4 . . . tl'ixe5? 1 5 .tl'ixe5 �xg5 1 6 .�xb7 �xb7 1 7 .tl'ie4 tl'ie6 PH. NielsenChuchelov, Germany Bundesliga 2006/07 . Now the simple l 8 . .Sxd7 �a6 1 9 .tl'ixf7 ! would have crushed Black's position : l 9 . . . .Sxf7 20 .�xf7 Wxf7 (20 . . . tl'id4 2 1 .'%Wbl ) 2 1 .tl'ixg5+ tl'ixg5 22 .�f5 ++-. 1 s .'{Wd2 �xgS 1 6.'{Wxgs h6 and Black is without problems;
C22) We would prefer to finish development first with 1 3 .�f4 .Se8 and now 1 4.'iYd2 If 1 4.�xc7 �xc7 1 5 .e5 , 1 5 . . . �xf3 1 is the ideal way for Black to finish his development: l 6 .�xf3 tl'ic6 1 7 .tl'ib5 �xe5 1 8 . .Sxd7 'W'f6 1 9 .�e4 l:rad8 <=2; 1 4 . .Sd2 1 ? is rather more logical, for example 1 4 . . . tl'ic6 1 5 .l:rad l tl'ie6 l 6 .�e3§?. 1 4 ... tl'ie6 1 S .�e3 d6 I 6.tl'ih4 1 6 . tl'id5 �f8 . I 6 .. . g6 White

has managed to successfully weaken the enemy kingside, but the position still holds many opportunities for Black. 1 7.f4 Another example : 1 7 .tlJdS �xh4 l 8 . gxh4 <1Jd7 l 9 .f4? �xdS t 20 .VWxdS t2Jf6 2 1 .'i¥xd6 l:J:d8 22 .°iWeS <1Jg4+ . 1 7 ... <1Jd7 1 8.fS? ! <1Jd4t and Black took the initiative in Kirsch-Maduekwe, email 2007 .
After the text move Black has two main replies : l 1 . . .h6 and l l . . . f6 . 1 1 . . .�xgS ' is inferior.
1 1 .. .fG A) Clearly worse is 1 1 ...�xgS?
1 2.tbxgS 4::lf6 1 3 .�xb7 'iWxb7 1 4.<1Jc3 . The drawback of 1 1 . . . �xgS i s becoming visible. Black is unable to castle due to the tactical blow tlJdS . Without the e7-bishop, the d6-square has become critically weak, and his king is also still in the middle : 14 ... h6 After 1 4 . . . dS 1 S . tlJxdS ! +- Black was completely crushed in Timman -Wegener, Germany 2009 ; and 1 4 . . . 0 -0 ? ? fails to 1 s .tt:Jds . 1 5 .tlJbS! 0-0 1 6.4Jd6 °iWa6 1 7.<1Jgxf7 ! The final strike. 1 7 ... ti:xf7 1 8.°iWb3 c4 1 9.°iWf3+-B) 1 1 ... h6 is a safer reply, keeping the
kingside unexposed.
Analysis d iagram
However, this allows the trade of the bishops, which often means that tl1e
Chap t e r 7 : 1 0 . .Ud l 1lWc8 - S i d e Moves
d6-square remains without surveillance. 1 2.�xe7 This leads to positional play. 1 2 .RxdS was introduced by the always entertaining player Alexey Shirov, but according to our analyses Black could have accepted the challenge : 1 2 . . . �xdSN. You might easily believe that this sacrifice was well prepared by the wizard from Riga ( 1 2 . . . hxgS 1 3 .<1Jc3 <1Jc6 1 4.l:!.ad l <1Jb4 1 5 .VWe4 c;t>f8 1 6 .tt:Jes tlJxdS 1 7 .tlJxdS �f6oo witl1 a big mess in Shirov-Timman, Karlsbad 2007 ) : 1 3 .�xe7 c;t>xe7 1 4.<1Jc3 �e6 1 S .<1Jh4 <1Jc6 (Black needs only one tempo to bring the rook into play, so White has to act at once) 1 6 .f4 (threatening to capture the bishop) 1 6 . . . g 6 1 7 .f S gxfS 1 8 .tlJxfS + c;t>f8 1 9 .l:!.fl <1Jd4 and White doesn't have enough resources - Black should be OK. 1 2 ... <1Jxe7 1 3 .e4 0-0 1 4.<1Jc3 4::lbc6 1 5 .1:.d2 �a6 1 S . . . �b8 ' ? 1 6 .l:!.ad l .l:ld8 likely equalizes according to Postny-Chuchelov, Dresden 2007 . in ChessBase Magazine 1 1 8 . 1 6.�h3 White is close to winning back the pawn. However, the question remains whether he can claim an advantage:
B 1 ) 1 6 .. . °iWb8 ! ? 1 7 . .ixd7 °iWb7 1 8.gad 1 l:.ad8 and Black had successfully organized harmony between his pieces in Sargissian-Wojtaszek, Germany Bundesliga 2 0 0 6 / 0 7 ;
Bl) 1 6 ... 4Jg6 1 7.�xd7 °iWb7
Analysis diagram
99

A Cu t t i n g -Edge G a m b i t a g a i n s t the Qu een 's I n d i an - Par t I I I
B 2 l ) 1 8Jhdl ! tL'lgeS Probably this scared Aronian off a little during the game (see B22) . If 1 8 . . . &rad8 1 9 .�xc6 ld:xd2 20 .�xb7 Ihc2 2 l .�xa6 l:Ixb2 2 2 .a4 White's minor pieces offer better chances than Black's rooks. 1 9.tL'lxeS tlixeS 20.'iitg2 We don't have to be afraid of giving our nice bishop, because it would lead to a nice penetration on the seventh rank. 20 ... .l:l.ad8 2 1 .°iYa4 and White keeps the pressure, while Black can hardly improve his pieces;
B22) 1 8 . .ih3 was a solid decision, but it cedes the d-file to the enemy rook: 1 8 ... liad8 1 9 .l::tadl 'i¥b8 20.�g2 with a draw in Aronian-Carlsen, Wijk aan Zee 2 0 0 7 ;
B23) 1 8 . .ixc6 'i¥xc6 1 9.tlJdS is given by Krasenkow.
Tkachiev's choice of 1 1 . . .f 6 was picked up ever since Leko successfully held Aronian with it a couple of months later.
Black weakens his kingside, but White will face difficulties retrieving the sacrificed pawn. It is interesting to note that the text move appeared twice during the blitz tournament of the Tal Memorial in 2 0 0 8 , where Carlsen first used it against Alexeev, and on the next day Karpov also played it against Gelfand.
1 00
White can choose between 1 2 .�c l and 1 2 .�d2 .
1 2.�d2 The most healthy retreat, however it obstructs the rook on d l . It also makes sense to withdraw the bishop to its original square: 1 2.�cl
Analysis diagram
A) 1 2 ... tllc7 1 3 .e4 tllc6 1 4.t2Jc3 0-0 1 S .�e3 d6 1 6 .tllh4 g6� The weak kingside and the passive black pieces ensure White compensation, AlexeevCarlsen, Moscow (blitz) 2008 ;
B ) 12 ... tllb4 Preparing the advance in the centre. 1 3 .°iYb3 dS 1 4.a3 c4 Forces the queen to c3 , where it obstructs the development of the b I -knight. On the other hand, this move hands over the d4-square to White. 1 S .°iYc3 tlJ4a6 1 6.'i¥c2 l 6 .'i¥e3 ! ? (hindering Black's castling attempts) 1 6 . . . t2Jc7 l 7 . t2Jc3 t2Jba6 1 8 .t2Jd4 °iYd7 1 9 .'i¥f3co occurred in Alexeev-Tkachiev, Calvia 2007 . 1 6 ... 0-0 1 7.t2Jc3 t2Jc7 1 8.�f4 t2Jba6 1 9.t2Jd4� and White got good play for the pawn in Gelfand-Karpov, Moscow (blitz) 2008 ;
C ) 12 ... tllc6 !?N This suggestion by Kuzmin has not been tested in tourna -ment practice yet. However, we found a correspondence game with it. Obviously the knight is untouchable due to 1 3 . . . t2Jb4. We give a short demonstra-
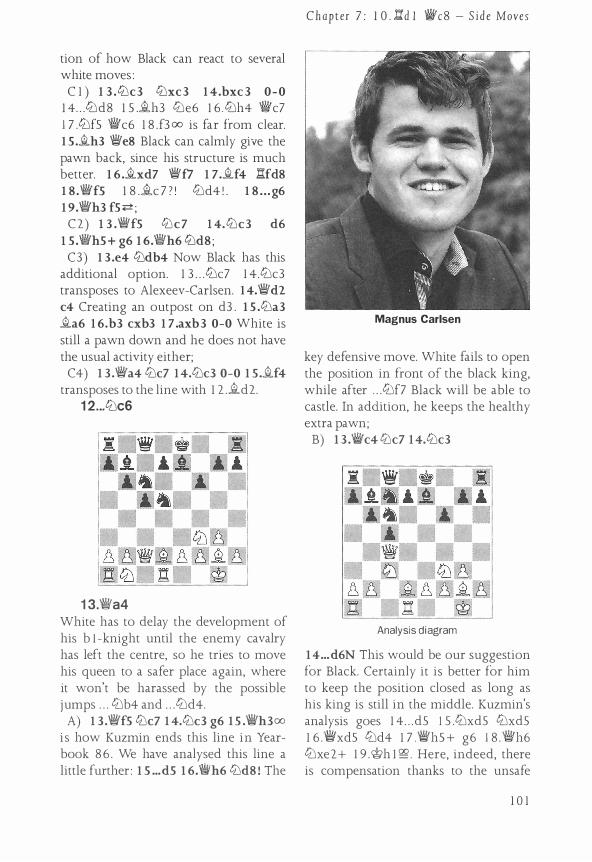
tion of how Black can react to several white moves :
C l ) 1 3 .4:Jc3 4:Jxc3 1 4.bxc3 0-0 l 4 . . . 4:Jd8 1 5 .�h3 4:Je6 l 6 .4:Jh4 'iWc7 1 7 .4:Jf5 'iWc6 1 8 .f3 oo is far from clear. 1 5 .�h3 'iWe8 Black can calmly give the pawn back, since his structure is much better. 1 6 .�xd7 'i¥£7 1 7 .�f4 llfd8 1 8 .'iVf5 1 8 .�c 7 ? ' 4:Jd4 ! . 1 8 .. . g6 1 9.'iVh3 f5�; C2) 1 3 .'iVf5 4:Jc7 1 4.4:Jc3 d6
1 5 .'iVh5+ g6 1 6.'iWh6 tt:Jds ; C3) 1 3 .e4 4:Jdb4 Now Black has this
additional option. 1 3 . . . 4:Jc7 1 4.4:Jc3 transposes to Alexeev-Carlsen. 1 4.'iWd2 c4 Creating an outpost on d3 . 1 5 .tl:la3 �a6 1 6.b3 cxb3 1 7 .axb3 0-0 White is still a pawn down and he does not have the usual activity either;
C4) 1 3 .'iVa4 4:Jc7 1 4.4:Jc3 0-0 1 5 .�f4 transposes to the line with 1 2 .�d2.
1 2 ... 4:Jc6
1 3.'iVa4 White has to delay the development of his b 1-knight until the enemy cavalry has left the centre, so he tries to move his queen to a safer place again, where it won't be harassed by the possible jumps . . . 4:Jb4 and . . . 4:Jd4.
A) 1 3 .'iVf5 4:Jc7 1 4.4:Jc3 g6 1 5 .'li'h3oo i s how Kuzmin ends this line in Yearbook 8 6 . We have analysed this line a little further : 1 5 ... d5 1 6.'liih6 4:Jd8 ! The
Chapter 7 : I 0 . �d I 'i¥c8 - S i d e Moves
Magnus Carlsen
key defensive move. White fails to open the position in front of the black king, while after . . . 4:Jf7 Black will be able to castle. In addition, he keeps the healthy extra pawn;
B) 1 3 .'liic4 4:Jc7 1 4.4:Jc3
Analysis diagram
1 4 ... d6N This would be our suggestion for Black. Certainly it is better for him to keep the position closed as long as his king is still in the middle. Kuzmin's analysis goes 1 4 . . . d5 1 5 .4:Jxd5 4:Jxd5 1 6 .'fVxd5 4:Jd4 1 7 .'li'h5 + g6 1 8 .'iWh6 4:Jxe2+ 1 9 .�h l g?_ Here, indeed, there is compensation thanks to the unsafe
1 0 1

A C u t t i n g - Edge G am b i t a g a i n s t the Qu een ' s I nd i an - Pa rt I I I
black king. However, in our opinion Black 'helps' White in this line. 1 5 .e4 and now:
B l ) 1 5 ... 'i¥d7 1 6 . .ie3 tt::la5 1 7.'i¥d3 0-0 1 8 .�h4 g6 1 9.e5 The only chance to start some action. 1 9 ... c4 20.'i¥c2 .ixg2 2 1 .'>t>xg2 'i¥c6+ 2 1 . . . fxeS always allows the perpetual after 2 2 .tt::lxg6 hxg6 23 .'i¥xg6+=. 22.'iitigl f5<=t;
Bl ) 1 5 . . . 'iWe6 1 6 .tt::ld5 0-0-0 1 6 . . . 0-0? loses material after 1 7 . .ifl ! . 1 7.a4oo; B3) 1 5 .. . tt::la5 1 6.'fid3 0-0 1 7.tt::lh4g?
Though Black has managed to castle, his kingside is still far from safe;
B4) 1 5 ... tt::le5 is a very logical continuation : 1 6 .�xe5 fxe5 1 7 .f4 .ia6 1 8.'i¥a4+ b5 1 9 .'i¥a5 0-0 20.fxe5 dxe5 2 1 . .ie3 and White has some play for the pawn, but it is quite questionable whether it will be enough for something glorious.
1 3 ... tt::lc7 1 4.tt::lc3 0-0 1 5 . .if4 tt::le6 1 6 . .id6
1 6 . .ie3 is Kuzmin's suggestion, which was already played in a virtual game a couple of years ago: 1 6 .. . .t!.f7 1 7 .l::!.d2 .if8 1 8.J:l.adl We were able to understand the sense of moves until here. 1 8 . . . J:i.b8 1 8 . . . tt::laS was played in Dullemond-Slawinski , email 2 0 0 8 . Later Black might try to follow up with . . . a7-a6 and . . . b6-b5.
Conclusion
The position is still very complicated, it is more suitable for humans than for computers.
1 6 ... &res Leko's decision is too modest. Kuzmin believes that it would have been better to start counterplay on the queenside with l 6 . . . a6 ' 1 7 .tt::lh4 bS l 8 .'iWe4 tt::laS+. His analysis ends here, and we can only agree with him.
1 7 . .ixe 7 tt::lxe 7 Keeping the material with 1 7 . . . J:l.xe7 results in tough positional pressure by White after 1 8 .tt::lbS .
1 8.'iWxd7 "ifxd7 1 9 . .l::!.xd7 .ic6 Black has equalized easily, but has given up his winning chances too.
20.a'.d6 tt::ld8 21 .tt::lh4 .ixg2 22.'ltxg2 tt::lf7=
And the players did not spend much more time in Aronian-Leko, Wijk aan Zee 2008 .
Summing i t up, we believe that two of the four discussed deviations might be playable for White. There is still a lot to discover after 1 1 .�gS and l l . e4, while in the other lines Black equalizes pretty easily. Therefore, we do not recommend tl1ose to the reader.
1 0 2

Chapter 8
10.gd1 "i¥c8 11.a3 - Minor Lines
1 .d4 tllf6 2.c4 e6 3.tllf3 b6 4.g3 �a6 5.'ll!Vc2 c5 6.d5 exd5 7.cxd5 �b7 8.�g2 tt:Jxd5 9.0-0 �e7 1 0.gd 1 'll!Vc8 1 1 .a3
The text move is the most popular by far and we have not found any reason to deviate from it. Let 's summarize our impressions to set up a train of thought. The experience from the previous chapter, where we saw that after 1 O . . . 'll!Vc8 , 1 1 .'li!VfS is unfortunate, should encourage us to find something better. As we will also soon see, Black can execute his other main move, 1 O . . . tllc6 , because his knight on dS is indirectly protected by the hidden fork . . . tllb4. All this makes the conclusion pretty obvious : White anticipates these motifs with the text. Hopefully this detailed explanation will help the reader to avoid mixing the two lines up.
At this juncture we will analyse only two minor moves: Ivanchuk's choice l l . . .d6 and the tricky l 1 . . .h6.
1 .d4 tllf6 2.c4 e6 3.tllf3 b6 4.g3 �a6 5.�c2 c5 6.d5 exd5 7.cxd5 �b7 8 . ..tg2 tllxd5 9.0-0 �e7 1 0.gd1 'll!Vc8 1 1 .a3 d6
This looks a bit strange at first glance. Black intends to prevent the advance e4-e5 . Her Maj esty also keeps an eye on the fS -square, so seemingly the dS -knight cannot be so easily attacked.
A) 1 1 ...0-0?! is already premature, though even a few good players fell into this trap : 1 2.'ll!Ve4! White uses the same trick that we saw earlier. The unprotected e7 -bishop is one of the drawbacks of the move 1 0 . . . � c8 . 1 2 ... tllc3 1 3 .�xe7 tllxdl 14.'ll!Vd6 An uncommon sight: the knight is captured on d l ! 14 ... tllxf2 1 5 .@xf2 .Iles 1 6.�f4 .l:te6 1 7 .'ll!Vd2 d5 1 8 .tllgs .!lf6
1 0 3

A Cu t t i n g -E dge G a m b i t a g a i n s t the Qu een 's I n d i an - Par t I I I
Analysis d iagram
This occurred in D. Doric-A. Kovacevic , Novi Sad 2009 . In that game White took on dS too early and later Black managed to survive. It would have been better to first force a weakening in Black's kingside with 1 9 .'i¥d3 !N 'iVfs 1 9 . . . g6 20 .�xdS �xdS 2 1 .'iVxdS tbc6 2 2 .tbc3 h6 2 3 .ltJge4 .l::[fs 24.'i¥d2 �d8 2 5 .�d6+-. 20.ltJe4 Taking the knight is taboo due to mate on d8 . 20 .'iVxfS .ld.xfS 2 l .ltJc3 is also good. 20 ... gS 2 1 .tllxf6+ 'iVxf6 22.CiJc3 Black manages to regain the material, however his remaining pieces are far-off spectators. 22 ... gxf4 23.CiJxdS fxg3 + 24.�gl ! 'iVf2+ 25 .�hl CiJd7 26.llfl ± The upcoming check on e7 will be painful.
B) When we see a move like l 1 ... h6 over the board, we tend to smile and underestimate it. However, despite the fact that we found only one game with it in Mega Database 20 1 3 , we had some headaches proving an advantage for White here.
B l ) 1 2.e4!? tt:Jc7 1 3 .tllc3 0-0 1 4.�f4 White lures the black knight to e6 in order to be able to occupy the dS -square. 14 ... CiJe6 In this position (see diagram) we believe that we have found an improvement on the game MelkumyanNarayanan, Dubai 2009 .
1 04
Analysis d iagram
1 5 .�e3 ! ?N The above-mentioned game saw 1 5 .CiJdS .i:te8 1 6 .�h3 ? ! . Now the following trick works well for Black: l 6 . . . ltJc6 'N 1 7 .�xe 6 ? ' fxe6 1 8 .CiJc7 .l::[f8 1 9 .tlJxa8 gS !+ . 1 5 ... tt:Jc6 16 .CiJdS .Ue8 1 7 . .tiac 1 The position is very complex. Black might be OK, but he has to find couple of accurate moves. An illustrative line might be 1 7 ... �gS !? 1 8 .tlJxgS hxgS 1 9 .f4 gxf4 20.gxf4 tt:Jed4 2 1 .Vj'f2 'iVd8 22.�hl and White has good play against the king with l:rg 1 and later f 4-fS ;
B2) 1 2 .tlJh4 is the best way to eliminate the central knight and also to gain a few tempi : 1 2 ... �xh4 1 3.�xd5 �xdS 1 4 . .UxdS �e7 1 5 .tlJc3 CiJc6 1 6.�f4 0-0
Analysis d iagram
So far things were pretty obvious, but now White has a crucial choice to make:
B2 1 ) 1 7.e3N 'iVb7 1 8.l:Ih5 ! Suddenly changing plans with an extravagant de-

C hapter 8 : 1 0 . ld'.d l Vi'c8 l l . a 3 - Mino r L ines
cision. The rook turns to the black king, vacating its square for the knight at the same time. The standard 1 8 . .l::i.ad l gives Black time to organize his defence: 1 8 . . . .i:lad8 1 9 .l::rhS (repeating the same plan, as before) 1 9 . . . d6 2 0 .ttJds °i¥d7 0 2 J .jixh6 gxh6 22 .I:i'.xh6 fS 23 .'iVc3 tbeS 24.f4 �g7 (this intermediate move solves Black's remaining problems) 2 5 .l:rh3 'l!He60 and Black holds on. 1 8 ... .llad8 1 8 . . . d6 1 9 .ttJds ttJes 20 .'iVe4�. 1 9.tiJdS It is too early to sacrifice the bishop, since 1 9 .jixh6 gxh6 20 .Wk'fs �g7 2 1 .'iVg4+ jigs would probably lead to a draw only. 1 9 ... d6 20.'iVe4 Also here, 20 .jixh6 is too early : 20 . . . gxh6 2 1 .l:txh6 fS 22 .Wle2 tbeS 23 .t2Jxe7+ 'iVxe7 24 .'iYhS 'iYg7 2 5 .f4 I:i'.f6 26 . .i:lxf6 'i¥xf6 27 . fxeS dxe S = . 20 . . . 'iVd7 2 1 .jixh6 ! 'iVe6 2 1 . . . fS 22 .'l!Hc4 .J::!.f7 2 3 .jif4±.
Analysis d iagram
Black seems to be prepared for the attack, but the real thunder is still to come . . . 22.jixg?! ! Showtime1 This is probably one of the nicest moments in our book. 22 ... 'i¥xe4 2 3.jif6 A wonderful sight: Black has one extra queen in total, but he cannot avoid losing a pawn! 23 ... jixf6 2 3 . . . 'iVh7 24.tbxe7+ tbxe7 2 5 .I:ixh7 �xh7 2 6 .jixe7 . 24.t2Jxf6+ 'it>g7 25 .tbxe4;
B 2 2) 1 7.llad1 Ue8 ! The key move for Black. At first sight its importance is hardly apparent, but let's see:
B22 1 ) 1 8.ttJbs t2Jd4 1 9.t2Jxd4 cxd4 20 .lkl 'iVxc2 2 1 Jhc2 jif6 = Raijmaekers-Gurmen, email 2 0 0 9 . After White takes the pawn Black likely replies with . . . g7-g5 , when it will be problematic to find a good place for the bishop;
B222) 1 8.°iVd3 d6 ! 1 9.jixd6 jif6+2; B223) There i s no time for 1 8.e3 due
to 1 8 ... tlJb4 ! ! , which is the point of Black's plant 1 9.axb4 cxb4= Since the bishop on e7 is protected already, White is unable to get out of the pin with tempo by 20 .'iVe4. So here we see that 1 7 . . . I:!.e8 was very useful!
1 2.ttJd4! A very smart and surprising centralization, taking advantage of the pins.
1 2 ... t2Jf6 1 3.jixb7 The annoying 1 3 .'iVa4+ check is only seemingly unpleasant : 1 3 . . . <;t>f8 1 4.jixb7 'iVxb7 1 5 .ttJfs dS !N We believe that this cold-blooded move is a stronger reply than 1 5 . . . 'iY e4 (on account of his insecure king, Black rushes to trade queens) 1 6 .'iVxe4 tbxe4 1 7 .f3 tbf 6 1 8 . tbc3 tbc6 1 9 .jif4 l':td8 2 0 .e4� . Here, White was able to gain a few important tempi to complete his piece development and achieved a stable edge in KengisGalojan, Abu Dhabi 2009 . 1 6 .jigs h6 1 7.tbxe7 1 7 .°iVh4 t2Jbd 7 . 1 7 ... hxgS 1 8 .ttJxdS tlJc6 with a double-edged position.
1 3 ... 'iVxb7 1 4.ttJf5 0-0 1 5.ttJc3 Until here the play was more or less forced.
1 5 ... ttJcG This natural developing move gives White a nice tactical opportunity.
1 05
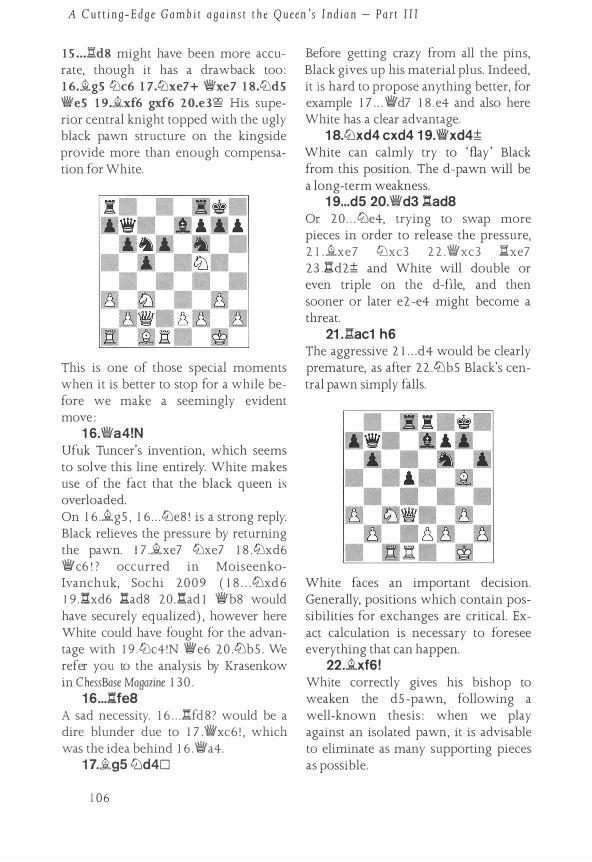
A C u t t i n g -Edg e Gam b i t a g a i n s t t h e Queen 's Ind i an - Par t I I I
15 ... �d8 might have been more accurate, though it has a drawback too : 1 6.�g5 tbc6 1 7 .tbxe7 + �xe7 1 8.tbd5 �e5 1 9.�xf6 gxf6 20.e3� His superior central knight topped with the ugly black pawn structure on the kingside provide more than enough compensation for White.
This is one of those special moments when it is better to stop for a while before we make a seemingly evident move :
1 6.�a4!N Ufuk Tuncer's invention, which seems to solve this line entirely. White makes use of the fact that the black queen is overloaded. On 1 6 .�gS , 1 6 . . . tbe8 ! is a strong reply. Black relieves the pressure by returning the pawn. 1 7 .�xe7 tbxe7 1 8 .tbxd6 � c6 ! ? occurred in MoiseenkoIvanchuk, Sochi 2009 ( 1 8 . . . t2Jxd6 l 9 .J;:i'.xd6 .l:i.ad8 20 .k!.ad l �b8 would have securely equalized) , however here White could have fought for the advantage with l 9 .tbc4!N �e6 20 .lLJbS . We ref er you to the analysis by Krasenkow in ChessBase Magazine 1 3 0 .
1 6 ... l:l'.fe8 A sad necessity. l 6 . . . �fd8? would be a dire blunder due to 1 7 .�xc6 ! , which was the idea behind l 6 .�a4.
1 7.�g5 t2Jd4D
1 06
Before getting crazy from all the pins, Black gives up his material plus. Indeed, it is hard to propose anything better, for example 1 7 . . . �d7 1 8 .e4 and also here White has a clear advantage.
1 8.t2Jxd4 cxd4 1 9.�xd4t White can calmly try to ' flay ' Black from this position. The d-pawn will be a long-term weakness.
1 9 ... d5 20.�d3 J:tad8 Or 2 0 . . . l2Je4, trying to swap more pieces in order to release the pressure, 2 l ..2.xe7 tbxc3 2 2 .�xc3 .l:lxe7 23 .l:i'.d2t and White will double or even triple on the d-file, and then sooner or later e2-e4 might become a threat.
21 . .!:lac1 h6 The aggressive 2 1 . . . d4 would be clearly premature, as after 22 .lLJbS Black's central pawn simply falls.
White faces an important decision. Generally, positions which contain possibilities for exchanges are critical. Exact calculation is necessary to foresee everything that can happen.
22 . .2.xf6! White correctly gives his bishop to weaken the dS -pawn, following a well-known thesis : when we play against an isolated pawn, it is advisable to eliminate as many supporting pieces as possible.

Chap ter 8 : 1 0 . .a'.d l i!fc8 l l . a 3 - Mino r L in es
Vassily lvanchuk
22 ... .ixf6 23.l/Wf3 lid7 Or 23 . . . .Ues 24.e3 l/Wd7 25 .I:i'.d3 ! l:i'.fs 26 .1/Wd l d4 27 . .l:r.cl ' . Everything is ready just in time, and Black cannot hold his isolated pawn.
Conclusion
24.1:1.xdS! White liquidates into a clearly better endgame.
24 ... .ixc3 25Jhd7 l/Wxd7 26.J:ixc3 �d1 + 27.�g2 l/Wxe2 28.I:i'.c7 �xf3+ 29.'it>xf3 a5 30Jk6
Black needs very good technique in order to be able to hold this.
During our editorial work, we had the naive thought that we would easily cope with the motifs discussed in this part. However, later we had to admit that both l l . . . h6 and 1 l . . . d6 require deeper analysis. When we did more research, we gained a lot of useful experience and found some blind alleys that we have also revealed to the reader in order to provide him with a better view on the logic of the possibilities in this variation.
1 0 7

Chapter 9
10.Md1 �c8 11.a3 - Main Moves
1 .d4 tt:lf6 2.c4 e6 3.tt:lf3 b6 4.g3 �a6 S.'iWc2 cS 6.dS exdS 7.cxdS �b7 8.�g2 tt:JxdS 9.0-0 �e7 1 0.�d1 'iWc8 1 1 .a3
We enter the realm of the critical moves. The most common options are the knight retreats 1 1 . . . tt:lc7 and 1 1 . . .tt:lf6. We saw in the previous chapter that Black's 1 0th move hardly solves the problems with his pieces. His b7-bishop is protected now, but he is still unable to castle. It is quite logical that he wants to put his knight on a safer place now, after which the more dynamic . . . d7 -d5 will be available. For this, 1 O . . . 'iWc8 was useful, because the queen has moved out of the vis-a-vis on the d-file.
1 .d4 tt:lf6 2.c4 e6 3.tt:lf3 b6 4.g3 �a6 S.'iWc2 cS 6.dS exdS 7.cxdS �b7 8.�g2 tt:JxdS 9.0-0 �e7 1 0.I:rd 1 'iWc8 1 1 .a3 tt:lf6
If 1 1 . .. tt:lc7 1 2.tt:lc3
Analysis diagram
1 0 8
At this point Black has three approximately equally good options : 1 2 . . . dS , 1 2 . . . tt:lc6 and 1 2 . . . 0 -0 : A) 12 ... ds 1 3 .�f4 And now: A l ) 1 3 ... d4?
Analysis diagram

Chap ter 9 : 1 0 . .l:td l �c8 1 1 . a 3 - Ma i n Moves
This too opt1m1snc try was seen in Postny-Parligras , Rethymnon 2 0 1 0 , where White missed the following nice trick: l 4.tt:lxd4!N This little sacrifice also occurred in the game, only a few moves later, when it was less effective. White counts on the bad position of the black king. 1 4 ... �xg2 1 4 . . . cxd4? runs into the spectacular 1 5 . tbdS ! tbxdS 1 6 .�xc8+ �xc8 1 7 .�xdS and the rook on a8 is captured. 1 S .tbfs �c6 1 6 .tbe4! tbbs 1 7 .tbxg7+ �f8 1 8.�h6+- Black is playing practically without his two rooks, while his king is also in huge danger;
Al ) 1 3 . . . 0-0 1 4.�xc7 �xc7 1 5 .tbxd5 After 1 5 .l:rxdS tbd7 1 6 . .l::!.dl i:Iad8 1 7 .1:!.ad 1 a6= Black equalized without problems in Gelfand-Z. Almasi, Lugo 2009 . 1 5 ... �xd5 1 6 .lhd5 tbc6 Both sides have achieved what they wanted to achieve : White has regained the pawn, while Black has finished his development. 1 7.l:'!adl a'.ad8
Analysis d iagram
1 8.e4! Frankly, this variation upset me a little, since despite all of our efforts the resulting posltlons seemed very drawish. After many attempts we came to the conclusion that White has to keep at least a pair of rooks on the board, and the only way to accomplish that is with the text move. However
simple the position looks, it is in fact quite complex. These analyses have been elaborated upon with the kind cooperation of grandmaster Laszlo Gonda. l 8 .e3 is too positional, giving Black the chance to trade all the rooks: 1 8 . . . �xdS 1 9 .hlxdS l:ld8 20 .tbd2 bS with an equal position in Prusikin-Roser, Mitropa Cup, Chur 20 1 0 . 1 8 ... g6 Black opens the back rank and takes control of the weak fS -square. l 8 . . . �f6 was a very tempting option, especially since White has weakened the centre with e3 -e4, but: l 9 .b4! (it is possible to overlook such a dynamic reaction) 1 9 . . . �e 7 20 .�h3 ! (White forces the exchange. He will be able to transfer his knight to the centre afterwards) 2 0 . . . .l:IxdS 2 I .exdS tbeS 22 .tbd4. The position contains many more alternatives for the white side, since his knight is ready for a jump to bS or fS . 1 9 .h4 We can do the same in more ambitious style. Now it is hard to guess whether White wants to continue with h4-h5 or with the less concrete �h3 . 1 9 .. Jlxd5 Trying to reduce the tension. 20.exd5 tbe5
Analysis diagram
2 1 .tbd4! This is one of the hidden tricks in this structure. Black covers one weak light square (fS ) , but there are still other ones on the queenside. 2 1 .. . .l:!.dS 22.l:.el �f6 Threatening to ' trade' with the foxy
1 09

A Cu t t i n g - Edge Gam b i t a g a i n s t th e Qu een ' s I nd i an - Par t I I I
23 . . . tlld3 . 23.Se2 !;!; White's position is preferable due to his space advantage owing to the handsome guy on dS . Basically, two plans are available to create an outpost on c6 : chasing away the eS -knight with f2-f4 or preparing another passer with b2-b4-b5 ;
A3) 1 3 .. . tt:Jba6 An ugly move, but at least it thematically continues development. 1 4.�a4+ This points out the drawback of Black's last move. The a4-e8 diagonal has become weaker.
A3 1 ) The pretty ugly 1 4 ... 'it>f8?! was seen in Arnn Prasad-Melkumyan, New Delhi 2008 . White could have punished Black's mistake with 1 S .b4!N. Again we have to open the position, whatever it takes. 1 S ... �f6 After 1 5 . . . cxb4 1 6 .axb4 tllxb4 1 7 . e4 ! dxe4 1 8 .tlleS tlle6 1 9 . tllxe4 i White has wonderful piece play for the pawns . 1 6 .l:!.ac l d4 ( 1 6 . . . �c3 1 7 .l::c3 tlle6 1 8 .�h3±) It might seem that Black has consolidated his position, but. . . 1 7.bS ! This forces the knight back, after which its mate on c7 will be less well protected. 1 7 ... tllb8
Analysis d iagram
1 8.tllxd4! A great discovery, destroying the black pawn chain at the right time. 1 8 ... �xg2 After 1 8 . . . �xd4 1 9 .tlle4+it is impossible to defend the d6-square and the �d4 at the same time. 1 9 .@xg2 �xd4 1 9 . . . cxd4 20 .tlle4 �b7 2 1 .f3
1 1 0
tlle6 2 2 .tlld6+- . 20.�xc7 �xc7 2 1 .tlldS The beginning of a tactical sweep. 2 1 . . . �eS If 2 l . . . �b7 22 .l:rxd4 cxd4 2 3 .�b4+ Wg8 24.l::c8+ �xc8 25 .tlle7 + wins in style. 22.�xd4 Right now Black might start to understand the pressing problem of his back rank. 22 ... tllc6 23.l:!.d3 tlld4 24.tllc3 �f6 24 . . . tllxe2 2 5 .tllxe2 �xe2 2 6 .i:ie3+-and �e4 comes next. 25.�dl ± This perfect example is from Sukhonos-De Blois Figueredo, email 2009 . White will smoke out the d4-knight with e2-e 3 , subsequently he will attack Black's weaknesses on the seventh rank. The h8-rook is still gasping for air . . . ;
A32 ) Certainly 1 4 . . . 1l!!Yd7N would have been much more natural than the king move : 1 S .1l!!Yxd7+ @xd7 1 6.tllxdS tllxdS 1 7 .e4 �d6 1 8 .�xd6 'it>xd6 1 9.exdS;!;
Analysis d iagram
White has a strong passed pawn and the black king is not the ideal blocking piece. Besides, his knight on a6 also stands pretty unfortunately. There are many possibilities to annoy Black, for instance b2-b4, making the d4-square free for the knight, or tllf3 -g5 -e4.
B) 1 2 .. . tllc6 1 3 .�f4 At this stage we will consider 1 3 . . . 0-0? ! and 1 3 . . . tlle6 :
B 1 ) 13 . . . 0-0?! It is very surprising that after such a natural move Black

Chap t er 9 : 1 0 . .l:l'.d l \W'c8 1 1 . a 3 - Ma i n Moves
could already be in trouble ! 14.�xc7 ! A fine decision. White gives the bishop, enabling both of his knights to join the action with tempo. 1 4 ... Wixc7 1 5 .tLlb5 Wids 1 S . . . Wic8 1 6 .tLld6 �xd6 1 7 .l:ixd6i with pressure on the d-file. 1 6 .tLle5 ! ttJxe5 1 7 .�xb7 .l:i'.b8 1 8.�e4 So far the play was quite forced, but now Black has to decide which pawn he keeps. 1 8 .. . a6 1 8 . . . h6 ! 7 1 9 .tbxa7 bS 20 .tLlc6 tLixc6 2 l .�xc6 d6 2 2 .b3 �f6 2 3 .l';1a2:t. White's a-passer will demand the enemy's attention, and his bishop is also much stronger. 1 9 .�xh7 + ! 'itih8
Analysis diagram
20.l::[d5 ! !N This clinical move refutes the whole line ! White transfers his rook to the kingside. After 20 .'!Wfs g6 2 1 .'!WxeS+ �f6 22 .'!Wf4 axbS 23 .'!Wh6 �gs 24.'!Wh3 Wg7 2 S .�xg6 ! 'itixg6oo the game went really crazy in Sargissian-Grischuk, Dresden ( ol) 2008 , commented by Igor Stohl in ChessBase Magazine 1 2 8 . See Game 7 . 20 ... ttJg4 20 . . . d6 , trying to capture the bishop, fails to 2 1 .tLlc3 g6 22 .f4 �xh7 (after 22 . . . ttJg4 23 .�xg6 �g7 24.�fs tLle3 2 S .'iVd2 tLlxdS 2 6 .tLlxdS i . White has great pieces and many pawns against the 'naked' black king) 2 3 .fxeS Wic7 24.l:iad l .blbd8 2 S .Wia4 ! i . Black is very passive, and he will have a lot of trouble avoiding the penetration by .bld7 . Into the bargain, White has
tLlc3 -e4 in order to increase the pressure. 2 1 ..t!.h5 tLlf6 22.llh3 axb5 Up to here the play was quite direct, but now White continues with a quiet move : 23 . .tldl !
Analysis d iagram
An unusual sight : Black is a piece up, but he is practically in a zugzwang position. The main threat is 24.l:i'.xd7 . 23 ... d 5 23 . . . g6 24.'!Wc 1 1 ( ' If the door is closed, use the window! ' , as the saying goes. The queen finds another route to the king) 24 . . . tLlg4 (24 . . . tLlhS only temporarily solves the problems: 2S . .!:rdS ! (the right moment to connect the second rook) 2 S . . . Wg7 26 .a'.hxhS gxhS 2 7 .�xhs� and 'nothing's gonna stop us i ' ) 2 S .�xg6+ Wg7 2 6 .�fs �gs 2 7 .i:[h7+ <Ji?g8 2 8 .f4 �f6 29 . .1.':Ihs+- . White wins back the piece and then wins the game. 24.�e4+! This is the accurate order. 24 ... Wg8 25 .lhd5 !
Analysis diagram
1 1 1

A Cu t t i n g - E dge G o m b i t a g o i n s t the Qu een 's I n d i an - Par t I I I
The rook tries to divert the knight from the defence:
B l l ) 2S ... �d6 26.�h7+ @h8 The king might get bored with this repeated tango. 27.�d3 �e7 If 2 7 . . . c4 2 8 .�f3 (coming closer step by step) 28 . . . �e? 29 .l:idhS ! 'Knock-knock-knocking on heaven's door . . .' 29 . . . g6 3 0 .�xg6+ @g7 3 1 .�b l .l:Ig8 32 .�fS+- and even the greatest escape artist would not be able to get out of this position alive. 28 . .b!.xd6± White is already a pawn up and b5 may be next. Appetite comes while eating;
B l 2) 25 ... tt:'ixdS? fails to an immediate mate after 26.�h7 + @h8 and now 27 .�g8+ ;
B 1 3 ) 2S . . . � e 8 2 6.�h 7 + Wh8 2 7.UdhS ! We can give one of the two. 2 7 ... tllxhS 28.i::!.xhS g6 29.�c3+ f6 30.�xg6++-. B2) 1 3 ...tlle6 1 4.e3 0-0
Analysis d iagram
1 S .�d6 Here we found a novelty that will also be worth a try : l 5 . tlld5 ! ?N l:.e8 1 6 .tlld2 tllxf4 1 7 . gxf4 �f8 l 8 .tlle4§? with fully-fledged play for White.
B2 1 ) 1 S ... �d8 1 6.tllh4 The knight is untouchable, because the rook would hang on f8 . 1 6 ... g6 1 7.�xe7 �xe7 1 8.tllds �d8
1 1 2
Analysis d iagram
We have followed the game PlompLiebert, email 2009 . Here it is best to weaken the black fortress with 1 9.�c3N. This looks the most natural to us. 1 9 ... f6 20.l:.d2 lif7 2 1 .:tadl :tc8 22.f4 fS Otherwise White plays f4-f5 himself 23 .tllf3 d6 24.h4§? The black king has become weaker and weaker, while the pressure is j ust getting heavier. White has regrouped his pieces on absolutely ideal positions, and Black can hardly make a move ;
B22) We also examined the tricky 1 S ... tt:'icd4 1 6 .tllxd4 tllxd4 1 7.exd4 �xd6 1 8 .�xb7 �xb7 1 9 .dxcS and now:
B 2 2 1 ) 1 9 . . . �eS 20 .cxb6 axb6 20 . . . �xc3 hardly leads to an equal position, because the black pawns remain very vulnerable : 2 l .�xc3 axb6 22 .�d6±. 2 1 .tlldS �fe8 22.l:!.ac l ;!;
Analysis diagram

Chap ter 9 : 1 0 . 1::\d l Yi'c 8 l l . a 3 - Ma i n Moves
White has a 'monster' on d5 , and he controls the important files as well. The pawn surplus on the queenside is also in White's favour;
B 2 2 2) 1 9 ... �xc5 Black has succeeded in exchanging many minor pieces while keeping his material plus. Nevertheless, there are still enough resources for White: 20.b4 j;_e7 2 1 .tlldS Everything by force. The white pieces improve their positions with tempo. 2 1 ...J;_ds 22.�e4 �c6 23 .l:!.ac l V/Ve6 24.�f3;!; Black is completely passive, White's central cavalry is again the ' jewel' in his position. C) 1 2 ... 0-0 Here, like above, we pro
pose two bishop moves: 1 3 .j/_f4 and J 3 .j/_g5 ! ? . C 1 ) 1 3 .�f4 t2Je6
Analysis d iagram
We follow the game StefanovaMkrtchian, Jermuk 20 1 0, but here the Bulgarian ex-World Champion went completely wrong with l 4.J;_d6 and lost the game later on. She should have chosen the natural 1 4.tiJdS !?N j/_xd5 1 5 .tl.xdS . White has gone for the light-squared bishop, thus he can create more pressure on the long diagonal. 1 5 ... ttJxf4 If 1 5 . . . tbc6 l 6 .j;_e5 , taking control over d4. If it is left untouched, the bishop will run back to c3 , keeping an eye on the other diagonal. So,
l 6 . . . t2ixe5 1 7 .t2ixe5 d6 l 8 . tbc4�. 1 6.gxf4 t2Jc6 1 7.tl.ad1 � c7 1 8 .e3 llad8 The last moves by both sides were pretty logical. Now White has to improve his kingside pieces. 1 9 .tiJd2 d6 20.tbe4� with great play for the pawn;
C2) 1 3 .j/_gS ! ? also comes into serious consideration, as it practically forces Black to weaken his kingside: 1 3 ... f6 1 4.j/_f4 tlle6 1 5 .�d6 Again the bishop occupies the d6-square. 1 5 .e3 seems to be a bit slow: 1 5 . . . J::!.f7 l 6 .�d2 tbc6 1 7 .l:iad l j/_f3 with an open battle. 1 5 ... J;_xd6 1 5 . . . tbc6 would allow the white knight to join the action: l 6 .t2ib5 I:!'.e8 ( 1 6 . . . j;_a6 J 7 .j/_xe7 tbxe7 1 8 .tbd6 �c7 l 9 .tbh4 .l:iab8 20 .e3;\; with a strategic advantage) 1 7 .j;_xe7 .i::!.xe7 1 8 .tbd6 �c7 1 9 .b4g?.
• •
Analysis diagram
White has full compensation for the pawn. His knight occupies a powerful outpost on d6, the rooks create pressure on the c- and cl-files. The position can be slowly improved with e2-e3 and, later on, tiJh4. 1 6.lhd6 tbc6 1 7 .I:!adl t2Jcd4 Black understandably intends to get rid of as many pieces as possible. In case of 1 7 . . . .l:If7N 1 8 .e3 t2Ja5 1 9 .tbe4 l::!.b8 20 . .l::!.6d2 �xe4 2 l .'i¥xe4�, White's active pieces, in combination with the weak light squares in Black's camp, en-
1 1 3

A C u t t i n g -Edge G a m b i t a g a i n s t the Qu een ' s Ind i an - Pa rt I I I
sure him reasonable compensation -�h3 might be an option to increase the pressure in the future. 1 8.tt:lxd4 tllxd4 1 9.'i¥d3 �xg2
Analysis d iagram
C2 1 ) 20.�xg2 'i¥b7+ This all happened in Tritt-Slawinski, email 2 0 1 0 . Here we found an extraordinary reply : 2 1 ..tl.d5 ! Covering the diagonal, allowing the king to stay on g2 to support the chasing plans with f2-f3 followed by e2-e3 . 2 1 .. . .!ladS 22.f3 l:rfe8 23 .e3 tllc6 24.tt:lb5 .ld.e6 25.'i¥c4gg Thus, White could have posed further problems to Black. The knight will gracefully nestle on d6;
C22) 20.'i¥c4+!?N This intermediate check is our discovery. It is pretty unpleasant. Black has to continue very accurately in order to hold the balance. 20 ... .l::rf7! A surprising reaction: the rook will play an important part in the defence of the d7 -pawn. Here is an example of how easy it is to go wrong for Black in this line : 20 . . . �h8 ? ' 2 1 .�xg2 .i:re8 22 .e3 tt:lc6 23 .�d5 tt:le5 24.h3 i . White takes control over the g4 square, so f2-f4 will be available next. After this, the invasion along the d-file is unstoppable. 2 1 .�xg2 'i¥b7+ 22.'it>gl .Se8 23 .b4 f5 ! Another difficult-to-find reply. Black tries to create some counterplay. 2 3 . . . tt:le6 would be too greedy and
1 1 4
too passive . After i t , the subtle 24.M6d2 !;\; ensures an advantage. The rook hands over its place to the knight, and there are three pieces that may be able to make use of the square d6 . 24.bxc5 bxc5 25 .lldsgg
Analysis d iagram
Black has to find a couple more precise moves to equalize completely.
1 2.�gS
We should mention that all of the first 6 games played from this position in 2008 were won by White! We would like to emphasize the importance of accuracy in the move order. Starting with 1 2.tt:lc3 allows Black a perfect occupation of the centre : 1 2 . ..d5 1 3 .�g5 tt:lbd7 1 4.e4 1 4 .�h3 ! ?N is an old discovery we made with grandmaster Farago : 1 4 . . . 'i¥c6 1 5 .tt:lxd5 tt:lxd5 1 6 .�xe7 �xe7 1 7 .J:1xd5 'i¥xd5 1 8 .:a.d r 'iVxd l +

Chap t e r 9 : 1 0 . l:td l ifc 8 1 1 . a 3 - Ma in Moves
Ivan Farago
1 9 .1/Wxd l l':i.hd8oo. 14 ... d4 1 5 .e5 ! Add-ing some ' cocoa' . 1 5 ... <1Jxe5 1 6 .<1Jxe5 .ixg2 1 7 .'i¥a4+ <1Jd7 and now:
A) 1 8 .\t>xg2 'i¥b7+ This move, which is our improvement on Anka's analysis in Yearbook 89 , seems to solve everything. 1 8 . . . .ixg S 7 1 1 9. <1Je4;!; was given by Anka. 1 9.f3 .ixg5 20.l::te l 2 0 .<1Je47 7 .ie7 . Now White has no time for l:i:el due to . . . b6-b5 . This i s the major difference with Anka 's line. 20 . . . 0-0 2 1 .<1Jxd7 dxc3 22.<1Jxf8 cxb2 23 . .tees lhe8 24.'iVxeS 'i¥e7 After the big give and take, the picture becomes peaceful. 2S.'1Wxe7 .ixe7 26.�b l Wxf8=;
B) 1 8 . .ixe? \t>xe7 1 9 .l::te l <1Jxe5 20 . .llxe5 + Wf8 2 1 .@xg2 dxc3 22.bxc3 g6 23 .J:l.ae1 g? and White soon had to content himself with a draw in Kramnik-Leko, Moscow 2008 .
After the text move, Black has a wide range of alternatives: 1 2 . . . 0-0, 1 2 . . . <1Jc6, 1 2 . . . dS , 1 2 . . . .ie4 and 1 2 . . . h6.
1 2 . . . hG A logical continuation. Black intends to get rid of the pin, and furthermore to gain the bishop pair.
A) 1 2 ... 0-0 is one of the most evident deviations. 1 3 .<1Jc3 At this stage we must consider 1 3 . . . l':i.d8 and 1 3 . . . dS .
A l ) 13 . . . h6 1 4 . .ixf6 .ixf6 1 5 .<1Jd5 transposes to our main line 1 2 . . . h6 ;
A2) 1 3 . . . l::rds 1 4.tt::lh4 A typical manoeuvre. White is trying to trade bishops in order to take firmer control of the important dS -square. Besides, this knight manoeuvre also creates a lot of danger for Black. 14 ... g6 Black noticed our idea. A pity. On 1 4 . . . .ixg2 , l S .<1JfS ! is an important intermediate move. 1 5 . . . <1Jc6 1 6 .<;;t>xg2 .l:.e8 ( 1 6 . . . 'WVb7 1 7 .e4 d6 1 8 .WV a4 'it>f8 1 9 .l:Iac 1 ;!:; was played in Turgut-Sabaev, email 2009 . The posrnon speaks for itself) 1 7 .@g l 1 ;t . A wise prophylaxis, moving the king from the diagonal. Black had problems with the organization of his pieces in F. Atakisi-Hitzegrad, email 2009 .
Analysis diagram
Now how to continue? 1 5 .<1Jf5 ! ! 'Dach! ' , as the Germans would say. This brilliant sacrifice blows Black's fortress apart. 1 S . .ixf6 was also promising : 1 S . . . .ixf6 1 6 .tt:Jds .ixh4 1 7 .gxh4 .ixdS ( 1 7 . . . <1Jc6 1 8 .b4-+) 1 8 . .ixdS <1Jc6 1 9 .hS <1Je7 . Black should give some material back as he urgently needs to defend his king. Two games reached this position, but for some reason White refrained from grabbing the
1 1 5

A C u t t i n g -Edg e G amb i t a g a i n s t t h e Qu een 's I nd i an - Par t I I I
rook in both of them. After 20 .jlxa8 �xa8 2 l .b4 d6 22 .bxcS bxcS 23 .�c4 White is an exchange up and has good winning chances until the a-pawns remain. If Black tries for counterplay by . . . tllfS , we can instantly occupy the long diagonal with � d S , followed by ki.ab l -b7 . 1 5 ... gxf5 1 6 . .t!.d6 ! ! It seems that somebody has drunk (too much) blood! Is this a mouse slip? But j oking aside - the rook constitutes a perfect blockade of Black's queenside pieces and diverts the last defensive piece, the e 7 -bishop. 1 6 . . . jlxg2 1 6 . . . jlxd6 1 7 .jlxf6 (now Black is faced with the prospect of the killing manoeuvre �d2-g5 ) 1 7 . . . tllc6 1 8 .�d2 tlld4 ( 1 8 . . . tlleS 1 9 .�xd6) 1 9 .'iYgs+ Wf8 2 0 .jlxb7 'i¥xb7 2 1 .jlxd8 tlle6 2 2 .'i¥h6+±. White has got back more than enough material . The rest is just a technical task. 1 7. �x.f5 !
Analysis diagram
We saw all these moves in the masterpiece Mignon-Satici, email 20 1 0. Now the only way for Black to strengthen his play was 1 7 ... jlxd6 1 8.jlxf6 tlJc6 Or 1 8 . . . 'i¥c6 1 9 .'iYgs+ Wf8 20 .�dl and the attack crashes through. 1 9. � g5 + Wf8 20.tlJb5 The knight joins the assault. 20 ... �8 2 1 .ktdl While White brings the last piece to the battleground, the a8-rook is still a silent 'kibitzer ' . 2 1 ... jle7 22.�g7+ We8 23.'li'g8+ �f8 24.tlJd6+
1 1 6
�xd6 25 . .i::lxd6 jle4 26.�8! A smart move to finish witl1. It is not urgent to take a passive rook. The upcoming trick is just marvellous! 26 ... ll'.ac8 2 6 . . . jlg6 2 7 .f4�. 2 7.lhc6 ! jlxc6 2 7 . . . dxc6 28 .jlxd8 �xd8 29 .'iYes++-. 28.jle7!
Analysis diagram
A cute example and one of those rare occasions where we do not need many pieces to give mate.
A3) 1 3 ... d5 1 4.tlJh4!N In our opinion, this aggressive move gives the strongest support to White's attacking plans. The knight opens the diagonal for the fianchettoed bishop and will appear on fS very soon. 1 4 ... Ii:e8 1 4 . . . g6 would weaken the dark squares around the king : 1 5 .jlxf6 jlxf6 1 6 .tllxdS jld8 1 7 .tllf3 t and Black's kingside remains vulnerable. Again he has six ( ! ) pieces on his back rank. 1 5 .tlJf5 t2Jbd7
Analysis diagram
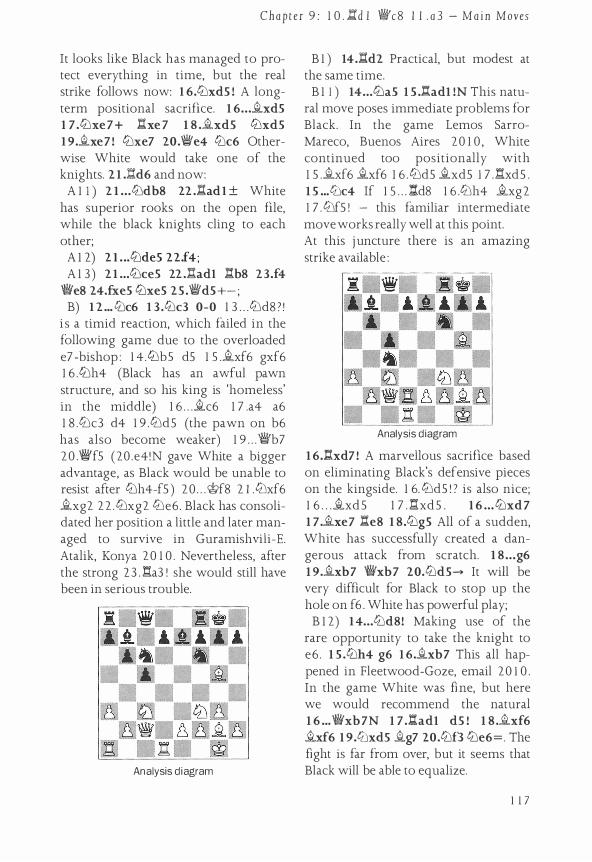
Chap t e r 9 : 1 0 . l::rd l ifc8 l l . a 3 - Ma i n Moves
It looks like Black has managed to protect everything in time, but the real strike follows now: 1 6.ti:JxdS ! A longterm positional sacrifice. 1 6 ... �xdS 1 7 .tbxe 7 + .a'.xe 7 1 8 .�xdS ttJxdS 1 9.�xe7 ! tbxe7 20.'i¥e4 ti:Jc6 Otherwise White would take one of the knights. 2 1 .gd6 and now:
A l 1 ) 2 1 ...tlJdbS 22 . .a'.adl ± White has superior rooks on the open file, while the black knights cling to each other;
A l 2) 2 1 . .. tlJdeS 22.f4 ; A 1 3) 2 1 ...tlJceS 22 . .l:Iadl .l:!.b8 23.f4
'!Wes 24.fxes tt:JxeS 25 .'iYds+-; B) 1 2 ... tlJc6 1 3 .ti:Jc3 0-0 1 3 . . . ti:Jd8 ? '
i s a timid reaction, which failed in the following game due to the overloaded e7 -bishop : 1 4.tt:Jbs dS 1 5 .�xf6 gxf6 l 6 .tbh4 (Black has an awful pawn structure, and so his king is 'homeless' in the middle) l 6 . . . �c6 1 7 .a4 a6 1 8 .ti:Jc3 d4 1 9 .ti:JdS (the pawn on b6 has also become weaker) 1 9 . . . '!Wb 7 20 .Vi'fS (20 .e4!N gave White a bigger advantage, as Black would be unable to resist after ti:Jh4-fS ) 20 . . . �f8 2 l .ti:Jxf6 �xg2 22 .ti:Jxg2 ti:Je6. Black has consolidated her position a little and later managed to survive in Guramishvili-E. Atalik, Kanya 20 1 0 . Nevertheless, after the strong 23 . .l:ra3 ! she would still have been in serious trouble.
Analysis d iagram
B 1 ) 14 . .a'.d2 Practical, but modest at the same time.
B 1 1 ) 14 ... tt:Jas 1 s . .!ladl !N This natural move poses immediate problems for Black. In the game Lemos SarroMareco, Buenos Aires 20 1 0 , White continued too positionally with 1 S .�xf6 �xf 6 1 6 . ti:JdS �xdS 1 7 . .i:IxdS . 1 S ... ti:Jc4 If 1 5 . . . i:Id8 1 6 .ti:Jh4 �xg2 1 7 . ti:JfS ! - this familiar intermediate move works really well at this point. At this j uncture there is an amazing strike available :
Analysis d iagram
1 6 . .a'.xd7 ! A marvellous sacrifice based on eliminating Black's defensive pieces on the kingside. 1 6. ti:JdS ! ? is also nice; 1 6 . . . �xdS 1 7 . .a'.xdS . 1 6 ... ti:Jxd7 1 7 .�xe7 a'.e8 1 8.ti:JgS All of a sudden, White has successfully created a dan -gerous attack from scratch. 1 8 ... g6 1 9.�xb7 '!Wxb7 20.ti:JdS__,. It will be very difficult for Black to stop up the hole on f6 . White has powerful play;
B 1 2) 1 4 ... ti:JdS! Making use of the rare opportunity to take the knight to e6 . 1 S .ti:Jh4 g6 1 6.�xb7 This all happened in Fleetwood-Gaze, email 20 1 0 . In the game White was fine, but here we would recommend the natural 1 6 ... '!Wxb7N 1 7 .l:i.adl dS ! 1 8 .�xf6 �xf6 1 9.ti:JxdS �g7 20.ti:Jf3 tbe6=. The fight is far from over, but it seems that Black will be able to equalize.
1 1 7

A C u t t i n g -Edg e Gamb i t a g a i n s t the Qu een 's Ind i an - Pa rt I I I
B2) 1 4.e3 !N We tried several moves here, but in the end we came to the conclusion that since there are no concrete tricks in this position, it is necessary to cover the d4-square with the pawn, liberating the f3 -knight. 1 4 ... h6 1 4 . . . ttJaS 1 5 .l:!.ac l (preparing b2-b4 since the black queen stays on the file) 1 5 . . . °i¥d8 1 6 .'1:lh4 �xg2 1 7 .Wxg2t . This is the moment when we can comfortably recapture with the king, because there will not be any annoying checks on the long diagonal. 1 S .�xf6 �xf6 1 6.'1:le4! On this special occasion it is better to place the knight on e4 than to dS . 1 6 ... �e7 1 6 . . . 'iJJJ/d8 1 7 .'1:ld6 .l:!.b8 1 8 .'1:lxb7 l:hb7 1 9 .'1:ld2g?. The activity of the white pieces provides more than enough compensation. 1 7 .tlJd6 Making the d6-square available for the rook in order to double on the cl-file. 1 7 . . . �xd6 1 8 . .!:i.xd6 'iJJJ/c 7 1 9 . .!lad l l:!.ad8 20.'1:lh4 The optimum way to improve our minor pieces. 20 ... tlJe7 20 . . JHe8 2 1 .'iJJJ/a4. 2 1 .�xb7 'iJJJ/xb7 22.'iJJJ/a4t White has a very comfortable position; he is close to grabbing the d7 -pawn, although keeping the pressure might also be a good decision.
C) 1 2 ... ds
Analysis diagram
Anand's move, which was criticized by grandmaster Postny in ChessBase Magazine
1 1 8
1 2 6 . Black neglects his development. Before giving our suggestion, we would like to present the previous developments in this line.
C 1 ) 1 3 .�xf6 All four games in the database continued with this move, with an almost perfect score for White. But we made a comprehensive analysis, and our improvement on one of the 'sidelines' might pose some problems. 1 3 ... �xf6 1 4.'1:lc3 ..ixc3 1 S .bxc3 Please note : this line is for players who are insensitive to pawn structure considerations. White's structure is currently far from nice, but he compensates for it with active piece play. 1S ... 'ifc7 This natural reply occurred in a correspondence game, which attracted our attention. After l 5 . . . '1:la6 l 6 . '1:lh4 g 6 1 7 .�xdS �xdS 1 8 ..lhds 0-0 1 9 . .i::tad 1 '1:lc7 20 . .l:i.d7t Black was under pressure in Topalov-Anand, Bilbao 2008 . For further information, please check Postny's analysis and our game section at the end of this chapter. 1 6.tlJgS '1:ld7 1 7 .�xdS �xdS 1 8.�xdS '1:lf6 19 .J:tfs ! l 9 .'iJJJ/a4+ �f8oo. Now: C l 1 ) 1 9 ... 'iJJJ/e7? It is hard to under
stand this move. White played the game really confidently from here: 20 . .!ldl h6 2 1 ..l:i.xf6 ! gxf6 2 1 . . .hxgS 2 2 .'iJJJ/a4+ �f8 2 3 . .i::txb6 'iJJJ/xe2 24 . .l:i.bd6± . 22.tLlh7
Analysis d iagram

Ch ap t e r 9 : 1 0 . ltd 1 'iV c 8 1 1 . a 3 - Main Moves
An entertaining picture: the black king is caught in the middle by an extraordinary motif. 22 . . . �e6 2 3 .l::!:d3± Kopasov-Kulczycki , corr. 2 0 1 1 ;
C l 2) 1 9 ... 0-0-0!N We think that this surprising move is the most challenging one in this variation. At first sight it looks a bit dubious that the black king hides behind an open pawn structure. However, we could not find any effective plans to break open Black's queenside. After the insertion of the advance a2-a4 with . . . a7 -aS the position runs out of dynamics, besides the white rook is pretty misplaced on fS .
Cl) 1 3.llld4!N We suggest this attractive move as an early improvement. White already tries to seize the initiative. 1 3 . . . llle4 1 3 . . . lllc6 1 4. lllfs llld40 1 S .lllxd4 cxd4 l 6 .�a4+ �d7 1 7 .�xd4 0-0 1 8 .lllc3 h6 1 9 .�e3:t and White has created a good blockade already, with pleasant play against the weak isolated pawn; and the ultra-naive 1 3 . . . cxd4? runs into 1 4.�xc8+ �xc8 1 S .�xf6 �xf6 1 6 .�xdS , winning an exchange. 1 4.�xe4! Taking the right piece. 1 4.�xe? is less effective due to 1 4 . . . cxd4 1 S .�xc8+ jlxc8 1 6 .�b4. This middlegame appears to be in White's favour, but regaining the gambit pawn costs valuable time. 1 6 . . . �e6 ( 1 6 . . . lllc6 allows 1 7 .llldl ! ) 1 7 .l::txd4 lllc6 1 8 .l:f.d l lllxb4 1 9 .axb4 We? and Black has reasonable chances of a draw. 14 ... dxe4 On 1 4 . . . �xgS ? 1 S .lllf5 1 0-0 l 6 .llld6 wins material. 1 S .lllbS f6 1 6.�f4 0-0 1 7.�d6! Vacating the weak d6-square for the knight. 1 7 ... �xd6 1 7 . . . lllc6 1 8 .�xe? lllxe7 1 9 .�c4+ Wh8 20 .llld6 WHb8 (the queen tries to evade the forks. In the event of 20 . . . �c? , 2 1 .lllf?+ Wg8 22 .llld8+ would be really irritating ' tiki-taka' play: 2 2 . . . Wh8
2 3 .llle6 �es 24.lllxf8 l:rxf8 2 5 .lllc3±) 2 1 .lllc3 h6 22 .�e6 lllg6 2 3 .lllcxe4 i .
Analysis d iagram
White has finally retrieved the pawn. His pieces are still very active. Later on he can double on the cl-file or advance on the queenside with b2-b4. 1 8.lllxd6 �c7 1 9.lllc3 and now: C2 1 ) 1 9 ... e3 20.lllcbS ! Our king
safety is of secondary importance, if we take into account that this move wins an exchange practically by force. 20 ... exfl+ 2 1 .Wxfl �e7 The only place for the queen. 22.lllfs �eS? This loses by force on account of a lovely queen shuffle. If 22 . . . �e4 2 3 .�xe4 �xe4 24.lllfd6± and after lllc7 the a8-rook falls. 23.lllbd6 �a6 24.�b3+ c4 2S.�f3 llld7 2 5 . . . �cs + 2 6 .e3 llld7 2 7 .llle7+ (finishing smartly) 27 . . . Wh8 28 .'ii'xa8 .l:Ixa8 2 9 .lllf?+ .
Analysis d iagram
1 1 9

A Cu t t i n g -Edg e Gam b i t a g a i n s t the Qu een ' s I nd i an - Pa rt I I I
This must be the kind of mate we all dream of during our entire career. 26.I:l.dS ! A fantastic entry. 26 ... 'MVxb2 2 7 . 'MV e4! ! Walk silently, otherwise you'll wake the children. . . 27 ... tlleS 2 7 . . . tllcs 2 8 .tlle7+ @h8 29 .V!!Vxh7+ @xh7 3 0 .�hS + . Black gets checkmated without having made any moves with his rooks. Another eye-catching finish! 28.I:l.xeS ! Bang ' 28 ... 'MVxeS 29.tlle7+ @hS 30.tllf7+ Notice that the above motif also works 'vice versa' ;
C22) 1 9 .. . �c6 20.b4; C23) 1 9 ... 'MVe7 is the only way to
hold the e4-pawn. However, it postpones Black's development. 20.b4! Obviously White has to act on the queenside. 20 ... cxb4 2 1 .axb4 e3 22.f3 tllc6 23 .tllcbS J::!.ad8 Though Black has finished bringing out his pieces, he cannot get rid of the annoying knight on d6 . Additionally, the weak a2-g8 diagonal is a big drawback in his position. 24.tllxb7 'MVxb7 2S.tlld6 t;
D) 1 2 ... �e4
Analysis diagram
Such slightly strange moves occur only in correspondence chess, but we believe that this one deserves more attention. 1 3.'MVc l !N In our opinion this is the right place for the queen, instead of disturbing the harmony among the white pieces. As an extra option, it can be quickly transferred to the kingside.
1 20
1 3 .'MVb3 tbc6 1 4.'MVe3 was seen in Nyffeler-Watson, corr 2009 , but after 1 4 . . . dS !N Black seems to be fine. 1 3 ... 0-0 1 4.tllc3 Here we will check all three plausible bishop moves :
D I ) 1 4 . . . �c6? 1 S .e4 h6 1 6.�xh6 gxh6 1 7. 'MVxh6 would be even worse for Black com pared to 1 4 . . . � b 7 , as now the bishop barricades the c6-square from his other pieces;
D2) 14 ... �b7 1S .e4! We found this to be the most powerful move. White benefits from the fact that the e7-bishop is unprotected, so the text points out the main drawback of Black's queen on c8. The engines stubbornly adhere to 1 S .tbh4, which leads to an equal endgame with correct play. 1 S ... h6 Black tries to get rid of the annoying pin. If 1 S . . . tllc6 1 6 .eS tbe8 1 7. tbdS ! (White keeps playing powerfully. One move builds on the other. The seemingly self-evident 1 7 .�h3 ! ? is met with 1 7 .. .fS !) 1 7 . . . �xgS 1 8 .'MVxgS 'MVd8 1 9 .'MVhS .l::rb8 (if 1 9 .. .f6 20 .tbf4± and White's initiative is beyond doubt. One of the finest threats is tbf3-g S followed by �dS ' ) 20 .tlle3 tbe7 2 1 . .l:id2 t and again White exerts pressure on the d-file. 1 6.�xh6! A good opportunity to snap something. 1 6 . . . gxh6 1 6 . . . tbxe4 1 7 . ttJdS ! �xdS 1 8 .l:txdS gxh6 1 9 . .a'.hS-+. 1 7.'MVxh6 tllh7 1 8.eS .!:!:es l 8 . . . 'MVc6
Analysis d iagram

Chap t e r 9 : 1 0 . !l'.d l '!Wc8 I I . a 3 - Ma in Moves
I 9 .�d6 ! (again the right method to mop up the black queenside) l 9 . . . �xd6 20 . exd6 �xf3 (otherwise <1:Jh4 would come) 2 I .�xf3 �xf3 22 .1/Wf4 �hS 23 .tlJdS <1:Jc6 24.<1:Je7+ <1:Jxe7 25 .dxe7 .l:!.fe8 26 .ld.e l +-, the kingside pawn advance will quash all Black's surviving hopes. 1 9. 'ifhs ! Stepping out of the 1/Wc6-tempo. I 9 .tt:Jds ?' is less effective, Black survives by a miracle after 1 9 . . . �xdS 2 0 .�xdS 1lW c6 2 I .1:!.d6 1lW e4. 1 9 ... �£8 2 0. tlJdS �xdS 2 1 ..!:!:xdS <1:Jc6 22.<1:Jh4 An obvious move, which increases the strength of the fianchettobishop and brings the knight to the action. 22 .J::!:ad l l:te6 23 . .!:l.xd7 'i¥e8 is less convincing. 22 ... I:re6 A last-minute aid. 23.�e4 Ilh6 24.'i¥g4+ Wh8 25.tt:Jfs The position is getting nicer and nicer for us with every move. 2S ... .!::i.g6 26.'ifhs 'li'e8 2 7.f4� It's unlikely that Black can stop this huge attack;
D3) 1 4 ... jLxf3 1 S . .§l.xf3 <1:Jc6
Analysis diagram
D3 1 ) 1 6.tlJbS !? forces Black to give back the pawn: 1 6 ... dS The incurious 1 6 . . . h6 runs into 1 7 . <1:Jd6 ! jLxd6 1 8 .�xf6 1/Wc7 1 9 .1/Wd2:t . 1 7 .jLxf6 �xf6 1 8 . .§l.xdS and White is slightly better, as he has more active pieces. The play might continue as follows : 1 8 ... a6 1 9.<1:Jd6 'tl!Yc7 20.tt:le4 .§l.es 20 . . . �e7 2 I .b4! .
• •
Analysis d i agram
The position seems to be quite equal, although the white bishop can create more danger for the enemy king than its black colleague. Fortunately there is also an immediate tactical punch: 2 1 .tt:lxcS ! A shattering sacrifice out of the blue sky! White takes advantage from the fact that there is a pin on the a8-rook and the cl -queen is overloaded. 2 1 . . .bxcS 2 l . . .<1:Jd4 leads to extensive 2 2 . .!::i.xd4
simplifications �xd4 2 3 .�xa8
after 1/WxcS
24.1/WxcS bxcS and the arising endgame seems easily holdable for Black. As the position is interesting, we didn't stop our analyses here : 2 5 .�b7 �xb2 2 6 .�a2 �c l 2 7 .�xa6 l:!.a8 2 8 .�bS �xa3 (28 . . . l:ha3 2 9 .klc2 .i'.:!.a l 3 0 .�g2 �a3 3 l .l:!'.d2 is also in White's favour. The black rook is out of play) 29 .1.:rd2 . The dust has settled and it is time to cool down . 29 . . . g6 3 0 . .a.d7 .l:!.f8 3 1 . .§l.c4:t White keeps pressure on f7 , while Black's pieces are practically glued to this weakness. 22.'iYxcS a'.ac8 After 2 2 . . . l::r ad8 2 3 .�xc6 �xb2 24 . .ld:xd8 Iixd8 25 .l:!:a2 a healthy extra pawn remains for us. 23 . .§l.xc6 .§l.xb2 24 . .b!.a2 jLxa3 2 S . 'li'xa3 'li'xc6 2 6.1/Wxa6;\; Black has reasonable chances for a draw in the endgame, but White can certainly try for a win without any risk.
1 2 1

A C u t t i ng - Edge G a m b i t a g a i n s t the Qu een 's I nd i an - Par t I I I
D3 2) 1 6.b4! A s the black lightsquared bishop has disappeared, White is able to start an initiative on the queenside. 1 6 . . . cxb4 1 7 .axb4 h6 1 7 . . . a 6 1 8 . <1J a 4 VWb 7 1 9 . VW e 3 t . 1 8.�xf6 �xf6 1 9 .l:ta3! 1 9 .bS ? ! would not win material, but instead allows Black a nice trick: 1 9 . . . <1Jd4 20 .�xa8 VWxc3 ' . 1 9 ... a6 1 9 . . . l:lb8 20 .<1Jds �gs 2 1 .VWb2 bS .
Analysis diagram
Black has stopped White on the queenside and he is still a pawn up . . . 2 2 .�e4 ! ! . Preparing a lethal attack on the b 1 -h7 diagonal with the attractive manoeuvre 2 2 . . . Jae8 2 3 .�b l �. White has good attacking opportunities, as most of his pieces are ' shooting' at the kingside. 20.<1Jd5 �d8 2 1 .�e4! t An identical plan to the previous one. The black pieces are completely passive, while White can make progress on the kingside very quickly.
1 3.�xfG �xf6 1 4.<1Jc3! We believe that this is the most accurate move, targeting dS as usual. Advancing with l 4 . e4 0-0 1 S . es �e7 1 6 .<1Jc3 looks tempting - however, it is less effective : 1 6 . . . <1Jc6 1 7 .lid2 ( 1 7 . VW fS is better, though after the strong 1 7 . . . d S ! 1 8 . VWxc8 .l:Iaxc8 1 9 .<1JxdS life8 the chances are just equal) 1 7 . . . �e8 1 8 .�e l �f8 1 9 .'lWd l
1 2 2
occurred in Shulman-Cordova , Merida 2 0 0 8 , but here Black could have gone for active counterplay with 1 9 . . . <1JaS ' N 2 0 . ld'.xd7 �c6 2 1 .�d2 <1Jc4+ as indicated by grandmaster Ivan Farago.
1 4 ... 0-0 1 5.<1Jd5
Here we examine the following three replies : 1 S . . . VW d8 , 1 S . . . �xdS and the new move 1 S . . . �d8 .
1 5 ... �xd5 A) Clearly inferior was 1 5 .. . 'iVdS?
due to 1 6.<1Jxf6+ 'iVxf6 1 7 .<1Jg5 ! hxg5 1 8 .�xb7 <1Jc6 1 9 . ..ixaS �xa8 20 . .l:i:xd7 with a winning position in ValeBoreika, email 2 0 1 1 .
B) 1 5 .. . �ds 16 .i.h3 ! We are on the 1 6th move, and Black still has 6 pieces on his back rank. Do we need to say more? 1 6 .. . �eS 1 6 . . . <1Jc6 ? 1 7 .�xd7 ! . 1 7 .e4 i.c6 Overprotecting d 7 in order to be able to develop the queenside. 1 8 .<1Jd2 Since all the preparations have been made, we are ready to finally bring over the knight.
B l ) 1 8 ... �xd5 1 9.exd5 'iVc7 20.�e l ! Occupying the open file. 2 0 . . . J:!.fs 2 1 ..!:le2 2 1 .d6 ! ? is also very promising , for example : 2 1 . . . 'ii'xd6 22 .<1Jc4 'ii'c7 2 3 . liad l �f6 24 .'iVe4i . 2 1 ...d6 22 . .l:rael <1Jd7 Now, just before he can consolidate, Black meets with a tactical disaster:

Chap t e r 9 : 1 0 . 1:1'.d l �c8 l l . a 3 - Ma in Moves
Analysis diagram
23.l:Ie7! l!lxe7 24 . .!:!.xe7 .a'.ad8 25 .lile6! This is the point! Black is tied up right to left . 25 ... @h8 26.tt:'ie4!� The final blow! 26 ... fxe6 27 .tt:'igs hxg5 2 7 . . . J:i'.fS 28 .tt:'ixe6 . 28.�g6 White has sacrificed half the board to give mate, which he now successfully achieves;
B2) 1 8 ... tt:'ia6 1 9.tt:'ic4 �b8
Analysis diagram
20.tt:'ide3 ! ! A remarkable motif: White retreats his knight from the centre, and in addition sacrifices the important e4-pawn. The necessity of this weird regrouping can be explained by the threat of . . . b6-b5 followed by . . . c5 -c4 and . . . tt:'icS . Now White is ready for tt:'ic4-d6. 20 ... lilxe4 This seems to be critical. If 20 . . . tt:'ic7 2 l .tt:'id6 I!f8 22 .tt:'iefS tt:'ie6 23 .�e2i . 2 1 .�e2 A funny situation has arisen: despite having an extra pawn and the bishop pair, Black still has to overcome great confusion in his camp.
He faces threats like lilxd7 or tt:'id6, plus both his e8-rook and a6-knight are unprotected. 2 1 . .. ds 2 1 . . .lilc7 2 2 .lilxd7 lilb7 ( 2 2 . . . l:f.d8 2 3 .lilbs '&'b7 24.tt:'id2±) 2 3 .�c2 !± . 22.tt:'ixd5 lilgs 23 .lild7 Winning an exchange by force. 23 ... l!lxdS 24.l!lxe8 l!lxc4 25 .�xc4 'i¥xe8 26.�xa6 lilf6 2 7.l:Id2 Black has some compensation, he might put his bishop on d4 later on, but anyway White's chances are clearly better;
1 6.i:rxdS tt:Jc6 l 6 . . . a6 vacates the a7 -square for the rook, so it can defend the d7 -pawn from there. But this is rather a 1 00-years plan . . . 1 7 .tt:'id2 tt:'ic6 1 8 .tt:'ie4 lile7 1 9 .e3 .:l.a7 20 .J::l:ad l t . Each of the white pieces stood clearly better than their colleagues in Efremov-Krivtsov, email 2009 .
1 7 . .l::rad1 !
White has successfully doubled on the d-file, and now Black has to decide whether he wants to suffer further pressure or reduce the tension by giving the pawn back. Now we examine the moves 1 7 . . . l:td8 , 1 7 . . . �a6 and 1 7 . . . tt:'id4 . At first sight 1 7 .e3 looks like another obvious move. However, after the counter 1 7 . . . V/Vc7 1 8 . .a:ad l l:!.ad8 1 9 . .i:!.hS tt:'ie7 20 .g4 g6 ! 2 1 . .l:th6 dS<=Z the position is double-edged according to our analyses with grandmaster Farago.
1 2 3

A Cu t t i n g -Edge G a m b i t a g a i n s t the Qu een ' s I n d i an - Pa r t I I I
1 7 ... tlld4 Black tries to swap all he can, hoping that he will have good drawing chances in an endgame with opposite-coloured bishops.
A) Protecting the pawn by tooth and nail with 1 7 ... l:td8 means that Black will be suffering under pressure : 1 8.tlld2 and now: A l ) 1 8 ... tlle7 1 9.tlle4! !N A fantastic
reply based on the unfortunate configuration of the black pieces. 1 9 . .l:id6 was a typical reaction. Usually when a valuable piece is attacked, the first thing that comes to mind is to move it away This habit can mislead a player in such critical situations. After 1 9 . . . .l:!.b8 20 . .l::!'.xf6 gxf6 2 1 .tlle4 dS 22 .tllxf6+ 'it>g7 2 3 .tllxdS �e6<2 White failed to get enough play for the material in Iturrizaga Bonelli-So, Wijk aan Zee 2009 . 1 9 ... tllxdS 20.tlld6 �c7 2 1 .YlxdS .l:ff8 2 1 . . .�xd6 ? 22 .Ylxfl+ . 22.�g6!± It is always great to make such straightforward moves. White's mission is accomplished;
A2) 1 8 .. . �c7 19 .tLlc4 i.e7 20.e3t with an evident positional advantage. Mason-Dorer, email 2009 ;
A3) 18 . . . tlld4 1 9.�d3 and now: A3 1 ) 1 9 ... ld'.b8 20.e3 tlle6
Analysis d iagram
2 I .ti:Je4!? White rejected this solid move in the game Adhiban-Sethura-
1 24
man, Chennai 2008 (Game 8 ) . The reason might be that he wanted to keep the pieces on the board. After 2 1 .tllc4 �a6 , now our invention i s the showy 2 2 .Jlf3 1 !N. This is the prologue to a deep positional concept, preparing an assault against the weakest point in Black's camp, the fl -pawn, cooperating with the tlld6 by Jlh5 . If 2 2 . . . bS (22 . . . g6 2 3 .h4 and later both .i:r.d6 and tlld6 might be dangerous) 2 3 . tlld6 i . 2 1 . . . Yle7 22.l:hd7 This is the best possible deal: White has gained back the gambit pawn and has penetrated to the seventh rank as well . His light-squared bishop is still the most valuable piece in the position. 22 . . . bS 2 3 .Ylh3 �c6 24.�dS 'iYxd5 25 . .ld. l xdst with a pleasant endgame;
A3 2) 1 9 . . . tlle6 20 .tlle4 i.d4 2 1 .�c2± with wonderful play in Dunlop-Casella, email 2 0 1 1 ;
A33 ) 1 9 .. . �c7 20.tlle4 Yle7 2 1 .f4i and White's domination was perceptible in Baumgartner-Kruger, email 2009 ; B ) 17 . . . �a6 Black abandons the back
rank in order to finish his development. He will also try to trade rooks on the open d-file. 1 8.l:!.xd7 .ld.ad8 1 9.Ylh3 !
Analysis diagram
This returning motif is also very effective here. The bishop has done its work

Chapte r 9 : 1 0 . 1:!'.d l �c 8 I l . a 3 - Main Moves
on the long diagonal, so now it gets a new mission: to defend the rook.
B I ) 1 9 . . . ti:Jd4 20.ti:Jxd4 .l:l.xd7 2 1 ..ixd7 .ixd4 22.e3t Gerasimov-A. Zawadski , email 2009 . Although the position seems to be quite simple and drawish, the following example demonstrates well how complicated things still are: 22 ... .if6 23 . .ifs 'iVbs 2 3 . . . g6 ? 24 .�xg6 fxg 6 2 5 .Wixg6 + �g7 2 6 . l:rd 7 ; and fortunately the exchange of rooks is still unavailable to Black: 23 . . . .l::!.dS ? 24 . .l:!.xd8+ �xd8 2 5 .Widl �e7 26 .iYd7 �f8 27 . .ie4+- . 24.�d7! A remarkable moment. White sacrifices the bl-pawn in order to create pressure on the seventh rank. Wasting time by protecting the pawn with 24.b3 ? ! would allow 2 4 . . . l:ld8=. 2 4 ... 'li'xb2 2S.'iVc4 'iVc3 25 . . . �xa3 ? 26 . .l:!.xf7 ! . 26 . .id3 'iVxc4 2 7 . .ixc4 A funny situation: Black has a big majority on the queenside, but it is irrelevant because our bishop blockades the pawns perfectly. Besides, it also keeps an eye on f7 , glueing the black rook to its defence. 2 7 ... as 28.a4t
Analysis diagram
White has a long-term advantage; B2) 1 9 . . .lhd7 doesn't work due to
20.lhd7 �d8 2 1 .�e4t . By now we can appreciate the necessity of the move l 9 .�h3 ;
B3) We also studied 1 9 .. . c4 20.l:r7d6! .ld.xd6 2 1 .I:txd6 tt:Jas 2 1 . . . ti:JeS 22 . tt:JxeS �xeS 23 . .i:!.dS �f6 24.a4 1± (White has successfully fixed the black queenside pawns) 24 . . . l:tdS? 25 . .l:!.xd8+ �xd8 26 .'iVd2+- . After penetrating to d7 , the queen will smash everything in front of her. 22.tlJd4 .ixd4 23Jhd4 bS 24.'li'fS± , White has total domination.
1 8.tt:Jxd4 We are not against any good ideas. If there is a possibility to transpose to a favourable endgame, why should we refrain from it? 1 8. 'iY d3 ! ? deserves attention too : 1 8 . . . 'iVc7 1 8 . . . .i::!.eS l 9 .ti:Jxd4 cxd4 20 .l:rhS ! (White involves the rook in the attack while the bishop will replace it in the centre) 20 . . . .1::!.bS 2 1 .�dS �es 22 ..lheS �xeS 23 .'iYfst , the white pieces are much more active. 1 9.ti:Jd2 d6 20.e3 ti:Je6 2 1 .ti:Je4g? Brodda-Sabaev, email 20 1 0 . White has to think twice before grabbing back the pawn, as he can also keep the tension by pushing f4-f5 . Black needs to defend very accurately
1 8 ... cxd4 1 9.Wixc8 .!::!:axes 20.l:lxd7 l:Ic2
A draw was prematurely agreed here in Gomez Ledo-Corrales Jimenez, Balaguer 20 1 0 . We prefer White, so we have analysed the position further.
21 .b3 White has the better pawn structure, supported by a superior bishop.
21 ... a5 2 l .. Jhe2 2 2 ..lha?t . White's queenside majority might become very dangerous in the long term, since the promotion square a8 is covered by the big cannon on g2 .
22.Wf1 .l:re8 22 . . . .l:l.b2? 23 . .ids .
23.�f3 .l:rb2 24.:Rd3t
1 2 5

A Cu t t i n g -E dge G a m b i t a g a i n s t the Qu een ' s I n d i an - Pa rt I I I
Black remains condemned to passive defence. We can win more space with h4-h5 . The difference between the two bishops is significant.
Sargissian, Gabriel Grischuk, Alexander Dresden ol 2008 (7)
Game 7
1 .d4 tt:lf6 2.c4 e6 3.tt:lf3 b6 4.g3 �a6 5.'MVc2 c5 6.d5 exd5 7.cxd5 �b7 8.�g2 tt:Jxd5 9.0-0 �e7 1 O.I:!.d1 'MVc8 1 1 .a3
This was the actual fashion after the game Topalov-Anand.
1 1 ... tt:Jc7 1 2.tt:lc3 tt:lc6 1 3.�f4 0-0?!
An understandable decision, however, there are already more concrete motifs in the position. 1 3 . . . tt:le6 was the right continuation according to grandmaster Stohl, though we beheve that after 1 4.e3 0-0 1 5 .�d6 or 1 5 . tt:ld5 ! 7 White maintains his pressure.
1 4.�xc7 'ifxc7 1 5.tt:lb5! Stronger than 1 5 .tt:ld5 Vi'd8oo.
1 5 ... 'MVdS 1 5 . . . Vi'c8 ? ! 1 6 .tt:ld6 �xd6 1 7 .l:!.xd6i would lead to a pleasant initiative.
1 6.tt:leS 1 6 .tt:ld6 �xd6 (we didn't find anything wrong with this capture ; 1 6 . . . �a6 ! ?<2
1 26
is given by Stohl) 1 7 . .i:Ixd6 WV e7 1 8 .l:iad l .llad8<=Z .
1 6 ... tt:Jxe5 1 7.�xb7 l:!.b8 1 8.�e4 White has managed to grab the b7 -bishop quite early in the game and now he is going for the recapture of the gambit pawn.
1 8 ... a6!? 1 8 . . . g6 1 9 .tt:lxa7 b5 20 .tt:lc6 tt:lxc6 2 l .�xc6 d6 22 .b3:t .
1 9.�xh7+! 'iith8
20.°'lWfS!? In the ChessBase analysis this move got an exclamation mark, but on page 1 1 1 we showed what is the strongest move here : 2 0 .l:!.d5 ! 1 tt:lg4 2 1 ..!:rh5 tt:lf6 22 . .l::!.h3 axb5 2 3 .�dl !� .
20 ... 96? Although this was not criticized by the commentators, our analysis convinced us that this was Black's first ser.ious mistake . 20 . . . axb5 should have been played : 2 1 .°'lWh5 tt:lg4 22 .°'lWxg4 g6 2 3 .�xg6 (23 .°'lWh3 @g7 24.�xg6 fxg6 2 5 .l:i.xd7 '1We8 26 .Vi'e6 i::If7 2 7 .laad l i is the line given by Stohl, but after 2 7 . . . Vi'f8 it is really hard to say who's chances are better) 23 . . . fxg6 24.l:i'.xd7 Vi'e8 2 5 .Vi'e6 .l::i.f7 2 6 . .l:!.ad l gg and everything is still open.
21 .'iWxeS+ �f6 22.Vi'f4 axb5 23.Vi'h6 �g5 24.°'lWh3 'it>g7 25.�xg6! 'it>xg6 26Jid6+ 'it>g7 27 . .i:Iad 1

Chapter 9 : 1 0 . 1:!'.d l YtWc8 1 1 . a3 - Ma i n Moves
The players have concluded a series of forced moves. Approaching the time trouble phase, Black now faces bigger problems.
27 ... .l::i:gS?! 27 . . . .l:ih8 was slightly better: 2 8 .�g4 �f8 2 9 . .l::i. l d5 ' (this is the way to keep the initiative. Stohl gives 29 .�xd7 'YWf6 30 .h!'. l d6@f? . However, after the counter 3 0 . . . �g7 3 1 .h4 �xh4 3 2 .�xg7 + Wxg7 3 3 . gxh4 l:!.xh4 the position is a dead draw) 2 9 . . . �c l (29 . . . i:rg8 30 .'YWhS 'YWe7 3 1 ..l::.xd7 'YWe6 32 . .l:!.7d6 �e7 3 3 .e4± and Black is doomed to complete passivity) 3 0 . .l:!.xd7 �e8 3 l .e4--+ with an unpleasant attack.
28.f4 �f6 29.e4! .l:Ih8 29 . . . �d4+ ?? would be a blunder because of 3 0 . .l:'.:i. l xd4 cxd4 3 1 .�h6+, so Black has to admit he has lost a tempo with his rook.
30.�g4+ @f8 31 .e5 Ji.e7 32.h!'.xd7 V/Ue8
33.f5?! White continues inaccurately under great tension. Stahl's suggestion, the energetic 3 3 .e6 ! , was appropriate:
Gabriel Sargissian
A) 3 3 . . . .l:'.:i.h6 3 4. fS l:Id8 3 5 . .!:!.xd8 �xd8 3 6 .id:d7± and Black is paralysed;
B) 3 3 . . . f6 ? runs into 34 . .l:Ixe 7 ' �xe7 3 5 . �d7+-; C) 33 . . . .t(h7 34 .a'.xe7 ! '&'xe7 35 . .l:!.d7
V/Uf6 3 6 .e7+ �e8 3 7 .�d l ! +- wins in a fabulous way.
33 .. .fG 34.�f4 c4?! A desperate measure. The natural 34 . . . l:!.d8 was advisable. Anyway, the reply 3 5 .e6 .l::.h7D 3 6 .h4--+ was still clearly favourable for White.
35.eG? Closing the position increases Black's chances. Grischuk puts up a blockade, after which he can plod on. 3 5 . exf6 was the obvious way to proceed, for example : 3 5 . . . �xf6 3 6 .V/Ud6+ �g8 3 7 .'&'ds + (3 7 .'YWxf6 ? 'YWe3 +=) 37 . . . '>t>f8 . Now Stohl suggests the following deep plan: 3 8 .h4! (White clears the h3-square for his king. Black is prac-
1 2 7

A C u t t i n g - Edge G a m b i t a g a i n s t the Queen ' s I nd i an - Par t I I I
tically helpless) 3 8 . . . ld.c8 (3 8 . . . �e3 + 3 9 .Wg2 �e2+ 40 . Wh3 l:!'.xh4+ 4 1 .gxh4 �e3 + 4 2 . Wg2 �e2+ 43 .Wh l +-) 3 9 .Wg 2 1 l:!'.h6 40 . .r:re 1 �hS 4 1 .l:ie4+-.
35 .. JkS 36.ld:1 d4 Jd.h7?1 Understandably, during time-trouble Black aims mainly to secure his position. Searching for counterplay by 3 6 . . . c3 deserved serious attention: 3 7 .bxc3 �hS (3 7 . . . �xc3 ? 38 .�xe7 !) 3 8 .l:i.d2 .l::!.h7 39 .h4 .i::rg7 40.Wg2 Wg8�.
37.h4 Wg8 In spite of Black's passivity, it is still not easy for White to push his pawns. Initially the Russian grandmaster holds on well.
38.'it>h2 l:rg7?1 3 8 . . . �hS would have been preferable.
39.�f3 Wh8 40.�a7 'i?VfS 41 .l:rdd7
White has managed to penetrate with both of his rooks to the seventh rank, which engages his opponent's attention.
41 ... .ld.eS 42.Jd.ab 7 l:!.b8?
A serious blunder by Grischuk. 42 . . . Wh7 was the lesser evil: 43 .l:[xb6 .r:rb8 (Black has to exchange a pair of rooks at all cost) 44.l::i.c6 I:l:a8 45 .Wh3 .l:!.c8 46 .r!b6 .i::i.b8 47 .l::ra6 I:l:d8.
43 . .l::!.a7? White returns the favour instantly.
1 28
43 . .ld.xe7 ! ! would have won in style : 43 . . Jhe7 44.'i?Vhs+ 'it>g8 45 .'i?Vg6+ Wh8 46.J::[xb8 'iWxb8 47 .'i?Vxf6+ �g7 48 .'i?Vc3+-.
43 ... l::l:eS? A strange decision. Again, trying to trade rooks was more accurate: 43 . . . id.d8 ! .
44.'it>h31? 44.l::i.ab7 ! , making use of the fact that Black is unable to oppose with his rook due to l;Ixe 7 : 44 . . . 'i¥g8 45 . .l:'!.xb6 .l:lb8 46 .l:!.a6 b4 47 . .l.:!.aa7 'i?Vf8 48 .axb4 J:'.rxb4 49 .�ab 7 l:!.xb7 S O .'/Wxb 7 'i?Ve8 5 1 .�h3t.
44 ... 'i?VgS? It was still not too late to play 44 . . . .l:Id8 .
45 . .l::ra6 45 .'i?VhS + ! ? is a good attempt to test Black : 45 . . . .llh7 46 .'i¥g6 'i?Vf8D ( 46 . . . l::rg7 47 .'i?Vh6+ r!h7 48 .�e3 'i?Vf8 49 .�xb6±) 47 .Wh2 and now:
A) 47 . . . l:!'.g7 48 .'i?Vh6+ Wg8 49 .'i?Vd2 .l::!.c8 SO .r!ab7oo;
B) 4 7 . . . .l:!.d8 ? loses to a marvellous combination:
Analysis diagram
48.'i?Vxh7+ ! ! Wxh7 49.l:i'.xe7+ Wg8 SO .l:i.h7+- and .I:i.af7 next;
C) 47 . . . c3 48 .bxc3 l:!.g7 49.'i?Vh6+ Wg8 s o .'i?Vd2± .
45 ... 'i?Vh7 46 . .l::.l.aS White worried about the possible counter on the g-file, so he decided to swap rooks.

Chap t e r 9 : 1 0 . l:I<l l �c 8 I I . a 3 - Ma in Moves
46 .. . l:txaS 47.'M!Yxa8+ J:lg8 48.'M!Yf3 l:i'.g7 49.'1Wf4 'fWh5 50.g4 'lWe8 51 .�b7 'i£?h7 52.�e4 £.c5!?
Stahl's recommendation 5 2 . . . b4! ? looks logical, in order to open the position and activate the queen: 5 3 .axb4 °'lWa4 54.°'lWf3 £.d8 ( 54 . . . �xb4 also leads to a draw, but in a more adventurous way : 5 5 .g5 fxg5 5 6 .hxg5 l:i.xg5 5 7 .f6 'M!Ye l 5 8 . .!::rxe 7 + @h6 5 9 . f7 .l:!hs+ 6 0 .'fWxhS+ WxhS 6 1 . f8°'lW °'lWh l + 6 2 . Wg3 °'lWg l + =) 5 5 . g S �xb7 5 6 .'1Wxb7+ @h8= . Both kings are exposed, Black should be able to hold this.
53.g5 J;;!'.xb7? 5 3 . . . 'lW d8 ' was more solid.
54.'lWxb7+ V/lie7
55.g6+? S S .°'lWd7 @h8 ! ( 5 5 . . . @g7 5 6 .@g4 is winning for White, as mentioned by Stohl) . Though the computer persistently shows a huge advantage for some time, we failed to find a winning plan for White : 5 6 .g6 ( 5 6 .@g4 °'lWf8) 5 6 . . . b4 5 7 .axb4 £.xb4 5 8 .Wg4 @g7 5 9 .hS Wh6 60 .'fWc8 °'lWf8 6 1 .'tWc7 £.e7 62 .'tWf4+ 'i£?g7 6 3 .h6+ Wg8= .
55 ... wg7?! 5 5 . . . Wh6! 5 6 .'tWd7 b4 5 7 .axb4 £.xb4 5 8 .'i£?g4 bS ! +:± 5 9 .°'lWxbS 'tWa7 ' 60 .'tWxb4 'fWd4+ 6 l .@f3 °'lWd3+= is a precise defence given by Stohl.
56.'(Wd7 b4 57.axb4 £.xb4 58.\t>g4 wh6 59.@f3
5 9. 'lW c8 ! Once more we have to enter into a controversy with the Slovak grandmaster about the evaluation of this endgame. 5 9 . . . 'M!Yf8 1 • Just as earlier, we believe that with this retreat Black can fight on (59 . . . <;bg7 60 .hS £.d2 6 1 .i¥d7 £.b4 62 .i¥c6+- wins for White according to Stohl) : 60 .'fWxc4 £.e7 6 1 .i¥c6 (6 1 .°'lWc l + \t>g7=) 6 1 . . . 'fWd8 (6 1 . . .@g7 62 .hS) 62 .i¥d7 'M!Ya8 ! 6 3 .@f4 °'lWb8+ 64.\t>f3 'lWa8+ 6S .@e3 °'lWf8 .
59 ... b5 5 9 . . . 'M!Yg7 60 .hS (60 .'fWds £.cs 6 1 .hS °'lWc7 (6 1 . . .@xh5 62 .°'lWe4+-) 62 .°'lWxc4 'fWd8 6 3 .'!Wf4+ @g7 64.h6+ \t>g8 6S .@e2 £.e7 66.°'lWa4 °'lWb80 67 .Wf3 bSD 6 8 .'M!Yg4 �b7 +=) 60 . . . �f8 ! (60 . . . £.e7 ? allows a nice mate: 6 1 .'M!Yd2+ WxhS 62 .°'lWh2+ WgS 63 .'(Wf4+ @hs 64.°'lWg4+ Wh6 65 .°'lWh4+) 6 1 .\t>g4 £.e7 62 .°'lWd2+ \t>g7 63 .h6+ Wg8= and it is difficult to make progress.
60.@e4 60.°'lWxb5 °'lWf8 ! ! - this move is again not mentioned for some reason ( 60 . . . 'lW d6? 6 1 .°'lWd7 +- was correctly given) : 6 1 .V//ids £.e7 62.hS 'tWb8 63 .°'lWd2+ \t>g7 64.h6+ Wg8 (the position looks scary, but Black can activate his queen at least) 65 .°'lWdS °'lWa7 66 .°'lWc6 �b80 and Black might survive.
60 ... £.c5? The decisive mistake.
• • •
1 29

A Cu t t i ng -Edge G a m b i t a g a i n s t the Qu een ' s I nd i an - Par t I I I
60 . . . �g7 ! ! would have saved the game, as Stohl ascertained: 6 1 .@ds ( 6 1 .�xbS �cl=) 6 1 . . .gfg and White is unable do anything special: 62 .@d4 gb4 6 3 .'?WxbS (63 .We4 '?We7 64.@f4 @g7 6 5 .hS '?Wxd7 6 6 .exd7 gas 67 .We4 b4 6 8 .Wd4 c3 69 .bxc3 bxc3 70 .@d3 Wh6 7 l . Wc2 Wg7 7 2 . @b3 @h6=) 6 3 . . . �a7 + 64.@xc4 ge7=.
61 .@d5 This nice king march crowns the game.
61 ... gb4 6 1 . . . Wg7 62 .hS Wh6 6 3 . Wc6 b4 64 .�d2+ �xhS 6 5 . g 7 ! �xg7 66 .�h2+ WgS 6 7 .�g3 + +- .
62.'i£?c6 �c5+ 63.Wb7 �e7 64.'i£?a6 1 -0
64 . . . Wg7 65 .�xe7+ .2.xe7 66 .WxbS+-. Another entertaining battle that started with an original sacrifice, full of new and exciting positions, and rounded off with a very complex endgame.
Game s
Adhiban, Baskaran Sethuraman, Sethuraman Chennai 2008 (8)
1 .d4 tt:'if6 2.c4 e6 3.tt:'if3 b6 4.g3 gas 5.'?Wc2 �b7 6.gg2 c5 7.d5 exd5 8.cxd5 tt:'ixd5 9.0-0 ge 7 1 O.lld1 �cs 1 1 .a3 tt:'if6 1 2 . .2.95 h6 1 3.gxf6 .2.xf6 14.tt:'ic3 0-0 1 5.tt:'id5
1 3 0
Baskaran Adhiban
1 5 ... gxd5 Retreating the bishop with 1 5 ... .2.dS looks quite ugly. However, White can also easily go wrong here. Therefore we give some instructive examples :
A) 1 6 .�h3 ! .bre8 1 6 . . . tt:'ic6? 1 7 .gxd7 ! . 1 7 .e4t ; B) 1 6.tt:'id2 tt:'ic6 1 7.tt:'ic4 This ma
noeuvre, which we will also see in the game, is less effective here. 1 7 ... �b8 1 8.b4 d6 1 9.llabl b5�; C) Proceeding aggressively by
16 .llleS fails to yield anything due to 1 6 ... tt:'ic6 1 7.tt:'ixd7 tl'id4! 1 8 .llxd4 cxd4 1 9 .�xc8 l:!.xc8 20.tl'ixfS Wxf8 2 1 .lllxb6 2 1 .:!:i'.d 1 gxdS 22 .gxdS �c2 . 2 1 ...gxb6 22.�xb7 Mc2= A big difference with the endgame in the main line of this chapter is that here the black bishop supports a later counter with . . . d4-d3 very well; D) 1 6 . .t'.l:d2 was our first intention,
but the counter 1 6 ... d6 1 7 .Iiadl llld7 ( 1 7 . . . tt:'ic6 ? ! 1 8 .tt:'ie3 ! .2.c7 1 9 .tt:'ifs :!:i'.e8 20 .tt:'i3h4 ! t) 1 8.�h3 '1Wc6 1 9.llle3 tl'if6 20.Uxd6 '1We4oo made us less enthusiastic.

Chap t e r 9 : 1 0 . :i'.d l �c8 l l . a 3 - Ma in Moves
1 6 . .l:i:xdSg;? l2Jc6 1 7 . .l:i:ad 1 l:td8 1 8.l2Jd2
Let's summarize the things White has obtained in exchange for the gambit pawn: 1 . He has managed to double on the cl-file; 2 . His fianchettoed bishop is clearly stronger; 3 . There are many weak squares (c4, d5 , d6 ) which White can occupy with his pieces, while Black fails to create any long-term outpost.
1 8 ... l2Jd4 In the event of 1 8 . . . 'iUc7 1 9 .lLlc4 lLld4 20 .°iVd3 d6 2 l .e3 lLle6 2 2 .f4t White can build up a stable edge as well.
1 9.�d3 .l:i:b8 20.e3 Commencing to drive the black pieces back.
20 ... l2Je6 21 .l2Jc4!? An option for hungry players is 2 l .lLle4 �e7 2 2 . .r!xd7 b5 (22 . . . .l:!.xd7 2 3 .'i¥xd7 'i¥xd7 24 . .l:i:xd7±) 2 3 .�h3 'i¥c6 24.°iVd5 'iVxd5 25 . .l::!. l xd5t with a pleasant endgame.
21 ... Wia6 2 1 . . .�e7 2 2 . .l:i:xd7 �f6 2 3 .a4 a6 .
22.b3? As the old rule says, passive moves are rarely good. 2 2 .�f3 ! ! is the beginning of a deep plan: 2 2 . . . b5 2 3 .lLld6 g6 24.h4--+ with a fierce attack on the black king.
22 ... bS! 23.l2Jd6
23 ... c4? Black returns the favour immediately. Probably he was afraid of some kingside advance. 2 3 . . . 'i¥xa3 ! was the right decision : 24 .h4 (24 .lLlxb5 �b4) 24 . . . .l:i:f8 (being greedy with 24 . . . c4 leads to an enormous white attack after 2 5 . 'W' f5 �xb3 2 6 .�e4 lLlf8 2 7 .Wih5 --+) 2 5 .'W'f5 �e7 2 6 .h5 �xd6 2 7 . .l::!.xd6 'W'xb3 2 8 .�e4 lLlg5 29 .�c2 �c3 3 0 .'itih l l:ib6 3 1 .l:rxb6 axb6 3 2 .f4 g6 3 3 .hxg 6 lLle6 and Black survives by a miracle.
24.bxc4 bxc4 25.l2Jxc4± The position is strategically super for White again.
25 ... a'.dcS 26.l2Jd6!? 26 .�fl ! , keeping the queens on as long as possible, would have been better: 26 . . . l:!c7 27 .h4 l:!bc8 2 8 .lLld6 �xd3 29 .�xd3 (White has slowly improved his pieces, while the black rooks are still quite useless) 29 . . . l:ld8 ( 29 . . . .l:i:c l 3 0 .lLlxc8 .l::!.xd l + 3 1 .Wg2±) 3 0 .l:!a5± .
26 ... �xd3 27 . .l:i:5xd3t l:Ic7 28.�f1 ?!
It seems that White realized his previous inaccuracy. Playing more aggressively with 2 8 .lLle4! was stronger : 2 8 . . . �e 7 29 . .l::f.xd7 (giving the a-pawn for an initiative - 29 .a4 ! ?) 29 . . . �xa3 30 .l:i.xc7 lLixc7 3 1 . l:td7 lLlb5 3 2 .�fl f5 3 3 .�c4+ Wh8 34.lLld2t and the white pieces will be very annoying.
28 ... �b2? Black pretends to be ambitious, however this just allows an unpleasant pin. 2 8 . . . l2Jc5 ! was correct: 2 9 . l:td5 �e 7 3 0 .lLlb5 l':!.cb7 (chasing the knight ensures good counterplay) 3 l .a4 lLlxa4 3 2 .id.xd7 l2Jc5 .
1 3 1

A C u t t i ng -Edge Gam b i t a g a i n s t the Qu een 's I n d i an - Pa rt I I I
29.l:!:d5?! White could have made use of this un -expected opportunity with 29 .J:ib 1 ! f(b6 3 0 . .1::!.dd l iilf6 3 l .1:i:xb6 axb6 3 2 .tLlc4± and Black will lose a pawn.
29 ... ti:JfS 30.l:!:b1 J.:!.c1 31 . .!d.xc1 iilxc1 32.tt:Jc4± nb3 33.&ta5
White has managed to navigate his pieces to the ideal squares, now the defence of his a-pawn causes big headaches for Black. If 3 3 .a4 g6 34 . .l:!.d6±.
33 . . . d5 34.�xd5 iilxa3 Bagging the a3-pawn at least.
35.1:!.a5 Jt..e7 36.1:!.xa7 iilc5 37.J.:!.c7 tt:Je6?
The strange 3 7 . . . �bS may have been slightly better: 3 8 .Wg2 Jt..b4 39 .f4±.
38.1:!.cS+ �f8 39.ti:Je5 Iib1 40.'itig2 J;ld1
40 . . . gS 4 1 .iilc4 'itig7 42 .iilxe6 fxe6 43 .l:i:e8+-.
41 .iilc4 ti:Jd8
Conclusion
42.ti:Jxf7! A flashy combination to finish. The rest does not require further comment.
42 ... ti:Jxf7 43.l:tc7 �b4 44.iilxf7+ @h7 45Jk8 .l::rd2 46.h4 g6 47.'g,c7 iildG 48.�b7 'iitg7 49.�ea+ 'iitf6 50 . .l::i:f7+ we5 51 .l::rh7 Jt..c5 52.'iitf3 iilf8 53 . .£xg6 .l::!.b2 54.�f7 iilb4 55 . .l::ib7 Wf6 56.Jt..d3 Jt..c3 57.�xb2 iilxb2 58.'itig4 Jt..c1 59.e4 iild2 60.f4 Jt..e1 61 .e5+ 'itig7 62.f5 h5+ 63.'iitxh5 iilxg3 64.f6+ @f7 65.iilc4+ 'itif8 66.eG 1 -0
As we announced in the introduction, this chapter contains the crucial lines after 1 0 . . . � c8 l 1 .a3 , one of the most grandiose parts of this book. Before putting our shoulders to tl1e wheel, we hardly expected iliat everything would go smooilily witl1out us having to face any serious problems in finding an opening advantage. Naturally our suspicions were proved right: as time passed we faced more and more new obstacles. Surprisingly, many of iliem appeared in sidelines.
Some of our solutions were found only shortly before publishing. However, having maintained a demanding attitude combined with persistence, finally we can now firmly declare iliat ilie presented material should satisfy all the players who choose the white colour. We expect iliat ilie (early) powerful novelties in, for instance, Topalov-A.nand and Sargissian-Grischuk will change the evaluation of various lines.
Alexey Kuzmin wrote in Yearbook 8 6 : ' . . .it is not possible to indicate a clear-cut way of gaining even a slight, but stable opening plus, and so, for the moment, devotees of the Queen's Indian with black have no reason to be particularly concerned.' We hope that the kind reader will think differently after a careful study of ilie material in tl1is chapter.
1 3 2

Chapter 10
10.�d1 tt:Jc6 - Minor Lines
1 .d4 <1::lf6 2.c4 e6 3.<1::lf3 b6 4.g3 �a6 S.�c2 cS 6.dS exdS 7.cxdS �b7 8.�g2 <1:JxdS 9.0-0 �e 7 1 0.J:i.d1 <1:Jc6
This move is Peter Leko's discovery, which he employed successfully against Aronian at the Tal Memorial in 2006 . Since then there have been almost 1 00 games played until this year. Black can simply develop his knight, as its colleague is indirectly protected by the move . . . <1::lc6-b4. In this chapter we will first discuss the minor answers.
1 .d4 <1::lf6 2.c4 e6 3.<1::lf3 b6 4.g3 �a6 S.�c2 cs 6.dS exdS 7.cxdS �b7 8.�g2 <1:JxdS 9.0-0 �e7 1 O.l:id 1 <1:Jc6
Here we will examine the moves 1 1 .a3 , 1 1 .'1::lc3 and the most popular 1 1 .�a4.
1 1 .�a4 This is the main option. White puts the queen in a more active position, where it won't be harassed by possible forks with . . . <1::lb4 or . . . <1::ld4.
A) 1 1 .a3 According to the databases, this move is the signal for an open battle, as only 3 of the 1 7 games ended in a draw. The idea behind it is again to avoid the . . . <1::lb4 sortie, so later on it will be easier for White to occupy the dS-square. 1 1 . .. '1::lc7 1 2 .�f4 1 2 .'1::lc3 0-0 1 3 .e4 ( 1 3 .�f4 <1::le6 likely transposes to the line with 1 2 .�f4) 1 3 . . . d6 1 4.�e3 (provoking the black knight's move to e6 might have been better: 1 4.�f4! ?) 1 4 . . . �c8 1 5 .<1::ld5 ! ? <1::lxd5
1 3 3

A C u t t i ng - Edge G a m b i t a g a i n s t the Qu een 's Ind i a n - Pa r t I I I
Peter Leko
1 6 .exdS tllb8 1 7 .tllgS �xgS 1 8 .�xgS l:i:e8 and Black was a healthy pawn up in Panchanathan-D. Kononenko, Pardubice 20 1 1 . 1 2 .. . Clle6 1 3 .e3 A not very attractive but necessary move to cover the d4-square, which makes a crucial difference with the variations discussed in Chapter 9 . 1 3 . . . tllxf4 1 4.exf4 White will be able to occupy the weakened dS -square, but his pawn structure becomes decidedly uglier. 1 4 ... 0-0 1 S .tt:'ic3 d6 1 6.Ii:d2 l:re8 The Bulgarian white player had already had a game with this line : l 6 . . . �d7 1 7 .llad l llad8 1 8 .tt:'ids (White has built up a strong position, which is difficult to improve further) l 8 . . . h6 1 9 .b4 l::rfe8 2 0 . bxcS bxcS 2 1 .tt:'ieS �c8 2 2 .tt:'ixe 7 + .l:he7 2 3 .�xc6 �xc6 24 . .l:!.xd6 (he has regained the pawn without reaching anything more) 24 . . . .i::i'.xd6 2S . .i::i'.xd6 �e8 2 6 .�d3 f6 2 7 . �dS + c;;t>h7 2 8 .�d 3 + c;;t>g8 29 .�dS + Wh7 3 0 .�d3+ and the players agreed a draw in CheparinovSasikiran, Bastia 2 0 1 1 . 1 7 . .l:tad1 h6 1 8.tlles
1 34
Analysis diagram
1 8 ... tt:'id40 Basically this move leads to forced simplifications after which Black's problems are over. 1 9 .l:txd4 �xg2 20.�4d2 �h3 2 1 .tt:'ibs �cs 22.tt:'ixd6 �xd6 23.tl.xd6 f6 ! 24.1:!'.xf6 'W'b7 There is nothing better for White than a repetition : 2S.'i¥c4+ 2 5 . f3 would be met by 2 5 . . JheS 26 .fxeS gxf 6 and White will have to prove his compensation . 2S ... �h7 26 .�d3+ Wg8 27 .'i¥b3 + @h7= Cheparinov-Z. Almasi , Porto Carras 2 0 1 1 . Later Black managed to win the game, which helped the Hungarian national team to a memorable victory over the Bulgarians in the last round of the European Team Championship ;
B) 1 1 .tt:'ic3 Bologan's idea got an exclamation mark in Krasenkow's analysis. However, only few players have repeated it since. 1 1 .. . tt:'ixc3 1 2.bxc3
Analysis diagram
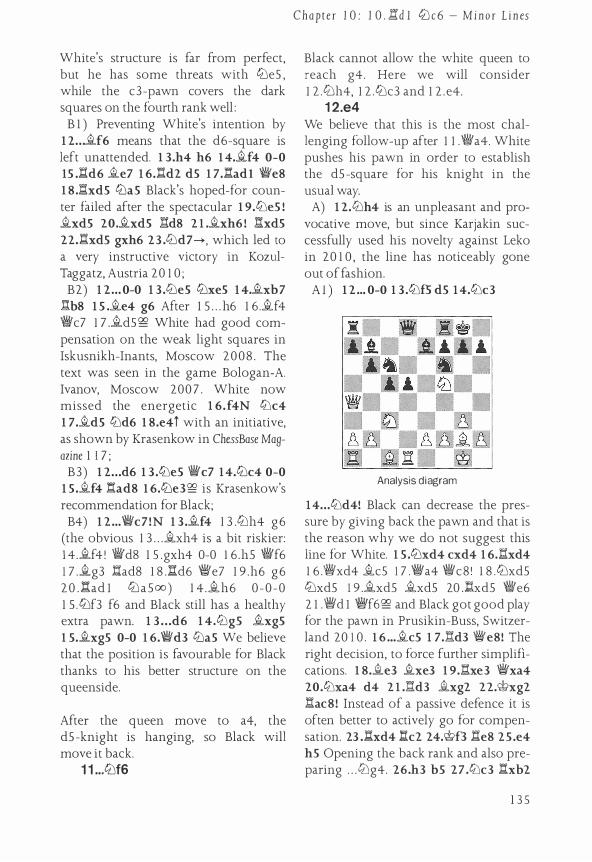
White's structure is far from perfect, but he has some threats with tLleS , while the c3-pawn covers the dark squares on the fourth rank well :
B 1 ) Preventing White's intention by 1 2 .. . �f6 means that the d6-square is left unattended. 1 3.h4 h6 1 4.�f4 0-0 1S . .a'.d6 �e7 1 6 . .l:Id2 dS 1 7.lladl V/iie8 1 8 .a'.xdS ttJaS Black's hoped-for counter failed after the spectacular 1 9 .tlleS ! �xdS 20.£.xdS .l:i.d8 2 1 .�xh6 ! i::IxdS 22.SxdS gxh6 23 .tLld7-+, which led to a very instructive victory in KozulTaggatz, Austria 20 1 0 ;
B2) 1 2 ... 0-0 1 3 .tLleS tbxeS 1 4.£.xb7 l:i.b8 1 S .�e4 g6 After 1 5 . . . h6 1 6 .�f4 l}jj/c7 1 7 .�dSg? White had good compensation on the weak light squares in Iskusnikh-Inants, Moscow 2008 . The text was seen in the game Bologan-A. Ivanov, Moscow 200 7 . White now missed the energetic l 6 .f4N tllc4 1 7.�dS tlld6 1 8.e4t with an initiative, as shown by Krasenkow in ChessBase Magazine 1 1 7 ;
B3) 1 2 .. . d6 1 3 .tlles Wlc7 14.tbc4 0-0 1 S .�f4 l:rad8 1 6.tiJeJg? is Krasenkow's recommendation for Black;
B4) 1 2 ... V/iic7 !N 1 3 .£.f4 1 3 .tiJh4 g6 (the obvious 1 3 . . . �xh4 is a bit riskier: l 4.�f4 ! 'iVd8 1 5 .gxh4 0-0 1 6 .hS V/iif6 1 7 .�g3 .i:t:ad8 1 8 .l:td6 V/iie7 1 9 .h6 g6 2 0 . .l:i.ad l tLlaSoo) 1 4 .�h6 0-0-0 1 S . tbf3 f 6 and Black still has a healthy extra pawn. 1 3 . . . d6 1 4.tLlgS £.xgS 1 S.£.xgS 0-0 1 6.V/iid3 tLlaS We believe that the position is favourable for Black thanks to his better structure on the queenside.
After the queen move to a4, the dS -knight is hanging, so Black will move it back.
1 1 ... ttJf6
Chap t e r 1 0 : 1 0 . l:i:d l .:1J c 6 - Mino r L i n es
Black cannot allow the white queen to reach g4. Here we will consider l 2 .tLlh4, l 2 .tbc3 and l 2 .e4.
1 2.e4 We believe that this is the most challenging follow-up after l l .V/iia4. White pushes his pawn in order to establish the dS -square for his knight in the usual way.
A) 1 2.tLlh4 is an unpleasant and provocative move, but since Karjakin successfully used his novelty against Leko in 20 1 0 , the line has noticeably gone out of fashion.
A 1 ) 1 2 ... 0-0 1 3 .tllfS dS l 4.tllc3
• •
Analysis diagram
l 4 ... tlld4! Black can decrease the pressure by giving back the pawn and that is the reason why we do not suggest this line for White. 1 S .ttJxd4 cxd4 1 6.!lxd4 1 6 .V/ijxd4 �cs 1 7 .°i¥a4 V/iic8 ' 1 8 .ttJxdS tLlxdS 1 9 .�xdS �xdS 20 . .l::!xdS V/iie6 2 1 .V/ijd l V/iff6g? and Black got good play for the pawn in Prusikin-Buss, Switzerland 20 1 0 . 1 6 ... £.cs 1 7 . .tl.d3 'i¥e8! The right decision, to force further simplifications. 1 8.�e3 £.xe3 1 9 . .!:i.xe3 'i¥xa4 20.tllxa4 d4 2 1 ..tl.d3 �xg2 22.\:tixg2 l1ac8! Instead of a passive defence it is often better to actively go for compensation. 23 . .Sxd4 .bi:c2 24.Wf3 .!:i'.e8 2S.e4 hS Opening the back rank and also preparing . . . tbg4. 26.h3 bS 27 .tllc3 .llxb2
1 3 5

A Cu t t i n g -E dge G a m b i t a g a i n s t the Qu een 's I n d i an - Pa rt I I I
and Black equalized convincingly in A. Grigoryan-Sasikiran, Bastia 20 1 1 ;
A2) The position after 1 2 . . . g6 also poses a difficult task for the white player : 1 3 .�h6 The arising positions are pretty much playable for both sides, with many complications and tricks. 1 3 . . .�f8 1 4.�xf8 @xf8 1 5 .tt:'ic3 @g7
A2 1 ) 1 6 .J::td6 ttJaS 1 7.'iYf4 �xg2 1 8.@xg2 h6?
Analysis d iagram
Black overlooked a fine trick in a rapid game. l 8 . . . tLle8 was more solid, when after l 9 . .!:l:d3 'iYf6� it is hard to see whether White will have enough resources for any advantage . 19 .t2Jxg6 ! !N The black fortress could have been destroyed by this spectacular move. 1 9. tLle4 tLlxe4 2 0. 'iY xe4 occurred in Aronian-Leko, Nice (rapid) 2 0 0 9 , but after 2 0 . . . 'iY e8 2 1 . 'iY g4 tLlc6 Black could have fought on . 1 9 . . . fxg6 20.lladl .Iles 2 1 .e4 It is quite rare to be able to continue an attack with silent moves after sacrificing a piece. The whole idea is based on the fact that the f6-knight is overloaded. Black is practically helpless against the advance e4-e5 . 2 1 . . . tLlc6 2 1 . . . tLlc4 2 2 .l::rxf6 'iYxf6 2 3 .l::ixd7 + l::re7 24 .'iYxf6+ Wxf6 2 5 .ttJds + +-. 2 2 . llxc6 dxc6 23 . .!lxd8 .l:i.axd8
1 3 6
24.eS± and the outcome of the game is not in doubt.
A22) 1 6 .'i¥f4 .Iles The position after 1 6 . . . 'l/H e7 ! ? 1 7 .'iV gSg? was also far from clear in Nyback-Wojtaszek, Warsaw 2 009 . 1 7 .ttJbs ds ! 1 s .ttJd6
Analysis d iagram
1 8 . . . .i::i:esD Black temporarily sacrifices the bishop in order to gather his pieces together. 1 9 .tt:'ixb7 �e7 20.tLlxcS bxcSoo Aronian-Karj akin, Jermuk 2009 . White has a good bishop, but his knight is completely misplaced on h4. Black also has good counterplay on the b- and e-files.
B) 1 2 .tLlc3 0-0 1 3 .g4! ?
Analysis diagram
We could expect Shirov's enterprising ideas to create some mess. Actually, as he jokingly confirmed recently, the pawn push to g4 might be his favourite move.

B l ) 1 3 .. . t2Jb4 1 4.a3 1 4. gS tiJfdS 1 5 .tbxdS ikxdS 1 6 .a3 bS 1 7 .'fWxbS l::!.b8 l 8 .'fWa4 ikc6+2 is given by Stohl in Chessbase Magazine 1 1 9 . 1 4 ... ttJbd5 1 5 .tt:lxd5 �xd5 1 6.g5 �c6 1 7.'fWh4 tbe8 Karolyi mentions 1 7 . . . tbe4 1 8 .tiJeS tiJd6 1 9 .tbxc6 dxc6 20 .ikxc6 as clearly favourable for White. 1 8.tbe5
Analysis d iagram
White's play has been very forcing. 1 8 ... .£xg2 1 9 . .!lxd? �b7!? Black decides to sacrifice his queen for reason -able compensation. Another option was 1 9 . . . �c8 2 0 . .l:!.xe7 (20 .Wxg2 ikd6 2 1 .g6 ! hxg6 22 .tbxg6 fxg6 2 3 .�c4+ �h7 24.�h4+=) 20 . . . ikc6 as indicated by Stohl. (20 . . . ikh3 ! ?) 20 . .t!.xdS .ld.xd8 2 I ..£e3 .t!.d5 22 .ttJf3 tt:ld6 23.'liVa4 b5! 24.'liVc2 ttJf5g? led to a very exciting battle in the World Championship Candidates' game Shirov-Aronian, Elista 2007 ;
B2) 1 3 • • • h6 1 4.h4 1 4 .tbh4 c4 1 S .�xc4 ttJeS 1 6 .�f4 ttJfxg4! (according to my old analysis Black has this strong retort. 1 6 . . . ikxg2 1 7 .tbxg2 d6 1 8 .tbe3:t is given by Kuzmin in Yearbook 8 5 ) 1 7 .ikxb7 ikgs 1 8 .'fWfs ikxc l 1 9 .i:[axc l 'fWxh4 20 .'iYf4 (20 .ikxa8 ?? �xh2+ 2 1 .Wfl g6) 20 . . . .i::lae8 and Black is a pawn up. l 4 ... tbh7 1 5 . .£f400 In Yearbook 9 8 , Tibor Karolyi gives 1 S . tbeS as unclear. However, after
Chap ter 1 0 : 1 O . .!:l'.d 1 CLJc6 - Mino r l i n es
1 5 . . . tDxeS 1 6 .ikxb7 .t!.b8 1 7 .ike4 .£xh4 1 8 .ikf4 .ld.e8 1 9 .ikxeS l:ixeS 20 .l:!.xd7 �gs+ White's kingside will collapse.
B3) 1 3 ... g6 ! ? is suggested by Tibor Karolyi. This solid reply secures the kingside convincingly. Going for the bishop by 1 4.gS ttJhs 1 5 .ttJes ttJxeS 1 6 . .£xb7oo might be White's reaction. The gS -pawn will be untouchable due to the fork with f2-f4.
12 . . . 0-0 1 3.e5 ttJe8 1 4.ttJc3 ttJc7 1 4 . . . � c8? ! was rather unfortunate. The game Ehlvest-A. Ivanov, Cali 2007 , continued with 1 5 .tiJdS ikd8 . Now 1 6 .ikh3:t is better for White according to Krasenkow.
1 5.ike3
In this complex position Black has to play very carefully.
1 5 ... 'if'eS!? Proceeding with caution. On the other hand there are more dynamic reactions available too :
A) 1 5 ... f6 l 6.l::l.d2 fxe5? ! 1 7 .ttJxe5 tbxe5 1 8 .�xb7 .l2:b8 1 9 .�e4 d6 20 . .£f4 t The white bishop pair dominates the whole board , GnusarevBocharov, Tomsk 2009 ;
B) 15 ... �cS?! 1 6J:td2 a6 was seen in Khenkin-Schneider Zinner, Bad Homburg 2008 . We improve White's play with 1 7 . .t!.ad l ttJ b5 1 8.�f4t. Black has
1 3 7

A Cu t t i n g - Edge G a m b i t a g a i n s t the Qu een 's Ind i an - Par t I I I
to face unpleasant pressure on the d-file;
C) I S • • • fS ! ? comes into serious consideration: I 6.exf6 In case of 1 6 .l:!.d2 'i¥e8 1 7 .l:l.ad l I:!'.d8 1 8 .lLJgS @h8 1 9 .h4 a6 20 .lLJdS lLJxdS 2 1 . .txdS h6 2 2 .'i¥f4 .ta8 + Black has nothing to worry about. I 6 ... .txf6
Analysis d iagram
1 7 . .lld6 .te7 1 7 . . . �e7 was another playable option, with which we found a few correspondence games: 1 8 . .l:!.ad l .l:!.ad8 1 9 . l2Je4 l2Je8 (a strange regrouping , but it seems to work) 20 .l2Jxf6+ (20 .�f4 h6 and in spite of the hugely crowded centre, there is nothing concrete for White : 2 1 .'i¥b3 + �f7 ) 20 . . . l2Jxf6 2 I . .tf4 �de8 with level chances in Vayser-Ciucurel, email 20 1 1 . I 8.l:i'.d2 dS I 9.�f4 Until here Black has achieved many things he wanted. Now he should have continued with I 9 ... �f6!N 20 . .txc7 'i¥xc7 2 1 .tLlxdS �f7<=± . Instead, l 9 . . . d4? was too optimistic: 20 .l2Jxd4! l2Jxd4 2 l .�xb7 �gs 2 2 .'tl¥c4+ <;i?h8 2 3 .�xgS �xgS 24.l:i'.xd4! (probably Black had overlooked this reply) 24 . . . cxd4 2S .l2Je4 �es 26 . .i::t'.c l 1± Cheparinov-Drenchev, Plovdiv 20 1 2 .
1 6.l:!d2 It was a small surprise when we noticed that White had not tried this line for 4
1 3 8
years. One of the reasons could be the game Naer-Motylev from the KO World Cup of 2009 , given below. 1 6.tLld2 was tried recently on the highest level: 1 6 ... .l::f.bS 1 7 .l2Jc4 bS ! This dynamic reply leads to further exchanges, comfortably decreasing White's pressure. 1 8 .tLlxbS lLJxbS 1 9.'iYxbS tl:lxeS 20.tl:lxeS �xg2 2 1 .'i¥xd7 �as 22.l:i'.d2 l:Id8= and Black had no problems in Aronian-Leko, Wijk aan Zee 20 1 3 , but later he quite unnecessarily gave a pawn. The game Naer-Motylev went as follows:
1 6 ... .l:!.d8 H.!:[ad1
1 7 .. .fS !? Before getting completely j ammed in, Black goes for some counterplay. However, the text might be too hasty. 1 7 ... @h8 ! ? has also occurred in a game. Black intends to move his king to a safer place before he starts an action with his f-pawn. Our efforts have not sufficed to discover any advantage for White:
A) 1 8.�gS .txgS 1 9 .tt:JxgS f6 and now:
A l ) 20 . .txc6 �xc6 2 1 .'ti'xc6 dxc6 22.I!.xdS fxgS 23.llxeS 1'.rxe8 24.I!.d7 tLlbS 2S .@g2 2S .tl:le4 h6 2S ... tl:lc3 26.bxc3 @g8 2 7.f4 .l:rf8!= Black defended very accurately and achieved a draw in Pierzak-R yvova, email 2 0 0 9 ;

A2) 20.exf6 gxf6 Though it looks a bit scary, Black's camp is still sufficiently stable, viz. :
A2 1 ) 2 1 .'it'f4 fxgS 22.'it'xc7 �a8 23 . .a'.xd7 �xd7 24.'it'xd7 tlld4= ; A22) 2 1 .tllge4?? dS and suddenly the
knight is captured in the middle of the board;
A23 ) 2 1 .tllh3 tlle6; B) 1 8 .tlle4 t2:le6 1 9 .tlld6 �xd6
20.l:ixd6 f6 2 1 .exf6 �xf6+2; C) 1 8.'it'c2 f6 1 9.exf6 �xf6 20.tllgS
�xgS 2 1 .�xgS lab8 ! 22.�f4 l:!.xf4! 23 .gxf4 tlld4 24.l::txd4 cxd4 with a comfortable position for Black.
1 8.exf6 �xf6
1 9.�xc5 Thanks to this fine trick White wins back the gambit pawn, although the battle is still open. Krasenkow mentions 1 9 .tllgS ! ? as an option in ChessBase Magazine 1 2 7 . Here we think that both 1 9 . . . tlle 6 , 1 9 . . . dS and 1 9 . . . d6 are playable for Black. One example : 1 9 ... tlle6 2 0 .t2:lce4 2 0 .tllge4 �xc3 2 1 .bxc3 (2 1 .tllxc3 �a8+) 2 1 . . .dS ! 22 . .l:.xdS tllcd4 1 +± this nice move is the point of the line. If White takes the black queen , the cl-rook will recapture and the dS -bastion will remain hanging. 20 .. .tbxgS 2 1 .t2Jd6 2 1 . tllxgS dS I 2 2 .�xdS + .a'.xdS 2 3 .J::!.xdS tlleS 24 .'it'e4 tllf3 + !
Chap ter 1 0 : 1 0 . .tl'.d l CLJ c 6 - Mino r L i n es
2 S .'it'xf3 �xgS= . 2 1 . .. 'iVhs 22 .tllxb7 .ld.de8 2 3 .tlld6 �xe3 ! 24.fxe3 tliesg? Black has sufficient compensation for the exchange.
1 9 .. . bxc5 20.'it'b3+ tlle6 20 . . . dS is suggested as a possibly better option for Black by Krasenkow. However, after the reply 2 1 .V/Hxb? 1::1.f? 22 .'iYb3 .i::!.b8 23 .'iYa4 .a'.b4 24.'i¥c2;!; his conclusion is that White has a stable advantage.
21 . WUxb 7 tlled4 Black succeeds in closing the cl-file just in time, while the f-file has been opened for his rook.
22.tllxd4 �xd4 23.'iYb3+ Wh8 24.tllb5
24 ... .a'.bS! This was the critical improvement on the game, which had been played approximately a year before. 24 . . . dS 2 5 .tllxd4 tllxd4 26 .Wla3 'iYbS 2 7 .V!iixa? l:l.a8 28 .'iYe?;l; was seen in Akopian-Palac, Kallithea 2008 .
25.'i¥a4 'i¥h5 Black has successfully adopted Krasenkow's analysis to improve on the above-mentioned game.
26.tllxd4 tllxd4 27.'i¥xd7 .l:txb2 28.V/iie7
2 8 .'lllxa? tlle2+ 29 .Wh l tllc3 3 0 .'iYe? .Sg8 3 1 . .l:'Id8 'iYxd l + 3 2 .1::!.xd l tllxd 1 g? .
1 39

A C u t t i ng -Edge G a m b i t a g a i n s t the Qu een 's I n d i an - Par t I I I
28 .. JUbS! Precise play by the Russian grandmaster. The modest 2 8 . . . i:lbb8 would be less good: 29 .�xa? I:rbe8 3 0 .<;;t>h l 1 tt:Jf3 3 l .�xf3 �xf3 + 3 2 .<;;t>g l c4 3 3 .VWc5 c3 34 . .ild3 '%We2 3 5 . .:a.d? !:t .
Conclusion
29.h3 J::rxa2 30.I:rxa2 VWxd1 + 31 .<;;t>h2 tt:Jf3+ 32.�xf3 VWxf3 33.VWxcS h6 34 . .l:.a3 VWb7 35 . .l:!.xa7 VWb6 36.VWxb6 .ilxb6
with a drawn endgame in NaerMotylev, Khanty-Mansiysk 2009 .
In the beginning of this section we have seen two fairly aggressive moves by White. It was clear that 1 O .tLle5 hardly poses Black any great problems, while the tricky 1 O .VWe4 requires some cautious and accurate handling by Black.
From our point of view, we believe that basically only l 1 .VWa4 followed by l 2 .e4 offers good play for White. In our main line we would like to illustrate how the theory has been improved; however, we believe that Black should probably refrain from it with the alternatives between the 1 5- 1 ? th moves, if he does not want to fight for a draw from a worse position.
1 40

Chapter 11
10.Md1 tt:Jc6 - Main Line 11. 'iYfS
1 .d4 tt:Jf6 2.c4 e6 3.tt:Jf3 b6 4.g3 jia6 5.'l?Vc2 c5 6.d5 exd5 7.cxd5 .£b7 8.jig2 tt:Jxd5 9.0-0 .£e7 1 O.lid 1 tt:Jc6 1 1 .'l?Vf5
We go over to an examination of the main lines after Leko's move 1 0 . . . tbc6. It is worth comparing the statements between Anka (Yearbook 89) and Karolyi (Yearbook 9 8 ) . In the former it is written that Black's main move is clearly 1 0 . . . 'l?Vc8 , while i n the latter we can read that 'Black's most common move i s 1 O . . . tbc6.' These are good examples that illustrate how fast theory has grown.
1 .d4 tt:Jf6 2.c4 e6 3.tt:Jf3 b6 4.g3 jia6 5.'l?Vc2 c5 6.d5 exd5 7.cxd5 jib 7 8.jig2 tt:Jxd5 9.0-0 jie 7 1 O.lid1 tt:Jc6 1 1 .'l?Vf5 tt:Jf6
It is interesting to compare the statistics here. According to Mega Database 2 0 1 3 , only a little more than 2 S % of the games ended in a draw from this position, while White's winning percentage is about 49%, almost doubling Black's. However, we should note that the number of games (only 2 from last year) has apparently fallen back.
1 2.e4 White starts with the usual pawn advance.
His main aim is to kick away the knight from f6 with e4-e5 . Then the d7 -pawn would immediately hang too, while the dS-square might easily be occupied later on. At the same time, the black kingside would become more vulnerable.
1 4 1

A C u t t i ng -Edge G a m b i t a g a i n s t the Qu een ' s Ind i an - Pa r t I I I
We have reached the first point where Black has several interesting deviations. Now there is a split between l 2 . . . d6 and l 2 . . .g6 . The natural 1 2 ... 0-0 1 3 .eS tlle8 1 4.t2Jc3 ! 'if c8 1 5 .tllds transposes to Chapter 6 .
1 2 ... 96 This is the most fashionable continuation by far. Though it looks ugly, there is some prophylaxis in it . The white queen will have to return to f 4 and after e4-e5 Black has a good reply in . . . tLlhS , gaining a tempo. The move 1 2 ... d6 was invented by Judit Polgar in 2 0 0 7 . It posed many difficulties for us, since it seems that White has to enter into long, more or less forced lines. 1 3 .eS 'if d7 The idea behind the previous move. 1 4. 'if xd7 + 1 4.V!Vc2 is the only way to avoid trading the queens, but we think that this line is too sharp and objectively less promising: 1 4 . . . tLlb4 1 5 .�e2 !ka6 1 6 .V!V e 1 tLlc2 1 7. V!V d2 tLixa 1 1 8 . exf6 �xf6 1 9 . .!::f.e l + !ke7 20 .tlJc3 0-0-0 '+2 occurred in A . Jankovic-G. Papp, Zagreb 20 1 1 . We did a lot of analysis here, but with accurate play by both sides the maximum White can reach is probably a draw. 14 ... tt:Jxd7 1 5 .exd6 �f6 1 6 . .tlel + Wf8 1 7 .tllc3 tt:Jb4
Analysis d iagram
1 42
Judit Polgar
So far the moves were quite forced. Now White has to determine in which way he wants to continue. We have long advocated 1 8 .l:ld 1 , which was Krasenkow's suggestion, but the arising positions looked relatively easy for Black, so we tried to find something else.
A) Earlier, White twice tried 1 8.!kgs with success, but we are not convinced that the following lines ensure any advantage for us : 1 8 ... tt:Jc2 1 9.l::e7 �xf3 1 9 . . . !kxe7 !N appears to be a possible improvement for Black: 20 .�xe7+ (20 .dxe7+ We8 2 1 .l:!.c l f6) 20 . . . 'it>g8 2 1 .l:!.d 1 f 600. So far the analysis by Pelletier. White has compensation for the exchange, but the position is very unclear. 20.�xf3 !kxgS 2 I ..l:i.xd7 l:i:d8 22 . .l:[xd8+ �xd8 23 . .l:tdl tlld4= and Black could equalize in CarlsenPelletier, Biel 2008 . See Game 9 ;
B) 1 8 .tLleS ! Ufuk's suggestion, with which White seems to keep the upper hand. It leads to further exchanges, but the resulting endgame is clearly favourable for White: 1 8 ... tt:JxeS 1 9.�xb7 a'.d8 After l 9 . . . l:!.b8 20 .!ke4 tLlbd3

Chap t e r 1 1 : 1 0 . !rd l � c 6 - Main L i n e 1 1 . VM'fs
2 1 .Se2 we do not have to worry about losing the bishop pair, since the advanced d6-pawn still gives real potential for us. Besides, the enemy kingside also looks awkward : 2 1 . . . tbxc l 22 .Il:xc I (with some help White has successfully completed his development) 2 2 . . . J::i'.d8 23 .l:!.ce l ! (this is the way to keep the pressure) 2 3 . . . .!!f.xd6 24.f4 tbg4 (24 . . . tbd7 hardly makes a big difference: 2 5 .�f3 g6 2 6 .ttJbst) 2 5 .�f3 (Black's following moves are practically forced) 2 5 . . . �d4+ 26 .�fl tbf6 2 7 .ttJbS .l:!.d8 ( 27 . . . .!!f.d7 28 .�c6 .i::!.d8 29 .tbxd4 cxd4 30 . .l:!.e7 with a pleasant edge) 2 8 . .l:!.e7 J::i'.d7 29 . .l:!.xd7 tbxd7 3 0 .tbxa7 g6 3 1 .l:!.d l 1 t . Now the black knight leaves the d-file to avoid the threat of tbc6 , but after that the b6-pawn will become vulnerable. White can immediately take action by playing either tbc8 or tbc6. Later his passed a-pawn, supported by the light-squared bishop, will likely be decisive. 20 . .l:f.dl
Analysis diagram
Black has three different knight jumps here:
B 1 ) 20 . . . tllc4 2 1 .d7 �e7 22 .�c8 tbeS 23 .�f4 ttJxd7 Black has managed to take the dangerous d-pawn, but he has problems with the coordination of his pieces. 24 . .lael + tbes 2S .�b7 .!:i.d7!
Winning an important additional tempo. 26.�g2 ttJd3 27 . .i.xeS! White gets two pieces for the rook and pawn. 2 7 ... �xeS 28.f4 tbxel 29.laxel Shd8 30.lhes+ �f8 3 1 .�fl .l:!.d2+ 32 . .l:!.e2 In our opinion, White has better chances in this endgame, as his minor pieces can be mobilized more easily;
B2) 20 ... tbed3 2 1 .i::i'.b l ! Over-protecting the bl-pawn in order to make the c l -bishop free. 2 1 ...c4 22.�d2 The annoying knights will not stay there long after a2-a3 . 22 ... a'.xd6?! 23 .tbe4 i:[e6 24.tbxf6 gxf6 2S.b3t ;
B 3 ) 20 . . . tbc2 2 1 .l:'i:b l tbd4 22 .b4 k:[xd6 2 3 .�dS ! White successfully opens the position on the queenside. The b4-pawn is taboo due to the following counter: 23 ... cxb4? 24.Sxd4 bxc3 2S . .i.a3+- .
1 3.�f4
We will look at 1 3 . . . h6 ? , the adventur-ous 1 3 . . . ttJhS and the evident 1 3 . . . 0-0 .
1 3 ... 0-0 A) 1 3 ... h6? is a stupid reaction, trying
to prevent the mate threat with 'iVh6 and tbgS . Black should finish his development first . After 1 4.tllc3 gS ( 1 4 . . . tt:Jhs 1 5 .�e3 tbg7 1 6 .ttJds±) 1 5 .�fs a6 1 6.eS tbg8 1 7.tllds tt:Jas 1 8 .b4 the white position is sound, T. Franzen-Sowden, email 2 0 0 7 ;
B) 1 3 .. . ttJhS !?
1 43

A C u t t i ng -Edge G a m b i t a g a i n s t the Qu een 's I n d i an - Pa rt I I I
Analysis diagram
Surprisingly it is less easy to refute this ugly reply:
B l ) 14.'i¥h6 �.f8 1 5 .'i¥e3 In case of l s .'i¥d2 ..tg7 l 6 .lllc3 0-0 Black gives back the pawn, in turn he gets active play : 1 7 .'i¥xd7 lllaS l 8 .'tiia4 'tiie8<2, J.Torres-Kourkoulos Arditi s , Athens 20 1 2 . B l 1 ) 1 5 ... ..te7 1 6.tlJc3 0-0
1: •
•
Analysis diagram
1 7.eSN This is our improvement on a previous game. White fixes the black pawn on d 7. 1 7. 'iY d3 is premature; after 1 7 . . . d6 1 8 . ..th6 .:res 1 9 .llldS ..tf6 1 20 . g4 ..tg7 ' + Black had a very comfortable position in VorobievSacerdotali , email 2 0 0 9 . 1 7 . . . tbg7 1 8. 'iii d3 §? White keeps pressure on the d-file and will also improve his queenside pieces. Black remains more or less passive ;
B l 2) 1 5 ... ..tg7 ! ?N
1 44
Analysis diagram
This would be more natural; however, the knight has no way back from hS . 16 .eS 0-0 1 7 .g4 Generally these are the moments where the 'bestseller' books stop their analysis. Keeping our honest attitude (just as we did not hide 1 5 . . . ..tg7 from our kind readers, although it is a new move) , i t would also be false to pretend that with the knight capture everything is over, for example : 1 7 . . . .t'!.e8 1 8.gxhS 1 8 .'tiig S ! ? - trading queens when having a material advantage is an understandable attitude. On the other hand, Black will be able to grab more pawns in this line: 1 8 . . . lllxeS 1 9 .'i¥xd8 �axd8 2 0 .lllxeS ii.xg2 2 l .�xg2 .lheS 22 .gxhS �xhS 2 3 .lllc3 dS <2, it is disputable to which side the balance will tilt. 1 8 ... tt:JxeS Black has two pawns and some play for the piece. 1 9 .tlJxeS ..txg2 1 9 . . . 1::1.xeS 2 0 .'li'g3 ..txg 2 2 l .'tiixg2 ;!; . 20.\t>xg2 l::i.xe5 2 1 .'i¥f3 .llf5 ! A spark-ignition in a seemingly uneventful position. After 2 1 . . .dS 2 2 .lllc3 d4 2 3 .h6 lifs 24.'tiie4, despite the big muddle, we prefer our little material plus. 22.J::i.xd7 Picking up the glove. 22 . . . 'iff8 2 3 .'tiid3 ..td4 24 . .l:!.xd4 The rook would be caught anyway, so it's better to sacrifice it now. 24 ... cxd4 25.hxg6 hxg6 26.tLld2 White is slightly better; the knight will support the defence from e4.

Chap t e r 1 1 : 1 0 . l:ld l tt:lc6 - Ma in L i n e 1 1 . 'irfs
B2) 1 4.'€ifd2 0-0 1 5 .tllc3
• •
Analysis d iagram
B2 1 ) With 1 5 ... �f6 Black leaves the pawn to White in order to organize some counterplay: 16 .'€ifxd7 1 6 .g4 tllg7 1 7 .�xd7 �xc3 1 8 .bxc3 'ifxd7 1 9 .1:!.xd7 �a6 oo . 1 6 ... .ixc3! It is necessary to eliminate the knight before it appears on dS . The hS-knight will finally be able to retreat too. 1 7 .bxc3 tllf6 1 8 .'€/fxdS �fxd8 1 9 . .l:!.xd8+ tllxd8 Fortunately the recapture with the rook is not possible due to .igs . 20.tlld2 4Je6 2 1 .f3 Fixing the centre and preparing the knight manoeuvre. 2 1 .. . �a6 22.tllfl ! Proceeding along the best route. From e3 the horse ideally controls both the d 1 - and dS-squares. 22 ... 1:!.dS 23.tlle3 Black is out of useful moves, while White's plan might be to advance with a4-a5 . 2 3 .. . tlld 7 24.tlld5:;1; ; B22 ) 1 5 ... d6 1 6.'€ifh6 I t looks a s if
White creates a dangerous attack, but Black manages to create good counterplay : 1 6 ... l:i:eS 1 7 .tllg5 .ixg5 1 8 . ..txg5 f6 1 9 . .ie3 1 9 . .ic l tllg 7 ! ? 20 .tllbs tlles 2 I . tllxd6 tllf7 ! �. 1 9 . . . tlle5 20 . ..tc 1 The only move to save the queen. 20 ... tllg7 2 1 .'iiid2 tlle6 22.f4 tllc6 23 .b3 tllcd4 Black has achieved his main aim, transferring a knight to d4, so the long diagonal is well blockaded. 24 . ..tb2 4Jg7 !
Instead of staying passive, he wants to clear the way for his bishop with . . .f6-f5 . 25 .l:tel White has to regroup some of his pieces too. 2 5 .. . '€/fd7 26.tlldl fS ! A well-timed counter. 2 7 . ..txd4 cxd4 28.'ifxd4 fxe4 29 . ..txe4 .ixe4 30.lhe4 4Jf5 = The position has crystallized out. There is not enough material for White to harbour any great hopes;
B3 ) We also tested 1 4. '€iU g4 tllf6 1 5 . 'i¥h3 but failed to find anything good after 1 5 ... h5! 1 6.tllc3 4Jg4� when our queen is squeezed completely out of play.
1 4.eS The question might be raised by the reader whether this pawn advance is really urgent or whether there is a better option for White to benefit from the weakened black kingside. We will present an answer to this question. The natural 1 4.tlJc3 occurred two times in practice so far, but we consider this plan to be a bit slow: 1 4 ... d6 1 5 .b3 '€/fb8 Black prepares to place the knight on es in order to close the long diagonal . After 1 5 . . . tllhS 1 6 .'i¥e3 �f6 1 7 .�b2 tlld4 ! ? 1 8 .tllxd4 ! (an excellent retort) 1 8 . . . cxd4 1 9 .Jd.xd4 ..txd4 20 .'i¥xd4 'i¥f6 2 1 .'i¥d2 'i¥e7 2 2 .tllbS� White had reasonable compensation in Scepanovic-M. Perunovic , Belgrade
1 45

A C u t t i n g -Edge G a m b i t a g a i n s t the Qu een ' s I n d i an - Pa r t I I I
2 0 0 7 . 1 6 .�b2 .!Lies 1 7 . .!Libs .!Lihs 1 8.�e3 �c6 1 9 . .!Lic3 �f6 20 . .!Liel White is trying to kick the central knight out with f2-f4, but unfortunately this also takes some time. 20 ... �g7 ! ? 2 1 .1it'e2 l:i.e8 22.f4 .!Lid? 23 .eS �xg2 24.�xg2 dxeSD 2S .l!i.xd7 exf4oo Besides the many pawns Black got good play for the piece in Shen Yang-T. Kosintseva, Nizhnij Novgorod 2007 .
1 4 ... .!Lih5 The g6-pawn ideally protects the knight and it also has a way back via g 7 . In this position White can choose mainly between three queen moves. We will mention all of them, in order to explain how we came to our final conclusion. But the two best queen moves are 1 S .�g4 and 1 S .�c4 ! .
1 5.�c4! A) 1 S ."'i1Uh6?! looks ambitious, but it
is definitely harmless, as we realized during our analysis with grandmaster Denes Boros already many years ago. 1 S ... �c7 ! Clearly the strongest reply. After 1 5 . . . .!Lid4 1 6 . .!Lixd 4 �xg 2 1 7 .'>t>xg2 cxd4 Black was also fine in Aronian-Leko, Moscow 2006 . 1 6.�gS 1 6 .�e3 .!Lib4 1 7 . .!Lia3 a6+ . 1 6 ... .!LixeS 1 7 . .!LixeS �xe5 1 8 .�xe7 �xg2 1 9.�xf8 �c6+ K. Schulz-Ryvova , email 2008 ;
1 46
B) 1 5 .�g4 is the most popular move. Checking all the possible deviations here, we could not find anything very promising for White. The main move is . . . d7 -dS , but we think that our suggestion equalizes in the most convincing way : 1 5 .•. �b8 ! This surprising reaction was first played in tournament practice already in 2007 by Georgian grandmaster Hrant Melkumyan. Black attacks the important central pawn immediately, while his queen stands securely, far removed from the hits on d7 . 1 5 . . . .!Lig7 ! ? , Judit Polgar's choice, is also interesting: 1 6 . .!Lic3 .!Lie6 1 7 .�e3 l:!.b8 1 8 . .!LidS .!Lib4! l 9 . .!Lixe7+ �xe7<± Giri-J. Polgar, Hoogeveen 2 0 0 9 . 1 6 . .!Lic3 ! The tempting 1 6 .�h6 is innocuous due to 1 6 . . . .l:i.e 8 1 7 . .!bc3 .!LixeS 1 8 . .!LixeS �xg2+ and Black had a comfortable material advantage in Y. VovkMelkumyan, Lvov 2007 . 16 . . . .!LixeS ! Now a long , forced line begins. 1 7 . .!LixeS �xg2 1 8 . .!Lixd7 �b7 1 9 . .!Lixf8
Analysis d iagram
1 9 ... .!Lif6 This is the most direct way. After 1 9 . . . �h l , according to our analysis 20 . .!LidSN is the safest way for White here (20 .�h3 �xf8g? resulted in a messy position in Steinman-Nikolenko, email 20 1 0) : 20 . . . �xdS 2 l .�d7 .!Lif6 22 .�xb7 �xb7 23 . .!Lid7 .!LidSg? and the extra pawn along with the pair of

Chap ter 1 1 : 1 0 . l:rd l '2l c 6 - Ma i n l i n e 1 1 . °iYfS
bishops give enough compensation for the exchange. 20.�h4 �hl 2 1 .f3 �xf3 22 . .!ld2 Though the position looks scary, the battle is still open. 22 ... c4 Now there follow a few only moves by both sides: 23 .tlld7 J::!.e8 24.J:!.f2 �cs 2S.i.e3 l 5 .tllxf6+? is strongly met by l 5 . . . �xf6 ! . 2S ... i.xe3 26.tllxf6+ �f8 2 7.tlld7+ 2 7 .�h6+ meets with a smart reaction: 2 7 . . . �xh6 l 8 . l:rxf3 �xf3 l9 .tllxe8 Wxe8 3 0 .tllbS �e3 + 3 1 .Wfl 'iit>f8� and White's small material plus is offset by Black's active bishops. 2 7 ... �gS 28.tllf6+ and a draw was agreed in Coleman-Sanakoev, corr l007 .
After the queen move to c4 Black has a wide range of equally good moves: 1 5 . . . tllg 7 , 1 5 . . . �c7 , 1 5 . . . tllaS and 1 5 . . . dS .
1 5 ... d5 Black intends to solve the problem of his d-pawn, preferring not to have it glued to d7 .
A) 1S . . . tllg7 is probably the most natural reply. 1 6 .tllc3 tLle6 1 7 .�e3 J:!.c8 1 8 .�a4! The queen walks out of the danger area, the threat was 1 8 . . . tll cd4 . 1 8 ... a6 1 9 . .!'.:td2 bS 20.�dl White has managed an ideal doubling on the d-file, and the pressure is mounting. 20 .. . tllbS 2 1 .a4 Subtle play, winning space on the
queenside and forcing Black to fix the pawn structure. 2 1 . . . b4 In the event of l l . . . bxa4 2 2 .tLldS ! �xdS 2 3 .lhdS 'Wfc7 24 .'tWxa4 tllc6 l S . �ad l � Black has more weaknesses. 22.tLldS jlxdS 2 3 .J::!.xdS and now:
A 1 ) 23 ... J::!.c7 24.�fl !:;!:;
Analysis diagram
White has managed to pin the knight to b8 , while he has improved most of his own pieces. Later he will play on the weak light squares. This was seen in Game 1 0 , Kozul-M. Nemeth, Austria l 0 1 0 , shown further on; Al) Moving out of the pin with
23 ... �c7 !?N is also possible : 24.�e2 lHd8 25 . .l:l'.adl and now 2S ... tLlc6 l5 . . . c4 l6 . a5 :;!:; ; l 5 . . . d6? ! (Black tries to get rid of his backward pawn) l 6 .exd6 llxd6 27 . .l::!.xd6 �xd6 l 8 .tllg 5 :;!:; with good play thanks to the superior bishops. 26.h4! as l 6 . . . b3 2 7 .�dl as l 8 .'iYc4 I:!.b8 l 9 .�c3� . 2 7 .jlhJ� White has perfect compensation for the pawn. He can try to gain more initiative on the kingside.
B) 1 S • • • �c7 As it worked well in the line above, Black again tries to attack our central pawn immediately. 16 .�h6 Now we will analyse B 1 ) 1 6 . . . .t!.f d8 and Bl) 1 6 . . . tllg 7 :
B l ) 1 6 ... .l:tfdS 1 7.tllc3 tLias 1 8 .�e2 dS We follow Amanov-Yang, Lubbock
1 47

A C u t t i n g -Edg e G a m b i t a g a i n s t the Queen ' s I nd i an - Pa r t I I I
20 1 1 , but there White missed the energetic 1 9.e6 !N f6 20.�acl d4. In the event of 20 . . . �b8 we can work with a similar method: 2 1 .tt::lh4 d4 2 2 .tt::lfS i t . 2 1 .tt::lbS �b8 2 2.b4 Trying to open the queenside at all costs. 22 ... tt::lc6 23 .bxcS bxcS
Analysis d iagram
We have reached the culmination of the struggle. White has to prove something very urgently, otherwise Black consolidates his position. 24.tlJfxd4! ! This fantastic sacrifice gives the game a turn in our favour. 24 ... tt::lxd4 2S.tt::lxd4 �xg2 This looks like a clear loss of material, but the best is still to come! 26.tlJfS ! and now:
B l 1 ) 26 . . . �b7 2 7 .tllxe7 + �xe 7 28 .'it>xg2 tllg7 29 .�xg7 �xg7 30.�e3;!; White's position is preferable thanks to his strong e-pawn and the weak black king;
B 1 2) 26 ... �xd l + 2 7 .�xd l ! A very important decision . Normally a rook is much better on an open file, but this is a special situation : we might need to transfer it to the kingside with ki.c4-g4 . 2 7 . . . gxfS 2 8 .�xhS 'lWe8 29.�xfS ! If the rook were on dl now, Black could have simply returned his bishop to c 6 . 29 ... �g6 30 .�xg6+ hxg6 3 1 .�xg2 gs
1 48
Analysis d i agram
32.l::i.dl ! The right plan to rescue the bishop. 32 ... 'it>h7 3 2 . . . c4 3 3 . .l::!.d7 &te8 3 4 .h4. 3 3 .�d7 'it>xh6 3 3 . . . .l::!:e 8 3 4.�f8 1 . 34.�xe7 <;t>g6 3S .I:i.c7 .l:!:e8 36.e7 c4 3 7.'>t>f3+- After this exciting skirmish, White manages to simplify into a winning endgame;
B 1 3 ) 26 ... gxfS 2 7 .l::fxd8 + �xd8 28.'ilfxhS There is no time for Black to retain the bishop due to mate in two. 28 ... 'i¥e8 29.'ilfxfS±
B2) 1 6 ... tllg7 and now: B2 l ) 1 7 .tllc3 It is possible to give our
important central pawn, if we calculate the ensuing complications well : 1 7 .. . tlixeS 1 7 . . . tlla S l 8 .'lWe2 .!::!.fe8 1 9 .l':rac 1 � was good for White in Lehnhoff-Lindsalu, Internet 2 0 0 9 . 1 8 .tlJxeS �xg2 1 9 .�f4! This 'zwischenzug' is the point of White's idea. 1 9 ... d6
Analysis d iagram

Chap t e r 1 1 : 1 0 . !'rd l tZ:lc6 - Ma in L i n e 1 1 . vgffs
B2 l l ) Leko's suggestion of 20.tZ:lxg6 did not win our approval here : 20 . . . hxg6 2 1 .@xg2 'lit'b7+ 22.tbds Most of the white pieces remain active, in addition the black kingside structure is half opened. Black has to play accurately. Here we found 22 .. JHeS!N. 22 . . . ttJfs 23 .�e4 Wg7 24.�d2 (piloting the bishop to the long diagonal) 24 . . . .l:!.ae8 2 5 .�c3 + f6 2 6 . tbxf6 �xe4+ 2 7 .tbxe4+ '.t>f7 28 .�d3 c4 29 . .l:!.d2;t was given by Peter Leko in Chess Informant 98 . Indeed, it looks really promising. 2 3.�e4 @h8 The king had to walk away from the tbf6+ threat. 24.'iYf3 llle6 25 .jLd2 jLf8 26,jLc3 + jLg?+± Black has organized his defence well and he still has an extra pawn;
B2 l 2) 20.lllg4 White delays recapturing the dangerous light-squared bishop, because there are more concrete issues in the position. 20 ... �b7 2 1 .tbh6+ Now we can see the point of the knight manoeuvre. 2 1 ...@hS 22.tbxf7+ lhf7 23.�xf7 l:lf8 24.'iYc4;t This happened in Postny-Pacher, Zagreb 2 0 1 1 (Game 1 1 ) , although Suat Atalik had also reached this point in his analysis in Chess Informant 98 already five years before! White has a material advantage and it is quite hard to see whether Black can create any great danger on the long diagonal, as White always has the possibility of tiJdS to close it .
B22) 1 7 . .l:!.el !?N The protection of the es -outpost in this simple way is our discovery. Though the move looks preposterous, White can afford to lose some time. 1 7 .. JHe8 1 7 . . . d6 l 8 .exd6 �xd6 1 9 .tbc3 tLlaS 2 0 . �d3 c4 2 l .�c2�. 1 8.tbc3 llla5 1 9 .'iYd3 tbe6 1 9 . . . �ad8? ! allows an invasion on d6 : 20 .tbbs �b8 2 l .�c3 1 �c6 22 .t2ld6 �xd6 23 .exd6 tbfS 24.�f4 with a
strong attack on the long diagonal. 20.l:Iadl .!:i:ad8 2 1 .tbd2 2 1 .tLlbS is less effective here in view of 2 l . . . �b8 22 .�c3 �xf3 23 .�xf3 tbc6. 2 I . .. jLxg2 2 l . . .c4 2 2 .�fl . 22.<;t>xg2� and Black has to be very careful.
C) 1 5 ... tLlaS A dynamic continuation, which opens the long diagonal for the bishop. 1 6.'iYd3 l 6 .'iYc2 ! ?� is also worth a try. 1 6 ... c4 Black wants to chase the queen from the d-file, but the text abandons the control of the d4-square. The alternative is 1 6 . . . '/Wc7 1 7 .tbc3 !iad8 1 8 .�h6 .l:;[fe8 .
Analysis d iagram
White has developed all of his pieces and he could have seized the initiative with 1 9 .tLlbSN (the knight is heading to d6 in order to force a trade of the dark-squared bishop. After this, Black would not be able to fill the holes around his king. 1 9 . tiJdS was too positional: 1 9 . . . �xdS 20 .'l/i'xdS tbg7oo Leite-Cvak , email 20 1 0) 1 9 . . . '!Wb8 20 .t2ld6 �xd6 2 l .exd6t . 1 7.'iYe2 lies After 1 7 . . . tbg7 1 8 .tbc3 tbe6 1 9 .�h6 .a'.e8 20 .tiJdS a'.c8 2 1 .h4t White's edge is obvious. 1 8.lllc3 1lc8 1 8 . . . �f6 1 9 .�e3 ! (let him take ! ) 1 9 . . . �xeS 2 0 .tLlxeS J:rxeS (20 . . . �xg2 2 1 .tbxf? ! '.t>xf7 2 2 .'.t>xg2±) 2 1 .�xb7 tbxb7 2 2 .�xc4�. There is no coordination between Black's pieces. Without
1 49

A C u t t i n g -Edg e Gam b i t a g a i n s t the Queen ' s I n d i an - Par t I I I
the bishop his king i s very vulnerable, and the d7 -pawn is also a potential weakness . 1 9.ilh6 tt:Jg7 If 1 9 . . . .!:l.cS 2 0 .ile3 ! (White uses a nice trick to harass the rook) 20 . . . ilxf3 2 1 .ilxf3 l:heS 2 2 .ilxb6 ! 'i¥b8 2 3 .�xa 7 ! l:!.xe2 24.ilxb8 l:!.xb2 2 S .ilc7 ::t . The pair of bishops and the a-pawn ensure White a long-lasting advantage. 20.l:td2 Increasing the pressure on the cl-file. 20 ... tlJe6 2 1 ..l::rad 1 tlJcS If 2 1 . . .ilc6 2 2 .h4- bS 2 3 .tlJd4 tbxd4 24 . .l:rxd4 ilcs 2S . .l:f.4d2 'i¥e7 26 .ilf4± . The c6-bishop is highly overloaded, while the knight on aS is still completely misplaced.
Analysis diagram
It seems that the knight has arrived just in time. If it could jump further to d3 , Black would get enough counterplay. 22.e6! This powerful move destroys Black's hopes:
C l ) 2 2 . . .ilf8 2 3 .exf7 + Wxf7 24.ile3i and Black got into trouble in Fichaud-A. Kiss, email 20 1 O ;
Cl ) 2 2 . . .�f6 2 3 . .l::i.xd7 tbxd7 24 . .l::!.xd7 +- ;
C 3 ) 2 2 . . . fxe6 ? 2 3 . a'.xd7 ' tbxd7 24.'i¥xe6+ �h8 2S . .!:l.xd7+- .
1 6.exd6 Greediness leads nowhere : 1 6 . .SxdS ? t tlJaS ! .
1 6 ... ilxd6
l S O
Black's speculation was correct, since he is still ahead in development, so it is impossible for White to immediately exploit the pin on the cl-file.
1 7.tt:Jc3 A) 1 7 .ilh6?! .!:!.es 1 8 .tlJc3 White
brings out his pieces gradually, so now Black has to be a little careful. The best way to handle this position was showed in the following game : 1 8 . . . tLlaS 1 9.'i¥g4 ilc6! A great cold-blooded response, preventing the threat of tlJbS . 20.tLlgS tlJf6 2 1 .'ii'h4 'ii'e7N We consider this natural move to be the strongest reply. Black makes use of the fact that the knight has left the f3-square, so a'.e 1 is unavailable for the moment. 2 1 . . . ilxgl 22 .Wxgl 'iYc7� is also playable, but after a few more moves in Rodshtein-Volke, Kalli th ea 2 0 0 8 , Black went wrong and lost the game in the end. 22.tlJdS tlJxdS 23 .ilxdS ilxdS 24.J:i.xdS �es ! This is the point of 2 1 . . . Vi' eS ! . The bishop keeps an eye on the h8-square, so that any tricks with ilf8 now fail. Although the text allows White to set up a pin with id:e 1 , Black will still have enough resources for a good defence. 25 .l:!.e1
Analysis d iagram
2S ... �xg3 ! This strike leads to a draw practically by force. 2 5 . . . f6 is also possible. 26.hxg3 In case of 2 6 . .Sxe7 ilxh4

Chap ter 1 1 : 1 0 . .!:ld l tbc6 - Main L ine 1 1 . �fS
27 . .l:!.xf7 gxgS 2 8 .!ig7 + Wh8 29 . .'.i:lxgS tbc6 Black should be fine. 26 ... �xel + 27 .Wg2 '\We7 2s.gf8 'tWb7 29.'1Wxh7+ @xf8 As he has nothing concrete, White has to agree to the repetition. 30.'\Whs+ We7 3 1 .'tWes+ @fS=; B) As war as we know, 1 7.ggsN is an
untested byway. However, we found nothing special after 1 7 ... '\Wc7 1 8.tbc3 tbes 1 9.tbxeS gxeS 20.tbbs '\Wes� and Black still has an extra pawn.
1 7 ... tbaS A very logical reply. The knight forces the white queen in front of the rook and opens the long diagonal for the bishop at the same time.
1 8.'\Wd3
It is difficult to determine the right place for the bishop. Both retreats, l 8 . . . ge7N and l 8 . . . gc7 , have their pluses and minuses.
1 8 ... �c7 Straying so far from the fianchettoed king is not ideal, on the other hand the black queen will be able to occupy one of the open files. 1 8 ... �e7 From here it is easier to protect the kingside. However, now the queen's mobility is restricted as well. 1 9 .'\We2 Gelfand describes this position as unpleasant for Black in ChessBase Magazine 1 3 2 . We went a bit further. 1 9 ... '\Wes 20.gh6 tbg7 Now the black
Boris Gelfand
pieces look quite 'packed' , but this is only a temporary situation. White can hardly avoid the liberating move . . . gf6 . 2 1 .lllds gxdS 22 . .i:IxdS gf6 If 22 . . . .'.i:ld8 23 .tbd2 l:IxdS 24.gxdS �d8 25 .'f¥f3 g? with some pressure thanks to the active bishops.
Analysis diagram
23.�d2! The key move of the variation! Naturally White wants to keep the queens on the board, since he can also protect the b2-pawn in this way. We have analysed the following replies :
A) The avid 23 ... tbc4? would lose a piece after 24.'tWf4 �xb2 25 . .i::t.bl ;
B) 23 ... '\Wbs 24 . .l:.i:dl '\Wxb2 Now the queen trade has become inevitable, but
1 s 1

A C u t t in g -Edg e G a m b i t a g a i n s t the Qu een 's I n d i an - Par t I I I
later Black will fail to oppose from d8 . I f 24 . . . <1.Jc6 2 5 .b3 .!::i'.ad8 2 6 .'i¥f4 with an initiative. 25.'i¥xb2 �xb2 26.J::[d? �f6 Black has to beware of the <1.JgS threat, as his f7-pawn is pretty weak, so fortunately he has no time to push his c-pawn immediately. 2 7.tt.Jes .tlac8 If 27 . . . .l:!.ae8 28 .t2lg4 �d4 29 .l::rxa7 White has satisfactory play for the pawn.
Analysis diagram
28.<1.Jxf7 ! ! The second tactical strike, which puts the game back into White's hands. 28 ... I:!:xf7 29.i.ds J::i.f8 30.Iha7 It is funny, but Black simply doesn't have a useful reaction here. 30 ... tllc6 3 0 . . . �d4 holds the position only for a while : 3 1 ..l:!.b l ! c4 3 2 . .l:ld l l ± . 3 1 .i.xf7+ l::i'.xf7 3 2.�a8+ t2ld8 32 . . . .l:!.f8 ? 33 . .l:Ixf8+ Wxf8 34 . .!:'.i'.d6+- . 3 3 .J::i.axd8+ i.xd8 34.J::i.xd8 + J::i:f8 3S .l:Id7! It is important to understand the necessity of this move. White forces the black rook to the seventh rank, so later there is an option to move behind the king side pawns with a check on d8 . 3S . . . l::!.f7 36.�d6 One of the queenside pawns must fall, as otherwise Black has to give the h7 -pawn. 3 6 . . . Rb7? ! 3 7.Rd8+ @f7 38 .l:i.h8± White gains a material plus, while his king will arrive on the other flank in time;
C) 2 3 ... �d8 is another critical variation : 24.l:Ie l .llxdS 25 .�xdS �d8
1 5 2
26.tllgS In the current situation it is unnecessary to refrain from exchanging queens. The remaining white pieces are fairly active. 26 ... t2lc6 In case of 2 6 . . . 'iY'xdS 2 7 .i.xdS ilxgS 2 8 .�xgS .l:re8 29 .J:ld l � White has compensation. His plan might be to put the bishop on f6 , and then follow up with a2-a3 /b2-b4. The black rook will basically stay on the back rank to avoid any mating threats. 2 7 .tl:ie4 t2ld4 28.�d7 ! A great solution, limiting the opponent 's options. If 2 8 .�b7 'i¥e7oo. 28 .. . tl:idfS 29 .tllxf6+ �xf6 30.�f4� The bishop pair dominates both diagonals. Black always has to be very careful.
1 9.'i¥c2 �e7 1 9 ... �c8? ! 20.tllds �xdS 2 1 .l:i:xdS �e6 2 1 . . . t2lf6 22 .�d l ±.
.1 •
Analysis d iagram
Black has managed to connect his rooks and it seems that after .. J:iad8 he will be completely fine. 22.l:txhS ! ! Certainly, instead of doing Black the favour of returning his rook, White blows up the pawn front before the black king in a nice way. 22 ... gxhS 23 .tl:igs�
20.�h6!N This ambitious move is mentioned in Gelfand's notes as a possible option. We have improved it and analysed it to a really convincing advantage for White.

Chap te r 1 1 : 1 0 . 1:!'.d l CLlc6 - Ma i n l ine 1 1 . 1/Wfs
20.a'.e l is also very interesting, but much more complicated: 20 ... �d7 2 1 .£.gs f6 22.£.h6 l:!.fd8 23 .�adl 'i!'f7 24.b4gg Gelfand-Leko, Jermuk 2009 . The analysis by Gelfand can be seen in ChessBase Magazine 1 3 2 . It's also Game 1 2 at the end of this chapter.
20 ... .l:!.feS A) The natural 20 ... tLlg7 would run
into 2 1 .b4!? 2 1 .tlldS £.xdS 22 . .l:!.xdS is also promising. 2 1 . . . cxb4 2 2 .tlldS £.xdS 23.i::txdS . White has successfully opened both the c-file and the long diagonal for his queen. 23 ... I:!.ac8 24.�b2 f6 25 . .!d.el �f7
Analysis diagram
26.tllgS ! This marvellous sacrifice is the fruit of the harmony between the wellplaced white pieces. 26 ... fxgS 2 7 .l:lxaS bxaS 28 . .idS± ;
B) In the event of 2 0 ... .i::!:fd8 , 2 1 .l:i.el is a pretty evident reply.
21 .tlld5 White shouldn't miss the opportunity to gain the bishop pair.
21 ... £.xd5 22 . .!:rxd5 .!:.l.ad8 23 . .ld.xdS £.xd8
It might seem that Black is getting closer to his goal after each exchange, but the real problems are only about to start.
24 . .!d.e1 'ifd7 25.i:rd1 Certainly, enough pieces have been swapped.
25 ... 'lllfeG
A) 25 ... 'i!'c7 would be met by the surprising 26.b4 ! . White gives another pawn in order to intrude on the seventh rank. 26 ... cxb4 2 7.'i!'xc7 £.xc7 28.l:rd7 £.d8 29.tt:'ieS ! and the £7-pawn falls next;
B) 25 ... 'i!'fs 26.'i!'xfS gxfS 27 . .lad7t 26.b4!
White opens the c-file for his queen, but what is more important, he vacates the bl-square for a later mating attack along the long diagonal.
26 ... tllcG 26 ... cxb4 allows us to activate our knight: 2 7.tlld4 'i!'es 28.tt:'ic6 Black suffers from huge back-rank problems. 28 ... 'i!'c7 29.'i!'a4 White will regain the pawns one by one, while keeping the initiative.
27.il,f1 ! This tricky move is in fact very strong. There are serious threats from c4 or bS . The simple 27 .bxcS i s also very good: 2 7 ... bxcS 28.�el White will retrieve the material, so an endgame is already good for him due to his two bishops. 28 ... 'i¥d7 29.l:he8+ 'lllfxe8 30.'i!'xcS il,b6 3 1 .'i!'d6 tt:'ig7 32.£.hH This position is also very satisfactory. The bishops are the real rulers here. In addition, the black king is still far from secure.
27 ... tllg7 A) 2 7 . . . tt:'ixb4? instantly loses a piece
after 28.'i!'a4;
1 5 3

A C u t t i n g - Edge Gam b i t a g a i n s t the Qu een 's I nd i an - Par t I I I
B ) 2 7 ... 'iVf6 28.'it>g2 tlld4 29.ltJxd4 cxd4 30.�bst
28.bxc5 bxc5 29.'iVxcSt White has achieved much more than he could ever wish for. All endgames are clearly favourable for him, but he is also still able to keep his queen on the board.
Carlsen, Magnus Pelletier, Yannick Biel 2008 ( 1 )
Game 9
1 .d4 tllf6 2.c4 e6 3.tllf3 b6 4.g3 �a6 5.'MVc2 �b7 6.�g2 c5 7.d5 exd5 8.cxd5 tllxd5 9.0-0 �e7 1 O . .l:i.d1 tllc6 1 1 .'iVfS tllf6 1 2.e4 d6 1 3.e5 'iVd7 1 4.�xd7+ tllxd7 1 5.exd6 �f6 1 6 . .l:i.e1 + 'it>f8 1 7.tllc3 tllb4 1 8.�g5!?
Krasenkow mentions 18 . .t'!.dl in his comments to the game Bareev-Polgar, Elista 2007 . He immediately stops there, with a ;!; evaluation. For some time this continuation was our choice too, but we failed to prove a real advantage after 1 8 ... tllc2 1 9 .1::\bl l:rd8 and the critical escape for Black usually starts with . . . h7-h6 followed by . . . g7-g6 .
1 8 ... tllc2 1 8 . . . �xgS 1 9 .tllxgS �xg2 20 .@xg2 tllc6 2 1 .f4;!;.
1 9.l':i:e7!? A risky decision by Carlsen. 1 9 .�xf6 is enough for a draw only : l 9 . . . tllxf6 20 . .l:!.e7 �xf3 2 1 .�xf3 l:re8 22 . .l:Ixe8+ @xe8 23 . .l:!.d l @d7 24.�g2 tlld4 2 S .�h3 + 'it>c6 ( 2 S . . . Wxd6 26 .tllbS+) 2 6 .�g2+=.
1 9 ... �xf3?! Black plays it safe ; it seems that he believed his strong opponent.
1 54
1 9 ... �xe7 ! , accepting the sacrifice, even gives winning chances for Black : 20.dxe7+ 20 .�xe7 + �g8 2 1 ..l::td l f6 was later given by the Swiss grandmaster. Now, 22 .�fl (22 .tlldS �f7 2 3 .l::(d2 tlld4 (23 . . . �xdS 24.tllgS+) 24.tllxd4 cxd4 2S .l:!.xd4 l:!.hc8) 2 2 . . . g6 2 3 .tlldS �g7 24.a3 (24.�bS tllb4 ! ) 24 . . . a6�. 20 ... 'it>es 2 1 .Scl 2 1 .tllbs 7 ! f6 . 2 1 ...f6 ! 2 1 . . .h6 2 2 .�h4 ! . 22 .Sxc2 fxg5 23.ld.e2g? a6 24.tllxgS �xg2 25.Wxg2 .lla7 26 . .l:ie6 26 .tllds tllf6 . 26 ... ltJf6 2 6 . . . h6 2 7 .l:Ic6 ! . 2 7.1hb6 'it>xe 7 28 .tlle6 llaa8 29.tllxcS=.
20.�xf3 �xg5 20 . . . l:Id8 ?? 2 i .�ds +- .
21 .l':rxd7 .l:!:d8 22 . .l:rxdS+ �xd8 23 . .l:!d 1 tlld4
Black has equalized more or less easily, the last problem he has to solve is the placement of his rook.
24.�g2!? 24.�ds hS 2S .�c4 l:!.h6 2 6 .tllbs tllxbS 2 7 .�xbS .l:i.e6 2 8 . .l:!dS g6=.
24 ... h5 25.a4 2 S .�fl gS 2 6 .tllbS tllxbS 2 7 .�xbS .l:!:h6 2 8 . .l:!.ds .l:!.e6 29 .b3 I:!.e4 3 0 .�c4 .Md4 3 1 .l!xd4 cxd4 3 2 .'it>g2 �f6 3 3 .<;t>f3 �es 34.d7 �c7 3 S .'it>e4 <:Jile7= would have been rather similar to the game, where Black can easily hold the endgame due to the opposite-coloured bishops.
25 ... a6! 26.�b7 .l:!:h6

Chapter 1 1 : 1 0 . �d 1 tLlc6 - Ma in L i n e 1 1 . VlffS
27.d7 l:i'.d6 28 . .2,c8 t2lf3+ 29.<t>g2 l:txd1 30.tZ:lxd1 tZ:le1 + 31 .Wf1 tZ:lf3 32.h4
3 2 .@e2 tZ:lxh2 3 3 .f3 fails to capture the knight, because 3 3 . . . gS= followed by . . . g5 -g4 comes just in time.
32 ... @e7 3 2 . . . aS ' ? . keeping the a-pawn, was an option too : 3 3 .@e2 tZ:leS 34.tZ:le3 @e7 3 5 .f4 tZ:lc6=.
33.tZ:le3 3 3 . .2,xa6 tZ:le5 (3 3 . . . Wxd7 34 . .2,e2t) 34.f4 tZ:lxd7 3 5 .tZ:le3 g6=.
33 ... gG 34 . .2,xaG wxd7 35.We2 tZ:le5
3 5 . . . tZ:ld4+? 1 would allow a march of the white king: 3 6 .'itid3 .2,[6 ( 3 6 . . . .2,c7 3 7 . .2,c4t) 3 7 .We4 tZ:le6 3 8 .tLlc4 tZ:lc7 39 . .2,b7 b5 40.axb5 tZ:lxb5 4 1 .'itid5t.
36.f 4 tLlg4! 3 6 . . . tZ:lc6 ? ! 3 7 . .2,b5 1t .
37 . .2,b5+ r:Jefe7 38.tZ:ld5+ r:Jefd6 39 . .2,c4 tZ:lhG 40.tZ:le3 .2,fG
In spite of all White's efforts , the position still looks like a dead draw.
41 . .2,d3 .2,d8 42.'itif3
42 ... tZ:lg4 ?! Black decides to enter to a bishop endgame, which is naturally often drawn even with a pawn down. Easier was 42 . . . f5 ! 43 . .2,c4 (43 .tZ:lc4+ @e6 44.tZ:le5 @f6 45 . .2,c4 .2,c7) 43 . . . We7 44.We2 tZ:lg4=.
43.tZ:lxg4 hxg4+ 44.Wxg4t @e6 45.�c4+ 'itie7 46.r:Jeff3
A) 46.f5 .2,c7 ; B) 46.Wg5 @f8+ 47 .Wh6 �f6 48 .b3
�d4. 46 .. .f5D 47.@e2 Wf8 48.Wd3 .2,fG 49.b3 �b2!
Good understanding. Black transfers his bishop towards the queenside just in time. The lazy 49 . . . Wg7? would lose immediately after 50 . .2,d5 .2,d4 5 l .Wc4.
50 . .2,d5 �a3 51 .@c4 .2,b4 52.wb5 �a5
Black has consolidated his queenside with the bishop, while his king is able to defend the kingside.
53 . .2,c4
53 ... 'itie7?? The decisive mistake by Pelletier. Playing under constant pressure can be really annoying. 5 3 . . . Wg7 would have held the position: 54 .Wc6 @h6 55 .Wb5 r:Jefh5 5 6 . .2.e2+ Wh6 5 7 . .2,f3 Wg7 5 8 . .2,d5 Wh6= and White cannot manage to break through with h4-h5 .
54.@cG+- @f6 54 . . . Wf8 55 . .2,d3 We8 56 .h5 gxh5 5 7 . .2,xf5 @fl 5 8 . .2,c2+-.
55 . .2,d3 Black is in zugzwang.
55 ... @f7
1 5 5

A C u t t i ng -Edge G a m b i t a g a i n s t the Queen 's I n d i an - Part I I I
S S . . . 'it>e6 S 6 .g4! fxg4 S 7 . .£xg6 g3 S8 . .£e4+- .
56.h5! gxh5 S6 . . . Wf6 S 7 .hxg6 @xg6 S8 . g4+- .
57 . .£xf5 @f6 58 . .£e4 @g7 59 . .£f3 Wh6 60.'it>b5 �g6 61 . .£d1 r;,ith6 62.jie2 'it>g6 63.jif3 @h6 64 . .£c6 1 -0
Kozul, Zdenko :N'eIDeth, l\.fiklos Austria 20 1 0 (2)
Game 1 0
1 .d4 t2if6 2.c4 e6 3.t2if3 b6 4.g3 .£a6 5.�c2 .£b7 6 . .£92 c5 7.d5 exd5 8.cxd5 t2ixd5 9.0-0 .£e7 1 0.l:rd1 t2ic6 1 1 .�f5 t2if6 1 2.e4 g6 1 3.�f4 0-0 1 4.e5 t2ih5 1 5.�c4!
This move was first tested less than a year before this game, though it was suggested in Chess Informant 98 in the annotations to the game Aronian-Leko, Moscow 2006 .
15 ... t2ig7 1 6.t2ic3 t2ie6 1 7.jie3
1 1 .. Jka A straightforward continuation, Black is threatening . . . t2ic6-d4 already. Undermining the centre by 1 7 . . .f6 ! ? looks risky, however after 1 8 . .£h3 there is still 1 8 . . .fS D and after 1 9 . tLldS g? it is not easy to draw a final conclusion.
1 S 6
1 8.�a4 Moving out of danger and keeping an eye on the weak pawns ( a 7 , d7) .
1 8 ... a6 1 9.J::rd2 ! Enabling a retreat for the queen.
1 9 ... b5 20.�d1 t2ib8 21 .a4 b4 This seems a bit committal. Probably Black wanted to avoid opening the a-file. 2 1 . . . .£c6 ! ? keeps the flexibility : 2 2 . axbS axbS 2 3 .tLldS .£xdS 24 . .llxdSg? and White is still active, but he will have to work hard to build this out to a secure advantage.
22.ttJd5 jixd5 23 . .!d:xd5 lk7?! A too cautious decision. Black tries to relieve his knight of the defence of d7 , so it can start moving towards the centre.
A) Preparing to create a passer with 23 ... c4 would be in harmony with 2 l . . . b4, for example: 24.h4 24.tLld2 c3 2 S .bxc3 bxc3 2 6 .tLle4 c2 2 7 .�d2 �c7 2 8 .tLlf6+ .£xf6 29 .exf6 , but there are hardly any hopes of mating in view of 2 9 . . . d6+=Z . 24 . . . c3 2 5 .bxc3 .!:!.xc3 2S . . . bxc3 is less effective here due to 2 6 .i::i.c l . 26.hS A thematic advance, which can help White to set up a mat-ing net by hS -h6 later. 26 . . . �cS 2 7 . .£xc5 tLixcS After 27 . . . I:txcS 2 8 .l:hcS tLixcS 29 .�d6 �as 3 0 .ld.b l ! i White has strong pressure over the whole board. 28.tLlh2g? with good play on the kingside;
B) 23 ... �c7 and now: B l ) 24.�fl c4 25 .llcl c3 26.bxc3
bxc3 27 .tLld2 After regrouping the knight White will eventually win the pawn back. 2 7 ... �c6 ! 28.l::ld3 �xa4 29.tLle4 c2 29 . . . �aS 3 0 .tLlxc3 �xeS 3 1 .tLldS .£cs 32 .lic2 !;i; . 30.tLlc3 �c4 3 0 . . . �aS 3 1 .tLldS �d8 3 2 .l:Id2 . 3 1 .tLldSg? and though he is two pawns down, White has good compensation;
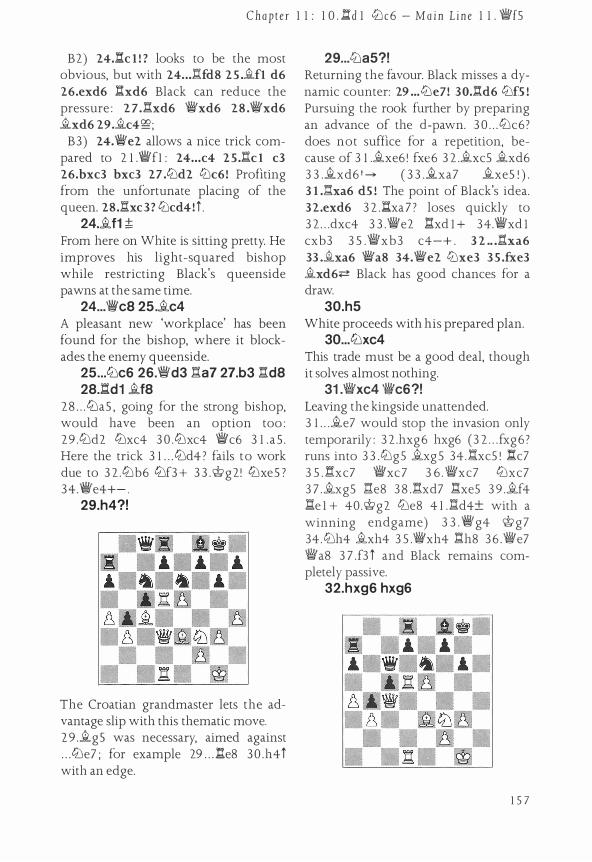
Chap t e r 1 1 : 1 0 . ..!::i'.d 1 tLlc6 - Ma in L i n e 1 1 . �f 5
B2) 24.i::t'.c l ! ? looks to be the most obvious, but with 24 .. Jlfd8 25 .�fl d6 26.exd6 .l:i.xd6 Black can reduce the pressure : 2 7 . .!lxd6 'li'xd6 28 .Wixd6 �xd6 29.�c4�;
B3) 24.'li'e2 allows a nice trick compared to 2 1 .'iYfl : 24 ... c4 25 .1:!.cl c3 26.bxc3 bxc3 27 .tLld2 tLic6! Profiting from the unfortunate placing of the queen. 28.�xc3? tLlcd4!t .
24.�f1 ;!; From here on White is sitting pretty. He improves his light-squared bishop while restricting Black's queenside pawns at the same time.
24 ... i:Yca 25.�c4 A pleasant new 'workplace' has been found for the bishop, where it blockades the enemy queenside.
25 ... tt:JcG 26.�d3 lia7 27.b3 1:!.d8 28.�d1 �f8
28 . . . tLlaS , going for the strong bishop, would have been an option too : 29 .tLld2 tLixc4 3 0 .tLixc4 �c6 3 1 .aS . Here the trick 3 1 . . . tLld4? fails to work due to 3 2 .tLlb6 tLlf3 + 3 3 .�g2! tLixeS ? 34.i:Ye4+- .
29.h4?!
The Croatian grandmaster lets the advantage slip with this thematic move. 2 9 .�gs was necessary, aimed against . . . tLie7 ; for example 29 . . . I:f.e8 30 .h4t with an edge.
29 ... tt:JaS?! Returning the favour. Black misses a dynamic counter: 29 ... tLie7! 30.Ild6 tLlfS ! Pursuing the rook further by preparing an advance of the cl-pawn. 3 0 . . . tLlc6? does not suffice for a repetition, because of 3 1 .�xe6 ! fxe6 3 2 .�xcS �xd6 3 3 .�xd6 ' --+ ( 3 3 .�xa7 �xe5 ' ) . 3 1 ..llxa6 dS ! The point of Black's idea. 32.exd6 3 2 . .l:!.xa7 ? loses quickly to 3 2 . . . dxc4 3 3 .'iWe2 l:;(xd l + 34.VWxd l cxb3 3 5 .'iWxb3 c4-+ . 3 2 .. Jha6 33 . .txa6 'li'a8 34.'li'e2 tLixe3 35 .fxe3 �xd6� Black has good chances for a draw.
30.hS White proceeds with his prepared plan.
30 ... tt:Jxc4 This trade must be a good deal, though it solves almost nothing.
31 .�xc4 i:Yc6?! Leaving the kingside unattended. 3 1 . . .�e7 would stop the invasion only temporarily : 3 2 .hxg6 hxg6 (3 2 . . .fxg6? runs into 3 3 .tLlgS �xgS 34.k:!.xcS ! .l:!c7 3 S .a:xc7 �xc7 3 6 .'iWxc7 tLixc7 3 7 .�xgS !:l:e8 3 8 .!:i:xd7 l:!.xeS 3 9 .�f4 .l:Ie l + 40.�g2 tLie8 4 1 .l:!.d4± with a winning endgame) 3 3 .i:Yg4 �g7 34.tLlh4 �xh4 3 5 .�xh4 l:!.h8 3 6 .�e7 'iWa8 3 7 .f3 t and Black remains completely passive.
32.hxgG hxg6
1 5 7

A C u t t i n g -E dge G a m b i t a g a i n s t th e Queen 's I n d i an - Par t I I I
33.tt:JgS!? 3 3 .£.gS ! was still more violent, for example 3 3 . . . a'.e8 34.£.f6 +-.
33 ... .l:!.eS 34.tt:Je4 £.g7 34 . . . £.e7 3 5 .f4 tt:Jd4 3 6 .£.xd4 cxd4 3 7 . .l::!.Sxd4±.
35.f4 There is a huge difference between the white and the black armies. The enemy major pieces are just distant observers of the events.
35 ... as 36.tt:Jd6 kle7 37.fS tt:Jc7 3 7 . . . £.xeS 3 8 .fxe6 ( 3 8 .SxeS 'i¥f3 3 9 . .l:rddS f6 40 . .l:!.xcS ) 3 8 . . . fxe6 3 9 .'iWe4+-.
38.£.gS tt:Jxd5 39.£.xe7 tt:Je3 40.1ifxf7+ @h8 41 .'iWeS+ @h7 42.1ifxg6+ @98 43.l:rd2 1 -0
Postny, Evgeny Pacher, Milan Zagreb 2 0 1 1 ( 1 )
Game 1 1
1 .d4 tt:Jf6 2.c4 e6 3.tt:Jf3 b6 4.g3 £.a6 5.'i¥c2 £.b7 6.£.g2 c5 7.d5 exd5 8.cxd5 tt:Jxd5 9.0-0 £.e7 1 0.Rd1 tt:Jc6 1 1 .'iWfS tt:Jf6 1 2.e4 g6 1 3.'i¥f4 0-0 1 4.eS tt:Jh5 1 5.1ifc4 V//ic7 1 6.£.h6 tt:Jg7 1 7.tt:Jc3 tt:Jxe5 1 8.tt:JxeS £.xg2 1 9.�f4 d6 20.tt:Jg4
1 5 8
20 ... VWb7? Black makes a seemingly logical move, which is in fact a mistake. The surprising 20 ... .ic6 ! was the correct reply: 2 1 .tt:Jh6+ 2 1 .tt:Jds £.xdS 2 2 .tLlh6 + ! 'it>h8 2 3 . VIVxdS tt:Je6 24 .tt:Jxf7 + .t:!.xf7 25 .�xa 8 + I:!'.f8 2 6 .'iWe4 tt:Jxf4 2 7 .gxf4 .if6� with good compensation. 2 I . .. @h8 22.tt:Jxf7+ Rxf7 23 .V//ixf7 .tl'.f8 24.V//ic4 24.'i¥b3 ? ! g S ! 2 5 .£.e3 'iWd7� ; unfortunately tt:Jds is not possible now due to . . . £.a4. 24 ... .ia8 ! Black has enough time to organize a good arrangement on the long diagonal. Now:
A) 2S .tt:Jd5 V/lic6 26.f3 Against the threat of . . . .ttfs . 26 . . . £.d8 2 7 . .ih6 2 7 .b4 tt:Je6 28 . .tt:d3 tt:Jxf4 29 . gxf4 (29 .tt:Jxf4 bS) 29 . . . 1ifd7 3 0 . l:Ie l V/Jif7� . These positions are still very messy, but the bishop pair and White's ugly doubled f-pawns ensure reasonable counterchances for Black. 2 7 ... r.l.xf3 28.llfl ViVxdS 29.'iWxdS �xd5 30 . .l:!:xf3 �xf3 3 1 .Rfl tLlfS 32 . .l:l.xf3 £.f6� and Black has enough material for the exchange. His queenside majority might become dangerous in the future ;
B) 2S . .l:!.d2 g5 Freeing the el-bishop. 26.�e3 �f6 2 7.tt:Jds VIVb7 28.l::radl tt:Jfs 29.VIVe4 .ig7� Although the position is far from clear, Black should probably be OK.
21 .tt:Jh6+ @ha 22.tt:Jxf7 + �xf7 23.V//ixf7 Rf8
2 3 . . . tt:Jfs ? 24. tt:Jds ± . 24.V/lic4 �f5?
An unfortunate decision by Black. 24 . . . �c6 would have kept some chances : 2S.tt:Jd5 A big difference compared to the line with 20 . . . £.c6 is that now Black is unable to change the arrangement of his pieces on the long diagonal. Normally, the queen should stay

Chapte r 1 1 : 1 0 . .a'.d l tt:::l c6 - Main L ine 1 1 . �fS
in front in order to be able to set up more serious threats. 25 ... tLlf5 26.b4! b5 27 .'iVc3+ Wg8 28.tbxe7+ 'iVxe7 2 9. bxc5 dxc5 2 9 . . . tbh 4 7 seems to be too risky. 30 .'iVb3 + Wh8 3 1 .:i.e l 'iVd7 3 2 .gxh4 I:rxf4 3 3 .h3 ! .l::rxh4 34.l:re6±. 30.'iVe5;!:;
25.�xd6 �f6 2 5 . . . �h l does not change much: 26.'l!Ufl �f3 27 .nd3 �xd6 28 . .ld.xd6 J:if8 29.'i¥d3+-
26.g4 �h1 27.�f1 �f3 Although the position looks a bit scary, there is absolutely no concrete threat from Black.
28.�e5 28 .l:i.d2 was also good, for example: A) 28 ... .ig5 29.I:i.d5 ! .l:Ixc3 30 . .t:lxg5
z:!.d3 3 1 .i.e5+- Later h2-h3 is always available to open a Luft for the king;
B) 28 ... tbe6 29 . .l::!:e l tbg5 30.h4 'iVd7 3 1 .hxg5 �xg4+ 32.�g3+- and Black has shot his bolt;
C) 28 ... .llxc3 29.bxc3 �xc3 30 . .b!.adl �xd2 3 1 . .li:xd2
28 ... tbeG
29.�xfG+? White follows the old principle that simplifications are often good when we have a material advantage. The current situation required a more
direct handling : 29.'iVe2 ! tbd4 29 . . . .a:fs 3 0 .�xf6+ l:.xf6 3 1 ..a:dS ! �xd5
3 2 .�e5+- . 30Jixd4! cxd4 3 1 .l:!.el ! These moves are obviously far from easy for the human brain. 3 1 .. . dxc3 3 1 . . . .ixe5 3 2 .�xe5+ �g7 3 3 .�xg7+ @xg7 34.tLle4 and the bishop i s caught. 3 2.�xf6+ .l:i.xf6 3 3 .'iVes+ �g7 34 . .l:f.e7+ 'i'xe7 3 5 .'iVxe 7 + l:tf7 36.'i'e5++-
29 ... .l:i.xf6� Suddenly it is not so easy anymore.
30.tbe2!? 30 . .b!.d6 .l:If4 3 1 .h3 tbd4 The black knight can jump as it pleases. In the event of 3 1 . . .tLlgS 3 2 . .l:!.ad l �c60 3 3 .tbd5 tLlf3+ 34.@h l tLld4 3 5 .�g2 .l:!.f8 36 .�xd4' cxd4 3 7 .�e4 �xdS 3 8 . .l:!.xdS White will have a small material plus. 32 . .l:!.dl �c6 3 3 .ktd8+ <;tig? 34.�d3 'i'e7 35 .�e3 l:l.xg4+ 36.hxg4 'i!'xd8� and the outcome should be a draw.
30 ... �f3 30 . . . 'it>g? 3 l . .l::rd3 �c6oo.
31 .h3D h5!? Black keeps playing aggressively. The quiet 3 l . . .'iVe7 may have been better : 3 2 . .l:Id3 tLlgS 3 3 . .l:Ie3 .l:.e6 34.lhe6 �xe6�.
32 . .l':l.dG! White realizes the danger in time.
32 ... hxg4 33.J:t:ad1 Preparing against the attack along the h-file.
33 ... 'iVh7??
1 5 9

A C u t t i n g -E dge G amb i t a g a i n s t th e Qu een ' s I n d i an - Par t I I I
And Black falls into the trap. Pushing the queen just a little less far, to 3 3 . . . �g7 , would have secured at least a draw for Black: 34 .hxg4 (34 .tllg3 gxd l 3 5 .�xd l tlld4 3 6 .l:rxf6 �xf6 3 7 .hxg4 �f4 3 8 .'iit>fl =) 3 4 . . . �h6 (34 . . . tllgS 3 5 .l::!.xf6 �xf6 3 6 .�e l gc6 3 7 .�c3 tllf3 + 3 8 . 'it>fl tllh2+=) 3 S .tllg3 gxd l 3 6 .�xd l �f4=.
34.:i:l:xe6! This little sacrifice decides the game.
34 ... a'.xe6 35.UdS+ �g7 36.�d7+ 'it>g8 37 . .l:rxh7 gxe2 38.'li'c1 ! 'iit>xh7 39.�f4 I:re7 40.hxg4 c4 41 .'it>g2 gd3 42.@g3 @g7 43.@h4 :§:f7 44.�e5+ �ts 45.'li'bS+ 'it>g7 46.@g5 1 -0
Gelfand, Boris Leko, Peter Jermuk 2009 ( 1 3 )
Game 1 2
1 .d4 tllf6 2.c4 e6 3.tllf3 b6 4.g3 gas 5.�c2 gb7 s.gg2 c5 7.d5 exd5 8.cxd5 tllxd5 9.0-0 ge 7 1 0.�d1 tllc6 1 1 .'li'f5 tllf6 1 2.e4 g6 1 3.�f4 0-0 14.e5 tllh5 1 5.'l!Hc4 d5
Gelfand considers this to be the most natural reply. Black gets rid of the backward d7 -pawn.
1 6.exd6 gxd6 1 7.tllc3! An improvement from the ex-World Cup winner's kitchen. His compatriot unnecessarily inserted 1 7 .gh6 :§:e8 1 8 .tllc3 tllaS and had to retreat with 1 9 .�g4 ( 1 9 .�d3 is met by 1 9 . . . gf8+) l 9 . . . gc6 2 0 .tllgs tllf6 when Black was absolutely fine in Rodshtein-Volke, Kallithea 2008 .
1 7 ... tlla5 1 8.�d3 gc1 After 1 8 . . . ge7 , 1 9 .�e2 ' is unpleasant according to Gelfand. As we described
1 60
in the analysis section, after the counter 1 9 . . . �e8 20 .gh6 tllg7 2 1 .tllds gxdS 2 2 .l:i'.xdS gf 6 the critical move 2 3 . � d 2 ! ensures White good play.
1 9.�c2 Let us quote from Gelfand's comments : 'Now I had got the position I wanted to play. White is a pawn down, but tllaS , tllhS and gc7 are poorly placed and thus White has full compensation for the pawn. I was aware that engines do not see a big danger for Black and this gave me extra confidence and motivation. I was convinced that my assessment of the position was correct and was eager to prove that a human's view on a position can sometimes be more precise than a computer's one (a very unpopular opinion nowadays) .'
1 9 ... �e7 After 1 9 . . . Vi' c8 2 0. tlldS gxdS 2 1 . .!d.xdS Wke6 the following line is a good illustration of White's huge opportunities : 22 .l::!.xhS ! gxhS 23 .b4 �c4 24.�d2 gd8 2 s .gb2 'li'xb4 26 .gc3 �a4 2 7 .tllgS !-+ as given by Sergey Shipov.
20.lle1 'Any other reasonable move - 20 .tllbS , 20 .tlldS , 20 .ggs , 20 .gh6 - deserves attention as well, but I chose the most concrete way ' , writes Gelfand. We have examined a couple of them. The natural 20,gh6! is the best choice.

Chap t e r 1 1 : 1 O . .a'.d 1 CLlc6 - Ma in L i n e 1 1 . Vi'f5
Now 20 ... .l:!.fe8 After 20 . . . t2lg7 , 2 l .b4! , a similar plan to the one we will also see further on in the game, works here as well : 2 l . . . cxb4 2 2 .tLldS �xd5 2 3 .�xd5 1lac8 24.'lWb2 f6 25 . .l:!.e l 'lWf7 2 6 .tLlg S ! (this is the point of the whole plan! ) 2 6 . . . fxgS 27 . .l::!.xaS bxa5 28 .�dS tt:Jfs 2 9 .�xf7 + .l:!.xf7 3 0 .�xg S ± . 2 1 .tLldS Acquiring Black's light-squared bishop is often our aim. 2 1 .. .�xdS 22 . .l:!.xdS l:Iad8 2 3 .llxd8 �xd8 24.J::!.e l 'lWd7 2 5 .i:!:dl �e6 26.b4! We drew this idea from the present game. 26 ... tllc6 2 7.bxcS bxcS 28.tlel �d7 29..!:heS+ �xe8 30.�xcS with a clear advantage. For further analyses see the theory section above.
20 ... 'lWd7 20 . . . 'lWf6 2 1 .�g5 �g7 (the fianchettoed queen looks pretty bizarre) 2 2 .'lWd2 ! t .
21 .�gS 2 1 .�h6 is another suggestion by Gelfand, however it is probably less effective than before : 2 1 . . JHe8 22 . .i::[ad 1 .i::[xe l + 23 .tLlxe l g?.
21 .. .fG?!
The Israeli grandmaster evaluates this reply as inaccurate. He believes that it was better to play 2 1 . . . l:lfe8 2 2 . .i::[ad l l:he l + 23 .tLlxe l 'i¥g4 24.f4 !oo with a messy position.
22.�hG Gelfand also mentions 22.Uadl as an alternative that deserves serious consideration: 22 ... 'lWf7 If 2 2 . . .'lWg7 23 .�d2 with the idea of tLlbS . The ambitious 23 . . . t2lc4? would now be premature, as it allows 24.�b3 'lWf7 2 5 .tLlg S ! +- . 23 .tLlbS 2 3 .�h6 .i::[fd8 leads to the game. 2 3 . . . .l:!.adS 24.�h6 llxdl 25 . .bi.xdl l::!.d8 2 5 . . . l::!.c8 26 .t2lxa7;\; , regaining the pawn and keeping some pressure. 26 . .bi.xd8+ �xd8 2 7 .t2ld6g? White has good play for the pawn, while the black king has become really weak.
22 ... l:Ifd8 In the event of 2 2 . . . lHe8 23 . .i::i.ad 1 l::txe l + 24.tLlxe l ! 'i¥f7 2 5 .�xb7 t2lxb7 2 6 .'i¥a4! t2ld6 (26 . . . !Id8 2 7 .'i¥xa7) 27 .tLldS ensures White full compensation, as Gelfand describes.
23 . .l::!.ad1 2 3 . t2le4 was harmless due to 2 3 . . . 'iV d3 24.'i¥xd3 l:.i.xd3 2 5 .g4 fs 1 .
23 ... 'lWf7
24.b4! This advance is based on the idea of opening the c-file in front of the queen, so t2lb5 will become a threat. As Gelfand writes : 'White cannot afford to slow down. He should keep the flame of initiative burning even at the cost of new sacrifices.'
1 6 1

A C u t t i ng -Edge G a m b i t a g a i n s t the Qu een 's I nd i an - Par t I I I
24.ti:Jb5 was an option too : 24 . . . ti:Jc6 (24 . . . hlxd l 2 5 .l:i'.xd l .l:!.d8 26 . .l:!.xd8+ �xd8 2 7 .ti:Jd6 Wle7 28 .ti:Jxb7 ti:Jxb7 29 .b4 1 ) 2 5 .a3 i::rxd l 26 .i::rxd l hld8 2 7. b4 with some pressure in both cases.
24 ... cxb4 24 . . . ti:Jc6 25 .bxc5 bxc5 2 6 .ti:Jb5 ! leads to unfavourable consequences for Black.
25.tt:JbS :!.xd1 25 . . . hldc8? ? loses to 2 6 .�h3 ! �xf3 (2 6 . . . f5 2 7 .ti:Jg5 Wlc4 28 .Wlxc4+ (even simpler is 2 8 .�xf5 ! ) 2 8 . . . ti:Jxc4 29 .hle7) 2 7 .�e6 Wlxe6 28 . .l::!.xe6+- .
26.!:!.xd 1 .l:!.d8 The most natural decision. Black wants to get rid of as many attacking pieces as possible. 26 ... l:i.cS is riskier, because it steps into 2 7 .�h3 ! . Simplifying into an endgame by 2 7 .tt:Jxc7 Wlxc7 2 8 .Wlxc7 l:[xc7 2 9 . .!:f.d8+ fails to yield an advantage after 29 . . . @f? 3 0 . .a'.f8+ We7 3 l . .l:!.h8 ti:Jg7 ! ! according to Shipov's analysis. 2 7 ... fS 28.ti:JgS ! We found this direct move to be much more convincing than 2 8 .�g2�. which was given by Gelfand. 2 8 . . . Wle7 2 9.ti:Jxc7 lhc 7 3 0.Wid2 White is seriously threatening to penetrate on one of the two open files. 30 ... ltJf6 3 0 . . . .l:!.c8 3 l .g4' (an important intermediate move) 3 l . . . ti:Jg7 3 2 .�g2 ! �xg 2 3 3 . @xg2 Wlb 7 + 34 .�g l - . 3 1 .l:rel and now 3 1 . . . i.e4 3 1 . . . tLle4 3 2 . tt:Jxe4 �xe4 3 3 . .l:Ixe4 !+- ; or 3 1 . . .Wld7 3 2 .W/xd7 .'.a.xd7 3 3 . .l:[e6+- . 3 2 . .l:!.xe4! fxe4 3 3 .�e6 + Wh8 34.Wif4 Black 's kingside is terribly vulnerable, and what's more, all the white pieces are ' shooting' in that direction. 34 .. . W/d8 3 S.ttJxe4 l:Ic6 36 .Wles .i::l.cSO 3 7.ttJxcS ti:Jc6 3 8.Wle3 bxcS 3 9 .WlxcS ti:Jd4 40.i.c4 ti:Jf3 + 4 1 .Wg2 Wla8 42.Wifs+
1 62
Wixf8 43.�xf8+- and White should be able to realize his huge advantage.
27 . .!:f.xd8+ �xd8 28.tt:Jd6
·�· �· i
?t:s i � . . ·�
• • • • .tb b ·�· ·�--:;--� , � 1 . . �
Thanks to the last exchange, the enemy bishop was diverted from c7 , so White can go for the sentinel on b 7 .
28 ... 'i¥d7 28 . . . Wlc7 29 .Wid2 ! (29 .Wle2 Wle7 ) . During the game White was hoping for the following spectacular finish : 29 . . . �c6 30 .ti:Je5 ' ! �xg2 (30 . . . fxe5 3 l .�d5 + Wh8 3 2 .tt:Jf7 +) 3 l .'it>xg2 Wies (3 1 . . . fxe5 3 2 . Wid 5 + Wh8 33 .tt:Jf7 + Wg8 34.tt:Jxd8+) 3 2 .ti:Je4' .
29.tt:Jxb7 Gelfand: 'The game moves on to a new stage. For the last 1 0 moves Black has not been able to find a moment to get any of his knights into the game. White managed to exchange the key piece -�b7 - and is now starting to penetrate into Black's camp by the white squares.' 29 .Wid2 , trying to repeat the same trick, fails to work as 29 . . . �c6 30 .ti:Je5 fxe5 3 l .�d5 + @h8 3 2. tt:Jf7 + is only a draw.
29 ... tt:Jxb7 30.Wic4+ The immediate 3 0 .�h3 also deserved attention. It is difficult to define the right move order. However, the bishop move would probably lead to similar positions as well.
30 ... �ha On 3 0 . . . Wlf7 White had prepared 3 1 . WI c8 (later analysis showed that

Chap ter 1 1 : 1 O . .Ud 1 tllc 6 - Main L i n e 1 1 . �ES
3 1 .'i¥xf7 + 1 @xf7 3 2 .tlld4 is even stronger as after 3 2 . . . tllcS 3 3 .�dS + We? , 34.g4! wins a piece) 3 1 . . .�c? 32 .'iWa8 .
31 .�h3! 3 1 .tlld4 tllc5 3 2 .'i¥xb4 was also possible, but not in the spirit of the position (Gelfand) .
31 ... 'i¥e7 The naive 3 1 . . . 'i¥xh3 ? meets with mate after 3 2.'iVf? .
32.'i¥d5 In our opinion, occupying the centre with 3 2 .tlld4 ' might have been a bit stronger. Then 3 2 . . . tlld6 3 3 .'iYdS transposes to the game.
32 ... tlldG A) Locking out the light-squared
bishop by 3 2 .. .fS looks extremely dangerous, but it is playable: 3 3 . tllg 5 (33 .�gS 'i¥c7) 3 3 . . . tllf6 34.'iWb3 tlld6 3 5 .tlle6�. White's pressure is still strong; B) 3 2 . . . tllcS 3 3 .tlld4.
33.tlld4
33 ... 'iWe1 +? 'After this mistake Black's position deteriorates' - Gelfand. Better was 33 . . . tllf? (33 . . .fs allows 34.tllc6 'i¥c7 3 5 .�f8 ! ) 34.�d2 fS 3 5 .tllc6 �e8 3 6 .tllxd8 tllxd8 3 7 .�xb4�. The position with the open kingside still looks very tough for Black, but maybe his chances would be higher than in the game.
34.�f1 34.@g2 ! ? 'iYeS (34 . . . 'i¥e4+? 3 5 .'i¥xe4 tllxe4 3 6 .tlle6 �e7 3 7 .g4) 3 S .'i¥a8 was also possible, with a slight advantage to White.
34 ... 'i¥e5 35.'iYaS 'i¥e8 35 . . . tllf? 3 6 .�e3 .
36.'iWxa7 tllf7 37.�e3?! Gelfand believes that he played correctly up to now, but starting here he began to make several mistakes. Simpler could have been 3 7 .�d2 fS ( 3 7 . . . tlles 3 8 .�xb4 tllg7 3 9 .'i¥b8) 38 .�xb4 tllf6 3 9 .�c3 .
37 ... tlle5 38.'iYaS 'i¥g8 Black wants to have his queen protected and he hopes to take the al-pawn in some lucky cases. He should have finally brought his knight back: 3 8 . . . tllg ? ! 3 9 .tllclt .
39.tllcG 3 9 .tlle6 is easier, for example : 3 9 . . . 'i¥xe6 40 .'i¥xd8+ @g7 4 1 .'i¥c7+ Wg8 42 .'i¥b8+ Wg7 43 .'i¥b7++- and 3 9 . . . �e? 40 .'i¥xg8+ Wxg8 4 1 .�xb6± are the winning lines g iven by Gelfand.
39 ... tllxcG 40.�xcG tllg7 · 'The time control had been passed.
White has retained an advantage, but Black keeps drawing chances. Unfortunately the second half of the game was marked by numerous mistakes from both sides.'
1 63

A C u t t i n g - Edge G a m b i t a g a i n s t the Queen ' s I nd i an - Par t I I I
The greedy 4 0 . . . �xa2? immediately loses a piece to 4 1 .g4 tllg7 42 .�d7 VWg8 43 .�h6 .
41 .�hG
41 ...�e7 4 1 . . . '&' f8 might have been a bit more resistant: 42 .�c4 �e 7 ( 42 . . . '&'cs 43 .�b7 �f8 (43 . . . �e7 44.�dS) 44.h3 �e7 45 .'&'dS) 43 .'&'ds (Black can only pass, while White is able to strengthen his position step by step) 43 . . . '&'f8 44.g4 (44.�d4 ! ? is an interesting al terna t i ve : 44 . . . g S (44 . . . �e7 4S .�d2 �c7 46 .'&'ds , winning the b4-pawn) 4S .'&'d3 followed by �b3-c2) 44 . . . gS (44 . . . �e7 4S .�f7 �xf7 46 .�xf7 �d6 47 .�d2 , trapping the knight, was White's idea during the game) 4S .'&'d4 �e7 46 .�xb6t .
42.�c4 �dB 43.�e3! White retreats his bishop in order to grab the b6-pawn.
43 ... tllf5 43 . . . �cS 44.�xcS bxcS 45 .'&'xcS �b8 46.�e7 fS 47 .�f7 is winning for White.
44.�xb6 �f8 44 . . . '&'d l + 4S .@g2 tllh4+ , speculating on some kind of counterchance, fails to bring success due to the calm 46 .@h3 tllfs 47 .g4 1+-.
45.�eG
1 64
White's plan was the following : exchange queens, then march with the king to the b-pawn and later simplify into a won ending. That plan seems good, but he executed it in an unfortunate way. 4 S . '&' dS may have been preferable.
45 ... tllg7
46.�d7? White decides to go for an endgame in which he certainly enjoys a lasting advantage. On the other hand, it was unnecessary to hasten things. 46 .�b3 !N keeps the pressure, for example: 46 . . . hS 47 .h4 �d6 48 .@g2 tllfs 49 .'&'b7 tlle7 s o .'&'d7 tllfs S l .�e6 tllg7 5 2 .�dS± with a kind of zugzwang position.
46 ... h5 47.�ca @gs 48.@f1 '&'xc8 49.�xcB @f7 50.@e2 tlle6 51 .Wd3 tllc5+ 52.@c4 tlle4 53.�aG
S 3 .�d7 ? ! would allow Black to remove the queenside pawns : S 3 . . . tlld2+ 54 .WdS b3 .
53 ... @eG S3 . . . tlld2+? ! S4.�d3 b3 ?? (S4 . . . tllf3 S S .h3) S S .Wxd2 bxa2 S 6 .�c4+ is the difference with the above-mentioned line.
54.�e3 54.�bs h4.
54 ... tllc3?!

Chap ter 1 1 : 1 0 . l:rd l t2lc6 - Main L i n e 1 1 . �f5
• •
5 4 . . .f5 ! , pushing forward the kingside pawns, was rather necessary.
55.@b3?! 5 5 .�c8 + ! , driving the king back, would have been really practical : 5 5 . . . Wf7 ( 5 5 . . . We5 ? 5 6 . a3 ! tlld5 5 7 .�d4+ Wd6 5 8 .axb4+-) 56 .�b3 tlle4 5 7 .�h3 t .
55 ... tlld5 56.�c4!? 5 6 .�d4, keeping the enemy king at bay, was likely more effective.
56 ... @e5 57.�xd5 �xd5 58.�d2 Gelfand evaluates: 'White has achieved his goal - the bishop ending, but in a very bad version. Black's pieces are very active and the position is drawn.'
58 ... �c5 59.f3 f5 60.�xb4 �g1 61 .h3 �f2
Black could have saved the game with 6 1 . . . g5 . Now Gelfand examines the following variations:
A) 6 2 .�e l g4 6 3 . fxg4 hxg4 (63 . . .fxg4 64.h4+-) 64.h4 (64.hxg4 fxg4 6 5 .a4 Wc6 6 6 . Wc4 �h2) 64 . . . �h2 ! 65 .h5 f4 66 .gxf4 �xf4= ;
B) 62 .�d2 g4 6 3 .fxg4 fxg4 64.h4 �fl 65 .�f4 We4 66 .a4 �e l = . He mentions that he even saw the amazing counter 66 . . . Wf3 6 7 .a5 �xg3 68 .�xg3 Wxg3 69 .a6 Wh2 70 . a7 g3 7 1 .a8'MU g2 and Black survives , because the h-pawns are useful for hiding the king from checks;
C) 6 2 .g4 fxg4 63 . fxg4 hxg4 64.hxg4 'it>e4 .
62.g4 fxg4 63.fxg4 hxg4 64.hxg4
• • • •
. . · � · ·�· .
• . 8 . �· . .
8 . • • • • •
64 ... g5? The final mistake. According to Gelfand the draw was still attainable after the incredible 64 . . . �h4! ! and now:
A) 65 .�a5 We4 66 .a4 Wf4 6 7 .�c7+ (67 .g5 We5) 6 7 . . . �xg4 68 .a5 Wf5 69 .�b6 �g3 70 .a6 �b8 7 1 .�c4 �e6 72 .Wb5 'it>d6=; B) 65 .a4 �d8 6 6 .a5 (66 .�c3 �e4)
66 . . . �xa5 ! 6 7 .�xa5 g5 ! ! ; C) 65 .Wa4 �c4! 6 6 .�d2 �d8 ! .
65.a4 �b6 65 . . . �e4 66 .Wc4 Wf3 6 7 .a5 .
66.�e7! The 20 1 2 World Championship finalist grabs the opportunity.
66 ... We4 66 . . . �e3 6 7 .Wb4.
67.�xg 5 'it>f3 68.@c4 @xg4 69.�b5 �f2 70.�d2 'it>f5 71 .a5 �e4 72.'it>cG! 'it>d3 73.�g5 'it>c4 74.�e7 �e3 75.aG �a7 76.�dS �b8 77.�c7 �a 7 78.�b7 1 -0
A very complex game with many instructive parts from the opening till the end.
1 65

A C u t t i n g - E dge G a m b i t a g a i n s t th e Qu een 's I nd i an - Par t I I I
Conclusion The second main line, 1 O . . . lllc6 , caused a lot of difficulties for us. We immediately got stuck after Judit Polgar's l 2 . . . d6 , after which we were unable to find any real advantage for a long time. Finally, the dynamic 1 8 . llleS ! seems to be a satisfactory solution.
In general we can say that Black does not have so many good options to deviate in this chapter. As we have seen, the first real branching point is at move 1 S . It took a while until we realized that only 1 S . � c4 promises White an advantage. We mentioned White's other alternatives too in order to explain how we reached this conclusion.
In the end, we believe that we have worked out many promising ways for the white player to give him pretty good causes for optimism, however the investigations are still far from completed here.
1 66

Index of Variations
1.d4 tt:Jf6 2.c4 e6 3.tt:Jf3 b6 4.g3 �a6 5.'i¥c2 cs 6.d5
6 . . . 'iWe7 . . . . . . . . . . . . . . . . . . . . . . . . . 1 5 6 . . . �d6 . . . . . . . . . . . . . . . . . . . . . 1 6 6 . . . d6 . . . . . . . . . . . . . . . . . . . . . . 2 7 6 . . . g 6 7 .e4 gg7 8 .tbc3
8 . . . 0-0 . . . . . . . . . . . . . . . . . . 2 9 8 . . . exdS 9 .eS . . . 29
6 . . . bs 7 .e4 . . . . . . . . . . . . . . . . . . 3 1
6 . . . exd5 7 .cxd5 g6 8.tt:Jc3 �g7 9.�g2 0-0 10.0-0 d6 11.�e1
1 1 . . . lie8 . . . . . . . . . . . . . . . . . . . . . . . . 1 8 1 L.tbbd7 . . . . . . . . . . . . . . . . . . . . . . . 1 9 1 1 . . . b5 1 2 .e4
1 2 . . . tt:Jbd7 . . . . . . . . . . . . . . 2 1 1 2 . . . b4 . . . . . . . . . . . . . . . . . . . . . . . 2 1
6 . . . exd5 7 .cxd5
7 . . . gb7 8 .gg2 d6 9 .o-o 9 . . . tbxdS . . . . . . . . . . . . . . . . . . . . . 39 9 . . . gxdS . . . . . . . . . . . . . . . . . . . . . 39 9 . . . �e7 . . . . . . . . . . . . . . . . . . . . . . 39
7 . . . bs 8 .Jlg2 d6 9 .o-o 9 . . . �e7 . . . . . . . . . . . . . . . . . . . . . . 40 9 . . . tt:Jbd7 . . . . . . . . . . . . . . . . . . . . . 40
7 . . . Jle7 8 .tbc3 0-0 9 .�g2 d6 1 0 .0-0 1 0 . . . bs . . . . . . . . . . . . . . . . . . . . . . . 4 1 I O . . . lie8 . . . . . . . . . . . . . . . . . . . 42 I O . . . tt:Jbd7 1 l . a4 . . . . . . . . . . . . . . . 44
1 6 7

1 68
7 . . . �b7 8.�g2 �xdS 9.tbc3
9 . . . iLe6 1 0 .tbe5 . . . . . . . . . . . . . . . . . . 5 0 9 . . . iLxf3 l O .iLxf3 tbc6 l l .'1Wa4 . . . . . . 5 1 9 . . . iLb7 1 0 .e4
l O . . . tbc6 . . . . . . . . . . . . . . . . . . . . . 5 3 I O . . . iLe7 1 1 .0-0 . . . . . . . . . . . . . . . 5 4
9 . . . jLc6 1 0 .e4 1 O . . . d6 . . . . . . . . . . . . . . . . . . . . . . . 64 1 0 . . . iLe7
1 1 . 0-0 l 1 . . .d6 l 2 .tt:Jh4 . . . . . . . . . . 66 1 1 . . . 0-0 1 2 .l:!.d l . . . . . . . . . . 6 7
l l .jlf4 l l . . . tba6 . . . . . . . . . . . . . . . . 69 l l . . . tt:Jh5 . . . . . . . . . . . . . . 69 l 1 . . . 0-0
1 2 .0-0-0 . . . . . . . . . . . . . 70 1 2 .lld ! . . . . . . . . . . . . . . 70
7 .. . �b7 8.�g2 tbxdS
9 .'1Wb3 . . . . . . . . . . . . . . . . . . . . . . . . . . 7 6 9 .0-0 ii.el
1 o .tt:Je5 . . . . . . . . . . . . . . . . . . . . . . 7 7 1 o .'/We4 . . . . . . . . . . . . . . . . . 7 8 1 0 .l:!.d !
1 O . . . tt:Jf6 . . . . . . . . . . . . . . . . . . . 7 9 1 O . . . tlJb4 . . . . . . . . . . . . . . 7 9 1 0 . . . 0-0 . . . . . . . . . . . . . . . 8 1 1 0 . . . tt:Jc7 l l .tbc3
1 1 . . . 0-0 . . . . . . . . . . . . 8 2 l l . . . tt:Je6 . . . . . . . . . . . . 8 2 l l . . . d 5 . . . . . . . . . . . . . . . . . 8 3 l l . . . '/Wc8
l 2 .il.g5 . . . . . . . . . 8 3 1 2 .il.f4 . . . . . . . . . 84
l l . . .tbc6 . . . . . . . . . . . 89 1 l . . . a6
1 2 .il.f4 . . . . . . . . . . . . . . 90 l 2 .'/Wf5 . . . . . . . . . 90 l 2 .il.e3 . . . . . . . . . . . . . . 90

Ind ex o f Va r i a t i on s
9.0-0 �e7 10.�d1 '1i'c8
1 1 .'lWf5 . . . . . . . . . . . . . . . . . . . 9 6 1 1 .tt:'ih4 . . . . . . . . . . . . . . . . . . . . . . . . . 9 7 l 1 .e4 . . . . . . . . . . . . . . . . . . . . . . . . . . 9 7 1 l .�g5
l 1 . . .kxg5 . . . . . . . . . . . . . . . . . . . . 99 l 1 . . . h6 . . . . . . . . . . . . . . . . . . . . . . . 99 1 1 . . . f6
1 2 .�c l . . . . . . . . . . . . . . . . . . 1 00 1 2 .�d2 tt:'ic6 . . . . . . . . . . . . . . 1 0 1
1 1 .a3 1 1 . . . 0-0 . . . . . . . . . . . . . . . . . . . . . 1 03 l l . . . h6 . . . . . . . . . . . . . . . 1 04 1 1 . . . d6 1 2 .tt:'id4 . . . . . . . . . . . . . . . 1 05 l l . . . tt:'ic7 l 2 .tt:'ic3
1 2 . . . d5 . . . . . . . . . . . . . . . . . . . 1 08 1 2 . . . tt:'ic6 . . . . . . . . . . . 1 1 0 1 2 . . . 0-0 . . . . . . . . . . . . . . . . . . 1 1 3
l l . . . tt:'if6 1 2 .tt:'ic3 1 2 .�g5
1 2 . . . 0-0 . . . . . . . . . . . . . . . 1 1 5 1 2 . . . tt:'ic6 . . . . . . . . . . . . . . . 1 1 7 1 2 . . . d5 . . . . . . . . . . . . . . . . 1 1 8 1 2 . . . �e4. . . . . . . . . 1 20 1 2 . . . h6 1 3 .�xf6 . . . 1 2 2
9.0-0 �e7 10.l':i:d1 tl:Jc6
1 1 .a3 . . . . . . . . . . . . . . . . . . . . . . . . . 1 3 3 1 1 .tt:'ic3 . . . . . . . . . . . . . . . . . . . . . . . . 1 34 l 1 .'lWa4 tt:'if6
1 2 . tt:'ih4 . . . . . . . . . . . . . . . . . . . . . 1 3 5 1 2 .tt:'ic3 . . . . . . . . . . . . . . . . . . . . . 1 3 6 1 2 .e4 0-0 1 3 .e5 . . . . . . . . . . . . . . . 1 3 7
1 1 .VWf5 tt:'if6 1 2 .e4 1 2 . . . d6 . . . . . . . . . . . . . . . . . . . . . . 1 42 1 2 . . . g 6 1 3 .�f4 . . . . . . . . . . . . . . . 1 43
1 69

Index of Names Numbers refer to pages.
A Aagaard 7 3 Adhiban 78 , 1 24, 1 3 0 Aguiar Garcia 20 Akopian 1 39 Alexeev 1 00- 1 0 1 Almasi,Z 2 1 , S J , 1 09 , 1 34 Alvarez Ibarra 1 S Amanov 1 47 Ambroz 4 1 Anand 78 , 98 , I 1 8 , 1 26 ,
1 3 2 Andrei kin I S Anka 9 , 1 1 S , 1 4 1 Arabidze 68 Arnaudov 90 Arnold,M 44 Aronian 1 4, 7 0 , 78 , 96 , J OO , 1 0 2 , 1 3 3 , 1 3 6- 1 3 8 , 1 46, I S 6 Arun Prasad 1 1 0 Ash win 47 Atakisi,F 69, I J S Atalik,E I 1 7 Atalik,S 1 49 Aupi Royo 8 3
B Bacrot 79 Baklan S 2 , 7 8 Bakre 6 S Bareev I S4 Baumgartner 1 24 Beliavsky 1 4, 80 , 9 2 , 9 7-98 Benes 4 1 Berczes 6 S Bitoon 86 Bocharov 1 3 7 Boe] 9 Bologan 1 3 S Boreika 1 2 2 Boros 9, 1 46 Braun 83 Brodda 1 2 S Bronstein 1 3 Buss 1 3 S
1 7 0
c Franzen 1 43 Cao 2 1 Fuhrmann 3 8 Capablanca 1 4 Carlsen 1 4, 96-98 , G
1 00- 1 0 1 , Galojan ! OS 1 42 , 1 S4 Gelfand 3 9 , 70 , 9 7 , 1 00 ,
Casella 1 24 1 09 , l S l , 1 S 3 , Caspi 42 1 60- 1 63 , 1 6S Cheng 8 1 Gentil 1 2 Cheparinov 1 34, 1 3 8 Gerasirnov 1 2S Chuchelov 98-99 Giddins 9, 49 Ciucurel 1 3 8 Giri 1 4, 1 46 Coleman 1 47 Gnusarev I 3 7 Cordova 1 22 Gomez Ledo 1 2S Corrales Jimenez 1 2 S Gonda 9, 1 09 Cramling 1 4 Gongora Reyes 8 1 Crawley 39 Gordon 69 , 7 3 , 7 6 Cvak 1 49 Gormally 69 , 7 3
Goze 1 1 7 D Granda Zuniga 49
De Blois Figueredo 1 I 0 Granski S4 Deepak 7 0 Greet 6 S Djavadov 47 Grigoria.n,L J S Dorer 1 24 Grigoriants 7 7 Dorfman 4 1 Grigoryan 1 3 6 Doric,D 1 04 Grischuk I l l , 1 26- 1 2 8 , 1 3 2 Drenchev 1 3 8 Groot en 6 S Dullemond 1 02 Groth 3 9 Dunlop 1 24 Griinfeld 1 3 Doring 3 8 Guramishvili 68 , 1 1 7
Gurmen ! O S E Gutierrez Delgado 8 1
Efremov 1 8 , 1 2 3 Ehl vest 1 3 7 H El Gindy 1 4 Hera I S , 8 2 Emelin 20 Hiltunen 69 Ertan 42 Hitzegrad I I S Erturan 3 I Eu we 1 4 Evseev 40 Ibrahimov 7 7
Ider 1 8 F In ants 1 3 S
Farago 9, 1 1 4, 1 22- 1 2 3 Iotov 1 4 Fichaud I S O Iskusnikh 1 3 S Fleetwood 1 1 7 Iturrizaga Bonelli 86 , 1 24

Ivanchuk Ivanov, A Ivanov,S
J Jankovic Jumabayev
K Kachiani-Gersinska
1 03 , I 06 1 3 S , 1 3 7
1 4
1 42 2 1 , 2 3
1 4 84 Kanep
Karjakin Karolyi
Karpov Kasparov Kazhgaleev Kearns Kengis
7 8 , 1 3 S- 1 3 6 9, 80-8 1 , 8 S , 1 3 7 ,
1 4 1 9 , 7 9 , 1 00
9, 1 2 S I , 7 6
1 8
Keres Khalifman Khamrakulov Khenkin Khoroslev Khukhashvili Kirsch Kiss.A Klimciauskas Kniest Koch Kohlweyer Kononenko,D Kopasov Kortchnoi Kosintseva,T Kostic Kos tin
l OS J S 9 8 68
1 3 7 1 8 S 8 99
l S O 8 2 6 9 8 2 3 9
1 34 86 , 1 1 9
1 4 1 46 S 3 8 1
Kotsur 1 8
Kourkoulos Arditis 1 44 Kovacevic.A 1 04 Kozul I 3 S . l 4 7 , 1 S 6 Kraai S4 Kramnik 7 7 , I I S Krasenkow 9 7 , 1 00 , 1 06 , 1 34- 1 3 S , 1 3 7 , 1 3 9 , 1 42 , 1 S4 Krivtsov 1 23 Kruger 1 24 Kulczycki 1 1 9 Kuzmin 9, 98 , 1 00- 1 02 , 1 3 2 ,
1 3 7 Kosebay S4
L Lalith Landenbergue Le Quang Lehnhoff
68 64
20 , 86 1 48
Leitao 1 9 Leite 1 49 Leko 7 7 -7 9. 9 7 . 1 02 , 1 I S ,
1 3 3 , 1 3 S - 1 3 6 , 1 3 8 , 1 46 , 1 49 , 1 S 6 , 1 60
Lemos Sarro Leon Hoyos Liebert Lindsalu Llanes Hurtado Ly
M Maciej a Maduekwe Mamedyarov Mare co Margvelashvili Marinov Marjanovic Markos Markus Marquez Abreu Mason Meins Melkumyan
Miedema Miezis Mignon Mikheev
1 1 7 S4
1 1 2 1 48
9 40
S 2 , 60 99 3 9
1 1 7 2 1 , 2 3
8 3 1 2 1 4 9
6S 1 24
S I 82 , 1 04, 1 1 0 ,
1 46 7 8 S I
1 1 6 40
76 -77 Miroshnichenko Mkrtchian 1 1 3
1 4 1 06
1 3 8 , 1 40
Mladenov Moiseenko Motylev
N Naer Nakamura Narayanan Nazaryev Nemeth ,M Nguyen Anh Dung Nielsen.PH Nikolac
1 3 8 , 1 40 7 8
1 04 S 2
1 47 , I S 6 2 0
66 , 9 8 S 3
Index o f Names
Nikolai dis Nikolenko Nimzowitsch Nisipeanu Ny back Nyffeler
0 Ostrovskiy Ould Ahmed
p Pacher Palac Panchana than Pantaleoni Pantovic Pantsulaia Papp Paragua Parligras Pashikian Pedersen.NV Pelletier Pereira,J Perunovic Petrosian Picas Nebril Pieniazek Pierzak
S 9 1 46
1 3 S 2 , 9 3
1 3 6 1 20
1 4 l S
1 49 , I S 8 1 3 9 1 34
6S 8 2
7 7- 78 1 42 9 7
S 8 , I 09 3 1 , 89 , 96
8 6 1 42 , I S4- 1 S S
1 9 1 45
7 3 20 8 2
1 3 8 Pirc 1 3 Plomp 1 1 2 Folgar 1 42 , 1 46 , I S4, 1 66 Portisch 1 3 Postny 99 , 1 09 , 1 1 8 , 1 49 , I S8 Prakash 70 Prusikin Pushkov
R Raijmaekers Raykhman Riazantsev Ris
8 3 , 1 09 , 1 3 S S 2
! OS 1 8 7 8 7 7
Rizouk 1 4
Rodriguez Amezqueta 6S Rodshtein 64, 96 , I SO , 1 60 Roktim 6S Rombaldoni,D I 8 Ronat,O Roser
1 7 1
1 S 1 09

A Cu t t i ng -edge G amb i t a g a i n s t the Qu een ' s I n d i an
Rotstein 80 , 9 2 Shneider,A 7 7 u Rusev 86 Shulman 1 22 Uraev 40 Ryvova 1 3 8 , 1 46 Skorna 3 9
Slawinski 1 02 , 1 1 4 v s Slugin 7 7 Vaganian 2 8
Sabaev 1 1 s . 1 2S So 9 7 , 1 24 Vale 1 2 2 Sacerdotali 1 44 Sokolov,A S 3 , S 8 , 60 Vallejo Pons S 2 , 60 Sakelsek 7 8 Sowden 1 43 Van Wely 89 Salvador S 3 Spraggett 7 7 Vayser 1 3 8
Sammalvuo,N 68 Stefan ova I 1 3 Vetter 8 2
Sanakoev 1 47 Steinman 1 46 Vitiugov 2 0 Santagati S 3 Stohl 1 26- 1 27 , 1 29- 1 3 0 , 1 3 7 Volke J SO , 1 60 Sanz Perez 1 S Sub a 90 Vorobiev 1 44 Sargissian 9 7 , 99 , I J 1 , 1 26 , Sukhonos 1 1 0 Vovk 1 46
1 3 2 Sundararajan 66 Vuilleumier 68 Sasikiran J S , 1 34, 1 3 6 Svidler 7 8 Satici J J 6 Swapnil 68 w Savchenko S 9 Szabo,B 6S Watson 1 20 Sax J 4- 1 s Wegener 99 Scepanovic 82 , J 4S T Wirig 69 Schneider Zinner J 3 7 Taggatz 1 3 S Woj taszek 99 , 1 3 6 Schulz 1 46 Timman 9 7 , 99 Sethuraman 1 24, J 3 0 Tkachiev S 3 , S 8 , 60 , 79 , J OO y Shanava 68 Topalov 90 , 9 3 , J 1 8 , 1 26 , Yakovenko 66 , 68 Shankland 44 J 3 2 Yang 1 47 Shen Yang 1 46 Torres J 44 Sherry 66 Toth.A 40 z Shipov 1 60 , 1 62 Tregubov 6S Zatonskih 6 8 Shirov 99 , 1 3 6- 1 3 7 Tritt I J 4 Zatsurdaev 40 Shishkov 84 Tuncer 9 Zawadski,A 1 2S Shitrit 1 8 Turgut 1 1 s Zilberstein 2 8
Game l ist
Margvelashvili, Giorgi - Jumabayev, Rinat . . . . . . . Porto Madryn Wch-jr 2 0 0 9 . . . . 2 3
Ashwin, Jayaram - Djavadov, Ramil . . . . . . . . . Baku 2 0 0 8 . . . . . . . . . . . . . . . . 47
Vallejo Pons, Francisco - Macieja, Bartlomiej . . . . Turin ol 2 0 0 6 . . . . . . . . . . . . . . 60
Gormally, Daniel - Gordon, Stephen . . . . . . . . .. . Swansea ch-GBR 2 0 0 6 . . . . . . . . 7 3
Beliavsky, Alexander - Rotstein, Arkadij .... . . .. Austria Bundesliga 2 0 0 7 / 0 8 . . . 9 2
Topalov, Veselin - Nisipeanu, Liviu-Dieter. . . .. . . Bucharest 2 0 1 2 . . . . . . . . . . . . . 9 3
Sargissian, Gabriel - Grischuk, Alexander ... ... . Dresden ol 2 0 0 8 . . . . . . . . . . . 1 2 6
Adhiban, Baskaran - Sethuraman, Sethuraman .. . Chennai 2 0 0 8 . . . . . . . . . . . . . 1 3 0
Carlsen, Magnus - Pelletier, Yannick ... . . . ..... Biel 2 0 0 8 . . . . . . . . . . . . . . . . 1 5 4
Kozul, Zdenko - Nemeth, Miklos ... . . . . . . . ... Austria 2 0 1 0 . . . . . . . . . . . . . . 1 5 6
Postny, Evgeny - Pach er, Milan . . . . . . . . . . . . .. . Zagreb 2 0 1 1 . . . . . . . . . . . . . . 1 5 8
Gelfand, Boris - Leko, Peter ... .. . . . . . . . . . . . . Jermuk 2 0 0 9 . . . . . . . . . . . . . . 1 6 0
1 7 2

lmre Hera
Born in Budapest in 1 98 6 . He fell in love with chess at the age of four, when his father showed him the game of kings. The first bigger success came quite fast, since he came 6th at the U l O world youth championship in 1 994 as one of the youngest players of the group. Hera is two-times Hungarian Youth Rapid Champion and was the World Youth Rapid Champion in 1 998 . In the same year he made his first IM-norm, when he was only 1 1 . 5 years old.
After a big break (2000-2005) due to secondary studies, Hera started to play chess again and became grandmaster within 1 . 5 years. One of his biggest successes was the European Championship in 2 0 0 7 . where he qualified to the World Cup with a performance of 2 7 0 3 . He was unbeaten at the European Club Cup in 2008 on board one, drawing with top GM Vassily Ivanchuk. As a grandmaster he won a lot of international tournaments, such as: the Oberwart open in 2007 (ahead of 20 GMs) and 2 0 1 1 , Zurich open 2008 , Liechtenstein open 2009 , Split GM 20 1 0 , Eschborn open 20 1 2 , tied first in the 1 20th Scottish Championship 20 1 3 , Sarkany-Aranytiz GM 2 0 1 3 . He was the silver medalist in the Hungarian Individual Championship in 2 0 1 1 . As a team player he was the top scorer on his boards in the Slovak Extraliga 2005/2006 and 2006/ 2007 . Hungary 2009120 1 0 and the Polish Ekstraliga in 20 1 1 .
Ufuk Tuncer
Born on 28 December 1 9 78 in Brake (Region Niedersachsen/ Germany) . Tuncer is an FM who has scored two IM norms. His current Ela is 2 3 3 1 . He started playing chess in 1 9 85 ( 'garden chess ') , and in 1 992 (Club Kornwestheim/Region Wi.irttemberg) . He was 1 1 times Youth Champion in the Blitz Tournament of the Region Wurttemberg. Tuncer also plays in several leagues: Belgium (Champion 20 1 3) , Austria 1 . Bundesliga (3rd Place 20 1 3) , Turkey, Germany. Some individual successes: at the ECC in Rhodes 20 1 3 he beat GM Bologan; and in the 1 . Bundesliga Austria 20 1 1 he won against GM Ribli Tuncer is the opening coach of IM (WGM) Elisabeth Pahtz, He has worked for a lot of grandmasters , and has been an analyst for famous trainers of top players. He has also written many opening Surveys for New in Chess Yearbooks.
1 7 3

Bibliography
Books
Aagaard, Jacob: The Queen's Indian Defence (Everyman Chess 2002) Anapolsky, Sergey: The Queen's Indian Defence, ( 1 997) Greet, Andrew: Play the Queen 's Indian, (Everyman Chess 2009) Emms, John: Starting out : The Queen's Indian (Everyman Chess 2004) Khalifman, Alexander: Opening for Black according to Karpov (Chess Stars 200 1 )
Periodicals
Chess Informant ChessBase Magazine New In Chess Yearbooks
Electronic resources
Mega Database 20 1 3 TWIC Mega Correspondence 20 1 3
1 74

The (unauthorized) sequel to My System
and Chess Praxis
"If N imzowitsch had published a n additional
third part of his two-volume 'System' series,
he would definitely have used a large part of
the material that is collected in this book."
Peter Anderberg, Schoch Magazine
"A must for every fan of the
great teacher of the Hypermodern."
KARL Magazine
paperback • 416 pages • €34.95 • available at your local (chess)bookseller or at newinchess.com • a NEWINCH!liS publication
Ivan Sokolov
SACRlflCf AN D
INITIATIVf I N CHES S
-- t Seize the Mornen
to Get the Advantage l'ltwll'IOI�
"A sacrifice is the natural product of the
initiative" - Ivan Sokolov
"The material which this book contains will
make it a classic. Studying it is fun."
German Correspondence Chess Federation
"Once again Sokolov has produced a n excellent
book that is a pleasure to read."
Joe Petrolito, Australasian Chess Magazine
paperback • 256 pages • €24.95 • available at your local (chess)bookseller or at newinchess.com • a NEWlNCH!liS publication