A COMPARISON OF RECTIFIED PHOTOGRAPHY AND ORTHOPHOTOGRAPHY AS APPLIED TO HISTORIC FLOORS – WITH...
6
A COMPARISON OF RECTIFIED PHOTOGRAPHY AND ORTHOPHOTOGRAPHY AS APPLIED TO HISTORIC FLOORS – WITH PARTICULAR REFERENCE TO CROUGHTON ROMAN VILLA D. P. Andrews*, N. J. Beckett, M. Clowes, S. M. Tovey English Heritage, Metric Survey Team, 37 Tanner Row, York, YO1 6WP, UK [email protected] *Corresponding author KEY WORDS: Archaeology, Digital Photogrammetry, Mosaic, Orthoimage, Rectification ABSTRACT: Historic floors which consist of mosaic or decorative tiles are often of high cultural or academic value, but by their very nature are vulnerable to decay and damage. On the other hand floors and footings are often the only surviving parts of a ruined building, especially in an archaeological context. They present particular conservation challenges and therefore often require a high quality metric record. The photographic recording of such floors has traditionally been undertaken using rectified photography methods. As most floors are relatively flat this is usually the most appropriate approach. The exponential increase in the power of personal computers during the late 20 th C and more recently the quality of digital camera technology has made digital rectification increasingly accessible to the non-professional surveyor. The less widespread technology of orthophotography (orthorectification using stereo-photography) can also be applied to historic floors and may be particularly appropriate for archaeological floors which have often suffered subsidence. This paper will compare the application of both methods to a Roman mosaic briefly revealed by an archaeological excavation at Croughton, Northamptonshire, UK in 2002. The practicalities and economics of fieldwork and processing methodologies will be examined. The resulting outputs will be compared for both quality and accuracy. 1. INTRODUCTION Recording historic floors has always been a challenge mainly because they are characterised by large areas of repetitive detail but also exhibit minor variations due to wear, damage, repair or errors in the original creation. For these reasons an image-based approach is usually employed. Before the advent of digital image processing, producing a photographic product which covered an entire floor was a difficult and time-consuming job. More usually a compromise product such as individual photographs and a key was accepted. The development of digital rectification software and digital photogrammetry has meant that it is now much easier to produce a scaled photographic montage of an historic floor that can be printed out or used in a digital environment. Digital rectification is the obvious progression from traditional rectified photography and is becoming increasingly accessible. Whilst requiring more photography and a greater investment in hardware and software, digital orthophotography does present some advantages. For example, any undulations in the floor can be accommodated and a montage is a direct result of the process rather than a second stage. 2. WHY RECORD? Mosaic and tiled floors are an important part of our cultural heritage and it is commonly agreed that it is desirable if not essential to have records of such artefacts in order to aid academic study, improve access and as a last resort should a disaster occur. Any academic paper on the subject of mosaics or tiles will be illustrated with photographs and drawings but a scaled photographic product should give a better understanding of the subject. A digital image of a floor can be used on a web site, for example, to aid peoples’ understanding and enjoyment of it. In some cases this will be the only way to experience the floor. This could be because physical access is a problem for the disabled. Some floors in working buildings may be covered with furniture and so not normally entirely visible (Dallas in Fawcett 1998). In other cases, mosaic floors have been only briefly revealed as the result of an archaeological dig and must be recorded before re-burial if they are to be studied in any detail. Floors are inherently vulnerable to damage and wear. As well as the obvious fact that they are walked on, and increasingly so in the modern age of mass tourism, floors have also suffered from among other things burials, the insensitive installation of services and the theft of tiles and tesserae. Fawcett asserts that the mass tourism of the past 50 years has caused more damage to historic floors than that inflicted over the last 700 years of general use and abuse (Fawcett 1998). Many historic floors are in working buildings such as Cathedrals so it is not normally an option to completely prohibit foot traffic. For this reason it is important to record floors to enable the monitoring of wear. It is also one of the guiding principles of conservation that all interventions, such as restoration work are recorded. Even if wear is not a major problem and no conservation work is planned, it will always be sensible to have some sort of ante-disaster record in case of a cataclysmic event. This record would in the worst case become a substitute for the real floor if it were totally destroyed, or become a guide to its restoration if salvageable damage occurred.
-
Upload
english-heritage -
Category
Documents
-
view
7 -
download
0
Transcript of A COMPARISON OF RECTIFIED PHOTOGRAPHY AND ORTHOPHOTOGRAPHY AS APPLIED TO HISTORIC FLOORS – WITH...

A COMPARISON OF RECTIFIED PHOTOGRAPHY AND ORTHOPHOTOGRAPHY AS APPLIED TO HISTORIC FLOORS – WITH PARTICULAR REFERENCE TO
CROUGHTON ROMAN VILLA
D. P. Andrews*, N. J. Beckett, M. Clowes, S. M. Tovey
English Heritage, Metric Survey Team, 37 Tanner Row, York, YO1 6WP, UK [email protected]
*Corresponding author KEY WORDS: Archaeology, Digital Photogrammetry, Mosaic, Orthoimage, Rectification ABSTRACT: Historic floors which consist of mosaic or decorative tiles are often of high cultural or academic value, but by their very nature are vulnerable to decay and damage. On the other hand floors and footings are often the only surviving parts of a ruined building, especially in an archaeological context. They present particular conservation challenges and therefore often require a high quality metric record. The photographic recording of such floors has traditionally been undertaken using rectified photography methods. As most floors are relatively flat this is usually the most appropriate approach. The exponential increase in the power of personal computers during the late 20th C and more recently the quality of digital camera technology has made digital rectification increasingly accessible to the non-professional surveyor. The less widespread technology of orthophotography (orthorectification using stereo-photography) can also be applied to historic floors and may be particularly appropriate for archaeological floors which have often suffered subsidence. This paper will compare the application of both methods to a Roman mosaic briefly revealed by an archaeological excavation at Croughton, Northamptonshire, UK in 2002. The practicalities and economics of fieldwork and processing methodologies will be examined. The resulting outputs will be compared for both quality and accuracy.
1. INTRODUCTION
Recording historic floors has always been a challenge mainly because they are characterised by large areas of repetitive detail but also exhibit minor variations due to wear, damage, repair or errors in the original creation. For these reasons an image-based approach is usually employed. Before the advent of digital image processing, producing a photographic product which covered an entire floor was a difficult and time-consuming job. More usually a compromise product such as individual photographs and a key was accepted. The development of digital rectification software and digital photogrammetry has meant that it is now much easier to produce a scaled photographic montage of an historic floor that can be printed out or used in a digital environment. Digital rectification is the obvious progression from traditional rectified photography and is becoming increasingly accessible. Whilst requiring more photography and a greater investment in hardware and software, digital orthophotography does present some advantages. For example, any undulations in the floor can be accommodated and a montage is a direct result of the process rather than a second stage.
2. WHY RECORD?
Mosaic and tiled floors are an important part of our cultural heritage and it is commonly agreed that it is desirable if not essential to have records of such artefacts in order to aid academic study, improve access and as a last resort should a disaster occur. Any academic paper on the subject of mosaics or tiles will be illustrated with photographs and drawings but
a scaled photographic product should give a better understanding of the subject. A digital image of a floor can be used on a web site, for example, to aid peoples’ understanding and enjoyment of it. In some cases this will be the only way to experience the floor. This could be because physical access is a problem for the disabled. Some floors in working buildings may be covered with furniture and so not normally entirely visible (Dallas in Fawcett 1998). In other cases, mosaic floors have been only briefly revealed as the result of an archaeological dig and must be recorded before re-burial if they are to be studied in any detail. Floors are inherently vulnerable to damage and wear. As well as the obvious fact that they are walked on, and increasingly so in the modern age of mass tourism, floors have also suffered from among other things burials, the insensitive installation of services and the theft of tiles and tesserae. Fawcett asserts that the mass tourism of the past 50 years has caused more damage to historic floors than that inflicted over the last 700 years of general use and abuse (Fawcett 1998). Many historic floors are in working buildings such as Cathedrals so it is not normally an option to completely prohibit foot traffic. For this reason it is important to record floors to enable the monitoring of wear. It is also one of the guiding principles of conservation that all interventions, such as restoration work are recorded. Even if wear is not a major problem and no conservation work is planned, it will always be sensible to have some sort of ante-disaster record in case of a cataclysmic event. This record would in the worst case become a substitute for the real floor if it were totally destroyed, or become a guide to its restoration if salvageable damage occurred.

3. RECTIFIED PHOTOGRAPHY
Rectified photography relies on the fact that a photograph taken square on to a completely flat plane is analogous to an orthographic projection of that plane. For this reason it is most suitable when a floor is completely flat (see Fig. 1). Slight undulations will produce slight scale errors but they may be acceptable if within the scale tolerances required for the survey. Larger undulations can be accommodated by using orthophotography. 3.1
3.2
Analogue
The traditional analogue method of producing a rectified photograph involves taking photographs as square on as possible to the floor. They are then printed to scale in the darkroom using an overlay plot of the control points. Each individual print must then be spliced together so that it fits to the adjacent prints and the control overlay. The edges of the prints will be cut to follow lines of detail such as the edges of tiles. In order to improve the appearance of the join when the prints are stuck together, it is usual to feather the print by removing some of the substrate paper using an abrasive. This allows the remaining emulsion to be stuck down flush. The resulting montage of prints is a one-off, so to make copies it must be re-photographed with a large format copy camera.
Digital
The power of the standard desk top PC has reached a stage where digital rectification is available to all. Professional, fully featured rectification software such as Rolliemetric MSR does cost in the region of 2500 Euros but less sophisticated packages such as Monobild are available for as little as 350 Euros. For the AutoCAD user a plugin called Photoplan is available from Kubit and is priced approximately mid-way between the previously mentioned packages. Digital rectification obviously requires digital images and until recently these were usually acquired by scanning conventional negatives. Digital cameras and digital backs for conventional cameras have reached a stage of development where it is now perfectly possible to use ‘born digital’ images for digital rectification and indeed photogrammetry. The size of the digital chip is still smaller than a medium format film frame so more photographs, more control and more time spent on processing are usually required. Professional rectification systems usually allow for the correction of lens distortion assuming calibration information is available. Others will contain a calibration routine. Here, digital rectification has a distinct advantage over analogue methods that allow no possibility of correcting for lens distortion. As with analogue rectification, control can range from scaled distances to full 3-D control. Some packages also feature perspective correction which, assuming the subject contains enough horizontal and vertical lines, means only one or two distance measurements are required for scaling. If a number of images are to be montaged together, it will be necessary to have full control in the form of co-ordinated targets or detail points. Many rectification packages have a montaging routine but often the results are not particularly satisfactory. An alternative is to montage the images using photographic manipulation software such as Photoshop. As well as allowing adjustment of contrast, colour etc, the images
Figure 1. Rectified photography montage of a tiled floor from Windsor Castle, UK can be cut along lines of detail and feathered. In this approach it is essential to have full control so that targets can be matched together pixel by pixel. It is also helpful to import an image of the control that can be overlaid as a check on the accuracy of the montaging.
4. ORTHOPHOTOGRAPHY
Many historic floors tend not to be flat; especially mosaics that have been buried and then excavated (see Fig. 2). The availability of Digital Photogrammetric Workstations (DPWs) means it is now possible to record these subjects accurately by producing an orthophotograph (Clowes 1997 & 2002). In an orthophotograph variations in scale due to relief as well as tilts can be corrected. In order to produce an orthophotograph, stereo-photography is required. This can be acquired in exactly the same way as for rectified photography but at least twice as many photographs are required to cover the same area. The photography is usually scanned with a dedicated photogrammetric scanner or a calibrated digital camera may be employed. The imagery is loaded onto the DPW and the required orientations undertaken. Aerial triangulation methods can be used to set up whole strips or blocks of photography. Here an economy in the amount of control required can be achieved by using a bundle adjustment. Fewer control points are required because tie points are used to join the models together. Once the models are set up a Digital Elevation Model (DEM) is produced using automatic stereo-matching. It is often necessary to undertake some manual editing, however. The finished DEM can then be used to produce an orthophotograph or can be used in its own right as a model of the surface of the floor. A DEM grid spacing of 10 cm is usually sufficient to map any undulations rigorously enough to result in an accurate orthophotograph at architectural scales i.e. 1:50 or 1:20. To create the orthophotograph it is necessary to identify the images required and then indicate the area of each that is to be used. Seam polygons are used to determine the lines along which each image is to be cut. These polygons butt-join although the images can be
feathered together thus producing one orthophotograph without visible joints. The orthphotograph routine can also be set to automatically balance the colour and exposure across the whole final image. This can have mixed results because in the case of an archaeological excavation, for example, areas of earth may appear in the images and skew the colour of the mosaic detail. As with rectified photography the orthophotograph can be attached to an AutoCAD drawing for printing.
Figure 2. Orthophotograph of a temporarily revealed Roman
mosaic at Lopen, Somerset, UK
5. THE APPLICATION OF BOTH METHODS AT CROUGHTON ROMAN VILLA
Each method has its own advantages and disadvantages. As a general rule, however, the greater the accuracy required the more time and money will be required to achieve it. Croughton Roman Villa is situated near the village of Croughton in Northamptonshire, UK. A mosaic floor was revealed during excavations in 1998 and again in 2002. The English Heritage Metric Survey team were asked to record the mosaic before it was re-buried. The floor undulates due to subsidence and plough damage, and this indicated the use of orthophotography as the main method of recording. The Team had recently acquired a Kodack DCS Pro digital back for a Mamiya RZ67 ProII camera so it was used to obtain photography suitable for rectification at the same time as the capture of stereo-photography using a Rollei 6006 semi-metric camera. 5.1 Fieldwork
Both sets of photography were taken with the camera mounted on an extension bar attached to a conventional photographic tripod. The camera centres were approximately 1.5 metres above the surface of the mosaic which produced a negative scale of about 1:30 (both cameras have 50mm lenses). The convention of final product scale being no more
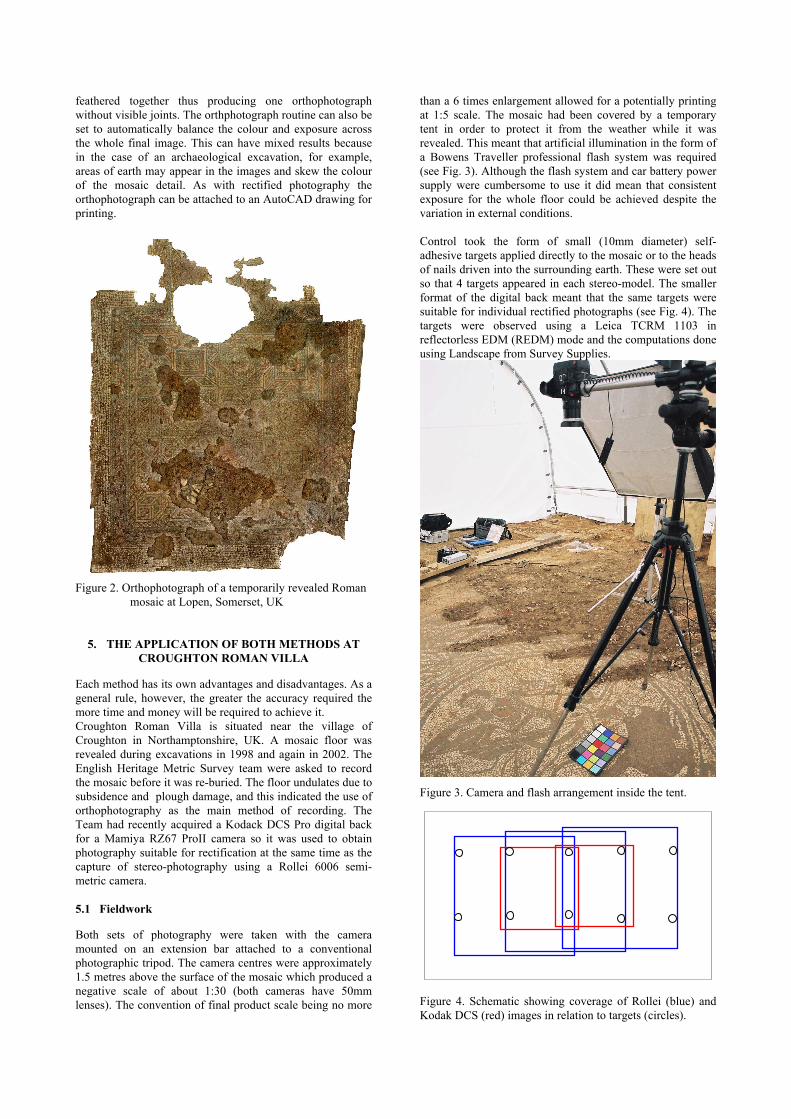
than a 6 times enlargement allowed for a potentially printing at 1:5 scale. The mosaic had been covered by a temporary tent in order to protect it from the weather while it was revealed. This meant that artificial illumination in the form of a Bowens Traveller professional flash system was required (see Fig. 3). Although the flash system and car battery power supply were cumbersome to use it did mean that consistent exposure for the whole floor could be achieved despite the variation in external conditions. Control took the form of small (10mm diameter) self-adhesive targets applied directly to the mosaic or to the heads of nails driven into the surrounding earth. These were set out so that 4 targets appeared in each stereo-model. The smaller format of the digital back meant that the same targets were suitable for individual rectified photographs (see Fig. 4). The targets were observed using a Leica TCRM 1103 in reflectorless EDM (REDM) mode and the computations done using Landscape from Survey Supplies.
Figure 3. Camera and flash arrangement inside the tent.
Figure 4. Schematic showing coverage of Rollei (blue) and Kodak DCS (red) images in relation to targets (circles).
5.2 Rectified Photography
Rectified photography can be an economic and relatively quick method of producing a record of sufficient accuracy for most purposes. It requires less photography than orthophotography and the equipment and software required are cheaper. This means that it is possible for conservators rather than specialist surveyors to undertake the work. For larger projects, however, it is probably more economical to employ an experienced contractor. The disadvantage is that rectified photography will only work successfully on relatively flat surfaces. Approximately 80 photographs from the Kodak DCS were rectified using Photoplan by Kubit in AutoCAD 2004 Map. Whilst undertaking the rectification it became apparent that some control was missing or in-accurate. In some cases this was due to the targets coming loose between the taking of the photograph and the observation of the control. In others the inaccuracy was probably due to the angle of incidence of the REDM beam being too shallow. It was, however, possible to successfully rectify sufficient photographs by passing detail points from adjacent photographs. The photographs were not merged together to form a single image but were clipped so as to hide the joins. The consistent exposure and colour balance from the digital back meant that this was potentially a very successful approach. At the beginning of the processing, to allow for the possibility of printing at 1:5 scale it was decided to retain the resolution of the images as supplied by the digital back, as a result each rectified image, covering only 1.5m x 1.5m, was on average 50Mb in size. This revealed a limitation to AutoCAD as a rectification platform – even using a computer with 2Gb RAM – it was impossible to display all the photographs at once. To overcome this problem the .TIF files were converted to .ECW format produced by ER Mapper. Apart from the fact that it is a lossless compression this format was chosen because the compressor is available as a free internet download and AutoCAD 2004 Map accepts .ECW files. Each file was reduced in size to an average 0.6Mb.
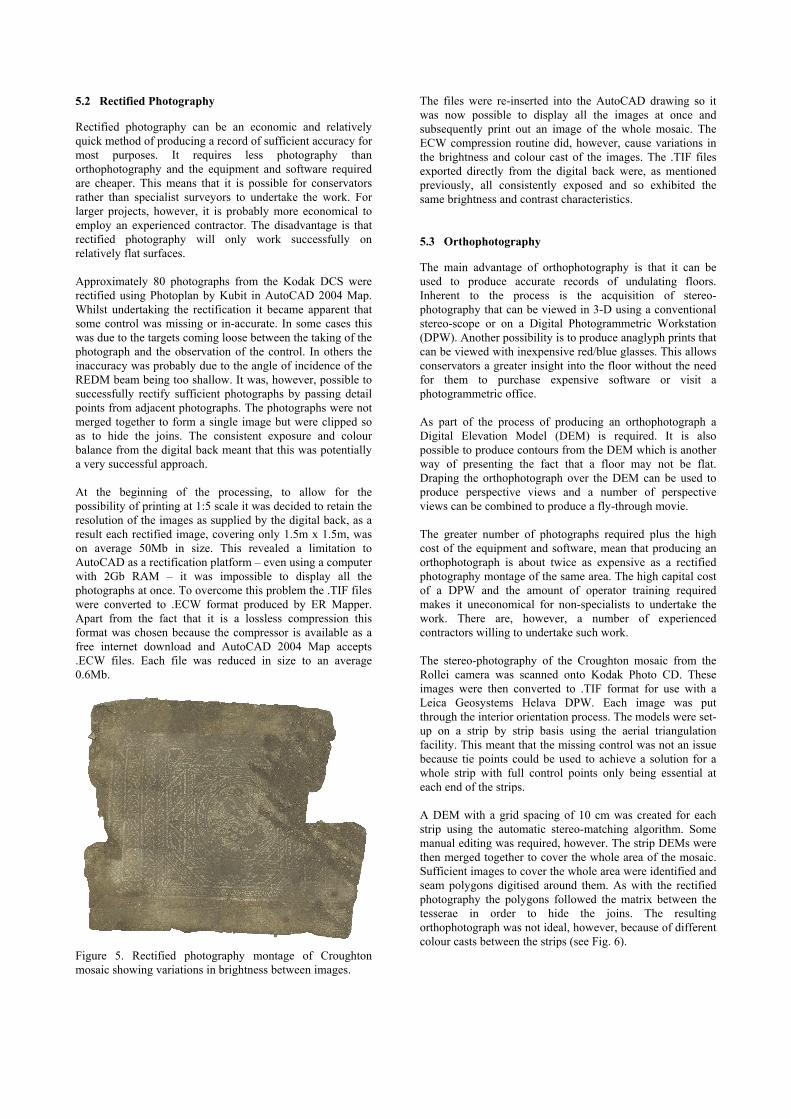
Figure 5. Rectified photography montage of Croughton mosaic showing variations in brightness between images.
The files were re-inserted into the AutoCAD drawing so it was now possible to display all the images at once and subsequently print out an image of the whole mosaic. The ECW compression routine did, however, cause variations in the brightness and colour cast of the images. The .TIF files exported directly from the digital back were, as mentioned previously, all consistently exposed and so exhibited the same brightness and contrast characteristics. 5.3 Orthophotography
The main advantage of orthophotography is that it can be used to produce accurate records of undulating floors. Inherent to the process is the acquisition of stereo-photography that can be viewed in 3-D using a conventional stereo-scope or on a Digital Photogrammetric Workstation (DPW). Another possibility is to produce anaglyph prints that can be viewed with inexpensive red/blue glasses. This allows conservators a greater insight into the floor without the need for them to purchase expensive software or visit a photogrammetric office. As part of the process of producing an orthophotograph a Digital Elevation Model (DEM) is required. It is also possible to produce contours from the DEM which is another way of presenting the fact that a floor may not be flat. Draping the orthophotograph over the DEM can be used to produce perspective views and a number of perspective views can be combined to produce a fly-through movie. The greater number of photographs required plus the high cost of the equipment and software, mean that producing an orthophotograph is about twice as expensive as a rectified photography montage of the same area. The high capital cost of a DPW and the amount of operator training required makes it uneconomical for non-specialists to undertake the work. There are, however, a number of experienced contractors willing to undertake such work. The stereo-photography of the Croughton mosaic from the Rollei camera was scanned onto Kodak Photo CD. These images were then converted to .TIF format for use with a Leica Geosystems Helava DPW. Each image was put through the interior orientation process. The models were set-up on a strip by strip basis using the aerial triangulation facility. This meant that the missing control was not an issue because tie points could be used to achieve a solution for a whole strip with full control points only being essential at each end of the strips. A DEM with a grid spacing of 10 cm was created for each strip using the automatic stereo-matching algorithm. Some manual editing was required, however. The strip DEMs were then merged together to cover the whole area of the mosaic. Sufficient images to cover the whole area were identified and seam polygons digitised around them. As with the rectified photography the polygons followed the matrix between the tesserae in order to hide the joins. The resulting orthophotograph was not ideal, however, because of different colour casts between the strips (see Fig. 6).
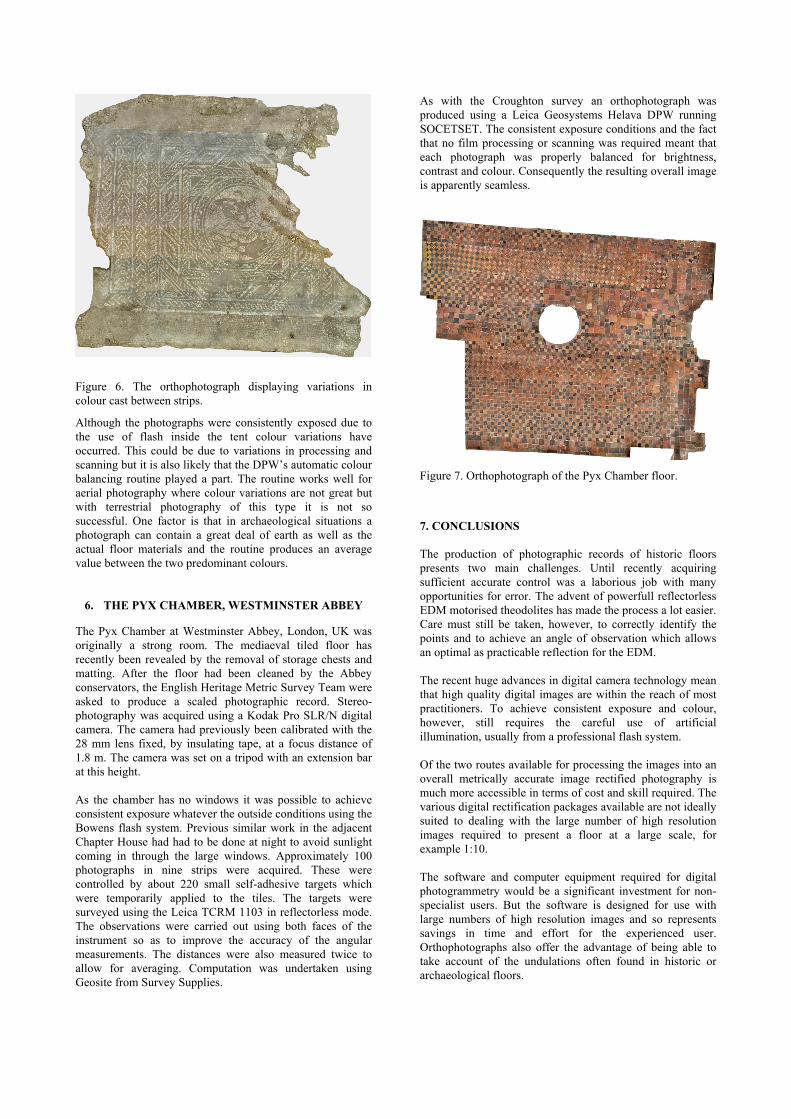
Figure 6. The orthophotograph displaying variations in colour cast between strips.
Although the photographs were consistently exposed due to the use of flash inside the tent colour variations have occurred. This could be due to variations in processing and scanning but it is also likely that the DPW’s automatic colour balancing routine played a part. The routine works well for aerial photography where colour variations are not great but with terrestrial photography of this type it is not so successful. One factor is that in archaeological situations a photograph can contain a great deal of earth as well as the actual floor materials and the routine produces an average value between the two predominant colours.
6. THE PYX CHAMBER, WESTMINSTER ABBEY
The Pyx Chamber at Westminster Abbey, London, UK was originally a strong room. The mediaeval tiled floor has recently been revealed by the removal of storage chests and matting. After the floor had been cleaned by the Abbey conservators, the English Heritage Metric Survey Team were asked to produce a scaled photographic record. Stereo-photography was acquired using a Kodak Pro SLR/N digital camera. The camera had previously been calibrated with the 28 mm lens fixed, by insulating tape, at a focus distance of 1.8 m. The camera was set on a tripod with an extension bar at this height. As the chamber has no windows it was possible to achieve consistent exposure whatever the outside conditions using the Bowens flash system. Previous similar work in the adjacent Chapter House had had to be done at night to avoid sunlight coming in through the large windows. Approximately 100 photographs in nine strips were acquired. These were controlled by about 220 small self-adhesive targets which were temporarily applied to the tiles. The targets were surveyed using the Leica TCRM 1103 in reflectorless mode. The observations were carried out using both faces of the instrument so as to improve the accuracy of the angular measurements. The distances were also measured twice to allow for averaging. Computation was undertaken using Geosite from Survey Supplies.
As with the Croughton survey an orthophotograph was produced using a Leica Geosystems Helava DPW running SOCETSET. The consistent exposure conditions and the fact that no film processing or scanning was required meant that each photograph was properly balanced for brightness, contrast and colour. Consequently the resulting overall image is apparently seamless.
Figure 7. Orthophotograph of the Pyx Chamber floor.
7. CONCLUSIONS The production of photographic records of historic floors presents two main challenges. Until recently acquiring sufficient accurate control was a laborious job with many opportunities for error. The advent of powerfull reflectorless EDM motorised theodolites has made the process a lot easier. Care must still be taken, however, to correctly identify the points and to achieve an angle of observation which allows an optimal as practicable reflection for the EDM. The recent huge advances in digital camera technology mean that high quality digital images are within the reach of most practitioners. To achieve consistent exposure and colour, however, still requires the careful use of artificial illumination, usually from a professional flash system. Of the two routes available for processing the images into an overall metrically accurate image rectified photography is much more accessible in terms of cost and skill required. The various digital rectification packages available are not ideally suited to dealing with the large number of high resolution images required to present a floor at a large scale, for example 1:10. The software and computer equipment required for digital photogrammetry would be a significant investment for non-specialist users. But the software is designed for use with large numbers of high resolution images and so represents savings in time and effort for the experienced user. Orthophotographs also offer the advantage of being able to take account of the undulations often found in historic or archaeological floors.

7. REFERENCES
Clowes, M., 1997. Mosaicing the Mosaic – Roman restoration goes digital. Surveying World, May/June 1997, pp 36-37
Clowes, M., 2002. Digital Photogrammetry at English Heritage: a Pictorial Review of Projects to Date. Photogrammetric Record, 17(99), pp 441-452.
Dallas, R. in Fawcett, J., 1998. Historic Floors: Their History and Conservation. Butterworth Heinemann, Oxford, pp 91.
Fawcett, J., 1998. Historic Floors: Their History and Conservation. Butterworth Heinemann, Oxford, pp 2.