7 Writing Device/PLC Data in CSV File - PRO-FACE
20
7-1 7 Writing Device/PLC Data in CSV File 7.1 Try to Write Device/PLC Data in CSV File .................................................................... 7-2 7.2 Setting Guide .............................................................................................................. 7-19
-
Upload
khangminh22 -
Category
Documents
-
view
11 -
download
0
Transcript of 7 Writing Device/PLC Data in CSV File - PRO-FACE
7-1
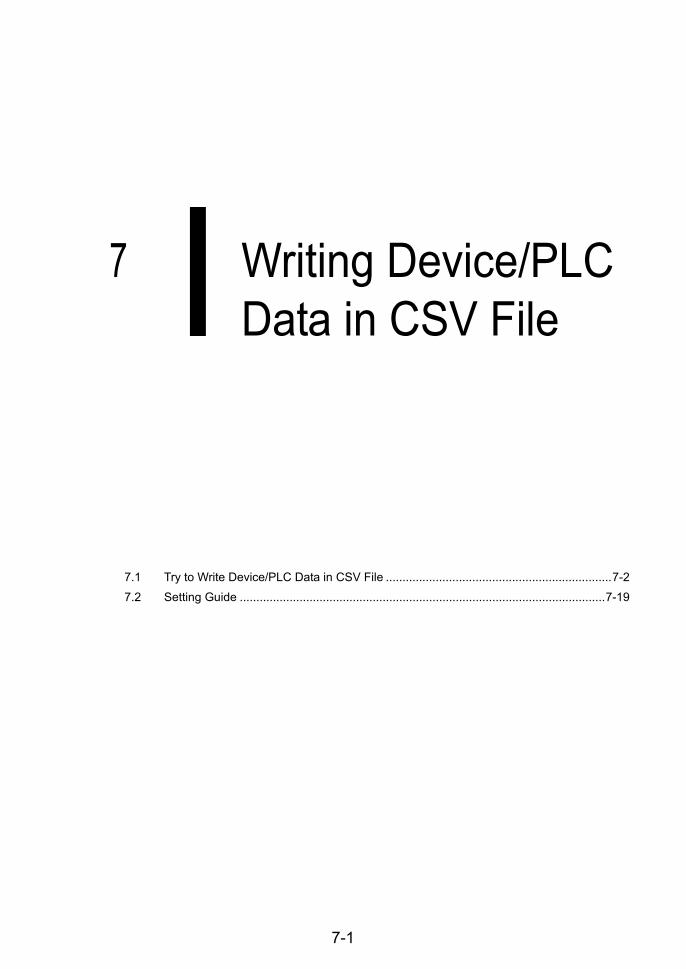
7 Writing Device/PLC Data in CSV File
7.1 Try to Write Device/PLC Data in CSV File ....................................................................7-2
7.2 Setting Guide ..............................................................................................................7-19
Try to Write Device/PLC Data in CSV File
Pro-Server EX Reference Manual 7-2
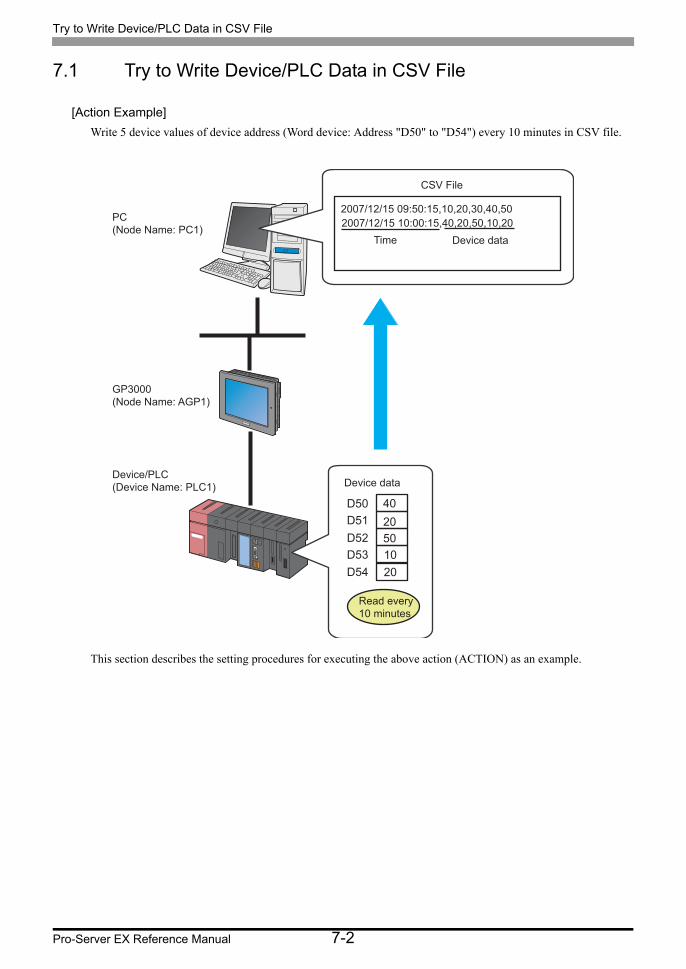
7.1 Try to Write Device/PLC Data in CSV File
[Action Example]
Write 5 device values of device address (Word device: Address "D50" to "D54") every 10 minutes in CSV file.
This section describes the setting procedures for executing the above action (ACTION) as an example.
PC
(Node Name: PC1)
Device/PLC
(Device Name: PLC1) Device data
CSV File
D50
D51
D52
D53
D54
40
50
10
20
20
GP3000
(Node Name: AGP1)
Read every
10 minutes
2007/12/15 09:50:15,10,20,30,40,50
2007/12/15 10:00:15,40,20,50,10,20
Device dataTime
Try to Write Device/PLC Data in CSV File
7-3 Pro-Server EX Reference Manual
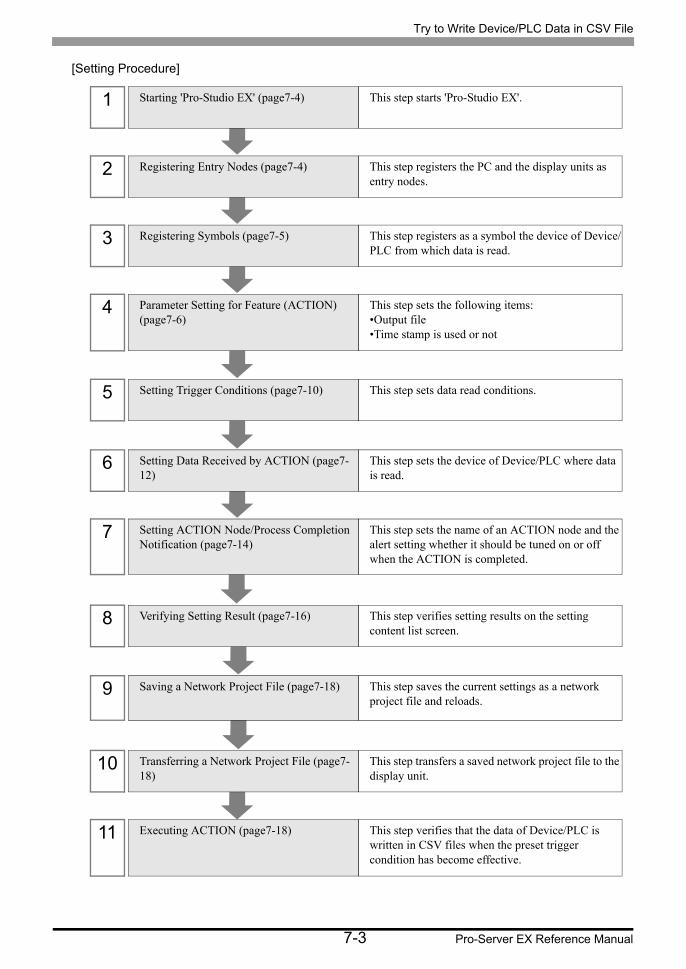
[Setting Procedure]
11 Executing ACTION (page7-18) This step verifies that the data of Device/PLC is written in CSV files when the preset trigger condition has become effective.
10 Transferring a Network Project File (page7-18)
This step transfers a saved network project file to the display unit.
9 Saving a Network Project File (page7-18) This step saves the current settings as a network project file and reloads.
8 Verifying Setting Result (page7-16) This step verifies setting results on the setting content list screen.
7 Setting ACTION Node/Process Completion Notification (page7-14)
This step sets the name of an ACTION node and the alert setting whether it should be tuned on or off when the ACTION is completed.
6 Setting Data Received by ACTION (page7-12)
This step sets the device of Device/PLC where data is read.
5 Setting Trigger Conditions (page7-10) This step sets data read conditions.
3 Registering Symbols (page7-5) This step registers as a symbol the device of Device/PLC from which data is read.
1 Starting 'Pro-Studio EX' (page7-4) This step starts 'Pro-Studio EX'.
2 Registering Entry Nodes (page7-4) This step registers the PC and the display units as entry nodes.
4 Parameter Setting for Feature (ACTION) (page7-6)
This step sets the following items:•Output file•Time stamp is used or not
Try to Write Device/PLC Data in CSV File
Pro-Server EX Reference Manual 7-4
7.1.1 Starting 'Pro-Studio EX'
This step starts 'Pro-Studio EX'.
Refer to "3 Trial of Pro-Server EX" for details about starting method.
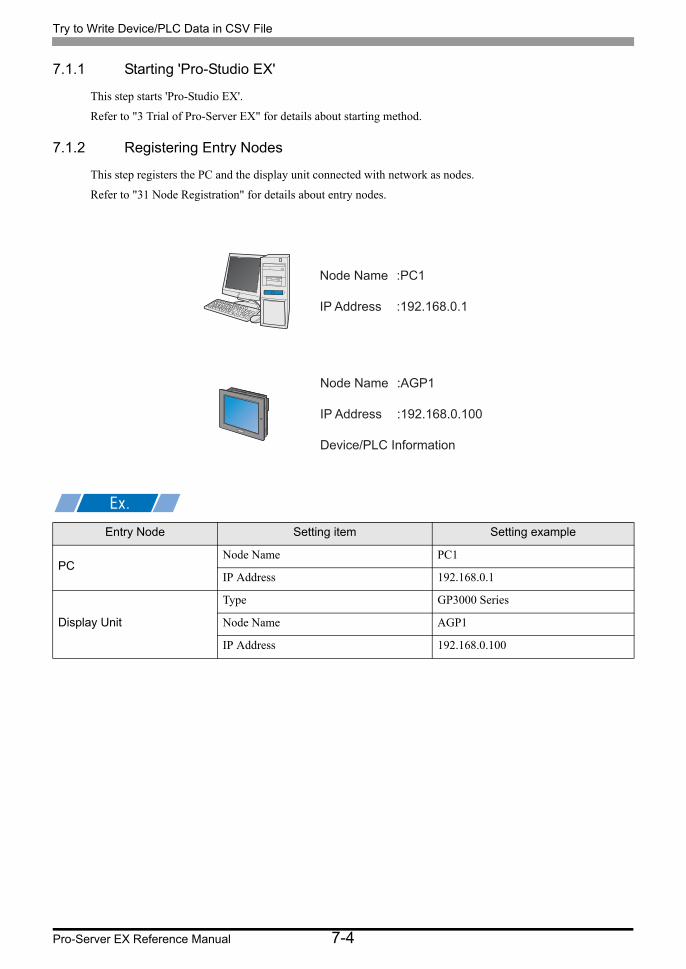
7.1.2 Registering Entry Nodes
This step registers the PC and the display unit connected with network as nodes.
Refer to "31 Node Registration" for details about entry nodes.
Entry Node Setting item Setting example
PCNode Name PC1
IP Address 192.168.0.1
Display Unit
Type GP3000 Series
Node Name AGP1
IP Address 192.168.0.100
Node Name :PC1
IP Address :192.168.0.1
Node Name :AGP1
IP Address :192.168.0.100
Device/PLC Information
Try to Write Device/PLC Data in CSV File
7-5 Pro-Server EX Reference Manual
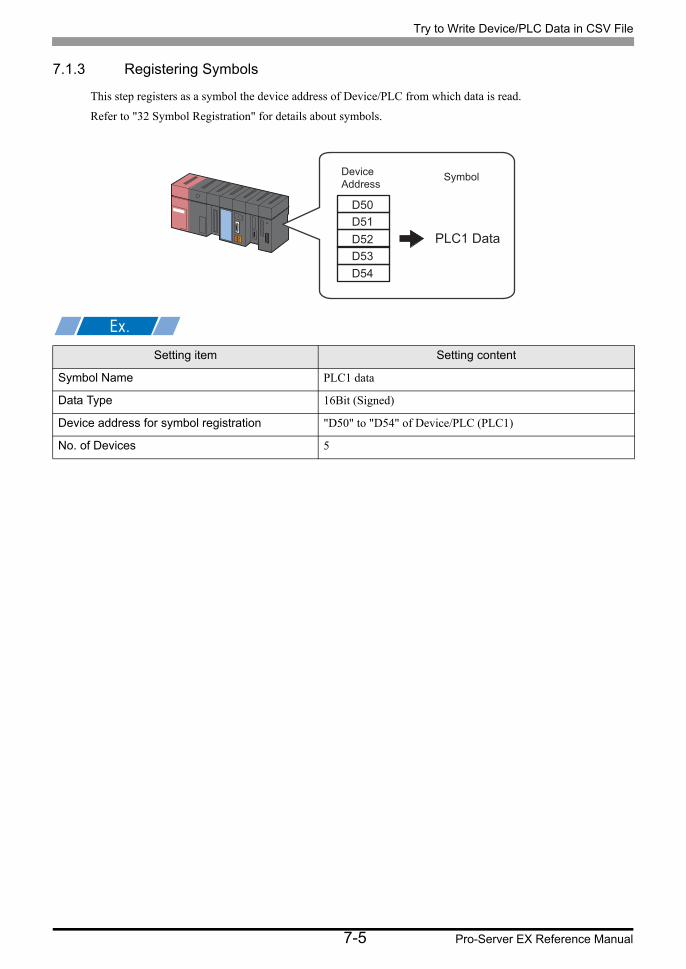
7.1.3 Registering Symbols
This step registers as a symbol the device address of Device/PLC from which data is read.
Refer to "32 Symbol Registration" for details about symbols.
Setting item Setting content
Symbol Name PLC1 data
Data Type 16Bit (Signed)
Device address for symbol registration "D50" to "D54" of Device/PLC (PLC1)
No. of Devices 5
Device
Address
D50
D51
D52
D53
D54
PLC1 Data
Symbol

Try to Write Device/PLC Data in CSV File
Pro-Server EX Reference Manual 7-6
7.1.4 Parameter Setting for Feature (ACTION)
This step makes settings to write data in CSV files. (parameter settings)
Refer to "7.2 Setting Guide" for more details about ACTION parameter.
Setting item Setting content
ACTION Name CSV Upload
Where to Save File PC Desktop
Saved File Name Device data
File Save Method Append data to Book
Time Stamp Forward
Device data
First collection data (at 9:50)
2007/12/15 09:50:15,10,20,30,40,50
Second collection data (at 9:50)
2007/12/15 10:00:15,40,20,50,10,20
Desktop
File Name
Time Stamp
Try to Write Device/PLC Data in CSV File
7-7 Pro-Server EX Reference Manual
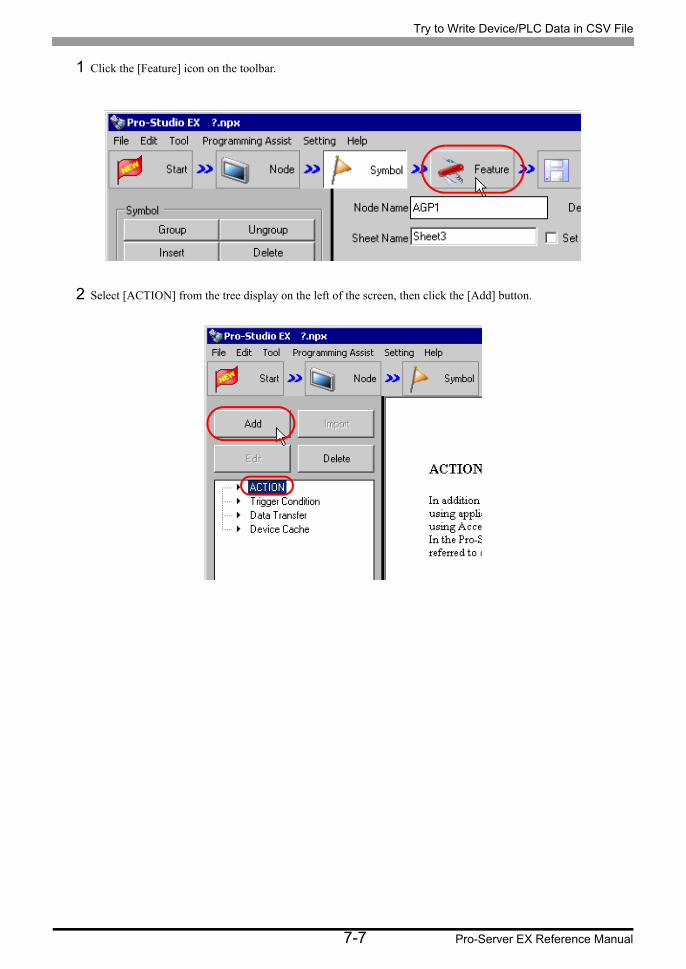
1 Click the [Feature] icon on the toolbar.
2 Select [ACTION] from the tree display on the left of the screen, then click the [Add] button.
Try to Write Device/PLC Data in CSV File
Pro-Server EX Reference Manual 7-8
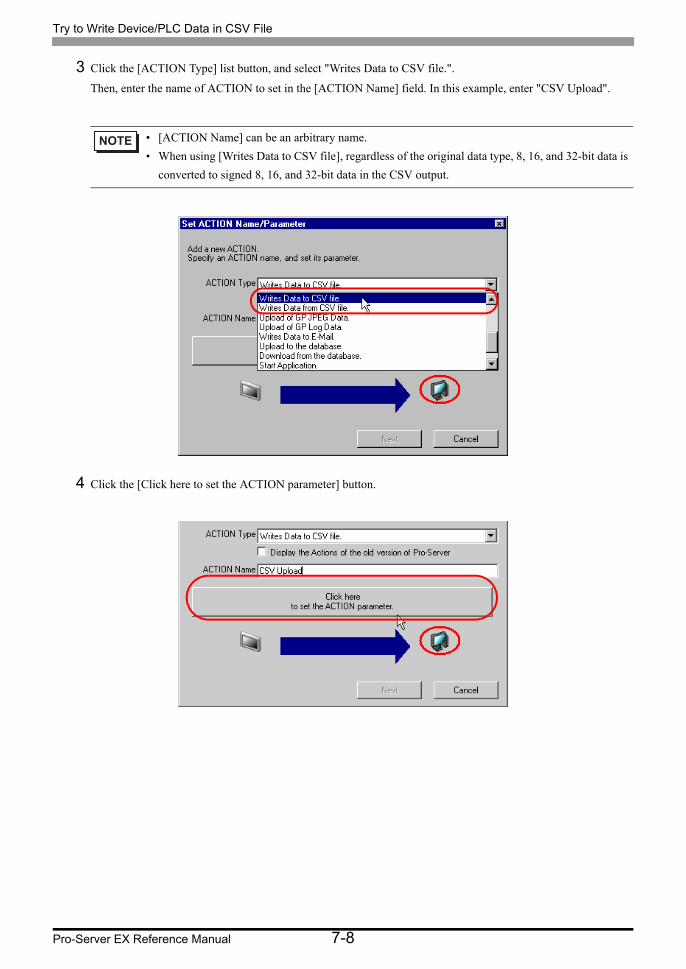
3 Click the [ACTION Type] list button, and select "Writes Data to CSV file.".
Then, enter the name of ACTION to set in the [ACTION Name] field. In this example, enter "CSV Upload".
4 Click the [Click here to set the ACTION parameter] button.
• [ACTION Name] can be an arbitrary name.
• When using [Writes Data to CSV file], regardless of the original data type, 8, 16, and 32-bit data is
converted to signed 8, 16, and 32-bit data in the CSV output.
Try to Write Device/PLC Data in CSV File
7-9 Pro-Server EX Reference Manual
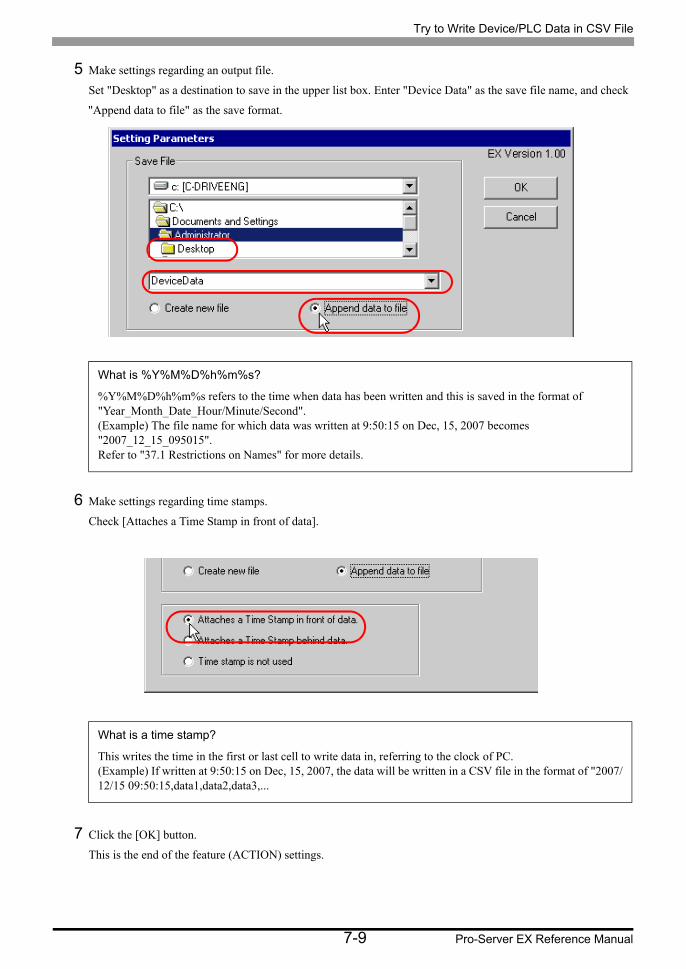
5 Make settings regarding an output file.
Set "Desktop" as a destination to save in the upper list box. Enter "Device Data" as the save file name, and check
"Append data to file" as the save format.
6 Make settings regarding time stamps.
Check [Attaches a Time Stamp in front of data].
7 Click the [OK] button.
This is the end of the feature (ACTION) settings.
What is %Y%M%D%h%m%s?
%Y%M%D%h%m%s refers to the time when data has been written and this is saved in the format of "Year_Month_Date_Hour/Minute/Second".(Example) The file name for which data was written at 9:50:15 on Dec, 15, 2007 becomes "2007_12_15_095015".Refer to "37.1 Restrictions on Names" for more details.
What is a time stamp?
This writes the time in the first or last cell to write data in, referring to the clock of PC.(Example) If written at 9:50:15 on Dec, 15, 2007, the data will be written in a CSV file in the format of "2007/12/15 09:50:15,data1,data2,data3,...
Try to Write Device/PLC Data in CSV File
Pro-Server EX Reference Manual 7-10
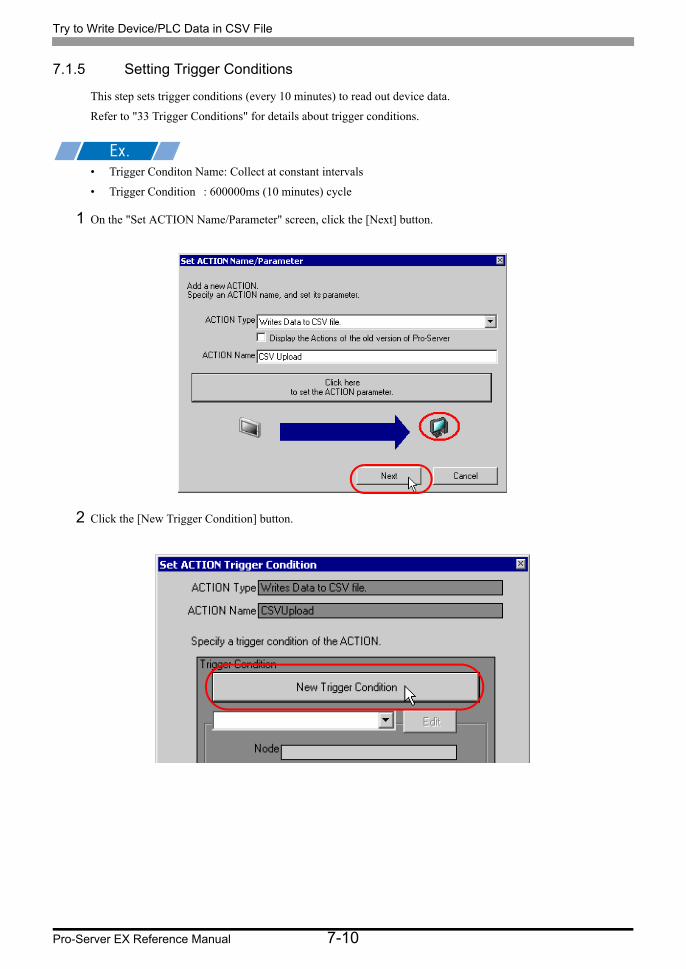
7.1.5 Setting Trigger Conditions
This step sets trigger conditions (every 10 minutes) to read out device data.
Refer to "33 Trigger Conditions" for details about trigger conditions.
• Trigger Conditon Name: Collect at constant intervals
• Trigger Condition : 600000ms (10 minutes) cycle
1 On the "Set ACTION Name/Parameter" screen, click the [Next] button.
2 Click the [New Trigger Condition] button.
Try to Write Device/PLC Data in CSV File
7-11 Pro-Server EX Reference Manual
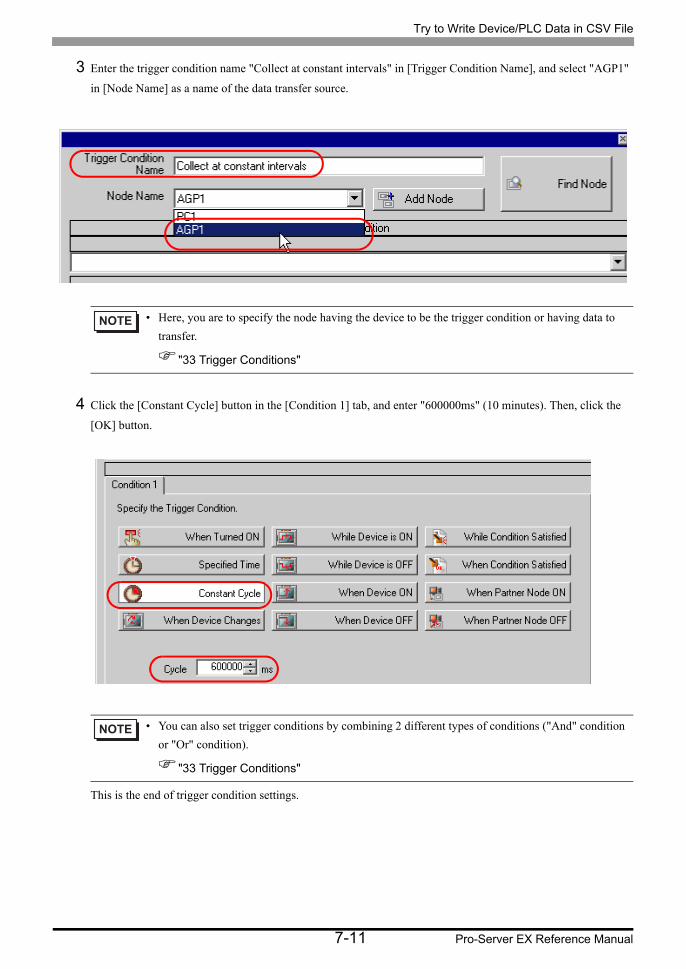
3 Enter the trigger condition name "Collect at constant intervals" in [Trigger Condition Name], and select "AGP1"
in [Node Name] as a name of the data transfer source.
4 Click the [Constant Cycle] button in the [Condition 1] tab, and enter "600000ms" (10 minutes). Then, click the
[OK] button.
This is the end of trigger condition settings.
• Here, you are to specify the node having the device to be the trigger condition or having data to
transfer.
"33 Trigger Conditions"
• You can also set trigger conditions by combining 2 different types of conditions ("And" condition
or "Or" condition).
"33 Trigger Conditions"

Try to Write Device/PLC Data in CSV File
Pro-Server EX Reference Manual 7-12
7.1.6 Setting Data Received by ACTION
This step sets data to transfer in ACTION.
• Device Name as Transfer Source: PLC1
• Transfer Source Device: PLC1 symbol "PLC1 data"
1 On the "Set ACTION Trigger Condition" screen, click the [Next] button.
Try to Write Device/PLC Data in CSV File
7-13 Pro-Server EX Reference Manual
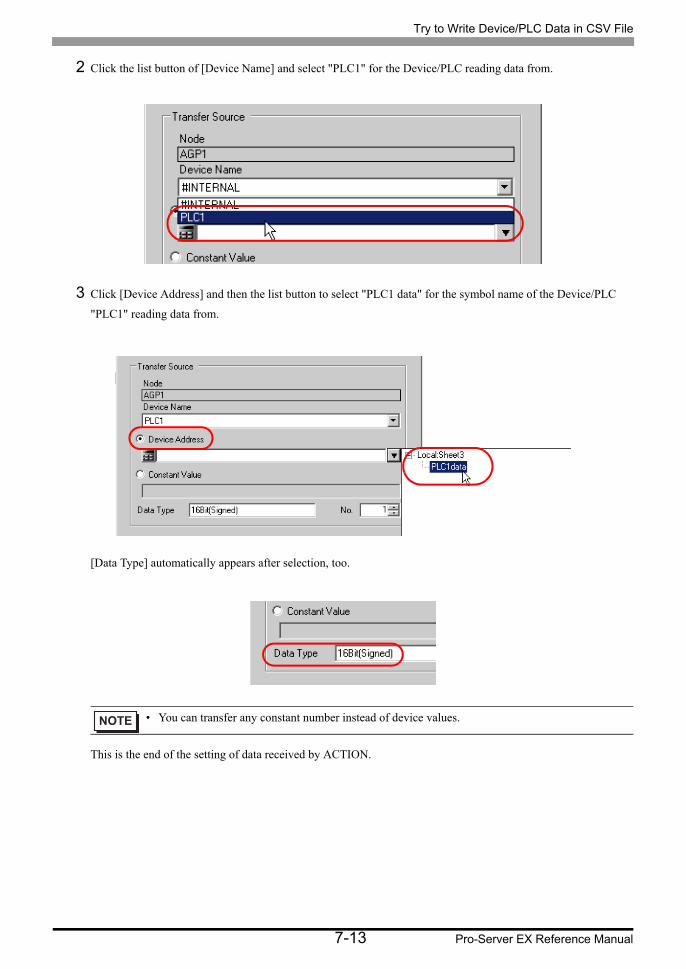
2 Click the list button of [Device Name] and select "PLC1" for the Device/PLC reading data from.
3 Click [Device Address] and then the list button to select "PLC1 data" for the symbol name of the Device/PLC
"PLC1" reading data from.
[Data Type] automatically appears after selection, too.
This is the end of the setting of data received by ACTION.
• You can transfer any constant number instead of device values.
Try to Write Device/PLC Data in CSV File
Pro-Server EX Reference Manual 7-14
7.1.7 Setting ACTION Node/Process Completion Notification
This step sets the name of an ACTION node and the alert setting whether it should be tuned on or off when the
ACTION is completed.
• ACTION Node : PC1
• Receive Notification: OFF
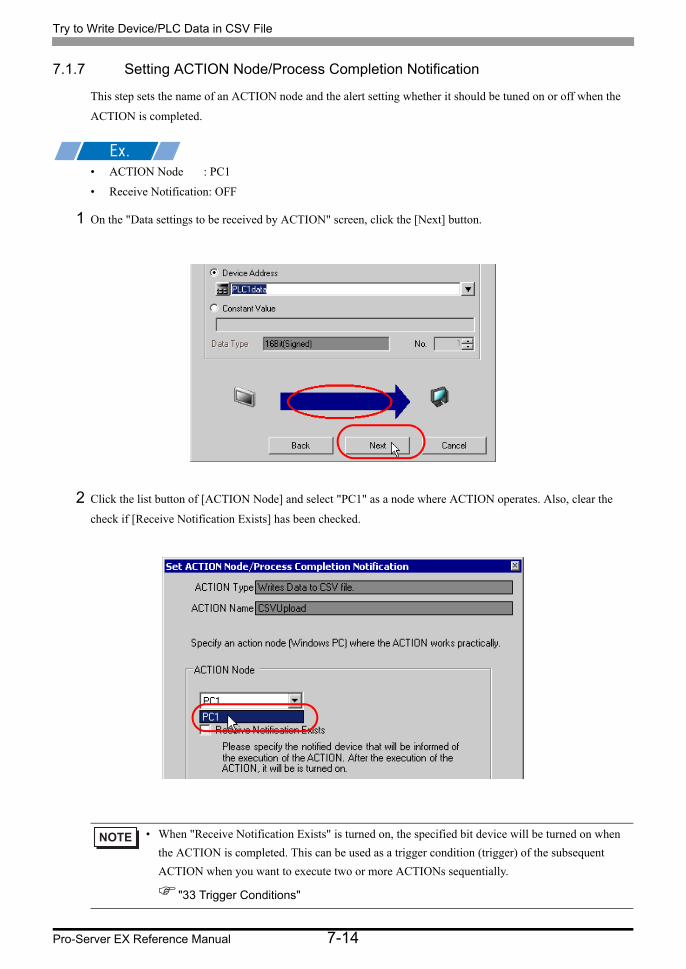
1 On the "Data settings to be received by ACTION" screen, click the [Next] button.
2 Click the list button of [ACTION Node] and select "PC1" as a node where ACTION operates. Also, clear the
check if [Receive Notification Exists] has been checked.
• When "Receive Notification Exists" is turned on, the specified bit device will be turned on when
the ACTION is completed. This can be used as a trigger condition (trigger) of the subsequent
ACTION when you want to execute two or more ACTIONs sequentially.
"33 Trigger Conditions"
Try to Write Device/PLC Data in CSV File
7-15 Pro-Server EX Reference Manual
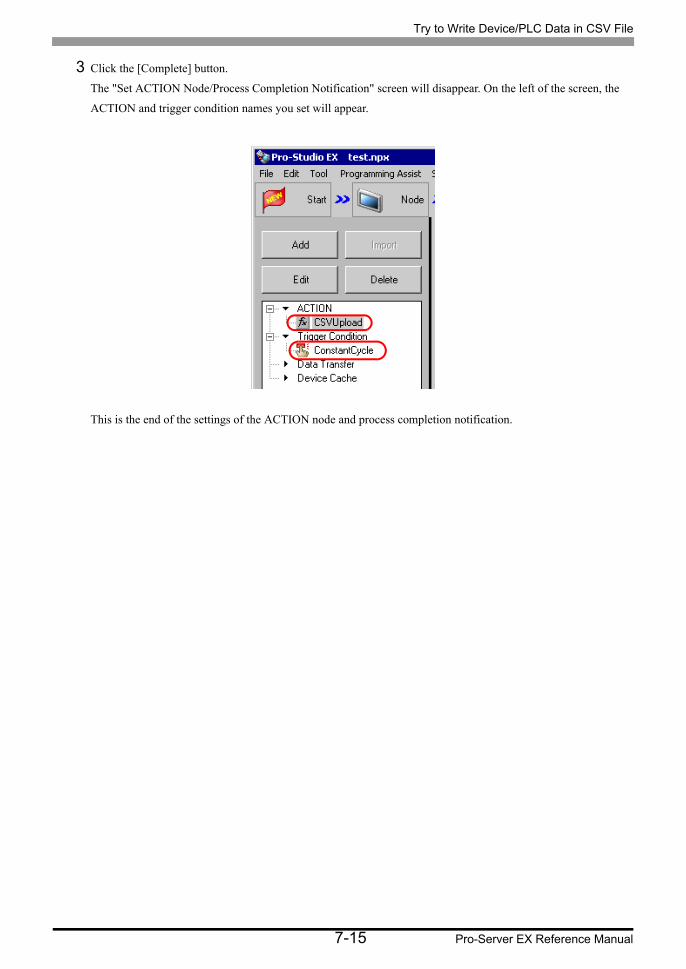
3 Click the [Complete] button.
The "Set ACTION Node/Process Completion Notification" screen will disappear. On the left of the screen, the
ACTION and trigger condition names you set will appear.
This is the end of the settings of the ACTION node and process completion notification.
Try to Write Device/PLC Data in CSV File
Pro-Server EX Reference Manual 7-16
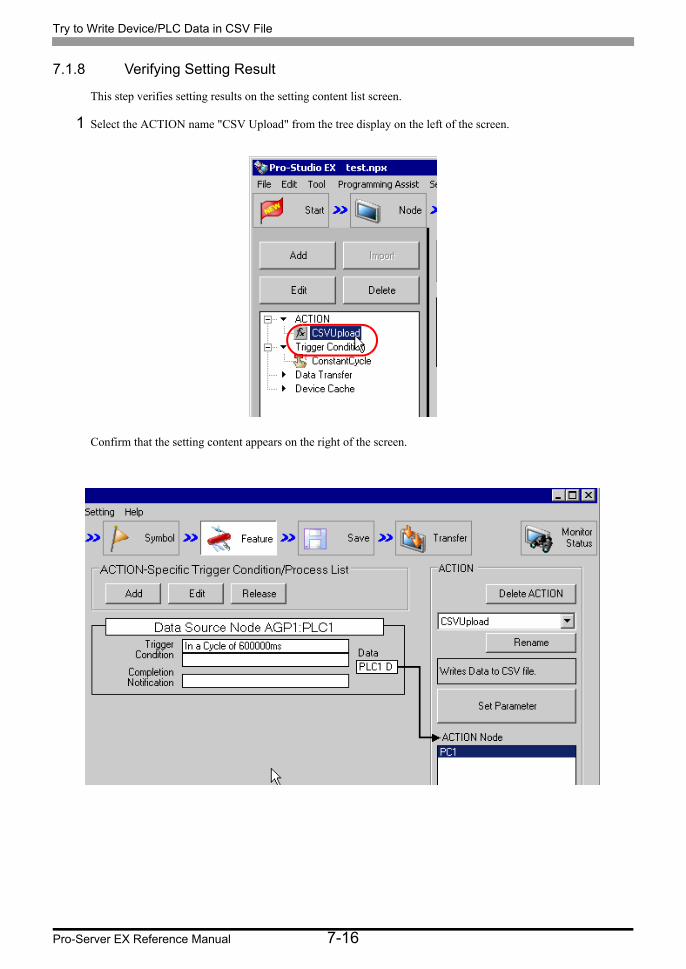
7.1.8 Verifying Setting Result
This step verifies setting results on the setting content list screen.
1 Select the ACTION name "CSV Upload" from the tree display on the left of the screen.
Confirm that the setting content appears on the right of the screen.
Try to Write Device/PLC Data in CSV File
7-17 Pro-Server EX Reference Manual
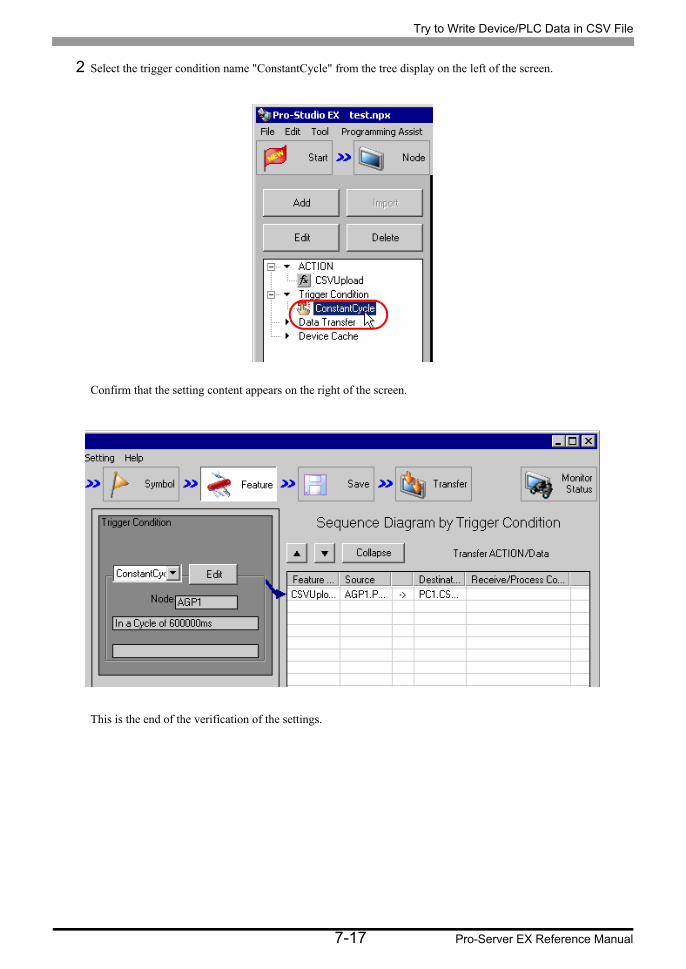
2 Select the trigger condition name "ConstantCycle" from the tree display on the left of the screen.
Confirm that the setting content appears on the right of the screen.
This is the end of the verification of the settings.
Try to Write Device/PLC Data in CSV File
Pro-Server EX Reference Manual 7-18
7.1.9 Saving a Network Project File
This step saves the current settings as a network project file and reloads to 'Pro-Server EX'.
Refer to "25 Saving" for details about saving a network project file.
• Path of network project file : Desktop\CSV_upload.npx
• Title : CSV upload action
7.1.10 Transferring a Network Project File
This step transfers a saved network project file to entry nodes.
Refer to "26 Transferring" for details about transferring a network project file.
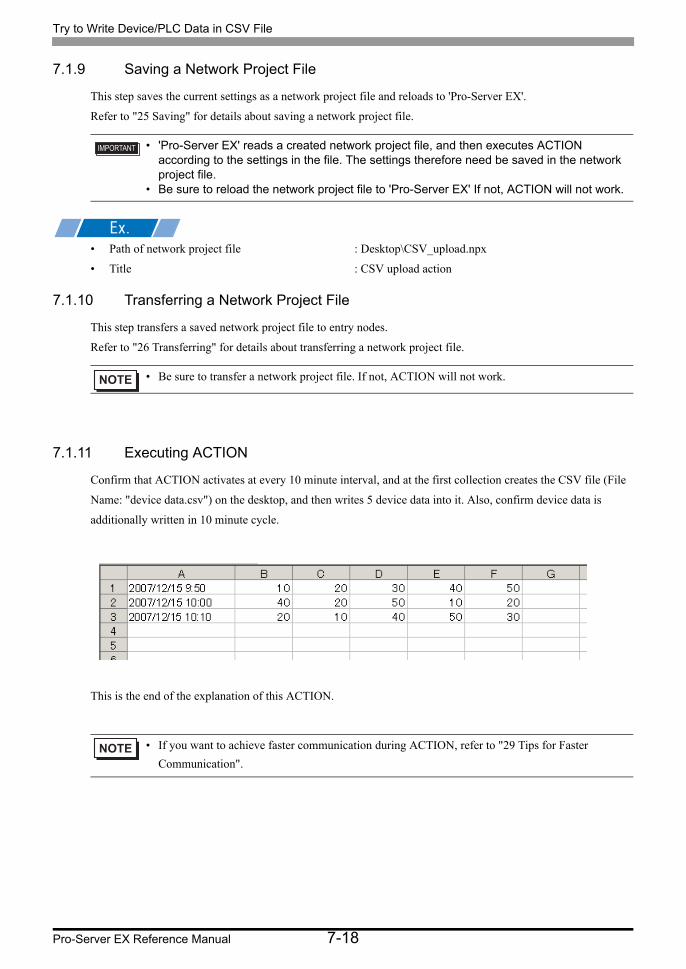
7.1.11 Executing ACTION
Confirm that ACTION activates at every 10 minute interval, and at the first collection creates the CSV file (File
Name: "device data.csv") on the desktop, and then writes 5 device data into it. Also, confirm device data is
additionally written in 10 minute cycle.
This is the end of the explanation of this ACTION.
• 'Pro-Server EX' reads a created network project file, and then executes ACTION according to the settings in the file. The settings therefore need be saved in the network project file.
• Be sure to reload the network project file to 'Pro-Server EX' If not, ACTION will not work.
• Be sure to transfer a network project file. If not, ACTION will not work.
• If you want to achieve faster communication during ACTION, refer to "29 Tips for Faster
Communication".
Setting Guide
7-19 Pro-Server EX Reference Manual
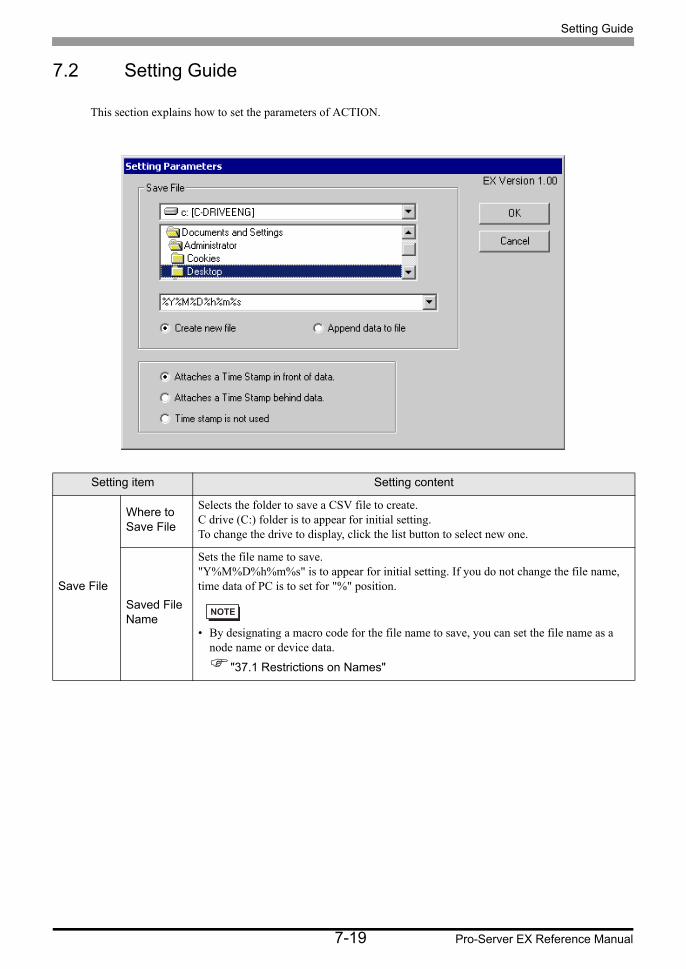
7.2 Setting Guide
This section explains how to set the parameters of ACTION.
Setting item Setting content
Save File
Where to Save File
Selects the folder to save a CSV file to create.C drive (C:) folder is to appear for initial setting.To change the drive to display, click the list button to select new one.
Saved File Name
Sets the file name to save."Y%M%D%h%m%s" is to appear for initial setting. If you do not change the file name, time data of PC is to set for "%" position.
• By designating a macro code for the file name to save, you can set the file name as a node name or device data.
"37.1 Restrictions on Names"
Setting Guide
Pro-Server EX Reference Manual 7-20
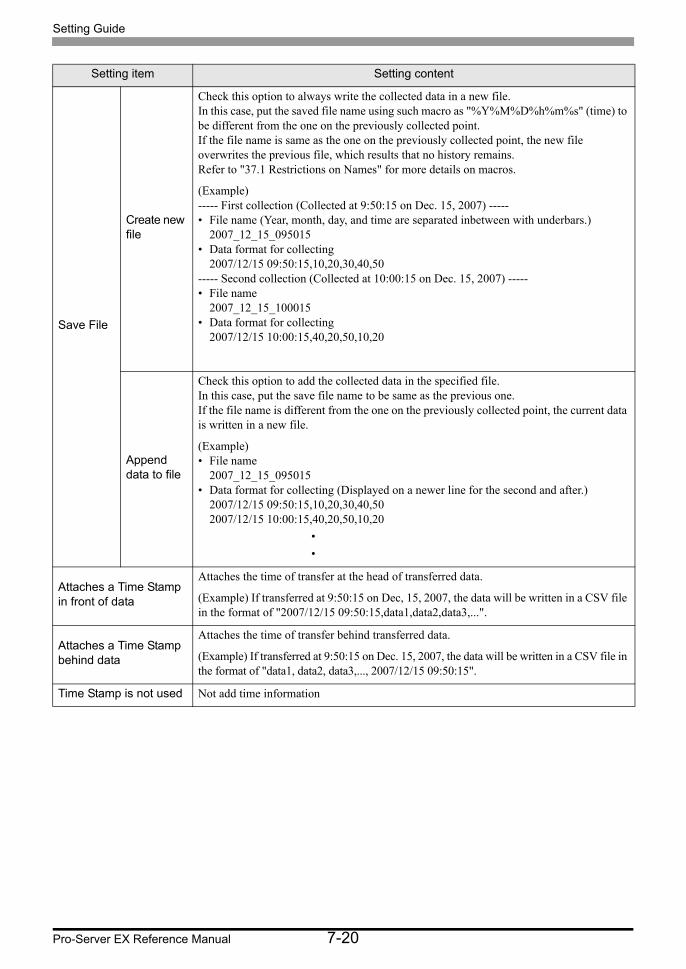
Save File
Create new file
Check this option to always write the collected data in a new file.In this case, put the saved file name using such macro as "%Y%M%D%h%m%s" (time) to be different from the one on the previously collected point.If the file name is same as the one on the previously collected point, the new file overwrites the previous file, which results that no history remains.Refer to "37.1 Restrictions on Names" for more details on macros.
(Example)----- First collection (Collected at 9:50:15 on Dec. 15, 2007) -----• File name (Year, month, day, and time are separated inbetween with underbars.)
2007_12_15_095015• Data format for collecting
2007/12/15 09:50:15,10,20,30,40,50----- Second collection (Collected at 10:00:15 on Dec. 15, 2007) -----• File name
2007_12_15_100015• Data format for collecting
2007/12/15 10:00:15,40,20,50,10,20
Append data to file
Check this option to add the collected data in the specified file.In this case, put the save file name to be same as the previous one.If the file name is different from the one on the previously collected point, the current data is written in a new file.
(Example)• File name
2007_12_15_095015• Data format for collecting (Displayed on a newer line for the second and after.)
2007/12/15 09:50:15,10,20,30,40,502007/12/15 10:00:15,40,20,50,10,20
•
•
Attaches a Time Stamp in front of data
Attaches the time of transfer at the head of transferred data.
(Example) If transferred at 9:50:15 on Dec, 15, 2007, the data will be written in a CSV file in the format of "2007/12/15 09:50:15,data1,data2,data3,...".
Attaches a Time Stamp behind data
Attaches the time of transfer behind transferred data.
(Example) If transferred at 9:50:15 on Dec. 15, 2007, the data will be written in a CSV file in the format of "data1, data2, data3,..., 2007/12/15 09:50:15".
Time Stamp is not used Not add time information
Setting item Setting content