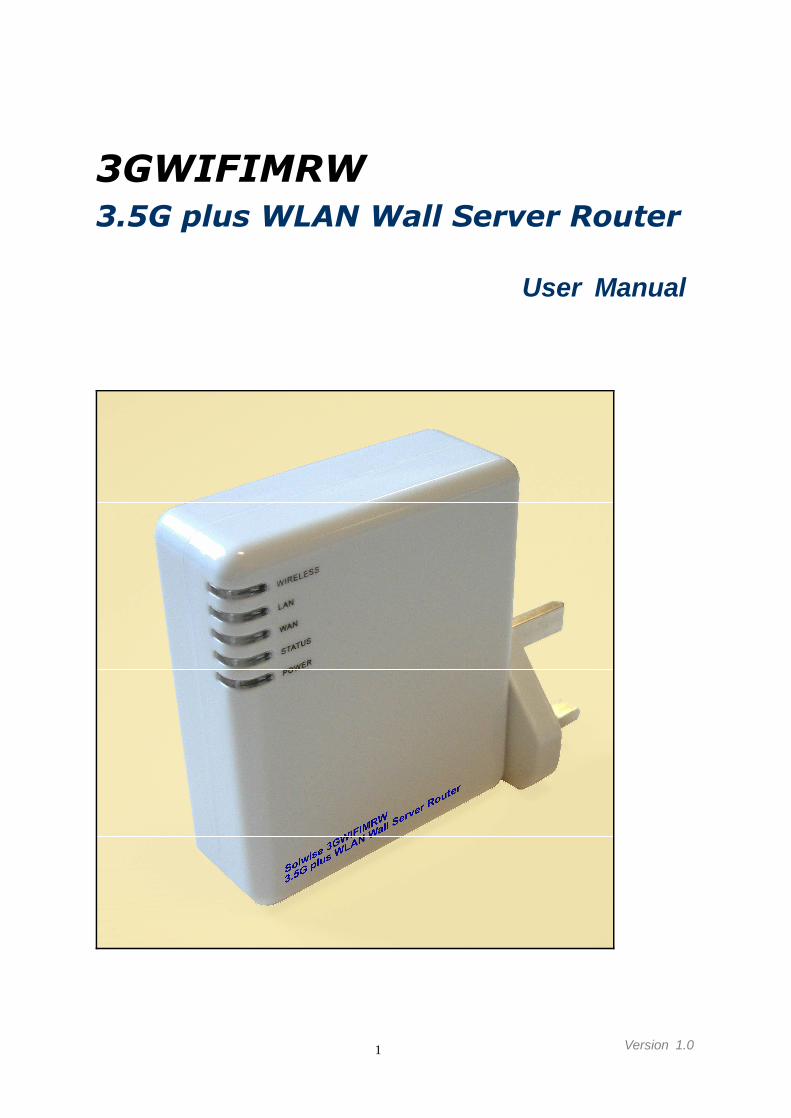
3GWIFIMRW - 3.5G plus WLAN Wall Server Router - Solwise
225
Version 1.0 1 3GWIFIMRW 3.5G plus WLAN Wall Server Router User Manual
-
Upload
khangminh22 -
Category
Documents
-
view
0 -
download
0
Transcript of 3GWIFIMRW - 3.5G plus WLAN Wall Server Router - Solwise
Version 1.01
3GWIFIMRW3.5G plus WLAN Wall Server Router
User Manual

Version 1.02
Table of Contents
CHAPTER 1 INTRODUCTION........................................................................................................................ 8
1.1 OVERVIEW ................................................................................................ 8
1.2 FEATURES ................................................................................................ 9
1.3 SPECIFICATIONS ....................................................................................... 10
1.3.1 SIX VIEWS OF PRODUCT APPEARANCE .............................................................. 11
1.4 SYSTEM REQUIREMENTS.............................................................................. 12
1.5 GET YOUR IP AUTOMATICALLY & MANUALLY ....................................................... 12
1.5.1 Network Testing .............................................................................. 15
CHAPTER 2 HARDWARE INSTALLATION ............................................................................................... 18
2.1 DIAGRAM OF CONNECTING HARDWARE TO 3.5G PLUS WLAN MOBILE SERVER ROUTER ..... 18
2.1.1 Router Mode Hardware Connection and Application................................ 18
2.1.2 AP Mode Hardware Connection and Application..................................... 19
2.1.3 Client Mode Hardware Connection and Application ................................. 19
CHAPTER 3 ROUTER MODE ....................................................................................................................... 20
3.1 ADMINISTRATOR QUICK SETUP INSTRUCTION....................................................... 20
3.2 QUICK SETUP .......................................................................................... 21
3.2.1 WAN Setup (Internet Connection)........................................................ 23
3.2.2 LAN Setup ..................................................................................... 30
3.2.3 Wireless Setup................................................................................ 31
3.2.4 Time Server Setup ........................................................................... 32
3.2.5 Password Setup .............................................................................. 33
3.2.6 USB Disk Management Setup ............................................................. 34
3.2.7 User Account Management Setup ....................................................... 34
3.2.8 Firewall Setup................................................................................. 35
3.2.9 QoS Configuration Setup .................................................................. 36
3.2.10 FTP Server Setup ............................................................................ 37
3.2.11 Printer Server Setup......................................................................... 37
3.2.12 Web Camera Server Setup ................................................................. 38
3.2.13 Samba Server Setup ........................................................................ 38
3.2.14 Quick Setup Finish .......................................................................... 38
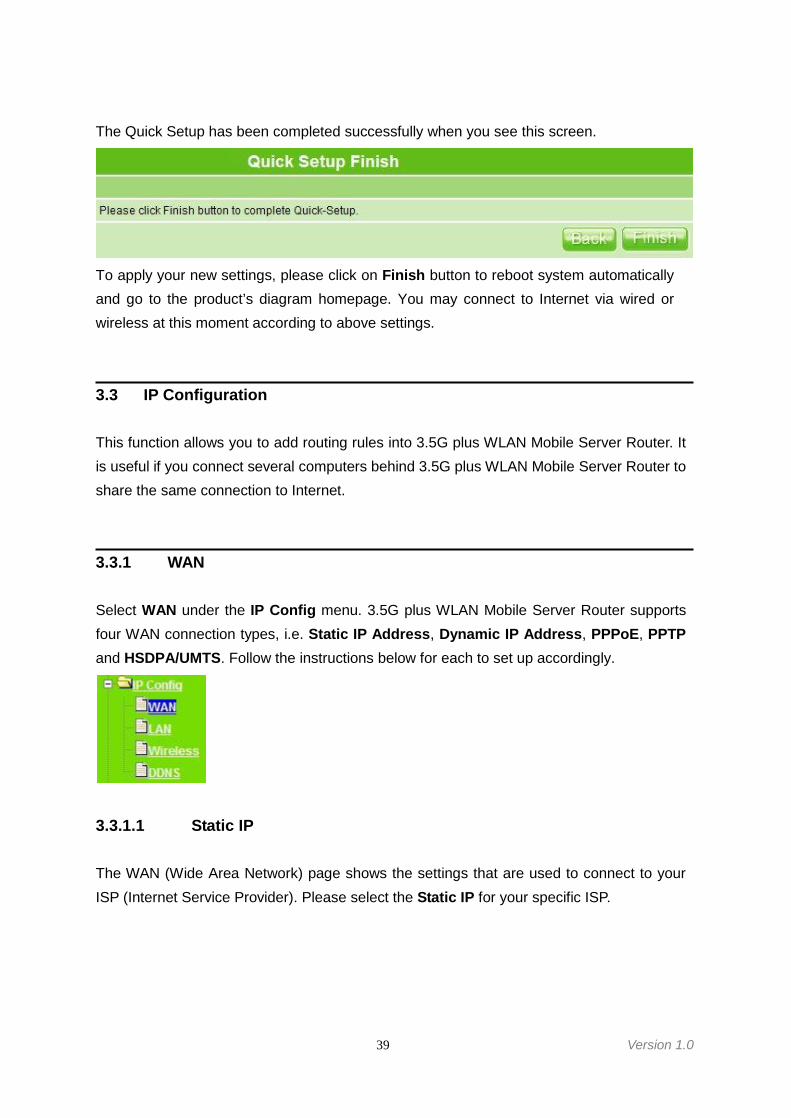
3.3 IP CONFIGURATION .................................................................................... 39
3.3.1 WAN ............................................................................................. 39
3.3.2 LAN .............................................................................................. 48
3.3.3 Wireless ........................................................................................ 49
Version 1.03
3.3.4 DDNS............................................................................................ 53
3.4 ADVANCED ............................................................................................. 54
3.4.1 NAT .............................................................................................. 55
3.4.2 Firewall ......................................................................................... 57
3.4.3 QoS.............................................................................................. 64
3.5 SERVER................................................................................................. 65
3.5.1 Samba Server ................................................................................. 65
3.5.2 FTP Server ..................................................................................... 68
3.5.3 Web Camera Server ......................................................................... 69
3.5.4 Printer Server ................................................................................. 77
3.6 SYSTEM MANAGEMENT ............................................................................... 85
3.6.1 Reboot .......................................................................................... 85
3.6.2 Change Password ........................................................................... 85
3.6.3 Firmware Upgrade ........................................................................... 86
3.6.4 Profile Save.................................................................................... 87
3.6.5 Remote Management........................................................................ 88
3.6.6 Time ............................................................................................. 90
3.6.7 UPnP Setting .................................................................................. 91
3.6.8 User Account Management................................................................ 91
3.6.9 Folder Management ......................................................................... 93
3.6.10 Email Alert ..................................................................................... 94
3.7 LOG & STATUS ......................................................................................... 96
3.7.1 Network Configuration...................................................................... 96
3.7.2 User Account List ............................................................................ 97
3.7.3 Event Log ...................................................................................... 98
3.8 LOGOUT ................................................................................................ 98
3.9 PERSONAL CONFIGURATION .......................................................................... 98
3.9.1 Anonymous ................................................................................. 100
3.9.2 My Document ............................................................................... 101
3.9.3 My Webcam.................................................................................. 102
3.9.4 My Status..................................................................................... 102
3.10 SITE MAP ............................................................................................. 103
CHAPTER 4 AP MODE ................................................................................................................................. 104
4.1 ADMINISTRATOR QUICK SETUP INSTRUCTION..................................................... 104
4.2 QUICK SETUP ........................................................................................ 105
4.2.1 LAN Setup ................................................................................... 107
4.2.2 Wireless Setup.............................................................................. 108
Version 1.04
4.2.3 Time Server Setup ......................................................................... 110
4.2.4 Password Setup ............................................................................ 110
4.2.5 USB Disk Management Setup ........................................................... 111
4.2.6 User Account Management Setup ..................................................... 111
4.2.7 FTP Server Setup .......................................................................... 112
4.2.8 Printer Server Setup....................................................................... 113
4.2.9 Web Camera Server Setup ............................................................... 113
4.2.10 Samba Server Setup ...................................................................... 113
4.2.11 Quick Setup Finish ........................................................................ 114
4.3 IP CONFIGURATION .................................................................................. 114
4.3.1 LAN ............................................................................................ 114
4.3.2 Wireless ...................................................................................... 116
4.4 SERVER............................................................................................... 120
4.4.1 Samba Server ............................................................................... 121
4.4.2 FTP Server ................................................................................... 123
4.4.3 Web Camera Server ....................................................................... 124
4.4.4 Printer Server ............................................................................... 133
4.5 SYSTEM MANAGEMENT ............................................................................. 139
4.5.1 Reboot ........................................................................................ 139
4.5.2 Change Password ......................................................................... 139
4.5.3 Firmware Upgrade ......................................................................... 140
4.5.4 Profile Save.................................................................................. 141
4.5.5 Remote Management...................................................................... 142
4.5.6 Time ........................................................................................... 143
4.5.7 UPnP Setting ................................................................................ 143
4.5.8 User Account Management.............................................................. 144
4.5.9 Folder Management ....................................................................... 145
4.5.10 Email Alert ................................................................................... 146
4.6 LOG & STATUS ....................................................................................... 148
4.6.1 Network Configuration.................................................................... 148
4.6.2 User Account List .......................................................................... 149
4.6.3 Event Log .................................................................................... 149
4.7 LOGOUT .............................................................................................. 150
4.8 PERSONAL CONFIGURATION ........................................................................ 150
4.8.1 Anonymous ................................................................................. 152
4.8.2 My Document ............................................................................... 153
4.8.3 My Webcam.................................................................................. 154
4.8.4 My Status..................................................................................... 154
Version 1.05
4.9 SITE MAP ............................................................................................. 155
CHAPTER 5 CLIENT MODE ....................................................................................................................... 156
5.1 ADMINISTRATOR QUICK SETUP..................................................................... 156
5.2 QUICK SETUP ........................................................................................ 157
5.2.1 SITE SURVEY SETUP ................................................................................ 158
5.2.2 Wireless Setup.............................................................................. 159
5.2.3 Time Server Setup ......................................................................... 160
5.2.4 Password Setup ............................................................................ 160
5.2.5 USB Disk Management Setup ........................................................... 161
5.2.6 User Account Management Setup ..................................................... 161
5.2.7 FTP Server Setup .......................................................................... 162
5.2.8 Web Camera Server Setup ............................................................... 162
5.2.9 Printer Server Setup....................................................................... 163
5.2.10 Samba Server Setup ...................................................................... 163
5.2.11 Quick Setup Finish ........................................................................ 163
5.3 IP CONFIGURATION .................................................................................. 164
5.3.1 LAN ............................................................................................ 164
5.3.2 Site Survey .................................................................................. 165
5.4 SERVER............................................................................................... 167
5.4.1 Samba Server ............................................................................... 167
5.4.2 FTP Server ................................................................................... 170
5.4.3 Web Camera Server ....................................................................... 171
5.4.4 Printer Server ............................................................................... 179
5.5 SYSTEM MANAGEMENT ............................................................................. 186
5.5.1 Reboot ........................................................................................ 186
5.5.2 Change Password ......................................................................... 186
5.5.3 Firmware Upgrade ......................................................................... 187
5.5.4 Profile Save.................................................................................. 188
5.5.5 Remote Management...................................................................... 189
5.5.6 Time ........................................................................................... 190
5.5.7 UPnP Setting ................................................................................ 191
5.5.8 User Account Management.............................................................. 191
5.5.9 Folder Management ....................................................................... 193
5.5.10 Email Alert ................................................................................... 194
5.6 LOG & STATUS ....................................................................................... 195
5.6.1 Network Configuration.................................................................... 195
5.6.2 User Account List .......................................................................... 196
Version 1.06
5.6.3 Event Log .................................................................................... 196
5.7 LOGOUT .............................................................................................. 197
5.8 PERSONAL CONFIGURATION ........................................................................ 197
5.8.1 Anonymous ................................................................................. 199
5.8.2 My Document ............................................................................... 200
5.8.3 My Webcam.................................................................................. 201
5.8.4 My Status..................................................................................... 201
5.9 SITE MAP ............................................................................................. 202
CHAPTER 6 DDNS SERVICE APPLICATION .......................................................................................... 203
CHAPTER 7 Q & A......................................................................................................................................... 207
7.1 INSTALLATION ............................................................................................ 207
7.2 LED....................................................................................................... 207
7.3 IP ADDRESS.............................................................................................. 208
7.4 OS SETTING ............................................................................................. 209
7.5 3.5G PLUS WLAN MOBILE SERVER ROUTER SETUP ................................................ 210
7.6 WIRELESS LAN.......................................................................................... 212
7.7 SAMBA SERVER.......................................................................................... 215
7.8 USB FTP SERVER ...................................................................................... 215
7.9 WEBCAM SERVER ....................................................................................... 216
7.10 PRINTER SERVER ...................................................................................... 217
7.11 SUPPORT................................................................................................ 217
7.12 OTHERS ................................................................................................. 218
7.13 USB DEVICE ........................................................................................... 218
CHAPTER 8 APPENDICES .......................................................................................................................... 219
8.1 PRINTER .............................................................................................. 219
8.2 WEB CAMERA........................................................................................ 219
8.3 USB DEVICES........................................................................................ 224
8.4 OPERATING SYSTEMS ............................................................................... 225
8.5 BROWSERS........................................................................................... 225
8.6 EASY SETUP ......................................................................................... 225
8.7 COMMUNICATIONS REGULATION INFORMATION ................................................... 225
Version 1.07
CE Statement of Conformity
This product has been tested in typical configuration by Ecom Sertech Corp and was found
to comply with the essential requirement of “Council Directive on the Approximation of the
Laws of the Member States relating to Electromagnetic Compatibility” (89/336/EEC;
92/31/EEC; 93/68/EEC)
Marking by the above symbol indicates compliance with the Essential Requirements of the
R&TTE Directive of the European Union (1999/5/EC). This equipment meets the following
conformance standards:
EN300 328, EN301 489-17, EN60950
Countries of Operation and Conditions of Use in the European Community
This device is intends to be operated in all countries of the European Community.
Requirement is for indoors vs. outdoors operation, license requirements and allowed
channels of operation apply in some countries as described in this document.
Note: The user must use the configuration utility provided with this product to check
the current channel of operation and confirm that the devices operating in
conformance with the spectrum usage rules for the European Community countries as
described below.
If operation is occurring outside of the allowable channels as indicated in this guide, then
the user must cease operating the product and consult with the local technical support staff
responsible for the wireless network.
This device may be operated indoors or outdoors in all countries of the European
Community using the 2.4GHz band: Channels 1 – 13, except where noted below:
· In Italy the end-user must apply for a license from the national spectrum authority to
operate this device outdoors.
· In France outdoor operation is only permitted using the 2.4 – 2.454 GHz band:
Channels 1 – 7.
Version 1.08
Chapter 1 Introduction
1.1 Overview
3.5G plus WLAN Mobile Server Router might be small in size, but is huge in functionality,
supporting multiple operation modes, including Access Point (AP) mode, Router mode, and
Wireless Client mode. You can switch among these modes easily by using 3.5G plus WLAN
Mobile Server Router's 3-way configuration switch. In addition to, there are 2 USB ports
available for connecting any devices which allow LAN users to utilize shared printer and
samba server. Also, apply 3.5G plus WLAN Mobile Server Router with a Webcam to monitor
in real time, or with a USB-connected Flash/Drive to become a FTP server providing shared
download service in the mean time.
In other words, monitor your home with a Webcam by taking pictures via 3.5G plus WLAN
Mobile Server Router and record all images into the USB HDD for reviewing. Often
marketed as surveillance tools for home or office security, network Webcams are now being
employed by early adopters for more personal matters, such as watching kids and
monitoring pets. The Webcam can be remotely accessed and controlled via a browser.
Moreover, while connectting 3.5G plus WLAN Mobile Server Router with 3.5G USB dongle
to access Internet or work as connection backup, you can immediately speed up data
transmission, as well as calling out and receiving phone calls via a cell phone.
Version 1.09
1.2 Features
3.5G plus WLAN Mobile Server Router’s main functions, including Wireless Access, PrinterServer, Webcam Monitor, Samba Server, FTP Server and IP Sharing etc. are shown asbelow. These features and their applying instructions specified in User Manual will not onlyfulfill your requirements, but also ease your inconvenience from the job.
Easy SetupProprietary utility is designed to let users, even the beginners, complete their server setupseasily and access Internet without any difficulty. 3 Operation ModesThe unit provides Router, AP and Client operation modes by sliding side switches first. Web GUIFriendly user interface only requires supported web browser to start advanced setup. Printer Server3.5G plus WLAN Mobile Server Router supports LPR protocol, so users can use sharedprinter from both WAN and LAN. Webcam ServerThe product supports USB Web Camera, which provides easy and affordable solution forhome security. It allows users monitoring home from anywhere via online webcam. Also,you might be alerted by an email with an intruder picture. Samba ServerIt is located on your network places to provide shared information and printer for LAN users. FTP Server3.5G plus WLAN Mobile Server Router supports FAT32/EXT3 file system format. Plug withUSB hard drive or thumb drive, it will become a FTP server, and the users can share files onthe Internet. Security/EncryptionThe unit is equipped with encryption types of WEP, WPA, 802.1x and so on to give moresecurity assurance. Real-time Monitoring3.5G plus WLAN Mobile Server Router can save real-time images from connectedwebcamera for the purpose of home safety monitoring. 3.5G Internet ConnectionWith a 3.5G USB dongle, 3.5G plus WLAN Mobile Server Router can upgrade its datatransmission rate on the Internet.
Version 1.010
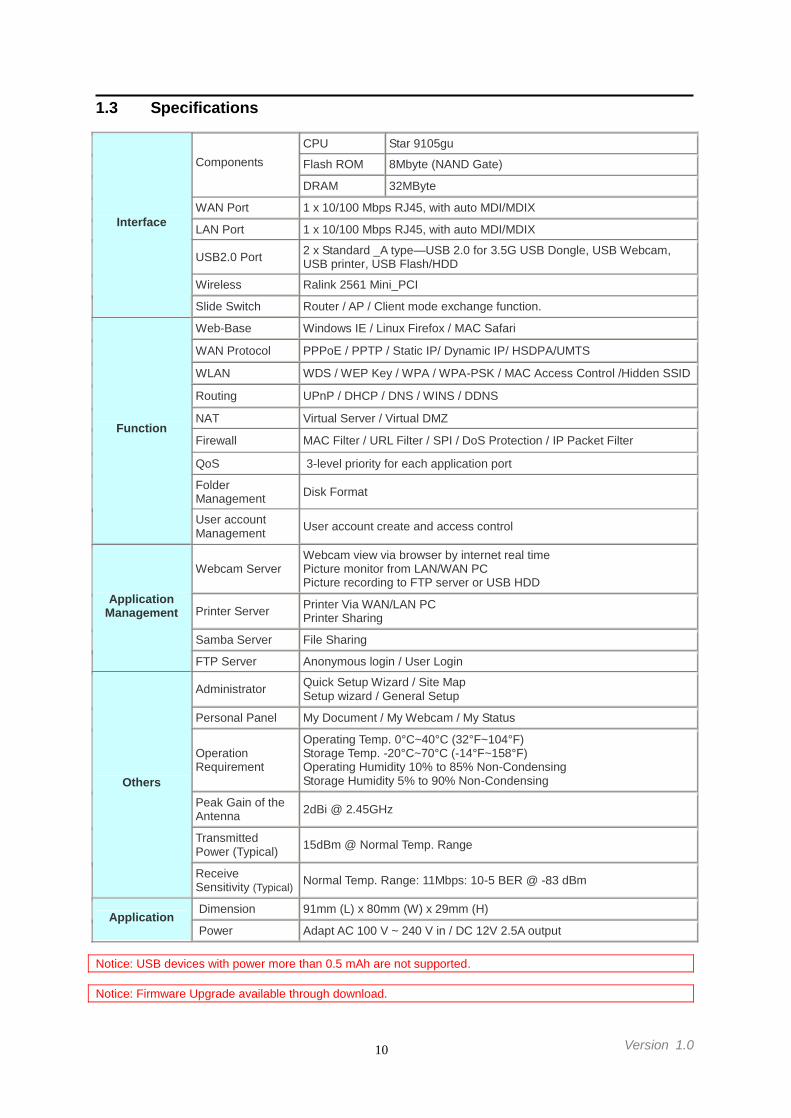
1.3 Specifications
CPU Star 9105gu
Flash ROM 8Mbyte (NAND Gate)Components
DRAM 32MByte
WAN Port 1 x 10/100 Mbps RJ45, with auto MDI/MDIX
LAN Port 1 x 10/100 Mbps RJ45, with auto MDI/MDIX
USB2.0 Port 2 x Standard _A type—USB 2.0 for 3.5G USB Dongle, USB Webcam,USB printer, USB Flash/HDD
Wireless Ralink 2561 Mini_PCI
Interface
Slide Switch Router / AP / Client mode exchange function.
Web-Base Windows IE / Linux Firefox / MAC Safari
WAN Protocol PPPoE / PPTP / Static IP/ Dynamic IP/ HSDPA/UMTS
WLAN WDS / WEP Key / WPA / WPA-PSK / MAC Access Control /Hidden SSID
Routing UPnP / DHCP / DNS / WINS / DDNS
NAT Virtual Server / Virtual DMZ
Firewall MAC Filter / URL Filter / SPI / DoS Protection / IP Packet Filter
QoS 3-level priority for each application port
FolderManagement Disk Format
Function
User accountManagement User account create and access control
Webcam ServerWebcam view via browser by internet real timePicture monitor from LAN/WAN PCPicture recording to FTP server or USB HDD
Printer Server Printer Via WAN/LAN PCPrinter Sharing
Samba Server File Sharing
ApplicationManagement
FTP Server Anonymous login / User Login
Administrator Quick Setup Wizard / Site MapSetup wizard / General Setup
Personal Panel My Document / My Webcam / My Status
OperationRequirement
Operating Temp. 0°C~40°C (32°F~104°F)Storage Temp. -20°C~70°C (-14°F~158°F)Operating Humidity 10% to 85% Non-CondensingStorage Humidity 5% to 90% Non-Condensing
Peak Gain of theAntenna 2dBi @ 2.45GHz
TransmittedPower (Typical) 15dBm @ Normal Temp. Range
Others
ReceiveSensitivity (Typical) Normal Temp. Range: 11Mbps: 10-5 BER @ -83 dBm
Dimension 91mm (L) x 80mm (W) x 29mm (H)Application
Power Adapt AC 100 V ~ 240 V in / DC 12V 2.5A output
Notice: USB devices with power more than 0.5 mAh are not supported.
Notice: Firmware Upgrade available through download.
Version 1.011
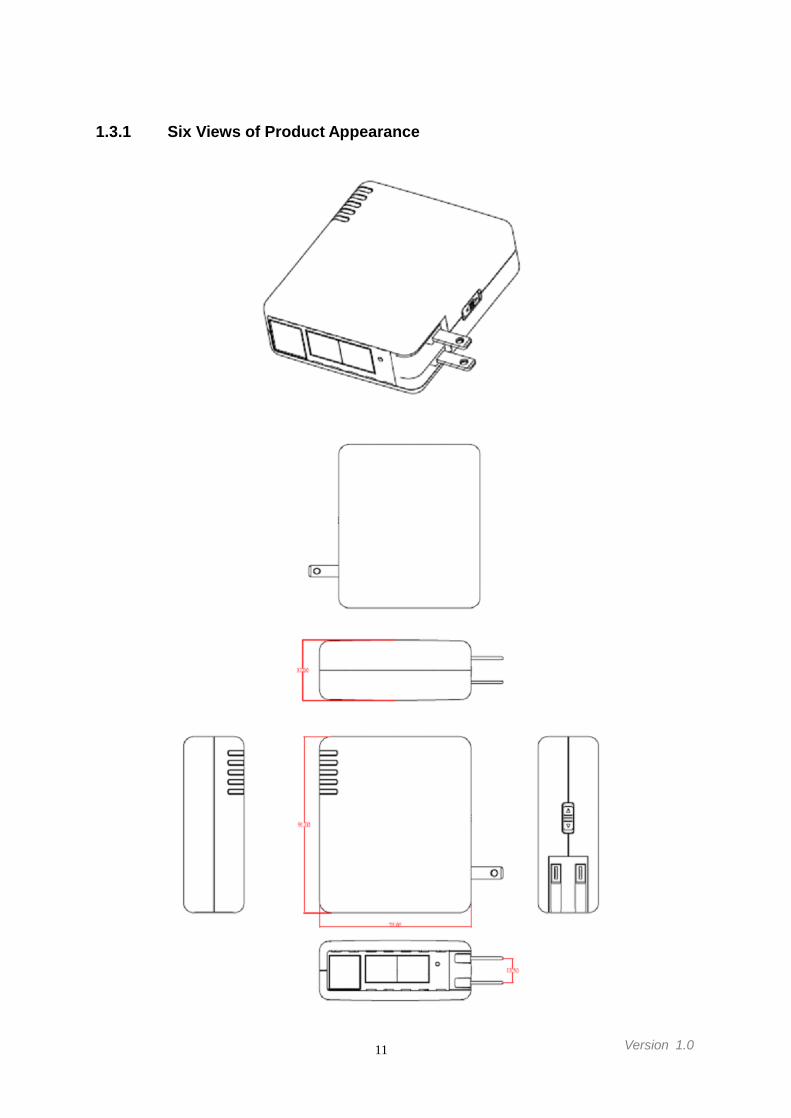
1.3.1 Six Views of Product Appearance
Version 1.012
1.4 System Requirements
To begin with 3.5G plus WLAN Mobile Server Router, you must have the following minimumsystem requirements. If your system can’t correspond to the following requirements, youmight get some unknown troubles on your system.
XDSL/Cable Modem and broadband Internet Account. One Ethernet (10 BASE-T or 10/100 BASE-TX) network interface card. TCP/IP and at least one web browser software installed (E.g.: Internet Explorer 5.0,
Netscape Navigator 7.x, Apple Safari 2.03 or higher version). At lease one 802.11g (54Mbps) or one 802.11b (11Mbps) wireless adapter for wireless
mobile clients. Recommended OS: Win2000 or WinXP / Linux.
1.5 Get Your IP Automatically & Manually
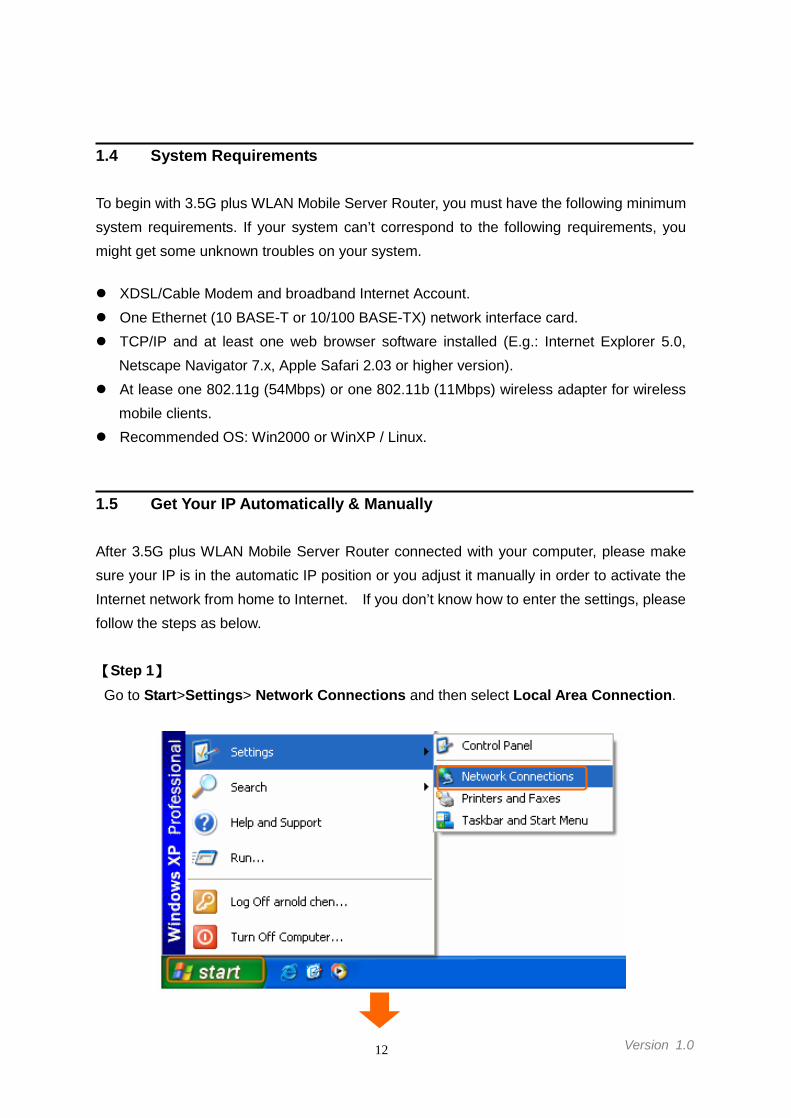
After 3.5G plus WLAN Mobile Server Router connected with your computer, please makesure your IP is in the automatic IP position or you adjust it manually in order to activate theInternet network from home to Internet. If you don’t know how to enter the settings, pleasefollow the steps as below.
【Step 1】Go to Start>Settings> Network Connections and then select Local Area Connection.
Version 1.013
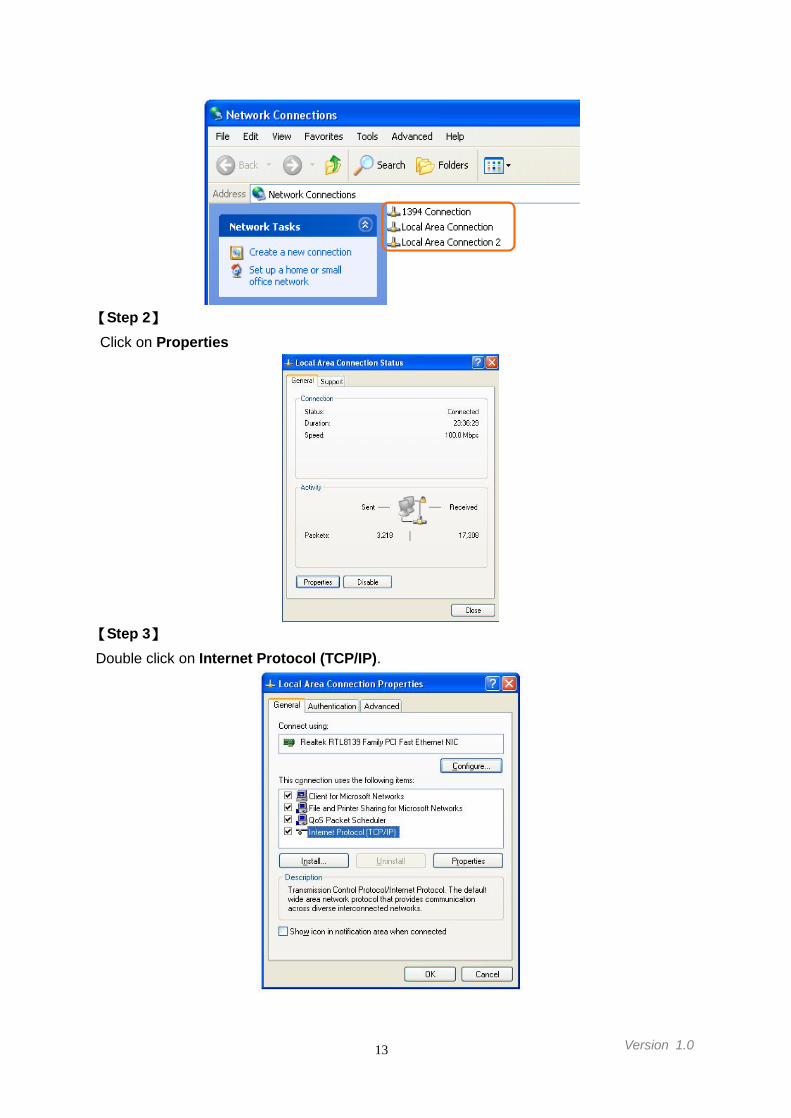
【Step 2】Click on Properties
【Step 3】Double click on Internet Protocol (TCP/IP).
Version 1.014
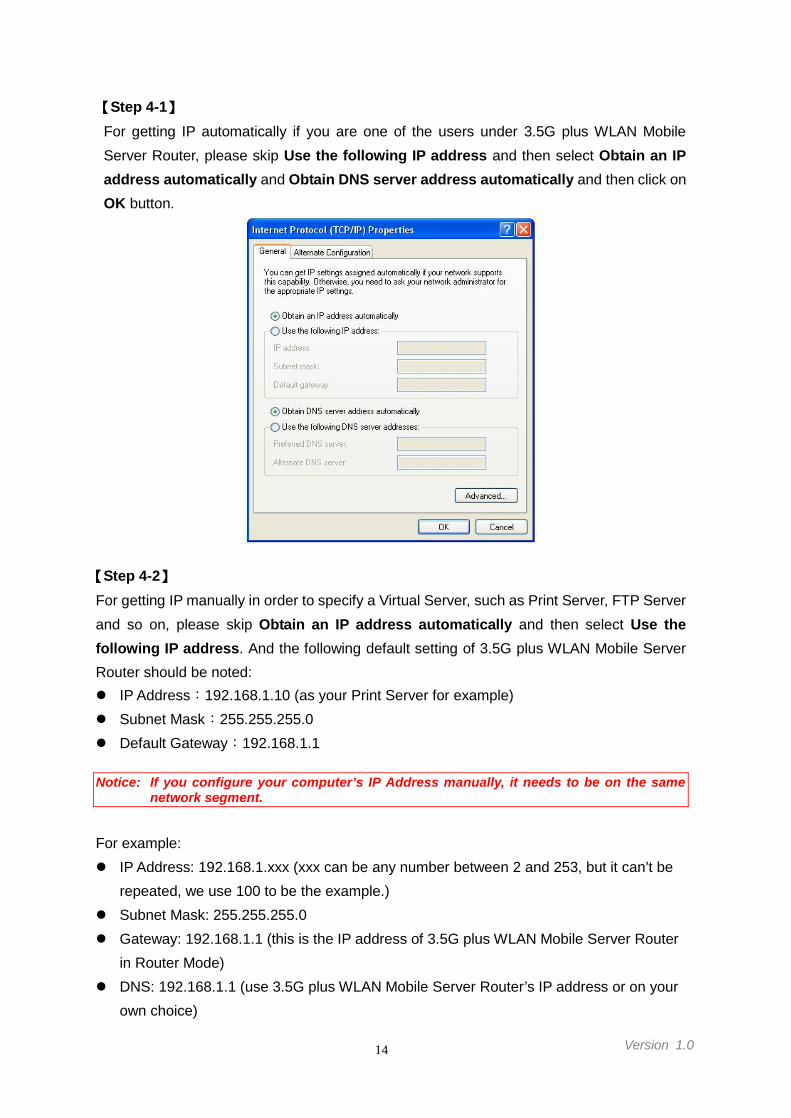
【Step 4-1】For getting IP automatically if you are one of the users under 3.5G plus WLAN MobileServer Router, please skip Use the following IP address and then select Obtain an IPaddress automatically and Obtain DNS server address automatically and then click onOK button.
【Step 4-2】For getting IP manually in order to specify a Virtual Server, such as Print Server, FTP Serverand so on, please skip Obtain an IP address automatically and then select Use thefollowing IP address. And the following default setting of 3.5G plus WLAN Mobile ServerRouter should be noted: IP Address:192.168.1.10 (as your Print Server for example) Subnet Mask:255.255.255.0 Default Gateway:192.168.1.1
Notice: If you configure your computer’s IP Address manually, it needs to be on the samenetwork segment.
For example: IP Address: 192.168.1.xxx (xxx can be any number between 2 and 253, but it can’t be
repeated, we use 100 to be the example.) Subnet Mask: 255.255.255.0 Gateway: 192.168.1.1 (this is the IP address of 3.5G plus WLAN Mobile Server Router
in Router Mode) DNS: 192.168.1.1 (use 3.5G plus WLAN Mobile Server Router’s IP address or on your
own choice)
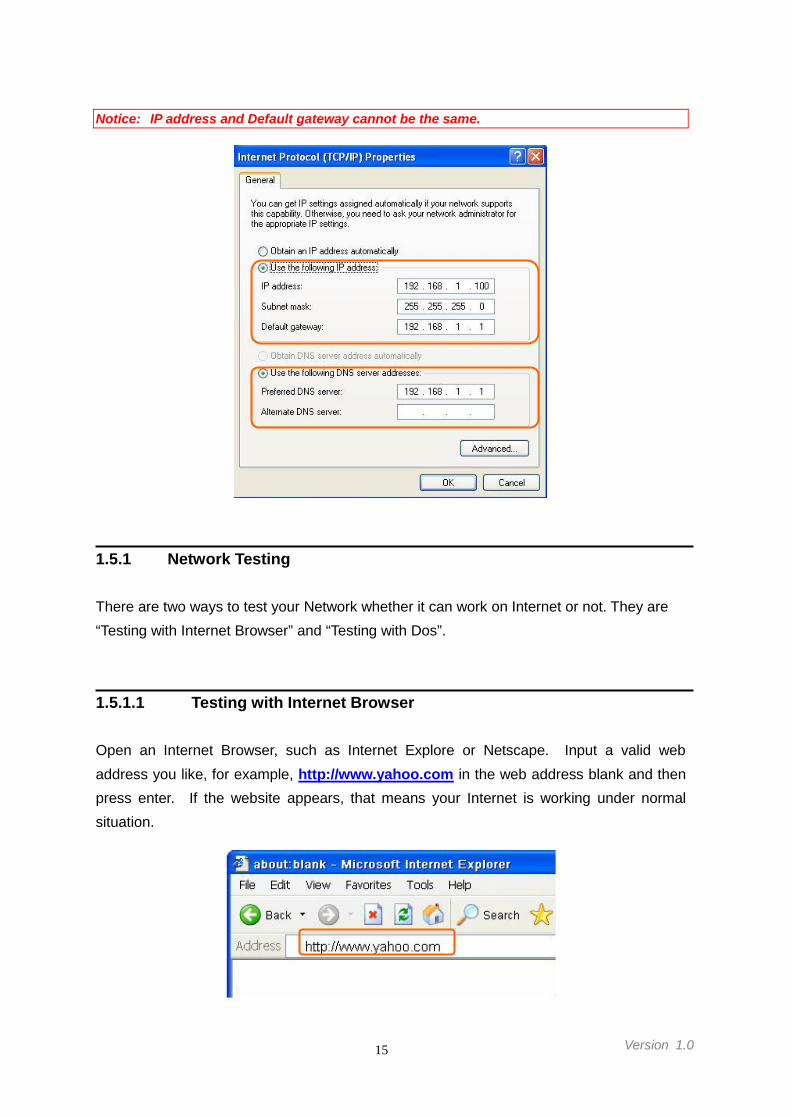
Version 1.015
Notice: IP address and Default gateway cannot be the same.
1.5.1 Network Testing
There are two ways to test your Network whether it can work on Internet or not. They are“Testing with Internet Browser” and “Testing with Dos”.
1.5.1.1 Testing with Internet Browser
Open an Internet Browser, such as Internet Explore or Netscape. Input a valid webaddress you like, for example, http://www.yahoo.com in the web address blank and thenpress enter. If the website appears, that means your Internet is working under normalsituation.
Version 1.016
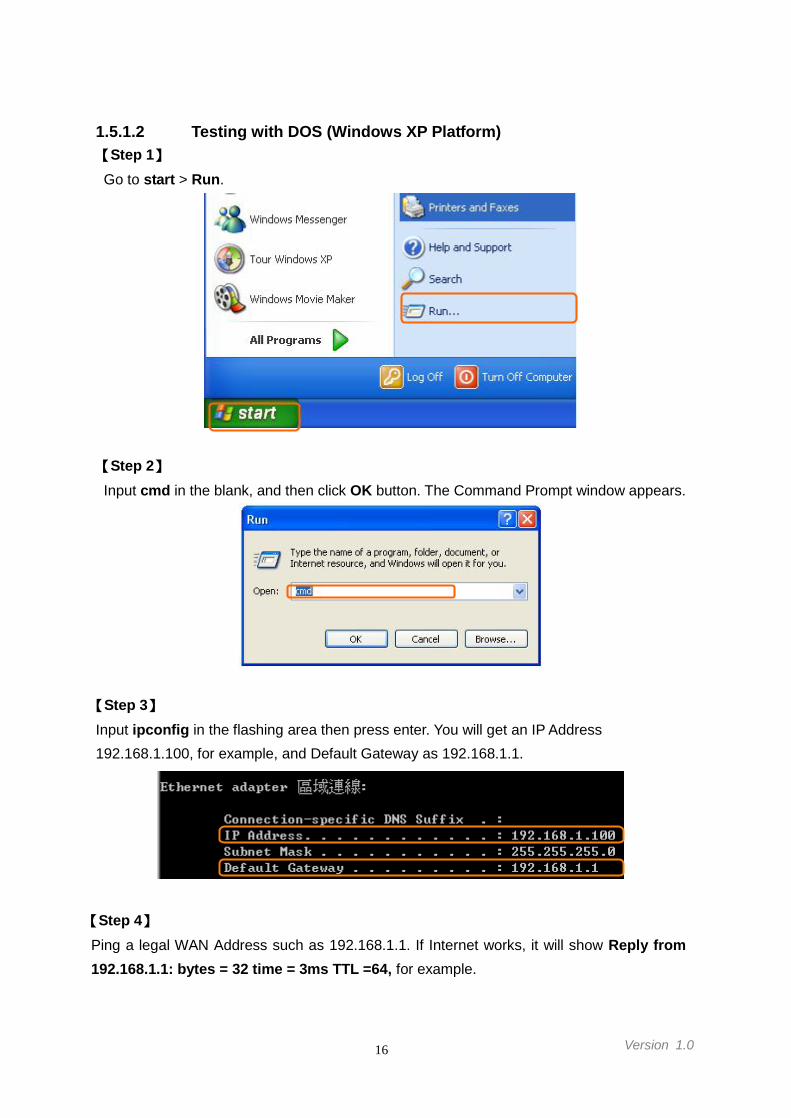
1.5.1.2 Testing with DOS (Windows XP Platform)【Step 1】Go to start > Run.
【Step 2】Input cmd in the blank, and then click OK button. The Command Prompt window appears.
【Step 3】Input ipconfig in the flashing area then press enter. You will get an IP Address192.168.1.100, for example, and Default Gateway as 192.168.1.1.
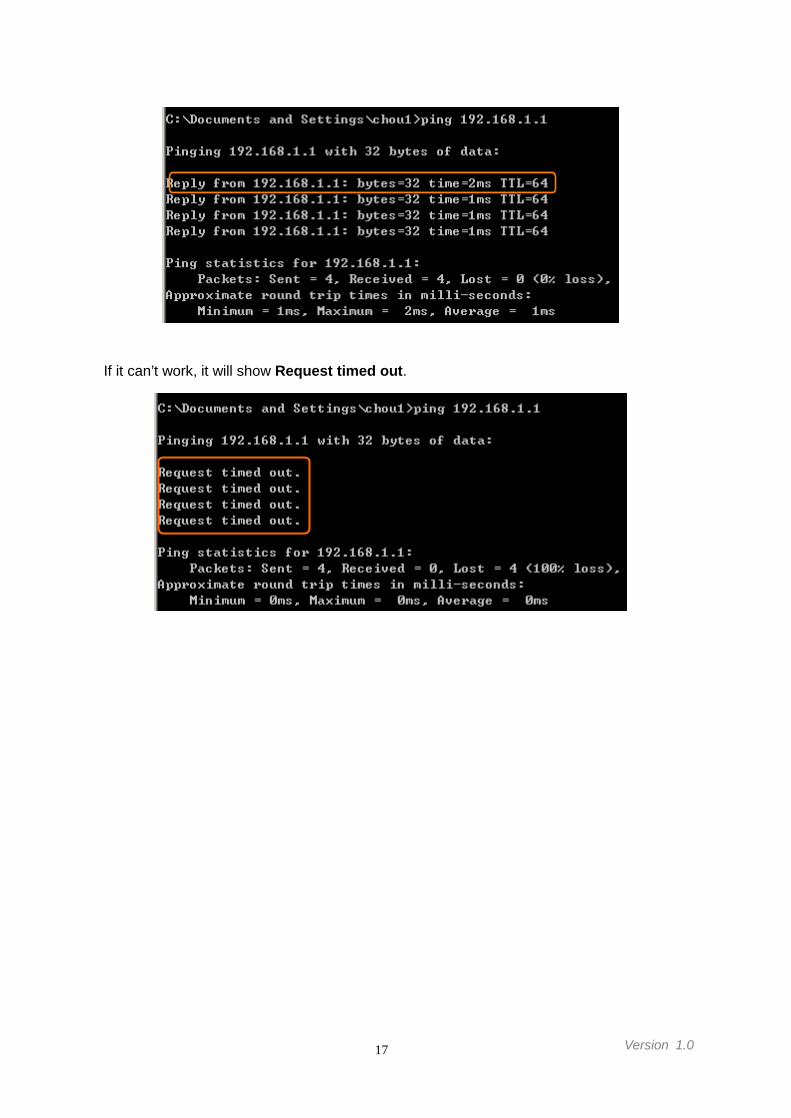
【Step 4】Ping a legal WAN Address such as 192.168.1.1. If Internet works, it will show Reply from192.168.1.1: bytes = 32 time = 3ms TTL =64, for example.
Version 1.017
If it can’t work, it will show Request timed out.
18 Version 1.0
Chapter 2 Hardware Installation
2.1 Diagram of Connecting Hardware to 3.5G plus WLAN Mobile Server Router
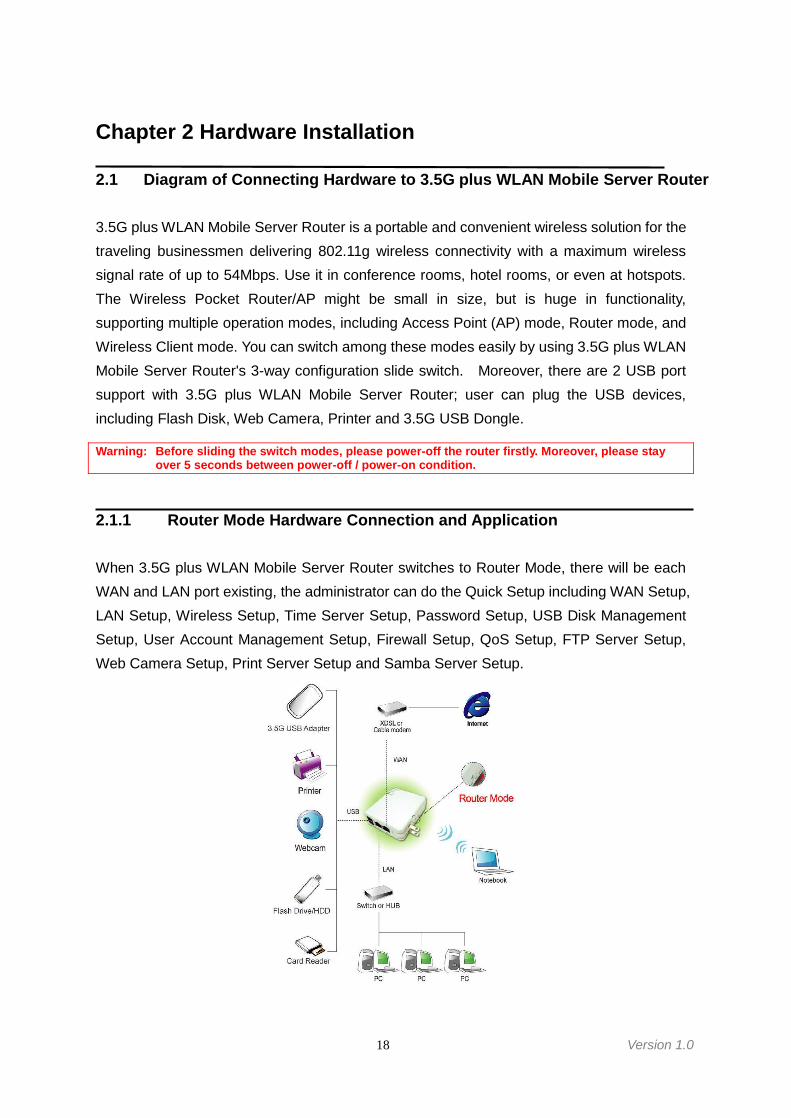
3.5G plus WLAN Mobile Server Router is a portable and convenient wireless solution for thetraveling businessmen delivering 802.11g wireless connectivity with a maximum wirelesssignal rate of up to 54Mbps. Use it in conference rooms, hotel rooms, or even at hotspots.The Wireless Pocket Router/AP might be small in size, but is huge in functionality,supporting multiple operation modes, including Access Point (AP) mode, Router mode, andWireless Client mode. You can switch among these modes easily by using 3.5G plus WLANMobile Server Router's 3-way configuration slide switch. Moreover, there are 2 USB portsupport with 3.5G plus WLAN Mobile Server Router; user can plug the USB devices,including Flash Disk, Web Camera, Printer and 3.5G USB Dongle.
Warning: Before sliding the switch modes, please power-off the router firstly. Moreover, please stayover 5 seconds between power-off / power-on condition.
2.1.1 Router Mode Hardware Connection and Application
When 3.5G plus WLAN Mobile Server Router switches to Router Mode, there will be eachWAN and LAN port existing, the administrator can do the Quick Setup including WAN Setup,LAN Setup, Wireless Setup, Time Server Setup, Password Setup, USB Disk ManagementSetup, User Account Management Setup, Firewall Setup, QoS Setup, FTP Server Setup,Web Camera Setup, Print Server Setup and Samba Server Setup.
19 Version 1.0
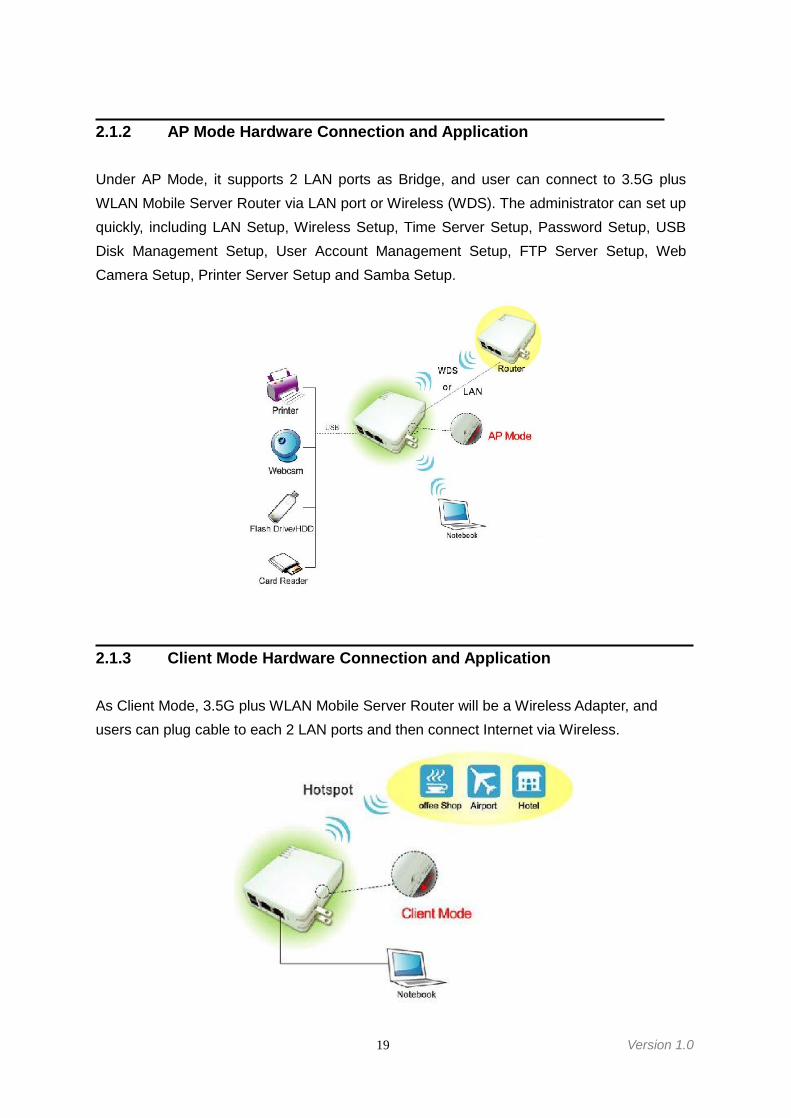
2.1.2 AP Mode Hardware Connection and Application
Under AP Mode, it supports 2 LAN ports as Bridge, and user can connect to 3.5G plusWLAN Mobile Server Router via LAN port or Wireless (WDS). The administrator can set upquickly, including LAN Setup, Wireless Setup, Time Server Setup, Password Setup, USBDisk Management Setup, User Account Management Setup, FTP Server Setup, WebCamera Setup, Printer Server Setup and Samba Setup.
2.1.3 Client Mode Hardware Connection and Application
As Client Mode, 3.5G plus WLAN Mobile Server Router will be a Wireless Adapter, andusers can plug cable to each 2 LAN ports and then connect Internet via Wireless.

20 Version 1.0
Chapter 3 Router Mode
3.1 Administrator Quick Setup Instruction
Make sure to switch the mode into Router Mode, then open a Microsoft Internet Explorer,Mozilla Firefox or Apple Safari browser, and enter http://192.168.1.1 (Default Gateway)into browser’s blank.
Notice: If the homepage doesn’t appear, please check if the TCP/IP configuration is obtaining IP addressautomatically or not. If you don’t know how to do it, please refer to “1.5 Get your IP Automatically& Manually”.
Homepage
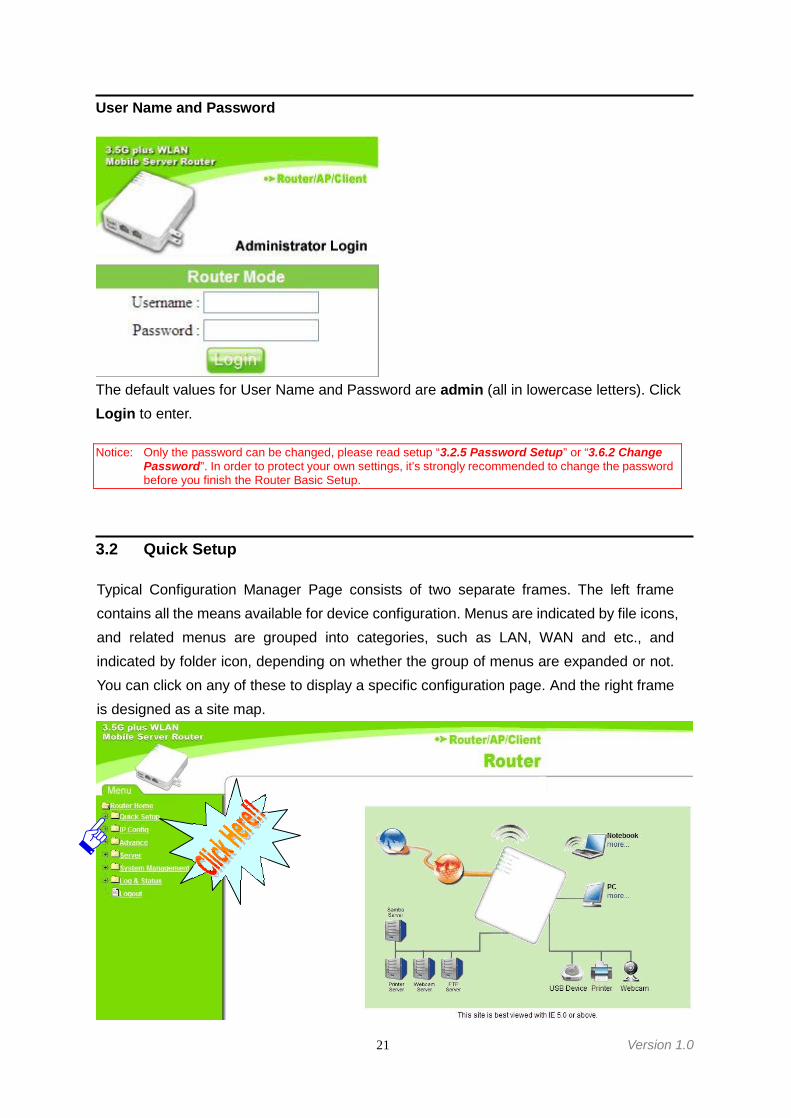
Please click on Administrator button to log in setup at first time, also any settings can be
changed in the future. Only the Administrator has the right to modify all settings.
21 Version 1.0
User Name and Password
The default values for User Name and Password are admin (all in lowercase letters). ClickLogin to enter.
Notice: Only the password can be changed, please read setup “3.2.5 Password Setup” or “3.6.2 ChangePassword”. In order to protect your own settings, it’s strongly recommended to change the passwordbefore you finish the Router Basic Setup.
3.2 Quick Setup
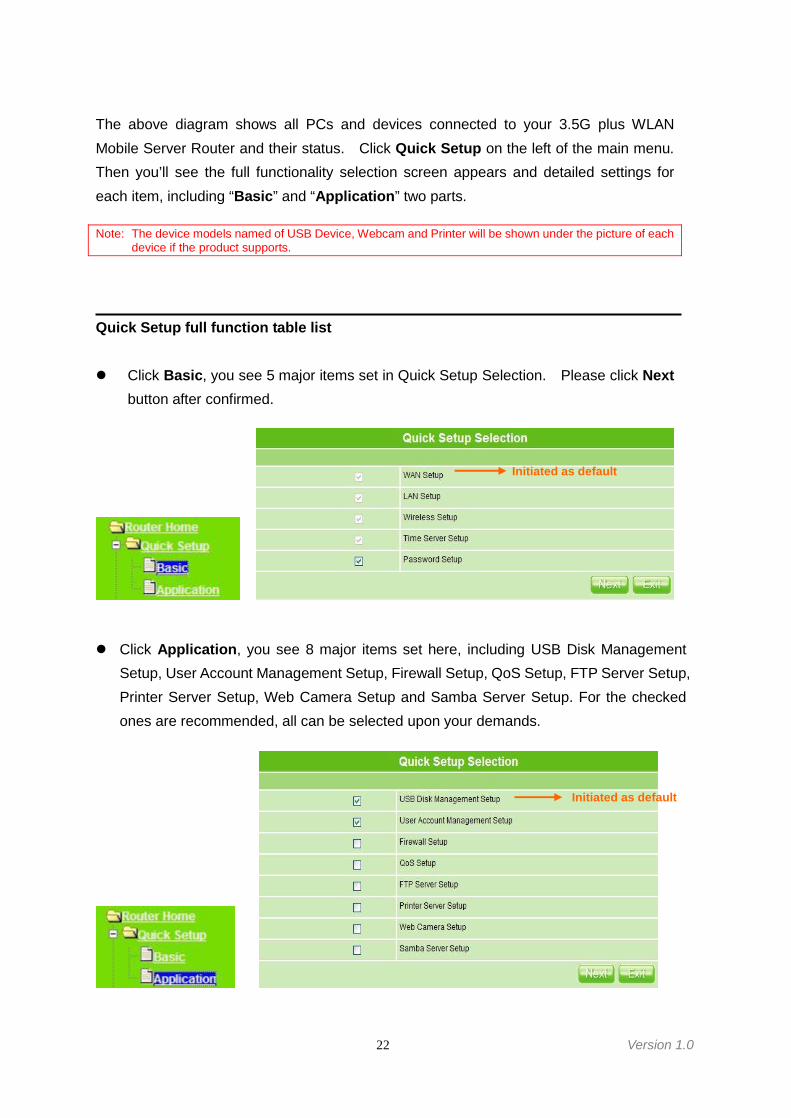
Typical Configuration Manager Page consists of two separate frames. The left framecontains all the means available for device configuration. Menus are indicated by file icons,and related menus are grouped into categories, such as LAN, WAN and etc., andindicated by folder icon, depending on whether the group of menus are expanded or not.You can click on any of these to display a specific configuration page. And the right frameis designed as a site map.
22 Version 1.0
The above diagram shows all PCs and devices connected to your 3.5G plus WLANMobile Server Router and their status. Click Quick Setup on the left of the main menu.Then you’ll see the full functionality selection screen appears and detailed settings foreach item, including “Basic” and “Application” two parts.
Note: The device models named of USB Device, Webcam and Printer will be shown under the picture of eachdevice if the product supports.
Quick Setup full function table list
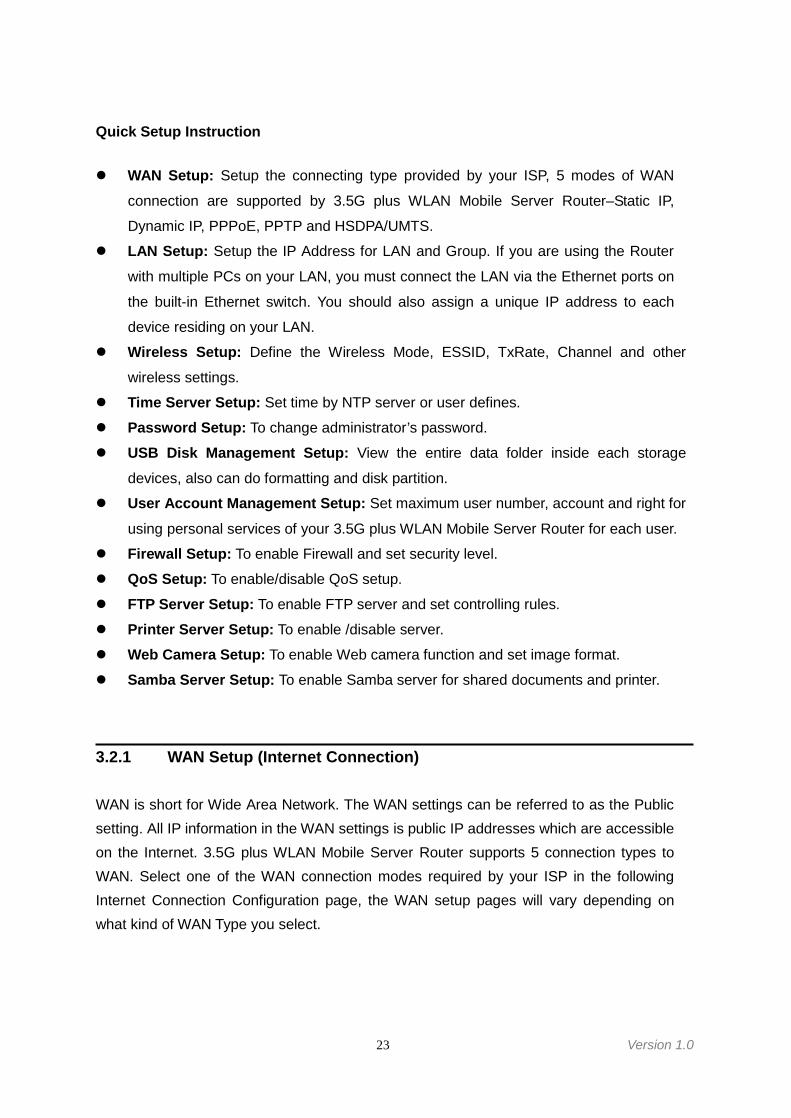
Click Basic, you see 5 major items set in Quick Setup Selection. Please click Nextbutton after confirmed.
Click Application, you see 8 major items set here, including USB Disk ManagementSetup, User Account Management Setup, Firewall Setup, QoS Setup, FTP Server Setup,Printer Server Setup, Web Camera Setup and Samba Server Setup. For the checkedones are recommended, all can be selected upon your demands.
Initiated as default
Initiated as default
23 Version 1.0
Quick Setup Instruction
WAN Setup: Setup the connecting type provided by your ISP, 5 modes of WAN
connection are supported by 3.5G plus WLAN Mobile Server Router–Static IP,
Dynamic IP, PPPoE, PPTP and HSDPA/UMTS.
LAN Setup: Setup the IP Address for LAN and Group. If you are using the Router
with multiple PCs on your LAN, you must connect the LAN via the Ethernet ports on
the built-in Ethernet switch. You should also assign a unique IP address to each
device residing on your LAN.
Wireless Setup: Define the Wireless Mode, ESSID, TxRate, Channel and other
wireless settings.
Time Server Setup: Set time by NTP server or user defines.
Password Setup: To change administrator’s password.
USB Disk Management Setup: View the entire data folder inside each storage
devices, also can do formatting and disk partition.
User Account Management Setup: Set maximum user number, account and right for
using personal services of your 3.5G plus WLAN Mobile Server Router for each user.
Firewall Setup: To enable Firewall and set security level.
QoS Setup: To enable/disable QoS setup.
FTP Server Setup: To enable FTP server and set controlling rules.
Printer Server Setup: To enable /disable server.
Web Camera Setup: To enable Web camera function and set image format.
Samba Server Setup: To enable Samba server for shared documents and printer.
3.2.1 WAN Setup (Internet Connection)
WAN is short for Wide Area Network. The WAN settings can be referred to as the Publicsetting. All IP information in the WAN settings is public IP addresses which are accessibleon the Internet. 3.5G plus WLAN Mobile Server Router supports 5 connection types toWAN. Select one of the WAN connection modes required by your ISP in the followingInternet Connection Configuration page, the WAN setup pages will vary depending onwhat kind of WAN Type you select.
24 Version 1.0
Choose your WAN type as the above mentioned, and its associated settings will show upunderneath at the same time.
3.2.1.1 WAN Type – Static IP
Choose Static IP Address if all WAN IP information is provided to you by your ISP. You willneed to enter the IP address, IP Netmask and IP gateway as provided. Each entered fieldsmust be in the appropriate IP form, which are four IP octets separated by a dot (x.x.x.x). TheRouter will not accept the IP address if it is not in this format. If ISP provides you DNSinformation, please select Specify DNS Server IP and fill in Primary field at least;otherwise, Domain Name can’t be used.In particular, here provides 3G or 3.5G transmission rate when the device is plugged, eithera 3.5G USB Dongle or Card Bus; just check to apply for the backup. In other words, onceStatic IP connection is disconnected, the system automatically connects Internet via 3.5Gadapter. If 3.5G signal is not available, it starts to search downward for 3/2.75/2.5G signalsuntil none existed. The default interval between the two connection detection is 3 minutes.The interval range is from 1 to 3 minutes.The 3.5G feature is working as mutual backup for other 4 WAN Types, and the requiredinformation is listed as follows, such as user name, password and SIM PIN etc. That is,setting up the interval time to auto detect whether the Internet connection is lost or not. Ifyes, the system immediately switches to 3.5G Internet connection until the original Static IPconnection is back during the next detection.
See 3.2.1.1
See 3.2.1.2
See 3.2.1.3
See 3.2.1.4
See 3.2.1.5
25 Version 1.0
Please click on Next button to go on 3.2.2 LAN Setup.
3.2.1.2 WAN Type – Dynamic IP
Choose Dynamic IP to obtain IP address information automatically from your ISP. Selectthis option if your ISP does not give you any IP numbers to use. This option is commonlyused for Cable modem services. If ISP provided you DNS information, please selectSpecify DNS Server IP; otherwise, select No Default DNS Server.In particular, here provides 3G or 3.5G transmission rate when the device is plugged, eithera 3.5G USB Dongle or Card Bus; just check to apply for the backup. In other words, onceDynamic IP connection is disconnected, the system automatically connects Internet via3.5G adapter. If 3.5G signal is not available, it starts to search downward for 3/2.75/2.5Gsignals until none existed. The default interval between the two connection detection is 3minutes. The interval range is from 1 to 3 minutes.The 3.5G feature is working as mutual backup for other 4 WAN Types, and the requiredinformation is listed as follows, such as user name, password and SIM PIN etc. That is,setting up the interval time to auto detect whether the Internet connection is lost or not. Ifyes, the system immediately switches to 3.5G Internet connection until the original Dynamic

26 Version 1.0
IP connection is back during the next detection.
Click on Next button to go on 3.2.2 LAN Setup.
3.2.1.3 WAN Type – PPPoE
This option is typically used for DSL services. Choose PPPoE (Point to Point Protocolover Ethernet) if your ISP uses PPPoE connection. Your ISP will provide you with ausername and password. MTU stands for Maximum Transmission Unit. For PPPoEconnections, you may need to change the MTU setting in order to work correctly with yourISP. As Idle Time, it’s the amount of time of inactivity before disconnecting your PPPoEsession. Enter an Idle Time (in minutes) to define and period of time for which the Internetconnection is maintained during inactivity. If the Auto-reconnect enabled, the Router willautomatically connect to your ISP after your system is restarted, or if the connection isdropped. If ISP provides you DNS information, please select Specify DNS Server IP;otherwise, select No Default DNS Server.
Input it if requested by your ISP (Ex:Wireless Mobile Router)
MAC address
27 Version 1.0
In particular, here provides 3G or 3.5G transmission rate when the device is plugged, eithera 3.5G USB Dongle or Card Bus; just check to apply for the backup. In other words, onceDynamic IP connection is disconnected, the system automatically connects Internet via3.5G adapter. If 3.5G signal is not available, it starts to search downward for 3/2.75/2.5Gsignals until none existed. The default interval between the two connection detection is 3minutes. The interval range is from 1 to 3 minutes.The 3.5G feature is working as mutual backup for other 4 WAN Types, and the requiredinformation is listed as follows, such as user name, password and SIM PIN etc. That is,setting up the interval time to auto detect whether the Internet connection is lost or not. Ifyes, the system immediately switches to 3.5G Internet connection until the original PPoEconnection is back during the next detection.
Click on Next button to go on 3.2.2 LAN Setup.
3.2.1.4 WAN Type – PPTP
Enter as provided.
Enter as provided.
28 Version 1.0
This option is typically used for DSL services. Some DSL service providers supply aspecial DSL modem. This kind of modem only supports the PPTP tunnel to access theInternet, you should create a PPTP tunnel that carries a PPP session and terminates onthe DSL model. Once the tunnel has been established, this kind of DSL modem willforward the PPP session to the ISP. As long as the PPP session is connected, all the localusers will be able to share this PPP session to access to the Internet. If ISP provided youDNS information, please select Specify DNS Server IP; otherwise, select No DefaultDNS Server.In particular, here provides 3G or 3.5G transmission rate when the device is plugged, eithera 3.5G USB Dongle or Card Bus; just check to apply for the backup. In other words, onceDynamic IP connection is disconnected, the system automatically connects Internet via3.5G adapter. If 3.5G signal is not available, it starts to search downward for 3/2.75/2.5Gsignals until none existed. The default interval between the two connection detection is 3minutes. The interval range is from 1 to 3 minutes.The 3.5G feature is working as mutual backup for other 4 WAN Types, and the requiredinformation is listed as follows, such as user name, password and SIM PIN etc. That is,setting up the interval time to auto detect whether the Internet connection is lost or not. Ifyes, the system immediately switches to 3.5G Internet connection until the original PPTPconnection is back during the next detection.
29 Version 1.0
Please enter the account’s name and password which provided by your ISP, and thenclick on Next button to go on 3.2.2 LAN Setup.
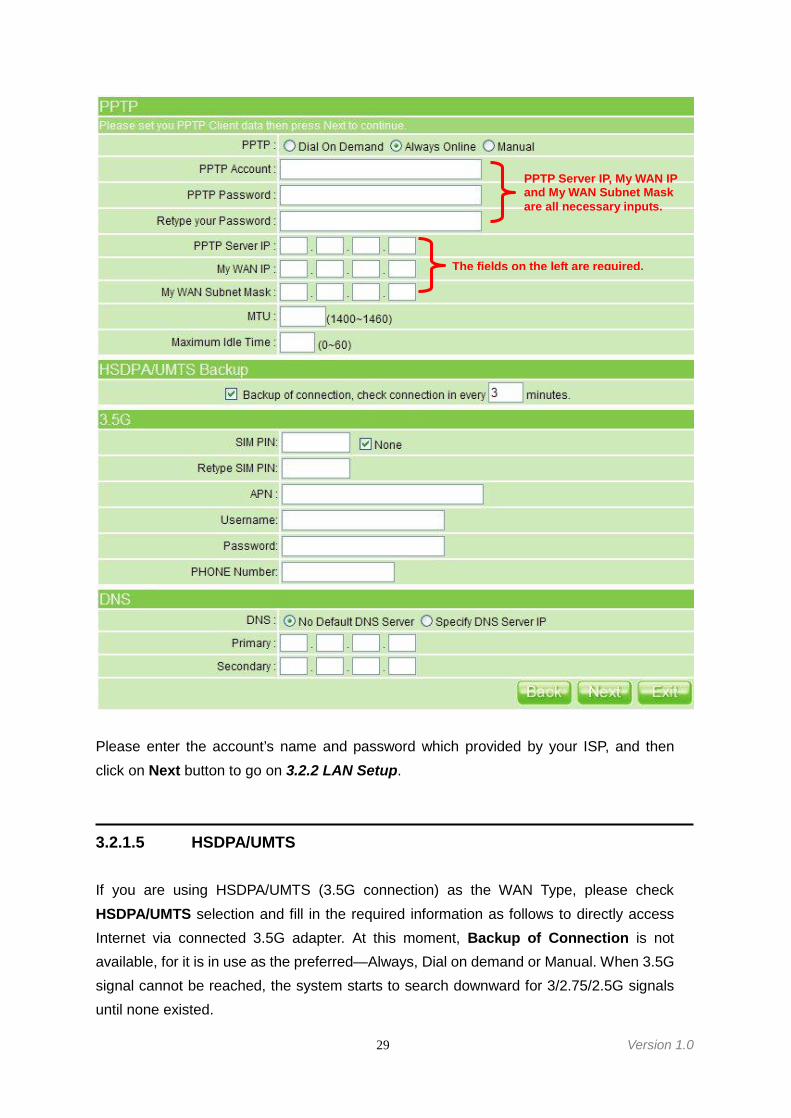
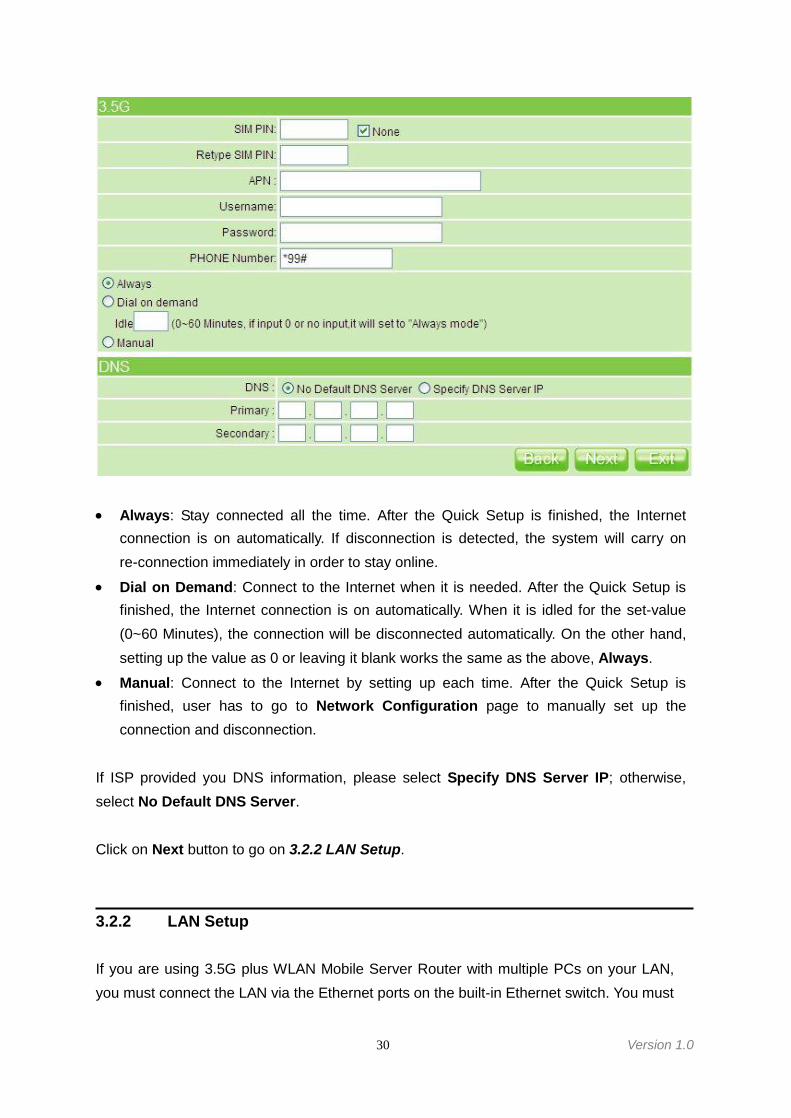
3.2.1.5 HSDPA/UMTS
If you are using HSDPA/UMTS (3.5G connection) as the WAN Type, please checkHSDPA/UMTS selection and fill in the required information as follows to directly accessInternet via connected 3.5G adapter. At this moment, Backup of Connection is notavailable, for it is in use as the preferred—Always, Dial on demand or Manual. When 3.5Gsignal cannot be reached, the system starts to search downward for 3/2.75/2.5G signalsuntil none existed.
PPTP Server IP, My WAN IPand My WAN Subnet Maskare all necessary inputs.
The fields on the left are required.
30 Version 1.0
Always: Stay connected all the time. After the Quick Setup is finished, the Internetconnection is on automatically. If disconnection is detected, the system will carry onre-connection immediately in order to stay online.
Dial on Demand: Connect to the Internet when it is needed. After the Quick Setup isfinished, the Internet connection is on automatically. When it is idled for the set-value(0~60 Minutes), the connection will be disconnected automatically. On the other hand,setting up the value as 0 or leaving it blank works the same as the above, Always.
Manual: Connect to the Internet by setting up each time. After the Quick Setup isfinished, user has to go to Network Configuration page to manually set up theconnection and disconnection.
If ISP provided you DNS information, please select Specify DNS Server IP; otherwise,select No Default DNS Server.
Click on Next button to go on 3.2.2 LAN Setup.
3.2.2 LAN Setup
If you are using 3.5G plus WLAN Mobile Server Router with multiple PCs on your LAN,you must connect the LAN via the Ethernet ports on the built-in Ethernet switch. You must
31 Version 1.0
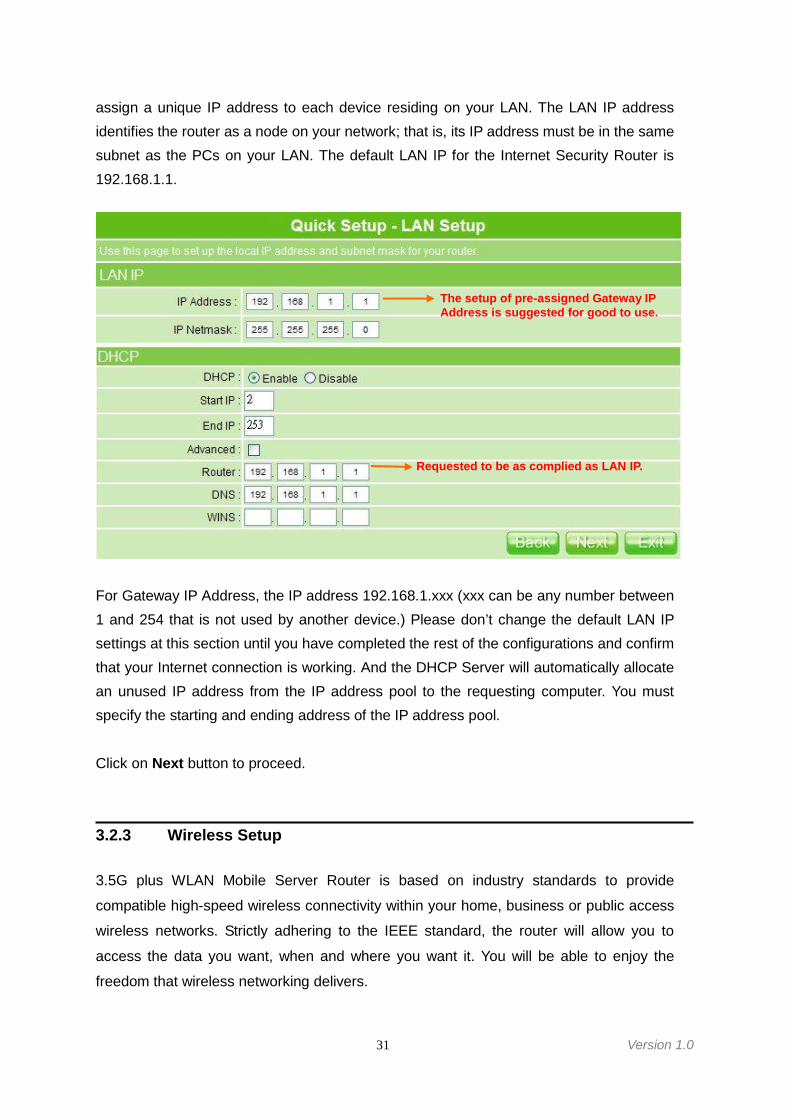
assign a unique IP address to each device residing on your LAN. The LAN IP addressidentifies the router as a node on your network; that is, its IP address must be in the samesubnet as the PCs on your LAN. The default LAN IP for the Internet Security Router is192.168.1.1.
For Gateway IP Address, the IP address 192.168.1.xxx (xxx can be any number between1 and 254 that is not used by another device.) Please don’t change the default LAN IPsettings at this section until you have completed the rest of the configurations and confirmthat your Internet connection is working. And the DHCP Server will automatically allocatean unused IP address from the IP address pool to the requesting computer. You mustspecify the starting and ending address of the IP address pool.
Click on Next button to proceed.
3.2.3 Wireless Setup
3.5G plus WLAN Mobile Server Router is based on industry standards to provide
compatible high-speed wireless connectivity within your home, business or public access
wireless networks. Strictly adhering to the IEEE standard, the router will allow you to
access the data you want, when and where you want it. You will be able to enjoy the
freedom that wireless networking delivers.
The setup of pre-assigned Gateway IPAddress is suggested for good to use.
Requested to be as complied as LAN IP.
32 Version 1.0
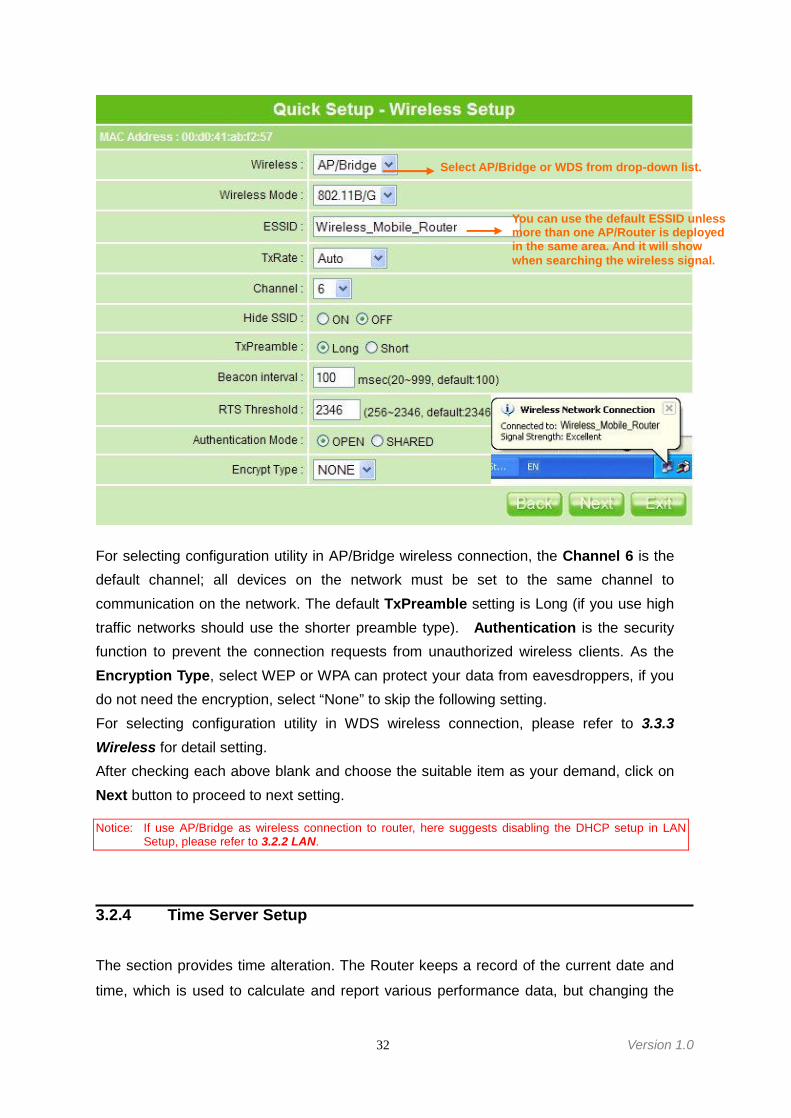
For selecting configuration utility in AP/Bridge wireless connection, the Channel 6 is thedefault channel; all devices on the network must be set to the same channel tocommunication on the network. The default TxPreamble setting is Long (if you use hightraffic networks should use the shorter preamble type). Authentication is the securityfunction to prevent the connection requests from unauthorized wireless clients. As theEncryption Type, select WEP or WPA can protect your data from eavesdroppers, if youdo not need the encryption, select “None” to skip the following setting.For selecting configuration utility in WDS wireless connection, please refer to 3.3.3Wireless for detail setting.After checking each above blank and choose the suitable item as your demand, click onNext button to proceed to next setting.
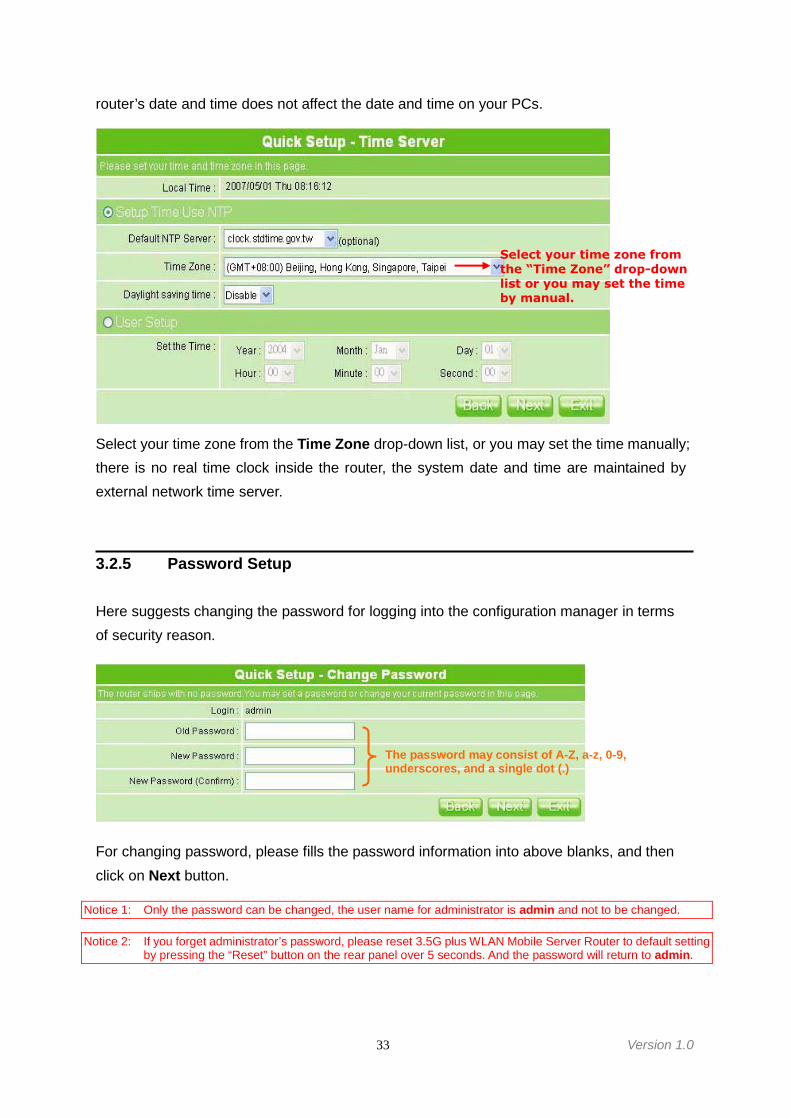
Notice: If use AP/Bridge as wireless connection to router, here suggests disabling the DHCP setup in LANSetup, please refer to 3.2.2 LAN.
3.2.4 Time Server Setup
The section provides time alteration. The Router keeps a record of the current date and
time, which is used to calculate and report various performance data, but changing the
Select AP/Bridge or WDS from drop-down list.
You can use the default ESSID unlessmore than one AP/Router is deployedin the same area. And it will showwhen searching the wireless signal.
33 Version 1.0
router’s date and time does not affect the date and time on your PCs.
Select your time zone from the Time Zone drop-down list, or you may set the time manually;there is no real time clock inside the router, the system date and time are maintained byexternal network time server.
3.2.5 Password Setup
Here suggests changing the password for logging into the configuration manager in termsof security reason.
For changing password, please fills the password information into above blanks, and thenclick on Next button.
Notice 1: Only the password can be changed, the user name for administrator is admin and not to be changed.
Notice 2: If you forget administrator’s password, please reset 3.5G plus WLAN Mobile Server Router to default settingby pressing the “Reset” button on the rear panel over 5 seconds. And the password will return to admin.
Select your time zone fromthe “Time Zone” drop-downlist or you may set the timeby manual.
The password may consist of A-Z, a-z, 0-9,underscores, and a single dot (.)
34 Version 1.0
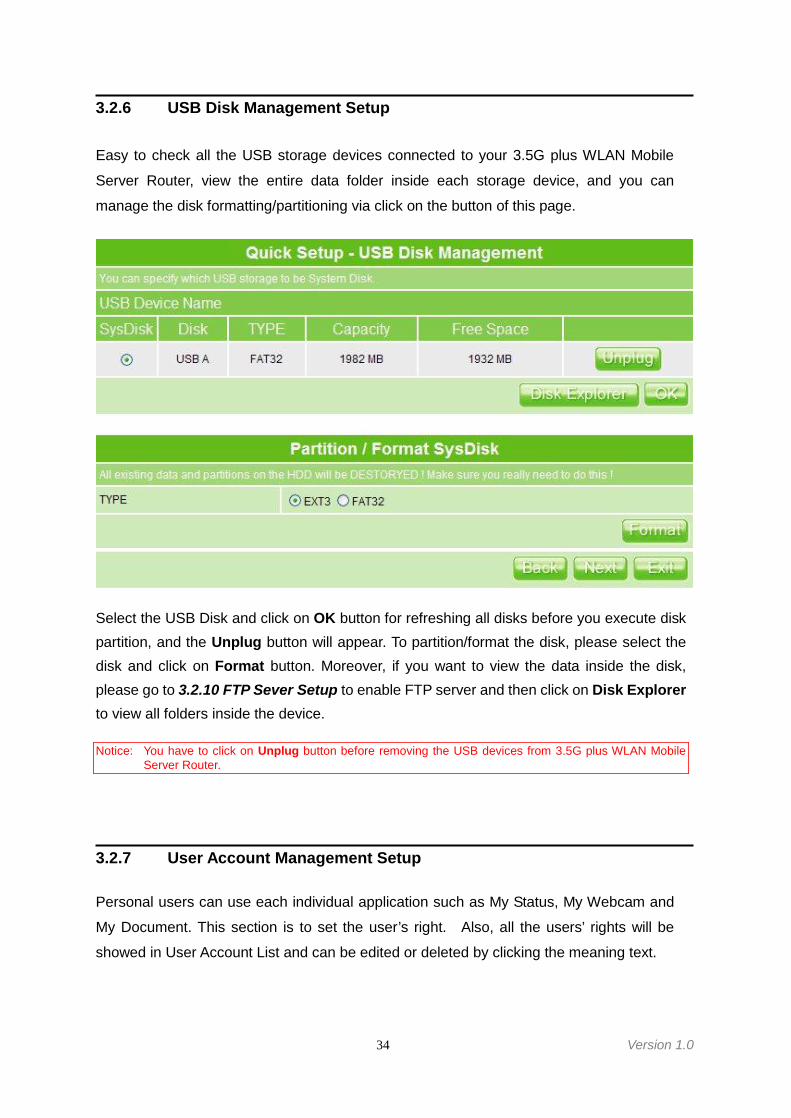
3.2.6 USB Disk Management Setup
Easy to check all the USB storage devices connected to your 3.5G plus WLAN Mobile
Server Router, view the entire data folder inside each storage device, and you can
manage the disk formatting/partitioning via click on the button of this page.
Select the USB Disk and click on OK button for refreshing all disks before you execute diskpartition, and the Unplug button will appear. To partition/format the disk, please select thedisk and click on Format button. Moreover, if you want to view the data inside the disk,please go to 3.2.10 FTP Sever Setup to enable FTP server and then click on Disk Explorerto view all folders inside the device.
Notice: You have to click on Unplug button before removing the USB devices from 3.5G plus WLAN MobileServer Router.
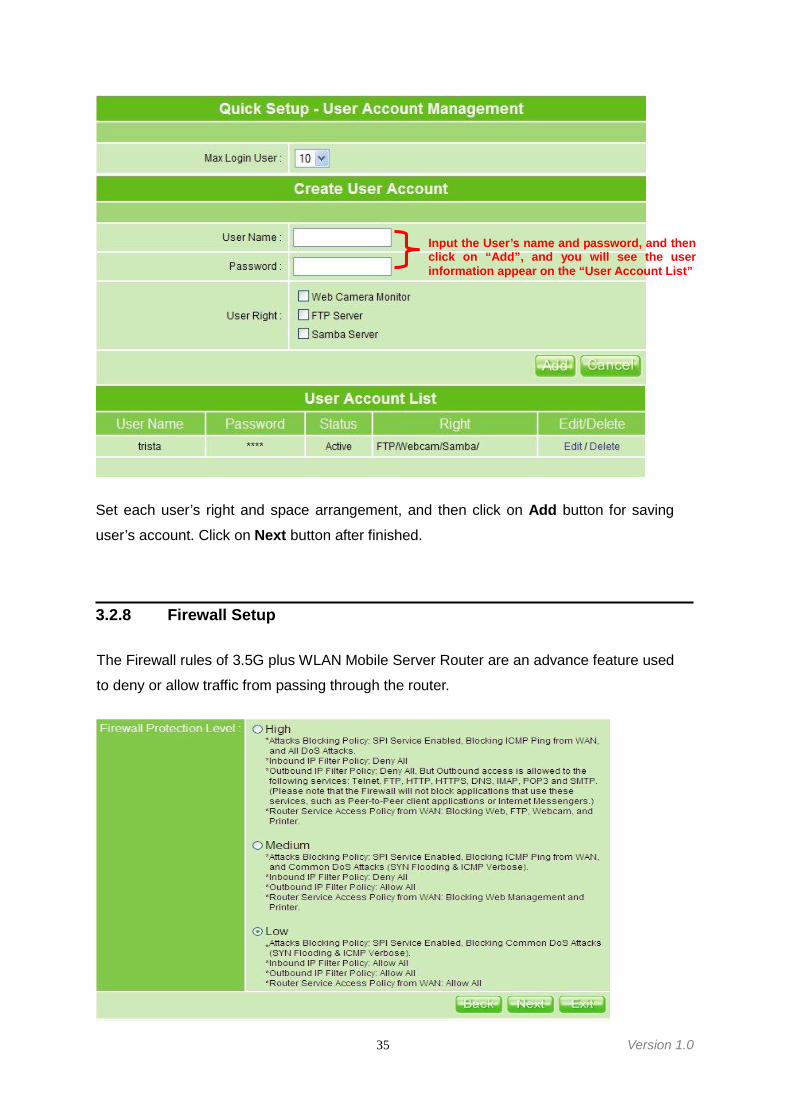
3.2.7 User Account Management Setup
Personal users can use each individual application such as My Status, My Webcam and
My Document. This section is to set the user’s right. Also, all the users’ rights will be
showed in User Account List and can be edited or deleted by clicking the meaning text.
35 Version 1.0
Set each user’s right and space arrangement, and then click on Add button for saving
user’s account. Click on Next button after finished.
3.2.8 Firewall Setup
The Firewall rules of 3.5G plus WLAN Mobile Server Router are an advance feature used
to deny or allow traffic from passing through the router.
Input the User’s name and password, and thenclick on “Add”, and you will see the userinformation appear on the “User Account List”
36 Version 1.0
The default setting for Firewall Protection Level security is Low, which attacks BlockingPolicy, allow all Inbound and Outbound IP Filter Policy, and allow all router service accesspolicy from WAN. Please change it as your demand, and click on Next button to next step(see also 3.4.2.1 Firewall Configuration).
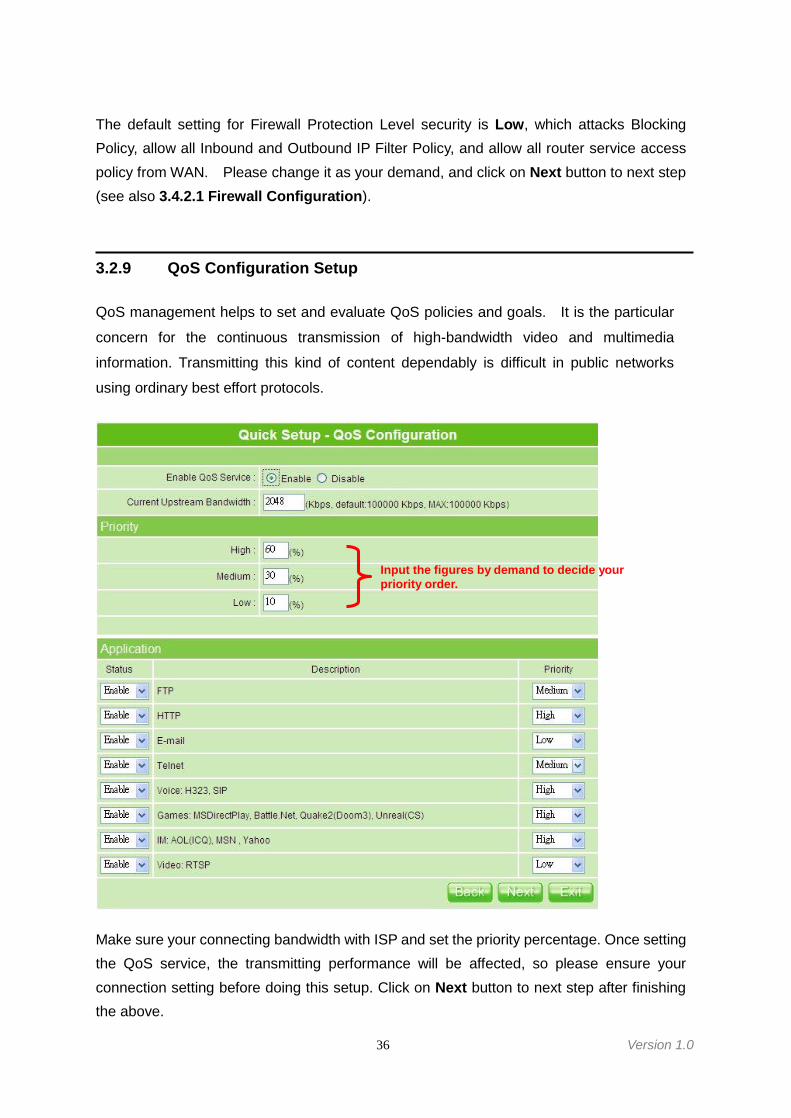
3.2.9 QoS Configuration Setup
QoS management helps to set and evaluate QoS policies and goals. It is the particular
concern for the continuous transmission of high-bandwidth video and multimedia
information. Transmitting this kind of content dependably is difficult in public networks
using ordinary best effort protocols.
Make sure your connecting bandwidth with ISP and set the priority percentage. Once settingthe QoS service, the transmitting performance will be affected, so please ensure yourconnection setting before doing this setup. Click on Next button to next step after finishingthe above.
Input the figures by demand to decide yourpriority order.

37 Version 1.0
3.2.10 FTP Server Setup
3.5G plus WLAN Mobile Server Router can be the FTP Server providing users to transmit
files, also for the guest to download the files from assigned website. Moreover, by
connecting USB HDD, USB Flash to the router, user can easily set up a FTP Server to
share or download files for local or remote users.
Set the FTP Server and related setting. Disable the function as demand, and click on Nextbutton to continue.
3.2.11 Printer Server Setup
3.5G plus WLAN Mobile Server Router supports LPR-protocol, as well as NetBIOS, and is
convenient for sharing printer. In other words, it is an Internet access solution for your
LAN/WAN, which provides you the shared web surfing, and supports USB interface printer.
Any users in the same subnet of 3.5G plus WLAN Mobile Server Router can print their
document via the network printers.
Enable the printer and click on Next button to next setup.
Notice: After above Printer Server in Quick Setup finished, the related printing settings on 3.5G plus WLANMobile Server Router and PC have to be set up, too. Please refer to 3.5.4 Printer Server to set thedetails.
If the USB device isn’t enabled first,you can’t enable FTP Server. (Noteven click on “Enable”)
If the printer isn’t connected,you can’t choose “Enable”.
38 Version 1.0
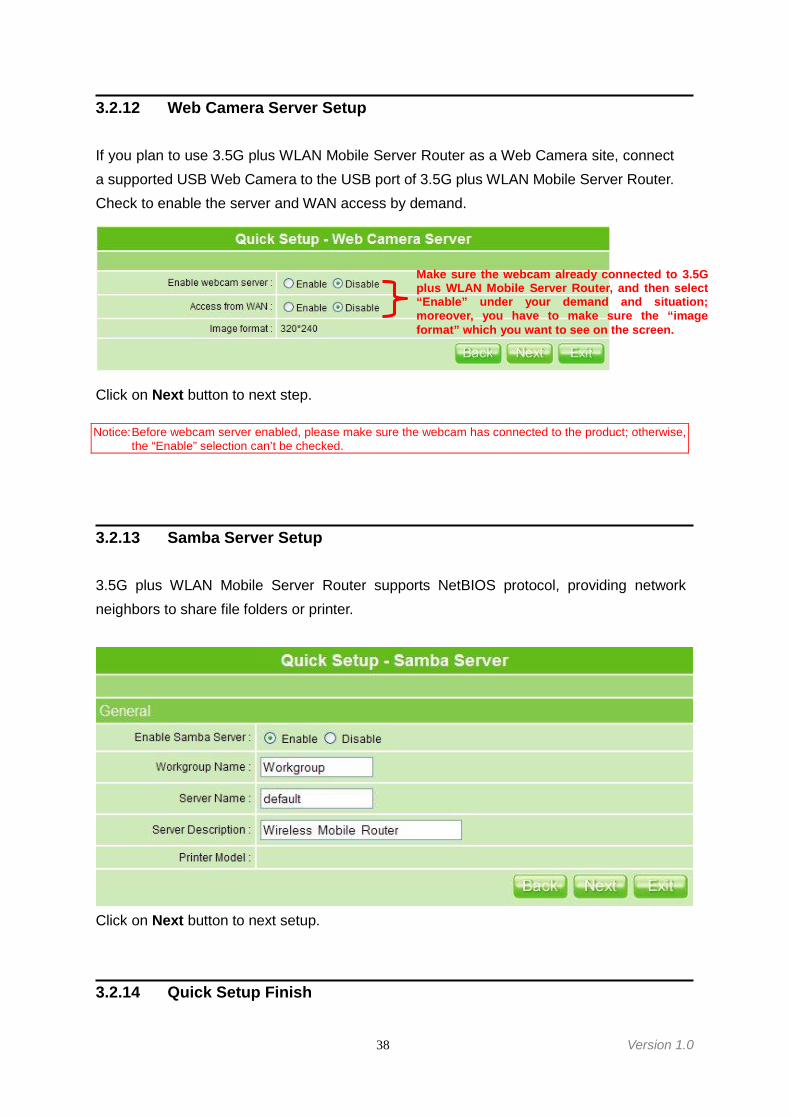
3.2.12 Web Camera Server Setup
If you plan to use 3.5G plus WLAN Mobile Server Router as a Web Camera site, connecta supported USB Web Camera to the USB port of 3.5G plus WLAN Mobile Server Router.Check to enable the server and WAN access by demand.
Click on Next button to next step.
Notice:Before webcam server enabled, please make sure the webcam has connected to the product; otherwise,the “Enable” selection can’t be checked.
3.2.13 Samba Server Setup
3.5G plus WLAN Mobile Server Router supports NetBIOS protocol, providing networkneighbors to share file folders or printer.
Click on Next button to next setup.
3.2.14 Quick Setup Finish
Make sure the webcam already connected to 3.5Gplus WLAN Mobile Server Router, and then select“Enable” under your demand and situation;moreover, you have to make sure the “imageformat” which you want to see on the screen.
39 Version 1.0
The Quick Setup has been completed successfully when you see this screen.
To apply your new settings, please click on Finish button to reboot system automaticallyand go to the product’s diagram homepage. You may connect to Internet via wired orwireless at this moment according to above settings.
3.3 IP Configuration
This function allows you to add routing rules into 3.5G plus WLAN Mobile Server Router. Itis useful if you connect several computers behind 3.5G plus WLAN Mobile Server Router toshare the same connection to Internet.
3.3.1 WAN
Select WAN under the IP Config menu. 3.5G plus WLAN Mobile Server Router supportsfour WAN connection types, i.e. Static IP Address, Dynamic IP Address, PPPoE, PPTPand HSDPA/UMTS. Follow the instructions below for each to set up accordingly.
3.3.1.1 Static IP
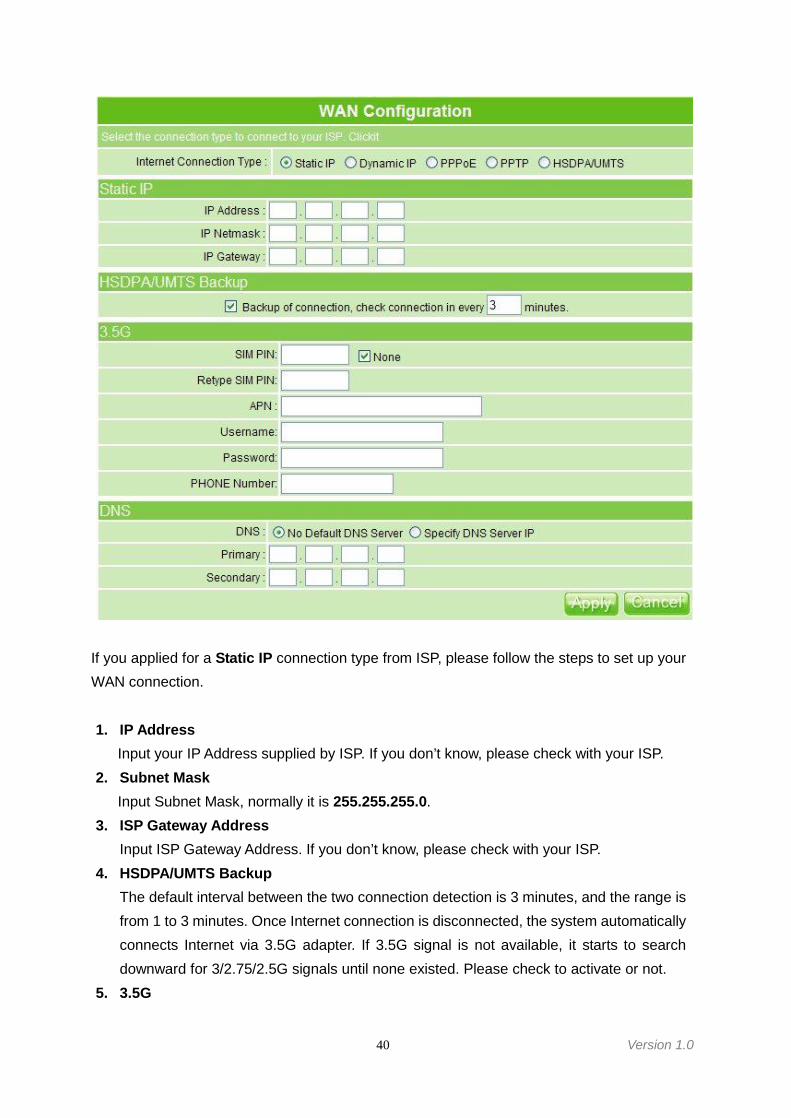
The WAN (Wide Area Network) page shows the settings that are used to connect to yourISP (Internet Service Provider). Please select the Static IP for your specific ISP.
40 Version 1.0
If you applied for a Static IP connection type from ISP, please follow the steps to set up yourWAN connection.
1. IP AddressInput your IP Address supplied by ISP. If you don’t know, please check with your ISP.
2. Subnet MaskInput Subnet Mask, normally it is 255.255.255.0.
3. ISP Gateway AddressInput ISP Gateway Address. If you don’t know, please check with your ISP.
4. HSDPA/UMTS BackupThe default interval between the two connection detection is 3 minutes, and the range isfrom 1 to 3 minutes. Once Internet connection is disconnected, the system automaticallyconnects Internet via 3.5G adapter. If 3.5G signal is not available, it starts to searchdownward for 3/2.75/2.5G signals until none existed. Please check to activate or not.
5. 3.5G
41 Version 1.0
This feature requires user to enter user name, password and SIM PIN etc.; also it isworking as mutual backup for other 4 WAN Types. That is, setting up the interval time toauto detect whether the Internet connection is lost or not. If yes, the system immediatelyswitches to 3.5G Internet connection until the original connection is back during the nextdetection.
6. DNSIf ISP provides you DNS information, please select Specify DNS Server IP and inputthe DNS information into the blank; otherwise, select No Default DNS Server.
7. Apply & CancelClick on Apply button to continue. Click on Cancel button to clear the settings on thispage.
3.3.1.2 Dynamic IP
If you applied for a Dynamic IP connection type from ISP, please follow the steps to set upyour WAN connection. Cable modem providers typically use dynamic assignment of IPAddress.
42 Version 1.0
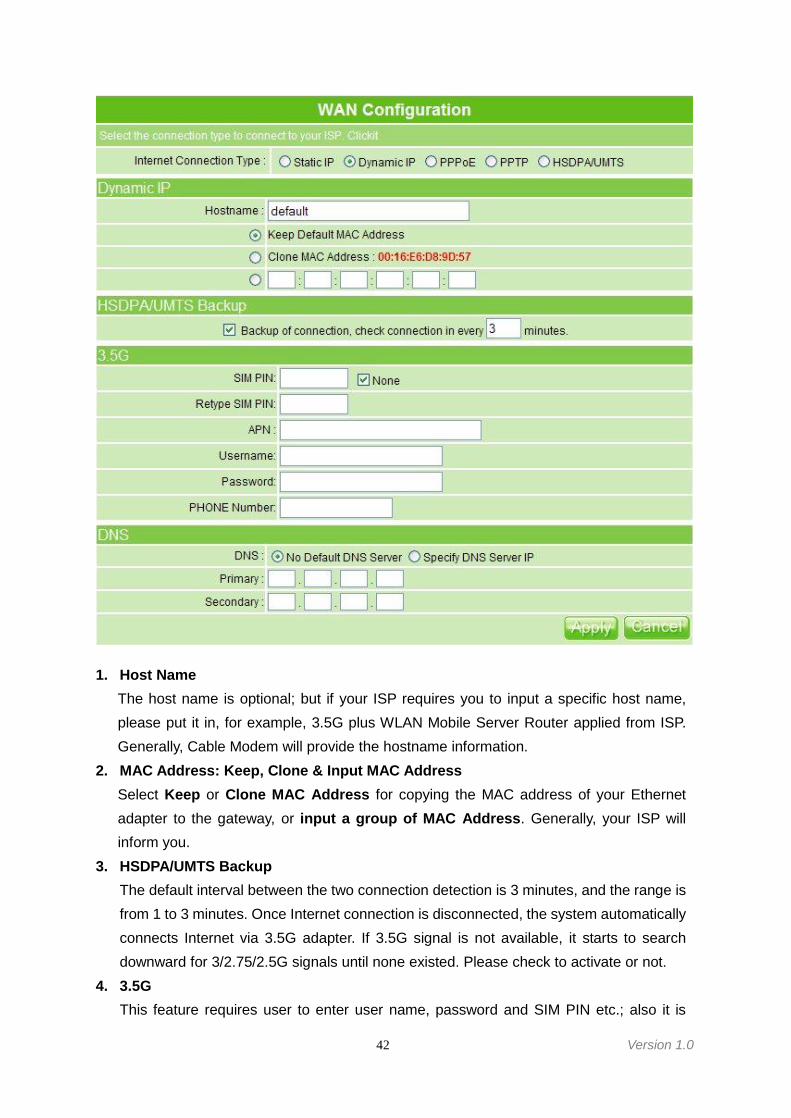
1. Host NameThe host name is optional; but if your ISP requires you to input a specific host name,please put it in, for example, 3.5G plus WLAN Mobile Server Router applied from ISP.Generally, Cable Modem will provide the hostname information.
2. MAC Address: Keep, Clone & Input MAC AddressSelect Keep or Clone MAC Address for copying the MAC address of your Ethernetadapter to the gateway, or input a group of MAC Address. Generally, your ISP willinform you.
3. HSDPA/UMTS BackupThe default interval between the two connection detection is 3 minutes, and the range isfrom 1 to 3 minutes. Once Internet connection is disconnected, the system automaticallyconnects Internet via 3.5G adapter. If 3.5G signal is not available, it starts to searchdownward for 3/2.75/2.5G signals until none existed. Please check to activate or not.
4. 3.5GThis feature requires user to enter user name, password and SIM PIN etc.; also it is
43 Version 1.0
working as mutual backup for other 4 WAN Types. That is, setting up the interval time toauto detect whether the Internet connection is lost or not. If yes, the system immediatelyswitches to 3.5G Internet connection until the original connection is back during the nextdetection.
5. DNSIf ISP provides you DNS information, please select Specify DNS Server IP and inputthe DNS information into the blank; otherwise, select No Default DNS Server.
6. Apply & CancelClick on Apply button to continue. Click on Cancel button to clear the settings on thispage.
3.3.1.3 PPPoE
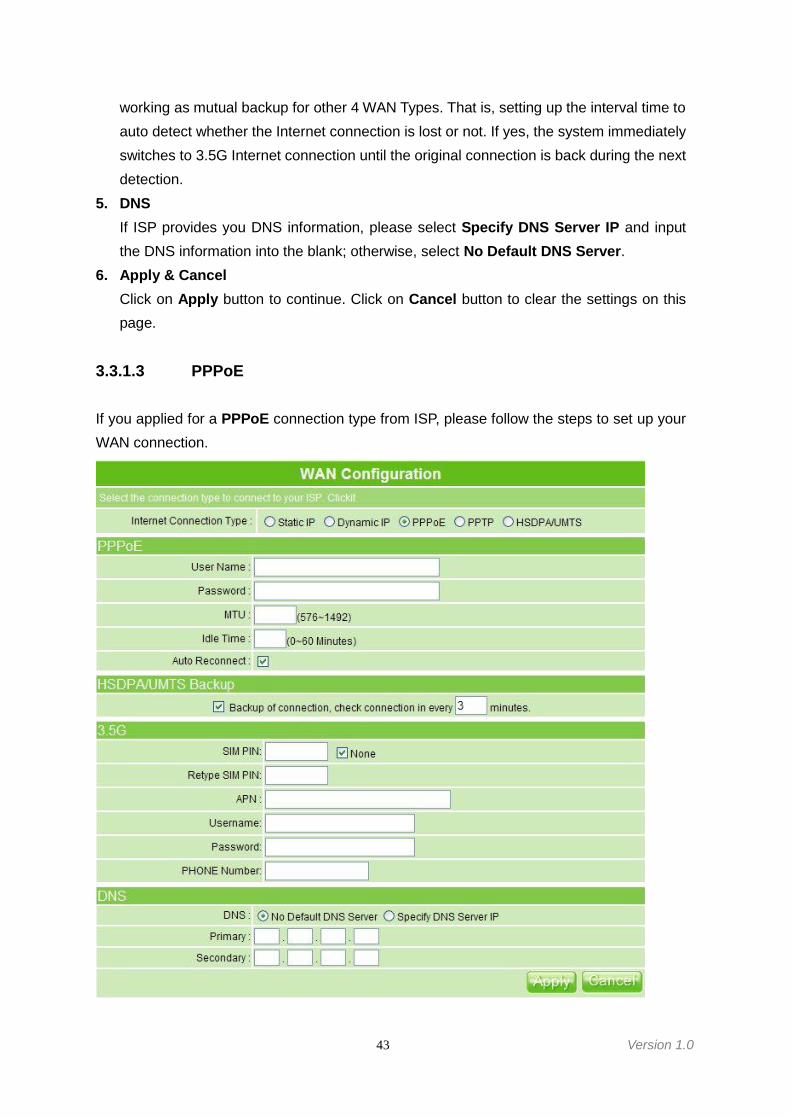
If you applied for a PPPoE connection type from ISP, please follow the steps to set up yourWAN connection.
44 Version 1.0
1. User NameInput your user name supplied by ISP. If you don’t know, please check with your ISP.
2. PasswordInput your Password supplied by ISP.
3. MTUMTU stands for Maximum Transmission Unit. For PPPoE connection, you may need toset the MTU setting in order to work correctly with your ISP.
4. Idle TimeIt is the time of inactivity before disconnecting your PPPoE session. Enter an Idle Time(in minutes) to define a maximum period of time for which the Internet connect ismaintained during inactivity. If the connection is inactive for longer than the defined IdleTime, then the connection will be dropped. Either set this to zero or enableAuto-reconnect to disable this feature.
5. Auto-reconnectIf checked, the Router will automatically connect to your ISP after your system isrestarted or if the connection is dropped.
6. HSDPA/UMTS BackupThe default interval between the two connection detection is 3 minutes, and the range isfrom 1 to 3 minutes. Once Internet connection is disconnected, the system automaticallyconnects Internet via 3.5G adapter. If 3.5G signal is not available, it starts to searchdownward for 3/2.75/2.5G signals until none existed. Please check to activate or not.
7. 3.5GThis feature requires user to enter user name, password and SIM PIN etc.; also it isworking as mutual backup for other 4 WAN Types. That is, setting up the interval time toauto detect whether the Internet connection is lost or not. If yes, the system immediatelyswitches to 3.5G Internet connection until the original connection is back during the nextdetection.
8. DNSIf ISP provides you DNS information, please select Specify DNS Server IP and inputthe DNS information into the blank; otherwise, select No Default DNS Server.
9. Apply & CancelClick on Apply button to continue. Click on Cancel button to clear the settings on thispage.
3.3.1.4 PPTP
If you have applied for a PPTP connection type from ISP, please follow the steps to set upyour WAN connection.
45 Version 1.0
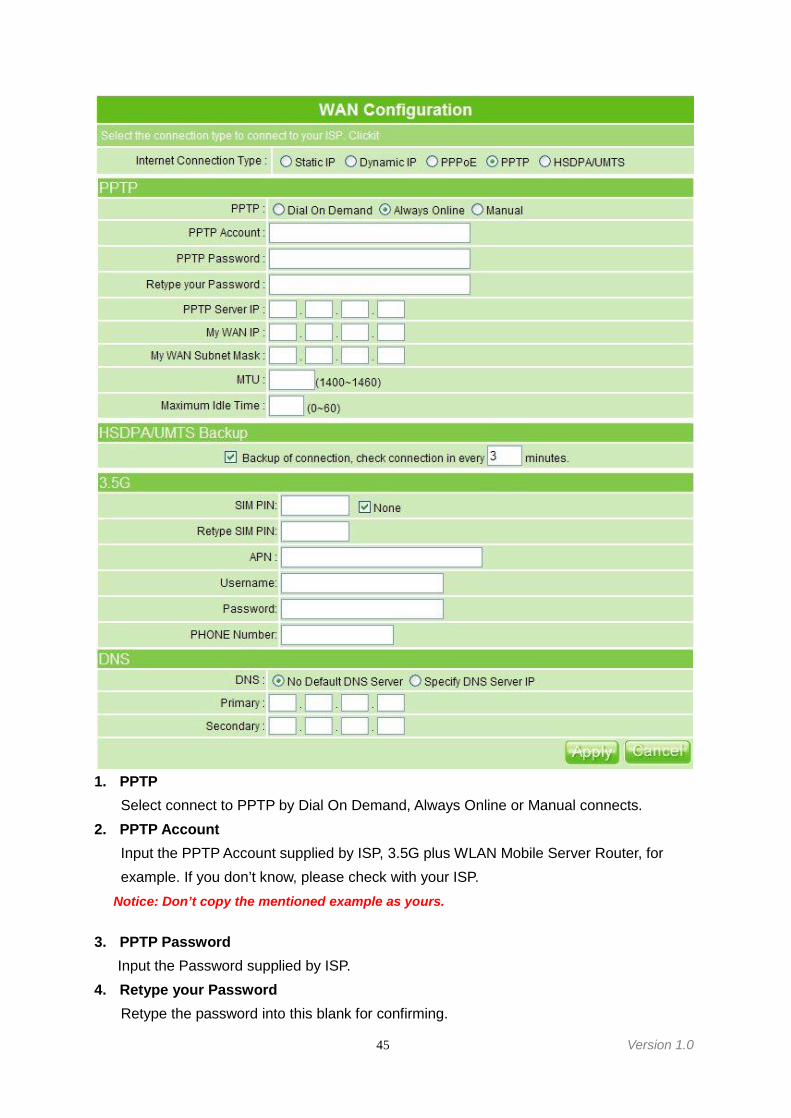
1. PPTPSelect connect to PPTP by Dial On Demand, Always Online or Manual connects.
2. PPTP AccountInput the PPTP Account supplied by ISP, 3.5G plus WLAN Mobile Server Router, forexample. If you don’t know, please check with your ISP.
※ Notice: Don’t copy the mentioned example as yours.
3. PPTP PasswordInput the Password supplied by ISP.
4. Retype your PasswordRetype the password into this blank for confirming.
46 Version 1.0
5. PPTP Server IPInput the Server IP supplied by ISP. If you don’t know, please check with your ISP.Input the WAN IP address provided by your ISP.
6. My WAN Subnet MaskInput the WAN Subnet Mask supplied by your ISP. If you don’t know, please check withyour ISP.
7. MTUMTU stands for Maximum Transmission Unit. For PPTP connections, you may need toset the MTU setting in order to work correctly with your ISP.
8. Maximum Idle TimeIt is the time of inactivity before disconnecting your PPTP session. Enter an Idle Time(in minutes) to define a maximum period of time for which the Internet connect ismaintained during inactivity. If the connection is inactive for longer than the defined IdleTime, then the connection will be dropped. Either set this to zero or enableAuto-reconnect to disable this feature.
9. HSDPA/UMTS BackupThe default interval between the two connection detection is 3 minutes, and the range isfrom 1 to 3 minutes. Once Internet connection is disconnected, the system automaticallyconnects Internet via 3.5G adapter. If 3.5G signal is not available, it starts to searchdownward for 3/2.75/2.5G signals until none existed. Please check to activate or not.
10. 3.5GThis feature requires user to enter user name, password and SIM PIN etc.; also it isworking as mutual backup for other 4 WAN Types. That is, setting up the interval time toauto detect whether the Internet connection is lost or not. If yes, the system immediatelyswitches to 3.5G Internet connection until the original connection is back during the nextdetection.
10. DNSIf ISP provides you DNS information, please select Specify DNS Server IP and inputthe DNS information into the blank; otherwise, select No Default DNS Server.
11. Apply & CancelClick on Apply button to continue. Click on Cancel button to clean the setting on thispage. If you don’t know how to do, please click on Help button.
3.3.1.5 HSDPA/UMTS
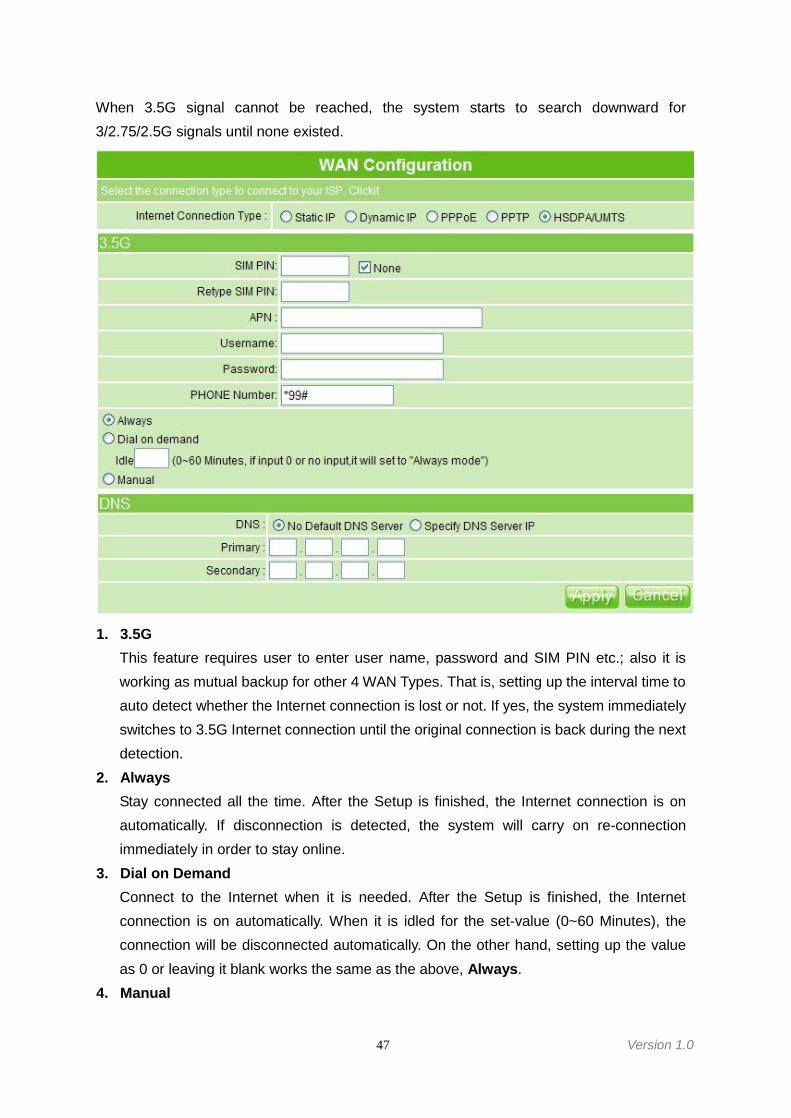
If you have applied for a HSDPA/UMTS connection type from ISP, please follow the steps toset up your WAN connection. At this moment, Backup of Connection is not available.
47 Version 1.0
When 3.5G signal cannot be reached, the system starts to search downward for3/2.75/2.5G signals until none existed.
1. 3.5GThis feature requires user to enter user name, password and SIM PIN etc.; also it isworking as mutual backup for other 4 WAN Types. That is, setting up the interval time toauto detect whether the Internet connection is lost or not. If yes, the system immediatelyswitches to 3.5G Internet connection until the original connection is back during the nextdetection.
2. AlwaysStay connected all the time. After the Setup is finished, the Internet connection is onautomatically. If disconnection is detected, the system will carry on re-connectionimmediately in order to stay online.
3. Dial on DemandConnect to the Internet when it is needed. After the Setup is finished, the Internetconnection is on automatically. When it is idled for the set-value (0~60 Minutes), theconnection will be disconnected automatically. On the other hand, setting up the valueas 0 or leaving it blank works the same as the above, Always.
4. Manual
48 Version 1.0
Connect to the Internet by setting up each time. After the Setup is finished, user has togo to Network Configuration page to manually set up the connection anddisconnection.
5. DNSIf ISP provides you DNS information, please select Specify DNS Server IP and inputthe DNS information into the blank; otherwise, select No Default DNS Server.
6. Apply & CancelClick on Apply button to continue. Click on Cancel button to clear the settings on thispage.
3.3.2 LAN
Use this page to set up the local IP address and subnet mask for your router. Please selectLAN under the IP Config menu and follow the instructions below to enter the LAN settingpage to configure the settings you want.
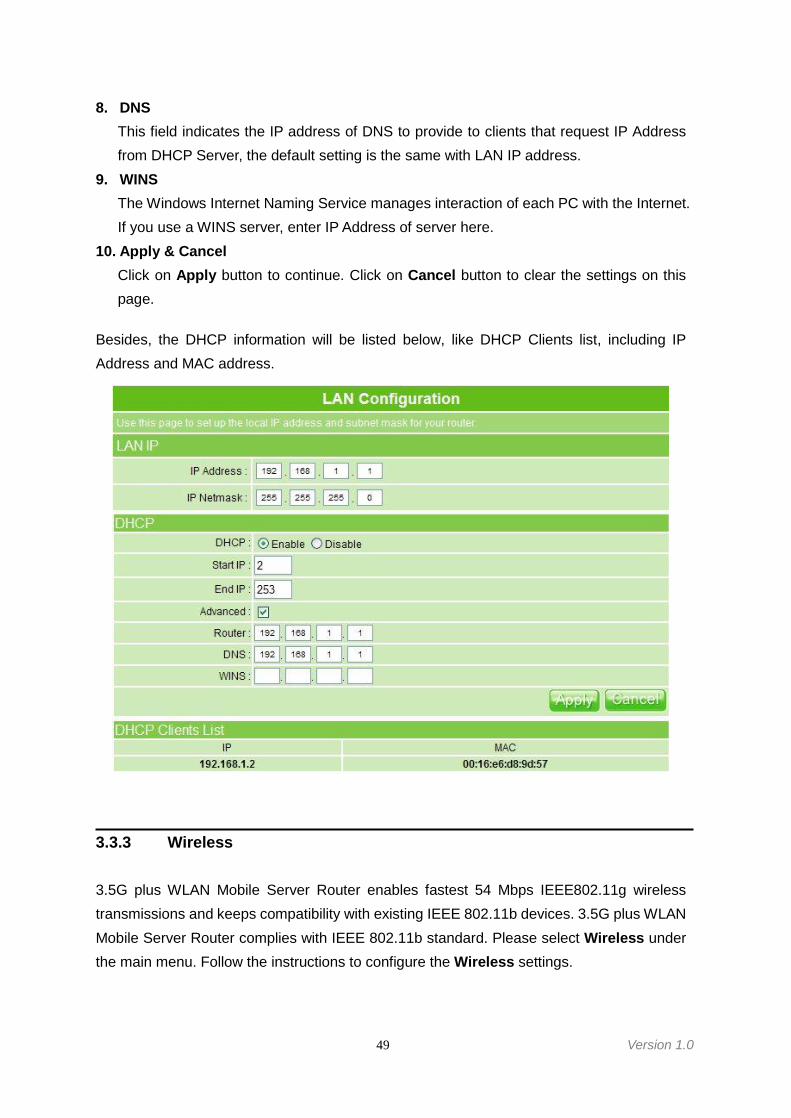
1. IP AddressThe default value of LAN IP address is 192.168.1.1 for this router.
2. IP NetmaskInput Subnet Mask, normally it is 255.255.255.0.
3. DHCPEnable or disable DHCP services. The DHCP server will automatically allocate anunused IP address from the IP address pool to the requesting computer if enabled.
4. Start IPThis field specifies the first address in the pool to be assigned by the DHCP server inyour local network. The default setting is 2.
5. End IPThis field specifies the last address in the pool to be assigned by the DHCP server inyour local network. The default setting is 253.
6. AdvancedEnable the advance setting and then setup the Router, DNS and WINS value.
7. RouterThis field indicates the IP address of DNS to provide to clients that request IP Addressfrom DHCP Server, the default setting is the same with LAN IP address.
49 Version 1.0
8. DNSThis field indicates the IP address of DNS to provide to clients that request IP Addressfrom DHCP Server, the default setting is the same with LAN IP address.
9. WINSThe Windows Internet Naming Service manages interaction of each PC with the Internet.If you use a WINS server, enter IP Address of server here.
10. Apply & CancelClick on Apply button to continue. Click on Cancel button to clear the settings on thispage.
Besides, the DHCP information will be listed below, like DHCP Clients list, including IPAddress and MAC address.
3.3.3 Wireless
3.5G plus WLAN Mobile Server Router enables fastest 54 Mbps IEEE802.11g wirelesstransmissions and keeps compatibility with existing IEEE 802.11b devices. 3.5G plus WLANMobile Server Router complies with IEEE 802.11b standard. Please select Wireless underthe main menu. Follow the instructions to configure the Wireless settings.

50 Version 1.0
1. WirelessSelect AP/Bridge or WDS to allow or disallow the wireless operation.
2. Wireless ModeThis field indicates the 802.11g interface mode. “802.11G” prevents the 802.11b clientsfrom accessing the router. “802.11B/G” allows both 802.11b and 802.11g clients toaccess the router. “802.11B” will enable the network as an 802.11b wireless network. Bydefault, the mode is “802.11B/G”.
3. ESSIDYou can use the default ESSID and radio channel unless more than one 3.5G plusWLAN Mobile Server Router or access point is deployed in the same area. Under thissituation, it is advised that you should use a different ESSID and radio channel for eachof 3.5G plus WLAN Mobile Server Router or access point in order to distinguish fromeach other. All of 3.5G plus WLAN Mobile Server Routers and your wireless LAN cardsmust have the same ESSID to allow a wireless mobile client roaming inbetween. Bydefault, the ESSID is set to Wireless_Mobile_Router.
4. TxRate
51 Version 1.0
Select the transmission rate for the network. The default setting is Auto.5. Channel
IEEE 802.11g and 802.11b devices are direct sequence spread spectrum devices thatspread a radio signal over a range of frequencies. The range of frequencies used by adirect sequence device is called Channel.The 802.11g and 802.11b specification supports up to 14 overlapping Channels for radiocommunication. But only 11 Channels are supported in the United States and thereforebuilt-in on 3.5G plus WLAN Mobile Server Router. To minimize interference, configureeach of 3.5G plus WLAN Mobile Server Router to use Non-overlapping channels.Non-overlapping channels have 25 MHz separation beginning at the first allowedchannel for the country (for the US and most of Europe, channel 1, 6 & 11 are used.)Make sure that 3.5G plus WLAN Mobile Server Router sharing the same Channel (orChannels close in number) is as far away from each other as possible, based on theresults of your site survey of the facility. You can find the site survey utility in 3.5G plusWLAN Mobile Server Router’s setup CD. By default, the channel is 6.
6. Hide SSIDThis term is used to increase the security level. Check it to hide SSID informationagainst the wireless clients that are sniffing radio. By default, this option is inactive.
7. TxPreambleThe default TxPreamble setting is Long (if you use high traffic networks should use theshorter preamble type)
8. Beacon IntervalBeacons are packets sent by an access point to synchronize a wireless network. Specifya beacon interval value. Default (100) is recommended.
9. RTS ThresholdThis value should remain at its default setting of 2346. If you encounter inconsistent dataflow, only minor modifications to the value range between 256 and 2346 arerecommended
10. Authentication ModeFour authentication methods are supported: Open and Shared. Select Open, yourwireless network would be intruded by anonymous. Not only your network bandwidthwould be shared; but also transmitting data might be intercepted. Select Sharedfunction and it can be taken effect.
11. Encrypt Type - WEPThere are two types of encrypt type can be selected, including WEP and WPA.WEP Encryption: Enabling WEP can protect your data from eavesdroppers. If you donot need this feature, select “None” to skip the following setting. 3.5G plus WLAN MobileServer Router supports both 64-bit and 128-bit encryption using the Wired Equivalent
52 Version 1.0
Privacy (WEP) algorithm. Select the type of encryption you want to use (64 or 128 bit)and configure one to four WEP Keys. The “1280bit” method is more secure than the“64-bit”.Key Type: For 64bits WEP key, either 5 ASCII characters or 10 hexadecimal digitalsleading by 0x can be entered. For 128bits WEP key, either 13 ASCII characters or 26hexadecimal digits leading by 0x can be entered.
Note: 128 bits WEP is most secure, but has more encryption/decryption overhead. Note that all wirelessdevices must support the same WEP encryption bit size and have the same key. Four keys can beentered here, but only one key can be selected at a time. The keys can be entered in ASCII orHexadecimal. Select the item from drop-down list you wish to use.
Pass phrase: Automatically generate four WEP keys. A WEP key is either 10 or 26hexadecimal digits (0~9, a~f, and A~F) based on whether you select 64 bit or 128 bit inthe WEP drop-down menu. Type a combination of up to 64 letters, numbers, or symbolsin the blank, 3.5G plus WLAN Mobile Server Router uses an algorithm to generate fourWEP keys for encryption. If you want to type in the keys manually, leave this field blank.
Note: This function eases users from having to remember their passwords. But this isn’t as secure asmanual assignment.
WEP Key: At most four keys can be set. A WEP key is either 10 or 26 hexadecimaldigits (0~9, a~f, and A~F) based on whether you select 64 bit or 128 bit in the WEPdrop-down list. 3.5G plus WLAN Mobile Server Router must have at least the samedefault key.
12. Encrypt Type - WPAThe WPA encrypts each frame transmitted from the radio using the pre-shared key (PSK)which entered from this panel or a key got dynamically through 802.1x.WPA-PSK (TKSP): Allow the access from WPA clients simultaneously and theencryption keys are given from PSK respectively.
WPA Rekey Timer: Allows for the session keys to be refreshed over time,minimizing the amount of data that is encrypted with the same session key.
53 Version 1.0
ASKII: The 8~63 ASCII characters can be entered, for example,“0123456789ABCD….”
Radius with 802.x: Check this circle to enable Radius client function.WPA Rekey Timer: Allows for the session keys to be refreshed over time,minimizing the amount of data that is encrypted with the same session key.RADIUS Server IP: The IP address of RADIUS server.RADIUS Server Port: The UDP port number that the RADIUS server is listed.The default value is 1812.Shared Secret: The RADIUS server and client share a secret that is used toauthenticate the messages sent between them. You must configure both sidesto sue the same shared secret.
13. Apply & CancelClick on Apply button to save the settings. If you want to clear the settings, please clickon Cancel button. The functional button, Cancel can take effect after clicking on Applybutton.
3.3.4 DDNS
Dynamic DNS allows you to make an assumed name as a dynamic IP address to a static
hostname. Please configure the dynamic DNS below. Please select DDNS under the IPConfig menu, and follow the instructions below to enter the DDNS setting page to configurethe settings you want.

54 Version 1.0
1. Service ProviderChoose correct Service Provider from drop-down list, here including dyndns, dhs, odsand tzo embedded in 3.5G plus WLAN Mobile Server Router.
2. Enable / Disable DDNSSelect enable to use DDNS function. Each time your IP address to WAN is changed,and the information will be updated to DDNS service provider automatically.
3. Host NameThis field represents the host name you register to Dynamic-DNS service and expect toexport to the world.
4. User NameUser name is used as an identity to login Dynamic-DNS service.
5. PasswordPassword is applied to login Dynamic-DNS service.
6. Apply & CancelClick on Apply button to continue. Click on Cancel button to clear the setting on thispage.
3.4 AdvancedThere are NAT settings, Firewall setting and QoS setting included in advance setup. Theadvanced setting is in Router Mode only.

55 Version 1.0
3.4.1 NAT
NAT is a method of mapping one or more IP addresses and/or services ports into differentspecified services, where NAT stands for Network Address Translation. It allows the internalIP addresses of many computers on a Local Area Network (LAN) to be translated to onepublic address, saving users’ cost. It also plays a security role by obscuring the true IPaddresses of important machines from potential hackers on the Internet. For convenience,we called a router having the NAT facility as a NAT-enabled router.
3.4.1.1 Virtual Server
To offer services, like WWW, FTP, provided by a server in your local network accessible foroutside users, you should specify a local IP address to the server. Then, add the IP addressand network protocol type, port number, and name of the service in the following list. Basedon the list, the gateway will forward service request from outside users to the correspondinglocal server.
1. Enable Virtual Server: Check Enable to apply all those rules in Virtual Server List
56 Version 1.0
into 3.5G plus WLAN Mobile Server Router.2. Description: Enter the description of the virtual server, this field allows you to record
what this rule is used for.3. Private IP: Specify the private IP address of the internal host offering the service.4. Protocol Type: Specify the transport layer protocol (TCP or UDP).5. Private Port: Specify the private port number of the service offered by the internal
host.6. Public Port: Specify the private IP address of the internal host offering the service.7. Schedule: Set up the schedule for server.8. Add: Click on Add button to record this setting.9. Apply & Cancel
Click on Apply button to add the settings into the list table. Click on Cancel button toclear the settings on this page.
10. Virtual Server ListShows all IDs and relevant information on server for administrator to edit or delete.
3.4.1.2 Virtual DMZ
Virtual DMZ allows you to expose one computer to Internet, so that all inbound packets willbe redirected to the computer you set. It is useful while you run some applications that useuncertain incoming ports. Please use it carefully.
1. Enable/Disable Virtual DMZ: Check Enable to apply Virtual DMZ for the Router.2. IP Address: This field stands for the destination IP address that you like to redirect the
matched packet to.3. Apply & Cancel
Click on Apply button to continue. Click on Cancel button to clear the setting on thispage.
57 Version 1.0
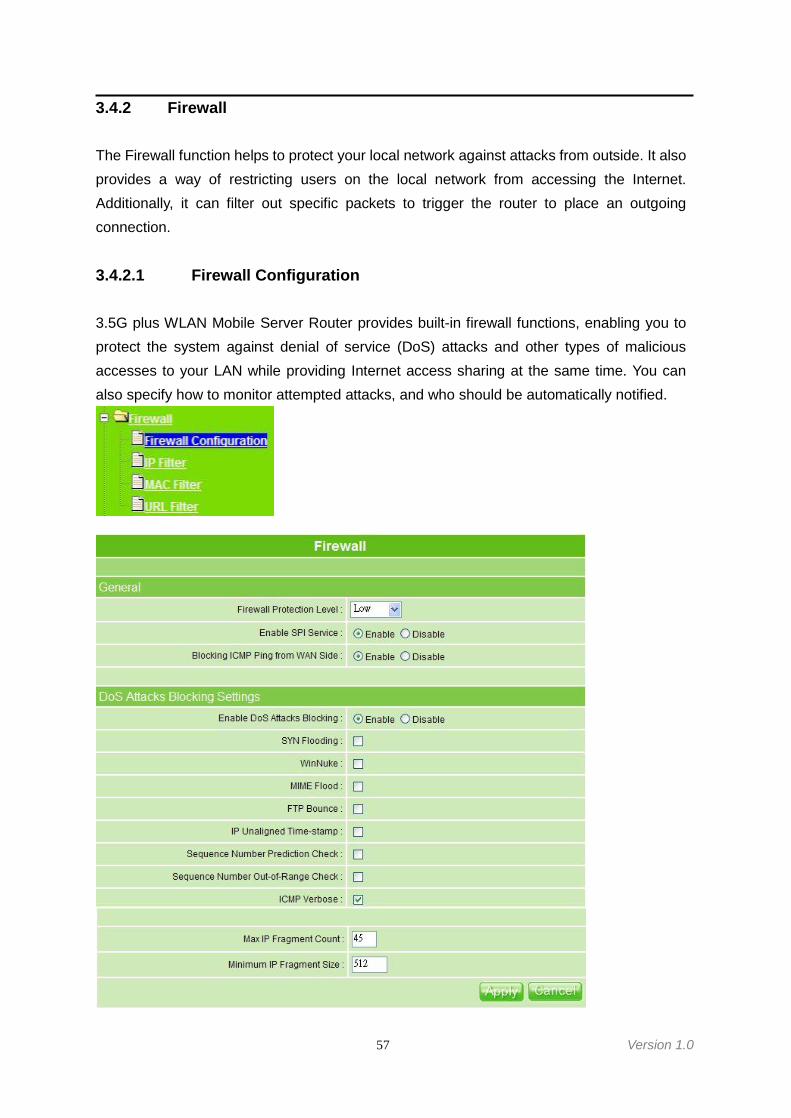
3.4.2 Firewall
The Firewall function helps to protect your local network against attacks from outside. It alsoprovides a way of restricting users on the local network from accessing the Internet.Additionally, it can filter out specific packets to trigger the router to place an outgoingconnection.
3.4.2.1 Firewall Configuration
3.5G plus WLAN Mobile Server Router provides built-in firewall functions, enabling you toprotect the system against denial of service (DoS) attacks and other types of maliciousaccesses to your LAN while providing Internet access sharing at the same time. You canalso specify how to monitor attempted attacks, and who should be automatically notified.
58 Version 1.0
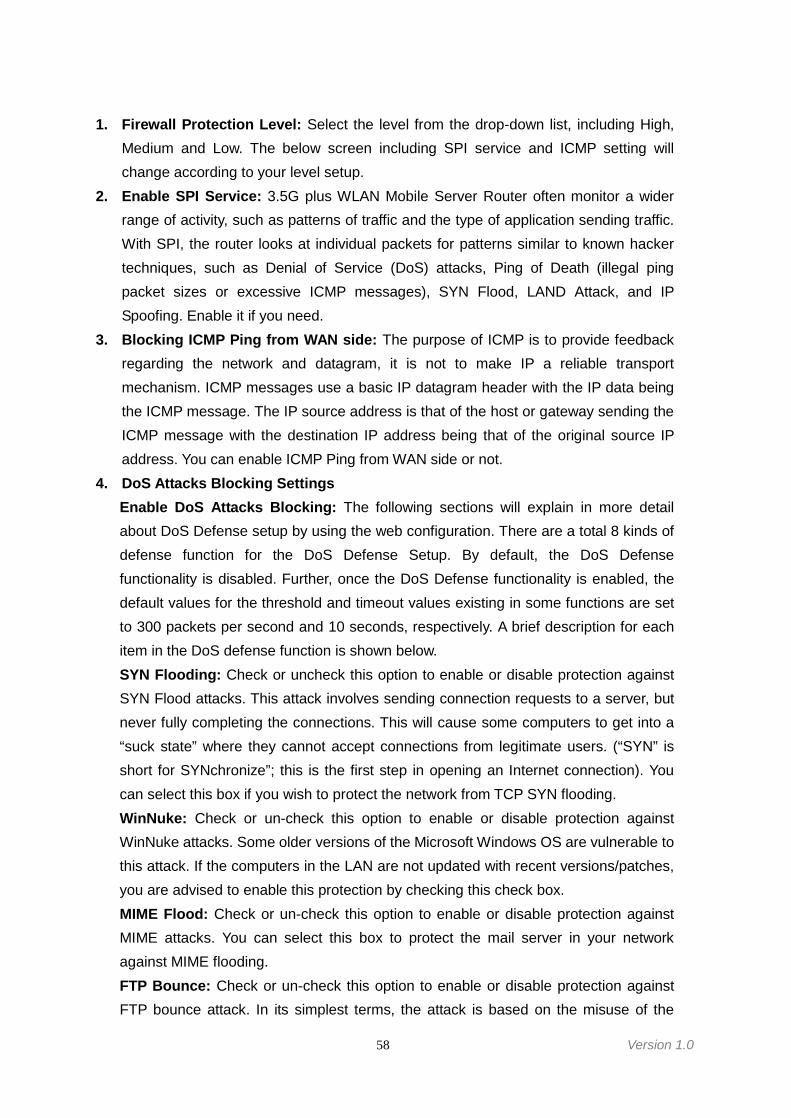
1. Firewall Protection Level: Select the level from the drop-down list, including High,Medium and Low. The below screen including SPI service and ICMP setting willchange according to your level setup.
2. Enable SPI Service: 3.5G plus WLAN Mobile Server Router often monitor a widerrange of activity, such as patterns of traffic and the type of application sending traffic.With SPI, the router looks at individual packets for patterns similar to known hackertechniques, such as Denial of Service (DoS) attacks, Ping of Death (illegal pingpacket sizes or excessive ICMP messages), SYN Flood, LAND Attack, and IPSpoofing. Enable it if you need.
3. Blocking ICMP Ping from WAN side: The purpose of ICMP is to provide feedbackregarding the network and datagram, it is not to make IP a reliable transportmechanism. ICMP messages use a basic IP datagram header with the IP data beingthe ICMP message. The IP source address is that of the host or gateway sending theICMP message with the destination IP address being that of the original source IPaddress. You can enable ICMP Ping from WAN side or not.
4. DoS Attacks Blocking SettingsEnable DoS Attacks Blocking: The following sections will explain in more detailabout DoS Defense setup by using the web configuration. There are a total 8 kinds ofdefense function for the DoS Defense Setup. By default, the DoS Defensefunctionality is disabled. Further, once the DoS Defense functionality is enabled, thedefault values for the threshold and timeout values existing in some functions are setto 300 packets per second and 10 seconds, respectively. A brief description for eachitem in the DoS defense function is shown below.SYN Flooding: Check or uncheck this option to enable or disable protection againstSYN Flood attacks. This attack involves sending connection requests to a server, butnever fully completing the connections. This will cause some computers to get into a“suck state” where they cannot accept connections from legitimate users. (“SYN” isshort for SYNchronize”; this is the first step in opening an Internet connection). Youcan select this box if you wish to protect the network from TCP SYN flooding.WinNuke: Check or un-check this option to enable or disable protection againstWinNuke attacks. Some older versions of the Microsoft Windows OS are vulnerable tothis attack. If the computers in the LAN are not updated with recent versions/patches,you are advised to enable this protection by checking this check box.MIME Flood: Check or un-check this option to enable or disable protection againstMIME attacks. You can select this box to protect the mail server in your networkagainst MIME flooding.FTP Bounce: Check or un-check this option to enable or disable protection againstFTP bounce attack. In its simplest terms, the attack is based on the misuse of the
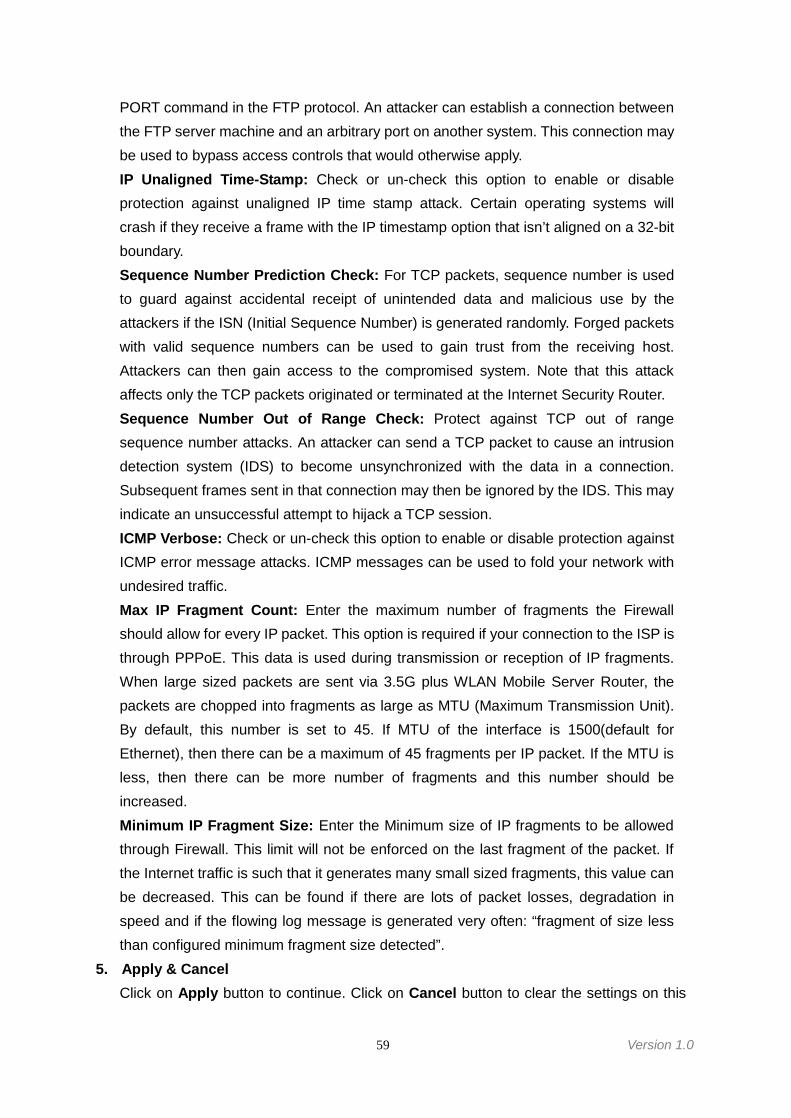
59 Version 1.0
PORT command in the FTP protocol. An attacker can establish a connection betweenthe FTP server machine and an arbitrary port on another system. This connection maybe used to bypass access controls that would otherwise apply.IP Unaligned Time-Stamp: Check or un-check this option to enable or disableprotection against unaligned IP time stamp attack. Certain operating systems willcrash if they receive a frame with the IP timestamp option that isn’t aligned on a 32-bitboundary.Sequence Number Prediction Check: For TCP packets, sequence number is usedto guard against accidental receipt of unintended data and malicious use by theattackers if the ISN (Initial Sequence Number) is generated randomly. Forged packetswith valid sequence numbers can be used to gain trust from the receiving host.Attackers can then gain access to the compromised system. Note that this attackaffects only the TCP packets originated or terminated at the Internet Security Router.Sequence Number Out of Range Check: Protect against TCP out of rangesequence number attacks. An attacker can send a TCP packet to cause an intrusiondetection system (IDS) to become unsynchronized with the data in a connection.Subsequent frames sent in that connection may then be ignored by the IDS. This mayindicate an unsuccessful attempt to hijack a TCP session.ICMP Verbose: Check or un-check this option to enable or disable protection againstICMP error message attacks. ICMP messages can be used to fold your network withundesired traffic.Max IP Fragment Count: Enter the maximum number of fragments the Firewallshould allow for every IP packet. This option is required if your connection to the ISP isthrough PPPoE. This data is used during transmission or reception of IP fragments.When large sized packets are sent via 3.5G plus WLAN Mobile Server Router, thepackets are chopped into fragments as large as MTU (Maximum Transmission Unit).By default, this number is set to 45. If MTU of the interface is 1500(default forEthernet), then there can be a maximum of 45 fragments per IP packet. If the MTU isless, then there can be more number of fragments and this number should beincreased.Minimum IP Fragment Size: Enter the Minimum size of IP fragments to be allowedthrough Firewall. This limit will not be enforced on the last fragment of the packet. Ifthe Internet traffic is such that it generates many small sized fragments, this value canbe decreased. This can be found if there are lots of packet losses, degradation inspeed and if the flowing log message is generated very often: “fragment of size lessthan configured minimum fragment size detected”.
5. Apply & CancelClick on Apply button to continue. Click on Cancel button to clear the settings on this
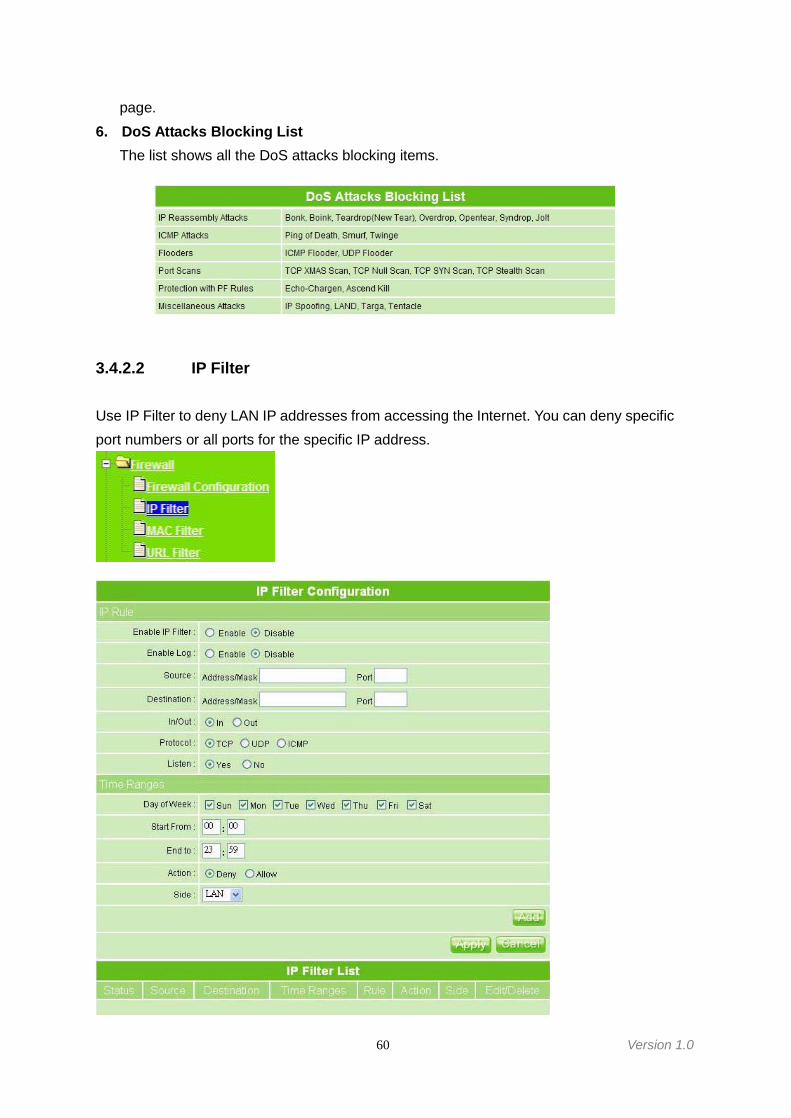
60 Version 1.0
page.6. DoS Attacks Blocking List
The list shows all the DoS attacks blocking items.
3.4.2.2 IP Filter
Use IP Filter to deny LAN IP addresses from accessing the Internet. You can deny specificport numbers or all ports for the specific IP address.
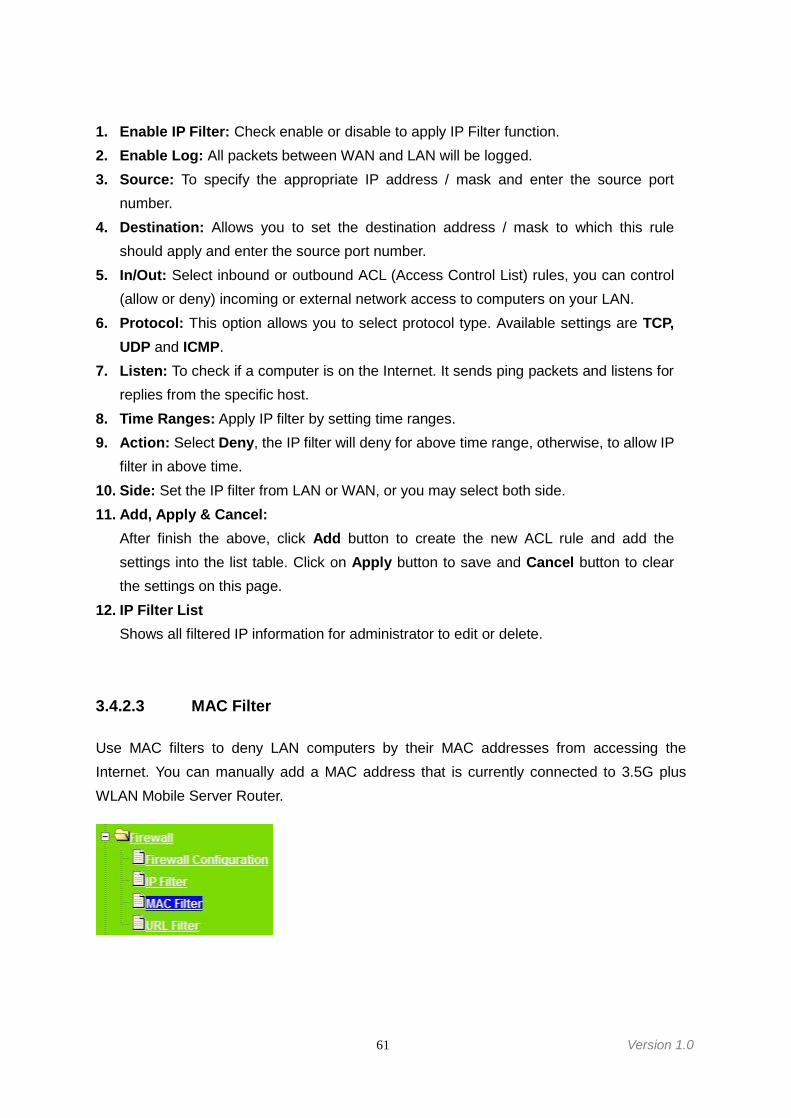
61 Version 1.0
1. Enable IP Filter: Check enable or disable to apply IP Filter function.2. Enable Log: All packets between WAN and LAN will be logged.3. Source: To specify the appropriate IP address / mask and enter the source port
number.4. Destination: Allows you to set the destination address / mask to which this rule
should apply and enter the source port number.5. In/Out: Select inbound or outbound ACL (Access Control List) rules, you can control
(allow or deny) incoming or external network access to computers on your LAN.6. Protocol: This option allows you to select protocol type. Available settings are TCP,
UDP and ICMP.7. Listen: To check if a computer is on the Internet. It sends ping packets and listens for
replies from the specific host.8. Time Ranges: Apply IP filter by setting time ranges.9. Action: Select Deny, the IP filter will deny for above time range, otherwise, to allow IP
filter in above time.10. Side: Set the IP filter from LAN or WAN, or you may select both side.11. Add, Apply & Cancel:
After finish the above, click Add button to create the new ACL rule and add thesettings into the list table. Click on Apply button to save and Cancel button to clearthe settings on this page.
12. IP Filter ListShows all filtered IP information for administrator to edit or delete.
3.4.2.3 MAC Filter
Use MAC filters to deny LAN computers by their MAC addresses from accessing theInternet. You can manually add a MAC address that is currently connected to 3.5G plusWLAN Mobile Server Router.
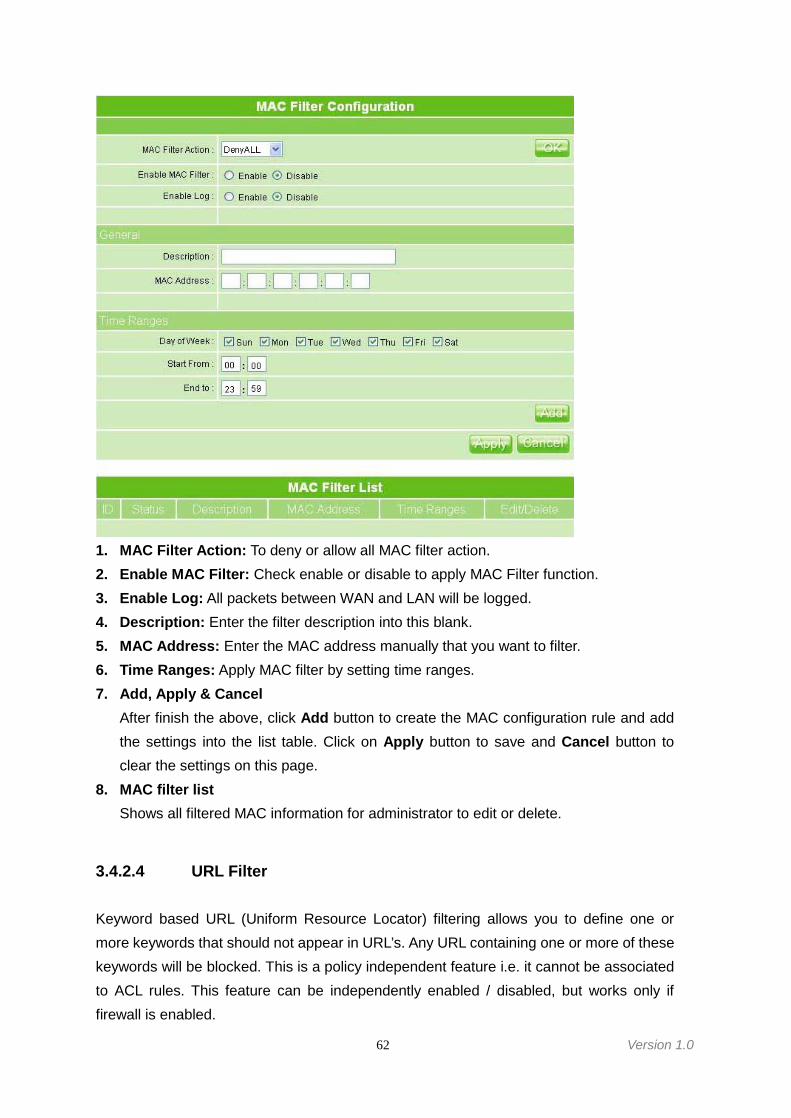
62 Version 1.0
1. MAC Filter Action: To deny or allow all MAC filter action.2. Enable MAC Filter: Check enable or disable to apply MAC Filter function.3. Enable Log: All packets between WAN and LAN will be logged.4. Description: Enter the filter description into this blank.5. MAC Address: Enter the MAC address manually that you want to filter.6. Time Ranges: Apply MAC filter by setting time ranges.7. Add, Apply & Cancel
After finish the above, click Add button to create the MAC configuration rule and addthe settings into the list table. Click on Apply button to save and Cancel button toclear the settings on this page.
8. MAC filter listShows all filtered MAC information for administrator to edit or delete.
3.4.2.4 URL Filter
Keyword based URL (Uniform Resource Locator) filtering allows you to define one ormore keywords that should not appear in URL’s. Any URL containing one or more of thesekeywords will be blocked. This is a policy independent feature i.e. it cannot be associatedto ACL rules. This feature can be independently enabled / disabled, but works only iffirewall is enabled.
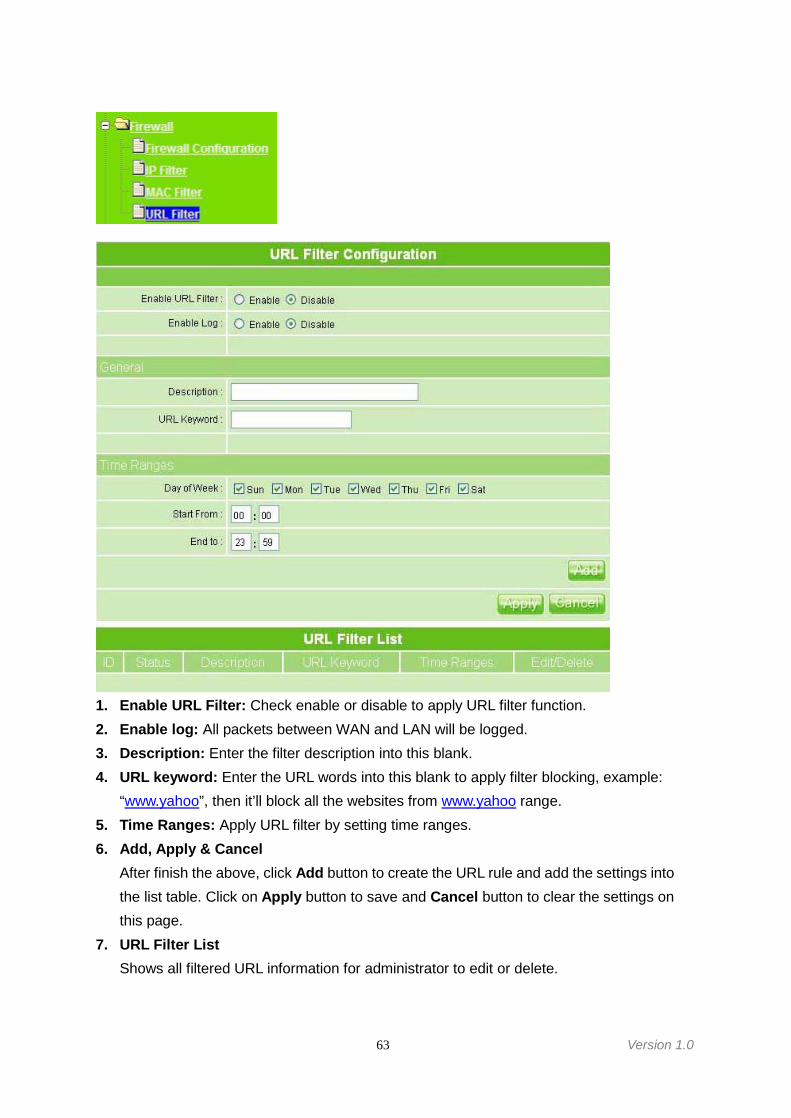
63 Version 1.0
1. Enable URL Filter: Check enable or disable to apply URL filter function.2. Enable log: All packets between WAN and LAN will be logged.3. Description: Enter the filter description into this blank.4. URL keyword: Enter the URL words into this blank to apply filter blocking, example:
“www.yahoo”, then it’ll block all the websites from www.yahoo range.5. Time Ranges: Apply URL filter by setting time ranges.6. Add, Apply & Cancel
After finish the above, click Add button to create the URL rule and add the settings intothe list table. Click on Apply button to save and Cancel button to clear the settings onthis page.
7. URL Filter ListShows all filtered URL information for administrator to edit or delete.
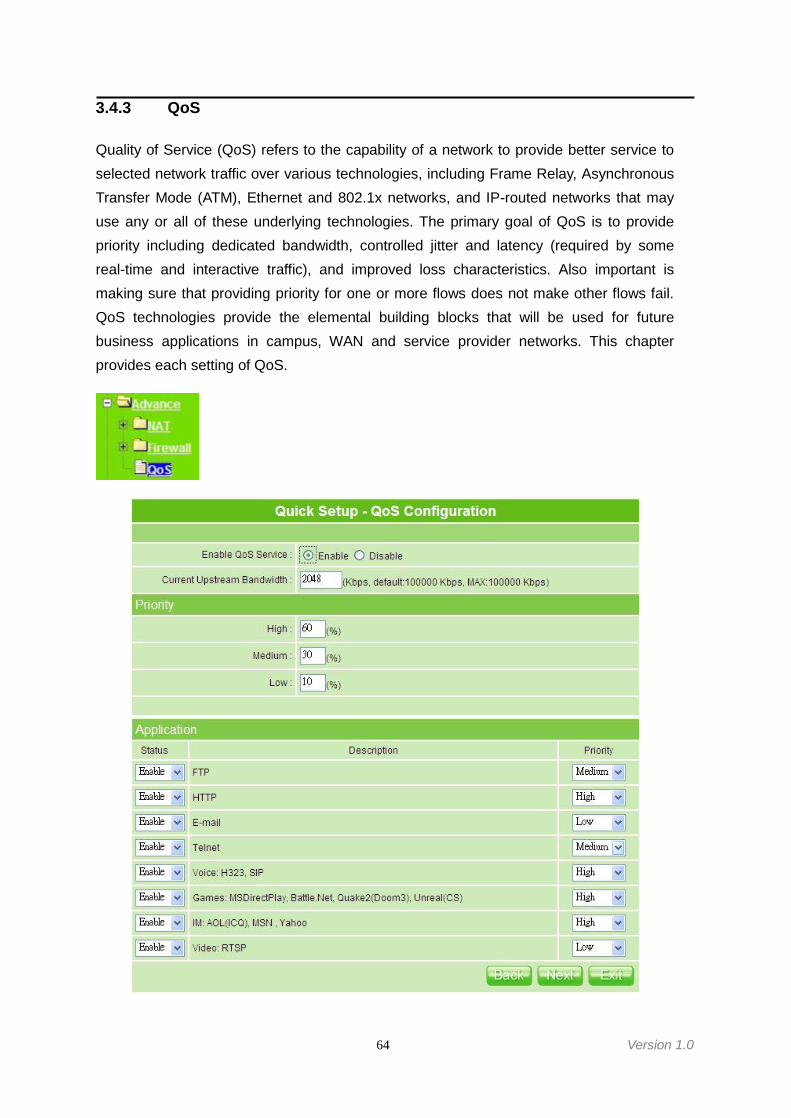
64 Version 1.0
3.4.3 QoS
Quality of Service (QoS) refers to the capability of a network to provide better service toselected network traffic over various technologies, including Frame Relay, AsynchronousTransfer Mode (ATM), Ethernet and 802.1x networks, and IP-routed networks that mayuse any or all of these underlying technologies. The primary goal of QoS is to providepriority including dedicated bandwidth, controlled jitter and latency (required by somereal-time and interactive traffic), and improved loss characteristics. Also important ismaking sure that providing priority for one or more flows does not make other flows fail.QoS technologies provide the elemental building blocks that will be used for futurebusiness applications in campus, WAN and service provider networks. This chapterprovides each setting of QoS.
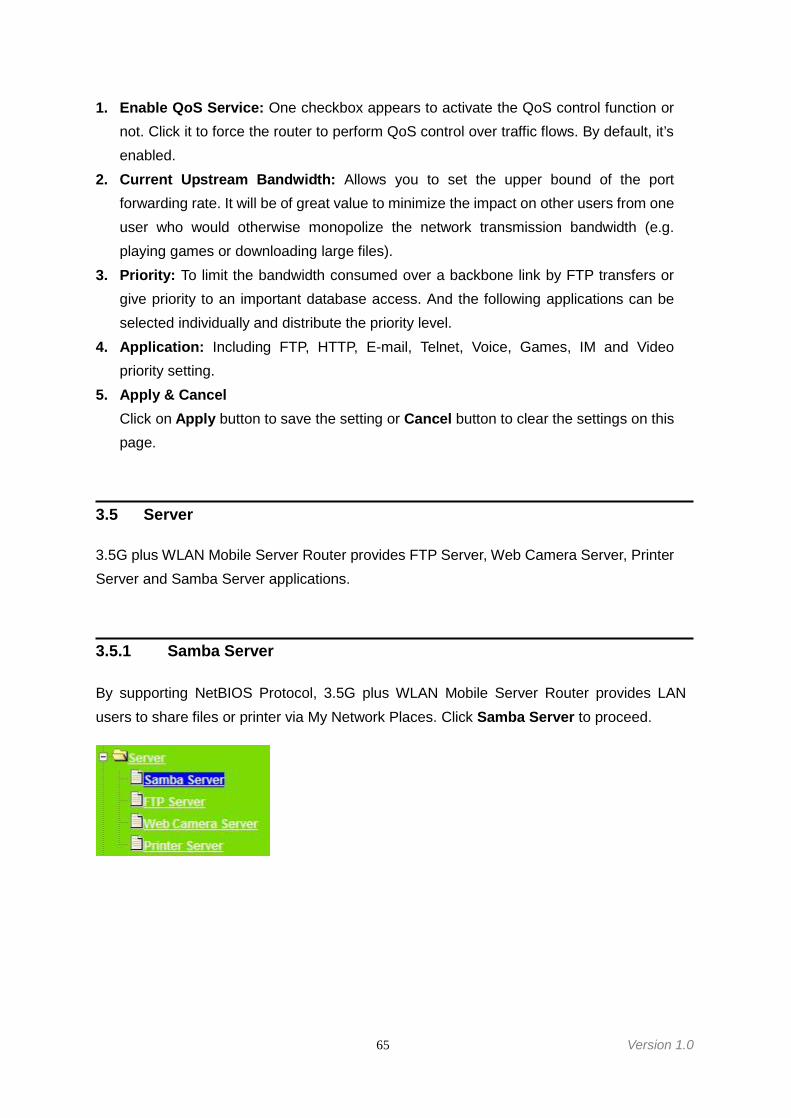
65 Version 1.0
1. Enable QoS Service: One checkbox appears to activate the QoS control function ornot. Click it to force the router to perform QoS control over traffic flows. By default, it’senabled.
2. Current Upstream Bandwidth: Allows you to set the upper bound of the portforwarding rate. It will be of great value to minimize the impact on other users from oneuser who would otherwise monopolize the network transmission bandwidth (e.g.playing games or downloading large files).
3. Priority: To limit the bandwidth consumed over a backbone link by FTP transfers orgive priority to an important database access. And the following applications can beselected individually and distribute the priority level.
4. Application: Including FTP, HTTP, E-mail, Telnet, Voice, Games, IM and Videopriority setting.
5. Apply & CancelClick on Apply button to save the setting or Cancel button to clear the settings on thispage.
3.5 Server
3.5G plus WLAN Mobile Server Router provides FTP Server, Web Camera Server, PrinterServer and Samba Server applications.
3.5.1 Samba Server
By supporting NetBIOS Protocol, 3.5G plus WLAN Mobile Server Router provides LANusers to share files or printer via My Network Places. Click Samba Server to proceed.
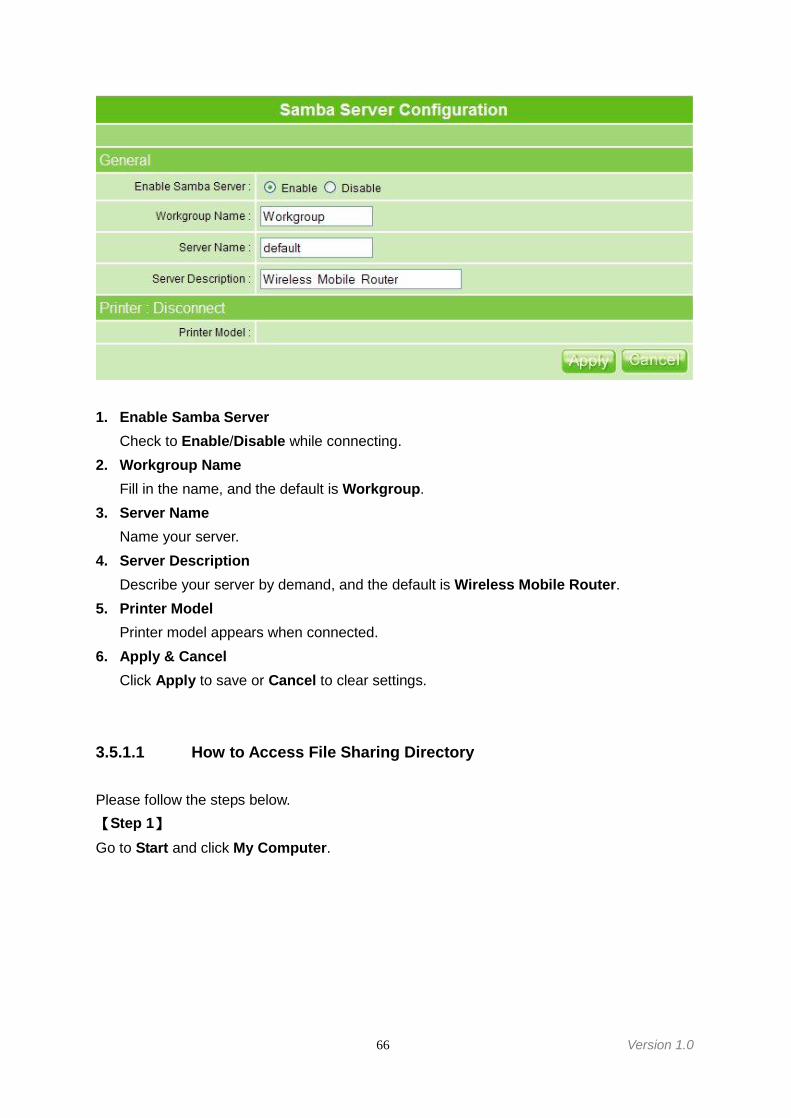
66 Version 1.0
1. Enable Samba ServerCheck to Enable/Disable while connecting.
2. Workgroup NameFill in the name, and the default is Workgroup.
3. Server NameName your server.
4. Server DescriptionDescribe your server by demand, and the default is Wireless Mobile Router.
5. Printer ModelPrinter model appears when connected.
6. Apply & CancelClick Apply to save or Cancel to clear settings.
3.5.1.1 How to Access File Sharing Directory
Please follow the steps below.【Step 1】Go to Start and click My Computer.
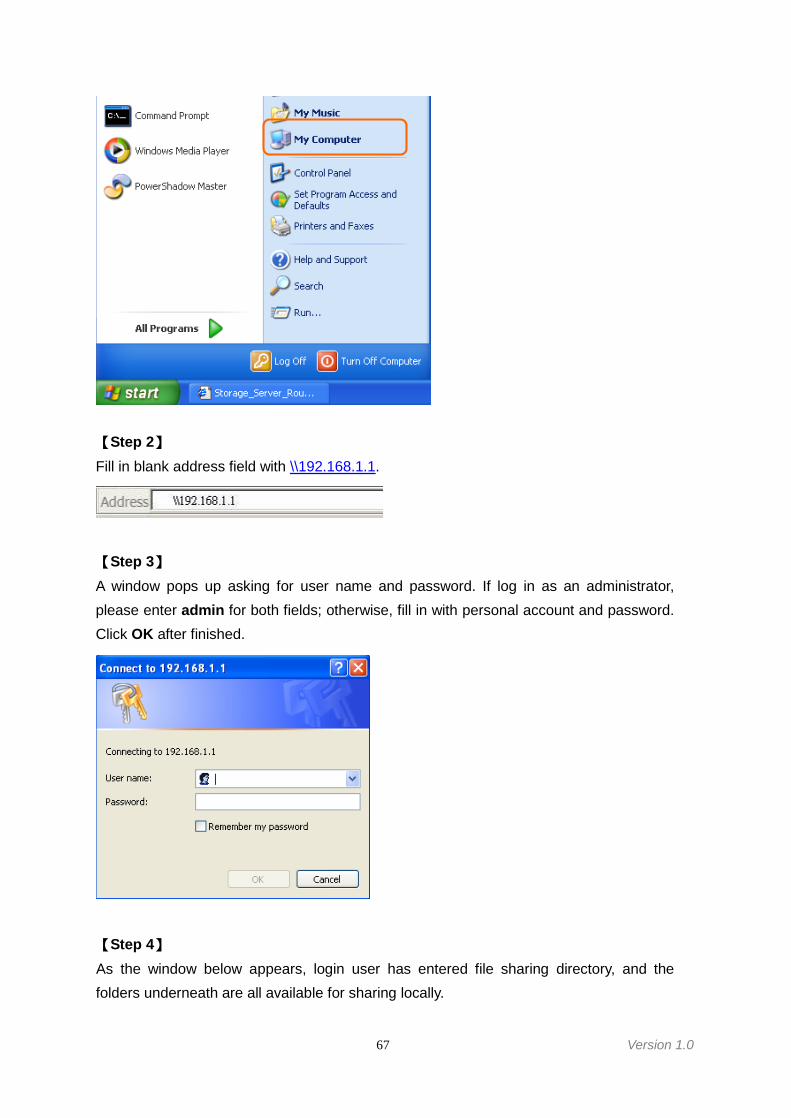
67 Version 1.0
【Step 2】Fill in blank address field with \\192.168.1.1.
【Step 3】A window pops up asking for user name and password. If log in as an administrator,please enter admin for both fields; otherwise, fill in with personal account and password.Click OK after finished.
【Step 4】As the window below appears, login user has entered file sharing directory, and thefolders underneath are all available for sharing locally.
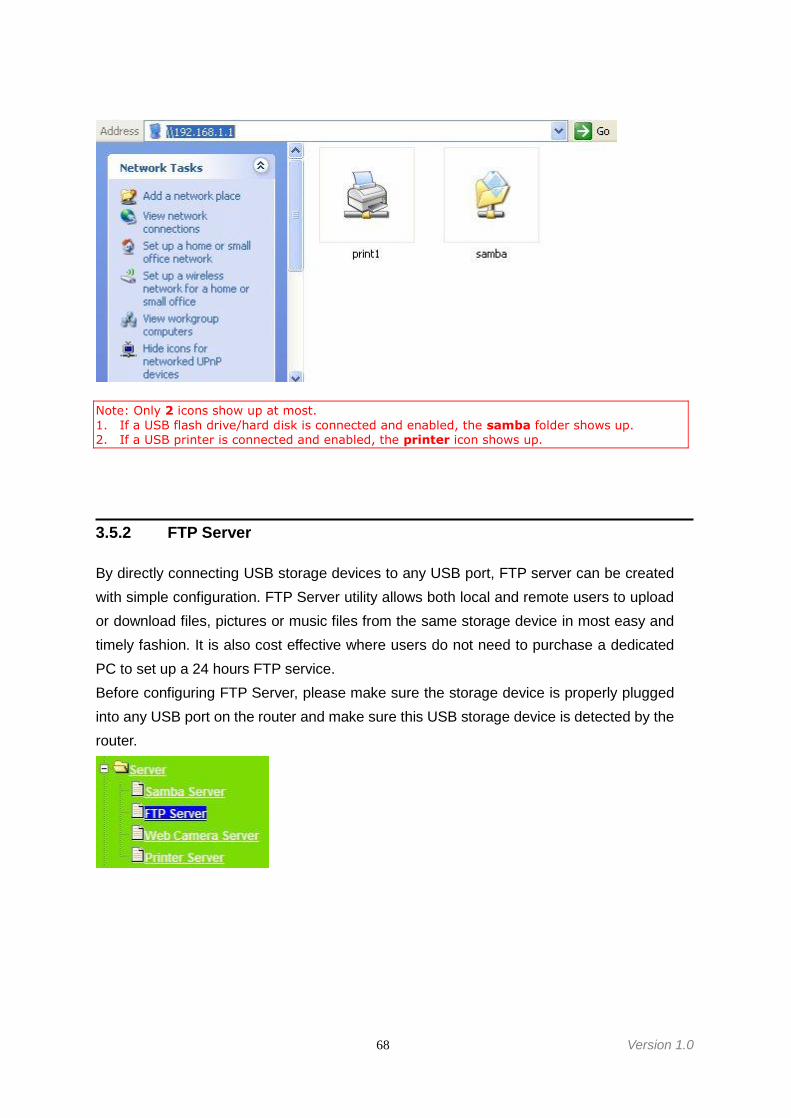
68 Version 1.0
Note: Only 2 icons show up at most.1. If a USB flash drive/hard disk is connected and enabled, the samba folder shows up.2. If a USB printer is connected and enabled, the printer icon shows up.
3.5.2 FTP Server
By directly connecting USB storage devices to any USB port, FTP server can be createdwith simple configuration. FTP Server utility allows both local and remote users to uploador download files, pictures or music files from the same storage device in most easy andtimely fashion. It is also cost effective where users do not need to purchase a dedicatedPC to set up a 24 hours FTP service.Before configuring FTP Server, please make sure the storage device is properly pluggedinto any USB port on the router and make sure this USB storage device is detected by therouter.
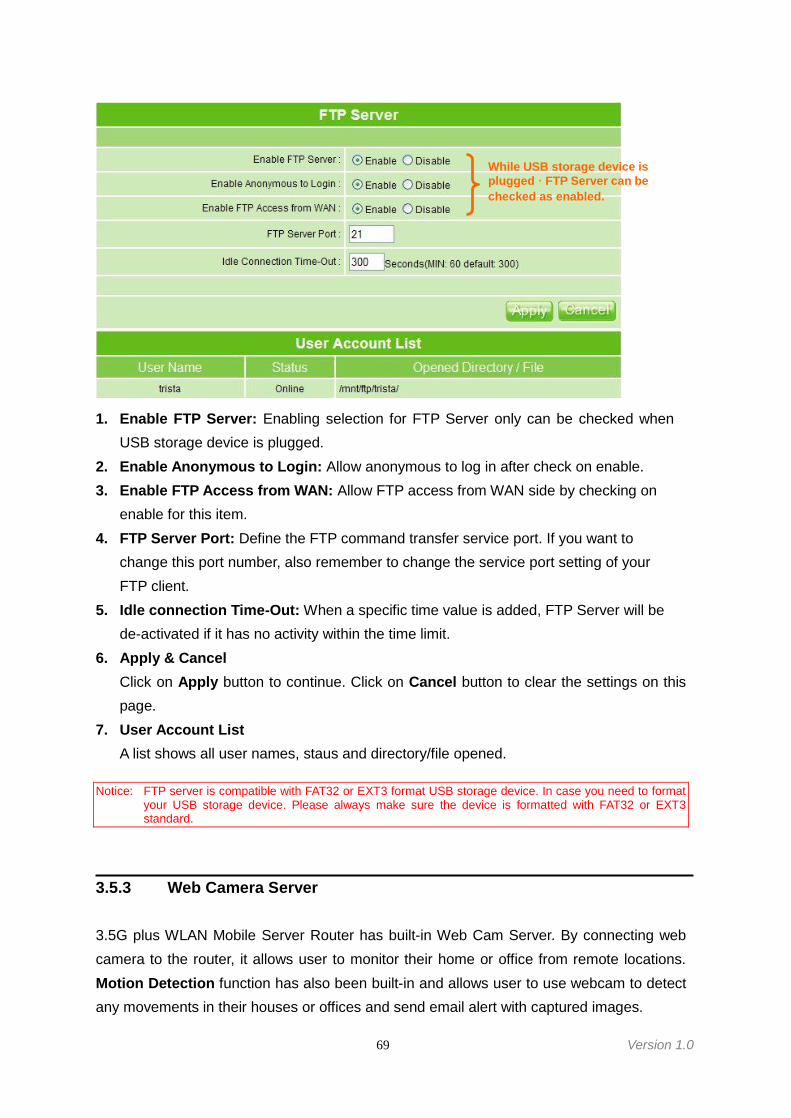
69 Version 1.0
1. Enable FTP Server: Enabling selection for FTP Server only can be checked whenUSB storage device is plugged.
2. Enable Anonymous to Login: Allow anonymous to log in after check on enable.3. Enable FTP Access from WAN: Allow FTP access from WAN side by checking on
enable for this item.4. FTP Server Port: Define the FTP command transfer service port. If you want to
change this port number, also remember to change the service port setting of yourFTP client.
5. Idle connection Time-Out: When a specific time value is added, FTP Server will bede-activated if it has no activity within the time limit.
6. Apply & CancelClick on Apply button to continue. Click on Cancel button to clear the settings on thispage.
7. User Account ListA list shows all user names, staus and directory/file opened.
Notice: FTP server is compatible with FAT32 or EXT3 format USB storage device. In case you need to formatyour USB storage device. Please always make sure the device is formatted with FAT32 or EXT3standard.
3.5.3 Web Camera Server
3.5G plus WLAN Mobile Server Router has built-in Web Cam Server. By connecting webcamera to the router, it allows user to monitor their home or office from remote locations.Motion Detection function has also been built-in and allows user to use webcam to detectany movements in their houses or offices and send email alert with captured images.
While USB storage device isplugged,FTP Server can bechecked as enabled.
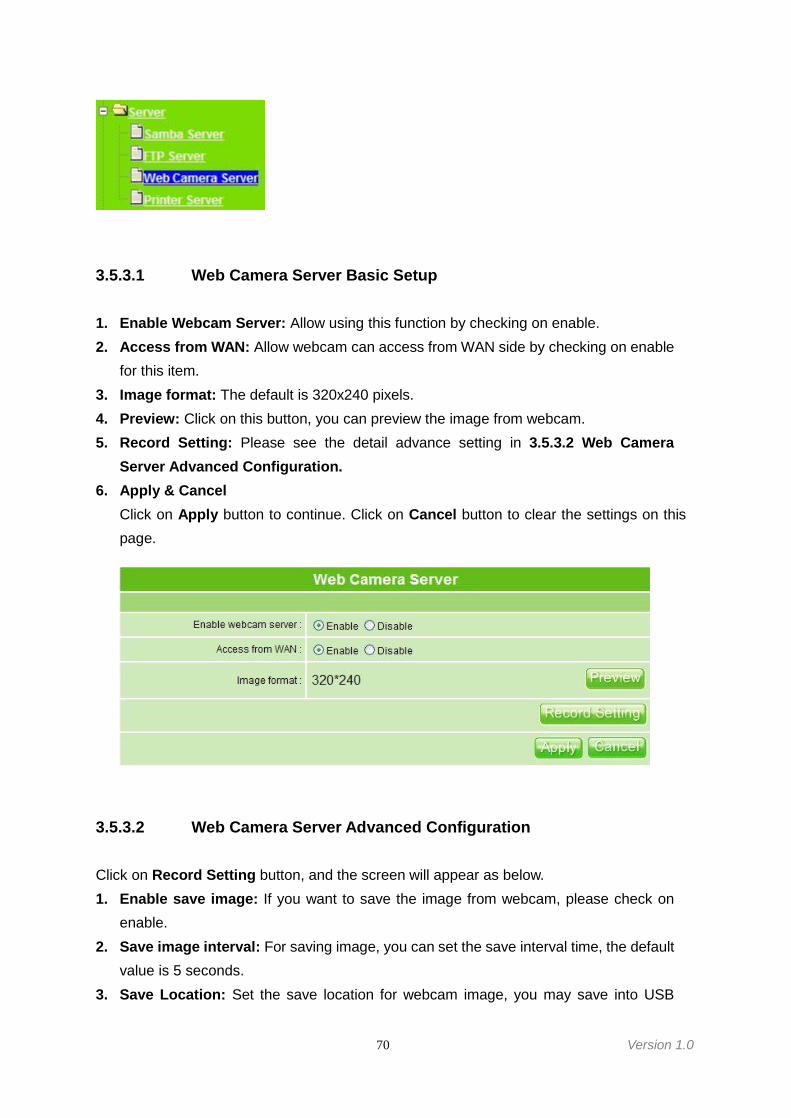
70 Version 1.0
3.5.3.1 Web Camera Server Basic Setup
1. Enable Webcam Server: Allow using this function by checking on enable.2. Access from WAN: Allow webcam can access from WAN side by checking on enable
for this item.3. Image format: The default is 320x240 pixels.4. Preview: Click on this button, you can preview the image from webcam.5. Record Setting: Please see the detail advance setting in 3.5.3.2 Web Camera
Server Advanced Configuration.6. Apply & Cancel
Click on Apply button to continue. Click on Cancel button to clear the settings on thispage.
3.5.3.2 Web Camera Server Advanced Configuration
Click on Record Setting button, and the screen will appear as below.1. Enable save image: If you want to save the image from webcam, please check on
enable.2. Save image interval: For saving image, you can set the save interval time, the default
value is 5 seconds.3. Save Location: Set the save location for webcam image, you may save into USB
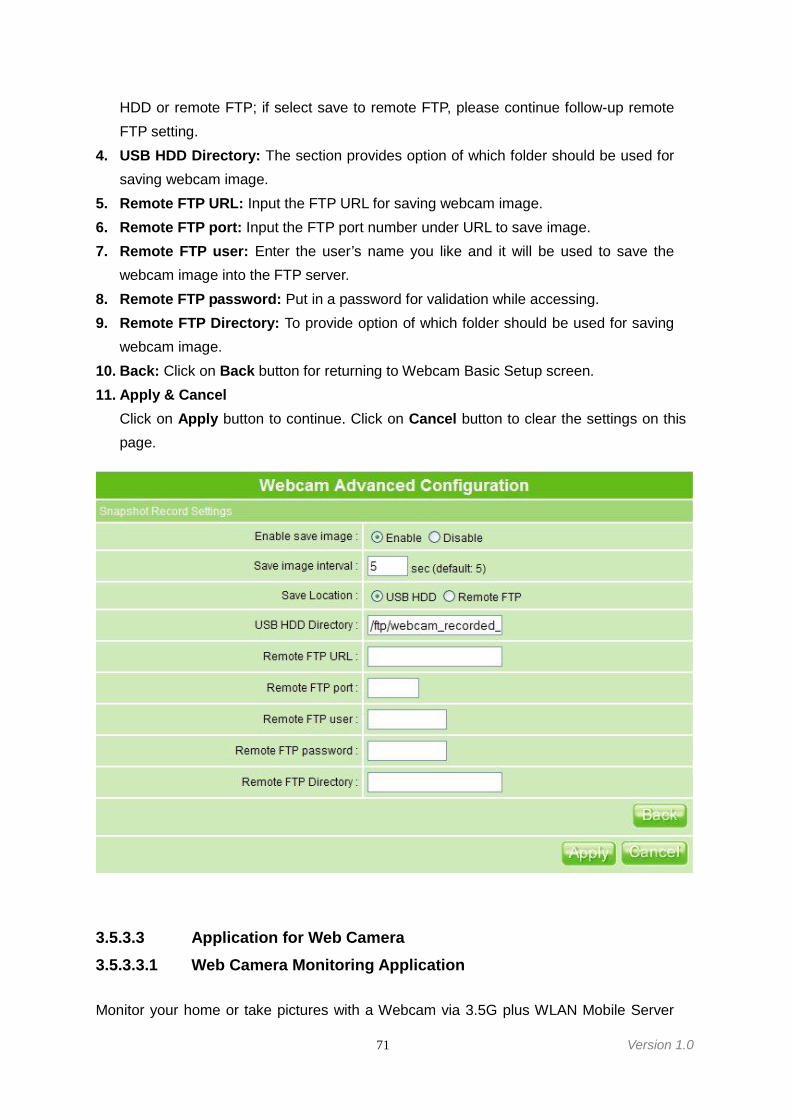
71 Version 1.0
HDD or remote FTP; if select save to remote FTP, please continue follow-up remoteFTP setting.
4. USB HDD Directory: The section provides option of which folder should be used forsaving webcam image.
5. Remote FTP URL: Input the FTP URL for saving webcam image.6. Remote FTP port: Input the FTP port number under URL to save image.7. Remote FTP user: Enter the user’s name you like and it will be used to save the
webcam image into the FTP server.8. Remote FTP password: Put in a password for validation while accessing.9. Remote FTP Directory: To provide option of which folder should be used for saving
webcam image.10. Back: Click on Back button for returning to Webcam Basic Setup screen.11. Apply & Cancel
Click on Apply button to continue. Click on Cancel button to clear the settings on thispage.
3.5.3.3 Application for Web Camera3.5.3.3.1 Web Camera Monitoring Application
Monitor your home or take pictures with a Webcam via 3.5G plus WLAN Mobile Server
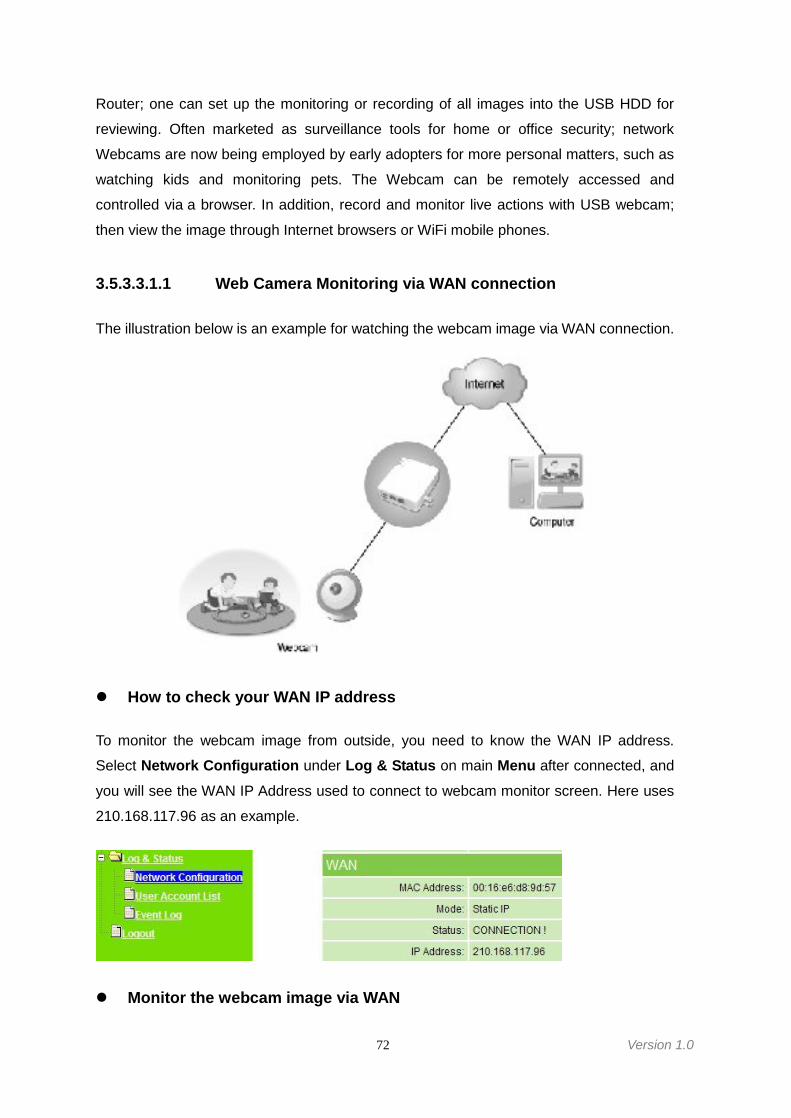
72 Version 1.0
Router; one can set up the monitoring or recording of all images into the USB HDD for
reviewing. Often marketed as surveillance tools for home or office security; network
Webcams are now being employed by early adopters for more personal matters, such as
watching kids and monitoring pets. The Webcam can be remotely accessed and
controlled via a browser. In addition, record and monitor live actions with USB webcam;
then view the image through Internet browsers or WiFi mobile phones.
3.5.3.3.1.1 Web Camera Monitoring via WAN connection
The illustration below is an example for watching the webcam image via WAN connection.
How to check your WAN IP address
To monitor the webcam image from outside, you need to know the WAN IP address.
Select Network Configuration under Log & Status on main Menu after connected, and
you will see the WAN IP Address used to connect to webcam monitor screen. Here uses
210.168.117.96 as an example.
Monitor the webcam image via WAN
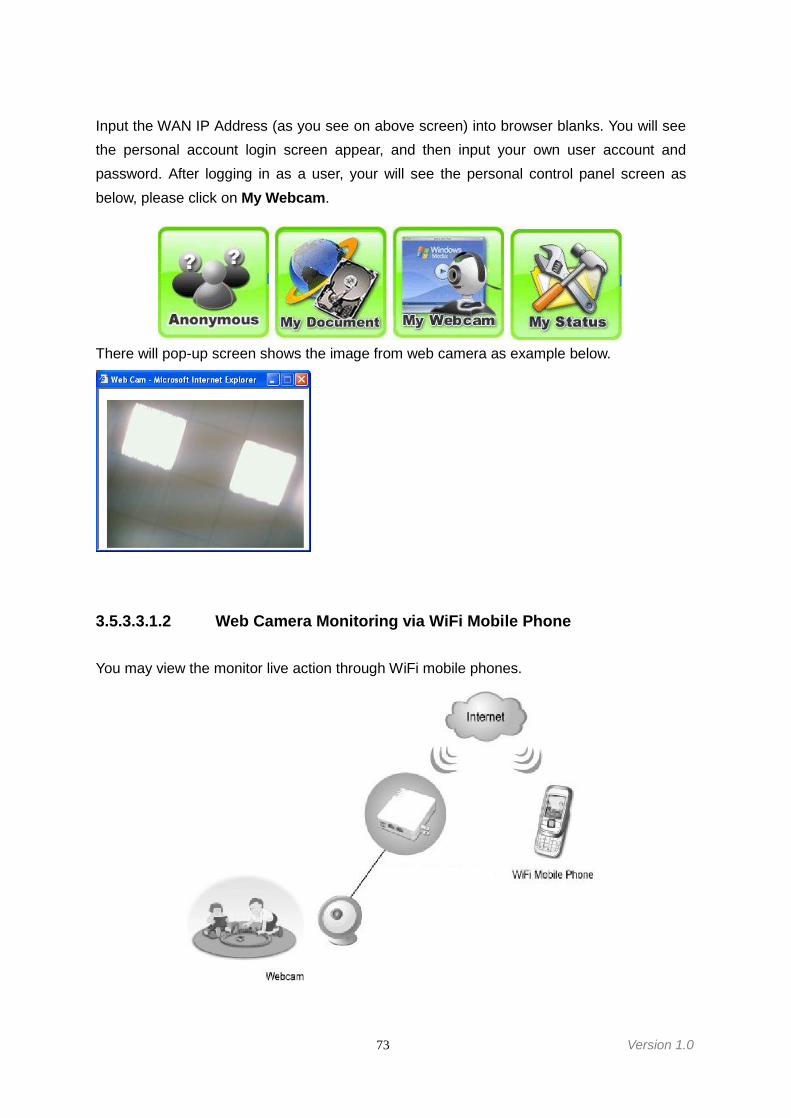
73 Version 1.0
Input the WAN IP Address (as you see on above screen) into browser blanks. You will seethe personal account login screen appear, and then input your own user account andpassword. After logging in as a user, your will see the personal control panel screen asbelow, please click on My Webcam.
There will pop-up screen shows the image from web camera as example below.
3.5.3.3.1.2 Web Camera Monitoring via WiFi Mobile Phone
You may view the monitor live action through WiFi mobile phones.
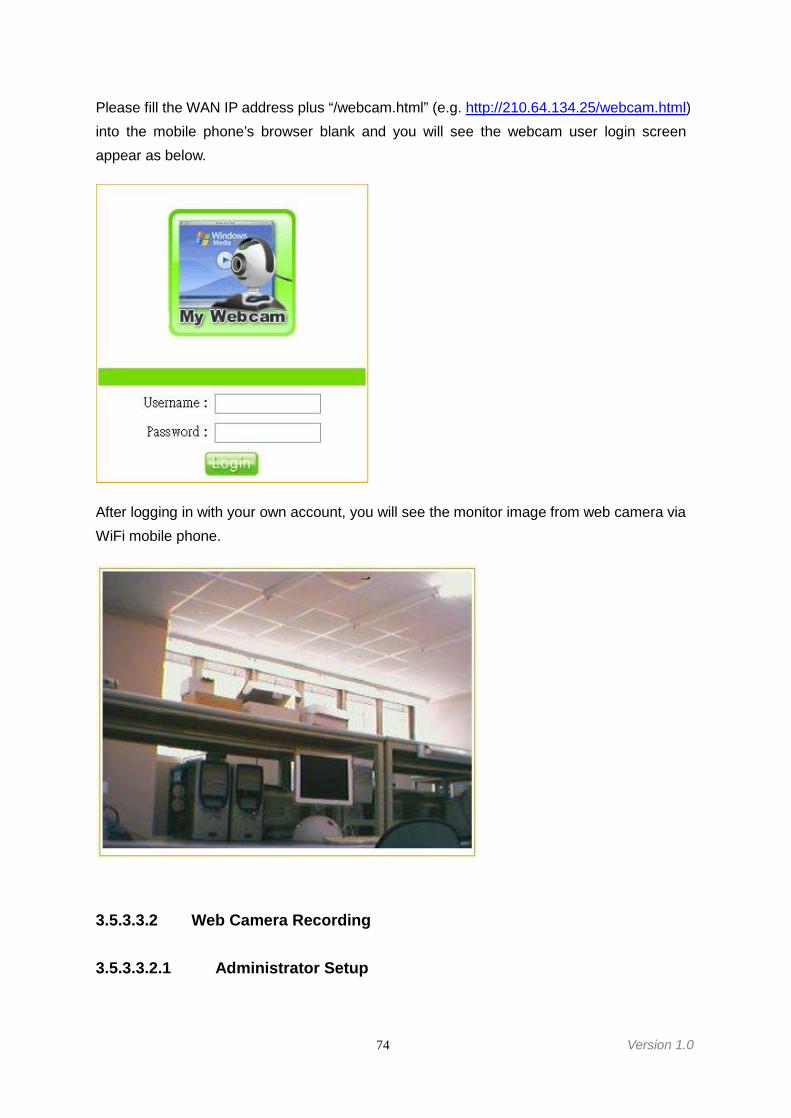
74 Version 1.0
Please fill the WAN IP address plus “/webcam.html” (e.g. http://210.64.134.25/webcam.html)into the mobile phone’s browser blank and you will see the webcam user login screenappear as below.
After logging in with your own account, you will see the monitor image from web camera viaWiFi mobile phone.
3.5.3.3.2 Web Camera Recording
3.5.3.3.2.1 Administrator Setup
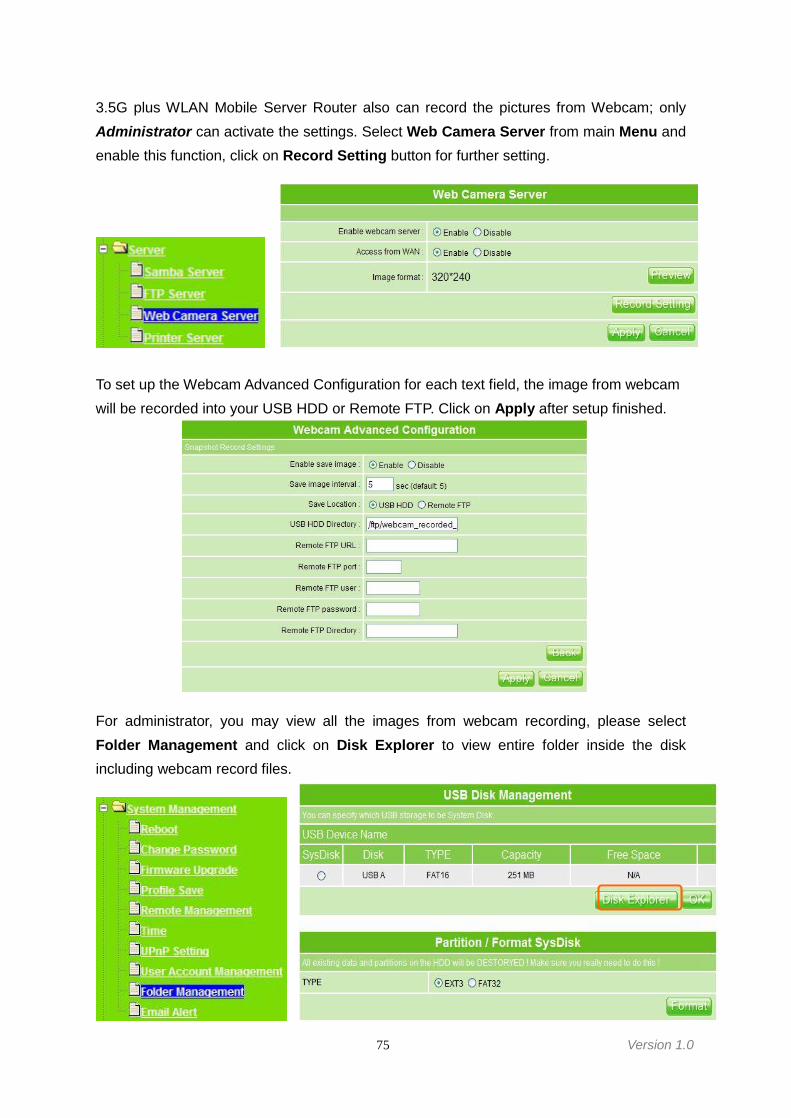
75 Version 1.0
3.5G plus WLAN Mobile Server Router also can record the pictures from Webcam; onlyAdministrator can activate the settings. Select Web Camera Server from main Menu andenable this function, click on Record Setting button for further setting.
To set up the Webcam Advanced Configuration for each text field, the image from webcamwill be recorded into your USB HDD or Remote FTP. Click on Apply after setup finished.
For administrator, you may view all the images from webcam recording, please selectFolder Management and click on Disk Explorer to view entire folder inside the diskincluding webcam record files.
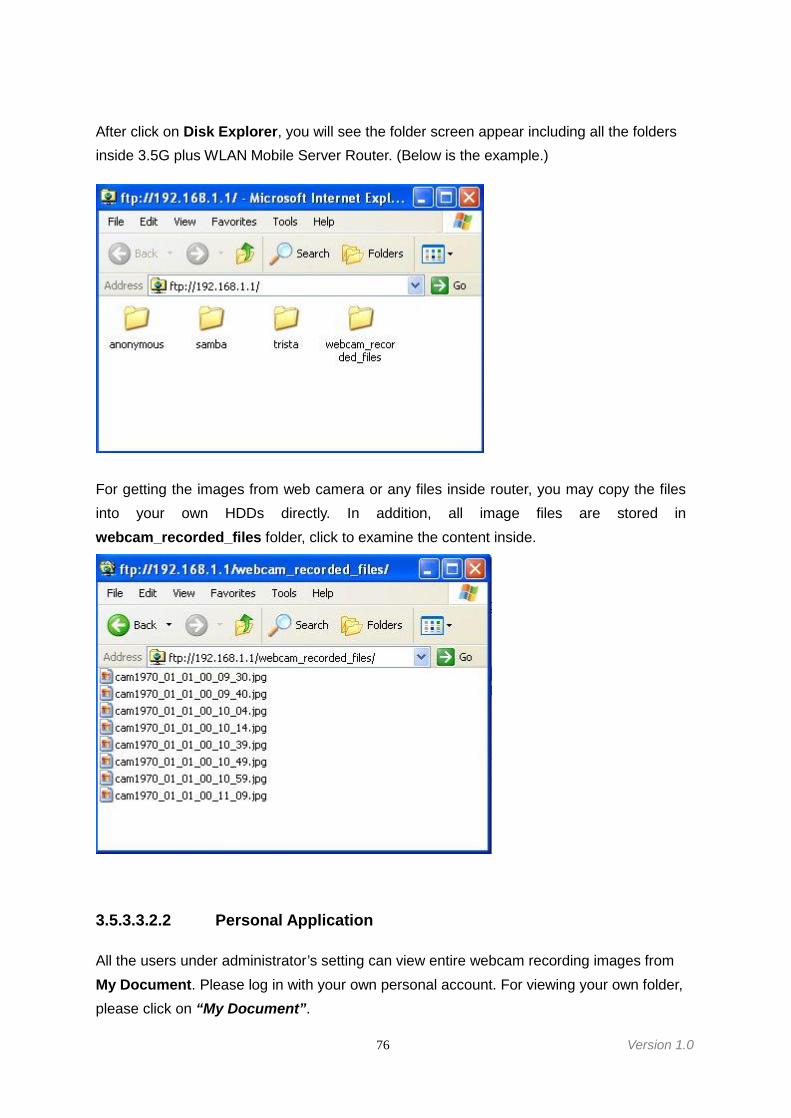
76 Version 1.0
After click on Disk Explorer, you will see the folder screen appear including all the foldersinside 3.5G plus WLAN Mobile Server Router. (Below is the example.)
For getting the images from web camera or any files inside router, you may copy the filesinto your own HDDs directly. In addition, all image files are stored inwebcam_recorded_files folder, click to examine the content inside.
3.5.3.3.2.2 Personal Application
All the users under administrator’s setting can view entire webcam recording images fromMy Document. Please log in with your own personal account. For viewing your own folder,please click on “My Document”.
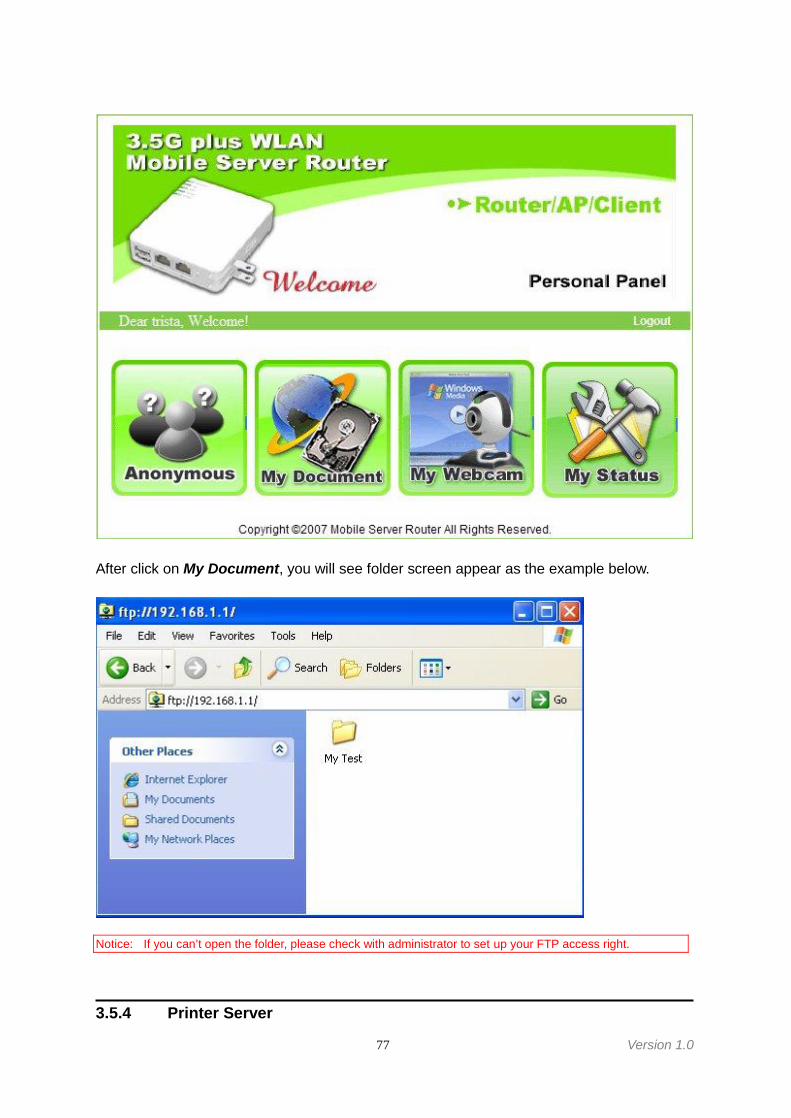
77 Version 1.0
After click on My Document, you will see folder screen appear as the example below.
Notice: If you can’t open the folder, please check with administrator to set up your FTP access right.
3.5.4 Printer Server

78 Version 1.0
3.5G plus WLAN Mobile Server Router has two USB ports for connecting with printers tobe shared on the local area network. Follow the steps to set up your PC to connect to aprinter server.
1. Enable Printer Server: Check enable for applying printer server.2. Enable Printer Access From WAN: Allow printer can access from WAN side by
checking on enable for this item.3. Printer Model: The printer model will be shown when the USB printer is plugged.4. Printer Name: Enter the name you like.5. Printer Description: Enter your description by demand.6. Apply & Cancel
Click on Apply button to continue. Click on Cancel button to clear the settings on thispage.
Besides the above is finished, the printer setting on PC also needs to be set as follows.
3.5.4.1 Printer Setting on PC
After enabling Printer Server in Quick Setup and Printer Server Configuration, pleasefollow the steps to set the detail LPR settings on your PC. (The example below is forWindows XP platform.)
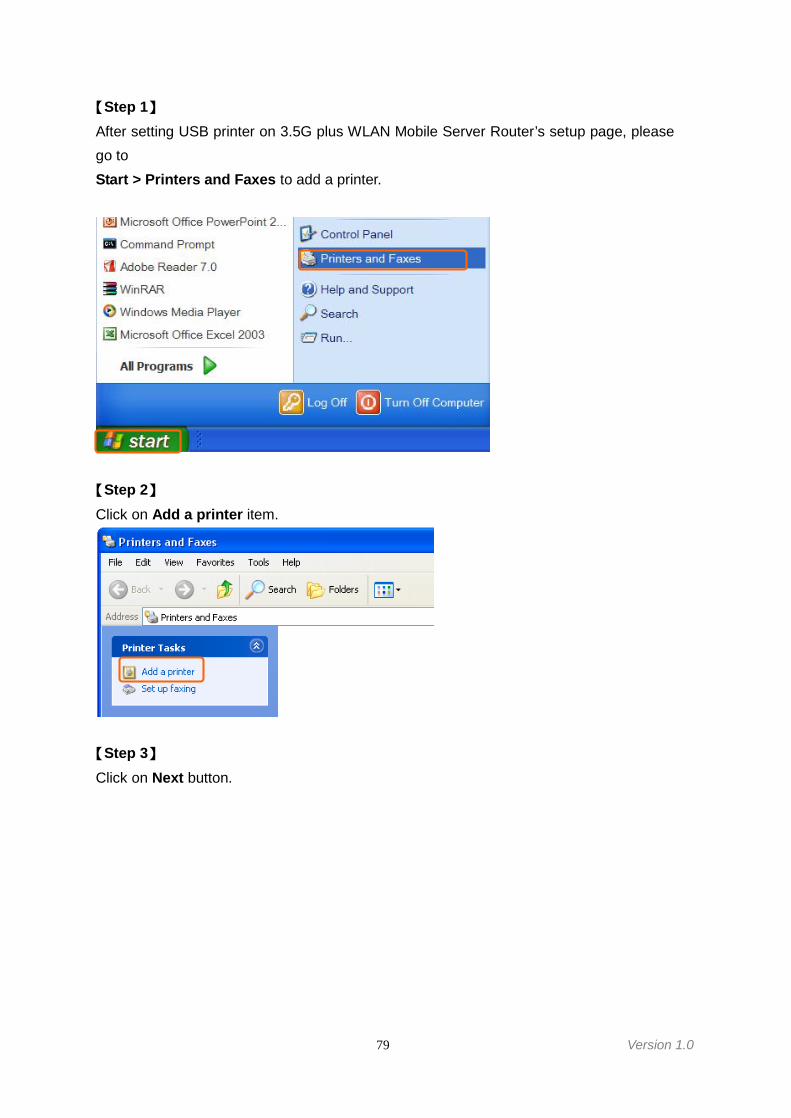
79 Version 1.0
【Step 1】After setting USB printer on 3.5G plus WLAN Mobile Server Router’s setup page, pleasego toStart > Printers and Faxes to add a printer.
【Step 2】Click on Add a printer item.
【Step 3】Click on Next button.
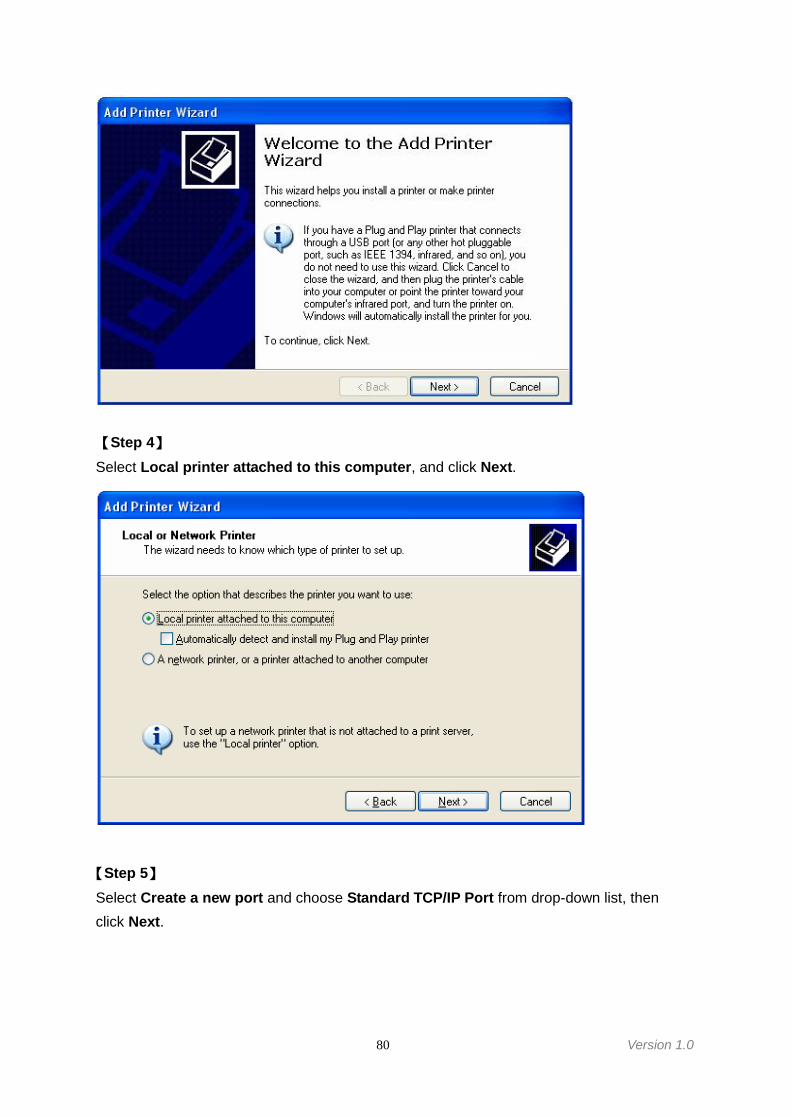
80 Version 1.0
【Step 4】Select Local printer attached to this computer, and click Next.
【Step 5】Select Create a new port and choose Standard TCP/IP Port from drop-down list, thenclick Next.

81 Version 1.0
【Step 6】Click Next.
【Step 7】Put in 3.5G plus WLAN Mobile Server Router’s address: 192.168.1.1 and click Next.
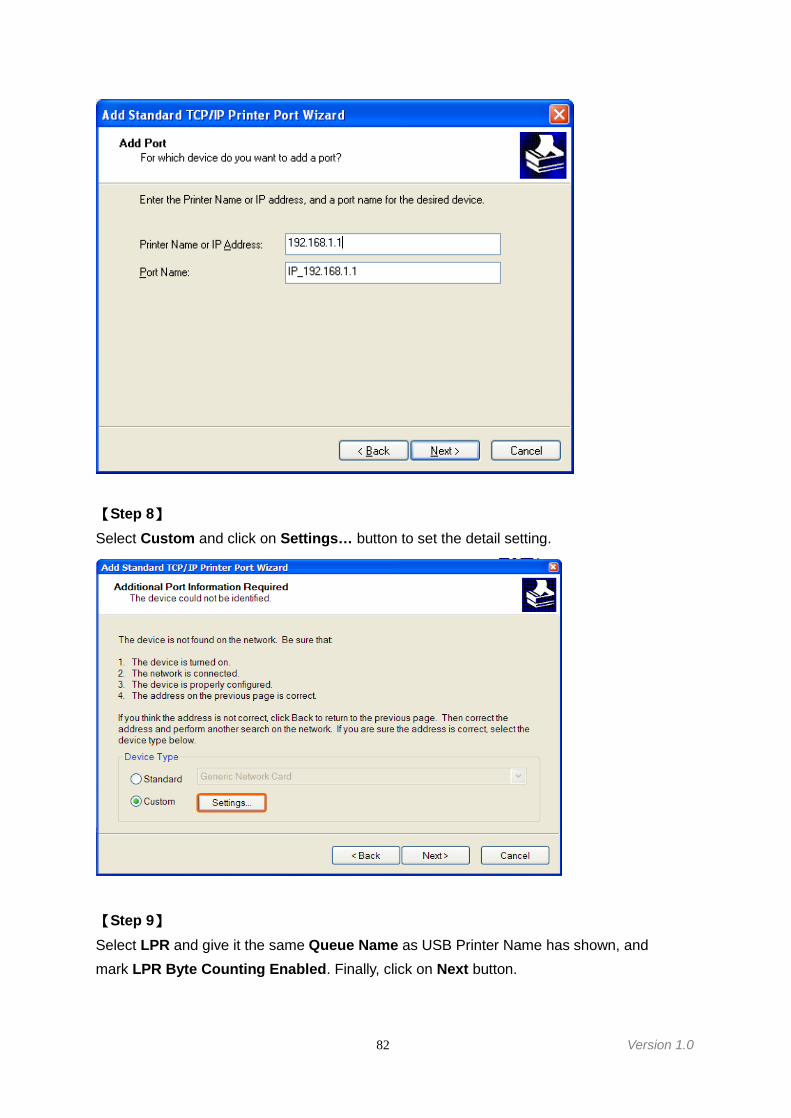
82 Version 1.0
【Step 8】Select Custom and click on Settings… button to set the detail setting.
【Step 9】Select LPR and give it the same Queue Name as USB Printer Name has shown, andmark LPR Byte Counting Enabled. Finally, click on Next button.
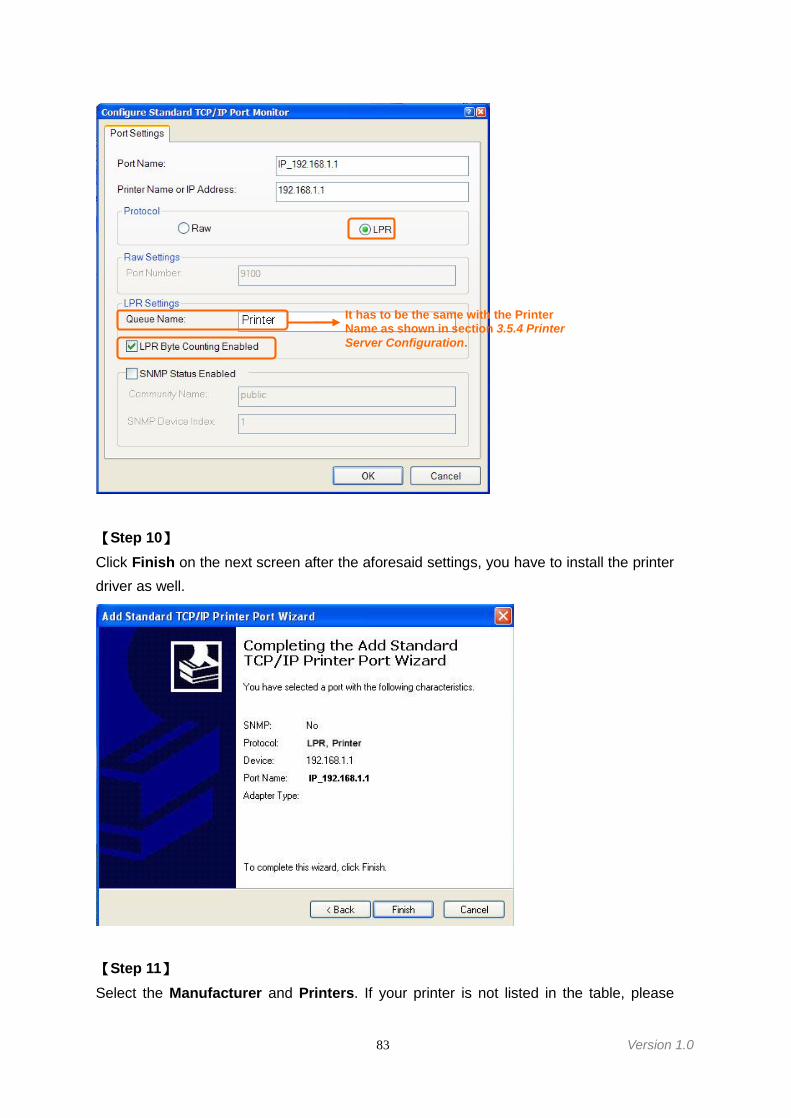
83 Version 1.0
【Step 10】Click Finish on the next screen after the aforesaid settings, you have to install the printerdriver as well.
【Step 11】Select the Manufacturer and Printers. If your printer is not listed in the table, please
It has to be the same with the PrinterName as shown in section 3.5.4 PrinterServer Configuration.
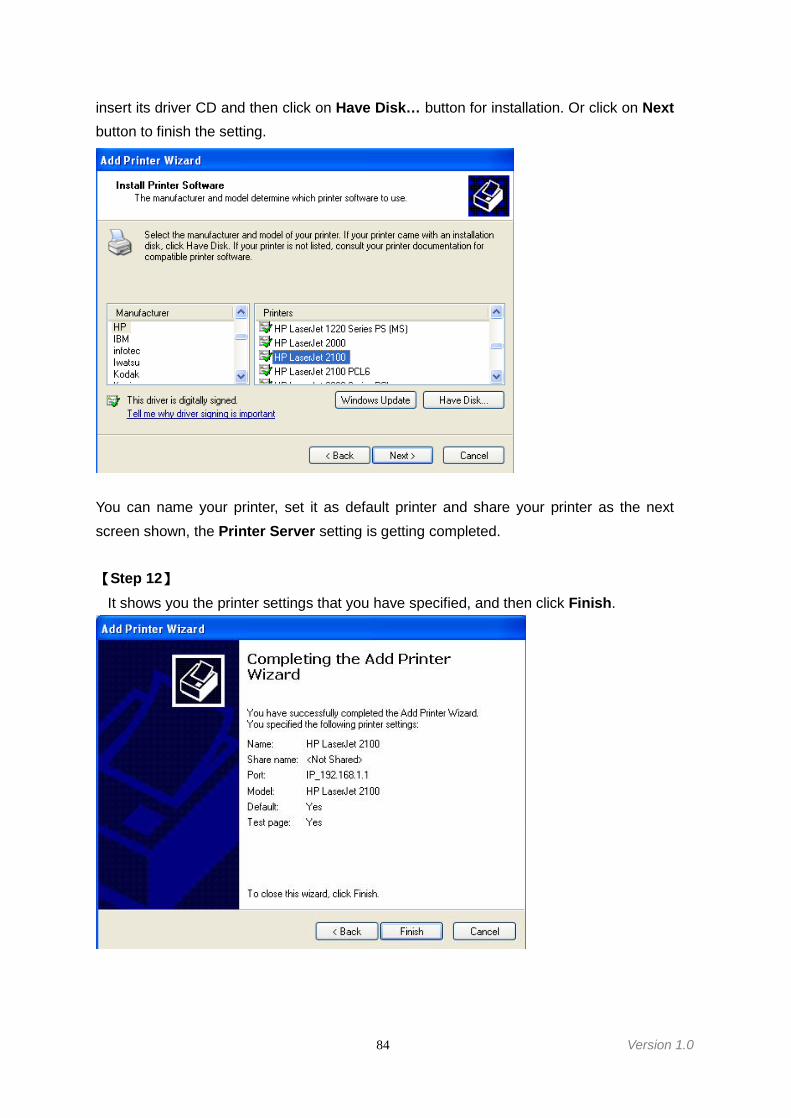
84 Version 1.0
insert its driver CD and then click on Have Disk… button for installation. Or click on Nextbutton to finish the setting.
You can name your printer, set it as default printer and share your printer as the nextscreen shown, the Printer Server setting is getting completed.
【Step 12】It shows you the printer settings that you have specified, and then click Finish.
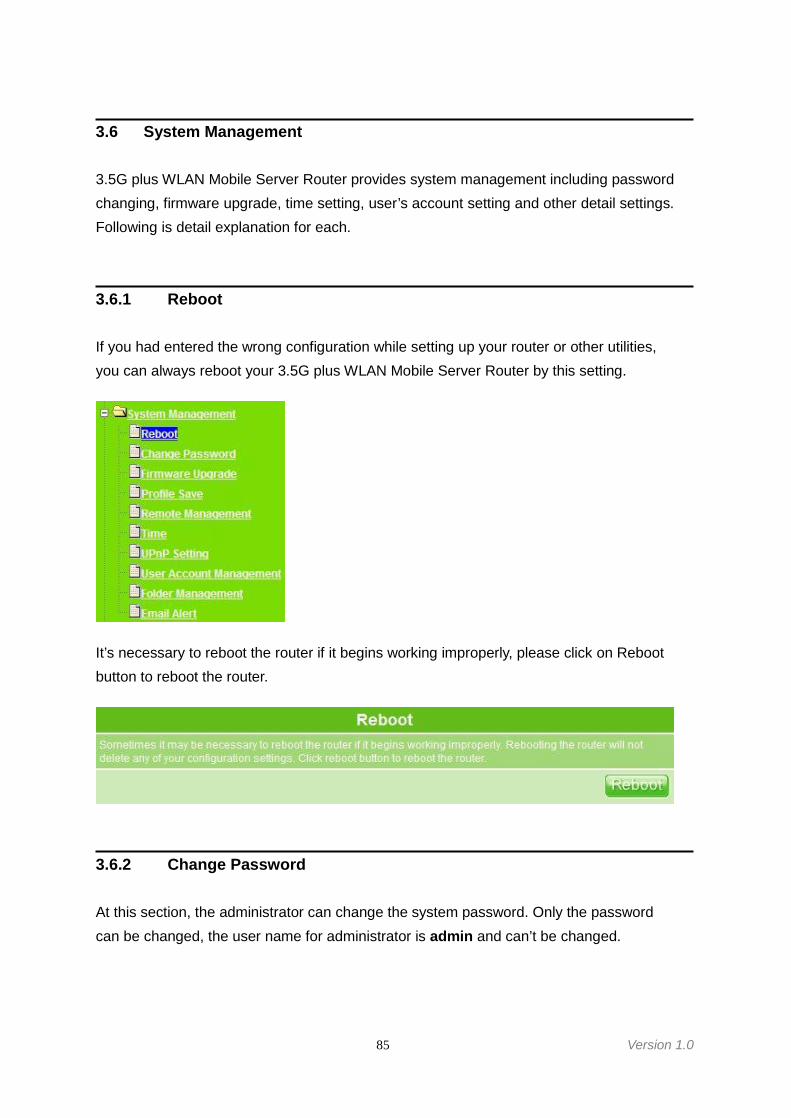
85 Version 1.0
3.6 System Management
3.5G plus WLAN Mobile Server Router provides system management including passwordchanging, firmware upgrade, time setting, user’s account setting and other detail settings.Following is detail explanation for each.
3.6.1 Reboot
If you had entered the wrong configuration while setting up your router or other utilities,you can always reboot your 3.5G plus WLAN Mobile Server Router by this setting.
It’s necessary to reboot the router if it begins working improperly, please click on Rebootbutton to reboot the router.
3.6.2 Change Password
At this section, the administrator can change the system password. Only the passwordcan be changed, the user name for administrator is admin and can’t be changed.
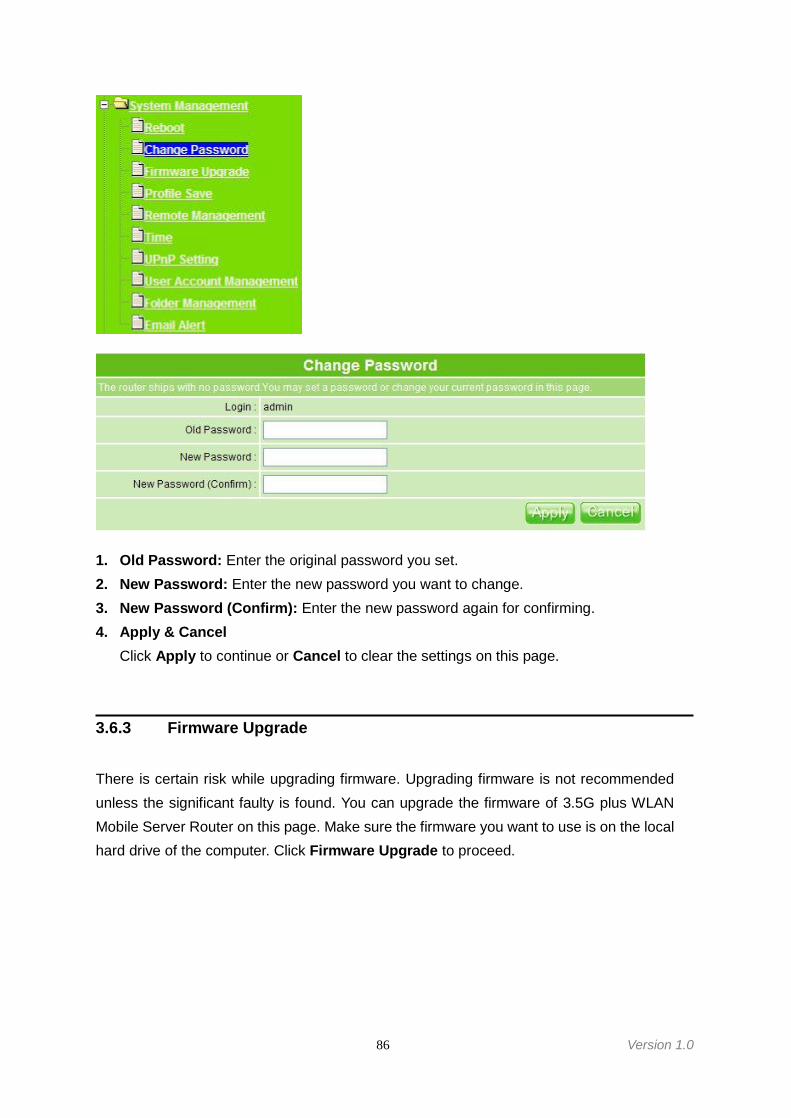
86 Version 1.0
1. Old Password: Enter the original password you set.2. New Password: Enter the new password you want to change.3. New Password (Confirm): Enter the new password again for confirming.4. Apply & Cancel
Click Apply to continue or Cancel to clear the settings on this page.
3.6.3 Firmware Upgrade
There is certain risk while upgrading firmware. Upgrading firmware is not recommendedunless the significant faulty is found. You can upgrade the firmware of 3.5G plus WLANMobile Server Router on this page. Make sure the firmware you want to use is on the localhard drive of the computer. Click Firmware Upgrade to proceed.
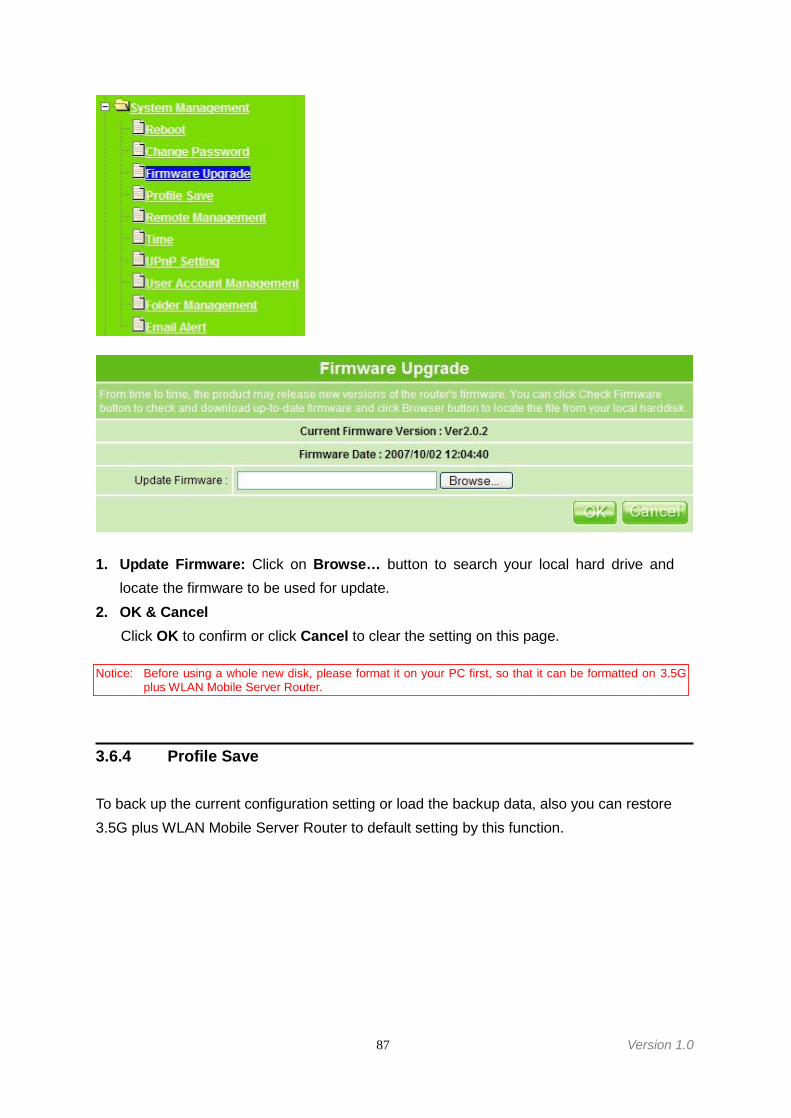
87 Version 1.0
1. Update Firmware: Click on Browse… button to search your local hard drive andlocate the firmware to be used for update.
2. OK & CancelClick OK to confirm or click Cancel to clear the setting on this page.
Notice: Before using a whole new disk, please format it on your PC first, so that it can be formatted on 3.5Gplus WLAN Mobile Server Router.
3.6.4 Profile Save
To back up the current configuration setting or load the backup data, also you can restore3.5G plus WLAN Mobile Server Router to default setting by this function.

88 Version 1.0
1. Save Settings To PC: Click on Save button for saving the configuration setting intoassigned location.
2. Load Settings From PC: Click on “Browse…” button for searching the savingconfiguration from hard drive, and then click on Load button to load all the settingsinto the router.
3. Restore To Factory Default Settings: After you have tried other methods fortroubleshooting your network, you may choose to restore 3.5G plus WLAN MobileServer Router to the factory default settings.
4. ApplyClick on Apply button to save the settings.
3.6.5 Remote Management
Remote Management allows 3.5G plus WLAN Mobile Server Router to be configured fromthe Internet by a web browser. In general, only a member of your network can browse thebuilt-in web pages to perform “Administrator” tasks. This feature enables you to performthe tasks from the remote (Internet) host.

89 Version 1.0
1. HTTP Connection Port: The port number used to access the router.2. Remote Management: You can allow any Internet IP address to access the router, or
set up deny rule according to IP setting.3. IP Address: Internet IP address of the computer that has access to the router.4. Description: Enter the description for the remote configuration.5. Add, Apply & Cancel
Click on Add button to add the remote list, click on Apply button to activate, or click onCancel button to clear the settings on this page.
6. Remote Management IP ListDisplay, edit or delete IDs, description and IP address of allowed remote list.
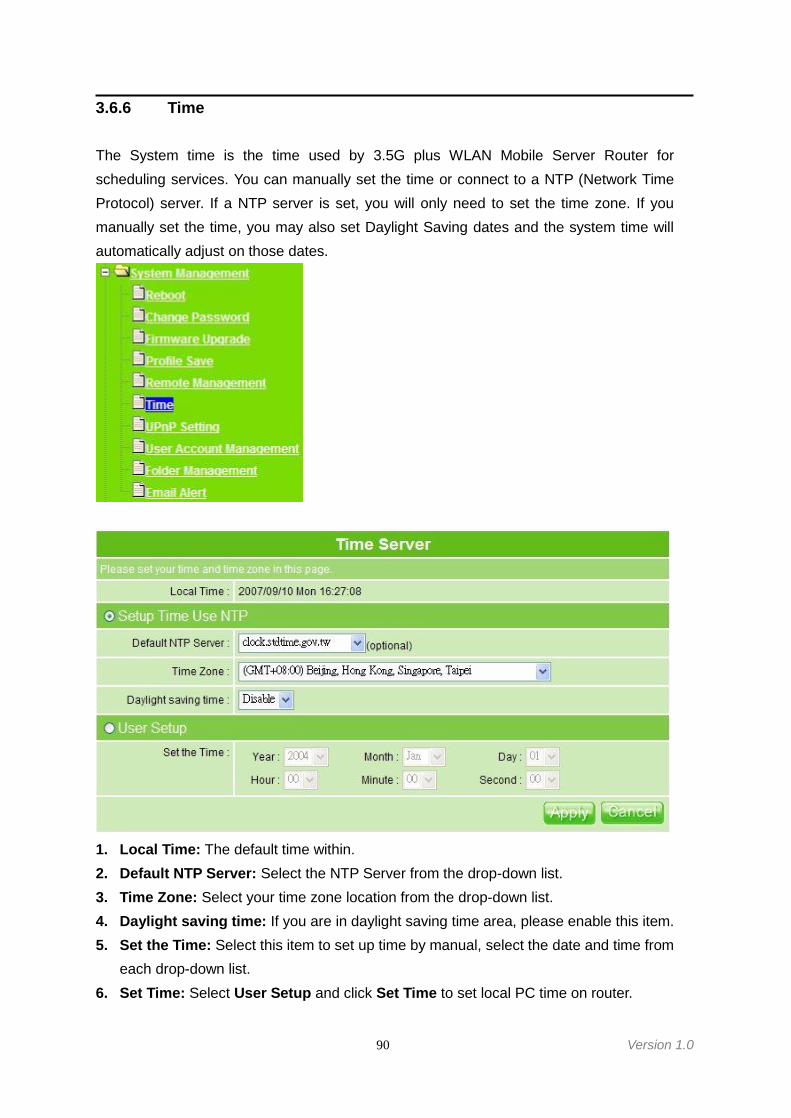
90 Version 1.0
3.6.6 Time
The System time is the time used by 3.5G plus WLAN Mobile Server Router forscheduling services. You can manually set the time or connect to a NTP (Network TimeProtocol) server. If a NTP server is set, you will only need to set the time zone. If youmanually set the time, you may also set Daylight Saving dates and the system time willautomatically adjust on those dates.
1. Local Time: The default time within.2. Default NTP Server: Select the NTP Server from the drop-down list.3. Time Zone: Select your time zone location from the drop-down list.4. Daylight saving time: If you are in daylight saving time area, please enable this item.5. Set the Time: Select this item to set up time by manual, select the date and time from
each drop-down list.6. Set Time: Select User Setup and click Set Time to set local PC time on router.
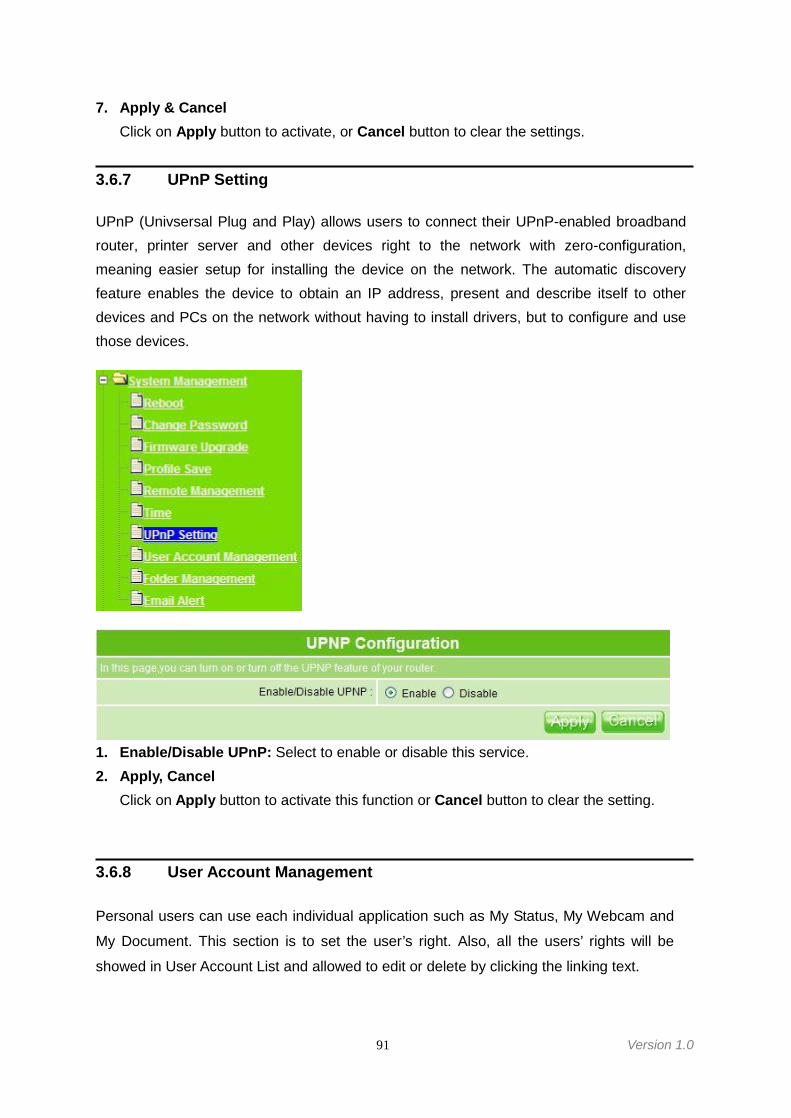
91 Version 1.0
7. Apply & CancelClick on Apply button to activate, or Cancel button to clear the settings.
3.6.7 UPnP Setting
UPnP (Univsersal Plug and Play) allows users to connect their UPnP-enabled broadbandrouter, printer server and other devices right to the network with zero-configuration,meaning easier setup for installing the device on the network. The automatic discoveryfeature enables the device to obtain an IP address, present and describe itself to otherdevices and PCs on the network without having to install drivers, but to configure and usethose devices.
1. Enable/Disable UPnP: Select to enable or disable this service.2. Apply, Cancel
Click on Apply button to activate this function or Cancel button to clear the setting.
3.6.8 User Account Management
Personal users can use each individual application such as My Status, My Webcam and
My Document. This section is to set the user’s right. Also, all the users’ rights will be
showed in User Account List and allowed to edit or delete by clicking the linking text.
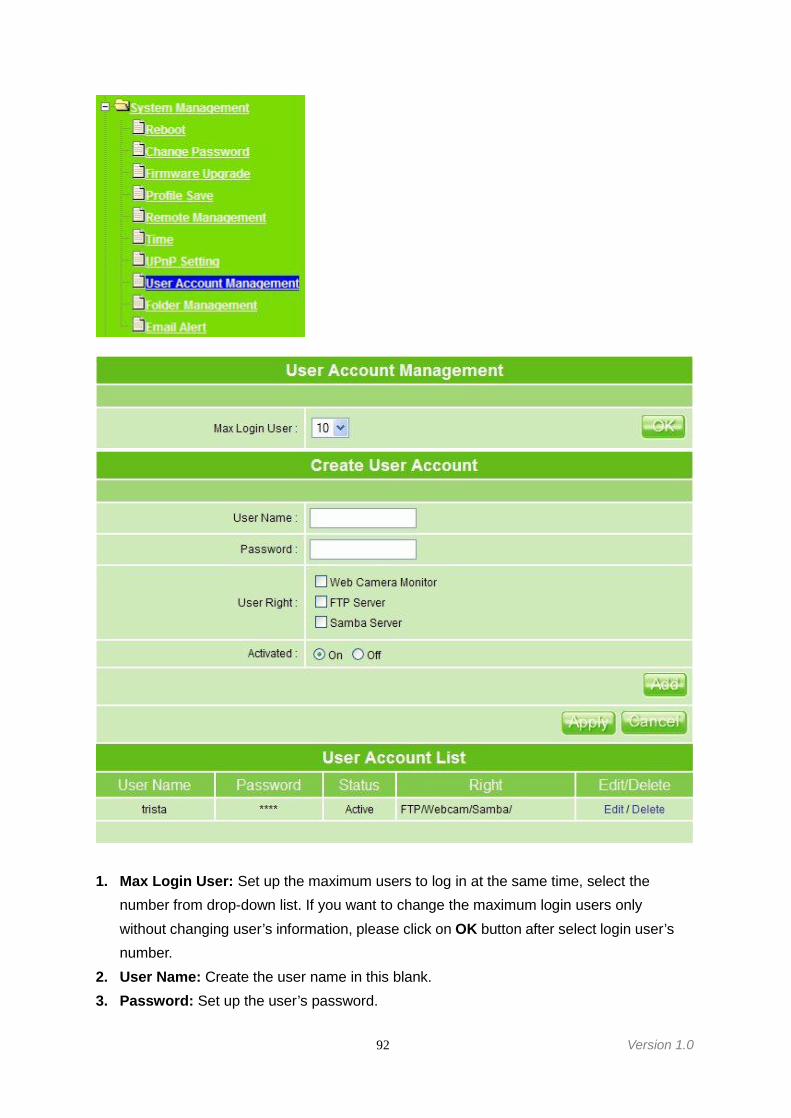
92 Version 1.0
1. Max Login User: Set up the maximum users to log in at the same time, select thenumber from drop-down list. If you want to change the maximum login users onlywithout changing user’s information, please click on OK button after select login user’snumber.
2. User Name: Create the user name in this blank.3. Password: Set up the user’s password.

93 Version 1.0
4. User Right: Check to allow set-user accessing Samba folder, monitoring fromwebcam or using FTP server.
5. Activated: Click On to allow the user’s right to be applied immediately.6. Add, Apply & Cancel
After finishing the above, click Add button to create user account. Click on Apply buttonto add set-user into the account list or Cancel button to clear the settings on this page.
7. User Account ListThe list shows all users’ names, passwords, status and rights.
3.6.9 Folder Management
Easy to check all the USB storage devices connected to 3.5G plus WLAN Mobile Server
Router, view the entire data folder inside each storage devices, and you can manage the
disk formatting / partition via clicking the button on this page.
1. Select the USB Disk and click OK for refreshing all disks before you perform disk
partition, and the Unplug button appears afterwards.
2. To partition/format the disk, please select the disk and click on Format button.
3. Moreover, if you want to view the data inside the disk, please go to 3.2.10 FTP SeverSetup to enable FTP server and then click on Disk Explorer to view all the folders
inside the device.
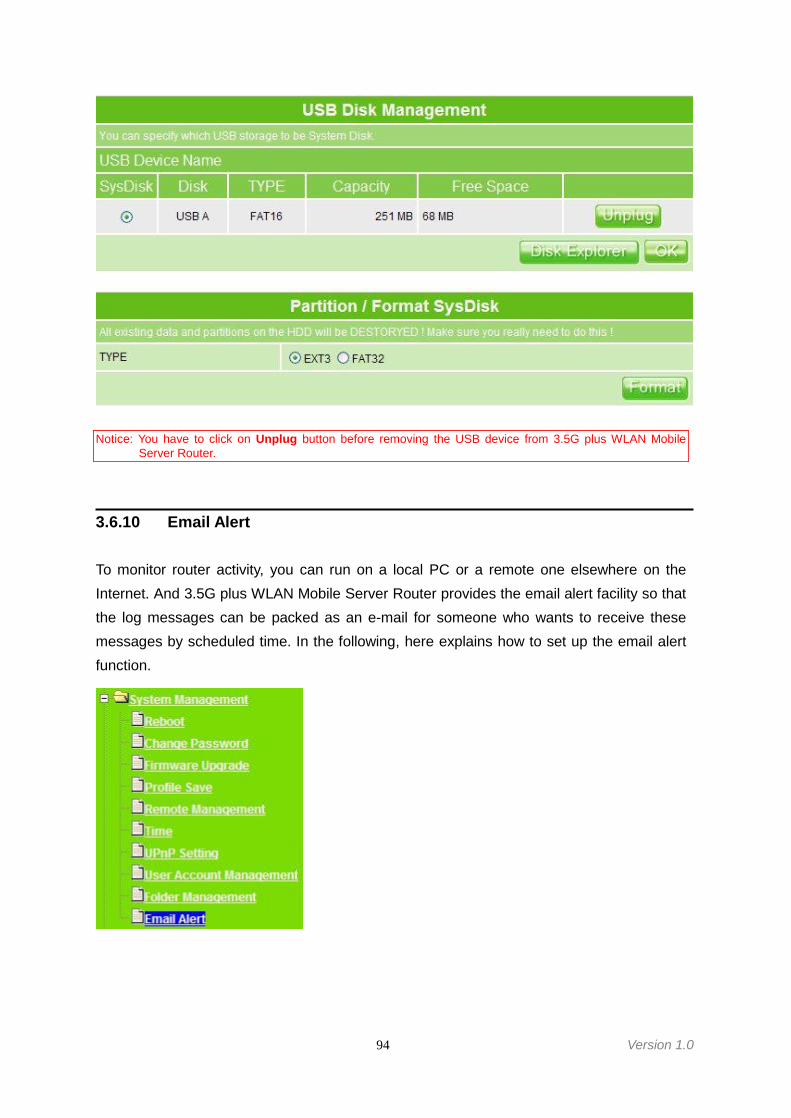
94 Version 1.0
Notice: You have to click on Unplug button before removing the USB device from 3.5G plus WLAN MobileServer Router.
3.6.10 Email Alert
To monitor router activity, you can run on a local PC or a remote one elsewhere on theInternet. And 3.5G plus WLAN Mobile Server Router provides the email alert facility so thatthe log messages can be packed as an e-mail for someone who wants to receive thesemessages by scheduled time. In the following, here explains how to set up the email alertfunction.
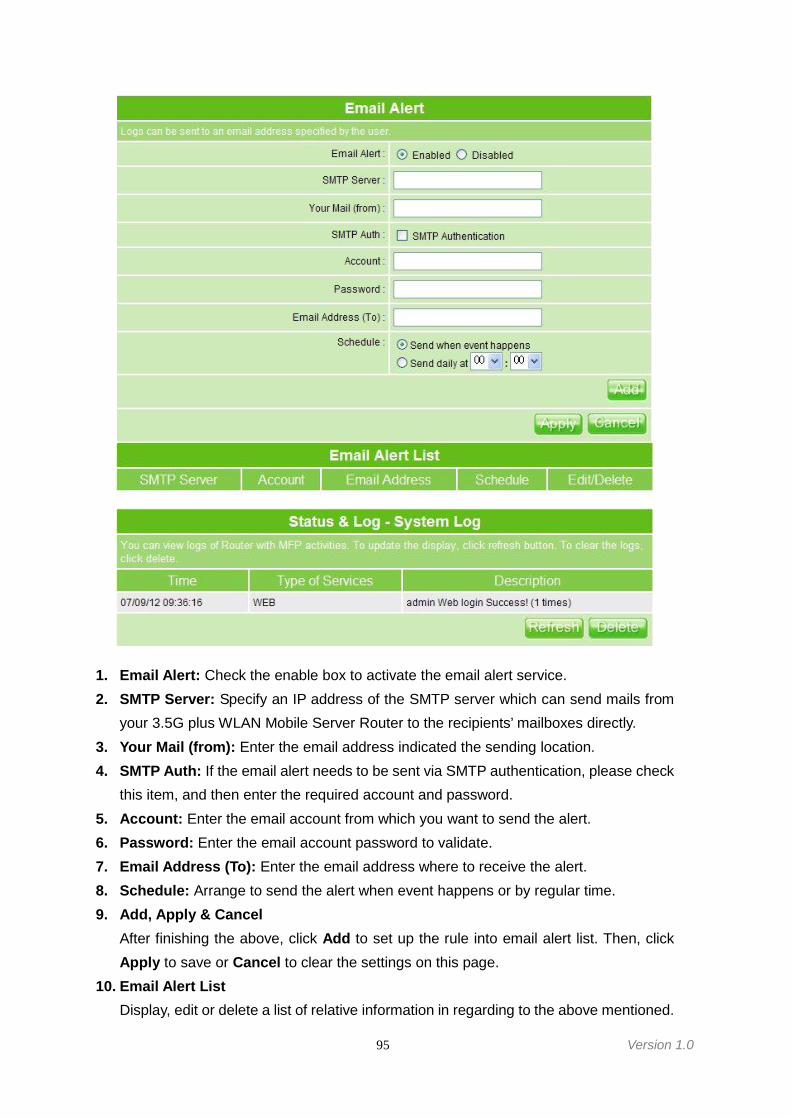
95 Version 1.0
1. Email Alert: Check the enable box to activate the email alert service.2. SMTP Server: Specify an IP address of the SMTP server which can send mails from
your 3.5G plus WLAN Mobile Server Router to the recipients’ mailboxes directly.3. Your Mail (from): Enter the email address indicated the sending location.4. SMTP Auth: If the email alert needs to be sent via SMTP authentication, please check
this item, and then enter the required account and password.5. Account: Enter the email account from which you want to send the alert.6. Password: Enter the email account password to validate.7. Email Address (To): Enter the email address where to receive the alert.8. Schedule: Arrange to send the alert when event happens or by regular time.9. Add, Apply & Cancel
After finishing the above, click Add to set up the rule into email alert list. Then, clickApply to save or Cancel to clear the settings on this page.
10. Email Alert ListDisplay, edit or delete a list of relative information in regarding to the above mentioned.

96 Version 1.0
11. Refresh & DeleteClick on Refresh to renew the login data and other system status information, or clickon Delete to clear these logs.
3.7 Log & Status
3.5G plus WLAN Mobile Server Router provides the log list, connection status and user’saccount.
3.7.1 Network Configuration
Network Configuration shows all connection status of LAN, WAN, Wireless and pluggedUSB devices.
Each block shows configuration status, you may click Refresh to update the screen list. IfWAN connection is in dynamic, click Release to free the used IP or Renew to get a newone.
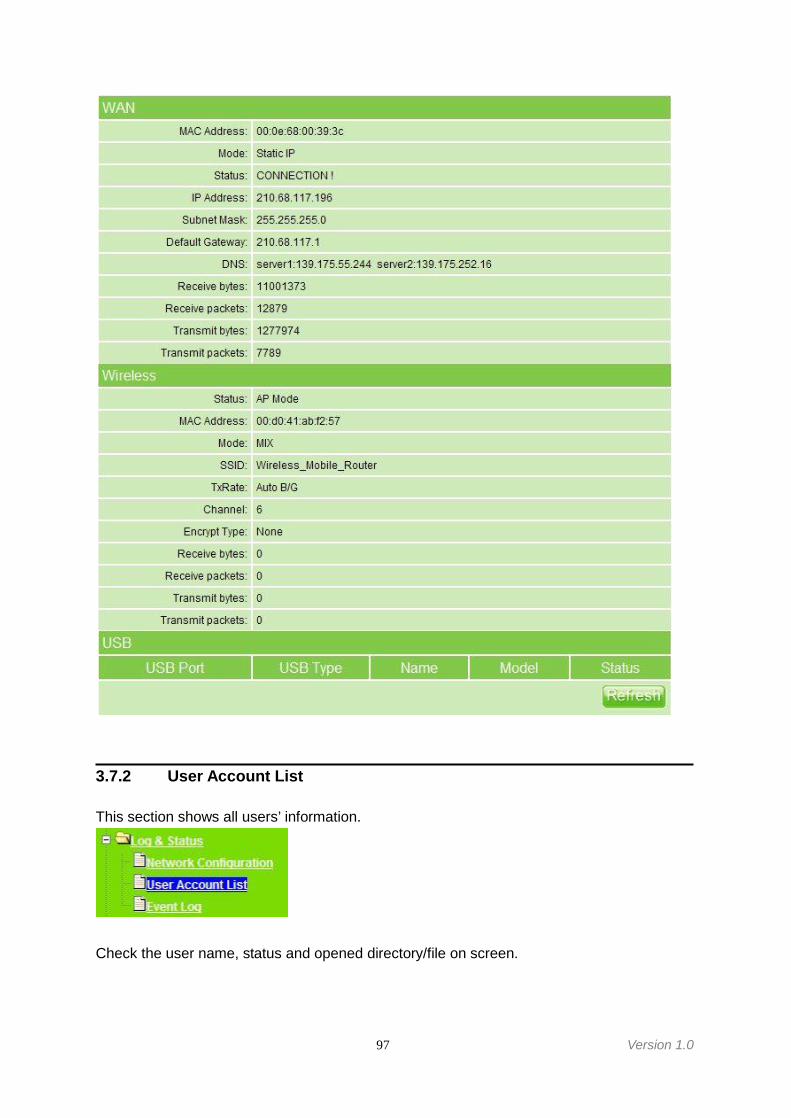
97 Version 1.0
3.7.2 User Account List
This section shows all users’ information.
Check the user name, status and opened directory/file on screen.
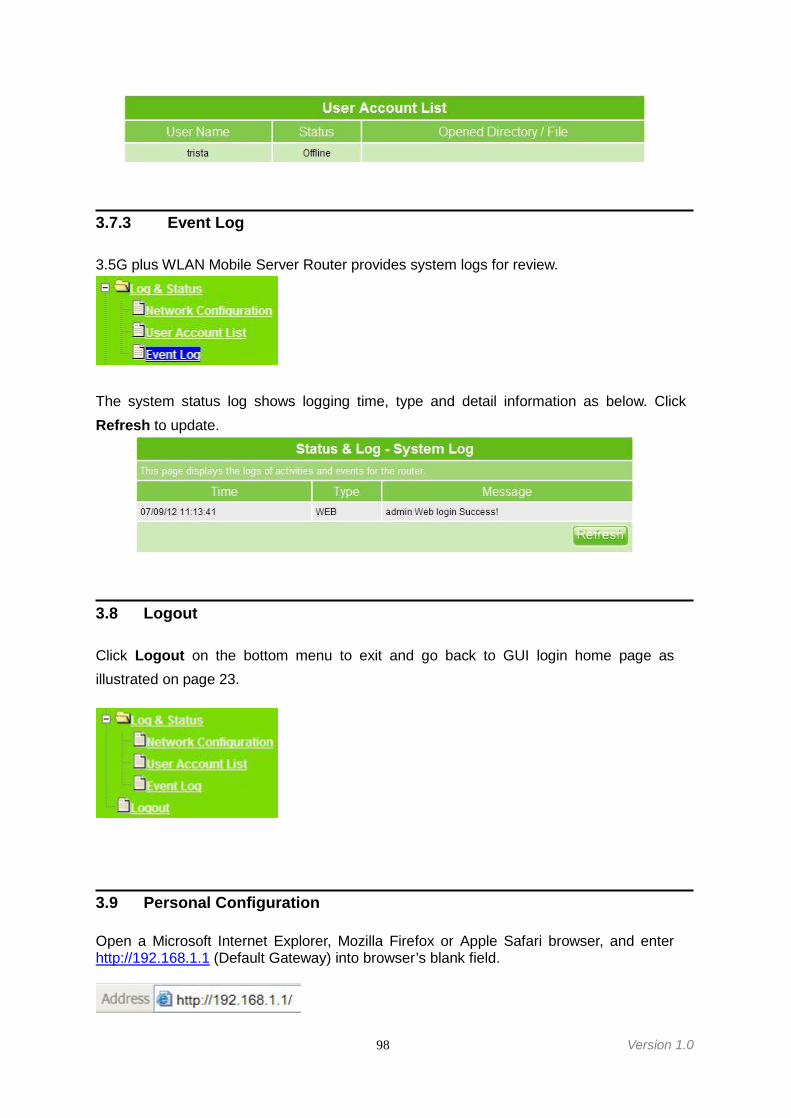
98 Version 1.0
3.7.3 Event Log
3.5G plus WLAN Mobile Server Router provides system logs for review.
The system status log shows logging time, type and detail information as below. ClickRefresh to update.
3.8 Logout
Click Logout on the bottom menu to exit and go back to GUI login home page asillustrated on page 23.
3.9 Personal Configuration
Open a Microsoft Internet Explorer, Mozilla Firefox or Apple Safari browser, and enterhttp://192.168.1.1 (Default Gateway) into browser’s blank field.
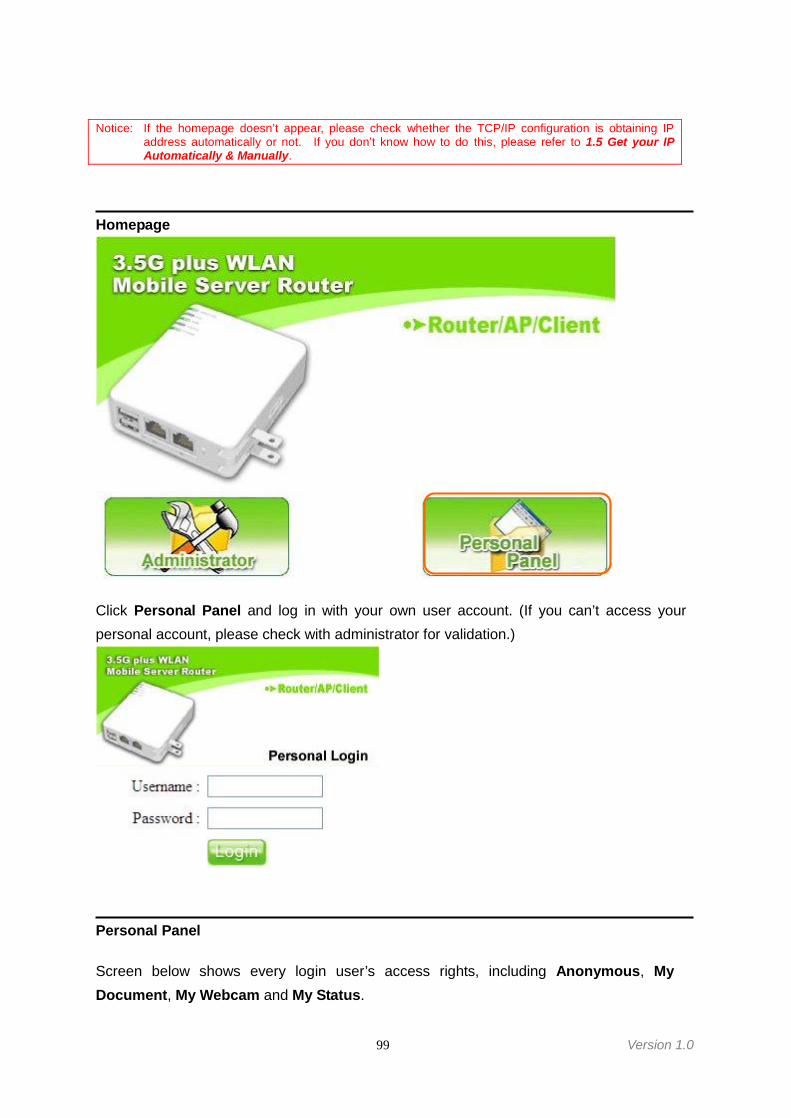
99 Version 1.0
Notice: If the homepage doesn’t appear, please check whether the TCP/IP configuration is obtaining IPaddress automatically or not. If you don’t know how to do this, please refer to 1.5 Get your IPAutomatically & Manually.
Homepage
Click Personal Panel and log in with your own user account. (If you can’t access yourpersonal account, please check with administrator for validation.)
Personal Panel
Screen below shows every login user’s access rights, including Anonymous, MyDocument, My Webcam and My Status.
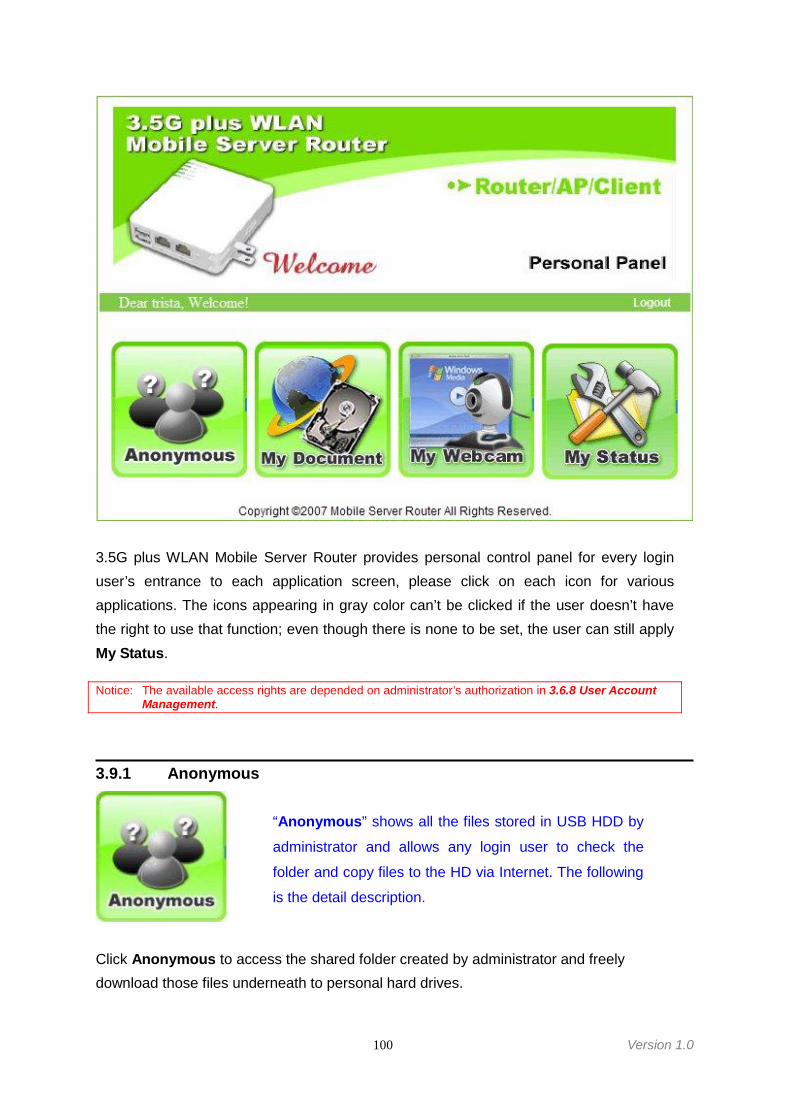
100 Version 1.0
3.5G plus WLAN Mobile Server Router provides personal control panel for every loginuser’s entrance to each application screen, please click on each icon for variousapplications. The icons appearing in gray color can’t be clicked if the user doesn’t havethe right to use that function; even though there is none to be set, the user can still applyMy Status.
Notice: The available access rights are depended on administrator’s authorization in 3.6.8 User AccountManagement.
3.9.1 Anonymous
Click Anonymous to access the shared folder created by administrator and freelydownload those files underneath to personal hard drives.
“Anonymous” shows all the files stored in USB HDD by
administrator and allows any login user to check the
folder and copy files to the HD via Internet. The following
is the detail description.
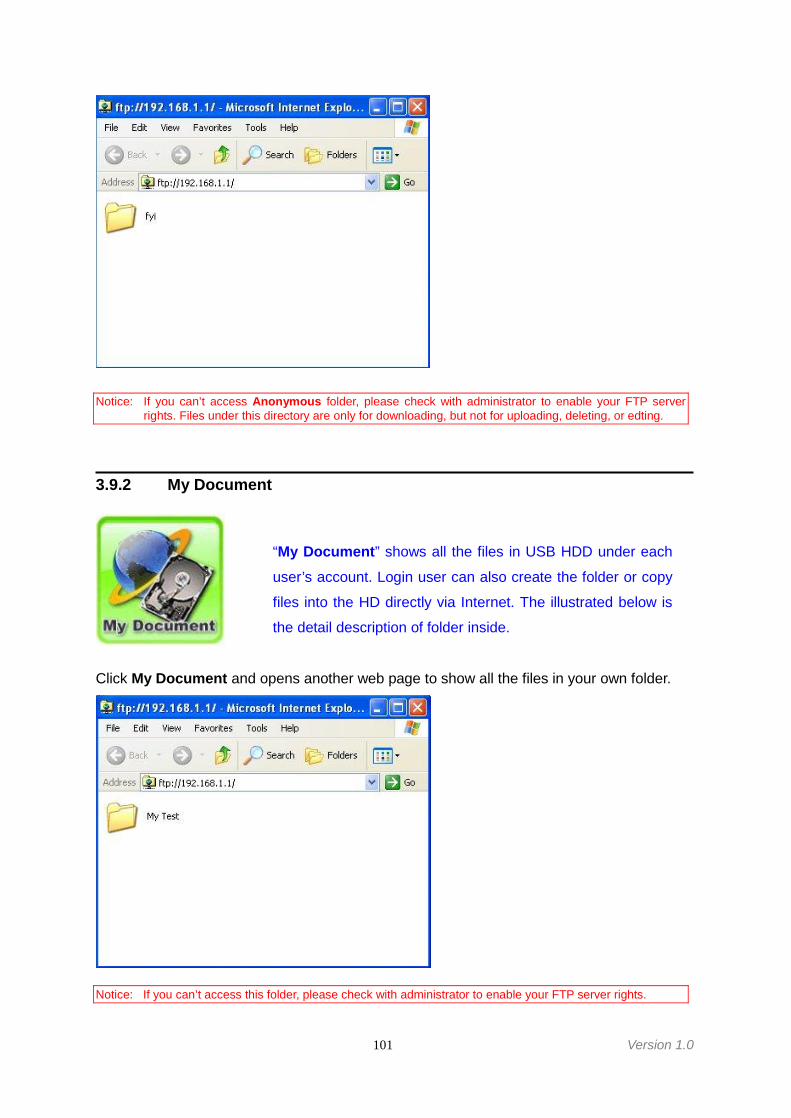
101 Version 1.0
Notice: If you can’t access Anonymous folder, please check with administrator to enable your FTP serverrights. Files under this directory are only for downloading, but not for uploading, deleting, or edting.
3.9.2 My Document
Click My Document and opens another web page to show all the files in your own folder.
Notice: If you can’t access this folder, please check with administrator to enable your FTP server rights.
“My Document” shows all the files in USB HDD under each
user’s account. Login user can also create the folder or copy
files into the HD directly via Internet. The illustrated below is
the detail description of folder inside.
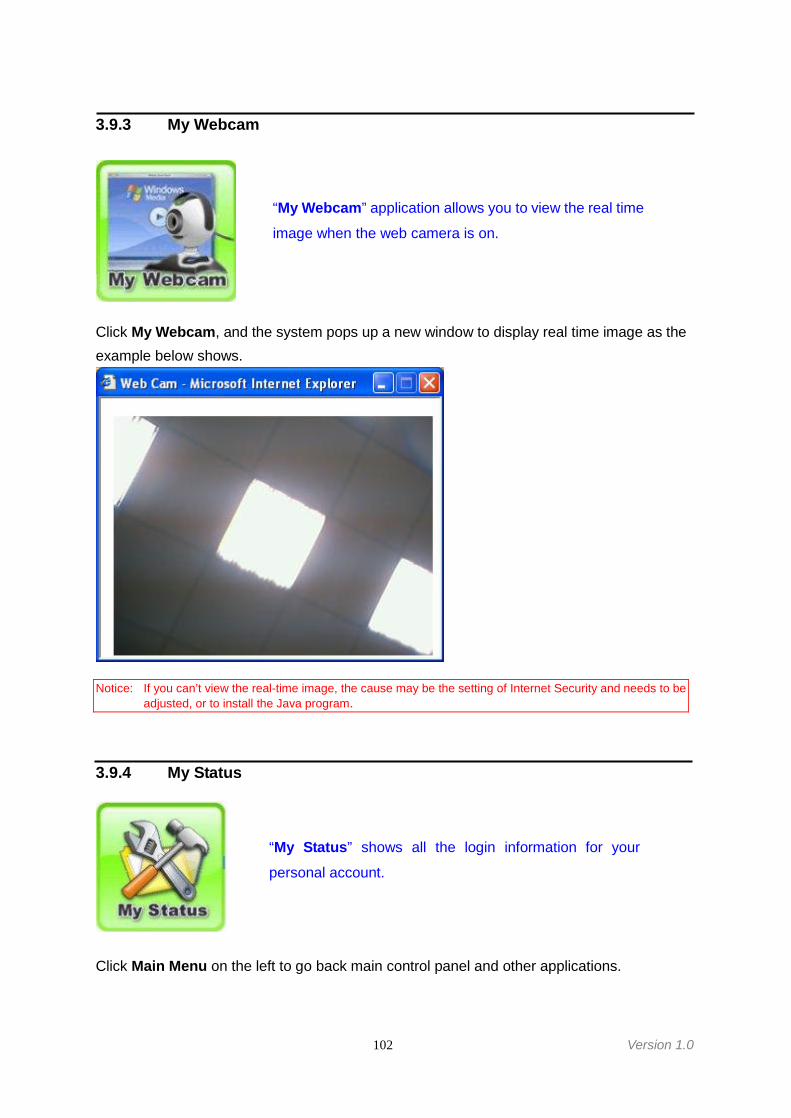
102 Version 1.0
3.9.3 My Webcam
Click My Webcam, and the system pops up a new window to display real time image as theexample below shows.
Notice: If you can’t view the real-time image, the cause may be the setting of Internet Security and needs to beadjusted, or to install the Java program.
3.9.4 My Status
Click Main Menu on the left to go back main control panel and other applications.
“My Status” shows all the login information for your
personal account.
“My Webcam” application allows you to view the real time
image when the web camera is on.
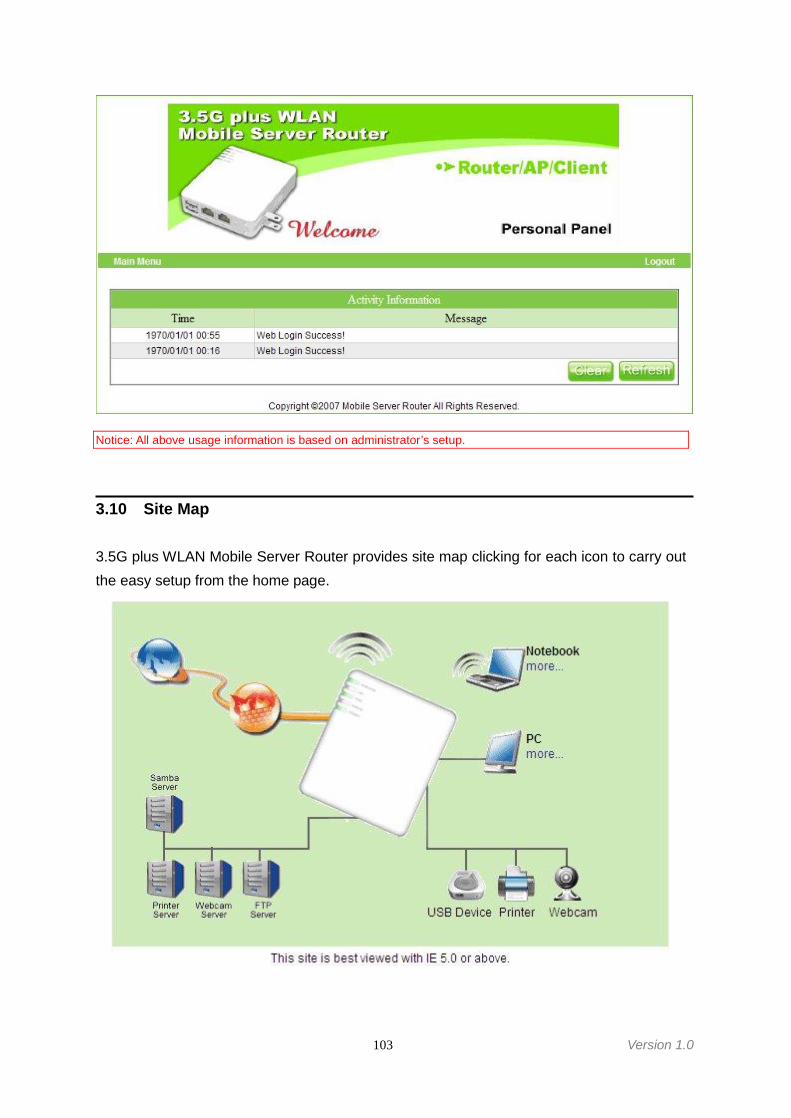
103 Version 1.0
Notice: All above usage information is based on administrator’s setup.
3.10 Site Map
3.5G plus WLAN Mobile Server Router provides site map clicking for each icon to carry outthe easy setup from the home page.
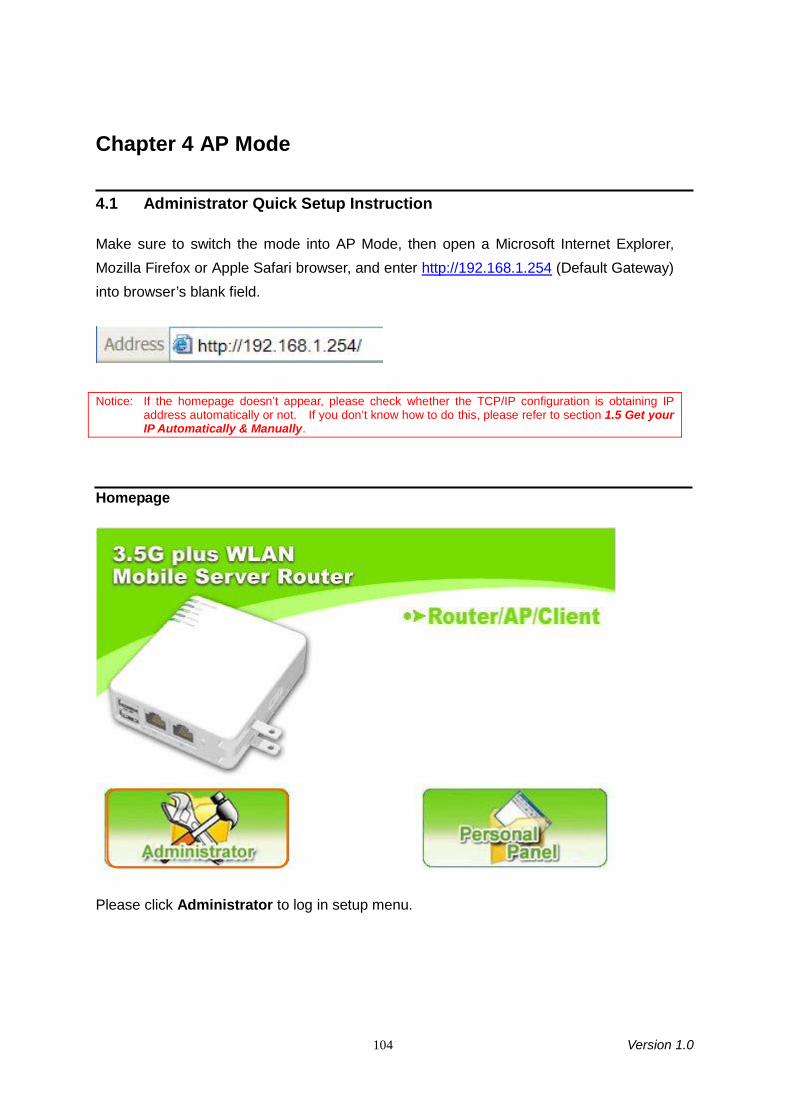
104 Version 1.0
Chapter 4 AP Mode
4.1 Administrator Quick Setup Instruction
Make sure to switch the mode into AP Mode, then open a Microsoft Internet Explorer,Mozilla Firefox or Apple Safari browser, and enter http://192.168.1.254 (Default Gateway)into browser’s blank field.
Notice: If the homepage doesn’t appear, please check whether the TCP/IP configuration is obtaining IPaddress automatically or not. If you don’t know how to do this, please refer to section 1.5 Get yourIP Automatically & Manually.
Homepage
Please click Administrator to log in setup menu.
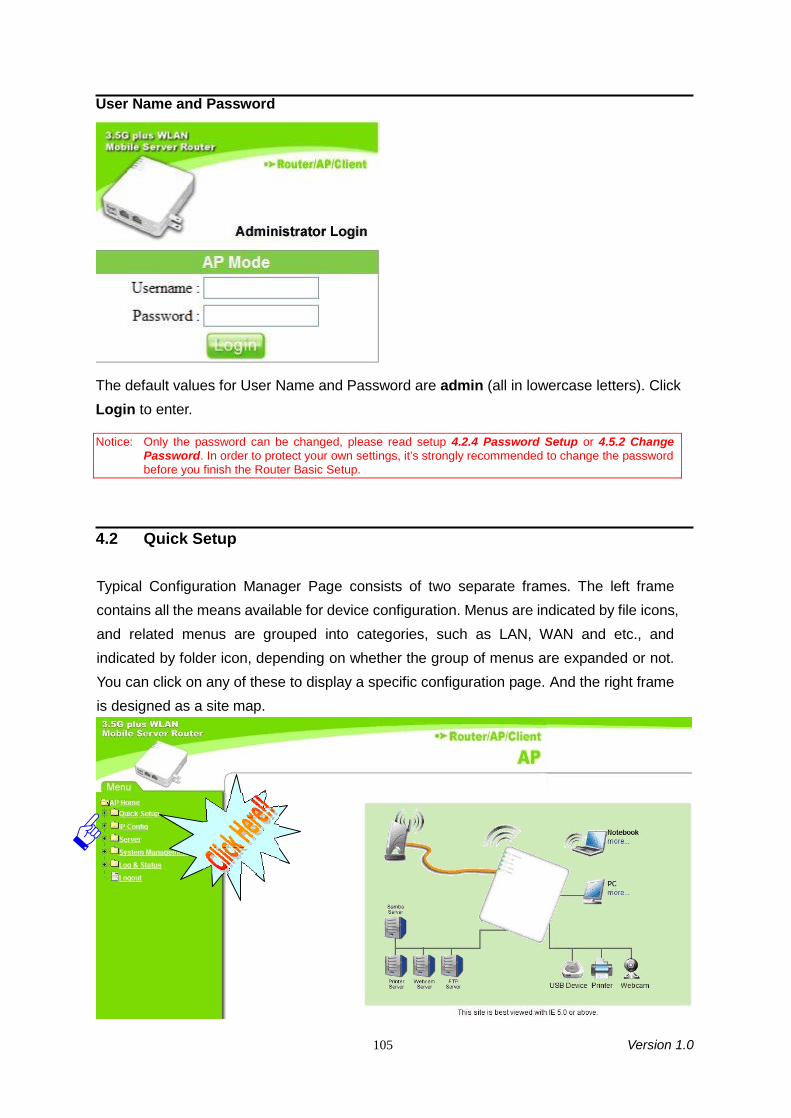
105 Version 1.0
User Name and Password
The default values for User Name and Password are admin (all in lowercase letters). ClickLogin to enter.
Notice: Only the password can be changed, please read setup 4.2.4 Password Setup or 4.5.2 ChangePassword. In order to protect your own settings, it’s strongly recommended to change the passwordbefore you finish the Router Basic Setup.
4.2 Quick Setup
Typical Configuration Manager Page consists of two separate frames. The left framecontains all the means available for device configuration. Menus are indicated by file icons,and related menus are grouped into categories, such as LAN, WAN and etc., andindicated by folder icon, depending on whether the group of menus are expanded or not.You can click on any of these to display a specific configuration page. And the right frameis designed as a site map.
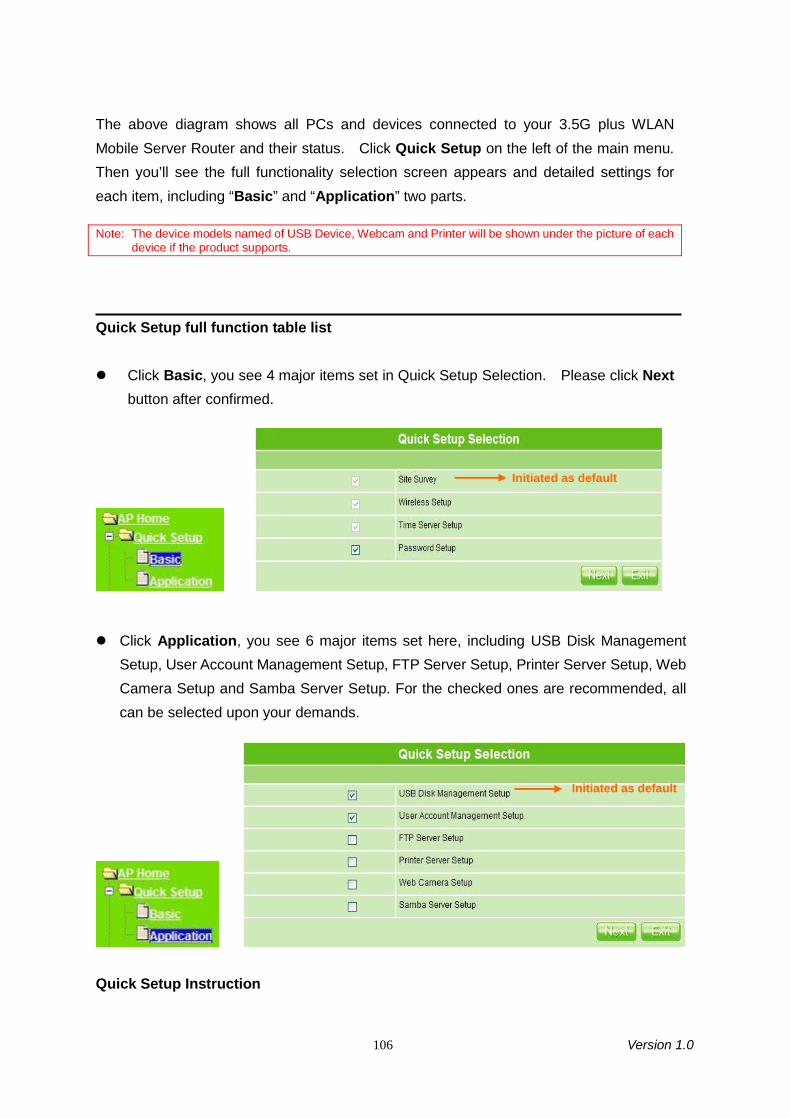
106 Version 1.0
The above diagram shows all PCs and devices connected to your 3.5G plus WLANMobile Server Router and their status. Click Quick Setup on the left of the main menu.Then you’ll see the full functionality selection screen appears and detailed settings foreach item, including “Basic” and “Application” two parts.
Note: The device models named of USB Device, Webcam and Printer will be shown under the picture of eachdevice if the product supports.
Quick Setup full function table list
Click Basic, you see 4 major items set in Quick Setup Selection. Please click Nextbutton after confirmed.
Click Application, you see 6 major items set here, including USB Disk ManagementSetup, User Account Management Setup, FTP Server Setup, Printer Server Setup, WebCamera Setup and Samba Server Setup. For the checked ones are recommended, allcan be selected upon your demands.
Quick Setup Instruction
Initiated as default
Initiated as default
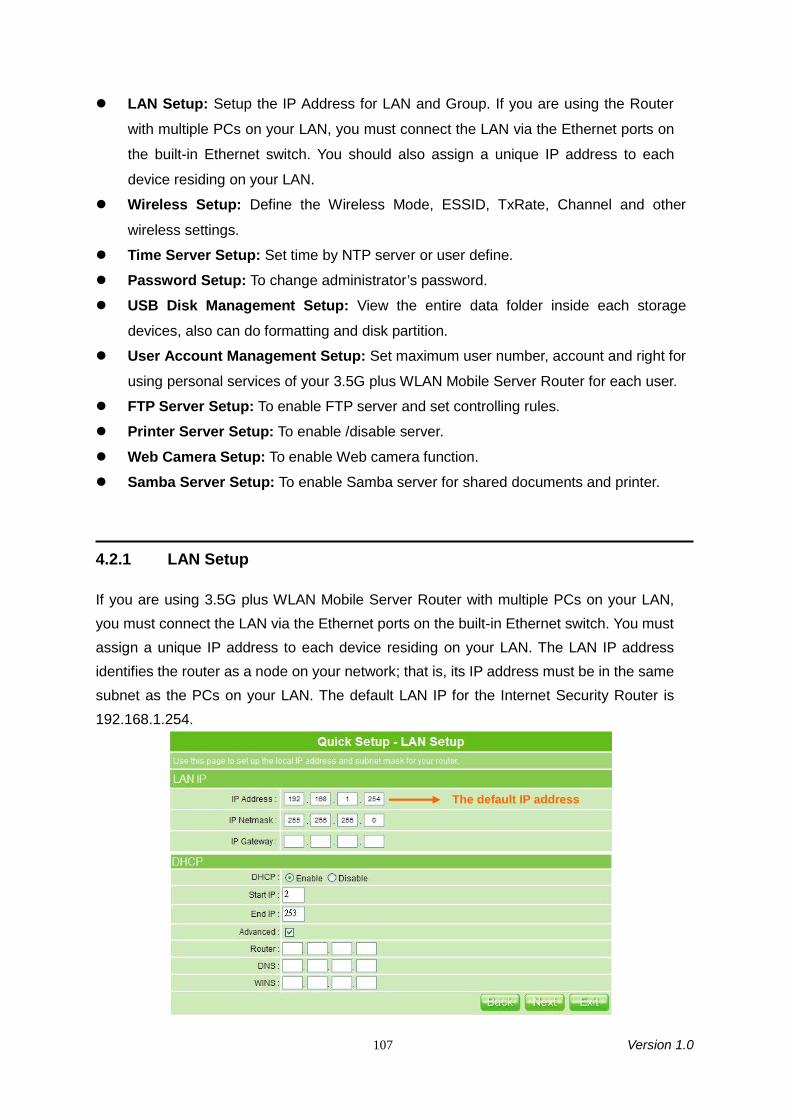
107 Version 1.0
LAN Setup: Setup the IP Address for LAN and Group. If you are using the Router
with multiple PCs on your LAN, you must connect the LAN via the Ethernet ports on
the built-in Ethernet switch. You should also assign a unique IP address to each
device residing on your LAN.
Wireless Setup: Define the Wireless Mode, ESSID, TxRate, Channel and other
wireless settings.
Time Server Setup: Set time by NTP server or user define.
Password Setup: To change administrator’s password.
USB Disk Management Setup: View the entire data folder inside each storage
devices, also can do formatting and disk partition.
User Account Management Setup: Set maximum user number, account and right for
using personal services of your 3.5G plus WLAN Mobile Server Router for each user.
FTP Server Setup: To enable FTP server and set controlling rules.
Printer Server Setup: To enable /disable server.
Web Camera Setup: To enable Web camera function.
Samba Server Setup: To enable Samba server for shared documents and printer.
4.2.1 LAN Setup
If you are using 3.5G plus WLAN Mobile Server Router with multiple PCs on your LAN,you must connect the LAN via the Ethernet ports on the built-in Ethernet switch. You mustassign a unique IP address to each device residing on your LAN. The LAN IP addressidentifies the router as a node on your network; that is, its IP address must be in the samesubnet as the PCs on your LAN. The default LAN IP for the Internet Security Router is192.168.1.254.
The default IP address
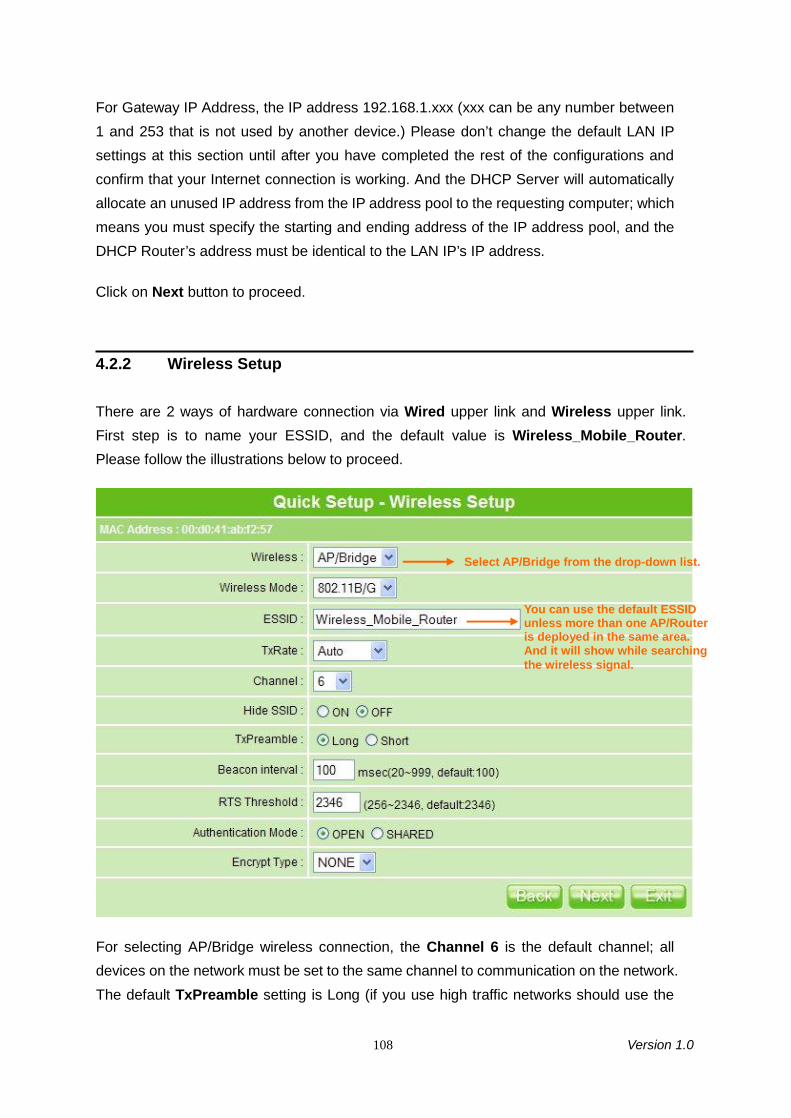
108 Version 1.0
For Gateway IP Address, the IP address 192.168.1.xxx (xxx can be any number between1 and 253 that is not used by another device.) Please don’t change the default LAN IPsettings at this section until after you have completed the rest of the configurations andconfirm that your Internet connection is working. And the DHCP Server will automaticallyallocate an unused IP address from the IP address pool to the requesting computer; whichmeans you must specify the starting and ending address of the IP address pool, and theDHCP Router’s address must be identical to the LAN IP’s IP address.
Click on Next button to proceed.
4.2.2 Wireless Setup
There are 2 ways of hardware connection via Wired upper link and Wireless upper link.First step is to name your ESSID, and the default value is Wireless_Mobile_Router.Please follow the illustrations below to proceed.
For selecting AP/Bridge wireless connection, the Channel 6 is the default channel; alldevices on the network must be set to the same channel to communication on the network.The default TxPreamble setting is Long (if you use high traffic networks should use the
Select AP/Bridge from the drop-down list.
You can use the default ESSIDunless more than one AP/Routeris deployed in the same area.And it will show while searchingthe wireless signal.
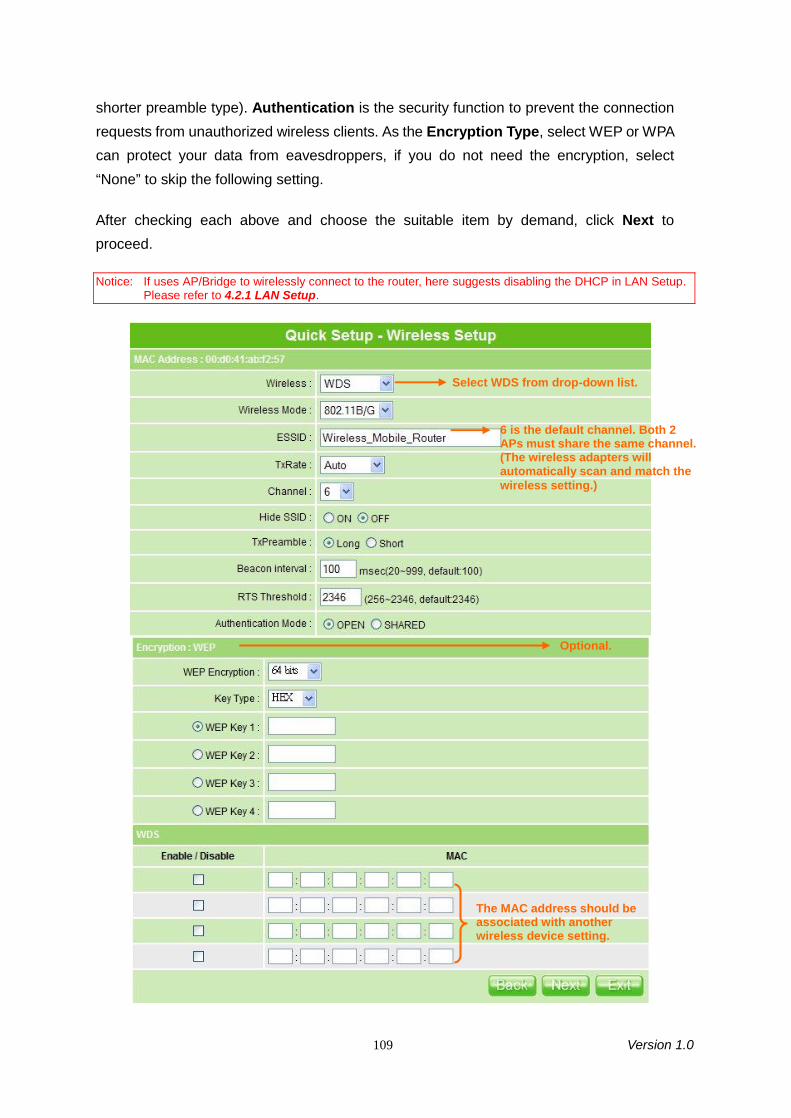
109 Version 1.0
shorter preamble type). Authentication is the security function to prevent the connectionrequests from unauthorized wireless clients. As the Encryption Type, select WEP or WPAcan protect your data from eavesdroppers, if you do not need the encryption, select“None” to skip the following setting.
After checking each above and choose the suitable item by demand, click Next toproceed.
Notice: If uses AP/Bridge to wirelessly connect to the router, here suggests disabling the DHCP in LAN Setup.Please refer to 4.2.1 LAN Setup.
Select WDS from drop-down list.
6 is the default channel. Both 2APs must share the same channel.(The wireless adapters willautomatically scan and match thewireless setting.)
Optional.
The MAC address should beassociated with anotherwireless device setting.
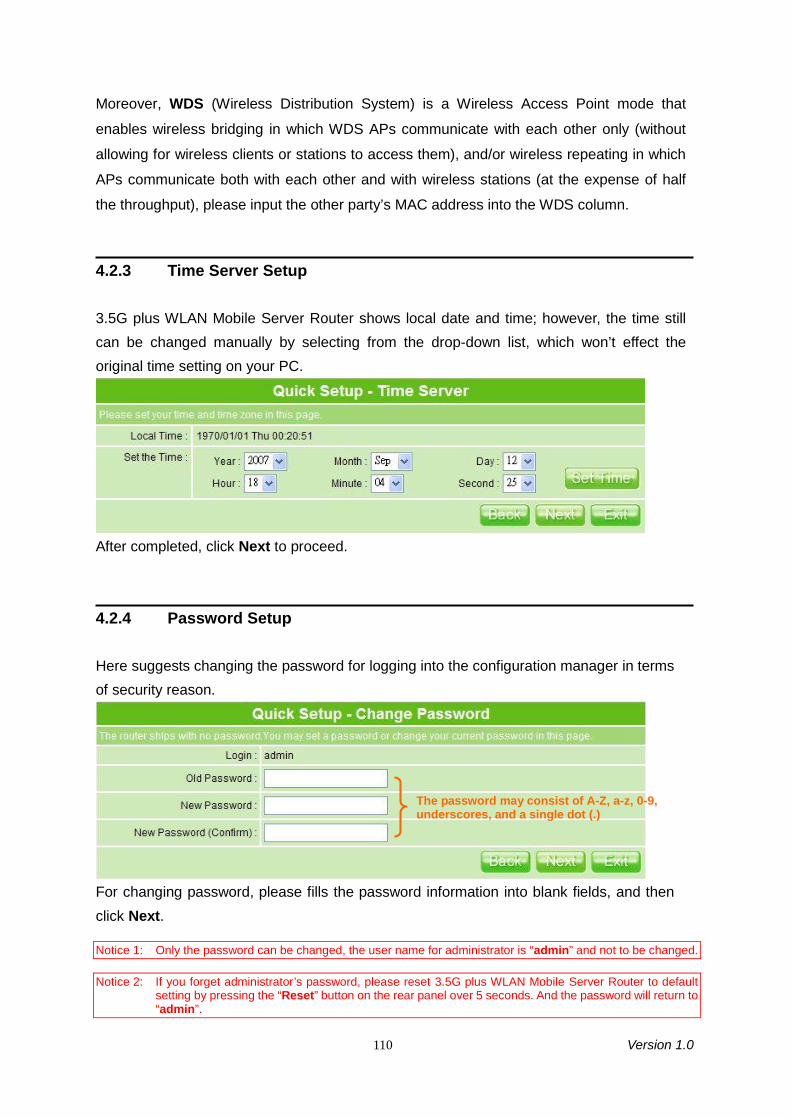
110 Version 1.0
Moreover, WDS (Wireless Distribution System) is a Wireless Access Point mode that
enables wireless bridging in which WDS APs communicate with each other only (without
allowing for wireless clients or stations to access them), and/or wireless repeating in which
APs communicate both with each other and with wireless stations (at the expense of half
the throughput), please input the other party’s MAC address into the WDS column.
4.2.3 Time Server Setup
3.5G plus WLAN Mobile Server Router shows local date and time; however, the time stillcan be changed manually by selecting from the drop-down list, which won’t effect theoriginal time setting on your PC.
After completed, click Next to proceed.
4.2.4 Password Setup
Here suggests changing the password for logging into the configuration manager in termsof security reason.
For changing password, please fills the password information into blank fields, and thenclick Next.
Notice 1: Only the password can be changed, the user name for administrator is “admin” and not to be changed.
Notice 2: If you forget administrator’s password, please reset 3.5G plus WLAN Mobile Server Router to defaultsetting by pressing the “Reset” button on the rear panel over 5 seconds. And the password will return to“admin”.
The password may consist of A-Z, a-z, 0-9,underscores, and a single dot (.)
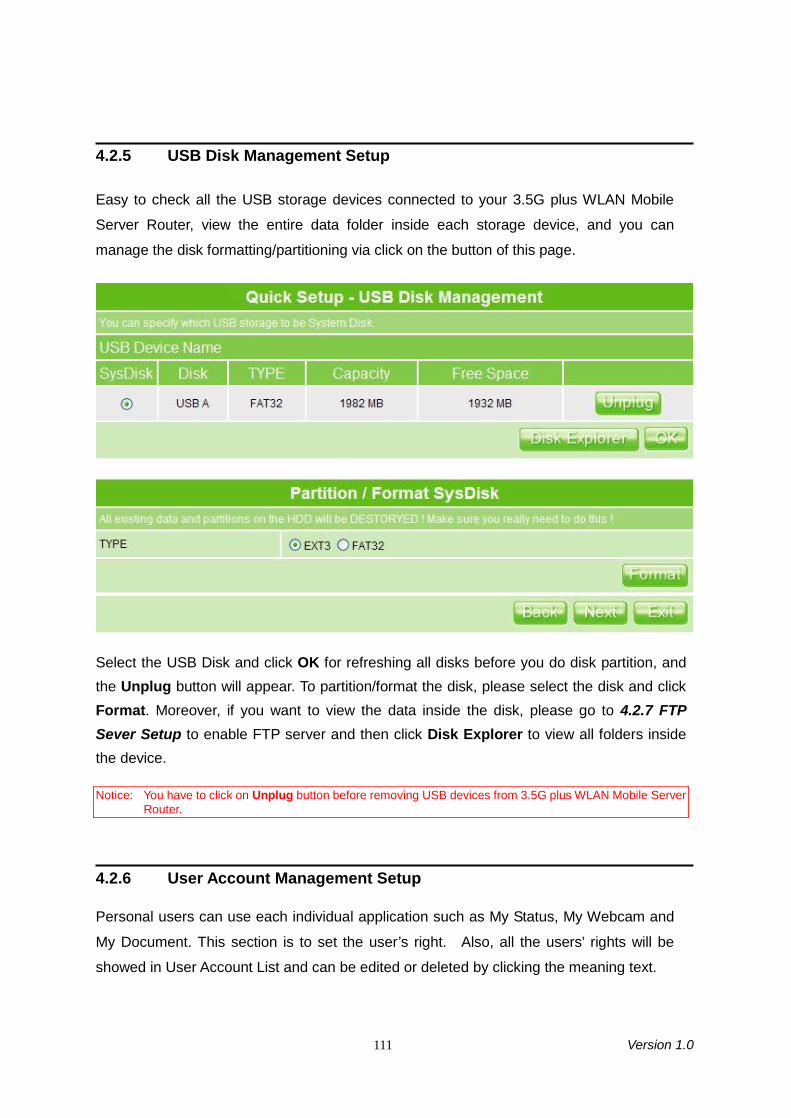
111 Version 1.0
4.2.5 USB Disk Management Setup
Easy to check all the USB storage devices connected to your 3.5G plus WLAN Mobile
Server Router, view the entire data folder inside each storage device, and you can
manage the disk formatting/partitioning via click on the button of this page.
Select the USB Disk and click OK for refreshing all disks before you do disk partition, andthe Unplug button will appear. To partition/format the disk, please select the disk and clickFormat. Moreover, if you want to view the data inside the disk, please go to 4.2.7 FTPSever Setup to enable FTP server and then click Disk Explorer to view all folders insidethe device.
Notice: You have to click on Unplug button before removing USB devices from 3.5G plus WLAN Mobile ServerRouter.
4.2.6 User Account Management Setup
Personal users can use each individual application such as My Status, My Webcam and
My Document. This section is to set the user’s right. Also, all the users’ rights will be
showed in User Account List and can be edited or deleted by clicking the meaning text.
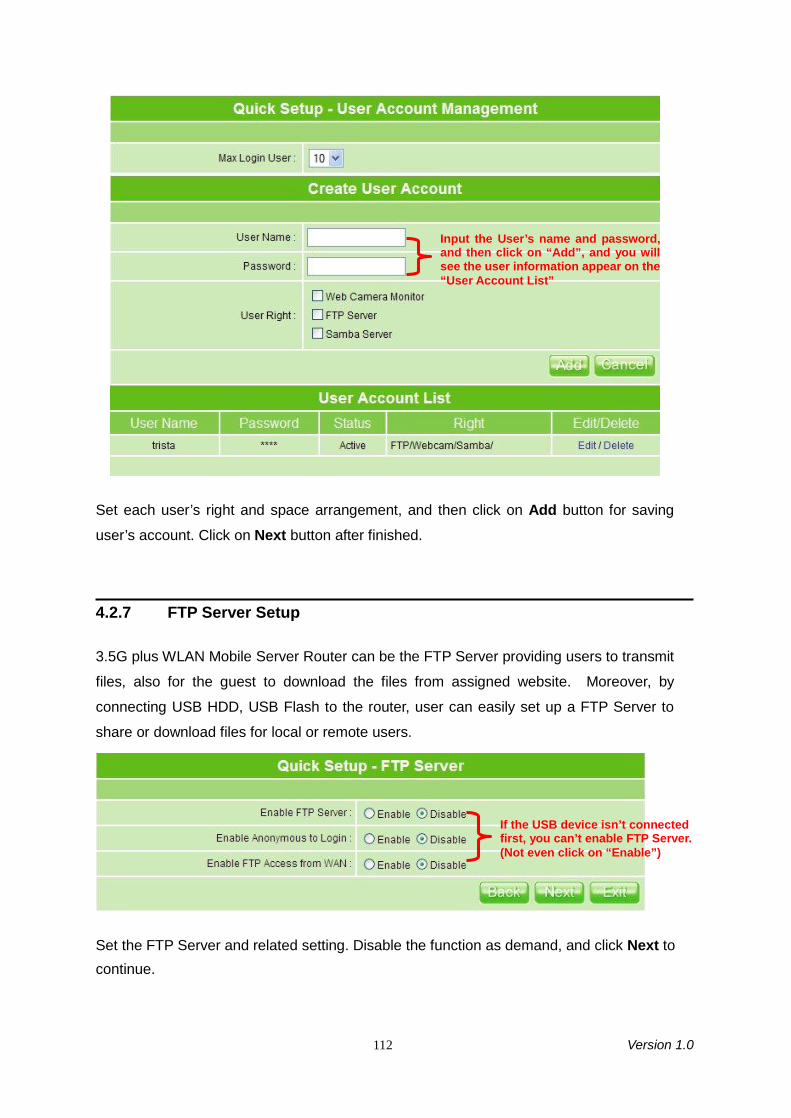
112 Version 1.0
Set each user’s right and space arrangement, and then click on Add button for saving
user’s account. Click on Next button after finished.
4.2.7 FTP Server Setup
3.5G plus WLAN Mobile Server Router can be the FTP Server providing users to transmit
files, also for the guest to download the files from assigned website. Moreover, by
connecting USB HDD, USB Flash to the router, user can easily set up a FTP Server to
share or download files for local or remote users.
Set the FTP Server and related setting. Disable the function as demand, and click Next tocontinue.
Input the User’s name and password,and then click on “Add”, and you willsee the user information appear on the“User Account List”
If the USB device isn’t connectedfirst, you can’t enable FTP Server.(Not even click on “Enable”)

113 Version 1.0
4.2.8 Printer Server Setup
3.5G plus WLAN Mobile Server Router supports LPR-protocol, as well as NetBIOS, and is
convenient for sharing printer. In other words, it is an Internet access solution for your
LAN/WAN, which provides you the shared web surfing, and supports USB interface printer.
Any users in the same subnet of 3.5G plus WLAN Mobile Server Router can print their
document via the network printers.
Enable the printer and click on Next button to next setup.
Notice: After above Printer Server in Quick Setup finished, the related printing settings on 3.5G plus WLANMobile Server Router and PC have to be set up, too. Please refer to 4.4.4 Printer Server to set thedetails.
4.2.9 Web Camera Server Setup
If you plan to use 3.5G plus WLAN Mobile Server Router as a Web Camera site, justconnect a supported USB Web Camera to its USB port. Then check Enable for bothEnable webcam server and Access from WAN to activate.
Click on Next button to next step.
Notice:Before webcam server enabled, please make sure the webcam has connected to the product; otherwise,the “Enable” selection can’t be checked.
4.2.10 Samba Server Setup
3.5G plus WLAN Mobile Server Router supports NetBIOS protocol, providing networkneighbors to share file folders or printer.
If the printer isn’t connected,you can’t choose “Enable”.
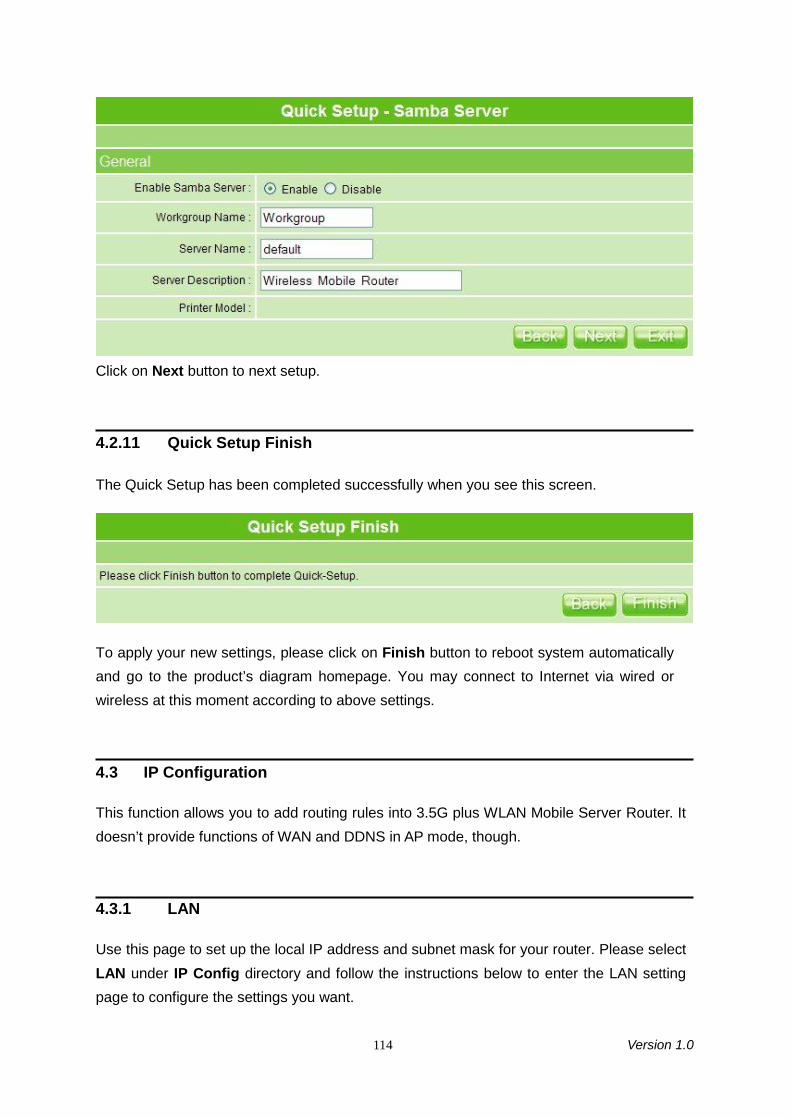
114 Version 1.0
Click on Next button to next setup.
4.2.11 Quick Setup Finish
The Quick Setup has been completed successfully when you see this screen.
To apply your new settings, please click on Finish button to reboot system automaticallyand go to the product’s diagram homepage. You may connect to Internet via wired orwireless at this moment according to above settings.
4.3 IP Configuration
This function allows you to add routing rules into 3.5G plus WLAN Mobile Server Router. Itdoesn’t provide functions of WAN and DDNS in AP mode, though.
4.3.1 LAN
Use this page to set up the local IP address and subnet mask for your router. Please selectLAN under IP Config directory and follow the instructions below to enter the LAN settingpage to configure the settings you want.

115 Version 1.0
1. IP AddressThe default value of LAN IP address is 192.168.1.254 for this router.
2. IP NetmaskFill in Subnet Mask, normally it is 255.255.255.0.
3. IP GatewayFill in with the default gateway address. If you don’t know, please check your ISP.
4. DHCPEnable or disable DHCP services. DHCP server will automatically allocate an unused IPaddress from the IP address pool to the requesting computer if enabled.
5. Start IPThis field specifies the first address in the pool to be assigned by DHCP server in yourlocal network. The default setting is 2.
6. End IPThis field specifies the last address in the pool to be assigned by the DHCP server inyour local network. The default setting is 253.
7. AdvancedEnable the advance setting and then set up the Router, DNS and WINS value.
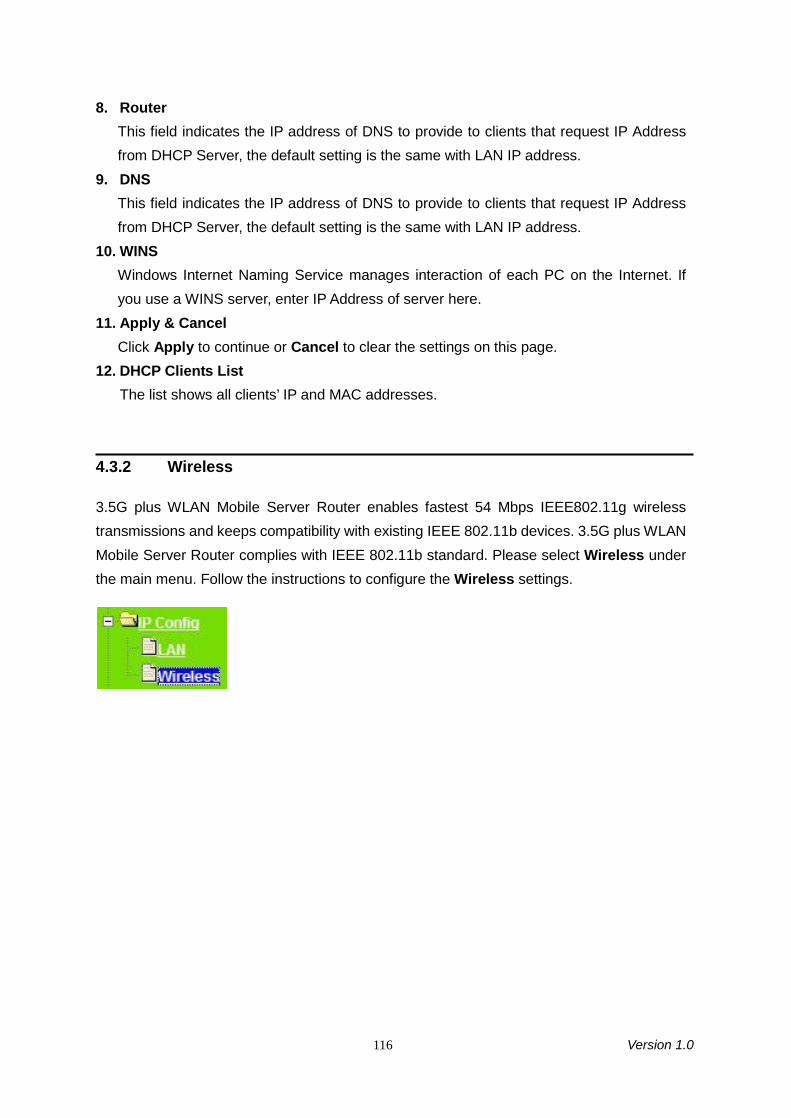
116 Version 1.0
8. RouterThis field indicates the IP address of DNS to provide to clients that request IP Addressfrom DHCP Server, the default setting is the same with LAN IP address.
9. DNSThis field indicates the IP address of DNS to provide to clients that request IP Addressfrom DHCP Server, the default setting is the same with LAN IP address.
10. WINSWindows Internet Naming Service manages interaction of each PC on the Internet. Ifyou use a WINS server, enter IP Address of server here.
11. Apply & CancelClick Apply to continue or Cancel to clear the settings on this page.
12. DHCP Clients ListThe list shows all clients’ IP and MAC addresses.
4.3.2 Wireless
3.5G plus WLAN Mobile Server Router enables fastest 54 Mbps IEEE802.11g wirelesstransmissions and keeps compatibility with existing IEEE 802.11b devices. 3.5G plus WLANMobile Server Router complies with IEEE 802.11b standard. Please select Wireless underthe main menu. Follow the instructions to configure the Wireless settings.

117 Version 1.0
1. WirelessSelect AP/Bridge or WDS to allow or disallow the wireless operation.
2. Wireless ModeThis field indicates the 802.11g interface mode. “802.11G” prevents the 802.11b clientsfrom accessing the router. “802.11B/G” allows both 802.11b and 802.11g clients toaccess the router. “802.11B” will enable the network as an 802.11b wireless network. Bydefault, the mode is “802.11B/G”.
3. ESSIDYou can use the default ESSID and radio channel unless more than one 3.5G plusWLAN Mobile Server Router or access point is deployed in the same area. Under thissituation, it is advised that you should use a different ESSID and radio channel for eachof 3.5G plus WLAN Mobile Server Router or access point in order to distinguish fromeach other. All of 3.5G plus WLAN Mobile Server Routers and your wireless LAN cardsmust have the same ESSID to allow a wireless mobile client roaming inbetween. Bydefault, the ESSID is set to Wireless_Mobile_Router.
4. TxRateSelect the transmission rate for the network. The default setting is Auto.
5. ChannelIEEE 802.11g and 802.11b devices are direct sequence spread spectrum devices thatspread a radio signal over a range of frequencies. The range of frequencies used by a
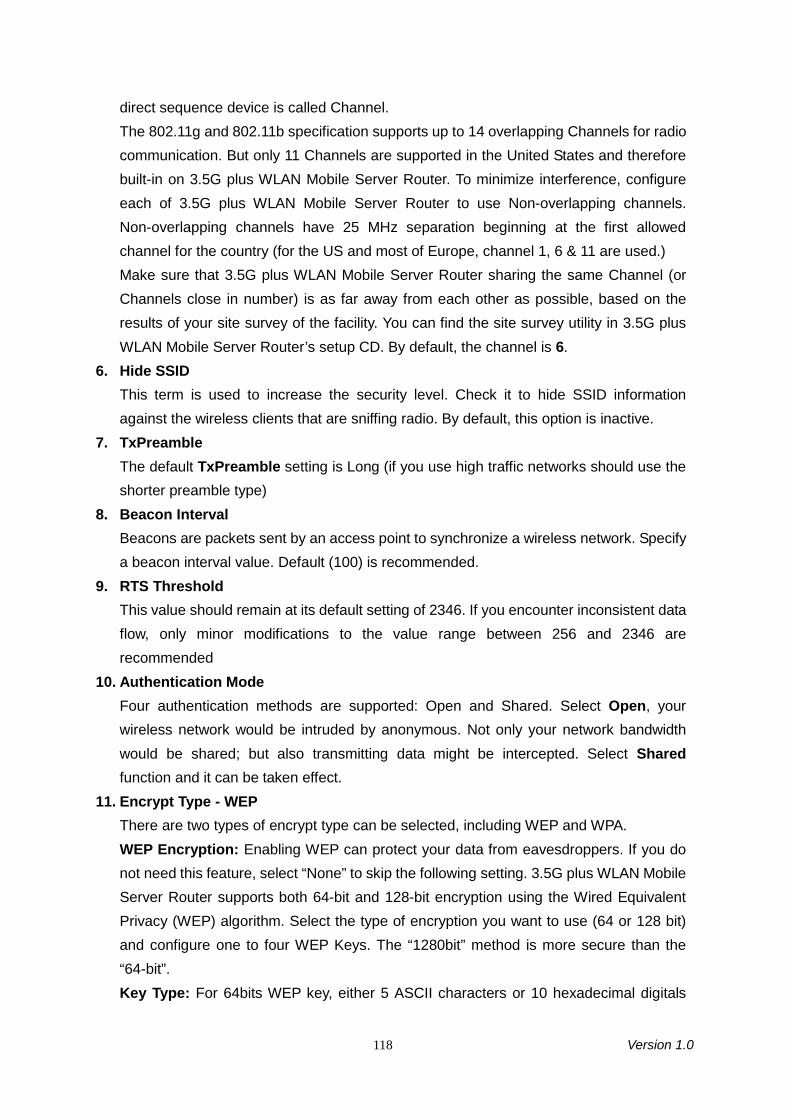
118 Version 1.0
direct sequence device is called Channel.The 802.11g and 802.11b specification supports up to 14 overlapping Channels for radiocommunication. But only 11 Channels are supported in the United States and thereforebuilt-in on 3.5G plus WLAN Mobile Server Router. To minimize interference, configureeach of 3.5G plus WLAN Mobile Server Router to use Non-overlapping channels.Non-overlapping channels have 25 MHz separation beginning at the first allowedchannel for the country (for the US and most of Europe, channel 1, 6 & 11 are used.)Make sure that 3.5G plus WLAN Mobile Server Router sharing the same Channel (orChannels close in number) is as far away from each other as possible, based on theresults of your site survey of the facility. You can find the site survey utility in 3.5G plusWLAN Mobile Server Router’s setup CD. By default, the channel is 6.
6. Hide SSIDThis term is used to increase the security level. Check it to hide SSID informationagainst the wireless clients that are sniffing radio. By default, this option is inactive.
7. TxPreambleThe default TxPreamble setting is Long (if you use high traffic networks should use theshorter preamble type)
8. Beacon IntervalBeacons are packets sent by an access point to synchronize a wireless network. Specifya beacon interval value. Default (100) is recommended.
9. RTS ThresholdThis value should remain at its default setting of 2346. If you encounter inconsistent dataflow, only minor modifications to the value range between 256 and 2346 arerecommended
10. Authentication ModeFour authentication methods are supported: Open and Shared. Select Open, yourwireless network would be intruded by anonymous. Not only your network bandwidthwould be shared; but also transmitting data might be intercepted. Select Sharedfunction and it can be taken effect.
11. Encrypt Type - WEPThere are two types of encrypt type can be selected, including WEP and WPA.WEP Encryption: Enabling WEP can protect your data from eavesdroppers. If you donot need this feature, select “None” to skip the following setting. 3.5G plus WLAN MobileServer Router supports both 64-bit and 128-bit encryption using the Wired EquivalentPrivacy (WEP) algorithm. Select the type of encryption you want to use (64 or 128 bit)and configure one to four WEP Keys. The “1280bit” method is more secure than the“64-bit”.Key Type: For 64bits WEP key, either 5 ASCII characters or 10 hexadecimal digitals
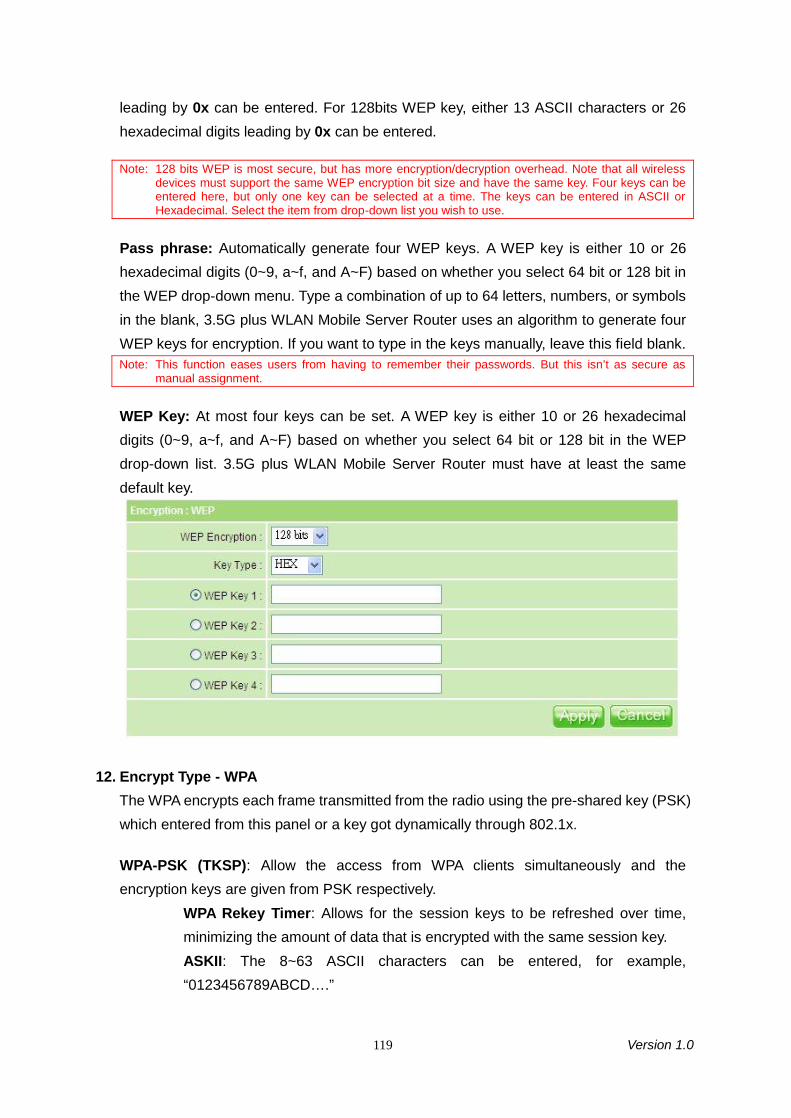
119 Version 1.0
leading by 0x can be entered. For 128bits WEP key, either 13 ASCII characters or 26hexadecimal digits leading by 0x can be entered.
Note: 128 bits WEP is most secure, but has more encryption/decryption overhead. Note that all wirelessdevices must support the same WEP encryption bit size and have the same key. Four keys can beentered here, but only one key can be selected at a time. The keys can be entered in ASCII orHexadecimal. Select the item from drop-down list you wish to use.
Pass phrase: Automatically generate four WEP keys. A WEP key is either 10 or 26hexadecimal digits (0~9, a~f, and A~F) based on whether you select 64 bit or 128 bit inthe WEP drop-down menu. Type a combination of up to 64 letters, numbers, or symbolsin the blank, 3.5G plus WLAN Mobile Server Router uses an algorithm to generate fourWEP keys for encryption. If you want to type in the keys manually, leave this field blank.Note: This function eases users from having to remember their passwords. But this isn’t as secure as
manual assignment.
WEP Key: At most four keys can be set. A WEP key is either 10 or 26 hexadecimaldigits (0~9, a~f, and A~F) based on whether you select 64 bit or 128 bit in the WEPdrop-down list. 3.5G plus WLAN Mobile Server Router must have at least the samedefault key.
12. Encrypt Type - WPAThe WPA encrypts each frame transmitted from the radio using the pre-shared key (PSK)which entered from this panel or a key got dynamically through 802.1x.
WPA-PSK (TKSP): Allow the access from WPA clients simultaneously and theencryption keys are given from PSK respectively.
WPA Rekey Timer: Allows for the session keys to be refreshed over time,minimizing the amount of data that is encrypted with the same session key.ASKII: The 8~63 ASCII characters can be entered, for example,“0123456789ABCD….”
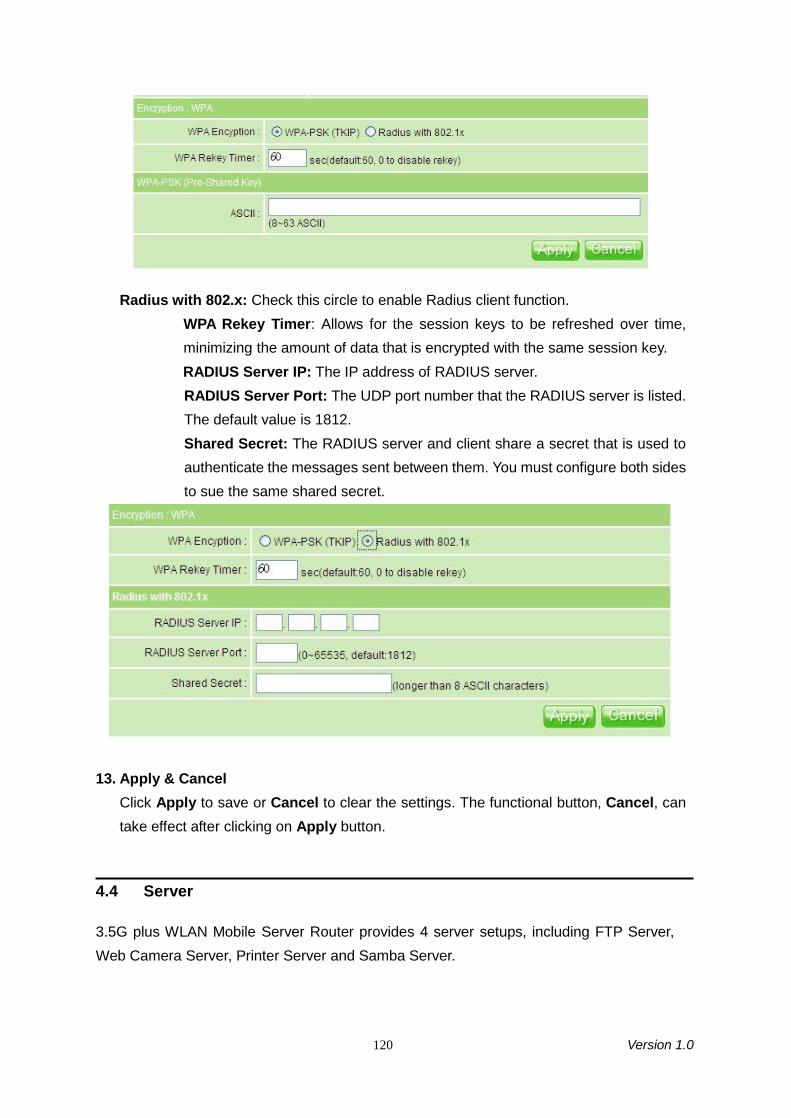
120 Version 1.0
Radius with 802.x: Check this circle to enable Radius client function.WPA Rekey Timer: Allows for the session keys to be refreshed over time,minimizing the amount of data that is encrypted with the same session key.RADIUS Server IP: The IP address of RADIUS server.RADIUS Server Port: The UDP port number that the RADIUS server is listed.The default value is 1812.Shared Secret: The RADIUS server and client share a secret that is used toauthenticate the messages sent between them. You must configure both sidesto sue the same shared secret.
13. Apply & CancelClick Apply to save or Cancel to clear the settings. The functional button, Cancel, cantake effect after clicking on Apply button.
4.4 Server
3.5G plus WLAN Mobile Server Router provides 4 server setups, including FTP Server,Web Camera Server, Printer Server and Samba Server.

121 Version 1.0
4.4.1 Samba Server
By supporting NetBIOS Protocol, 3.5G plus WLAN Mobile Server Router provides LANusers to share files or printer via My Network Places. Click Samba Server to proceed.
1. Enable Samba ServerCheck to Enable/Disable while connecting.
2. Workgroup NameFill in the name, and the default is Workgroup.
3. Server NameName your server.
4. Server DescriptionDescribe your server by demand, and the default is Wireless Mobile Router.
5. Printer ModelPrinter model appears when connected.
6. Apply & CancelClick Apply to save or Cancel to clear settings.
4.4.1.1 How to Access File Sharing Directory
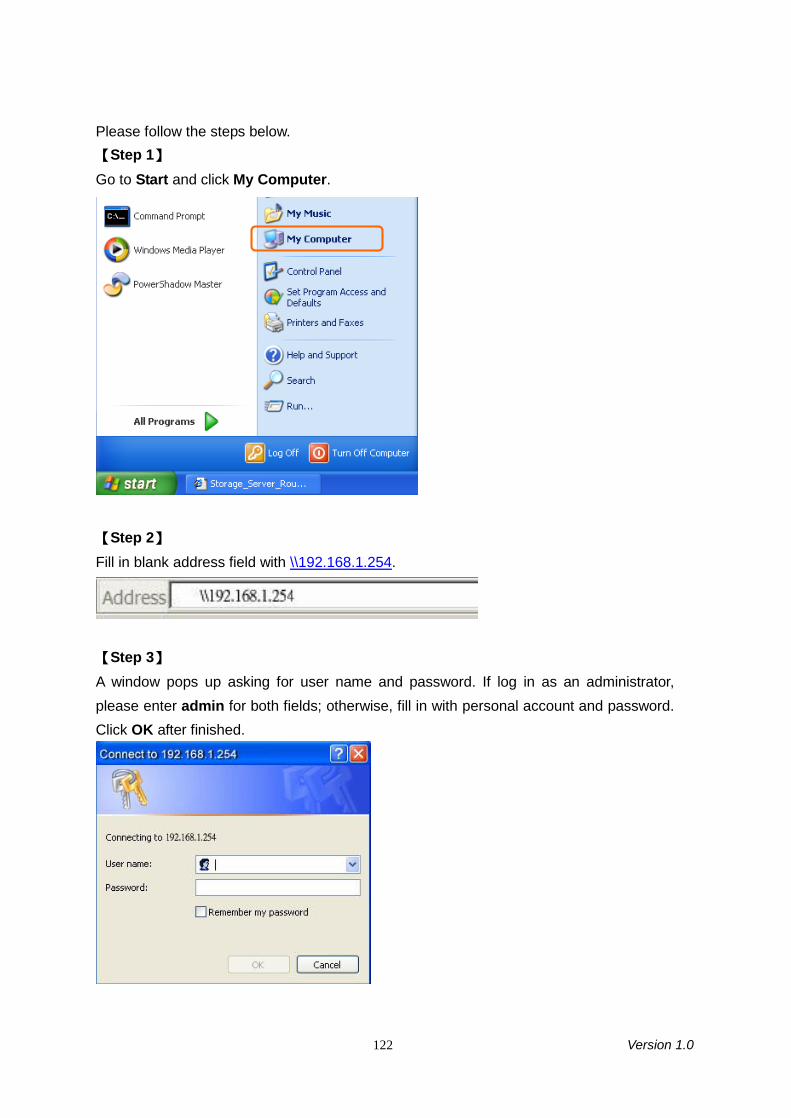
122 Version 1.0
Please follow the steps below.【Step 1】Go to Start and click My Computer.
【Step 2】Fill in blank address field with \\192.168.1.254.
【Step 3】A window pops up asking for user name and password. If log in as an administrator,please enter admin for both fields; otherwise, fill in with personal account and password.Click OK after finished.
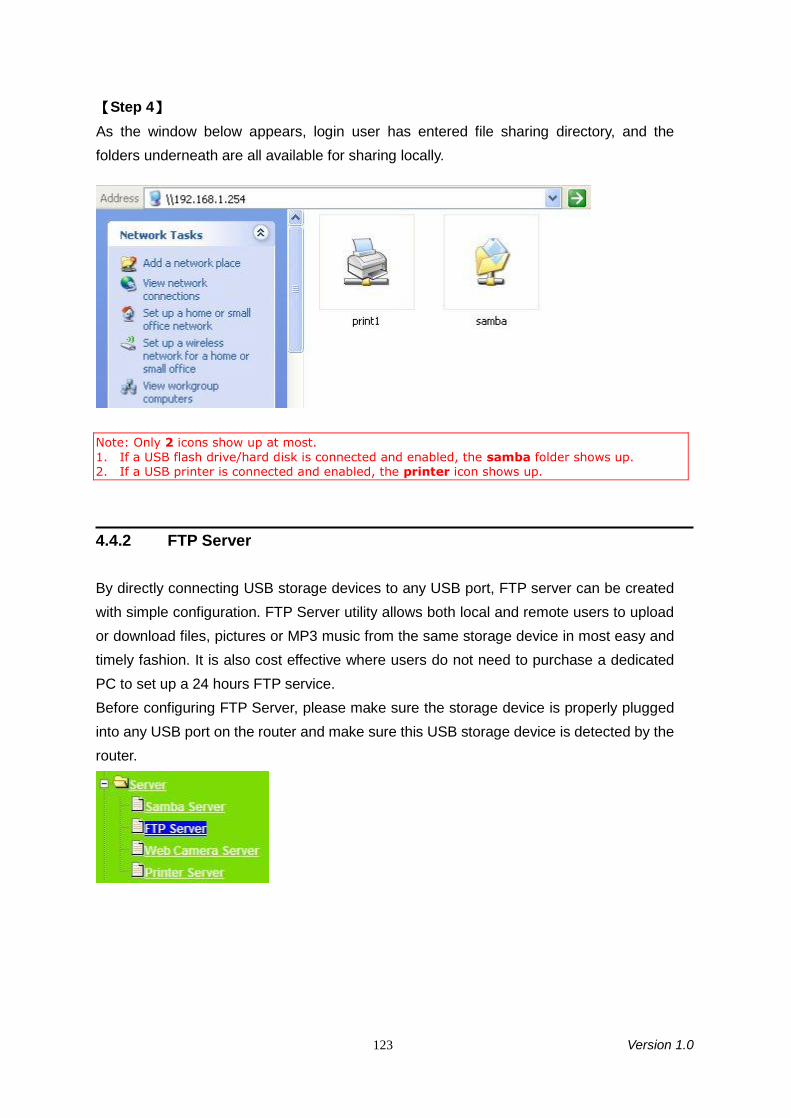
123 Version 1.0
【Step 4】As the window below appears, login user has entered file sharing directory, and thefolders underneath are all available for sharing locally.
Note: Only 2 icons show up at most.1. If a USB flash drive/hard disk is connected and enabled, the samba folder shows up.2. If a USB printer is connected and enabled, the printer icon shows up.
4.4.2 FTP Server
By directly connecting USB storage devices to any USB port, FTP server can be createdwith simple configuration. FTP Server utility allows both local and remote users to uploador download files, pictures or MP3 music from the same storage device in most easy andtimely fashion. It is also cost effective where users do not need to purchase a dedicatedPC to set up a 24 hours FTP service.Before configuring FTP Server, please make sure the storage device is properly pluggedinto any USB port on the router and make sure this USB storage device is detected by therouter.
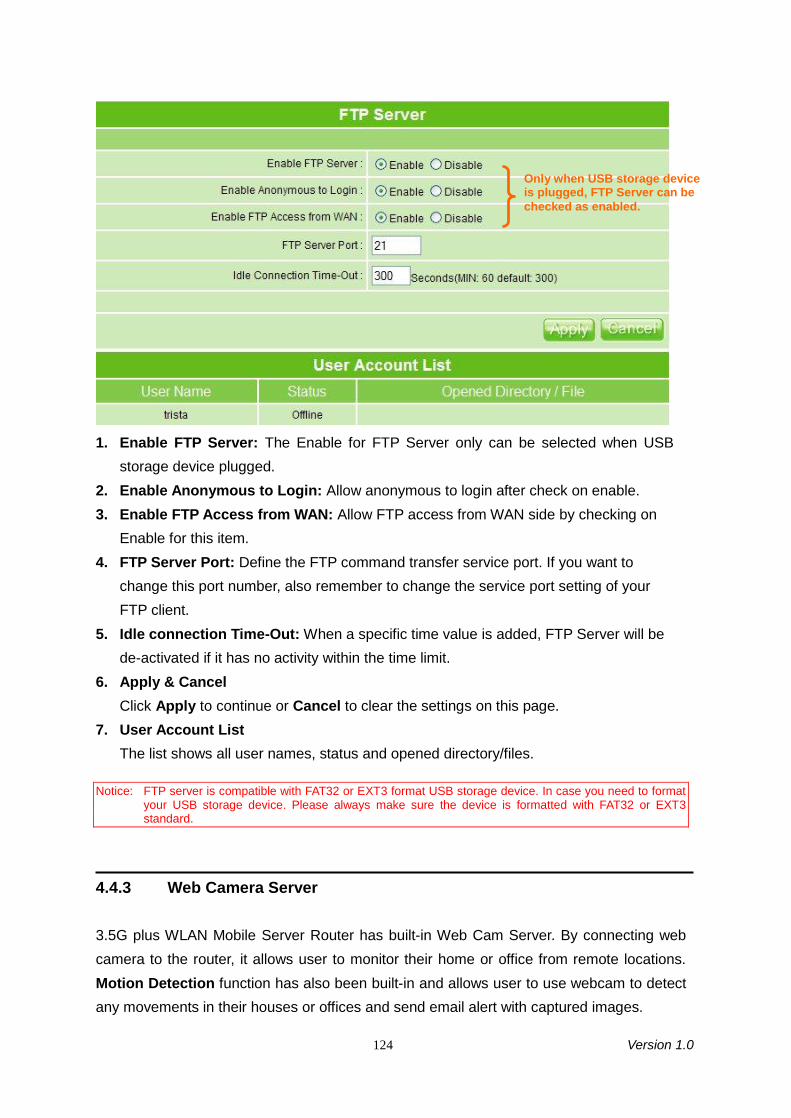
124 Version 1.0
1. Enable FTP Server: The Enable for FTP Server only can be selected when USBstorage device plugged.
2. Enable Anonymous to Login: Allow anonymous to login after check on enable.3. Enable FTP Access from WAN: Allow FTP access from WAN side by checking on
Enable for this item.4. FTP Server Port: Define the FTP command transfer service port. If you want to
change this port number, also remember to change the service port setting of yourFTP client.
5. Idle connection Time-Out: When a specific time value is added, FTP Server will bede-activated if it has no activity within the time limit.
6. Apply & CancelClick Apply to continue or Cancel to clear the settings on this page.
7. User Account ListThe list shows all user names, status and opened directory/files.
Notice: FTP server is compatible with FAT32 or EXT3 format USB storage device. In case you need to formatyour USB storage device. Please always make sure the device is formatted with FAT32 or EXT3standard.
4.4.3 Web Camera Server
3.5G plus WLAN Mobile Server Router has built-in Web Cam Server. By connecting webcamera to the router, it allows user to monitor their home or office from remote locations.Motion Detection function has also been built-in and allows user to use webcam to detectany movements in their houses or offices and send email alert with captured images.
Only when USB storage deviceis plugged, FTP Server can bechecked as enabled.
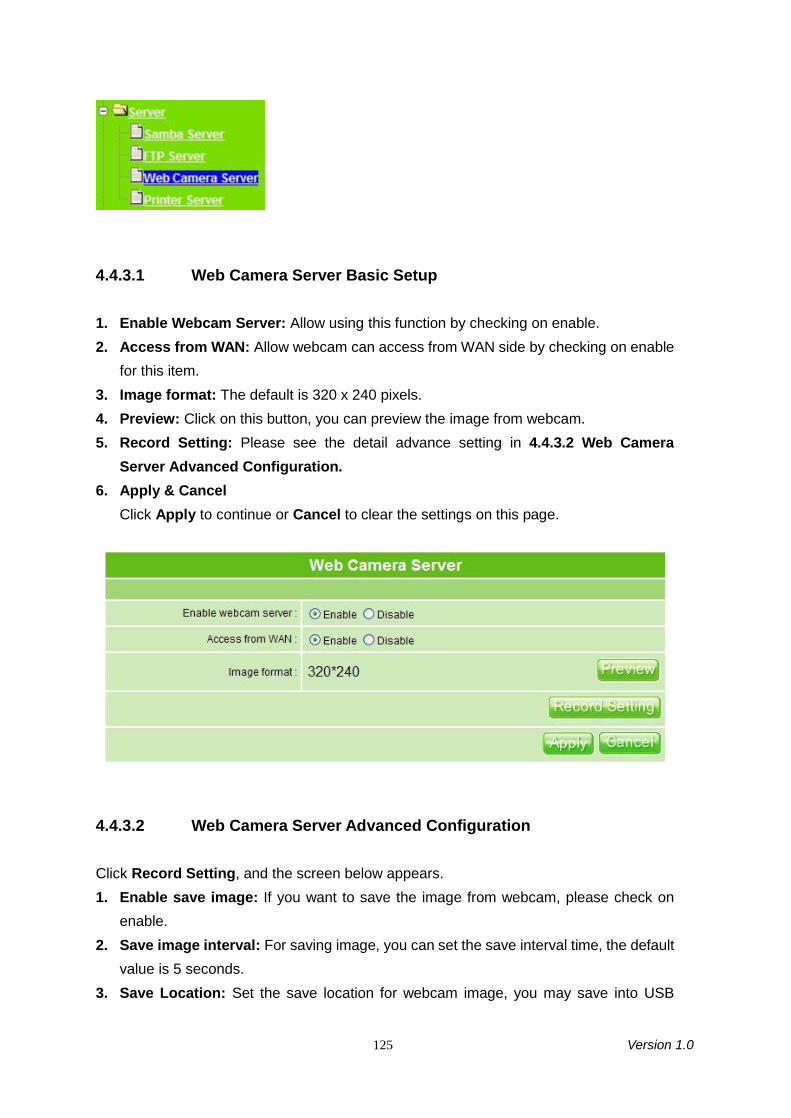
125 Version 1.0
4.4.3.1 Web Camera Server Basic Setup
1. Enable Webcam Server: Allow using this function by checking on enable.2. Access from WAN: Allow webcam can access from WAN side by checking on enable
for this item.3. Image format: The default is 320 x 240 pixels.4. Preview: Click on this button, you can preview the image from webcam.5. Record Setting: Please see the detail advance setting in 4.4.3.2 Web Camera
Server Advanced Configuration.6. Apply & Cancel
Click Apply to continue or Cancel to clear the settings on this page.
4.4.3.2 Web Camera Server Advanced Configuration
Click Record Setting, and the screen below appears.1. Enable save image: If you want to save the image from webcam, please check on
enable.2. Save image interval: For saving image, you can set the save interval time, the default
value is 5 seconds.3. Save Location: Set the save location for webcam image, you may save into USB
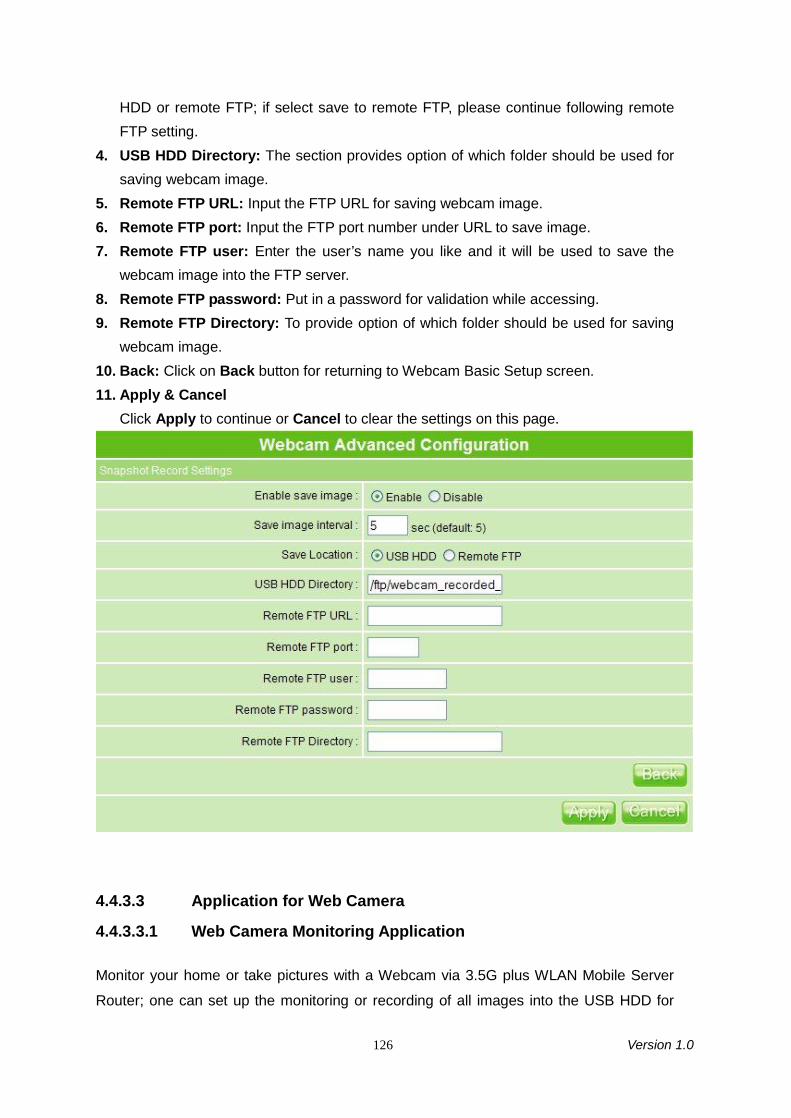
126 Version 1.0
HDD or remote FTP; if select save to remote FTP, please continue following remoteFTP setting.
4. USB HDD Directory: The section provides option of which folder should be used forsaving webcam image.
5. Remote FTP URL: Input the FTP URL for saving webcam image.6. Remote FTP port: Input the FTP port number under URL to save image.7. Remote FTP user: Enter the user’s name you like and it will be used to save the
webcam image into the FTP server.8. Remote FTP password: Put in a password for validation while accessing.9. Remote FTP Directory: To provide option of which folder should be used for saving
webcam image.10. Back: Click on Back button for returning to Webcam Basic Setup screen.11. Apply & Cancel
Click Apply to continue or Cancel to clear the settings on this page.
4.4.3.3 Application for Web Camera
4.4.3.3.1 Web Camera Monitoring Application
Monitor your home or take pictures with a Webcam via 3.5G plus WLAN Mobile Server
Router; one can set up the monitoring or recording of all images into the USB HDD for
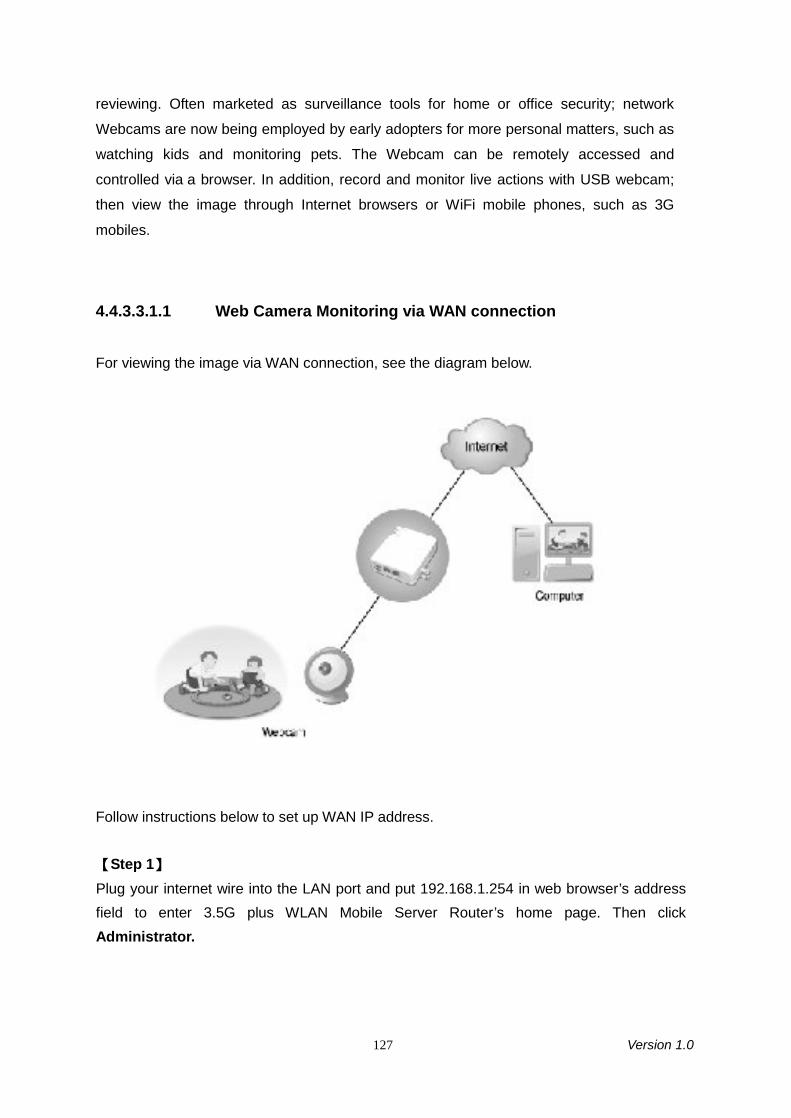
127 Version 1.0
reviewing. Often marketed as surveillance tools for home or office security; network
Webcams are now being employed by early adopters for more personal matters, such as
watching kids and monitoring pets. The Webcam can be remotely accessed and
controlled via a browser. In addition, record and monitor live actions with USB webcam;
then view the image through Internet browsers or WiFi mobile phones, such as 3G
mobiles.
4.4.3.3.1.1 Web Camera Monitoring via WAN connection
For viewing the image via WAN connection, see the diagram below.
Follow instructions below to set up WAN IP address.
【Step 1】Plug your internet wire into the LAN port and put 192.168.1.254 in web browser’s addressfield to enter 3.5G plus WLAN Mobile Server Router’s home page. Then clickAdministrator.

128 Version 1.0
【Step 2】Enter the default value, admin, for both administrator’s name and password and log in theproduct’s main menu page.
【Step 3】Click LAN under IP Config folder on the left side menu. Then set IP Address in the samesubnet with upper-layer device, for example, 192.168.2.49; 192.168.2.1 for IP Gateway.After that, disable DHCP function and click Apply to save the settings.
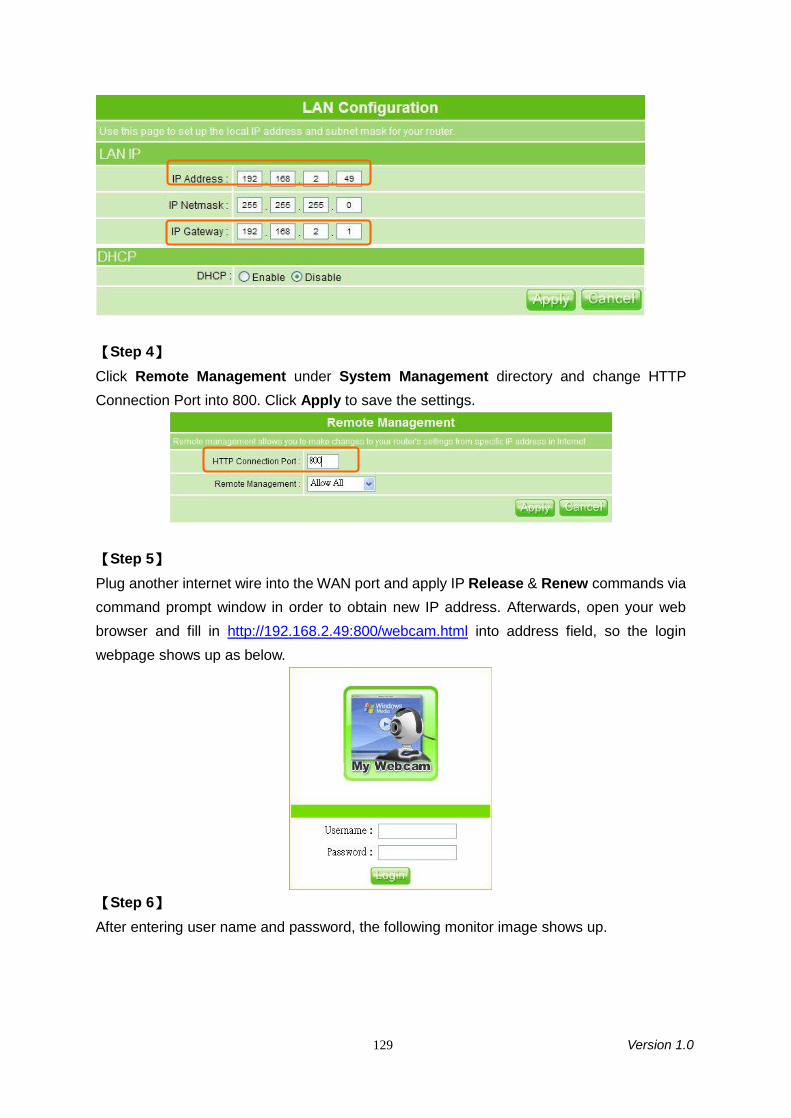
129 Version 1.0
【Step 4】Click Remote Management under System Management directory and change HTTPConnection Port into 800. Click Apply to save the settings.
【Step 5】Plug another internet wire into the WAN port and apply IP Release & Renew commands viacommand prompt window in order to obtain new IP address. Afterwards, open your webbrowser and fill in http://192.168.2.49:800/webcam.html into address field, so the loginwebpage shows up as below.
【Step 6】After entering user name and password, the following monitor image shows up.
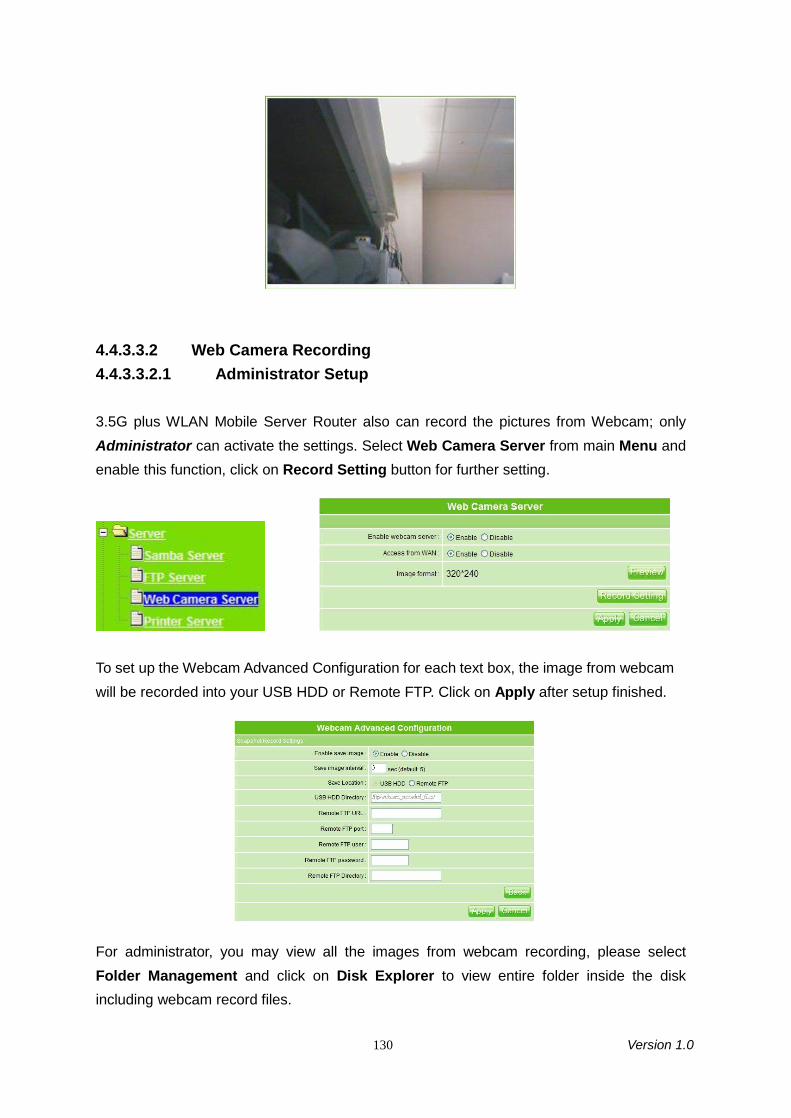
130 Version 1.0
4.4.3.3.2 Web Camera Recording4.4.3.3.2.1 Administrator Setup
3.5G plus WLAN Mobile Server Router also can record the pictures from Webcam; onlyAdministrator can activate the settings. Select Web Camera Server from main Menu andenable this function, click on Record Setting button for further setting.
To set up the Webcam Advanced Configuration for each text box, the image from webcamwill be recorded into your USB HDD or Remote FTP. Click on Apply after setup finished.
For administrator, you may view all the images from webcam recording, please selectFolder Management and click on Disk Explorer to view entire folder inside the diskincluding webcam record files.
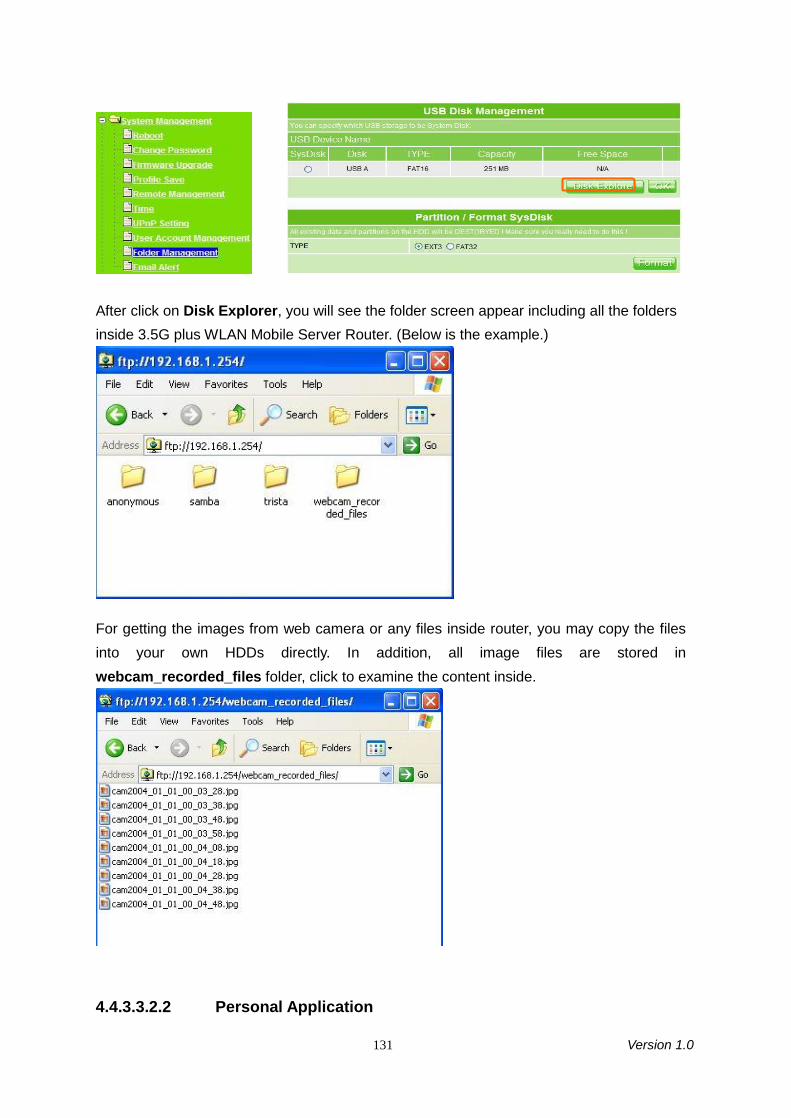
131 Version 1.0
After click on Disk Explorer, you will see the folder screen appear including all the foldersinside 3.5G plus WLAN Mobile Server Router. (Below is the example.)
For getting the images from web camera or any files inside router, you may copy the filesinto your own HDDs directly. In addition, all image files are stored inwebcam_recorded_files folder, click to examine the content inside.
4.4.3.3.2.2 Personal Application
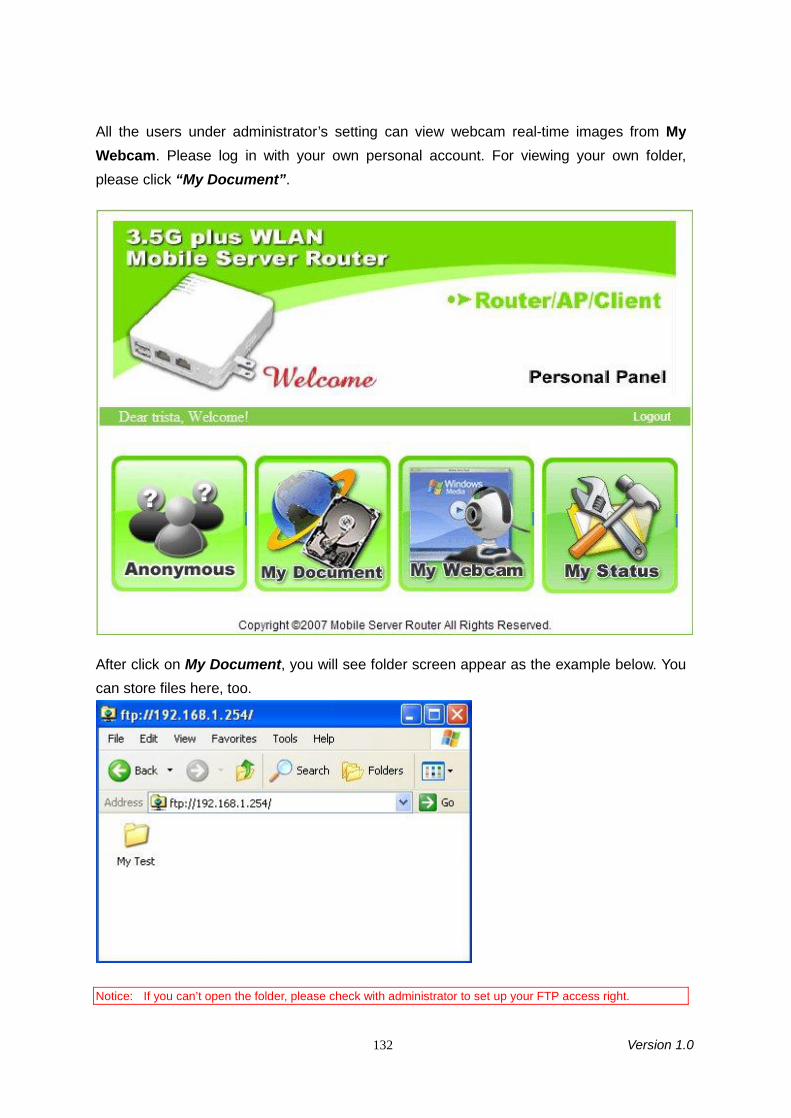
132 Version 1.0
All the users under administrator’s setting can view webcam real-time images from MyWebcam. Please log in with your own personal account. For viewing your own folder,please click “My Document”.
After click on My Document, you will see folder screen appear as the example below. Youcan store files here, too.
Notice: If you can’t open the folder, please check with administrator to set up your FTP access right.

133 Version 1.0
4.4.4 Printer Server
Follow the illustrations below to set up your 3.5G plus WLAN Mobile Server Router andUSB-connected printer.
1. Enable Printer Server: Check enable for applying printer server.2. Enable Printer Access From WAN: Allow printer can access from WAN side by
checking enable for this item.3. Printer Model: The printer model shows up while plugging a USB printer.4. Printer Name: Enter the preferred name of your printer.5. Printer Description: Enter the description of printer as your demand.6. Apply & Cancel
Click Apply to continue or Cancel to clear the settings on this page.
Besides finishing the above, the printer setting on PC also needs to be set as follows.
4.4.4.1 Printer Setting on PC
After enabling Printer Server in Quick Setup and Printer Server Configuration, pleasefollow the steps to set the detail LPR settings on your PC. (The example below is forWindows XP platform.)

134 Version 1.0
【Step 1】After setting USB printer on 3.5G plus WLAN Mobile Server Router’s setup page, pleasego toStart > Printers and Faxes to add a printer.
【Step 2】Click on Add a printer item.
【Step 3】Click on Next button.
【Step 4】
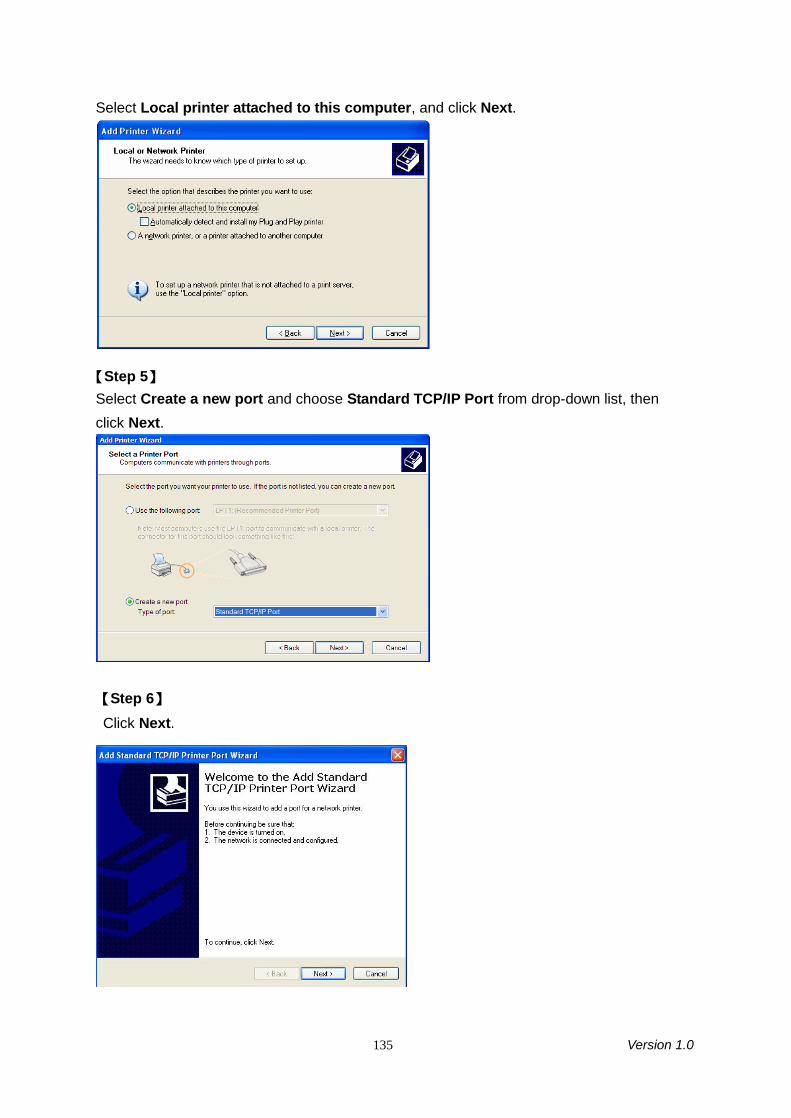
135 Version 1.0
Select Local printer attached to this computer, and click Next.
【Step 5】Select Create a new port and choose Standard TCP/IP Port from drop-down list, thenclick Next.
【Step 6】Click Next.
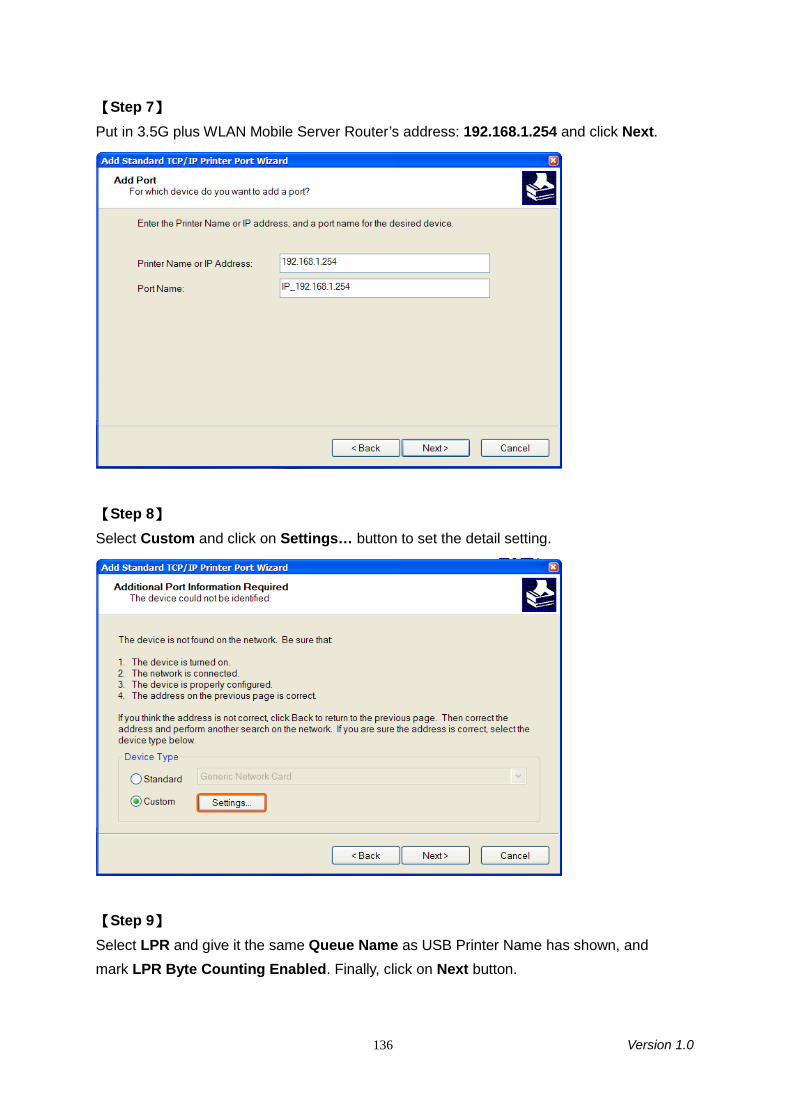
136 Version 1.0
【Step 7】Put in 3.5G plus WLAN Mobile Server Router’s address: 192.168.1.254 and click Next.
【Step 8】Select Custom and click on Settings… button to set the detail setting.
【Step 9】Select LPR and give it the same Queue Name as USB Printer Name has shown, andmark LPR Byte Counting Enabled. Finally, click on Next button.

137 Version 1.0
【Step 10】Click Finish on the next screen after the aforesaid settings, you have to install the printerdriver as well.
It has to be the same with thePrinter Name as shown in section4.4.4 Printer Server Configuration.
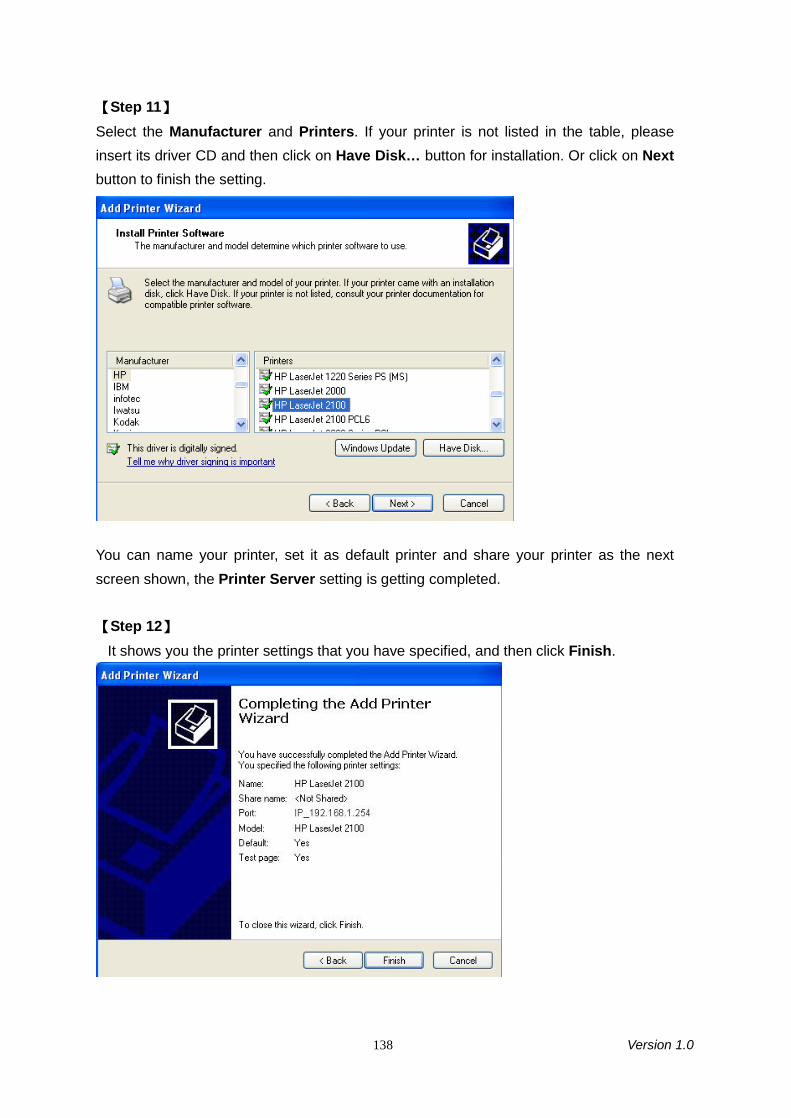
138 Version 1.0
【Step 11】Select the Manufacturer and Printers. If your printer is not listed in the table, pleaseinsert its driver CD and then click on Have Disk… button for installation. Or click on Nextbutton to finish the setting.
You can name your printer, set it as default printer and share your printer as the nextscreen shown, the Printer Server setting is getting completed.
【Step 12】It shows you the printer settings that you have specified, and then click Finish.
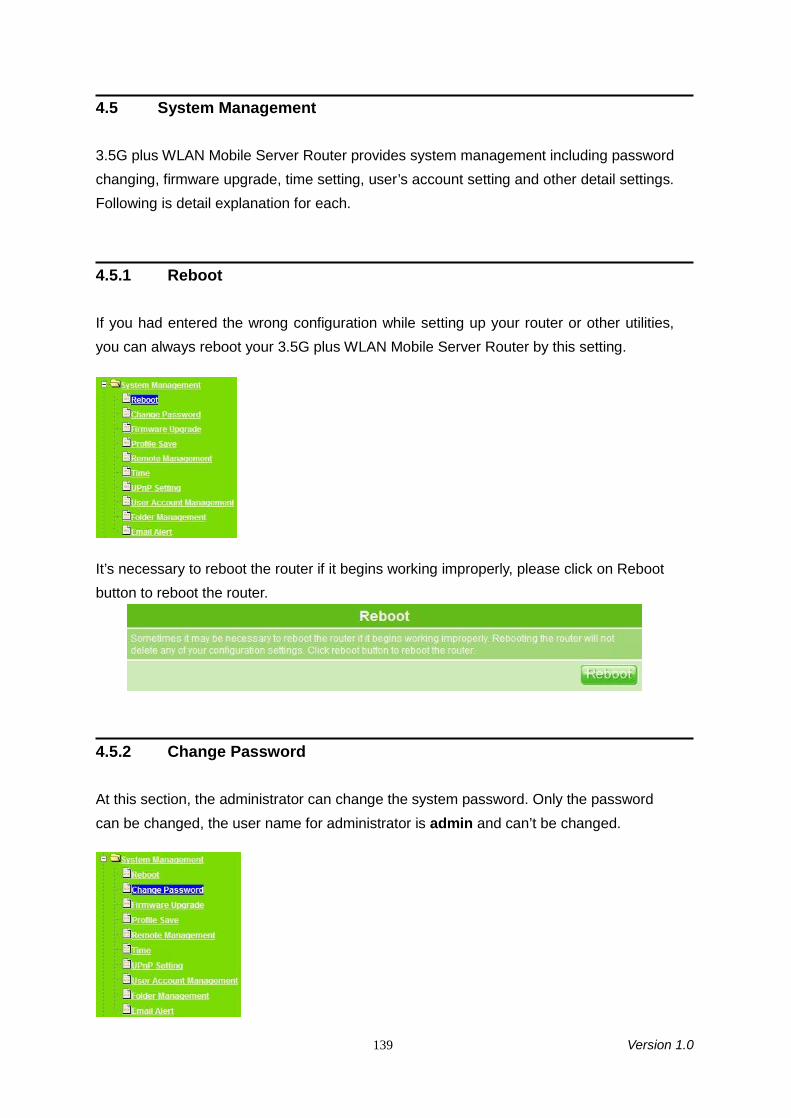
139 Version 1.0
4.5 System Management
3.5G plus WLAN Mobile Server Router provides system management including passwordchanging, firmware upgrade, time setting, user’s account setting and other detail settings.Following is detail explanation for each.
4.5.1 Reboot
If you had entered the wrong configuration while setting up your router or other utilities,you can always reboot your 3.5G plus WLAN Mobile Server Router by this setting.
It’s necessary to reboot the router if it begins working improperly, please click on Rebootbutton to reboot the router.
4.5.2 Change Password
At this section, the administrator can change the system password. Only the passwordcan be changed, the user name for administrator is admin and can’t be changed.
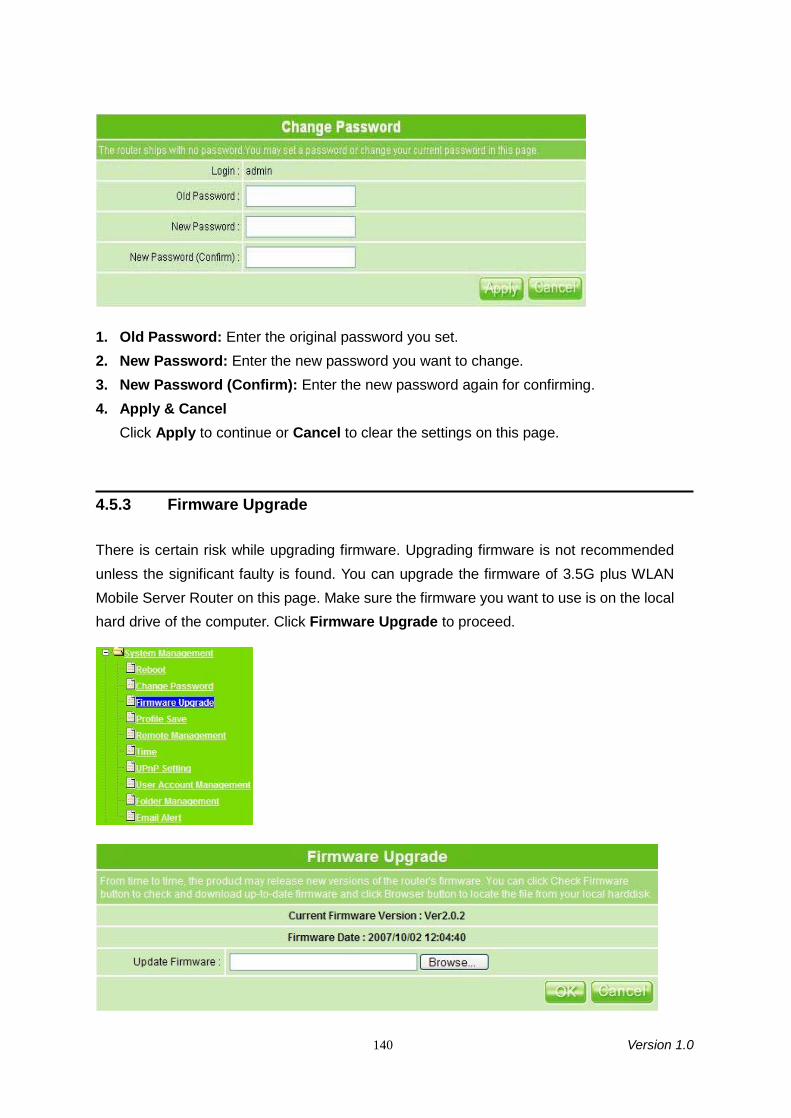
140 Version 1.0
1. Old Password: Enter the original password you set.2. New Password: Enter the new password you want to change.3. New Password (Confirm): Enter the new password again for confirming.4. Apply & Cancel
Click Apply to continue or Cancel to clear the settings on this page.
4.5.3 Firmware Upgrade
There is certain risk while upgrading firmware. Upgrading firmware is not recommendedunless the significant faulty is found. You can upgrade the firmware of 3.5G plus WLANMobile Server Router on this page. Make sure the firmware you want to use is on the localhard drive of the computer. Click Firmware Upgrade to proceed.
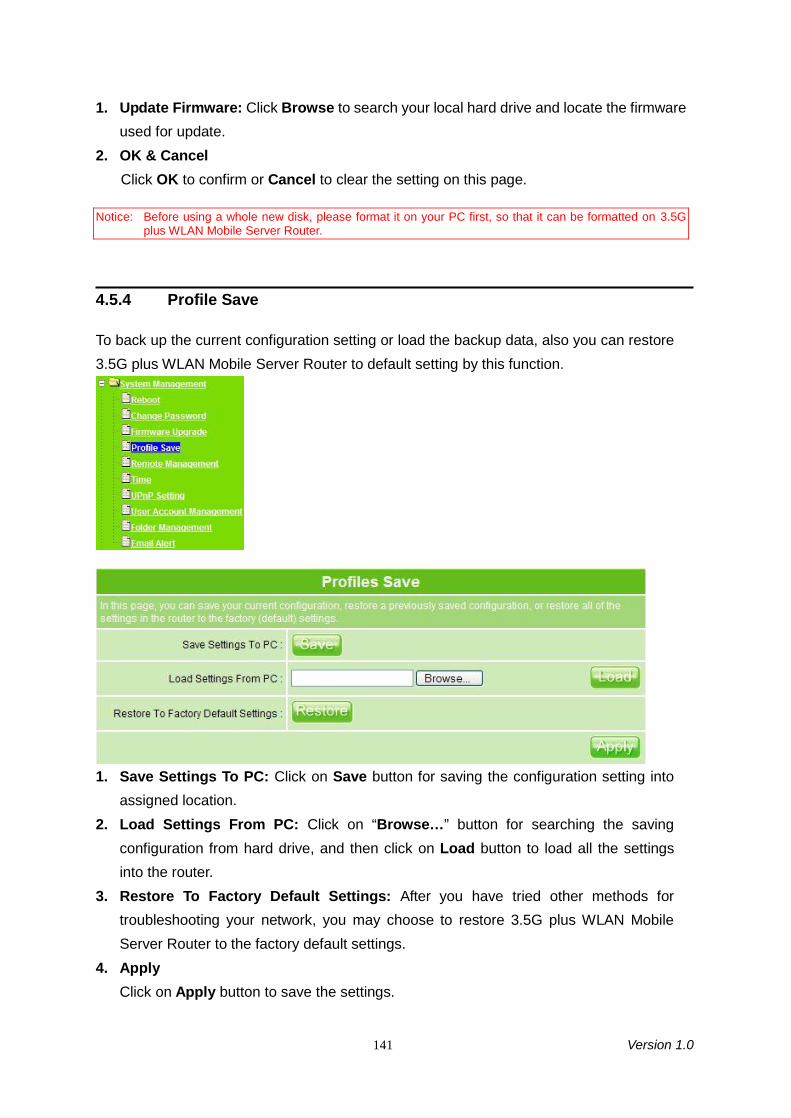
141 Version 1.0
1. Update Firmware: Click Browse to search your local hard drive and locate the firmwareused for update.
2. OK & CancelClick OK to confirm or Cancel to clear the setting on this page.
Notice: Before using a whole new disk, please format it on your PC first, so that it can be formatted on 3.5Gplus WLAN Mobile Server Router.
4.5.4 Profile Save
To back up the current configuration setting or load the backup data, also you can restore3.5G plus WLAN Mobile Server Router to default setting by this function.
1. Save Settings To PC: Click on Save button for saving the configuration setting intoassigned location.
2. Load Settings From PC: Click on “Browse…” button for searching the savingconfiguration from hard drive, and then click on Load button to load all the settingsinto the router.
3. Restore To Factory Default Settings: After you have tried other methods fortroubleshooting your network, you may choose to restore 3.5G plus WLAN MobileServer Router to the factory default settings.
4. ApplyClick on Apply button to save the settings.
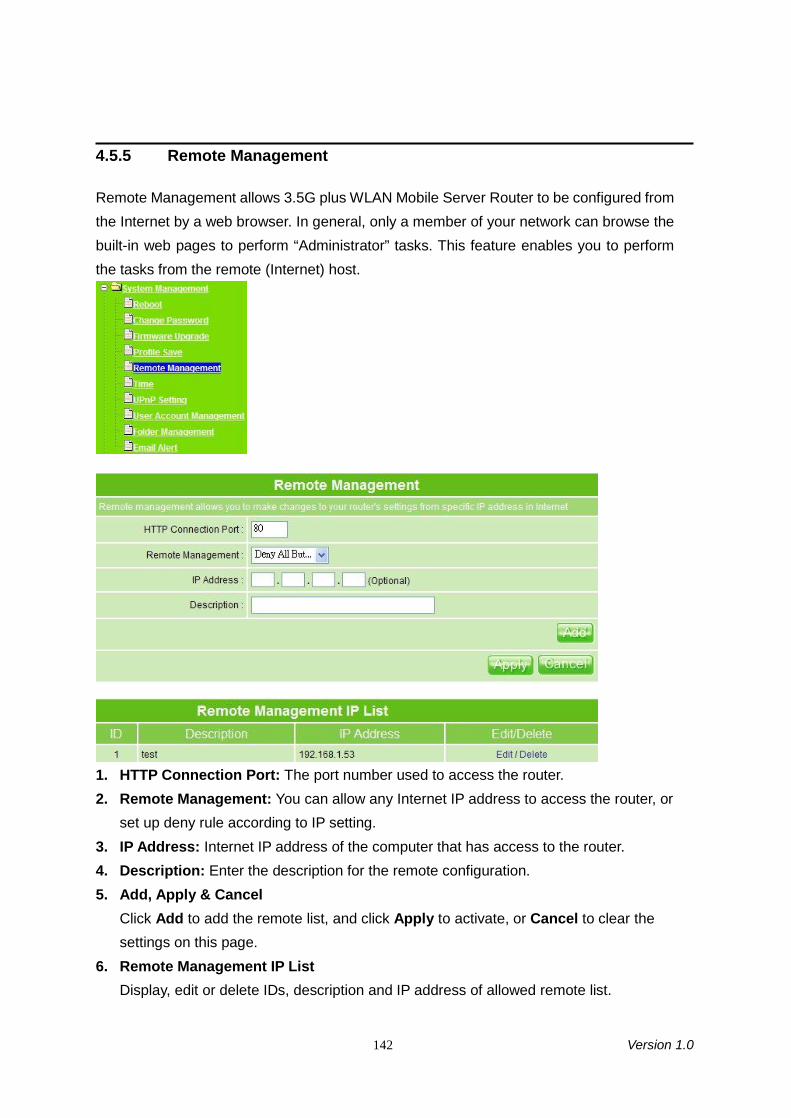
142 Version 1.0
4.5.5 Remote Management
Remote Management allows 3.5G plus WLAN Mobile Server Router to be configured fromthe Internet by a web browser. In general, only a member of your network can browse thebuilt-in web pages to perform “Administrator” tasks. This feature enables you to performthe tasks from the remote (Internet) host.
1. HTTP Connection Port: The port number used to access the router.2. Remote Management: You can allow any Internet IP address to access the router, or
set up deny rule according to IP setting.3. IP Address: Internet IP address of the computer that has access to the router.4. Description: Enter the description for the remote configuration.5. Add, Apply & Cancel
Click Add to add the remote list, and click Apply to activate, or Cancel to clear thesettings on this page.
6. Remote Management IP ListDisplay, edit or delete IDs, description and IP address of allowed remote list.
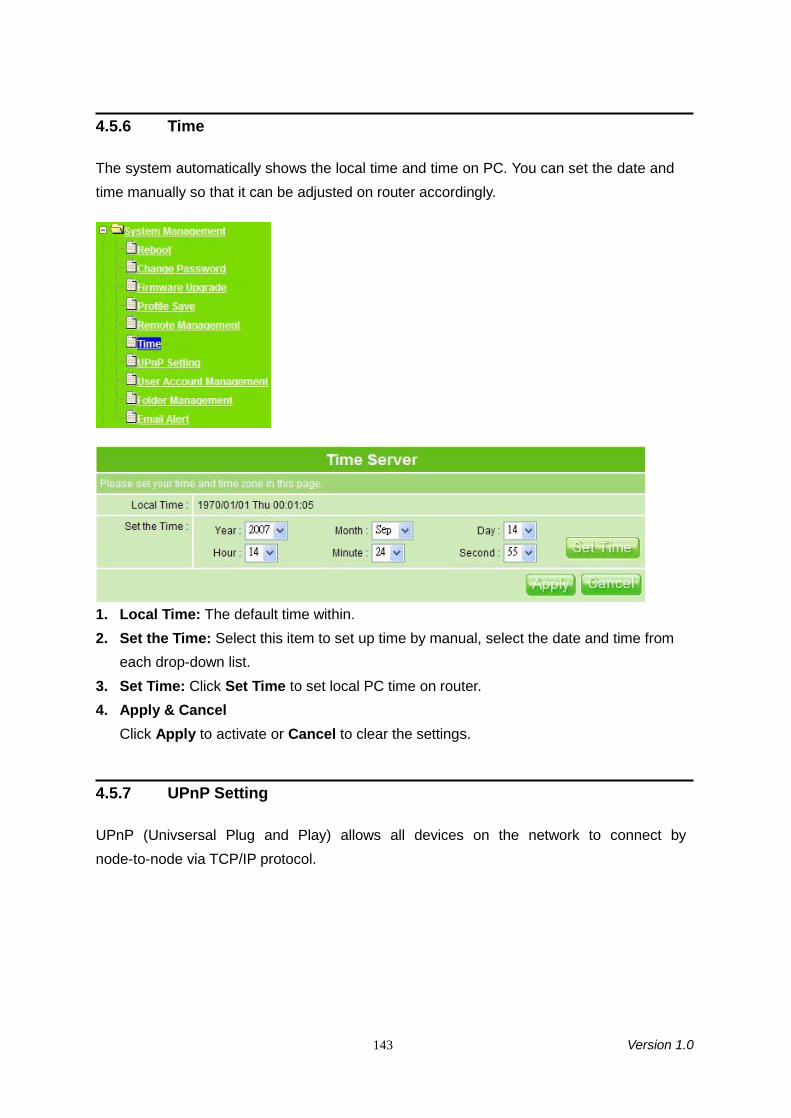
143 Version 1.0
4.5.6 Time
The system automatically shows the local time and time on PC. You can set the date andtime manually so that it can be adjusted on router accordingly.
1. Local Time: The default time within.2. Set the Time: Select this item to set up time by manual, select the date and time from
each drop-down list.3. Set Time: Click Set Time to set local PC time on router.4. Apply & Cancel
Click Apply to activate or Cancel to clear the settings.
4.5.7 UPnP Setting
UPnP (Univsersal Plug and Play) allows all devices on the network to connect bynode-to-node via TCP/IP protocol.
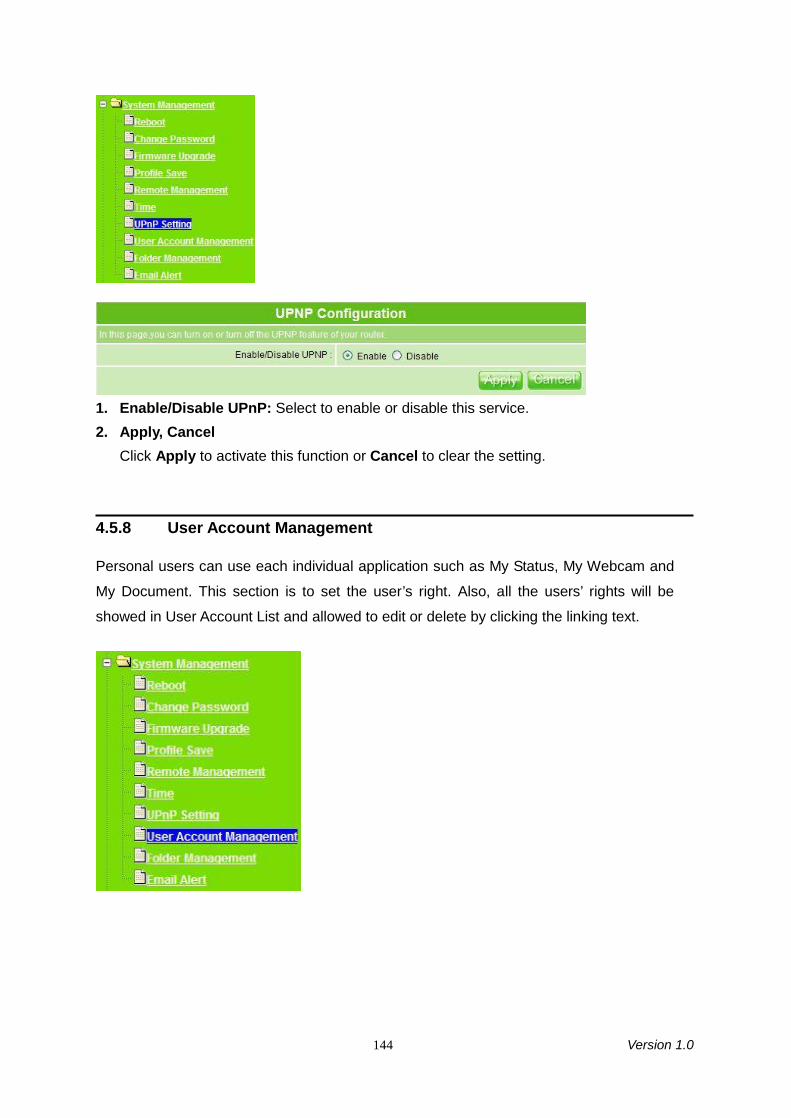
144 Version 1.0
1. Enable/Disable UPnP: Select to enable or disable this service.2. Apply, Cancel
Click Apply to activate this function or Cancel to clear the setting.
4.5.8 User Account Management
Personal users can use each individual application such as My Status, My Webcam and
My Document. This section is to set the user’s right. Also, all the users’ rights will be
showed in User Account List and allowed to edit or delete by clicking the linking text.

145 Version 1.0
1. Max Login User: Set up the maximum users to log in at the same time, select thenumber from drop-down list. If you want to change the maximum login users onlywithout changing user’s information, please click on OK button after select login user’snumber.
2. User Name: Create the user name in this blank.3. Password: Set up the user’s password.4. User Right: Check to allow the user accessing Samba folder, monitoring from
webcam or using FTP server.5. Activated: Click On to allow the user’s right to be applied immediately.6. Add, Apply & Cancel
After finishing the above, click Add button to create user account. Click on Apply buttonto add set-user into the account list or Cancel button to clear the settings on this page.
7. User Account ListThe list shows all users’ names, passwords, status and rights.
4.5.9 Folder Management
Easy to check all the USB storage devices connected to 3.5G plus WLAN Mobile Server
Router, view the entire data folder inside each storage devices, and you can manage the
disk formatting / partition via clicking the button on this page.
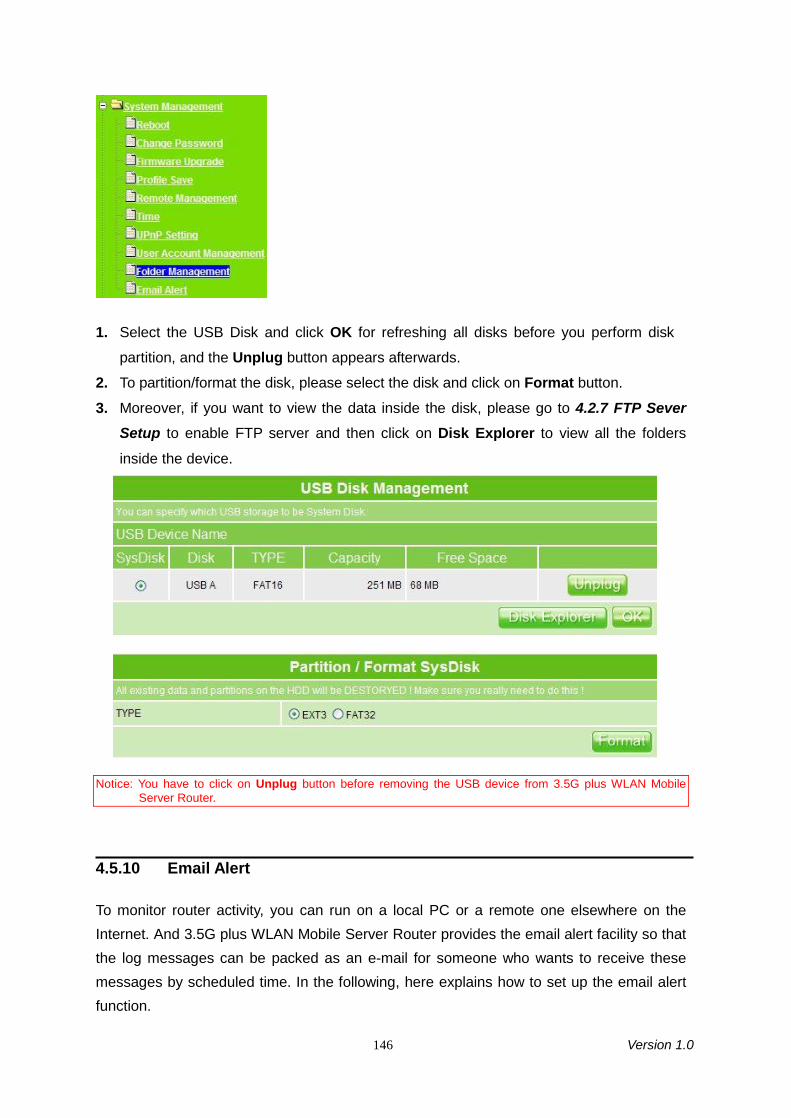
146 Version 1.0
1. Select the USB Disk and click OK for refreshing all disks before you perform disk
partition, and the Unplug button appears afterwards.
2. To partition/format the disk, please select the disk and click on Format button.
3. Moreover, if you want to view the data inside the disk, please go to 4.2.7 FTP SeverSetup to enable FTP server and then click on Disk Explorer to view all the folders
inside the device.
Notice: You have to click on Unplug button before removing the USB device from 3.5G plus WLAN MobileServer Router.
4.5.10 Email Alert
To monitor router activity, you can run on a local PC or a remote one elsewhere on theInternet. And 3.5G plus WLAN Mobile Server Router provides the email alert facility so thatthe log messages can be packed as an e-mail for someone who wants to receive thesemessages by scheduled time. In the following, here explains how to set up the email alertfunction.
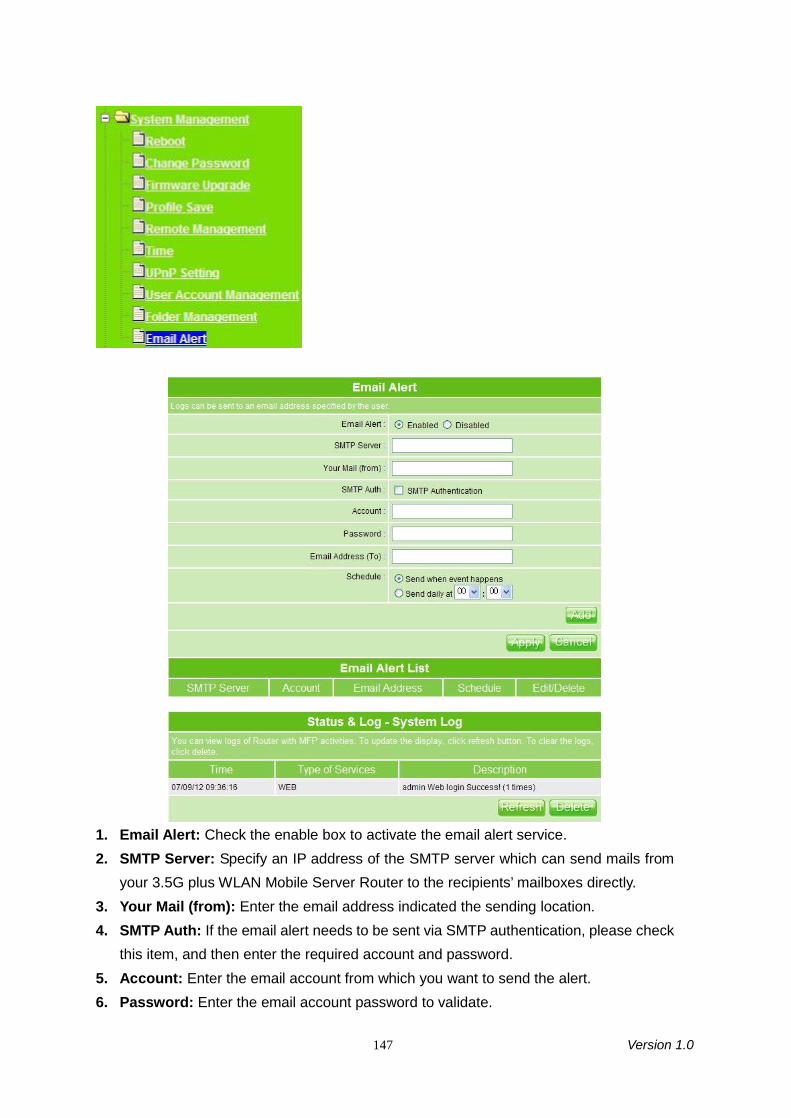
147 Version 1.0
1. Email Alert: Check the enable box to activate the email alert service.2. SMTP Server: Specify an IP address of the SMTP server which can send mails from
your 3.5G plus WLAN Mobile Server Router to the recipients’ mailboxes directly.3. Your Mail (from): Enter the email address indicated the sending location.4. SMTP Auth: If the email alert needs to be sent via SMTP authentication, please check
this item, and then enter the required account and password.5. Account: Enter the email account from which you want to send the alert.6. Password: Enter the email account password to validate.
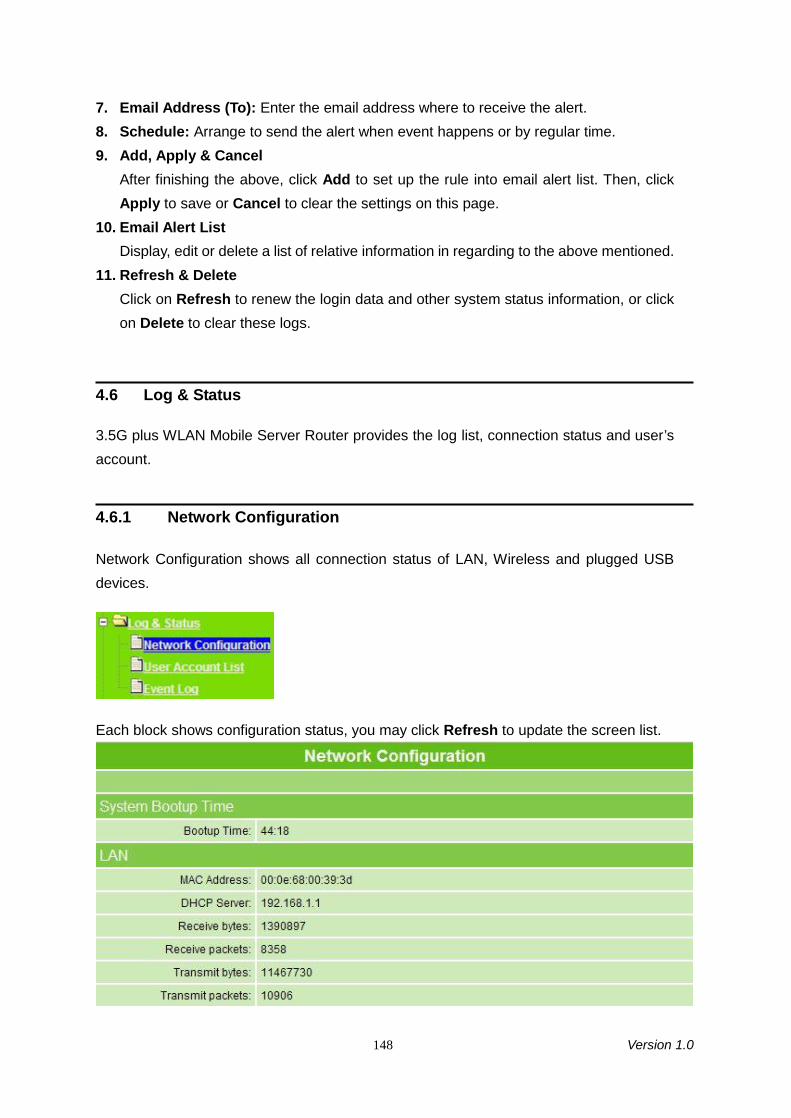
148 Version 1.0
7. Email Address (To): Enter the email address where to receive the alert.8. Schedule: Arrange to send the alert when event happens or by regular time.9. Add, Apply & Cancel
After finishing the above, click Add to set up the rule into email alert list. Then, clickApply to save or Cancel to clear the settings on this page.
10. Email Alert ListDisplay, edit or delete a list of relative information in regarding to the above mentioned.
11. Refresh & DeleteClick on Refresh to renew the login data and other system status information, or clickon Delete to clear these logs.
4.6 Log & Status
3.5G plus WLAN Mobile Server Router provides the log list, connection status and user’saccount.
4.6.1 Network Configuration
Network Configuration shows all connection status of LAN, Wireless and plugged USBdevices.
Each block shows configuration status, you may click Refresh to update the screen list.

149 Version 1.0
4.6.2 User Account List
This section shows all users’ information.
Check the user name, status and opened directory/file on screen.
4.6.3 Event Log
3.5G plus WLAN Mobile Server Router provides system logs for review.
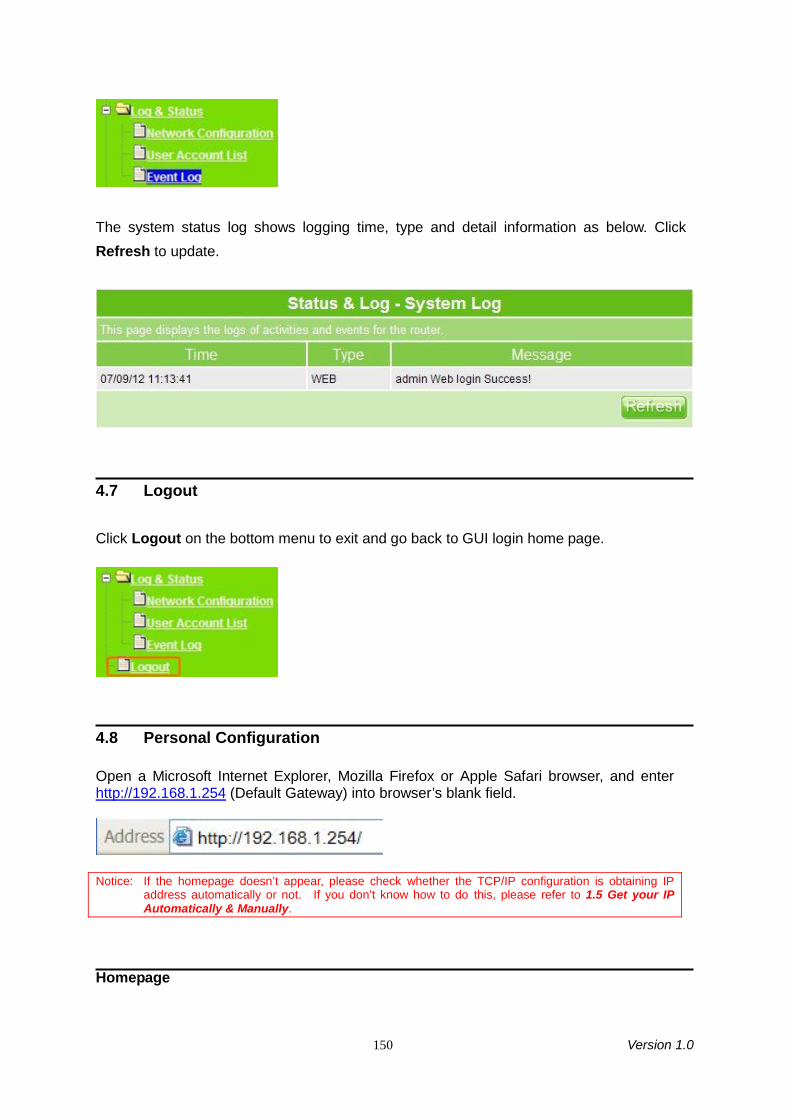
150 Version 1.0
The system status log shows logging time, type and detail information as below. ClickRefresh to update.
4.7 Logout
Click Logout on the bottom menu to exit and go back to GUI login home page.
4.8 Personal Configuration
Open a Microsoft Internet Explorer, Mozilla Firefox or Apple Safari browser, and enterhttp://192.168.1.254 (Default Gateway) into browser’s blank field.
Notice: If the homepage doesn’t appear, please check whether the TCP/IP configuration is obtaining IPaddress automatically or not. If you don’t know how to do this, please refer to 1.5 Get your IPAutomatically & Manually.
Homepage

151 Version 1.0
Click Personal Panel and log in with your own user account. (If you can’t access yourpersonal account, please check with administrator for validation.)
Personal Panel
Screen below shows every login user’s access rights, including Anonymous, MyDocument, My Webcam and My Status.

152 Version 1.0
3.5G plus WLAN Mobile Server Router provides personal control panel for every loginuser’s entrance to each application screen, please click on each icon for application. Theicons appear in gray color can’t be clicked if the user doesn’t have the right to use thatfunction; even though there is none to be set, the user can still apply My Status.
Notice: The available access rights are depended on administrator’s authorization in 4.5.8 User AccountManagement.
4.8.1 Anonymous
Click Anonymous to access the shared folder created by administrator and freelydownload those files underneath to personal hard drives.
“Anonymous” shows all the files stored in USB HDD by
administrator and allows any login user to check the
folder and copy files to the HD via Internet. The following
is the detail description.
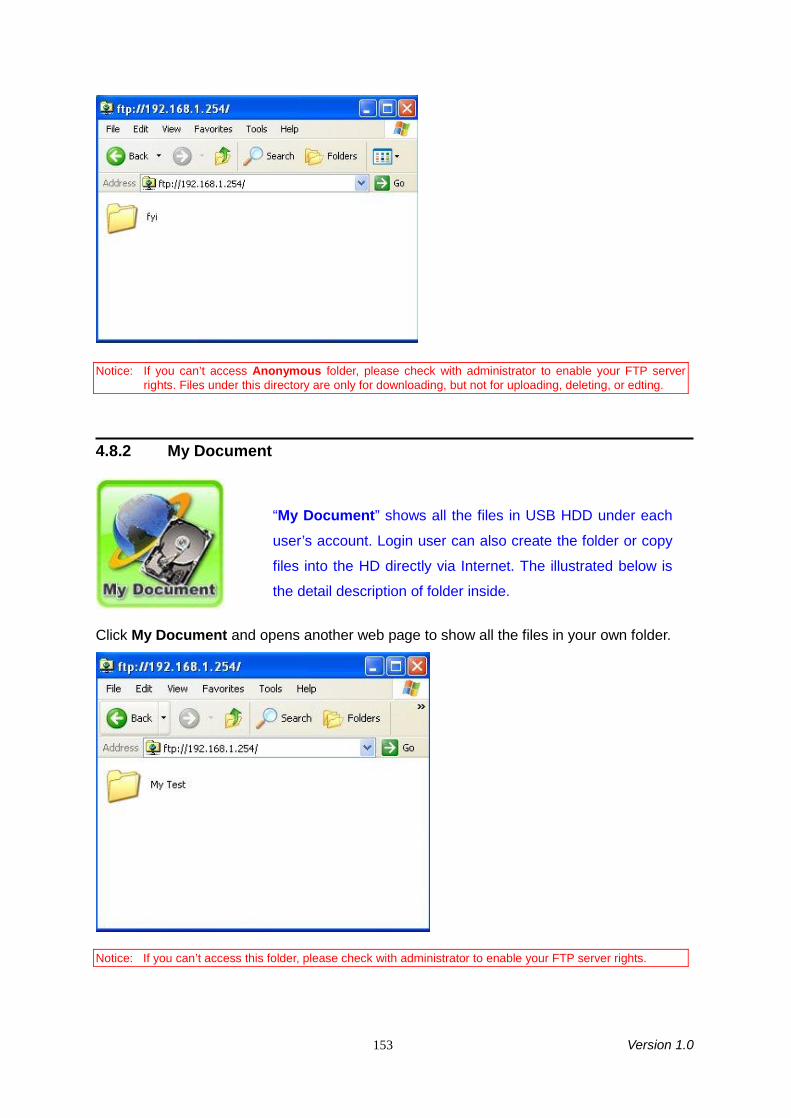
153 Version 1.0
Notice: If you can’t access Anonymous folder, please check with administrator to enable your FTP serverrights. Files under this directory are only for downloading, but not for uploading, deleting, or edting.
4.8.2 My Document
Click My Document and opens another web page to show all the files in your own folder.
Notice: If you can’t access this folder, please check with administrator to enable your FTP server rights.
“My Document” shows all the files in USB HDD under each
user’s account. Login user can also create the folder or copy
files into the HD directly via Internet. The illustrated below is
the detail description of folder inside.
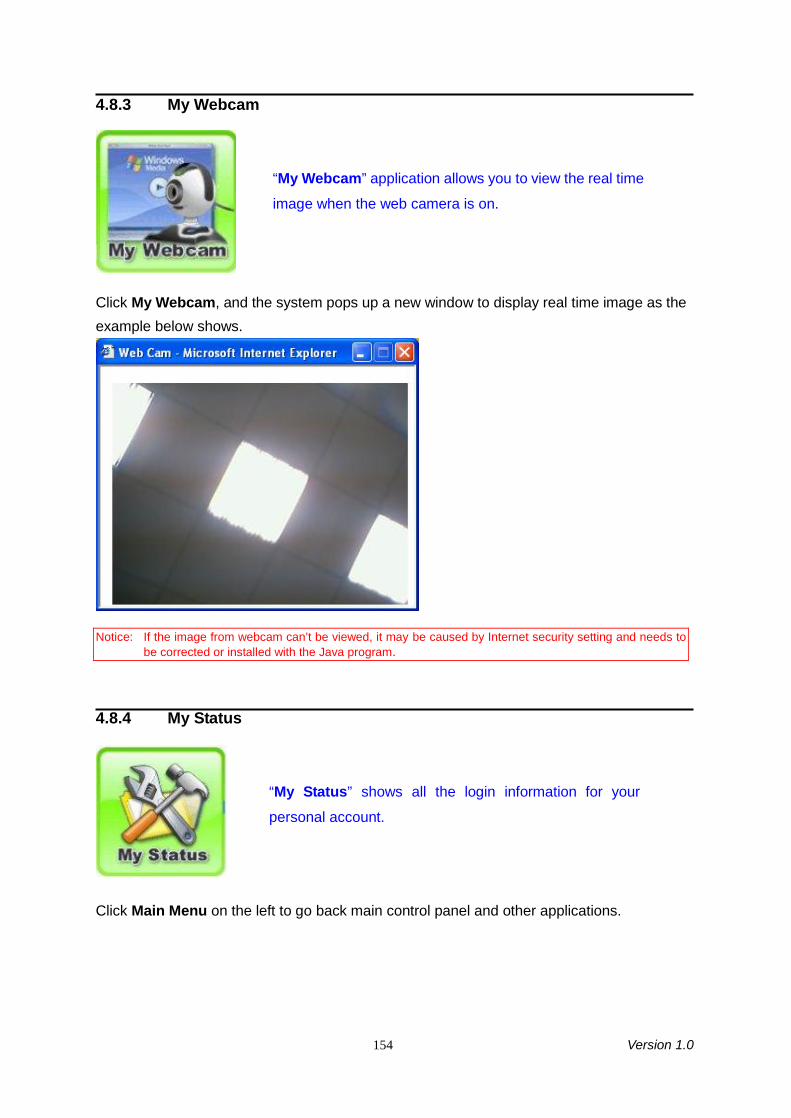
154 Version 1.0
4.8.3 My Webcam
Click My Webcam, and the system pops up a new window to display real time image as theexample below shows.
Notice: If the image from webcam can’t be viewed, it may be caused by Internet security setting and needs tobe corrected or installed with the Java program.
4.8.4 My Status
Click Main Menu on the left to go back main control panel and other applications.
“My Webcam” application allows you to view the real time
image when the web camera is on.
“My Status” shows all the login information for your
personal account.
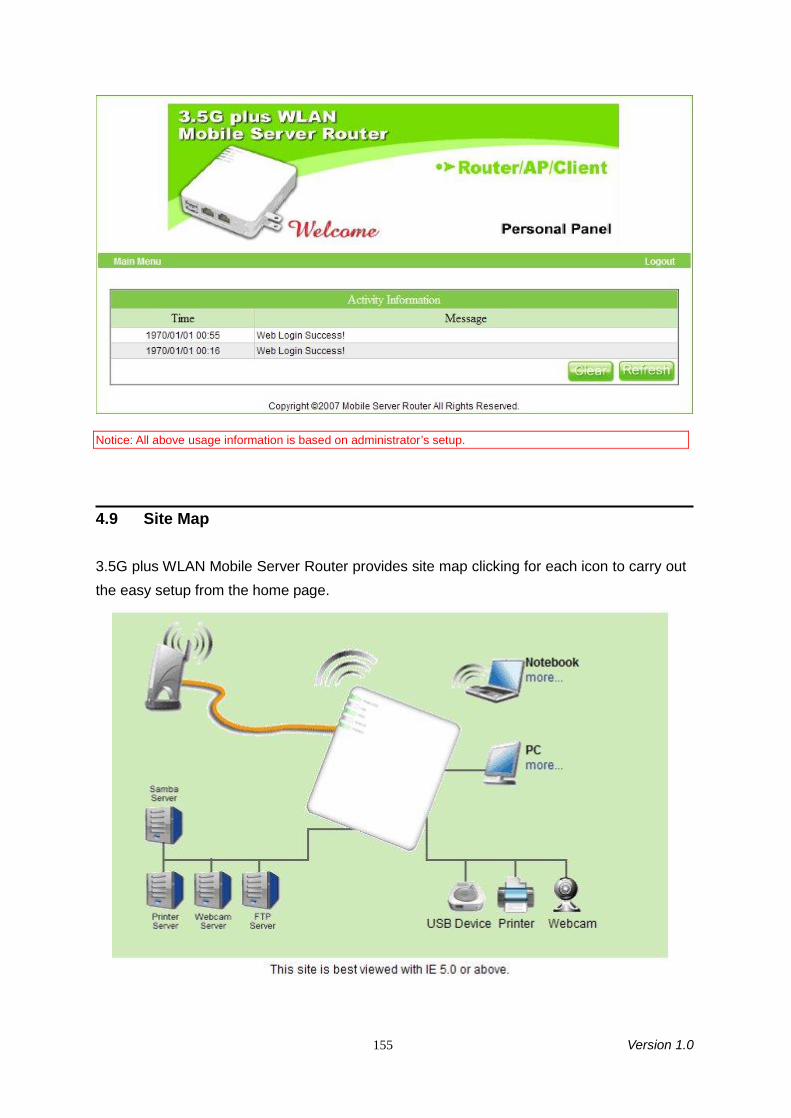
155 Version 1.0
Notice: All above usage information is based on administrator’s setup.
4.9 Site Map
3.5G plus WLAN Mobile Server Router provides site map clicking for each icon to carry outthe easy setup from the home page.

156 Version 1.0
Chapter 5 Client Mode
5.1 Administrator Quick Setup
Make sure to switch the mode into Client Mode, then open a Microsoft Internet Explorer,Mozilla Firefox or Apple Safari browser, and enter http://10.64.64.64 (Default Gateway)into browser’s blank field.
Notice: If the homepage doesn’t appear, please check whether the TCP/IP configuration is obtaining IPaddress automatically or not. If you don’t know how to do this, please refer to section 1.5 Get yourIP Automatically & Manually.
Homepage
Please click Administrator to log in setup menu.
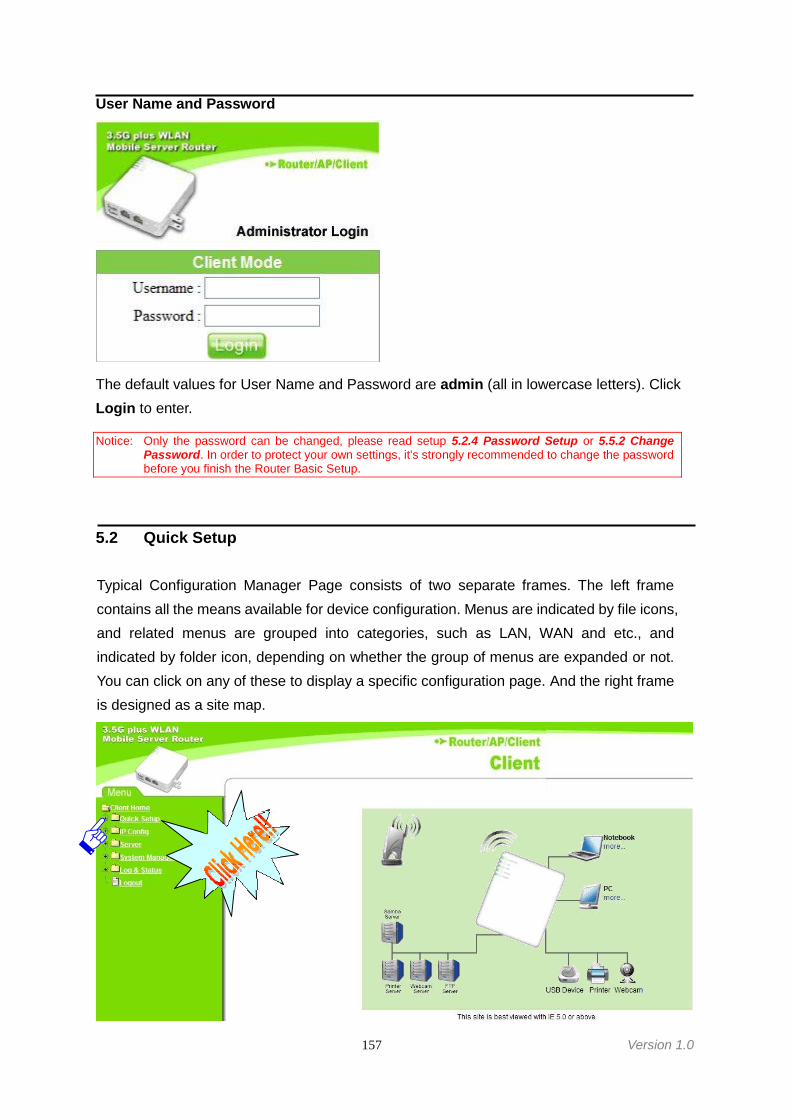
157 Version 1.0
User Name and Password
The default values for User Name and Password are admin (all in lowercase letters). ClickLogin to enter.
Notice: Only the password can be changed, please read setup 5.2.4 Password Setup or 5.5.2 ChangePassword. In order to protect your own settings, it’s strongly recommended to change the passwordbefore you finish the Router Basic Setup.
5.2 Quick Setup
Typical Configuration Manager Page consists of two separate frames. The left framecontains all the means available for device configuration. Menus are indicated by file icons,and related menus are grouped into categories, such as LAN, WAN and etc., andindicated by folder icon, depending on whether the group of menus are expanded or not.You can click on any of these to display a specific configuration page. And the right frameis designed as a site map.

158 Version 1.0
The above diagram shows all PCs and devices connected to your 3.5G plus WLANMobile Server Router and their status. Click Quick Setup on the left of the main menu.Then you’ll see the full functionality selection screen appears and detailed settings foreach item, including “Basic” and “Application” two parts.
Note: The device models named of USB Device, Webcam and Printer will be shown under the picture of eachdevice if the product supports.
Quick Setup full function table list
Click Basic, you see 4 major items set in Quick Setup Selection. Please click Nextto continue.
Click Application, you see 6 major items set here, including USB Disk ManagementSetup, User Account Management Setup, FTP Server Setup, Printer Server Setup, WebCamera Setup and Samba Server Setup. For the checked ones are recommended, allcan be selected upon your demands.
5.2.1 Site Survey Setup
Search for available wireless APs to access Internet. Click Rescan to show the information.
Initiated as default
Initiated as default
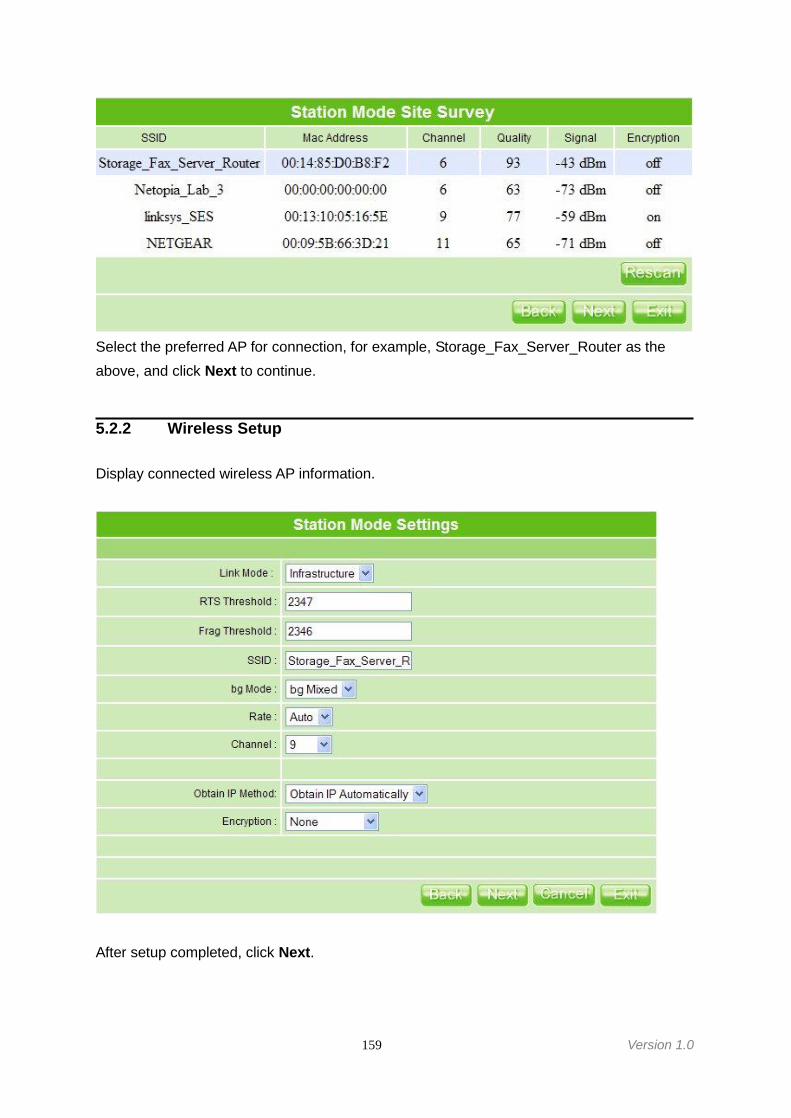
159 Version 1.0
Select the preferred AP for connection, for example, Storage_Fax_Server_Router as theabove, and click Next to continue.
5.2.2 Wireless Setup
Display connected wireless AP information.
After setup completed, click Next.
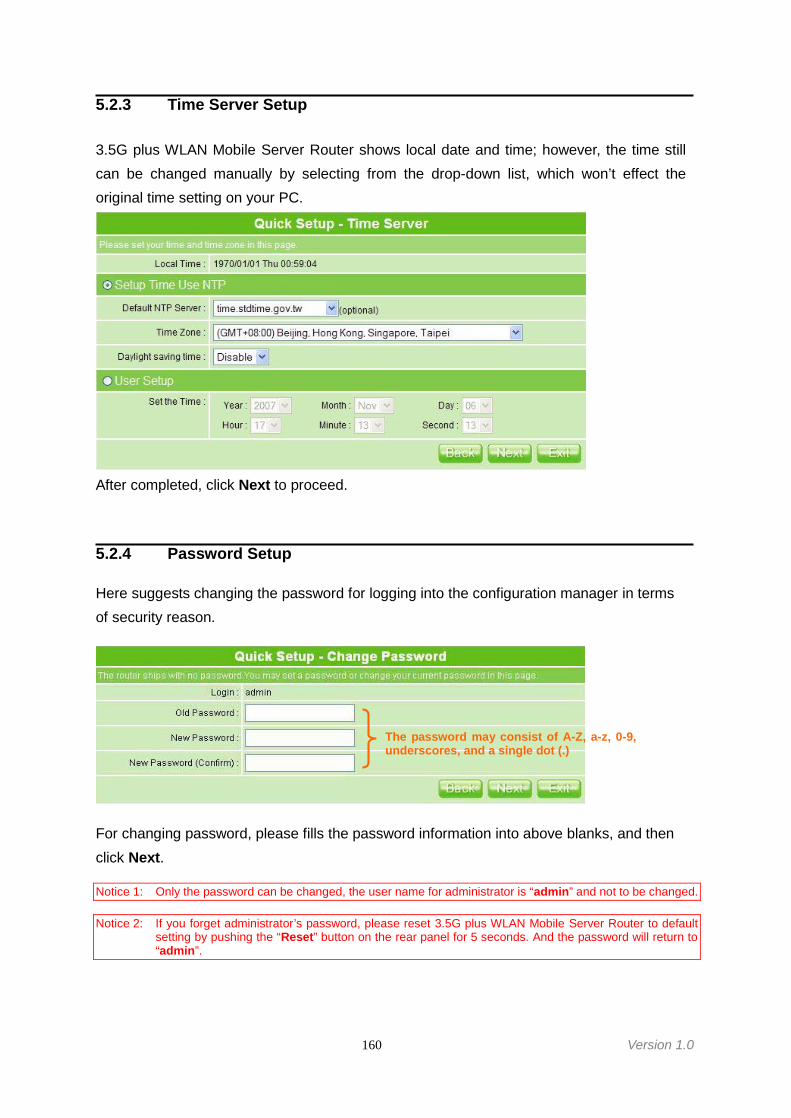
160 Version 1.0
5.2.3 Time Server Setup
3.5G plus WLAN Mobile Server Router shows local date and time; however, the time stillcan be changed manually by selecting from the drop-down list, which won’t effect theoriginal time setting on your PC.
After completed, click Next to proceed.
5.2.4 Password Setup
Here suggests changing the password for logging into the configuration manager in termsof security reason.
For changing password, please fills the password information into above blanks, and thenclick Next.
Notice 1: Only the password can be changed, the user name for administrator is “admin” and not to be changed.
Notice 2: If you forget administrator’s password, please reset 3.5G plus WLAN Mobile Server Router to defaultsetting by pushing the “Reset” button on the rear panel for 5 seconds. And the password will return to“admin”.
The password may consist of A-Z, a-z, 0-9,underscores, and a single dot (.)
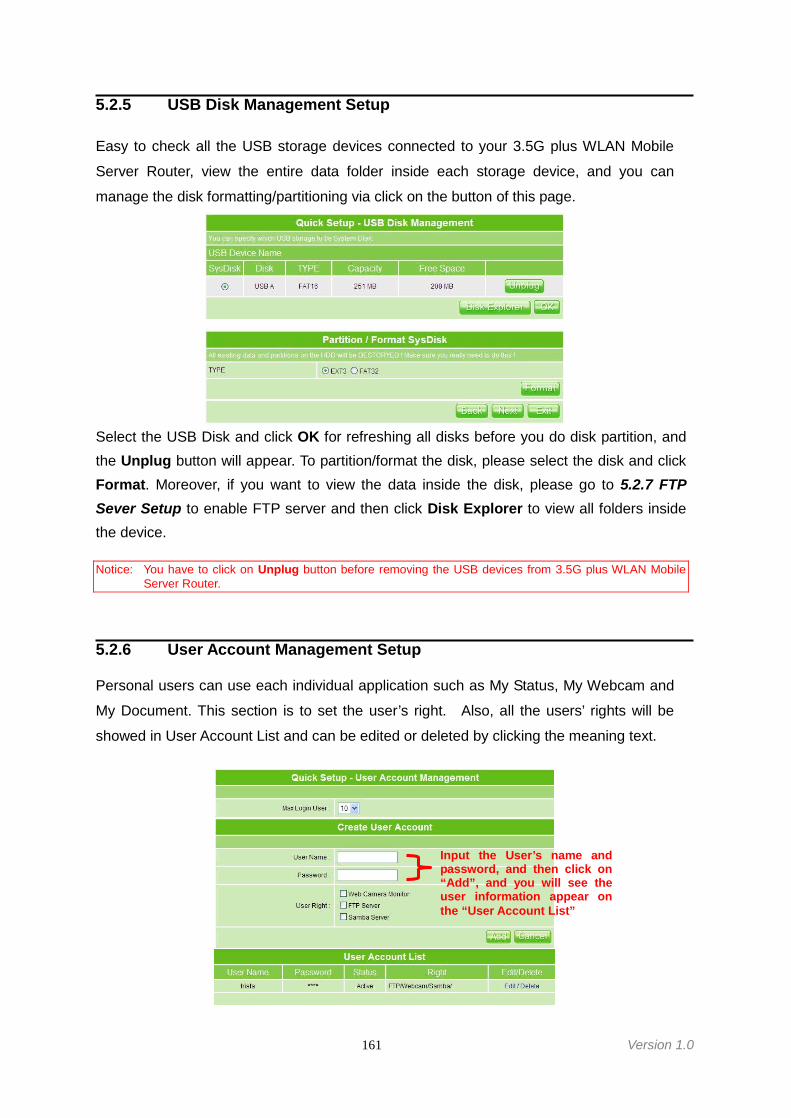
161 Version 1.0
5.2.5 USB Disk Management Setup
Easy to check all the USB storage devices connected to your 3.5G plus WLAN Mobile
Server Router, view the entire data folder inside each storage device, and you can
manage the disk formatting/partitioning via click on the button of this page.
Select the USB Disk and click OK for refreshing all disks before you do disk partition, andthe Unplug button will appear. To partition/format the disk, please select the disk and clickFormat. Moreover, if you want to view the data inside the disk, please go to 5.2.7 FTPSever Setup to enable FTP server and then click Disk Explorer to view all folders insidethe device.
Notice: You have to click on Unplug button before removing the USB devices from 3.5G plus WLAN MobileServer Router.
5.2.6 User Account Management Setup
Personal users can use each individual application such as My Status, My Webcam and
My Document. This section is to set the user’s right. Also, all the users’ rights will be
showed in User Account List and can be edited or deleted by clicking the meaning text.
Input the User’s name andpassword, and then click on“Add”, and you will see theuser information appear onthe “User Account List”

162 Version 1.0
Set each user’s right and space arrangement, and then click on Add button for saving
user’s account. Click on Next button after finished.
5.2.7 FTP Server Setup
3.5G plus WLAN Mobile Server Router can be the FTP Server providing users to transmit
files, also for the guest to download the files from assigned website. Moreover, by
connecting USB HDD, USB Flash to the router, user can easily set up a FTP Server to
share or download files for local or remote users.
Set the FTP Server and related setting. Disable the function as demand, and click Next tocontinue.
5.2.8 Web Camera Server Setup
If you plan to use 3.5G plus WLAN Mobile Server Router as a Web Camera site, connecta supported USB Web Camera to the USB port of 3.5G plus WLAN Mobile Server Router.Check both Enable webcam server and Access from WAN as Enable to activate.
Click on Next button to next step.
Notice:Before webcam server enabled, please make sure the webcam has connected to the product; otherwise,the “Enable” selection can’t be checked.
If the USB device isn’t enabled first,you can’t enable FTP Server. (Noteven click on “Enable”)
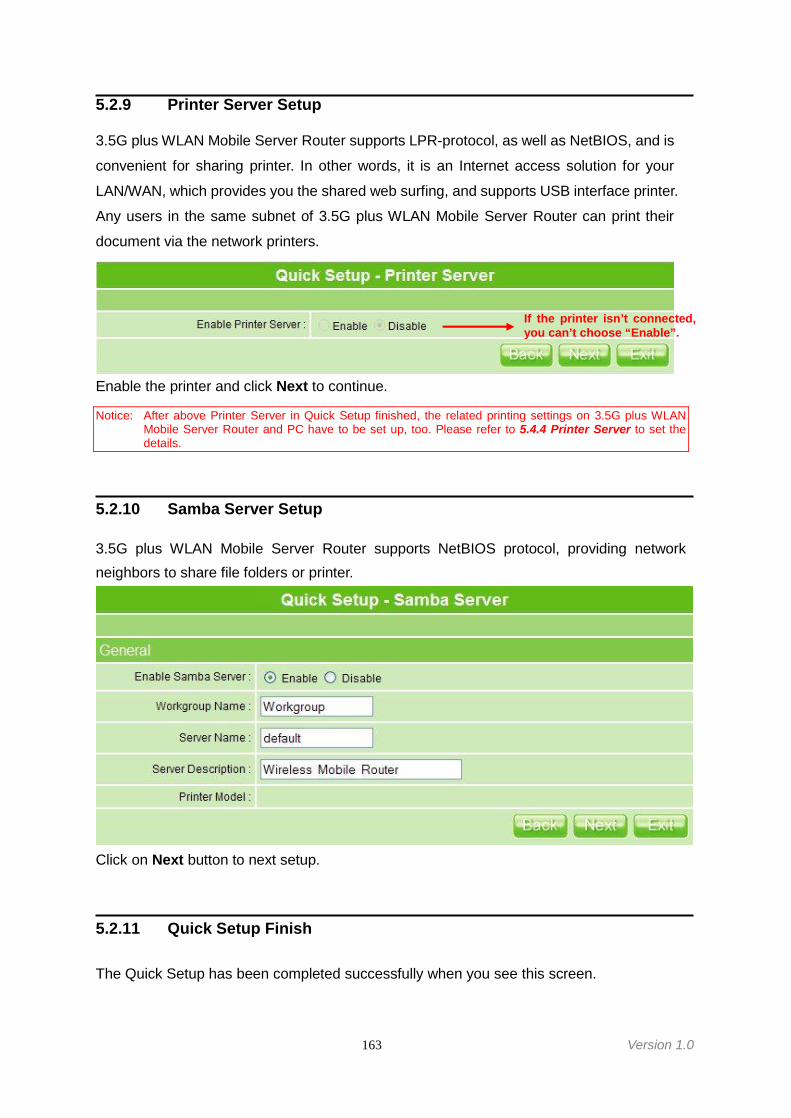
163 Version 1.0
5.2.9 Printer Server Setup
3.5G plus WLAN Mobile Server Router supports LPR-protocol, as well as NetBIOS, and is
convenient for sharing printer. In other words, it is an Internet access solution for your
LAN/WAN, which provides you the shared web surfing, and supports USB interface printer.
Any users in the same subnet of 3.5G plus WLAN Mobile Server Router can print their
document via the network printers.
Enable the printer and click Next to continue.
Notice: After above Printer Server in Quick Setup finished, the related printing settings on 3.5G plus WLANMobile Server Router and PC have to be set up, too. Please refer to 5.4.4 Printer Server to set thedetails.
5.2.10 Samba Server Setup
3.5G plus WLAN Mobile Server Router supports NetBIOS protocol, providing networkneighbors to share file folders or printer.
Click on Next button to next setup.
5.2.11 Quick Setup Finish
The Quick Setup has been completed successfully when you see this screen.
If the printer isn’t connected,you can’t choose “Enable”.
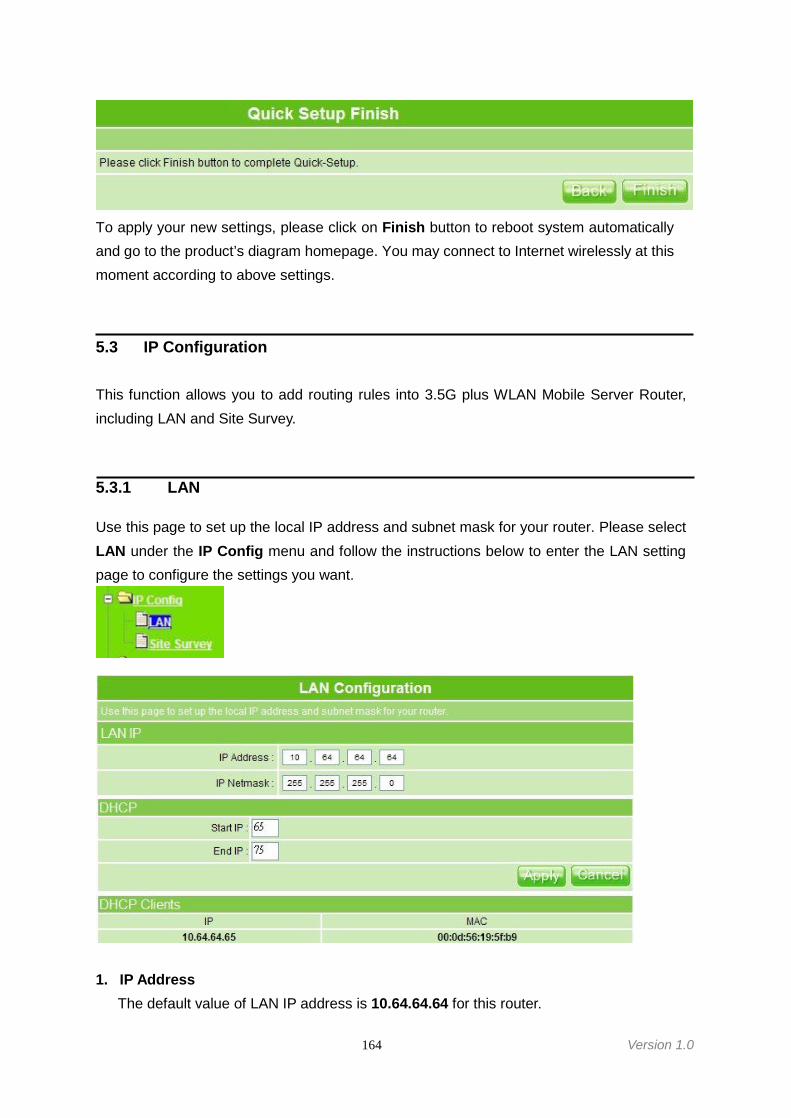
164 Version 1.0
To apply your new settings, please click on Finish button to reboot system automaticallyand go to the product’s diagram homepage. You may connect to Internet wirelessly at thismoment according to above settings.
5.3 IP Configuration
This function allows you to add routing rules into 3.5G plus WLAN Mobile Server Router,including LAN and Site Survey.
5.3.1 LAN
Use this page to set up the local IP address and subnet mask for your router. Please selectLAN under the IP Config menu and follow the instructions below to enter the LAN settingpage to configure the settings you want.
1. IP AddressThe default value of LAN IP address is 10.64.64.64 for this router.
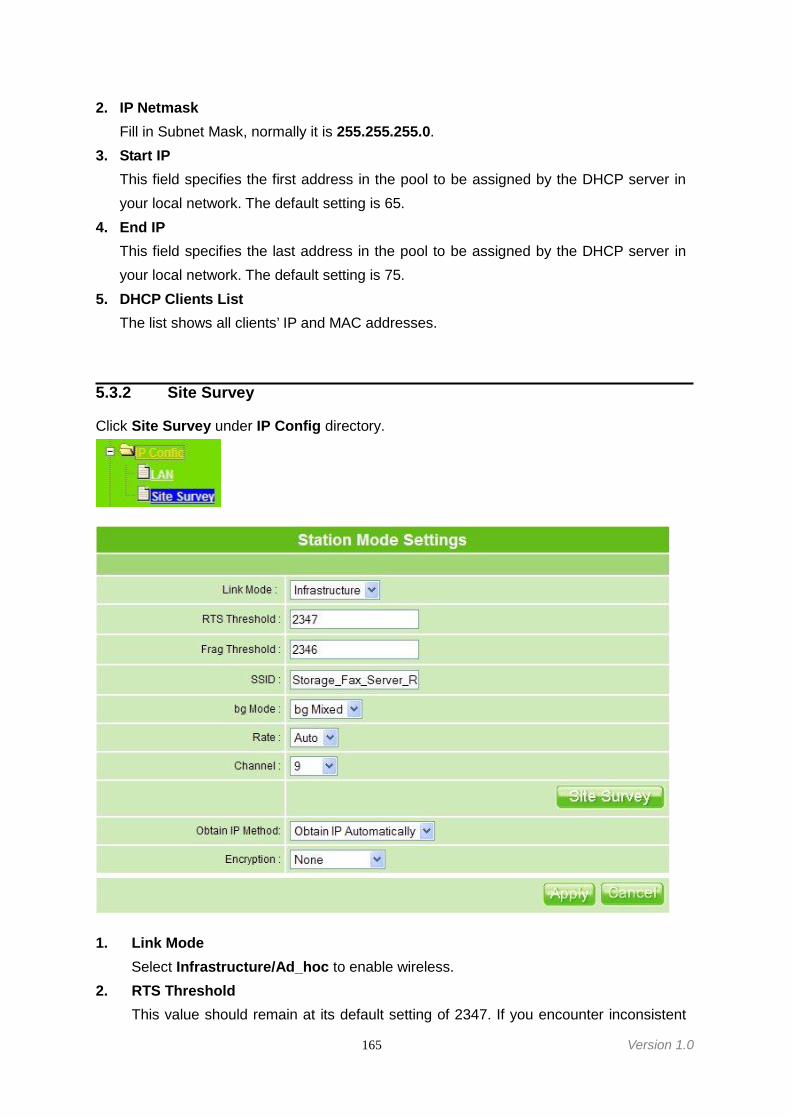
165 Version 1.0
2. IP NetmaskFill in Subnet Mask, normally it is 255.255.255.0.
3. Start IPThis field specifies the first address in the pool to be assigned by the DHCP server inyour local network. The default setting is 65.
4. End IPThis field specifies the last address in the pool to be assigned by the DHCP server inyour local network. The default setting is 75.
5. DHCP Clients ListThe list shows all clients’ IP and MAC addresses.
5.3.2 Site Survey
Click Site Survey under IP Config directory.
1. Link ModeSelect Infrastructure/Ad_hoc to enable wireless.
2. RTS ThresholdThis value should remain at its default setting of 2347. If you encounter inconsistent

166 Version 1.0
data flow, only minor modifications of the value range between 256 and 2347 arerecommended
3. Frag ThresholdTo identify the maximum length of packet, the overflow packet length wil befragmentized. The allowed range is from 256 to 2346, and default length is 2346 bytes.Only minor modifications of the value range are recommended here.
4. SSIDName your wireless network, and the default is previously selected wireless AP.
5. bg ModeThis field indicates the 802.11g interface mode. 802.11g prevents the 802.11b clientsfrom accessing the router; 802.11b provides 802.11b standard wireless network. Bydefault, the value is bg Mixed, which allows both 802.11b and 802.11g clients toaccess the router.
6. RateSelect the transmission rate up to 54Mbps for the network. The default setting is Auto.
7. Channel3.5G plus WLAN Mobile Server Router supports up to 14 overlapping channels forradio communication (For the US and most of Europe, channel 1, 6 & 11 are used.) Bydefault, the channel is Auto.
8. Obtain IP AutomaticallyCheck to allow system automatically obtaining IP.
9. Specify an IPPut in the required information as specified upon your demand.
10. EncryptionInclude 4 options of Open System, Shared Key, TKIP and AES.Open System & Shared KeyWEP Encryption3.5G plus WLAN Mobile Server Router supports both 64-bit and 128-bit encryptionusing the Wired Equivalent Privacy (WEP) algorithm. Select the type of encryption youwant to use (64 or 128 bit) and configure one to four WEP Keys. The “1280bit” methodis more secure than the “64-bit”.Key Type: For 64bits WEP key, either 5 ASCII characters or 10 hexadecimal digitalsleading by 0x can be entered. For 128bits WEP key, either 13 ASCII characters or 26hexadecimal digits leading by 0x can be entered.
Note: 128 bits WEP is most secure, but has more encryption/decryption overhead. Note that all wirelessdevices must support the same WEP encryption bit size and have the same key. Four keys can beentered here, but only one key can be selected at a time. The keys can be entered in ASCII orHexadecimal. Select the item from drop-down list you wish to use.
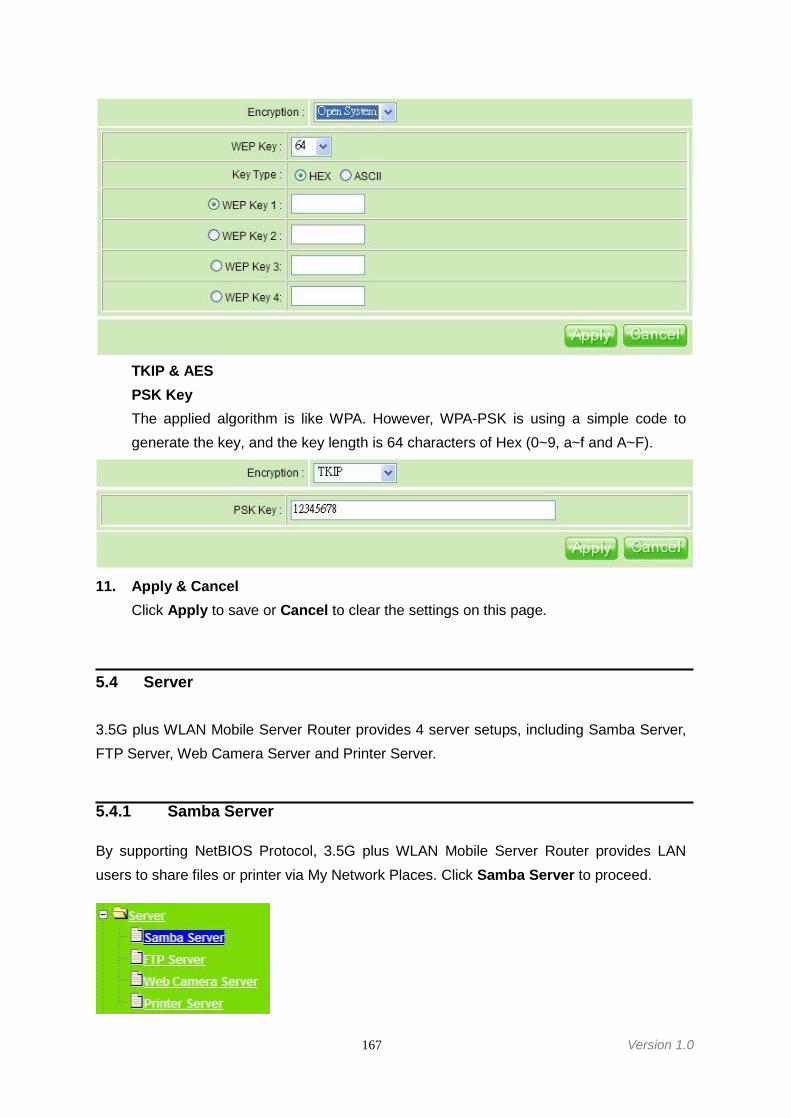
167 Version 1.0
TKIP & AESPSK KeyThe applied algorithm is like WPA. However, WPA-PSK is using a simple code togenerate the key, and the key length is 64 characters of Hex (0~9, a~f and A~F).
11. Apply & CancelClick Apply to save or Cancel to clear the settings on this page.
5.4 Server
3.5G plus WLAN Mobile Server Router provides 4 server setups, including Samba Server,FTP Server, Web Camera Server and Printer Server.
5.4.1 Samba Server
By supporting NetBIOS Protocol, 3.5G plus WLAN Mobile Server Router provides LANusers to share files or printer via My Network Places. Click Samba Server to proceed.
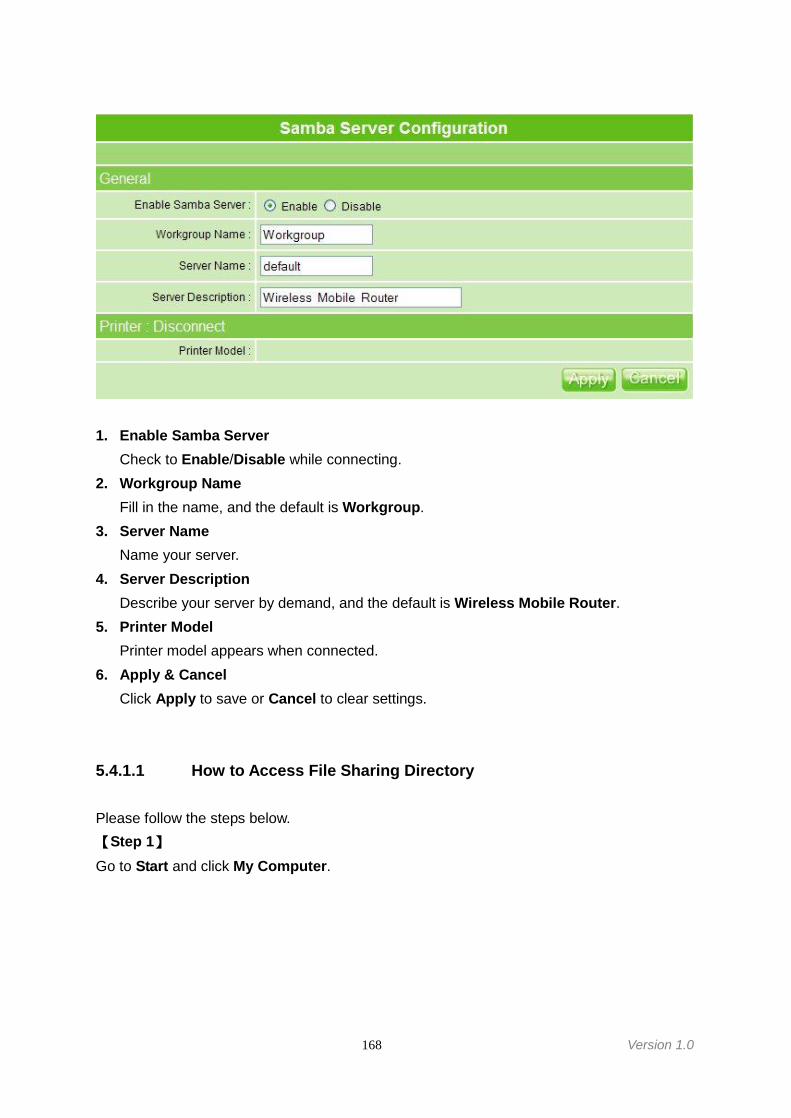
168 Version 1.0
1. Enable Samba ServerCheck to Enable/Disable while connecting.
2. Workgroup NameFill in the name, and the default is Workgroup.
3. Server NameName your server.
4. Server DescriptionDescribe your server by demand, and the default is Wireless Mobile Router.
5. Printer ModelPrinter model appears when connected.
6. Apply & CancelClick Apply to save or Cancel to clear settings.
5.4.1.1 How to Access File Sharing Directory
Please follow the steps below.【Step 1】Go to Start and click My Computer.
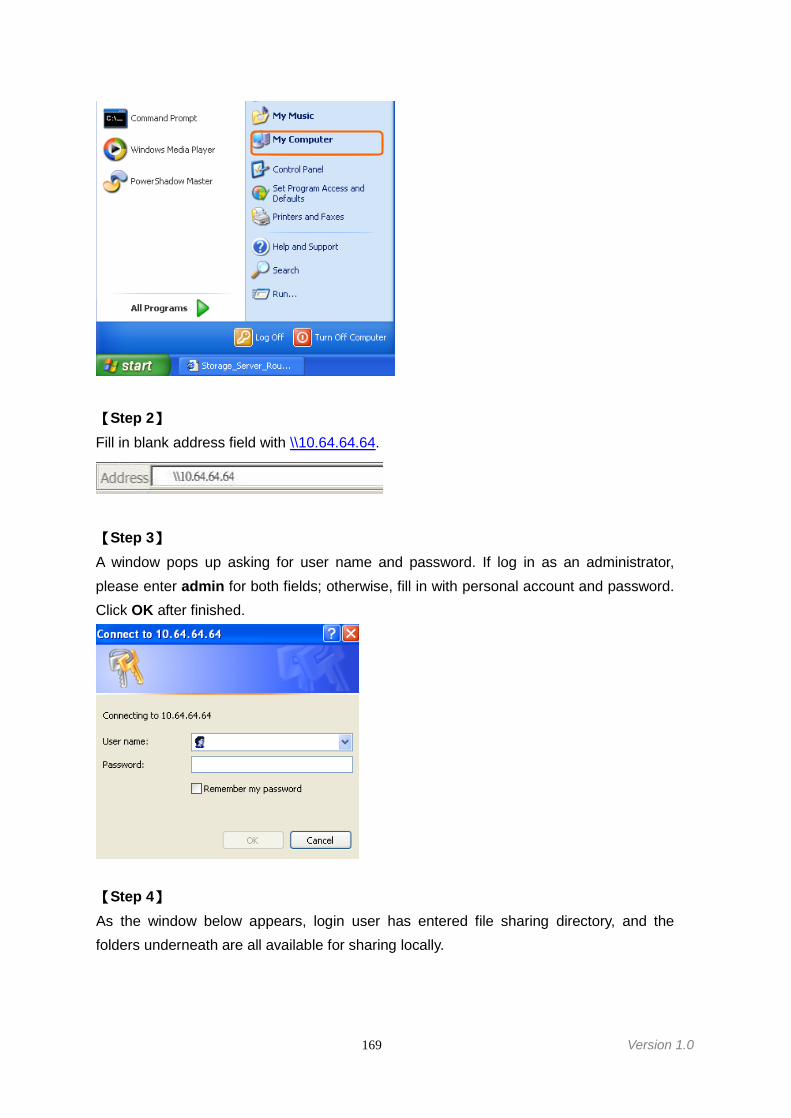
169 Version 1.0
【Step 2】Fill in blank address field with \\10.64.64.64.
【Step 3】A window pops up asking for user name and password. If log in as an administrator,please enter admin for both fields; otherwise, fill in with personal account and password.Click OK after finished.
【Step 4】As the window below appears, login user has entered file sharing directory, and thefolders underneath are all available for sharing locally.
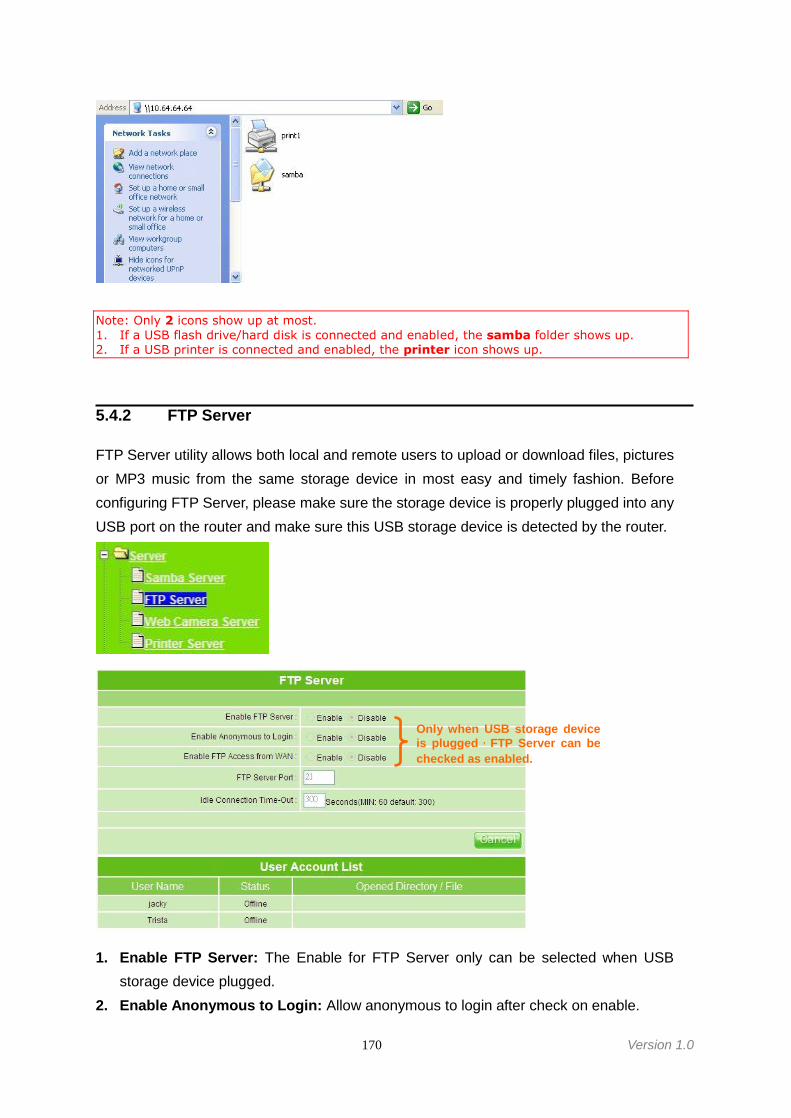
170 Version 1.0
Note: Only 2 icons show up at most.1. If a USB flash drive/hard disk is connected and enabled, the samba folder shows up.2. If a USB printer is connected and enabled, the printer icon shows up.
5.4.2 FTP Server
FTP Server utility allows both local and remote users to upload or download files, picturesor MP3 music from the same storage device in most easy and timely fashion. Beforeconfiguring FTP Server, please make sure the storage device is properly plugged into anyUSB port on the router and make sure this USB storage device is detected by the router.
1. Enable FTP Server: The Enable for FTP Server only can be selected when USBstorage device plugged.
2. Enable Anonymous to Login: Allow anonymous to login after check on enable.
Only when USB storage deviceis plugged,FTP Server can bechecked as enabled.
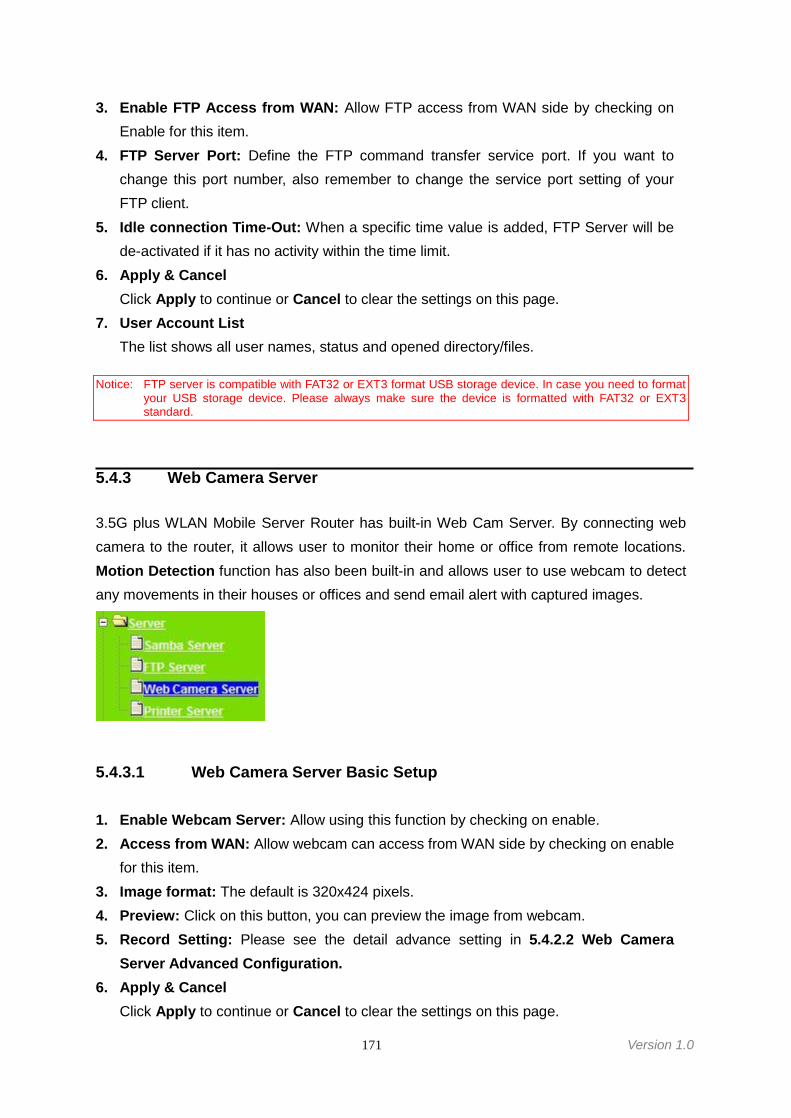
171 Version 1.0
3. Enable FTP Access from WAN: Allow FTP access from WAN side by checking onEnable for this item.
4. FTP Server Port: Define the FTP command transfer service port. If you want tochange this port number, also remember to change the service port setting of yourFTP client.
5. Idle connection Time-Out: When a specific time value is added, FTP Server will bede-activated if it has no activity within the time limit.
6. Apply & CancelClick Apply to continue or Cancel to clear the settings on this page.
7. User Account ListThe list shows all user names, status and opened directory/files.
Notice: FTP server is compatible with FAT32 or EXT3 format USB storage device. In case you need to formatyour USB storage device. Please always make sure the device is formatted with FAT32 or EXT3standard.
5.4.3 Web Camera Server
3.5G plus WLAN Mobile Server Router has built-in Web Cam Server. By connecting webcamera to the router, it allows user to monitor their home or office from remote locations.Motion Detection function has also been built-in and allows user to use webcam to detectany movements in their houses or offices and send email alert with captured images.
5.4.3.1 Web Camera Server Basic Setup
1. Enable Webcam Server: Allow using this function by checking on enable.2. Access from WAN: Allow webcam can access from WAN side by checking on enable
for this item.3. Image format: The default is 320x424 pixels.4. Preview: Click on this button, you can preview the image from webcam.5. Record Setting: Please see the detail advance setting in 5.4.2.2 Web Camera
Server Advanced Configuration.6. Apply & Cancel
Click Apply to continue or Cancel to clear the settings on this page.
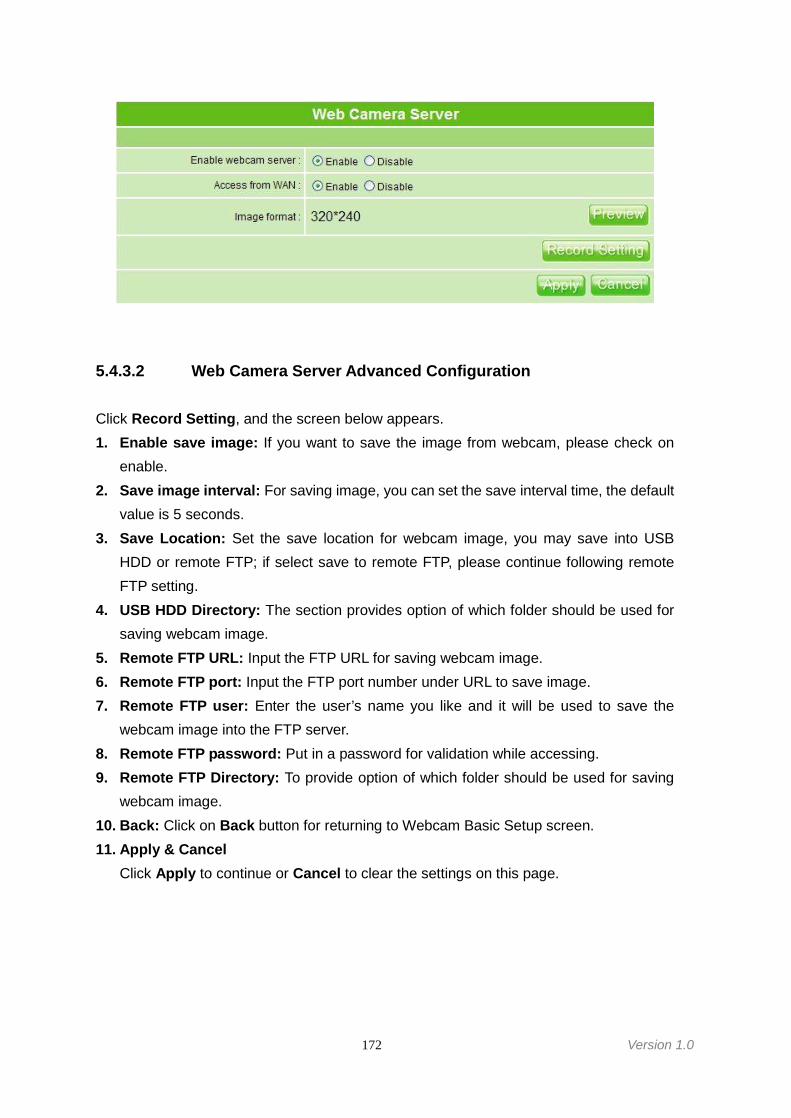
172 Version 1.0
5.4.3.2 Web Camera Server Advanced Configuration
Click Record Setting, and the screen below appears.1. Enable save image: If you want to save the image from webcam, please check on
enable.2. Save image interval: For saving image, you can set the save interval time, the default
value is 5 seconds.3. Save Location: Set the save location for webcam image, you may save into USB
HDD or remote FTP; if select save to remote FTP, please continue following remoteFTP setting.
4. USB HDD Directory: The section provides option of which folder should be used forsaving webcam image.
5. Remote FTP URL: Input the FTP URL for saving webcam image.6. Remote FTP port: Input the FTP port number under URL to save image.7. Remote FTP user: Enter the user’s name you like and it will be used to save the
webcam image into the FTP server.8. Remote FTP password: Put in a password for validation while accessing.9. Remote FTP Directory: To provide option of which folder should be used for saving
webcam image.10. Back: Click on Back button for returning to Webcam Basic Setup screen.11. Apply & Cancel
Click Apply to continue or Cancel to clear the settings on this page.
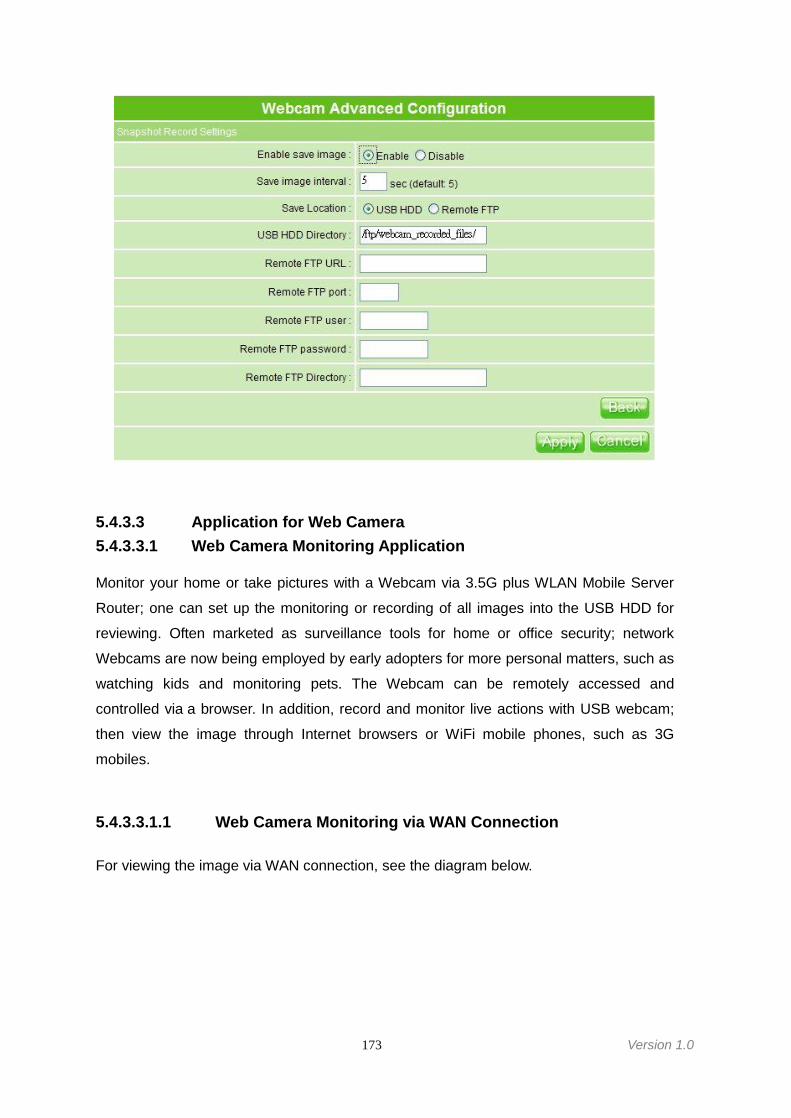
173 Version 1.0
5.4.3.3 Application for Web Camera5.4.3.3.1 Web Camera Monitoring Application
Monitor your home or take pictures with a Webcam via 3.5G plus WLAN Mobile Server
Router; one can set up the monitoring or recording of all images into the USB HDD for
reviewing. Often marketed as surveillance tools for home or office security; network
Webcams are now being employed by early adopters for more personal matters, such as
watching kids and monitoring pets. The Webcam can be remotely accessed and
controlled via a browser. In addition, record and monitor live actions with USB webcam;
then view the image through Internet browsers or WiFi mobile phones, such as 3G
mobiles.
5.4.3.3.1.1 Web Camera Monitoring via WAN Connection
For viewing the image via WAN connection, see the diagram below.
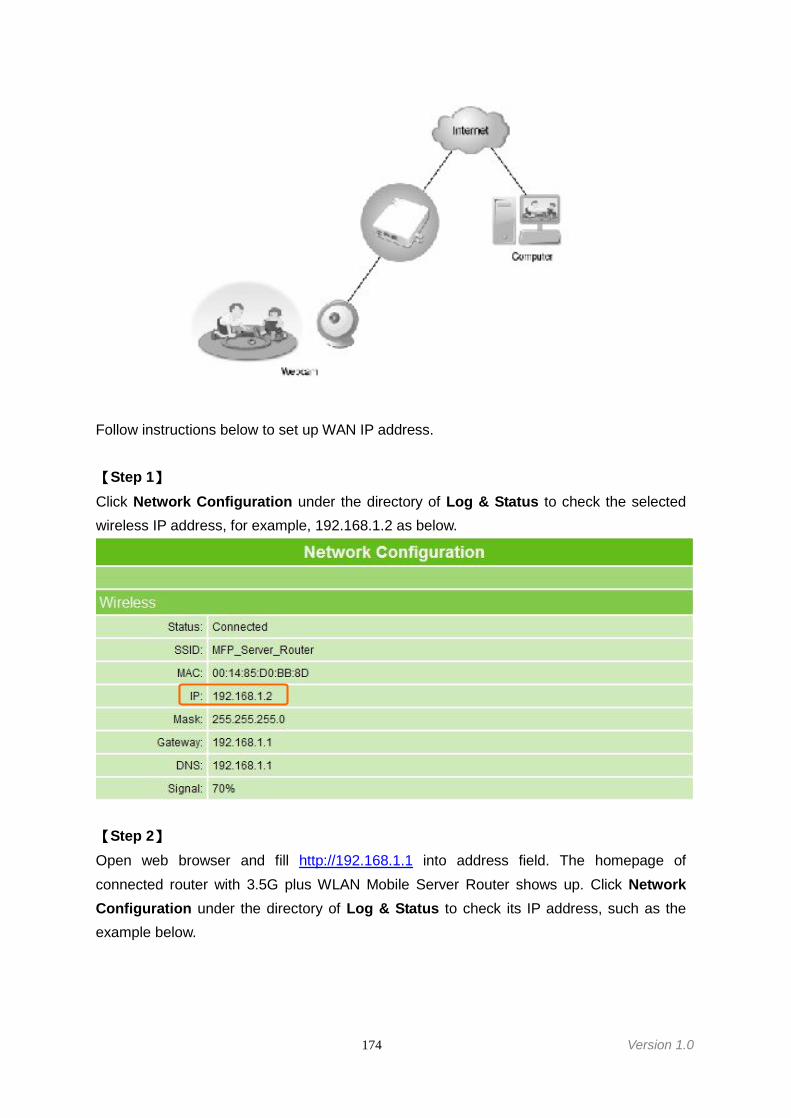
174 Version 1.0
Follow instructions below to set up WAN IP address.
【Step 1】Click Network Configuration under the directory of Log & Status to check the selectedwireless IP address, for example, 192.168.1.2 as below.
【Step 2】Open web browser and fill http://192.168.1.1 into address field. The homepage ofconnected router with 3.5G plus WLAN Mobile Server Router shows up. Click NetworkConfiguration under the directory of Log & Status to check its IP address, such as theexample below.
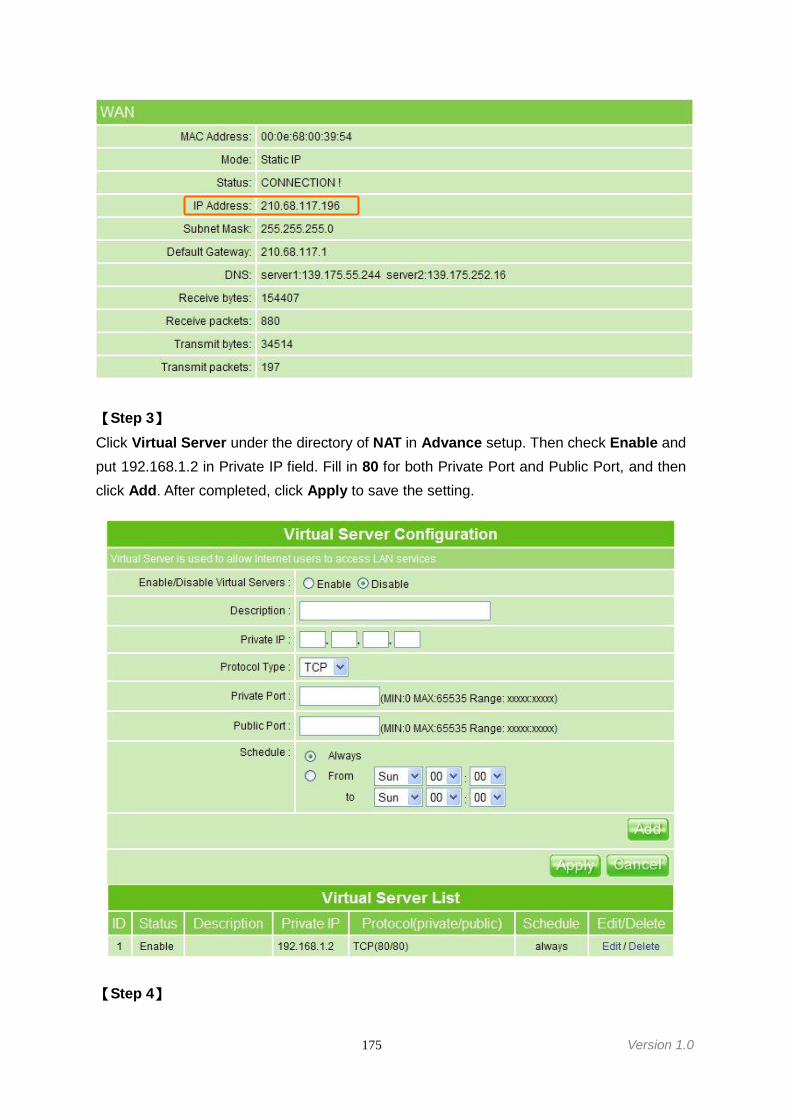
175 Version 1.0
【Step 3】Click Virtual Server under the directory of NAT in Advance setup. Then check Enable andput 192.168.1.2 in Private IP field. Fill in 80 for both Private Port and Public Port, and thenclick Add. After completed, click Apply to save the setting.
【Step 4】
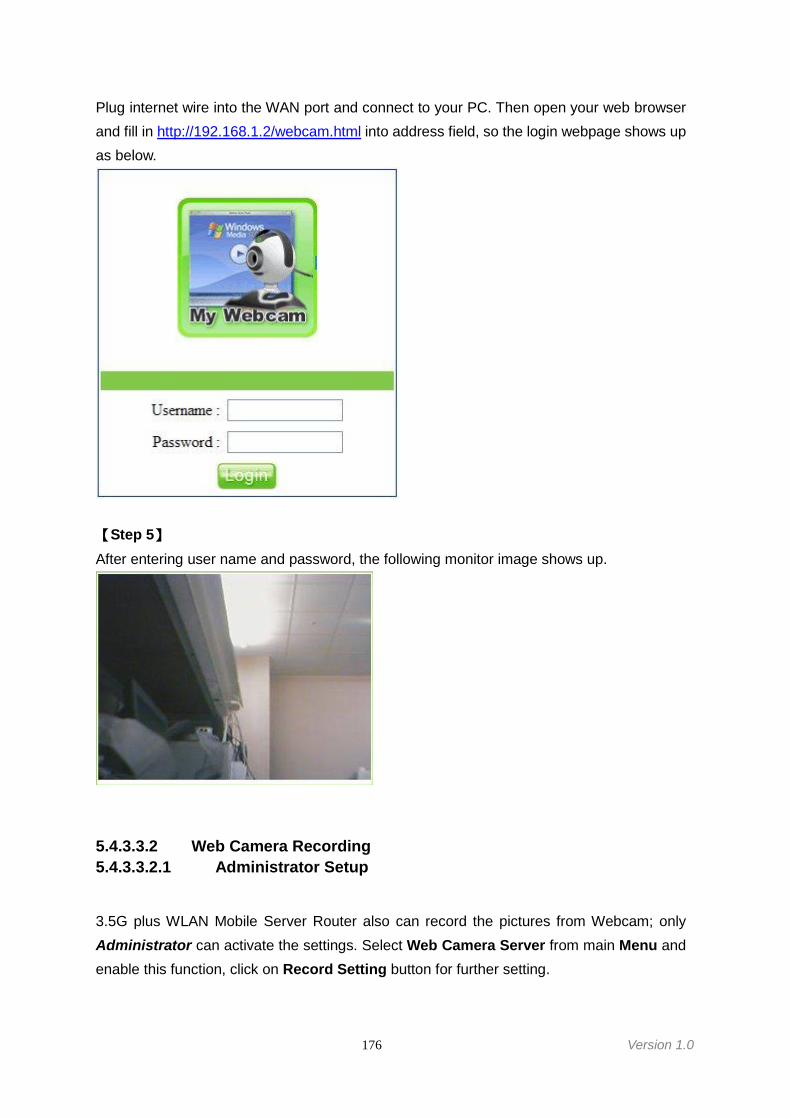
176 Version 1.0
Plug internet wire into the WAN port and connect to your PC. Then open your web browserand fill in http://192.168.1.2/webcam.html into address field, so the login webpage shows upas below.
【Step 5】After entering user name and password, the following monitor image shows up.
5.4.3.3.2 Web Camera Recording5.4.3.3.2.1 Administrator Setup
3.5G plus WLAN Mobile Server Router also can record the pictures from Webcam; onlyAdministrator can activate the settings. Select Web Camera Server from main Menu andenable this function, click on Record Setting button for further setting.
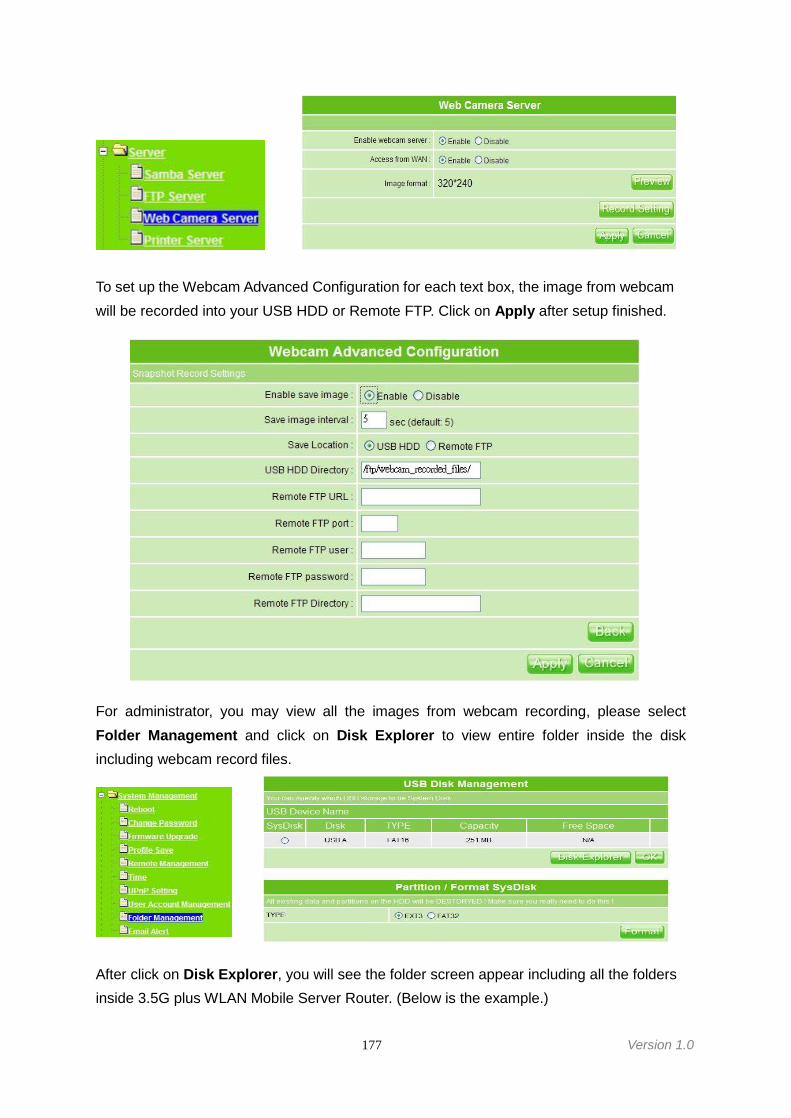
177 Version 1.0
To set up the Webcam Advanced Configuration for each text box, the image from webcamwill be recorded into your USB HDD or Remote FTP. Click on Apply after setup finished.
For administrator, you may view all the images from webcam recording, please selectFolder Management and click on Disk Explorer to view entire folder inside the diskincluding webcam record files.
After click on Disk Explorer, you will see the folder screen appear including all the foldersinside 3.5G plus WLAN Mobile Server Router. (Below is the example.)
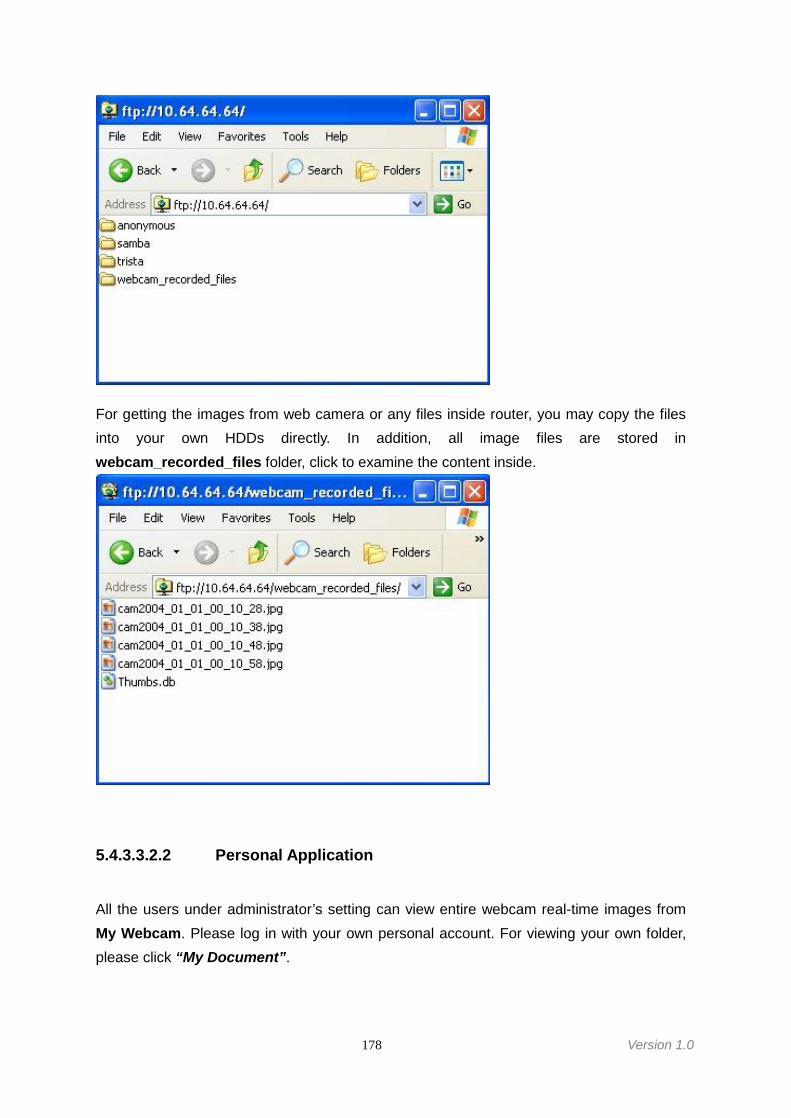
178 Version 1.0
For getting the images from web camera or any files inside router, you may copy the filesinto your own HDDs directly. In addition, all image files are stored inwebcam_recorded_files folder, click to examine the content inside.
5.4.3.3.2.2 Personal Application
All the users under administrator’s setting can view entire webcam real-time images fromMy Webcam. Please log in with your own personal account. For viewing your own folder,please click “My Document”.
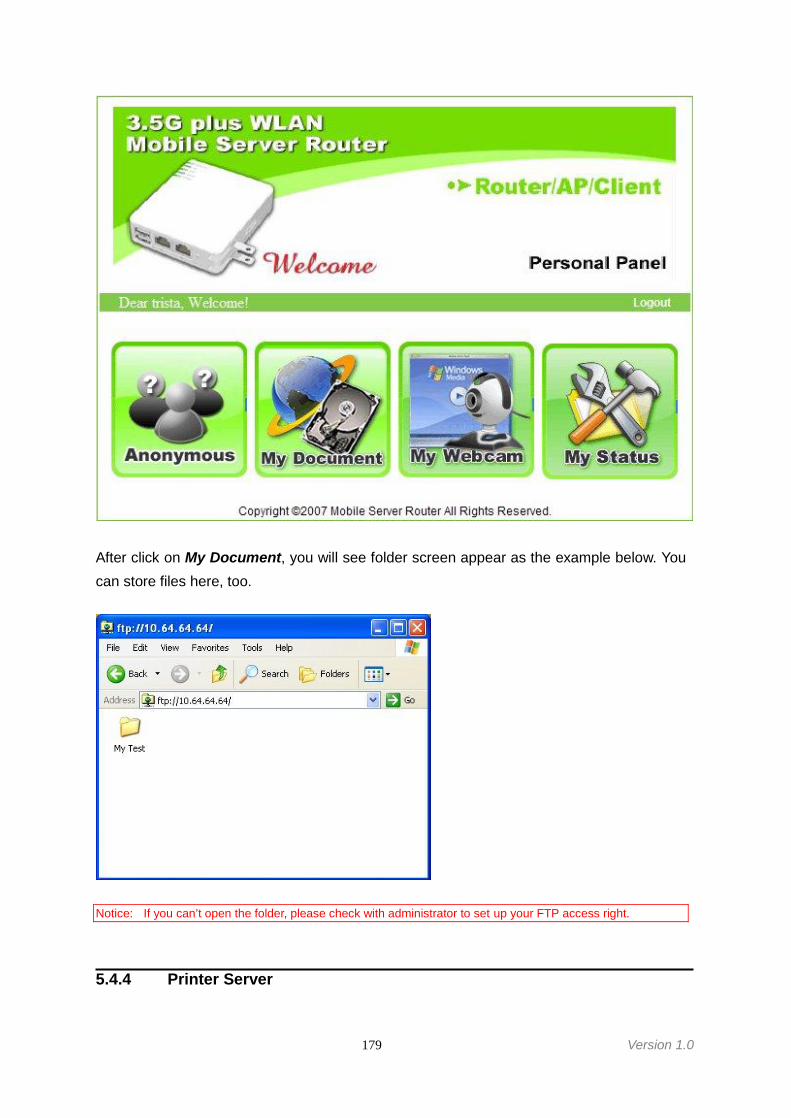
179 Version 1.0
After click on My Document, you will see folder screen appear as the example below. Youcan store files here, too.
Notice: If you can’t open the folder, please check with administrator to set up your FTP access right.
5.4.4 Printer Server
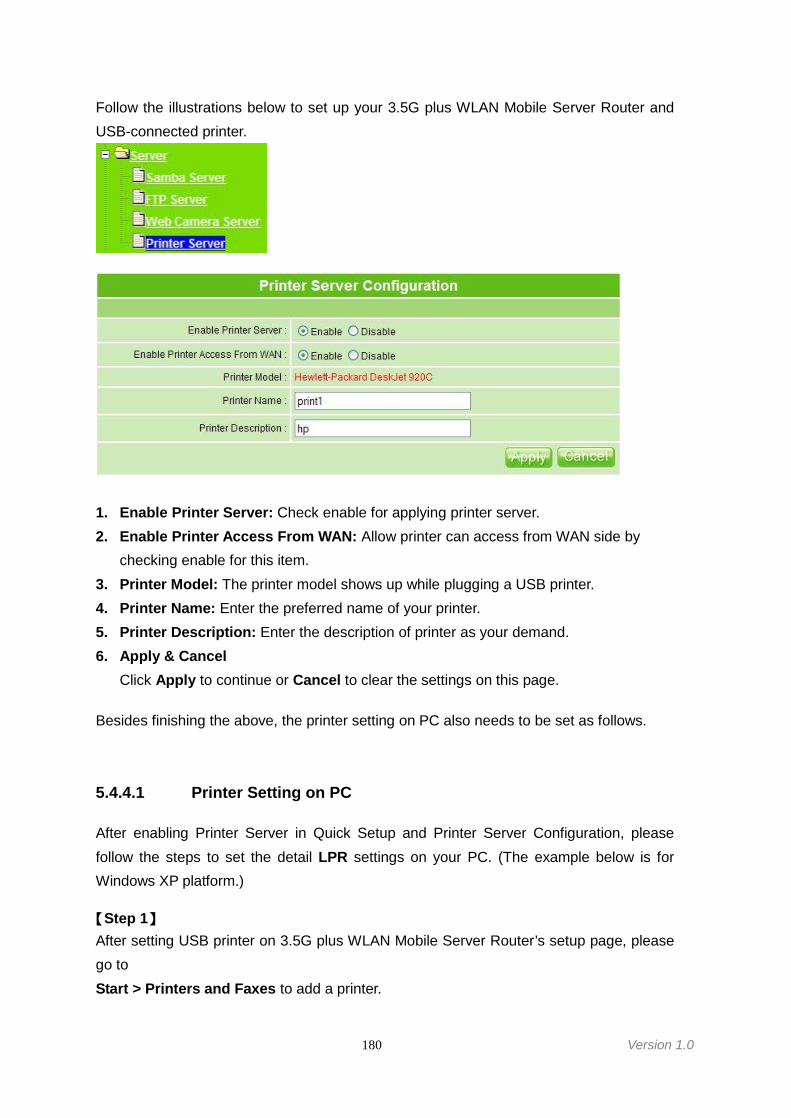
180 Version 1.0
Follow the illustrations below to set up your 3.5G plus WLAN Mobile Server Router andUSB-connected printer.
1. Enable Printer Server: Check enable for applying printer server.2. Enable Printer Access From WAN: Allow printer can access from WAN side by
checking enable for this item.3. Printer Model: The printer model shows up while plugging a USB printer.4. Printer Name: Enter the preferred name of your printer.5. Printer Description: Enter the description of printer as your demand.6. Apply & Cancel
Click Apply to continue or Cancel to clear the settings on this page.
Besides finishing the above, the printer setting on PC also needs to be set as follows.
5.4.4.1 Printer Setting on PC
After enabling Printer Server in Quick Setup and Printer Server Configuration, pleasefollow the steps to set the detail LPR settings on your PC. (The example below is forWindows XP platform.)
【Step 1】After setting USB printer on 3.5G plus WLAN Mobile Server Router’s setup page, pleasego toStart > Printers and Faxes to add a printer.
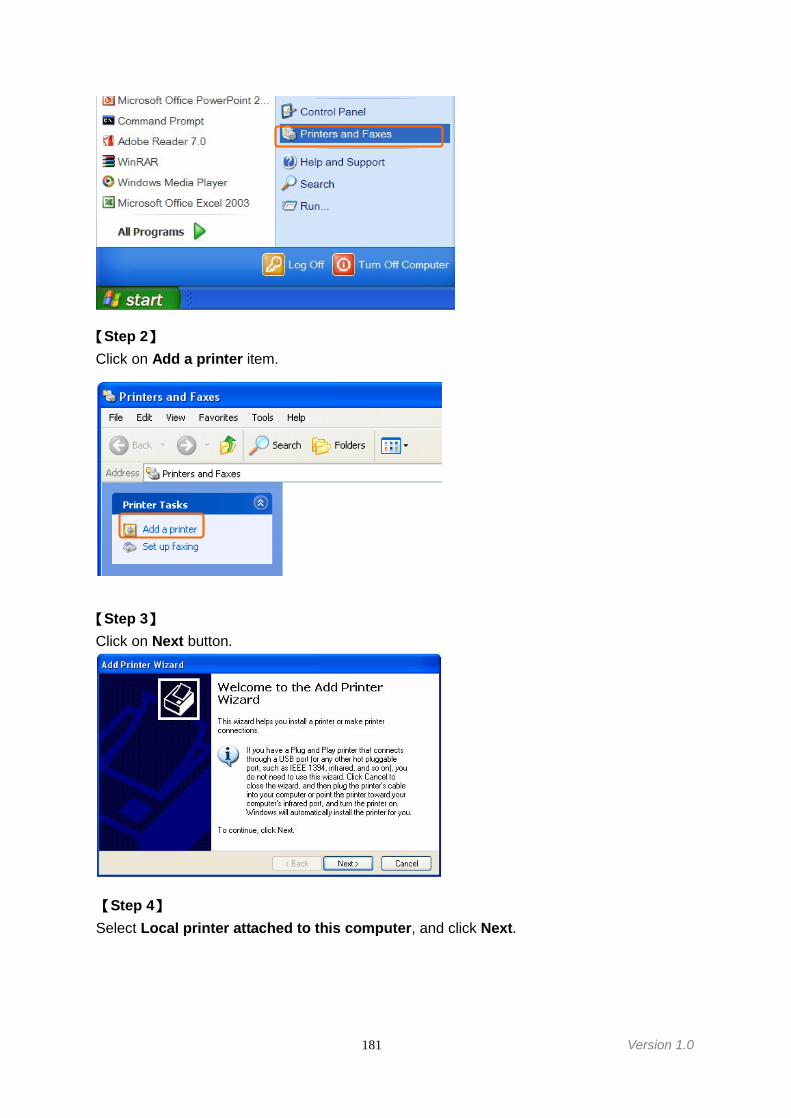
181 Version 1.0
【Step 2】Click on Add a printer item.
【Step 3】Click on Next button.
【Step 4】Select Local printer attached to this computer, and click Next.

182 Version 1.0
【Step 5】Select Create a new port and choose Standard TCP/IP Port from drop-down list, thenclick Next.
【Step 6】Click Next.
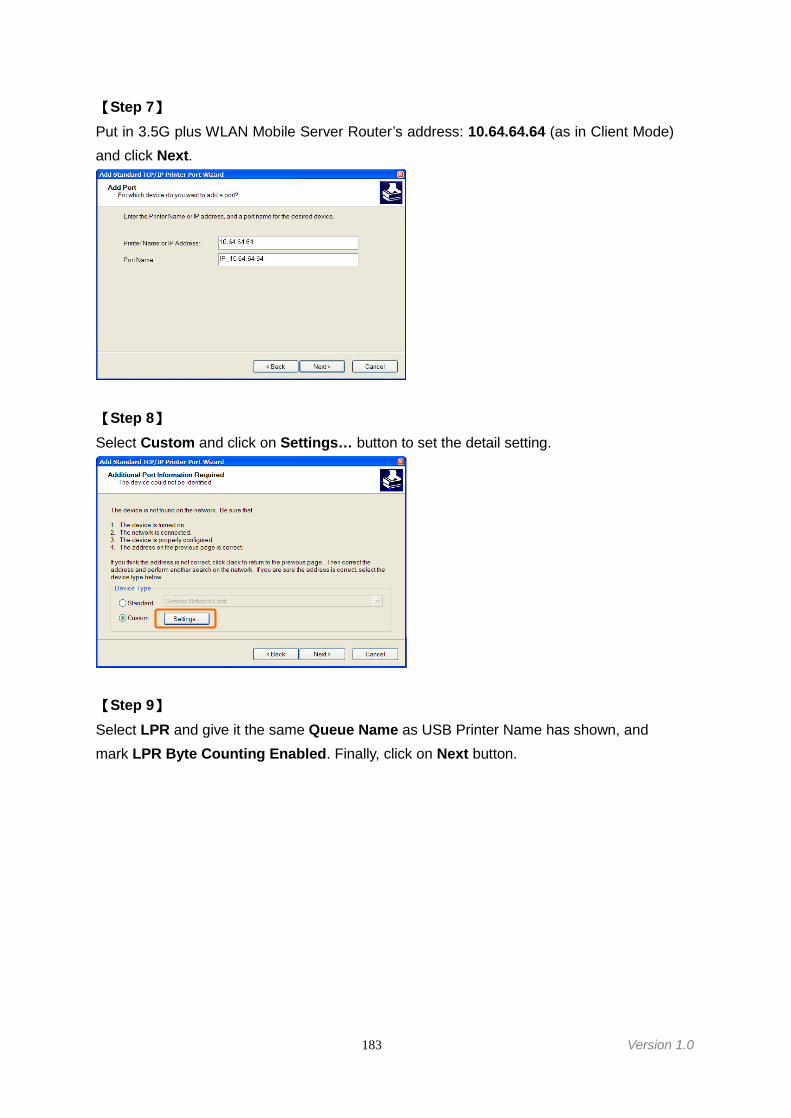
183 Version 1.0
【Step 7】Put in 3.5G plus WLAN Mobile Server Router’s address: 10.64.64.64 (as in Client Mode)and click Next.
【Step 8】Select Custom and click on Settings… button to set the detail setting.
【Step 9】Select LPR and give it the same Queue Name as USB Printer Name has shown, andmark LPR Byte Counting Enabled. Finally, click on Next button.
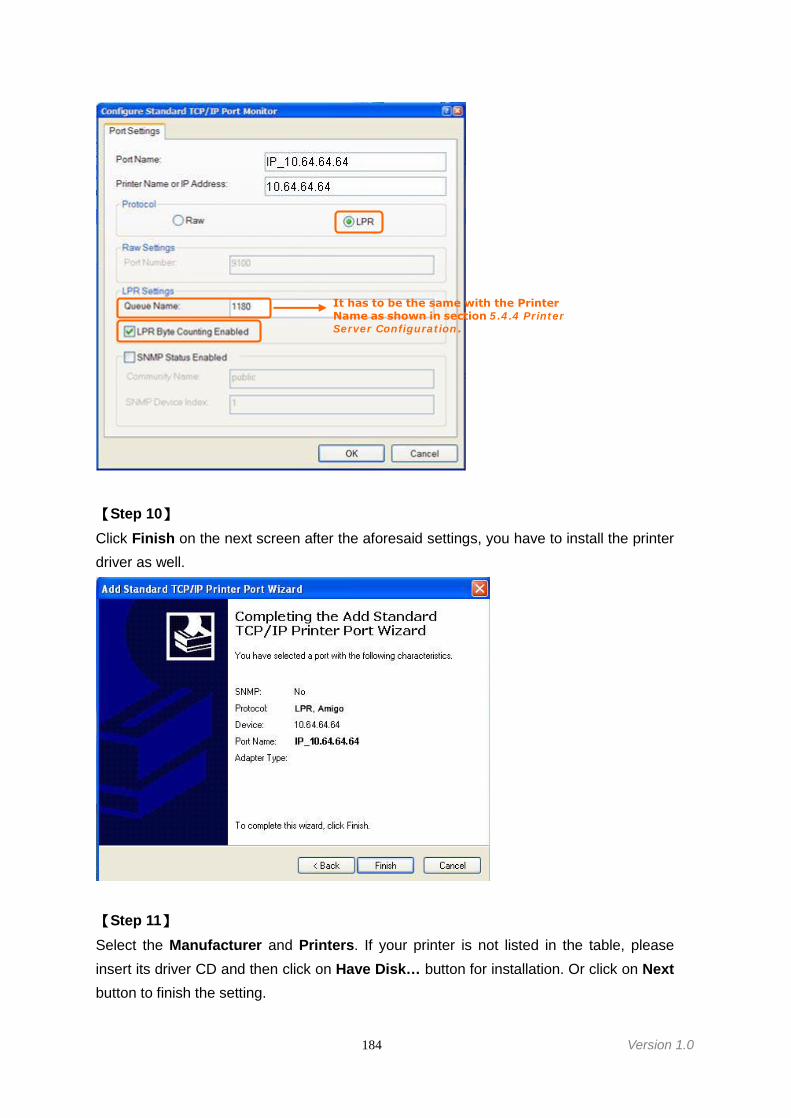
184 Version 1.0
【Step 10】Click Finish on the next screen after the aforesaid settings, you have to install the printerdriver as well.
【Step 11】Select the Manufacturer and Printers. If your printer is not listed in the table, pleaseinsert its driver CD and then click on Have Disk… button for installation. Or click on Nextbutton to finish the setting.
It has to be the same with the PrinterName as shown in section 5.4.4 PrinterServer Configuration.
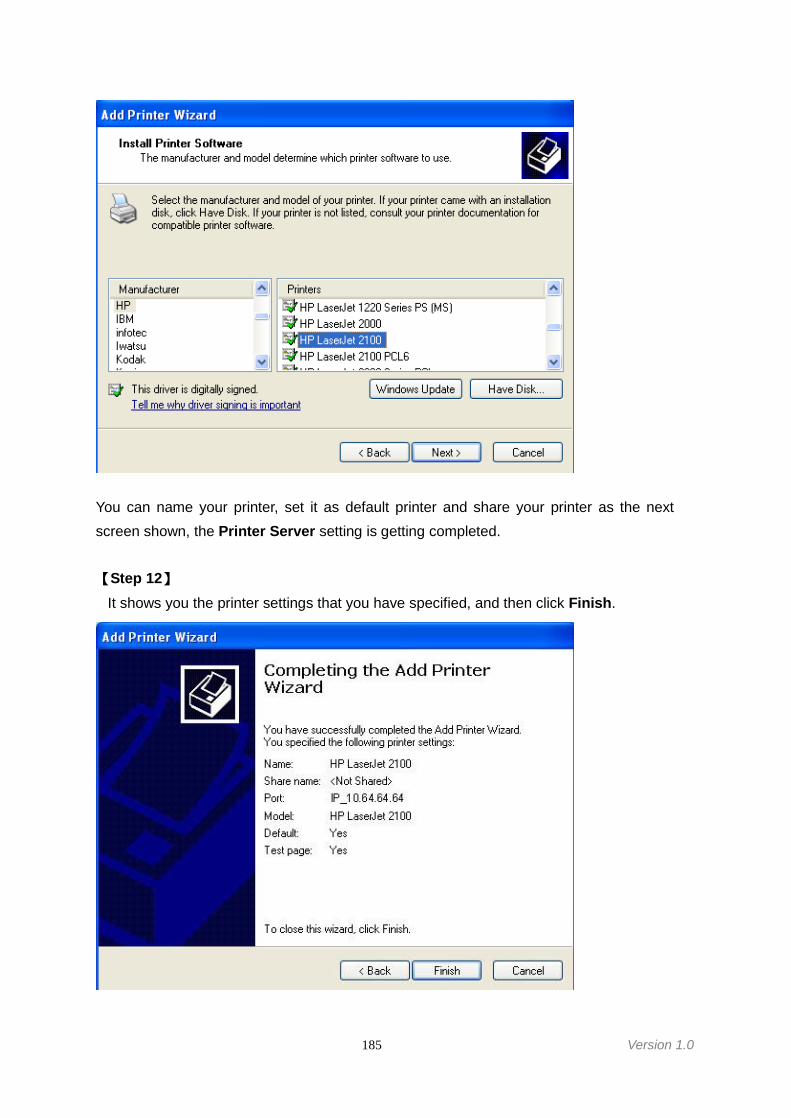
185 Version 1.0
You can name your printer, set it as default printer and share your printer as the nextscreen shown, the Printer Server setting is getting completed.
【Step 12】It shows you the printer settings that you have specified, and then click Finish.
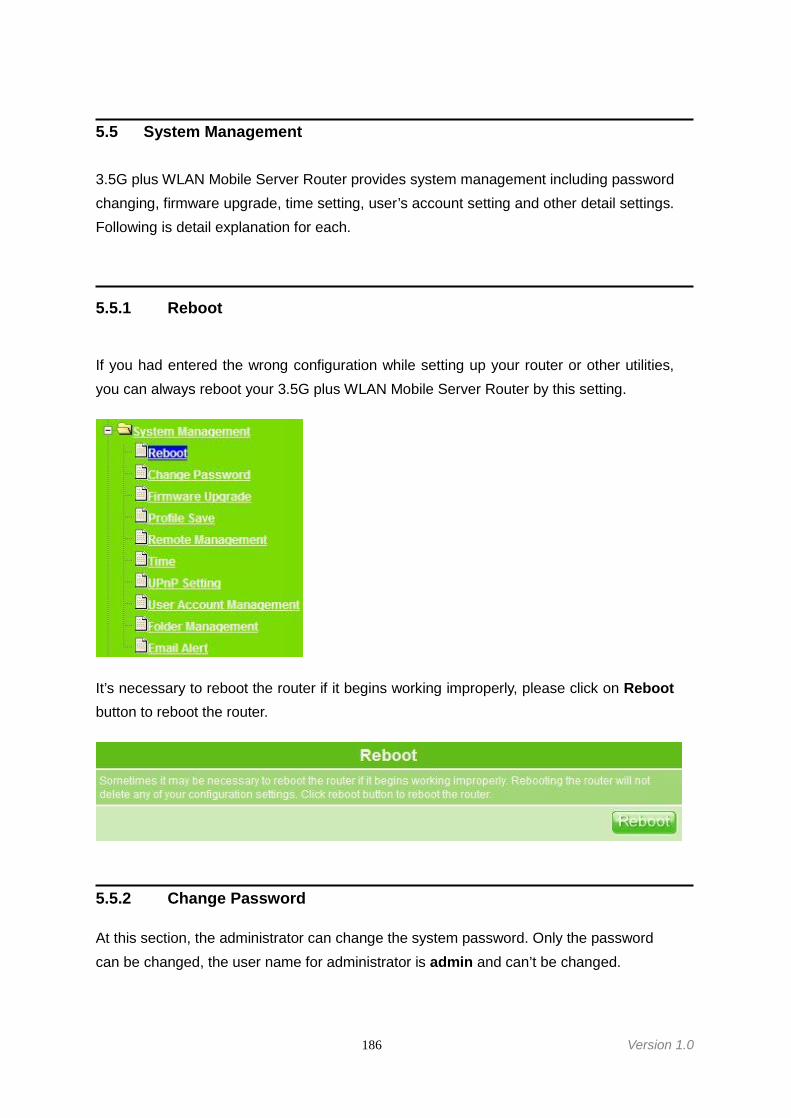
186 Version 1.0
5.5 System Management
3.5G plus WLAN Mobile Server Router provides system management including passwordchanging, firmware upgrade, time setting, user’s account setting and other detail settings.Following is detail explanation for each.
5.5.1 Reboot
If you had entered the wrong configuration while setting up your router or other utilities,you can always reboot your 3.5G plus WLAN Mobile Server Router by this setting.
It’s necessary to reboot the router if it begins working improperly, please click on Rebootbutton to reboot the router.
5.5.2 Change Password
At this section, the administrator can change the system password. Only the passwordcan be changed, the user name for administrator is admin and can’t be changed.
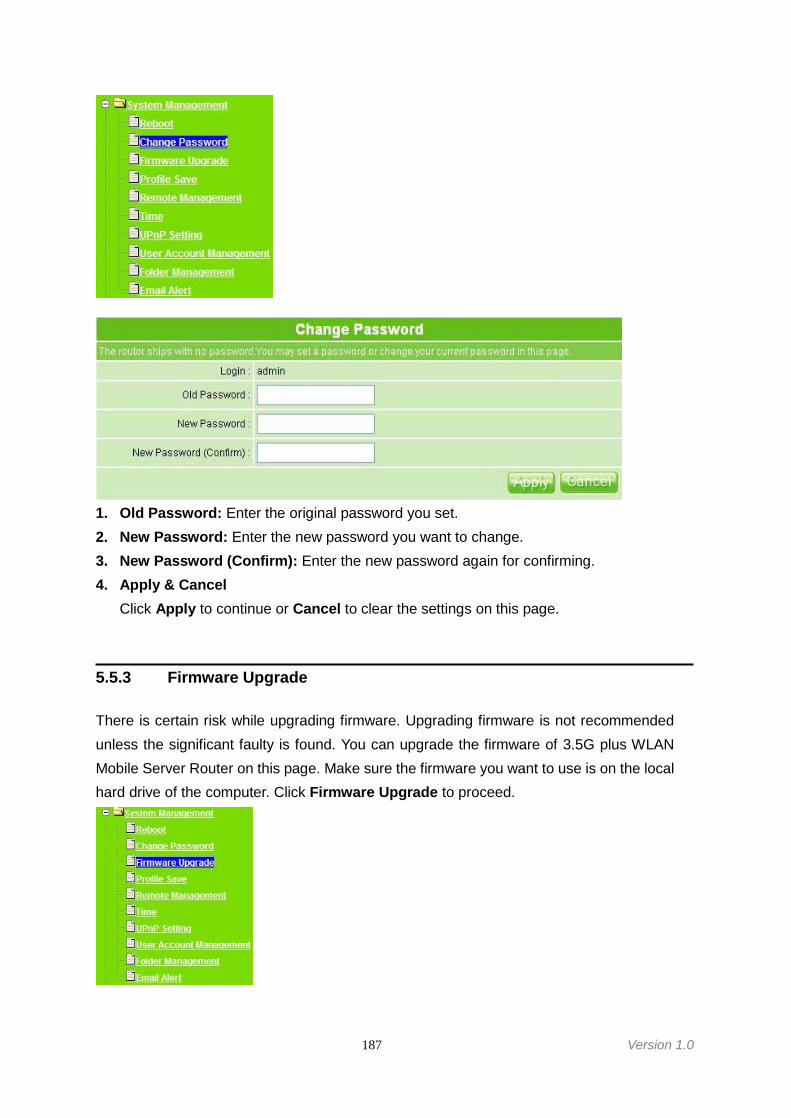
187 Version 1.0
1. Old Password: Enter the original password you set.2. New Password: Enter the new password you want to change.3. New Password (Confirm): Enter the new password again for confirming.4. Apply & Cancel
Click Apply to continue or Cancel to clear the settings on this page.
5.5.3 Firmware Upgrade
There is certain risk while upgrading firmware. Upgrading firmware is not recommendedunless the significant faulty is found. You can upgrade the firmware of 3.5G plus WLANMobile Server Router on this page. Make sure the firmware you want to use is on the localhard drive of the computer. Click Firmware Upgrade to proceed.
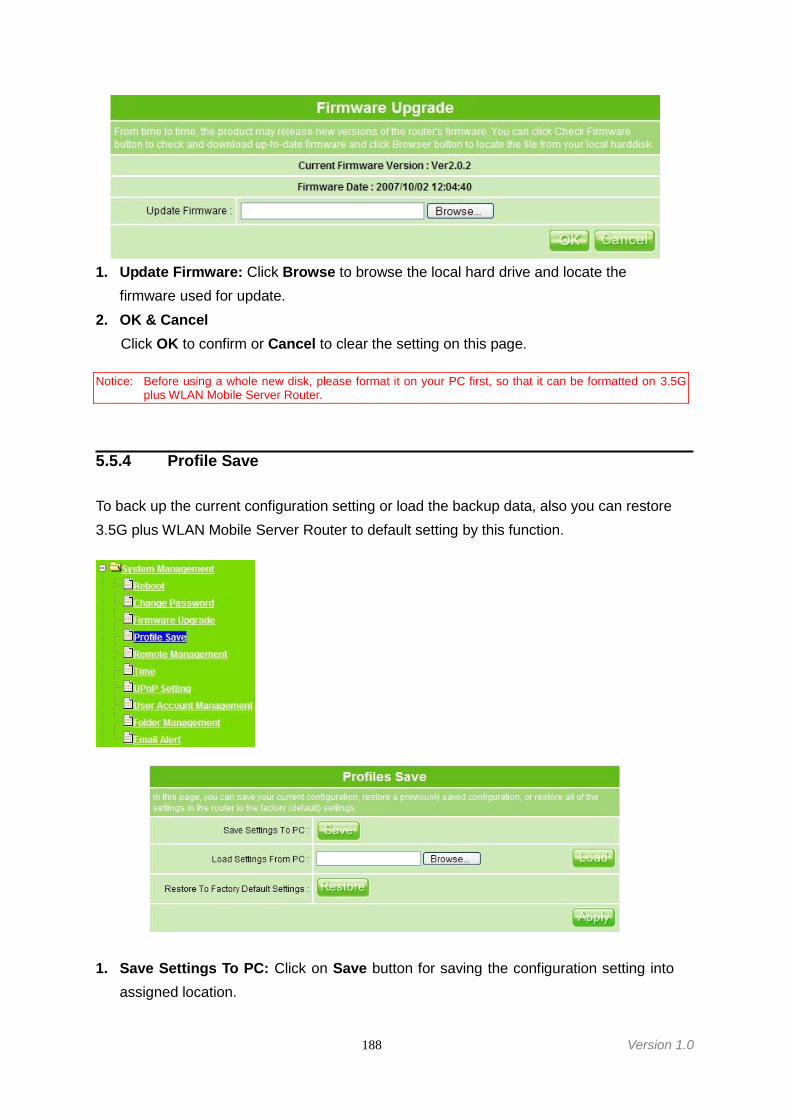
188 Version 1.0
1. Update Firmware: Click Browse to browse the local hard drive and locate thefirmware used for update.
2. OK & CancelClick OK to confirm or Cancel to clear the setting on this page.
Notice: Before using a whole new disk, please format it on your PC first, so that it can be formatted on 3.5Gplus WLAN Mobile Server Router.
5.5.4 Profile Save
To back up the current configuration setting or load the backup data, also you can restore3.5G plus WLAN Mobile Server Router to default setting by this function.
1. Save Settings To PC: Click on Save button for saving the configuration setting intoassigned location.
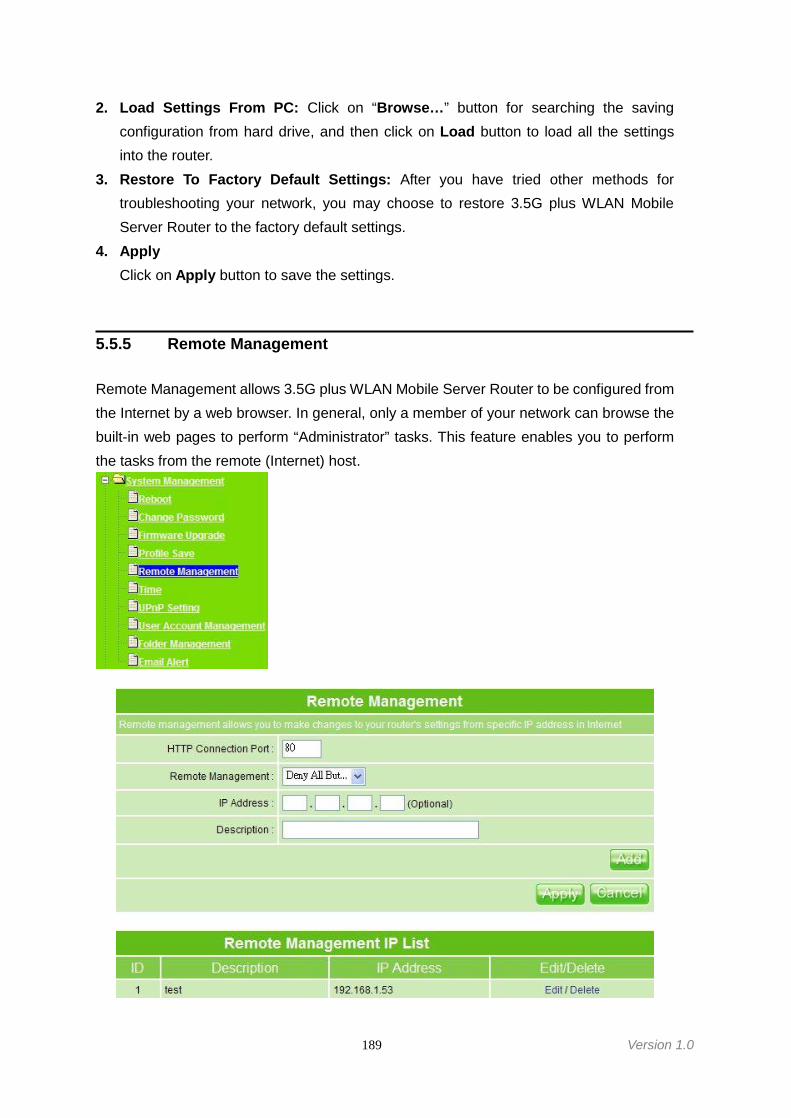
189 Version 1.0
2. Load Settings From PC: Click on “Browse…” button for searching the savingconfiguration from hard drive, and then click on Load button to load all the settingsinto the router.
3. Restore To Factory Default Settings: After you have tried other methods fortroubleshooting your network, you may choose to restore 3.5G plus WLAN MobileServer Router to the factory default settings.
4. ApplyClick on Apply button to save the settings.
5.5.5 Remote Management
Remote Management allows 3.5G plus WLAN Mobile Server Router to be configured fromthe Internet by a web browser. In general, only a member of your network can browse thebuilt-in web pages to perform “Administrator” tasks. This feature enables you to performthe tasks from the remote (Internet) host.

190 Version 1.0
1. HTTP Connection Port: The port number used to access the router.2. Remote Management: You can allow any Internet IP address to access the router, or
set up deny rule according to IP setting.3. IP Address: Internet IP address of the computer that has access to the router.4. Description: Enter the description for the remote configuration.5. Add, Apply & Cancel
Click Add to add the remote list, and click Apply to activate, or Cancel to clear thesettings on this page.
6. Remote Management IP ListDisplay, edit or delete IDs, description and IP address of allowed remote list.
5.5.6 Time
The system automatically shows the local time and time on PC. You can set the time anddate manually so that it can be adjusted on router accordingly.
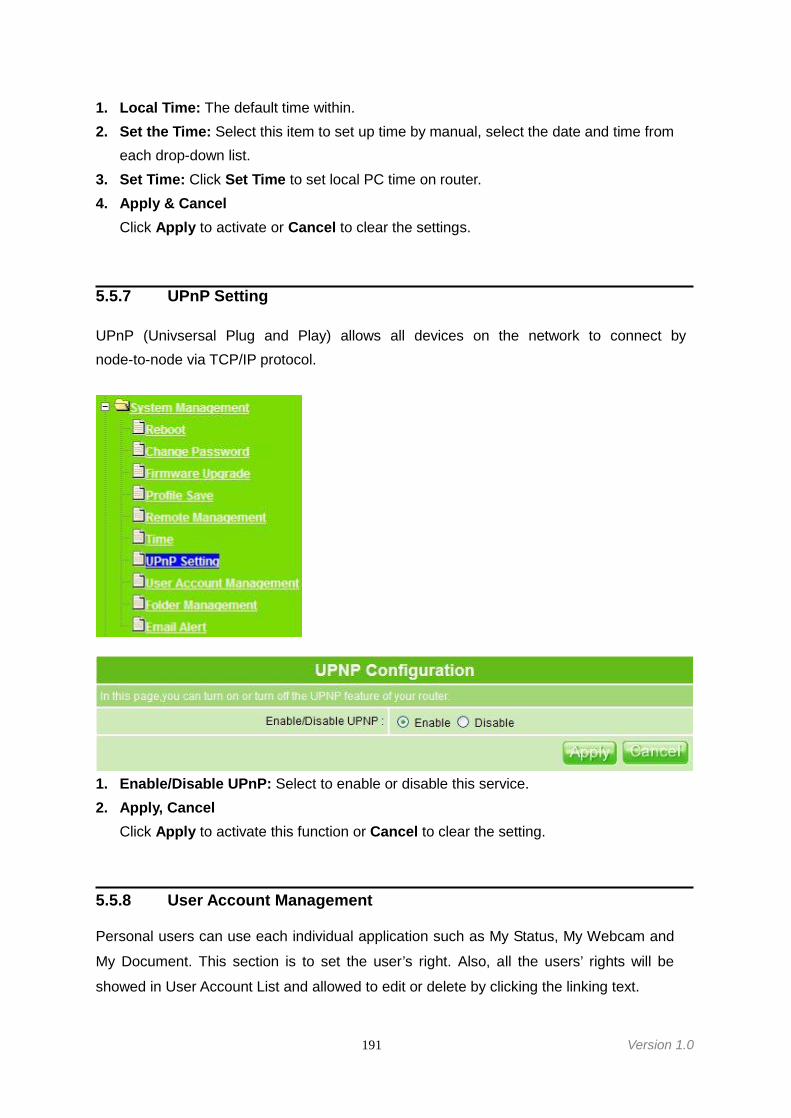
191 Version 1.0
1. Local Time: The default time within.2. Set the Time: Select this item to set up time by manual, select the date and time from
each drop-down list.3. Set Time: Click Set Time to set local PC time on router.4. Apply & Cancel
Click Apply to activate or Cancel to clear the settings.
5.5.7 UPnP Setting
UPnP (Univsersal Plug and Play) allows all devices on the network to connect bynode-to-node via TCP/IP protocol.
1. Enable/Disable UPnP: Select to enable or disable this service.2. Apply, Cancel
Click Apply to activate this function or Cancel to clear the setting.
5.5.8 User Account Management
Personal users can use each individual application such as My Status, My Webcam and
My Document. This section is to set the user’s right. Also, all the users’ rights will be
showed in User Account List and allowed to edit or delete by clicking the linking text.

192 Version 1.0
1. Max Login User: Set up the maximum users to log in at the same time, select thenumber from drop-down list. If you want to change the maximum login users onlywithout changing user’s information, please click on OK button after select login user’snumber.
2. User Name: Create the user name in this blank.3. Password: Set up the user’s password.4. User Right: Check to allow set-user accessing Samba folder, monitoring from
webcam or using FTP server.5. Activated: Click On to allow the user’s right to be applied immediately.6. Add, Apply & Cancel
After finishing the above, click Add to create user account. Click Apply to add set-userinto the account list or Cancel to clear the settings on this page.
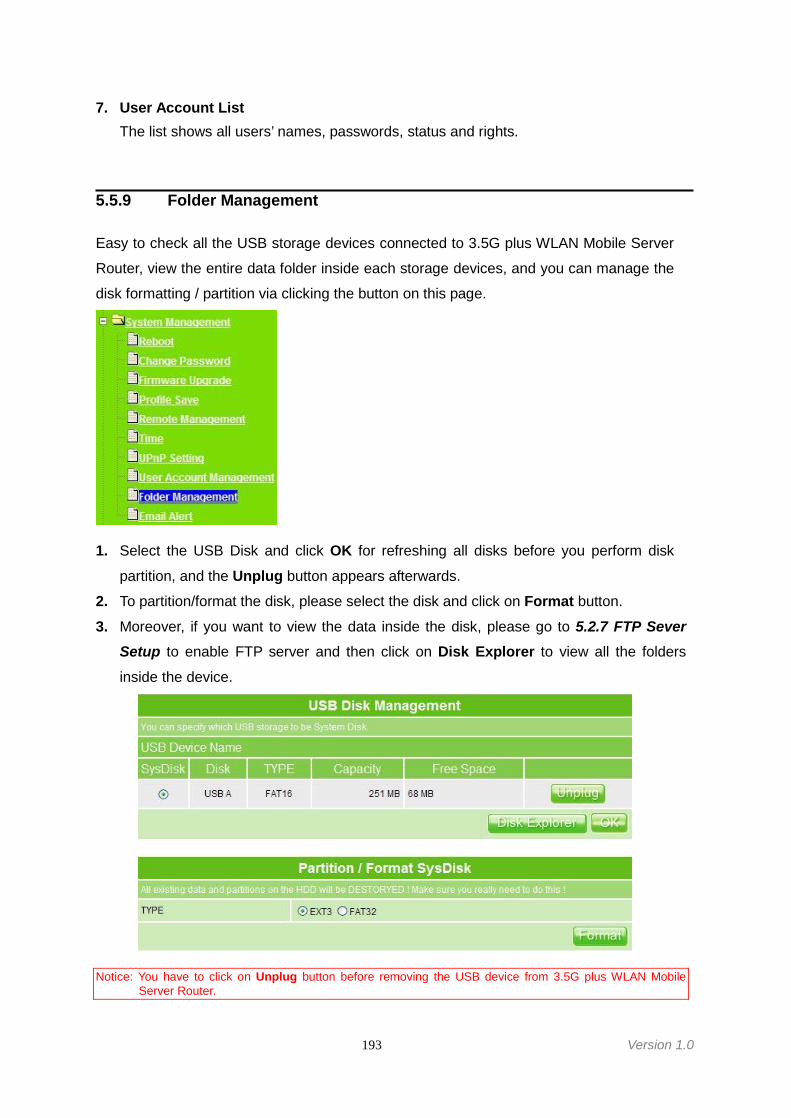
193 Version 1.0
7. User Account ListThe list shows all users’ names, passwords, status and rights.
5.5.9 Folder Management
Easy to check all the USB storage devices connected to 3.5G plus WLAN Mobile Server
Router, view the entire data folder inside each storage devices, and you can manage the
disk formatting / partition via clicking the button on this page.
1. Select the USB Disk and click OK for refreshing all disks before you perform disk
partition, and the Unplug button appears afterwards.
2. To partition/format the disk, please select the disk and click on Format button.
3. Moreover, if you want to view the data inside the disk, please go to 5.2.7 FTP SeverSetup to enable FTP server and then click on Disk Explorer to view all the folders
inside the device.
Notice: You have to click on Unplug button before removing the USB device from 3.5G plus WLAN MobileServer Router.
194 Version 1.0
5.5.10 Email Alert
To monitor router activity, you can run on a local PC or a remote one elsewhere on theInternet. And 3.5G plus WLAN Mobile Server Router provides the email alert facility so thatthe log messages can be packed as an e-mail for someone who wants to receive thesemessages by scheduled time. In the following, here explains how to set up the email alertfunction.
195 Version 1.0
1. Email Alert: Check the enable box to activate the email alert service.2. SMTP Server: Specify an IP address of the SMTP server which can send mails from
your 3.5G plus WLAN Mobile Server Router to the recipients’ mailboxes directly.3. Your Mail (from): Enter the email address indicated the sending location.4. SMTP Auth: If the email alert needs to be sent via SMTP authentication, please check
this item, and then enter the required account and password.5. Account: Enter the email account from which you want to send the alert.6. Password: Enter the email account password to validate.7. Email Address (To): Enter the email address where to receive the alert.8. Schedule: Arrange to send the alert when event happens or by regular time.9. Add, Apply & Cancel
After finishing the above, click Add to set up the rule into email alert list. Then, clickApply to save or Cancel to clear the settings on this page.
10. Email Alert ListDisplay, edit or delete a list of relative information in regarding to the above mentioned.
11. Refresh & DeleteClick on Refresh to renew the login data and other system status information, or clickon Delete to clear these logs.
5.6 Log & Status
3.5G plus WLAN Mobile Server Router provides the log list, connection status and user’saccount.
5.6.1 Network Configuration
Network Configuration shows current status of wireless connection and plugged USBdevices.
Click Refresh if you wish to update the screen list.
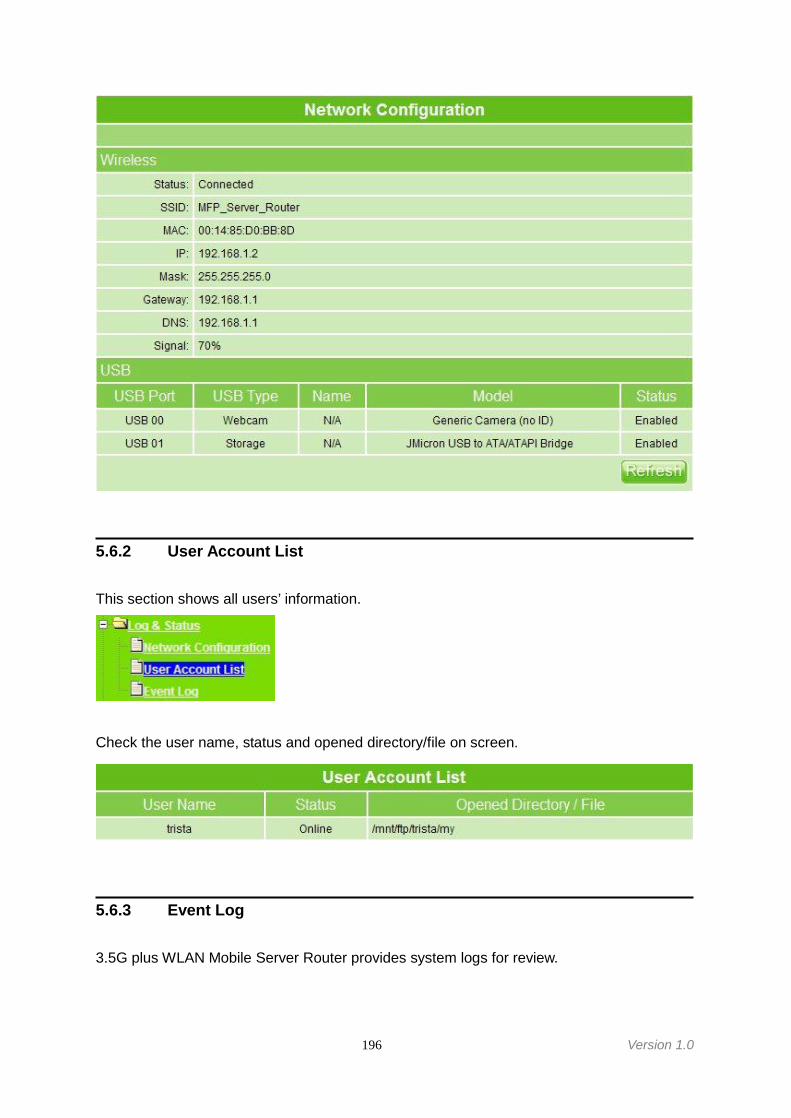
196 Version 1.0
5.6.2 User Account List
This section shows all users’ information.
Check the user name, status and opened directory/file on screen.
5.6.3 Event Log
3.5G plus WLAN Mobile Server Router provides system logs for review.

197 Version 1.0
The system status log shows logging time, type and detail information as below. ClickRefresh to update.
5.7 Logout
Click Logout on the bottom menu to exit and go back to login home page.
5.8 Personal Configuration
Open a Microsoft Internet Explorer, Mozilla Firefox or Apple Safari browser, and enterhttp://10.64.64.64 (Default Gateway) into browser’s blank field.
Notice: If the homepage doesn’t appear, please check whether the TCP/IP configuration is obtaining IPaddress automatically or not. If you don’t know how to do this, please refer to 1.5 Get your IPAutomatically & Manually.
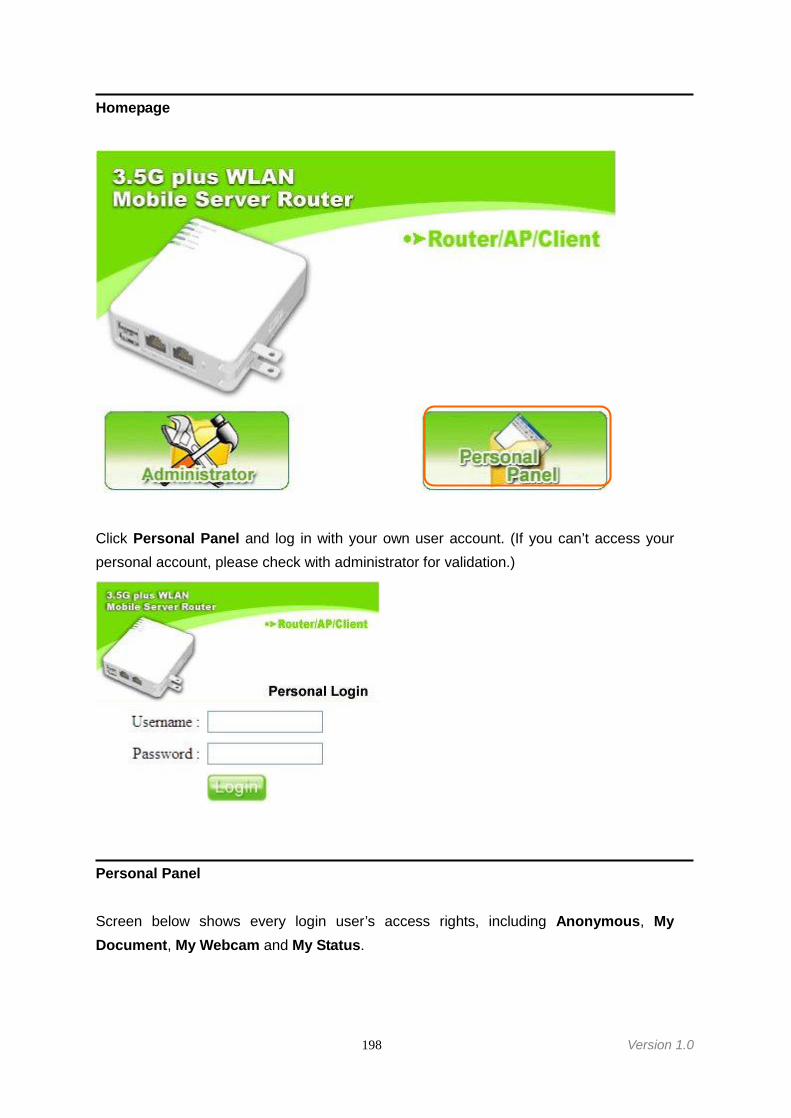
198 Version 1.0
Homepage
Click Personal Panel and log in with your own user account. (If you can’t access yourpersonal account, please check with administrator for validation.)
Personal Panel
Screen below shows every login user’s access rights, including Anonymous, MyDocument, My Webcam and My Status.
199 Version 1.0
3.5G plus WLAN Mobile Server Router provides personal control panel for every loginuser’s entrance to each application screen, please click on each icon for application. Theicons appear in gray color can’t be clicked if the user doesn’t have the right to use thatfunction; even though there is none to be set, the user can still apply My Status.
Notice: The available access rights are depended on administrator’s authorization in 5.5.8 User AccountManagement.
5.8.1 Anonymous
Click Anonymous to access the shared folder created by administrator and freelydownload those files underneath to personal hard drives.
“Anonymous” shows all the files stored in USB HDD by
administrator and allows any login user to check the
folder and copy files to the HD via Internet. The following
is the detail description.
200 Version 1.0
Notice: If you can’t access Anonymous folder, please check with administrator to enable your FTP serverrights. Files under this directory are only for downloading, but not for uploading, deleting, or edting.
5.8.2 My Document
Click My Document and opens another web page to show all the files in your own folder.
Notice: If you can’t access this folder, please check with administrator to enable your FTP server rights.
“My Document” shows all the files in USB HDD under each
user’s account. Login user can also create the folder or copy
files into the HD directly via Internet. The illustrated below is
the detail description of folder inside.
201 Version 1.0
5.8.3 My Webcam
Click My Webcam, and the system pops up a new window to display real time image as theexample below shows.
Notice: If the image from webcam can’t be viewed, it may be caused by Internet security setting and needs tobe corrected or installed with the Java program.
5.8.4 My Status
Click Main Menu on the left to go back main control panel and other applications.
“My Webcam” application allows you to view the real time
image when the web camera is on.
“My Status” shows all the login information for your
personal account.
202 Version 1.0
Notice: All above usage information is based on administrator’s setup.
5.9 Site Map
3.5G plus WLAN Mobile Server Router provides site map clicking for each icon to carry outthe easy setup from the home page.
203 Version 1.0
Chapter 6 DDNS Service Application
DDNS is a service changes the dynamic IP to the static IP. The settings of DDNS can solvethe problem of being given the different IP by router every time. After setting the Router,your host name would correspond to your dynamic IP. Moreover, via the host nameapplication, it could be easier for you to use FTP, Webcam and Printer remotely.Dynamic DNS allows you to make an assumed name as a dynamic IP address to a statichost name. Please configure the dynamic DNS below. Please select Dynamic DNS underthe IP Config folder, and follow the instructions below to enter the Dynamic DNS page toconfigure the settings you want.If you don’t have a DDNS account, please follow the steps to complete your DDNS withDynamic IP settings.
【Step 1】
First access the Internet and fill http://www.dyndns.com/ into the address field of your webbrowser, then click Create Account.
【Step 2】
Fill in the form as required, and then click on Create Account button.
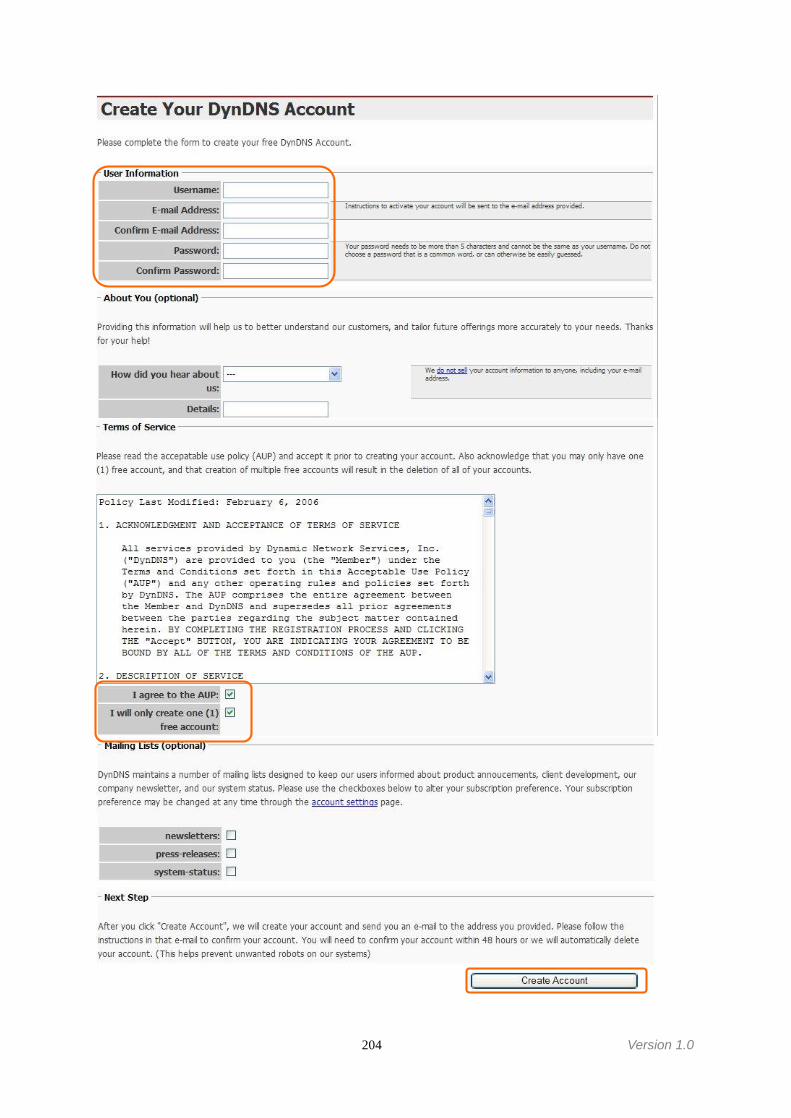
204 Version 1.0
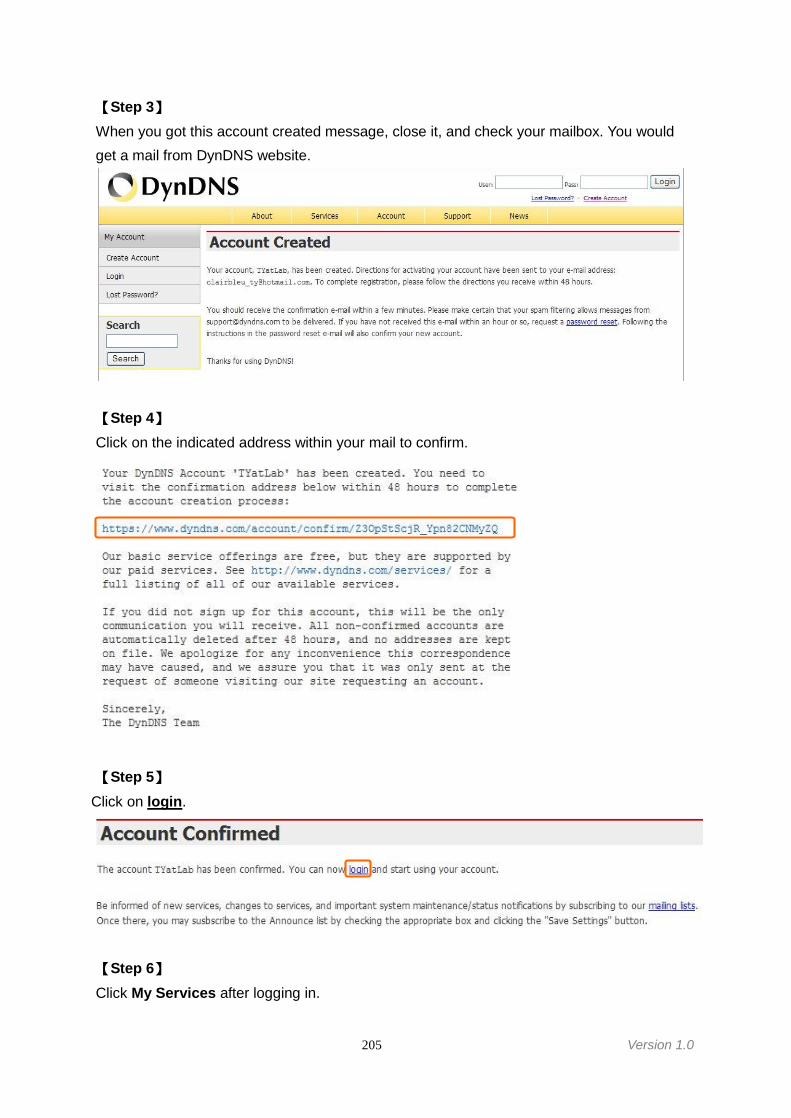
205 Version 1.0
【Step 3】When you got this account created message, close it, and check your mailbox. You wouldget a mail from DynDNS website.
【Step 4】Click on the indicated address within your mail to confirm.
【Step 5】Click on login.
【Step 6】Click My Services after logging in.
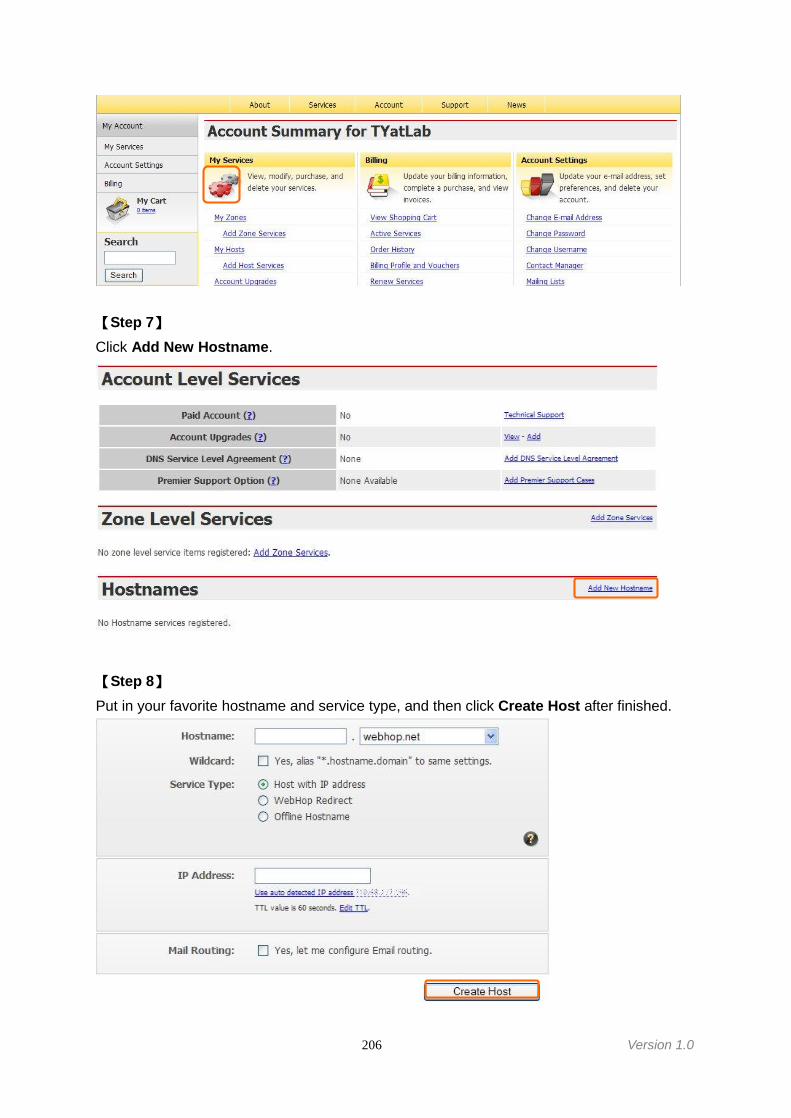
206 Version 1.0
【Step 7】Click Add New Hostname.
【Step 8】Put in your favorite hostname and service type, and then click Create Host after finished.
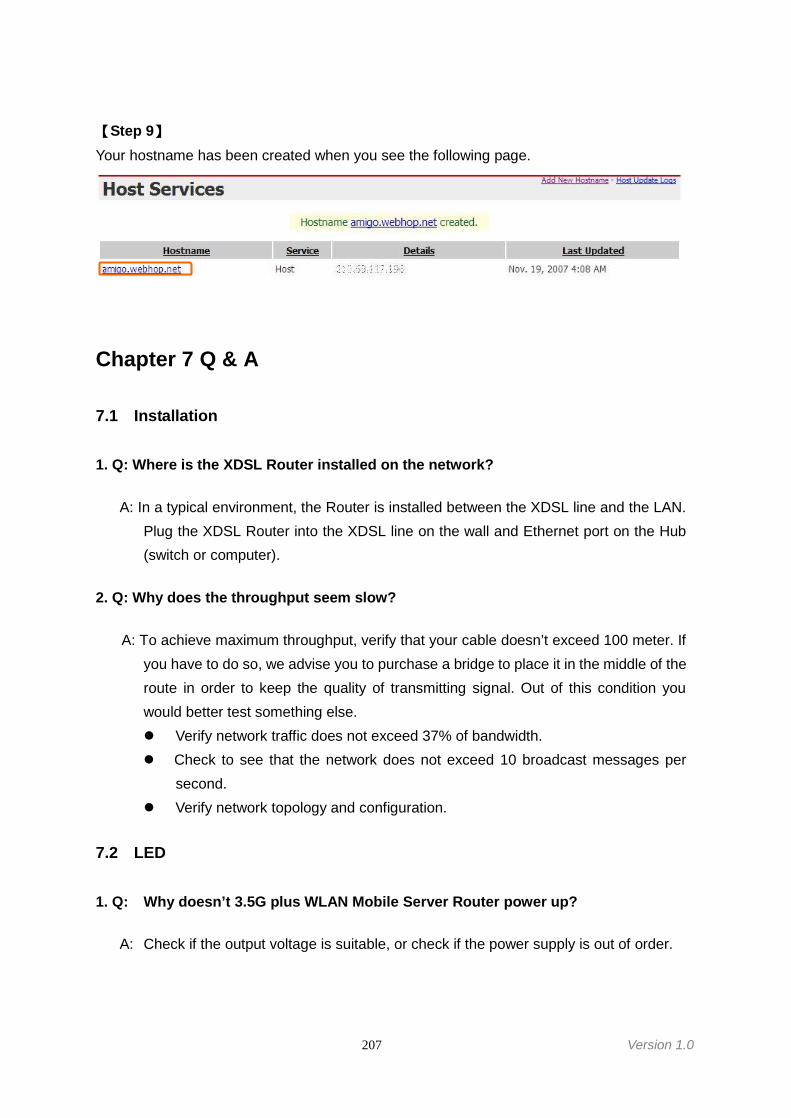
207 Version 1.0
【Step 9】Your hostname has been created when you see the following page.
Chapter 7 Q & A
7.1 Installation
1. Q: Where is the XDSL Router installed on the network?
A: In a typical environment, the Router is installed between the XDSL line and the LAN.Plug the XDSL Router into the XDSL line on the wall and Ethernet port on the Hub(switch or computer).
2. Q: Why does the throughput seem slow?
A: To achieve maximum throughput, verify that your cable doesn’t exceed 100 meter. Ifyou have to do so, we advise you to purchase a bridge to place it in the middle of theroute in order to keep the quality of transmitting signal. Out of this condition youwould better test something else. Verify network traffic does not exceed 37% of bandwidth. Check to see that the network does not exceed 10 broadcast messages per
second. Verify network topology and configuration.
7.2 LED
1. Q: Why doesn’t 3.5G plus WLAN Mobile Server Router power up?
A: Check if the output voltage is suitable, or check if the power supply is out of order.

208 Version 1.0
2. Q: The Internet browser still cannot find or connect to 3.5G plus WLAN MobileServer Router after verifying the IP address and LAN cable, the changescannot be made, or password is lost.
A: In case 3.5G plus WLAN Mobile Server Router is inaccessible, you can try to restoreits factory default settings. Please press the “Reset” button and keep it pressed forover 7 seconds and the light of STATUS will vanish. The LEDs will flash again whenreset is successful.
3. Q: Why does 3.5G plus WLAN Mobile Server Router shut down unexpectedly?
A: Re-plug your power adapter. Then, check the STATUS indicator; if it is off, theinternal flash memory is damaged. For more help, please contact with your provider.
7.3 IP Address
1. Q: What is the default IP address of the router for LAN port?
A: The default IP address is 192.168.1.1 with subnet mask 255.255.255.0
2. Q: I don't know my WAN IP.
A: There are two ways to know.Way 1: Check with your Internet Service Provider.Way 2: Check the setting screen of 3.5G plus WLAN Mobile Server Router. Click
on Status & Log item to select Network Configuration on the Main Menu.WAN IP is shown on the WAN interface.
3. Q: How can I check whether I have static WAN IP Address?
A: Consult your ISP to confirm the information, or check Network Configuration in3.5G plus WLAN Mobile Server Router’s Main Menu.
4. Q: Will the Router allow me to use my own public IPs and Domain, or do I have touse the IPs provided by the Router?
A: Yes, the Router mode allows for customization of your public IPs and Domain.
209 Version 1.0
7.4 OS Setting
1. Q: Why can’t my computer work online after connecting to 3.5G plus WLANMobile Server Server Router?
A: It’s possible that your Internet protocol (TCP/IP) was set to use the following IPaddress. Please do as the following steps. (Windows 2000 & XP) Start>Settings>Network and Dial-up Connections>double click on Internet Protocol(TCP/IP)>select obtain IP address automatically> Click on OK button. Then, open Internet
browser for testing. If you still can’t go online, please test something else below.
Verify network configuration by ensuring that there are no duplicate IP addresses. Power down the device in question and ping the assigned IP address of the
device. Ensure no other device responds to that address. Check that the cables and connectors or use another LAN cable.
2. Q: Why can't I connect to the router's configuration utility?
A: Possible Solution 1: Make sure that your Ethernet connect properly and securely.Make sure that you've plugged in the power cord.
Possible Solution 2: Make sure that your PC is using an IP address within the rangeof 192.168.1.2 to 192.168.1.254. Make sure that the address of the subnet mask is255.255.255.0. If necessary, the Default Gateway data should be at 192.168.1.1. Toverify these settings, perform the following steps:
Windows 95, 98, or My Users:
1. Click on Windows Start > click on Run > input winipcfg > click on OK button.2. Check the IP Address, Subnet Mask, Default Gateway data. Is this data
correct? If the data isn't correct, click on Release All. Then click on Renew All.
Windows NT, 2000, or XP Users:
1. Click on Windows Start > click on Run > input cmd > click on OK button.2. At the DOS prompt, type ipconfig/all.3. Check the IP Address, Subnet Mask, Default Gateway data. Is this data
correct? If the data isn't correct. Please input ipconfig/release > press Enter >input ipconfig/renew > press Enter.
210 Version 1.0
Possible Solution 3: Verify the connection setting of your Web browser and verifythat the HTTP Proxy feature of your Web browser is disabled. Make theseverifications so that your Web browser can read configuration pages inside yourrouter. Launch your Web browser. Internet Explorer Users:
1.Click on Tools > Internet Options > Connections tab.2. Select never dial a connection, click on Apply button, and then click on OK
button.3.Click on Tools and then click on Internet Options.4.Click on Connections and then click on LAN Settings.5. Make sure none of the check boxes are selected and click on OK button.6. Click on OK button.
Netscape Navigator Users:
1. Click on Edit > Preferences > double-click Advanced in the Category window.2. Click on Proxies > select Direct connection to the Internet > click on OK
button.3. Click on Edit again and then click on Preferences.4. Under category, double-click on Advanced and then click on Proxies.5. Select Direct connection to the Internet and click on OK button.6. Click on OK button.
3. Q: Web page hangs, corrupt downloads, or nothing but junk characters is beingdisplayed on the screen. What do I need to do?
A: Force your NIC to 10Mbps or half duplex mode, and turn off the "Auto-negotiate"feature of your NIC as a temporary measure. (Please look at the Network ControlPanel, in your Ethernet Adapter's Advanced Properties tab.)
4. Q: Why can't I connect to the Web Configuration?
A: you can remove the proxy server settings in your web browser.
7.5 3.5G plus WLAN Mobile Server Router Setup
1. Q: Why does 3.5G plus WLAN Mobile Server Router’s setup page shut downunexpectedly?
211 Version 1.0
A: If one of the pages appears incompletely in 3.5G plus WLAN Mobile Server Router’ssetup pages, please click on Logout item on the Main Menu before shutting it down.Don’t keep it working. Then, close Internet browser and open it again for going backto the previous page.
2. Q: Why can’t my USB devices and LAN ports work properly after setting theDHCP?
A: There are two rules over here.Rule1: After connecting USB devices, please reboot your Router.Rule2: Before finishing the DHCP setup, please don’t connect any computer to LAN
ports, because the conflict of having the same IP may occur and cause somecomputers a lot of trouble.
※ Notice: Make sure that you always click on the Apply button afterconfiguring each setting. And in order to let other LAN ports work properly,please reboot your PC.
3. Q: I don’t know how to configure DHCP.
A: DHCP is commonly used in the large local network. It allows you to manage anddistribute IP addresses from 2 to 254 throughout your local network via 3.5G plusWLAN Mobile Server Router. Without DHCP, you would have to configure eachcomputer separately. It’s very troublesome. Please Open Internet browser > Input192.168.1.1 in the website blank field > Select DHCP Server under the IP ConfigMenu. For more information, please refer to 3.3.2 (Router Mode) or 4.3.1 (APMode).
4. Q: How do I upgrade the firmware of 3.5G plus WLAN Mobile Server Router?
A: Periodically, a new Flash Code is available for 3.5G plus WLAN Mobile ServerRouter on your product supplier’s website. Ideally, you should update 3.5G plusWLAN Mobile Server Router’s Flash Code using Firmware Upgrade on the SystemManagement menu of 3.5G plus WLAN Mobile Server Router Settings.
5. Q: My 3.5G plus WLAN Mobile Server Router cannot connect to the ISP?
A: There are three possible solutions.
1. Check the Cable/XDSL modem is power on.2. Check the Cable/XDSL link light is on to verify a good physical connection.
212 Version 1.0
3. Check the WAN port LED to verify if the Cable/XDSL modem is connected to therouter:
If your ISP Login method is following, please make sure the username andpassword are correct or not.If your ISP is using dynamic IP addressing (DHCP) then the DHCP protocol does nothave the authentication feature. Some Cable service providers often use thefollowing to determine user’s identification.
6. Q: Why is that I can ping to outside hosts, but cannot access Internet websites?
A: Check the DNS server settings on your PC. You should get the DNS serverssettings from your ISP. If your PC is running a DHCP client, remove any DNS IPaddress setting. As the router assign the DNS settings to the DHCP-client-enabledPC.
7. Q: 3.5G plus WLAN Mobile Server Router couldn’t save the setting after click onApply button?
A: 3.5G plus WLAN Mobile Server Router will start to run after the setting finishedapplying, but the setting isn’t written into memory. Here we suggest if you want tomake sure the setting would be written into memory, please reboot the device viaReboot under System Management directory.
7.6 Wireless LAN
1. Q: Why couldn’t my wireless notebook work on-line after checking?
A: Generally, Wireless networks can sometimes be very complicated to set up,particularly if you're dealing with encryption and products from different vendors.Any number of variables can keep your workstations from talking to each other.Let's go over some of more common ones.
For starters, verify that your router and your workstation are using the same SSIDdescriptions. SSID acts as a password when a mobile device tries to connect to thewireless network. The SSID also differentiates one WLAN from another, so allaccess points and all devices attempting to connect to a specific WLAN must usethe same SSID. A workstation will not be permitted to connect to the network unless
213 Version 1.0
it can provide this unique identifier. This is similar to the function of your network'sWorkgroup or Domain name.
When you're experiencing conductivity problems, it is always best to keep thingssimple. So next you are going to do is that, please disable any WEP encryption youmight have configured.
Successful implementation of encryption also includes the use of a shared key. AHEX key is the most common, but other formats are also used. This key identifiesthe workstation to the router as a trusted member of this network. Differentmanufacturers can implement this key technology in ways that might prevent themfrom working correctly with another vendor's products. So pay attention to detail isgoing to be the key to a successful installation.
Next make sure the router and the NIC are configured to use the samecommunications channel. There are normally 11 of them, and the default channelcan also vary from vendor to vendor. You might also want to confirm that the routerhas DHCP services enabled and an address pool configured. If not, the NIC won'tbe able to pick up an IP address. I have run across a few access points that offerDHCP services but do not assign all of the needed IP information to the NIC. As aresult, I was able to connect to the network, but could not browse the web. The pointis, don't assume anything. Verify for yourself that all of the required settings arebeing received by the workstation.
Finally, you might want to keep the system you're trying to configure in the sameroom as the router, at least during the initial configuration, in order to minimizepotential interference from concrete walls or steel beams.
2. Q: My PC can’t locate the Wireless Access Point.
A: Check the following:
Your PC is set to Infrastructure Mode. (Access Points are always in
Infrastructure Mode.)
The SSID on your PC and the Wireless Access Point are the same. Rememberthat the SSID is case-sensitive. So, for example “Workgroup” does NOT match“workgroup”.
Both your PC and the Wireless Access Point must have the same setting forWEP. The default setting for the Wireless Router is disabled, so your wirelessstation should also have WEP disabled.

214 Version 1.0
If WEP is enabled on the Wireless Router, your PC must have WEP enabled,and the key must match.
If the Wireless Router’s Wireless screen is set to Allow LAN access to selectedWireless Stations only, then each of your Wireless stations must have beenselected, or access will be blocked.
To see if radio interference is causing a problem, see if connection is possiblewhen close to the Wireless Access Point. Remember that the connection rangecan be as little as 100 feet in poor environments.
3. Q: Wireless connection speed is very slow.
A: The wireless system will connect at highest possible speed, depending on thedistance and the environment. To obtain the highest possible connection speed, youcan experiment with following:
Access Point location: Try adjusting the location and orientation of the AccessPoint.
Wireless Channel: If interference is the problem, changing to another channelmay show a marked improvement.
Radio Interference: Other devices may be causing interference. You canexperiment by switching other devices off, and see if this helps. Any “noisy”devices should be shielded or relocated.
RF Shielding: Your environment may tend to block transmission between thewireless stations. This will mean high access speed is only possible when closeto the Access Point.
4. Q: Some applications do not run properly when using the Wireless Router.
A: The Wireless Router processes the data passing through it, so it is not transparent.Use the Special Application feature to allow the use of Internet applications which donot function correctly. If this does solve the problem, you can use the DMZ function.This should work with almost every application, but:
It is a security risk, since the firewall is disabled. Only one (1) PC can use this feature.
5. Q: I can’t connect to the Wireless Router to configure it.
A: Check the following:
215 Version 1.0
The Wireless Router is properly installed, LAN connections are OK, and it ispowered ON.
Make sure that your PC and the Wireless Router are on the same networksegment.
If your PC is set to “Obtain an IP Address automatically” (DHCP client), restart it. If your PC uses a Fixed (Static) IP address, make sure that it is using an IP
Address within the range 192.168.1.129 to 192.168.1.253 and thus compatiblewith the Wireless Router’s default IP Address of 192.168.1.254. Also, the NetworkMask should be set to 255.255.255.0 to match the Wireless Router. In Windows,you can check these settings by using Control Panel ~ Network to check theProperties for the TCP/IP protocol.
6. Q: The WinXP wireless interface couldn’t communicate the WEP with 3.5G plusWLAN Mobile Server Router’s wireless interface.
A: The default WEP of WinXP is Authentication Open System - WEP, but the WEP of3.5G plus WLAN Mobile Server Router is only for Shared Key - WEP, it caused bothsides couldn’t communicate. Please select the WEP of WinXP from AuthenticationOpen System to Pre-shared Key - WEP, and then the WEP wireless interfacebetween WinXP and 3.5G plus WLAN Mobile Server Router would be communicated.
7.7 Samba Server
1. Q: Why can’t I access the Samba Folder via my network places while connectingto 3.5G plus WLAN Mobile Server Router?
A: First, you should check if you have connected assigned storage device properly.Then enable Samba Server afterwards, so that it can be accessed.
7.8 USB FTP Server
1. Q: How does 3.5G plus WLAN Mobile Server Router assign numbers for the Hard Disk?
A: The USB FTP operation of 3.5G plus WLAN Mobile Server Router is to assign thenumbers as a, b, c, d when catch different HDs, if there are 2 or more main partitionsin the same HD, then the assign number will plus 1,2,3,4 (e.g. a1, a2, a3, a4); andthe logic partition will be assigned number from 5 (e.g. a5, a6, a7……).Example: There are 2 hard disks, one of them has 1 main partition and 2 logicpartitions, and the other one has 2 main partitions. Both these 2 hard disks connect
216 Version 1.0
to 3.5G plus WLAN Mobile Server Router’s USB port, and the screen will show therouter’s data folder as a1, a5, a6, b1, b2 when log in FTP.
※ Notice: To authorize the right to each user who uses 3.5G plus WLAN MobileServer Router FTP function, please go to the router’s data folder to set up.
3. Q: How to Add Account under USB FTP Server?
A: To add a new Account, Username and Password are not allowed to leave with blankspace, and the password should be 1 to 8 letters. When input the words, thecharacter will always show hexed (6) “*” form for the security scruple. For adding thenew users, please click on Add button to add the name into User Account List, andthen the user can start to use the function of 3.5G plus WLAN Mobile Server Router.
4. Q: How to remove or revise the files on FTP server?
A: If there is any file needing to be revised, here suggests downloading the file to theHDD of PC and modifying it locally. Then upload to FTP server again after revised.
7.9 Webcam Server
1. Q: I cannot view Webcam’s video screen from WAN.
A: Please follow the steps below.Step1. Open Internet browser and enter http://192.168.1.1 in the address field.Step2. Enter admin in both "User Name" and "Password" fields. Then, click on
Login button.Step3. Click on Web Camera Server under Server directory of the Main Menu.Step4. Then, select Enable to turn on Webcam Access from WAN.
2. Q: Why is that the image from Webcam is so vague?
A: Please adjust the circular-frame around the Webcam’s Len, until the image fromWebcam showed on PC’s screen is clear.
3. Q: Can I use two Webcams at the same time?
A: No, 3.5G plus WLAN Mobile Server Router supports only one Webcam to monitor.
217 Version 1.0
4. Q: Can I use any digital camera which supports webcam function to connect to3.5G plus WLAN Mobile Server Router?
A: No, 3.5G plus WLAN Mobile Server Router doesn’t support digital camera.
5. Q: Does 3.5G plus WLAN Mobile Server Router support all Webcam models?
A: No, 3.5G plus WLAN Mobile Server Router only supports the Webcams possessingOV511, OV511+, SAA8115HL, Sonix PcCam, Sonix PcCam+, Sonix sn9c102PHv7131R, Sonix sn9c120 OV7648, Generic spca536a, Z-star Vimicro 0301p, Z-starVimicro Zc0302 or SAA8116HL chipsets.
6. Q: Why couldn’t the image of USB Webcam be seen from WAN?
A: Besides making sure to enable the USB Webcam Access from WAN, the RemoteManagement should be enabled as well, so that the image of USB Webcam could beseen from WAN.
7.10 Printer Server
1. Q: Why can’t my printer work?
A: For more details, please refer to Chapter 3.5.5 Print Server in the USB Application.Maybe 3.5G plus WLAN Mobile Server Router doesn’t support your printer. You cancontact with us to get more updated information about printer driver support.
2. Q: Printer is beginning printing, but it prints slowly and with unidentified wordsor codes. How could it happen?
A: Your printer’s driver is lost or incompatible with your router. Please set up the printer’sdriver again. If you don’t have the appropriate driver or want to get a compatible one,please contact with your printer supplier.
7.11 Support
1. Q: Why can’t the NTFS hard disk be used with 3.5G plus WLAN Mobile ServerRouter?
A: 3.5G plus WLAN Mobile Server Router doesn’t support the NTFS hard disk. It onlysupports EXT3 and FAT32 file systems.
218 Version 1.0
2. Q: Why can’t my USB devices work on 3.5G plus WLAN Mobile Server Router?A: Maybe your USB devices and 3.5G plus WLAN Mobile Server Router are not
compatible. So if you want to know whether your inserted device such as USB WebCamera, USB Printer or USB HDD corresponds with 3.5G plus WLAN Mobile ServerRouter, please check with your product supplier.
3. Q: What is the maximum number of IP addresses that the XDSL Router willsupport?
A: The Router will support to 253 IP addresses with NAT mode.
5. Q: Is the Router cross-platform compatible?A: Any platform that supports Ethernet and TCP/IP is compatible with the Router.
7.12 Others
1. Q: Why can’t I receive corrupted FTP downloads?A: If you are experiencing corrupted files when you download a file with your FTP client,
try using another FTP program.
2. Q: Why does the router dial out for PPPoE mode very often?A: Normally some of game, music or anti-virus program will send out packets that trigger
the router to dial out, you can close these programs. Or you can set the idle time to 0,then control to dial out manually.
3. Q: What can I do if there is already a DHCP server in LAN?A: If there are two DHCP servers existing on the same network, it may cause conflict
and generate trouble. In this situation, we suggest to disable DHCP server in routerand configure your PC manually.
7.13 USB Device
1. Q: How many USB devices can be connected to the Product?A: 3.5G plus WLAN Mobile Server Router supports maximum of 2 USB ports.
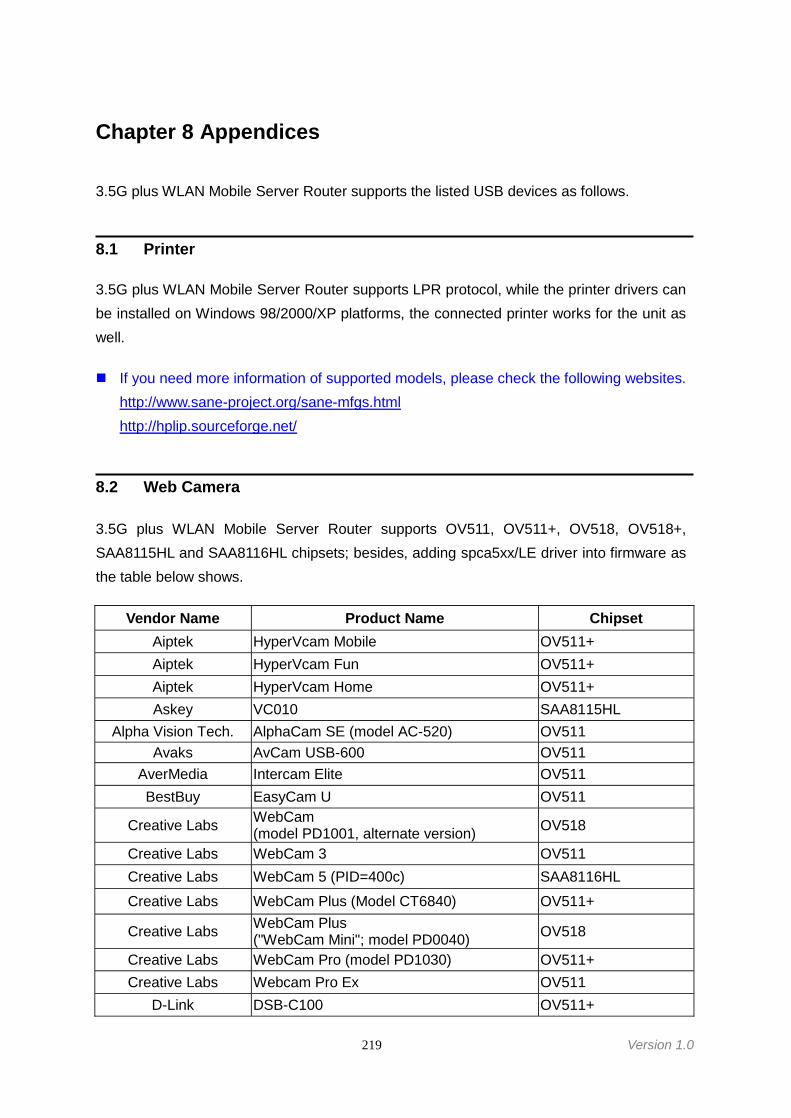
219 Version 1.0
Chapter 8 Appendices
3.5G plus WLAN Mobile Server Router supports the listed USB devices as follows.
8.1 Printer
3.5G plus WLAN Mobile Server Router supports LPR protocol, while the printer drivers canbe installed on Windows 98/2000/XP platforms, the connected printer works for the unit aswell.
If you need more information of supported models, please check the following websites.http://www.sane-project.org/sane-mfgs.htmlhttp://hplip.sourceforge.net/
8.2 Web Camera
3.5G plus WLAN Mobile Server Router supports OV511, OV511+, OV518, OV518+,SAA8115HL and SAA8116HL chipsets; besides, adding spca5xx/LE driver into firmware asthe table below shows.
Vendor Name Product Name ChipsetAiptek HyperVcam Mobile OV511+Aiptek HyperVcam Fun OV511+Aiptek HyperVcam Home OV511+Askey VC010 SAA8115HL
Alpha Vision Tech. AlphaCam SE (model AC-520) OV511Avaks AvCam USB-600 OV511
AverMedia Intercam Elite OV511BestBuy EasyCam U OV511
Creative Labs WebCam(model PD1001, alternate version) OV518
Creative Labs WebCam 3 OV511Creative Labs WebCam 5 (PID=400c) SAA8116HL
Creative Labs WebCam Plus (Model CT6840) OV511+
Creative Labs WebCam Plus("WebCam Mini"; model PD0040) OV518
Creative Labs WebCam Pro (model PD1030) OV511+Creative Labs Webcam Pro Ex OV511
D-Link DSB-C100 OV511+
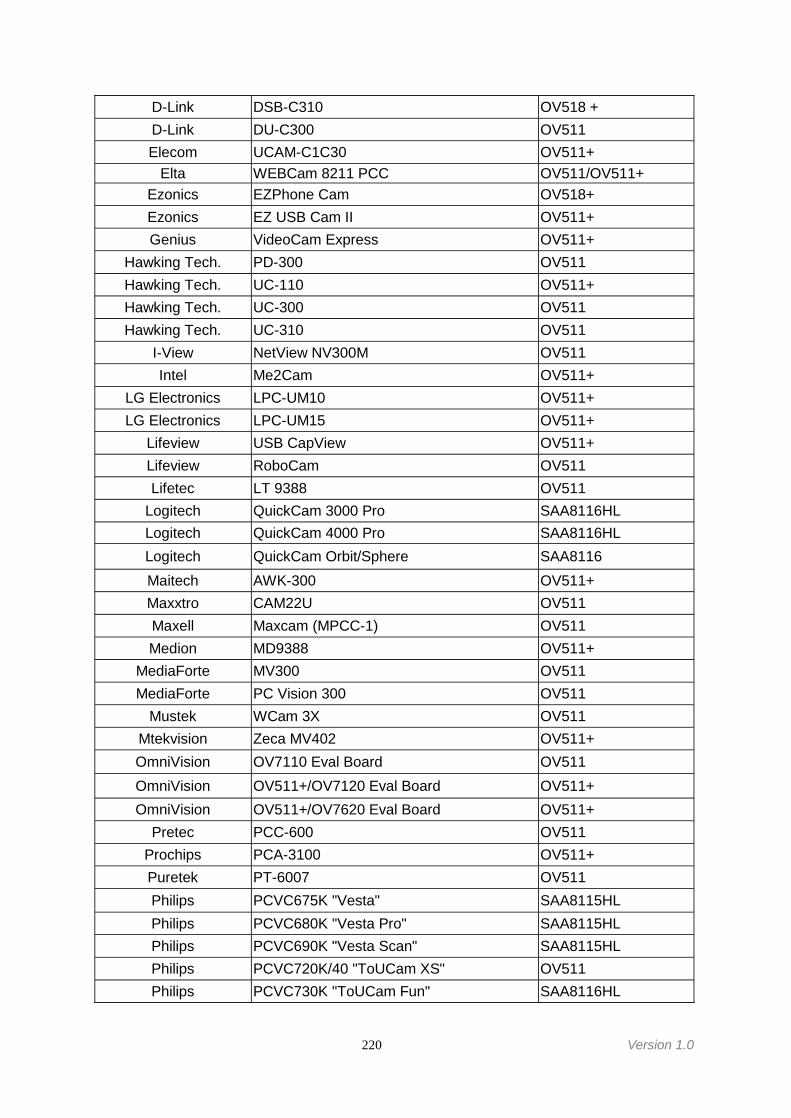
220 Version 1.0
D-Link DSB-C310 OV518 +D-Link DU-C300 OV511Elecom UCAM-C1C30 OV511+
Elta WEBCam 8211 PCC OV511/OV511+Ezonics EZPhone Cam OV518+Ezonics EZ USB Cam II OV511+Genius VideoCam Express OV511+
Hawking Tech. PD-300 OV511Hawking Tech. UC-110 OV511+Hawking Tech. UC-300 OV511Hawking Tech. UC-310 OV511
I-View NetView NV300M OV511Intel Me2Cam OV511+
LG Electronics LPC-UM10 OV511+LG Electronics LPC-UM15 OV511+
Lifeview USB CapView OV511+Lifeview RoboCam OV511Lifetec LT 9388 OV511
Logitech QuickCam 3000 Pro SAA8116HLLogitech QuickCam 4000 Pro SAA8116HLLogitech QuickCam Orbit/Sphere SAA8116Maitech AWK-300 OV511+Maxxtro CAM22U OV511Maxell Maxcam (MPCC-1) OV511Medion MD9388 OV511+
MediaForte MV300 OV511MediaForte PC Vision 300 OV511
Mustek WCam 3X OV511Mtekvision Zeca MV402 OV511+OmniVision OV7110 Eval Board OV511OmniVision OV511+/OV7120 Eval Board OV511+OmniVision OV511+/OV7620 Eval Board OV511+
Pretec PCC-600 OV511Prochips PCA-3100 OV511+Puretek PT-6007 OV511Philips PCVC675K "Vesta" SAA8115HLPhilips PCVC680K "Vesta Pro" SAA8115HLPhilips PCVC690K "Vesta Scan" SAA8115HLPhilips PCVC720K/40 "ToUCam XS" OV511Philips PCVC730K "ToUCam Fun" SAA8116HL
221 Version 1.0
Philips PCVC740K "ToUCam Pro" SAA8116HLPhilips PCVC750K "ToUCam Scan" SAA8116HLSotec Sotec Afine Eye SAA8115HLSuma EON OV511+
Samsung MPC-C10 SAA8115HLSamsung MPC-C30 SAA8115HLSamsung Anycam MPC-M10 OV511+
TRENDNet TV-PC100 OV511+TRENDNet TV-PC300 OV511+TRENDNet TV-PC301 OV511+
Trust Sp@ceC@m USB OV511Trust Sp@ceC@m 150 OV511+Trust Sp@ceC@m 200 OV511+Trust Sp@ceC@m 300 OV511+
Typhoon WebShot 350 OV518+TEVion MD9308 OV511+
TCE NetCam 310u OV511Terratec TerraCam PRO OV511+Terratec TerraCam USB PRO OV511+Waytech I-Pac VIC-30 OV511+Webeye 2000B OV511+
Vendor Name Product NameDriver
Spca5xx/LEAiptek Aiptek PocketDVII1.3 MPixels spca533a
Aiptek Mini PenCam 2M spca504b
Aiptek PenCam SD 2M spca504b
Aiptek Pocket DV3100 spca533a
Aiptek Pocket DV3500 spca536a
Aiptek Pocket DV5100 spca536a
Aiptek Pocket DV5300 spca536a
Aiptek PocketCam 2M spca504b
Aiptek PocketCam 3M spca504b
Aiptek PocketCam 4M spca533
Aiptek Slim3200 spca533a
Aiptek/Sunplus Mini Pencam 1.3 spca504b
Benq DC 1300 spca504b
Benq DC 1500 spca533a
Benq DC 3410 spca533a

222 Version 1.0
Concord Concord 3045 spca536a
Creative Creative Instant Zc0301
Creative Creative Instant Zc0301
Creative Creative Live! Zc0301P
Creative Creative Live!Cam VideoIM Vc301p
Creative Creative notebook pd1171 --
Creative Creative NX Zc0301
Creative Creative NX Pro Zc0301P
Creative Creative NX Pro2 Zc0301P
Creative Creative WebCam Live! Vc301p
Creative Live! Cam Optia --
Creative Live! Cam Optia AF --
Creative Live! Cam Voice --
Creative PC Cam 350 spca504c
Creative PC Cam 600 spca504c
Creative PC Cam 750 spca504b
Creative WebCam Live! Motion --
Creative WebCam Live! Ultra --
Creative WebCam Live! Ultra for Notebooks --
Creative Webcam Mobile Zc0301P
Creative Webcam NoteBook Zc0301P
Digital Dream Enigma 1.3 spca504b
Digital Dream Epsilon 1.3 spca533a
Generic Generic vimicro 303b --
Generic Generic Zc0305b --
Genius Dsc-1.3M Smart spca504b-P3
Genius Eye 310 --
Genius Genius eye 311Q sn9c120
Genius Look 1320 --
Genius Look 313 Media --
Genius Look 316 --
Genius Look 320S --
Genius Slim 310NB --
Genius Slim 322 --
Genius Video CAM EYE --
Genius VideoCam Express V2 spca561a
Genius VideoCam GE111 Pac207
223 Version 1.0
Genius VideoCAM Look --
Genius VideoCAM Messenger --
Genius VideoCAM Trek --
Genius VideoCamV2 Zc0301P
Genius VideoCamV3 Zc0301P
jenoptik JDC 21 LCD spca533
JVC GC-A50 spca504b
Kowa Bs-888e spca536
Labtec NoteBooks Zc0302
Labtec Webcam Pro Zc0302
LG Lic-300 sn9c105
Logitech Clicksmart 420 spca504b
Logitech Clicksmart 820 spca533a
Logitech Communicate STX Zc0302
Logitech Communicate STX Vc0302
Logitech NoteBook Deluxe Zc0302
Logitech QuickCam Chat zc030x
Logitech QuickCam IM zc030x
Logitech QuickCam IM zc030x
Logitech QuickCam IM zc030x
Logitech QuickCam IM/Connect zc030x
Logitech QuickCam IM+Sound zc030x
Logitech QuickCam tor Notebook zc030x
Megapix Megapix V4 spca533a
Mercury Cyberpix S550V --
Mercury Peripherals Inc. --
MercuryDigital Mercury Digital Pro 3.1 Mp spca533
Micro Innovation WebCam320 zc030x
Mustek DV 3000 spca533a
Mustek DV4000 spca536a
Mustek Gsmart D30 spca533a
Mustek Gsmart LCD2 spca533a
Mustek Gsmart LCD3 spca533a
Mustek Gsmart mini2 spca504a
Mustek Gsmart mini3 spca504a
Mustek MDC 4000 spca533a
Mustek MDC 5500z spca533a
224 Version 1.0
Mustek Mustek Wcam 300A 2 --
Mustek Mustek WCam300AN --
Mustek WCam300A Zc0301P
Polaroid Ion 80 spca504b
Polaroid PDC2030 spca504b
Polaroid PDC3070 spca533a
Terratec TeraCam2 move1.3 spca504b
8.3 USB Devices
3.5G plus WLAN Mobile Server Router supports FAT16, FAT32 and EXT3 file systems.1. Flash Drive
Vendor Name Product Name NotePanram MEMORY BLOCK USB2.0
A-DATA Lover USB2.0
A-DATA My Flash PD1 (512MB) USB2.0
Zynet PD-A2 USB 2.0
Maxtor DiamondMax Plus8 USB 2.0
Kingston Data Traveler 2.0
Shuttle SFD-0128
Apacer HandyDrive
PQI I-Ststick 32MB
Apacer Handy Steno 64MB USB 1.1
ASUS AI-flash 2 64MB
ASUS 32MB
GENUINE 32MB
NEXS SD card
Transcend JetFlash 128 MB USB 2.0
SanDisk Curzer Mini Flash 256MB USB 2.0
PQI Cool Drive(U339) 128 MB USB 2.0
KingMax 128MB USB 1.0
Kinggaroo SONA 128MB USB 2.0
2. External Hard Drive
Vendor Name Model No. Chipset Note TestedAli m5621 al √

225 Version 1.0
Ali m5637 al √Hi-Speed HD-D14-U2 Ali m5642 a1 FUJI 60G (5400rpm) √
GL811E √GL811USB √
MySon Century CS88186_107 √Cypress CY7C68300-56PVC √
8.4 Operating Systems
1. MicroSoft: Windows 2000, XP (Chinese/English), Vista2. Apple: Mac OS X 10.4.7
8.5 Browsers
1. Internet Explorer ver. 6 and 72. Firefox ver. 2.0.0.43. Safari ver. 2.0.4 or higher version
8.6 Easy Setup
MicroSoft: Windows 2000, XP, Vista
8.7 Communications Regulation Information
Should any consumers need to learn more information, services and supports, pleasecontact the supplier of your product directly.