3-6 Years old - CL Granada
51
Rv:05/03-09-15. Pág 1/51 PRE-CAMBRIDGE ENGLISH ASSESSMENT: YOUNG LEARNERS EXAMS 3-6 Years old
-
Upload
khangminh22 -
Category
Documents
-
view
1 -
download
0
Transcript of 3-6 Years old - CL Granada

Rv:05/03-09-15. Pág 1/51
PRE-CAMBRIDGE ENGLISH
ASSESSMENT:
YOUNG LEARNERS EXAMS
3-6 Years old

Rv:04/03-09-15. Pág 2/51
TEACHERS’ PLANNING: INFANT EDUCATION/ PRE-STARTERS 2015-2016
CONTENTS
01. Introduction 03
02. How to use this guide 03
03. Week planning 04
04. Activity 17: My class 32
05. Worksheet 1: The rainbow song poster
33
06. Worksheet 2: Wall circle sheet 34
07. Worksheet 3: Animal flashcards 35
08. Worksheet 4: Old Macdonald’s Farm song poster
37
09. Worksheet 5: Animal worksheet 38
10. Worksheet 6: Numbers 39
11. Worksheet 7: Match the numbers with your hand
40
12. Worksheet 8: Morning routines flashcards
41
13. Worksheet 9: Morning routines song poster
44
14. Worksheet 10: My morning 45
15. Worksheet 11: Body parts flashcards
46
16. Worksheet 12: Head? Shoulder? Eyes?
47
17. Worksheet 13: Where are my things?
48
18. Worksheet 14: Where are the animals?
49
19. Worksheet 15: The weather song 50
20. Worksheet 16 What do you wear when it’s...?:
51
Rv:04/03-09-15. Pág 3/51
1. INTRODUCTION
First of all, I would like to thank you for your participation and effort. Remember
you can count on CL for all the support you may need. Due to the great demand for preparation of official exams, the main objective of
this planning is to introduce kids in the format of Reading, Writing, Listening and Speaking Papers for the Young Learners of English Cambridge ESOL exams. Note that the specific paper and the level are indicated below the title of each worksheet.
We can never forget that we work with CHILDREN, and, for this reason, we have a
huge responsibility; everything should be perfect, we cannot make any mistakes. Thus, please, USE COMMON SENSE. From the first day of the course our only concern should be children’s learning.
This guide is meant to make the first days easier for you. These first few days are
fundamental to getting the children familiar with the lesson routine. Any doubts you have, let us know as soon as possible:
• The first day may be chaotic. You may even have more students than on your list, so write their full names and their course year on your list.
• Explain to your group where they have to wait for you. Go to the classroom in order, walking and without shouting. At the time we have the lessons, there will be other teachers having lessons as well and we could disturb them.
• Once in the classroom, establish some basic rules and explain the way the lessons are going to be organised.
• Before finishing the lesson, make sure children tidy up all the material they have used, and that the classroom is tidied up as well. You should be the first to enter the classroom and be the last to leave.
• You will find chalk in the classroom that you have been assigned to in schools and we will give you a board pen for the lessons in the academy.
• For the first lessons use the songs and games suggested below or any other activities you are familiar with.
• Don’t expect your students to bring their pencil cases the first day. Once you meet them tell them to do so for the following lessons.
• Remember: THE MORE ENGLISH YOU USE IN CLASS, THE MORE ENGLISH CHILDREN WILL LEARN.
2. HOW TO USE THIS GUIDE
In this guide you will find lots of songs and games to practice as you see fit. Remember that very young learners have very short attention spans so you will need to change activities often. On the other hand, they love repetition, so you will often sing the same song or play the same game various times every class.

Rv:04/03-09-15. Pág 4/51
Remind students they can practise at home with the resources they can find on our website: “Área de Padres y Alumnos”. The answers for every worksheet are on the web as well. There are resources for teachers as well.
3. WEEK PLANNING
CL GROUPS: we want everybody to do at least one part of a lesson in the first couple of weeks using the CL website. You should find an extra-worksheet and instructions on “Teacher’s corner: General English Resources”. The same worksheet is available for students in “Área de Padres y Alumnos: Recursos Idiomas: Kids”.
WEEK 1
SONG 1 Using a Hello song at the beginning of class signals the start of the lesson and helps provide a nice transition into a learning environment. With younger learners, use the same hello song several weeks in a row so that students get to know it well. This will build their confidence and give them a sense of security at the start of the lesson as they immediately know what to do.
� Instructions:
Gestures to use with The Hello Song
These are quite straight forward. First time you play the song do the gestures and
encourage everyone to do them with you.
• Wave as you sing the “Hello, hello” parts.
• Gesture as you sing “Let’s sing”, “let’s play” or “knock, knock, knock”
Using The Hello Song in class
Use the song each lesson as the warm up to the class. Here is a suggested warm up
routine which you can use in each of your young learners’ classes:
1. Greetings: Greet the students by name as they enter the classroom and gesture for
them to sit down.
Rv:04/03-09-15. Pág 5/51
2. Name Tags: Before class prepare some name tags (stickers or pin-on tags) with
each student’s name written on in lower-case letters. Sit down with your students
and lay out the name tags in front of you. Pick up each tag and call out the name.
Try and encourage each student to put their hand up and say “yes”. Hand over the
tags and help to pin / stick on. Later on as your students recognize their written
names you can have each student in turn pick out their own name tag.
3. Glove Puppet greetings: Use a glove puppet (such as a Sesame Street puppet) to
greet the students. Keep him in a cloth bag. Bring out the bag, open it enough to
see in and shout into the bag the puppet’s name (e.g. “Cookie Monster!”). Then
move your ear to the opening to listen – nothing. Go to each student and encourage
them to shout the puppet’s name into the bag – each time nothing happens. Finally,
get all the students together to shout the name at the same time. This time the
puppet wakes up and jumps out of the bag! The puppet then chats to each students:
“Hello”, “What’s your name?” “Goodbye / See you” before going back into the bag
and back to sleep.
In later lessons (as the students learn the words to the Hello Song) you can practise
using the target vocab via conversations between the puppet and each student (E.g.
Puppet: Hello, how are you today? Student: I’m fine, thank you. And how about
you?”).
4. Sing “Hello Song”:
Sit in a circle and sing along to the song. Encourage students to clap along, pat their
laps or use gestures in time with the music. The Hello Song is a good song to start
the lesson with, especially as it has an accompanying See you later song to sing at
the end of the lesson.
5. Do “Exercise Routine” activity: Say the following and have the students follow
your lead: “Stand up (teacher stands and so does everyone else), “Hands up /
hands down” (x 3-5), “Jump” (x3-5), “Run! / Stop!” (x3-5), “Turn around! / Stop!” (x3-
5), finally “Sit down”. Throughout the course you can introduce other commands,
such as “Hop”, “Wiggle”, “Crouch” and so on.
Extra activity: Once your students have got to know these exercises you can play
“Teacher Says” using these actions.

Rv:04/03-09-15. Pág 6/51
6. Review past lesson vocab / structures / games / songs / etc.: Reviewing past
lessons is very important – students need constant practice of new vocab,
structures, songs, games and so on. Always review your last lesson as well as
some parts from other previous lessons. You can spend 5-10 minutes reviewing –
it’s fine to recycle games and activities from your past lessons to review as kids
enjoy playing familiar games (although be careful not to play a game to death).
THE HELLO SONG
♫ Hello! (Hello!) [Wave with your right hand.]
Hello! (Hello!) [Wave with your left hand.]
Come in. [Motion to come inside.]
Let's sing. [Pretend you are singing into a microphone.]
Let's play. [Run in place.]
Hello! (Hello!) [Wave with your right hand.]
Hello! (Hello!) [Wave with your left hand.]
Knock, knock, knock. [Pretend to knock on a door.]
Come on in! [Motion for someone to come inside.]
Let's sing. [Pretend you are singing into a microphone.]
And play. [Run in place.]
And learn together. [Tap your finger on your temple.]
Knock, knock! [Thrust your fist in the air.] ♫
http://supersimplelearning.com/songs/original-series/one/knock-knock-hello/
SONG 2
"Clean Up!" is the perfect simple song to signal clean up time in the classroom. Use this song to transition easily from one activity to another by having kids help with putting things away.
� Instructions:
The easiest way to introduce the song is simply to start playing it each time you clean up after an activity. Children will very quickly associate this song with clean up time.
When using the song for the first time, use a puppet to demonstrate cleaning up some blocks or other small items.

Rv:04/03-09-15. Pág 7/51
Challenge the children to have everything cleaned up and put away before the song is finished. It's incredible how quickly they start moving towards the end of the song.
CLEAN UP
♫ Clean up, clean up. Everybody, let's clean up.
Clean up, clean up. Put your things away.
(Repeat 3x)
Clean up! Clean up! Clean up! Put your things away. Pick up your toys.
Pick up your books. Pick up your shoes.
Put your things away.
Clean up, clean up. Everybody, let's clean up.
Clean up, clean up. Put your things away.
(Repeat) ♫
http://supersimplelearning.com/songs/original-series/one/clean-up/
SONG 3
This is a great song to end a class with. It's upbeat, easy to learn, and ends class on a positive note. It's a fun way for the kids to say, "Goodbye" to each other and to the teacher.
� Instructions:
Gestures to use with See you later
These are quite straight forward. First time you play the song do the gestures and
encourage everyone to do them with you.
• Wave as you sing the “Goodbye, goodbye” parts.
• Hold your hand above your eyes (as you would when you are looking into the
distance and keeping the sun out of your eyes) and look at another student as you
sing “See you later”.

Rv:04/03-09-15. Pág 8/51
• Tap watch (or imaginary watch) and then point to the door as you sing “It’s time to
go”.
Using See you later song in class
Use the song each lesson as the wrap up to the class. Here is a suggested wrap up routine
which you can use at the end of your young learners’ classes:
1. Say Goodbye to glove puppet: Take out the bag again and get everyone to wake
up the glove puppet by shouting its name into the bag (e.g. “Cookie Monster!”).
Bring out the puppet and go through the same routine as in the warm up – go to
each S and say hello, ask their name and the say goodbye / see you later. Then put
the puppet back in the bag (back to sleep). After the students get to know the See
you later song, then the puppet and students can use some of the target vocab
when saying goodbye (e.g. See you later, It’s time to go).
2. Sing “See you later” :
The “See you later song” is a good way to sign off the class. Sit together in a circle
and sing and clap along or use the song gestures.
3. Do “Quick Check”: Time to leave the class. Make sure everything is put away and
the students have gathered their belongings. Have them line up at the door and
place yourself between the door and the students. For each student check one new
word (e.g. hold up a colour or fruit and ask “What’s this?”). For very young kids you
can hold up one of the worksheets you did in the lesson and ask them to touch an
object (e.g. “Touch the apple”). When they give you an answer say goodbye (and
say a target phrase, such as “See you later”) and let them leave.
SEE YOU LATER
♫ See you later. [Make circles with thumbs and index fingers around each eye, and then extend your arms out and point out to the class.]
See you later. See you later.
Take care. [Wave with one hand.] Goodbye. [Wave with the other hand.]
It's time to go. [Point to your watch, or where your watch would go on your wrist.] I'll see you later. [Make circles with thumbs and index fingers around each eye, and then
extend your arms out and point out to the class.]
Rv:04/03-09-15. Pág 9/51
It's time to go. See you later. [Make circles with thumbs and index fingers around each eye.]
Goodbye. [Extend your arms out and point out to the class.]
See you later. See you later. See you later.
Take care. Goodbye. ♫
http://supersimplelearning.com/songs/original-series/one/see-you-later/
WORKSHEET 1+2: I can sing a rainbow
Revise or teach your pupils colours in English. Ask each pupil in turn to stand up and TOUCH or POINT TO something red in the classroom, something blue, something purple,M A good way to practise colours in English is by using The Rainbow Song together with its worksheet.
� Instructions:
Gestures and activities to use with The Rainbow Song
There are a number of activities you can do as you sing along to the song:
• Simply pat your knees or clap in time with the music as you sing the song.
• Give each student a print out of the Rainbow Song poster (Worksheet 1). Ask them
to colour it. As they sing along they touch each colour or picture.
• Give out the 7 colours to students (coloured paper, origami paper, coloured blocks,
coloured pencils – anything will do) and have students touch the colours in time with
the song.
• Put coloured paper up around the walls of the classroom. Have all of your students
point to each colour as it is sung.
Using The Rainbow Song in class
This is a wonderful song to use when teaching the colours – even the youngest child enjoys
singing along to this tune.

Rv:04/03-09-15. Pág 10/51
1. Start by teaching the vocab. Depending on the age / level of your students you
may want to teach a just few words per class, building up to the full 7 colour words
over a series of lessons. Prepare coloured paper (origami paper is great for this) –
enough colours for each student in your class (so, 1 red per student, 1 yellow per
student, etc.). Hold up the first coloured paper and elicit the colour (e.g. red). Chorus
and practise saying the colour. Then pass the coloured paper around the class so
each student can hold and say the colour. Do this for the rest of the colours.
2. Play “Colour Stand Up and Jump”. Give out all of the coloured papers, 1 colour
per student. Tell your students to sit down. Say a colour (e.g. “red”) and the
students holding that colour have to quickly stand up, jump and then sit down. Start
off slowly and get faster and faster.
3. Play “Touch the Colours on Posters”. If your classroom has lots of colourful
posters on the walls, this is a great activity to do. Demonstrate by shouting out a
colour (e.g. “Red”). Run to a poster and touch anywhere that has a red colour. Do
the same for another colour (e.g. “Blue”). Each time run to a new poster. Now have
the students do the activity – shout out a colour and have them all run around the
classroom touching the colours on posters.
4. Do “Colour the Circles” activity. Before class, prepare 7 large sheets of white
paper (or if you are teaching less colours that day, enough sheets of paper for the
colours you are teaching). On each sheet draw a large circle which fills up the sheet
(or print the wall circle sheet –worksheet 2-). Then stick the sheets on the walls of
the classroom, at a height your students can reach. At this point of your lesson,
take out your coloured pencils/crayons and demonstrate the activity. Walk around
the class and colour a small part of each circle with one colour (always say the
colour as you are colouring). So there will be one circle with some red colour in it,
one with yellow, and so on. Next, tell your students to take out their coloured
pencils/crayons. Have them walk around the classroom, colouring in a bit of each
circle with the same colours you used. Make sure they say the colour as they do
each colouring.
5. Play “Point at the Coloured Circles”. Have all of your students sit down. Call out
a colour and demonstrate by pointing at the coloured circle on the wall. Do all of the
colours in the order of the song, with the students pointing at the different coloured
circles.

Rv:04/03-09-15. Pág 11/51
6. Sing “The Rainbow Song”. The first time you play the song, put up the Rainbow
Song poster on the board (worksheet 1). Quickly elicit the colours. Play the song
and sing along, touching the colours as you sing. You can even invite a student to
come up to the board and touch the colours with you. Next, give out all 7 colours
(e.g. coloured paper, pencils, etc.) to each student. Get each student to lay out the
colours in front of him/her, in the order of the song. As you play the song again,
have all students touch each colour and sing along.
THE RAINBOW SONG
Red and yellow and pink and green, Purple and orange and blue.
I can sing a rainbow, Sing a rainbow,
Sing a rainbow too!
Listen with your eyes, Listen with your eyes,
And sing everything you see. You can sing a rainbow,
Sing a rainbow, Sing along with me.
Red and yellow and pink and green,
Purple and orange and blue. We can sing a rainbow,
Sing a rainbow, Sing a rainbow too
https://www.youtube.com/watch?v=E-SbZpfAAAw
WORKSHEET 3+4+5: Old MacDonald
� Instructions:
Gestures and activities to use with Old MacDonald
There are a number of activities you can do as you sing along to the song:
Farmer - Pretend to hold on to your overall straps.
Cow - Pretend to milk a cow.
Horse - Place your thumb on your right temple and bend your index and middle fingers up
Rv:04/03-09-15. Pág 12/51
and down.
Pig - Push the tip of your nose up with one finger.
Sheep - Pretend to pet a sheep.
Duck - Open and close your full hand in front of your mouth, imitating a duck's bill.
Rooster - With your fingers spread wide, touch your thumb to your forehead, representing
a rooster's comb.
Using the Old MacDonald song in class
All kids love this song, with its animal sounds and catchy tune. Use it with your farm animal
themed lessons.
1. Use farm animal plastic toys for “play time”. If you have a small class, start off
sitting together playing with the farm animals and any other farm toys to go with
them (buildings and barns, tractors, pens, other animals, etc.). For larger classes, if
you have enough sets you can put the class into groups with the animal toys to play
with.
2. Introduce the vocab. As you are playing, start saying the animal vocab and animal
sounds. E.g. “This is a pig – oink, oink!”. As you and your students play with the
animals tell them the animal names and sounds in English.
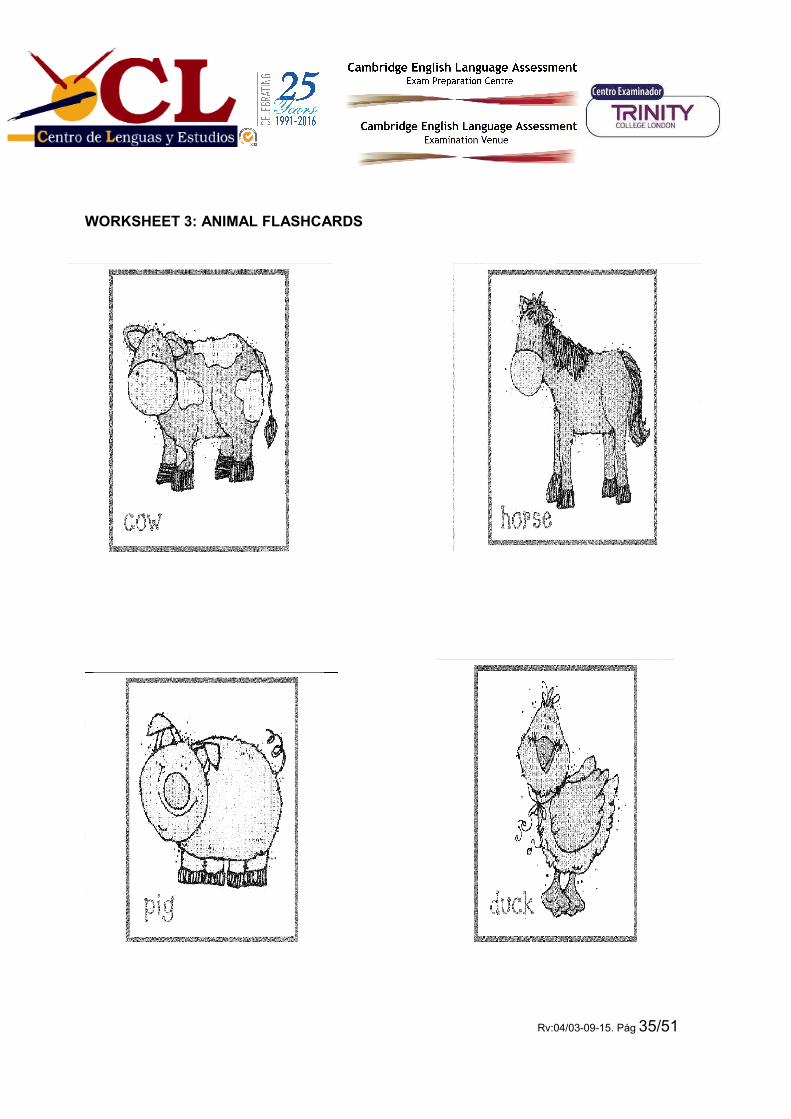
3. Teach & practice the vocab. After playing for a while collect all of the toys and put
them away, keeping the cow, dog, sheep, duck and pig out. You’ll also need the
same farm animal flashcards (worksheet 3). Put the flashcards on the floor. Hold up
one of the plastic animals and chorus the vocab, as follows:
T: “cow, cow, cow”
Ss” “cow, cow, cow”
T” And a cow says Moo. Moo, moo, moo”
Ss: “Moo, moo, moo”
Then ask which flashcard (on the floor) is the cow. Encourage your students to
point or touch the correct flashcard. Then place the animal on its corresponding
flashcard. Do for all of the animals.
4. Play “Put the animal on the flashcard”. Now you have 5 animals toys sitting on
their flashcards. Pick up each animal toy and throw it somewhere in the classroom.

Rv:04/03-09-15. Pág 13/51
Call out different students to pick up an animal and place it back on the correct
flashcard.
5. Play “Flashcard touch” and “The missing flashcard” game. Put the animal toys
away. Keep the flashcards on the floor. Tell your students to sit around the
flashcards on the floor (or on a table) and to put their hands up in the air. Say a
flashcard (e.g. “Pig”) and students have to quickly touch the correct card. Play a
few rounds. After that, tell your students to close and to cover their eyes. Turn over
one of the cards. Say “Open your eyes”. The students have to shout out the
missing card.
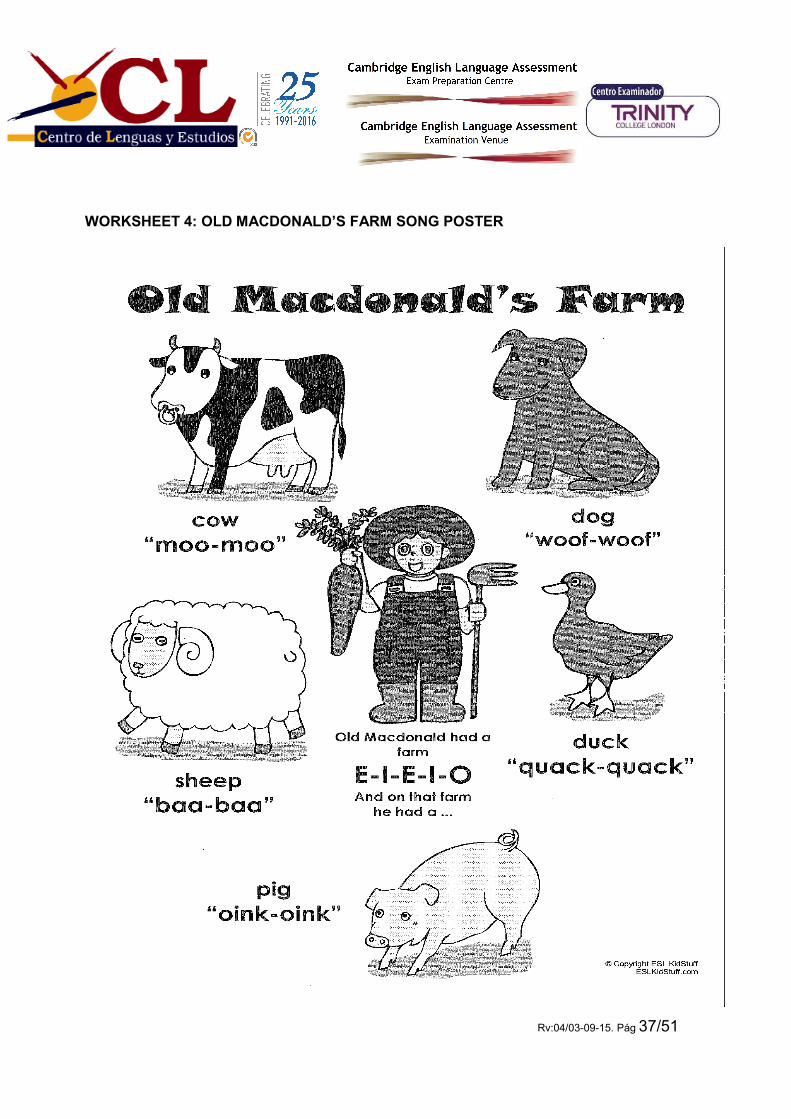
6. Sing “Old MacDonald”. Either stick the flashcards in the order of the song on the
board or use the Old MacDonald song poster (Worksheet 4). First, practise the
gestures (above) for the farmer and the animals. Then play the song and
encourage your students to sing along with you as they do the actions.
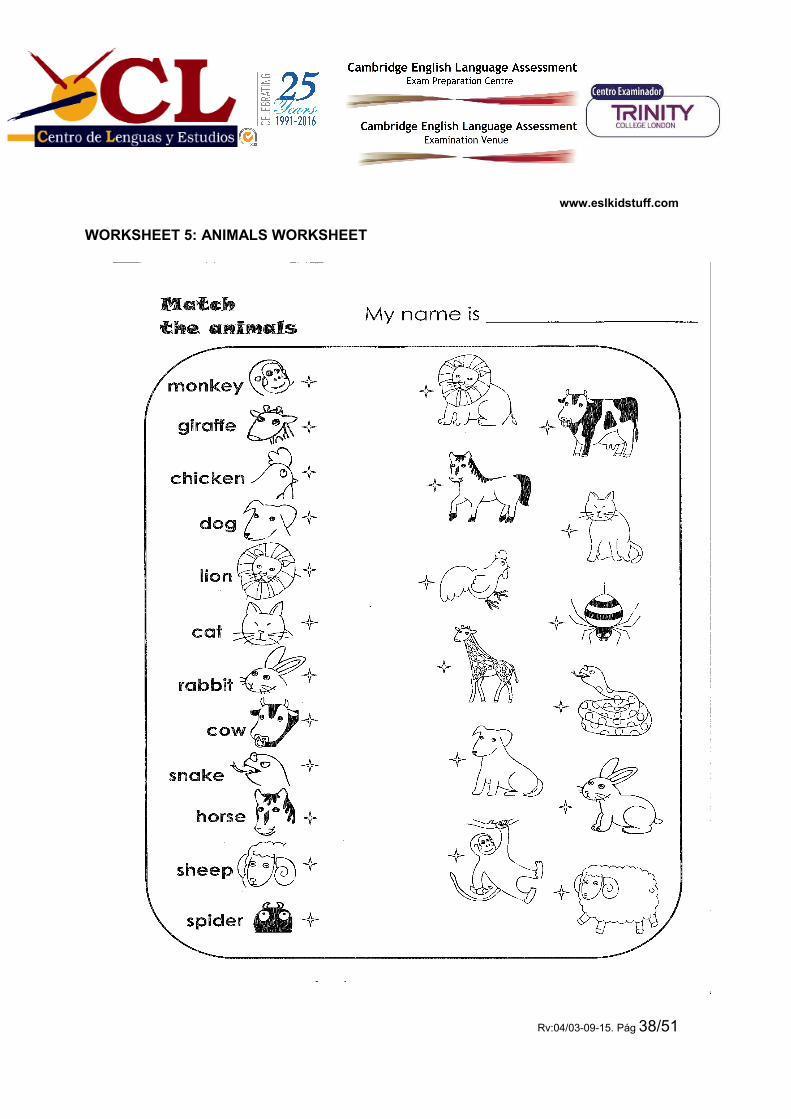
7. Do an animals worksheet. To finish off this section of the lesson, give out
worksheets to practise and learn new animals. You may need to teach some new
animals your SS don’t know. As your students are doing the worksheets, ask
questions (e.g. “what animal is that?”, “What noise does it make?”, etc.) (worksheet
5)
OLD MACDONALD
♫ What does a COW say? [Cow gesture.]
Moo. [Say, "Moo" while making the cow gesture.]
Old McDonald had a farm. E-I-E-I-O. [Farmer gesture.]
And on that farm he had a COW. E-I-E-I-O. [Cow gesture.]
With a moo moo here. [Continue making the cow gesture and "moo, moo" to the
left.]
A moo moo there. ["Moo, moo" to the right.]
Here a moo. ["Moo" to the left.]
There a moo. ["Moo" to the right.]
Everywhere a moo moo. ["Moo, moo" as you move your head in a circular
motion.]
Old McDonald had a farm. E-I-E-I-O. [Farmer gesture.]

Rv:04/03-09-15. Pág 14/51
What does a HORSE say? [Horse gesture.]
Neigh, neigh. [Say, "Neigh, neigh" while making the horse gesture.]
Old McDonald had a farm. E-I-E-I-O.
And on that farm he had a HORSE. E-I-E-I-O. [Horse gesture.]
With a neigh neigh here. [Continue making the horse gesture and "neigh, neigh"
to the left.]
A neigh neigh there. ["Neigh, neigh" to the right.]
Here a neigh. ["Neigh" to the left.]
There a neigh. ["Neigh" to the right.]
Everywhere a neigh neigh. ["Neigh, neigh" as you move your head in a circular
motion.]
Old McDonald had a farm. E-I-E-I-O.
What does a PIG say? [Pig gesture.]
Oink, oink. [Say, "Oink, oink" while making the pig gesture.]
Old McDonald had a farm. E-I-E-I-O. And on that farm he had a PIG. E-I-E-I-O.
[Pig gesture.]
With an oink oink here. [Continue making the pig gesture and "oink, oink" to the
left.]
An oink oink there. ["Oink, oink" to the right.]
Here an oink. ["Oink" to the left.]
There an oink. ["Oink" to the right.]
Everywhere an oink oink. ["Oink, oink" as you move your head in a circular
motion.]
Old McDonald had a farm. E-I-E-I-O.
What does a SHEEP say? [Sheep gesture.]
Baaa, baaa. [Say, "Baaa, baaa" while making the sheep gesture.]
Old McDonald had a farm. E-I-E-I-O.
And on that farm he had a SHEEP. E-I-E-I-O. [Sheep gesture.]
With a baaa baaa here. [Continue making the sheep gesture and "baaa, baaa"
to the left.]
A baaa baaa there. ["Baaa, baaa" to the right.]
Here a baaa. ["Baaa" to the left.]
There a baaa. ["Baaa" to the right.]
Everywhere a baaa baaa. ["Baaa, baaa" as you move your head in a circular
Rv:04/03-09-15. Pág 15/51
motion.]
Old McDonald had a farm. E-I-E-I-O.
What does a DUCK say? [Duck gesture.]
Quack, quack. [Say, "Quack, quack" while making the duck gesture.]
Old McDonald had a farm. E-I-E-I-O.
And on that farm he had a DUCK. E-I-E-I-O. [Duck gesture.]
With a quack quack here. [Continue making the duck gesture and "quack,
quack" to the left.]
A quack quack there. ["Quack, quack" to the right.]
Here a quack. ["Quack" to the left.]
There a quack. ["Quack" to the right.]
Everywhere a quack quack. ["Quack, quack" as you move your head in a
circular motion.]
Old McDonald had a farm. E-I-E-I-O.
What does a ROOSTER say? [Rooster gesture.]
Cock-a-doodle-doo! [Say, "Cock-a-doodle-doo" while making the rooster
gesture.]
Old McDonald had a farm. E-I-E-I-O.
And on that farm he had a ROOSTER. E-I-E-I-O. [Rooster gesture.]
With a cock-a-doodle-doo. [Continue making the rooster gesture and "cock-a-
doodle-doo" to the left.]
Cock-a-doodle-doo. ["Cock-a-doodle-doo" to the right.]
Cock-a-doodle-doodle-doodle-doodle-doodle-doo. ["Cock-a-doodle-do" as you
move your head in a circular motion.]
Old McDonald had a farm. E-I-E-I-O. ♫
http://supersimplelearning.com/songs/original-series/three/old-mcdonald-learn-it/
WEEK 2
WORKSHEET 6+7: Numbers, numbers, numbers
� Instructions:
Gestures to use with The Numbers Song
First time you play the song do the gestures and encourage everyone to do them with you.

Rv:04/03-09-15. Pág 16/51
• As the music is in a marching-style start off with everyone marching enthusiastically
on the spot to the rhythm. With the little kids’ versions, you can ask them to do the
gestures from the song.
• Whilst marching, count off the numbers on your fingers as the numbers are sung.
Using The Numbers Song in class
This song is great to use when you are teaching numbers and counting, but it can also be
used as a fun warm-up or played at any point in the lesson. If you are teaching numbers:
1. Play the song: Before even teaching any of the numbers, you can begin with this
song. Get everyone to stand up and march along. You can teach your SS to do
some actions at the same time as they say a number. For example, when they say
one they can jump, two they can kick, three they can clap their hands,... In the little
kids’ versions, your SS can do the gestures as indicated in the song.
2. Teach numbers vocab: Depending on the age of your class you can teach the
numbers over a series of lessons. For under 3s, two or three numbers each lesson
is fine, older students can learn more each lesson. Sit the students down so they
are facing you. Show them worksheet 6, so that they can see the numbers. You
can also use some familiar objects to teach the numbers (e.g. in this case we’ll use
plastic fruit). First, elicit each of the fruit and put each one on the floor / table in front
of you in a line. Then touch each fruit and slowly count (T: “1 M. 2 M. 3″). Do this
two or three times. Then have the class all repeat as you count / touch each fruit.
Finally, model this with a couple of students – ask one or two kids to touch and
count the fruit as the rest of the class watches (give lots of encouragement and
congratulate them when finished).
3. Students practise numbers: Put the students in pairs and give each pair a number
of objects (e.g. 3 plastic fruit, 3 cars, 3 pencils, etc.). Have the Ss practise counting
and touching the objects.
4. Play “Put in the box”: Now get a big box of objects and make sure you have
enough objects of each category for the numbers you are teaching (e.g. 3 plastic
fruit, 3 cars, 3 pencils, etc.). Throw the objects all around the classroom. Then
choose a student and say “Marcus, put three (pencils) in the box”. As the student
picks up each object make sure everyone counts along (1M 2 M 3). Then have the
student count the objects as s/he puts them in the box. Do this with everyone.
Rv:04/03-09-15. Pág 17/51
Finally, for a bit of crazy fun, throw all the objects out and let everyone scramble to
find, count and put all of their objects back in the box again (all at the same time!).
5. Play “Classroom Touch”: Get everyone to stand up and then the teacher shouts
out classroom objects for the kids to run to and touch (e.g. T: “Everyone touch three
tables!”, “Everyone touch three books!”). Possible classroom objects to touch:
tables, chairs, pencils, crayons, books, windows, shoes, etc. A good idea is to
prepare some pictures of items (e.g. 3 apples, 3 super heroes, 3 monster faces,
etc.) and stick them on the walls before class. Then the students can run and touch
these as well.
6. Sing “The Numbers Song”: Sing the song again (with all the actions) to conclude
the action part of this lesson topic.
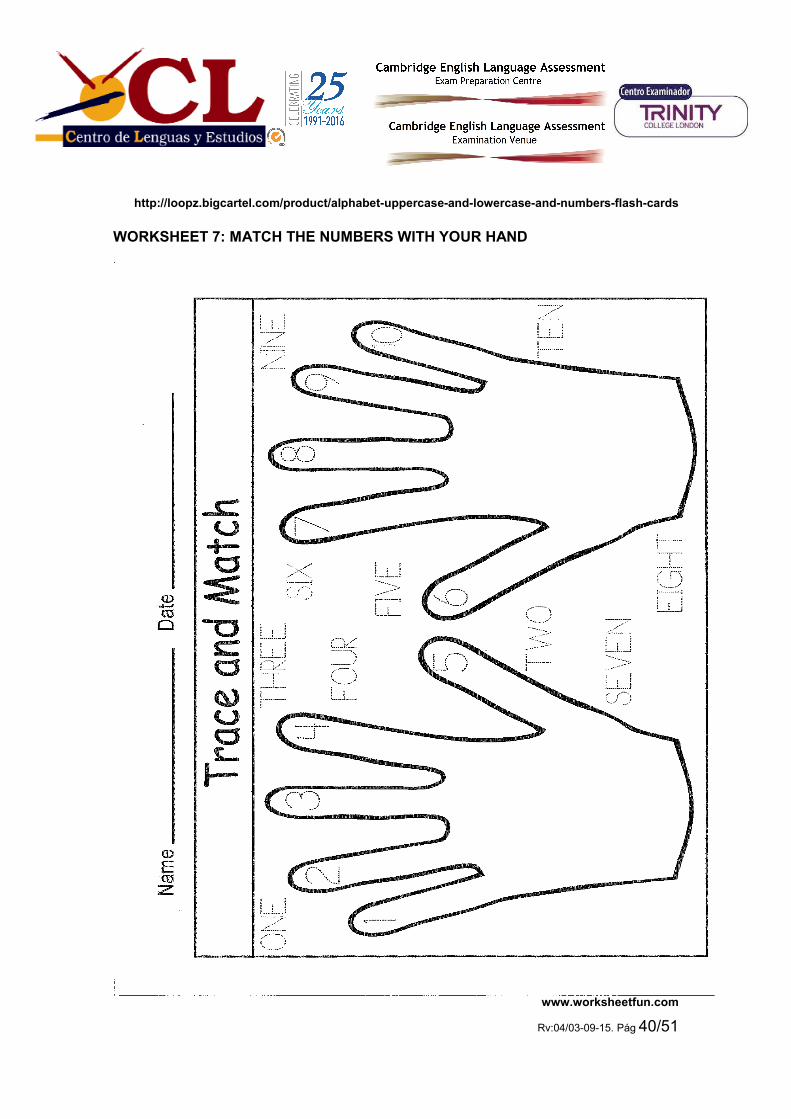
7. Do numbers worksheet: Finish with some quiet time doing a numbers related
worksheet . If you are teaching to read and write the numbers, you can do this with
worksheet 7 .
THE NUMBERS SONG
♫ Let's get started with some counting! [Make a circle or a line.]
Can you count to 20? [Everybody jumps up and says "YEAH!!!"]
Here we go! [Start marching! The march leader, either teacher or a student, sets
the pace.]
One!
Two!
Three!
Four!
Five!
Six!
Seven!
Eight!
Nine!
Ten!
Eleven!
Twelve!
Rv:04/03-09-15. Pág 18/51
[The music quiets down here, sing quietly or whisper. If you are marching, start
tip-toeing.]
Thirteen.
Fourteen.
Fifteen.
Sixteen.
Seventeen!
Eighteen!
Nineteen!
Twenty!
YAY!!!!!! [Everybody claps, jumps up and down, and says "YAY!" ]
That was fun! ♫
http://supersimplelearning.com/songs/original-series/two/count-and-move/
TEN IN THE BED (FOR LITTLE KIDS)
♫ Here we go!
There were ten in the bed [Hold up 10 fingers.]
and the little one said, [Hold your hands close together, indicating 'small.']
"Roll over, roll over" [Roll hands around each other, or each student turns to the right and
says, "Roll over! Roll over!"]
So they all rolled over and one fell out. [Everyone rolls to the right and the student in the first
chair 'falls out' of the bed.]
Nine! [Hold up 10 fingers and then take one away, leaving 9.]
There were nine in the bed [Hold up 9 fingers.]
and the little one said,
"Roll over, roll over"
So they all rolled over and one fell out.
Eight! [Hold up 9 fingers and then take one away, leaving 8.]
There were eight in the bed [Hold up 8 fingers.]
and the little one said,
"Roll over, roll over"
So they all rolled over and one fell out.

Rv:04/03-09-15. Pág 19/51
Seven! [Hold up 8 fingers and then take one away, leaving 7.]
There were seven in the bed [Hold up 7 fingers.]
and the little one said,
"Roll over, roll over"
So they all rolled over and one fell out.
Six! [Hold up 7 fingers and then take one away, leaving 6.]
There were six in the bed [Hold up 6 fingers.]
and the little one said,
"Roll over, roll over"
So they all rolled over and one fell out.
Five! [Hold up 6 fingers and then take one away, leaving 5.]
There were five in the bed [Hold up 5 fingers.]
and the little one said,
"Roll over, roll over"
So they all rolled over and one fell out.
Four! [Hold up 5 fingers and then take one away, leaving 4.]
There were four in the bed [Hold up 4 fingers.]
and the little one said,
"Roll over, roll over"
So they all rolled over and one fell out.
Three! [Hold up 4 fingers and then take one away, leaving 3.]
There were three in the bed [Hold up 3 fingers.]
and the little one said,
"Roll over, roll over"
So they all rolled over and one fell out.
Two! [Hold up 3 fingers and then take one away, leaving 2.]
There were two in the bed [Hold up 2 fingers.]
and the little one said,
"Roll over, roll over"
So they both rolled over and one fell out.
One! [Hold up 2 fingers and then take one away, leaving 1.]
There was one in the bed [Hold up 1 finger.]
and the little one said,

Rv:04/03-09-15. Pág 20/51
"I'm lonely...[sigh]" [The one remaining student lays down on the chair, then everyone shouts
"WAKE UP!" and the student falls out of bed.] ♫
http://supersimplelearning.com/songs/original-series/one/ten-in-the-bed/
FIVE LITTLE MONKEYS (FOR LITTLE KIDS)
♫ Five little monkeys [Hold up five fingers.]
jumping on the bed. [Jump up and down.]
One fell off [Hold up one finger and then roll your hand down towards the floor.]
and bumped his head. [Tap your head with your fist.]
Mama called the doctor and the doctor said, [Put your pinky to your mouth and thumb to your
ear like a telephone.]
"No more monkeys jumping on the bed!" [Put one hand on your hip and wag your index
finger.]
Four little monkeys [Hold up four fingers.]
jumping on the bed.
One fell off
and bumped his head.
Mama called the doctor and the doctor said,
"No more monkeys jumping on the bed!"
Three little monkeys [Hold up three fingers.]
jumping on the bed.
One fell off
and bumped her head.
Mama called the doctor and the doctor said,
"No more monkeys jumping on the bed!"
Two little monkeys [Hold up two fingers.]
jumping on the bed.
One fell off
and bumped his head.
Mama called the doctor and the doctor said,
"No more monkeys jumping on the bed!"
One little monkey [Hold up one finger.]
jumping on the bed.

Rv:04/03-09-15. Pág 21/51
She fell off
and bumped her head.
Mama called the doctor and the doctor said,
"No more monkeys jumping on the bed!" ♫
http://supersimplelearning.com/songs/original-series/one/five-little-monkeys/
WORKSHEET 8+9+10: Morning routines
� Instructions:
Gestures and activities to use with “The Morning Routines Song”
As you sing the song, follow these actions:
• “Good morning! Good Morning!” – stretch your arms up (as if just waking up)
• “It’s time to wake up” – point at imaginary wrist watch for “It’s time to” and open your
hands in front of your eyes for “wake up” (to gesture opening your eyes)
• “I have to get up” – do an energetic star jump on “get up”.
• “I wash my face (wash, wash, wash)” – gesture washing your face
• “I brush my hair (brush, brush, brush)” – gesture brushing your hair
• “I get dressed (dressed, dressed, dressed)” – gesture getting dressed
• “There’s such a lot to do!” – gesture wiping your forehead and looking tired out
• “I eat my breakfast (eat, eat, eat)” – gesture eating breakfast
• “I brush my teeth (brush, brush, brush)” – gesture brushing your teeth
• “I put on my shoes (put on, put on)” – gesture putting on your shoes
• “It’s time to go to school.” – point at imaginary wrist watch for “It’s time to” and wave
goodbye for “go to school”.
Using “The Morning Routines Song” in class
The song is great fun with loads of easy gestures. It helps make teaching morning routine
verbs fun.
Rv:04/03-09-15. Pág 22/51
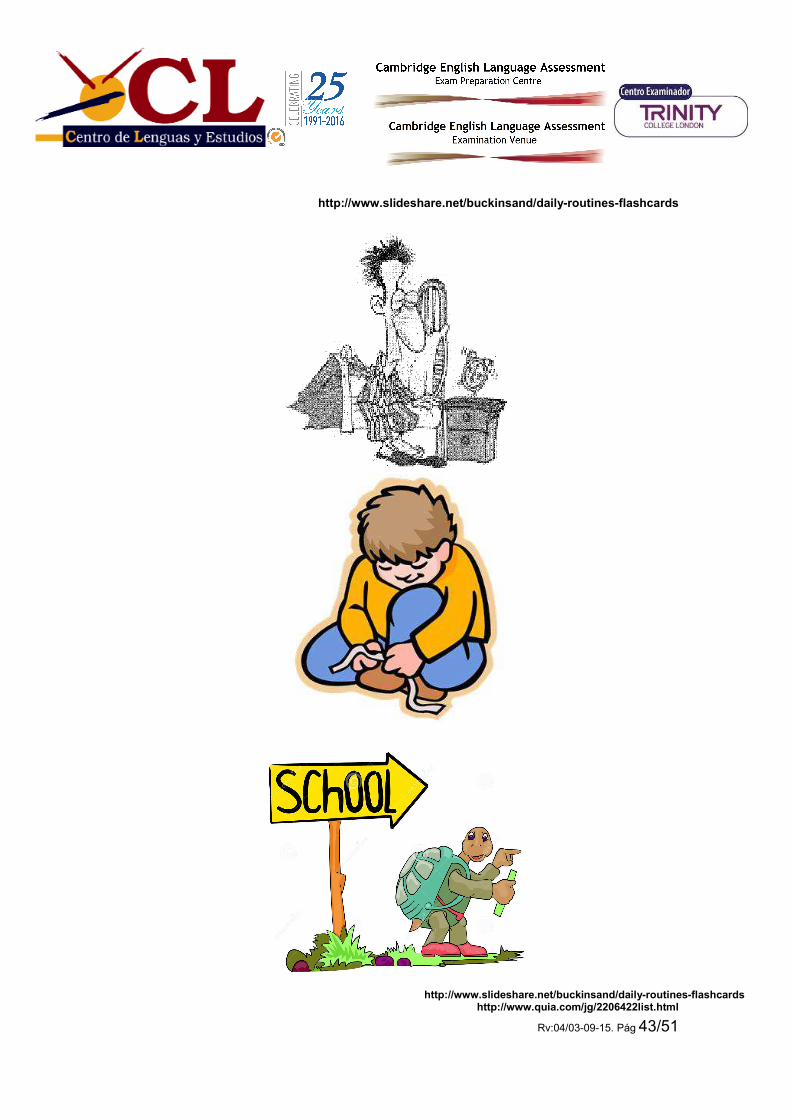
1. Teach the morning routines verbs. Start with a guessing game. Before class print
out the flashcards for morning routines (worksheet 8). Start with an easy one –
“brush my teeth” – look at the card but don’t show it to anyone. Do the action for
brushing your teeth and ask “What am I doing?”. It’s OK if the students answer in
their first language – whoever answers first is the winner. Try and elicit the English
or if not, teach “brush my teeth”. For the next card, the winner can look at the card
and do the action. Again, elicit / teach the English. Continue until all the cards /
actions have been guessed.
2. Practice the morning routines verbs. Put the cards randomly on the board (stick
on with blue-tak or tape) and draw a circle around each card. Start by chorusing
each card quickly (T: “wake up”, Ss: “Wake up”). Go through chorusing all the cards
at least three times, getting quicker and quicker as you go. Next, point to a card and
say “What’s this?”. Get everyone to say the card together. Point to each card and
get the class to shout out the verbs together as you touch each card. Finally,
remove one card from the board – the circle it was in will still be there. Point to the
empty circle and again say “What’s this?” – get everyone to shout out together the
missing card. Point to other cards and elicit them, slowly removing all the cards
from the board leaving just their circles. See if everyone can remember the words
without any cards being there!
3. Play “Flashcard touch” on the board. Put the cards back on the board, at a
height that everyone can reach. Model the game first – select a student and say
“Touch put on my shoes”. The student should go to the board and touch the correct
card. Then get the student to do the same for you. When everyone has got the
idea put them in pairs and get each pair to stand at the other end of the room. In
pairs, each student says a verb phrase as their partner runs to the board and
touches the right card.
4. Do “Morning Routines” Drawings. Give out a large sheet of paper (e.g. A3) to
each student and model the activity. Draw things you do in the morning (e.g. brush
your teeth, eat toast, watch TV) – it doesn’t have to be just the activities from the
flashcards / song, anything that you do is good. Then encourage each student to
draw what they do. As they are drawing, go around the class asking questions (e.g.
What’s this? Do you really eat chocolate for breakfast, etc.?). At the end, get
everyone to stick their sheet of paper on the classroom walls. Pair up students and
get them to try and guess what the pictures are.

Rv:04/03-09-15. Pág 23/51
5. Sing “The Morning Routines” song. Put the morning routine flashcards up on the
board in the order of the song, or alternatively, use the song poster (worksheet 9).
Get everyone to stand up and teach the actions and gestures for the song. Then
play the song and get everyone to sing and do the actions along with you. Play
twice so everyone gets the hang of it.
6. Do the “My Morning″ worksheet. Give out the My Morning worksheet (worksheet
10) to each student. Tell your SS to match the pictures with the sentences. As
everyone is working on their worksheets go around the class and ask questions
(e.g. Do you brush your teeth in the morning?).
7. Play charades. To finish the class, get together the morning routines flashcards.
Divide the class into 2 teams. One student comes to the front of the class and acts
out the flashcard you show to him/her. The first person to shout out the correct
answer wins a point for his/her team.
THE MORNING ROUTINES SONG
Chorus:
Good morning! Good Morning!
It’s time to wake up.
Good morning! Good Morning!
I have to get up.
Verse 1:
I wash my face (wash, wash, wash),
I brush my hair (brush, brush, brush),
I get dressed (dressed, dressed, dressed),
There’s such a lot to do!
Chorus:
Good morning! Good Morning!
It’s time to wake up.
Good morning! Good Morning!
I have to get up.

Rv:04/03-09-15. Pág 24/51
Verse 2:
I eat my breakfast (eat, eat, eat),
I brush my teeth (brush, brush, brush),
I put on my shoes (put on, put on),
There’s such a lot to do!
It’s time to go to school.
http://www.eslkidstuff.com/blog/songs/new-song-the-morning-routines-
song#sthash.F6sIDEkm.dpbs
https://www.youtube.com/watch?v=eyPfpSt-SXc
WEEK 3
WORKSHEET 11+12: Head, shoulders, knees and toes
� Instructions:
Gestures and activities to use with Head, Shoulders, Knees & Toes
Doing the gestures with this song is a must! They are very simple and the kids will pick
them up really quickly as they follow you.
Everyone needs to stand up. Simply touch the parts of your body with both hands in time
with the song.
Using Head, Shoulders, Knees & Toes in class
This song can be used as a fun, energy burner at any time but it is also a very nice way to
teach parts of the body. Here are some ideas on using the song in your ESL kids lessons:
1. Start by teaching the vocab. Depending on the age / level of your students you
may want to teach a just few words per class, building up to the full 8 words over a
series of lessons. Prepare flashcards of the parts of the body used in the song
(worksheet 11). Slowly reveal each flashcard card and have your students touch
their part of the body (so, when you show the “head” flashcard get everyone to
touch their heads). Chorus each word three times and then ask your students to
individually say each word.

Rv:04/03-09-15. Pág 25/51
2. Practise the vocab. Lay the flashcards that you have just taught in front of you,
facing your students (or lined up on the board). Randomly touch each card and have
your students touch that part of their body and say the word. Do a final round with
the cards in the correct order of the song (so they are basically doing a practice run
of the song).
3. Play the song. Everyone stand up. As the song plays the teacher sings and does
all the actions, touching each part of his/her body with two hands in time with the
song. Make sure your students are following along. It’s easy and fun so your
students will love doing this. Each verse gets faster so by the last verse it will be
frantic but great fun.
4. Play “Teacher Says”. This is the game “Simon Says” but using the word “teacher”,
or your name, instead. Go straight into the game (no explanations necessary) by
saying “Teacher says touch your (knees)”. Do the action and make sure everyone
else follows along. Do a few more “touch your eyes, touch your toes”, etc. Then at
some point give a command without the “Teacher says” part (e.g. “Touch your
mouth”). First time round, everyone will touch their mouth, so make it very clear that
they shouldn’t do this when you don’t say “Teacher says”. After a while your
students will get the hang of it. Play the game faster and faster. When a student
makes a mistake they have to sit the rest of the game out. The last student
standing is the winner.
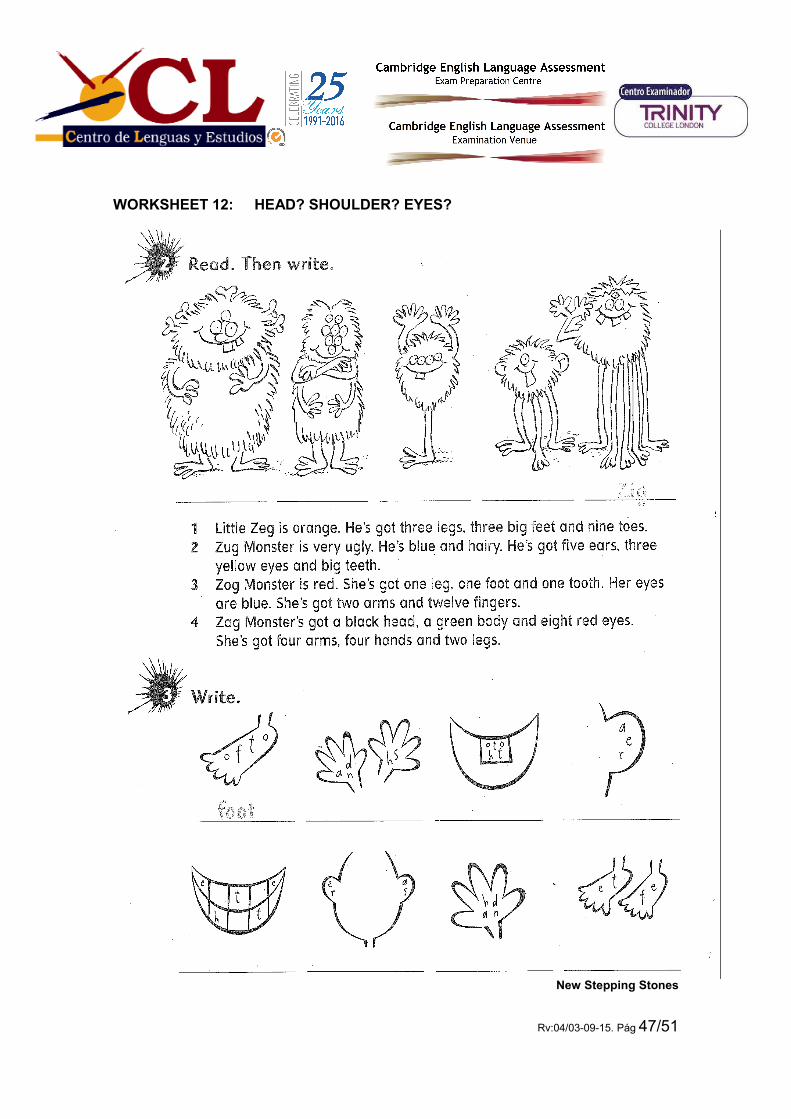
5. Do a body worksheet. To finish off this section of the lesson, give out worksheets
which have body parts. Review the words and teach them the new words that may
appear in the worksheet (worksheet 12). Ask your SS to colour the monsters
according to the instructions and to write the body parts. As your students are doing
the worksheets, ask questions (e.g. “which part of the body is that?”, etc.).
HEAD, SHOULDERS, KNEES AND TOES
Verse 1:
Head, shoulders, knees and toes,
Head, shoulders, knees and toes,
Eyes and ears and mouth and nose,
Head, shoulders, knees and toes.

Rv:04/03-09-15. Pág 26/51
Verse 2:
Head, shoulders, knees and toes,
Head, shoulders, knees and toes,
Eyes and ears and mouth and nose,
Head, shoulders, knees and toes.
Verse 3:
Head, shoulders, knees and toes,
Head, shoulders, knees and toes,
Eyes and ears and mouth and nose,
Head, shoulders, knees and toes.
http://www.eslkidstuff.com/blog/songs/head-shoulders-knees-and-
toes#sthash.AKsVogN4.dpbs
https://www.youtube.com/watch?v=lMQcwNZVUO8
WORKSHEET 13+14: Where are my things?
� Instructions:
Using the “Where are my Things?” listening in class
The song is great for an active listening exercise (you will have to read it aloud)!
1. Teach the prepositions vocab. For this you’ll need a box and a small toy animal.
Before class, put the animal inside the box. In class, sit your students down and
take out the box. Rattle the box and have your students rattle the box and try to
guess what is inside. Take out the toy and introduce it to the class. Also elicit the
word “box”. Sit the toy on the box and ask “Where is it?”. Elicit/Teach the
preposition “on” and then “It’s on the box”. Do the same for the rest of the
prepositions (on, under, in, behind, next to, in front of, between)
2. Practise the prepositions. Put students in pairs and give each pair a box and toy –
or anything which can be used to practise the prepositions (e.g. a pencil and pencil
case). Have each pair ask and answer questions using the prepositions.
3. Play “Where Is / Where Are”. Take out a pen and elicit the word. Have everyone
close their eyes. Hide the pen somewhere in the classroom (e.g. inside a book).

Rv:04/03-09-15. Pág 27/51
Tell everyone to open their eyes and ask them “Where is the pen?”. Have each
student guess using the structure “Is it (under) the (chair)?”. When the pen is finally
found take out a pair of shoes (can be a dolls pair). Elicit / Teach “They’re shoes”
and show the contrast between “It’s” and “They’re”. Again, have your students close
their eyes as you hide the shoes. Students try and guess their location by asking
questions such as “Are they (behind) the (desk)?”.
Now put students in pairs and have each pair hide objects and ask where things are
using the prepositions and structures.
4. Read “Where are my Things” with listening worksheet. Give everyone
worksheet 13. Elicit the items on the worksheet. Ask the students to listen to you
and tell you where the pen and shoes are on the worksheet. Read it twice to give
everyone a good chance of getting the answer right.
5. Play “Prepositions Pictionary”. For smaller classes you can play this on the board
– larger classes can use paper to play in groups. Start by modelling the activity.
Bring a student up to the class. Say “Draw a cat on a car”. The student has to draw
the picture. Then get the student who drew the picture to say a new sentence and
another student to draw the picture. Keep playing so that everyone has a chance to
draw and say a sentence.
6. Do a preposition worksheet: To finish off this section of the lesson, give out
worksheet 14 and ask your SS to complete it drawing the animals in the right place.
WHERE ARE MY THINGS?
It’s time to go to school but where are my things?
Verse 1:
Where are my things? Where are my things?
Where are my things? Where can they be?
Where is my pen? Where is my pen?
Is it on the table?
No!

Rv:04/03-09-15. Pág 28/51
Is it under the desk?
No!
Is it in the drawer?
No!
Where is it?
It’s behind the curtains!
Verse 2:
Where are my things? Where are my things?
Where are my things? Where can they be?
Where are my shoes? Where are my shoes?
Are they next to the TV?
No!
Are they in front of the door?
No!
Are they between the sofa and the chair?
No!
Where are they?
They’re on your feet!
WEEK 4
WORKSHEET 15-16: What’s the weather like?
� Instructions:
Gestures to use with The Weather Song
There are some easy gestures you can do as you sing along to the song:
1. For the question part “How’s the weather?”, sing along and do the ‘palms of the
hands up’ question gesture.
2. For the “Look outside” part, face the window and put your hand over your eyes (like
a salute), as if you were looking into the distance.

Rv:04/03-09-15. Pág 29/51
3. Use hand gestures for the weather words:
• sunny: slowly spread your arms out
• rainy: wiggle your fingers downwards like rain
• windy: gesture wind blowing out of your mouth
• cloudy: make cloudy shapes with your hands
• snowy: wiggle your fingers downwards like snow and shiver
• foggy: close your eyes and put your hand out in front like you are trying to feel for
something you can’t see
• hot: fan your face
• cold: shiver and wrap your arms around your body
Using The Weather Song in class
This is a song you can use to teach the weather and you can also use it as part of your
lesson routine to check and review the weather every lesson.
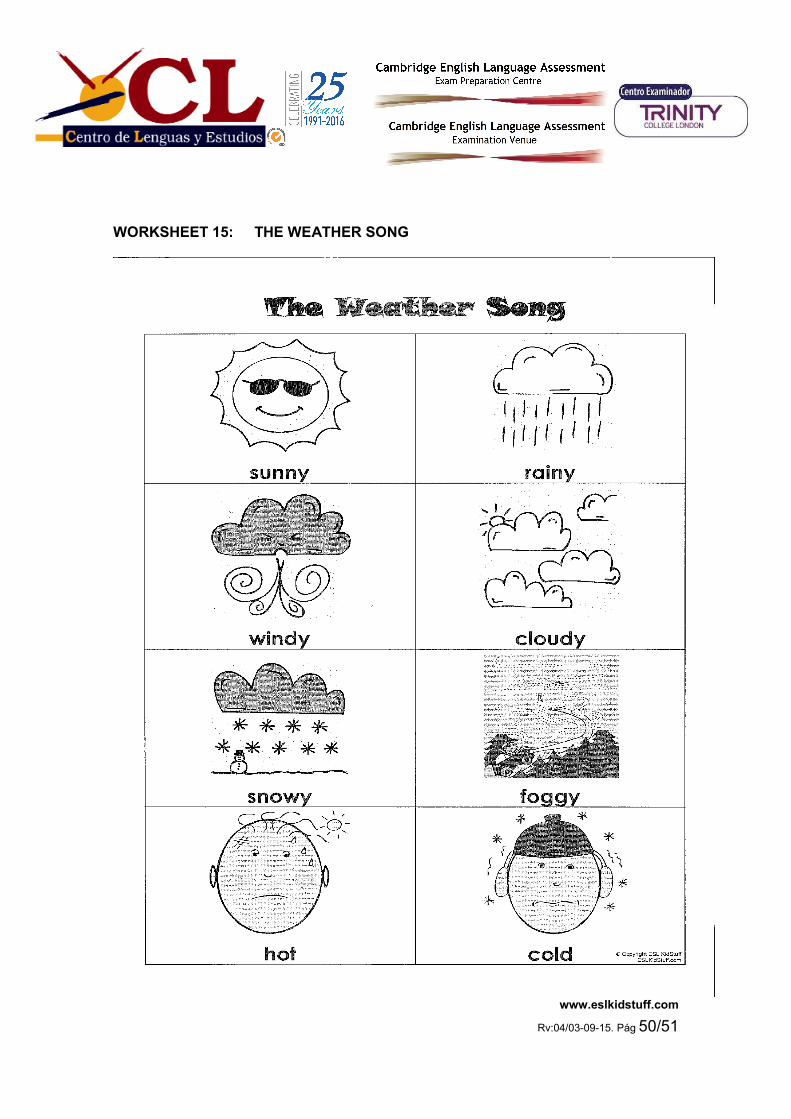
1. Start by teaching the vocab. Before class prepare weather pictures for the vocab
sunny, rainy, windy, cloudy, snowy, foggy, hot, cold. You can use worksheet 15.
Stick them around the walls of your classroom.
2. Play “Touch the cards”. Once the class has started, the teacher walks around the
classroom touching the weather cards. As you touch each card do the song gesture
while saying the vocab (e.g. it’s sunny!). As you do this encourage your students to
do the gestures and say the words with you. Next, get all your students to stand up.
Teacher shouts out a weather word (e.g. “It’s rainy!”) and students have to run over
to the correct picture, touch it and do the gesture. If you have a lot of students it is
worthwhile having multiple pictures of each card placed around the walls of the
room.
3. Talk about the weather outside. Motion for your students to come over to the
window (or even outside). Say a few times “How’s the weather?”, “Look outside”.
Elicit from the class the weather and if it’s hot or cold (you can also teach “warm” if

Rv:04/03-09-15. Pág 30/51
necessary). E.g. “It’s cloudy and rainy and cold”. Then ask each student in turn
“How’s the weather?” and encourage them to reply.
4. Play the song. First put the weather flashcards on the board in the order of the
song. Have all the students stand up and watch you as you sing along and use the
gestures. Encourage them to join in and sing along. Play the song two or three
times.
5. Play flashcard concentration. Put the class into groups of 4. Each group will need
two sets of weather flashcards. Model the activity first by having everyone watch
you play with one group: shuffle the cards and lay them out face down on the floor.
Turn over two cards. If they are different, turn them back over – it is the end of your
turn. If they are the same (e.g. two sunny cards) you keep the cards (remove them
from the game) and have another go. At the end, all of the cards will have been
removed. The player with the most cards is the winner.
6. Play Flashcard Basketball. Students, in teams, take shots with a ball (or
scrunched up piece of paper) at a trash can/box/etc. First show a flashcard to
student 1. If s/he answers correctly then s/he can have a shot at the basket. If the
student gets the ball in the basket then s/he wins 2 points. If the S hits the basket
without going inside then s/he wins 1 point. The with the most points is the winner.
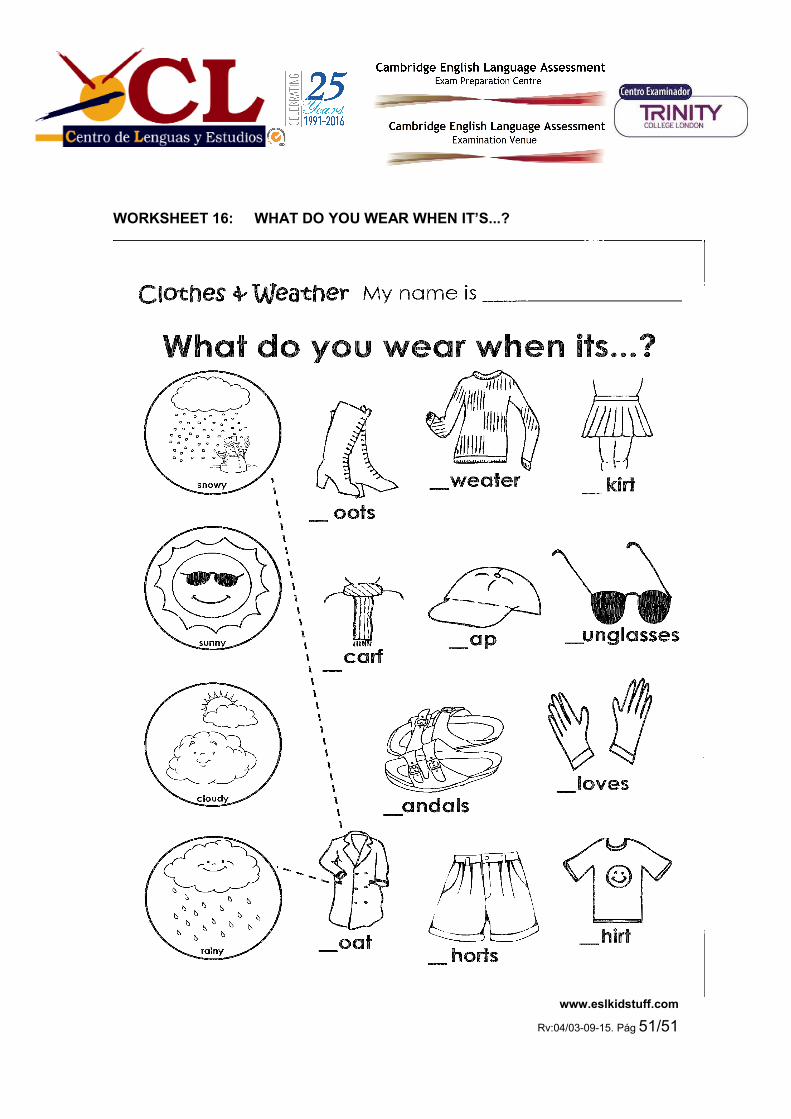
7. Do a weather worksheet. To finish off this section of the lesson, give out worksheet
16. Teach your SS some clothes vocabulary, so that they can complete the activity.
As your students are doing the worksheets, ask questions (e.g. “what is that?”,
etc.).
THE WEATHER SONG
Verse 1:
How’s the weather? How’s the weather?
Look outside.
How’s the weather? How’s the weather?
Look outside.
It’s sunny, it’s rainy, it’s windy, it’s cloudy.
It’s snowy, it’s foggy, it’s hot, it’s cold.
Verse 2:

Rv:04/03-09-15. Pág 31/51
How’s the weather? How’s the weather?
Look outside.
How’s the weather? How’s the weather?
Look outside.
It’s sunny, it’s rainy, it’s windy, it’s cloudy.
It’s snowy, it’s foggy, it’s hot, it’s cold.
http://www.eslkidstuff.com/blog/songs/the-weather-song#sthash.6yNrCk78.dpbs
https://www.youtube.com/watch?v=fWIhHTfJ34M
ACTIVITY 17: My class
� Instructions:
Teach your SS the most important classroom objects (pen, pencil, rubber, ruler, table, chair, door, window, door, desk, board, book) by pointing to them in the class. Then, play these games:
I spy
T says "I spy with my little eye something that begins with B". Ss try to guess the object (e.g. "book").
Label the Classroom
There are three versions of this:
1. For the very young: print and cut out images of classroom objects (worksheet 16), put some tape on the back and give some pictures to each S. Each time teach / elicit each object.The Ss then walk around the class stick the pictures on the objects. Once done, say to your Ss "Give me the (pencil) picture", and the kids go and fetch the correct picture and give to you. You could wait for this last part until the end of the lesson as a fun review.
2. Reading recognition: write labels of various classroom objects before class on post-its and stick them all around the room (on the wrong objects). Ss have to move the labels and stick them to the correct objects.

Rv:04/03-09-15. Pág 32/51
3. Writing practice: have your Ss write labels for various classroom objects on post-its. Then stick them to the correct objects. At the end of the class as a review, get all the Ss to rearrange the labels and then put back on to the correct objects again.
Touch
Have Ss run around the classroom touching things that T orders them to do (e.g. "Touch a desk", "Touch the door", "Touch your school bag", etc.).
Vanishing Classroom Objects Game
This is great fun. Set up the classroom so there are various objects visible, e.g. a book, a school bag, a chair, pens, pencils, a rubber, etc. - basically whatever vocab you have pre-taught. Give the Ss a minute to look at the room. Then ask everyone to leave the room. T then hides one object and asks the Ss to come back in. They have to say what is missing. It's good to start with some easy things and then get progressively harder. Variation: the S who guesses the missing object first can hide the next object.

Rv:04/03-09-15. Pág 33/51
VISUAL MATERIAL
WORKSHEET 1: THE RAINBOW SONG POSTER

Rv:04/03-09-15. Pág 34/51
www.eslkidstuff.com
WORKSHEET 2: WALL CIRCLE SHEET
www.eslkidstuff.com
Rv:04/03-09-15. Pág 35/51
WORKSHEET 3: ANIMAL FLASHCARDS

Rv:04/03-09-15. Pág 36/51
www.thedaycarelady.com
www.activityvillage.co.uk
Rv:04/03-09-15. Pág 37/51
WORKSHEET 4: OLD MACDONALD’S FARM SONG POSTER
Rv:04/03-09-15. Pág 38/51
www.eslkidstuff.com WORKSHEET 5: ANIMALS WORKSHEET

Rv:04/03-09-15. Pág 39/51
www.eslkidstuff.com
WORKSHEET 6: NUMBERS
Rv:04/03-09-15. Pág 40/51
http://loopz.bigcartel.com/product/alphabet-uppercase-and-lowercase-and-numbers-flash-cards
WORKSHEET 7: MATCH THE NUMBERS WITH YOUR HAND
www.worksheetfun.com

Rv:04/03-09-15. Pág 41/51
WORKSHEET 8: MORNING ROUTINES FLASHCARDS
http://www.slideshare.net/buckinsand/daily-routines-flashcards

Rv:04/03-09-15. Pág 42/51
Rv:04/03-09-15. Pág 43/51
http://www.slideshare.net/buckinsand/daily-routines-flashcards
http://www.slideshare.net/buckinsand/daily-routines-flashcards http://www.quia.com/jg/2206422list.html

Rv:04/03-09-15. Pág 44/51
http://thumbs.dreamstime.com/z/turtle-go-to-school-23422132.jpg
WORKSHEET 9: MORNING ROUTINES SONG POSTER
www.eslkidstuff.com

Rv:04/03-09-15. Pág 45/51
WORKSHEET 10: MY MORNING
www.eslkidstuff.com

Rv:04/03-09-15. Pág 46/51
WORKSHEET 11: BODY PARTS FLASHCARDS
http://www.eslkidstuff.com
Rv:04/03-09-15. Pág 47/51
WORKSHEET 12: HEAD? SHOULDER? EYES?
New Stepping Stones

Rv:04/03-09-15. Pág 48/51
WORKSHEET 13: WHERE ARE MY THINGS?
www.eslkidstuff.com

Rv:04/03-09-15. Pág 49/51
WORKSHEET 14: WHERE ARE THE ANIMALS?
www.eslkidstuff.com
Rv:04/03-09-15. Pág 50/51
WORKSHEET 15: THE WEATHER SONG
www.eslkidstuff.com
Rv:04/03-09-15. Pág 51/51
WORKSHEET 16: WHAT DO YOU WEAR WHEN IT’S...?
www.eslkidstuff.com