2021 RX 350, RX 450h Pre-Delivery Service (PDS) - NHTSA
10
L-SB-0025-20 July 29, 2020 2021 RX 350, RX 450h Pre-Delivery Service (PDS) Service Category General Section Pre-Delivery Service Market USA © 2020 Lexus, a division of Toyota Motor Sales, USA Page 1 of 10 Applicability YEAR(S) MODEL(S) ADDITIONAL INFORMATION 2021 RX350, RX450H Introduction This bulletin contains the vehicle specific pre-delivery services for 2021 model year RX 350 and RX 450h vehicles. Additionally, refer to the applicable Pre-Delivery Service (PDS) Check Sheet for services to be performed. Warranty Information OP CODE DESCRIPTION TIME OFP T1 T2 N/A Not Applicable to Warranty – – – – Procedures D/C Cut Fuse Installation ..................................................................................................... 2 Deletion of Vehicle Alert History ........................................................................................... 3 Tire Pressure Warning System (TPWS) Initialization............................................................ 4 Memorize Steering Angle Neutral Point................................................................................ 4 Intelligent Clearance Sonar System Calibration* .................................................................. 4 Front Emergency Towing Eyelet Removal and Hole Cover Installation*............................... 5 Rear Left-hand Side Transport Hook Removal and Bolt Installation*.................................... 6 Front License Plate and Mounting Bracket Installation*........................................................ 8 Installation of Rubber Body Plugs* ..................................................................................... 10 *If Applicable
-
Upload
khangminh22 -
Category
Documents
-
view
1 -
download
0
Transcript of 2021 RX 350, RX 450h Pre-Delivery Service (PDS) - NHTSA

L-SB-0025-20 July 29, 2020
2021 RX 350, RX 450h Pre-Delivery Service (PDS)
Service Category General
Section Pre-Delivery Service Market USA
© 2020 Lexus, a division of Toyota Motor Sales, USA Page 1 of 10
Applicability
YEAR(S) MODEL(S) ADDITIONAL INFORMATION
2021 RX350, RX450H
Introduction
This bulletin contains the vehicle specific pre-delivery services for 2021 model year RX 350 and
RX 450h vehicles. Additionally, refer to the applicable Pre-Delivery Service (PDS) Check Sheet
for services to be performed.
Warranty Information
OP CODE DESCRIPTION TIME OFP T1 T2
N/A Not Applicable to Warranty – – – –
Procedures
D/C Cut Fuse Installation ..................................................................................................... 2
Deletion of Vehicle Alert History ........................................................................................... 3
Tire Pressure Warning System (TPWS) Initialization............................................................ 4
Memorize Steering Angle Neutral Point................................................................................ 4
Intelligent Clearance Sonar System Calibration* .................................................................. 4
Front Emergency Towing Eyelet Removal and Hole Cover Installation* ............................... 5
Rear Left-hand Side Transport Hook Removal and Bolt Installation* .................................... 6
Front License Plate and Mounting Bracket Installation* ........................................................ 8
Installation of Rubber Body Plugs* ..................................................................................... 10
*If Applicable

L-SB-0025-20 July 29, 2020 Page 2 of 10
2021 RX 350, RX 450h Pre-Delivery Service (PDS)
© 2020 Lexus, a division of Toyota Motor Sales, USA
D/C Cut Fuse Installation
To minimize battery discharge during transportation and storage, the D/C cut fuse (10A) has
been removed at the assembly plant and temporarily stored in the blank space of the relay block
in the engine compartment. During PDS, reinstall the D/C cut fuse (10A) into its original location
and clear ALL related Diagnostic Trouble Codes (DTCs).
Figure 1.
1 Relay Block 3 Install D/C Cut Fuse (10A) (Original Location)
2 Remove D/C Cut Fuse (10A)
NOTE
While the vehicle is stored at the dealership, disconnect the negative (–) battery terminal to prevent battery discharge. Refer to Service Bulletin No. L-SB-0017-20, Battery Maintenance During PDS, for battery maintenance information.
z 1
z 3
z 2

L-SB-0025-20 July 29, 2020 Page 3 of 10
2021 RX 350, RX 450h Pre-Delivery Service (PDS)
© 2020 Lexus, a division of Toyota Motor Sales, USA
Deletion of Vehicle Alert History
As the D/C cut fuse is removed, the communication between the various ECUs is interrupted.
When the D/C fuse is reinstalled, the communication status is restored, but Lexus Enform
Service Connect may store malfunction history in the form of vehicle alert history.
Therefore, it is necessary to operate the multi-display and delete the vehicle alert history AFTER
installing the D/C cut fuse during PDS at the dealership.
Deletion Procedure
1. Turn the engine switch (power switch) to the ON position (ON mode).
2. Push the Menu switch on the remote touch device.
3. On the multi-display, enter the following menus: Info – Vehicle Alert History.
4. If there is vehicle alert history stored, perform the Delete History operation.
5. When the vehicle alert history deletion confirmation screen is displayed, select Yes.
6. Turn the engine switch (power switch) to the OFF position (OFF mode).
HINT
If there is no vehicle alert history stored, the system will display a message stating “There is no vehicle alert history.”
HINT
If there is no vehicle alert history stored, the system will display a message stating “There is no vehicle alert history.”

L-SB-0025-20 July 29, 2020 Page 4 of 10
2021 RX 350, RX 450h Pre-Delivery Service (PDS)
© 2020 Lexus, a division of Toyota Motor Sales, USA
Tire Pressure Warning System (TPWS) Initialization
Refer to the applicable Repair Manual for the TPWS initialization procedure (RX 350 / RX 450h).
Note the spare tire does NOT have a TPWS sensor.
Memorize Steering Angle Neutral Point
As a result of the removal of the D/C cut fuse, the power source to the steering angle sensor is
cut off. When the D/C cut fuse is reinstalled, the parking assist monitor system will be operative,
but it cannot display guidelines to assist parking operation because the center position
recognized by the steering angle sensor may not be in an initial position. Therefore, perform
steering angle neutral point initialization AFTER installing the D/C cut fuse during PDS.
Refer to the applicable Repair Manual for the steering angle neutral point initialization procedure
(RX 350 / RX 450h).
Perform Intelligent Clearance Sonar System Calibration
As a result of the removal of the D/C cut fuse, the steering angle sensor power source is cut off.
When the D/C cut fuse is reinstalled, the center position recognized by the steering angle sensor
may not be the appropriate position. Therefore, it is necessary to perform intelligent clearance
sonar system calibration AFTER installing the D/C cut fuse during PDS.
Refer to the applicable Repair Manual for the intelligent clearance sonar system
calibration procedure:
Driving Method (R X350 / RX 450h).
Techstream Method (RX 350 / RX 450h) (procedure 4).
NOTE
To adjust the tire pressure correctly when the outside temperature is significantly colder than shop temperature, perform a Health Check using Techstream and select the compensation tire pressure checkbox. Compensation pressures will display on the Health Check results screen. Adjust the tire pressure when the tires are cold.

L-SB-0025-20 July 29, 2020 Page 5 of 10
2021 RX 350, RX 450h Pre-Delivery Service (PDS)
© 2020 Lexus, a division of Toyota Motor Sales, USA
Front Emergency Towing Eyelet Removal and Hole Cover Installation
1. Remove the front emergency towing eyelets from the front bumper by turning them counterclockwise.
Figure 2.
1 Front Emergency Towing Eyelet
2. Install the two, front emergency towing eyelet hole covers, which are stored in the glove compartment, onto the radiator lower grille.
A. Insert the arrow-shaped tab of the front emergency towing eyelet hole cover “A” into the eyelet hole tab “B” as shown.
B. Install the front emergency towing eyelet hole cover to the hole in the radiator lower grille.
Figure 3.
A Arrow-shaped Tab
B Eyelet Hole Tab
1 Front Emergency Towing Eyelet Hole Cover
NOTE
If it is difficult to loosen the front emergency towing eyelets, use a steel bar.
Dispose of the removed two front emergency towing eyelets.
z
1
z A
z B
z 1

L-SB-0025-20 July 29, 2020 Page 6 of 10
2021 RX 350, RX 450h Pre-Delivery Service (PDS)
© 2020 Lexus, a division of Toyota Motor Sales, USA
Rear Left-hand Side Transport Hook Removal and Bolt Installation
A rear transport hook is installed to tie down the vehicle when it is shipped from the assembly
plant in Japan. Remove the transport hook and reinstall the bolts.
1. Raise the vehicle.
2. Remove the two bolts and rear left-hand side transport hook.
Figure 4.
A RX 350, RX 450h B RX 350L, RX 450hL
1 Rear Left-hand Side Transport Hook 2 Bolts
NOTE
Dispose of the removed rear transport hook.
Do NOT remove rear right-hand side transport hook.
z A
z B
z 1
z 2

L-SB-0025-20 July 29, 2020 Page 7 of 10
2021 RX 350, RX 450h Pre-Delivery Service (PDS)
© 2020 Lexus, a division of Toyota Motor Sales, USA
Rear Left-hand Side Transport Hook Removal and Bolt Installation (continued)
3. Re-tighten the two bolts to the same points where the rear transport hook was installed.
Torque: 30 N*m (306 kgf*cm, 22 ft.*lbf)
4. Apply a hole plug to the hole hidden by the rear transport hook.
5. Lower the vehicle safely.
Figure 5.
A RX 350, RX 450h B RX 350L, RX 450hL
1 Hole Plug 2 Bolts
NOTE
The hole plug is located in the glove box.
z A
z B
z 1
z 2
z 2
L-SB-0025-20 July 29, 2020 Page 8 of 10
2021 RX 350, RX 450h Pre-Delivery Service (PDS)
© 2020 Lexus, a division of Toyota Motor Sales, USA
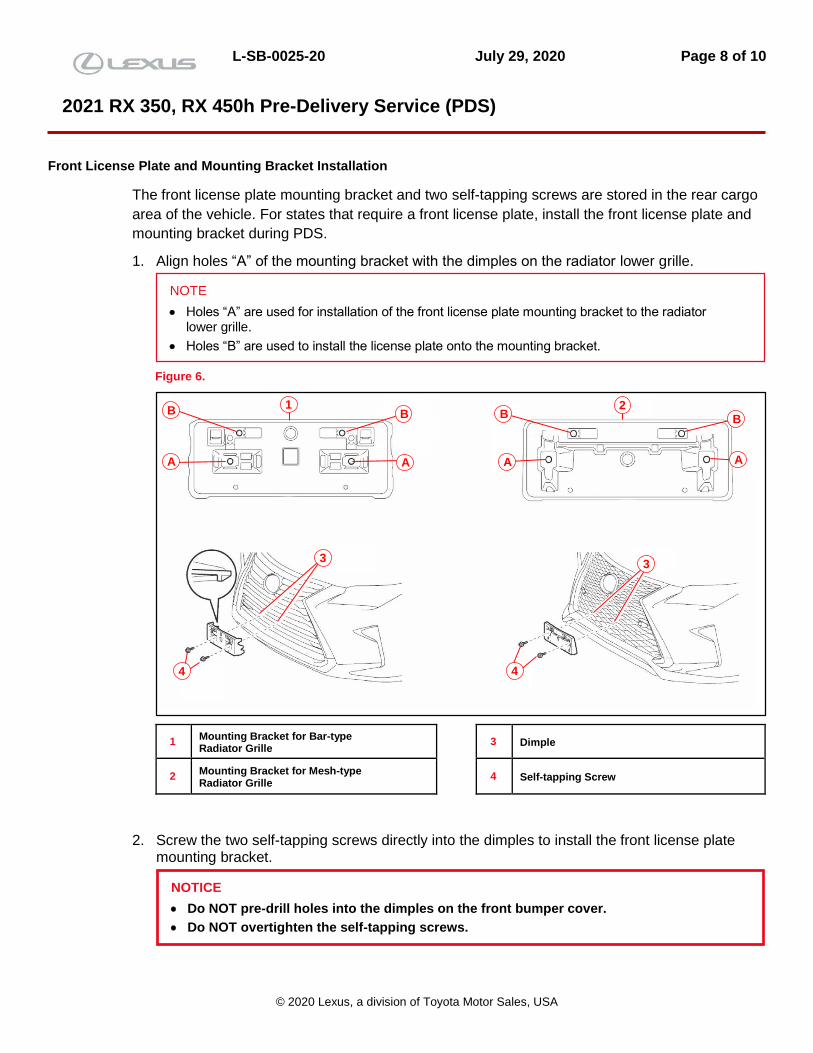
Front License Plate and Mounting Bracket Installation
The front license plate mounting bracket and two self-tapping screws are stored in the rear cargo
area of the vehicle. For states that require a front license plate, install the front license plate and
mounting bracket during PDS.
1. Align holes “A” of the mounting bracket with the dimples on the radiator lower grille.
Figure 6.
1 Mounting Bracket for Bar-type Radiator Grille
3 Dimple
2 Mounting Bracket for Mesh-type Radiator Grille
4 Self-tapping Screw
2. Screw the two self-tapping screws directly into the dimples to install the front license plate mounting bracket.
NOTICE
Do NOT pre-drill holes into the dimples on the front bumper cover.
Do NOT overtighten the self-tapping screws.
NOTE
Holes “A” are used for installation of the front license plate mounting bracket to the radiator lower grille.
Holes “B” are used to install the license plate onto the mounting bracket.
z 3
z 4
z B z
2
z A
z B
z A
z 3
z 4
z A
z A
z 1
z B
z B

L-SB-0025-20 July 29, 2020 Page 9 of 10
2021 RX 350, RX 450h Pre-Delivery Service (PDS)
© 2020 Lexus, a division of Toyota Motor Sales, USA
Front License Plate and Mounting Bracket Installation (continued)
3. Install the front license plate onto the mounting bracket using two noncorroding bolts with the following dimensions:
Nominal Length: 15.0 mm (0.59 in.)
Diameter: 6.0 mm (0.24 in.)
Figure 7.
1 Nominal Length
2 Diameter
Figure 8.
A Vehicles Equipped With Bar-type Radiator Grille
B Vehicles Equipped With Mesh-type Radiator Grille
1 Front License Plate
2 Bolt
z A
z B
z 2 z
1
z 2 z
1
z 2
z 1
L-SB-0025-20 July 29, 2020 Page 10 of 10
2021 RX 350, RX 450h Pre-Delivery Service (PDS)
© 2020 Lexus, a division of Toyota Motor Sales, USA
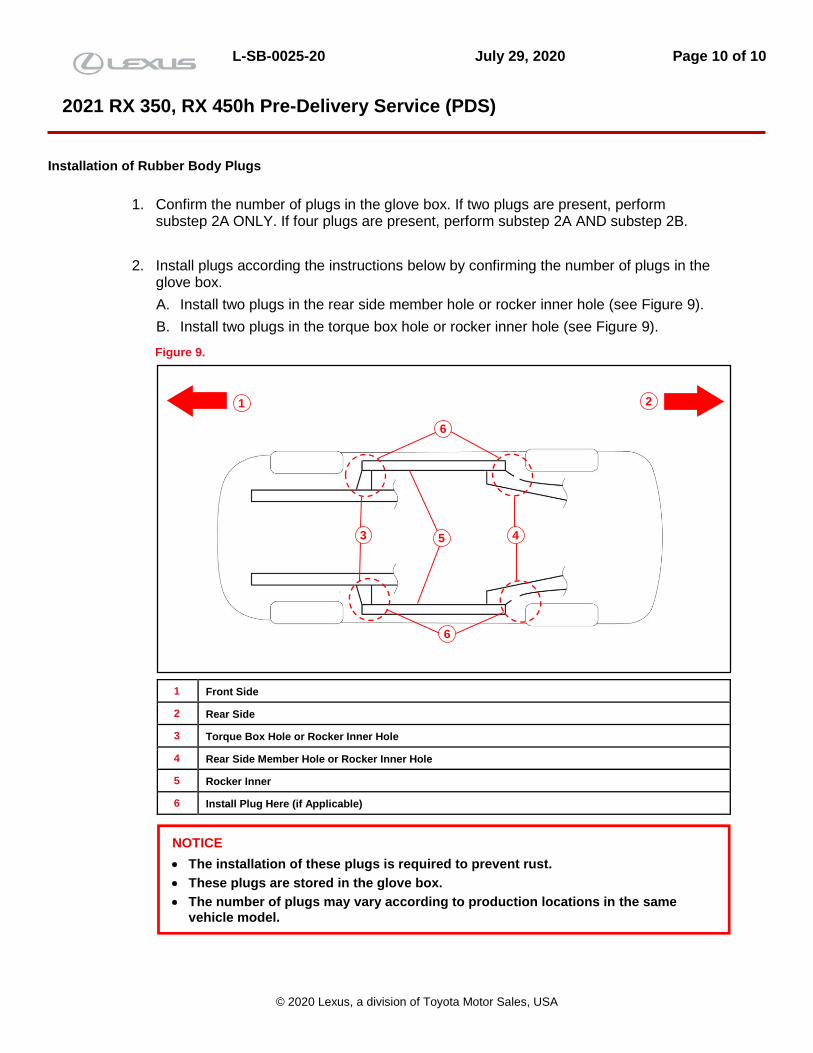
Installation of Rubber Body Plugs
1. Confirm the number of plugs in the glove box. If two plugs are present, perform substep 2A ONLY. If four plugs are present, perform substep 2A AND substep 2B.
2. Install plugs according the instructions below by confirming the number of plugs in the glove box.
A. Install two plugs in the rear side member hole or rocker inner hole (see Figure 9).
B. Install two plugs in the torque box hole or rocker inner hole (see Figure 9).
Figure 9.
1 Front Side
2 Rear Side
3 Torque Box Hole or Rocker Inner Hole
4 Rear Side Member Hole or Rocker Inner Hole
5 Rocker Inner
6 Install Plug Here (if Applicable)
z 1 z
2
z 3
z 4
z 6
z 6
z 5
NOTICE
The installation of these plugs is required to prevent rust.
These plugs are stored in the glove box.
The number of plugs may vary according to production locations in the same
vehicle model.