2019 Dodge Journey Quick Reference Guide - NET
16
2019 JOURNEY QUICK REFERENCE GUIDE
-
Upload
khangminh22 -
Category
Documents
-
view
2 -
download
0
Transcript of 2019 Dodge Journey Quick Reference Guide - NET

2019 JOURNEY QUICK REFERENCE GUIDE

Stadium Tip ’n Slide(7 Passenger Models)This feature allows passengers to easily enter orexit the third-row passenger seats from either sideof the vehicle.
To Move The Second-Row Passenger Seat Forward
NOTE:Raise the 40% seatback/armrest before movingthe 60% seat, to allow for full seat travel.
Move the control lever on the upper outboard sideof the seatback forward. Then, in one fluid motion,the seat cushion flips upward and the seat movesforward on its tracks.
Rear Seat Lever Locations
1 — Forward/Rearward Adjustment Lever2 — Recliner/Seatback Release Lever3 — Tip ’n Slide Control Lever
Seat In Tip ‘n Slide Position
S E AT S

To Unfold And Move The Second-Row PassengerSeat Rearward
1. Move the seatback rearward until it locks inplace and then continue sliding the seat rear-ward on its tracks until it locks in place.
2. Push the seat cushion downward to lock it inplace.
3. Adjust the seat track position as desired.
For further information, and applicable warningsand cautions, please refer to the Owner’s Manual atwww.mopar.com/en-us/care/owners-manual.html(U.S. Residents) or www.owners.mopar.ca (Cana-dian Residents).
Comfort FeaturesHeated Seats
The front heated seats controls are located withinthe climate or controls menu screen of theUconnect system.
Heated Steering Wheel
The steering wheel contains a heating elementthat heats the steering wheel to one temperaturesetting. The heated steering wheel control is lo-cated within the Uconnect system. You can gainaccess to the control buttons through the climatescreen or the controls screen.
For further information, and applicable warningsand cautions, please refer to the Owner’s Manual atwww.mopar.com/en-us/care/owners-manual.html(U.S. Residents) or www.owners.mopar.ca (Cana-dian Residents).
In-Floor Storage Bin WithRemovable LinerAn in-floor storage bin is located behind each frontseat.
In Floor Storage
C A R G O F E AT U R E S

To Access The Storage Bin
1. Position the front seat to at least a mid-trackposition to provide easier access to the storagebin.
2. Move the floor mat aside (if equipped).
3. Pull the door latch release-loop upward to re-lease the latch, and then forward to open thestorage bin door.
For further information, and applicable warningsand cautions, please refer to the Owner’s Manual atwww.mopar.com/en-us/care/owners-manual.html(U.S. Residents) or www.owners.mopar.ca (Cana-dian Residents).
Speed Control
When engaged, the Speed Control takes over accel-erator operations at speeds greater than 25 mph(40 km/h).
The Speed Control buttons are located on the rightside of the steering wheel.
Speed Control Switches
1 — CANCEL2 — ON/OFF3 — RES (+)/Resume/Accel4 — SET (-)/Decel
S P E E D C O N T R O L

NOTE:In order to ensure proper operation, the SpeedControl system has been designed to shut down ifmultiple Speed Control functions are operated atthe same time. If this occurs, the Speed Controlsystem can be reactivated by pushing the SpeedControl ON/OFF button and resetting the desiredvehicle set speed.
To Activate
Push the ON/OFF button. The Cruise Control SetIndicator Light in the instrument cluster displaywill illuminate. To turn the system off, push theON/OFF button a second time. The Cruise ControlSet Indicator Light will turn off. The system shouldbe turned off when not in use.
To Set A Desired Speed
Turn the Speed Control on. When the vehicle hasreached the desired speed, push the SET (-) but-ton and release. Release the accelerator and thevehicle will operate at the selected speed.
To Deactivate
A soft tap on the brake pedal, pushing the CAN-CEL button, or normal brake pressure while slow-ing the vehicle will deactivate Speed Control with-out erasing the set speed memory. Pushing theON/OFF button or turning the ignition switch OFFerases the set speed in memory.
To Resume Speed
To resume a previously set speed, push the RES (+)button and release. Resume can be used at anyspeed above 20 mph (32 km/h).
To Increase Speed
When the Speed Control is set, you can increasespeed by pushing the RES (+) button.
To Decrease Speed
When the Speed Control is set, you can decreasespeed by pushing the SET (-) button.
To Accelerate For Passing
Press the accelerator as you would normally. Whenthe pedal is released, the vehicle will return to theset speed.
For further information, and applicable warningsand cautions, please refer to the Owner’s Manual atwww.mopar.com/en-us/care/owners-manual.html(U.S. Residents) or www.owners.mopar.ca (Cana-dian Residents).

Keyless Enter-N-Go — PassiveEntry
The Keyless Enter-N-Go Passive Entry system isan enhancement to the vehicle’s Remote KeylessEntry feature. This feature allows you to lock andunlock the vehicle's door(s) and liftgate withouthaving to push the key fob lock or unlock buttons,as well as starting and stopping the vehicle withthe push of a button.
To Unlock From The Driver OrPassenger Side
With a valid Keyless Enter-N-Go key fob locatedoutside the vehicle and within 5 ft (1.5 m) of thedriver or passenger side door handle, grab eitherfront door handle to unlock the door automatically.
To Lock The Vehicle
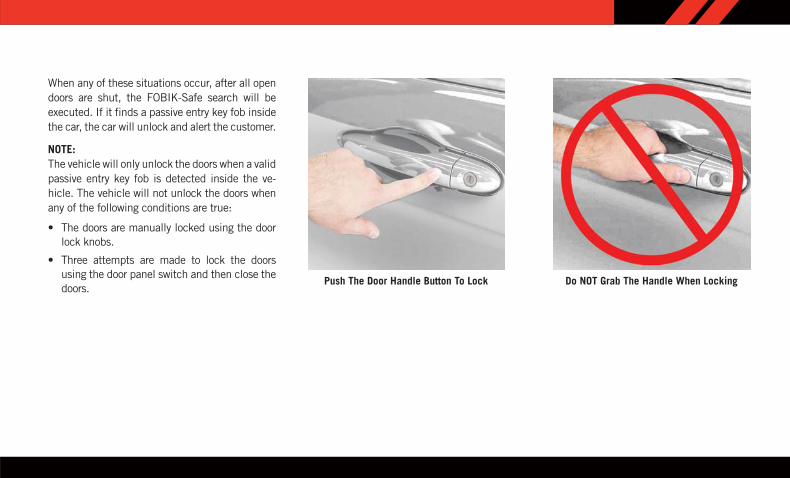
Both front door handles have buttons located onthe outside of the handle. With one of the vehicle’sKeyless Enter-N-Go key fobs located outside thevehicle and within 5 ft (1.5 m) of the driver's orpassenger front door handle, push the door handlebutton to lock all four doors and liftgate.
Do NOT grab the door handle when pushing thedoor handle lock button. This could unlock thedoor(s).
Preventing Inadvertent Locking Of Passive EntryKey Fob In Vehicle (FOBIK-Safe)
To minimize the possibility of unintentionally lock-ing a passive entry key fob inside your vehicle, thepassive entry system is equipped with an auto-matic door unlock feature which will function ifthe ignition switch is in the OFF position.
FOBIK-Safe only executes in vehicles with passiveentry. There are three situations that trigger aFOBIK-Safe search in any passive entry vehicle:
• A lock request is made by a valid passive entrykey fob while a door is open.
• A lock request is made by the passive entrydoor handle while a door is open.
• A lock request is made by the door panel switchwhile the door is open
Grab The Door Handle To Unlock
P A S S I V E E N T R Y
When any of these situations occur, after all opendoors are shut, the FOBIK-Safe search will beexecuted. If it finds a passive entry key fob insidethe car, the car will unlock and alert the customer.
NOTE:The vehicle will only unlock the doors when a validpassive entry key fob is detected inside the ve-hicle. The vehicle will not unlock the doors whenany of the following conditions are true:
• The doors are manually locked using the doorlock knobs.
• Three attempts are made to lock the doorsusing the door panel switch and then close thedoors.
Push The Door Handle Button To Lock Do NOT Grab The Handle When Locking

NOTE:
• After pushing the door handle button, you mustwait two seconds before you can lock or unlockthe doors, using either passive entry doorhandle. This is done to allow you to check if thevehicle is locked by pulling the door handlewithout the vehicle reacting and unlocking.
• If passive entry is disabled using UconnectSystem, the key protection described in "Pre-venting Inadvertent Locking of Passive EntryKey Fob in Vehicle" remains active/functional.
• The Passive Entry system will not operate if thekey fob battery is dead.
Lock Or Unlock The Liftgate
With a valid Keyless Enter-N-Go key fob within5 feet (1.5 meters) of the liftgate, push the elec-tronic liftgate lock/unlock pad located to the left ofthe liftgate handle to unlock the liftgate. Push thebutton a second time to lock the liftgate.
For further information, and applicable warningsand cautions, please refer to the Owner’s Manual athttps://www.mopar.com/en-us/care/ownersmanual.html(U.S. Residents) or www.owners.mopar.ca (CanadianResidents).
Remote Start — If EquippedPush the remote start button on the key fobtwice within five seconds. Pushing the remotestart button a third time shuts the engine off.
With Remote Start, the engine will only run for15 minutes (timeout) unless the keyless ignition isplaced in the ON/RUN position.
Before the end of 15-minute cycle, push andrelease the unlock button on the key fob to unlockthe doors and disarm the vehicle security alarm(if equipped). Then, prior to the end of the 15-minute cycle, push and release the ignitionSTART/STOP button.
The vehicle must be started with the key fob aftertwo consecutive timeouts.
For further information, and applicable warningsand cautions, please refer to the Owner’s Manual athttps://www.mopar.com/en-us/care/owners-manual.html(U.S. Residents) or www.owners.mopar.ca (CanadianResidents).
Electronic Liftgate Lock/Unlock Pad
R E M O T E S T A R T

Parkview Rear Back-Up CameraYou can see an on-screen image of the rear of yourvehicle whenever the gear selector is put intoREVERSE. The ParkView Rear Back-Up Cameraimage appears on the display screen located onthe center stack of the instrument panel.
NOTE:If the display screen appears foggy, clean thecamera lens located on the rear of the vehicleabove the license plate.
For further information, and applicable warningsand cautions, please refer to the Owner’s Manual atwww.mopar.com/en-us/care/owners-manual.html(U.S. Residents) or www.owners.mopar.ca (Cana-dian Residents).
Instrument Cluster Display
The instrument cluster display features a driverinteractive display that is located in the instru-ment cluster. Pushing the controls on the left sideof the steering wheel allows the driver to selectvehicle information and Personal Settings.
• Push the up arrow button to scroll upwardthrough the main menus (Fuel Economy, Ve-hicle Speed, Trip Info, Vehicle Info, Messages,Units, System Set-Up, Turn Menu Off) and submenus.
• Push the down arrow button to scroll downwardthrough the main menus and sub menus.
• Push the right arrow button for access to mainmenus, sub menus or to select a personalsetting in the setup menu.
• Push the BACK button to scroll back to a previ-ous menu or sub menu.
Instrument Cluster Display Controls
S A F E T Y F E AT U R E S I N S T R U M E N T C L U S T E RD I S P L AY

Selectable Menu ItemsThe instrument cluster features a driver interac-tive display that is located in the of the center ofthe instrument cluster. Pushing the controls onthe left side of the steering wheel allows the driverto select vehicle information and Personal Set-tings. Push the up or down arrow buttons to scrollthrough the main menu feature items. To enter thesubmenu’s of a feature menu item, push the rightarrow button then push the right arrow button toselect or reset the submenu feature items:
Radio Info Tire PressureVehicle Info MessagesFuel Economy Vehicle SpeedTrip Info Turn Menu Off
For further information, and applicable warningsand cautions, please refer to the Owner’s Manual atwww.mopar.com/en-us/care/owners-manual.html(U.S. Residents) or www.owners.mopar.ca (CanadianResidents).
AUTO Button• Push the AUTO button on the Integrated Center
Stack (ICS) Climate Controls, OR on the radiotouchscreen when viewing the Climate ControlsMain Screen.
• Select the desired temperature by pushing theup or down temperature buttons for the driveror passenger.
• The system will maintain the set temperatureautomatically.
Air Conditioning A/C• If the A/C button is pushed while in AUTO
mode, the system will exit AUTO mode and stayin A/C. The mode and blower will retain theclosest mode and blower position to those usedin AUTO.
• MAX A/C sets the control for maximum coolingperformance.
• Press and release to toggle between MAX A/Cand the prior settings. The button on the touch-screen illuminates when MAX A/C is on.
• In MAX A/C, the blower level and mode positioncan be adjusted. Pushing other settings willcause the MAX A/C operation to switch to theprior settings and turn MAX A/C off.
Uconnect 3/3 NAV With 8.4–inch DisplayAutomatic Climate Controls
A U T O M AT I C C L I M AT E C O N -T R O L S — I F E Q U I P P E D

SYNC Temperature Button• Press the “SYNC” button on the touchscreen to
control the driver and passenger temperaturessimultaneously. Press the “SYNC” button onthe touchscreen a second time to control thetemperatures individually.
Air Recirculation• Use Recirculation for maximum A/C operation.
• For window defogging, turn the recirculationbutton off.
• If the recirculation button is pushed while inthe AUTO mode, the indicator light may flashthree times to indicate the cabin air is beingcontrolled automatically.
LocationThe steering wheel audio controls are located onthe rear surface of the steering wheel.
Climate Control Knobs
Steering Wheel Audio Controls
S T E E R I N G W H E E L A U D I OC O N T R O L S

FunctionLeft Switch
• Push the switch up or down to search for thenext listenable station.
• Push the button in the center to select the nextpreset station.
Right Switch
• Push the switch up or down to increase ordecrease the volume.
• Push the button in the center to change modesAM/FM/CD/SAT.
USB Port
This feature allows an iPod or external USB deviceto be plugged into the USB port. The USB portsupports certain iPod and iPhone devices. TheUSB port also supports playing music from exter-nal USB devices. Some iPod software versionsmay not fully support the USB port features.
Please visit Apple’s website for iPod software up-dates. Connect your iPod or compatible deviceusing a USB cable connected to the USB port.USB memory sticks with audio files can also beused. Then, audio from the device can be playedon the vehicle’s sound system while providing theartist, track title, and album information on theradio display (if available on device). When con-nected, the iPod/USB device can be controlledusing the radio or steering wheel audio controls toplay, skip to the next or previous track, browse,and list the contents.
AUX/Audio JackThe AUX/audio jack provides a means to connect aportable audio device, such as an MP3 player, tothe vehicle’s sound system. This requires the useof a 3.5 mm stereo audio patch cable. AUX modeis entered by pushing the Media button. Once inMedia mode, select the AUX button when theaudio jack is connected. Volume on the connecteddevice may need to be adjusted to optimize audioquality.
Uconnect Media Hub
F R O N T U S B P O R T / A U D I OJ A C K ( A U X ) P O R T

NOTE:The Owner’s Mobile App content is applicable tovehicles sold in the U.S. market and are notavailable from the Canadian App Store or GooglePlay Store.
Key Features• Owner Information For Your Vehicle
• Accident Assistant
• Online Service Scheduling
• Roadside Assistance
• Maintenance History
• And More
To get this FREE application, go directly to theApp Store or Google Play Store and enter thesearch keyword “Dodge”.
The DRIVE DODGE Application is the essentialapp for owners of Dodge brand vehicles. The appputs driver and lifestyle information right in the
palm of your hand, anywhere you go. Whether it’sproviding information about specific product fea-tures, taking a tour through your vehicle’s equip-ment, staying up to date on your vehicle’s health,knowing what steps to take following an accident,or scheduling your next appointment, we knowyou’ll find the app an important extension of yourDodge vehicle. Simply download the FREE app,select your make and model and enjoy the ride.
Features/Benefits• Available for free on iOS and Android smart-
phones and tablets.
• Select Dodge brand vehicles from model year2011 to current model year.
• You can also add other Chrysler, Jeep, Ram,FIAT or Alfa Romeo vehicles.*
• Easy access to vehicle information anywhereyou go using categories, bookmarks, searchand an A-Z index.
• Vehicle information such as operating instruc-tions, maintenance, service history, vehiclecontrols and emergency procedures.
• Find a dealer or an FCA-certified repair facility.
• Easily document and email an accident report.
• A parking reminder that allows you to drop a pinon your location and navigate back to yourvehicle.
• Contact customer care with one click.
• Access to vehicle heritage, parts, accessories,and social media networks.
• Schedule your next service appointment.
• Available in English and Spanish.
*App supports selected vehicles from model year2011 to present.
To get this FREE application, go directly to theApp Store or Google Play Store and enter thesearch keyword “Dodge”.
D R I V E D O D G E M O B I L E A P P


Whether i t ’s providing information about
specif ic product features, taking a tour
through your vehicle’s heritage, knowing what
steps to take fol lowing an accident or scheduling your
next appointment, we know you’l l f ind the app an
important extension of your Dodge brand vehicle. Simply
download the app, select your make and model and enjoy
the r ide. To get this app, go directly to the App Store or
Google Play and enter the search keyword “Dodge” (U.S.
residents only) .
www.dodge.com/en/owners (U.S.) provides special offers
tailored to your needs, customized vehicle galleries,
personalized service records and more. To get this
information, just create an account and check back often.
Get warranty and other information online – you can review
and print or download a copy of the Owner’s Manual,
Navigation/Uconnect manuals and the limited warranties
provided by FCA US LLC for your vehicle by visiting
www.dodge.com/en/owners (U.S.) or www.owners.mopar.ca (Canada). Click on the applicable link in the “Popular
Topics” area of the www.dodge.com/en/owners (U.S.) or
www.owners.mopar.ca (Canada) homepage and follow
the instructions to select the applicable year, make and
model of your vehicle.
D O W N L O A D A F R E E E L E C T R O N I C
C O P Y O F T H E M O S T U P - T O - D A T E
O W N E R ’ S M A N U A L , M E D I A A N D
W A R R A N T Y B O O K L E T B Y V I S I T I N G :
WWW.MOPAR.COM/EN-US/CARE/OWNERS-MANUAL.HTML
(U .S . RES IDENTS) ;
WWW.OWNERS .MOPAR.CA
(CANADIAN RES IDENTS) .
DODGE.COM (U .S . )
DODGE.CA (CANADA)
©2018 FCA US LLC . ALL R IGHTS RESERVED.
DODGE IS A REGISTERED TRADEMARK OF FCA US LLC .
APP STORE IS A REGISTERED TRADEMARK OF APPLE INC .
GOOGLE PLAY STORE IS A REGISTERED TRADEMARK OF GOOGLE
19
JC-Q
RG
-AA
FIR
ST
ED
ITIO
N