2018 EDITION - Climb Strong
42
2018 EDITION
-
Upload
khangminh22 -
Category
Documents
-
view
1 -
download
0
Transcript of 2018 EDITION - Climb Strong

2018 EDITION

COPY RIGHTSCLIMB STRONG
Hangboard Manual2018 Edition
Text © Steve BechtelIllustrations and Layout © Kian Stewart
All Rights ReservedPrinted in USA
Climb Strong134 Lincoln St
Lander WY 82520www.climbstrong.com
The author and Climb Strong assume no liability for accidents or injuries related to climbing or the training activities described in this book.

TABLE OF CONTENTS
THE PATH TO STRENGTH ...................................................................................................1 METTLE ...............................................................................................................................2 INTRODUCTION TO ISOMETRICS .............................................................................................2 TESTING YOUR STRENGTH .....................................................................................................3 Max in seconds X total load (bodyweight+load) X .0333 + total load .................................3 WHO SHOULD BE ON THE BOARDS? ........................................................................................4 WHEN DOES HANGBOARD TRAINING FIT IN THE YEAR? .............................................................4
SELECTING A HANGBOARD ............................................................................................16
ADDITIONAL TOOLS .............................................................................................................7 GRIP TOOLS .........................................................................................................................7 TAPE, CHALK, AND BRUSHES .................................................................................................8 UNLOADING AND LOADING .....................................................................................................8
PREPARING TO TRAIN .......................................................................................................10 GENERAL WARM-UP ...........................................................................................................10 WRIST, HAND, AND FINGER WARM-UP ..................................................................................11 LIGHT IT UP .......................................................................................................................13
EXERCISES AND HAND POSITIONS ...........................................................................14 VARIATIONS IN WRIST AND ELBOW POSITIONS / SINGLE ARM HANGS ......................................14 PRIMARY GRIP POSITIONS ..................................................................................................15 SECONDARY GRIP POSITIONS ..............................................................................................16 RARE / SPECIALIZED GRIP POSITIONS ...................................................................................16
THE HANGBOARD PLANS ................................................................................................18 THE WORLD’S SIMPLEST HANGBOARD PLAN ..........................................................................18 GO 30 ...............................................................................................................................20 GO 50 ...............................................................................................................................21 GO A HUNDRED ..................................................................................................................21 3-6-9 LADDERS ..................................................................................................................26 KARA KUDJAM SINGLE ARM HANG PLAN ...............................................................................29 INTEGRATED STRENGTH ......................................................................................................30 7:13 INTERMITTENT HANGS ................................................................................................33 CONTRAST LOAD HANGBOARD TRAINING ...............................................................................34
THE LONG HAUL .................................................................................................................36
“One thousand days of lessons for discipline; ten thousand days of lessons for mastery.” - Miyamoto Musashi ..................................................................................................................38


1
01 | THE PATH TO STRENGTH
How do I get stronger fingers? What exercises do I do, in what order, and how often to optimize improvements? What do the loads look like? Is climbing enough?
These are all questions we have when starting training program for finger strength. The bottom line in climbing well is staying stuck to the wall, and the point of contact that fails first is usually the fingers. I believe heavily in continued practice and skill development, but at some point the muscles and the structure of the body should be taxed in focused sessions in order to bring about improvements.
If you have spent any time reading my training articles or books, you know that I advocate resistance training in addition to your climbing practice. Hangboarding and finger strength training methods are simply sport-specific resistance exercises, not so different from pull-ups, presses, or squats.
Many of the plans and sessions that follow feature weight training and mobility drills in conjunction with finger training. I recommend that you don’t ignore these exercises when doing the hangboard programs. Most climbers will benefit from non-specific training when it comes to generating force, and a little time in the weight room is a fast path to strength.
Strength is the master quality in fitness. All other facets of climbing performance are derivatives of strength. Likewise, if two competitors go head-to-head, all other things being equal, the stronger competitor will win. Strength is a long-term commitment and must be addressed continually throughout your career.
What follows in this manual are strength-building, strength-maintenance, hypertrophy, and endurance protocols for finger strength. We offer plans for hangboard-only training, hangboard and bodyweight training, integrated strength sessions (combining hangboard with weights and other drills in small circuit formats), and non-specific grip exercises.
I believe that finger strength training should be a career-long process, much like brushing your teeth is a life-long habit. We don’t brush with next week in mind so much as with 20 years from now.

2
METTLEOne of the factors that is common to top-level athletes is their ability to put forth all-out efforts. These efforts manifest in the form of championship performances or in limit-level redpoints, but the ability to apply this level of effort is built in training. Hard efforts in the gym are not only an opportunity for your body to get stronger, but also your mind.
The more solid and focused efforts you put forth, the better you get at putting them forth. Along with this comes strength, of course, but also the knowledge that you are strong. When you encounter a small hold on a climb, you will be able to think back on all those hours spent on the boards last winter and rest assured that this hold will not hurt you nor hinder your progress. Training then is more than just being strong.
INTRODUCTION TO ISOMETRICSIsometric strength is the quality we are trying to develop on the hangboard. This is simply the ability to hold a static position under load: in this case with the fingers. Isometric strength is quick to manifest, but tends to plateau early in an athlete’s career. Many experienced climbers can attest to this fact.
Clearly the majority of training for the fingers should be done in static positions. It is an error, however, to train the fingers and hands exclusively in this manner. By occasionally adding in other grip exercises such as crushing movements, rotation at the wrist, finger extensions, and wrist flexion and extension, we can supplement our isometric strength. Two big benefits of adding in additional movements include greater forearm hypertrophy and reduced chance of injury.
Isometric training, as I mentioned earlier, leads to great increases in strength. This strength is limited to the specific angle that has been trained, though. In order to develop strength in several joint angles, we must train several joint angles! Although exactly numbers vary, it is thought that the joint angle specificity is around 20 to 30 degrees. This leads us to the practice of training the fingers in a closed-crimp, a half-crimp, and an open-hand position in many hangboard programs…all with the idea of addressing strength in all of these positions.
In theory, this is solid. In reality, it is a bit hard to train these angles as carefully as we’d like. More recently, I have gone back to simply programming hold types such as small edge, medium edge, sloper, pinch, etc. By addressing each hold the way the climber naturally uses them, we tend to see good gains in strength and a more natural use of the various angles of the joints.
There are three big keys to keep in mind when it comes to isometrics:
1. Increases in strength are quickly diminished as one reaches high levels of strength. Most climbers will reach well past 50% of their strength potential in the first year of training, with smaller and smaller gains coming in each year thereafter.
2. Progress will be quicker in the early stages of an individual cycle. This kills motivation a bit, but it is critical to work through any plateau to eek out even a tiny increase…don’t jump ship after just a few weeks!

3
3. Maximum efforts have got to be part of your training. This does not mean that all efforts must be maximal, just that in order to force the body to adapt, we need to give it a good reason to.
It should be noted that the fewer different joint angles and finger positions one trains, the greater the gains will be in those areas. There is a tremendous amount of crossover between positions on the hangboard, and trying to train all of them will make progress in each of the individual positions very slow.
Similarly, strength gained in isometric training, such as on the hangboard, does not directly result in gains in concentric strength, eccentric strength, or rate of force production. What this means is that you have got to take the strength you build on the boards and apply it to real movement. Watch a slowed-down video of someone making a dynamic movement in climbing and you’ll see the fingers extend slightly on contact (eccentric) and then close to the climber’s optimal holding angle (concentric). All of this happens very quickly, with the fingers going from a relatively relaxed state to full tension in milliseconds.
Any good training cycle on the hangboard, then, should also include some bouldering or campus work, especially toward the latter stages of the cycle.
TESTING YOUR STRENGTHOne of the most difficult parts of isometric training is knowing whether or not it is working. The motivation to finish a pull-up or squat is very clear, whether you’re successful in a static hang is less so. With this in mind, I suggest doing a simple test once a month or so to see if your maximum strength is up to par.
We like to use a formula to correct maximum strength prediction for hangboard positions. To test, simply work up to a hang that you can only hold for 5-10 seconds. Once you complete the hang, plug some numbers in the following formula:
With the baseline numbers attained using this formula, you can then test your training along the way. At the end of a training phase, you can ramp up and test your numbers for anywhere from 3 to 10 seconds and then plug them into the formula to compare with previous tests. The beauty is that you need not hang for the exact same time to get a good idea of progress. Over the course of a year, you should get around 5 or 6 testing numbers per trained position to see what is really happening in your training.
Max in Seconds X Total Load (bodyweight+load) X .0333 + total load

4
WHO SHOULD BE ON THE BOARDS?
The hangboard is a tool. Every climber can benefit from using the boards - it’s just a matter of how much and when.
When asked about when and how much hangboard training to do, my first question is “How long have you been climbing?” The process of skill acquisition is a long one and can’t be hastened by forcing strength into the formula. One simply needs to be strong enough to execute the basic skills of the sport in order to get better. As a general reference, I recommend the following:
• 1-4 years of regular climbing: No more than one short session per week on the board, 1000-1500 feet of climbing minimum per week.
• 4-6 years of regular climbing (and over the age of 18): Up to 2 sessions per week on the board, 10+ pitches of leading or 25+ boulders (after warm-up) per week.
• 7+ years of regular climbing: Hangboard 1-3 times per week at varying volumes year-round. Continue high-volume practice and integrate board training with other sessions. 1 session per week minimum non-specific grip training.
WHEN DOES HANGBOARD TRAINING FIT IN THE YEAR?It is simplest to look at your finger strength training as either a gaining or maintaining session. In a gaining session, strength takes precedence and the session goal is about getting stronger. In a maintaining session, the goal is to do just enough training to hold on to the strength you have, and to focus instead on another facet of improvement. For most climbers, there is a distinct off-season that allows them time to increase strength and power without the additional stress of having to perform well on the rock.
In the off-season, one can take 8-16 weeks away from a climbing focus and build a better foundation. During this time, grip training can occur as many as 3 days per week and sessions can

5
be an hour or more in duration. As one closes in on the in-season, hangboard session durations are reduced and the session frequency drops. However, load (or difficulty) of the individual exercises should be maintained at a level of 80% to 90% of the off-season values.
If the values start to drop off, we add a bit more volume. If they continue to drop off after that, it is recommended that the athlete step away from performance for a week or two and again refocus on strength. This drop is usually an indication that there was not a sufficiently long off-season and the athlete tried to ramp up strength too quickly.
During a redpointing or sending phase, hangs can drop off to as infrequently as 1x per 10 days. These sessions can even be piggybacked on a climbing day to help facilitate recovery between sessions, as shown in the example below:
CLIMBING DAY
Warm-Up - 2 x 10c, 1 x 12b, 5 x 5 sec hangs on portable hangboard
Sending Attempts - 3 x attempts on 13c
Work Capacity - 2 x redpoints on 12c
HANGBOARD WORK (60-90 MINUTES AFTER CLIMBING)
15-20 minutes general grip warm-up and forearm massage
3 sets each of 3 non-specific grips (grips not fully addressed in your climbing day) 10 seconds on, 50 seconds off. Massage and stretching between.
4 sets each of 2 specific grips (grips required by your current climbing goal) 15 seconds on 45 seconds off. This work is done in a strength-endurance zone to avoid overtraining the pattern.
During the rest of the year, hangboarding can take a more aggressive role in your training, but can easily be done on the same days as weights, bouldering, or even endurance training. You, yourself, will have to decide how much training to do on these days and be willing to adjust the training duration based on fatigue, skin, and joint pain. I’ll reiterate that it is regularity that is the biggest factor in strength gain, so how much you do and how hard can vary without too many negative consequences.

6
02 | SELECTING A HANGBAORD
There are many options available to you when it comes to selecting a board. Although most of your selection criteria should be up to personal preference, I suggest you consider a few criteria when selecting your tools. There are few boards that will meet all of your criteria, so many climbers end up training on several boards eventually.
• Your board should fit you. Many hangboards feel too wide for narrow shoulders or vice versa. Consider an adjustable-width board (such as the Trango boards) or a board with offset grips such as the Tension Grindstone Board.
• Figure out if you are more into plastic or wood. Small grips are easier to come by on plastic boards and they are generally less expensive. Wood is more comfortable for most people, but the boards are a bit more expensive to produce.
• How many options do you really need? Do you feel the need for several kinds of pockets? Do the slopers in your area feel like the ones the board is trying to simulate? Most of us will need a few edge sizes, a jug, and maybe a pocket or two. Simple tends to be better, as variety can confuse. Consider that you may also be able to train specialized positions on a different board, a system wall, or even using a tool such as a pinch block before deciding that a hugely varied board is a necessity.
A final note: Placement of your board is key. Make sure it is in a space where you want to spend some time. Conditions should be conducive to hard training and sitting around between sets…your garage can be pretty nasty in the middle of the winter!
Trango Rock Prodigy Board Tension Grindstone Board

7
03 | ADDITIONAL TOOLS
There is more to hang boarding than the hangboard. In order to train finger strength properly, we need to understand that specific static position holds on the board are only part of the formula for success. To continue to keep seeing good gains, you’ll need to consider adding a few tools to your quiver. These include tools to help you train antagonist muscles and supporting structures. The tools also include implements to enhance the experience on the board itself.
GRIP TOOLSIn order to have a complete grip training program, you’ll want a few additional tools beside your board. For the most part, these are available in commercial climbing gyms, but are also easily purchased for home use.
EXPANSION BANDS These are simply thick rubber bands you can use to resist the extension of the fingers. Even one set of extensions done before a hang workout can enhance the strength you can display on the board, and building stronger antagonists will also keep injuries at bay. I like the Expand Your Hands Bands from Iron Mind. You can also use a variety of other similar tools.
THERABAND FLEXBARThis is a thick piece of rubber that you can use for several different contractions. Although the tension is quite modest, it is a great warm-up tool and is excellent for elbow tendon rehabilitation purposes. I especially like the tool for training through finger injuries or when there is a skin issue holding you back. All climbers should buy the thickest/highest resistance version, which is dark blue.
SPRING-LOADED GRIPPERS: A medium-resistance gripper is excellent for warm-ups between sets, and heavy grippers can be effectively employed to train concentric grip within the sessions. For warm-ups you should use a gripper that you can fully close for 10+ reps. Working sets should feature grippers that you can fully close for 2-6 reps. Again, I’ll recommend Iron Mind here. Their Captains of Crush Grippers are durable, come in a variety of tensions, and are well calibrated to provide consistent tension.
8
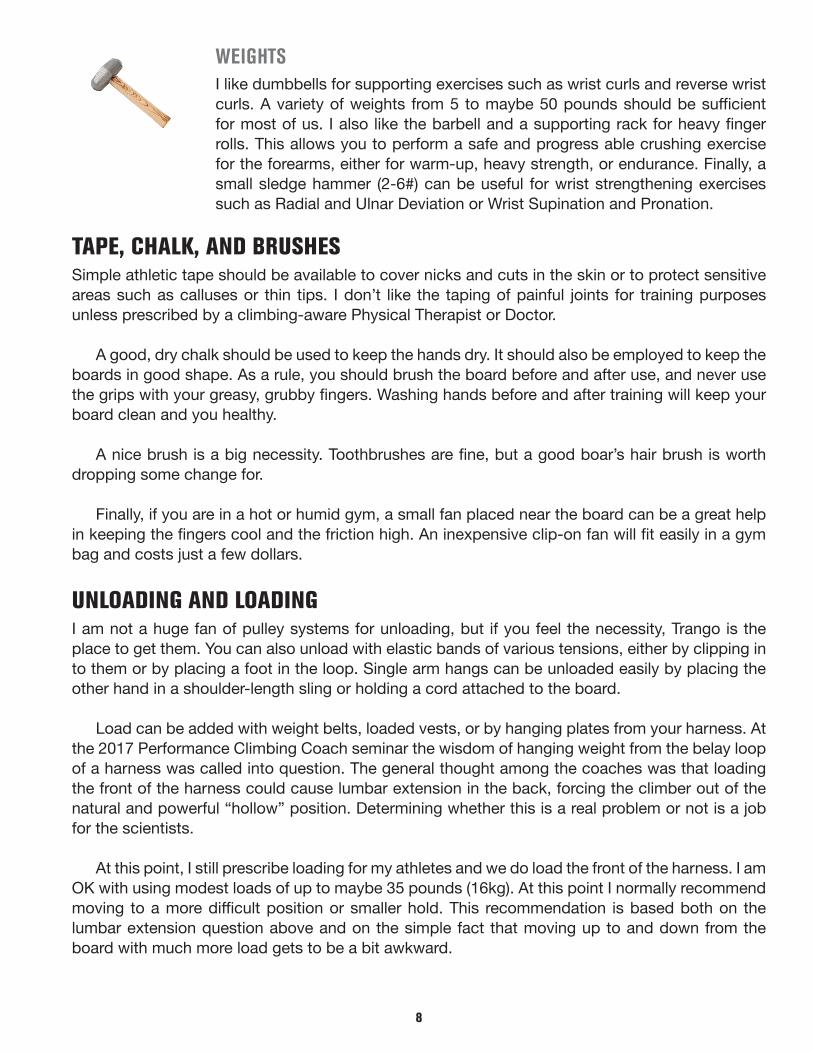
WEIGHTSI like dumbbells for supporting exercises such as wrist curls and reverse wrist curls. A variety of weights from 5 to maybe 50 pounds should be sufficient for most of us. I also like the barbell and a supporting rack for heavy finger rolls. This allows you to perform a safe and progress able crushing exercise for the forearms, either for warm-up, heavy strength, or endurance. Finally, a small sledge hammer (2-6#) can be useful for wrist strengthening exercises such as Radial and Ulnar Deviation or Wrist Supination and Pronation.
TAPE, CHALK, AND BRUSHESSimple athletic tape should be available to cover nicks and cuts in the skin or to protect sensitive areas such as calluses or thin tips. I don’t like the taping of painful joints for training purposes unless prescribed by a climbing-aware Physical Therapist or Doctor.
A good, dry chalk should be used to keep the hands dry. It should also be employed to keep the boards in good shape. As a rule, you should brush the board before and after use, and never use the grips with your greasy, grubby fingers. Washing hands before and after training will keep your board clean and you healthy.
A nice brush is a big necessity. Toothbrushes are fine, but a good boar’s hair brush is worth dropping some change for.
Finally, if you are in a hot or humid gym, a small fan placed near the board can be a great help in keeping the fingers cool and the friction high. An inexpensive clip-on fan will fit easily in a gym bag and costs just a few dollars.
UNLOADING AND LOADINGI am not a huge fan of pulley systems for unloading, but if you feel the necessity, Trango is the place to get them. You can also unload with elastic bands of various tensions, either by clipping in to them or by placing a foot in the loop. Single arm hangs can be unloaded easily by placing the other hand in a shoulder-length sling or holding a cord attached to the board.
Load can be added with weight belts, loaded vests, or by hanging plates from your harness. At the 2017 Performance Climbing Coach seminar the wisdom of hanging weight from the belay loop of a harness was called into question. The general thought among the coaches was that loading the front of the harness could cause lumbar extension in the back, forcing the climber out of the natural and powerful “hollow” position. Determining whether this is a real problem or not is a job for the scientists.
At this point, I still prescribe loading for my athletes and we do load the front of the harness. I am OK with using modest loads of up to maybe 35 pounds (16kg). At this point I normally recommend moving to a more difficult position or smaller hold. This recommendation is based both on the lumbar extension question above and on the simple fact that moving up to and down from the board with much more load gets to be a bit awkward.

9
I understand…you’re a badass and that kind of loading is nothing for you and you always have trained with a 70 pound weight. By all means, keep after it…especially since you keep getting better year after year, right?
Single-Arm hangs can be unloaded by using the non-working arm to hold on to a sling or cord attached to the board.

10
04 | PREPARING TO TRAIN
GENERAL WARM-UPA hangboard workout doesn’t need a super-long warm-up, but there are big benefits to getting revved up beforehand. We display the greatest strength when our nervous system is ready for high-intensity activity. We can do this most effectively by turning on high-threshold motor units through high-intensity exercise. But to do high-intensity exercise, we need some blood flowing.
In a gym, I recommend just getting on a piece of cardiovascular equipment such as a treadmill, stepper, or air bike and slowly increasing speed for around 50 calories. These values vary, but the idea is to track work rather than just time. As you get warm your calories will click by faster and faster. Once you’ve finished on the cardio equipment, hit a set of fast push-ups for 10 reps and 10 fast squats at bodyweight. A pull-up or two should be enough to get you ready to move on to more specific work.
At home, a 50 calorie jog might not be convenient, so consider doing a progressive “55” of push-ups and squats. Start with one push-up and one squat, then two of each, then three, four, five, and all the way up to ten each. Rest as needed and regress the exercises a bit if you are getting sloppy. If you have a kettlebell, add some swings to the mix.
Push Up (Top) Push Up (Bottom)

11
WRIST, HAND, AND FINGER WARM-UPTo get the forearms warm, around 30 reps each side with the warm-up weight gripper is a good start. We then follow a series of finger and wrist movements:
• TIGHT FISTS TO WIDE-OPEN HANDS - Hold your hands up to your sides, like you are going to wave “hello” with both hands at the same time. Ball the hands into tight fists and hold for one second, then stretch them out to full extension for one second. Go for a full forearm flex on the fists and try to feel a real stretch in the palm and fingers on the extensions. Do 10 reps.
Tight Fists
Squat (Top)
Wide-Open Hands
Squat (Bottom)

12
• WRIST TENDON GLIDES: This exercise is one I learned from my friend Dr. Jared Vagy, The Climbing Doctor
• FINGER TENDON GLIDES: Another Vagy exercise, this one gets the finger tendons primed.
Wrist Glides (Start)
FTG (Start) FTG (Middle) FTG (End)
Wrist Glides (Finish)

13
• WRIST ROTATIONS: Back to the “stick-em-up” position. Put both hands in tight fists, then rotate them internally, all the way around their range of motion. Do ten reps, then rotate them the other way. Do ten reps.
LIGHT IT UPAfter the wrist rotations, we move to the board. I like to use the biggest edge on the board, though some might prefer even the jug holds. Grasp the edge, pick up your feet and hang for a one-count. step down, drop your hands to your sides, then immediately reach back up and hang for a 2-count. Repeat the process for three, then four, and so on up to ten seconds. After the ten-second-hang, step back up on the board, grab the edge and do a pull-up. Lower to 1/4 of the way, then pull-up again. Lower to 1/2 way, then back up, lower to 3/4 then back up, and finally finish with another pull-up.
Wrist Rotation (Start)
1/4 1/2 3/4
Wrist Rotation (Finish)

14
05 | EXERCISES AND HAND POSITIONS
It might seem obvious to you which hand positions to use when training on a hangboard. Although, I’ll argue that sometimes our preferences are our weakness, I’ll allow that you might skip this section if you have no need for these explanations. In general, hand positions are selected based on their ability to simulate the grips we use on the rock. The original hangboards even attempted to mimic the feel of real rock.
Over the years some bright climbers have applied a great deal of isometric strength research and biomechanics to the practice, and we now have a greater understanding of what a climber needs for a well-rounded ability to hold on to rock. The first thing to not is what’s called joint-angle variance. This refers to the findings that strength gained in isometric positions carries over only to a small degree from the position trained.
If a climber trains at a half-crimp position, we can assume that the proximal interphlangial joint or PIP (the second joint of the finger) was held near a 90 degree angle. Joint angle variance tells us that the strength gained in that position will carry over to around 15 degrees on either side of that angle, or about 75 to 105 degrees. Although there are gains across these angles, research shows that the further one is from the actual angle trained, the less the carryover of strength gain.
With this in mind, climbers have settled on training three or four angles in the PIP. Collectively, we now recognize the full crimp, half crimp, and open hand position to cover the most joint angles. Some climbers like the closed crimp, which is a more pronounced version of the full crimp.
We also hang positions that utilize counter pressure from the thumb or palm, collectively called pinches. In addition to pinches, we train several combinations of fingers in pocket positions, as well as all of the single fingers. I have organized the many positions into groups based on their relative usefulness across all forms of climbing and their usefulness in preventing injury.
VARIATIONS IN WRIST AND ELBOW POSITIONS / SINGLE ARM HANGSBeyond hand positions, you should be conscious of two other factors: arm position and single arm hangs. Joint angle variance applies to the elbow joint and wrist as much has it does the fingers. Consider that research shows variations as high as 60% in maximal strength in a grip test depending on slight changes in the angle of the wrist.
If you boulder or climb on a variety of rock types and angles, you are sure to experience having to use the wrists at different angles. If you come across a position or movement that feels particularly difficult, look at the angles of the wrists and elbows and try to see what’s going on there.

15
As we climb up rock, our elbows tend to go from somewhere near full extension to somewhere near full flexion…sometimes we reach so far that we start to extend the elbows again as the hand passes below the plane of the shoulder. I think it is a wise climber that trains a variety of elbow joint angles over the course of a strength cycle. Like the fingers, you might need to address as many as four different angles. It is foolish to think that we can train all of these positions and it is also unnecessary. Simply addressing each possible angle occasionally and making sure it is strong enough should make up the bulk of your training.
As you advance in your hangboard practice, you should consider also trying single arm hangs. One-arm hangs are an advanced technique that climbers can use to intensify hangs, shore up unilateral deficits in strength, and learn important shoulder positioning cues. The single-arm program listed later not only addresses single arm strength, but elbow joint variance as well. I recommend that advanced climbers do this work at least one training cycle per year.
PRIMARY GRIP POSITIONSOPEN HAND Four fingers used, distal interphlangial joint (DIP) held above the proximal interphalangial joint (PIP). The thumb is occasionally used, stacked alongside the index finger.
HALF CRIMPThe PIP is held close to 90 degrees and is close to level with the DIP when fully loaded.
FULL CRIMPThe PIP is held at an acute angle and the DIP at an obtuse one. Under full load, the DIP is below the level of the PIP.
WIDE PINCHGenerally considered any pinch that is wider than the little finger is long. Classically, this is trained with a pinch block with weight attached. Most climbers use a 3-4” block for this.
NARROW PINCHA pinch narrower than the little finger is long. Again, pinch blocks are usually used, the most common 1.5 to 2 inches wide.

16
SECONDARY GRIP POSITIONSCLOSED CRIMPA crimp held with the thumb tucked next to or on top of the index finger.
THREE FINGER POCKET, FIRST THREEAn open-hand position using just the first three fingers.
TWO-FINGER POCKET, FIRST PAIROpen hand, index and middle.
TWO-FINGER POCKET, SECOND PAIRMost people’s strongest two-finger position, the middle and ring.
ONE FINGER POCKET, MIDDLE FINGEROpen hand position with just the middle finger. This is the strongest single finger in most experienced climbers.
RARE / SPECIALIZED GRIP POSITIONSTHREE FINGER CRIMP A potentially injurious position for the untrained, can be useful for people who address several types of small pockets or crimps.
THREE FINGER POCKET, LAST THREE An undervalued position, the back three can be every bit as strong as the first three, and sometime work better in steep terrain.

17
TWO FINGER POCKET, OUTSIDE PAIRAgain, an undervalued position, the back two can sometimes fit in a pocket that is too “baggy” for one finger but too tight for the first or second pair.
ONE FINGER POCKET, INDEX FINGERInitially the strongest single finger, most people stop using this one individually as middle finger strength comes on.
ONE FINGER POCKET, RING FINGERhugely undervalued (and frequently injured) the ring finger possesses great strength potential. Some researchers claim that this finger has a greater strength potential than the middle finger due to its similar tendon structure, yet shorter lever length.
ONE FINGER POCKET, LITTLE FINGERRarely used, but a fun party trick for the very strong.

18
The following plans are build on a series of sessions rather than on a weekly template. I do this because strength gains are based primarily on the number of times the athlete is subject to an overload, not the number of weeks over which overloads occur. For example, a strong young climber with an open schedule might be able to effectively train on the hangboard 4 days per week. An over-the-hill climber like myself might only be able to hit one session every five days. On a 4-week program, one of us would get 16 sessions in where the other would get only 5. Clearly both of us would have a different outcome from the training.
That being said, I still like to see most hangboard training happen in blocks of around 4-6 weeks. This is often more for the athlete’s motivation to train and need for variety than for physiological reasons. The plans normally call for 10-16 total sessions. If it takes an athlete more than 6 weeks to complete these sessions, I feel that there are going to be potential losses in improvement.
Before starting or modifying one of the following plans, I suggest taking a hard look at your schedule. Does this plan work with my current weekly and monthly commitments? Does this plan fit with the additional training I have planned? Does this plan work in regard to my desired outcomes this year?
THE WORLD’S SIMPLEST HANGBOARD PLAN
As if complicating things made them somehow more effective. If you have not been training at all, the most effective solution is to start easy. On the flip-side, if you are bogged down by timing and loading and figuring out optimal hold sizes on the board, you might need to take a step back.
I suggest 8 repeats of this hangboard protocol, with a maximum frequency of 2-3 days per week. It’s so short and so simple, you will want to add more to it. I caution you that to do so might diminish the results. Have the courage to focus and you’ll be pleased with what you find.
06 | THE HANGBOARD PLANS
TOOLS
1 medium-sized edge + additional weight
as needed
TIME
6 minutes after warm-up
CYCLES
8 sessions

19
In this session, you’re going to pick an edge that you can hang on for 10 to 15 seconds without really fighting. If you’ve been away for a long time, consider starting this by using a pull-up bar instead of a hangboard. Then, you’ll do a simple time ladder:
Hang for 5 seconds, rest 25
Hang for 10 seconds, rest 20
Hang for 15 seconds, rest 15
This takes 90 seconds. Repeat it four times.
If you complete the whole session without much issue, add 5 pounds for the next session or move to the next-smaller hold, but keep the sets and times fixed.
This session can be done the same day as a weight training session, or the morning before a climbing day.

20
GO 30
Go 30 is an excellent hangboard plan for 3 different types of climbers:
1. Climbers that are short on time.
2. Climbers that have been away from training for more than 3 months.
3. Climbers that have not trained specific finger strength before.
The idea of the Go 30 plan is the same as the Go 50 and Go a Hundred - you will load each position for a total of 30 seconds per session. Hang sets should be between 5 and 20 seconds. At the beginning of each cycle, you’ll be using bigger holds and will trend toward the 20 second end of things. As the cycle progresses, you’ll be on the smaller holds, and will end up having to do the sets for shorter durations. If you get to where you can’t do 5-second hangs, reduce the load.
Select a board with a series of edge sizes. My personal preference is a Tension Grindstone Board, but the Eva Lopez boards are good, as would be a well-populated campus board. As opposed to Go a Hundred, we usually just do this plan for one cycle.
Start with the largest edge on the board. On the Grindstone, this will be 35mm, and will be pretty damned easy for most relatively experienced climbers. This workout should just involve doing 2 sets of 15 second hangs or one set of 10 and one set of 20 seconds. Do this for 2 sessions, which can be three days in a row if your schedule allows. Don’t add load, just do it at bodyweight, keeping it simple and easy.
Session 3 and 4 you will move to the next smaller edge, which is the 30mm on the Grindstone. This is a bit of a leap, but most climbers will still be able to stick with the 15-20 second sets. Session 5 will see you on the 25mm edge, which you’ll do for 2 sessions (sessions 5 and 6). Most climbers spread these sessions out to at least every other day, but I leave this up to the individual.
Sessions 7 and 8 are done on the 20mm edge, then sessions 9 and 10 on the 15mm. Many
climbers will be able to stick with 15 or more seconds per hang straight through all 10 sessions. Good job. This is a 10-session cycle, and it doesn’t really matter if it takes you 2 weeks or 4 weeks to complete...discipline and patience are the key to getting stronger.
If you need to break these down to 10 second or even 5, that’s fine. It just shows us that you’ll move through the whole plan more quickly. Here is a review of the progression in table form with some example hold sizes:
TOOLS
Hangboard with multiple edge sizes
TIME
10 minutes
CYCLES
10 sessions

21
After you complete all 10 sessions in the series, it is possible to go through and repeat it again at higher loads. However, I suggest that moving up to a higher-volume program is more effective for most climbers. Most times, we suggest the climber move up to the Go 50 program or a Ladder program.
GO 50Go 50 is an intermediate step between the Go 30 and Go a Hundred plans. It is a 10-session series of hangs where you’ll work the edge for 50 total seconds of hanging. The same rules apply in Go 50 as they do in the other “Go” programs. I like this plan as an in-season maintenance plan, as it is easily placed during a performance climbing day without any negative effects.
GO A HUNDRED
Finger strength is indisputably useful in climbing and having more of it usually helps you get better. For many of us, enough finger strength can make up for a lack of technique or power. As much as we’d like to gain this strength quickly, however, it doesn’t happen. What’s worse...most climbers who have been in the sport for long enough are already close to their genetic potential for strength, so seeing improvements is even harder.
I can’t tell you the number of emails I’ve received about how this or that program didn’t work, only to find that the writer of the email didn’t really do the complete sessions and didn’t follow the
TOOLS
Hangboard with multiple edge sizes
TIME
20 minutes
CYCLES
20 sessions
SESSION #
1 and 2
5 and 6
9 and 10
3 and 4
7 and 8
Mediumest
Smallest
Second-Largest
Second-Smallest
EDGE SIZE
Largest
25mm
15mm
30mm
20mm
35mm
(GRINDSTONE)
20mm
22mm
24mm
16mm
Top Edge
(PROGRESSION)

22
program for the whole duration. Of course it didn’t work! What is the value of a training program that an athlete can’t follow? What is the value of a training program that is so intense that the athlete can’t stick with it long enough to get strong?
The major complaint I get about most of my hangboard programs is that they feel too easy. Well, I’d way rather get strong without suffering than suffer without getting strong. That’s where this plan really shines - it’s simple, progressive, and gets you strong over the long haul.
Go A Hundred is simple. You hang for 100 seconds on an edge, then progress slowly to smaller and smaller holds. This plan is dependent on using a board with multiple hold sizes, such as the Tension Climbing Grindstone Board or the Transgression/Progression Board (assuming you’ve got thick calluses on your fingertips and a thick wallet in your pocket). It works reasonably well with a campus or system board with multiple edge sizes, but I’ve found you need about 5 progressively smaller edges to make it work.
Hang sets should be between 5 and 20 seconds. At the beginning of each cycle, you’ll be using bigger holds and will trend toward the 20 second end of things. As the cycle progresses, you’ll be on the smaller holds, and will end up having to do the sets for shorter durations. If you get to where you can’t do 5-second hangs, you’re past the point of useful work and increasing your chance of injury...especially at a volume of 100 seconds per session. At this point, you should opt for a bigger series of holds.
Yes, I am aware that a 20 second load edges toward muscular endurance more than strength when it comes to adaptation. I like 20 second loads, though, because we are in a safe zone for the connective tissue in the fingers and because this represents a more real-world load - when we are climbing many of us tend to hang on for longer than 5 seconds per hold. If you think this seems crazy, don’t email me about it...just stick with doing repeaters.
The sessions can be done by integrating them with other strength work, or simply as straight sets. Rest as needed. Ahh, yes… “rest as needed.” The number one worried question I get from climbers that are tied to the clock is “how much time, exactly, should I rest between sets?” It doesn’t matter much, but if you’re getting pumped as you go through the session, it’s not enough rest and if you eat a meal between sets, it might be too much. If you’re honestly not sure, go for 5 minutes.
The metric should not be how tired the training makes you, but rather how strong.
One recommendation I’ll make is to do a quick set of finger extensions (I like the Expand Your Hands Band) for 10 reps per hand. There is good science behind activating antagonists to increase strength in the agonists, but honestly, I just think it makes my fingers feel better!
My last training cycle in the weight room was a 5x2 circuit, so I typically did 5 rounds of:
Deadlift x 2
1-Arm 1-Leg Push Up x 2 each side

23
Pistol Squat x 2 each sideDB Row x 2 each side
Levers x 2
Edge Hang x 20 seconds (or less!)
Extensions x 10 each side
If I didn’t get all 100 seconds on the hang, I’d add a few sets at the end. No big deal.
Yes, you’re only training one hold position. Although I don’t feel it’s necessary for most climbers, you can add supplemental positions (at significantly reduced volumes). I suggest doing 20-30 seconds of total loading on supplemental positions, in 5-10 second sets. A nice way of setting this up would be to cycle in maybe two other positions in an alternating fashion, like this:
Hang Edge 20 secondsHang 2F Pocket 10 sec
Hang Edge 20 secondsHang Pinch 10 sec
Hang Edge 20 secondsHang 2F Pocket 10 sec
Hang Edge 20 secondsHang Pinch 10 sec
Hang Edge 20 secondsHang 2F Pocket 10 sec
As always, I’ll remind you that the specifics don’t matter as much as regular loading and progression through a long cycle. Dialing in some killer session that you only do once or twice in a full training cycle is a waste of time. Although it might make you tougher and boost your ego, it won’t make you stronger.

24
CYCLE 1This is the one you’ll feel like you don’t need. You’re experienced, you just sent 13c, and you’ve got a “good base” - whatever that means. If you want to get stronger and you want to avoid injury, please don’t disregard this cycle. Each time you do this plan, you must do cycle 1 - it’s the part that keeps you from getting hurt.
Start with the largest edge on the board. On the Grindstone, this will be 35mm, and will be pretty damned easy for most relatively experienced climbers. This workout should just involve doing 5 sets of 20 second hangs. Do this for 2 sessions, which can be three days in a row if your schedule allows. Don’t add load, just do it at bodyweight, keeping it simple and easy.
Session 3 and 4 you will move to the next smaller edge, which is the 30mm on the Grindstone. This is a bit of a leap, but most climbers will still be able to stick with the 20 second sets. Session 5 will see you on the 25mm edge, which you’ll do for 2 sessions (sessions 5 and 6). Most climbers spread these sessions out to at least every other day, but I leave this up to the individual.
Sessions 7 and 8 are done on the 20mm edge, then sessions 9 and 10 on the 15mm. Many climbers will be able to stick with 20 seconds per hang straight through all 10 sessions. Good job. This is a 10-session cycle, and it doesn’t really matter if it takes you 2 weeks or 4 weeks to complete...discipline and patience are the key to getting stronger.
If you need to break these down to 15 second sets, 10 or even 5, that’s fine. It just shows us that you’ll move through the whole plan more quickly. Here is a review of Cycle 1 in table form with some example hold sizes:
CYCLE 2After you complete cycle 1, take 3-4 days off from the board. You can climb a little, but remember that the less you stress your fingers, the stronger you’ll get in the next cycle. Rest is an integral part of this training. If you made it through the whole progression at 20 seconds per hang, add 20% to your bodyweight for this series. If you dropped down to shorter-duration sets, but were able to
SESSION #
1 and 2
5 and 6
9 and 10
3 and 4
7 and 8
Mediumest
Smallest
Second-Largest
Second-Smallest
EDGE SIZE
Largest
25mm
15mm
30mm
20mm
35mm
(GRINDSTONE)
20mm
22mm
24mm
16mm
Top Edge
(PROGRESSION)

25
stay above the 5 second mark, add 10%. If you were working at 5 second sets by the end, stick with bodyweight.
You will use the exact-same load for the whole cycle, so be conservative.
We are tempted to try to up the ante every time we do well in strength training. In this plan, though, the improvements come by progressing to smaller holds and bringing the loads up slowly. Think long term instead of next week. Think Roth IRA instead of Vegas Strip.
Cycle 2 will feature more rest between sessions. I recommend at least one day between. Again, you can put these in with other strength work, with a mobility session, or even with some bouldering or climbing. Here is a session of integrated strength one of our athletes did recently in cycle 2:
KB Swing x 10, Overhead Press x 5, Straight Leg Raise x 5, Hang 15mm (+20%) x 15 sec
KB Swing x 10, Overhead Press x 5, Straight Leg Raise x 5, Hang 15mm (+20%) x 13 sec
KB Swing x 10, Overhead Press x 5, Straight Leg Raise x 5, Hang 15mm (+20%) x 15 sec
Rack Step-Up x 5+5, Pull-Up x 5, Ab Wheel x5, Hang 15mm (+20%) x 12 sec
Rack Step-Up x 5+5, Pull-Up x 5, Ab Wheel x5, Hang 15mm (+20%) x 13 sec
Rack Step-Up x 5+5, Pull-Up x 5, Ab Wheel x5, Hang 15mm (+20%) x 12 sec
TGU x 1+1, Plank Rope Pull x 10m, Frog x 45 sec, Hang 15mm (+20%) x 12 sec
TGU x 1+1, Plank Rope Pull x 10m, Frog x 45 sec, Hang 15mm (+20%) x 8 sec
TGU x 1+1, Plank Rope Pull x 10m, Frog x 45 sec
You will follow the exact-same progression as Cycle 1. Typically, the first few sessions will go easily, with most hangs at close to 20 seconds. Later in the phase, the sessions can be real
PERFORMANCE LAST PHASE
All sessions at 20 seconds
All sessions at more than 5 seconds
Some sessions at 5 seconds
Bodyweight + 20%
Bodyweight + 10%
Bodyweight
LOAD FOR CYCLE 2

26
grinders. In the latter phases, you may end up with sets of 5-10 seconds, split by lots of rest, for 10-20 sets...a serious day’s work.
After completing Cycle 2, there are two options. You can once again add 10% or 20% load and complete another training cycle. I recommend this only for athletes that completed Cycle 2 easily, sticking with 10 or more second hangs.
If you were getting down into the 5-10 second hang zone, go back to Cycle 1, doing all the hangs at bodyweight for 10 full sessions.
This is a finger strength plan that can be done many months per year, and can be “run in the background” with other climbing training, especially during Cycle 1.
3-6-9 LADDERSOf all the training programs I’ve written, this may be the most effective. It is also the most controversial and misunderstood. The idea of ladder training is well-known in the world of strength training, but since it doesn’t feel difficult and doesn’t result in a pump, most climbers dismiss it as ineffective after trying it just a few times. Here’s the thing, though: you need to be in it for the long haul. This program, or programs similar to it, results in incredible longterm gains for those that can stick.
Most climbers are looking for a program that results in quick gains in strength and a feeling of hard work. I don’t care how long a program takes, how hard it feels, or who is endorsing it - I only care if it makes the climber stronger and keeps the climber from being injured.
Over the past few years, we’ve seen some incredible climbing gyms opening around the world. We’re talking multi-million-dollar indoor crags here, some so diverse and huge that you might never want to wander outside again. Strangely, though, the gyms aren’t cranking out superstars as fast as you’d think. I had a great discussion with one of America’s top climbers, and he summed it up nicely: “The crag doesn’t make the man.”
SESSION #
1 and 2
5 and 6
9 and 10
3 and 4
7 and 8
Mediumest
Smallest
Second-Largest
Second-Smallest
EDGE SIZE
Largest
25mm
15mm
30mm
20mm
35mm
(GRINDSTONE)
20mm
22mm
24mm
16mm
Top Edge
(PROGRESSION)

27
Many of our athletes train in basements, garages, or co-op gyms. Some aren’t so lucky and at best manage to work out on a home hangboard. Fascinatingly, these are some of our best climbers. For these climbers, this is as close as I’ve seen to a one-size-fits-all hangboard plan.
This idea originally came from Pavel Tsatsouline in his book Enter The Kettlebell. I mentioned the idea to Chris Liddel (one of the guys who has a hangboard only to train on) and he went crazy with it for a year before coming back to me. Chris has a board, a few weights, and some plates he could add for resistance, but he didn’t like the weight adding part, so he changed things around a little.
In Pavel’s book, he reminds us that isometric strength is better developed through increasing volume and frequency of training than through adding load alone. I’d seen this assertion elsewhere, so we thought we’d give it a try.
The general gist is that you do several sets of exercise at the same load (weight), but vary the volume with each set. By laddering up 1 rep, 2 reps, 3 reps, and then repeating, the athlete is forcing more volume into a workout and allowing for more adaptation potential.
We picked 3, 6, and 9 second hangs to force a change in stimulus between sets. Each time you come back to the 3 second hangs, you get a little reprieve on the difficulty, but even these shorter sets add to the overall volume. For climbers not able to add load to hangs, or for those who have hit a hangboard plateau, this is a good option.
PROTOCOL 12-3 sessions per week. The big key is to start on holds that feel easy, that you can hold comfortably for 9 seconds. The overload to the system is not so much muscular as it is a strain on the connective tissue of the hands and fingers. This takes a long time to develop. Several compelling studies (yes, real university studies!) show that submaximal work can create big jumps in isometric strength, so take it easy at first. You’ll know when you’re strong enough to progress.
Select 3-4 hold types or positions. You’ll stick with these throughout the 8 week phase, so choose wisely.
3-4 positions, all held straight-arm with “active” shoulders.
WEEK 1: 3 STRAIGHT LADDERS 3-6-9 SEC. ON A 45 SECOND CLOCK.
THIS MEANS:
position 1: 3 sec, rest, 6 sec, rest, 9 sec, rest remainder of 45 sec.position 2: 3 sec, rest, 6 sec, rest, 9 sec, rest remainder of 45 sec. position 3: 3 sec, rest, 6 sec, rest, 9 sec, rest remainder of 45 sec.
take a bit longer rest between groups if you’d like.
position 1: 3 sec, rest, 6 sec, rest, 9 sec, rest remainder of 45 sec.position 2: 3 sec, rest, 6 sec, rest, 9 sec, rest remainder of 45 sec.

28
position 3: 3 sec, rest, 6 sec, rest, 9 sec, rest remainder of 45 sec.
position 1: 3 sec, rest, 6 sec, rest, 9 sec, rest remainder of 45 sec.position 2: 3 sec, rest, 6 sec, rest, 9 sec, rest remainder of 45 sec. position 3: 3 sec, rest, 6 sec, rest, 9 sec, rest remainder of 45 sec.
WEEK 2: 4 LADDERS 3-6-9 SEC.
WEEK 3: 5 LADDERS 3-6-9 SEC.
WEEK 4: 3 LADDERS 3-6-9-12 SEC.
WEEK 5: 4 LADDERS 3-6-9-12 SEC.
WEEK 6: 5 LADDERS 3-6-9-12 SEC.
WEEK 7: 4 LADDERS 1-3-6-9-12 SEC.
WEEK 8: 5 LADDERS 1-3-6-9-12 SEC.
These are all done without added weight. The value goes beyond just strength training, and gives a good endurance stimulus as well. The time commitment toward the end gets big, and that’s where we separate the (mentally) weak from the strong.
PROTOCOL 22 sessions per week. 3 hold positions. These are done “Circuit Style” rather than straight. This protocol is shorter, more intense, and better in-season. We use half-crimp, full crimp, and an open hand position.
WEEK 1: 3 CIRCUIT LADDERS 3-6-9 SEC. ON A 30 SECOND CLOCK.
WEEK 2: 4 LADDERS 3-6-9 SEC.
WEEK 3: 5 LADDERS 3-6-9 SEC.
WEEK 4: 3 LADDERS 3-6-9 SEC.
WEEK 5: 4 LADDERS 3-6-9 SEC.
WEEK 6: 5 LADDERS 3-6-9 SEC.
WEEK 7: 4 LADDERS 3-6-9 SEC.
WEEK 8: 5 LADDERS 3-6-9 SEC.

29
KARA KUDJAM SINGLE ARM HANG PLANIn the spring of 2015, we started experimenting with the excellent finger and upper body strength program designed by Australian powerhouse Chris Webb-Parsons. For those of you unfamiliar with his program, it goes like this:
Find an edge you can hang on the hangboard (single arm) in a half-crimp position. Using a rope or sling, hang this edge with one hand while taking weight as necessary with the unloaded arm. The program calls for three sets of hangs in each of three positions: straight arm, bent arm (slightly greater than 90 degree bend), and lock-off. Doing nine sets total, you’ll take as much weight off as necessary to complete the set time (usually 10 seconds or 5 seconds...see below). At the end of each set, release the assisting arm to increase the load on the working arm.
Chris suggests doing this workout 2-3 times per week. In our planning, we trained climbers two times per week on this program, with an addition of some other training as detailed below. For the full explanation of Chris’s original program, check out his video online. Our program differs slightly.
I took the basic CWP format and integrated it with resistance training and mobility exercises, to help my athletes “fill the time” between hangs. In short, we did a set of hangs, then a resistance exercise, then a mobility or stability drill. We integrated this with a 6-week focus on medium level bouldering, followed by a 6 week phase of redpointing. As simple as the plan was, it was spectacularly successful, especially with our climbers that were weak on the assessments, or whose projects were strength-oriented.
The two strength sessions of the week looked like this:
SESSION 13x L + R hang, straight arm
Straight Arm Bent Arm Lock-off

30
Hip Mobility 45-60sec1+1 Get-Up
3xL + R hang, bent armShoulder Mobility 45-60sec3+3 1 arm, 1 leg Push-Up
3xL + R hang, bent armShoulder Mobility 45-60sec3+3 1 arm, 1 leg Push-Up
3xL + R hang, >90Splits 45-60 secHardstyle Sit-Up x5
SESSION 2 3x L + R hang, straight armHip Mobility 45-60sec5x Deadlift5 sec +5 sec x Pinch Block
3xL + R hang, bent armShoulder Mobility 45-60sec5x Back Squat5x Roll-out on Barbell
3xL + R hang, >90Splits 45-60 secHardstyle Sit-Up x5Seated Straight Leg Raise x5
INTEGRATED STRENGTH Training sessions should be simple and logical to follow. I prefer to under-program the training and let my athletes add-on more at the end than to over-program and risk them not finishing the workout. In the integrated strength sessions, we program three hangboard exercises, three strength exercises, and three mobility drills. These are grouped into small circuits that are each

31
performed three times. For example, in one circuit, you’d do an edge hang, a set of squats, and a prying cobra. This group would be done three times before moving on to the next group.
The pacing of this session is its beauty, you move slowly and deliberately between the three exercises, and the movements and load are different enough that each exercise serves as an effective “rest” from the other two. For most climbers, each circuit takes about five minutes, and thus each group takes about fifteen. Including a good warm-up, the session takes about an hour. That being said, there is no reason to hurry through this…going heavy is more important than going fast.
THE BASIC FORMAT LOOKS LIKE THIS:
3 rounds, resting as neededHangboard Position 1Hip HingeHip Mobility
3 rounds, resting as neededHangboard Position 2Upper Body PressShoulder Mobility
3 rounds, resting as neededHangboard Position 3SquatHip Mobility
There is little reason to add more groups, rounds, or sets. The volume is high enough to make you stronger but low enough to keep from tapping you out for the week. If you need a little more work, consider adding some easy bouldering or route laps at the end of the session. If you are in the weight room (and can’t climb right after the session), consider adding a barbell or kettlebell complex.
Below are three session formats we’ve used successfully with our athletes:
INTEGRATED STRENGTH 1 (10 SECOND HANGS)This is a standard, easy-to-implement program that can be done in most good gyms.
3 rounds, resting as neededOpen Hand Hang, 2 Arms x10 secDeadlift x3Frog x60sec
3 rounds, resting as neededPinch Block, 3” x10 sec per sideOne-Arm Kettlebell Press x6+6Kettlebell Arm Bar x30 sec per side

32
3 rounds, resting as neededHalf Crimp, 2 Arms x 10 secSingle Leg Squat x3+3Tug of War Squat x 60 sec
INTEGRATED STRENGTH 2 (SINGLE ARM, 10 SEC HANGS)This workout implements the Kara Kudjam hangboard protocol with resistance andmobility training. This is a good program for an intermediate to advanced trainee.
3 rounds, resting as neededHalf Crimp, 1 Arm, Straight Arm x10 sec per sideKettlebell Swing x10Frog x60sec
3 rounds, resting as neededHalf Crimp, 1 Arm, Bent Arm x10 sec per sideOne-Arm Kettlebell Bench Press x6+6Lat/Rhomboid Foam Roll 60 sec 3 rounds, resting as neededHalf Crimp, 1 Arm, Lock Off x10 sec per sideRear Foot Elevated Split Squat x3+3Tug of War Squat x 60 sec
INTEGRATED STRENGTH 3 (BODYWEIGHT ONLY, 3-3-3 SECOND HANGS)This workout is appropriate for those who do not have a weight room close to their hangboard. This session incorporates 3-3-3 second hangs with bodyweight resistance exercise. The 3-3-3 hangs are done on a 5 second clock: hang 3 seconds, let go for 2, hang for 3, let go for 2, hang for 3, then move on to the next exercise.
3 rounds, resting as neededHalf Crimp, 2 Arms, Straight Arm x 3-3-3 secSingle Leg Hip Thrust x10+10Prying Cobra x60 sec
3 rounds, resting as neededPinch Block, 3” x 3-3-3 sec per sideOne-Arm Push-Up x3+3Overhead Squat 60 sec
3 rounds, resting as neededPocket Hang, Second Pair, 2 Arms, Straight Arm x 3-3-3 secPistol Squat x3+3Tug of War Squat x 60 sec

33
7:13 INTERMITTENT HANGS
I have been opposed to time-driven strength sessions for most of my career. This position is based on the fact that load is the most important factor in gaining strength and taking the time to provide enough load each session is key. This means that worrying about holding rest periods to a specific length should not be important. Several hangboard programs control for both work and rest. Climbers are comfortable with this set-up because they don’t have to pay attention to what is happening in their muscles - they just respond to the beeping of the alarm.
There is nothing inherently wrong with this type of training. In fact, there are several physiological factors that contribute to good climbing that result from reduced or limited rest, including mental toughness and strength endurance. I still prefer, however, to lean toward creating the maximum strength possible.
It is a rare climber that is not familiar with the 7-seconds-on-3-seconds-off cycle of intermittent hangs. It is an effective and rightly popular program. Like every program, however, a climber will see fewer adaptations with each training cycle, to the point that such a program will no longer result in significant gains.
This is exactly where one of the best redpoint climbers in the world was last year when we spoke about hangboarding. He has seriously strong fingers, but had plateaued for the last year or so and was seeking a way forward. A fan of 7:3 hangs, he wanted to know how to manipulate the program he was on in order to start progressing again.
In trying to gain significant strength one of the first places we look is increasing load. Since this climber had probably maxed out what he could do - there is no lack of motivation or toughness here - we next looked at recovery between repetitions. A 7:3 work:rest ratio calls for more than twice as much work as recovery, which is firmly within the realm of hypertrophy and muscular endurance training. In order to keep things simple and maintain the format he liked, I suggested a plan that would reverse the ratio, and we built the 7:13 (approximately a 1:2 work:rest ratio) protocol.
The session called for working three grip positions (edge, pocket, and pinch). Each position was held for 6 repetitions each set, 7 seconds on, 13 seconds off...a total of 2 minutes. This work was followed by a two minute rest. After resting, you’d then repeat the same position for two more full sets. You then follow the same protocol with the pocket and pinch grips. Stick with the same grips for the entire training cycle, and adjust load as needed as you gain strength.
TOOLS
Hangboard with a small edge and a
medium-sized pocket, a pinch block
TIME
34 minutes, after warm-up
CYCLES
12 sessions

34
EDGE POCKET PINCH
6 x 7:13 (2:00) 6 x 7:13 (2:00) 6 x 7:13 (2:00)
6 x 7:13 (2:00) 6 x 7:13 (2:00) 6 x 7:13 (2:00)
6 x 7:13 (2:00) 6 x 7:13 (2:00) 6 x 7:13 (2:00)
Rest 2:00 Rest 2:00
Rest 2:00 Rest 2:00 Rest 2:00
Rest 2:00 Rest 2:00 Rest 2:00
Most climbers would do a higher-volume session like this in a dedicated strength phase. I suggest doing the sessions 2-3 times per week for most athletes, but aim for the 12 sessions rather than a specific number of weeks. These sessions can be effectively combined with weight lifting sessions or high-intensity core work. Some amount of skill work and easier bouldering can be placed at both ends of the focus session.
CONTRAST LOAD HANGBOARD TRAININGThe debate rages whether to load your hangboard training with added weight or to go to smaller holds. Whether to hang one arm or two. Whether to train multiple grips or just one. The answer, and you won’t like it, is all of these are right, at a certain time. The only huge error is to constantly follow one program, a recipe for injury and staleness.
I like progressive load programs for strength training, but my hangboard plans call for more frequent, higher volume sessions - and the fingers just won’t tolerate the continual progression. Enter the contrast-load week, where you simply alternate back and forth between a heavy load and a heavier one. This is a high-strength program and is appropriate only for advanced climbers with many cycles of hangboard training experience. I started testing out the structure of this program after seeing good results with some other strength exercises done in a similar format.
The work/rest ratio on these sessions bleeds over into strength-endurance, but you’ll see plenty of strength gains. This is a good antecedent to our normal ladder program or a more traditional straight-set strength protocol.
The general set-up is like this:
• You’ll hang two different hold types. Pick whichever holds you like, but the correct answer for one of them is half-crimp. For my sport climbing friends, I usually recommend a 2-finger pocket, for boulderers some kind of open-hand hold. The world of pinch grips is still imperfect in hangboarding, so if pinches are your weakness, follow Steve Maisch’s

35
advice and build a couple of pinch blocks you can hang weight from...this will work just fine with this plan.
• You are going to do hangs three days per week for three weeks, then take a rest week. Monday, Wednesday, Friday works well if you’re not climbing on the weekends. If you are integrating it with climbing aim for Sunday, Tuesday, Thursday. I recommend doing a different training plan afterward, but repeating the series for another 4 weeks has been done.
• You’re going to use an easy-to-load weight for the training - this needs to be simple and quick. Your heavy weight should be around 25% of bodyweight, and your light weight should be the closest easy-to-load weight at half the heavy weight. Our team use kettlebells, but plates work fine. My training weight, for example, is a 50 pound kettlebell on heavy days and a 25 pounder on light days.
A 2,4,6 x 2 set consists of a 2 second hang, drop hands to straight down at sides, then a 4 second hang, then drop hands to sides, then a 6 second hang, drop hands to sides, and then start again at 2, then 4, then 6. The dropping of the hands to the sides lets the blood flow back into the arms, but then you get right back to work. This drop should be 2-3 seconds total. The set in this example would take about 40 seconds.
• You’ll do one of the prescribed sets for hold position 1, then rest 2-3 minutes before repeating the same set pattern for the second hold position. You’ll then rest 2-3 minutes, and continue the pattern for the total prescribed number of sets for the session.
Heavy days in bold.
Week 1
Week 3
Week 2
Wek4
(3x 2,4,6) x 3
(2x 2,4,6) x 3
Rest
DAY 1
(2x 2,4,6) x 2
(3x 2,4,6) x 3
(3x 4,6) x 3
(2x 2,4,6) x 2
(2x 2,4,6) x 2
DAY 2
(3x 4,6) x 4
(3x 4,6) x 3
Rest
(2x 2,4,6) x 3
DAY 3

36
07 | THE LONG HAUL
Climbers need strong fingers. The more strength one can develop and maintain, the easier every other facet of training will become. Too often, we look at training the fingers as if it should be some crushing workout rather than a long, slow process of building tissue. Although the workouts in this manual are built in 10 or 20 session series, no single workout plan should be the end of the road. In injury prevention and strength development, the road goes on forever.
Have patience and you will succeed. Get greedy, hurry, and you’ll get hurt.

37

38
“ONE THOUSAND DAYS
OF LESSONS FOR
DISCIPLINE;
TEN THOUSAND DAYS
OF LESSONS FOR
MASTERY.”
MIYAMOTO MUSASHI


![[Second Edition,.]](https://static.fdokumen.com/doc/165x107/6322fad1887d24588e04752c/second-edition.jpg)