
2016-2021 6th Gen Camaro Dedicated Fuel System - Nitrous ...
17
2016-2021 6th Gen Camaro Dedicated Fuel System PART NUMBER 00-12032 WWW.NITROUSOUTLET.COM/INSTALLATION-GUIDES NITROUS OUTLET | 305 SOUTH 28TH STREET | WACO, TX 76710 | P: 254-848-4300 | WWW.NITROUSOUTLET.COM ©N2O060121 1 IMPORTANT: All appropriate safety equipment (gloves, tools etc.) must be used during the installation of this product(s). Nitro Dave’s LLC accepts NO responsibility for injuries resulting in the installation of any product(s). Nitrous oxide is for off-road use only. INSTALLATION INSTRUCTIONS This Nitrous Outlet vehicle specific dedicated fuel system is designed specifically for the 2016-2021 6th Gen Chevrolet Camaro. If you need any assistance during installation or if you have questions about this dedicated fuel system, call our Tech Help Line at (254) 848-4300. Tools Needed for Installation*: • 13mm Deep Socket • 10mm Deep Socket • Ratchet • 9/16” Wrench • 11/16” Wrench • 3/4” Wrench • T40 Torx bit • Body Tool • Razorblade • Drill • 3/8” Drill Bit • 7/8” Hole Saw • Large Hose Cutters • Jack & Jack Stands • Center Punch • 1-1/16” Hole Saw • 9/64” Allen Wrench *These are the tools required for installation of this kit on a stock vehicle. If your vehicle has aftermarket parts, other tools may be required. Pre-Installation Tips: • Adding a Fuel Pressure Safety Switch will prevent the nitrous system from activation in the event fuel pressure drops. Low Pressure Part # 00-60000 High Pressure Part # 00-60001 • A Fuel Pressure Gauge is needed as a visual reference for fuel pressure. Low Pressure Part # 00-63003 High Pressure Part # 00-63004 • A mild grade (Blue)Loctite is recommended on straight threads such as the ones on the regulator (3/8NPT). • This fuel system is designed to work in conjunction with pump gas, E85 and most race gas. Not for use with alcohol or methanol. • Some Fuels with a high ethanol content may cause the lid gasket to swell causing a situation to where removing the lid can be difficult. Step 1: • Open the trunk of your vehicle and remove the floor/spare tire cover. Step 2: • Using a 9/16” wrench, remove the 4 panel nuts holding the plastic panel at the rear of the trunk.
-
Upload
khangminh22 -
Category
Documents
-
view
1 -
download
0
Transcript of 2016-2021 6th Gen Camaro Dedicated Fuel System - Nitrous ...
2016-2021 6th Gen Camaro Dedicated Fuel SystemPART NUMBER 00-12032
I N S T A L L A T I O N I N S T R U C T I O N S
W W W . N I T R O U S O U T L E T . C O M / I N S T A L L A T I O N - G U I D E S
N I T R O U S O U T L E T | 3 0 5 S O U T H 2 8 T H S T R E E T | W A C O , T X 7 6 7 1 0 | P : 2 5 4 - 8 4 8 - 4 3 0 0 | W W W. N I T R O U S O U T L E T. C O M
©N2
O060
121
1
IMPORTANT: All appropriate safety equipment (gloves, tools etc.) must be used during the installation of this product(s).Nitro Dave’s LLC accepts NO responsibility for injuries resulting in the installation of any product(s). Nitrous oxide is for off-road use only.
I N S T A L L A T I O N I N S T R U C T I O N S
This Nitrous Outlet vehicle specific dedicated fuel system is designed specifically for the 2016-2021 6th Gen Chevrolet Camaro. If you need any assistance during installation or if you have questions about this dedicated fuel system, call our Tech Help Line at (254) 848-4300.
Tools Needed for Installation*:• 13mm Deep Socket • 10mm Deep Socket • Ratchet • 9/16” Wrench • 11/16” Wrench • 3/4” Wrench• T40 Torx bit • Body Tool • Razorblade • Drill • 3/8” Drill Bit • 7/8” Hole Saw• Large Hose Cutters • Jack & Jack Stands • Center Punch • 1-1/16” Hole Saw • 9/64” Allen Wrench
*These are the tools required for installation of this kit on a stock vehicle. If your vehicle has aftermarket parts, other tools may be required.
Pre-Installation Tips:• Adding a Fuel Pressure Safety Switch will prevent the nitrous system from activation in the event fuel pressure drops. Low Pressure Part # 00-60000 High Pressure Part # 00-60001• A Fuel Pressure Gauge is needed as a visual reference for fuel pressure. Low Pressure Part # 00-63003 High Pressure Part # 00-63004• A mild grade (Blue)Loctite is recommended on straight threads such as the ones on the regulator (3/8NPT).• This fuel system is designed to work in conjunction with pump gas, E85 and most race gas. Not for use with alcohol or methanol.• Some Fuels with a high ethanol content may cause the lid gasket to swell causing a situation to where removing the lid can be difficult.
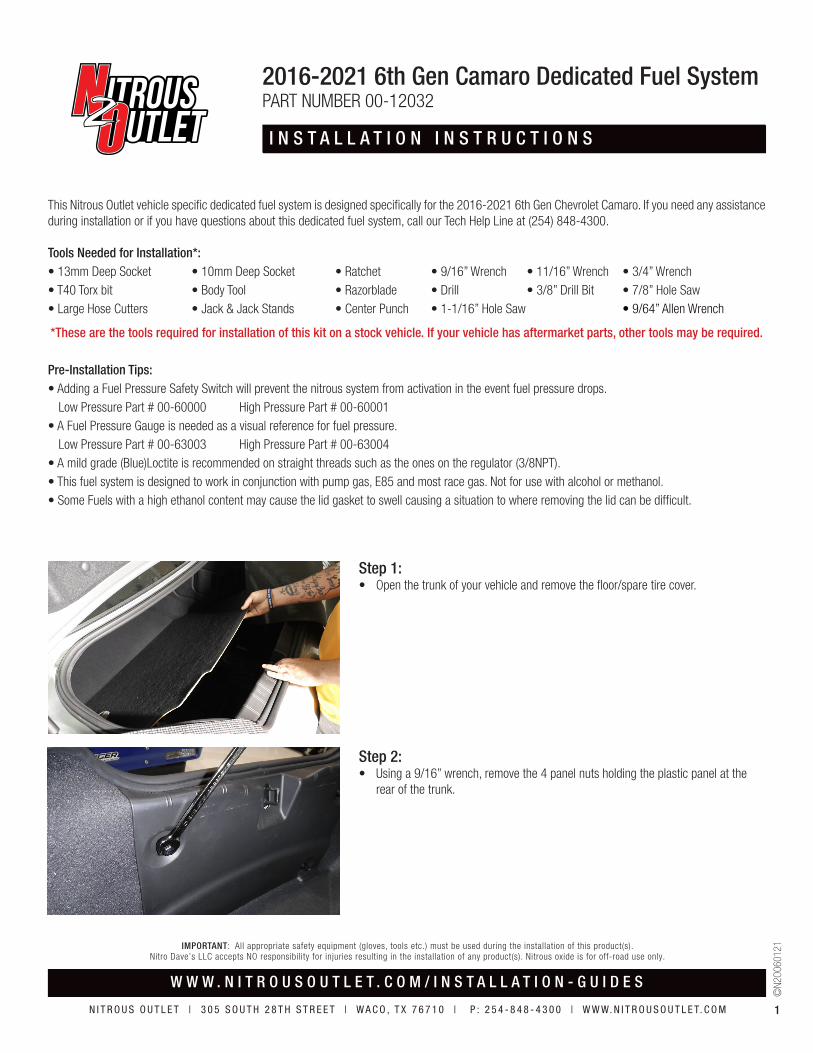
Step 1:• Open the trunk of your vehicle and remove the floor/spare tire cover.
Step 2:• Using a 9/16” wrench, remove the 4 panel nuts holding the plastic panel at the rear of the trunk.

2016-2021 6th Gen Camaro Dedicated Fuel SystemPART NUMBER 00-12032
I N S T A L L A T I O N I N S T R U C T I O N S
W W W . N I T R O U S O U T L E T . C O M / I N S T A L L A T I O N - G U I D E S
N I T R O U S O U T L E T | 3 0 5 S O U T H 2 8 T H S T R E E T | W A C O , T X 7 6 7 1 0 | P : 2 5 4 - 8 4 8 - 4 3 0 0 | W W W. N I T R O U S O U T L E T. C O M
©N2
O060
121
2
IMPORTANT: All appropriate safety equipment (gloves, tools etc.) must be used during the installation of this product(s).Nitro Dave’s LLC accepts NO responsibility for injuries resulting in the installation of any product(s). Nitrous oxide is for off-road use only.
Step 4: • Using a 10mm socket, loosen the nut and remove and remove the negative battery terminal.
Step 5:• Remove the spare tire kit from the trunk. Using a T40 Torx bit, remove the foam insert from the vehicle.
Step 6:• Using a 10mm socket, remove the nut closest to the rear bumper holding the electronics bracket on the driver side.
Step 3:• Pull the bottom of the panel forward then pull up to remove it from the vehicle.

2016-2021 6th Gen Camaro Dedicated Fuel SystemPART NUMBER 00-12032
I N S T A L L A T I O N I N S T R U C T I O N S
W W W . N I T R O U S O U T L E T . C O M / I N S T A L L A T I O N - G U I D E S
N I T R O U S O U T L E T | 3 0 5 S O U T H 2 8 T H S T R E E T | W A C O , T X 7 6 7 1 0 | P : 2 5 4 - 8 4 8 - 4 3 0 0 | W W W. N I T R O U S O U T L E T. C O M
©N2
O060
121
3
IMPORTANT: All appropriate safety equipment (gloves, tools etc.) must be used during the installation of this product(s).Nitro Dave’s LLC accepts NO responsibility for injuries resulting in the installation of any product(s). Nitrous oxide is for off-road use only.
Step 9:• Install 1/4-20 Rivet Nuts and bolt tank in to vehicle.
Step 8:• Check under the area you are drilling to ensure it is clear of any electrical or fuel systems components. If it is clear, use a 3/8” drill bit to drill the holes you marked.
Step 7:• Place the tank in the bottom of the trunk and mark the four mounting hole locations.
Step 10:• Jack up the driver side of the car and place jack stands under the car for safety. Using a 10mm socket, remove the under car panels.

2016-2021 6th Gen Camaro Dedicated Fuel SystemPART NUMBER 00-12032
I N S T A L L A T I O N I N S T R U C T I O N S
W W W . N I T R O U S O U T L E T . C O M / I N S T A L L A T I O N - G U I D E S
N I T R O U S O U T L E T | 3 0 5 S O U T H 2 8 T H S T R E E T | W A C O , T X 7 6 7 1 0 | P : 2 5 4 - 8 4 8 - 4 3 0 0 | W W W. N I T R O U S O U T L E T. C O M
©N2
O060
121
4
IMPORTANT: All appropriate safety equipment (gloves, tools etc.) must be used during the installation of this product(s).Nitro Dave’s LLC accepts NO responsibility for injuries resulting in the installation of any product(s). Nitrous oxide is for off-road use only.
Step 12:• Behind the front wheel, feed the lines up the back side of the front fender well and into the engine bay.
Step 11:• Route the feed and return lines underneath the driver’s side of the car along the rocker panel.
Step 13:• Route the hoses between the strut tower and brake master cylinder, under the strut tower brace.

2016-2021 6th Gen Camaro Dedicated Fuel SystemPART NUMBER 00-12032
I N S T A L L A T I O N I N S T R U C T I O N S
W W W . N I T R O U S O U T L E T . C O M / I N S T A L L A T I O N - G U I D E S
N I T R O U S O U T L E T | 3 0 5 S O U T H 2 8 T H S T R E E T | W A C O , T X 7 6 7 1 0 | P : 2 5 4 - 8 4 8 - 4 3 0 0 | W W W. N I T R O U S O U T L E T. C O M
©N2
O060
121
5
IMPORTANT: All appropriate safety equipment (gloves, tools etc.) must be used during the installation of this product(s).Nitro Dave’s LLC accepts NO responsibility for injuries resulting in the installation of any product(s). Nitrous oxide is for off-road use only.
Step 15:• In front of the back tire, route the lines beside the fuel tank, then upward around the suspension mounts, then up through the hole in the floor of the quarter panel.
Step 14:• In the trunk, remove the body plug from the driver side quarter panel floor.
2016-2021 6th Gen Camaro Dedicated Fuel SystemPART NUMBER 00-12032
I N S T A L L A T I O N I N S T R U C T I O N S
W W W . N I T R O U S O U T L E T . C O M / I N S T A L L A T I O N - G U I D E S
N I T R O U S O U T L E T | 3 0 5 S O U T H 2 8 T H S T R E E T | W A C O , T X 7 6 7 1 0 | P : 2 5 4 - 8 4 8 - 4 3 0 0 | W W W. N I T R O U S O U T L E T. C O M
©N2
O060
121
6
IMPORTANT: All appropriate safety equipment (gloves, tools etc.) must be used during the installation of this product(s).Nitro Dave’s LLC accepts NO responsibility for injuries resulting in the installation of any product(s). Nitrous oxide is for off-road use only.
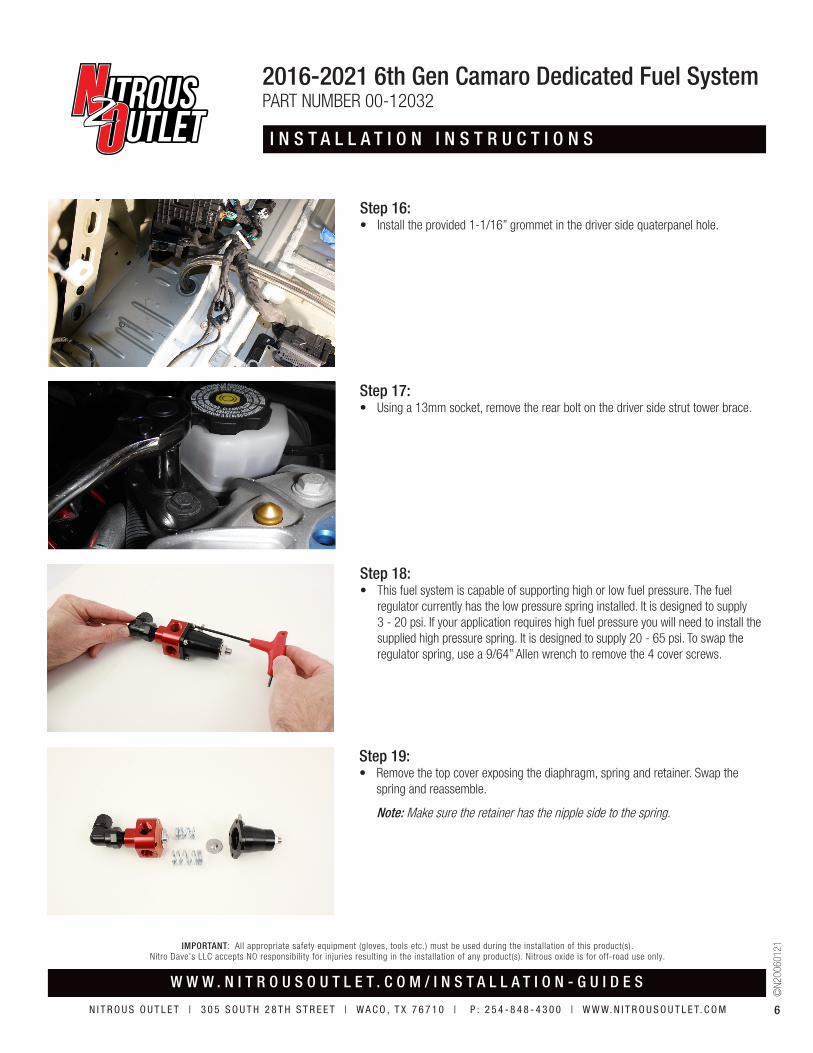
Step 17:• Using a 13mm socket, remove the rear bolt on the driver side strut tower brace.
Step 18:• This fuel system is capable of supporting high or low fuel pressure. The fuel regulator currently has the low pressure spring installed. It is designed to supply 3 - 20 psi. If your application requires high fuel pressure you will need to install the supplied high pressure spring. It is designed to supply 20 - 65 psi. To swap the regulator spring, use a 9/64” Allen wrench to remove the 4 cover screws.
Step 19:• Remove the top cover exposing the diaphragm, spring and retainer. Swap the spring and reassemble.
Note: Make sure the retainer has the nipple side to the spring.
Step 16:• Install the provided 1-1/16” grommet in the driver side quaterpanel hole.

2016-2021 6th Gen Camaro Dedicated Fuel SystemPART NUMBER 00-12032
I N S T A L L A T I O N I N S T R U C T I O N S
W W W . N I T R O U S O U T L E T . C O M / I N S T A L L A T I O N - G U I D E S
N I T R O U S O U T L E T | 3 0 5 S O U T H 2 8 T H S T R E E T | W A C O , T X 7 6 7 1 0 | P : 2 5 4 - 8 4 8 - 4 3 0 0 | W W W. N I T R O U S O U T L E T. C O M
©N2
O060
121
7
IMPORTANT: All appropriate safety equipment (gloves, tools etc.) must be used during the installation of this product(s).Nitro Dave’s LLC accepts NO responsibility for injuries resulting in the installation of any product(s). Nitrous oxide is for off-road use only.
Step 21:• Using a 3/4” wrench, install the 3/8”NPT x 6AN 90° fitting on the left side of the fuel pressure regulator. Tighten the fitting with the 6AN thread pointed the direction of the return port. Use blue Loc-tite on the fittings NPT theads.
Step 20:• Using a 5/16” Allen wrench, install the 3/8”NPT hex plugs in the front and back of the fuel pressure regulator. Use blue Loc-tite on the fittings NPT theads.
Step 22:• Using a 3/4” wrench, install the 3/8”NPT x 6AN straight fittings in the remaining ports of the fuel pressure regulator. Use blue Loc-tite on the fittings NPT theads.
Step 23:• Bend the Aeromotive supplied regulator bracket to fit as shown. The vertical leg should be as close as possible to the regulator without contacting it. The horizontal leg should be even with the screws holding the regulator together.

2016-2021 6th Gen Camaro Dedicated Fuel SystemPART NUMBER 00-12032
I N S T A L L A T I O N I N S T R U C T I O N S
W W W . N I T R O U S O U T L E T . C O M / I N S T A L L A T I O N - G U I D E S
N I T R O U S O U T L E T | 3 0 5 S O U T H 2 8 T H S T R E E T | W A C O , T X 7 6 7 1 0 | P : 2 5 4 - 8 4 8 - 4 3 0 0 | W W W. N I T R O U S O U T L E T. C O M
©N2
O060
121
8
IMPORTANT: All appropriate safety equipment (gloves, tools etc.) must be used during the installation of this product(s).Nitro Dave’s LLC accepts NO responsibility for injuries resulting in the installation of any product(s). Nitrous oxide is for off-road use only.
Step 25:• Using the supplied bracket, install the Fuel Pressure Regulator with the vacuum line pointed toward the front of the vehicle.
Step 24:Using a 9/64” Allen wrench, install the fuel pressure regulator on the provided mounting bracket as shown.
Step 26:• Pull the fuel lines to the Fuel Pressure Regulator in the engine bay and to the fuel tank in the trunk. Tape the raw ends of each line, then using large cutters, cut the excess length of the fuel lines. Make sure to leave a little extra. You will have to replace the line if you cut it too short.
Step 27:• Put the female side of the hose end onto the fuel hose.

2016-2021 6th Gen Camaro Dedicated Fuel SystemPART NUMBER 00-12032
I N S T A L L A T I O N I N S T R U C T I O N S
W W W . N I T R O U S O U T L E T . C O M / I N S T A L L A T I O N - G U I D E S
N I T R O U S O U T L E T | 3 0 5 S O U T H 2 8 T H S T R E E T | W A C O , T X 7 6 7 1 0 | P : 2 5 4 - 8 4 8 - 4 3 0 0 | W W W. N I T R O U S O U T L E T. C O M
©N2
O060
121
9
IMPORTANT: All appropriate safety equipment (gloves, tools etc.) must be used during the installation of this product(s).Nitro Dave’s LLC accepts NO responsibility for injuries resulting in the installation of any product(s). Nitrous oxide is for off-road use only.
Step 29:• Blow air through one of the lines and note where you connect it to the regulator. Connect one hose to the input and one hose to the return of the Fuel Pressure Regulator.
Step 28:• Spray silicon lubricant onto the threads of the male side of the hose end, then screw it into the female side of the hose end. Use a 3/4” wrench to tighten it down. Both hoses will have 90* hose ends where they connect to the tank. Under the hood, the hoses will need to have straight hose ends.
Step 30:• Disconnect the electrical connections from the Control Module to the driver side of the fuel tank. This will allow for room to route and connect the supply and return hoses to the tank.
Step 31:• Using an 11/16” wrench, connect the supply line to the lowest fitting closest to the rear of the car. Connect the return line to the highest fitting toward the front of the car.

2016-2021 6th Gen Camaro Dedicated Fuel SystemPART NUMBER 00-12032
I N S T A L L A T I O N I N S T R U C T I O N S
W W W . N I T R O U S O U T L E T . C O M / I N S T A L L A T I O N - G U I D E S
N I T R O U S O U T L E T | 3 0 5 S O U T H 2 8 T H S T R E E T | W A C O , T X 7 6 7 1 0 | P : 2 5 4 - 8 4 8 - 4 3 0 0 | W W W. N I T R O U S O U T L E T. C O M
©N2
O060
121
10
IMPORTANT: All appropriate safety equipment (gloves, tools etc.) must be used during the installation of this product(s).Nitro Dave’s LLC accepts NO responsibility for injuries resulting in the installation of any product(s). Nitrous oxide is for off-road use only.
Step 33:• Using the excess 8” line from Step 19, install one 90° hose end & one straight hose end. Connect the 90° end to the Fuel Pressure Regulator and the straight end to the fuel solenoid. If you purchased a Fuel Pressure Gauge, install it between the Fuel Pressure Regulator and the line leading to the fuel solenoid. *Shown with optional Fuel Pressure Gauge: P/N 00-63004-6*
Step 32:• Reconnect the electrical connections to the Control Module.
Step 34:• Connect a vacuum line from the Fuel Pressure Regulator to the supercharger bypass valve on front of the engine.
2016-2021 6th Gen Camaro Dedicated Fuel SystemPART NUMBER 00-12032
I N S T A L L A T I O N I N S T R U C T I O N S
W W W . N I T R O U S O U T L E T . C O M / I N S T A L L A T I O N - G U I D E S
N I T R O U S O U T L E T | 3 0 5 S O U T H 2 8 T H S T R E E T | W A C O , T X 7 6 7 1 0 | P : 2 5 4 - 8 4 8 - 4 3 0 0 | W W W. N I T R O U S O U T L E T. C O M
©N2
O060
121
11
IMPORTANT: All appropriate safety equipment (gloves, tools etc.) must be used during the installation of this product(s).Nitro Dave’s LLC accepts NO responsibility for injuries resulting in the installation of any product(s). Nitrous oxide is for off-road use only.
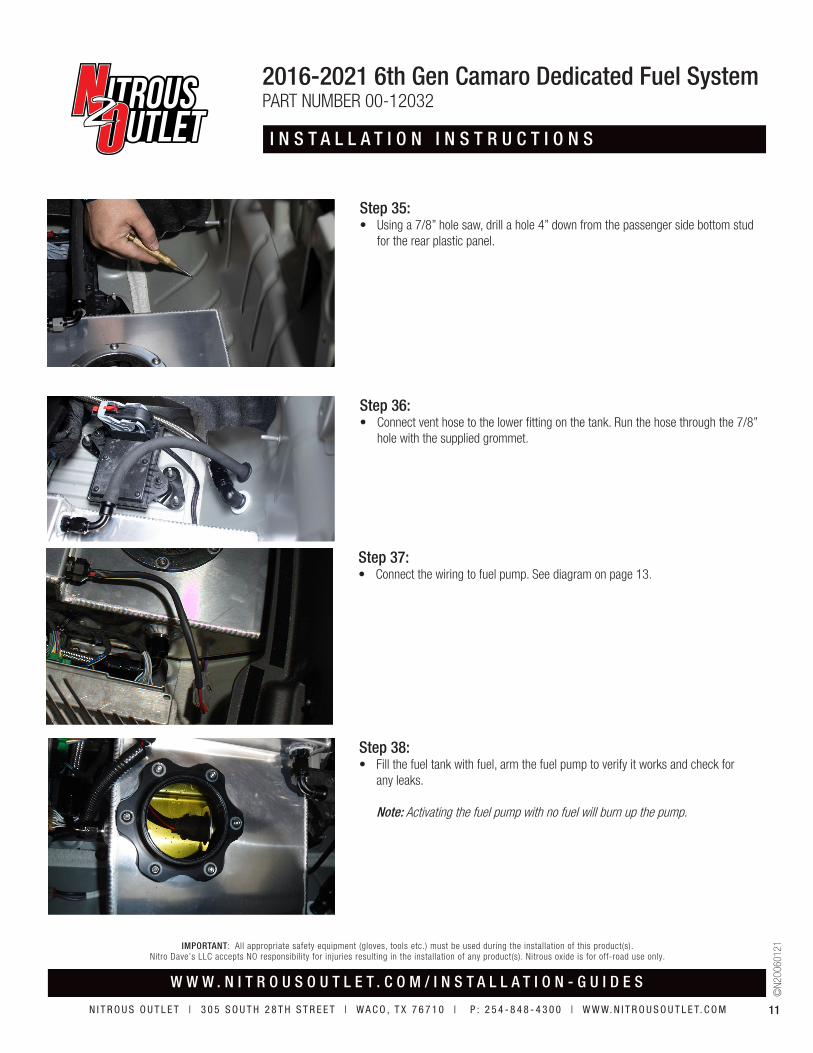
Step 36:• Connect vent hose to the lower fitting on the tank. Run the hose through the 7/8” hole with the supplied grommet.
Step 35:• Using a 7/8” hole saw, drill a hole 4” down from the passenger side bottom stud for the rear plastic panel.
Step 37:• Connect the wiring to fuel pump. See diagram on page 13.
Step 38:• Fill the fuel tank with fuel, arm the fuel pump to verify it works and check for any leaks. Note: Activating the fuel pump with no fuel will burn up the pump.

2016-2021 6th Gen Camaro Dedicated Fuel SystemPART NUMBER 00-12032
I N S T A L L A T I O N I N S T R U C T I O N S
W W W . N I T R O U S O U T L E T . C O M / I N S T A L L A T I O N - G U I D E S
N I T R O U S O U T L E T | 3 0 5 S O U T H 2 8 T H S T R E E T | W A C O , T X 7 6 7 1 0 | P : 2 5 4 - 8 4 8 - 4 3 0 0 | W W W. N I T R O U S O U T L E T. C O M
©N2
O060
121
12
IMPORTANT: All appropriate safety equipment (gloves, tools etc.) must be used during the installation of this product(s).Nitro Dave’s LLC accepts NO responsibility for injuries resulting in the installation of any product(s). Nitrous oxide is for off-road use only.
Step 39:• To set the regulated fuel pressure you will need to reference back to the nitrous systems jetting card. Pick the desired fuel pressure that matches the fuel jet you chose. The most accurate way to set the fuel systems fuel pressure is to set the flowing pressure. In order to do this you will need a flow tool kit. The flow tool kit uses a certified accurate gauge and places the flow restriction jet at the end of the fuel system feed hose. (The Nitrous Outlet Certified Fuel Pressure Test Gauge kit is part # 00-63010.)
Step 40:• Using a 9/16” wrench, loosen the nut at the top of the fuel pressure regulator. Using a 3/16” Allen wrench, adjust the set screw to achieve the desired fuel pres sure. Turn the Allen wrench to the right to increase pressure. Turn the Allen wrench to the left to decrease pressure. Once the pressure is set, use the 9/16” wrench to tighten the nut to lock the set screw in place.
CONCLUSION• www
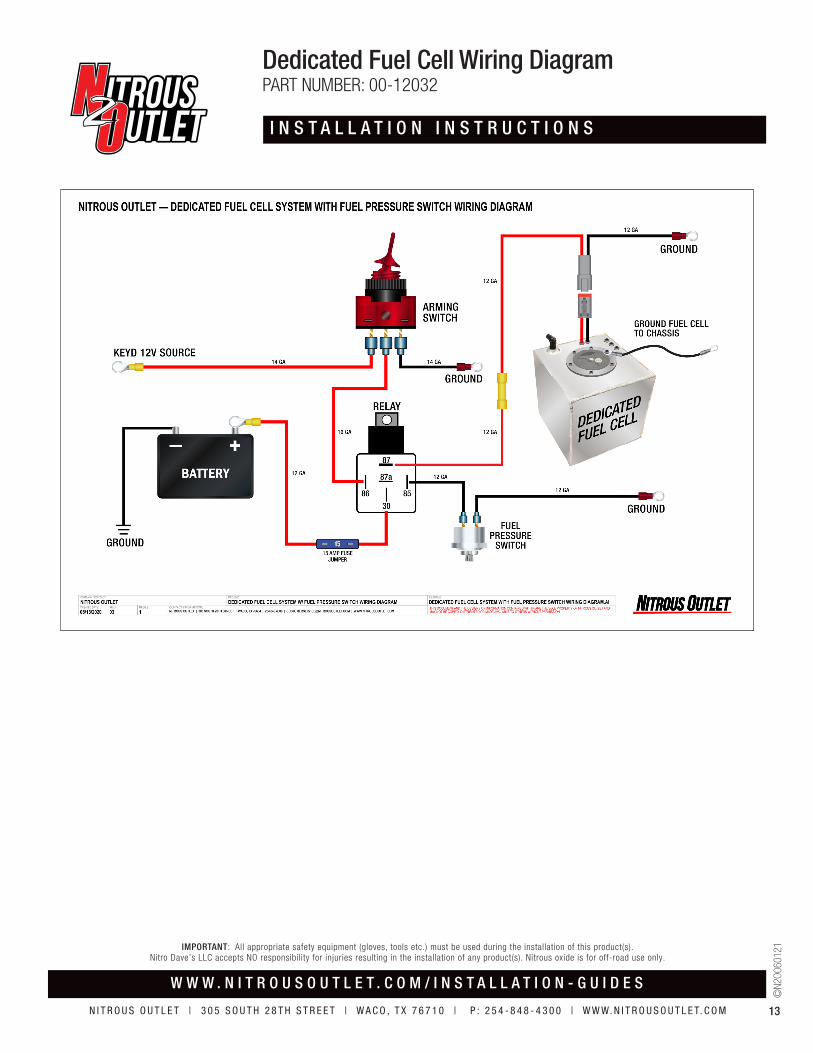
Dedicated Fuel Cell Wiring DiagramPART NUMBER: 00-12032
I N S T A L L A T I O N I N S T R U C T I O N S
W W W . N I T R O U S O U T L E T . C O M / I N S T A L L A T I O N - G U I D E S
N I T R O U S O U T L E T | 3 0 5 S O U T H 2 8 T H S T R E E T | W A C O , T X 7 6 7 1 0 | P : 2 5 4 - 8 4 8 - 4 3 0 0 | W W W. N I T R O U S O U T L E T. C O M
©N2
O060
121
13
IMPORTANT: All appropriate safety equipment (gloves, tools etc.) must be used during the installation of this product(s).Nitro Dave’s LLC accepts NO responsibility for injuries resulting in the installation of any product(s). Nitrous oxide is for off-road use only.

W W W . N I T R O U S O U T L E T . C O M / I N S T A L L A T I O N - G U I D E S
N I T R O U S O U T L E T | 3 0 5 S O U T H 2 8 T H S T R E E T | W A C O , T X 7 6 7 1 0 | P : 2 5 4 - 8 4 8 - 4 3 0 0 | W W W. N I T R O U S O U T L E T. C O M
©N2
O060
121
14
IMPORTANT: All appropriate safety equipment (gloves, tools etc.) must be used during the installation of this product(s).Nitro Dave’s LLC accepts NO responsibility for injuries resulting in the installation of any product(s). Nitrous oxide is for off-road use only.
Deutsch Connector Assembly Instructions
I N S T A L L A T I O N I N S T R U C T I O N S
Deutsch Connector Assembly: To assemble Deutsch terminal ends you can use a special crimper, or if done cautiously, this can be done with a pair of needle nose pliers.
Step 1:• Strip the end of the wire you want to place the connector on about 3/8”.
Step 2:• Using a crimp tool or needle nose pliers, crimp the connector down. First the smaller crimp and then the larger crimp, make sure the weather pack seal gets crimped with the larger side.
Step 3:• Once your sure you have a good crimp slide the pins into the connector housing being sure to match the wires correctly on each side. Push the pin in the housing until you feel a positive click and the wire cannot be pulled back out of the connector.
Step 4:• Install the provided pin retainer lock in the connector body. It simply snaps in to place.

PTFE Hose End Installation Instructions
I N S T A L L A T I O N I N S T R U C T I O N S
W W W . N I T R O U S O U T L E T . C O M / I N S T A L L A T I O N - G U I D E S
N I T R O U S O U T L E T | 3 0 5 S O U T H 2 8 T H S T R E E T | W A C O , T X 7 6 7 1 0 | P : 2 5 4 - 8 4 8 - 4 3 0 0 | W W W. N I T R O U S O U T L E T. C O M
©N2
O060
121
15
IMPORTANT: All appropriate safety equipment (gloves, tools etc.) must be used during the installation of this product(s).Nitro Dave’s LLC accepts NO responsibility for injuries resulting in the installation of any product(s). Nitrous oxide is for off-road use only.
• Using two 3/4” wrenches, thread the male and female ends together.
• Insert the male end into the open end of the hose.
• Put the female side of the hose end onto the fuel hose.
• Put the inner sleeve of the fitting on the end of the hose with the tapered end over the Teflon inner liner.
Tools Needed for Installation:• 2 - 3/4” Wrenches • These instructions will work with straight, 45° and 90° hose ends

W W W . N I T R O U S O U T L E T . C O M / I N S T A L L A T I O N - G U I D E S
N I T R O U S O U T L E T | 3 0 5 S O U T H 2 8 T H S T R E E T | W A C O , T X 7 6 7 1 0 | P : 2 5 4 - 8 4 8 - 4 3 0 0 | W W W. N I T R O U S O U T L E T. C O M
©N2
O060
121
16
IMPORTANT: All appropriate safety equipment (gloves, tools etc.) must be used during the installation of this product(s).Nitro Dave’s LLC accepts NO responsibility for injuries resulting in the installation of any product(s). Nitrous oxide is for off-road use only.
Do-It-Yourself Riv-Nut Installation Instructions
I N S T A L L A T I O N I N S T R U C T I O N S
This document is used for Do-It-Yourself rivet nut installation instructions. If you need any assistance during installation or if you have questions about this plate system, call our Tech Help Line at (254) 848-4300.
Tools Needed for Installation*:• 1/2” Wrench • 7/16” Wrench • 1/4”-20 Bolt about 1 1/2” long (Does not have to be a socket head) • 1/4”-20 Nut • 5/16-18” Nut
*These are the tools required for installation of this kit on a stock vehicle. If your vehicle has aftermarket parts, other tools may be required.
Step 1:• Thread the ¼-20 nut all the way onto the ¼-20 bolt. Slide the bigger nut over the ¼-20 bolt and then thread the rivnut onto the ¼-20 bolt.
Step 2:• Insert rivnut assembly into an 11/32” hole
Step 3:• Use both the 7/16” and ½” wrench. Hold the ½” wrench still and tighten the ¼-20 nut till it stops.

W W W . N I T R O U S O U T L E T . C O M / I N S T A L L A T I O N - G U I D E S
N I T R O U S O U T L E T | 3 0 5 S O U T H 2 8 T H S T R E E T | W A C O , T X 7 6 7 1 0 | P : 2 5 4 - 8 4 8 - 4 3 0 0 | W W W. N I T R O U S O U T L E T. C O M
©N2
O060
121
17
IMPORTANT: All appropriate safety equipment (gloves, tools etc.) must be used during the installation of this product(s).Nitro Dave’s LLC accepts NO responsibility for injuries resulting in the installation of any product(s). Nitrous oxide is for off-road use only.
Do-It-Yourself Riv-Nut Installation Instructions
I N S T A L L A T I O N I N S T R U C T I O N S
Step 4:• Un-thread the ¼-20 bolt with the nuts to complete the install.


![Dictionary of Chemistry [6th Ed.]](https://static.fdokumen.com/doc/165x107/6316ba01f68b807f88035f31/dictionary-of-chemistry-6th-ed.jpg)


