2014 TAURUS Owner's Manual - Dealer E Process
554
2014 TAURUS Owner’s Manual EG1J 19A321 AA | October 2013 | Second Printing | Owner’s Manual | Taurus | Litho in U.S.A. 2014 TAURUS Owner’s Manual fordowner.com ford.ca
-
Upload
khangminh22 -
Category
Documents
-
view
3 -
download
0
Transcript of 2014 TAURUS Owner's Manual - Dealer E Process

2014 TAURUS Owner’s Manual
EG1J 19A321 AA | October 2013 | Second Printing | Owner’s Manual | Taurus | Litho in U.S.A.
20
14 T
AU
RU
S O
wn
er’s
Ma
nu
al
fordowner.com ford.ca
Introduction 9
Child Safety 17Child seat positioning . . . . . . . . . . . . . . . . . . . . . . . . . . . . . . . . . . .19Booster seats . . . . . . . . . . . . . . . . . . . . . . . . . . . . . . . . . . . . . . . . .21Installing child seats . . . . . . . . . . . . . . . . . . . . . . . . . . . . . . . . . . . .24Child safety locks . . . . . . . . . . . . . . . . . . . . . . . . . . . . . . . . . . . . . .31
Safety Belts 32Fastening the safety belts . . . . . . . . . . . . . . . . . . . . . . . . . . . . . . . .34Safety belt height adjustment . . . . . . . . . . . . . . . . . . . . . . . . . . . . .37Safety belt warning light and indicator chime. . . . . . . . . . . . . . . . . .37Safety belt-minder . . . . . . . . . . . . . . . . . . . . . . . . . . . . . . . . . . . . .38Child restraint and safety belt maintenance . . . . . . . . . . . . . . . . . . .40
Personal Safety System 41
Supplementary Restraints System 42Driver and passenger airbags . . . . . . . . . . . . . . . . . . . . . . . . . . . . .44Front passenger sensing system . . . . . . . . . . . . . . . . . . . . . . . . . . .45Side airbags . . . . . . . . . . . . . . . . . . . . . . . . . . . . . . . . . . . . . . . . . .49Safety canopy curtain airbags . . . . . . . . . . . . . . . . . . . . . . . . . . . . .51Crash sensors and airbag indicator . . . . . . . . . . . . . . . . . . . . . . . . .53Airbag disposal. . . . . . . . . . . . . . . . . . . . . . . . . . . . . . . . . . . . . . . .54
Keys and Remote Control 55General information on radio frequencies. . . . . . . . . . . . . . . . . . . . .55Remote control . . . . . . . . . . . . . . . . . . . . . . . . . . . . . . . . . . . . . . .56Keys . . . . . . . . . . . . . . . . . . . . . . . . . . . . . . . . . . . . . . . . . . . . . . .56Replacing a lost key or remote control. . . . . . . . . . . . . . . . . . . . . . .62
Table of Contents 1
2014 TaurusOwners Guide gf, 2nd Printing, September 2013USA (fus)

MyKey 63Settings, MyKey . . . . . . . . . . . . . . . . . . . . . . . . . . . . . . . . . . . . . . .63Creating. . . . . . . . . . . . . . . . . . . . . . . . . . . . . . . . . . . . . . . . . . . . .64Clearing . . . . . . . . . . . . . . . . . . . . . . . . . . . . . . . . . . . . . . . . . . . . .65System status. . . . . . . . . . . . . . . . . . . . . . . . . . . . . . . . . . . . . . . . .65Remote start, MyKey . . . . . . . . . . . . . . . . . . . . . . . . . . . . . . . . . . .66Troubleshooting, MyKey . . . . . . . . . . . . . . . . . . . . . . . . . . . . . . . . .66
Locks 68Locking and unlocking . . . . . . . . . . . . . . . . . . . . . . . . . . . . . . . . . .68SecuriCode™ keyless entry keypad . . . . . . . . . . . . . . . . . . . . . . . . .72Trunk release . . . . . . . . . . . . . . . . . . . . . . . . . . . . . . . . . . . . . . . . .75Interior luggage compartment release . . . . . . . . . . . . . . . . . . . . . . .76
Security 77SecuriLock® passive anti-theft system. . . . . . . . . . . . . . . . . . . . . . .77Anti-theft alarm . . . . . . . . . . . . . . . . . . . . . . . . . . . . . . . . . . . . . . .80
Steering Wheel 81Adjusting the steering wheel . . . . . . . . . . . . . . . . . . . . . . . . . . . . . .81Steering wheel controls . . . . . . . . . . . . . . . . . . . . . . . . . . . . . . . . .83
Pedals 86Adjustable pedals . . . . . . . . . . . . . . . . . . . . . . . . . . . . . . . . . . . . . .86
Wipers and Washers 87Windshield wipers . . . . . . . . . . . . . . . . . . . . . . . . . . . . . . . . . . . . .87Rain-sensing wipers . . . . . . . . . . . . . . . . . . . . . . . . . . . . . . . . . . . .87Windshield washers . . . . . . . . . . . . . . . . . . . . . . . . . . . . . . . . . . . .88
2 Table of Contents
2014 TaurusOwners Guide gf, 2nd Printing, September 2013USA (fus)

Lighting 89Lighting control . . . . . . . . . . . . . . . . . . . . . . . . . . . . . . . . . . . . . . .89Autolamps . . . . . . . . . . . . . . . . . . . . . . . . . . . . . . . . . . . . . . . . . . .90Instrument lighting dimmer. . . . . . . . . . . . . . . . . . . . . . . . . . . . . . .90Headlamp exit delay . . . . . . . . . . . . . . . . . . . . . . . . . . . . . . . . . . . .91Daytime running lamps . . . . . . . . . . . . . . . . . . . . . . . . . . . . . . . . . .91Automatic high beam control . . . . . . . . . . . . . . . . . . . . . . . . . . . . .92Direction indicators . . . . . . . . . . . . . . . . . . . . . . . . . . . . . . . . . . . .94Interior lamps . . . . . . . . . . . . . . . . . . . . . . . . . . . . . . . . . . . . . . . .94
Windows and Mirrors 96Power windows . . . . . . . . . . . . . . . . . . . . . . . . . . . . . . . . . . . . . . .96Exterior mirrors . . . . . . . . . . . . . . . . . . . . . . . . . . . . . . . . . . . . . . .98Interior mirrors . . . . . . . . . . . . . . . . . . . . . . . . . . . . . . . . . . . . . .100Sun visors . . . . . . . . . . . . . . . . . . . . . . . . . . . . . . . . . . . . . . . . . .100Sunshade . . . . . . . . . . . . . . . . . . . . . . . . . . . . . . . . . . . . . . . . . . .101Moonroof . . . . . . . . . . . . . . . . . . . . . . . . . . . . . . . . . . . . . . . . . . .102
Instrument Cluster 103Gauges. . . . . . . . . . . . . . . . . . . . . . . . . . . . . . . . . . . . . . . . . . . . .103Warning lamps and indicators . . . . . . . . . . . . . . . . . . . . . . . . . . . .104Audible warnings and indicators . . . . . . . . . . . . . . . . . . . . . . . . . .109
Information Displays 110Controls . . . . . . . . . . . . . . . . . . . . . . . . . . . . . . . . . . . . . . . . . . . .110Trip computer . . . . . . . . . . . . . . . . . . . . . . . . . . . . . . . . . . . . . . .114Information messages . . . . . . . . . . . . . . . . . . . . . . . . . . . . . . . . . .121
Climate Control 130Manual heating and air conditioning. . . . . . . . . . . . . . . . . . . . . . . .130Dual automatic temperature control. . . . . . . . . . . . . . . . . . . . . . . .132Rear window defroster . . . . . . . . . . . . . . . . . . . . . . . . . . . . . . . . .139Cabin air filter . . . . . . . . . . . . . . . . . . . . . . . . . . . . . . . . . . . . . . .140
Table of Contents 3
2014 TaurusOwners Guide gf, 2nd Printing, September 2013USA (fus)

Seats 142Sitting in the correct position . . . . . . . . . . . . . . . . . . . . . . . . . . . .142Head restraints. . . . . . . . . . . . . . . . . . . . . . . . . . . . . . . . . . . . . . .143Front manual seats . . . . . . . . . . . . . . . . . . . . . . . . . . . . . . . . . . . .146Power seats . . . . . . . . . . . . . . . . . . . . . . . . . . . . . . . . . . . . . . . . .147Memory function . . . . . . . . . . . . . . . . . . . . . . . . . . . . . . . . . . . . .149Heated seats . . . . . . . . . . . . . . . . . . . . . . . . . . . . . . . . . . . . . . . .150Heated and ventilated seats. . . . . . . . . . . . . . . . . . . . . . . . . . . . . .151
Universal Garage Door Opener (If Equipped) 156HomeLink® wireless control system . . . . . . . . . . . . . . . . . . . . . . .157
Auxiliary Power Points 161
Storage Compartments 162Center console . . . . . . . . . . . . . . . . . . . . . . . . . . . . . . . . . . . . . . .162Overhead console . . . . . . . . . . . . . . . . . . . . . . . . . . . . . . . . . . . . .163
Starting and Stopping the Engine 164Ignition switch . . . . . . . . . . . . . . . . . . . . . . . . . . . . . . . . . . . . . . .165Engine block heater . . . . . . . . . . . . . . . . . . . . . . . . . . . . . . . . . . .170
Fuel and Refueling 172Fuel quality . . . . . . . . . . . . . . . . . . . . . . . . . . . . . . . . . . . . . . . . .173Running out of fuel. . . . . . . . . . . . . . . . . . . . . . . . . . . . . . . . . . . .175Refueling . . . . . . . . . . . . . . . . . . . . . . . . . . . . . . . . . . . . . . . . . . .176Fuel consumption . . . . . . . . . . . . . . . . . . . . . . . . . . . . . . . . . . . . .179
Transmission 183Automatic transmission. . . . . . . . . . . . . . . . . . . . . . . . . . . . . . . . .183
All-Wheel Drive (If Equipped) 188All wheel drive . . . . . . . . . . . . . . . . . . . . . . . . . . . . . . . . . . . . . . .188
4 Table of Contents
2014 TaurusOwners Guide gf, 2nd Printing, September 2013USA (fus)

Brakes 195Brakes . . . . . . . . . . . . . . . . . . . . . . . . . . . . . . . . . . . . . . . . . . . . .195Hints on driving with anti-lock brakes . . . . . . . . . . . . . . . . . . . . . .196Parking brake. . . . . . . . . . . . . . . . . . . . . . . . . . . . . . . . . . . . . . . .196
Traction Control 197Traction Control™ . . . . . . . . . . . . . . . . . . . . . . . . . . . . . . . . . . . .197
Stability Control 198AdvanceTrac® . . . . . . . . . . . . . . . . . . . . . . . . . . . . . . . . . . . . . . .200
Parking Aids 201Sensing system. . . . . . . . . . . . . . . . . . . . . . . . . . . . . . . . . . . . . . .201Active park assist . . . . . . . . . . . . . . . . . . . . . . . . . . . . . . . . . . . . .203Rear-view camera system . . . . . . . . . . . . . . . . . . . . . . . . . . . . . . .208
Cruise Control 212Using cruise control . . . . . . . . . . . . . . . . . . . . . . . . . . . . . . . . . . .212Using Adaptive Cruise Control. . . . . . . . . . . . . . . . . . . . . . . . . . . .213
Driving Aids 222Driver alert . . . . . . . . . . . . . . . . . . . . . . . . . . . . . . . . . . . . . . . . .222Lane keeping system. . . . . . . . . . . . . . . . . . . . . . . . . . . . . . . . . . .224Blind Spot Information System (BLIS) with Cross Traffic Alert(CTA) . . . . . . . . . . . . . . . . . . . . . . . . . . . . . . . . . . . . . . . . . . . . .228Collision warning system . . . . . . . . . . . . . . . . . . . . . . . . . . . . . . . .233Steering . . . . . . . . . . . . . . . . . . . . . . . . . . . . . . . . . . . . . . . . . . . .236
Load Carrying 238Cargo net . . . . . . . . . . . . . . . . . . . . . . . . . . . . . . . . . . . . . . . . . . .238Vehicle loading . . . . . . . . . . . . . . . . . . . . . . . . . . . . . . . . . . . . . . .238
Towing 246Trailer towing. . . . . . . . . . . . . . . . . . . . . . . . . . . . . . . . . . . . . . . .246Wrecker towing . . . . . . . . . . . . . . . . . . . . . . . . . . . . . . . . . . . . . .250Recreational towing . . . . . . . . . . . . . . . . . . . . . . . . . . . . . . . . . . .251
Table of Contents 5
2014 TaurusOwners Guide gf, 2nd Printing, September 2013USA (fus)

Driving Hints 253Economical driving . . . . . . . . . . . . . . . . . . . . . . . . . . . . . . . . . . . .253Driving through water. . . . . . . . . . . . . . . . . . . . . . . . . . . . . . . . . .254Floor mats . . . . . . . . . . . . . . . . . . . . . . . . . . . . . . . . . . . . . . . . . .255
Roadside Emergencies 256Getting roadside assistance . . . . . . . . . . . . . . . . . . . . . . . . . . . . . .256Hazard warning flashers . . . . . . . . . . . . . . . . . . . . . . . . . . . . . . . .257Fuel cut-off switch . . . . . . . . . . . . . . . . . . . . . . . . . . . . . . . . . . . .257Jump-starting the vehicle . . . . . . . . . . . . . . . . . . . . . . . . . . . . . . .258
Customer Assistance 261Reporting safety defects (U.S. only) . . . . . . . . . . . . . . . . . . . . . . .268Reporting safety defects (Canada only) . . . . . . . . . . . . . . . . . . . . .268
Fuses 269Changing a fuse . . . . . . . . . . . . . . . . . . . . . . . . . . . . . . . . . . . . . .269Fuse specification chart . . . . . . . . . . . . . . . . . . . . . . . . . . . . . . . .270
Maintenance 278General information . . . . . . . . . . . . . . . . . . . . . . . . . . . . . . . . . . .278Opening and closing the hood . . . . . . . . . . . . . . . . . . . . . . . . . . . .279Under hood overview . . . . . . . . . . . . . . . . . . . . . . . . . . . . . . . . . .280Engine oil dipstick . . . . . . . . . . . . . . . . . . . . . . . . . . . . . . . . . . . .284Engine oil check. . . . . . . . . . . . . . . . . . . . . . . . . . . . . . . . . . . . . .284Engine coolant check . . . . . . . . . . . . . . . . . . . . . . . . . . . . . . . . . .285Automatic transmission fluid check . . . . . . . . . . . . . . . . . . . . . . . .290Brake fluid check . . . . . . . . . . . . . . . . . . . . . . . . . . . . . . . . . . . . .295Fuel filter. . . . . . . . . . . . . . . . . . . . . . . . . . . . . . . . . . . . . . . . . . .295Washer fluid check . . . . . . . . . . . . . . . . . . . . . . . . . . . . . . . . . . . .296Battery . . . . . . . . . . . . . . . . . . . . . . . . . . . . . . . . . . . . . . . . . . . .296Checking the wiper blades . . . . . . . . . . . . . . . . . . . . . . . . . . . . . .298Air filter(s) . . . . . . . . . . . . . . . . . . . . . . . . . . . . . . . . . . . . . . . . .298Adjusting the headlamps . . . . . . . . . . . . . . . . . . . . . . . . . . . . . . . .300
6 Table of Contents
2014 TaurusOwners Guide gf, 2nd Printing, September 2013USA (fus)

Changing a bulb . . . . . . . . . . . . . . . . . . . . . . . . . . . . . . . . . . . . . .302Bulb specification chart. . . . . . . . . . . . . . . . . . . . . . . . . . . . . . . . .306
Vehicle Care 307Cleaning products. . . . . . . . . . . . . . . . . . . . . . . . . . . . . . . . . . . . .307Cleaning the exterior . . . . . . . . . . . . . . . . . . . . . . . . . . . . . . . . . .307Waxing. . . . . . . . . . . . . . . . . . . . . . . . . . . . . . . . . . . . . . . . . . . . .309Repairing minor paint damage . . . . . . . . . . . . . . . . . . . . . . . . . . . .309Cleaning the engine . . . . . . . . . . . . . . . . . . . . . . . . . . . . . . . . . . .309Cleaning the windows and wiper blades . . . . . . . . . . . . . . . . . . . . .310Cleaning the interior . . . . . . . . . . . . . . . . . . . . . . . . . . . . . . . . . . .311Cleaning the instrument panel and instrument cluster lens . . . . . . .311Cleaning leather seats . . . . . . . . . . . . . . . . . . . . . . . . . . . . . . . . . .312Cleaning the alloy wheels . . . . . . . . . . . . . . . . . . . . . . . . . . . . . . .313Vehicle storage . . . . . . . . . . . . . . . . . . . . . . . . . . . . . . . . . . . . . . .313
Wheels and Tires 316Tire care . . . . . . . . . . . . . . . . . . . . . . . . . . . . . . . . . . . . . . . . . . .316Using summer tires. . . . . . . . . . . . . . . . . . . . . . . . . . . . . . . . . . . .331Using snow chains . . . . . . . . . . . . . . . . . . . . . . . . . . . . . . . . . . . .331Tire Pressure Monitoring System (TPMS) . . . . . . . . . . . . . . . . . . .332Changing a road wheel . . . . . . . . . . . . . . . . . . . . . . . . . . . . . . . . .336Temporary mobility kit . . . . . . . . . . . . . . . . . . . . . . . . . . . . . . . . .343Technical specifications. . . . . . . . . . . . . . . . . . . . . . . . . . . . . . . . .351Wheel lug nut torque . . . . . . . . . . . . . . . . . . . . . . . . . . . . . . . . . .351
Capacities and Specifications 352Part numbers . . . . . . . . . . . . . . . . . . . . . . . . . . . . . . . . . . . . . . . .359Vehicle identification number . . . . . . . . . . . . . . . . . . . . . . . . . . . .360Vehicle certification label . . . . . . . . . . . . . . . . . . . . . . . . . . . . . . .361Transmission code designation. . . . . . . . . . . . . . . . . . . . . . . . . . . .361
Accessories 362Accessories . . . . . . . . . . . . . . . . . . . . . . . . . . . . . . . . . . . . . . . . .362
Table of Contents 7
2014 TaurusOwners Guide gf, 2nd Printing, September 2013USA (fus)

Ford Extended Service Plan 364
Audio System 367MyFord™ system . . . . . . . . . . . . . . . . . . . . . . . . . . . . . . . . . . . . .369Satellite radio information . . . . . . . . . . . . . . . . . . . . . . . . . . . . . . .379Auxiliary input jack . . . . . . . . . . . . . . . . . . . . . . . . . . . . . . . . . . .382USB port . . . . . . . . . . . . . . . . . . . . . . . . . . . . . . . . . . . . . . . . . . .384
SYNC® 385Pairing your phone for the first time . . . . . . . . . . . . . . . . . . . . . . .390911 Assist™ . . . . . . . . . . . . . . . . . . . . . . . . . . . . . . . . . . . . . . . . .405Vehicle Health Report . . . . . . . . . . . . . . . . . . . . . . . . . . . . . . . . . .408
MyFord Touch® (If Equipped) 432Infotainment display . . . . . . . . . . . . . . . . . . . . . . . . . . . . . . . . . . .439Voice recognition . . . . . . . . . . . . . . . . . . . . . . . . . . . . . . . . . . . . .440Listening to music . . . . . . . . . . . . . . . . . . . . . . . . . . . . . . . . . . . .444Phone features . . . . . . . . . . . . . . . . . . . . . . . . . . . . . . . . . . . . . . .465Information Menu . . . . . . . . . . . . . . . . . . . . . . . . . . . . . . . . . . . . .472Settings . . . . . . . . . . . . . . . . . . . . . . . . . . . . . . . . . . . . . . . . . . . .484Climate features . . . . . . . . . . . . . . . . . . . . . . . . . . . . . . . . . . . . . .496Navigation system. . . . . . . . . . . . . . . . . . . . . . . . . . . . . . . . . . . . .499
Appendices 510
Scheduled Maintenance 529Normal scheduled maintenance and log . . . . . . . . . . . . . . . . . . . . .534
Index 546
The information contained in this publication was correct at the time of going toprint. In the interest of continuous development, we reserve the right to changespecifications, design or equipment at any time without notice or obligation.No part of this publication may be reproduced, transmitted, stored in a retrievalsystem or translated into any language in any form by any means without ourwritten permission. Errors and omissions excepted.
© Ford Motor Company 2013
8 Table of Contents
2014 TaurusOwners Guide gf, 2nd Printing, September 2013USA (fus)

ABOUT THIS MANUALThank you for choosing Ford. We recommend that you take some time toget to know your vehicle by reading this manual. The more that youknow about it, the greater the safety and pleasure you will get fromdriving it.
WARNING: Always drive with due care and attention whenusing and operating the controls and features on your vehicle.
Note: This manual describes product features and options availablethroughout the range of available models, sometimes even before theyare generally available. It may describe options not fitted to your vehicle.
Note: Some of the illustrations in this manual may be used for differentmodels, so may appear different to you on your vehicle. However, theessential information in the illustrations is always correct.
Note: Always use and operate your vehicle in line with all applicablelaws and regulations.
Note: Pass on this manual when selling your vehicle. It is an integralpart of the vehicle.
This manual may qualify the location of a component as left-hand side orright-hand side. The side is determined when facing forward in the seat.
A. Right-hand side
B. Left-hand side
Protecting the EnvironmentYou must play your part in protecting the environment. Correctvehicle usage and the authorized disposal of waste, cleaningand lubrication materials are significant steps toward this aim.
A
B
Introduction 9
2014 TaurusOwners Guide gf, 2nd Printing, September 2013USA (fus)

SYMBOL GLOSSARY
WARNING: You risk death or serious injury to yourself andothers if you do not follow the instruction highlighted by the
warning symbol.
These are some of the symbols you may see on your vehicle.
Symbol Description Symbol Description Symbol Description
Safety alert See Owner’sManual
Anti-lockbrakingsystem
Avoidsmoking,flames, orsparks
Battery Battery acid
Brake fluid –non petroleumbase
Brake system Cabin airfilter
Check fuelcap
Child SafetyDoor Lockand Unlock
Child seatlower anchor
Child seattether anchor
Cruisecontrol
Do not openwhen hot
Engine airfilter
Enginecoolant
Enginecoolanttemperature
Engine oil Explosivegas
Fan warning
Fasten safetybelt
Front airbag Front foglamps
10 Introduction
2014 TaurusOwners Guide gf, 2nd Printing, September 2013USA (fus)

Symbol Description Symbol Description Symbol Description
Fuel pumpreset
Fusecompartment
Hazardwarningflasher
Heated rearwindow
Interiorluggagecompartmentrelease
Jack
Lightingcontrol
Low tirepressurewarning
Maintaincorrect fluidlevel
Panic alarm Parking aidsystem
Parkingbrake system
Powersteering fluid
Powerwindowsfront andrear
Powerwindowlockout
Service enginesoon
Side airbag Stabilitycontrol
Windshielddefrost anddemist
Windshieldwasher andwiper
Introduction 11
2014 TaurusOwners Guide gf, 2nd Printing, September 2013USA (fus)

DATA RECORDING
Service Data RecordingService data recorders in your vehicle are capable of collecting andstoring diagnostic information about your vehicle. This potentiallyincludes information about the performance or status of various systemsand modules in the vehicle, such as engine, throttle, steering or brakesystems. In order to properly diagnose and service your vehicle, FordMotor Company, Ford of Canada, and service and repair facilities mayaccess or share among them vehicle diagnostic information receivedthrough a direct connection to your vehicle when diagnosing or servicingyour vehicle. Additionally, when your vehicle is in for service or repair,Ford Motor Company, Ford of Canada, and service and repair facilitiesmay access or share among them data for vehicle improvement purposes.For U.S. only (if equipped), if you choose to use the SYNC® VehicleHealth Report, you consent that certain diagnostic information may alsobe accessed electronically by Ford Motor Company and Ford authorizedservice facilities, and that the diagnostic information may be used for anypurpose. See the SYNC® chapter for more information.
Event Data RecordingThis vehicle is equipped with an event data recorder (EDR).The main purpose of an EDR is to record, in certain crash or nearcrash-like situations, such as an airbag deployment or hitting aroad obstacle; this data will assist in understanding how avehicle’s systems performed. The EDR is designed to record datarelated to vehicle dynamics and safety systems for a short periodof time, typically 30 seconds or less. The EDR in this vehicle isdesigned to record such data as:
• How various systems in your vehicle were operating;
• Whether or not the driver and passenger safety belts werebuckled/fastened;
• How far (if at all) the driver was depressing the acceleratorand/or the brake pedal;
• How fast the vehicle was travelling;
• Where the driver was positioning the steering wheel.
This data can help provide a better understanding of thecircumstances in which crashes and injuries occur.
12 Introduction
2014 TaurusOwners Guide gf, 2nd Printing, September 2013USA (fus)

Note: EDR data is recorded by your vehicle only if a non-trivialcrash situation occurs; no data is recorded by the EDR under normaldriving conditions and no personal data or information (e.g., name,gender, age, and crash location) is recorded (see limitationsregarding 911 Assist and Traffic, Directions and Information privacybelow). However, parties, such as law enforcement, could combinethe EDR data with the type of personally identifying data routinelyacquired during a crash investigation.
To read data recorded by an EDR, special equipment is required,and access to the vehicle or the EDR is needed. In addition to thevehicle manufacturer, other parties, such as law enforcement, thathave such special equipment, can read the information if they haveaccess to the vehicle or the EDR. Ford Motor Company and Ford ofCanada do not access event data recorder information withoutobtaining consent, unless pursuant to court order or whererequired by law enforcement, other government authorities orother third parties acting with lawful authority. Other parties mayseek to access the information independently of Ford MotorCompany and Ford of Canada.
Note: Including to the extent that any law pertaining to EventData Recorders applies to SYNC® or its features, please note thefollowing: Once 911 Assist (if equipped) is enabled (set ON), 911Assist may, through any paired and connected cell phone, discloseto emergency services that the vehicle has been in a crash involvingthe deployment of an airbag or, in certain vehicles, the activation ofthe fuel pump shut-off. Certain versions or updates to 911 Assistmay also be capable of being used to electronically or verballyprovide to 911 operators the vehicle location (such as latitude andlongitude), and/or other details about the vehicle or crash orpersonal information about the occupants to assist 911 operatorsto provide the most appropriate emergency services. If you do notwant to disclose this information, do not activate the 911 Assistfeature. See your SYNC® chapter for more information.
Additionally, when you connect to Traffic, Directions andInformation (if equipped, U.S. only), the service uses GPStechnology and advanced vehicle sensors to collect the vehicle’scurrent location, travel direction, and speed (“vehicle travelinformation”), only to help provide you with the directions, trafficreports, or business searches that you request. If you do not wantFord or its vendors to receive this information, do not activatethe service. For more information, see Traffic, Directions andInformation, Terms and Conditions. See your SYNC® chapter formore information.
Introduction 13
2014 TaurusOwners Guide gf, 2nd Printing, September 2013USA (fus)

CALIFORNIA PROPOSITION 65
WARNING: Some constituents of engine exhaust, certain vehiclecomponents, certain fluids contained in vehicles and certain
products of component wear contain or emit chemicals known to theState of California to cause cancer and birth defects or otherreproductive harm.
PERCHLORATE MATERIALNote: Certain components in your vehicle, such as airbag modules,safety belt pretensioners, and remote control batteries, may containperchlorate material. Special handling may apply for service or vehicleend of life disposal. See www.dtsc.ca.gov/hazardouswaste/perchlorate formore information.
FORD CREDIT (U.S. ONLY)Ford Credit offers a full range of financing and lease plans to help youacquire your vehicle. If you have financed or leased your vehicle throughFord Credit, thank you for your business.
For your convenience, we offer a number of ways to contact us, as wellas help manage your account.
Phone: 1-800-727-7000
For more information regarding Ford Credit, as well as access toAccount Manager, please go to www.fordcredit.com.
REPLACEMENT PARTS RECOMMENDATIONYour vehicle has been built to the highest standards using quality parts.We recommend that you demand the use of genuine Ford and Motorcraftparts whenever your vehicle requires scheduled maintenance or repair.You can clearly identify genuine Ford and Motorcraft parts by looking forthe Ford, FoMoCo or Motorcraft branding on the parts or their packaging.
Scheduled Maintenance and Mechanical RepairsOne of the best ways for you to make sure that your vehicle providesyears of service is to have it maintained in line with ourrecommendations using parts that conform to the specifications detailedin this owner’s manual. Genuine Ford and Motorcraft parts meet orexceed these specifications.
14 Introduction
2014 TaurusOwners Guide gf, 2nd Printing, September 2013USA (fus)

Collision RepairsWe hope that you never experience a collision, but accidents do happen.Genuine Ford replacement collision parts meet our stringentrequirements for fit, finish, structural integrity, corrosion protection anddent resistance. During vehicle development, we validate that these partsdeliver the intended level of protection as a whole system. A great wayto know for sure you are getting this level of protection is to use genuineFord replacement collision parts.
Warranty on Replacement PartsGenuine Ford and Motorcraft replacement parts are the onlyreplacement parts that benefit from a Ford Warranty. Damage caused toyour vehicle as a result of the failure of non-Ford parts may not becovered by the Ford Warranty. For additional information, see the termsand conditions of the Ford Warranty.
SPECIAL NOTICES
New Vehicle Limited WarrantyFor a detailed description of what is covered and what is not covered byyour vehicle’s New Vehicle Limited Warranty, see the warrantyinformation that is provided to you along with your owner’s manual.
Special InstructionsFor your added safety, your vehicle is fitted with sophisticated electroniccontrols.
WARNING: Please read the Supplementary Restraints System
chapter. Failure to follow the specific warnings and instructionscould result in personal injury.
WARNING: Front seat mounted rear-facing child or infant seatsshould NEVER be placed in front of an active passenger airbag.
Introduction 15
2014 TaurusOwners Guide gf, 2nd Printing, September 2013USA (fus)

MOBILE COMMUNICATIONS EQUIPMENTUsing mobile communications equipment is becoming increasinglyimportant in the conduct of business and personal affairs. However, youmust not compromise your own or others’ safety when using suchequipment. Mobile communications can enhance personal safety andsecurity when appropriately used, particularly in emergency situations.Safety must be paramount when using mobile communicationsequipment to avoid negating these benefits.
Mobile communication equipment includes, but is not limited to, cellularphones, pagers, portable email devices, text messaging devices andportable two-way radios.
WARNING: Driving while distracted can result in loss of vehiclecontrol, crash and injury. We strongly recommend that you use
extreme caution when using any device that may take your focus offthe road. Your primary responsibility is the safe operation of yourvehicle. We recommend against the use of any handheld device whiledriving and encourage the use of voice-operated systems when possible.Make sure you are aware of all applicable local laws that may affect theuse of electronic devices while driving.
EXPORT UNIQUE (NON–UNITED STATES/CANADA) VEHICLESPECIFIC INFORMATIONFor your particular global region, your vehicle may be equipped withfeatures and options that are different from the features and options thatare described in this owner’s manual. A market unique supplement maybe supplied that complements this book. By referring to the marketunique supplement, if provided, you can properly identify those features,recommendations and specifications that are unique to your vehicle. Thisowner’s manual is written primarily for the U.S. and Canadian Markets.Features or equipment listed as standard may be different on units builtfor Export. See this owner’s manual for all other requiredinformation and warnings.
16 Introduction
2014 TaurusOwners Guide gf, 2nd Printing, September 2013USA (fus)
GENERAL INFORMATIONSee the following sections for directions on how to properly use safetyrestraints for children.
WARNING: Always make sure your child is secured properly in adevice that is appropriate for their height, age and weight. Child
safety restraints must be bought separately from your vehicle. Failureto follow these instructions and guidelines may result in an increasedrisk of serious injury or death to your child.
WARNING: All children are shaped differently. Therecommendations for safety restraints are based on probable
child height, age and weight thresholds from NHTSA and other safetyorganizations, or are the minimum requirements of law. Fordrecommends checking with a NHTSA Certified Child Passenger SafetyTechnician (CPST) and consulting your pediatrician to make sure yourchild seat is appropriate for your child, and is compatible with andproperly installed in your vehicle. To locate a child seat fitting stationand CPST, contact the NHTSA toll free at 1-888-327-4236 or on theinternet at http://www.nhtsa.dot.gov. In Canada, check with your localSt. John Ambulance office for referral to a CPST or for furtherinformation, contact your provincial ministry of transportation, or locateyour local St. John Ambulance office by searching for St. JohnAmbulance on the internet, or Transport Canada at 1–800–333–0371(http://www.tc.gc.ca). Failure to properly restrain children in safetyseats made especially for their height, age, and weight may result in anincreased risk of serious injury or death to your child.
Child Safety 17
2014 TaurusOwners Guide gf, 2nd Printing, September 2013USA (fus)

Recommendations for Safety Restraints for Children
Child size, height, weight, orage
Recommended restrainttype
Infants ortoddlers
Children weighing 40 lb (18 kg)or less (generally age four oryounger).
Use a child safety seat(sometimes called an infantcarrier, convertible seat, ortoddler seat).
Smallchildren
Children who have outgrown or nolonger properly fit in a child safetyseat (generally children who are lessthan 4 ft. 9 in. (1.45 m) tall, aregreater than age four (4) and lessthan age twelve (12), and between40 lb (18 kg) and 80 lb (36 kg) andupward to 100 lb (45 kg) ifrecommended by your childrestraint manufacturer).
Use a belt-positioningbooster seat.
Largerchildren
Children who have outgrown orno longer properly fit in abelt-positioning booster seat(generally children who are at least4 ft. 9 in. (1.45 m) tall or greaterthan 80 lb (36 kg) or 100 lb(45 kg) if recommended by childrestraint manufacturer).
Use a vehicle safety belthaving the lap belt snug andlow across the hips,shoulder belt centeredacross the shoulder andchest, and seat backupright.
• You are required by law to properly use safety seats for infants andtoddlers in the United States and Canada.
• Many states and provinces require that small children use approvedbooster seats until they reach age eight, a height of 4 feet 9 inches(1.45 meters) tall, or 80 pounds (36 kilograms). Check your local andstate or provincial laws for specific requirements about the safety ofchildren in your vehicle.
• When possible, always properly restrain children twelve (12) years ofage and under in a rear seating position of your vehicle. Accidentstatistics suggest that children are safer when properly restrained inthe rear seating positions than in a front seating position. See FrontPassenger Sensing System in the Supplementary Restraints Systemchapter for more information.
18 Child Safety
2014 TaurusOwners Guide gf, 2nd Printing, September 2013USA (fus)

CHILD SEAT POSITIONING
WARNING: Airbags can kill or injure a child in a child seat.Never place a rear-facing child seat in front of an active airbag.
If you must use a forward-facing child seat in the front seat, move thevehicle seat upon which the child seat is installed all the way back.When possible, all children age 12 and under should be properlyrestrained in a rear seating position. If all children cannot be seated andrestrained properly in a rear seating position, properly restrain thelargest child in the front seat.
WARNING: Always carefully follow the instructions andwarnings provided by the manufacturer of any child restraint to
determine if the restraint device is appropriate for your child’s size,height, weight, or age. Follow the child restraint manufacturer’sinstructions and warnings provided for installation and use inconjunction with the instructions and warnings provided by yourvehicle manufacturer. A safety seat that is improperly installed orutilized, is inappropriate for your child’s height, age or weight, or doesnot properly fit the child, may increase the risk of serious injury ordeath.
WARNING: Never let a passenger hold a child on his or her lapwhile your vehicle is moving. The passenger cannot protect the
child from injury in a crash, which may result in serious injury or death.
WARNING: Never use pillows, books, or towels to boost a child.They can slide around and increase the likelihood of injury or
death in a crash.
WARNING: Always restrain an unoccupied child seat or boosterseat. These objects may become projectiles in a crash or sudden
stop, which may increase the risk of serious injury.
Child Safety 19
2014 TaurusOwners Guide gf, 2nd Printing, September 2013USA (fus)

WARNING: Never place, or allow a child to place, the shoulderbelt under a child’s arm or behind the back because it reduces
the protection for the upper part of the body and may increase the riskof injury or death in a crash.
WARNING: To avoid risk of injury, do not leave children or petsunattended in your vehicle.
RestraintType
Combinedweight ofchild and
childrestraint
seat
Use any attachment method as indicatedbelow by X.
LATCH(loweranchorsand toptetheranchor)
LATCH(loweranchorsonly)
Safetybeltand toptetheranchor
Safetybelt andLATCH(loweranchorsand toptetheranchor)
Safetybeltonly
Rear-facingchild seat
Up to 65 lb(29.5 kg) X X
Rear-facingchild seat
Over 65 lb(29.5 kg) X
Forward-facing childseat
Up to 65 lb(29.5 kg) X X X
Forward-facing childseat
Over 65 lb(29.5 kg) X X
Note: The child seat must rest tightly against the vehicle seat uponwhich it is installed. It may be necessary to lift or remove the headrestraint. See the Seats chapter for information on head restraints.
20 Child Safety
2014 TaurusOwners Guide gf, 2nd Printing, September 2013USA (fus)

BOOSTER SEATS
WARNING: Never place, or allow a child to place, the shoulderbelt under a child’s arm or behind the back because it reduces
the protection for the upper part of the body and may increase the riskof injury or death in a crash.
Use a belt-positioning booster seat for children who have outgrown or nolonger properly fit in a child safety seat (generally children who are lessthan 4 feet 9 inches (1.45 meters) tall, are greater than age four (4) andless than age twelve (12), and between 40 pounds (18 kilograms) and80 pounds (36 kilograms) and upward to 100 pounds (45 kilograms) ifrecommended by your child restraint manufacturer). Many state andprovincial laws require that children use approved booster seats untilthey reach age eight (8), a height of 4 feet 9 inches (1.45 meters) tall, or80 pounds (36 kilograms).
Booster seats should be used until you can answer YES to ALL of thesequestions when the child is seated without a booster seat.
• Can the child sit all the wayback against their vehicle seatwith knees bent comfortably atthe edge of the seat cushion?
• Can the child sit withoutslouching?
• Does the lap belt rest low across the hips?• Is the shoulder belt centered on the shoulder and chest?• Can the child stay seated like this for the whole trip?
Always use booster seats in conjunction with your vehicle lap andshoulder belt.
Child Safety 21
2014 TaurusOwners Guide gf, 2nd Printing, September 2013USA (fus)

Types of Booster Seats• Backless booster seats
If your backless booster seat has a removable shield, remove the shield.If a vehicle seating position has a low seat back or no head restraint, abackless booster seat may place your child’s head (as measured at thetops of the ears) above the top of the seat. In this case, move thebackless booster to another seating position with a higher seat back orhead restraint and lap and shoulder belts, or consider using a high backbooster seat.
• High back booster seats
If, with a backless booster seat, you cannot find a seating position thatadequately supports your child’s head, a high back booster seat would bea better choice.
22 Child Safety
2014 TaurusOwners Guide gf, 2nd Printing, September 2013USA (fus)

Children and booster seats vary in size and shape. Choose a booster thatkeeps the lap belt low and snug across the hips, never up across thestomach, and lets you adjust the shoulder belt to cross the chest and restsnugly near the center of the shoulder. The following drawings comparethe ideal fit (center) to a shoulder belt uncomfortably close to the neckand a shoulder belt that could slip off the shoulder. The drawings alsoshow how the lap belt should be low and snug across the child’s hips.
If the booster seat slides on the vehicle seat upon which it is being used,placing a rubberized mesh sold as shelf or carpet liner under the boosterseat may improve this condition. Do not introduce any item thicker thanthis under the booster seat. Check with the booster seat manufacturer’sinstructions.
Child Safety 23
2014 TaurusOwners Guide gf, 2nd Printing, September 2013USA (fus)

INSTALLING CHILD SEATS
Child SeatsUse a child safety seat (sometimescalled an infant carrier, convertibleseat, or toddler seat) for infants,toddlers or children weighing40 pounds (18 kilograms) or less(generally age four or younger).
Using Lap and Shoulder BeltsWARNING: Airbags can kill or injure a child in a child seat.Never place a rear-facing child seat in front of an active airbag.
If you must use a forward-facing child seat in the front seat, move theseat upon which the child seat is installed all the way back.
WARNING: Airbags can kill or injure a child in a child seat.Children 12 and under should be properly restrained in the rear
seat whenever possible.
WARNING: Depending on where you secure a child restraint,and depending on the child restraint design, you may block
access to certain safety belt buckle assemblies or LATCH loweranchors, rendering those features potentially unusable. To avoid risk ofinjury, occupants should only use seating positions where they are ableto be properly restrained.
When installing a child safety seat with combination lap and shoulder belts:• Use the correct safety belt buckle for that seating position.• Insert the belt tongue into the proper buckle until you hear a snap
and feel it latch. Make sure the tongue is securely fastened in thebuckle.
• Keep the buckle release button pointing up and away from the safetyseat, with the tongue between the child seat and the release button,to prevent accidental unbuckling.
24 Child Safety
2014 TaurusOwners Guide gf, 2nd Printing, September 2013USA (fus)

• Place the vehicle seat upon which the child seat will be installed inthe upright position.
• Put the safety belt in the automatic locking mode. See Step 5. Thisvehicle does not require the use of a locking clip.
Perform the following steps when installing the child seat withcombination lap and shoulder belts:
Note: Although the child seat illustrated is a forward-facing child seat,the steps are the same for installing a rear-facing child seat.
1. Position the child safety seat in aseat with a combination lap andshoulder belt.
2. Pull down on the shoulder beltand then grasp the shoulder beltand lap belt together.
3. While holding the shoulder andlap belt portions together, route thetongue through the child seataccording to the child seatmanufacturer’s instructions. Be surethe belt webbing is not twisted.
Child Safety 25
2014 TaurusOwners Guide gf, 2nd Printing, September 2013USA (fus)
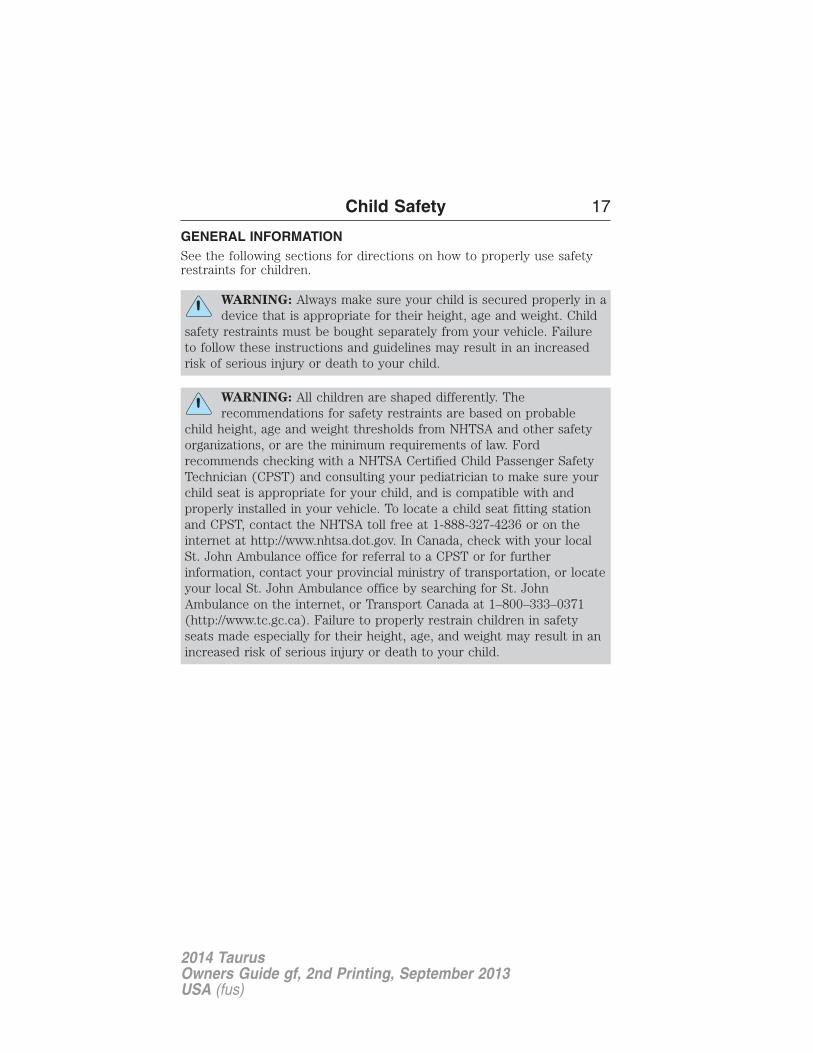
4. Insert the belt tongue into theproper buckle (the buckle closest tothe direction the tongue is comingfrom) for that seating position untilyou hear a snap and feel the latchengage. Make sure the tongue islatched securely by pulling on it.
5. To put the retractor in theautomatic locking mode, grasp theshoulder portion of the belt and pulldownward until all of the belt ispulled out.
Note: The automatic locking mode is available on the front passengerand rear seats. This vehicle does not require the use of a locking clip.
6. Allow the belt to retract to remove slack. The belt will click as itretracts to indicate it is in the automatic locking mode.
7. Try to pull the belt out of the retractor to make sure the retractor isin the automatic locking mode. You should not be able to pull more beltout. If the retractor is not locked, unbuckle the belt and repeat Steps 5and 6.
8. Remove remaining slack from thebelt. Force the seat down with extraweight, for example, by pressingdown or kneeling on the childrestraint while pulling up on theshoulder belt in order to force slackfrom the belt.
26 Child Safety
2014 TaurusOwners Guide gf, 2nd Printing, September 2013USA (fus)

This is necessary to remove the remaining slack that will exist once theextra weight of the child is added to the child restraint. It also helpsto achieve the proper snugness of the child seat to your vehicle.Sometimes, a slight lean toward the buckle will provide extra help toremove remaining slack from the belt.
9. Attach the tether strap (if the child seat is equipped). See UsingTether Straps later in this chapter.
10. Before placing the child in theseat, forcibly move the seat forwardand back to make sure the seat issecurely held in place.
To check this, grab the seat at the belt path and attempt to move it sideto side and forward and back. There should be no more than 1 inch(2.5 centimeters) of movement for proper installation.
Ford recommends checking with a NHTSA Certified Child PassengerSafety Technician to make certain the child restraint is properly installed.In Canada, check with your local St. John Ambulance office for referralto a Child Passenger Safety Technician.
Using Lower Anchors and Tethers for CHildren (LATCH)
WARNING: Never attach two child safety seats to the sameanchor. In a crash, one anchor may not be strong enough to hold
two child safety seat attachments and may break, causing serious injuryor death.
WARNING: Depending on where you secure a child restraint,and depending on the child restraint design, you may block
access to certain safety belt buckle assemblies or LATCH loweranchors, rendering those features potentially unusable. To avoid risk ofinjury, occupants should only use seating positions where they are ableto be properly restrained.
Child Safety 27
2014 TaurusOwners Guide gf, 2nd Printing, September 2013USA (fus)

The LATCH system is composed of three vehicle anchor points: two loweranchors located where seat back and seat cushion meet (called the seatbight) and one top tether anchor located behind that seating position.
LATCH compatible child safety seats have two rigid or webbing mountedattachments that connect to the two lower anchors at the LATCHequipped seating positions in your vehicle. This type of attachmentmethod eliminates the need to use safety belts to attach the child seat,however the safety belt can still be used to attach the child seat. Forforward-facing child seats, the top tether strap must also be attached tothe proper top tether anchor, if a top tether strap has been providedwith your child seat.
Your vehicle has LATCH loweranchors for child seat installation atthe seating positions marked withthe child seat symbol.
The LATCH anchors are located atthe rear section of the rear seatbetween the cushion and seat backbelow the symbols as shown. Followthe child seat manufacturer’sinstructions to properly install achild seat with LATCH attachments.
Follow the instructions on attaching child safety seats with tether straps.See Using Tether Straps later in this chapter.
Attach LATCH lower attachments of the child seat only to the anchorsshown.
28 Child Safety
2014 TaurusOwners Guide gf, 2nd Printing, September 2013USA (fus)

Child seat positioning for LATCH lower anchorsAll the LATCH lower anchors are equally spaced, 11 inches(28 centimeters) apart, allowing for the following child seat positioning:
• If a single child seat is installed using the LATCH lower anchors, it canbe installed at any rear seating position.
• If two child safety seats are installed using the LATCH lower anchors,they must be placed in the outboard seating positions only.
• If three child safety seats are installed, you can install two using theLATCH lower anchors by placing them in each outboard seatingposition and the third in the center using the lap and shoulder belt,OR you can use the LATCH lower anchors for the center child safetyseat and the lap and shoulder belts for the other two child safety seatsin the outboard positions. Use the tether anchors if applicable.
Combining Safety Belt and LATCH Lower Anchors for AttachingChild Safety SeatsWhen used in combination, either the safety belt or the LATCH loweranchors may be attached first, provided a proper installation is achieved.Attach the tether strap afterward, if included with the child seat.
Using Tether StrapsMany forward-facing child safety seats include a tether strapwhich extends from the back of the child safety seat and hooksto an anchoring point called the top tether anchor. Tether
straps are available as an accessory for many older safety seats.
Contact the manufacturer of your child seat for information aboutordering a tether strap, or to obtain a longer tether strap if the tetherstrap on your safety seat does not reach the appropriate top tetheranchor in your vehicle.
Once the child safety seat has been installed using either the safety belt,the lower anchors of the LATCH system, or both, you can attach the toptether strap.
Child Safety 29
2014 TaurusOwners Guide gf, 2nd Printing, September 2013USA (fus)

The tether strap anchors in your vehicle are in the following positions(shown from top view):
Perform the following steps to install a child safety seat with tetheranchors:
Note: If you install a child seat with rigid LATCH attachments, do nottighten the tether strap enough to lift the child seat off your vehicle seatcushion when the child is seated in it. Keep the tether strap just snugwithout lifting the front of the child seat. Keeping the child seat justtouching your vehicle seat gives the best protection in a severe crash.
1. Route the tether strap over the top of the head restraint.
2. Locate the correct anchor for theselected seating position.
3. Open the tether anchor cover.
30 Child Safety
2014 TaurusOwners Guide gf, 2nd Printing, September 2013USA (fus)

4. Clip the tether strap to theanchor as shown.
5. Tighten the child safety seat tether strap according to themanufacturer’s instructions.
If your child restraint system is equipped with a tether strap, and thechild restraint manufacturer recommends its use, Ford also recommendsits use.
CHILD SAFETY LOCKSThe childproof locks are located on the rear edge of each rear door andmust be set separately for each door.
When these locks are set, the reardoors cannot be opened from theinside.
• Insert the key and turn to thelock position (key horizontal) toengage the childproof locks.
• Insert the key and turn to theunlock position (key vertical) todisengage the childproof locks.
Child Safety 31
2014 TaurusOwners Guide gf, 2nd Printing, September 2013USA (fus)

PRINCIPLES OF OPERATION
WARNING: Never let a passenger hold a child on his or her lapwhile your vehicle is moving. The passenger cannot protect the
child from injury in a crash.
WARNING: It is extremely dangerous to ride in a cargo area,inside or outside of a vehicle. In a crash, people riding in these
areas are more likely to be seriously injured or killed. Do not allowpeople to ride in any area of your vehicle that is not equipped withseats and safety belts. Be sure everyone in your vehicle is in a seat andusing a safety belt properly.
WARNING: Always drive and ride with your seatback uprightand the lap belt snug and low across the hips.
WARNING: To reduce the risk of injury, make sure children sitwhere they can be properly restrained.
WARNING: All occupants of your vehicle, including the driver,should always properly wear their safety belts, even when an
airbag supplemental restraint system is provided. Failure to properlywear your safety belt could seriously increase the risk of injury ordeath.
WARNING: In a rollover crash, an unbelted person issignificantly more likely to die than a person wearing a safety
belt.
WARNING: Each seating position in your vehicle has a specificsafety belt assembly which is made up of one buckle and one
tongue that are designed to be used as a pair. 1) Use the shoulder belton the outside shoulder only. Never wear the shoulder belt under thearm. 2) Never swing the safety belt around your neck over the insideshoulder. 3) Never use a single belt for more than one person.
32 Safety Belts
2014 TaurusOwners Guide gf, 2nd Printing, September 2013USA (fus)

WARNING: When possible, all children 12 years old and undershould be properly restrained in a rear seating position. Failure
to follow this could seriously increase the risk of injury or death.
WARNING: Safety belts and seats can become hot in a vehiclethat has been closed up in sunny weather; they could burn a
small child. Check seat covers and buckles before you place a childanywhere near them.
WARNING: Front and rear seat occupants, including pregnantwomen, should wear safety belts for optimum protection in an
accident.
All seating positions in your vehicle have lap and shoulder safety belts.All occupants of the vehicle should always properly wear their safetybelts, even when an airbag supplemental restraint system is provided.
The safety belt system consists of:
• Lap and shoulder safety belts.
• Shoulder safety belt with automatic locking mode (except driversafety belt).
• Height adjuster at the front outboard seating positions.
• Safety belt pretensioner at the front outboard seating positions.
• Belt tension sensor at the front outboard passenger seating position.
• Safety belt warning light and chime. See Safety belt warninglight and indicator chime later in this chapter.
• Crash sensors and monitoring system with readinessindicator. See Crash sensors and airbag indicator in theSupplemental Restraint System chapter.
The safety belt pretensioners are designed to activate in frontal,near-frontal and side crashes, and in rollovers. The safety beltpretensioners at the front seating positions are designed to tighten thesafety belts firmly against the occupant’s body when activated. This helpsincrease the effectiveness of the safety belts. In frontal crashes, thesafety belt pretensioners can be activated alone or, if the crash is ofsufficient severity, together with the front airbags.
Safety Belts 33
2014 TaurusOwners Guide gf, 2nd Printing, September 2013USA (fus)

FASTENING THE SAFETY BELTSThe front outboard and rear safety restraints in your vehicle arecombination lap and shoulder belts.
1. Insert the belt tongue into theproper buckle (the buckle closest tothe direction the tongue is comingfrom) until you hear a snap and feelit latch. Make sure the tongue issecurely fastened in the buckle.
2. To unfasten, press the releasebutton and remove the tongue fromthe buckle.
Restraint of Pregnant Women
WARNING: Always ride and drive with your seatback uprightand the safety belt properly fastened. The lap portion of the
safety belt should fit snug and be positioned low across the hips.The shoulder portion of the safety belt should be positioned acrossthe chest. Pregnant women should also follow this practice. See thefollowing figure.
34 Safety Belts
2014 TaurusOwners Guide gf, 2nd Printing, September 2013USA (fus)

Pregnant women should alwayswear their safety belts. The lap beltportion of a combination lap andshoulder belt should be positionedlow across the hips below the bellyand worn as tight as comfort willallow. The shoulder belt should bepositioned to cross the middle ofthe shoulder and the center of thechest.
Safety Belt Locking Modes
WARNING: After any vehicle crash, the safety belt system at allpassenger seating positions must be checked by an authorized
dealer to verify that the automatic locking retractor feature for childseats is still functioning properly. In addition, all safety belts should bechecked for proper function.
WARNING: The belt and retractor assembly must be replaced ifthe safety belt assembly automatic locking retractor feature or
any other safety belt function is not operating properly when checkedby an authorized dealer. Failure to replace the belt and retractorassembly could increase the risk of injury in crashes.
All safety restraints in the vehicle are combination lap and shoulderbelts. The driver safety belt has the first type of locking mode. The frontoutboard passenger and rear seat safety belts have both types of lockingmodes described as follows:
Vehicle Sensitive ModeThis is the normal retractor mode, which allows free shoulder belt lengthadjustment to your movements and locking in response to vehiclemovement. For example, if the driver brakes suddenly or turns a cornersharply, or the vehicle receives an impact of about 5 mph (8 km/h) ormore, the combination safety belts will lock to help reduce forwardmovement of the driver and passengers.
In addition, the retractor is designed to lock if the webbing is pulled outtoo quickly. If this occurs, let the belt retract slightly and pull webbingout again in a slow and controlled manner.
Safety Belts 35
2014 TaurusOwners Guide gf, 2nd Printing, September 2013USA (fus)

Automatic Locking Mode
In this mode, the shoulder belt is automatically pre-locked. The belt willstill retract to remove any slack in the shoulder belt. The automaticlocking mode is not available on the driver safety belt.
When to Use the Automatic Locking Mode
This mode should be used any time a child safety seat, except a booster,is installed in passenger front or rear seating positions. Children 12 yearsold and under should be properly restrained in a rear seating positionwhenever possible. See the Child Safety chapter.
How to Use the Automatic Locking Mode1. Buckle the combination lap and shoulderbelt.
2. Grasp the shoulder portion and pulldownward until the entire belt is pulled out.
3. Allow the belt to retract. As the beltretracts, you will hear a clicking sound.This indicates the safety belt is now in theautomatic locking mode.
How to Disengage the Automatic Locking Mode
Unbuckle the combination lap and shoulder belt and allow it to retractcompletely to disengage the automatic locking mode and activate thevehicle sensitive (emergency) locking mode.
Safety Belt Extension Assembly
WARNING: Do not use extensions to change the fit of theshoulder belt across the torso.
If the safety belt is too short when fully extended, you can obtain asafety belt extension assembly from an authorized dealer.
Use only extensions manufactured by the same supplier as the safetybelt. Manufacturer identification is located at the end of the webbing onthe label. Also, use the safety belt extension only if the safety belt is tooshort for you when fully extended.
36 Safety Belts
2014 TaurusOwners Guide gf, 2nd Printing, September 2013USA (fus)

SAFETY BELT HEIGHT ADJUSTMENT
WARNING: Position the safety belt height adjusters so that thebelt rests across the middle of your shoulder. Failure to adjust
the safety belt properly could reduce the effectiveness of the safety beltand increase the risk of injury in a crash.
Adjust the height of the shoulder belt so the belt rests across the middleof your shoulder.
To adjust the shoulder belt height:
1. Squeeze the button and slide the heightadjuster up or down.
2. Release the button and pull down on theheight adjuster to make sure it is locked inplace.
SAFETY BELT WARNING LIGHT AND INDICATOR CHIMEThis lamp illuminates and an audible warning will sound if thedriver’s safety belt has not been fastened when the vehicle’signition is turned on.
Conditions of Operation
If... Then...
The driver’s safety belt is notbuckled before the ignitionswitch is turned to the onposition...
The safety belt warning lightilluminates 1-2 minutes and thewarning chime sounds 4-8 seconds.
The driver’s safety belt isbuckled while the indicatorlight is illuminated and thewarning chime is sounding...
The safety belt warning light andwarning chime turn off.
The driver’s safety belt isbuckled before the ignitionswitch is turned to the onposition...
The safety belt warning light andindicator chime remain off.
Safety Belts 37
2014 TaurusOwners Guide gf, 2nd Printing, September 2013USA (fus)

SAFETY BELT-MINDER®This feature supplements the safety belt warning function by providingadditional reminders by intermittently sounding a chime and illuminatingthe safety belt warning light when the driver’s or front passenger’s seat isoccupied and the safety belt is unbuckled.
The system uses information from the front passenger sensing system todetermine if a front seat passenger is present and therefore potentially inneed of a warning. To avoid activating the Belt-Minder feature for objectsplaced in the front passenger seat, warnings will only be given to frontseat occupants as determined by the front passenger sensing system.
If the Belt-Minder warnings have expired (warnings for about fiveminutes) for one occupant (driver or front passenger), the otheroccupant can still activate the Belt-Minder feature.
If... Then...
The driver’s and frontpassenger’s safety belts arebuckled before the ignitionswitch is turned to the onposition or less than1-2 minutes have elapsed sincethe ignition switch has beenturned to on...
The Belt-Minder feature will notactivate.
The driver’s or frontpassenger’s safety belt is notbuckled when the vehicle hasreached at least 6 mph(9.7 km/h) and 1-2 minuteshave elapsed since the ignitionswitch has been turned to on...
The Belt-Minder feature is activated -the safety belt warning lightilluminates and the warning chimesounds for six seconds every25 seconds, repeating for about fiveminutes or until the safety belts arebuckled.
38 Safety Belts
2014 TaurusOwners Guide gf, 2nd Printing, September 2013USA (fus)

If... Then...
The driver’s or frontpassenger’s safety belt becomesunbuckled for about oneminute while the vehicle istraveling at least 6 mph(9.7 km/h) and more than1-2 minutes have elapsed sincethe ignition switch has beenturned to on...
The Belt-Minder feature is activated -the safety belt warning lightilluminates and the warning chimesounds for six seconds every25 seconds, repeating for about fiveminutes or until the safety belts arebuckled.
Deactivating and Activating the Belt-Minder® Feature
WARNING: While the design allows you to deactivate yourBelt-Minder, this system is designed to improve your chances of
being safely belted and surviving an accident. We recommend you leavethe Belt-Minder system activated for yourself and others who may useyour vehicle. To reduce the risk of injury, do not deactivate or activatethe Belt-Minder feature while driving your vehicle.
Note: You can activate and deactivate the driver and front passengerBelt-Minder independently. When deactivating or activating one seatingposition, do not buckle the other position as this will terminate theprocess.
Read Steps 1 - 5 thoroughly before proceeding with the programmingprocedure.
Note: If you are using MyKey, you cannot disable Belt-Minder. Also, ifthe Belt-Minder has been previously disabled, it will be re-enabled duringthe use of MyKey. See the MyKey chapter.
You can activate and deactivate this feature by performing the followingprocedure:
Before following the procedure, make sure that:
• The parking brake is set.
• The transmission is in park P.
• The ignition is off.
• The driver and front passenger safety belts are unbuckled.
Safety Belts 39
2014 TaurusOwners Guide gf, 2nd Printing, September 2013USA (fus)

1. Switch the ignition on. Do not start the engine.
2. Wait until the safety belt warning light turns off (about one minute).
3. Wait 10 seconds after the safety belt warning light turns off.
• Step 4 must be completed within 20 seconds after the completion ofStep 3.
4. Buckle then unbuckle the safety belt three times at a moderate speed,ending in the unbuckled state.
• After Step 4, the safety belt warning light will turn on for threeseconds.
5. Within about seven seconds of the light turning off, buckle thenunbuckle the safety belt. The safety belt warning light will blink.
• This will disable the Belt-Minder feature for that seating position if itis currently enabled.
• This will enable the Belt-Minder feature for that seating position if it iscurrently disabled.
CHILD RESTRAINT AND SAFETY BELT MAINTENANCEInspect the vehicle safety belts and child safety seat systems periodicallyto make sure they work properly and are not damaged. Inspect thevehicle and child seat safety belts to make sure there are no nicks, tearsor cuts. Replace if necessary. All vehicle safety belt assemblies, includingretractors, buckles, front safety belt buckle assemblies, buckle supportassemblies (slide bar-if equipped), shoulder belt height adjusters (ifequipped), shoulder belt guide on seat back (if equipped), child safetyseat LATCH and tether anchors, and attaching hardware, should beinspected after a crash. Read the child restraint manufacturer’sinstructions for additional inspection and maintenance informationspecific to the child restraint.
Ford Motor Company recommends that all safety belt assemblies in usein vehicles involved in a crash be replaced. However, if the crash wasminor and an authorized dealer finds that the belts do not show damageand continue to operate properly, they do not need to be replaced.Safety belt assemblies not in use during a crash should also be inspectedand replaced if either damage or improper operation is noted.
For proper care of soiled safety belts, see Cleaning the Interior in theVehicle Care chapter.
40 Safety Belts
2014 TaurusOwners Guide gf, 2nd Printing, September 2013USA (fus)

PERSONAL SAFETY SYSTEM™The Personal Safety System provides an improved overall level of frontalcrash protection to front seat occupants and is designed to help furtherreduce the risk of airbag-related injuries. The system is able to analyzedifferent occupant conditions and crash severity before activating theappropriate safety devices to help better protect a range of occupants ina variety of frontal crash situations.
Your vehicle’s Personal Safety System consists of:
• Driver and passenger dual-stage airbag supplemental restraints.
• Front outboard safety belts with pretensioners, energy managementretractors (first row only), and safety belt usage sensors.
• Driver’s seat position sensor.
• Front passenger sensing system.
• Passenger airbag off and on indicator lamp.
• Front crash severity sensors.
• Restraints control module with impact and safing sensors.
• Restraint system warning light and backup tone.
• The electrical wiring for the airbags, crash sensor(s), safety beltpretensioners, front safety belt usage sensors, driver seat positionsensor, front passenger sensing system, and indicator lights.
How Does the Personal Safety System Work?The Personal Safety System can adapt the deployment strategy of yourvehicle’s safety devices according to crash severity and occupantconditions. A collection of crash and occupant sensors providesinformation to the restraints control module. During a crash, therestraints control module may activate the safety belt pretensionersand/or either one or both stages of the dual-stage airbag supplementalrestraints based on crash severity and occupant conditions.
Personal Safety System 41
2014 TaurusOwners Guide gf, 2nd Printing, September 2013USA (fus)
PRINCIPLES OF OPERATION
WARNING: Airbags do not inflate slowly or gently, and the riskof injury from a deploying airbag is the greatest close to the trim
covering the airbag module.
WARNING: All occupants of your vehicle, including the driver,should always properly wear their safety belts, even when an airbag
supplemental restraint system is provided. Failure to properly wear yoursafety belt could seriously increase the risk of injury or death.
WARNING: Airbags can kill or injure a child in a child seat.Always transport children 12 years old and under in the back
seat and always properly use appropriate child restraints.
WARNING: Never place your arm over the airbag module, as adeploying airbag can result in serious arm fractures or other
injuries.
WARNING: Airbags can kill or injure a child in a child seat.Never place a rear-facing child seat in front of an active airbag.
If you must use a forward-facing child seat in the front seat, move theseat upon which the child seat is installed all the way back.
WARNING: Do not attempt to service, repair, or modify theairbag supplemental restraint systems or its fuses as you could be
seriously injured or killed. Contact your authorized dealer as soon aspossible.
WARNING: Several airbag system components get hot afterinflation. Do not touch them after inflation as this may result in
serious injury.
WARNING: If the airbag has deployed, the airbag will not functionagain and must be replaced immediately. If the airbag is not
replaced, the unrepaired area will increase the risk of injury in a crash.
42 Supplementary Restraints System
2014 TaurusOwners Guide gf, 2nd Printing, September 2013USA (fus)

The airbags are a supplemental restraint system and are designed towork with the safety belts to help protect the driver and right frontpassenger from certain upper body injuries. Airbags do not inflate slowly;there is a risk of injury from a deploying airbag.
Note: You will hear a loud bang and see a cloud of harmless powderyresidue if an airbag deploys. This is normal.
The airbags inflate and deflate rapidly upon activation. After airbagdeployment, it is normal to notice a smoke-like, powdery residue orsmell the burnt propellant. This may consist of cornstarch, talcumpowder (to lubricate the bag) or sodium compounds (for example,baking soda) that result from the combustion process that inflates theairbag. Small amounts of sodium hydroxide may be present which mayirritate the skin and eyes, but none of the residue is toxic.
While the system is designed to help reduce serious injuries, contactwith a deploying airbag may also cause abrasions or swelling. Temporaryhearing loss is also a possibility as a result of the noise associated witha deploying airbag. Because airbags must inflate rapidly and withconsiderable force, there is the risk of death or serious injuries, such asfractures, facial and eye injuries or internal injuries, particularly tooccupants who are not properly restrained or are otherwise out ofposition at the time of airbag deployment. Thus, it is extremelyimportant that occupants be properly restrained as far away from theairbag module as possible while maintaining vehicle control.
Routine maintenance of the airbags is not required.
SOS POST-CRASH ALERT SYSTEM™The system flashes the turn signal lamps and sounds the horn(intermittently) in the event of a serious impact that deploys an airbagequipped on your vehicle, such as front, side, side curtain or SafetyCanopy.
The horn and lamps will turn off when:
• You press the hazard control button.
• You press the panic button (if equipped) on the remote entrytransmitter.
• Your vehicle runs out of power.
Supplementary Restraints System 43
2014 TaurusOwners Guide gf, 2nd Printing, September 2013USA (fus)

DRIVER AND PASSENGER AIRBAGS
WARNING: Never place your arm or any objects over an airbagmodule. Placing your arm over a deploying airbag can result in
serious arm fractures or other injuries. Objects placed on or over theairbag inflation area may cause those objects to be propelled by theairbag into your face and torso causing serious injury.
WARNING: Airbags can kill or injure a child in a child seat.Never place a rear-facing child seat in front of an active airbag.
If you must use a forward-facing child seat in the front seat, move theseat upon which the child seat is installed all the way back.
The driver and front passengerairbags will deploy during significantfrontal and near-frontal crashes.
The driver and passenger front airbag system consists of:
• Driver and passenger airbag modules.
• Crash sensors and monitoring system with readinessindicator. See Crash Sensors and Airbag Indicator later inthis chapter.
• Front passenger sensing system.
Proper Driver and Front Passenger Seating Adjustment
WARNING: The National Highway Traffic Safety Administrationrecommends a minimum distance of at least 10 inches
(25 centimeters) between an occupant’s chest and the driver airbagmodule. Failure to follow this could seriously increase the risk of injuryor death.
44 Supplementary Restraints System
2014 TaurusOwners Guide gf, 2nd Printing, September 2013USA (fus)

To properly position yourself away from the airbag:
• Move your seat to the rear as far as you can while still reaching thepedals comfortably.
• Recline the seat slightly (one or two degrees) from the uprightposition.
After all occupants have adjusted their seats and put on safety belts,it is very important that they continue to sit properly. Properly seatedoccupants sit upright, lean against the seat back, and center themselveson the seat cushion, with their feet comfortably extended on the floor.Sitting improperly can increase the chance of injury in a crash event. Forexample, if an occupant slouches, lies down, turns sideways, sits forward,leans forward or sideways, or puts one or both feet up, the chance ofinjury during a crash is greatly increased.
Children and Airbags
WARNING: Airbags can kill or injure a child in a child seat.Never place a rear-facing child seat in front of an active airbag.
If you must use a forward-facing child seat in the front seat, move theseat upon which the child seat is installed all the way back.
Children must always be properlyrestrained. Accident statisticssuggest that children are safer whenproperly restrained in the rearseating positions than in the frontseating position. Failure to followthese instructions may increase therisk of injury in a crash.
FRONT PASSENGER SENSING SYSTEM
WARNING: Even with Advanced Restraints Systems, children 12and under should be properly restrained in a rear seating
position. Failure to follow this could seriously increase the risk of injuryor death.
Supplementary Restraints System 45
2014 TaurusOwners Guide gf, 2nd Printing, September 2013USA (fus)

WARNING: Sitting improperly out of position or with the seatback reclined too far can take off weight from the seat cushion
and affect the decision of the front passenger sensing system, resultingin serious injury or death in a crash.Always sit upright against your seat back, with your feet on the floor.
WARNING: To reduce the risk of possible serious injury:Do not stow objects in seat back map pocket or hang objects off
seat back if a child is in the front passenger seat.Do not place objects underneath the front passenger seat or betweenthe seat and the center console.Check the passenger airbag off for proper airbag status.Failure to follow these instructions may interfere with the passengerseat sensing system.
WARNING: Any alteration or modification to the front passengerseat may affect the performance of the front passenger sensing
system which could seriously increase the risk of injury or death.
This system works with sensors that are part of the front passenger’sseat and safety belt to detect the presence of a properly-seated occupantand determine if the front passenger’s frontal airbag should be enabled(may inflate) or not.
The front passenger sensing systemuses a passenger airbag statusindicator which will illuminateindicating that the front passengerfrontal airbag is either ON (enabled)or OFF (disabled). The indicatorlamp is located in the center stack ofthe instrument panel.
Note: When the ignition is first turned on, the passenger airbag statusindicator OFF and ON lamps will illuminate for a short period of time toconfirm it is functional.
46 Supplementary Restraints System
2014 TaurusOwners Guide gf, 2nd Printing, September 2013USA (fus)

The front passenger sensing system is designed to disable (will notinflate) the front passenger’s frontal airbag when the front passengerseat is unoccupied, or a rear facing infant seat, a forward-facing childrestraint, or a booster seat is detected. Even with this technology,parents are strongly encouraged to always properly restrain children inthe rear seat. The sensor also turns off the passenger front airbag andseat-mounted side airbag when the passenger seat is empty.
• When the front passenger sensing system disables (will not inflate)the front passenger frontal airbag, the passenger airbag statusindicator will illuminate the OFF lamp and stay lit to remind you thatthe front passenger frontal airbag is disabled.
• If the child restraint has been installed and the passenger airbagstatus indicator illuminates the ON lamp, then turn the vehicle off,remove the child restraint from the vehicle and reinstall the restraintfollowing the child restraint manufacturer’s instructions.
The front passenger sensing system is designed to enable (may inflate)the front passenger’s frontal airbag anytime the system senses that aperson of adult size is sitting properly in the front passenger seat.
• When the front passenger sensing system enables the front passengerfrontal airbag (may inflate), the passenger airbag status indicator willilluminate the ON lamp and remain illuminated.
If a person of adult size is sitting in the front passenger’s seat, but thepassenger airbag status indicator OFF lamp is lit, it is possible that theperson isn’t sitting properly in the seat. If this happens:
• Turn the vehicle off and ask the person to place the seat back in thefull upright position.
• Have the person sit upright in the seat, centered on the seat cushion,with the person’s legs comfortably extended.
• Restart the vehicle and have the person remain in this position forabout two minutes. This will allow the system to detect that personand enable the passenger’s frontal airbag.
• If the indicator OFF lamp remains lit even after this, the personshould be advised to ride in the rear seat.
Supplementary Restraints System 47
2014 TaurusOwners Guide gf, 2nd Printing, September 2013USA (fus)

OccupantPassenger airbag
status indicatorPassenger airbag
EmptyOFF: Lit
DisabledON: Unlit
ChildOFF: Lit
DisabledON: Unlit
AdultOFF: Unlit
EnabledON: Lit
Note: When the passenger airbag status indicator OFF lamp isilluminated, the passenger side airbag (seat mounted) may be disabled toavoid the risk of airbag deployment injuries.
After all occupants have adjusted their seats and put on safety belts, it’svery important that they continue to sit properly. A properly seatedoccupant sits upright, leaning against the seat back, and centered on theseat cushion, with their feet comfortably extended on the floor. Sittingimproperly can increase the chance of injury in a crash event. Forexample, if an occupant slouches, lies down, turns sideways, sits forward,leans forward or sideways, or puts one or both feet up, the chance ofinjury during a crash is greatly increased.
If you think that the state of the passenger airbag status indicator lampis incorrect, check for the following:
• Objects lodged underneath the seat
• Objects between the seat cushion and the center console
• Objects hanging off the seat back
• Objects stowed in the seat back map pocket
• Objects placed on the occupant’s lap
• Cargo interference with the seat
• Other passengers pushing or pulling on the seat
• Rear passenger feet and knees resting or pushing on the seat
The conditions listed above may cause the weight of a properly seatedoccupant to be incorrectly interpreted by the front passenger sensingsystem. The person in the front passenger seat may appear heavier orlighter due to the conditions described in the previous list.
48 Supplementary Restraints System
2014 TaurusOwners Guide gf, 2nd Printing, September 2013USA (fus)

Make sure the front passenger sensing system is operatingproperly. See Crash Sensors and Airbag Indicator later in thischapter.
If the airbag readiness light is lit, do the following:The driver and adult passengers should check for objects lodgedunderneath the front passenger seat, or cargo interfering with the seat.If there are lodged objects or cargo is interfering with the seat, take thefollowing steps to remove the obstruction:• Pull the vehicle over.• Turn the vehicle off.• Driver and adult passengers should check for any objects lodged
underneath the front passenger seat or cargo interfering with the seat.• Remove the obstruction(s) (if found).• Restart the vehicle.• Wait at least two minutes and verify that the airbag readiness light in
the instrument cluster is no longer illuminated.• If the airbag readiness light in the instrument cluster remains illuminated,
this may or may not be a problem due to the front passenger sensingsystem.
Do not attempt to repair or service the system. Take your vehicleimmediately to an authorized dealer.
If it is necessary to modify an advanced front airbag system to accommodatea person with disabilities, contact the Ford Customer Relationship Center atthe phone number shown in the Customer Assistance section of this owner’smanual.
SIDE AIRBAGS
WARNING: Do not place objects or mount equipment on or nearthe airbag cover, on the side of the seatbacks (of the front seats),
or in front seat areas that may come into contact with a deployingairbag. Failure to follow these instructions may increase the risk ofpersonal injury in the event of a crash.
WARNING: Do not use accessory seat covers. The use ofaccessory seat covers may prevent the deployment of the side
airbags and increase the risk of injury in an accident.
Supplementary Restraints System 49
2014 TaurusOwners Guide gf, 2nd Printing, September 2013USA (fus)

WARNING: Do not lean your head on the door. The side airbagcould injure you as it deploys from the side of the seatback.
WARNING: Do not attempt to service, repair, or modify theairbag, its fuses or the seat cover on a seat containing an airbag,
as you could be seriously injured or killed. Contact your authorizeddealer as soon as possible.
WARNING: If the side airbag has deployed, the airbag will notfunction again. The side airbag system (including the seat) must
be inspected and serviced by an authorized dealer. If the airbag is notreplaced, the unrepaired area will increase the risk of injury in a crash.
The side airbags are located on the outboard side of the seat backs ofthe front seats. In certain sideways crashes, the airbag on the sideaffected by the crash will be inflated. The airbag was designed to inflatebetween the door panel and occupant to further enhance the protectionprovided occupants in side impact crashes.
The system consists of thefollowing:
• A tag on the seatback indicatingthat side airbags are found onyour vehicle.
• Side airbags located inside theseatback of the driver and frontpassenger seats.
• Crash sensors and monitoring system with readinessindicator. See Crash Sensors and Airbag Indicator later inthis chapter.
• Front passenger sensing system.Note: The passenger sensing system will deactivate the passengerseat-mounted side airbag if it detects an empty passenger seat.The design and development of the side airbag system includedrecommended testing procedures that were developed by a group ofautomotive safety experts known as the Side Airbag Technical WorkingGroup. These recommended testing procedures help reduce the risk ofinjuries related to the deployment of side airbags.
50 Supplementary Restraints System
2014 TaurusOwners Guide gf, 2nd Printing, September 2013USA (fus)

SAFETY CANOPY® CURTAIN AIRBAGS
WARNING: Do not place objects or mount equipment on or nearthe headliner at the siderail that may come into contact with a
deploying curtain airbag. Failure to follow these instructions mayincrease the risk of personal injury in the event of a crash.
WARNING: Do not lean your head on the door. The curtainairbag could injure you as it deploys from the headliner.
WARNING: Do not attempt to service, repair, or modify thecurtain airbags, its fuses, the A, B, or C pillar trim, or the
headliner on a vehicle containing curtain airbags, as you could beseriously injured or killed. Contact your authorized dealer as soon aspossible.
WARNING: All occupants of your vehicle including the drivershould always wear their safety belts even when an airbag
supplemental restraint system and curtain airbag is provided. Failure toproperly wear your safety belt could seriously increase the risk of injuryor death.
WARNING: To reduce risk of injury, do not obstruct or placeobjects in the deployment path of the curtain airbag.
WARNING: If the curtain airbags have deployed, the curtainairbags will not function again. The curtain airbags (including the
A, B and C pillar trim and headliner) must be inspected and servicedby an authorized dealer. If the curtain airbag is not replaced, theunrepaired area will increase the risk of injury in a crash.
Supplementary Restraints System 51
2014 TaurusOwners Guide gf, 2nd Printing, September 2013USA (fus)
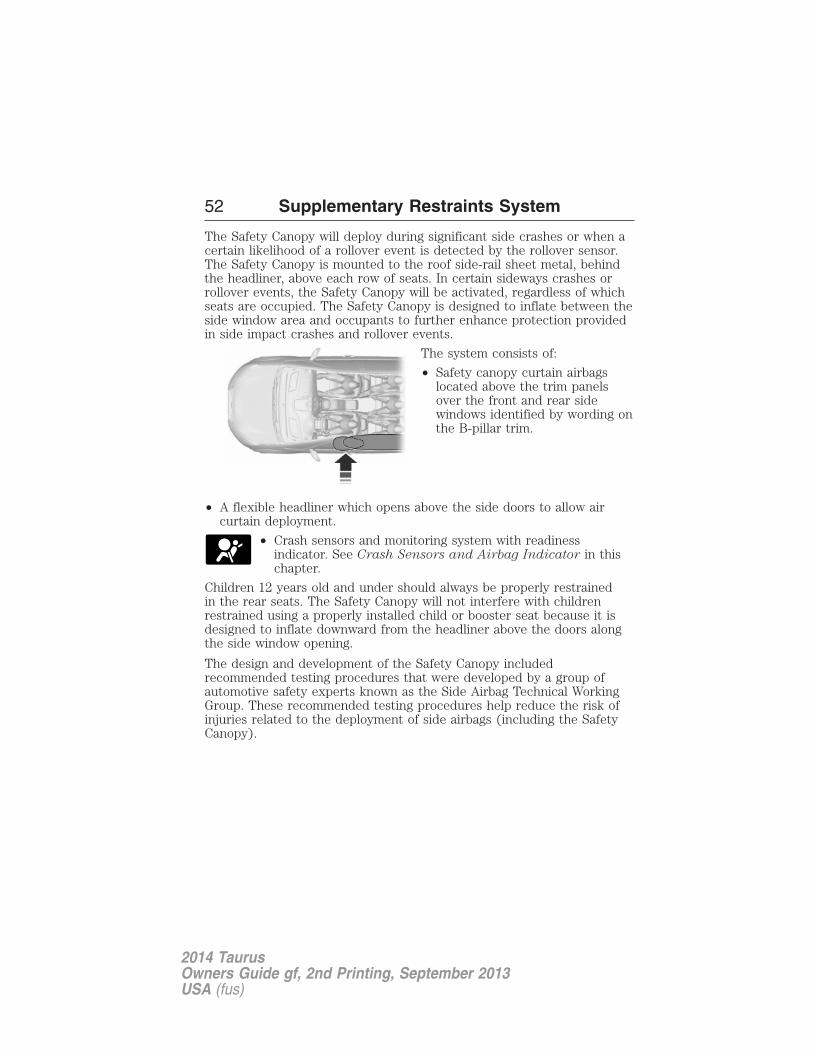
The Safety Canopy will deploy during significant side crashes or when acertain likelihood of a rollover event is detected by the rollover sensor.The Safety Canopy is mounted to the roof side-rail sheet metal, behindthe headliner, above each row of seats. In certain sideways crashes orrollover events, the Safety Canopy will be activated, regardless of whichseats are occupied. The Safety Canopy is designed to inflate between theside window area and occupants to further enhance protection providedin side impact crashes and rollover events.
The system consists of:
• Safety canopy curtain airbagslocated above the trim panelsover the front and rear sidewindows identified by wording onthe B-pillar trim.
• A flexible headliner which opens above the side doors to allow aircurtain deployment.
• Crash sensors and monitoring system with readinessindicator. See Crash Sensors and Airbag Indicator in thischapter.
Children 12 years old and under should always be properly restrainedin the rear seats. The Safety Canopy will not interfere with childrenrestrained using a properly installed child or booster seat because it isdesigned to inflate downward from the headliner above the doors alongthe side window opening.
The design and development of the Safety Canopy includedrecommended testing procedures that were developed by a group ofautomotive safety experts known as the Side Airbag Technical WorkingGroup. These recommended testing procedures help reduce the risk ofinjuries related to the deployment of side airbags (including the SafetyCanopy).
52 Supplementary Restraints System
2014 TaurusOwners Guide gf, 2nd Printing, September 2013USA (fus)

CRASH SENSORS AND AIRBAG INDICATOR
WARNING: Modifying or adding equipment to the front end ofyour vehicle (including frame, bumper, front end body structure
and tow hooks) may affect the performance of the airbag system,increasing the risk of injury. Do not modify the front end of yourvehicle.
Your vehicle has a collection of crash and occupant sensors whichprovide information to the restraints control module. The restraintscontrol module deploys (activates) the front safety belt pretensioners,driver airbag, passenger airbag, seat mounted side airbags, and theSafety Canopy. Based on the type of accident (frontal impact, sideimpact or rollover) the restraints control module will deploy theappropriate safety devices.
The restraints control module also monitors the readiness of the abovesafety devices plus the crash and occupant sensors. The readiness of thesafety system is indicated by a warning indicator light in the instrumentcluster or by a backup tone if the warning light is not working. See theInstrument Cluster chapter. Routine maintenance of the airbag is notrequired.
A difficulty with the system is indicated by one or more of the following:
• The readiness light will either flash or stay lit.
• The readiness light will not illuminate immediately after theignition is turned on.
• A series of five beeps will be heard. The tone pattern will repeatperiodically until the problem or light are repaired.
If any of these things happen, even intermittently, have the supplementalrestraint system serviced at an authorized dealer immediately. Unlessserviced, the system may not function properly in the event of a crash.
The safety belt pretensioners and the airbag supplemental restraintsystem are designed to activate when the vehicle sustains frontal orsideways deceleration sufficient to cause the restraints control module todeploy a safety device or when a certain likelihood of a rollover event isdetected by the rollover sensor.
Supplementary Restraints System 53
2014 TaurusOwners Guide gf, 2nd Printing, September 2013USA (fus)

The fact that the safety belt pretensioners or airbags did not activate forboth front seat occupants in a crash does not mean that something iswrong with the system. Rather, it means the restraints control moduledetermined the accident conditions (such as crash severity, belt usage)were not appropriate to activate these safety devices.
• The design of the front airbags is to activate only in frontal andnear-frontal crashes (not rollovers, side impacts or rear impacts)unless the crash causes sufficient frontal deceleration.
• The design of the safety belt pretensioners is to activate in frontal,near-frontal and side crashes, and in rollovers.
• The design of the side airbags is to inflate in certain side impactcrashes. Side airbags may activate in other types of crashes if thevehicle experiences sufficient sideways motion or deformation.
• The design of the Safety Canopy is to inflate in certain side impactcrashes or rollover events. The Safety Canopy may activate in othertypes of crashes if the vehicle experiences sufficient sideways motionor deformation, or a certain likelihood of rollover.
AIRBAG DISPOSALContact your authorized dealer as soon as possible. Airbags must bedisposed of by qualified personnel.
54 Supplementary Restraints System
2014 TaurusOwners Guide gf, 2nd Printing, September 2013USA (fus)

GENERAL INFORMATION ON RADIO FREQUENCIESThis device complies with part 15 of the FCC Rules and with IndustryCanada license-exempt RSS standard(s). Operation is subject to thefollowing two conditions: (1) This device may not cause harmfulinterference, and (2) This device must accept any interference received,including interference that may cause undesired operation.Note: Changes or modifications not expressly approved by the partyresponsible for compliance could void the user’s authority to operate theequipment. The term IC before the radio certification number onlysignifies that Industry Canada technical specifications were met.The typical operating range for your transmitter is approximately 33 feet(10 meters). Vehicles with the remote start feature will have a greaterrange. A decrease in operating range could be caused by:• weather conditions• nearby radio towers• structures around your vehicle• other vehicles parked next to your vehicle.The radio frequency used by your remote control can also be used byother short-distance radio transmissions, for example amateur radios,medical equipment, wireless headphones, remote controls and alarmsystems. If the frequencies are jammed, you will not be able to use yourremote control. You can lock and unlock the doors with the key.Note: Make sure your vehicle is locked before leaving it unattended.Note: If you are in range, the remote control will operate if you pressany button unintentionally.
Intelligent Access (If Equipped)The system uses a radio frequency signal to communicate with yourvehicle and authorize your vehicle to unlock when one of the followingconditions is met:
• You touch the inside of the front exterior door handle.
• You press the luggage compartment button.
• You press a button on the transmitter.
If excessive radio frequency interference is present in the area or if thetransmitter battery is low, it may be necessary to mechanically unlockyour door. You can use the mechanical key blade in your intelligentaccess key to open the driver door in this situation. Refer to RemoteControl in this chapter for more information on the location and use ofthe mechanical key blade.
Keys and Remote Control 55
2014 TaurusOwners Guide gf, 2nd Printing, September 2013USA (fus)

REMOTE CONTROL
Integrated Keyhead Transmitters (IKTs) (If Equipped)Use the key blade to start yourvehicle and unlock or lock thedriver door from outside yourvehicle. The transmitter portionfunctions as the remote control.
Note: Your vehicle’s keys camewith a security label that providesimportant key cut information.Keep the label in a safe place forfuture reference.
Intelligent Access Key (If Equipped)Your intelligent access keys operatethe power locks and the remotestart system. The key must be inyour vehicle to activate thepush-button start system.
The intelligent access key alsocontains a removable mechanical keyblade that you can use to unlock thedriver door. Slide the release on theback of the transmitter to release thekey blade, and then pull the bladeout.
CA
UTIO
N
TO B
E R
EM
OV
ED
BY
CU
STO
ME
R O
NLY
56 Keys and Remote Control
2014 TaurusOwners Guide gf, 2nd Printing, September 2013USA (fus)

Note: Your vehicle’s back-up keyscame with a security tag thatprovides important key cutinformation. Keep the tag in a safeplace for future reference.
Replacing the BatteryNote: Refer to local regulations when disposing of transmitter batteries.
Note: Do not wipe off any grease on the battery terminals or on theback surface of the circuit board.
Note: Replacing the battery will not delete the transmitter from yourvehicle. The transmitter should operate normally.
The remote control uses one coin-type three-volt lithium battery CR2032or equivalent.
Integrated Keyhead Transmitter1. Twist a thin coin in the slot near the keyring to remove the battery cover (1).
2. Carefully peel up the rubber gasket (2)from the transmitter if it does not come offwith the battery cover.
3. Remove the old battery (3).
4. Insert the new battery. Refer to the instructions inside the integratedkeyhead transmitter for the correct orientation of the battery. Press thebattery down to ensure that the battery is fully seated in the batteryhousing cavity.
5. Reinstall the rubber gasket.
6. Snap the battery cover back onto the key.
3
2
1
Keys and Remote Control 57
2014 TaurusOwners Guide gf, 2nd Printing, September 2013USA (fus)

Intelligent Access Transmitter1. Remove the backup key from the transmitter.
2. Twist a thin coin under the tabhidden behind the backup key headto remove the battery cover. Do notuse the backup key to remove thecover or you could damage theintelligent access key.
3. Remove the old battery.
4. Insert a new battery with the + facing downward. Press the batterydown to make sure it is fully in the housing.
5. Snap the battery cover back onto the transmitter and install thebackup key.
Memory Feature (If Equipped)This feature allows you to recall the driver seat, power mirrors andadjustable pedals (if equipped) memory positions.
Press the unlock button on the remote control or activate intelligentaccess (if equipped) to recall memory. The seat and power mirrorsautomatically move to the memory position. The mirrors will move to theprogrammed position and the seat will move to the easy entry position.The seat will move to the final position when the ignition is switched outof off (if easy entry feature is enabled).
58 Keys and Remote Control
2014 TaurusOwners Guide gf, 2nd Printing, September 2013USA (fus)

Programming Memory to the TransmitterTo activate this feature:
A. Type 1
B. Type 2
1. Move the memory features to the desired positions using theassociated controls, located on the side seat panels.
2. Press and hold button 1 for five seconds. A tone will sound confirmingmemory position has been set. Continue to hold until a second tone isheard after five seconds.
3. Within three seconds press the lock button on the remote control.
4. Wait 10 seconds, and then press the unlock button on the remotecontrol.
5. Repeat this procedure for memory button 2 and another transmitter ifdesired.
Deactivating Memory from the TransmitterTo deactivate this feature:
1. Press and hold either the 1 or 2 button for five seconds. A tone willsound when the memory store is done. Continue to hold until a secondtone is heard.
2. Within three seconds press the unlock button on the remote control.
3. Repeat this procedure for each additional transmitter if desired.
A B
Keys and Remote Control 59
2014 TaurusOwners Guide gf, 2nd Printing, September 2013USA (fus)

Car FinderPress the button twice within three seconds. The horn will soundand the turn signals will flash. We recommend you use thismethod to locate your vehicle, rather than using the panic alarm.
Sounding a Panic AlarmPress the button to activate the alarm. Press the button againor switch the ignition on to deactivate.
Note: The panic alarm will only operate when the ignition is off.
Remote Start (If Equipped)
WARNING: To avoid exhaust fumes, do not use remote start ifyour vehicle is parked indoors or areas that are not well ventilated.
Note: Do not use remote start if your vehicle is low on fuel.
The remote start button is on the transmitter.
This feature allows you to start your vehicle from outside your vehicle.The transmitter has an extended operating range.
Vehicles with automatic climate control can be configured to operatewhen the vehicle is remote started. See the Climate Control chapter formore information. A manual climate control system will run at the settingit was set to when your vehicle was last turned off.
Many states and provinces have restrictions for the use of remote start.Check your local and state or provincial laws for specific requirementsregarding remote start systems.
The remote start system will not work if:
• the ignition is on
• the alarm system is triggered
• you disable the feature
• the hood is open
• the transmission is not in P
• the vehicle battery voltage is too low
• the service engine soon light is on.
60 Keys and Remote Control
2014 TaurusOwners Guide gf, 2nd Printing, September 2013USA (fus)

Remote Starting the Vehicle
Note: You must press each button within three seconds of each other.Your vehicle will not remote start and the horn will not sound if you donot follow this sequence.
The label on your transmitterdetails the starting procedure.
To remote start your vehicle:
1. Press the lock button to lock all the doors.
2. Press the remote start button twice. The exterior lamps will flashtwice.
The horn will sound if the system fails to start.
Note: If you remote start your vehicle with an integrated keyheadtransmitter, you must switch the ignition on before driving your vehicle.If you remote start your vehicle with an intelligent access transmitter,you must have a programmed intelligent access key inside your vehicleand press the START/STOP button on the instrument panel once whileapplying the brake pedal before driving your vehicle.
The power windows will not work during the remote start and the radiowill not turn on automatically.
The parking lamps will remain on and your vehicle will run for 5, 10, or15 minutes, depending on the setting. See the Information Displayschapter to select the duration of the remote start system.
Extending the Vehicle Run TimeRepeat Steps 1 and 2 with your vehicle still running to extend the runtime for another remote start duration. If the duration is set to last10 minutes, the duration will extend by another 10 minutes beginningafter what is left of the first activation time. For example, if your vehiclehad been running from the first remote start for five minutes, yourvehicle will continue to run now for a total of 15 minutes.
Wait at least five seconds before remote starting after a vehicle shutdown.
Keys and Remote Control 61
2014 TaurusOwners Guide gf, 2nd Printing, September 2013USA (fus)

Turning the Vehicle Off After Remote StartingPress the button once. The parking lamps will turn off.
You may have to be closer to your vehicle than when starting due toground reflection and the added noise of the running vehicle.
You can disable or enable the remote start system through theinformation display. See the Information Display chapter.
REPLACING A LOST KEY OR REMOTE CONTROLYou can purchase replacement or additional keys or remote controls froman authorized dealer. A dealer can program the transmitters to yourvehicle or you may be able to program them yourself. See the Securitychapter for information on programming your transmitters.
62 Keys and Remote Control
2014 TaurusOwners Guide gf, 2nd Printing, September 2013USA (fus)

PRINCIPLES OF OPERATIONMyKey allows you to program keys with restricted driving modes topromote good driving habits. All but one of the keys programmed to thevehicle can be activated with these restricted modes.
Any keys that have not been programmed are referred to asadministrator keys or admin keys. These can be used to:• create a MyKey• program configurable MyKey settings• clear all MyKey features.
When you have programmed a MyKey, you can access the followinginformation using the information display:• How many admin keys and MyKeys are programmed to your vehicle.• The total distance your vehicle has traveled using a MyKey.
Note: All MyKeys are programmed to the same settings. You cannotprogram them individually.Note: For vehicles with intelligent access key (push-button start), whenboth a MyKey and an admin intelligent access key (fob) are present, theadmin fob will be recognized to start the vehicle.
Non-configurable SettingsThe following settings cannot be changed by an admin key user:
• Belt-Minder. You cannot disable this feature. The audio system willmute when the front seat occupants’ safety belts are not fastened.
• Early low fuel warning. The low fuel warning is activated earlier, givingthe MyKey user more time to refuel.
• Driver assist features, if equipped on your vehicle, are forced on:parking aid, blind spot information system (BLIS) with cross trafficalert, lane departure warning and forward collision warning system.
• Satellite radio adult content restrictions.
MyKey 63
2014 TaurusOwners Guide gf, 2nd Printing, September 2013USA (fus)

Configurable SettingsWith an admin key, you can configure certain MyKey settings when youfirst create a MyKey and before you recycle the key or restart theengine. You can also change the settings afterward with an admin key.
• A vehicle speed limit can be set. Warnings will be shown in the displayfollowed by an audible tone when your vehicle reaches the set speed.You cannot override the set speed by fully depressing the acceleratorpedal or by setting cruise control.
• Vehicle speed minders of 45, 55 or 65 mph (75, 90 or 105 km/h).Once you select a speed, it will be shown in the display, followed byan audible tone when the preselected vehicle speed is exceeded.
• Audio system maximum volume of 45%. A message will be shown inthe display when you attempt to exceed the limited volume. Also, thespeed-sensitive or compensated automatic volume control will bedisabled.
• Always on setting. When this is selected, you will not be able to turnoff AdvanceTrac, 911 Assist or the do not disturb feature (if yourvehicle is equipped with these features).
CREATING A MYKEYUse the information display to create a MyKey:
1. Insert the key you want to program into the ignition. If your vehicle isequipped with a push-button start and you do not have a backup slot,hold the intelligent access key next to the steering column. The correctposition to place your fob is in another chapter. See Starting andStopping the Engine.
2. Switch the ignition on.
3. Access the main menu on the information display controls, and selectSettings, then MyKey by pressing OK or the > button.
4. Press OK or the > button to select Create MyKey.
5. When prompted, hold the OK button until you see a messageinforming you to label this key as a MyKey. The key will be restricted atthe next start.
MyKey is successfully created. Make sure you label it so you candistinguish it from the admin keys.
You can also program configurable settings for the key(s). Refer toProgramming/Changing Configurable Settings.
64 MyKey
2014 TaurusOwners Guide gf, 2nd Printing, September 2013USA (fus)
Programming/Changing Configurable SettingsUse the information display to access your configurable MyKey settings:
1. Switch the ignition on using an admin key. If your vehicle haspush-button start, place the intelligent access key fob into the backupslot. The location of your backup slot is in another chapter. See Startingand Stopping the Engine.
2. Access the main menu and select Settings, then MyKey by pressingOK or the > button.
3. Use the arrow buttons to get to a configurable feature.
4. Press OK or > to make a selection.Note: You can clear or change your MyKey settings at any time duringthe same key cycle as you created the MyKey. Once you have switchedthe engine off, however, you will need an admin key to change or clearyour MyKey settings.
CLEARING ALL MYKEYSYou can clear all MyKeys within the same key cycle as you created theMyKey. If you switch your ignition off, however, you will need to use anadmin key to clear your MyKeys.Note: When you clear your MyKeys, you remove all restrictions andreturn all MyKeys to their original admin key status at once.
To clear all MyKeys of all MyKey settings, use the information display todo the following:1. Access the main menu and select Settings, then MyKey.2. Scroll to Clear All and press the OK button.3. Hold the OK button until ALL MYKEYS CLEARED displays .
CHECKING MYKEY SYSTEM STATUSYou can find information about your programmed MyKeys by using theinformation display.
MYKEY DISTANCE
Tracks the distance when drivers use a MyKey. The only way to deletethe accumulated distance is by using an admin key to clear your MyKey.If the distance does not accumulate as expected, then the intended useris not using the MyKey, or an admin key user recently cleared and thenrecreated a MyKey.
MyKey 65
2014 TaurusOwners Guide gf, 2nd Printing, September 2013USA (fus)

NUMBER OF MYKEY(S)
Indicates the number of MyKeys programmed to your vehicle. Use thisfeature to detect how many MyKeys you have for your vehicle anddetermine when a MyKey has been deleted.
NUMBER OF ADMIN KEY(S)
Indicates how many admin keys are programmed to your vehicle. Usethis feature to determine how many unrestricted keys you have for yourvehicle, and detect if an additional MyKey has been programmed.
USING MYKEY WITH REMOTE START SYSTEMSMyKey is not compatible with non-Ford-approved aftermarket remotestart systems. If you choose to install a remote start system, please seeyour Ford authorized dealer for a Ford-approved remote start system.
MYKEY TROUBLESHOOTING
Condition Potential causes
I cannot create aMyKey.
• The key or fob used to start the vehicledoes not have admin privileges.• The key or fob used to start the vehicle isthe only admin key (there always has to be atleast one admin key).• Vehicles with push-button start: Theintelligent access key is not in the backup slot.The backup slot location information is inanother chapter. See Starting and Stopping
the Vehicle.• SecuriLock passive anti-theft system isdisabled or in unlimited mode.
I cannot program theconfigurable settings.
• The key or fob used to start the vehicledoes not have admin privileges.• No MyKeys are created. See Creating a
MyKey.
66 MyKey
2014 TaurusOwners Guide gf, 2nd Printing, September 2013USA (fus)

Condition Potential causes
I cannot clear theMyKeys.
• The key or fob used to start the vehicledoes not have admin privileges.• No MyKeys are created. Refer to Creating a
MyKey.
I lost the only adminkey.
• Purchase a new key from your authorizeddealer.
I lost a key. • Program a spare key. See SecuriLock in theSecurity.
No MyKey functionswith intelligent accesskey (push- buttonstart).
• An admin fob is present at engine start.• No MyKey has been created. See Creating a
MyKey.
MyKey distances donot accumulate.
• The MyKey user is not using the MyKey.• An admin key holder cleared the MyKeysand created new MyKeys.• The key system has been reset.
MyKey 67
2014 TaurusOwners Guide gf, 2nd Printing, September 2013USA (fus)

LOCKING AND UNLOCKINGYou can use the power door lock control or the remote control to lockand unlock your vehicle.Power Door LocksThe power door lock control is located on the driver and front passengerdoor panels.
A. Unlock
B. Lock
Remote ControlYou can use the remote control anytime your vehicle is not running.
Unlocking the Doors (Two-Stage Unlock)Press the button to unlock the driver door.
Press the button again within three seconds to unlock all doors.The turn signals will flash.
Press and hold both the lock and unlock buttons on the remote controlfor four seconds to disable or enable two-stage unlocking. Disablingtwo-stage unlocking allows all vehicle doors to unlock with one press ofthe button. The turn signals will flash twice to indicate a change to theunlocking mode. The unlocking mode applies to the remote control,keyless entry keypad and intelligent access.Intelligent access at the driver door unlocks all doors when you havedisabled two-stage unlocking.Locking the Doors
Press the button to lock all the doors. The turn signals willilluminate.
Press the button again within three seconds to confirm that all the doorsare closed. The doors will lock again, the horn will sound and the turnsignals will illuminate if all the doors and the luggage compartment areclosed.
68 Locks
2014 TaurusOwners Guide gf, 2nd Printing, September 2013USA (fus)

Note: If any door or the luggage compartment is open, or if the hood isopen on vehicles with an anti-theft alarm or remote start, the hornsounds twice and the lamps will not flash.
Opening the TrunkPress the button twice within three seconds to open the trunk.
Make sure to close and latch the trunk before driving your vehicle.An unlatched trunk may cause objects to fall out or block your view.
Activating Intelligent Access (If Equipped)You must have the intelligent access key within 3 feet (1 meter) of yourvehicle.
At the Front DoorsPull a front exterior door handle to unlock and open the door. Theunlock sensor is on the back of the handle. Make sure not to touch thelock sensor area on the front of the handle.
Press and hold the lock sensor areafor about a second to lock yourvehicle. To avoid unlocking the doorinadvertently, make sure to onlytouch the lock sensor and not otherareas of the door handle.
After locking the doors with thelock sensor, there is a brief delay
before you can unlock your vehicle. This delay lets you pull the doorhandle to make sure it locked.
Note: Keep the door handle surface clean to avoid issues with operation.
At the TrunkPress the exterior trunk release button hidden near the license plate.
Smart Unlocks for Integrated Keyhead TransmitterThis feature helps to prevent you from locking yourself out of yourvehicle if your key is still in the ignition.
When you open one of the front doors and lock your vehicle with thepower door lock control, all the doors will lock then unlock if your key isstill in the ignition.
Locks 69
2014 TaurusOwners Guide gf, 2nd Printing, September 2013USA (fus)

You can still lock your vehicle with the key in the ignition. To do this,use the keyless entry keypad with the driver door closed, or press thelock button on the transmitter even if the doors are not closed.If both front doors are closed, you can lock your vehicle by any method,regardless of whether the key is in the ignition or not.
Smart Unlocks for Intelligent Access Keys (If Equipped)This feature helps to prevent you from unintentionally locking yourintelligent access key inside your vehicle’s passenger compartment orrear cargo area.When you lock your vehicle using the driver or passenger power door lockcontrol (with the door open, transmission in P and ignition off), after youclose the door your vehicle will search for an intelligent access key in thepassenger compartment. If your vehicle finds a key, all of the doors willimmediately unlock and the horn will sound, indicating that a key is inside.
You can override the smart unlock feature and intentionally lock theintelligent access key inside your vehicle. To do this, lock your vehicleafter you have closed all the doors by:
• using the keyless entry keypad
• pressing the lock button on another intelligent access key
• touching the locking area on the handle with another intelligent accesskey in your hand.
When you open one of the front doors and lock your vehicle using thepower door lock control, all doors will lock then unlock if:
• the ignition is on, or
• the ignition is off and the transmission is not in P.
Autolock Feature (If Enabled)The autolock feature will lock all the doors when:
• all the doors are closed,
• the ignition is on,
• you shift into any gear putting your vehicle in motion, and
• your vehicle reaches a speed greater than 12 mph (20 km/h).
The autolock feature repeats when:• you open then close any door while the ignition is on and the vehicle
speed is 9 mph (15 km/h) or lower, and• your vehicle then reaches a speed greater than 12 mph (20 km/h).
70 Locks
2014 TaurusOwners Guide gf, 2nd Printing, September 2013USA (fus)

Autounlock Feature (If Enabled)The autounlock feature will unlock all the doors when:
• the ignition is on, all the doors are closed, and your vehicle has beenin motion at a speed greater than 12 mph (20 km/h);
• your vehicle has then come to a stop and the ignition is switched offor to accessory; and
• the driver door is opened within 10 minutes of the ignition beingswitched off or to accessory.
Note: The doors will not autounlock if you electronically lock the vehicleafter you switch the ignition off and before you open the driver door.
Enabling or DisablingNote: You can enable or disable the autolock and autounlock featuresindependently of each other.
You can enable or disable these features:• through an authorized dealer• using the information display (if equipped with this feature).
Illuminated EntryThe interior lamps and select exterior lamps illuminate when you use theintegrated keyhead transmitter, intelligent access key or the keylessentry keypad to unlock the vehicle.
The system will turn off the lights if:
• you switch the ignition on
• you press the lock button on the remote control
• you lock your vehicle using the keyless entry keypad
• after 25 seconds of illumination.
The lights will not turn off if:
• you turn them on with the dimmer control
• any door is open.
Illuminated ExitThe interior lamps and select exterior lamps illuminate when all doorsare closed and you switch the ignition off and remove the key from theignition (integrated keyhead transmitter only).
Locks 71
2014 TaurusOwners Guide gf, 2nd Printing, September 2013USA (fus)

The lamps turn off if all the doors remain closed and:
• 25 seconds elapse
• you insert the key in the ignition (integrated keyhead transmitter only)
• you press the START/STOP button (intelligent access key only).
Battery SaverIf you leave the courtesy lamps, dome lamps or headlamps on, thebattery saver shuts them off 10 minutes after you switch the ignition off.
Accessory Mode Battery Saver for Intelligent Access Keys(If Equipped)If you leave your vehicle in the run ignition state, it will shut off once itdetects a certain amount of battery drain or after 45 minutes.
SECURICODE™ KEYLESS ENTRY KEYPAD (IF EQUIPPED)The keypad, located near the driver window, is invisible until you touchit. It then lights up so you can see and touch the appropriate buttons.
Note: If you enter your entry code too fast on the keypad, the unlockfunction may not work. Enter your entry code again more slowly.
You can use the keypad to:
• lock or unlock the doors
• open the trunk
• recall memory features
• enable or disable the autolockand autounlock
• arm and disarm the anti-theftalarm (if equipped)
72 Locks
2014 TaurusOwners Guide gf, 2nd Printing, September 2013USA (fus)

You can operate the keypad with the factory-set 5-digit entry code.The code is located on the owner’s wallet card in the glove box and isavailable from an authorized dealer. You can also create up to three ofyour own 5-digit personal entry codes.
Programming a Personal Entry CodeTo create your own personal entry code:
1. Enter the factory-set code.
2. Press the 1•2 on the keypad within five seconds.
3. Enter your personal 5-digit code. You must enter each number withinfive seconds of each other.
4. For memory recall feature, enter the sixth digit 1•2 to store driver 1settings or 3•4 to store driver 2 settings.
Note: Pressing 5•6, 7•8, or 9•0 keypad numbers as a sixth digit willnot recall a driver memory setting.
Note: The factory-set code cannot be associated with a memory setting.
5. The doors will lock and then unlock to confirm that programming iscomplete.
You may also program a personal entry code through the MyFord Touchor MyLincoln Touch system. Refer to the MyFord Touch or MyLincolnTouch chapter.
Tips:
• Do not set a code that uses five of the same number.
• Do not use five numbers in sequential order.
• The factory-set code will work even if you have set your own personalcode.
Erasing a Personal Code1. Enter the factory-set 5-digit code.
2. Press and release 1•2 on the keypad within five seconds.
3. Press and hold 1•2 for two seconds. This must be done within fiveseconds of completing Step 2.
All personal codes are now erased and only the factory-set 5-digit codewill work.
Locks 73
2014 TaurusOwners Guide gf, 2nd Printing, September 2013USA (fus)

Anti-Scan FeatureThe keypad will go into an anti-scan mode if you enter the wrong codeseven times (35 consecutive button presses). This mode disables thekeypad for one minute and the keypad lamp will flash.
The anti-scan feature will turn off after:
• one minute of keypad inactivity
• pressing the unlock button on the remote control
• switching the ignition on
• unlocking the vehicle using intelligent access.
Unlocking and Locking the DoorsTo unlock the driver door: Enter the factory-set 5-digit code or yourpersonal code. You must press each number within five seconds of eachother. The interior lamps will illuminate. Note: All doors will unlock ifthe two-stage unlocking feature is disabled. Refer to Locking andUnlocking earlier in this chapter.
To unlock all doors: Enter the factory-set code or your personal code,then press 3•4 within five seconds.
To lock all doors: Press and hold 7•8 and 9•0 at the same time withthe driver door closed. You do not need to enter the keypad code first.
Displaying the Factory-Set Code with Integrated KeyheadTransmittersNote: You will need to have two programmed Integrated KeyheadTransmitters for this procedure.
To display the factory-set code in the information display:
1. Place the first programmed key in the ignition.
2. Turn the ignition off and remove the first programmed key.
3. Place the second programmed key in the ignition.
74 Locks
2014 TaurusOwners Guide gf, 2nd Printing, September 2013USA (fus)

You will see the factory-set code in the message center. The codeappears for a few seconds.
Note: The code may not display until after any other warning messagesfirst display.
TRUNK RELEASE
From Inside Your VehiclePress the button located on the instrument panel.
Vehicles with Intelligent Access1. Unlock the trunk with the remotecontrol or power door lock control.The trunk unlocks when you press therelease button if the intelligent accesstransmitter is within 3 feet (1 meter)of the trunk.
2. Press the release button locatednear the license plate.
Locks 75
2014 TaurusOwners Guide gf, 2nd Printing, September 2013USA (fus)

INTERIOR LUGGAGE COMPARTMENT RELEASE
WARNING: Keep vehicle doors and luggage compartment lockedand keep keys and remote transmitters out of a child’s reach.
Unsupervised children could lock themselves in the trunk and riskinjury. Children should be taught not to play in vehicles.
WARNING: Do not leave children, unreliable adults, or animalsunattended in your vehicle. On hot days, the temperature in the
trunk or vehicle interior can rise very quickly. Exposure of people oranimals to these high temperatures for even a short time can causedeath or serious heat-related injuries, including brain damage. Smallchildren are particularly at risk.
Your vehicle is equipped with a release handle that provides a means ofescape for children and adults if they become locked inside the luggagecompartment.
Adults should familiarize themselves with the operation and location ofthe release handle.
The handle is located inside theluggage compartment either on theluggage compartment door (lid) ornear the tail lamps. It is composedof a material that will glow for hoursin darkness following brief exposureto ambient light.
Pull the handle and push up on theluggage compartment door (lid) toopen from within the luggagecompartment.
76 Locks
2014 TaurusOwners Guide gf, 2nd Printing, September 2013USA (fus)

SECURILOCK® PASSIVE ANTI-THEFT SYSTEMNote: The system is not compatible with non-Ford aftermarket remotestart systems. Use of these systems may result in vehicle startingproblems and a loss of security protection.Note: Metallic objects, electronic devices or a second coded key on thesame key chain may cause vehicle starting issues if they are too close tothe key when starting your vehicle. Prevent these objects from touchingthe coded key while starting the engine. Switch the ignition off, move allobjects on the key chain away from the coded key and restart yourvehicle if a problem occurs.Note: Do not leave a duplicate coded key in your vehicle. Always takeyour keys and lock all doors when leaving your vehicle.The system helps prevent the engine from starting unless you use a codedkey programmed to your vehicle. Using the wrong key may prevent yourvehicle from starting. A message may appear in the information display.If you are unable to start your vehicle with a correctly coded key, amalfunction has occurred. A message may appear in the information display.
Automatic ArmingYour vehicle arms immediately after you switch the ignition off.
Automatic DisarmingYour vehicle disarms when you switch the ignition on with a coded key.
Replacement KeysNote: Your vehicle comes with two integrated keyhead transmitters ortwo intelligent access keys.The integrated keyhead transmitter functions as a programmed ignitionkey that operates all the locks and starts the vehicle, as well as a remotecontrol.The intelligent access key functions as a programmed key that operatesthe driver door lock and activates the intelligent access with push buttonstart systems, as well as a remote control.If your programmed transmitters or standard SecuriLock coded keys(integrated keyhead transmitters only) are lost or stolen and you do nothave an extra coded key, you will need to have your vehicle towed to anauthorized dealer. The key codes need to be erased from your vehicleand new coded keys will need to be programmed.Store an extra programmed key away from the vehicle in a safe place tohelp prevent any inconveniences. See an authorized dealer to purchaseadditional spare or replacement keys.
Security 77
2014 TaurusOwners Guide gf, 2nd Printing, September 2013USA (fus)

Programming a Spare Integrated Keyhead TransmitterNote: A maximum of eight coded keys can be programmed to yourvehicle. Only four of these eight can be integrated keyhead transmitters.You can program your own integrated keyhead transmitters or standardSecuriLock coded keys to your vehicle. This procedure will program boththe engine immobilizer key code and the remote entry portion of theremote control to your vehicle.Only use integrated keyhead transmitters or standard SecuriLock keys.You must have two previously programmed coded keys and the newunprogrammed key readily accessible. See your authorized dealer to havethe spare key programmed if two previously programmed coded keys arenot available.Read and understand the entire procedure before you begin.1. Insert the first previously programmed coded key into the ignition.2. Turn the ignition from off to on. Keep the ignition on for at least threeseconds, but no more than 10 seconds.3. Turn the ignition off and remove the first coded key from the ignition.
4. After three seconds but within 10 seconds of turning the ignition off,insert the second previously coded key into the ignition.
5. Turn the ignition from off to on. Keep the ignition on for at least threeseconds, but no more than 10 seconds.
6. Turn the ignition off and remove the second previously programmedcoded key from the ignition.
7. After three seconds but within 20 seconds of turning the ignition offand removing the previously programmed coded key, insert the newunprogrammed key into the ignition.
8. Turn the ignition from off to on. Keep the ignition on for at least sixseconds until you hear the door locks cycle.
9. Remove the newly programmed coded key from the ignition.
The key will start your vehicle’s engine and will operate the remote entrysystem (if the new key is an integrated keyhead transmitter) if it hasbeen successfully programmed.
Wait 20 seconds and repeat Steps 1 through 8 if the key was notsuccessfully programmed. Take your vehicle to your authorized dealer tohave the new key programmed if you are still unsuccessful.
Wait 20 seconds and then repeat this procedure from Step 1 to programan additional key.
78 Security
2014 TaurusOwners Guide gf, 2nd Printing, September 2013USA (fus)

Programming a Spare Intelligent Access Key (If Equipped)Note: A maximum of four intelligent access keys can be programmed toyour vehicle. You must take your vehicle and all access keys to yourauthorized dealer to be erased and reprogrammed if you would like toreplace a previously programmed access key with a new access key, or ifyou already have four access keys programmed to your vehicle.You must have two previously programmed intelligent access keys insideyour vehicle and the new unprogrammed intelligent access keys readilyaccessible. See your authorized dealer to have the spare keyprogrammed if two previously programmed keys are not available.Make sure that your vehicle is off before beginning this procedure. Makesure that all doors are closed before beginning and that they remainclosed throughout the procedure. Perform all steps within 30 seconds ofstarting the sequence. Stop and wait for at least one minute beforestarting again if any steps are performed out of sequence.Read and understand the entire procedure before you begin.
1. Place the new unprogrammed intelligentaccess key in the pocket inside of thecenter console with the buttons facing outand with key ring up.
2. Press the driver or passenger powerdoor unlock control three times.
3. Press and release the brake pedal onetime.
4. Press the driver or passenger powerdoor lock control three times.
5. Press and release the brake pedal one time. The indicator on theSTART/STOP button should begin to rapidly flash, indicating theprogramming mode has been entered and two programmed intelligentaccess keys have been detected in your vehicle.
6. Press the START/STOP button within one minute. A message willappear in the information display indicating that the new intelligentaccess key was programmed.
7. Remove the intelligent access key from the center console pocket andpress the unlock button on the newly programmed intelligent access keyto exit programming mode.
8. Verify that the remote entry functions operate (press lock thenunlock, making sure you end in unlock) and that your vehicle starts withnew intelligent access key.
Security 79
2014 TaurusOwners Guide gf, 2nd Printing, September 2013USA (fus)

ANTI-THEFT ALARM (IF EQUIPPED)The system will warn you of unauthorized entry to your vehicle.
The turn signal lamps will flash and sound the horn up to a total of10 times when:
• any door, the hood or the luggage compartment is opened withoutusing the keypad, the remote control or the intelligent accesstransmitter (if equipped)
• the ignition is turned on with an invalid key.
Take all keys and remote controls to an authorized dealer if there is anypotential alarm problem with your vehicle.
Arming the AlarmThe system is ready to arm whenever the ignition is off. Lock the vehicleto arm the alarm.
The turn signal lamps will flash once after locking the vehicle to indicatethe alarm is in the pre-armed mode. It will become fully armed in20 seconds.
Disarming the AlarmTo disarm the alarm, do any of the following:
• Press the power door unlock button within the 20-second pre-armedmode.
• Press the unlock button on the remote control.
• Unlock the doors with the keyless entry pad.
• Enter the vehicle using intelligent access (if equipped).
• Turn the ignition on with a valid key (if equipped with an integratedkeyhead transmitter only).
• Press the panic button on the remote control. The alarm system willstill be armed, but this shuts off the horn and turn lamps when thealarm is sounding.
Note: If the driver door is unlocked with a key, a tone will sound whenyou open the door and a message will appear in the information display.You will have 12 seconds to disarm the alarm using any of the actionsabove, otherwise the alarm will trigger.
80 Security
2014 TaurusOwners Guide gf, 2nd Printing, September 2013USA (fus)
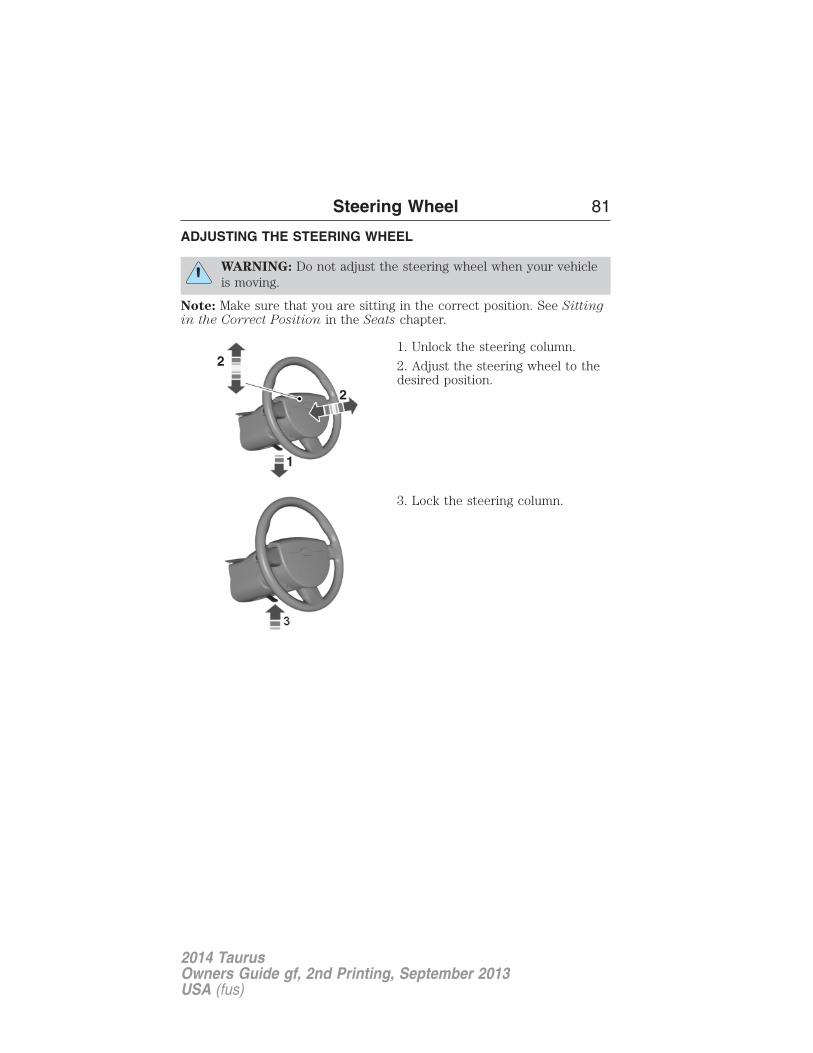
ADJUSTING THE STEERING WHEEL
WARNING: Do not adjust the steering wheel when your vehicleis moving.
Note: Make sure that you are sitting in the correct position. See Sittingin the Correct Position in the Seats chapter.
1. Unlock the steering column.
2. Adjust the steering wheel to thedesired position.
3. Lock the steering column.
Steering Wheel 81
2014 TaurusOwners Guide gf, 2nd Printing, September 2013USA (fus)

Power Tilt and Telescope Steering Column (If Equipped)
WARNING: Do not adjust the steering wheel when your vehicleis moving.
Note: Make sure that you are sitting in the correct position. Refer toSitting in the Correct Position in the Seats chapter.
Use the control on the side of thesteering column to adjust theposition.
To adjust:
• tilt: press the top or bottom of thecontrol
• telescope: press the front or rearof the control.
Easy Entry and Exit FeatureWhen you switch the ignition off, the steering column will move to thefull up and forward position to allow extra room to exit your vehicle.The column will return to the previous setting when you switch theignition on. You can enable or disable this feature in the informationdisplay. See General Information in the Information Displays chapter.
Memory FeatureYou can save and recall the steering column position with the memoryfunction. Refer to the Seats chapter.
Pressing the adjustment control during memory recall cancels theoperation. The column responds to the adjustment control.
The steering column sets a stopping position just short of the end of thecolumn position to prevent damage to the steering column. A newstopping position sets if the steering column encounters an object whentilting or telescoping.
82 Steering Wheel
2014 TaurusOwners Guide gf, 2nd Printing, September 2013USA (fus)

To reset the steering column to its normal stopping position:
1. Press the steering column control again after encountering the newstopping position.
2. Continue pressing the control until it reaches the end of the columnposition.
A new stopping position is set. The next time you tilt or telescope thesteering column, it will stop just short of the end of the column position.
AUDIO CONTROLSEEK: Press to select the next orprevious stored preset or track.Press and hold to select the next orprevious frequency or seek througha track.
MEDIA: Press repeatedly to scrollthrough available audio modes.
MUTE: Press to silence the radio.
VOL (Volume): Press to increase or decrease the volume.
VOICE CONTROL (IF EQUIPPED)A. Phone mode
B. Voice recognition
See the SYNC or MyFord Touch chapter.
SEEK
MEDIA
MUTE
VOL
SEEKVOL
A
B
Steering Wheel 83
2014 TaurusOwners Guide gf, 2nd Printing, September 2013USA (fus)

CRUISE CONTROLType 1
Type 2
See the Cruise Control chapter for information on this feature.
SET
RESCNCL
ONOFF
GAP
84 Steering Wheel
2014 TaurusOwners Guide gf, 2nd Printing, September 2013USA (fus)

INFORMATION DISPLAY CONTROLSee the Information Displayschapter for more information.
Cluster Display Control FeaturesIf equipped with:
MyFord system: This controlfunctions the same as the centercontrol on the faceplate. SeeMyFord system in the AudioSystems chapter.
MyFord Touch: Use this control to adjust the right side of the clusterdisplay. Navigate through the screen and press OK to select. See theMyFord Touch chapter.
HEATED STEERING WHEEL (IF EQUIPPED)See the MyFord Touch chapter.
Steering Wheel 85
2014 TaurusOwners Guide gf, 2nd Printing, September 2013USA (fus)

ADJUSTABLE PEDALS (IF EQUIPPED)
WARNING: Never adjust the accelerator and brake pedal withfeet on the pedals while the vehicle is moving.
The control is located on the left side of the steering column. Press andhold the appropriate control to move the pedals.
A. Farther
B. Closer
The pedal positions are saved and recalled with the memory feature(if equipped). Refer to the Seats chapter.
The pedals should only be adjusted when the vehicle is parked.
A B
86 Pedals
2014 TaurusOwners Guide gf, 2nd Printing, September 2013USA (fus)

WINDSHIELD WIPERSNote: Fully defrost the windshield before switching on the windshieldwipers.
Note: Make sure you switch off the windshield wipers before entering acar wash.
Note: Clean the windshield and wiper blades if they begin to leave streaksor smears. If that does not resolve the issue, install new wiper blades.
Note: Do not operate the wipers on a dry windshield. This may scratchthe glass, damage the wiper blades or cause the wiper motor to burn out.Always use the windshield washers before wiping a dry windshield.
Rotate the end of the control awayfrom you to increase the speed ofthe wipers. Rotate toward you todecrease the speed of the wipers.
RAIN-SENSING WIPERS (IF EQUIPPED)Note: Wet road conditions may result in inconsistent or unexpectedwiping or smearing. Lower the sensitivity, switch to normal or high-speedwiping or turn the wipers off to reduce smearing.
Note: Turn off the wipers before entering a car wash.
Use the rotary control to adjust thesensitivity to one of the intervalmoisture settings. The wipers willnot cycle until moisture is detectedon the windshield. The wiper speedwill vary based on the amount ofmoisture detected on the windshieldand the sensitivity setting. The
wipers will continue to wipe as long as moisture is detected.
Keep the outside of the windshield clean, especially the area around theinterior mirror where the sensor is located, or sensor performance maybe affected.
Wipers and Washers 87
2014 TaurusOwners Guide gf, 2nd Printing, September 2013USA (fus)

WINDSHIELD WASHERSNote: Do not operate the wipers on a dry windshield. This may scratchthe glass, damage the wiper blades or cause the wiper motor to burn out.Always use the windshield washer before wiping a dry windshield.
Note: Do not operate the washer when the washer reservoir is empty.This may cause the washer pump to overheat.
Press the end of the stalk toactivate the washer.
• A brief press causes a single wipe without washer fluid.
• A quick press and hold causes the wipers to swipe three times withwasher fluid.
• A long press and hold will activate the wipers and washer fluid for upto 10 seconds.
A wipe will occur a few seconds after washing to clear any remainingwasher fluid. This feature can be turned on and off in the informationdisplay.
88 Wipers and Washers
2014 TaurusOwners Guide gf, 2nd Printing, September 2013USA (fus)
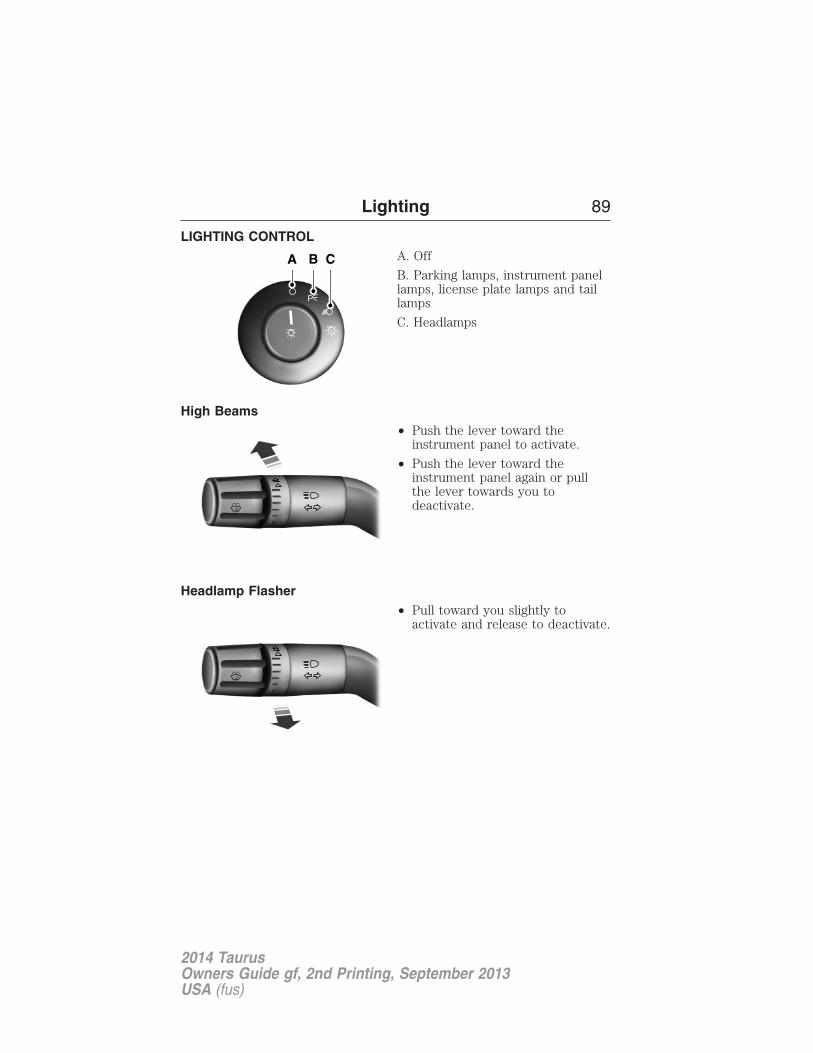
LIGHTING CONTROLA. Off
B. Parking lamps, instrument panellamps, license plate lamps and taillamps
C. Headlamps
High Beams• Push the lever toward the
instrument panel to activate.
• Push the lever toward theinstrument panel again or pullthe lever towards you todeactivate.
Headlamp Flasher• Pull toward you slightly to
activate and release to deactivate.
Lighting 89
2014 TaurusOwners Guide gf, 2nd Printing, September 2013USA (fus)

AUTOLAMPS
WARNING: In severe weather conditions, it may be necessary toswitch your headlamps on manually.
Note: If the vehicle is equipped with autolamps, it will have thewindshield wiper rainlamp feature. When the windshield wipers areturned to low- or high-speed wiping during daylight, and the headlampcontrol is in the autolamp position, the exterior lamps will turn on after abrief delay and will remain on until the wipers are turned off.
The autolamp system provides lightsensitive automatic on-off control ofthe exterior lights normallycontrolled by the headlamp control.
The headlamps will remain on for aperiod of time after you switch theignition off. You can adjust the timedelay using the message centerin the instrument cluster.See Information displays.
INSTRUMENT LIGHTING DIMMER• Tap the top or bottom of the
control to brighten or dimall interior lit componentsincrementally.
• Press and hold the top of thecontrol to activate the “dome on”feature. This will turn on theinterior courtesy lights. Fullypress and hold the bottom of thecontrol to turn off the interiorcourtesy lights.
90 Lighting
2014 TaurusOwners Guide gf, 2nd Printing, September 2013USA (fus)

HEADLAMP EXIT DELAYYou can set the delay time to keep the headlamps on for up to threeminutes after the ignition is turned off.
Follow the steps below to change the delay time (Steps 1 through 6must be done within 10 seconds):
1. Turn the ignition off.
2. Turn the lighting control to the autolamp position.
3. Turn the lighting control to the off position.
4. Turn the ignition on.
5. Turn the ignition off.
6. Turn the lighting control to the autolamp position. The headlamps andparking lamps will turn on.
7. Turn the lighting control to the off position when the desired delaytime has been reached. The headlamps and parking lamps will turn off.You can set the headlamp exit delay to one of the following settings:
• Off
• 10 seconds
• 20 seconds
• 120 seconds
Note: You can also adjust the time delay using the display controls inthe instrument cluster. See the Information Displays chapter.
DAYTIME RUNNING LAMPS (IF EQUIPPED)
WARNING: Always remember to turn on your headlamps atdusk or during inclement weather. The Daytime Running Lamp
(DRL) system does not activate the tail lamps and generally may notprovide adequate lighting during these conditions. Failure to activateyour headlamps under these conditions may result in a collision.
The system turns the headlamps on with a reduced output.
To activate:
• the ignition must be in the on position and
• the lighting control is in the off, autolamp, or parking lamp position and
• the transmission is not in PARK.
Lighting 91
2014 TaurusOwners Guide gf, 2nd Printing, September 2013USA (fus)

AUTOMATIC HIGH BEAM CONTROL (IF EQUIPPED)The system will automatically turn on your high beams if it is darkenough and no other traffic is present. When it detects an approachingvehicle’s headlights, a preceding vehicle’s tail lamps or street lighting, thesystem will turn off the high beams (low beams remain on) before theydistract other drivers.
Note: If it appears that automatic control of the high beams is notfunctioning properly, check the windshield in front of the camera forblockage. A clear view of the road is required for proper systemoperation. Any windshield damage in the area of the camera field-of-viewshould be repaired.
Note: If a blockage is detected (e.g. bird dropping, bug splatter, snow, orice) and no changes are observed, the system will go into low beammode until the blockage is cleared. A message may also appear in theinstrument cluster display noting the front camera is blocked.
Note: Typical road dust, dirt and water spots will not affect theautomatic high beam system’s performance. However, in cold orinclement weather conditions, the automatic high beam system’savailability may be decreased. If the driver wants to change the beamstate independently of the system, the driver may turn the high beamson or off using the multifunction switch stalk. Automatic control willresume when conditions are correct.
Note: Modification of the vehicle ride height (e.g. using much largertires) may degrade feature performance.
A camera sensor is centrally mounted behind the windshield of thevehicle, and monitors the conditions to decide when to switch the highbeams off and on.
Once the system is active the high beams will switch on if:
• The ambient light level is low enough that high beams are needed.
• There is no traffic in front of the vehicle.
• Vehicle speed is greater than 25 mph (40 km/h).
• Severe weather is not detected.
The high beams will switch off if:
• An approaching vehicle’s headlights or a preceding vehicle’s tail lampsare detected.
• The vehicle speed falls below 19 mph (30 km/h).
92 Lighting
2014 TaurusOwners Guide gf, 2nd Printing, September 2013USA (fus)

• The ambient light level is high enough that high beams are notneeded.
• Severe rain, snow or fog is detected.
• The camera is blocked.
Activating the system
Switch the system on within the information display. See Informationdisplays.
Turn the lighting control to theautolamps position.
Manually overriding the system
When the automatic control hasactivated high beams, pushing orpulling the stalk will provide atemporary override to low beam.
To permanently deactivate the system use the information display menuor turn the lighting control switch from autolamps to headlamps.
Lighting 93
2014 TaurusOwners Guide gf, 2nd Printing, September 2013USA (fus)

DIRECTION INDICATORS• Push down to activate the left
turn signal.
• Push up to activate the right turnsignal.
Note: Tap the lever up or down to make the direction indicators flashonly three times to indicate a lane change.
INTERIOR LAMPS
Front row map lampsThe map lamps are located on theoverhead console. Press the outeredge of the clear lens to turn on thelamps. The map lamps also lightwhen:
• any door is opened.
• the instrument panel dimmerbutton is pressed until thecourtesy lamp comes on.
• the remote entry controls are pressed and the ignition is off.
94 Lighting
2014 TaurusOwners Guide gf, 2nd Printing, September 2013USA (fus)

Rear dome/reading lamps
Your vehicle may have readinglamps within the rear domelamp(s).
Press the switches on either sideof the dome lamp to turn on thereading lamps. The direction of thereading lamps can be adjusted bypressing on the sides of the readinglamps.
The dome/reading lamps will light when:
• any door is opened.
• the remote entry controls are pressed and the ignition is off.
Lighting 95
2014 TaurusOwners Guide gf, 2nd Printing, September 2013USA (fus)

POWER WINDOWS
WARNING: Do not leave children unattended in your vehicleand do not let children play with the power windows. They may
seriously injure themselves.
WARNING: When closing the power windows, you should verifythey are free of obstructions and make sure that children and
pets are not in the proximity of the window openings.
Press or lift the switches to operatethe windows.
• Press the switch to the firstdetent and hold to open thewindow.
• Lift the switch to the first detentand hold to close the window.
Rear Window BuffetingYou may hear a pulsing noise when one or both of the rear windows areopen. This noise can be reduced by lowering a front windowapproximately 2–3 inches (5–8 centimeters).
One-Touch Up or DownThis feature automatically open or closes the driver’s window (andpassenger’s window, if equipped with this feature).
Press or lift the switch completely and release. The window will fullyopen or close. Press or lift it again to stop the window.
Global Opening (If Equipped)Note: The ignition must be off and the accessory delay feature must benot activated to operate this feature.
Note: To disable this feature, contact your authorized dealer.
Press and hold the unlock button on the remote control to begin openingthe front windows and venting the moon roof (if equipped). Release thebutton once motion starts. The windows and moonroof will continueopening.
Press the lock or unlock button on the remote control to stop motion.
AUTO
96 Windows and Mirrors
2014 TaurusOwners Guide gf, 2nd Printing, September 2013USA (fus)

Bounce-Back (One-Touch Up or Down Windows Only)The window stops automatically while closing and reverse some distanceif there is an obstacle in the way.
Overriding the Bounce-Back Feature
WARNING: When you override the bounce-back feature thewindow will not reverse if it detects an obstacle. Take care when
closing the windows to avoid personal injury or damage to your vehicle.
Pull up the window switch and hold within two seconds of the windowreaching the bounce-back position. The window travels up with nobounce-back protection. The window stops if you release the switchbefore the window is fully closed.
Window LockPress the control to lock or unlockthe rear window controls.
Accessory DelayYou can use the window switches for several minutes after you switchthe ignition off, or until you open either front door.
Windows and Mirrors 97
2014 TaurusOwners Guide gf, 2nd Printing, September 2013USA (fus)

EXTERIOR MIRRORS
Power Exterior Mirrors
WARNING: Do not adjust the mirror while your vehicle is inmotion.
A. Left mirror
B. Adjustment control
C. Right mirror
To adjust your mirrors:
1. Press the button to select the mirror you want to adjust. An indicatorlight on the button will illuminate.
2. Use the adjustment control to adjust the position of the mirror.
3. Press the mirror button again to deselect the mirror. The indicatorlight will turn off.
Foldaway Exterior MirrorsPush the mirror toward the door window glass. Make sure that you fullyengage the mirror in its support when returning it to its original position.
Heated Exterior Mirror (If Equipped)The heated exterior mirrors switch on with the heated rear window.See Heated Windows and Mirrors in the Climate Control chapter.
Memory Mirrors (If Equipped)You can save and recall the mirror positions through the memoryfunction. See Memory function in the Seats chapter.
Auto-Dimming Feature (If Equipped)The driver’s side exterior mirror will automatically dim when the interiorauto-dimming mirror is activated.
98 Windows and Mirrors
2014 TaurusOwners Guide gf, 2nd Printing, September 2013USA (fus)

Integrated Blind Spot Mirrors (If Equipped)
WARNING: Objects in the blind spot mirror are closer than theyappear.
Blind spot mirrors have an integrated convex mirror built into the upperoutboard corner of the exterior mirrors. They are designed to assist youby increasing visibility along the side of your vehicle.
Check the main mirror first before a lane change, then check the blindspot mirror. If no vehicles are present in the blind spot mirror and thetraffic in the adjacent lane is at a safe distance, signal that you are goingto change lanes. Glance over your shoulder to verify traffic is clear, andcarefully change lanes.
The image of the approachingvehicle is small and near the inboardedge of the main mirror when it is ata distance. The image becomeslarger and begins to move outboardacross the main mirror as the vehicleapproaches (A). The image willtransition from the main mirror andbegin to appear in the blind spotmirror as the vehicle approaches(B). The vehicle will transition toyour peripheral field of view as itleaves the blind spot mirror (C).
Blind Spot Information System (BLIS®) with Cross Traffic Alert(CTA) (If Equipped)Refer to Blind Spot Information System (BLIS®) with Cross TrafficAlert (CTA) in the Driving Aids chapter.
A
B
C
Windows and Mirrors 99
2014 TaurusOwners Guide gf, 2nd Printing, September 2013USA (fus)

INTERIOR MIRROR
WARNING: Do not adjust the mirror when your vehicle ismoving.
Note: Do not clean the housing or glass of any mirror with harshabrasives, fuel or other petroleum or ammonia based cleaning products.
You can adjust the interior mirror to your preference. Some mirrors alsohave a second pivot point. This lets you move the mirror head up ordown and from side to side.
Pull the tab below the mirror toward you to reduce glare at night.
Auto-Dimming Mirror (If Equipped)Note: Do not block the sensors on the front and back of the mirror.Mirror performance may be affected. A rear center passenger or raisedrear center head restraint may also block light from reaching the sensor.
The mirror will dim automatically to reduce glare when bright lights aredetected from behind your vehicle. It will automatically return to normalreflection when you select reverse gear to make sure you have a clearview when backing up.
SUN VISORS
Slide-On-RodRotate the visor toward the sidewindow and extend it rearward forextra sunlight coverage.
Retract the visor before moving itback toward the windshield andstoring it.
100 Windows and Mirrors
2014 TaurusOwners Guide gf, 2nd Printing, September 2013USA (fus)

Illuminated Visor Vanity MirrorLift the cover to switch on thelamp.
SUNSHADE (IF EQUIPPED)The power rear sunshade covers the rear window of the vehicle.
The control is located in the centerconsole access bin.
Press the control to move the sunshade up or down.
Note: Do not try to manually move the sunshade.
The sunshade has a one-touch down feature. Press and release thecontrol to move the sunshade down. To stop motion during one-touchoperation, press the control a second time.
The sunshade automatically retracts when you move the gearshift leverto position R.
Windows and Mirrors 101
2014 TaurusOwners Guide gf, 2nd Printing, September 2013USA (fus)
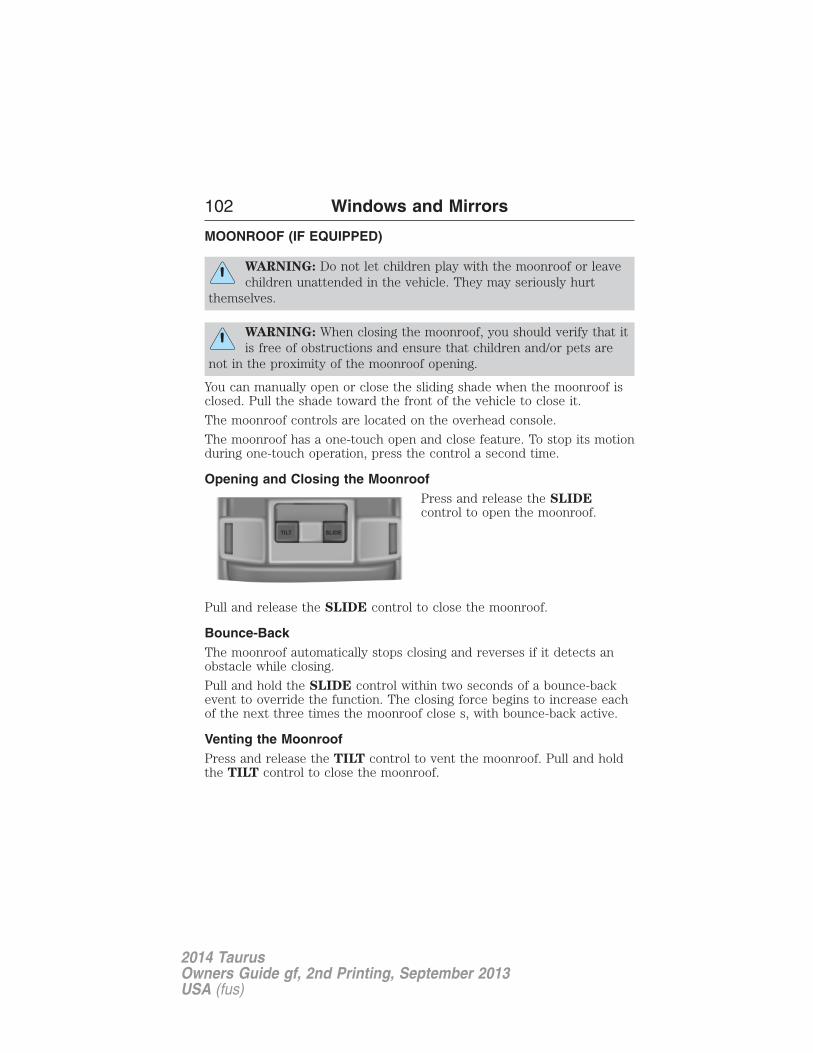
MOONROOF (IF EQUIPPED)
WARNING: Do not let children play with the moonroof or leavechildren unattended in the vehicle. They may seriously hurt
themselves.
WARNING: When closing the moonroof, you should verify that itis free of obstructions and ensure that children and/or pets are
not in the proximity of the moonroof opening.
You can manually open or close the sliding shade when the moonroof isclosed. Pull the shade toward the front of the vehicle to close it.
The moonroof controls are located on the overhead console.
The moonroof has a one-touch open and close feature. To stop its motionduring one-touch operation, press the control a second time.
Opening and Closing the MoonroofPress and release the SLIDEcontrol to open the moonroof.
Pull and release the SLIDE control to close the moonroof.
Bounce-BackThe moonroof automatically stops closing and reverses if it detects anobstacle while closing.
Pull and hold the SLIDE control within two seconds of a bounce-backevent to override the function. The closing force begins to increase eachof the next three times the moonroof close s, with bounce-back active.
Venting the MoonroofPress and release the TILT control to vent the moonroof. Pull and holdthe TILT control to close the moonroof.
SLIDETILT
102 Windows and Mirrors
2014 TaurusOwners Guide gf, 2nd Printing, September 2013USA (fus)

GAUGES
Type 1Cluster shown in standard measure – metric clusters similar.
A. Tachometer
B. Information display. See Information displays for more information.
C. Speedometer
D. Fuel gauge
Fuel gaugeIndicates approximately how much fuel is left in the fuel tank (when theignition is on). The fuel gauge may vary slightly when the vehicle is inmotion or on a grade. The fuel icon and arrow indicates which side ofthe vehicle the fuel filler door is located.
A
D
CB
Instrument Cluster 103
2014 TaurusOwners Guide gf, 2nd Printing, September 2013USA (fus)

Type 2Cluster shown in standard measure – metric clusters similar.
A. Left information display. See Information displays for moreinformation.
B. Speedometer
C. Right information display. See MyFord Touch™ for more information.
WARNING LAMPS AND INDICATORSThese indicators can alert you to a vehicle condition that may becomeserious enough to cause expensive repairs. Many lights will illuminatewhen you start your vehicle to make sure they work. If any light remainson after starting the vehicle, refer to the respective system warning lightfor additional information.
Note: Some warning indicators are reconfigurable telltales (RTT). Theseindicators appear in the information display and function the same as awarning light, but do not display on startup.
A B C
104 Instrument Cluster
2014 TaurusOwners Guide gf, 2nd Printing, September 2013USA (fus)

Adaptive cruise control (if equipped) (RTT)The speed control system indicator light changes color to indicate whatmode the system is in:
• On (white light): Illuminates when the adaptive cruise control systemis turned on. Turns off when the speed control system is turned off.
• Engaged (green light): Illuminates when the adaptive cruise controlsystem is engaged. Turns off when the speed control system isdisengaged.
Airbag readinessIf this light fails to illuminate when the ignition is turned on,continues to flash or remains on, contact your authorized dealeras soon as possible. A chime will sound when there is a
malfunction in the indicator light.
Anti-lock brake systemIf the ABS light stays illuminated or continues to flash, amalfunction has been detected. Contact your authorized dealeras soon as possible. Normal braking is still functional unless the
brake warning light also is illuminated.
Brake system warning lightTo confirm the brake system warning light is functional, it willmomentarily illuminate when the ignition is turned to the onposition when the engine is not running, or in a position
between on and start, or by applying the parking brake when the ignitionis turned to the on position.
If it illuminates when you are driving, check that the parking brake is notengaged. If the parking brake is not engaged, this indicates low brakefluid level or a brake system malfunction. Have the system checkedimmediately by your authorized dealer.
Instrument Cluster 105
2014 TaurusOwners Guide gf, 2nd Printing, September 2013USA (fus)

WARNING: Driving a vehicle with the brake system warninglight on is dangerous. A significant decrease in braking
performance may occur. It will take you longer to stop the vehicle.Have the vehicle checked by your authorized dealer as soon as possible.Driving extended distances with the parking brake engaged can causebrake failure and the risk of personal injury.
Charging system (RTT)Illuminates when the battery is not charging properly. If it stayson while the engine is running, there may be a malfunction withthe charging system. Contact your authorized dealer as soon as
possible. This indicates a problem with the electrical system or a relatedcomponent.
Door ajar (RTT)Displays when the ignition is on and any door is not completelyclosed.
Engine oil pressure (RTT)Illuminates when the oil pressure falls below the normal range.
Engine coolant temperature (RTT)Illuminates when the engine coolant temperature is high. Stopthe vehicle as soon as possible, switch off the engine and letcool.
Grade assist (if equipped) (RTT)Illuminates when grade assist is turned on.
Heads up display (if equipped)A red beam of lights will illuminate on the windshield in certaininstances when using adaptive cruise control and/or thecollision warning system. It will also illuminate momentarily
when you start your vehicle to make sure the display works.
106 Instrument Cluster
2014 TaurusOwners Guide gf, 2nd Printing, September 2013USA (fus)

High beamsIlluminates when the high-beam headlamps are on.
Low fuel (RTT)Illuminates when the fuel level in the fuel tank is at or nearempty.
Low tire pressure warningIlluminates when your tire pressure is low. If the light remainson at start up or while driving, the tire pressure should bechecked. When the ignition is first turned to on, the light will
illuminate for 3 seconds to ensure the bulb is working. If the light doesnot turn on or begins to flash, contact your authorized dealer as soon aspossible.
Low washer fluid (RTT)Illuminates when the windshield washer fluid is low.
Park lamps
Illuminates when the park lamps are on.
Powertrain malfunction/reduced power (RTT)Illuminates when a powertrain or an AWD fault has beendetected. Contact your authorized dealer as soon as possible.
Safety beltReminds you to fasten your safety belt. A Belt-Minder® chimewill also sound to remind you to fasten your safety belt.
Instrument Cluster 107
2014 TaurusOwners Guide gf, 2nd Printing, September 2013USA (fus)

Service engine soonThe service engine soon indicator light illuminates when theignition is first turned to the on position to check the bulb andto indicate whether the vehicle is ready for
Inspection/Maintenance (I/M) testing. Normally, the “service engine soon”light will stay on until the engine is cranked, then turn itself off if nomalfunctions are present. However, if after 15 seconds the “serviceengine soon” light blinks eight times, it means that the vehicle is notready for I/M testing. See the Readiness for inspection/maintenance(I/M) testing in the Fuel and Refueling chapter.
Solid illumination after the engine is started indicates the on-boarddiagnostics system (OBD-II) has detected a malfunction. Refer toOn-board diagnostics (OBD-II) in the Fuel and Refueling chapter.If the light is blinking, engine misfire is occurring which could damageyour catalytic converter. Drive in a moderate fashion (avoid heavyacceleration and deceleration) and have your vehicle servicedimmediately by your authorized dealer.
WARNING: Under engine misfire conditions, excessive exhausttemperatures could damage the catalytic converter, the fuel
system, interior floor coverings or other vehicle components, possiblycausing a fire.
Speed control (if equipped) (RTT)The speed control system indicator light changes color toindicate what mode the system is in:
• On (gray light-type 1, white light-type 2): Illuminates when the speedcontrol system is turned on. Turns off when the speed control systemis turned off.
• Engaged (white light-type 1, green light-type 2): Illuminates when thespeed control system is engaged. Turns off when the speed controlsystem is disengaged.
108 Instrument Cluster
2014 TaurusOwners Guide gf, 2nd Printing, September 2013USA (fus)
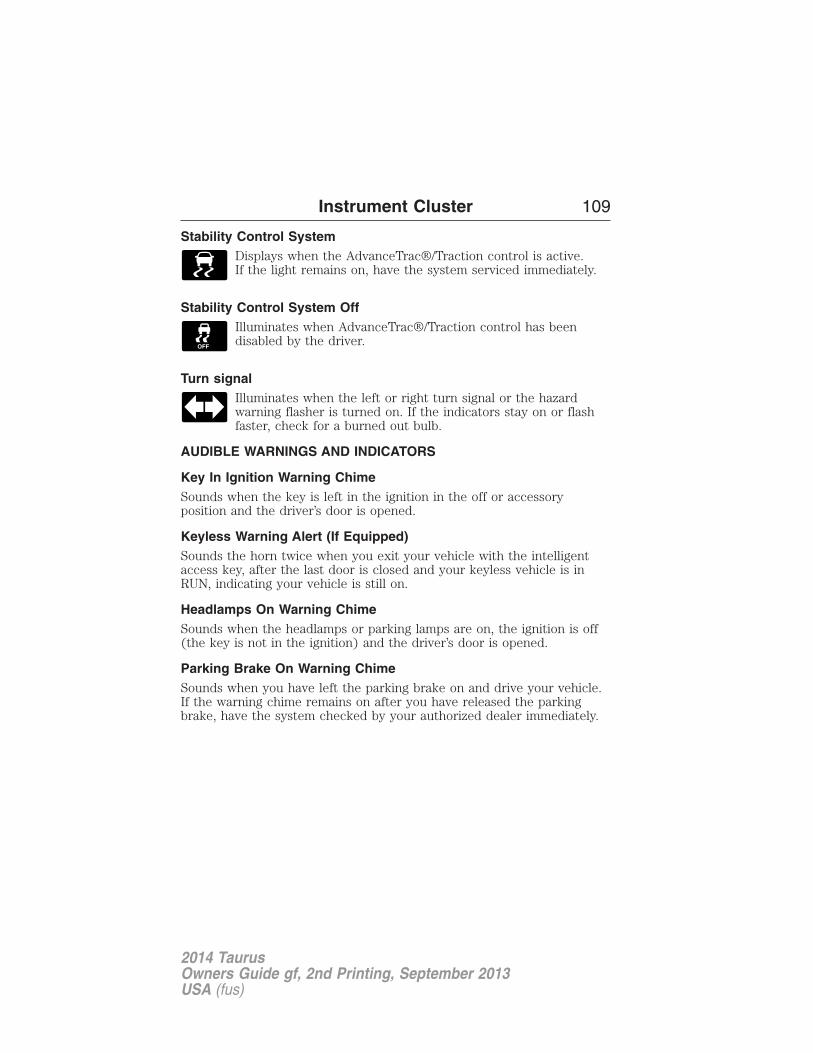
Stability Control SystemDisplays when the AdvanceTrac®/Traction control is active.If the light remains on, have the system serviced immediately.
Stability Control System OffIlluminates when AdvanceTrac®/Traction control has beendisabled by the driver.
Turn signalIlluminates when the left or right turn signal or the hazardwarning flasher is turned on. If the indicators stay on or flashfaster, check for a burned out bulb.
AUDIBLE WARNINGS AND INDICATORS
Key In Ignition Warning ChimeSounds when the key is left in the ignition in the off or accessoryposition and the driver’s door is opened.
Keyless Warning Alert (If Equipped)Sounds the horn twice when you exit your vehicle with the intelligentaccess key, after the last door is closed and your keyless vehicle is inRUN, indicating your vehicle is still on.
Headlamps On Warning ChimeSounds when the headlamps or parking lamps are on, the ignition is off(the key is not in the ignition) and the driver’s door is opened.
Parking Brake On Warning ChimeSounds when you have left the parking brake on and drive your vehicle.If the warning chime remains on after you have released the parkingbrake, have the system checked by your authorized dealer immediately.
Instrument Cluster 109
2014 TaurusOwners Guide gf, 2nd Printing, September 2013USA (fus)

GENERAL INFORMATION
WARNING: Driving while distracted can result in loss of vehiclecontrol, crash and injury. We strongly recommend that you use
extreme caution when using any device that may take your focus offthe road. Your primary responsibility is the safe operation of yourvehicle. We recommend against the use of any handheld device whiledriving and encourage the use of voice-operated systems when possible.Make sure you are aware of all applicable local laws that may affect theuse of electronic devices while driving..
Various systems on your vehicle can be controlled using the informationdisplay controls on the steering wheel. Corresponding information isdisplayed in the information display.
Information Display Controls (Type 1)• Press the up and down arrow
buttons to scroll through andhighlight the options within amenu.
• Press the right arrow button toenter a sub-menu.
• Press the left arrow button toexit a menu.
• Press the OK button to chooseand confirm a setting/messages.
MenuYou can access the menus using the information display control.
Note: Some options may appear slightly different or not at all if theitems are optional.
110 Information Displays
2014 TaurusOwners Guide gf, 2nd Printing, September 2013USA (fus)

†Trip 1 & 2
Trip Odometer Hold OK to ResetTrip TimerAverage FuelCompass (located in lower line of display). Note: this will also displayin other menus.Total Odometer (located in lower line of display). Note: this will alsodisplay in other menus.†See Trip and fuel economy computer later in this section for moreinformation.
Fuel Economy
Distance to EInst Fuel EconAverage FuelCompass (located in lower line of display). Note: this will also displayin other menus.Total Odometer (located in lower line of display). Note: this will alsodisplay in other menus.†See Trip and fuel economy computer later in this section for moreinformation.
Information
MyKey® Dist. (if key is programmed) — Distance traveled when aprogrammed key is in use.MyKey® Info — Number of MyKeys and admin keys programmedCoolant Temp. — The engine coolant indicator will change colorsindicating: blue for cool, gray for normal and red for hot. If the enginecoolant temperature exceeds the normal range, stop the vehicle assoon as safely possible, switch off the engine and let the engine cool.
Information Displays 111
2014 TaurusOwners Guide gf, 2nd Printing, September 2013USA (fus)

Settings
Driver Assist Traction Control — check enabled (default) / uncheckdisabledBlind Spot — check enabled (default) / uncheckdisabledCollision Warning Sensitivity High, Normal or
LowChimes (not selectable if using aMyKey)Warning (not selectable if using aMyKey)
Cross Traffic — check enabled (default) / uncheckdisabledCruise Control Adaptive or NormalRear Park Aid — check enabled (default) / uncheckdisabled
Display Language Select your applicable languageUnits Distance Miles & Gal. or
km/L or L/100kmTemperature Fahrenheit (°F)
or Celsius (°C)
112 Information Displays
2014 TaurusOwners Guide gf, 2nd Printing, September 2013USA (fus)

Settings
Convenience Auto Engine Off — check enabled (default) / uncheckdisabledAuto Highbeam — check enabled (default) / uncheckdisabledAutolamp Delay Off or number of secondsCompass Display — check enabled (default) /
uncheck disabledDTE Calculation Normal or TowingEasy Entry/Exit — check enabled (default) / uncheckdisabledLocks Autolock — check enabled
(default) / uncheck disabledAutounlock — check enabled(default) / uncheck disabledRemote Unlock All Doors or
Driver FirstOil life Reset Set XXX% — Hold OK to ResetRemote Start Climate Control Auto or Last
SettingSeats and Wheelor Front Seats
Automatic or Off
Duration (5, 10 or15 minutes)
System — check enabled (default) /uncheck disabled
Windows Remote Open or CloseWipers Courtesy Wipe — check enabled
(default) / uncheck disabledRain Sensing — check enabled(default) / uncheck disabled
Information Displays 113
2014 TaurusOwners Guide gf, 2nd Printing, September 2013USA (fus)

Settings
MyKey Create MyKey Hold OK to Create MyKey911 Assist Always On or User SelectableTraction Control Always On or User SelectableMax Speed 80 MPH (130 km/h) or OffSpeed Minder 45 mph (75 km/h), 55 mph
(90 km/h), 65 mph (105 km/h) orOff
Volume LimiterClear MyKeys Hold OK to Clear MyKeys
TRIP AND FUEL ECONOMY COMPUTER
Resetting the Trip ComputerPress and hold OK on the current screen to reset the respective trip,distance, time and fuel information.
OdometerRegisters the total accumulated distance for the lifetime of the vehicle.This value cannot be reset.
Trip OdometerRegisters the distance of individual journeys.
Trip TimerRegisters the total time of a trip.
Fuel UsedShows the amount of fuel used for a given trip.
Distance to EIndicates the approximate distance the vehicle will travel on the fuelremaining in the tank. Changes in driving pattern may cause the value tovary.
Average FuelIndicates the average fuel consumption since the function was last reset.
114 Information Displays
2014 TaurusOwners Guide gf, 2nd Printing, September 2013USA (fus)

Information MessagesSee Information Messages later in this chapter for more information.
Information Display Controls (Type 2)• Press the up and down arrow
buttons to scroll through andhighlight the options within amenu.
• Press the right arrow button toenter a sub-menu.
• Press the left arrow button toexit a menu.
• Press the OK button to chooseand confirm a setting/messages.
Main menuFrom the main menu bar on the left side of the information display, youcan choose from the following categories:
• Display Mode
• Trip 1 & 2
• Fuel Economy
• Driver Assist
• Settings
Scroll up/down to highlight one of the categories, then press the rightarrow key or OK to enter into that category. Press the left arrow key asneeded to exit back to the main menu.
Display ModeUse the up/down arrow buttons to choose between the following displayoptions.
Display mode
Display mode Option 1 Option 2 Option 3XXX mi (km) to empty XBar tachometer XRound tachometer X X
Information Displays 115
2014 TaurusOwners Guide gf, 2nd Printing, September 2013USA (fus)

Display mode
Display mode Option 1 Option 2 Option 3Engine coolant temp gauge XFuel gauge Always
PresentAlwaysPresent
AlwaysPresent
Total odometer (lower leftcorner)
AlwaysPresent
AlwaysPresent
AlwaysPresent
Regardless of display mode chosen, when SelectShift Automatic™transmission (SST) is activated, the cluster will change to the roundtachometer if not already selected. After the round tachometerdisplays, other display modes with the bar tachometer can also bechosen.
• XXX mi (km) to empty: Shows approximate fuel level before the fueltank reaches empty. The value is dynamic and can change (raise orlower) depending on driving style.
• Fuel gauge: Indicates approximately how much fuel is left in the fueltank. The fuel gauge may vary slightly when the vehicle is in motionor on a grade. When the fuel level becomes low, the level indicator willchange to amber. When the fuel level becomes critically low, the levelindicator will change to red.Note: When a MyKey® is in use, low fuel warnings will display earlier.The fuel icon and arrow indicates which side of the vehicle the fuelfiller door is located.
• Bar/Round tachometer: Indicates the engine speed in revolutions perminute. Driving with your tachometer pointer continuously at the topof the scale may damage the engine. During SelectShift Automatic™transmission (SST) use, the currently selected gear will appear in thedisplay.
• Engine coolant temperature gauge: Indicates engine coolanttemperature. At normal operating temperature, the level indicator willbe in the normal range. If the engine coolant temperature exceeds thenormal range, stop the vehicle as soon as safely possible, switch offthe engine and let the engine cool.
116 Information Displays
2014 TaurusOwners Guide gf, 2nd Printing, September 2013USA (fus)

Trip 1 & 2Choose between the standard or enhanced trip display.
Trip 1 & 2
Trip 1 & 2
Trip distanceAverage fuel economy
Elapsed trip timeHold OK to Reset
Estimated amount of fuel consumedTotal odometer (lower left corner)Press and hold OK to reset the currently displayed trip information.
• Trip distance — shows the accumulated trip distance.
• Elapsed trip time— timer stops when the vehicle is turned off andrestarts when the vehicle is restarted.
• Average fuel economy — shows the average fuel economy for a given trip.
• Estimated amount of fuel consumed — shows the amount of fuel usedfor a given trip.
• Elapsed trip time — timer stops when the vehicle is turned off andrestarts when the vehicle is restarted.
Fuel EconomyUse the left/right arrow buttons to choose the desired fuel economy display.
Fuel Economy
Fuel EconomyInst FuelEconomy
XX. Min FuelHistory
Instantaneous fuel usage XFuel usage over a 30 minute time span XAverage MPG Always PresentXXX mi (km) to E Always PresentTotal odometer (lower left corner)Hold OK to Reset. Resets the currently displayed fuel usage information.
• Inst. Fuel Economy: This display shows a visual graph of yourinstantaneous fuel economy.
• XX. Min Fuel History: This display shows a bar chart of your fuel history.
Information Displays 117
2014 TaurusOwners Guide gf, 2nd Printing, September 2013USA (fus)

Driver AssistIn this mode, you can configure different driver setting choices.
Note: Some items are optional and may not appear.
Driver Assist
Traction Ctrl — check enabled (default) / uncheck disabledBlindspot — check enabled (default) / uncheck disabledCollision Warn Sensitivity High / Normal / LowCross Traffic — check enabled (default) / uncheck disabledCruise Control Adaptive or NormalDriver Alert Driver Alert — check enabled / uncheck disabled
Driver Alert Disp. — shows current alert statusFront Park Aid — check enabled (default) / uncheck disabledLane KeepingSys
Mode Alert / Aid / BothIntensity High / Normal / Low
Rear Park Aid — check enabled (default) / uncheck disabled
118 Information Displays
2014 TaurusOwners Guide gf, 2nd Printing, September 2013USA (fus)

Settings
Vehicle Auto Engine Off — check enabled / uncheck disabledDTE Calculation Normal / TowingEasy Entry/Exit — check enabled / uncheck disabledLighting Auto highbeam — check enabled
(default) / uncheck disabledAutolamp Delay Off or number of
secondsLocks Autolock — check enabled (default) /
uncheck disabledAutounlock — check enabled(default) / uncheck disabledRemote Unlocking All doors /
Driver’s doorOil Life Reset Set to XXX % — Hold OK to Reset
Remote Start
Climate Control(using this featureallows you toselect differentclimate controlmodes when thevehicle is startedusing the remotestart feature)
Auto / LastSetting
Seats & Wheel orFront Seats
Auto / Off
Duration5 / 10 /15 minutes
System — check enabled (default) /uncheck disabled
Windows Remote Open or Close
Wipers
Courtesy Wipe — check enabled(default) / uncheck disabledRain Sensing — check enabled(default) / uncheck disabled
Information Displays 119
2014 TaurusOwners Guide gf, 2nd Printing, September 2013USA (fus)

Settings (cont’d)
*MyKey MyKey Status MyKeys / Admin KeysCreateMyKey
Hold OK to Create MyKey
911 Assist Always On / User SelectableTractionControl
Always On / User Selectable
Max Speed Choose desired speed or offSpeed Minder Choose desired speed or offVolumeLimiter
On / Off
Do NotDisturb
Always On / User Selectable
MyKeyReport
On / Off
Clear MyKeys Hold OK to Clear All MyKeys
*Some MyKey items will only appear if a MyKey is set.
Settings (cont’d)
Display Distance Miles & Gal.km/LL/100km
GaugeDisplay
Fuel Gauge / Fuel + Tach
Language Select your applicable language —Hold OK to Set
Temperature Fahrenheit (°F) / Celsius (°C)
120 Information Displays
2014 TaurusOwners Guide gf, 2nd Printing, September 2013USA (fus)

INFORMATION MESSAGESNote: Depending on the vehicle options equipped with your vehicle, notall of the messages will display or be available. Certain messages may beabbreviated or shortened depending upon which cluster type you have.
Press the OK button toacknowledge and remove somemessages from the informationdisplay. Other messages will beremoved automatically after a shorttime. Certain messages need to beconfirmed before you can accessthe menus.
Message indicators: Some messages will be supplemented by a systemspecific symbol.
Adaptive Cruise
Control Messages
Action / Description
Adaptive CruiseMalfunction
Displayed when a radar malfunction ispreventing the ACC from engaging.
Adaptive Cruise NotAvailable
Displayed when conditions exist such that theadaptive cruise cannot function properly.
Adaptive Cruise NotAvailable SensorBlocked
Displayed when the radar is blocked becauseof poor radar visibility due to bad weather orice/mud/water in front of radar. Driver cantypically clean the sensor to resolve.
AdvanceTrac® /
Traction Control
Messages
Action / Description
Service AdvanceTrac Displayed when the AdvanceTrac® system hasdetected a condition that requires service.Contact your authorized dealer as soon aspossible.
Traction control off Displayed when the traction control has beendisabled by the driver.
Information Displays 121
2014 TaurusOwners Guide gf, 2nd Printing, September 2013USA (fus)

Alarm/Security
Messages
Action / Description
Vehicle Alarm To StopAlarm, Start Vehicle.
Displayed when the perimeter alarm system isarmed and the vehicle is entered using the keyon the driver’s side door. In order to preventthe perimeter alarm system from triggering,the ignition must be turned to start or onbefore the 12 second chime expires.
Automatic Engine
Shutdown Messages
Action / Description
Engine Shuts Off inXX Seconds
Displays when the engine is getting ready toshut off.
Engine Shut Off forFuel Economy
Displays when the engine has shut off to helpincrease fuel economy.
Engine Shuts Off inXX Seconds Press OKto Override
Displays when the engine is getting ready toshut off. You can press OK on the left steeringwheel button to override the shut down.
AWD Messages Action / Description
AWD Off Displayed when the AWD system has beenautomatically disabled to protect itself. This iscaused by operating the vehicle with thecompact spare tire installed or if the system isoverheating. The AWD system will resumenormal function and clear this message afterdriving a short distance with the road tirere-installed or after the system is allowed tocool.
Check AWD Displayed in conjunction with the ThrottleControl/Transmission/AWD light when theAWD system is not operating properly. If thewarning stays on or continues to come on,contact your authorized dealer as soon aspossible.
122 Information Displays
2014 TaurusOwners Guide gf, 2nd Printing, September 2013USA (fus)

AWD Messages Action / Description
Change AWD PowerTransfer Unit Lube
Displayed when the AWD system needs itspower transfer unit lubrication changed. Thismessage may be set if a vehicle hasexperienced extended periods ofextreme/severe duty cycle driving. See yourauthorized dealer for service. (Taurus SHOPerformance Package Only)
Battery and
Charging System
Messages
Action / Description
Check ChargingSystem
Displayed when the charging system needsservicing. If the warning stays on or continuesto come on, contact your authorized dealer assoon as possible.
Turn Power Off toSave Battery
Displayed when the battery managementsystem determines that:• the battery is at a low state of charge or,• the ignition has been in accessory positionor on position with the engine off forapproximately 45 minutes.Turn the ignition off as soon as possible toprotect the battery. This message will clearonce the vehicle has been started and thebattery state of charge has recovered. Turningoff unnecessary electrical loads will allowfaster battery state-of-charge recovery.
Transport ModeContact Dealer
Contact your authorized dealer as soon aspossible.
Factory Mode ContactDealer
Contact your authorized dealer as soon aspossible.
Information Displays 123
2014 TaurusOwners Guide gf, 2nd Printing, September 2013USA (fus)

BLIS® Messages Action / Description
Blindspot NotAvailable SensorBlocked See Manual
Displayed when the blind spot informationsystem/cross traffic alert system sensors areblocked. Driver can typically clean the sensorto resolve.
Blindspot System Fault Displayed when a fault with the blind spotinformation system has occurred. Contact yourauthorized dealer as soon as possible.
Cross Traffic NotAvailable SensorBlocked
Displayed when the blind spot informationsystem/cross traffic alert system sensors areblocked. Driver can typically clean the sensorto resolve.
Cross Traffic SystemFault
Displayed when a fault with the cross trafficalert system has occurred. Contact yourauthorized dealer as soon as possible.
Vehicle ComingFrom X
Displayed when the blind spot informationsystem with cross traffic alert (CTA) system isoperating and senses a vehicle.
Brake System
Messages
Action / Description
Brake Fluid LevelLOW
Indicates the brake fluid level is low and thebrake system should be inspected immediately.
Check Brake System Displayed when the brake system needsservicing. If the warning stays on or continuesto come on, contact your authorized dealer assoon as possible.
Park Brake Engaged Displayed when the parking brake is set, theengine is running and the vehicle is drivenmore than 3 mph (5 km/h). If the warningstays on after the parking brake is released,contact your authorized dealer as soon aspossible.
124 Information Displays
2014 TaurusOwners Guide gf, 2nd Printing, September 2013USA (fus)
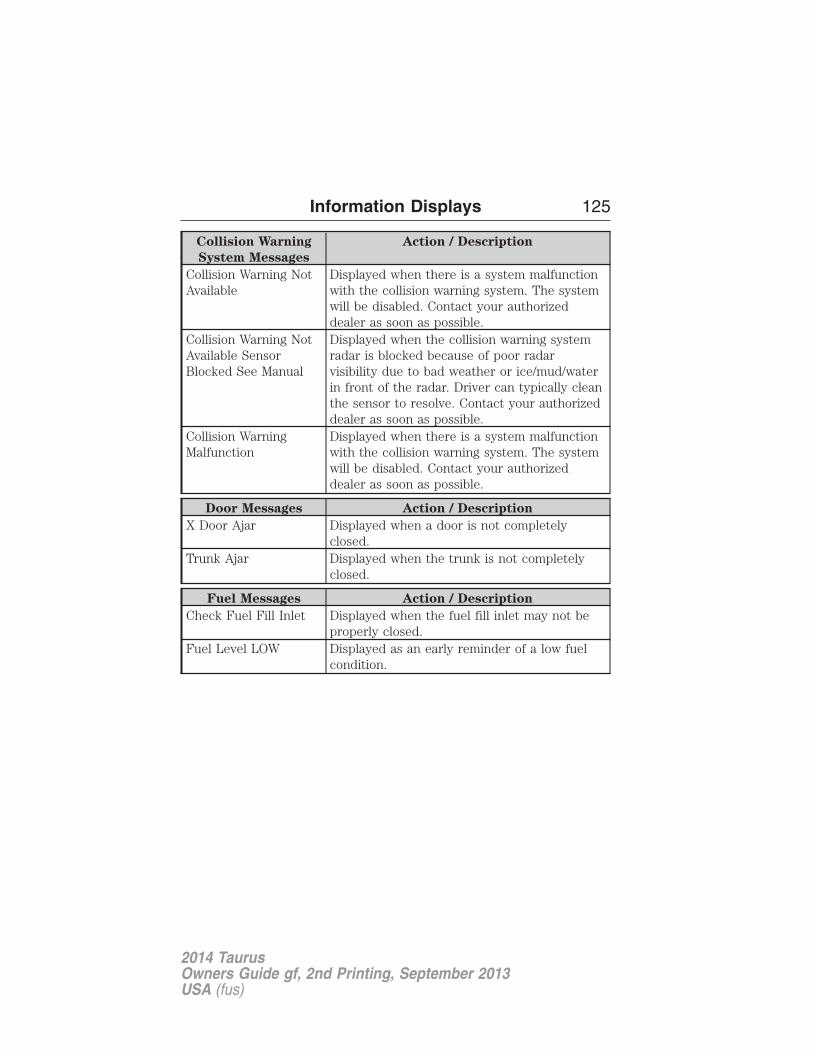
Collision Warning
System Messages
Action / Description
Collision Warning NotAvailable
Displayed when there is a system malfunctionwith the collision warning system. The systemwill be disabled. Contact your authorizeddealer as soon as possible.
Collision Warning NotAvailable SensorBlocked See Manual
Displayed when the collision warning systemradar is blocked because of poor radarvisibility due to bad weather or ice/mud/waterin front of the radar. Driver can typically cleanthe sensor to resolve. Contact your authorizeddealer as soon as possible.
Collision WarningMalfunction
Displayed when there is a system malfunctionwith the collision warning system. The systemwill be disabled. Contact your authorizeddealer as soon as possible.
Door Messages Action / Description
X Door Ajar Displayed when a door is not completelyclosed.
Trunk Ajar Displayed when the trunk is not completelyclosed.
Fuel Messages Action / Description
Check Fuel Fill Inlet Displayed when the fuel fill inlet may not beproperly closed.
Fuel Level LOW Displayed as an early reminder of a low fuelcondition.
Information Displays 125
2014 TaurusOwners Guide gf, 2nd Printing, September 2013USA (fus)

Keys and Intelligent
Access Messages
Action / Description
No Key Detected Displayed if the intelligent access key is notdetected by the system in the following threescenarios:•When the start/stop button is pressed in anattempt to either start the engine or cyclethrough the ignition states.•When the engine is running and a door isopened then closed.•When the vehicle’s speed exceeds 10 mph(16 km/h) for the first time after starting.
Key Programmed xKeys Total
Displayed during spare key programming,when an intelligent access key is programmedto the system.
Max Number of KeysLearned
Displayed during spare key programming whenthe maximum number of keys have beenprogrammed.
Press Brake to Start Displayed when the start/stop button ispressed without the brake pedal being applied.This is a reminder that the brake pedal mustbe applied when the start/stop button ispressed in order to start the engine.
Restart Now or Key isNeeded
Displayed when the start/stop button ispressed to shut off the engine and a IntelligentAccess Key is not detected inside the vehicle.
Accessory Power isActive
Displayed when the vehicle is in the accessoryignition state.
Starting System Fault This message is displayed when there is aproblem with your vehicle’s starting system.See your authorized dealer for service.
126 Information Displays
2014 TaurusOwners Guide gf, 2nd Printing, September 2013USA (fus)

Lane Keeping
System Messages
Action / Description
Lane keeping Sys.Malfunction Servicerequired
The system has malfunctioned. Contact yourauthorized dealer as soon as possible.
Front CameraTemporarily NotAvailable
The system has detected a condition that hascaused the system to be temporarilyunavailable.
Front Camera LowVisibility Clean Screen
The system has detected a condition therequires the windshield to be cleaned tooperate properly.
Front CameraMalfunction ServiceRequired
The system has malfunctioned. Contact yourauthorized dealer as soon as possible.
Keep Hands onSteering Wheel
Displayed when the system requests the driverto keep their hands on the steering wheel.
Maintenance
Messages
Action / Description
LOW Engine OilPressure
Stop the vehicle as soon as safely possible,turn off the engine. Check the oil level. If thewarning stays on or continues to come on withyour engine running, contact your authorizeddealer as soon as possible.
Change Engine OilSoon
Displayed when the engine oil life remaining is10% or less.
Oil Change Required Displayed when the oil life left reaches 0%.Engine CoolantOvertemperature
Displayed when the engine coolanttemperature is excessively high.
Washer Fluid LevelLOW
Indicates the washer fluid reservoir is less thanone quarter full. Check the washer fluid level.
Steering MalfunctionService Now
Displays when the steering system needsservice. See your authorized dealer.
Information Displays 127
2014 TaurusOwners Guide gf, 2nd Printing, September 2013USA (fus)

Maintenance
Messages
Action / Description
Service Power SteeringNow
The power steering system has detected acondition within the power steering systemthat requires service immediately. See yourauthorized dealer.
Power Steering AssistFault
The power steering system has disabled powersteering assist due to a system error. See yourauthorized dealer.
MyKey® Messages Action / Description
MyKey active DriveSafely
Displayed when MyKey® is active.
MyKey not Created Displayed during key programming whenMyKey® cannot be programmed.
Speed Limited to xxMPH/km/h
Displayed when starting the vehicle andMyKey® is in use and the MyKey speed limitis on.
Near Vehicle TopSpeed
Displayed when a MyKey® is in use and theMyKey speed limit is on and the vehicle speedis near the selected top speed.
Check Speed DriveSafely
Displayed when a MyKey® is in use and theoptional setting is on and the vehicle exceedsa preselected speed.
Buckle Up to UnmuteAudio
Displayed when a MyKey® is in use andBelt-Minder® is activated.
Could Not ProgramIntegrated Key
Displayed when an attempt is made to programa spare key using two existing MyKeys.
Park Aid Messages Action / Description
Check Park Aid Displayed when the transmission is inR (Reverse) and the park aid is disabled.
Check Rear Park Aid Displayed when the transmission is inR (Reverse) and the park aid is disabled.
Rear Park Aid On Off Displays the rear park aid status.
128 Information Displays
2014 TaurusOwners Guide gf, 2nd Printing, September 2013USA (fus)

Passenger Sensing
System Message
Action / Description
Occupant SensorBLOCKED RemoveObjects NearPassenger Seat
Displayed when objects are by the passengerseat. After the objects are moved away fromthe seat, if the warning stays on or continuesto come on contact your authorized dealer assoon as possible.
Reminder Messages Action / Description
Steering column lock:Remove and re-insertkey while turningwheel to unlock
Displays when you need to turn the steeringwheel in order to disengage the steering lock.
Shift to Park Displayed when the engine is turned off andshift select lever is in any position other thanP (Park).
Engine On Displays when the driver’s door is opened, thevehicle is on park and the engine is on.
Tire Messages Action / Description
LOW Tire Pressure Displays when one or more tires on yourvehicle have low tire pressure.
Tire Pressure MonitorFault
Displays when the tire pressure monitoringsystem is malfunctioning. If the warning stayson or continues to come on, contact yourauthorized dealer.
Tire Pressure SensorFault
Displayed when a tire pressure sensor ismalfunctioning, or your spare tire is in use.For more information on how the systemoperates under these conditions, refer to Tire
Pressure Monitoring System (TPMS) in theWheels and tires chapter . If the warningstays on or continues to come on, contact yourauthorized dealer as soon as possible.
Information Displays 129
2014 TaurusOwners Guide gf, 2nd Printing, September 2013USA (fus)

MANUAL HEATING AND AIR CONDITIONING SYSTEM
A. Fan speed control: Controls the volume of air circulated in yourvehicle. Turn to select the desired fan speed or switch off. If you switchthe fan off, the windshield may fog up.
B. Defrost: Distributes air through the windshield defroster vents anddemister vents. This setting can also be used to defog and clear thewindshield of a thin covering of ice.
C. Power: Press to turn the system off and on. When the system is off,outside air cannot enter the vehicle.
D. A/C: Press to turn air conditioning off and on. Air conditioning coolsthe vehicle using outside air. To improve air conditioning when startingyour vehicle, drive with the windows slightly open for two to threeminutes.
E. Recirculated air: Press to switch between outside air andrecirculated air. When the LED on the button is lit, the air currently inthe passenger compartment is being recirculated. Using recirculated aircan reduce the time needed to cool the interior and reduce unwantedodors from entering your vehicle.
130 Climate Control
2014 TaurusOwners Guide gf, 2nd Printing, September 2013USA (fus)

F. Temperature control: Controls the temperature of the air circulatedin your vehicle. Turn to select the desired temperature.
G. MAX A/C: Distributes recirculated air through the instrument panelvents to cool the vehicle. This position is more economical and efficientthan normal air conditioning.
H. Air distribution control: Press to set the air distribution to aposition listed below:
Distributes air through the windshield defroster vents, demistervents and floor vents.
Distributes air through the instrument panel vents.
Distributes air through the instrument panel vents, floor vents,and demister vents.
Distributes air through the floor vents.
I. Rear defrost: Turns the heated windows and mirrors off and on.See Heated windows and mirrors later in this chapter for moreinformation.
Climate Control 131
2014 TaurusOwners Guide gf, 2nd Printing, September 2013USA (fus)

DUAL AUTOMATIC TEMPERATURE CONTROL SYSTEM
Note: You can switch temperature units between Fahrenheit and Celsius.See Menu features in the MyFord Touch or MyLincoln Touch chapter.
A. Power/Driver temperature control: Press to turn the climatecontrol system off and on. When the system is off, outside air cannotenter the vehicle.Turn to increase or decrease the air temperature for the driver side ofthe vehicle.This control also adjusts the passenger side temperature when dual zoneoperation is disengaged.
B. AUTO: Press to turn on fully automatic operation. Select the desiredtemperature using the temperature control. The system automaticallydetermines fan speed, air distribution, air conditioning operation, andoutside or recirculated air, to heat or cool the vehicle to maintain theselected temperature.
C. Air distribution control: Press to set the air distribution to aposition listed below:
Distributes air through the windshield defroster vents, demistervents and floor vents.
Distributes air through the instrument panel vents.
G
HK
E
DB
FA
I
C
J
132 Climate Control
2014 TaurusOwners Guide gf, 2nd Printing, September 2013USA (fus)

Distributes air through the instrument panel vents, floor vents,and demister vents.
Distributes air through the floor vents.
D. A/C: Press to turn air conditioning off and on. Air conditioning coolsthe vehicle using outside air. To improve air conditioning when startingyour vehicle, drive with the windows slightly open for two to threeminutes.Use air conditioning with recirculated air to improve cooling performanceand efficiency.Note: Air conditioning turns on automatically in MAX A/C, Defrost andFloor/Defrost.
E. Recirculated air: Press to switch between outside air andrecirculated air. When the LED on the button is lit, the air currently inthe passenger compartment is being recirculated. Using recirculated aircan reduce the time needed to cool the interior and reduce unwantedodors from entering your vehicle.Note: Recirculated air engages automatically when MAX A/C is selectedor can be turned on manually in any airflow mode except Defrost.
F. PASS TEMP: Press and turn to increase or decrease the airtemperature on the passenger side of the vehicle.
G. MAX A/C: Distributes recirculated air through the instrument panelvents to cool the vehicle. This position is more economical and efficientthan normal air conditioning.
H. Fan speed control: Press + or - to increase or decrease the volumeof air circulated in your vehicle.
I. Heated seat controls (if equipped): Turn the driver or passengerheated seats off and on. See Heated seats in the Seats chapter for moreinformation.
J. Rear defrost: Turns the heated windows and mirrors off and on.See Heated windows and mirrors later in this chapter for moreinformation. If your vehicle is equipped with heated mirrors, this buttonturns them on also.
K. Defrost: Distributes air through the windshield defroster vents anddemister vents. This setting can also be used to defog and clear thewindshield of a thin covering of ice.
Climate Control 133
2014 TaurusOwners Guide gf, 2nd Printing, September 2013USA (fus)

DUAL AUTOMATIC TEMPERATURE CONTROL SYSTEM(WITH SONY® AUDIO SYSTEM)
Note: You can switch temperature units between Fahrenheit and Celsius.See Menu features in the MyFord Touch or MyLincoln Touch chapter.
A. Defrost: Distributes air through the windshield defroster vents anddemister vents. This setting can also be used to defog and clear thewindshield of a thin covering of ice.
B. Rear defrost: Turns the heated windows and mirrors off and on.See Heated windows and mirrors later in this chapter for moreinformation. If your vehicle is equipped with heated mirrors, this buttonturns them on also.
C. AUTO: Press to turn on fully automatic operation. Select the desiredtemperature using the temperature control. The system automaticallydetermines fan speed, air distribution, air conditioning operation, andoutside or recirculated air, to heat or cool the vehicle to maintain theselected temperature.
D. CLIMATE: Press to turn the climate control system off and on.When the system is off, outside air cannot enter the vehicle.
J I H
E
F
G
DCBA
134 Climate Control
2014 TaurusOwners Guide gf, 2nd Printing, September 2013USA (fus)

E. A/C: Press to turn air conditioning off and on. Air conditioning coolsthe vehicle using outside air. To improve air conditioning when startingyour vehicle, drive with the windows slightly open for two to threeminutes.Use air conditioning with recirculated air to improve cooling performanceand efficiency.Note: Air conditioning turns on automatically in MAX A/C, Defrost andFloor/Defrost.
F. MAX A/C: Distributes recirculated air through the instrument panelvents to cool the vehicle. This position is more economical and efficientthan normal air conditioning.
G. Recirculated air: Press to switch between outside air andrecirculated air. When the LED on the button is lit, the air currently inthe passenger compartment is being recirculated. Using recirculated aircan reduce the time needed to cool the interior and reduce unwantedodors from entering your vehicle.Note: Recirculated air engages automatically when MAX A/C is selectedor can be turned on manually in any airflow mode except Defrost.Note: For better cooling in hot conditions, recirculated air automaticallyengages when in Panel or Panel/Floor modes and the air conditioning ison. You can switch to fresh air by pressing the recirculated air buttonagain.
H. DUAL: Allows the passenger to set their temperature independent ofthe driver temperature.Press + or - to increase or decrease the air temperature on thepassenger side of the vehicle when in dual zone mode.
I. Fan speed control: Press + or - to increase or decrease the volumeof air circulated in your vehicle.
J. Driver temperature control: Press + or - to increase or decreasethe air temperature inside the vehicle.This control also adjusts the passenger side temperature when dual zoneoperation is disengaged.
Climate Control 135
2014 TaurusOwners Guide gf, 2nd Printing, September 2013USA (fus)

DUAL AUTOMATIC TEMPERATURE CONTROL SYSTEM(WITH MyTemp)
Note: You can switch temperature units between Fahrenheit and Celsius.See Settings in the MyFord Touch or MyLincoln Touch chapter.A. MyTemp: Allows you to quickly adjust to a frequently used settingwith a single touch.Press + and - to increase and decrease the temperature.Touch and hold MyTemp to save the current temperature. To access thesetting again, touch the MyTemp indicator again.B. Power/Fan speed control: Press to turn the system off and on.When the system is off, outside air cannot enter the vehicle.Turn to increase or decrease the fan speed.C. DUAL: Allows the passenger to set their temperature independent ofthe driver temperature.D. Recirculated air: Press to switch between outside air andrecirculated air. When the LED on the button is lit, the air currently inthe passenger compartment is being recirculated. Using recirculated aircan reduce the time needed to cool the interior and reduce unwantedodors from entering your vehicle.Note: Recirculated air engages automatically when MAX A/C is selectedor can be turned on manually in any airflow mode except Defrost.
E. MAX A/C: Distributes recirculated air through the instrument panelvents to cool the vehicle. This position is more economical and efficientthan normal air conditioning.
A CB
I H
R
G F E D
136 Climate Control
2014 TaurusOwners Guide gf, 2nd Printing, September 2013USA (fus)

F. A/C: Press to turn air conditioning off and on. Air conditioning coolsthe vehicle using outside air. To improve air conditioning when startingyour vehicle, drive with the windows slightly open for two to threeminutes.Use air conditioning with recirculated air to improve cooling performanceand efficiency.Note: Air conditioning turns on automatically in MAX A/C, Defrost andFloor/Defrost.
G. AUTO: Press to turn on fully automatic operation. Select the desiredtemperature using the temperature control. The system automaticallydetermines fan speed, air distribution, air conditioning operation, andoutside or recirculated air, to heat or cool the vehicle to maintain theselected temperature.
H. Rear defrost: Turns the heated windows and mirrors off and on.See Heated windows and mirrors later in this chapter for moreinformation. If your vehicle is equipped with heated mirrors, this buttonturns them on also.
I. Defrost: Distributes air through the windshield defroster vents anddemister vents. This setting can also be used to defog and clear thewindshield of a thin covering of ice.
GENERAL OPERATING TIPS
Manual Climate Control• To reduce fog build-up on the windshield during humid weather, select
Defrost. You can also improve clearing by increasing the temperatureand fan speed.
• To reduce humidity build-up inside the vehicle, do not drive with thesystem off or with recirculated air engaged.
• Do not put objects under the front seats that will interfere with theairflow to the back seats.
• Remove any snow, ice or leaves from the air intake area at the base ofthe windshield.
• To improve the air conditioning cool down, drive with the windowsslightly open for 2-3 minutes after start-up or until you have aired outthe vehicle.
• You may feel a small amount of air from the floor vent regardless ofthe air distribution setting you select.
Climate Control 137
2014 TaurusOwners Guide gf, 2nd Printing, September 2013USA (fus)

During extreme high ambient temperatures when idling stationary forextended periods in gear, run the air conditioning in the MAX A/C mode,adjust the blower fan speed to the lowest setting and put the vehicle’stransmission into position P (automatic transmission) to continue toreceive cool air from your air conditioning system.For maximum cooling performance in A/C mode, press MAX A/C.
For maximum cooling performance in panel or panel/floor modes:1. Move temperature control to the coolest setting.2. Select A/C and recirculated air to provide colder airflow.3. Set the fan to the highest speed initially, and then adjust to maintain
comfort.
To aid in side window defogging and demisting in cold or humid weather:1. Select Floor/Panel.2. Select A/C.3. Adjust the temperature control to maintain comfort.4. Set the fan speed to the highest setting.5. Direct the outer instrument panel vents toward the side windows.6. To increase airflow to the outer instrument panel vents, close the
vents located in the middle of the instrument panel.
Automatic Climate Control• To reduce fog build-up on the windshield during humid weather, select
Defrost. You can also improve clearing by increasing the temperatureand fan speed.
• To reduce humidity build-up inside the vehicle, do not drive with thesystem off or with recirculated air engaged.
• Do not put objects under the front seats that will interfere with theairflow to the back seats.
• Remove any snow, ice or leaves from the air intake area at the base ofthe windshield.
• To improve the air conditioning cool down, drive with the windowsslightly open for 2-3 minutes after start-up or until you have aired outthe vehicle.
• You may feel a small amount of air from the floor vent regardless ofthe air distribution setting you select.
During extreme high ambient temperatures when idling stationary forextended periods in gear, run the air conditioning in the MAX A/C mode,adjust the blower fan speed to the lowest setting and put the vehicle’s
138 Climate Control
2014 TaurusOwners Guide gf, 2nd Printing, September 2013USA (fus)

transmission into position P (automatic transmission) to continue toreceive cool air from your air conditioning system.
For maximum cooling performance in AUTO mode, press MAX A/C.
For maximum cooling performance in manual override control:1. Choose the Panel, A/C, and recirculated air controls.2. Set the temperature to LO.3. Set the fan to the highest blower setting.
To aid in side window defogging and demisting in cold or humid weather:1. Select Floor/Panel.2. Select A/C.3. Adjust the temperature control to maintain comfort.4. Set the fan speed to the highest setting.5. Direct the outer instrument panel vents toward the side windows.6. To increase airflow to the outer instrument panel vents, close the
vents located in the middle of the instrument panel.
HEATED WINDOWS AND MIRRORS (IF EQUIPPED)
Heated Rear WindowNote: The ignition must be switched on to use this feature.
Press the button to clear the rear window of thin ice and fog. Press thebutton again within 10 minutes to switch it off. It switches offautomatically after 10 minutes, or when you switch the ignition off.
Do not use razor blades or other sharp objects to clean the insideof the rear window or to remove decals from the inside of therear window. This may cause damage to the heated grid lines.Your warranty does not cover this damage.
Heated Exterior Mirrors (If Equipped)Note: Do not remove ice from the mirrors with a scraper or attempt toreadjust the mirror glass that has frozen in place. These actions couldcause damage to the glass and mirrors.
Note: Do not clean the housing or glass of any mirror with harshabrasives, fuel or other petroleum-based cleaning products.
Both mirrors heat to remove ice, mist and fog when you switch on theheated rear window.
Climate Control 139
2014 TaurusOwners Guide gf, 2nd Printing, September 2013USA (fus)

CABIN AIR FILTERNote: Make sure you have a cabin air filter installed at all times. Thisprevents foreign objects from entering the system. Running the systemwithout a filter in place could result in degradation or damage to thesystem.
Your vehicle is equipped with a cabin air filter, which is located just infront of the windshield under the cowl grille on the passenger side ofyour vehicle.
The particulate air filtration system reduces the concentration ofairborne particles, such as dust, spores and pollen, in the air supplied tothe interior of your vehicle. The particulate filtration system gives thefollowing benefits to customers:
• Improves the customer’s driving comfort by reducing particleconcentration.
• Improves the interior compartment cleanliness.
• Protects the climate control components from particle deposits.
For more information regarding the interval at which you should replacethe cabin air filter, see the Scheduled Maintenance chapter.
For additional cabin air filter information, or to replace the filter, see anauthorized dealer.
REMOTE START CLIMATE OPERATION (IF EQUIPPED)The climate control system adjusts the cabin temperature during remotestart.
You cannot adjust the system during remote start operation. In addition,the SYNC display and other displays remain blank during remote startoperation. Turn the ignition on to return the system to its previoussettings. You can now make adjustments. You will need to turn certainvehicle-dependent features back on, such as:• heated seats• cooled seats• heated steering wheel• heated mirrors• heated rear window.
You can adjust the settings using the information display controls.See the Information Displays chapter.
140 Climate Control
2014 TaurusOwners Guide gf, 2nd Printing, September 2013USA (fus)
Manual Climate SystemsIn hot weather, the climate control system is set to MAX A/C.
In moderate weather, the system either heats or cools (based onprevious settings). The rear defroster and heated mirrors are notautomatically turned on.
In cold weather, maximum heat is provided in floor/defrost mode.The rear defroster and heated mirrors are automatically turned on.
Automatic Climate SystemsIn hot weather, the system is set to 72°F (22°C). Cooled seats are set tohigh (if available and selected to AUTO in the information display).
In moderate weather, the system either heats or cools (based onprevious settings). The rear defroster, heated mirrors and heated/cooledseats are not automatically turned on.
In cold weather, the system is set to 72°F (22°C). The heated seats andheated steering wheel are set to high (if available, and selected to AUTOin the information display). The rear defroster and heated mirrors areautomatically turned on.
Climate Control 141
2014 TaurusOwners Guide gf, 2nd Printing, September 2013USA (fus)

SITTING IN THE CORRECT POSITION
WARNING: Sitting improperly out of position or with the seatback reclined too far can take off weight from the seat cushion
and affect the decision of the passenger sensing system, resulting inserious injury or death in a crash. Always sit upright against your seatback, with your feet on the floor.
WARNING: Do not recline the seat back as this can cause theoccupant to slide under the seat’s safety belt, resulting in severe
personal injury in the event of a crash.
WARNING: Do not place objects higher than the seat backs toreduce the risk of injury in a crash or during heavy braking or
when stopping suddenly.
When you use them properly, theseat, head restraint, safety belt andairbags will provide optimumprotection in the event of a crash.
We recommend that you follow these guidelines:
• Do not recline the seat back more than 30 degrees from vertical.
• Sit in an upright position with the base of your spine as far back aspossible.
• Adjust the head restraint so that the top of it is level with the top ofyour head and as far forward as possible, remaining comfortable.
• Keep sufficient distance between yourself and the steering wheel.We recommend a minimum of 10 inches (25 centimeters) betweenyour breastbone and the airbag cover.
• Hold the steering wheel with your arms slightly bent.
142 Seats
2014 TaurusOwners Guide gf, 2nd Printing, September 2013USA (fus)

• Bend your legs slightly so that you can press the pedals fully.
• Position the shoulder strap of the safety belt over the center of yourshoulder and position the lap strap tightly across your hips.
Make sure that your driving position is comfortable and that you canmaintain full control of your vehicle.
HEAD RESTRAINTS
WARNING: To minimize the risk of neck injury in the event of acrash, the driver and passenger occupants should not sit in or
operate the vehicle, until the head restraint is placed in its properposition. The driver should never adjust the head restraint while thevehicle is in motion.
WARNING: The adjustable head restraint is a safety device.Whenever possible it should be installed and properly adjusted
when the seat is occupied.
WARNING: Install the head restraint properly to minimize therisk of neck injury in the event of a crash.
Note: Before adjusting any head restraint, adjust the seat back to anupright driving or riding position. Properly adjust the head restraint sothat the top of the head restraint is even with the top of your head andpositioned as close as possible to the back of your head. For occupantsof extremely tall stature, adjust the head restraint to its full up position.To adjust the head restraint, do the following:
Front seat head restraints
Seats 143
2014 TaurusOwners Guide gf, 2nd Printing, September 2013USA (fus)

Rear seat center head restraint
The head restraints consist of:
A. An energy absorbing head restraint
B. Two steel stems
C. Guide sleeve adjust and release button
D. Guide sleeve unlock and remove button
• Raise: Pull up on the head restraint (A).
• Lower: Press and hold the guide sleeve adjust and release button (C)and push down on the head restraint (A).
• Remove: Pull up the head restraint until it reaches the highestadjustment position and then press and hold both the adjust andrelease button (C) and the unlock and remove button (D), then pullup on the head restraint.
• Reinstall: Align the steel stems into the guide sleeves and push thehead restraint down until it locks.
Rear seat non-adjustableoutboard head restraints
A
B
C
D
A
B
C
144 Seats
2014 TaurusOwners Guide gf, 2nd Printing, September 2013USA (fus)

The head restraints consist of:
A. An energy absorbing head restraint
B. Two steel stems
C. Guide sleeve unlock and remove button
• Remove: Simultaneously press and hold both unlock and removebuttons (C), then pull up on the head restraint.
• Reinstall: Align the steel stems into the guide sleeves and push thehead restraint down until it locks.
Tilting Head Restraints (If Equipped)The front head restraints may tilt for extra comfort. To tilt the headrestraint, do the following:
1. Adjust the seatback to an upright driving or ridingposition.
2. Tilt the head restraint forward by gently pullingthe top of the head restraint.
Once it is in its forward-most position, tilt it forward once more torelease it to the upright position.
Note: Do not attempt to force the head restraint backward after it istilted. Instead, continue tilting it forward until the head restraint releasesto the upright position.
Seats 145
2014 TaurusOwners Guide gf, 2nd Printing, September 2013USA (fus)

MANUAL SEATS
WARNING: Do not adjust the driver’s seat or seatback while thevehicle is moving.
WARNING: Rock the seat backward and forward after releasingthe lever to make sure that it is fully engaged.
Moving the seats backward andforward
WARNING: Before returning the seatback to its original position,make sure that cargo or any objects are not trapped behind the
seatback. After returning the seatback to its original position, pull onthe seatback to ensure that it has fully latched. An unlatched seat maybecome dangerous in the event of a sudden stop or crash.
Recline adjustment
Lumbar adjustment
146 Seats
2014 TaurusOwners Guide gf, 2nd Printing, September 2013USA (fus)

POWER SEATS (IF EQUIPPED)
WARNING: Never adjust the driver’s seat or seat back when thevehicle is moving.
WARNING: Before returning the seat back to its originalposition, make sure that cargo or any objects are not trapped
behind the seat back.
Note: On vehicles with memory seats, to prevent damage to the seat,the power seats are designed to set a stopping position just short of theend of the seat track. If the seat encounters an object while movingforward or backward, a new stopping position will be set.To reset the seat to its normal stopping position:1. After encountering the new stopping position, press the power seatcontrol again to override.2. Continue pressing the control until it reaches the end of the seat track.3. Continue pressing the control for about two seconds. You will feel theseat bounce back slightly.
Seats 147
2014 TaurusOwners Guide gf, 2nd Printing, September 2013USA (fus)

Power Lumbar (If Equipped)
Multi-Contour Active Motion™ Seat (If Equipped)Note: The massage system will turn off after 20 minutes.
Note: The engine must be running or the vehicle must be in accessorymode to activate the seats.
Note: Allow a few seconds for any selection to activate. The seat backand cushion massage cannot function at the same time.
A. Cushion and seat back massagecontrol
B. Lumbar control
C. Power seat controls
• Seat cushion massage: Press and release the front portion of the massagecontrol (A). Press again to cancel or press the lumbar control to cancel.
• Seat back massage: Press and release the rear portion of the massagebutton (A). Press again to cancel or press the lumbar control to cancel.
• Lumbar selection: Press either up or down on the lumbar control (B)to select the top, middle, or bottom part of the seat back.
• Lumbar adjust: Press and hold the front of the lumbar control (B) toincrease the firmness of the selected portion of the seat back or pressand hold the rear of the lumbar to decrease the firmness.
• Power seat controls (C)
We recommend first selecting the lumbar to the desired setting and thenselecting the back or cushion massage setting.
BA
C
148 Seats
2014 TaurusOwners Guide gf, 2nd Printing, September 2013USA (fus)

MEMORY FUNCTION (if equipped)The memory control, located on the side seat panel, allows positioningrecall of the:• Driver seat.• Power mirrors.• Adjustable pedals (if equipped).• Power tilt/telescopic steering column (if equipped).
A. Type 1
B. Type 2
Programming a memory positionNote: You can program a memory position at any time.• To program a position, move the memory features to the desired
positions using the associated controls. Press and hold the desiredmemory button for at least two seconds. A chime will soundconfirming that a memory position has been set.
• To program another position, repeat the previous procedure using theother buttons.
Recalling a memory positionYou can recall a programmed memory position:
• In any gearshift position if the ignition is not on.
• Only in park (P) or neutral (N) if the ignition is on.
Press the desired memory control to recall a memory position.
Recalling a memory position with the remote controlThe memory positions are also recalled when you press unlock on yourremote control (if the transmitter is programmed to a memory position)or, when you enter a valid personal entry code that is programmed to amemory position. If you enable the easy entry feature, the seat will first
A B
Seats 149
2014 TaurusOwners Guide gf, 2nd Printing, September 2013USA (fus)

move to the easy entry position. The seat will move to the final positionwhen the key is in the ignition or when the push button start system isput in accessory mode or started.
To program the memory feature to a remote control, see the Keys andremote control chapter.
Easy Entry and Exit Feature (If Equipped)This feature can move the seat rearward and the optional steeringcolumn up and forward to allow extra room to exit the vehicle.
This occurs when:
• You place the transmission in neutral (N) or park (P), and
• You turn the ignition off.
The seat and steering wheel will move to their original positions when:
• You place the transmission in neutral (N) or park (P), and
• You turn the ignition on.
Turn the Easy Entry/Exit feature on or off through the informationdisplay settings menu. See the Information Displays chapter.
HEATED SEATS (IF EQUIPPED)WARNING: Persons who are unable to feel pain to the skinbecause of advanced age, chronic illness, diabetes, spinal cord
injury, medication, alcohol use, exhaustion, or other physical conditions,must exercise care when using the seat heater. The seat heater maycause burns even at low temperatures, especially if used for longperiods of time. Do not place anything on the seat that insulates againstheat, such as a blanket or cushion, because this may cause the seatheater to overheat. Do not puncture the seat with pins, needles, orother pointed objects because this may damage the heating elementwhich may cause the seat heater to overheat. An overheated seat maycause serious personal injury.
The heated seats will only function when the ignition is in the on position.
Note: Do not do the following:
• Place heavy objects on the seat
• Operate the seat heater if water or any other liquid is spilled on theseat. Allow the seat to dry thoroughly.
150 Seats
2014 TaurusOwners Guide gf, 2nd Printing, September 2013USA (fus)

To operate the heated seats:
Press the heated seat symbol to cycle through the variousheat settings and off. Warmer settings are indicated bymore indicator lights.
HEATED AND VENTILATED SEATS (IF EQUIPPED)
Heated Seats
WARNING: Persons who are unable to feel pain to the skinbecause of advanced age, chronic illness, diabetes, spinal cord
injury, medication, alcohol use, exhaustion, or other physical conditions,must exercise care when using the seat heater. The seat heater maycause burns even at low temperatures, especially if used for longperiods of time. Do not place anything on the seat that insulates againstheat, such as a blanket or cushion, because this may cause the seatheater to overheat. Do not puncture the seat with pins, needles, orother pointed objects because this may damage the heating elementwhich may cause the seat heater to overheat. An overheated seat maycause serious personal injury.
The heated seats will only function when the engine is running.
Note: Do not do the following:
• Place heavy objects on the seat
• Operate the seat heater if water or any other liquid is spilled on theseat. Allow the seat to dry thoroughly.
To operate the heated seats:
Press the heated seat symbol to cycle through the variousheat settings and off. Warmer settings are indicated bymore indicator lights.
If the engine falls below 350 RPM while the heated seats are on, thefeature will turn itself off. You will need to reactivate it.
Seats 151
2014 TaurusOwners Guide gf, 2nd Printing, September 2013USA (fus)

Ventilated SeatsThe ventilated seats will only function when the engine is running.
To operate the ventilated seats:
Press the ventilated seat symbol to cycle through thevarious cooling settings and off. Cooler settings areindicated by more indicator lights.
If the engine falls below 350 RPM while the ventilated seats are on, thefeature will turn itself off. You will need to reactivate it.
Note: When the heated or ventilated front seat is active, you will be ableto hear the fan operating inside the seat. This is normal.
Heated and Ventilated Seat Air Filter Replacement (If Equipped)The climate controlled seat system includes air filters. You must replacethem periodically. See the scheduled maintenance information.
Locate the filters under each front seat and access them from thesecond-row foot-well area. Move the front seats all the way forward andto the full up positions to ease access.
To remove an air filter:
1. Turn the vehicle off.
2. Push up on the outside rigid edgeof the filter and rotatecounterclockwise once the tabs arereleased, then remove the filter.
A/C
152 Seats
2014 TaurusOwners Guide gf, 2nd Printing, September 2013USA (fus)

To install a filter:
1. First, position the filter in itshousing making sure that the farforward end is all the way up in thehousing.
2. Push in on the center of theoutside edge of the filter and rotateup into the housing until it clipsinto position.
REAR SEATS
Split-folding Rear Seat
WARNING: Before returning the seatback to its original position,make sure that cargo or any objects are not trapped behind the
seatback. After returning the seatback to its original position, pull onthe seatback to make sure that it has fully latched. An unlatched seatmay become dangerous in the event of a sudden stop or crash .
You can fold one or both rear seatbacks.
• Lower: Pull the strap located on theoutboard side of the seatback torelease it, and then fold the seatbackdown.
• Raise: Pull up on the seat and push itback until you hear it latch into place.
Seats 153
2014 TaurusOwners Guide gf, 2nd Printing, September 2013USA (fus)

REAR SEAT ARMREST (IF EQUIPPED)
WARNING: Use only soft cups in the cupholder. Hard objectscan injure you in a crash.
To access the cup holders, rotate thearmrest forward. To open the storagecompartment (if equipped), pull up onthe latch.
Rear Heated Seats (If Equipped)
WARNING: Persons who are unable to feel pain to the skinbecause of advanced age, chronic illness, diabetes, spinal cord
injury, medication, alcohol use, exhaustion, or other physical conditions,must exercise care when using the seat heater. The seat heater maycause burns even at low temperatures, especially if used for longperiods of time. Do not place anything on the seat that insulates againstheat, such as a blanket or cushion, because this may cause the seatheater to overheat. Do not puncture the seat with pins, needles, orother pointed objects because this may damage the heating elementwhich may cause the seat heater to overheat. An overheated seat maycause serious personal injury.
Note: Do not do the following:
• Place heavy objects on the seat
• Operate the seat heater if water or any other liquid is spilled on theseat. Allow the seat to dry thoroughly.
154 Seats
2014 TaurusOwners Guide gf, 2nd Printing, September 2013USA (fus)

The rear seat heat controls are located on the rear of the center console.
The heated seats only operate when the ignition is on. To operate theheated seats:
• Press the indicated side of the control for minimumheat.
• Press again to turn off.
• Press the indicated side of the control for maximumheat.
• Press again to turn off.
The indicator light will illuminate when the heated seats have beenactivated.
Seats 155
2014 TaurusOwners Guide gf, 2nd Printing, September 2013USA (fus)
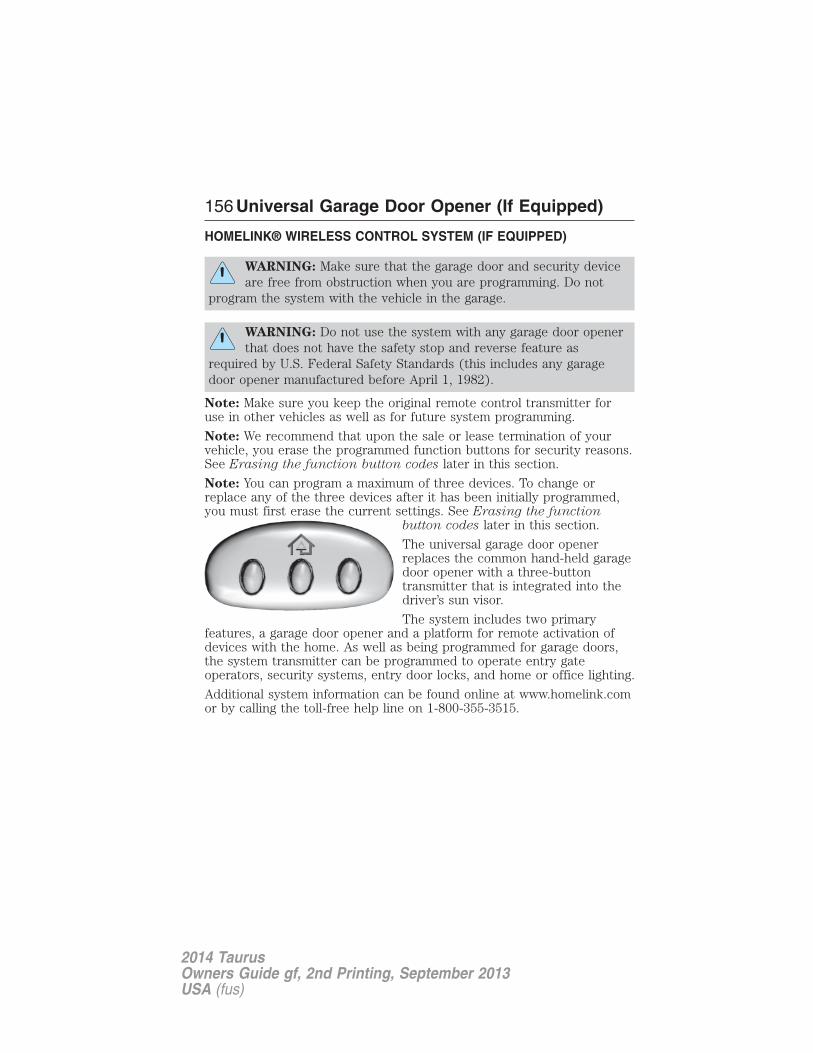
HOMELINK® WIRELESS CONTROL SYSTEM (IF EQUIPPED)
WARNING: Make sure that the garage door and security deviceare free from obstruction when you are programming. Do not
program the system with the vehicle in the garage.
WARNING: Do not use the system with any garage door openerthat does not have the safety stop and reverse feature as
required by U.S. Federal Safety Standards (this includes any garagedoor opener manufactured before April 1, 1982).
Note: Make sure you keep the original remote control transmitter foruse in other vehicles as well as for future system programming.
Note: We recommend that upon the sale or lease termination of yourvehicle, you erase the programmed function buttons for security reasons.See Erasing the function button codes later in this section.
Note: You can program a maximum of three devices. To change orreplace any of the three devices after it has been initially programmed,you must first erase the current settings. See Erasing the function
button codes later in this section.
The universal garage door openerreplaces the common hand-held garagedoor opener with a three-buttontransmitter that is integrated into thedriver’s sun visor.
The system includes two primaryfeatures, a garage door opener and a platform for remote activation ofdevices with the home. As well as being programmed for garage doors,the system transmitter can be programmed to operate entry gateoperators, security systems, entry door locks, and home or office lighting.
Additional system information can be found online at www.homelink.comor by calling the toll-free help line on 1-800-355-3515.
156 Universal Garage Door Opener (If Equipped)
2014 TaurusOwners Guide gf, 2nd Printing, September 2013USA (fus)

ProgrammingNote: Put a new battery in the hand-held transmitter. This will ensurequicker training and accurate transmission of the radio-frequency signal.
1. With your vehicle parked outside of the garage and your key in theignition, turn the key so that the ignition is in the on position.
2. Hold your hand-held, garage doortransmitter 1–3 inches (2–8 centimeters)away from the HomeLink button you wantto program.
3. Using both hands, simultaneously pressand hold the desired HomeLink buttonand the hand-held transmitter button.DO NOT release either one until the
HomeLink indicator light flashes slowly and then rapidly. When theindicator light flashes rapidly, both buttons may be released. The rapidflashing indicates successful training.
4. Press and hold the HomeLink button you programmed for fiveseconds, then release. You may need to do this twice to activate thedoor. If your garage door does not operate, watch the HomeLinkindicator light.
If the indicator light stays on, the programming is complete. Press andrelease the programmed HomeLink button, and then begin programmingyour garage door opener. See below for Steps 5 – 7.
If the indicator light flashes rapidly for two seconds and then turns to aconstant light, the HomeLink button is not programmed yet. Do thefollowing:Press and hold the HomeLink button while you press and release thehand-held transmitter button every two seconds. The HomeLinkindicator light will flash slowly and then rapidly once the HomeLinkfunction button recognizes and accepts the hand-held transmitter’s radiofrequency signal.
After programming the HomeLink button, follow Steps 5 – 7 as listedbelow to program your garage door opener.
Universal Garage Door Opener (If Equipped) 157
2014 TaurusOwners Guide gf, 2nd Printing, September 2013USA (fus)

Note: You may need a ladder to reach the unitand you may need to remove the cover orlamp lens on your garage door opener.
5. Press the learn button on the garage dooropener motor, and then you have 30 secondsto complete the next step.
6. Return to your car.
7. Press and hold the function button youwant to program for two seconds, thenrelease. Repeat this step. Depending onyour brand of garage door opener, youmay need to repeat this sequence a thirdtime.
To program additional buttons, repeat Steps 1 – 4 .
For questions or comments, please contact HomeLink® atwww.homelink.com or 1-800-355-3515.
Erasing the Function Button CodesNote: You cannot erase individualbuttons.
1. Press and hold the outer two functionbuttons simultaneously for approximately20 seconds until the indicator lights abovethe buttons flash rapidly.
2. When the indicator lights flash, releasethe buttons. The codes for all buttons areerased.
Reprogramming a single buttonTo program a device to a previously trained button, follow these steps:
1. Press and hold the desired button. Do NOT release the button.
2. The indicator light will begin to flash after 20 seconds. Withoutreleasing the button, follow Step 1 in the Programming section.
For questions or comments, contact HomeLink® at www.homelink.comor 1-800-355-3515.
158 Universal Garage Door Opener (If Equipped)
2014 TaurusOwners Guide gf, 2nd Printing, September 2013USA (fus)

Programming HomeLink to a Genie Intellicode 2 garage dooropenerNote: The Genie Intellicode 2 transmitter must already be programmedto operate with the garage door opener.
Programing the transmittersTo program HomeLink to the transmitter you must first put thetransmitter into programming mode. To do this:
A. Red LED
B. Green LED
1. Press and hold one of the buttons on the hand-held transmitter for10 seconds. The LED light will change from green to green and red.2. Press the same button twice to confirm the change to Programmingmode. If done properly the LED light will appear red.3. Hold the transmitter within 1–3 inches (2–8 centimeters) of thebutton on the sun visor you want to program.4. Press and hold both the programmed Genie button on the hand-heldtransmitter and the button on the sun visor you want to program. Theindicator light on the sun visor will flash rapidly when the programmingis successful.Note: the Genie transmitter will transmit for up to 30 seconds. IfHomeLink does not program within 30 seconds the Genie transmitter willneed to be pressed again. If the Genie transmitter LED displays greenand red, release the button until the LED turns off before pressing thebutton again.
Once HomeLink has been programmed successfully, the Genietransmitter must be changed out of program mode. To do this:
1. Press and hold the previously programmed Genie button on thehand-held transmitter for 10 seconds. The indicator light will changefrom red to red and green.
2. Press the same button twice to confirm the change. If done correctlythe LED will turn green.
BA
Universal Garage Door Opener (If Equipped) 159
2014 TaurusOwners Guide gf, 2nd Printing, September 2013USA (fus)

Programming HomeLink to the Genie Intellicode garage dooropener motorNote: You may need a ladder to access the garage door opener motor.
To program HomeLink to the garagedoor opener motor:1. Press and hold the PROGRAMbutton on the garage door openermotor until both blue LED’s turn on.2. Release the PROGRAM button.Only the smaller round LED shouldbe on.3. Press and release the programbutton. The larger purple LED willflash
Note: The next two steps must be completed in 30 seconds.
4. Press and release the Genie Intellicode 2 hand-held transmitter’spreviously programmed button. Both indicator lights on the garage dooropener motor unit should now flash purple.
5. Press and hold the previously programmed button on the sun visor fortwo seconds. Repeat this step up to 3 times until the garage door moves.Programming is now complete.
Clearing a HomeLink deviceTo erase programming from the three HomeLink buttons, press and holdthe two outer HomeLink buttons until the indicator light begins to flash.The LED will begin flashing in 10 to 20 seconds, at which time bothbuttons should be released. Programming has now been erased, and theLED should blink slowly to indicate the device is in train mode when anyone of the three HomeLink buttons is pressed.
FCC and RSS-210 Industry Canada ComplianceThis device complies with Part 15 of the FCC Rules and with RSS-210 ofIndustry Canada. Operation is subject to the following two conditions:(1) this device may not cause harmful interference, and (2) this devicemust accept any interference received, including interference that maycause undesired operation.
Changes or modifications to your device not expressly approved by theparty responsible for compliance can void the user’s authority to operatethe equipment.
160 Universal Garage Door Opener (If Equipped)
2014 TaurusOwners Guide gf, 2nd Printing, September 2013USA (fus)

AUXILIARY POWER POINTS
WARNING: Do not plug optional electrical accessories into thecigarette lighter socket (if equipped). Improper use of the lighter
can cause damage not covered by your warranty, and can result in fireor serious injury.
Note: If used when the engine is not running, the battery will discharge.There may be insufficient power to restart your engine.
Note: Do not insert objects other than an accessory plug into the powerpoint. This will damage the outlet and blow the fuse.
Note: Do not hang any type of accessory or accessory bracket from theplug.
Note: Do not use the power point over the vehicle capacity of 12 voltsDC 180 watts or a fuse may blow.
Note: Do not use the power point for operating a cigarette lighterelement.
Note: Improper use of the power outlet can cause damage not coveredby your warranty.
Note: Always keep the power point caps closed when not in use.
Run the engine for full capacity use of the power point. To prevent thebattery from being discharged:
• Do not use the power point longer than necessary when the engine isnot running.
• Do not leave devices plugged in overnight or when the vehicle isparked for extended periods.
LocationsPower points may be found:
• on the instrument panel under a panel door
• in the center console storage compartment
• on the rear of the center console.
Auxiliary Power Points 161
2014 TaurusOwners Guide gf, 2nd Printing, September 2013USA (fus)

CENTER CONSOLEStow items in the cupholder carefully as items may become loose duringhard braking, acceleration or collisions, including hot drinks which mayspill.
Note: The appearance and features of the center console may bedifferent than shown based on your vehicle’s option level.
Available console features include:
A. Cupholders
B. Utility compartment with audioinput jack, USB port, SD card slotand power point
C. Rear power point, rear heatedseats control
Some consoles have panel doorscovering the cupholders andswitches. Press the doors to openthem.
Some cupholders have a divider.Pull up on the divider and move itin the slots to best fit the cup youare using.
162 Storage Compartments
2014 TaurusOwners Guide gf, 2nd Printing, September 2013USA (fus)
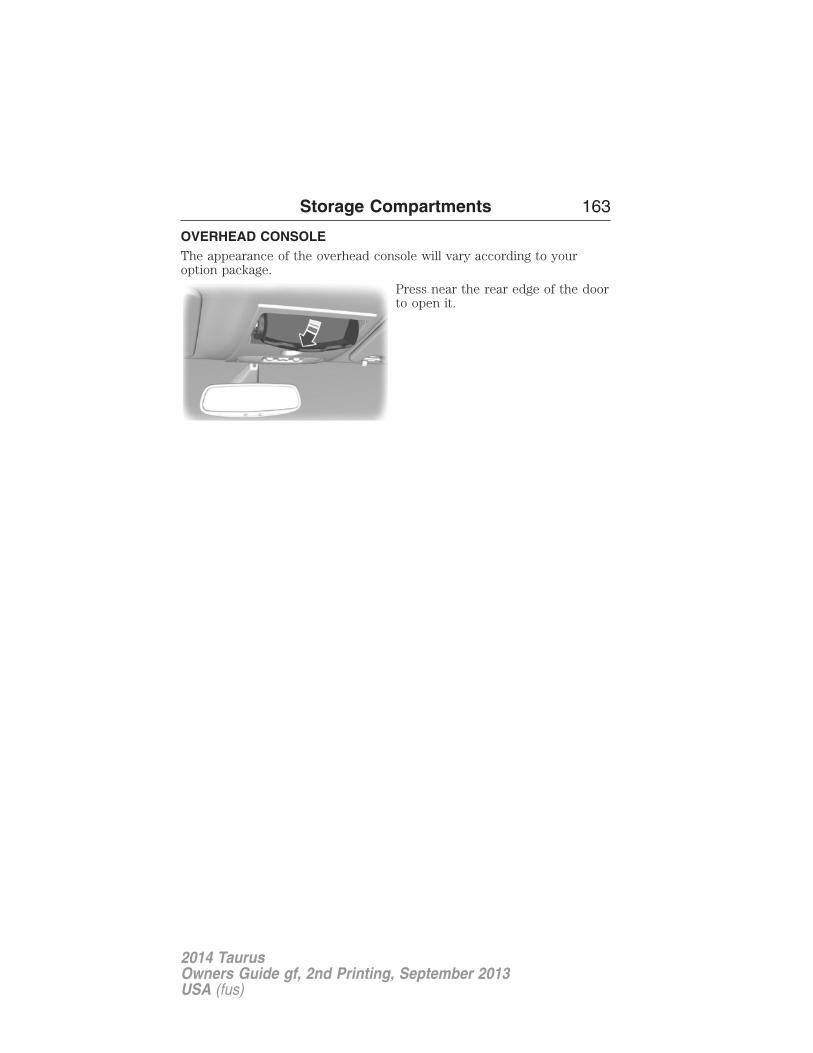
OVERHEAD CONSOLEThe appearance of the overhead console will vary according to youroption package.
Press near the rear edge of the doorto open it.
Storage Compartments 163
2014 TaurusOwners Guide gf, 2nd Printing, September 2013USA (fus)

GENERAL INFORMATION
WARNING: Extended idling at high engine speeds can producevery high temperatures in the engine and exhaust system,
creating the risk of fire or other damage.
WARNING: Do not park, idle, or drive your vehicle on dry grassor other dry ground cover. The emission system heats up the
engine compartment and exhaust system, which can start a fire.
WARNING: Do not start your vehicle in a closed garage or inother enclosed areas. Exhaust fumes can be toxic. Always open
the garage door before you start the engine.
WARNING: If you smell exhaust fumes inside your vehicle,have your vehicle checked by an authorized dealer immediately.
Do not drive if you smell exhaust fumes.
If you disconnect the battery, your vehicle may exhibit some unusualdriving characteristics for approximately 5 miles (8 kilometers) after youconnect it. This is because the engine management system must realignitself with the engine. You may disregard any unusual drivingcharacteristics during this period.
The powertrain control system meets all Canadian interference-causingequipment standard requirements regulating the impulse electrical fieldor radio noise.
Do not press the accelerator pedal while starting the engine. If you havedifficulty starting the engine, see Failure to start later in this section.
164 Starting and Stopping the Engine
2014 TaurusOwners Guide gf, 2nd Printing, September 2013USA (fus)

IGNITION SWITCH (IF EQUIPPED)
A. Off: The ignition is off.Note: When you switch the ignition off and leave your vehicle, do notleave your key in the ignition. This could cause your vehicle battery tolose charge.
B. Accessory: Allows the electrical accessories, such as the radio, tooperate while the engine is not running.Note: Do not leave the ignition key in this position for too long. Thiscould cause your vehicle battery to lose charge.
C. On: All electrical circuits are operational and the warning lamps andindicators illuminate.
D. Start: Cranks the engine.
KEYLESS STARTING (IF EQUIPPED)Note: The keyless starting system may not function if the key is close tometal objects or electronic devices such as cellular phones.
Note: A valid key must be located inside your vehicle to switch theignition on and start the engine.
Note: When locking your vehicle, any remote controls left inside thevehicle may become disabled. A message may appear in the informationdisplay indicating that there is no key detected if you try to start theengine. Press the unlock button on the remote control to enable it, andthen start the engine.
C
DB
A
Starting and Stopping the Engine 165
2014 TaurusOwners Guide gf, 2nd Printing, September 2013USA (fus)

Ignition Modes
Off: Turns the ignition off.• Without applying the brake pedal, press and release the button once
when the ignition is in the on mode, or when the engine is runningbut the vehicle is not in motion.
Accessory: Allows some electrical accessories to operate while theengine is not running.• Without applying the brake pedal, press and release the button once.
On: All electrical circuits are operational. Warning lamps and indicatorsare illuminated.• Without applying the brake pedal, press and release the button once
from accessory mode.• Without applying the brake pedal, press and release the button twice
from off mode.
Start: Starts the engine.• Press the brake pedal, and then press the button for any length of
time. An indicator light on the button illuminates when then ignitionis on and when the engine starts.
STARTING A GASOLINE ENGINEWhen you start the engine, the idle speed increases, this helps to warmup the engine. If the engine idle speed does not slow down automatically,have your vehicle checked by an authorized dealer.
Note: You can crank the engine for a total of 60 seconds (without theengine starting) before the starting system temporarily disables. The60 seconds does not have to be all at once. For example, if you crank theengine three times for 20 seconds each time, without the engine starting,you reached the 60-second time limit. A message appears in theinformation display alerting you that you exceeded the cranking time.You cannot attempt to start the engine for at least 15 minutes. After15 minutes, you are limited to a 15-second engine cranking time. You needto wait 60 minutes before you can crank the engine for 60 seconds again.
STARTSTOP
ENGINE
166 Starting and Stopping the Engine
2014 TaurusOwners Guide gf, 2nd Printing, September 2013USA (fus)

Before starting the engine check the following:• Make sure all occupants have fastened their safety belts.• Make sure the headlamps and electrical accessories are off.• Make sure the parking brake is on.• Make sure the gearshift is in position P.• Turn the ignition key to the on position. If your vehicle is equipped
with a keyless ignition, see the following instructions.
Vehicles with an Ignition KeyNote: Do not touch the accelerator pedal.1. Fully press the brake pedal.2. Turn the key to the start position. Release the key when the engine
starts.
Note: The engine may continue cranking for up to 15 seconds or until itstarts.
Note: If you cannot start the engine on the first try, wait for a shortperiod and try again.
Vehicles with Keyless StartNote: Do not touch the accelerator pedal.1. Fully press the brake pedal.2. Press the button.
The system does not function if:
• The key frequencies are jammed.
• The key battery has no charge.
If you are unable to start your vehicle, do the following:
1. Locate the key backup slot in thecenter console utilitycompartment.
2. With the buttons facing the rearof the vehicle and the key ringup, place the key into backupslot.
3. With the key in this position,press the brake pedal, then thebutton to switch the ignition onand start your vehicle.
Starting and Stopping the Engine 167
2014 TaurusOwners Guide gf, 2nd Printing, September 2013USA (fus)

Fast Restart (Vehicles with Keyless Start)The fast restart feature allows you to restart the engine within20 seconds of switching it off, even if a valid key is not present.
Within 20 seconds of switching the engine off, press the brake pedal andpress the button. After 20 seconds have expired, you can no longer startthe engine without the key present inside your vehicle.
Once the engine has started, it remains running until you press thebutton, even if the system does not detect a valid key. If you open andclose a door while the engine is running, the system searches for a validkey. You cannot start the engine if the system does not detect a valid keywithin 20 seconds.
Failure to StartIf you cannot start the engine after three attempts, wait 10 seconds andfollow this procedure:1. Fully press the brake pedal.2. Fully press the accelerator pedal and hold it there.3. Start the engine.
Automatic Engine ShutdownIf your vehicle is equipped with a keyless ignition, it has a feature thatautomatically shuts down the engine if it has been idling for an extendedperiod. The ignition also turns off in order to save battery power. Beforethe engine shuts down, a message appears in the information displayshowing a timer counting down from 30 seconds. If you do not intervenewithin 30 seconds, the engine shuts down. Another message appears inthe information display to inform you that the engine has shut down inorder to save fuel. Start your vehicle as you normally do.
Automatic Engine Shutdown Override
Note: You cannot permanently switch off the automatic engine shutdownfeature. When you switch it off temporarily, it turns on at the nextignition cycle.
You can stop the engine shutdown, or reset the timer, at any point beforethe 30-second countdown has expired by doing any of the following:• You can reset the timer by interacting with your vehicle (such as
pressing the brake pedal or accelerator pedal).• You can temporarily switch off the shutdown feature any time the
ignition is on (for the current ignition cycle only). Use the informationdisplay to do so.
168 Starting and Stopping the Engine
2014 TaurusOwners Guide gf, 2nd Printing, September 2013USA (fus)

• During the countdown before engine shutdown, you are prompted topress OK or RESET (depending on your type of information display)to temporarily switch the feature off (for the current ignition cycleonly).
Stopping the Engine When Your Vehicle is Stationary1. Move the transmission selector lever to position P.2. If your vehicle has an ignition key, turn the key to the off position.
If your vehicle has a keyless start system, press the button once.3. Apply the parking brake.
Note: This switches off the ignition, all electrical circuits, warning lampsand indicators.
Note: If the engine is idling for 30 minutes, the ignition and engineautomatically shut down.
Stopping the Engine When Your Vehicle is Moving
WARNING: Switching off the engine when the vehicle is stillmoving will result in a loss of brake and steering assistance.
The steering will not lock, but higher effort will be required. When theignition is switched off, some electrical circuits, warning lamps andindicators may also be off.
1. If your vehicle has an ignition key, move the transmissionselector lever to position N and use the brakes to bring your vehicleto a safe stop. When your vehicle has stopped, move the transmissionselector lever to position P and turn the key to the off position.
2. If your vehicle has a keyless start system, press and hold thebutton for one second, or press it three times within two seconds.Move the transmission selector lever to position N and use the brakesto bring your vehicle to a safe stop. When your vehicle has stopped,move the transmission selector lever to position P and switch theignition off.
3. Apply the parking brake.
Your vehicle may have remote start capability. Refer to Remote start inthe Keys and Remote Control chapter.
Starting and Stopping the Engine 169
2014 TaurusOwners Guide gf, 2nd Printing, September 2013USA (fus)

Guarding Against Exhaust Fumes
WARNING: If you smell exhaust fumes inside your vehicle,have this checked immediately. Do not drive your vehicle if you
smell exhaust fumes. Carbon monoxide is present in exhaust fumes.Take precautions to avoid its dangerous effects.
Important Ventilating InformationIf you stop your vehicle and leave the engine idling for long periods, werecommend that you do one of the following:• Open the windows at least 1 inch (2.5 centimeters).• Set your climate control to outside air.
ENGINE BLOCK HEATER (IF EQUIPPED)
WARNING: Failure to follow engine block heater instructionscould result in property damage or physical injury.
WARNING: Do not use your heater with ungrounded electricalsystems or two-pronged (cheater) adapters. There is a risk of
electrical shock.
Note: The heater is most effective when outdoor temperatures are below0°F (-18°C).
The heater acts as a starting aid by warming the engine coolant. Thisallows the climate control system to respond quickly. The equipmentincludes a heater element (installed in the engine block) and a wireharness. You can connect the system to a grounded 120–volt A/Celectrical source.
We recommend that you do the following for safe and correct operation:
• Use a 16-gauge outdoor extension cord that is product certified byUnderwriter’s Laboratory or Canadian Standards Association. Thisextension cord must be suitable for use outdoors, in coldtemperatures, and be clearly marked Suitable for Use with OutdoorAppliances. Never use an indoor extension cord outdoors; it couldresult in an electric shock or become a fire hazard.
• Use as short an extension cord as possible.
170 Starting and Stopping the Engine
2014 TaurusOwners Guide gf, 2nd Printing, September 2013USA (fus)

• Do not use multiple extension cords.
• Make sure that when in operation, the extension cord plug and theheater cord plug connections are free and clear of water. This couldcause an electric shock or fire.
• Make sure your vehicle is parked in a clean area, clear ofcombustibles.
• Make sure the heater, heater cord and extension cord are firmlyconnected.
• Check for heat anywhere in the electrical hookup once the system hasbeen operating for approximately 30 minutes.
• Make sure the system is unplugged and properly stowed before drivingyour vehicle. Make sure the protective cover seals the prongs of theblock heater cord plug when not in use.
• Keep plug terminals clean and free of dirt and corrosion.
• Make sure the heater system is checked for proper operation beforewinter.
Using the Engine Block HeaterMake sure the receptacle terminals are clean and dry before use.To clean them, use a dry cloth.
The heater uses 0.4 to 1.0 kilowatt-hours of energy per hour of use.The system does not have a thermostat. It achieves maximumtemperature after approximately three hours of operation. Using theheater longer than three hours does not improve system performanceand unnecessarily uses electricity.
Starting and Stopping the Engine 171
2014 TaurusOwners Guide gf, 2nd Printing, September 2013USA (fus)

SAFETY PRECAUTIONS
WARNING: Do not overfill the fuel tank. The pressure in anoverfilled tank may cause leakage and lead to fuel spray and fire.
WARNING: The fuel system may be under pressure. If you heara hissing sound near the fuel filler inlet, do not refuel until the
sound stops. Otherwise, fuel may spray out, which could cause seriouspersonal injury.
WARNING: Automotive fuels can cause serious injury or death ifmisused or mishandled.
WARNING: The flow of fuel through a fuel pump nozzle canproduce static electricity, which can cause a fire if fuel is pumped
into an ungrounded fuel container.
WARNING: Fuel ethanol and gasoline may contain benzene,which is a cancer-causing agent.
WARNING: When refueling always shut the engine off and neverallow sparks or open flames near the filler neck. Never smoke
while refueling. Fuel vapor is extremely hazardous under certainconditions. Care should be taken to avoid inhaling excess fumes.
Observe the following guidelines when handling automotive fuel:• Extinguish all smoking materials and any open flames before refueling
your vehicle.
• Always turn off the vehicle before refueling.
• Automotive fuels can be harmful or fatal if swallowed. Fuel, such asgasoline, is highly toxic and if swallowed can cause death orpermanent injury. If fuel is swallowed, call a physician immediately,even if no symptoms are immediately apparent. The toxic effects offuel may not be visible for hours.
• Avoid inhaling fuel vapors. Inhaling too much fuel vapor of any kindcan lead to eye and respiratory tract irritation. In severe cases,excessive or prolonged breathing of fuel vapor can cause seriousillness and permanent injury.
172 Fuel and Refueling
2014 TaurusOwners Guide gf, 2nd Printing, September 2013USA (fus)

• Avoid getting fuel liquid in your eyes. If fuel is splashed in the eyes,remove contact lenses (if worn), flush with water for 15 minutes andseek medical attention. Failure to seek proper medical attention couldlead to permanent injury.
• Fuels can also be harmful if absorbed through the skin. If fuel issplashed on the skin or clothing, promptly remove contaminatedclothing and wash skin thoroughly with soap and water. Repeated orprolonged skin contact with fuel liquid or vapor causes skin irritation.
• Be particularly careful if you are taking Antabuse or other forms ofdisulfiram for the treatment of alcoholism. Breathing gasoline vapors,or skin contact could cause an adverse reaction. In sensitiveindividuals, serious personal injury or sickness may result. If fuel issplashed on the skin, promptly wash skin thoroughly with soap andwater. Consult a physician immediately if you experience an adversereaction.
FUEL QUALITYNote: Use of any fuel other than those recommended may causepowertrain damage and a loss of vehicle performance; repairs may not becovered under warranty.
Choosing the Right Fuel (Gasoline Engines)Use only UNLEADED gasoline or UNLEADED gasoline blended with amaximum of 15% ethanol in your gasoline vehicle. If your vehicle is aFlex Fuel Vehicle (FFV), it will have a yellow bezel placed over the fuelfill inlet.
Do not use:
• Fuels containing more than 15% ethanol or E-85 fuel.
• Fuels containing methanol.
• Fuels containing metallic based additives, including manganese-basedcompounds.
• Fuels containing the octane booster additive, methylcyclopentadienylmanganese tricarbonyl (MMT).
• Leaded-fuel (The use of leaded fuel is prohibited by law).
Note: Use of any fuel other than recommended fuel can causepowertrain damage, impair the emission control system or cause loss ofvehicle performance. Any damage to vehicle that is caused by use of fuelnot recommended will not be covered under warranty.
Fuel and Refueling 173
2014 TaurusOwners Guide gf, 2nd Printing, September 2013USA (fus)
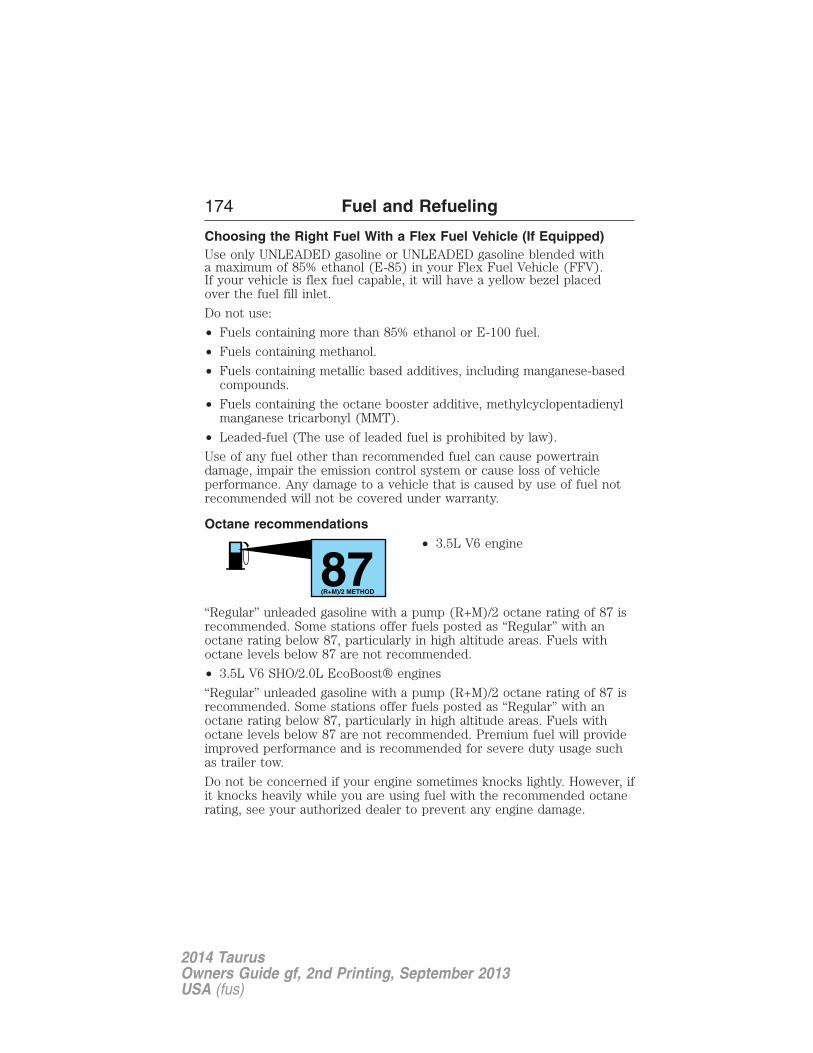
Choosing the Right Fuel With a Flex Fuel Vehicle (If Equipped)Use only UNLEADED gasoline or UNLEADED gasoline blended witha maximum of 85% ethanol (E-85) in your Flex Fuel Vehicle (FFV).If your vehicle is flex fuel capable, it will have a yellow bezel placedover the fuel fill inlet.
Do not use:
• Fuels containing more than 85% ethanol or E-100 fuel.
• Fuels containing methanol.
• Fuels containing metallic based additives, including manganese-basedcompounds.
• Fuels containing the octane booster additive, methylcyclopentadienylmanganese tricarbonyl (MMT).
• Leaded-fuel (The use of leaded fuel is prohibited by law).
Use of any fuel other than recommended fuel can cause powertraindamage, impair the emission control system or cause loss of vehicleperformance. Any damage to a vehicle that is caused by use of fuel notrecommended will not be covered under warranty.
Octane recommendations• 3.5L V6 engine
“Regular” unleaded gasoline with a pump (R+M)/2 octane rating of 87 isrecommended. Some stations offer fuels posted as “Regular” with anoctane rating below 87, particularly in high altitude areas. Fuels withoctane levels below 87 are not recommended.
• 3.5L V6 SHO/2.0L EcoBoost® engines
“Regular” unleaded gasoline with a pump (R+M)/2 octane rating of 87 isrecommended. Some stations offer fuels posted as “Regular” with anoctane rating below 87, particularly in high altitude areas. Fuels withoctane levels below 87 are not recommended. Premium fuel will provideimproved performance and is recommended for severe duty usage suchas trailer tow.
Do not be concerned if your engine sometimes knocks lightly. However, ifit knocks heavily while you are using fuel with the recommended octanerating, see your authorized dealer to prevent any engine damage.
87(R+M)/2 METHOD
174 Fuel and Refueling
2014 TaurusOwners Guide gf, 2nd Printing, September 2013USA (fus)

RUNNING OUT OF FUELAvoid running out of fuel because this situation may have an adverseeffect on powertrain components.
If you have run out of fuel:
• You may need to cycle the ignition from off to on several times afterrefueling to allow the fuel system to pump the fuel from the tank tothe engine. On restarting, crank time will be a few seconds longerthan normal. With keyless ignition, just start the engine. Crank timewill be longer than usual.
• Normally, adding 1 gallon (3.8 liters) of fuel is enough to restart theengine. If the vehicle is out of fuel and on a steep grade, more than1 gallon (3.8 liters) may be required.
• The service engine soon indicator may come on. For more informationon the service engine soon indicator, see Warning Lamps andIndicators in the Instrument Cluster chapter.
Refilling with a Portable Fuel Container
WARNING: Do not insert the nozzle of a portable fuel containeror aftermarket funnel into the capless fuel system. This could
damage the fuel system and its seal, and may cause fuel to run onto theground instead of filling the tank, which could result in serious personalinjury.
WARNING: Do not try to pry open or push open the capless fuelsystem with foreign objects. This could damage the fuel system
and its seal and cause injury to you or others.
Note: Do not use aftermarket funnels; they will not work with thecapless fuel system and can damage it. The included funnel has beenspecially designed to work safely with your vehicle.
When filling the vehicle’s fuel tank from a portable fuel container, use thefunnel included with the vehicle.
Fuel and Refueling 175
2014 TaurusOwners Guide gf, 2nd Printing, September 2013USA (fus)

1. Locate the white plastic funnel in the spare tire compartment.
2. To open the fuel filler door, pressthe center of the rear edge and thenrelease.
3. Slowly insert the funnel into the capless fuelsystem.
4. Fill the vehicle with fuel from the portable fuel container.
5. When done, clean the funnel or properly dispose of it. Extra funnelscan be purchased from your authorized dealer if you choose to disposeof the funnel.
REFUELING
WARNING: Fuel vapor burns violently and a fuel fire can causesevere injuries. To help avoid injuries to you and others:
• Read and follow all the instructions on the pump island.• Turn off your engine when you are refueling.• Do not smoke if you are near fuel or refueling your vehicle.• Keep sparks, flames and smoking materials away from fuel.• Stay outside your vehicle and do not leave the fuel pump unattended
when refueling your vehicle - this is against the law in some places.• Keep children away from the fuel pump; never let children pump fuel.• Do not use personal electronic devices while refueling.
176 Fuel and Refueling
2014 TaurusOwners Guide gf, 2nd Printing, September 2013USA (fus)

Use the following guidelines to avoid electrostatic charge build-up whenfilling an ungrounded fuel container:
• Place approved fuel container on the ground.
• DO NOT fill a fuel container while it is in the vehicle (including thecargo area).
• Keep the fuel pump nozzle in contact with the fuel container while filling.
• DO NOT use a device that would hold the fuel pump handle in the fillposition.
Easy Fuel® No Cap Fuel System
WARNING: The fuel system may be under pressure. If you heara hissing sound near the fuel filler door, do not refuel until the
sound stops. Otherwise, fuel may spray out, which could cause seriouspersonal injury.
When fueling your vehicle:
1. Turn the engine off.
2. To open the fuel filler door, pressthe center of the rear edge and thenrelease.
3. Slowly insert the fuel filler nozzlefully into the fuel system, and leavethe nozzle fully inserted to openboth doors until you are donepumping. Hold handle higher duringinsertion for easier access.
Fuel and Refueling 177
2014 TaurusOwners Guide gf, 2nd Printing, September 2013USA (fus)

4. After you are done pumping fuel,slowly remove the fuel fillernozzle—allow about five to tenseconds after pumping fuel beforeremoving the fuel filler nozzle. Thisallows residual fuel to drain backinto the fuel tank and not spill ontothe vehicle.
Note: A fuel spillage concern may occur if overfilling the fuel tank. Donot overfill the tank to the point that the fuel is able to bypass the fuelfiller nozzle. The overfilled fuel may run down the drain located withinthe fuel filler housing and to the ground.
5. To close the fuel filler door, press the center of the rear edge and thenrelease. The fuel door with latch closed.
If the fuel fill inlet was not properly closed, a Check Fuel Fill Inletmessage may appear on the information display.
At the next opportunity, do the following:
1. Safely pull off the road.
2. Turn off the engine.
3. Open the fuel filler door and remove any visible debris from the fuelfill opening.
4. Insert either the fuel fill nozzle or the fuel fill funnel provided with thevehicle several times to dislodge any debris and allow the inlet to closeproperly.
If this action corrects the problem, the message may not resetimmediately. It may take several driving cycles for the message to turnoff. A driving cycle consists of an engine start-up (after four or morehours with the engine off) followed by city or highway driving.Continuing to drive with the message on may cause the service enginesoon lamp to turn on as well.
178 Fuel and Refueling
2014 TaurusOwners Guide gf, 2nd Printing, September 2013USA (fus)

FUEL CONSUMPTION
Filling the TankThe advertised capacity is the indicated capacity and the empty reservecombined. Indicated capacity is the difference in the amount of fuel in afull tank and a tank when the fuel gauge indicates empty. Empty reserveis the amount of fuel in the tank after the fuel gauge indicates empty.
Note: The amount of usable fuel in the empty reserve varies and shouldnot be relied upon to increase driving range. When refueling your vehicleafter the fuel gauge indicates empty, you might not be able to refuel thefull amount of the advertised capacity of the fuel tank due to the emptyreserve still present in the tank.
For consistent results when filling the fuel tank:
• Turn the ignition off before fueling; an inaccurate reading results if theengine is left running.
• Use the same fill rate (low–medium–high) each time the tank is filled.
• Allow no more than two automatic click–offs when filling.
Results are most accurate when the filling method is consistent.
Calculating Fuel EconomyDo not measure fuel economy during the first 1000 miles(1600 kilometers) of driving (this is your engine’s break-in period); amore accurate measurement is obtained after 2000 miles–3000 miles(3200 kilometers–4800 kilometers). Also, fuel expense, frequency offill-ups or fuel gauge readings are not accurate ways to measure fueleconomy.
1. Fill the fuel tank completely and record the initial odometer reading.
2. Each time you fill the tank, record the amount of fuel added.
3. After at least three to five tank fill-ups, fill the fuel tank and recordthe current odometer reading.
4. Subtract your initial odometer reading from the current odometerreading.
5. Calculate fuel economy as follows:
Standard: Divide miles traveled by gallons used.
Metric: Multiply liters used by 100, then divide by kilometers traveled.
Fuel and Refueling 179
2014 TaurusOwners Guide gf, 2nd Printing, September 2013USA (fus)

Keep a record for at least one month and record the type of driving(city or highway). This provides an accurate estimate of the vehicle’s fueleconomy under current driving conditions. Additionally, keeping recordsduring summer and winter show how temperature impacts fuel economy.In general, lower temperatures mean lower fuel economy.
EMISSION CONTROL SYSTEM
WARNING: Do not park, idle, or drive your vehicle in dry grassor other dry ground cover. The emission system heats up the
engine compartment and exhaust system, which can start a fire.
WARNING: Exhaust leaks may result in entry of harmful andpotentially lethal fumes into the passenger compartment. If you
smell exhaust fumes inside your vehicle, have your dealer inspect yourvehicle immediately. Do not drive if you smell exhaust fumes.
Your vehicle is equipped with various emission control components anda catalytic converter which will enable your vehicle to comply withapplicable exhaust emission standards. To make sure that the catalyticconverter and other emission control components continue to workproperly:
• Use only the specified fuel listed.
• Avoid running out of fuel.
• Do not turn off the ignition while your vehicle is moving, especially athigh speeds.
• Have the items listed in Scheduled Maintenance Informationperformed according to the specified schedule.
The scheduled maintenance items listed in Scheduled MaintenanceInformation are essential to the life and performance of your vehicleand to its emissions system.
If other than Ford, Motorcraft® or Ford-authorized parts are used formaintenance replacements or for service of components affectingemission control, such non-Ford parts should be equivalent to genuineFord Motor Company parts in performance and durability.
Illumination of the service engine soon indicator, charging systemwarning light or the temperature warning light, fluid leaks, strange odors,smoke or loss of engine power could indicate that the emission controlsystem is not working properly.
180 Fuel and Refueling
2014 TaurusOwners Guide gf, 2nd Printing, September 2013USA (fus)

An improperly operating or damaged exhaust system may allow exhaustto enter the vehicle. Have a damaged or improperly operating exhaustsystem inspected and repaired immediately.
Do not make any unauthorized changes to your vehicle or engine. Bylaw, vehicle owners and anyone who manufactures, repairs, services,sells, leases, trades vehicles, or supervises a fleet of vehicles are notpermitted to intentionally remove an emission control device or preventit from working. Information about your vehicle’s emission system is onthe Vehicle Emission Control Information Decal located on or near theengine. This decal also lists engine displacement.
Please consult your warranty information for complete emission warrantyinformation.
On-board Diagnostics (OBD-II)Your vehicle is equipped with a computer that monitors the engine’semission control system. This system is commonly known as theon-board diagnostics system (OBD-II). The OBD-II system protects theenvironment by ensuring that your vehicle continues to meetgovernment emission standards. The OBD-II system also assists yourauthorized dealer in properly servicing your vehicle.
When the service engine soon indicator illuminates, the OBD-IIsystem has detected a malfunction. Temporary malfunctionsmay cause the service engine soon indicator to illuminate.
Examples are:
1. The vehicle has run out of fuel—the engine may misfire or run poorly.
2. Poor fuel quality or water in the fuel—the engine may misfire or runpoorly.
3. The fuel fill inlet may not have been properly closed. See Easy Fuel®No Cap Fuel System in this chapter.
4. Driving through deep water—the electrical system may be wet.
These temporary malfunctions can be corrected by filling the fuel tankwith good quality fuel, properly closing the fuel fill inlet or letting theelectrical system dry out. After three driving cycles without these or anyother temporary malfunctions present, the service engine soon indicatorshould stay off the next time the engine is started. A driving cycleconsists of a cold engine start-up followed by mixed city or highwaydriving. No additional vehicle service is required.
Fuel and Refueling 181
2014 TaurusOwners Guide gf, 2nd Printing, September 2013USA (fus)

If the service engine soon indicator remains on, have your vehicleserviced at the first available opportunity. Although some malfunctionsdetected by the OBD-II may not have symptoms that are apparent,continued driving with the service engine soon indicator on can result inincreased emissions, lower fuel economy, reduced engine andtransmission smoothness, and can lead to more costly repairs.
Readiness for Inspection/Maintenance (I/M) TestingSome state, provincial and local governments may haveInspection/Maintenance (I/M) programs to inspect the emission controlequipment on your vehicle. Failure to pass this inspection could preventyou from getting a vehicle registration.
If the service engine soon indicator is on or the bulb does notwork, the vehicle may need to be serviced. See On-boardDiagnostics (OBD-II) in this chapter.
Your vehicle may not pass the I/M test if the service engine soonindicator is on or not working properly (bulb is burned out), or if theOBD-II system has determined that some of the emission control systemshave not been properly checked. In this case, the vehicle is considerednot ready for I/M testing.
If the vehicle’s engine or transmission has just been serviced, or thebattery has recently run down or been replaced, the OBD-II system mayindicate that the vehicle is not ready for I/M testing. To determine if thevehicle is ready for I/M testing, turn the ignition key to the on positionfor 15 seconds without cranking the engine. If the service engine soonindicator blinks eight times, it means that the vehicle is not ready for I/Mtesting; if the service engine soon indicator stays on solid, it means thatthe vehicle is ready for I/M testing.
The OBD-II system is designed to check the emission control systemduring normal driving. A complete check may take several days. If thevehicle is not ready for I/M testing, the following driving cycle consistingof mixed city and highway driving may be performed:
15 minutes of steady driving on an expressway or highway followed by20 minutes of stop-and-go driving with at least four 30-second idle periods.
Allow the vehicle to sit for at least eight hours without starting the engine.Then, start the engine and complete the above driving cycle. The enginemust warm up to its normal operating temperature. Once the engine isstarted, do not turn off the engine until the above driving cycle is complete.If the vehicle is still not ready for I/M testing, the above driving cycle willhave to be repeated.
182 Fuel and Refueling
2014 TaurusOwners Guide gf, 2nd Printing, September 2013USA (fus)

AUTOMATIC TRANSMISSION
WARNING: Always set the parking brake fully and make surethe gearshift is latched in P (Park). Turn the ignition to the off
position and remove the key whenever you leave your vehicle.
Your vehicle has been designed to improve fuel economy by reducingfuel usage while coasting or decelerating. When you take your foot offthe accelerator pedal and the vehicle begins to slow down, the torqueconverter clutch locks up and aggressively shuts off fuel flow to theengine while decelerating. This fuel economy benefit may be perceivedas a light to medium braking sensation when removing your foot fromthe accelerator pedal.
P (Park)
This position locks the transmissionand prevents the front wheels fromturning.
To put your vehicle in gear:
• Press the brake pedal
• Move the gearshift lever into thedesired gear
To put your vehicle in P (Park):
• Come to a complete stop
• Move the gearshift lever and securely latch it in P (Park)
R (Reverse)
With the gearshift lever in R (Reverse), the vehicle will move backward.Always come to a complete stop before shifting into and out of R(Reverse).
N (Neutral)
With the gearshift lever in N (Neutral), the vehicle can be started and isfree to roll. Hold the brake pedal down while in this position.
D (Drive) with overdrive
The normal driving position for the best fuel economy. Transmissionoperates in gears one through six. The automatic transmission shiftstrategy has the ability to detect hilly terrain or mountainous areas andwill provide a limited amount of grade assist features automatically.
P
R
N
D
S
Transmission 183
2014 TaurusOwners Guide gf, 2nd Printing, September 2013USA (fus)

S (Sport)
Moving the gearshift lever to S (Sport):
• Provides additional grade (engine) braking and extends lower gearoperation to enhance performance for uphill climbs, hilly terrain ormountainous areas. This will increase engine RPM during enginebraking.
• Provides additional lower gear operation through the automatictransmission shift strategy which reacts to vehicle inputs (vehicleacceleration, accelerator pedal, brake pedal and vehicle speed).
• Gears are selected more quickly and at higher engine speeds.
SelectShift Automatic® Transmission (If Equipped)Your SelectShift automatic transmission gives you the ability to manuallychange gears if you’d like. To use SelectShift, move the gearshift leverinto S (Sport). Now you can use select shift to manually change gears.
If your vehicle is equipped with (+)/(–) buttons on the side of yourgearshift lever:
• Press (–) on the gearshift leverbutton to manually downshift thetransmission.
• Press (+) on the gearshift leverbutton to manually upshift thetransmission.
Paddle Shifters (if equipped)
The paddle shifters allow you to shift gears quickly, without taking yourhands off the steering wheel. Temporary manual control is providedwhen pulling the paddles with the gearshift in the D (Drive) position.
184 Transmission
2014 TaurusOwners Guide gf, 2nd Printing, September 2013USA (fus)

The system will determine when temporary manual control is no longerdesired and reverts back to automatic control. Extensive manual controlcan be achieved by moving the shifter to the S (Sport) position. Thesystem will stay in manual control until the shifter is moved out of themanual position.
If your vehicle is equipped with paddles on the steering wheel:
• Pull the left paddle (–) todownshift the transmission.
• Pull the right paddle (+) to upshiftthe transmission.
Upshift to the recommended shift speeds according to the followingchart:
Upshifts when accelerating (recommended for best fuel
economy)
Shift from:1 - 2 15 mph (24 km/h)2 - 3 25 mph (40 km/h)3 - 4 40 mph (64 km/h)4 - 5 45 mph (72 km/h)5 - 6 50 mph (80 km/h)
The instrument cluster will show the selected gear you are currently in.
In order to prevent the engine from running at too low an RPM, whichmay cause it to stall, SelectShift will automatically make some downshiftsif it has determined that you have not downshifted in time. It will stillallow you to downshift at any time as long as SelectShift determines thatthe engine will not be damaged from over-revving.
Note: Return the gear shift lever from S (Sport) to D (Drive) whenmanual control is no longer desired.
Note: Engine damage may occur if excessive engine revving is heldwithout shifting.
Transmission 185
2014 TaurusOwners Guide gf, 2nd Printing, September 2013USA (fus)

Brake-Shift Interlock
WARNING: Do not drive your vehicle until you verify that thebrake lamps are working.
WARNING: When doing this procedure, you will be taking thevehicle out of park which means the vehicle can roll freely. To
avoid unwanted vehicle movement, always fully set the parking brakeprior to doing this procedure. Use wheel chocks if appropriate.
WARNING: If the parking brake is fully released, but the brakewarning lamp remains illuminated, the brakes may not be
working properly. See your authorized dealer as soon as possible.
Note: See your authorized dealer as soon as possible if this procedure isused.
Use the brake-shift interlock lever to move the gearshift lever from the P(Park) position in the event of an electrical malfunction or if your vehiclehas a dead battery.
Note: For some markets, this feature will be disabled.
Apply the parking brake and turn the ignition off before performing thisprocedure.
1. Using a screwdriver (or similartool), remove the insert next to thegearshift lever.
186 Transmission
2014 TaurusOwners Guide gf, 2nd Printing, September 2013USA (fus)

2. Insert the screwdriver (or similartool) into the hole and press the leverforward while pulling the gearshiftlever out of position P and into theposition N.
3. Remove the tool and reinstall theinsert.
4. Start the vehicle and release theparking brake.
Automatic Transmission Adaptive LearningThis feature is designed to increase durability and provide consistentshift feel over the life of the vehicle. A new vehicle or transmission mayhave firm shifts, soft shifts or both. This operation is considered normaland will not affect function or durability of the transmission. Over time,the adaptive learning process will fully update transmission operation.Additionally, whenever the battery is disconnected or a new batteryinstalled, the strategy must be relearned.
If Your Vehicle Gets Stuck in Mud or SnowNote: Do not rock the vehicle if the engine is not at normal operatingtemperature or damage to the transmission may occur.
Note: Do not rock the vehicle for more than a minute or damage to thetransmission and tires may occur, or the engine may overheat.
If your vehicle gets stuck in mud or snow, it may be rocked out byshifting between forward and reverse gears, stopping between shifts in asteady pattern. Press lightly on the accelerator in each gear.
Transmission 187
2014 TaurusOwners Guide gf, 2nd Printing, September 2013USA (fus)

Using your All Wheel Drive (AWD) systemAWD uses all four wheels to power the vehicle. This increases traction,enabling you to drive over terrain and road conditions that aconventional two-wheel drive vehicles cannot. The AWD system is activeall the time and requires no input from the operator.Note: Your AWD vehicle is not intended for off-road use. The AWDfeature gives your vehicle some limited off-road capabilities in whichdriving surfaces are relatively level, obstruction-free and otherwise similarto normal on-road driving conditions. Operating your vehicle under otherthan those conditions could subject the vehicle to excessive stress whichmight result in damage which is not covered under your warranty.
Note: When an AWD system fault is present, the warning Check AWDwill display in the information display. The AWD system is notfunctioning correctly and defaulted to front-wheel drive. When thiswarning is displayed, have your vehicle serviced at an authorized dealer.
Note: The AWD Off message may also be displayed in the informationdisplay if the AWD system has overheated and defaulted to front-wheeldrive. This condition may occur if the vehicle was operated in extremeconditions with excessive wheel slip, such as deep sand. To resumenormal AWD function as soon as possible, stop the vehicle in a safelocation and stop the engine for at least 10 minutes. After the engine hasbeen restarted and the AWD system has adequately cooled, the AWD Offmessage will turn off and normal AWD function will return. In the eventthe engine is not stopped, the AWD Off message will turn off when thesystem cools and normal AWD function returns.
The Power Transfer Unit (PTU) does not require any normal scheduledmaintenance. Do not check or change the PTU lubricant unless the unithas been submerged in water or shows signs of leakage
The Power Transfer Unit (PTU) in Taurus SHO™ performance packagevehicles is electronically monitored and notifies the driver of requiredservice by displaying the message Change AWD Power Transfer UnitLube in the information display. The PTU lube will be more likely torequire a fluid change if the vehicle has experienced extended periods ofextreme/severe duty cycle driving. Do not check or change the PTUlubricant unless the unit has been submerged in water, shows signs ofleakage or a message indicating required service is displayed. Contactyour authorized dealer for service and to reset the PTU lube life monitor.
Do not use a spare tire of a different size other than the tire provided.If the mini-spare tire is installed, the AWD system may disableautomatically and enter front-wheel drive only mode to protect driveline
188 All-Wheel Drive (If Equipped)
2014 TaurusOwners Guide gf, 2nd Printing, September 2013USA (fus)

components. This condition may be indicated by an AWD Off messagein the information display. If there is an AWD Off message in theinformation display from using the spare tire, this indicator should turnoff after reinstalling the repaired or replaced normal road tire and cyclingthe ignition off and on. It is recommended to reinstall the repaired orreplaced road tire as soon as possible. Major dissimilar tire sizes betweenthe front and rear axles could cause the AWD system to stop functioningand default to front-wheel drive or damage the AWD system.
Driving In Special Conditions With All-Wheel Drive (AWD)
AWD vehicles are equipped for driving on sand, snow, mud and roughroads and have operating characteristics that are somewhat differentfrom conventional vehicles, both on and off the highway.
When driving at slow speeds in deep sand under high outsidetemperatures, use a low gear when possible. Lower gear operation willmaximize the engine and transmission cooling capability.
Under severe operating conditions, the A/C may cycle on and off toprotect overheating of the engine.
Basic operating principles in special conditions• Drive slower in strong crosswinds which can affect the normal steering
characteristics of your vehicle.
• Be extremely careful when driving on pavement made slippery byloose sand, water, gravel, snow or ice.
If Your Vehicle Goes Off the Edge of the Pavement• If your vehicle goes off the edge of the pavement, slow down, but
avoid severe brake application, ease the vehicle back onto thepavement only after reducing your speed. Do not turn the steeringwheel too sharply while returning to the road surface.
• It may be safer to stay on the apron or shoulder of the road and slowdown gradually before returning to the pavement. You may losecontrol if you do not slow down or if you turn the steering wheel toosharply or abruptly.
• It often may be less risky to strike small objects, such as highwayreflectors, with minor damage to your vehicle rather than attempt asudden return to the pavement which could cause the vehicle to slidesideways out of control or rollover. Remember, your safety and thesafety of others should be your primary concern.
All-Wheel Drive (If Equipped) 189
2014 TaurusOwners Guide gf, 2nd Printing, September 2013USA (fus)

If Your Vehicle Gets Stuck
WARNING: Always set the parking brake fully and make surethe gearshift is latched in P (Park). Turn the ignition to the lock
position and remove the key whenever you leave your vehicle.
WARNING: If the parking brake is fully released, but the brakewarning lamp remains illuminated, the brakes may not be
working properly. See your authorized dealer.
WARNING: Do not spin the wheels at over 35 mph (56 km/h).The tires may fail and injure a passenger or bystander.
Note: Do not rock the vehicle if the engine is not at normal operatingtemperature or damage to the transmission may occur.Note: Do not rock the vehicle for more than a few minutes or damageto the transmission and tires may occur or the engine may overheat.If your vehicle gets stuck in mud or snow it may be rocked out byshifting between forward and reverse gears, stopping between shifts,in a steady pattern. Press lightly on the accelerator in each gear.If your vehicle is equipped with AdvanceTrac® with Roll StabilityControl™, it may be beneficial to disengage the AdvanceTrac® withRoll Stability Control™ system while attempting to rock the vehicle.
Emergency Maneuvers• In an unavoidable emergency situation where a sudden sharp turn
must be made, remember to avoid “over-driving” your vehicle (i.e.,turn the steering wheel only as rapidly and as far as required to avoidthe emergency). Excessive steering will result in less vehicle control,not more. Additionally, smooth variations of the accelerator and/orbrake pedal pressure should be utilized if changes in vehicle speed arecalled for. Avoid abrupt steering, acceleration or braking which couldresult in an increased risk of loss of vehicle control, vehicle rolloverand/or personal injury. Use all available road surface to return thevehicle to a safe direction of travel.
• In the event of an emergency stop, avoid skidding the tires and do notattempt any sharp steering wheel movements.
• If the vehicle goes from one type of surface to another (i.e., fromconcrete to gravel) there will be a change in the way the vehicleresponds to a maneuver (steering, acceleration or braking). Again,avoid these abrupt inputs.
190 All-Wheel Drive (If Equipped)
2014 TaurusOwners Guide gf, 2nd Printing, September 2013USA (fus)

SandWhen driving over sand, try to keep all four wheels on the most solidarea of the trail. Avoid reducing the tire pressures but shift to a lowergear and drive steadily through the terrain. Apply the accelerator slowlyand avoid excessive wheel slip.
Do not drive your vehicle in deep sand for an extended period of time.This could cause the AWD system to overheat and default to front-wheeldrive. If this occurs AWD Off will be displayed in the Information Display.
To resume normal AWD function as soon as possible, stop the vehicle ina safe location and stop the engine for at least 10 minutes. After theengine has been restarted and the AWD system has adequately cooled,the AWD Off message will turn off and normal AWD function will return.In the event the engine is not stopped, the AWD Off message will turnoff when the system cools and normal AWD function returns.
When driving at slow speeds in deep sand under high outsidetemperatures, use L (Low) gear when possible. L (Low) gear operationwill maximize the engine and transmission cooling capability.
Under severe operating conditions, the A/C may cycle on and off toprotect overheating of the engine.
Avoid driving at excessive speeds, this causes vehicle momentum to workagainst you and your vehicle could become stuck to the point thatassistance may be required from another vehicle. Remember, you may beable to back out the way you came if you proceed with caution.
Mud and WaterIf you must drive through high water, drive slowly. Traction or brakecapability may be limited.
When driving through water, determine the depth; avoid water higherthan the bottom of the wheel rims (for cars) or the bottom of the hubs(for trucks) (if possible) and proceed slowly. If the ignition system getswet, the vehicle may stall.
Once through water, always try the brakes. Wet brakes do not stop thevehicle as effectively as dry brakes. Drying can be improved by movingyour vehicle slowly while applying light pressure on the brake pedal.
Be cautious of sudden changes in vehicle speed or direction when youare driving in mud. Even AWD vehicles can lose traction in slick mud.As when you are driving over sand, apply the accelerator slowly andavoid spinning your wheels. If the vehicle does slide, steer in thedirection of the slide until you regain control of the vehicle.
All-Wheel Drive (If Equipped) 191
2014 TaurusOwners Guide gf, 2nd Printing, September 2013USA (fus)

After driving through mud, clean off residue stuck to rotating driveshaftsand tires. Excess mud stuck on tires and rotating driveshafts causes animbalance that could damage drive components.
Note: Driving through deep water may damage the transmission.
If the front or rear axle is submerged in water, the axle lubricant andPTU (power transfer unit) lubricant should be checked and changed ifnecessary.
“Tread Lightly” is an educationalprogram designed to increase publicawareness of land-use regulationsand responsibilities in our nationswilderness areas. Ford MotorCompany joins the U.S. Forest
Service and the Bureau of Land Management in encouraging you to helppreserve our national forest and other public and private lands by“treading lightly.”
Driving on Hilly or Sloping TerrainNote: Avoid driving crosswise or turning on steep slopes or hills. Adanger lies in losing traction, slipping sideways and possibly rolling over.Whenever driving on a hill, determine beforehand the route you will use.Do not drive over the crest of a hill without seeing what conditions areon the other side. Do not drive in reverse over a hill without the aid ofan observer.
Although natural obstacles may make it necessary to travel diagonally upor down a hill or steep incline, you should always try to drive straight upor straight down.
When climbing a steep slope or hill, start in a lower gear rather thandownshifting to a lower gear from a higher gear once the ascent hasstarted. This reduces strain on the engine and the possibility of stalling.
If you do stall out, do not try to turnaround because you might roll over.It is better to back down to a safe location.
Apply just enough power to the wheels to climb the hill. Too muchpower will cause the tires to slip, spin or lose traction, resulting in loss ofvehicle control.
192 All-Wheel Drive (If Equipped)
2014 TaurusOwners Guide gf, 2nd Printing, September 2013USA (fus)

Descend a hill in the same gear youwould use to climb up the hill toavoid excessive brake applicationand brake overheating. Do notdescend in neutral; instead,disengage overdrive or manuallyshift to a lower gear. Whendescending a steep hill, avoidsudden hard braking as you couldlose control. The front wheels haveto be turning in order to steer thevehicle.
Your vehicle has anti-lock brakes, therefore apply the brakes steadily.Do not “pump” the brakes.
Driving on Snow and Ice
WARNING: If you are driving in slippery conditions that requiretire chains or cables, then it is critical that you drive cautiously.
Keep speeds down, allow for longer stopping distances and avoidaggressive steering to reduce the chances of a loss of vehicle controlwhich can lead to serious injury or death. If the rear end of the vehicleslides while cornering, steer in the direction of the slide until youregain control of the vehicle.
Note: Excessive tire slippage can cause transmission damage.
AWD vehicles have advantages over 2WD vehicles in snow and ice butcan skid like any other vehicle.
Should you start to slide while driving on snowy or icy roads, turn thesteering wheel in the direction of the slide until you regain control.
Avoid sudden applications of power and quick changes of direction onsnow and ice. Apply the accelerator slowly and steadily when startingfrom a full stop.
Avoid sudden braking as well. Although an AWD vehicle may acceleratebetter than a two-wheel drive vehicle in snow and ice, it won’t stop anyfaster, because as in other vehicles, braking occurs at all four wheels. Donot become overconfident as to road conditions.
All-Wheel Drive (If Equipped) 193
2014 TaurusOwners Guide gf, 2nd Printing, September 2013USA (fus)

Make sure you allow sufficient distance between you and other vehiclesfor stopping. Drive slower than usual and consider using one of the lowergears. In emergency stopping situations, apply the brake steadily. Sinceyour vehicle is equipped with a four wheel anti-lock brake system (ABS),do not “pump” the brakes. Refer to the Brakes chapter for additionalinformation on the operation of the anti-lock brake system.
Maintenance and ModificationsThe suspension and steering systems on your vehicle have been designedand tested to provide predictable performance whether loaded or emptyand durable load carrying capability. For this reason, Ford MotorCompany strongly recommends that you do not make modifications suchas adding or removing parts (such as lift kits or stabilizer bars) or byusing replacement parts not equivalent to the original factory equipment.
Any modifications to a vehicle that raise the center of gravity can makeit more likely the vehicle will rollover as a result of a loss of control.Ford Motor Company recommends that caution be used with any vehicleequipped with a high load or device (such as ladder or luggage racks).
Failure to maintain your vehicle properly may void the warranty, increaseyour repair cost, reduce vehicle performance and operational capabilitiesand adversely affect driver and passenger safety. Frequent inspection ofvehicle chassis components is recommended if the vehicle is subjected tooff-highway usage.
194 All-Wheel Drive (If Equipped)
2014 TaurusOwners Guide gf, 2nd Printing, September 2013USA (fus)

GENERAL INFORMATIONNote: Occasional brake noise is normal. If a metal-to-metal, continuousgrinding or continuous squeal sound is present, the brake linings may beworn out. Have them inspected by an authorized dealer. If your vehiclehas continuous vibration or shudder in the steering wheel while braking,have your vehicle inspected by an authorized dealer.
Note: Brake dust may accumulate on the wheels, even under normaldriving conditions. Some dust is inevitable as the brakes wear and doesnot contribute to brake noise. See the Vehicle Care chapter for wheelcleaning instructions.
See the Instrument Cluster chapter for information on thebrake system warning light.
Wet brakes result in reduced braking efficiency. Gently press the brakepedal a few times when driving from a car wash or standing water to drythe brakes.
Brake Over AcceleratorIn the event the accelerator pedal becomes stuck or entrapped, applysteady and firm pressure to the brake pedal to slow your vehicle andreduce engine power. If you experience this condition, apply the brakesand bring your vehicle to a safe stop. Turn the engine off, shift toposition P and apply the parking brake, then inspect the acceleratorpedal for any interferences. If none are found and the condition persists,have your vehicle towed to the nearest authorized dealer.
Brake AssistBrake assist detects when you brake heavily by measuring the rate atwhich you press the brake pedal. It provides maximum braking efficiencyas long as you press the pedal. Brake assist can reduce stoppingdistances in critical situations.
Brakes 195
2014 TaurusOwners Guide gf, 2nd Printing, September 2013USA (fus)

Anti-Lock Brake SystemThis system helps you maintain steering control during emergency stopsby keeping the brakes from locking.
This lamp momentarily illuminates when you turn the ignitionon. If the light does not illuminate during start-up, remains onor flashes, the anti-lock brake system may be disabled and may
need to be serviced.
If the anti-lock brake system is disabled, normal braking is stilleffective. If the brake warning lamp illuminates with the parkingbrake released, have your brake system serviced immediately.
HINTS ON DRIVING WITH ANTI-LOCK BRAKESWhen the system is operating, the brake pedal will pulse and may travelfurther. Maintain pressure on the brake pedal. You may also hear a noisefrom the system. This is normal.
The anti-lock braking system will not eliminate the dangers inherentwhen:
• You drive too closely to the vehicle in front of you.
• Your vehicle is hydroplaning.
• You take corners too fast.
• The road surface is poor.
PARKING BRAKE
WARNING: If the parking brake is fully released, but the brakewarning lamp remains illuminated, then driving your vehicle
could result in reduced braking ability, increased stopping distances andpotential loss of brakes. See your authorized dealer as soon as possible.
WARNING: Always set the parking brake fully and make surethat the transmission is securely latched in park (P). Failure to
set the parking brake and engage park could result in vehicle roll-away,property damage or bodily injury.
To set the parking brake, press the parking brake pedal down to itsfullest extent.
To release the parking brake, press the parking brake pedal down again.
196 Brakes
2014 TaurusOwners Guide gf, 2nd Printing, September 2013USA (fus)

PRINCIPLES OF OPERATIONThe traction control system helps avoid drive wheel spin and loss oftraction.
If your vehicle begins to slide, the system applies the brakes to individualwheels and, when needed, reduces engine power at the same time. If thewheels spin when accelerating on slippery or loose surfaces, the systemreduces engine power in order to increase traction.
USING TRACTION CONTROLNote: If your vehicle is equipped with MyKey®, it is possible to preventturning the traction control system off. See the MyKey chapter.
In certain situations (for example, stuck in snow or mud), turning thetraction control off may be beneficial as this allows the wheels to spinwith full engine power. Turn the traction control system off by pressingthe stability control button located in the access door under the climatecontrols on Taurus SHO models, or through the information display onother models.
System indicator lights and messages
WARNING: If a failure has been detected within theAdvanceTrac® system, the stability control light will illuminate
steadily. Verify that the AdvanceTrac® system was not manuallydisabled through using the information display control. If the stabilitycontrol light still illuminates steadily, have the system serviced by anauthorized dealer immediately. Operating your vehicle withAdvanceTrac® disabled could lead to an increased risk of loss ofvehicle control, vehicle rollover, personal injury and death.
The stability control light temporarily illuminates on enginestart-up and flashes when a driving condition activates thestability system.
The stability control off light temporarily illuminates on enginestart-up and stays on when the system is in sport mode, thetraction control system is turned off.
When the traction control system is turned off or on, a message appearsin the information display showing system status.
Traction Control 197
2014 TaurusOwners Guide gf, 2nd Printing, September 2013USA (fus)

PRINCIPLES OF OPERATION
WARNING: Vehicle modifications involving braking system,aftermarket roof racks, suspension, steering system, tire
construction and wheel or tire size may change the handlingcharacteristics of your vehicle and may adversely affect theperformance of the AdvanceTrac® system. In addition, installing anystereo loudspeakers may interfere with and adversely affect theAdvanceTrac® system. Install any aftermarket stereo loudspeakeras far as possible from the front center console, the tunnel, and thefront seats in order to minimize the risk of interfering with theAdvanceTrac® sensors. Reducing the effectiveness of theAdvanceTrac® system could lead to an increased risk of loss ofvehicle control, vehicle rollover, personal injury and death.
WARNING: Remember that even advanced technology cannotdefy the laws of physics. It is always possible to lose control of a
vehicle due to inappropriate driver input for the conditions. Aggressivedriving on any road condition can cause you to lose control of yourvehicle increasing the risk of personal injury or property damage.Activation of the AdvanceTrac® system is an indication that at leastsome of the tires have exceeded their ability to grip the road; this couldreduce the operator’s ability to control the vehicle potentially resultingin a loss of vehicle control, vehicle rollover, personal injury and death.If your AdvanceTrac® system activates, SLOW DOWN.
198 Stability Control
2014 TaurusOwners Guide gf, 2nd Printing, September 2013USA (fus)

The AdvanceTrac® system helps you keep control of your vehicle whenon a slippery surface. The electronic stability control portion of thesystem helps avoid skids and lateral slides and the traction controlsystem helps avoid drive wheel spin and loss of traction. See theTraction Control chapter for details on traction control systemoperation.
A Vehicle without AdvanceTrac®skidding off its intended route.
B Vehicle with AdvanceTrac®maintaining control on a slipperysurface.
Stability Control 199
2014 TaurusOwners Guide gf, 2nd Printing, September 2013USA (fus)

USING ADVANCETRAC®The system automatically activates when you start your engine. Theelectronic stability control portion of the system is disabled when thetransmission is in reverse (R) or, on SHO models, if you press the ESCOFF switch and hold it for more than five seconds when the brakes areapplied and the vehicle is at a stop. You can turn off the traction controlportion of the system independently. See the Traction Control chapter.
AdvanceTrac Features
Button
functionsMode
Icon
statusESC TCS
Default atstart-up
—On during
bulbcheck
Enabled Enabled
Button pressedmomentarily
Tractioncontrol off
On Enabled Disabled
Button pressedtwice; brakesapplied
Sport mode(SHO with
performancepack only)
On Enabled Enabled
Button pressedand held morethan 5 seconds;brakes applied;no throttle
AdvanceTracDisabled (SHO
withperformancepack only)
On Disabled Disabled
Button pressedagain afterdeactivation
AdvanceTracfully enabled
Off Enabled Enabled
The SHO model is equipped with a sport mode which allows the driverto reduce normal AdvanceTrac system intervention and provide a morespirited driving experience. To enter sport mode, press the stabilitycontrol button twice rapidly with the brakes applied. The messageappears in the information display that the system is now in sport mode.
Note: Sport mode is not intended to be used on public roadways.
200 Stability Control
2014 TaurusOwners Guide gf, 2nd Printing, September 2013USA (fus)
SENSING SYSTEM (IF EQUIPPED)
WARNING: To help avoid personal injury, please read andunderstand the limitations of the system as contained in this
section. Sensing is only an aid for some (generally large and fixed)objects when moving in reverse on a flat surface at parking speeds.Traffic control systems, inclement weather, air brakes, and externalmotors and fans may also affect the function of the sensing system; thismay include reduced performance or a false activation.
WARNING: To help avoid personal injury, always use cautionwhen in R (Reverse) and when using the sensing system.
WARNING: This system is not designed to prevent contact withsmall or moving objects. The system is designed to provide a
warning to assist the driver in detecting large stationary objects toavoid damaging the vehicle. The system may not detect smaller objects,particularly those close to the ground.
WARNING: Certain add-on devices such as large trailer hitches,bike or surfboard racks and any device that may block the normal
detection zone of the system, may create false beeps.
Note: Keep the sensors (located on the bumper/fascia) free from snow,ice and large accumulations of dirt. If the sensors are covered, thesystem’s accuracy can be affected. Do not clean the sensors with sharpobjects.
Note: If your vehicle sustains damage to the bumper/fascia, leaving itmisaligned or bent, the sensing zone may be altered causing inaccuratemeasurement of obstacles or false alarms.
The sensing system warns the driver of obstacles within a certain rangeof the bumper area. The system turns on automatically whenever theignition is switched on.
Parking Aids 201
2014 TaurusOwners Guide gf, 2nd Printing, September 2013USA (fus)

When receiving a detection warning, the radio volume is reduced to apredetermined level. After the warning goes away, the radio volumereturns to the previous level.
The system can be turned off using the information display control.Refer to the Information Display chapter.
If a fault is present in the system, a warning message appears in theinformation display and does not allow the driver to switch the faultedsystem on.
Note: If your vehicle is equipped with MyKey®, it is possible to preventturning the sensing system off. Refer to the MyKey® chapter.
Using the Rear Sensing SystemThe rear sensors are only active when the transmission is in R. As thevehicle moves closer to the obstacle, the rate of the audible warningincreases. When the obstacle is fewer than 12 inches (30 centimeters)away, the warning sounds continuously. If a stationary or receding objectis detected farther than 12 inches (30 centimeters) from the side of thevehicle, the tone sounds for only three seconds. Once the system detectsan object approaching, the warning sounds again.
A. Coverage area of up to 6 feet(2 meters) from the rear bumper(with a decreased coverage area atthe outer corners of the bumper).
The system detects certain objects while the transmission is in R:
• and moving toward a stationary object at a speed of 3 mph (5 km/h)or less.
• but not moving, and a moving object is approaching the rear of thevehicle at a speed of 3 mph (5 km/h) or less.
A
202 Parking Aids
2014 TaurusOwners Guide gf, 2nd Printing, September 2013USA (fus)

ACTIVE PARK ASSIST (IF EQUIPPED)
WARNING: This system is designed to be a supplementary parkaid. It may not work in all conditions and is not intended to
replace the driver’s attention and judgment. The driver is responsiblefor avoiding hazards and maintaining a safe distance and speed, evenwhen the system is in use.
Note: The driver is always responsible for controlling the vehicle,supervising the system and intervening if required.
The system detects an available parallel parking space and automaticallysteers the vehicle into the space (hands-free) while you control theaccelerator, gearshift and brakes. The system visually and/or audiblyinstructs the driver to park the vehicle.
The system may not function correctly if something passes between thefront bumper and the parking space (i.e. a pedestrian or cyclist) or if theedge of the neighboring parked vehicle is high from the ground (i.e. abus, tow truck or flatbed truck).
Note: The sensors may not detect objects in heavy rain or otherconditions that cause disruptive reflections.
Note: The sensors may not detect objects with surfaces that absorbultrasonic waves.
Note: After a tire change the system will go through a relearningprocedure. During this time the system performance may deteriorate.
The system should not be used if:
• a foreign object (i.e. bike rack or trailer) is attached to the front orrear of the vehicle or at another location close to the sensors.
• an overhanging object (i.e. surfboard) is attached to the roof.
• the front bumper or side sensors are damaged (i.e. in a collision) orobstructed by a foreign object (i.e. front bumper cover).
• a mini-spare tire is in use.
Parking Aids 203
2014 TaurusOwners Guide gf, 2nd Printing, September 2013USA (fus)

Using Active Park AssistPress the button; the touch screendisplays a message and acorresponding graphic to indicateit’s searching for a parking space.Use the turn signal to indicatewhich side of the vehicle you wantthe system to search on.
Note: If the turn signal is not on, the system automatically searches onthe vehicle’s passenger side.
When a suitable space is found, the touch screen displays a message anda chime sounds. Slow down and stop at approximately position (A), thenfollow the instructions on the touch screen.Note: You must observe that the selected space remains clear ofobstructions at all times in the maneuver.Note: Vehicles with overhanging loads (e.g. a bus or a truck), streetfurniture and other items may not be detected by active park assist.You must ensure the selected space is suitable for parking.Note: The vehicle should be driven as parallel to other vehicles aspossible while passing a parking space.Note: The system always offers the last detected parking space (i.e. ifthe vehicle detects multiple spaces while you are driving, it offers thelast one).Note: If driven above approximately 20 mph (35 km/h), the touchscreen shows a message to alert the driver to reduce vehicle speed.
204 Parking Aids
2014 TaurusOwners Guide gf, 2nd Printing, September 2013USA (fus)

Automatic Steering into Parking SpaceNote: If vehicle speed exceeds 6 mph (10 km/h), the system turns offand you need to take full control of the vehicle.
Note: If a maneuver is interrupted before completion, the system turnsoff and you need to full take control of the vehicle. In some instancesafter an interruption a message may appear that would allow you toresume the maneuver.
With hands off the wheel (and nothing obstructing its movement) andthe transmission in R (Reverse), the vehicle steers itself as instructionsto safely move the vehicle back and forward in the space are displayed inthe touch screen. While reversing, the touch screen displays a messageinstructing the driver to check their surroundings (for safety reasons)and to back-up slowly, accompanied by a corresponding graphic.
When you think the vehicle has enough space in front and behind it, oryou hear a solid tone from the parking aid, bring the vehicle to acomplete stop.
Parking Aids 205
2014 TaurusOwners Guide gf, 2nd Printing, September 2013USA (fus)

When automatic steering is finished, the touch screen displays a messageindicating that the active park assist process is done. The driver isresponsible for checking the parking job and making any necessarycorrections before putting the transmission in P (Park).
Deactivating the Park Assist FeatureThe system can be deactivated manually by:
• pressing the active park assist button
• grabbing the steering wheel
• driving above approximately 20 mph (35 km/h) for 30 seconds duringan active park search
• driving above 6 mph (10 km/h) during automatic steering
• turning off the traction control system.
Certain vehicle conditions can also deactivate the system:
• Traction control has activated on a slippery or loose surface.
• Anti-lock brake system activation or failure.
• Any door (except the driver’s) opens.
• Something touches the steering wheel.
If a problem occurs with the system, a warning message is displayed,followed by a chime. Occasional active park assist messages may occurin normal operation. For recurring or frequent active park assist faults,contact an authorized dealer to have your vehicle serviced.
Troubleshooting the System
The system does not look for a space
The traction control system may be offAny door (except the driver’s) may not be completely closed
The system does not offer a particular space
Something may be contacting the front bumper or side sensorsThere is not enough room on both sides of the vehicle in order to parkThere is not enough space for the parking maneuver on the oppositeside of the parking space
206 Parking Aids
2014 TaurusOwners Guide gf, 2nd Printing, September 2013USA (fus)

The system does not offer a particular space
The vehicle is farther than 5 ft (1.5 m) from the parking spaceThe vehicle is closer than 16 in. (40 cm) from neighboring parkedvehiclesThe transmission is in R (Reverse); the vehicle must be movingforward to detect a parking space
The system does not position the vehicle where I want in
the space
The vehicle is rolling in the opposite direction of the transmission(i.e. rolling forward when R [Reverse] is selected)The transmission is in R (Reverse); the vehicle must be movingforward to detect a parking spaceAn irregular curb along the parking space prevents the system fromaligning the vehicle properlyVehicles or objects bordering the space may not be positioned correctlyThe vehicle was pulled too far past the parking space. The systemperforms best when you drive the same distance past the parkingspaceThe tires may not be installed or maintained correctly (i.e. not inflatedcorrectly, improper size, or of different sizes)A repair or alteration has changed detection capabilitiesA parked vehicle has a high attachment (i.e. salt sprayer, snowplow,moving truck bed, etc.)The parking space length or position of parked objects changed afteryour vehicle passedThe temperature around your vehicle changes quickly (i.e. driving froma heated garage into the cold, or after leaving a car wash)
Parking Aids 207
2014 TaurusOwners Guide gf, 2nd Printing, September 2013USA (fus)

REAR VIEW CAMERA SYSTEM (IF EQUIPPED)
WARNING: The rear view camera system is a reverse aidsupplement device that still requires the driver to use it in
conjunction with the interior and exterior mirrors for maximumcoverage.
WARNING: Objects that are close to either corner of thebumper or under the bumper, might not be seen on the screen
due to the limited coverage of the camera system.
WARNING: Back up as slow as possible since higher speedsmight limit your reaction time to stop the vehicle.
WARNING: Use caution when using the rear video camera and thetrunk is ajar. If the trunk is ajar, the camera will be out of position
and the video image may be incorrect. All guidelines (if enabled) havebeen removed when the trunk is ajar.
WARNING: Use caution when turning camera features on or offwhile in R (Reverse). Make sure the vehicle is not moving.
The rear view camera system provides a video image of the area behindthe vehicle.
During operation, lines appear in the display which represent yourvehicle’s path and proximity to objects behind the vehicle.
The camera is located on the trunkunder the badge.
208 Parking Aids
2014 TaurusOwners Guide gf, 2nd Printing, September 2013USA (fus)

Using the Rear View Camera SystemThe rear view camera system displays what is behind your vehicle whenyou place the transmission in R. The system uses fixed guidelines whichshow the actual path the vehicle is moving in while reversing in astraight line. This can be helpful when backing into a parking space oraligning the vehicle with another object behind the vehicle.
Note: Do not use the camera system if the trunk is ajar.
Note: If the image comes on while the transmission is not in R, have thesystem inspected by your authorized dealer.
Note: When towing, the camera only sees what is being towed behindthe vehicle. This might not provide adequate coverage as it usuallyprovides in normal operation and some objects might not be seen.In some vehicles, the guidelines may disappear once the trailer towconnector is engaged.
Note: The camera may not operate correctly under the followingconditions:• Nighttime or dark areas if one or both reverse lamps are not
operating.• The camera’s view is obstructed by mud, water or debris. Clean the
lens with a soft, lint-free cloth and non-abrasive cleaner.• The rear of the vehicle is hit or damaged, causing the camera to
become misaligned.
Parking Aids 209
2014 TaurusOwners Guide gf, 2nd Printing, September 2013USA (fus)

Guidelines and the CenterlineNote: Fixed guidelines and active guidelines (if equipped) are onlyavailable when the transmission is in R (Reverse).Note: The centerline is only available if Fixed or Active (if equipped)guidelines are on.
A. Active guidelines (if equipped)
B. Centerline
C. Fixed guideline: Green zone
D. Fixed guideline: Yellow zone
E. Fixed guideline: Red zone
F. Rear bumper
If your vehicle is equipped with active guidelines they are only shownwith fixed guidelines. To use active guidelines, turn the steering wheel topoint the guidelines toward an intended path. If the steering wheelposition is changed while reversing, the vehicle might deviate from theoriginal intended path.The fixed and active guidelines fade in and out depending on thesteering wheel position. When the steering wheel position is straight, theactive guidelines are not shown.Always use caution while reversing. Objects in the red zone are closestto your vehicle and objects in the green zone are further away. Objectsare getting closer to your vehicle as they move from the green zone tothe yellow or red zones. Use the side view mirrors and rear view mirrorto get better coverage on both sides and rear of the vehicle.
Selectable settings for this feature are ACTIVE + FIXED, FIXED andOFF.
A B C D
F
E
210 Parking Aids
2014 TaurusOwners Guide gf, 2nd Printing, September 2013USA (fus)

Enhanced Park AidsNote: Enhanced park aids is only available when the transmission is inR (Reverse).
Note: The reverse sensing system is not effective at speeds above 3 mph(5 km/h) and may not detect certain angular or moving objects.
The enhanced park aids allows the driver to view the area that is beingdetected by the reverse sensing system. The system uses red, yellow andgreen highlights which appear on top of the video image when an objectis detected by the reverse sensing system. The alert highlights theclosest object detected. The reverse sensing alert can be disabled and ifenhanced park aids is enabled, highlighted areas are still displayed.
Selectable settings for this feature are ON and OFF.
Manual Zoom
WARNING: When manual zoom is on, the full area behind thevehicle is not shown. Be aware of your surroundings when using
the manual zoom feature.
Note: Manual zoom is only available when the transmission is inR (Reverse).
Note: When manual zoom is enabled, only the centerline is shown.
Allows the driver to get a closer view of an object behind the vehicle.The zoomed image keeps the bumper in the image to provide areference. When the transmission is shifted out of R (Reverse), thefeature automatically turns off and must be reset when it is used again.
Selectable settings for this feature are (+) and (-). The default settingfor the manual zoom is OFF.
Rear Camera DelayWhen shifting the transmission out of R (Reverse) and into any gearother than P (Park), the camera image remains in the display until thevehicle speed reaches 6 mph (10 km/h). This occurs when the rearcamera delay feature is on, or until a radio button is selected.
Selectable settings for this feature are ON and OFF. The default settingfor the rear camera delay is OFF.
Parking Aids 211
2014 TaurusOwners Guide gf, 2nd Printing, September 2013USA (fus)

PRINCIPLES OF OPERATIONCruise control lets you maintain a set speed without keeping your footon the accelerator pedal.
USING CRUISE CONTROL
WARNING: Do not use cruise control in heavy traffic, onwinding roads or when the road surface is slippery. This could
result in loss of vehicle control, serious injury or death.
WARNING: When you are going downhill, your vehicle speedmay increase above the set speed. The system will not apply the
brakes. Change down a gear to assist the system in maintaining the setspeed. Failure to do so could result in loss of vehicle control, seriousinjury or death.
Note: Cruise control will disengage if your vehicle speed decreases morethan 10 mph (16 km/h) below your set speed while driving uphill.
The cruise controls are located onthe steering wheel.
Switching Cruise Control OnPress the ON control up and release.
The indicator will appear in the instrument cluster.
Setting a Speed1. Accelerate to the desired speed.2. Press the SET control upward and release.3. Take your foot off the accelerator pedal.
The indicator will change colors in the instrument cluster.
212 Cruise Control
2014 TaurusOwners Guide gf, 2nd Printing, September 2013USA (fus)

Changing the Set Speed
Note: If you accelerate by pressing the accelerator pedal, the set speedwill not change. When you release the accelerator pedal, you will returnto the speed that you previously set.
• Press SET up or down and hold to increase or decrease the set speed.Release the control when you reach the desired speed.
• Press SET up or down and release. The set speed will change inapproximately 1 mph (2 km/h) increments.
• Press the accelerator pedal or brake pedal until you reach the desiredspeed. Press SET up and release.
Canceling the Set Speed
Press CNCL or tap the brake pedal. The set speed will not be erased.
Resuming the Set Speed
Press and release RES.
Switching Cruise Control OffNote: The set speed is erased when you switch off cruise control.
Press the OFF control down and release or turn off the ignition.
USING ADAPTIVE CRUISE CONTROL (IF EQUIPPED)
WARNING: Always pay close attention to changing roadconditions, especially when using adaptive cruise control.
Adaptive cruise control cannot replace attentive driving. Failing tofollow any of the warnings below or failing to pay attention to the roadmay result in a collision, serious injury or death.
WARNING: Adaptive cruise control is not a collision warning oravoidance system. Additionally, adaptive cruise control will not
detect:• stationary or slow moving vehicles below 6 mph (10 km/h)• pedestrians or objects in the roadway• oncoming vehicles in the same lane.
Cruise Control 213
2014 TaurusOwners Guide gf, 2nd Printing, September 2013USA (fus)

WARNING: Do not use the adaptive cruise control whenentering or leaving a highway, in heavy traffic or on roads that
are winding, slippery or unpaved.
WARNING: Do not use in poor visibility, specifically fog, rain,spray or snow.
Note: It is your responsibility to stay alert, drive safely and be in controlof your vehicle at all times.
The system adjusts your speed to maintain a proper distance betweenyou and the vehicle in front of you in the same lane. You can select fromone of four GAP settings. The controls are located on the steering wheel.
At startup, the system sets the gap to the last selected setting. Onceactivated, you can deactivate the system at any time by pressing the brakepedal, pressing the steering wheel OFF control or pressing the CNCLcontrol. In addition, you can temporarily increase the vehicle speed abovethe current speed by manually pressing on the accelerator pedal.
The controls for using your cruisecontrol are located on the steeringwheel.
Setting Adaptive Cruise Control1. Press and release ON.
The information display will showthe gray indicator light, current gapsetting and SET. The system is setto standby mode.
2. Accelerate to the desired speed.
SET
RESCNCL
ONOFF
GAP
214 Cruise Control
2014 TaurusOwners Guide gf, 2nd Printing, September 2013USA (fus)

3. Press SET upward and release. The vehicle speed is stored in thememory.
The information display will show a green indicator light,current gap setting and desired set speed.
4. Take your foot off the accelerator pedal.
5. A lead vehicle graphic willilluminate if there is a vehicledetected in front of you.
Note: When adaptive cruise control is active, the set speed displayed inthe information display may vary slightly from the speedometer.
Following a Vehicle
WARNING: When following a vehicle in front of you, yourvehicle will not decelerate automatically to a stop, nor will your
vehicle always decelerate quickly enough to avoid a collision withoutdriver intervention. Always apply the brakes when necessary. Failing todo so may result in a collision, serious injury or death.
WARNING: Adaptive cruise control only warns of vehiclesdetected by the radar sensor. In some cases there may be no
warning or the warning may be delayed. The driver should always applythe brakes when necessary. Failing to do so may result in a collision,serious injury or death.
Note: The brakes may emit a sound when they are being modulated bythe adaptive cruise control system.
When a vehicle ahead of you enters the same lane or a slower vehicle isahead in the same lane, the vehicle speed adjusts to maintain a presetgap distance. The distance setting is adjustable.
The lead vehicle graphic will be illuminated.
Your vehicle will maintain a constant distance between the vehicle aheaduntil:
• the vehicle in front of you accelerates to a speed above the set speed
• the vehicle in front of you moves out of your lane or out of view
Cruise Control 215
2014 TaurusOwners Guide gf, 2nd Printing, September 2013USA (fus)

• the vehicle speed falls below 16 mph (26 km/h)
• a new gap distance is set.
The vehicle brakes will be automatically applied to slow your vehicle tomaintain a safe distance from the vehicle in front. The maximum brakingwhich is applied by the system is limited and can be overridden by thedriver applying the brakes.
If the system predicts that its maximum braking level will not besufficient, an audible warning will sound while the system continues tobrake. This is accompanied by a heads-up display; a red warning barilluminating on the windshield. You should take immediate action.
Setting the Gap DistanceNote: It is your responsibility to select a gap appropriate to the drivingconditions.
You can decrease or increase thedistance between your vehicle andthe vehicle in front of you bypressing the GAP control up ordown. The selected gap will display
in the information display as shown by the bars in the graphic. Four gapdistance settings are available.
Graphic
display (bars
between
vehicles)
Following
distance
Following
distance at
60 mph
(100 km/h)
Dynamic
behavior
1 bar 1 second 31 yards (28 m) Sporty2 bars 1.4 seconds 43 yards (39 m) Normal3 bars 1.8 seconds 55 yards (50 m) Normal4 bars 2.2 seconds 67 yards (61 m) Comfort
Each time you restart your vehicle, the system will select the last chosengap for the current driver.
216 Cruise Control
2014 TaurusOwners Guide gf, 2nd Printing, September 2013USA (fus)

Disengaging Adaptive Cruise ControlPress the brake pedal or press CNCL to disengage the system. The lastset speed will display with a strikethrough.
Disengaging the system will not erase your previous set speed.
Overriding Adaptive Cruise Control
WARNING: Whenever the driver is overriding the ACC bypressing the accelerator pedal, the ACC will not automatically
apply the brakes to maintain separation from any vehicle ahead.
You can override the set speed and gap distance by pressing theaccelerator pedal.
When you are overriding the system, the green indicator lightilluminates and the follow vehicle does not show in theinformation display. The system will resume operation when
you release the accelerator pedal. The vehicle speed will decrease to theset speed, or a lower speed if following a slower vehicle.
Changing the Set SpeedThere are three ways to change the set speed:
• Accelerate or brake to the desired speed and press SET upward andrelease.
• Increase or decrease the speed by holding SET upward or downwarduntil the desired set speed is shown on the information display.The vehicle speed will gradually change to the selected speed.
• Increase or decrease the speed in increments of 1 mph (2 km/h) bybriefly pressing SET upward or downward.
The system may apply the brakes to slow your vehicle down to the newset speed. The set speed will display continuously in the informationdisplay while the system is active.
Cruise Control 217
2014 TaurusOwners Guide gf, 2nd Printing, September 2013USA (fus)

Resuming the Set SpeedNote: Resume should only be used if you are aware of the set speed andintend to return to it.
Press and release RES. Your vehicle will return to the previously setspeed. The set speed will display continuously in the information displaywhile the system is active.
Low Speed Automatic CancellationThe system is not functional at vehicle speeds below 16 mph (26 km/h).An audible alarm sounds and the automatic braking released if yourvehicle drops below this speed.
Hilly Condition UsageNote: An audible alarm sounds and the system shuts down if it isapplying brakes for an extended period of time. This allows the brakes tocool down. The system will function normally again when the brakeshave cooled down.
You should select a lower gear position when the system is active insituations such as prolonged downhill driving on steep grades, forexample driving in mountainous areas. Your vehicle needs additionalengine braking in these situations to reduce the load on the vehicle’sregular brake system to prevent them from overheating.
Switching Off Adaptive Cruise ControlNote: The set speed memory will erase when you switch the system off.
Press and release OFF or turn off the ignition.
Detection IssuesThe radar sensor has a limited field of vision. It may not detect vehiclesat all or detect a vehicle later than expected in some situations. The leadvehicle graphic will not illuminate if the system does not detect a vehiclein front of you.
218 Cruise Control
2014 TaurusOwners Guide gf, 2nd Printing, September 2013USA (fus)

Detection issues can occur:
A. When driving on a different linethan the vehicle in front.
B. With vehicles that edge into yourlane. The system can only detectthese vehicles once they move fullyinto your lane.
C. There may be issues with thedetection of vehicles in front whendriving into and coming out of abend or curve in the road.
In these cases the system may brake late or unexpectedly. You shouldstay alert and intervene when necessary.
If the front end of your vehicle is hit or damaged, the radar sensing zonemay be altered causing missed or false vehicle detections. See yourauthorized dealer to have the radar checked for proper coverage andoperation.
Adaptive Cruise Control Not AvailableSeveral conditions exist which can cause the system to deactivate orprevent the system from activating when requested. These conditionsinclude:
• a blocked sensor
• high brake temperature
• a failure in the system or a related system.
Cruise Control 219
2014 TaurusOwners Guide gf, 2nd Printing, September 2013USA (fus)

Blocked Sensor
WARNING: Do not use ACC when towing a trailer with brakecontrols. Aftermarket trailer brakes will not function properly
when ACC is activated because the brakes are electronically controlled.Failing to do so may result in loss of vehicle control, which could resultin serious injury.
WARNING: Do not use tires sizes other than thoserecommended because this can affect the normal operation of
ACC. Failing to do so may result in a loss of vehicle control, whichcould result in serious injury.
A message regarding a blockedsensor is displayed if the radarsignals from the sensor have beenobstructed. The sensor is locatedbehind a fascia cover near the driverside of the lower grille. A vehicleahead cannot be detected and thesystem will not function when the
radar signals are obstructed. The following table lists possible causes andactions for this message being displayed.
Cause Action
The surface of the radar in thegrille is dirty or obstructed insome way.
Clean the grille surface in front ofthe radar or remove the objectcausing the obstruction.
The surface of the radar in thegrille is clean but the messageremains in the display.
Wait a short time. It may takeseveral minutes for the radar todetect that it is no longerobstructed.
Heavy rain or snow is interferingwith the radar signals.
Do not use the system in theseconditions because it may notdetect any vehicle ahead.
220 Cruise Control
2014 TaurusOwners Guide gf, 2nd Printing, September 2013USA (fus)

Cause Action
Swirling water, or snow or ice onthe surface of the road mayinterfere with the radar signals.
Do not use system in theseconditions because it may notdetect any vehicle ahead.
You are in a desert or remote areawith no other vehicles and noroadside objects.
Wait a short time or switch tonormal cruise control.
Due to the nature of radar technology, it is possible to get a blockagewarning and not be blocked. This can happen, for example, when drivingin sparse rural or desert environments. A false blocked condition willeither self-clear or clear after a key cycle.
Switching to Normal Cruise Control
WARNING: Normal cruise control will not brake due to slowervehicles. Always be aware of which mode is selected and apply
the brakes when necessary.
You can manually change from adaptive cruise control to normal cruisecontrol through the information display.
The cruise control indicator light will replace the adaptivecruise control indicator light if normal cruise control is selected.The gap setting will not be displayed, the system will not
automatically respond to lead vehicles and automatic braking will not beactivated. The system will default to adaptive cruise control when theengine is started.
Cruise Control 221
2014 TaurusOwners Guide gf, 2nd Printing, September 2013USA (fus)

DRIVER ALERT (IF EQUIPPED)
WARNING: The driver alert system is designed to aid you. It isnot intended to replace your attention and judgment. You are still
responsible to drive with due care and attention.
Note: The system will store the on/off setting in the information displaymenu through ignition cycles.
Note: If enabled in the menu, the system will be active above 40 mph(64 km/h). When below the activation speed the driver alert system willinform you the system is unavailable.
Note: The system works as long as one lane marking can be detectedby the camera.
Note: If the camera is blocked or if the windshield is damaged, thesystem may not function.
Note: The system may not be available in poor weather or other lowvisibility conditions.
The system automatically monitors your driving behavior using variousinputs including the front camera sensor.
If the system detects that your driving alertness is reduced below acertain threshold, the system will alert you using a chime and a messagein the cluster display
Switching the System On and OffYou may switch the system on or off through the Information Display.Refer to the Information Displays chapter. The system on or off settingis stored and will use your last setting the next time the vehicle is started.
System WarningsNote: The system will not issue warnings below approximately 40 mph(64 km/h).
The warning system is in two stages. At first the system issues atemporary warning that you need to take a rest. This message will onlyappear for a short time. If the system detects further reduction in drivingalertness, another warning may be issued which will remain in theinformation display for a longer time. Press OK on the steering wheelcontrol to clear the warning.
222 Driving Aids
2014 TaurusOwners Guide gf, 2nd Printing, September 2013USA (fus)

System DisplayWhen active the system will run automatically in the background andonly issue warning if required. You can view the status at any time usingthe information display. Refer to the Information Displays chapter.
The alertness level is shown by six steps in a colored bar.
The current assessment of youralertness is within a typical range.
The current assessment of youralertness indicates that you shouldrest as soon as safely possible.
The status bar will travel from left to right as the calculated alertnesslevel decreases. As the rest icon is approached the color turns fromgreen to yellow to red. The yellow position represents the first warningis active and the red position represents the second warning is active.
Note: If you have recently received a warning; you should considerresting, even if the current assessment is with the typical range.
Note: The alertness level will be shown in grey if the camera sensorcannot track the road lane markings or if the vehicle speed drops belowapproximately 40 mph (64 km/h).
Resetting the SystemYou can reset the system by either:
• Switching the ignition off and on.
• Stopping the vehicle and then opening and closing the driver’s door.
Driving Aids 223
2014 TaurusOwners Guide gf, 2nd Printing, September 2013USA (fus)

LANE KEEPING SYSTEM (IF EQUIPPED)
WARNING: The system is designed to aid the driver. It isnot intended to replace the driver’s attention and judgment.
The driver is still responsible to drive with due care and attention.
The system detects unintentional drifting toward the outside of the laneand alerts and/or aids the driver to stay in the lane through the steeringsystem and instrument cluster display. The system automatically detectsand tracks the road lane markings using a camera that is mountedbehind the interior rear view mirror.
Note: The system works above 40 mph (64 km/h).
Note: The system works as long as one lane marking can be detected bythe camera.
Note: If the camera is blocked or if the windshield is damaged, thesystem may not function.
Note: When Aid mode is on and the system detects no driver steeringactivity for a short period after system activation, the system alerts thedriver to keep their hands on the steering wheel. The system may detecta light touch or grip on the steering wheel as hands-off driving.
Switching the System On and OffPress the button located on the center console to switch thesystem on or off.
Note: The system on/off setting is stored until it is manual changed,unless a MyKey® is detected. If a MyKey® is detected, the system isdefaulted to on and the mode is set to Alert.
Note: If a MyKey® is detected, pressing the button will not affect theon/off status of the system. Only the Mode and Intensity settings can bechanged when a MyKey® is present.
System SettingsThe system has one standard feature setting and one optional settingmenu available. To view or adjust the settings, refer to the InformationDisplays chapter. The last-known selection for each of these settings isstored by the system. You do not need to readjust your settings eachtime you turn on the system.
224 Driving Aids
2014 TaurusOwners Guide gf, 2nd Printing, September 2013USA (fus)

Mode: This setting allows the driver to select which of the systemfeatures will be enabled.
Alert only – Provides a steeringwheel vibration when an unintendedlane departure is detected.
Aid only – Provides a steering inputtoward the lane center when anunintended lane departure isdetected.
Alert + Aid – Provides both asteering wheel vibration and inputtoward the lane center when anunintended lane departure isdetected.
A. Alert
B. Aid
Note: The alert and aid diagrams are meant to illustrate general zonecoverage. They are not intended to provide the exact zone parameters.
Intensity: This setting affects the intensity of the steering wheelvibration used for the alert mode. This setting does not impact the aidmode.
• Low
• Medium
• High
A
B
A
B
Driving Aids 225
2014 TaurusOwners Guide gf, 2nd Printing, September 2013USA (fus)

System DisplayWhen you switch the system on, an overhead graphic of avehicle with lane markings will be displayed in the leftinstrument cluster display.
If the aid mode is selected after you switch the system on,arrows will be displayed with the lane markings.
When you switch the system off, the lane marking graphics will no longerbe displayed.Note: The overhead vehicle graphic may still be displayed if adaptivecruise control is enabled.While the system is on, the color of the lane markings will change toindicate the system status.Gray: Indicates that the system is temporarily unable to provide awarning or intervention on the indicated side(s). This may be because:• the vehicle is under the activation speed• the turn indicator is active• the vehicle is in a dynamic maneuver• the road has no or poor lane markings in the camera field-of-view• the camera is obscured or unable to detect the lane markings due to
environmental conditions (e.g. significant sun angles or shadows,snow, heavy rain, fog), traffic conditions (e.g. following a largevehicle that is blocking or shadowing the lane), or vehicle conditions(e.g. poor headlamp illumination).
See Troubleshooting for additional information.
Green: Indicates that the system is available or ready to provide awarning or intervention, on the indicated side(s).
Yellow: Indicates that the system is providing or has just provided a lanekeeping aid intervention.
Red: Indicates that the system is providing or has just provided a lanekeeping alert warning.
The system can be temporarily disabled at any time by the following:
• Quick braking
• Fast acceleration
• Using the turn signal indicator
• Evasive steering maneuver
226 Driving Aids
2014 TaurusOwners Guide gf, 2nd Printing, September 2013USA (fus)

Troubleshooting
Why is the feature not available (line markings are gray)
when I can see the lane markings on the road?
Vehicle speed is outside the operational range of the featureSun is shining directly into the camera lensQuick intentional lane changeStaying too close to the lane markingDriving at high speeds in curvesPrevious feature activation happened within the last one secondAmbiguous lane markings (mainly in construction zones)Rapid transition from light to dark or vice versaSudden offset in lane markingsABS or AdvanceTrac activationCamera blockage due to dirt, grime, fog, frost or water on thewindshieldToo close to the vehicle in front of youTransitioning between no lane markings to lane markings or vice versaStanding water on the roadFaint lane markings (partial yellow lane markings on concrete roads)Lane width too narrow or too wideCamera not calibrated after a windshield replacementWhen driving on tight roads or on uneven roads
Why does the vehicle not come back into the middle of the lane
always, as expected, in the Aid or Aid + Alert mode?
High cross windsLarge road crownRough roads, grooves, shoulder drop-offsHeavy uneven loading of the vehicle or improper tire inflation pressureIf the tires have been exchanged (including snow tires), or thesuspension has been modified
Driving Aids 227
2014 TaurusOwners Guide gf, 2nd Printing, September 2013USA (fus)

BLIND SPOT INFORMATION SYSTEM (BLIS®) WITH CROSSTRAFFIC ALERT (CTA) (IF EQUIPPED)
WARNING: To help avoid injuries, NEVER use the BLIS® as areplacement for using the interior and exterior mirrors and
looking over your shoulder before changing lanes. BLIS® is not areplacement for careful driving and only an assist.
BLIS® aids the driver in detectingvehicles that may have entered theblind spot zone (A). The detectionarea is on both sides of the vehicle,extending rearward from theexterior mirrors to approximately10 feet (3 meters) beyond thebumper. The system alerts you ifcertain vehicles enter the blind spotzone while driving.
CTA warns the driver of vehicles approaching from the sides when thetransmission is in R (Reverse).
Note: BLIS® is not designed to prevent contact with other vehicles orobjects; or to detect parked vehicles, people, animals or infrastructure(fences, guardrails, trees, etc.). It is designed to alert the driver tovehicles in the blind zones.
Note: When a vehicle passes quickly through the blind zone (typicallyfewer than two seconds), the system does not trigger.
228 Driving Aids
2014 TaurusOwners Guide gf, 2nd Printing, September 2013USA (fus)

Using the SystemsBLIS® turns on when the engine is started and the vehicle is drivenforward above 3 mph (5 km/h); it remains on while the transmission isin D (Drive) and N (Neutral). If shifted out of D (Drive) or N (Neutral),the system enters CTA mode. Once shifted back into D (Drive), BLIS®turns back on when the vehicle is driven above 3 mph (5 km/h).
Note: BLIS® does not function in R (Reverse) or P (Park) or provideany additional warning when a turn signal is on.
CTA detects approaching vehicles from up to 45 feet (14 meters) awaythough coverage decreases when the sensors are blocked. Reversingslowly helps increase the coverage area and effectiveness.
WARNING: To help avoid personal injury, NEVER use the CTAsystem as a replacement for using the interior and exterior
mirrors and looking over your shoulder before backing out of a parkingspace. CTA is not a replacement for careful driving and only an assist.
In this first example, the left sensor is only partially obstructed; zonecoverage is nearly maximized.
Driving Aids 229
2014 TaurusOwners Guide gf, 2nd Printing, September 2013USA (fus)

Zone coverage also decreases when parking at shallow angles. Here, theleft sensor is mostly obstructed; zone coverage on that side is severelylimited.
System Lights and MessagesThe BLIS® and CTA systemsilluminate a yellow alert indicator inthe outside mirror on the side ofthe vehicle the approaching vehicleis coming from.
Note: The alert indicator dims when nighttime darkness is detected.
CTA also sounds an audible alarm and a message appears in theinformation display indicating a vehicle is coming from the right or left.CTA works with the reverse sensing system which sounds its ownaudible alarm; see the Parking Aids chapter.
230 Driving Aids
2014 TaurusOwners Guide gf, 2nd Printing, September 2013USA (fus)

System Sensors
WARNING: Just prior to the system recognizing a blockedcondition and alerting the driver, the number of missed objects
will increase. To help avoid injuries, NEVER use the BLIS® as areplacement for using the side and rear view mirrors and looking overyour shoulder before changing lanes. BLIS® is not a replacement forcareful driving and only an assist.
Note: It is possible to get a blockage warning with no blockage present;this is rare and known as a false blockage warning. A false blockedcondition either self-corrects or clears after a key cycle.
The system uses radar sensorswhich are located behind thebumper fascia on each side of thevehicle. Do not allow these areas tobecome obstructed by mud, snow orbumper stickers, as this can causedegraded system performance.
If the system detects a degraded performance condition, a blockedsensor warning or low visibility warning will appear in the informationdisplay and the alert indicator illuminates in the appropriate mirror(s).The information display warning can be cleared but the alert indicatorremains illuminated.
When the blockage is removed, the system can be reset in two ways: 1)when at least two objects are detected while driving, or 2) turn theignition key from on to off, then back on. If the blockage is still presentafter the key cycle, the system senses again that it is blocked afterdriving in traffic.
Reasons for messages being displayed
The radar surface isdirty or obstructed
Clean the fascia area in front of the radar orremove the obstruction.
The radar surface isnot dirty or obstructed
Drive normally in traffic for a few minutes toallow the radar to detect passing vehicles so itcan clear the blocked state.
Driving Aids 231
2014 TaurusOwners Guide gf, 2nd Printing, September 2013USA (fus)

Reasons for messages being displayed
Heavy rainfall/snowfallinterferes with theradar signals
No action required. The system automaticallyresets to an unblocked state once therainfall/snowfall rate decreases or stops. Donot use BLIS® and/or CTA in these conditions.
System LimitationsThe BLIS® and CTA systems do have their limitations; situations such assevere weather conditions or debris build-up on the sensor area maylimit vehicle detection.The following are other situations that may limit the BLIS®:• Certain maneuvering of vehicles entering and exiting the blind zone.
• Vehicles passing through the blind zone at very fast rates.
• When several vehicles forming a convoy pass through the blind zone.
The following are other situations that may limit the CTA system:
• Adjacently parked vehicles or objects obstructing the sensors.
• Approaching vehicles passing at speeds greater than 15 mph(24 km/h).
• Driving in reverse faster than 3 mph (5 km/h).
• Backing out of an angled parking spot.
False AlertsNote: If you connected a trailer to your vehicle the BLIS® system maydetect the trailer causing a false alert. To avoid false alerts you may wantto turn the BLIS off manually.
There may be certain instances when either the BLIS® or CTA systemsilluminate the alert indicator with no vehicle in the coverage zone; this isknown as a false alert. Some amount of false alerts are normal; they aretemporary and self-correct.
System ErrorsIf either system senses a problem with the left or right sensor, theBLIS® indicator in the information display will illuminate and remain on.Also, BLIND SPOT SYSTEM FAULT or CROSS TRAFFIC SYSTEMFAULT message will appear. When problems that may cause the left orright indicator not to illuminate, only the information display messagefaults appear.
232 Driving Aids
2014 TaurusOwners Guide gf, 2nd Printing, September 2013USA (fus)

Switching the Systems Off and OnOne or both systems can be switched off temporarily by using theinformation display control; refer to the Information Display chapter.When the BLIS® is switched off, the driver does not receive alerts andthe information display shows BLIND SPOT SYS OFF and/or CTASYSTEM OFF. The system switches back on whenever the ignition isswitched on.
One or both systems can also be switched off permanently at yourauthorized dealer. Once switched off, switching it back on must also bedone at the dealership.
COLLISION WARNING SYSTEM (IF EQUIPPED)
WARNING: This system is designed to be a supplementarydriving aid. It is not intended to replace the driver’s attention,
and judgment, or the need to apply the brakes. This system does NOTactivate the brakes automatically. Failure to press the brake pedal toactivate the brakes may result in a collision.
WARNING: The collision warning system with brake supportcannot help prevent all collisions. Do not rely on this system to
replace driver judgment and the need to maintain distance and speed.
Note: The system does not detect, warn or respond to potentialcollisions with vehicles to the rear or sides of the vehicle.
Note: The collision warning system is active at speeds aboveapproximately 5 mph (8 km/h).
This system is designed to alertthe driver of certain collision risks.A radar detects if your vehicle israpidly approaching another vehicletraveling in the same direction asyours.
Driving Aids 233
2014 TaurusOwners Guide gf, 2nd Printing, September 2013USA (fus)

If it is, a red warning lightilluminates and an audible warningchime sounds.
The brake support system assists the driver in reducing the collisionspeed by charging the brakes. If the risk of collision further increasesafter the warning light illuminates, the brake support prepares the brakesystem for rapid braking. This may be apparent to the driver. The systemdoes not automatically activate the brakes but, if the brake pedal ispressed, full force braking is applied even if the brake pedal is lightlypressed.
Using the Collision Warning System
WARNING: The collision warning system’s brake support canonly help reduce the speed at which a collision occurs if the
driver applies the vehicle’s brakes. The brake pedal must be pressedjust like any typical braking situation.
The warning system and chime can be turned on and off separately;the warning system sensitivity can be adjusted to one of three possiblesettings by using the information display control. Refer to theInformation Displays chapter.
Note: If the system cannot be turned off in a vehicle equipped withMyKey®, refer to the MyKey® chapter.
Note: If collision warnings are perceived as being too frequent ordisturbing then the warning sensitivity can be reduced, though themanufacturer recommends using the highest sensitivity setting wherepossible. Setting lower sensitivity would lead to fewer and later systemwarnings. Refer to the Information Displays chapter for instructions onreducing the sensitivity.
234 Driving Aids
2014 TaurusOwners Guide gf, 2nd Printing, September 2013USA (fus)

Blocked SensorsIf a message regarding a blockedsensor appears in the informationdisplay, the radar signals from thesensor have been obstructed. Thesensors are located behind a fasciacover near the driver side of thelower grille. When the sensors areobstructed, a vehicle ahead cannot
be detected and the collision warning system does not function. Thefollowing table lists possible causes and actions for this message beingdisplayed.
Cause Action
The surface of the radar in thegrille is dirty or obstructed insome way
Clean the grille surface in front ofthe radar or remove the objectcausing the obstruction
The surface of the radar in thegrille is clean but the messageremains in the display
Wait a short time. It may takeseveral minutes for the radar todetect that it is no longerobstructed
Heavy rain, spray, snow, or fog isinterfering with the radar signals
The collision warning system istemporarily disabled. Collisionwarning should automaticallyreactivate a short time after theweather conditions improve.
Swirling water, or snow or ice onthe surface of the road mayinterfere with the radar signals
The collision warning system istemporarily disabled. Collisionwarning should automaticallyreactivate a short time after theweather conditions improve.
Driving Aids 235
2014 TaurusOwners Guide gf, 2nd Printing, September 2013USA (fus)

System Limitations
WARNING: The collision warning system’s brake support canonly help reduce the speed at which a collision occurs if the
driver applies the vehicle’s brakes. The brake pedal must be pressedjust like any typical braking situation.
Due to the nature of radar technology, there may be certain instanceswhere vehicles do not provide a collision warning. These include:
• Stationary vehicles or vehicles moving below 6 mph (10 km/h).
• Pedestrians or objects in the roadway.
• Oncoming vehicles in the same lane.
• Severe weather conditions (see blocked sensor section).
• Debris build-up on the grille near the headlamps (see blocked sensorsection).
• Small distance to vehicle ahead.
• Steering wheel and pedal movements are large (very active driving style).
• High interior temperatures, which may deactivate the illumination orthe warning lamps until the interior temperature reduces (audiblewarning still sounds).
Certain conditions may reduce the visibility of the warning lamp;therefore, it is recommended to keep the audible warning on.
If the front end of the vehicle is hit or damaged, the radar sensing zonemay be altered causing missed or false collision warnings. See yourauthorized dealer to have your collision warning radar checked forproper coverage and operation.
STEERING
Electric Power Steering
WARNING: The electric power steering system has diagnosticchecks that continuously monitor the system to ensure proper
operation. When a system error is detected a steering message willappear in the information display.
236 Driving Aids
2014 TaurusOwners Guide gf, 2nd Printing, September 2013USA (fus)

WARNING: The electric power steering system has diagnosticchecks that continuously monitor the system to ensure proper
operation of the electronic system. When an electronic error isdetected, a message will be displayed in the information display.If this happens, stop the vehicle in a safe place, and turn off the engine.After at least 10 seconds, reset the system by restarting the engine,and watch the information display for a steering message. If a steeringmessage returns, or returns while driving, take the vehicle to yourdealer to have it checked.
WARNING: Obtain immediate service if a system error isdetected. You may not notice any difference in the feel of your
steering, but a serious condition may exist. Failure to do so may resultin loss of steering control.
Your vehicle is equipped with an electric power-assisted steering system.There is no fluid reservoir to check or fill.
If your vehicle loses electrical power while you are driving (or if theignition is turned off), you can steer the vehicle manually, but it takesmore effort. Extreme continuous steering may increase the effort ittakes for you to steer. This occurs to prevent internal overheating andpermanent damage to your steering system. If this should occur, you willneither lose the ability to steer the vehicle manually nor will it causepermanent damage. Typical steering and driving maneuvers will allow thesystem to cool and steering assist will return to normal.
When a steering system error is detected, steering messages may appearin the information display.
Steering TipsIf the steering wanders or pulls, check for:
• an improperly inflated tire
• uneven tire wear
• loose or worn suspension components
• loose or worn steering components
• improper vehicle alignment
A high crown in the road or high crosswinds may also make the steeringseem to wander/pull.
Driving Aids 237
2014 TaurusOwners Guide gf, 2nd Printing, September 2013USA (fus)

CARGO NET (IF EQUIPPED)
WARNING: The cargo net is not designed to restrain objectsduring a collision or heavy braking.
The cargo net secures lightweightobjects in the cargo area. Attachthe net to the anchors provided.Do not put more than 50 pounds(22 kilograms) in the net.
LOAD LIMIT
Vehicle Loading – With and Without a TrailerThis section will guide you in the proper loading of your vehicle and/ortrailer, to keep your loaded vehicle weight within its design ratingcapability, with or without a trailer. Properly loading your vehicle willprovide maximum return of vehicle design performance. Before loadingyour vehicle, familiarize yourself with the following terms for determiningyour vehicle’s weight ratings, with or without a trailer, from the vehicle’sTire Label or Safety Compliance Certification Label:
Base Curb Weight – is the weight of the vehicle including a full tank offuel and all standard equipment. It does not include passengers, cargo, oroptional equipment.
Vehicle Curb Weight – is the weight of your new vehicle when youpicked it up from your authorized dealer plus any aftermarketequipment.
238 Load Carrying
2014 TaurusOwners Guide gf, 2nd Printing, September 2013USA (fus)

Payload – is the combined weight of cargo and passengers that thevehicle is carrying. The maximum payload for your vehicle can be foundon the Tire Label on the B-Pillar or the edge of the driver’s door(vehicles exported outside the US and Canada may not have a TireLabel). Look for “THE COMBINED WEIGHT OF OCCUPANTSAND CARGO SHOULD NEVER EXCEED XXX kg OR XXX lb.” formaximum payload. The payload listed on the Tire Label is the maximumpayload for the vehicle as built by the assembly plant. If any aftermarketor authorized-dealer installed equipment has been installed on thevehicle, the weight of the equipment must be subtracted from thepayload listed on the Tire Label in order to determine the new payload.
WARNING: The appropriate loading capacity of your vehiclecan be limited either by volume capacity (how much space is
available) or by payload capacity (how much weight the vehicle shouldcarry). Once you have reached the maximum payload of your vehicle,do not add more cargo, even if there is space available. Overloading orimproperly loading your vehicle can contribute to loss of vehicle controland vehicle rollover.
Load Carrying 239
2014 TaurusOwners Guide gf, 2nd Printing, September 2013USA (fus)

Example only:
240 Load Carrying
2014 TaurusOwners Guide gf, 2nd Printing, September 2013USA (fus)

Cargo Weight – includes all weight added to the Base Curb Weight,including cargo and optional equipment. When towing, trailer tongue loadweight is also part of cargo weight.
GAW (Gross Axle Weight) – is the total weight placed on each axle(front and rear) – including vehicle curb weight and all payload.
GAWR (Gross Axle Weight Rating) – is the maximum allowableweight that can be carried by a single axle (front or rear). Thesenumbers are shown on the Safety Compliance Certification Label.The label shall be affixed to either the door hinge pillar,door-latch post, or the door edge that meets the door-latch post,next to the driver’s seating position. The total load on each axlemust never exceed its GAWR.
Note: For trailer towing information refer to Trailer towing found inthis chapter or the RV and Trailer Towing Guide provided by yourauthorized dealer.
GVW (Gross Vehicle Weight) – is the Vehicle Curb Weight + cargo +passengers.
Load Carrying 241
2014 TaurusOwners Guide gf, 2nd Printing, September 2013USA (fus)

GVWR (Gross Vehicle Weight Rating) – is the maximum allowableweight of the fully loaded vehicle (including all options, equipment,passengers and cargo). The GVWR is shown on the SafetyCompliance Certification Label. The label shall be affixed toeither the door hinge pillar, door-latch post, or the door edge thatmeets the door-latch post, next to the driver’s seating position.The GVW must never exceed the GVWR.
• Example only:
242 Load Carrying
2014 TaurusOwners Guide gf, 2nd Printing, September 2013USA (fus)

WARNING: Exceeding the Safety Compliance Certification Labelvehicle weight rating limits could result in substandard vehicle
handling or performance, engine, transmission and/or structural damage,serious damage to the vehicle, loss of control and personal injury.
GCW (Gross Combined Weight) – is the weight of the loaded vehicle(GVW) plus the weight of the fully loaded trailer.
GCWR (Gross Combined Weight Rating) – is the maximum allowableweight of the vehicle and the loaded trailer – including all cargo andpassengers – that the vehicle can handle without risking damage.(Important: The towing vehicle’s braking system is rated for operationat GVWR, not at GCWR. Separate functional brakes should be used forsafe control of towed vehicles and for trailers where the GCW of thetowing vehicle plus the trailer exceed the GVWR of the towing vehicle.The GCW must never exceed the GCWR.
Maximum Loaded Trailer Weight – is the highest possible weight ofa fully loaded trailer the vehicle can tow. It assumes a vehicle with onlymandatory options, no cargo (internal or external), a tongue load of10–15% (conventional trailer), and driver only (150 lb. [68 kg]).Consult your authorized dealer (or the RV and Trailer Towing Guideprovided by your authorized dealer) for more detailed information.
WARNING: Do not exceed the GVWR or the GAWR specified onthe Safety Compliance Certification Label.
WARNING: Do not use replacement tires with lower loadcarrying capacities than the original tires because they may lower
the vehicle’s GVWR and GAWR limitations. Replacement tires with ahigher limit than the original tires do not increase the GVWR andGAWR limitations.
Load Carrying 243
2014 TaurusOwners Guide gf, 2nd Printing, September 2013USA (fus)

WARNING: Exceeding any vehicle weight rating limitation couldresult in serious damage to the vehicle and/or personal injury.
Steps for determining the correct load limit:
1. Locate the statement “The combined weight of occupants and cargoshould never exceed XXX kg or XXX lbs.” on your vehicle’s placard.
2. Determine the combined weight of the driver and passengers that willbe riding in your vehicle.
3. Subtract the combined weight of the driver and passengers fromXXX kg or XXX lbs.
4. The resulting figure equals the available amount of cargo and luggageload capacity. For example, if the “XXX” amount equals 1,400 lbs. andthere will be five 150 lb. passengers in your vehicle, the amount ofavailable cargo and luggage load capacity is 650 lbs. (1400–750 (5 x 150)= 650 lb.).
5. Determine the combined weight of luggage and cargo being loaded onthe vehicle. That weight may not safely exceed the available cargo andluggage load capacity calculated in Step 4.
6. If your vehicle will be towing a trailer, load from your trailer will betransferred to your vehicle. Consult this manual to determine how thisreduces the available cargo and luggage load capacity of your vehicle.
The following gives you a few examples on how to calculate the availableamount of cargo and luggage load capacity:
• Suppose your vehicle has a 1400 lb. (635 kg) cargo and luggagecapacity. You decide to go golfing. Is there enough load capacity tocarry you, 4 of your friends and all the golf bags? You and four friendsaverage 220 lb. (99 kg) each and the golf bags weigh approximately30 lb. (13.5 kg) each. The calculation would be: 1,400 - (5 x 220) -(5 x 30) = 1,400 - 1,100 - 150 = 150 lb. Yes, you have enough loadcapacity in your vehicle to transport four friends and your golf bags.In metric units, the calculation would be: 635 kg - (5 x 99 kg) -(5 x 13.5 kg) = 635 - 495 - 67.5 = 72.5 kg.
244 Load Carrying
2014 TaurusOwners Guide gf, 2nd Printing, September 2013USA (fus)

• Suppose your vehicle has a 1400 lb. (635 kg) cargo and luggagecapacity. You and one of your friends decide to pick up cement fromthe local home improvement store to finish that patio you have beenplanning for the past 2 years. Measuring the inside of the vehicle withthe rear seat folded down, you have room for 12-100 lb. (45 kg) bagsof cement. Do you have enough load capacity to transport the cementto your home? If you and your friend each weigh 220 lb. (99 kg), thecalculation would be: 1,400 - (2 x 220) - (12 x 100) = 1,400 - 440 -1,200 = - 240 lb. No, you do not have enough cargo capacity to carrythat much weight. In metric units, the calculation would be: 635 kg -(2 x 99 kg) - (12 x 45 kg) = 635 - 198 - 540 = -103 kg. You will needto reduce the load weight by at least 240 lb. (104 kg). If you remove3-100 lb. (45 kg) cement bags, then the load calculation would be:
1,400 - (2 x 220) - (9 x 100) = 1,400 - 440 - 900 = 60 lb. Now youhave the load capacity to transport the cement and your friend home.In metric units, the calculation would be: 635 kg - (2 x 99 kg) - (9 x45 kg) = 635 - 198 - 405 = 32 kg.
The above calculations also assume that the loads are positioned in yourvehicle in a manner that does not overload the Front or the Rear GrossAxle Weight Rating specified for your vehicle on the Safety ComplianceCertification Label. The label shall be affixed to either the door hingepillar, door-latch post, or the door edge that meets the door-latch post,next to the driver’s seating position.
Load Carrying 245
2014 TaurusOwners Guide gf, 2nd Printing, September 2013USA (fus)

TOWING A TRAILER
WARNING: Do not exceed the GVWR or the GAWR specified onthe certification label.
WARNING: Towing trailers beyond the maximum recommendedgross trailer weight exceeds the limit of your vehicle and could
result in engine damage, transmission damage, structural damage, lossof vehicle control, vehicle rollover and personal injury.
Note: For information on electrical items such as fuses or relays, see theFuses chapter.
Your vehicle’s load capacity designation is by weight, not by volume, soyou cannot necessarily use all available space when loading a vehicle.
Towing a trailer places an extra load on your vehicle’s engine,transmission, axle, brakes, tires and suspension. Inspect thesecomponents periodically during, and after, any towing operation.
Load PlacementTo help minimize how trailer movement affects your vehicle whendriving:• Load the heaviest items closest to the trailer floor.• Load the heaviest items centered between the left and right side
trailer tires.• Load the heaviest items above the trailer axles or just slightly forward
toward the trailer tongue. Do not allow the final trailer tongue weightto go above or below 10–15% of the loaded trailer weight.
• Select a tow bar with the correct rise or drop. When both the loadedvehicle and trailer are connected, the trailer frame should be level, orslightly angled down toward your vehicle, when viewed from the side.
When driving with a trailer or payload, a slight takeoff vibration orshudder may be present due to the increased payload weight. You canfind more information about proper trailer loading and setting yourvehicle up for towing under Load limit in the Load Carrying chapterand in the RV & Trailer Towing Guide, available at an authorizeddealer.
246 Towing
2014 TaurusOwners Guide gf, 2nd Printing, September 2013USA (fus)

RECOMMENDED TOWING WEIGHTSNote: Do not exceed the trailer weight for your vehicle configurationlisted in the chart below.Note: Make sure to take into consideration trailer frontal area. Do notexceed 12 feet2 (1.11 meters2) trailer frontal area.Note: For high altitude operation, reduce the gross combined weight by2% per 1000 feet (300 meters) starting at the 1000 foot (300 meter)elevation point.
Note: Certain states require electric trailer brakes for trailers over aspecified weight. Be sure to check state regulations for this specifiedweight. The maximum trailer weights listed may be limited to thisspecified weight, as your vehicle’s electrical system may not include thewiring connector needed to use electric trailer brakes.
Your vehicle may tow a Class I trailer provided the maximum trailer weightis less than or equal to the maximum trailer weight listed for your vehicleconfiguration on the following chart.
Powertrain Maximum trailer weight
3.5L TiVCT front-wheel drive 1000 lb (454 kg)3.5L TiVCT all-wheel drive 1000 lb (454 kg)2.0L GTDI front-wheel drive 1000 lb (454 kg)3.5L GTDI all-wheel drive No trailer towing permitted
ESSENTIAL TOWING CHECKSFollow these guidelines for safe towing:• Do not tow a trailer until you drive your vehicle at least 1000 miles
(1600 kilometers).• Consult your local motor vehicle laws for towing a trailer.• See the instructions included with towing accessories for the proper
installation and adjustment specifications.• Service your vehicle more frequently if you tow a trailer. See your
scheduled maintenance information.• If you use a rental trailer, follow the instructions the rental agency
gives you.
For load specification terms found on the tire label and SafetyCompliance label and for instructions on calculating your vehicle’s load,refer to Load limit in the Load Carrying chapter.
Remember to account for the trailer tongue weight as part of yourvehicle load when calculating the total vehicle weight.
Towing 247
2014 TaurusOwners Guide gf, 2nd Printing, September 2013USA (fus)

HitchesDo not use a hitch that either clamps onto the bumper or attaches to theaxle.Distribute the trailer load so 10-15% of the total trailer weight is on thetongue.
Safety ChainsNote: Never attach safety chains to the bumper.Always connect the safety chains to the hook retainers of your vehiclehitch.To connect the safety chains, cross them under the trailer tongue andallow enough slack for turning tight corners. Do not allow the chains todrag on the ground.
Trailer Brakes
WARNING: Do not connect a trailer’s hydraulic brake systemdirectly to your vehicle’s brake system. Your vehicle may not have
enough braking power and your chances of having a collision greatlyincrease.
Electric brakes and manual, automatic or surge-type trailer brakes aresafe if you install them properly and adjust them to the manufacturer’sspecifications. The trailer brakes must meet local and federal regulations.The rating for the tow vehicle’s braking system operation is at thegross vehicle weight rating, not the gross combined weight rating.
Trailer Lamps
WARNING: Never connect any trailer lamp wiring to thevehicle’s tail lamp wiring; this may damage the electrical system
resulting in a fire. Contact an authorized dealer as soon as possible forassistance in proper trailer tow wiring installation. Additional electricalequipment may be required.
Trailer lamps are required on most towed vehicles. Make sure all runninglights, brake lights, turn signals and hazard lights are working.
Before Towing a TrailerPractice turning, stopping and backing up to get the feel of yourvehicle-trailer combination before starting on a trip. When turning, makewider turns so the trailer wheels clear curbs and other obstacles.
248 Towing
2014 TaurusOwners Guide gf, 2nd Printing, September 2013USA (fus)

When Towing a Trailer• Do not drive faster than 70 mph (113 km/h) during the first 500 miles
(800 kilometers).• Do not make full-throttle starts.• Check your hitch, electrical connections and trailer wheel lug nuts
thoroughly after you have traveled 50 miles (80 kilometers).• When stopped in congested or heavy traffic during hot weather, place
the gearshift in position P to aid engine and transmission cooling andto help air conditioning performance.
• Turn off the speed control with heavy loads or in hilly terrain. Thespeed control may turn off automatically when you are towing onlong, steep grades.
• Shift to a lower gear when driving down a long or steep hill. Do notapply the brakes continuously, as they may overheat and become lesseffective.
• If your transmission is equipped with a Grade Assist or Tow/Haulfeature, use this feature when towing. This provides engine brakingand helps eliminate excessive transmission shifting for optimum fueleconomy and transmission cooling.
• Allow more distance for stopping with a trailer attached. Anticipatestops and brake gradually.
• Avoid parking on a grade. However, if you must park on a grade:1. Turn the steering wheel to point your vehicle tires away from
traffic flow.2. Set your vehicle parking brake.3. Place the automatic transmission in position P.4. Place wheel chocks in front and back of the trailer wheels.
(Chocks not included with vehicle.)
Launching or Retrieving a Boat or Personal Watercraft (PWC)Note: Disconnect the wiring to the trailer before backing the trailer intothe water.
Note: Reconnect the wiring to the trailer after removing the trailer fromthe water.
When backing down a ramp during boat launching or retrieval:• Do not allow the static water level to rise above the bottom edge of
the rear bumper.• Do not allow waves to break higher than 6 inches (15 centimeters)
above the bottom edge of the rear bumper.
Towing 249
2014 TaurusOwners Guide gf, 2nd Printing, September 2013USA (fus)

Exceeding these limits may allow water to enter vehicle components:• Causing internal damage to the components.• Affecting driveability, emissions, and reliability.
Replace the rear axle lubricant anytime the rear axle submerges inwater. Water may have contaminated the rear axle lubricant, which doesnot normally require checking or changing unless it is leaking or otheraxle repair is required.
TRANSPORTING THE VEHICLE
If you need to have your vehicle towed, contact a professional towingservice or, if you are a member of a roadside assistance program, yourroadside assistance service provider.
We recommend the use of a wheel lift and dollies or flatbed equipmentto tow your vehicle. Do not tow with a slingbelt. Ford Motor Companyhas not approved a slingbelt towing procedure. Vehicle damage mayoccur if towed incorrectly, or by any other means.
Ford Motor Company produces a towing manual for all authorized towtruck operators. Have your tow truck operator refer to this manual forproper hook-up and towing procedures for your vehicle.
250 Towing
2014 TaurusOwners Guide gf, 2nd Printing, September 2013USA (fus)

It is acceptable to have your front-wheel drive vehicle towed from thefront if using proper wheel lift equipment to raise the front wheels offthe ground. When towing in this manner, the rear wheels can remain onthe ground.
Front-wheel drive vehicles must have the front wheels placed on a towdolly when towing your vehicle from the rear using wheel lift equipment.This prevents damage to the transmission.
Towing an all-wheel drive vehicle requires that all wheels be off theground, such as using a wheel lift and dollies or flatbed equipment. Thisprevents damage to the transmission, all-wheel drive system and vehicle.
TOWING THE VEHICLE ON FOUR WHEELS
Emergency TowingIf your vehicle becomes inoperable (without access to wheel dollies,car-hauling trailer, or flatbed transport vehicle), it can be flat-towed(all wheels on the ground, regardless of the powertrain and transmissionconfiguration) under the following conditions:• Your vehicle is facing forward for towing in a forward direction.• Place the transmission in position N. See Automatic transmission in
the Transmission chapter if you cannot move the transmission intoN.
• Maximum speed is 35 mph (56 km/h).• Maximum distance is 50 miles (80 kilometers).
Recreational Towing
Vehicles Equipped with a 2.0L EngineNote: Put your climate control system in recirculated air mode toprevent exhaust fumes from entering your vehicle. See the ClimateControl chapter.
Follow these guidelines if you have a need for recreational towing, suchas towing your vehicle behind a motorhome. We designed theseguidelines to prevent damage to your transmission.
You can tow your vehicle with the front wheels off the ground by using atow dolly. If you are using a tow dolly, follow the instructions specifiedby the equipment provider. Otherwise, you cannot tow your vehicle.
Towing 251
2014 TaurusOwners Guide gf, 2nd Printing, September 2013USA (fus)

Vehicles Equipped with a 3.5L EngineNote: Put your climate control system in recirculated air mode toprevent exhaust fumes from entering your vehicle. See the ClimateControl chapter.
Follow these guidelines if you have a need for recreational towing, suchas towing your vehicle behind a motorhome or truck. We designed theseguidelines to prevent damage to your vehicle after it is hooked-up to therecreational vehicle or tow dolly.
You can tow your front-wheel drive vehicle with all four wheels on theground or with the front wheels off the ground by using a tow dolly.If you are using a tow dolly, follow the instructions specified by theequipment provider. If you are towing with all four wheels on the ground,see the following instructions.
You can tow your all-wheel drive vehicle with all four wheels on theground or with all four wheels off the ground using a vehicle transporttrailer. Do not tow your all-wheel drive vehicle with the front wheels offthe ground (by using a tow dolly) and the rear wheels on the ground.This causes damage to your all-wheel drive system. If you are using avehicle transport trailer, follow the instructions specified by theequipment provider. If you are towing with all four wheels on the ground,see the following instructions.
If you tow your vehicle with all four wheels on the ground:• Tow only in the forward direction.• Release the parking brake.• Place the transmission in position N.• Do not exceed 65 mph (105 km/h).• Start the engine and allow it to run for five minutes at the beginning
of each day and every six hours thereafter. With the engine runningand your foot on the brake, shift into position D and then intoposition R before shifting back into position N.
252 Towing
2014 TaurusOwners Guide gf, 2nd Printing, September 2013USA (fus)

BREAKING-INYou need to break in new tires for approximately 300 miles(480 kilometers). During this time, your vehicle may exhibit some uniquedriving characteristics. Avoid driving too fast during the first 1000 miles(1600 kilometers). Vary your speed frequently and change up throughthe gears early. Do not labor the engine. Do not tow during the first1000 miles (1600 kilometers).
ECONOMICAL DRIVINGFuel economy is affected by several things, such as how you drive, theconditions you drive under and how you maintain your vehicle.
There are some things to keep in mind that may improve your fueleconomy:
• Accelerate and slow down in a smooth, moderate fashion.
• Drive at steady speeds without stopping.
• Anticipate stops; slowing down may eliminate the need to stop.
• Combine errands and minimize stop-and-go driving.
• Close the windows for high-speed driving.
• Drive at reasonable speeds (traveling at 55 mph [88 km/h] uses 15%less fuel than traveling at 65 mph [105 km/h]).
• Keep the tires properly inflated and use only the recommended size.
• Use the recommended engine oil.
• Perform all regularly scheduled maintenance.
There are also some things you may not want to do because they mayreduce your fuel economy:
• Sudden or hard accelerations.
• Rev the engine before turning it off.
• Idle for periods longer than one minute.
• Warm up your vehicle on cold mornings.
• Use the air conditioner or front defroster.
• Use the speed control in hilly terrain.
• Rest your foot on the brake pedal while driving.
• Drive a heavily loaded vehicle or tow a trailer.
Driving Hints 253
2014 TaurusOwners Guide gf, 2nd Printing, September 2013USA (fus)

• Carry unnecessary weight (approximately 1 mpg [0.4 km/L] is lost forevery 400 pounds [180 kilograms] of weight carried).
• Add particular accessories to your vehicle (e.g.; bug deflectors,rollbars or light bars, running boards, ski racks).
• Drive with the wheels out of alignment.
DRIVING THROUGH WATER
WARNING: Drive through water in an emergency only, and notas part of normal driving.
WARNING: Engine damage can occur if water enters the airfilter.
Note: Driving through deep water may allow water into the transmissionor air intake and can cause internal vehicle damage or cause it to stall.
Note: Once through the water, always dry the brakes by moving yourvehicle slowly while applying light pressure on the brake pedal.
If driving through deep or standing water is unavoidable, proceed veryslowly. Never drive through water that is higher than the bottom of thewheel rims (for cars) or the bottom of the hubs (for trucks).
When driving through water,traction or brake capability may belimited. Also, water may enter yourengine’s air intake and severelydamage your engine or your vehiclemay stall.
Wet brakes do not stop the vehicleas quickly as dry brakes.
254 Driving Hints
2014 TaurusOwners Guide gf, 2nd Printing, September 2013USA (fus)

FLOOR MATS
WARNING: Always use floor mats that are designed to fit thefoot well of your vehicle, leaving the pedal area unobstructed,
and which can be firmly secured to retention posts so that they cannotslip out of position and interfere with the pedals or impair safeoperation of your vehicle in other ways.• Incorrectly fitted floor mats can cause the accelerator pedal to
become stuck in the open position. This can cause loss of vehiclecontrol.
• Always correctly install the floor mats to the retention posts so thatthey cannot slip out of position or obstruct pedal operation.
• Do not place unsecured floor mats or any other covering in the footwell.
• Do not place additional floor mats or any other covering on top ofthe original floor mats. This will reduce the pedal clearance andinterfere with the pedal operation.
• Do not allow objects to fall or become trapped under the pedals ofyour vehicle. This can cause loss of vehicle control.
• Carry out regular inspections to make sure the floor mats are secure.
To install the floor mats, position the floor mat eyelet over the retentionpost and press down to lock in position.
Remove in reverse order.
Driving Hints 255
2014 TaurusOwners Guide gf, 2nd Printing, September 2013USA (fus)

ROADSIDE ASSISTANCE
Vehicles Sold in the United States: Getting Roadside AssistanceTo fully assist you should you have a vehicle concern, Ford MotorCompany offers a complimentary Roadside Assistance program.This program is separate from the New Vehicle Limited Warranty.• 24 hours a day, seven days a week• For the coverage period listed on the Roadside Assistance Card
included in your Owner’s Manual portfolio.Roadside assistance will cover:• A flat tire change with a good spare (except vehicles that have been
supplied with a tire inflation kit).• Battery jump start.• Lock-out assistance (key replacement cost is the customer’s
responsibility).• Fuel delivery – Independent Service Contractors, if not prohibited by
state, local or municipal law, shall deliver up to 2.0 gallons (7.5 liters)of gasoline or 5.0 gallons (18.9 liters) of diesel fuel to a disabledvehicle. Fuel delivery service is limited to two no-charge occurrenceswithin a 12-month period.
• Winch out – available within 100 feet (30.5 meters) of a paved orcounty maintained road, no recoveries.
• Towing – Ford eligible vehicles will be towed to an authorized dealerwithin 35 miles (56.3 kilometers) of the disablement location or to thenearest authorized dealer. If a member requests to be towed to anauthorized dealer more than 35 miles (56.3 kilometers) from thedisablement location, the member shall be responsible for any mileagecosts in excess of 35 miles (56.3 kilometers).
Roadside Assistance will include up to $200 coverage for a towed trailerif the disabled eligible vehicle requires service at the nearest authorizeddealer. If the towing vehicle is operational but the trailer is not, then thetrailer does not qualify for any roadside services.
Vehicles Sold in the United States: Using Roadside AssistanceComplete the roadside assistance identification card and place it in yourwallet for quick reference. This card is found in the owner’s manualportfolio in the glove compartment.
U.S. Ford vehicle customers who require Roadside Assistance, call1-800-241-3673.
256 Roadside Emergencies
2014 TaurusOwners Guide gf, 2nd Printing, September 2013USA (fus)

If you need to arrange roadside assistance for yourself, Ford MotorCompany will reimburse a reasonable amount for towing to the nearestdealership within 35 miles (56.3 kilometers). To obtain reimbursementinformation, U.S. Ford vehicle customers call 1-800-241-3673. Customerswill be asked to submit their original receipts.
Vehicles Sold in Canada: Getting Roadside AssistanceCanadian clients who require roadside assistance, call 1–800–665–2006.
Vehicles Sold in Canada: Using Roadside AssistanceFor your convenience, you may complete the roadside assistanceidentification card found in the centerfold of this warranty guide andretain for future reference.
Canadian roadside coverage and benefits may differ from the U.S.coverage. If you require more information, please refer to the coveragesection of your warranty guide, call us in Canada at 1-800-665-2006, orvisit our website at www.ford.ca.
HAZARD WARNING FLASHERSThe hazard flasher control is located on the instrument panelby the radio. Use it when your vehicle is disabled and iscreating a safety hazard for other motorists.
• Press the flasher control and all front and rear direction signals willflash.
• Press the flasher control again to turn them off.
Note: With extended use, the flashers may run down your 12–voltbattery.
FUEL CUT-OFF SWITCH
WARNING: Failure to inspect and if necessary repair fuel leaksafter a collision may increase the risk of fire and serious injury.
Ford Motor Company recommends that the fuel system be inspected byan authorized dealer after any collision.
In the event of a moderate to severe collision, this vehicle is equippedwith a fuel pump shut-off feature that stops the flow of fuel to theengine. Not every impact will cause a shut-off.
Roadside Emergencies 257
2014 TaurusOwners Guide gf, 2nd Printing, September 2013USA (fus)

Should your vehicle shut off after a collision, you may restart yourvehicle by doing the following:
1. Turn the ignition off.
2. Turn the ignition on.
3. Repeat steps 1 and 2 to re-enable fuel pump.
Note: If your vehicle has the push button start system, press thestop/start button twice to reactivate the fuel system.
JUMP-STARTING THE VEHICLE
WARNING: The gases around the battery can explode if exposedto flames, sparks, or lit cigarettes. An explosion could result in
injury or vehicle damage.
WARNING: Batteries contain sulfuric acid which can burn skin,eyes and clothing, if contacted.
Do not attempt to push-start your automatic transmission vehicle.Automatic transmissions do not have push-start capability. Attemptingto push-start a vehicle with an automatic transmission may causetransmission damage.
When the battery is disconnected or a new battery is installed, theautomatic transmission must relearn its shift strategy. As a result, thetransmission may exhibit a combination of firm and soft shifts. Thisoperation is considered normal and will not affect function or durabilityof the transmission. Over time, the adaptive learning process will fullyupdate transmission operation.
Preparing Your VehicleNote: Use only a 12–volt supply to start your vehicle.
Note: Do not disconnect the battery of the disabled vehicle as this coulddamage the vehicle’s electrical system.
1. Park the booster vehicle close to the hood of the disabled vehiclemaking sure the two vehicles do not touch. Set the parking brake onboth vehicles and stay clear of the engine cooling fan and other movingparts.
258 Roadside Emergencies
2014 TaurusOwners Guide gf, 2nd Printing, September 2013USA (fus)
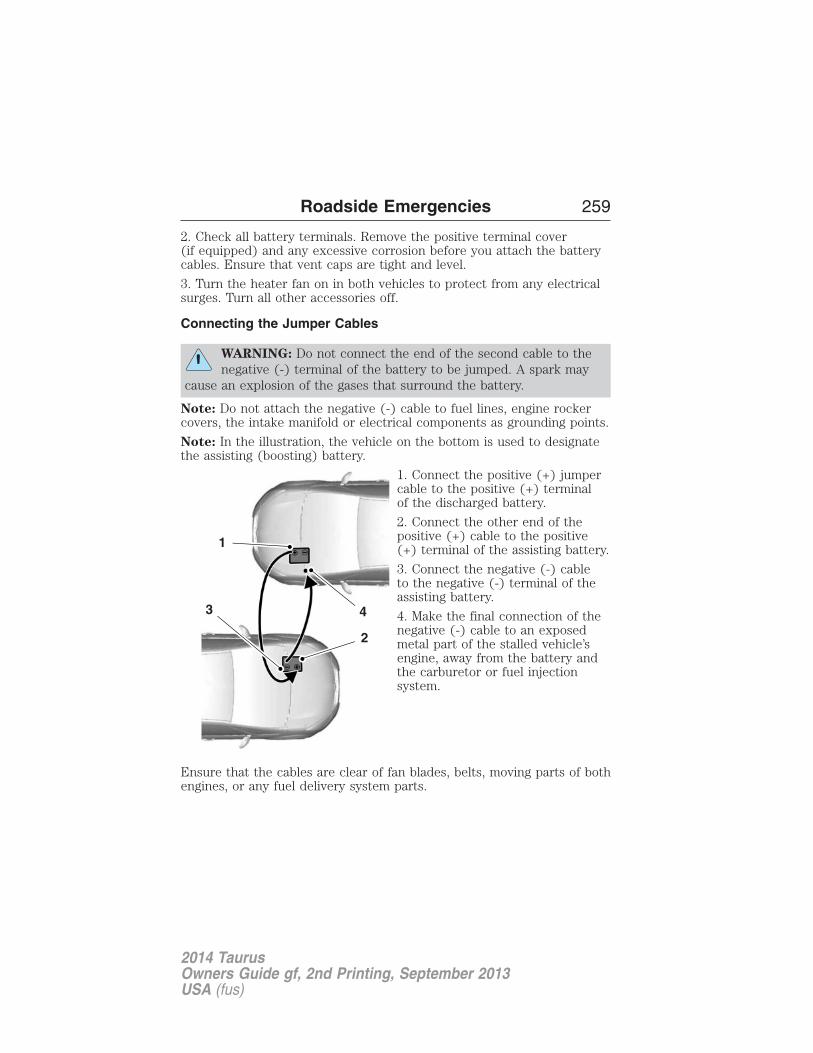
2. Check all battery terminals. Remove the positive terminal cover(if equipped) and any excessive corrosion before you attach the batterycables. Ensure that vent caps are tight and level.
3. Turn the heater fan on in both vehicles to protect from any electricalsurges. Turn all other accessories off.
Connecting the Jumper Cables
WARNING: Do not connect the end of the second cable to thenegative (-) terminal of the battery to be jumped. A spark may
cause an explosion of the gases that surround the battery.
Note: Do not attach the negative (-) cable to fuel lines, engine rockercovers, the intake manifold or electrical components as grounding points.
Note: In the illustration, the vehicle on the bottom is used to designatethe assisting (boosting) battery.
1. Connect the positive (+) jumpercable to the positive (+) terminalof the discharged battery.
2. Connect the other end of thepositive (+) cable to the positive(+) terminal of the assisting battery.
3. Connect the negative (-) cableto the negative (-) terminal of theassisting battery.
4. Make the final connection of thenegative (-) cable to an exposedmetal part of the stalled vehicle’sengine, away from the battery andthe carburetor or fuel injectionsystem.
Ensure that the cables are clear of fan blades, belts, moving parts of bothengines, or any fuel delivery system parts.
4
2
1
3
Roadside Emergencies 259
2014 TaurusOwners Guide gf, 2nd Printing, September 2013USA (fus)

Jump Starting1. Start the engine of the booster vehicle and run the engine at amoderately increased speed.
2. Start the engine of the disabled vehicle.
3. Once the disabled vehicle has been started, run both engines for anadditional three minutes before disconnecting the jumper cables.
Removing the Jumper CablesNote: In the illustration, the vehicle on the bottom is used to designatethe assisting (boosting) battery.
Remove the jumper cables in the reverse order that they wereconnected.
1. Remove the jumper cable fromthe ground metal surface.
2. Remove the jumper cable on thenegative (-) terminal of the boostervehicle’s battery.
3. Remove the jumper cable fromthe positive (+) terminal of thebooster vehicle’s battery.
4. Remove the jumper cable fromthe positive (+) terminal of thedisabled vehicle’s battery.
After the disabled vehicle has been started and the jumper cablesremoved, allow it to idle for several minutes so the engine computer canrelearn its idle conditions.
4
1
3
2
260 Roadside Emergencies
2014 TaurusOwners Guide gf, 2nd Printing, September 2013USA (fus)

GETTING THE SERVICES YOU NEEDWarranty repairs to your vehicle must be performed by an authorizeddealer. While any authorized dealer handling your vehicle line willprovide warranty service, we recommend you return to your sellingauthorized dealer who wants to ensure your continued satisfaction.
Please note that certain warranty repairs require special training,equipment or both, so not all authorized dealers are authorized toperform all warranty repairs. This means that, depending on thewarranty repair needed, you may have to take your vehicle to anotherauthorized dealer.
A reasonable time must be allowed to perform a repair after taking yourvehicle to the authorized dealer. Repairs will be made using Ford orMotorcraft parts, or remanufactured or other parts that are authorizedby Ford.
Away from HomeIf you are away from home when your vehicle needs service, contact theFord Customer Relationship Center or use the online resources listedbelow to find the nearest authorized dealer.
In the United States:
Mailing AddressFord Motor CompanyCustomer Relationship CenterP.O. Box 6248Dearborn, MI 48121
Telephone1-800-392-3673 (FORD)(TDD for the hearing impaired: 1-800-232-5952)
OnlineAdditional information and resources are available online atwww.fordowner.com.
These are some of the items that can be found online:
• U.S. Dealer Locator by Dealer Name, City/State, or Zip Code
• Owner Manuals
• Maintenance Schedules
• Recalls
• Ford Extended Service Plans
Customer Assistance 261
2014 TaurusOwners Guide gf, 2nd Printing, September 2013USA (fus)

• Ford Genuine Accessories• Service specials and promotions.In Canada:Mailing addressCustomer Relationship CentreFord Motor Company of Canada, LimitedP.O. Box 2000Oakville, Ontario L6K 1C8Telephone1-800-565-3673 (FORD)Onlinewww.ford.ca
Additional AssistanceIf you have questions or concerns, or are unsatisfied with the service youare receiving, follow these steps:1. Contact your Sales Representative or Service Advisor at your selling orservicing authorized dealer.2. If your inquiry or concern remains unresolved, contact the SalesManager, Service Manager or Customer Relations Manager.
3. If you require assistance or clarification on Ford Motor Companypolicies, please contact the Ford Customer Relationship Center.
In order to help serve you better, please have the following informationavailable when contacting a Customer Relationship Center:
• Vehicle Identification Number (VIN)
• Your telephone number (home and business)
• The name of the authorized dealer and city where located
• The vehicle’s current odometer reading.
In some states, you must directly notify Ford in writing before pursuingremedies under your state’s warranty laws. Ford is also allowed a finalrepair attempt in some states.
In the United States, a warranty dispute must be submitted to the BBBAUTO LINE before taking action under the Magnuson-Moss WarrantyAct, or to the extent allowed by state law, before pursuing replacementor repurchase remedies provided by certain state laws. This disputehandling procedure is not required prior to enforcing state created rightsor other rights which are independent of the Magnuson-Moss WarrantyAct or state replacement or repurchase laws.
262 Customer Assistance
2014 TaurusOwners Guide gf, 2nd Printing, September 2013USA (fus)

IN CALIFORNIA (U.S. ONLY)California Civil Code Section 1793.2(d) requires that, if a manufactureror its representative is unable to repair a motor vehicle to conform tothe vehicle’s applicable express warranty after a reasonable number ofattempts, the manufacturer shall be required to either replace thevehicle with one substantially identical or repurchase the vehicle andreimburse the buyer in an amount equal to the actual price paid orpayable by the consumer (less a reasonable allowance for consumeruse). The consumer has the right to choose whether to receive a refundor replacement vehicle.
California Civil Code Section 1793.22(b) presumes that the manufacturerhas had a reasonable number of attempts to conform the vehicle to itsapplicable express warranties if, within the first 18 months of ownershipof a new vehicle or the first 18000 mi (29 000 km), whichever occursfirst:
1. Two or more repair attempts are made on the same nonconformitylikely to cause death or serious bodily injury OR
2. Four or more repair attempts are made on the same nonconformity(a defect or condition that substantially impairs the use, value or safetyof the vehicle) OR
3. The vehicle is out of service for repair of nonconformities for a totalof more than 30 calendar days (not necessarily all at one time).
In the case of 1 or 2 above, the consumer must also notify themanufacturer of the need for the repair of the nonconformity at thefollowing address:
Ford Motor Company16800 Executive Plaza DriveMail Drop 3NE-BDearborn, MI 48126
You are required to submit your warranty dispute to BBB AUTO LINEbefore asserting in court any rights or remedies conferred by CaliforniaCivil Code Section 1793.22(b). You are also required to use BBB AUTOLINE before exercising rights or seeking remedies created by the FederalMagnuson-Moss Warranty Act, 15 U.S.C. sec. 2301 et seq. If you chooseto seek redress by pursuing rights and remedies not created by CaliforniaCivil Code Section 1793.22(b) or the Magnuson-Moss Warranty Act,resorting to BBB AUTO LINE is not required by those statutes.
Customer Assistance 263
2014 TaurusOwners Guide gf, 2nd Printing, September 2013USA (fus)

THE BETTER BUSINESS BUREAU (BBB) AUTO LINE PROGRAM(U.S. ONLY)Your satisfaction is important to Ford Motor Company and to your dealer.If a warranty concern has not been resolved using the three-stepprocedure outlined earlier in this chapter in the Getting the ServicesYou Need section, you may be eligible to participate in the BBB AUTOLINE program.The BBB AUTO LINE program consists of two parts – mediation andarbitration. During mediation, a representative of the BBB will contactboth you and Ford Motor Company to explore options for settlement ofthe claim. If an agreement is not reached during mediation or you do notwant to participate in mediation, and if your claim is eligible, you mayparticipate in the arbitration process. An arbitration hearing will bescheduled so that you can present your case in an informal settingbefore an impartial person. The arbitrator will consider the testimonyprovided and make a decision after the hearing.Disputes submitted to the BBB AUTO LINE program are usually decidedwithin 40 days after you file your claim with the BBB. You are not boundby the decision, and may reject the decision and proceed to court whereall findings of the BBB Auto Line dispute, and decision, are admissible inthe court action. Should you choose to accept the BBB AUTO LINEdecision, Ford is then bound by the decision, and must comply with thedecision within 30 days of receipt of your acceptance letter.
BBB AUTO LINE Application: Using the information provided below,please call or write to request a program application. You will be askedfor your name and address, general information about your new vehicle,information about your warranty concerns, and any steps you havealready taken to try to resolve them. A Customer Claim Form will bemailed that will need to be completed, signed and returned to the BBBalong with proof of ownership. Upon receipt, the BBB will review theclaim for eligibility under the Program Summary Guidelines.
You can get more information by calling BBB AUTO LINE at1-800-955-5100, or writing to:
BBB AUTO LINE3033 Wilson Boulevard, Suite 600Arlington, Virginia 22201
BBB AUTO LINE applications can also be requested by calling the FordMotor Company Customer Relationship Center at 1-800-392-3673.
Note: Ford Motor Company reserves the right to change eligibilitylimitations, modify procedures, or to discontinue this process at any timewithout notice and without obligation.
264 Customer Assistance
2014 TaurusOwners Guide gf, 2nd Printing, September 2013USA (fus)

UTILIZING THE MEDIATION or ARBITRATION PROGRAM(CANADA ONLY)This pertains to vehicles delivered to authorized Canadian dealers.In those cases, where you continue to feel that the efforts by Ford ofCanada and the authorized dealer to resolve a factory-related vehicleservice concern have been unsatisfactory, Ford of Canada participates inan impartial third party mediation or arbitration program administered bythe Canadian Motor Vehicle Arbitration Plan (CAMVAP).
The CAMVAP program is a straightforward and relatively speedyalternative to resolve a disagreement when all other efforts to producea settlement have failed. This procedure is without cost to you and isdesigned to eliminate the need for lengthy and expensive legalproceedings.
In the CAMVAP program, impartial third-party arbitrators conducthearings at mutually convenient times and places in an informalenvironment. These impartial arbitrators review the positions of theparties, make decisions and, when appropriate, render awards to resolvedisputes. CAMVAP decisions are fast, fair, and final as the arbitrator’saward is binding on both you and Ford of Canada.
CAMVAP services are available in all Canadian territories and provinces.For more information, without charge or obligation, call your CAMVAPProvincial Administrator directly at 1-800-207-0685 or visitwww.camvap.ca.
GETTING ASSISTANCE OUTSIDE THE U.S. AND CANADABefore exporting your vehicle to a foreign country, contact theappropriate foreign embassy or consulate. These officials can inform youof local vehicle registration regulations and where to find unleaded fuel.
If you cannot find unleaded fuel or can only get fuel with an anti-knockindex lower than is recommended for your vehicle, contact our CustomerRelationship Center.
The use of leaded fuel in your vehicle without proper conversion maydamage the effectiveness of your emission control system and may causeengine knocking or serious engine damage. Ford Motor Company or Fordof Canada is not responsible for any damage caused by use of improperfuel. Using leaded fuel may also result in difficulty importing your vehicleback into the United States.
Customer Assistance 265
2014 TaurusOwners Guide gf, 2nd Printing, September 2013USA (fus)

If your vehicle must be serviced while you are traveling or living inAsia-Pacific Region, Sub-Saharan Africa, U.S. Virgin Islands, CentralAmerica, the Caribbean, and Israel, contact the nearest authorizeddealer. If the authorized dealer cannot help you, contact:
FORD MOTOR COMPANYFORD EXPORT OPERATIONS & GLOBAL INITIATIVESCustomer Relationship Center1555 Fairlane DriveFairlane Business Park #3Allen Park, Michigan 48101U.S.A.Telephone: (313) 594-4857FAX: (313) 390-0804Email: [email protected]
For customers in Guam, the Commonwealth of the NorthernMariana Islands (CNMI), America Samoa, and the U.S. VirginIslands, please feel free to call our Toll-Free Number:(800) 841-FORD (3673)
If your vehicle must be serviced while you are traveling or livingin Puerto Rico, contact the nearest authorized dealer. If theauthorized dealer cannot help you, contact:
FORD MOTOR COMPANYFORD EXPORT OPERATIONS & GLOBAL INITIATIVESCustomer Relationship Center1555 Fairlane DriveFairlane Business Park #3Allen Park, Michigan 48101Telephone: (800) 841-FORD (3673)FAX: (313) 390-0804Email: [email protected]
If your vehicle must be serviced while you are traveling or livingin the Middle East, contact the nearest authorized dealer. If theauthorized dealer cannot help you, contact:
Ford Middle EastCustomer Relationship CenterP.O. Box 21470Dubai, United Arab EmiratesTelephone: +971 4 3326084
266 Customer Assistance
2014 TaurusOwners Guide gf, 2nd Printing, September 2013USA (fus)

Toll-Free Number of the Kingdom of Saudi Arabia: 800 8971409Local Telephone Number of Kuwait: 24810575FAX: +971 4 3327299Email: [email protected]
If you buy your vehicle in North America and then relocate to any of theabove locations, register your vehicle identification number (VIN) andnew address with Ford Motor Company Export Operations & GlobalGrowth Initiatives by emailing [email protected].
If you are in another foreign country, contact the nearestauthorized dealer. In the event your inquiry is unresolved,communicate your concern with the dealership’s Sales Manager,Service Manager or Customer Relations Manager. If you requireadditional assistance or clarification, please contact therespective Customer Relationship Center as previously listed.
Customers in the U.S. should call 1-800-392-3673.
ORDERING ADDITIONAL OWNER’S LITERATURETo order the publications in this portfolio, contact Helm, Incorporated at:
HELM, INCORPORATED47911 Halyard DrivePlymouth, Michigan 48170Attention: Customer Service
Or to order a free publication catalog, call toll free: 1-800-782-4356
Monday-Friday 8:00 a.m. - 6:00 p.m. EST
Helm, Incorporated can also be reached by their website:www.helminc.com.
(Items in this catalog may be purchased by credit card, check ormoney order.)
Obtaining a French Owner’s ManualA French owner’s manual can be obtained from your authorized dealer orby contacting Helm, Incorporated using the contact information listedpreviously in this section.
Customer Assistance 267
2014 TaurusOwners Guide gf, 2nd Printing, September 2013USA (fus)

REPORTING SAFETY DEFECTS (U.S. ONLY)If you believe that your vehicle hasa defect which could cause a crashor could cause injury or death, youshould immediately inform theNational Highway Traffic Safety
Administration (NHTSA) in addition to notifying Ford Motor Company.
If NHTSA receives similar complaints, it may open an investigation, and if itfinds that a safety defect exists in a group of vehicles, it may order a recalland remedy campaign. However, NHTSA cannot become involved inindividual problems between you, your dealer, or Ford Motor Company.
To contact NHTSA, you may call the Vehicle Safety Hotline toll-free at1–888–327–4236 (TTY: 1–800–424–9153); go to http://www.safercar.gov;or write to:
Administrator1200 New Jersey Avenue, SoutheastWashington, D.C. 20590
You can also obtain other information about motor vehicle safety fromhttp://www.safercar.gov.
REPORTING SAFETY DEFECTS (CANADA ONLY)If you believe that your vehicle has a defect which could cause a crash orcould cause injury or death, you should immediately inform TransportCanada, using their toll-free number: 1–800–333–0510, or online at:http://www.tc.gc.ca/eng/roadsafety/menu.htm
268 Customer Assistance
2014 TaurusOwners Guide gf, 2nd Printing, September 2013USA (fus)

CHANGING A FUSE
Fuses
WARNING: Always replace a fuse with one that has thespecified amperage rating. Using a fuse with a higher amperage
rating can cause severe wire damage and could start a fire.
If electrical components in yourvehicle are not working, a fuse mayhave blown. Blown fuses areidentified by a broken wire withinthe fuse. Check the appropriatefuses before replacing any electricalcomponents.
Standard Fuse Amperage Rating and Color
COLOR
Fuse
rating
Mini
fuses
Standard
fuses
Maxi
fuses
Cartridge
maxi
fuses
Fuse link
cartridge
2A Grey Grey — — —3A Violet Violet — — —4A Pink Pink — — —5A Tan Tan — — —
7.5A Brown Brown — — —10A Red Red — — —15A Blue Blue — — —20A Yellow Yellow Yellow Blue Blue25A Natural Natural — Natural Natural30A Green Green Green Pink Pink40A — — Orange Green Green50A — — Red Red Red60A — — Blue Yellow Yellow70A — — Tan — Brown80A — — Natural Black Black
15
Fuses 269
2014 TaurusOwners Guide gf, 2nd Printing, September 2013USA (fus)

FUSE SPECIFICATION CHART
Power Distribution Box
WARNING: Always disconnect the battery before servicing highcurrent fuses.
WARNING: To reduce risk of electrical shock, always replace thecover to the power distribution box before reconnecting the
battery or refilling fluid reservoirs.
The power distribution box is located in the engine compartment. It hashigh-current fuses that protect your vehicle’s main electrical systemsfrom overloads.
If the battery has been disconnected and reconnected, see Changing theVehicle Battery in the Maintenance chapter.
The high-current fuses are coded as follows:Fuse or relay
number
Fuse amp
rating
Protected components
1 — Not used2 — Not used3 — Not used
9798
77
9695 94 93 92 91 90 89
88
66
44
78
56
39
26
18 1617
3 12456789
192021222324
2728293031
40414243
55575859606162636465
798081828384858687
67
45
32
10111213
333435
464748495051
686970717274
7376
75
53
37 36
54
38
25
15
14
52
270 Fuses
2014 TaurusOwners Guide gf, 2nd Printing, September 2013USA (fus)

Fuse or relay
number
Fuse amp
rating
Protected components
4 30A** Wiper motor relay5 50A** Anti-lock brake system pump6 — Not used7 — Not used8 20A** Moonroof, Power sunshade9 20A** Second row powerpoint
10 — Not used11 — Heated rear window relay12 — Not used13 — Starter motor high-current relay14 — Left-hand cooling fan #2 relay15 — Fuel pump ultra relay16 — Not used17 — Not used18 40A** Front blower motor relay19 30A** Starter relay20 20A** Storage bin powerpoint21 20A** Rear heated seat module22 — Not used23 30A** Driver power seat, Memory
module24 — Not used25 — Not used26 40A** Rear window defrost relay27 20A** Cigar lighter28 30A** Climate controlled seats29 40A** Electric fan relay 130 40A** Electric fan relay 231 25A** Electric fan relay 332 — Not used33 — Right-hand cooling fan relay
Fuses 271
2014 TaurusOwners Guide gf, 2nd Printing, September 2013USA (fus)

Fuse or relay
number
Fuse amp
rating
Protected components
34 — Blower motor high-current relay35 — Left-hand cooling fan #1 relay36 — Not used37 — Not used38 — Not used39 — Not used40 — Not used41 — Not used42 30A** Passenger power seat43 20A** Anti-lock brake system valves44 — Not used45 5A* Rain sensor46 — Not used47 — Not used48 — Not used49 — Not used50 15A* Heated mirrors51 — Not used52 — Not used53 — Not used54 — Not used55 — Wiper relay56 — Not used57 20A* Left high-intensity discharge
headlamp58 10A* Alternator A-line59 10A* Brake on/off switch60 — Not used61 — Not used62 10A* A/C clutch relay
272 Fuses
2014 TaurusOwners Guide gf, 2nd Printing, September 2013USA (fus)

Fuse or relay
number
Fuse amp
rating
Protected components
63 — Not used64 — Not used65 30A* Fuel pump relay, Fuel injectors66 — Powertrain control module relay67 20A* Oxygen sensor heater, Mass
airflow sensor, Variable camshafttiming solenoid valve, Canistervent solenoid, Canister purgesolenoid
68 20A* Ignition coils69 20A* Vehicle power #1 (powertrain
control module)70 15A* A/C clutch, Fan control relay
coils (1-3), Variable airconditioning compressor,Auxiliary transmission warmup,Turbo charge waste-gate control,Electronic compressor bypassvalve, All-wheel drive module,Positive crankcase ventilationheater
71 — Not used72 — Not used73 — Not used74 — Not used75 — Not used76 — Not used77 — Not used78 20A* Right high-intensity discharge
headlamp79 5A* Adaptive cruise control module
Fuses 273
2014 TaurusOwners Guide gf, 2nd Printing, September 2013USA (fus)

Fuse or relay
number
Fuse amp
rating
Protected components
80 — Not used81 — Not used82 — Not used83 — Not used84 — Not used85 — Not used86 7.5A* Powertrain control module
keep-alive power and relay,Canister vent solenoid
87 5A* Run/start relay88 — Run/start relay89 5A* Front blower relay coil, Electrical
power assist steering module90 10A* Powertrain control module
run/start91 10A* Adaptive cruise control module92 10A* Anti-lock brake system module,
Adaptive headlamp module93 5A* Rear window defroster relay94 30A** Passenger compartment fuse
panel run/start95 — Not used96 — Not used97 — Not used98 — A/C clutch relay
*Mini Fuses **Cartridge Fuses
274 Fuses
2014 TaurusOwners Guide gf, 2nd Printing, September 2013USA (fus)

Passenger Compartment Fuse Panel
The fuse panel is located under the instrument panel to the left of thesteering wheel. You may need to remove a trim panel to access it.
The fuses are coded as follows.Fuse or relay
number
Fuse amp
rating
Protected components
1 30A Left front and right rear smartwindow motors
2 15A Driver seat switch power3 30A Right front smart window motor4 10A Demand lamps battery saver relay
and coil5 20A Audio amplifiers6 5A Not used (spare)7 7.5A Driver seat module logic, Left front
door zone module, Keypad
1
2
3
4
5
6
7
8
9
10
11
12
13
14
15
16
17
18
19
20
21
22 33 41
42
43
44
45
34
35
36
37
23
24
25
26
27
28 38 46
39 4729
32
40
31
30
48
49
Fuses 275
2014 TaurusOwners Guide gf, 2nd Printing, September 2013USA (fus)

Fuse or relay
number
Fuse amp
rating
Protected components
8 10A Not used (spare)9 10A SYNC module, Multi-function
displays, Electronic finish panel,Radio frequency transceiver module
10 10A Run accessory relay11 10A Intelligent access module logic,
Heads-up display12 15A Puddle lamp, Backlighting LED,
Interior lighting13 15A Right front turn, Right rear turn14 15A Left front turn, Left rear turn15 15A Stop lamp, Backup lamp16 10A Right front low beam17 10A Left front low beam18 10A Start button, Keypad illumination,
Brake shift interlock, Powertraincontrol module wakeup, Immobilizertransceiver module
19 20A Audio amplifier20 20A All lock motor relay, Driver lock
motor relay21 10A Not used (spare)22 20A Horn relay23 15A Steering wheel control module logic,
Instrument cluster24 15A Steering wheel control module,
Datalink25 15A Decklid release relay26 5A Ignition switch or push button start
switch27 20A Intelligent access module power28 15A Not used (spare)
276 Fuses
2014 TaurusOwners Guide gf, 2nd Printing, September 2013USA (fus)

Fuse or relay
number
Fuse amp
rating
Protected components
29 20A Radio, Global positioning systemmodule
30 15A Front park lamps31 5A Not used (spare)32 15A Smart window motors, Master
window and mirror switch, Rearwindow power sunshade module,Lock switch illumination
33 10A Not used (spare)34 10A Reverse park aid module, Automatic
high beam and lane departuremodule, Rear heated seat module,Blind spot monitor module, Rearvideo camera
35 5A Motorized humidity sensor, Heads-updisplay, Traction control switch
36 10A Heated steering wheel37 10A Not used (spare)38 10A Auto–dimming mirror (without
automatic high beam and lanedeparture module), Moonroofmodule and switch
39 15A High beams40 10A Rear park lamps41 7.5A Occupant classification sensor,
Restraint control module42 5A Not used (spare)43 10A Not used (spare)44 10A Not used (spare)45 5A Not used (spare)46 10A Climate control module47 15A Fog lamp relay48 30A Circuit
BreakerFront passenger power window,Rear power windows
Fuses 277
2014 TaurusOwners Guide gf, 2nd Printing, September 2013USA (fus)

GENERAL INFORMATIONHave your vehicle serviced regularly to help maintain its roadworthinessand resale value. There is a large network of Ford authorized dealers whoare there to help you with their professional servicing expertise. We believethat their specially trained technicians are best qualified to service yourvehicle properly and expertly. They are supported by a wide range ofhighly specialized tools developed specifically for servicing your vehicle.
To help you service your vehicle, we provide Scheduled MaintenanceInformation which makes tracking routine service easy.
If your vehicle requires professional service, your authorized dealer canprovide the necessary parts and service. Check your warrantyinformation to find out which parts and services are covered.
Use only recommended fuels, lubricants, fluids and service partsconforming to specifications. Motorcraft® parts are designed and built toprovide the best performance in your vehicle.
Precautions• Do not work on a hot engine.
• Make sure that nothing gets caught in moving parts.
• Do not work on a vehicle with the engine running in an enclosedspace, unless you are sure you have enough ventilation.
• Keep all open flames and other burning material (such as cigarettes)away from the battery and all fuel related parts.
Working with the Engine Off1. Set the parking brake and shift to P (Park).
2. Turn off the engine and remove the key (if equipped).
3. Block the wheels.
Working with the Engine On
WARNING: To reduce the risk of vehicle damage or personalburn injuries, do not start your engine with the air cleaner
removed and do not remove it while the engine is running.
1. Set the parking brake and shift to position P (Park) .
2. Block the wheels.
278 Maintenance
2014 TaurusOwners Guide gf, 2nd Printing, September 2013USA (fus)

OPENING AND CLOSING THE HOOD1. Inside the vehicle, pull the hoodrelease handle located under thebottom of the instrument panel nearthe steering column.
2. Go to the front of the vehicle andrelease the auxiliary latch that islocated under the front center ofthe hood.
3. Lift the hood.
Maintenance 279
2014 TaurusOwners Guide gf, 2nd Printing, September 2013USA (fus)

UNDER HOOD OVERVIEW
3.5L V6 engine
A. Engine coolant reservoir
B. Windshield washer fluid reservoir
C. Brake fluid reservoir
D. Battery
E. Power distribution box
F. Air filter assembly
G. Automatic transmission fluid dipstick
H. Engine oil dipstick
I. Engine oil filler cap
A
I H G F
B C D E
280 Maintenance
2014 TaurusOwners Guide gf, 2nd Printing, September 2013USA (fus)

3.5L V6 SHO engine
A. Engine coolant reservoir
B. Brake fluid reservoir
C. Battery
D. Power distribution box
E. Air filter assembly
F. Automatic transmission fluid dipstick (out of view)
G. Engine oil dipstick
H. Engine oil filler cap
I. Windshield washer fluid reservoir
A B C D
EFGHI
Maintenance 281
2014 TaurusOwners Guide gf, 2nd Printing, September 2013USA (fus)

Engine shield
Some vehicles may be equipped with an aero-shield under the engine.This shield needs to be removed for service, including oil and filterchanges. It is secured with four quick release fasteners.
282 Maintenance
2014 TaurusOwners Guide gf, 2nd Printing, September 2013USA (fus)

2.0L EcoBoost® Engine
A. Engine coolant reservoir
B. Brake fluid reservoir
C. Battery
D. Power distribution box
E. Air filter assembly
F. Engine oil filler cap
G. Engine oil dipstick
H. Windshield washer fluid reservoir
A
H G F E
B C D
Maintenance 283
2014 TaurusOwners Guide gf, 2nd Printing, September 2013USA (fus)

ENGINE OIL DIPSTICK2.0L EcoBoost
A. MIN
B. MAX
3.5L, 3.7L and 3.5L EcoBoost
A. MIN
B. MAX
ENGINE OIL CHECKNote: Check the level before starting the engine.
Note: Make sure that the level is between the MIN and MAX marks.
1. Make sure that your vehicle is on level ground.
2. Turn the engine off and wait 10 minutes for the oil to drain into theoil pan.
3. Remove the dipstick and wipe it with a clean, lint-free cloth. Replacethe dipstick and remove it again to check the oil level.
If the level is at the MIN mark, add oil immediately.
Adding Engine OilNote: Do not remove the filler cap when the engine is running.
Note: Do not add engine oil further than the MAX mark. Oil levels abovethe MAX mark may cause engine damage.
A B
284 Maintenance
2014 TaurusOwners Guide gf, 2nd Printing, September 2013USA (fus)

Only use oils certified for gasoline engines by theAmerican Petroleum Institute (API). An oil with thistrademark symbol conforms to the current engineand emission system protection standards and fueleconomy requirements of the International LubricantsSpecification Advisory Council (ILSAC), comprised ofU.S. and Japanese automobile manufacturers.
1. Remove the filler cap.
2. Add engine oil that meets Ford specifications. See Capacities andSpecifications for more information.
3. Replace the filler cap. Turn it until you feel a strong resistance.
ENGINE COOLANT CHECK
Checking the Engine CoolantThe concentration and level of engine coolant should be checked at theintervals listed in Scheduled Maintenance Information.
Note: Make sure that the level is at the FULL COLD level or within theCOLD FILL RANGE in the coolant reservoir.
Note: Coolant expands when it is hot. The level may extend beyond theCOLD FILL RANGE.
If the level is below the COLD FILL RANGE, add coolant immediately.See Adding Engine Coolant in this chapter.
The coolant concentration should be maintained at 50%, which equatesto a freeze point between -34°F (-37°C).
Note: For best results, coolant concentration should be tested with arefractometer such as Rotunda tool 300ROB75240 available from yourdealer. Ford does not recommend the use of hydrometers or coolant teststrips for measuring coolant concentrations.
Note: Automotive fluids are not interchangeable; do not use enginecoolant/antifreeze or windshield washer fluid outside of its specifiedfunction and vehicle location.
Maintenance 285
2014 TaurusOwners Guide gf, 2nd Printing, September 2013USA (fus)

Adding Engine Coolant
WARNING: Do not add engine coolant when the engine is hot.Steam and scalding liquids released from a hot cooling system
can burn you badly. Also, you can be burned if you spill coolant on hotengine parts.
WARNING: Do not put engine coolant in the windshield washerfluid container. If sprayed on the windshield, engine coolant
could make it difficult to see through the windshield.
WARNING: To reduce the risk of personal injury, make sure theengine is cool before unscrewing the coolant pressure relief cap.
The cooling system is under pressure; steam and hot liquid can comeout forcefully when the cap is loosened slightly.
WARNING: Do not add coolant further than the MAX mark.
Note: Do not use stop leak pellets, cooling system sealants or additivesas they can cause damage to the engine cooling and/or heating systems.This damage would not be covered under your vehicle’s warranty.Note: During normal vehicle operation, the engine coolant may changecolor from orange to pink or light red. As long as the engine coolant isclear and uncontaminated, this color change does not indicate the enginecoolant has degraded nor does it require the engine coolant to bedrained, the system to be flushed, or the engine coolant to be replaced.• DO NOT MIX different colors or types of coolant in your vehicle. Make
sure the correct coolant is used. Mixing of engine coolants may harmyour engine’s cooling system. The use of an improper coolant may harmengine and cooling system components and may void the warranty.
• In case of emergency, a large amount of water without engine coolantmay be added in order to reach a vehicle service location. In thisinstance, the cooling system must be drained, chemically cleaned withMotorcraft Premium Cooling System Flush, and refilled with enginecoolant as soon as possible. Water alone (without engine coolant) cancause engine damage from corrosion, overheating or freezing.
• Do not use alcohol, methanol, brine or any engine coolants mixed withalcohol or methanol antifreeze (coolant). Alcohol and other liquids cancause engine damage from overheating or freezing.
286 Maintenance
2014 TaurusOwners Guide gf, 2nd Printing, September 2013USA (fus)

• Do not add extra inhibitors or additives to the coolant. These can beharmful and compromise the corrosion protection of the enginecoolant.
Unscrew the cap slowly. Any pressure will escape as you unscrew the cap.
Add prediluted engine coolant meeting the Ford specification. SeeCapacities and Specifications for more information.
Whenever coolant has been added, the coolant level in the coolantreservoir should be checked the next few times you drive the vehicle.If necessary, add enough prediluted engine coolant to bring the coolantlevel to the proper level.
Recycled Engine Coolant
Ford Motor Company does NOT recommend the use of recycled enginecoolant since a Ford-approved recycling process is not yet available.
Used engine coolant should be disposed of in an appropriatemanner. Follow your community’s regulations and standards for recyclingand disposing of automotive fluids.
Severe ClimatesIf you drive in extremely cold climates:
• It may be necessary to have a Ford authorized dealer increase thecoolant concentration above 50%.
• A coolant concentration of 60% will provide improved freeze pointprotection. Engine coolant concentrations above 60% will decrease theoverheat protection characteristics of the engine coolant and maycause engine damage.
If you drive in extremely hot climates:
• It may be necessary to have a Ford authorized dealer decrease thecoolant concentration to 40%.
• A coolant concentration of 40% will provide improved overheatprotection. Engine coolant concentrations below 40% will decrease thecorrosion and freeze protection characteristics of the engine coolantand may cause engine damage.
Vehicles driven year-round in non-extreme climates should useprediluted engine coolant for optimum cooling system and engineprotection.
Maintenance 287
2014 TaurusOwners Guide gf, 2nd Printing, September 2013USA (fus)

Engine fluid temperature management (EcoBoost engine only)
WARNING: To reduce the risk of collision and injury, be preparedthat the vehicle speed may reduce and the vehicle may not be able
to accelerate with full power until the fluid temperatures reduce.
Your vehicle has been designed to pull a trailer, but because of the addedload, the vehicle’s engine may temporarily reach higher temperaturesduring severe operating conditions such as ascending a long or steepgrade while pulling a trailer in hot ambient temperatures.
At this time, you may notice your engine coolant temperature gaugeneedle move toward the H (hot) and the POWER REDUCED TO LOWERTEMP message may appear on the message center.
You may notice a reduction in the vehicle’s speed caused by reducedengine power. Your vehicle has been designed to enter this mode ifcertain high temperature/high load conditions take place in order tomanage the engine’s fluid temperatures. The amount of speed reductionwill depend on the vehicle loading, towing, grade, ambient temperature,and other factors. If this occurs, there is no need to pull off the road.The vehicle can continue to be driven while this message is active.
The air conditioning may also cycle on and off during severe operatingconditions to protect overheating of the engine. When the engine coolanttemperature decreases to a more normal operating temperature, the airconditioning will turn on once again.
If you notice any of the following:
• the engine coolant temperature gauge moves fully into the red (hot)area
• the coolant temperature warning light illuminates
• the service engine soon indicator illuminates
1. Pull off the road as soon as safely possible and place the vehicle in P(Park).
2. Leave the engine running until the coolant temperature gauge needlemoves away from the H range. After several minutes, if this does nothappen, follow the remaining steps.
3. Turn the engine off and wait for it to cool before checking the coolantlevel.
288 Maintenance
2014 TaurusOwners Guide gf, 2nd Printing, September 2013USA (fus)

WARNING: Never remove the coolant reservoir cap while theengine is running or hot.
4. If the coolant level is normal, you may restart your engine andcontinue on.
5. If the coolant is low, add coolant, restart the engine and take yourvehicle to an authorized dealer. See Adding engine coolant in thischapter for more information.
Refer to fail-safe cooling for additional information.
What You Should Know About Fail-Safe CoolingIf the engine coolant supply is depleted, this feature allows the vehicle tobe driven temporarily before incremental component damage is incurred.The fail-safe distance depends on ambient temperatures, vehicle load andterrain.
How Fail-Safe Cooling WorksIf the engine begins to overheat:
• The engine coolant temperature gauge will move to the red (hot)area.
• The service engine soon indicator will illuminate.
• The coolant temperature warning light will illuminate.
If the engine reaches a preset over-temperature condition, the enginewill automatically switch to alternating cylinder operation. Each disabledcylinder acts as an air pump and cools the engine.
When this occurs the vehicle will still operate. However:
• The engine power will be limited.
• The air conditioning system will be disabled.
Continued operation will increase the engine temperature and the enginewill completely shut down, causing steering and braking effort to increase.
Once the engine temperature cools, the engine can be re-started. Takeyour vehicle to an authorized dealer as soon as possible to minimizeengine damage.
Maintenance 289
2014 TaurusOwners Guide gf, 2nd Printing, September 2013USA (fus)

When Fail-Safe Mode is ActivatedYou have limited engine power when in the fail-safe mode, so drive thevehicle with caution. The vehicle will not be able to maintain high-speedoperation and the engine will run rough. Remember that the engine iscapable of completely shutting down automatically to prevent enginedamage, therefore:1. Pull off the road as soon as safely possible and turn off the engine.2. Arrange for the vehicle to be taken to an authorized dealer.3. If this is not possible, wait a short period for the engine to cool.4. Check the coolant level and replenish if low.
WARNING: Fail-safe mode is for use during emergencies only.Operate the vehicle in fail-safe mode only as long as necessary to
bring the vehicle to rest in a safe location and seek immediate repairs.When in fail-safe mode, the vehicle will have limited power, will not beable to maintain high-speed operation, and may completely shut downwithout warning, potentially losing engine power, power steering assist,and power brake assist, which may increase the possibility of a crashresulting in serious injury.
WARNING: Never remove the coolant reservoir cap while theengine is running or hot. The hot coolant is under pressure and
may cause serious burns.
5. Re-start the engine and take your vehicle to an authorized dealer.Note: Driving the vehicle without repairing the engine problem increasesthe chance of engine damage. Take your vehicle to an authorized dealeras soon as possible.
TRANSMISSION FLUID CHECK
6F35 TRANSMISSION (if equipped)Note: Transmission fluid should be checked by an authorized dealer.If required, fluid should be added by an authorized dealer.
The automatic transmission does not have a transmission fluid dipstick.
Refer to your scheduled maintenance information for scheduledintervals for fluid checks and changes. Your transmission does notconsume fluid. However, the fluid level should be checked if thetransmission is not working properly, (i.e., if the transmission slips orshifts slowly) or if you notice some sign of fluid leakage.
290 Maintenance
2014 TaurusOwners Guide gf, 2nd Printing, September 2013USA (fus)

Do not use supplemental transmission fluid additives, treatments orcleaning agents. The use of these materials may affect transmissionoperation and result in damage to internal transmission components.
6F50/6F55 Transmission
WARNING: The dipstick cap and surrounding components maybe hot; gloves are recommended.
WARNING: Use gloves when moving the air filter assembly;components will be hot.
Note: Automatic transmission fluid expands when warmed. To obtainan accurate fluid check, drive the vehicle until it is warmed up(approximately 20 miles [30 km]). If your vehicle has been operated foran extended period at high speeds, in city traffic during hot weather orpulling a trailer, the vehicle should be turned off until normal operatingtemperatures are reached to allow the fluid to cool before checking.Depending on vehicle use, cooling times could take up to 30 minutesor longer.Refer to your scheduled maintenance information for scheduledintervals for fluid checks and changes. Your transmission does notconsume fluid. However, the fluid level should be checked if thetransmission is not working properly, i.e., if the transmission slips orshifts slowly or if you notice some sign of fluid leakage.1. Drive the vehicle 20 miles (30 km) or until it reaches normal operatingtemperature.2. Park the vehicle on a level surface and engage the parking brake.3. With the parking brake engaged and your foot on the brake pedal,start the engine and move the gearshift lever through all of the gearranges. Allow a minimum of 10 seconds for each gear to engage.4. Latch the gearshift lever in P (Park) and leave the engine running.5. Remove the dipstick, wiping it clean with a clean, dry lintfree rag. Ifnecessary, refer to Under hood overview in this chapter for the locationof the dipstick. (For vehicles with the EcoBoost engine, move the airfilter assembly aside to access the transmission dipstick. See Moving theAir Filter Assembly (EcoBoost engine) for more information.
6. Install the dipstick making sure it is fully seated in the filler tube byturning it to the locked position.
7. Remove the dipstick and inspect the fluid level. The fluid should be inthe designated areas for normal operating temperature.
Maintenance 291
2014 TaurusOwners Guide gf, 2nd Printing, September 2013USA (fus)

Moving the Air Filter Assembly (EcoBoost engine)
WARNING: Do not run engine with the air filter disconnected.
1. Shut the engine off.
2. Clean the area around the clampthat connects the air filter assemblyto the rubber hose (1).
3. Remove the bolt cover(if equipped).
4. Remove two bolts that attach the air filter assembly to the front of thevehicle (2).
5. Loosen the clamp holding the air filter assembly to the rubber hose (1).
6. Remove the harness retaining clip by pulling up (3). Do notdisconnect the sensor (4).
292 Maintenance
2014 TaurusOwners Guide gf, 2nd Printing, September 2013USA (fus)
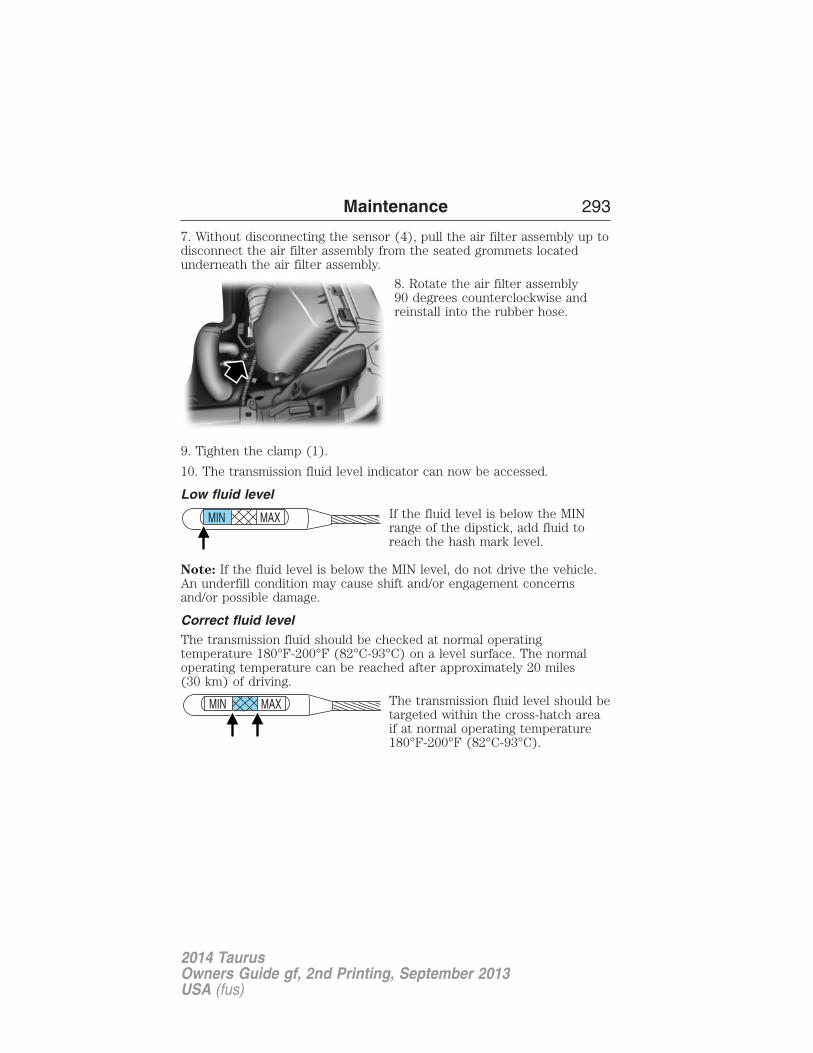
7. Without disconnecting the sensor (4), pull the air filter assembly up todisconnect the air filter assembly from the seated grommets locatedunderneath the air filter assembly.
8. Rotate the air filter assembly90 degrees counterclockwise andreinstall into the rubber hose.
9. Tighten the clamp (1).
10. The transmission fluid level indicator can now be accessed.
Low fluid levelIf the fluid level is below the MINrange of the dipstick, add fluid toreach the hash mark level.
Note: If the fluid level is below the MIN level, do not drive the vehicle.An underfill condition may cause shift and/or engagement concernsand/or possible damage.
Correct fluid levelThe transmission fluid should be checked at normal operatingtemperature 180°F-200°F (82°C-93°C) on a level surface. The normaloperating temperature can be reached after approximately 20 miles(30 km) of driving.
The transmission fluid level should betargeted within the cross-hatch areaif at normal operating temperature180°F-200°F (82°C-93°C).
MAXMIN
Maintenance 293
2014 TaurusOwners Guide gf, 2nd Printing, September 2013USA (fus)

High fluid levelIf the fluid level is above the MAXrange of the dipstick, remove fluid toreach the hashmark level.
Note: Fluid level above the MAX level may cause shift and/orengagement concerns and/or possible damage.High fluid levels can be caused by an overheating condition. If yourvehicle has been operated for an extended period at high speeds, in citytraffic during hot weather or pulling a trailer, the vehicle should beturned off until normal operating temperatures are reached. Dependingon vehicle use, cooling times could take up to 30 minutes or longer.
Adjusting Automatic Transmission Fluid LevelsBefore adding any fluid, make sure the correct type is used. The type offluid used is normally indicated on the dipstick and also in the Technicalspecifications section in this chapter.Note: Use of a non-approved automatic transmission fluid may causeinternal transmission component damage.
If necessary, add fluid in 1/2 pint(250 ml) increments through thefiller tube until the level is correct.
If an overfill occurs, excess fluidshould be removed by an authorizeddealer.
Note: An overfill condition of transmission fluid may cause shift and/orengagement concerns and/or possible damage.Do not use supplemental transmission fluid additives, treatments orcleaning agents. The use of these materials may affect transmissionoperation and result in damage to internal transmission components.For vehicles equipped with the EcoBoost engine, reinstall the air filterassembly.After the fluid level has been checked and adjusted as necessary, do thefollowing:1. Shut the engine off.
2. Loosen the clamp holding the air filter assembly to the rubber hose.
3. Rotate the air filter assembly 90 degrees clockwise withoutdisconnecting the sensor.
MAXMIN
MAXMIN
294 Maintenance
2014 TaurusOwners Guide gf, 2nd Printing, September 2013USA (fus)

4. Seat the air filter assembly back into the grommets by pushing downon the air filter assembly.5. Tighten the clamp.6. Install and tighten two bolts that attach air filter assembly to the frontof the vehicle.7. Install the bolt cover (if equipped).8. Reinstall the harness retaining clip into the front of the air filterassembly.
BRAKE FLUID CHECKFluid levels between the MIN and MAX lines are within the normaloperating range; there is no need to add fluid. If the fluid levels areoutside of the normal operating range, the performance of the systemcould be compromised; seek service from your authorized dealerimmediately.
POWER STEERING FLUID CHECKYour vehicle is equipped with an electric power steering (EPS) system.There is no fluid reservoir to check or fill. For additional information onthe electric power steering (EPS) system, Refer to Driving Aids.
FUEL FILTERYour vehicle is equipped with a lifetime fuel filter that is integrated withthe fuel tank. Regular maintenance or replacement is not needed.
WASHER FLUID CHECK
WARNING: If you operate your vehicle in temperatures below40°F (5°C), use washer fluid with antifreeze protection. Failure
to use washer fluid with antifreeze protection in cold weather couldresult in impaired windshield vision and increase the risk of injury oraccident.
Add fluid to fill the reservoir if the level is low. Only use a washer fluidthat meets Ford specifications. See the technical specifications chart inthe Capacities and Specifications chapter.
State or local regulations on volatile organic compounds may restrict theuse of methanol, a common windshield washer antifreeze additive.Washer fluids containing non-methanol antifreeze agents should be usedonly if they provide cold weather protection without damaging thevehicle’s paint finish, wiper blades or washer system.
Maintenance 295
2014 TaurusOwners Guide gf, 2nd Printing, September 2013USA (fus)

CHANGING THE VEHICLE BATTERY
WARNING: Batteries normally produce explosive gases whichcan cause personal injury. Therefore, do not allow flames, sparks
or lighted substances to come near the battery. When working near thebattery, always shield your face and protect your eyes. Always provideproper ventilation.
WARNING: When lifting a plastic-cased battery, excessivepressure on the end walls could cause acid to flow through the
vent caps, resulting in personal injury and damage to the vehicle orbattery. Lift the battery with a battery carrier or with your hands onopposite corners.
WARNING: Keep batteries out of reach of children. Batteriescontain sulfuric acid. Avoid contact with skin, eyes or clothing.
Shield your eyes when working near the battery to protect againstpossible splashing of acid solution. In case of acid contact with skin oreyes, flush immediately with water for a minimum of 15 minutes andget prompt medical attention. If acid is swallowed, call a physicianimmediately.
WARNING: Battery posts, terminals and related accessoriescontain lead and lead compounds. Wash hands after handling.
Your vehicle is equipped with a Motorcraft® maintenance-free batterywhich normally does not require additional water during its life ofservice.Note: If your battery has a cover or a shield, make sure it is reinstalledafter the battery has been cleaned or replaced.For longer, trouble-free operation, keep the top of the battery clean anddry. Also, make certain the battery cables are always tightly fastened tothe battery terminals.If you see any corrosion on the battery or terminals, remove the cablesfrom the terminals and clean with a wire brush. You can neutralize theacid with a solution of baking soda and water.It is recommended that the negative battery cable terminal bedisconnected from the battery if you plan to store your vehicle for anextended period of time.
296 Maintenance
2014 TaurusOwners Guide gf, 2nd Printing, September 2013USA (fus)

Battery relearnBecause your vehicle’s engine is electronically controlled by a computer,some control conditions are maintained by power from the battery. Whenthe battery is disconnected or a new battery is installed, the engine mustrelearn its idle and fuel trim strategy for optimum driveability andperformance. To begin this process:
1. With the vehicle at a complete stop, set the parking brake.
2. Put the gearshift lever in P (Park), turn off all accessories and startthe engine.
3. Run the engine until it reaches normal operating temperature.
4. Allow the engine to idle for at least one minute.
5. Turn the A/C on and allow the engine to idle for at least one minute.
6. Drive the vehicle to complete the relearning process.
• The vehicle may need to be driven to relearn the idle and fuel trimstrategy.
• Note: If you do not allow the engine to relearn its idle trim, the idlequality of your vehicle may be adversely affected until the idle trim iseventually relearned.
When the battery is disconnected or a new battery installed, thetransmission must relearn its adaptive strategy. As a result of this, thetransmission may shift firmly. This operation is considered normal andwill not affect function or durability of the transmission. Over time theadaptive learning process will fully update transmission operation to itsoptimum shift feel.
If the battery has been disconnected or a new battery has been installed,the clock and the preset radio stations must be reset once the battery isreconnected.
Always dispose of automotive batteries in a responsible manner. Followyour local authorized standards for disposal. Call your local authorizedrecycling center to find out more about recycling automotive batteries.
Maintenance 297
2014 TaurusOwners Guide gf, 2nd Printing, September 2013USA (fus)

CHECKING THE WIPER BLADESRun the tip of your fingers over the edge of the bladeto check for roughness.
Clean the wiper blades with washer fluid or waterapplied with a soft sponge or cloth.
CHANGING THE WIPER BLADES1. Pull the wiper blade and arm awayfrom the glass.
2. Squeeze the locking tabs to releasethe blade from the arm and pull theblade away from the arm to remove it.
3. Attach the new blade to the armand snap it into place.
Replace wiper blades at least once peryear for optimum performance.
Poor wiper quality can be improvedby cleaning the wiper blades and thewindshield.
To prolong the life of the wiper blades, it is highly recommended toscrape off the ice on the windshield before turning on the wipers.The layer of ice has many sharp edges and can damage the micro edgeof the wiper rubber element.
AIR FILTER CHECK
WARNING: To reduce the risk of vehicle damage and/or personalburn injuries, do not start your engine with the air cleaner
removed and do not remove it while the engine is running.
298 Maintenance
2014 TaurusOwners Guide gf, 2nd Printing, September 2013USA (fus)

When changing the air filter element, use only the air filter elementlisted. Refer to Motorcraft® Part Numbers in the Capacities andSpecifications chapter.
For EcoBoost equipped vehicles: When servicing the air cleaner, it isimportant that no foreign material enter the air induction system. Theengine and turbocharger are susceptible to damage from even smallparticles.
Refer to Scheduled Maintenance for the appropriate intervals forchanging the air filter element.
Note: Failure to use the correct air filter element may result in severeengine damage. The customer warranty may be void for any damage tothe engine if the correct air filter element is not used.
Changing the Air Filter Element3.5L V6 engine
2.0L EcoBoost® engine
Maintenance 299
2014 TaurusOwners Guide gf, 2nd Printing, September 2013USA (fus)

3.5L V6 SHO engine
1. Release the clamps that secure the air filter housing cover.
2. Carefully separate the two halves of the air filter housing.
3. Remove the air filter element from the air filter housing.
4. Wipe the air filter housing and cover clean to remove any dirt ordebris and to ensure good sealing.
5. Install a new air filter element. Be careful not to crimp the filterelement edges between the air filter housing and cover. This could causefilter damage and allow unfiltered air to enter the engine if not properlyseated.
6. Replace the air filter housing cover and securethe clamps. Be sure that the air cleaner cover tabsare engaged into the slots of the air cleaner housing.
ADJUSTING THE HEADLAMPSThe headlamps on your vehicle are properly aimed at the assembly plant.If your vehicle has been in an accident, an authorized dealer shouldcheck the alignment of your headlamps.
300 Maintenance
2014 TaurusOwners Guide gf, 2nd Printing, September 2013USA (fus)

Vertical Aim Adjustment1. Park the vehicle directly in front of a wall or screen on a level surface,approximately 25 feet (7.6 meters) away.
• (1) 8 feet (2.4 meters)
• (2) Center height of lamp toground
• (3) 25 feet (7.6 meters)
• (4) Horizontal reference line
2. Measure the height of the headlamp bulb center from the ground andmark an 8 foot (2.4 meter) horizontal reference line on the vertical wallor screen at this height (a piece of masking tape works well). The centerof the lamp is marked by a 3 millimeter circle on the headlamp lens.
3. Turn on the low beam headlamps to illuminate the wall or screen andopen the hood.
To see a clearer light pattern for adjusting, you may want to block thelight from one headlamp while adjusting the other.
On the wall or screen you willobserve a flat zone of high intensitylight located at the top of the righthand portion of the beam pattern.If the top edge of the high intensitylight zone is not at the horizontalreference line, the headlamp willneed to be adjusted.
Maintenance 301
2014 TaurusOwners Guide gf, 2nd Printing, September 2013USA (fus)

4. Locate the vertical adjuster oneach headlamp. Using a Phillipsnumber 2 screwdriver, turn theadjuster either clockwise orcounterclockwise in order to adjustthe vertical aim of the headlamp.
5. Close the hood and turn off thelamps.
HORIZONTAL AIM IS NOT REQUIRED FOR THIS VEHICLE AND ISNOT ADJUSTABLE.
CHANGING A BULB
Lamp Assembly CondensationExterior lamps are vented to accommodate normal changes in pressure.Condensation can be a natural by-product of this design. When moist airenters the lamp assembly through the vents, there is a possibility thatcondensation can occur when the temperature is cold. When normalcondensation occurs, a thin film of mist can form on the interior of thelens. The thin mist eventually clears and exits through the vents duringnormal operation. Clearing time may take as long as 48 hours under dryweather conditions.
These are examples of acceptable condensation:
• Presence of thin mist (no streaks, drip marks or droplets).
• Fine mist covers less than 50% of the lens.
These are examples of unacceptable moisture (usually caused by a lampwater leak):
• Water puddle inside the lamp.
• Large water droplets, drip marks or streaks present on the interior ofthe lens.
Take your vehicle to a dealer for service if any of the above conditions ofunacceptable moisture are present.
302 Maintenance
2014 TaurusOwners Guide gf, 2nd Printing, September 2013USA (fus)

Replacing headlamp bulbs
WARNING: Handle a halogen headlamp bulb carefully and keepout of children’s reach. Grasp the bulb only by its plastic base
and do not touch the glass. The oil from your hand could cause thebulb to break the next time the headlamps are operated.
Note: If the bulb is accidentally touched, it should be cleaned withrubbing alcohol before being used.
Headlamp:
A. Front parking lamp/turn signalbulb
B. Low/High beam headlamp bulb
C. Sidemarker bulb
Low/High beam bulbs:
1. Make sure the headlamp switchis in the off position, then open thehood.
2. Reach in behind the headlampassembly to access the bulbs andconnectors.
3. Remove service cap.
4. Remove bulb from the headlamp assembly by turning itcounterclockwise, then pull it straight out.
A B C
Maintenance 303
2014 TaurusOwners Guide gf, 2nd Printing, September 2013USA (fus)

Front parking lamp/turnsignal/sidemarker bulbs:
1. Make sure headlamp switch isin the off position, then open thehood.
2. Reach in behind the headlampassembly to access the bulb socketsand connectors.
3. Rotate the bulb socket counterclockwise and remove from the lampassembly.
4. Carefully pull the bulb out of the socket and push in the new bulb.
Install the new bulbs in reverse order from the steps above.
Replacing HID headlamp bulbs (if equipped)The headlamps on your vehicle use a “high intensity discharge” source.These lamps operate at a high voltage. When the bulb is burned out, thebulb and starter capsule assembly must be replaced by your authorizeddealer.
Replacing stop/tail/turn and sidemarker lamp bulbsYour vehicle is equipped with a tail lamp assembly containing integralmultiple light emitting diodes (LED) for the stop/tail/turn and sidemarkerfunctions. If replacement is required, see your authorized dealer.
Replacing backup lamp bulbs1. Make sure the headlamp switch is in the off position.
2. Remove the deck lid trim panel press pinsand carefully pull the panel away to exposethe backside of the backup lamp assembly.
304 Maintenance
2014 TaurusOwners Guide gf, 2nd Printing, September 2013USA (fus)

3. Remove bulb socket by rotating itcounterclockwise, then pull it out ofthe lamp assembly.
4. Pull the bulb straight from thesocket.
5. Install the new bulb in reverse order.
Replacing high-mount brake lamp bulbs
Your vehicle is equipped with an LED high-mount brake lamp. It isdesigned to last the life of the vehicle. If replacement is required, it isrecommended that you see your authorized dealer.
Replacing license plate lamp bulbs1. Make sure the headlamp switch is in the off position.
2. Remove the two screws from thelicense plate lamp assembly.
3. Carefully pull the bulb out fromthe contacts.
Install new bulb(s) in reverse order.
Maintenance 305
2014 TaurusOwners Guide gf, 2nd Printing, September 2013USA (fus)

Replacing supplemental park lamp bulbsYour vehicle is equipped with an LED supplemental park lamp. It isdesigned to last the life of the vehicle. If replacement is required, it isrecommended that you see your authorized dealer.
BULB SPECIFICATION CHARTReplacement bulbs are specified in the chart below. Headlamp bulbsmust be marked with an authorized “D.O.T.” for North America and an“E” for Europe to ensure lamp performance, light brightness and patternand safe visibility. The correct bulbs will not damage the lamp assemblyor void the lamp assembly warranty and will provide quality bulb burntime.
Function Number of bulbsTrade
number
Low series low/high beamheadlamp
2 HIR2
* High series Low/highbeam headlamp (HID)
2 D3S
Front park/turn lamp 23457AK(amber)
Sidemarker lamp (front) 2 194NA* Sidemarker lamp (rear) 2 LED* Tail/brake lamp 2 LED* Rear turn lamp 2 LEDBackup lamp 2 921License plate lamp 2 C5W* High-mount brake lamp 1 LED* Supplemental park lamp 2 LEDMap lamp 2 W5WLDome/reading lamps 2 W5WLAll replacement bulbs are clear in color except where noted.To replace all instrument panel lights - see your authorized dealer.* To replace these lights - see your authorized dealer.
306 Maintenance
2014 TaurusOwners Guide gf, 2nd Printing, September 2013USA (fus)

GENERAL INFORMATIONYour Ford or Lincoln authorized dealer has many quality productsavailable to clean your vehicle and protect its finishes.
CLEANING PRODUCTSFor best results, use the following products or products of equivalentquality:
Motorcraft Bug and Tar Remover (ZC-42)
Motorcraft Custom Bright Metal Cleaner (ZC-15)
Motorcraft Detail Wash (ZC-3-A)
Motorcraft Dusting Cloth (ZC-24)
Motorcraft Engine Shampoo and Degreaser (United States only) (ZC-20)
Motorcraft Engine Shampoo (Canada only) (CXC-66-A)
Motorcraft Multi-Purpose Cleaner (Canada only) (CXC-101)
Motorcraft Premium Glass Cleaner (Canada only) (CXC-100)
Motorcraft Premium Quality Windshield Washer Fluid (Canada only)[CXC-37-(A, B, D or F)]
Motorcraft Premium Windshield Wash Concentrate with Bitterant(United States only) ZC-32-B1)
Motorcraft Professional Strength Carpet & Upholstery Cleaner (ZC-54)
Motorcraft Spot and Stain Remover (United States only) (ZC-14)
Motorcraft Ultra-Clear Spray Glass Cleaner (ZC-23)
Motorcraft Wheel and Tire Cleaner (ZC-37-A)
CLEANING THE EXTERIORWash your vehicle regularly with cool or lukewarm water and a neutralpH shampoo, such as Motorcraft® Detail Wash.
• Never use strong household detergents or soap, such as dish washingor laundry liquid. These products can discolor and spot paintedsurfaces.
• Never wash a vehicle that is hot to the touch or during exposure tostrong, direct sunlight.
• Dry the vehicle with a chamois or soft terry cloth towel in order toeliminate water spotting.
Vehicle Care 307
2014 TaurusOwners Guide gf, 2nd Printing, September 2013USA (fus)

• Immediately remove items such as gasoline, diesel fuel, bird droppingsand insect deposits because they can cause damage to the vehicle’spaintwork and trim over time. Use Motorcraft Bug and Tar Remover.
• Note: Suntan lotions and insect repellents can damage any paintedsurface; if these substances come in contact with your vehicle, wash itoff as soon as possible.
• Remove any exterior accessories before entering a car wash.
Stripes or Graphics (if equipped)Do not use a commercial or high-pressure wand on the surface or edgeof stripes and graphics. This can cause damage to the film and cause theedge of the film to peel away from the vehicle surface.
Exterior ChromeNote: Never use abrasive materials such as steel wool or plastic pads asthey can scratch the chrome surface.
Note: Do not use chrome cleaner, metal cleaner or polish on wheels andwheel covers.
• Wash the vehicle first, using cool or lukewarm water and a neutral pHshampoo, such as Motorcraft Detail Wash.
• Use Motorcraft Custom Bright Metal Cleaner. Apply the product asyou would a wax to clean bumpers and other chrome parts; allow thecleaner to dry for a few minutes, then wipe off the haze with a clean,dry rag.
• Do not apply cleaning product to hot surfaces and do not leavecleaning product on chrome surfaces for a period of time exceedingthat which is recommended.
• Note: Using other non-recommended cleaners can result in severeand permanent cosmetic damage.
UnderbodyFlush the complete underside of your vehicle frequently. Keep body anddoor drain holes free from packed dirt.
Cleaning Plastic Exterior PartsUse only approved products to clean plastic parts.
• For routine cleaning, use Motorcraft Detail Wash.
• If tar or grease spots are present, use Motorcraft Bug and Tar Remover.
308 Vehicle Care
2014 TaurusOwners Guide gf, 2nd Printing, September 2013USA (fus)

WAXINGRegular waxing is necessary to protect the paint on your car from theelements. We recommend that you wash and wax the painted surfaceonce or twice a year.
When washing and waxing, park your vehicle in a shaded area out ofdirect sunlight. Always wash your vehicle before applying wax.• Use a quality wax that does not contain abrasives.• Follow the manufacturer’s instructions to apply and remove the wax.• Apply a small amount of wax in a back-and-forth motion, not in
circles.• Do not allow wax to come in contact with any non-body (low-gloss
black) colored trim. The wax discolors or stains the parts over time,such as:• Bumpers• Grained door handles• Side mouldings• Mirror housings• Windshield cowl area.
• Do not apply wax to glass areas.• After waxing, your car’s paint should feel smooth, and be free of
streaks and smudges.
REPAIRING MINOR PAINT DAMAGEYour authorized dealer has touch-up paint to match your vehicle’s color.Take your color code (printed on a sticker in the driver’s door jamb) toan authorized dealer to make sure you get the correct color.
• Remove particles, such as bird droppings, tree sap, insect deposits, tarspots, road salt and industrial fallout, before repairing paint chips.
• Always read the instructions before using the products.
CLEANING THE ENGINEEngines are more efficient when they are clean because grease and dirtbuildup keep the engine warmer than normal.
When washing:
• Take care when using a power washer to clean the engine. Thehigh-pressure fluid could penetrate the sealed parts and causedamage.
• Do not spray a hot engine with cold water to avoid cracking theengine block or other engine components.
Vehicle Care 309
2014 TaurusOwners Guide gf, 2nd Printing, September 2013USA (fus)

• Spray Motorcraft Engine Shampoo and Degreaser on all parts thatrequire cleaning and pressure rinse clean. In Canada, use MotorcraftEngine Shampoo.
• Never wash or rinse the engine while it is hot or running; water in therunning engine may cause internal damage.
• Never wash or rinse any ignition coil, spark plug wire or spark plugwell, or the area in and around these locations.
• Cover the battery, power distribution box, and air filter assembly toprevent water damage when cleaning the engine.
CLEANING THE WINDOWS AND WIPER BLADESThe windows and wiper blades should be cleaned regularly. If the wipersdo not wipe properly, substances on the vehicle’s glass or the wiperblades may cause squeaking or chatter noise from the blades, andstreaking and smearing of the windshield. To clean these items, followthese tips:
• The windows may be cleaned with a non-abrasive cleaner such asMotorcraft® Ultra-Clear Spray Glass Cleaner.
• The wiper blades can be cleaned with isopropyl (rubbing) alcohol orMotorcraft Premium Windshield Washer Concentrates in the U.S.,or Motorcraft Premium Quality Windshield Washer Fluid in Canada.Replace your wiper blades when they appear worn or do not functionproperly.
• Do not use abrasive materials, as they may cause scratches.
• Do not use fuel, kerosene, or paint thinner to clean any parts.
If you cannot remove those streaks after cleaning with the glass cleaneror if the wipers chatter and move in a jerky motion, clean the outersurface of the windshield and the wiper blades using a sponge or softcloth with a neutral detergent or mild-abrasive cleaning solution. Aftercleaning, rinse the windshield and wiper blades with clean water. Thewindshield is clean if beads do not form when you rinse the windshieldwith water.
Note: Do not use sharp objects, such as a razor blade, to clean theinside of the rear window or to remove decals, as it may cause damageto the rear window defroster’s heated grid lines.
310 Vehicle Care
2014 TaurusOwners Guide gf, 2nd Printing, September 2013USA (fus)
CLEANING THE INTERIOR
WARNING: Do not use cleaning solvents, bleach or dye on thevehicle’s safety belts, as these actions may weaken the belt webbing.
WARNING: On vehicles equipped with seat-mounted airbags, donot use chemical solvents or strong detergents. Such products
could contaminate the side airbag system and affect performance of theside airbag in a collision.
For fabric, carpets, cloth seats, safety belts and seats equipped with sideairbags:
• Remove dust and loose dirt with a vacuum cleaner.
• Apply a layer of high quality foam cleaner, designed for automotiveinteriors, to the dry stained area (s) of the item you are cleaning andallow soaking for one minute.
• If grease or tar is present on the material, spot-clean the area firstwith Motorcraft Spot and Stain Remover. In Canada, use MotorcraftMulti-Purpose Cleaner.
• If a ring forms on the fabric after spot cleaning, clean the entire areaimmediately (but do not oversaturate) or the ring can set.
• Do not use household cleaning products or glass cleaners, which canstain and discolor the fabric and affect the flame retardant abilities ofthe seat materials.
CLEANING THE INSTRUMENT PANEL AND INSTRUMENTCLUSTER LENS
WARNING: Do not use chemical solvents or strong detergentswhen cleaning the steering wheel or instrument panel to avoid
contamination of the airbag system.
Clean the instrument panel and cluster lens with a clean, damp, white,cotton cloth, then use a clean and dry, white, cotton cloth to dry theseareas.
Vehicle Care 311
2014 TaurusOwners Guide gf, 2nd Printing, September 2013USA (fus)

• Avoid cleaners or polishes that increase the gloss of the upper portionof the instrument panel. The dull finish in this area helps protect thedriver from undesirable windshield reflection.
• Be certain to wash or wipe your hands clean if you have been incontact with certain products, such as insect repellent and suntanlotion, in order to avoid possible damage to the interior paintedsurfaces.
• Do not use household or glass cleaners as these may damage thefinish of the instrument panel, interior trim and cluster lens.
• Do not allow air fresheners and hand sanitizers to spill on interiorsurfaces. If a spill occurs, wipe off immediately. Damage may not becovered by your warranty.
If a staining liquid like coffee or juice has been spilled on the instrumentpanel or on interior trim surfaces, clean as follows:
1. Wipe up spilled liquid using a clean, white, cotton cloth.
2. Wipe the surface with a damp, clean, white, cotton cloth. For morethorough cleaning, use a mild soap and water solution. If the spot cannotbe completely cleaned by this method, the area may be cleaned using acommercially available cleaning product designed for automotiveinteriors.
3. If necessary, apply more soap and water solution or cleaning productto a clean, white, cotton cloth and press the cloth onto the soiled area;allow this to set at room temperature for 30 minutes.
4. Remove the soaked cloth, and if it is not soiled badly, use this cloth toclean the area by using a rubbing motion for 60 seconds.
5. Following this, wipe area dry with a clean, white, cotton cloth.
CLEANING LEATHER SEATS (IF EQUIPPED)• Remove dust and loose dirt with a vacuum cleaner.
• Clean spills and stains as quickly as possible.
• For routine cleaning, wipe the surface with a soft, damp cloth. Formore thorough cleaning, wipe the surface with a mild soap and watersolution. Dry the area with a soft cloth.
• If the leather cannot be completely cleaned using a mild soap andwater solution, the leather may be cleaned using a commerciallyavailable leather cleaning product designed for automotive interiors.
312 Vehicle Care
2014 TaurusOwners Guide gf, 2nd Printing, September 2013USA (fus)

• To check for compatibility, first test any cleaner or stain remover onan inconspicuous part of the leather.
• Do not use household cleaning products, alcohol solutions,oil/petroleum-based leather conditioners, or solvents or cleanersintended specifically for rubber, vinyl and plastics. These productsmay cause premature wearing or damage to the leather.
CLEANING THE ALLOY WHEELSNote: Do not use chrome cleaner, metal cleaner or polish on wheelsand wheel covers.A clearcoat paint finish coats aluminum wheels and wheel covers.In order to maintain their condition:• Clean weekly with Motorcraft Wheel and Tire Cleaner. Use a sponge
to remove heavy deposits of dirt and brake dust accumulation. Rinsethoroughly with a strong stream of water when you have completedthe cleaning process.
• To remove tar and grease, use Motorcraft Bug and Tar Remover.
• Never apply any cleaning chemical to hot or warm wheel rims orcovers.
• Some automatic car washes may cause damage to the finish on yourwheel rims or covers.
• Industrial-strength (heavy-duty) cleaners, or cleaning chemicals,in combination with brush agitation to remove brake dust and dirt,could wear away the clearcoat finish over time.
• Do not use hydrofluoric acid-based or high caustic-based wheelcleaners, steel wool, fuels or strong household detergent.
• If you intend on parking your vehicle for an extended period aftercleaning the wheels with a wheel cleaner, drive your vehicle for a fewminutes before doing so. This reduces the risk of increased corrosionof the brake discs.
VEHICLE STORAGEIf you plan on storing your vehicle for an extended period of time(30 days or more), read the following maintenance recommendations tomake sure your vehicle stays in good operating condition.
All motor vehicles and their components were engineered and tested forreliable, regular driving. Long-term storage under various conditions maylead to component degradation or failure unless specific precautions aretaken to preserve the components.
Vehicle Care 313
2014 TaurusOwners Guide gf, 2nd Printing, September 2013USA (fus)

General
• Store all vehicles in a dry, ventilated place.
• Protect from sunlight, if possible.
• If vehicles are stored outside, they require regular maintenance toprotect against rust and damage.
Body
• Wash vehicle thoroughly to remove dirt, grease, oil, tar or mud fromexterior surfaces, rear-wheel housing and underside of front fenders.
• Periodically wash vehicles stored in exposed locations.
• Touch up raw or primed metal to prevent rust.
• Cover chrome and stainless steel parts with a thick coat of auto waxto prevent discoloration. Re-wax as necessary when the vehicle iswashed.
• Lubricate hood latch, all door latches and trunk lid hinges with a lightgrade oil.
• Cover interior trim to prevent fading.
• Keep all rubber parts free from oil and solvents.
Engine
• The engine oil and filter should be changed prior to storage, as usedengine oil contains contaminates that may cause engine damage.
• Start the engine every 15 days. Run at fast idle until it reaches normaloperating temperature.
• With your foot on the brake, shift through all the gears while theengine is running.
Fuel system
• Fill the fuel tank with high-quality fuel until the first automatic shutoffof the fuel pump nozzle.
Cooling system
• Protect against freezing temperatures.
• When removing vehicle from storage, check coolant fluid level.Confirm there are no cooling system leaks, and fluid is at therecommended level.
314 Vehicle Care
2014 TaurusOwners Guide gf, 2nd Printing, September 2013USA (fus)

Battery
• Check and recharge as necessary. Keep connections clean.
• If storing your vehicle for more than 30 days without recharging thebattery, it may be advisable to disconnect the battery cables to ensurebattery charge is maintained for quick starting.
Note: If battery cables are disconnected, it will be necessary to resetmemory features.
Brakes
• Make sure brakes and parking brake are fully released.
Tires
• Maintain recommended air pressure.
Miscellaneous
• Make sure all linkages, cables, levers and pins under vehicle arecovered with grease to prevent rust.
• Move vehicles at least 25 feet (8 meters) every 15 days to lubricateworking parts and prevent corrosion.
Removing Vehicle from StorageWhen your vehicle is ready to come out of storage, do the following:
• Wash your vehicle to remove any dirt or grease film build-up onwindow surfaces.
• Check windshield wipers for any deterioration.
• Check under the hood for any foreign material that may have collectedduring storage (mice/squirrel nests).
• Check the exhaust for any foreign material that may have collectedduring storage.
• Check tire pressures and set tire inflation per the Tire Label.
• Check brake pedal operation. Drive the vehicle 15 feet (4.5 meters)back and forth to remove rust build-up.
• Check fluid levels (including coolant, oil and gas) to make sure thereare no leaks and fluids are at recommended levels.
• If the battery was removed, clean the battery cable ends and inspect.
Contact your authorized dealer if you have any concerns or issues.
Vehicle Care 315
2014 TaurusOwners Guide gf, 2nd Printing, September 2013USA (fus)

TIRE CARE
Information About Uniform Tire Quality GradingTire Quality Grades apply to newpneumatic passenger car tires. The TireQuality Grades can be found whereapplicable on the tire sidewall betweentread shoulder and maximum sectionwidth. For example:
• Treadwear 200 Traction AA Temperature A
These Tire Quality Grades are determined by standards that theUnited States Department of Transportation has set.
Tire Quality Grades apply to new pneumatic passenger car tires.They do not apply to deep tread, winter-type snow tires, space-saver ortemporary use spare tires, light truck or LT type tires, tires with nominalrim diameters of 10 to 12 inches or limited production tires as defined inTitle 49 Code of Federal Regulations Part 575.104(c)(2).
U.S. Department of Transportation-Tire quality grades: The U.S.Department of Transportation requires Ford Motor Company to give youthe following information about tire grades exactly as the governmenthas written it.
TreadwearThe treadwear grade is a comparative rating based on the wear rate of thetire when tested under controlled conditions on a specified governmenttest course. For example, a tire graded 150 would wear 11⁄2 times as wellon the government course as a tire graded 100. The relative performanceof tires depends upon the actual conditions of their use, however, and maydepart significantly from the norm due to variations in driving habits,service practices, and differences in road characteristics and climate.
Traction AA A B C
WARNING: The traction grade assigned to this tire is based onstraight-ahead braking traction tests, and does not include
acceleration, cornering, hydroplaning or peak traction characteristics.
316 Wheels and Tires
2014 TaurusOwners Guide gf, 2nd Printing, September 2013USA (fus)

The traction grades, from highest to lowest are AA, A, B, and C.The grades represent the tire’s ability to stop on wet pavement asmeasured under controlled conditions on specified government testsurfaces of asphalt and concrete. A tire marked C may have poortraction performance.
Temperature A B C
WARNING: The temperature grade for this tire is established fora tire that is properly inflated and not overloaded. Excessive
speed, underinflation, or excessive loading, either separately or incombination, can cause heat buildup and possible tire failure.
The temperature grades are A (the highest), B and C, representing thetire’s resistance to the generation of heat and its ability to dissipate heatwhen tested under controlled conditions on a specified indoor laboratorytest wheel. Sustained high temperature can cause the material of the tireto degenerate and reduce tire life, and excessive temperature can lead tosudden tire failure. The grade C corresponds to a level of performancewhich all passenger car tires must meet under the Federal Motor VehicleSafety Standard No. 139. Grades B and A represent higher levels ofperformance on the laboratory test wheel than the minimum requiredby law.
Glossary of Tire Terminology• Tire label: A label showing the OE (Original Equipment) tire sizes,
recommended inflation pressure and the maximum weight the vehiclecan carry.
• Tire Identification Number (TIN): A number on the sidewall ofeach tire providing information about the tire brand andmanufacturing plant, tire size and date of manufacture. Also referredto as DOT code.
• Inflation pressure: A measure of the amount of air in a tire.
• Standard load: A class of P-metric or Metric tires designed to carry amaximum load at 35 psi [37 psi (2.5 bar) for Metric tires]. Increasingthe inflation pressure beyond this pressure will not increase the tire’sload-carrying capability.
Wheels and Tires 317
2014 TaurusOwners Guide gf, 2nd Printing, September 2013USA (fus)

• Extra load: A class of P-metric or Metric tires designed to carry aheavier maximum load at 41 psi [43 psi (2.9 bar) for Metric tires].Increasing the inflation pressure beyond this pressure will not increasethe tire’s load-carrying capability.
• kPa: Kilopascal, a metric unit of air pressure.
• PSI: Pounds per square inch, a standard unit of air pressure.
• Cold tire pressure: The tire pressure when the vehicle has beenstationary and out of direct sunlight for an hour or more and prior tothe vehicle being driven for 1 mile (1.6 kilometers).
• Recommended inflation pressure: The cold inflation pressure foundon the Safety Compliance Certification Label (affixed to either thedoor hinge pillar, door-latch post, or the door edge that meets thedoor-latch post, next to the driver’s seating position) or Tire Labellocated on the B-Pillar or the edge of the driver’s door.
• B-pillar: The structural member at the side of the vehicle behind thefront door.
• Bead area of the tire: Area of the tire next to the rim.
• Sidewall of the tire: Area between the bead area and the tread.
• Tread area of the tire: Area of the perimeter of the tire thatcontacts the road when mounted on the vehicle.
• Rim: The metal support (wheel) for a tire or a tire and tube assemblyupon which the tire beads are seated.
INFORMATION CONTAINED ON THE TIRE SIDEWALLBoth U.S. and Canada Federal regulations require tire manufacturersto place standardized information on the sidewall of all tires. Thisinformation identifies and describes the fundamental characteristics ofthe tire and also provides a U.S. DOT Tire Identification Number forsafety standard certification and in case of a recall.
318 Wheels and Tires
2014 TaurusOwners Guide gf, 2nd Printing, September 2013USA (fus)

Information on P Type TiresP215/65R15 95H is an example of atire size, load index and speedrating. The definitions of theseitems are listed below. (Note thatthe tire size, load index and speedrating for your vehicle may bedifferent from this example.)
A. P: Indicates a tire, designated by the Tire and Rim Association, thatmay be used for service on cars, sport utility vehicles, minivans and lighttrucks.
Note: If your tire size does not begin with a letter, this may mean it isdesignated by either the European Tire and Rim Technical Organizationor the Japan Tire Manufacturing Association.
B. 215: Indicates the nominal width of the tire in millimeters fromsidewall edge to sidewall edge. In general, the larger the number, thewider the tire.
C. 65: Indicates the aspect ratio which gives the tire’s ratio of height towidth.
D. R: Indicates a radial type tire.
E. 15: Indicates the wheel or rim diameter in inches. If you change yourwheel size, you will have to purchase new tires to match the new wheeldiameter.
F. 95: Indicates the tire’s load index. It is an index that relates to howmuch weight a tire can carry. You may find this information in yourowner’s manual. If not, contact a local tire dealer.
Note: You may not find this information on all tires because it is notrequired by federal law.
H
I
J
KL
M
A
B
C D EF
G
Wheels and Tires 319
2014 TaurusOwners Guide gf, 2nd Printing, September 2013USA (fus)

G. H: Indicates the tire’s speed rating. The speed rating denotes thespeed at which a tire is designed to be driven for extended periods oftime under a standard condition of load and inflation pressure. The tireson your vehicle may operate at different conditions for load and inflationpressure. These speed ratings may need to be adjusted for the differencein conditions. The ratings range from 81 mph (130 km/h) to 186 mph(299 km/h). These ratings are listed in the following chart.
Note: You may not find this information on all tires because it is notrequired by federal law.
Letter rating Speed rating - mph (km/h)
M 81 (130)N 87 (140)Q 99 (159)R 106 (171)S 112 (180)T 118 (190)U 124 (200)H 130 (210)V 149 (240)W 168 (270)Y 186 (299 )
Note: For tires with a maximum speed capability over 149 mph(240 km/h), tire manufacturers sometimes use the letters ZR. Forthose with a maximum speed capability over 186 mph (299 km/h), tiremanufacturers always use the letters ZR.
H. U.S. DOT Tire Identification Number (TIN): This begins withthe letters DOT and indicates that the tire meets all federal standards.The next two numbers or letters are the plant code designating where itwas manufactured, the next two are the tire size code and the last fournumbers represent the week and year the tire was built. For example,the numbers 317 mean the 31st week of 1997. After 2000 the numbersgo to four digits. For example, 2501 means the 25th week of 2001. Thenumbers in between are identification codes used for traceability. Thisinformation is used to contact customers if a tire defect requires a recall.
I. M+S or M/S: Mud and Snow, orAT: All Terrain, orAS: All Season.
320 Wheels and Tires
2014 TaurusOwners Guide gf, 2nd Printing, September 2013USA (fus)

J. Tire Ply Composition and Material Used: Indicates the number ofplies or the number of layers of rubber-coated fabric in the tire tread andsidewall. Tire manufacturers also must indicate the ply materials in thetire and the sidewall, which include steel, nylon, polyester, and others.
K. Maximum Load: Indicates the maximum load in kilograms andpounds that can be carried by the tire. See the Safety ComplianceCertification Label (affixed to either the door hinge pillar, door-latchpost, or the door edge that meets the door-latch post, next to thedriver’s seating position), for the correct tire pressure for your vehicle.
L. Treadwear, Traction and Temperature Grades
• Treadwear: The treadwear grade is a comparative rating based on thewear rate of the tire when tested under controlled conditions on aspecified government test course. For example, a tire graded 150would wear one and one-half (11⁄2) times as well on the governmentcourse as a tire graded 100.
• Traction: The traction grades, from highest to lowest, are AA, A, B,and C. The grades represent the tire’s ability to stop on wet pavementas measured under controlled conditions on specified government testsurfaces of asphalt and concrete. A tire marked C may have poortraction performance.
• Temperature: The temperature grades are A (the highest), B and C,representing the tire’s resistance to the generation of heat and itsability to dissipate heat when tested under controlled conditions on aspecified indoor laboratory test wheel.
M. Maximum Inflation Pressure: Indicates the tire manufacturer’smaximum permissible pressure or the pressure at which the maximumload can be carried by the tire. This pressure is normally higher than thevehicle manufacturer’s recommended cold inflation pressure, which canbe found on the Safety Compliance Certification Label (affixed to eitherthe door hinge pillar, door-latch post, or the door edge that meets thedoor-latch post, next to the driver’s seating position), or Tire Label whichis located on the B-Pillar or the edge of the driver’s door. The coldinflation pressure should never be set lower than the recommendedpressure on the vehicle label.
The tire suppliers may have additional markings, notes or warnings, suchas standard load or radial tubeless.
Wheels and Tires 321
2014 TaurusOwners Guide gf, 2nd Printing, September 2013USA (fus)

Additional Information Contained on the Tire Sidewall for LT TypeTires
LT type tires have some additionalinformation beyond those of P typetires. These differences aredescribed below.
Note: Tire Quality Grades do notapply to this type of tire.
A. LT: Indicates a tire, designatedby the Tire and Rim Association,that is intended for service on lighttrucks.
B. Load Range/Load InflationLimits: Indicates the tire’sload-carrying capabilities and itsinflation limits.
C. Maximum Load Dual lb (kg) at psi (kPa) cold: Indicates themaximum load and tire pressure when the tire is used as a dual, definedas four tires on the rear axle (a total of six or more tires on the vehicle).
D. Maximum Load Single lb (kg) at psi (kPa) cold: Indicates themaximum load and tire pressure when the tire is used as a single,defined as two tires (total) on the rear axle.
A
BC
BD
322 Wheels and Tires
2014 TaurusOwners Guide gf, 2nd Printing, September 2013USA (fus)

Information on T Type TiresT type tires have some additionalinformation beyond those of P typetires. These differences aredescribed below.
T145/80D16 is an example of a tiresize.
Note: The temporary tire size foryour vehicle may be different fromthis example. Tire Quality Gradesdo not apply to this type of tire.
A. T: Indicates a type of tire, designated by the Tire and RimAssociation, that is intended for temporary service on cars, sport-utilityvehicles, minivans and light trucks.B. 145: Indicates the nominal width of the tire in millimeters fromsidewall edge to sidewall edge. In general, the larger the number, thewider the tire.C. 80: Indicates the aspect ratio, which gives the tire’s ratio of height towidth. Numbers of 70 or lower indicate a short sidewall.
D. D: Indicates a diagonal type tire. R: Indicates a radial type tire.
E. 16: Indicates the wheel or rim diameter in inches. If you change yourwheel size, you will have to purchase new tires to match the new wheeldiameter.
Location of the Tire LabelYou will find a Tire Label containing tire inflation pressure by tire sizeand other important information located on the B-Pillar or the edge ofthe driver’s door. See the payload description and graphic in the LoadCarrying chapter.
AB C D
E
Wheels and Tires 323
2014 TaurusOwners Guide gf, 2nd Printing, September 2013USA (fus)

INFLATING YOUR TIRESSafe operation of your vehicle requires that your tires are properlyinflated. Remember that a tire can lose up to half of its air pressurewithout appearing flat.
Every day before you drive, check your tires. If one looks lower than theothers, use a tire gauge to check pressure of all tires and adjust if required.
At least once a month and before long trips, inspect each tire and checkthe tire pressure with a tire gauge (including spare, if equipped). Inflateall tires to the inflation pressure recommended by Ford Motor Company.
WARNING: Under-inflation is the most common cause of tirefailures and may result in severe tire cracking, tread separation
or blowout, with unexpected loss of vehicle control and increased riskof injury. Under-inflation increases sidewall flexing and rollingresistance, resulting in heat build-up and internal damage to the tire.It also may result in unnecessary tire stress, irregular wear, loss ofvehicle control and accidents. A tire can lose up to half of its airpressure and not appear to be flat!
You are strongly urged to buy a reliable tire pressure gauge, as automaticservice station gauges may be inaccurate. Ford recommends the use of adigital or dial-type tire pressure gauge rather than a stick-type tirepressure gauge.
Use the recommended cold inflation pressure for optimum tireperformance and wear. Under-inflation or over-inflation may causeuneven treadwear patterns.
Always inflate your tires to the Ford recommended inflation pressureeven if it is less than the maximum inflation pressure information foundon the tire. The Ford recommended tire inflation pressure is found onthe Safety Compliance Certification Label (affixed to either the doorhinge pillar, door-latch post, or the door edge that meets the door-latchpost, next to the driver’s seating position), or Tire Label which is locatedon the B-Pillar or the edge of the driver’s door. Failure to follow the tirepressure recommendations can cause uneven treadwear patterns andadversely affect the way your vehicle handles.
324 Wheels and Tires
2014 TaurusOwners Guide gf, 2nd Printing, September 2013USA (fus)

Maximum Inflation Pressure is the tire manufacturer’s maximumpermissible pressure or the pressure at which the maximum loadcan be carried by the tire. This pressure is normally higher than themanufacturer’s recommended cold inflation pressure, which can be foundon the Safety Compliance Certification Label (affixed to either the doorhinge pillar, door-latch post, or the door edge that meets the door-latchpost, next to the driver’s seating position), or Tire Label which is locatedon the B-Pillar or the edge of the driver’s door. The cold inflationpressure should never be set lower than the recommended pressure onthe Safety Compliance Certification Label or Tire Label.
When weather temperature changes occur, tire inflation pressures alsochange. A 10°F (6°C) temperature drop can cause a correspondingdrop of 1 psi (7 kPa) in inflation pressure. Check your tire pressuresfrequently and adjust them to the proper pressure which can be foundon the Safety Compliance Certification Label or Tire Label.
To check the pressure in your tire(s):
1. Make sure the tires are cool, meaning they are not hot from drivingeven a mile.
Note: If you are checking tire pressure when the tire is hot (for example,driven more than 1 mile [1.6 kilometers]), never bleed or reduce airpressure. The tires are hot from driving and it is normal for pressures toincrease above recommended cold pressures. A hot tire at or belowrecommended cold inflation pressure could be significantly under-inflated.
Note: If you have to drive a distance to get air for your tire(s), checkand record the tire pressure first and add the appropriate air pressurewhen you get to the pump. It is normal for tires to heat up and the airpressure inside to go up as you drive.
2. Remove the cap from the valve on one tire, then firmly press the tiregauge onto the valve and measure the pressure.
3. Add enough air to reach the recommended air pressure.
Note: If you overfill the tire, release air by pressing on the metal stem inthe center of the valve. Then recheck the pressure with your tire gauge.
4. Replace the valve cap.
5. Repeat this procedure for each tire, including the spare.
Wheels and Tires 325
2014 TaurusOwners Guide gf, 2nd Printing, September 2013USA (fus)

Note: Some spare tires operate at a higher inflation pressure than theother tires. For T-type mini-spare tires, see the Dissimilar Spare Tireand Wheel Assembly Information section. Store and maintain at 60 psi(4.15 bar). For full-size and dissimilar spare tires, see Dissimilar SpareTire and Wheel Assembly Information under Changing a Road Wheelin this chapter. Store and maintain at the higher of the front and rearinflation pressure as shown on the Tire Label.6. Visually inspect the tires to make sure there are no nails or other objectsembedded that could poke a hole in the tire and cause an air leak.7. Check the sidewalls to make sure there are no gouges, cuts or bulges.
Inspecting Your Tires and Wheel Valve StemsPeriodically inspect the tire treads for uneven or excessive wear andremove objects such as stones, nails or glass that may be wedged in thetread grooves. Check the tire and valve stems for holes, cracks, or cutsthat may permit air leakage and repair or replace the tire and replacethe valve stem. Inspect the tire sidewalls for cracking, cuts, bruises andother signs of damage or excessive wear. If internal damage to the tire issuspected, have the tire demounted and inspected in case it needs to berepaired or replaced. For your safety, tires that are damaged or showsigns of excessive wear should not be used because they are more likelyto blow out or fail.
Improper or inadequate vehicle maintenance can cause tires to wearabnormally. Inspect all your tires, including the spare, frequently, andreplace them if one or more of the following conditions exist:
Tire WearWhen the tread is worn down to1/16th of an inch (2 millimeters),tires must be replaced to helpprevent your vehicle from skiddingand hydroplaning. Built-intreadwear indicators, or wear bars,which look like narrow strips ofsmooth rubber across the tread willappear on the tire when the tread isworn down to 1/16th of an inch(2 millimeters).
When the tire tread wears down to the same height as these wear bars,the tire is worn out and must be replaced.
326 Wheels and Tires
2014 TaurusOwners Guide gf, 2nd Printing, September 2013USA (fus)

DamagePeriodically inspect the tire treads and sidewalls for damage (such asbulges in the tread or sidewalls, cracks in the tread groove andseparation in the tread or sidewall). If damage is observed or suspected,have the tire inspected by a tire professional. Tires can be damagedduring off-road use, so inspection after off-road use is alsorecommended.
WARNING: Age
Tires degrade over time depending on many factors such asweather, storage conditions, and conditions of use (such as load, speed,inflation pressure) the tires experience throughout their lives.In general, tires should be replaced after six years regardless of treadwear. However, heat caused by hot climates or frequent high loadingconditions can accelerate the aging process and may require tires to bereplaced more frequently.You should replace your spare tire when you replace the road tires orafter six years due to aging even if it has not been used.
U.S. DOT Tire Identification NumberBoth U.S. and Canada Federal regulations require tire manufacturers toplace standardized information on the sidewall of all tires. Thisinformation identifies and describes the fundamental characteristics ofthe tire and also provides a U.S. DOT Tire Identification Number forsafety standard certification and in case of a recall.
This begins with the letters DOT and indicates that the tire meets allfederal standards. The next two numbers or letters are the plant codedesignating where it was manufactured, the next two are the tire sizecode and the last four numbers represent the week and year the tire wasbuilt. For example, the numbers 317 mean the 31st week of 1997. After2000 the numbers go to four digits. For example, 2501 means the 25thweek of 2001. The numbers in between are identification codes used fortraceability. This information is used to contact customers if a tire defectrequires a recall.
Wheels and Tires 327
2014 TaurusOwners Guide gf, 2nd Printing, September 2013USA (fus)

Tire Replacement Requirements
WARNING: Only use replacement tires and wheels that are thesame size, load index, speed rating and type (such as P-metric
versus LT-metric or all-season versus all-terrain) as those originallyprovided by Ford. The recommended tire and wheel size may be found oneither the Safety Compliance Certification Label (affixed to either the doorhinge pillar, door-latch post, or the door edge that meets the door-latchpost, next to the driver’s seating position), or the Tire Label which islocated on the B-Pillar or edge of the driver’s door. If this information isnot found on these labels, then you should contact your authorized dealeras soon as possible. Use of any tire or wheel not recommended by Fordcan affect the safety and performance of your vehicle, which could resultin an increased risk of loss of vehicle control, vehicle rollover, personalinjury and death. Additionally the use of non-recommended tires andwheels could cause steering, suspension, axle, transfer case or powertransfer unit failure. If you have questions regarding tire replacement,contact your authorized dealer as soon as possible.
WARNING: To reduce the risk of serious injury, when mountingreplacement tires and wheels, you should not exceed the
maximum pressure indicated on the sidewall of the tire to set the beadswithout additional precautions listed below. If the beads do not seat atthe maximum pressure indicated, re-lubricate and try again.When inflating the tire for mounting pressures up to 20 psi (1.38 bar)greater than the maximum pressure on the tire sidewall, the followingprecautions must be taken to protect the person mounting the tire:1. Make sure that you have the correct tire and wheel size.2. Lubricate the tire bead and wheel bead seat area again.3. Stand at a minimum of 12 feet (3.66 meters) away from the tirewheel assembly.4. Use both eye and ear protection.For a mounting pressure more than 20 psi (1.38 bar) greater than themaximum pressure, a Ford dealer or other tire service professionalshould do the mounting.Always inflate steel carcass tires with a remote air fill with the personinflating standing at a minimum of 12 feet (3.66 meters) away from thetire wheel assembly.
328 Wheels and Tires
2014 TaurusOwners Guide gf, 2nd Printing, September 2013USA (fus)

Your vehicle is equipped with tires designed to provide a safe ride andhandling capability.
Important: Remember to replace the wheel valve stems when the roadtires are replaced on your vehicle.
The two front tires or two rear tires should generally be replaced as apair.
The tire pressure sensors mounted in the wheels (originally installed onyour vehicle) are not designed to be used in aftermarket wheels.
The use of wheels or tires not recommended by Ford Motor Companymay affect the operation of your tire pressure monitoring system.
If the tire pressure monitoring system indicator is flashing, the system ismalfunctioning. Your replacement tire might be incompatible with yourtire pressure monitoring system, or some component of the system maybe damaged.
Safety Practices
WARNING: If your vehicle is stuck in snow, mud, or sand, donot rapidly spin the tires. Spinning the tires can tear the tire and
cause an explosion. A tire can explode in as little as three to fiveseconds.
WARNING: Do not spin the wheels at over 35 mph (56 km/h).The tires may fail and injure a passenger or bystander.
Driving habits have a great deal to do with your tire mileage and safety.
• Observe posted speed limits.
• Avoid fast starts, stops and turns.
• Avoid potholes and objects on the road.
• Do not run over curbs or hit the tire against a curb when parking.
Highway HazardsNo matter how carefully you drive, there is always the possibility thatyou may eventually have a flat tire on the highway. Drive slowly to theclosest safe area out of traffic. This may further damage the flat tire, butyour safety is more important.
Wheels and Tires 329
2014 TaurusOwners Guide gf, 2nd Printing, September 2013USA (fus)

If you feel a sudden vibration or ride disturbance while driving, or yoususpect your tire or vehicle has been damaged, immediately reduce yourspeed. Drive with caution until you can safely pull off the road. Stop andinspect the tires for damage. If a tire is under-inflated or damaged,deflate it, remove the wheel and replace it with your spare tire andwheel. If you cannot detect a cause, have the vehicle towed to thenearest repair facility or tire dealer to have the vehicle inspected.
Tire and Wheel AlignmentA bad jolt from hitting a curb or pothole can cause the front end of yourvehicle to become misaligned or cause damage to your tires. If yourvehicle seems to pull to one side when you are driving, the wheels maybe out of alignment. Have an authorized dealer check the wheelalignment periodically.
Wheel misalignment in the front or the rear can cause uneven and rapidtreadwear of your tires and should be corrected by an authorized dealer.Front-wheel drive vehicles and those with an independent rearsuspension may require alignment of all four wheels.
The tires should also be balanced periodically. An unbalanced tire andwheel assembly may result in irregular tire wear.
Tire RotationNote: If your tires show uneven wear ask an authorized dealer to checkfor and correct any wheel misalignment, tire imbalance or mechanicalproblem involved before tire rotation.
Note: Your vehicle may be equipped with a dissimilar spare tire andwheel assembly. A dissimilar spare tire and wheel assembly is defined asa spare tire or wheel that is different in brand, size or appearance fromthe road tires and wheels. If you have a dissimilar spare tire and wheelassembly, it is intended for temporary use only and should not be usedin a tire rotation.
Note: After having your tires rotated, inflation pressure must be checkedand adjusted to the vehicle requirements.
Rotating your tires at the recommended interval (as indicated in thescheduled maintenance information) will help your tires wear moreevenly, providing better tire performance and longer tire life.
330 Wheels and Tires
2014 TaurusOwners Guide gf, 2nd Printing, September 2013USA (fus)

• Front-wheel drive/All-wheel drivevehicles (front tires at left ofdiagram)
Sometimes irregular tire wear can be corrected by rotating the tires.
USING SUMMER TIRESYour Taurus SHO may be equipped with summer tires to providesuperior performance on wet and dry roads. Summer tires do not havethe Mud and Snow (M+S or M/S) tire traction rating on the tire sidewall. Since summer tires do not have the same traction performance asAll-season or Snow tires, Ford does not recommend using summer tireswhen temperatures drop to approximately 40°F (5°C) or below(depending on tire wear and environmental conditions) or in snow/iceconditions. Like any tire, summer tire performance is affected by tirewear and environmental conditions. If you must drive in thoseconditions, Ford recommends using Mud and Snow (M+S, M/S),All-season or Snow tires.
USING SNOW CHAINS
WARNING: Snow tires must be the same size, load index, speedrating as those originally provided by Ford. Use of any tire or
wheel not recommended by Ford can affect the safety and performanceof your vehicle, which could result in an increased risk of loss of vehiclecontrol, vehicle rollover, personal injury and death. Additionally, the useof non-recommended tires and wheels could cause steering, suspension,axle, transfer case or power transfer unit failure.
Note: The suspension insulation and bumpers will help prevent vehicledamage. Do not remove these components from your vehicle when usingsnow tires and chains.
Wheels and Tires 331
2014 TaurusOwners Guide gf, 2nd Printing, September 2013USA (fus)

The tires on your vehicle may have all-weather treads to provide tractionin rain and snow. However, in some climates, you may need to use snowtires and chains. If you need to use chains, it is recommended that steelwheels (of the same size and specifications) be used, as chains may chipaluminum wheels.
Follow these guidelines when using snow tires and chains:
• If possible, avoid fully loading your vehicle.
• Use only SAE Class S cables or equivalent on P235/60R17 orP235/55R18 tires on the front tires only. SAE Class S chains or otherconventional link chains may cause damage to the vehicle’s wheelhouse and/or body. Use of optional spike spider type traction devicesor equivalent is also acceptable.
• Do not install tire chains, cables or optional traction devices on therear tires. This could cause damage to the vehicle’s wheel house orbody.
• Do not use tire chains, cables or optional traction devices withoptional P255/45R19 or 245/45R20 tires.
• Install tire cables securely, verifying that the tire cables do not touchany wiring, brake lines or fuel lines.
• Do not exceed 30 mph (48 km/h) with tire cables on your vehicle.
• Drive cautiously. If you hear the cables rub or bang against yourvehicle, stop and retighten the cables. If this does not work, removethe cables to prevent damage to your vehicle.
• Remove the tire cables when they are no longer needed. Do not usetire cables on dry roads.
TIRE PRESSURE MONITORING SYSTEM
WARNING: The tire pressure monitoring system is NOT asubstitute for manually checking tire pressure. The tire pressure
should be checked periodically (at least monthly) using a tire gauge.See Inflating Your Tires in this chapter. Failure to properly maintainyour tire pressure could increase the risk of tire failure, loss of control,vehicle rollover and personal injury.
332 Wheels and Tires
2014 TaurusOwners Guide gf, 2nd Printing, September 2013USA (fus)

Each tire, including the spare (if provided), should be checkedmonthly when cold and inflated to the inflation pressurerecommended by the vehicle manufacturer on the vehicle
placard or tire inflation pressure label. (If your vehicle has tires of adifferent size than the size indicated on the vehicle placard or tireinflation pressure label, you should determine the proper tire inflationpressure for those tires.)
As an added safety feature, your vehicle has been equipped with a tirepressure monitoring system (TPMS) that illuminates a low tire pressuretelltale when one or more of your tires is significantly under-inflated.Accordingly, when the low tire pressure telltale illuminates, you shouldstop and check your tires as soon as possible, and inflate them to theproper pressure. Driving on a significantly under-inflated tire causes thetire to overheat and can lead to tire failure. Under-inflation also reducesfuel efficiency and tire tread life, and may affect the vehicle’s handlingand stopping ability.
Please note that the TPMS is not a substitute for proper tiremaintenance, and it is the driver’s responsibility to maintain correct tirepressure, even if under-inflation has not reached the level to triggerillumination of the TPMS low tire pressure telltale.
Your vehicle has also been equipped with a TPMS malfunction indicatorto indicate when the system is not operating properly. The TPMSmalfunction indicator is combined with the low tire pressure telltale.When the system detects a malfunction, the telltale will flash forapproximately one minute and then remain continuously illuminated.This sequence will continue upon subsequent vehicle start-ups as long asthe malfunction exists.
When the malfunction indicator is illuminated, the system may not beable to detect or signal low tire pressure as intended. TPMS malfunctionsmay occur for a variety of reasons, including the installation ofreplacement or alternate tires or wheels on the vehicle that prevent theTPMS from functioning properly. Always check the TPMS malfunctiontelltale after replacing one or more tires or wheels on your vehicle toensure that the replacement or alternate tires and wheels allow theTPMS to continue to function properly.
The tire pressure monitoring system complies with part 15 of the FCCrules and with RSS-210 of Industry Canada. Operation is subject to thefollowing two conditions: (1) This device may not cause harmfulinterference, and (2) This device must accept any interference received,including interference that may cause undesired operation.
Wheels and Tires 333
2014 TaurusOwners Guide gf, 2nd Printing, September 2013USA (fus)

Changing Tires with a Tire Pressure Monitoring SystemNote: Each road tire is equippedwith a tire pressure sensor locatedinside the tire and wheel assemblycavity. The pressure sensor isattached to the valve stem. Thepressure sensor is covered by thetire and is not visible unless thetire is removed. Take care whenchanging the tire to avoid damagingthe sensor.
You should always have your tires serviced by an authorized dealer.
Check the tire pressure periodically (at least monthly) using an accuratetire gauge. See Inflating Your Tires in this chapter.
Understanding Your Tire Pressure Monitoring SystemThe tire pressure monitoring system measures pressure in your four roadtires and sends the tire pressure readings to your vehicle. The low tirepressure warning light will turn on if the tire pressure is significantly low.Once the light is illuminated, your tires are under-inflated and need to beinflated to the manufacturer’s recommended tire pressure. Even if thelight turns on and a short time later turns off, your tire pressure stillneeds to be checked.
When Your Temporary Spare Tire Is InstalledWhen one of your road tires needs to be replaced with the temporaryspare, the system will continue to identify an issue to remind you thatthe damaged road wheel and tire assembly needs to be repaired and putback on your vehicle.
To restore the full function of the tire pressure monitoring system, havethe damaged road wheel and tire assembly repaired and remounted onyour vehicle.
When You Believe Your System Is Not Operating ProperlyThe main function of the tire pressure monitoring system is to warn youwhen your tires need air. It can also warn you in the event the system isno longer capable of functioning as intended. See the following chart forinformation concerning your tire pressure monitoring system:
334 Wheels and Tires
2014 TaurusOwners Guide gf, 2nd Printing, September 2013USA (fus)

Low tire
pressure
warning light
Possible cause Customer action required
Solid warninglight
Tire(s)under-inflated
1. Make sure tires are at the properpressure. See Inflating Your Tires
in this chapter.2. After inflating your tires to themanufacturer’s recommendedpressure as shown on the Tire Label(located on the edge of driver’s dooror the B-Pillar), the vehicle must bedriven for at least two minutes over20 mph (32 km/h) before the lightturns off.
Spare tire in use Repair the damaged road wheel andtire and reinstall it on the vehicle torestore system function. For adescription on how the systemfunctions, see When Your
Temporary Spare Tire is Installed
in this section.TPMSmalfunction
If the tires are properly inflated andthe spare tire is not in use but thelight remains on, contact yourauthorized dealer as soon as possible.
Flashing warninglight
Spare tire in use Repair the damaged road wheeland tire assembly and reinstall iton the vehicle to restore systemfunction. For a description on howthe system functions, see When
Your Temporary Spare Tire is
Installed in this section.TPMSmalfunction
If the tires are properly inflated andthe spare tire is not in use but thelight remains on, contact yourauthorized dealer as soon as possible.
Wheels and Tires 335
2014 TaurusOwners Guide gf, 2nd Printing, September 2013USA (fus)

When Inflating Your Tires
When putting air into your tires (such as at a gas station or in yourgarage), the tire pressure monitoring system may not respondimmediately to the air added to your tires.
It may take up to two minutes of driving over 20 mph (32 km/h) for thelight to turn off after you have filled your tires to the recommendedinflation pressure.
How Temperature Affects Your Tire PressureThe tire pressure monitoring system monitors tire pressure in eachpneumatic tire. While driving in a normal manner, a typical passengertire inflation pressure may increase about 2 to 4 psi (14 to 28 kPa) froma cold start situation. If the vehicle is stationary overnight with theoutside temperature significantly lower than the daytime temperature,the tire pressure may decrease approximately 3 psi (21 kPa) for a dropof 30°F (17°C) in ambient temperature. This lower pressure value maybe detected by the tire pressure monitoring system as being significantlylower than the recommended inflation pressure and activate the systemwarning light for low tire pressure. If the low tire pressure warning lightis on, visually check each tire to verify that no tire is flat. If one or moretires are flat, repair as necessary. Check the air pressure in the roadtires. If any tire is under-inflated, carefully drive the vehicle to thenearest location where air can be added to the tires. Inflate all the tiresto the recommended inflation pressure.
CHANGING A ROAD WHEEL
WARNING: The use of tire sealants may damage your tirepressure monitoring system and should not be used. However,
if you must use a sealant, have an authorized dealer install a new tirepressure monitoring system sensor and valve stem.
WARNING: See Tire Pressure Monitoring System in thischapter for important information. If the tire pressure monitoring
sensor becomes damaged, it will no longer function.
Note: The tire pressure monitoring system indicator light will illuminatewhen the spare tire is in use. To restore the full function of the monitoringsystem, all road wheels equipped with tire pressure monitoring sensorsmust be mounted on this vehicle.
336 Wheels and Tires
2014 TaurusOwners Guide gf, 2nd Printing, September 2013USA (fus)

If you get a flat tire while driving, do not apply the brake heavily.Instead, gradually decrease your speed. Hold the steering wheel firmlyand slowly move to a safe place on the side of the road.
Have a flat serviced by an authorized dealer in order to prevent damageto the system sensors. See Tire Pressure Monitoring System earlier inthis chapter. Replace the spare tire with a road tire as soon as possible.During repairing or replacing of the flat tire, have the authorized dealerinspect the tire pressure monitoring system sensor for damage.
Dissimilar Spare Tire and Wheel Assembly Information
WARNING: Failure to follow these guidelines could result in anincreased risk of loss of vehicle control, injury or death.
If you have a dissimilar spare tire and wheel assembly, then it is intendedfor temporary use only. This means that if you need to use it, you shouldreplace it as soon as possible with a road tire and wheel assembly that isthe same size and type as the road tires and wheels that were originallyprovided by Ford. If the dissimilar spare tire or wheel is damaged, itshould be replaced rather than repaired.
A dissimilar spare tire and wheel assembly is defined as a spare tire orwheel that is different in brand, size or appearance from the road tiresand wheels and can be one of three types:
1. T-type mini-spare: This spare tire begins with the letter T for tiresize and may have Temporary Use Only molded in the sidewall.
2. Full-size dissimilar spare with label on wheel: This spare tire hasa label on the wheel that states: THIS TIRE AND WHEEL FORTEMPORARY USE ONLY
When driving with one of the dissimilar spare tires listed above, do not:
• exceed 50 mph (80 km/h).
• load the vehicle beyond maximum vehicle load rating listed on theSafety Compliance Label.
• tow a trailer.
• use snow chains on the end of the vehicle with the dissimilar spare tire.
• use more than one dissimilar spare tire at a time.
• use commercial car washing equipment.
• try to repair the dissimilar spare tire.
Wheels and Tires 337
2014 TaurusOwners Guide gf, 2nd Printing, September 2013USA (fus)

Use of one of the dissimilar spare tires listed above at any one wheellocation can lead to impairment of the following:
• Handling, stability and braking performance
• Comfort and noise
• Ground clearance and parking at curbs
• Winter weather driving capability
• Wet weather driving capability
• All-wheel driving capability
3. Full-size dissimilar spare without label on wheel
When driving with the full-size dissimilar spare tire and wheel assembly,do not:
• exceed 70 mph (113 km/h).
• use more than one dissimilar spare tire and wheel at a time.
• use commercial car washing equipment.
• use snow chains on the end of the vehicle with the dissimilar sparetire and wheel.
The usage of a full-size dissimilar spare tire and wheel assembly can leadto impairment of the following:
• Handling, stability and braking performance
• Comfort and noise
• Ground clearance and parking at curbs
• Winter weather driving capability
• Wet weather driving capability
• All-wheel driving capability (if applicable)
• Load leveling adjustment (if applicable)
When driving with the full-size dissimilar spare tire and wheel assembly,additional caution should be given to:
• towing a trailer.
• driving vehicles equipped with a camper body.
• driving vehicles with a load on the cargo rack.
Drive cautiously when using a full-size dissimilar spare tire and wheel,and seek service as soon as possible.
338 Wheels and Tires
2014 TaurusOwners Guide gf, 2nd Printing, September 2013USA (fus)

Tire Change Procedure
WARNING: When one of the front wheels is off the ground, thetransmission alone will not prevent your vehicle from moving or
slipping off the jack, even if the transmission is in park (P).
WARNING: To help prevent your vehicle from moving when youchange a tire, be sure to place the transmission in park (P), set
the parking brake and block (in both directions) the wheel that isdiagonally opposite (other side and end of the vehicle) to the tire beingchanged.
WARNING: Never get underneath a vehicle that is supportedonly by a jack. If your vehicle slips off the jack, you or someone
else could be seriously injured.
WARNING: Do not attempt to change a tire on the side of yourvehicle close to moving traffic. Pull far enough off the road to
avoid the danger of being hit when operating the jack or changing thewheel.
WARNING: Always use the jack provided as original equipmentwith your vehicle. If using a jack other than the one provided as
original equipment with your vehicle, make sure the jack capacity isadequate for the vehicle weight, including any vehicle cargo ormodifications.
Note: Passengers should not remain in the vehicle when it is beingjacked.
1. Park on a level surface, set the parking brake and activate the hazardflashers.
2. Place the transmission in park (P) and turn the engine off.
Wheels and Tires 339
2014 TaurusOwners Guide gf, 2nd Printing, September 2013USA (fus)

3. Lift the trunk cargo cover, and removethe wing nut that secures the spare tireby turning it counterclockwise.
4. Lift and remove the spare tire fromthe trunk.
5. Remove the second wing nut thatsecures the jack retention bracket byturning it counterclockwise, then removethe jack kit from your vehicle.
6. Remove the jack and the wrench fromthe felt bag. Fold down the wrenchsocket used to loosen the lug nuts and tooperate the jack.
Vehicle jacking1. Block the diagonally oppositewheel.
2. If your vehicle has wheel covers,remove them with the lug wrenchtip and loosen each wheel lug nutone-half turn counterclockwise.
Do not remove them until the wheel is raised off the ground.
3. The vehicle jacking points are shown here, and are depicted on theyellow warning label on the jack.
Note: Jack at the specified locations to avoid damage to the vehicle.
340 Wheels and Tires
2014 TaurusOwners Guide gf, 2nd Printing, September 2013USA (fus)

4. Small arrow-shaped marks on the sills show the location of the jackingpoints.
5. Remove the lug nuts with the lug wrench.
6. Replace the flat tire with the spare tire, making sure the valve stem isfacing outward. Reinstall the lug nuts until the wheel is snug against thehub. Do not fully tighten the lug nuts until the wheel has been lowered.
7. Lower the wheel by turning the jack handle counterclockwise.
8. Remove the jack and fully tighten the lugnuts in the order shown. See Wheel LugNut Torque Specifications later in thischapter for the proper lug nut torquespecification.
9. Put the flat tire, jack and lug wrenchaway. Make sure the jack is fastened so itdoes not rattle when you drive. Unblock thewheels.
Wheels and Tires 341
2014 TaurusOwners Guide gf, 2nd Printing, September 2013USA (fus)

Stowing the flat tire1. Remove the extension bolt from the exterior pocket of the felt bag.
2. Insert the straight end of the jack retentionbracket through the eyelet of the angled bracketand swing the retention bracket over the jack.With the jack in place, place the end of theretention bracket over the threaded stud in thetrunk floor and secure it with the plastic wingnut.
3. Screw the extension bolt onto the threadedstud of the jack retention bracket.
4. Place the flat tire in the sparetire well with the wheel facing up.
5. Safely secure the wheel byscrewing the large wing nut ontothe extension bolt.
Note: If you are stowing the temporary spare tire, place the tire over thejack and secure it with the large wing nut.
342 Wheels and Tires
2014 TaurusOwners Guide gf, 2nd Printing, September 2013USA (fus)

TEMPORARY MOBILITY KIT (IF EQUIPPED)Note: The temporary mobility kit sealant compound in the canister is tobe used for one tire only. See your Ford authorized dealer for additionalreplacement sealant canisters.Your vehicle may be equipped with a temporary mobility kit (located inthe spare tire well in the trunk). The temporary mobility kit consists ofan air compressor to reinflate the tire and a sealing compound in acanister that will effectively seal most punctures caused by nails orsimilar objects. This kit will provide a temporary seal allowing you todrive your vehicle up to 120 miles (200 km) at a maximum speed of50 mph (80 km/h).
A. Air compressor (inside)
B. Diverter knob
C. On/Off button
D. Air pressure gauge
E. Deflation button
F. Sealant bottle/canister
G. Sealant filling clear tube
H. Sealant tube – tire valveconnector
I. Yellow cap tool
J. Air compressor hose
K. Air hose – tire valve connector
L. Accessory power plug
M. Casing/housing
General Information
WARNING: Failure to follow these guidelines could result in anincreased risk of loss of vehicle control, injury or death.
Note: Do not use the temporary mobility kit if a tire has becomeseverely damaged by driving the vehicle with a tire that has insufficientair pressure. Only punctured areas located within the tire tread can besealed with the temporary mobility kit.
AM
B C D
F
E
G
HIJ
L
K
Wheels and Tires 343
2014 TaurusOwners Guide gf, 2nd Printing, September 2013USA (fus)

Do not attempt to repair punctures larger than 1⁄4 inch (6 millimeters)or damage to the tire’s sidewall. The tire may not completely seal.
Loss of air pressure may adversely affect tire performance. For thisreason:
• Note: Do not drive the vehicle above 50 mph (80 km/h).
• Note: Do not drive further than 120 miles (200 kilometers). Driveonly to your closest authorized dealer or tire repair shop to have yourtire inspected.
• Drive carefully and avoid abrupt steering maneuvers.
• Periodically monitor tire inflation pressure in the affected tire; if thetire is losing pressure, have the vehicle towed.
• Read the information in the Tips for Use of the Temporary MobilityKit section to make sure of safe operation of the temporary mobilitykit and your vehicle.
Tips for Use of the Temporary Mobility KitRead the following list of tips to ensure safe operation of the temporarymobility kit:
• Before operating the temporary mobility kit, make sure your vehicle issafely off the road and away from moving traffic. Turn on the hazardlights.
• Always set the parking brake to make sure the vehicle doesn’t moveunexpectedly.
• Do not remove any foreign objects, such as nails or screws, from thetire.
• When using the temporary mobility kit, leave the engine running(only if the vehicle is outdoors or in a well-ventilated area) so thecompressor does not drain the vehicle’s battery.
• Do not allow the compressor to operate continuously for more than15 minutes. This will help prevent the compressor from overheating.
• Never leave the temporary mobility kit unattended when it isoperating.
• Sealant compound contains latex. Make sure that you use thenon-latex gloves provided to avoid an allergic reaction.
• Keep the temporary mobility kit away from children.
344 Wheels and Tires
2014 TaurusOwners Guide gf, 2nd Printing, September 2013USA (fus)

• Only use the temporary mobility kit when the ambient temperature isbetween -40°F (-40°C) and 158°F (70°C).
• Only use the sealing compound before the use by date. The use bydate is on the lower right hand corner of the label located on thesealant canister (bottle). Check the use by date regularly and replacethe canister after four years.
• Do not store the temporary mobility kit unsecured inside thepassenger compartment of the vehicle as it may cause injury during asudden stop or crash. Always store the kit in its original location.
• After sealant use, an authorized Ford dealer must replace the tirepressure monitoring system sensor and valve stem on the wheel.
• When inflating a tire or other objects, use the black air hose only.Do not use the transparent hose which is designed for sealantapplication only.
• Operating the temporary mobility kit could cause an electricaldisturbance in radio, CD, and DVD player operation.
What to Do When a Tire Is PuncturedA tire puncture within the tire’s tread area can be repaired in two stageswith the temporary mobility kit:
• In the first stage, the tire will be reinflated with a sealing compoundand air. After the tire has been reinflated, you will need to drive thevehicle a short distance (about 4 miles [6 kilometers]) to distribute thesealant in the tire.
• In the second stage, check the tire pressure and adjust, if necessary,to the vehicle’s tire inflation pressure.
First Stage: Reinflating the Tire with Sealing Compound and Air
WARNING: Do not stand directly over the temporary mobilitykit while inflating the tire. If you notice any unusual bulges or
deformations in the tire’s sidewall during inflation, stop and callroadside assistance.
WARNING: If the tire does not inflate to the recommended tirepressure within 15 minutes, stop and call roadside assistance.
Wheels and Tires 345
2014 TaurusOwners Guide gf, 2nd Printing, September 2013USA (fus)

Preparation
Park the vehicle in a safe, level and secure area, away from movingtraffic. Turn the hazard lights on. Apply the parking brake and turn theengine off. Inspect the flat tire for visible damage.
Sealant compound contains latex. To avoid any allergic reactions, use thenon-latex gloves located in the accessory box on the underside of thetemporary mobility kit housing.
Do not remove any foreign object that has pierced the tire. If a punctureis located in the tire sidewall, stop and call roadside assistance.
1. Remove the valve cap from the tire valve.
2. Unwrap the clear tube from the compressor housing.
3. Remove the tube cap and fasten the metal connector of the tube tothe tire valve, turning clockwise. Make sure the connection is tightlyfastened.
4. Plug the power cable into the12-volt power point in the vehicle.
5. Remove the warning sticker found on the canister and place it on thetop of the instrument panel or the center of the dash.
6. Note: Start the engine only if the vehicle is outdoors or in awell-ventilated area.
346 Wheels and Tires
2014 TaurusOwners Guide gf, 2nd Printing, September 2013USA (fus)

7. Push and turn dial (A)counterclockwise to the sealantposition. Turn on the kit by pressingthe on button (B).
8. Inflate the tire to the pressurelisted on the Tire Label located onthe driver’s door or the door jambarea.
Note: When the sealing compound is first added into the tire, the airpressure gauge reading on the compressor unit may indicate a highervalue; this is normal and should be no reason for concern. The pressurewill drop after about 30 seconds of operation. The tire pressure has to bechecked with the compressor in the OFF position to get the correct tirepressure reading.9. When the recommended tire pressure is reached, turn off the kit bypressing the on and off button, then disconnect the kit from the tirevalve and the power point. Re-install the valve cap on the tire valve,place the tube cap on the metal connector, and return the kit to thestowage area.10. Note: Immediately and cautiously, drive the vehicle 4 miles(6 kilometers) to distribute the sealant evenly inside the tire. Do notexceed 50 mph (80 km/h).
Note: If you experience any unusual vibration, ride disturbance ornoise while driving, reduce your speed until you can safely pull off tothe side of the road to call for roadside assistance. Note: Do notproceed to the second stage of this operation.
11. After 4 miles (6 kilometers), stop and check the tire pressure.See Second Stage: Checking Tire Pressure.
A
B
Wheels and Tires 347
2014 TaurusOwners Guide gf, 2nd Printing, September 2013USA (fus)

Second Stage: Checking Tire Pressure
WARNING: The power plug may get hot after use and should behandled carefully while unplugging.
Check the air pressure of your tires as follows:1. Remove the valve cap from the tire valve.2. Unhook the black hose from the side of the compressor and fastenfirmly on the valve stem by turning clockwise.
WARNING: If you are proceeding from the First stage:
Reinflating the tire with sealing compound and air sectionand have injected sealant in the tire and the pressure is below 20 psi(1.4 bar), stop and call roadside assistance. If tire pressure is above20 psi (1.4 bar), continue to the next step.
3. Turn the dial clockwise to the air position. Turn on the kit by pressingthe on/off button.
4. Adjust the tire to therecommended inflation pressurefrom the tire label located on thedriver’s door or door jamb area.Pressing the deflation button nearthe sealant canister removes airfrom the tire.
Note: The tire pressure has to bechecked with the compressor in theoff position to get the correct tirepressure reading.
5. Turn the compressor off by pressing the on/off button.6. Unplug the hoses, re-install the valve cap on the tire and return thekit to the stowage area.What to do after the Tire has been SealedAfter using the temporary mobility kit to seal your tire, replace thesealant canister and clear tube (hose). Sealing compound and spareparts can be obtained and replaced at an authorized Ford MotorCompany dealership or tire dealer. Empty sealant bottles may bedisposed of at home. However, liquid residue from the sealing compoundshould be disposed by your local Ford Motor Company dealership or tiredealer, or in accordance with local waste disposal regulations.
PSIBAR
348 Wheels and Tires
2014 TaurusOwners Guide gf, 2nd Printing, September 2013USA (fus)

Note: After the sealing compound has been used, the maximum vehiclespeed is 50 mph (80 km/h) and the maximum driving distance is120 miles (200 km). Inspect the sealed tire immediately.
Note: After sealant use, the TPMS sensor and valve stem on the wheelmust be replaced by an authorized Ford dealer.
You can check the tire pressure any time within the 120 miles (200 km)by performing the procedure from Second stage: Checking tirepressure listed previously.
Removal of the sealant canister from the temporary mobility kit
1. Unwrap the clear tube from thecompressor housing.
2. Press the button located on thetemporary mobility kit compressorhousing below the canister whilepulling up on the sealant canister.
Wheels and Tires 349
2014 TaurusOwners Guide gf, 2nd Printing, September 2013USA (fus)

Installation of the sealant canister to the temporary mobility kit
1. Align the sealant canister withthe temporary mobility kit housing.
2. Once aligned, seat the sealantcanister by lightly pushing downuntil you hear an audible click.
3. Wrap the clear tube around thecompressor housing.
Note: If you experience any difficulties with the removal or installationof the sealant canister, consult your Ford Motor Company authorizeddealer for assistance.
350 Wheels and Tires
2014 TaurusOwners Guide gf, 2nd Printing, September 2013USA (fus)
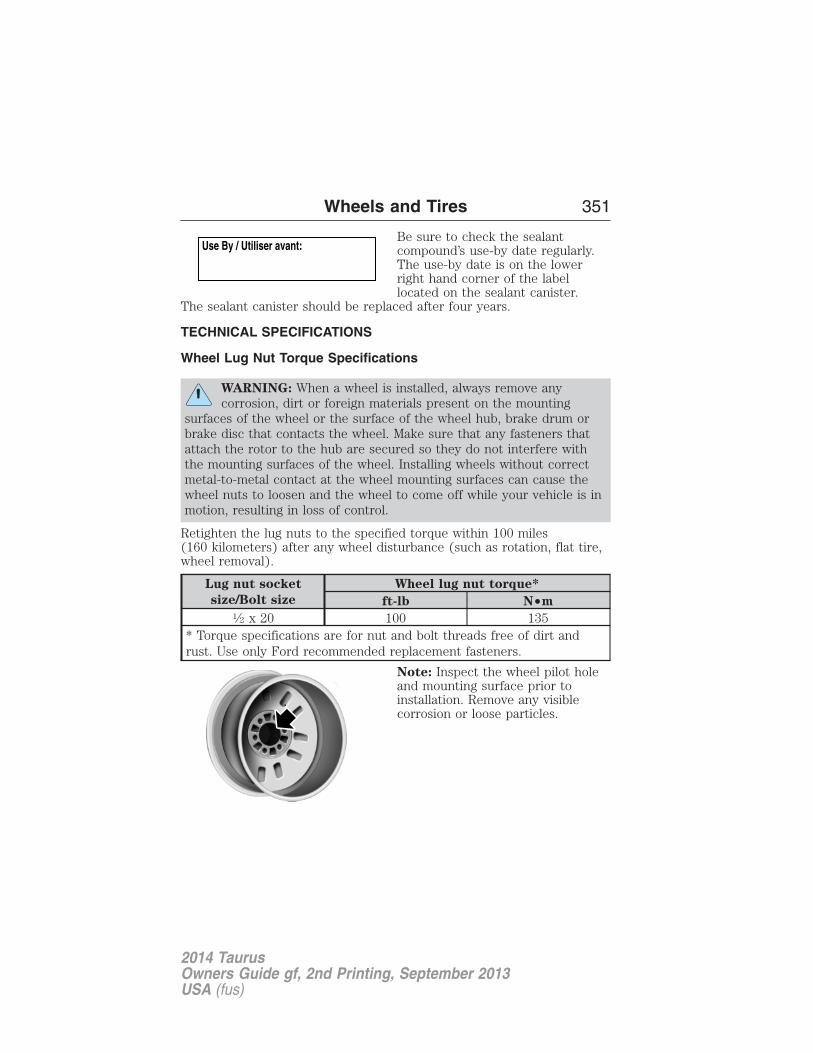
Be sure to check the sealantcompound’s use-by date regularly.The use-by date is on the lowerright hand corner of the labellocated on the sealant canister.
The sealant canister should be replaced after four years.
TECHNICAL SPECIFICATIONS
Wheel Lug Nut Torque Specifications
WARNING: When a wheel is installed, always remove anycorrosion, dirt or foreign materials present on the mounting
surfaces of the wheel or the surface of the wheel hub, brake drum orbrake disc that contacts the wheel. Make sure that any fasteners thatattach the rotor to the hub are secured so they do not interfere withthe mounting surfaces of the wheel. Installing wheels without correctmetal-to-metal contact at the wheel mounting surfaces can cause thewheel nuts to loosen and the wheel to come off while your vehicle is inmotion, resulting in loss of control.
Retighten the lug nuts to the specified torque within 100 miles(160 kilometers) after any wheel disturbance (such as rotation, flat tire,wheel removal).
Lug nut socket
size/Bolt size
Wheel lug nut torque*
ft-lb N•m1⁄2 x 20 100 135
* Torque specifications are for nut and bolt threads free of dirt andrust. Use only Ford recommended replacement fasteners.
Note: Inspect the wheel pilot holeand mounting surface prior toinstallation. Remove any visiblecorrosion or loose particles.
Wheels and Tires 351
2014 TaurusOwners Guide gf, 2nd Printing, September 2013USA (fus)

ENGINE SPECIFICATIONS
Engine 3.5L V6 engine3.5L V6 SHO
engine
2.0L EcoBoost
engine
Cubic inches 214 214 122
Required fuelSee Octane recommendations in the Fuel and
Refueling chapter.Firing order 1–4–2–5–3–6 1–4–2–5–3–6 1-3-4-2Ignitionsystem
Coil on plug Coil on plug Coil on plug
Spark pluggap
0.049-0.053 in.(1.25-1.35 mm)
0.033–0.037 in.(0.84–0.94 mm)
0.027–0.031 in.(0.70–0 .80 mm)
Compressionratio
10.8:1 10.0:1 9.3:1
Engine Drivebelt Routing3.5L V6 engine
352 Capacities and Specifications
2014 TaurusOwners Guide gf, 2nd Printing, September 2013USA (fus)

3.5L V6 SHO engine
2.0L EcoBoost engine
Capacities and Specifications 353
2014 TaurusOwners Guide gf, 2nd Printing, September 2013USA (fus)

TE
CH
NIC
AL
SP
EC
IFIC
AT
ION
S
Item
sC
ap
acit
yF
ord
part
nam
eo
r
eq
uiv
ale
nt
Fo
rd
part
nu
mb
er
/F
ord
sp
ecif
icati
on
Bra
kefl
uid1
Bet
wee
nM
AX
and
MIN
onre
serv
oir
Mot
orcr
aft
DO
T4
LVH
igh
Per
form
ance
Mot
orV
ehic
leB
rake
Flu
idP
M-2
0/
WSS
-M6C
65-A
2
Doo
rla
tch,
hood
latc
h,au
xilia
ryho
odla
tch,
seat
trac
ks,
trun
kan
dlif
tgat
ela
tche
s
—M
ulti
-Pur
pose
Gre
ase
(Lit
hium
grea
se)
Mot
orcr
aft
XL
-5(a
eros
ol)
Mul
ti-P
urpo
seG
reas
eE
SA-M
1C93
-B/
CR
CM
ulti
-Pur
pose
Gre
ase
SL31
51
Loc
kcy
linde
rs—
Mot
orcr
aft
Pen
etra
ting
and
Loc
kL
ubri
cant
XL
-1/
Non
e
Aut
omat
ictr
ansm
issi
onfl
uid
2,3
10.9
quar
ts(1
0.3L
)(6
F50
)
Mot
orcr
aft
ME
RC
ON
LVA
TF
2X
T-10
-QLV
/M
ER
CO
NLV
11.6
quar
ts(1
1.0L
)(6
F55
)9.
0qu
arts
(8.5
L)
(6F
35)
354 Capacities and Specifications
2014 TaurusOwners Guide gf, 2nd Printing, September 2013USA (fus)

Item
sC
ap
acit
yF
ord
part
nam
eo
r
eq
uiv
ale
nt
Fo
rd
part
nu
mb
er
/F
ord
sp
ecif
icati
on
Rea
rdi
ffer
enti
al(A
llW
heel
Dri
ve)
fluid
2.4
pint
s(1
.15L
)
Mot
orcr
aft
SAE
80W
-90
Pre
miu
mR
ear
Axl
eL
ubri
cant
XY-
80W
90-Q
L/
WSP
-M2C
197-
A
Pow
erT
rans
fer
Uni
t(P
TU
)fl
uid
(All
Whe
elD
rive
)4
18ou
nces
(0.5
3L)
Mot
orcr
aft
SAE
75W
-140
Synt
heti
cR
ear
Axl
eL
ubri
cant
XY-
75W
140-
QL
/W
SL-M
2C19
2-A
Eng
ine
oil5
,6,7
3.5L
V6
engi
ne6.
0qu
arts
(5.7
L)
Mot
orcr
aft
SAE
5W-2
0M
otor
Oil
oreq
uiva
lent
WSS
-M2C
945-
A
3.5L
V6
Supe
rH
igh
Out
put
(SH
O)
engi
ne6.
0qu
arts
(5.7
L)
Mot
orcr
aft
SAE
5W-3
0M
otor
Oil
oreq
uiva
lent
WSS
-M2C
946-
A
2.0L
Eco
Boo
sten
gine
5.7
quar
ts(5
.4L
)
Mot
orcr
aft
SAE
5W-3
0M
otor
Oil
oreq
uiva
lent
WSS
-M2C
946-
A
Capacities and Specifications 355
2014 TaurusOwners Guide gf, 2nd Printing, September 2013USA (fus)

Item
sC
ap
acit
yF
ord
part
nam
eo
r
eq
uiv
ale
nt
Fo
rd
part
nu
mb
er
/F
ord
sp
ecif
icati
on
Eng
ine
cool
ant8
3.5L
V6
engi
ne11
.1qu
arts
(10.
5L)
Mot
orcr
aft
Ora
nge
Ant
ifre
eze/
Coo
lant
Pre
dilu
ted
VC
-3D
IL-B
(US)
;C
VC
-3D
IL-B
(Can
ada)
/W
SS-M
97B
44-D
2
3.5L
V6
Supe
rH
igh
Out
put
(SH
O)
engi
ne11
.4qu
arts
(10.
8L)
2.0L
Eco
Boo
sten
gine
11.6
quar
ts(1
1.0L
)
Fue
lta
nk19
.0ga
llons
(71.
9L
)—
—
356 Capacities and Specifications
2014 TaurusOwners Guide gf, 2nd Printing, September 2013USA (fus)

Item
sC
ap
acit
yF
ord
part
nam
eo
r
eq
uiv
ale
nt
Fo
rd
part
nu
mb
er
/F
ord
sp
ecif
icati
on
Win
dshi
eld
was
her
flui
dF
illas
requ
ired
Mot
orcr
aft
Pre
miu
mW
inds
hiel
dW
ashe
rC
once
ntra
tew
ith
Bit
tera
nt(U
S);
Pre
miu
mQ
ualit
yW
inds
hiel
dW
ashe
rF
luid
(Can
ada)
ZC
-32-
A1
orZ
C-3
2-B
1(U
S;)
CX
C-3
7-(A
,B
,D
,an
dF
)(C
anad
a)/
WSB
-M8B
16-A
2/-
-
A/C
Ref
rige
rant
Cap
acit
y9
2.0L
Eco
Boo
sten
gine
1.62
lb(0
.74k
g)3.
5LV
6en
gine
1.43
lb(0
.65k
g)
Mot
orcr
aft
R–1
34a
Ref
rige
rant
YN-1
9(U
S);
CYN
16–R
(Can
ada)
/W
SH-M
17B
19–A
A/C
Ref
rige
rant
Com
pres
sor
Oil9
2.0L
GT
DI
&3.
5LT
iVC
T5.
2fl
oz(0
.153
L)
Mot
orcr
aft
PAG
Ref
rige
rant
Com
pres
sor
Oil
YN-1
2–D
WSH
-M1C
231–
B
1F
ord
reco
mm
ends
usin
gM
otor
craf
t(F
ord)
DO
T4
LVH
igh
Per
form
ance
Bra
keF
luid
oreq
uiva
lent
mee
ting
WSS
-M6C
65-A
2.U
seof
any
flui
dot
her
than
the
reco
mm
ende
dfl
uid
may
caus
ede
grad
edbr
ake
perf
orm
ance
and
not
mee
tth
eF
ord
perf
orm
ance
stan
dard
s.K
eep
brak
efl
uid
clea
nan
ddr
y.C
onta
min
atio
nw
ith
dirt
,w
ater
,pe
trol
eum
prod
ucts
orot
her
mat
eria
lsm
ayre
sult
inbr
ake
syst
emda
mag
ean
dpo
ssib
lefa
ilure
.2A
ppro
xim
ate
dry
fill
capa
city
.A
ctua
lam
ount
may
vary
duri
ngfl
uid
chan
ges.
Capacities and Specifications 357
2014 TaurusOwners Guide gf, 2nd Printing, September 2013USA (fus)

Item
sC
ap
acit
yF
ord
part
nam
eo
r
eq
uiv
ale
nt
Fo
rd
part
nu
mb
er
/F
ord
sp
ecif
icati
on
3A
utom
atic
tran
smis
sion
sth
atre
quir
eM
ER
CO
NLV
shou
ldon
lyus
eM
ER
CO
NLV
flui
d.R
efer
tosch
ed
ule
dm
ain
ten
an
ce
info
rm
ati
on
tode
term
ine
the
corr
ect
serv
ice
inte
rval
.U
seof
any
flui
dot
her
than
the
reco
mm
ende
dfl
uid
may
caus
etr
ansm
issi
onda
mag
e.4Se
eyo
urau
thor
ized
deal
erfo
rfl
uid
leve
lch
ecki
ngor
filli
ng.
5Yo
uren
gine
has
been
desi
gned
tous
eM
otor
craf
ten
gine
oils
oreq
uiva
lent
oils
that
mee
tF
ord
spec
ific
atio
ns.
Itis
also
acce
ptab
leto
use
anen
gine
oil
ofre
com
men
ded
visc
osit
ygr
ade
that
mee
tsA
PI
SNre
quir
emen
tsan
ddi
spla
ysth
eA
PI
Cer
tifi
cati
onM
ark
for
gaso
line
engi
nes.
6D
ono
tus
esu
pple
men
tal
engi
neoi
lad
diti
ves
inyo
uren
gine
.T
hey
are
unne
cess
ary
and
coul
dle
adto
engi
neda
mag
eth
atis
not
cove
red
byF
ord’
sw
arra
nty.
7D
ono
tus
eA
PI
Sca
tego
ryoi
lsla
bele
das
SN,
SM,
SLor
low
erca
tego
ryun
less
the
labe
lal
sodi
spla
yth
eA
PI
cert
ific
atio
nm
ark.
The
seoi
lsdo
not
mee
tth
ere
quir
emen
tsof
the
engi
nean
dem
issi
onsy
stem
s.8A
ddth
eco
olan
tty
peor
igin
ally
equi
pped
inyo
urve
hicl
e.9W
arn
ing:T
heai
rco
ndit
ioni
ngre
frig
eran
tsy
stem
cont
ains
refr
iger
ant
R13
4Aun
der
high
pres
sure
.O
peni
ngth
eai
rco
ndit
ioni
ngre
frig
eran
tsy
stem
can
caus
epe
rson
alin
jury
.A
irco
ndit
ioni
ngre
frig
eran
tsy
stem
isto
bese
rvic
edon
lyby
qual
ifie
dpe
rson
nel.
358 Capacities and Specifications
2014 TaurusOwners Guide gf, 2nd Printing, September 2013USA (fus)

MOTORCRAFT® PART NUMBERS
Component3.5L V6
engine
3.5L V6 SHO
engine
2.0L EcoBoost
engine
Air filterelement
FA-1884 FA-1884 FA-1884
Oil filter FL-500-S FL-500-S FL-910-SBattery BXT-59 BXT-65-650 BXT-65-650Spark plugs SP-5341 SP-5341 SP-5271
Cabin air filter FP68 FP68 FP68Seat air filter FS-104Windshieldwiper blade(Utility)
WW-2206-PF (driver side)WW-2601-PF (passenger side)
WW1106 (rear)Windshieldwiper blade(Sedan)
WW-2501 (driver side)WW-2043 (passenger side)
1 Refer to scheduled maintenance information for the appropriateintervals for changing the spark plugs.
Note: Replace the spark plugs with ones that meet Ford material anddesign specifications for your vehicle, such as Motorcraft® or equivalentreplacement parts. The customer warranty may be void for any damageto the engine if such spark plugs are not used.
Capacities and Specifications 359
2014 TaurusOwners Guide gf, 2nd Printing, September 2013USA (fus)

VEHICLE IDENTIFICATION NUMBERThe vehicle identification numberis located on the driver’s sideinstrument panel.
Please note that in the graphic,XXXX is representative of yourvehicle identification number.
The Vehicle Identification Number (VIN) contains the followinginformation:
A. World manufacturer identifier
B. Brake system / Gross VehicleWeight Rating (GVWR) / RestraintDevices and their location
C. Make, vehicle line, series, bodytype
D. Engine type
E. Check digit
F. Model year
G. Assembly plant
H. Production sequence number.
XXXXXXXXXXXXXXXXX
360 Capacities and Specifications
2014 TaurusOwners Guide gf, 2nd Printing, September 2013USA (fus)

VEHICLE CERTIFICATION LABELThe National Highway Traffic SafetyAdministration Regulations requirethat a Safety Compliance CertificationLabel be affixed to a vehicle andprescribe where the SafetyCompliance Certification Label maybe located. The Safety ComplianceCertification Label shall be affixed toeither the door hinge pillar, the doorlatch post, or the edge of the doornear the door latch, next to thedriver’s seating position.
TRANSMISSION CODE DESIGNATIONYou can find a transmission code onthe Safety Compliance CertificationLabel. The following table tells youwhich transmission each coderepresents.
Description Code
6-speed automatic transmission (6F50) J6-speed automatic transmission (6F55) C6-speed automatic transmission (6F35) 6
Capacities and Specifications 361
2014 TaurusOwners Guide gf, 2nd Printing, September 2013USA (fus)

ACCESSORIESFor a complete listing of the accessories that are available for yourvehicle, please contact an authorized dealer or visit our online store atwww.Accessories.Ford.com (United States only).
Ford Motor Company will repair or replace any properly authorizeddealer-installed Ford Genuine Accessories found to be defective infactory-supplied materials or workmanship during the warranty period,as well as any component damaged by the defective accessories.
Ford Motor Company will warrant your vehicle through the warranty thatprovides the greatest benefit:
• 12 months or 12000 miles (20000 kilometers) (whichever occurs first).
• The remainder of your new vehicle limited warranty.
Contact an authorized dealer for details and a copy of the warranty.
Exterior style• Moon roof deflector
• Rear spoiler
• Chrome mirror caps
• Side window deflector
• Splash guards
Interior style• All-weather floor mats
• Carpeted floor mats
• Sport pedals
• Ambient lighting
• Rear seat entertainment*
Lifestyle• Ash cup / smoker’s package
• Cargo organization and management
• Cargo net
• Roof racks and carriers*
362 Accessories
2014 TaurusOwners Guide gf, 2nd Printing, September 2013USA (fus)

Peace of mind• Remote start
• Wheel locks
• Locking fuel plug for capless fuel system
• Bumper mounted parking sensors*
• Vehicle security
*The accessory manufacturer designs, develops and therefore warrantsFord Licensed Accessories, and does not design or test these accessoriesto Ford Motor Company engineering requirements. Contact anauthorized Ford dealer for the manufacturer’s limited warranty details,and request a copy of the Ford Licensed Accessories product limitedwarranty from the accessory manufacturer.
For maximum vehicle performance, keep the following information inmind when adding accessories or equipment to your vehicle:
• When adding accessories, equipment, passengers and luggage to yourvehicle, do not exceed the total weight capacity of the vehicle or ofthe front or rear axle (GVWR or GAWR as indicated on the SafetyCompliance Certification label). Ask an authorized dealer for specificweight information.
• The Federal Communications Commission (FCC) and Canadian RadioTelecommunications Commission (CRTC) regulate the use of mobilecommunications systems that are equipped with radio transmitters,for example, two-way radios, telephones and theft alarms. Any suchequipment installed in your vehicle should comply with FederalCommunications Commission (FCC) and Canadian RadioTelecommunications Commission (CRTC) regulations and should beinstalled only by an authorized dealer.
• An authorized dealer needs to install mobile communications systems.Improper installation may harm the operation of your vehicle,particularly if the manufacturer did not design the mobilecommunication system specifically for automotive use.
• If you or an authorized Ford dealer add any non-Ford customelectrical or electronic accessories or components to your vehicle, youmay adversely affect battery performance and durability. In addition,you may also adversely affect the performance of other electricalsystems in the vehicle.
Accessories 363
2014 TaurusOwners Guide gf, 2nd Printing, September 2013USA (fus)

FORD ESP EXTENDED SERVICE PLANSPROTECT YOURSELF FROM THE RISING COST OF VEHICLE REPAIRSWITH A FORD EXTENDED SERVICE PLAN.
SERVICE PLANS (U.S. only)More than 32 Million Ford and Lincoln owners have discovered thepowerful protection Ford ESP. It is the only extended service planbacked by Ford Motor Company, and provides peace of mind protectionbeyond the expiration of the New Vehicle Warranty coverage.
Ford ESP can quickly pay for itselfOne service bill – the cost of parts and labor – can easily exceed theprice of your Ford Extended Service Plan. With Ford ESP, you minimizeyour risk for unexpected repair bills and rising repair costs.
Coverage for up to 500+ covered componentsThere are four, Extended Service Plans with different levels of coverage.Ask your dealer for details.
1. PremiumCARE – Our most comprehensive coverage. With over 500covered components, this plan is so complete that we generally onlydiscuss what’s not covered.
2. ExtraCARE – Covers 113 components, and includes many high techitems
3. BaseCARE – Covers 84 components
4. PowertrainCARE – Covers 29 critical components
Ford ESP is honored by all Ford and Lincoln Dealers in the UnitedStates and Canada. It is the only Extended Service Plan authorized andbacked by Ford Motor Company. That means you get:
• Reliable, quality service anywhere you go
• Repairs performed by factory trained technicians, using Genuine Fordand Lincoln parts
Rental Car Reimbursement1st day Rental Benefit – You take advantage of replacementtransportation if your vehicle is at the dealership for same day coveredrepairs.
Extended Rental Benefits – If your vehicle is kept overnight forcovered repairs, you are eligible for rental car coverage, includingBumper to Bumper warranty repairs, or Field Service Actions.
364 Ford Extended Service Plan
2014 TaurusOwners Guide gf, 2nd Printing, September 2013USA (fus)

Roadside AssistanceExclusive 24/7 roadside assistance, including:
• Towing, flat-tire change and battery jump starts
• Out of fuel and lock-out assistance
• Travel Expense reimbursement for lodging, meals and rental car
• Destination assistance for taxi, shuttle, rental car coverage andemergency transportation
Transferable CoverageIf you sell your vehicle before your Ford Extended Service Plan coverageexpires, you can transfer any remaining coverage to the new owner.Whenever you sell your vehicle, prospective buyers may have a higherdegree of confidence that vehicle was properly maintained with FordESP, thereby improving resale value!
Avoid the Rising cost of vehicle maintenanceFord ESP also offers a Premium Maintenance Plan that covers allscheduled maintenance, and select items that routinely wear out.
The coverage is prepaid, so you never have to worry about affordingvehicle maintenance. It covers regular checkups, routine inspections,preventative care and replacement items that require periodic attentionfor normal wear:
• Windshield Wiper Blades
• Spark Plugs (except in California)
• The clutch Disc
• Brake pads and linings
• Shock Absorbers
• Belts and Hoses
• Diesel Exhaust Fluid Replenishment
Contact your selling dealership today so they can customize a GenuineFord Extended Service Plan that fits your driving lifestyle and budget.
Ford Extended Service Plan 365
2014 TaurusOwners Guide gf, 2nd Printing, September 2013USA (fus)
Interest Free Financing Options AvailableTake advantage of our interest free installment payment plan. Just a 10%down payment will provide you with an affordable, no interest, no feepayment program.
Complete the information below and mail to:
Ford ESPPO Box 8072Royal Oak Michigan 48068-0039
To learn more, call our Ford ESP specialists at 800-367-3377. Don’tforget to ask about our interest free payment program, allowing you allthe security and benefits Ford ESP has to offer while paying over time.You are pre-approved with no credit checks, no hassles!
SERVICE PLANS (CANADA ONLY)You can get more protection for your vehicle by purchasing a FordExtended Service Plan. Ford Extended Service Plan is the only servicecontract backed by Ford Motor Company of Canada, Limited. Dependingon the plan you purchase, Ford Extended Service Plan provides benefitssuch as:
• Rental reimbursement
• Coverage for certain maintenance and wear items
• Protection against repair costs after your New Vehicle LimitedWarranty Coverage expires
• Roadside Assistance benefits
There are several Ford Extended Service Plans available in various time,distance and deductible combinations. Each plan is tailored to fit yourown driving needs, including reimbursement for towing and rental.
When you purchase Ford Extended Service Plan, you receive addedpeace-of-mind protection throughout Canada and the United States,provided by a network of participating Ford Motor Company dealers.The Lincoln Maintenance Protection Plan is honored at authorizedLincoln dealers.
Note: Repairs performed outside of Canada and the United States arenot eligible for Ford Extended Service Plan coverage.
This information is subject to change.
For more information, visit your local Ford of Canada dealer orwww.ford.ca to find the Ford Extended Service Plan that is right for you.
366 Ford Extended Service Plan
2014 TaurusOwners Guide gf, 2nd Printing, September 2013USA (fus)

GENERAL INFORMATION
Radio Frequencies and Reception FactorsAM and FM frequencies are established by the Federal CommunicationsCommission (FCC) and the Canadian Radio and TelecommunicationsCommission (CRTC). Those frequencies are:
AM: 530, 540–1700, 1710 kHz
FM: 87.9–107.7, 107.9 MHz
Radio reception factors
Distance and
strength
The further you travel from an FM station,the weaker the signal and the weaker thereception.
Terrain Hills, mountains, tall buildings, bridges,tunnels, freeway overpasses, parking garages,dense tree foliage and thunderstorms caninterfere with the reception.
Station overload When you pass a ground-based broadcastrepeating tower, a stronger signal mayovertake a weaker one and result in the audiosystem muting.
CD and CD Player InformationNote: CD units play commercially pressed 4.75-inch (12 centimeter)audio compact discs only. Due to technical incompatibility, certainrecordable and re-recordable compact discs may not function correctlywhen used in Ford CD players.
Note: Do not insert CDs with homemade paper (adhesive) labels intothe CD player as the label may peel and cause the CD to becomejammed. You should use a permanent felt tip marker rather thanadhesive labels on your homemade CDs. Ballpoint pens may damageCDs. Please contact your authorized dealer for further information.
Note: Do not use any irregularly shaped discs or discs with a scratchprotection film attached.
Always handle discs by their edges only. Clean the disc with an approvedCD cleaner only. Wipe it from the center of the disc toward the edge.Do not clean in a circular motion.
Do not expose discs to direct sunlight or heat sources for extended periods.
Audio System 367
2014 TaurusOwners Guide gf, 2nd Printing, September 2013USA (fus)

MP3 Track and Folder StructureAudio systems capable of recognizing and playing MP3 individual tracksand folder structures work as follows:• There are two different modes for MP3 disc playback: MP3 track
mode (system default) and MP3 folder mode.• MP3 track mode ignores any folder structure on the MP3 disc. The
player numbers each MP3 track on the disc (noted by the .mp3 fileextension) from T001 to a maximum of T255. Note: The maximumnumber of playable MP3 files may be less depending on the structureof the CD and exact model of radio present.
• MP3 folder mode represents a folder structure consisting of one levelof folders. The CD player numbers all MP3 tracks on the disc (notedby the .mp3 file extension) and all folders containing MP3 files, fromF001 (folder) T001 (track) to F253 T255.
• Creating discs with only one level of folders helps with navigationthrough the disc files.
If you are burning your own MP3 discs, it is important to understandhow the system reads the structures you create. While various files maybe present, (files with extensions other than mp3), only files with the.mp3 extension are played; other files are ignored by the system. Thisenables you to use the same MP3 disc for a variety of tasks on your workcomputer, home computer and your in-vehicle system.
In track mode, the system displays and plays the structure as if it wereonly one level deep (all .mp3 files play, regardless of being in a specificfolder). In folder mode, the system only plays the .mp3 files in thecurrent folder.
368 Audio System
2014 TaurusOwners Guide gf, 2nd Printing, September 2013USA (fus)

MyFord® SYSTEM
WARNING: Driving while distracted can result in loss of vehiclecontrol, crash and injury. We strongly recommend that you use
extreme caution when using any device that may take your focus offthe road. Your primary responsibility is the safe operation of yourvehicle. We recommend against the use of any hand-held device whiledriving and encourage the use of voice-operated systems when possible.Make sure you are aware of all applicable local laws that may affect theuse of electronic devices while driving.
Note: Some features, such as Sirius satellite radio, may not be availablein your location. Check with an authorized dealer.
A. RADIO: Press this button to listen to the radio or change radiofrequency bands. Press the function buttons below the radio screen toselect different radio functions.
B. CD: Press this button to listen to a CD. Press the function buttonsbelow the radio screen to select on-screen options of Repeat or Shuffle.
A B
ON
ML
KJ
EI
H
C
FG
D
Audio System 369
2014 TaurusOwners Guide gf, 2nd Printing, September 2013USA (fus)

C. Memory presets:• In radio mode, store your favorite radio stations. To store a radio
station, tune to the station, then press and hold a preset button untilsound returns.
• In CD mode, press one of these buttons to select a track.
D. Function buttons: Select different functions of the audio systemdepending on which mode you are in (such as Radio mode or CD mode).
E. TUNE:• In radio mode, turn the control to manually search the frequency
band.• In satellite radio mode, turn the control to tune to the next or
previous channel.
F. Reverse and Fast Forward; AM/FM/CD Seek:• In radio mode, select a frequency band and press one of these
buttons. The system stops at the first station it finds in that direction.Press and hold one of these buttons to move quickly in that directionto the next strong radio station or memory preset.
• In Sirius mode, press one of these buttons to select the previous ornext channel. If you select a specific category (such as Jazz, Rock orNews), use these buttons to find the previous or next channel in theselected category. Press and hold one of these buttons to movequickly in that direction to the next channel or category.
• In CD mode, press one of these buttons to select the previous or nexttrack. Press and hold one of these buttons to move quickly in thatdirection within the current track.
G. OK and arrow buttons:• Press the up and down or left and right arrow buttons to browse
menu selections.• Press OK to confirm menu selections.
H. Eject: Press this button to eject a CD.
I. Power and Volume:• Press this button to switch the system off and on.• Turn it to adjust the volume.
J. CLOCK: Press this button to access the clock setting. Use the centerarrow controls to change the hours and minutes.
K. SOUND: Press this button to adjust settings for Treble, Middle, Bass,Balance and Fade.
370 Audio System
2014 TaurusOwners Guide gf, 2nd Printing, September 2013USA (fus)

L. MENU: Press this button to access different audio system features.See Menu structure later in this section.
M. PHONE: Press this button to access the phone features of the SYNCsystem. See the SYNC chapter for more information.
N. AUX: Press this button to access your auxiliary input jack or switchbetween devices you plug into the input jack or USB port. See Auxiliaryinput jack later in this chapter.
O. SIRIUS: Press this button to listen to Sirius satellite radio.
Menu StructureNote: Depending on your system, some options may appear slightlydifferent.
Press MENU.
Press the up and down arrow buttons to scroll through the options.
Press the right arrow to enter a menu. Press the left arrow to exit amenu.
Press OK to confirm a selection.
Radio Settings
Scan Select for a brief sampling of all availablechannels.
Set Category Select to have the system search by certainmusic categories (such as Rock, Pop orCountry).
RBDS/RDS Text Select to view additional broadcast data, ifavailable. This feature defaults to off. RBDSmust be on for you to set a category.
SIRIUS
Scan Select for a brief sampling of all availablechannels.
Show ESN Select to view your satellite radio electronicserial number (ESN). You need this numberwhen communicating with Sirius to activate,modify or track your account.
Audio System 371
2014 TaurusOwners Guide gf, 2nd Printing, September 2013USA (fus)

SIRIUS
Channel Guide Select to view available satellite radiochannels. Press OK to open a list of thefollowing options for this channel: TuneChannel, Skip Channel or Lock Channel. Onceyou skip or lock a channel, you can only accessit by pressing Direct and entering the channelnumber. Locking or unlocking a channelrequires your PIN.
Set Category Select to view channel categories (such asPop, Rock or News). If you select a category,seek and scan functions only stop on channelsin that category.
Alerts Select to turn off or turn on alerts for songs,artists or teams. The system alerts you whenthe selection is playing on another channel.Save up to 20 alerts.
Unlock All Stations Use your PIN to unlock previously lockedstations.
Skip No Stations Remove the skip feature from all the channelsyou previously skipped.
Parental Lock (PIN) Select to create a PIN, which allows you tolock or unlock channels. Your initial PIN is1234.
Audio Settings
Spd. Comp. Vol. Automatically adjusts the volume tocompensate for speed and wind noise. You canset the system between 0 and +7.
Sound Select to adjust settings for Treble, Middle,Bass, Fade and Balance.
Occupancy Mode Select to optimize sound quality for the chosenseating position.
372 Audio System
2014 TaurusOwners Guide gf, 2nd Printing, September 2013USA (fus)

CD Settings
Scan All Select to scan all disc selections.Scan Folder Select to scan all music in the current MP3
folder.CD Compression Select to bring soft and loud passages together
for a more consistent listening level.
Clock Settings
Set Time Select to set the time.Set Date Select to set the calendar date.24h Mode Select to view clock time in a 12–hour mode or
24–hour mode.
Display Settings
Dimming Select to change display brightness.Language Select to display the language in English,
French or Spanish.Temp. Setting Select to display the outside temperature in
Fahrenheit or Celsius.
Audio System 373
2014 TaurusOwners Guide gf, 2nd Printing, September 2013USA (fus)
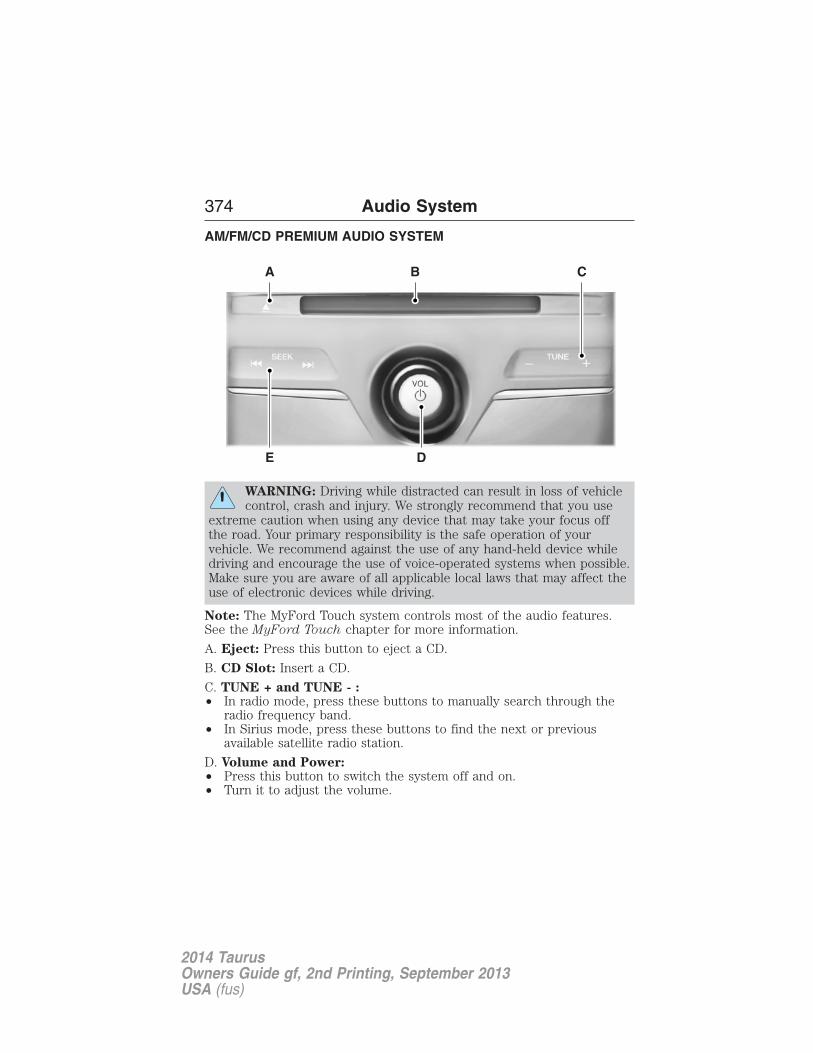
AM/FM/CD PREMIUM AUDIO SYSTEM
WARNING: Driving while distracted can result in loss of vehiclecontrol, crash and injury. We strongly recommend that you use
extreme caution when using any device that may take your focus offthe road. Your primary responsibility is the safe operation of yourvehicle. We recommend against the use of any hand-held device whiledriving and encourage the use of voice-operated systems when possible.Make sure you are aware of all applicable local laws that may affect theuse of electronic devices while driving.
Note: The MyFord Touch system controls most of the audio features.See the MyFord Touch chapter for more information.
A. Eject: Press this button to eject a CD.
B. CD Slot: Insert a CD.
C. TUNE + and TUNE - :• In radio mode, press these buttons to manually search through the
radio frequency band.• In Sirius mode, press these buttons to find the next or previous
available satellite radio station.
D. Volume and Power:• Press this button to switch the system off and on.• Turn it to adjust the volume.
A
E D
B C
374 Audio System
2014 TaurusOwners Guide gf, 2nd Printing, September 2013USA (fus)

E. SEEK, Reverse and Fast Forward:• In radio mode, select a frequency band and press one of these
buttons. The system stops at the first station it finds in that direction.• In Sirius mode, press these buttons to select the previous or next
channel. If a specific category is selected (such as Jazz, Rock orNews), use these buttons to find the previous or next channel in theselected category.
• In CD mode, press these buttons to select the previous or next track.
AM/FM/CD SONY® AUDIO SYSTEM (IF EQUIPPED)
WARNING: Driving while distracted can result in loss of vehiclecontrol, crash and injury. We strongly recommend that you use
extreme caution when using any device that may take your focus offthe road. Your primary responsibility is the safe operation of yourvehicle. We recommend against the use of any hand-held device whiledriving and encourage the use of voice-operated systems when possible.Make sure you are aware of all applicable local laws that may affect theuse of electronic devices while driving.
Note: The MyFord Touch® system controls most of the audio features.See the MyFord Touch® chapter for more information.
A. SOURCE: Press this button to access different audio modes, such asAM, FM and A/V Input.
B
D
A C
E
Audio System 375
2014 TaurusOwners Guide gf, 2nd Printing, September 2013USA (fus)

B. Seek, Reverse and Fast Forward:• In radio mode, select a frequency band and press one of these
buttons. The system stops at the first station it finds in that direction.• In Sirius mode, press these buttons to select the previous or next
channel. If a specific category is selected (such as Jazz, Rock orNews), use these buttons to find the previous or next channel in theselected category.
• In CD mode, press these buttons to select the previous or next track.
C. SOUND: Press this button to access settings for Treble, Middle, Bass,Balance and Fade.
D. TUNE + and TUNE - :• In radio mode, press these buttons to manually search through the
radio frequency band.• In Sirius mode, press these buttons to find the next or previous
available satellite radio station.
E. Power and Volume:• Press this button to switch the system off and on.• Turn it to adjust the volume.
HD RADIO™ INFORMATION (IF AVAILABLE)Note: HD Radio broadcasts are not available in all markets.
HD Radio technology is the digital evolution of analog AM/FM radio.Your system has a special receiver that allows it to receive digitalbroadcasts (where available) in addition to the analog broadcasts,it already receives. Digital broadcasts provide a better sound qualitythan analog broadcasts with free, crystal-clear audio and no static ordistortion. For more information, and a guide to available stations andprogramming, please visit www.hdradio.com.
When HD Radio is on and you tune to a station broadcasting HD Radiotechnology, you may notice the HD Radio logo on your screen. When thislogo is available, you may also see Title and Artist fields on-screen.
The multicast indicator appears in FM mode (only) if the current stationis broadcasting multiple digital broadcasts. The highlighted numberssignify available digital channels where new or different content isavailable. HD1 signifies the main programming status and is available inanalog and digital broadcasts. Other multicast stations (HD2 throughHD7) are only available digitally.
376 Audio System
2014 TaurusOwners Guide gf, 2nd Printing, September 2013USA (fus)

When HD Radio broadcasts are active, you can access the followingfunctions:
When you select: You can:
Scan Hear a brief sampling of all available stations.This feature still works when HD Radioreception is on, although it does not scan forHD2-HD7 channels. You may see the HD logoappear if the station has a digital broadcast.
To save a multicast
station as a preset
When the channel is active on-screen, pressand hold a memory preset slot until the soundreturns. There is a brief mute while the radiosaves the station. Sound returns whenfinished. When recalling a HD2 or HD3memory preset, there is a mute before thedigital audio plays, as the system must onceagain acquire the digital signal.As with any saved radio station, you cannotaccess the saved station if your vehicle isoutside the station’s reception area.
HD Radio Reception and Station Troubleshooting
Potential reception issues
Reception area If you are listening to a multicast station andyou are on the fringe of the reception area, thestation may mute due to weak signal strength.If you are listening to HD1, the systemswitches back to the analog broadcast until thedigital broadcast is available again. However, ifyou are listening to any of the possible HD2through HD7 multicast channels, the stationmutes and stays muted unless it is able toconnect to the digital signal again.
Audio System 377
2014 TaurusOwners Guide gf, 2nd Printing, September 2013USA (fus)

Potential reception issues
Station blending When the system first receives a station(aside from HD2-HD7 multicast stations), itfirst plays the station in the analog version.Once the receiver verifies the station is an HDRadio station, it shifts to the digital version.Depending on the station quality, you mayhear a slight sound change when the stationchanges from analog to digital. Blending is theshift from analog to digital sound or digitalback to analog sound.
In order to provide the best possible experience, use the contact form toreport any station issues found while listening to a station broadcastingwith HD Radio technology. Independent entities own and operate eachstation. These stations are responsible for making sure all audio streamsand data fields are accurate.
Potential station issues
Issue Cause Action
Echo, stutter, skip orrepeat in audio.Increase or decreasein audio volume.
This is poor timealignment by the radiobroadcaster.
No action required.This is a broadcastissue.
Sound fading orblending in and out.
The radio is shiftingbetween analog anddigital audio.
No action required.The reception issuemay clear up as youcontinue to drive.
There is an audiomute delay whenselecting HD2 or HD3,multicast preset orDirect Tune.
The digital multicast isnot available until theHD Radio broadcast isdecoded. Oncedecoded, the audio isavailable.
No action required.This is normalbehavior. Wait untilthe audio is available.
378 Audio System
2014 TaurusOwners Guide gf, 2nd Printing, September 2013USA (fus)

Potential station issues
Issue Cause Action
Cannot access HD2 orHD3 multicast channelwhen recalling apreset or from a directtune.
The previously storedmulticast preset ordirect tune is notavailable in yourcurrent reception area.
No action required.The station is notavailable in yourcurrent location.
Text information doesnot match currentlyplaying audio.
Data service issue bythe radio broadcaster.
Fill out the stationissue form at websitelisted below.*
There is no textinformation shown forcurrently selectedfrequency.
Data service issue bythe radio broadcaster.
Fill out the stationissue form at websitelisted below.*
HD2-HD7 stations notfound when Scan ispressed.
Pressing Scan disablesHD2-HD7 channelsearch.
No action required.This is normalbehavior.
*http://www.ibiquity.com/automotive/report_radio_station_experiences
HD Radio™ Technology manufactured under license from iBiquity DigitalCorp. U.S. and foreign patents. HD Radio™ and the HD and HD Radiologos are proprietary trademarks of iBiquity Digital Corp. Ford MotorCompany and iBiquity Digital Corp. are not responsible for the contentsent using HD Radio technology. Content may be changed, added ordeleted at any time at the station owner’s discretion.
SATELLITE RADIO INFORMATION (IF EQUIPPED)
Satellite Radio ChannelsSirius broadcasts a variety of music, news, sports, weather, traffic andentertainment satellite radio channels. For more information and acomplete list of Sirius satellite radio channels, visit www.siriusxm.com inthe United States, www.sirius.ca in Canada, or call Sirius at1–888–539–7474.
Note: This receiver includes the eCos real-time operating system. eCosis published under the eCos License.
Audio System 379
2014 TaurusOwners Guide gf, 2nd Printing, September 2013USA (fus)

Satellite Radio Reception Factors
Potential satellite radio reception issues
Antenna
obstructions
For optimal reception performance, keep theantenna clear of snow and ice build-up andkeep luggage and other material as far awayfrom the antenna as possible.
Terrain Hills, mountains, tall buildings, bridges,tunnels, freeway overpasses, parking garages,dense tree foliage and thunderstorms caninterfere with your reception.
Station overload When you pass a ground-basedbroadcast-repeating tower, a stronger signalmay overtake a weaker one and the audiosystem may mute.
Satellite radio signal
interference
Your display may show ACQUIRING . . . toindicate the interference and the audiosystem may mute.
Sirius Satellite Radio ServiceNote: Sirius reserves the unrestricted right to change, rearrange, add ordelete programming including canceling, moving or adding particularchannels, and its prices, at any time, with or without notice to you.Ford Motor Company shall not be responsible for any such programmingchanges.
Sirius satellite radio is asubscription-based satellite radioservice that broadcasts a variety ofmusic, sports, news, weather, trafficand entertainment programming.Your factory-installed Sirius satelliteradio system includes hardware and
a limited subscription term which begins on the date of sale or lease ofyour vehicle. See an authorized dealer for availability.
For more information on extended subscription terms (a service fee isrequired), the online media player and a complete list of Sirius satelliteradio channels, and other features, please visit www.siriusxm.com in theUnited States, www.sirius.ca in Canada, or call Sirius at 1–888–539–7474.
380 Audio System
2014 TaurusOwners Guide gf, 2nd Printing, September 2013USA (fus)

Satellite Radio Electronic Serial Number (ESN)You need your ESN to activate, modify or track your satellite radioaccount. When in satellite radio mode, you can view this number bypressing SIRIUS and memory preset 1 at the same time. To access yourESN, press the bottom left corner of the touchscreen, then SIRIUS >Options.
Troubleshooting
Radio display Condition Possible action
Acquiring Radio requires morethan two seconds toproduce audio for theselected channel.
No action required.This message shoulddisappear shortly.
Sat Fault/SIRIUSsystem failure
There is an internalmodule or systemfailure present.
If this message doesnot clear shortly, orwith an ignition keycycle, your receivermay have a fault. Seean authorized dealerfor service.
Invalid Channel The channel is nolonger available.
Tune to anotherchannel or chooseanother preset.
Unsubscribed Channel Your subscriptiondoes not include thischannel.
Contact Sirius at1–888–539–7474 tosubscribe to thechannel, or tune toanother channel.
No Signal The signal is lost fromthe Sirius satellite orSirius tower to yourvehicle antenna.
The signal is blocked.When you move intoan open area, thesignal should return.
Audio System 381
2014 TaurusOwners Guide gf, 2nd Printing, September 2013USA (fus)

Radio display Condition Possible action
Updating Update of channelprogramming inprogress.
No action required.The process may takeup to three minutes.
Call SIRIUS1–888–539–7474
Your satellite service isno longer available.
Call Sirius at1–888–539–7474 toresolve subscriptionissues.
None Found. CheckChannel Guide.
All the channels in theselected category areeither skipped orlocked.
Use the channel guideto turn off the Lock orSkip function on thatstation.
Subscription Updated Sirius has updated thechannels available foryour vehicle.
No action required.
AUXILIARY INPUT JACK
WARNING: Driving while distracted can result in loss of vehiclecontrol, crash and injury. We strongly recommend that you use
extreme caution when using any device that may take your focus offthe road. Your primary responsibility is the safe operation of yourvehicle. We recommend against the use of any hand-held device whiledriving and encourage the use of voice-operated systems when possible.Make sure you are aware of all applicable local laws that may affect theuse of electronic devices while driving.
WARNING: For safety reasons, do not connect or adjust thesettings on your portable music player while your vehicle is
moving.
382 Audio System
2014 TaurusOwners Guide gf, 2nd Printing, September 2013USA (fus)

WARNING: Store the portable music player in a secure location,such as the center console or the glove box, when your vehicle is
moving. Hard objects may become projectiles in a crash or sudden stop,which may increase the risk of serious injury. The audio extension cablemust be long enough to allow the portable music player to be safelystored while your vehicle is moving.
The auxiliary input jack allows youto connect and play music fromyour portable music player throughyour vehicle speakers. You can useany portable music player designedfor use with headphones. Your audioextension cable must have male1⁄8-inch (3.5 millimeter) connectorsat each end.
1. Switch off the engine, radio and portable music player. Set theparking brake and put the transmission in position P.
2. Plug the extension cable from the portable music player into theauxiliary input jack.
3. Switch the radio on. Select either a tuned FM station or a CD.4. Adjust the volume as desired.5. Switch your portable music player on and adjust its volume to half
its maximum level.6. Press AUX until LINE or LINE IN appears in the display. You
should hear music from your device even if it is low.7. Adjust the volume on your portable music player until it reaches the
volume level of the FM station or CD. Do this by switching back andforth between the AUX and FM or CD controls.
LINE IN
Audio System 383
2014 TaurusOwners Guide gf, 2nd Printing, September 2013USA (fus)

USB PORT (IF EQUIPPED)
WARNING: Driving while distracted can result in loss of vehiclecontrol, crash and injury. We strongly recommend that you use
extreme caution when using any device that may take your focus offthe road. Your primary responsibility is the safe operation of yourvehicle. We recommend against the use of any hand-held device whiledriving and encourage the use of voice-operated systems when possible.Make sure you are aware of all applicable local laws that may affect theuse of electronic devices while driving.
The USB port is located in the center console. It allows you to plug inmedia playing devices, memory sticks and charge devices (if supported).See the SYNC chapter for more information.
MEDIA HUB (IF EQUIPPED)The media hub is located in the center console and has the followingfeatures:
A. A/V inputs
B. SD card slot
C. USB ports
For more information, see the MyFord Touch chapter.
C
BA
384 Audio System
2014 TaurusOwners Guide gf, 2nd Printing, September 2013USA (fus)

SYNC is an in-vehicle communications system that works with yourBluetooth-enabled cellular phone and portable media player. This allowsyou to:• Make and receive calls.
• Access and play music from your portable music player.
• Use 911 Assist, Vehicle Health Report and SYNC Services (Traffic,Directions & Information) (if equipped).
• Use applications, such as Pandora and Stitcher, via SYNC AppLink™(if applicable).
• Access phonebook contacts and music via voice commands.
• Stream music from your connected phone.
• Text message.
• Use the advanced voice recognition system.
• USB device charging (if your device supports this).
SYNC® 385
2014 TaurusOwners Guide gf, 2nd Printing, September 2013USA (fus)

GENERAL INFORMATIONMake sure you review your device’s manual before using it with SYNC.
SupportThe SYNC support team is available to help you with any questions youcannot answer on your own.
Monday-Saturday, 8:30am-9:00pm EST.
Sunday, 10:30am-7:30pm EST.
In the United States, call: 1–800–392–3673.
In Canada, call: 1–800–565–3673.
Times are subject to change due to holidays.
SYNC Owner AccountWhy do I need a SYNC owner account?• Required to activate Vehicle Health Report and to view the reports
online.• Required to activate the subscription-based SYNC Services and to
personalize your Saved Points and Favorites.• Essential for keeping up with the latest software downloads available
for SYNC.• Access to customer support for any questions you may have.
Driving RestrictionsFor your safety, certain features are speed-dependent and restrictedwhen your vehicle is traveling over 3 mph (5 km/h).
Safety Information
WARNING: Driving while distracted can result in loss of vehiclecontrol, crash and injury. We strongly recommend that you use
extreme caution when using any device that may take your focus offthe road. Your primary responsibility is the safe operation of yourvehicle. We recommend against the use of any handheld device whiledriving and encourage the use of voice-operated systems when possible.Make sure you are aware of all applicable local laws that may affect theuse of electronic devices while driving.
386 SYNC®
2014 TaurusOwners Guide gf, 2nd Printing, September 2013USA (fus)

When using SYNC:• Do not operate playing devices if the power cords or cables are broken,
split or damaged. Place cords and cables out of the way, so they do notinterfere with the operation of pedals, seats, compartments or safedriving abilities.
• Do not leave playing devices in your vehicle during extreme conditionsas it could cause them damage. See your device’s manual for furtherinformation.
• Do not attempt to service or repair the system. See your authorizeddealer.
For your safety, some SYNC functions are speed-dependent. Their use islimited to when your vehicle is traveling at speeds under 3 mph (5 km/h).Make sure that you review your device’s manual before using it with SYNC.
Privacy InformationWhen a cellular phone is connected to SYNC, the system creates aprofile within your vehicle that is linked to that cellular phone. Thisprofile is created in order to offer you more cellular features and tooperate more efficiently. Among other things, this profile may containdata about your cellular phone book, text messages (read and unread),and call history, including history of calls when your cell phone was notconnected to the system. In addition, if you connect a media device,the system creates and retains an index of supported media content.The system also records a short development log of approximately10 minutes of all recent system activity. The log profile and other systemdata may be used to improve the system and help diagnose any problemsthat may occur.
The cellular profile, media device index, and development log remain inthe vehicle unless you delete them and are generally accessible only inthe vehicle when the cellular phone or media player is connected. If youno longer plan to use the system or the vehicle, we recommend youperform a Master Reset to erase all stored information.
System data cannot be accessed without special equipment and accessto the vehicle’s SYNC module. Ford Motor Company and Ford of Canadado not access the system data for any purpose other than as describedabsent consent, a court order, or where required by law enforcement,other government authorities, or other third parties acting withlawful authority. Other parties may seek to access the informationindependently of Ford Motor Company and Ford of Canada. For furtherprivacy information, see the sections on 911 Assist, Vehicle HealthReport, and Traffic, Directions and Information.
SYNC® 387
2014 TaurusOwners Guide gf, 2nd Printing, September 2013USA (fus)

USING VOICE RECOGNITIONThis system helps you control many features using voice commands.This allows you to keep your hands on the wheel and focus on what is infront of you.
Initiating a Voice SessionPush the voice icon; a tone sounds and Listening appears in thedisplay. Say any of the following:
Say: If you want to:
“Phone” Make calls.“USB” Access the device connected to your USB port.“Bluetooth Audio” Stream audio from your phone.“Line in” Access the device connected to the auxiliary
input jack.“Cancel” Cancel the requested action.“SYNC” Return to the main menu.“Voice settings” Adjust the level of voice interaction and
feedback.“Vehicle Health Report” Run a vehicle health report.*
“Services” Access the SYNC Services portal.*
“Mobile apps” Access mobile applications.*
“Help” Hear a list of voice commands available in thecurrent mode.
*If equipped, U.S. only.
System Interaction and FeedbackThe system provides feedback through audible tones, prompts, questionsand spoken confirmations depending on the situation and the chosenlevel of interaction (voice settings). You can customize the voicerecognition system to provide more or less instruction and feedback.
The default setting is to a higher level of interaction in order to help youlearn to use the system. You can change these settings at any time.
388 SYNC®
2014 TaurusOwners Guide gf, 2nd Printing, September 2013USA (fus)

Adjusting the Interaction LevelPush the voice icon; when prompted, say “Voice settings”, thenany of the following:
When you say: The system:
“Interaction mode standard” Provides more detailed interaction andguidance.
“Interaction mode advanced” Provides less audible interaction andmore tone prompts.
The system defaults to the standard interaction mode.
Confirmation prompts are short questions the system asks when it is notsure of your request or when there are multiple possible responses toyour request. (For example, the system may ask “Phone, is thatcorrect?”) If turned off, the system simply makes a best guess as to whatyou requested and you may still occasionally be asked to confirmsettings.
“Confirmation prompts on”“Confirmation prompts off”
The system creates candidate lists when it has the same confidence levelof several options based on your voice command. When turned on, youmay be prompted with as many as four possibilities for clarification.
For example, “Say 1 after the tone to call John Doe at home. Say 2 afterthe tone to call Johnny Doe on mobile. Say 3 after the tone to call JaneDoe at home.” Or, “Say 1 after the tone to play John Doe, Say 2 after thetone to play Johnny Doe.”
“Phone candidate lists on”“Phone candidate lists off”“Media candidate lists on”“Media candidate lists off”
SYNC® 389
2014 TaurusOwners Guide gf, 2nd Printing, September 2013USA (fus)

Helpful Hints• Make sure the interior of the vehicle is as quiet as possible. Wind
noise from open windows and road vibrations may prevent the systemfrom correctly recognizing spoken commands.
• After pressing the voice icon, wait until after the tone sounds andListening appears before saying a command. Any command spokenprior to this does not register with the system.
• Speak naturally, without long pauses between words.
• At any time you can interrupt the system while it is speaking bypressing the voice icon.
USING SYNC WITH YOUR PHONEHands-free calling is one of the main features of SYNC. While the systemsupports a variety of features, many are dependent on your cellularphone’s functionality. At a minimum, most cellular phones with Bluetoothwireless technology support the following functions:
• Answering an incoming call
• Ending a call
• Using privacy mode
• Dialing a number
• Redialing
• Call waiting notification
• Caller ID.
Other features, such as text messaging using Bluetooth and automaticphonebook download, are phone-dependent features. To check yourphone’s compatibility, see your phone’s user manual and visitwww.SYNCMyRide.com, www.SYNCMyRide.ca or www.syncmaroute.ca.
Pairing a Phone for the First TimeNote: SYNC can support downloading up to approximately 1000 entriesper Bluetooth-enabled cellular phone.
Note: Make sure the vehicle ignition and radio are turned on and thetransmission is in position P.
Note: To scroll through the menus, press the up and down arrows onyour audio system.
390 SYNC®
2014 TaurusOwners Guide gf, 2nd Printing, September 2013USA (fus)

Wirelessly pairing your phone with SYNC allows you to make and receivehands-free calls.1. Press the phone button; when the display indicates no phone is
paired, press OK.2. When Find SYNC appears in the display, press OK.3. Put your phone into Bluetooth discovery mode. See your phone’s
user guide if necessary.4. When prompted on your phone’s display, enter the six-digit PIN
provided by SYNC in the radio display.5. The display indicates when the pairing is successful.
Depending on your phone’s capability and your market, the system mayprompt you with questions such as setting the current phone as theprimary phone (the phone SYNC automatically tries to connect with firstupon vehicle start-up), downloading your phone book, etc.
Pairing Subsequent PhonesNote: To scroll through the menus, press the up and down arrows onyour audio system.
Note: Make sure the vehicle ignition and radio are turned on and thatthe transmission is in position P.1. Press the phone button and scroll until System Settings is selected.2. Press OK and scroll until Bluetooth Devices is selected and press OK.3. Scroll until Add Bluetooth Device is selected and press OK.4. When Find SYNC appears in the display, press OK.5. Put your phone into Bluetooth discovery mode. See your phone’s
user guide if necessary.6. When prompted on your phone’s display, enter the six-digit PIN
provided by SYNC in the radio display. The display indicates whenthe pairing is successful.
7. The system then prompts with questions such as if you would like toset the current phone as the primary phone (the phone SYNCautomatically tries to connect with first upon vehicle start-up),download your phone book, etc.
SYNC® 391
2014 TaurusOwners Guide gf, 2nd Printing, September 2013USA (fus)

Phone Voice CommandsPress the voice icon and say “Phone”. Say any of the following:
“PHONE”
“Call <name>”1,2
“Call <name> on mobile OR cell”1,2
“Call <name> on other”1,2
“Phone book <name> at home”2
“Phone book <name> on mobile OR cell”2
“Call history outgoing”2
“Phone book <name> on Other”2
“Call history missed”2
“Menu”2,3
“Join”“Call <name> at home”1,2
“Call <name> at work” OR “Call <name> in office”1,2
“Dial”1,4
“Phone book <name>”2
“Phone book <name> at work” OR “Phone book <name> at office”2
“Call history incoming”2
“Connections”2
“Go to privacy”“Hold”
1These commands do not require you to say “Phone” first.2These commands are not available until phone information is completelydownloaded using Bluetooth.3See “MENU” table below.4See “DIAL” table below.
“MENU”
“(Phone) connections”*
“(Phone) settings (message) notification off”*
“(Phone) settings (message) notification on”*
392 SYNC®
2014 TaurusOwners Guide gf, 2nd Printing, September 2013USA (fus)

“MENU”
“(Phone) settings (set) phone ringer”*
“(Phone) settings (set) ringer 1”*
“(Phone) settings (set) ringer 2”*
“(Phone) settings (set) ringer 3”*
“(Phone) settings (set) ringer off”*
“Battery”“Phone name”
“Signal”“Text message inbox”
*Words in ( ) are optional and do not have to be spoken for the systemto understand the command.
Phone book commands: When you ask SYNC® to access a phone bookname, number, etc., the requested information appears in the display toview. Press the phone button and say “Call” to call the contact.
“DIAL”
“411” (four-one-one), “911” (nine-one-one)“700 (seven hundred)” (seven hundred)“800 (eight hundred)” (eight hundred)“900 (nine hundred)” (nine hundred)
“#” (pound)“<number> 0–9”
“Asterisk” (*)“Clear” (deletes all entered digits)
“Delete” (deletes one digit)“Plus”“Star”
Note: To exit dial mode, press and hold the phone button or pressMENU to go to the PHONE menu.
SYNC® 393
2014 TaurusOwners Guide gf, 2nd Printing, September 2013USA (fus)

Making CallsPress the voice icon and when prompted say:1. Say “Call <name>” or “Dial”, then the desired number.2. When the system confirms the number, say “Dial” again to initiate the
call.
To erase the last spoken digit, say “Delete” or press the left arrowbutton. To erase all spoken digits, say “Clear” or press and hold the leftarrow button.
To end the call, press and hold the phone button.
Receiving CallsWhen receiving a call, you can:
• Answer the call by pressing the phone button.
• Reject the call by pressing and holding the phone button.
• Ignore the call by doing nothing.
Phone Options during an Active CallDuring an active call, you have additional menu features which becomeavailable such as putting a call on hold, joining calls, etc. Use the arrowbuttons to scroll through the menu options.
To access:1. Press MENU during an active call.2. When Active Call Menu is selected, press OK.3. Scroll to cycle through the following options:
When you select: You can:
Mute Call? Mute the call.Privacy Switch a call from an active hands-free
environment to your cellular phone for a moreprivate conversation.Press OK when Privacy on/off appears.(The display indicates In Privacy and the systemtransfers your call.)
394 SYNC®
2014 TaurusOwners Guide gf, 2nd Printing, September 2013USA (fus)
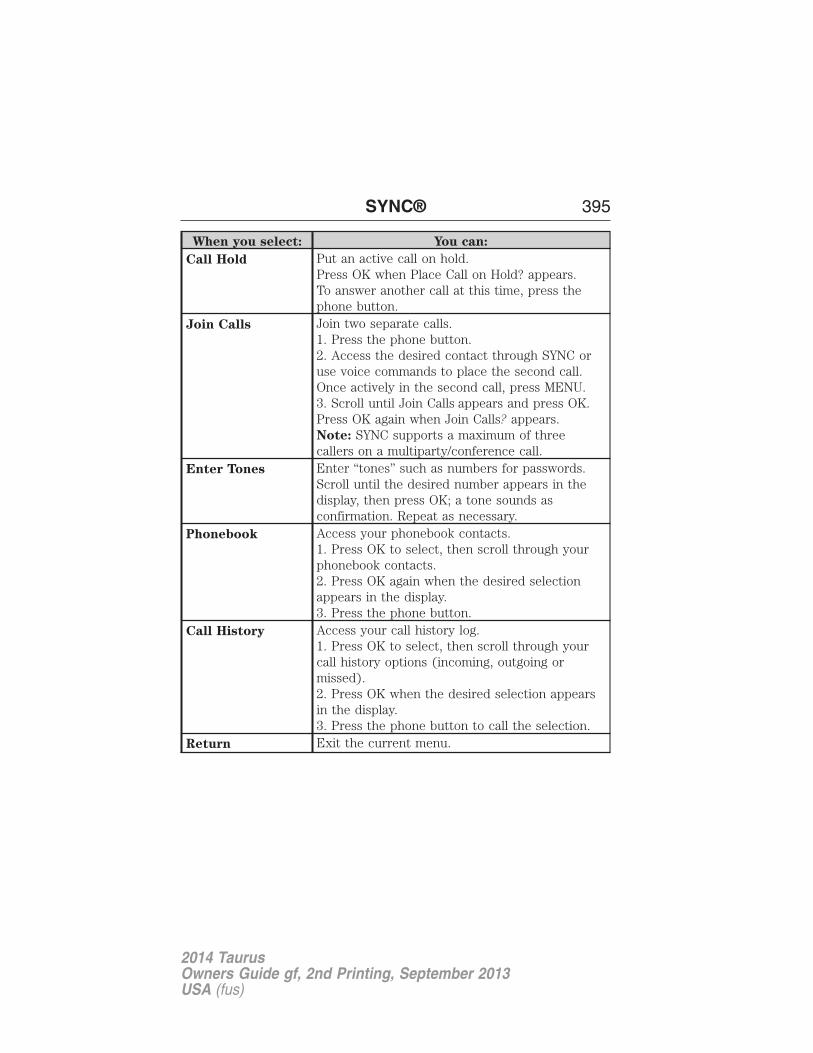
When you select: You can:
Call Hold Put an active call on hold.Press OK when Place Call on Hold? appears.To answer another call at this time, press thephone button.
Join Calls Join two separate calls.1. Press the phone button.2. Access the desired contact through SYNC oruse voice commands to place the second call.Once actively in the second call, press MENU.3. Scroll until Join Calls appears and press OK.Press OK again when Join Calls? appears.Note: SYNC supports a maximum of threecallers on a multiparty/conference call.
Enter Tones Enter “tones” such as numbers for passwords.Scroll until the desired number appears in thedisplay, then press OK; a tone sounds asconfirmation. Repeat as necessary.
Phonebook Access your phonebook contacts.1. Press OK to select, then scroll through yourphonebook contacts.2. Press OK again when the desired selectionappears in the display.3. Press the phone button.
Call History Access your call history log.1. Press OK to select, then scroll through yourcall history options (incoming, outgoing ormissed).2. Press OK when the desired selection appearsin the display.3. Press the phone button to call the selection.
Return Exit the current menu.
SYNC® 395
2014 TaurusOwners Guide gf, 2nd Printing, September 2013USA (fus)

Accessing Features through the Phone MenuSYNC’s phone menu allows you to redial a number, access your callhistory and phone book and send text messages as well as access phoneand system settings. You can also access advanced features, such as 911Assist, Vehicle Health Report and SYNC Services.1. Press the phone button to enter the Phone Menu.2. Scroll to cycle through:
When you select: You can:
Phone Redial Redial the last number called (if available). PressOK to select, then press OK again to confirm.
Call History1 Allows you to access any previously dialed,received or missed calls while your phone hasbeen connected to the system.1. Press OK to select.2. Scroll to select from Call History Incoming,Call History Outgoing or Call History Missed.Press OK make your selection.3. Press OK or the phone button to call thedesired selection.Note: The system attempts to automaticallyre-download your phone book and call historyeach time your phone connects to SYNC(if the auto download feature is on and yourBluetooth-enabled cellular phone supports thisfeature).
Phonebook1,2 Allows you to access your downloadedphonebook.1. Press OK to confirm and enter. If yourphonebook has fewer than 255 listings, theyappear alphabetically in flat file mode. If thereare more, they are organized into alphabeticalcategories.2. Scroll until the desired contact appears, thenpress OK.3. Press OK or the phone button.
396 SYNC®
2014 TaurusOwners Guide gf, 2nd Printing, September 2013USA (fus)

When you select: You can:
Text Message1 Enables you to send, download and delete textmessages.
Phone Settings1 Allows you to view your phone’s status, set ringtones, select your message notification, changephone book entries and automatically downloadyour cellular phone among other features.
SYNC Services3 Access the SYNC services portal where you canrequest various types of information, trafficreports and directions.
911 Assist4 Place an emergency call to a 911 operator foryou after an accident (if the feature is usedproperly).
Vehicle Health
Report3Create and receive a diagnostic report card onyour vehicle.
Mobile Apps3 Interact with SYNC-capable mobile applicationson your smartphone.
System Settings Access Bluetooth Devices menu listings (add,connect, set as primary, on/off, delete) as well asAdvanced menu listings (prompts, languages,defaults, master reset, install application andsystem information).
Exit Phone Menu Exit the phone menu by pressing OK.1This is a phone-dependent feature.2This is a phone-dependent and speed-dependent feature.3If equipped, United States only.4If equipped, United States and Canada only.
Text MessagingNote: This is a phone-dependent feature.
SYNC allows you to receive, send, download and delete text messages.The system can also read incoming text messages to you so that you donot have to take your eyes off the road.
SYNC® 397
2014 TaurusOwners Guide gf, 2nd Printing, September 2013USA (fus)

Receiving a Text MessageNote: This is a phone-dependent feature. Your phone must supportdownloading text messages using Bluetooth to receive incoming textmessages.
Note: Forwarding a text message is a speed-dependent feature and canonly be done when the vehicle is traveling at 3 mph (5 km/h) or less.
Note: Only one recipient is allowed per text message.
When a new message arrives, an audible tone sounds and the displayindicates you have a new message. You have these options:1. Press the voice button, wait for the prompt and say “Read Message”
to have SYNC read the message to you.2. Press OK to receive and open the text message or do nothing and
the message goes into your text message inbox. Press OK again andSYNC reads your message aloud as you are not able to view themessage. You can then also choose whether you’d like to reply orforward the message.
3. Press OK and scroll to choose between:• Reply to Text Message: Press OK to access and then scroll
through the list of pre-defined messages to send.• Forward Text Message: Press OK to forward the message to
anyone in your Phonebook or Call History. You can also chooseEnter Number.
Sending, Downloading and Deleting Your Text MessagesText messaging is a phone-dependent feature. If your phone iscompatible, SYNC allows you to receive, send, download and delete textmessages.1. Press the phone button.2. Scroll until Text Message appears and press OK.3. Scroll to select from the following options:
Send Text Message? enables you to send a new text message based ona pre-defined set of 15 messages.Download Unread Msgs allows you to download your unread messages(only) to SYNC. To download the messages, press OK to select. Thedisplay indicates your messages are being downloaded. When complete,SYNC takes you to your inbox.Delete All Messages? allows you to delete current text messages fromSYNC (not your phone). To delete the messages, press OK to select.The display indicates when all your text messages have been deleted andSYNC returns you to the text message menu.
398 SYNC®
2014 TaurusOwners Guide gf, 2nd Printing, September 2013USA (fus)

Note: SYNC does not automatically download all of your unread textmessages at every ignition cycle (as it does with call history andphonebook if automatic download is set to on).
Return exits the current menu when you press OK.
If you select Send Text Message?:1. Press OK to select. If the system detects your phone does not
support this feature, Unsupported appears in the display and SYNCreturns to the main menu.
2. Scroll to cycle through the message options in the following chart.3. Press OK when the desired selection is in the display. The system
now needs to know who to send the message to.4. Scroll to cycle through Phonebook or Call History entries. You can
also select Enter Number to audibly enter a desired number.5. Press OK to enter the desired menu and scroll to select the specific
contact.6. Press OK when the contact appears and press OK again to confirm
when the system asks if you would like to send the message. Eachtext message is sent with the following signature: “This message wassent from my <Ford or Lincoln>”.
Pre-defined text message options
Can’t talk right nowCall me
Call you laterBe there in 10 minutesBe there in 20 minutes
YesNo
Why?Thanks
Where R you?I need more directions
I love youToo funny
Can’t wait to see youI’m stuck in traffic
SYNC® 399
2014 TaurusOwners Guide gf, 2nd Printing, September 2013USA (fus)

Accessing Your Phone SettingsThese are phone-dependent features. Your phone settings allow you toaccess and adjust features such as your ring tone, text messagenotification, modify your phone book and also set up automaticdownload.1. Press the phone button.2. Scroll until Phone Settings appears, then press OK.3. Scroll to select from the following options:
When you select: You can:
Phone Status See the provider, name, signal power, batterypower and roaming status of your connectedphone.Press OK to select and scroll to view theinformation. When done, press OK again toreturn to the phone status menu.
Set Ringer Select which ring tone sounds during anincoming call (one of the system’s or yourphone’s).1. Press OK to select and scroll to hearRinger 1, Ringer 2, Ringer 3 and PhoneRinger.2. Press OK to select.Note: If your phone supports in-band ringing,your phone’s ringer sounds when PhoneRinger is chosen.
Message Notification Have the option of hearing an audible tone tonotify you when a text message arrives.1. Press OK to select and scroll betweenMessage Notification On or MessageNotification Off.2. Press OK to select.
400 SYNC®
2014 TaurusOwners Guide gf, 2nd Printing, September 2013USA (fus)

When you select: You can:
Modify Phonebook Modify the contents of your phone book(such as add, delete, download). Press OK toselect and scroll between:Add Contacts: Press OK to add more contactsfrom your phone book. Push the desiredcontact(s) on your phone. See your phone’suser guide on how to push contacts.Delete Phonebook: Press OK to delete thecurrent phone book and call history. WhenDelete Phonebook appears, press OK toconfirm. SYNC takes you back to the PhoneSettings menu.Download Phonebook: Press OK to select andpress OK again when ConfirmDownload? appears.
Auto Download Automatically download your phone bookeach time your phone connects to SYNC.Press OK to select. When Auto DownloadOn? appears, press OK to have yourphonebook automatically downloaded eachtime.Select Off to NOT download your phonebookevery time your phone connects to SYNC.Your phonebook, call history and textmessages can only be accessed when yourspecific phone is connected to SYNC.Note: Downloading times are phone- andquantity-dependent.Note: When auto download is on, anychanges, additions or deletions saved sinceyour last download are deleted.
Return Exit the current menu.
SYNC® 401
2014 TaurusOwners Guide gf, 2nd Printing, September 2013USA (fus)

System SettingsSystem Settings provide access to your Bluetooth Devices andAdvanced menu features. Use the arrow buttons to scroll through themenu options.
The Bluetooth Devices menu allows you to add, connect, delete and seta phone as primary as well as turn your Bluetooth feature on and off.
The Advanced menu allows you to access and set prompts, languages,defaults, perform a master reset, install an application and view systeminformation.
Bluetooth Devices Menu OptionsThis menu allows you to add, connect, delete, set a phone as primary,and turn Bluetooth on or off.1. Press the phone button to enter the Phone Menu.2. Scroll until System Settings appears and press OK.3. Scroll until Bluetooth Devices appears and select OK.4. Scroll to select from the following options:
If you select: You can:
Add Bluetooth
Device*See Using SYNC with your phone earlier inthis chapter for pairing instructions.
Connect Bluetooth
Device
Connect a previously pairedBluetooth-enabled phone.1. Press OK to select and view a list ofpreviously paired phones.2. Scroll until the desired device is chosen,then press OK to connect the phone.Note: Only one device can be connected at atime. When another phone is connected, theprevious one is disconnected.
Set Primary Phone Set a previously paired phone as your primaryphone.Press OK to select and scroll to select thedesired phone. Press OK to confirm.Note: SYNC attempts to connect with theprimary phone at every ignition cycle. When aphone is selected as primary, it appears firstin the list and is marked with an asterisk (*).
402 SYNC®
2014 TaurusOwners Guide gf, 2nd Printing, September 2013USA (fus)

If you select: You can:
Set Bluetooth On/Off Turn the Bluetooth feature on and off.Press OK and scroll to toggle between On andOff. When the desired selection is chosen,press OK.Note: Turning Bluetooth off disconnects allBluetooth devices and deactivates allBluetooth features.
Delete Device Delete a paired phone.Press OK and scroll to select the device.Press OK to confirm.
Delete All Devices Delete all previously paired phones (and allinformation originally saved with those phones).Press OK to select.
Return Exit the current menu.*This is a speed-dependent feature.
Advanced Menu OptionsThis menu allows you to access settings such as prompts, languages,defaults, perform a master reset, install an application and view systeminformation.1. Press the phone button to enter the Phone Menu.2. Scroll until System Settings appears and press OK.3. Scroll until Advanced appears and select OK.4. Scroll to select from the following options:
If you select: You can:
Prompts Get help from SYNC by using questions,helpful hints or asking you for a specificaction. To turn these prompts on or off:1. Press OK to select and scroll to selectbetween on or off.2. Press OK when the desired selectionappears in the display. SYNC takes you backto the Advanced menu.
SYNC® 403
2014 TaurusOwners Guide gf, 2nd Printing, September 2013USA (fus)

If you select: You can:
Languages Choose between English, Espanol and Francais.Once selected, all of SYNC’s radio displays andprompts are in the selected language.1. Press OK to select and then scroll throughthe languages.2. Press OK when the desired selection appearsin the display. If you change the languagesetting, the display indicates that the system isupdating. When complete, SYNC takes youback to the Advanced menu.
Factory Defaults Return to the factory default settings.This selection does not erase your indexedinformation (phonebook, call history, textmessages and paired devices).1. Press OK to select and then press OK againwhen Restore Defaults? appears in the display.2. Press OK to confirm.
Master Reset Completely erase all information stored onSYNC (phonebook, call history, text messagesand paired devices) and return to the factorydefault settings.Press OK to select. The display indicateswhen complete and SYNC takes you back tothe Advanced menu.
Install Application Install applications you have downloaded.Press OK and scroll to select. Press OK toconfirm.
System Info Access the Auto Version number as well asthe FPN number.Press OK to select.
MAP Profile This is a Bluetooth component which canfurther help your phone with the exchange oftext messages.
Return Exit the current menu.
404 SYNC®
2014 TaurusOwners Guide gf, 2nd Printing, September 2013USA (fus)

SYNC APPLICATIONS AND SERVICES (IF EQUIPPED)Note: In order for the following features to work, your cellular phonemust be compatible with SYNC. To check your phone’s compatibility, visitwww.SYNCMyRide.com, www.SYNCMyRide.ca or www.syncmaroute.ca.
• SYNC Services (if equipped, United States only): Provides access totraffic, directions and information such as travel, horoscopes, stockprices and more.
• 911 Assist: Can alert 911 in the event of an emergency.
• Vehicle Health Report (if equipped, United States only): Provides adiagnostic and maintenance report card of your vehicle.
911 Assist®
WARNING: Unless the 911 Assist setting is set on prior to acrash, the system will not dial for help which could delay
response time, potentially increasing the risk of serious injury or deathafter a crash.
WARNING: Do not wait for 911 Assist to make an emergencycall if you can do it yourself. Dial emergency services
immediately to avoid delayed response time which could increase therisk of serious injury or death after a crash. If you do not hear 911Assist within five seconds of the crash, the system or phone may bedamaged or non-functional.
WARNING: Always place your phone in a secure location in thevehicle so it does not become a projectile or get damaged in a
crash. Failure to do so may cause serious injury to someone or damagethe phone which could prevent 911 Assist from working properly.
Note: SYNC 911 Assist feature must be set on prior to the incident.
Note: Before setting this feature on, ensure that you read the 911 Assistprivacy notice later in this section for important information.
Note: If 911 Assist is turned on or off by any user, that setting appliesfor all paired phones. If 911 Assist is turned off, a voice message playsand/or a display message/icon comes on when the vehicle is started aftera previously paired phone connects.
SYNC® 405
2014 TaurusOwners Guide gf, 2nd Printing, September 2013USA (fus)

Note: Every phone operates differently. While SYNC 911 Assist workswith most cellular phones, some may have trouble using this feature.
If a crash deploys an airbag (excludes knee airbags and rear inflatablesafety belts [if equipped]) or activates the fuel pump shut-off, your SYNCequipped vehicle may be able to contact emergency services by dialing911 through a paired and connected Bluetooth-enabled phone. For moreinformation about 911 Assist, visit www.SYNCMyRide.com,www.SYNCMyRide.ca or www.syncmaroute.ca.
• For information on airbag deployment, see the Supplementary
Restraints System chapter.
• For information on the fuel pump shut-off, see the Roadside
Emergencies chapter.
Setting 911 Assist OnPerform the following:1. Press the phone button to enter the Phone Menu.2. Scroll until 911 Assist is selected.3. Press OK to confirm and enter the 911 Assist menu.4. Scroll to select between On and Off selections.5. Press OK when the desired option appears in the radio display.
Set On or Set Off appears in the display as confirmation.
Off selections include: Off with reminder and Off without reminder.Off with reminder provides a display and voice reminder at phoneconnection at vehicle start. Off without reminder provides a displayreminder only without a voice reminder at phone connection.
To make sure that 911 Assist works properly:
• SYNC must be powered and working properly at the time of theincident and throughout feature activation and use.
• SYNC 911 Assist feature must be set on prior to the incident.
• A Bluetooth-enabled and compatible phone has to be paired andconnected to SYNC.
• A connected Bluetooth-enabled phone must have the ability to makeand maintain an outgoing call at the time of the incident.
• A connected Bluetooth-enabled phone must have adequate networkcoverage, battery power and signal strength.
• The vehicle must have battery power and be located in the UnitedStates, Canada or in a territory in which 911 is the emergency number.
406 SYNC®
2014 TaurusOwners Guide gf, 2nd Printing, September 2013USA (fus)

In the Event of a CrashNot all crashes deploy an airbag or activate the fuel pump shut-off(which would activate 911 Assist); however, if 911 Assist is triggered,SYNC tries to contact emergency services. If a connected phone isdamaged or loses connection to SYNC, SYNC searches for, and tries toconnect to, any available previously paired phone and tries to make thecall to 911.
Before making the call:• SYNC provides a short window of time (about 10 seconds) to cancel
the call. Failure to cancel the call results in SYNC attempting to dial911.
• SYNC says the following, or a similar message: “SYNC will attempt tocall 911, to cancel the call, press Cancel on your screen or press andhold the phone button on your steering wheel.”
If the call is not cancelled and a successful call is made, a pre-recordedmessage is played for the 911 operator, then the occupant(s) in thevehicle is able to talk with the operator. Be prepared to provide yourname, phone number and location immediately, because not all 911systems are capable of receiving this information electronically.
911 Assist May Not Work If• Your cellular phone or 911 Assist hardware was damaged in a crash.
• The vehicle’s battery or SYNC system has no power.
• The phone(s) paired and connected to the system was thrown fromthe vehicle.
911 Assist Privacy NoticeOnce 911 Assist is set on, it may disclose to emergency services that thevehicle has been in a crash involving the deployment of an airbag oractivation of the fuel pump shut-off. Certain versions or updates to 911Assist may also be capable of electronically or verbally disclosing to 911operators the vehicle location, and/or other details about the vehicle orcrash to assist 911 operators to provide the most appropriate emergencyservices. If you do not want to disclose this information, do not turn thefeature on.
SYNC® 407
2014 TaurusOwners Guide gf, 2nd Printing, September 2013USA (fus)

Vehicle Health Report
WARNING: Always follow scheduled maintenance instructions,regularly inspect your vehicle, and seek repair for any damage or
problem you suspect. Vehicle Health Report supplements, but cannotreplace normal maintenance and vehicle inspection. Vehicle HealthReport only monitors certain systems that are electronically monitoredby the vehicle and will not monitor or report the status of any othersystem, (i.e., brake lining wear). Failure to perform scheduledmaintenance and regularly inspect your vehicle may result in vehicledamage and serious injury.
Note: Your Vehicle Health Report feature requires activation prior touse. Visit www.SYNCMyRide.com to register. There is no fee orsubscription associated with Vehicle Health Report, but you must registerto use this feature.
Note: This feature may not function properly if you have enabled callerID blocking on your mobile phone. Before running a report, review theVehicle Health Report privacy notice.
Note: In order to allow a break-in period for your vehicle, you may notbe able to create a Vehicle Health Report until your vehicle odometerhas reached 200 miles.
Register for Vehicle Health Report and set your report preferences atwww.SYNCMyRide.com. After registering, you can request a VehicleHealth Report (inside your vehicle). Return to your account atwww.SYNCMyRide.com to view your report. You can also choose forSYNC to automatically remind you to run reports at specific mileageintervals. Cellular phone airtime usage may apply when reporting.
The system allows you to check your vehicle’s overall health in the formof a diagnostic report card. The vehicle health report contains valuableinformation such as:
• Vehicle Diagnostic Information
• Scheduled maintenance
• Open Recalls and Field Service Actions
• Unserviced items from vehicle inspections by your authorized dealer.
You can run a report (after the vehicle has been running a minimum of60 seconds) by pressing the voice button and saying “Vehicle healthreport”, or pressing the phone button.
408 SYNC®
2014 TaurusOwners Guide gf, 2nd Printing, September 2013USA (fus)

To run a report using the phone button:1. Press the phone button to enter Phone Menu.2. Scroll until Vehicle Health is selected and press OK.3. Scroll to select from the following options:
Vehicle Health Report options
User Preferences:
Press OK to select
and enter the menu.
Scroll to select from:
Automatic Reports: Press OK and select onor off. Select On to have SYNC automaticallyprompt you to run a health report at certainmileage intervals. Note: You must first turnthis feature on before you can select themileage intervals at which you would like tobe prompted.Mileage Intervals: Press OK. Scroll to selectbetween 5000, 7500 or 10000 mile intervalsand press OK to make your selection.Return: Press OK to exit the menu.
Run Report? Press OK for SYNC to run a health report ofyour vehicle’s diagnostic systems and send theresults to Ford where it is combined withscheduled maintenance information, openrecalls and other field service actions andunserviced vehicle inspection items from yourauthorized dealer.
Vehicle Health Report Privacy NoticeWhen you run a Vehicle Health Report, Ford Motor Company maycollect your cellular phone number (to process your report request) anddiagnostic information about your vehicle. Certain versions or updates toVehicle Health Report may also collect additional vehicle information.Ford may use the vehicle information it collects for any purpose.If you do not want to disclose your cellular phone number or vehicleinformation, do not run the feature or set up your Vehicle Health Reportprofile at www.SYNCMyRide.com. See www.SYNCMyRide.com - VehicleHealth Report Terms and Conditions, and Privacy Statement - for moreinformation.
SYNC® 409
2014 TaurusOwners Guide gf, 2nd Printing, September 2013USA (fus)

SYNC Services: Traffic, Directions & Information (TDI)Note: SYNC Services requires activation prior to use. Visitwww.SYNCMyRide.com to register and check your eligibility forcomplimentary services. Standard phone and message rates may apply.Subscription may be required. You must also have the active SYNCServices Bluetooth-enabled cellular phone paired and connected to thesystem in order to connect to, and use, SYNC Services. See Using SYNCwith your phone for pairing instructions.
Note: This feature does not function properly if you have enabled callerID blocking on your mobile phone. Make sure your mobile phone is notblocking caller ID before using SYNC Services.
Note: The driver is ultimately responsible for the safe operation of thevehicle, and therefore, must evaluate whether it is safe to follow thesuggested directions. Any navigation features are provided only as anaid. Make your driving decisions based on your observations of localconditions and existing traffic regulations. Do not follow the routesuggestions if doing so would result in an unsafe or illegal maneuver, ifyou would be placed in an unsafe situation, or if you would be directedinto an area that you consider unsafe. Maps used by this system may beinaccurate because of errors, changes in roads, traffic conditions ordriving conditions.
Note: When you connect, the service uses GPS technology and advancedvehicle sensors to collect the vehicle’s current location, travel directionand speed to help provide you with the directions, traffic reports, orbusiness searches you request. Further, to provide the services yourequest and for continuous improvement, the service may collect andrecord call details and voice communications. For more information, seeSYNC Services Terms and Conditions at www.SYNCMyRide.com. If youdo not want Ford or its service providers to collect the vehicle travelinformation or other information identified in the Terms and Conditions,do not activate or use the service.
SYNC Services uses advanced vehicle sensors, integrated GPS technologyand comprehensive map and traffic data, to give you personalized trafficreports, precise turn-by-turn directions, business search, news, sports,weather and more. For a complete list of services, or to learn more,please visit www.SYNCMyRide.com.
410 SYNC®
2014 TaurusOwners Guide gf, 2nd Printing, September 2013USA (fus)

Connecting to SYNC Services Using Voice Commands1. Press the voice button.2. When prompted, say “Services”. This initiates an outgoing call to
SYNC Services using your paired and connected Bluetooth-enabledcellular phone.
3. Once you are connected to the service, follow the voice prompts torequest the desired service, such as “Traffic” or “Directions”. You canalso say “What are my choices?” to receive a complete list of availableservices from which to choose.
4. Say “Services” to return to the services main menu or for help, say “Help”.
Connecting to SYNC Services Using the Phone Menu1. Press the phone button to enter the Phone Menu.2. Scroll until Services appears in the display.3. Press OK to confirm and enter the Services menu. The display
indicates the system is connecting.4. Press OK. SYNC initiates the call to the Services portal.5. Once connected, follow the voice prompts to request your desired
Service, such as Traffic or Directions. You can also say “What are mychoices?” to receive a complete list of available services from whichto choose.
6. To return to the Services menu, say “Services” or for help, say “Help”.
Receiving Turn-by-Turn Directions1. When connected to SYNC Services, say “Directions” or “Business
search”. To find the closest business or type of business to yourcurrent location, just say “Business search” and then “Search nearme”. If you need further assistance in finding a location you can say“Operator” at any time within a Directions or Business search tospeak with a live operator. You may also be prompted to speak withan operator when the automatic system has difficulty matching yourvoice request. The live operator can assist you by searching forbusinesses by name or by category, residential addresses by streetaddress or by name or specific street intersections. Operator Assist isa feature of your SYNC Services subscription. For more informationon Operator Assist visit www.SYNCMyRide.com/support.
2. Follow the voice prompts to select your destination. Once yourdestination is selected, your current vehicle location is uploaded anda route based on current traffic conditions is calculated and sentback to your vehicle. After the route download is complete, thephone call is automatically ended. You then receive audible and visualdriving instructions as you travel toward your destination.
SYNC® 411
2014 TaurusOwners Guide gf, 2nd Printing, September 2013USA (fus)

3. While on an active route, you can select or say “Route summary” or“Route status” to view the Route Summary turn list or the RouteStatus ETA. You can also turn voice guidance on or off, cancel theroute or update the route.
If you miss a turn, SYNC automatically asks if you want the routeupdated. Just say, “Yes” when prompted and a new route will bedelivered to your vehicle.
Disconnecting from SYNC Services1. Press and hold the phone button on the steering wheel.2. Say “Good-bye” from the SYNC Services main menu.
SYNC Services quick tips
Personalizing You can personalize your Services feature toprovide quicker access to your most used orfavorite information. You can save addresspoints such as work or home. You can alsosave favorite information like sports teams ora news category. To learn more, log ontowww.SYNCMyRide.com.
Push to interrupt Press the voice button at any time (while youare connected to SYNC Services) to interrupta voice prompt or an audio clip (such as asports report), wait for the listening tone, andsay your voice command.
Portable Your subscription is associated with yourBluetooth-enabled cellular phone number,not your VIN (Vehicle Identification Number).You can pair and connect your phone to anyvehicle equipped with SYNC Services andcontinue enjoying your personalized services.You can even access your account outside thevehicle. Just use the number on your phone’scall history. Traffic and Directions features donot function properly but information servicesand the 411 connect and text messagefeatures are available.
412 SYNC®
2014 TaurusOwners Guide gf, 2nd Printing, September 2013USA (fus)

USING SYNC WITH YOUR MEDIA PLAYER
You can access and play music from your digital music player over thevehicle’s speaker system using the system’s media menu or voicecommands. You can also sort and play your music by specific categories,such as artists, albums, etc.
SYNC is capable of hosting nearly any digital media player including:iPod, Zune™, Plays from device players, and most USB drives. SYNC alsosupports audio formats such as MP3, WMA, WAV and ACC.
Connecting Your Digital Media Player via the USB Port
Note: If your digital media player has a power switch, ensure that thedevice is turned on.
To connect using voice commands:1. Plug the device into the vehicle’s USB port.2. Press the voice icon and when prompted, say “USB”.3. You can now play music by saying any of the appropriate voice
commands. See the media voice commands.
To connect using the system menu:1. Plug the device into the vehicle’s USB port.2. Press AUX and then MENU to enter the Media Menu.3. Scroll until Select Source appears and press OK.4. Scroll to select USB and press OK.5. Depending on how many digital media files are on your connected
device, Indexing may appear in the radio display. When indexing iscomplete, the screen returns to the Play Menu.
6. Press OK and scroll through selections of:• Play All• Artists• Albums• Genres• Playlists• Tracks• Explore USB• Similar Music• Return
When the desired selection appears in the display, press OK to buildyour desired music selection.
SYNC® 413
2014 TaurusOwners Guide gf, 2nd Printing, September 2013USA (fus)

What’s Playing?At any time when a track is playing, you can press the voiceicon and ask the system, “What’s playing?”. The system readsthe metadata tags (if populated) of the playing track to you.
Media Voice CommandsPress the voice icon and, when prompted, say “USB” then anyof the following:
“USB”
“Autoplay off”“Autoplay on”
“(Phone) (Media) (Bluetooth) Connections”“Pause”“Play”
“Play album <name>”1,3
“Play all”“Play artist <name>”1,3
“Play genre <name>”1,3
“Play next folder”2
“Play next track”“Play playlist <name>”1,3
“Play previous folder”2
“Play previous track”“Play song <name>”1,3
“Play track <name>”1,3
“Refine album <name>”1,3
“Refine artist <name>”1,3
“Refine song <name>”1,3
“Refine track <name>”1,3
“Repeat off”“Repeat on”
“Search album <name>”1,3
“Search artist <name>”1,3
“Search genre <name>”1,3
414 SYNC®
2014 TaurusOwners Guide gf, 2nd Printing, September 2013USA (fus)

“USB”
“Search song <name>”1,3
“Search track <name>”1,3
“Shuffle off”“Shuffle on”
“Similar music”“What’s playing?”
1“<name>” is a dynamic listing, meaning that it could be the name of anydesired group, artist, etc.2Voice commands which are only available in folder mode.3Voice commands which are not available until indexing is complete.
Voice command guide
“Autoplay” Turn on to listen to music which has alreadybeen randomly indexed during the indexingprocess.Turn off and the system does not begin toplay any of your music until all media has allbeen indexed. Indexing times can vary fromdevice to device and also with regard to thenumber of songs being indexed.
“Search/Play Genre” The system searches all the data from yourindexed music and, if available, begins to playthe chosen type of music. You can only playgenres of music which are present in theGENRE metadata tags that you have on yourdigital media player.
“Similar Music” The system compiles a playlist and then playssimilar music to what is currently playingfrom the USB port using indexed metadatainformation.
“Search/Play
Artist/Track/Album”
The system searches for a specificartist/track/album from the music indexedthrough the USB port.
SYNC® 415
2014 TaurusOwners Guide gf, 2nd Printing, September 2013USA (fus)

Voice command guide
“Refine” This allows you to make your previouscommand more specific. For example, if youasked to search and play all music by acertain artist, you could then say “refinealbum” and choose a specific album from thelist to view. If you then select Play, the systemonly plays music from that specific album.
Press the voice icon and when prompted say “Bluetooth Audio” and thenany of the following:
“BLUETOOTH AUDIO”
“(Phone) (Media) (Bluetooth) Connections”“Pause”“Play”
“Play next track ”“Play previous track ”
Media Menu FeaturesThe media menu allows you to select your media source, how to playyour music (by artist, genre, shuffle, repeat, etc.), and also to add,connect or delete devices.1. Press AUX and then MENU to enter the Media Menu.2. Scroll to cycle through:
When you select: You can:
Play Menu Play your music by artist, album, genre,playlists, tracks, similar music or to simply,play all. You can also choose to Explore USBto view the supported digital music files onyour playing device.See Play Menu later in this section for moreinformation.
416 SYNC®
2014 TaurusOwners Guide gf, 2nd Printing, September 2013USA (fus)
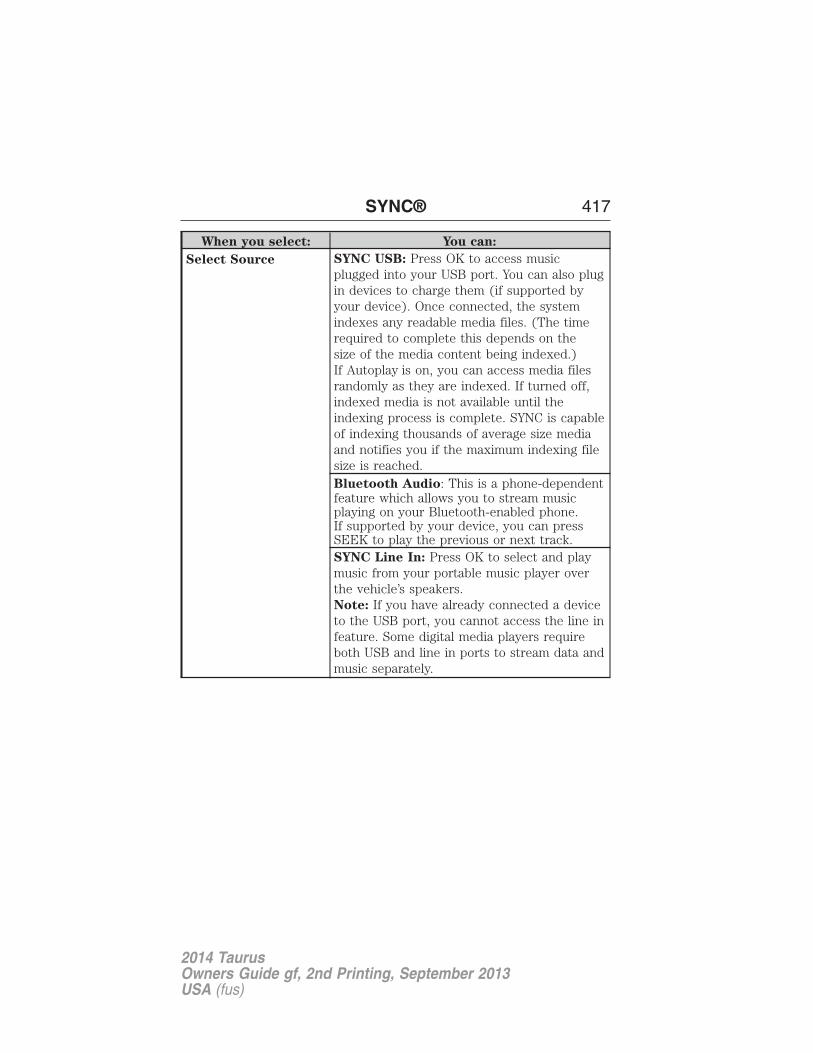
When you select: You can:
Select Source SYNC USB: Press OK to access musicplugged into your USB port. You can also plugin devices to charge them (if supported byyour device). Once connected, the systemindexes any readable media files. (The timerequired to complete this depends on thesize of the media content being indexed.)If Autoplay is on, you can access media filesrandomly as they are indexed. If turned off,indexed media is not available until theindexing process is complete. SYNC is capableof indexing thousands of average size mediaand notifies you if the maximum indexing filesize is reached.Bluetooth Audio: This is a phone-dependentfeature which allows you to stream musicplaying on your Bluetooth-enabled phone.If supported by your device, you can pressSEEK to play the previous or next track.SYNC Line In: Press OK to select and playmusic from your portable music player overthe vehicle’s speakers.Note: If you have already connected a deviceto the USB port, you cannot access the line infeature. Some digital media players requireboth USB and line in ports to stream data andmusic separately.
SYNC® 417
2014 TaurusOwners Guide gf, 2nd Printing, September 2013USA (fus)

When you select: You can:
Media Settings Choose to shuffle or repeat your music andselect your Autoplay settings. Once theseselections are turned on, they remain on untilturned off. Press SEEK to play the previousor next track.Note: Some digital media players requireboth USB and line in ports to stream data andmusic separately. Press OK to select and thenscroll to choose from:Shuffle: Press OK to shuffle available mediafiles in the current playlist. Note: To shuffleall media tracks, you must select Play All inthe Play Menu and then select Shuffle.Repeat: Press OK to repeat any song.Autoplay: Press OK to listen to music whichhas already been randomly indexed duringthe indexing process.
Mobile Apps Interact with SYNC-capable mobileapplications on your smart phone. See SYNC
AppLink earlier in this chapter for moreinformation.
System Settings Access Bluetooth Device menu listings(add, connect, set as primary, on/off, delete)as well as Advanced menu listings (prompts,languages, defaults, master reset, installapplication and system information).Note: See System Settings for moreinformation.
Exit Media Menu Press OK to exit the media menu.
418 SYNC®
2014 TaurusOwners Guide gf, 2nd Printing, September 2013USA (fus)

Accessing Your Play MenuThis menu allows you to select and play your media by artist, album,genre, playlist, track, similar music or even to explore what is on yourUSB device.1. Make sure that your device is plugged into the USB port and is
turned on.2. Press AUX and then MENU to enter the Media Menu.3. Scroll to select the Play Menu and press OK.
If there are no media files to access, the display indicates there is nomedia. If there are media files, you have the following options to scrollthrough and select from:
When you select: You can:
Play All Play all indexed media (tracks) from yourplaying device in flat file mode, one at a timein numerical order.Press OK to select. The first track titleappears in the display.
Artists Sort all indexed media by artist. Onceselected, the system lists and then play allartists and tracks alphabetically. If there areless than 255 indexed artist, they are listedalphabetically in flat file mode. If there aremore, they are categorized in alphabeticalcategories.1. Press OK to select. You can select to playAll Artists or any indexed artist.2. Scroll until the desired artist is chosen andpress OK.
SYNC® 419
2014 TaurusOwners Guide gf, 2nd Printing, September 2013USA (fus)

When you select: You can:
Albums Sort all indexed media by albums. If there areless than 255 indexed albums, they are listedalphabetically in flat file mode. If there aremore, they are organized into alphabeticalcategories.1. Press OK to enter the album menu andselect from playing all albums or from anyindividual indexed album.2. Scroll until the desired album is chosen andpress OK.
Genres Sort indexed music by genre (category) type.SYNC lists the genres alphabetically in flat filemode. If there are more than 255, SYNCautomatically organizes them into alphabeticalcategories.Press OK to select and then scroll to selectthe desired genre and press OK.
Playlists Access your playlists (from formats such asASX, .M3U, .WPL, .MTP.). The system listsyour playlists alphabetically in flat file mode.If there are more than 255, they are organizedinto alphabetical categories.Press OK to select. Then scroll to select thedesired playlist and press OK.
Tracks Search for and play a specific track which hasbeen indexed. SYNC lists your tracksalphabetically in flat file mode. If there aremore than 255, SYNC automatically organizesthem into alphabetical categories.Press OK to select. Then scroll to select thedesired track and press OK.
420 SYNC®
2014 TaurusOwners Guide gf, 2nd Printing, September 2013USA (fus)

When you select: You can:
Explore USB Explore all supported digital media on yourmedia device connected to the USB port.You can only view media content which iscompatible with SYNC; other files saved arenot visible.Press OK to select. Then scroll to exploreindexed media on your flash drive.
Similar Music Play music similar to what is currently playingfrom the USB port. The system uses themetadata information of each song to compilea playlist for you.Press OK to select. The system creates anew list of similar songs and begins playing.The metadata tags must be populated for thisfeature to include each track.Note: With certain playing devices, if yourmetadata tags are not populated, the trackswon’t be available in voice recognition, playmenu or similar music. However, if you placethese tracks onto your playing device in “MassStorage Device Mode”, they are available invoice recognition, play menu browsing andsimilar music. Unknowns are placed into anyunpopulated metadata tag.
Return Exit the current menu.
System SettingsSystem settings provide access to your Bluetooth Devices andAdvanced menu features.
The Bluetooth Devices menu allows you to add, connect and delete adevice as turn the Bluetooth feature on and off.
Your Advanced menu allows you to access and set prompts, languages,defaults and perform a master reset.
SYNC® 421
2014 TaurusOwners Guide gf, 2nd Printing, September 2013USA (fus)

Bluetooth Devices Menu OptionsThis menu allows you to add, connect and delete devices as well as turnBluetooth on and off.1. Press AUX and then MENU to enter the Media Menu.2. Scroll until System Settings appears and select OK.3. Scroll until Bluetooth Devices appears.4. Press OK and then scroll to select from:
When you select: You can:
Add Bluetooth
Device*Allows you to pair additional devices to thesystem.1. Press OK to select and press OK againwhen Find SYNC appears in the display.2. Follow the directions in your phone’s userguide to put your phone into discovery mode.A six-digit PIN appears in the display.3. When prompted on your phone’s six-digitdisplay, enter the PIN.
Connect Bluetooth
Device
Connect a previously pairedBluetooth-enabled phone.1. Press OK to select and view a list ofdevices.2. Scroll until the desired device is chosenand press OK to connect the device.
Set Bluetooth On/Off Turn the Bluetooth feature on and off.Press OK and scroll to toggle between On andOff. When the desired selection is chosen,press OK. Turning Bluetooth off disconnectsall Bluetooth devices and deactivatesBluetooth features.
Delete Device Delete a paired media device.Press OK and scroll to select the device.Press OK to confirm.
Delete All Devices Delete all previously paired devices.Press OK to select.
Return Exit the current menu.*This is a speed-dependent feature
422 SYNC®
2014 TaurusOwners Guide gf, 2nd Printing, September 2013USA (fus)

Advanced Menu OptionsThis menu allows you to access settings such as prompts, language,performing a master reset as well as returning to factory defaults.1. Press AUX and then MENU to access the Media Menu.2. Scroll until System Settings appears and select OK.3. Scroll until Advanced appears.4. Press OK and then scroll to select from the following:
When you select: You can:
Prompts Have SYNC guide you via questions, helpfulhints or ask you for a specific action.1. Press OK to select and scroll to selectbetween on or off.2. Press OK when the desired selectionappears in the display. SYNC takes you backto the Advanced menu.
Languages Choose from English, Francais and Espanol.The displays and prompts are in the selectedlanguage.1. Press OK to select and then scroll throughthe languages.2. Press OK when the desired selectionappears in the display.3. If you change the language setting, thedisplay indicates that the system is updating.When complete, SYNC takes you back to theAdvanced menu.
Factory Defaults Return to the factory default settings. Thisselection does not erase your indexedinformation (phonebook, call history, textmessages and paired devices).1. Press OK to select and then press OK againwhen Restore Defaults? appears in the display.2. Press OK to confirm.
SYNC® 423
2014 TaurusOwners Guide gf, 2nd Printing, September 2013USA (fus)

When you select: You can:
Master Reset Completely erase all information stored onSYNC (all phonebook, call history, textmessages and all paired devices) and returnto the factory default settings.
Application Download new software applications(if available) and then load the desiredapplications through your USB port. See theweb site for more information.
Return Exit the current menu.
TROUBLESHOOTINGYour SYNC system is easy to use. However, should questions arise,see the tables below.
Use the website at any time to check your phone’s compatibility,register your account and set preferences as well as access acustomer representative via an online chat (during certain hours).Visit www.SYNCMyRide.com, www.SYNCMyRide.ca orwww.syncmaroute.ca for more information.
Phone issues
Issue Possible cause(s) Possible solution(s)
Excessivebackgroundnoise during aphone call.
The audio controlsettings on yourphone may beaffecting SYNCperformance.
Review your phone’s user guideregarding audio adjustments.
During a call,I can hear theother personbut they cannothear me.
Possible phonemalfunction.
Try turning off the device,resetting the device, removing thedevice’s battery, then trying again.
424 SYNC®
2014 TaurusOwners Guide gf, 2nd Printing, September 2013USA (fus)

Phone issues
Issue Possible cause(s) Possible solution(s)
SYNC is notable todownload myphonebook.
• This is aphone-dependentfeature, OR• Possible phonemalfunction.
• Go to the website to review yourphone’s compatibility.• Try turning off the device,resetting the device or removingthe device’s battery, then tryingagain.• Try pushing your phonebookcontacts to SYNC by using theAdd Contacts feature.• Use the SYNCmyphone featureavailable on the website.
The systemsays PhonebookDownloadedbut myphonebook inSYNC is emptyor is missingcontacts.
Limitations on yourphone’s capability.
• Try pushing your phonebookcontacts to SYNC by using theAdd Contacts feature.• If the missing contacts arestored on your SIM card, trymoving them to the devicememory.• Remove any pictures or specialring tones associated with themissing contact.
SYNC® 425
2014 TaurusOwners Guide gf, 2nd Printing, September 2013USA (fus)

Phone issues
Issue Possible cause(s) Possible solution(s)
I am havingtroubleconnecting myphone to SYNC.
• This is aphone-dependentfeature, OR• Possible phonemalfunction.
• Go to the website to review yourphone’s compatibility.• Try turning off the device,resetting the device or removingthe device’s battery, then tryingagain.• Try deleting your device fromSYNC, deleting SYNC from yourdevice and trying again.• Check the security and autoaccept/prompt always settingsrelative to the SYNC Bluetoothconnection on your phone.• Update your device’s softwarefirmware.• Turn off the Auto phonebookdownload setting.
Text messagingis not workingon SYNC.
• This is aphone-dependentfeature, OR• Possible phonemalfunction.
• Go to the website to review yourphone’s compatibility.• Try turning off the device,resetting the device or removingthe device’s battery, then tryingagain.
426 SYNC®
2014 TaurusOwners Guide gf, 2nd Printing, September 2013USA (fus)

USB and media issues
Issue Possible cause(s) Possible solution(s)
I am havingtroubleconnecting mydevice.
Possible devicemalfunction.
• Try turning off the device,resetting the device or removingthe device’s battery, then tryingagain.• Make sure you are using themanufacturer’s cable.• Make sure the USB cable isproperly inserted into the deviceand the vehicle’s USB port.• Make sure that the device doesnot have an auto-install programor active security settings.
SYNC does notrecognize mydevice whenI turn on thecar.
This is a devicelimitation.
Make sure you are not leaving thedevice in your vehicle during veryhot or cold temperatures.
Bluetoothaudio does notstream.
• This is aphone-dependentfeature, OR• The device is notconnected.
Make sure the device isconnected to SYNC and thatyou have pressed play on yourdevice.
SYNC® 427
2014 TaurusOwners Guide gf, 2nd Printing, September 2013USA (fus)

USB and media issues
Issue Possible cause(s) Possible solution(s)
SYNC does notrecognizemusic that ison my device.
• Your music filesmay not containthe proper artist,song title, album orgenre information,OR• The file may becorrupted, OR• The song mayhave copyrightprotection whichdoes not allow itto play.
• Make sure that all song detailsare populated.• Some devices require you tochange the USB settings frommass storage to MTP class.
Vehicle Health Report and SYNC Services
(Traffic, Directions and Information) issues
Issue Possible cause(s) Possible solution(s)
I received atext that theVehicle HealthReport is notactivated.
• Your account maynot be activated onthe website, OR• You may have thewrong VIN (vehicleidentificationnumber) listed.
• This is a free feature, but youmust first register online to use it.• Make sure that your VIN iscorrectly listed in your account.
I am unable toretrieve thereport on thewebsite, or Ireceive asystem error.
The preferreddealer informationdid not loadcorrectly.
When you register your account,you must list a preferred dealer.If one is already listed, tryselecting another dealer andlogging out. Log back in andchange it back to your preferreddealer and retrieve the report.
428 SYNC®
2014 TaurusOwners Guide gf, 2nd Printing, September 2013USA (fus)

Vehicle Health Report and SYNC Services
(Traffic, Directions and Information) issues
Issue Possible cause(s) Possible solution(s)
I am unable tosubmit a report.
• This could be dueto your phone’scompatibility, OR• Bad signalstrength, OR• Your phone maynot be activated onthe website.
• Update your mobile number inyour account on the website.• Make sure you have full signalstrength and that your Bluetooth
volume level has been turned up.• Try deleting your phone andperforming a clean pairing.
I heard acommercialwhen I tried touse Traffic,Directions andInformation.
• The phone in useis not activated, OR• Your phone hasID blocker active.
• This is a free feature, but youmust first register online to use it.• Turn off ID blocker on yourphone as the system recognizesyou by your phone number.• Make sure the currentlyconnected phone is the sameone that is registered on yourSyncMyRide account.
SYNC® 429
2014 TaurusOwners Guide gf, 2nd Printing, September 2013USA (fus)

Voice command issues
Issue Possible cause(s) Possible solution(s)
SYNC does notunderstandwhat I amsaying.
• You may beusing the wrongvoice commands,OR• You may bespeaking too soonor at the wrongtime.
• Review the Phone voicecommands and the Media voicecommands at the beginning oftheir respective sections.• Be aware that SYNC’smicrophone is either in your rearview mirror or in the headlinerjust above the windshield.
SYNC does notunderstand thename of a songor artist.
• You may beusing the wrongvoice commands,OR• You may not besaying the nameexactly as it issaved, OR• The system maynot be reading thename the sameway you aresaying it.
• Review the media voicecommands at the beginning ofthe media section.• Say the song or artist exactlyas listed. If you say, “Play ArtistPrince”, the system does not playmusic by Prince and theRevolution or Prince and theNew Power Generation.• Make sure you are saying thecomplete title, such as “Californiaremix featuring Jennifer Nettles”.• If the songs are saved in allCAPS, you have to spell them.LOLA requires you to say, “PlayL-O-L-A”.• Do not use special charactersin the title as the system doesnot recognize them.
430 SYNC®
2014 TaurusOwners Guide gf, 2nd Printing, September 2013USA (fus)

Voice command issues
Issue Possible cause(s) Possible solution(s)
SYNC does notunderstand oris calling thewrong contactwhen I want tomake a call.
• You may be usingthe wrong voicecommands, OR• You may not besaying the nameexactly as it issaved, OR• Contacts in yourphonebook may bevery short andsimilar, or they maycontain specialcharacters, OR• Your phonebookcontacts may besaved in CAPS.
• Review the phone voicecommands at the beginning ofthe phone section.• Make sure you are saying thecontacts exactly as listed.For example, if a contact is savedas Joe Wilson, say“Call Joe Wilson”.• The system works better if youlist full names, such as“Joe Wilson” rather than “Joe”.• Do not use special characterssuch as 123 or ICE, as thesystem does not recognize them.• If contacts are saved in CAPS,you have to spell them. JAKErequires you to say, “CallJ-A-K-E”.
AppLink issues
Issue Possible cause(s) Possible solution(s)
SYNC does notfind any mobileapps that areon my phone.
• Your device maynot support theAppLink feature, OR• The applicationdoes not supportAppLink., OR• If you have aniPhone, it may notbe plugged in, OR• Your phone maynot be paired orconnected.
• Check the website forcompatible devices andapplications.• Make sure your device is pairedand connected. If you have aniPhone, make sure it is pluggedin using the USB and that theapplication is running in theforeground.
SYNC® 431
2014 TaurusOwners Guide gf, 2nd Printing, September 2013USA (fus)

INTRODUCTION
WARNING: Driving while distracted can result in loss of vehiclecontrol, crash and injury. We strongly recommend that you use
extreme caution when using any device that may take your focus offthe road. Your primary responsibility is the safe operation of yourvehicle. We recommend against the use of any hand-held device whiledriving and encourage the use of voice-operated systems when possible.Make sure you are aware of all applicable local laws that may affect theuse of electronic devices while driving.
A. Phone
B. Navigation (or Information if your vehicle is not equipped withNavigation)
C. Climate
D. Settings
E. Home
F. Information
G. Entertainment
A B
G CDF E
432 MyFord Touch® (If Equipped)
2014 TaurusOwners Guide gf, 2nd Printing, September 2013USA (fus)

This system uses a four-corner strategy to provide quick access severalvehicle features and settings. The touchscreen provides easy interactionwith your cellular phone, multimedia, climate control and navigationsystem. The corners display any active modes within those menus, suchas phone status or the climate temperature.
Note: Some features are not available while your vehicle is moving.
Note: Your system is equipped with a feature that allows you to accessand control audio features for 30 minutes after you switch the ignitionoff (and no doors open).
PHONE
Press to select any of the following:• Making and Receiving Calls• Quick Dial• Phonebook• Call History• Text Messaging• Settings
NAVIGATION
Press to select any of the following:• My Home• Favorites• Previous Destinations• Point of Interest• Emergency• Street Address• Intersection• City Center• Map• Edit Route Cancel Route
CLIMATE
Press to select any of the following:• Driver Settings• Recirculated Air• Auto• Dual• Passenger Settings• A/C• Defrost
MyFord Touch® (If Equipped) 433
2014 TaurusOwners Guide gf, 2nd Printing, September 2013USA (fus)

SETTINGS
Press to select any of the following:• Clock• Display• Sound• Vehicle• Settings• Help
HOME
Press to access your home screen. Depending on your vehicle’s optionpackage and software, your screens may vary in appearance from thedescriptions in this section. Your features may also be limited dependingon your market. Check with your authorized dealer for availability.
INFORMATION
Press to select any of the following:• SYNC Services• Sirius Travel Link• Alerts• Calendar• SYNC Apps
If the icon is yellow, see Alerts in the Information section of thischapter.
ENTERTAINMENT
Press to select any of the following:• AM• FM• SIRIUS• CD• USB• BT Stereo• SD Card• A/V In
434 MyFord Touch® (If Equipped)
2014 TaurusOwners Guide gf, 2nd Printing, September 2013USA (fus)

Using the Touch-sensitive Controls on Your SystemTo turn a feature on and off, just touch the graphic with your finger.To get the best performance from the touch-sensitive controls:• Do not press hard on the controls. They are sensitive to light touch.• Use your bare finger to touch the center of a touch-control graphic.
Touching off-center of the graphic may affect operation of a nearbycontrol.
• Make sure your hands are clean and dry.• Keep metal and other conductive material away from the surface
of the touchscreen as this may cause electronic interference(for example, inadvertently turning on a feature other than the oneyou meant to turn on).
Depending on your vehicle and option package, you may also have thesecontrols on your bezel:• Power: Switch the media or climate features off and on.• VOL: Control the volume of playing media.• Fan: Control the speed of the climate system fan.• Seek and Tune buttons: Use as you normally would in media modes.• Eject: Eject a CD from the entertainment system.• SOURCE: Touch the word repeatedly to see all available media
modes. The screen does not change, but you see the media change inthe lower left status bar.
• SOUND: Touch the word to access the Sound menu where you canadjust settings such as: Bass, Treble, Midrange, Balance and Fade,THX Deep Note Demo, DSP (Digital Signal Processing), OccupancyMode and Speed Compensated Volume. (Your vehicle may not haveall of these sound options.)
• Hazard flasher: Switch the hazard flashers off and on.
Cleaning the Touchscreen DisplayUse a clean, soft cloth such as one used for cleaning glasses. If dirt orfingerprints are still visible, apply a small amount of alcohol to the cloth.Do not pour or spray alcohol onto the display. Do not use detergent orany type of solvent to clean the display.
MyFord Touch® (If Equipped) 435
2014 TaurusOwners Guide gf, 2nd Printing, September 2013USA (fus)
SupportThe SYNC support team is available to help you with any questions youcannot answer on your own.
Monday-Saturday, 8:30am-9:00pm EST.
Sunday, 10:30am-7:30pm EST.
In the United States, call: 1–800–392–3673.
In Canada, call: 1–800–565–3673.
Times are subject to change due to holidays.
Safety Information
WARNING: Driving while distracted can result in loss of vehiclecontrol, crash and injury. We strongly recommend that you use
extreme caution when using any device that may take your focus offthe road. Your primary responsibility is the safe operation of yourvehicle. We recommend against the use of any handheld device whiledriving and encourage the use of voice-operated systems when possible.Make sure you are aware of all applicable local laws that may affect theuse of electronic devices while driving.
When using SYNC:
• Do not operate playing devices if the power cords or cables arebroken, split or damaged. Place cords and cables out of the way, sothey do not interfere with the operation of pedals, seats,compartments or safe driving abilities.
• Do not leave playing devices in your vehicle during extreme conditionsas it could cause them damage. See your device’s manual for furtherinformation.
• Do not attempt to service or repair the system. See your authorizeddealer.
For your safety, some SYNC functions are speed-dependent. Their use islimited to when your vehicle is traveling at speeds under 3 mph (5 km/h).
Make sure that you review your device’s manual before using it withSYNC.
436 MyFord Touch® (If Equipped)
2014 TaurusOwners Guide gf, 2nd Printing, September 2013USA (fus)

Speed-restricted Features
Some features of this system may be too difficult to use while yourvehicle is moving so they are restricted from use unless your vehicle isstationary.
• Screens that are too crowded with information, such as Point ofInterest reviews and ratings, Sirius Travel Link sports scores, movietimes and ski conditions.
• Any action that requires you to use a keyboard is restricted, such asentering a navigation destination or editing information.
• All lists are limited so the user can view fewer entries (such as phonecontacts or recent phone call entries).
See the following chart for more specific examples:
Restricted Features
Cellular Phone Pairing a Bluetooth phoneAdding phonebook contacts or uploadingphonebook contacts (from a USB)List entries are limited for phone contacts andrecent phone call entries
System Functionality Editing the keypad codeEnabling Valet ModeEditing settings while the rear view camera orActive Park Assist are active
Wi-Fi and Wireless Editing wireless settingsEditing the list of wireless networks
Videos, Photos andGraphics
Playing videoEditing the screen’s wallpaper or adding newwallpaper
Text Messages Composing text messagesViewing received text messagesEditing preset text messages
Navigation Using the keyboard to enter a destinationDemo navigation routeAdding or Editing Address Book entries orAvoid Areas
MyFord Touch® (If Equipped) 437
2014 TaurusOwners Guide gf, 2nd Printing, September 2013USA (fus)

Privacy InformationWhen a cellular phone is connected to SYNC, the system creates aprofile within your vehicle that is linked to that cellular phone. Thisprofile is created in order to offer you more cellular features and tooperate more efficiently. Among other things, this profile may containdata about your cellular phone book, text messages (read and unread),and call history, including history of calls when your cell phone was notconnected to the system. In addition, if you connect a media device,the system creates and retains an index of supported media content.The system also records a short development log of approximately10 minutes of all recent system activity. The log profile and other systemdata may be used to improve the system and help diagnose any problemsthat may occur.
The cellular profile, media device index, and development log remain inthe vehicle unless you delete them and are generally accessible only inthe vehicle when the cellular phone or media player is connected. If youno longer plan to use the system or the vehicle, we recommend youperform a Master Reset to erase all stored information.
System data cannot be accessed without special equipment and access tothe vehicle’s SYNC module. Ford Motor Company and Ford of Canada donot access the system data for any purpose other than as describedabsent consent, a court order, or where required by law enforcement,other government authorities, or other third parties acting with lawfulauthority. Other parties may seek to access the informationindependently of Ford Motor Company and Ford of Canada. For furtherprivacy information, see the sections on 911 Assist, Vehicle HealthReport, and Traffic, Directions and Information.
438 MyFord Touch® (If Equipped)
2014 TaurusOwners Guide gf, 2nd Printing, September 2013USA (fus)

ACCESSING AND ADJUSTING MODES THROUGH YOUR RIGHTVEHICLE INFORMATION DISPLAY (IF EQUIPPED)
The display is located on the right side of your instrument cluster.You can use your steering wheel controls to view and make minoradjustments to active modes without taking your hands off the wheel.For example:• In Entertainment mode, you can view what is now playing, change
the audio source and select memory presets.• In Phone mode, you can accept or reject an incoming call.• If your vehicle is equipped with Navigation, you can view the current
route or cancel a route.
Use the OK and arrow buttons on the right side of your steering wheelto scroll through the available modes.You can make selections from the menu by using the OK button.The selection menu expands and different options appear.• Press OK to enter the mode.• Press the left or right arrows to make adjustments within the chosen
mode. Small white arrows appear in the menu you are in whichindicate that you can scroll in those directions to enter more menus.
• Press OK to confirm your selection.
MyFord Touch® (If Equipped) 439
2014 TaurusOwners Guide gf, 2nd Printing, September 2013USA (fus)

Note: If your vehicle is not equipped with Navigation, Compass appearsin the display instead of Navigation. If you press the right arrow to gointo the Compass menu, you can see the compass graphic. The compassdisplays the direction in which the vehicle is traveling, not true direction(i.e., if the vehicle is traveling west, the middle of the compass graphicdisplays west; north displays to the left of west though its true directionis to the right of west).
USING VOICE RECOGNITIONThis system helps you control many features using voice commands.This allows you to keep your hands on the wheel and focus on what is infront of you. The system provides feedback through audible tones,prompts, questions and spoken confirmations depending on the situationand the chosen level of interaction (voice settings).
The system also asks short questions (confirmation prompts) when it isnot sure of your request or when there are multiple possible responsesto your request.
When using voice commands, words and icons may appear in the lowerleft status bar indicating the status of the voice session (such asListening, Success, Failed, Paused or Try Again).
How to Use Voice Commands with Your SystemPress the voice icon. After the tone, speak your commandclearly.
These commands can be said at any time.
“Cancel”“Exit”
“Go back”“List of commands”
“Main menu”“Next page”
“Previous page”“What can I say?”
“Help”
440 MyFord Touch® (If Equipped)
2014 TaurusOwners Guide gf, 2nd Printing, September 2013USA (fus)

What Can I Say?To access the available voice commands for the current session, do oneof the following:
• During a voice session, press the Help icon (?) in the lower left statusbar of the screen.
• Say, “What can I say?” for an on-screen listing of the possible voicecommands associated with your current voice session.
• Press the voice icon. After the tone, say, “Help” to hear a list ofpossible voice commands.
Helpful Hints• Make sure the interior of your vehicle is as quiet as possible. Wind
noise from open windows and road vibrations may prevent the systemfrom correctly recognizing spoken commands.
• After pressing the voice icon, wait until after the tone sounds andListening appears before saying a command. Any command spokenprior to this does not register with the system.
• Speak naturally, without long pauses between words.
• At any time, you can interrupt the system while it is speaking bypressing the voice icon.
Accessing a List of Available Commands• If you use the touchscreen, press the Settings icon > Help > Voice
Command List.
• If you use the steering wheel control, press the voice icon. After thetone, speak your command clearly.
Voice command list
“Audio list of commands”“Bluetooth audio list of commands”
“Browse list of commands”“CD list of commands”
“Climate control list of commands”“List of commands”
“Navigation list of commands”*
“Phone list of commands”
MyFord Touch® (If Equipped) 441
2014 TaurusOwners Guide gf, 2nd Printing, September 2013USA (fus)

Voice command list
“Radio list of commands”“SD card list of commands”
“Sirius satellite list of commands”**
“Travel link list of commands”*
“USB list of commands”“Voice instructions list of commands”
“Voice settings list of commands”“Help”
*This command is only available when your vehicle is equipped with thenavigation system, and the navigation system SD card is in the card slot.**This command is only available when you have an active Sirius satelliteradio subscription.
Voice SettingsVoice settings allow you to customize the level of system interaction,help and feedback. The system defaults to standard interaction that usescandidate lists and confirmation prompts as these provide the highestlevel of guidance and feedback.
Interaction Mode: Novice mode provides detailed interaction andguidance while the advanced mode has less audible interaction and moretone prompts.
Confirmation Prompts: The system uses these short questions toconfirm your voice request. If turned off, the system simply makes a bestguess as to what you requested. The system may still occasionally askyou to confirm settings.
Phone/Media Candidate Lists: Candidate lists are lists of possibleresults from your voice commands. The system creates these lists whenit has the same confidence level of several options based on your voicecommand.
442 MyFord Touch® (If Equipped)
2014 TaurusOwners Guide gf, 2nd Printing, September 2013USA (fus)

To access these settings using the touchscreen:1. Press the Settings icon > Settings > Voice Control.2. Select from:
• Interaction Mode• Confirmation Prompts• Media Candidate Lists• Phone Candidate Lists• Voice Control Volume.
To access these settings using voice commands:
Press the voice icon. Wait for the prompt “Please say acommand”. Another tone sounds to let you know the system islistening.
Voice settings using voice commands
“Interaction Mode Novice”“Interaction Mode Advanced”“Confirmation Prompts On”“Confirmation Prompts Off”“Phone Candidate Lists On”“Phone Candidate Lists Off”“Media Candidate Lists On”“Media Candidate Lists Off”
“Help”
Using Voice Commands with the Touchscreen OptionsYour voice system has a dual mode feature which allows you to switchbetween using voice commands and making on-screen selections. This isavailable only when the system displays a list of candidates generatedduring a voice session. For example, when entering in a street address ortrying to call a contact from the phone you paired to the system.
MyFord Touch® (If Equipped) 443
2014 TaurusOwners Guide gf, 2nd Printing, September 2013USA (fus)

ENTERTAINMENT
A. AM 1 and AM AST
B. FM 1, FM 2 and FM AST
C. SIRIUS
D. CD
E. USB
F. Touch this button to scroll down for more options, such as:• SD Card• BT Stereo• A/V In
G. These buttons change with the media mode you are in.
H. Radio memory presets and CD controls.
Note: Some features may not be available in your area. Contact anauthorized dealer for more information.
You can access these options using the touchscreen or voice commands.
Browsing Device Content
When listening to audio on a device, you can browse through otherdevices without having to change sources. For example, if you arecurrently listening to audio on an SD card, you can browse all the artiststhat are stored on your USB device.
A
B
C
D
E
F
G
H
444 MyFord Touch® (If Equipped)
2014 TaurusOwners Guide gf, 2nd Printing, September 2013USA (fus)

Press the voice icon on the steering wheel. When prompted,you can say:
“BROWSE” within devices
“Browse”*
“Browse <league> games”**
“Browse <Sirius category> channels”**
“Browse Sirius channel guide”**
“Browse SD card”“Browse USB”
“Help”*If you have said “Browse”, you can then say any commands in thefollowing chart.**This command is only usable if you have an active subscription toSirius satellite radio.
“BROWSE”
“<League> games”*
”<Sirius category> channels”*
“SD card”**
“Sirius channel guide”*
“USB”**
“Help”*This command is only usable if you have an active subscription to Siriussatellite radio.**For more commands in SD card or USB mode, see the “SD card andUSB Port” section of this chapter.
For a complete list of “Browse” voice commands, see USB and SD cardvoice commands and Bluetooth audio voice commands in thefollowing sections.
Your voice system allows you to change audio sources with a simplevoice command. For example, if you are listening to music on a USBdevice, then want to switch to a satellite radio channel, simply press thevoice button on the steering wheel controls and say the name of theSirius station (such as, “the Highway”). The following voice commands
MyFord Touch® (If Equipped) 445
2014 TaurusOwners Guide gf, 2nd Printing, September 2013USA (fus)

are available at the top level of the voice session no matter whichcurrent audio source you are listening to (such as a USB device or Siriussatellite radio). Note: This is only available when your MyFord Touchsystem language is set to North American English.
“AM <530 - 1710>” “FM <87.9 – 107.9>”“<530 - 1710>” “<87.9 – 107.9>”
“Sirius <0-223>”* “<Channel name>”*
“Play [genre] <name>”** “Play [playlist] <name>”**
“Play [artist] <name>”** “Play [song] <name>”**
“Play [album] <name>”** “Play <name (song or album)> by<artist name>”
“Play <name>” “Sports games”*
*This command is only usable if you have an active subscription to Siriussatellite radio.**The commands that have [ ] around the word means that the word isoptional. For example, if you say, “Play Metallica”, this is the same as thevoice command, “Play [artist] <name>”.
AM and FMTouch the AM or FM tab to listen to the radio.
To change between AM and FM presets, just touch the AM orFM tab.
Memory PresetsSave a station by pressing and holding one of the memory preset areas.There is a brief mute while the radio saves the station. Sound returnswhen finished.
HD RadioTouch this button to turn HD Radio on. The light on the buttonilluminates when the feature is on. HD Radio allows you to receive radiobroadcasts digitally, where available, providing free, crystal-clear sound.See HD Radio information later in this chapter.
ScanTouch this button to go to the next strong AM or FM radio station.The light on the button illuminates when the feature is on.
446 MyFord Touch® (If Equipped)
2014 TaurusOwners Guide gf, 2nd Printing, September 2013USA (fus)

OptionsSound Settings allows you to adjust settings for:• Bass• Midrange• Treble• Balance and Fade• DSP (Digital Signal Processing)• Occupancy Mode• Speed Compensated Volume.
Note: Your vehicle may not have all these sound settings.
Set PTY for Seek/Scan allows you to select a category of music youwould like to search for. You can then choose to either seek or scan forthe stations playing that category.
RDS Text Display allows you to view the information broadcast by FMstations.
AST allows you to have the system automatically store the six strongeststations in your current location.
TAG Button is available when HD Radio is on, and allows you to tag asong to download later. When you select On, TAG appears on-screenwhen HD Radio is active. You can touch TAG to save the information ofthe song that is playing. When you plug in your portable music player,the information transfers, if supported by your device. When you areconnected to iTunes, the tags appear to remind you of the songs youwould like to download. See HD Radio information later in this chapter.
Direct TuneTouch this button to manually enter the desired station number. TouchEnter when you are done.
HD Radio™ Information (If Available)Note: HD Radio broadcasts are not available in all markets.
HD Radio technology is the digital evolution of analog AM/FM radio.Your system has a special receiver that allows it to receive digitalbroadcasts (where available) in addition to the analog broadcasts, italready receives. Digital broadcasts provide a better sound quality thananalog broadcasts with free, crystal-clear audio and no static ordistortion. For more information, and a guide to available stations andprogramming, please visit www.hdradio.com.
MyFord Touch® (If Equipped) 447
2014 TaurusOwners Guide gf, 2nd Printing, September 2013USA (fus)

When HD Radio is on and you tune to a station broadcasting HD Radiotechnology, you may notice the following indicators on your screen:
HD) logo blinks when acquiring a digital station and stays solidwhen digital audio is playing. When this logo is available, youmay also see Title and Artist fields on-screen.
Multicast indicator appears in FM mode (only) if the current station isbroadcasting multiple digital broadcasts. The highlighted numbers signifyavailable digital channels where new or different content is available.HD1 signifies the main programming status and is available in analog anddigital broadcasts. Other multicast stations (HD2 through HD7) are onlyavailable digitally.
TAG allows you to save a song to download later when you are on anacquired HD Radio station and the feature is on. To turn the feature onand use it:1. Press AM or FM > Options > TAG button > On.
2. When you hear a song you like, touch TAG.
3. The system automatically saves the song’s information and transfersit to your portable music player (if supported) when you connect itto the system. The system automatically transfers the tag to yourplayer (if already connected) and a pop-up confirms the transfer.
4. When you access iTunes with your portable music player, the tagsappear to you as a reminder. The system allows you to tag up toapproximately 100 songs. For a list of devices that support tagging,see www.SYNCMyRide.com, www.SYNCMyRide.ca orwww.syncmaroute.ca.
When HD Radio broadcasts are active, you can access the followingfunctions:• Scan allows you to hear a brief sampling of all available stations. This
feature still works when HD Radio reception is on, although it doesnot scan for HD2-HD7 channels. You may see the HD logo appear ifthe station has a digital broadcast.
• Memory presets allow you to save an active channel as a memorypreset. Touch and hold a memory preset slot until the sound returns.There is a brief mute while the radio saves the station. Sound returnswhen finished. When switching to an HD2 or HD3 memory preset, thesound mutes before the digital audio plays, because the system has toreacquire the digital signal.• Note: As with any saved radio station, you cannot access the
saved station if your vehicle is outside the station’s reception area.
448 MyFord Touch® (If Equipped)
2014 TaurusOwners Guide gf, 2nd Printing, September 2013USA (fus)

HD Radio Reception and Station Troubleshooting
Potential Reception Issues
Reception area If you are listening to a multicast station andyou are on the fringe of the reception area, thestation may mute due to weak signal strength.If you are listening to HD1, the system switchesback to the analog broadcast until the digitalbroadcast is available again. However, if you arelistening to any of the possible HD2 throughHD7 multicast channels, the station mutes andstays muted unless it is able to connect to thedigital signal again.
Station blending When the system first receives a station (asidefrom HD2-HD7 multicast stations), it first playsthe station in the analog version. Once thereceiver verifies the station is an HD Radiostation, it shifts to the digital version.Depending on the station quality, you may heara slight sound change when the station changesfrom analog to digital. Blending is the shift fromanalog to digital sound or digital back to analogsound.
In order to provide the best possible experience, use the contact form toreport any station issues found while listening to a station broadcastingwith HD Radio technology. Independent entities own and operate eachstation. These stations are responsible for making sure all audio streamsand data fields are accurate.
Potential station issues
Issue Cause Action
Echo, stutter, skip orrepeat in audio.Increase or decreasein audio volume.
This is poor timealignment by the radiobroadcaster.
No action required.This is a broadcastissue.
MyFord Touch® (If Equipped) 449
2014 TaurusOwners Guide gf, 2nd Printing, September 2013USA (fus)

Potential station issues
Issue Cause Action
Sound fading orblending in and out.
The radio is shiftingbetween analog anddigital audio.
No action required.The reception issuemay clear up as youcontinue to drive.
There is an audiomute delay whenselecting HD2 or HD3,multicast preset orDirect Tune.
The digital multicast isnot available until theHD Radio broadcast isdecoded. Oncedecoded, the audio isavailable.
No action required.This is normalbehavior. Wait untilthe audio is available.
Cannot access HD2 orHD3 multicast channelwhen recalling apreset or from a directtune.
The previously storedmulticast preset ordirect tune is notavailable in yourcurrent reception area.
No action required.The station is notavailable in yourcurrent location.
Text information doesnot match currentlyplaying audio.
Data service issue bythe radio broadcaster.
Fill out the stationissue form at websitelisted below.*
There is no textinformation shown forcurrently selectedfrequency.
Data service issue bythe radio broadcaster.
Fill out the stationissue form at websitelisted below.*
HD2-HD7 stations notfound when Scan ispressed.
Pressing Scan disablesHD2-HD7 channelsearch.
No action required.This is normalbehavior.
*http://www.ibiquity.com/automotive/report_radio_station_experiences
HD Radio Technology manufactured under license from iBiquity DigitalCorp. U.S. and foreign patents. HD Radio and the HD and HD Radiologos are proprietary trademarks of iBiquity Digital Corp. Ford MotorCompany and iBiquity Digital Corp. are not responsible for the contentsent using HD Radio technology. Content may be changed, added ordeleted at any time at the station owner’s discretion.
450 MyFord Touch® (If Equipped)
2014 TaurusOwners Guide gf, 2nd Printing, September 2013USA (fus)

Radio Voice CommandsIf you are listening to the radio, press the voice button on thesteering wheel control. When prompted, say any of thecommands in the following chart.
If you are not listening to the radio, press the voice button and, after thetone, say “Radio”, then any of the commands in the following chart.
“RADIO”
“<87.9–107.9>” “FM preset <#>”“<87.9–107.9> HD”* “FM1”
“<530–1710>” “FM 1 preset <#>”“AM” “FM2”
“AM <530–1710>” “FM 2 preset <#>”“AM autoset” “HD <#>” *
“AM autoset preset <#>” “Preset <#>”“AM preset <#>” “Radio off”
“FM” “Radio on”“FM <87.9–107.9>” “Set PTY”
“FM <87.9-107.9> HD <#>”* “Tune”**
“FM autoset” “Help”“FM autoset preset <#>”
*If available.**If you have said, “Tune”, see the following “Tune” chart.
“TUNE”
“<87.9–107.9>” “FM autoset”“<87.9-107.9> HD <#>”* “FM autoset preset <#>”
“<530–1710>” “FM preset <#>”“AM” “FM1”
“AM <530–1710>” “FM 1 preset <#>”“AM autoset” “FM2”
“AM autoset preset <#>” “FM 2 preset <#>”“AM preset <#>” “HD <#>”*
“FM” “Preset <#>”“FM <87.9–107.9>” “Help”
“FM <87.9-107.9> HD <#>”*
*If available.
MyFord Touch® (If Equipped) 451
2014 TaurusOwners Guide gf, 2nd Printing, September 2013USA (fus)

Sirius Satellite Radio (If Activated)Press the lower left corner of the touchscreen, then select theSIRIUS tab.
PresetsSave a channel by pressing and holding one of the memory preset areas.There is a brief mute while the radio saves the channel. Sound returnswhen finished.
ALERTSave the current song, artist, or team as a favorite. The system alertsyou when it plays again on any channel.
ReplayReplay audio on the current channel. You can replay approximately45 minutes of audio as long as you have remained tuned to the currentstation. Changing stations erases the previous audio.
While in replay mode:• Press and release the seek buttons to hear the previous or next song.• Press and hold the seek buttons to reverse or fast forward in the
current track.• Press play or pause to play or pause the audio.• Press Replay to return to live audio if you have been using the
feature to replay audio.
ScanTouch this button to hear a brief sampling of channels.
OptionsSound Settings allows you to adjust settings for:• Bass• Midrange• Treble• Balance and Fade• DSP (Digital Signal Processing)• Occupancy Mode• Speed Compensated Volume.
Note: Your vehicle may not have all these sound settings.
452 MyFord Touch® (If Equipped)
2014 TaurusOwners Guide gf, 2nd Printing, September 2013USA (fus)

Set Category for Seek/Scan allows you to select a category of musicyou would like to search for. You can then choose to either seek or scanfor the stations playing that category.
Parental Lockout allows you to lock and unlock channels, change orreset your PIN or unlock all channels. To use this feature, you need yourinitial PIN, which is 1234.
Artist/Title/Team Alerts allows you to select Artists, Titles and Teamsthat you would like the system to alert you to when they are playing onother channels. Press Edit Alerts to delete or turn off alerts. You canalso set all alerts to on or off. When an alert appears on the screen, youcan choose to Tune to the channel, to Cancel the alert or to DisableAlerts. If you are listening to a sporting event, you can save your favoriteteams so that the system can alert you when they are playing on asatellite radio channel.Note: Sirius does not support the Alert feature on all channels. FordMotor Company shall not be responsible for Alert feature variation.
Electronic Serial Number (ESN) is required when you need toactivate, modify or track your satellite radio account. The ESN is on theSystem Information Screen (SR ESN: XXXXXXXXXXXX). To access yourESN, press the bottom left corner of the touchscreen, then SIRIUS >Options.
Direct TuneTouch this button to manually enter the desired satellite channelnumber. Touch Enter when you are done.
BrowseTouch this button to view a list of all available stations. Scroll to seemore categories. Touch the station you want to listen to.
Touch Skip if you want to skip this channel.
Touch Lock if you do not want anyone to listen to this channel.
Touch Title or Artist to see song and artists on other stations.
MyFord Touch® (If Equipped) 453
2014 TaurusOwners Guide gf, 2nd Printing, September 2013USA (fus)
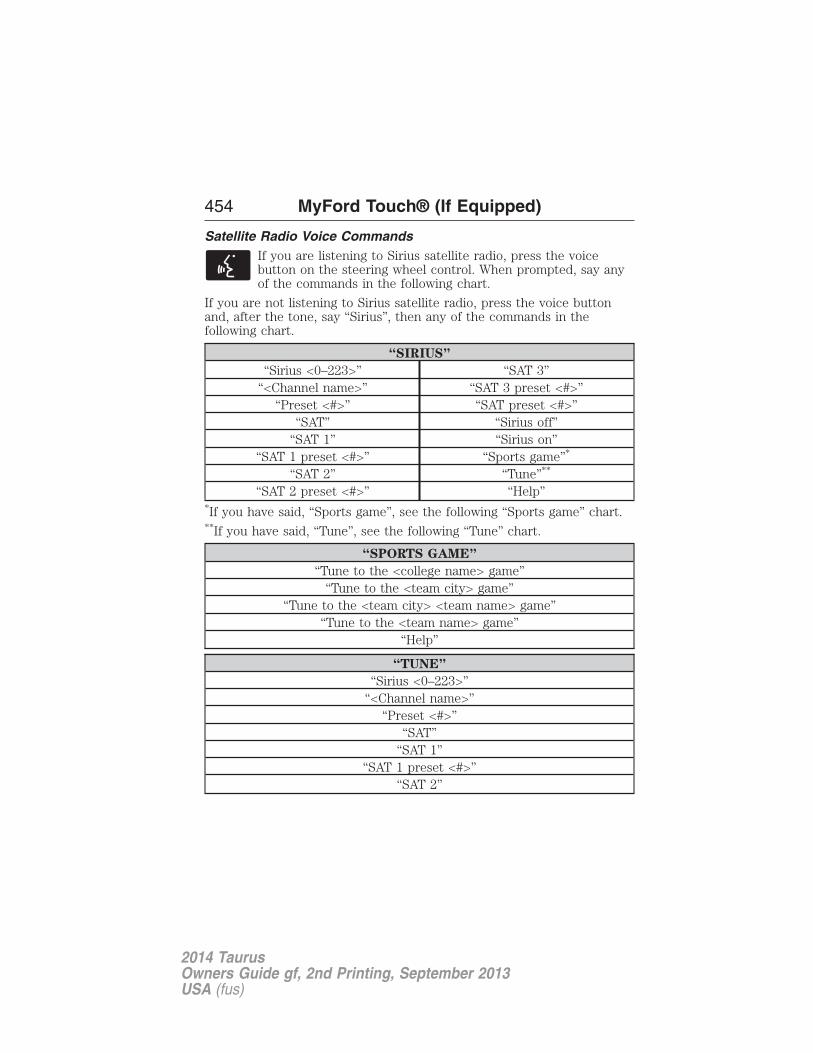
Satellite Radio Voice CommandsIf you are listening to Sirius satellite radio, press the voicebutton on the steering wheel control. When prompted, say anyof the commands in the following chart.
If you are not listening to Sirius satellite radio, press the voice buttonand, after the tone, say “Sirius”, then any of the commands in thefollowing chart.
“SIRIUS”
“Sirius <0–223>” “SAT 3”“<Channel name>” “SAT 3 preset <#>”
“Preset <#>” “SAT preset <#>”“SAT” “Sirius off”
“SAT 1” “Sirius on”“SAT 1 preset <#>” “Sports game”*
“SAT 2” “Tune”**
“SAT 2 preset <#>” “Help”*If you have said, “Sports game”, see the following “Sports game” chart.**If you have said, “Tune”, see the following “Tune” chart.
“SPORTS GAME”
“Tune to the <college name> game”“Tune to the <team city> game”
“Tune to the <team city> <team name> game”“Tune to the <team name> game”
“Help”
“TUNE”
“Sirius <0–223>”“<Channel name>”
“Preset <#>”“SAT”
“SAT 1”“SAT 1 preset <#>”
“SAT 2”
454 MyFord Touch® (If Equipped)
2014 TaurusOwners Guide gf, 2nd Printing, September 2013USA (fus)

“TUNE”
“SAT 2 preset <#>”“SAT 3”
“SAT 3 preset <#>”“Help”
Sirius Satellite Radio Information
Note: Sirius reserves the unrestricted right to change, rearrange, add ordelete programming including canceling, moving or adding particularchannels, and its prices, at any time, with or without notice to you.Ford Motor Company shall not be responsible for any such programmingchanges.
Note: This receiver includes the eCos real-time operating system. eCosis published under the eCos License.
Sirius satellite radio is asubscription-based satellite radioservice that broadcasts a variety ofmusic, sports, news, weather, trafficand entertainment programming.Your factory-installed Sirius satelliteradio system includes hardware and
a limited subscription term that begins on the date of sale or lease ofyour vehicle. See your authorized dealer for availability.
For more information on extended subscription terms (a service fee isrequired), the online media player and a list of Sirius satellite radiochannels, and other features, please visit www.siriusxm.com in theUnited States, www.sirius.ca in Canada, or call Sirius at 1-888-539-7474.
Potential satellite radio reception issues
Antenna
obstructions
For optimal reception performance, keep theantenna clear of snow and ice build-up andkeep luggage and other materials as far awayfrom the antenna as possible.
Terrain Hills, mountains, tall buildings, bridges,tunnels, freeway overpasses, parking garages,dense tree foliage and thunderstorms caninterfere with your reception.
MyFord Touch® (If Equipped) 455
2014 TaurusOwners Guide gf, 2nd Printing, September 2013USA (fus)

Potential satellite radio reception issues
Station overload When you pass a ground-basedbroadcast-repeating tower, a stronger signalmay overtake a weaker one and the audiosystem may mute.
Satellite radio
signal interference
Your display may show ACQUIRING . . . toindicate the interference and the audio systemmay mute.
Sirius troubleshooting tips
Radio display Condition Possible action
Acquiring... Radio requires morethan two seconds toproduce audio for theselected channel.
No action required.This message shoulddisappear shortly.
Sat Fault/SIRIUSsystem failure.
There is an internalmodule or systemfailure present.
If this message doesnot clear shortly, orwith an ignition keycycle, your receivermay have a fault. Seeyour authorized dealerfor service.
Invalid Channel. The channel is nolonger available.
Tune to anotherchannel or chooseanother preset.
Unsubscribed Channel. Your subscription doesnot include thischannel.
Contact Sirius at1–888–539–7474 tosubscribe to thechannel, or tune toanother channel.
No Signal. The signal is lost fromthe Sirius satellite orSirius tower to yourvehicle antenna.
The signal is blocked.When you move intoan open area, thesignal should return.
456 MyFord Touch® (If Equipped)
2014 TaurusOwners Guide gf, 2nd Printing, September 2013USA (fus)

Sirius troubleshooting tips
Radio display Condition Possible action
Updating. Update of channelprogramming inprogress.
No action required.The process may takeup to three minutes.
Call SIRIUS1–888–539–7474.
Your satellite service isno longer available.
Contact Sirius at1-888-539-7474 toresolve subscriptionissues.
None Found. CheckChannel Guide.
All the channels in theselected channels areeither skipped orlocked.
Use the channel guideto turn off the Lock
or Skip function onthat station.
Subscription Updated. Sirius has updated thechannels available foryour vehicle.
No action required.
CDPress the lower left corner of the touchscreen, and then selectthe CD tab.
You can also advance and reverse the current track or current folder, ifapplicable.
RepeatTouch this button to repeat the currently playing track, all tracks on thedisc or turn the feature off if already on.
ShuffleTouch this button to play the tracks or entire albums in random order, orturn the feature off if already on.
ScanTouch this button to hear a brief sampling of all available tracks.
More InfoTouch this button to see disc information.
MyFord Touch® (If Equipped) 457
2014 TaurusOwners Guide gf, 2nd Printing, September 2013USA (fus)

OptionsSound Settings allows you to adjust settings for:• Bass• Midrange• Treble• Balance and Fade• DSP (Digital Signal Processing)• Occupancy Mode• Speed Compensated Volume.
Note: Your vehicle may not have all these sound settings.
Compression allows you to turn the compression feature on and off.
BrowseTouch this button to look through all available CD tracks.
CD Voice CommandsIf you are listening to a CD, press the voice button on thesteering wheel control. When prompted, say any of thecommands in the following chart.
If you are not listening to a CD, press the voice button and, after thetone, say “CD”, then any of the commands in the following chart.
“CD”
“Pause” “Repeat off”“Play” “Repeat track”
“Play next track” “Shuffle”“Play previous track” “Shuffle CD”*
“Play track <1–512>” “Shuffle folder”*
“Repeat” “Shuffle off”“Repeat folder”* “Help”
*This applies to WMA or MP3 files only.
SD Card Slot and USB Port
SD Card SlotNote: Your SD card slot is spring-loaded. To remove the SD card, pressthe card in and the system ejects it. Do not attempt to pull the card toremove it as this could cause damage.
458 MyFord Touch® (If Equipped)
2014 TaurusOwners Guide gf, 2nd Printing, September 2013USA (fus)

Note: The navigation system also uses this card slot. See Navigationsystem later in this chapter for more information.
The slot is located either in the center consoleor behind a small access door in theinstrument panel. To access and play musicfrom your card, press the lower left corner ofthe touchscreen, and then select SD Cardfrom the list on the left side of the screen.
SD logo is a trademark of SD-3C,LLC.
USB PortThe ports are located either in the centerconsole or behind a small access door in theinstrument panel. To access and play musicfrom your device, press the lower left cornerof the touchscreen, and then select the USBtab.
This feature allows you to plug in media playing devices, memory sticks,flash drives or thumb drives, and charge devices if they support thisfeature.
In order to playback video from your iPod or iPhone, if compatible, youmust have a special combination USB/RCA composite video cable, whichyou can buy from Apple. When you connect the cable to your iPod oriPhone, plug the other end into both the RCA jacks and the USB port.
Playing Music from Your DeviceInsert your device and select the SD Card or USB tab once the systemrecognizes it. You can then select from the following options:
Repeat replays the currently playing song or album.
Shuffle plays music on the selected album or folder in random order.
Similar Music allows you to choose music similar to what is currentlyplaying.
MyFord Touch® (If Equipped) 459
2014 TaurusOwners Guide gf, 2nd Printing, September 2013USA (fus)

More Info displays information such as current track, artist name,album and genre.
Options allows you to view and adjust various media settings.• Sound Settings allows you to adjust settings for:
• Bass• Midrange• Treble• Balance and Fade• DSP (Digital Signal Processing)• Occupancy Mode• Speed Compensated Volume.
Note: Your vehicle may not have all these sound settings.• Media Player Settings allows you to select more settings, which is
under Media Player. See Settings.• Device Information displays software and firmware information
about the currently connected media device.• Update Media Index indexes your device each time you connect it
to make sure you have the latest voice commands available for allmedia on the device.
Browse allows you to view the contents of the device. It also allows youto search by categories, such as genre, artist or album.
If you want to view song information such as Title, Artist, File, Folder,Album, and Genre, touch the on-screen album art.
You can also touch What’s Playing to hear how the system pronouncesthe current band and song. This can be helpful when using voicecommands to make sure the system correctly plays your request.
SD Card and USB Voice CommandsIf you are listening to a USB device or an SD card, press thevoice button on the steering wheel control. When prompted, sayany of the commands in the following chart.
If you are not listening to a USB device or an SD card, press the voicebutton and, after the tone, say “USB” or “SD card”, then any of thecommands in the following chart.
“USB” or “SD CARD”
“Browse”* “Play previous song”“Next” “Play similar music”“Pause” “Play song <name>”
460 MyFord Touch® (If Equipped)
2014 TaurusOwners Guide gf, 2nd Printing, September 2013USA (fus)

“USB” or “SD CARD”
“Play” “Play TV show <name>”**
“Play album <name>” “Play TV show episode <name>”**
“Play all” “Play video <name>”**
“Play artist <name>” “Play video podcast <name>”**
“Play audiobook <name>” “Play video podcast episode<name>”**
“Play author <name>” “Play video playlist <name>”**
“Play composer <name>” “Previous”“Play folder <name>” “Repeat all”“Play genre <name>” “Repeat off”
“Play movie <name>”** “Repeat one”“Play music video <name>”** “Shuffle”
“Play next song” “Shuffle off”“Play playlist <name>” “What’s this?”“Play podcast <name>” “Help”
“Play podcast episode <name>”*If you have said you would like to browse your USB or SD card, thesystem prompts you to specify what you would like to browse. Whenprompted, see the following “Browse” chart.**This command is only available in USB mode and aredevice-dependent.
“BROWSE”
“Album <name>” “All video podcasts”*
“All albums” “All videos”*
“All artists” “Artist <name>”“All audiobooks” “Audiobook <name>”
“All authors” “Author <name>”“All composers” “Composer <name>”
“All folders” “Folder <name>”“All genres” “Genre <name>”
“All movies” * “Playlist <name>”“All music videos”* “Podcast <name>”
“All playlists” “TV show <name>”*
MyFord Touch® (If Equipped) 461
2014 TaurusOwners Guide gf, 2nd Printing, September 2013USA (fus)

“BROWSE”
“All podcasts” “Video <name>”*
“All songs” “Video playlist <name>”*
“All TV shows”* “Video podcast <name>”*
“All video playlists”* “Help”*This command is only available in USB mode and are device-dependent.
Supported Media Players, Formats and Metadata Information
SYNC is capable of hosting nearly any digital media player, includingiPod®, Zune™, plays from device players, and most USB drives.Supported audio formats include MP3, WMA, WAV and AAC.
It is also able to organize your indexed media from your playing device bymetadata tags. Metadata tags, which are descriptive software identifiersembedded in the media files, provide information about the file.
If your indexed media files contain no information embedded in thesemetadata tags, SYNC may classify the empty metadata tags as Unknown.
In order to playback video from your iPod® or iPhone®, (if compatible),you MUST have a special combination USB/RCA composite video cable(which you can buy from Apple®). When the cable is connected to youriPod® or iPhone®, plug the other end into both the RCA jacks and theUSB port.
Bluetooth Audio
Your system allows you to stream audio over your vehicle’s speakers fromyour connected, Bluetooth-enabled cellular phone.
To access, press the lower left corner on the touchscreen, thenselect the BT Stereo tab.
Bluetooth Audio Voice CommandsIf you are listening to a Bluetooth audio device, press the voicebutton on the steering wheel control. When prompted, say“Next song”, “Pause”, “Play” or “Previous song”.
If you are not listening to a Bluetooth audio device, press the voicebutton and, after the tone, say “Bluetooth Audio”, then “Next song”,“Pause”, “Play” or “Previous song”.
462 MyFord Touch® (If Equipped)
2014 TaurusOwners Guide gf, 2nd Printing, September 2013USA (fus)

A/V Inputs
WARNING: Driving while distracted can result in loss of vehiclecontrol, crash and injury. We strongly recommend that you use
extreme caution when using any device that may take your focus offthe road. Your primary responsibility is the safe operation of yourvehicle. We recommend against the use of any hand-held device whiledriving and encourage the use of voice-operated systems when possible.Make sure you are aware of all applicable local laws that may affect theuse of electronic devices while driving.
WARNING: For safety reasons, do not connect or adjust thesettings on your portable music player while your vehicle is
moving.
WARNING: Store the portable music player in a secure location,such as the center console or the glove box, when your vehicle is
in motion. Hard objects may become projectiles in a crash or suddenstop, which may increase the risk of serious injury. The audio extensioncable must be long enough to allow the portable music player to besafely stored while your vehicle is moving.
Your A/V inputs allow you to connect anauxiliary audio/video source (such as agaming systems or a personal camcorder)by connecting RCA cords (not included)to these input jacks. The jacks are yellow,red and white and are located eitherbehind a small access door on the
instrument panel or in your center console.
You can also use the A/V inputs as an auxiliary input jack to play musicfrom your portable music player over your vehicle’s speakers. Plug inyour 1/8 inch (3.5 millimeter) RCA adapter into the two left A/V inputjacks (red and white).
Press the lower left corner of the touchscreen, and then select A/V In.
MyFord Touch® (If Equipped) 463
2014 TaurusOwners Guide gf, 2nd Printing, September 2013USA (fus)

To use the auxiliary input jack feature, make sure that your portablemusic player is designed for use with headphones and that it is fullycharged. You also need an audio extension cable with stereo male1/8th-inch (3.5 millimeter) connectors at one end and a RCA jack at theother.1. Switch off the engine, radio and portable music player. Set the
parking brake and put the transmission in position P.2. Attach one end of the audio extension cable to the headphone output
of your player and the other end into the adapter in one of the twoleft A/V input jacks (white or red) inside the center console.
3. Press the lower left corner on the touchscreen. Select either a tunedFM station or a CD (if there is a CD already loaded into the system).
4. Adjust the volume as desired.5. Turn the portable music player on and adjust the volume to 1⁄2 the
maximum.6. Press the lower left corner on the touchscreen. Select the A/V In tab.
(You should hear audio from your portable music player although itmay be low.)
7. Adjust the sound on your portable music player until it reaches thelevel of the FM station or CD by switching back and forth betweenthe controls.
In order to playback video from your iPod® or iPhone® (if compatible),you must have a special combination USB/RCA composite video cable(which you can buy from Apple®). When the cable is connected to youriPod® or iPhone®, plug the other end into both the RCA jacks and theUSB port.
Troubleshooting• Do not connect the audio input jack to a line level output. The jack
only works correctly with devices that have a headphone output witha volume control.
• Do not set the portable music player’s volume level higher than isnecessary to match the volume of the CD or FM radio as this causesdistortion and reduces sound quality.
• If the music sounds distorted at lower listening levels, turn theportable music player volume down. If the problem persists, replace orrecharge the batteries in the portable media player.
• Control the portable media player in the same manner when usedwith headphones, as the auxiliary input jack does not provide control(such as Play or Pause) over the attached portable media player.
464 MyFord Touch® (If Equipped)
2014 TaurusOwners Guide gf, 2nd Printing, September 2013USA (fus)

PHONE
A. PhoneB. Quick DialC. PhonebookD. History
E. Messaging
F. Settings
Hands-free calling is one of the main features of SYNC. Once you pairyour phone, you can access many options using the touchscreen or voicecommands. While the system supports a variety of features, many aredependent on your cellular phone’s functionality. At a minimum, mostcellular phones with Bluetooth wireless technology support the followingfunctions:• Answering an incoming call• Ending a call• Using privacy mode• Dialing a number• Redialing• Call waiting notification• Caller ID.
Other features, such as text messaging using Bluetooth and automaticphonebook download, are phone-dependent features. To check yourphone’s compatibility, see your phone’s user manual and visitwww.SYNCMyRide.com, www.SYNCMyRide.ca or www.syncmaroute.ca.
A
B
C
D
E
F
MyFord Touch® (If Equipped) 465
2014 TaurusOwners Guide gf, 2nd Printing, September 2013USA (fus)

Pairing Your Phone for the First Time
WARNING: Driving while distracted can result in loss of vehiclecontrol, crash and injury. We strongly recommend that you use
extreme caution when using any device that may take your focus offthe road. Your primary responsibility is the safe operation of yourvehicle. We recommend against the use of any hand-held device whiledriving and encourage the use of voice-operated systems when possible.Make sure you are aware of all applicable local laws that may affect theuse of electronic devices while driving.
The first thing you must do to use the phone features of SYNC is to pairyour Bluetooth-enabled cellular phone with SYNC. This allows you to useyour phone in a hands-free manner.
Note: Put the transmission in position P. Turn on your vehicle ignitionand the radio.1. Touch Add Phone in the upper left corner of the touchscreen. Find
SYNC appears on the screen and instructs you to begin the pairingprocess from your device.
2. Make sure that Bluetooth is set to On and that your cellular phone isin the proper mode. See your phone’s manual if necessary.• Select SYNC, and a six-digit PIN appears on your device.
3. If you are prompted to enter a PIN on your device, it does notsupport Secure Simple Pairing. To pair, enter the PIN displayed onthe touchscreen. Skip the next step.
4. When prompted on your phone’s display, confirm that the PINprovided by SYNC matches the PIN displayed on your cellular phone.
5. The display indicates when the pairing is successful.
SYNC may prompt you with more phone options. For more informationon your phone’s capability, see your phone’s manual and visit thewebsite.
Pairing Subsequent PhonesNote: Put the transmission in position P. Turn on your vehicle ignitionand the radio.1. Press the Phone corner of the touchscreen > Settings > BT
Devices > Add Device.2. Make sure that Bluetooth is set to On and that your cellular phone
is in the proper mode. See your phone’s manual if necessary.• Select SYNC, and a six-digit PIN appears on your device.
466 MyFord Touch® (If Equipped)
2014 TaurusOwners Guide gf, 2nd Printing, September 2013USA (fus)

3. If you are prompted to enter a PIN on your device, it does notsupport Secure Simple Pairing. To pair, enter the PIN displayed onthe touchscreen. Skip the next step.
4. When prompted on your phone’s display, confirm that the PINprovided by SYNC matches the PIN displayed on your cellular phone.
5. The display indicates when the pairing is successful.
SYNC may prompt you with more phone options. For more informationon your phone’s capability, see your phone’s user guide and visit thewebsite.
Making CallsPress the voice button on your steering wheel controls. Whenprompted, say, “Call <name>” or say “Dial”, then the desirednumber.
To end the call or exit phone mode, press this phone button.
Receiving CallsDuring an incoming call, an audible tone sounds. Call informationappears in the display if it is available.
Accept the call by pressing Accept on the touchscreen or bypressing this phone button on your steering wheel controls.
Reject the call by pressing Reject on the touchscreen or by pressing thisphone button on your steering wheel controls.
Ignore the call by doing nothing. SYNC logs it as a missed call.
Phone Menu OptionsPress the top left corner on your touchscreen to select from thefollowing options:
PhoneTouch this button to access the on-screen numerical pad to enter anumber and place a call. During an active call, you can also choose to:• Mute the call• Put it on hold• Turn on privacy (returns the call to your cellular phone)• Join two calls• End the call.
MyFord Touch® (If Equipped) 467
2014 TaurusOwners Guide gf, 2nd Printing, September 2013USA (fus)

Quick DialSet up favorite contacts from you phonebook or history folder.
PhonebookTouch this button to access and call any contacts in your previouslydownloaded phone book. The system places the entries in alphabeticalcategories summarized at the top of the screen.
To turn on contact picture settings, if your device supports this feature,press Phone > Settings > Manage Phonebook > Download photosfrom Phonebook > On.
HistoryAfter you connect your Bluetooth-enabled phone to SYNC, you canaccess any previously dialed, received or missed calls. You can alsochoose to save these to your Favorites or to Quick Dial.
Note: This is a phone-dependent feature. If your phone does not supportdownloading call history using Bluetooth, SYNC keeps track of calls madewith the SYNC system.
MessagingSend text messages using your touchscreen. See Text messaging later inthis section.
SettingsTouch this button to access various phone settings, such turningBluetooth on and off, managing your phonebook and more. See Phonesettings later in this section.
Text MessagingNote: Downloading and sending text messages using Bluetooth arephone-dependent features.
Note: Certain features in text messaging are speed-dependent and notavailable when your vehicle is traveling at speeds over 3 mph (5 km/h).
Note: SYNC does not download read text messages from your phone.
You can send and receive text messages using Bluetooth, read themaloud and translate text messaging acronyms, such as LOL.1. Touch the top left corner of the display to access the Phone menu.2. Select Messaging.
468 MyFord Touch® (If Equipped)
2014 TaurusOwners Guide gf, 2nd Printing, September 2013USA (fus)
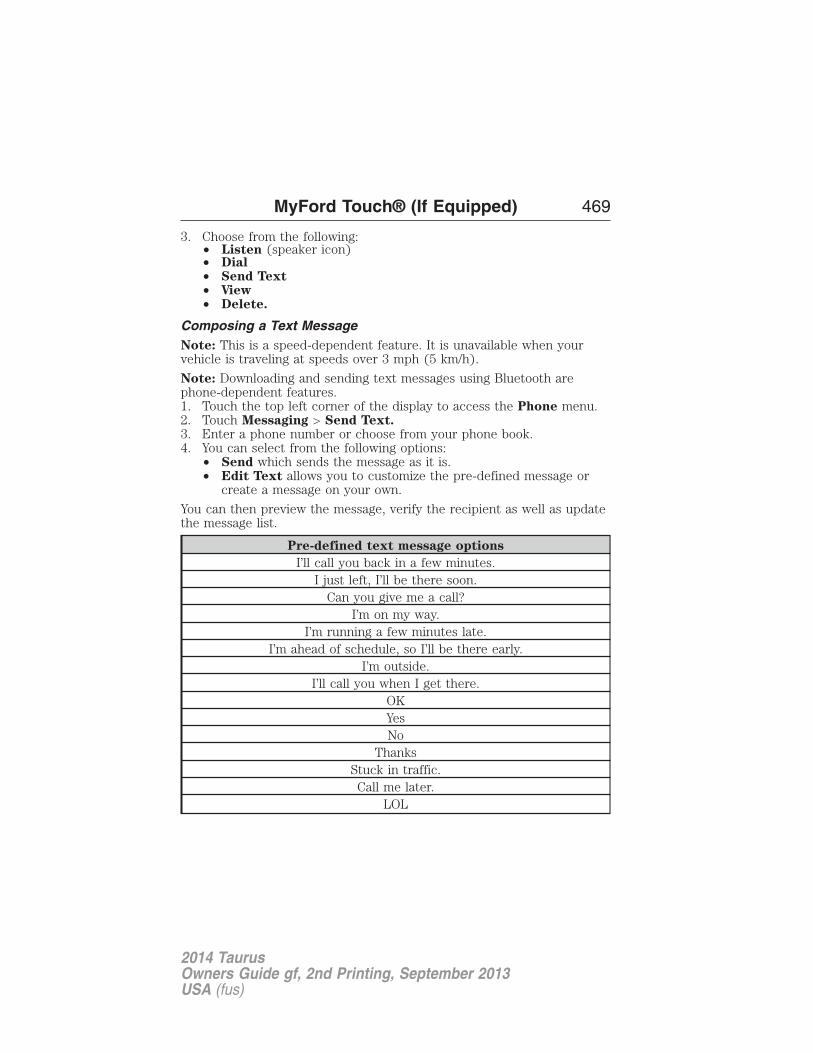
3. Choose from the following:• Listen (speaker icon)• Dial• Send Text• View• Delete.
Composing a Text MessageNote: This is a speed-dependent feature. It is unavailable when yourvehicle is traveling at speeds over 3 mph (5 km/h).
Note: Downloading and sending text messages using Bluetooth arephone-dependent features.1. Touch the top left corner of the display to access the Phone menu.2. Touch Messaging > Send Text.3. Enter a phone number or choose from your phone book.4. You can select from the following options:
• Send which sends the message as it is.• Edit Text allows you to customize the pre-defined message or
create a message on your own.
You can then preview the message, verify the recipient as well as updatethe message list.
Pre-defined text message options
I’ll call you back in a few minutes.I just left, I’ll be there soon.
Can you give me a call?I’m on my way.
I’m running a few minutes late.I’m ahead of schedule, so I’ll be there early.
I’m outside.I’ll call you when I get there.
OKYesNo
ThanksStuck in traffic.Call me later.
LOL
MyFord Touch® (If Equipped) 469
2014 TaurusOwners Guide gf, 2nd Printing, September 2013USA (fus)

Receiving a Text MessageWhen a new message arrives, an audible tone sounds and the screendisplays a pop-up with the caller name and ID, if supported by yourphone. You can press:
• View to view the text message.
• Listen for SYNC to read the message to you.
• Dial to call the contact.
• Ignore to exit the screen.
Note: If you select View and your vehicle is traveling over 3 mph(5 km/h), the system offers to read the message to you instead ofallowing you to view it while driving.
Phone SettingsPress Phone > Settings.
Bluetooth DevicesTouch this tab to connect, disconnect, add or delete a device, as well assave it as a favorite.
BluetoothTouch this tab to turn Bluetooth off or on.
Do Not DisturbTouch this tab if you want all calls to go directly to your voice mail andnot ring in the vehicle. When this feature is on, text messagenotifications do not ring inside the cabin either.
911 AssistTurn on or turn off the 911 Assist feature. See 911 Assist in the SYNCServices and Applications section.
Phone RingerSelect the ring tone you want to hear when you receive a call. Choosefrom possible system ring tones, your currently paired phone’s ring tone,a beep, text-to-speech or a silent notification.
Text Message NotificationSelect a text message notification, if supported by your phone. Choosefrom possible system alert tones, text-to-speech or silent.
470 MyFord Touch® (If Equipped)
2014 TaurusOwners Guide gf, 2nd Printing, September 2013USA (fus)

Internet Data ConnectionIf your phone is compatible, use this screen to adjust your internet dataconnection. Select to make your connection profile with the personalarea network or to turn off your connection. You can also choose toadjust your settings or have the system always connect, never connectwhen roaming or query on connect. Press ? for more information.
Manage PhonebookTouch this button to access features such as automatic phonebookdownload, re-download your phonebook, add contacts from your phoneas well as delete or upload your phonebook.
Roaming WarningTouch this button to have the system alert you when your phone is inroaming mode.
Phone Voice CommandsPress the voice button on the steering wheel control. After thetone, say any of the following commands:
“PHONE”
“Call” “Join calls”*
“Call <name>” “Listen to text message <#>”“Call <name> at home” “Listen to text messages”“Call <name> at work” “Messages”**
“Call <name> on cell” “Mute call”*
“Call <name> on other” “Pair phone”“Call voicemail” “Privacy on”*
“Dial” “Read text message”“Do not disturb off” “Reply to text messages”“Do not disturb on” “Turn ringer off”
“Forward text messages” “Turn ringer on”“Go to hands free”* “Unmute call”*
“Hold call off”* “Help”“Hold on”*
*This command is only available during an active call.**If you have said “Messages”, see the following “Messages” chart.
MyFord Touch® (If Equipped) 471
2014 TaurusOwners Guide gf, 2nd Printing, September 2013USA (fus)

“MESSAGES”
“Call”“Forward text messages”
“Listen to text message <#>”“Listen to text messages”“Reply to text messages”
“Help”
INFORMATIONIf your vehicle is equipped with Navigation, touch thei (Information) button to access these features. If your vehicleis not equipped with Navigation, touch the corner of the
touchscreen with the green tab.
Under the Information menu, you can access features, such as:A. SYNC Services
B. Sirius Travel Link
C. Alerts
D. Calendar
E. SYNC Applications.
A
B
C
D
E
472 MyFord Touch® (If Equipped)
2014 TaurusOwners Guide gf, 2nd Printing, September 2013USA (fus)
SYNC Services (If Equipped, United States Only)Note: SYNC Services requires activation before use. Visitwww.SYNCMyRide.com to register and check your eligibility forcomplimentary services. Standard phone and message rates may apply.Subscription may be required. You must also have the active SYNCServices Bluetooth-enabled cellular phone paired and connected to thesystem in order to connect to, and use, SYNC Services. See Phoneearlier in this chapter for pairing instructions.
Note: This feature does not function properly if you have enabled callerID blocking on your mobile phone. Make sure your mobile phone is notblocking caller ID before using SYNC Services.
Note: The driver is ultimately responsible for the safe operation of thevehicle, and therefore, must evaluate whether it is safe to follow thesuggested directions. Any navigation features are provided only as anaid. Make your driving decisions based on your observations of localconditions and existing traffic regulations. Do not follow the routesuggestions if doing so would result in an unsafe or illegal maneuver, ifyou would be placed in an unsafe situation, or if you would be directedinto an area that you consider unsafe. Maps used by this system may beinaccurate because of errors, changes in roads, traffic conditions ordriving conditions.
Note: When you connect, the service uses GPS technology and advancedvehicle sensors to collect your vehicle’s current location, travel directionand speed to help provide you with the directions, traffic reports, orbusiness searches you request. Further, to provide the services yourequest, for continuous improvement, the service may collect and recordcall details and voice communications. For more information, see SYNCServices Terms and Conditions at www.SYNCMyRide.com. If you do notwant Ford or its service providers to collect your vehicle travelinformation or other information identified in the Terms and Conditions,do not subscribe or use the service.
SYNC Services uses advanced vehicle sensors, integrated GPS technologyand comprehensive map and traffic data, to give you personalized trafficreports, precise turn-by-turn directions, business search, news, sports,weather and more. For a complete list of services, or to learn more,please visit www.SYNCMyRide.com.
MyFord Touch® (If Equipped) 473
2014 TaurusOwners Guide gf, 2nd Printing, September 2013USA (fus)

Connecting to SYNC Services Using Voice CommandsPress the voice button on the steering wheel controls.
1. When prompted, say “Services”. This initiates an outgoing call toSYNC Services using your paired and connected Bluetooth-enabledcellular phone.
2. Once you connect to the service, follow the voice prompts to requestthe desired service, such as “Traffic” or “Directions”. You can alsosay, “What are my choices?” to receive a list of available servicesfrom which to choose.
3. Say, “Services” to return to the Services main menu or for help, say,“Help”.
Connecting to SYNC Services Using the TouchscreenIf your vehicle is equipped with Navigation, touch thei (Information) button to access these features. If your vehicleis not equipped with Navigation, touch the corner of the
touchscreen with the green tab.
Press Services.1. Select Connect to Services to initiate an outgoing call to SYNC
Services using your paired and connected Bluetooth-enabled cellularphone.
2. Once you connect to the service, follow the voice prompts to requestthe desired service, such as “Traffic” or “Directions”. You can alsosay, “What are my choices?” to receive a list of available servicesfrom which to choose.
3. Say, “Services” to return to the Services main menu or for help, say,“Help”.
Receiving Turn-by-Turn Directions1. When connected to SYNC Services, say “Directions” or “Business
Search”. To find the closest business or type of business to yourcurrent location, just say “Business Search” and then “Search NearMe”. If you need further assistance in finding a location, you can say“Operator” at any time within a Directions or Business search tospeak with a live operator. The system may prompt you to speakwith an operator when it has difficulty matching your voice request.The live operator can assist you by searching for businesses by nameor by category, residential addresses by street address or by name orspecific street intersections. Operator Assist is a feature of yourSYNC Services subscription. For more information on OperatorAssist, visit www.SYNCMyRide.com/support.
474 MyFord Touch® (If Equipped)
2014 TaurusOwners Guide gf, 2nd Printing, September 2013USA (fus)

2. Follow the voice prompts to select your Destination. After the routedownload is finished, the phone call automatically ends.
If your vehicle is not equipped with Navigation:• Turn-by-turn directions appear in the information display, in the
status bar of your touchscreen system and on the SYNC Servicesscreen. You also receive driving instructions from audible prompts.
• When on an active route, you can select Route Summary or RouteStatus using the touchscreen controls or voice commands to viewthe Route Summary Turn List or the Route Status ETA. You canalso turn voice guidance on or off, cancel the route or update theroute.
If you miss a turn, SYNC automatically asks if you want the routeupdated. Just say, “Yes” when prompted and the system delivers a newroute to your vehicle.
If your vehicle is equipped with Navigation, SYNC Services downloadsyour requested destination to the navigation system. The navigationsystem then calculates the route and provides driving instructions.See the Navigation system section for more information.
Disconnecting from SYNC Services1. Press and hold the phone button on the steering wheel.2. Say “Good-bye” from the SYNC Services main menu.
SYNC Services quick tips
Personalizing You can personalize your Services feature toprovide quicker access to your most used orfavorite information. You can save addresspoints, such as work or home. You can alsosave favorite information like sports teams,such as Detroit Lions, or a news category.You can learn more about personalization bylogging onto www.SYNCMyRide.com.
Push to interrupt Press the voice button at any time (whileconnected to SYNC Services) to interrupt avoice prompt or an audio clip (such as asports report) and say your voice command.
MyFord Touch® (If Equipped) 475
2014 TaurusOwners Guide gf, 2nd Printing, September 2013USA (fus)

SYNC Services quick tips
Portable Your subscription is associated with yourBluetooth-enabled cellular phone number,not your VIN (Vehicle Identification Number).You can pair and connect your phone to anyvehicle equipped with SYNC Services andcontinue enjoying your personalized services.
SYNC Services Voice CommandsWhen a route has been downloaded (non-navigation systems),press the voice button on the steering wheel control. Whenprompted, say any of the following commands:
“SERVICES”
“Cancel route”“Navigation voice off”“Navigation voice on”
“Next turn”“Route status”
“Route summary”“Services”
“Update route”“Help”
Sirius Travel Link (If Equipped and If Activated)
WARNING: Driving while distracted can result in loss of vehiclecontrol, crash and injury. We strongly recommend that you use
extreme caution when using any device that may take your focus offthe road. Your primary responsibility is the safe operation of yourvehicle. We recommend against the use of any hand-held device whiledriving and encourage the use of voice-operated systems when possible.Make sure you are aware of all applicable local laws that may affect theuse of electronic devices while driving.
Note: In order to use Sirius Travel Link, your vehicle must be equippedwith navigation and your navigation SD card must be in the SD card slot.
476 MyFord Touch® (If Equipped)
2014 TaurusOwners Guide gf, 2nd Printing, September 2013USA (fus)

Note: A paid subscription is required to access and use these features.Go to www.siriusxm.com/travellink for more information.Note: Visit www.siriusxm.com/traffic# and click on Coverage map anddetails for a complete listing of all traffic areas covered by Sirius TravelLink.Note: Neither Sirius nor Ford is responsible for any errors orinaccuracies in the Sirius Travel Link services or its use in vehicles.When you subscribe to Sirius Travel Link, it can help you locate the bestgas prices, find movie listings, get current traffic alerts, view the currentweather map, get accurate ski conditions and see scores to currentsports games.
If your vehicle is equipped with Navigation, touch thei (Information) button to access these features. If your vehicleis not equipped with Navigation, touch the corner of the
touchscreen with the green tab.
Traffic On Route and Traffic NearbyTouch these buttons to identify traffic incidents on your route, nearbyyour vehicle’s current location or near any of your favorite places, ifprogrammed.
Fuel PricesTouch this button to view fuel prices at stations close to your vehicle’slocation or on an active navigation route.
Movie ListingsTouch this button to view nearby movie theaters and their show times,if available.
WeatherTouch this button to view the nearby weather, current weather, or thefive day forecast for the chosen area. Select Map to see the weathermap, which can show storms, radar information, charts and winds. SelectArea to select from a listing of weather locations.
Sports InfoTouch this button to view scores and schedules from a variety of sports.You can also save up to 10 favorite teams for easier access. The scoreautomatically refreshes when a game is in progress.
Ski ConditionsTouch this button to view ski conditions for a specific area.
MyFord Touch® (If Equipped) 477
2014 TaurusOwners Guide gf, 2nd Printing, September 2013USA (fus)

Sirius Travel Link Voice CommandsNote: In order to use Sirius Travel Link, your vehicle must be equippedwith navigation and your navigation SD card must be in the SD card slot.
Press the voice button on the steering wheel controls and, whenprompted, say any of the following:
Travel Link voice commands
“5–day weather forecast” “Sports scores”*
“Fuel prices” “Traffic”“Movie listings” “Travel Link”**
“Sports headlines”* “Weather”“Sports schedule”* “Weather map”
*If you have said, “Sports headlines”, “Sports schedule” or “Sportsscores”, you may say any of the commands in the “Sports headlines,Sports schedules and Sports scores” commands chart:**If you have said, “Travel Link”, you may say any of the commands inthe “Travel Link” chart:
Sports headlines, sports schedules and sports scores voice
commands
“Baseball” “My teams”“College basketball” “NBA”
“College football” “NFL”“Golf” “NHL”“MLS” “WNBA”
“Motor sports”
“TRAVEL LINK”
“5–day weatherforecast”
“Golf schedule” “NBA scores”
“Baseball headlines” “MLS headlines” “NFL headlines”“Baseball schedule” “MLS schedule” “NFL schedule”
“Baseball scores” “MLS scores” “NFL scores”“College basketball
headlines”“Motor sports” “NHL headlines”
478 MyFord Touch® (If Equipped)
2014 TaurusOwners Guide gf, 2nd Printing, September 2013USA (fus)

“TRAVEL LINK”
“College basketballschedule”
“Motor sports order” “NHL schedule”
“College basketballscores”
“Motor sportsschedule”
“NHL scores”
“College footballheadlines”
“Movie listings” “Traffic”
“College footballschedule”
“My team headlines” “Weather”
“College footballscores”
“My teams schedule” “Weather map”
“Fuel prices” “My teams scores” “WNBA headlines”“Golf headlines” “NBA headlines” “WNBA schedule”
“Golf leaderboard” “NBA schedule” “WNBA scores”
AlertsIf your vehicle is equipped with Navigation, touch thei (Information) button to access these features. If your vehicleis not equipped with Navigation, touch the corner of the
touchscreen with the green tab.
Press Alerts, and then choose from any of the following services:• View the message.• Delete the message.• Delete All messages.
This screen displays any system messages (such as an SD card fault).
Note: The system alerts you to any messages by turning the informationicon yellow. After you read or delete the messages, the icon returns towhite.
CalendarIf your vehicle is equipped with Navigation, touch thei (Information) button to access these features. If your vehicleis not equipped with Navigation, touch the corner of the
touchscreen with the green tab.
Press Calendar. You can view the current calendar by day, week ormonth.
MyFord Touch® (If Equipped) 479
2014 TaurusOwners Guide gf, 2nd Printing, September 2013USA (fus)

911 Assist® (If Equipped)
WARNING: Unless the 911 Assist setting is set on before acrash, the system will not dial for help, which could delay
response time, potentially increasing the risk of serious injury or deathafter a crash.
WARNING: Do not wait for 911 Assist to make an emergencycall if you can do it yourself. Dial emergency services
immediately to avoid delayed response time, which could increase therisk of serious injury or death after a crash. If you do not hear 911Assist within five seconds of the crash, the system or phone may bedamaged or non-functional.
WARNING: Always place your phone in a secure location in yourvehicle so it does not become a projectile or damaged in a crash.
Failure to do so may cause serious injury to someone or damage thephone, which could prevent 911 Assist from working properly.
Note: The SYNC 911 Assist feature must be set on prior to the incident.
Note: Before setting this feature on, make sure that you read the 911Assist privacy notice later in this section for important information.
Note: If any user turns 911 Assist on or off, that setting applies for allpaired phones. If 911 Assist is turned off, either a voice message plays ora display message (or icon) comes on (or both) when your vehicle isstarted after a previously paired phone connects.
Note: Every phone operates differently. While SYNC 911 Assist workswith most cellular phones, some may have trouble using this feature.
If a crash deploys an airbag (excludes knee airbags and rear inflatablesafety belts [if equipped]) or activates the fuel pump shut-off, yourSYNC-equipped vehicle may be able to contact emergency services bydialing 911 through a paired and connected Bluetooth-enabled phone.You can learn more about the 911 Assist feature, visitwww.SYNCMyRide.com, www.SYNCMyRide.ca or www.syncmaroute.ca.• For information on airbag deployment, see the Supplementary
Restraints System chapter.• For information on the fuel pump shut-off, see the Roadside
Emergencies chapter.
480 MyFord Touch® (If Equipped)
2014 TaurusOwners Guide gf, 2nd Printing, September 2013USA (fus)

Setting 911 Assist OnIf your vehicle is equipped with Navigation, touch thei (Information) button to access these features. If your vehicleis not equipped with Navigation, touch the corner of the
touchscreen with the green tab.
Press Apps > 911 Assist, > On.
You can also access 911 Assist by:
• Pressing the Settings icon > Settings > Phone > 911Assist, or
• Pressing the Settings icon > Help > 911 Assist.
To Make Sure that 911 Assist Works Properly• SYNC must be powered and working properly at the time of the
incident and throughout feature activation and use.• The 911 Assist feature must be set on before the incident.• You must pair and connect a Bluetooth-enabled and compatible phone
to SYNC.• A connected Bluetooth-enabled phone must have the ability to make
and maintain an outgoing call at the time of the incident.• A connected Bluetooth-enabled phone must have adequate network
coverage, battery power and signal strength.• The vehicle must have battery power and be located in the United
States, Canada or in a territory in which 911 is the emergencynumber.
In the Event of a CrashNot all crashes deploy an airbag or activate the fuel pump shut-off(which would trigger 911 Assist); however, SYNC tries to contactemergency services if 911 Assist triggers. If a connected phone sustainsdamage or loses connection to SYNC, SYNC searches for, and tries toconnect to, any available previously paired phone and tries to make thecall to 911.
Before making the call:• SYNC provides a short window of time (about 10 seconds) to cancel
the call. If you fail to cancel the call, SYNC attempts to dial 911.• SYNC says the following, or a similar message: “SYNC will attempt to
call 911, to cancel the call, press Cancel on your screen or press andhold the phone button on your steering wheel.”
MyFord Touch® (If Equipped) 481
2014 TaurusOwners Guide gf, 2nd Printing, September 2013USA (fus)

If you do not cancel the call, and SYNC makes a successful call, apre-recorded message plays for the 911 operator, and then theoccupant(s) in your vehicle is able to talk with the operator. Be preparedto provide your name, phone number and location immediately, becausenot all 911 systems are capable of receiving this information electronically.
911 Assist May Not Work If• Your cellular phone or 911 Assist hardware sustains damage in a
crash.• The vehicle’s battery or SYNC system has no power.• The phone(s) thrown from your vehicle are the ones paired and
connected to the system.
911 Assist Privacy NoticeWhen you turn on 911 Assist, it may disclose to emergency services thatyour vehicle has been in a crash involving the deployment of an airbag oractivation of the fuel pump shut-off. Certain versions or updates to 911Assist may also be capable of electronically or verbally disclosing to 911operators your vehicle location or other details about your vehicle orcrash to assist 911 operators to provide the most appropriate emergencyservices. If you do not want to disclose this information, do not turn thefeature on.
Vehicle Health Report (If Equipped, United States Only)
WARNING: Always follow scheduled maintenance instructions,regularly inspect your vehicle, and seek repair for any damage or
problem you suspect. Vehicle Health Report supplements, but cannotreplace, normal maintenance and vehicle inspection. Vehicle HealthReport only monitors certain systems electronically monitored by yourvehicle and will not monitor or report the status of any other system,(such as brake lining wear). Failure to perform scheduled maintenanceand regularly inspect your vehicle may result in vehicle damage andserious injury.
Note: Your Vehicle Health Report feature requires activation prior touse. Visit www.SYNCMyRide.com to register. There is no fee orsubscription associated with Vehicle Health Report, but you must registerto use this feature.
Note: This feature may not function properly if you have enabled callerID blocking on your mobile phone. Before running a report, review theVehicle Health Report Privacy Notice.
482 MyFord Touch® (If Equipped)
2014 TaurusOwners Guide gf, 2nd Printing, September 2013USA (fus)

Note: In order to allow a break-in period for your vehicle, you may notbe able to create a Vehicle Health Report until your vehicle odometer hasreached 200 miles.
Note: Cellular phone and SMS charges may apply when making a report.
Register for Vehicle Health Report and set your report preferences atwww.SYNCMyRide.com. After registering, you can request a VehicleHealth Report (inside your vehicle). Return to your account atwww.SYNCMyRide.com to view your report. You can also choose forSYNC to remind you automatically to run reports at specific mileageintervals. Cellular phone airtime usage may apply when reporting.
The system allows you to check your vehicle’s overall health in the formof a diagnostic report card. The Vehicle Health Report contains valuableinformation, such as:• Vehicle Diagnostic Information• Scheduled maintenance• Open Recalls and Field Service Actions• Items noted during vehicle inspections by your authorized dealer that
still need servicing.
Making a ReportIf your vehicle is equipped with Navigation, touch thei (Information) button to access these features. If your vehicleis not equipped with Navigation, touch the corner of the
touchscreen with the green tab.
If you want to run a report by using the touchscreen, touch Apps >Vehicle Health Report.
To run a report by voice command, press the voice button onthe steering wheel and, when prompted, say “Vehicle healthreport”.
Vehicle Health Report Privacy NoticeWhen you create a Vehicle Health Report, Ford Motor Company maycollect your cellular phone number (to process your report request) anddiagnostic information about your vehicle. Certain versions or updatesto Vehicle Health Report may also collect more vehicle information.Ford may use your vehicle information it collects for any purpose. If youdo not want to disclose your cellular phone number or vehicle information,do not run the feature or set up your Vehicle Health Report profile atwww.SYNCMyRide.com. See www.SYNCMyRide.com (Vehicle Health ReportTerms and Conditions, and Privacy Statement) for more information.
MyFord Touch® (If Equipped) 483
2014 TaurusOwners Guide gf, 2nd Printing, September 2013USA (fus)

SETTINGS
A. Clock
B. Display
C. Sound
D. Vehicle
E. Settings
F. HelpUnder this menu, you can set your clock, access and adjust thedisplay, sound and vehicle settings as well as access settings forspecific modes or the help feature.
ClockNote: You cannot manually set the date. Your vehicle’s GPS does this foryou.
Note: If the battery has been disconnected, your vehicle needs to acquirea GPS signal to update the clock. Once your vehicle acquires the signal,it may take a few minutes for the update to display the correct time.1. Press the Settings icon > Clock.2. Press + and − to adjust the time.
From this screen, you can also make other adjustments, such as 12– or24–hour mode, activate GPS time synchronization and have the systemautomatically update for new time zones.
A
B
C
D
E
F
484 MyFord Touch® (If Equipped)
2014 TaurusOwners Guide gf, 2nd Printing, September 2013USA (fus)

You can also turn the outside air temperature display on and off. Itappears at the top center of the touchscreen, next to the time and date.
The system automatically saves any updates you make to the settings.
DisplayYou can adjust the touchscreen display through the touchscreen or bypressing the voice button on your steering wheel controls and whenprompted, say, “Display settings”.
Press the Settings icon > Display, to access and makeadjustments using the touchscreen.
• Brightness allows you to make the screen display brighter ordimmer.
• Auto DIM, when set to On, lets you use the Auto Dim Manual Offsetfeature. When set to Off, screen brightness does not change.
• Mode allows you to set the screen to a certain brightness or have thesystem automatically change based on the outside light level, or turnthe display off.• If you select AUTO or NIGHT, you have the options of turning
the display’s Auto Dim feature on or off and changing the AutoDim Manual Offset feature.
• Auto Dim Manual Offset allows you to adjust screen dimming asthe outside lighting conditions change from day to night. This featurealso allows you to adjust screen brightness using the instrument paneldimming control.
Edit Wallpaper• You can have your touchscreen display the default photo or upload
your own.
Uploading Photos for Your Home Screen WallpaperNote: You cannot load photos directly from your camera. You mustaccess the photos either from your USB mass storage device or from anSD card.
Note: Photographs with extremely large dimensions (such as 2048 x 1536)may not be compatible and appear as a blank (black) image on the display.
Your system allows you to upload and view up to 32 photos.
To access, press the Settings icon > Display > Edit Wallpaper, andthen follow the system prompts to upload your photographs.
MyFord Touch® (If Equipped) 485
2014 TaurusOwners Guide gf, 2nd Printing, September 2013USA (fus)

Only the photograph(s), which meets the following conditions, display:• Compatible file formats are as follows: .jpg, .gif, .png, .bmp.• Each file must be 1.5 MB or less.• Recommended dimensions: 800 x 384.
SoundPress the Settings icon > Sound, then select from thefollowing:
Sound Settings
Bass DSP*
Midrange Occupancy Mode*
Treble Speed Compensated VolumeSet Balance and Fade
*If equipped.
VehiclePress the Settings icon > Vehicle, then select from thefollowing:
• Ambient Lighting• Vehicle Health Report• Door Keypad Code• Rear View Camera• Enable Valet Mode.
Ambient Lighting (If Equipped)When activated, ambient lighting illuminates footwells and cupholderswith a choice of colors. To access and make adjustments:1. Press the Settings icon > Vehicle > Ambient Lighting.2. Touch the desired color.3. Use the scroll bar to increase or decrease the intensity.
To turn the feature on or off, press the power button.
Vehicle Health ReportTurn Automatic Reminders on and off and set the mileage interval atwhich you would like to receive the reports. Press ? for more informationon these selections.
When done making your selections, press Run Vehicle Health ReportNow if you want your report.
486 MyFord Touch® (If Equipped)
2014 TaurusOwners Guide gf, 2nd Printing, September 2013USA (fus)

Door Keypad CodeTo change the keypad code for your keyless entry keypad system:1. Press the Settings icon > Vehicle > Door Keypad Code.2. Enter your current factory code, then, when prompted, enter your
new code.
Rear View CameraThis menu allows you to access settings for your rear view camera.Press the Settings icon > Vehicle > Rear View Camera, then selectfrom the following settings:• Rear Camera Delay• Visual Park Aid Alert• Guidelines.
Enable Valet ModeValet mode allows you to lock the system. No information is accessibleuntil the system is unlocked with the correct PIN.1. Press the Settings icon > Vehicle > Enable Valet Mode.2. When prompted, enter a four-digit PIN.
After you press Continue, the system locks until you enter the PIN again.
Note: If the system locks, and you need to reset the PIN, enter 3681 andthe system unlocks.
SettingsAccess and adjust system settings, voice features, as well as phone,navigation and wireless settings.
SystemPress the Settings icon > Settings > System, then select fromthe following:
System
Language Select to have the touchscreen display inEnglish, Spanish or French.
Distance Select to display units in kilometers or miles.Temperature Select to display units in Celsius or
Fahrenheit.System Prompt
Volume
Adjust the volume of voice prompts from thesystem.
MyFord Touch® (If Equipped) 487
2014 TaurusOwners Guide gf, 2nd Printing, September 2013USA (fus)

System
Touch Screen Button
Beep
Select to have the system beep to confirmchoices made through the touchscreen.
Touch Panel Button
Beep
Select to have the system beep to confirmbutton choices made through the climate oraudio system.
Keyboard Layout Have the touchscreen keyboard display inQWERTY or ABC format.
Install Applications Install any downloaded applications or viewthe current software licenses.
Master Reset Select to restore factory defaults. This erasesall personal settings and personal data.
Voice ControlPress the Settings icon > Settings > Voice Control, thenselect from the following:
Voice control
Interaction Mode Standard interaction mode provides moredetailed interaction and guidance. Advancedmode has less audible interaction and moretone prompts.
Confirmation
Prompts
Have the system ask you short questions if ithas not clearly heard or understood yourrequest.Note: Even with confirmation prompts turnedoff, the system may occasionally ask you toconfirm settings.
Media Candidate
Lists
Candidate lists are possible results from yourvoice commands. The system simply makes abest guess at your request with these turnedoff.
488 MyFord Touch® (If Equipped)
2014 TaurusOwners Guide gf, 2nd Printing, September 2013USA (fus)

Voice control
Phone Candidate
Lists
Candidate lists are possible results from yourvoice commands. The system simply makes abest guess at your request with these turnedoff.
Voice Control Volume This allows you to adjust the system’s voicevolume level.
Media PlayerPress the Settings icon > Settings > Media Player, then selectfrom the following:
Media player
Autoplay When this feature is on, the systemautomatically switches to the media sourceupon initial connection. This allows you tolisten to music during the indexing process.When this feature is off, the system does notautomatically switch to the inserted mediasource.
Bluetooth Devices Select to connect, disconnect, add or delete adevice. You can also set a device as yourfavorite so that the system automaticallyattempts to connect to that device at everyignition cycle.
Gracenote Database
Info
This allows you to view the version level ofthe Gracenote Database.
Gracenote Mgmt With this feature on, the Gracenote Databasesupplies metadata information for your musicfiles. This overrides information from yourdevice. This feature defaults to off.
Cover Art Priority With this feature on, the Gracenote Databasesupplied cover art for your music files. Thisoverrides any art from your device. Thisfeature defaults to Media Player.
MyFord Touch® (If Equipped) 489
2014 TaurusOwners Guide gf, 2nd Printing, September 2013USA (fus)

NavigationPress the Settings icon > Settings > Navigation, then selectfrom the following:
Navigation
Map Preferences Turn breadcrumbs on and off.Have the system display your turn list top tobottom or bottom to top.Turn the Parking POI notification on and off.
Route Preferences Preferred Route allows you to choose tohave the system display the Shortest,
Fastest or most Ecological route first. If youset Always Use Preferred Route to Yes,the system uses the selected route type tocalculate only one route to the desireddestination. Always Use Preferred Route
bypasses route selection in destinationprogramming. The system only calculates oneroute based on the preferred route setting.Eco Time Penalty allows you to select a low,medium or high cost for the calculated EcoRoute. The higher the setting, the longer thetime allotment is for the route.Have the system avoid freeways.Have the system avoid tollroads.Have the system avoid ferries or car trains.Have the system use high-occupancy vehiclelanes.
Navigation
Preferences
Have the system use guidance prompts.Have the system automatically fill-inState/Province information.
490 MyFord Touch® (If Equipped)
2014 TaurusOwners Guide gf, 2nd Printing, September 2013USA (fus)

Navigation
Traffic Preferences Have the system display areas whereroadwork occurs.Have the system display incident icons.Have the system display areas where difficultdriving conditions may occur.Have the system display areas where snowand ice on the road may occur.Have the system display any smog alerts.Have the system display weather warnings.Have the system display where there may bereduced visibility.Have the system turn on your radio for trafficannouncements.
Avoid Areas Enter specific areas that you would like toavoid on planned navigation routes.
Phone SettingsPress the Settings icon > Settings > Phone, then select fromthe following:
Phone
Bluetooth Devices Connect, disconnect, add or delete a device,as well as save it as a favorite.
Bluetooth Turn Bluetooth on and off.Do Not Disturb Have all calls go directly to your voice mail
and not ring inside your vehicle. With thisfeature turned on, text message notificationsare also suppressed and do not ring insideyour vehicle.
911 Assist Turn on or turn off the 911 Assist feature.See 911 Assist in the SYNC applications
and services section.
MyFord Touch® (If Equipped) 491
2014 TaurusOwners Guide gf, 2nd Printing, September 2013USA (fus)

Phone
Phone Ringer Select the type of notification for phone calls- ring tone, beep, text to speech, or have it besilent.
Text Message
Notification
Select the type of notification for textmessages - alert tone, beep, text to speech, orhave it be silent.
Internet Data
Connection
If compatible with your phone, you can adjustyour internet data connection. Select to makeyour connection profile with the personal areanetwork or to turn off your connection. Youcan also choose to adjust your settings orhave the system always connect, neverconnect when roaming or query on connect.Press ? for more information.
Manage Phonebook Access features, such as automatic phonebookdownload, re-download your phonebook, addcontacts from your phone as well as delete orupload your phonebook.
Roaming Warning Have the system alert you when in Roamingmode.
Wireless & InternetYour system has a Wi-Fi feature that creates a wireless network withinyour vehicle, thereby allowing other devices (such as personal computersor phones) in your vehicle to speak to each other, share files or playgames. Using this Wi-Fi feature, everyone in your vehicle can also gainaccess the internet if you have a USB mobile broadband connectioninside your vehicle, your phone supports personal area networking and ifyou park outside a wireless hotspot.
Press the Settings icon > Settings > Wireless & Internet,then select from the following:
492 MyFord Touch® (If Equipped)
2014 TaurusOwners Guide gf, 2nd Printing, September 2013USA (fus)

Wireless & Internet
Wi-Fi Settings Wi-Fi Network (Client) Mode turns theWi-Fi feature on and off in your vehicle. Makesure you turn it on for connectivity purposes.Choose a Wireless Network allows you to usea previously stored wireless network. You cancategorize by alphabetical listing, priority andsignal strength. You can also choose to searchfor a network, connect to a network, disconnectfrom a network, receive more information,prioritize a network or delete a network.Gateway (Access Point) Mode makes SYNCan access point for a phone or a computerwhen turned on. This forms the local areanetwork within your vehicle for things, such asgame playing, file transfer and internetbrowsing. Press ? for more information.Gateway (Access Point) Settings allows youto view and change settings for using SYNC asthe internet gateway.Gateway (Access Point) Device List allowsyou to view recent connections to your Wi-Fisystem.
USB Mobile
Broadband
Instead of using Wi-Fi, your system can also usea USB mobile broadband connection to accessthe internet. (You must turn on your mobilebroadband device on your personal computerbefore connecting it to the system.) This screenallows you to set up what is your typical areafor your USB mobile broadband connection.(USB mobile broadband settings may notdisplay if the device is already on.) You canselect the following: Country, Carrier, PhoneNumber, User Name and Password.
MyFord Touch® (If Equipped) 493
2014 TaurusOwners Guide gf, 2nd Printing, September 2013USA (fus)

Wireless & Internet
Bluetooth Settings Shows you the currently paired devices as wellas giving you your typical Bluetooth options toconnect, disconnect, set as favorite, delete andadd device. Bluetooth is a registered trademarkof the Bluetooth SIG.
Prioritize
Connection
Methods
Choose your connection methods and changethem as needed. You can select to ChangeOrder and have the system either alwaysattempt to connect using a USB mobilebroadband or using Wi-Fi.
The Wi-Fi CERTIFIED Logo is acertification mark of the Wi-Fi Alliance.
HelpPress the Settings icon > Help, then select from the following:
Help
Where Am I? View your vehicle’s current location, if your vehicleis equipped with navigation. If your vehicle is notequipped with navigation, nothing displays.
System Information Touchscreen system serial number.Your vehicle identification number (VIN).Touchscreen system software version.Navigation system version.Map database version.Sirius satellite radio electronic serial number(ESN).Gracenote Database Information and Libraryversion.
494 MyFord Touch® (If Equipped)
2014 TaurusOwners Guide gf, 2nd Printing, September 2013USA (fus)

Help
Software Licenses View the licenses for any software andapplications installed on your system.
Driving
Restrictions
Certain features are not accessible when yourvehicle is moving.
911 Assist Turn on and turn off the 911 Assist feature.See 911 Assist in the SYNC applications and
services section.In Case of Emergency (ICE) Speed Dial
allows you to save up to two numbers as ICEcontacts for quick access if there is anemergency. Select Edit to access yourphonebook and then select the desiredcontacts. The numbers then appear as optionson this screen for the ICE 1 and ICE 2 buttons.The ICE contacts you select appear at the endof the 911 Assist call process.
Voice Command
List
View categorized lists of voice commands.
To access Help using the voice commands, press the voice button, then,after the tone, say “Help”. The system provides allowable voicecommands for the current mode.
MyFord Touch® (If Equipped) 495
2014 TaurusOwners Guide gf, 2nd Printing, September 2013USA (fus)

CLIMATEPress the lower right corner on the touchscreen to access your climatecontrol features. Depending on your vehicle line and option package,your climate screen may look different from the screen shown here.
A. Power: Touch to switch the system off and on. Outside air cannotenter your vehicle when you switch off the system.B. Passenger settings:• Touch DUAL to switch on the passenger temperature control.• Touch + or – to adjust the temperature.• Touch the heated seat icon to control the heated seat.• Touch the cooled seat icon to control the cooled seat.C. Fan speed: Touch + or – to adjust fan speed.
D. Recirculated air: Touch to turn the recirculated air on or off which:• May reduce the amount of time needed to cool down the interior.• May help reduce odors from reaching the interior.• Engages automatically when MAX A/C is selected.• May be engaged manually in any airflow mode except defrost.• May turn off in all airflow modes except MAX A/C to reduce fog
potential.
E. MAX A/C: Touch to cool your vehicle with recirculated air. Touchagain for normal A/C operation. MAX A/C:• Distributes air through instrument panel vents.• Is more economical and efficient than normal A/C mode.• May help reduce odors from entering your vehicle.
A
K B
J C
I H G F E D
496 MyFord Touch® (If Equipped)
2014 TaurusOwners Guide gf, 2nd Printing, September 2013USA (fus)

F. A/C: Touch to turn the air conditioning on or off.• Use with recirculated air to improve cooling performance and
efficiency.• Engages automatically in MAX A/C, defrost and floor/defrost.
G. AUTO: Touch to engage automatic operation, then set thetemperature using the temperature control. The system automaticallycontrols:• Fan speed• Airflow distribution• A/C on or off• Outside or recirculated air.
H. Rear defroster: Touch to turn the rear window defroster and heatedmirrors.
I. Defrost: Touch to clear the windshield of fog and thin ice. Touchagain to return to the previous airflow selection. When on, defrost:• Provides outside air to reduce window fogging.• Distributes air through the windshield defroster vents and demister
vents.
J. Manual controls: Select any of the following airflow distribution modes:• Floor and Defrost: Distributes air through the windshield defroster
vents, demister vents, floor vents and rear seat floor vents, and providesoutside air to reduce window fogging.
• Panel: Distributes air through the instrument panel vents.• Panel and Floor: Distributes air through the instrument panel vents,
demister vents, floor vents and rear seat floor vents.• Floor: Distributes air through the demister vents, floor vents and rear
seat floor vents.
K. Driver settings: Depending on your vehicle and option package, youmay have the following features:• Touch + or – to adjust the temperature.• If your vehicle is equipped with heated seats, touch the heated seat
icon to control the heated seat. See the Seats chapter.• If your vehicle is equipped with cooled seats, touch the cooled seat
icon to control the cooled seat. See the Seats chapter.• Touch and hold MyTemp to select a temperature you would like your
vehicle to remember and maintain for you.• If your vehicle is equipped with a heated steering wheel, touch the
heated steering wheel icon to warm the steering wheel.
Note: If your vehicle is equipped with a wood-trimmed steering wheel,it does not heat between the 10 o’clock and 2 o’clock positions.
MyFord Touch® (If Equipped) 497
2014 TaurusOwners Guide gf, 2nd Printing, September 2013USA (fus)
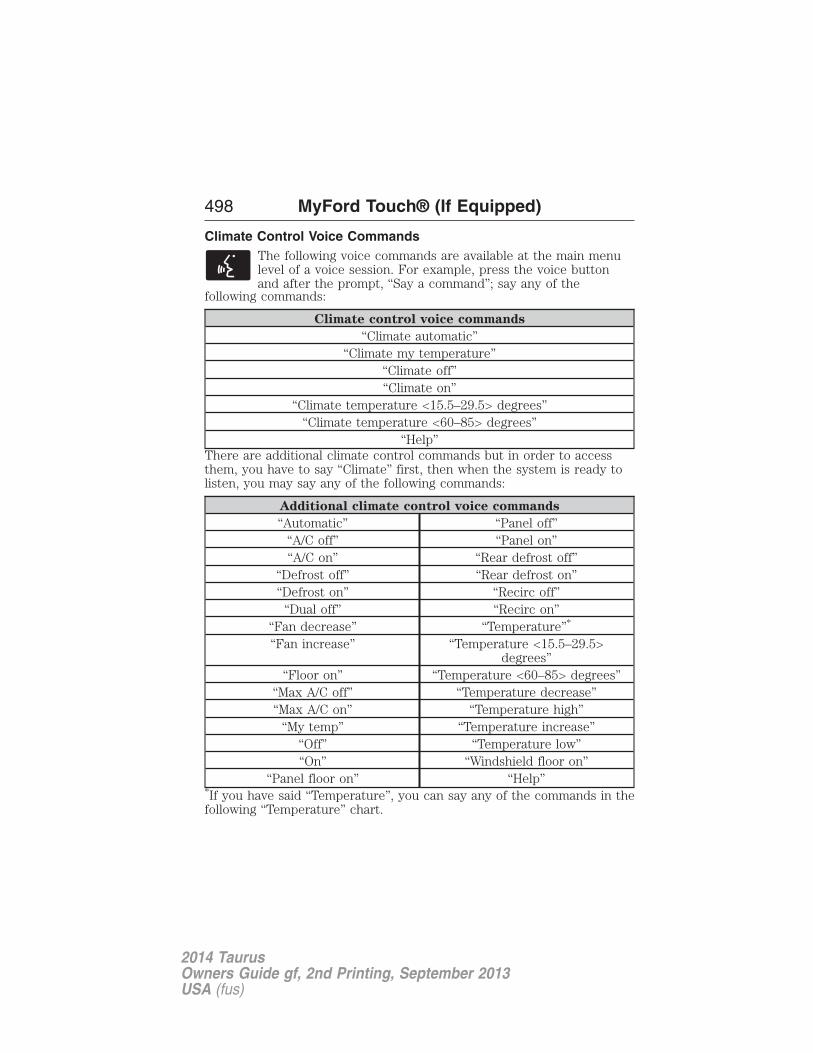
Climate Control Voice CommandsThe following voice commands are available at the main menulevel of a voice session. For example, press the voice buttonand after the prompt, “Say a command”; say any of the
following commands:
Climate control voice commands
“Climate automatic”“Climate my temperature”
“Climate off”“Climate on”
“Climate temperature <15.5–29.5> degrees”“Climate temperature <60–85> degrees”
“Help”There are additional climate control commands but in order to accessthem, you have to say “Climate” first, then when the system is ready tolisten, you may say any of the following commands:
Additional climate control voice commands
“Automatic” “Panel off”“A/C off” “Panel on”“A/C on” “Rear defrost off”
“Defrost off” “Rear defrost on”“Defrost on” “Recirc off”
“Dual off” “Recirc on”“Fan decrease” “Temperature”*
“Fan increase” “Temperature <15.5–29.5>degrees”
“Floor on” “Temperature <60–85> degrees”“Max A/C off” “Temperature decrease”“Max A/C on” “Temperature high”
“My temp” “Temperature increase”“Off” “Temperature low”“On” “Windshield floor on”
“Panel floor on” “Help”*If you have said “Temperature”, you can say any of the commands in thefollowing “Temperature” chart.
498 MyFord Touch® (If Equipped)
2014 TaurusOwners Guide gf, 2nd Printing, September 2013USA (fus)

“TEMPERATURE”
“High”“Low”
“<15.5–29.5> degrees”“<60–85> degrees”
“Help”
NAVIGATION SYSTEM (IF EQUIPPED)Note: The navigation SD card must be in the SD card slot to operatethe navigation system. If you need a replacement SD card, see yourauthorized dealer.Note: The SD card slot is spring-loaded. To remove the SD card, justpush the card in and release it. Do not attempt to pull the card out toremove it; this could cause damage.
Your navigation system is comprised of two main features, destinationmode and map mode.
To set a destination, press the green corner of your touchscreen, thenDest when it appears. See Setting a destination later in this chapter.
To view the navigation map and your vehicle’s current location, touch thegreen bar in the upper right hand corner of the touchscreen, or, pressDest > Map. See Map mode later in this chapter.
Setting a DestinationPress the green corner of your touchscreen, then Dest when it appears.Choose any of the following:
Destination selections
My Home Street AddressFavorites IntersectionPrevious Destinations City CenterPoint of Interest MapEmergency Edit Route Cancel Route
1. Enter the necessary information into the highlighted text fields(in any order). For address destination entry, Go! appears once youenter all the necessary information. Pressing Go! makes the addresslocation appear on the map. If you choose Previous Destination,
the last 20 destinations you have selected appear.
MyFord Touch® (If Equipped) 499
2014 TaurusOwners Guide gf, 2nd Printing, September 2013USA (fus)

2. Select Set as Dest to make this your destination. You can alsochoose to set this as a waypoint (have the system route to this pointon the way to your current destination) or save it as a favorite. Thesystem considers any Avoid Areas selections in its route calculation.
3. Choose from up to three different types of routes, and then selectStart Route.
• Fastest Route: Uses the fastest moving roads possible.• Shortest Route: Uses the shortest distance possible.• Eco Route: Uses the most fuel-efficient route.
You can cancel the route or have the system demo the route for you.Select Route Prefs to set route preferences like avoiding freeways,tollroads, ferries and car trains as well as to use or not usehigh-occupancy vehicle lanes. (High-occupancy vehicle lanes are alsoknown as carpool or diamond lanes. People who ride in buses, vanpoolsor carpools use these lanes.)
Note: If your vehicle is on a recognized road and you do not press theStart Route button, the system defaults to the Fastest Route optionand begins guidance.
During route guidance, you can press the talking bubble icon thatappears in the upper right navigation corner (green bar) if you want thesystem to repeat route guidance information. When the system repeatsthe last guidance instruction, it updates the distance to the nextguidance instruction, since it detects when the vehicle is moving.
Point of Interest (POI) CategoriesYour system offers a variety of points of interest categories.
Main categories
Food/Drink & Dining AutomotiveTravel & Transportation ShoppingFinancial Entertainment & ArtsEmergency Recreation & SportsCommunity GovernmentHealth & Medicine Domestic Services
500 MyFord Touch® (If Equipped)
2014 TaurusOwners Guide gf, 2nd Printing, September 2013USA (fus)

Within these main categories, there are subcategories which containmore listings:
Subcategories
RestaurantGolf
ParkingHome & Garden
Personal Care ServicesAutomobile Dealership
Government OfficePublic Transit
Education
To expand these listings, press the + in front of the point of interest listing.
When programming a point of interest destination, the system allows youto sort the resulting lists alphabetically, by distance or by cityseekrlistings (if available).
Pressing the Search Areas button allows you to search for points ofinterest nearby, near a city or state or near a destination, if a route isactive.
Pressing the Search By Name button allows you to directly enter thepoint of interest name into the system by using the keyboard.
cityseekr (If Available)Note: cityseekr point of interest information is limited to approximately912 cities (881 in the United States, 20 in Canada and 11 in Mexico).
cityseekr, when available, is a service thatprovides more information about certainpoints of interest such as restaurants,hotels and attractions.
When you have selected a point ofinterest, the location and informationappear, such as address and phonenumber. If cityseekr lists the point of
interest, more information is available, such as a brief description, hotelcheck-in and checkout times or restaurant hours.
MyFord Touch® (If Equipped) 501
2014 TaurusOwners Guide gf, 2nd Printing, September 2013USA (fus)

Press More Information for a longer review, a list of services andfacilities, the average room or meal price as well as the website link.
This screen displays either a facility photo (if available) or point ofinterest icons, such as:
Hotel
Coffeehouse
Food & Drink
Nightlife
Attraction
This icon appears when your selection exists in multiplecategories within the system.
When you are viewing more information for hotels, cityseekr also tellsyou if the hotel has certain services and facilities using icons.
Hotel services and facilities
Restaurant 24 Hr Room ServiceBusiness Center Fitness CenterHandicap Facilities Internet AccessLaundry PoolRefrigerator Wi-Fi
502 MyFord Touch® (If Equipped)
2014 TaurusOwners Guide gf, 2nd Printing, September 2013USA (fus)

For restaurants, cityseekr can provide information, such as star rating,average cost, review, handicap access, hours of operation, and websiteaddress.For hotels, cityseekr can provide information, such as star rating, pricecategory, review, check-in and check-out times, hotel service icons andwebsite address.
Setting Your Navigation PreferencesSelect settings for the system to take into account when planning your route.
Press the Settings icon > Settings > Navigation.
Map PreferencesBreadcrumbs displays your vehicle’s previously traveled route withwhite dots. Turn this feature ON or OFF.
Turn List Format allows you to choose to have the system display yourturn list Top to Bottom or Bottom to Top.
Parking POI Notification sets the automatic parking points of interestnotification. Turn this feature ON or OFF. When parking points ofinterest notification is on, the icons display on the map when you getclose to your destination. This may not be very useful in dense areas,and may clutter the map when other points of interest display.
Route PreferencesPreferred Route allows you to choose to have the system display theShortest, Fastest or most Ecological route first. If you set AlwaysUse Preferred Route to Yes, the system uses the selected route typeto calculate only one route to the desired destination.
Always Use Preferred Route bypasses route selection in destinationprogramming. The system only calculates one route based on thepreferred route setting.
Eco Time Penalty allows you to select a low, medium or high cost forthe calculated Eco Route. The higher the setting, the longer the timeallotment is for the route.
Avoid features allows you to choose to have the system avoid freeways,toll roads, ferries and car trains when planning your route. Turn thesefeatures ON or OFF.
Use HOV Lanes allows you to choose to have the system usehigh-occupancy vehicle lanes, if available, when planning your route.
MyFord Touch® (If Equipped) 503
2014 TaurusOwners Guide gf, 2nd Printing, September 2013USA (fus)

Navigation Preferences
Guidance Prompts allows you to choose to have the system use Voice
& Tones or Tone Only on your programmed route.
Auto - Fill State/Province allows you have the system automatically fillin the state and province based on the information already entered intothe system. Turn this feature ON or OFF.
Traffic Preferences
Avoid Traffic Problems allows you to choose how you want the systemto handle traffic problems along your route.• Automatic: Have the system reroute you to avoid traffic incidents
that develop and impact the current route. The system does notprovide a traffic alert notification.
• Manual: Have the system always provide a traffic alert notificationfor traffic incidents along the planned route. You have a choice toaccept or ignore the notification before making the route deviation.
Traffic Alert Notification allows you to choose have the systemdisplay traffic alert notifications.
Other traffic alert features allows you to turn on certain, or all, trafficicons on the map such as road work, incident, accidents and closedroads. Scroll down to view all the different types of alerts. Turn thesefeatures ON or OFF.
Avoid AreasAvoid Areas allows you to choose areas which you want the system toavoid when calculating a route for you.
Press Add to program an entry. Once you make a selection, the systemtries to avoid the area(s) if possible for all routes. To delete a selection,choose the listing on the screen. When the screen changes to AvoidAreas Edit, you can press Delete at the bottom right of the screen.
Map ModePress the green bar in the upper right area of the touchscreen to viewmap mode. Map mode shows advanced viewing comprised of both 2Dcity maps as well as 3D landmarks (when available).
2D city maps show detailed outlines of buildings, visible land use andland elements and detailed railway infrastructure for the most essentialcities around the globe. These maps also contain features, such as townblocks, building footprints, and railways.
504 MyFord Touch® (If Equipped)
2014 TaurusOwners Guide gf, 2nd Printing, September 2013USA (fus)

3D landmarks appear as clear, visible objects that are typicallyrecognizable and have a certain tourist value. The 3D landmarks appearin 3D map mode only. Coverage varies, and improves with updated mapreleases.
Change the appearance of the mapdisplay by repeatedly pressing thearrow button in the upper leftcorner of the screen. It togglesbetween three different map modes:Heading up, North up, and 3D.
Heading up (2D map) always shows the direction of forwardtravel to be upward on the screen. This view is available for mapscales up to 2.5 miles (4 kilometers). The system remembers thissetting for larger map scales, but shows the map in North up
only. If the scale returns below this level, the system restores Heading up.
North up (2D map) always shows the northern direction to beupward on the screen.
3D map mode provides an elevated perspective of the map.This viewing angle can be adjusted and the map can be rotated180 degrees by touching the map twice, and then dragging yourfinger along the shaded bar with arrows at the bottom of the map.
View switches between full map, street list and exit view in routeguidance.
Menu displays a pop-up box that allows direct access to navigationsettings, View/Edit Route, Sirius Travel Link, Guidance Mute and CancelRoute.
Re-center the map by pressing this icon whenever you scrollthe map away from your vehicle’s current location.
Auto ZoomPress the green bar to access map mode, then select the + or - zoombutton to bring up the zoom level and Auto buttons on the touchscreen.When you press Auto, Auto Zoom turns on and Auto displays in thebottom left corner of the screen in the map scale. The map zoom level
MyFord Touch® (If Equipped) 505
2014 TaurusOwners Guide gf, 2nd Printing, September 2013USA (fus)

then synchronizes with vehicle speed. The slower your vehicle istraveling, the farther in the map zooms in; the faster your vehicle istraveling, the farther the map zooms out. To turn the feature off, justpress the + or - button again.
In 3D mode, rotate the map view by swiping your finger across theshaded bar with the arrows.
Map IconsVehicle mark shows the current location of your vehicle.It stays in the center of the map display, except when in scrollmode.
Scroll cursor allows you to scroll the map; the fixed icon is inthe center of the screen. The map position closest to the cursoris in a window on the top center part of the screen.
Address book entry default icon(s) indicates the location onthe map of an address book entry. This is the default symbolshown after the entry has been stored to the Address Book byany method other than the map. You can select from any of the
22 icons available. You can use each icon more than once.
Home indicates the location on the map currently stored as thehome position. You can only save one address from the AddressBook as your Home entry. You cannot change this icon.
POI (Point Of Interest) icons indicate locations of any pointof interest categories you choose to display on the map. You canchoose to display three point of interest categories on the map atone time.
Starting point indicates the starting point of a planned route.
Waypoints indicates the location of a waypoint on the map.The number inside the circle is different for each waypoint andrepresents the position of the waypoint in the route list.
Destination symbol indicates the ending point of a plannedroute.
506 MyFord Touch® (If Equipped)
2014 TaurusOwners Guide gf, 2nd Printing, September 2013USA (fus)

Next maneuver point indicates the location of the next turn onthe planned route.
No GPS symbol indicates that insufficient GPS satellite signalsare available for accurate map positioning. This icon may displayunder normal operation in an area with poor GPS access.
Quick-touch ButtonsWhen in map mode, touch anywhere on the map display to access morefeatures.
Set as DestTouch this button to select a scrolled location on the map as yourdestination. You may scroll the map by pressing your index finger on themap display. When you reach the desired location, simply let go and thentouch Set as Dest.
Set as WaypointTouch this button to set the current location as a waypoint.
Save to FavoritesTouch this button to save the current location to your favorites.
POI IconsTouch this button to select icons to display on the map. You can selectup to three icons to display on the map at the same time. Turn these ONor OFF.
Cancel RouteTouch this button to cancel the active route.
View/Edit RouteAccess these features when a route is active:• View Route• Edit Destination/Waypoints• Edit Turn List• Detour• Edit Route Preferences• Edit Traffic Preferences• Cancel Route.
MyFord Touch® (If Equipped) 507
2014 TaurusOwners Guide gf, 2nd Printing, September 2013USA (fus)

Nokia is the digital map provider for the navigation application. If youfind map data errors, you may report them directly to Nokia by going tohttp://mapreporter.navteq.com. Nokia evaluates all reported map errorsand responds with the result of their investigation by e-mail.
Navigation Map UpdatesAnnual navigation map updates are available for purchase throughyour dealership, by calling 1-800-NAVMAPS (in Mexico, call01–800–557–5539) or going to www.navigation.com/ford. You need tospecify the make and model of your vehicle to determine if there is anupdate available.
Navigation Voice CommandsWhen in navigation mode, press the voice button on thesteering wheel control. After the tone, say any of the followingcommands:
Navigation system voice commands
“Cancel next waypoint”1 “Navigation”3
“Cancel route”1 “Navigation voice volume decrease”1
“Destination”2 “Navigation voice volume increase”1
“Destination <nametag>” “Repeat instruction”“Destination <POI category>” “Show 3D”
“Destination favorites” “Show heading up”“Destination home” “Show map”
“Destination intersection” “Show north up”“Destination nearest
<POI category>”“Show route”1
“Destination nearest POI” “Show turn list”1
“Destination play nametags” “Voice guidance off”“Destination POI” “Voice guidance on”
“Destination POI category” “Where am I?”“Destination previous destination” “Zoom in”
“Destination street address” “Zoom out”“Detour”1 “Help”
1This command is only available when a navigation route is active.2If you have said the command, “Destination”, you may say any of theabove commands or commands in the following Destination chart.
508 MyFord Touch® (If Equipped)
2014 TaurusOwners Guide gf, 2nd Printing, September 2013USA (fus)

3If you have said the command, “Navigation”, you may say any of theabove commands or commands in the following Navigation chart.
“DESTINATION”
“<nametag>”“<POI category>”
“Favorites”“Home”
“Intersection”“Nearest <POI category>”
“Nearest POI”“Play nametags”“POI category”
“Previous destination”“Street address”
“Help”
“NAVIGATION”
“Destination”*
“Zoom city”“Zoom country”
“Zoom in minimum”“Zoom out maximum”
“Zoom province”“Zoom state”“Zoom street”
“Zoom to <distance>”“Help”
*If you have said, “Destination”, you may say any of the commands in theDestination chart.
One-shot Destination Street AddressWhen you say either “Navigation destination street address” or“Destination street address”, the system asks you to say the full address.The system displays an example on-screen. You can then speak theaddress naturally, such as “One two three four Main Street, Anytown”.
MyFord Touch® (If Equipped) 509
2014 TaurusOwners Guide gf, 2nd Printing, September 2013USA (fus)

GENERAL INFORMATION
SYNC® End User License Agreement (EULA)• You have acquired a device (“DEVICE”) that includes softwarelicensed by Ford Motor Company and its affiliates (“FORD MOTORCOMPANY”) from an affiliate of Microsoft Corporation (“MS”). Thoseinstalled software products of MS origin, as well as associated media,printed materials, and “online” or electronic documentation (“MSSOFTWARE”) are protected by international intellectual property lawsand treaties. The MS SOFTWARE is licensed, not sold. All rightsreserved.• The MS SOFTWARE may interface with and/or communicate with,or may be later upgraded to interface with and/or communicate withadditional software and/or systems provided by FORD MOTORCOMPANY. The additional software and systems of FORD MOTORCOMPANY origin, as well as associated media, printed materials, and“online” or electronic documentation (“FORD SOFTWARE”) areprotected by international intellectual property laws and treaties.The FORD SOFTWARE is licensed, not sold. All rights reserved.• The MS SOFTWARE and/or FORD SOFTWARE may interface withand/or communicate with, or may be later upgraded to interface withand/or communicate with additional software and/or systems provided bythird party software and service suppliers. The additional software andservices of third party origin, as well as associated media, printedmaterials, and “online” or electronic documentation (“THIRD PARTYSOFTWARE”) are protected by international intellectual property lawsand treaties. The THIRD PARTY SOFTWARE is licensed, not sold.All rights reserved.• The MS SOFTWARE, FORD SOFTWARE and THIRD PARTYSOFTWARE hereinafter collectively and individually will be referred toas �SOFTWARE.�IF YOU DO NOT AGREE TO THIS END USER LICENSEAGREEMENT (“EULA”), DO NOT USE THE DEVICE OR COPYTHE SOFTWARE. ANY USE OF THE SOFTWARE, INCLUDING BUTNOT LIMITED TO USE ON THE DEVICE, WILL CONSTITUTEYOUR AGREEMENT TO THIS EULA (OR RATIFICATION OF ANYPREVIOUS CONSENT).
GRANT OF SOFTWARE LICENSE: This EULA grants you thefollowing license:• You may use the SOFTWARE as installed on the DEVICE and as
otherwise interfacing with systems and/or services provide by orthrough FORD MOTOR COMPANY or its third party software andservice providers.
510 Appendices
2014 TaurusOwners Guide gf, 2nd Printing, September 2013USA (fus)

DESCRIPTION OF OTHER RIGHTS AND LIMITATIONS:
• Speech Recognition: If the SOFTWARE includes speech recognitioncomponent(s), you should understand that speech recognition is aninherently statistical process and that recognition errors are inherentin the process. Neither FORD MOTOR COMPANY nor its suppliersshall be liable for any damages arising out of errors in the speechrecognition process.
• Limitations on Reverse Engineering, Decompilation andDisassembly: You may not reverse engineer, decompile, ordisassemble nor permit others to reverse engineer, decompile ordisassemble the SOFTWARE, except and only to the extent that suchactivity is expressly permitted by applicable law notwithstanding thislimitation.
• Limitations on Distributing, Copying, Modifying and CreatingDerivative Works: You may not distribute, copy, make modificationsto or create derivative works based on the SOFTWARE, except andonly to the extent that such activity is expressly permitted byapplicable law notwithstanding this limitation.
• Single EULA: The end user documentation for the DEVICE andrelated systems and services may contain multiple EULAs, such asmultiple translations and/or multiple media versions (e.g., in the userdocumentation and in the software). Even if you receive multipleEULAs, you are licensed to use only one (1) copy of the SOFTWARE.
• SOFTWARE Transfer: You may permanently transfer your rightsunder this EULA only as part of a sale or transfer of the DEVICE,provided you retain no copies, you transfer all of the SOFTWARE(including all component parts, the media and printed materials, anyupgrades, and, if applicable, the Certificate(s) of Authenticity), andthe recipient agrees to the terms of this EULA. If the SOFTWARE isan upgrade, any transfer must include all prior versions of theSOFTWARE.
• Termination: Without prejudice to any other rights, FORD MOTORCOMPANY or MS may terminate this EULA if you fail to comply withthe terms and conditions of this EULA.
• Security Updates/Digital Rights Management: Content owners usethe WMDRM technology included in your DEVICE to protect theirintellectual property, included copyrighted content. Portions of theSOFTWARE on your DEVICE use WMDRM software to accessWMDRM-protected content. If the WMDRM software fails to protectthe content, content owners may ask Microsoft to revoke the
Appendices 511
2014 TaurusOwners Guide gf, 2nd Printing, September 2013USA (fus)

SOFTWARE’s ability to use WMDRM to play or copy protectedcontent. This action does not affect unprotected content. When yourDEVICE downloads licenses for protected content, you agree thatMicrosoft may include a revocation list with the licenses. Contentowners may require you to upgrade the SOFTWARE on your DEVICEto access their content. If you decline an upgrade, you will not be ableto access content that requires the upgrade.
• Consent to Use of Data: You agree that MS, Microsoft Corporation,FORD MOTOR COMPANY, third party software and systems suppliers,their affiliates and/or their designated agent may collect and usetechnical information gathered in any manner as part of productsupport services related to the SOFTWARE or related services. MS,Microsoft Corporation, FORD MOTOR COMPANY, third party softwareand services suppliers, their affiliates and/or their designated agentmay use this information solely to improve their products or toprovide customized services or technologies to you. MS, MicrosoftCorporation, FORD MOTOR COMPANY, third party software andsystems suppliers, their affiliates and/or their designated agent maydisclose this information to others, but not in a form that personallyidentifies you.
• Internet-Based Services Components: The SOFTWARE maycontain components that enable and facilitate the use of certainInternet-based services. You acknowledge and agree that MS, MicrosoftCorporation, FORD MOTOR COMPANY, third party software andservice suppliers, their affiliates and/or their designated agent mayautomatically check the version of the SOFTWARE and/or itscomponents that you are utilizing and may provide upgrades orsupplements to the SOFTWARE that may be automaticallydownloaded to your DEVICE.
• Additional Software/Services: The SOFTWARE may permit FORDMOTOR COMPANY, third party software and service suppliers, MS,Microsoft Corporation, their affiliates and/or their designated agent toprovide or make available to you SOFTWARE updates, supplements,add-on components, or Internet-based services components of theSOFTWARE after the date you obtain your initial copy of theSOFTWARE (“Supplemental Components”).
If FORD MOTOR COMPANY or third party software and servicessuppliers provide or make available to you Supplemental Componentsand no other EULA terms are provided along with the SupplementalComponents, then the terms of this EULA shall apply.
512 Appendices
2014 TaurusOwners Guide gf, 2nd Printing, September 2013USA (fus)
If MS, Microsoft Corporation, their affiliates and/or their designated agentmake available Supplemental Components, and no other EULA terms areprovided, then the terms of this EULA shall apply, except that the MS,Microsoft Corporation or affiliate entity providing the SupplementalComponent(s) shall be the licensor of the Supplemental Component(s).FORD MOTOR COMPANY, MS, Microsoft Corporation, their affiliatesand/or their designated agent reserve the right to discontinue withoutliability any Internet-based services provided to you or made available toyou through the use of the SOFTWARE.• Links to Third Party Sites: The MS SOFTWARE may provide you
with the ability to link to third party sites through the use of theSOFTWARE. The third party sites are not under the control of MS,Microsoft Corporation, their affiliates and/or their designated agent.Neither MS nor Microsoft Corporation nor their affiliates nor theirdesignated agent are responsible for (i) the contents of any thirdparty sites, any links contained in third party sites, or any changes orupdates to third party sites, or (ii) webcasting or any other form oftransmission received from any third party sites. If the SOFTWAREprovides links to third party sites, those links are provided to you onlyas a convenience, and the inclusion of any link does not imply anendorsement of the third party site by MS, Microsoft Corporation,their affiliates and/or their designated agent.
• Obligation to Drive Responsibly: You recognize your obligation todrive responsibly and keep attention on the road. You will read andabide with the DEVICE operating instructions particularly as theypertain to safety and assumes any risk associated with the use of theDEVICE.
UPGRADES AND RECOVERY MEDIA: If the SOFTWARE is providedby FORD MOTOR COMPANY separate from the DEVICE on media suchas a ROM chip, CD ROM disk(s) or via web download or other means,and is labeled “For Upgrade Purposes Only” or �For Recovery PurposesOnly� you may install one (1) copy of such SOFTWARE onto theDEVICE as a replacement copy for the existing SOFTWARE, and use itin accordance with this EULA, including any additional EULA termsaccompanying the upgrade SOFTWARE.
INTELLECTUAL PROPERTY RIGHTS: All title and intellectualproperty rights in and to the SOFTWARE (including but not limited toany images, photographs, animations, video, audio, music, text and“applets,” incorporated into the SOFTWARE), the accompanying printedmaterials, and any copies of the SOFTWARE, are owned by MS,Microsoft Corporation, FORD MOTOR COMPANY, or their affiliates or
Appendices 513
2014 TaurusOwners Guide gf, 2nd Printing, September 2013USA (fus)

suppliers. The SOFTWARE is licensed, not sold. You may not copy theprinted materials accompanying the SOFTWARE. All title and intellectualproperty rights in and to the content which may be accessed through useof the SOFTWARE is the property of the respective content owner andmay be protected by applicable copyright or other intellectual propertylaws and treaties. This EULA grants you no rights to use such content.All rights not specifically granted under this EULA are reserved by MS,Microsoft Corporation, FORD MOTOR COMPANY, third party softwareand service providers, their affiliates and suppliers. Use of any on-lineservices which may be accessed through the SOFTWARE may begoverned by the respective terms of use relating to such services. If thisSOFTWARE contains documentation that is provided only in electronicform, you may print one copy of such electronic documentation.EXPORT RESTRICTIONS: You acknowledge that the SOFTWARE issubject to U.S. and European Union export jurisdiction. You agree tocomply with all applicable international and national laws that apply tothe SOFTWARE, including the U.S. Export Administration Regulations,as well as end-user, end-use and destination restrictions issued byU.S. and other governments. For additional information, seehttp://www.microsoft.com/exporting/.
TRADEMARKS: This EULA does not grant you any rights in connectionwith any trademarks or service marks of FORD MOTOR COMPANY, MS,Microsoft Corporation, third party software or service providers, theiraffiliates or suppliers.
PRODUCT SUPPORT: Product support for the SOFTWARE is notprovided by MS, its parent corporation Microsoft Corporation, or theiraffiliates or subsidiaries. For product support, please refer to FORDMOTOR COMPANY instructions provided in the documentation for theDEVICE. Should you have any questions concerning this EULA, or if youdesire to contact FORD MOTOR COMPANY for any other reason, pleaserefer to the address provided in the documentation for the DEVICE.
No Liability for Certain Damages: EXCEPT AS PROHIBITED BYLAW, FORD MOTOR COMPANY, ANY THIRD PARTY SOFTWARE ORSERVICES SUPPLIERS, MS, MICROSOFT CORPORATION AND THEIRAFFILIATES SHALL HAVE NO LIABILITY FOR ANY INDIRECT,SPECIAL, CONSEQUENTIAL OR INCIDENTAL DAMAGES ARISINGFROM OR IN CONNECTION WITH THE USE OR PERFORMANCE OFTHE SOFTWARE. THIS LIMITATION SHALL APPLY EVEN IF ANYREMEDY FAILS OF ITS ESSENTIAL PURPOSE. IN NO EVENT SHALLMS, MICROSOFT CORPORATION AND/OR THEIR AFFILIATES BELIABLE FOR ANY AMOUNT IN EXCESS OF U.S. TWO HUNDREDFIFTY DOLLARS (U.S.$250.00).
514 Appendices
2014 TaurusOwners Guide gf, 2nd Printing, September 2013USA (fus)

• THERE ARE NO WARRANTIES OTHER THAN THOSE THAT MAYEXPRESSLY BE PROVIDED FOR YOUR NEW VEHICLE.
AdobeContains Adobe® [Flash® Player] or [AIR®] technology by AdobeSystems Incorporated. This [Licensee Product] contains [Adobe® Flash®Player] [Adobe® AIR®] software under license from Adobe SystemsIncorporated, Copyright � 1995-2009 Adobe Macromedia Software LLC.All rights reserved. Adobe, Flash and AIR are trademarks of AdobeSystems Incorporated.
End user notice
Microsoft® Windows® Mobile for Automotive Important SafetyInformationThis system Ford SYNC™ contains software that is licensed toManufacturer FORD MOTOR COMPANY by an affiliate of MicrosoftCorporation pursuant to a license agreement. Any removal, reproduction,reverse engineering or other unauthorized use of the software from thissystem in violation of the license agreement is strictly prohibited andmay subject you to legal action.Read and follow instructions
Before using your Windows Automotive-based system, read and follow allinstructions and safety information provided in this end user manual(“User’s Guide”). Not following precautions found in this User’s Guidecan lead to an accident or other serious consequences.
Keep User’s Guide in Vehicle
When kept in the vehicle, the User’s Guide will be a ready reference foryou and other users unfamiliar with the Windows Automotive-basedsystem. Please make certain that before using the system for the firsttime, all persons have access to the User’s Guide and read itsinstructions and safety information carefully.
WARNING: Operating certain parts of this system while drivingcan distract your attention away from the road, and possibly
cause an accident or other serious consequences. Do not changesystem settings or enter data non-verbally (using your hands) whiledriving. Stop the vehicle in a safe and legal manner before attemptingthese operations. This is important since while setting up or changingsome functions you might be required to distract your attention awayfrom the road and remove your hands from the wheel.
Appendices 515
2014 TaurusOwners Guide gf, 2nd Printing, September 2013USA (fus)

General operationVoice Command Control
Functions within the Windows Automotive-based system may beaccomplished using only voice commands. Using voice commands whiledriving allows you to operate the system without removing your handsfrom the wheel.Prolonged Views of Screen
Do not access any function requiring a prolonged view of the screen whileyou are driving. Pull over in a safe and legal manner before attempting toaccess a function of the system requiring prolonged attention. Evenoccasional short scans to the screen may be hazardous if your attention hasbeen diverted away from your driving task at a critical time.
Volume Setting
Do not raise the volume excessively. Keep the volume at a level whereyou can still hear outside traffic and emergency signals while driving.Driving while unable to hear these sounds could cause an accident.
Use of Speech Recognition Functions
Speech recognition software is inherently a statistical process which issubject to errors. It is your responsibility to monitor any speechrecognition functions included in the system and address any errors.
Navigation Features
Any navigation features included in the system are intended to provideturn by turn instructions to get you to a desired destination. Please makecertain all persons using this system carefully read and follow instructionsand safety information fully.
Distraction Hazard
Any navigation features may require manual (non-verbal) setup.Attempting to perform such set-up or insert data while driving canseriously distract your attention and could cause an accident or otherserious consequences. Stop the vehicle in a safe and legal manner beforeattempting these operations.
Let Your Judgment Prevail
Any navigation features are provided only as an aid. Make your drivingdecisions based on your observations of local conditions and existingtraffic regulations. Any such feature is not a substitute for your personaljudgment. Any route suggestions made by this system should neverreplace any local traffic regulations or your personal judgment orknowledge of safe driving practices.
516 Appendices
2014 TaurusOwners Guide gf, 2nd Printing, September 2013USA (fus)

Route Safety
Do not follow the route suggestions if doing so would result in an unsafeor illegal maneuver, if you would be placed in an unsafe situation, or ifyou would be directed into an area that you consider unsafe. The driveris ultimately responsible for the safe operation of the vehicle andtherefore, must evaluate whether it is safe to follow the suggesteddirections.
Potential Map Inaccuracy
Maps used by this system may be inaccurate because of changes inroads, traffic controls or driving conditions. Always use good judgmentand common sense when following the suggested routes.
Emergency Services
Do not rely on any navigation features included in the system to routeyou to emergency services. Ask local authorities or an emergencyservices operator for these locations. Not all emergency services such aspolice, fire stations, hospitals and clinics are likely to be contained in themap database for such navigation features.
TeleNav Software End User License AgreementPlease read these terms and conditions carefully before you use theTeleNav Software. Your use of the TeleNav Software indicates thatyou accept these terms and conditions. If you do not accept theseterms and conditions, do not break the seal of the package, launch,or otherwise use the TeleNav Software.
TeleNav may revise this Agreement and the privacy policy at any time,with or without notice to you. You agree to visit http://www.telenav.comfrom time to time to review the then current version of this Agreementand of the privacy policy.
1. Safe and Lawful UseYou acknowledge that devoting attention to the TeleNav Software maypose a risk of injury or death to you and others in situations thatotherwise require your undivided attention, and you therefore agree tocomply with the following when using the TeleNav Software: (a) observeall traffic laws and otherwise drive safely; (b) use your own personaljudgment while driving. If you feel that a route suggested by the TeleNavSoftware instructs you to perform an unsafe or illegal maneuver, placesyou in an unsafe situation, or directs you into an area that you considerto be unsafe, do not follow such instructions; (c) do not inputdestinations, or otherwise manipulate the TeleNav Software, unless your
Appendices 517
2014 TaurusOwners Guide gf, 2nd Printing, September 2013USA (fus)

vehicle is stationary and parked; (d) do not use the TeleNav Software forany illegal, unauthorized, unintended, unsafe, hazardous, or unlawfulpurposes, or in any manner inconsistent with this Agreement; (e)arrange all GPS and wireless devices and cables necessary for use of theTeleNav Software in a secure manner in your vehicle so that they willnot interfere with your driving and will not prevent the operation of anysafety device (such as an airbag).You agree to indemnify and hold TeleNav harmless against all claimsresulting from any dangerous or otherwise inappropriate use of theTeleNav Software in any moving vehicle, including as a result of yourfailure to comply with the directions above.
2. Account InformationYou agree: (a) when registering the TeleNav Software, to provideTeleNav with true, accurate, current, and complete information aboutyourself, and (b) to inform TeleNav promptly of any changes to suchinformation, and to keep it true, accurate, current and complete.
3. Software LicenseSubject to your compliance with the terms of this Agreement, TeleNavhereby grants to you a personal, non-exclusive, non-transferable license(except as expressly permitted below in connection with your permanenttransfer of the TeleNav Software license), without the right to sublicense,to use the TeleNav Software (in object code form only) in order toaccess and use the TeleNav Software. This license shall terminate uponany termination or expiration of this Agreement. You agree that you willuse the TeleNav Software only for your personal business or leisurepurposes, and not to provide commercial navigation services to otherparties.
3.1 License limitationsYou agree not to do any of the following: (a) reverse engineer,decompile, disassemble, translate, modify, alter or otherwise change theTeleNav Software or any part thereof; (b) attempt to derive the sourcecode, audio library or structure of the TeleNav Software without theprior express written consent of TeleNav; (c) remove from the TeleNavSoftware, or alter, any of TeleNav’s or its suppliers’ trademarks, tradenames, logos, patent or copyright notices, or other notices or markings;(d) distribute, sublicense or otherwise transfer the TeleNav Software toothers, except as part of your permanent transfer of the TeleNavSoftware; or (e) use the TeleNav Software in any manner that (i)infringes the intellectual property or proprietary rights, rights of publicityor privacy or other rights of any party, (ii) violates any law, statute,
518 Appendices
2014 TaurusOwners Guide gf, 2nd Printing, September 2013USA (fus)
ordinance or regulation, including but not limited to laws and regulationsrelated to spamming, privacy, consumer and child protection, obscenityor defamation, or (iii) is harmful, threatening, abusive, harassing,tortuous, defamatory, vulgar, obscene, libelous, or otherwiseobjectionable; and (f) lease, rent out, or otherwise permit unauthorizedaccess by third parties to the TeleNav Software without advanced writtenpermission of TeleNav.
4. Disclaimers
To the fullest extent permissible pursuant to applicable law, in no eventwill TeleNav, its licensors and suppliers, or agents or employees of any ofthe foregoing, be liable for any decision made or action taken by you oranyone else in reliance on the information provided by the TeleNavSoftware. TeleNav also does not warrant the accuracy of the map orother data used for the TeleNav Software. Such data may not alwaysreflect reality due to, among other things, road closures, construction,weather, new roads and other changing conditions. You are responsiblefor the entire risk arising out of your use of the TeleNav Software. Forexample but without limitation, you agree not to rely on the TeleNavSoftware for critical navigation in areas where the well-being or survivalof you or others is dependent on the accuracy of navigation, as the mapsor functionality of the TeleNav Software are not intended to supportsuch high risk applications, especially in more remote geographical areas.TELENAV EXPRESSLY DISCLAIMS AND EXCLUDES ALL WARRANTIESIN CONNECTION WITH THE TELENAV SOFTWARE, WHETHERSTATUTORY, EXPRESS OR IMPLIED, INCLUDING ALL WARRANTIESWHICH MAY ARISE FROM COURSE OF DEALING, CUSTOM OR TRADEAND INCLUDING, BUT NOT LIMITED TO, THE IMPLIED WARRANTIESOF MERCHANTABILITY, FITNESS FOR A PARTICULAR PURPOSE ANDNON-INFRINGEMENT OF THIRD PARTY RIGHTS WITH RESPECT TOTHE TELENAV SOFTWARE. Certain jurisdictions do not permit thedisclaimer of certain warranties, so this limitation may not apply to you.
5. Limitation of LiabilityTO THE EXTENT PERMITTED UNDER APPLICABLE LAW, UNDERNO CIRCUMSTANCES SHALL TELENAV OR ITS LICENSORS ANDSUPPLIERS BE LIABLE TO YOU OR TO ANY THIRD PARTY FOR ANYINDIRECT, INCIDENTAL, CONSEQUENTIAL, SPECIAL OR EXEMPLARYDAMAGES (INCLUDING IN EACH CASE, BUT NOT LIMITED TO,DAMAGES FOR THE INABILITY TO USE THE EQUIPMENT ORACCESS DATA, LOSS OF DATA, LOSS OF BUSINESS, LOSS OFPROFITS, BUSINESS INTERRUPTION OR THE LIKE) ARISING OUT
Appendices 519
2014 TaurusOwners Guide gf, 2nd Printing, September 2013USA (fus)

OF THE USE OF OR INABILITY TO USE THE TELENAV SOFTWARE,EVEN IF TELENAV HAS BEEN ADVISED OF THE POSSIBILITY OFSUCH DAMAGES.NOTWITHSTANDING ANY DAMAGES THAT YOU MIGHT INCUR FORANY REASON WHATSOEVER (INCLUDING, WITHOUT LIMITATION,ALL DAMAGES REFERENCED HEREIN AND ALL DIRECT ORGENERAL DAMAGES IN CONTRACT, TORT (INCLUDINGNEGLIGENCE) OR OTHERWISE), THE ENTIRE LIABILITY OFTELENAV AND OF ALL OF TELENAV’S SUPPLIERS SHALL BELIMITED TO THE AMOUNT ACTUALLY PAID BY YOU FOR THETELENAV SOFTWARE. SOME STATES AND/OR JURISDICTIONS DONOT ALLOW THE EXCLUSION OR LIMITATION OF INCIDENTAL ORCONSEQUENTIAL DAMAGES, SO THE ABOVE LIMITATIONS OREXCLUSIONS MAY NOT APPLY TO YOU.
6. Arbitration and Governing LawYou agree that any dispute, claim or controversy arising out of orrelating to this Agreement or the TeleNav Software shall be settled byindependent arbitration involving a neutral arbitrator and administeredby the American Arbitration Association in the County of Santa Clara,California. The arbitrator shall apply the Commercial Arbitration Rules ofthe American Arbitration Association, and the judgment upon the awardrendered by the arbitrator may be entered by any court havingjurisdiction. Note that there is no judge or jury in an arbitrationproceeding and the decision of the arbitrator shall be binding uponboth parties. You expressly agree to waive your right to a jury trial.This Agreement and performance hereunder will be governed by andconstrued in accordance with the laws of the State of California, withoutgiving effect to its conflict of laws provisions. To the extent judicialaction is necessary in connection with the binding arbitration, bothTeleNav and you agree to submit to the exclusive jurisdiction of thecourts of the County of Santa Clara, California. The United NationsConvention on Contracts for the International Sale of Goods shall notapply.
7. AssignmentYou may not resell, assign, or transfer this Agreement or any of yourrights or obligations, except in totality, in connection with yourpermanent transfer of the TeleNav Software, and expressly conditionedupon the new user of the TeleNav Software agreeing to be bound by theterms and conditions of this Agreement. Any such sale, assignment ortransfer that is not expressly permitted under this paragraph will resultin immediate termination of this Agreement, without liability to TeleNav,
520 Appendices
2014 TaurusOwners Guide gf, 2nd Printing, September 2013USA (fus)

in which case you and all other parties shall immediately cease all use ofthe TeleNav Software. Notwithstanding the foregoing, TeleNav mayassign this Agreement to any other party at any time without notice,provided the assignee remains bound by this Agreement.
8. Miscellaneous8.1 This Agreement constitutes the entire agreement between TeleNavand you with respect to the subject matter hereof.8.2 Except for the limited licenses expressly granted in this Agreement,TeleNav retains all right, title and interest in and to the TeleNavSoftware, including without limitation all related intellectual propertyrights. No licenses or other rights which are not expressly granted in thisAgreement are intended to, or shall be, granted or conferred byimplication, statute, inducement, estoppel or otherwise, and TeleNav andits suppliers and licensors hereby reserve all of their respective rightsother than the licenses explicitly granted in this Agreement.8.3 By using the TeleNav Software, you consent to receive from TeleNavall communications, including notices, agreements, legally requireddisclosures or other information in connection with the TeleNav Software(collectively, “Notices”) electronically. TeleNav may provide such Noticesby posting them on TeleNav’s Website or by downloading such Notices toyour wireless device. If you desire to withdraw your consent to receiveNotices electronically, you must discontinue your use of the TeleNavSoftware.8.4 TeleNav’s or your failure to require performance of any provisionshall not affect that party’s right to require performance at any timethereafter, nor shall a waiver of any breach or default of this Agreementconstitute a waiver of any subsequent breach or default or a waiver ofthe provision itself.8.5 If any provision herein is held unenforceable, then such provision willbe modified to reflect the intention of the parties, and the remainingprovisions of this Agreement will remain in full force and effect.8.6 The headings in this Agreement are for convenience of referenceonly, will not be deemed to be a part of this Agreement, and will not bereferred to in connection with the construction or interpretation of thisAgreement. As used in this Agreement, the words “include” and“including,” and variations thereof, will not be deemed to be terms oflimitation, but rather will be deemed to be followed by the words“without limitation.”
Appendices 521
2014 TaurusOwners Guide gf, 2nd Printing, September 2013USA (fus)

9. Other Vendors Terms and ConditionsThe TeleNav Software utilizes map and other data licensed toTeleNav by third party vendors for the benefit of you and other endusers. This Agreement includes end-user terms applicable to thesecompanies (included at the end of this Agreement), and thus youruse of the TeleNav Software is also subject to such terms. You agree tocomply with the following additional terms and conditions, whichare applicable to TeleNav’s third party vendor licensors:
NavTeq End User License Agreement
END USER TERMS
The content provided (“Data”) is licensed, not sold. By opening thispackage, or installing, copying, or otherwise using the Data, you agreeto be bound by the terms of this agreement. If you do not agree to theterms of this agreement, you are not permitted to install, copy, use,resell or transfer the Data. If you wish to reject the terms of thisagreement, and have not installed, copied, or used the Data, you mustcontact your retailer or NAVTEQ North America, LLC (“NT”) withinthirty (30) days of purchase for a refund of your purchase price.To contact NT, please visit www.navteq.com.
The Data is provided for your personal, internal use only and may not beresold. It is protected by copyright, and is subject to the following terms(this “End User License Agreement”) and conditions which are agreed toby you, on the one hand, and NAVTEQ North America, LLC (“NT”) andits licensors (including their licensors and suppliers) on the other hand.
The Data for areas of Canada includes information taken with permissionfrom Canadian authorities, including: � Her Majesty the Queen in Rightof Canada, � Queen’s Printer for Ontario, � Canada Post Corporation,GeoBase ®.
NT holds a nonexclusive license from the United States Postal Service ®to publish and sell ZIP+4 ® information.
� United States Postal Service ® 2009. Prices are not established,controlled or approved by the United States Postal Service ®. Thefollowing trademarks and registrations are owned by the USPS: UnitedStates Postal Service, USPS, and ZIP+4.
The Data for Mexico includes certain Data from Instituto Nacional deEstadística y Geografía.
522 Appendices
2014 TaurusOwners Guide gf, 2nd Printing, September 2013USA (fus)

TERMS AND CONDITIONS
License Limitations on Use: You agree that your license to usethis Data is limited to and conditioned on use for solely personal,noncommercial purposes, and not for service bureau, timesharing orother similar purposes. Except as otherwise set forth herein, you agreenot to otherwise reproduce, copy, modify, decompile, disassemble orreverse engineer any portion of this Data, and may not transfer ordistribute it in any form, for any purpose, except to the extent permittedby mandatory laws.
License Limitations on Transfer: Your limited license does not allowtransfer or resale of the Data, except on the condition that you maytransfer the Data and all accompanying materials on a permanent basisif: (a) you retain no copies of the Data; (b) the recipient agrees to theterms of this End User License Agreement; and (c) you transfer the Datain the exact same form as you purchased it by physically transferring theoriginal media (e.g., the CD-ROM or DVD you purchased), all originalpackaging, all Manuals and other documentation. Specifically, Multi-discsets may only be transferred or sold as a complete set as provided to youand not as a subset thereof.
Additional License Limitations: Except where you have beenspecifically licensed to do so by NT in a separate written agreement, andwithout limiting the preceding paragraph, your license is conditioned onuse of the Data as prescribed in this agreement, and you may not (a) usethis Data with any products, systems, or applications installed orotherwise connected to or in communication with vehicles capable ofvehicle navigation, positioning, dispatch, real time route guidance, fleetmanagement or similar applications; or (b) with, or in communicationwith, including without limitation, cellular phones, palmtop and handheldcomputers, pagers, and personal digital assistants or PDAs.
WARNING: This Data may contain inaccurate or incompleteinformation due to the passage of time, changing circumstances,
sources used and the nature of collecting comprehensive geographicData, any of which may lead to incorrect results.
Appendices 523
2014 TaurusOwners Guide gf, 2nd Printing, September 2013USA (fus)

No Warranty: This Data is provided to you “as is”, and you agree to use itat your own risk. NT and its licensors (and their licensors and suppliers)make no guarantees, representations or warranties of any kind, express orimplied, arising by law or otherwise, including but not limited to, content,quality, accuracy, completeness, effectiveness, reliability, fitness for aparticular purpose, usefulness, use or results to be obtained from this Data,or that the Data or server will be uninterrupted or error free.
Disclaimer of Warranty: NT AND ITS LICENSORS (INCLUDINGTHEIR LICENSORS AND SUPPLIERS) DISCLAIM ANY WARRANTIES,EXPRESS OR IMPLIED, OF QUALITY, PERFORMANCE,MERCHANTABILITY, FITNESS FOR A PARTICULAR PURPOSE ORNON-INFRINGEMENT. Some States, Territories and Countries do notallow certain warranty exclusions, so to that extent the above exclusionmay not apply to you.
Disclaimer of Liability: NT AND ITS LICENSORS (INCLUDING THEIRLICENSORS AND SUPPLIERS) SHALL NOT BE LIABLE TO YOU INRESPECT OF ANY CLAIM, DEMAND OR ACTION, IRRESPECTIVE OFTHE NATURE OF THE CAUSE OF THE CLAIM, DEMAND OR ACTIONALLEGING ANY LOSS, INJURY OR DAMAGES, DIRECT OR INDIRECT,WHICH MAY RESULT FROM THE USE OR POSSESSION OF THIS DATA;OR FOR ANY LOSS OF PROFIT, REVENUE, CONTRACTS OR SAVINGS,OR ANY OTHER DIRECT, INDIRECT, INCIDENTAL, SPECIAL ORCONSEQUENTIAL DAMAGES ARISING OUT OF YOUR USE OF ORINABILITY TO USE THIS DATA, ANY DEFECT IN THIS DATA, OR THEBREACH OF THESE TERMS OR CONDITIONS, WHETHER IN ANACTION IN CONTRACT OR TORT OR BASED ON A WARRANTY, EVENIF NT OR ITS LICENSORS HAVE BEEN ADVISED OF THE POSSIBILITYOF SUCH DAMAGES. Some States, Territories and Countries do not allowcertain liability exclusions or damages limitations, so to that extent theabove may not apply to you.
Export Control: You agree not to export from anywhere any part of theData or any direct product thereof except in compliance with, and withall licenses and approvals required under, applicable export laws, rulesand regulations, including but not limited to the laws, rules andregulations administered by the Office of Foreign Assets Control of theU.S. Department of Commerce and the Bureau of Industry and Securityof the U.S. Department of Commerce. To the extent that any such exportlaws, rules or regulations prohibit NT from complying with any of itsobligations hereunder to deliver or distribute Data, such failure shall beexcused and shall not constitute a breach of this Agreement.
524 Appendices
2014 TaurusOwners Guide gf, 2nd Printing, September 2013USA (fus)

Entire Agreement: These terms and conditions constitute the entireagreement between NT (and its licensors, including their licensors andsuppliers) and you pertaining to the subject matter hereof, andsupersedes in their entirety any and all written or oral agreementspreviously existing between us with respect to such subject matter.Severability: You and NT agree that if any portion of this agreement isfound illegal or unenforceable, that portion shall be severed and theremainder of the Agreement shall be given full force and effect.Governing Law: The above terms and conditions shall be governed bythe laws of the State of Illinois, without giving effect to (i) its conflict oflaws provisions, or (ii) the United Nations Convention for Contracts forthe International Sale of Goods, which is explicitly excluded. You agreeto submit to the personal jurisdiction of the State of Illinois for any andall disputes, claims and actions arising from or in connection with theData provided to you hereunder.Government End Users: If the Data is being acquired by or on behalfof the United States government or any other entity seeking or applyingrights similar to those customarily claimed by the United Statesgovernment, this Data is a “commercial item” as that term is defined at48 C.F.R. (“FAR”) 2.101, is licensed in accordance with this End UserLicense Agreement, and each copy of Data delivered or otherwisefurnished shall be marked and embedded as appropriate with thefollowing “Notice of Use”, and be treated in accordance with such Notice:
NOTICE OF USE
CONTRACTOR (MANUFACTURER/ SUPPLIER)NAME:
NAVTEQ
CONTRACTOR (MANUFACTURER/SUPPLIER)ADDRESS:
425 West Randolph Street, Chicago, IL 60606.
This Data is a commercial item as defined in FAR 2.101and is subject to the EndUser License Agreement under
which this Data was provided.� 2011 NAVTEQ. All rights reserved.
If the Contracting Officer, federal government agency, or any federalofficial refuses to use the legend provided herein, the ContractingOfficer, federal government agency, or any federal official must notifyNAVTEQ prior to seeking additional or alternative rights in the Data.
Wi-Fi hotspot data provided by JiWire �2013 JiWire.
Appendices 525
2014 TaurusOwners Guide gf, 2nd Printing, September 2013USA (fus)

Gracenote® CopyrightCD and music — related data from Gracenote, Inc., copyright �2000–2007 Gracenote. Gracenote Software, copyright � 2000–2007Gracenote. This product and service may practice one or more of thefollowing U.S. Patents #5,987,525; #6,061,680; #6,154,773, #6,161,132,#6,230,192, #6,230,207, #6,240,459, #6,330,593, and other patents issuedor pending. Some services supplied under license from Open Globe, Inc.for U.S. Patent: #6,304,523.
Gracenote and CDDB are registered trademarks of Gracenote. TheGracenote logo and logotype, and the �Powered by Gracenote™� logo aretrademarks of Gracenote.
Gracenote® End User License Agreement (EULA)This device contains software from Gracenote, Inc. of 2000 Powell StreetEmeryville, California 94608 (“Gracenote”).
The software from Gracenote (the “Gracenote Software”) enables thisdevice to do disc and music file identification and obtain music-relatedinformation, including name, artist, track, and title information(“Gracenote Data”) from online servers (“Gracenote Servers”), and toperform other functions. You may use Gracenote Data only by means ofthe intended End User functions of this device
This device may contain content belonging to Gracenote’s providers.If so, all of the restrictions set forth herein with respect to GracenoteData shall also apply to such content and such content providers shall beentitled to all of the benefits and protections set forth herein that areavailable to Gracenote.
You agree that you will use the content from Gracenote (“GracenoteContent”), Gracenote Data, the Gracenote Software, and GracenoteServers for your own personal, non-commercial use only. You agree notto assign, copy, transfer or transmit the Gracenote Content, GracenoteSoftware or any Gracenote Data (except in a Tag associated with a musicfile) to any third party. YOU AGREE NOT TO USE OR EXPLOITGRACENOTE CONTENT, GRACENOTE DATA, THE GRACENOTESOFTWARE, OR GRACENOTE SERVERS, EXCEPT AS EXPRESSLYPERMITTED HEREIN.
You agree that your non-exclusive licenses to use the Gracenote Content,Gracenote Data, the Gracenote Software, and Gracenote Servers willterminate if you violate these restrictions. If your licenses terminate, youagree to cease any and all use of the Gracenote Content, GracenoteData, the Gracenote Software, and Gracenote Servers. Gracenote,
526 Appendices
2014 TaurusOwners Guide gf, 2nd Printing, September 2013USA (fus)
respectively, reserve all rights in Gracenote Data, the GracenoteSoftware, and the Gracenote Servers and Gracenote Content, includingall ownership rights. Under no circumstances will either Gracenotebecome liable for any payment to you for any information that youprovide, including any copyrighted material or music file information.You agree that Gracenote may enforce its respective rights, collectivelyor separately, under this agreement against you, directly in eachcompany’s own name.
Gracenote uses a unique identifier to track queries for statisticalpurposes. The purpose of a randomly assigned numeric identifier is toallow Gracenote to count queries without knowing anything about whoyou are. For more information, see the web page at www.gracenote.comfor the Gracenote Privacy Policy
THE GRACENOTE SOFTWARE, EACH ITEM OF GRACENOTE DATAAND THE GRACENOTE CONTENT ARE LICENSED TO YOU “AS IS.”NEITHER GRACENOTE MAKES ANY REPRESENTATIONS ORWARRANTIES, EXPRESS OR IMPLIED, REGARDING THE ACCURACYOF ANY GRACENOTE DATA FROM THE GRACENOTE SERVERS ORGRACENOTE CONTENT. GRACENOTE COLLECTIVELY ANDSEPARATELY RESERVE THE RIGHT TO DELETE DATA AND/ORCONTENT FROM THE COMPANIES’ RESPECTIVE SERVERS OR, INTHE CASE OF GRACENOTE, CHANGE DATA CATEGORIES FOR ANYCAUSE THAT GRACENOTE DEEMS SUFFICIENT. NO WARRANTY ISMADE THAT EITHER GRACENOTE CONTENT OR THE GRACENOTESOFTWARE OR GRACENOTE SERVERS ARE ERROR-FREE OR THATTHE FUNCTIONING OF THE GRACENOTE SOFTWARE ORGRACENOTE SERVERS WILL BE UNINTERRUPTED. GRACENOTE ISNOT OBLIGATED TO PROVIDE YOU WITH ANY ENHANCED ORADDITIONAL DATA TYPES THAT GRACENOTE MAY CHOOSE TOPROVIDE IN THE FUTURE AND IS FREE TO DISCONTINUE ITSONLINE SERVICES AT ANY TIME. GRACENOTE DISCLAIM ALLWARRANTIES EXPRESS OR IMPLIED, INCLUDING, BUT NOT LIMITEDTO, IMPLIED WARRANTIES OF MERCHANTABILITY, FITNESS FOR APARTICULAR PURPOSE, TITLE, AND NON-INFRINGEMENT. NEITHERGRACENOTE WARRANTS THE RESULTS THAT WILL BE OBTAINEDBY YOUR USE OF THE GRACENOTE SOFTWARE OR ANYGRACENOTE SERVER. IN NO CASE WILL GRACENOTE BE LIABLEFOR ANY CONSEQUENTIAL OR INCIDENTAL DAMAGES OR FOR ANYLOST PROFITS OR LOST REVENUES FOR ANY REASONWHATSOEVER.
� Gracenote 2007
Appendices 527
2014 TaurusOwners Guide gf, 2nd Printing, September 2013USA (fus)

Vehicle with SYNC onlyFCC ID: KMHSG1G1 IC: 1422A-SG1G1
Vehicle with SYNC and MyFord Touch or MyLincoln TouchFCC ID: KMHSYNCG2 IC: 1422A-SYNCG2
This device complies with Part 15 of the FCC Rules and with RSS-210 ofIndustry Canada. Operation is subject to the following two conditions:(1) This device may not cause harmful interference, and (2) this devicemust accept any interference received, including interference that maycause undesired operation.
WARNING: Changes or modifications not expressively approvedby the party responsible for compliance could void the user’s
authority to operate the equipment. The term “IC:” before the radiocertification number only signifies that Industry Canada technicalspecifications were met.
The antenna used for this transmitter must not be co-located oroperating in conjunction with any other antenna or transmitter.
528 Appendices
2014 TaurusOwners Guide gf, 2nd Printing, September 2013USA (fus)

GENERAL MAINTENANCE INFORMATION
Why Maintain Your Vehicle?Carefully following the maintenance schedule helps protect against majorrepair expenses resulting from neglect or inadequate maintenance andmay help to increase the value of your vehicle when you sell or trade it.Keep all receipts for completed maintenance with your vehicle.
We have established regular maintenance intervals for your vehicle basedupon rigorous testing. It is important that you have your vehicle servicedat the proper times. These intervals serve two purposes; one is tomaintain the reliability of your vehicle and the second is to keep yourcost of owning your vehicle down.
It is your responsibility to have all scheduled maintenance performed andto make sure that the materials used meet the specifications identified inthe Capacities and Specifications chapter of this owner’s manual.
Failure to perform scheduled maintenance invalidates warranty coverageon parts affected by the lack of maintenance.
Why Maintain Your Vehicle at Your Dealership?
Factory-Trained TechniciansService technicians participate in extensive factory-sponsoredcertification training to help them become experts on the operation ofyour vehicle. Ask your dealership about the training and certificationtheir technicians have received.
Genuine Ford and Motorcraft® Replacement PartsDealerships stock Ford, Motorcraft and Ford-authorized brandedre-manufactured replacement parts. These parts meet or exceed ourspecifications. Parts installed at your dealership carry a nationwide12-month or 12000-mile (20000 kilometers) parts and labor limitedwarranty.
If you do not use Ford authorized parts they may not meet ourspecifications and depending on the part, it could affect emissionscompliance.
Scheduled Maintenance 529
2014 TaurusOwners Guide gf, 2nd Printing, September 2013USA (fus)

ConvenienceMany dealerships have extended evening and Saturday hours to makeyour service visit more convenient and they offer one stop shopping.They can perform any services that are required on your vehicle, fromgeneral maintenance to collision repairs.Note: Not all dealers have extended hours or body shops. Please contactyour dealer for details.
Protecting Your InvestmentMaintenance is an investment that will pay dividends in the form ofimproved reliability, durability and resale value. To maintain the properperformance of your vehicle and its emission control systems, it isimperative that scheduled maintenance be completed at the designatedintervals.Your vehicle is equipped with the Intelligent Oil-Life Monitor (IOLM)system which displays a message in the information display at the properoil change service interval; this interval may be up to one year or10000 miles (16000 kilometers). When ENGINE OIL CHANGE DUE orOIL CHANGE REQUIRED appears in the information display, it is timefor an oil change; the oil change must be done within two weeks or500 miles (800 kilometers) of the ENGINE OIL CHANGE DUE or OILCHANGE REQUIRED message appearing. The Intelligent Oil-Life Monitormust be reset after each oil change; see the Information Displayschapter.If your information display is prematurely reset or becomes inoperative,you should perform the oil change interval at six months or 5000 miles(8000 kilometers) from your last oil change. Never exceed one year or10000 miles (16000 kilometers) between oil change intervals.Your vehicle is very sophisticated and built with multiple, complex,performance systems. Every manufacturer develops these systems usingdifferent specifications and performance features. That is why it isimportant to rely upon your dealership to properly diagnose and repairyour vehicle.
Ford Motor Company has recommended maintenance intervals for variousparts and component systems based upon engineering testing. Ford MotorCompany relies upon this testing to determine the most appropriatemileage for replacement of oils and fluids to protect your vehicle at thelowest overall cost to you and recommends against maintenance schedulesthat deviate from the scheduled maintenance information.
Ford strongly recommends the use of only genuine Ford, Motorcraft orFord-authorized remanufactured replacement parts because they areengineered for your vehicle.
530 Scheduled Maintenance
2014 TaurusOwners Guide gf, 2nd Printing, September 2013USA (fus)

Additives and ChemicalsFord Motor Company recommended additives and chemicals are listedin the owner manual and in the Ford Workshop Manual. Additionalchemicals or additives not approved by Ford Motor Company are notrecommended as part of normal maintenance. Please consult yourwarranty information.
Oils, Fluids and FlushingIn many cases, fluid discoloration is a normal operating characteristicand, by itself, does not necessarily indicate a concern or that the fluidneeds to be changed. However, discolored fluids that also show signs ofoverheating and foreign material contamination should be inspectedimmediately by a qualified expert, such as the factory-trained techniciansat your dealership. Your vehicle’s oils and fluids should be changed at thespecified intervals or in conjunction with a repair. Flushing is a viableway to change fluid for many vehicle sub-systems during scheduledmaintenance. It is critical that systems are flushed only with new fluidthat is the same as that required to fill and operate the system, or usinga Ford-approved flushing chemical.
Owner Checks and ServicesCertain basic maintenance checks and inspections should be performedevery month or at six month intervals.
Check every month
Engine oil level.Function of all interior and exterior lights.Tires (including spare) for wear and proper pressure.Windshield washer fluid level.
Check every six months
Battery connections. Clean if necessary.Body and door drain holes for obstructions. Clean if necessary.Cooling system fluid level and coolant strength.Door weatherstrips for wear. Lubricate if necessary.Hinges, latches and outside locks for proper operation. Lubricate ifnecessary.Parking brake for proper operation.
Scheduled Maintenance 531
2014 TaurusOwners Guide gf, 2nd Printing, September 2013USA (fus)

Check every six months
Safety belts and seat latches for wear and function.Safety warning lamps (brake, ABS, airbag, safety belt) for operation.Washer spray and wiper operation. Clean or replace blades as necessary.
Multi-point InspectionIn order to keep your vehicle running right, it is important to have thesystems on your vehicle checked regularly. This can help identifypotential issues and prevent major problems. Ford Motor Companyrecommends the following multi-point inspection be performed at everyscheduled maintenance interval to help make sure your vehicle keepsrunning great.
Multi-point Inspection
Accessory drive belt(s) Half-shaft dust boots (if equipped)Battery performance Horn operationClutch operation (if equipped) Radiator, cooler, heater and A/C hosesEngine air filter Suspension component for leaks or
damageExhaust system Steering and linkageExterior lamps and hazardwarning system operation
Tires (including spare) for wear andproper pressure**
Fluid levels*; fill if necessary Windshield for cracks, chips or pitsFor oil and fluid leaks Washer spray and wiper operation
*Brake, coolant recovery reservoir, manual and automatic transmission(with an underhood dipstick), power steering (if equipped) and windowwasher**If your vehicle is equipped with a temporary mobility kit, check the tiresealant expiration Use By date on the canister. Replace as needed.
Be sure to ask your dealership service advisor or technician about themulti-point vehicle inspection. It’s a comprehensive way to perform athorough inspection of your vehicle. It’s your checklist that gives youimmediate feedback on the overall condition of your vehicle. You’ll knowwhat’s been checked, what’s okay, as well as those things that mayrequire future or immediate attention. The multi-point vehicle inspectionis one more way to keep your vehicle running great!
532 Scheduled Maintenance
2014 TaurusOwners Guide gf, 2nd Printing, September 2013USA (fus)

Scheduled Maintenance 533
2014 TaurusOwners Guide gf, 2nd Printing, September 2013USA (fus)

NORMAL SCHEDULED MAINTENANCE AND LOG
Intelligent Oil-Life Monitor®Your vehicle is equipped with an Intelligent Oil-Life Monitor thatdetermines when the engine oil needs to be changed based on how yourvehicle is used. By using several important factors in its calculations,the monitor helps reduce the cost of owning your vehicle and reduceenvironmental waste at the same time. This means you won’t have toremember to change the oil on a mileage-based schedule; the vehiclelets you know when an oil change is due by displaying ENGINE OILCHANGE DUE or OIL CHANGE REQUIRED in the information display.The following table is intended to provide examples of vehicle use andits impact on engine oil change intervals; it is provided as a guidelineonly. Actual engine oil change intervals depend on several factors andgenerally decrease with severity of use.
When to expect the OIL CHANGE REQUIRED message
Interval Vehicle use and examples
7500-10000 miles(12000-16000 km)
Normal
– Normal commuting with highway driving– No, or moderate, load or towing– Flat to moderately hilly roads– No extended idling
5000-7499 miles(8000-11999 km)
Severe
– Moderate to heavy load or towing– Mountainous or off-road conditions– Extended idling– Extended hot or cold operation
3000-4999 miles(4800-7999 km)
Extreme
– Maximum load or towing– Extreme hot or cold operation
534 Scheduled Maintenance
2014 TaurusOwners Guide gf, 2nd Printing, September 2013USA (fus)

Normal scheduled maintenance*
At every oil changeinterval as indicated bythe information display
Change engine oil and filter.**
Rotate tires, inspect tire wear and measuretread depth.Perform multi-point inspection(recommended).Inspect automatic transmission fluid level(if equipped with dipstick). Consult dealer forrequirements.Inspect brake pads, shoes, rotors, drums,brake linings, hoses and parking brake.Inspect engine cooling system strength andhoses.Inspect exhaust system and heat shields.Inspect rear axle and U-joints. Lubricate ifequipped with grease fittings (All-wheel drivevehicles).Inspect half-shaft boots (if equipped).Inspect steering linkage, ball joints,suspension, tie-rod ends, driveshaft andU-joints. Lubricate if equipped with greasefittings.Inspect wheels and related components forabnormal noise, wear, looseness or drag.
*Do not exceed one year or 10000 miles (16000 kilometers) betweenservice intervals.**Reset your Intelligent Oil-Life Monitor after each engine oil and filterchange. See the Instrument Cluster chapter.
Scheduled Maintenance 535
2014 TaurusOwners Guide gf, 2nd Printing, September 2013USA (fus)

Other maintenance items1
Every 20000 miles(32000 km)
Replace cabin air filter (if equipped).
Every 30000 miles(48000 km)
Replace climate-controlled (heated andcooled) seat filter2.Replace engine air filter.
At 100000 miles(160000 km)
Change engine coolant.3
Every 100000 miles(160000 km)
Replace spark plugs.Inspect accessory drive belt(s).4
Every 150000 miles(240000 km)
Change automatic transmission fluid.Replace accessory drive belt(s) if not replacedwithin the last 100000 miles (160000 km).
1These maintenance items can be performed within 3000 miles(4800 kilometers) of the last oil change. Do not exceed the designateddistance for the interval.2If your vehicle has climate-controlled (heated and cooled) seats.3Initial replacement at six years or 100000 miles (160000 kilometers),then every three years or 50000 miles (80000 kilometers).4After initial inspection, inspect every other oil change until replaced.
536 Scheduled Maintenance
2014 TaurusOwners Guide gf, 2nd Printing, September 2013USA (fus)

Maintenance Schedule LogDEALER VALIDATION:
P&A CODE:RO#: HOURS:DATE: MILEAGE:
DEALER VALIDATION:
P&A CODE:RO#: HOURS:DATE: MILEAGE:
DEALER VALIDATION:
P&A CODE:RO#: HOURS:DATE: MILEAGE:
DEALER VALIDATION:
P&A CODE:RO#: HOURS:DATE: MILEAGE:
DEALER VALIDATION:
P&A CODE:RO#: HOURS:DATE: MILEAGE:
DEALER VALIDATION:
P&A CODE:RO#: HOURS:DATE: MILEAGE:
DEALER VALIDATION:
P&A CODE:RO#: HOURS:DATE: MILEAGE:
DEALER VALIDATION:
P&A CODE:RO#: HOURS:DATE: MILEAGE:
DEALER VALIDATION:
P&A CODE:RO#: HOURS:DATE: MILEAGE:
DEALER VALIDATION:
P&A CODE:RO#: HOURS:DATE: MILEAGE:
Scheduled Maintenance 537
2014 TaurusOwners Guide gf, 2nd Printing, September 2013USA (fus)

DEALER VALIDATION:
P&A CODE:RO#: HOURS:DATE: MILEAGE:
DEALER VALIDATION:
P&A CODE:RO#: HOURS:DATE: MILEAGE:
DEALER VALIDATION:
P&A CODE:RO#: HOURS:DATE: MILEAGE:
DEALER VALIDATION:
P&A CODE:RO#: HOURS:DATE: MILEAGE:
DEALER VALIDATION:
P&A CODE:RO#: HOURS:DATE: MILEAGE:
DEALER VALIDATION:
P&A CODE:RO#: HOURS:DATE: MILEAGE:
DEALER VALIDATION:
P&A CODE:RO#: HOURS:DATE: MILEAGE:
DEALER VALIDATION:
P&A CODE:RO#: HOURS:DATE: MILEAGE:
DEALER VALIDATION:
P&A CODE:RO#: HOURS:DATE: MILEAGE:
DEALER VALIDATION:
P&A CODE:RO#: HOURS:DATE: MILEAGE:
538 Scheduled Maintenance
2014 TaurusOwners Guide gf, 2nd Printing, September 2013USA (fus)

DEALER VALIDATION:
P&A CODE:RO#: HOURS:DATE: MILEAGE:
DEALER VALIDATION:
P&A CODE:RO#: HOURS:DATE: MILEAGE:
DEALER VALIDATION:
P&A CODE:RO#: HOURS:DATE: MILEAGE:
DEALER VALIDATION:
P&A CODE:RO#: HOURS:DATE: MILEAGE:
DEALER VALIDATION:
P&A CODE:RO#: HOURS:DATE: MILEAGE:
DEALER VALIDATION:
P&A CODE:RO#: HOURS:DATE: MILEAGE:
DEALER VALIDATION:
P&A CODE:RO#: HOURS:DATE: MILEAGE:
DEALER VALIDATION:
P&A CODE:RO#: HOURS:DATE: MILEAGE:
DEALER VALIDATION:
P&A CODE:RO#: HOURS:DATE: MILEAGE:
DEALER VALIDATION:
P&A CODE:RO#: HOURS:DATE: MILEAGE:
Scheduled Maintenance 539
2014 TaurusOwners Guide gf, 2nd Printing, September 2013USA (fus)

SPECIAL OPERATING CONDITIONSIf you operate your vehicle primarily in any of the following conditions,you need to perform additional maintenance as indicated. If youoccasionally operate your vehicle under any of these conditions, it isnot necessary to perform the additional maintenance. For specificrecommendations, see your dealership service advisor or technician.
Perform the services shown in the following tables when specified orwithin 3000 miles (4800 kilometers) of the OIL CHANGE REQUIREDmessage appearing in the information display.
Example #1: The OIL CHANGE REQUIRED message comes on at28751 miles (46270 kilometers); perform the 30000 mile (48000 kilometer)automatic transmission fluid replacement.
Example #2: The OIL CHANGE REQUIRED message has not come on,but the odometer reads 30000 miles (48000 kilometers); perform theengine air filter replacement. (i.e., Intelligent Oil-Life Monitor was resetat 25000 miles [40000 kilometers].)
Towing a trailer or using a camper or car-top carrier
As required Change engine oil and filter as indicated bythe information display and perform serviceslisted in the Normal Scheduled Maintenancechart.
Inspect frequently,service as required
Inspect and lubricate U-joints.See axle maintenance items underExceptions.
Every 30000 miles(48000 km)
Change automatic transmission fluid(except Focus).
Every 60000 miles(96000 km)
Change manual transmission fluid.
Extensive idling or low-speed driving for long distances as in
heavy commercial use (such as delivery, taxi, patrol car or livery)
As required Change engine oil and filter as indicated bythe information display and perform serviceslisted in the Normal Scheduled Maintenancechart.
Inspect frequently,service as required
Replace cabin air filter (if equipped).Replace engine air filter.
540 Scheduled Maintenance
2014 TaurusOwners Guide gf, 2nd Printing, September 2013USA (fus)

Extensive idling or low-speed driving for long distances as in
heavy commercial use (such as delivery, taxi, patrol car or livery)
Every 30000 miles(48000 km)
Change automatic transmission fluid(except Focus).
Every 60000 miles(96000 km)
Replace spark plugs.
Operating in dusty or sandy conditions such as unpaved or
dusty roads
Inspect frequently,service as required
Replace cabin air filter (if equipped).Replace engine air filter.
Every 5000 miles(8000 km)
Inspect the wheels and related components forabnormal noise, wear, looseness or drag.Rotate tires, inspect tires for wear andmeasure tread depth.
Every 5000 miles(8000 km) or sixmonths
Change engine oil and filter.*
Perform multi-point inspection.
Every 30000 miles(48000 km)
Change automatic transmission fluid(except Focus).
Every 50000 miles(80000 km)
Change manual transmission fluid.
*Reset your Intelligent Oil-Life Monitor after each engine oil and filterchange. See the Instrument Cluster chapter.
Exclusive use of E85 (flex fuel vehicles only)
Every oil change If ran exclusively on E85, fill the fuel tank fullwith regular unleaded fuel.
Scheduled Maintenance 541
2014 TaurusOwners Guide gf, 2nd Printing, September 2013USA (fus)

Special Operating Condition LogDEALER VALIDATION:
P&A CODE:RO#: HOURS:DATE: MILEAGE:
DEALER VALIDATION:
P&A CODE:RO#: HOURS:DATE: MILEAGE:
DEALER VALIDATION:
P&A CODE:RO#: HOURS:DATE: MILEAGE:
DEALER VALIDATION:
P&A CODE:RO#: HOURS:DATE: MILEAGE:
DEALER VALIDATION:
P&A CODE:RO#: HOURS:DATE: MILEAGE:
DEALER VALIDATION:
P&A CODE:RO#: HOURS:DATE: MILEAGE:
DEALER VALIDATION:
P&A CODE:RO#: HOURS:DATE: MILEAGE:
DEALER VALIDATION:
P&A CODE:RO#: HOURS:DATE: MILEAGE:
DEALER VALIDATION:
P&A CODE:RO#: HOURS:DATE: MILEAGE:
DEALER VALIDATION:
P&A CODE:RO#: HOURS:DATE: MILEAGE:
542 Scheduled Maintenance
2014 TaurusOwners Guide gf, 2nd Printing, September 2013USA (fus)

DEALER VALIDATION:
P&A CODE:RO#: HOURS:DATE: MILEAGE:
DEALER VALIDATION:
P&A CODE:RO#: HOURS:DATE: MILEAGE:
DEALER VALIDATION:
P&A CODE:RO#: HOURS:DATE: MILEAGE:
DEALER VALIDATION:
P&A CODE:RO#: HOURS:DATE: MILEAGE:
DEALER VALIDATION:
P&A CODE:RO#: HOURS:DATE: MILEAGE:
DEALER VALIDATION:
P&A CODE:RO#: HOURS:DATE: MILEAGE:
DEALER VALIDATION:
P&A CODE:RO#: HOURS:DATE: MILEAGE:
DEALER VALIDATION:
P&A CODE:RO#: HOURS:DATE: MILEAGE:
DEALER VALIDATION:
P&A CODE:RO#: HOURS:DATE: MILEAGE:
DEALER VALIDATION:
P&A CODE:RO#: HOURS:DATE: MILEAGE:
Scheduled Maintenance 543
2014 TaurusOwners Guide gf, 2nd Printing, September 2013USA (fus)

EXCEPTIONSThere are several exceptions to the Normal Schedule. They are listedbelow:
Normal vehicle axle maintenance: Rear axles and power take-off(PTO) units with synthetic fluid and light-duty trucks equipped withFord-design axles are lubricated for life; do not check or change fluidunless a leak is suspected, service is required or the assembly has beensubmerged in water. During long periods of trailer towing with outsidetemperatures above 70°F (21°C) and at wide-open throttle for longperiods above 45 mph (72 km/h), non-synthetic rear axle fluids shouldbe changed every 3000 miles (4800 kilometers) or three months,whichever comes first. This interval can be waived if the axle is filledwith 75W140 synthetic gear fluid meeting Ford specificationWSL-M2C192-A, part number F1TZ-19580-B or equivalent. Add frictionmodifier XL-3 (EST-M2C118-A) or equivalent for complete refill ofTraction-Lok rear axles (see Technical specifications in the Capacitiesand Specifications chapter for details).
Police/Taxi/Livery vehicle axle maintenance: Change rear axle fluidevery 100000 miles (160000 kilometers). Rear axle fluid change may bewaived if the axle was filled with 75W140 synthetic gear fluid meetingFord specification WSL-M2C192-A, part number FITZ-19580-B orequivalent. Add four ounces (118 mL) of additive friction modifier XL-3(EST-M2C118-A) or equivalent for complete refill of Traction-Lok rearaxles. The axle fluid should be changed anytime the axle has beensubmerged in water.
California fuel filter replacement: If the vehicle is registered inCalifornia, the California Air Resources Board has determined that thefailure to perform this maintenance item will not nullify the emissionwarranty or limit recall liability prior to the completion of the vehicle’suseful life. Ford Motor Company, however, urges you to have allrecommended maintenance services performed at the specified intervalsand to record all vehicle service.
Class A Motorhome: Change brake fluid every two years.
Hot climate oil change intervals: Vehicles operating in the MiddleEast, North Africa, Sub-Saharan Africa or locations with similar climatesusing an American Petroleum Institute (API) Certified for GasolineEngines (Certification mark) oil of SM or SN quality, the normal oilchange interval is 5000 miles (8000 kilometers).If the available API SM or SN oils are not available, then the oil changeservice interval is 3000 miles (4800 kilometers).
544 Scheduled Maintenance
2014 TaurusOwners Guide gf, 2nd Printing, September 2013USA (fus)

Edge/MKX AWD only: Vehicles operating off-road in sand during highambient temperatures must replace the AWD PTU (All-wheel drivePower Transfer Unit) lube every 20000 miles (32000 kilometers).
Engine air filter & cabin air filter replacement: Engine air filterand cabin air filter life is dependent on exposure to dusty and dirtyconditions. Vehicles operated in these conditions will require frequentinspection and replacement of the engine air filter and cabin air filter.
ENGINE COOLANT CHANGE RECORD
Initial change Six years or 100000 miles (160000 km)(whichever comes first)
After initial change Every three years or 50000 miles (80000 km)
Engine Coolant Change LogDEALER VALIDATION:
P&A CODE:RO#: HOURS:DATE: MILEAGE:
DEALER VALIDATION:
P&A CODE:RO#: HOURS:DATE: MILEAGE:
DEALER VALIDATION:
P&A CODE:RO#: HOURS:DATE: MILEAGE:
DEALER VALIDATION:
P&A CODE:RO#: HOURS:DATE: MILEAGE:
DEALER VALIDATION:
P&A CODE:RO#: HOURS:DATE: MILEAGE:
DEALER VALIDATION:
P&A CODE:RO#: HOURS:DATE: MILEAGE:
Scheduled Maintenance 545
2014 TaurusOwners Guide gf, 2nd Printing, September 2013USA (fus)

911 Assist™ ......................405, 480
A
ABS (see Brakes) .....................196Accessing and using yourUSB port ....................................458Accessing call history/phonebook during active call .............394Accessing your calendar ..........479Accessing your media menufeatures ......................................416Accessing your phone menufeatures ......................................396
Accessory delay ..........................97
Active call menu options .........394
Active Park Assist .....................203
Adaptive Cruise Control ...........213
Adding (pairing) a phone ........466
Advanced menu options ...403, 423
Advanced menu options(prompts, languages, defaults,master reset, installingapplications) ..............................403
Airbag supplemental restraintsystem ..........................................44
and child safety seats ..............45description ................................44disposal ......................................54driver airbag ..............................44passenger airbag .......................44side airbag ...........................44, 49
Air cleaner filter .......298–299, 359
Air conditioning ........................130manual heating and airconditioning system ...............130
Air filter, cabin ..........................140
All Wheel Drive (AWD),driving off road .........................188Ambient mood/lighting .............486AM/FM .......................................446Antifreeze (see Enginecoolant) .....................................285Anti-lock brake system(see Brakes) ..............................196Anti-theft system ..................77, 80
arming the system ..............77, 80disarming a triggered system ...80
Audio systemSingle CD ................369, 374–375
Audio system(see Radio) ................369, 374–375
Automatic transmissiondriving an automaticoverdrive .................................183fluid, adding ....................290–291fluid, checking ................290–291fluid, refill capacities ..............354fluid, specification ..................354Selectshift (SST) ....................184
Auxiliary Input Jack .................455
Auxiliary input jack (Line in) ...382
Auxiliary powerpoint ................161
A/V inputs ..........................384, 463
B
Battery .......................................296acid, treating emergencies .....296jumping a disabled battery ....258maintenance-free ....................296replacement, specifications ....359servicing ..................................296
Blind Spot InformationSystem .......................................228
546 Index
2014 TaurusOwners Guide gf, 2nd Printing, September 2013USA (fus)

Booster seats ...............................22Brakes ........................................195
anti-lock ...................................196anti-lock brake system (ABS)warning light ...........................196brake warning light ................196fluid, checking and adding ....295fluid, refill capacities ..............354fluid, specifications .................354lubricant specifications ..........354parking ....................................196shift interlock ..........................186trailer .......................................248
C
Capacities for refilling fluids ....354
Cargo net ...................................238
CD ..............................369, 374–375
CD player ..........................367, 457
CD voice commands .................458
Cell phone use ............................16
Changing a tire .........................336
Child safety restraints ..........27, 29
Child safety seatsattaching with tether straps ....29automatic locking mode(retractor) .................................35LATCH .......................................27
Child safety seats - boosterseats .............................................22
Cleaning the touchscreen ........435
Cleaning your vehicle ...............307engine compartment ..............309instrument panel ....................311interior .....................................311plastic parts ............................308washing ....................................307
waxing .....................................309wheels ......................................313wiper blades ............................310
Climate control (see Airconditioning or Heating) ..........130Climate voice commands .........498Clock ..................................369, 484Collision Warning System .........233Compass Display .......................114Console ......................................162
overhead ..................................163
Coolant ......................................285checking and adding ..............285refill capacities ........................354specifications ..........................354
Cross Traffic Alert ....................228
Cruise control ...........................212
Cupholder(s) .............................154
Customer Assistance ................256Ford Extended ServicePlan ..........................................364Getting roadside assistance ...256Getting the service youneed .........................................261Ordering additional owner’sliterature .................................267Utilizing the Mediation/Arbitration Program ...............265
D
Defrost ...............130, 132, 134, 136rear window ............................139
Dipstickautomatic transmissionfluid ..................................290–291engine oil .................................284
Display settings .........................485
Index 547
2014 TaurusOwners Guide gf, 2nd Printing, September 2013USA (fus)

Driver alert ................................222
Driving under specialconditions ..................187, 190, 192
sand .........................................191snow and ice ...........................193through water .................191, 254
Dual automatic temperaturecontrol (DATC) .........132, 134, 136
E
Electronic message center .......110
Electronic stability control ......200
Emergencies, roadsidejump-starting ..........................258running out of fuel .................175
Emergency brake(see Parking brake) ..................196
Emission control system ..........180
End user license agreement ....510
Engine ........................................352cleaning ...................................309coolant .....................................285fail-safe cooling .......................289idle speed control ...................296lubrication specifications .......354refill capacities ........................354service points ..................281, 283
Engine block heater .................170
Engine oilchecking and adding ..............284dipstick ....................................284filter, specifications ................359refill capacities ........................354specifications ..........................354
Event data recording ..................12
Exhaust fumes ..........................170
F
Fail safe cooling ........................289
Fleet MyKey programming ........63
Floor mats .................................255
Fluid capacities .........................354
Four-Wheel Drive vehiclesdriving off road .......................189
Fuelcap ...........................................177capacity ...................................354choosing the right fuel ...173–174filler funnel .............................175filling your vehicle with fuel ...177filter, specifications ........295, 359fuel pump shut-off ..................257octane rating ...................174, 352quality ......................................173running out of fuel .................175safety information relatingto automotive fuels ................172
Fuel and distance computer ....114outside temperatureindicator ..................................114to empty indicator ..................114trip distance ............................114trip/reset button .....................114
Fuel - flex fuel vehicle(FFV) .........................................174
Fuses ..................................269–270
G
Garage door opener ..................156
Gas cap (see Fuel cap) ............177
Gauges ...............................103–104odometer .................................114trip odometer ..........................114
548 Index
2014 TaurusOwners Guide gf, 2nd Printing, September 2013USA (fus)

H
Hazard flashers .........................257
HD Radio™ ...............................447
Headlampsaiming ..............................300–301bulb specifications ..................306flash to pass ..............................89high beam ...........................89, 92replacing bulbs .......................303
Head restraints .........................143
Heated steering wheel ..............496
Heating ..............130, 132, 134, 136
Help ............................................494
Homelink wireless controlsystem ........................................156
Hood ..........................................279
How to use voice commands ...440
I
Ignition ...............................165, 352
Illuminated visor mirror ...100–101
Information displays .................110
Inspection/maintenance (I/M)testing ........................................182
Instrument panelcleaning ...................................311cluster ......................................104
Intelligent Access Key ................56
J
Jack ............................................336positioning ...............................336storage .....................................336
Joining two calls(multiparty/conference call) ....394
Jump-starting your vehicle ......258
K
Keyless entry systemautolock .....................................70keypad .......................................73locking and unlocking doors ....74programming entry code .........73
Keys .......................................56, 77positions of the ignition .........165
L
Lampsbulb replacementspecifications chart ................306headlamps, flash to pass ..........89interior lamps ...........................94replacing bulbs .......................303
Lane keeping system ................224
LATCH anchors ...........................27
Lights, warning and indicator ...104
Listening to music ....................444
Load limits .................................238
Locksautolock .....................................70childproof ..................................31doors ..........................................68
Lubricant specifications ...........354
Lug nuts ....................................351
M
Making and receiving calls .......467
Index 549
2014 TaurusOwners Guide gf, 2nd Printing, September 2013USA (fus)

MAP DVD - Loading andUnloading ..................................467
Map icons ..................................506
Map mode ..................................504
Map preferences .......................503
Map updates ..............................508
Massage seats ............................148
Media Bluetooth menu options(adding, connecting, deleting,turning on/off) ..........................422
Message center .........................110warning messages ...........115, 121
Mirrors .................................98, 100fold away ...................................98programmable memory ............58side view mirrors (power) .......98
Moon roof ..................................102
Motorcraft® parts .............307, 359
Multi-contour seats ...................148
MyFord Touch™ system ..........432
MyKey ..........................................63
N
Navigation features ...................499
Navigation voice commands ....508
Notifications ..............................479
O
Octane rating ............................174
P
Pairing other phones ........391, 466
Pairing your phone ...................466
Pairing your phone forthe first time .....................390, 466Parental MyKey programming ...63Park Assist ................................203Parking brake ............................196Parts (see Motorcraft®parts) .........................................359Passenger OccupantClassification Sensor ...................45Phone Bluetooth menu options(adding, connecting, deleting,turning on/off) ..........................402Phone redial ..............................396Phone settings ..................470, 491Phone voice commands ............471Playing music (by artist,album, genre, playlist, tracks,similar) ......................................419POI categories ...........................500Point of Interest (POI) .............500Power distribution box(see Fuses) ...............................270Power door locks ........................68Power mirrors .............................98Powerpoint ................................161Power steering ..........................236
fluid, checking and adding ....295fluid, refill capacity ................354fluid, specifications .................354
Power Windows ...........................96Privacy information ..........387, 438Push button start system .........165Putting a call on/off hold .........394
Q
Quick touch buttons .................507
550 Index
2014 TaurusOwners Guide gf, 2nd Printing, September 2013USA (fus)

R
Radio ..........................369, 374–375AM/FM .....................................446Single CD ................369, 374–375
Radio reception .........................367Radio voice commands .............451Rear heated seats .....................154Rear view cameradisplay ................................208, 487Rear windowdefroster ............130, 132, 134, 136Receiving a textmessage .............................398, 470
Recommendations forattaching safety restraintsfor children ..................................24
Relays ................................269–270
Remote entry systemilluminated entry ......................71locking/unlocking doors ...........68opening the trunk .....................69replacing the batteries .............57
Reverse sensing system ...........202
Roadside assistance ..................256
Route preferences ....................503
S
Safety Belt Maintenance ............40
Safety belts (see Safetyrestraints) ..............................34, 37
Safety defects, reporting ..........268
Safety information ............386, 436
Safety restraints ..............34–35, 37Belt-Minder® ............................37extension assembly ..................36
for adults .............................34–35for children ...............................24Occupant ClassificationSensor ........................................45safety belt maintenance ...........40seat belt maintenance ..............40warning light and chime ..........37
Safety restraints - LATCHanchors ........................................27
Safety seats for children ............24
Safety ComplianceCertification Label ....................361
Satellite Radio ...................369, 452
Scheduled Maintenance GuideNormal ScheduledMaintenance and Log .............534
SD card ......................384, 458, 499
Seat belts (see Safetyrestraints) ....................................34
Seatschild safety seats ......................24climate control ........................152easy access/easyout feature ..150front seats ...............146–147, 151heated ..............................150, 154memory seat .....................58, 149
SecuriCode keyless entrysystem ..........................................72
SecuriLock passive anti-theftsystem ..........................................77
Selecting your media source(USB, Line in, BT audio) .........416
Sending new text messages .....469
Setting a destination ................499
Setting a destination byvoice ...........................................499
Settings ......................................484
Index 551
2014 TaurusOwners Guide gf, 2nd Printing, September 2013USA (fus)

Setting the clock ...............369, 484
Side air curtain ...........................51
Side-curtain airbags system .......51
SIRIUS® satellite radio ....369, 452
SIRIUS satellite radio voicecommands .................................454
SIRIUS Travel Link ...................476
SIRIUS Travel Link voicecommands .................................478
SOS Post Crash Alert .................43
Spark plugs,specifications .....................352, 359
Specification chart,lubricants ...................................354
Stability system .........................200
Starting your vehicle ................166jump starting ..........................258push button start system .......165
Steering wheel ............................81controls ......................................83tilting ...................................81–82
Sunshade ...................................101
Supplemental Restraint System(SRS) (see airbags) ....................44
Supported media file types ......462
Supported player, mediaformats and metadatainformation ................................462
SYNC® customersupport ..............................386, 436
SYNC® Services ................410, 473
System settings .........................487
T
Temperature control(see Climatecontrol) ......130, 132, 134, 136, 496
Temporary mobility kit .............343
Text messaging .................397, 468
Text messaging (sending,downloading, deleting) .....398, 400
Tilt steering wheel ................81–82
Tires ...................................316, 336alignment ................................330care ..........................................316changing ..........................336, 339checking the pressure ............326inflating ...................................324label .........................................323replacing ..................................328rotating ....................................330safety practices .......................329sidewall information ...............318snow tires and chains ............331spare tire .................................337Temporary mobility kit ..........343terminology .............................317tire grades ...............................317treadwear ........................316, 326
Touchscreen features(climate) ....................................496
Towing .......................246, 250–251recreational towing .................251trailer towing ..........................246wrecker ....................................250
Traction control ........................197
Traffic, Directions andInformation ................................410
552 Index
2014 TaurusOwners Guide gf, 2nd Printing, September 2013USA (fus)

Traffic preferences ...................503Transaxle
fluid, refill capacities ..............354lubricant specifications ..........354
Transmissionbrake-shift interlock (BSI) ....186fluid, checking and adding(automatic) .....................290–291
Trunk .....................................75–76remote release ..........................69
Turn signal ..................................94
U
USB port ............................384, 458
Using privacy mode ..................394
V
Vehicle health report ........408, 482
Vehicle Identification Number(VIN) ..........................................360
Vehicle loading ..........................238
Ventilating your vehicle ...........170
Voice commands in mediamode ..........................................414
Voice commands in phonemode ..........................................392
Voice recognition ......................440
W
Warning lights (see Lights) .....104
Washer fluid ..............................295
Water, Driving through .............254
Windowspower .........................................96
Windshield washer fluid andwipers ..........................................87
checking and adding fluid .....295replacing wiper blades ...........298
Wrecker towing .........................250
Index 553
2014 TaurusOwners Guide gf, 2nd Printing, September 2013USA (fus)