2019 FLEX Owner's Manual - Dealer E Process
513
2019 FLEX Owner’s Manual July 2018 Second Printing Litho in U.S.A. KA8J 19A321 AB owner.ford.com ford.ca 2019 FLEX Owner’s Manual 3512388_19b_Flex_OM_EN-US_061618.indd 1 6/20/18 6:41 AM
-
Upload
khangminh22 -
Category
Documents
-
view
7 -
download
0
Transcript of 2019 FLEX Owner's Manual - Dealer E Process

2019 FLEX Owner’s Manual
July 2018Second Printing
Litho in U.S.A.
KA8J 19A321 AB
owner.ford.com ford.ca
2019 FLEX O
wner’s M
anual
3512388_19b_Flex_OM_EN-US_061618.indd 1 6/20/18 6:41 AM

The information contained in this publication was correct at the time of going to print. In the interest ofcontinuous development, we reserve the right to change specifications, design or equipment at any timewithout notice or obligation. No part of this publication may be reproduced, transmitted, stored in aretrieval system or translated into any language in any form by any means without our written permission.Errors and omissions excepted.© Ford Motor Company 2018
All rights reserved.Part Number: 201803 20180605183615
California Proposition 65
WARNING: Operating, servicing andmaintaining a passenger vehicle or off-highwaymotor vehicle can expose you to chemicalsincluding engine exhaust, carbon monoxide,phthalates, and lead, which are known to the Stateof California to cause cancer and birth defects orother reproductive harm. To minimize exposure,avoid breathing exhaust, do not idle the engineexcept as necessary, service your vehicle in awell-ventilated area and wear gloves or wash yourhands frequently when servicing your vehicle. Formore information go towww.P65Warnings.ca.gov/passenger-vehicle.
WARNING: Battery posts, terminals andrelated accessories contain lead and leadcompounds, chemicals known to the State ofCalifornia to cause cancer and reproductive harm.Wash your hands after handling.


IntroductionAbout This Manual ..........................................7Symbols Glossary ............................................7Data Recording .................................................9Perchlorate ........................................................11Ford Credit .........................................................11Replacement Parts Recommendation
............................................................................12Special Notices ...............................................12Mobile Communications Equipment
............................................................................13Export Unique Options .................................13
EnvironmentProtecting the Environment .......................14
At a GlanceInstrument Panel Overview ........................15
Child SafetyGeneral Information ......................................17Installing Child Restraints ...........................18Booster Seats .................................................28Child Restraint Positioning ........................30Child Safety Locks .........................................32
SeatbeltsPrinciple of Operation .................................34Fastening the Seatbelts ..............................35Seatbelt Height Adjustment .....................38Seatbelt Warning Lamp and Indicator
Chime ............................................................39Seatbelt Reminder .......................................39Child Restraint and Seatbelt
Maintenance ................................................41Seatbelt Extension ........................................41
Personal Safety System™Personal Safety System™ .........................43
Supplementary RestraintsSystem
Principle of Operation .................................44Driver and Passenger Airbags ..................45Front Passenger Sensing System ...........46Side Airbags ....................................................48Safety Canopy™ ...........................................49Crash Sensors and Airbag Indicator ......50Airbag Disposal ...............................................51
Keys and Remote ControlsGeneral Information on Radio
Frequencies .................................................52Remote Control .............................................53Replacing a Lost Key or Remote Control
..........................................................................56
MyKey™Principle of Operation ..................................57Creating a MyKey ..........................................58Clearing All MyKeys ......................................58Checking MyKey System Status ..............59Using MyKey With Remote Start
Systems ........................................................59MyKey Troubleshooting ..............................59
Doors and LocksLocking and Unlocking .................................61Keyless Entry ..................................................64
LiftgateManual Liftgate ..............................................67Power Liftgate ................................................68
SecurityPassive Anti-Theft System .........................71Anti-Theft Alarm ............................................72
1
Flex (TP3) , enUSA, Edition date: 201803, Second-Printing
Table of Contents
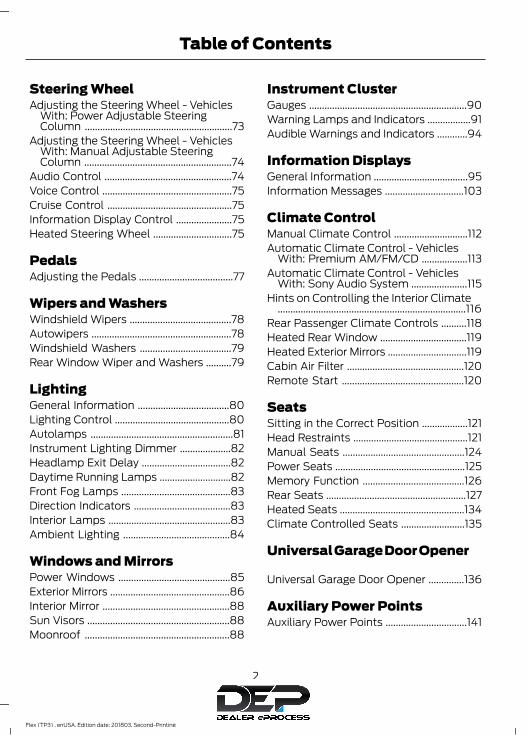
Steering WheelAdjusting the Steering Wheel - Vehicles
With: Power Adjustable SteeringColumn ..........................................................73
Adjusting the Steering Wheel - VehiclesWith: Manual Adjustable SteeringColumn ..........................................................74
Audio Control ..................................................74Voice Control ...................................................75Cruise Control .................................................75Information Display Control ......................75Heated Steering Wheel ...............................75
PedalsAdjusting the Pedals .....................................77
Wipers and WashersWindshield Wipers ........................................78Autowipers .......................................................78Windshield Washers ....................................79Rear Window Wiper and Washers ..........79
LightingGeneral Information ....................................80Lighting Control .............................................80Autolamps ........................................................81Instrument Lighting Dimmer ....................82Headlamp Exit Delay ...................................82Daytime Running Lamps ............................82Front Fog Lamps ...........................................83Direction Indicators ......................................83Interior Lamps ................................................83Ambient Lighting ..........................................84
Windows and MirrorsPower Windows ............................................85Exterior Mirrors ...............................................86Interior Mirror ..................................................88Sun Visors ........................................................88Moonroof .........................................................88
Instrument ClusterGauges ..............................................................90Warning Lamps and Indicators .................91Audible Warnings and Indicators ............94
Information DisplaysGeneral Information .....................................95Information Messages ...............................103
Climate ControlManual Climate Control .............................112Automatic Climate Control - Vehicles
With: Premium AM/FM/CD ..................113Automatic Climate Control - Vehicles
With: Sony Audio System ......................115Hints on Controlling the Interior Climate
..........................................................................116Rear Passenger Climate Controls ..........118Heated Rear Window ..................................119Heated Exterior Mirrors ...............................119Cabin Air Filter ..............................................120Remote Start ................................................120
SeatsSitting in the Correct Position ..................121Head Restraints .............................................121Manual Seats ................................................124Power Seats ...................................................125Memory Function ........................................126Rear Seats .......................................................127Heated Seats .................................................134Climate Controlled Seats .........................135
Universal Garage Door Opener
Universal Garage Door Opener ..............136
Auxiliary Power PointsAuxiliary Power Points ................................141
2
Flex (TP3) , enUSA, Edition date: 201803, Second-Printing
Table of Contents

Storage CompartmentsCenter Console .............................................143Overhead Console ......................................144
Starting and Stopping theEngine
General Information ...................................145Ignition Switch ..............................................145Keyless Starting ...........................................146Starting a Gasoline Engine ......................146Engine Block Heater ...................................149
Fuel and RefuelingSafety Precautions .......................................151Fuel Quality .....................................................151Fuel Filler Funnel Location .......................152Running Out of Fuel ....................................152Refueling .........................................................154Fuel Consumption ......................................156
Engine Emission ControlEmission Law ................................................158Catalytic Converter .....................................159
TransmissionAutomatic Transmission ...........................162
All-Wheel DriveUsing All-Wheel Drive ...............................166
BrakesGeneral Information ....................................173Hints on Driving With Anti-Lock Brakes
.........................................................................174Parking Brake .................................................174
Traction ControlPrinciple of Operation ................................175Using Traction Control ...............................175
Stability ControlPrinciple of Operation ................................176Using Stability Control ...............................177
Parking AidsPrinciple of Operation ................................178Rear Parking Aid ...........................................178Active Park Assist ........................................179Rear View Camera ......................................183
Cruise ControlPrinciple of Operation ................................187Using Cruise Control ...................................187Using Adaptive Cruise Control ...............188
Driving AidsBlind Spot Information System .............194Cross Traffic Alert ........................................196Steering ...........................................................199Collision Warning System ........................199
Load CarryingCargo Nets ....................................................202Roof Racks and Load Carriers ...............202Load Limit ......................................................202
TowingTowing a Trailer ...........................................208Trailer Sway Control ..................................209Recommended Towing Weights ..........209Essential Towing Checks ...........................211Towing the Vehicle on Four Wheels ......214
Driving HintsBreaking-In .....................................................216Economical Driving .....................................216Driving Through Water ...............................217Floor Mats .......................................................217
3
Flex (TP3) , enUSA, Edition date: 201803, Second-Printing
Table of Contents

Roadside EmergenciesRoadside Assistance ..................................219Hazard Flashers ..........................................220Fuel Shutoff ..................................................220Jump Starting the Vehicle .........................221Post-Crash Alert System ..........................223Transporting the Vehicle ..........................223
Customer AssistanceGetting the Services You Need ..............225In California (U.S. Only) ............................226The Better Business Bureau (BBB) Auto
Line Program (U.S. Only) .....................227Utilizing the Mediation/Arbitration
Program (Canada Only) ......................228Getting Assistance Outside the U.S. and
Canada .......................................................228Ordering Additional Owner's Literature
........................................................................230Reporting Safety Defects (U.S. Only)
........................................................................230Reporting Safety Defects (Canada Only)
........................................................................230
FusesFuse Specification Chart ..........................232Changing a Fuse ...........................................241
MaintenanceGeneral Information ..................................243Opening and Closing the Hood .............243Under Hood Overview - 3.5L Duratec
........................................................................244Under Hood Overview - 3.5L Ecoboost™
........................................................................245Engine Oil Dipstick ......................................247Engine Oil Check .........................................247Oil Change Indicator Reset .....................248Engine Coolant Check ..............................249Automatic Transmission Fluid Check
........................................................................253
Brake Fluid Check .......................................255Power Steering Fluid Check ....................255Washer Fluid Check ...................................255Changing the 12V Battery ........................256Checking the Wiper Blades .....................257Changing the Wiper Blades ....................258Adjusting the Headlamps .......................259Removing a Headlamp ............................260Changing a Bulb .........................................260Changing the Engine Air Filter ...............263
Vehicle CareGeneral Information ..................................265Cleaning Products ......................................265Cleaning the Exterior .................................265Waxing ............................................................267Cleaning the Engine ...................................267Cleaning the Windows and Wiper Blades
........................................................................267Cleaning the Interior ..................................268Cleaning the Instrument Panel and
Instrument Cluster Lens ......................268Cleaning Leather Seats ............................269Repairing Minor Paint Damage ..............270Cleaning the Wheels .................................270Vehicle Storage ............................................270Body Styling Kits ..........................................272
Wheels and TiresGeneral Information ...................................273Tire Care .........................................................275Using Snow Chains ....................................288Tire Pressure Monitoring System .........289Changing a Road Wheel ..........................293Technical Specifications .........................298
Capacities and Specifications
Engine Specifications - 3.5L Duratec........................................................................299
4
Flex (TP3) , enUSA, Edition date: 201803, Second-Printing
Table of Contents

Engine Specifications - 3.5L Ecoboost™........................................................................299
Motorcraft Parts - 3.5L Duratec ...........300Motorcraft Parts - 3.5L Ecoboost™ .....302Vehicle Identification Number ...............303Vehicle Certification Label ......................304Transmission Code Designation ...........304Capacities and Specifications - 3.5L
Duratec .......................................................305Capacities and Specifications - 3.5L
Ecoboost™ ..............................................309Bulb Specification Chart ...........................313
Audio SystemGeneral Information ...................................315Audio Unit - Vehicles With: AM/FM/CD/
SYNC/Satellite Radio ............................316Audio Unit - Vehicles With: Premium AM/
FM/CD ..........................................................321Audio Unit - Vehicles With: Sony AM/FM/
CD .................................................................322USB Port .........................................................323Media Hub .....................................................323
SYNC™General Information ..................................324Using Voice Recognition ..........................326Using SYNC™ With Your Phone ...........329SYNC™ Applications and Services ......342Using SYNC™ With Your Media Player
........................................................................344SYNC™ Troubleshooting ........................354
SYNC™ 3General Information ..................................362Home Screen ................................................374Using Voice Recognition ...........................375Entertainment .............................................382Climate ...........................................................392Phone ..............................................................394Navigation ....................................................400
Apps ................................................................408Settings ............................................................411SYNC™ 3 Troubleshooting .....................424
AccessoriesAccessories ...................................................438
Ford ProtectFord Protect .................................................440
Scheduled MaintenanceGeneral Maintenance Information ......442Normal Scheduled Maintenance .........445Special Operating Conditions Scheduled
Maintenance ............................................448Scheduled Maintenance Record ..........450
AppendicesElectromagnetic Compatibility ............460End User License Agreement ................462Type Approvals ...........................................488
5
Flex (TP3) , enUSA, Edition date: 201803, Second-Printing
Table of Contents

6
Flex (TP3) , enUSA, Edition date: 201803, Second-Printing

ABOUT THIS MANUALThank you for choosing Ford. Werecommend that you take some time toget to know your vehicle by reading thismanual. The more that you know aboutyour vehicle, the greater the safety andpleasure you will get from driving it.
WARNING: Driving while distractedcan result in loss of vehicle control, crashand injury. We strongly recommend thatyou use extreme caution when using anydevice that may take your focus off theroad. Your primary responsibility is the safeoperation of your vehicle. We recommendagainst the use of any hand-held devicewhile driving and encourage the use ofvoice-operated systems when possible.Make sure you are aware of all applicablelocal laws that may affect the use ofelectronic devices while driving.
Note: This manual describes productfeatures and options available throughoutthe range of available models, sometimeseven before they are generally available. Itmay describe options not fitted to thevehicle you have purchased.Note: Some of the illustrations in thismanual may show features as used indifferent models, so may appear differentto you on your vehicle.Note: Always use and operate your vehiclein line with all applicable laws andregulations.Note: Pass on this manual when sellingyour vehicle. It is an integral part of yourvehicle.This manual may qualify the location of acomponent as left-hand side or right-handside. The side is determined when facingforward in the seat.
E154903
Right-hand side.ALeft-hand side.B
SYMBOLS GLOSSARYThese are some of the symbols you maysee on your vehicle.
E162384
Air conditioning system
E231157
Air conditioning system lubricanttype
Anti-lock braking system
Avoid smoking, flames or sparks
Battery
Battery acid
Brake fluid - non petroleumbased
Brake system
7
Flex (TP3) , enUSA, Edition date: 201803, Second-Printing
Introduction

E270480
Brake system
Cabin air filter
Check fuel cap
Child safety door lock or unlock
Child seat lower anchor
Child seat tether anchor
E71340
Cruise control
Do not open when hot
Engine air filter
Engine coolant
Engine coolant temperature
Engine oil
Explosive gas
Fan warning
E71880
Fasten seatbelt
E231160
Flammable
E67017
Front airbag
Front fog lamps
Fuel pump reset
Fuse compartment
Hazard flashers
Heated rear window
Windshield defrosting system
Interior luggage compartmentrelease
Jack
E161353
Keep out of reach of children
Lighting control
Low tire pressure warning
Maintain correct fluid level
Note operating instructions
8
Flex (TP3) , enUSA, Edition date: 201803, Second-Printing
Introduction

E270945
Horn control
Panic alarm
E139213
Parking aid
Parking brake
Power steering fluid
Power windows front/rear
Power window lockout
E231159
Requires registered technician
Safety alert
See Owner's Manual
E231158
See Service Manual
Service engine soon
E270849
Passenger airbag activated
E270850
Passenger airbag deactivated
Side airbag
E167012
Shield the eyes
E138639
Stability control
E163957
Hill descent control
E271982
Trail control
E270969
Windshield wiping system
Windshield wash and wipe
DATA RECORDINGService Data RecordingService data recorders in your vehicle arecapable of collecting and storingdiagnostic information about your vehicle.This potentially includes information aboutthe performance or status of varioussystems and modules in the vehicle, suchas engine, throttle, steering or brakesystems. In order to properly diagnose andservice your vehicle, Ford Motor Company(Ford of Canada in Canada), and serviceand repair facilities may access or shareamong them vehicle diagnosticinformation received through a directconnection to your vehicle whendiagnosing or servicing your vehicle.Additionally, Ford Motor Company (Fordof Canada, in Canada) may, wherepermitted by law, use vehicle diagnosticinformation for vehicle improvement orwith other information we may have aboutyou, (for example, your contactinformation), to offer you products orservices that may interest you. Data maybe provided to our service providers such
9
Flex (TP3) , enUSA, Edition date: 201803, Second-Printing
Introduction

as part suppliers that may help diagnosemalfunctions, and who are similarlyobligated to protect data. We retain thisdata only as long as necessary to performthese functions or to comply with law. Wemay provide information where requiredin response to official requests to lawenforcement or other governmentauthorities or third parties acting withlawful authority or court order, and suchinformation may be used in legalproceedings. For U.S. only (if equipped), ifyou choose to use connected apps andservices, such as SYNC Vehicle HealthReport or MyFord Mobile App, you consentthat certain diagnostic information mayalso be accessed electronically by FordMotor Company and Ford authorizedservice facilities, and that the diagnosticinformation may be used to provideservices to you, personalizing yourexperience, troubleshoot, and to improveproducts and services and offer youproducts and services that may interestyou, where permitted by law. For Canadaonly, for more information, please reviewthe Ford of Canada privacy policy atwww.ford.ca, including our U.S. datastorage and use of service providers inother jurisdictions who may be subject tolegal requirements in Canada, the UnitedStates and other countries applicable tothem, for example, lawful requirements todisclose personal information togovernmental authorities in thosecountries. See SYNC™ (page 324).
Event Data RecordingThis vehicle is equipped with an eventdata recorder. The main purpose of anevent data recorder is to record, incertain crash or near crash-likesituations, such as an airbagdeployment or hitting a road obstacle;
this data will assist in understandinghow a vehicle’s systems performed.The event data recorder is designed torecord data related to vehicle dynamicsand safety systems for a short periodof time, typically 30 seconds or less.The event data recorder in this vehicleis designed to record such data as:• How various systems in your vehicle
were operating;• Whether or not the driver and
passenger safety belts werebuckled/fastened;
• How far (if at all) the driver wasdepressing the accelerator and/orthe brake pedal; and
• How fast the vehicle was traveling;and
• Where the driver was positioningthe steering wheel.
This data can help provide a betterunderstanding of the circumstances inwhich crashes and injuries occur.Note: Event data recorder data isrecorded by your vehicle only if anon-trivial crash situation occurs; no datais recorded by the event data recorderunder normal driving conditions and nopersonal data or information (e.g., name,gender, age, and crash location) isrecorded (see limitations regarding 911Assist and Traffic, directions andInformation privacy below). However,parties, such as law enforcement, couldcombine the event data recorder datawith the type of personally identifyingdata routinely acquired during a crashinvestigation.To read data recorded by an event datarecorder, special equipment is required,and access to the vehicle or the eventdata recorder is needed. In addition tothe vehicle manufacturer, otherparties, such as law enforcement, thathave such special equipment, can read
10
Flex (TP3) , enUSA, Edition date: 201803, Second-Printing
Introduction
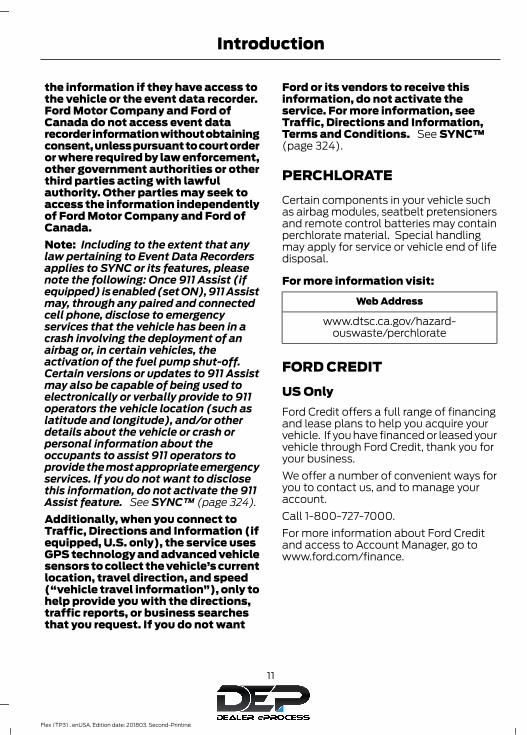
the information if they have access tothe vehicle or the event data recorder.Ford Motor Company and Ford ofCanada do not access event datarecorder information without obtainingconsent, unless pursuant to court orderor where required by law enforcement,other government authorities or otherthird parties acting with lawfulauthority. Other parties may seek toaccess the information independentlyof Ford Motor Company and Ford ofCanada.Note: Including to the extent that anylaw pertaining to Event Data Recordersapplies to SYNC or its features, pleasenote the following: Once 911 Assist (ifequipped) is enabled (set ON), 911 Assistmay, through any paired and connectedcell phone, disclose to emergencyservices that the vehicle has been in acrash involving the deployment of anairbag or, in certain vehicles, theactivation of the fuel pump shut-off.Certain versions or updates to 911 Assistmay also be capable of being used toelectronically or verbally provide to 911operators the vehicle location (such aslatitude and longitude), and/or otherdetails about the vehicle or crash orpersonal information about theoccupants to assist 911 operators toprovide the most appropriate emergencyservices. If you do not want to disclosethis information, do not activate the 911Assist feature. See SYNC™ (page 324).Additionally, when you connect toTraffic, Directions and Information (ifequipped, U.S. only), the service usesGPS technology and advanced vehiclesensors to collect the vehicle’s currentlocation, travel direction, and speed(“vehicle travel information”), only tohelp provide you with the directions,traffic reports, or business searchesthat you request. If you do not want
Ford or its vendors to receive thisinformation, do not activate theservice. For more information, seeTraffic, Directions and Information,Terms and Conditions. See SYNC™(page 324).
PERCHLORATECertain components in your vehicle suchas airbag modules, seatbelt pretensionersand remote control batteries may containperchlorate material. Special handlingmay apply for service or vehicle end of lifedisposal.
For more information visit:
Web Address
www.dtsc.ca.gov/hazard-ouswaste/perchlorate
FORD CREDITUS OnlyFord Credit offers a full range of financingand lease plans to help you acquire yourvehicle. If you have financed or leased yourvehicle through Ford Credit, thank you foryour business.We offer a number of convenient ways foryou to contact us, and to manage youraccount.Call 1-800-727-7000.For more information about Ford Creditand access to Account Manager, go towww.ford.com/finance.
11
Flex (TP3) , enUSA, Edition date: 201803, Second-Printing
Introduction

REPLACEMENT PARTSRECOMMENDATIONWe have built your vehicle to the higheststandards using quality parts. Werecommend that you demand the use ofgenuine Ford and Motorcraft partswhenever your vehicle requires scheduledmaintenance or repair. You can clearlyidentify genuine Ford and Motorcraft partsby looking for the Ford, FoMoCo orMotorcraft branding on the parts or theirpackaging.
Scheduled Maintenance andMechanical RepairsOne of the best ways for you to make surethat your vehicle provides years of serviceis to have it maintained in line with ourrecommendations using parts thatconform to the specifications detailed inthis Owner’s Manual. Genuine Ford andMotorcraft parts meet or exceed thesespecifications.
Collision RepairsWe hope that you never experience acollision, but accidents do happen.Genuine Ford replacement collision partsmeet our stringent requirements for fit,finish, structural integrity, corrosionprotection and dent resistance. Duringvehicle development we validate thatthese parts deliver the intended level ofprotection as a whole system. A great wayto know for sure you are getting this levelof protection is to use genuine Fordreplacement collision parts.
Warranty on Replacement PartsGenuine Ford and Motorcraft replacementparts are the only replacement parts thatbenefit from a Ford Warranty. The FordWarranty may not cover damage causedto your vehicle as a result of failednon-Ford parts. For additional information,refer to the terms and conditions of theFord Warranty.
SPECIAL NOTICESNew Vehicle Limited WarrantyFor a detailed description of what iscovered and what is not covered by yourvehicle’s New Vehicle Limited Warranty,see the Warranty Manual that is providedto you along with your Owner’s Manual.
Special InstructionsFor your added safety, your vehicle is fittedwith sophisticated electronic controls.
WARNING: You risk death or seriousinjury to yourself and others if you do notfollow the instruction highlighted by thewarning symbol. Failure to follow thespecific warnings and instructions couldresult in personal injury.
WARNING: NEVER use a rearwardfacing child restraint on a seat protectedby an ACTIVE AIRBAG in front of it, DEATHor SERIOUS INJURY to the CHILD canoccur.
12
Flex (TP3) , enUSA, Edition date: 201803, Second-Printing
Introduction

On Board Diagnostics Data LinkConnector
WARNING: Do not connect wirelessplug-in devices to the data link connector.Unauthorized third parties could gainaccess to vehicle data and impair theperformance of safety related systems.Only allow repair facilities that follow ourservice and repair instructions to connecttheir equipment to the data link connector.
Your vehicle has an OBD Data LinkConnector (DLC) that is used inconjunction with a diagnostic scan tool forvehicle diagnostics, repairs andreprogramming services. Installing anaftermarket device that uses the DLCduring normal driving for purposes such asremote insurance company monitoring,transmission of vehicle data to otherdevices or entities, or altering theperformance of the vehicle, may causeinterference with or even damage tovehicle systems. We do not recommendor endorse the use of aftermarket plug-indevices unless approved by Ford. Thevehicle Warranty will not cover damagecaused by an aftermarket plug-in device.
MOBILE COMMUNICATIONSEQUIPMENT
WARNING: Driving while distractedcan result in loss of vehicle control, crashand injury. We strongly recommend thatyou use extreme caution when using anydevice that may take your focus off theroad. Your primary responsibility is the safeoperation of your vehicle. We recommend
against the use of any hand-held devicewhile driving and encourage the use ofvoice-operated systems when possible.Make sure you are aware of all applicablelocal laws that may affect the use ofelectronic devices while driving.
Using mobile communications equipmentis becoming increasingly important in theconduct of business and personal affairs.However, you must not compromise yourown or others’ safety when using suchequipment. Mobile communications canenhance personal safety and security whenappropriately used, particularly inemergency situations. Safety must beparamount when using mobilecommunications equipment to avoidnegating these benefits. Mobilecommunication equipment includes, butis not limited to, cellular phones, pagers,portable email devices, text messagingdevices and portable two-way radios.
EXPORT UNIQUE OPTIONSFor your particular global region, yourvehicle may be equipped with features andoptions that are different from the featuresand options that are described in thisOwner’s Manual. A market uniquesupplement may be supplied thatcomplements this book. By referring to themarket unique supplement, if provided,you can properly identify those features,recommendations and specifications thatare unique to your vehicle. This Owner’sManual is written primarily for the U.S. andCanadian Markets. Features or equipmentlisted as standard may be different on unitsbuilt for export. Refer to this Owner’sManual for all other requiredinformation and warnings.
13
Flex (TP3) , enUSA, Edition date: 201803, Second-Printing
Introduction

PROTECTING THEENVIRONMENTYou should play your part in protecting theenvironment. Correct vehicle usage andthe authorized disposal of waste, cleaningand lubrication materials are significantsteps toward this aim.
For details about Ford MotorCompany's sustainability progress andinitiatives visit:
Web Address
www.sustainability.ford.com
14
Flex (TP3) , enUSA, Edition date: 201803, Second-Printing
Environment

INSTRUMENT PANEL OVERVIEW
E232260
Air vent.AWiper lever. See WindshieldWipers (page 78).
B
Direction Indicators. SeeDirection Indicators (page 83).
C
Information display control. SeeInformation Display Control(page 75).
D
Instrument cluster. See Gauges(page 90).
E
Information display control. SeeInformation Display Control(page 75).
F
Audio system. See AudioSystem (page 315).
G
Hazard flasher switch. SeeHazard Flashers (page 220).
H
Information and entertainmentdisplay.
I
Passenger airbag indicator light.See Front Passenger SensingSystem (page 46).
J
Climate controls. See ClimateControl (page 112).
K
Keyless start button. SeeKeyless Starting (page 146).
L
Audio control. See AudioControl (page 74).
M
Horn.NSteering wheel adjustment. SeeAdjusting the Steering Wheel(page 74).
O
15
Flex (TP3) , enUSA, Edition date: 201803, Second-Printing
At a Glance

Cruise control switches. SeeUsing Cruise Control (page187).
P
Hood release. See Opening andClosing the Hood (page 243).
Q
Instrument panel dimmercontrol. See InstrumentLighting Dimmer (page 82).
R
Lighting control. See LightingControl (page 80).
S
16
Flex (TP3) , enUSA, Edition date: 201803, Second-Printing
At a Glance

GENERAL INFORMATIONSee the following sections for directionson how to properly use safety restraintsfor children.
WARNING: Always make sure yourchild is secured properly in a device that isappropriate for their height, age andweight. Child safety restraints must bebought separately from your vehicle.Failure to follow these instructions andguidelines may result in an increased riskof serious injury or death to your child.
WARNING: All children are shapeddifferently. The National Highway TrafficSafety Administration and other safetyorganizations, base their recommendationsfor child restraints on probable child height,age and weight thresholds, or on theminimum requirements of the law. Werecommend that you check with a NHTSACertified Child Passenger Safety
Technician (CPST) to make sure that youproperly install the child restraint in yourvehicle and that you consult yourpediatrician to make sure you have a childrestraint appropriate for your child. Tolocate a child restraint fitting station andCPST, contact NHTSA toll free at1-888-327-4236 or go towww.nhtsa.dot.gov. In Canada, contactTransport Canada toll free at1-800-333-0371 or go to www.tc.gc.ca tofind a Child Car Seat Clinic in your area.Failure to properly restrain children in childrestraints made especially for their height,age and weight, may result in an increasedrisk of serious injury or death to your child.
WARNING: On hot days, thetemperature inside the vehicle can rise veryquickly. Exposure of people or animals tothese high temperatures for even a shorttime can cause death or serious heatrelated injuries, including brain damage.Small children are particularly at risk.
17
Flex (TP3) , enUSA, Edition date: 201803, Second-Printing
Child Safety

Recommendations for Safety Restraints for Children
Recommended restrainttype
Child size, height, weight, or ageChild
Use a child safety seat(sometimes called an
infant carrier, convertibleseat, or toddler seat).
Children weighing 40 lb (18 kg) or less(generally age four or younger).
Infants ortoddlers
Use a belt-positioningbooster seat.
Children who have outgrown or no longerproperly fit in a child safety seat (gener-ally children who are less than 4 ft. 9 in.(1.45 m) tall, are greater than age four
and less than age 12, and between 40 lb(18 kg) and 80 lb (36 kg) and upward to100 lb (45 kg) if recommended by your
child restraint manufacturer).
Small children
Use a vehicle seatbelthaving the lap belt snugand low across the hips,shoulder belt centered
across the shoulder andchest, and seatback
upright.
Children who have outgrown or no longerproperly fit in a belt-positioning boosterseat (generally children who are at least
4 ft. 9 in. (1.45 m) tall or greater than80 lb (36 kg) or 100 lb (45 kg) if recom-mended by child restraint manufacturer).
Larger children
• You are required by law to properly usesafety seats for infants and toddlers inthe United States and Canada.
• Many states and provinces require thatsmall children use approved boosterseats until they reach age eight, aheight of 4 feet 9 inches (1.45 meters)tall, or 80 lb (36 kg). Check your localand state or provincial laws for specificrequirements about the safety ofchildren in your vehicle.
• When possible, always properlyrestrain children 12 years of age andunder in a rear seating position of yourvehicle. Accident statistics suggest thatchildren are safer when properlyrestrained in the rear seating positionsthan in a front seating position. SeeFront Passenger Sensing System(page 46).
INSTALLING CHILDRESTRAINTSChild Restraints
E142594
18
Flex (TP3) , enUSA, Edition date: 201803, Second-Printing
Child Safety

Use a child restraint (sometimes called aninfant carrier, convertible seat, or toddlerseat) for infants, toddlers or childrenweighing 40 lb (18 kg) or less (generallyage four or younger).
Using Lap and Shoulder Belts
WARNING: Do not place a rearwardfacing child restraint in front of an activeairbag. Failure to follow this instructioncould result in personal injury or death.
WARNING: Properly secure children12 years old and under in a rear seatingposition whenever possible. If you areunable to properly secure all children in arear seating position, properly secure thelargest child on the front seat. If you mustuse a forward facing child restraint on thefront seat, move the seat as far back aspossible. Failure to follow theseinstructions could result in personal injuryor death.
WARNING: Depending on where yousecure a child restraint, and depending onthe child restraint design, you may blockaccess to certain seatbelt buckleassemblies and LATCH lower anchors,rendering those features potentiallyunusable. To avoid risk of injury, make sureoccupants only use seating positionswhere they are able to be properlyrestrained.
When installing a child restraint withcombination lap and shoulder belts:• Use the correct seatbelt buckle for that
seating position.• Insert the belt tongue into the proper
buckle until you hear a snap and feel itlatch. Make sure the tongue is securelyfastened in the buckle.
• Keep the buckle release buttonpointing up and away from the safetyseat, with the tongue between the childrestraint and the release button, toprevent accidental unbuckling.
• Place the vehicle seat upon which thechild restraint will be installed in theupright position.
• For second-row seating positions,adjust the recliner slightly to improvechild restraint fit. If needed, remove thehead restraints.
• For third-row seating positions, stowthe head restraints to improve childrestraint fit. See Head Restraints(page 121).
• Put the seatbelt in the automaticlocking mode. See Step 5. This vehicledoes not require the use of a lockingclip.
Perform the following steps wheninstalling the child restraint withcombination lap and shoulder belts:Note: Although the child restraintillustrated is a forward facing child restraint,the steps are the same for installing a rearfacing child restraint.Note: The lock-off device on some childrestraints may not accommodate theshoulder portion of the inflatable seatbelt.Follow all instructions provided by themanufacturer of the child restraint regardingthe necessary and proper use of the lock-offdevice. In some instances these deviceshave been provided only for use in vehicleswith seatbelt systems that would otherwiserequire a locking clip.
19
Flex (TP3) , enUSA, Edition date: 201803, Second-Printing
Child Safety

Standard Seatbelts
E142528
1. Position the child restraint in a seatwith a combination lap and shoulderbelt.
E142529
2. After positioning the child restraint inthe proper seating position, pull downon the shoulder belt and then grasp theshoulder belt and lap belt togetherbehind the belt tongue.
E142530
3. While holding the shoulder and lap beltportions together, route the tonguethrough the child restraint accordingto the child restraint manufacturer'sinstructions. Be sure the belt webbingis not twisted.
E142531
4. Insert the belt tongue into the properbuckle (the buckle closest to thedirection the tongue is coming from)for that seating position until you heara snap and feel the latch engage. Makesure the tongue is latched securely bypulling on it.
20
Flex (TP3) , enUSA, Edition date: 201803, Second-Printing
Child Safety

E142875
5. To put the retractor in the automaticlocking mode, grasp the shoulderportion of the belt and pull downwarduntil you pull all of the belt out.
Note: The automatic locking mode isavailable on the front passenger and rearseats.6. Allow the belt to retract to remove
slack. The belt clicks as it retracts toindicate it is in the automatic lockingmode.
7. Try to pull the belt out of the retractorto make sure the retractor is in theautomatic locking mode (you shouldnot be able to pull more belt out). If theretractor is not locked, unbuckle thebelt and repeat Steps 5 and 6.
E142533
8. Remove remaining slack from the belt.Force the seat down with extra weight,for example, by pressing down orkneeling on the child restraint whilepulling up on the shoulder belt in orderto force slack from the belt. This isnecessary to remove the remainingslack that exists once you add the extraweight of the child to the child restraint.It also helps to achieve the propersnugness of the child restraint to yourvehicle. Sometimes, a slight leantoward the buckle provides extra helpto remove remaining slack from thebelt.
9. Attach the tether strap (if the childrestraint is equipped).
E142534
10. Before placing the child in the seat,forcibly move the seat forward andback to make sure the seat is securelyheld in place. To check this, grab theseat at the belt path and attempt tomove it side to side and forward andback. There should be no more than1 in (2.5 cm) of movement for properinstallation.
We recommend checking with a NHTSACertified Child Passenger SafetyTechnician to make certain the childrestraint is properly installed. In Canada,check with Transport Canada for referralto a Child Car Seat Clinic.
21
Flex (TP3) , enUSA, Edition date: 201803, Second-Printing
Child Safety

Inflatable Seatbelts
E142528
1. Position the child restraint in a seatwith a combination lap and shoulderbelt.
E146522
2. After positioning the child restraint inthe proper seating position, grasp theshoulder belt and lap belt togetherbehind the belt tongue.
E142530
3. While holding the shoulder and lap beltportions together, route the tonguethrough the child restraint accordingto the child restraint manufacturer'sinstructions. Be sure the belt webbingis not twisted.
E146523
4. Insert the belt tongue into the properbuckle (the buckle closest to thedirection the tongue is coming from)for that seating position until you heara snap and feel the latch engage. Makesure the tongue is latched securely bypulling on it.
22
Flex (TP3) , enUSA, Edition date: 201803, Second-Printing
Child Safety

E146524
5. To put the retractor in the automaticlocking mode, grasp the lap portion ofthe inflatable seatbelt and pull upwarduntil you pull all of the belt out.
Note: The automatic locking mode isavailable on the front passenger and rearseats.Note: Unlike the standard seatbelt, theinflatable seatbelt's unique lap portion locksthe child restraint for installation. The abilityfor the shoulder portion of the belt to movefreely is normal, even after the lap belt hasbeen put into the automatic locking mode.Note: The lock-off device on some childrestraints may not accommodate theshoulder portion of the inflatable seatbelt.Follow all instructions provided by themanufacturer of the child restraint regardingthe necessary and proper use of the lock-offdevice. In some instances, these deviceshave been provided only for use in vehicleswith seatbelt systems that would otherwiserequire a locking clip.6. Allow the belt to retract to remove
slack. The belt clicks as it retracts toindicate it is in the automatic lockingmode.
7. Try to pull the belt out of the retractorto make sure the retractor is in theautomatic locking mode (you shouldnot be able to pull more belt out). If theretractor is not locked, unbuckle thebelt and repeat Steps 5 and 6.
E146525
8. Remove remaining slack from the belt.Force the seat down with extra weight,for example, by pressing down orkneeling on the child restraint whilepulling down on the lap belt in order toforce slack from the belt. This isnecessary to remove the remainingslack that exists once you add the extraweight of the child to the child restraint.It also helps to achieve the propersnugness of the child restraint to yourvehicle. Sometimes, a slight leantoward the buckle will additionally helpto remove remaining slack from thebelt.
9. Attach the tether strap (if the childrestraint is equipped).
23
Flex (TP3) , enUSA, Edition date: 201803, Second-Printing
Child Safety

E142534
10. Before placing the child in the seat,forcibly move the seat forward andback to make sure the seat is securelyheld in place. To check this, grab theseat at the belt path and attempt tomove it side to side and forward andback. There should be no more than1 in (2.5 cm) of movement for properinstallation.
We recommend checking with a NHTSACertified Child Passenger SafetyTechnician to make certain the childrestraint is properly installed. In Canada,check with Transport Canada for referralto a Child Car Seat Clinic.
Using Lower Anchors and Tethersfor CHildren (LATCH)
WARNING: Do not attach two childsafety restraints to the same anchor. In acrash, one anchor may not be strongenough to hold two child safety restraintattachments and may break, causingserious injury or death.
WARNING: Depending on where yousecure a child restraint, and depending onthe child restraint design, you may blockaccess to certain seatbelt buckleassemblies and LATCH lower anchors,rendering those features potentiallyunusable. To avoid risk of injury, make sureoccupants only use seating positionswhere they are able to be properlyrestrained.
The LATCH system is composed of threevehicle anchor points: two lower anchorswhere the seat backrest and seat cushionmeet (called the seat bight) and one toptether anchor behind that seating position.LATCH compatible child restraints havetwo rigid or webbing mountedattachments that connect to the two loweranchors at the LATCH equipped seatingpositions in your vehicle. This type ofattachment method eliminates the needto use seatbelts to attach the childrestraint. However, you can still use theseatbelt to attach the child restraint. Forforward-facing child restraints, you mustattach the top tether strap to the propertop tether anchor if a top tether strap hasbeen provided with your child restraint.Your vehicle has LATCH lower anchors forchild restraint installation at the seatingpositions marked with the child restraintsymbol.Second-Row Bucket Seats andThird-Row Passenger Side
E190825
24
Flex (TP3) , enUSA, Edition date: 201803, Second-Printing
Child Safety

Second-Row Bench Seats andThird-Row Passenger Side
E190826
E144054
The LATCH anchors are at the rear sectionof the rear seat between the cushion andseat backrest below the symbols asshown. Follow the child restraintmanufacturer's instructions to properlyinstall a child restraint with LATCHattachments.Follow the instructions on attaching childrestraints with tether straps. See UsingTether Straps later in this chapter.Attach LATCH lower attachments of thechild restraint only to the anchors shown.
Use of Inboard Lower Anchors from theOutboard Seating Positions (CenterSeating Use)
WARNING: The standardizedspacing for LATCH lower anchors is 11 in(280 mm) center to center. Do not useLATCH lower anchors for the centerseating position unless the child restraintmanufacturer's instructions permit andspecify using anchors spaced at least asfar apart as those in this vehicle.
The lower anchors at the center of thesecond row bench seat are spaced 20.5 in(52 cm) apart. The standardized spacingfor LATCH lower anchors is 11 in (28 cm)center to center. You cannot install a childrestraint with rigid LATCH attachments atthe center seating position. You can onlyuse LATCH compatible child restraints(with attachments on belt webbing) atthis seating position provided that the childrestraint manufacturer’s instructionspermit use with the anchor spacing stated.Do not attach a child restraint to any loweranchor if an adjacent child restraint isattached to that anchor.Each time you use the safety seat, checkthat the seat is properly attached to thelower anchors and tether anchor, ifapplicable. Tug the child restraint from sideto side and forward and back where it issecured to your vehicle. The seat shouldmove less than one inch when you do thisfor a proper installation.If the child restraint is not anchoredproperly, the risk of a child being injured ina crash greatly increases.
25
Flex (TP3) , enUSA, Edition date: 201803, Second-Printing
Child Safety

Combining Seatbelt and LATCH LowerAnchors for Attaching Child RestraintsWhen used in combination, either theseatbelt or the LATCH lower anchors maybe attached first, provided a properinstallation is achieved. Attach the tetherstrap afterward, if included with the childrestraint.
Using Tether StrapsMany forward-facing childrestraints include a tether strapwhich extends from the back of
the child restraint and hooks to ananchoring point called the top tetheranchor. Tether straps are available as anaccessory for many older safety seats.
Contact the manufacturer of your childrestraint for information about ordering atether strap, or to obtain a longer tetherstrap if the tether strap on your safety seatdoes not reach the appropriate top tetheranchor in your vehicle.Once you install the child restraint usingeither the seatbelt, the lower anchors ofthe LATCH system, or both, you can attachthe top tether strap.The tether strap anchors in your vehicleare in the following positions (shown fromtop view):Second-Row Bucket Seats andThird-Row Passenger Side
E190827
Second-Row Bench Seats andThird-Row Passenger Side
E190828
Perform the following steps to install achild restraint with tether anchors:Note: If you install a child restraint with rigidLATCH attachments, do not tighten thetether strap enough to lift the child restraintoff your vehicle seat cushion when the childis seated in it. Keep the tether strap just snugwithout lifting the front of the child restraint.Keeping the child restraint just touching yourvehicle seat gives the best protection in asevere crash.
E190829
26
Flex (TP3) , enUSA, Edition date: 201803, Second-Printing
Child Safety

Placement of the Tether Strap• Second row outermost seat positions:
Route the child restraint tether strapover the seat backrest, under the headrestraint and between the headrestraint posts. If needed, remove thehead restraint to improve the fit of thechild restraint or tether strap.
• Second row center seat positions:Route the child restraint tether strapover the top of the head restraint. Ifneeded, remove the head restraint toimprove the fit of the child restraint ortether strap. See Head Restraints(page 121).
• Third row seat position: Route the childrestraint tether strap over the seatbackrest, under the head restraint andbetween the head restraint posts. Ifneeded, fold the head restraint downto improve the fit of the child restraintor tether strap. See Head Restraints(page 121).
1. Route the tether strap.2. Locate the correct anchor for the
selected seating position.3. Clip the tether strap to the anchor as
shown. The tether hook may betwisted ½ turn to improve installation.If the tether strap is clipped incorrectly,the child restraint may not be retainedproperly in the event of a crash.
E190833
4. Tighten the child restraint tether strapaccording to the manufacturer'sinstructions.
If the safety seat is not anchored properly,the risk of a child being injured in a crashgreatly increases.If your child restraint system has a tetherstrap, and the child restraint manufacturerrecommends its use, we also recommendits use.Second-Row Bucket (40/40)
E190830
27
Flex (TP3) , enUSA, Edition date: 201803, Second-Printing
Child Safety

Second-Row Bench (60/40)
E190831
Third-Row
E190832
Note: The cargo tie downs at the rear edgeof the floor are not tether anchors.
BOOSTER SEATS
WARNING: Do not put the shouldersection of the seatbelt or allow the childto put the shoulder section of the seatbeltunder their arm or behind their back. Failureto follow this instruction could reduce theeffectiveness of the seatbelt and increasethe risk of injury or death in a crash.
Note: Some booster seat seatbelt guidesmay not accommodate the shoulder portionof the inflatable seatbelt.Use a belt-positioning booster seat forchildren who have outgrown or no longerproperly fit in a child safety seat (generallychildren who are less than 57 in (1.45 m)tall, are greater than age four (4) and lessthan age twelve (12), and between 40 lb(18 kg) and 80 lb (36 kg) and upward to100 lb (45 kg) if recommended by yourchild restraint manufacturer). Many stateand provincial laws require that childrenuse approved booster seats until theyreach age eight, a height of 57 in (1.45 m)tall, or 80 lb (36 kg).Booster seats should be used until you cananswer YES to ALL of these questionswhen seated without a booster seat:
28
Flex (TP3) , enUSA, Edition date: 201803, Second-Printing
Child Safety

E142595
• Can the child sit all the way backagainst their vehicle seat backrest withknees bent comfortably at the edge ofthe seat cushion?
• Can the child sit without slouching?• Does the lap belt rest low across the
hips?• Is the shoulder belt centered on the
shoulder and chest?• Can the child stay seated like this for
the whole trip?Always use booster seats in conjunctionwith your vehicle lap and shoulder belt.
Types of Booster Seats
E68924
• Backless booster seats
If your backless booster seat has aremovable shield, remove the shield. If avehicle seating position has a low seatbackrest or no head restraint, a backlessbooster seat may place your child's head(as measured at the tops of the ears)above the top of the seat. In this case,move the backless booster to anotherseating position with a higher seat backrestor head restraint and lap and shoulderbelts, or consider using a high back boosterseat.
E70710
• High back booster seatsIf, with a backless booster seat, you cannotfind a seating position that adequatelysupports your child's head, a high backbooster seat would be a better choice.Children and booster seats vary in size andshape. Choose a booster that keeps thelap belt low and snug across the hips,never up across the stomach, and lets youadjust the shoulder belt to cross the chestand rest snugly near the center of theshoulder. The following drawings comparethe ideal fit (center) to a shoulder beltuncomfortably close to the neck and ashoulder belt that could slip off theshoulder. The drawings also show how thelap belt should be low and snug across thechild's hips.
29
Flex (TP3) , enUSA, Edition date: 201803, Second-Printing
Child Safety

E142596
E142597
If the booster seat slides on the vehicleseat upon which it is being used, placing arubberized mesh sold as shelf or carpetliner under the booster seat may improvethis condition. Do not introduce any itemthicker than this under the booster seat.Check with the booster seatmanufacturer's instructions.
CHILD RESTRAINTPOSITIONING
WARNING: Do not place a rearwardfacing child restraint in front of an activeairbag. Failure to follow this instructioncould result in personal injury or death.
WARNING: Properly secure children12 years old and under in a rear seatingposition whenever possible. If you areunable to properly secure all children in arear seating position, properly secure thelargest child on the front seat. If you mustuse a forward facing child restraint on thefront seat, move the seat as far back aspossible. Failure to follow theseinstructions could result in personal injuryor death.
WARNING: Always carefully followthe instructions and warnings provided bythe manufacturer of any child restraint todetermine if the restraint device isappropriate for your child's size, height,weight, or age. Follow the child restraint
30
Flex (TP3) , enUSA, Edition date: 201803, Second-Printing
Child Safety

manufacturer's instructions and warningsprovided for installation and use inconjunction with the instructions andwarnings provided by your vehiclemanufacturer. A safety seat that isimproperly installed or utilized, isinappropriate for your child's height, age,or weight or does not properly fit the childmay increase the risk of serious injury ordeath.
WARNING: Do not allow apassenger to hold a child on their lap whenyour vehicle is moving. Failure to follow thisinstruction could result in personal injuryor death in the event of a sudden stop orcrash.
WARNING: Do not use pillows,books or towels to boost your child'sheight. Failure to follow this instructioncould result in personal injury or death.
WARNING: Properly secure childrestraints or booster seats when they arenot in use. They could become projectilesin a sudden stop or crash. Failure to followthis instruction could result in personalinjury or death.
WARNING: Do not put the shouldersection of the seatbelt or allow the childto put the shoulder section of the seatbeltunder their arm or behind their back. Failureto follow this instruction could reduce theeffectiveness of the seatbelt and increasethe risk of injury or death in a crash.
WARNING: Do not leave children orpets unattended in your vehicle. Failure tofollow this instruction could result inpersonal injury or death.
31
Flex (TP3) , enUSA, Edition date: 201803, Second-Printing
Child Safety

Recommendations for Attaching Child Safety Restraints for Children
Use Any Attachment Method as Indicated Below by X
CombinedWeight ofChild and
ChildRestraint
RestraintType
SeatbeltOnly
Seatbeltand LATCH
(LowerAnchorsand TopTether
Anchor)
Seatbeltand TopTetherAnchor
LATCH(Lower
AnchorsOnly)
LATCH(Lower
Anchorsand TopTether
Anchor)
XXUp to 65 lb(29.5 kg)
Rear facingchild
restraint
XOver 65 lb(29.5 kg)
Rear facingchild
restraint
XXXUp to 65 lb(29.5 kg)
Forwardfacingchild
restraint
XXOver 65 lb(29.5 kg)
Forwardfacingchild
restraint
Note: The child restraint must rest tightlyagainst the vehicle seat upon which it isinstalled. It may be necessary to lift orremove the head restraint. See Seats (page121).
CHILD SAFETY LOCKSWhen these locks are set, the rear doorscannot be opened from the inside.
32
Flex (TP3) , enUSA, Edition date: 201803, Second-Printing
Child Safety

E112197
The childproof locks are located on therear edge of each rear door and must beset separately for each door.
Left-Hand SideTurn counterclockwise to lock andclockwise to unlock.
Right-Hand SideTurn clockwise to lock andcounterclockwise to unlock.
33
Flex (TP3) , enUSA, Edition date: 201803, Second-Printing
Child Safety
PRINCIPLE OF OPERATION
WARNING: Always drive and ridewith your seatback upright and the lap beltsnug and low across the hips.
WARNING: Children must alwaysbe properly restrained.
WARNING: Never let a passengerhold a child on his or her lap while thevehicle is moving. The passenger cannotprotect the child from injury in a crash.
WARNING: All occupants of yourvehicle, including the driver, should alwaysproperly wear their seatbelts, even whenan airbag supplemental restraint systemis provided. Failure to properly wear yourseatbelt could seriously increase the riskof injury or death.
WARNING: It is extremely dangerousto ride in a cargo area, inside or outside ofa vehicle. In a crash, people riding in theseareas are more likely to be seriously injuredor killed. Do not allow people to ride in anyarea of your vehicle that is not equippedwith seats and seatbelts. Make sureeveryone in your vehicle is in a seat andproperly using a seatbelt. Failure to followthis warning could result in seriouspersonal injury or death.
WARNING: In a rollover crash, anunbelted person is significantly more likelyto die than a person wearing a seatbelt.
WARNING: Each seating position inyour vehicle has a specific seatbeltassembly made up of one buckle and onetongue designed to be used as a pair. Usethe shoulder belt on the outside shoulderonly. Never wear the shoulder belt underthe arm. Never use a single seatbelt formore than one person.
WARNING: Even with advancedrestraints systems, properly restrainchildren 12 and under in a rear seatingposition. Failure to follow this couldseriously increase the risk of injury or death.
WARNING: Seatbelts and seats maybe hot in a vehicle that is in the sunshine.The hot seatbelts or seats may burn asmall child. Check seat covers and bucklesbefore you place a child anywhere nearthem.
All seating positions in your vehicle havelap and shoulder seatbelts. All occupantsof the vehicle should always properly weartheir seatbelts, even when an airbagsupplemental restraint system is provided.The seatbelt system consists of:• Lap and shoulder seatbelts.• Shoulder seatbelt with automatic
locking mode, (except driver seatbeltand rear inflatable seatbelt).
• Height adjuster at the front outboardseating positions.
• Seatbelt pretensioner at the frontoutboard seating positions.
• Belt tension sensor at the frontoutboard passenger seating position.
E71880
• Seatbelt warning light and chime.
34
Flex (TP3) , enUSA, Edition date: 201803, Second-Printing
Seatbelts

E67017
• Crash sensors and monitoring systemwith readiness indicator.
The seatbelt pretensioners and rearinflatable seatbelts are designed toactivate in frontal, near-frontal and sidecrashes, and in rollovers. The seatbeltpretensioners at the front seating positionsare designed to tighten the seatbelts firmlyagainst the occupant’s body whenactivated. This helps increase theeffectiveness of the seatbelts. In frontalcrashes, the seatbelt pretensioners can beactivated alone or, if the crash is ofsufficient severity, together with the frontairbags.
FASTENING THE SEATBELTSStandard belts shown, inflatable beltssimilarThe front outboard and rear safetyrestraints in the vehicle are combinationlap and shoulder belts.
E142587
1. Insert the belt tongue into the properbuckle (the buckle closest to thedirection the tongue is coming from)until you hear a click and feel it latch.Make sure you securely fasten thetongue in the buckle.
E142588
2. To unfasten, press the release buttonand remove the tongue from thebuckle.
Using Seatbelts During Pregnancy
WARNING: Always ride and drivewith your seatback upright and properlyfasten your seatbelt. Fit the lap portion ofthe seatbelt snugly and low across thehips. Position the shoulder portion of theseatbelt across your chest. Pregnantwomen must follow this practice. See thefollowing figure.
E142590
35
Flex (TP3) , enUSA, Edition date: 201803, Second-Printing
Seatbelts

Pregnant women should always wear theirseatbelt. Position the lap belt portion of acombination lap and shoulder belt lowacross the hips below the belly and wornas tight as comfort allows. Position theshoulder belt to cross the middle of theshoulder and the center of the chest.
Seatbelt Locking Modes
WARNING: If your vehicle is involvedin a crash, have the seatbelts andassociated components inspected as soonas possible. Failure to follow thisinstruction could result in personal injuryor death.
All safety restraints in the vehicle arecombination lap and shoulder belts. Thedriver seatbelt has the vehicle sensitivelocking mode. The front outboardpassenger and rear seat belts have boththe vehicle sensitive locking mode and theautomatic locking mode.
Vehicle Sensitive ModeThis is the normal retractor mode, whichallows free shoulder belt lengthadjustment to your movements andlocking in response to vehicle movement.For example, if the driver brakes suddenlyor turns a corner sharply, or the vehiclereceives an impact of about 5 mph(8 km/h) or more, the combinationseatbelts lock to help reduce forwardmovement of the driver and passengers.In addition, the retractor is designed to lockif you pull the webbing out too quickly. Ifthe seatbelt retractor locks, slowly lowerthe height adjuster to allow the seatbeltto retract. If the retractor does not unlock,pull the seatbelt out slowly then feed a
small length of webbing back toward thestowed position. For rear seatbelts, reclinethe rear seat backrest or push the seatbackrest cushion away from the seatbelt.Feed a small length of webbing backtoward the stowed position.
Automatic Locking ModeIn this mode, the shoulder beltautomatically pre-locks. The belt stillretracts to remove any slack in theshoulder belt. The automatic locking modeis not available on the driver seatbelt.
When to Use the Automatic LockingModeUse this mode any time a child safety seat,except a booster, is installed in passengerfront or rear seating positions. Properlyrestrain children 12 years old and under ina rear seating position whenever possible.See Child Safety (page 17).
How to Use the Automatic LockingModeNon-inflatable seatbelts
E142591
1. Buckle the combination lap andshoulder belt.
36
Flex (TP3) , enUSA, Edition date: 201803, Second-Printing
Seatbelts

2. Grasp the shoulder portion and pulldownward until you pull the entire beltout. As the belt retracts, you will heara clicking sound. This indicates theseatbelt is now in the automaticlocking mode.
Rear outboard inflatable seatbelts (secondrow only–if equipped)
E146363
1. Buckle the combination lap andshoulder belt.
2. Grasp the lap portion of the belt andpull upward until you pull the entirebelt out.
3. Allow the belt to retract. As the beltretracts, you will hear a clicking sound.This indicates the seatbelt is now in theautomatic locking mode.
How to Disengage the AutomaticLocking ModeUnbuckle the combination lap andshoulder belt and allow it to retractcompletely to disengage the automaticlocking mode and activate the vehiclesensitive (emergency) locking mode.
Rear Inflatable Seatbelt (If Equipped)
WARNING: Do not attempt toservice, repair, or modify thesupplementary restraint system orassociated components. Failure to followthis instruction could result in personalinjury or death.
Note: The rear inflatable seatbelts arecompatible with most infant and childsafety car seats and belt positioning boosterseats when properly installed. This isbecause they are designed to fill with acooled gas at a lower pressure and at aslower rate than traditional airbags. Afterinflation, the shoulder portion of theseatbelt remains cool to the touch.The rear inflatable seatbelts are in theshoulder portion of the seatbelts of thesecond-row outboard seating positions.The rear inflatable seatbelt consists of thefollowing:• An inflatable bag in the shoulder
seatbelt webbing.• Lap seatbelt webbing with automatic
locking mode.• Crash sensors and monitoring system
with readiness indicator. See CrashSensors and Airbag Indicator (page50).
How does the rear inflatable seatbeltsystem work?
WARNING: If a supplementaryrestraint system component has deployed,it will not function again. Have the systemand associated components inspected assoon as possible. Failure to follow thisinstruction could result in personal injuryor death.
37
Flex (TP3) , enUSA, Edition date: 201803, Second-Printing
Seatbelts

The rear inflatable seatbelts function likestandard restraints in everyday usage.
E146364
During a crash of sufficient force, theinflatable belt inflates from inside thewebbing.
E146365
The fully inflated belt's increased diametermore effectively holds the occupant in theappropriate seating position, and spreadscrash forces over more area of the bodythan regular seatbelts. This helps reducepressure on the chest and helps controlhead and neck motion for passengers.
The rear inflatable seatbelts are designedto inflate in frontal or near-frontal crashes,some side impact crashes and rollovers.The fact that the rear inflatable seatbeltdid not inflate in a crash does not meanthat something is wrong with the system.Rather, it means the forces were not of thetype sufficient to cause activation.
Stowing the Rear Inflatable SeatbeltThe rear inflatable seatbelt has a snapretainer for stowing the seatbelt againstthe quarter trim panel when it is not in use.This prevents the seatbelt tongue fromrattling against the side of the seat andkeeps it out of the way when folding ortumbling the second row seats.
E209845
Press the retainer on the seatbelt onto themating snap to stow. To use the seatbelt,pull it away from the quarter trim panel.
SEATBELT HEIGHTADJUSTMENT
WARNING: Position the safety beltheight adjuster so that the belt rests acrossthe middle of your shoulder. Failure toadjust the safety belt properly couldreduce the effectiveness of the safety beltand increase the risk of injury in a crash.
38
Flex (TP3) , enUSA, Edition date: 201803, Second-Printing
Seatbelts

Adjust the height of the shoulder belt sothe belt rests across the middle of yourshoulder.
E209844
To adjust the shoulder belt height:1. Press the side release buttons and slide
the height adjuster up or down.2. Release the buttons and pull down on
the height adjuster to make sure it islocked in place.
SEATBELT WARNING LAMPAND INDICATOR CHIME
E71880
This lamp illuminates and anaudible warning will sound if thedriver seatbelt has not been
fastened when the vehicle's ignition isturned on.
Conditions of operation
ThenIf
The seatbelt warning light illuminates andthe warning chime sounds for a few
seconds.
The driver seatbelt is not buckled beforethe ignition switch is turned to the on posi-
tion...
The seatbelt warning light and warningchime turn off.
The driver seatbelt is buckled while theindicator light is illuminated and the
warning chime is sounding...
The seatbelt warning light and indicatorchime remain off.
The driver seatbelt is buckled before theignition switch is turned to the on position...
SEATBELT REMINDERBelt-Minder™This feature supplements the safety beltwarning function by providing additionalreminders that intermittently sound a toneand illuminate the safety belt warning lightwhen you are in the driver seat or you havea front seat passenger and a safety belt isunbuckled.
The system uses information from thefront passenger sensing system todetermine if a front seat passenger ispresent and therefore potentially in needof a warning. To avoid the system turningon the Belt-Minder feature for objects youplace on the front passenger seat, only thefront seat passengers receive warnings asdetermined by the front passenger sensingsystem.If the Belt-Minder warnings expire(warnings for about five minutes) for onepassenger (driver or front passenger), theother passenger can still cause theBelt-Minder feature to turn on.
39
Flex (TP3) , enUSA, Edition date: 201803, Second-Printing
Seatbelts

Then...If...
The Belt-Minder feature will not activate.You and the front seat passenger buckleyour safety belts before you switch theignition on or less than 1–2 minutes elapseafter you switch the ignition on...
The Belt-Minder feature activates, thesafety belt warning light illuminates and awarning tone sounds for 6 seconds every25 seconds, repeating for about 5 minutesor until you and the front seat passengerbuckle your safety belts.
You or the front seat passenger do notbuckle your safety belts before your vehiclereaches at least 6 mph (9.7 km/h) and 1–2minutes elapse after you switch the ignitionon...
The Belt-Minder feature activates, thesafety belt warning light illuminates and awarning tone sounds for 6 seconds every25 seconds, repeating for about 5 minutesor until you and the front seat passengerbuckle your safety belts.
The safety belt for the driver or frontpassenger is unbuckled for about 1 minutewhile the vehicle is traveling at least 6 mph(9.7 km/h) and more than 1–2 minuteselapse after you switch the ignition on...
Deactivating and Activating theBelt-Minder Feature
WARNING: While the system allowsyou to switch this feature off, the intent ofthe system is to remind you to wear yoursafety belt to improve your chance tosurvive an accident. We recommend youleave the system switched on for yourselfand others who may use the vehicle.
Note: The driver and front passengerwarnings switch on and off independently.When you perform this procedure for oneseating position, do not buckle the otherposition as this will terminate the process.Note: If you are using MyKey, you cannotdisable the Belt-Minder. Also, if you havepreviously disabled the Belt-Minder, it willbe re-enabled during the use of MyKey. SeeMyKey™ (page 57). .
Read Steps 1–4 thoroughly beforeproceeding with the programmingprocedure.Before following the procedure, make surethat:• The parking brake is set.• The transmission is in park (P).• The ignition is off.• The driver and front passenger safety
belts are unbuckled.1. Switch the ignition on. Do not start the
vehicle.2. Wait until the safety belt warning light
turns off (about 1 minute). After Step2, wait an additional 5 seconds beforeproceeding with Step 3. Once you startStep 3, you must complete theprocedure within 20 seconds.
40
Flex (TP3) , enUSA, Edition date: 201803, Second-Printing
Seatbelts

3. For the seating position you areswitching off, buckle then unbuckle thesafety belt three times at a moderatespeed, ending in the unbuckled state.After Step 3, the safety belt warninglight turns on.
4. While the safety belt warning light ison, buckle and then unbuckle thesafety belt. After Step 4, the safety beltwarning light flashes for confirmation.
• This will switch the feature off for thatseating position if it is currently on.
• This will switch the feature on for thatseating position if it is currently off.
CHILD RESTRAINT ANDSEATBELT MAINTENANCEInspect the vehicle seatbelts and childsafety seat systems periodically to makesure they work properly and are notdamaged. Inspect the vehicle and childrestraint seatbelts to make sure there areno nicks, tears or cuts. Replace ifnecessary. All vehicle seatbelt assemblies,including retractors, buckles, front seatbeltbuckle assemblies, buckle supportassemblies (slide bar-if equipped),shoulder belt height adjusters (ifequipped), shoulder belt guide on seatbackrest (if equipped), child safety seatLATCH and tether anchors, and attachinghardware, should be inspected after acrash. Read the child restraintmanufacturer's instructions for additionalinspection and maintenance informationspecific to the child restraint.
We recommend that all seatbeltassemblies in use in vehicles involved in acrash be replaced. However, if the crashwas minor and an authorized dealer findsthat the belts do not show damage andcontinue to operate properly, they do notneed to be replaced. Seatbelt assembliesnot in use during a crash should also beinspected and replaced if either damageor improper operation is noted.Properly care for seatbelts. See VehicleCare (page 265).
SEATBELT EXTENSION
WARNING: Persons who fit into thevehicle's seatbelt should not use anextension. Unnecessary use could result inserious personal injury in the event of acrash.
WARNING: Only use extensionsprovided free of charge by Ford MotorCompany dealers. The dealer will providean extension designed specifically for thisvehicle, model year and seating position.The use of an extension intended foranother vehicle, model year or seatingposition may not offer you the fullprotection of your vehicle’s seatbeltrestraint system.
WARNING: Never use seatbeltextensions to install child restraints.
WARNING: Do not use a seatbeltextension with an inflatable seatbelt.
WARNING: Do not use extensionsto change the fit of the belt across thetorso, over the lap or to make the seatbeltbuckle easier to reach.
41
Flex (TP3) , enUSA, Edition date: 201803, Second-Printing
Seatbelts

If, because of body size or driving position,it is not possible to properly fasten theseatbelt over your lap and shoulder, anextension that is compatible with theseatbelts is available free of charge fromFord Motor Company dealers. Only Fordseatbelt extensions made by the originalequipment seatbelts manufacturer shouldbe used with Ford seatbelts. Ask yourauthorized dealer if your extension iscompatible with your Ford vehicle restraintsystem.
42
Flex (TP3) , enUSA, Edition date: 201803, Second-Printing
Seatbelts

This system provides an improved overalllevel of frontal crash protection to frontseat occupants and is designed to helpfurther reduce the risk of airbag-relatedinjuries. The system analyzes differentoccupant conditions and crash severitybefore activating the appropriate safetydevices to help better protect occupantsin a variety of frontal crash situations.Your vehicle's Personal Safety Systemconsists of:• Driver and passenger dual-stage airbag
supplemental restraints.• Front seat outermost seatbelts with
pretensioners, energy managementretractors (first row only) and seatbeltusage sensors.
• Driver seat position sensor.• Front passenger sensing system.• Passenger airbag off and on indicator
lamp.• Front crash severity sensors.• Restraints control module with impact
and safing sensors.• Restraint system warning light and
tone.• The electrical wiring for the airbags,
crash sensors, seatbelt pretensioners,front seatbelt usage sensors, driverseat position sensor, front passengersensing system and indicator lights.
How Does the Personal SafetySystem Work?The Personal Safety System can adapt thedeployment strategy of the safety devicesaccording to crash severity and occupantconditions. A collection of crash andoccupant sensors provides information tothe restraints control module. During acrash, the restraints control module maydeploy the seatbelt pretensioners, one orboth stages of the dual-stage airbagsbased on crash severity and occupantconditions.
43
Flex (TP3) , enUSA, Edition date: 201803, Second-Printing
Personal Safety System™

PRINCIPLE OF OPERATION
WARNING: Airbags do not inflateslowly or gently, and the risk of injury froma deploying airbag is the greatest close tothe trim covering the airbag module.
WARNING: All occupants of yourvehicle, including the driver, should alwaysproperly wear their seatbelts, even whenan airbag supplemental restraint systemis provided. Failure to properly wear yourseatbelt could seriously increase the riskof injury or death.
WARNING: Even with advancedrestraints systems, properly restrainchildren 12 and under in a rear seatingposition. Failure to follow this couldseriously increase the risk of injury or death.
WARNING: Do not place your armson the airbag cover or through the steeringwheel. Failure to follow this instructioncould result in personal injury.
WARNING: Keep the areas in frontof the airbags free from obstruction. Donot affix anything to or over the airbagcovers. Objects could become projectilesduring airbag deployment or in a suddenstop. Failure to follow this instruction couldresult in personal injury or death.
WARNING: Airbags can kill or injurea child in a child restraint. Never place arear-facing child restraint in front of anactive airbag. If you must use aforward-facing child restraint in the frontseat, move the seat upon which the childrestraint is installed all the way back.
WARNING: Do not attempt toservice, repair, or modify thesupplementary restraint system orassociated components. Failure to followthis instruction could result in personalinjury or death.
WARNING: Several airbag systemcomponents get hot after inflation. Toreduce the risk of injury, do not touch themafter inflation.
WARNING: If a supplementaryrestraint system component has deployed,it will not function again. Have the systemand associated components inspected assoon as possible. Failure to follow thisinstruction could result in personal injuryor death.
The airbags are a supplemental restraintsystem and are designed to work with theseatbelts to help protect the driver andright front passenger from certain upperbody injuries. Airbags do not inflate slowly;there is a risk of injury from a deployingairbag.Note: You will hear a loud bang and see acloud of harmless powdery residue if anairbag deploys. This is normal.The airbags inflate and deflate rapidlyupon activation. After airbag deployment,it is normal to notice a smoke-like, powderyresidue or smell the burnt propellant. Thismay consist of cornstarch, talcum powder(to lubricate the bag) or sodiumcompounds (for example, baking soda)that result from the combustion processthat inflates the airbag. Small amounts ofsodium hydroxide may be present whichmay irritate the skin and eyes, but none ofthe residue is toxic.
44
Flex (TP3) , enUSA, Edition date: 201803, Second-Printing
Supplementary Restraints System

While the system is designed to helpreduce serious injuries, contact with adeploying airbag may also cause abrasionsor swelling. Temporary hearing loss is alsoa possibility as a result of the noiseassociated with a deploying airbag.Because airbags must inflate rapidly andwith considerable force, there is the risk ofdeath or serious injuries such as fractures,facial and eye injuries or internal injuries,particularly to occupants who are notproperly restrained or are otherwise out ofposition at the time of airbag deployment.Thus, it is extremely important thatoccupants be properly restrained as faraway from the airbag module as possiblewhile maintaining vehicle control.Routine maintenance of the airbags is notrequired.
DRIVER AND PASSENGERAIRBAGS
WARNING: Do not place your armson the airbag cover or through the steeringwheel. Failure to follow this instructioncould result in personal injury.
WARNING: Keep the areas in frontof the airbags free from obstruction. Donot affix anything to or over the airbagcovers. Objects could become projectilesduring airbag deployment or in a suddenstop. Failure to follow this instruction couldresult in personal injury or death.
WARNING: Airbags can kill or injurea child in a child restraint. Never place arear-facing child restraint in front of anactive airbag. If you must use aforward-facing child restraint in the frontseat, move the seat upon which the childrestraint is installed all the way back.
E151127
The driver and front passenger airbags willdeploy during significant frontal and nearfrontal crashes.The driver and passenger front airbagsystem consists of:• Driver and passenger airbag modules.• Front passenger sensing system.
E67017
· Crash sensors and monitoringsystem with readiness indicator.See Crash Sensors and Airbag
Indicator (page 50).
Proper Driver and Front PassengerSeating Adjustment
WARNING: National Highway TrafficSafety Administration (NHTSA)recommends a minimum distance of atleast 10 in (25 cm) between an occupant'schest and the driver airbag module.
To properly position yourself away fromthe airbag:• Move your seat to the rear as far as you
can while still reaching the pedalscomfortably.
• Recline the seat slightly (one or twodegrees) from the upright position.
45
Flex (TP3) , enUSA, Edition date: 201803, Second-Printing
Supplementary Restraints System

After all occupants have adjusted theirseats and put on seatbelts, it is veryimportant that they continue to sitproperly. A properly seated occupant sitsupright, leaning against the seatback, andcentered on the seat cushion, with theirfeet comfortably extended on the floor.Sitting improperly can increase the chanceof injury in a crash event. For example, ifan occupant slouches, lies down, turnssideways, sits forward, leans forward orsideways, or puts one or both feet up, thechance of injury during a crash is greatlyincreased.
Children and Airbags
WARNING: Airbags can kill or injurea child in a child restraint. Never place arear-facing child restraint in front of anactive airbag. If you must use aforward-facing child restraint in the frontseat, move the seat upon which the childrestraint is installed all the way back.
E142846
Children must always be properlyrestrained. Accident statistics suggest thatchildren are safer when properly restrainedin the rear seating positions than in thefront seating position. Failure to followthese instructions may increase the risk ofinjury in a crash.
FRONT PASSENGER SENSINGSYSTEM
WARNING: Even with advancedrestraints systems, properly restrainchildren 12 and under in a rear seatingposition. Failure to follow this couldseriously increase the risk of injury or death.
WARNING: Sitting improperly, outof position or with the seatback reclinedtoo far can take weight off the seat cushionand affect the decision of the passengersensing system, resulting in serious injuryor death in the event of a crash. Always situpright against your seat back, with yourfeet on the floor.
WARNING: Any alteration ormodification to the front passenger seatmay affect the performance of the frontpassenger sensing system. This couldseriously increase the risk of injury or death.
This system works with sensors that arepart of the front passenger seat andseatbelt to detect the presence of aproperly-seated occupant and determineif the front passenger frontal airbag shouldbe enabled (may inflate) or not.
E253275
The front passenger sensing system usesa passenger airbag status indicator thatilluminates indicating that the frontpassenger frontal airbag is either on(enabled) or off (disabled).
46
Flex (TP3) , enUSA, Edition date: 201803, Second-Printing
Supplementary Restraints System

The indicator lamp is in the center stack ofthe instrument panel.Note: The passenger airbag status indicatoroff and on indicator lamps illuminate for ashort period of time when you first switchthe ignition on to confirm it is functional.The front passenger sensing system isdesigned to disable (will not inflate) thefront passenger frontal airbag when thefront passenger seat is unoccupied, or arear facing infant seat, a forward-facingchild restraint, or a booster seat isdetected. Even with this technology,parents are strongly encouraged toalways properly restrain children in the rearseat. The sensor also turns off thepassenger front airbag and seat-mountedside airbag when the passenger seat isempty.• When the front passenger sensing
system disables (will not inflate) thefront passenger frontal airbag, thepassenger airbag status indicatorilluminates the off lamp and stays litto remind you that the front passengerfrontal airbag is disabled.
• If you have installed the child restraintand the passenger airbag statusindicator illuminates the on lamp, thenswitch the vehicle off, remove the childrestraint from the vehicle and reinstallthe restraint following the childrestraint manufacturer's instructions.
The front passenger sensing system isdesigned to enable (may inflate) the frontpassenger frontal airbag anytime thesystem senses that a person of adult sizeis sitting properly in the front passengerseat.• When the front passenger sensing
system enables the front passengerfrontal airbag (may inflate), thepassenger airbag status indicatorilluminates the on lamp and remainsilluminated.
If a person of adult size is sitting in the frontpassenger seat, but the airbag off indicatorlamp is lit, it is possible that the person isnot sitting properly in the seat. If thishappens:• Switch the vehicle off and ask the
person to place the seatback in the fullupright position.
• Have the person sit upright in the seat,centered on the seat cushion, with theperson’s legs comfortably extended.
• Restart the vehicle and have the personremain in this position for about twominutes. This allows the system todetect that person and enable thepassenger frontal airbag.
• If the indicator off lamp remains liteven after this, advise the person toride in the rear seat.
Passenger airbagPassenger airbag statusindicator
Occupant
DisabledOFF: LitEmpty
ON: Unlit
DisabledOFF: LitChild
47
Flex (TP3) , enUSA, Edition date: 201803, Second-Printing
Supplementary Restraints System

Passenger airbagPassenger airbag statusindicator
Occupant
ON: Unlit
EnabledOFF: UnlitAdult
ON: Lit
Note: When the passenger airbag statusindicator off light is illuminated, thepassenger (seat mounted) side airbag maybe disabled to avoid the risk of airbagdeployment injuries.After all occupants have adjusted theirseats and put on seatbelts, it is veryimportant that they continue to sitproperly. A properly seated occupant sitsupright, leaning against the seatback, andcentered on the seat cushion, with theirfeet comfortably extended on the floor.Sitting improperly can increase the chanceof injury in a crash event. For example, ifan occupant slouches, lies down, turnssideways, sits forward, leans forward orsideways, or puts one or both feet up, thechance of injury during a crash greatlyincreases.
E67017
Make sure the front passengersensing system is operatingproperly. See Crash Sensors
and Airbag Indicator (page 50).
Do not attempt to repair or service thesystem. Take your vehicle immediately toan authorized dealer.If it is necessary to modify an advancedfront airbag system to accommodate aperson with disabilities, contact the FordCustomer Relationship Center. SeeGetting the Services You Need (page225).
SIDE AIRBAGS
WARNING: Do not place objects ormount equipment on or near the airbagcover, on the side of the seatbacks (of thefront seats), or in front seat areas that maycome into contact with a deploying airbag.Failure to follow these instructions mayincrease the risk of personal injury in theevent of a crash.
WARNING: Do not use accessoryseat covers. The use of accessory seatcovers may prevent the deployment of theside airbags and increase the risk of injuryin an accident.
WARNING: Do not lean your headon the door. The side airbag could injureyou as it deploys from the side of theseatback.
WARNING: Do not attempt toservice, repair, or modify the airbag, itsfuses or the seat cover on a seat containingan airbag as you could be seriously injuredor killed. Contact your authorized dealeras soon as possible.
48
Flex (TP3) , enUSA, Edition date: 201803, Second-Printing
Supplementary Restraints System

WARNING: If the side airbag hasdeployed, the airbag will not functionagain. The side airbag system (includingthe seat) must be inspected and servicedby an authorized dealer. If the airbag is notreplaced, the unrepaired area will increasethe risk of injury in a crash.
The side airbags are located on theoutboard side of the seatbacks of the frontseats. In certain sideways crashes, theairbag on the side affected by the crashwill be inflated. The airbag was designedto inflate between the door panel andoccupant to further enhance the protectionprovided occupants in side impact crashes.
E152533
The system consists of the following:• A label or embossed side panel
indicating that side airbags are fittedto your vehicle.
• Side airbags located inside the driverand front passenger seatbacks.
• Front passenger sensing system.
E67017
• Crash sensors and monitoring systemwith readiness indicator. See CrashSensors and Airbag Indicator (page50).
Note: The passenger sensing system willdeactivate the passenger seat-mountedside airbag if it detects an empty passengerseat.The design and development of the sideairbag system included recommendedtesting procedures that were developedby a group of automotive safety expertsknown as the Side Airbag TechnicalWorking Group. These recommendedtesting procedures help reduce the risk ofinjuries related to the deployment of sideairbags.
SAFETY CANOPY™
WARNING: Do not place objects ormount equipment on or near the headlinerat the siderail that may come into contactwith a deploying curtain airbag. Failure tofollow these instructions may increase therisk of personal injury in the event of acrash.
WARNING: Do not lean your headon the door. The curtain airbag could injureyou as it deploys from the headliner.
WARNING: Do not attempt toservice, repair, or modify thesupplementary restraint system orassociated components. Failure to followthis instruction could result in personalinjury or death.
WARNING: All occupants of yourvehicle, including the driver, should alwaysproperly wear their seatbelts, even whenan airbag supplemental restraint systemis provided. Failure to properly wear yourseatbelt could seriously increase the riskof injury or death.
49
Flex (TP3) , enUSA, Edition date: 201803, Second-Printing
Supplementary Restraints System

WARNING: To reduce risk of injury,do not obstruct or place objects in thedeployment path of the airbag.
WARNING: If a supplementaryrestraint system component has deployed,it will not function again. Have the systemand associated components inspected assoon as possible. Failure to follow thisinstruction could result in personal injuryor death.
The Safety Canopy will deploy duringsignificant side crashes or when a certainlikelihood of a rollover event is detectedby the rollover sensor. The Safety Canopyis mounted to the roof side-rail sheetmetal, behind the headliner, above eachrow of seats. In certain sideways crashesor rollover events, the Safety Canopy willbe activated, regardless of which seats areoccupied. The Safety Canopy is designedto inflate between the side window areaand occupants to further enhanceprotection provided in side impact crashesand rollover events.
E75004
The system consists of the following:• Safety canopy curtain airbags above
the trim panels over the front and rearside windows identified by a label orwording on the headliner or roof-pillartrim.
• A flexible headliner which opens abovethe side doors to allow air curtaindeployment
E67017
· Crash sensors and monitoringsystem with readiness indicator.See Crash Sensors and Airbag
Indicator (page 50).
Always properly restrain children 12 yearsold and under in the rear seats. The SafetyCanopy will not interfere with childrenrestrained using a properly installed childor booster seat because it is designed toinflate downward from the headliner abovethe doors along the side window opening.The design and development of the SafetyCanopy included recommended testingprocedures that were developed by agroup of automotive safety experts knownas the Side Airbag Technical WorkingGroup. These recommended testingprocedures help reduce the risk of injuriesrelated to the deployment of side airbags(including the Safety Canopy).
CRASH SENSORS ANDAIRBAG INDICATOR
WARNING: Modifying or addingequipment to the front end of the vehicle(including frame, bumper, front end bodystructure and tow hooks) may affect theperformance of the airbag system,increasing the risk of injury. Do not modifythe front end of the vehicle.
50
Flex (TP3) , enUSA, Edition date: 201803, Second-Printing
Supplementary Restraints System

Your vehicle has a collection of crash andoccupant sensors which provideinformation to the restraints controlmodule. The restraints control moduledeploys (activates) the front safety beltpretensioners, driver airbag, passengerairbag, seat mounted side airbags, theSafety Canopy and rear inflatable safetybelts. Based on the type of crash, therestraints control module will deploy theappropriate safety devices.The restraints control module alsomonitors the readiness of the above safetydevices plus the crash and occupantsensors. The readiness of the safetysystem is indicated by a warning indicatorlight in the instrument cluster or by abackup tone if the warning light is notworking. Routine maintenance of theairbag is not required.A difficulty with the system is indicated byone or more of the following:
E67017
The readiness light will notilluminate immediately after theignition is turned on.
• The readiness light will either flash orstay lit.
• A series of five beeps will be heard. Thetone pattern will repeat periodicallyuntil the problem, the light or both arerepaired.
If any of these things happen, evenintermittently, have the supplementalrestraint system serviced at an authorizeddealer immediately. Unless serviced, thesystem may not function properly in theevent of a crash.
The fact that the safety belt pretensionersor front airbags did not activate for bothfront seat occupants in a crash does notmean that something is wrong with thesystem. Rather, it means the restraintscontrol module determined the accidentconditions (crash severity, belt usage)were not appropriate to activate thesesafety devices.• The design of the front airbags is to
activate only in frontal and near-frontalcrashes (not rollovers, side impacts orrear impacts) unless the crash causessufficient frontal deceleration.
• The safety belt pretensioners and rearinflatable safety belts are designed toactivate in frontal, near-frontal, sideand rollover crashes.
• The design of the side airbags is toinflate in certain side crashes. Sideairbags may activate in other types ofcrashes if the vehicle experiencessufficient sideways motion ordeformation.
• The design of the Safety Canopy is toinflate in certain side impact crashesand when a certain likelihood ofrollover is detected by the rolloversensor. The Safety Canopy mayactivate in other types of crashes if thevehicle experiences sufficient sidewaysmotion or deformation, or a certainlikelihood of rollover.
AIRBAG DISPOSALContact your authorized dealer as soon aspossible. Airbags must be disposed of byqualified personnel.
51
Flex (TP3) , enUSA, Edition date: 201803, Second-Printing
Supplementary Restraints System

GENERAL INFORMATION ONRADIO FREQUENCIESThis device complies with Part 15 of theFCC Rules and with Licence exempt RSSStandards of Industry Canada. Operationis subject to the following two conditions:• This device may not cause harmful
interference, and• This device must accept any
interference received, includinginterference that may cause undesiredoperation.
WARNING: Changes ormodifications not expressively approvedby the party responsible for compliancecould void the user's authority to operatethe equipment. The term "IC:" before theradio certification number only signifiesthat Industry Canada technicalspecifications were met.
The typical operating range for yourtransmitter is approximately 33 ft (10 m).Vehicles with the remote start feature willhave a greater range. One of the followingcould cause a decrease in operating range:• weather conditions• nearby radio towers• structures around the vehicle• other vehicles parked next to your
vehicleOther short-distance radio transmitters,such as amateur radios, medicalequipment, wireless headphones, remotecontrols and alarm systems may operateon the same frequency as your remotecontrol. If other transmitters are operatingon those frequencies, you may not be ableto use your remote control. Using yourremote control near some types ofelectronic equipment, such as USB devices,
computers or cell phones can interfere withremote operation. Operating your remotecontrol near metal or metallic-finishedpurses, bags or clothing can interfere withremote operation. You can lock and unlockthe doors with the key.Note: Make sure to lock your vehicle beforeleaving it unattended.Note: If you are in range, the remote controlwill operate if you press any buttonunintentionally.
Intelligent AccessThe system uses a radio frequency signalto communicate with your vehicle andauthorize your vehicle to unlock when oneof the following conditions are met:• You touch the inside of any exterior
door handle within 3 ft (1 m) proximityof an intelligent access key.
• You press the luggage compartmentbutton.
• You press a button on the transmitter.If excessive radio frequency interferenceis present in the area or if the transmitterbattery is low, you may need tomechanically unlock your door. You canuse the mechanical key blade in yourintelligent access key to open the driverdoor in this situation. See RemoteControl (page 53).
52
Flex (TP3) , enUSA, Edition date: 201803, Second-Printing
Keys and Remote Controls
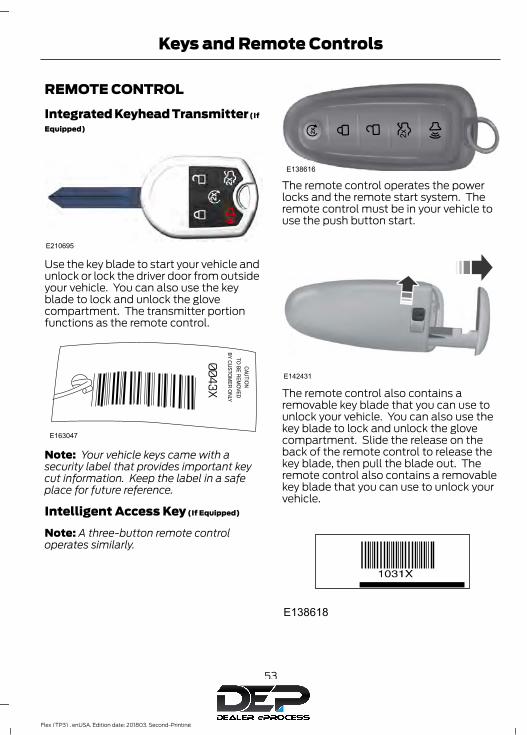
REMOTE CONTROLIntegrated Keyhead Transmitter (If
Equipped)
E210695
Use the key blade to start your vehicle andunlock or lock the driver door from outsideyour vehicle. You can also use the keyblade to lock and unlock the glovecompartment. The transmitter portionfunctions as the remote control.
E163047
Note: Your vehicle keys came with asecurity label that provides important keycut information. Keep the label in a safeplace for future reference.
Intelligent Access Key (If Equipped)
Note: A three-button remote controloperates similarly.
E138616
The remote control operates the powerlocks and the remote start system. Theremote control must be in your vehicle touse the push button start.
E142431
The remote control also contains aremovable key blade that you can use tounlock your vehicle. You can also use thekey blade to lock and unlock the glovecompartment. Slide the release on theback of the remote control to release thekey blade, then pull the blade out. Theremote control also contains a removablekey blade that you can use to unlock yourvehicle.
E138618
53
Flex (TP3) , enUSA, Edition date: 201803, Second-Printing
Keys and Remote Controls

Note: Your vehicle keys came with asecurity label that provides important keycut information. Keep the label in a safeplace for future reference.
Replacing the BatteryNote: Refer to local regulations whendisposing of the remote control batteries.Note: Do not wipe off any grease on thebattery terminals or on the back surface ofthe circuit board.Note: Replacing the battery does not erasethe programmed key from your vehicle. Theremote control should operate normally.The remote control uses one coin-typebattery.
Integrated Keyhead Transmitter
E235202
1. Twist a thin coin in the slot of theremote control near the key ring toremove the battery cover.
2. Carefully remove the rubber gasketfrom the remote control if it does notcome off with the battery cover.
3. Remove the old battery.
E235203
4. Insert a new battery with the + facingupward. Press the battery down tomake sure it is fully in the housing.
5. Reinstall the battery housing coveronto the remote control.
Intelligent Access Key1. Remove the key blade from the remote
control.
E142432
2. Twist a thin coin under the tab hiddenbehind the key blade head to removethe battery cover. Do not use the keyblade to remove the cover or you coulddamage it.
54
Flex (TP3) , enUSA, Edition date: 201803, Second-Printing
Keys and Remote Controls

E138622
3. Remove the old battery.4. Insert a new battery with the + facing
downward. Press the battery down tomake sure it is fully in the housing.
5. Reinstall the battery housing coveronto the remote control and install thekey blade.
Car Finder
E138623
Press the button twice withinthree seconds.
The horn sounds and the directionindicators flash. We recommend you usethis method to locate your vehicle, ratherthan using the panic alarm.Note: If any door or the liftgate is open, orif the hood is open on vehicles with ananti-theft alarm or remote start, the hornsounds twice and the direction indicatorsdo not flash.
Sounding the Panic Alarm
E138624
Press the button to sound thepanic alarm. Press the buttonagain or switch the ignition on to
switch it off.Note: The panic alarm only operates whenthe ignition is off.
Remote Start (If Equipped)
WARNING: To avoid exhaust fumes,do not use remote start if your vehicle isparked indoors or in areas that are not wellventilated.
Note: Do not use remote start if your fuellevel is low.
E138625
The remote start button is on theremote control.
This feature allows you to start yourvehicle from the outside. The remotecontrol has an extended operating range.Vehicles with automatic climate controlcan be configured to operate when thevehicle is remote started. See AutomaticClimate Control (page 113).Many states and provinces haverestrictions for the use of remote start.Check your local and state or provinciallaws for specific requirements regardingremote start systems.The remote start system does not work ifany of the following occur:• The ignition is on.• The anti-theft alarm triggers.• You switch off the feature.• The hood is open.• The transmission is not in park (P).• The battery voltage is below the
minimum operating voltage.• The service engine soon indicator was
on the last time your vehicle wasdriven.
55
Flex (TP3) , enUSA, Edition date: 201803, Second-Printing
Keys and Remote Controls

Remote Starting Your VehicleNote: You must press each button withinthree seconds of each other. If you do notfollow this sequence, your vehicle does notstart remotely, the direction indicators donot flash twice and the horn does not sound.
E138626
To start your vehicle remotely:1. Press the lock button to lock all the
doors.2. Press the remote start button twice.
The exterior lamps flash twice.The horn sounds if the system fails to start,unless quiet start is on. Quiet start runsthe blower fan at a slower speed to reducenoise. You can switch this feature on oroff in the information display. SeeGeneral Information (page 95).Note: If you remote start your vehicle withan integrated keyhead transmitter, you mustswitch the ignition on before driving yourvehicle. If you remote start your vehicle withan intelligent access transmitter, you mustpress the push button ignition switch on theinstrument panel once while applying thebrake pedal before driving your vehicle.The power windows do not work duringremote start and the radio does not turnon automatically.The parking lamps remain on and thevehicle runs for 5, 10 or 15 minutes,depending on the setting.
Extending the Engine Running TimeTo extend the engine running time durationof your vehicle during remote start, repeatsteps 1 and 2 while the engine is running.If the duration is set to 10 minutes, theduration extends by another 10 minutes.For example, if your vehicle had beenrunning from the first remote start for 5minutes, your vehicle continues to run nowfor a total of 20 minutes. You can extendthe remote start up to a maximum of 35minutes.Wait at least five seconds before remotestarting after the engine stops running.
Turning Your Vehicle Off After RemoteStarting
E138625
Press the button once. Theparking lamps switch off.
You may have to be closer to your vehicleto remotely switch off your vehicle afterremote starting. This is due to the addednoise of your running vehicle.You can switch this feature on or off in theinformation display. See GeneralInformation (page 95).
Memory Feature (If Equipped)
You can program the remote control torecall memory setting positions. SeeMemory Function (page 126). Press theunlock button on the remote control torecall the memory positions.
REPLACING A LOST KEY ORREMOTE CONTROLReplacement keys or remote controls canbe purchased from an authorized dealer.Authorized dealers can program remotecontrols for your vehicle. See PassiveAnti-Theft System (page 71).
56
Flex (TP3) , enUSA, Edition date: 201803, Second-Printing
Keys and Remote Controls

PRINCIPLE OF OPERATIONMyKey allows you to program keys withrestricted driving modes to promote gooddriving habits. All but one of the keysprogrammed to the vehicle can beactivated with these restricted modes.Any keys that have not been programmedare referred to as administrator keys oradmin keys. They can be used to:• Create a MyKey.• Program configurable MyKey settings.• Clear all MyKey features.When you have programmed a MyKey, youcan access the following information usingthe information display:• How many admin keys and MyKeys are
programmed to your vehicle.• The total distance your vehicle has
traveled using a MyKey.Note: All MyKeys are programmed to thesame settings. You cannot program themindividually.Note: For vehicles equipped with apush-button start switch: When both aMyKey and an admin key are present whenyou start your vehicle, the system recognizesthe admin key only.
Non-configurable SettingsThe following settings cannot be changedby an admin key user:• Belt-Minder or safety belt reminder.
You cannot disable this feature. Theaudio system will mute when the frontseat occupants’ safety belts are notfastened.
• Early low fuel. The low fuel warning isactivated earlier, giving the MyKey usermore time to refuel.
• Driver assist features, if equipped onyour vehicle, are forced on: parking aid,blind spot information system (BLIS),cross traffic alert, lane departurewarning and forward collision warningsystem.
• Satellite radio adult contentrestrictions (available only in somemarkets).
Configurable SettingsWith an admin key, you can configurecertain MyKey settings when you firstcreate a MyKey and before you recycle thekey or restart the vehicle. You can alsochange the settings afterward with anadmin key:• A vehicle speed limit can be set.
Warnings will be shown in the display,followed by an audible tone when yourvehicle reaches the set speed. Youcannot override the set speed by fullydepressing the accelerator pedal or bysetting cruise control.
WARNING: Do not set MyKeymaximum speed limit to a limit that willprevent the driver from maintaining a safespeed considering posted speed limits andprevailing road conditions. The driver isalways responsible to drive in accordancewith local laws and prevailing conditions.Failure to do so could result in accident orinjury.
57
Flex (TP3) , enUSA, Edition date: 201803, Second-Printing
MyKey™

• Various vehicle speed reminders so youknow when your vehicle approachesthe limits. Warnings appear in theinformation display and an audiblewarning sounds when you exceed thelimit.
• Audio system maximum volume of45%. A message will be shown in thedisplay when you attempt to exceedthe limited volume. Also, thespeed-sensitive or compensatedautomatic volume control will bedisabled.
• Always on setting. When this isselected, you will not be able to turnoff Advance Trac or traction control,911 Assist or Emergency Assistance, orDo Not Disturb (if your vehicle isequipped with these features).
CREATING A MYKEYUse the information display to create aMyKey:1. Insert the key you want to program into
the ignition. See Starting a GasolineEngine (page 146). If your vehicle isequipped with a push-button start,place the remote control into thebackup slot. See Passive Anti-TheftSystem (page 71).
2. Switch the ignition on.3. Access the main menu in the
information display and then scrollthrough the menus to change thesettings of your MyKey. From theMyKey menu select the option CreateMyKey. See Information Displays(page 95).
4. When prompted, hold the OK buttonuntil you see a message informing youto label this key as a MyKey. Theprogrammed restrictions apply whenyou key off, open and close the driverdoor and restart your vehicle with theprogrammed key or transmitter.
MyKey is successfully created. Make sureyou label it so you can distinguish it fromthe admin keys.You can also program configurablesettings for the key(s). See Programmingand Changing Configurable Settings.
Programming and ChangingConfigurable SettingsUse the information display to access yourconfigurable MyKey settings.1. Switch the ignition on using an admin
key or transmitter you want to program.2. Access the main menu in the
information display and then scrollthrough the menus to change thesettings of your MyKey. SeeInformation Displays (page 95).
3. Follow the instructions in the display.Note: You can clear or change your MyKeysettings at any time during the same keycycle as you created the MyKey. Once youhave switched the vehicle off, however, youwill need an admin key to change or clearyour MyKey settings.
CLEARING ALL MYKEYSWhen you clear your MyKeys, you removeall restrictions and return all MyKeys totheir original admin key status at once. Toclear all MyKeys of all MyKey settings, usethe information display.1. Switch the ignition on using an admin
key.
58
Flex (TP3) , enUSA, Edition date: 201803, Second-Printing
MyKey™

2. Access the main menu in theinformation display and then scrollthrough the menus to begin clearingyour MyKey programming. SeeInformation Displays (page 95).
3. Follow the instructions in the display.4. A confirmation message appears in the
display after you finish clearing yourMyKeys.
Note: When you clear your MyKeys, youremove all restrictions and return all MyKeysto their original admin key status. Youcannot remove the MyKey restrictionsindividually.
CHECKING MYKEY SYSTEMSTATUSYou can find information about yourprogrammed MyKeys by using theinformation display. See InformationDisplays (page 95).
MyKey DistanceTracks the distance when drivers use aMyKey. The only way to delete theaccumulated distance is by using an adminkey to clear all MyKeys. If the distance doesnot accumulate as expected, then theintended user is not using the MyKey, or anadmin key user recently cleared and thenrecreated a MyKey.
Number of MyKeysIndicates the number of MyKeysprogrammed to your vehicle. Use thisfeature to detect how many MyKeys youhave for your vehicle and determine whenall MyKeys have been deleted.
Number of Admin KeysIndicates how many admin keys areprogrammed to your vehicle. Use thisfeature to determine how many adminkeys you have for your vehicle, and detectif an additional MyKey has beenprogrammed.
USING MYKEY WITH REMOTESTART SYSTEMSMyKey is not compatible with nonFord-approved, aftermarket remote startsystems. If you choose to install a remotestart system, see an authorized dealer fora Ford-approved remote start system.
MYKEY TROUBLESHOOTING
Potential CausesCondition
The key or transmitter used to start the vehicledoes not have admin privileges.
I cannot create a MyKey.
Vehicles with keyless start: Make sure you placethe transmitter into the backup slot. SeePassive Anti-Theft System (page 71).
59
Flex (TP3) , enUSA, Edition date: 201803, Second-Printing
MyKey™

Potential CausesCondition
The key or transmitter used to start the vehicleis the only admin key. There always has to beat least one admin key.The passive anti-theft system is disabled or inunlimited mode.
The transmitter used to start your vehicle doesnot have admin privileges.
I cannot program the configurablesettings.
There are no MyKeys programmed to thevehicle. See Creating a MyKey (page 58).
The key or transmitter used to start the vehicledoes not have admin privileges.
I cannot clear the MyKeys.
No MyKeys are created. See Creating a MyKey(page 58).
Purchase a new key or transmitter from anauthorized dealer.
I lost the only admin key.
Program a spare key or transmitter. You mayneed to see an authorized dealer. See PassiveAnti-Theft System (page 71).
I lost a key.
The MyKey user is not using the MyKey.The MyKey distance does not accumu-late. An admin key holder cleared the MyKeys and
created new MyKeys.The key system has been reset.
An admin transmitter is present at vehicle start.No MyKey functions with the trans-mitter. There are no MyKeys programmed to your
vehicle. See Creating a MyKey (page 58).
60
Flex (TP3) , enUSA, Edition date: 201803, Second-Printing
MyKey™

LOCKING AND UNLOCKINGYou can use the power door lock controlor the remote control to lock and unlockyour vehicle.
Power Door LocksThe power door lock control is on the driverand front passenger door panels.
E224861
A
B
Unlock.ALock.B
Remote ControlYou can use the remote control at anytime.
Unlocking the Doors (Two-StageUnlock)
E138629
Press the button to unlock thedriver door.Press the button again within
three seconds to unlock all doors. Thedirection indicators will flash.
Press and hold both the lock and unlockbuttons on the remote control for threeseconds to change between driver door orall doors unlock mode. The directionindicators will flash twice to indicate achange to the unlocking mode. Driver doormode only unlocks the driver door whenyou press the unlock button once. All doormode unlocks all doors when you pressthe unlock button once. The unlockingmode applies to the remote control,keyless entry keypad and intelligentaccess.
Locking the Doors
E138623
Press the button to lock alldoors. The direction indicatorswill flash.
Press the button again within threeseconds to confirm that all the doors areclosed. The doors will lock again, the hornwill sound and the direction indicators willflash if all the doors and the liftgate areclosed.Note: If any door or the liftgate is open, orif the hood is open on vehicles with ananti-theft alarm or remote start, the hornwill sound twice and the direction indicatorswill not flash.
Locking and Unlocking the Doorswith the Key BladeLocking with the KeyTurn the top of the key toward the front ofyour vehicle.
Unlocking with the KeyTurn the top of the key toward the rear ofyour vehicle.Note: If the child safety locks are on andyou pull the interior handle, you will onlyturn off the emergency locking, not the childsafety lock. You can only open the doorsusing the external door handle.
61
Flex (TP3) , enUSA, Edition date: 201803, Second-Printing
Doors and Locks

Opening a Rear Door From theInsidePull the interior door handle twice tounlock and open a rear door. The first pullunlocks the door and the second pullopens the door.
Activating Intelligent Access (If
Equipped)
General InformationYou can unlock and lock the vehiclewithout taking the keys out of your pocketor purse when your intelligent access keyis within 3 ft (1 m) of your vehicle.Intelligent access uses a sensor on theback of the door handle for unlocking anda separate sensor on the face of each doorhandle for locking.The system will not function if:• Your vehicle battery has no charge.• The key battery has no charge.• The key frequencies are jammed.Note: The system may not function if thepassive key is close to metal objects orelectronic devices, for example keys or a cellphone.Note: If the system does not function, usethe key blade to lock and unlock yourvehicle. See Remote Control (page 53).
Unlocking Using Intelligent Access
E248555
With your intelligent access key within 3 ft(1 m) of your vehicle, touch the unlocksensor on the back of the door handle fora brief period and then pull on the doorhandle to unlock, being careful to nottouch the lock sensor at the same time orpulling the door handle too quickly. Theintelligent access system requires a briefdelay to authenticate your intelligentaccess key fob.
Locking Using Intelligent Access
E248556
With your intelligent access key within 3 ft(1 m) of your vehicle, touch the outer doorhandle lock sensor for approximately onesecond to lock, being careful to not touchthe unlock sensor on the back of the doorhandle at the same time. After locking, youcan immediately pull on the door handleto confirm locking occurred withoutinadvertently unlocking.
At the LiftgatePress the exterior liftgate release buttonon the top of the liftgate pull-cup handle.See Manual Liftgate (page 67).
Smart Unlocks for IntegratedKeyhead Transmitter (If Equipped)
This helps to prevent you from lockingyourself out of your vehicle if the key is stillin the ignition.When you open one of the front doors andlock your vehicle with the power door lockcontrol, all the doors will lock then unlockand the horn will sound twice if the key isstill in the ignition.
62
Flex (TP3) , enUSA, Edition date: 201803, Second-Printing
Doors and Locks

You can still lock your vehicle with the keyin the ignition by either:• Using the keyless entry keypad with the
driver door closed.• Pressing the lock button on the remote
control even if the doors are not closed.If both front doors are closed, you can lockyour vehicle by any method, regardless ofwhether the key is in the ignition or not.
Smart Unlocks for IntelligentAccess Keys (If Equipped)
This helps to prevent you from locking yourkey inside the passenger compartment orrear cargo area.When you electronically lock your vehiclewith any door open, transmission in park(P) and the ignition off, the system willsearch for an intelligent access key in thepassenger compartment after you closethe last door. If the system finds a key, allof the doors will immediately unlock andthe horn sounds twice, indicating that akey is inside.You can override the smart unlock featureand intentionally lock the intelligent accesskey inside your vehicle.To override smart unlock, lock your vehicleafter you have closed all doors by:• Using the keyless entry keypad.• Pressing the lock button on another
intelligent access key.• Touching the locking area on the front
of the door handle with anotherintelligent access key in your hand.
When you open one of the front doors andlock your vehicle using the power door lockcontrol, all doors will lock then unlock if:• The ignition is on.• The ignition is off and the transmission
is not in park (P).
AutolockAutolock locks all the doors when all of thefollowing occur:• All doors are closed.• The ignition is on.• You shift into any gear putting your
vehicle in motion.• Your vehicle attains a speed greater
than 4 mph (7 km/h).
AutounlockAutounlock unlocks all the doors when allof the following occur:• The ignition is on, all the doors are
closed and your vehicle has been inmotion at a speed greater than 4 mph(7 km/h).
• Your vehicle comes to a stop and youswitch the ignition off or to accessory.
• You open the driver door within 10minutes of switching the ignition off orto accessory.
Note: If you electronically lock your vehicleafter you switch the ignition off with thedriver door closed, the doors will notautounlock.
Enabling or Disabling AutounlockTo enable or disable autounlock, do thefollowing:1. Switch the ignition on.2. Press the power door unlock control
three times.3. Switch the ignition off.4. Press the power door unlock control
three times.5. Switch the ignition on. The horn
sounds indicating your vehicle is inprogramming mode.
63
Flex (TP3) , enUSA, Edition date: 201803, Second-Printing
Doors and Locks

6. Press the power door lock control andwithin five seconds, press the powerdoor unlock control. The horn soundsonce if disabled or twice if enabled.
7. Switch the ignition off. The hornsounds indicating programming iscomplete.
Illuminated EntryThe interior lamps and some exteriorlamps illuminate when you unlock thedoors with the remote control.The lamps turn off if:• The ignition is on.• You press the remote control lock
button.• 25 seconds have elapsed.The lamps do not turn off if:• You switch them on with the lighting
control.• Any door is open.
Illuminated ExitThe interior lamps and some exteriorlamps illuminate when all doors are closedand you switch the ignition off.The lamps turn off if all the doors remainclosed and:• 25 seconds have elapsed.• You lock your vehicle from the outside.
Battery SaverIf you leave the courtesy lamps, interiorlamps or headlamps on, the battery savershuts them off 10 minutes after you switchthe ignition off.
Battery Saver for Intelligent AccessKeys (If Equipped)If you leave the ignition switched on andthe engine is not running, the battery saverwill turn the ignition off when it detects acertain amount of battery drain, or after45 minutes have elapsed.
KEYLESS ENTRYSECURICODE™ Keyless EntryKeypadThe keypad is near the driver window. Itilluminates when touched.Note: If you enter your entry code too faston the keypad, the unlock function may notwork. Enter your entry code again moreslowly.
E138637
You can use the keypad to do thefollowing:• Lock or unlock the doors.• Program and erase user codes.• Arm and disarm the anti-theft alarm.• Recall memory seat and mirror
positions.
64
Flex (TP3) , enUSA, Edition date: 201803, Second-Printing
Doors and Locks

You can operate the keypad with thefactory-set five-digit entry code. The codeis on the owner’s wallet card in the glovebox and is available from an authorizeddealer. You can also program up to five ofyour own five-digit personal entry codes.
Programming a Personal Entry Code1. Enter the factory-set five-digit code.2. Press 1·2 on the keypad within five
seconds.3. Enter your personal five-digit code.
You must press each number withinfive seconds of each other.
4. Press 1·2 on the keypad to savepersonal code 1.
The doors lock then unlock to confirm thatprogramming was successful.To program additional personal entrycodes, repeat steps 1 through 3, then forstep 4:• Press 3·4 to save personal code 2.• Press 5·6 to save personal code 3.• Press 7·8 to save personal code 4.• Press 9·0 to save personal code 5.Hints:• Do not set a code that uses five of the
same number.• Do not use five numbers in sequential
order.• The factory-set code works even if you
have set your own personal code.
Recalling Memory Positions (IfEquipped)The programmed entry codes recall drivermemory positions as follows:• Entry code 1 recalls driver 1 memory
positions.• Entry code 2 recalls driver 2 memory
positions.
Note: Personal entry codes 3, 4 and 5 willnot recall memory positions.
Erasing a Personal Code1. Enter the factory-set five-digit code.2. Press and release 1·2 on the keypad
within five seconds.3. Press and hold 1·2 for two seconds.
You must do this within five secondsof completing step 2.
All personal codes erase and only thefactory-set five-digit code works.
Anti-Scan FeatureThe keypad goes into an anti-scan modeif you enter the wrong code seven times.This mode turns off the keypad for oneminute and the keypad lamp flashes.The anti-scan feature turns off after anyof the following occur:• One minute of keypad inactivity.• You press the unlock button on the
remote control.• You switch your vehicle on.• You unlock the vehicle using intelligent
access.
Locking and Unlocking the Doors
Locking All DoorsPress and hold 7·8 and 9·0 on the keypadsimultaneously with the driver door closed.You do not need to enter a code first.
Unlocking All DoorsEnter the factory-set code or your personalcode, then press 3·4 on the keypad withinfive seconds.
65
Flex (TP3) , enUSA, Edition date: 201803, Second-Printing
Doors and Locks

Unlocking Only the Driver DoorEnter the factory-set or your personalfive-digit code. You must press eachnumber within five seconds of each other.The interior lamps illuminate.Note: All doors unlock if the two-stageunlocking feature is turned off. See Lockingand Unlocking (page 61).
66
Flex (TP3) , enUSA, Edition date: 201803, Second-Printing
Doors and Locks

MANUAL LIFTGATE (If Equipped)
WARNING: It is extremely dangerousto ride in a cargo area, inside or outside ofa vehicle. In a crash, people riding in theseareas are more likely to be seriously injuredor killed. Do not allow people to ride in anyarea of your vehicle that is not equippedwith seats and seatbelts. Make sureeveryone in your vehicle is in a seat andproperly using a seatbelt. Failure to followthis warning could result in seriouspersonal injury or death.
WARNING: Make sure that you fullyclose the liftgate to prevent exhaust fumesfrom entering your vehicle. If you areunable to fully close the liftgate, open theair vents or the windows to allow fresh airto enter your vehicle. Failure to follow thisinstruction could result in personal injuryor death.
Note: Be careful when opening or closingthe liftgate in a garage or other enclosedarea to avoid damaging the liftgate.Note: Do not hang anything, for examplea bike rack, from the glass or liftgate. Thiscould damage the liftgate and itscomponents.Note: Do not leave the liftgate open whendriving. This could damage the liftgate andits components.
Opening the LiftgateManually
E138632
Press the button in the top of the liftgatepull cup handle to unlatch the liftgate, thenpull on the outside handle.
With the Remote Control
E138630
Press the button twice withinthree seconds.
Closing the Liftgate
E268796
Handles are inside the liftgate to help withclosing.
67
Flex (TP3) , enUSA, Edition date: 201803, Second-Printing
Liftgate

POWER LIFTGATE (If Equipped)
WARNING: It is extremely dangerousto ride in a cargo area, inside or outside ofa vehicle. In a crash, people riding in theseareas are more likely to be seriously injuredor killed. Do not allow people to ride in anyarea of your vehicle that is not equippedwith seats and seatbelts. Make sureeveryone in your vehicle is in a seat andproperly using a seatbelt. Failure to followthis warning could result in seriouspersonal injury or death.
WARNING: Make sure that you fullyclose the liftgate to prevent exhaust fumesfrom entering your vehicle. If you areunable to fully close the liftgate, open theair vents or the windows to allow fresh airto enter your vehicle. Failure to follow thisinstruction could result in personal injuryor death.
WARNING: Keep keys out of reachof children. Do not allow children tooperate or play near an open or movingpower liftgate. You should supervise theoperation of the power liftgate at all times.
Note: Make sure that you close the liftgatebefore operating or moving your vehicle,especially in an enclosure, like a garage ora parking structure. This could damage theliftgate and its components.Note: Do not hang anything, for examplea bike rack, from the glass or liftgate. Thiscould damage the liftgate and itscomponents.The liftgate only operates with thetransmission in park (P).If there is a problem with the open or closerequest, a tone sounds for one of thefollowing reasons:
• The ignition is on and the transmissionis not in park (P).
• The battery voltage is below theminimum operating voltage.
• The liftgate is not fully closed and yourvehicle speed is at or above 3 mph(5 km/h).
If the liftgate starts to close after it hasfully opened, this indicates there may beexcessive weight on the liftgate or apossible strut failure. A repetitive tonesounds and the liftgate closes undercontrol. Remove any excessive weight fromthe liftgate. If the liftgate continues toclose after opening, have the systemchecked by an authorized dealer.
Opening and Closing the Liftgate
WARNING: Make sure all personsare clear of the power liftgate area beforeusing the power liftgate control.
Note: Make sure the area behind yourvehicle is free from obstruction and thatthere is enough room for you to operate theliftgate. Objects too close to your vehicle,for example a wall, garage door or anothervehicle may come into contact with themoving liftgate. This could damage theliftgate and its components.Note: Be careful when opening or closingthe liftgate in a garage or other enclosedarea to avoid damaging the liftgate.Note: Do not leave the liftgate open whenyou are driving. This could damage theliftgate and its components.
From the Instrument Panel
E138633
With the transmission in park(P), press the button on theinstrument panel.
68
Flex (TP3) , enUSA, Edition date: 201803, Second-Printing
Liftgate

Remote Control
E138630
Press the button twice withinthree seconds.
Outside Control Button
Opening the Liftgate1. Unlock the liftgate with the remote
control or power door unlock control.If an intelligent access key is within 3 ft(1 m) of the liftgate, the liftgate unlockswhen you press the liftgate releasebutton.
E138632
2. Press the button located in the top ofthe liftgate pull-cup handle.
Note: Allow the power system to open theliftgate. Manually pushing or pulling theliftgate may activate the system’s obstacledetection feature and stop the poweroperation or reverse its direction, replicatea strut failure, or damage mechanicalcomponents.
Closing the Liftgate
WARNING: Keep clear of the liftgatewhen using the rear switch.
E244708
Press and release the liftgate controlbutton in the rear cargo area.
Stopping the Liftgate MovementNote: Do not apply sudden excessive forceto the liftgate while it is in motion. Thiscould damage the power liftgate and itscomponents.You can stop the liftgate movement bydoing any of the following:• Pressing the liftgate control button.• Pressing the liftgate button on the
remote control twice.• Pressing the liftgate button on the
instrument panel.
Obstacle DetectionWhen ClosingThe system stops when it detects anobstacle. A tone sounds and the systemreverses to open. Once your remove theobstacle, you can power close the liftgate.Note: Entering your vehicle while theliftgate is closing can cause your vehicle tobounce and activate obstacle detection. Toprevent this, let the power liftgate closecompletely before you enter your vehicle.Before driving off, check the instrumentcluster for a liftgate or door ajar message orwarning indicator. Failure to do this couldresult in unintentionally leaving the liftgateopen while driving.
69
Flex (TP3) , enUSA, Edition date: 201803, Second-Printing
Liftgate

When OpeningThe system stops when it detects anobstacle and a tone sounds. Once youremove the obstacle, you can continue tooperate the liftgate.
70
Flex (TP3) , enUSA, Edition date: 201803, Second-Printing
Liftgate
PASSIVE ANTI-THEFTSYSTEMNote: The system is not compatible withnon-Ford aftermarket remote start systems.Use of these systems may result in vehiclestarting problems and a loss of securityprotection.Note: Metallic objects, electronic devicesor a second coded key on the same keychain may cause vehicle starting problemsif they are too close to the key when startingthe engine. Prevent these objects fromtouching the coded key while starting theengine. Switch the ignition off, move allobjects on the key chain away from thecoded key and restart the engine if aproblem occurs.Note: Do not leave a duplicate coded keyin the vehicle. Always take your keys andlock all doors when leaving the vehicle.
SecuriLock®The system is an engine immobilizationsystem. It is designed to help prevent theengine from being started unless a codedkey programmed to your vehicle is used.Using the wrong key may prevent theengine from starting. A message mayappear in the information display.If you are unable to start the engine with acorrectly coded key, a malfunction hashappened and a message may appear inthe information display.
Automatic ArmingThe vehicle arms immediately after youswitch the ignition off.
Automatic DisarmingSwitching the ignition on with a coded keydisarms the vehicle.
Replacement KeysNote: Your vehicle comes equipped withtwo integrated keyhead transmitters or twointelligent access keys.The integrated keyhead transmitterfunctions as a programmed ignition keythat operates all the locks and starts thevehicle, as well as a remote control.The intelligent access key functions as aprogrammed key that operates the driverdoor lock and activates the intelligentaccess with push button start system, aswell as a remote control.If your programmed transmitters orstandard SecuriLock coded keys(integrated keyhead transmitters only) arelost or stolen and you do not have an extracoded key, you will need to have yourvehicle towed to an authorized dealer. Youneed to erase the key codes from yourvehicle and program new coded keys.Store an extra programmed key away fromthe vehicle in a safe place to help preventany inconveniences. See your authorizeddealer to purchase additional spare orreplacement keys.
Programming a Spare IntegratedKeyhead TransmitterNote: You can program a maximum of eightcoded keys to your vehicle. All eight can beintegrated keyhead transmitters.You can program your own integratedkeyhead transmitter or standardSecuriLock coded keys to your vehicle. Thisprocedure will program both the engineimmobilizer keycode and the remote entryportion of the remote control to yourvehicleOnly use integrated keyhead transmittersor standard SecuriLock keys.
71
Flex (TP3) , enUSA, Edition date: 201803, Second-Printing
Security

You must have two previouslyprogrammed coded keys and the newunprogrammed key readily accessible. Seeyour authorized dealer to have the sparekey programmed if two previouslyprogrammed coded keys are not available.Read and understand the entire procedurebefore you begin.1. Insert the first previously programmed
coded key into the ignition.2. Switch the ignition from off to on. Keep
the ignition on for at least threeseconds, but no more than 10 seconds.
3. Switch the ignition off and remove thefirst coded key from the ignition.
4. After three seconds but within 10seconds of switching the ignition off,insert the second previously coded keyinto the ignition.
5. Switch the ignition from off to on. Keepthe ignition on for at least threeseconds, but no more than 10 seconds.
6. Switch the ignition off and remove thesecond previously programmed codedkey from the ignition.
7. After three seconds but within 10seconds of switching the ignition offand removing the previouslyprogrammed coded key, insert the newunprogrammed key into the ignition.
8. Switch the ignition from off to on. Keepthe ignition on for at least six seconds.
9. Remove the newly programmed codedkey from the ignition.
If the key has been successfullyprogrammed it will start the engine andoperate the remote entry system (if thenew key is an integrated keyheadtransmitter).If programming was not successful, wait10 seconds and repeat Steps 1 through 8.If you are still unsuccessful, take yourvehicle to your authorized dealer.
Programming a Spare IntelligentAccess KeySee your authorized dealer to haveadditional keys programmed to yourvehicle.
ANTI-THEFT ALARMThe system will warn you of anunauthorized entry to your vehicle. It willbe triggered if any door, the luggagecompartment or the hood is openedwithout using the key, remote control orkeyless entry keypad.The direction indicators will flash and thehorn will sound if unauthorized entry isattempted while the alarm is armed.Take all remote controls to an authorizeddealer if there is any potential alarmproblem with your vehicle.
Arming the AlarmThe alarm is ready to arm when there isnot a key in your vehicle. Electronically lockyour vehicle to arm the alarm.
Disarming the AlarmDisarm the alarm by any of the followingactions:• Unlock the doors or luggage
compartment with the remote controlor keyless entry keypad.
• Switch your vehicle on or start yourvehicle.
• Use a key in the driver door to unlockyour vehicle, then switch your vehicleon within 12 seconds.
Note: Pressing the panic button on theremote control will stop the horn and signalindicators, but will not disarm the system.
72
Flex (TP3) , enUSA, Edition date: 201803, Second-Printing
Security
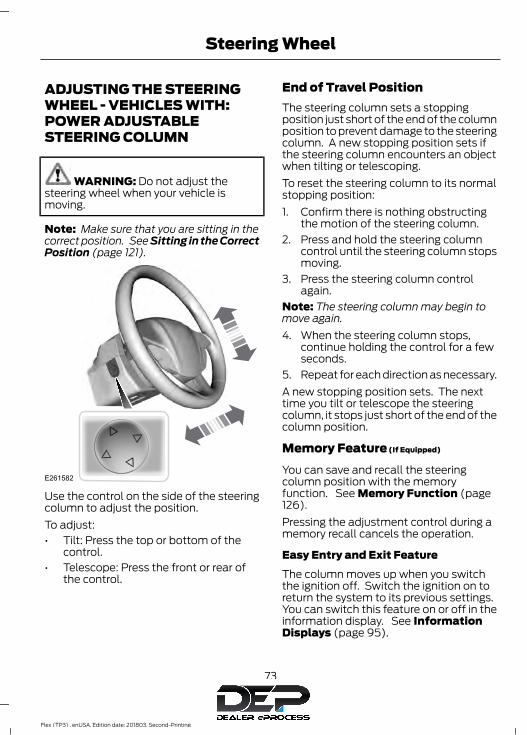
ADJUSTING THE STEERINGWHEEL - VEHICLES WITH:POWER ADJUSTABLESTEERING COLUMN
WARNING: Do not adjust thesteering wheel when your vehicle ismoving.
Note: Make sure that you are sitting in thecorrect position. See Sitting in the CorrectPosition (page 121).
E261582
Use the control on the side of the steeringcolumn to adjust the position.To adjust:• Tilt: Press the top or bottom of the
control.• Telescope: Press the front or rear of
the control.
End of Travel PositionThe steering column sets a stoppingposition just short of the end of the columnposition to prevent damage to the steeringcolumn. A new stopping position sets ifthe steering column encounters an objectwhen tilting or telescoping.To reset the steering column to its normalstopping position:1. Confirm there is nothing obstructing
the motion of the steering column.2. Press and hold the steering column
control until the steering column stopsmoving.
3. Press the steering column controlagain.
Note: The steering column may begin tomove again.4. When the steering column stops,
continue holding the control for a fewseconds.
5. Repeat for each direction as necessary.A new stopping position sets. The nexttime you tilt or telescope the steeringcolumn, it stops just short of the end of thecolumn position.
Memory Feature (If Equipped)
You can save and recall the steeringcolumn position with the memoryfunction. See Memory Function (page126).Pressing the adjustment control during amemory recall cancels the operation.
Easy Entry and Exit FeatureThe column moves up when you switchthe ignition off. Switch the ignition on toreturn the system to its previous settings.You can switch this feature on or off in theinformation display. See InformationDisplays (page 95).
73
Flex (TP3) , enUSA, Edition date: 201803, Second-Printing
Steering Wheel

Note: If you press any adjustment ormemory button when in easy exit mode, thesystem cancels the operation.Note: Depending on your vehicle, thecolumn may move up and in.
ADJUSTING THE STEERINGWHEEL - VEHICLES WITH:MANUAL ADJUSTABLESTEERING COLUMN
WARNING: Do not adjust thesteering wheel when your vehicle ismoving.
Note: Make sure that you are sitting in thecorrect position. See Sitting in the CorrectPosition (page 121).
E259854
1. Unlock the steering column.2. Adjust the steering wheel to the desired
position.
E259855
3. Lock the steering column.
AUDIO CONTROLYou can operate the following functionswith the control:
E272897
V
Volume up.AVolume down.BSeek up and down or next.C
Seek, Next or PreviousPress the seek button to:• Tune the radio to the next or previous
stored preset.• Play the next or the previous track.
74
Flex (TP3) , enUSA, Edition date: 201803, Second-Printing
Steering Wheel

Press and hold the seek button to:• Tune the radio to the next station up
or down the frequency band.• Seek through a track.
VOICE CONTROL
E173609
V
Phone mode.AVoice recognition.B
CRUISE CONTROLType One
E173610
See Using Cruise Control (page 187).
Type Two
E173611
See Using Adaptive Cruise Control(page 188).
INFORMATION DISPLAYCONTROL
E173617
See Information Displays (page 95).
HEATED STEERING WHEEL (If
Equipped)
Switch the heated steering wheel on andoff using the touchscreen.
Touch the button to switch theheated steering wheel on andoff.
Note: You can use the heated steeringwheel only when the engine is running.
75
Flex (TP3) , enUSA, Edition date: 201803, Second-Printing
Steering Wheel

Note: The system uses a sensor and isdesigned to control the temperature of thesteering wheel and to prevent it fromoverheating.Note: In warm temperatures, the steeringwheel quickly reaches its maximumtemperature and the system reduces thecurrent to the heating element. This couldcause you to think that the system hasstopped working but it has not. This isnormal.
76
Flex (TP3) , enUSA, Edition date: 201803, Second-Printing
Steering Wheel

ADJUSTING THE PEDALS
WARNING: Never use the controlswhile your feet are on the accelerator andbrake pedals and the vehicle is moving.
You can find the control on the left side ofthe steering column. Press and hold theappropriate side of the control to move thepedals.
A B
E162916
A. FartherB. CloserYou can save and recall the pedal positionswith the memory feature. See MemoryFunction (page 126).Note: Adjust the pedals only when yourvehicle is in P (Park).
77
Flex (TP3) , enUSA, Edition date: 201803, Second-Printing
Pedals (If Equipped)
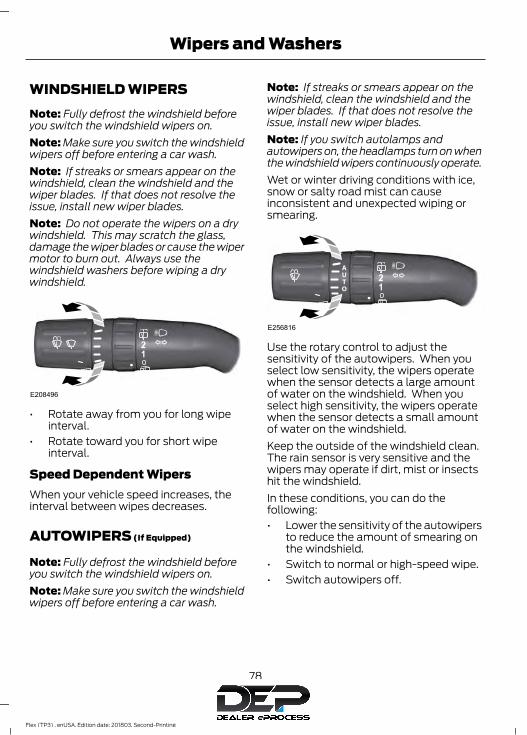
WINDSHIELD WIPERSNote: Fully defrost the windshield beforeyou switch the windshield wipers on.Note: Make sure you switch the windshieldwipers off before entering a car wash.Note: If streaks or smears appear on thewindshield, clean the windshield and thewiper blades. If that does not resolve theissue, install new wiper blades.Note: Do not operate the wipers on a drywindshield. This may scratch the glass,damage the wiper blades or cause the wipermotor to burn out. Always use thewindshield washers before wiping a drywindshield.
E208496
• Rotate away from you for long wipeinterval.
• Rotate toward you for short wipeinterval.
Speed Dependent WipersWhen your vehicle speed increases, theinterval between wipes decreases.
AUTOWIPERS (If Equipped)
Note: Fully defrost the windshield beforeyou switch the windshield wipers on.Note: Make sure you switch the windshieldwipers off before entering a car wash.
Note: If streaks or smears appear on thewindshield, clean the windshield and thewiper blades. If that does not resolve theissue, install new wiper blades.Note: If you switch autolamps andautowipers on, the headlamps turn on whenthe windshield wipers continuously operate.Wet or winter driving conditions with ice,snow or salty road mist can causeinconsistent and unexpected wiping orsmearing.
E256816
Use the rotary control to adjust thesensitivity of the autowipers. When youselect low sensitivity, the wipers operatewhen the sensor detects a large amountof water on the windshield. When youselect high sensitivity, the wipers operatewhen the sensor detects a small amountof water on the windshield.Keep the outside of the windshield clean.The rain sensor is very sensitive and thewipers may operate if dirt, mist or insectshit the windshield.In these conditions, you can do thefollowing:• Lower the sensitivity of the autowipers
to reduce the amount of smearing onthe windshield.
• Switch to normal or high-speed wipe.• Switch autowipers off.
78
Flex (TP3) , enUSA, Edition date: 201803, Second-Printing
Wipers and Washers

WINDSHIELD WASHERSNote: Do not operate the wipers on a drywindshield. This may scratch the glass,damage the wiper blades or cause the wipermotor to burn out. Always use thewindshield washer before wiping a drywindshield.Note: Do not operate the washers whenthe washer reservoir is empty. This maycause the washer pump to overheat.
E208497
• A brief press causes a single wipewithout washer fluid.
• A brief press and hold causes thewipers to swipe three times withwasher fluid.
• A long press and hold turns on thewipers and washer fluid for up to 10seconds.
A wipe occurs a few seconds after washingto clear any remaining washer fluid. Youcan switch this feature on or off in theinformation display.
REAR WINDOW WIPER ANDWASHERSNote: Make sure you switch the windshieldwipers off before entering a car wash.
Rear Window Wiper Blade
E208498
Intermittent wipe.2Low speed wipe.1Off.0
Rear Window WasherRotate and hold the control to the top orbottom position to switch on the rearwasher. The control returns to the 2 or 0position when you release it.
Rear Camera Washer (If Equipped)
Switching on the rear washer also turns onthe rear camera washer.
79
Flex (TP3) , enUSA, Edition date: 201803, Second-Printing
Wipers and Washers

GENERAL INFORMATIONCondensation in the Exterior FrontLamps and Rear LampsExterior front lamps and rear lamps havevents to accommodate normal changesin air pressure.Condensation can be a natural by-productof this design. When moist air enters thelamp assembly through the vents, there isa possibility that condensation can occurwhen the temperature is cold. Whennormal condensation occurs, a fine mistcan form on the interior of the lens. Thefine mist eventually clears and exitsthrough the vents during normal operation.Clearing time may take as long as 48 hoursunder dry weather conditions.Examples of acceptable condensation are:• The presence of a fine mist (no streaks,
drip marks or large droplets).• A fine mist covers less than 50% of the
lens.Examples of unacceptable condensationare:• A water puddle inside the lamp.• Streaks, drip marks or large droplets
present on the interior of the lens.If you see any unacceptable condensation,have your vehicle checked by an authorizeddealer.
LIGHTING CONTROL
E156651
A B C
Lamps off.AParking lamps, instrument panellamps, license plate lamps andtail lamps.
B
Headlamps.C
Headlamp High Beam
E167827
Push the lever away from you toswitch the high beam on.
80
Flex (TP3) , enUSA, Edition date: 201803, Second-Printing
Lighting

Push the lever away from you again or pullthe lever toward you to switch the highbeam off.
Flashing the Headlamp High Beam
E163268
Slightly pull the lever toward you andrelease it to flash the headlamps.
AUTOLAMPS
WARNING: The system does notrelieve you of your responsibility to drivewith due care and attention. You may needto override the system if it does not turnthe headlamps on in low visibilityconditions, for example daytime fog.
E158778
When the lighting control is in theautolamps position, the headlamps turnon in low light situations, or when thewipers turn on.The headlamps remain on for a period oftime after you switch the ignition off. Usethe information display controls to adjustthe period of time that the headlampsremain on.Note: If you switch the autolamps on, youcannot switch the high beams on until thesystem turns the low beams on.
Windshield Wiper ActivatedHeadlampsWhen you switch the autolamps on, theheadlamps turn on within 10 seconds ofswitching the wipers on. They turn offapproximately 60 seconds after you switchthe windshield wipers off.The headlamps do not turn on with thewipers:• During a single wipe.• When you use the windshield washer.Note: If you switch the autolamps and theautowipers on, the headlamps turn on whenthe windshield wipers continuously operate.
81
Flex (TP3) , enUSA, Edition date: 201803, Second-Printing
Lighting

INSTRUMENT LIGHTINGDIMMER
E163270
Adjust the brightness of the instrumentpanel and all applicable lit components inthe vehicle during headlamp and parkinglamp operation.• Tap the top or bottom of the control
to brighten or dim all interior litcomponents incrementally.
• Press and hold at the first position thetop or bottom of the control until youreach the desired lighting level.
• Press and hold the top of the controlto the full on position to activate the“dome on” feature. This turns on theinterior courtesy lights. The lightsremain on until you press the bottomof the control.
HEADLAMP EXIT DELAYSet the delay time to keep the headlampson for up to three minutes after switchingoff the ignition.Follow the steps below to change thedelay time:Note: Complete steps 1 through 6 within 10seconds.1. Switch the ignition off.
2. Select the autolamp position on thelighting control.
3. Switch the lighting control to the offposition.
4. Switch the ignition on.5. Switch the ignition off.6. Select the autolamp position on the
lighting control. The headlamps andparking lamps turn on.
7. Switch the lighting control to the offposition when reaching the requireddelay time. The headlamps and parkinglamps turn off.
Set the headlamp exit delay to one of thefollowing settings:• Off.• 10 seconds.• 20 seconds.• 120 seconds.Note: Adjust the time delay using thedisplay controls in the information display.See Information Displays (page 95).
DAYTIME RUNNING LAMPS (If
Equipped)
WARNING: The daytime runninglamps system does not activate the rearlamps and may not provide adequatelighting during low visibility drivingconditions. Make sure you switch theheadlamps on, as appropriate, during alllow visibility conditions. Failure to do somay result in a crash.
The system turns the lamps on in daylightconditions.To switch the system on, switch thelighting control to any position exceptheadlamps.
82
Flex (TP3) , enUSA, Edition date: 201803, Second-Printing
Lighting

FRONT FOG LAMPS (If Equipped)
E156823
Pull the lighting control toward you toswitch the fog lamps on.You can switch the fog lamps on when thelighting control is in any position exceptoff.
DIRECTION INDICATORS
E163272
Push the lever up or down to usethe direction indicators.
Note: Tap the lever up or down to make thedirection indicators flash three times.
INTERIOR LAMPSThe lamps turn on under the followingconditions:• You open any door.• You press a button on the remote
control• You press the outer edge of the clear
lens on the front row map lamp.Front Row Map Lamps
E166237
Second Row Reading LampsWith Moonroof
E173272
83
Flex (TP3) , enUSA, Edition date: 201803, Second-Printing
Lighting
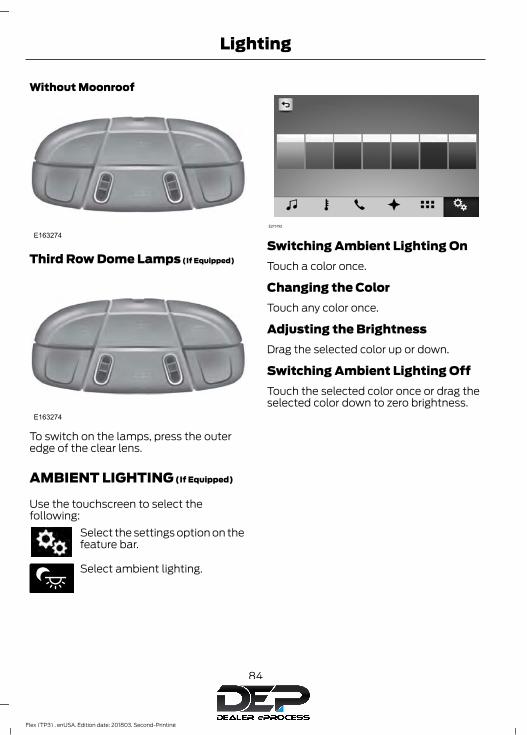
Without Moonroof
E163274
Third Row Dome Lamps (If Equipped)
E163274
To switch on the lamps, press the outeredge of the clear lens.
AMBIENT LIGHTING (If Equipped)
Use the touchscreen to select thefollowing:
Select the settings option on thefeature bar.
E279027
Select ambient lighting.
E273192
Switching Ambient Lighting OnTouch a color once.
Changing the ColorTouch any color once.
Adjusting the BrightnessDrag the selected color up or down.
Switching Ambient Lighting OffTouch the selected color once or drag theselected color down to zero brightness.
84
Flex (TP3) , enUSA, Edition date: 201803, Second-Printing
Lighting

POWER WINDOWS
WARNING: Do not leave childrenunattended in your vehicle and do not letthem play with the power windows. Failureto follow this instruction could result inpersonal injury.
WARNING: When closing the powerwindows, verify they are free of obstructionand make sure that children and pets arenot in the proximity of the windowopenings.
E146043
Note: You may hear a pulsing noise whenjust one of the windows is open. Lower theopposite window slightly to reduce thisnoise.Press the control to open the window.Lift the control to close the window.
One-Touch DownPress the control to open the window.Press again or lift it to stop the window.
One-Touch UpLift the control fully and release it. Pressagain or lift it to stop the window.
Bounce-BackThe window will automatically stop andreverse some distance if it detects anobstacle while closing.
Overriding the Bounce-Back Feature
WARNING: When you override thebounce-back feature the window will notreverse if it detects an obstacle. Take carewhen closing the windows to avoidpersonal injury or damage to your vehicle.
Pull up the window switch and hold withina few seconds of the window reaching thebounce-back position. The window travelsup with no bounce-back protection. Thewindow will stop if you release the switchbefore the window fully closes.
Window Lock
E144072
Press the control to lock or unlock the rearwindow controls. It will illuminate whenyou lock the rear window controls.
Accessory DelayThe window switches remain operationalfor several minutes when you switch theignition off or until you open either frontdoor.
85
Flex (TP3) , enUSA, Edition date: 201803, Second-Printing
Windows and Mirrors

EXTERIOR MIRRORSPower Exterior Mirrors
WARNING: Do not adjust the mirrorswhen your vehicle is moving. This couldresult in the loss of control of your vehicle,serious personal injury or death.
E163059
B
A C
Left-hand mirror.AOff.BRight-hand mirror.C
To adjust a mirror:1. Select the mirror you want to adjust.2. Move the control in the direction you
want to tilt the mirror.3. Return the control to the center
position to lock the mirrors in place.
Fold-Away Exterior MirrorsPush the mirror toward the door windowglass. Make sure that you fully engage themirror in its support when returning it to itsoriginal position.
Power-Folding Mirrors (If Equipped)
E163060
Note: Moving the mirrors 10 or more timeswithin one minute, or repeated folding andunfolding of the mirrors while holding thecontrol down during full travel, may disablethe system to protect the motors fromoverheating. Wait approximately threeminutes with the vehicle running, and up to10 minutes with the vehicle off, for thesystem to reset and for function to return tonormal.Pull the control back to fold the mirrors inor out.
Loose MirrorIf you manually fold your power-foldingmirrors, they may not work properly evenafter you re-position them. You need toreset them if:• The mirrors vibrate when you drive.• The mirrors feel loose.• The mirrors do not stay in the folded or
unfolded position.• One of the mirrors is not in its normal
driving position.To reset the power-fold feature, use thepower-folding mirror control to fold andunfold the mirrors. You may hear a loudnoise as you reset the power-foldingmirrors. This sound is normal. Repeat thisprocess as needed each time you manuallyfold the mirrors.
86
Flex (TP3) , enUSA, Edition date: 201803, Second-Printing
Windows and Mirrors

Heated Exterior Mirrors (If Equipped)
See Heated Exterior Mirrors (page 119).
Memory Mirrors (If Equipped)
You can save and recall the mirrorpositions through the memory function.See Memory Function (page 126).
Direction Indicator Mirrors (If Equipped)
The outer portion of the appropriate mirrorhousing blinks when you switch on thedirection indicator.
Puddle Lamps (If Equipped)
The lamps on the bottom part of the mirrorhousing light when you use yourtransmitter to unlock the doors or whenyou open a door.
Integrated Blind Spot Mirror (If
Equipped)
WARNING: Objects in the mirror arecloser than they appear.
Blind spot mirrors have an integratedconvex mirror built into the upper outboardcorner of the exterior mirrors. They canassist you by increasing visibility along theside of your vehicle.Check the main mirror first before a lanechange, then check the blind spot mirror.If no vehicles are present in the blind spotmirror and the traffic in the adjacent laneis at a safe distance, signal that you aregoing to change lanes. Glance over yourshoulder to verify traffic is clear, andcarefully change lanes.
A
B
C
E138665
The image of the approaching vehicle issmall and near the inboard edge of themain mirror when it is at a distance. Theimage becomes larger and begins to moveoutboard across the main mirror as thevehicle approaches (A). The imagetransitions from the main mirror and beginsto appear in the blind spot mirror as thevehicle approaches (B). The vehicletransitions to your peripheral field of viewas it leaves the blind spot mirror (C).
Blind Spot Information System (If
Equipped)
See Blind Spot Information System(page 194).
87
Flex (TP3) , enUSA, Edition date: 201803, Second-Printing
Windows and Mirrors

INTERIOR MIRROR
WARNING: Do not adjust the mirrorwhen your vehicle is moving.
Note: Do not clean the housing or glass ofany mirror with harsh abrasives, fuel or otherpetroleum or ammonia-based cleaningproducts.You can adjust the interior mirror to yourpreference. Some mirrors also have asecond pivot point. This lets you move themirror head up or down and from side toside.
Auto-Dimming MirrorNote: Do not block the sensors on the frontand back of the mirror. Mirror performancemay be affected. A rear center passenger orraised rear center head restraint may alsoblock light from reaching the sensor.The mirror will dim automatically to reduceglare when bright lights are detected frombehind your vehicle. It will automaticallyreturn to normal reflection when you selectreverse gear to make sure you have a clearview when backing up.
SUN VISORS
E138666
Rotate the sun visor toward the sidewindow and extend it rearward for extrashade.
Illuminated Vanity Mirror
E162197
Lift the cover to switch the lamp on.
MOONROOF (If Equipped)
WARNING: Do not let children playwith the moonroof or leave themunattended in the vehicle. They mayseriously hurt themselves.
WARNING: When closing themoonroof, you should verify that it is freeof obstructions and make sure thatchildren and pets are not in the proximityof the roof opening.
You can manually open or close the slidingshade when the moonroof is closed. Pullthe shade toward the front of your vehicleto close it.The moonroof controls are located on theoverhead console and have a one-touchopen and close feature. To stop it duringone-touch operation, press the control asecond time.
88
Flex (TP3) , enUSA, Edition date: 201803, Second-Printing
Windows and Mirrors

Opening and Closing the Moonroof
E163063
Press and release the SLIDE control toopen the moonroof. The moonroof willstop short of the fully opened position.Note: This position helps to reduce windnoise or rumbling which may happen withthe moonroof fully open. Press and releasethe control again to fully open themoonroof.Pull and release the SLIDE control to closethe moonroof.
Bounce-BackThe moonroof will stop automaticallywhile closing. It will reverse some distanceif there is an obstacle in the way.Pull and hold the SLIDE control within twoseconds of a bounce-back event tooverride this function. While bounce-backis active, the closing force increases foreach of the next three times that you closethe moonroof.
Venting the MoonroofPress and release the TILT control to ventthe moonroof. Pull and hold the TILTcontrol to close the moonroof.
89
Flex (TP3) , enUSA, Edition date: 201803, Second-Printing
Windows and Mirrors
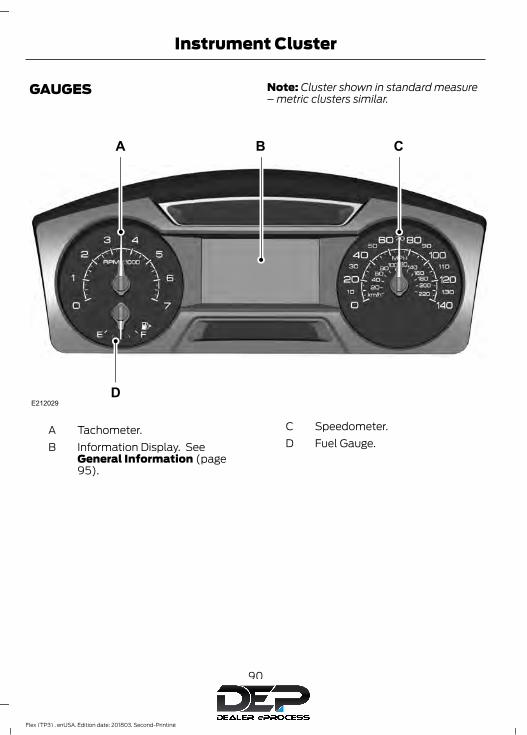
GAUGES Note: Cluster shown in standard measure– metric clusters similar.
E212029
Tachometer.AInformation Display. SeeGeneral Information (page95).
B
Speedometer.CFuel Gauge.D
90
Flex (TP3) , enUSA, Edition date: 201803, Second-Printing
Instrument Cluster

E217329
Left information display. SeeGeneral Information (page95).
A
Speedometer.BRight information display. Seeyour SYNC information.
C
WARNING LAMPS ANDINDICATORSThe following warning lamps andindicators alert you to a vehicle conditionthat may become serious. Some lampsilluminate when you start your vehicle tomake sure they work. If any lamps remainon after starting your vehicle, refer to therespective system warning lamp for furtherinformation.
Note: Some warning indicators appear inthe information display and operate thesame as a warning lamp but do notilluminate when you start your vehicle.
Adaptive Cruise Control (If Equipped)
E144524
The speed control systemindicator light changes color toindicate what mode the system
is in: See Using Adaptive Cruise Control(page 188).On (white light): Illuminates when theadaptive cruise control system is turnedon. Turns off when the speed controlsystem is turned off.Engaged (green light): Illuminates whenthe adaptive cruise control system isengaged. Turns off when the speed controlsystem is disengaged.
91
Flex (TP3) , enUSA, Edition date: 201803, Second-Printing
Instrument Cluster

Airbag Readiness
E67017
If this light fails to illuminatewhen you switch the ignition on,continues to flash or remains on,
it indicates a malfunction. Have the systemchecked by your authorized dealer. A tonesounds when there is a malfunction.
Anti-Lock Braking SystemIf it illuminates when you aredriving, this indicates amalfunction. You will continue
to have the normal braking system(without ABS) unless the brake systemwarning lamp is also illuminated. Have thesystem checked by your authorized dealer.
BatteryIf it illuminates while driving, itindicates a malfunction. Switchoff all unnecessary electrical
equipment and have the system checkedby your authorized dealer immediately.
Brake System
WARNING: Driving your vehicle withthe warning lamp on is dangerous. Asignificant decrease in brakingperformance may occur. It may take youlonger to stop your vehicle. Have yourvehicle checked as soon as possible.Driving extended distances with theparking brake engaged can cause brakefailure and the risk of personal injury.
E144522
It illuminates when you engagethe parking brake and theignition is on.
If it illuminates when your vehicle ismoving, make sure the parking brake isdisengaged. If the parking brake isdisengaged, this indicates low brake fluidlevel or a brake system fault. Have yourvehicle checked immediately.
Charging SystemIt illuminates when the batteryis not charging properly.If it stays on while the engine is
running , there may be a malfunction withthe charging system. Contact yourauthorized dealer as soon as possible. Thisindicates a problem with the electricalsystem or a related component.
Cruise Control (If Equipped)
E71340
It illuminates when you switchthe system on.See Using Cruise Control
(page 187).
Directional IndicatorIlluminates when you switch onthe left or right or the hazardwarning flasher. If the indicators
stay on or flash faster, check for a burnedout bulb. See Changing a Bulb (page 260).
Door AjarDisplays when the ignition is onand any door is not completelyclosed.
Engine Coolant TemperatureIlluminates when the enginecoolant temperature is high.Stop the vehicle as soon as
possible, switch off the engine and let cool.See Engine Coolant Check (page 249).
92
Flex (TP3) , enUSA, Edition date: 201803, Second-Printing
Instrument Cluster

Engine OilIt illuminates when you switchthe ignition on.If it illuminates when the engine
is running this indicates a malfunction.Stop your vehicle as soon as it is safe todo so and switch the engine off. Check theengine oil level. If the oil level is sufficient,this indicates a system malfunction. Haveyour vehicle checked immediately.See Engine Oil Check (page 247).
Fasten Seatbelt Warning Lamp
E71880
It illuminates and a chimesounds until you fasten theseatbelts.
Front Airbag
E67017
If it fails to illuminate when youstart your vehicle, continues toflash or remains on, it indicates
a malfunction. Have the system checkedby your authorized dealer.
Front Fog Lamps (If Equipped)
Lights when you switch the frontfog lamps on.
Head Up Display (If Equipped)
E156133
A red beam of lights willilluminate on the windshield incertain instances when using
adaptive cruise control and/or the collisionwarning system. It will also illuminatemomentarily when you start your vehicleto make sure the display works.
High BeamIt will illuminate when you switchthe high beam headlamps on. Itwill flash when you use the
headlamp flasher.
Liftgate Ajar
E162453
Illuminates when you do notcompletely close the liftgate.
Low Fuel LevelIt will illuminate when the fuellevel is low or the fuel tank isnearly empty. Refuel as soon as
possible.
Low Tire Pressure WarningIt illuminates if the tire pressurein one or more tires is below thecorrect tire pressure.
It also illuminates momentarily when youswitch the ignition on to confirm the lampis functional. If it does not illuminate whenyou switch the ignition on, or begins toflash at any time, have the system checkedby your authorized dealer.
Low Washer Fluid
E132353
It will illuminate when thewindshield washer fluid is low.
Parking LampsIt will illuminate when you switchthe parking lamps on.
93
Flex (TP3) , enUSA, Edition date: 201803, Second-Printing
Instrument Cluster

Powertrain Malfunction/ReducedPower
Illuminates when a powertrainor an AWD fault has beendetected. Contact your
authorized dealer as soon as possible.
Service Engine SoonIf it illuminates when the engineis running this indicates amalfunction. The On Board
Diagnostics system has detected amalfunction of the vehicle emission controlsystem.If it flashes, engine misfire may beoccurring. Increased exhaust gastemperatures could damage the catalyticconverter or other vehicle components.Drive in a moderate fashion (avoid heavyacceleration and deceleration) and haveyour vehicle immediately serviced.It illuminates when you switch the ignitionon prior to engine start to check the bulband to indicate whether your vehicle isready for Inspection and Maintenance(I/M) testing.Normally, it illuminates until the engine iscranked and automatically turns off if nomalfunctions are present. However, if after15 seconds it flashes eight times, thisindicates that your vehicle is not ready forInspection and Maintenance (I/M) testing.See Emission Law (page 158).
Stability Control
E138639
It will flash when the system isactive. If it remains illuminatedor does not illuminate when you
switch the ignition on, this indicates amalfunction. During a malfunction thesystem will switch off. Have the systemchecked by your authorized dealerimmediately. See Using StabilityControl (page 177).
Stability Control Off
E130458
It illuminates when you switchthe system off.
AUDIBLE WARNINGS ANDINDICATORSKey in Ignition Warning ChimeSounds when you open the driver's doorand you have left the key in the ignition.
Keyless Warning Alert (If Equipped)
Sounds the horn twice when you exit yourvehicle with the intelligent access key, afterthe last door is closed and your keylessvehicle is in RUN, indicating your vehicle isstill on.
Headlamps On Warning ChimeSounds when you remove the key from theignition and open the driver's door and youhave left the headlamps or parking lampson.
Parking Brake On Warning ChimeSounds when you have left the parkingbrake on and drive your vehicle. If thewarning chime remains on after you havereleased the parking brake, have thesystem checked by an authorized dealerimmediately.
94
Flex (TP3) , enUSA, Edition date: 201803, Second-Printing
Instrument Cluster

GENERAL INFORMATION
WARNING: Driving while distractedcan result in loss of vehicle control, crashand injury. We strongly recommend thatyou use extreme caution when using anydevice that may take your focus off theroad. Your primary responsibility is the safeoperation of your vehicle. We recommendagainst the use of any hand-held devicewhile driving and encourage the use ofvoice-operated systems when possible.Make sure you are aware of all applicablelocal laws that may affect the use ofelectronic devices while driving.
Various systems on your vehicle can becontrolled using the information displaycontrols on the steering wheel.Corresponding information is displayed inthe information display.
E204495
This icon gives you the ability toswitch a feature on or off. Acheck in the box indicates the
feature is enabled, and uncheckedindicates the feature is disabled.
Information Display Controls(Type 1)
E214426
• Press the up and down arrow buttonsto scroll through and highlight theoptions within a menu.
• Press the right arrow button to enter asub-menu.
• Press the left arrow button to exit amenu.
• Press and hold the left arrow button atany time to return to the main menudisplay (escape button).
• Press the OK button to choose andconfirm settings or messages.
MenuYou can access the menu using theinformation display control.
95
Flex (TP3) , enUSA, Edition date: 201803, Second-Printing
Information Displays

Note: Some options may appear slightlydifferent or not at all if the items areoptional.
• Trip 1 & 2• Fuel Economy• Information• Settings
Trip 1 & 2
Trip 1 & 2
Speedometer
Trip distance
Average fuel economy
Elapsed trip time
Hold OK to Reset
Note: Press and hold OK to reset thecurrently displayed trip information.
SpeedometerShows vehicle speed digitally.
Trip distanceShows the accumulated trip distance.
Average fuel economyShows the average fuel economy for agiven trip.
Elapsed trip timeWhen you switch off your vehicle the timerstops and restarts when you restart yourvehicle.
Fuel EconomyUse the left or right arrow buttons tochoose the desired fuel economy display.
Fuel Economy
Inst Fuel Econ
Average Fuel
Note: Press and hold OK to reset thecurrently displayed fuel usage information.
Inst Fuel EconomyThis display shows a visual graph of yourinstantaneous fuel economy.
Average FuelThis display shows the average fuelconsumption since the function was lastreset.
96
Flex (TP3) , enUSA, Edition date: 201803, Second-Printing
Information Displays

Information
Information
Intelligent AWD
MyKey® Distance (if key is programmed) — Distance traveled when a programmed keyis in use.
MyKey® Information — Number of MyKeys and admin keys programmed)
Coolant Temp. — The engine coolant indicator will change colors indicating: blue forcool, gray for normal and red for hot. If the engine coolant temperature exceeds thenormal range, stop the vehicle as soon as safely possible, switch off the engine and letthe engine cool.
Settings
Settings
Traction CtrlDriver Assist
Blindspot
High, Normal orLow
SensitivityCollision Warn
Chimes
Warning
Cross Traffic
Adaptive or NormalCruise Control
Front Park Aid
Rear Park Aid
Trailer Sway
Select your applicable languageLanguageDisplay
Miles & GAL, l/100km or km/l
DistanceUnits
Fahrenheit (°F) orCelsius (°C)
Temperature
Auto Engine OffConvenience
97
Flex (TP3) , enUSA, Edition date: 201803, Second-Printing
Information Displays
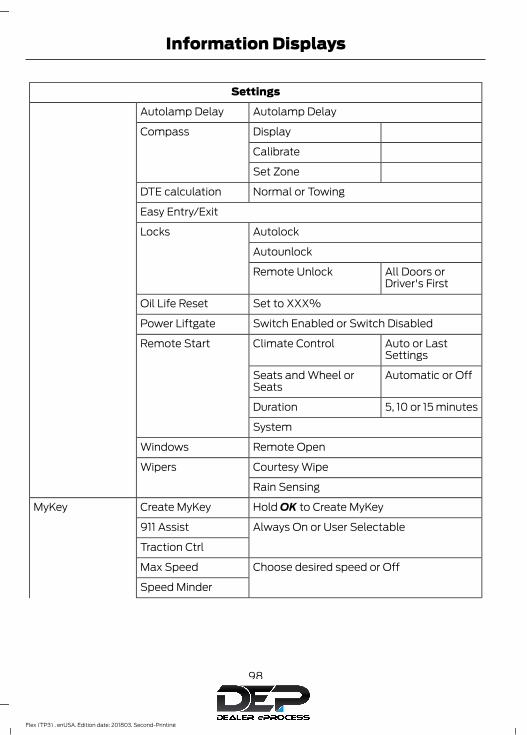
Settings
Autolamp DelayAutolamp Delay
DisplayCompass
Calibrate
Set Zone
Normal or TowingDTE calculation
Easy Entry/Exit
AutolockLocks
Autounlock
All Doors orDriver's First
Remote Unlock
Set to XXX%Oil Life Reset
Switch Enabled or Switch DisabledPower Liftgate
Auto or LastSettings
Climate ControlRemote Start
Automatic or OffSeats and Wheel orSeats
5, 10 or 15 minutesDuration
System
Remote OpenWindows
Courtesy WipeWipers
Rain Sensing
Hold OK to Create MyKeyCreate MyKeyMyKey
Always On or User Selectable911 Assist
Traction Ctrl
Choose desired speed or OffMax Speed
Speed Minder
98
Flex (TP3) , enUSA, Edition date: 201803, Second-Printing
Information Displays

Settings
Volume Limiter
Do Not Disturb
Hold OK to Clear All MyKeysClear MyKeys
Information Display Controls(Type 2)
E217330
• Press the up and down arrow buttonsto scroll through and highlight theoptions within a menu.
• Press the right arrow button to enter asub-menu.
• Press the left arrow button to exit amenu.
• Press and hold the left arrow button atany time to return to the main menudisplay (escape button).
• Press the OK button to choose andconfirm settings or messages.
Main menuFrom the main menu bar on the left sideof the information display, you can choosefrom the following categories:Scroll up or down to highlight one of thecategories and then press the right arrowkey or OK to enter into that category. Pressthe left arrow key as needed to exit backto the main menu.• Display Mode• Trip 1 & 2• Fuel Economy• Driver Assist• Settings
Display ModeUse the up or down arrow buttons tochoose between the following displayoptions.
99
Flex (TP3) , enUSA, Edition date: 201803, Second-Printing
Information Displays

Display Mode
XXX mi (km) to empty, Fuel gauge and Total odometerOption 1
Round tachometer, Fuel gauge and Total odometerOption 2
Round tachometer, Engine coolant temp gauge, Fuel gauge and Totalodometer
Option 3
Digital speedometer, Fuel gauge and Total odometerOption 4
Regardless of display mode chosen, when you use the SelectShift Automatic™ trans-mission (SST), the cluster will change to the round tachometer if not already selected.
XXX mi (km) to emptyShows approximate fuel level before thefuel tank reaches empty. The value isdynamic and can change (raise or lower)depending on driving style.
Fuel gaugeSwitch the ignition on. The fuel gauge willindicate approximately how much fuel isin the fuel tank. The arrow next to the fuelpump symbol shows the fuel filler doorside of your vehicle. When the fuel levelbecomes low, the level indicator willchange to amber. When the fuel levelbecomes critically low, the level indicatorwill change to red.Note: The fuel gauge level may vary slightlywhen your vehicle is moving or when drivingon a slope.Note: When a MyKey® is in use, low fuelwarnings will display earlier.
Round tachometerIndicates the engine speed in revolutionsper minute. Driving with your tachometerpointer continuously at the top of the scalemay damage the engine. During SelectShiftAutomatic™ transmission (SST) use, thecurrently selected gear will appear in thedisplay.
Engine coolant temperature gaugeIndicates engine coolant temperature. Atnormal operating temperature, the levelindicator will be in the normal range. If theengine coolant temperature exceeds thenormal range, stop your vehicle as soon assafely possible, switch off the engine andlet the engine cool.
Trip 1 & 2Choose between the following tripdisplays.
Trip 1 & 2
Trip distance
Average fuel economy
Elapsed trip time
Hold OK to Reset
100
Flex (TP3) , enUSA, Edition date: 201803, Second-Printing
Information Displays

Note: Press and hold OK to reset thecurrently displayed trip information.
Trip distanceShows the accumulated trip distance.
Average fuel economyShows the average fuel economy for agiven trip.
Elapsed trip timeWhen you switch off your vehicle the timerstops and restarts when you restart yourvehicle.
Fuel EconomyUse the left or right arrow buttons tochoose the desired fuel economy display.
Fuel Economy
Inst Fuel Economy
30 Min Fuel History
Note: Press and hold OK to reset thecurrently displayed fuel usage information.
Inst Fuel EconomyThis display shows a visual graph of yourinstantaneous fuel economy.
30 Min Fuel HistoryThis display shows a bar chart of your fuelhistory.
Driver AssistUse the up or down arrow buttons tochoose between the following displayoptions.Note: Some items are optional and maynot appear.
Driver Assist
Traction Control
Blindspot
High, Normal or LowSensitivityCollision Warn
Cross Traffic
—Adaptive or NormalCruise Control
Driver Alert
Front Park Aid
Rear Park Aid
Trailer Sway
101
Flex (TP3) , enUSA, Edition date: 201803, Second-Printing
Information Displays

SettingsIn this mode, you can configure different
driver setting choices.Note: Some items are optional and maynot appear.
Settings
Sport, Normal or ComfortHandling in DDriveControl
Vehicle
Sport or NormalHandling in S
Auto Engine Off
Normal or TowingDTE Calcula-tion
Easy Entry / Exit
Select time intervalAutolamp DelayLighting
AutolockLocks
Autounlock
All doors or Driver doorRemote Unlocking
Remaining Life XXX% - Hold OK to ResetOil LifeReset
Switch Enabled or Switch DisabledPower Lift-gate
Auto or Last SettingsClimate ControlRemoteStart
Auto Heated or OffSeats and Wheel orSeats
5, 10 or 15 minutesDuration
System
Remote OpenWindows
Remote Close
Courtesy WipeWipers
Rain Sensing
MyKeys and Admin KeysMykeyStatus
MyKey
Hold OK to Create MyKeyCreateMyKey
102
Flex (TP3) , enUSA, Edition date: 201803, Second-Printing
Information Displays

Settings
Always On or User Selectable911 Assist
TractionControl
Choose desired speed or offMax Speed
Speed Minder
On or OffVolumeLimiter
Always On or User SelectableDo NotDisturb
On or OffMyKeyReport
Hold OK to Clear All MyKeysClearMyKeys
Miles & GAL, l/100km or km/lDistanceDisplay Settings
Fuel Gauge or Fuel + TachGaugeDisplay
Choose your applicable setting - Hold OK to SetLanguage
Fahrenheit (°F) or Celsius (°C)Temper-ature
Note: Some MyKey items will only appearif a MyKey is set.
INFORMATION MESSAGESNote: Depending on the vehicle optionsequipped with your vehicle, not all of themessages will display or be available.Certain messages may be abbreviated orshortened depending upon which clustertype you have.
E173229
Press the OK button to acknowledge andremove some messages from theinformation display. Other messages willbe removed automatically after a shorttime.Certain messages need to be confirmedbefore you can access the menus.
103
Flex (TP3) , enUSA, Edition date: 201803, Second-Printing
Information Displays

Adaptive Cruise Control
ActionMessage
A radar malfunction is preventing the adaptive cruise fromengaging. See Using Adaptive Cruise Control (page 188).
Adaptive CruiseMalfunction
Conditions exist such that the adaptive cruise cannot functionproperly. See Using Adaptive Cruise Control (page 188).
Adaptive Cruise NotAvailable
The radar is blocked because of poor radar visibility due tobad weather or ice/mud/water in front of radar. Driver cantypically clean the sensor to resolve. See Using Adaptive
Cruise Control (page 188).
Adaptive Cruise NotAvailable Sensor
Blocked See Manual
AdvanceTrac™
ActionMessage
The system detects a malfunction due to a blocked sensor.Service AdvanceTrac
The traction control has been disabled or enabled by thedriver.
AdvanceTrac Off On
Alarm
ActionMessage
The alarm has been triggered due to unauthorized entry. SeeAnti-Theft Alarm (page 72).
Vehicle Alarm To StopAlarm, Start Vehicle.
Automatic Engine Shutdown
ActionMessage
The engine is getting ready to shut off.Engine Shuts Off In{seconds to shut off:#0}
Seconds
The engine has shut off to help increase fuel economy.Engine Shut Off For FuelEconomy
The engine is getting ready to shut off. You can press OK onthe left steering wheel button to override the shut down.
Engine Shuts Off in{seconds to shut off:#0}
Seconds Press Ok toOverride
104
Flex (TP3) , enUSA, Edition date: 201803, Second-Printing
Information Displays

AWD
ActionMessage
Displays if the AWD system disables to protect itself. Thismay occur if you operate the vehicle after installing the
compact spare tire, if the system is overheating or if there isan issue with another vehicle system that prevents the AWD
system from operating. The AWD system resumes normaloperation and clears this message after you install the roadtire and you switch the ignition on and off, or after you allowthe system to cool. If this message remains on, have a quali-
fied technician service your vehicle to repair other vehiclesystems.
AWD OFF
The all-wheel drive system is not operating properly and thepowertrain fault indicator is illuminated. See Warning Lamps
and Indicators (page 91). If the warning stays illuminatedor continues to illuminate, contact an authorized dealer as
soon as possible.
Check AWD
Battery and Charging System
ActionMessage
The charging system needs servicing. If the warning stays onor continues to come on, contact an authorized dealer as soon
as possible.
Check Charging System
The battery management system determines that the batteryis at a low state of charge. Turn the ignition off as soon as
possible to protect the battery. This message will clear oncethe vehicle has been started and the battery state of chargehas recovered. Turning off unnecessary electrical loads will
allow faster battery state-of-charge recovery.
Turn Power Off To SaveBattery
105
Flex (TP3) , enUSA, Edition date: 201803, Second-Printing
Information Displays

Blind Spot Information and Cross Traffic Alert System
ActionMessage
A fault with the system has occurred. Contact an authorizeddealer as soon as possible.
Blindspot System Fault
The system sensors are blocked. Contact an authorized dealeras soon as possible. See Blind Spot Information System
(page 194).
Blindspot Not AvailableSensor Blocked See
Manual
The system detects a vehicle. See Blind Spot InformationSystem (page 194).
Vehicle Coming From X
The blind spot information system and cross traffic alertsystem sensors are blocked. See Blind Spot Information
System (page 194).
Cross Traffic Not Avail-able Sensor Blocked See
Manual
A fault with the system has occurred. Contact an authorizeddealer as soon as possible.
Cross Traffic SystemFault
Brake System
ActionMessage
The brake fluid level is low and the brake system should beinspected immediately. See Brake Fluid Check (page 255).
Brake Fluid Level Low
The brake system needs servicing. Stop the vehicle in a safeplace. Contact an authorized dealer.
Check Brake System
The parking brake is set, the engine is running and you driveyour vehicle more than 3 mph (5 km/h). If the warning stayson after the parking brake is released, contact an authorized
dealer as soon as possible.
Park Brake Engaged
106
Flex (TP3) , enUSA, Edition date: 201803, Second-Printing
Information Displays

Collision Warning System
ActionMessage
There is a system malfunction with the collision warningsystem. The system will be disabled. Contact an authorized
dealer as soon as possible.
Collision WarningMalfunction
The collision warning system radar is blocked because of poorradar visibility due to bad weather or ice/mud/water in frontof the radar. Driver can typically clean the sensor to resolve.
Contact an authorized dealer as soon as possible.
Collision Warning NotAvailable Sensor
Blocked See Manual
There is a system malfunction with the collision warningsystem. The system will be disabled. Contact an authorized
dealer as soon as possible.
Collision Warning NotAvailable
Doors and Locks
ActionMessage
The door listed is not completely closed.X Door Ajar
The luggage compartment is not completely closed.Trunk Ajar
The driver’s door is opened, your vehicle is in park and theengine is on.
Engine ON
Fuel
ActionMessage
An early reminder of a low fuel condition.Fuel Level Low
The fuel fill inlet may not be properly closed.Check Fuel Fill Inlet
107
Flex (TP3) , enUSA, Edition date: 201803, Second-Printing
Information Displays

Keys and Intelligent Access
ActionMessage
A reminder to press the brake while starting your vehicle.To START Press Brake
The key is not detected by the system. See Keyless Starting(page 146).
No Key Detected
The Start Stop button is pressed to shut off the engine andan Intelligent Access key is not detected inside your vehicle.
Restart Now or Key isNeeded
Your vehicle is in the accessory ignition state.Accessory Power isActive
There is a problem with your vehicle’s starting system. Seean authorized dealer for service.
Starting System Fault
During spare key programming, an intelligent access key isprogrammed to the system.
Key Programmed x KeysTotal
During spare key programming, the maximum number of keyshave been programmed.
Max Number of KeysLearned
Maintenance
ActionMessage
Stop your vehicle as soon as safely possible, turn off theengine. Check the oil level. If the warning stays on or continuesto come on with your engine running, contact an authorized
dealer as soon as possible.
Low Engine Oil Pressure
The engine oil life remaining is 10% or less. See Engine OilCheck (page 247).
Change Engine Oil Soon
The oil life left reaches 0%. See Engine Oil Check (page 247).Oil Change Required
The engine coolant temperature is excessively high.Engine Coolant OverTemperature
The washer fluid is low and needs to be refilled.Washer Fluid Level Low
Indicates that your vehicle is still in Transport mode. This maynot allow some features to operate properly. Contact an
authorized dealer.
Transport Mode ContactDealer
Indicates that your vehicle is still in Factory mode. This maynot allow some features to operate properly. Contact an
authorized dealer.
Factory Mode ContactDealer
108
Flex (TP3) , enUSA, Edition date: 201803, Second-Printing
Information Displays

MyKey
ActionMessage
MyKey cannot be programmed during key programming .MyKey not Created
MyKey is active.MyKey Active DriveSafely
When starting your vehicle, a MyKey is in use and the MyKeyspeed limit is on.
Speed Limited to XXMPH/km/h
When a MyKey is in use, the MyKey speed limit is on and yourvehicle speed is approaching 80 mph (130 km/h).
Near Vehicle Top Speed
MyKey is active.Check Speed DriveSafely
A MyKey is in use and Belt-Minder is activated.Buckle Up to UnmuteAudio
An attempt is made to program a spare key using two existingMyKeys.
Could Not ProgramIntegrated Key
Park Aid
ActionMessage
The system has detected a condition that requires service.Contact your authorized dealer. See Rear Parking Aid (page
178).
Check Park Aid
The system has detected a condition that requires service.Contact your authorized dealer. See Rear Parking Aid (page
178).
Check Rear Park Aid
The park aid status.Rear Park Aid On Off
109
Flex (TP3) , enUSA, Edition date: 201803, Second-Printing
Information Displays

Power Steering
ActionMessage
The power steering system has detected a condition thatrequires service. See an authorized dealer.
Steering Fault ServiceNow
The power steering system is not working. Stop your vehiclea safe place. Contact an authorized dealer.
Service Power SteeringNow
The power steering system has detected a condition withinthe power steering system or passive entry or passive start
system requires service. Contact an authorized dealer.
Steering Assist FaultService Required
Seats
ActionMessage
Objects are by the passenger seat. After the objects are movedaway from the seat, if the warning stays on or continues tocome on contact an authorized dealer as soon as possible.
Occupant SensorBLOCKED Remove
Objects Near PassengerSeat
Tire Pressure Monitoring System
ActionMessage
One or more tires on your vehicle have low tire pressure. SeeTire Pressure Monitoring System (page 289).
Tire Pressure Low
The tire pressure monitoring system is malfunctioning. If thewarning stays on or continues to come on, contact an
authorized dealer. See Tire Pressure Monitoring System(page 289).
Tire Pressure MonitorFault
A tire pressure sensor is malfunctioning, or your spare tire isin use. For more information on how the system operatesunder these conditions, See Tire Pressure Monitoring
System (page 289). If the warning stays on or continues tocome on, contact an authorized dealer as soon as possible.
Tire Pressure SensorFault
110
Flex (TP3) , enUSA, Edition date: 201803, Second-Printing
Information Displays

Traction Control
ActionMessage
Displays the status of the traction control system. See UsingTraction Control (page 175).
Traction Control Off
Transmission
ActionMessage
You switched the engine off and shift select lever is in anyposition other than P (Park).
Shift to Park
Towing
ActionMessage
The system detects trailer sway, so you need to reduce yourspeed.
Trailer Sway ReduceSpeed
111
Flex (TP3) , enUSA, Edition date: 201803, Second-Printing
Information Displays

MANUAL CLIMATE CONTROLDirecting the Air
E265283
Press and release the button todirect air between theinstrument panel air vents,
footwell air vents and windshield air ventsand de-mister.
Setting the Blower Motor Speed
E265389
Turn the control to adjust the volume ofair circulated in the vehicle.Note: Lights on the control illuminate toindicate the fan speed.
Setting the Temperature
E265862
Turn the control to set the temperature.
Switching Defrost On and OffPress and release the button todistribute air through thewindshield air vents and
de-mister.
Air directed to the instrument panel andfootwell air vents turns off. You can alsouse this setting to defog and clear thewindshield of a thin covering of ice.
Switching the Air Conditioning Onand Off
Press and release the button toswitch the air conditioning on oroff.
Use air conditioning with recirculated airto improve cooling performance andefficiency.Note: In certain conditions (for example,maximum defrost) the air conditioningcompressor may continue to operate eventhough you switch off the air conditioning.
112
Flex (TP3) , enUSA, Edition date: 201803, Second-Printing
Climate Control

Switching the Climate Control Onand Off
Press and release the button.
Switching Maximum AirConditioning On and Off
Turn the temperature controlcounterclockwise to the lowestsetting for maximum cooling.
The left-hand and right-hand settings setto LO, recirculated air flows through theinstrument panel air vents, air conditioningturns on and the blower motor adjusts tothe highest speed.
Switching Recirculated Air On andOff
Press and release the button toswitch between outside air andrecirculated air.
The air currently in the passengercompartment recirculates. This mayreduce the time needed to cool the interior(when used with A/C) and reduceunwanted odors from entering your vehicle.Note: Recirculated air may turn off (orprevent you from switching on) in all air flowmodes except MAX A/C to reduce the riskof fogging. Recirculation may also turn onand off in various air distribution controlcombinations during hot weather in orderto improve cooling efficiency.
Rear Climate Control LockIndicator
E265757
When illuminated, you can onlyoperate the rear passengersettings through the front
controls.
Switching the Rear ClimateControl On and Off
Press and release the button.
Setting the Rear Blower MotorSpeed
Press and release + or - to adjustthe volume of air circulated inthe rear passenger
compartment.
Setting the Rear Temperature
E265400
Press and release + or - to setthe temperature.
AUTOMATIC CLIMATECONTROL - VEHICLES WITH:PREMIUM AM/FM/CDNote: You can switch temperature unitsbetween Fahrenheit and Celsius.
Setting the Blower Motor Speed
E265389
113
Flex (TP3) , enUSA, Edition date: 201803, Second-Printing
Climate Control

Turn the control to adjust the volume ofair circulated in the vehicle.
Setting the TemperaturePress and release + or - on the left-handside of the climate control to set theleft-hand temperature.Note: This control also adjusts theright-hand side temperature when youswitch off dual zone mode.Press and release + or - on the right-handside of the climate control to set theright-hand temperature.
Switching Auto Mode On and OffPress and release the button toswitch on automatic operation,then set the temperature.
The system adjusts the blower motorspeed, air distribution, air conditioningoperation, and outside or recirculated airto reach and maintain the temperature youhave set.Note: You can also switch off dual zonemode by pressing and holding the buttonfor more than two seconds.
Switching Defrost On and OffPress and release the button todistribute air through thewindshield air vents and
de-mister.
Air directed to the instrument panel andfootwell air vents turns off. You can alsouse this setting to defog and clear thewindshield of a thin covering of ice.
Switching Dual Zone Mode On andOff
E265280
Press to switch on temperaturecontrol for the right-hand side ofthe vehicle.
Switching the Air Conditioning Onand Off
Press and release the button toswitch the air conditioning on oroff.
Use air conditioning with recirculated airto improve cooling performance andefficiency.Note: In certain conditions, such asmaximum defrost, the air conditioningcompressor may continue to operate eventhough you switch off the air conditioning.
Switching the Climate Control Onand Off
Press and release the button.
Switching Maximum AirConditioning On and Off
Turn the temperature controlcounterclockwise to the lowestsetting for maximum cooling.
The left-hand and right-hand settings setto LO, recirculated air flows through theinstrument panel air vents, air conditioningturns on and the blower motor adjusts tothe highest speed.
Switching Recirculated Air On andOff
Press and release the button toswitch between outside air andrecirculated air.
The air currently in the passengercompartment recirculates. This mayreduce the time needed to cool the interior,when used with A/C, and reduce unwantedodors from entering your vehicle.
114
Flex (TP3) , enUSA, Edition date: 201803, Second-Printing
Climate Control

Note: Recirculated air may turn off, orprevent you from switching on, in all air flowmodes except MAX A/C to reduce the riskof fogging. Recirculation may also turn onand off in various air distribution controlcombinations during hot weather in orderto improve cooling efficiency.
AUTOMATIC CLIMATECONTROL - VEHICLES WITH:SONY AUDIO SYSTEMNote: You can switch temperature unitsbetween Fahrenheit and Celsius.
Setting the Blower Motor SpeedPress and release + or - to adjustthe volume of air circulated inthe vehicle.
Setting the TemperaturePress and release + or - on the left-handside of the climate control to set theleft-hand temperature.Note: This control also adjusts theright-hand side temperature when youswitch off dual zone mode.Press and release + or - on the right-handside of the climate control to set theright-hand temperature.
Switching Auto Mode On and OffPress and release the button toswitch on automatic operation,then set the temperature.
The system adjusts the blower motorspeed, air distribution, air conditioningoperation, and outside or recirculated airto reach and maintain the temperature youhave set.
Note: You can also switch off dual zonemode by pressing and holding the buttonfor more than two seconds.
Switching the Air Conditioning Onand Off
Press and release the button toswitch the air conditioning on oroff.
Use air conditioning with recirculated airto improve cooling performance andefficiency.Note: In certain conditions, such asmaximum defrost, the air conditioningcompressor may continue to operate eventhough you switch off the air conditioning.
Switching the Climate Control Onand Off
Press and release the button.
Switching Defrost On and OffPress and release the button todistribute air through thewindshield air vents and
de-mister.
Air directed to the instrument panel andfootwell air vents turns off. You can alsouse this setting to defog and clear thewindshield of a thin covering of ice.
Switching Maximum AirConditioning On and Off
Press and release the button formaximum cooling.
The left-hand and right-hand settings setto LO, recirculated air flows through theinstrument panel air vents, air conditioningturns on and the blower motor adjusts tothe highest speed.
115
Flex (TP3) , enUSA, Edition date: 201803, Second-Printing
Climate Control

Switching Recirculated Air On andOff
Press and release the button toswitch between outside air andrecirculated air.
The air currently in the passengercompartment recirculates. This mayreduce the time needed to cool the interior,when used with A/C, and reduce unwantedodors from entering your vehicle.Note: Recirculated air may turn off, orprevent you from switching on, in all air flowmodes except MAX A/C to reduce the riskof fogging. Recirculation may also turn onand off in various air distribution controlcombinations during hot weather in orderto improve cooling efficiency.
HINTS ON CONTROLLING THEINTERIOR CLIMATEGeneral HintsNote: Prolonged use of recirculated air maycause the windows to fog up.Note: You may feel a small amount of airfrom the footwell air vents regardless of theair distribution setting.Note: To reduce humidity build-up insideyour vehicle, do not drive with the systemswitched off or with recirculated air alwaysswitched on.Note: Do not place objects under the frontseats as this may interfere with the airflowto the rear seats.
Note: Remove any snow, ice or leaves fromthe air intake area at the base of thewindshield.Note: To improve the time to reach acomfortable temperature in hot weather,drive with the windows open until you feelcold air through the air vents.
Manual Climate ControlNote: To reduce fogging of the windshieldduring humid weather, adjust the airdistribution control to the windshield airvents position.
Automatic Climate ControlNote: Adjusting the settings when yourvehicle interior is extremely hot or cold isnot necessary. The system automaticallyadjusts to heat or cool the interior to yourselected temperature as quickly as possible.For the system to function efficiently, theinstrument panel and side air vents shouldbe fully open.Note: If you select AUTO during coldtemperatures, the system directs airflow tothe windshield and side window vents. Inaddition, the fan may run at a slower speeduntil the engine warms up.Note: If you select AUTO during hottemperatures and the inside of the vehicleis hot, the system automatically usesrecirculated air to maximize interior cooling.Fan speed may also reduce until the aircools.
116
Flex (TP3) , enUSA, Edition date: 201803, Second-Printing
Climate Control

Quickly Heating the Interior
Automatic climate controlManual climate control
Press AUTO.Adjust the fan speed to the highestsetting.
1
Adjust the temperature control to thedesired setting.
Adjust the temperature control to thefull heat setting.
2
Direct air to the footwell using the airdistribution buttons.
3
Recommended Settings for Heating
Automatic climate controlManual climate control
Press AUTO.Adjust the fan speed to the centersetting.
1
Adjust the temperature control to thedesired setting. Use 72°F (22°C) as astarting point, then adjust the setting asnecessary.
Adjust the temperature control to themidway point of the hot settings.
2
Direct air to the footwell using the airdistribution buttons.
3
Quickly Cooling the Interior
Automatic climate controlManual climate control
Select MAX A/C.Select MAX A/C.1
Drive with the windows open until youfeel cold air through the air vents.
2
117
Flex (TP3) , enUSA, Edition date: 201803, Second-Printing
Climate Control

Recommended Settings for Cooling
Automatic climate controlManual climate control
Press AUTO.Adjust the fan speed to the centersetting.
1
Adjust the temperature control to thedesired setting. Use 72°F (22°C) as astarting point, then adjust the setting asnecessary.
Adjust the temperature control to themidway point of the cold settings.
2
Direct air to the instrument panel usingthe air distribution buttons.
3
Defogging the Side Windows in Cold Weather
Automatic climate controlManual climate control
Press the defrost button.Direct air to the windshield using the airdistribution buttons.
1
Adjust the temperature control to thedesired setting. Use 72°F (22°C) as astarting point, then adjust the setting asnecessary.
Press A/C.2
Adjust the temperature control to thedesired setting.
3
Adjust the fan speed to the highestsetting.
4
REAR PASSENGER CLIMATECONTROLSDirecting Air to the Overhead AirVents
Press and release the button todirect airflow to instrumentpanel air vents.
Directing Air to the Overhead andRear Footwell Air Vents
Press and release the button todirect airflow to instrumentpanel air vents and footwell air
vents.
Directing Air to the Rear FootwellAir Vents
Press and release the button todirect airflow to rear footwell airvents.
118
Flex (TP3) , enUSA, Edition date: 201803, Second-Printing
Climate Control

Setting the Rear Blower MotorSpeed
E265389
Turn the control to adjust the volume ofair circulated in the rear passengercompartment.
Rear Control Lock Indicator
E265289
When illuminated, you can onlyoperate the rear passengersettings through the front
controls.
Setting the Rear Temperature
E265290
Turn the control to set the reartemperature.
Switching the Rear Heated SeatsOn and Off
Press and release the button tocycle through the various heatsettings and off.
See Heated Seats (page 134).
HEATED REAR WINDOW
E184884
Press the button to clear the rearwindow of thin ice and fog. Theheated rear window turns off
after a short period of time.Note: Make sure the engine is on beforeoperating the heated windows.Note: Do not use razor blades or othersharp objects to clean or remove decalsfrom the inside of the heated rear window.The vehicle Warranty may not coverdamage caused to the heated rear windowgrid lines.
HEATED EXTERIOR MIRRORSWhen you switch the heated rear windowon, the heated exterior mirrors turn on.Note: Do not remove ice from the mirrorswith a scraper or adjust the mirror glasswhen it is frozen in place.Note: Do not clean the mirror housing orglass with harsh abrasives, fuel or otherpetroleum-based cleaning products.
119
Flex (TP3) , enUSA, Edition date: 201803, Second-Printing
Climate Control

CABIN AIR FILTERYour vehicle is equipped with a cabin airfilter, which gives you and your passengersthe following benefits:• It improves your driving comfort by
reducing particle concentration.• It improves the interior compartment
cleanliness.• It protects the climate control
components from particle deposits.You can locate the cabin air filter behindthe glove box.Note: Make sure you have a cabin air filterinstalled at all times. This prevents foreignobjects from entering the system. Runningthe system without a filter in place couldresult in degradation or damage to thesystem.Replace the filter at regular intervals. SeeScheduled Maintenance (page 442).For additional cabin air filter information,or to replace the filter, see an authorizeddealer.
REMOTE START (If Equipped)
The system adjusts the interiortemperature depending on your chosensettings during remote start.You cannot adjust the climate controlsetting during remote start operation.When you switch the ignition on, theclimate control system returns to theprevious settings. You can now makeadjustments.Some features may remain on if they turnon during remote start:• Driver heated seat.• Driver cooled seat.• Heated steering wheel.
• Heated mirrors.• Heated rear window.Note: If the passenger heated or cooledseats are on when you switch the vehicleoff, they default to the driver setting whenyou switch the vehicle on.You can adjust the default remote startsettings using the information displaycontrols. See Information Displays(page 95).
Automatic SettingsIn hot weather, the system is set to 72°F(22°C). The cooled seats are set to high(if available, and you select AUTO in theinformation display).In moderate weather, the system eitherheats or cools (based on pre-selectedsettings). The rear defroster, heatedmirrors and heated or cooled seats do notturn on.In cold weather, the system is set to 72°F(22°C). The heated seats and heatedsteering wheel are set to high (if available,and you select AUTO in the informationdisplay). The rear defroster and heatedmirrors turn on.
120
Flex (TP3) , enUSA, Edition date: 201803, Second-Printing
Climate Control

SITTING IN THE CORRECTPOSITION
WARNING: Sitting improperly, outof position or with the seatback reclinedtoo far can take weight off the seat cushionand affect the decision of the passengersensing system, resulting in serious injuryor death in the event of a crash. Always situpright against your seat back, with yourfeet on the floor.
WARNING: Do not recline theseatback too far as this can cause theoccupant to slide under the seatbelt,resulting in serious injury in the event of acollision.
WARNING: Do not place objectshigher than the top of the seat backrest.Failure to follow this instruction couldresult in personal injury or death in theevent of a sudden stop or crash.
E68595
When you use them properly, the seat,head restraint, seatbelt and airbags willprovide optimum protection in the eventof a crash.
We recommend that you follow theseguidelines:• Sit in an upright position with the base
of your spine as far back as possible.• Do not recline the seat backrest so that
your torso is more than 30° from theupright position.
• Adjust the head restraint so that thetop of it is level with the top of yourhead and as far forward as possible.Make sure that you remaincomfortable.
• Keep sufficient distance betweenyourself and the steering wheel. Werecommend a minimum of 10 in(25 cm) between your breastbone andthe airbag cover.
• Hold the steering wheel with your armsslightly bent.
• Bend your legs slightly so that you canpress the pedals fully.
• Position the shoulder strap of theseatbelt over the center of yourshoulder and position the lap straptightly across your hips.
Make sure that your driving position iscomfortable and that you can maintain fullcontrol of your vehicle.
HEAD RESTRAINTS
WARNING: Fully adjust the headrestraint before you sit in or operate yourvehicle. This will help minimize the risk ofneck injury in the event of a crash. Do notadjust the head restraint when your vehicleis moving.
121
Flex (TP3) , enUSA, Edition date: 201803, Second-Printing
Seats

WARNING: The head restraint is asafety device. Whenever possible it shouldbe installed and properly adjusted whenthe seat is occupied. Failure to adjust thehead restraint properly could reduce itseffectiveness during certain impacts.
Note: Adjust the seat backrest to an uprightdriving position before adjusting the headrestraint. Adjust the head restraint so thatthe top of it is level with the top of your headand as far forward as possible. Make surethat you remain comfortable. If you areextremely tall, adjust the head restraint toits highest position.Front Seat Head Restraints
E138642
Second Row Center Seat HeadRestraint (If Equipped)
E138645
The head restraints consist of:
An energy absorbing headrestraint.
A
Two steel stems.BGuide sleeve adjust and releasebutton.
C
Guide sleeve unlock and removebutton.
D
Adjusting the Head RestraintRaising the Head RestraintPull the head restraint up.
Lowering the Head Restraint1. Press and hold button C.2. Push the head restraint down.
Removing the Head Restraint1. Pull the head restraint up until it
reaches its highest position.2. Press and hold buttons C and D.3. Pull the head restraint up.
Installing the Head Restraint1. Align the steel stems into the guide
sleeves.2. Press and hold buttons C and D.
122
Flex (TP3) , enUSA, Edition date: 201803, Second-Printing
Seats

3. Push the head restraint down until itlocks.
Second Row Outermost Seat HeadRestraints
E162872
A
C
B
The head restraints consist of:
An energy absorbing headrestraint.
A
Two steel stems.BGuide sleeve unlock and removebuttons.
C
The outermost head restraints arenon-adjustable, but they can be removed.
Removing the Head Restraint1. Pull the head restraint up until it
reaches its highest position.2. Press and hold the C buttons.3. Pull the head restraint up.
Installing the Head Restraint1. Align the steel stems into the guide
sleeves.2. Press and hold the C buttons.3. Push the head restraint down until it
locks.
Third Row Head Restraints (IfEquipped)
E190836
The head restraints consist of:
An energy absorbing headrestraint.
A
Two steel stems.BFold strap.C
Folding the Head RestraintPull the fold strap (C). Pull the headrestraint back up to reset.Note: Press the stow or fold button on thepower folding seats to fold the headrestraint.
123
Flex (TP3) , enUSA, Edition date: 201803, Second-Printing
Seats
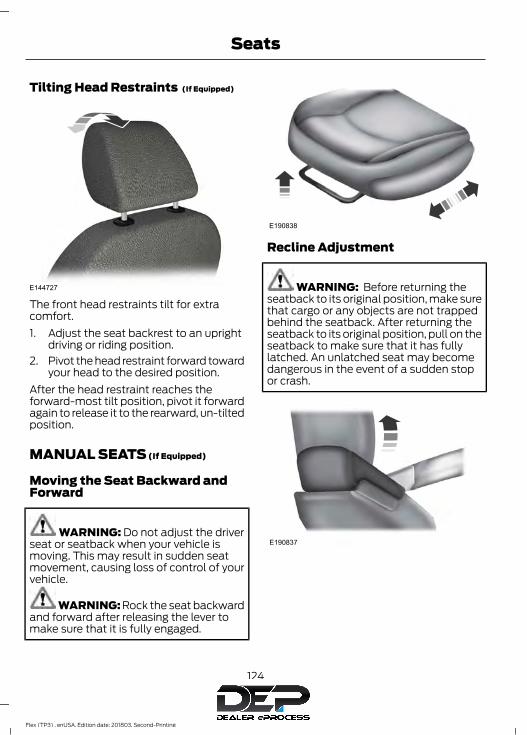
Tilting Head Restraints (If Equipped)
E144727
The front head restraints tilt for extracomfort.1. Adjust the seat backrest to an upright
driving or riding position.2. Pivot the head restraint forward toward
your head to the desired position.After the head restraint reaches theforward-most tilt position, pivot it forwardagain to release it to the rearward, un-tiltedposition.
MANUAL SEATS (If Equipped)
Moving the Seat Backward andForward
WARNING: Do not adjust the driverseat or seatback when your vehicle ismoving. This may result in sudden seatmovement, causing loss of control of yourvehicle.
WARNING: Rock the seat backwardand forward after releasing the lever tomake sure that it is fully engaged.
E190838
Recline Adjustment
WARNING: Before returning theseatback to its original position, make surethat cargo or any objects are not trappedbehind the seatback. After returning theseatback to its original position, pull on theseatback to make sure that it has fullylatched. An unlatched seat may becomedangerous in the event of a sudden stopor crash.
E190837
124
Flex (TP3) , enUSA, Edition date: 201803, Second-Printing
Seats

Lumbar Adjustment (If Equipped)
E209846
POWER SEATS
WARNING: Do not adjust the driver'sseat or seatback when your vehicle ismoving. Adjusting your seatback while yourvehicle is in motion may cause loss ofcontrol of your vehicle.
WARNING: Do not place cargo orany objects behind the seatback beforereturning it to the original position.
E138647
125
Flex (TP3) , enUSA, Edition date: 201803, Second-Printing
Seats

Power Lumbar (If Equipped)
E138648
MEMORY FUNCTION (If Equipped)
WARNING: Before activating thememory seat, make sure that the areaimmediately surrounding the seat is clearof obstructions and that all occupants areclear of moving parts.
WARNING: Do not use the memoryfunction when your vehicle is moving.
This feature automatically recalls theposition of the following:• Driver seat.• Power mirrors.• Optional power steering column.• Optional power adjustable foot pedals.The memory control is on the driver door.
21
E205043
Saving a PreSet Position1. Switch the ignition on.2. Adjust the memory features to your
desired position.3. Press and hold the desired preset
button until you hear a single tone.You can save up to two preset memorypositions. You can save a memory presetat any time.
Recalling a PreSet PositionPress and release the preset buttonassociated with your desired drivingposition. The memory features move tothe position stored for that preset.You can recall a programmed memoryposition:• Only in park (P) or neutral (N) if the
ignition is on.• In any gearshift position if the ignition
is not on.You can also recall a programmed memoryposition by:• Pressing your remote control
transmitter unlock button (if theremote control is programmed to amemory position).
• Unlocking your vehicle with anintelligent access key (if it isprogrammed to a memory position).
Note: Using a linked keyfob to recall yourmemory position when the ignition is offmoves the seat to the Easy Entry position.
126
Flex (TP3) , enUSA, Edition date: 201803, Second-Printing
Seats

Note: Adjusting any active memory featureor pressing a memory switch during amemory recall cancels the operation.
Linking a PreSet Position to yourRemote Control or IntelligentAccess Key FobYour vehicle can save the preset memorypositions for up to two remote controls.1. With the ignition on, move the memory
features to the desired positions.2. Press and hold the desired preset
button for about five seconds. A tonesounds after about two seconds.Continue holding until you hear asecond tone.
3. Within three seconds, press the lockbutton on the remote control you arelinking.
To unlink a remote control, follow thesame procedure – except in step 3, pressthe unlock button on the remote control.Note: If more than one linked remotecontrol or intelligent access key is in range,the memory function moves to the settingsof the first key to initiate a memory recall.
Easy Entry and Exit FeatureThis feature adjusts the position of the seatand steering column to allow easier exitand entry to the vehicle.The driver seat automatically moves 2 in(5 cm) rearward when the transmission isin park (P) and you remove the key fromthe ignition or you switch the ignition off.The driver seat and steering wheel returnto their previous positions when you putthe key in the ignition or switch the ignitionon.You can enable or disable this featurethrough the information display. SeeInformation Displays (page 95).
REAR SEATSAdjusting the Rear SeatsSecond Row Seats
WARNING: Always drive and ridewith your seatback upright and the lap beltsnug and low across the hips.
WARNING: Reclining the seatbackcan cause an occupant to slide under theseat's seatbelt, resulting in severe personalinjuries in the event of a crash.
Recline Adjustment
E209847
Note: For the bench seat only, make surethe center seatbelt is unbuckled beforefolding the seatback.Lift the handle to adjust the seatbackrearward or forward. You can also fold theseatback forward until it is flat.
127
Flex (TP3) , enUSA, Edition date: 201803, Second-Printing
Seats

Moving the Seats Backward andForward (If equipped)
E190838
Power Fold and Tumble Seat
WARNING: Do not fold a seat if it isoccupied. Failure to follow this instructioncould result in personal injury.
This feature is available for the right-handseat on seven-passenger vehicles and onboth sides for six-passenger vehicles.
E190848
The control is at the back of the rear dooropening. Press it to fold the seatback downand tumble the seat forward for access tothe third row.
Note: When you switch the ignition off, thepower fold feature works until the batterysaver turns it off after 10 minutes. You canreactivate the power seats by pressing theunlock button on the remote entry key fobor by using the unlock procedure on thekeyless entry keypad. See Doors and Locks(page 61). Keep the key in the accessory orrun position to prevent the feature fromtiming out.
Third Row Seats (Accessing the Seat)
WARNING: Check under the seatcushion to make sure no cargo or objectsare under the seat cushion before returningthe seat cushion to its original position, andthat the seat cushion locks into place.Failure to do so may prevent the seat fromoperating properly in the event of a crash,which could increase the risk of seriousinjury.
WARNING: Do not adjust a seat orrelease a seat floor latch when the vehicleis moving. Failure to follow this instructioncould result in personal injury or death ina sudden stop or crash.
WARNING: Do not drive your vehiclewith a seat that is unlatched or in thefolded position. Failure to follow thisinstruction could result in personal injuryor death in the event of a sudden stop orcrash.
Note: Remove items from the second-rowseat. Make sure that no bulky objects suchas purses or briefcases are on the floor infront of the second-row seats beforetumbling them.Note: For second-row bench seats, makesure the center seatbelt is unbuckled beforefolding the seatback.
128
Flex (TP3) , enUSA, Edition date: 201803, Second-Printing
Seats

Note: You may have to move the front-rowseat forward to allow the second-row seatto be fully tumbled.Fold and tumble the second-row seat toaccess the third row.
E209848
1. Lift the handle on the side of the seat.The seatback folds flat.
E190844
2. Lift the handle all the way up until theseat releases from the floor. Rotate theseat forward to allow access to thethird row. Note: The seatback must befolded flat in order to release the floorlatches. Make sure that there are noobjects on the seat cushion that mayrestrict the seatback from folding flat.
E190845
3. To return the seatback to the floor fromthe tumbled position, rotate the seatdown until you hear it latching to thefloor.
E209849
4. Lift the seatback toward the rear of thevehicle, and rotate the seatback untilyou hear a click, locking it in the uprightposition.
Note: The seatback will not raise if the rearlatch hooks are not properly engaged to thefloor striker. If the seatback does not raise,then repeat Step 4.
129
Flex (TP3) , enUSA, Edition date: 201803, Second-Printing
Seats

Third Row Seat Exit
E209850
1. Pull on the strap on the back of thesecond row seat. This folds theseatback forward. Pull the strap asecond time to tumble the seatforward, allowing easy exit from thethird row seat. Note: You must fold theseatback flat in order to release thefloor latches. Make sure that there areno objects on the seat cushion thatmay restrict the seatback from foldingflat.
E190850
2. To return the seatback to the floor fromthe tumbled position, rotate the seatdown until you hear it latching to thefloor.
E209849
3. Lift the seatback toward the rear of thevehicle, and rotate the seatback untilyou hear a click, locking it in the uprightposition. Note: The seatback will notraise if the rear latch hooks are notproperly engaged to the floor striker. Ifthe seatback does not raise, thenrepeat steps 3 and 4.
E190847
4. Make sure that the rear latch hooks areproperly engaged with the floor striker.
Note: Make sure that the seat and seatbackare latched securely in position. Keep floorarea free of objects that would preventproper seat engagement.
130
Flex (TP3) , enUSA, Edition date: 201803, Second-Printing
Seats

Stowing the Third Row SeatNote: Remove all objects from the seat andstowage tub. Objects in the seat or stowagetub may cause serious damage to the seatupholstery and cause improper seatfunction.
E210069
1. From the rear of the vehicle, stow thehead restraints by pulling the strap onthe middle of the seatback just belowthe head restraint. Then, fold theseatback by pulling and holding the redstrap while pushing the seatbackforward. Release the strap once theseatback starts rotating forward.
E209852
2. Release the cushion latches by pullingthe short black strap while pulling onthe strap at the top of the seatback.This tumbles the seat all the way intothe floor tub.
Note: Do not use the seat anchors as cargotie downs.
E209853
Note: Do not use the third row seat back asa load floor when the seatback is folded.Sharp objects may result in damage to seatupholstery.Note: Make sure that the area under theseat is free of objects before stowing it.
Unstowing the Third Row Seat
WARNING: Make sure the seat fullylocks into place by rocking it backward andforward. Not securing the seat into thelocked position can be dangerous in acrash and could cause serious personalinjury or death.
Note: Make sure that there are no objectssuch as books, purses or brief cases on theload floor before unstowing the seat. Failureto remove all objects from the top of theload floor prior to unstowing it may causedamage to the seat.Note: Make sure the area under the forwardportion of the load floor is free of objectsbefore unstowing the third row seat.
131
Flex (TP3) , enUSA, Edition date: 201803, Second-Printing
Seats

E209854
1. Unlatch and lift the seat out of the floortub by squeezing and pulling up on thehandle. Once the seat is at a verticalposition, push the seat over, letting itfall onto the latches.
E209852
2. To return the seatback to the uprightposition, pull the red strap. Then, whileholding the red strap, pull the longstrap on the seatback to raise theseatback.
3. Pull the head restraints up to theirnormal positions.
PowerFold™Third Row Seats (Ifequipped)The third row seat features a powerone-touch operation that allows you toadjust the left, right, or both seats into aNORMAL, STOW, FOLD, or TAILGATEposition with just one touch of a button.Note: The power fold seats work only whenthe transmission is in park (P) and thetailgate is open. If the ignition is off and thefeature is still running, the battery saverturns it off after 10 minutes. You canreactivate the power seats by pressing theunlock button on the remote entry key fobor by using the unlock procedure on thekeyless entry keypad. See Keyless Entry(page 64). Keep the key in the accessory orrun position to prevent the feature fromtiming out.The third row power seat buttons arebehind the third row seats on the left-handquarter trim panel.
132
Flex (TP3) , enUSA, Edition date: 201803, Second-Printing
Seats

E209855
Press to return the seat to thenormal seating position.
A
Press to stow the seat into thetub floor.
B
Press the top of the button tofold down the seatback. Pressthe bottom portion of the buttonto put the seat into the tailgateposition.
C
Press to select either right-handseat, the left-hand seat or both.
D
Note: The third row seat includes obstacledetection that allows the seat to stop andreverse direction if it hits an obstacle so thatthe obstacle can be removed.Note: Pressing a different button while thepower seat feature is already beingperformed may cause the first selected seatmovement to be cancelled. Allow the firstseat movement to be completed beforepressing a button for another function.
Note: Make sure that there are no objectssuch as books, purses or briefcases on theload floor before unstowing the seat. Failureto remove all objects from the top of theload floor prior to unstowing it may causedamage to the seat.Note: In order to allow the seat to completethe stowed position, do not place objectsunder the seat before stowing. Remove allobjects from the seat and stowage tub.Note: In the unlikely event that the thirdrow power seat stops prematurely or travelsto an unexpected position, press the FOLDbutton (C) to reset the seat and return it toa normal position.
WARNING: Do not sit in seats thatare rearward facing when your vehicle ismoving. This is not a correct seatingposition and the seatbelts do not properlyfunction this way. Failure to follow thisinstruction could result in personal injuryor death in a sudden stop or crash.
133
Flex (TP3) , enUSA, Edition date: 201803, Second-Printing
Seats

E245760
HEATED SEATS (If Equipped)
Front Seats
WARNING: People who are unableto feel pain to their skin because ofadvanced age, chronic illness, diabetes,spinal cord injury, medication, alcohol use,exhaustion or other physical conditions,must exercise care when using the heatedseat. The heated seat may cause burnseven at low temperatures, especially ifused for long periods of time. Do not placeanything on the seat that insulates againstheat, such as a blanket or cushion. Thismay cause the heated seat to overheat.Do not puncture the seat with pins, needlesor other pointed objects. This may damagethe heating element which may cause theheated seat to overheat. An overheatedseat may cause serious personal injury.
Do not do the following:• Place heavy objects on the seat.• Operate the heated seat if water or any
other liquid spills on the seat. Allow theseat to dry thoroughly.
Note: You must switch the ignition on touse this feature.
E146322
Press the heated seat symbol to cyclethrough the various heat settings and off.More indicator lights indicate warmersettings.
Second Row Heated Seats (If Equipped)
WARNING: Persons who are unableto feel pain to the skin because ofadvanced age, chronic illness, diabetes,spinal cord injury, medication, alcohol use,exhaustion, or other physical conditions,must exercise care when using the seatheater. The seat heater may cause burnseven at low temperatures, especially ifused for long periods of time. Do not placeanything on the seat that insulates againstheat, such as a blanket or cushion, becausethis may cause the seat heater to overheat.Do not puncture the seat with pins,needles, or other pointed objects becausethis may damage the heating elementwhich may cause the seat heater tooverheat. An overheated seat may causeserious personal injury.
Do not do the following:• Place heavy objects on the seat.• Operate the seat heater if water or any
other liquid spills on the seat. Allow theseat to dry thoroughly.
Note: You must switch the ignition on touse this feature.
134
Flex (TP3) , enUSA, Edition date: 201803, Second-Printing
Seats

E146322
Press the heated seat symbol to cyclethrough the various heat settings and off.More indicator lights indicate warmersettings.
CLIMATE CONTROLLED SEATS(If Equipped)
Heated Seats
WARNING: People who are unableto feel pain to their skin because ofadvanced age, chronic illness, diabetes,spinal cord injury, medication, alcohol use,exhaustion or other physical conditions,must exercise care when using the heatedseat. The heated seat may cause burnseven at low temperatures, especially ifused for long periods of time. Do not placeanything on the seat that insulates againstheat, such as a blanket or cushion. Thismay cause the heated seat to overheat.Do not puncture the seat with pins, needlesor other pointed objects. This may damagethe heating element which may cause theheated seat to overheat. An overheatedseat may cause serious personal injury.
Do not do the following:• Place heavy objects on the seat.• Operate the heated seat if water or any
other liquid spills on the seat. Allow theseat to dry thoroughly.
Note: You must switch the ignition on touse this feature.
E146322
Press the heated seat symbol to cyclethrough the various heat settings and off.More indicator lights indicate warmersettings.
Cooled SeatsNote: You must switch the ignition on touse this feature.
E146309
Press the cooled seat symbol to cyclethrough the various cool settings and off.More indicator lights indicate coolersettings.If the engine falls below 350 RPM whilethe cooled seats are on, the feature willturn itself off. You will need to reactivateit.
Climate Controlled Seat Air FilterReplacementYour vehicle is equipped with lifetime airfilters that are integrated with the seats.Regular maintenance or replacement isnot required.
135
Flex (TP3) , enUSA, Edition date: 201803, Second-Printing
Seats

HomeLink Wireless ControlSystem
WARNING: Do not use the systemwith any garage door opener that does nothave the safety stop and reverse featureas required by U.S. Federal SafetyStandards (this includes any garage dooropener manufactured before April 1, 1982).A garage door opener which cannot detectan object, signaling the door to stop andreverse, does not meet current federalsafety standards. Using a garage dooropener without these features increasesthe risk of serious injury or death.
Note: Make sure that the garage door andsecurity device are free from obstructionwhen you are programming. Do not programthe system with the vehicle in the garage.Note: Make sure you keep the originalremote control transmitter for use in othervehicles as well as for future systemprogramming.Note: We recommend that upon the saleor lease termination of your vehicle, youerase the programmed function buttons forsecurity reasons. See Erasing the FunctionButton Codes.Note: You can program a maximum ofthree devices. To change or replace any ofthe three devices after it has been initiallyprogrammed, you must first erase thecurrent settings. See Erasing the FunctionButton Codes.
E142657
The universal garage door opener replacesthe common hand-held garage dooropener with a three-button transmitterthat is integrated into the driver’s sun visor.The system includes two primary features,a garage door opener and a platform forremote activation of devices within thehome. As well as being programmed forgarage doors, the system transmitter canbe programmed to operate entry gateoperators, security systems, entry doorlocks and home or office lighting.Additional system information can befound online at www.homelink.com,www.youtube.com/HomeLinkGentex orby calling the toll-free help line on1-800-355-3515.
In-Vehicle ProgrammingThis process is to program your hand-heldtransmitter and your in-vehicle HomeLinkbutton.Note: The programming steps belowassume you will be programming HomeLinkthat was not previously programmed.Note: Put a new battery in the hand-heldtransmitter. This will ensure quicker trainingand accurate transmission of theradio-frequency signal.
E142658
1. With your vehicle parked outside of thegarage, turn your ignition to the onposition, but do not start your vehicle.
136
Flex (TP3) , enUSA, Edition date: 201803, Second-Printing
Universal Garage Door Opener (If Equipped)

2. Hold your hand-held garage doortransmitter 2–6 in (5–14 cm) awayfrom the HomeLink button you wantto program.
3. Using both hands, simultaneously,press and hold the desired HomeLinkbutton and the hand-held transmitterbutton. DO NOT release either one untilthe HomeLink indicator light flashesslowly and then rapidly. When theindicator light flashes rapidly, bothbuttons may be released. The rapidflashing indicates successful training.
Note: You may need to use a differentmethod if you live in Canada or havedifficulties programming your gate operatoror garage door opener. See Gate Operator/ Canadian Programming.4. Press and hold the HomeLink button
you programmed for two seconds, thenrelease. You may need to do this twiceto activate the door. If your garage doordoes not operate, watch the HomeLinkindicator light.
If the indicator light stays on, theprogramming is complete. No furtheraction is needed.If the indicator light flashes rapidly for 2seconds and then turns to a constant light,the HomeLink button is not programmedyet. See Programming Your Garage DoorOpener Motor.To program additional buttons, repeatSteps 1 – 4.For questions or comments, please contactHomeLink at www.homelink.com,www.youtube.com/HomeLinkGentex or1-800-355-3515.
Programming Your Garage DoorOpener MotorNote: You may need a ladder to reach theunit and you may need to remove the coveror lamp lens on your garage door opener.
E142659
1. Press the learn button on the garagedoor opener motor and then you have30 seconds to complete the next twosteps.
2. Return to your vehicle.
E142658
3. Press and hold the function button youwant to program for 2 seconds, thenrelease. Repeat this step. Dependingon your brand of garage door opener,you may need to repeat this sequencea third time.
Gate Operator / CanadianProgrammingCanadian radio-frequency laws requiretransmitter signals to “time-out” (or quit)after several seconds of transmission –which may not be long enough forHomeLink to pick up the signal duringprogramming. Similar to this Canadian law,some U.S. gate operators are designed to“time-out” in the same manner.Note: If programming a garage door openeror gate operator, it is advised to unplug thedevice during the “cycling” process toprevent possible overheating.
137
Flex (TP3) , enUSA, Edition date: 201803, Second-Printing
Universal Garage Door Opener (If Equipped)

1. Press and hold the HomeLink buttonwhile you press and release, every twoseconds, your hand-held transmitteruntil the HomeLink indicator lightchanges from a slow to a rapidlyblinking light.
2. Release both the HomeLink andhand-held transmitter buttons.
3. Continue programing HomeLink. SeeIn-Vehicle Programming.
Erasing the Function Button CodesNote: You cannot erase individual buttons.
E142660
1. Press and hold the outer two functionbuttons simultaneously forapproximately 20 seconds until theindicator lights above the buttons flashrapidly.
2. When the indicator lights flash, releasethe buttons. The codes for all buttonsare erased.
Reprogramming a Single ButtonTo program a device to a previously trainedbutton, follow these steps:1. Press and hold the desired button. Do
NOT release the button.2. The indicator light will begin to flash
after 20 seconds. Without releasing thebutton, follow Step 1 in theProgramming section.
For questions or comments, contactHomeLink at www.homelink.com,www.youtube.com/HomeLinkGentex or1-800-355-3515.
Programming to a Genie Intellicode 2Garage Door OpenerNote: The Genie Intellicode 2 transmittermust already be programmed to operatewith the garage door opener.Note: To program HomeLink to thetransmitter you must first put thetransmitter into programming mode.
BAE142661
Red indicator lightA.Green indicator lightB.
1. Press and hold one of the buttons onthe hand-held transmitter for 10seconds. The indicator light will changefrom green to red and green.
2. Press the same button twice to confirmthe change to programming mode. Ifdone properly the indicator light willappear red.
3. Hold the transmitter within 1–3 in(2–8 cm) of the button on the visor youwant to program.
138
Flex (TP3) , enUSA, Edition date: 201803, Second-Printing
Universal Garage Door Opener (If Equipped)

4. Press and hold both the programmedGenie button on the hand-heldtransmitter and the button you wantto program. The indicator light on thevisor will flash rapidly when theprogramming is successful.
Note: The Genie transmitter will transmitfor up to 30 seconds. If HomeLink does notprogram within 30 seconds the Genietransmitter will need to be pressed again. Ifthe Genie transmitter indicator light displaysgreen and red, release the button until theindicator light turns off before pressing thebutton again.Once HomeLink has been programmedsuccessfully, the Genie transmitter mustbe changed out of program mode. To dothis:1. Press and hold the previously
programmed Genie button on thehand-held transmitter for 10 seconds.The indicator light will change from redto red and green.
2. Press the same button twice to confirmthe change. If done correctly theindicator light will turn green.
Programming HomeLink to the GenieIntellicode Garage Door Opener MotorNote: You may need a ladder to access thegarage door opener motor.
E142662
1. Press and hold the program button onthe garage door opener motor untilboth blue indicator lights turn on.
2. Release the program button. Only thesmaller round indicator light should beon.
3. Press and release the program button.The larger purple indicator light willflash.
Note: The next two steps must becompleted in 30 seconds.4. Press and release the Genie Intellicode
2 hand-held transmitter’s previouslyprogrammed button. Both indicatorlights on the garage door opener motorunit should now flash purple.
5. Press and hold the previouslyprogrammed button on the visor for 2seconds. Repeat this step up to 3 timesuntil the garage door moves.
Programming is now complete.
Clearing a HomeLink DeviceTo erase programming from the threeHomeLink buttons press and hold the twoouter HomeLink buttons until the indicatorlight begins to flash. The indicator light willbegin flashing in 10 to 20 seconds, at whichtime both buttons should be released.Programming has now been erased, andthe indicator light should blink slowly toindicate the device is in train mode whenany of the three HomeLink buttons arepressed.
139
Flex (TP3) , enUSA, Edition date: 201803, Second-Printing
Universal Garage Door Opener (If Equipped)

FCC and RSS-210 Industry CanadaComplianceThis device complies with Part 15 of theFCC Rules and with RSS-210 of IndustryCanada. Operation is subject to thefollowing two conditions: (1) this devicemay not cause harmful interference, and(2) this device must accept anyinterference received, includinginterference that may cause undesiredoperation.Changes or modifications to your devicenot expressly approved by the partyresponsible for compliance can void theuser’s authority to operate the equipment.
140
Flex (TP3) , enUSA, Edition date: 201803, Second-Printing
Universal Garage Door Opener (If Equipped)

12 Volt DC Power Point
WARNING: Do not plug optionalelectrical accessories into the cigar lightersocket. Incorrect use of the cigar lightercan cause damage not covered by thevehicle warranty, and can result in fire orserious injury.
Note: When you switch the ignition on, youcan use the socket to power 12 voltappliances with a maximum current ratingof 15 amps.If the power supply does not work after youswitch the ignition off, switch the ignitionon.Note: Do not hang any accessory from theaccessory plug.Note: Do not use the power point over thevehicle capacity of 12 volt DC 180 watts ora fuse may blow.Note: Always keep the power point capsclosed when not in use.Do not insert objects other than anaccessory plug into the power point. Thisdamages the power point and may blowthe fuse.Run the vehicle for full capacity use of thepower point.To prevent the battery from running out ofcharge:• Do not use the power point longer than
necessary when the vehicle is notrunning.
• Do not leave devices plugged inovernight or when you park your vehiclefor extended periods.
LocationsPower points may be in the followinglocations:• Inside the center console.• On the rear of the center console.• In the cargo area.• On the passenger side floor panel.
110 Volt AC Power Point (If Equipped)
WARNING: Do not keep electricaldevices plugged in the power pointwhenever the device is not in use. Do notuse any extension cord with the 110 volt ACpower point, since it will defeat the safetyprotection design. Doing so may cause thepower point to overload due to poweringmultiple devices that can reach beyondthe 150 watt load limit and could result infire or serious injury.
Note: The power point turns off when youswitch the ignition off, or when the batteryvoltage drops below 11 volts.You can use the power point for electricdevices that require up to 150 watts. It ison the rear of the center console.
E194174
Note: Depending on your vehicle, the powerpoint cover may open to the right or upward.
141
Flex (TP3) , enUSA, Edition date: 201803, Second-Printing
Auxiliary Power Points

When the indicator light on the power pointis:• On: The power point is working, the
ignition is on and a device is pluggedin.
• Off: The power point is off, the ignitionis off or no device is plugged in.
• Flashing: The power point is in faultmode.
The power outlet temporarily turns offpower when in fault mode if the deviceexceeds the 150 watt limit. Unplug yourdevice and switch the ignition off. Switchthe ignition back on, but do not plug yourdevice back in. Let the system cool off andswitch the ignition off to reset the faultmode. Switch the ignition back on andmake sure the indicator light remains on.Do not use the power point for certainelectric devices, including:• Cathode-ray, tube-type televisions.• Motor loads, such as vacuum cleaners,
electric saws and other electric powertools or compressor-drivenrefrigerators.
• Measuring devices, which processprecise data, such as medicalequipment or measuring equipment.
• Other appliances requiring anextremely stable power supply such asmicrocomputer-controlled electricblankets or touch-sensor lamps.
142
Flex (TP3) , enUSA, Edition date: 201803, Second-Printing
Auxiliary Power Points

CENTER CONSOLEStow items in the cup holder carefully asitems may become loose during hardbraking, acceleration or crashes, includinghot drinks which may spill.Available console features include:
E210728
Front storage compartment.ACup holder.BCenter storage compartmentwith auxiliary power point andUSB ports.
C
Auxiliary power point or cigarlighter.
D
Rear storage compartment.EAuxiliary power point.FRear climate controls.G
Second Row Center Console (If
Equipped)
E211667
Cup holder.AArmrest.BUtility compartment andrefrigerator unit.
C
Console Refrigerator and Freezer(If Equipped)
This feature operates when the vehicle ison or in accessory mode. Limit the time ofuse when the vehicle is in accessory modeto avoid the vehicle battery running out ofcharge. You should only use this featurewhen the vehicle is running.
E211653
143
Flex (TP3) , enUSA, Edition date: 201803, Second-Printing
Storage Compartments

Flip the console lid forward, then lift off thecover to open the cooling compartment.Make sure to replace the cover after usingit. This helps maintain a more consistentcooling temperature.
E211668
Refrigerator: Briefly press and holdCOOL. The indicator light on the cool sideof the switch illuminates and the indicatorlight on the freeze side glows when therefrigerator is active. The temperaturecools to approximately 41°F (5°C). Brieflypress and hold COOL again to switch offthe refrigerator. Briefly press and holdFREEZE to change to freezer mode.Freezer: Briefly press and hold FREEZE.Both indicator lights illuminate when thefreezer is active. The temperature cools toapproximately 23°F (-5°C). Press FREEZEagain to switch off the freezer. Press COOLto change to refrigerator mode.
This feature turns off when you switch thevehicle off. It turns back on to the lastmode when you restart the vehicle.
Cleaning and MaintenanceNote: Condensation on the inside walls ofthe refrigerator is normal under certainconditions.This feature is maintenance free, but youcan clean the inside of the unit and thecover with a mild soap and water solution.
OVERHEAD CONSOLE
E75193
Press near the rear edge of the door toopen it.
144
Flex (TP3) , enUSA, Edition date: 201803, Second-Printing
Storage Compartments

GENERAL INFORMATION
WARNING: Extended idling at highengine speeds can produce very hightemperatures in the engine and exhaustsystem, creating the risk of fire or otherdamage.
WARNING: Do not park, idle or driveyour vehicle on dry grass or other dryground cover. The emission system heatsup the engine compartment and exhaustsystem, creating the risk of fire.
WARNING: Do not start the enginein a closed garage or in other enclosedareas. Exhaust fumes can be toxic. Alwaysopen the garage door before you start theengine.
WARNING: Exhaust leaks may resultin entry of harmful and potentially lethalfumes into the passenger compartment.If you smell exhaust fumes inside yourvehicle, have your vehicle inspectedimmediately. Do not drive if you smellexhaust fumes.
If you disconnect the battery, your vehiclemay exhibit some unusual drivingcharacteristics for approximately 5 mi(8 km) after you reconnect it. This isbecause the engine management systemmust realign itself with the engine. Youcan disregard any unusual drivingcharacteristics during this period.The powertrain control system meets allCanadian interference-causing equipmentstandard requirements regulating theimpulse electrical field or radio noise.
When you start the engine, avoid pressingthe accelerator pedal before and duringoperation. Only use the accelerator pedalwhen you have difficulty starting theengine.
IGNITION SWITCH (If Equipped)
E252522
0
/ //
///
0 (off) - The ignition is off.Note: When you switch the ignition off andleave your vehicle, do not leave your key inthe ignition. This could cause your vehiclebattery to lose charge.I (accessory) - Allows the electricalaccessories, such as the radio, to operatewhile the engine is not running.Note: Do not leave the ignition key in thisposition for too long. This could cause yourvehicle battery to lose charge.II (on) - All electrical circuits areoperational and the warning lamps andindicators illuminate.III (start) - Cranks the engine.
145
Flex (TP3) , enUSA, Edition date: 201803, Second-Printing
Starting and Stopping the Engine

KEYLESS STARTING (If Equipped)
Note: The keyless starting system may notfunction if the key is close to metal objectsor electronic devices such as cellularphones.Note: A valid key must be located insideyour vehicle to switch the ignition on andstart the engine.
Ignition Modes
E191075
The keyless starting system has threemodes:Off: Turns the ignition off.• Without applying the brake pedal,
press and release the button oncewhen the ignition is in the on mode, orwhen the engine is running but thevehicle is not moving.
On: All electrical circuits are operationaland the warning lamps and indicatorsilluminate.• Without applying the brake pedal,
press and release the button once.Note: You may have to press the pushbutton ignition switch twice to switch theignition on.Start: Starts the engine.
• Press the brake pedal, and then pressthe button for any length of time. Anindicator light on the button illuminateswhen then ignition is on and when theengine starts.
STARTING A GASOLINEENGINEWhen you start the engine, the idle speedincreases. This helps to warm up theengine. If the engine idle speed does notslow down automatically, have yourvehicle checked as soon as possible.Note: You can crank the engine for a totalof 60 seconds without the engine startingbefore the starting system temporarilydisables. The 60 seconds does not have tobe all at once. For example, if you crank theengine three times for 20 seconds eachtime, without the engine starting, youreached the 60-second time limit. Amessage appears in the information displayalerting you that you exceeded the crankingtime. You cannot attempt to start theengine for at least 15 minutes. After 15minutes, you are limited to a 15-secondengine cranking time. You need to wait 60minutes before you can crank the engine for60 seconds again.Before starting your vehicle, check thefollowing:• Make sure all occupants have fastened
their seatbelts.• Make sure the headlamps and
electrical accessories are off.• Make sure the parking brake is on.• Make sure the transmission is in park
(P).• Switch the ignition on. For vehicles with
a keyless ignition, see the followinginstructions.
146
Flex (TP3) , enUSA, Edition date: 201803, Second-Printing
Starting and Stopping the Engine
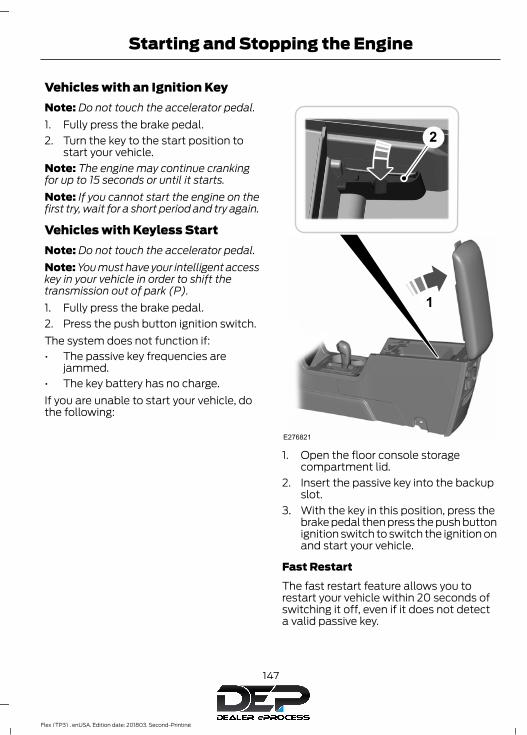
Vehicles with an Ignition KeyNote: Do not touch the accelerator pedal.1. Fully press the brake pedal.2. Turn the key to the start position to
start your vehicle.Note: The engine may continue crankingfor up to 15 seconds or until it starts.Note: If you cannot start the engine on thefirst try, wait for a short period and try again.
Vehicles with Keyless StartNote: Do not touch the accelerator pedal.Note: You must have your intelligent accesskey in your vehicle in order to shift thetransmission out of park (P).1. Fully press the brake pedal.2. Press the push button ignition switch.The system does not function if:• The passive key frequencies are
jammed.• The key battery has no charge.If you are unable to start your vehicle, dothe following:
E276821
1. Open the floor console storagecompartment lid.
2. Insert the passive key into the backupslot.
3. With the key in this position, press thebrake pedal then press the push buttonignition switch to switch the ignition onand start your vehicle.
Fast RestartThe fast restart feature allows you torestart your vehicle within 20 seconds ofswitching it off, even if it does not detecta valid passive key.
147
Flex (TP3) , enUSA, Edition date: 201803, Second-Printing
Starting and Stopping the Engine

Within 20 seconds of switching the engineoff, press the brake pedal and press thepush button ignition switch. After 20seconds, you can no longer start yourvehicle if it does not detect a valid passivekey.Once your vehicle starts, it remains runninguntil you press the push button ignitionswitch, even if your vehicle does not detecta valid passive key. If you open and closea door while your vehicle is running, thesystem searches for a valid passive key.You cannot start your vehicle if the systemdoes not detect a valid passive key within20 seconds.
Failure to StartIf you cannot start the engine after threeattempts, wait 10 seconds and follow thisprocedure:1. Fully press the brake pedal.2. Shift into park (P).3. Fully depress the accelerator pedal and
hold it there.4. Start the engine.
Automatic Engine ShutdownThis automatically shuts down your vehicleif it has been idling for an extended periodof time. The ignition also turns off in orderto save battery power. Before your vehicleshuts down, a message appears in theinformation display showing a timercounting down from 30 seconds. If you donot intervene within 30 seconds, yourvehicle shuts down. Another messageappears in the information display toinform you that your vehicle has shut downto save fuel. Start your vehicle as younormally do.
Automatic Engine Shutdown OverrideNote: You cannot permanently switch offthe automatic shutdown feature. When youswitch it off temporarily, it turns on at thenext ignition cycle.You can stop the shutdown, or reset thetimer, at any point before the 30-secondcountdown has expired by doing any of thefollowing:• You can reset the timer by interacting
with your vehicle, for example pressingthe brake or accelerator pedal.
• You can temporarily switch off theshutdown feature any time the ignitionis on using the information display. SeeInformation Displays (page 95). Thefeature only remains off for the currentignition cycle.
• During the 30-second countdown, thesystem prompts you to press OK orRESET to temporarily switch thefeature off for the current ignition cycleonly.
Stopping the Engine When YourVehicle is StationaryVehicles with an Ignition Key1. Shift into park (P).2. Switch the ignition off.3. Apply the parking brake.
Vehicles with Keyless Start1. Shift into park (P).2. Press the push button ignition switch.3. Apply the parking brake.Note: The ignition, all electrical circuits andall warning lamps and indicators will beturned off.Note: If the engine is idling for 30 minutes,the ignition and engine automatically shutdown.
148
Flex (TP3) , enUSA, Edition date: 201803, Second-Printing
Starting and Stopping the Engine

Stopping the Engine When YourVehicle is Moving
WARNING: Switching off the enginewhen your vehicle is still moving results ina significant decrease in brakingassistance. Higher effort is required toapply the brakes and to stop your vehicle.A significant decrease in steeringassistance could also occur. The steeringdoes not lock, but higher effort could berequired to steer your vehicle. When youswitch the ignition off, some electricalcircuits, for example airbags, also turn off.If you unintentionally switch the ignitionoff, shift into neutral (N) and restart theengine.
Vehicles with an Ignition Key1. Shift into neutral and use the brakes to
bring your vehicle to a safe stop.2. When your vehicle has stopped, shift
into park (P) and switch the ignitionoff.
3. Apply the parking brake.
Vehicles with Keyless Start1. Shift into neutral and use the brakes to
bring your vehicle to a safe stop.2. When your vehicle has stopped, shift
into park (P).3. Press and hold the push button ignition
switch, or press it three times withintwo seconds.
4. Apply the parking brake.
Guarding Against Exhaust Fumes
WARNING: Exhaust leaks may resultin entry of harmful and potentially lethalfumes into the passenger compartment.If you smell exhaust fumes inside yourvehicle, have your vehicle inspectedimmediately. Do not drive if you smellexhaust fumes.
Important Ventilating InformationIf you stop your vehicle and then leave theengine idling for long periods, werecommend that you do one of thefollowing:• Open the windows at least 1 in (3 cm).• Set your climate control to outside air.
ENGINE BLOCK HEATER (If
Equipped)
WARNING: Failure to follow engineblock heater instructions could result inproperty damage or serious personal injury.
WARNING: Do not use your heaterwith ungrounded electrical systems ortwo-pronged adapters. There is a risk ofelectrical shock.
WARNING: Do not fully close thehood, or allow it to drop under its ownweight when using the engine block heater.This could damage the power cable andmay cause an electrical short resulting infire, injury and property damage.
Note: The heater is most effective whenoutdoor temperatures are below 0°F(-18°C).
149
Flex (TP3) , enUSA, Edition date: 201803, Second-Printing
Starting and Stopping the Engine

The heater acts as a starting aid bywarming the engine coolant. This allowsthe climate control system to respondquickly. The equipment includes a heaterelement (installed in the engine block) anda wire harness. You can connect thesystem to a grounded 120-volt ACelectrical source.We recommend that you do the followingfor a safe and correct operation:• Use a 16-gauge outdoor extension cord
that is product certified byUnderwriter’s Laboratory (UL) orCanadian Standards Association(CSA). This extension cord must besuitable for use outdoors, in coldtemperatures, and be clearly markedSuitable for Use with OutdoorAppliances. Do not use an indoorextension cord outdoors. This couldresult in an electric shock or become afire hazard.
• Use as short an extension cord aspossible.
• Do not use multiple extension cords.• Make sure that when in operation, the
extension cord plug and heater cordplug connections are free and clear ofwater. This could cause an electricshock or fire.
• Make sure your vehicle is parked in aclean area, clear of combustibles.
• Make sure the heater, heater cord andextension cord are firmly connected.
• Check for heat anywhere in theelectrical hookup once the system hasbeen operating for approximately 30minutes.
• Make sure the system is unplugged andproperly stowed before starting anddriving your vehicle. Make sure theprotective cover seals the prongs of theblock heater cord plug when not in use.
• Make sure the heater system ischecked for proper operation beforewinter.
Using the Engine Block HeaterMake sure the receptacle terminals areclean and dry prior to use. Clean them witha dry cloth if necessary.The heater uses 0.4 to 1.0 kilowatt-hoursof energy per hour of use. The system doesnot have a thermostat. It achievesmaximum temperature afterapproximately three hours of operation.Using the heater longer than three hoursdoes not improve system performance andunnecessarily uses electricity.
150
Flex (TP3) , enUSA, Edition date: 201803, Second-Printing
Starting and Stopping the Engine

SAFETY PRECAUTIONS
WARNING: Do not overfill the fueltank. The pressure in an overfilled tank maycause leakage and lead to fuel spray andfire.
WARNING: The fuel system may beunder pressure. If you hear a hissing soundnear the fuel filler inlet, do not refuel untilthe sound stops. Otherwise, fuel may sprayout, which could cause serious personalinjury.
WARNING: Fuels can cause seriousinjury or death if misused or mishandled.
WARNING: Fuel may containbenzene, which is a cancer-causing agent.
WARNING: When refueling alwaysshut the engine off and never allow sparksor open flames near the fuel tank fillervalve. Never smoke or use a cell phonewhile refueling. Fuel vapor is extremelyhazardous under certain conditions. Avoidinhaling excess fumes.
Follow these guidelines when refueling:• Extinguish all smoking materials and
any open flames before refueling yourvehicle.
• Always switch the engine off beforerefueling.
• Automotive fuels can be harmful orfatal if swallowed. Fuel is highly toxicand if swallowed can cause death orpermanent injury. If fuel is swallowedimmediately call a physician, even if nosymptoms are immediately apparent.The toxic effects of fuel may not beapparent for hours.
• Avoid inhaling fuel vapors. Inhaling fuelvapor can lead to eye and respiratorytract irritation. In severe cases,excessive or prolonged breathing offuel vapor can cause serious illness andpermanent injury.
• Avoid getting fuel in your eyes. If yousplash fuel in your eyes, immediatelyremove contact lenses (if worn), flushwith water for 15 minutes and seekmedical attention. Failure to seekproper medical attention could lead topermanent injury.
• Fuels can be harmful if absorbedthrough the skin. If you splash fuel onyour skin, clothing or both, promptlyremove contaminated clothing andthoroughly wash your skin with soapand water. Repeated or prolonged skincontact causes skin irritation.
• Be particularly careful if you are takingAntabuse or other forms of Disulfiramfor the treatment of alcoholism.Breathing fuel vapors could cause anadverse reaction, serious personalinjury or sickness. Immediately call aphysician if you experience any adversereactions.
FUEL QUALITYChoosing the Right Fuel
E161513
Your vehicle is designed to operate onregular unleaded gasoline with a minimumpump (R+M)/2 octane rating of 87.
151
Flex (TP3) , enUSA, Edition date: 201803, Second-Printing
Fuel and Refueling

Some fuel stations, particularly those inhigh altitude areas, offer fuels posted asregular unleaded gasoline with an octanerating below 87. The use of these fuelscould result in engine damage that will notbe covered by the vehicle warranty.For best overall vehicle and engineperformance, premium fuel with an octanerating of 91 or higher is recommended. Theperformance gained by using premium fuelis most noticeable in hot weather as wellas other conditions, for example whentowing a trailer. See Towing (page 208).Do not be concerned if the enginesometimes knocks lightly. However, if theengine knocks heavily while using fuel withthe recommended octane rating, contactan authorized dealer to prevent any enginedamage.We recommend Top Tier detergentgasolines, where available to help minimizeengine deposits and maintain optimalvehicle and engine performance. Foradditional information, refer towww.toptiergas.com.Note: Use of any fuel for which the vehiclewas not designed can impair the emissioncontrol system, cause loss of vehicleperformance, and cause damage to theengine which may not be covered by thevehicle Warranty.Do not use:• Diesel fuel.• Fuels containing kerosene or paraffin.• Fuel containing more than 15% ethanol
or E85 fuel.• Fuels containing methanol.• Fuels containing metallic-based
additives, including manganese-basedcompounds.
• Fuels containing the octane boosteradditive, methylcyclopentadienylmanganese tricarbonyl (MMT).
• Leaded fuel, using leaded fuel isprohibited by law.
The use of fuels with metallic compoundssuch as methylcyclopentadienylmanganese tricarbonyl (commonly knownas MMT), which is a manganese-basedfuel additive, will impair engineperformance and affect the emissioncontrol system.
FUEL FILLER FUNNELLOCATIONThe fuel filler funnel is in the spare wheelstorage tray.
RUNNING OUT OF FUELRunning out of fuel can cause damage notcovered by the vehicle Warranty.If your vehicle runs out of fuel:• Add a minimum of 1.3 gal (5 L) of fuel
to restart the engine.• You may need to switch the ignition
from off to on several times afterrefueling to allow the fuel system topump the fuel from the tank to theengine. When restarting, cranking timetakes a few seconds longer thannormal.
Note: If your vehicle is on a steep slope,more fuel may be required.
Filling a Portable Fuel Container
WARNING: Flow of fuel through afuel pump nozzle can produce staticelectricity. This can cause a fire if you arefilling an ungrounded fuel container.
152
Flex (TP3) , enUSA, Edition date: 201803, Second-Printing
Fuel and Refueling

Use the following guidelines to avoidelectrostatic charge build-up, which canproduce a spark, when filling anungrounded fuel container:• Only use an approved fuel container to
transfer fuel to your vehicle. Place thecontainer on the ground when filling it.
• Do not fill a fuel container when it isinside your vehicle (including the cargoarea).
• Keep the fuel pump nozzle in contactwith the fuel container when filling it.
• Do not use a device that holds the fuelpump nozzle lever in the fill position.
Adding Fuel From a Portable FuelContainer
WARNING: Do not insert the nozzleof a fuel container or an aftermarket funnelinto the fuel filler neck. This may damagethe fuel system filler neck or its seal andcause fuel to run onto the ground.
WARNING: Do not try to pry open orpush open the capless fuel system withforeign objects. This could damage the fuelsystem and its seal and cause injury to youor others.
WARNING: Do not dispose of fuelin the household refuse or the publicsewage system. Use an authorized wastedisposal facility.
When refueling the vehicle fuel tank froma fuel container, use the fuel filler funnelincluded with your vehicle. See Fuel FillerFunnel Location (page 152).Note: Do not use aftermarket funnels asthey may not work with the capless fuelsystem and can damage it.When refueling the vehicle fuel tank froma fuel container, do the following:
1. Fully open the fuel filler door.2. Fully insert the fuel filler funnel into the
fuel filler inlet.
E157452
3. Add fuel to your vehicle from the fuelcontainer.
4. Remove the fuel filler funnel.5. Fully close the fuel filler door.6. Clean the fuel filler funnel and place it
back in your vehicle or correctly disposeof it.
Note: Extra funnels can be purchased froman authorized dealer if you choose todispose of the funnel.
153
Flex (TP3) , enUSA, Edition date: 201803, Second-Printing
Fuel and Refueling

REFUELINGRefueling System Overview
E267248
B
C
A
Fuel filler door.AFuel tank filler valve.BFuel tank filler pipe.C
Your vehicle does not have a fuel tank fillercap.
E206911
A B
C D
Left-hand side. To open the fuelfiller door, press the center rearedge of the fuel filler door andthen release.
A
Right-hand side. To open thefuel filler door, press the centerrear edge of the fuel filler doorand then release.
B
Left-hand side. Pull the rear ofthe fuel filler door to open it.
C
Right-hand side. Pull the rear ofthe fuel filler door to open it.
D
Refueling Your Vehicle
WARNING: When refueling alwaysshut the engine off and never allow sparksor open flames near the fuel tank fillervalve. Never smoke or use a cell phonewhile refueling. Fuel vapor is extremelyhazardous under certain conditions. Avoidinhaling excess fumes.
154
Flex (TP3) , enUSA, Edition date: 201803, Second-Printing
Fuel and Refueling

WARNING: The fuel system may beunder pressure. If you hear a hissing soundnear the fuel filler inlet, do not refuel untilthe sound stops. Otherwise, fuel may sprayout, which could cause serious personalinjury.
WARNING: Do not pry open the fueltank filler valve. This could damage thefuel system. Failure to follow thisinstruction could result in fire, personalinjury or death.
WARNING: Do not remove the fuelpump nozzle from its fully inserted positionwhen refueling.
WARNING: Stop refueling when thefuel pump nozzle automatically shuts offfor the first time. Failure to follow this willfill the expansion space in the fuel tank andcould lead to fuel overflowing.
WARNING: Do not overfill the fueltank. The pressure in an overfilled tank maycause leakage and lead to fuel spray andfire.
WARNING: Wait at least fiveseconds before removing the fuel pumpnozzle to allow any residual fuel to draininto the fuel tank.
1. Fully open the fuel filler door.2. Select the correct fuel pump nozzle for
your vehicle.
E139202
A
3. Insert the fuel pump nozzle up to thefirst notch on the nozzle A. Keep thefuel pump nozzle resting on the fueltank filler pipe.
E139203
A
B
4. Hold the fuel pump nozzle in positionB when refueling. Holding the fuelpump nozzle in position A can affectthe flow of fuel and shut off the fuelpump nozzle before the fuel tank is full.
155
Flex (TP3) , enUSA, Edition date: 201803, Second-Printing
Fuel and Refueling

E206912
A B
5. Operate the fuel pump nozzle withinthe area shown.
E119081
6. When you finish refueling slightly raisethe fuel pump nozzle and slowlyremove it.
7. Fully close the fuel filler door.Do not attempt to start the engine if youhave filled the fuel tank with incorrect fuel.Incorrect fuel use could cause damage notcovered by the vehicle Warranty. Have yourvehicle immediately checked.
Refueling System Warning (If Equipped)
If the fuel tank filler valve does not fullyclose, a message could appear in theinformation display.
Message
Check Fuel Fill Inlet
If the message appears, do the following:1. Stop your vehicle as soon as it is safe
to do so and switch the engine off.2. Shift into park (P) or neutral (N).
3. Apply the parking brake.4. Fully open the fuel filler door.5. Check the fuel tank filler valve for any
debris that may be restricting itsmovement.
6. Remove any debris from the fuel tankfiller valve.
7. Fully insert a fuel pump nozzle or thefuel filler funnel provided with yourvehicle into the fuel filler pipe. SeeFuel Filler Funnel Location (page152). This action should dislodge anydebris that may be preventing the fueltank filler valve from fully closing.
8. Remove the fuel pump nozzle or fuelfiller funnel from the fuel filler pipe.
9. Fully close the fuel filler door.Note: The message may not immediatelyreset. If the message continues to appearand a warning lamp illuminates, have yourvehicle checked as soon as possible.
FUEL CONSUMPTIONAdvertised CapacityThe advertised capacity is the maximumamount of fuel that you can add to the fueltank after running out of fuel. Included inthe advertised capacity is an emptyreserve. The empty reserve is anunspecified amount of fuel that remainsin the fuel tank when the fuel gaugeindicates empty.Note: The amount of fuel in the emptyreserve varies and should not be relied uponto increase driving range.
Fuel EconomyYour vehicle calculates fuel economyfigures through the trip computer averagefuel function. See General Information(page 95).
156
Flex (TP3) , enUSA, Edition date: 201803, Second-Printing
Fuel and Refueling
The first 1,000 mi (1,500 km) of driving isthe break-in period of the engine. A moreaccurate measurement is obtained after2,000 mi (3,000 km).
Impacting Fuel Economy• Incorrect tire inflation pressures.• Fully loading your vehicle.• Carrying unnecessary weight.• Adding certain accessories to your
vehicle such as bug deflectors, rollbarsor light bars, running boards and skiracks.
• Using fuel blended with alcohol. SeeFuel Quality (page 151).
• Fuel economy may decrease with lowertemperatures.
• Fuel economy may decrease whendriving short distances.
• You may get better fuel economy whendriving on flat terrain than when drivingon hilly terrain.
157
Flex (TP3) , enUSA, Edition date: 201803, Second-Printing
Fuel and Refueling

EMISSION LAW
WARNING: Do not remove or alterthe original equipment floor covering orinsulation between it and the metal floorof the vehicle. The floor covering andinsulation protect occupants of the vehiclefrom the engine and exhaust system heatand noise. On vehicles with no originalequipment floor covering insulation, do notcarry passengers in a manner that permitsprolonged skin contact with the metalfloor. Failure to follow these instructionsmay result in fire or personal injury.
U.S. federal laws and certain state lawsprohibit removing or rendering inoperativeemission control system components.Similar federal or provincial laws mayapply in Canada. We do not approve of anyvehicle modification without firstdetermining applicable laws.
Tampering with emissionscontrol systems includingrelated sensors or the Diesel
Exhaust Fluid system can result in reducedengine power and the illumination of theservice engine soon light.
Tampering With a Noise ControlSystemFederal laws prohibit the following acts:• Removal or rendering inoperative by
any person other than for purposes ofmaintenance.
• Repair or replacement of any device orelement of the design incorporated intoa new vehicle for the purpose of noisecontrol prior to its sale or delivery tothe ultimate purchaser or while it is inuse.
• The use of the vehicle after any personremoves or renders inoperative anydevice or element of the design.
The U.S. Environmental Protection Agencymay presume to constitute tampering asfollows:• Removal of hood blanket, fender apron
absorbers, fender apron barriers,underbody noise shields or acousticallyabsorptive material.
• Tampering or rendering inoperative theengine speed governor, to allow enginespeed to exceed manufacturerspecifications.
If the engine does not start, runs rough,experiences a decrease in engineperformance, experiences excess fuelconsumption or produces excessiveexhaust smoke, check for the following:• A plugged or disconnected air inlet
system hose.• A plugged engine air filter element.• Water in the fuel filter and water
separator.• A clogged fuel filter.• Contaminated fuel.• Air in the fuel system, due to loose
connections.• An open or pinched sensor hose.• Incorrect engine oil level.
158
Flex (TP3) , enUSA, Edition date: 201803, Second-Printing
Engine Emission Control

• Incorrect fuel for climatic conditions.• Incorrect engine oil viscosity for
climactic conditions.Note: Some vehicles have a lifetime fuelfilter that is integrated with the fuel tank.Regular maintenance or replacement is notneeded.Note: If these checks do not help youcorrect the concern, have your vehiclechecked as soon as possible.
Noise Emissions Warranty,Prohibited Tampering Acts andMaintenanceOn January 1, 1978, Federal regulationbecame effective governing the noiseemission on trucks over 10,000 lb(4,536 kg) Gross Vehicle Weight Rating(GVWR). The preceding statementsconcerning prohibited tampering acts andmaintenance, and the noise warrantyfound in the Warranty Guide, areapplicable to complete chassis cabs over10,000 lb (4,536 kg) GVWR.
CATALYTIC CONVERTER
WARNING: Do not park, idle or driveyour vehicle on dry grass or other dryground cover. The emission system heatsup the engine compartment and exhaustsystem, creating the risk of fire.
WARNING: The normal operatingtemperature of the exhaust system is veryhigh. Never work around or attempt torepair any part of the exhaust system untilit has cooled. Use special care whenworking around the catalytic converter.The catalytic converter heats up to a veryhigh temperature after only a short periodof engine operation and stays hot after theengine is switched off.
WARNING: Exhaust leaks may resultin entry of harmful and potentially lethalfumes into the passenger compartment.If you smell exhaust fumes inside yourvehicle, have your vehicle inspectedimmediately. Do not drive if you smellexhaust fumes.
Your vehicle has various emission controlcomponents and a catalytic converter thatenables it to comply with applicableexhaust emission standards.To make sure that the catalytic converterand other emission control componentscontinue to work properly:• Do not crank the engine for more than
10 seconds at a time.• Do not run the engine with a spark plug
lead disconnected.• Do not push-start or tow-start your
vehicle. Use booster cables. See JumpStarting the Vehicle (page 221).
• Use only the specified fuel listed.• Do not switch the ignition off when your
vehicle is moving.• Avoid running out of fuel.• Have the items listed in scheduled
maintenance information performedaccording to the specified schedule.
Note: Resulting component damage maynot be covered by the vehicle Warranty.The scheduled maintenance items listedin scheduled maintenance information areessential to the life and performance ofyour vehicle and to its emissions system.If you use anything other than Ford,Motorcraft or Ford-authorized parts formaintenance replacements or for serviceof components affecting emission control,such non-Ford parts should be equivalentto genuine Ford Motor Company parts inperformance and durability.
159
Flex (TP3) , enUSA, Edition date: 201803, Second-Printing
Engine Emission Control

Illumination of the service engine soonindicator, charging system warning light orthe temperature warning light, fluid leaks,strange odors, smoke or loss of enginepower could indicate that the emissioncontrol system is not working properly.An improperly operating or damagedexhaust system may allow exhaust toenter the vehicle. Have a damaged orimproperly operating exhaust systeminspected and repaired immediately.Do not make any unauthorized changes toyour vehicle or engine. By law, vehicleowners and anyone who manufactures,repairs, services, sells, leases, tradesvehicles, or supervises a fleet of vehiclesare not permitted to intentionally removean emission control device or prevent itfrom working. Information about yourvehicle’s emission system is on the VehicleEmission Control Information Decallocated on or near the engine. This decalalso lists engine displacement.Please consult your warranty informationfor complete details.
On-Board Diagnostics (OBD-II)Your vehicle has a computer known as theon-board diagnostics system (OBD-II) thatmonitors the engine’s emission controlsystem. The system protects theenvironment by making sure that yourvehicle continues to meet governmentemission standards. The OBD-II systemalso assists a service technician in properlyservicing your vehicle.
When the service engine soonindicator illuminates, the OBD-IIsystem has detected a
malfunction. Temporary malfunctions maycause the service engine soon indicator toilluminate. Examples are:
1. Your vehicle has run out of fuel—theengine may misfire or run poorly.
2. Poor fuel quality or water in thefuel—the engine may misfire or runpoorly.
3. The fuel fill inlet may not have closedproperly. See Refueling (page 154).
4. Driving through deep water—theelectrical system may be wet.
You can correct these temporarymalfunctions by filling the fuel tank withgood quality fuel, properly closing the fuelfill inlet or letting the electrical system dryout. After three driving cycles without theseor any other temporary malfunctionspresent, the service engine soon indicatorshould stay off the next time you start theengine. A driving cycle consists of a coldengine startup followed by mixed city andhighway driving. No additional vehicleservice is required.If the service engine soon indicator remainson, have your vehicle serviced at the firstavailable opportunity. Although somemalfunctions detected by the OBD-II maynot have symptoms that are apparent,continued driving with the service enginesoon indicator on can result in increasedemissions, lower fuel economy, reducedengine and transmission smoothness andlead to more costly repairs.
Readiness for Inspection andMaintenance (I/M) TestingSome state and provincial and localgovernments may haveInspection/Maintenance (I/M) programsto inspect the emission control equipmenton your vehicle. Failure to pass thisinspection could prevent you from gettinga vehicle registration.
If the service engine soonindicator is on or the bulb doesnot work, your vehicle may need
service. See On-Board Diagnostics.
160
Flex (TP3) , enUSA, Edition date: 201803, Second-Printing
Engine Emission Control

Your vehicle may not pass the I/M test ifthe service engine soon indicator is on ornot working properly (bulb is burned out),or if the OBD-II system has determinedthat some of the emission control systemshave not been properly checked. In thiscase, the vehicle is not ready for I/Mtesting.If the vehicle’s engine or transmission hasjust been serviced, or the battery hasrecently run down or been replaced, theOBD-II system may indicate that thevehicle is not ready for I/M testing. Todetermine if the vehicle is ready for I/Mtesting, turn the ignition key to the onposition for 15 seconds without crankingthe engine. If the service engine soonindicator blinks eight times, it means thatthe vehicle is not ready for I/M testing; ifthe service engine soon indicator stays onsolid, it means that your vehicle is readyfor I/M testing.The OBD-II system checks the emissioncontrol system during normal driving. Acomplete check may take several days.If the vehicle is not ready for I/M testing,you can perform the following driving cycleconsisting of mixed city and highwaydriving:1. 15 minutes of steady driving on an
expressway or highway followed by 20minutes of stop-and-go driving with atleast four 30-second idle periods.
2. Allow your vehicle to sit for at leasteight hours with the ignition off. Then,start the vehicle and complete theabove driving cycle. The vehicle mustwarm up to its normal operatingtemperature. Once started, do not turnoff the vehicle until the above drivingcycle is complete.
If the vehicle is still not ready for I/Mtesting, you need to repeat the abovedriving cycle.
161
Flex (TP3) , enUSA, Edition date: 201803, Second-Printing
Engine Emission Control

AUTOMATIC TRANSMISSION
WARNING: Always fully apply theparking brake. Make sure you shift into park(P) for vehicles with an automatictransmission. Switch the ignition off andremove the key whenever you leave yourvehicle.
WARNING: Do not apply the brakepedal and accelerator pedalsimultaneously. Applying both pedalssimultaneously for more than a fewseconds will limit engine performance,which may result in difficulty maintainingspeed in traffic and could lead to seriousinjury.
Understanding the Positions ofYour Automatic TransmissionPutting your vehicle in gear:1. Fully press down the brake pedal.2. Move the gearshift lever into the
desired gear.3. Come to a complete stop.4. Move the gearshift lever and securely
latch it in park (P).
P
R
N
D
S
E142628
Park (P)This position locks the transmission andprevents the wheels from turning.
Reverse (R)With the gearshift lever in reverse (R), yourvehicle moves backward. Always come toa complete stop before shifting into andout of reverse (R).
Neutral (N)With the gearshift lever in neutral (N), yourvehicle can be started and is free to roll.Hold the brake pedal down while in thisposition.
Drive (D)Drive (D) is the normal driving position forthe best fuel economy. The overdrivefunction allows automatic upshifts anddownshifts through gears one through six.
Sport (S)Moving the gearshift lever to sport (S):• Provides additional grade (engine)
braking and extends lower gearoperation to enhance performance foruphill climbs, hilly terrain ormountainous areas. This increasesengine RPM during engine braking.
• Provides additional lower gearoperation through the automatictransmission shift strategy.
• Gears are selected more quickly andat higher engine speeds.
SelectShift Automatic™TransmissionYour vehicle is equipped with a SelectShiftAutomatic transmission gearshift lever.The SelectShift Automatic transmissiongives you the ability to change gears up ordown (without a clutch) as desired.
162
Flex (TP3) , enUSA, Edition date: 201803, Second-Printing
Transmission

In order to prevent the engine from runningat too low an RPM, which may cause it tostall, SelectShift still automatically makessome downshifts if it has determined thatyou have not downshifted in time.Although SelectShift makes somedownshifts for you, it still allows you todownshift at any time as long as theSelectShift determines that damage willnot be caused to the engine fromover-revving.Note: Engine damage may occur if youmaintain excessive engine revving withoutshifting.SelectShift does not automatically upshift,even if the engine is approaching the RPMlimit. It must be shifted manually bypressing the + button.If equipped with the toggle on thegearshift lever:• Press the (+) button to upshift.• Press the (-) button to downshift.
E142629
If equipped with steering wheelpaddles:With your vehicle in drive (D), the paddleshifters provide temporary manual control.They allow you the ability to shift gearsquickly, without taking your hands off thesteering wheel.
You can achieve extensive manual controlby moving the gearshift lever to the sport(S) position.• Pull the right paddle (+) to upshift.• Pull the left paddle (–) to downshift.
E144821
The system determines when temporarymanual control is no longer in use andreturns to automatic control.Upshift to the recommended shift speedsaccording to the following chart:
Upshifts when accelerating (recom-mended for best fuel economy)
Shift from:
15 mph (24 km/h)1 - 2
25 mph (40 km/h)2 - 3
40 mph (64 km/h)3 - 4
45 mph (72 km/h)4 - 5
50 mph (80 km/h)5 - 6
The instrument cluster displays yourcurrently selected gear.Note: The system stays in manual controluntil you make another shift selection (forexample, drive [D]).
163
Flex (TP3) , enUSA, Edition date: 201803, Second-Printing
Transmission

Brake-Shift Interlock
WARNING: Do not drive your vehicleuntil you verify that the stoplamps areworking.
WARNING: When doing thisprocedure, you need to take thetransmission out of park (P) which meansyour vehicle can roll freely. To avoidunwanted vehicle movement, always fullyapply the parking brake prior to doing thisprocedure. Use wheels chocks ifappropriate.
WARNING: If the parking brake isfully released, but the brake warning lampremains illuminated, the brakes may notbe working properly. Have your vehiclechecked as soon as possible.
Note: For some markets this feature will bedisabled.Your vehicle is equipped with a brake-shiftinterlock feature that prevents moving thegearshift lever from park (P) when theignition is in the on position and the brakepedal is not pressed.If you cannot move the gearshift lever outof park (P) position with the ignition in theon position and the brake pedal pressed,a malfunction may have occurred. It ispossible that a fuse has blown or yourvehicle’s brake lamps are not operatingproperly. See Fuse Specification Chart(page 232).If the fuse is not blown and the brakelamps are working properly, the followingprocedure will allow you to move thegearshift lever from park (P):1. Apply the parking brake, turn the
ignition off and remove the key.
E211089
2. Remove the cup holder insert.3. Using a screwdriver (or similar tool),
release the tab to the access door andremove.
4. Locate the brake shift interlock leveron the passenger side of the shifterassembly.
5. Apply the brake pedal. Using ascrewdriver (or similar tool), pressdown and hold the brake shift interlocklever while pulling the gearshift leverout of park (P) and into neutral (N).
6. Install the access door and cup holderinsert.
7. Apply the brake pedal, start the vehicle,and release the parking brake.
164
Flex (TP3) , enUSA, Edition date: 201803, Second-Printing
Transmission

Automatic Transmission AdaptiveLearningThis feature may increase durability andprovide consistent shift feel over the lifeof your vehicle. A new vehicle ortransmission may have firm shifts, softshifts or both. This operation is considerednormal and does not affect function ordurability of the transmission. Over time,the adaptive learning process fully updatestransmission operation.
If Your Vehicle Gets Stuck In Mudor SnowNote: Do not rock the vehicle if the engineis not at normal operating temperature ordamage to the transmission may occur.Note: Do not rock the vehicle for more thana minute or damage to the transmission andtires may occur, or the engine may overheat.If your vehicle gets stuck in mud or snow,you may rock it out by shifting betweenforward and reverse gears, stoppingbetween shifts in a steady pattern. Presslightly on the accelerator in each gear.
165
Flex (TP3) , enUSA, Edition date: 201803, Second-Printing
Transmission

USING ALL-WHEEL DRIVEAll-wheel drive uses all four wheels topower the vehicle. This increases traction,enabling you to drive over terrain and roadconditions that a conventional two-wheeldrive vehicle cannot. The AWD system isactive all the time and requires no inputfrom the operator.Note: Your AWD vehicle is not intended foroff-road use. The AWD feature gives yourvehicle some limited off-road capabilitiesin which driving surfaces are relatively level,obstruction-free and otherwise similar tonormal on-road driving conditions.Operating your vehicle under other thanthose conditions could subject the vehicleto excessive stress which might result indamage which is not covered under yourwarranty.
Note: When an AWD system fault ispresent, the warning Check AWD displaysin the information display. The AWD systemis not functioning correctly and defaults tofront-wheel drive. When this warningdisplays, have your vehicle serviced at anauthorized dealer.Note: The AWD OFF message may alsoappear in the information display if the AWDsystem overheats and defaults tofront-wheel drive. This may occur if thevehicle is operated in extreme conditionswith excessive wheel slip, such as deepsand. To resume normal AWD function assoon as possible, stop the vehicle in a safelocation and stop the engine for at least 10minutes. After the engine has beenrestarted and the AWD system hasadequately cooled, the AWD OFF messagewill turn off and normal AWD functionreturns. If the engine is not stopped, theAWD OFF message turns off when thesystem cools and normal AWD functionreturns.
All-Wheel Drive Messages
Action / DescriptionAWD Messages
Displays if the AWD system disables toprotect itself. This may occur if you operatethe vehicle after installing the compactspare tire, if the system is overheating or ifthere is an issue with another vehiclesystem that prevents the AWD system from
AWD OFF
operating. The AWD system resumes
166
Flex (TP3) , enUSA, Edition date: 201803, Second-Printing
All-Wheel Drive (If Equipped)

Action / DescriptionAWD Messages
normal operation and clears this messageafter you install the road tire and you switchthe ignition on and off, or after you allowthe system to cool. If this message remainson, have a qualified technician service yourvehicle to repair other vehicle systems.
Displayed in conjunction with the power-train malfunction/reduced power lightwhen the system is not operating properly.If the warning stays on or continues tocome on, contact your authorized dealeras soon as possible.
Check AWD
Operating AWD Vehicles WithSpare TiresA spare tire of a different size other thanthe tire provided should never be used. TheAWD system may disable automaticallyand enter front-wheel drive only mode toprotect driveline components if a non-fullsized tire is installed. This condition maydisplay an AWD OFF message in theinformation display. If there is an AWD OFFmessage in the information display fromusing a non-full sized spare tire, thisindicator should turn off after reinstallingthe repaired or replaced normal road tireand cycling the ignition off and on. It isrecommended to reinstall the repaired orreplaced road tire as soon as possible.Major dissimilar tire sizes between the frontand rear axles (for example, 17 inch lowprofile tires on the front axle and 22 inchhigh profile tires on the rear axle) couldcause the AWD system to stop functioningand default to front-wheel drive or damagethe AWD system.
Operating AWD Vehicles WithMismatched Tires
WARNING: Only use replacementtires and wheels that are the same size,load index, speed rating and type (such asP-metric versus LT-metric or all-seasonversus all-terrain) as those originallyprovided by Ford. The recommended tireand wheel size may be found on either theSafety Compliance Certification Label(affixed to either the door hinge pillar,door-latch post, or the door edge thatmeets the door-latch post, next to thedriver's seating position), or the Tire Labelwhich is located on the B-Pillar or edge ofthe driver's door. If this information is notfound on these labels, then you shouldcontact your authorized dealer as soon aspossible. Use of any tire or wheel notrecommended by Ford can affect thesafety and performance of your vehicle,which could result in an increased risk ofloss of vehicle control, vehicle rollover,personal injury and death.
167
Flex (TP3) , enUSA, Edition date: 201803, Second-Printing
All-Wheel Drive (If Equipped)

WARNING: The use ofnon-recommended tires and wheels couldcause steering, suspension, axle, transfercase or power transfer unit failure. If youhave questions regarding tire replacement,contact your authorized dealer as soon aspossible.
Major dissimilar tire sizes between the frontand rear axles (for example, 17 inch lowprofile tires on the front axle and 22 inchhigh profile tires on the rear axle) couldcause the AWD system to stop functioningand default to front-wheel drive or damagethe AWD system. However, the AWDsystem is capable of tolerating anycombination of new and worn tires of thesame original tire size. For example, using3 worn tread tires and 1 new tread tire allof the same original tire size, can betolerated by the AWD system.
Driving In Special Conditions WithAll-Wheel Drive (AWD)AWD vehicles are equipped for driving onsand, snow, mud and rough roads and haveoperating characteristics that aresomewhat different from conventionalvehicles, both on and off the highway.When driving at slow speeds in deep sandunder high outside temperatures, use a lowgear when possible. Lower gear operationwill maximize the engine and transmissioncooling capability.Under severe operating conditions, the A/Cmay cycle on and off to protectoverheating of the engine.
Basic operating principles in specialconditions• Drive slower in strong crosswinds which
can affect the normal steeringcharacteristics of your vehicle.
• Be extremely careful when driving onpavement made slippery by loose sand,water, gravel, snow or ice.
If Your Vehicle Goes Off the Edge of thePavement• If your vehicle goes off the edge of the
pavement, slow down, but avoid severebrake application, ease the vehicleback onto the pavement only afterreducing your speed. Do not turn thesteering wheel too sharply whilereturning to the road surface.
• It may be safer to stay on the apron orshoulder of the road and slow downgradually before returning to thepavement. You may lose control if youdo not slow down or if you turn thesteering wheel too sharply or abruptly.
• It often may be less risky to strike smallobjects, such as highway reflectors,with minor damage to your vehiclerather than attempt a sudden return tothe pavement which could cause thevehicle to slide sideways out of controlor rollover. Remember, your safety andthe safety of others should be yourprimary concern.
If Your Vehicle Gets Stuck
WARNING: Always fully apply theparking brake. Make sure you shift into park(P) for vehicles with an automatictransmission. Switch the ignition off andremove the key whenever you leave yourvehicle.
168
Flex (TP3) , enUSA, Edition date: 201803, Second-Printing
All-Wheel Drive (If Equipped)

WARNING: If the parking brake isfully released, but the brake warning lampremains illuminated, the brakes may notbe working properly. Have your vehiclechecked as soon as possible.
WARNING: Do not spin the wheelsat over 34 mph (55 km/h). The tires mayfail and injure a passenger or bystander.
Note: Do not rock the vehicle if the engineis not at normal operating temperature ordamage to the transmission may occur.Note: Do not rock the vehicle for more thana few minutes or damage to thetransmission and tires may occur or theengine may overheat.If your vehicle gets stuck in mud or snow itmay be rocked out by shifting betweenforward and reverse gears, stoppingbetween shifts, in a steady pattern. Presslightly on the accelerator in each gear.If your vehicle is equipped withAdvanceTrac® with Roll StabilityControl™, it may be beneficial todisengage the AdvanceTrac® with RollStability Control™ system whileattempting to rock the vehicle.
Emergency Maneuvers• In an unavoidable emergency situation
where a sudden sharp turn must bemade, remember to avoid"over-driving" your vehicle (that is, turnthe steering wheel only as rapidly andas far as required to avoid theemergency). Excessive steering willresult in less vehicle control, not more.Additionally, smooth variations of theaccelerator and/or brake pedalpressure should be utilized if changesin vehicle speed are called for. Avoid
abrupt steering, acceleration or brakingwhich could result in an increased riskof loss of vehicle control, vehiclerollover and/or personal injury. Use allavailable road surface to return thevehicle to a safe direction of travel.
• In the event of an emergency stop,avoid skidding the tires and do notattempt any sharp steering wheelmovements.
• If the vehicle goes from one type ofsurface to another (that is, fromconcrete to gravel) there will be achange in the way the vehicle respondsto a maneuver (steering, accelerationor braking). Again, avoid these abruptinputs.
SandMost of the time traction control improvestire traction by managing wheel slipthrough Brake, Engine, and AWDcalibrations. However, during low speeddriving, disabling traction control in deepsand can help keep the wheels moving tomaintain vehicle momentum.When driving over sand, try to keep all fourwheels on the most solid area of the trail.Avoid reducing the tire pressures but shiftto a lower gear and drive steadily throughthe terrain. Apply the accelerator slowlyand avoid spinning the wheels.Do not drive your vehicle in deep sand foran extended period of time. This couldcause the AWD system to overheat anddefault to front-wheel drive. If this occurs,an AWD OFF message displays in theinformation display. To resume normalAWD function as soon as possible, stopthe vehicle in a safe location and stop theengine for at least 10 minutes. After theengine has been restarted and the AWD
169
Flex (TP3) , enUSA, Edition date: 201803, Second-Printing
All-Wheel Drive (If Equipped)

system has adequately cooled, the AWDOFF message turns off and normal AWDfunction returns. In the event the engine isnot stopped, the AWD OFF message turnsoff when the system cools and normalAWD function returns.When driving at slow speeds in deep sandunder high outside temperatures, use L(Low) gear when possible. L (Low) gearoperation will maximize the engine andtransmission cooling capability.Under severe operating conditions, the A/Cmay cycle on and off to protectoverheating of the engine.Avoid excessive speed because vehiclemomentum can work against you andcause the vehicle to become stuck to thepoint that assistance may be required fromanother vehicle. Remember, you may beable to back out the way you came if youproceed with caution.
Mud and WaterIf you must drive through high water, driveslowly. Traction or brake capability maybe limited.When driving through water, determine thedepth; avoid water higher than the bottomof the wheel rims (for cars) or the bottomof the hubs (for trucks) (if possible) andproceed slowly. If the ignition system getswet, the vehicle may stall.Once through water, always try the brakes.Wet brakes do not stop the vehicle aseffectively as dry brakes. Drying can beimproved by moving your vehicle slowlywhile applying light pressure on the brakepedal.
Be cautious of sudden changes in vehiclespeed or direction when you are driving inmud. Even AWD vehicles can lose tractionin slick mud. As when you are driving oversand, apply the accelerator slowly andavoid spinning your wheels. If the vehicledoes slide, steer in the direction of the slideuntil you regain control of the vehicle.After driving through mud, clean off residuestuck to rotating driveshafts and tires.Excess mud stuck on tires and rotatingdriveshafts causes an imbalance thatcould damage drive components.Note: Driving through deep water maydamage the transmission.If the front or rear axle is submerged inwater, have the power transfer unit (PTU)or rear axle serviced by an authorizeddealer.
E143950
“Tread Lightly” is an educational programdesigned to increase public awareness ofland-use regulations and responsibilitiesin our nations wilderness areas. Ford MotorCompany joins the U.S. Forest Service andthe Bureau of Land Management inencouraging you to help preserve ournational forest and other public and privatelands by “treading lightly.”
Driving on Hilly or Sloping TerrainNote: Avoid driving crosswise or turning onsteep slopes or hills. A danger lies in losingtraction, slipping sideways and possiblyrolling over. Whenever driving on a hill,determine beforehand the route you willuse. Do not drive over the crest of a hillwithout seeing what conditions are on theother side. Do not drive in reverse over a hillwithout the aid of an observer.
170
Flex (TP3) , enUSA, Edition date: 201803, Second-Printing
All-Wheel Drive (If Equipped)

Although natural obstacles may make itnecessary to travel diagonally up or downa hill or steep incline, you should alwaystry to drive straight up or straight down.When climbing a steep slope or hill, startin a lower gear rather than downshifting toa lower gear from a higher gear once theascent has started. This reduces strain onthe engine and the possibility of stalling.If you do stall out, do not try to turnaroundbecause you might roll over. It is better toback down to a safe location.Apply just enough power to the wheels toclimb the hill. Too much power will causethe tires to slip, spin or lose traction,resulting in loss of vehicle control.
E143949
Descend a hill in the same gear you woulduse to climb up the hill to avoid excessivebrake application and brake overheating.Do not descend in neutral; instead,disengage overdrive or manually shift to alower gear. When descending a steep hill,avoid sudden hard braking as you couldlose control. The front wheels have to beturning in order to steer the vehicle.Your vehicle has anti-lock brakes, thereforeapply the brakes steadily. Do not “pump”the brakes.
Driving on Snow and Ice
WARNING: If you are driving inslippery conditions that require tire chainsor cables, then it is critical that you drivecautiously. Keep speeds down, allow forlonger stopping distances and avoidaggressive steering to reduce the chancesof a loss of vehicle control which can leadto serious injury or death. If the rear end ofyour vehicle slides while cornering, steer inthe direction of the slide until you regaincontrol of your vehicle.
Note: Excessive tire slippage can causedriveline damage.AWD vehicles have advantages over 2WDvehicles in snow and ice but can skid likeany other vehicle.Should you start to slide while driving onsnowy or icy roads, turn the steering wheelin the direction of the slide until you regaincontrol.Avoid sudden applications of power andquick changes of direction on snow andice. Apply the accelerator slowly andsteadily when starting from a full stop.Avoid sudden braking as well. Although anAWD vehicle may accelerate better thana two-wheel drive vehicle in snow and ice,it won’t stop any faster, because as in othervehicles, braking occurs at all four wheels.Do not become overconfident as to roadconditions.Make sure you allow sufficient distancebetween you and other vehicles forstopping. Drive slower than usual andconsider using one of the lower gears. Inemergency stopping situations, apply thebrake steadily. Since your vehicle isequipped with a four wheel (ABS), do not“pump” the brakes. See Hints on DrivingWith Anti-Lock Brakes (page 174).
171
Flex (TP3) , enUSA, Edition date: 201803, Second-Printing
All-Wheel Drive (If Equipped)

Maintenance and ModificationsThe suspension and steering systems onyour vehicle have been designed andtested to provide predictable performancewhether loaded or empty and durable loadcarrying capability. For this reason, FordMotor Company strongly recommends thatyou do not make modifications such asadding or removing parts (such as loweringkits or stabilizer bars) or by usingreplacement parts not equivalent to theoriginal factory equipment.Any modifications to a vehicle that raisethe center of gravity can make it more likelythe vehicle will rollover as a result of a lossof control. Ford Motor Companyrecommends that caution be used withany vehicle equipped with a high load ordevice (such as ladder or luggage racks).Failure to maintain your vehicle properlymay void the warranty, increase your repaircost, reduce vehicle performance andoperational capabilities and adverselyaffect driver and passenger safety.Frequent inspection of vehicle chassiscomponents is recommended if the vehicleis subjected to off-highway usage.
172
Flex (TP3) , enUSA, Edition date: 201803, Second-Printing
All-Wheel Drive (If Equipped)

GENERAL INFORMATIONNote: Occasional brake noise is normal. Ifa metal-to-metal, continuous grinding orcontinuous squeal sound is present, thebrake linings may be worn-out. Have thesystem checked by an authorized dealer. Ifyour vehicle has continuous vibration orshudder in the steering wheel while braking,have it checked by an authorized dealer.Note: Brake dust may accumulate on thewheels, even under normal drivingconditions. Some dust is inevitable as thebrakes wear and does not contribute tobrake noise. See Cleaning the Wheels(page 270).Note: Depending on applicable laws andregulations in the country for which yourvehicle was originally built, your brake lampsmay flash during heavy braking. Followingthis, your hazard lights may also flash whenyour vehicle comes to a stop.
E270480
See Warning Lamps andIndicators (page 91).
Wet brakes result in reduced brakingefficiency. Gently press the brake pedal afew times when driving from a car wash orstanding water to dry the brakes.
Brake Over AcceleratorIn the event the accelerator pedalbecomes stuck or entrapped, apply steadyand firm pressure to the brake pedal toslow the vehicle and reduce engine power.If you experience this condition, apply thebrakes and bring your vehicle to a safestop. Move the transmission to park (P),switch the engine off and apply the parkingbrake. Inspect the accelerator pedal forany interference. If none are found and thecondition persists, have your vehicle towedto the nearest authorized dealer.
Brake AssistBrake assist detects when you rapidlybrake by measuring the rate at which youpress the brake pedal. It providesmaximum braking efficiency as long as youpress the pedal. It can also reducestopping distances in critical situations.
Anti-lock Brake SystemThis system helps you maintain steeringcontrol during emergency stops by keepingthe brakes from locking.
If it illuminates when you aredriving, this indicates amalfunction. Your vehicle
continues to have normal braking withoutthe anti-lock brake system function. Haveyour vehicle checked as soon as possible.It also momentarily illuminates when youswitch the ignition on to confirm the lampis functional. If it does not illuminate whenyou switch the ignition on, or begins toflash at any time, have the system checkedby an authorized dealer.
E270480
It illuminates when you engagethe parking brake and theignition is on.If it illuminates when your vehicleis moving, make sure the parkingbrake is disengaged. If the
parking brake is disengaged, this indicateslow brake fluid level or a brake systemfault. Have your vehicle checked as soonas possible.
It also momentarily illuminates when youswitch the ignition on to confirm the lampis functional. If it does not illuminate whenyou switch the ignition on, or begins toflash at any time, have the system checkedby an authorized dealer.
173
Flex (TP3) , enUSA, Edition date: 201803, Second-Printing
Brakes

HINTS ON DRIVING WITHANTI-LOCK BRAKESThe anti-lock braking system does noteliminate the risks when:• You drive too closely to the vehicle in
front of you.• Your vehicle is hydroplaning.• You take corners too fast.• The road surface is poor.Note: If the system activates, the brakepedal may pulse and may travel further.Maintain pressure on the brake pedal. Youmay also hear a noise from the system. Thisis normal.
PARKING BRAKE
WARNING: Always set the parkingbrake fully and make sure the transmissionis locked in park (P). Failure to set theparking brake and engage park could resultin vehicle roll-away, property damage orbodily injury.
To set the parking brake, press the parkingbrake pedal down to its fullest extent. Thebrake warning lamp in the instrumentcluster will illuminate and remainsilluminated until the parking brake isreleased.To release the parking brake, press theparking brake pedal down again.If you are parking your vehicle on a gradeor with a trailer, press and hold the brakepedal down, then set the parking brake.There may be a little vehicle movement asthe parking brake sets to hold the vehicle'sweight. This is normal and should be noreason for concern. If needed, press and
hold the service brake pedal down, thentry reapplying the parking brake. Chock thewheels if required. If the parking brakecannot hold the weight of the vehicle, theparking brake may need to be serviced orthe vehicle may be overloaded.
174
Flex (TP3) , enUSA, Edition date: 201803, Second-Printing
Brakes

PRINCIPLE OF OPERATIONThe traction control system helps avoiddrive wheel spin and loss of traction.If your vehicle begins to slide, the systemapplies the brakes to individual wheelsand, when needed, reduces engine powerat the same time. If the wheels spin whenaccelerating on slippery or loose surfaces,the system reduces engine power in orderto increase traction.
USING TRACTION CONTROL
WARNING: The stability and tractioncontrol light illuminates steadily if thesystem detects a failure. Make sure youdid not manually disable the tractioncontrol system using the informationdisplay controls or the switch. If thestability control and traction control lightis still illuminating steadily, have thesystem serviced by an authorized dealerimmediately. Operating your vehicle withthe traction control disabled could lead toan increased risk of loss of vehicle control,vehicle rollover, personal injury and death.
The system automatically turns on eachtime you switch the ignition on.If your vehicle is stuck in mud or snow,switching traction control off may bebeneficial as this allows the wheels to spin.Note: When you switch traction control off,stability control remains fully active.
Switching the System OffWhen you switch the system off or on, amessage appears in the informationdisplay showing system status.You can switch the system off by eitherusing the information display controls orthe switch.
Using the Information DisplayControlsYou can switch this feature off or on in theinformation display. See GeneralInformation (page 95).
Using a Switch (If Equipped)
Use the traction control switch on theinstrument panel to switch the system offor on.
System Indicator Lights andMessages
E138639
The stability and traction controllight:
• Temporarily illuminates on enginestart-up.
• Flashes when a driving conditionactivates either of the systems.
• Illuminates if a problem occurs in eitherof the systems.
E130458
The stability and traction controloff light temporarily illuminateson engine start-up and stays on
when you switch the traction controlsystem off.
175
Flex (TP3) , enUSA, Edition date: 201803, Second-Printing
Traction Control

PRINCIPLE OF OPERATION
WARNING: Vehicle modificationsinvolving braking system, aftermarket roofracks, suspension, steering system, tireconstruction and wheel and tire size maychange the handling characteristics of yourvehicle and may adversely affect theperformance of the electronic stabilitycontrol system. In addition, installing anystereo loudspeakers may interfere withand adversely affect the electronic stabilitycontrol system. Install any aftermarketstereo loudspeaker as far as possible fromthe front center console, the tunnel, andthe front seats in order to minimize the riskof interfering with the electronic stabilitycontrol sensors. Reducing theeffectiveness of the electronic stabilitycontrol system could lead to an increasedrisk of loss of vehicle control, vehiclerollover, personal injury and death.
WARNING: Remember that evenadvanced technology cannot defy the lawsof physics. It’s always possible to losecontrol of a vehicle due to inappropriatedriver input for the conditions. Aggressivedriving on any road condition can causeyou to lose control of your vehicleincreasing the risk of personal injury orproperty damage. Activation of theelectronic stability control system is anindication that at least some of the tireshave exceeded their ability to grip the road;this could reduce the operator’s ability tocontrol the vehicle potentially resulting ina loss of vehicle control, vehicle rollover,personal injury and death. If your electronicstability control system activates, SLOWDOWN.
The system automatically turns on eachtime you switch the ignition on.
If a fault occurs in either the stabilitycontrol or the traction control system, youmay experience the following conditions:• The stability and traction control light
illuminates steadily.• The stability control and traction
control systems do not enhance yourvehicle's ability to maintain traction ofthe wheels.
If a driving condition activates either thestability control or the traction controlsystem you may experience the followingconditions:• The stability and traction control light
flashes.• Your vehicle slows down.• Reduced engine power.• A vibration in the brake pedal.• The brake pedal is stiffer than usual.• If the driving condition is severe and
your foot is not on the brake, the brakepedal may move as the system applieshigher brake force.
The stability control system has severalfeatures built into it to help you maintaincontrol of your vehicle:
Electronic Stability ControlThe system enhances your vehicle’s abilityto prevent skids or lateral slides byapplying brakes to one or more of thewheels individually and, if necessary,reducing engine power.
Roll Stability ControlThe system enhances your vehicle’s abilityto prevent rollovers by detecting yourvehicle’s roll motion and the rate at whichit changes by applying the brakes to oneor more wheels individually.
176
Flex (TP3) , enUSA, Edition date: 201803, Second-Printing
Stability Control

Traction ControlThe system enhances your vehicle’s abilityto maintain traction of the wheels bydetecting and controlling wheel spin. SeeUsing Traction Control (page 175).
E72903
A A
AB
B
B
B
Vehicle without stability controlskidding off its intended route.
A
Vehicle with stability controlmaintaining control on a slipperysurface.
B
USING STABILITY CONTROLThe system automatically turns on eachtime you switch the ignition on.You cannot switch the stability control androll stability control systems off, but whenyou shift into reverse (R), the systemsdeactivate.You can switch the traction control systemoff or on. See Using Traction Control(page 175).
177
Flex (TP3) , enUSA, Edition date: 201803, Second-Printing
Stability Control

PRINCIPLE OF OPERATION
WARNING: To help avoid personalinjury, always use caution when in reverse(R) and when using the sensing system.
WARNING: The system may notdetect objects with surfaces that absorbreflection. Always drive with due care andattention. Failure to take care may resultin a crash.
WARNING: Traffic control systems,inclement weather, air brakes, externalmotors and fans may affect the correctoperation of the sensing system.This maycause reduced performance or false alerts.
WARNING: The system may notdetect small or moving objects, particularlythose close to the ground.
Note: If your vehicle is equipped withMyKey™, the sensing system cannot beturned off when a MyKey™ is present. SeePrinciple of Operation (page 57).Note: Keep the sensors, located on thebumper or fascia, free from snow, ice andlarge accumulations of dirt. If the sensorsare covered, the system’s accuracy can beaffected. Do not clean the sensors withsharp objects.Note: If your vehicle sustains damage tothe bumper or fascia, leaving it misalignedor bent, the sensing zone may be alteredcausing inaccurate measurement ofobstacles or false alerts.
Note: Certain add-on devices installedaround the bumper or fascia may createfalse alerts. For example, large trailerhitches, bike or surfboard racks, license platebrackets, bumper covers or any other devicethat may block the normal detection zoneof the system. Remove the add-on deviceto prevent false alerts.Note: When a trailer is connected to yourvehicle, the rear parking aid may detect thetrailer and therefore provide an alert. Disablethe rear parking aid when a trailer isconnected to prevent the alert.The sensing system warns the driver ofobstacles within a certain range of yourvehicle. The system turns on automaticallywhenever you switch the ignition on.The system can be switched off throughthe information display menu or from thepop-up message that appears once youshift the transmission into reverse (R). SeeGeneral Information (page 95).If a fault is present in the system, a warningmessage appears in the informationdisplay. See Information Messages(page 103).
REAR PARKING AIDThe rear sensors are only active when thetransmission is in reverse (R). As yourvehicle moves closer to the obstacle, therate of the audible warning increases.When the obstacle is less than 12 in(30 cm) away, the warning soundscontinuously. If the system detects astationary or receding object farther than12 in (30 cm) from the corners of thebumper, the tone sounds for only threeseconds. Once the system detects anobject approaching, the warning soundsagain.
178
Flex (TP3) , enUSA, Edition date: 201803, Second-Printing
Parking Aids

E130178
Coverage area of up to 6 ft (1.8 m) fromthe rear bumper. There may be decreasedcoverage area at the outer corners of thebumper.The system detects certain objects whilethe transmission is in reverse (R) :• Your vehicle is moving toward a
stationary object at a speed of 3 mph(5 km/h) or less.
• Your vehicle is not moving, but amoving object is approaching the rearof your vehicle at a speed of 3 mph(5 km/h) or less.
• Your vehicle is moving at a speed ofless than 3 mph (5 km/h) and a movingobject is approaching the rear of yourvehicle at a speed of less than 3 mph(5 km/h).
ACTIVE PARK ASSIST (If Equipped)
WARNING: You must remain in yourvehicle when the system turns on. At alltimes, you are responsible for controllingyour vehicle, supervising the system andintervening, if required. Failure to take caremay result in the loss of control of yourvehicle, serious personal injury or death.
WARNING: The system is designedto aid the driver. It is not intended toreplace your attention and judgment. Youare still responsible to drive with due careand attention.
WARNING: The sensors may notdetect objects in heavy rain or otherconditions that cause interference.
WARNING: Active park assist doesnot apply the brakes under anycircumstances.
Note: The blind spot information systemdoes not detect traffic alongside or behindyour vehicle during an active park assistmaneuver.Note: Active park assist is a multi-stepprocess and may require you to shift yourtransmission multiple times. Follow theon-screen instructions until you completethe parking process.The system detects an available parallelparking space and automatically steersyour vehicle (hands-free) while you controlthe accelerator, transmission and brakes.The system visually and audibly guides youto park your vehicle.If you are uncomfortable with the proximityto any vehicle or object, you may chooseto override the system by grabbing thesteering wheel or pushing the active parkassist button.
179
Flex (TP3) , enUSA, Edition date: 201803, Second-Printing
Parking Aids

The system may not operate correctly inany of the following conditions:• You use a spare tire or a tire
significantly worn more than the othertires.
• One or more tires are improperlyinflated.
• You try to park on a tight curve.• Something passes between the front
bumper and the parking space. Forexample, a pedestrian or cyclist.
• The edge of the neighboring parkingvehicle is high off the ground. Forexample, a bus, tow truck or flatbedtruck.
• The weather conditions are poor. Forexample, during heavy rain, snow orfog.
Note: Keep the sensors, located on thefascia, free from now, ice and largeaccumulations of dirt. Covered sensors canaffect the systems accuracy. Do not cleanthe sensors with sharp objects.Note: The sensors may not detect objectswith surfaces that absorb ultrasonic wavesor cause ultrasonic interference. Forexample, motorcycle exhaust, truck airbrakes or horns.
Note: Following a change in tire size, thesystem must recalibrate and operation maybe impaired for a short time.Do not use the system if:• You have attached a bike rack, trailer
or other object near the sensors on thefront or rear of your vehicle.
• You have attached an overhangingobject to the roof. For example, asurfboard.
• A foreign object damages or obstructsthe sensors.
• The correct tire size is not in use. Forexample, when using a mini-spare tire.
Using Active Park Assist
E146186
Press the button to turn thesystem on or off.
When driving at a speed less than 22 mph(35 km/h), the system automatically scansboth sides of your vehicle for an availableparking space. The system displays amessage and a corresponding graphic toindicate it is searching for a parking space.Use the direction indicator to selectsearching either to the left hand side orright hand side of your vehicle. If thedirection indicator is not used, the systemdefaults to the passenger side of yourvehicle.
E130107
180
Flex (TP3) , enUSA, Edition date: 201803, Second-Printing
Parking Aids

When the system finds a suitable space itdisplays a message and a tone sounds.Stop your vehicle and follow theinstructions on the display screen. If yourvehicle is moving very slowly, you mayneed to pull forward a short distancebefore the system is ready to park.Note: You can also activate the systemafter you drive partially or completely passthe parking space. To do so, press the activepark assist button and the system informsyou if you recently passed a suitable parkingspace.Note: You must observe that the selectedspace remains clear of obstructions at alltimes in the maneuver.Note: You should drive your vehicle within5 ft (1.5 m) and as parallel to the othervehicles as possible while passing a parkingspace.
Note: The system always offers the lastdetected parking space. For example, if yourvehicle detects multiple spaces while youare driving, it offers the last detected space.Note: If driven above approximately 22 mph(35 km/h), the display screen shows amessage to alert you to reduce your vehiclespeed.
Automatic Steering into ParkingSpaceNote: If vehicle speed exceeds 6 mph(9 km/h) or the maneuver is interrupted, forexample driver input is detected, the systemswitches off and you need to take fullcontrol of your vehicle.When you shift the transmission intoreverse (R), with your hands off thesteering wheel and nothing obstructing itsmovement, your vehicle steers itself intothe space. The system displays instructionsto move your vehicle back and forth in thespace.
E130108
When you think your vehicle has enoughspace in front and behind it, or you hear asolid tone from the parking aid(accompanied by a touchscreen displaymessage and a chime), bring your vehicleto a complete stop.
When automatic steering is complete, thesystem displays a message and a chimesounds, indicating that the active parkassist process is finished. You areresponsible for checking the parking joband making any necessary correctionsbefore leaving your vehicle.
181
Flex (TP3) , enUSA, Edition date: 201803, Second-Printing
Parking Aids

Deactivating the Park AssistFeatureManually deactivate the system by:• Pressing the active park assist button
during an active maneuver.• Grabbing the steering wheel during an
active maneuver.• Driving above approximately 22 mph
(35 km/h) for 30 seconds during anactive park search.
• Driving above 6 mph (9 km/h) duringautomatic steering.
• Switching off the traction controlsystem.
Certain vehicle conditions can alsodeactivate the system, such as:• Traction control has activated.• There is an anti-lock brake system
activation or failure.If a problem occurs with the system, awarning message displays accompaniedby a tone. Occasional system messagesmay occur in normal operation. Forrecurring or frequent system faults, contactan authorized dealer to have your vehicleserviced.
Troubleshooting the System
The system does not look for a space
The traction control system may be off.
The transmission is in reverse (R). Your vehicle must be moving forward to detect aparking space.
The system does not offer a particular space
The sensors may be covered. For example, with snow, ice or dirt. Covered sensors canaffect the system's functionality
There is not enough room in the parking space for your vehicle to safely park.
There is not enough space for the parking maneuver on the opposite side of the parkingspace.
The parking space is farther than 5 ft (1.5 m) or closer than 16 in (40 cm) away.
Your vehicle is going faster than 22 mph (35 km/h).
You may have recently disconnected or replaced the battery. After a battery disconnect,the vehicle must be driven on a straight road for a short period of time.
182
Flex (TP3) , enUSA, Edition date: 201803, Second-Printing
Parking Aids

The system does not position your vehicle where I want in the space
Your vehicle is rolling in the opposite direction of the transmission. For example, rollingforward when the transmission is in reverse (R).
An irregular curb along the parking space prevents the system from aligning your vehicleproperly.
Vehicles or objects bordering the space may not be positioned correctly.
Your vehicle was pulled too far past the parking space. The system performs best whenyou drive the same distance past the parking space.
The tires may not be installed or maintained correctly. For example, not inflated correctly,improper size or of a different size.
A repair or alteration has changed detection capabilities.
A parked vehicle has a high attachment. For example, a salt sprayer, snowplow or movingtruck bed.
The parking space length or position of parked objects changed after your vehicle passed.
The temperature around your vehicle changes quickly. For example, when driving froma heated garage into the cold, or after leaving a car wash.
REAR VIEW CAMERA
WARNING: The rear view camerasystem is a reverse aid supplement devicethat still requires the driver to use it inconjunction with the interior and exteriormirrors for maximum coverage.
WARNING: Objects that are closeto either corner of the bumper or under thebumper, might not be seen on the screendue to the limited coverage of the camerasystem.
WARNING: Use caution when therear cargo door is ajar. If the rear cargo dooris ajar, the camera will be out of positionand the video image may be incorrect. Allguidelines disappear when the rear cargodoor is ajar. Failure to follow thisinstruction could result in personal injury.
WARNING: Reverse your vehicleslowly. Failure to follow this instructioncould result in the loss of control of yourvehicle, personal injury or death.
WARNING: Do not switch thecamera features on or off when yourvehicle is moving.
183
Flex (TP3) , enUSA, Edition date: 201803, Second-Printing
Parking Aids

The rear view camera system provides avideo image of the area behind yourvehicle. During operation, lines appear inthe display which represent your vehicle’spath and proximity to objects behind yourvehicle.
E142435
The camera is located on the luggagecompartment door.
Using the Rear View CameraSystemThe rear view camera system displayswhat is behind your vehicle when you placethe transmission in reverse (R).Note: The reverse sensing system is noteffective at speeds above 3 mph (5 km/h)and may not detect certain angular ormoving objects.The system uses three types of guides tohelp you see what is behind your vehicle:• Active guidelines (if equipped): Show
the intended path of your vehicle whenreversing.
• Fixed guidelines: Show the actual pathyour vehicle is moving in while reversingin a straight line. This can be helpfulwhen backing into a parking space oraligning your vehicle with anotherobject behind you.
• Centerline: Helps align the center ofyour vehicle with an object (forexample, a trailer).
Note: When towing, the camera only seeswhat you are towing. This might not provideadequate coverage as it usually providesduring normal operation and some objectsmay not be seen. In some vehicles, theguidelines disappear when you connect thetrailer tow connector.The camera may not operate correctlyunder the following conditions:• Nighttime or dark areas if one or both
reverse lamps are not operating.• Mud, water or debris obstructs the
camera's view. Clean the lens with asoft, lint-free cloth and non-abrasivecleaner.
• The rear of your vehicle is hit ordamaged, causing the camera tobecome misaligned.
Active Guidelines (If Equipped)Note: Active guidelines are only shown withfixed guidelines while your vehicle is inreverse (R).
184
Flex (TP3) , enUSA, Edition date: 201803, Second-Printing
Parking Aids

A B C D
F
E
E142436
Active guidelineACenterlineBFixed guideline: Green zoneCFixed guideline: Yellow zoneDFixed guideline: Red zoneERear bumperF
To use active guidelines, turn the steeringwheel to point the guidelines toward anintended path. If you change the steeringwheel position while reversing, your vehiclemight deviate from the original intendedpath.The fixed and active guidelines fade in andout depending on the steering wheelposition. The active guidelines do notdisplay when the steering wheel positionis straight.
Fixed GuidelinesNote: Fixed guidelines are only availablewhen the transmission is in reverse (R).Note: The centerline is only available iffixed guidelines are on.
E163914
A
E
D
C
B
Rear bumperAFixed guideline: Red ZoneBFixed guideline: Yellow zoneCFixed guideline: Green zoneDCenterlineE
Always use caution while reversing.Objects in the red zone are closest to yourvehicle and objects in the green zone arefarther away. Objects are getting closer toyour vehicle as they move from the greenzone to the yellow or red zones. Use theside view mirrors and rear view mirror toget better coverage on both sides and rearof the vehicle.
Manual Zoom
WARNING: When manual zoom ison, the full area behind your vehicle maynot show. Be aware of your surroundingswhen using the manual zoom feature.
Note: Manual zoom is only available whenthe transmission is in reverse (R).
185
Flex (TP3) , enUSA, Edition date: 201803, Second-Printing
Parking Aids

Note: When you enable manual zoom, onlythe centerline is shown.Manual zoom allows you to get a closerview of an object behind your vehicle. Thezoomed image keeps the bumper in theimage to provide a reference. The zoomfeature is only active while thetransmission is in reverse (R).Selectable settings for this feature areZoom in (+) and Zoom out (-). Press thesymbol in the camera screen to change theview. The default setting is Zoom OFF.
Camera System SettingsThe rear view camera system settings canbe accessed through the display screen.See Settings (page 411).
Enhanced Park Aids or Park Pilot (IfEquipped)The system provides an image of yourvehicle and the sensor zones in the displayscreen. The zones highlight green, yellowand red when the parking aid sensorsdetect an object in the coverage area.Selectable settings for this feature are ONand OFF.
Rear Camera DelayWhen shifting the transmission out ofreverse (R) and into any gear other thanpark (P), the camera image remains in thedisplay until:• Your vehicle speed reaches
approximately 6 mph (10 km/h).• You shift your vehicle into park (P).Selectable settings for this feature are ONand OFF. The default setting for the rearcamera delay is OFF.
186
Flex (TP3) , enUSA, Edition date: 201803, Second-Printing
Parking Aids

PRINCIPLE OF OPERATIONCruise control lets you maintain a setspeed without keeping your foot on theaccelerator pedal. You can use cruisecontrol when your vehicle speed is greaterthan 20 mph (30 km/h).
USING CRUISE CONTROL
WARNING: Do not use cruise controlon winding roads, in heavy traffic or whenthe road surface is slippery. This couldresult in loss of vehicle control, seriousinjury or death.
WARNING: When you are goingdownhill, your vehicle speed could increaseabove the set speed. The system does notapply the brakes.
To help the system to maintain the setspeed when going downhill, downshift toa lower gear.Your vehicle speed could decrease belowthe set speed when driving uphill.Note: The system cancels if your vehiclespeed drops below 10 mph (16 km/h) underthe set speed when driving uphill.
E265860
The cruise controls are on the steeringwheel. See Using Cruise Control (page187).
Switching Cruise Control On
E265296
Press the toggle button upward.
E71340
The indicator appears in theinformation display.
Setting the Cruise SpeedDrive to the desired speed.
E265306
Press the toggle button upwardor downward to set the currentspeed.
Take your foot off the accelerator pedal.Note: The indicator changes color.
Changing the Set Speed
E265306
Press the toggle button upwardor downward to increase ordecrease the set speed in small
increments.
Press and hold up or down to accelerateor decelerate, respectively. Release thebutton when you reach the desired speed.Press the accelerator or brake pedal untilyou reach the desired speed. Press thetoggle button either direction.Note: If you accelerate by pressing only theaccelerator pedal, the set speed does notchange. When you release the acceleratorpedal, your vehicle returns to the speed thatyou previously set.
Canceling the Set Speed
E265298
Press and release the button, ortap the brake pedal to cancel theset speed.
187
Flex (TP3) , enUSA, Edition date: 201803, Second-Printing
Cruise Control

Note: The system remembers the setspeed.
Resuming the Set SpeedPress and release to resume theset speed.
Switching Cruise Control Off
E265297
Press and hold the toggle buttondownward when the system isin standby mode, or switch the
ignition off.Note: You erase the set speed when youswitch the system off.
USING ADAPTIVE CRUISECONTROL (If Equipped)
WARNING: Always pay closeattention to changing road conditionswhen using adaptive cruise control. Thesystem does not replace attentive driving.Failing to pay attention to the road mayresult in a crash, serious injury or death.
WARNING: Do not use the adaptivecruise control when entering or leaving ahighway, on roads with intersections orroundabouts or non-vehicular traffic orroads that are winding, slippery, unpaved,or steep slopes.
WARNING: Do not use the systemin poor visibility, for example fog, heavyrain, spray or snow.
WARNING: Do not use the systemwhen towing a trailer that has aftermarketelectronic trailer brake controls. Failure tofollow this instruction could result in theloss of control of your vehicle, personalinjury or death.
WARNING: Do not use tire sizesother than those recommended becausethis can affect the normal operation of thesystem. Failure to do so may result in a lossof vehicle control, which could result inserious injury.
WARNING: Adaptive cruise controlmay not detect stationary or slow movingvehicles below 6 mph (10 km/h).
WARNING: Adaptive cruise controldoes not detect pedestrians or objects inthe road.
WARNING: Adaptive cruise controldoes not detect oncoming vehicles in thesame lane.
WARNING: Adaptive cruise controlis not a crash warning or avoidance system.
Note: It is your responsibility to stay alert,drive safely and be in control of the vehicleat all times.The system adjusts your vehicle speed tomaintain the set gap between you and thevehicle in front of you in the same lane.You can select four gap settings.The system uses a radar sensor thatprojects a beam directly in front of yourvehicle.
188
Flex (TP3) , enUSA, Edition date: 201803, Second-Printing
Cruise Control

E265860
The adaptive cruise controls are on thesteering wheel.
Switching Adaptive Cruise ControlOn
E265296
Press and release the button.
E144529
The indicator, current gap settingand set speed appear in theinformation display.
E164805
Setting the Adaptive Cruise SpeedDrive to your preferred speed.
E265306
Press the toggle button upwardor downward to set the currentspeed.
Take your foot off the accelerator pedal.The indicator, current gap setting and setspeed appear in the information display.
E164805
Note: When adaptive cruise control isactive, the speedometer may vary slightlyfrom the set speed displayed in theinformation display.
Following a Vehicle
WARNING: When following avehicle, your vehicle does not alwaysdecelerate quickly enough to avoid a crashwithout driver intervention. Always applythe brakes when necessary. Failing to doso may result in a crash, serious injury ordeath.
WARNING: Adaptive cruise controlonly warns of vehicles detected by theradar sensor. In some cases there may beno warning or a delayed warning. Youshould always apply the brakes whennecessary. Failure to do so may result in acrash, serious injury or death.
When a vehicle ahead of you enters thesame lane or a slower vehicle is ahead inthe same lane, the vehicle speed adjuststo maintain a preset gap distance. Avehicle graphic appears in the informationdisplay.Note: When you are following a vehicle andyou switch on a direction indicator, adaptivecruise control may provide a smalltemporary acceleration to help you pass.Note: The brakes may emit noise whenapplied by the system.
189
Flex (TP3) , enUSA, Edition date: 201803, Second-Printing
Cruise Control

Your vehicle maintains a consistent gapfrom the vehicle ahead until:• The vehicle in front of you accelerates
to a speed above the set speed.• The vehicle in front of you moves out
of the lane you are in.• Your vehicle speed falls below 12 mph
(20 km/h).• You set a new gap distance.The system applies the brakes to slow yourvehicle to maintain a safe gap distancefrom the vehicle in front. The system onlyapplies limited braking. You can overridethe system by applying the brakes.If the system determines that its maximumbraking level is not sufficient, an audiblewarning sounds when the systemcontinues to brake. A red warning bardisplays on the windshield and you musttake immediate action.
Setting the Gap DistanceYou can decrease or increase the distancebetween your vehicle and the vehicle infront by pressing the gap control.
E265275
Press the toggle button upwardor downward to set gapdistance.
E164805
The selected gap appears in theinformation display as shown by the barsin the image.Note: The gap setting is time dependentand therefore the distance adjusts with yourvehicle speed.
Note: It is your responsibility to select a gapappropriate to the driving conditions.
Adaptive Cruise Control Gap Settings
Dynamicbehavior
Distance GapGraphicdisplay,
bars indic-ated
betweenvehicles
Sport.Closest.1
Normal.Close.2
Normal.Medium.3
Comfort.Far.4
Each time you switch the system on, itselects the last chosen gap setting.
Overriding the Set Speed
WARNING: If you override thesystem by pressing the accelerator pedal,it does not automatically apply the brakesto maintain a gap from any vehicle ahead.
When you press the accelerator pedal, youoverride the set speed and gap distance.
E144529
When you override the system,the green indicator lightilluminates and the vehicle
image does not appear in the informationdisplay.The system resumes operation when yourelease the accelerator pedal. The vehiclespeed decreases to the set speed, or alower speed if following a slower vehicle.
190
Flex (TP3) , enUSA, Edition date: 201803, Second-Printing
Cruise Control

Changing the Set Speed
E265306
Press the toggle button upwardor downward to increase ordecrease the set speed in small
increments.
Press and hold either direction to changethe set speed in large increments. Releasethe button when you reach your preferredspeed.Press the accelerator or brake pedal untilyou reach your preferred speed. Press thetoggle button either direction.The system may apply the brakes to slowthe vehicle to the new set speed. The setspeed displays continuously in theinformation display when the system isactive.
Canceling the Set Speed
E265298
Press and release the button, ortap the brake pedal to cancel theset speed.
Note: The set speed is stored.
Resuming the Set SpeedPress and release to resume theset speed.
Note: Only use resume if you are aware ofthe set speed and intend to return to it.
Automatic CancellationThe system is not functional at vehiclespeeds below 12 mph (20 km/h). Theinformation display indicates low enginespeed, an audible alarm sounds and theautomatic braking releases if the vehicledrops below this speed.Automatic cancellation can also occurwhen:
• The tires lose traction.• The engine speed is too low.• You apply the parking brake.
Hilly Condition UsageSelect a lower gear when the system isactive in situations such as prolongeddownhill driving on steep grades, forexample in mountainous areas. Thesystem needs additional engine braking inthese situations to reduce the load on thevehicle’s regular brake system to preventit from overheating.Note: An audible alarm sounds and thesystem shuts down if it applies brakes foran extended period of time. This allows thebrakes to cool. The system functionsnormally again after the brakes cool.
Switching Adaptive Cruise ControlOff
E265297
Press and release the buttonwhen the system is in standbymode, or switch the ignition off.
Note: You erase the set speed and gapsetting when you switch the system off.
Detection Issues
WARNING: On rare occasions,detection issues can occur due to the roadinfrastructures, for example bridges,tunnels and safety barriers. In these cases,the system may brake late orunexpectedly. At all times, you areresponsible for controlling your vehicle,supervising the system and intervening, ifrequired.
WARNING: If the systemmalfunctions, have your vehicle checkedas soon as possible.
191
Flex (TP3) , enUSA, Edition date: 201803, Second-Printing
Cruise Control

The radar sensor has a limited field of view.It may not detect vehicles at all or detecta vehicle later than expected in somesituations. The lead vehicle graphic doesnot illuminate if the system does notdetect a vehicle in front of you.
E71621
Detection issues can occur:
With vehicles that edge into yourlane that can only be detectedonce they have moved fully intoyour lane.
A
With motorcyclists that may bedetected late, or not at all.
B
With vehicles in front of youwhen going into and coming outof a bend. The detection beamdoes not follow sharp curves inthe road.
C
In these cases, the system may brake lateor unexpectedly. You should stay alert andtake action when necessary.If something hits the front end of yourvehicle or damage occurs, theradar-sensing zone may change. This couldcause missed or false vehicle detection.
System Not AvailableConditions that can cause the system todeactivate or prevent the system fromactivating when requested include:• A blocked sensor.• High brake temperature.• A failure in the system or a related
system.
Blocked Sensor
E145632
A message displays if something obstructsthe radar signals from the sensor. Thesensor is in the lower grille. The systemcannot detect a vehicle ahead and doesnot function when something blocks thesensor.Note: You cannot see the sensor. It isbehind a fascia panel.Keep the front of your vehicle free of dirt,metal badges or objects. Vehicle frontprotectors and aftermarket lights may alsoblock the sensor.
192
Flex (TP3) , enUSA, Edition date: 201803, Second-Printing
Cruise Control

Possible Causes and Actions for This Message Displaying:
ActionCause
Clean the grille surface in front of the radaror remove the object causing the obstruc-tion.
The surface of the radar is dirty orobstructed.
Wait a short time. It may take severalminutes for the radar to detect that it is freefrom obstruction.
The surface of the radar is clean but themessage remains in the display.
Do not use the system in these conditionsbecause it may not detect any vehiclesahead.
Heavy rain or snow is interfering with theradar signals.
Do not use the system in these conditionsbecause it may not detect any vehiclesahead.
Water, snow or ice on the surface of theroad may interfere with the radar signals.
Wait a short time or switch to normal cruisecontrol.
You are in a desert or remote area with noother vehicles and no roadside objects.
Due to the nature of radar technology, it is possible to get a blockage warning with noactual block. A false blocked condition either self clears, or clears after you restart yourvehicle.
Switching to Normal CruiseControl
WARNING: Normal cruise controlwill not brake when your vehicle isapproaching slower vehicles. Always beaware of which mode you have selectedand apply the brakes when necessary.
E71340
The cruise control indicator lightreplaces the adaptive cruisecontrol indicator light if you
select normal cruise control. The gapsetting does not display, and the systemdoes not respond to lead vehicles.Automatic braking remains active tomaintain set speed.
You can change from adaptive cruisecontrol to normal cruise control throughthe information display.
193
Flex (TP3) , enUSA, Edition date: 201803, Second-Printing
Cruise Control

BLIND SPOT INFORMATIONSYSTEM (If Equipped)
WARNING: Never use the BlindSpot Information System as a replacementfor using the interior and exterior mirrorsor looking over your shoulder beforechanging lanes. The Blind Spot InformationSystem is not a replacement for carefuldriving.
A
A
E124788
The Blind Spot Information System isdesigned to aid you in detecting vehiclesthat may have entered the blind spot zone(A). The detection area is on both sides ofyour vehicle, extending rearward from theexterior mirrors to approximately 10 ft(3 m) beyond the bumper. The system isdesigned to alert you if certain vehiclesenter the blind spot zone while driving.Note: The Blind Spot Information Systemdoes not prevent contact with other vehiclesor objects; nor detect parked vehicles,people, animals or infrastructure (fences,guardrails, trees). It’s only designed to alertyou to vehicles in the blind spot zones.
Note: When a vehicle passes quicklythrough the blind spot zone, typically fewerthan two seconds, the system does nottrigger.
Using the SystemThe Blind Spot Information System turnson when you start the engine and you driveyour vehicle forward above 3 mph(5 km/h).For automatic transmissions, the BlindSpot Information System remains on whilethe transmission is in drive (D). If shiftedinto reverse (R) or park (P) the Blind SpotInformation System turns off. Once shiftedback into drive (D), the Blind SpotInformation System turns back on whenyou drive your vehicle above 3 mph(5 km/h).For manual transmissions, the Blind SpotInformation System is on for all gearsexcept the reverse (R).Note: The Blind Spot Information Systemdoes not function in reverse (R) or park (P).
System Lights and Messages
E142442
The Blind Spot Information Systemilluminates an amber alert indicator in theoutside mirror on the side of your vehiclethe approaching vehicle is coming from.The alert indicator dims when the systemdetects nighttime darkness.
194
Flex (TP3) , enUSA, Edition date: 201803, Second-Printing
Driving Aids

System Sensor Blockage
E205199
The system uses radar sensors that arelocated behind the bumper fascia on eachside of your vehicle. Any dirt, mud andsnow in front of the sensors and/or drivingin heavy rain can cause systemdegradation. Also, other types ofobstructions in front of the sensor cancause system degradation. This is referredto as a ‘blocked’ condition.Note: Do not apply bumper stickers and/orrepair compound to these areas, this cancause degraded system performance.If the system detects a degradedperformance condition, a message warningof a blocked sensor will appear in theinformation display. Also the system alertindicators will remain ON and the systemwill no longer provide any vehicle warnings.You can clear the information displaywarning but the alert indicators will remainilluminated.A "blocked" condition can be cleared intwo ways:• After the blockage in front of the
sensors is removed or therainfall/snowfall rate decreases orstops, drive for a few minutes in trafficto allow the sensors to detect passingvehicles.
• By cycling the ignition from ON to OFFand then back ON.
Note: When towing a trailer, the sensorsmay detect the trailer thus causing a falsealert. It may be desirable to turn the BlindSpot Information System off if the falsealerts become annoying.
System ErrorsIf the system senses a problem with theleft or right sensor, the telltale willilluminate and a message will appear inthe information display. See InformationMessages (page 103).
System LimitationsThe system does have its limitations;situations such as severe weatherconditions or debris build-up on the sensormay limit vehicle detection.The following are other situations that maylimit the system:• Certain maneuvering of vehicles
entering and exiting the blind zone.• Vehicles passing through the blind zone
at very fast rates.• When several vehicles forming a
convoy pass through the blind zone.
Switching the System Off and OnYou can temporarily switch the Blind SpotInformation System off in the informationdisplay. See General Information (page95). When the Blind Spot InformationSystem switches off, you will not receivealerts and the information display showsa system off message. The telltale in thecluster also illuminates. When you switchthe Blind Spot Information System on oroff, the alert indicators flash twice.Note: The system switches back on everytime you start your vehicle.
195
Flex (TP3) , enUSA, Edition date: 201803, Second-Printing
Driving Aids
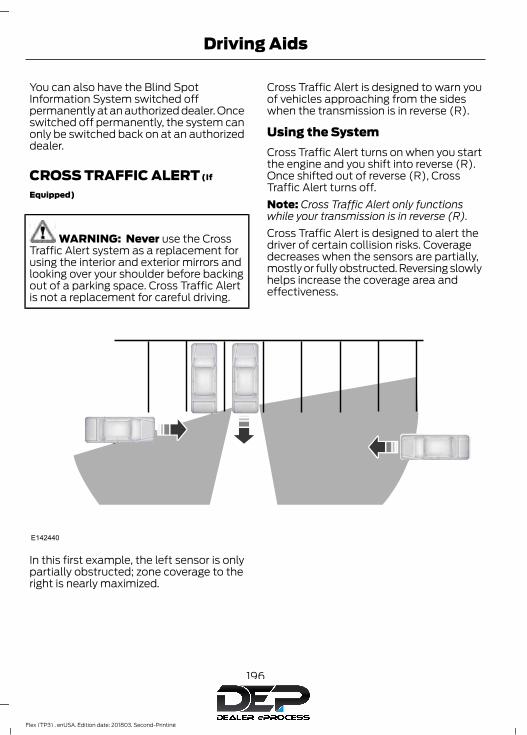
You can also have the Blind SpotInformation System switched offpermanently at an authorized dealer. Onceswitched off permanently, the system canonly be switched back on at an authorizeddealer.
CROSS TRAFFIC ALERT (If
Equipped)
WARNING: Never use the CrossTraffic Alert system as a replacement forusing the interior and exterior mirrors andlooking over your shoulder before backingout of a parking space. Cross Traffic Alertis not a replacement for careful driving.
Cross Traffic Alert is designed to warn youof vehicles approaching from the sideswhen the transmission is in reverse (R).
Using the SystemCross Traffic Alert turns on when you startthe engine and you shift into reverse (R).Once shifted out of reverse (R), CrossTraffic Alert turns off.Note: Cross Traffic Alert only functionswhile your transmission is in reverse (R).Cross Traffic Alert is designed to alert thedriver of certain collision risks. Coveragedecreases when the sensors are partially,mostly or fully obstructed. Reversing slowlyhelps increase the coverage area andeffectiveness.
E142440
In this first example, the left sensor is onlypartially obstructed; zone coverage to theright is nearly maximized.
196
Flex (TP3) , enUSA, Edition date: 201803, Second-Printing
Driving Aids

E142441
Zone coverage also decreases whenparking at shallow angles. Here, the leftsensor is mostly obstructed; zone coverageon that side is severely limited.
System Lights, Messages andAudible Alerts
E142442
The Cross Traffic Alert illuminates anamber alert indicator in the outside mirroron the side of your vehicle the approachingvehicle is coming from. Cross Traffic Alertalso sounds an audible alert and amessage appears in the informationdisplay indicating a vehicle is coming fromthe right or left. Cross Traffic Alert workswith the reverse sensing system thatsounds its own series of tones. See RearParking Aid (page 178).
E205199
The system uses radar sensors that arelocated behind the bumper fascia on eachside of your vehicle. Do not allow mud,snow or bumper stickers to obstruct theseareas, this can cause degraded systemperformance. See Blind Spot
197
Flex (TP3) , enUSA, Edition date: 201803, Second-Printing
Driving Aids

Information System (page 194). If theBlind Spot Information System is blocked,Cross Traffic Alert is also blocked. Acorresponding message appears in theinformation display as soon as you shiftthe transmission into reverse (R).
System LimitationsCross Traffic Alert has its limitations;situations such as severe weatherconditions or debris build-up on the sensorarea may limit vehicle detection.The system detects approaching vehiclesfrom up to 45 ft (14 m) away, thoughcoverage decreases when the sensors areblocked. Reversing slowly helps increasethe coverage area and effectiveness.The following are other situations that maylimit the Cross Traffic Alert performance:• Stationary or slow moving vehicles.• Pedestrians or objects in the roadway.• Oncoming vehicles in the same lame.• Severe weather conditions.• Debris build-up near or around the
sensor(s).• Small distance to the vehicle ahead.• Adjacently parking vehicles or objects
obstructing the sensors.• Approaching vehicles passing at
speeds greater than 15 mph (24 km/h).• Driving in reverse faster than 3 mph
(5 km/h).• Backing out of an angled parking spot.If the rear end of the vehicle is hit ordamaged, the radar sensing zone may bealtered causing missed or false collisionwarnings. See your authorized dealer tohave your collision warning radar checkedfor proper coverage and operation.
False AlertsNote: When towing a trailer, the sensorsmay detect the trailer thus causing a falsealert. It may be desirable to turn the BlindSpot Information System off if the falsealerts become annoying.There may be certain instances when thereis a false alert by the Cross Traffic Alertsystem that illuminates the alert indicatorwith no vehicle in the coverage zone. Someamount of false alerts are normal; they aretemporary and self-correct.
System ErrorsIf Cross Traffic Alert senses a problem withthe left or right sensor a message willappear in the information display. SeeInformation Messages (page 103).
Switching the System Off and OnYou can temporarily switch Cross TrafficAlert off in the information display. SeeInformation Messages (page 103). Whenyou switch Cross Traffic Alert off, you willnot receive alerts and the informationdisplay will display a system off message.Note: The Cross Traffic Alert switches onwhenever the ignition is switched on andready to provide appropriate alerts whenthe transmission is in reverse (R). CrossTraffic Alert will not remember the lastselected on or off setting.You can also have Cross Traffic Alertswitched off permanently at an authorizeddealer. Once switched off permanently,the system can only be switched back onat an authorized dealer.
198
Flex (TP3) , enUSA, Edition date: 201803, Second-Printing
Driving Aids

STEERINGElectric Power Steering
WARNING: The electric powersteering system has diagnostic checks thatcontinuously monitor the system. If a faultis detected, a message displays in theinformation display. Stop your vehicle assoon as it is safe to do so. Switch theignition off. After at least 10 seconds,switch the ignition on and watch theinformation display for a steering systemwarning message. If a steering systemwarning message returns, have the systemchecked by an authorized dealer.
WARNING: If the system detects anerror, you may not feel a difference in thesteering, however a serious condition mayexist. Obtain immediate service from anauthorized dealer, failure to do so mayresult in loss of steering control.
Your vehicle has an electric power steeringsystem. There is no fluid reservoir. Nomaintenance is required.If your vehicle loses electrical power whileyou are driving, electric power steeringassistance is lost. The steering system stilloperates and you can steer your vehiclemanually. Manually steering your vehiclerequires more effort.Extreme continuous steering may increasethe effort required for you to steer yourvehicle. This increased effort preventsoverheating and permanent damage tothe steering system. You do not lose theability to steer your vehicle manually.Typical steering and driving maneuversallow the system to cool and return tonormal operation.
Steering TipsIf the steering wanders or pulls, check for:• Correct tire pressures.• Uneven tire wear.• Loose or worn suspension
components.• Loose or worn steering components.• Improper vehicle alignment.Note: A high crown in the road or highcrosswinds may also make the steeringseem to wander or pull.
Adaptive LearningThe electronic power steering systemadaptive learning helps correct roadirregularities and improves overall handlingand steering feel. It communicates withthe brake system to help operateadvanced stability control and accidentavoidance systems. Additionally, wheneverthe battery is disconnected or a newbattery installed, you must drive yourvehicle a short distance before the systemrelearns the strategy and reactivates allsystems.
COLLISION WARNING SYSTEM(If Equipped)
PRINCIPLE OF OPERATION
WARNING: This system is designedto be a supplementary driving aid. It is notintended to replace the driver’s attention,and judgment, or the need to apply thebrakes. This system does NOT activate thebrakes automatically. Failure to press thebrake pedal to activate the brakes mayresult in a collision.
199
Flex (TP3) , enUSA, Edition date: 201803, Second-Printing
Driving Aids

WARNING: The collision warningsystem with brake support cannot helpprevent all collisions. Do not rely on thissystem to replace driver judgment and theneed to maintain distance and speed.
Note: The system does not detect, warn orrespond to potential collisions with vehiclesto the rear or sides of the vehicle.Note: The collision warning system is activeat speeds above approximately 5 mph(8 km/h).
E156130
This system is designed to alert the driverof certain collision risks. A radar detects ifyour vehicle is rapidly approaching anothervehicle traveling in the same direction asyours.
E156131
If it is, a red warning light illuminates andan audible warning chime sounds.
The brake support system assists the driverin reducing the collision speed by chargingthe brakes. If the risk of collision furtherincreases after the warning lightilluminates, the brake support preparesthe brake system for rapid braking. Thismay be apparent to the driver. The systemdoes not automatically activate the brakesbut, if the brake pedal is pressed, full forcebraking is applied even if the brake pedalis lightly pressed.
Using the Collision Warning System
WARNING: The collision warningsystem’s brake support can only helpreduce the speed at which a collisionoccurs if the driver applies the vehicle’sbrakes. The brake pedal must be pressedjust like any typical braking situation.
The warning system sensitivity can beadjusted to one of three possible settingsby using the information display control.See General Information (page 95).Note: If collision warnings are perceived asbeing too frequent or disturbing then thewarning sensitivity can be reduced, thoughthe manufacturer recommends using thehighest sensitivity setting where possible.Setting lower sensitivity would lead to fewerand later system warnings. See GeneralInformation (page 95).
Blocked Sensors
E145632
200
Flex (TP3) , enUSA, Edition date: 201803, Second-Printing
Driving Aids

If a message regarding a blocked sensorappears in the information display, theradar signals from the sensor have beenobstructed. The sensors are located behinda fascia cover near the driver side of thelower grille. When the sensors are
obstructed, a vehicle ahead cannot bedetected and the collision warning systemdoes not function. The following table listspossible causes and actions for thismessage being displayed.
ActionCause
Clean the grille surface in front of the radaror remove the object causing the obstruc-
tion
The surface of the radar in the grille is dirtyor obstructed in some way
Wait a short time. It may take severalminutes for the radar to detect that it is no
longer obstructed
The surface of the radar in the grille is cleanbut the message remains in the display
The collision warning system is temporarilydisabled. Collision warning should automat-
ically reactivate a short time after theweather conditions improve
Heavy rain, spray, snow, or fog is interferingwith the radar signals
The collision warning system is temporarilydisabled. Collision warning should automat-
ically reactivate a short time after theweather conditions improve
Swirling water, or snow or ice on the surfaceof the road may interfere with the radar
signals
System Limitations
WARNING: The collision warningsystem’s brake support can only helpreduce the speed at which a collisionoccurs if the driver applies the vehicle’sbrakes. The brake pedal must be pressedjust like any typical braking situation.
Due to the nature of radar technology,there may be certain instances wherevehicles do not provide a collision warning.These include:• Stationary vehicles or vehicles moving
below 6 mph (10 km/h).• Pedestrians or objects in the roadway.• Oncoming vehicles in the same lane.
• Severe weather conditions (seeblocked sensor section).
• Debris build-up on the grille near theheadlamps (see blocked sensorsection).
• Small distance to vehicle ahead.• Steering wheel and pedal movements
are large (very active driving style).If the front end of the vehicle is hit ordamaged, the radar sensing zone may bealtered causing missed or false collisionwarnings. See your authorized dealer tohave your collision warning radar checkedfor proper coverage and operation.
201
Flex (TP3) , enUSA, Edition date: 201803, Second-Printing
Driving Aids

CARGO NETS (If Equipped)
WARNING: This net is not designedto restrain objects during a collision orheavy braking.
E210596
The cargo net secures lightweight objectsin the cargo area. Attach the net to theprovided anchors. Do not put more than50 lb (22 kg) in the net.
ROOF RACKS AND LOADCARRIERS
WARNING: When loading the roofracks, we recommend you evenly distributethe load, as well as maintain a low centerof gravity. Loaded vehicles, with highercenters of gravity, may handle differentlythan unloaded vehicles. Take extraprecautions, such as slower speeds andincreased stopping distance, when drivinga heavily loaded vehicle.
The maximum recommended load, evenlydistributed on the roof rack, is 100 lb(45 kg).Note: Never place loads directly on the roofpanel. The roof panel is not designed todirectly carry a load.You must place loads directly on thecrossbars fitted to the roof rack side rails.When using the roof rack system, werecommend that you use genuine Fordaccessory crossbars specifically designedfor your vehicle.Make sure that you securely fasten theload. Check the tightness of the loadbefore driving and at each fuel stop.
LOAD LIMIT
Vehicle Loading - with andwithout a TrailerThis section guides you in theproper loading of your vehicle,trailer, or both. Keep your loadedvehicle weight within its designrating capability, with or withouta trailer. Properly loading yourvehicle provides maximum returnof vehicle design performance.
202
Flex (TP3) , enUSA, Edition date: 201803, Second-Printing
Load Carrying

Before you load your vehicle,become familiar with thefollowing terms for determiningyour vehicle’s weight rating, withor without a trailer, from thevehicle’s Tire and LoadingInformation label or SafetyCompliance Certification label.
Tire and Loading Label InformationExample:
E198719
Payload
E143816
PAYLOAD
203
Flex (TP3) , enUSA, Edition date: 201803, Second-Printing
Load Carrying

Payload is the combined weightof cargo and passengers that yourvehicle is carrying. The maximumpayload for your vehicle appearson the Tire and Loading label. Thelabel is either on the B-pillar or theedge of the driver door. Vehiclesexported outside the US andCanada may not have a tire andloading label. Look for “Thecombined weight of occupantsand cargo should never exceedXXX kg OR XXX lb” for maximumpayload. The payload listed on theTire and Loading Information labelis the maximum payload for yourvehicle as built by the assemblyplant. If you install any additionalequipment on your vehicle, youmust determine the new payload.Subtract the weight of theequipment from the payload listedon the Tire and Loading label.When towing, trailer tongueweight or king pin weight is alsopart of payload.
WARNING: The appropriateloading capacity of your vehiclecan be limited either by volumecapacity (how much space isavailable) or by payload capacity(how much weight the vehicleshould carry). Once you havereached the maximum payload ofyour vehicle, do not add morecargo, even if there is spaceavailable. Overloading orimproperly loading your vehiclecan contribute to loss of vehiclecontrol and vehicle rollover.
GAWR (Gross Axle WeightRating)GAWR is the maximum allowableweight that a single axle (front orrear) can carry. These numbersare on the Safety ComplianceCertification label. The label islocated on the door hinge pillar,door-latch post, or the door edgethat meets the door-latch post,next to the driver seating position.The total load on each axle mustnever exceed its Gross AxleWeight Rating.
GVWR (Gross Vehicle WeightRating)GVWR is the maximum allowableweight of the fully loaded vehicle.This includes all options,equipment, passengers and cargo.It appears on the SafetyCompliance Certification label.The label is located on the doorhinge pillar, door-latch post, or thedoor edge that meets thedoor-latch post, next to the driverseating position.The gross vehicle weight mustnever exceed the Gross VehicleWeight Rating.
204
Flex (TP3) , enUSA, Edition date: 201803, Second-Printing
Load Carrying

Safety Compliance Certification LabelExample:
E198828
WARNING: Exceeding theSafety Compliance Certificationlabel vehicle weight limits canadversely affect the performanceand handling of your vehicle,cause vehicle damage and canresult in the loss of control of yourvehicle, serious personal injury ordeath.
Maximum Loaded TrailerWeightMaximum loaded trailer weight isthe highest possible weight of afully loaded trailer the vehicle cantow. Consult an authorized dealer(or the RV and Trailer TowingGuide available at an authorizeddealer) for more detailedinformation.
GCWR (Gross CombinedWeight Rating)GCWR is the maximum allowableweight of the vehicle and theloaded trailer, including all cargoand passengers, that the vehiclecan handle without riskingdamage. (Important: The towing
vehicle’s braking system is ratedfor operation at Gross VehicleWeight Rating, not at GrossCombined Weight Rating.)Separate functional brakes shouldbe used for safe control of towedvehicles and for trailers where theGross Combined Weight of thetowing vehicle plus the trailerexceed the Gross Vehicle WeightRating of the towing vehicle.The gross combined weight mustnever exceed the Gross CombinedWeight Rating.Note: For trailer towinginformation refer to the RV andTrailer Towing Guide available atan authorized dealer.
WARNING: Do not exceedthe GVWR or the GAWR specifiedon the certification label.
WARNING: Do not usereplacement tires with lower loadcarrying capacities than theoriginal tires because they maylower your vehicle's GVWR andGAWR limitations. Replacementtires with a higher limit than theoriginal tires do not increase theGVWR and GAWR limitations.
205
Flex (TP3) , enUSA, Edition date: 201803, Second-Printing
Load Carrying

WARNING: Exceeding anyvehicle weight rating canadversely affect the performanceand handling of your vehicle,cause vehicle damage and canresult in the loss of control of yourvehicle, serious personal injury ordeath.
Steps for determining thecorrect load limit:1. Locate the statement "The
combined weight of occupantsand cargo should never exceedXXX kg or XXX lb." on yourvehicle’s placard.
2. Determine the combinedweight of the driver andpassengers that will be ridingin your vehicle.
3. Subtract the combined weightof the driver and passengersfrom XXX kg or XXX lb.
4. The resulting figure equals theavailable amount of cargo andluggage load capacity. Forexample, if the “XXX” amountequals 1,400 lb. and there willbe five 150 lb. passengers inyour vehicle, the amount ofavailable cargo and luggageload capacity is 650 lb.(1400-750 (5 x 150) = 650 lb.)
5. Determine the combinedweight of luggage and cargobeing loaded on the vehicle.That weight may not safelyexceed the available cargo andluggage load capacitycalculated in Step 4.
6. If your vehicle will be towing atrailer, load from your trailerwill be transferred to yourvehicle. Consult this manual todetermine how this reduces theavailable cargo and luggageload capacity of your vehicle.
Helpful examples for calculatingthe available amount of cargoand luggage load capacitySuppose your vehicle has a1400-pound (635-kilogram) cargoand luggage capacity. You decideto go golfing. Is there enough loadcapacity to carry you, four of yourfriends and all the golf bags? Youand four friends average 220pounds (99 kilograms) each andthe golf bags weigh approximately30 pounds (13.5 kilograms) each.The calculation would be: 1400 -(5 x 220) - (5 x 30) = 1400 - 1100- 150 = 150 pounds. Yes, you haveenough load capacity in yourvehicle to transport four friendsand your golf bags. In metric units,the calculation would be: 635kilograms - (5 x 99 kilograms) -(5 x 13.5 kilograms) = 635 - 495 -67.5 = 72.5 kilograms.
206
Flex (TP3) , enUSA, Edition date: 201803, Second-Printing
Load Carrying

Suppose your vehicle has a1400-pound (635-kilogram) cargoand luggage capacity. You andone of your friends decide to pickup cement from the local homeimprovement store to finish thatpatio you have been planning forthe past two years. Measuring theinside of the vehicle with the rearseat folded down, you have roomfor twelve 100-pound(45-kilogram) bags of cement. Doyou have enough load capacity totransport the cement to yourhome? If you and your friend eachweigh 220 pounds (99 kilograms),the calculation would be: 1400 -(2 x 220) - (12 x 100) = 1400 - 440- 1200 = - 240 pounds. No, you donot have enough cargo capacityto carry that much weight. Inmetric units, the calculation wouldbe: 635 kilograms - (2 x 99kilograms) - (12 x 45 kilograms) =635 - 198 - 540 = -103 kilograms.You will need to reduce the loadweight by at least 240 pounds(104 kilograms). If you removethree 100-pound (45-kilogram)cement bags, then the loadcalculation would be:1400 - (2 x220) - (9 x 100) = 1400 - 440 -900 = 60 pounds. Now you havethe load capacity to transport thecement and your friend home. Inmetric units, the calculation wouldbe: 635 kilograms - (2 x 99kilograms) - (9 x 45 kilograms) =635 - 198 - 405 = 32 kilograms.
The above calculations alsoassume that the loads arepositioned in your vehicle in amanner that does not overloadthe front or the rear gross axleweight rating specified for yourvehicle on the Safety ComplianceCertification label.
Special Loading Instructionsfor Owners of Pick-up Trucksand Utility-type Vehicles
WARNING: When loadingthe roof racks, we recommend youevenly distribute the load, as wellas maintain a low center ofgravity. Loaded vehicles, withhigher centers of gravity, mayhandle differently than unloadedvehicles. Take extra precautions,such as slower speeds andincreased stopping distance, whendriving a heavily loaded vehicle.
207
Flex (TP3) , enUSA, Edition date: 201803, Second-Printing
Load Carrying

TOWING A TRAILER
WARNING: Do not exceedthe GVWR or the GAWR specifiedon the certification label.
WARNING: Towing trailersbeyond the maximumrecommended gross trailer weightexceeds the limit of your vehicleand could result in enginedamage, transmission damage,structural damage, loss of vehiclecontrol, vehicle rollover andpersonal injury.
Note: Your vehicle may haveelectrical items, such as fuses orrelays, related to towing. SeeFuses (page 232).Your vehicle's load capacitydesignation is by weight, not byvolume, so you cannot necessarilyuse all available space whenloading a vehicle or trailer.Towing a trailer places an extraload on your vehicle's engine,transmission, axle, brakes, tiresand suspension. Inspect thesecomponents periodically during,and after, any towing operation.
Load PlacementTo help minimize how trailermovement affects your vehiclewhen driving:• Load the heaviest items closest
to the trailer floor.• Load the heaviest items
centered between the left andright side trailer tires.
• Load the heaviest items abovethe trailer axles or just slightlyforward toward the trailertongue. Do not allow the finaltrailer tongue weight to goabove or below 10-15% of theloaded trailer weight.
• Select a ball mount with thecorrect rise or drop. When boththe loaded vehicle and trailerare connected, the trailer frameshould be level, or slightlyangled down toward yourvehicle, when viewed from theside.
When driving with a trailer orpayload, a slight takeoff vibrationor shudder may be present due tothe increased payload weight.Additional information regardingproper trailer loading and settingyour vehicle up for towing islocated in the Load Carryingchapter. See Load Limit (page202).You can also find information inthe RV & Trailer Towing Guideavailable at your authorizeddealer, or online.
208
Flex (TP3) , enUSA, Edition date: 201803, Second-Printing
Towing

RV & Trailer Towing Guide Onlinehttp://www.fleet.ford.com/towing-guides/Website
TRAILER SWAY CONTROL (If
Equipped)
WARNING: Turning off trailer swaycontrol increases the risk of loss of vehiclecontrol, serious injury or death. Ford doesnot recommend disabling this featureexcept in situations where speed reductionmay be detrimental (such as hill climbing),the driver has significant trailer towingexperience, and can control trailer swayand maintain safe operation.
Note: This feature does not prevent trailersway, but reduces it when it begins.Note: This feature cannot stop all trailersfrom swaying.Note: In some cases, if your vehicle speedis too high, the system may turn on multipletimes, gradually reducing your vehicle speed.The system applies the brakes to theindividual wheels and reduces enginetorque to aid vehicle stability. If the trailerbegins to sway, the stability controlwarning lamp flashes and a messageappears in the information display. SeeInformation Messages (page 103). Slowyour vehicle down, pull safely to the sideof the road and check for correct loaddistribution. See Load Carrying (page202).You can switch this feature off in theinformation display. When you switch theignition on, the system automatically turnson.
RECOMMENDED TOWINGWEIGHTS
Note: Do not exceed the trailerweight for your vehicleconfiguration listed in the chartbelow.Note: Make sure to take intoconsideration trailer frontal area.Do not exceed 20 ft² (1.86 m²) ifyour vehicle can tow a class Itrailer, or 40 ft² (3.72 m²) if yourvehicle can tow a class III trailer.Note: For high altitude operation,reduce the gross combined weightby 2% per 1,000 ft (300 m)starting at the 1,000 ft (300 m)elevation point.Note: Certain states requireelectric trailer brakes for trailersover a specified weight. Checkstate regulations for this specifiedweight. The maximum trailerweights listed may be limited tothis specified weight, as thevehicle’s electrical system may notinclude the wiring connectorneeded to use electric trailerbrakes.
209
Flex (TP3) , enUSA, Edition date: 201803, Second-Printing
Towing

Your vehicle may tow a trailerprovided the maximum trailerweight is less than or equal to the
maximum trailer weight listed foryour vehicle configuration on thefollowing chart.
Maximum trailerweight
Maximum GCWRPowertrain andtrailer class
2,000 lb (907 kg)6,900 lb (3,131 kg)3.5L TiVCT front-wheel drive, Class I
2,000 lb (907 kg)7,050 lb (3,199 kg)3.5L TiVCT all-wheeldrive, Class I
2,000 lb (907 kg)7,070 lb (3,208 kg)3.5L GTDi all-wheeldrive, Class I
4,500 lb (2,042 kg) *9,355 lb (4,244 kg)3.5L TiVCT front-wheel drive, Class III
4,500 lb (2,042 kg) **9,520 lb (4,319 kg)3.5L TiVCT all-wheeldrive, Class III
4,500 lb (2,042 kg) **9,620 lb (4,364 kg)3.5L GTDi all-wheeldrive, Class III
* For towing trailers up to 3500 lb (1588 kg), use a weight-carrying hitchand ball, which uniformly spreads the trailer tongue loads through yourvehicle’s underbody structure. For towing trailers over 3500 lb (1588kg), up to 4500 lb (2042 kg), we recommend you use aweight-distributing hitch to increase front axle load while towing.**For towing trailers up to 4500 lb (2042 kg), use a weight-carrying hitchand ball, which uniformly spreads the trailer tongue loads through yourvehicle's underbody structure.
210
Flex (TP3) , enUSA, Edition date: 201803, Second-Printing
Towing

ESSENTIAL TOWING CHECKSFollow these guidelines for safe towing:• Do not tow a trailer until you drive your
vehicle at least 1,000 mi (1,600 km).• Consult your local motor vehicle laws
for towing a trailer.• See the instructions included with
towing accessories for the properinstallation and adjustmentspecifications.
• Service your vehicle more frequently ifyou tow a trailer. See ScheduledMaintenance (page 442).
• If you use a rental trailer, follow theinstructions the rental agency givesyou.
You can find information on loadspecification terms found on the tire labeland Safety Compliance label as well asinstructions on calculating your vehicle'sload in the Load Carrying chapter. SeeLoad Limit (page 202).Remember to account for the trailertongue weight as part of your vehicle loadwhen calculating the total vehicle weight.
Trailer Towing Connector(Vehicles with a Trailer TowingPackage and 7–Pin Connector)
E211391
When attaching the trailer wiring connectorto your vehicle, only use a proper fittingconnector that works with the vehicle andtrailer functions. Some seven-positionconnectors may have the SAE J2863 logo,which confirms that it is the proper wiringconnector and works correctly with yourvehicle.
FunctionColor
Left turn signal and stop lampYellow
Ground (-)White
Electric brakesBlue
Right turn signal and stoplamp
Green
Battery (+)Orange
Running lightsBrown
Reverse lightsGrey
211
Flex (TP3) , enUSA, Edition date: 201803, Second-Printing
Towing
HitchesDo not use a hitch that either clamps ontothe bumper or attaches to the axle.Distribute the trailer load so 10-15% of thetotal trailer weight is on the tongue.
Weight-Distributing Hitch
WARNING: Do not adjust the springbars so that your vehicle's rear bumper ishigher than before attaching the trailer.Doing so will defeat the function of theweight-distributing hitch, which may causeunpredictable handling, and could resultin serious personal injury.
When hooking-up a trailer using aweight-distributing hitch, always use thefollowing procedure:1. Park your vehicle, without the trailer,
on a level surface.2. Measure the height of the top of your
vehicle’s front wheel opening on thefender. This is H1.
3. Attach the trailer to your vehiclewithout the weight-distributing barsconnected.
4. Measure the height of the top of yourvehicle’s front wheel opening on thefender a second time. This is H2.
5. Install and adjust the tension in theweight distributing bars so that theheight of the front fender isapproximately halfway between H1 andH2.
6. Check that the trailer is level. If notlevel, adjust the ball height accordinglyand repeat Steps 3–6.
Safety ChainsNote: Never attach safety chains to thebumper.
Always connect the safety chains to thehook retainers of your vehicle hitch.To connect the safety chains, cross themunder the trailer tongue and allow enoughslack for turning tight corners. Do not allowthe chains to drag on the ground.
Trailer Brakes
WARNING: Do not connect a trailer'shydraulic brake system directly to yourvehicle's brake system. Your vehicle maynot have enough braking power and yourchances of having a collision greatlyincrease.
Electric brakes and manual, automatic orsurge-type trailer brakes are safe if youinstall them properly and adjust them tothe manufacturer's specifications. Thetrailer brakes must meet local and federalregulations.The rating for the tow vehicle's brakingsystem operation is at the gross vehicleweight rating, not the gross combinedweight rating.Separate functioning brake systemsare required for safe control of towedvehicles and trailers weighing morethan 1500 lb (680 kg) when loaded.
Trailer Brake Controller Connector(If Equipped)
The connector is located under theinstrument panel above the brake pedal.
212
Flex (TP3) , enUSA, Edition date: 201803, Second-Printing
Towing

E211392
Trailer Lamps
WARNING: Never connect any trailerlamp wiring to the vehicle's tail lampwiring; this may damage the electricalsystem resulting in fire. Contact yourauthorized dealer as soon as possible forassistance in proper trailer tow wiringinstallation. Additional electricalequipment may be required.
Trailer lamps are required on most towedvehicles. Make sure all running lights, brakelights, turn signals and hazard lights areworking.
Before Towing a TrailerPractice turning, stopping and backing upto get the feel of your vehicle-trailercombination before starting on a trip.When turning, make wider turns so thetrailer wheels clear curbs and otherobstacles.
When Towing a Trailer• Do not drive faster than 70 mph
(113 km/h) during the first 500 mi(800 km).
• Do not make full-throttle starts.• Check your hitch, electrical connections
and trailer wheel lug nuts thoroughlyafter you have traveled 50 mi (80 km).
• When stopped in congested or heavytraffic during hot weather, place thegearshift in park (P) to aid engine andtransmission cooling and to help A/Cperformance.
• Turn off the speed control with heavyloads or in hilly terrain. The speedcontrol may turn off automaticallywhen you are towing on long, steepgrades.
• Shift to a lower gear when driving downa long or steep hill. Do not apply thebrakes continuously, as they mayoverheat and become less effective.
• If your transmission is equipped with aGrade Assist or Tow/Haul feature, usethis feature when towing. This providesengine braking and helps eliminateexcessive transmission shifting foroptimum fuel economy andtransmission cooling.
• Allow more distance for stopping witha trailer attached. Anticipate stops andbrake gradually.
• Avoid parking on a grade. However, ifyou must park on a grade:
1. Turn the steering wheel to point yourvehicle tires away from traffic flow.
213
Flex (TP3) , enUSA, Edition date: 201803, Second-Printing
Towing

2. Set your vehicle parking brake.3. Place the automatic transmission in
park (P).4. Place wheel chocks in front and back
of the trailer wheels. Chocks are notincluded with your vehicle.
Launching or Retrieving a Boat orPersonal Watercraft (PWC)Note: Disconnect the wiring to the trailerbefore backing the trailer into the water.Note: Reconnect the wiring to the trailerafter removing the trailer from the water.When backing down a ramp during boatlaunching or retrieval:• Do not allow the static water level to
rise above the bottom edge of the rearbumper.
• Do not allow waves to break higherthan 6 in (15 cm) above the bottomedge of the rear bumper.
Exceeding these limits may allow water toenter vehicle components:• Causing internal damage to the
components.• Affecting driveability, emissions, and
reliability.Any time the rear axle submerges in water,replace the rear axle lubricant. Water maycontaminate the rear axle lubricant, whichis not a normal maintenance inspectionitem unless there is a possibility of a leakor other axle repair is required.
TOWING THE VEHICLE ONFOUR WHEELSEmergency TowingIf your vehicle becomes inoperable(without access to wheel dollies or vehicletransport trailer), it can be flat-towed (allwheels on the ground, regardless of thepowertrain and transmissionconfiguration) under the followingconditions:• Your vehicle is facing forward for
towing in a forward direction.• Shift into neutral (N). If you cannot
shift into neutral (N), you may need tooverride it. See Transmission (page162).
• Maximum speed is 35 mph (56 km/h).• Maximum distance is 50 mi (80 km).
Recreational TowingNote: Put your climate control system inrecirculated air mode to prevent exhaustfumes from entering the vehicle. SeeClimate Control (page 112).Follow these guidelines if you have a needfor recreational (RV) towing. An exampleof recreational towing would be towingyour vehicle behind a motorhome. Wedesigned these guidelines to preventdamage to your transmission.You can tow your vehicle with all fourwheels on the ground.If you tow your vehicle with all four wheelson the ground:• Tow only in the forward direction.• Release the parking brake.
Vehicles with Keyless Start1. Start the vehicle by pressing the brake
pedal, and then pressing the keylessstart button until the vehicle starts.
214
Flex (TP3) , enUSA, Edition date: 201803, Second-Printing
Towing

2. Press the brake pedal and shift thegearshift into neutral (N).
3. Turn the vehicle off by pressing thekeyless start button once.
4. Disconnect the negative (black) cablefrom the battery. You need the doorkey to lock and unlock doors when thebattery cable is disconnected. SeeChanging the 12V Battery (page 256).
Note: The anti-theft system does not workuntil you reconnect the battery cable.Start the engine within 15 minutes ofreconnecting the battery cable.
Vehicles with an Ignition Key1. Start the vehicle by pressing the brake
pedal, and then turning the ignition keyuntil the vehicle starts.
2. Press the brake pedal and shift thetransmission into neutral (N).
3. Turn off your vehicle by turning theignition key past the accessory position.The key position is between theaccessory and off positions. SeeIgnition Switch (page 145).
4. Disconnect the negative (black) cablefrom the battery. See Changing the12V Battery (page 256).
Note: The anti-theft system does not workuntil you reconnect the battery cable.Start the engine within 15 minutes ofreconnecting the battery cable.
All Vehicles• Do not exceed 65 mph (105 km/h).• Start the engine and allow it to run for
five minutes at the beginning of eachday and every six hours thereafter. Withthe engine running and your foot on thebrake, shift into drive (D) and then intoreverse (R) before shifting back intoneutral (N).
Front-wheel Drive VehiclesAlternatively, you can tow your front-wheeldrive vehicle with the front wheels off theground by using a tow dolly, or with all fourwheels off the ground using a vehicletransport trailer. If you are using a towdolly, follow the instructions specified bythe equipment provider.
All-wheel Drive VehiclesAlternatively, you can tow your all-wheeldrive vehicle with all four wheels off theground using a vehicle transport trailer. Donot tow your all-wheel drive vehicle withthe front wheels off the ground (by usinga tow dolly) and the rear wheels on theground. This causes damage to yourall-wheel drive system. If you are using avehicle transport trailer, follow theinstruction specified by the equipmentprovider.
215
Flex (TP3) , enUSA, Edition date: 201803, Second-Printing
Towing

BREAKING-INYou need to break in new tires forapproximately 300 mi (480 km). Duringthis time, your vehicle may exhibit someunusual driving characteristics.Avoid driving too fast during the first1,000 mi (1,600 km). Vary your speedfrequently and change up through thegears early. Do not labor the engine.Do not tow during the first 1,000 mi(1,600 km).
ECONOMICAL DRIVINGYour fuel economy is affected by severalthings, such as how you drive, theconditions you drive under, and how youmaintain your vehicle.You may improve your fuel economy bykeeping these things in mind:• Accelerate and slow down in a smooth,
moderate fashion.• Drive at steady speeds without
stopping.• Anticipate stops; slowing down may
eliminate the need to stop.• Combine errands and minimize
stop-and-go driving.• Close the windows for high-speed
driving.• Drive at reasonable speeds (traveling
at 55 mph [88 km/h] uses 15% lessfuel than traveling at 65 mph [105km/h]).
• Keep the tires properly inflated and useonly the recommended size.
• Use the recommended engine oil.• Perform all regularly scheduled
maintenance.
Avoid these actions; they reduce your fueleconomy:• Sudden accelerations or hard
accelerations.• Revving the engine before turning it off.• Idle for periods longer than one minute.• Warm up your vehicle on cold
mornings.• Use the air conditioner or front
defroster.• Use the speed control in hilly terrain.• Rest your foot on the brake pedal while
driving.• Drive a heavily loaded vehicle or tow a
trailer.• Carry unnecessary weight
(approximately 1 mpg [0.4 km/L] islost for every 400 lb [180 kilogram] ofweight carried).
• Driving with the wheels out ofalignment.
Conditions• Heavily loading a vehicle or towing a
trailer may reduce fuel economy at anyspeed.
• Adding certain accessories to yourvehicle (for example bug deflectors,rollbars, light bars, running boards, skiracks or luggage racks) may reducefuel economy.
• To maximize the fuel economy, drivewith the tonneau cover installed (ifequipped).
• Using fuel blended with alcohol maylower fuel economy.
• Fuel economy may decrease with lowertemperatures during the first 5–10 mi(12–16 km) of driving.
• Driving on flat terrain offers improvedfuel economy as compared to drivingon hilly terrain.
216
Flex (TP3) , enUSA, Edition date: 201803, Second-Printing
Driving Hints

• Transmissions give their best fueleconomy when operated in the topcruise gear and with steady pressureon the gas pedal.
• Four-wheel-drive operation (ifequipped) is less fuel efficient thantwo-wheel-drive operation.
• Close the windows for high-speeddriving.
DRIVING THROUGH WATER
WARNING: Do not drive throughflowing or deep water as you may losecontrol of your vehicle.
Note: Driving through standing water cancause vehicle damage.Note: Engine damage can occur if waterenters the air filter.Before driving through standing water,check the depth. Never drive through waterthat is higher than the bottom of the frontrocker area of your vehicle.
E266447
When driving through standing water, drivevery slowly and do not stop your vehicle.Your brake performance and traction maybe limited. After driving through water andas soon as it is safe to do so:
• Lightly press the brake pedal to dry thebrakes and to check that they work.
• Check that the horn works.• Check that the exterior lights work.• Turn the steering wheel to check that
the steering power assist works.
FLOOR MATS
WARNING: Use a floor mat designedto fit the footwell of your vehicle that doesnot obstruct the pedal area. Failure tofollow this instruction could result in theloss of control of your vehicle, personalinjury or death.
WARNING: Pedals that cannotmove freely can cause loss of vehiclecontrol and increase the risk of seriouspersonal injury.
WARNING: Secure the floor mat toboth retention devices so that it cannotslip out of position and interfere with thepedals. Failure to follow this instructioncould result in the loss of control of yourvehicle, personal injury or death.
WARNING: Do not place additionalfloor mats or any other covering on top ofthe original floor mats. This could result inthe floor mat interfering with the operationof the pedals. Failure to follow thisinstruction could result in the loss ofcontrol of your vehicle, personal injury ordeath.
WARNING: Always make sure thatobjects cannot fall into the driver foot wellwhile your vehicle is moving. Objects thatare loose can become trapped under thepedals causing a loss of vehicle control.
217
Flex (TP3) , enUSA, Edition date: 201803, Second-Printing
Driving Hints
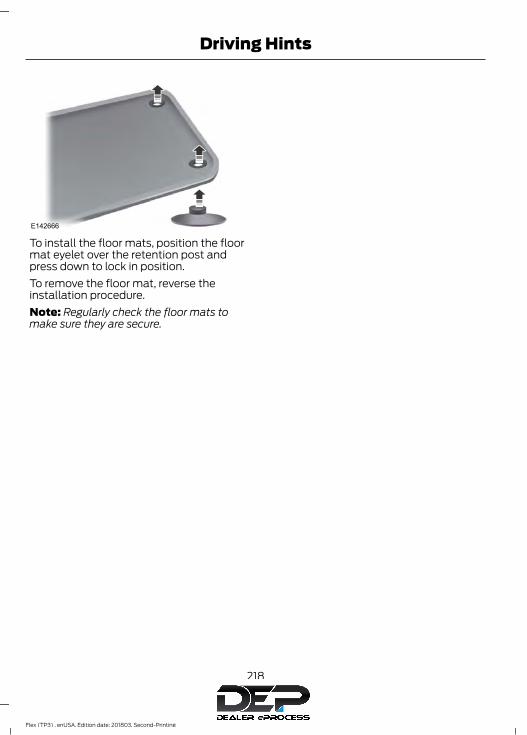
E142666
To install the floor mats, position the floormat eyelet over the retention post andpress down to lock in position.To remove the floor mat, reverse theinstallation procedure.Note: Regularly check the floor mats tomake sure they are secure.
218
Flex (TP3) , enUSA, Edition date: 201803, Second-Printing
Driving Hints

ROADSIDE ASSISTANCEVehicles Sold in the United States:Getting Roadside AssistanceTo fully assist you should you have avehicle concern, Ford Motor Companyoffers a complimentary roadsideassistance program. This program isseparate from the New Vehicle LimitedWarranty.The service is available:• 24 hours a day, seven days a week.• For the coverage period listed on the
Roadside Assistance Card included inyour Owner's Manual portfolio.
Roadside Assistance covers:• A flat tire change with a good spare
(except vehicles supplied with a tireinflation kit).
• Battery jump start.• Lock-out assistance (key replacement
cost is the customer's responsibility).• Fuel delivery — independent service
contractors, if not prohibited by state,local or municipal law, shall deliver upto 2 gal (8 L) of gasoline or 5 gal (20 L)of diesel fuel to a disabled vehicle.Roadside Assistance limits fuel deliveryservice to two no-charge occurrenceswithin a 12-month period.
• Winch out — available within 98 ft(30 m) of a paved or countymaintained road, no recoveries.
• Towing — independent servicecontractors, if not prohibited by state,local or municipal law, shall tow Fordeligible vehicles to an authorized dealerwithin 35 mi (56 km) of thedisablement location or to the nearestauthorized dealer. If a memberrequests a tow to an authorized dealerthat is more than 35 mi (56 km) fromthe disablement location, the membershall be responsible for any mileagecosts in excess of 35 mi (56 km).
• Roadside Assistance includes up to$200 for a towed trailer if the disabledeligible vehicle requires service at thenearest authorized dealer. If the towingvehicle is operational but the trailer isnot, then the trailer does not qualify forany roadside services.
Vehicles Sold in the United States:Using Roadside AssistanceComplete the roadside assistanceidentification card and place it in yourwallet for quick reference. This card is inthe owner's information portfolio in theglove compartment.United States vehicle customers whorequire Roadside Assistance, call1-800-241-3673.If you need to arrange roadside assistancefor yourself, Ford Motor Companyreimburses a reasonable amount fortowing to the nearest dealership within35 mi (56 km). To obtain reimbursementinformation, United States vehiclecustomers call 1-800-241-3673.Customers need to submit their originalreceipts.
219
Flex (TP3) , enUSA, Edition date: 201803, Second-Printing
Roadside Emergencies

Vehicles Sold in Canada: GettingRoadside AssistanceTo fully assist you should you have avehicle concern, Ford Motor Company ofCanada, Limited offers a complimentaryroadside assistance program. This programis eligible within Canada or the continentalUnited States.The service is available 24 hours a day,seven days a week.This program is separate from the NewVehicle Limited Warranty, but the coverageis concurrent with the powertrain coverageperiod of your vehicle. Canadian roadsidecoverage and benefits may differ from theU.S. coverage.If you require more information, please callus in Canada at 1-800-665-2006, or visitour website at www.ford.ca.
Vehicles Sold in Canada: UsingRoadside AssistanceComplete the roadside assistanceidentification card and place it in yourwallet for quick reference.In Canada, this card is found in theWarranty Guide in the glove compartmentof your vehicle.
Vehicles Sold in Canada: RoadsideAssistance Program CoverageThe service is available 24 hours a day,seven days a week.Canadian roadside coverage and benefitsmay differ from the U.S. coverage.If you require more information, pleaserefer to the coverage section of yourwarranty guide, call us in Canada at1-800-665-2006, or visit our website atwww.ford.ca.
HAZARD FLASHERSNote: The hazard flashers operate whenthe ignition is in any position, or if the key isnot in the ignition. If used when the vehicleis not running, the battery loses charge. Asa result, there may be insufficient power torestart your vehicle.
The flasher control is on theinstrument panel. Use yourhazard flashers when your
vehicle is creating a safety hazard for othermotorists.
• Press the flasher control and all frontand rear direction indicators flash.
• Press the button again to switch themoff.
FUEL SHUTOFF
WARNING: If your vehicle has beeninvolved in a crash, have the fuel systemchecked. Failure to follow this instructioncould result in fire, personal injury or death.
Note: When you try to restart your vehicleafter a fuel shutoff, the vehicle makes surethat various systems are safe to restart.Once the vehicle determines the systemsare safe, then the vehicle allows you torestart.Note: In the event that your vehicle doesnot restart after your third attempt, contacta qualified technician.The fuel pump shutoff stops the flow offuel to the engine in the event of amoderate to severe crash. Not everyimpact causes a shutoff.Should your vehicle shut off after a crash,you may restart your vehicle.
220
Flex (TP3) , enUSA, Edition date: 201803, Second-Printing
Roadside Emergencies

If your vehicle has a key system:1. Switch off the ignition.2. Switch to start position.3. Switch off the ignition.4. Switch on the ignition to re-enable the
fuel pump.5. If the vehicle does not start, repeat
steps 1 through 4.If your vehicle has a push button startsystem:1. Press START/STOP to switch off your
vehicle.2. Press the brake pedal and
START/STOP to switch on yourvehicle.
3. Remove your foot from the brake pedaland press START/STOP to switch offyour vehicle.
4. You can attempt to start the vehicleby pressing the brake pedal andSTART/STOP, or press START/STOPwithout pressing the brake pedal.
5. If the vehicle does not start, repeatsteps 1 through 4.
JUMP STARTING THE VEHICLE
WARNING: Batteries normallyproduce explosive gases which can causepersonal injury. Therefore, do not allowflames, sparks or lighted substances tocome near the battery. When working nearthe battery, always shield your face andprotect your eyes. Always provide correctventilation.
WARNING: Keep batteries out ofreach of children. Batteries contain sulfuricacid. Avoid contact with skin, eyes orclothing. Shield your eyes when workingnear the battery to protect against possiblesplashing of acid solution. In case of acidcontact with skin or eyes, flushimmediately with water for a minimum of15 minutes and get prompt medicalattention. If acid is swallowed, call aphysician immediately.
WARNING: Use only adequatelysized cables with insulated clamps.
Preparing Your VehicleDo not attempt to push-start yourautomatic transmission vehicle.Note: Attempting to push-start a vehiclewith an automatic transmission may causetransmission damage.Note: Use only a 12-volt supply to start yourvehicle.Note: Do not disconnect the battery of thedisabled vehicle as this could damage thevehicle electrical system.Park the booster vehicle close to the hoodof the disabled vehicle, making sure thetwo vehicles do not touch.
Connecting the Jumper Cables
WARNING: Do not attach the cablesto fuel lines, engine rocker covers, theintake manifold or electrical componentsas grounding points. Stay clear of movingparts. To avoid reverse polarityconnections, make sure that you correctlyidentify the positive (+) and negative (-)terminals on both the disabled and boostervehicles before connecting the cables.
221
Flex (TP3) , enUSA, Edition date: 201803, Second-Printing
Roadside Emergencies

WARNING: Do not attach the endof the positive cable to the studs orL-shaped eyelet located above the positive(+) terminal of your vehicle’s battery. Highcurrent may flow through and causedamage to the fuses.
WARNING: Do not connect the endof the second cable to the negative (-)terminal of the battery to be jumped. Aspark may cause an explosion of the gasesthat surround the battery.
Note: In the illustration, the bottom vehiclerepresents the booster vehicle.
4
2
1
3
E142664
1. Connect the positive (+) jumper cableto the positive (+) terminal of thedischarged battery.
2. Connect the other end of the positive(+) cable to the positive (+) terminalof the booster vehicle battery.
3. Connect the negative (-) cable to thenegative (-) terminal of the boostervehicle battery.
4. Make the final connection of thenegative (-) cable to an exposed metalpart of the stalled vehicle's engine,away from the battery and the fuelinjection system, or connect thenegative (-) cable to a groundconnection point if available.
Jump Starting1. Start the engine of the booster vehicle
and rev the engine moderately, or pressthe accelerator gently to keep yourengine speed between 2000 and 3000RPM, as shown in your tachometer.
2. Start the engine of the disabled vehicle.3. Once the disabled vehicle has been
started, run both vehicle engines for anadditional three minutes beforedisconnecting the jumper cables.
Removing the Jumper CablesRemove the jumper cables in the reverseorder that they were connected.
222
Flex (TP3) , enUSA, Edition date: 201803, Second-Printing
Roadside Emergencies

4
1
3
2
E142665
1. Remove the negative (-) jumper cablefrom the disabled vehicle.
2. Remove the jumper cable on thenegative (-) terminal of the boostervehicle battery.
3. Remove the jumper cable from thepositive (+) terminal of the boostervehicle battery.
4. Remove the jumper cable from thepositive (+) terminal of the disabledvehicle battery.
5. Allow the engine to idle for at least oneminute.
POST-CRASH ALERT SYSTEMThe system flashes the direction indicatorsand sounds the horn (intermittently) in theevent of a serious impact that deploys anairbag (front, side, side curtain or SafetyCanopy) or the seatbelt pretensioners.The horn and indicators turn off when:• You press the hazard control button.• You press the panic button on the
remote entry transmitter (if equipped).• Your vehicle runs out of power.• Sounding of the horn is only enabled
in specific markets.
TRANSPORTING THE VEHICLE
E143886
223
Flex (TP3) , enUSA, Edition date: 201803, Second-Printing
Roadside Emergencies

If you need to have your vehicle towed,contact a professional towing service or,if you are a member of a roadsideassistance program, your roadsideassistance service provider.We recommend the use of a wheel lift anddollies or flatbed equipment to tow yourvehicle. Do not tow with a slingbelt. FordMotor Company has not approved aslingbelt towing procedure. Vehicledamage may occur if towed incorrectly, orby any other means.Ford Motor Company produces a towingmanual for all authorized tow truckoperators. Have your tow truck operatorrefer to this manual for proper hook-upand towing procedures for your vehicle.It is acceptable to have your front-wheeldrive vehicle towed from the front if usingproper wheel lift equipment to raise thefront wheels off the ground. When towingin this manner, the rear wheels can remainon the ground.Front-wheel drive vehicles must have thefront wheels placed on a tow dolly whentowing your vehicle from the rear usingwheel lift equipment. This preventsdamage to the transmission.Towing an all-wheel or four-wheel drivevehicle requires that all wheels be off theground, such as using a wheel lift anddollies or flatbed equipment. This preventsdamage to the transmission, all-wheel orfour-wheel drive system and vehicle.
224
Flex (TP3) , enUSA, Edition date: 201803, Second-Printing
Roadside Emergencies

GETTING THE SERVICES YOUNEEDWarranty repairs to your vehicle must beperformed by an authorized dealer. Whileany authorized dealer handling your vehicleline will provide warranty service, werecommend you return to your sellingauthorized dealer who wants to ensureyour continued satisfaction.Please note that certain warranty repairsrequire special training and equipment, sonot all authorized dealers are authorizedto perform all warranty repairs. This meansthat, depending on the warranty repairneeded, you may have to take your vehicleto another authorized dealer.A reasonable time must be allowed toperform a repair after taking your vehicleto the authorized dealer. Repairs will bemade using Ford or Motorcraft® parts, orremanufactured or other parts that areauthorized by Ford.
Away From HomeIf you are away from home when yourvehicle needs service, contact the FordCustomer Relationship Center or use theonline resources listed below to find thenearest authorized dealer.In the United States:Mailing addressFord Motor CompanyCustomer Relationship CenterP.O. Box 6248Dearborn, MI 48126Telephone1-800-392-3673 (FORD)(TDD for the hearing impaired:1-800-232-5952)Additional information and resources areavailable online:
Website
www.owner.ford.com
These are some of the items that can befound online:• U.S. dealer locator by Dealer Name,
City/State or Zip Code.• Owner Manuals.• Maintenance Schedules.• Recalls.• Ford Extended Service Plans.• Ford Genuine Accessories.• Service specials and promotions.In Canada:Mailing addressCustomer Relationship CentreFord Motor Company of Canada, LimitedP.O. Box 2000Oakville, Ontario L6K 0C8Telephone1-800-565-3673 (FORD)
Website
www.ford.ca
Twitter@FordServiceCA (English Canada)@FordServiceQC (Quebec)
Additional AssistanceIf you have questions or concerns, or areunsatisfied with the service you arereceiving, follow these steps:1. Contact your Sales Representative or
Service Advisor at your selling orservicing authorized dealer.
225
Flex (TP3) , enUSA, Edition date: 201803, Second-Printing
Customer Assistance

2. If your inquiry or concern remainsunresolved, contact the Sales Manager,Service Manager or Customer RelationsManager.
3. If you require assistance or clarificationon Ford Motor Company policies,please contact the Ford CustomerRelationship Center.
In order to help us serve you better, pleasehave the following information availablewhen contacting a Customer RelationshipCenter:• Vehicle Identification Number.• Your telephone number (home and
business).• The name of the authorized dealer and
city where located.• The vehicle’s current odometer reading.In some states within the United States,you must directly notify Ford in writingbefore pursuing remedies under yourstate's warranty laws, and Ford is alsoallowed a final repair attempt.Additionally, in some states within theUnited States, a consumer has the optionof submitting a warranty dispute to theBBB Auto Line before taking action underthe Magnuson-Moss Warranty Act, or tothe extent allowed by state law, beforepursuing replacement or repurchaseremedies provided by certain state laws.This dispute handling procedure is notrequired prior to enforcing state createdrights or other rights which are independentof the Magnuson-Moss Warranty Act orstate replacement or repurchase laws.
IN CALIFORNIA (U.S. ONLY)California Civil Code Section 1793.2(d)requires that, if a manufacturer or itsrepresentative is unable to repair a motorvehicle to conform to the vehicle’sapplicable express warranty after areasonable number of attempts, themanufacturer shall be required to eitherreplace the vehicle with one substantiallyidentical or repurchase the vehicle andreimburse the buyer in an amount equal tothe actual price paid or payable by theconsumer (less a reasonable allowancefor consumer use). The consumer has theright to choose whether to receive a refundor replacement vehicle.California Civil Code Section 1793.22(b)presumes that the manufacturer has hada reasonable number of attempts toconform the vehicle to its applicableexpress warranties if, within the first 18months of ownership of a new vehicle orthe first 18,000 mi (29,000 km), whicheveroccurs first:1. Two or more repair attempts are made
on the same non-conformity likely tocause death or serious bodily injury OR
2. Four or more repair attempts are madeon the same nonconformity (a defector condition that substantially impairsthe use, value or safety of the vehicle)OR
3. The vehicle is out of service for repairof nonconformities for a total of morethan 30 calendar days (not necessarilyall at one time).
In the case of 1 or 2 above, the consumermust also notify the manufacturer of theneed for the repair of the nonconformityat the following address:Ford Motor Company16800 Executive Plaza DriveMail Drop 3NE-BDearborn, MI 48126
226
Flex (TP3) , enUSA, Edition date: 201803, Second-Printing
Customer Assistance

You are required to submit your warrantydispute to BBB AUTO LINE before assertingin court any rights or remedies conferredby California Civil Code Section 1793.22(b).You are also required to use BBB AUTOLINE before exercising rights or seekingremedies created by the FederalMagnuson-Moss Warranty Act, 15 U.S.C.sec. 2301 et seq. If you choose to seekredress by pursuing rights and remediesnot created by California Civil Code Section1793.22(b) or the Magnuson-MossWarranty Act, resort to BBB AUTO LINE isnot required by those statutes.
THE BETTER BUSINESSBUREAU (BBB) AUTO LINEPROGRAM (U.S. ONLY)Your satisfaction is important to FordMotor Company and to your dealer. If awarranty concern has not been resolvedusing the three-step procedure outlinedearlier in this chapter in the Getting theServices you need section, you may beeligible to participate in the BBB AUTOLINE program.The BBB AUTO LINE program consists oftwo parts – mediation and arbitration.During mediation, a representative of theBBB will contact both you and Ford MotorCompany to explore options for settlementof the claim. If an agreement is not reachedduring mediation or you do not want toparticipate in mediation, and if your claimis eligible, you may participate in thearbitration process. An arbitration hearingwill be scheduled so that you can presentyour case in an informal setting before animpartial person. The arbitrator willconsider the testimony provided and makea decision after the hearing.
Disputes submitted to the BBB AUTO LINEprogram are usually decided within fortydays after you file your claim with the BBB.You are not bound by the decision, andmay reject the decision and proceed tocourt where all findings of the BBB AutoLine dispute, and decision, are admissiblein the court action. Should you choose toaccept the BBB AUTO LINE decision, Fordis then bound by the decision, and mustcomply with the decision within 30 daysof receipt of your acceptance letter.BBB AUTO LINE Application: Using theinformation provided below, please call orwrite to request a program application.You will be asked for your name andaddress, general information about yournew vehicle, information about yourwarranty concerns, and any steps you havealready taken to try to resolve them. ACustomer Claim Form will be mailed thatwill need to be completed, signed andreturned to the BBB along with proof ofownership. Upon receipt, the BBB willreview the claim for eligibility under theProgram Summary Guidelines.You can get more information bycalling BBB AUTO LINE at1-800-955-5100, or writing to:BBB AUTO LINE3033 Wilson Boulevard, Suite 600Arlington, Virginia 22201BBB AUTO LINE applications can also berequested by calling the Ford MotorCompany Customer Relationship Centerat 1-800-392-3673.Note: Ford Motor Company reserves theright to change eligibility limitations, modifyprocedures, or to discontinue this processat any time without notice and withoutobligation.
227
Flex (TP3) , enUSA, Edition date: 201803, Second-Printing
Customer Assistance
UTILIZING THEMEDIATION/ARBITRATIONPROGRAM (CANADA ONLY)For vehicles delivered to authorizedCanadian dealers. In those cases whereyou continue to feel that the efforts by Fordof Canada and the authorized dealer toresolve a factory-related vehicle serviceconcern have been unsatisfactory, Ford ofCanada participates in an impartial thirdparty mediation/arbitration programadministered by the Canadian MotorVehicle Arbitration Plan (CAMVAP).The CAMVAP program is a straight forwardand relatively speedy alternative to resolvea disagreement when all other efforts toproduce a settlement have failed. Thisprocedure is without cost to you and isdesigned to eliminate the need for lengthyand expensive legal proceedings.In the CAMVAP program, impartialthird-party arbitrators conduct hearings atmutually convenient times and places inan informal environment. These impartialarbitrators review the positions of theparties, make decisions and, whenappropriate, render awards to resolvedisputes. CAMVAP decisions are fast, fair,and final as the arbitrator’s award isbinding on both you and Ford of Canada.CAMVAP services are available in allCanadian territories and provinces. Formore information, without charge orobligation, call your CAMVAP ProvincialAdministrator directly at 1-800-207-0685or visit www.camvap.ca.
GETTING ASSISTANCEOUTSIDE THE U.S. ANDCANADABefore exporting your vehicle to a foreigncountry, contact the appropriate foreignembassy or consulate. These officials caninform you of local vehicle registrationregulations and where to find unleadedfuel or petrol/gas engines or the propersulfur fuel for diesel engines.If you cannot find the proper fuelrecommended for your vehicle, contactour Customer Relationship Center.The use of improper fuels in your vehiclewithout proper conversion may damagethe effectiveness of your emission controlsystem and may cause engine knocking orserious engine damage. Ford MotorCompany or Ford of Canada is notresponsible for any damage caused by useof improper fuel. Using improper fuels mayalso result in difficulty importing yourvehicle back into the United States.If your vehicle must be serviced while youare traveling or living in Asia-Pacific Region,Sub-Saharan Africa, U.S. Virgin Islandsand/or Puerto Rico, Central America, theCaribbean, and Israel and the Middle East,contact the nearest authorized dealer. Ifthe authorized dealer cannot help you,contact the corresponding Ford CustomerAssistance Center:FORD MOTOR COMPANYCustomer Relationship Centers in:
228
Flex (TP3) , enUSA, Edition date: 201803, Second-Printing
Customer Assistance

E-mailFaxPhoneCustomer Relation-ship Center
[email protected]/AN/AAsia Pacific
[email protected]+1 313 594 4857Caribbean andCentral America
[email protected] 4 3327 266
Ford
Middle East
80004443673
Lincoln80004441066
UAE80004441066
Saudi Arabia8008443673
Mobily and Zain cellphone users in Saudi
800850078
[email protected]/AN/ANorth Africa
[email protected]/A+1-800-841-3673Puerto Rico and U.S.Virgin Islands
[email protected]/A+1-313-594-4857Sub-Saharan Africa
[email protected] [email protected]/A+82-02-1600-6003South Korea
If you buy your vehicle in North Americaand then relocate to any of the abovelocations, register your vehicleidentification number (VIN) and newaddress with Ford Global Trade Servicesby emailing, [email protected].
If you are in another foreign country,contact the nearest authorized dealer. Inthe event your inquiry is unresolved,communicate your concern with thedealership’s Sales Manager, ServiceManager or Customer Relations Manager.If you require additional assistance orclarification, please contact the respectiveCustomer Relationship Center aspreviously listed.Customers in the U.S. should call1-800-392-3673.
229
Flex (TP3) , enUSA, Edition date: 201803, Second-Printing
Customer Assistance

ORDERING ADDITIONALOWNER'S LITERATURETo order the publications in this portfolio,contact Helm, Incorporated at:HELM, INCORPORATED47911 Halyard DrivePlymouth, Michigan 48170Attention: Customer ServiceOr to order a free publication catalog, calltoll free: 1-800-782-4356Monday-Friday 8:00 a.m. - 6:00 p.m. ESTHelm, Incorporated can also be reachedby their website:www.helminc.com(Items in this catalog may be purchasedby credit card, check or money order.)
Obtaining a French Owner’sManualFrench Owner’s Manual can be obtainedfrom your authorized dealer or bycontacting Helm, Incorporated using thecontact information listed previously in thissection.
REPORTING SAFETY DEFECTS(U.S. ONLY)
E142557
If you believe that your vehicle hasa defect which could cause acrash or could cause injury ordeath, you should immediatelyinform the National HighwayTraffic Safety Administration(NHTSA) in addition to notifyingFord Motor Company.
If NHTSA receives similarcomplaints, it may open aninvestigation, and if it finds that asafety defect exists in a group ofvehicles, it may order a recall andremedy campaign. However,NHTSA cannot become involvedin individual problems betweenyou, your dealer, or Ford MotorCompany.To contact NHTSA, you may callthe Vehicle Safety Hotlinetoll-free at 1-888-327-4236 (TTY:1-800-424-9153); go tohttp://www.safercar.gov; or writeto:Administrator1200 New Jersey Avenue,SoutheastWashington, D.C. 20590You can also obtain otherinformation about motor vehiclesafety fromhttp://www.safercar.gov.
REPORTING SAFETY DEFECTS(CANADA ONLY)If you believe that your vehicle has a defectwhich could cause a crash or could causeinjury or death, you should immediatelyinform Transport Canada and Ford ofCanada.
230
Flex (TP3) , enUSA, Edition date: 201803, Second-Printing
Customer Assistance

Transport Canada Contact Information
http://www.tc.gc.ca/eng/motorvehiclesafety/reporting-defects-motor-vehicles.html (English)
Website
http://www.tc.gc.ca/fra/securiteautomobile/signaler-defauts-vehicules-automobiles.html (French)
Website
1–800–333–0510Phone
Ford of Canada Contact Information
www.ford.caWebsite
1–800–565-3673Phone
231
Flex (TP3) , enUSA, Edition date: 201803, Second-Printing
Customer Assistance

FUSE SPECIFICATION CHARTPower Distribution Box
WARNING: Always disconnect thebattery before servicing high current fuses.
WARNING: To reduce risk ofelectrical shock, always replace the coverto the power distribution box beforereconnecting the battery or refilling fluidreservoirs.
The power distribution box is in the enginecompartment. It has high-current fusesthat protect the vehicle's main electricalsystems from overloads.If you disconnect and reconnect thebattery, you will need to reset somefeatures. See Changing the 12V Battery(page 256).
E173618
9798
77
9695 94 93 92 91 90 89
88
66
44
78
56
39
26
18 1617
3 12456789
192021222324
2728293031
40414243
55575859606162636465
798081828384858687
67
45
32
10111213
333435
464748495051
686970717274
7376
75
53
37 36
54
38
25
15
14
52
Protected ComponentsFuse Amp RatingFuse or RelayNumber
Fan relay 2.40A11
Fan relay 1.40A12
Trailer brake control module.30A13
Wipers.30A14Washer pump.
232
Flex (TP3) , enUSA, Edition date: 201803, Second-Printing
Fuses

Protected ComponentsFuse Amp RatingFuse or RelayNumber
Anti-lock brake system pump.50A15
Center console power point (without rearpark aid).20A16
Power liftgate.30A17
Moonroof.20A18
Second row console power point.20A19
Third row power seats relay.Relay10
Heated rear window relay.Relay11
Trailer tow battery charge relay.Relay12
Starter motor relay.Relay13
Cooling fan number 2 relay.Relay14
Fuel pump relay.Relay15
Not used.-16
110V AC power point.30A117
Front blower motor relay.40A118
Starter relay.30A119
Storage bin power point.20A120
Instrument panel power point / cigarlighter.20A121
Third row seat module.30A122
Driver power seat.30A123Memory module.
Trailer tow battery charge.30A124
Not used.-25
233
Flex (TP3) , enUSA, Edition date: 201803, Second-Printing
Fuses

Protected ComponentsFuse Amp RatingFuse or RelayNumber
Rear window defroster.40A126Heated mirrors.
Cargo power point.20A127
Front heated and cooled seats.30A128
Front heated seats (without cooled seats).20A129
Rear heated seats.20A130
Electric fan relay 3.25A131
Auxiliary blower motor relay.Relay32
Cooling fan #1 relay.Relay33
Front blower motor relay.Relay34
Cooling fan (series) relay.Relay35
Not used.-36
Trailer tow right-hand stop/turn lampsrelay.
Relay37
Trailer tow reverse lamps relay.Relay38
Auxiliary blower motor.30A139
Not used.-40
Not used.-41
Passenger power seat.30A142
Anti-lock brake system valves.20A143
Windshield washer relay.Relay44
Rain sensor.5A245
Canister vent solenoid (EcoBoost engines).5A246
Washer pump.15A247
234
Flex (TP3) , enUSA, Edition date: 201803, Second-Printing
Fuses

Protected ComponentsFuse Amp RatingFuse or RelayNumber
Front park lamps.10A248
Not used.-49
Heated mirrors.10A250
Not used.-51
Not used.-52
Trailer tow left-hand stop/turn lamps relay.Relay53
Not used.-54
Wiper relay.Relay55
Fuel injectors.30A256Fuel pump relay.
Left-hand high intensity discharge head-lamp.20A257
Alternator sensor.10A258
Brake on/off switch.10A259
Trailer tow back-up lamps.10A260
Not used.-61
A/C clutch relay.10A262
Trailer tow stop/turn lamps.15A263
Rear wipers.15A264
Not used.-65
Powertrain control module – vehicle powerrelay.
Relay66
Vehicle power #2 – oxygen sensor heater.20A267Mass airflow sensor.Variable camshaft timing solenoid valve.Canister vent solenoid.Canister purge solenoid.
235
Flex (TP3) , enUSA, Edition date: 201803, Second-Printing
Fuses

Protected ComponentsFuse Amp RatingFuse or RelayNumber
Vehicle power #4 (ignition coils).20A268
Vehicle power 1 (powertrain controlmodule).20A269
Vehicle power #3 (coil) – A/C clutch relay.15A270Fan control relay coils 1-3.Variable air conditioning compressor.Auxiliary transmission warmup.Turbo charge waste-gate control.Electronic compressor bypass valve.All-wheel drive module.Positive crankcase ventilation heater.
Not used.-71
Not used.-72
Not used.-73
Not used.-74
Not used.-75
Not used.-76
Trailer tow park lamps relay.Relay77
Right high-intensity discharge headlamp.20A278
Not used.-79
Not used.-80
Not used.-81
Rear washer.15A282
Not used.-83
Trailer tow park lamps.20A284
Not used.-85
Powertrain control module.5A286Keep alive power and relay.Powertrain control module relay.
236
Flex (TP3) , enUSA, Edition date: 201803, Second-Printing
Fuses

Protected ComponentsFuse Amp RatingFuse or RelayNumber
Canister vent solenoid (non-EcoBoostengines).
Run/start relay.5A287
Run/start relay.Relay88
Anti–lock brake system module.10A289
Powertrain control module run/start.10A290
Adaptive cruise control module.10A291
Front blower relay coil.5A292Power steering module.
Auxiliary blower motor.5A293Rear window defroster relay power.Battery charge relay.
Body control module run/start.30A194
Front passenger window switch.5A295
Not used.-96
Not used.-97
A/C clutch relay.Relay981 J Case Low Profile fuse.2 Mini fuse.
Passenger Compartment FusePanelThe fuse panel is under the instrumentpanel to the left of the steering wheel. Youmay need to remove a trim panel to accessit.
237
Flex (TP3) , enUSA, Edition date: 201803, Second-Printing
Fuses

E163102
Protected ComponentsFuse Amp RatingFuse or RelayNumber
Driver front power window.30A1
Memory seat.15A2Second row seats.
Passenger side front window.30A3
Demand lamps battery saver relay.10A4
Audio amplifier20A5Active noise control module.
Not used (spare).5A6
Driver seat module logic.7.5A7Left front door zone module.Keypad.
Power liftgate.10A8
238
Flex (TP3) , enUSA, Edition date: 201803, Second-Printing
Fuses

Protected ComponentsFuse Amp RatingFuse or RelayNumber
SYNC module.10A9Electronic finish panel.Radio frequency transceiver module.
Run accessory relay.10A10Front wiper motor relay.
Intelligent access module logic.10A11Heads-up display.
Puddle lamp.15A12Backlighting LED.Interior lighting.
Right-hand direction indicators.15A13
Left-hand direction indicators.15A14
Center high mounted stop lamp.15A15Backup lamp.
Right low beam headlamp.10A16
Left low beam headlamp.10A17
Third row power seats.10A18Start button.Keypad illumination.Brake-shift interlock.Powertrain control module wake-up.Anti-theft system.
Not used (spare).20A19
Locks.20A20
Extended power module.10A21
Horn relay.20A22
Steering wheel control module logic.15A23Instrument cluster.
Steering wheel control module.15A24Datalink.
Liftgate release.15A25
Ignition switch.5A26
239
Flex (TP3) , enUSA, Edition date: 201803, Second-Printing
Fuses

Protected ComponentsFuse Amp RatingFuse or RelayNumber
Push button ignition switch.
Intelligent access module power.20A27
Not used (spare).15A28
Radio.20A29Global positioning system module.
Front park lamps.15A30Trailer tow relay for park lamps.Front side markers.
Trailer tow brake controller.5A31
Smart window motors.15A32Master window and mirror switch.Lock switch illumination.Moonroof.110V AC power point.Interior rearview mirror.
Not used (spare).10A33
Reverse park aid module.10A34Rear heated seat module.Blind spot monitor module.Rear video camera.Interior mirror.
Climate control humidity sensor.5A35Heads-up display.
Heated steering wheel.10A36
Refrigerator.10A37
Front passenger window switch.10A38
High beams.15A39
Rear park lamps.10A40License plate lamps.
Extended power module.7.5A41
Not used (spare).5A42
Not used (spare).10A43
240
Flex (TP3) , enUSA, Edition date: 201803, Second-Printing
Fuses

Protected ComponentsFuse Amp RatingFuse or RelayNumber
Not used (spare).10A44
Not used (spare).5A45
Climate control module.10A46
Fog lamp relay power.15A47Front direction indicators.
Front passenger power window.30A Circuit breaker48Rear power windows.
Delayed accessory relay.Relay49Body control module.
CHANGING A FUSEFuses
WARNING: Always replace a fusewith one that has the specified amperagerating. Using a fuse with a higher amperagerating can cause severe wire damage andcould start a fire.
E217331
If electrical components in the vehicle arenot working, a fuse may have blown. Blownfuses are identified by a broken wire withinthe fuse. Check the appropriate fusesbefore replacing any electricalcomponents.
241
Flex (TP3) , enUSA, Edition date: 201803, Second-Printing
Fuses

Fuse Types
E207206
Fuse TypeCallout
Micro 2A
Micro 3B
MaxiC
MiniD
M CaseE
J CaseF
J Case Low ProfileG
242
Flex (TP3) , enUSA, Edition date: 201803, Second-Printing
Fuses

GENERAL INFORMATIONHave your vehicle serviced regularly to helpmaintain its roadworthiness and resalevalue. There is a large network ofauthorized dealers that are there to helpyou with their professional servicingexpertise. We believe that their speciallytrained technicians are best qualified toservice your vehicle properly and expertly.They are supported by a wide range ofhighly specialized tools developedspecifically for servicing your vehicle.If your vehicle requires professional service,an authorized dealer can provide thenecessary parts and service. Check yourwarranty information to find out whichparts and services are covered.Use only recommended fuels, lubricants,fluids and service parts conforming tospecifications. Motorcraft® parts aredesigned and built to provide the bestperformance in your vehicle.
Precautions• Do not work on a hot engine.• Make sure that nothing gets caught in
moving parts.• Do not work on a vehicle with the
engine running in an enclosed space,unless you are sure you have enoughventilation.
• Keep all open flames and other burningmaterial (such as cigarettes) awayfrom the battery and all fuel relatedparts.
Working with the Engine Off1. Set the parking brake and shift the
transmission to park (P).2. Switch off the engine.3. Block the wheels.
Working with the Engine On
WARNING: To reduce the risk ofvehicle damage and personal burn injuries,do not start your engine with the air cleanerremoved and do not remove it while theengine is running.
1. Set the parking brake and shift thetransmission to park (P).
2. Block the wheels.
OPENING AND CLOSING THEHOODOpening the Hood
E253246
1. Inside the vehicle, pull the hood releasehandle located under the left-handside of the instrument panel.
2. Slightly lift the hood.
243
Flex (TP3) , enUSA, Edition date: 201803, Second-Printing
Maintenance

2
E203009
3
3. Release the hood latch by pushing thesecondary release lever to yourleft-hand side.
E202009
4
4. Open the hood. The hood strutsautomatically support the hood.
Closing the Hood1. Lower the hood and allow it to drop
under its own weight for the last8–12 in (20–30 cm).
Note: Make sure that the hood is correctlyclosed.
UNDER HOOD OVERVIEW - 3.5L DURATEC
244
Flex (TP3) , enUSA, Edition date: 201803, Second-Printing
Maintenance

E253238
Engine coolant reservoir. SeeEngine Coolant Check (page249).
A
Windshield washer fluidreservoir. See Washer FluidCheck (page 255).
B
Brake fluid reservoir. See BrakeFluid Check (page 255).
C
Battery. See Changing the 12VBattery (page 256).
D
Engine compartment fuse box.See Fuse Specification Chart(page 232).
E
Air filter assembly. SeeChanging the Engine Air Filter(page 263).
F
Automatic transmission fluiddipstick. See AutomaticTransmission Fluid Check(page 253).
G
Engine oil dipstick. See EngineOil Dipstick (page 247).
H
Engine oil filler cap. See EngineOil Check (page 247).
I
UNDER HOOD OVERVIEW - 3.5L ECOBOOST™
245
Flex (TP3) , enUSA, Edition date: 201803, Second-Printing
Maintenance

E173375
Engine coolant reservoir. SeeEngine Coolant Check (page249).
A.
Engine oil filler cap. See EngineOil Check (page 247).
B.
Engine oil dipstick. See EngineOil Dipstick (page 247).
C.
Brake fluid reservoir. See BrakeFluid Check (page 255).
D.
Battery. See Changing the 12VBattery (page 256).
E.
Engine compartment fuse box.See Fuses (page 232).
F.
Air filter assembly. SeeChanging the Engine Air Filter(page 263).
G.
Automatic transmission dipstick.See Automatic TransmissionFluid Check (page 253).
H.
Washer fluid reservoir. SeeWasher Fluid Check (page 255).
I.
246
Flex (TP3) , enUSA, Edition date: 201803, Second-Printing
Maintenance

ENGINE OIL DIPSTICK
E146429
MINAMAXB
ENGINE OIL CHECKTo check the engine oil level consistentlyand accurately, do the following:1. Make sure the parking brake is on. Make
sure the transmission is in park (P) orneutral (N).
2. Run the engine until it reaches normaloperating temperature.
3. Make sure that your vehicle is on levelground.
4. Switch the engine off and wait 15minutes for the oil to drain into the oilpan. Checking the engine oil level toosoon after you switch the engine offmay result in an inaccurate reading.
5. Open the hood. See Opening andClosing the Hood (page 243).
6. Remove the dipstick and wipe it witha clean, lint-free cloth. See UnderHood Overview (page 244).
7. Replace the dipstick and remove itagain to check the oil level. See UnderHood Overview (page 244).
8. Make sure that the oil level is betweenthe maximum and minimum marks. Ifthe oil level is at the minimum mark,add oil immediately. See Capacitiesand Specifications (page 305).
9. If the oil level is correct, replace thedipstick and make sure it is fully seated.
Note: Do not remove the dipstick when theengine is running.Note: If the oil level is between themaximum and minimum marks, the oil levelis acceptable. Do not add oil.Note: The oil consumption of new enginesreaches its normal level after approximately3,000 mi (5,000 km).
Adding Engine Oil
WARNING: Do not remove the fillercap when the engine is running.
Do not use supplemental engine oiladditives because they are unnecessaryand could lead to engine damage that maynot be covered by the vehicle Warranty.
E142732
247
Flex (TP3) , enUSA, Edition date: 201803, Second-Printing
Maintenance

Only use oils certified for gasoline enginesby the American Petroleum Institute (API).An oil with this trademark symbolconforms to the current engine andemission system protection standards andfuel economy requirements of theInternational Lubricants SpecificationAdvisory Committee (ILSAC).To top up the engine oil level do thefollowing:1. Clean the area surrounding the engine
oil filler cap before you remove it.2. Remove the engine oil filler cap. See
Under Hood Overview (page 244).Turn it counterclockwise and removeit.
3. Add engine oil that meets ourspecifications. See Capacities andSpecifications (page 305). You mayhave to use a funnel to pour the engineoil into the opening.
4. Recheck the oil level.5. If the oil level is correct, replace the
dipstick and make sure it is fully seated.6. Replace the engine oil filler cap. Turn
it clockwise until you feel a strongresistance.
Note: Do not add oil further than themaximum mark. Oil levels above themaximum mark may cause engine damage.Note: Make sure you install the oil filler capcorrectly.Note: Soak up any spillage with anabsorbent cloth immediately.
OIL CHANGE INDICATORRESETUse the information display controls onthe steering wheel to reset the oil changeindicator.
From the main menu scroll to:
Action and descriptionMessage
Press the right arrow button,then from this menu scrollto the following message.
Settings
Press the right arrow button,then from this menu scrollto the following message.
Vehicle
Press the right arrow button,then from this menu scrollto the following message.
Oil Life
Press and hold the OKbutton until the instrumentcluster displays thefollowing message.
Hold OK toReset
Reset Successful
When the oil change indic-ator resets the instrumentcluster displays 100%.
Remaining Life
{00}%
If the instrument clusterdisplays one of the followingmessages, repeat theprocess.
Not Reset
Reset Cancelled
248
Flex (TP3) , enUSA, Edition date: 201803, Second-Printing
Maintenance

ENGINE COOLANT CHECK
WARNING: Do not remove thecoolant reservoir cap when the engine ison or the cooling system is hot. Wait 10minutes for the cooling system to cooldown. Cover the coolant reservoir cap witha thick cloth to prevent the possibility ofscalding and slowly remove the cap.Failure to follow this instruction couldresult in personal injury.
WARNING: Do not put coolant in thewindshield washer reservoir. If sprayed onthe windshield, coolant could make itdifficult to see through the windshield.
WARNING: To reduce the risk ofpersonal injury, make sure the engine iscool before unscrewing the coolantpressure relief cap. The cooling system isunder pressure. Steam and hot liquid cancome out forcefully when you loosen thecap slightly.
WARNING: Do not add coolantfurther than the MAX mark.
When the engine is cold, check theconcentration and level of the coolant atthe intervals listed in the scheduledmaintenance information. See ScheduledMaintenance (page 442).Note: Make sure that the coolant level isbetween the MIN and MAX marks on thecoolant reservoir.Note: Coolant expands when it is hot. Thelevel may extend beyond the MAX mark.
Maintain coolant concentration within48% to 50%, which equates to a freezepoint between -29°F (-34°C) and -35°F(-37°C). Coolant concentration should bechecked using a refractometer. We do notrecommend the use of hydrometers orcoolant test strips for measuring coolantconcentration.
Adding Coolant
WARNING: Do not add enginecoolant when the engine is hot. Failure tofollow this instruction could result inpersonal injury.
WARNING: Do not remove thecoolant reservoir cap when the engine ison or the cooling system is hot. Wait 10minutes for the cooling system to cooldown. Cover the coolant reservoir cap witha thick cloth to prevent the possibility ofscalding and slowly remove the cap.Failure to follow this instruction couldresult in personal injury.
WARNING: Do not put coolant in thewindshield washer reservoir. If sprayed onthe windshield, coolant could make itdifficult to see through the windshield.
Note: Do not use stop leak pellets, coolingsystem sealants, or non-specified additivesas they can cause damage to the enginecooling or heating systems. Resultingcomponent damage may not be covered bythe vehicle Warranty.Note: Automotive fluids are notinterchangeable.
249
Flex (TP3) , enUSA, Edition date: 201803, Second-Printing
Maintenance

It is very important to use predilutedcoolant approved to the correctspecification in order to avoid plugging thesmall passageways in the engine coolingsystem. See Capacities andSpecifications (page 299). Do not mixdifferent colors or types of coolant in yourvehicle. Mixing of engine coolants or usingan incorrect coolant may harm the engineor cooling system components and maynot be covered by the vehicle Warranty.Note: If prediluted coolant is not available,use the approved concentrated coolantdiluting it to 50/50 with distilled water. SeeCapacities and Specifications (page 299).Using water that has not been deionisedmay contribute to deposit formation,corrosion and plugging of the small coolingsystem passageways.Note: Coolants marketed for all makes andmodels may not be approved to ourspecifications and may cause damage tothe cooling system. Resulting componentdamage may not be covered by the vehicleWarranty.If the coolant level is at or below theminimum mark, add prediluted coolantimmediately.To top up the coolant level do thefollowing:1. Unscrew the cap slowly. Any pressure
escapes as you unscrew the cap.2. Add prediluted coolant approved to
the correct specification. SeeCapacities and Specifications (page299).
3. Add enough prediluted coolant toreach the correct level.
4. Replace the coolant reservoir cap, turnit clockwise until you feel a strongresistance.
5. Check the coolant level in the coolantreservoir the next few times you driveyour vehicle. If necessary, add enoughprediluted engine coolant to bring thecoolant level to the correct level.
If you have to add more than 1.1 qt (1 L) ofengine coolant per month, have yourvehicle checked as soon as possible.Operating an engine with a low level ofcoolant can result in engine overheatingand possible engine damage.Note: During normal vehicle operation, thecoolant may change color from orange topink or light red. As long as the coolant isclear and uncontaminated, this color changedoes not indicate the coolant has degradednor does it require the coolant to be drained,the system to be flushed, or the coolant tobe replaced.In case of emergency, you can add a largeamount of water without engine coolantin order to reach a vehicle service location.In this instance, qualified personnel:1. Must drain the cooling system.2. Chemically clean the coolant system.3. Refill with engine coolant as soon as
possible.Water alone, without engine coolant, cancause engine damage from corrosion,overheating or freezing.Do not use the following as a coolantsubstitute:• Alcohol.• Methanol.• Brine.• Any coolant mixed with alcohol or
methanol antifreeze.Alcohol and other liquids can cause enginedamage from overheating or freezing.
250
Flex (TP3) , enUSA, Edition date: 201803, Second-Printing
Maintenance

Do not add extra inhibitors or additives tothe coolant. These can be harmful andcompromise the corrosion protection ofthe coolant.
Recycled CoolantWe do not recommend the use of recycledcoolant as an approved recycling processis not yet available.Note: Dispose of used coolant in theappropriate manner.Follow your community's regulations andstandards for recycling and disposing ofautomotive fluids.
Severe ClimatesIf you drive in extremely cold climates:• It may be necessary to increase the
coolant concentration above 50%.• A coolant concentration of 60%
provides improved freeze pointprotection. Coolant concentrationsabove 60% decrease the overheatprotection characteristics of thecoolant and may cause enginedamage.
If you drive in extremely hot climates:• You can decrease the coolant
concentration to 40%.• Coolant concentrations below 40%
decrease the freeze and corrosionprotection characteristics of thecoolant and may cause enginedamage.
Vehicles driven year-round in non-extremeclimates should use prediluted coolant foroptimum cooling system and engineprotection.
Coolant ChangeAt specific mileage intervals, as listed inthe scheduled maintenance information,the coolant should be changed. Addprediluted coolant approved to the correctspecification. See Capacities andSpecifications (page 299).
Fail-Safe CoolingFail-safe cooling allows you to temporarilydrive your vehicle before any incrementalcomponent damage occurs. The fail-safedistance depends on ambienttemperature, vehicle load and terrain.
How Fail-Safe Cooling WorksIf the engine begins to overheat,the coolant temperature gaugemoves toward the red zone:
A warning lamp illuminates anda message may appear in theinformation display.
If the engine reaches a presetover-temperature condition, the engineautomatically switches to alternatingcylinder operation. Each disabled cylinderacts as an air pump and cools the engine.When this occurs, your vehicle stilloperates, however:• Engine power is limited.• The air conditioning system turns off.Continued operation increases the enginetemperature, causing the engine tocompletely shut down. Your steering andbraking effort increases in this situation.When the engine temperature cools, youcan re-start the engine. Have your vehiclechecked as soon as possible to minimizeengine damage.
251
Flex (TP3) , enUSA, Edition date: 201803, Second-Printing
Maintenance

When Fail-Safe Mode Is Activated
WARNING: Fail-safe mode is for useduring emergencies only. Operate yourvehicle in fail-safe mode only as long asnecessary to bring your vehicle to rest in asafe location and seek immediate repairs.When in fail-safe mode, your vehicle willhave limited power, will not be able tomaintain high-speed operation, and maycompletely shut down without warning,potentially losing engine power, powersteering assist, and power brake assist,which may increase the possibility of acrash resulting in serious injury.
WARNING: Do not remove thecoolant reservoir cap when the engine ison or the cooling system is hot. Wait 10minutes for the cooling system to cooldown. Cover the coolant reservoir cap witha thick cloth to prevent the possibility ofscalding and slowly remove the cap.Failure to follow this instruction couldresult in personal injury.
Your vehicle has limited engine powerwhen in the fail-safe mode, drive yourvehicle with caution. Your vehicle does notmaintain high-speed operation and theengine may operate poorly.Remember that the engine is capable ofautomatically shutting down to preventengine damage. In this situation:1. Pull off the road as soon as safely
possible and switch the engine off.2. If you are a member of a roadside
assistance program, we recommendthat you contact your roadsideassistance service provider.
3. If this is not possible, wait for a shortperiod of time for the engine to cool.
4. Check the coolant level. If the coolantlevel is at or below the minimum mark,add prediluted coolant immediately.
5. When the engine temperature cools,you can re-start the engine. Have yourvehicle checked as soon as possible tominimize engine damage.
Note: Driving your vehicle without repairincreases the chance of engine damage.
Engine Coolant TemperatureManagement (If Equipped)
WARNING: To reduce the risk ofcrash and injury, be prepared that thevehicle speed may reduce and the vehiclemay not be able to accelerate with fullpower until the coolant temperaturereduces.
If you tow a trailer with your vehicle, theengine may temporarily reach a highertemperature during severe operatingconditions, for example ascending a longor steep grade in high ambienttemperatures.At this time, you may notice the coolanttemperature gauge moves toward the redzone and a message may appear in theinformation display.You may notice a reduction in vehiclespeed caused by reduced engine power inorder to manage the engine coolanttemperature. Your vehicle may enter thismode if certain high-temperature andhigh-load conditions take place. Theamount of speed reduction depends onvehicle loading, grade and ambienttemperature. If this occurs, there is noneed to stop your vehicle. You cancontinue to drive.
252
Flex (TP3) , enUSA, Edition date: 201803, Second-Printing
Maintenance

The air conditioning may automaticallyturn on and off during severe operatingconditions to protect the engine fromoverheating. When the coolanttemperature decreases to the normaloperating temperature, the air conditioningturns on.If the coolant temperature gauge movesfully into the red zone, or if the coolanttemperature warning or service enginesoon messages appear in your informationdisplay, do the following:1. Stop your vehicle as soon as it is safe
to do so. Fully apply the parking brake,shift into park (P) or neutral (N).
2. Leave the engine running until thecoolant temperature gauge needlereturns to the normal position. If thetemperature does not drop afterseveral minutes, follow the remainingsteps.
3. Switch the engine off and wait for it tocool. Check the coolant level.
4. If the coolant level is at or below theminimum mark, add prediluted coolantimmediately.
5. If the coolant level is normal, restartthe engine and continue.
AUTOMATIC TRANSMISSIONFLUID CHECKDo not use supplemental transmissionfluid additives because they areunnecessary and could lead totransmission damage that may not becovered by the vehicle Warranty.The transmission does not consume fluid.However, if the transmission slips or shiftsslowly you should check the fluid level. Ifyou notice a sign of leaking fluid, contactan authorized dealer.
Checking the Transmission FluidLevel
WARNING: The dipstick andsurrounding components are hot. Usegloves when moving components andchecking the transmission fluid level.Failure to follow this warning could resultin serious personal injury.
Only check the transmission fluid levelwhen the engine is at normal operatingtemperature 179°F (82°C)-199°F (93°C).Normal operating temperature is reachedafter driving approximately 20 mi (30 km).
E190273
A B
Minimum.AMaximum.B
Note: Check the fluid level with the enginerunning and the transmission in park (P).1. Make sure that your vehicle is on level
ground.2. Rotate the automatic transmission
fluid cap in a counterclockwisedirection. See Under Hood Overview(page 245).
3. Remove the cap and dipstick and wipeit with a clean, lint-free cloth. Replacethe cap and dipstick and remove itagain to check the fluid level.
253
Flex (TP3) , enUSA, Edition date: 201803, Second-Printing
Maintenance

4. Make sure that the fluid level isbetween the MIN and the MAX marks.If the fluid level is at the MIN mark, addfluid immediately. See AddingTransmission Fluid.
5. Replace the automatic transmissionfluid cap and dipstick. Turn it clockwiseuntil you feel a strong resistance.
Low Fluid LevelIf the fluid level is within the minimumrange (below point A) add the correctspecification fluid to be within the hashmark area. See Capacities andSpecifications (page 305).Note: If the fluid level is below theminimum range do not drive your vehicle. Alow fluid level can damage the transmission.
Correct Fluid LevelIf the fluid level is within the hash markarea (between points A and B) do not addany fluid.
High Fluid LevelIf the fluid level is above the maximumrange (above point B) fluid may need tobe removed. High fluid levels may becaused by a overheating condition. If youhave operated your vehicle at high speeds,towing a trailer or in city traffic during hotweather, allow your vehicle to cool for aminimum of 30 minutes before recheckingthe level.Note: An overfill condition can damage thetransmission.
Adding Transmission Fluid*
1. Rotate the automatic transmissionfluid cap in a counterclockwisedirection.
2. Remove the cap and dipstick and wipeit with a clean, lint-free cloth.
3. Add fluid that meets the Fordspecifications. See Capacities andSpecifications (page 305). Pour thefluid directly into the automatictransmission fluid cap and dipstickhole.
4. Replace the cap and dipstick andremove it again to check the fluid level.
5. Make sure that the fluid level isbetween the MIN and the MAX marks.
6. Replace the automatic transmissionfluid cap and dipstick. Turn it clockwiseuntil you feel a strong resistance.
*Vehicles With Turbocharged Engines
WARNING: Do not start the enginewith the air filter removed. This can causedamage not covered by the vehicleWarranty and can result in serious injury.
1. Loosen the clamp holding the air filterassembly to the rubber hose.
2. Remove the air filter assembly securingbolts.
3. Lift the air filter assembly to disengagethe locating pins.
4. Rotate the air filter assembly slightlyin a counterclockwise direction.
5. Check the transmission fluid level.6. Install the air filter assembly in reverse
order. Tighten the air filter assemblysecuring bolts until you feel a strongresistance.
254
Flex (TP3) , enUSA, Edition date: 201803, Second-Printing
Maintenance

BRAKE FLUID CHECK
WARNING: Do not use any fluidother than the recommended brake fluidas this will reduce brake efficiency. Use ofincorrect fluid could result in the loss ofvehicle control, serious personal injury ordeath.
WARNING: Only use brake fluid froma sealed container. Contamination withdirt, water, petroleum products or othermaterials may result in brake systemdamage or failure. Failure to adhere to thiswarning could result in the loss of vehiclecontrol, serious personal injury or death.
WARNING: Do not allow the fluid totouch your skin or eyes. If this happens,rinse the affected areas immediately withplenty of water and contact your physician.
WARNING: A fluid level between theMAX and MIN lines is within the normaloperating range and there is no need toadd fluid. A fluid level not in the normaloperating range could compromise theperformance of the system. Have yourvehicle checked immediately.
E170684
To avoid fluid contamination, the reservoircap must remain in place and fully tight,unless you are adding fluid.Only use fluid that meets Fordspecifications. See Capacities andSpecifications (page 299).
POWER STEERING FLUIDCHECKYour vehicle is equipped with an electricpower steering (EPS) system. There is nofluid reservoir to check or fill.
WASHER FLUID CHECK
WARNING: If you operate yourvehicle in temperatures below 41.0°F(5°C), use washer fluid with antifreezeprotection. Failure to use washer fluid withantifreeze protection in cold weather couldresult in impaired windshield vision andincrease the risk of injury or accident.
255
Flex (TP3) , enUSA, Edition date: 201803, Second-Printing
Maintenance

Note: The front and rear washer systemsare supplied from the same reservoir.Add fluid to fill the reservoir if the level islow. Only use a washer fluid that meetsour specifications. See Capacities andSpecifications (page 299).State or local regulations on volatileorganic compounds may restrict the useof methanol, a common windshield washerantifreeze additive. Washer fluidscontaining non-methanol antifreezeagents should be used only if they providecold weather protection without damagingthe vehicle’s paint finish, wiper blades orwasher system.
CHANGING THE 12V BATTERY
WARNING: Batteries normallyproduce explosive gases which can causepersonal injury. Therefore, do not allowflames, sparks or lighted substances tocome near the battery. When working nearthe battery, always shield your face andprotect your eyes. Always provide correctventilation.
WARNING: When lifting aplastic-cased battery, excessive pressureon the end walls could cause acid to flowthrough the vent caps, resulting in personalinjury and damage to the vehicle or battery.Lift the battery with a battery carrier orwith your hands on opposite corners.
WARNING: Keep batteries out ofreach of children. Batteries contain sulfuricacid. Avoid contact with skin, eyes orclothing. Shield your eyes when workingnear the battery to protect against possiblesplashing of acid solution. In case of acidcontact with skin or eyes, flushimmediately with water for a minimum of15 minutes and get prompt medicalattention. If acid is swallowed, call aphysician immediately.
WARNING: Battery posts, terminalsand related accessories contain lead andlead compounds, chemicals known to theState of California to cause cancer andreproductive harm. Wash your handsafter handling.
Your vehicle has a Motorcraft®maintenance-free battery which normallydoes not require additional water duringits life of service.Note: If your vehicle's battery has a coveror shield, make sure it is reinstalled after thebattery has been cleaned or replaced.Note: See an authorized dealer for lowvoltage battery access, testing, orreplacement.When a low voltage battery replacementis necessary, see an authorized dealer toreplace the low voltage battery with a Fordrecommended replacement low voltagebattery that matches the electricalrequirements of the vehicle.To ensure proper operation of the batterymanagement system (BMS), do not allowa technician to connect any electricaldevice ground connection directly to thelow voltage battery negative post. Aconnection at the low voltage batterynegative post can cause inaccuratemeasurements of the battery conditionand potential incorrect system operation.
256
Flex (TP3) , enUSA, Edition date: 201803, Second-Printing
Maintenance

Note: If a person adds electrical orelectronic accessories or components to thevehicle, the accessories or components mayadversely affect the low voltage batteryperformance and durability and may alsoaffect the performance of other electricalsystems in the vehicle.For longer, trouble-free operation, keep thetop of the battery clean and dry. Also,make certain the battery cables are alwaystightly fastened to the battery terminals.If you see any corrosion on the battery orterminals, remove the cables from theterminals and clean with a wire brush. Youcan neutralize the acid with a solution ofbaking soda and water.When a battery replacement is required,the battery should only be replaced witha Ford recommended replacement batterythat matches the electrical requirementsof the vehicle.Because your vehicle’s engine iselectronically-controlled by a computer,some engine control settings aremaintained by power from the low voltagebattery. Some engine computer settings,like the idle trim and fuel trim strategy,optimize the driveability and performanceof the engine. Some other computersettings, like the clock and radio stationpresets, are also maintained in memory bypower from the low voltage battery. Whena technician disconnects and connects thelow voltage battery, these settings areerased. Complete the following procedurein order to restore the settings:1. With the vehicle at a complete stop,
set the parking brake.2. Shift the transmission into park (P).3. Switch off all accessories.4. Fully press the brake pedal and start
the vehicle.
5. Run the engine until it reaches normaloperating temperature. While theengine is warming up, complete thefollowing: Reset the clock. See AudioSystem (page 315). Reset the powerwindows bounce-back feature. SeeWindows and Mirrors (page 85).Reset the radio station presets. SeeAudio System (page 315).
6. Allow the engine to idle for at least oneminute. If the engine turns off, pressthe accelerator pedal to start theengine.
7. While the engine is running, press thebrake pedal and shift into neutral (N).
8. Allow the engine to run for at least oneminute by pressing on the acceleratorpedal.
9. Drive the vehicle at least 12 mi (20 km)to completely relearn the idle and fueltrim strategy.
Note: If you do not allow the engine torelearn the idle and fuel trim strategy, theidle quality of your vehicle may be adverselyaffected until the engine computereventually relearns the idle trim and fueltrim strategy.Make sure that you dispose of old batteriesin an environmentally friendly way. Seekadvice from your local authority aboutrecycling old batteries.
CHECKING THE WIPERBLADES
E142463
257
Flex (TP3) , enUSA, Edition date: 201803, Second-Printing
Maintenance

Run the tip of your fingers over the edge ofthe blade to check for roughness.Clean the wiper blades with washer fluidor water applied with a soft sponge orcloth.
CHANGING THE WIPERBLADESYou can improve poor wiper quality bycleaning the wiper blades and thewindshield.Replace the wiper blades at least annuallyfor optimum performance.
Front Wiper Blades1. Lift the wiper arm away from the glass.Note: Do not hold the wiper blade whenlifting the wiper arm.Note: Make sure that the wiper arm doesnot spring back against the glass when thewiper blade is not attached.
A
E165794
2. Release the wiper blade lock (A) andseparate the wiper blade from thewiper arm.
3. Remove the wiper blade.4. Install in the reverse order.
Note: Make sure that the wiper blade locksinto place. Lower the wiper arm and bladeback on the windshield. The wiper arms willautomatically return to their normal positionwhen you turn the ignition on.
Rear Window Wiper Blade
E253247
1. Grab the wiper arm with one handclose to the arm/blade joint and pull itas far away from the glass as possible.Do not use excessive force because itcan break the wiper arm at the heel.Hold it there until the next step.
Note: Do not hold the wiper blade whenlifting the wiper arm.Note: Make sure that the wiper arm doesnot spring back against the glass when thewiper blade is not attached.2. Grab the primary structure of the blade
with the other hand close to thearm/blade joint.
258
Flex (TP3) , enUSA, Edition date: 201803, Second-Printing
Maintenance

E253248
3. The wiper arm has a snap retentionfeature to receive a cross pin from thewiper blade structure. Grip tightly andpress on the arm/blade joint frombeneath and separate the blade fromthe arm. Avoid rotating the wiper bladestructure and trapping your left handbetween the arm and blade.
4. Attach the new wiper to the wiper armand press it into place.
Note: Make sure that the wiper blade locksinto place.
ADJUSTING THE HEADLAMPSVertical AimHeadlamp Aim Target
E142592
8 ft (2.4 m).ACenter height of lamp to ground.B25 ft (7.6 m).CHorizontal reference line.D
Vertical Aim Adjustment1. Park your vehicle on a level surface
approximately 25 ft (7.6 m) away froma vertical wall or screen.
2. Apply the parking brake.3. Measure the height from the center of
the headlamp to the ground.Note: There may be an identifying mark onthe lens to help you locate the center of theheadlamp bulb.4. Mark a horizontal reference line on the
vertical wall or screen that is aminimum of 8 ft (2.4 m) long.
5. Switch the low beam headlamps onand open the hood.
259
Flex (TP3) , enUSA, Edition date: 201803, Second-Printing
Maintenance

E142465
6. There is a distinct change from light todark in the right-hand portion of theheadlamp beam pattern. Position thetop edge of this cut-off at thehorizontal reference line.
E220457
7. To adjust the vertical aim, use asuitable tool to rotate the adjusterclockwise or counterclockwise.
Note: To see a clearer light pattern whileadjusting one headlamp, block the lightfrom the other headlamp.8. Close the hood and switch the low
beam headlamps off.
Horizontal Aim AdjustmentHorizontal aim is not adjustable on yourvehicle.
REMOVING A HEADLAMPTo gain access to the headlamp securingbolts and to remove the headlampassembly, you must first remove the frontfascia and front bumper assemblies. Werecommend you see an authorized dealer.
E220458
CHANGING A BULB
WARNING: Switch the lamps andthe ignition off. Failure to do so could resultin serious personal injury.
WARNING: Bulbs can become hot.Let the bulb cool down before removing it.Failure to do so could result in personalinjury.
Use the correct specification bulb. SeeBulb Specification Chart (page 313).Install in the reverse order unless otherwisestated.
260
Flex (TP3) , enUSA, Edition date: 201803, Second-Printing
Maintenance

Headlamp
E220459
A B
C
Headlamp low beam. Headlamphigh beam.
A
Front direction indicator. Frontparking lamp.
B
Front direction indicator.Frontparking lamp.
C
Front Direction Indicator and FrontParking Lamp
E220501
1. Switch all of the lamps and the ignitionoff.
2. Turn the bulb holder counterclockwiseand remove it.
3. Remove the bulb by pulling it straightout.
Headlamp Low Beam andHeadlamp High BeamNote: If your vehicle has high-intensitydischarge headlamps, these lamps operateat a high voltage. See an authorized dealerif they fail.
3E220460
1. Switch all of the lamps and the ignitionoff.
2. Disconnect the electrical connector.3. Turn the bulb holder counterclockwise
and remove it.Note: You cannot separate the bulb fromthe bulb holder.Note: Do not touch the bulb glass.
261
Flex (TP3) , enUSA, Edition date: 201803, Second-Printing
Maintenance

Front Fog Lamp (If Equipped)
E220461
1. Switch all of the lamps and the ignitionoff.
2. Use suitable tools, for example ascrewdriver and a socket wrench, toremove the wheel arch liner fixings.Carefully reposition the wheel arch linerto access to the front fog lamp bulband electrical connector.
Note: To remove the lower push pin, use aflat-bladed screwdriver to pull up the centerrelease pin.3. Disconnect the electrical connector.
E174588
4. Turn the bulb holder counterclockwiseand remove it.
Note: You cannot separate the bulb fromthe bulb holder.Note: Do not touch the bulb glass.
Brake and Rear Lamps, RearDirection Indicator and ReversingLamp
E220463
C
B A
D
2
Rear side marker lamp.ATail lamp.BReversing lamp.CBrake and tail lamp.Reardirection indicator.
D
262
Flex (TP3) , enUSA, Edition date: 201803, Second-Printing
Maintenance

1
E220462
1. Remove the retaining bolts from thelamp assembly. Gently pull the lampassembly away from the vehicle.
2. Turn the bulb holder counterclockwiseand remove it.
3. Remove the bulb by pulling it straightout.
LED LampsLED lamps are not serviceable items. Seean authorized dealer if they fail.The following lamps are LED:• Front side marker lamps.• Side direction indicator.• Central high mounted brake lamp.• Stop and tail lamp. (If equipped)
License Plate Lamp
E2206171
2
3
1. Remove the screws that secure thelens to the lamp housing.
2. Remove the lamp lens.3. Remove the bulb by pulling it straight
out.
CHANGING THE ENGINE AIRFILTER
WARNING: To reduce the risk ofvehicle damage and personal burn injuries,do not start your engine with the air cleanerremoved and do not remove it while theengine is running.
263
Flex (TP3) , enUSA, Edition date: 201803, Second-Printing
Maintenance

When changing the engine air filter, do notallow debris or foreign material to enterthe air induction system. Enginecomponents are susceptible to damagenot covered by the vehicle Warranty.Change the air filter element at the correctinterval. See Scheduled Maintenance(page 442).Incorrect component use can causedamage not covered by the vehicleWarranty. See Motorcraft Parts (page300).To replace the air filter element do thefollowing:
E200522
1. Remove the clips that secure the airfilter housing cover.
2. Carefully lift the air filter housing cover.3. Remove the air filter element from the
air filter housing.
4. Wipe any dirt or debris from the air filterhousing and cover to make sure no dirtgets in the engine and that you have agood seal.
5. Install a new air filter element. Becareful not to crimp the filter elementedges between the air filter housingand cover. This could cause filterdamage and allow unfiltered air toenter the engine if it is not properlyseated.
6. Install the air filter housing cover.7. Engage the clips to secure the air filter
housing cover to the air filter housing.
264
Flex (TP3) , enUSA, Edition date: 201803, Second-Printing
Maintenance

GENERAL INFORMATIONYour dealer has many quality productsavailable to clean your vehicle and protectits finishes.
CLEANING PRODUCTSMaterialsFor best results, use the following productsor products of equivalent quality:
SpecificationName
Motorcraft® Bug and Tar Remover, ZC-42 (U.S. & Canada)
ESR-M5B194-BMotorcraft® Custom Bright Metal Cleaner, ZC-15 (U.S. & Canada)
ESR-M14P4-AMotorcraft® Detail Wash, ZC-3-A (U.S. & Canada)
ESR-M14P3-AMotorcraft® Engine Shampoo and Degreaser, ZC-20 (U.S.)
Motorcraft® Engine Shampoo, CXC-66-A (Canada)
Motorcraft® Premium Leather and Vinyl Cleaner, ZC-56 (U.S. &Canada)
Motorcraft® Multi-Purpose Cleaner, CXC-101 (Canada)
WSS-M14P19-AMotorcraft® Premium Windshield Wash Concentrate withBitterant, ZC-32-B2 (U.S.)
WSS-M14P19-AMotorcraft® Premium Quality Windshield Washer Fluid, CXC-37-A/B/D/F (Canada)
Motorcraft® Professional Strength Carpet & Upholstery Cleaner,ZC-54 (U.S. & Canada)
ESR-M14P5-AMotorcraft® Premium Glass Cleaner, CXC-100 (Canada)
Motorcraft® Spot and Stain Remover, ZC-14 (U.S.)
ESR-M14P5-AMotorcraft® Ultra-Clear Spray Glass Cleaner, ZC-23 (U.S.)
Motorcraft® Wheel and Tire Cleaner, ZC-37-A (U.S. & Canada)
CLEANING THE EXTERIORWash your vehicle regularly with cool orlukewarm water and a neutral pHshampoo, we recommend MotorcraftDetail Wash.
• Never use strong household detergentsor soap, for example dish washing orlaundry liquid. These products candiscolor and spot painted surfaces.
• Never wash your vehicle when it is hotto the touch, or during strong or directsunlight.
265
Flex (TP3) , enUSA, Edition date: 201803, Second-Printing
Vehicle Care

• Dry your vehicle with a chamois or softterry cloth towel to eliminate waterspotting.
• Immediately remove fuel spillages, birddroppings, insect deposits and road tar.These may cause damage to yourvehicle’s paintwork or trim over time.We recommend Motorcraft Bug andTar Remover.
• Remove any exterior accessories, forexample antennas, before entering acar wash.
• When filling with AdBlue®, remove anyresidue on painted surfacesimmediately.
Note: Suntan lotions and insect repellentscan damage painted surfaces. If thesesubstances come in contact with yourvehicle, wash the affected area as soon aspossible.
Cleaning the HeadlampsNote: Do not scrape the headlamp lensesor use abrasives, alcoholic solvents orchemical solvents to clean them.Note: Do not wipe the headlamps whenthey are dry.
Exterior Chrome Parts• Apply a high quality-cleaning product
to bumpers and other chrome parts.Follow the manufacturer’s instructions.We recommend Motorcraft CustomBright Metal Cleaner.
• Do not apply the cleaning product tohot surfaces. Do not leave the cleaningproduct on chrome surfaces longerthan the time recommended.
• Using non-recommended cleaners canresult in severe and permanentcosmetic damage.
Note: Never use abrasive materials, forexample steel wool or plastic pads as theycan scratch the chrome surface.
Note: Do not use chrome cleaner, metalcleaner or polish on wheels or wheel covers.
Exterior Plastic PartsFor routine cleaning we recommendMotorcraft Detail Wash. If tar or greasespots are present, we recommendMotorcraft Bug and Tar Remover.
Stripes or Graphics (If Equipped)
Hand washing your vehicle is preferredhowever, pressure washing may be usedunder the following conditions:• Do not use water pressure higher than
2,000 psi (14,000 kPa).• Do not use water hotter than 179°F
(82°C).• Use a spray with a 40° wide spray
angle pattern.• Keep the nozzle at a 12 in (305 mm)
distance and 90° angle to yourvehicle's surface.
Note: Holding the pressure washer nozzleat an angle to the vehicle's surface maydamage graphics and cause the edges topeel away from the vehicle's surface.
UnderbodyRegularly clean the underside of yourvehicle using water. Keep body and doordrain holes free of debris or foreignmaterial.
Under HoodFor removing black rubber marks fromunder the hood we recommend MotorcraftWheel and Tire Cleaner or Motorcraft Bugand Tar Remover.
266
Flex (TP3) , enUSA, Edition date: 201803, Second-Printing
Vehicle Care

WAXINGRegular waxing is necessary to protect yourcar's paint from the elements. Werecommend that you wash and wax thepainted surface once or twice a year.When washing and waxing, park yourvehicle in a shaded area out of directsunlight. Always wash your vehicle beforeapplying wax.• Use a quality wax that does not contain
abrasives.• Follow the manufacturer’s instructions
to apply and remove the wax.• Apply a small amount of wax in a
back-and-forth motion, not in circles.• Do not allow wax to come in contact
with any non-body (low-gloss black)colored trim. The wax will discolor orstain the parts over time.• Roof racks.• Bumpers.• Grained door handles.• Side moldings.• Mirror housings.• Windshield cowl area.
• Do not apply wax to glass areas.• After waxing, your car's paint should
feel smooth, and be free of streaks andsmudges.
CLEANING THE ENGINEEngines are more efficient when they areclean because grease and dirt buildup keepthe engine warmer than normal.
When washing:• Take care when using a power washer
to clean the engine. The high-pressurefluid could penetrate the sealed partsand cause damage.
• Do not spray a hot engine with coldwater to avoid cracking the engineblock or other engine components.
• Spray Motorcraft Engine Shampoo andDegreaser on all parts that requirecleaning and pressure rinse clean. InCanada, use Motorcraft EngineShampoo.
• Never wash or rinse the engine while itis hot or running; water in the runningengine may cause internal damage.
• Never wash or rinse any ignition coil,spark plug wire or spark plug well, orthe area in and around these locations.
• Cover the battery, power distributionbox, and air filter assembly to preventwater damage when cleaning theengine.
CLEANING THE WINDOWS ANDWIPER BLADESCar wash chemicals and environmentalfallout can result in windshield and wiperblade contamination. Dirty windshield andwipers will result in poor windshield wiperoperation. Keep the windshield and wiperblades clean to maintain windshield wiperperformance.
267
Flex (TP3) , enUSA, Edition date: 201803, Second-Printing
Vehicle Care

To clean the windshield and wiper blades:• Clean the windshield with a
non-abrasive glass cleaner. Whencleaning the interior of the windshield,avoid getting any glass cleaner on theinstrument panel or door panels. Wipeany glass cleaner off these surfacesimmediately.
• For windshields contaminated withtree sap, chemicals, wax or bugs, cleanthe entire windshield using steel wool(no greater than 0000 grade) in acircular motion and rinse with water.
• Clean the wiper blades with isopropylrubbing alcohol or windshield washerconcentrate.
Note: Do not use razor blades or othersharp objects to clean or remove decalsfrom the inside of the heated rear window.The vehicle warranty does not coverdamage caused to the heated rear windowgrid lines.
CLEANING THE INTERIOR
WARNING: Do not use cleaningsolvents, bleach or dye on the vehicle'sseatbelts, as these actions may weakenthe belt webbing.
WARNING: On vehicles equippedwith seat-mounted airbags, do not usechemical solvents or strong detergents.Such products could contaminate the sideairbag system and affect performance ofthe side airbag in a crash.
For fabric, carpets, cloth seats and seatsequipped with side airbags:• Remove dust and loose dirt with a
vacuum cleaner.• Remove light stains and soil with
Motorcraft Professional StrengthCarpet & Upholstery Cleaner.
• If grease or tar is present on thematerial, spot-clean the area first withMotorcraft Spot and Stain Remover. InCanada, use Motorcraft Multi-PurposeCleaner.
• If a ring forms on the fabric after spotcleaning, clean the entire areaimmediately (but do not oversaturate)or the ring will set.
• Do not use household cleaningproducts or glass cleaners, which canstain and discolor the fabric and affectthe flame retardant abilities of the seatmaterials.
MirrorsDo not clean the housing or glass of anymirror with harsh abrasives, fuel or otherpetroleum or ammonia-based cleaningproducts.
CLEANING THE INSTRUMENTPANEL AND INSTRUMENTCLUSTER LENS
WARNING: Do not use chemicalsolvents or strong detergents whencleaning the steering wheel or instrumentpanel to avoid contamination of the airbagsystem.
Note: Follow the same procedure ascleaning leather seats for cleaning leatherinstrument panels and leather interior trimsurfaces. See Cleaning Leather Seats(page 269).
268
Flex (TP3) , enUSA, Edition date: 201803, Second-Printing
Vehicle Care

Clean the instrument panel and clusterlens with a clean, damp and soft cloth,then use a clean, dry and soft cloth to drythese areas.• Avoid cleaners or polishes that increase
the gloss of the upper portion of theinstrument panel. The dull finish in thisarea helps protect you fromundesirable windshield reflection.
• Do not use any household cleaningproducts or glass cleaners as thesemay damage the finish of theinstrument panel, interior trim andcluster lens.
• Wash or wipe your hands clean if youhave been in contact with certainproducts such as insect repellent andsuntan lotion to avoid possible damageto the interior painted surfaces.
• Do not allow air fresheners and handsanitizers to spill onto interior surfaces.If a spill occurs, wipe off immediately.Your warranty may not cover thesedamages.
If a staining liquid like coffee or juice hasbeen spilled on the instrument panel or oninterior trim surfaces:1. Wipe up spilled liquid using a clean,
soft cloth as quickly as possible.2. Use Motorcraft Premium Leather and
Vinyl Cleaner or a commerciallyavailable leather cleaning product forautomotive interiors. Test any cleaneror stain remover on an inconspicuousarea.
3. Alternatively, wipe the surface with aclean, soft cloth and a mild soap andwater solution. Dry the area with aclean, soft cloth.
4. If necessary, apply more soap andwater solution or cleaning product toa clean, soft cloth and press it onto thesoiled area. Allow this to set at roomtemperature for 30 minutes.
5. Remove the soaked cloth, then with aclean, damp cloth, use a rubbingmotion for 60 seconds on the soiledarea.
6. Dry the area with a clean, soft cloth.
CLEANING LEATHER SEATS (If
Equipped)
Note: Follow the same procedure ascleaning leather seats for cleaning leatherinstrument panels and leather interior trimsurfaces.For routine cleaning, wipe the surface witha soft, damp cloth and a mild soap andwater solution. Dry the area with a clean,soft cloth.For cleaning and removing stains such asdye transfer, use Motorcraft PremiumLeather and Vinyl Cleaner or acommercially available leather cleaningproduct for automotive interiors.Note: Test any cleaner or stain remover onan inconspicuous area.You should:• Remove dust and loose dirt with a
vacuum cleaner.• Clean and treat spills and stains as
soon as possible.Do not use the following products as thesemay damage the leather:• Oil and petroleum or silicone-based
leather conditioners.• Household cleaners.• Alcohol solutions.• Solvents or cleaners intended
specifically for rubber, vinyl andplastics.
269
Flex (TP3) , enUSA, Edition date: 201803, Second-Printing
Vehicle Care

REPAIRING MINOR PAINTDAMAGEAuthorized dealers have touch-up paint tomatch your vehicle’s color. Your vehiclecolor code is printed on a sticker on thefront, left-hand side door jamb. Take yourcolor code to your authorized dealer tomake sure you get the correct color.Before repairing minor paint damage, usea cleaner such as Motorcraft Bug and TarRemover to remove particles such as birddroppings, tree sap, insect deposits, tarspots, road salt and industrial fallout.Always read the instructions before usingcleaning products.
CLEANING THE WHEELS (If
Equipped)
1. Regularly clean them with a wheelcleaner. We recommend that you useFord approved wheel cleaner ifavailable.
2. Remove dirt and brake dust with asponge.
3. Remove tar and grease with a bug andtar remover. We recommend that youuse Ford approved bug and tar removerif available.
4. Thoroughly rinse the wheels with waterafter cleaning.
If you intend on parking your vehicle for anextended period after cleaning the wheelswith a wheel cleaner, drive your vehicle fora few minutes before doing so. Thisreduces the risk of corrosion of the brakediscs, brake pads and linings.Do not clean the wheels when they are hot.Note: Some car washes could damagewheel rims and covers.
Note: Using non-recommended cleaners,harsh cleaning products, chrome wheelcleaners or abrasive materials coulddamage wheel rims and covers.
VEHICLE STORAGEIf you plan on storing your vehicle for 30days or more, read the followingmaintenance recommendations to makesure your vehicle stays in good operatingcondition.We engineer and test all motor vehiclesand their components for reliable, regulardriving. Under various conditions,long-term storage may lead to degradedengine performance or failure unless youuse specific precautions to preserve enginecomponents.
General• Store all vehicles in a dry, ventilated
place.• Protect from sunlight, if possible.• If vehicles are stored outside, they
require regular maintenance to protectagainst rust and damage.
Body• Wash your vehicle thoroughly to
remove dirt, grease, oil, tar or mud fromexterior surfaces, rear-wheel housingand the underside of front fenders.
• Periodically wash your vehicle if it isstored in exposed locations.
• Touch-up exposed or primed metal toprevent rust.
• Cover chrome and stainless steel partswith a thick coat of auto wax to preventdiscoloration. Re-wax as necessarywhen you wash your vehicle.
• Lubricate all hood, door and luggagecompartment hinges and latches witha light grade oil.
270
Flex (TP3) , enUSA, Edition date: 201803, Second-Printing
Vehicle Care

• Cover interior trim to prevent fading.• Keep all rubber parts free from oil and
solvents.
Engine• Change the engine oil and filter prior to
storage because used engine oilcontains contaminates which maycause engine damage.
• Start the engine every 15 days for aminimum of 15 minutes. Run at fast idlewith the climate controls set to defrostuntil the engine reaches normaloperating temperature.
• With your foot on the brake, shiftthrough all the gears while the engineis running.
• We recommend that you change theengine oil before you use your vehicleagain.
Fuel system• Fill the fuel tank with high-quality fuel
until the first automatic shutoff of thefuel pump nozzle.
Cooling system• Protect against freezing temperatures.• When removing your vehicle from
storage, check coolant fluid level.Confirm that there are no coolingsystem leaks and that fluid is at therecommended level.
Battery• Check and recharge as necessary. Keep
connections clean.• If storing your vehicle for more than 30
days without recharging the battery,we recommend that you disconnectthe battery cables to maintain batterycharge for quick starting.
Note: It is necessary to reset memoryfeatures if battery cables are disconnected.
Brakes• Make sure the brakes and parking brake
release fully.
Tires• Maintain recommended air pressure.
Miscellaneous• Make sure all linkages, cables, levers
and pins under your vehicle are coveredwith grease to prevent rust.
• Move vehicles at least 25 ft (7.5 m)every 15 days to lubricate working partsand prevent corrosion.
Removing Vehicle From StorageWhen your vehicle is ready to come out ofstorage, do the following:• Wash your vehicle to remove any dirt
or grease film build-up on windowsurfaces.
• Check windshield wipers for anydeterioration.
• Check under the hood for any foreignmaterial that may have collectedduring storage such as mice or squirrelnests.
• Check the exhaust for any foreignmaterial that may have collectedduring storage.
• Check tire pressures and set tireinflation per the Tire Label.
• Check brake pedal operation. Driveyour vehicle 15 ft (4.5 m) back andforth to remove rust build-up.
271
Flex (TP3) , enUSA, Edition date: 201803, Second-Printing
Vehicle Care

• Check fluid levels (including coolant,oil and gas) to make sure there are noleaks, and fluids are at recommendedlevels.
• If you remove the battery, clean thebattery cable ends and check fordamage.
Contact an authorized dealer if you haveany concerns or issues.
BODY STYLING KITSThe distance between the underside ofyour vehicle and the ground is less thanthat of other models. Drive with extremecare to avoid damage to your vehicle.
272
Flex (TP3) , enUSA, Edition date: 201803, Second-Printing
Vehicle Care

GENERAL INFORMATIONUse only approved wheel and tire sizes,using other sizes could damage yourvehicle. If you change the diameter of thetires from that fitted at the factory, thespeedometer may not display the correctspeed. Take your vehicle to an authorizedFord dealer to have the systemreprogrammed. If you intend to change thesize of the wheels from that fitted by themanufacturer, you can check the suitabilitywith an authorized dealer.Additional information related to thefunctionality and maintenance of your tirescan be found later in this chapter. See TireCare (page 275).The Ford recommended tire inflationpressures can be found on the Tire Label,which is located on the B-pillar or the edgeof the driver's door. This information canalso be found on the Safety ComplianceCertification Label, affixed to either thedoor hinge pillar, door-latch post, or thedoor edge that meets the door latch post;next to the driver’s seating position.Ford strongly recommends maintainingthese tire pressures at all times. Failure tofollow the tire pressure recommendationscan cause uneven treadwear patterns,reduced fuel economy, and adverselyaffect the way your vehicle handles.Note: Check and set the tire pressure at theambient temperature in which you areintending to drive your vehicle and when thetires are cold.Note: Check your tire pressures at leastonce per month.Set the pressure for your spare tire to thehighest value given for your vehicle and tiresize combination, if equipped.
Notice to utility vehicle and truckowners
WARNING: Utility vehicles have asignificantly higher rollover rate than othertypes of vehicles.
WARNING: Vehicles with a highercenter of gravity (utility and four-wheeldrive vehicles) handle differently thanvehicles with a lower center of gravity(passenger cars). Avoid sharp turns,excessive speed and abrupt steering inthese vehicles. Failure to drive cautiouslyincreases the risk of losing control of yourvehicle, vehicle rollover, personal injury anddeath.
WARNING: In a rollover crash, anunbelted person is significantly more likelyto die than a person wearing a seatbelt.
WARNING: Do not becomeoverconfident in the ability of four-wheeldrive vehicles. Although a four-wheel drivevehicle may accelerate better than atwo-wheel drive vehicle in low tractionsituations, it won't stop any faster thantwo-wheel drive vehicles. Always drive ata safe speed.
E145298
273
Flex (TP3) , enUSA, Edition date: 201803, Second-Printing
Wheels and Tires
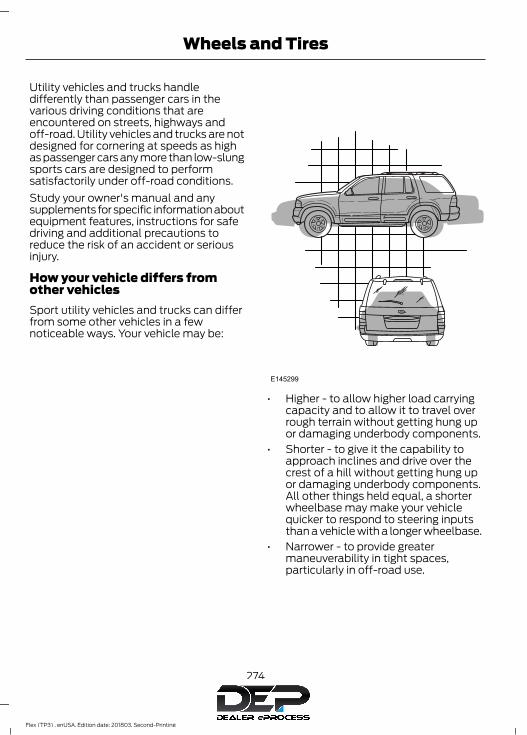
Utility vehicles and trucks handledifferently than passenger cars in thevarious driving conditions that areencountered on streets, highways andoff-road. Utility vehicles and trucks are notdesigned for cornering at speeds as highas passenger cars any more than low-slungsports cars are designed to performsatisfactorily under off-road conditions.Study your owner's manual and anysupplements for specific information aboutequipment features, instructions for safedriving and additional precautions toreduce the risk of an accident or seriousinjury.
How your vehicle differs fromother vehiclesSport utility vehicles and trucks can differfrom some other vehicles in a fewnoticeable ways. Your vehicle may be:
E145299
• Higher - to allow higher load carryingcapacity and to allow it to travel overrough terrain without getting hung upor damaging underbody components.
• Shorter - to give it the capability toapproach inclines and drive over thecrest of a hill without getting hung upor damaging underbody components.All other things held equal, a shorterwheelbase may make your vehiclequicker to respond to steering inputsthan a vehicle with a longer wheelbase.
• Narrower - to provide greatermaneuverability in tight spaces,particularly in off-road use.
274
Flex (TP3) , enUSA, Edition date: 201803, Second-Printing
Wheels and Tires

E168583
As a result of the above dimensionaldifferences, Sport utility vehicles andtrucks often have a higher center of gravityand a greater difference in center of gravitybetween the loaded and unloadedcondition. These differences that makeyour vehicle so versatile also make ithandle differently than an ordinarypassenger car.
TIRE CARE
Information About UniformTire Quality Grading
E142542
Tire Quality Grades apply to newpneumatic passenger car tires.The Quality grades can be foundwhere applicable on the tiresidewall between tread shoulderand maximum section width. Forexample: Treadwear 200Traction AA Temperature A.These Tire Quality Grades aredetermined by standards that theUnited States Department ofTransportation has set.Tire Quality Grades apply to newpneumatic passenger car tires.They do not apply to deep tread,winter-type snow tires,space-saver or temporary usespare tires, light truck or LT typetires, tires with nominal rimdiameters of 10 to 12 inches orlimited production tires as definedin Title 49 Code of FederalRegulations Part 575.104 (c)(2).
275
Flex (TP3) , enUSA, Edition date: 201803, Second-Printing
Wheels and Tires

U.S. Department ofTransportation Tire qualitygrades: The U.S. Department ofTransportation requires FordMotor Company to give you thefollowing information about tiregrades exactly as the governmenthas written it.
TreadwearThe treadwear grade is acomparative rating based on thewear rate of the tire when testedunder controlled conditions on aspecified government test course.For example, a tire graded 150would wear 1½ times as well onthe government course as a tiregraded 100. The relativeperformance of tires dependsupon the actual conditions of theiruse, however, and may departsignificantly from the norm due tovariations in driving habits, servicepractices, and differences in roadcharacteristics and climate.
Traction AA A B C
WARNING: The tractiongrade assigned to this tire is basedon straight-ahead braking tractiontests, and does not includeacceleration, cornering,hydroplaning or peak tractioncharacteristics.
The traction grades, from highestto lowest are AA, A, B, and C. Thegrades represent the tire’s abilityto stop on wet pavement asmeasured under controlledconditions on specifiedgovernment test surfaces ofasphalt and concrete. A tiremarked C may have poor tractionperformance.
Temperature A B C
WARNING: The temperaturegrade for this tire is established fora tire that is properly inflated andnot overloaded. Excessive speed,underinflation, or excessiveloading, either separately or incombination, can cause heatbuildup and possible tire failure.
The temperature grades are A(the highest), B and C,representing the tire’s resistanceto the generation of heat and itsability to dissipate heat whentested under controlled conditionson a specified indoor laboratorytest wheel. Sustained hightemperature can cause thematerial of the tire to degenerateand reduce tire life, and excessivetemperature can lead to suddentire failure. The grade Ccorresponds to a level ofperformance which all passengercar tires must meet under the
276
Flex (TP3) , enUSA, Edition date: 201803, Second-Printing
Wheels and Tires

Federal Motor Vehicle SafetyStandard No. 139. Grades B and Arepresent higher levels ofperformance on the laboratorytest wheel than the minimumrequired by law.
Glossary of Tire Terminology*Tire label: A label showing theoriginal equipment tire sizes,recommended inflation pressureand the maximum weight thevehicle can carry.*Tire Identification Number(TIN): A number on the sidewallof each tire providing informationabout the tire brand andmanufacturing plant, tire size anddate of manufacture. Also referredto as DOT code.*Inflation pressure: A measureof the amount of air in a tire.*Standard load: A class ofP-metric or Metric tires designedto carry a maximum load at setpressure. For example: ForP-metric tires 35 psi (2.4 bar) andfor Metric tires 36 psi (2.5 bar).Increasing the inflation pressurebeyond this pressure will notincrease the tire’s load carryingcapability.*Extra load: A class of P-metricor Metric tires designed to carry aheavier maximum load at 42 psi(2.9 bar). Increasing the inflationpressure beyond this pressure willnot increase the tire’s loadcarrying capability.
*kPa: Kilopascal, a metric unit ofair pressure.*PSI: Pounds per square inch, astandard unit of air pressure.*Cold tire pressure: The tirepressure when the vehicle hasbeen stationary and out of directsunlight for an hour or more andprior to the vehicle being driven for1 mi (1.6 km).*Recommended inflationpressure: The cold inflationpressure found on the SafetyCompliance Certification Label(affixed to either the door hingepillar, door-latch post, or the dooredge that meets the door-latchpost, next to the driver's seatingposition), or Tire Label located onthe B-Pillar or the edge of thedriver door.* B-pillar: The structural memberat the side of the vehicle behindthe front door.*Bead area of the tire: Area ofthe tire next to the rim.* Sidewall of the tire: Areabetween the bead area and thetread.*Tread area of the tire: Area ofthe perimeter of the tire thatcontacts the road when mountedon the vehicle.*Rim: The metal support (wheel)for a tire or a tire and tubeassembly upon which the tirebeads are seated.
277
Flex (TP3) , enUSA, Edition date: 201803, Second-Printing
Wheels and Tires

Information Contained on theTire SidewallBoth United States and CanadaFederal regulations require tiremanufacturers to placestandardized information on thesidewall of all tires. Thisinformation identifies anddescribes the fundamentalcharacteristics of the tire and alsoprovides a U.S. DOT TireIdentification Number for safetystandard certification and in caseof a recall.
Information on P Type Tires
H
I
J
KL
M
A
BC D E
FG
E142543
P215/65R15 95H is an example ofa tire size, load index and speedrating. The definitions of theseitems are listed below. (Note thatthe tire size, load index and speedrating for your vehicle may bedifferent from this example.)
A. P: Indicates a tire, designatedby the Tire and Rim Association,that may be used for service oncars, sport utility vehicles,minivans and light trucks. Note: Ifyour tire size does not begin witha letter this may mean it isdesignated by either the EuropeanTire and Rim TechnicalOrganization or the Japan TireManufacturing Association.B. 215: Indicates the nominalwidth of the tire in millimetersfrom sidewall edge to sidewalledge. In general, the larger thenumber, the wider the tire.C. 65: Indicates the aspect ratiowhich gives the tire's ratio ofheight to width.D. R: Indicates a radial type tire.E. 15: Indicates the wheel or rimdiameter in inches. If you changeyour wheel size, you will have topurchase new tires to match thenew wheel diameter.F. 95: Indicates the tire's loadindex. It is an index that relates tohow much weight a tire can carry.You may find this information inyour owner’s manual. If not,contact a local tire dealer.Note: You may not find thisinformation on all tires because itis not required by federal law.
278
Flex (TP3) , enUSA, Edition date: 201803, Second-Printing
Wheels and Tires

G. H: Indicates the tire's speedrating. The speed rating denotesthe speed at which a tire isdesigned to be driven for extendedperiods of time under a standardcondition of load and inflationpressure. The tires on your vehiclemay operate at differentconditions for load and inflationpressure. These speed ratings mayneed to be adjusted for thedifference in conditions. Theratings range from 81 mph(130 km/h) to 186 mph(299 km/h). These ratings arelisted in the following chart.Note: You may not find thisinformation on all tires because itis not required by federal law.
Speed ratingLetterrating
81 mph (130 km/h)M87 mph (140 km/h)N99 mph (159 km/h)Q106 mph (171 km/h)R112 mph (180 km/h)S118 mph (190 km/h)T124 mph (200 km/h)U130 mph (210 km/h)H149 mph (240 km/h)V
Speed ratingLetterrating
168 mph (270 km/h)W186 mph (299 km/h)Y
Note: For tires with a maximumspeed capability over 149 mph(240 km/h), tire manufacturerssometimes use the letters ZR. Forthose with a maximum speedcapability over 186 mph (299km/h), tire manufacturers alwaysuse the letters ZR.
H. U.S. DOT Tire IdentificationNumber (TIN): This begins withthe letters DOT and indicates thatthe tire meets all federalstandards. The next two numbersor letters are the plant codedesignating where it wasmanufactured, the next two arethe tire size code and the last fournumbers represent the week andyear the tire was built. Forexample, the numbers 317 meanthe 31st week of 1997. After 2000,the numbers go to four digits. Forexample, 2501 means the 25thweek of 2001. The numbers inbetween are identification codesused for traceability. Thisinformation is used to contactcustomers if a tire defect requiresa recall.I. M+S or M/S: Mud and Snow, orAT: All Terrain, orAS: All Season.
279
Flex (TP3) , enUSA, Edition date: 201803, Second-Printing
Wheels and Tires

J. Tire Ply Composition andMaterial Used: Indicates thenumber of plies or the number oflayers of rubber-coated fabric inthe tire tread and sidewall. Tiremanufacturers also must indicatethe ply materials in the tire and thesidewall, which include steel,nylon, polyester, and others.K. Maximum Load: Indicates themaximum load in kilograms andpounds that can be carried by thetire. See the Safety ComplianceCertification Label (affixed toeither the door hinge pillar,door-latch post, or the door edgethat meets the door-latch post,next to the driver's seatingposition), for the correct tirepressure for your vehicle.L. Treadwear, Traction andTemperature Grades:*Treadwear The treadwear gradeis a comparative rating based onthe wear rate of the tire whentested under controlled conditionson a specified government testcourse. For example, a tire graded150 would wear one and one-halftimes as well on the governmentcourse as a tire graded 100.
*Traction: The traction grades,from highest to lowest are AA, A,B, and C. The grades represent thetire's ability to stop on wetpavement as measured undercontrolled conditions on specifiedgovernment test surfaces ofasphalt and concrete. A tiremarked C may have poor tractionperformance.*Temperature: The temperaturegrades are A (the highest), B andC, representing the tire'sresistance to the generation ofheat and its ability to dissipateheat when tested under controlledconditions on a specified indoorlaboratory test wheel.M. Maximum InflationPressure: Indicates the tiremanufacturers' maximumpermissible pressure or thepressure at which the maximumload can be carried by the tire. Thispressure is normally higher thanthe vehicle manufacturer'srecommended cold inflationpressure which can be found onthe Safety ComplianceCertification Label (affixed toeither the door hinge pillar,door-latch post, or the door edgethat meets the door-latch post,next to the driver's seatingposition), or Tire Label which islocated on the B-Pillar or the edgeof the driver’s door. The coldinflation pressure should never beset lower than the recommendedpressure on the vehicle label.
280
Flex (TP3) , enUSA, Edition date: 201803, Second-Printing
Wheels and Tires

The tire suppliers may haveadditional markings, notes orwarnings such as standard loador radial tubeless.
Additional InformationContained on the Tire Sidewallfor LT Type TiresNote: Tire Quality Grades do notapply to this type of tire.
A
BC
BDE142544
LT type tires have some additionalinformation beyond those of Ptype tires; these differences aredescribed below.A. LT: Indicates a tire, designatedby the Tire and Rim Association,that is intended for service on lighttrucks.B. Load Range and LoadInflation Limits: Indicates thetire's load-carrying capabilitiesand its inflation limits.
C. Maximum Load Dual lb (kg)at psi (kPa) cold: Indicates themaximum load and tire pressurewhen the tire is used as a dual,defined as four tires on the rearaxle (a total of six or more tires onthe vehicle).D. Maximum Load Single lb(kg) at psi (kPa) cold: Indicatesthe maximum load and tirepressure when the tire is used asa single, defined as two tires(total) on the rear axle.
Information on T Type TiresT145/80D16 is an example of atire size.Note: The temporary tire size foryour vehicle may be different fromthis example. Tire Quality Gradesdo not apply to this type of tire.
281
Flex (TP3) , enUSA, Edition date: 201803, Second-Printing
Wheels and Tires

AB C D
E
E142545
T type tires have some additionalinformation beyond those of Ptype tires; these differences aredescribed below:A. T: Indicates a type of tire,designated by the Tire and RimAssociation, that is intended fortemporary service on cars, sportutility vehicles, minivans and lighttrucks.B. 145: Indicates the nominalwidth of the tire in millimetersfrom sidewall edge to sidewalledge. In general, the larger thenumber, the wider the tire.
C. 80: Indicates the aspect ratiowhich gives the tire's ratio ofheight to width. Numbers of 70 orlower indicate a short sidewall.D. D: Indicates a diagonal type tire.R: Indicates a radial type tire.E. 16: Indicates the wheel or rimdiameter in inches. If you changeyour wheel size, you will have topurchase new tires to match thenew wheel diameter.
Recommended Tire Pressuresand Inflating Your TiresSafe operation of your vehiclerequires that your tires areproperly inflated. Remember thata tire can lose up to half of its airpressure without appearing flat.Every day before you drive, checkyour tires. If one looks lower thanthe others, use a tire gauge tocheck the pressure of all tires andadjust if required.At least once a month and beforelong trips, inspect each tire andcheck the tire pressure with a tiregauge (including spare, ifequipped). Inflate all tires to theinflation pressure recommendedby Ford Motor Company.
WARNING: Under-inflationis the most common cause of tirefailures and may result in severetire cracking, tread separation orblowout, with unexpected loss ofvehicle control and increased risk
282
Flex (TP3) , enUSA, Edition date: 201803, Second-Printing
Wheels and Tires

of injury. Under-inflation increasessidewall flexing and rollingresistance, resulting in heatbuildup and internal damage tothe tire. It also may result inunnecessary tire stress, irregularwear, loss of vehicle control andaccidents. A tire can lose up tohalf of its air pressure and notappear to be flat!
You are strongly urged to buy areliable tire pressure gauge, asautomatic service station gaugesmay be inaccurate. Fordrecommends the use of a digitalor dial-type tire pressure gaugerather than a stick-type tirepressure gauge. Use therecommended cold inflationpressure for optimum tireperformance and wear.Under-inflation or over-inflationmay cause uneven treadwearpatterns.Always inflate your tires to theFord recommended inflationpressure even if it is less than themaximum inflation pressureinformation found on the tire. Youwill find a Tire Label containingthe Ford recommended tireinflation pressure by the tire sizeand other important informationlocated on the B-Pillar or the edgeof the driver’s door.
The Ford recommended tireinflation pressure is also found onthe Safety ComplianceCertification Label (affixed toeither the door hinge pillar,door-latch post, or the door edgethat meets the door-latch on theB-pillar, or on the edge of thedriver’s door.Failure to follow the tire pressurerecommendations can causeuneven treadwear patterns andadversely affect the way yourvehicle handles.
Inspecting Your Tires andWheel Valve StemsPeriodically inspect the tire treadsfor uneven or excessive wear andremove objects such as stones,nails or glass that may be wedgedin the tread grooves. Check the tireand valve stems for holes, cracks,or cuts that may permit airleakage and repair or replace thetire and replace the valve stem.Inspect the tire sidewalls forcracking, cuts, bruises and othersigns of damage or excessivewear. If internal damage to the tireis suspected, have the tiredemounted and inspected in caseit needs to be repaired or replaced.For your safety, tires that aredamaged or show signs ofexcessive wear should not be usedbecause they are more likely toblow out or fail.
283
Flex (TP3) , enUSA, Edition date: 201803, Second-Printing
Wheels and Tires

Improper or inadequate vehiclemaintenance can cause tires towear abnormally. Inspect all yourtires, including the spare,frequently, and replace them ifone or more of the followingconditions exist:
Tire Wear
E142546
When the tread is worn down toone sixteenth of an inch (2 mm),tires must be replaced to helpprevent your vehicle from skiddingand hydroplaning. Built-intreadwear indicators, or wear bars,which look like narrow strips ofsmooth rubber across the treadwill appear on the tire when thetread is worn down to onesixteenth of an inch (2 mm).When the tire tread wears downto the same height as these wearbars, the tire is worn out and mustbe replaced.
DamagePeriodically inspect the tire treadsand sidewalls for damage (suchas bulges in the tread or sidewalls,cracks in the tread groove andseparation in the tread orsidewall). If damage is observedor suspected, have the tireinspected by a tire professional.Tires can be damaged duringoff-road use, so inspection afteroff-road use is alsorecommended.
Age
WARNING: Tires degradeover time depending on manyfactors such as weather, storageconditions, and conditions of use(load, speed, inflation pressure)the tires experience throughouttheir lives.In general, tires should bereplaced after six years regardlessof tread wear. However, heatcaused by hot climates orfrequent high loading conditionscan accelerate the aging processand may require tires to bereplaced more frequently.You should replace your spare tirewhen you replace the road tires orafter six years due to aging even ifit has not been used.
284
Flex (TP3) , enUSA, Edition date: 201803, Second-Printing
Wheels and Tires

U.S. DOT Tire IdentificationNumberBoth United States and CanadaFederal regulations require tiremanufacturers to placestandardized information on thesidewall of all tires. Thisinformation identifies anddescribes the fundamentalcharacteristics of the tire and alsoprovides a U.S. DOT TireIdentification Number for safetystandard certification and in caseof a recall.This begins with the letters DOTand indicates that the tire meetsall federal standards. The nexttwo numbers or letters are theplant code designating where itwas manufactured, the next twoare the tire size code and the lastfour numbers represent the weekand year the tire was built. Forexample, the numbers 317 meanthe 31st week of 1997. After 2000,the numbers go to four digits. Forexample, 2501 means the 25thweek of 2001. The numbers inbetween are identification codesused for traceability. Thisinformation is used to contactcustomers if a tire defect requiresa recall.
Tire ReplacementRequirementsYour vehicle is equipped with tiresdesigned to provide a safe rideand handling capability.
WARNING: Only usereplacement tires and wheels thatare the same size, load index,speed rating and type (such asP-metric versus LT-metric orall-season versus all-terrain) asthose originally provided by Ford.The recommended tire and wheelsize may be found on either theSafety Compliance CertificationLabel (affixed to either the doorhinge pillar, door-latch post, or thedoor edge that meets thedoor-latch post, next to thedriver's seating position), or theTire Label which is located on theB-Pillar or edge of the driver'sdoor. If this information is notfound on these labels, then youshould contact your authorizeddealer as soon as possible. Use ofany tire or wheel notrecommended by Ford can affectthe safety and performance ofyour vehicle, which could result inan increased risk of loss of vehiclecontrol, vehicle rollover, personalinjury and death.
WARNING: To reduce therisk of serious injury, whenmounting replacement tires andwheels, you should not exceed themaximum pressure indicated onthe sidewall of the tire to set thebeads without additionalprecautions listed below. If thebeads do not seat at themaximum pressure indicated,re-lubricate and try again.
285
Flex (TP3) , enUSA, Edition date: 201803, Second-Printing
Wheels and Tires

WARNING: For a mountingpressure more than 20 psi(1.38 bar) greater than themaximum pressure, a Ford dealeror other tire service professionalshould do the mounting.
WARNING: Always inflatesteel carcass tires with a remoteair fill with the person inflatingstanding at a minimum of 12 ft(3.66 m) away from the wheeland tire assembly.
WARNING: When inflatingthe tire for mounting pressures upto 20 psi (1.38 bar) greater thanthe maximum pressure on the tiresidewall, the followingprecautions must be taken toprotect the person mounting thetire:
• Make sure that you have thecorrect tire and wheel size.
• Lubricate the tire bead andwheel bead seat area again.
• Stand at a minimum of 12 ft(3.66 m) away from the wheeland tire assembly.
• Use both eye and earprotection.
Important: Remember to replacethe wheel valve stems when theroad tires are replaced on yourvehicle.It is recommended that the twofront tires or two rear tiresgenerally be replaced as a pair.
The tire pressure sensors mountedin the wheels (originally installedon your vehicle) are not designedto be used in aftermarket wheels.The use of wheels or tires notrecommended by Ford MotorCompany may affect theoperation of your tire pressuremonitoring system.If the tire pressure monitoringsystem indicator is flashing, yoursystem is malfunctioning. Yourreplacement tire might beincompatible with your tirepressure monitoring system, orsome component of the systemmay be damaged.
Safety Practices
WARNING: If your vehicle isstuck in snow, mud or sand, do notrapidly spin the tires; spinning thetires can tear the tire and causean explosion. A tire can explode inas little as three to five seconds.
WARNING: Do not spin thewheels at over 34 mph (55 km/h).The tires may fail and injure apassenger or bystander.
Driving habits have a great dealto do with your tire mileage andsafety.*Observe posted speed limits*Avoid fast starts, stops and turns
286
Flex (TP3) , enUSA, Edition date: 201803, Second-Printing
Wheels and Tires

*Avoid potholes and objects onthe road*Do not run over curbs or hit thetire against a curb when parking
Highway HazardsNo matter how carefully you drive,there is always the possibility thatyou may eventually have a flat tireon the highway. Drive slowly to theclosest safe area out of traffic.This may further damage the flattire, but your safety is moreimportant.If you feel a sudden vibration orride disturbance while driving, oryou suspect your tire or vehiclehas been damaged, immediatelyreduce your speed. Drive withcaution until you can safely pulloff the road. Stop and inspect thetires for damage. If a tire isunder-inflated or damaged,deflate it, remove wheel andreplace it with your spare tire andwheel. If you cannot detect acause, have the vehicle towed tothe nearest repair facility or tiredealer to have the vehicleinspected.
Tire and Wheel AlignmentA bad jolt from hitting a curb orpothole can cause the front endof your vehicle to becomemisaligned or cause damage toyour tires. If your vehicle seems topull to one side when you aredriving, the wheels may be out ofalignment. Have an authorizeddealer check the wheel alignmentperiodically.Wheel misalignment in the frontor the rear can cause uneven andrapid treadwear of your tires andshould be corrected by anauthorized dealer. Front-wheeldrive vehicles and those with anindependent rear suspension (ifequipped) may require alignmentof all four wheels.The tires should also be balancedperiodically. An unbalanced tireand wheel assembly may result inirregular tire wear.
Tire RotationNote: If your tires show unevenwear, ask an authorized dealer tocheck for and correct any wheelmisalignment, tire imbalance ormechanical problem involvedbefore tire rotation.
287
Flex (TP3) , enUSA, Edition date: 201803, Second-Printing
Wheels and Tires

Note: Your vehicle may beequipped with a dissimilar sparewheel and tire assembly. Adissimilar spare wheel and tireassembly is defined as a sparewheel and tire assembly that isdifferent in brand, size orappearance from the road tires andwheels. If you have a dissimilarspare wheel and tire assembly, it isintended for temporary use onlyand should not be used in a tirerotation.Note: After having your tiresrotated, inflation pressure must bechecked and adjusted to thevehicle requirements.Rotating your tires at therecommended interval will helpyour tires wear more evenly,providing better tire performanceand longer tire life. Sometimesirregular tire wear can becorrected by rotating the tires. SeeScheduled Maintenance (page442).
E142547
USING SNOW CHAINS
WARNING: Snow tires must be thesame size, load index, and speed rating asthose originally provided by Ford. Use ofany tire or wheel not recommended byFord can affect the safety andperformance of your vehicle, which couldresult in an increased risk of loss of vehiclecontrol, vehicle rollover, personal injury,and death. Additionally, the use ofnon-recommended tires and wheels couldcause steering, suspension, axle, transfercase, or power transfer unit failure. It is alsostrongly advised to follow the Fordrecommended tire inflation pressure foundon the Safety Compliance CertificationLabel (affixed to either the door hingepillar, door-latch post, or the door edgethat meets the door-latch post, next to thedriver’s seating position), or Tire Labelwhich is located on the B-Pillar or the edgeof the driver door. Failure to follow the tirepressure recommendations can causeuneven treadwear patterns and adverselyaffect the way your vehicle handles.
Note: The suspension insulation andbumpers will help prevent vehicle damage.Do not remove these components from yourvehicle when using snow tires and chains.The tires on your vehicle have all-weathertreads to provide traction in rain and snow.However, in some climates, you may needto use snow tires and cables. If you needto use cables, it is recommended that steelwheels (of the same size andspecifications) be used, as cables may chipaluminum wheels.
288
Flex (TP3) , enUSA, Edition date: 201803, Second-Printing
Wheels and Tires

Follow these guidelines when using snowtires and chains:• If possible, avoid fully loading your
vehicle.• Use only SAE Class S snow chains,
snow cables or equivalent on the frontaxle for P235/60R17, P235/60R18, andP235/55R19 equipped vehicles. Theuse of snow chains, snow cables orother traction assist devices that arelarger than SAE Class S may causedamage to your vehicle’s wheel house,suspension and/or body.
• Do not install tire chains, cables, oroptional traction devices on the reartires. This could cause damage to thevehicle’s wheel house or body.
• Do not use tire chains, cables, oroptional traction devices with255/45R20 tires.
• Install cable chains securely, verifyingthat the cables do not touch any wiring,brake lines or fuel lines.
• Do not exceed 30 mph (48 km/h) withtire cables on your vehicle.
• Drive cautiously. If you hear the cablesrub or bang against your vehicle, stopand retighten the cables. If this doesnot work, remove the cables to preventdamage to your vehicle.
• Remove the tire cables when they areno longer needed. Do not use tirecables on dry roads.
TIRE PRESSURE MONITORINGSYSTEM
WARNING: The tire pressuremonitoring system is not a substitute formanually checking tire pressures. Youshould periodically check tire pressuresusing a pressure gauge. Failure to correctlymaintain tire pressures could increase therisk of tire failure, loss of control, vehiclerollover and personal injury.
Note: You should only use tire sealants inroadside emergencies as they may causedamage to the tire pressure monitoringsystem sensor.Note: If the tire pressure monitoring systemsensor becomes damaged, it may notfunction.
Each tire, including the spare, ifprovided, should be checkedmonthly when cold and inflated
to the inflation pressure recommended bythe vehicle manufacturer on the vehicleplacard or tire inflation pressure label.Installation of any tires that are not theoriginal equipment tire size can cause thespeedometer to display incorrect vehiclespeed.
As an added safety feature, your vehiclehas been equipped with a Tire PressureMonitoring System (TPMS) thatilluminates a low tire pressure telltalewhen one or more of your tires issignificantly under-inflated. Accordingly,when the low tire pressure telltaleilluminates, you should stop and checkyour tires as soon as possible, and inflatethem to the proper pressure. Driving on asignificantly under-inflated tire causes thetire to overheat and can lead to tire failure.Under-inflation also reduces fuel efficiencyand tire tread life, and may affect thevehicle’s handling and stopping ability.
289
Flex (TP3) , enUSA, Edition date: 201803, Second-Printing
Wheels and Tires

Please note that the TPMS is not asubstitute for proper tire maintenance, andit is the driver’s responsibility to maintaincorrect tire pressure, even if under-inflationhas not reached the level to triggerillumination of the TPMS low tire pressuretelltale.Your vehicle has also been equipped witha TPMS malfunction indicator to indicatewhen the system is not operating properly.The TPMS malfunction indicator iscombined with the low tire pressuretelltale. When the system detects amalfunction, the telltale will flash forapproximately one minute and then remaincontinuously illuminated. This sequencewill continue upon subsequent vehiclestart-ups as long as the malfunction exists.When the malfunction indicator isilluminated, the system may not be ableto detect or signal low tire pressure asintended. TPMS malfunctions may occurfor a variety of reasons, including theinstallation of replacement or alternatetires or wheels on the vehicle that preventthe TPMS from functioning properly.Always check the TPMS malfunctiontelltale after replacing one or more tires orwheels on your vehicle to ensure that thereplacement or alternate tires and wheelsallow the TPMS to continue to functionproperly.This device complies with Part 15 of theFCC Rules and with License exempt RSSStandards of Industry Canada. Operationis subject to the following two conditions:1. This device may not cause harmful
interference, and2. This device must accept any
interference received, includinginterference that may cause undesiredoperation.
Note: Changes or modifications notexpressively approved by the partyresponsible for compliance could void theuser's authority to operate the equipment.The term "IC:" before the radio certificationnumber only signifies that Industry Canadatechnical specifications were met.
Changing Tires With a TirePressure Monitoring System
E142549
Note: Each road tire is equipped with a tirepressure sensor located inside the wheeland tire assembly cavity. The pressuresensor is attached to the valve stem. Thepressure sensor is covered by the tire and isnot visible unless the tire is removed. Takecare when changing the tire to avoiddamaging the sensor.You should always have your tires servicedby an authorized dealer.Check the tire pressure periodically, atleast monthly, using an accurate tire gauge.See Inflating Your Tires in this chapter.
Understanding Your Tire PressureMonitoring SystemThe tire pressure monitoring systemmeasures pressure in your four road tiresand sends the tire pressure readings toyour vehicle. The low tire pressure warninglight will turn on if the tire pressure issignificantly low. Once the light is
290
Flex (TP3) , enUSA, Edition date: 201803, Second-Printing
Wheels and Tires

illuminated, your tires are under-inflatedand need to be inflated to themanufacturer’s recommended tirepressure. Even if the light turns on and ashort time later turns off, your tire pressurestill needs to be checked.
When Your Temporary Spare Tire isInstalledWhen one of your road tires needs to bereplaced with the temporary spare, thesystem will continue to identify an issue toremind you that the damaged road wheeland tire assembly needs to be repaired andput back on your vehicle.
To restore the full function of the tirepressure monitoring system, have thedamaged road wheel and tire assemblyrepaired and remounted on your vehicle.
When You Believe Your System is NotOperating ProperlyThe main function of the tire pressuremonitoring system is to warn you whenyour tires need air. It can also warn you inthe event the system is no longer capableof functioning as intended. See thefollowing chart for information concerningyour tire pressure monitoring system:
291
Flex (TP3) , enUSA, Edition date: 201803, Second-Printing
Wheels and Tires

Customer action requiredPossible causeLow tire pressurewarning light
Make sure tires are at the proper pres-sure. See Inflating your tires in thischapter. After inflating your tires to themanufacturer’s recommended pressureas shown on the Tire Label, located onthe edge of driver’s door or the B-Pillar,the vehicle must be driven for at leasttwo minutes over 20 mph (32 km/h)before the light turns off.
Tire(s) under-inflatedSolid warning light
Repair the damaged road wheel and tireassembly and reinstall it on the vehicleto restore system function. For adescription on how the system functions,see When your temporary spare tireis installed in this section.
Spare tire in use
If the tires are properly inflated and thespare tire is not in use but the lightremains on, contact your authorizeddealer as soon as possible.
TPMS malfunction
Repair the damaged road wheel and tireassembly and reinstall it on the vehicleto restore system function. For adescription on how the system functions,see When your temporary spare tireis installed in this section.
Spare tire in useFlashing warninglight
If the tires are properly inflated and thespare tire is not in use but the lightremains on, contact your authorizeddealer as soon as possible.
TPMS malfunction
When Inflating Your TiresWhen putting air into your tires, such as ata gas station or in your garage, the tirepressure monitoring system may notrespond immediately to the air added toyour tires.
It may take up to two minutes of drivingover 20 mph (32 km/h) for the light to turnoff after you have filled your tires to therecommended inflation pressure.
292
Flex (TP3) , enUSA, Edition date: 201803, Second-Printing
Wheels and Tires

How Temperature Affects Your TirePressureThe tire pressure monitoring systemmonitors tire pressure in each pneumatictire. While driving in a normal manner, atypical passenger tire inflation pressuremay increase about 2–4 psi (14–28 kPa)from a cold start situation. If the vehicle isstationary overnight with the outsidetemperature significantly lower than thedaytime temperature, the tire pressure maydecrease about 3 psi (21 kPa) for a drop of30°F (17°C) in ambient temperature. Thislower pressure value may be detected bythe tire pressure monitoring system asbeing significantly lower than therecommended inflation pressure andactivate the system warning light for lowtire pressure. If the low tire pressurewarning light is on, visually check each tireto verify that no tire is flat. If one or moretires are flat, repair as necessary. Checkthe air pressure in the road tires. If any tireis under-inflated, carefully drive the vehicleto the nearest location where air can beadded to the tires. Inflate all the tires tothe recommended inflation pressure.
CHANGING A ROAD WHEEL
WARNING: The use of tire sealantmay damage your tire pressure monitoringsystem and should only be used inroadside emergencies. If you must use asealant, the Ford Tire Mobility Kit sealantshould be used. The tire pressuremonitoring system sensor and valve stemon the wheel must be replaced by anauthorized dealer after use of the sealant.
WARNING: See Tire PressureMonitoring System (page 289). If the tirepressure monitor sensor becomesdamaged, it will no longer function.
Note: The tire pressure monitoring systemindicator light will illuminate when the sparetire is in use. To restore the full function ofthe monitoring system, all road wheelsequipped with tire pressure monitoringsensors must be mounted on the vehicle.If you get a flat tire while driving, do notapply the brake heavily. Instead, graduallydecrease your speed. Hold the steeringwheel firmly and slowly move to a safeplace on the side of the road.Have a flat serviced by an authorizeddealer in order to prevent damage to thetire pressure monitoring system sensors.See Tire Pressure Monitoring System(page 289). Replace the spare tire with aroad tire as soon as possible. Duringrepairing or replacing of the flat tire, havethe authorized dealer inspect the tirepressure monitoring system sensor fordamage.
Dissimilar Spare Wheel and TireAssembly Information
WARNING: Failure to follow theseguidelines could result in an increased riskof loss of vehicle control, injury or death.
If you have a dissimilar spare wheel andtire, then it is intended for temporary useonly. This means that if you need to use it,you should replace it as soon as possiblewith a road wheel and tire assembly thatis the same size and type as the road tiresand wheels that were originally providedby Ford. If the dissimilar spare tire or wheelis damaged, it should be replaced ratherthan repaired.A dissimilar spare wheel and tire assemblyis defined as a spare wheel and tireassembly that is different in brand, size orappearance from the road tires and wheelsand can be one of three types:
293
Flex (TP3) , enUSA, Edition date: 201803, Second-Printing
Wheels and Tires

1. T-type mini-spare: This spare tirebegins with the letter T for tire size andmay have Temporary Use Only molded inthe sidewall.2. Full-size dissimilar spare with labelon wheel: This spare tire has a label onthe wheel that states: THIS WHEEL ANDTIRE ASSEMBLY FOR TEMPORARY USEONLY.When driving with one of the dissimilarspare tires listed above, do not:• Exceed 50 mph (80 km/h).• Load the vehicle beyond maximum
vehicle load rating listed on the SafetyCompliance Label.
• Tow a trailer.• Use snow chains on the end of the
vehicle with the dissimilar spare tire.• Use more than one dissimilar spare tire
at a time.• Use commercial car washing
equipment.• Try to repair the dissimilar spare tire.Use of one of the dissimilar spare tireslisted above at any one wheel location canlead to impairment of the following:• Handling, stability and braking
performance.• Comfort and noise.• Ground clearance and parking at curbs.• Winter weather driving capability.• Wet weather driving capability.• All-wheel driving capability.3. Full-size dissimilar spare withoutlabel on wheelWhen driving with the full-size dissimilarspare wheel and tire assembly, do not:• Exceed 70 mph (113 km/h).• Use more than one dissimilar spare
wheel and tire assembly at a time.
• Use commercial car washingequipment.
• Use snow chains on the end of thevehicle with the dissimilar spare wheeland tire assembly.
The usage of a full-size dissimilar sparewheel and tire assembly can lead toimpairment of the following:• Handling, stability and braking
performance.• Comfort and noise.• Ground clearance and parking at curbs.• Winter weather driving capability.• Wet weather driving capability.• All-wheel driving capability.When driving with the full-size dissimilarspare wheel and tire assembly additionalcaution should be given to:• Towing a trailer.• Driving vehicles equipped with a
camper body.• Driving vehicles with a load on the
cargo rack.Drive cautiously when using a full-sizedissimilar spare wheel and tire assemblyand seek service as soon as possible.
Tire Change Procedure
WARNING: When one of the frontwheels is off the ground, the transmissionalone will not prevent your vehicle frommoving or slipping off the jack, even if thetransmission is in park (P) or neutral (N).
294
Flex (TP3) , enUSA, Edition date: 201803, Second-Printing
Wheels and Tires

WARNING: To help prevent yourvehicle from moving when you change atire, be sure to place the transmission inpark (P) or neutral (N), set the parkingbrake, and block (in both directions) thewheel that is diagonally opposite (otherside and end of your vehicle) to the tirebeing changed.
WARNING: Never get underneath avehicle that is supported only by a jack. Ifthe vehicle slips off the jack, you orsomeone else could be seriously injured.
WARNING: Do not attempt tochange a tire on the side of the vehicleclose to moving traffic. Pull far enough offthe road to avoid the danger of being hitwhen operating the jack or changing thewheel.
WARNING: Always use the jackprovided as original equipment with yourvehicle. If using a jack other than the oneprovided as original equipment with yourvehicle, make sure the jack capacity isadequate for the vehicle weight, includingany vehicle cargo or modifications.
Note: Passengers should not remain in yourvehicle when the vehicle is being jacked.Note: Jack at the specified locations toavoid damage to the vehicle.Note: If the third row seat is stowed in thefloor, you will need to unstow it to accessthe spare tire.1. Park on a level surface, set the parking
brake and activate the hazard flashers.2. Place the transmission in park (P) and
turn the engine off.
E142551
3. Block the diagonally opposite wheel.
E211099
4. Remove the carpeted floor panellocated in the rear of the vehicle, thenremove the wing nut that secures thespare tire by turning itcounterclockwise.
295
Flex (TP3) , enUSA, Edition date: 201803, Second-Printing
Wheels and Tires

5. Lift and remove the spare tire from thetrunk.
6. Remove the second wing nut thatsecures the jack retention bracket byturning it counterclockwise. Thenremove the jack kit from the vehicle.
7. Remove the jack, L-shaped bolt, andthe wrench from the felt bag. Folddown the wrench socket to use toloosen the lug nuts and to operate thejack.
8. Remove the wheel cover with the lugwrench tip and loosen each wheel lugnut one-half turn counterclockwise,but do not remove them until the wheelis raised off the ground.
E145908
9. The vehicle jacking points are shownabove, and are depicted on the warninglabel on the jack.
E201156
10. Put the jack in the jack notch next tothe tire you are changing. Turn thejack handle clockwise until the wheelis completely off the ground.
11. Remove the lug nuts with the lugwrench.
12. Replace the flat tire with the sparetire, making sure the valve stem isfacing outward. Reinstall the lug nutsuntil the wheel is snug against thehub. Do not fully tighten the lug nutsuntil the wheel has been lowered.
13. Lower the wheel by turning the jackhandle counterclockwise.
1
2
3 4
5
E75442
14. Remove the jack and fully tighten thelug nuts in the order shown. SeeTechnical Specifications (page298).
15. Install the wheel cover.
296
Flex (TP3) , enUSA, Edition date: 201803, Second-Printing
Wheels and Tires

Stowing the flat tire
E194296
If you are stowing the flat tire, remove theL-shaped bolt from the external pocket ofthe felt bag. With the third row seat in theraised position, stand the flat tire in therear of the vehicle with the tire’s valve stemfacing the rear of the vehicle. Fasten theflat tire to the vehicle by inserting theL-shaped bolt through one of the lug boltholes in the wheel. Turn it clockwise intothe threaded hole in the vehicle until thetire is secured.If you are stowing the temporary spare tire,place the tire over the jack and secure itwith the large wing nut.
Stowing the jack
E211100
1. Fully collapse the jack, fold the lugwrench socket into the handle andplace the jack and wrench into the feltbag. Place the extension bolt orL-shaped bolt into the external pocketof the felt bag. Position the jack asshown to make sure that the locatingholes in the jack base can be placed onthe locating tabs of the jack mountingbracket in the spare tire tub.
2. Securely close the wrenchcompartment and the jack bag usingthe Velcro™ straps.
3. Place the jack kit on the angled bracketin the spare tire tub, using the locatingtabs to position the jack correctly.
E211101
297
Flex (TP3) , enUSA, Edition date: 201803, Second-Printing
Wheels and Tires

4. Insert the straight end of the jackretention bracket through the eyelet ofthe angled bracket and swing theretention bracket over the jack. Withthe jack in place, place the looped end
of the retention bracket over thethreaded stud in the trunk floor andsecure it with the plastic wing nut.
TECHNICAL SPECIFICATIONS
Wheel Lug Nut Torque Specifications
WARNING: When you install a wheel, always remove any corrosion, dirt or foreignmaterials present on the mounting surfaces of the wheel or the surface of the wheel hub,brake drum or brake disc that contacts the wheel. Make sure to secure any fasteners thatattach the rotor to the hub so they do not interfere with the mounting surfaces of thewheel. Installing wheels without correct metal-to-metal contact at the wheel mountingsurfaces can cause the wheel nuts to loosen and the wheel to come off while your vehicleis in motion, resulting in loss of vehicle control, personal injury or death.
lb.ft (Nm) *Bolt size
100 lb.ft (135 Nm)1/2 x 20
*Torque specifications are for nut and bolt threads free of dirt and rust. Use only Fordrecommended replacement fasteners.Retighten the lug nuts to the specified torque within 100 miles (160 kilometers) after anywheel disturbance (such as tire rotation, changing a flat tire, wheel removal).
E145950
Wheel pilot boreAInspect the wheel pilot hole andmounting surface prior to installation.Remove any visible corrosion or looseparticles.
298
Flex (TP3) , enUSA, Edition date: 201803, Second-Printing
Wheels and Tires

ENGINE SPECIFICATIONS - 3.5L DURATEC
3.5L V6Engine
214Cubic inches
Minimum 87 octaneRequired fuel
1-4-2-5-3-6Firing order
Coil on plugIgnition system
0.049 - 0.053 in (1.25 mm - 1.35 mm)Spark plug gap
10.8:1Compression ratio
Drivebelt Routing3.5L Engine
E191904
ENGINE SPECIFICATIONS - 3.5L ECOBOOST™
3.5L EcoBoostEngine
214Cubic inches
Minimum 87 octaneRequired fuel
1-4-2-5-3-6Firing order
299
Flex (TP3) , enUSA, Edition date: 201803, Second-Printing
Capacities and Specifications

3.5L EcoBoostEngine
Coil on plugIgnition system
0.030–0.033 in (0.75–0.85 mm)Spark plug gap
10.0:1Compression ratio
Drivebelt Routing3.5L EcoBoost Engine
E191904
MOTORCRAFT PARTS - 3.5L DURATEC
Part NumberComponent
FA-1884Air filter element
FL-500-SOil filter
BXT-65-650Battery
SP-520Spark plugs
FP-68Cabin air filter
WW-2301 (driver side)Windshield wiper blade
300
Flex (TP3) , enUSA, Edition date: 201803, Second-Printing
Capacities and Specifications

Part NumberComponent
WW-2103 (passenger side)
WW-1202Rear window wiper blade
We recommend Motorcraft replacement parts available at your Ford dealer or atfordparts.com for scheduled maintenance. These parts meet or exceed Ford MotorCompany’s specifications and are engineered for your vehicle. Use of other parts mayimpact vehicle performance, emissions and durability. Your warranty may be void for anydamage related to use of other parts.If a Motorcraft oil filter is not available, use an oil filter that meets industry performancespecification SAE/USCAR-36.For spark plug replacement, contact an authorized dealer. Replace the spark plugs at theappropriate intervals. See Scheduled Maintenance (page 442).
301
Flex (TP3) , enUSA, Edition date: 201803, Second-Printing
Capacities and Specifications

MOTORCRAFT PARTS - 3.5L ECOBOOST™
Part NumberComponent
FA-1884Air filter element
FL-500-SOil filter
BXT-65-750Battery
SP-534Spark plugs
FP-68Cabin air filter
WW-2301 (driver side)Windshield wiper bladeWW-2103 (passenger side)
WW-1202Rear window wiper blade
We recommend Motorcraft replacement parts available at your Ford dealer or atfordparts.com for scheduled maintenance. These parts meet or exceed Ford MotorCompany’s specifications and are engineered for your vehicle. Use of other parts mayimpact vehicle performance, emissions and durability. Your warranty may be void for anydamage related to use of other parts.If a Motorcraft oil filter is not available, use an oil filter that meets industry performancespecification SAE/USCAR-36.For spark plug replacement, contact an authorized dealer. Replace the spark plugs at theappropriate intervals. See Scheduled Maintenance (page 442).
302
Flex (TP3) , enUSA, Edition date: 201803, Second-Printing
Capacities and Specifications

VEHICLE IDENTIFICATIONNUMBERThe vehicle identification number islocated on the left-hand side of theinstrument panel.
E142476
Please note that in the graphic, XXXX isrepresentative of your vehicle identificationnumber.The Vehicle Identification Number containsthe following information:
E142477
World manufacturer identifierABrake system, Gross VehicleWeight Rating, Restraint Devicesand their locations
B
Make, vehicle line, series, bodytype
C
Engine typeDCheck digitEModel yearFAssembly plantGProduction sequence numberH
303
Flex (TP3) , enUSA, Edition date: 201803, Second-Printing
Capacities and Specifications

VEHICLE CERTIFICATIONLABEL
E167469
The National Highway Traffic SafetyAdministration Regulations require that aSafety Compliance Certification Label beaffixed to a vehicle and prescribe wherethe Safety Compliance Certification Labelmay be located. The Safety ComplianceCertification Label shall be affixed to eitherthe door hinge pillar, the door latch post,or the edge of the door near the door latch,next to the driver's seating position.
TRANSMISSION CODEDESIGNATION
E167814
The transmission code is on the SafetyCompliance Certification Label. Thefollowing table shows the transmissioncode along with the transmissiondescription.
CodeDescription
GSix-speed automatic transmission 6F55
JSix-speed automatic transmission 6F50
304
Flex (TP3) , enUSA, Edition date: 201803, Second-Printing
Capacities and Specifications

CAPACITIES AND SPECIFICATIONS - 3.5L DURATEC
Capacities
WARNING: The air conditioning refrigerant system contains refrigerant under highpressure. Only qualified personnel should service the air conditioning refrigerant system.Opening the air conditioning refrigerant system can cause personal injury.
CapacityItem
6.0 qt (5.7 L)Engine oil
13.2 qt (12.5 L)Engine coolant
Between MIN/MAX on brake fluid reservoirBrake fluid
10.9 qt (10.3 L) 1Automatic transmission fluid
2.43 pt (1.15 L)Rear axle fluid (All Wheel Drive)
17.9 fl oz (0.53 L)Power Transfer Unit (PTU) fluid (All WheelDrive)
Fill as requiredWindshield washer fluid
18.6 gal (70.4 L)Fuel tank
2.31 lb (1.05 kg)A/C refrigerant
8.96 fl oz (265 ml)A/C refrigerant compressor oil1 Approximate dry fill capacity. Actual amount may vary during fluid changes.
305
Flex (TP3) , enUSA, Edition date: 201803, Second-Printing
Capacities and Specifications

SpecificationsMaterials
SpecificationName
WSS-M2C945-B1Recommended motor oil (U.S.):Motorcraft® SAE 5W-20 Premium Synthetic Blend MotorOilXO-5W20-QSP
WSS-M2C945-B1Recommended Motor oil (Canada):Motorcraft® SAE 5W-20 Super Premium Motor OilCXO-5W20-LSP12
WSS-M2C945-B1Optional motor oil (U.S.):Motorcraft® SAE 5W-20 Full Synthetic Motor OilXO-5W20-QFS
WSS-M2C945-B1Optional Motor oil (Canada):Motorcraft® SAE 5W-20 Synthetic Motor OilCXO-5W20-LFS12
WSS-M97B44-D2Engine coolant (U.S.):Motorcraft® Orange Prediluted Antifreeze/CoolantVC-3DIL-B
WSS-M97B44-D2Engine coolant (Canada):Motorcraft® Orange Prediluted Antifreeze/CoolantCVC-3DIL-B
WSS-M6C65-A2Brake fluid:Motorcraft® DOT 4 Low Viscosity (LV) High PerformanceMotor Vehicle Brake FluidPM-20
WSS-M2C938-AAutomatic transmission fluid (U.S.):MERCON® LVMotorcraft® MERCON® LV Automatic Transmission Fluid
XT-10-QLVC
WSS-M2C938-AAutomatic transmission fluid (Canada):MERCON® LVMotorcraft® MERCON® LV Automatic Transmission Fluid
CXT-10-LV12
WSP-M2C197-ARear axle fluid (U.S.):Motorcraft® SAE 80W-90 Premium Rear Axle LubricantXY-80W90-QL
WSP-M2C197-ARear axle fluid (Canada):Motorcraft® SAE 80W-90 Premium Rear Axle LubricantCXY-80W90-1L
306
Flex (TP3) , enUSA, Edition date: 201803, Second-Printing
Capacities and Specifications

SpecificationName
WSL-M2C192-APower Transfer Unit (PTU) fluid (All Wheel Drive) (U.S.):Motorcraft® SAE 75W-140 Synthetic Rear Axle LubricantXY-75W140-QL
WSL-M2C192-APower Transfer Unit (PTU) fluid (All Wheel Drive)(Canada):Motorcraft® SAE 75W-140 Synthetic Rear Axle LubricantCXY-75W140-1L
WSS-M14P19-AWindshield washer fluid (U.S.):Motorcraft® Premium Windshield Wash Concentratewith BitterantZC-32-B2
WSS-M14P19-AWindshield washer fluid (Canada):Motorcraft® Premium Quality Windshield Washer FluidCXC-37-(A, B, D, F)
WSH-M17B19-AA/C refrigerant (U.S.):Motorcraft® R-134a RefrigerantYN-19
WSH-M17B19-AA/C refrigerant (Canada):R-134a RefrigerantCYN-19-R
WSH-M1C231-BA/C refrigerant compressor oil:Motorcraft® PAG Refrigerant Compressor OilYN-12-D
ESB-M1C93-BMulti-purpose grease:Motorcraft® Multi-Purpose Grease SprayXL-5-A
-Lock cylinders (U.S.):Penetrating and Lock LubricantXL-1
-Lock cylinders (Canada):Penetrating FluidCXC-51-A
307
Flex (TP3) , enUSA, Edition date: 201803, Second-Printing
Capacities and Specifications

If you use oil and fluids that do not meetthe defined specification and viscositygrade, this may lead to:• Component damage which is not
covered by the vehicle warranty.• Longer engine cranking periods.• Increased emission levels.• Reduced engine performance.• Reduced fuel economy.• Degraded brake performance.We recommend Motorcraft® motor oil foryour vehicle. If Motorcraft® oil is notavailable, use motor oils of therecommended viscosity grade that meetAPI SN requirements and display the APICertification Mark for gasoline engines. Donot use oil labeled with API SN servicecategory unless the label also displays theAPI certification mark.
E142732
An oil that displays this symbol conformsto current engine, emission system andfuel economy performance standards ofILSAC.Do not use supplemental engine oiladditives because they are unnecessaryand could lead to engine damage that maynot be covered by your vehicle warranty.Note: Ford recommends using DOT 4 LowViscosity (LV) High Performance Brake Fluidor equivalent meeting WSS-M6C65-A2. Useof any fluid other than the recommendedfluid may cause degraded brakeperformance and not meet the Fordperformance standards. Keep brake fluidclean and dry. Contamination with dirt,water, petroleum products or othermaterials may result in brake systemdamage and possible failure.Note: Automatic transmissions that requireMERCON® LV transmission fluid shouldonly use MERCON® LV transmission fluid.The use of any other fluid may causetransmission damage.
Alternative Engine Oil forExtremely Cold ClimatesTo improve engine cold start performance,we recommend that you use the followingalternative engine oil in extremely coldclimates, where the ambient temperaturereaches -22.0°F (-30°C) or below.
Materials
SpecificationName
WSS-M2C947-B1Motorcraft® SAE 0W-20 Premium Synthetic Blend MotorOil:Engine Oil - SAE 0W-20XO-0W20-QSP
308
Flex (TP3) , enUSA, Edition date: 201803, Second-Printing
Capacities and Specifications
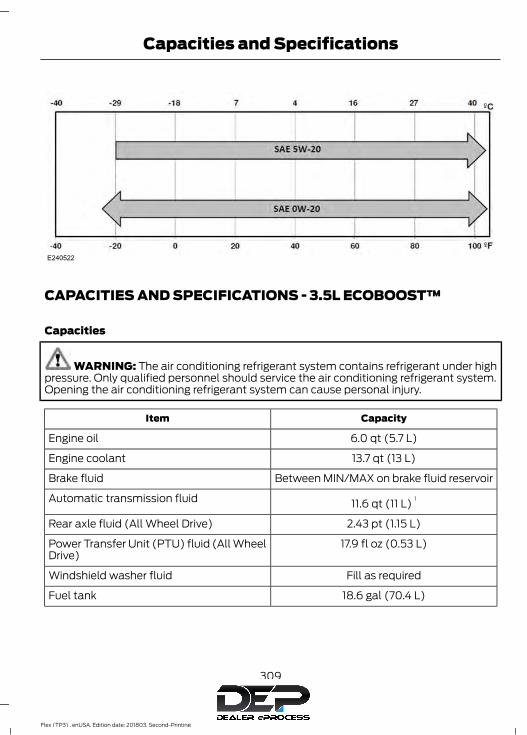
E240522
CAPACITIES AND SPECIFICATIONS - 3.5L ECOBOOST™
Capacities
WARNING: The air conditioning refrigerant system contains refrigerant under highpressure. Only qualified personnel should service the air conditioning refrigerant system.Opening the air conditioning refrigerant system can cause personal injury.
CapacityItem
6.0 qt (5.7 L)Engine oil
13.7 qt (13 L)Engine coolant
Between MIN/MAX on brake fluid reservoirBrake fluid
11.6 qt (11 L) 1Automatic transmission fluid
2.43 pt (1.15 L)Rear axle fluid (All Wheel Drive)
17.9 fl oz (0.53 L)Power Transfer Unit (PTU) fluid (All WheelDrive)
Fill as requiredWindshield washer fluid
18.6 gal (70.4 L)Fuel tank
309
Flex (TP3) , enUSA, Edition date: 201803, Second-Printing
Capacities and Specifications

CapacityItem
2.45 lb (1.11 kg)A/C refrigerant
7.95 fl oz (235 ml)A/C refrigerant compressor oil1 Approximate dry fill capacity. Actual amount may vary during fluid changes.
SpecificationsMaterials
SpecificationName
WSS-M2C946-B1Recommended motor oil (U.S.):Motorcraft® SAE 5W-30 Premium Synthetic Blend MotorOilXO-5W30-QSP
WSS-M2C946-B1Recommended Motor oil (Canada):Motorcraft® SAE 5W-30 Super Premium Motor OilCXO-5W30-LSP12
WSS-M2C946-B1Optional motor oil (U.S.):Motorcraft® SAE 5W-30 Full Synthetic Motor OilXO-5W30-QFS
WSS-M2C946-B1Optional Motor oil (Canada):Motorcraft® SAE 5W-30 Synthetic Motor OilCXO-5W30-LFS12
WSS-M97B44-D2Engine coolant (U.S.):Motorcraft® Orange Prediluted Antifreeze/CoolantVC-3DIL-B
WSS-M97B44-D2Engine coolant (Canada):Motorcraft® Orange Prediluted Antifreeze/CoolantCVC-3DIL-B
WSS-M6C65-A2Brake fluid:Motorcraft® DOT 4 Low Viscosity (LV) High PerformanceMotor Vehicle Brake FluidPM-20
WSS-M2C938-AAutomatic transmission fluid (U.S.):MERCON® LVMotorcraft® MERCON® LV Automatic Transmission Fluid
XT-10-QLVC
WSS-M2C938-AAutomatic transmission fluid (Canada):MERCON® LVMotorcraft® MERCON® LV Automatic Transmission Fluid
310
Flex (TP3) , enUSA, Edition date: 201803, Second-Printing
Capacities and Specifications

SpecificationName
CXT-10-LV12
WSP-M2C197-ARear axle fluid (U.S.):Motorcraft® SAE 80W-90 Premium Rear Axle LubricantXY-80W90-QL
WSP-M2C197-ARear axle fluid (Canada):Motorcraft® SAE 80W-90 Premium Rear Axle LubricantCXY-80W90-1L
WSL-M2C192-APower Transfer Unit (PTU) fluid (All Wheel Drive) (U.S.):Motorcraft® SAE 75W-140 Synthetic Rear Axle LubricantXY-75W140-QL
WSL-M2C192-APower Transfer Unit (PTU) fluid (All Wheel Drive)(Canada):Motorcraft® SAE 75W-140 Synthetic Rear Axle LubricantCXY-75W140-1L
WSS-M14P19-AWindshield washer fluid (U.S.):Motorcraft® Premium Windshield Wash Concentratewith BitterantZC-32-B2
WSS-M14P19-AWindshield washer fluid (Canada):Motorcraft® Premium Quality Windshield Washer FluidCXC-37-(A, B, D, F)
WSH-M17B19-AA/C refrigerant (U.S.):Motorcraft® R-134a RefrigerantYN-19
WSH-M17B19-AA/C refrigerant (Canada):R-134a RefrigerantCYN-19-R
WSH-M1C231-BA/C refrigerant compressor oil:Motorcraft® PAG Refrigerant Compressor OilYN-12-D
ESB-M1C93-BMulti-purpose grease:Motorcraft® Multi-Purpose Grease SprayXL-5-A
-Lock cylinders (U.S.):Penetrating and Lock LubricantXL-1
-Lock cylinders (Canada):
311
Flex (TP3) , enUSA, Edition date: 201803, Second-Printing
Capacities and Specifications

SpecificationName
Penetrating FluidCXC-51-A
If you use oil and fluids that do not meetthe defined specification and viscositygrade, this may lead to:• Component damage which is not
covered by the vehicle warranty.• Longer engine cranking periods.• Increased emission levels.• Reduced engine performance.• Reduced fuel economy.• Degraded brake performance.We recommend Motorcraft motor oil foryour vehicle. If Motorcraft oil is notavailable, use motor oils of therecommended viscosity grade that meetAPI SN requirements and display the APICertification Mark for gasoline engines. Donot use oil labeled with API SN servicecategory unless the label also displays theAPI certification mark.
E142732
An oil that displays this symbol conformsto current engine, emission system andfuel economy performance standards ofILSAC.Do not use supplemental engine oiladditives because they are unnecessaryand could lead to engine damage that maynot be covered by your vehicle warranty.Note: Ford recommends using DOT 4 LowViscosity (LV) High Performance Brake Fluidor equivalent meeting WSS-M6C65-A2. Useof any fluid other than the recommendedfluid may cause degraded brakeperformance and not meet the Fordperformance standards. Keep brake fluidclean and dry. Contamination with dirt,water, petroleum products or othermaterials may result in brake systemdamage and possible failure.Note: Automatic transmissions that requireMERCON® LV transmission fluid shouldonly use MERCON® LV transmission fluid.The use of any other fluid may causetransmission damage.
Alternative Engine Oil forExtremely Cold ClimatesTo improve engine cold start performance,we recommend that you use the followingalternative engine oil in extremely coldclimates, where the ambient temperaturereaches -22.0°F (-30°C) or below.
Materials
SpecificationName
WSS-M2C953-A1Motorcraft® SAE 0W-30 Premium Synthetic Blend Motor Oil:Engine Oil - SAE 0W-30XO-0W30-QSP
312
Flex (TP3) , enUSA, Edition date: 201803, Second-Printing
Capacities and Specifications

E240523
BULB SPECIFICATION CHARTReplacement bulbs are specified in thechart below. Headlamp bulbs must bemarked with an authorized D.O.T. markingfor North America to make sure they havethe proper lamp performance, lightbrightness, light pattern and safe visibility.The correct bulbs will not damage thelamp assembly or void the lamp assemblywarranty and will provide quality bulbillumination time.
Exterior Lamps
Power (Watt)SpecificationLamp
LEDLEDFront side marker lamps.
27/93157NAFront direction indicator.Front parking lamps.
55/659008 H13Headlamp low beam.Headlamp high beam.
55H11Front fog lamps.
LEDLEDSide direction indicator.
5194Rear side marker lamp.
5194Rear lamp.
313
Flex (TP3) , enUSA, Edition date: 201803, Second-Printing
Capacities and Specifications

Power (Watt)SpecificationLamp
27/33157KBrake and rear lamp.Rear direction indicator.
LEDLEDOptional stop and rear lamp.
LEDLEDCentral high mounted brake lamp.
16921Reversing lamps.
5C5WLLicense plate lamp.Note: LED lamps are not serviceable. See an authorized dealer if they fail.
Interior Lamps
Power (Watt)SpecificationLamp
10578Interior lamp.
10578Rear dome lamp.
612V6WMap lamp.
314
Flex (TP3) , enUSA, Edition date: 201803, Second-Printing
Capacities and Specifications
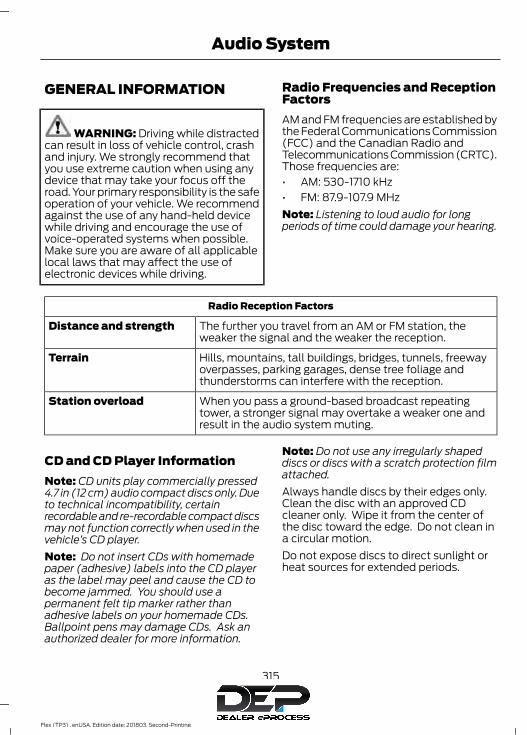
GENERAL INFORMATION
WARNING: Driving while distractedcan result in loss of vehicle control, crashand injury. We strongly recommend thatyou use extreme caution when using anydevice that may take your focus off theroad. Your primary responsibility is the safeoperation of your vehicle. We recommendagainst the use of any hand-held devicewhile driving and encourage the use ofvoice-operated systems when possible.Make sure you are aware of all applicablelocal laws that may affect the use ofelectronic devices while driving.
Radio Frequencies and ReceptionFactorsAM and FM frequencies are established bythe Federal Communications Commission(FCC) and the Canadian Radio andTelecommunications Commission (CRTC).Those frequencies are:• AM: 530-1710 kHz• FM: 87.9-107.9 MHzNote: Listening to loud audio for longperiods of time could damage your hearing.
Radio Reception Factors
The further you travel from an AM or FM station, theweaker the signal and the weaker the reception.
Distance and strength
Hills, mountains, tall buildings, bridges, tunnels, freewayoverpasses, parking garages, dense tree foliage andthunderstorms can interfere with the reception.
Terrain
When you pass a ground-based broadcast repeatingtower, a stronger signal may overtake a weaker one andresult in the audio system muting.
Station overload
CD and CD Player InformationNote: CD units play commercially pressed4.7 in (12 cm) audio compact discs only. Dueto technical incompatibility, certainrecordable and re-recordable compact discsmay not function correctly when used in thevehicle’s CD player.Note: Do not insert CDs with homemadepaper (adhesive) labels into the CD playeras the label may peel and cause the CD tobecome jammed. You should use apermanent felt tip marker rather thanadhesive labels on your homemade CDs.Ballpoint pens may damage CDs. Ask anauthorized dealer for more information.
Note: Do not use any irregularly shapeddiscs or discs with a scratch protection filmattached.Always handle discs by their edges only.Clean the disc with an approved CDcleaner only. Wipe it from the center ofthe disc toward the edge. Do not clean ina circular motion.Do not expose discs to direct sunlight orheat sources for extended periods.
315
Flex (TP3) , enUSA, Edition date: 201803, Second-Printing
Audio System

MP3 and WMA Track and FolderStructureAudio systems capable of recognizing andplaying MP3 and WMA individual tracksand folder structures work as follows:• There are two different modes for MP3
and WMA disc playback: MP3 andWMA track mode (system default) andMP3 and WMA folder mode.
• MP3 and WMA track mode ignores anyfolder structure on the MP3 and WMAdisc. The player numbers each MP3and WMA track on the disc (noted bythe MP3 or WMA file extension) fromT001 to a maximum of T255. Themaximum number of playable MP3 andWMA files may be less depending onthe structure of the CD and exactmodel of radio present.
• MP3 and WMA folder mode representsa folder structure consisting of onelevel of folders. The CD player numbersall MP3 and WMA tracks on the disc(noted by the MP3 or WMA fileextension) and all folders containingMP3 and WMA files, from F001 (folder)T001 (track) to F253 T255.
• Creating discs with only one level offolders helps with navigation throughthe disc files.
If you are burning your own MP3 and WMAdiscs, it is important to understand howthe system reads the structures you create.While various files may be present (fileswith extensions other than MP3 andWMA), only files with the MP3 and WMAextension are played; other files areignored by the system. This enables you touse the same MP3 and WMA disc for avariety of tasks on your work computer,home computer and your in-vehiclesystem.
In track mode, the system displays andplays the structure as if it were only onelevel deep (all MP3 and WMA files play,regardless of being in a specific folder). Infolder mode, the system only plays theMP3 and WMA files in the current folder.
AUDIO UNIT - VEHICLES WITH:AM/FM/CD/SYNC/SATELLITERADIO
WARNING: Driving while distractedcan result in loss of vehicle control, crashand injury. We strongly recommend thatyou use extreme caution when using anydevice that may take your focus off theroad. Your primary responsibility is the safeoperation of your vehicle. We recommendagainst the use of any hand-held devicewhile driving and encourage the use ofvoice-operated systems when possible.Make sure you are aware of all applicablelocal laws that may affect the use ofelectronic devices while driving.
Note: Some features, such as satelliteradio, may not be available in your location.Check with an authorized dealer.Note: Depending on your vehicle optionpackage, your system may look differentfrom what you see here.
Accessing the Auxiliary MediaSources
E265277
Press and release to access orswitch between media devices.
Accessing the Clock Settings
E265278
Press and release to access theclock setting.Use the center arrow controls to
change the hours and minutes.
316
Flex (TP3) , enUSA, Edition date: 201803, Second-Printing
Audio System

Accessing the Menu
E265038
Press and release to accessdifferent audio system features.
Accessing the Phone Features
E265037
Press and release to access thephone features of the SYNCsystem.
Accessing the Sound Settings
E142611
Press and release to accesssettings for Treble, Midrange,Bass, Fade and Balance.
Use the up and down arrow buttons toselect the various settings. Press OK toconfirm a selection, press the left and rightarrow buttons to change the settings.Press OK to set or press MENU to exit.Sound settings can be set for each audiosource independently.
Adjusting the Volume
E265373
Turn to adjust the volume.
Changing Radio Stations
E265696
In radio mode, turn to search through theradio frequency band.In satellite radio mode, turn to find theprevious or next available satellite radiostation.
Ejecting the CD
E265032
Press and release to eject a CD.
Listening to a CD
E265039
Press and release to listen to aCD.
Listening to the Radio
E265033
Press and release to listen to theradio or change radio stations.
Listening to Satellite Radio
E265034
Press and release to listen tosatellite radio.
317
Flex (TP3) , enUSA, Edition date: 201803, Second-Printing
Audio System

Muting the Audio
E265043
Press and release to mute theplaying audio.
Playing or Pausing MediaPress and release to either playor pause the audio.
Switching the Audio Unit On andOff
Press and release the button.
Using the Display ControlUse the up and down arrow buttons toselect the various settings. When you makeyour selection, press the left and rightarrow buttons to change the settings.
E265041
Press and release to confirm aselection.
Press and release the function buttonsbelow the display to select differentfunctions of the audio system dependingon which mode you are in.
Using the Number BlockIn radio mode, store and recall your favoriteradio stations. To store a radio station, tuneto the station, then press and hold a presetbutton until sound returns. In phone mode,enter a phone number.
Using Seek, Fast Forward andReverse
In radio mode, select a frequency band andpress and release either button. Thesystem stops at the first station it finds inthat direction.In satellite radio mode, press and releaseto select the next or previous satellite radiostation. If you select a specific category,such as jazz, rock or news, press to find thenext or previous station in the category youselect.
Menu StructurePress MENU.Press the up and down arrow buttons toscroll through the options.Press the right arrow to enter a menu.Press the left arrow to exit a menu.Press OK to confirm a selection.Note: Depending on your system, someoptions may appear slightly different.
318
Flex (TP3) , enUSA, Edition date: 201803, Second-Printing
Audio System

Radio
Use the left and right arrows to go up or down thefrequency band.
Manual Tune
Select for a brief sampling of all available channels.Scan
Select to store the six strongest local stations on the AM-AST and FM-AST frequency bands.
AST
Select to have the system search by certain musiccategories such as Rock, Pop or Country.
Set Category for Seek/Scan
Select to view additional broadcast data, if available. Thisfeature defaults to off. RBDS must be on for you to set acategory.
RDS Text Display
Satellite Radio
Select for a brief sampling of all available channels.Scan
Select to view your satellite radio electronic serial number(ESN). You will need this number when communicatingwith your satellite radio provider to activate, modify ortrack your account.
Electronic Serial Number(ESN)
Select to view available satellite radio channels. Press OKto open a list of the following options for this channel.Once you skip or lock a channel, you can only access it bypressing Direct Tune and entering the channel number.Locking or unlocking a channel requires your PIN.
Check Channel Guide
Select to view channel categories such as Pop, Rock orNews. If you select a category, seek and scan functionsonly stop on channels in that category.
Set Category for Seek/Scan
Select to switch alerts on or off for songs, artists or teams.The system alerts you when the selection is playing onanother channel. Save up to 20 alerts.
Alerts
Use your PIN to unlock previously locked stations.Unlock All Stations
Use to restore any channels you previously skipped.Skip No Stations
Select to create a PIN, which allows you to lock or unlockchannels. Your initial PIN is 1234.
Parental Lockout
319
Flex (TP3) , enUSA, Edition date: 201803, Second-Printing
Audio System

Audio Settings
Automatically adjusts the volume to compensate forspeed and wind noise. You can set the system between0 and +7 or off, low, medium and high.
Speed CompensatedVolume
Select to adjust settings for Treble, Midrange, Bass, Fadeor Balance.
Sound
Select to optimize sound quality for the chosen seatingposition.
Occupancy Mode
Choose between stereo and surround. Only with theexternal sound systems.
Sound Mode
CD Settings
Select to scan all disc selections.Scan All
Select to scan all music in the current MP3 folder.Scan Folder
Select to bring soft and loud passages together for a moreconsistent listening level.
CD Compression
Clock Settings
Select to set the time and calendar date.Set Date and Time
Select to view clock time in a 12-hour mode or 24-hourmode.
24 Hour
Display Settings
Select to change display brightness.Brightness
Select to display the language in English, French orSpanish.
Language
Select to display the outside temperature in Fahrenheitor Celsius.
Temp. Setting
320
Flex (TP3) , enUSA, Edition date: 201803, Second-Printing
Audio System

AUDIO UNIT - VEHICLES WITH:PREMIUM AM/FM/CD
WARNING: Driving while distractedcan result in loss of vehicle control, crashand injury. We strongly recommend thatyou use extreme caution when using anydevice that may take your focus off theroad. Your primary responsibility is the safeoperation of your vehicle. We recommendagainst the use of any hand-held devicewhile driving and encourage the use ofvoice-operated systems when possible.Make sure you are aware of all applicablelocal laws that may affect the use ofelectronic devices while driving.
Note: Some features, such as satelliteradio, may not be available in your location.Check with an authorized dealer.Note: The touchscreen system controlsmost of the audio features.
Adjusting the Volume
E265373
Turn to adjust the volume.
Changing Radio Stations
E265272
In radio mode, press and release + or - tosearch through the radio frequency band.In satellite radio mode, press and release+ or - to find the previous or next availablesatellite radio station.
Ejecting the CD
E265032
Press and release to eject a CD.
Inserting a CDInsert a CD into the CD slot.
Switching the Audio Unit On andOff
Press and release the button.
Using Seek, Fast Forward andReverse
In radio mode, select a frequency band andpress and release either button. Thesystem stops at the first station it finds inthat direction.In satellite radio mode, press and releaseto select the next or previous satellite radiostation. If you select a specific category,such as jazz, rock or news, press to find thenext or previous station in the category youselect.
321
Flex (TP3) , enUSA, Edition date: 201803, Second-Printing
Audio System

In CD mode, press and release to selectthe next or previous track. Press and holdto move quickly forward or backwardthrough the current track.
AUDIO UNIT - VEHICLES WITH:SONY AM/FM/CD
WARNING: Driving while distractedcan result in loss of vehicle control, crashand injury. We strongly recommend thatyou use extreme caution when using anydevice that may take your focus off theroad. Your primary responsibility is the safeoperation of your vehicle. We recommendagainst the use of any hand-held devicewhile driving and encourage the use ofvoice-operated systems when possible.Make sure you are aware of all applicablelocal laws that may affect the use ofelectronic devices while driving.
Note: Some features, such as satelliteradio, may not be available in your location.Check with an authorized dealer.Note: The touchscreen controls most ofthe audio features.
Accessing the Sound Settings
E265271
Press and release to accesssettings for Treble, Midrange,Bass, Fade and Balance.
Adjusting the Volume
E276988
Turn to adjust the volume.
Changing Radio Stations
E265272
In radio mode, press and release + or - tosearch through the radio frequency band.In satellite radio mode, press and release+ or - to find the previous or next availablesatellite radio station.
Selecting the Audio Modes
E265276
Press and release to accessdifferent audio modes such asAM, FM and CD.
Switching the Audio Unit On andOff
Press and release the button.
322
Flex (TP3) , enUSA, Edition date: 201803, Second-Printing
Audio System

Using Seek, Fast Forward andReverse
In radio mode, select a frequency band andpress and release either button. Thesystem stops at the first station it finds inthat direction.In CD mode, press and release to selectthe next or previous track. Press and holdto move quickly forward or backwardthrough the current track.In satellite radio mode, press and releaseto select the next or previous satellite radiostation. If you select a specific category,such as jazz, rock or news, press to find thenext or previous station in the category youselect.
USB PORT
WARNING: Driving while distractedcan result in loss of vehicle control, crashand injury. We strongly recommend thatyou use extreme caution when using anydevice that may take your focus off theroad. Your primary responsibility is the safeoperation of your vehicle. We recommendagainst the use of any hand-held devicewhile driving and encourage the use ofvoice-operated systems when possible.Make sure you are aware of all applicablelocal laws that may affect the use ofelectronic devices while driving.
E201595
The USB port allows you to plug in mediaplaying devices, memory sticks and chargedevices, if supported.
MEDIA HUB
WARNING: Driving while distractedcan result in loss of vehicle control, crashand injury. We strongly recommend thatyou use extreme caution when using anydevice that may take your focus off theroad. Your primary responsibility is the safeoperation of your vehicle. We recommendagainst the use of any hand-held devicewhile driving and encourage the use ofvoice-operated systems when possible.Make sure you are aware of all applicablelocal laws that may affect the use ofelectronic devices while driving.
The media hub may be on the instrumentpanel or center console.The media hub may contain one or moreof the following inputs:See USB Port (page 323).
323
Flex (TP3) , enUSA, Edition date: 201803, Second-Printing
Audio System

GENERAL INFORMATION
E198355
SYNC is an in-vehicle communicationssystem that works with yourBluetooth-enabled cellular phone andportable media player. This allows you to:• Make and receive calls.• Access and play music from your
portable music player.• Use 911 Assist.*
• Use applications, such as Spotify, viaSYNC AppLink.**
• Access phonebook contacts and musicusing voice commands.
• Stream music from your connectedphone.
• Text message.
• Use the advanced voice recognitionsystem.
• Charge your USB device (if your devicesupports this).
*These features are not available in allmarkets and require activation.**Available AppLink enabled apps vary bymarket.Make sure that you review your device'smanual before using it with SYNC.
SupportThe SYNC support team is available tohelp you with any questions you cannotanswer on your own.Monday-Saturday, 8:30am-9:00pm EST.
324
Flex (TP3) , enUSA, Edition date: 201803, Second-Printing
SYNC™

Sunday, 10:30am-7:30pm EST.In the United States, call 1-800-392-3673.In Canada, call 1-800-565-3673.Times are subject to change due toholidays.
SYNC Owner AccountWhy do I need a SYNC owner account?• Essential for keeping up with the latest
software downloads available forSYNC.
• Access to customer support for anyquestions you may have.
Driving RestrictionsFor your safety, certain features arespeed-dependent and restricted when yourvehicle is traveling over 3 mph (5 km/h).
Safety Information
WARNING: Driving while distractedcan result in loss of vehicle control, crashand injury. We strongly recommend thatyou use extreme caution when using anydevice that may take your focus off theroad. Your primary responsibility is the safeoperation of your vehicle. We recommendagainst the use of any hand-held devicewhile driving and encourage the use ofvoice-operated systems when possible.Make sure you are aware of all applicablelocal laws that may affect the use ofelectronic devices while driving.
When using SYNC:• Do not operate playing devices if the
power cords or cables are broken, splitor damaged. Place cords and cablesout of the way, so they do not interferewith the operation of pedals, seats,compartments or safe driving abilities.
• Do not leave playing devices in yourvehicle during extreme conditions as itcould cause them damage. See yourdevice's manual for further information.
• Do not attempt to service or repair thesystem. See an authorized dealer.
Privacy InformationWhen a cellular phone is connected toSYNC, the system creates a profile withinyour vehicle that is linked to that cellularphone. This profile is created in order tooffer you more cellular features and tooperate more efficiently. Among otherthings, this profile may contain data aboutyour cellular phone book, text messages(read and unread), and call history,including history of calls when your cellularphone was not connected to the system.In addition, if you connect a media device,the system creates and retains an index ofsupported media content. The system alsorecords a short development log ofapproximately 10 minutes of all recentsystem activity. The log profile and othersystem data may be used to improve thesystem and help diagnose any problemsthat may occur.The cellular profile, media device index,and development log will remain in thevehicle unless you delete them and aregenerally accessible only in the vehiclewhen the cellular phone or media playeris connected. If you no longer plan to usethe system or the vehicle, we recommendyou perform a Master Reset to erase allstored information.
325
Flex (TP3) , enUSA, Edition date: 201803, Second-Printing
SYNC™

System data cannot be accessed withoutspecial equipment and access to thevehicle's SYNC module. Ford MotorCompany and Ford of Canada will notaccess the system data for any purposeother than as described absent consent, acourt order, or where required by lawenforcement, other governmentauthorities, or other third parties actingwith lawful authority. Other parties mayseek to access the informationindependently of Ford Motor Company andFord of Canada. For further privacyinformation, see the section on 911 Assist.
USING VOICE RECOGNITIONThis system helps you control manyfeatures using voice commands. Thisallows you to keep your hands on thewheel and focus on what is in front of you.
Helpful Hints• Make sure the interior of your vehicle is
as quiet as possible. Wind noise fromopen windows and road vibrations mayprevent the system from correctlyrecognizing spoken commands.
• After pressing the voice button, waituntil after the tone sounds andListening appears before saying acommand. Any command spokenbefore this does not register with thesystem.
• Speak naturally, without long pausesbetween words.
• At any time, you can interrupt thesystem while it is speaking by pressingthe voice button.
Initiating a Voice Session
E142599
Initiate a voice session bypressing the voice button on thesteering wheel controls. See
Voice Control (page 75).
When prompted you can say any of the following:
If you want the system to carry out the followingVoice command
Stream audio from your phone.Bluetooth Audio
Cancel the requested action.Cancel
Access mobile applications.mobile (apps | applica-tions)
Make calls.Phone
Access the device connected to your USB port.USB [1]
326
Flex (TP3) , enUSA, Edition date: 201803, Second-Printing
SYNC™

If you want the system to carry out the followingVoice command
Adjust the level of voice interaction and feedback.Voice Settings | VoicePreferences
Hear a list of voice commands available in the current mode.Help
You can say any of the voice commands that appear within open and close brackets thatare separated by |. For example, where (cancel | stop | exit) appears you say; cancel orstop or exit.You must say any of the voice commands that appear outside of open and close brackets.For example, where mobile (apps | applications) appears, you must say mobile followedby either apps or applications.You do not need to say words that appear within square brackets. For example, for where(USB [stick] | iPOD | MP3 [player]) appears, you can say USB or USB stick.
System Interaction and FeedbackThe system provides feedback throughaudible tones, prompts, questions andspoken confirmations depending on thesituation and the chosen level ofinteraction (voice settings). You cancustomize the voice recognition system toprovide more or less instruction andfeedback.
The default setting is to a higher level ofinteraction in order to help you learn to usethe system. You can change these settingsat any time.
Adjusting the Interaction Level
E142599
Initiate a voice session bypressing the voice button on thesteering wheel controls. See
Voice Control (page 75).
When prompted say the following:
If you want the system to carry out the followingVoice command
Voice Settings | Voice Preferences
Followed by either of the following:
Provide more detailed interaction and guidance.Interaction ModeStandard
Provide less audible interaction and more tone prompts.Interaction ModeAdvanced
The system defaults to the standard interaction mode.
327
Flex (TP3) , enUSA, Edition date: 201803, Second-Printing
SYNC™

Confirmation prompts are short questionsthe system asks when it is not sure of yourrequest or when there are multiple possibleresponses to your request. For example,the system may ask "Phone, is that
correct?". If turned off, the system simplymakes a best guess as to what yourequested and may ask you to confirmsettings.
If you want the system to carry out the followingVoice command
Make a best guess from the command; you may still occa-sionally be asked to confirm settings.
Confirmation PromptsOff
Clarify your voice command with a short question.Confirmation PromptsOn
The system creates candidate lists whenit has the same confidence level of severaloptions based on your voice command.When turned on, it may prompt you withas many as four possibilities forclarification.
For example, say "Say 1 after the tone tocall John Doe at home. Say 2 after the toneto call Johnny Doe on mobile. Say 3 afterthe tone to call Jane Doe at home." Youcould also say "Say 1 after the tone to playJohn Doe, Say 2 after the tone to playJohnny Doe."
If you want the system to carry out the followingVoice command
Make a best guess from the media candidate list. You maystill occasionally be asked questions.
Media Candidate ListsOff
Clarify your voice command for media candidates.Media Candidate Lists On
Make a best guess from the phone candidate list. You maystill occasionally be asked questions.
Phone Candidate ListsOff
Clarify your voice command for phone candidates.Phone Candidate ListsOn
328
Flex (TP3) , enUSA, Edition date: 201803, Second-Printing
SYNC™

USING SYNC™ WITH YOURPHONEHands-free calling is one of the mainfeatures of SYNC. While the systemsupports a variety of features, many aredependent on your cell phone'sfunctionality. At a minimum, most cellphones with Bluetooth wireless technologysupport the following functions:• Answering an incoming call.• Ending a call.• Using privacy mode.• Dialing a number.• Redialing.• Call waiting notification.• Caller ID.
Other features, such as text messagingusing Bluetooth and automatic phonebookdownload, are cell phone-dependentfeatures. To check your cell phone'scompatibility, see your cell phone's manualand visit www.SYNCMyRide.com,www.SYNCMyRide.ca orwww.syncmaroute.ca.
Pairing a Cell Phone for the FirstTimeNote: SYNC can support downloading upto approximately 1,000 entries perBluetooth-enabled cell phone.Note: Make sure to switch on the ignitionand the radio. Put the transmission inposition park (P) (automatic transmission)or neutral with the parking brake applied(manual transmission).Note: To scroll through the menus, pressthe up and down arrows on your audiosystem.Wirelessly pairing your cell phone withSYNC allows you to make and receivehands-free calls.
Press the phone button. When the display indicates there is no cell phone paired,do the following:
Action and DescriptionMessage
Press the OK button.NO PHONE
FIND SYNC 1. Press the OK button.2. Put your cell phone into Bluetooth discovery mode. See
your device's manual if necessary.3. When prompted on your cell phone's display, enter the
six-digit PIN provided by SYNC in the radio display. Thedisplay indicates when the pairing is successful.
329
Flex (TP3) , enUSA, Edition date: 201803, Second-Printing
SYNC™

Depending on your cell phone's capabilityand your market, the system may promptyou with questions, such as setting thecurrent cell phone as the primary cellphone (the cell phone SYNC automaticallytries to connect with first upon vehiclestart-up) and downloading yourphonebook.
Pairing Subsequent Cell PhonesNote: To scroll through the menus, pressthe up and down arrows on your audiosystem.Note: Make sure to switch on the ignitionand the radio. Put the transmission inposition park (P) (automatic transmission)or neutral with the parking brake applied(manual transmission).
Press the phone button, then scroll to:
ActionMessage
Press the OK button.PHONE SETNGS
Press the OK button.BT DEVICES
Press the OK button. When the following message appearsin the display.
ADD DEVICE
FIND SYNC 1. Press the OK button.2. Put your cell phone into Bluetooth discovery mode. See
your device's manual if necessary.3. When prompted on your cell phone's display, enter the
six-digit PIN provided by SYNC in the radio display. Thedisplay indicates when the pairing is successful.
The system then prompts with questions, such as if you would like to set the current cellphone as the primary cell phone (the cell phone SYNC automatically tries to connectwith first upon vehicle start-up) or download your phonebook.
Phone Voice CommandsPress the voice icon and say:
Voice Commands
Phone
You can then say any of the followingcommands.
Call History Incoming
Call History Missed
Call History Outgoing
Voice Commands
Phonebook ___
Phonebook ___ at Home
Phonebook ___ at Work
Phonebook ___ in Office
Phonebook ___ on Cell
___ is a dynamic listing that should be thename of a contact in your phonebook. Forexample you could say "Call Mom".
330
Flex (TP3) , enUSA, Edition date: 201803, Second-Printing
SYNC™

You can also say any of the following:
Voice Command
Call ___
Call ___ at Home
Call ___ at Work
Call ___ in Office
Call ___ on Mobile
Call ___ on Other
Dial
None of these commands are availableuntil your cell phone information iscompletely downloaded using Bluetooth.
___ is a dynamic listing that should be thename of a contact in your phonebook. Forexample you could say "Call Mom".
The following commands are onlyavailable during active calls:
Voice Commands
Go To Privacy
Hold
Join
Phone Menu Commands
To access the phone menu with voicecommands, press the voice button andwhen prompted say:
Voice Command
[Phone] Menu
You can then say any of the following:
[Phone] Connections | [Media] Connec-tions | [Bluetooth] Connections
Voice Command
[Phone] Settings [Message] NotificationOn
[Phone] Settings [Message] NotificationOff
[Phone] Settings [Set] Phone Ringer
[Phone] Settings [Set] Ringer 1
[Phone] Settings [Set] Ringer 2
[Phone] Settings [Set] Ringer 3
[Phone] Settings [Set] Ringer Off
Battery
Phone Name
Signal
Text Message Inbox
Send [New] Text Message
You do not need to say word containedwithin brackets for the system tounderstand your command.Note: To exit dial mode, press and hold thephone button or press MENU to go to thePHONE menu.
Phonebook CommandsWhen you ask SYNC to access content, forexample the phonebook name or number,the requested information appears in thedisplay to view.
331
Flex (TP3) , enUSA, Edition date: 201803, Second-Printing
SYNC™

Making a CallPress the voice button and when prompted say:
Action and DescriptionVoice Command
This command is not available until your cell phone informa-tion is completely downloaded using Bluetooth.
Call ___
Use to enter a phone number digit by digit.Dial
When the system confirms the number say one of the following commands:
To confirm the number and initiate the call.Dial
To erase the last spoken digit. You can also press the leftarrow button.
delete
To erase all spoken digits. You can also press and hold theleft arrow button.
clear
To end a call, press and hold the red phone button.
Receiving CallsWhen receiving a call, you can:• Answer the call by pressing the phone
button.• Reject the call by pressing and holding
the red phone button.• Ignore the call by doing nothing.
Phone Options during an ActiveCallDuring an active call, you have more menufeatures that become available, forexample putting a call on hold or joiningcalls. Use the arrow buttons to scrollthrough the menu options.
Press the MENU button during an active call, then scroll to:
Action and DescriptionMessage
Press the OK button.CALL MENU
Select one of the following:
Press the OK button to switch a call from an active hands-free envir-onment to your cell phone for a more private conversation.
PRIVACY
Press the OK button to put an active call on hold.CALL HOLD
Join two separate calls. SYNC supports a maximum of three callerson a multiparty call or conference call.
JOIN CALLS
332
Flex (TP3) , enUSA, Edition date: 201803, Second-Printing
SYNC™
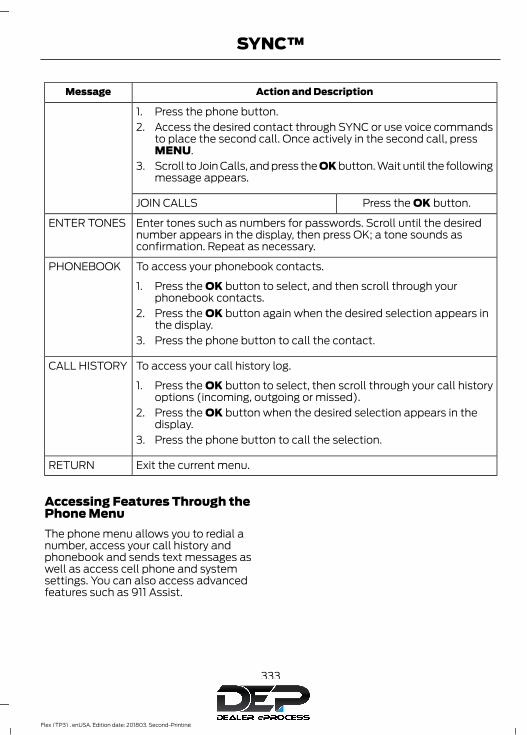
Action and DescriptionMessage
1. Press the phone button.2. Access the desired contact through SYNC or use voice commands
to place the second call. Once actively in the second call, pressMENU.
3. Scroll to Join Calls, and press the OK button. Wait until the followingmessage appears.
Press the OK button.JOIN CALLS
Enter tones such as numbers for passwords. Scroll until the desirednumber appears in the display, then press OK; a tone sounds asconfirmation. Repeat as necessary.
ENTER TONES
To access your phonebook contacts.PHONEBOOK
1. Press the OK button to select, and then scroll through yourphonebook contacts.
2. Press the OK button again when the desired selection appears inthe display.
3. Press the phone button to call the contact.
To access your call history log.CALL HISTORY
1. Press the OK button to select, then scroll through your call historyoptions (incoming, outgoing or missed).
2. Press the OK button when the desired selection appears in thedisplay.
3. Press the phone button to call the selection.
Exit the current menu.RETURN
Accessing Features Through thePhone MenuThe phone menu allows you to redial anumber, access your call history andphonebook and sends text messages aswell as access cell phone and systemsettings. You can also access advancedfeatures such as 911 Assist.
333
Flex (TP3) , enUSA, Edition date: 201803, Second-Printing
SYNC™

Press the phone button to enter the Phone Menu, then scroll to:
Action and DescriptionMessage
Press the OK button to redial the last number called.PHONE REDIALPress the OK button again to confirm.
Access any previously dialed, received or missed calls after youconnect your Bluetooth-enabled cell phone to SYNC.
PHONE REDIAL
Press the OK button then select one of the following and press theOK button again to confirm.
INCOMING
OUTGOING
MISSED
The system attempts to automatically re-download your phonebookand call history each time your cell phone connects to SYNC (if theauto download feature is on and your Bluetooth-enabled cell phonesupports this feature).
To browse your phonebook select:PHONEBOOK
Press OK. Scroll down or up to thedesired name and press OK.
BROWSE
In addition to the Phonebook entryname, the phone number label (Work,
Cell, Home or Other) shows on thedisplay. If there are multiple phone
number entries for a particular Phone-book name, you can scroll through the
different phone labels at this time.Once you have the desired phone label
on the screen press OK. The phonenumber that is stored under the
selected label will be shown on thedisplay. Press OK to dial this number.
To search for a contact in your phone book select:
Press OK.SEARCHScroll down until you see the first letter
of your phonebook entry. Press OK.Scroll down until you see the second
letter of your desired phonebook entry.Press OK.
334
Flex (TP3) , enUSA, Edition date: 201803, Second-Printing
SYNC™

Action and DescriptionMessage
Repeat entering letters to narrow yoursearch. When you are satisfied with
your entry press the right arrow key onthe bezel.
SYNC will jump to the phonebookcontact name that matches your entry.
Press OK.In addition to the Phonebook entry
name, the phone number label (Work,Cell, Home or Other) shows on thedisplay. If there are multiple phone
number entries for a particular Phone-book name, you can scroll through the
different phone labels at this time.Once you have the desired phone label
on the screen press OK.The phone number that is stored underthe selected label will be shown on thedisplay. Press OK to dial this number.
Press the OK button to send, download, read and delete textmessages.1
TEXT MESSAGE
View your cell phone's status, set ring tones, select your messagenotification, change phonebook entries and automatically downloadyour cell phone content among other features. 1
PHONE SETNGS
Automatically place an emergency call to a 911 operator followinga crash. 2
911 Assist
Interact with SYNC-capable mobile applications on your smart-phone.
APPLICATIONS
Access Bluetooth Devices menu listings and advanced menu listings.SYS SETTINGS
Press the OK button to exit the phone menu.EXIT MENU1 This is a cell phone-dependent feature.2 This is an optional feature and available in the United States and Canada only
Text MessagingNote: This is a cell phone-dependentfeature.
SYNC allows you to receive, send,download and delete text messages. Thesystem can also read incoming textmessages to you so that you do not haveto take your eyes off the road.
335
Flex (TP3) , enUSA, Edition date: 201803, Second-Printing
SYNC™

Receiving a Text MessageNote: This is a cell phone-dependentfeature. Your cell phone must supportdownloading text messages using Bluetoothto receive incoming text messages.Note: Forwarding a text message is aspeed-dependent feature. It is only availablewhen your vehicle is traveling at 3 mph (5km/h) or less.
Note: Only one recipient is allowed per textmessage.When a new text message arrives, anaudible tone sounds and the informationdisplay indicates you have a new message.Following the notification you can doany of the following:Do nothing to have the message go intoyour text message inbox.
To have SYNC read you the message using voice commands, press the voicebutton and when prompted say:
Action and DescriptionVoice Command
SYNC will read the most recent text message to you.Read Message | ReadText Message | TextMessage
To open the test message, press OK toreceive and open the text message. PressOK again and SYNC reads your messagealoud as you are not able to view themessage. You can then also choosewhether you’d like to reply or forward themessage.
Reply or forward the message, press OK and scroll to choose between:
Action and DescriptionMessage
Press the OK button to access and then scroll through thelist of pre-defined messages to send.
REPLY TO MSG
Press the OK button to forward the message to anyone inyour Phonebook or Call History. You can also choose enter anumber.
FORWARD MSG
Sending, Downloading and DeletingYour Text MessagesText messaging is a cell phone-dependentfeature. If your cell phone is compatible,SYNC allows you to receive, send,download and delete text messages.
Note: Sending a text message is aspeed-dependent feature. It is only availablewhen your vehicle is traveling at 3 mph (5km/h) or less.Note: You can only have one recipient pertext message.
336
Flex (TP3) , enUSA, Edition date: 201803, Second-Printing
SYNC™

Press the phone button, then scroll to:
Action and DescriptionMessage
Press the OK button.TEXT MESSAGE
Select one of the following:
Allows you to send a new text message based on a pre-defined set of 15 messages.
SEND MSG?
1. Press the OK button.2. Scroll to your desired message.3. Press the OK button.4. Scroll through your phonebook, call history entries or enter
a new number.5. Press the OK button to enter the desired contact.6. Press the OK button again when the system asks if you
would like to send the message. The system sends eachtext message with the following signature: This messagewas sent from my Ford.
Allows you to download your unread messages to SYNC. Todownload the messages, press the OK button to select. Thedisplay indicates the system is downloading your messages.When downloading is complete, SYNC returns you to theinbox.
DOWNLOAD MSG
Allows you to delete current text messages from SYNC. Todelete the messages, press the OK button to select. Thedisplay indicates when it is finished deleting all your textmessages. SYNC returns you to the text message menu.
DELETE ALL
Press the OK button to exit the current menu.RETURN
Accessing Your Phone SettingsThese are cell phone-dependent features.Your cell phone settings allow you toaccess and adjust some features. Forexample ring tones, text messagenotification, modify your phonebook andset up automatic download.
337
Flex (TP3) , enUSA, Edition date: 201803, Second-Printing
SYNC™

Press the phone button, then scroll to:
Action and DescriptionMessage
Press the OK button.PHONESETNGS
Select one of the following:
See the provider, name, signal power, battery power and roamingstatus of your connected cell phone.
PHONESTATUS
Press OK to select and scroll to view the information. When done,press OK again to return to the phone status menu.
Select which ring tone sounds during an incoming call. You can chooseone of the system ring tones or your cell phone ring tones.
SET RINGER
Press the OK button and scroll to hear the available options. You canalso choose to use to use your phone's ring tone.
Press the OK button to select the desired ring tone. If your cell phonesupports in-band ringing, your cell phone ring plays when you choosethe phone ringer option.
You have the option of hearing an audible tone to notify you when atext message arrives.
MSG NTFY
Press the OK button then select one of the following and press theOK button again to confirm.
MSG NTFY ON
MSG NTFY OFF
Modify the contents of your phone book (such as add, delete, down-load). Press OK to select and scroll between:
MODIFYPHONEBOOK
Press the OK button to add more contacts from yourphonebook. Push the desired contact(s) on your cellphone. See your cell phone's manual on how to push
contacts.
ADDCONTACTS
Press OK to delete the current phone book and callhistory. When Delete Phonebook appears, press OK
to confirm. SYNC takes you back to the PhoneSettings menu.
DELETEPHONEBOOK
Press OK to select and press OK again when ConfirmDownload? appears.
DOWNLOADPHONEBOOK
Automatically download your phone book each time your phoneconnects to SYNC. Press OK to select.
AUTODOWN-LOAD
338
Flex (TP3) , enUSA, Edition date: 201803, Second-Printing
SYNC™

Action and DescriptionMessage
When this message appears, press OK to have yourphonebook automatically downloaded each time.
AUTO ON?
Select Off to NOT download your phonebook everytime your phone connects to SYNC. Your phonebook,call history and text messages can only be accessed
when your specific phone is connected to SYNC.
When enabled, SYNC speaks the contact name that is displayed onthe screen during phonebook browsing.
SPEAK NAMES
Exit the current menu.RETURN1 Downloading times are cell phone-dependent and quantity-dependent. When AutoDownload is on, it automatically deletes any changes, additions or deletions saved sinceyour last download.
System SettingsThis menu provides access to yourBluetooth Devices and Advanced menufeatures. Use the arrow buttons to scrollthrough the menu options.
Bluetooth DevicesThe Bluetooth Devices menu allows youto add, connect and delete devices, set acell phone as primary as well as turn yourBluetooth feature on and off.
Press the Phone button to enter the Phone Menu, then scroll to:
Action and DescriptionMessage
Press the OK button.SYS SETTINGS
Press the OK button.BT DEVICES
Select one of the following:
See Using SYNC™ With Your Phone (page 329). 1ADD DEVICE
Connect a previously paired Bluetooth-enabled phone. 2CONNECT BTPress OK to select and view a list of previously paired phones.Scroll until the desired device is chosen, then press OK toconnect the phone.
Set a previously paired phone as your primary phone. 4SET PRIMARY?Press OK to select and scroll to select the desired phone.Press OK to confirm.
Turn the Bluetooth feature on and off. 4BT ON/OFF
339
Flex (TP3) , enUSA, Edition date: 201803, Second-Printing
SYNC™

Action and DescriptionMessage
Press OK and scroll to toggle between On and Off. When thedesired selection is chosen, press OK.Setting Bluetooth to off disconnects all Bluetooth devicesand turns off all Bluetooth features.
Delete a paired cell phone.DEL DEVICEPress the OK button and scroll to select the device. Press OKto confirm.
Delete all previously paired phones (and all informationoriginally saved with those phones).
DELETE ALL
Press OK to select.
Exit the current menu.RETURN1 This is a speed-dependent feature. It is only available when your vehicle is traveling at3 mph (5 km/h) or less.2 You can only connect one device at a time. When another cell phone is connected, theprevious one is disconnected.3 SYNC attempts to connect with the primary phone at every ignition cycle. When a phoneis selected as primary, it appears first in the list and is marked with an asterisk (*).4 Turning Bluetooth off disconnects all Bluetooth devices and deactivates all Bluetoothfeatures.
AdvancedThe Advanced menu allows you to accessand set prompts, languages, defaults,perform a master reset, install anapplication and view system information.
To access the advanced menu, press the phone button to enter the Phone Menu,the scroll to:
Action and DescriptionMessage
Press OK.SYS SETTINGS
Press OK.ADVANCED
Select one of the following:
Get help from SYNC by using questions, helpful hints or asking you fora specific action. To turn these prompts on or off:
PROMPTS
340
Flex (TP3) , enUSA, Edition date: 201803, Second-Printing
SYNC™

Action and DescriptionMessage
1. Press the OK button to select and scroll to select between On andOff.
2. Press the OK button when the desired selection appears in thedisplay. SYNC returns you to the Advanced menu.
1. Press OK to select and then scroll through the languages. Choosebetween English, Français and Español. Once selected, all of theradio displays and prompts are in the selected language.
2. Press OK when the desired selection appears in the display. If youchange the language setting, the display indicates that the systemis updating. When complete, SYNC returns you to the Advancedmenu.
LANGUAGES
Return to the factory default settings. This selection does not eraseyour indexed information, for example phonebook, call history, textmessages or paired devices.
DEFAULTS
Press the OK button to select and then press OK again when thefollowing message appears in the display.
RESTORE?
Completely erase all information stored on SYNC, for examplephonebook, call history, text messages and paired devices, and returnthe system to the factory default settings.
MASTERRESET
Press OK to select. The display indicates when complete. SYNC returnsyou to the Advanced menu.
Press OK to select.SYNC REBOOT
Press OK to select. You only need to pressthe OK button once. SYNC will be unre-
sponsive for 2-4 minutes while it isrebooting. Wait 2-4 minutes before
attempting to execute a SYNC command.
CONFIRM REBOOT?
Install applications you have downloaded.INSTALL APPPress the OK button and scroll to select. Press the OK button toconfirm.
Access the Auto Version number as well as the FDN number.SYSTEM INFOPress the OK button to select.
Exit the current menu.RETURN
341
Flex (TP3) , enUSA, Edition date: 201803, Second-Printing
SYNC™

SYNC™ APPLICATIONS ANDSERVICES (If Equipped)
In order for the following features to work,your cell phone must be compatible withSYNC. To check your phone'scompatibility, visit www.SYNCMyRide.com,www.SYNCMyRide.ca orwww.syncmaroute.ca.• 911 Assist: Can alert 911 in the event of
an emergency.
911 Assist (If Equipped)
WARNING: Unless the 911 Assistsetting is set on before a crash, the systemwill not dial for help which could delayresponse time, potentially increasing therisk of serious injury or death after a crash.
WARNING: Do not wait for 911 Assistto make an emergency call if you can do ityourself. Dial emergency servicesimmediately to avoid delayed responsetime which could increase the risk ofserious injury or death after a crash. If youdo not hear 911 Assist within five secondsof the crash, the system or phone may bedamaged or non-functional.
WARNING: Always place your phonein a secure location in your vehicle so itdoes not become a projectile or getdamaged in a crash. Failure to do so maycause serious injury to someone or damagethe phone which could prevent 911 Assistfrom working properly.
Note: The SYNC 911 Assist feature must beset on before the incident.Note: Before setting this feature on, makesure that you read the 911 Assist PrivacyNotice later in this section for importantinformation.Note: If any user turns 911 Assist on or off,that setting applies for all paired phones. If911 Assist is turned off, either a voicemessage plays or a display message (oricon) comes on (or both) when your vehicleis started after a previously paired phoneconnects.Note: Every phone operates differently.While SYNC 911 Assist works with mostcellular phones, some may have troubleusing this feature.If a crash deploys an airbag (excludingknee airbags and rear inflatable safetybelts [if equipped]) or activates the fuelpump shut-off, your SYNC-equippedvehicle may be able to contact emergencyservices by dialing 911 through a paired andconnected Bluetooth-enabled phone. Youcan learn more about the 911 Assistfeature, visit www.SYNCMyRide.com,www.SYNCMyRide.ca orwww.syncmaroute.ca.See Supplementary Restraints System(page 44). Important information aboutairbag deployment is in this chapter.See Roadside Emergencies (page 219).Important information about the fuel pumpshut-off is in this chapter.
342
Flex (TP3) , enUSA, Edition date: 201803, Second-Printing
SYNC™

Switching 911 Assist On or Off
Press the phone button to enter the phone menu and scroll to:
Action and DescriptionMessage
Press the OK button to confirm and enter the 911 Assist menu.911 Assist
Press the OK button when the desired option appears in theradio display.
On
Off
Off selections include:
Action and DescriptionMessage
Provides a display and voice reminder at phone connectionat vehicle start.
Off with reminder:
Provides a display reminder only without a voice reminder atphone connection.
Off without reminder:
To make sure that 911 Assist workscorrectly:• SYNC must be powered and working
properly at the time of the incident andthroughout feature activation and use.
• The 911 Assist feature must be set onbefore the incident.
• You must pair and connect aBluetooth-enabled and compatiblecell phone to SYNC.
• A connected Bluetooth-enabled phonemust have the ability to make andmaintain an outgoing call at the timeof the incident.
• A connected Bluetooth-enabled phonemust have adequate network coverage,battery power and signal strength.
• The vehicle must have battery powerand be located in the U.S., Canada orin a territory in which 911 is theemergency number.
In the Event of a CrashNot all crashes will deploy an airbag oractivate the fuel pump shut-off (thetriggers for 911 Assist). If a connected cellphone sustains damage or loses itsconnection to SYNC during a crash, SYNCwill search for and try to connect to apreviously paired cell phone; SYNC willthen attempt to call the emergencyservices.Before making the call:• SYNC provides a short window of time
(about 10 seconds) to cancel the call.If you fail to cancel the call, SYNCattempts to dial 911.
• SYNC says the following, or a similarmessage: "SYNC will attempt to call911, to cancel the call, press Cancel onyour screen or press and hold thephone button on your steering wheel."
343
Flex (TP3) , enUSA, Edition date: 201803, Second-Printing
SYNC™
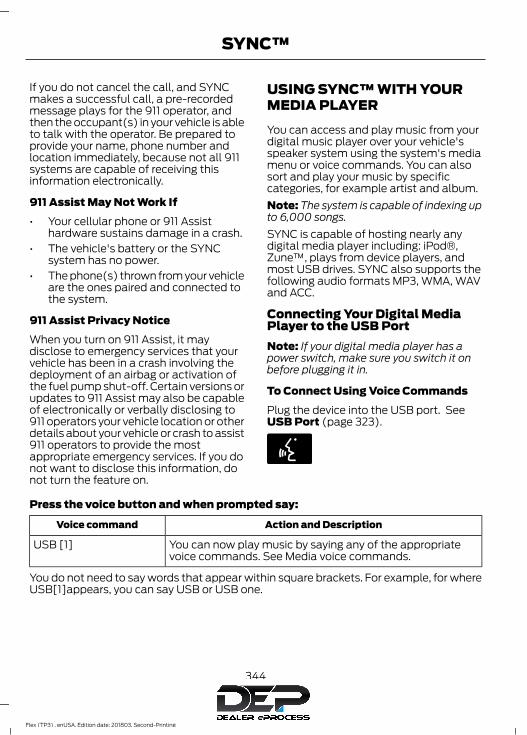
If you do not cancel the call, and SYNCmakes a successful call, a pre-recordedmessage plays for the 911 operator, andthen the occupant(s) in your vehicle is ableto talk with the operator. Be prepared toprovide your name, phone number andlocation immediately, because not all 911systems are capable of receiving thisinformation electronically.
911 Assist May Not Work If• Your cellular phone or 911 Assist
hardware sustains damage in a crash.• The vehicle's battery or the SYNC
system has no power.• The phone(s) thrown from your vehicle
are the ones paired and connected tothe system.
911 Assist Privacy NoticeWhen you turn on 911 Assist, it maydisclose to emergency services that yourvehicle has been in a crash involving thedeployment of an airbag or activation ofthe fuel pump shut-off. Certain versions orupdates to 911 Assist may also be capableof electronically or verbally disclosing to911 operators your vehicle location or otherdetails about your vehicle or crash to assist911 operators to provide the mostappropriate emergency services. If you donot want to disclose this information, donot turn the feature on.
USING SYNC™ WITH YOURMEDIA PLAYERYou can access and play music from yourdigital music player over your vehicle'sspeaker system using the system's mediamenu or voice commands. You can alsosort and play your music by specificcategories, for example artist and album.Note: The system is capable of indexing upto 6,000 songs.SYNC is capable of hosting nearly anydigital media player including: iPod®,Zune™, plays from device players, andmost USB drives. SYNC also supports thefollowing audio formats MP3, WMA, WAVand ACC.
Connecting Your Digital MediaPlayer to the USB PortNote: If your digital media player has apower switch, make sure you switch it onbefore plugging it in.
To Connect Using Voice CommandsPlug the device into the USB port. SeeUSB Port (page 323).
E142599
Press the voice button and when prompted say:
Action and DescriptionVoice command
You can now play music by saying any of the appropriatevoice commands. See Media voice commands.
USB [1]
You do not need to say words that appear within square brackets. For example, for whereUSB[1]appears, you can say USB or USB one.
344
Flex (TP3) , enUSA, Edition date: 201803, Second-Printing
SYNC™

To Connect Using the System MenuPlug the device into the USB port. See
USB Port (page 323).Press the AUX button, then the Menubutton to enter the Media Menu.
You can then scroll to:
Action and DescriptionMessage
Press the OK button.SELECT SRC
Press the OK button.SYNC USBDepending on how many digital media files are on yourconnected device, the following message may appear in theradio display.
Indexing…
When indexing is complete, the screen returns to the Play menu. You can thenselect one of the following:
PLAY ALL
ARTISTS
ALBUMS
GENRES
PLAYLISTS
TRACKS
EXPLORE USB
SIMILARMUSIC
Exit the current menu.RETURN
What's Playing?When a track is playing, you can ask thesystem to tell you what is currently playing.
345
Flex (TP3) , enUSA, Edition date: 201803, Second-Printing
SYNC™

Press the voice button and when prompted say:
Action and DescriptionVoice command
The system reads the metadata tags of the playing track,and if the metadata tags are populated, the system will tellyou what track is playing.
Whats This? | WhatsPlaying?
You can say any of the voice commands that appear within open and close brackets thatare separated by |. For example, where; (what's | what is) appears you say; what's orwhat is.You must say any of the voice commands that appear outside of open and close brackets.For example, where text shows: (what's | what is) playing, you must say; "what's playing"or "what is playing".
Media Voice CommandsPress the voice button and whenprompted say any of the following:
Voice command
USB [1]
You can then say any of the following
[Phone] Connections | [Media] Connec-tions | [Bluetooth] Connections
Pause
Play
Play All1,2Play Artist ___
1,2Play Album ___
1,2Play Genre ___
3[Play] Next Folder
[Play] Next Track | [Play] Next Song1,2Play Playlist ___
3[Play] Previous Folder
Voice command
[Play] Previous Track | [Play] PreviousSong
1,2[Play] Next Track | [Play] Next Song
Repeat [On]
Repeat Off
Shuffle [On]
Shuffle Off1,2Search Album ___
1,2Search Artist ___
1,2The system searches allthe data from yourindexed music and, ifavailable, begins to playthe chosen type of music.You can only play genresof music which are presentin the GENRE metadatatags that you have on yourdigital media player.
SearchGenre ___
346
Flex (TP3) , enUSA, Edition date: 201803, Second-Printing
SYNC™

Voice command
1,2The system searches for aspecific artist/track/albumfrom the music indexedthrough the USB port.
SearchTrack ___| SearchSong ___
1,2This allows you to makeyour previous commandmore specific. By using thiscommand you can filterthough a previous selec-tion, such as an artist toplay only specific album.
Refinealbum ___
The system compiles aplaylist and then plays similarmusic to what is currentlyplaying from the USB portusing indexed metadatainformation.
SimilarMusic
Autoplay Off
Turn autoplay on to listen tomusic processed duringindexing. Turn autoplay off toallow the indexing process tofinish before the system playsany of your music.
Autoplay[on]
1 ___ is a dynamic listing, meaning that itcould be the name of anything, such as agroup, artist or song. For example youcould say "Play artist The Beatles".2 This voice command is not available untilindexing is complete.3 This voice command is only available infolder mode.
Bluetooth Audio Command Guide
Press the voice button and say:
Voice command
Bluetooth Audio
You can then say any of the following:
[Phone] Connections | [Media] Connec-tions | [Bluetooth] Connections
Pause
Play
[Play] Next Track | [Play] Next Song
[Play] Previous Track | [Play] PreviousSong
Media Menu FeaturesThe media menu allows you to select yourmedia source, how to play your music, forexample by artist, genre, shuffle or repeat,and to add, connect or delete devices.Press the AUX button, then the Menubutton to enter the Media Menu.
347
Flex (TP3) , enUSA, Edition date: 201803, Second-Printing
SYNC™

You can then scroll to:
Action and DescriptionMessage
Play your music by artist, album, genre,playlists, tracks, similar music or to simply,play all. You can also choose to ExploreUSB to view the supported digital musicfiles on your playing device.
PLAY MENU
See Play Menu later in this section for moreinformation.
Select one of the following:
Press the OK button to access musicplugged into your USB port. You can alsoplug in devices to charge them (if supportedby your device). Once connected, thesystem indexes any readable media files.1
SYNC USBSELECT SRC
Press the OK button. This is a phone-dependent feature that allows you tostream music playing on your Bluetooth-enabled phone. If supported by your device,you can press seek to play the previous ornext track.
SYNC BT
Press the OK button to select and playmusic from your portable music player overyour vehicle's speakers.2
SYNC LINE IN
(If Equipped)
Choose to shuffle or repeat your music and select your Auto-play settings. Once you turn these selections on, they remainon until you turn them off. Press SEEK to play the previous ornext track.3
MEDIA SETTIN
Press the OK button to shuffle availablemedia files in the current playlist. To shuffleall media tracks, you must select Play Allin the play menu and then select Shuffle.
SHUFFLE
Press the OK button to repeat any song.REPEAT
Press the OK button to turn autoplay on tolisten to music processed during indexing.Turn autoplay off to allow the indexingprocess to finish before the system playsany of your music.4
AUTOPLAY
348
Flex (TP3) , enUSA, Edition date: 201803, Second-Printing
SYNC™

Action and DescriptionMessage
Interact with SYNC-capable mobile applications on yoursmartphone.
APPLICATIONS
Access available Bluetooth Device menu listings as well asAdvanced menu listings.
SYS SETTINGS
Press OK to exit the media menu.EXIT MENU1The time required to complete this depends on the size of the media the system needsto index. If autoplay is on, you can listen to media processed during indexing. If autoplayis off, you cannot listen to music until the system finishes indexing media. SYNC is capableof indexing thousands of average size media and notifies you if it reaches the maximumindexing file size.2If you have already connected a device to the USB port, you cannot access the line infeature. Some digital media players require both USB and line in ports to stream dataand music separately.3Some digital media players require both USB and line in ports to stream data and musicseparately.4Indexing times can vary from device to device and with regard to the number of songsthe system needs to process.
Accessing Your Play MenuThis menu allows you to select and playyour media by artist, album, genre, playlist,track, similar music or even to explore whatis on your USB device.
Make sure that your device is plugged intothe USB port and is turned on.Press the AUX button, then the Menubutton to enter the Media Menu.
You can then scroll to select:
Action and DescriptionMessage
Press the OK button.PLAY MENU
If there are no media files to access, the display indicates there is no media. If there aremedia files, you have the following options:
Press the OK button. The first track title appears in thedisplay.
PLAY ALL
Play all indexed media (tracks) from your playing device inflat file mode, one at a time in numerical order.
349
Flex (TP3) , enUSA, Edition date: 201803, Second-Printing
SYNC™

Action and DescriptionMessage
Sort all indexed media by artist. Once selected, the systemlists and then plays all artists and tracks alphabetically. Ifthere are fewer than 255 indexed artists, the system liststhem alphabetically in flat file mode. If there are more than255, the system categorizes them alphabetically.
ARTISTS
1. Press the OK button. You can select to play all artists orany indexed artist.
2. Scroll to choose the desired artist. Press the OK button.
Sort all indexed media by albums. If there are fewer than 255indexed albums, the system lists them alphabetically in flatfile mode. If there are more than 255, the system categorizesthem alphabetically.
ALBUMS
1. Press the OK button. You can enter the album menu andselect from playing all albums or from any individualindexed album.
2. Scroll to choose the desired album. Press the OK button.
Sort indexed music by genre (category) type. SYNC lists thegenres alphabetically in flat file mode. If there are more than255, the system categorizes them alphabetically.
GENRES
1. Press the OK button.2. Scroll to select the desired genre. Press the OK button.
Access your playlists from formats ASX, M3U, WPL or MTP.The system lists your playlists alphabetically in flat file mode.If there are more than 255, the system categorizes themalphabetically.
PLAYLISTS
1. Press the OK button.2. Scroll to select the desired playlist. Press the OK button.
Search for and play a specific indexed track. SYNC lists yourtracks alphabetically in flat file mode. If there are more than255, the system categorizes them alphabetically.
TRACKS
1. Press the OK button.2. Scroll to select the desired track. Press the OK button.
350
Flex (TP3) , enUSA, Edition date: 201803, Second-Printing
SYNC™

Action and DescriptionMessage
Explore all supported digital media on your media deviceconnected to the USB port. You can only view media contentwhich is compatible with SYNC; other files saved are notvisible.
EXPLORE USB
1. Press the OK button.2. Scroll to explore indexed media on your flash drive.
Play music similar to what is currently playing from the USBport. The system uses the metadata information of each songto compile a playlist for you.*
SIMILARMUSIC
1. Press the OK button.2. The system creates a new list of similar songs and begins
playing. This feature does not include tracks with incom-plete metadata information. Press the OK button.
Exit the current menu.RETURN*With certain playing devices, if your metadata tags are not populated, the tracks are notavailable in voice recognition, play menu or similar music. However, if you place thesetracks onto your playing device in "Mass Storage Device Mode", they are available in voicerecognition, play menu browsing and similar music. The system places Unknown itemsinto any unpopulated metadata tag.
System SettingsSystem settings provide access to yourBluetooth Devices and Advanced menufeatures.
Bluetooth DevicesThe Bluetooth Devices menu allows youto enable, disable, add, connect and deletea Bluetooth device.Press the AUX button, then the Menubutton to enter the Media Menu.
You can then scroll to:
Action and DescriptionMessage
Press the OK button.SYS SETTINGS
Press the OK button.BT DEVICES
You can then select one of the following:
Pair more devices to the system.*ADD DEVICE
351
Flex (TP3) , enUSA, Edition date: 201803, Second-Printing
SYNC™

Action and DescriptionMessage
1. Press the OK button. When find SYNC appears in thedisplay, press the OK button again.
2. Follow the directions in your phone's manual to put yourphone into discovery mode. A six-digit PIN appears in thedisplay.
3. When prompted on your phone's six-digit display, enterthe PIN.
Connect a previously paired Bluetooth-enabled phone.Connect BT
1. Press OK to select and view a list of devices.2. Scroll until the desired device is chosen and press OK to
connect the device.
Turn the Bluetooth feature on and off.**BT ON/OFF
1. Press the OK button and scroll to toggle between on andoff.
2. Make a selection and press the OK button.
Delete a paired media device.DEL DEVICE
1. Press the OK button and scroll to select the device.2. Press the OK button to confirm.
Delete all previously paired devices.DELETE ALL
1. Press the OK button.2. Press the OK button to confirm.
Exit the current menu.RETURN*This is a speed-dependent feature. It is only available when your vehicle is traveling at 3mph (5 km/h) or less.**Setting Bluetooth to off disconnects all Bluetooth devices and turns off all Bluetoothfeatures.
AdvancedThe Advanced menu allows you to accessand set prompts, languages, defaults andperform a master reset.
Press the AUX button, then the Menubutton to enter the Media Menu.
352
Flex (TP3) , enUSA, Edition date: 201803, Second-Printing
SYNC™

You can then scroll to:
Action and DescriptionMessage
Press the OK button.SYS SETTINGS
Press the OK button.ADVANCED
You can then select one of the following:
Have SYNC guide you by asking questions, helpful hints orask you for a specific action.
PROMPTS
1. Press the OK button and scroll to toggle between on andoff.
2. Make a selection and press the OK button. SYNC takesyou back to the Advanced menu.
Choose from the available languages. The displays andprompts are in the selected language.
LANGUAGES
1. Press the OK button and scroll through the availablelanguages.
2. Press the OK button when the desired language appearsin the display.
3. If you change the language setting, the display indicatesthat the system is updating. When complete, SYNC takesyou back to the Advanced menu.
Return to the factory default settings. This selection doesnot erase your indexed information, for example phonebook,call history, text messages and paired devices.
DEFAULTS
1. Press the OK button.2. Press the OK button. When restore defaults appears in
the display, press the OK button again to confirm.
Completely erase all information stored on SYNC. Allphonebook, call history, text messages and all paired deviceswill be deleted and the system will return to the factorydefault settings.
MASTER RESET
Download available software applications through the USBport.
INSTALL APP
Exit the current menu.RETURN
353
Flex (TP3) , enUSA, Edition date: 201803, Second-Printing
SYNC™

SYNC™ TROUBLESHOOTINGYour SYNC system is easy to use. However,should questions arise, see the tablesbelow.
Use the website at any time to check yourphone's compatibility, register youraccount and set preferences as well asaccess a customer representative via anonline chat (during certain hours). Visitwww.SYNCMyRide.com,www.SYNCMyRide.ca orwww.syncmaroute.ca for moreinformation.
Phone issues
Possible solution(s)Possible cause(s)Issue
Review your phone's manualabout audio adjustments.
The audio control settingson your phone may beaffecting SYNC perform-ance.
There is excessive back-ground noise during a phonecall.
Try turning off the device,resetting the device,removing the device'sbattery, then trying again.
This may be a possiblephone malfunction.
During a call, I can hear theother person but theycannot hear me.
Go to the website to reviewyour phone's compatibility.
This is a phone-dependentfeature.
SYNC is not able to down-load my phonebook.
Try turning off the device,resetting the device orremoving the device'sbattery, then trying again.
This may be a possiblephone malfunction.
Try pushing your phonebookcontacts to SYNC by usingthe Add Contacts feature.Use the SYNCmyphonefeature available on thewebsite.
Try pushing your phonebookcontacts to SYNC by usingthe Add Contacts feature.
This may be a limitation onyour phone's capability.
The system says PhonebookDownloaded but thephonebook in SYNC isempty or missing contacts. If the missing contacts are
stored on your SIM card, trymoving them to the devicememory.Remove any pictures orspecial ring tones associ-ated with the missingcontact.
354
Flex (TP3) , enUSA, Edition date: 201803, Second-Printing
SYNC™

Phone issues
Possible solution(s)Possible cause(s)Issue
Depending upon your phone,you may have to grant SYNCpermission to access yourphonebook contacts. Makesure to confirm whenprompted by your phoneduring the phonebookdownload.
Go to the website to reviewyour phone's compatibility.
This is a phone-dependentfeature.
I am having troubleconnecting my phone toSYNC. Try turning off the device,
resetting the device orremoving the device'sbattery, then trying again.
This may be a possiblephone malfunction.
Try deleting your devicefrom SYNC, deleting SYNCfrom your device and tryingagain.Check the security and autoaccept and prompt alwayssettings relative to the SYNCBluetooth connection onyour phone.Update your device's firm-ware.Turn off the Auto phone-book download setting.
Go to the website to reviewyour phone's compatibility.
This is a phone-dependentfeature.
Text messaging is notworking on SYNC.
Try turning off the device,resetting the device orremoving the device'sbattery, then trying again.
This may be a possiblephone malfunction.
355
Flex (TP3) , enUSA, Edition date: 201803, Second-Printing
SYNC™

USB and media issues
Possible solution(s)Possible cause(s)Issue
Try turning off the device,resetting the device,removing the device'sbattery, then trying again.
This may be a possibledevice malfunction.
I am having troubleconnecting my device.
Make sure you are using themanufacturer's cable.Make sure you insert theUSB cable correctly into thedevice and the USB port.Make sure that the devicedoes not have an auto-install program or activesecurity settings.
Make sure you are notleaving the device in yourvehicle during very hot orcold temperatures.
This is a device limitation.SYNC does not recognizemy device when I turn on thecar.
Review the device compatib-ility chart on the SYNCwebsite to confirm yourphone supports theBluetooth audio streamingfunction.
This is a phone-dependentfeature.The device is not connected.
Bluetooth audio does notstream.
Make sure you correctlyconnect the device to SYNC,and that you have pressedplay on your device.
Make sure that all songdetails are populated.
Your music files may notcontain the correct artist,song title, album or genreinformation.
SYNC does not recognizemusic that is on my device.
Some devices require you tochange the USB settingsfrom mass storage to MTPclass.
The file may be corrupted.The song may have copy-right protection, which doesnot allow it to play.
356
Flex (TP3) , enUSA, Edition date: 201803, Second-Printing
SYNC™

Voice command issues
Possible solution(s)Possible cause(s)Issue
Review the phone voicecommands and the mediavoice commands at thebeginning of their respectivesections.
You may be using the wrongvoice commands.You may be speaking toosoon or at the wrong time.
SYNC does not understandwhat I am saying.
After pressing the voice icon,wait until after the tonesounds and Listeningappears before saying acommand. Any commandspoken before this does notregister with the system.
Review the media voicecommands at the beginningof the media section.
You may be using the wrongvoice commands.You may be saying thename differently than theway you saved it.
SYNC does not understandthe name of a song or artist.
Say the song or artistexactly as listed. If you say"Play Artist Prince", thesystem does not play musicby Prince and the Revolutionor Prince and the NewPower Generation.
The system may not bereading the name the sameway you are saying it.
Make sure you are saying thecomplete title, such as"California remix featuringJennifer Nettles".If the song titles are in allCAPS, you have to spellthem. LOLA requires you tosay "L-O-L-A".Do not use special charac-ters in the title. The systemdoes not recognize them.
Review the Phone voicecommands at the beginningof the phone section.
You may be using the wrongvoice commands.You may be saying thename differently than theway you saved it.
SYNC does not understandor is calling the wrongcontact when I want tomake a call.
357
Flex (TP3) , enUSA, Edition date: 201803, Second-Printing
SYNC™

Voice command issues
Possible solution(s)Possible cause(s)Issue
Make sure you are saying thecontacts exactly as they arelisted. For example, if yousave a contact as JoeWilson, say "Call JoeWilson".
The system may not bereading the name the sameway you are saying it.Contacts in your phonebookmay be very short andsimilar, or they may containspecial characters. Using the SYNC phone
menu, open the phonebookand scroll to the nameSYNC is having troubleunderstanding. SYNC willread the name to you, givingyou some idea of thepronunciation SYNC isexpecting.
Your phonebook contactsmay be in CAPS.
The system works better ifyou list full names, such as"Joe Wilson" rather than"Joe".Do not use special charac-ters, such as 123 or ICE, asthe system does not recog-nize them.If a contact is in CAPS, youhave to spell it. JAKErequires you to say "Call J-A-K-E".
AppLink issues
Possible solution(s)Possible cause(s)Issue
Ensure you have a compat-ible smartphone; an Androidwith OS 2.3 or higher or aniPhone 3GS or newer withiOS 5.0 or higher. Addition-ally, ensure your phone is
An AppLink capable phoneis not connected to SYNC.
When I select "Find NewApps," SYNC does not findany applications.
paired and connected to
358
Flex (TP3) , enUSA, Edition date: 201803, Second-Printing
SYNC™

AppLink issues
Possible solution(s)Possible cause(s)Issue
SYNC in order to findAppLink-capable apps onyour device. iPhone usersmust also connect toSYNC's USB port with anApple USB cable.
Ensure you have down-loaded and installed thelatest version of the appfrom your phone's app store.Ensure the app is running onyour phone. Some apps
AppLink-enabled apps arenot installed and running onyour mobile device.
My phone is connected, butI still cannot find any apps.
require you to register orlogin on the app on thephone before using themwith AppLink. Also, somemay have a "Ford SYNC"setting, so check the app'ssettings menu on the phone.
Closing and restarting appsmay help SYNC find theapplication if you cannotdiscover it inside the vehicle.On an Android device, ifapps have an "Exit" or "Quit"
Sometime apps do notproperly close and re-opentheir connection to SYNC,over ignition cycles, forexample.
My phone is connected, myapp(s) are running, but I stillcannot find any apps.
option, select that thenrestart the app. If the appdoes not have that option,you can also manually"Force Close" the app bygoing to the phone's settingsmenu, selecting "Apps."then finding the particularapp and choosing "Forcestop." Don't forget to restartthe app afterwards, thenselect "Find New Apps" onSYNC.
359
Flex (TP3) , enUSA, Edition date: 201803, Second-Printing
SYNC™

AppLink issues
Possible solution(s)Possible cause(s)Issue
On an iPhone with iOS7+, toforce close an app, doubletab the home button thenswipe up on the app to closeit. Tab the home buttonagain, then select the appagain to restart it. After afew seconds, the app shouldthen appear in SYNC'sMobile App's Menu.
Reset the Bluetooth on yourphone by turning it off andthen turning Bluetooth backon. If you are in your vehicle,SYNC should be able toautomatically re-connect toyour phone if you press the"Phone" button.
There is a bluetooth bug onsome order versions of theAndroid OS. This bug maycause apps that were foundthe last time your phoneconnected to SYNC not tobe found again if you havenot turned off bluetooth.
My Android phone isconnected, my app(s) arerunning, I restarted them,but I still cannot find anyapps.
360
Flex (TP3) , enUSA, Edition date: 201803, Second-Printing
SYNC™

AppLink issues
Possible solution(s)Possible cause(s)Issue
Unplug the USB cable fromthe phone, wait a moment,and plug the USB cableback in to the phone. After afew seconds, the app shouldappear in SYNC's MobileApps Menu. If not, "ForceClose" the application andrestart it.
The USB connection toSYNC may need to be reset.
My iPhone phone isconnected, my app isrunning, I restarted the appbut I still cannot find it onSYNC.
Try increasing the Bluetoothvolume of the device byusing the device's volumecontrol buttons which aremost often found on theside of the device.
The bluetooth volume onthe phone may be low.
I have an Android phone. Ifound and started my mediaapp on SYNC, but there is nosound or the sound is verylow.
Force close or uninstall theapps you do not want SYNCto find. If the app has a "FordSYNC" setting, disable thatsetting in the app's settingsmenu on the phone.
Some Android devices havea limited number ofbluetooth ports apps canuse to connect. If you havemore AppLink apps on yourphone than the number ofavailble Bluetooth ports, youwill not see all of your appslisted in SYNC's mobile appsmenu.
I can only see some of theAppLink apps running on myphone listed in SYNC'sMobile Apps Menu.
361
Flex (TP3) , enUSA, Edition date: 201803, Second-Printing
SYNC™

GENERAL INFORMATION
WARNING: Driving while distractedcan result in loss of vehicle control, crashand injury. We strongly recommend thatyou use extreme caution when using anydevice that may take your focus off theroad. Your primary responsibility is the safeoperation of your vehicle. We recommendagainst the use of any hand-held devicewhile driving and encourage the use ofvoice-operated systems when possible.Make sure you are aware of all applicablelocal laws that may affect the use ofelectronic devices while driving.
Getting to Know Your SystemThe SYNC 3 system allows you to interactwith a variety of features using thetouchscreen and voice commands. Byintegrating with your Bluetooth enabledphone, the touchscreen provides easyinteraction with audio, multimedia, climatecontrol, navigation, and your phone's SYNC3 compatible apps.
Using the TouchscreenTo operate the touchscreen, you cansimply touch the item or option that youwant to select. The button changes colorwhen you select it.The SYNC 3 layout allows you to quicklyselect the feature you wish to use.
E269856
362
Flex (TP3) , enUSA, Edition date: 201803, Second-Printing
SYNC™ 3

Action and DescriptionMenu ItemItem
This bar displays icons and messages pertaining to currentsystem activities including climate settings, voicecommands and phone functions such as text messages.
Status BarA
This button is available on the main screens. Pressing ittakes you to the home screen view.
HomeB
This shows the current time. You can set the clock manuallyor have it controlled by the vehicle's GPS location. SeeSettings (page 411).
ClockC
This displays the current outside temperature.OutsideTemperature
D
You can touch any of the buttons on this bar to select afeature.
Feature BarE
The touchscreen allows you quick accessto all of your comfort, navigation,communication and entertainmentoptions. Using the status and feature baryou can quickly select the feature you wantto use.Note: Your system is equipped with afeature that allows you to access andcontrol audio features for 10 minutes afteryou switch the ignition off (and no doorsopen).
The Status BarAdditional icons also display in the statusbar depending on market, vehicle optionsand current operation. If a feature is notactive, the icon does not display. Certainicons may move to the left or rightdepending on what options are active.
363
Flex (TP3) , enUSA, Edition date: 201803, Second-Printing
SYNC™ 3

E270077
i
DescriptionItemCallout
This shows the temperature the driver selects throughthe climate control system.
Driver Temper-ature
A
When you activate the heated steering wheel optionon the touch screen, this icon displays. It only displayswhen there is not a physical button for the heatedsteering wheel.
Heated steeringwheel
B
(If equipped)
When the passenger's temperature has beenadjusted and is no longer linked to the driver'stemperature, it displays here. If Dual is turned off andthe temperatures are linked, the passenger'stemperature does not display.
PassengerTemperature
C
This icon displays when your phone's microphone ismuted. A caller cannot hear you.
Microphone MuteD
This icon displays when the audio system is muted.MuteE
364
Flex (TP3) , enUSA, Edition date: 201803, Second-Printing
SYNC™ 3

DescriptionItemCallout
This icon appears when SYNC 3 receives a softwareupdate. Pressing the icon shows more details aboutthe new software.
DownloadF
This icon appears if a Wi-Fi network is connected.Wi-FiG
An available Wi-Fi network is within range.Wi-Fi in RangeH
This icon displays the phone signal strength and theroaming signal strength.
Signal StrengthI
This icon displays when you receive a text messageon your phone.
Text MessageJ
This icon displays when 911 Assist is set to off andyour phone is connected to SYNC.
911 Assist OffK
This icon displays when a phone call is active.In-CallL
Messages may also appear in the statusbar to provide you with notifications. Youcan select the message to view theassociated feature.
Feature Bar
FunctionsFeature Bar Item
Allows you to control the media playing inyour vehicle. You can control all audiofeatures including AM, FM and satelliteradio, CDs, and media streaming over aBluetooth device or through a USBconnection.
Audio
Allows you to adjust the temperature, fanspeed and airflow within the vehicle.
Climate
Allows you to make calls, receive calls, andaccess the phonebook of your connecteddevice.
Phone
Allows you to see your vehicle's location ona virtual road map, get driving directions toyour destination and find points of interestalong your route.
Navigation
(If equipped)
365
Flex (TP3) , enUSA, Edition date: 201803, Second-Printing
SYNC™ 3
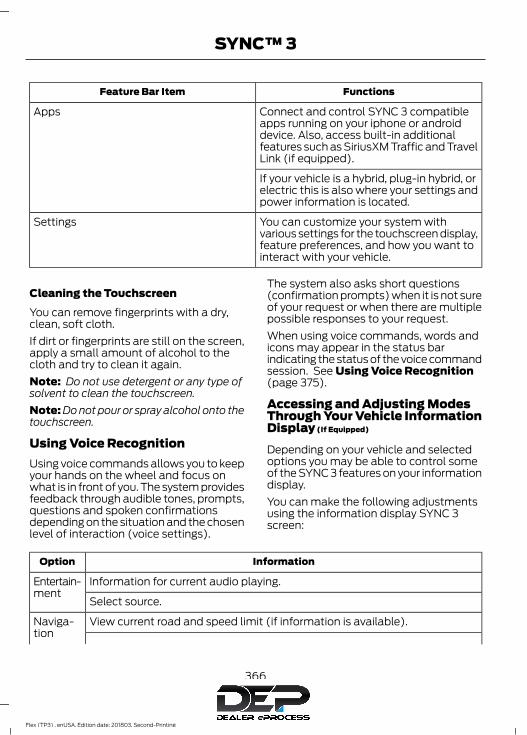
FunctionsFeature Bar Item
Connect and control SYNC 3 compatibleapps running on your iphone or androiddevice. Also, access built-in additionalfeatures such as SiriusXM Traffic and TravelLink (if equipped).
Apps
If your vehicle is a hybrid, plug-in hybrid, orelectric this is also where your settings andpower information is located.
You can customize your system withvarious settings for the touchscreen display,feature preferences, and how you want tointeract with your vehicle.
Settings
Cleaning the TouchscreenYou can remove fingerprints with a dry,clean, soft cloth.If dirt or fingerprints are still on the screen,apply a small amount of alcohol to thecloth and try to clean it again.Note: Do not use detergent or any type ofsolvent to clean the touchscreen.Note: Do not pour or spray alcohol onto thetouchscreen.
Using Voice RecognitionUsing voice commands allows you to keepyour hands on the wheel and focus onwhat is in front of you. The system providesfeedback through audible tones, prompts,questions and spoken confirmationsdepending on the situation and the chosenlevel of interaction (voice settings).
The system also asks short questions(confirmation prompts) when it is not sureof your request or when there are multiplepossible responses to your request.When using voice commands, words andicons may appear in the status barindicating the status of the voice commandsession. See Using Voice Recognition(page 375).
Accessing and Adjusting ModesThrough Your Vehicle InformationDisplay (If Equipped)
Depending on your vehicle and selectedoptions you may be able to control someof the SYNC 3 features on your informationdisplay.You can make the following adjustmentsusing the information display SYNC 3screen:
InformationOption
Information for current audio playing.Entertain-ment
Select source.
View current road and speed limit (if information is available).Naviga-tion
366
Flex (TP3) , enUSA, Edition date: 201803, Second-Printing
SYNC™ 3

InformationOption
View current route, next turn, time to your destination (depending on clusterlevel), distance to destination (depending on cluster level), and ability tocancel route.
If you do not have an active navigation route programed, the compass isshown.
If you are not on a call, a call can be made by selecting:1Phone
Missed callsOutgoing callsIncoming callsAll calls
If you are on a call, the call information is displayed on the information display.
If you are receiving a call, you can accept it by selecting OK on the right-handsteering wheel controls.
1 Depending on your vehicle options, all of these choices may not display.
Use the OK and arrow buttons on the rightside of your steering wheel to scrollthrough the available modes.The selection menu expands and differentoptions appear.• Press the up and down arrows to scroll
through the modes.• Press the right arrow to enter the mode,
use the left arrow to exit the mode.• Press the up and down arrows to make
adjustments within the chosen mode.• Press OK to confirm your selection.Note: If your vehicle is not equipped withnavigation, compass appears in the displayinstead of navigation. If you press the rightarrow to go into the compass menu, you cansee the compass graphic. The compassdisplays the direction in which the vehicleis traveling, not true direction (for example,if the vehicle is traveling west, the middleof the compass graphic displays west; northdisplays to the left of west though its truedirection is to the right of west).
Using the Controls on the SteeringWheelDepending on your vehicle and optionpackage, you can use different controls onyour steering wheel to interact with thetouchscreen system in different ways.VOL: Control the volume of audio output.Mute: Mute the audio output.Voice: Press to start a voice session. Pressagain to stop the voice prompt andimmediately begin speaking. Press andhold to end a voice session.SEEK NEXT:• While in radio mode, press to seek
between memory presets.• While in USB, Bluetooth Audio or CD
mode, press to seek between songs orpress and hold to fast seek.
SEEK PREVIOUS:• While in radio mode, press to seek
between memory presets.• While in USB, Bluetooth Audio or CD
mode, press to seek between songs orpress and hold to fast seek.
367
Flex (TP3) , enUSA, Edition date: 201803, Second-Printing
SYNC™ 3

PHONE ACCEPT: Press to answer a callor switch between calls.PHONE REJECT: Press to end a call orreject an incoming call.Note: On some models, SEEK NEXT maybe combined with PHONE REJECT andSEEK PREVIOUS may be combined withPHONE ACCEPT.M: Touch the control repeatedly to switchbetween media sources (modes).See Steering Wheel (page 73).
Using the Controls on the BezelDepending on your vehicle and optionpackage, you may also have these controlson your instrument panel:• Power: Switch the audio system on
and off.• VOL: Control the volume of playing
audio.• Seek and Tune: Use as you normally
would in audio modes.• Eject: Eject a CD from the audio
system.• SOURCE or MEDIA: Press repeatedly
to advance through available mediamodes.
• SOUND: Press to access the Soundmenu where you can adjust sound andother audio settings.
• 1-6: Press and hold to store or press toselect an AM, FM or SIRIUS memorypreset. See Audio System (page 315).
• DISP: Switch the display on or off. Youcan also touch the screen to switch thedisplay back on.
• Temperature, fan and climatecontrol buttons: Control thetemperature, fan speed or settings ofthe climate control system. SeeClimate Control (page 112).
911 Assist (If Equipped)
WARNING: Unless the 911 Assistsetting is set on before a crash, the systemwill not dial for help which could delayresponse time, potentially increasing therisk of serious injury or death after a crash.
WARNING: Do not wait for 911 Assistto make an emergency call if you can do ityourself. Dial emergency servicesimmediately to avoid delayed responsetime which could increase the risk ofserious injury or death after a crash. If youdo not hear 911 Assist within five secondsof the crash, the system or phone may bedamaged or non-functional.
WARNING: Always place your phonein a secure location in your vehicle so itdoes not become a projectile or getdamaged in a crash. Failure to do so maycause serious injury to someone or damagethe phone which could prevent 911 Assistfrom working properly.
Note: The SYNC 911 Assist feature must beset on before the incident.Note: The SYNC 911 Assist feature onlyoperates in the U.S., Canada or in a territoryin which 911 is the emergency number.Note: Before setting this feature on, makesure that you read the 911 Assist PrivacyNotice later in this section for importantinformation.Note: If any user sets 911 Assist to on or off,that setting applies for all paired phones. If911 Assist is switched off and the phone isconnected to SYNC, an icon displays on thestatus bar.Note: Every phone operates differently.While SYNC 911 Assist works with mostcellular phones, some may have troubleusing this feature.
368
Flex (TP3) , enUSA, Edition date: 201803, Second-Printing
SYNC™ 3

If a crash deploys an airbag (excludingknee airbags and rear inflatable safetybelts [if equipped]) or activates the fuelpump shut-off, your SYNC-equippedvehicle may be able to contact emergencyservices by dialing 911 through a paired andconnected Bluetooth enabled phone. Youcan learn more about the 911 Assistfeature, by visiting:
Website
www.owner.ford.comwww.syncmyride.cawww.syncmaroute.ca
For important information about airbagdeployment and the fuel pump shut-offplease see the Supplementary Restrainsand Roadside Emergencies sections ofyour owner manual.To switch 911 Assist on and off please viewthe settings information. See Settings(page 411).To make sure that 911 Assist workscorrectly:• SYNC must be powered and working
properly at the time of the incident andthroughout feature activation and use.
• The 911 Assist feature must be set onbefore the incident.
• You must pair and connect a Bluetoothenabled and compatible cell phone toSYNC.
• A connected Bluetooth enabled phonemust have the ability to make andmaintain an outgoing call at the timeof the incident.
• A connected Bluetooth enabled phonemust have adequate network coverage,battery power and signal strength.
• The vehicle must have battery powerand be located in the U.S., Canada orin a territory in which 911 is theemergency number.
In the Event of a CrashNot all crashes will deploy an airbag oractivate the fuel pump shut-off (thetriggers for 911 Assist). If a connected cellphone sustains damage or loses itsconnection to SYNC during a crash, SYNCwill search for and try to connect to apreviously paired cell phone; SYNC willthen attempt to call the emergencyservices.Before making the call:• SYNC provides a short window of time
(about 10 seconds) to cancel the call.If you fail to cancel the call, SYNCattempts to dial 911.
• SYNC says the following, or a similarmessage: "SYNC will attempt to call911, to cancel the call, press Cancel onyour screen or press and hold thephone button on your steering wheel."
If you do not cancel the call, and SYNCmakes a successful call, a pre-recordedmessage plays for the 911 operator, andthen the occupant(s) in your vehicle is ableto talk with the operator. Be prepared toprovide your name, phone number andlocation immediately, because not all 911systems are capable of receiving thisinformation electronically.
911 Assist May Not Work If• Your cellular phone or 911 Assist
hardware sustains damage in a crash.• The vehicle's battery or the SYNC
system has no power.• The phone(s) thrown from your vehicle
are the ones paired and connected tothe system.
369
Flex (TP3) , enUSA, Edition date: 201803, Second-Printing
SYNC™ 3

911 Assist Privacy NoticeWhen you switch on 911 Assist, it maydisclose to emergency services that yourvehicle has been in a crash involving thedeployment of an airbag or activation ofthe fuel pump shut-off. Certain versions orupdates to 911 Assist may also be capableof electronically or verbally disclosing to911 operators your vehicle location or otherdetails about your vehicle or crash to assist911 operators to provide the mostappropriate emergency services. If you donot want to disclose this information, donot switch the feature on.
Safety Information
WARNING: Driving while distractedcan result in loss of vehicle control, crashand injury. We strongly recommend thatyou use extreme caution when using anydevice that may take your focus off theroad. Your primary responsibility is the safeoperation of your vehicle. We recommendagainst the use of any hand-held devicewhile driving and encourage the use ofvoice-operated systems when possible.Make sure you are aware of all applicablelocal laws that may affect the use ofelectronic devices while driving.
• Do not attempt to service or repair thesystem. Have an authorized dealercheck your vehicle.
• Do not operate playing devices if thepower cords or cables are broken, splitor damaged. Place cords and cablesout of the way, so they do not interferewith the operation of pedals, seats,compartments or safe driving abilities.
• Do not leave playing devices in yourvehicle during extreme conditions as itcould cause them damage. See yourdevice's user guide for furtherinformation.
• For your safety, some SYNC 3 functionsare speed-dependent. Their use islimited to when your vehicle is travelingat speeds under 3 mph (5 km/h). Makesure that you review your device'smanual before using it with SYNC 3.
Speed-restricted FeaturesSome features of this system may be toodifficult to use while your vehicle is movingso they are restricted from use unless yourvehicle is stationary.• Screens crowded with information,
such as Point of Interest reviews andratings, SiriusXM Traffic and Travel Linksports scores, movie times or skiconditions.
• Any action that requires you to use akeyboard is restricted, such as enteringa navigation destination or editinginformation.
• All lists are limited so the user can viewfewer entries (such as phone contactsor recent phone call entries).
See the following table for more specificexamples.
370
Flex (TP3) , enUSA, Edition date: 201803, Second-Printing
SYNC™ 3

Restricted features
Pairing a Bluetooth phone.Cellular Phone
Browsing of list entries is limited for phone contacts andrecent phone calls.
Editing the keypad code.System Functionality
Enabling Valet Mode.
Editing settings while the rear view camera or active parkassist are active.
Editing Wi-Fi settings.Wi-Fi
Editing the list of wireless networks.
Connecting to a new Wi-Fi network.
Viewing received text messages.Text Messages
Using the keyboard to enter a destination.Navigation
Adding or editing Navigation Favorites entries or AvoidAreas.
Creating a SYNC Owner AccountWhy do I need a SYNC owner account?• Essential for keeping up with the latest
software and connected features.• Access to customer support for any
questions you may have.• Maintain account permissions.Visit the website to sign up and register.
Website
www.owner.ford.comwww.syncmyride.ca
Website
www.syncmaroute.ca
FordPass™ Connect (If Equipped)
With a FordPass-equipped vehicle, you canuse FordPass to track your vehicle’slocation and remotely access vehiclefeatures such as start, lock and unlock andvehicle status including fuel level andapproximate mileage. You can alsoschedule specific times to remotely startyour vehicle so it’s ready to hit the road assoon as you are. FordPass is availablethrough a free download via the Apple AppStore® or Google Play™. Message anddata rates may apply. Services may belimited by mobile phone network coveragearea.
371
Flex (TP3) , enUSA, Edition date: 201803, Second-Printing
SYNC™ 3

Updating Your SystemYou can choose to download the updateonto a USB drive or use Wi-Fi to deliverautomatic updates.
USB UpdatesTo use the USB update you need to loginto your owner account and visit the SYNCsoftware update page.
Website
www.owner.ford.comwww.syncmyride.cawww.syncmaroute.ca
The website notifies you if an update isavailable. You can then select to downloadthe update.You will need an empty USB drive. Pleasecheck the website for minimumrequirements. Once you have inserted theUSB drive into your computer, choose tostart the download. Follow the instructionsprovided to download the files to the USBdrive.The installation of most files occurs in thebackground, and does not interrupt youruse of the system. Navigation updatescannot be installed in the background,because the files are too large.To install the update in your vehicle,remove anything that is plugged in the USBports on the media hub and plug in theUSB drive containing the update. Whenthe USB drive is plugged in, the installationshould begin immediately. After asuccessful installation, the update isavailable the next time the vehicle isstarted.Please reference the website for anyfurther actions.
Updating Over Wi-FiTo update your System over Wi-Fi yourvehicle must be connected to a Wi-Fiaccess point. Data rates may apply.
To connect your system to Wi-Fi,select:
Menu Item
Settings
Wi-Fi
You can then select yourWi-Fi network. You mayhave to enter the securitycode if the network issecured. The systemconfirms when it hasconnected to the network.
AvailableWi-FiNetworks
You must also give the system permissionto update automatically. Upon vehicledelivery, the System asks you if you wouldlike to use the automatic update feature.If you agree to automatic updates, you canpress OK to confirm. If this selection doesnot appear upon vehicle delivery you canaccess it through the General Settings. SeeSettings (page 411). You can also performa master reset. See SYNC™ 3Troubleshooting (page 424).
372
Flex (TP3) , enUSA, Edition date: 201803, Second-Printing
SYNC™ 3

If you would like to switch this featureon later, select:
Menu Item
Settings
General
From this menu, you canenable automatic updates.If you have not done soalready, the systemprompts you to set up aWi-Fi connection when youenable this feature.
AutomaticSystemUpdates
When the system is connected via Wi-Fiand automatic updates are enabled, yoursystem checks for software updatesperiodically. If a new version is available, itdownloads at that time. Softwaredownloads can take place for up to 30minutes after you have switched yourvehicle off. The updates do not interruptthe normal use of your SYNC 3 system. Ifa download does not complete for anyreason, the download continues where itleft off at the next Wi-Fi connectedopportunity. Upon activation of an update,a banner displays on the touchscreenindicating the system update. Select theicon to see more detail. This icon displaysfor two ignition cycles.
To switch this feature off:
Menu Item
Settings
General
In this menu selection, youcan change the selectionfor automatic updates toOFF.
AutomaticSystemUpdates
Customer AssistanceThe SYNC support team is available tohelp you with any questions you are notable to answer on your own.Monday-Saturday, 8:30am-8:00pm EST.United States: 1-800-392-3673.Canada: 1-800-565-3673.Mexico: 01-800-719-8466.Times are subject to change due toholidays.
Privacy InformationWhen you connect a cellular phone toSYNC 3, the system creates a profile withinyour vehicle that links to that cellularphone. This profile helps in offering youmore cellular features and operating moreefficiently. Among other things, this profilemay contain data about your cellularphone book, text messages (read andunread), and call history, including historyof calls when your cell phone was notconnected to the system. In addition, if youconnect a media device, the systemcreates and retains an index of supportedmedia content. The system also records ashort diagnostic log of approximately 10minutes of all recent system activity. Thelog profile and other system data may beused to improve the system and helpdiagnose any problems that may occur.The cellular profile, media device index,and diagnostic log remain in your vehicleunless you delete them and are generallyaccessible only in your vehicle when thecellular phone or media player isconnected.If you no longer plan to use the system oryour vehicle, we recommend you performa Master Reset to erase all storedinformation. You can find more informationabout the Master Reset in GeneralSettings. See Settings (page 411). System
373
Flex (TP3) , enUSA, Edition date: 201803, Second-Printing
SYNC™ 3

data cannot be accessed without specialequipment and access to your vehicle'sSYNC 3 module. Ford Motor Company,Ford of Canada and The Lincoln MotorCompany do not access the system datafor any purpose other than as describedabsent consent, a court order, or where
required by law enforcement, othergovernment authorities, or other thirdparties acting with lawful authority. Otherparties may seek to access the informationindependently of Ford Motor Company,Ford of Canada and The Lincoln MotorCompany.
HOME SCREEN
E224962
Home screen displayTileItem
Shows the active media source.AudioA
374
Flex (TP3) , enUSA, Edition date: 201803, Second-Printing
SYNC™ 3

Home screen displayTileItem
If your vehicle does not have navigation, this space containsthe compass.
The name of the connected phone appears on the screen.The status of the phone features also appear. This includessignal strength, battery charge, text messaging androaming.
PhoneB
This map displays your current location or current route inreal time.
Navigation *C
When you have navigation active, you also see the nextturn and the length of time and distance to your destina-tion.If your vehicle does not have navigation, this space containsthe audio information.
* If equipped.
You can touch any of the feature displaysto access that feature.Anytime you select the home button, thesystem returns you to this screen.
USING VOICE RECOGNITIONThe SYNC 3 system allows you to use voicecommands, to control features like audioand climate controls. By using voicecommands, you can keep your hands onthe wheel and your eyes on the road.
You can access each feature controlled bySYNC 3 through a variety of commands.
E142599
To activate the SYNC 3 voicecommands push the voicebutton on the steering wheel and
wait for the prompt.
___ is a dynamic listing, meaning that it canbe the name of anything, such as artist, thename of contact or number. The contextand the description of the command tellyou what to say for this dynamic option.There are some commands that work forevery feature, these commands are:
Action and DescriptionVoice Command
Brings you to the main menu.Main Menu
Returns you to the previous screen.Go back
Ends the voice session.Cancel
Gives you a list of possible voice commands.List of Commands
You can name any feature and the system gives a list ofcommands available for the feature. For example, you couldsay:
___ List of Commands
375
Flex (TP3) , enUSA, Edition date: 201803, Second-Printing
SYNC™ 3

Action and DescriptionVoice Command
Phone List of Commands
Navigation List of Commands
You can use this command to view the next page of options onany screen where multiple pages of choices are given.
Next Page
You can use this command to view the previous page of optionson any screen where multiple pages of choices are given.
Previous Page
Gives you available commands you can use on the currentscreen.
Help
Included here are some of the mostpopular commands for each SYNC 3feature.
Audio Voice Commands___ is a dynamic listing, meaning that foraudio voice commands it can be the nameof a Sirius channel or a channel number, aradio frequency number, or the name of anartist, album, song or a genre.
To control the media features, press the voice button and when prompted, say:
DescriptionVoice command
You can say the Sirius channel name or numbersuch as "Sirius channel 16".
1Sirius Channel ___
You can also turn to a Sirius channel by saying the channel's name, such as "The Pulse".
Allows you to tune to a specific FM or AMfrequency such as "FM 88.7" or "AM 1580".
AM ___
FM ___
Allows you to tune to a specific HD frequencysuch as “FM 88.7 HD 1”.
1FM ___ HD ___
Allows you to listen to music on your Bluetoothconnected device.
Bluetooth Audio
Allows you to listen to music on your USBconnected device.
USB
For USB audio only, you can say the name of anartist, album, song or a genre to listen to thatselection. Your system must finish indexingbefore this option is available. For example, youcould say "Play artist, The Beatles" or "Play song,Penny Lane".
Play Genre ___
Play Playlist ___
Play Artist ___
Play Album ___
376
Flex (TP3) , enUSA, Edition date: 201803, Second-Printing
SYNC™ 3

DescriptionVoice command
Play Podcast ___
Play Song ___
Play Audiobook ___
For USB audio only, you can say the name of anartist, album, or a genre to browse by that selec-tion. Your system must finish indexing before thisoption is available. For example you can say"Browse The Beatles" or "Browse folk".
Browse ___
1 This option may not be available in all markets or may require a subscription.
Climate Voice CommandsYou can control the temperature of thevehicle using voice commands.
___ is a dynamic listing, meaning that forclimate voice commands it can be thedesired degrees for the temperaturesetting.
To adjust the temperature, say:
DescriptionVoice command
Adjust the temperature between 60–85°F(15.5–29.5°C).
Set Temperature ___
Phone Voice CommandsPairing a PhoneYou can use voice commands to connectyour Bluetooth enabled phone to thesystem.
To pair your phone, press the voice button and when prompted, say:
DescriptionVoice command
Follow the on-screen instructions to complete the pairingprocess. See Settings (page 411).
Pair Phone
Making Calls___ is a dynamic listing, meaning that forphone voice commands it can be the nameof the contact you wish to call or the digitsyou want to dial.
377
Flex (TP3) , enUSA, Edition date: 201803, Second-Printing
SYNC™ 3

Press the voice button and say a command similar to the following:
DescriptionVoice command
Allows you to call a specific contact from your phonebooksuch as "Call Jenny".
Call ___
Allows you to call a specific contact from your phonebookat a specific location such as "Call Jenny at Home".
Call ___ at ___
Allows you to dial a specific number such as “Dial 867-5309”.Dial ___
Please make sure that you are saying thecontact name exactly as it appears in yourcontact list.
Once you have provided the digits of the phone number, you can say the followingcommands:
DescriptionVoice Command
If you did not enter the full number with the first command, youcan continue saying the number.
<0-9>
Tells SYNC 3 to make the phone call.Dial
Tells SYNC 3 to erase the last block of digits you state.Delete
Tells SYNC 3 to erase the entire number.Clear
Text Message Voice Commands
To access text message options, press the voice button and say:
DescriptionVoice command
Listen to Message
You can say the number of the message youwould like to hear.
Listen to text message ___
Reply to Message
378
Flex (TP3) , enUSA, Edition date: 201803, Second-Printing
SYNC™ 3

Navigation Voice Commands (If
Equipped)
Setting a DestinationYou can use any of the followingcommands to set a destination or find a
point of interest.___ is a dynamic listing, meaning that fornavigation voice commands it can be a POIcategory or a major brand name, wheremajor brand name is a chain with morethan 20 locations
You can find an address, a point of interest (POI), or search for points of interestby category:
DescriptionVoice command
Allows you to enter the address search functionality. You canalso search for an address in a specific state or province.
Find an Address
State the name of the POI category or major brand name youwould like to search for such as "Find restaurants".
Find a ___
Allows you to enter the POI search functionality.Find a POI
Allows you to enter the intersection search functionality.Find an Intersection
State the name of a POI category or major brand name you wouldlike to search for.
Find the Nearest<POI Category>
Allows you to see a list of your previous destinations.Show PreviousDestinations
Allows you to see a list of your favorite destinations.Show Favorites
Allows you to route to your home address.Drive Home
Allows you to route to your work address.Drive to Work
In addition, you can say these commands when a route is active:
DescriptionVoice command
Cancels the current route.Cancel Route
Allows you to select an alternate route.Detour
Repeats the last guidance prompt.Repeat Instruction
Displays the active route.Show Route
Displays the list of upcoming maneuvers.Route Summary
379
Flex (TP3) , enUSA, Edition date: 201803, Second-Printing
SYNC™ 3

DescriptionVoice command
Provides current location.Where Am I
Allows you to zoom in on the map.Zoom in
Allows you to zoom out from the map.Zoom out
Mobile App Voice Commands (If Equipped)
The following voice commands are always available:
DescriptionVoice command
SYNC 3 will prompt you to say the name of an app to start it onSYNC 3.
Mobile Apps
SYNC 3 will list all of the currently available Mobile Apps.List Mobile Apps
SYNC 3 will search and connect to compatible app(s) running onyour mobile device.
Find Mobile Apps
There are also voice commands that you can use when app(s) are connected toSYNC 3:
DescriptionVoice command
At any time, you can say the name of a mobile app to start themobile app on SYNC 3.
Say the name of anapp
SYNC 3 will list the available voice commands for the specifiedapp if the app is running on SYNC 3.
Say the name of anapp, followed byhelp
SiriusXM Traffic and Travel LinkVoice Commands (If Equipped)
SiriusXM Traffic and Travel Link may notbe available in all markets. Activation anda subscription are required.
380
Flex (TP3) , enUSA, Edition date: 201803, Second-Printing
SYNC™ 3

You can say the following commands to access SiriusXM Traffic and Travel Link:
DescriptionVoice command
Displays a list of traffic incidents.Show Traffic
Displays the current weather map.Show Weather Map
Displays a list of fuel prices.Show Fuel Prices
Displays the 5 day weather forecast.Show 5 Day Fore-cast
Help
Voice Settings CommandsYou can say the following commands to access the voice settings:
DescriptionVoice command
Allows you to enter the voice settings functionality.Voice Settings
Sets standard prompting with longer prompts.Interaction ModeStandard
Sets advanced prompting with shorter prompts.Interaction ModeAdvanced
Allows the system to confirm before making a phone call.Call Confirmation On
The system does not confirm before placing a call.Call Confirmation Off
The system displays a short list of available commands.Voice Command Lists On
The system does not display the list of commands.Voice Command Lists Off
You can use the volume control to adjustthe volume of the system voice prompts.While prompt is active, adjust the volumecontrol up or down to your desired setting.
Note: Depending on the current climatecontrol settings, the fan speed mayautomatically go down while issuing voicecommands or while making and receivingphone calls via SYNC to reduce the amountof background noise in the vehicle. The fanspeed will automatically return to normaloperation once the voice session ends. Youcan adjust the fan speed during a voicesession, simply press the fan buttons (orturn the fan knob) to increase or decreasethe fan speed to the setting you prefer.
381
Flex (TP3) , enUSA, Edition date: 201803, Second-Printing
SYNC™ 3

To disable this automatic fan speedreduction feature during voice sessions,press and hold the climate control AC andRecirculated air buttons simultaneously,release and then increase fan speed within2 seconds. To re-enable this feature, repeatthe above sequence.
ENTERTAINMENT
E242502
Message and DescriptionMessage
SourcesA
Direct TuneB
PresetsC
382
Flex (TP3) , enUSA, Edition date: 201803, Second-Printing
SYNC™ 3

Note: Your vehicle may allow you to savepresets from different audio sources on thesame page.You can access these options using thetouchscreen or voice commands.
SourcesPress this button to select the source ofmedia you want to listen to.
Menu Item
AM
FM1SIRIUS
1CD
The name of the USB that is plugged in displays here.USB
Bluetooth Stereo
If you have SYNC 3 compatible apps on your connected smart phone, theydisplay here as individual source selections.
Apps
1 This feature may not be available in all markets and requires an active subscription.
AM/FM RadioTuning a StationYou can use the tune or seek controls onthe radio bezel to select a station.
To tune a station using thetouchscreen, select:
Menu Item
Direct Tune
A pop up appears, allowing you to type inthe frequency of a station. You can onlyenter a valid station for the source you arecurrently listening to.You can press the backspace button todelete the previously entered number.
Once you have entered the station'scall numbers, you can select:
Action and Descrip-tion
Menu Item
Press to beginplaying the stationyou have entered.
Enter
Press to exitwithout changingthe station.
Cancel
PresetsTo set a new preset, tune to the stationand then press and hold one of thememory preset buttons. The audio mutesbriefly while the system saves the stationand then returns.
383
Flex (TP3) , enUSA, Edition date: 201803, Second-Printing
SYNC™ 3

There are two preset banks available forAM and three banks for FM. To accessadditional presets, tap the preset button.The indicator on the preset button showswhich bank of presets you are currentlyviewing.
SiriusXM® Satellite Radio (IfActivated)Note: This feature may not be available inall markets and requires an activesubscription.
E234451
SiriusXM satellite radio is asubscription-based satellite radio servicethat broadcasts a variety of music, sports,news, weather, traffic and entertainmentprogramming. Your factory-installedSiriusXM satellite radio system includeshardware and a limited subscription termthat begins on the date of sale or lease ofyour vehicle. See an authorized dealer foravailability.For more information on extendedsubscription terms (a service fee isrequired), the online media player and alist of SiriusXM satellite radio channels,and other features, please visitwww.siriusxm.com in the United States,www.siriusxm.ca in Canada, or callSiriusXM at 1-888-539-7474.Note: SiriusXM reserves the unrestrictedright to change, rearrange, add or deleteprogramming. This includes canceling,moving or adding particular channels, andits prices, at any time, with or without noticeto you. We are not responsible for any suchprogramming changes.Note: This receiver includes the eCosreal-time operating system. eCos ispublished under the eCos License.
The following buttons are available for SiriusXM:
Action and DescriptionMenu Item
Touch this button to see a list of available stations.Browse
A pop-up appears, allowing you to type in the call numbers ofa station.
Direct Tune
Once you enter the stations call numbers, you can select:
The system tunes to the station you select.Enter
You exit the pop-up and the current stationcontinues to play.
Cancel
You can press the backspace button to delete the previousnumber.
384
Flex (TP3) , enUSA, Edition date: 201803, Second-Printing
SYNC™ 3

Action and DescriptionMenu Item
Replay audio on the current channel. You can replay approx-imately 45 minutes of audio as long as you remain tuned tothe current station. Changing stations erases the previousaudio.
Replay
When you are in replay mode, you are notable to select a different preset until youreturn to live audio. Pressing this buttonreturns you to the live broadcast.
Live
Save the current song, artist, or team as a favorite. The systemalerts you when it plays again on any channel.
ALERT
Selecting this button allows you to enable and edit alerts. SeeSettings (page 411).
Memory PresetsTo set a preset, tune to the station thenpress and hold one of the memory presetbuttons. The audio mutes briefly while thesystem saves the station and returns oncethe station is stored.
There are three preset banks available forSiriusXM. To access additional presets, tapthe preset button. The indicator on thepreset button shows which bank of presetsyou are currently viewing.
Satellite Radio Electronic SerialNumber (ESN)You need your ESN to activate, modify ortrack your satellite radio account. SeeSettings (page 411).
SiriusXM Satellite Radio Reception Factors and Troubleshooting
Potential Reception Issues
For optimal reception performance, keep the antenna clearof snow and ice build-up and keep luggage and othermaterials as far away from the antenna as possible.
Antenna obstructions
Hills, mountains, tall buildings, bridges, tunnels, freewayoverpasses, parking garages, dense tree foliage and thunder-storms can interfere with your reception.
Terrain
When you pass a ground-based broadcast-repeating tower,a stronger signal may overtake a weaker one and the audiosystem may mute.
Station overload
Your display may show ACQUIRING... to indicate the interfer-ence and the audio system may mute.
Satellite radio signalinterference
385
Flex (TP3) , enUSA, Edition date: 201803, Second-Printing
SYNC™ 3

Troubleshooting Tips
ActionCauseMessage
No action required. Thismessage should disappearshortly.
Radio requires more than twoseconds to produce audio forthe selected channel.
Acquiring Signal
If this message does not clearshortly, or with an ignition keycycle, your receiver may havea fault. See an authorizeddealer for service.
There is an internal module orsystem failure present.
Satellite antenna fault
SIRIUS system failure
Tune to another channel orchoose another preset.
The channel is no longer avail-able.
Invalid Channel
Contact SiriusXM at 1-888-539-7474 to subscribe to thechannel, or tune to anotherchannel.
Your subscription does notinclude this channel.
Unsubscribed Channel
The signal is blocked. Whenyou move into an open area,the signal should return.
The signal is lost from the Siri-usXM satellite or SiriusXMtower to your vehicle antenna.
Satellite acquiringsignal…
No action required. Theprocess may take up to threeminutes.
Update of channel program-ming in progress.
Updating…
Contact SiriusXM at 1-888-539-7474 to resolve subscrip-tion issues.
Your satellite service is nolonger available.
Questions? Call 1-888-539-7474
Use the channel guide to turnoff the Lock or Skip function onthat station.
All the channels in the selectedcategory are either skipped orlocked.
None found. Checkchannel guide.
No action required.SiriusXM has updated thechannels available for yourvehicle.
SIRIUS Subscriptionupdated
HD Radio™ Information (IfAvailable)Note: This feature may not be available inall markets.
To activate HD radio, please see the RadioSettings in the Settings Chapter. SeeSettings (page 411).Note: HD Radio broadcasts are notavailable in all markets.
386
Flex (TP3) , enUSA, Edition date: 201803, Second-Printing
SYNC™ 3

HD Radio technology is the digitalevolution of analog AM/FM radio. Yoursystem has a special receiver that allowsit to receive digital broadcasts (whereavailable) in addition to the analogbroadcasts, it already receives. Digitalbroadcasts provide a better sound qualitythan analog broadcasts with free,crystal-clear audio and no static ordistortion. For more information, and aguide to available stations andprogramming, please visit:
Website
www.hdradio.com
When HD Radio is on and you tune to astation broadcasting HD Radio technology,you may notice the following indicators onyour screen:
E142616
The HD logo is grey when acquiring a digitalstation, and then changes to orange whendigital audio is playing. When this logo isavailable, you may also see Title and Artistfields on-screen.The multicast indicator appears in FMmode (only) if the current station isbroadcasting multiple digital broadcasts.The highlighted numbers signify availabledigital channels where new or differentcontent is available. HD1 signifies the mainprogramming status and is available inanalog and digital broadcasts. Othermulticast stations (HD2 through HD7) areonly available digitally.Note: There is also an additional featurefor stations that have more than 1 HDmulticast (For example, HD1 or HD2). TheHD logo and Radio text appears as a button.Pressing this button allows you to cyclethrough all of the HD stations on thatspecific frequency. For example, if you areon 101.1 and it has HD1, HD2, HD3, pressingthe button repeatedly causes the radio tocycle through the HD stations in a cyclicincreasing order.
When HD Radio broadcasts are active, you can access the following functions:
Action and DescriptionMessage
Allows you to save an active channel as a memory preset.Touch and hold a memory preset slot until the sound returns.There is a brief mute while the radio saves the station. Soundreturns when the channel saves. When switching to an HD2or HD3 memory preset, the sound mutes before the digitalaudio plays, because the system has to reacquire the digitalsignal.
Presets
Note: As with any station you save, you cannot access the saved station if your vehicle isoutside the station’s reception area.
387
Flex (TP3) , enUSA, Edition date: 201803, Second-Printing
SYNC™ 3

HD Radio Reception and Station Troubleshooting
Potential Reception Issues
If you are listening to a multicast station and you are on thefringe of the reception area, the station may mute due toweak signal strength.
Reception area
If you are listening to HD1, the system changes back to theanalog broadcast until the digital broadcast is available again.However, if you are listening to any of the possible HD2-HD7multicast channels, the station mutes and stays muted unlessit is able to connect to the digital signal again.
When the system first receives a station (aside from HD2-HD7 multicast stations), it first plays the station in the analogversion. Once the receiver verifies the station is an HD Radiostation, it shifts to the digital version. Depending on the stationquality, you may hear a slight sound change when the stationchanges from analog to digital. Blending is the shift fromanalog to digital sound or digital back to analog sound.
Station blending
In order to provide the best possibleexperience, use the contact form to reportany station issues found while listening toa station broadcasting with HD Radiotechnology. Independent entities own andoperate each station. These stations areresponsible for ensuring all audio streamsand data fields are accurate.
Potential Station Issues
ActionCauseIssues
No action required. This is abroadcast issue.
This is poor time alignment bythe radio broadcaster.
Echo, stutter, skip orrepeat in audio.Increase or decrease inaudio volume.
No action required. The recep-tion issue may clear up as youcontinue to drive.
The radio is shifting betweenanalog and digital audio.
Sound fading orblending in and out.
No action required. This isnormal behavior. Wait until theaudio is available.
The digital multicast is notavailable until the HD Radiobroadcast is decoded. Oncedecoded, the audio is available.
There is an audio mutedelay when selectingHD2 or HD3, multicastpreset or Direct Tune.
388
Flex (TP3) , enUSA, Edition date: 201803, Second-Printing
SYNC™ 3

Potential Station Issues
ActionCauseIssues
No action required. The stationis not available in your currentlocation.
The previously stored multicastpreset or direct tune is notavailable in your current recep-tion area.
Cannot access HD2 orHD3 multicast channelwhen recalling a presetor from a direct tune.
Fill out the station issue form.1Data service issue by the radiobroadcaster.
Text information doesnot match currentlyplaying audio.
Fill out the station issue form.1
Data service issue by the radiobroadcaster.
There is no textinformation shown forcurrently selectedfrequency.
1 You can find the form here:
Website
http://hdradio.com/stations/feedback
HD Radio Technology manufactured underlicense from iBiquity Digital Corporationand foreign patents. HD Radio and the HDand HD Radio logos are proprietarytrademarks of DTS. The vehiclemanufacturer and DTS are not responsiblefor the content sent using HD Radiotechnology. Content may be changed,added or deleted at any time at the stationowner's discretion.
CD (If equipped)Once you select this option, the systemreturns you to the main audio screen.The current audio information appears onthe screen.
The following buttons are also available:
FunctionButton
You can use the browse button to select a track.Browse
Select this button and a small number one displays to indicatethe track is set to repeat.
Repeat
389
Flex (TP3) , enUSA, Edition date: 201803, Second-Printing
SYNC™ 3

FunctionButton
For MP3 CDs, this button allows you to toggle through repeatoff, repeat one track (a small number one displays), and repeatcurrent folder (a small folder displays).
Select the shuffle symbol to have the audio on the disk playin random order.
Shuffle
You can use the forward, reverse, pause orplay buttons to control the audio playback.
Bluetooth Stereo or USBBluetooth Stereo and USB allow you toaccess media that you store on yourBluetooth device or USB device such asmusic, audio books or podcasts.
The following buttons are available for Bluetooth and USB:
FunctionButton
Pressing the repeat button toggles the repeat setting throughthree modes: repeat off (button not highlighted), repeat all(button highlighted) and repeat track (button highlighted witha small number one).
Repeat
Play the tracks in random order.Shuffle
You can use the forward, reverse, pause orplay buttons to control the audio playback.To get more information about thecurrently playing track, press the cover artor Info button.
For some devices, SYNC 3 is able toprovide 30-second skip buttons when youlisten to audio books or podcasts. Thesebuttons allow you to skip forward orbackward within a track.While playing audio from a USB device youcan look for certain music by selecting thefollowing:
FunctionButton
If available, displays the list of tracks in theNow Playing playlist.
Browse
This option, which is available underbrowse, allows you to play all tracks or tofilter the available media into one of thebelow categories.
New Search
Play All
390
Flex (TP3) , enUSA, Edition date: 201803, Second-Printing
SYNC™ 3

FunctionButton
Playlists
Artist
Albums
Songs
Genres
Podcasts
Audio books
Composers
This button allows you to choose a specificletter to view within the category you arebrowsing.
A-Z Jump
If available, this allows you to browse thefolders and files on your USB device.
Explore Device
USB Ports
E211463
The USB ports are in the center console orbehind a small access door in theinstrument panel.This feature allows you to plug in USBmedia devices, memory sticks, flash drivesor thumb drives, and charge devices if theysupport this feature.
Select this option to play audio from yourUSB device.
AppsThe system supports the use of certainaudio apps such as iHeartRadio through aUSB or Bluetooth enabled device.Each app gives you different on-screenoptions depending on the app's content.See Apps (page 408).
Supported Media Players, Formatsand Metadata InformationThe system is capable of hosting nearlyany digital media player, including iPod,iPhone, and most USB drives.Supported audio formats include MP3,WMA, WAV, AAC, and FLAC.Supported audio file extensions includeMP3, WMA, WAV, M4A, M4B, AAC, andFLAC.
391
Flex (TP3) , enUSA, Edition date: 201803, Second-Printing
SYNC™ 3

Supported USB file systems include: FAT,exFAT, and NTFS.SYNC 3 is also able to organize the mediafrom your USB device by metadata tags.Metadata tags, which are descriptivesoftware identifiers embedded in themedia files, provide information about thefile.If your indexed media files contain noinformation embedded in these metadatatags, SYNC 3 may classify the emptymetadata tags as unknown.SYNC 3 is capable of indexing up to50,000 songs per USB device, for up to 10devices.
CLIMATETouch the climate button on thetouchscreen to access your climate controlfeatures. Depending on your vehicle lineand option package, your climate screenmay look different from one of the screensshown below. Your screen may not containall of the features shown.Note: You can switch temperature unitsbetween Fahrenheit and Celsius. SeeSettings (page 411).
E208805
392
Flex (TP3) , enUSA, Edition date: 201803, Second-Printing
SYNC™ 3

Driver temperature: Touch upor down to adjust thetemperature.
A
Heated steering wheel: Touchthe heated steering wheel iconto switch the heated steeringwheel on and off (if equipped).
B
Defrost: A pop up appears onthe screen to display the defrostoptions.
C
MAX Defrost: Touch the buttonto maximize defrosting. Outsideair flows through the windshieldvents, the fan automaticallyadjusts to the highest speed andthe temperature dial returns tothe full heat position. You canuse this setting to defog or cleara thin covering of ice from thewindshield. The heated rearwindow also automatically turnson when you select MAX Defrost.Defrost: Touch to clear thewindshield of fog and thin ice.Touch again to return to theprevious airflow selection. Whenon, defrost provides outside airto reduce window fogging anddistributes air through thewindshield defroster vents anddemister vents.Note: To prevent windowfogging, you cannot selectrecirculated air when Defrost ison.Heated rear window: Turns theheated rear window on and off.See the Heated Windows andMirrors chapter in your ownermanual.
AUTO: Touch the button toswitch on automatic operation.Select the desired temperatureusing the temperature control.The system adjusts fan speed,air distribution, air conditioningoperation, and selects outsideair or recirculated air to heat orcool the vehicle in order tomaintain the desiredtemperature.
D
Power: Touch the button toswitch the system on and off.Switching off the climate controlsystem prevents outside air fromentering the vehicle.
E
DUAL: This button lights upwhen the passenger controls areactive. To switch the dual zoneoperation off and link thepassenger temperature to thedriver temperature, touch theDUAL button to switch it off.
F
Passenger temperature:Touch up or down to adjust thetemperature.
G
Passenger heated andclimate controlled seats:
H
Touch the heated seat icon toadjust the heated seat off andon (if equipped).Touch the climate-controlledseat icon to adjust theclimate-controlled seat off andon (if equipped).Fan speed: Touch up or downto increase or decrease thevolume of air circulated in yourvehicle.
I
Rear: A pop up appears on thescreen to display the rear controloptions.
J
393
Flex (TP3) , enUSA, Edition date: 201803, Second-Printing
SYNC™ 3

Touch the power icon to switchthe rear climate controlfunctions off and on.Touch Rear Control to allowthe rear seat passengers toadjust the rear climate settings.Touch it again to prevent the rearseat passengers from adjustingthe settings. Rear Controlautomatically turns off when youuse the touchscreen to adjustthe rear climate settings.If your vehicle has automaticclimate controls, select Auto toconnect the rear climate settingsto the Auto settings of the driver.Touch the up and down arrowsto adjust the temperature.Manual airflow distributioncontrols: Select these controlsindividually or together to directthe air flow to the desired area.
K
Panel: Distributes air throughthe instrument panel vents.Floor: Distributes air through thedemister vents, floor vents andrear seat floor vents.A/C: A pop-up appears on thescreen to display the airconditioning options.
L
MAX A/C: Touch to cool yourvehicle with recirculated air.Touch again for normal A/Coperation. MAX A/C distributesair through instrument panelvents and may help reduce odorsfrom entering your vehicle. MAXA/C is more economical andefficient than normal A/C mode.
A/C: Touch to switch the airconditioning on or off. Use A/Cwith recirculated air to improvecooling performance andefficiency. A/C engagesautomatically in MAX A/C,defrost and footwell/defrost.Recirculated air: Touch toswitch the recirculated air on oroff which may reduce theamount of time needed to cooldown the interior and helpreduce odors from reaching theinterior. Recirculated air alsoengages automatically when youselect MAX A/C. You can engagethis manually in any airflowmode except defrost. It may alsoturn off in all airflow modesexcept MAX A/C to reduce fogpotential.Driver heated and climatecontrolled seats:
M
Touch the heated seat icon toadjust the heated seat off andon (if equipped).Touch the climate-controlledseat icon to adjust theclimate-controlled seat off andon (if equipped).
PHONE
WARNING: Driving while distractedcan result in loss of vehicle control, crashand injury. We strongly recommend thatyou use extreme caution when using anydevice that may take your focus off theroad. Your primary responsibility is the safeoperation of your vehicle. We recommend
394
Flex (TP3) , enUSA, Edition date: 201803, Second-Printing
SYNC™ 3

against the use of any hand-held devicewhile driving and encourage the use ofvoice-operated systems when possible.Make sure you are aware of all applicablelocal laws that may affect the use ofelectronic devices while driving.
Hands-free calling is one of the mainfeatures of the system. Once you pair yourcell phone, you can access many optionsusing the touchscreen or voice commands.While the system supports a variety offeatures, many are dependent on your cellphone’s functionality.
Pairing Your Cell Phone for theFirst TimePair your Bluetooth enabled phone withthe system before using the functions inhands-free mode.Switch on Bluetooth on your device tobegin pairing. See your phone’s manual ifnecessary.
To add a phone, select:
Menu Item
Add a Bluetooth Device
1. Follow the on-screen instructions.2. A prompt alerts you to search for the
system on your phone.3. Select your vehicle on your phone.4. Confirm that the six-digit number
appearing on your phone matches thesix-digit number on the touchscreen.
5. The touchscreen indicates when thepairing is successful.
6. Your phone may prompt you to givethe system permission to accessinformation. To check your phone’scompatibility, see your phone’s manualor visit the website.
Alternatively, to add a phone, select:
Menu Item
Add a Bluetooth Device
Then select:
Discover Other Bluetooth Devices
1. Follow the on-screen instructions.2. Select your phone's name when it
appears on the touchscreen.3. Confirm that the six-digit number
appearing on your phone matches thesix-digit number on the touchscreen.
4. The touchscreen indicates when thepairing is successful.
5. Your phone may prompt you to givethe system permission to accessinformation. To check your phone’scompatibility, see your phone’s manualor visit the website.
At a minimum, most cell phones withBluetooth wireless technology support thefollowing functions:• Answering an incoming call.• Ending a call.• Dialing a number.• Call waiting notification.• Caller identification.Other features, such as text messagingusing Bluetooth and automatic phonebookdownload, are phone-dependent features.
Phone MenuThis menu becomes available after pairinga phone.
395
Flex (TP3) , enUSA, Edition date: 201803, Second-Printing
SYNC™ 3

E251249
G
Action and DescriptionMenu ItemItem
Displays your recent calls.RecentCall List
AYou can place a call by selecting an entry from this list.You can also sort the calls by selecting the drop downmenu at the top of the screen. You can choose:
MissedOutgoingIncomingAll
All of your contacts from your phone display in alphabet-ical order.
ContactsB
Selecting this button allowsyou to choose a specific letterto view.
A-Z Jump
Displays the name of your phone and takes you to thephone settings options.
PhoneSettings
C
From this menu, you can pair subsequent devices, set ringtones and alerts.
396
Flex (TP3) , enUSA, Edition date: 201803, Second-Printing
SYNC™ 3

Action and DescriptionMenu ItemItem
Gives you access to the list of paired or connectedBluetooth devices allowing you to change or select adevice.
ChangeDevice
D
Displays all recent text messages.TextMessages
E
Use this keypad to dial in a phone number.PhoneKeypad
FUse the backspace button to delete numbers.
Press this button to begin acall.
Call
Touch this button to reject all incoming calls automatic-ally. Text message notifications do not display on thescreen. All ringtones and alerts are set to silent.
Do NotDisturb
G
Users with phones having voice servicesmay see a button to access the feature.For example, iPhone users see a Siri button.A press and hold of the voice button on thesteering wheel also accesses this feature.
Making CallsThere are many ways to make calls fromthe SYNC 3 system, including using voicecommands. See Using VoiceRecognition (page 375). You can use thetouchscreen to place calls as well.
397
Flex (TP3) , enUSA, Edition date: 201803, Second-Printing
SYNC™ 3

To call a number in your contacts,select:
Action and DescriptionMenu Item
You can then select thename of the contact youwant to call. Any numbersstored for that contactdisplay along with anystored contact photos. Youcan then select thenumber that you want tocall. The system begins thecall.
Contacts
To call a number from your recent calls,select:
Action and DescriptionMenu Item
You can then select anentry that you want to call.The system begins the call.
Recent CallList
To call a number that is not stored inyour phone, select:
Action and DescriptionMenu Item
Select the digits of thenumber you wish to call.
PhoneKeypad
The system begins the call.Call
Pressing the backspace button deletes thelast digit you typed.
Receiving CallsDuring an incoming call, an audible tonesounds. Caller information appears in thedisplay if it is available.
To accept the call, select:
Menu Item
AcceptNote: You can also accept the call bypressing the phone button on the steeringwheel.
To reject the call, select:
Menu Item
RejectNote: You can also reject the call bypressing the phone button on the steeringwheel.
Ignore the call by doing nothing. SYNC 3logs it as a missed call.
During a Phone CallDuring a phone call, the contacts nameand number display on the screen alongwith the call duration.The phone status items are also visible:• Signal Strength.• Battery.You can select any of the following duringan active phone call:
398
Flex (TP3) , enUSA, Edition date: 201803, Second-Printing
SYNC™ 3

Item
Immediately end aphone call. You canalso press thebutton on thesteering wheel.
End Call
Press this to accessthe phone keypad.
Keypad
You can switch themicrophone off sothe caller does nothear you.
Mute
Item
Privacy Transfer the call tothe cell phone orback to SYNC 3.
Text MessagingNote: Downloading and sending textmessages using Bluetooth are cellphone-dependent features.Note: Certain features in text messagingare speed-dependent and not availablewhen your vehicle is traveling at speeds over3 mph (5 km/h).
Receiving a Text Message
When a new message arrives, an audible tone sounds and the screen displays apop-up with the sender name and ID, if supported by your cell phone. You canselect:
Action and DescriptionMenu Item
Have SYNC 3 read the message to you.Hear It
View the text on the touchscreen.View
To call the sender.Call
You can select from 15 preset messages. Press the messagethat you would like to use and confirm to send the message.SYNC 3 confirms when the message is sent successfully.
Reply
To exit the screen.Close
Smartphone Connectivity (If Equipped)
SYNC 3 allows you to use Apple CarPlayand Android Auto to access your phone.When you use Apple CarPlay or AndroidAuto, you can:• Make calls.• Send and receive messages.• Listen to music.• Use your phone's voice assistant.
Apple CarPlay and Android Auto disablesome SYNC 3 features.Most Apple CarPlay and Android Autofeatures use mobile data.
Apple CarPlayApple CarPlay requires an iPhone 5 ornewer with iOS 7.1 or newer. Updating tothe latest iOS version is recommended.1. Plug your phone into a USB port. See
USB Port (page 323).
399
Flex (TP3) , enUSA, Edition date: 201803, Second-Printing
SYNC™ 3

2. Follow the prompts on thetouchscreen.
3. Follow the prompts that appear onyour phone to allow access to AppleCarPlay.
After completing the setup, your phoneconnects to CarPlay automatically whenplugged into a USB port.
To disable this feature from theSettings screen, select:
Menu Item
Apple CarPlay Preferences
Your device is listed if SYNC detectsApple CarPlay. Select the name of yourdevice and set the Apple CarPlay switchto off.
To return to SYNC 3, go to the AppleCarPlay home screen and select the SYNCapp.Note: Contact Apple for Apple CarPlaysupport.
Android AutoAndroid Auto is compatible with mostdevices with Android 5.0 or newer.1. Download the Android Auto app to
your device from Google Play toprepare your device (this may requiremobile data usage).
Note: The Android Auto App may not beavailable within your current market.2. Plug your device into a USB port. See
USB Port (page 323).3. Follow the prompt on the touchscreen.4. Follow the prompts that appear on
your device.Note: You may be prompted to updateadditional apps on your device (this mayrequire mobile data usage).
To disable this feature from theSettings screen, select:
Menu Item
Android Auto Preferences
Your device is listed if SYNC detectsAndroid Auto. Select the name of yourdevice and set the Android Auto switchto off.
Note: You may need to slide your Settingsscreen to the left to select Apple CarPlayPreferences or Android Auto Preferences.To return to SYNC 3, select thespeedometer icon in the Android Automenu bar at the bottom of thetouchscreen, and then touch the option toreturn to SYNC.Note: Contact Google for Android Autosupport.
NAVIGATION (If Equipped)
Your navigation system is comprised oftwo main features, destination mode andmap mode.
Map ModeMap mode shows advanced viewingcomprised of 2D city maps, 3D landmarksand 3D city models (when available). 2Dcity maps show detailed outlines ofbuildings, visible land use, landscapefeatures, and detailed railroadinfrastructure for the most essential citiesaround the globe.3D landmarks appear as clear, visibleobjects that are typically recognizable andhave a certain tourism value.
400
Flex (TP3) , enUSA, Edition date: 201803, Second-Printing
SYNC™ 3

3D city models are complete 3D modelsof entire city areas including navigableroads, parks, rivers and rendered buildings.3D landmarks and city models appear in3D map mode only. Coverage of thesevaries and improves with updated mapreleases.
E207752
Select the zoom in icon to see acloser view of the map.
E207753
Select the zoom out icon to seea farther away view of the map.
You can adjust the view in presetincrements. You can also pinch to zoom inor out of the map.The information bar tells you the namesof streets, cities or landmarks as you hoverover them with the crosshair curser.You can change your view of the map bytapping on the location indicator icon onthe right hand side of the screen. You canchoose from the following options:
E207750
Heading up (2D map) Thisalways shows the direction offorward travel to be upward onthe screen. This view is availablefor map scales up to 3 mi (5 km).
E207749
North up (2D map) alwaysshows the northern direction tobe upward on the screen.
E207748
3D map mode provides anelevated perspective of the map.Adjust this viewing angle androtate the map 180 degrees bytouching the map twice, and
then dragging your finger along the shadedbar with arrows at the bottom of the map.
E207751
Re-center the map by pressingthis icon whenever you scroll themap away from your vehicle’scurrent location.
E251780
E251779
Mute: Press to mute the audionavigation guidance. Press thebutton again to un-mute theguidance.
E207754
Points of Interest (POI)grouping icon: You can chooseup to three POI icons to displayon the map. If the chosen POIsare located close together or are
at the same location a box is used todisplay a single category icon instead ofrepeating the same icon, in order to reduceclutter. When you select the box on themap, a pop-up appears indicating howmany POIs are in this location. Select thepop up to see a list of the available POIs.You can scroll through and select POIsfrom this list.
If your vehicle is low on charge or fuel,station icons automatically display on themap.If you have subscribed to SiriusXM Trafficand Travel Link (where available), trafficflow will be indicated on the map by green(clear), yellow (slowing), and red(stopped) road highlights. Traffic flow isindicated where the information isavailable and varies across the US.You can choose to display traffic icons onthe map representing twelve differenttypes of incidents. See Settings (page411).You can set a destination by hoveringabove a location and selecting:
401
Flex (TP3) , enUSA, Edition date: 201803, Second-Printing
SYNC™ 3

ButtonButton
Start
Destination ModeTo set a destination, press:
DescriptionMenu Item
Destination
Enter a navigation destination in any of the following formats:
Street AddressSearch
(number, street, city, state)
For example "12 Mainstreet Dearborn MI"
Partial Address(number, street) if searching in current state(number, street and zip code (or postal code in Canada)) if searchingout of stateYou can enter unique addresses that contain door number prefixeswith or without the prefix. For example, you could enter "6N340Fairway Lane" or "340 Fairway Lane".
City
(name or zip code)
Point of Interest
(name or category)
Intersection
(street 1 / street 2)(street 1 and street 2)(street 1 & street 2)(street 1 @ street 2)(street 1 at street 2)
Latitude and Longitude
(##.###### , ##.######)This is in a decimal degrees format, one to six decimal places areaccepted.
You are given autocomplete options below the address bar to selectas you type.
402
Flex (TP3) , enUSA, Edition date: 201803, Second-Printing
SYNC™ 3

DescriptionMenu Item
If you do not give an exact destination, a menu displays with yourpossible selections.
Collections of your last 40 navigation destinations display here.Previous Destina-tions You can select any option from the list to select it as your destination.
Select this option to remove all previous destinations.DeleteAll
Select to navigate to your set Home destination.HomeThe time it takes to travel from your current location to Home displays.To set your Home, press:
A prompt appears asking if you would like to create afavorite for home. Select:
Home
Enter a location into the search bar and press:Yes
Save
Select to navigate to your set Work destination.WorkThe time it takes to travel from your current location to Work displays.To set your Work:
A prompt appears asking if you would like to create afavorite for work. Select:
Work
Enter a location into the search bar and press:Yes
Save
Favorites include any location you have previously saved.FavoritesTo add Favorites:
Select this button and enter a location into the destinationbar.
Add aFavorite
Select this option to have the system locate the addressyou have entered.
Search
Select this button when the address you have enteredappears on the screen.
Save
The address saves as a favorite and you see the favorites screen. Youcan now select this address from the favorites screen.
POI categories that may display (based on market and vehicleconfiguration):
Point of Interest(POI) Categories
Food
403
Flex (TP3) , enUSA, Edition date: 201803, Second-Printing
SYNC™ 3

DescriptionMenu Item
Fuel
Hotel
ATM
Press to view additional categories. Once you have selecteda category, follow the menus to find what you are lookingfor.
See All
Inside of these categories you can search by:
Nearby
Along Route
Near Destination
In a City
Once you have chosen your destination, press:
Action and DescriptionMenu Item
This saves the destination to your favorites.Save
This shows you a map of your entire route. You can then choose yourroute from three different options.
Start
Uses the fastest moving roadspossible.
Fastest
Uses the shortest distance possible.Shortest
Uses the most fuel-efficient route.Economical Route
The time and distance for each route also displays.
On the route screen, you can choose to cancel the current navigation.The system asks for confirmation then returns you to the map modescreen.
Cancel
Once you have chosen you destination, press:
Action and DescriptionMenu Item
The system uses a variety of screens and prompts to guide you to yourdestination.
Start
404
Flex (TP3) , enUSA, Edition date: 201803, Second-Printing
SYNC™ 3

Action and DescriptionMenu Item
During Route guidance, you can press the maneuver arrow icon on themap if you want the system to repeat route guidance instructions.When the system repeats the last guidance instruction, it updates thedistance to the next guidance instruction, since it detects that thevehicle is moving.The navigation map shows your estimated time of arrival, remainingtravel time and the distance to your destination.SYNC 3 may not always announce vehicle arrival at the exact pointof your destination and you may have to cancel a route manually.
Navigation MenuIn map mode and during active navigationyou can access the navigation menu.
During active navigation, touch the bottomof the screen to view the menu and otherbuttons.
To access the Navigation menu, press:
Button
Menu
You can then select:
A full screen map displays during navigation.Full MapScreen View
Highway exit information displays on the right hand sideof the screen during navigation.
HighwayExit Info
Points of interest icons display for restaurants, hotels,fuel stations and ATMs when they are present at theexit. You can select the POI icons to receive a listing ofspecific locations. You can select the POI location as awaypoint or destination if desired.
Only available during an active route. Displays all of theturns on the current route.
Turn List
You can choose to avoid any road on the turn list byselecting the road from the list. A screen then appearsand you can press:
Avoid
The system calculates a new route and displays a newturn list.
You can find the SiriusXM Traffic and Travel Link information bypressing this button. This information requires an active subscriptionto SiriusXM Traffic and Travel Link.
Traffic List
405
Flex (TP3) , enUSA, Edition date: 201803, Second-Printing
SYNC™ 3

Button
When a route is not active, a list of nearby traffic incidents displays(if any are present).When a route is active, you can choose to display a list of traffic nearbyor on the route.
Press this button to adjust your preferences. See Settings (page 411).NavigationSettings
Provides your current location city and the nearest road.Where Am I?
The following are only available on the menu during an active navigation route:
The system asks for confirmation and then returns you to the mapmode screen.
Cancel Route
Press this to see a map of the full route.View Route
An alternate route displays in comparison with the current route.Detour
Only available if you have an active waypoint on your route. SeeWaypoints later in this section for information on how to setwaypoints.
Edit Waypoints
Use this button to re-order or remove your waypoints.
Optimize OrderYou canalso havethe systemset theorder foryou bypressing:
GoTo return toyour routepress:
WaypointsYou can add a waypoint to a navigationroute as a destination along your route.To add a waypoint:
1. Select the search icon (magnifyingglass) while on an active route. Thisbrings up the destination menu.
2. Set your destination using any of thegiven methods. Once the destinationhas been selected, the screen allowsyou to set the destination as awaypoint by selecting:
406
Flex (TP3) , enUSA, Edition date: 201803, Second-Printing
SYNC™ 3

Menu Item
The waypoint list then appears and you areable to re-order all of your waypoints byselecting the menu icon on the right handside of the location. You can select up tofive waypoints.
Add Waypoint
Optimize OrderYou can also have the system set the orderfor you by pressing:
GoTo return to your route, press:
SYNC AppLinkThe AppLink app allows you to use someSYNC 3 navigation features on your phone.
First Mile NavigationWhen you switch your ignition off, thelocation of your vehicle is recorded andsent to your SYNC AppLink app. Thelocation of your vehicle can be viewedwithin the app. You can also view walkingdirections to your vehicle.
Last Mile NavigationWhen you park near your destination, thesystem provides walking directions to yourdestination.
POI SearchYour paired phone can be used to updatepoints of interest (POI) on the navigationsystem.
Send To CarYou can send destinations to yournavigation system using a computer orphone using AppLink.
cityseeker (If Equipped)
Note: cityseeker point of interest (POI)information is limited to approximately 1,110cities (1,049 in the United States, 36 inCanada and 15 in Mexico).
E225487
cityseeker, when available, is a service thatprovides more information about certainpoints of interest such as restaurants,hotels and attractions.When you have selected a point of interest,the location and information appear, suchas address, phone number and a starrating.Press More Information to see a photo,a review, a list of services and facilities, theaverage room or meal price and the webaddress. This screen displays the point ofinterest icons.
407
Flex (TP3) , enUSA, Edition date: 201803, Second-Printing
SYNC™ 3

For restaurants, cityseeker can provideinformation such as star rating, averagecost, review, handicap access, hours ofoperation, and website address.For hotels, cityseeker can provideinformation such as star rating, pricecategory, review, check-in and checkouttimes, hotel service icons and websiteaddress. Hotel service icons include:• Restaurant• Business center• Handicap facilities• Laundry• Refrigerator• 24 hour room service• Fitness center• Internet access• Pool• Wi-FiAttractions include nearby landmarks,amusement parks, historic buildings andmore. cityseeker can provide informationsuch as star rating, reviews, hour ofoperation and admission price.
SiriusXM Traffic and Travel LinkSiriusXM Traffic and Travel Link is availableon vehicles equipped with navigation andonly in select markets. You must activateand subscribe to receive SiriusXM Trafficand Travel Link information. It helps youlocate the best gas prices, find movielistings, get current traffic alerts, view theweather map, get accurate ski conditionsand see current sports scores. See Apps(page 408).
The system calculates a reasonableefficient route based on available speedlimits, traffic, and road conditions. You mayknow a local short cut that is more efficientat a given time than the route provided bySYNC 3, but you should expect a slightdifference in minutes or miles with theSYNC 3 route.
Navigation Map UpdatesAnnual navigation map updates areavailable for purchase through yourdealership, by calling 1-866-462-8837 inthe United States and Canada or01-800-557-5539 in Mexico. You can alsovisit:
Website
www.navigation.com/sync
You need to specify the make and modelof your vehicle to determine if there is anupdate available.HERE is the digital map provider for thenavigation application. If you find map dataerrors, you may report them directly toHERE by going towww.here.com/mapcreator. HEREevaluates all reported map errors andresponds with the result of theirinvestigation by e-mail.Map coverage includes the USA (includingPuerto Rico and the US Virgin Islands),Canada and Mexico.
APPSThe system enables voice, steering wheel,and touch screen control of SYNC 3AppLink enabled smartphone apps.Once an app is running through AppLink,you can control main features of the appthrough voice commands and steeringwheel controls.
408
Flex (TP3) , enUSA, Edition date: 201803, Second-Printing
SYNC™ 3

Note: Available AppLink enabled apps willvary by market.Note: You must pair and connect yoursmartphone via Bluetooth to SYNC 3 toaccess AppLink.Note: iPhone users need to connect thephone to the USB port.Note: For information on available apps,supported smartphone devices andtroubleshooting tips please visit:
Websites
owner.ford.comwww.syncmyride.ca
www.syncmaroute.ca
Note: Make sure you have an active accountfor the app that you have downloaded.Some apps will work automatically with nosetup. Other apps will want you to configureyour personal settings and personalize yourexperience by creating stations orfavorites.We recommend you do this athome or outside of your vehicle.Note: We encourage you to review thesmartphone app’s terms of service andprivacy policies because Ford is notresponsible for your app or its use of data.Note: AppLink is a native SYNC systemfeature. Accessing mobile apps throughAppLink is only possible when Android Autoor Apple CarPlay are disabled. Some appsmay only be accessible in the car throughAppLink and others only through AndroidAuto or Apple CarPlay. Please refer to theSmartphone Connectivity information todisable Android Auto or Apple CarPlay.Note: In order to use an app with SYNC 3,the app needs to be running in thebackground of your phone. If you shut downthe app on your phone, it shuts down theapp on SYNC 3 as well.
Note: If a SYNC 3 AppLink compatible appis not shown in the Apps Domain, make surethe required app is running on the mobiledevice.
Action and Descrip-tion
Menu Item
SYNC 3 will searchand connect tocompatible app(s)running on yourmobile device.
Find Mobile Apps
Enabling SYNC 3 Mobile AppsIn order to enable mobile apps, SYNC 3requires user consent to send and receiveapp authorization information and updatesusing the data plan associated with theconnected device.The connected device sends data to Fordin the United States. The information isencrypted and includes your VIN, SYNC 3module number, odometer, usagestatistics and debugging information. Weretain this data for only as long asnecessary to provide this service,troubleshoot, and improve products andservices and to offer you products andservices that may interest you whereallowed by law.Note: You must enable mobile apps foreach connected device the first time youselect a mobile app using the system.Note: Ford reserves the right to limitfunctionality or deactivate mobile apps atany time.Note: Standard data rates apply. Ford isnot responsible for any additional chargesyou may receive from your service provider,when your vehicle sends or receives datathrough the connected device. This includesany additional charges incurred due todriving in areas when roaming out of a homenetwork.
409
Flex (TP3) , enUSA, Edition date: 201803, Second-Printing
SYNC™ 3

You can enable and disable apps throughsettings. See Settings (page 411).
App PermissionsThe system organizes the App permissionsinto groups. You can grant these grouppermissions individually. You can changea permission group status any time whennot driving, by using the settings menu.While in the settings menu, you can alsosee the data included in each group.When you launch an app using SYNC 3,the system may ask you to grant certainpermissions, for example Vehicleinformation, Driving characteristics, GPSand Speed, and/or Push notifications. Youcan enable all groups or none of themduring the initial app permissions prompts.The settings menu offers individual grouppermission control.Note: You are only prompted to grantpermissions the first time you use an appwith SYNC 3.Note: If you disable group permissions,apps will still be enabled to work with SYNC3 unless you deactivate All Apps in thesettings menu.
SiriusXM Traffic and Travel Link (If
Equipped)
WARNING: Driving while distractedcan result in loss of vehicle control, crashand injury. We strongly recommend thatyou use extreme caution when using anydevice that may take your focus off theroad. Your primary responsibility is the safe
operation of your vehicle. We recommendagainst the use of any hand-held devicewhile driving and encourage the use ofvoice-operated systems when possible.Make sure you are aware of all applicablelocal laws that may affect the use ofelectronic devices while driving.
Note: SiriusXM Traffic and Travel Link maynot be available in all markets.Note: In order to use SiriusXM Traffic andTravel Link, your vehicle must havenavigation.Note: A paid subscription is required toaccess and use these features. Go towww.siriusxm.com/travellink for moreinformation.Note: Visit www.siriusxm.com/traffic andclick on Coverage map and details for acomplete listing of all traffic areas coveredby SiriusXM Traffic and Travel Link.Note: Neither Sirius nor Ford is responsiblefor any errors or inaccuracies in the SiriusXMTraffic and Travel Link services or its use invehicles.When you subscribe to SiriusXM Trafficand Travel Link, it can help you locate thebest gas prices, find movie listings, getcurrent traffic alerts, view the currentweather map, get accurate ski conditionsand see scores to current sports games.
410
Flex (TP3) , enUSA, Edition date: 201803, Second-Printing
SYNC™ 3

Action and DescriptionMenu Item
Touch these buttons to identify traffic incidents on your route,near your vehicle’s current location or near any of your favoriteplaces, if programmed.
Traffic on Route
Traffic Nearby
Touch this button to view fuel prices at stations close to yourvehicle’s location or on an active navigation route.
Fuel Prices
Touch this button to view nearby movie theaters and theirshow times, if available.
Movie Listings
Touch this button to view the nearby weather, current weather,or the five-day forecast for the chosen area.
Weather
Select to see the weather map,which can show storms, radarinformation, charts and winds.
Map
Select to choose from a listing ofweather locations.
Area
Touch this button to view scores and schedules from a varietyof sports. You can also save up to 10 favorite teams for easieraccess. The score automatically refreshes when a game is inprogress.
Sports Info
Touch this button to view ski conditions for a specific area.Ski Conditions
SETTINGSUnder this menu, you can access andadjust the settings for many of the systemfeatures. To access additional settings,swipe the screen left or right.
SoundPressing this button allows you to adjustthe following:
Sound Settings
Returns Treble, Midrange, and Bass sound settings to factory levels.Reset All
Adjusts the high frequency level.Treble
Adjusts the middle frequency level.Midrange
Adjusts the low frequency level.Bass
Adjusts the sound ratio from side to side or front to back.Balance / Fade
411
Flex (TP3) , enUSA, Edition date: 201803, Second-Printing
SYNC™ 3

Sound Settings
Adjusts the amount the audio system volume increases with speed,or turns the feature off.
SpeedCompensatedVol.
Optimizes the sound based on the location of the listeners.Occupancy Mode
StereoSound Settings
Surround
Your vehicle might not have all of these features.
Media PlayerThis button is available when a mediadevice such as a Bluetooth Stereo or USBdevice is the active audio source. Pressingthe button allows you to access thefollowing options for active devices only.
Action and DescriptionMenu Item
For some USB devices, SYNC 3 can adjust the playback speed ofpodcasts. When a podcast is playing, you can choose:
Podcast Speed
FasterNormalSlower
For some USB devices, SYNC 3 can adjust the playback speed ofaudiobooks. When an audiobook is playing, you can choose:
Audiobook Speed
FasterNormalSlower
Cover art displays from your device’s musicfiles. If no cover art for the files exists on thedevice, then the Gracenote Database providescover art.
Media PlayerCover Art Priority
The Gracenote Database supplied cover art isused for your music files. This overrides anycover art from your device.
Gracenote®
Switches on and off Gracenote® to provide metadata informationsuch as genre, artist, album.
Gracenote®Management
412
Flex (TP3) , enUSA, Edition date: 201803, Second-Printing
SYNC™ 3

Action and DescriptionMenu Item
This allows you to view the version level of the Gracenote Database.Gracenote® Data-base Info
This allows you to view the manufacturer and model number of yourmedia device.
Device Informa-tion
Erase the stored in media information in order to re-index.Update MediaIndex
ClockTo adjust the time, select the up and downarrows on either side of the screen. Thearrows on the left adjust the hour andarrows on the right adjust the minute. Youcan then select AM or PM.
You can adjust the following features:
Action and DescriptionMenu Item
Select how time displays.Clock Format
When active, the clock adjusts to time zone changes.Auto Time ZoneUpdate This feature is only available in vehicles with navigation.
When selected, the vehicle clock resets to GPS satellite time.Reset Clock toGPS Time
The system automatically saves anyupdates you make to the settings.
BluetoothPressing this button allows you to accessthe following:
ActionMenu Item
Turning Bluetooth off disconnects all devices and does not permitnew connections.
Bluetooth
You must activate Bluetooth to pair aBluetooth enabled device.The process of pairing a Bluetooth deviceis the same as pairing a phone. SeePairing a Device in Phone settings for howto pair a device and the available options.
PhonePair your Bluetooth enabled phone withthe system before using the functions inhands-free mode.Switch on Bluetooth on your device tobegin pairing. See your phone’s manual ifnecessary.
413
Flex (TP3) , enUSA, Edition date: 201803, Second-Printing
SYNC™ 3

To add a phone, select:
Menu Item
Add Phone
1. Follow the on-screen instructions.2. A prompt alerts you to search for the
system on your phone.3. Select your vehicle's make and model
as it displays on your phone.4. Confirm that the six-digit number
appearing on your phone matches thesix-digit number on the touchscreen.
5. The touchscreen indicates when thepairing is successful.
6. Your phone may prompt you to givethe system permission to accessinformation. To check your phone’scompatibility, see your phone’s manualor visit the website.
Alternatively, to add a phone, select:
Menu Item
Add Phone
Then select:
Discover Other Bluetooth Devices
1. Follow the on-screen instructions.2. Select your phone's name when it
appears on the touchscreen.3. Confirm that the six-digit number
appearing on your phone matches thesix-digit number on the touchscreen.
4. The touchscreen indicates when thepairing is successful.
5. Your phone may prompt you to givethe system permission to accessinformation. To check your phone’scompatibility, see your phone’s manualor visit the website.
Other features, such as text messagingusing Bluetooth and automatic phonebookdownload, are phone-dependent features.
To check your phone’s compatibility,see your phone’s manual or visit thewebsite:
Website
owner.ford.comwww.syncmyride.ca
www.syncmaroute.ca
Once you have paired a device you canadjust the following options.
Action and DescriptionMenu Item
View Devices
You can then select:
You can add a Bluetooth enabled device by following the steps inthe previous table.
Add a BluetoothDevice
You can select a phone by touching the name of the phone on the screen. You thenhave the following options:
Depending on the status of the device, you can select either of theseoptions to interact with the selected device.
Connect
414
Flex (TP3) , enUSA, Edition date: 201803, Second-Printing
SYNC™ 3

Action and DescriptionMenu Item
Disconnect
Allows you to select this device to be your preferred device.Make Primary
Removes the selected device from the system.Delete
Pressing the info icon next to the devicename allows you to see phone and deviceinformation.
Action and DescriptionMenu Item
Manage Contacts
You can then select:
Enable this option to have SYNC 3 periodically re-download yourphonebook to keep your contact list up to date.
Auto-DownloadContacts
Choose how you would like the system to display your contacts. Youcan choose:
Sort By:
Last NameFirst Name
Select this option to re-download your contact list manually.Re-downloadContacts
Select this option to delete the in vehicle contact list. Deleting thein vehicle list does not erase the contact list on the connected phone.
Delete Contacts
Action and DescriptionMenu Item
Set Phone Ringtone
You can then select:
No sound plays when a call comes to your phone.No Ringtone
The currently selected ringtone on your phone plays when you receivea call. This option may not be available for all phones. If this optionis available, it is the default setting.
Use Phone Ring-tone
You can also select one of the three available ringers.
415
Flex (TP3) , enUSA, Edition date: 201803, Second-Printing
SYNC™ 3

Action and DescriptionMenu Item
Text Messaging
You can then select:
No sound plays when a message comes to your phone.No Alert(Silence)
You can select one of the three available notification sounds.
When enabled, a voice prompt alerts you when you receive a newmessage.
Voice Readout
You can enable and disable the following options as well:
Action and DescriptionMenu Item
When enabled, vehicle audio (such as radio or apps) is muted for theduration of the phone call even when the phone call is in privacy.
Mute Audio inPrivacy
When enabled, an alert displays that your phone is roaming whenyou attempt to place a call.
RoamingWarning
When enabled, a message displays when the battery on your phoneis running low.
Low BatteryNotification
911 AssistNote: This service is only available in theUnited States and Canada.
Select this button to modify the on or offsetting for this feature. If the mobilephone’s contacts have been downloaded,you can adjust the following option:
Action and DescriptionMenu Item
You can select up to two numbers from your mobile device's phone-book as emergency contacts for quick access at the end of the 911Assist call process.
Set EmergencyContacts
RadioThis button is available if a Radio sourcesuch as AM or FM is the active mediasource. Pressing the button allows you toaccess the following features:
416
Flex (TP3) , enUSA, Edition date: 201803, Second-Printing
SYNC™ 3

Action and DescriptionMenu Item
Activation of this feature allows you to listen to HD radio broadcasts.FM HD Radio
AM HD Radio
(Dependent oncurrent radiosource, If Avail-able)
This feature is available when FM Radio is your active media source.Activate this feature to have the system display radio text.
Radio Text
RefreshAutoset Presets(AST)
Selecting this option stores the six strongest stations in your currentlocation to the last preset bank of the currently tuned source.
NavigationYou can adjust many of the Navigationpreferences by selecting the followingmenus.
Map Preferences
Action and DescriptionMenu Item
Map Preferences
Then select any of the following:
When this option is active, the system shows 3D renderings of build-ings.
3D City Model
When enabled, your vehicle’s previously traveled route displays withwhite dots.
Breadcrumbs
Enable this feature to display up to 3 POI icons on the navigation map.POI IconsA rest area POI icon may display on the map regardless of this setting.
Select POIsOnce this feature is activated you can selectthe icons you want displayed by selecting:
This menu allows you to choose which incident icons you would liketo have displayed on the navigation map.
Incident MapIcons
417
Flex (TP3) , enUSA, Edition date: 201803, Second-Printing
SYNC™ 3

Route Preferences
Second Level Messages, Actions and DescriptionsMenu Item
Route Preferences
Then select any of the following:
Choose to have the system display your chosen route type.Preferred Route
EcoFastestShortest
Bypass route selection in destination programming. The system onlycalculates one route based on your preferred route setting.
Always Use ___Route
When activated, the system uses your selected route type to calculateonly one route to the desired destination.
The system selects High Occupancy Vehicle or car pool lanes whenproviding route guidance.
Use HOV Lanes
The system searches for and displays available parking locations asyou approach your destination.
AutomaticallyFind Parking
Select a level of cost for the calculated Eco Route. The higher thesetting, the longer the time allotment is for the route.
Eco TimePenalty
Enable or disable considering traffic information when planning aroute. The system can find a faster route based on heavy traffic flowinformation or detect a Road Closed incident and find a detour routeif possible.
Dynamic RouteGuidance
If selected, SYNC 3 avoids freeways when computing a navigationroute.
Avoid Freeways
If selected, SYNC 3 avoids Toll Roads when computing a navigationroute.
Avoid TollRoads
If selected, SYNC 3 avoids the use of Ferries or Trains when computinga navigation route.
AvoidFerries/CarTrains
418
Flex (TP3) , enUSA, Edition date: 201803, Second-Printing
SYNC™ 3

Navigation Preferences
Action and DescriptionMenu Item
Navigation Preferences
You can adjust how the system provides prompts.GuidancePrompts
Then select any of the following:
A tone sounds followed by voice instructions.Voice and Tones
Only voice instructions are given.Voice Only
Only a tone sounds to prompt you.Tones Only
Navigation Source SelectionThe screen lists available alternativenavigation sources using Applink.
Mobile AppsYou can enable the control of compatiblemobile apps running on your Bluetooth orUSB device on SYNC 3. In order to enablemobile apps, SYNC 3 requires user consentto send and receive app authorizationinformation and updates using the dataplan associated with the connected device.
The connected devices send data to Fordin the United States. The encryptedinformation includes your VIN, SYNC 3module number, anonymous usagestatistics and debugging information.Updates may take place.Note: Not all Mobile Apps will becompatible with the system.Note: Standard data rates will apply. Fordis not responsible for any additional chargesyou may receive from your service provider,when your vehicle sends or receives datathrough the connected device.
Action and DescriptionMenu Item
Enable or disable the use of mobile apps on SYNC 3.Mobile AppsDisabling mobile apps in the settings menu disables automaticupdates and the use of mobile apps on SYNC 3.
You can view the status of mobile app permissions in the settingsmenu.
Once Mobile Apps is enabled, you have the following options:
This provides information on the current state of available appupdates.
Update MobileApps
There are three possible statuses:
Updating Mobile Apps…Up-To-DateUpdate Needed
419
Flex (TP3) , enUSA, Edition date: 201803, Second-Printing
SYNC™ 3

Action and DescriptionMenu Item
The system is trying to receivean update.
No update isrequired.
The system hasdetected a new apprequiring authoriza-tion or a generalpermissions update isrequired.
Select this button if anupdate is required and youwant to request this updatemanually. For example, whenyour mobile device isconnected to a Wi-Fi hotspot,select:
Request Update
Request Update
Grant or deny permissions to all apps at once.All Apps
Grant or deny an individual app particular permissions. App permis-sions are organized into groups. By pressing the info book icon, youcan see which signals are included in each group.
There may alsobe SYNC 3enabled appslisted underthese options.
Note: Ford is not responsible or liable forany damages or loss of privacy relating tousage of an app, or dissemination of anyvehicle data that you approve Ford toprovide to an app.
GeneralAccess and adjust the system settings,voice features, as well as phone, navigationand wireless settings.
Menu Item
Select to have the touchscreen display in English,Spanish or French.
Language
Select to display units in kilometers or miles.Distance
Select to display units in Celsius or Fahrenheit.Temperature
Select to have the system beep to confirm choicesmade through the touchscreen.
Touch Screen Beep
When you activate this option, the system automatic-ally updates when you have an available Internetconnection through a Wi-Fi network or mobileconnection.
Automatic System Updates
420
Flex (TP3) , enUSA, Edition date: 201803, Second-Printing
SYNC™ 3

Menu Item
Information pertaining to the system and its software.About SYNC
Documentation of the software license for the system.Software Licenses
Select to restore factory defaults. This erases allpersonal settings and personal data.
Master Reset
Wi-Fi & HotspotAccess SYNC Wi-Fi and Vehicle Hotspotsettings and information.
System Wi-FiYou can access the following:
Action and DescriptionMenu Item
Enable this option to connect to Wi-Fi for SYNC 3 vehicle softwareupdates.
Wi-Fi
This provides you with a list of available Wi-Fi networks within range.View AvailableNetworks
Clicking on a network from the list allows you to connect or disconnectfrom that network. The system may require a security code toconnect.
When you click the information button next to a network, moreinformation about the network displays such as the signal strength,connection status and security type.
The system alerts you when your vehicle is parked and a Wi-Finetwork is within range if SYNC is not already connected.
Wi-Fi AvailableNotifications
Vehicle Hotspot (If Equipped)You can access the following:
Action and DescriptionMenu Item
Allows you to turn the hotspot on and off.Wi-Fi HotspotOn/Off
Allows you to view and edit hotspot settings such as the SSID andpassword.
Settings
Allows you to view your vehicle's hotspot plan and data usage.Data Usage
Allows you to manage devices connected to your hotspot.Manage Devices
421
Flex (TP3) , enUSA, Edition date: 201803, Second-Printing
SYNC™ 3

Note: The Vehicle Wi-Fi Hotspot (VehicleHotspot) may be operational while ignitionis On and may remain operational while theignition is Off.Note: Vehicle Hotspot services are providedby the vehicle network carrier, subject toyour vehicle network carrier agreement,coverage and availability.Note: It is the account owner’sresponsibility to remove the vehicle fromthe vehicle network carrier account whenownership of the vehicle is transferred. If theowner would like to remove the vehicle fromthe account for any reason, please contactyour vehicle network carrier for moreinformation.Note: : Data, e.g. the Vehicle IdentificationNumber (VIN), SIM Card ID, and data planusage, is shared between Ford and thevehicle network carrier to provide theVehicle Hotspot service in accordance withyour vehicle network carrier agreement,coverage and availability, and may be usedto enable a seamless transition from an oldto new embedded modem and to confirmany updates are successfully delivered.Note: : For your convenience data usagemay be available for monitoring underSettings but may not reflect actual orcurrent usage. The vehicle network carrieris responsible for providing informationabout your account. Please contact thevehicle network carrier for more information.
Note: : Ford may need to update operatingsystem software on your vehicle, includingsecurity updates and bug fixes, to keepconnected services current, like VehicleHotspot, without prior notice to you.Note: If you do not have an active vehiclehotspot data plan, open your web browserand go to a website using the HTTP protocolto be automatically redirected to the vehiclenetwork carrier landing page where you canpurchase data. Websites using HTTPS willnot automatically redirect.
Ambient Lighting (If Equipped)
Tap a color once to active ambient lighting.This sets the color to the highest intensity.You can drag the colors up and down toincrease or decrease the intensity.To switch ambient lighting off, press theactive color once or drag the active colorall the way down to zero intensity.
VehicleNote: Your vehicle may not have all ofthese features.You can select the following features toupdate their settings.
Door Keypad CodeSelect this button to add or erase apersonal door keypad code. To add orerase a personal code, you first need toenter the five-digit factory set code. Youcan find this code on the owner's walletcard in the glove box or from yourauthorized dealer.
422
Flex (TP3) , enUSA, Edition date: 201803, Second-Printing
SYNC™ 3

Camera Settings
To make adjustments using the touchscreen, select:
Action and DescriptionMessage
Camera Settings
Then select from the following:
You can enable or disable this option using the slider.Rear CameraDelay
You can find more information on the rear-view camera system in the parking aids chapterof your owner manual.
Onboard Modem Serial Number (ESN)Selecting this button on the settings menushows you the ESN number for yoursystem. You need this number for certainregistrations such as Satellite Radio.
DisplayTo make adjustments using the touchscreen, select:
Action and DescriptionMenu Item
The screen goes black and does not display anything. To switch thescreen back on, simply tap the screen.
Display Off
Make the screen display brighter or dimmer.Brightness
You can select:Mode
The screen automatically switches between day andnight modes based on the outside light level.
Auto
The screen displays with a light background to enhancedaytime viewing.
Day
The screen displays with a darker background to makenighttime viewing easier.
Night
Enable this option to automatically dim the display brightness basedon ambient lighting conditions.
Auto Dim
423
Flex (TP3) , enUSA, Edition date: 201803, Second-Printing
SYNC™ 3

Voice Control You can adjust the voice control settingsby selecting the following options.
Menu Item
Enable this option to remove additional voice promptsand confirmations.
Advanced Mode
Enable this option to have the system confirm a contactsname with you before making a call.
Phone Confirmation
Enable this option to have the system display a list ofavailable voice commands when the voice button ispressed.
Voice Command List
Valet ModeValet mode allows you to lock the system.No information is accessible until thesystem is unlocked with the correct PIN.When you select valet mode a pop upappears informing you that a four digitcode must be entered to enable anddisable valet mode. You can use any PINyou choose but you must use the same PINto disable valet mode. The system asksyou to input the code.Note: If the system is locked and youcannot remember the PIN, please contactthe Customer Relationship Center.United States: 1-800-392-3673Canada: 1-800-565-3673
To enable valet mode, enter your chosenPIN. The system then asks to confirm yourPIN by reentering it. The system then locks.To unlock the system, enter the same pinnumber. The system reconnects to yourphone and all of your options are availableagain.
SYNC™ 3 TROUBLESHOOTINGYour SYNC 3 system is easy to use.However, should questions arise, pleaserefer to the tables below.To check your cell phone's compatibility,refer to the regional Ford or Lincolnwebsite.
424
Flex (TP3) , enUSA, Edition date: 201803, Second-Printing
SYNC™ 3
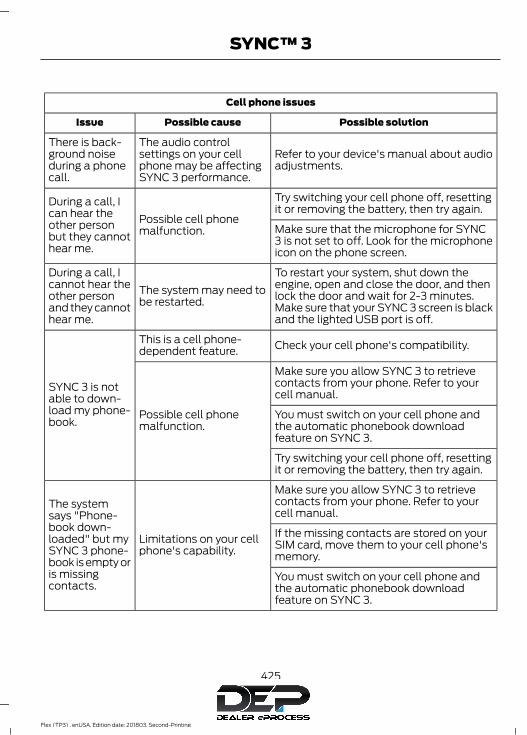
Cell phone issues
Possible solutionPossible causeIssue
Refer to your device's manual about audioadjustments.
The audio controlsettings on your cellphone may be affectingSYNC 3 performance.
There is back-ground noiseduring a phonecall.
Try switching your cell phone off, resettingit or removing the battery, then try again.
Possible cell phonemalfunction.
During a call, Ican hear theother personbut they cannothear me.
Make sure that the microphone for SYNC3 is not set to off. Look for the microphoneicon on the phone screen.
To restart your system, shut down theengine, open and close the door, and thenlock the door and wait for 2-3 minutes.Make sure that your SYNC 3 screen is blackand the lighted USB port is off.
The system may need tobe restarted.
During a call, Icannot hear theother personand they cannothear me.
Check your cell phone's compatibility.This is a cell phone-dependent feature.
SYNC 3 is notable to down-load my phone-book.
Make sure you allow SYNC 3 to retrievecontacts from your phone. Refer to yourcell manual.
Possible cell phonemalfunction.
You must switch on your cell phone andthe automatic phonebook downloadfeature on SYNC 3.
Try switching your cell phone off, resettingit or removing the battery, then try again.
Make sure you allow SYNC 3 to retrievecontacts from your phone. Refer to yourcell manual.
Limitations on your cellphone's capability.
The systemsays "Phone-book down-loaded" but mySYNC 3 phone-book is empty oris missingcontacts.
If the missing contacts are stored on yourSIM card, move them to your cell phone'smemory.
You must switch on your cell phone andthe automatic phonebook downloadfeature on SYNC 3.
425
Flex (TP3) , enUSA, Edition date: 201803, Second-Printing
SYNC™ 3

Cell phone issues
Possible solutionPossible causeIssue
Check your cell phone's compatibility.This is a cell phone-dependent feature.
I am havingtroubleconnecting mycell phone toSYNC 3.
Try switching your cell phone off, resettingit or removing the battery, then try again.
Possible cell phonemalfunction.
Try deleting your device from SYNC 3 anddeleting SYNC from your device, then tryingagain.
Always check the security and auto acceptprompt settings relative to the SYNC 3Bluetooth connection on your cell phone.
Update your cell phone's firmware.
Switch the auto download setting off.
Check your cell phone's compatibility.This is a cell phone-dependent feature.
Text messagingis not workingon SYNC 3.
Try switching your cell phone off, resettingit or removing the battery, then try again.
Possible cell phonemalfunction.
iPhone • Go to your cell phone's Settings.• Go to the Bluetooth Menu.• Press the blue circle to the right of the
device named with your vehicle makeand model to enter the next menu.
• Turn Show Notifications on.• Disconnect then reconnect your iPhone
from the SYNC 3 system to activate thissettings update.
Your iPhone is now set up to forwardincoming text messages to SYNC 3.Repeat these steps for every other SYNC 3vehicle that you connect. Your iPhone willonly forward incoming text messages toSYNC 3 if the iPhone is not unlocked in themessaging application.Replying to text messages using SYNC 3 isnot supported by iPhone.
426
Flex (TP3) , enUSA, Edition date: 201803, Second-Printing
SYNC™ 3

Cell phone issues
Possible solutionPossible causeIssue
Text messages from WhatsApp and Face-book Messenger are not supported.
Your cell phone must support downloadingtext messages through Bluetooth to receiveincoming text messages.
This is a cell phone-dependent feature.
Audible textmessages donot work on mycell phone.
Because each cell phone is different, referto your device's manual for the specific cellphone you are pairing. In fact, there can bedifferences between cell phones due tobrand, model, service provider and softwareversion.
This is a cell phone limita-tion.
USB and Bluetooth Stereo issues
Possible solutionPossible causeIssue
Disconnect the device from SYNC 3. Tryswitching your device off, resetting it orremoving the battery, then reconnect it toSYNC 3.
Possible device malfunc-tion.I am having
troubleconnecting mydevice.
Make sure you are using the manufacturer'scable.
Make sure to correctly insert the USB cableinto the device and your vehicle's USB port.
Make sure that the device does not havean auto-install program or active securitysettings.
Make sure your device is unlocked beforeconnecting it to SYNC 3.
The device has a lockscreen enabled.
Make sure you are not leaving the device inyour vehicle during very hot or coldtemperatures.
This is a device limitation.
SYNC 3 doesnot recognizemy device whenI start myvehicle.
Make sure you connect the device to SYNC3 and that you have started the mediaplayer on your device.
This is a device-dependent feature.
Bluetooth audiodoes notstream.
427
Flex (TP3) , enUSA, Edition date: 201803, Second-Printing
SYNC™ 3

USB and Bluetooth Stereo issues
Possible solutionPossible causeIssue
The device is notconnected.
Try switching your device off, resetting it orremoving the battery, then reconnect it toSYNC 3.
The device is in a badstate.
Make sure that all song details are popu-lated.
Your music files may notcontain the correct artist,song title, album or genreinformation.
SYNC 3 doesnot recognizemusic that is onmy device.
Try replacing the corrupt file with a newversion.
The file may becorrupted.
Some devices require you to change theUSB settings from mass storage to mediatransfer protocol class.
The song may havecopyright protection thatdoes not allow it to play.
Convert the file to a supported format. SeeEntertainment (page 382).
The file format is notsupported by SYNC 3.
Update media index. See Settings (page411).
The device needs to bere-indexed.
Make sure your device is unlocked beforeconnecting it to SYNC 3.
The device has a lockscreen enabled.
Disconnect the device from SYNC 3. Tryswitching your device off, resetting it orremoving the battery, then connect it backto SYNC 3.
This is a device limitation.
When I connectmy device, Isometimes donot hear anysound.
To listen to Apple devices through USB,select AirPlay from the devices ControlCenter, then select Dock Connector.
To listen to Apple devices throughBluetooth Stereo, select AirPlay from thedevices Control Center, then select SYNC.
Connect a compatible device or mediaplayer.
The device or mediaplayer is incompatible.
SYNC 3 doesnot display thesong informa-tion, repeat, orshuffle buttons.
428
Flex (TP3) , enUSA, Edition date: 201803, Second-Printing
SYNC™ 3

Wi-Fi Access Point issues
Possible solutionPossible causeIssue
Verify password.Password error.Failed connec-tion.
Check for a poor Wi-Fi signal.Weak signal.
Use a unique name for your SSID, don’t usethe default name unless it contains aunique identifier, such as part of the MACaddress.
Multiple Access pointswithin range with thesame SSID.
Position the vehicle close to the accesspoint with the front of the vehicle facing theaccess point direction and removeobstacles if possible. Other Wi-Fi,Bluetooth, microwave and cordless phonesmay cause interference.
Weak signal probablydue to distance from theaccess point, obstructionor high interference.
Disconnectingafter successfulconnection.
If the vehicle is equipped with heatedwindshield, try positioning the vehicle sothat the windshield is not facing the accesspoint. If you have metallic window tintingbut not on the windshield, position thevehicle to face the access point. If allwindows are tinted, you can open thewindows in the direction of the access pointif that is feasible.
There may be anobstruction betweenSYNC 3 and the accesspoint.
Poor signal seenby SYNC 3despite beingnear a accesspoint.
Try to remove other obstructions that mayimpact signal quality such as opening thegarage door.
Please set the network to visible and tryagain.
The access point wasdefined as a hiddennetwork.
An access pointis not listed inthe list of avail-able networks.
429
Flex (TP3) , enUSA, Edition date: 201803, Second-Printing
SYNC™ 3

Wi-Fi Access Point issues
Possible solutionPossible causeIssue
SYNC 3 currently does not provide anaccess point.
SYNC 3 does notcurrently provide aaccess point.
SYNC 3 is notseen whensearching forWi-Fi networksfrom your phoneor other devices.
Check the signal quality (under networkdetails), if SYNC 3 indicates good or excel-lent, test with another high-speed equippedaccess point where the environment ismore predictable.
Poor signal strength, toofar from the access point,access point issupporting multipleconnections, slowInternet connection orother problems.
Software down-load takes toolong.
Test the connection with another device, ifthe access point requires a subscription,you may contact the service provider.
It is possible that there isno new software. Theconnected access pointmay be a managed oneand it requires either asubscription or agreeingto the terms and condi-tions.
SYNC 3 seemsto connect witha access pointand the signalstrength isexcellent butthe software isnot beingupdated.
430
Flex (TP3) , enUSA, Edition date: 201803, Second-Printing
SYNC™ 3

AppLink Issues
Possible solution(s)Possible cause(s)Issue
Make sure you have a compatible smart-phone; an Android with OS 2.3 or higher oran iPhone 3GS or newer with iOS 5.0 orhigher. Additionally, make sure you pair andconnect your phone to SYNC 3 in order tofind AppLink-capable apps on your device.iPhone users must also connect to a USBport with an Apple USB cable.
You did not connect anApplink Compatiblephone to SYNC 3.
AppLink MobileApplications:When I select"Find MobileApps," SYNC 3does not findany applica-tions.
Make sure you have downloaded andinstalled the latest version of the app fromyour phone's app store. Make sure the appis running on your phone. Some appsrequire you to register or login to the appon the phone before using them withAppLink. Also, some may have a "FordSYNC" setting, so check the app's settingsmenu on the phone.
AppLink-enabled appsare not installed andrunning on your mobiledevice.
My phone isconnected, but Istill cannot findany apps.
Closing and restarting apps may help SYNC3 find the application if you cannot discoverit inside the vehicle. On an Android device,if apps have an 'Exit' or 'Quit' option, thenselect it and restart the app. If the app doesnot have that option, select the phone'ssettings menu and select 'Apps', then findthe particular app and choose 'Force stop.'Do not forget to restart the app afterward,then select "Find Mobile Apps" on SYNC 3.
Sometimes apps do notproperly close and re-open their connection toSYNC 3, over ignitioncycles, for example.
My phone isconnected, myapp(s) arerunning, but Istill cannot findany apps. On an iPhone with iOS7+, to force close an
app, double tap the home button thenswipe up on the app to close it. Tap thehome button again, then select the appagain to restart it. After a few seconds, theapp should then appear in SYNC 3's MobileApp's Menu.
431
Flex (TP3) , enUSA, Edition date: 201803, Second-Printing
SYNC™ 3

AppLink Issues
Possible solution(s)Possible cause(s)Issue
Switch Bluetooth off and then on to resetit on your phone. If you are in your vehicle,SYNC 3 should be able to automatically re-connect to your phone if you press the"Phone" button.
There is a Bluetooth issueon some older versionsof the Android operatingsystem that may causeapps that were found onyour previous vehicledrive to not be foundagain if you did notswitch Bluetooth off.
My Androidphone isconnected, myapp(s) arerunning, Irestarted them,but I still cannotfind any apps.
Unplug the USB cable from the phone, waita moment, and plug the USB cable back into the phone. After a few seconds, the appshould appear in SYNC 3's Mobile AppsMenu. If not, "Force Close" the applicationand restart it.
You may need to resetthe USB connection toSYNC 3.
My iPhone isconnected, myapp is running, Irestarted theapp but I stillcannot find it onSYNC 3.
Increase the Bluetooth volume of thedevice by using the device's volume controlbuttons which are most often found on theside of the device.
The Bluetooth volume onthe phone may be low.
I have anAndroid phone.I found andstarted mymedia app onSYNC 3, butthere is nosound or thesound is verylow.
Force close or uninstall the apps you do notwant SYNC 3 to find. If the app has a "FordSYNC" setting, disable that setting in theapp's settings menu on the phone.
Some Android deviceshave a limited number ofBluetooth ports thatapps can use to connect.If you have more AppLinkapps on your phone thanthe number of availableBluetooth ports, you willnot see all of your appslisted in the SYNC 3mobile apps menu.
I can only seesome of theAppLink appsrunning on myphone listed inthe SYNC 3Mobile AppsMenu.
432
Flex (TP3) , enUSA, Edition date: 201803, Second-Printing
SYNC™ 3

Voice command issues
Possible solutionPossible causeIssue
Review the cell phone voice commandsand the media voice commands at thebeginning of their respective sections.You may be using the
wrong voice commands.SYNC 3 doesnot understandwhat I amsaying.
Refer to the audio display during an activevoice session to find a list of voicecommands there.
Wait for the system to prompt you beforeyou state your command.
You may be speaking toosoon or at the wrongtime.
Review the media voice commands at thebeginning of the media section.
You may be using thewrong voice commands.
SYNC 3 doesnot understandthe name of asong or artist.
Say the song or artist name exactly as it isdisplayed on your device. For example, say"Play Artist Prince" or "Play song PurpleRain".
You may not be sayingthe name exactly as itappears on your device.
Make sure you are saying the complete titlesuch as "California remix featuring JenniferNettles".
If there are any abbreviations in the name,like ESPN or CNN, you have to spell those:"E-S-P-N" or "C-N-N".
Make sure that song titles, artists, album,and playlists names do not have any specialcharacters like *, - or +.
The song or artist namemay have some specialcharacters that are notbeing recognized bySYNC 3.
Make sure that you are saying the nameexactly as it appears on your phone. Forexample, if your contact is "Joe Wilson",say "Call Joe Wilson". If your contact nameis "Mom", say "Call Mom".
You may not be sayingthe name exactly as itappears on your phone-book.
SYNC 3 doesnot understandor is calling thewrong contactwhen I want tomake a call. Make sure that your contact names do not
have any special characters like *, - or +.The contact name maycontain special charac-ters.
433
Flex (TP3) , enUSA, Edition date: 201803, Second-Printing
SYNC™ 3

Voice command issues
Possible solutionPossible causeIssue
SYNC 3 applies the phonetic pronunciationrules of the selected language to thecontact names stored on your cell phone.
You may not be sayingthe name exactly as itappears on your phone-book.
The SYNC 3voice controlsystem is havingtrouble recog-nizing foreignnames storedon my cellphone.
Helpful Hint: You can select your contactmanually. Press PHONE. Select the optionfor phonebook and then contact name.Press the soft-key option to hear it. SYNC3 will read the contact name to you, givingyou some idea of the pronunciation it isexpecting.
SYNC 3 applies the phonetic pronunciationrules of the selected language to the namesstored on your media player or USB flashdrive. It is able to make some exceptionsfor very popular artist names (for example,U2) such that you can always use theEnglish pronunciation for these artists.
You may be saying theforeign names using thecurrently selectedlanguage for SYNC 3.
The SYNC 3voice controlsystem is havingtrouble recog-nizing foreigntracks, artists,albums, genresand playlistnames from mymedia player orUSB flash drive.
SYNC 3 uses a synthetically generatedvoice rather than pre-recorded humanvoice.
SYNC 3 uses text-to-speech voice prompttechnology.
The systemgenerates voiceprompts andthe pronunci-ation of somewords may notbe accurate formy language.
SYNC 3 offers several new voice controlfeatures for a wide range of languages.Dialing a contact name directly from thephonebook without pre-recording (forexample, “call John Smith”) or selecting atrack, artist, album, genre or playlist directlyfrom your media player (for example, "playartist Madonna").
434
Flex (TP3) , enUSA, Edition date: 201803, Second-Printing
SYNC™ 3

Personal Profiles
Possible cause and solutionIssue
Personal Profiles have not been set up.
I cannot create a profile.
An invalid profile name was entered.
A memory button was not selected whenprompted.
The vehicle’s ignition was not On and inPark or was shifted out of Run or Park whilecreating a profile.
Personal Profiles is turned off.
The lock button was not selected on akeyfob when prompted.
I cannot link a keyfob.
The keyfob selected was already associ-ated to another profile and an overwritewas declined.
A profile recall was performed while linkinga keyfob.
The vehicle’s ignition was not On and inPark, or was shifted out of Run or Park whilelinking a keyfob.
The old linking method is used.
The unsaved setting is not supported byPersonal Profiles.
My personalized settings do not save. A different Personal Profile is active thanexpected.
Another user has changed settings for thewrong Personal Profile.
A Personal Profile has not been created.
My profile will not recall.Personal Profiles is turned off.
The requested profile is already active.
The memory button being used is not linkedto a profile.
435
Flex (TP3) , enUSA, Edition date: 201803, Second-Printing
SYNC™ 3

Personal Profiles
Possible cause and solutionIssue
The keyfob being used is not linked to aprofile.
The wrong keyfob is being used.
A button other than unlock or remote startis being pressed on a linked keyfob.
The Personal Profile was deleted.
Personal Profiles is turned off.My preset positions recall but my profiledoes not.
The vehicle is in motion.My profile recalls but my preset positionsdo not. The preset positions are the same as the
Guest or previously active profile.
Unlink and relink your keyfob in thePersonal Profiles menu. You may need tosee your authorized dealer.
I lost a keyfob.
Keyfobs had been erased and reprogramed.This could happen if you let dealership adda new keyfob to replace lost one.I lost all profiles.Master Reset had been performed withoutyour acknowledgement.
436
Flex (TP3) , enUSA, Edition date: 201803, Second-Printing
SYNC™ 3

General
Possible solutionPossible causeIssue
SYNC 3 only supports four languages in asingle module for text display, voice controland voice prompts. The country where youbought your vehicle dictates the fourlanguages based on the most popularlanguages spoken. If the selected languageis not available, SYNC 3 remains in thecurrent active language.
SYNC 3 does not supportthe currently selectedlanguage for the instru-ment cluster and inform-ation and entertainmentdisplay.
The languageselected for theinstrumentcluster andinformation andentertainmentdisplay does notmatch theSYNC 3 SYNC 3 offers several new voice control
features for a wide range of languages.Dialing a contact name directly from thephonebook without pre-recording (forexample, “call John Smith”) or selecting atrack, artist, album, genre or playlist directlyfrom your media player (for example, "playartist Madonna").
language(phone, USB,Bluetoothaudio, voicecontrol andvoice prompts).
SYNC 3 System Reset
The system has a System Reset feature that can be performed if the function of a SYNC3 feature is lost. This reset is intended to restore functionality and will not erase anyinformation previously stored in the system (such as paired devices, phonebook, callhistory, text messages, or user settings). To perform a System Reset, press and holdthe Seek Up (>>|) button while pressing and holding the Radio Power button. Afterapproximately 5 seconds the screen will go black. Allow 1-2 minutes for the systemreset to complete. You may then resume using the SYNC 3 system.
For additional assistance with SYNC 3troubleshooting, refer to the regional Fordor Lincoln website.
437
Flex (TP3) , enUSA, Edition date: 201803, Second-Printing
SYNC™ 3

For a complete listing of the accessoriesthat are available for your vehicle, pleasecontact your authorized dealer or visit theonline store web site:
Web Address (United States)
www.Accessories.Ford.com
Web Address (Canada)
www.Accessories.Ford.ca
Ford Accessories are available for yourvehicle through an authorized Ford dealer.Ford Motor Company will repair or replaceany properly authorized dealer-installedFord Original Accessory found to bedefective in factory-supplied materials orworkmanship during the warranty period,as well as any component damaged by thedefective accessories.Ford Motor Company will warrant yourFord Original Accessory through thewarranty that provides the greatestbenefit:• 24 months, unlimited mileage.• The remainder of your new vehicle
limited warranty.Contact an authorized dealer for detailsand a copy of the warranty.
Exterior Style• Hood deflectors.• Side-window deflectors*.• Splash guards.• Spoiler.
Interior Style• Ambient lighting.• Door sill plates with logo.• Floor mats.
• Illuminated door sill plate.• Rear seat entertainment*.
Lifestyle• Ash cup or coin holder.• Bluetooth speakers*.• Camping tent*.• Cargo area protector.• Cargo net.• Cargo organization and management.• Conversation mirror.• Roof racks and carriers*.• Roof rails.• Seat covers*.• Trailer hitches, wiring harnesses and
accessories.• Tablet cradle.
Peace of Mind• Full vehicle covers*.• Locking fuel plug.• Remote start.• Roadside assistance kits*.• Vehicle security systems.• Wheel locks.*Ford Licensed Accessories. The accessorymanufacturer designs, develops andtherefore warrants Ford LicensedAccessories, and does not design or testthese accessories to Ford Motor Companyengineering requirements. Contact anauthorized Ford dealer for themanufacturer's limited warranty detailsand request a copy of the Ford LicensedAccessories product limited warranty fromthe accessory manufacturer.
438
Flex (TP3) , enUSA, Edition date: 201803, Second-Printing
Accessories

For maximum vehicle performance, keepthe following information in mind whenadding accessories or equipment to yourvehicle:• When adding accessories, equipment,
passengers and luggage to yourvehicle, do not exceed the total weightcapacity of the vehicle or of the frontor rear axle (GVWR or GAWR asindicated on the Safety ComplianceCertification label). Ask an authorizeddealer for specific weight information.
• The Federal CommunicationsCommission (FCC) and CanadianRadio TelecommunicationsCommission (CRTC) regulate the useof mobile communications systemsthat are equipped with radiotransmitters, for example two-wayradios, telephones and theft alarms.Any such equipment installed in yourvehicle should comply with FederalCommunications Commission (FCC)and Canadian RadioTelecommunications Commission(CRTC) regulations and should beinstalled only by an authorized dealer.
• An authorized dealer needs to installmobile communications systems.Improper installation may harm theoperation of your vehicle, particularlyif the manufacturer did not design themobile communication systemspecifically for automotive use.
• If you or an authorized dealer add anynon-Ford electrical accessories orcomponents to your vehicle, you mayadversely affect battery performanceand durability. In addition, you may alsoadversely affect the performance ofother electrical systems in the vehicle.
439
Flex (TP3) , enUSA, Edition date: 201803, Second-Printing
Accessories

PROTECT YOURSELF FROM THE RISINGCOST OF VEHICLE REPAIRS WITH A FORDPROTECT EXTENDED SERVICE PLAN.
Ford Protect Extended ServicePlans (U.S. Only)Ford Protect extended service plan meanspeace of mind. It’s the extended serviceplan backed by Ford Motor Company, andprovides more protection beyond the NewVehicle Limited Warranty coverage. Whenyou visit your Ford Dealer, Insist on FordProtect extended service plans!
Ford Protect Can Quickly Pay for ItselfOne trip to the Service Center could easilyexceed the price of your Ford Protectextended service plan. With Ford Protectextended service plan you minimize yourrisk for unexpected repair bills and risingrepair costs.
Up to 1,000+ Covered VehicleComponentsThere are four mechanical Ford Protectextended service plans with different levelsof coverage. Ask your authorized dealer fordetails.1. PremiumCARE - Our most
comprehensive coverage. With over1,000 covered components, this planis so complete it’s probably easier tolist what’s not covered.
2. ExtraCARE - Covers 113 components,and includes many high-tech items.
3. BaseCARE - Covers 84 components.4. PowertrainCARE - Covers 29 critical
components.Ford Protect extended service plans arehonored by all authorized Ford dealers inthe U.S., Canada and Mexico.
That means you get:• Reliable, quality service at any Ford or
Lincoln dealership.• Repairs performed by factory trained
technicians, using genuine parts.
Rental Car Reimbursement
1st day Rental BenefitIf you bring your car into your dealer forservice, we’ll give you a loaner to use forthe day.
Extended Rental BenefitsIf your vehicle is kept overnight for coveredrepairs, you are eligible for rental carcoverage, including warranty repairs, andField Service Actions.
Roadside AssistanceExclusive 24/7 roadside assistance,including:• Towing, flat-tire change and battery
jump starts.• Out of fuel and lock-out assistance.• Travel expense reimbursement for
lodging, meals and rental car.• Assistance for taxi, shuttle, rental car
coverage or other transportation.
Transferable CoverageIf you sell your vehicle before your FordProtect extended service plan coverageexpires, you can transfer any remainingcoverage to the new owner. Which shouldgive you and your potential buyer a littlemore peace of mind.
440
Flex (TP3) , enUSA, Edition date: 201803, Second-Printing
Ford Protect

Less Cost to Properly Maintain YourVehicleFord Protect extended service plan alsooffers a Premium Maintenance Plan thatcovers all scheduled maintenance, andselected wear items. The coverage isprepaid, so you never have to worry aboutthe cost of your vehicle’s maintenance.Covered maintenance includes:• Windshield wiper blades.• Spark plugs.• The clutch disc (if equipped).• Brake pads and linings.• Shock absorbers.• Struts.• Engine Belts.• Engine coolant hoses, clamps and
o-rings.• Diesel exhaust fluid replenishment (if
equipped).• Cabin air filter replacement every
20,000 mi (32,000 km) (electricvehicles only).
Interest Free Finance OptionsJust a 10% down payment will provide youwith an affordable, no interest, no feepayment program allowing you all thesecurity and benefits Ford Protectextended service plan has to offer whilepaying over time. You are pre-approvedwith no credit check or hassles. To learnmore, call our Ford Protect extendedservice plan specialists at 800-367-3377.Ford Protect Extended Service PlanP.O. Box 321067Detroit, MI 48232
Ford Protect Extended ServicePlan (CANADA ONLY)You can get more protection for yourvehicle by purchasing a Ford Protectextended service plan. Ford Protectextended service plan is the only servicecontract backed by Ford Motor Companyof Canada, Limited. Depending on the planyou purchase, Ford Protect extendedservice plan provides benefits such as:• Rental reimbursement.• Coverage for certain maintenance and
wear items.• Protection against repair costs after
your New Vehicle Limited WarrantyCoverage expires.
• Roadside Assistance benefits.There are several Ford Protect extendedservice plans available in various time,distance and deductible combinations.Each plan is tailored to fit your own drivingneeds, including reimbursement for towingand rental. When you purchase FordProtect extended service plan, you receiveadded peace-of-mind protectionthroughout Canada, the United States andMexico, provided by a network ofparticipating authorized Ford MotorCompany dealers.Note: Repairs performed outside ofCanada, the United States and Mexico arenot eligible for Ford Protect extendedservice plan coverage.This information is subject to change. Formore information; visit your local Ford ofCanada dealer or www.ford.ca to find theFord Protect extended service plan that isright for you.
441
Flex (TP3) , enUSA, Edition date: 201803, Second-Printing
Ford Protect

GENERAL MAINTENANCEINFORMATIONWhy Maintain Your Vehicle?Carefully following the maintenanceschedule helps protect against major repairexpenses resulting from neglect orinadequate maintenance and may help toincrease the value of your vehicle whenyou sell or trade it. Keep all receipts forcompleted maintenance with your vehicle.We have established regular maintenanceintervals for your vehicle based uponrigorous testing. It is important that youhave your vehicle serviced at the propertimes. These intervals serve two purposes;one is to maintain the reliability of yourvehicle and the second is to keep your costof owning your vehicle down.It is your responsibility to have allscheduled maintenance performed and tomake sure that the materials used meetthe specifications identified in this owner'smanual. See Capacities andSpecifications (page 299).Failure to perform scheduled maintenanceinvalidates warranty coverage on partsaffected by the lack of maintenance.
Why Maintain Your Vehicle at YourDealership?Factory-Trained TechniciansService technicians participate in extensivefactory-sponsored certification training tohelp them become experts on theoperation of your vehicle. Ask yourdealership about the training andcertification their technicians havereceived.
Genuine Ford and Motorcraft®Replacement PartsDealerships stock Ford, Motorcraft andFord-authorized branded re-manufacturedreplacement parts. These parts meet orexceed our specifications. Parts installedat your dealership carry a nationwide24-month or unlimited mile (kilometer)parts and labor limited warranty.If you do not use Ford authorized parts theymay not meet our specifications anddepending on the part, it could affectemissions compliance.
ConvenienceMany dealerships have extended eveningand Saturday hours to make your servicevisit more convenient and they offer onestop shopping. They can perform anyservices that are required on your vehicle,from general maintenance to collisionrepairs.Note: Not all dealers have extended hoursor body shops. Please contact your dealerfor details.
Protecting Your InvestmentMaintenance is an investment that paysdividends in the form of improvedreliability, durability and resale value. Tomaintain the proper performance of yourvehicle and its emission control systems,make sure you have scheduledmaintenance performed at the designatedintervals.Your vehicle is equipped with theIntelligent Oil-Life Monitor system, whichdisplays a message in the informationdisplay at the proper oil change interval.This interval may be up to one year or10,000 mi (16,000 km).
442
Flex (TP3) , enUSA, Edition date: 201803, Second-Printing
Scheduled Maintenance

When the oil change message appears inthe information display, it is time for an oilchange. Make sure you perform the oilchange within two weeks or 500 mi(800 km) of the message appearing. Makesure you reset the Intelligent Oil-LifeMonitor after each oil change. See OilChange Indicator Reset (page 248).If your information display resetsprematurely or becomes inoperative, youshould perform the oil change interval atsix months or 5,000 mi (8,000 km) fromyour last oil change. Never exceed one yearor 10,000 mi (16,000 km) between oilchange intervals.Your vehicle is very sophisticated and builtwith multiple, complex, performancesystems. Every manufacturer developsthese systems using differentspecifications and performance features.That is why it is important to rely upon yourdealership to properly diagnose and repairyour vehicle.Ford Motor Company has recommendedmaintenance intervals for various partsand component systems based uponengineering testing. Ford Motor Companyrelies upon this testing to determine themost appropriate mileage for replacementof oils and fluids to protect your vehicle atthe lowest overall cost to you andrecommends against maintenanceschedules that deviate from the scheduledmaintenance information.We strongly recommend the use of onlygenuine Ford, Motorcraft orFord-authorized re-manufacturedreplacement parts engineered for yourvehicle.
Additives and ChemicalsThis owner's manual and the FordWorkshop Manual list the recommendedadditives and chemicals for your vehicle.We do not recommend using chemicals oradditives not approved by us as part ofyour vehicle’s normal maintenance. Pleaseconsult your warranty information.
Oils, Fluids and FlushingIn many cases, fluid discoloration is anormal operating characteristic and, byitself, does not necessarily indicate aconcern or that the fluid needs to bechanged. However, a qualified expert, suchas the factory-trained technicians at yourdealership, should inspect discolored fluidsthat also show signs of overheating orforeign material contaminationimmediately.Make sure to change your vehicle’s oils andfluids at the specified intervals or inconjunction with a repair. Flushing is aviable way to change fluid for many vehiclesub-systems during scheduledmaintenance. It is critical that systems areflushed only with new fluid that is the sameas that required to fill and operate thesystem or using a Ford-approved flushingchemical.
Owner Checks and ServicesMake sure you perform the following basicmaintenance checks and inspections everymonth or at six-month intervals.
443
Flex (TP3) , enUSA, Edition date: 201803, Second-Printing
Scheduled Maintenance

Check Every Month
Engine oil level.
Function of all interior and exterior lights.
Tires (including spare) for wear and proper pressure.
Windshield washer fluid level.
Fuel and water separator. Drain if necessary (or if indicated by the information display).
Holes and slots in the tail pipe to make sure they are functional and clear of debris.
Check Every Six Months
Battery connections. Clean if necessary.
Body and door drain holes for obstructions. Clean if necessary.
Cooling system fluid level and coolant strength.
Door weatherstrips for wear. Lubricate if necessary.
Hinges, latches and outside locks for proper operation. Lubricate if necessary.
Parking brake for proper operation.
Safety belts and seat latches for wear and function.
Safety warning lamps (brake, ABS, airbag and safety belt) for operation.
Washer spray and wiper operation. Clean or replace blades as necessary.
Multi-Point InspectionIn order to keep your vehicle running right,it is important to have the systems on yourvehicle checked regularly. This can helpidentify potential issues and prevent majorproblems. We recommend having thefollowing multi-point inspection performedat every scheduled maintenance intervalto help make sure your vehicle keepsrunning great.
444
Flex (TP3) , enUSA, Edition date: 201803, Second-Printing
Scheduled Maintenance

Multi-Point Inspection
Hazard warning system operationAccessory drive belt(s)
Horn operationBattery performance
Radiator, cooler, heater and air conditioninghoses
Engine air filter
Suspension components for leaks ordamage
Exhaust system
Steering and linkageExterior lamps operation
Tires (including spare) for wear and properpressure2
Fluid levels1; fill if necessary
Windshield for cracks, chips or pitsFor oil and fluid leaks
Washer spray and wiper operationHalf-shaft dust boots1 Brake, coolant recovery reservoir, automatic transmission and window washer2If your vehicle is equipped with a temporary mobility kit, check the tire sealant expirationUse By date on the canister. Replace as needed.
Be sure to ask your dealership serviceadvisor or technician about the multi-pointvehicle inspection. It is a comprehensiveway to perform a thorough inspection ofyour vehicle. Your checklist gives youimmediate feedback on the overallcondition of your vehicle.
NORMAL SCHEDULEDMAINTENANCEIntelligent Oil-Life Monitor™Your vehicle is equipped with an IntelligentOil-Life Monitor that determines when youshould change the engine oil based on howyour vehicle is used. By using severalimportant factors in its calculations, themonitor helps reduce the cost of owningyour vehicle and reduces environmentalwaste at the same time.
This means you do not have to rememberto change the oil on a mileage-basedschedule. Your vehicle lets you know whenan oil change is due by displaying amessage in the information display.The following table provides examples ofvehicle use and its impact on oil changeintervals. It is a guideline only. Actual oilchange intervals depend on several factorsand generally decrease with severity ofuse.
445
Flex (TP3) , enUSA, Edition date: 201803, Second-Printing
Scheduled Maintenance

When to Expect the OIL CHANGE REQUIRED Message
Vehicle Use and ExampleInterval
Normal
7,500–10,000 mi(12,000–16,000 km)
Normal commuting with highway drivingNo, or moderate, load or towingFlat to moderately hilly roadsNo extended idling
Severe
5,000–7,500 mi(8,000–12,000 km)
Moderate to heavy load or towingMountainous or off-road conditionsExtended idlingExtended hot or cold operation
Extreme3,000–5,000 mi
(5,000–8,000 km) Maximum load or towingExtreme hot or cold operation
Normal Maintenance Intervals
At Every Oil Change Interval as Indicated by the Information Display1
Change engine oil and filter.2
Rotate the tires.
Perform a multi-point inspection recommended.
Inspect the automatic transmission fluid level. Consult your dealer for requirements.
Inspect the brake pads, rotors, hoses and parking brake.
Inspect the engine cooling system strength and hoses.
Inspect the exhaust system and heat shields.
Inspect the rear axle and U-joints all wheel drive only.
Inspect the half-shaft boots.
Inspect the steering linkage, ball joints, suspension, tire-rod ends, driveshaft and U-joints.
446
Flex (TP3) , enUSA, Edition date: 201803, Second-Printing
Scheduled Maintenance

At Every Oil Change Interval as Indicated by the Information Display1
Inspect the tires, tire wear and measure the tread depth.
Inspect the wheels and related components for abnormal noise, wear, looseness ordrag.
1 Do not exceed one year or 10,000 mi (16,000 km) between service intervals.2 Reset the Intelligent Oil-Life Monitor after engine oil and filter changes. See Oil ChangeIndicator Reset (page 248).
Other Maintenance Items 1
Replace cabin air filter.Every 20,000 mi(32,000 km)
Replace engine air filter.Every 30,000 mi(48,000 km)
Change engine coolant. 2At 100,000 mi(160,000 km)
Replace spark plugs.Every 100,000 mi(160,000 km) Inspect accessory drive belt(s). 3
Change automatic transmission fluid.Every 150,000 mi(240,000 km) Replace accessory drive belt(s). 4
1 Perform these maintenance items within 3,000 mi (4,800 km) of the last engine oil andfilter change. Do not exceed the designated distance for the interval.2 Initial replacement at six years or 100,000 mi (160,000 km), then every three years or50,000 mi (80,000 km).3 After initial inspection, inspect every other oil change until replaced.4 If not replaced within the last 100,000 mi (160,000 km).
447
Flex (TP3) , enUSA, Edition date: 201803, Second-Printing
Scheduled Maintenance

SPECIAL OPERATINGCONDITIONS SCHEDULEDMAINTENANCEIf you operate your vehicle primarily in anyof the following conditions, you need to
perform extra maintenance as indicated.If you operate your vehicle occasionallyunder any of these conditions, it is notnecessary to perform the extramaintenance. For specificrecommendations, see your dealershipservice advisor or technician.
Towing a trailer or using a car-top carrier
Change engine oil and filter as indicated by the informationdisplay and perform services listed in the Normal Sched-uled Maintenance chart.
As required
Inspect rear axle and U-joints (AWD only).Inspect frequently, serviceas required
Inspect half-shaft boots.
See axle maintenance items under Exceptions.
Change automatic transmission fluid.30,000 mi (48,000 km)
Replace spark plugs.60,000 mi (96,000 km)
Extensive idling or low-speed driving for long distances, as in heavy commercial use
Change engine oil and filter as indicated by the informationdisplay and perform services listed in the Normal Sched-uled Maintenance chart.
As required
Replace cabin air filter.Inspect frequently, serviceas required
Replace engine air filter.
Change automatic transmission fluid.30,000 mi (48,000 km)
Replace spark plugs.60,000 mi (96,000 km)
Extended Hot and Cold climate operation
Change engine oil and filter.*5,000 mi (8,000 km)
*Hot Climates only
448
Flex (TP3) , enUSA, Edition date: 201803, Second-Printing
Scheduled Maintenance

Operating in off-road (unpaved, sandy, dusty) and Mountainous conditions
Replace cabin air filter.Inspect frequently, serviceas required
Replace engine air filter.
Inspect the wheels and related components for abnormalnoise, wear, looseness or drag.
5,000 mi (8,000 km)
Rotate tires, inspect tires for wear and measure treaddepth.
Change engine oil and filter.*Every 5,000 mi (8,000 km)or six months
Perform multi-point inspection.
Change automatic transmission fluid.30,000 mi (48,000 km)*Reset your Intelligent Oil-Life Monitor after engine oil and filter changes. See Oil ChangeIndicator Reset (page 248).
Exclusive use of E85 (flex fuel vehicles only)
If ran exclusively on E85, fill the fuel tank full with regularunleaded fuel.
Every oil change
ExceptionsThere are several exceptions to the NormalSchedule:Axle and PTU maintenance: The PowerTransfer Unit (PTU) and rear axle (AWDonly) in your vehicle does not require anynormal scheduled maintenance. The PTUlubricant will be more likely to require afluid change if the vehicle has extendedperiods of extreme or severe duty cycledriving. Changing or checking the PTUlubricant is not necessary unless the unithas been submerged in water or showssigns of leakage. Contact your authorizeddealer for service.
California fuel filter replacement: If youregister your vehicle in California, theCalifornia Air Resources Board hasdetermined that the failure to perform thismaintenance item does not nullify theemission warranty or limit recall liabilitybefore the completion of your vehicle'suseful life. Ford Motor Company, however,urges you to have all recommendedmaintenance services performed at thespecified intervals and to record all vehicleservice.Hot climate oil change intervals:Vehicles operating in the Middle East,North Africa, Sub-Saharan Africa orlocations with similar climates using anAmerican Petroleum Institute (API)Certified for Gasoline Engines (Certificationmark) oil of SM or SN quality, the normaloil change interval is 5,000 mi (8,000 km).
449
Flex (TP3) , enUSA, Edition date: 201803, Second-Printing
Scheduled Maintenance

If the available API SM or SN oils are notavailable, then the oil change interval is3,000 mi (4,800 km).Engine air filter and cabin air filterreplacement: The life of the engine airfilter and cabin air filter is dependent onexposure to dusty and dirty conditions.Vehicles operated in these conditionsrequire frequent inspection andreplacement of the engine air filter andcabin air filter.
SCHEDULED MAINTENANCERECORD
E146852
Repair Order #:
Distance:
Engine hours (optional):
Multi-point inspection (recommended):Signature:
Dealer stamp
E146852
Repair Order #:
Distance:
Engine hours (optional):
Multi-point inspection (recommended):Signature:
Dealer stamp
450
Flex (TP3) , enUSA, Edition date: 201803, Second-Printing
Scheduled Maintenance

E146852
Repair Order #:
Distance:
Engine hours (optional):
Multi-point inspection (recommended):Signature:
Dealer stamp
E146852
Repair Order #:
Distance:
Engine hours (optional):
Multi-point inspection (recommended):Signature:
Dealer stamp
451
Flex (TP3) , enUSA, Edition date: 201803, Second-Printing
Scheduled Maintenance

E146852
Repair Order #:
Distance:
Engine hours (optional):
Multi-point inspection (recommended):Signature:
Dealer stamp
E146852
Repair Order #:
Distance:
Engine hours (optional):
Multi-point inspection (recommended):Signature:
Dealer stamp
452
Flex (TP3) , enUSA, Edition date: 201803, Second-Printing
Scheduled Maintenance

E146852
Repair Order #:
Distance:
Engine hours (optional):
Multi-point inspection (recommended):Signature:
Dealer stamp
E146852
Repair Order #:
Distance:
Engine hours (optional):
Multi-point inspection (recommended):Signature:
Dealer stamp
453
Flex (TP3) , enUSA, Edition date: 201803, Second-Printing
Scheduled Maintenance

E146852
Repair Order #:
Distance:
Engine hours (optional):
Multi-point inspection (recommended):Signature:
Dealer stamp
E146852
Repair Order #:
Distance:
Engine hours (optional):
Multi-point inspection (recommended):Signature:
Dealer stamp
454
Flex (TP3) , enUSA, Edition date: 201803, Second-Printing
Scheduled Maintenance

E146852
Repair Order #:
Distance:
Engine hours (optional):
Multi-point inspection (recommended):Signature:
Dealer stamp
E146852
Repair Order #:
Distance:
Engine hours (optional):
Multi-point inspection (recommended):Signature:
Dealer stamp
455
Flex (TP3) , enUSA, Edition date: 201803, Second-Printing
Scheduled Maintenance

E146852
Repair Order #:
Distance:
Engine hours (optional):
Multi-point inspection (recommended):Signature:
Dealer stamp
E146852
Repair Order #:
Distance:
Engine hours (optional):
Multi-point inspection (recommended):Signature:
Dealer stamp
456
Flex (TP3) , enUSA, Edition date: 201803, Second-Printing
Scheduled Maintenance

E146852
Repair Order #:
Distance:
Engine hours (optional):
Multi-point inspection (recommended):Signature:
Dealer stamp
E146852
Repair Order #:
Distance:
Engine hours (optional):
Multi-point inspection (recommended):Signature:
Dealer stamp
457
Flex (TP3) , enUSA, Edition date: 201803, Second-Printing
Scheduled Maintenance

E146852
Repair Order #:
Distance:
Engine hours (optional):
Multi-point inspection (recommended):Signature:
Dealer stamp
E146852
Repair Order #:
Distance:
Engine hours (optional):
Multi-point inspection (recommended):Signature:
Dealer stamp
458
Flex (TP3) , enUSA, Edition date: 201803, Second-Printing
Scheduled Maintenance

E146852
Repair Order #:
Distance:
Engine hours (optional):
Multi-point inspection (recommended):Signature:
Dealer stamp
E146852
Repair Order #:
Distance:
Engine hours (optional):
Multi-point inspection (recommended):Signature:
Dealer stamp
459
Flex (TP3) , enUSA, Edition date: 201803, Second-Printing
Scheduled Maintenance

ELECTROMAGNETICCOMPATIBILITY
WARNING: Do not place objects ormount equipment on or near the airbagcover, on the side of the seatbacks (of thefront seats), or in front seat areas that maycome into contact with a deploying airbag.Failure to follow these instructions mayincrease the risk of personal injury in theevent of a crash.
WARNING: Do not fasten antennacables to original vehicle wiring, fuel pipesand brake pipes.
WARNING: Keep antenna and powercables at least 4 in (10 cm) from anyelectronic modules and airbags.
Note: We test and certify your vehicle tomeet electromagnetic compatibilitylegislation (UNECE Regulation 10 or otherapplicable local requirements). It is yourresponsibility to make sure that anyequipment an authorized dealer installs onyour vehicle complies with applicable locallegislation and other requirements.Note: Any radio frequency transmitterequipment in your vehicle (such as cellulartelephones and amateur radio transmitters)must keep to the parameters in thefollowing table. We do not provide specialprovisions or conditions for installations oruse.
Car
E239120
460
Flex (TP3) , enUSA, Edition date: 201803, Second-Printing
Appendices

Van
E239122
Truck
E239121
461
Flex (TP3) , enUSA, Edition date: 201803, Second-Printing
Appendices

Antenna PositionsMaximum output power Watt (PeakRMS)
Frequency BandMHz
1501-30
2, 35050-54
2, 35068-88
2, 350142-176
2, 350380-512
2, 310806-870
Note: After the installation of radiofrequency transmitters, check fordisturbances from and to all electricalequipment in your vehicle, both in thestandby and transmit modes.Check all electrical equipment:• With the ignition ON.• With the engine running.• During a road test at various speeds.Check that electromagnetic fieldsgenerated inside your vehicle cabin by thetransmitter installed do not exceedapplicable human exposure requirements.
END USER LICENSEAGREEMENTVEHICLE SOFTWARE END USERLICENSE AGREEMENT (EULA)• You (“You” or “Your” as applicable)
have acquired a vehicle having severaldevices, including SYNC ® and variouscontrol modules, ("DEVICES") thatinclude software licensed or owned byFord Motor Company and its affiliates("FORD MOTOR COMPANY"). Thosesoftware products of FORD MOTORCOMPANY origin, as well as associatedmedia, printed materials, and "online"or electronic documentation("SOFTWARE") are protected byinternational intellectual property lawsand treaties. The SOFTWARE islicensed, not sold. All rights reserved.
• The SOFTWARE may interface withand/or communicate with, or may belater upgraded to interface with and/orcommunicate with additional softwareand/or systems provided by FORDMOTOR COMPANY.
462
Flex (TP3) , enUSA, Edition date: 201803, Second-Printing
Appendices

IF YOU DO NOT AGREE TO THIS ENDUSER LICENSE AGREEMENT ("EULA")DO NOT USE THE DEVICES OR COPYTHE SOFTWARE. ANY USE OF THESOFTWARE, INCLUDING BUT NOTLIMITED TO USE ON THE DEVICES,WILL CONSTITUTE YOUR AGREEMENTTO THIS EULA (OR RATIFICATION OFANY PREVIOUS CONSENT).GRANT OF SOFTWARE LICENSE: ThisEULA grants you the following license:• You may use the SOFTWARE as
installed on the DEVICES and asotherwise interfacing with systemsand/or services provide by or throughFORD MOTOR COMPANY or its thirdparty software and service providers.
Description of Other Rights andLimitations• Speech Recognition: If the
SOFTWARE includes speechrecognition component(s), you shouldunderstand that speech recognition isan inherently statistical process andthat recognition errors are inherent inthe process. Neither FORD MOTOR
COMPANY nor its suppliers shall beliable for any damages arising out oferrors in the speech recognitionprocess. It is your responsibility tomonitor any speech recognitionfunctions included in the system.
• Limitations on Reverse Engineering,Decompilation and Disassembly:You may not reverse engineer,decompile, translate, disassemble orattempt to discover any source codeor underlying ideas or algorithms of theSOFTWARE nor permit others toreverse engineer, decompile ordisassemble the SOFTWARE, exceptand only to the extent that such activityis expressly permitted by applicablelaw notwithstanding this limitation orto the extent as may be permitted bythe licensing terms governing use ofany open source components includedwith the SOFTWARE.
• Limitations on Distributing,Copying, Modifying and CreatingDerivative Works: You may notdistribute, copy, make modificationsto or create derivative works based onthe SOFTWARE, except and only to theextent that such activity is expresslypermitted by applicable lawnotwithstanding this limitation or tothe extent as may be permitted by thelicensing terms governing use of anyopen source components included withthe SOFTWARE.
• Single EULA: The end userdocumentation for the DEVICES andrelated systems and services maycontain multiple EULAs, such asmultiple translations and/or multiplemedia versions (e.g., in the userdocumentation and in the software).Even if you receive multiple EULAs, youare licensed to use only one (1) copy ofthe SOFTWARE.
463
Flex (TP3) , enUSA, Edition date: 201803, Second-Printing
Appendices

• SOFTWARE Transfer: You maypermanently transfer your rights underthis EULA only as part of a sale ortransfer of the DEVICES, provided youretain no copies, you transfer all of theSOFTWARE (including all componentparts, the media and printed materials,any upgrades, and, if applicable, theCertificate(s) of Authenticity), and therecipient agrees to the terms of thisEULA. If the SOFTWARE is an upgrade,any transfer must include all priorversions of the SOFTWARE.
• Termination: Without prejudice to anyother rights, FORD MOTOR COMPANYmay terminate this EULA if you fail tocomply with the terms and conditionsof this EULA.
• Internet-Based ServicesComponents: The SOFTWARE maycontain components that enable andfacilitate the use of certainInternet-based services. Youacknowledge and agree that FORDMOTOR COMPANY, third partysoftware and service suppliers, itsaffiliates and/or its designated agentmay automatically check the versionof the SOFTWARE and/or itscomponents that you are utilizing andmay provide upgrades or supplementsto the SOFTWARE that may beautomatically downloaded to yourDEVICES.
• Additional Software/Services: TheSOFTWARE may permit FORD MOTORCOMPANY, third party software andservice suppliers, its affiliates and/orits designated agent to provide or makeavailable to you SOFTWARE updates,supplements, add-on components, orInternet-based services componentsof the SOFTWARE after the date youobtain your initial copy of theSOFTWARE ("SupplementalComponents".) SOFTWARE updatesmay cause you to incur additional
charges from your wireless serviceprovider. If FORD MOTOR COMPANYor third party software and servicessuppliers provide or make available toyou Supplemental Components andno other EULA terms are providedalong with the SupplementalComponents, then the terms of thisEULA shall apply. FORD MOTORCOMPANY, its affiliates and/or itsdesignated agent reserve the right todiscontinue without liability anyInternet-based services provided toyou or made available to you throughthe use of the SOFTWARE.
• Links to Third Party Sites: TheSOFTWARE may provide you with theability to link to third party sites. Thethird party sites are not under thecontrol of FORD MOTOR COMPANY,its affiliates and/or its designatedagent. Neither FORD MOTORCOMPANY nor its affiliates nor itsdesignated agent are responsible for(I) the contents of any third party sites,any links contained in third party sites,or any changes or updates to thirdparty sites, or (ii) webcasting or anyother form of transmission receivedfrom any third party sites. If theSOFTWARE provides links to thirdparty sites, those links are provided toyou only as a convenience, and theinclusion of any link does not imply anendorsement of the third party site byFORD MOTOR COMPANY, its affiliatesand/or its designated agent.
• Obligation to Drive Responsibly:You recognize your obligation to driveresponsibly and keep attention on theroad. You will read and abide with theDEVICES operating instructionsparticularly as they pertain to safetyand you agree to assume any riskassociated with the use of theDEVICES.
464
Flex (TP3) , enUSA, Edition date: 201803, Second-Printing
Appendices

UPGRADES AND RECOVERY MEDIA:If the SOFTWARE is provided by FORDMOTOR COMPANY separate from theDEVICES on media such as a ROM chip,CD ROM disk(s) or via web download orother means, and is labeled "For UpgradePurposes Only" or "For Recovery PurposesOnly" you may install one (1) copy of suchSOFTWARE onto the DEVICES as areplacement copy for the existingSOFTWARE, and use it in accordance withthis EULA, including any additional EULAterms accompanying the upgradeSOFTWARE.INTELLECTUAL PROPERTY RIGHTS:All title and intellectual property rights inand to the SOFTWARE (including but notlimited to any images, photographs,animations, video, audio, music, text and"applets" incorporated into theSOFTWARE), the accompanying printedmaterials, and any copies of theSOFTWARE, are owned by FORD MOTORCOMPANY, or its affiliates or suppliers. TheSOFTWARE is licensed, not sold. You maynot copy the printed materialsaccompanying the SOFTWARE. All titleand intellectual property rights in and tothe content which may be accessedthrough use of the SOFTWARE is theproperty of the respective content ownerand may be protected by applicablecopyright or other intellectual propertylaws and treaties. This EULA grants you norights to use such content outside itsintended use. All rights not specificallygranted under this EULA are reserved byFORD MOTOR COMPANY, its affiliates,and third party software and serviceproviders and suppliers. Use of any on-lineservices which may be accessed throughthe SOFTWARE may be governed by therespective terms of use relating to suchservices. If this SOFTWARE containsdocumentation that is provided only inelectronic form, you may print one copy ofsuch electronic documentation.
EXPORT RESTRICTIONS: Youacknowledge that the SOFTWARE issubject to U.S. and European Union exportjurisdiction. You agree to comply with allapplicable international and national lawsthat apply to the SOFTWARE, includingthe U.S. Export Administration Regulations,as well as end-user, end-use anddestination restrictions issued by U.S. andother governments.TRADEMARKS: This EULA does not grantyou any rights in connection with anytrademarks or service marks of FORDMOTOR COMPANY, its affiliates, and thirdparty software and service providers.PRODUCT SUPPORT: Please refer toFORD MOTOR COMPANY instructionsprovided in the documentation for theDEVICES product support, such as thevehicle owner guide.Should you have any questions concerningthis EULA, or if you desire to contact FORDMOTOR COMPANY for any other reason,please refer to the address provided in thedocumentation for the DEVICES.No Liability for Certain Damages:EXCEPT AS PROHIBITED BY LAW, FORDMOTOR COMPANY, ANY THIRD PARTYSOFTWARE OR SERVICES SUPPLIERS,AND THEIR AFFILIATES SHALL HAVE NOLIABILITY FOR ANY INDIRECT, SPECIAL,CONSEQUENTIAL OR INCIDENTALDAMAGES ARISING FROM OR INCONNECTION WITH THE USE ORPERFORMANCE OF THE SOFTWARE. THISLIMITATION SHALL APPLY EVEN IF ANYREMEDY FAILS OF ITS ESSENTIALPURPOSE. THERE ARE NO WARRANTIESOTHER THAN THOSE THAT MAY BEEXPRESSLY PROVIDED FOR YOUR NEWVEHICLE.
465
Flex (TP3) , enUSA, Edition date: 201803, Second-Printing
Appendices

SYNC® Automotive Important SafetyInformation Read and followinstructions:• Before using your SYNC® system, read
and follow all instructions and safetyinformation provided in this end usermanual ("Owner Guide".) Notfollowing precautions found in theOwner Guide can lead to an accidentor other serious injuries.
General Operation• Voice Command Control: Certain
functions within the SYNC® systemmay be accomplished using voicecommands. Using voice commandswhile driving helps you to operate thesystem without removing your handsfrom the wheel or eyes from the road.
• Prolonged Views of Screen: Do notaccess any function requiring aprolonged view of the screen while youare driving. Pull over in a safe and legalmanner before attempting to access afunction of the system requiringprolonged attention.
• Volume Setting: Do not raise thevolume excessively. Keep the volumeat a level where you can still hearoutside traffic and emergency signalswhile driving. Driving while unable tohear these sounds could cause anaccident.
• Navigation Features: Any navigationfeatures included in the system areintended to provide turn by turninstructions to get you to a desireddestination. Please make certain allpersons using this system carefullyread and follow instructions and safetyinformation fully.
• Distraction Hazard: Any navigationfeatures may require manual(non-verbal) setup. Attempting toperform such set-up or insert datawhile driving can distract your attentionand could cause an accident or otherserious injury. Stop the vehicle in a safeand legal manner before attemptingthese operations.
• Let Your Judgment Prevail: Anynavigation features are provided onlyas an aid. Make your driving decisionsbased on your observations of localconditions and existing trafficregulations. Any such feature is not asubstitute for your personal judgment.Any route suggestions made by thissystem should never replace any localtraffic regulations or your personaljudgment or knowledge of safe drivingpractices.
• Route Safety: Do not follow the routesuggestions if doing so would result inan unsafe or illegal maneuver, if youwould be placed in an unsafe situation,or if you would be directed into an areathat you consider unsafe. The driver isultimately responsible for the safeoperation of the vehicle and therefore,must evaluate whether it is safe tofollow the suggested directions.
• Potential Map Inaccuracy: Mapsused by this system may be inaccuratebecause of changes in roads, trafficcontrols or driving conditions. Alwaysuse good judgment and common sensewhen following the suggested routes.
• Emergency Services: Do not rely onany navigation features included in thesystem to route you to emergencyservices. Ask local authorities or anemergency services operator for theselocations. Not all emergency servicessuch as police, fire stations, hospitalsand clinics are likely to be contained inthe map database for such navigationfeatures.
466
Flex (TP3) , enUSA, Edition date: 201803, Second-Printing
Appendices

Your Responsibilities and Assumptions ofRisk• You agree to each of the following:(a)
Any use of the SOFTWARE whiledriving an automobile or other vehiclein violation of applicable law orotherwise driving in an unsafe mannerpresents a significant risk of distracteddriving and should not be attemptedunder any circumstances;(b) Use ofthe SOFTWARE at excessive volumeposes a significant risk of hearingdamage and should not be attemptedunder any circumstances;(c) TheSOFTWARE may not be compatiblewith new or different versions of anoperating system, third party software,or third party services, and theSOFTWARE may potentially cause acritical failure of an operating system,third party software, or third partyservice.(d) Any third party serviceaccessed by or third party softwareused with the SOFTWARE (I) maycharge an additional fee for access, (ii)may not work correctly, on anuninterrupted basis, or error free, (iii)may change streaming formats ordiscontinue operation, (iv) may containadult, profane or offensive content; and(v) may contain inaccurate, false ormisleading traffic, weather, financialor safety information or other content;and (e) Use of the SOFTWARE maycause you to incur additional chargesfrom your wireless service provider(WSP) and any data or minutecalculators that may be included in thesoftware program are for referenceonly, are not warranted in any way andshould not be relied upon in anyway.
• When using the SOFTWARE, you agreeto be responsible for and assume theentire risk to the items set forth inSection (a) – (e) above.
Disclaimer of WarrantyYOU EXPRESSLY ACKNOWLEDGE ANDAGREE THAT USE OF THE DEVICES ANDSOFTWARE IS AT YOUR SOLE RISK ANDTHAT THE ENTIRE RISK AS TOSATISFACTORY QUALITY,PERFORMANCE, COMPATIBILITY,ACCURACY AND EFFORT IS WITH YOU.TO THE MAXIMUM EXTENT PERMITTEDBY APPLICABLE LAW, THE SOFTWAREAND ANY THIRD PARTY SOFTWARE ORTHIRD-PARTY SERVICES ARE PROVIDED"AS IS" AND “AS AVAILABLE”, WITH ALLFAULTS AND WITHOUT WARRANTY OFANY KIND, AND FORD MOTOR COMPANYHEREBY DISCLAIMS ALL WARRANTIESAND CONDITIONS WITH RESPECT TOTHE SOFTWARE, THIRD PARTYSOFTWARE, AND THIRD-PARTYSERVICES, EITHER EXPRESS, IMPLIED ORSTATUTORY, INCLUDING, BUT NOTLIMITED TO, THE IMPLIED WARRANTIESAND/OR CONDITIONS OFMERCHANTABILITY, OF SATISFACTORYQUALITY, OF FITNESS FOR ANARTICULAR PURPOSE, OF ACCURACY,OF QUIET ENJOYMENT, ANDNON-INFRINGEMENT OF THIRD-PARTYRIGHTS. FORD MOTOR COMPANY DOESNOT WARRANT (a) AGAINSTINTERFERENCE WITH YOUR ENJOYMENTOF THE SOFTWARE, THIRD PARTYSOFTWARE, OR THIRD-PARTY SERVICES,(b) THAT THE SOFTWARE, THIRD PARTYSOFTWARE, OR THIRD-PARTY SERVICESWILL MEET YOUR REQUIREMENTS, (c)THAT THE OPERATION OF THESOFTWARE, THIRD PARTY SOFTWARE,OR THIRD-PARTY SERVICES WILL BEUNINTERRUPTED OR ERROR-FREE, (d)OR THAT DEFECTS IN THE SOFTWARE,THIRD PARTY SOFTWARE, ORTHIRD-PARTY SERVICES WILL BECORRECTED. NO ORAL OR WRITTENINFORMATION OR ADVICE GIVEN BYFORD MOTOR COMPANY OR ITSAUTHORIZED REPRESENTATIVE SHALL
467
Flex (TP3) , enUSA, Edition date: 201803, Second-Printing
Appendices

CREATE A WARRANTY. SHOULD THESOFTWARE, THIRD PARTY SOFTWARE,OR THIRD-PARTY SERVICES PROVEDEFECTIVE, YOU ASSUME THE ENTIRECOST OF ALL NECESSARY SERVICING,REPAIR OR CORRECTION. SOMEJURISDICTIONS DO NOT ALLOW THEDISCLAIMER OF IMPLIED WARRANTIESOR LIMITATIONS ON APPLICABLESTATUTORY RIGHTS OF A CONSUMER,SO THE ABOVE DISCLAIMER MAY NOTFULLY APPLY TO YOU. THE SOLEWARRANTY PROVIDED BY FORD MOTORCOMPANY SHALL BE FOUND IN THEWARRANTY INFORMATION INCLUDINGWITH YOUR OWNER GUIDE. TO THEEXTENT THAT THERE IS ANY CONFLICTBETWEEN THE TERMS OF THIS SECTIONAND THE WARRANTY BOOKLET, THEWARRANTY BOOKLET SHALL CONTROL.
Applicable Law, Venue, Jurisdiction• The laws of the State of Michigan
govern this EULA and Your use of theSOFTWARE. Your use of theSOFTWARE may also be subject toother local, state, national, orinternational laws. Any litigation arisingout of or related to this EULA shall bebrought and maintained exclusively ina court of the State of Michiganlocated in Wayne County or in theUnited States District Court for theEastern District of Michigan. You herebyconsent to submit to the personaljurisdiction of a court in the State ofMichigan located in Wayne County andthe United States District Court for theEastern District of Michigan for anydispute arising out of or relating to thisEULA.
Binding Arbitration and Class ActionWaiver(a) Application. This Section applies toany dispute EXCEPT IT DOES NOTINCLUDE A DISPUTE RELATING TOCOPYRIGHT INFRINGEMENT, OR TO THEENFORCEMENT OR VALIDITY OF YOUR,FORD MOTOR COMPANY, OR ANY OFFORD MOTOR COMPANY’S LICENSORS’INTELLECTUAL PROPERTY RIGHTS.Dispute means any dispute, action, or othercontroversy between You and FORDMOTOR COMPANY, other than theexceptions listed above, concerning theSOFTWARE (including its price) or thisEULA, whether in contract, warranty, tort,statute, regulation, ordinance, or any otherlegal or equitable basis.(b) Notice of Dispute. In the event of aDispute, You or FORD MOTOR COMPANYmust give the other a “Notice of Dispute”,which is a written statement of the name,address, and contact information of theparty giving it, the facts giving rise to thedispute, and the relief requested. You andFORD MOTOR COMPANY will attempt toresolve any dispute through informalnegotiation within 60 days from the datethe Notice of Dispute is sent. After 60 days,You or FORD MOTOR COMPANY maycommence arbitration.(c) Small claims court. You may alsolitigate any dispute in small claims courtin your county of residence or FORDMOTOR COMPANY’S principal place ofbusiness, if the dispute meets allrequirements to be heard in the smallclaims court. You may litigate in smallclaims court whether or not Younegotiated informally first.(d) Binding arbitration. If You and FORDMOTOR COMPANY, do not resolve anydispute by informal negotiation or in smallclaims court, any other effort to resolvethe dispute will be conducted exclusivelyby binding arbitration. You are giving up
468
Flex (TP3) , enUSA, Edition date: 201803, Second-Printing
Appendices

the right to litigate (or participate in as aparty or class member) all disputes in courtbefore a judge or jury. Instead, all disputeswill be resolved before a neutral arbitrator,whose decision will be final except for alimited right of appeal under the FederalArbitration Act. Any court with jurisdictionover the parties may enforce thearbitrator’s award.(e) Class action waiver. Any proceedingsto resolve or litigate any dispute in anyforum will be conducted solely on anindividual basis. Neither you nor FORDMOTOR COMPANY, will seek to have anydispute heard as a class action, as a privateattorney general action, or in any otherproceeding in which any party acts orproposes to act in a representativecapacity. No arbitration or proceeding willbe combined with another without theprior written consent of all parties to allaffected arbitrations or proceedings.(f) Arbitration procedure. Anyarbitration will be conducted by theAmerican Arbitration Association (the“AAA”), under its Commercial ArbitrationRules. If You are an individual and use theSOFTWARE for personal or vehicle use, orif the value of the dispute is $75,000 orless whether or not You are an individualor how You use the SOFTWARE, the AAASupplementary Procedures forConsumer-Related Disputes will alsoapply. To commence arbitration, submit aCommercial Arbitration Rules Demand forArbitration form to the AAA. You mayrequest a telephonic or in-person hearingby following the AAA rules. In a disputeinvolving $10,000 or less, any hearing willbe telephonic unless the arbitrator findsgood cause to hold an in-person hearinginstead. For more information, see adr.orgor call 1-800-778-7879. You agree tocommence arbitration only in your countyof residence or FORD MOTOR COMPANY’Sprincipal place of business. The arbitrator
may award the same damages to Youindividually as a court could. The arbitratormay award declaratory or injunctive reliefonly to You individually, and only to theextent required to satisfy Your individualclaim.(g) Arbitration fees and incentives.• I. Disputes involving $75,000 or less.
FORD MOTOR COMPANY willpromptly reimburse your filing fees andpay the AAA’s and arbitrator’s fees andexpenses. If you reject FORD MOTORCOMPANY’S last written settlementoffer made before the arbitrator wasappointed (“last written offer”), yourdispute goes all the way to anarbitrator’s decision (called an“award”), and the arbitrator awardsyou more than the last written offer,FORD MOTOR COMPANY will give youthree incentives: (1) pay the greater ofthe award or $1,000; (2) pay twice yourreasonable attorney’s fees, if any; and(3) reimburse any expenses (includingexpert witness fees and costs) thatyour attorney reasonably accrues forinvestigating, preparing, and pursuingyour claim in arbitration. The arbitratorwill determine the amounts.
• ii. Disputes involving more than$75,000. The AAA rules will governpayment of filing fees and the AAA’sand arbitrator’s fees and expenses.
• iii. Disputes involving any amount. Inany arbitration you commence, FORDMOTOR COMPANY will seek its AAAor arbitrator’s fees and expenses, orYour filing fees it reimbursed, only if thearbitrator finds the arbitration frivolousor brought for an improper purpose. Inany arbitration FORD MOTORCOMPANY commences, it will pay all
469
Flex (TP3) , enUSA, Edition date: 201803, Second-Printing
Appendices

filing, AAA, and arbitrator’s fees andexpenses. It will not seek its attorney’sfees or expenses from you in anyarbitration. Fees and expenses are notcounted in determining how much adispute involves.
(h) Claims or disputes must be filedwithin one year. To the extent permittedby law, any claim or dispute under thisEULA to which this Section applies mustbe filed within one year in small claimscourt (Section c) or in arbitration (Sectiond). The one-year period begins when theclaim or dispute first could be filed. If sucha claim or dispute is not filed within oneyear, it is permanently barred.(I) Severability. If the class action waiver(Section e) is found to be illegal orunenforceable as to all or some parts of adispute, then that portion of Section e willnot apply to those parts. Instead, thoseparts will be severed and proceed in a courtof law, with the remaining parts proceedingin arbitration. If any other provision of thatportion Section e is found to be illegal orunenforceable, that provision will besevered with the remainder of Section eremaining in full force and effect.
Telenav Software End User LicenseAgreementPlease read these terms and conditionscarefully before you use the TeleNavSoftware. Your use of the TeleNavSoftware indicates that you accept theseterms and conditions. If you do not acceptthese terms and conditions, do not breakthe seal of the package, launch, orotherwise use the TeleNav Software.TeleNav may revise this Agreement andthe privacy policy at any time, with orwithout notice to you. You agree to visithttp://www.telenav.com from time to timeto review the then current version of thisAgreement and of the privacy policy.
1. Safe and Lawful UseYou acknowledge that devoting attentionto the TeleNav Software may pose a riskof injury or death to you and others insituations that otherwise require yourundivided attention, and you thereforeagree to comply with the following whenusing the TeleNav Software:(a) observe all traffic laws and otherwisedrive safely;(b) use your own personal judgment whiledriving. If you feel that a route suggestedby the TeleNav Software instructs you toperform an unsafe or illegal maneuver,places you in an unsafe situation, or directsyou into an area that you consider to beunsafe, do not follow such instructions;(c) do not input destinations, or otherwisemanipulate the TeleNav Software, unlessyour vehicle is stationary and parked;(d) do not use the TeleNav Software forany illegal, unauthorized, unintended,unsafe, hazardous, or unlawful purposes,or in any manner inconsistent with thisAgreement;(e) arrange all GPS and wireless devicesand cables necessary for use of theTeleNav Software in a secure manner inyour vehicle so that they will not interferewith your driving and will not prevent theoperation of any safety device (such as anairbag).You agree to indemnify and hold TeleNavharmless against all claims resulting fromany dangerous or otherwise inappropriateuse of the TeleNav Software in any movingvehicle, including as a result of your failureto comply with the directions above.
470
Flex (TP3) , enUSA, Edition date: 201803, Second-Printing
Appendices

2. Account InformationYou agree: (a) when registering theTeleNav Software, to provide TeleNav withtrue, accurate, current, and completeinformation about yourself, and (b) toinform TeleNav promptly of any changesto such information, and to keep it true,accurate, current and complete.
3. Software License• Subject to your compliance with the
terms of this Agreement, TeleNavhereby grants to you a personal,non-exclusive, non-transferable license(except as expressly permitted belowin connection with your permanenttransfer of the TeleNav Softwarelicense), without the right tosublicense, to use the TeleNavSoftware (in object code form only) inorder to access and use the TeleNavSoftware. This license shall terminateupon any termination or expiration ofthis Agreement. You agree that you willuse the TeleNav Software only for yourpersonal business or leisure purposes,and not to provide commercialnavigation services to other parties.
3.1 License Limitations• (a) reverse engineer, decompile,
disassemble, translate, modify, alteror otherwise change the TeleNavSoftware or any part thereof; (b)attempt to derive the source code,audio library or structure of theTeleNav Software without the priorexpress written consent of TeleNav;(c) remove from the TeleNavSoftware, or alter, any of TeleNav's orits suppliers' trademarks, trade names,logos, patent or copyright notices, orother notices or markings; (d)
distribute, sublicense or otherwisetransfer the TeleNav Software toothers, except as part of yourpermanent transfer of the TeleNavSoftware; or (e) use the TeleNavSoftware in any manner that
I. infringes the intellectual property orproprietary rights, rights of publicity orprivacy or other rights of any party,ii. violates any law, statute, ordinance orregulation, including but not limited to lawsand regulations related to spamming,privacy, consumer and child protection,obscenity or defamation, oriii. is harmful, threatening, abusive,harassing, tortuous, defamatory, vulgar,obscene, libelous, or otherwiseobjectionable; and (f) lease, rent out, orotherwise permit unauthorized access bythird parties to the TeleNav Softwarewithout advanced written permission ofTeleNav.
4. Disclaimers• To the fullest extent permissible
pursuant to applicable law, in no eventwill TeleNav, its licensors and suppliers,or agents or employees of any of theforegoing, be liable for any decisionmade or action taken by you or anyoneelse in reliance on the informationprovided by the TeleNav Software.TeleNav also does not warrant theaccuracy of the map or other data usedfor the TeleNav Software. Such datamay not always reflect reality due to,among other things, road closures,construction, weather, new roads andother changing conditions. You areresponsible for the entire risk arisingout of your use of the TeleNavSoftware. For example but withoutlimitation, you agree not to rely on theTeleNav Software for criticalnavigation in areas where thewell-being or survival of you or others
471
Flex (TP3) , enUSA, Edition date: 201803, Second-Printing
Appendices

is dependent on the accuracy ofnavigation, as the maps or functionalityof the TeleNav Software are notintended to support such high riskapplications, especially in more remotegeographical areas.
• TELENAV EXPRESSLY DISCLAIMSAND EXCLUDES ALL WARRANTIES INCONNECTION WITH THE TELENAVSOFTWARE, WHETHER STATUTORY,EXPRESS OR IMPLIED, INCLUDING ALLWARRANTIES WHICH MAY ARISEFROM COURSE OF DEALING, CUSTOMOR TRADE AND INCLUDING, BUT NOTLIMITED TO, THE IMPLIEDWARRANTIES OF MERCHANTABILITY,FITNESS FOR A PARTICULARPURPOSE AND NON-INFRINGEMENTOF THIRD PARTY RIGHTS WITHRESPECT TO THE TELENAVSOFTWARE.
• Certain jurisdictions do not permit thedisclaimer of certain warranties, so thislimitation may not apply to you.
5. Limitation of Liability• TO THE EXTENT PERMITTED UNDER
APPLICABLE LAW, UNDER NOCIRCUMSTANCES SHALL TELENAVOR ITS LICENSORS AND SUPPLIERSBE LIABLE TO YOU OR TO ANY THIRDPARTY FOR ANY INDIRECT,INCIDENTAL, CONSEQUENTIAL,SPECIAL OR EXEMPLARY DAMAGES(INCLUDING IN EACH CASE, BUT NOTLIMITED TO, DAMAGES FOR THEINABILITY TO USE THE EQUIPMENTOR ACCESS DATA, LOSS OF DATA,LOSS OF BUSINESS, LOSS OFPROFITS, BUSINESS INTERRUPTIONOR THE LIKE) ARISING OUT OF THEUSE OF OR INABILITY TO USE THETELENAV SOFTWARE, EVEN IFTELENAV HAS BEEN ADVISED OF THEPOSSIBILITY OF SUCH DAMAGES.NOTWITHSTANDING ANY DAMAGESTHAT YOU MIGHT INCUR FOR ANY
REASON WHATSOEVER (INCLUDING,WITHOUT LIMITATION, ALL DAMAGESREFERENCED HEREIN AND ALLDIRECT OR GENERAL DAMAGES INCONTRACT, TORT (INCLUDINGNEGLIGENCE) OR OTHERWISE), THEENTIRE LIABILITY OF TELENAV ANDOF ALL OF TELENAV'S SUPPLIERSSHALL BE LIMITED TO THE AMOUNTACTUALLY PAID BY YOU FOR THETELENAV SOFTWARE. SOME STATESAND/OR JURISDICTIONS DO NOTALLOW THE EXCLUSION ORLIMITATION OF INCIDENTAL ORCONSEQUENTIAL DAMAGES, SO THEABOVE LIMITATIONS OR EXCLUSIONSMAY NOT APPLY TO YOU.
6. Arbitration and Governing Law• You agree that any dispute, claim or
controversy arising out of or relating tothis Agreement or the TeleNavSoftware shall be settled byindependent arbitration involving aneutral arbitrator and administered bythe American Arbitration Associationin the County of Santa Clara, California.The arbitrator shall apply theCommercial Arbitration Rules of theAmerican Arbitration Association, andthe judgment upon the award renderedby the arbitrator may be entered by anycourt having jurisdiction. Note thatthere is no judge or jury in an arbitrationproceeding and the decision of thearbitrator shall be binding upon bothparties. You expressly agree to waiveyour right to a jury trial. This Agreementand performance hereunder will begoverned by and construed inaccordance with the laws of the Stateof California, without giving effect toits conflict of law provisions. To theextent judicial action is necessary inconnection with the binding arbitration,both TeleNav and you agree to submit
472
Flex (TP3) , enUSA, Edition date: 201803, Second-Printing
Appendices

to the exclusive jurisdiction of thecourts of the County of Santa Clara,California. The United NationsConvention on Contracts for theInternational Sale of Goods shall notapply.
7. Assignment• You may not resell, assign, or transfer
this Agreement or any of your rights orobligations, except in totality, inconnection with your permanenttransfer of the TeleNav Software, andexpressly conditioned upon the newuser of the TeleNav Software agreeingto be bound by the terms andconditions of this Agreement. Any suchsale, assignment or transfer that is notexpressly permitted under thisparagraph will result in immediatetermination of this Agreement, withoutliability to TeleNav, in which case youand all other parties shall immediatelycease all use of the TeleNav Software.Notwithstanding the foregoing,TeleNav may assign this Agreement toany other party at any time withoutnotice, provided the assignee remainsbound by this Agreement.
8. Miscellaneous
8.1This Agreement constitutes the entireagreement between TeleNav and you withrespect to the subject matter hereof.
8.2Except for the limited licenses expresslygranted in this Agreement, TeleNav retainsall right, title and interest in and to theTeleNav Software, including withoutlimitation all related intellectual propertyrights. No licenses or other rights which arenot expressly granted in this Agreementare intended to, or shall be, granted or
conferred by implication, statute,inducement, estoppel or otherwise, andTeleNav and its suppliers and licensorshereby reserve all of their respective rightsother than the licenses explicitly grantedin this Agreement.
8.3By using the TeleNav Software, youconsent to receive from TeleNav allcommunications, including notices,agreements, legally required disclosuresor other information in connection with theTeleNav Software (collectively, "Notices")electronically. TeleNav may provide suchNotices by posting them on TeleNav'sWebsite or by downloading such Noticesto your wireless device. If you desire towithdraw your consent to receive Noticeselectronically, you must discontinue youruse of the TeleNav Software.
8.4TeleNav's or your failure to requireperformance of any provision shall notaffect that party's right to requireperformance at any time thereafter, norshall a waiver of any breach or default ofthis Agreement constitute a waiver of anysubsequent breach or default or a waiverof the provision itself.
8.5If any provision herein is heldunenforceable, then such provision will bemodified to reflect the intention of theparties, and the remaining provisions ofthis Agreement will remain in full force andeffect.
473
Flex (TP3) , enUSA, Edition date: 201803, Second-Printing
Appendices

8.6The headings in this Agreement are forconvenience of reference only, will not bedeemed to be a part of this Agreement,and will not be referred to in connectionwith the construction or interpretation ofthis Agreement. As used in this Agreement,the words "include" and "including" andvariations thereof, will not be deemed tobe terms of limitation, but rather will bedeemed to be followed by the words"without limitation".
9. Other Vendors Terms and Conditions• The Telenav Software utilizes map and
other data licensed to Telenav by thirdparty vendors for the benefit of you andother end users. This Agreementincludes end-user terms applicable tothese companies (included at the endof this Agreement), and thus your useof the Telenav Software is also subjectto such terms. You agree to complywith the following additional terms andconditions, which are applicable toTelenav’s third party vendor licensors::
9.1 End User Terms Required by HERENorth America, LLCThe data (“Data”) is provided for yourpersonal, internal use only and not forresale. It is protected by copyright, and issubject to the following terms andconditions which are agreed to by you, onthe one hand, and Telenav (“Telenav”) andits licensors (including their licensors andsuppliers) on the other hand.© 2013 HERE. All rights reserved.The Data for areas of Canada includesinformation taken with permission fromCanadian authorities, including: © HerMajesty the Queen in Right of Canada, ©Queen's Printer for Ontario, © Canada PostCorporation, GeoBase®, © Department ofNatural Resources Canada.
HERE holds a non-exclusive license fromthe United States Postal Service® topublish and sell ZIP+4® information.©United States Postal Service® 2014.Prices are not established, controlled orapproved by the United States PostalService®. The following trademarks andregistrations are owned by the USPS:United States Postal Service, USPS, andZIP+4The Data for Mexico includes certain datafrom Instituto Nacional de Estadística yGeografía.
9.2 End User Terms Required by NAV2(Shanghai) Co., LtdThe data (“Data”) is provided for yourpersonal, internal use only and not forresale. It is protected by copyright, and issubject to the following terms andconditions which are agreed to by you, onthe one hand, and NAV2 (Shanghai) Co.,Ltd (“NAV2”) and its licensors (includingtheir licensors and suppliers) on the otherhand. 20xx. All rights reserved
Terms and ConditionsPermitted Use. You agree to use this Datatogether with the Telenav Software solelyfor the internal business and personalpurposes for which you were licensed, andnot for service bureau, time-sharing orother similar purposes. Accordingly, butsubject to the restrictions set forth in thefollowing paragraphs, you agree not tootherwise reproduce, copy, modify,decompile, disassemble, create anyderivative works of, or reverse engineer anyportion of this Data, and may not transferor distribute it in any form, for any purpose,except to the extent permitted bymandatory laws.
474
Flex (TP3) , enUSA, Edition date: 201803, Second-Printing
Appendices

Restrictions. Except where you have beenspecifically licensed to do so by Telenav,and without limiting the precedingparagraph, you may not use this Data (a)with any products, systems, or applicationsinstalled or otherwise connected to or incommunication with vehicles, capable ofvehicle navigation, positioning, dispatch,real time route guidance, fleetmanagement or similar applications; or (b)with or in communication with anypositioning devices or any mobile orwireless-connected electronic or computerdevices, including without limitationcellular phones, palmtop and handheldcomputers, pagers, and personal digitalassistants or PDAs.Warning. The Data may containinaccurate or incomplete information dueto the passage of time, changingcircumstances, sources used and thenature of collecting comprehensivegeographic data, any of which may lead toincorrect results.No Warranty. This Data is provided to you“as is,” and you agree to use it at your ownrisk. Telenav and its licensors (and theirlicensors and suppliers) make noguarantees, representations or warrantiesof any kind, express or implied, arising bylaw or otherwise, including but not limitedto, content, quality, accuracy,completeness, effectiveness, reliability,fitness for a particular purpose, usefulness,use or results to be obtained from thisData, or that the Data or server will beuninterrupted or error-free.Disclaimer of Warranty: TELENAV ANDITS LICENSORS (INCLUDING THEIRLICENSORS AND SUPPLIERS) DISCLAIMANY WARRANTIES, EXPRESS OR IMPLIED,OF QUALITY, PERFORMANCE,MERCHANTABILITY, FITNESS FOR A
PARTICULAR PURPOSE ORNON-INFRINGEMENT. Some States,Territories and Countries do not allowcertain warranty exclusions, so to thatextent the above exclusion may not applyto you.Disclaimer of Liability: TELENAV ANDITS LICENSORS (INCLUDING THEIRLICENSORS AND SUPPLIERS) SHALL NOTBE LIABLE TO YOU: IN RESPECT OF ANYCLAIM, DEMAND OR ACTION,IRRESPECTIVE OF THE NATURE OF THECAUSE OF THE CLAIM, DEMAND ORACTION ALLEGING ANY LOSS, INJURY ORDAMAGES, DIRECT OR INDIRECT, WHICHMAY RESULT FROM THE USE ORPOSSESSION OF THE INFORMATION; ORFOR ANY LOSS OF PROFIT, REVENUE,CONTRACTS OR SAVINGS, OR ANYOTHER DIRECT, INDIRECT, INCIDENTAL,SPECIAL OR CONSEQUENTIAL DAMAGESARISING OUT OF YOUR USE OF ORINABILITY TO USE THIS INFORMATION,ANY DEFECT IN THE INFORMATION, ORTHE BREACH OF THESE TERMS ORCONDITIONS, WHETHER IN AN ACTIONIN CONTRACT OR TORT OR BASED ON AWARRANTY, EVEN IF TELENAV OR ITSLICENSORS HAVE BEEN ADVISED OF THEPOSSIBILITY OF SUCH DAMAGES. SomeStates, Territories and Countries do notallow certain liability exclusions ordamages limitations, so to that extent theabove may not apply to you.Export Control. You shall not export fromanywhere any part of the Data or any directproduct thereof except in compliance with,and with all licenses and approvalsrequired under, applicable export laws,rules and regulations, including but notlimited to the laws, rules and regulationsadministered by the Office of ForeignAssets Control of the U.S. Department ofCommerce and the Bureau of Industry andSecurity of the U.S. Department ofCommerce. To the extent that any such
475
Flex (TP3) , enUSA, Edition date: 201803, Second-Printing
Appendices

export laws, rules or regulations prohibitHERE from complying with any of itsobligations hereunder to deliver ordistribute Data, such failure shall beexcused and shall not constitute a breachof this Agreement.Entire Agreement. These terms andconditions constitute the entire agreementbetween Telenav (and its licensors,including their licensors and suppliers) andyou pertaining to the subject matter hereof,and supersedes in their entirety any andall written or oral agreements previouslyexisting between us with respect to suchsubject matter.Governing Law. The above terms andconditions shall be governed by the lawsof the State of Illinois [insert “Netherlands”where European HERE Data is used],without giving effect to (i) its conflict oflaws provisions, or (ii) the United NationsConvention for Contracts for theInternational Sale of Goods, which isexplicitly excluded. You agree to submit tothe jurisdiction of the State of Illinois[insert “The Netherlands” where EuropeanHERE Data is used] for any and alldisputes, claims and actions arising fromor in connection with the Data provided toyou hereunder.Government End Users. If the Data isbeing acquired by or on behalf of theUnited States government or any otherentity seeking or applying rights similar tothose customarily claimed by the UnitedStates government, this Data is a“commercial item” as that term is definedat 48 C.F.R. (“FAR”) 2.101, is licensed inaccordance with these End-User Terms,and each copy of Data delivered orotherwise furnished shall be marked andembedded as appropriate with thefollowing “Notice of Use,” and shall betreated in accordance with such Notice:
NOTICE OF USE
CONTRACTOR (MANUFACTURER/SUPPLIER) NAME: HERE
CONTRACTOR (MANUFACTURER/SUPPLIER) ADDRESS: c/o Nokia, 425
West Randolph Street, Chicago, Illinois60606
This Data is a commercial item asdefined in FAR 2.101 and is subject to
these End-User Terms under which thisData was provided.
© 1987 – 2014 HERE – All rights reserved.
If the Contracting Officer, federalgovernment agency, or any federal officialrefuses to use the legend provided herein,the Contracting Officer, federalgovernment agency, or any federal officialmust notify HERE prior to seekingadditional or alternative rights in the Data.
I. US/Canada Territory
A. United States Data. The End-UserTerms for any Application containingData for the United States shall containthe following notices:
“HERE holds a non-exclusive licensefrom the United States PostalService® to publish and sell ZIP+4®information.”
“©United States Postal Service®20XX. Prices are not established,controlled or approved by the UnitedStates Postal Service®. The followingtrademarks and registrations areowned by the USPS: United StatesPostal Service, USPS, and ZIP+4.”
476
Flex (TP3) , enUSA, Edition date: 201803, Second-Printing
Appendices

B. Canada Data. The following provi-sions apply to the Data for Canada,which may include or reflect data fromthird party licensors (“Third PartyData”), including Her Majesty the Queenin Right of Canada (“Her Majesty”),Canada Post Corporation (“CanadaPost”) and the Department of NaturalResources of Canada (“NRCan”):
1. Disclaimer and Limitation: Clientagrees that its use of the Third PartyData is subject to the following provi-sions:
a. Disclaimer: The Third Party Datais licensed on an “as is” basis. Thelicensors of such data, including HerMajesty, Canada Post and NRCan,make no guarantees, representa-tions or warranties respecting suchdata, either express or implied,arising by law or otherwise, includingbut not limited to, effectiveness,completeness, accuracy or fitnessfor a particular purpose.
b. Limitation on Liability: The ThirdParty Data licensors, including HerMajesty, Canada Post and NRCan,shall not be liable: (i) in respect ofany claim, demand or action, irre-spective of the nature of the causeof the claim, demand or actionalleging any loss, injury or damages,direct or indirect, which may resultfrom the use or possession of suchData; or (ii) in any way for loss ofrevenues or contracts, or any otherconsequential loss of any kindresulting from any defect in theData.
2. Copyright Notice: In connection witheach copy of all or any portion of theData for the Territory of Canada, Clientshall affix in a conspicuous manner thefollowing copyright notice on at leastone of: (i) the label for the storagemedia of the copy; (ii) the packagingfor the copy; or (iii) other materialspackaged with the copy, such as usermanuals or end user license agree-ments: “This data includes informationtaken with permission from Canadianauthorities, including © Her Majestythe Queen in Right of Canada, ©Queen's Printer for Ontario, © CanadaPost Corporation, GeoBase®, © TheDepartment of Natural ResourcesCanada. All rights reserved.”
3. End-User Terms: Except as other-wise agreed by the parties, in connec-tion with the provision of any portionof the Data for the Territory of Canadato End-Users as may be authorizedunder the Agreement, Client shallprovide such End-Users, in a reason-ably conspicuous manner, with terms(set forth with other end user termsrequired to be provided under theAgreement, or as otherwise may beprovided, by Client) which shall includethe following provisions on behalf ofthe Third Party Data licensors,including Her Majesty, Canada Postand NRCan:
The Data may include or reflectdata of licensors, including HerMajesty the Queen in the Right ofCanada (“Her Majesty”), CanadaPost Corporation (“Canada Post”)and the Department of NaturalResources Canada (“NRCan”). Suchdata is licensed on an “as is” basis.The licensors, including Her Majesty,Canada Post and NRCan, make noguarantees, representations orwarranties respecting such data,
477
Flex (TP3) , enUSA, Edition date: 201803, Second-Printing
Appendices

either express or implied, arising bylaw or otherwise, including but notlimited to, effectiveness, complete-ness, accuracy or fitness for aparticular purpose. The licensors,including Her Majesty, Canada Postand NRCan, shall not be liable inrespect of any claim, demand oraction, irrespective of the nature ofthe cause of the claim, demand oraction alleging any loss, injury ordamages, direct or indirect, whichmay result from the use or posses-sion of the data or the Data. Thelicensors, including Her Majesty,Canada Post and NRCan, shall notbe liable in any way for loss ofrevenues or contracts, or any otherconsequential loss of any kindresulting from any defect in the dataor the Data.End User shall indemnify and saveharmless the licensors, including HerMajesty, Canada Post and NRCan,and their officers, employees andagents from and against any claim,demand or action, irrespective ofthe nature of the cause of the claim,demand or action, alleging loss,costs, expenses, damages or injuries(including injuries resulting in death)arising out of the use or possessionof the data or the Data.
4. Additional Provisions: The termscontained in this Section are in addi-tion to all of the rights and obligationsof the parties under the Agreement.To the extent that any of the provi-sions of this Section are inconsistentwith, or conflict with, any other provi-sions of the Agreement, the provisionsof this Section shall prevail.
II. Mexico. The following provision appliesto the Data for Mexico, which includescertain data from the Instituto Nacionalde Estadística y Geografía (“INEGI”):
A. Any and all copies of the Data and/orpackaging containing Data for Mexicoshall contain the following notice:“Fuente: INEGI (Instituto Nacional deEstadística y Geografía)”
III. Latin America Territory
A. Third Party Notices. Any and all copiesof the Data and/or packaging relatingthereto shall include the respective ThirdParty Notices set forth below and usedas described below corresponding tothe Territory (or portion thereof)included in such copy:
NoticeTerritory
IGN “INSTITUTOGEOGRAFICO NACIONALARGENTINO”
Argen-tina
“INSTITUTO GEOGRAFICOMILITAR DEL ECUADORAUTORIZACION N° IGM-2011-01- PCO-01 DEL 25 DEENERO DE 2011”
Ecuador
“source: © IGN 2009 - BDTOPO ®”
“Fuente: INEGI (InstitutoNacional de Estadística yGeografía)”
Guade-loupe,FrenchGuianaandMarti-niqueMexico
IV. Middle East Territory
478
Flex (TP3) , enUSA, Edition date: 201803, Second-Printing
Appendices
A. Third Party Notices. Any and all copiesof the Data and/or packaging relatingthereto shall include the respective ThirdParty Notices set forth below and usedas described below corresponding tothe Territory (or portion thereof)included in such copy:
NoticeCountry
“© Royal JordanianGeographic Centre”. Theforegoing notice requirementfor Jordan Data is a materialterm of the Agreement. IfClient or any of its permitted
Jordan
sublicensees (if any) fail tomeet such requirement,HERE shall have the right toterminate Client’s licensewith respect to the JordanData.
B. Jordan Data. Client and its permittedsublicensees (if any) are restricted fromlicensing and/or otherwise distributingHERE’s database for the country ofJordan (“Jordan Data”) for use in Enter-prise Applications to (i) non-Jordanianentities for use of the Jordan Data solelyin Jordan or (ii) Jordan-based customers.In addition, Client, its permitted subli-censees (if any) and End-Users arerestricted from using the Jordan Data inEnterprise Applications if such party is(i) a non-Jordanian entity using theJordan Data solely in Jordan or (ii) aJordan-based customer. For purposesof the foregoing, “Enterprise Applica-tions” shall mean Geomarketing applic-ations, GIS applications, mobile businessasset management applications, callcenter applications, telematics applica-tions, public organization Internetapplications or for providing geocodingservices.
V. Europe Territory
A. Use of Certain Traffic Codes in Europe
1. General Restrictions Applicable toTraffic Codes. Client acknowledgesand agrees that in certain countries ofthe Europe Territory, Client will needto obtain rights directly from thirdparty RDS-TMC code providers toreceive and use the Traffic Codes inthe Data and to deliver to End-UsersTransactions in any way derived fromor based on such Traffic Codes. Forsuch countries, HERE shall deliver theData incorporating Traffic Codes toClient only after receiving certificationfrom Client of its having obtained suchrights.
2. Display of Third Party RightsLegends for Belgium. Client shall, foreach Transaction that uses TrafficCodes for Belgium, provide thefollowing notice to the End-User:“Traffic Codes for Belgium areprovided by the Ministerie van deVlaamse Gemeenschap and theMinistèrie de l’Equipement et desTransports.”
B. Paper Maps. With respect to anylicense granted to Client relating tomaking, selling or distributing papermaps (i.e., a map fixed on a paper orpaper-like medium): (a) such licensewith respect to Data for the Territory ofGreat Britain is conditioned on Client’sentering into and complying with aseparate written agreement with theOrdnance Survey (“OS”) to create andsell paper maps, Client’s paying to theOS any and all applicable paper maproyalties, and Client’s complying withthe OS copyright notice requirements;(b) such license for selling or otherwisedistributing for charge with respect toData for the Territory of Czech Republic
479
Flex (TP3) , enUSA, Edition date: 201803, Second-Printing
Appendices

is conditioned on Client’s obtaining priorwritten consent from Kartografie a.s.;(c) such license for selling or distributingwith respect to Data for the Territory ofSwitzerland is conditioned on Client’sobtaining a permit from Bundesamt fürLandestopografie of Switzerland; (d)Client is restricted from using Data forthe Territory of France to create papermaps with a scale between 1:5,000 and1:250,000; and (e) Client is restrictedfrom using any Data to create, sell ordistribute paper maps that are the sameor substantially similar, in terms of datacontent and specific use of color,symbols and scale, to paper mapspublished by the European nationalmapping agencies, including withoutlimitation, Landervermessungämter ofGermany, Topografische Dienst of theNetherlands, Nationaal GeografischInstituut of Belgium, Bundesamt fürLandestopografie of Switzerland,Bundesamt für Eich-und Vermessung-swesen of Austria, and the NationalLand Survey of Sweden.
C. OS Enforcement. Without limitingSection IV(B) above, with respect toData for the Territory of Great Britain,Client acknowledges and agrees thatthe Ordnance Survey (“OS”) may bringa direct action against Client to enforcecompliance with the OS copyright notice(see Section IV(D) below) and papermap requirements (see Section IV(B)above) contained in this Agreement.
D. Third Party Notices. Any and all copiesof the Data and/or packaging relatingthereto shall include the respective ThirdParty Notices set forth below and usedas described below corresponding tothe Territory (or portion thereof)included in such copy:
NoticeCountry(ies)
“© Bundesamt für Eich-und Vermessungswesen”
Austria
“© EuroGeographics”
CroatiaCyprus,Estonia,Latvia,Lithuania,Moldova,Poland,Sloveniaand/orUkraine
“source: © IGN 2009 – BDTOPO ®”
France
“Die Grundlagendatenwurden mit Genehmigungder zuständigen Behördenentnommen”
Germany
“Contains OrdnanceSurvey data © Crowncopyright and databaseright 2010 Contains RoyalMail data © Royal Mailcopyright and databaseright 2010”
Great Britain
“Copyright GeomaticsLtd.”
Greece
“Copyright © 2003; Top-Map Ltd.”
Hungary
“La Banca Dati Italiana èstata prodotta usandoquale riferimento anchecartografia numerica edal tratto prodotta e fornitadalla Regione Toscana.”
Italy
“Copyright © 2000;Norwegian MappingAuthority”
Norway
“Source: IgeoE – Portugal”Portugal
480
Flex (TP3) , enUSA, Edition date: 201803, Second-Printing
Appendices

“Información geográficapropiedad del CNIG”
Spain
“Based upon electronicdata © National LandSurvey Sweden.”
Sweden
“TopografischeGrundlage: © Bundesamtfür Landestopographie.
Switzerland
E. Respective Country Distribution. Clientacknowledges that HERE has notreceived approvals to distribute mapdata for the following countries in suchrespective countries: Albania, Belarus,Kyrgyzstan, Moldova and Uzbekistan.HERE may update such list from time totime. The license rights granted to Clientunder this TL with respect to the Datafor such countries are contingent uponClient’s compliance with all applicablelaws and regulations, including, withoutlimitation, any required licenses orapprovals to distribute the Applicationincorporating such Data in suchrespective countries.
VI. Australia Territory
A. Third Party Notices. Any and all copiesof the Data and/or packaging relatingthereto shall include the respective ThirdParty Notices set forth below and usedas described below corresponding tothe Territory (or portion thereof)included in such copy:
Copyright. Based on data providedunder license from PSMA AustraliaLimited (www.psma.com.au).
Product incorporates data which is ©20XX Telstra Corporation Limited, GMHolden Limited, Intelematics AustraliaPty Ltd and Continental Pty Ltd.
B. Third Party Notices for Australia. Inaddition to the foregoing, the End-UserTerms for any Application containingRDS-TMC Traffic Codes for Australiashall contain the following notice:“Product incorporates traffic locationcodes which is © 20XX Telstra Corpora-tion Limited and its licensors.”
AT&T Vehicle Network CarrierTelematics DisclosureEND USER FOR PURPOSES OF THISSECTION MEANS YOU AND YOUR HEIRS,EXECUTORS, LEGAL PERSONALREPRESENTATITVES AND PERMITEDASSIGNS. FOR PURPOSES OF THISSECTION “UNDERLYING WIRELESSSERVICE CARRIER” INCLUDES ITSAFFILIATES AND CONTRACTORS ANDTHEIR RESPECTIVE OFFICERS,DIRECTORS, EMPLOYEES, SUCCESSORSAND ASSIGNS. END USER HAS NOCONTRACTUAL RELATIONSHIP WITHTHE UNDERLYING WIRELESS SERVICECARRIER AND END USER IS NOT A THIRDPARTY BENEFICIARY OF ANYAGREEMENT BETWEEN FORD ANDUNDERLYING CARRIER. END USERUNDERSTANDS AND AGREES THAT THEUNDERLYING CARRIER HAS NO LEGAL,EQUITABLE, OR OTHER LIABILITY OF ANYKIND TO END USER. IN ANY EVENT,REGARDLESS OF THE FORM OF THEACTION, WHETHER FOR BREACH OFCONTRACT, WARRANTY, NEGLIGENCE,STRICT LIABILITY IN TORT OROTHERWISE, END USER'S EXCLUSIVEREMEDY FOR CLAIMS ARISING IN ANYWAY IN CONNECTION WITH THISAGREEMENT, FOR ANY CAUSEWHATSOEVER, INCLUDING BUT NOTLIMITED TO ANY FAILURE OR
481
Flex (TP3) , enUSA, Edition date: 201803, Second-Printing
Appendices

DISRUPTION OF SERVICE PROVIDEDHEREUNDER, IS LIMITED TO PAYMENTOF DAMAGES IN AN AMOUNT NOT TOEXCEED THE AMOUNT PAID BY END USERFOR THE SERVICES DURING THETWO-MONTH PERIOD PRECEDING THEDATE THE CLAIM AROSE.(ii) END USER AGREES TO INDEMNIFYAND HOLD HARMLESS THE UNDERLYINGWIRELESS SERVICE CARRIER AND ITSOFFICERS, EMPLOYEES, AND AGENTSAGAINST ANY AND ALL CLAIMS,INCLUDING WITHOUT LIMITATIONCLAIMS FOR LIBEL, SLANDER, OR ANYPROPERTY DAMAGE, PERSONAL INJURYOR DEATH, ARISING IN ANY WAY,DIRECTLY OR INDIRECTLY, INCONNECTION WITH THIS AGREEMENTOR THE USE, FAILURE TO USE, ORINABILITY TO USE THE DEVICE EXCEPTWHERE THE CLAIMS RESULT FROM THEUNDERLYING CARRIER’S GROSSNEGLIGENCE OR WILLFUL MISCONDUCT.THIS INDEMNITY WILL SURVIVE THETERMINATION OF THE AGREEMENT.(iii) END USER HAS NO PROPERTY RIGHTIN ANY NUMBER ASSIGNED TO THEDEVICE.(iv) END USER UNDERSTANDS THATFORD AND THE UNDERLYING CARRIERCANNOT GUARANTY THE SECURITY OFWIRELESS TRANSMISSIONS, AND WILLNOT BE LIABLE FOR ANY LACK OFSECURITY RELATING TO THE USE OF THESERVICESTHE SERVICE IS FOR [END USER’S] USEONLY AND END USER MAY NOT RESELLTHE SERVICE TO ANY OTHER PARTY ENDUSER UNDERSTANDS THAT THEUNDERLYING CARRIER DOES NOTGUARANTEE ANY END USERUNINTERRUPTED SERVICE ORCOVERAGE. THE UNDERLYING CARRIERDOES NOT WARRANT THAT END USERSCAN OR WILL BE LOCATED USING THESERVICE. THE UNDERLYING CARRIER
MAKES NO WARRANTY, EXPRESS ORIMPLIED, OF MERCHANTABILITY ORFITNESS FOR A PARTICULAR PURPOSE,SUITABILITY, OR PERFORMANCEREGARDING ANY SERVICES OR GOODS,AND IN NO EVENT SHALL AT&T BELIABLE, WHETHER OR NOT DUE TO ITSOWN NEGLIGENCE, FOR ANY: (A) ACT OROMISSION OF A THIRD PARTY; (B)MISTAKES, OMISSIONS, INTERRUPTIONS,ERRORS, FAILURES TO TRANSMIT,DELAYS, OR DEFECTS IN THE SERVICEPROVIDED BY OR THROUGH THEUNDERLYING CARRIER; (C) DAMAGE ORINJURY CAUSED BY SUSPENSION ORTERMINATION BY THE UNDERLYINGCARRIER; OR (D) DAMAGE OR INJURYCAUSED BY A FAILURE OR DELAY INCONNECTING A CALL TO ANY ENTITY,INCLUDING 911 OR ANY OTHEREMERGENCY SERVICE. TO THE FULLEXTENT ALLOWED BY LAW, THE ENDUSER RELEASES, INDEMNIFIES ANDHOLDS THE UNDERLYING CARRIERHARMLESS FROM AND AGAINST ANYAND ALL CLAIMS OF ANY PERSON ORENTITY FOR DAMAGES OF ANY NATUREARISING IN ANY WAY FROM OR RELATINGTO, DIRECTLY OR INDIRECTLY, SERVICESPROVIDED BY THE UNDERLYING CARRIEROR ANY PERSON’S USE THEREOF,INCLUDING CLAIMS ARISING IN WHOLEOR IN PART FROM THE ALLEGEDNEGLIGENCE OF THE UNDERLYINGCARRIER.
VII. China Territory
Personal Use OnlyYou agree to use this Data together with[insert name of Client Application] for thesolely personal, non-commercial purposesfor which you were licensed, and not forservice bureau, time-sharing or othersimilar purposes. Accordingly, but subjectto the restrictions set forth in the followingparagraphs, you may copy this Data onlyas necessary for your personal use to (i)
482
Flex (TP3) , enUSA, Edition date: 201803, Second-Printing
Appendices

view it, and (ii) save it, provided that youdo not remove any copyright notices thatappear and do not modify the Data in anyway. You agree not to otherwise reproduce,copy, modify, decompile, disassemble orreverse engineer any portion of this Data,and may not transfer or distribute it in anyform, for any purpose, except to the extentpermitted by mandatory laws.
RestrictionsExcept where you have been specificallylicensed to do so by NAV2 , and withoutlimiting the preceding paragraph, you maynot (a) use this Data with any products,systems, or applications installed orotherwise connected to or incommunication with vehicles, capable ofvehicle navigation, positioning, dispatch,real time route guidance, fleetmanagement or similar applications; or (b)with or in communication with anypositioning devices or any mobile orwireless-connected electronic or computerdevices, including without limitationcellular phones, palmtop and handheldcomputers, pagers, and personal digitalassistants or PDAs. You agree to ceaseusing this Data if you fail to comply withthese terms and conditions.
Limited WarrantyNAV2 warrants that (a) the Data willperform substantially in accordance withthe accompanying written materials for aperiod of ninety (90) days from the dateof receipt, and (b) any support servicesprovided by NAV2 shall be substantially asdescribed in applicable written materialsprovided to you by NAV2, and NAV2’ssupport engineers will make commerciallyreasonable efforts to solve any problemissues.
rigCustomer RemediesNAV2 and its suppliers’ entire liability andyour exclusive remedy shall be, at NAV2’ssole discretion, either (a) return of the pricepaid, if any, or (b) repair or replacement ofthe Data that do not meet NAV2’s LimitedWarranty and that are returned to NAV2with a copy of your receipt. This LimitedWarranty is void if failure of the Data hasresulted from accident, abuse, ormisapplication. Any replacement Data willbe warranted for the remainder of theoriginal warranty period or thirty (30) days,whichever is longer. Neither these remediesnor any product support services offeredby NAV2 are available without proof ofpurchase from an authorized internationalsource.
No Other Warranty:EXCEPT FOR THE LMITED WARRANTYSET FORTH ABOVE AND TO THE EXTENTPERMITTED BY APPLICABLE LAW, NAV2AND ITS LICENSORS (INCLUDING THEIRLICENSORS AND SUPPLIERS) DISCLAIMANY WARRANTIES, EXPRESS OR IMPLIED,OF QUALITY, PERFORMANCE,MERCHANTABILITY, FITNESS FOR APARTICULAR PURPOSE, OWNERSHIP ORNON-INFRINGEMENT. Certain warrantyexclusions may not be permitted underapplicable law, so to that extent the aboveexclusion may not apply to you.
Limited Liability:TO THE EXTENT PERMITTED BYAPPLICABLE LAW, NAV2 AND ITSLICENSORS (INCLUDING THEIRLICENSORS AND SUPPLIERS) SHALL NOTBE LIABLE TO YOU: IN RESPECT OF ANYCLAIM, DEMAND OR ACTION,IRRESPECTIVE OF THE NATURE OF THECAUSE OF THE CLAIM, DEMAND ORACTION ALLEGING ANY LOSS, INJURY ORDAMAGES, DIRECT OR INDIRECT, WHICHMAY RESULT FROM THE USE ORPOSSESSION OF THE INFORMATION; OR
483
Flex (TP3) , enUSA, Edition date: 201803, Second-Printing
Appendices

FOR ANY LOSS OF PROFIT, REVENUE,CONTRACTS OR SAVINGS, OR ANYOTHER DIRECT, INDIRECT, INCIDENTAL,SPECIAL OR CONSEQUENTIAL DAMAGESARISING OUT OF YOUR USE OF ORINABILITY TO USE THIS INFORMATION,ANY DEFECT IN THE INFROMATION, ORTHE BREACH OF THESE TERMS ORCONDITIONS, WHETHER IN AN ACTIONIN CONTRACT OR TORT OR BASED ON AWARRANTY, EVEN IF NAV2 OR ITSLICENSORS HAVE BEEN ADVISED OF THEPOSSIBILITY OF SUCH DAMAGES. UNDERNO CIRCUMSTANCES SHALL NAV2’s ORITS SUPPLIERS’ LIABILITY HEREUNDEREXCEED THE PRICE PAID. Certain liabilityexclusions may not be permitted underapplicable law, so to that extent the aboveexclusion may not apply to you.
Export ControlYou agree not to export to anywhere anypart of the Data provided to you or anydirect product thereof except incompliance with, and with all licenses andapprovals required under, applicableexport laws, rules and regulations.
IP ProtectionThe Data are owned by NAV2 or itssuppliers and are protected by applicablecopyright and other intellectual propertylaw and treaties. The Data are providedsolely on the basis of a license to use, notsale.
Entire AgreementThese terms and conditions constitute theentire agreement between NAV2(and itslicensors, including their licensors andsuppliers) and you pertaining to the subjectmatter hereof, and supersedes in theirentirety any and all written or oralagreements previously existing betweenus with respect to such subject matter.
Governing Law.The above terms and conditions shall begoverned by the laws of the People’sRepublic of China, without giving effect to(i) its conflict of laws provisions, or (ii) theUnited Nations Convention for Contractsfor the International Sale of Goods, whichis explicitly excluded. Any dispute arisingfrom or in connection with the Dataprovided to you hereunder shall besubmitted to the Shanghai InternationalEconomic and Trade ArbitrationCommission for arbitration.
Gracenote® CopyrightCD and music-related data fromGracenote, Inc., copyright©2000-2007 Gracenote. GracenoteSoftware, copyright © 2000-2007Gracenote. This product and service maypractice one or more of the following U.S.Patents 5,987,525; 6,061,680; 6,154,773;6,161,132; 6,230,192; 6,230,207; 6.240,459;6,330,593 and other patents issued orpending. Some services supplied underlicense from Open Globe, Inc. for U.S.Patent 6,304,523.Gracenote and CDDB are registeredtrademarks of Gracenote. The Gracenotelogo and logotype, and the "Powered byGracenote™" logo are trademarks ofGracenote.
Gracenote® End User License Agreement(EULA)This device contains software fromGracenote, Inc. of 2000 Powell StreetEmeryville, California 94608("Gracenote").The software from Gracenote (the"Gracenote Software") enables this deviceto do disc and music file identification andobtain music-related information, includingname, artist, track, and title information("Gracenote Data") from online servers
484
Flex (TP3) , enUSA, Edition date: 201803, Second-Printing
Appendices

("Gracenote Servers"), and to performother functions. You may use GracenoteData only by means of the intended EndUser functions of this device. This devicemay contain content belonging toGracenote's providers. If so, all of therestrictions set forth herein with respect toGracenote Data shall also apply to suchcontent and such content providers shallbe entitled to all of the benefits andprotections set forth herein that areavailable to Gracenote. You agree that youwill use the content from Gracenote("Gracenote Content") , Gracenote Data,the Gracenote Software, and GracenoteServers for your own personal,non-commercial use only. You agree notto assign, copy, transfer or transmit theGracenote Content, Gracenote Softwareor any Gracenote Data (except in a Tagassociated with a music file) to any thirdparty. YOU AGREE NOT TO USE OREXPLOIT GRACENOTE CONTENT,GRACENOTE DATA, THE GRACENOTESOFTWARE, OR GRACENOTE SERVERS,EXCEPT AS EXPRESSLY PERMITTEDHEREIN.You agree that your non-exclusive licensesto use the Gracenote Content, GracenoteData, the Gracenote Software, andGracenote Servers will terminate if youviolate these restrictions. If your licensesterminate, you agree to cease any and alluse of the Gracenote Content, GracenoteData, the Gracenote Software, andGracenote Servers.Gracenote, respectively, reserve all rightsin Gracenote Data, the GracenoteSoftware, and the Gracenote Servers andGracenote Content, including all ownershiprights. Under no circumstances will eitherGracenote become liable for any paymentto you for any information that you provide,
including any copyrighted material ormusic file information. You agree thatGracenote may enforce its respectiverights, collectively or separately, under thisagreement against you, directly in eachcompany's own name.Gracenote uses a unique identifier to trackqueries for statistical purposes. Thepurpose of a randomly assigned numericidentifier is to allow Gracenote to countqueries without knowing anything aboutwho you are. For more information, see theweb page at www.gracenote.com for theGracenote Privacy Policy.THE GRACENOTE SOFTWARE, EACH ITEMOF GRACENOTE DATA AND THEGRACENOTE CONTENT ARE LICENSEDTO YOU "AS IS". NEITHER GRACENOTEMAKES ANY REPRESENTATIONS ORWARRANTIES, EXPRESS OR IMPLIED,REGARDING THE ACCURACY OF ANYGRACENOTE DATA FROM THEGRACENOTE SERVERS OR GRACENOTECONTENT. GRACENOTE COLLECTIVELYAND SEPARATELY RESERVE THE RIGHTTO DELETE DATA AND/OR CONTENTFROM THE COMPANIES' RESPECTIVESERVERS OR, IN THE CASE OFGRACENOTE, CHANGE DATACATEGORIES FOR ANY CAUSE THATGRACENOTE DEEMS SUFFICIENT. NOWARRANTY IS MADE THAT EITHERGRACENOTE CONTENT OR THEGRACENOTE SOFTWARE ORGRACENOTE SERVERS ARE ERROR-FREEOR THAT THE FUNCTIONING OF THEGRACENOTE SOFTWARE ORGRACENOTE SERVERS WILL BEUNINTERRUPTED. GRACENOTE IS NOTOBLIGATED TO PROVIDE YOU WITH ANYENHANCED OR ADDITIONAL DATA TYPESTHAT GRACENOTE MAY CHOOSE TOPROVIDE IN THE FUTURE AND IS FREETO DISCONTINUE ITS ONLINE SERVICESAT ANY TIME. GRACENOTE DISCLAIM ALLWARRANTIES EXPRESS OR IMPLIED,INCLUDING, BUT NOT LIMITED TO,
485
Flex (TP3) , enUSA, Edition date: 201803, Second-Printing
Appendices

IMPLIED WARRANTIES OFMERCHANTABILITY, FITNESS FOR APARTICULAR PURPOSE, TITLE, ANDNON-INFRINGEMENT. NEITHERGRACENOTE WARRANTS THE RESULTSTHAT WILL BE OBTAINED BY YOUR USEOF THE GRACENOTE SOFTWARE OR ANYGRACENOTE SERVER. IN NO CASE WILLGRACENOTE BE LIABLE FOR ANYCONSEQUENTIAL OR INCIDENTALDAMAGES OR FOR ANY LOST PROFITSOR LOST REVENUES FOR ANY REASONWHATSOEVER. © Gracenote 2007.
Radio Frequency StatementFCC ID: ACJ-SYNCG3-LIC: 216B-SYNCG3-LThis device complies with Part 15 of theFCC Rules and with RSS-210 of IndustryCanada. Operation is subject to thefollowing two conditions:(1) This device may not cause harmfulinterference, and(2) this device must accept anyinterference received, includinginterference that may cause undesiredoperation.
WARNING: Changes ormodifications not expressively approvedby the party responsible for compliancecould void the user's authority to operatethe equipment. The term "IC:" before theradio certification number only signifiesthat Industry Canada technicalspecifications were met.
The antenna used for this transmitter mustnot be co-located or operating inconjunction with any other antenna ortransmitter.
Taiwan TerritoryNote: In accordance with the managementapproach of low-power radio waveradiation motors:Article 12: For approved and certifiedlow-power radiation motor models,companies, firms or users must not alterthe frequency, increase the power orchange the characteristics and functionsof the original design without authorization.Article 14: The usage of low-powerradio-frequency motors must not affectaviation safety and interfere with legaltelecommunications. Should interferencebe detected, immediately stop using thedevice and only resume usage afterensuring that there is no longer anyinterference. For the legaltelecommunication and wirelesstelecommunication of the telco, thelow-power radio frequency motor must beable to tolerate legal limits of interferencefrom telecommunication, industrial,scientific and radio wave equipment.
SUNA TRAFFIC CHANNEL – TERMSAND CONDITIONSBy activating, using and/or accessing theSUNA Traffic Channel, SUNA Predictive orother content or material provided byIntelematics (together, SUNA Productsand/or Services), you must acceptcertain terms and conditions. The followingis a brief summary of the terms andconditions that apply to you. To view thefull terms and conditions relevant to youruse of the SUNA Products and/or Services,please consult:
Website
www.sunatraffic.com.au/termsandcon-ditions/
1. Acceptance
486
Flex (TP3) , enUSA, Edition date: 201803, Second-Printing
Appendices

By using SUNA Products and/or Services,you will be deemed to have accepted andagreed to be bound by the terms andconditions fully detailed at:
Website
www.sunatraffic.com.au/termsandcon-ditions/
2. Intellectual PropertySUNA Products and/or Services are foryour personal use. You may not record, orretransmit the content, nor use the contentin association with any other trafficinformation or route guidance service ordevice not approved by Intelematics. Youobtain no right of ownership in anyIntellectual Property Rights (includingcopyright) in the data that is used toprovide SUNA Products and/or Services.3. Appropriate UseSUNA Products and/or Services areintended as an aid to personal motoringand travel planning, and do not providecomprehensive or accurate information onall occasions. On occasions, you mayexperience additional delay as a result ofusing SUNA Products and/or Services. Youacknowledge that it is not intended, orsuitable, for use in applications where timeof arrival or driving directions may impactthe safety of the public or yourself.4. Use of SUNA Products and Serviceswhile drivingYou, and other authorised drivers of thevehicle in which SUNA Products and/orServices are available or installed andactive, remain at all times responsible forobserving all relevant laws and codes ofsafe driving. In particular, you agree to onlyactively operate SUNA Products and/orServices when the Vehicle is at a completestop and it is safe to do so.
5. Service Continuity and Reception ofthe SUNA Traffic ChannelWe will use reasonable endeavours toprovide the SUNA Traffic Channel 24 hoursa day, 365 days a year. The SUNA TrafficChannel may occasionally be unavailablefor technical reasons or for plannedmaintenance. We will try to performmaintenance at times when congestion islight. We reserve the right to withdrawSUNA Products and/or Services at anytime.Also, we cannot assure the uninterruptedreception of the SUNA Traffic ChannelRDS-TMC signal at any particular location.6. Limitation of LiabilityNeither Intelematics (nor its suppliers orthe manufacturer of your device (the“Suppliers”)) shall be liable to you or toany third party for any damages eitherdirect, indirect, incidental, consequentialor otherwise arising out of the use of orinability to use SUNA Products and/orServices even if Intelematics or a Supplierhas been advised of the possibility of suchdamages. You also acknowledge that theneither Intelematics nor any Supplierguarantees nor make any warranties thatrelate to the availability, accuracy orcompleteness of SUNA Products and/orServices, and to the extent which it islawful to do so, both Intelematics and eachSupplier excludes any warranties whichmight otherwise be implied by any Stateor Federal legislation in relation to SUNAProducts and/or Services.7. Please NoteGreat care has been taken in preparing thismanual. Constant product developmentmay mean that some information is notentirely up-to-date. The information in thisdocument is subject to change withoutnotice.
487
Flex (TP3) , enUSA, Edition date: 201803, Second-Printing
Appendices

TYPE APPROVALSRadio Frequency CertificationLogos for Tire Pressure MonitoringSensor(s)
E207816
Argentina
E197509
Brazil
E207818
European Union EU
E253824
Ghana
E253823
Jordan
E253822
Malaysia
E253812
E253813
Mexico
E197811
488
Flex (TP3) , enUSA, Edition date: 201803, Second-Printing
Appendices

Moldova
E207821
Morocco
E253817
Oman
E198001
Philippines
E253816
Russia
E197844
Serbia
E253820
Singapore
E198002
South Africa
E253819
South Korea
489
Flex (TP3) , enUSA, Edition date: 201803, Second-Printing
Appendices

E203679
Taiwan
E253818
Ukraine
E207817
United Arab Emirates
Radio Frequency CertificationLogos for Mid Range Radar
E269659
Argentina
E269662
Ghana
E269660
Jordan
490
Flex (TP3) , enUSA, Edition date: 201803, Second-Printing
Appendices

E269661
Morocco
E269664
South Africa
E269663
United Arab Emirates
Radio Frequency CertificationLogos for Passive Anti-TheftSystem
E274065
Argentina
E269675
Brazil
E274068
Djibouti
491
Flex (TP3) , enUSA, Edition date: 201803, Second-Printing
Appendices

E269674
Ghana
E274067
Jamaica
E269666
Jordan
E269673
Malaysia
E269670
Morocco
E274066
Paraguay
492
Flex (TP3) , enUSA, Edition date: 201803, Second-Printing
Appendices

E275754
Pakistan
E269672
Serbia
E269676
Singapore
E269667
South Africa
E269671
Ukraine
E269668
United Arab Emirates
493
Flex (TP3) , enUSA, Edition date: 201803, Second-Printing
Appendices

E269677
Vietnam
Radio Frequency CertificationLogos for Radio TransceiverModule
E272192
Djibouti
E272193
Jamaica
E272194
Jordan
E269683
Morocco
E269684
Pakistan
494
Flex (TP3) , enUSA, Edition date: 201803, Second-Printing
Appendices

E272195
Paraguay
E269681
Serbia
E269685
South Africa
E269682
Ukraine
E272196
United Arab Emirates
Radio Frequency CertificationLogos for Blind Spot InformationSystem
E269695
Ghana
495
Flex (TP3) , enUSA, Edition date: 201803, Second-Printing
Appendices

E269697
Malaysia
E269696
South Africa
E269694
United Arab Emirates
E269693
Vietnam
Radio Frequency CertificationLogos for Wireless Charging
E272903
United Arab Emirates
E273475
South Korea
496
Flex (TP3) , enUSA, Edition date: 201803, Second-Printing
Appendices

Radio Frequency CertificationLogos for SYNC 3
E252722
Brazil
E282218
497
Flex (TP3) , enUSA, Edition date: 201803, Second-Printing
Appendices

498
Flex (TP3) , enUSA, Edition date: 201803, Second-Printing
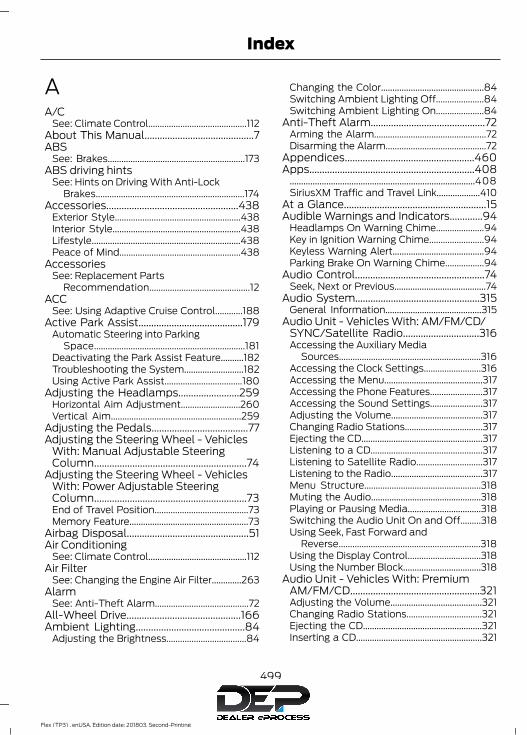
AA/C
See: Climate Control...........................................112About This Manual...........................................7ABS
See: Brakes............................................................173ABS driving hints
See: Hints on Driving With Anti-LockBrakes.................................................................174
Accessories....................................................438Exterior Style.......................................................438Interior Style........................................................438Lifestyle.................................................................438Peace of Mind.....................................................438
AccessoriesSee: Replacement Parts
Recommendation............................................12ACC
See: Using Adaptive Cruise Control............188Active Park Assist.........................................179
Automatic Steering into ParkingSpace..................................................................181
Deactivating the Park Assist Feature..........182Troubleshooting the System..........................182Using Active Park Assist..................................180
Adjusting the Headlamps........................259Horizontal Aim Adjustment..........................260Vertical Aim.........................................................259
Adjusting the Pedals......................................77Adjusting the Steering Wheel - Vehicles
With: Manual Adjustable SteeringColumn............................................................74
Adjusting the Steering Wheel - VehiclesWith: Power Adjustable SteeringColumn............................................................73End of Travel Position.........................................73Memory Feature....................................................73
Airbag Disposal................................................51Air Conditioning
See: Climate Control...........................................112Air Filter
See: Changing the Engine Air Filter.............263Alarm
See: Anti-Theft Alarm.........................................72All-Wheel Drive.............................................166Ambient Lighting...........................................84
Adjusting the Brightness...................................84
Changing the Color.............................................84Switching Ambient Lighting Off.....................84Switching Ambient Lighting On.....................84
Anti-Theft Alarm.............................................72Arming the Alarm.................................................72Disarming the Alarm............................................72
Appendices...................................................460Apps.................................................................408
.................................................................................408SiriusXM Traffic and Travel Link...................410
At a Glance........................................................15Audible Warnings and Indicators.............94
Headlamps On Warning Chime.....................94Key in Ignition Warning Chime........................94Keyless Warning Alert........................................94Parking Brake On Warning Chime.................94
Audio Control...................................................74Seek, Next or Previous........................................74
Audio System.................................................315General Information..........................................315
Audio Unit - Vehicles With: AM/FM/CD/SYNC/Satellite Radio..............................316Accessing the Auxiliary Media
Sources..............................................................316Accessing the Clock Settings.........................316Accessing the Menu...........................................317Accessing the Phone Features.......................317Accessing the Sound Settings.......................317Adjusting the Volume........................................317Changing Radio Stations..................................317Ejecting the CD.....................................................317Listening to a CD.................................................317Listening to Satellite Radio.............................317Listening to the Radio........................................317Menu Structure...................................................318Muting the Audio................................................318Playing or Pausing Media................................318Switching the Audio Unit On and Off.........318Using Seek, Fast Forward and
Reverse..............................................................318Using the Display Control................................318Using the Number Block..................................318
Audio Unit - Vehicles With: PremiumAM/FM/CD...................................................321Adjusting the Volume........................................321Changing Radio Stations.................................321Ejecting the CD....................................................321Inserting a CD.......................................................321
499
Flex (TP3) , enUSA, Edition date: 201803, Second-Printing
Index

Switching the Audio Unit On and Off..........321Using Seek, Fast Forward and
Reverse...............................................................321Audio Unit - Vehicles With: Sony AM/
FM/CD...........................................................322Accessing the Sound Settings......................322Adjusting the Volume.......................................322Changing Radio Stations................................322Selecting the Audio Modes............................322Switching the Audio Unit On and Off.........322Using Seek, Fast Forward and
Reverse..............................................................323Autolamps.........................................................81
Windshield Wiper ActivatedHeadlamps.........................................................81
Automatic Climate Control - VehiclesWith: Premium AM/FM/CD.....................113Setting the Blower Motor Speed...................113Setting the Temperature..................................114Switching Auto Mode On and Off.................114Switching Defrost On and Off........................114Switching Dual Zone Mode On and
Off.........................................................................114Switching Maximum Air Conditioning On
and Off................................................................114Switching Recirculated Air On and
Off.........................................................................114Switching the Air Conditioning On and
Off.........................................................................114Switching the Climate Control On and
Off.........................................................................114Automatic Climate Control - Vehicles
With: Sony Audio System........................115Setting the Blower Motor Speed...................115Setting the Temperature...................................115Switching Auto Mode On and Off.................115Switching Defrost On and Off........................115Switching Maximum Air Conditioning On
and Off................................................................115Switching Recirculated Air On and
Off........................................................................116Switching the Air Conditioning On and
Off.........................................................................115Switching the Climate Control On and
Off.........................................................................115Automatic Transmission............................162
Automatic Transmission AdaptiveLearning.............................................................165
Brake-Shift Interlock.........................................164If Your Vehicle Gets Stuck In Mud or
Snow..................................................................165SelectShift Automatic™
Transmission...................................................162Understanding the Positions of Your
Automatic Transmission.............................162Automatic Transmission Fluid
Check.............................................................253Adding Transmission Fluid ............................254Checking the Transmission Fluid
Level...................................................................253Autowipers........................................................78Auxiliary Power Points.................................141
110 Volt AC Power Point....................................14112 Volt DC Power Point......................................141Locations................................................................141
AWDSee: All-Wheel Drive.........................................166
BBattery
See: Changing the 12V Battery.....................256Blind Spot Information System..............194
Switching the System Off and On...............195System Errors.......................................................195System Limitations............................................195Using the System...............................................194
BLISSee: Blind Spot Information System..........194
Body Styling Kits...........................................272Bonnet Lock
See: Opening and Closing the Hood..........243Booster Seats..................................................28
Types of Booster Seats......................................29Brake Fluid Check........................................255Brakes................................................................173
General Information...........................................173Breaking-In......................................................216Bulb Specification Chart............................313
CCabin Air Filter...............................................120
500
Flex (TP3) , enUSA, Edition date: 201803, Second-Printing
Index

Capacities and Specifications - 3.5LDuratec.........................................................305Alternative Engine Oil for Extremely Cold
Climates...........................................................308Specifications.....................................................306
Capacities and Specifications - 3.5LEcoboost™.................................................309Alternative Engine Oil for Extremely Cold
Climates............................................................312Specifications......................................................310
Capacities and Specifications................299Cargo Nets.....................................................202Car Wash
See: Cleaning the Exterior..............................265Catalytic Converter......................................159
On-Board Diagnostics (OBD-II)...................160Readiness for Inspection and Maintenance
(I/M) Testing...................................................160Center Console..............................................143
Console Refrigerator and Freezer.................143Second Row Center Console..........................143
Changing a Bulb..........................................260Brake and Rear Lamps, Rear Direction
Indicator and Reversing Lamp.................262Front Direction Indicator and Front Parking
Lamp..................................................................261Front Fog Lamp..................................................262Headlamp..............................................................261Headlamp Low Beam and Headlamp High
Beam..................................................................261LED Lamps...........................................................263License Plate Lamp..........................................263
Changing a Fuse............................................241Fuses.......................................................................241
Changing a Road Wheel...........................293Dissimilar Spare Wheel and Tire Assembly
Information.....................................................293Tire Change Procedure....................................294
Changing the 12V Battery.........................256Changing the Engine Air Filter................263Changing the Wiper Blades.....................258
Front Wiper Blades...........................................258Rear Window Wiper Blade.............................258
Checking MyKey System Status...............59MyKey Distance....................................................59Number of Admin Keys......................................59Number of MyKeys..............................................59
Checking the Wiper Blades......................257
Child Restraint and SeatbeltMaintenance..................................................41
Child Restraint Positioning.........................30Child Safety........................................................17
General Information.............................................17Child Safety Locks..........................................32
Left-Hand Side......................................................33Right-Hand Side...................................................33
Cleaning Leather Seats.............................269Cleaning Products.......................................265
Materials...............................................................265Cleaning the Engine....................................267Cleaning the Exterior..................................265
Cleaning the Headlamps................................266Exterior Chrome Parts.....................................266Exterior Plastic Parts........................................266Stripes or Graphics...........................................266Underbody...........................................................266Under Hood.........................................................266
Cleaning the Instrument Panel andInstrument Cluster Lens........................268
Cleaning the Interior...................................268Mirrors....................................................................268
Cleaning the Wheels..................................270Cleaning the Windows and Wiper
Blades............................................................267Clearing All MyKeys.......................................58Climate............................................................392Climate Control..............................................112Climate Controlled Seats..........................135
Cooled Seats........................................................135Heated Seats........................................................135
Collision Warning System.........................199PRINCIPLE OF OPERATION...........................199
Coolant CheckSee: Engine Coolant Check............................249
Crash Sensors and Airbag Indicator.......50Creating a MyKey...........................................58
Programming and Changing ConfigurableSettings...............................................................58
Cross Traffic Alert.........................................196False Alerts...........................................................198Switching the System Off and On...............198System Errors.......................................................198System Lights, Messages and Audible
Alerts...................................................................197System Limitations............................................198Using the System...............................................196
501
Flex (TP3) , enUSA, Edition date: 201803, Second-Printing
Index

Cruise Control..................................................75Principle of Operation.......................................187
Cruise controlSee: Using Cruise Control................................187
Customer Assistance.................................225
DData Recording..................................................9
Event Data Recording..........................................10Service Data Recording........................................9
Daytime Running Lamps.............................82Direction Indicators.......................................83Doors and Locks..............................................61Driver and Passenger Airbags...................45
Children and Airbags..........................................46Proper Driver and Front Passenger Seating
Adjustment........................................................45Driving Aids.....................................................194Driving Hints...................................................216Driving Through Water................................217DRL
See: Daytime Running Lamps.........................82
EEconomical Driving......................................216Electromagnetic Compatibility.............460Emission Law.................................................158
Noise Emissions Warranty, ProhibitedTampering Acts and Maintenance..........159
Tampering With a Noise ControlSystem...............................................................158
End User License Agreement.................462VEHICLE SOFTWARE END USER LICENSE
AGREEMENT (EULA) .................................462Engine Block Heater....................................149
Using the Engine Block Heater......................150Engine Coolant Check...............................249
Adding Coolant..................................................249Coolant Change...................................................251Engine Coolant Temperature
Management..................................................252Fail-Safe Cooling................................................251Recycled Coolant................................................251Severe Climates..................................................251
Engine Emission Control...........................158
Engine ImmobilizerSee: Passive Anti-Theft System......................71
Engine Oil Check...........................................247Adding Engine Oil...............................................247
Engine Oil Dipstick.......................................247Engine Specifications - 3.5L
Duratec.........................................................299Drivebelt Routing...............................................299
Engine Specifications - 3.5LEcoboost™.................................................299Drivebelt Routing..............................................300
Entertainment..............................................382AM/FM Radio......................................................383Apps........................................................................391Bluetooth Stereo or USB................................390CD (If equipped)................................................389HD Radio™ Information (If
Available)........................................................386SiriusXM® Satellite Radio (If
Activated)........................................................384Sources..................................................................383Supported Media Players, Formats and
Metadata Information.................................391USB Ports..............................................................391
Environment......................................................14Essential Towing Checks............................211
Before Towing a Trailer.....................................213Hitches....................................................................212Launching or Retrieving a Boat or Personal
Watercraft (PWC).........................................214Safety Chains.......................................................212Trailer Brake Controller Connector...............212Trailer Brakes........................................................212Trailer Lamps........................................................213Trailer Towing Connector (Vehicles with a
Trailer Towing Package and 7–PinConnector)........................................................211
When Towing a Trailer.......................................213Event Data Recording
See: Data Recording..............................................9Export Unique Options..................................13Exterior Mirrors................................................86
Blind Spot Information System......................87Direction Indicator Mirrors.................................87Fold-Away Exterior Mirrors...............................86Heated Exterior Mirrors ......................................87Integrated Blind Spot Mirror.............................87Memory Mirrors ....................................................87
502
Flex (TP3) , enUSA, Edition date: 201803, Second-Printing
Index

Power Exterior Mirrors........................................86Power-Folding Mirrors.......................................86Puddle Lamps.......................................................87
FFastening the Seatbelts...............................35
Rear Inflatable Seatbelt.....................................37Seatbelt Locking Modes....................................36Using Seatbelts During Pregnancy................35
Flat TireSee: Changing a Road Wheel.......................293
Floor Mats........................................................217Fog Lamps - Front
See: Front Fog Lamps........................................83Foot Pedals
See: Adjusting the Pedals..................................77Ford Credit..........................................................11
US Only......................................................................11Ford Protect..................................................440
Ford Protect Extended Service Plan(CANADA ONLY)...........................................441
Ford Protect Extended Service Plans (U.S.Only).................................................................440
Front Fog Lamps............................................83Front Passenger Sensing System............46Fuel and Refueling........................................151Fuel Consumption.......................................156
Advertised Capacity..........................................156Fuel Economy......................................................156
Fuel Filler Funnel Location........................152Fuel Quality......................................................151
Choosing the Right Fuel....................................151Fuel Shutoff...................................................220Fuses.................................................................232Fuse Specification Chart...........................232
Passenger Compartment Fuse Panel........237Power Distribution Box....................................232
GGarage Door Opener
See: Universal Garage Door Opener...........136Gauges...............................................................90Gearbox
See: Transmission..............................................162
General Information on RadioFrequencies...................................................52Intelligent Access.................................................52
General Maintenance Information.......442Multi-Point Inspection.....................................444Owner Checks and Services..........................443Protecting Your Investment...........................442Why Maintain Your Vehicle?.........................442Why Maintain Your Vehicle at Your
Dealership?.....................................................442Getting Assistance Outside the U.S. and
Canada.........................................................228Getting the Services You Need...............225
Away From Home..............................................225
HHandbrake
See: Parking Brake..............................................174Hazard Flashers...........................................220Headlamp Adjusting
See: Adjusting the Headlamps.....................259Headlamp Exit Delay....................................82Headlamp Removal
See: Removing a Headlamp.........................260Headrest
See: Head Restraints..........................................121Head Restraints..............................................121
Adjusting the Head Restraint.........................122Tilting Head Restraints ....................................124
Heated Exterior Mirrors................................119Heated Rear Window...................................119Heated Seats..................................................134
Front Seats............................................................134Second Row Heated Seats.............................134
Heated Steering Wheel................................75Heating
See: Climate Control...........................................112Hints on Controlling the Interior
Climate...........................................................116Defogging the Side Windows in Cold
Weather..............................................................118General Hints........................................................116Quickly Cooling the Interior..............................117Quickly Heating the Interior..............................117Recommended Settings for Cooling............118Recommended Settings for Heating............117
503
Flex (TP3) , enUSA, Edition date: 201803, Second-Printing
Index

Hints on Driving With Anti-LockBrakes.............................................................174
Home Screen.................................................374Hood Lock
See: Opening and Closing the Hood..........243
IIgnition Switch...............................................145In California (U.S. Only).............................226Information Display Control.......................75Information Displays.....................................95
General Information............................................95Information Messages................................103
Adaptive Cruise Control...................................104AdvanceTrac™....................................................104Alarm......................................................................104Automatic Engine Shutdown........................104AWD........................................................................105Battery and Charging System........................105Blind Spot Information and Cross Traffic
Alert System....................................................106Brake System.......................................................106Collision Warning System................................107Doors and Locks..................................................107Fuel...........................................................................107Keys and Intelligent Access............................108Maintenance........................................................108MyKey.....................................................................109Park Aid..................................................................109Power Steering.....................................................110Seats........................................................................110Tire Pressure Monitoring System..................110Towing.......................................................................111Traction Control.....................................................111Transmission..........................................................111
Installing Child Restraints............................18Child Restraints......................................................18Using Lap and Shoulder Belts..........................19Using Lower Anchors and Tethers for
CHildren (LATCH)...........................................24Using Tether Straps.............................................26
Instrument Cluster........................................90Instrument Lighting Dimmer.....................82Instrument Panel Overview.........................15Interior Lamps.................................................83
Second Row Reading Lamps..........................83Third Row Dome Lamps...................................84
Interior Mirror...................................................88Auto-Dimming Mirror.........................................88
Introduction.........................................................7
JJump Starting the Vehicle..........................221
Connecting the Jumper Cables.....................221Jump Starting......................................................222Preparing Your Vehicle......................................221Removing the Jumper Cables.......................222
KKeyless Entry...................................................64
SECURICODE™ Keyless EntryKeypad................................................................64
Keyless Starting............................................146Ignition Modes.....................................................146
Keys and Remote Controls.........................52
LLiftgate...............................................................67Lighting Control..............................................80
Flashing the Headlamp High Beam...............81Headlamp High Beam.......................................80
Lighting..............................................................80General Information...........................................80
Load CarriersSee: Roof Racks and Load Carriers.............202
Load Carrying................................................202Load Limit.......................................................202
Special Loading Instructions for Owners ofPick-up Trucks and Utility-typeVehicles.............................................................207
Vehicle Loading - with and without aTrailer.................................................................202
Locking and Unlocking..................................61Activating Intelligent Access............................62Autolock...................................................................63Autounlock ............................................................63Battery Saver.........................................................64Enabling or Disabling Autounlock.................63Illuminated Entry..................................................64Illuminated Exit.....................................................64Locking and Unlocking the Doors with the
Key Blade.............................................................61
504
Flex (TP3) , enUSA, Edition date: 201803, Second-Printing
Index

Opening a Rear Door From the Inside..........62Power Door Locks.................................................61Remote Control.....................................................61Smart Unlocks for Integrated Keyhead
Transmitter........................................................62Smart Unlocks for Intelligent Access
Keys......................................................................63Lug Nuts
See: Changing a Road Wheel.......................293
MMaintenance..................................................243
General Information.........................................243Manual Climate Control..............................112
Directing the Air....................................................112Rear Climate Control Lock Indicator............113Setting the Blower Motor Speed...................112Setting the Rear Blower Motor Speed.........113Setting the Rear Temperature........................113Setting the Temperature...................................112Switching Defrost On and Off.........................112Switching Maximum Air Conditioning On
and Off................................................................113Switching Recirculated Air On and
Off.........................................................................113Switching the Air Conditioning On and
Off.........................................................................112Switching the Climate Control On and
Off.........................................................................113Switching the Rear Climate Control On and
Off.........................................................................113Manual Liftgate...............................................67
Closing the Liftgate..............................................67Opening the Liftgate...........................................67
Manual Seats.................................................124Lumbar Adjustment...........................................125Moving the Seat Backward and
Forward.............................................................124Recline Adjustment...........................................124
Media Hub......................................................323Memory Function.........................................126
Easy Entry and Exit Feature.............................127Linking a PreSet Position to your Remote
Control or Intelligent Access Key Fob...............................................................................127
Saving a PreSet Position.................................126
Message CenterSee: Information Displays.................................95
MirrorsSee: Windows and Mirrors................................85
Mobile Communications Equipment.......13Moonroof..........................................................88
Bounce-Back.........................................................89Opening and Closing the Moonroof.............89Venting the Moonroof........................................89
Motorcraft Parts - 3.5L Duratec............300Motorcraft Parts - 3.5L
Ecoboost™.................................................302MyKey Troubleshooting...............................59MyKey™.............................................................57
Principle of Operation.........................................57
NNavigation.....................................................400
cityseeker..............................................................407Destination Mode..............................................402Map Mode...........................................................400Navigation Map Updates...............................408Navigation Menu...............................................405SiriusXM Traffic and Travel Link..................408SYNC AppLink....................................................407Waypoints............................................................406
Normal Scheduled Maintenance..........445Intelligent Oil-Life Monitor™........................445Normal Maintenance Intervals....................446
OOil Change Indicator Reset......................248Oil Check
See: Engine Oil Check.......................................247Opening and Closing the Hood..............243
Closing the Hood...............................................244Opening the Hood.............................................243
Ordering Additional Owner'sLiterature.....................................................230Obtaining a French Owner’s Manual.........230
Overhead Console.......................................144
PParking Aids....................................................178
Principle of Operation.......................................178
505
Flex (TP3) , enUSA, Edition date: 201803, Second-Printing
Index

Parking Brake..................................................174Passive Anti-Theft System..........................71
SecuriLock®............................................................71PATS
See: Passive Anti-Theft System......................71Pedals..................................................................77Perchlorate.........................................................11Personal Safety System™..........................43
How Does the Personal Safety SystemWork?..................................................................43
Phone...............................................................394During a Phone Call..........................................398Making Calls.........................................................397Pairing Your Cell Phone for the First
Time...................................................................395Phone Menu........................................................395Receiving Calls...................................................398Smartphone Connectivity..............................399Text Messaging..................................................399
Post-Crash Alert System...........................223Power Door Locks
See: Locking and Unlocking..............................61Power Liftgate.................................................68
Obstacle Detection.............................................69Opening and Closing the Liftgate..................68Stopping the Liftgate Movement..................69
Power Seats....................................................125Power Lumbar.....................................................126
Power Steering Fluid Check.....................255Power Windows.............................................85
Accessory Delay...................................................85Bounce-Back.........................................................85One-Touch Down.................................................85One-Touch Up.......................................................85Window Lock.........................................................85
Protecting the Environment........................14Puncture
See: Changing a Road Wheel.......................293
RRear Parking Aid............................................178Rear Passenger Climate Controls...........118
Directing Air to the Overhead AirVents...................................................................118
Directing Air to the Overhead and RearFootwell Air Vents..........................................118
Directing Air to the Rear Footwell AirVents...................................................................118
Rear Control Lock Indicator.............................119Setting the Rear Blower Motor Speed.........119Setting the Rear Temperature........................119Switching the Rear Heated Seats On and
Off........................................................................119Rear Seats........................................................127
Adjusting the Rear Seats..................................127Rear View Camera.......................................183
Using the Rear View Camera System.........184Rear View Camera
See: Rear View Camera....................................183Rear Window Wiper and Washers...........79
Rear Camera Washer..........................................79Rear Window Washer.........................................79Rear Window Wiper Blade................................79
Recommended Towing Weights...........209Refueling..........................................................154
Refueling System Overview...........................154Refueling System Warning.............................156Refueling Your Vehicle......................................154
Remote Control..............................................53Car Finder................................................................55Integrated Keyhead Transmitter.....................53Intelligent Access Key.........................................53Memory Feature...................................................56Remote Start.........................................................55Replacing the Battery.........................................54Sounding the Panic Alarm................................55
Remote Start.................................................120Automatic Settings............................................120
Removing a Headlamp.............................260Repairing Minor Paint Damage...............270Replacement Parts
Recommendation........................................12Collision Repairs....................................................12Scheduled Maintenance and Mechanical
Repairs..................................................................12Warranty on Replacement Parts.....................12
Replacing a Lost Key or RemoteControl............................................................56
Reporting Safety Defects (CanadaOnly)..............................................................230
Reporting Safety Defects (U.S.Only)..............................................................230
506
Flex (TP3) , enUSA, Edition date: 201803, Second-Printing
Index

Roadside Assistance...................................219Vehicles Sold in Canada: Getting Roadside
Assistance.......................................................220Vehicles Sold in Canada: Roadside
Assistance Program Coverage................220Vehicles Sold in Canada: Using Roadside
Assistance.......................................................220Vehicles Sold in the United States: Getting
Roadside Assistance....................................219Vehicles Sold in the United States: Using
Roadside Assistance....................................219Roadside Emergencies...............................219Roof Racks and Load Carriers................202Running-In
See: Breaking-In..................................................216Running Out of Fuel.....................................152
Adding Fuel From a Portable FuelContainer..........................................................153
Filling a Portable Fuel Container...................152
SSafety Canopy™............................................49Safety Precautions........................................151Scheduled Maintenance Record...........450Scheduled Maintenance...........................442Seatbelt Extension.........................................41Seatbelt Height Adjustment......................38Seatbelt Reminder........................................39
Belt-Minder™........................................................39Seatbelts...........................................................34
Principle of Operation........................................34Seatbelt Warning Lamp and Indicator
Chime..............................................................39Conditions of operation.....................................39
Seats...................................................................121Security................................................................71Settings.............................................................411
911 Assist................................................................416Ambient Lighting...............................................422Bluetooth...............................................................413Clock........................................................................413Display...................................................................423General..................................................................420Media Player.........................................................412Mobile Apps..........................................................419Navigation..............................................................417Phone......................................................................413
Radio.......................................................................416Sound.......................................................................411Valet Mode...........................................................424Vehicle....................................................................422Voice Control.......................................................424Wi-Fi & Hotspot..................................................421
Side Airbags.....................................................48Sitting in the Correct Position...................121Snow Chains
See: Using Snow Chains.................................288Spare Wheel
See: Changing a Road Wheel.......................293Special Notices................................................12
New Vehicle Limited Warranty.........................12On Board Diagnostics Data Link
Connector............................................................13Special Instructions..............................................12
Special Operating Conditions ScheduledMaintenance..............................................448Exceptions...........................................................449
Speed ControlSee: Cruise Control.............................................187
Stability Control............................................176Principle of Operation.......................................176
Starter SwitchSee: Ignition Switch...........................................145
Starting a Gasoline Engine.......................146Automatic Engine Shutdown........................148Failure to Start.....................................................148Guarding Against Exhaust Fumes................149Important Ventilating Information...............149Stopping the Engine When Your Vehicle is
Moving...............................................................149Stopping the Engine When Your Vehicle is
Stationary.........................................................148Vehicles with an Ignition Key..........................147Vehicles with Keyless Start.............................147
Starting and Stopping the Engine..........145General Information..........................................145
Steering............................................................199Electric Power Steering....................................199
Steering Wheel................................................73Storage Compartments.............................143Sunroof
See: Moonroof......................................................88Sun Visors.........................................................88
Illuminated Vanity Mirror...................................88
507
Flex (TP3) , enUSA, Edition date: 201803, Second-Printing
Index

Supplementary Restraints System.........44Principle of Operation........................................44
Symbols Glossary.............................................7SYNC™ 3........................................................362
General Information.........................................362SYNC™ 3 Troubleshooting......................424SYNC™ Applications and
Services........................................................342911 Assist...............................................................342
SYNC™............................................................324General Information.........................................324
SYNC™ Troubleshooting.........................354
TTechnical Specifications
See: Capacities and Specifications............299The Better Business Bureau (BBB) Auto
Line Program (U.S. Only).......................227Tire Care...........................................................275
Glossary of Tire Terminology..........................277Information About Uniform Tire Quality
Grading..............................................................275Information Contained on the Tire
Sidewall............................................................278Temperature A B C............................................276Traction AA A B C...............................................276Treadwear.............................................................276
Tire Pressure Monitoring System..........289Changing Tires With a Tire Pressure
Monitoring System.......................................290Understanding Your Tire Pressure
Monitoring System ......................................290Tires
See: Wheels and Tires......................................273Towing a Trailer............................................208
Load Placement................................................208Towing the Vehicle on Four
Wheels...........................................................214Emergency Towing.............................................214Recreational Towing..........................................214
Towing.............................................................208Traction Control.............................................175
Principle of Operation.......................................175Trailer Sway Control...................................209Transmission Code Designation............304Transmission..................................................162Transporting the Vehicle...........................223
Type Approvals............................................488Radio Frequency Certification Logos for
Blind Spot Information System..............495Radio Frequency Certification Logos for Mid
Range Radar..................................................490Radio Frequency Certification Logos for
Passive Anti-Theft System........................491Radio Frequency Certification Logos for
Radio Transceiver Module........................494Radio Frequency Certification Logos for
SYNC 3..............................................................497Radio Frequency Certification Logos for Tire
Pressure Monitoring Sensor(s)...............488Radio Frequency Certification Logos for
Wireless Charging........................................496
UUnder Hood Overview - 3.5L
Duratec.........................................................244Under Hood Overview - 3.5L
Ecoboost™.................................................245Universal Garage Door Opener...............136
HomeLink Wireless Control System............136USB Port..........................................................323Using Adaptive Cruise Control................188
Automatic Cancellation....................................191Blocked Sensor....................................................192Canceling the Set Speed..................................191Changing the Set Speed...................................191Detection Issues...................................................191Following a Vehicle............................................189Hilly Condition Usage.........................................191Overriding the Set Speed................................190Resuming the Set Speed..................................191Setting the Adaptive Cruise Speed.............189Setting the Gap Distance................................190Switching Adaptive Cruise Control
Off........................................................................191Switching Adaptive Cruise Control
On........................................................................189Switching to Normal Cruise Control............193System Not Available........................................192
Using All-Wheel Drive................................166Driving In Special Conditions With
All-Wheel Drive (AWD)...............................168Operating AWD Vehicles With Mismatched
Tires.....................................................................167
508
Flex (TP3) , enUSA, Edition date: 201803, Second-Printing
Index

Operating AWD Vehicles With SpareTires.....................................................................167
Using Cruise Control....................................187Canceling the Set Speed.................................187Changing the Set Speed..................................187Resuming the Set Speed................................188Setting the Cruise Speed.................................187Switching Cruise Control Off.........................188Switching Cruise Control On..........................187
Using MyKey With Remote StartSystems..........................................................59
Using Snow Chains.....................................288Using Stability Control................................177Using SYNC™ With Your Media
Player............................................................344Accessing Your Play Menu.............................349Connecting Your Digital Media Player to the
USB Port..........................................................344Media Menu Features.......................................347Media Voice Commands................................346System Settings..................................................351What's Playing?.................................................345
Using SYNC™ With Your Phone............329Accessing Features Through the Phone
Menu..................................................................333Accessing Your Phone Settings....................337Making a Call.......................................................332Pairing a Cell Phone for the First
Time...................................................................329Pairing Subsequent Cell Phones.................330Phone Options during an Active Call.........332Phone Voice Commands................................330Receiving Calls....................................................332System Settings.................................................339Text Messaging...................................................335
Using Traction Control................................175Switching the System Off................................175System Indicator Lights and
Messages...........................................................175Using a Switch......................................................175Using the Information Display
Controls.............................................................175Using Voice Recognition...........................326
Audio Voice Commands..................................376Climate Voice Commands..............................377Initiating a Voice Session................................326Mobile App Voice Commands.....................380Navigation Voice Commands........................379
Phone Voice Commands.................................377SiriusXM Traffic and Travel Link Voice
Commands.....................................................380System Interaction and Feedback...............327Voice Settings Commands.............................381
Utilizing the Mediation/ArbitrationProgram (Canada Only)........................228
VVehicle Care...................................................265
General Information.........................................265Vehicle Certification Label.......................304Vehicle Identification Number................303Vehicle Storage.............................................270
Battery.....................................................................271Body........................................................................270Brakes......................................................................271Cooling system.....................................................271Engine......................................................................271Fuel system...........................................................271General..................................................................270Miscellaneous.......................................................271Removing Vehicle From Storage...................271Tires..........................................................................271
VentilationSee: Climate Control...........................................112
VINSee: Vehicle Identification Number............303
Voice Control....................................................75
WWarning Lamps and Indicators..................91
Adaptive Cruise Control......................................91Airbag Readiness..................................................92Anti-Lock Braking System................................92Battery......................................................................92Brake System.........................................................92Charging System..................................................92Cruise Control........................................................92Directional Indicator............................................92Door Ajar..................................................................92Engine Coolant Temperature...........................92Engine Oil................................................................93Fasten Seatbelt Warning Lamp......................93Front Airbag............................................................93Front Fog Lamps..................................................93
509
Flex (TP3) , enUSA, Edition date: 201803, Second-Printing
Index

Head Up Display...................................................93High Beam..............................................................93Liftgate Ajar............................................................93Low Fuel Level.......................................................93Low Tire Pressure Warning...............................93Low Washer Fluid.................................................93Parking Lamps......................................................93Powertrain Malfunction/Reduced
Power...................................................................94Service Engine Soon...........................................94Stability Control...................................................94Stability Control Off............................................94
Washer Fluid Check....................................255Washers
See: Cleaning the Exterior..............................265Waxing.............................................................267Wheel Nuts
See: Changing a Road Wheel.......................293Wheels and Tires..........................................273
General Information..........................................273Technical Specifications.................................298
Windows and Mirrors...................................85Windshield Washers.....................................79Windshield Wipers.........................................78
Speed Dependent Wipers.................................78Wiper Blades
See: Checking the Wiper Blades..................257Wipers and Washers.....................................78
510
Flex (TP3) , enUSA, Edition date: 201803, Second-Printing
Index