“100 years of Quality in Dental” - GC Europe
44
19 2021 “100 years of Quality in Dental”
-
Upload
khangminh22 -
Category
Documents
-
view
5 -
download
0
Transcript of “100 years of Quality in Dental” - GC Europe
19
2021
“100 years of Quality in Dental”
2 GC get connected
1. Excellent aesthetics with a significant time gain Interview with Michael Brüsch, Mark Bladen, Leonardo Cavallo, Carsten Fischer, Patrick Freudenthal,
Joaquin Garcia Arranz, Diederik Hellingh and Stefan Roozen 3
2. Maximal aesthetics within a micro-layer! A new, efficient concept for monolithic workpieces By Patric Freudenthal IQDENT / DTG, Sweden 8
3. CAD-CAM single tooth lithium-disilicate restoration through combined endodontic, surgical and prosthetic therapies
By Matteo Basso, Maria Giulia Pulcini, Carlo Vitelli, Arturo Dian, Katherine Radaelli and Clotilde Austoni, Italy. 13
4. Glass-fibre-reinforced composites as a core build-up in minimally invasive endodontics By Dr. Kaplan Sheudzhen, Russia 20
5. Simple adhesive luting in everyday practice – ONE for all By P.D. Dr. med. Dent. José Ignacio Zorzin, Germany 23
6. A surface-retained glass fiber-reinforced bridge with a CAD/CAM-fabricated pontic By Dr. Jasmina Bijelic-Donova (Finland), Dr. Clara Anton Y Otero (Switzerland), Prof. Dr. Pekka K. Vallittu (Finland)
and Prof. Dr. Ivo Krejci (Switzerland). 29
7. Don’t paint but seal - Maintaining the surface and individualizing the color By MDT Frederic Reimann, Germany 35
8. Ceramics and digital solutions from a single source: where manual and automated techniques go hand in hand
By Ralf Dahl, Germany 38
Contents
Dear reader,
A warm welcome to the 19th edition of our Get Connected magazine. When we started back in 2013 with this magazine, it was our intention to deliver you as a dental professional value added articles written by your colleagues. We strongly believe that it is our duty to help you in progressing by offering you the type of information that enables you to maximize the results you can achieve with our materials. And with this new issue we are once again bringing you insights in a few of our newest and ground-breaking products, often combining conventional and digital solutions.
For starters we look deeper inside our newest member of the ceramic family, Initial IQ ONE SQIN, the efficient concept for monolithic workpieces allowing maximal aesthetics within a micro-layer. In the form of an interview with our experts and developers, but also by means of an interesting article that does not only look at the aesthetic advantages but also at the economical aspects of this novel concept.
In the same field of prosthetic dentistry, we also look at the revolutionary new Initial LiSi Block in a case report on CAD-CAM single tooth lithium-disilicate restoration through combined endodontic, surgical and prosthetic therapies.
Fibre reinforced products are part of our portfolio for many years and interesting approaches in both the direct as indirect techniques are addressed in this magazine.
And with our universal resin cement G-CEM ONE we bring you a simplification in adhesive luting for your everyday practice whilst our Optiglaze Colour can be the perfect addition in your laboratory or practice to individualize and refine your restorations.
Our team of field specialists is more than willing to give you additional support and are looking forward to ‘ get connected’ with you. Last but not least we would like to draw your attention to our online platform https://www.gcdentalcampus.com where around 70 webinars can help you in broadening your knowledge on a variety of topics.
We hope you will enjoy reading these interesting articles and that they will enable you to get the maximum out of our line of products.
Yours sincerely,
André RumphorstGeneral Manager Marketing & Product Management - GC Europe NV
GC get connected 3
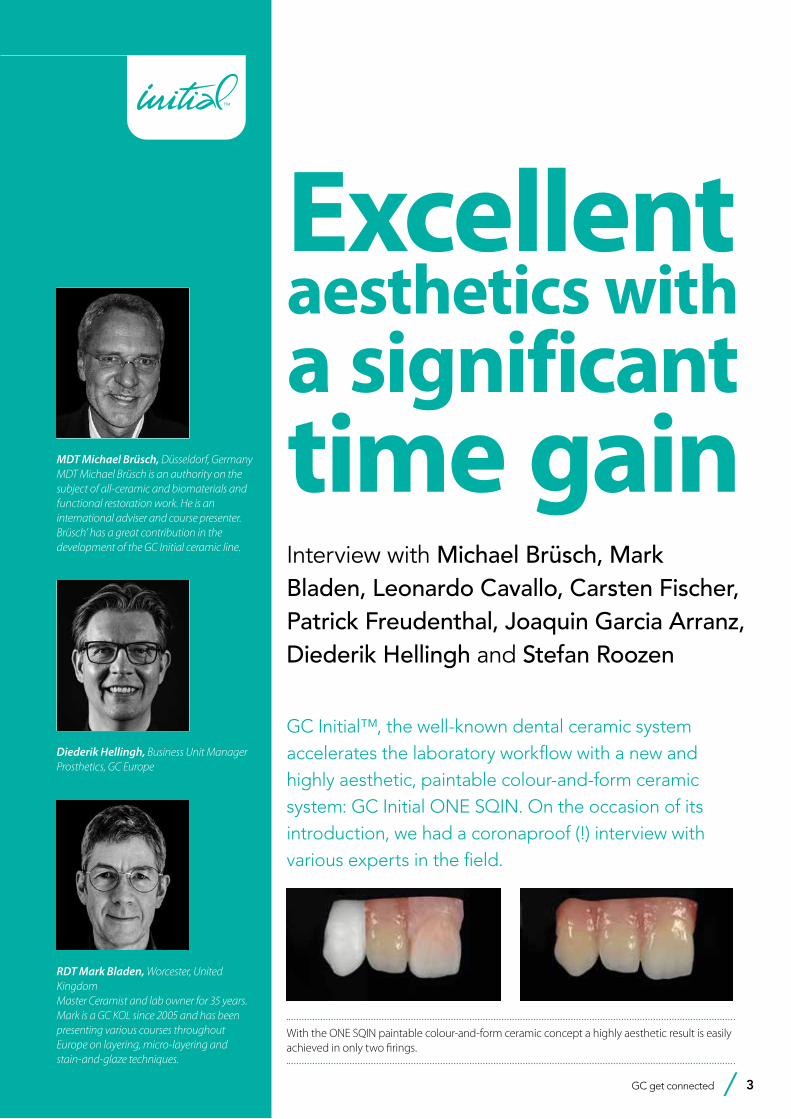
Excellent aesthetics with a significant time gainInterview with Michael Brüsch, Mark Bladen, Leonardo Cavallo, Carsten Fischer, Patrick Freudenthal, Joaquin Garcia Arranz, Diederik Hellingh and Stefan Roozen
MDT Michael Brüsch, Düsseldorf, GermanyMDT Michael Brüsch is an authority on the subject of all-ceramic and biomaterials and functional restoration work. He is an international adviser and course presenter. Brüsch’ has a great contribution in the development of the GC Initial ceramic line.
Diederik Hellingh, Business Unit Manager Prosthetics, GC Europe
RDT Mark Bladen, Worcester, United KingdomMaster Ceramist and lab owner for 35 years. Mark is a GC KOL since 2005 and has been presenting various courses throughout Europe on layering, micro-layering and stain-and-glaze techniques.
GC Initial™, the well-known dental ceramic system accelerates the laboratory workflow with a new and highly aesthetic, paintable colour-and-form ceramic system: GC Initial ONE SQIN. On the occasion of its introduction, we had a coronaproof (!) interview with various experts in the field.
With the ONE SQIN paintable colour-and-form ceramic concept a highly aesthetic result is easily achieved in only two firings.
4 GC get connected
Excellent aesthetics with a significant time gain
CDT Carsten Fischer, Frankfurt am Main, GermanyCDT Fischer owns a specialist dental laboratory in Frankfurt am Main and acts as an international consultant and his many publications bolster this role. The main focuses of his work include CAD/CAM technologies, ceramic double crowns, pressable ceramics and individual abutments.
MDT Patric Freudenthal, Ystad, SwedenSince 2004, Patric has lectured on different topics, such as: implants CAD/CAM, aesthetics, full ceramics, etc. Function & aesthetics with technology is the key-instrument in his everyday work.
MDT Joaquin García Arranz, Madrid, SpainJoaquin García Arranz (Quini) is a speaker of numerous courses in national and international conferences and author of different articles published in national magazines and author of the book “Experience Group”.
Why has GC developed the GC Initial IQ ONE SQIN concept and what does that actually mean?
Michael Brüsch: This novel concept has been developed to be able to follow the current market demands and it opens up a different and unique way of micro-layering.
Diederik Hellingh: While the entire manufacturing process is becoming more digitalized, customers are having increased aesthetic expectations. The pressure on the laboratories is high to work cost-efficient while delivering excellent quality. GC Initial ONE SQIN is the response to these demands. Highly aesthetic restorations for the anterior as well as the posterior area can be made without needing
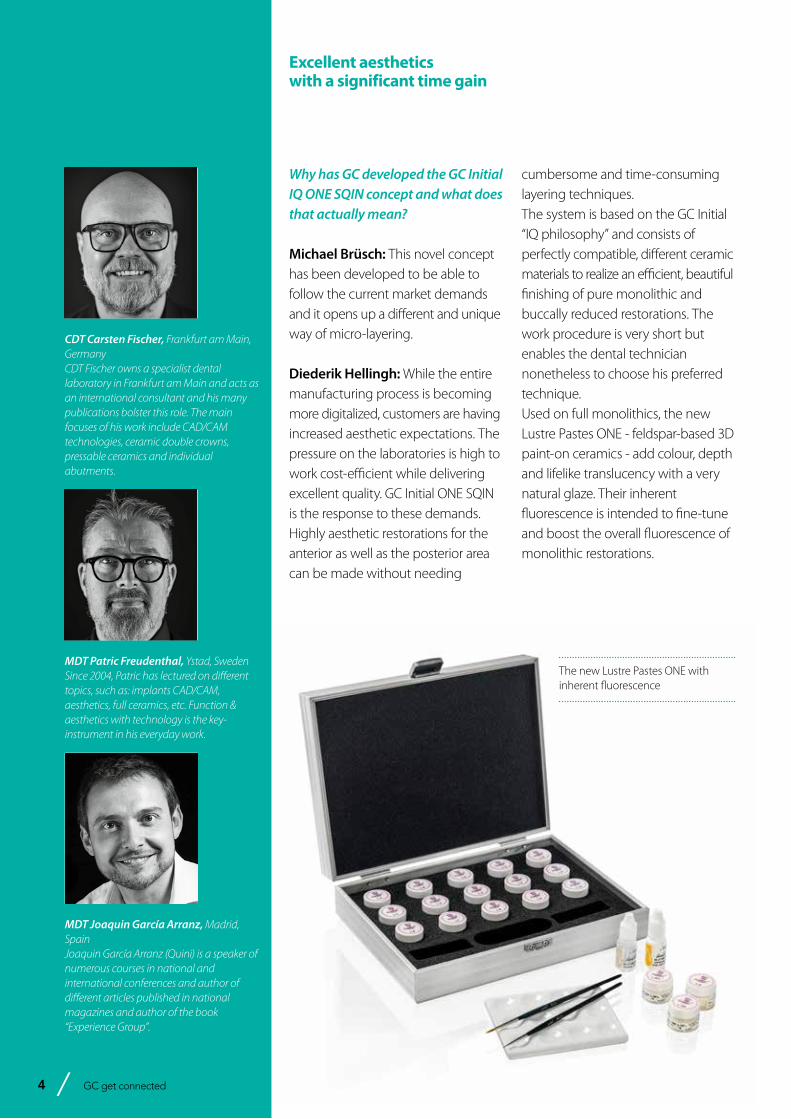
The new Lustre Pastes ONE with inherent fluorescence
cumbersome and time-consuming layering techniques.The system is based on the GC Initial “IQ philosophy” and consists of perfectly compatible, different ceramic materials to realize an efficient, beautiful finishing of pure monolithic and buccally reduced restorations. The work procedure is very short but enables the dental technician nonetheless to choose his preferred technique. Used on full monolithics, the new Lustre Pastes ONE - feldspar-based 3D paint-on ceramics - add colour, depth and lifelike translucency with a very natural glaze. Their inherent fluorescence is intended to fine-tune and boost the overall fluorescence of monolithic restorations.
4 GC get connected
GC get connected 5
Excellent aesthetics with a significant time gain
On buccally reduced monolithics, these Lustre Pastes ONE are used to characterize and add colour and also serve as connection firing before application of the new SQIN ceramics. The latter are easily applied in a thin layer of about 0.1–0.6 mm over the painted and fired Lustre Pastes ONE surface. Thanks to the refined mixture of feldspar-based glasses, a lifelike 3D-effect is created, not shy of any comparison to conventional layering. Their unique application and modelling properties will facilitate individual surface texturing and it has self-glazing properties so finishing can be reduced to the minimum.
The GC Initial product portfolio already comprises a full line-up. Why would it still be interesting to have this GC Initial IQ ONE SQIN concept in the lab?
Carsten Fischer: Because of big improvements in monolithic frameworks, the indication areas with regard to micro-layering have increased: micro-layering is now also used aesthetically in the anterior area and it is no longer possible to imagine the digital manufacturing process without it. A system like Initial IQ ONE SQIN is absolutely necessary in order to meet all the requirements of today’s modern dental technology in a dental laboratory.
Mark Bladen: Exactly. The ONE SQIN concept is meeting the requirements for microlayering of zirconia and lithium disilicate, but also brings the results to another level.
Joaquin Garcia Arranz: The new Lustre Pastes ONE provide the
fluorescence that is needed on monolithic frameworks like zirconia and lithium disilicate. Combine them with the SQIN ceramics and you can achieve stunning results.
Mark Bladen: And on top of that, it makes your work easier and predictable. And what if you have never used GC Initial before? Can you still step into this new concept?
Mark Bladen: In my opinion all ceramists will be interested in the ONE SQIN system as financial demands require labs to be more efficient – faster but meeting high aesthetic demands every time. I know of many labs who would be very interested in trying this system.
Carsten Fischer: Everyone could benefit from it! It is certainly interesting
for young dental technicians who want to achieve an aesthetically predictable result without great effort or to attend several courses. But also advanced dental technicians will appreciate the ultrafine grain of the powder, good fluorescence, excellent light-optical properties in the mouth and state-of-the-art technology.It is suitable for any laboratory that want to get into micro-layering and painting technology.
Diederik Hellingh: You do not need to be familiar with the Initial ceramic as the technique is very straightforward and predictable. From that perspective, it reminds the popular ‘Paint by number’ that most of us will know from our childhood: ‘Make a beautiful painting the first time you try’. IQ ONE SQIN is exactly like that.
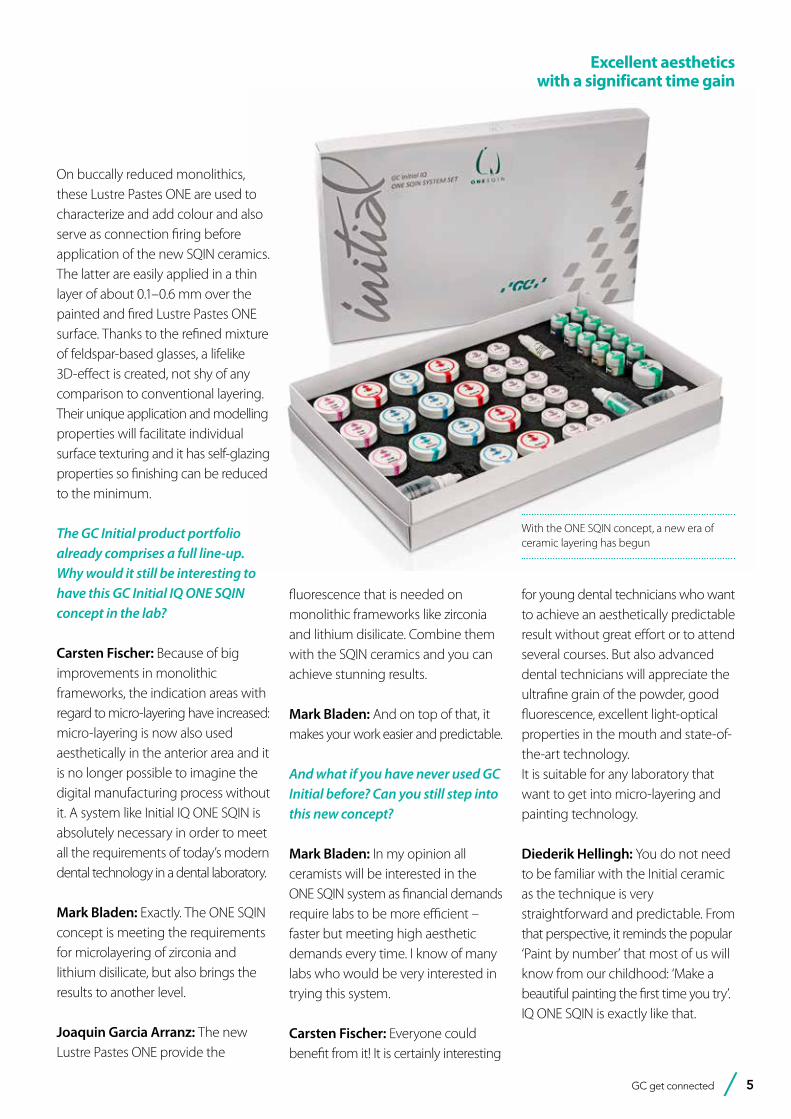
With the ONE SQIN concept, a new era of ceramic layering has begun

6 GC get connected6 GC get connected
What makes the synergy between the Lustre Pastes ONE, SQIN ceramics and Spectrum Stains unique in this concept?
Joaquin Garcia Arranz: It is a fully comprehensive concept that fits today’s trend of monolitic full ceramic restorations.
Carsten Fischer: The concept is well-coordinated and in its total provides very aesthetic results. And that without extreme effort!
Michael Brüsch: All components are simply optimally adjusted to each other. There is no comparative or better material with these excellent characteristics available on the market at the moment.
GC always develops products with the users’ needs in mind. What about GC Initial IQ ONE SQIN? What is the added value here?
Leonardo Cavallo: The ceramic is very dense and is easier to manage and to work with.
The material contracts less during firing and this makes it possible to work much faster. It adds fluorescence to zirconia and lithium disilicate monolithics, which is necessary to copy natural teeth.
Carsten Fischer: The colour accuracy and reproduction of V-shades are absolutely predictable with the use of the IQ ONE SQIN concept. When you apply the colours to the surface, you can see that they fit - you can really see what you get. The colours are very warm and with the correct firing, an extremely homogeneous result is obtained.
Mark Bladen: I also really like the special modeling liquid. It gives a high degree of control to shape and even build natural surface characterizations that remain after firing in the super-dense and qualitative ceramic surface, which – on top of that - is auto-glazed.
Stefan Roozen: The work process has been made so much faster and easier. Because of the low shrinkage and shiny effect after firing, corrections are hardly necessary.
Excellent aesthetics with a significant time gain
MDT Stefan Roozen, Zell am See, Austria MDT Roozen focuses in his work on the complex prosthetic reconstructions (both tooth and implant supported) and demanding restorations in the aesthetic and functional area. He is the author of several international publications, speaker at the Austrian Master school and speaker at international courses and congresses.
MDT Leonardo Cavallo, Sicily, ItalyLeonardo Cavallo runs a dental laboratory in Messina, Sicily where he focuses on aesthetic dentistry and implant supported restorations. His goal is to emulate the natural beauty of natural teeth.
GC get connected 7
Carsten Fischer: Compared to other systems, it is the most modern material science concept on the market. You do not have to learn a new technique (such as with competitive products) but can stay in your proven ceramic layering technique with the SQIN powders.
Patric Freudenthal: I really like that the surface texture can be adjusted so easily. I especially like it for single crowns; it is faster and much easier to control.
Michael Brüsch: And for large bridge constructions, it is particularly interesting that you can achieve this level of aesthetics with a minimal layer thickness.
Which three reasons would you state to convince your technician colleagues to step into this new GC Initial IQ ONE SQIN concept?
Joaquin Garcia Arranz: One, it is faster. Two, it is easier. And three, it’s more stable.
Patric Freudenthal: I would say “less is more”; less products but more or less the same result.On top of that, it is an easy-to-use and a very logic system.
Mark Bladen: I second that! It is easy to use and understand and the compact kit contains all that’s needed to reproduce any shade or features needed to copy every dentition. The results are better than with any other system on the market.
Carsten Fischer: First: time saving! Next to that, the predictability of results, including the colour, warmth, light dynamics and aesthetics. Last but not least, the functional properties: it renders homogeneous surfaces that are clearly more antagonist-friendly. In my opinion, no other manufacturer on the market can offer this quality of surfaces at the moment. A perfect development by Michael Brüsch and the GCE & Klema team. TOP!
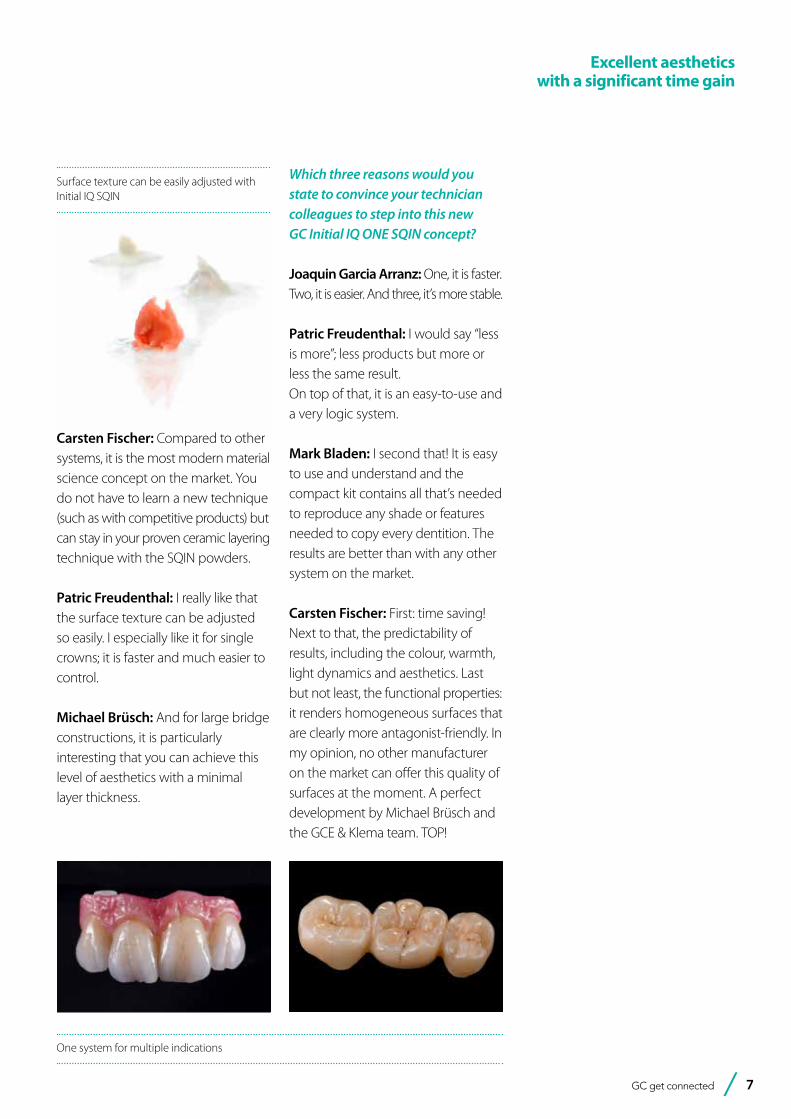
Surface texture can be easily adjusted with Initial IQ SQIN
One system for multiple indications
Excellent aesthetics with a significant time gain

8 GC get connected
Maximal aestheticswithin a micro-layer!A new, efficient concept for monolithic workpieces By Patric Freudenthal IQDENT / DTG, Sweden
Patric Freudenthal graduated as a dental technician in 1989 at the University of Malmö, Sweden. Before that he worked as a dental assistant between 1984-1986. After graduating, he worked as a technician for 10 years before starting his own lab with Björn Stoltz. IQDENT has worked with implants, CAD-CAM and aesthetics during all this time, with focus on bioinert materials. Since 2004, Patric has been lecturing on different topics, such as: implants, CAD-CAM, aesthetics, full ceramic etc. Function & aesthetics with technology is the key-instrument in his everyday work. He is a member (and board member) of The Dental Technicians Guild.
The start of all-ceramic restorations with zirconium dioxide (ZrO2, often referred to as zirconia) was only a small change from PFM, in the sense that the coping was only in a different material. However, the digital way of working made its entry in the dental lab with CAD (computer-aided design) and that saved us some money in the production
(Fig. 1). This has been important for the technique to succeed because the coping was expensive and not always the best. More detailed information can be found in my previous article about zirconia as a predicable material (Zirconia: Aesthetic, strong and predictable – first published in GC Get Connected 14, 2019).
Moment PFM Time Zirconia Time
Model 20 20
Spacer 3 6
Applying casting channels 2 0
Invest 2 0
Prepare alloy 5 0
Cut casting channels 3 0
Adjustments 5 0
Polishing 4 3
Margins 5 5
Wax-up 15 0
Investment material 3 0
Burn-out 4 0
Devest, sandblasting etc. 6 0
Try-in 3 1
Porcelain 40 40
Total time 120 75
Fig. 1: Production time comparison charts between the traditional PFM-crown and the first generation of zirconia

GC get connected 9
Maximal aesthetics within a micro-layer!
After CAD/CAM was established in the labs, a new era of ceramic materials arose to make the restorations look aesthetic and natural. In the early days before zirconia, titanium-ceramics were used, with a poor result but it was the only available option at that time. The dental industry became aware of the big market for new ceramics to layer on these full ceramic solutions (zirconia – alumina). This was the second stage of better results and better economy for the dental labs with full ceramic restorations.
When we got to full in-house production of all-ceramic work (zirconia), designing as well as milling, a door was opened to a new product portfolio.
It didn’t take a long time before semi-monolithic and full monolithic crowns were implemented and designed in our lab. This product type demanded a new approach making use of ceramic staining and layering techniques.
Fast forward a couple of years and lots of experimenting…..
As users of GC’s ceramic products, we immediately found a possibility with the Initial ceramic line and the combination of Initial Lustre Pastes NF and Initial Zr-FS (Fig. 2). This provided us two predictable products: monolithic crowns using a ceramic painting technique and semi-monolithic (designed for micro-layering ceramics) crowns.
Along the way, we learned a few things:• We saved time leading, to increased
profit• The shape and size were already in
place (CAD design)• The amount of different materials
used decreased• We didn’t lose our goal of delivering
esthetic results
This procedure and material selection became our standard protocol for all-ceramic solutions, both for zirconia and Initial LiSi Press (lithium disilicate pressable ceramic). With this standardised workflow, everything became more efficient and controlled. This set-up could be perceived by our customers in terms of positive
feedback, in our turnover and profit and in the amount of time spent in the lab – everything became better.
As business owners, we always look at our costs, production time and the effect on our profit, while maintaining the quality requirements.
Still we were not satisfied with this set-up. In my entire career, I’ve always searched for ways to improve whatever I’m doing and my business partner and I have made some good choices over the years (but also a few bad ones).
This has led us to our current situation. Our dental lab - IQDENT - is today a 98% digital lab. Our products are 90% all-ceramic and our standard products are monolithic and micro-layered crowns, bridges and implant work. We recently also engaged into digital dentures, partial dentures and splints. If we get requests for traditional PFM, we take care of the design but outsource the production (milling or metal sintering).
This way of thinking and running our business also lead us to experimenting with the available solutions. So we combined Initial Lustre Pastes NF with a little bit of Initial Spectrum Stains and Initial Zr-FS to get a more effective way for micro-layering without compromising on the aesthetics.
At the same time, GC was looking into novel ceramic solutions that lead to a new concept that fitted into their Initial IQ philosophy – “Intelligent Quintessence - with less you do more ….” and was launched as “the Initial IQ ONE SQIN concept”.
Fig. 2: Case with a foundation of Initial Lustre Pastes NF, sprinkled with Initial Zr-FS “CL-F”, then individualised with Initial Spectrum Stains and finalised with Initial Zr-FS (Enamel and CT).
2
10 GC get connected
The GC Initial IQ ONE SQIN concept in our lab
Step-by-step preparations: • Digital design is with a buccal
cut-back between 0.2-0.4 (Fig. 4)• Mill wax (or print) in case LiSi Press is
used or mill the zirconia • Press or sinter in the desired base
color• Prepare the framework for ceramic
layering as usual • Sandblast the framework slightly
with 2.0 bar pressure (pure Al2O3)
Step-by-step ceramics application:• Application of the ready-to-use new
LP ONE to cover the complete framework/coping. SPS are used for details (when required).
• Firing is done with vacuum following the instructions. The new LP ONE offer colour as well as fluorescence and serve as connection layer (Fig. 5).
It is all about material improvements based upon new Lustre Pastes with increased fluorescent character (Initial Lustre Pastes ONE – LP ONE) and new powder technology for micro-layering techniques (Initial SQIN), both compatible with the Initial Spectrum Stains (SPS). During the field tests performed in our lab, we could already notice the possibilities and potential of this concept. Now, after a few months into the evaluation phase, we have a solid system at our disposal for all-ceramic works:• Even more time saving • Predictable results • High quality output
When our “old way” using a protocol Initial Lustre Paste NF and Initial Zr-FS is compared to this new Initial IQ ONE SQIN concept, it can be seen that the protocol remains more or less the same, but a few steps and firing cycles could be removed (Fig. 3).
Moment
Initial Lustre Pastes+ Initial Zr-FS
Initial Lustre Pastes ONE + SQIN
Time Time
Processing 10 10
Printed model 0 0
Prepare margins 15 15
CAD/CAM 1 1
Cut out of blanks 10 10
Prepare coping 5 5
Coloring Liquids (unsintered) 5 5
Initial Lustre Pastes (sintered) 25 15
Ceramic layering 0 0
Finishing & polishing 10 10
Total time 71 61
Fig. 3: The left chart shows the “old” way and the right chart is with GC Initial IQ- ONE SQIN concept. Ten minutes are saved on every single unit.
Fig. 5: The lithium disilicate framework (Initial LiSi Press LT), individualised with Initial Lustre Pastes ONE.
5
Fig. 4: Digital design of the framework with a 0.2-0.4 mm buccal cut back
4
Maximal aesthetics within a micro-layer!
GC get connected 11
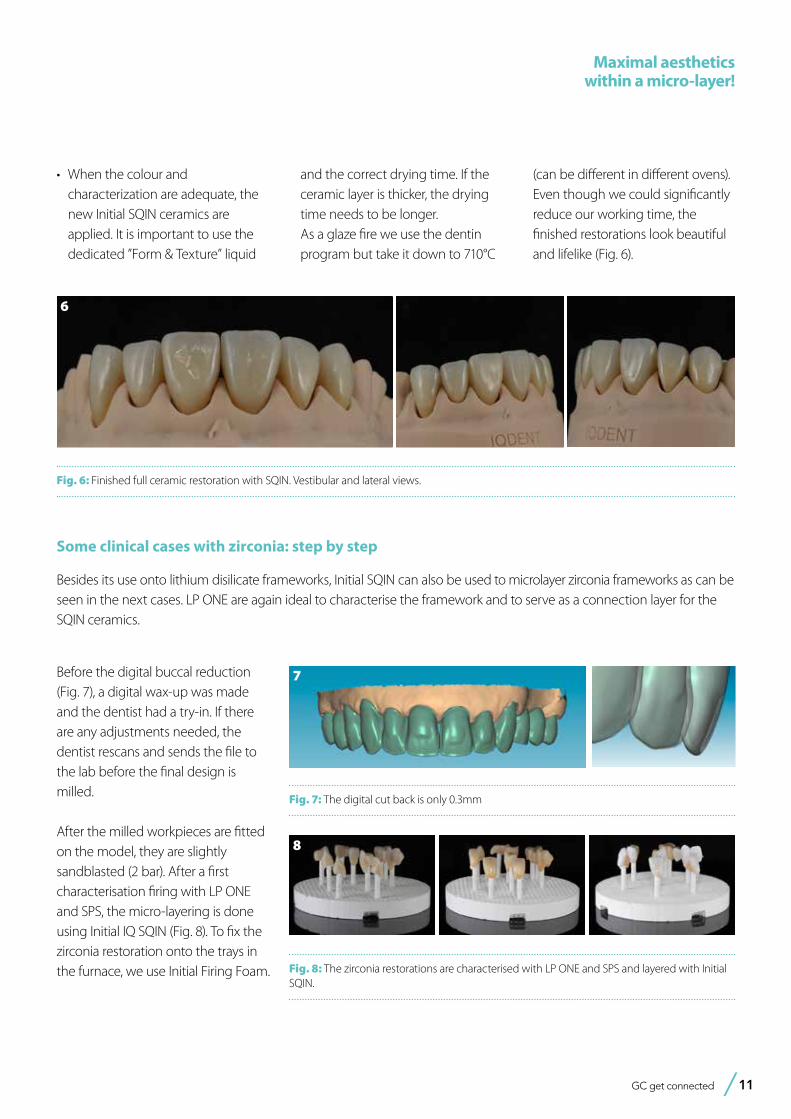
Fig. 6: Finished full ceramic restoration with SQIN. Vestibular and lateral views.
Maximal aesthetics within a micro-layer!
• When the colour and characterization are adequate, the new Initial SQIN ceramics are applied. It is important to use the dedicated ”Form & Texture” liquid
and the correct drying time. If the ceramic layer is thicker, the drying time needs to be longer.
As a glaze fire we use the dentin program but take it down to 710°C
(can be different in different ovens). Even though we could significantly reduce our working time, the finished restorations look beautiful and lifelike (Fig. 6).
6
Besides its use onto lithium disilicate frameworks, Initial SQIN can also be used to microlayer zirconia frameworks as can be seen in the next cases. LP ONE are again ideal to characterise the framework and to serve as a connection layer for the SQIN ceramics.
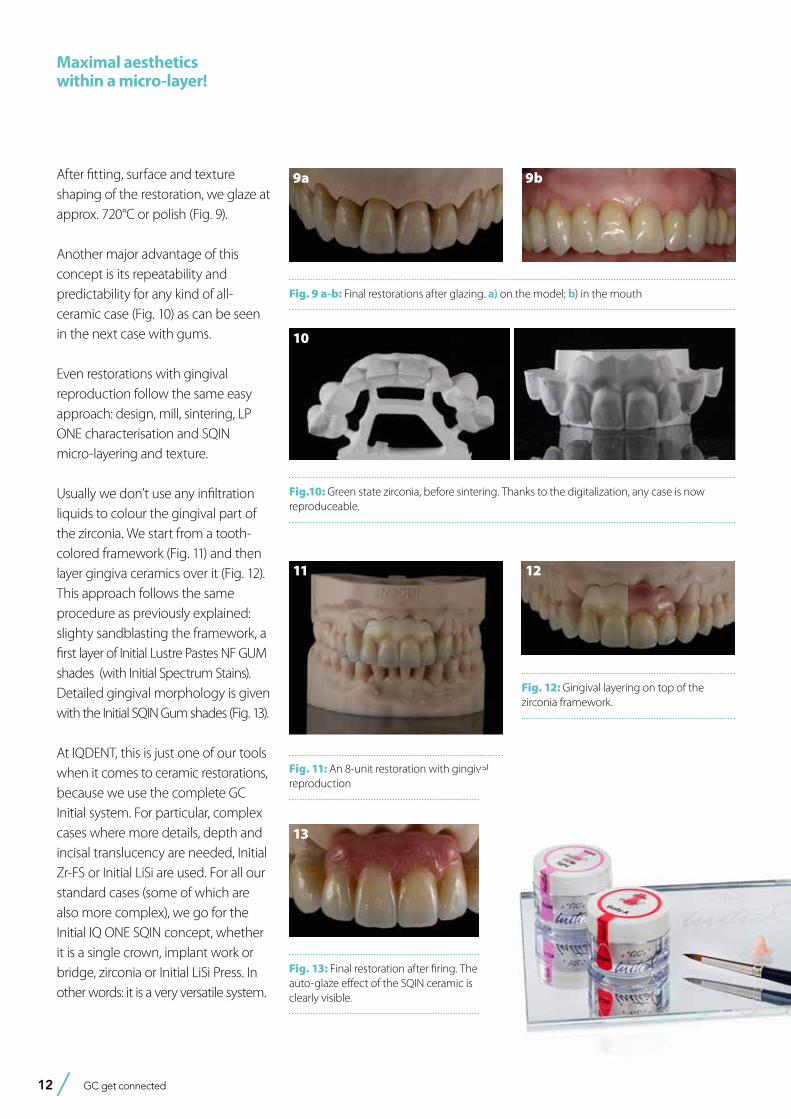
Fig. 7: The digital cut back is only 0.3mm
Some clinical cases with zirconia: step by step
Before the digital buccal reduction (Fig. 7), a digital wax-up was made and the dentist had a try-in. If there are any adjustments needed, the dentist rescans and sends the file to the lab before the final design is milled.
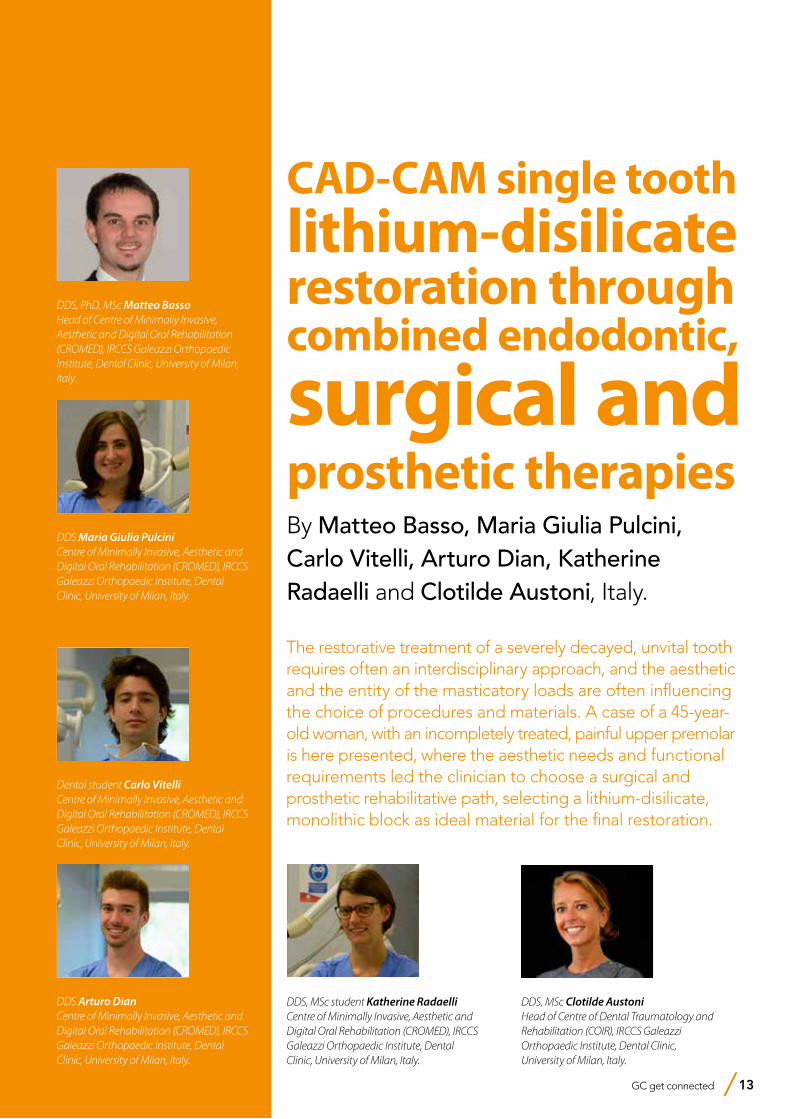
After the milled workpieces are fitted on the model, they are slightly sandblasted (2 bar). After a first characterisation firing with LP ONE and SPS, the micro-layering is done using Initial IQ SQIN (Fig. 8). To fix the zirconia restoration onto the trays in the furnace, we use Initial Firing Foam.
7
Fig. 8: The zirconia restorations are characterised with LP ONE and SPS and layered with Initial SQIN.
8
12 GC get connected
After fitting, surface and texture shaping of the restoration, we glaze at approx. 720°C or polish (Fig. 9).
Another major advantage of this concept is its repeatability and predictability for any kind of all-ceramic case (Fig. 10) as can be seen in the next case with gums.
Even restorations with gingival reproduction follow the same easy approach: design, mill, sintering, LP ONE characterisation and SQIN micro-layering and texture.
Usually we don’t use any infiltration liquids to colour the gingival part of the zirconia. We start from a tooth-colored framework (Fig. 11) and then layer gingiva ceramics over it (Fig. 12). This approach follows the same procedure as previously explained: slighty sandblasting the framework, a first layer of Initial Lustre Pastes NF GUM shades (with Initial Spectrum Stains). Detailed gingival morphology is given with the Initial SQIN Gum shades (Fig. 13).
At IQDENT, this is just one of our tools when it comes to ceramic restorations, because we use the complete GC Initial system. For particular, complex cases where more details, depth and incisal translucency are needed, Initial Zr-FS or Initial LiSi are used. For all our standard cases (some of which are also more complex), we go for the Initial IQ ONE SQIN concept, whether it is a single crown, implant work or bridge, zirconia or Initial LiSi Press. In other words: it is a very versatile system.
Fig.10: Green state zirconia, before sintering. Thanks to the digitalization, any case is now reproduceable.
Fig. 13: Final restoration after firing. The auto-glaze effect of the SQIN ceramic is clearly visible.
Fig. 9 a-b: Final restorations after glazing. a) on the model; b) in the mouth
9a 9b
10
Fig. 11: An 8-unit restoration with gingival reproduction
11
Fig. 12: Gingival layering on top of the zirconia framework.
12
13
Maximal aesthetics within a micro-layer!
GC get connected 13
CAD-CAM single toothlithium-disilicate restoration through combined endodontic,
surgical and prosthetic therapiesBy Matteo Basso, Maria Giulia Pulcini, Carlo Vitelli, Arturo Dian, Katherine Radaelli and Clotilde Austoni, Italy.
DDS, PhD, MSc Matteo BassoHead of Centre of Minimally Invasive, Aesthetic and Digital Oral Rehabilitation (CROMED), IRCCS Galeazzi Orthopaedic Institute, Dental Clinic, University of Milan, Italy.
DDS Maria Giulia PulciniCentre of Minimally Invasive, Aesthetic and Digital Oral Rehabilitation (CROMED), IRCCS Galeazzi Orthopaedic Institute, Dental Clinic, University of Milan, Italy.
Dental student Carlo VitelliCentre of Minimally Invasive, Aesthetic and Digital Oral Rehabilitation (CROMED), IRCCS Galeazzi Orthopaedic Institute, Dental Clinic, University of Milan, Italy.
DDS Arturo DianCentre of Minimally Invasive, Aesthetic and Digital Oral Rehabilitation (CROMED), IRCCS Galeazzi Orthopaedic Institute, Dental Clinic, University of Milan, Italy.
DDS, MSc student Katherine RadaelliCentre of Minimally Invasive, Aesthetic and Digital Oral Rehabilitation (CROMED), IRCCS Galeazzi Orthopaedic Institute, Dental Clinic, University of Milan, Italy.
DDS, MSc Clotilde AustoniHead of Centre of Dental Traumatology and Rehabilitation (COIR), IRCCS Galeazzi Orthopaedic Institute, Dental Clinic, University of Milan, Italy.
The restorative treatment of a severely decayed, unvital tooth requires often an interdisciplinary approach, and the aesthetic and the entity of the masticatory loads are often influencing the choice of procedures and materials. A case of a 45-year-old woman, with an incompletely treated, painful upper premolar is here presented, where the aesthetic needs and functional requirements led the clinician to choose a surgical and prosthetic rehabilitative path, selecting a lithium-disilicate, monolithic block as ideal material for the final restoration.

14 GC get connected
CAD-CAM single tooth lithium-disilicate restoration through combined endodontic, surgical and prosthetic therapies.
Fig. 1: Initial situation. The patient reported generic pain in the second quadrant, where there was a restoration in temporary material on tooth number 25.
Clinical case presentation
A 45-year-old female patient, B.S., referring intensive pain in her upper left dental arch, asked for a visit at the dental clinic of the IRCCS Istituto Ortopedico Galeazzi (Milan, Italy). During the anamnesis she told to be in good health status, without being affected by any chronic disease, and no smoking.
During the clinical oral examination, she didn’t exhibit any mucosal lesions, she presented an optimal level of oral hygiene but there were a lot of incongruous restorations and an apparently provisional restoration on tooth #25.
This element was not stimulated with the cold test and the radiographic image revealed an incomplete endodontic treatment (Figs. 1-2). The
the mind of professionals and in a certain part of literature1, lower than that of a crown over implant. In fact, the prognosis of different rehabilitations is strongly affected by many factors, mainly the dentist and his skills, but also the used materials.
However, considering the overall length in terms of months, the rehabilitative treatment of a natural tooth is usually faster and the conservative treatment represents always the best choice biologically, if allowed. In this case the right selection of the prosthetic material could be decisive.
Introduction
In case of a serious tooth decay, the treatment often requires an inter-disciplinary approach. The dentist can be required to restore aesthetic and function of an upper tooth, where the aesthetic and the entity of the masticatory loads are often influencing the choice of procedures and materials and even the general prognosis of the tooth. In particular, the factors that had to be considered in this case were the position and size of the cavity, the requirement to complete an endodontic treatment and the size of the final restoration. Moreover, having planned a prosthetic crown, the authors also considered the requirement of endodontic post, the position of the
bone crest in respect to the cavity margins, the length of the root, the status of the adjacent teeth, the overall oral hygiene and the patient’s compliance and, as important consideration, the cost/benefit ratio to explain to patient.In many cases where the rehabilitation plan of a premolar includes different and complex procedures such as endodontic treatments, posts or extensive restorations, the dentist tends to choose an implant-supported prosthetic rehabilitation, because the costs of the alternative conservative treatments could be similar to those of the implant-supported ones, but the overall prognosis of a tooth-supported prosthesis may result, in
element seemed to present a suitable root length for a conservative restoration, but the apical position of the carious lesion and the proximity of the interdental bone ridge didn’t allow a correct rehabilitation with prosthetic crown, respecting the biological width.2
Considering the patient’s factors (e.g. age, level of oral hygiene, absence of smoking or other risk factors) and status of the tooth (e.g. length of the root, endodontic access, periodontal status), it was communicated to the patient that the treatment plan would
Fig. 2: Initial radiograph showing endodontic dressing that had been present for some months, but the treatment was never completed. Note the depth of the caries lesion and the proximity of the interdental bone ridge, which may represent an obstacle for prosthetic rehabilitation.

GC get connected 15
CAD-CAM single tooth lithium-disilicate restoration through combined endodontic,
surgical and prosthetic therapies.
include an endodontic-prosthetic restoration through conservative therapies and CAD-CAM restoration in lithium-disilicate3-6:
Operational phases
The patient at the first appointment immediately required a quick solution for the pain, consecutive to an incomplete endodontic treatment and a partially removed carious lesion. So, the first step consisted in the removal of the decayed tissue of the distal face of the tooth 25 in its coronal portion and in the first third of the root.
The cervical limit of the decay was exposed; then the wall was restored with a glass hybrid material (EQUIA Forte™, GC) coated with the light-curable EQUIA Forte Coat™ to obtain a more resistant material even in case of occlusal loads7,8,9. A glass hybrid material was chosen because the apical edge of the tooth cavity was under the gingival margin, so it was impossible to obtain a correct isolation for a composite restoration: it’s known that the glass hybrid materials can tolerate acid and humid environments more than composite 7,8,9.
The glass hybrid EQUIA Forte was preferred to glass ionomer because better long-term results are reported in literature7,8,9,10.
After that, the tooth was endodontically treated. The tooth had only one root canal, processed with a hand file READY STEEL K-File™ (Dentsply Sirona) and for the shaping and refinement with mechanical file PROTAPER GOLD™
(Dentsply Sirona) at a working length of 20 mm.
The canal was sealed with a Thermafil™ cone (Dentsply Sirona) with an apical diameter of 0.30 mm (Figs. 3-4).
The third step of the treatment consisted of the crown lengthening, necessary to expose an adequate part of the root to obtain, after healing, the correct adhesion of the composite for the pre-prosthetic restoration and the successive prosthetic rehabilitation.
After the surgical flap elevation of the tissue and the bone remodeling, the
flap was repositioned apically and sutured with a vertical mattress suture anchored in the periosteum (Figs. 5-6). The suture was removed after 7 days (Fig. 7).
Fig. 3: Root canal therapy completed under proper isolation.
Fig. 4: Radiography of completed root canal therapy and reconstruction made completely in glass hybrid cement.
Fig. 5: Clinical crown lengthening with a minimally invasive technique without mesial and distal discharges. Note the proximity of the reconstruction in glass hybrid material to the mesial bone ridge.
Fig. 6: Suture at the end of surgical therapy. It was left in place for 7 days
Fig. 7: Suture removal at 7 days. Post-surgical edema is still present.

16 GC get connected
CAD-CAM single tooth lithium-disilicate restoration through combined endodontic, surgical and prosthetic therapies.
During the fourth phase, after waiting a postsurgical healing time of 4 weeks necessary for the correct maturation of the tissues (Fig. 8), the glass hybrid and coronal part of the endodontic material was removed with the Gates Glidden™ cutters (Dentsply Sirona) with 01-02-03 size. A glass fibre post with a medium size truncated cone form, Anatomical Post (DENTALICA, Italy), was inserted and bonded with a self-adhesive dual-cure cement (G-CEM LinkAce™ translucent, GC). The permanent composite restoration was completed with G-ænial Posterior™ shade A3 composite (GC) bonded with its respective self-etch adhesive (G-ænial Bond™).
After the restoration, the tooth was prepared with the BOPT technique5-6 . A provisional PMMA crown, obtained with an optical scan done before the preparation of the element with a AADVA IOS100 scanner (GC), was placed. During this phase the obsolete restorations of the teeth 24 and 26 were replaced. (Figs. 9-12)
After 4 more weeks, the prosthetic abutment was refined and the
definitive dental impression was taken with poly vinylsiloxane-ether (PVS-E, Exa’Lence™, GC) (Figs. 13-14). The dental impression was sent to the laboratory, where it was optically scanned and a CAD-CAM path was set.
As a consequence of the newly surgically modified prosthetic margin, the appropriate length of the abutment for an adhesive cementation had been obtained, and the high aesthetic requirement and the contemporary need of containing costs with a monolithic crown, led the clinical
choice to a lithium-disilicate crown with high translucency and suitable for the CAD-CAM technology.
The chosen material was the Initial LiSi Block™ (GC), because the ultra-thin structure of the Initial LiSi Block’s has two important advantages: first of all, the block is easy to be milled with the use of chairside milling machine in the lab, and secondly this material doesn’t require other steps in the oven to be sintered or glazed. In fact, Initial LiSi Block is the first completely crystalized lithium-disilicate block, so
Fig. 8: Recovery 2 weeks after surgery. Note the disappearance of post-surgical edema. The provisional crown was placed after two weeks to allow the formation of an epithelial-connective seal in the area.
Fig. 9: Prosthetic preparation of the dental element with BOPT technique. Note the minimal aggressiveness in the dental groove, recently traumatized by surgery.
Fig. 10: First relining in acrylic resin of the provisional crown in PMMA obtained by digital scanning of the arches, suitable to condition the tissues after only 4 weeks from the operation, taking advantage of the reparative thrust that follows a periodontal surgery.
Fig. 11: Provisional crown in PMMA finished and positioned. Composite reconstructions on teeth 24 and 26 have been replaced in order to construct correct contact points with the final crown
Fig. 12: Final radiography after positioning of the endodontic post, composite reconstruction and insertion of the provisional crown in PMMA. Note the distance between the edge of the cement used to fix the crown, more radiopaque than PMMA, and the new bone ridge created with periodontal surgery.

GC get connected 17
CAD-CAM single tooth lithium-disilicate restoration through combined endodontic,
surgical and prosthetic therapies.
the time for its crystallization could be saved and the software for the finishing and glazing would not have to compensate for any material contraction due to the temperature in the crystallizing oven.
In this way, margins remain extremely thin and clear and it’s particularly useful in this case. It’s also possible to reduce costs compared to the use of a highly aesthetic and functional material.
Additionally, the ultra-thin structure of the Initial LiSi Block permits easily polishing of the restoration even after the occlusal adjustments, leaving the
area extremely uniform and smooth. This reduces the finishing times, the brightness lasts longer and the occlusal contacts produce less
abrasion of the restoration and of the antagonists (Figs. 15-17).
Regarding the luting phase, the tooth abutment was etched with 37% orthophosphoric acid for 15 seconds (Fig. 18), rinsed and then dried with compressed air. The definitive crown was etched with 9% hydrofluoric acid for 20 seconds (Fig. 19), rinsed and dried with compressed air. According to manufacturer’s instruction, it is not recommended to etch Initial LiSi Block for more than 20 seconds, in order to preserve all properties of the material. Since the acid etching with the hydrofluoric acid may result the formation of crystals of lithium salts on the inner surface of the crown10, it’s important to put the crown in hot water for 1 minute after the acid removal, to eliminate the crystals and prevent any interference with the adhesive cementation, and then it must be carefully dried. Before the placement of the adhesive cement, a specific coupling agent was placed on the internal surface of the crown, in order to obtain a stronger adherence between the ceramic and the luting resin. For this reason, G-Multi Primer
Fig. 13: Final preparation of the tooth with the aim of taking the definitive impression. Note the total absence of bleeding despite having extended the preparation margins more apically than the first provisional.
Fig. 14: Definitive impression in PVS-E. The impression was scanned by a laboratory scanner and an entire CAD-CAM path was created for milling the final crown.
Fig. 15, 16 &17: Views of the monolithic restoration in lithium disilicate, polished and finished.
Fig. 18: Etching of the prosthetic abutment with orthophosphoric acid for 40”
Fig. 19: Treatment of the internal surface of the restoration with 9% hydrofluoric acid for 20”. Being lithium disilicate, the restoration must be placed in hot water for at least 60” after etching to eliminate some lithium salts that could form on the inner surface and which could weaken the adhesive bonds.

18 GC get connected
(GC) was selected and applied (Fig. 20). The luting phase was finally performed with the G-CEM LinkForce™ (GC), after the placement of the dedicated adhesive system (G-Premio Bond) on the tooth, blowing them with compressed air for 20 seconds, without curing them before the luting phase in order to allow a correct fit of the crown. Each crown surface was cured for 40 seconds (120” in total in order to correctly cure both adhesive and resin cement even through the ceramic) and the excesses of the luting material were finally removed.
Fig. 20: Application of the silane coupling agent to be left in place for at least 60”
Fig. 21: Adhesive cementation with adhesive composite resin. The absence of bleeding, the respect of the manufacturer’s instructions and the control of the prosthetic margins during the procedures is fundamental for the maintenance and the good outcome of the cementation.
Fig. 22: Final palatal view. Note the excellent integration of the margins also on the palatal side.
Discussion
At the end of the procedures, the restoration was precisely seated at equigingival level of the margins, it appeared to be morphologically integrated in the dental arch, with correct contact points and with a good chromatic match with the adjacent elements (Figs. 21-24). Upon X-ray examination, it was possible to see that the subgingival margins were also integrated, without any step or any plaque-retaining area that could be a problem for the home dental hygiene (Fig. 25). The patient didn’t
refer pain anymore and was completely satisfied with the prosthetic rehabilitation, that she found perfectly integrated at both functional and chromatic levels. She also found the colour of the prosthesis was better than her natural teeth’s.
CAD-CAM technology and chairside procedures, including the milling process that takes place completely inside the dental clinic, are actually a solid reality and these kind of digital machines are easily available since many years8.
Fig. 23: Final occlusal view. Fig. 24: Final occlusal view at higher magnification.
Fig. 25: Final radiography of the restoration in its position. It can be seen that margins were excellently integrated and the biological width was respected.
CAD-CAM single tooth lithium-disilicate restoration through combined endodontic, surgical and prosthetic therapies.
GC get connected 19
The required time for the a complete crown production inside the dental clinic, from projecting, milling to finishing, may vary depending on the material: the required production time ranges normally from 1 hour (for the simplest materials) to more than 4 hours (for the materials that after milling require more tests and passages in finishing furnaces. For this reason, and due to the diffusion of CAD-CAM procedures in laboratories as well, chairside procedures are actually less appreciated by many dentists, who see them as a possible waste of time, diverting dentists from the real clinical activity
However, the reliability of modern CAD-CAM systems and new materials allow dentists and laboratories to make new choices, even in the name of a smoother workflow and cost control, when possible. A millable material that has considerable aesthetic properties is in any case indispensable, whether a clinician decides for a full chairside procedure, or for sending the impression to the laboratory. Also the “monolithic” materials cannot actually afford to be opaque, not very natural and not very translucent, because very few professionals and patients are inclined to accept aesthetic compromises in modern times
Moreover, from the dentist’s point of view, polishing procedures after possible occlusal adjustments should not require much time, neither dedicated instruments and burs, which mean expenses for the clinic and less time to dedicate to dental activities.
Conclusions
An ideal monolithic material must have some fundamental characteristics, in order to make it an adequate choice for aesthetic and functional rehabilitations:
• High mechanical strength.
• Adequate translucency.• Ease of processing and milling.• Availability of different shades.• Possibility of effective and durable
luting with the most common adhesive systems or cements.
• Easy polishing phase involving few steps and burs.
• Availability for the most common chairside and laboratory milling machines (compatibility).
There is not an ideal, universal material that could be chosen for all prosthetic procedures. By the way, while selecting the material that could appear clinically ideal for a specific case, only a good mix of these characteristics can determine a clinical success of a prosthetic rehabilitation procedure with monolithic materials and, ultimately, full patient satisfaction.
CAD-CAM single tooth lithium-disilicate restoration through combined endodontic,
surgical and prosthetic therapies.
Bibliography
1) F.C. Setzer and S. Kim; Comparison of Long-term Survival of Implants and Endodontically Treated Teeth J Dent Res. 2014 Jan; 93(1): 19–26. doi: 10.1177/0022034513504782
Ruskin JD, Morton D, Karayazgan B, Amir J. (2005). Failed root canals: the case for extraction and immediate implant placement. J Oral Maxillofac Surg 63:829-831
Lundgren D, Rylander H, Laurell L. (2008). To save or extract, that is the question. Natural teeth or dental implants in periodontitis-susceptible patients: clinical decision-making and treatment strategies exemplified with patient case presentations. Periodontol 2000. 47:27-50
2) Lanning SK, Waldrop TC, Gunsolley JC, Maynard JG. Surgical crown lengthening: evaluation of the biological width. J Periodontol. 2003 Apr;74(4):468-74.
3) Khaled Al-Omiri M., Mahmoud A. A., Rayyan M. R., Abu-Hammad O. Fracture resistance of teeth restored with post-retained restorations: An overview. Journal of Endodontics. 2010;36(9):1439–1449. doi: 10.1016/j.joen.2010.06.005.
4) Barcellos R. R., Correia D. P. D., Farina A. P., Mesquita M. F., Ferraz C. C. R., Cecchin D. Fracture resistance of endodontically treated teeth restored with intra-radicular post: the effects of post system and dentine thickness. Journal of Biomechanics. 2013;46(15):2572–2577. doi: 10.1016/j.jbiomech.2013.08.016.
5) Loi I, Di Felice A. Biologically oriented preparation technique (BOPT): a new
approach for prosthetic restoration of periodontically healthy teeth. Eur J Esthet Dent. 2013 Spring;8(1):10-23.
6) Serra-Pastor B, Loi I, Fons-Font A, Solá-Ruíz MF, Agustín-Panadero R Periodontal and prosthetic outcomes on teeth prepared with biologically oriented preparation technique: a 4-year follow-up prospective clinical study. J Prosthodont Res. 2019 Apr 8. pii: S1883-1958(18)30193-2. doi: 10.1016/j.jpor.2019.03.006.
7) Türkün LS, Kanik Ö.; A Prospective Six-Year Clinical Study Evaluating Reinforced Glass Ionomer Cements with Resin Coating on Posterior Teeth: Quo Vadis? Oper Dent. 2016 Nov/Dec;41(6):587-598. Epub 2016 Aug 29.
8) Basso M, Nowakowska J.K, Del Fabbro M. Long-term Dental Restorations using high-viscosity Coated Glass ionomer Cements. Abstract 2494-IADR 2011, San Diego, USA
9) Lohbauer U1, Krämer N, Siedschlag G, Schubert EW, Lauerer B, Müller FA, Petschelt A, Ebert J.Strength and wear resistance of a dental glass-ionomer cement with a novel nanofilled resin coating.Am J Dent. 2011 Apr;24(2):124-8
10) Hesse D, Bonifácio CC, Bönecker M, Guglielmi Cde A, da Franca C, van Amerongen WE, Colares V, Raggio DP. Survival Rate of Atraumatic Restorative Treatment (ART) Restorations Using a Glass Ionomer Bilayer Technique with a Nanofilled Coating: A Bi-center Randomized Clinical Trial.Pediatr Dent. 2016 Jan-Feb;38(1):18-24.
20 GC get connected
Glass-fibre-reinforced composites as a core build-up in minimally invasive endodontics
By Dr. Kaplan Sheudzhen, Russia
Dr. Kaplan Sheudzhen graduated from the Kuban State Medical University (Russia) in 2010. Since 2014, he is an opinion leader for GC Russia and in 2016 he joined the GC Restorative Advisory Board. Has given many national lectures on aesthetic and restorative dentistry. His main area of interest lies in direct and indirect restorations and endodontic treatments using operating microscopy. In 2019, he co-founded the Diamonds Dental Clinic – a private dental office and study centre for dentists.
Even though dentistry is nowadays focusing more and more
on prevention, there is still a considerable amount of patients
with extensive caries lesions in need of endodontic treatment.
When the damage has already occurred, it’s important to
treat the lesion in a minimally invasive way. Preserving the
cervical dentine is of utmost importance here, as maintaining
a ferrule is necessary for a good prognosis of the restorative
treatment.
Since the introduction of microscopes and NiTi files in dentistry, preservation of the cervical dentine has become more simple and predictable. Several options exist for the post-endodontic treatment1: the treatment plan depends on the remaining tooth structure, wall thickness and the total cavity size.
Heavily damaged teeth often end up in a restorative cycle, with increasingly larger restorations after the original fractured and endodontic retreatments, the prognosis of the tooth becoming more and more challenging each time. Hence, it’s important to implement a correct treatment plan to preserve the teeth not only in the short term, but to avoid catastrophic failures that compromise the long-term survival.
GC get connected 21
Glass-fibre-reinforced composites as a core build-up in minimally invasive endodontics
1
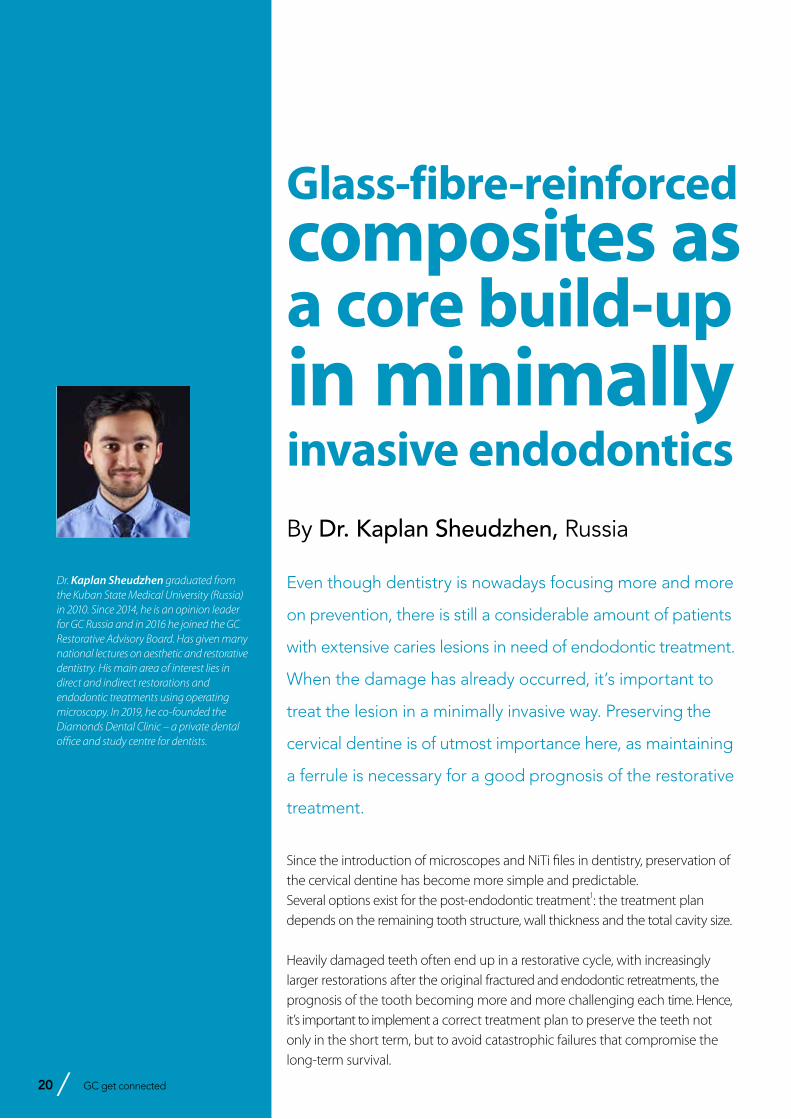
Fig. 1: Pre-operative situation with large orifice.
2
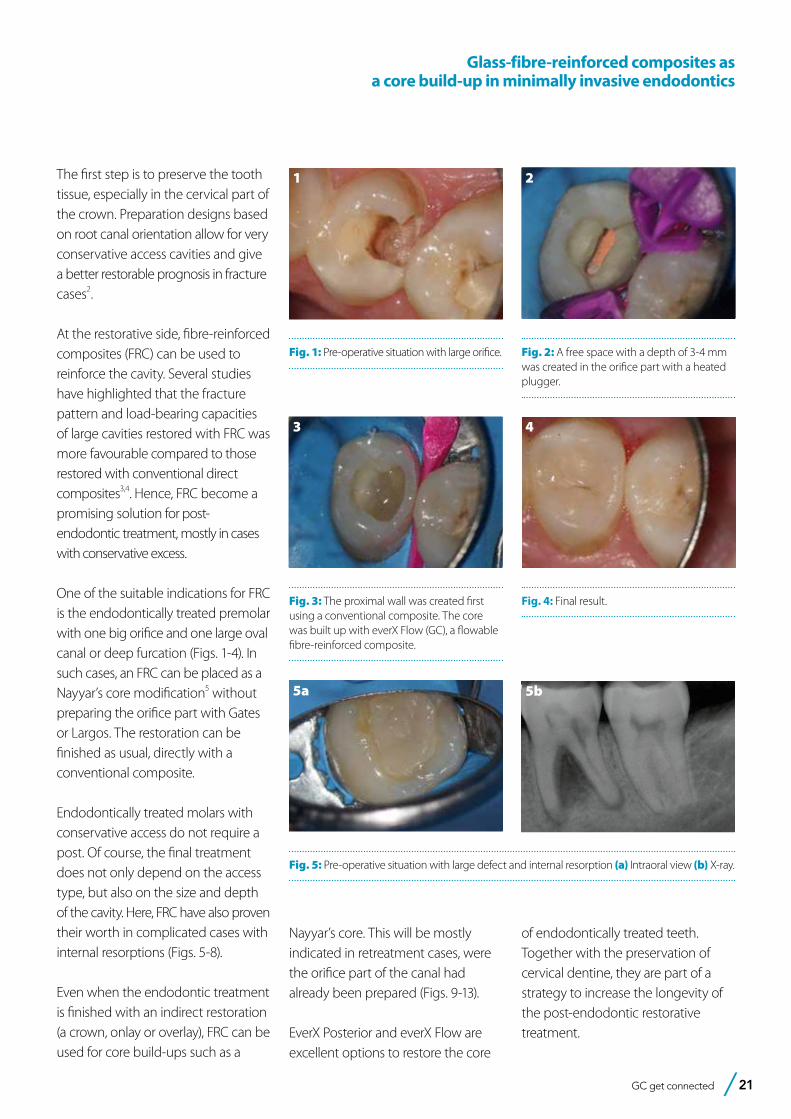
Fig. 2: A free space with a depth of 3-4 mm was created in the orifice part with a heated plugger.
3
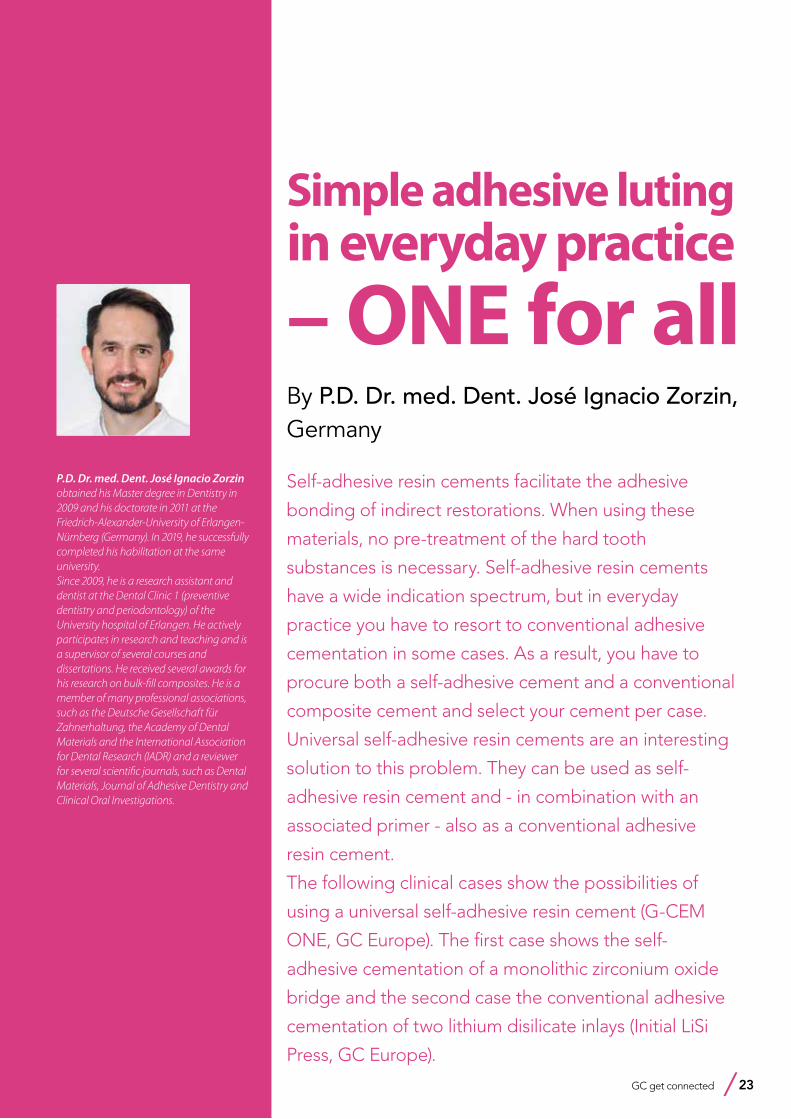
Fig. 3: The proximal wall was created first using a conventional composite. The core was built up with everX Flow (GC), a flowable fibre-reinforced composite.
4
Fig. 4: Final result.
The first step is to preserve the tooth tissue, especially in the cervical part of the crown. Preparation designs based on root canal orientation allow for very conservative access cavities and give a better restorable prognosis in fracture cases2.
At the restorative side, fibre-reinforced composites (FRC) can be used to reinforce the cavity. Several studies have highlighted that the fracture pattern and load-bearing capacities of large cavities restored with FRC was more favourable compared to those restored with conventional direct composites3,4. Hence, FRC become a promising solution for post-endodontic treatment, mostly in cases with conservative excess.
One of the suitable indications for FRC is the endodontically treated premolar with one big orifice and one large oval canal or deep furcation (Figs. 1-4). In such cases, an FRC can be placed as a Nayyar’s core modification5 without preparing the orifice part with Gates or Largos. The restoration can be finished as usual, directly with a conventional composite.
Endodontically treated molars with conservative access do not require a post. Of course, the final treatment does not only depend on the access type, but also on the size and depth of the cavity. Here, FRC have also proven their worth in complicated cases with internal resorptions (Figs. 5-8).
Even when the endodontic treatment is finished with an indirect restoration (a crown, onlay or overlay), FRC can be used for core build-ups such as a
5a
Fig. 5: Pre-operative situation with large defect and internal resorption (a) Intraoral view (b) X-ray.
5b
Nayyar’s core. This will be mostly indicated in retreatment cases, were the orifice part of the canal had already been prepared (Figs. 9-13).
EverX Posterior and everX Flow are excellent options to restore the core
of endodontically treated teeth. Together with the preservation of cervical dentine, they are part of a strategy to increase the longevity of the post-endodontic restorative treatment.

22 GC get connected
Fig. 12: Final X-ray.
Glass-fibre-reinforced composites as a core build-up in minimally invasive endodontics
7
Fig. 7: Final X-ray.
8
Fig. 8: X-ray at 6-months follow-up, after placement of a full ceramic crown.
9
Fig. 9: Pre-operative X-ray.
10
Fig. 10: Cavity before placement of everX Posterior (GC), a fibre-reinforced composite in paste consistency.
11
Fig. 11: Tooth prepared for the adhesive luting of an all-ceramic restoration.
12 13
Fig. 13: Follow-up after three years.
6a
Fig. 6: (a) Cavity and (b) access view after obturation.
6b References
1. Zarow M, Ramírez-Sebastià A, Paolone G, de Ribot Porta J, Mora J, Espona J, Durán-Sindreu F, Roig M. A new classification system for the restoration of root filled teeth. Int Endod J. 2018; 51(3):318-334.
2. Özyürek T, Ülker Ö, Özsezer Demiryürek E, Yılmaz F. The Effects of Endodontic Access Cavity Preparation Design on the Fracture Strength of Endodontically Treated Teeth: Traditional Versus Conservative Preparation. J Endod. 2018; 44(5):800-805.
3. Garoushi S, Sungur S, Boz Y, Ozkan P, Vallittu PK, Uctasli S, Lassila L. Influence of short-fiber composite base on fracture behavior of direct and indirect restorations. Clin Oral Investig. 2021 Jan 8 (Online ahead of print).
4. Geerts G, Pitout E, Visser H. Fracture resistance of endodontically treated premolars with fibre-reinforced composite restorations. Eur J Prosthodont Restor Dent. 2011; 19(1):25-31.
5. Nayyar A, Walton RE, Leonard LA. An amalgam coronal-radicular dowel and core technique for endodontically treated posterior teeth. J Prosthet Dent. 1980; 43(5):511-5.
GC get connected 23
Simple adhesive luting in everyday practice
– ONE for allBy P.D. Dr. med. Dent. José Ignacio Zorzin, Germany
P.D. Dr. med. Dent. José Ignacio Zorzin obtained his Master degree in Dentistry in 2009 and his doctorate in 2011 at the Friedrich-Alexander-University of Erlangen-Nürnberg (Germany). In 2019, he successfully completed his habilitation at the same university. Since 2009, he is a research assistant and dentist at the Dental Clinic 1 (preventive dentistry and periodontology) of the University hospital of Erlangen. He actively participates in research and teaching and is a supervisor of several courses and dissertations. He received several awards for his research on bulk-fill composites. He is a member of many professional associations, such as the Deutsche Gesellschaft für Zahnerhaltung, the Academy of Dental Materials and the International Association for Dental Research (IADR) and a reviewer for several scientific journals, such as Dental Materials, Journal of Adhesive Dentistry and Clinical Oral Investigations.
Self-adhesive resin cements facilitate the adhesive
bonding of indirect restorations. When using these
materials, no pre-treatment of the hard tooth
substances is necessary. Self-adhesive resin cements
have a wide indication spectrum, but in everyday
practice you have to resort to conventional adhesive
cementation in some cases. As a result, you have to
procure both a self-adhesive cement and a conventional
composite cement and select your cement per case.
Universal self-adhesive resin cements are an interesting
solution to this problem. They can be used as self-
adhesive resin cement and - in combination with an
associated primer - also as a conventional adhesive
resin cement.
The following clinical cases show the possibilities of
using a universal self-adhesive resin cement (G-CEM
ONE, GC Europe). The first case shows the self-
adhesive cementation of a monolithic zirconium oxide
bridge and the second case the conventional adhesive
cementation of two lithium disilicate inlays (Initial LiSi
Press, GC Europe).
24 GC get connected
Simple adhesive luting in everyday practice – ONE for all
1
Fig. 1: Temporary restoration from teeth 23 to 25
Case 1
The endodontically treated tooth 24 had to be extracted due to a root long fracture. It was decided to fill the gap by means of a three-unit monolithic zirconia bridge. After adhesive restorative therapy of abutment teeth 23 and 25, these teeth were prepared with an isogingival finish line (chamfer). After taking the impression, a provisional restoration was made, luted with a eugenol-free, temporary cement (Freegenol, GC Europe) and cleaned (Fig. 1). No eugenol-containing cement should be used to fasten the provisional restoration, as eugenol impairs the polymerization and adhesion of adhesives and composites.
After completion, the monolithic zirconia bridge was inserted (Fig. 2). For this purpose, the temporary solution was removed and then all remains of the luting cement were removed with a scaler and a polishing cup with pumice slurry (Fig. 3). The colour effect, accuracy of fit and occlusion of the bridge were checked (Fig. 4). Prior to adhesion, all intaglio surfaces of the restoration must be clean and slightly roughened. Saliva, in particular, adheres very strongly to the oxide ceramic due to its polarity and must be thoroughly removed. Cleaning with alcohol is unfortunately ineffective and phosphoric acid is absolutely contraindicated. In the case of zirconium oxide, the adhesive surfaces are cleaned and roughened after the try-in by sandblasting with aluminum oxide powder (35 µm grit) at low pressure (approx. 1.5 bar). Ideally, this is done chair-side (e.g. Airsonic Mini Sandblaster, Hager and Werke). For this purpose, it is advisable to mark the surfaces to be treated, as in the
2
Fig. 2: Monolithic zirconia bridge to be luted
3
Fig. 3: Abutment teeth 23 and 25, thoroughly cleaned
4
Fig. 4: Try-in of the restoration
5a
Fig. 5: The intaglio surface was marked with a black felt-tip pen as a visual control
5b
6a
Fig. 6: After sandblasting the intaglio surface, the black marking had entirely disappeared
6b
GC get connected 25
Simple adhesive luting in everyday practice – ONE for all
8
Fig. 8: Insertion of the bridge with strong pressure
9
Fig. 9: Tack-curing the excess cement for 1 s to give it an instant rubbery consistency
10
Fig. 10: Excess removal with a probe
11
Fig. 11: Occlusal view after cementation
12
Fig. 12: Vestibular view after cementation
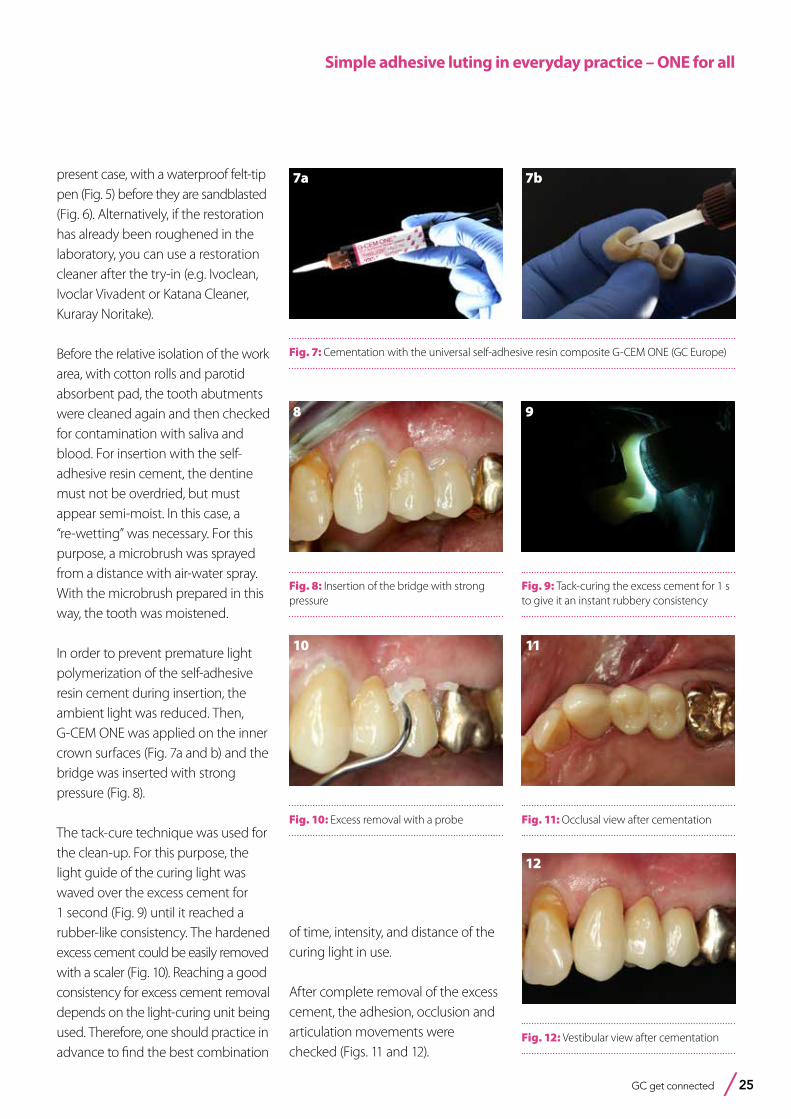
present case, with a waterproof felt-tip pen (Fig. 5) before they are sandblasted (Fig. 6). Alternatively, if the restoration has already been roughened in the laboratory, you can use a restoration cleaner after the try-in (e.g. Ivoclean, Ivoclar Vivadent or Katana Cleaner, Kuraray Noritake).
Before the relative isolation of the work area, with cotton rolls and parotid absorbent pad, the tooth abutments were cleaned again and then checked for contamination with saliva and blood. For insertion with the self-adhesive resin cement, the dentine must not be overdried, but must appear semi-moist. In this case, a “re-wetting” was necessary. For this purpose, a microbrush was sprayed from a distance with air-water spray. With the microbrush prepared in this way, the tooth was moistened.
In order to prevent premature light polymerization of the self-adhesive resin cement during insertion, the ambient light was reduced. Then, G-CEM ONE was applied on the inner crown surfaces (Fig. 7a and b) and the bridge was inserted with strong pressure (Fig. 8).
The tack-cure technique was used for the clean-up. For this purpose, the light guide of the curing light was waved over the excess cement for 1 second (Fig. 9) until it reached a rubber-like consistency. The hardened excess cement could be easily removed with a scaler (Fig. 10). Reaching a good consistency for excess cement removal depends on the light-curing unit being used. Therefore, one should practice in advance to find the best combination
7a
Fig. 7: Cementation with the universal self-adhesive resin composite G-CEM ONE (GC Europe)
7b
of time, intensity, and distance of the curing light in use.
After complete removal of the excess cement, the adhesion, occlusion and articulation movements were checked (Figs. 11 and 12).
26 GC get connected
17
Fig. 17: After cavity preparation for indirect glass ceramic restorations
13
Fig. 13: Deficient restorations on teeth 46 and 47
14
Fig. 14: After removal of the caries and the old restorations
15a
Fig. 15: Application of the two-step adhesive G2-BOND Universal
16
Fig. 16: Light-curing of the adhesive
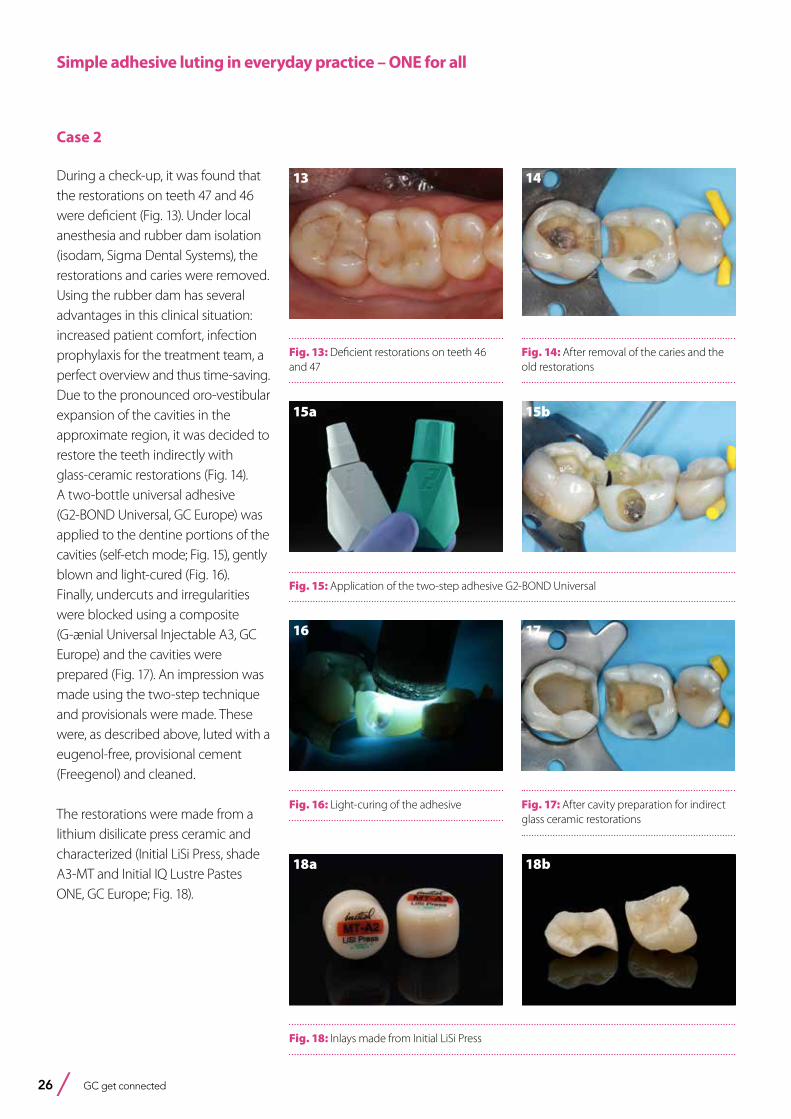
Case 2
During a check-up, it was found that the restorations on teeth 47 and 46 were deficient (Fig. 13). Under local anesthesia and rubber dam isolation (isodam, Sigma Dental Systems), the restorations and caries were removed. Using the rubber dam has several advantages in this clinical situation: increased patient comfort, infection prophylaxis for the treatment team, a perfect overview and thus time-saving. Due to the pronounced oro-vestibular expansion of the cavities in the approximate region, it was decided to restore the teeth indirectly with glass-ceramic restorations (Fig. 14). A two-bottle universal adhesive (G2-BOND Universal, GC Europe) was applied to the dentine portions of the cavities (self-etch mode; Fig. 15), gently blown and light-cured (Fig. 16). Finally, undercuts and irregularities were blocked using a composite (G-ænial Universal Injectable A3, GC Europe) and the cavities were prepared (Fig. 17). An impression was made using the two-step technique and provisionals were made. These were, as described above, luted with a eugenol-free, provisional cement (Freegenol) and cleaned.
The restorations were made from a lithium disilicate press ceramic and characterized (Initial LiSi Press, shade A3-MT and Initial IQ Lustre Pastes ONE, GC Europe; Fig. 18).
15b
Fig. 18: Inlays made from Initial LiSi Press
18b18a
Simple adhesive luting in everyday practice – ONE for all
GC get connected 27
19
Fig. 19: Try-in of the inlays
20
Fig. 20: The restorations were etched with hydrofluoric acid
22
Fig. 22: Selective enamel etching
23
Fig. 23: Preparations after etching
After having removed the provisional restorations and having thoroughly cleaned the cavities, the restorations were tried in and checked for fit and aesthetics (Fig. 19). This should be done under rubber dam to minimize the risk of incidental aspiration and to protect the ceramic from damage if the patient would bite on it. Evidently, the aforementioned good reasons for rubber dam remain also valid.
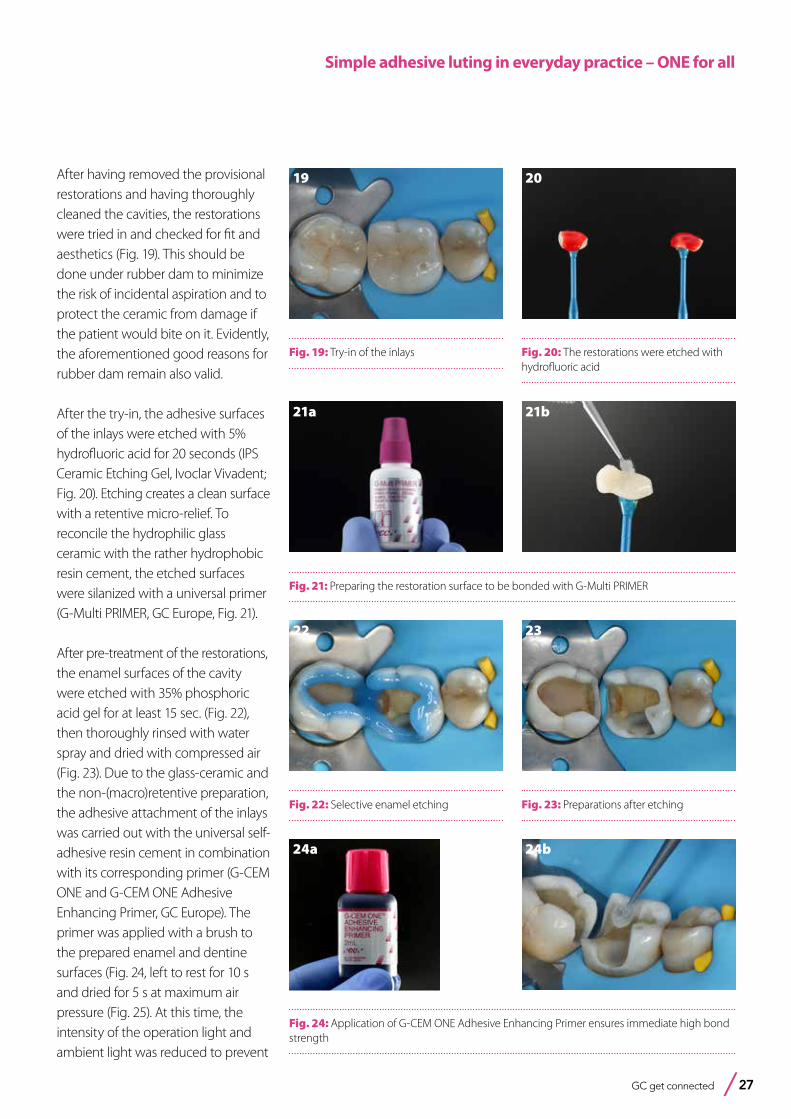
After the try-in, the adhesive surfaces of the inlays were etched with 5% hydrofluoric acid for 20 seconds (IPS Ceramic Etching Gel, Ivoclar Vivadent; Fig. 20). Etching creates a clean surface with a retentive micro-relief. To reconcile the hydrophilic glass ceramic with the rather hydrophobic resin cement, the etched surfaces were silanized with a universal primer (G-Multi PRIMER, GC Europe, Fig. 21).
After pre-treatment of the restorations, the enamel surfaces of the cavity were etched with 35% phosphoric acid gel for at least 15 sec. (Fig. 22), then thoroughly rinsed with water spray and dried with compressed air (Fig. 23). Due to the glass-ceramic and the non-(macro)retentive preparation, the adhesive attachment of the inlays was carried out with the universal self-adhesive resin cement in combination with its corresponding primer (G-CEM ONE and G-CEM ONE Adhesive Enhancing Primer, GC Europe). The primer was applied with a brush to the prepared enamel and dentine surfaces (Fig. 24, left to rest for 10 s and dried for 5 s at maximum air pressure (Fig. 25). At this time, the intensity of the operation light and ambient light was reduced to prevent
21a
Fig. 21: Preparing the restoration surface to be bonded with G-Multi PRIMER
21b
24a
Fig. 24: Application of G-CEM ONE Adhesive Enhancing Primer ensures immediate high bond strength
24b
Simple adhesive luting in everyday practice – ONE for all
28 GC get connected
25
Fig. 25: The preparations are ready for cementation
26
Fig. 26: Seating of the inlay
27
Fig. 27: Excess removal with a probe
28
Fig. 28: Light-curing of all margins
29
Fig. 29: After finishing of the margins
30
Fig. 30: Immediately after removal of the rubber dam. The teeth are still slightly dehydrated.
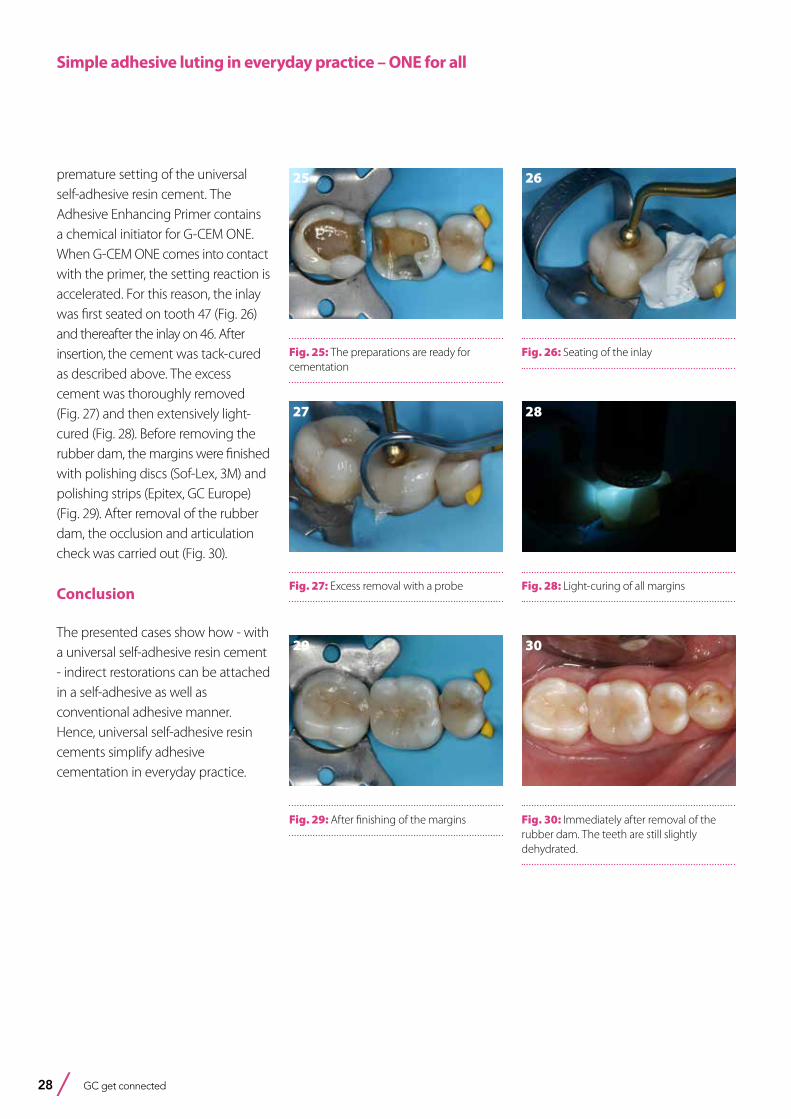
premature setting of the universal self-adhesive resin cement. The Adhesive Enhancing Primer contains a chemical initiator for G-CEM ONE. When G-CEM ONE comes into contact with the primer, the setting reaction is accelerated. For this reason, the inlay was first seated on tooth 47 (Fig. 26) and thereafter the inlay on 46. After insertion, the cement was tack-cured as described above. The excess cement was thoroughly removed (Fig. 27) and then extensively light-cured (Fig. 28). Before removing the rubber dam, the margins were finished with polishing discs (Sof-Lex, 3M) and polishing strips (Epitex, GC Europe) (Fig. 29). After removal of the rubber dam, the occlusion and articulation check was carried out (Fig. 30).
Conclusion
The presented cases show how - with a universal self-adhesive resin cement - indirect restorations can be attached in a self-adhesive as well as conventional adhesive manner. Hence, universal self-adhesive resin cements simplify adhesive cementation in everyday practice.
Simple adhesive luting in everyday practice – ONE for all

GC get connected 29
A surface-retained glass fiber-reinforced bridge with a CAD/CAM-fabricated ponticBy Dr. Jasmina Bijelic-Donova (Finland), Dr. Clara Anton Y Otero (Switzerland), Prof. Dr. Pekka K. Vallittu (Finland) and Prof. Dr. Ivo Krejci (Switzerland).
Dr. Jasmina Bijelic-Donova is Resident in Prosthodontics and University Lecturer at University of Turku (Finland), Department of Prosthetic Dentistry. She is interested in developing the biomimetic therapeutic concept utilizing the benefits of the new digital dentistry and dental technology. Correspondence: [email protected]
Fixed partial dentures (FPD) fabricated from FRC (hereafter abbreviated as FRC FPDs) are nowadays considered a minimally invasive and cost-effective treatment1,2. They gained popularity in the early 1990’s and since then have been commonly used in teeth with poor prognosis, as a substitute for removable partial dentures that replace a few missing teeth and in situations where costs are an issue3. Clinical experience has shown that most clinical failures are due to three main reasons: incorrect fiber orientation4, incorrectly designed fiber framework5,6 or inaccurate occlusal adjustment3. The most commonly reported reasons for FRC FPD failures are delamination and chipping of the veneering composite2,5,7–10, dislodgement4,8,9, and partial6 or complete debonding. Traditionally FRC FPDs have been fabricated directly (intraorally), semi-directly (chairside i.e. pre-making the fiber framework and the pontic partially extraorally)2,5,7 or indirectly (in a dental laboratory)3,4,6,8,9,11. Until today, CAD/CAM technology has been used only in vitro for fabricating the pontic of a simple FRC FPD12,13. To the authors’ knowledge, this technique, has not been yet implemented clinically.
Dr. Clara Anton y Otero is dentist and research collaborator an the department of Cariology and Endodontics of the University Hospital in Geneva (Switzerland) since 2018. Her focus is on non-/minimal-invasive treatments and on application of laser in this context.
Prof. Dr. Pekka Vallittu is the Dean of the Institute of Dentistry and holds the Chair of Biomaterials Science at the Faculty of Medicine, University of Turku (Finland). He is also the Director of Turku Clinical Biomaterials Centre. Since the 1980’s, he is predominantly investigating and developing fibre reinforcements and fibre reinforced composites.
Prof. Dr. Ivo Krejci is the past President of the University Dental Clinics of the University of Geneva and he is currently Director of the Department of Preventive Dentistry and Primary Dental Care at the same university.
30 GC get connected
A surface-retained glass fiber-reinforced bridge with a CAD/CAM-fabricated pontic
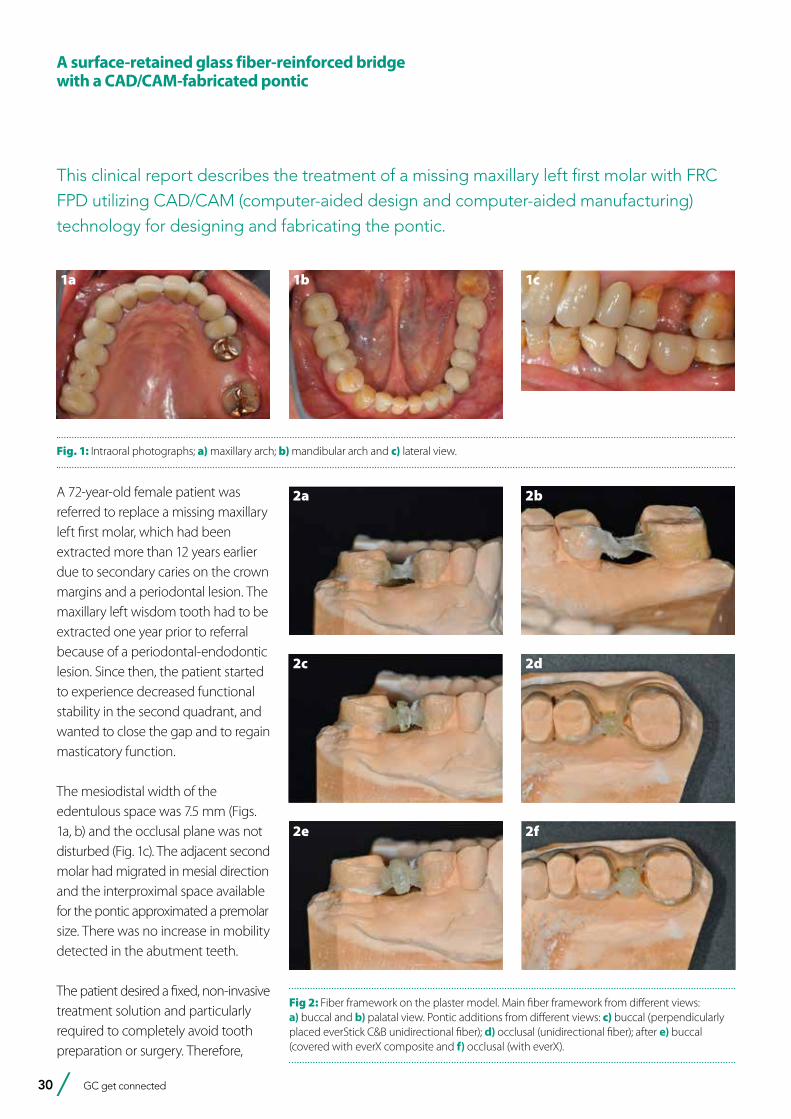
A 72-year-old female patient was referred to replace a missing maxillary left first molar, which had been extracted more than 12 years earlier due to secondary caries on the crown margins and a periodontal lesion. The maxillary left wisdom tooth had to be extracted one year prior to referral because of a periodontal-endodontic lesion. Since then, the patient started to experience decreased functional stability in the second quadrant, and wanted to close the gap and to regain masticatory function.
The mesiodistal width of the edentulous space was 7.5 mm (Figs. 1a, b) and the occlusal plane was not disturbed (Fig. 1c). The adjacent second molar had migrated in mesial direction and the interproximal space available for the pontic approximated a premolar size. There was no increase in mobility detected in the abutment teeth.
The patient desired a fixed, non-invasive treatment solution and particularly required to completely avoid tooth preparation or surgery. Therefore,
This clinical report describes the treatment of a missing maxillary left first molar with FRC FPD utilizing CAD/CAM (computer-aided design and computer-aided manufacturing) technology for designing and fabricating the pontic.
1a
Fig. 1: Intraoral photographs; a) maxillary arch; b) mandibular arch and c) lateral view.
1b 1c
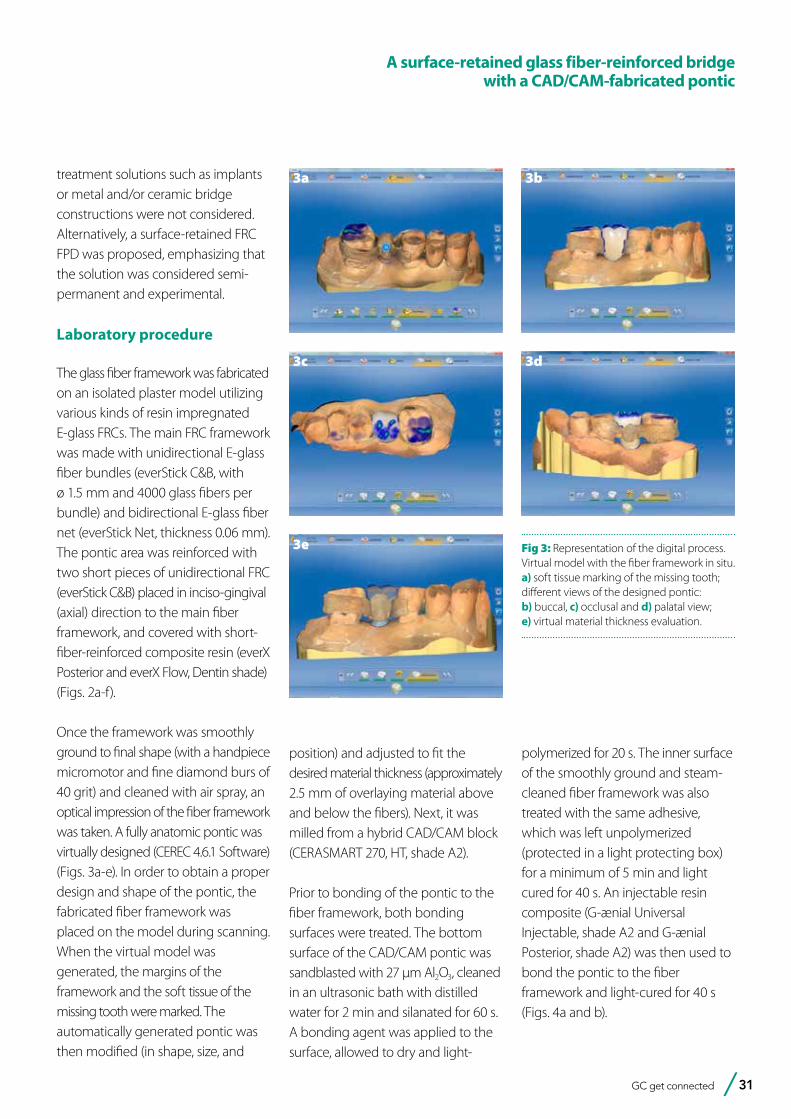
Fig 2: Fiber framework on the plaster model. Main fiber framework from different views: a) buccal and b) palatal view. Pontic additions from different views: c) buccal (perpendicularly placed everStick C&B unidirectional fiber); d) occlusal (unidirectional fiber); after e) buccal (covered with everX composite and f) occlusal (with everX).
2a
2c
2e
2b
2d
2f
GC get connected 31
A surface-retained glass fiber-reinforced bridge with a CAD/CAM-fabricated pontic
treatment solutions such as implants or metal and/or ceramic bridge constructions were not considered. Alternatively, a surface-retained FRC FPD was proposed, emphasizing that the solution was considered semi-permanent and experimental.
Laboratory procedure
The glass fiber framework was fabricated on an isolated plaster model utilizing various kinds of resin impregnated E-glass FRCs. The main FRC framework was made with unidirectional E-glass fiber bundles (everStick C&B, with ø 1.5 mm and 4000 glass fibers per bundle) and bidirectional E-glass fiber net (everStick Net, thickness 0.06 mm). The pontic area was reinforced with two short pieces of unidirectional FRC (everStick C&B) placed in inciso-gingival (axial) direction to the main fiber framework, and covered with short-fiber-reinforced composite resin (everX Posterior and everX Flow, Dentin shade) (Figs. 2a-f).
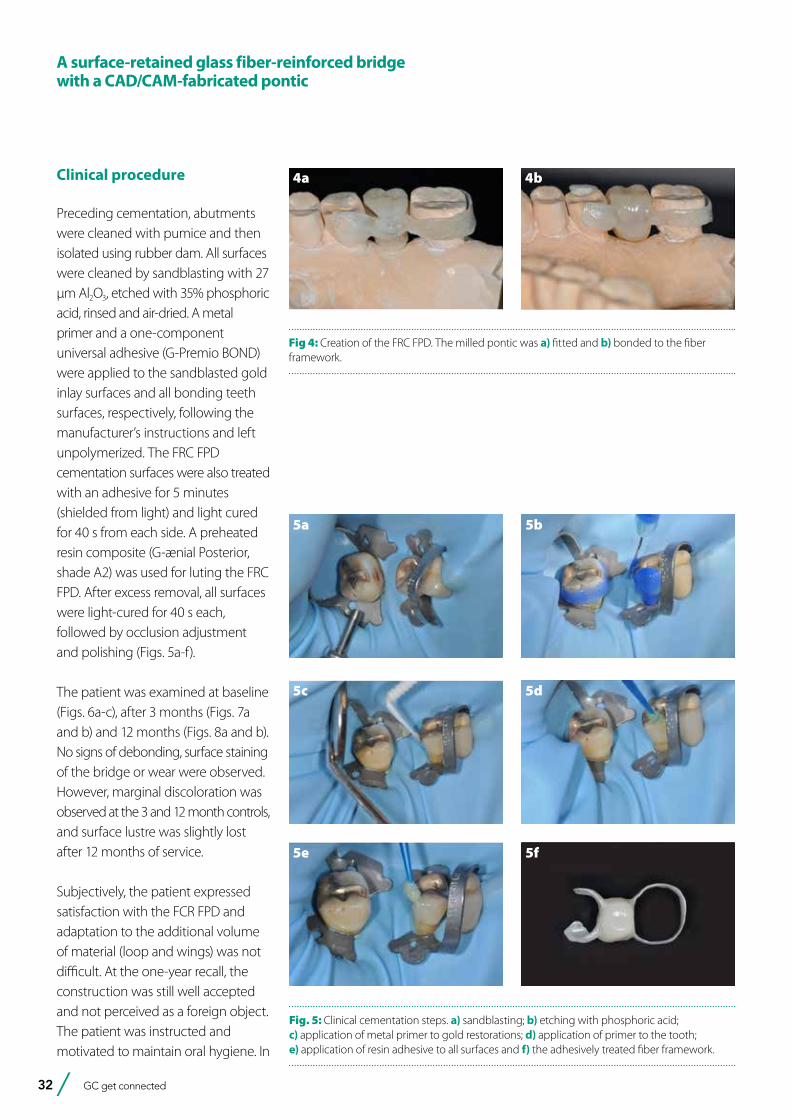
Once the framework was smoothly ground to final shape (with a handpiece micromotor and fine diamond burs of 40 grit) and cleaned with air spray, an optical impression of the fiber framework was taken. A fully anatomic pontic was virtually designed (CEREC 4.6.1 Software) (Figs. 3a-e). In order to obtain a proper design and shape of the pontic, the fabricated fiber framework was placed on the model during scanning. When the virtual model was generated, the margins of the framework and the soft tissue of the missing tooth were marked. The automatically generated pontic was then modified (in shape, size, and
position) and adjusted to fit the desired material thickness (approximately 2.5 mm of overlaying material above and below the fibers). Next, it was milled from a hybrid CAD/CAM block (CERASMART 270, HT, shade A2).
Prior to bonding of the pontic to the fiber framework, both bonding surfaces were treated. The bottom surface of the CAD/CAM pontic was sandblasted with 27 µm Al2O3, cleaned in an ultrasonic bath with distilled water for 2 min and silanated for 60 s. A bonding agent was applied to the surface, allowed to dry and light-
polymerized for 20 s. The inner surface of the smoothly ground and steam-cleaned fiber framework was also treated with the same adhesive, which was left unpolymerized (protected in a light protecting box) for a minimum of 5 min and light cured for 40 s. An injectable resin composite (G-ænial Universal Injectable, shade A2 and G-ænial Posterior, shade A2) was then used to bond the pontic to the fiber framework and light-cured for 40 s (Figs. 4a and b).
3a
3c
3e
3b
3d
Fig 3: Representation of the digital process. Virtual model with the fiber framework in situ. a) soft tissue marking of the missing tooth; different views of the designed pontic: b) buccal, c) occlusal and d) palatal view; e) virtual material thickness evaluation.
32 GC get connected
Clinical procedure
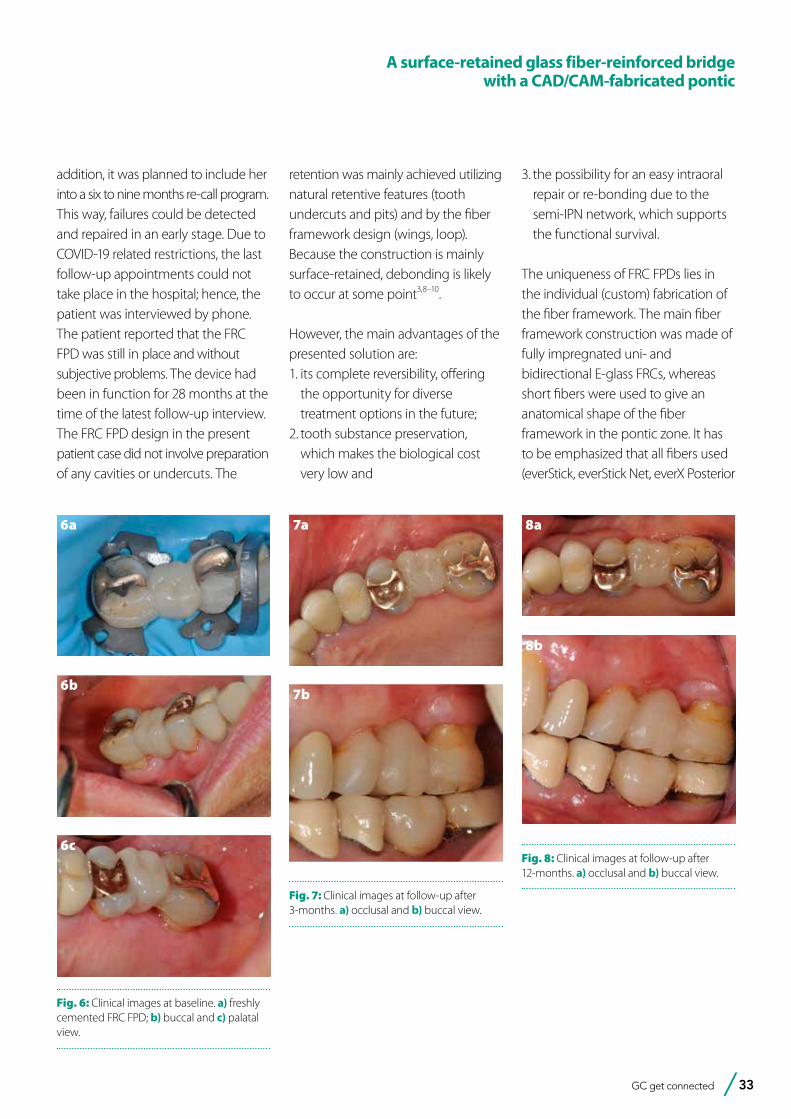
Preceding cementation, abutments were cleaned with pumice and then isolated using rubber dam. All surfaces were cleaned by sandblasting with 27 µm Al2O3, etched with 35% phosphoric acid, rinsed and air-dried. A metal primer and a one-component universal adhesive (G-Premio BOND) were applied to the sandblasted gold inlay surfaces and all bonding teeth surfaces, respectively, following the manufacturer’s instructions and left unpolymerized. The FRC FPD cementation surfaces were also treated with an adhesive for 5 minutes (shielded from light) and light cured for 40 s from each side. A preheated resin composite (G-ænial Posterior, shade A2) was used for luting the FRC FPD. After excess removal, all surfaces were light-cured for 40 s each, followed by occlusion adjustment and polishing (Figs. 5a-f).
The patient was examined at baseline (Figs. 6a-c), after 3 months (Figs. 7a and b) and 12 months (Figs. 8a and b). No signs of debonding, surface staining of the bridge or wear were observed. However, marginal discoloration was observed at the 3 and 12 month controls, and surface lustre was slightly lost after 12 months of service.
Subjectively, the patient expressed satisfaction with the FCR FPD and adaptation to the additional volume of material (loop and wings) was not difficult. At the one-year recall, the construction was still well accepted and not perceived as a foreign object. The patient was instructed and motivated to maintain oral hygiene. In
Fig 4: Creation of the FRC FPD. The milled pontic was a) fitted and b) bonded to the fiber framework.
4a 4b
5a 5b
5c 5d
5e 5f
Fig. 5: Clinical cementation steps. a) sandblasting; b) etching with phosphoric acid; c) application of metal primer to gold restorations; d) application of primer to the tooth; e) application of resin adhesive to all surfaces and f) the adhesively treated fiber framework.
A surface-retained glass fiber-reinforced bridge with a CAD/CAM-fabricated pontic
GC get connected 33
6a
6b
6c
Fig. 6: Clinical images at baseline. a) freshly cemented FRC FPD; b) buccal and c) palatal view.
7a
7b
Fig. 7: Clinical images at follow-up after 3-months. a) occlusal and b) buccal view.
8a
8b
Fig. 8: Clinical images at follow-up after 12-months. a) occlusal and b) buccal view.
addition, it was planned to include her into a six to nine months re-call program. This way, failures could be detected and repaired in an early stage. Due to COVID-19 related restrictions, the last follow-up appointments could not take place in the hospital; hence, the patient was interviewed by phone. The patient reported that the FRC FPD was still in place and without subjective problems. The device had been in function for 28 months at the time of the latest follow-up interview.The FRC FPD design in the present patient case did not involve preparation of any cavities or undercuts. The
retention was mainly achieved utilizing natural retentive features (tooth undercuts and pits) and by the fiber framework design (wings, loop). Because the construction is mainly surface-retained, debonding is likely to occur at some point3,8–10.
However, the main advantages of the presented solution are: 1. its complete reversibility, offering
the opportunity for diverse treatment options in the future;
2. tooth substance preservation, which makes the biological cost very low and
A surface-retained glass fiber-reinforced bridge with a CAD/CAM-fabricated pontic
3. the possibility for an easy intraoral repair or re-bonding due to the semi-IPN network, which supports the functional survival.
The uniqueness of FRC FPDs lies in the individual (custom) fabrication of the fiber framework. The main fiber framework construction was made of fully impregnated uni- and bidirectional E-glass FRCs, whereas short fibers were used to give an anatomical shape of the fiber framework in the pontic zone. It has to be emphasized that all fibers used (everStick, everStick Net, everX Posterior

34 GC get connected
and everX Flow) have the same matrix composition. This is the multiphase polymer matrix, known as semi-interpenetrating polymer network (semi-IPN), due to which reliable bond to the veneering composite and to the luting cement could be developed 3,14,15.
A surface-retained glass fiber-reinforced bridge with a CAD/CAM-fabricated pontic
The pontic in this clinical case was virtually designed using digital technology. The use of a digital technique was found to be beneficial for evaluating the material thickness, and optimizing the anatomy and shape of the overlaying structure around the fibers. Compared to direct composites, hybrid ceramic CAD/
CAM block have better mechanical properties16, which might also decrease the incidence of chipping and delamination within the veneering material. Furthermore, standardizing the fabrication quality will minimize operator-related flaws, such as air entrapment.
References:
1. Ahmed KE, Li KY, Murray CA. Longevity of fiber-reinforced composite fixed partial dentures (FRC FPD)—Systematic review. Journal of Dentistry. 2017 Jun;61:1–11.
2. Wolff D, Wohlrab T, Saure D, Krisam J, Frese C. Fiber-reinforced composite fixed dental prostheses: A 4-year prospective clinical trial evaluating survival, quality, and effects on surrounding periodontal tissues. The Journal of Prosthetic Dentistry. 2018 Jan;119(1):47–52.
3. Vallittu PK, Sevelius C. Resin-bonded, glass fiber-reinforced composite fixed partial dentures: A clinical study. The Journal of Prosthetic Dentistry. 2000 Oct;84(4):413–8.
4. Vallittu PK. Survival rates of resin-bonded, glass fiber–reinforced composite fixed partial dentures with a mean follow-up of 42 months: A pilot study. The Journal of Prosthetic Dentistry. 2004 Mar;91(3):241–6.
5. Wolff D. Fiber-reinforced Composite Fixed Dental Prostheses: A Retrospective Clinical Examination. The Journal of Adhesive Dentistry. 2010 Feb 12;13(2):187–94.
6. Kumbuloglu O, Özcan M. Clinical survival of indirect, anterior 3-unit surface-retained fibre-reinforced composite fixed dental prosthesis: Up to 7.5-years follow-up. Journal of Dentistry. 2015 Jun;43(6):656–63.
7. Frese C, Schiller P, Staehle HJ, Wolff D. Fiber-reinforced composite fixed dental prostheses in the anterior area: A 4.5-year follow-up. The Journal of Prosthetic Dentistry. 2014 Aug;112(2):143–9.
8. van Heumen CCM, Tanner J, van Dijken JWV, Pikaar R, Lassila LVJ, Creugers NHJ, et al. Five-year survival of 3-unit fiber-reinforced composite fixed partial dentures in the posterior area. Dental Materials. 2010 Oct;26(10):954–60.
9. van Heumen CCM, van Dijken JWV, Tanner J, Pikaar R, Lassila LVJ, Creugers NHJ, et al. Five-year survival of 3-unit fiber-reinforced composite fixed partial dentures in the anterior area. Dental Materials. 2009 Jun;25(6):820–7.
10. van Heumen CCM, Kreulen CM, Creugers NHJ. Clinical studies of fiber-reinforced resin-bonded fixed partial dentures: a systematic review. European Journal of Oral Sciences. 2009;117(1):1–6.
11. Vallittu PK. Prosthodontic treatment with a glass fiber-reinforced resin-bonded fixed partial denture: A clinical report. The Journal of Prosthetic Dentistry. 1999 Aug;82(2):132–5.
12. Perea L. Fiber-reinforced Composite Fixed Dental Prostheses with Various Pontics. The Journal of Adhesive Dentistry. 2013 Oct 30;16(2):161–8.
13. Vallittu P, Özcan M. Clinical Guide to Principles of Fiber-Reinforced Composites in Dentistry - 1st Edition [Internet]. 2017 [cited 2020 Jun 30]. Available from: https://www.elsevier.com/books/clinical-guide-to-principles-of-fiber-reinforced-composites-in-dentistry/vallittu/978-0-08-100607-8
14. Lastumäki TM, Lassila LVJ, Vallittu PK. The semi-interpenetrating polymer network matrix of fiber-reinforced composite and its effect on the surface adhesive properties. J Mater Sci Mater Med. 2003 Sep;14(9):803–9.
15. Vallittu PK. Interpenetrating Polymer Networks (IPNs) in Dental Polymers and Composites. Journal of Adhesion Science and Technology. 2009 Jan 1;23(7–8):961–72.
16. Ruse ND, Sadoun MJ. Resin-composite Blocks for Dental CAD/CAM Applications. J Dent Res. 2014 Dec 1;93(12):1232–4.
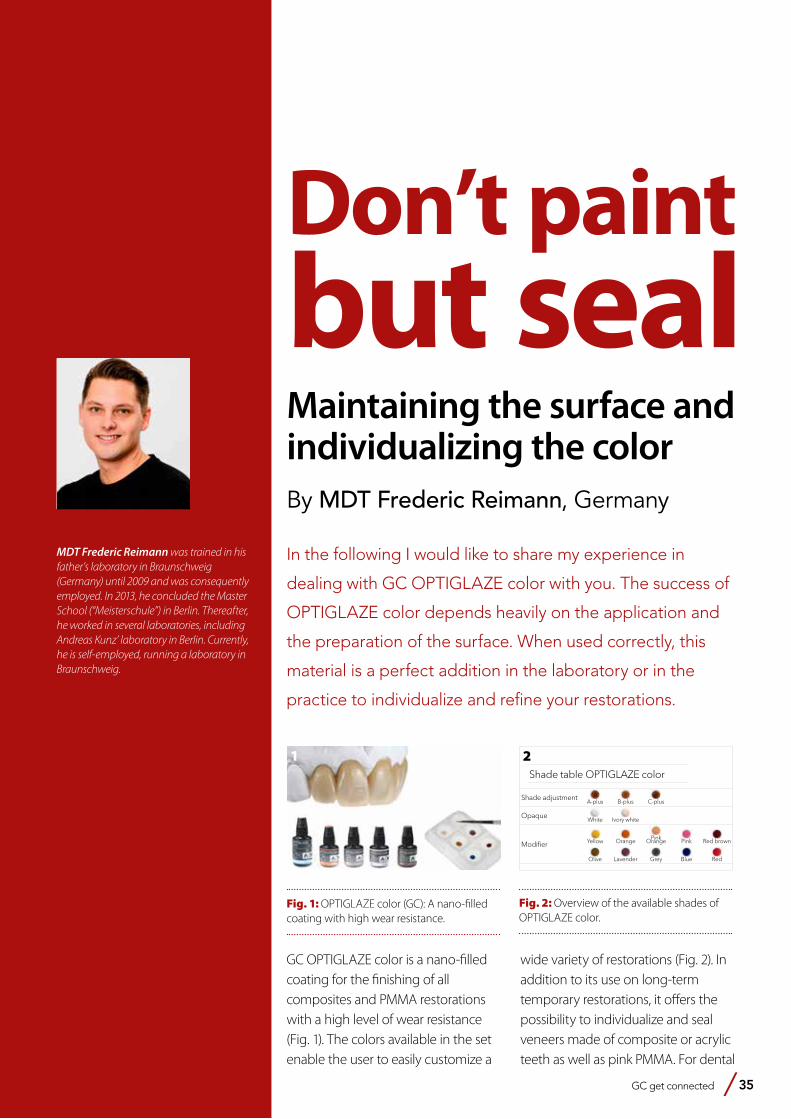
GC get connected 35
Don’t paint but sealMaintaining the surface and individualizing the colorBy MDT Frederic Reimann, Germany
MDT Frederic Reimann was trained in his father’s laboratory in Braunschweig (Germany) until 2009 and was consequently employed. In 2013, he concluded the Master School (“Meisterschule”) in Berlin. Thereafter, he worked in several laboratories, including Andreas Kunz’ laboratory in Berlin. Currently, he is self-employed, running a laboratory in Braunschweig.
In the following I would like to share my experience in
dealing with GC OPTIGLAZE color with you. The success of
OPTIGLAZE color depends heavily on the application and
the preparation of the surface. When used correctly, this
material is a perfect addition in the laboratory or in the
practice to individualize and refine your restorations.
1
Fig. 1: OPTIGLAZE color (GC): A nano-filled coating with high wear resistance.
Shade adjustmentA-plus B-plus C-plus
OpaqueWhite Ivory white
Modifi er Yellow Orange Pink Orange Pink Red brown
Olive Lavender Grey Blue Red
Shade table OPTIGLAZE color
2
Fig. 2: Overview of the available shades of OPTIGLAZE color.
GC OPTIGLAZE color is a nano-filled coating for the finishing of all composites and PMMA restorations with a high level of wear resistance (Fig. 1). The colors available in the set enable the user to easily customize a
wide variety of restorations (Fig. 2). In addition to its use on long-term temporary restorations, it offers the possibility to individualize and seal veneers made of composite or acrylic teeth as well as pink PMMA. For dental
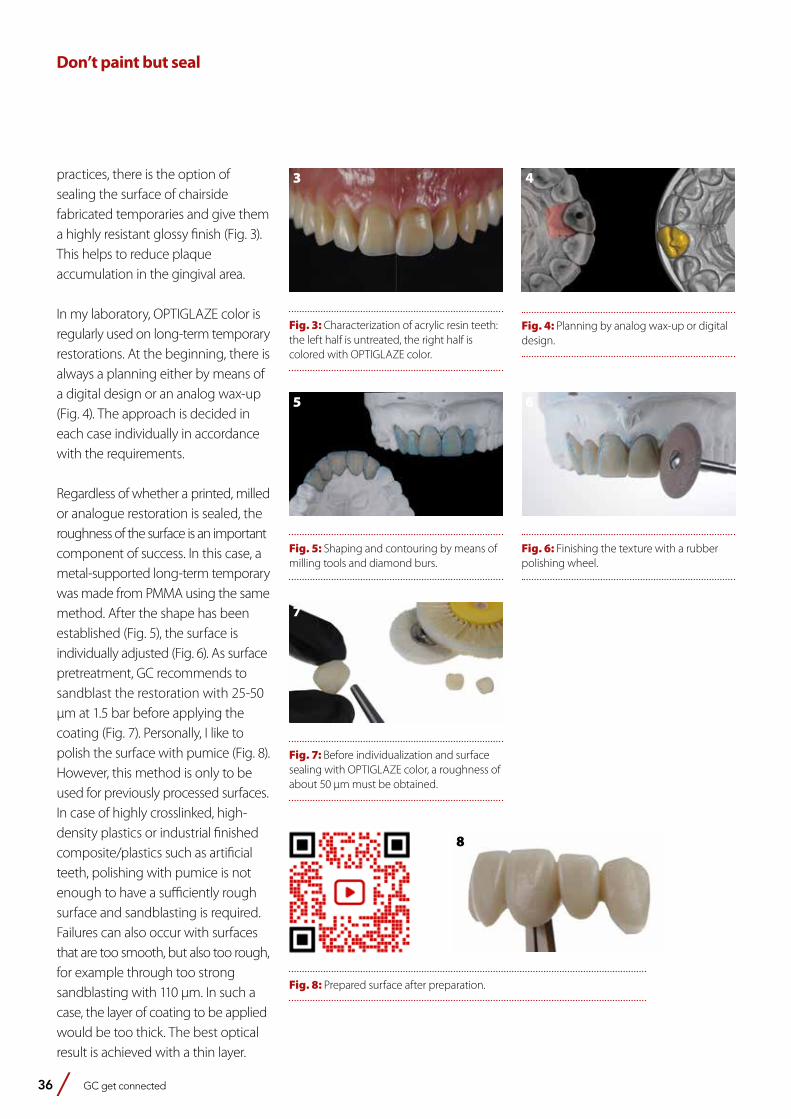
36 GC get connected
Don’t paint but seal
3
Fig. 3: Characterization of acrylic resin teeth: the left half is untreated, the right half is colored with OPTIGLAZE color.
4
Fig. 4: Planning by analog wax-up or digital design.
5
Fig. 5: Shaping and contouring by means of milling tools and diamond burs.
Fig. 8: Prepared surface after preparation.
7
Fig. 7: Before individualization and surface sealing with OPTIGLAZE color, a roughness of about 50 μm must be obtained.
6
Fig. 6: Finishing the texture with a rubber polishing wheel.
practices, there is the option ofsealing the surface of chairsidefabricated temporaries and give thema highly resistant glossy finish (Fig. 3).This helps to reduce plaqueaccumulation in the gingival area.
In my laboratory, OPTIGLAZE color isregularly used on long-term temporaryrestorations. At the beginning, there isalways a planning either by means ofa digital design or an analog wax-up(Fig. 4). The approach is decided ineach case individually in accordancewith the requirements.
Regardless of whether a printed, milledor analogue restoration is sealed, theroughness of the surface is an importantcomponent of success. In this case, ametal-supported long-term temporarywas made from PMMA using the samemethod. After the shape has beenestablished (Fig. 5), the surface isindividually adjusted (Fig. 6). As surfacepretreatment, GC recommends tosandblast the restoration with 25-50μm at 1.5 bar before applying thecoating (Fig. 7). Personally, I like topolish the surface with pumice (Fig. 8).However, this method is only to beused for previously processed surfaces.In case of highly crosslinked, high-density plastics or industrial finishedcomposite/plastics such as artificialteeth, polishing with pumice is notenough to have a sufficiently roughsurface and sandblasting is required.Failures can also occur with surfacesthat are too smooth, but also too rough,for example through too strongsandblasting with 110 μm. In such acase, the layer of coating to be appliedwould be too thick. The best opticalresult is achieved with a thin layer.
8
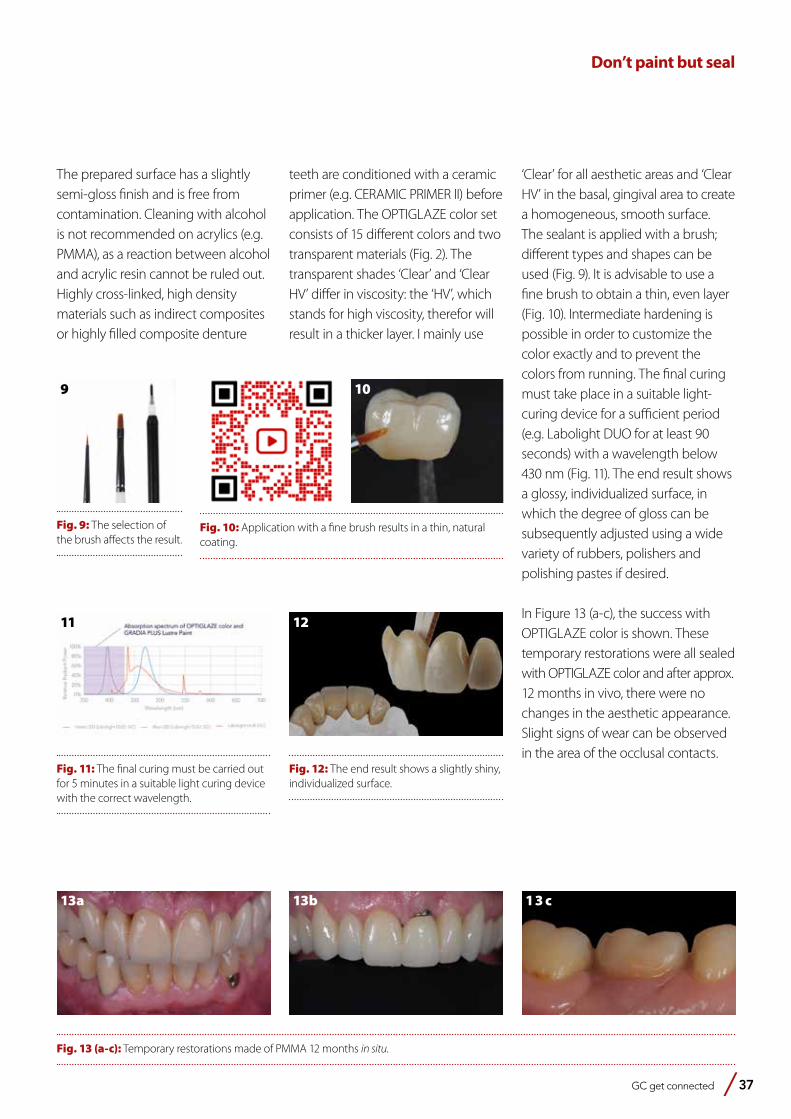
GC get connected 37
Don’t paint but seal
9
Fig. 9: The selection of the brush affects the result.
10
Fig. 10: Application with a fine brush results in a thin, natural coating.
11
Fig. 11: The final curing must be carried out for 5 minutes in a suitable light curing device with the correct wavelength.
12
Fig. 12: The end result shows a slightly shiny, individualized surface.
The prepared surface has a slightly semi-gloss finish and is free from contamination. Cleaning with alcohol is not recommended on acrylics (e.g. PMMA), as a reaction between alcohol and acrylic resin cannot be ruled out. Highly cross-linked, high density materials such as indirect composites or highly filled composite denture
teeth are conditioned with a ceramic primer (e.g. CERAMIC PRIMER II) before application. The OPTIGLAZE color set consists of 15 different colors and two transparent materials (Fig. 2). The transparent shades ‘Clear’ and ‘Clear HV’ differ in viscosity: the ‘HV’, which stands for high viscosity, therefor will result in a thicker layer. I mainly use
‘Clear’ for all aesthetic areas and ‘Clear HV’ in the basal, gingival area to create a homogeneous, smooth surface. The sealant is applied with a brush; different types and shapes can be used (Fig. 9). It is advisable to use a fine brush to obtain a thin, even layer (Fig. 10). Intermediate hardening is possible in order to customize the color exactly and to prevent the colors from running. The final curing must take place in a suitable light-curing device for a sufficient period (e.g. Labolight DUO for at least 90 seconds) with a wavelength below 430 nm (Fig. 11). The end result shows a glossy, individualized surface, in which the degree of gloss can be subsequently adjusted using a wide variety of rubbers, polishers and polishing pastes if desired.
In Figure 13 (a-c), the success with OPTIGLAZE color is shown. These temporary restorations were all sealed with OPTIGLAZE color and after approx. 12 months in vivo, there were no changes in the aesthetic appearance. Slight signs of wear can be observed in the area of the occlusal contacts.
13a
Fig. 13 (a-c): Temporary restorations made of PMMA 12 months in situ.
13b 13 c

38 GC get connected
Ceramics and digital solutions from a single source: where manual and automated techniques go hand in handBy Ralf Dahl, Germany
MDT Ralf Dahl did his dental technician training from 1981 to 1985. From 1985 to 1988, he intensified his knowledge in a commercial laboratory with a focus on precious metals, ceramics and attachment work.From 1988 to 1989, he worked as a dental technician in a private practice and then until 1990 as a senior dental technician. In 1991, he successfully completed his master’s exam (MDT/ZTM) at the Master School in Düsseldorf. Since 1994, he is co-owner and managing director of MB Dentaltechnik GmbH. He is a member of the “Dental Excellence International Laboratory Group”, the EDA and the DGÄZ. Ralf Dahl is a trainer for hands-on workshops and live patient courses in Germany and abroad. He is a guest lecturer at the Meisterschule Freiburg and the author of numerous specialist articles in Quintessenz and Dental Dialogue. He is specialized in technical lectures and practical work courses in the field of veneering technology and all-ceramics.
“Is an industrial revolution awaiting us in dental technology?” The author of the article addresses this question and comes to the conclusion that great digital technologies are helpful, but do not replace many of the manual skills of the dental technician. Rather, both go hand in hand. By means of a patient case, he presents the possibilities that result from the interplay of digital technologies, modern materials and dental skills.
Success can be planned: a patient case
A patient consulted the dental practice with the desire to have nice front teeth. Teeth 12 and 21 were restored with composite restorations and severely discolored (Fig. 1). Together with the prosthetic work team, it was decided to restore both teeth with zirconia-based crowns. There are certain requirements from a
preparatory and material point of view. For a detailed scan, the stumps should have an ideal geometry: that is the basis for an ideally fitting restoration. In order to meet the high aesthetic demands, the crowns had to be veneered manually. An adequate rounded chamfer, soft shapes with rounded angles and sufficient space in the veneering area ceramic offer the best conditions for a functional, aesthetic, long-term stable restoration.
GC get connected 39 GC get connected 39
Ceramics and digital solutions from a single source: where manual and automated techniques go hand in hand
1
Fig. 1: Initial situation. Teeth 12 and 21 are to be restored.
2
Fig. 2: Teeth prepared in accordance with the guidelines for ceramic restorations.
3
Fig. 3: The model with the prepared dies. a) Vestibular view; b) Oblique view
4
Fig. 4: The dental die-cut model in the Aadva Lab Scan 2. Direct insertion of the model through a magnetic multi-split base or adapter plate.
5
Fig. 5: The open design of the scanner offers a spacious work area.
The teeth were prepared accordingly. (Fig. 2).While the scanner can capture almost all geometries that are in the visual range, preparation areas that are complex in terms of milling technology are difficult to display. In the case of unsuitable geometries, the software is sometimes not able to capture the shapes correctly. The consequences are long post-processing times and laborious adjustments to the scaffolding. Basic requirements, e.g. minimum thickness, must also be taken into account with regard to the framework design: these are often already stored in the CAD software. If all specified parameters are strictly adhered to, a good fit and high
stability of the CAD/CAM-fabricated framework can be achieved.
After the impression was taken, models were made. The preparation margin was precisely demarcated on the master model (Fig. 3).
Digital exactitude: scanning and CAD construction
The models were digitized in a very short time with the Aadva Lab Scan 2 (GC), which offers a very high scanning accuracy (4 µm - ISO12836). The open design of the scanner allows direct access to the spacious work area with a measuring field spectrum no less than 85.2x58.1x82 mm (XYZ).
The model was clamped correspondingly (Figs. 4 and 5). Another advantage of this scanner became apparent here: the anti-slip mat on the system plate ensures optimum stability. Navigation through the user software is intuitive (Fig. 6). The object to be scanned is automatically guided into the measuring field: the automated Z-axis moves the model to the correct height so that the scanning process is carried out in the optimal focus area (Fig. 7). The scanner offers an astonishingly high flexibility; even though the program suggests a sequence of scan tabs for data acquisition, the user can freely decide whether or not this sequence should be modified according to individual needs.
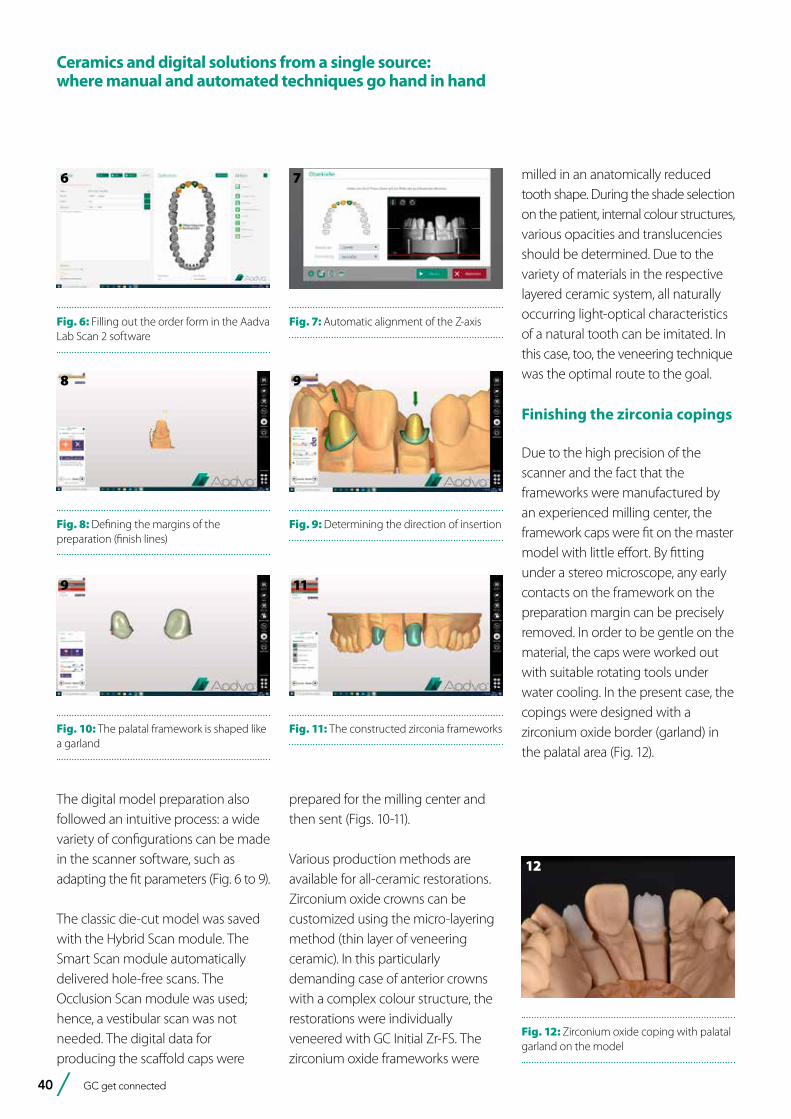
40 GC get connected
The digital model preparation also followed an intuitive process: a wide variety of configurations can be made in the scanner software, such as adapting the fit parameters (Fig. 6 to 9).
The classic die-cut model was saved with the Hybrid Scan module. The Smart Scan module automatically delivered hole-free scans. The Occlusion Scan module was used; hence, a vestibular scan was not needed. The digital data for producing the scaffold caps were
milled in an anatomically reduced tooth shape. During the shade selection on the patient, internal colour structures, various opacities and translucencies should be determined. Due to the variety of materials in the respective layered ceramic system, all naturally occurring light-optical characteristics of a natural tooth can be imitated. In this case, too, the veneering technique was the optimal route to the goal.
Finishing the zirconia copings
Due to the high precision of the scanner and the fact that the frameworks were manufactured by an experienced milling center, the framework caps were fit on the master model with little effort. By fitting under a stereo microscope, any early contacts on the framework on the preparation margin can be precisely removed. In order to be gentle on the material, the caps were worked out with suitable rotating tools under water cooling. In the present case, the copings were designed with a zirconium oxide border (garland) in the palatal area (Fig. 12).
6
Fig. 6: Filling out the order form in the Aadva Lab Scan 2 software
7
Fig. 7: Automatic alignment of the Z-axis
8
Fig. 8: Defining the margins of the preparation (finish lines)
9
Fig. 9: Determining the direction of insertion
prepared for the milling center and then sent (Figs. 10-11).
Various production methods are available for all-ceramic restorations. Zirconium oxide crowns can be customized using the micro-layering method (thin layer of veneering ceramic). In this particularly demanding case of anterior crowns with a complex colour structure, the restorations were individually veneered with GC Initial Zr-FS. The zirconium oxide frameworks were
9
Fig. 10: The palatal framework is shaped like a garland
11
Fig. 11: The constructed zirconia frameworks
12
Fig. 12: Zirconium oxide coping with palatal garland on the model
Ceramics and digital solutions from a single source: where manual and automated techniques go hand in hand
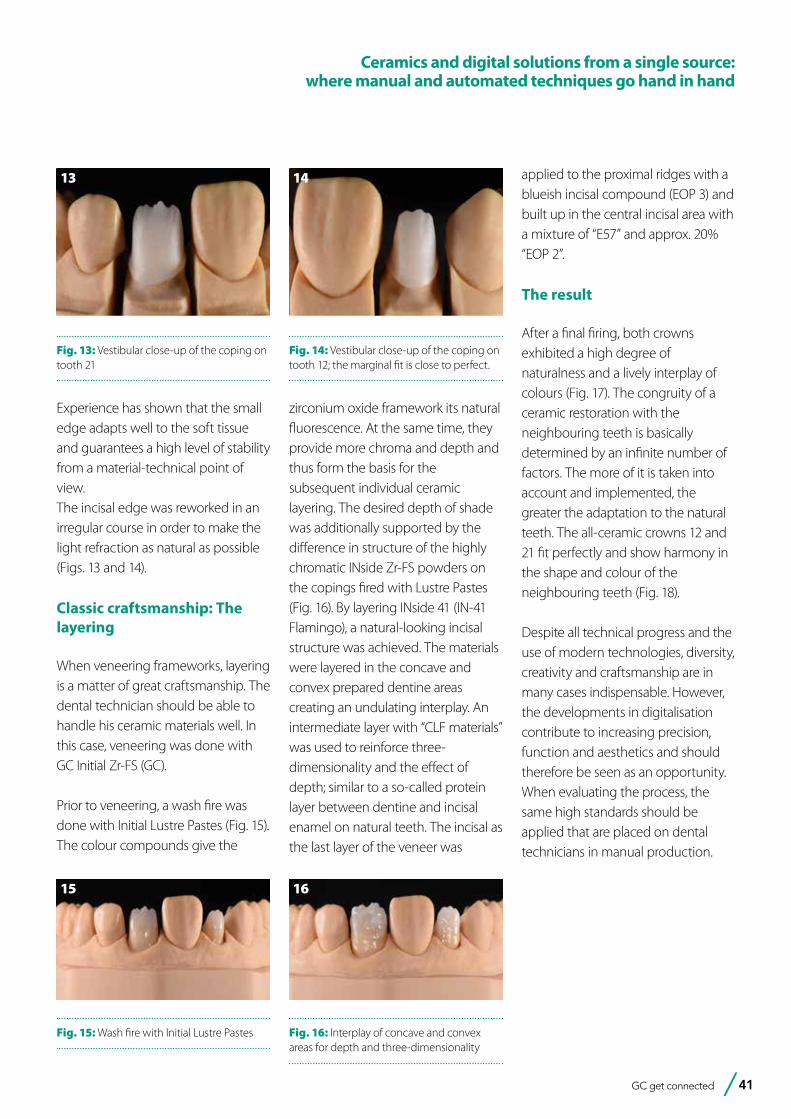
GC get connected 41
Ceramics and digital solutions from a single source: where manual and automated techniques go hand in hand
Experience has shown that the small edge adapts well to the soft tissue and guarantees a high level of stability from a material-technical point of view. The incisal edge was reworked in an irregular course in order to make the light refraction as natural as possible (Figs. 13 and 14).
Classic craftsmanship: The layering
When veneering frameworks, layering is a matter of great craftsmanship. The dental technician should be able to handle his ceramic materials well. In this case, veneering was done with GC Initial Zr-FS (GC).
Prior to veneering, a wash fire was done with Initial Lustre Pastes (Fig. 15). The colour compounds give the
zirconium oxide framework its natural fluorescence. At the same time, they provide more chroma and depth and thus form the basis for the subsequent individual ceramic layering. The desired depth of shade was additionally supported by the difference in structure of the highly chromatic INside Zr-FS powders on the copings fired with Lustre Pastes (Fig. 16). By layering INside 41 (IN-41 Flamingo), a natural-looking incisal structure was achieved. The materials were layered in the concave and convex prepared dentine areas creating an undulating interplay. An intermediate layer with “CLF materials” was used to reinforce three-dimensionality and the effect of depth; similar to a so-called protein layer between dentine and incisal enamel on natural teeth. The incisal as the last layer of the veneer was
13
Fig. 13: Vestibular close-up of the coping on tooth 21
14
Fig. 14: Vestibular close-up of the coping on tooth 12; the marginal fit is close to perfect.
16
Fig. 16: Interplay of concave and convex areas for depth and three-dimensionality
applied to the proximal ridges with a blueish incisal compound (EOP 3) and built up in the central incisal area with a mixture of “E57” and approx. 20% “EOP 2”.
The result
After a final firing, both crowns exhibited a high degree of naturalness and a lively interplay of colours (Fig. 17). The congruity of a ceramic restoration with the neighbouring teeth is basically determined by an infinite number of factors. The more of it is taken into account and implemented, the greater the adaptation to the natural teeth. The all-ceramic crowns 12 and 21 fit perfectly and show harmony in the shape and colour of the neighbouring teeth (Fig. 18).
Despite all technical progress and the use of modern technologies, diversity, creativity and craftsmanship are in many cases indispensable. However, the developments in digitalisation contribute to increasing precision, function and aesthetics and should therefore be seen as an opportunity. When evaluating the process, the same high standards should be applied that are placed on dental technicians in manual production.
15
Fig. 15: Wash fire with Initial Lustre Pastes
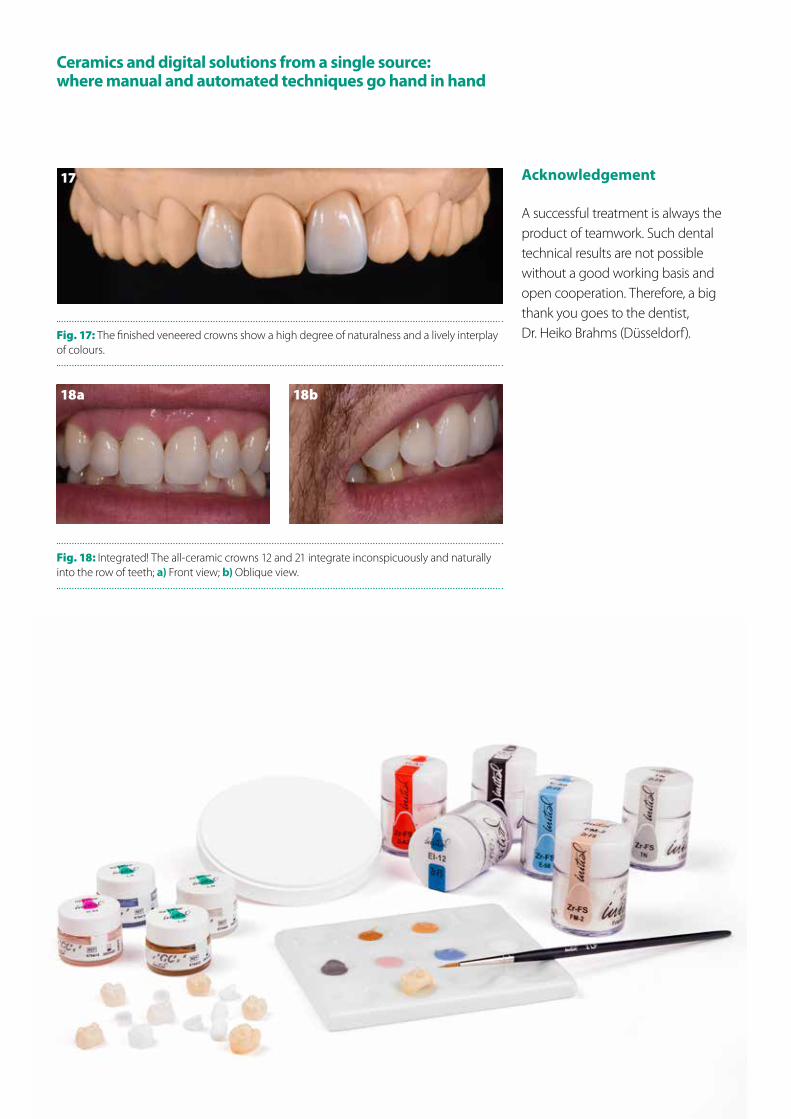
42 GC get connected
Ceramics and digital solutions from a single source: where manual and automated techniques go hand in hand
17
Fig. 17: The finished veneered crowns show a high degree of naturalness and a lively interplay of colours.
18a
Fig. 18: Integrated! The all-ceramic crowns 12 and 21 integrate inconspicuously and naturally into the row of teeth; a) Front view; b) Oblique view.
18b
Acknowledgement
A successful treatment is always the product of teamwork. Such dental technical results are not possible without a good working basis and open cooperation. Therefore, a big thank you goes to the dentist, Dr. Heiko Brahms (Düsseldorf).
GC get connected 43 GC get connected 43
Let’s get socialAs part of our service to customers to keep them up to date about our products and to help them use our products in a correct way, GC has an extensive presence across the social media channels. Be sure to connect with us here:
Subscribe to the GC YouTube channel
Tell us what you think!
How did you find out about GC Get Connected? Do you have any article suggestions?
We want to hear from you! Please send your comments and feedback
Like us onFacebook
Follow GC onLinkedIn
Customer Loyalty Program Get ConnectedDownload it now in the App store!https://www.gceurope.com/education/apps/
Follow GC on Instagram
GC EUROPE N.V.East European OfficeSiget 19BHR-10020 ZagrebTel. +385.1.46.78.474Fax. [email protected]://eeo.gceurope.com
GC IBÉRICADental Products, S.L.Edificio Codesa 2Playa de las Américas 2, 1°, Of. 4ES-28290 Las Rozas, MadridTel. +34.916.364.340Fax. [email protected]://europe.gc.dental/es-ES
GC AUSTRIA GmbHSwiss OfficeZürichstrasse 31CH-6004 LuzernTel. +41.41.520.01.78Fax. [email protected]://europe.gc.dental/de-CH
GC AUSTRIA GmbHTallak 124A-8103 Gratwein-StrassengelTel. +43.3124.54020Fax. [email protected]://europe.gc.dental/de-AT
GC Nordic Danish BranchScandinavian Trade BuildingGydevang 34-41DK-3450 AllerødTel. +45 51 15 03 [email protected]://europe.gc.dental/da-DK
GC NORDIC ABFinnish BranchLemminkäisenkatu 46FIN-20520 TurkuTel. [email protected]://europe.gc.dental/fi-FI
GC Europe NVBenelux Sales DepartmentResearchparkHaasrode-Leuven 1240Interleuvenlaan 33B-3001 LeuvenTel. +32.16 [email protected]://europe.gc.dental/nl-NL
GC UNITED KINGDOM Ltd.Coopers CourtNewport PagnellUK-Bucks. MK16 8JSTel. +44.1908.218.999Fax. [email protected]://uk.gceurope.com
GC FRANCE s.a.s.8 rue Benjamin Franklin94370 Sucy en Brie CedexTél. +33.1.49.80.37.91Fax. [email protected]://europe.gc.dental/fr-FR
GC NORDIC ABStrandvägen 54S-193 30 SigtunaTel: +46 768 54 43 [email protected]://nordic.gceurope.com
GC ITALIA S.r.l.Via Calabria 1I-20098 San GiulianoMilaneseTel. +39.02.98.28.20.68Fax. [email protected]://europe.gc.dental/it-IT
GC EUROPE N.V.Head OfficeResearchpark Haasrode-Leuven 1240Interleuvenlaan 33B-3001 LeuvenTel. +32.16.74.10.00Fax. [email protected]://europe.gc.dental
GC EUROPE
GC Europe N.V.Türkiye İrtibat OfisiCaferağa Mah.Albay Faik Sözdener Cad.İffet Gülhan İş Merkezi No:9 D:4TR-34710 Kadıköy / İstanbulTel. [email protected]://europe.gc.dental/tr-TR
GC Germany GmbHSeifgrundstraße 2D-61348 Bad HomburgTel. +49.6172.99.596.0Fax. [email protected]://europe.gc.dental/de-DE