-Fall & Spring Hours- (Labs are closed in observance of ...
97
EMPLOYEE EDITION COMPUTER AND TELECOMMUNICATION A GUIDE TO SERVICES
-
Upload
khangminh22 -
Category
Documents
-
view
8 -
download
0
Transcript of -Fall & Spring Hours- (Labs are closed in observance of ...

EMPLOYEE EDITION
COMPUTER ANDTELECOMMUNICATION
A GUIDE TO
SERVICES

Table of Contents I
Guide to Computer and Telecommunication Services Table of Contents
A. ACADEMIC SUPPORT ..................................................................................................................... A-1 WHO TO CALL FOR HELP .............................................................................................................................. A-1 OFFICE HOURS ............................................................................................................................................ A-1 WEB PAGE ................................................................................................................................................... A-2
Instructional Technology Resources ........................................................................................................ A-2
B. ACADEMIC COMPUTING FACILITIES ........................................................................................ B-1 General Purpose Labs ............................................................................................................................. B-1 Electronic Classroom Labs ...................................................................................................................... B-1 Housing Computer Labs (24-Hour Labs) ................................................................................................ B-1 Specialized Labs ...................................................................................................................................... B-1 Teaching Labs.......................................................................................................................................... B-1
RESERVATION OF ACADEMIC COMPUTER LABS ........................................................................................... B-2 GUIDELINES FOR THE RESERVATION OF ACADEMIC COMPUTER LABS ......................................................... B-2 SOFTWARE INSTALLATION REQUESTS .......................................................................................................... B-2 SOFTWARE LICENSING RECOMMENDATIONS ................................................................................................ B-2 LISTING AND DESCRIPTION OF COMPUTER LABS .......................................................................................... B-3 ELECTRONIC CLASSROOMS .......................................................................................................................... B-6
Lecture Room Electronic Classroom ....................................................................................................... B-6 Large Lecture Room Electronic Classroom ............................................................................................ B-6 Computer Lab Electronic Classroom ...................................................................................................... B-6
RESERVATION OF ELECTRONIC CLASSROOMS .............................................................................................. B-6 E-CLASSROOM ETIQUETTE ........................................................................................................................... B-6 LISTING AND DESCRIPTION OF ELECTRONIC CLASSROOMS .......................................................................... B-7 PORTABLE PROJECTION SYSTEM ................................................................................................................ B-11 HOURS OF OPERATION FOR LABS ............................................................................................................... B-12
C. USING COMPUTER LABS ............................................................................................................... C-1 VALID STUDENT IDS .................................................................................................................................... C-1 LOGGING ONTO COMPUTERS ........................................................................................................................ C-1 WINDOWS DESKTOP ..................................................................................................................................... C-1 SHUTTING DOWN/LOGGING OFF .................................................................................................................. C-2 SAVING YOUR WORK ................................................................................................................................... C-2
Memory Key / Flash Drives ..................................................................................................................... C-2 TIPS FOR PROTECTING YOUR FILES .............................................................................................................. C-2 CHECKING FOR VIRUSES .............................................................................................................................. C-2 VIRUS HOAXES ............................................................................................................................................. C-3 PRINTING FROM THE LABS............................................................................................................................ C-3 ELECTRONIC MAIL ....................................................................................................................................... C-3
Microsoft Outlook .................................................................................................................................... C-3 Email Attachments ................................................................................................................................... C-4 Email Caution .......................................................................................................................................... C-4
INTERNET ACCESS ........................................................................................................................................ C-6 COMPUTER ACCOUNTS ................................................................................................................................. C-6
Active Directory Account ......................................................................................................................... C-6 Exchange/Outlook Account ..................................................................................................................... C-6 Blackboard 9............................................................................................................................................ C-6 Accounts for Printing in AS203/AS234 .................................................................................................... C-6 Accessing Online Services ....................................................................................................................... C-6
SCHEDULED BACKUP/MAINTENANCE .......................................................................................................... C-7 WHERE TO GET HELP IN THE LABS............................................................................................................... C-7
Table of Contents II
Computer Lab Assistants ......................................................................................................................... C-7 Handouts .................................................................................................................................................. C-7
ONLINE PROBLEM REPORT ........................................................................................................................... C-7 STOCKTON UNIVERSITY HARDWARE & SOFTWARE SUPPORT GUIDELINES (FOR PERSONALLY-OWNED EQUIPMENT ONLY) ........................................................................................................................................................... C-7
D. WIRELESS NETWORK ACCESS .................................................................................................... D-1
E. ONLINE COURSE DEVELOPMENT TOOLS ................................................................................ E-1 BLACKBOARD 9 ............................................................................................................................................ E-1
Blackboard 9 Development Section Request ........................................................................................... E-2
F. PLAGIARISM PREVENTION SYSTEM .......................................................................................... F-1
G. TECHNOLOGY TRAINING PROGRAM ....................................................................................... G-1 CUSTOM TRAINING OPPORTUNITIES ............................................................................................................ G-1 LOCATION AND TIME OF TRAINING ............................................................................................................. G-1
H. ACCEPTABLE USE STANDARDS .................................................................................................. H-1 INTRODUCTION ...................................................................................................................................... H-1 STANDARD 1 - APPROPRIATE USE OF FACILITIES .................................................................................... H-1 STANDARD 2 - APPROPRIATE USE OF ACCOUNTS .................................................................................... H-1 STANDARD 3 - APPROPRIATE USE OF ACCESSIBLE MATERIALS .............................................................. H-2 STANDARD 4 - RELIABILITY AND INTEGRITY OF FACILITIES .................................................................... H-2 STANDARD 5 - RULES AND REGULATIONS ............................................................................................... H-2 STANDARD 6 - PROPRIETARY RIGHTS ...................................................................................................... H-2 STANDARD 7 - PRIVACY .......................................................................................................................... H-3 STANDARD 8 - SYSTEM SAFEGUARDS ...................................................................................................... H-3
I. TELECOMMUNICATION SERVICES .............................................................................................. I-1 LOCAL EXCHANGES ...................................................................................................................................... I-1 USING YOUR VOICE MAIL ............................................................................................................................. I-1 MODULAR MESSAGING SYSTEM QUICK REFERENCE GUIDE ......................................................................... I-3
J. SUPPLEMENTAL DOCUMENTATION ........................................................................................... J-1 MICROSOFT OFFICE PURCHASE PROGRAM – IS THIS PROGRAM STILL AVAILABLE? ....................................... J-1 OUTLOOK WEB APP 2013.............................................................................................................................. J-2 MICROSOFT OUTLOOK 2013 .............................................................................................................................5 MANAGING YOUR OUTLOOK DISK SPACE ...................................................................................................... J-7 CHANGING YOUR GOSTOCKTON PORTAL SECURITY QUESTIONS AND ANSWERS .......................................... J-8 CONTINGENCY PLANNING FOR ONLINE INSTRUCTION .................................................................................. J-9 BROWSER TROUBLESHOOTING FOR BLACKBOARD 9 ................................................................................... J-10 GUIDELINES FOR SAFEGUARDING PERSONALLY IDENTIFIABLE AND CONFIDENTIAL INFORMATION FROM UNAUTHORIZED OR ACCIDENTAL DISCLOSURE........................................................................................... J-17 PROTECTING AND COMPRESSING FILES IN WINDOWS ................................................................................. J-20 ACCESSING LIBRARY DATABASES .............................................................................................................. J-24 UNIVERSITY LIBRARY WEB-BASED CATALOG SYSTEM .............................................................................. J-26 GUIDE TO TURNITIN.COM, A PLAGIARISM PREVENTION SYSTEM ................................................................ J-28 PASSWORD PROTECTION ............................................................................................................................. J-29
Changing Your Active Directory Password ........................................................................................... J-31 UNSOLICITED E-MAIL (AKA “SPAM”) .......................................................................................................... J-32 STOCKTALK DISCUSSION LIST .................................................................................................................... J-35 INSTRUCTIONS FOR TEST SCORING .................................................................................................. J-36 GUIDE TO OBTAINING CLASS LISTS ONLINE ................................................................................................ J-37 CLASS DISTRIBUTION LISTS ........................................................................................................................ J-37 DISTRIBUTION LIST FOR PRECEPTORS ......................................................................................................... J-37
Table of Contents III
......................................................................................... J-38 USING THE CLASSROOM CONTROL SYSTEMS .............................................................................................. J-39 USING THE PHOENIX HANDHELD REMOTE CONTROL .................................................................................. J-46 STARBOARD SOFTWARE INSTRUCTIONS ...................................................................................................... J-47
K. INDEX ................................................................................................................................................ K-50

Academic Support
A-1
A.Academic Support The Office of Computer and Telecommunication Services provides support and training to students, faculty and staff in the use of computing facilities and additionally, supports faculty efforts to infuse technology into the curriculum. Computer labs under the supervision of the Office of Computer and Telecommunication Services are staffed by Lab Assistants who help maintain hardware and software and provide technical assistance to users.
Who to call for help
Computer Help Desk Call us at Or send us an e-mail at
(609) 652-4309, extension 4309 on campus [email protected]
We also have Lab Assistants strategically stationed in D001 to provide you with onsite assistance. (Please see Where to Get Help in the Labs on page C-7 for more information.)
Office Hours The administrative office hours are independent from the hours of the computer facilities. Although many of the facilities are open until late in the evening, most of the Computer and Telecommunication Services offices are closed after 5:00 p.m. During holidays essential offices are left open with limited personnel available for support. During the summer, the offices are open four days a week with extended hours per day. Fall & Spring Semester Hours
D127 – Main Office Monday – Friday 8:30 am - 5:00 pm
Head End (E-021) Monday – Thursday Friday
8:00 am 8:00 am
- -
8:00 pm 5:00 pm
HELP DESK (D-121)
Monday – Thursday Friday Saturday Sunday
8:00 am 8:00 am 8:00 am
12:00 Noon
- - - -
11:00 pm 5:00 pm 4:00 pm
10:00 pm
All Other Personnel Monday – Friday 8:30 am - 5:00 pm
Computer Lab Assistants are available from 8:00 a.m. to 11:00 pm, Monday through Thursday, until 5:00 p.m., Friday and Saturday, and from 12 noon to 10:00 pm on Sundays (Please see Hours of Operation for Labs for specific locations.) Summer Hours
Day Monday - Thursday 8:00 am - 5:15 pm
Evening Staff Monday - Thursday 2:00pm - 11:00 pm
HELP DESK Monday – Thursday Friday & Saturday
8:00 am 8:30 am
- -
10:00 pm 4:30 pm

Academic Support
A-2
Web Page The Computer and Telecommunication Services is also available on line. This page can be used as a great reference to up-to-date information on the department. The page’s address is http://compserv.stockton.edu Some of the topics addressed are:
• Full description, location and Hours of Operation of the Academic Computer Labs • Access to the Training Program Schedule • Helpful handouts and software • Listing of Who to Call for What which will explain which staff member to reach when you need help • Ability to Email staff members and student Lab Assistants • Links to Helpful Pages
Instructional Technology Resources A special section of the Computer & Telecommunication Services web page contains links to Instructional Technology Resources on the web (www.stockton.edu/intech). The major topics in this section are: • Creative Chaos
This is a weekly blog featuring emerging technologies and methods for using existing technologies in the instructional program.
• Electronic Self Defense
This section describes various electronic attacks and methods to defend against them. • Internet Plagiarism
This section provides links to online resources related to plagiarism issues including style manuals and plagiarism detection.
• Internet Search Tools
Links to information location services on the web including search engines, telephone and e-mail directories, maps and directions, webliographies, newsgroups and mailing lists, meta-searches, and all-in-one sites.
• Conferences
Links to upcoming conferences and organizational conference calendars focused on technology topics
• Corporate Resources Links to major hardware and software vendors of instructional technology products
• Journals Links to online journals focused instructional technology
• Legal Resources Links to site with information about legal issues related instructional technology (e.g., copyright, intellectual property, acceptable use, constitutional rights)
• Online Discussion Links to mailing lists, newsgroups, online conferences, and online web casts and chats focused on technology
• Organizations Links to technology focused organizations
• Readings/Resources Links to online articles, studies, white papers, and policy statements related to instructional technology

Academic Support
A-3
• Getting Ready This section contains announcements about changes in technology resources and services and reminders for the upcoming semester. It is updated twice a year, before the fall and spring semesters

Academic Computing Facilities
B-1
B.Academic Computing Facilities The academic computing facilities at Stockton are designed to provide students with the appropriate resources to support their educational experience. The labs provide a wide-range of software packages.
General Purpose Labs Labs: D002, D026 and D102 Description: All of the computer labs have access to the general software packages available through academic network servers. There are, however, certain labs that will run specialized software and other labs that are designed for use as electronic classroom labs. Both specialized labs and electronic classroom labs may be reserved by faculty, which will affect availability. Reservation schedules are posted outside each lab.
Electronic Classroom Labs Labs: CLC114, CM103, D004, D018, D019, D027, E221, F114, F210, F222 and G108 Description: These computer labs are equipped with a front-room lectern, housing a state-of-the-art computer, a document camera, and a converter box which channels signals from the Head End to the classroom. The output of these devices is displayed through a ceiling-mounted projector and controlled by a remote control unit or the AMX Synergy software. Although these rooms are often reserved by faculty they are also available to the general walk-in computer users when faculty are not using the rooms for teaching. (The lectern computer is for faculty use only.) Reservation schedules are posted outside each lab.
Housing Computer Labs (24-Hour Labs) Labs: Lakeside Center (LSC) and Residential Life Center (TRLC) Description: Just walking distance from the student dormitories and apartments, these labs are ideal for students who live within these residences. These labs are also open 24-hours a day and 7 days a week during the fall and spring semester. The facilities are equipped with security cameras and monitored by Stockton’s Police Department for added security.
Specialized Labs Labs: AS202, AS203, AS209, AS210, AS234, C004, C007, D017, E154, E219, E221, H101, USC245 and USC345 Description: Some of the academic computing facilities are designed with specific usage. The labs may have specialized equipment and/or software. Priority usage for these labs is designated for specific programs of study.
Teaching Labs Labs: CM103, D004, D018, D027, E012, F114, F210, F222 and G108 Description: The priority purpose and usage of these labs is for teaching and they are reserved most of the day. There are times, however, when the room may be available to walk-in users and anyone wishing to use these labs should check the posted schedule for available times.

Academic Computing Facilities
B-2
Reservation of Academic Computer Labs Computer labs can be reserved by any faculty or staff of the university wishing to use the facilities for computer demonstrations. In order to accommodate the maximum number of requests we ask that individuals reserving the labs adhere to the Guidelines for the Reservation of Academic Computer Labs. Reservation guidelines insure that instructional needs are met for both faculty and students. As a result of limited resources or because resources are sometimes bound to a particular lab (e.g., the multimedia lab where certain multimedia software and hardware are available) it is not always possible to accommodate all requests. However, every effort will be made to allocate resources carefully and equitably and balance reservations so they serve both lecture and walk-in use. In the event of conflicting requests, the Office of Academic Affairs will make the determination of how the resources will be used.
Guidelines for the Reservation of Academic Computer Labs Reservation requests should be submitted to your division during the course scheduling process. Reservation requests received during this process will be scheduled first, giving priority to requests that are consistent with a lab’s primary use. Requests received during the semester are scheduled on a first-come-first-serve basis around the existing reservations and at least two weeks notice is strongly recommended. Seven labs are available for general use reservations – CM103, D004, D018, D019, D027, F114, F222 and G108 – with the following caveats:
• Lab reservations requiring the installation of software must be accompanied by a Software Installation Request Form at least two weeks in advance of the reservation. Software installation request must be made in writing and all proper licensing, installation, and testing information provided. Software Installation Request Forms are available in D-121 and on the Computer and Telecommunication Services web page.
• At times when the demand for general use computer labs exceeds availability, classes that meet three times a week should reserve a lab for up to two sessions per week. Classes that meet two times a week should reserve a lab for up to one session a week. Exceptions are determined by the Dean(s) of the School(s) affected.
Under extraordinary circumstances, other labs may be utilized for reservations with the following conditions:
• Approved through the Office of Academic Affairs. • Lab reservations requiring the installation of software must be accompanied by a Software Installation
Request form at least two weeks in advance of the reservation. Software installation requests can be made online using the software request system on the Computer and Telecommunication Services web page.
Software Installation Requests Course specific software can be installed in the computer labs and electronic classroom lecterns at the request of faculty and staff. Because of the high level of usage of the facilities, it can be difficult to schedule software installations, and two-week lead time is required. Software Installation Requests can be completed using the software request system on the Computer and Telecommunication Services web page. Request must include: proof of license, installation instructions, product serial or registration codes (if required for installation), technical support contact information, and a testing protocol to assure that the software is correctly installed. In lieu of a testing protocol, the faculty or staff member may choose to test the software him/herself.
Software Licensing Recommendations When software is purchased for use in the labs, it is imperative that sufficient licenses are purchased so that the students are able to complete their class assignments. Based on past experience, the usual number of licenses needed for a network aware application can be calculated by counting the number of students in the largest section and adding 25% of the total number of students using the software. For example, if there are two sections of 30 students each, 45

Academic Computing Facilities
B-3
licenses (30 + .25*60) should be purchased. If the software is not network aware, the number of licenses needed is higher because the application can only be accessed on specific workstations. In that case 35% should be used for the estimate. When using software that is sold with textbooks, it is important to review the software license agreement. In most cases, the software accompanying a textbook may NOT be installed in a computer lab environment. Publishers generally require the purchase of separate lab licenses. In such cases, written authorization from the publisher will be required for installation. In order to speed the process, please provide this authorization with the software installation request.
Listing and Description of Computer Labs Below is a list of all of the computing facilities available through the Department of Computer and Telecommunication Services. The list describes:
• Type of lab--as described above • Type of computers and operating system are used on the computers • Number of seats • Hardware and software available in the particular labs
Base Software Install for every Academic Computer Lab
A complete list of available applications is posted at the entrance of the computer labs. This list is also accessible as an icon (Lab Applications) from the Windows desktop or on the Web at compserv.stockton.edu Windows Applications: MS Office 2013 (Word, Excel, Access, PowerPoint), Chrome, Firefox and Internet Explorer (for access to the Internet, Blackboard 9, WebBoard and other online services) Course Applications: CLEA Astronomy, Managerial Accounting, Microcase, Minitab, QM, Rockford Accounting, SPSS, Stat Pro and Decision Tools Suite, USSC Library, Winfract, Visual Analyst, Maple, SAS Programming Applications: BlueJ, GNAT Ada, Java Compiler, Visual Basic, Eclipse Web Browser Plug-ins: Adobe Acrobat Reader, Asymetrix Toolbook Neuron, Authorware Web Player, Chemscape Chimes, Adobe Shockwave Player, Adobe Flash Player, Quicktime, Realplayer

Academic Computing Facilities
B-4
Hardware Configuration
Lab Platform Operating System # of Computers Hardware AS202 Windows Windows 20 PC & 1 Faculty
Workstations HP Color LaserJet and HP B/W LaserJet.
AS203 Macintosh MAC OS X
21 student computers, 1 scanning station, and 1 Macintosh faculty computer
USB and FireWire ports, (2) Epson Expression flatbed scanners; Epson Stylus Pro large format inkjet photo printer, Xerox Phaser color printer, HP B/W Laser PostScript printers; and Nikon Coolscan film
AS210 – Windows Windows 5 (5) Intel Xeon Quad Core 2.27 ghz, 64 bit super computer cluster I left this listing in here, otherwise it would be an empty box
AS234 Macintosh Macintosh System OS X
22 student computers, 1 Macintosh faculty computer
USB and FireWire ports, (2) Epson Expression flatbed scanners;, and; Epson Stylus large format inkjet photo printer, HP color laser printer, HP B/W laser printer, Nikon Super Coolscan film/slide scanner.
AS209 Windows Windows 26 student & 1 Faculty Workstation
Epson Stylus Pro large format inkjet printer HP b/w laser printer and HP color laser printer.
CLC114 Windows Windows 22 and 1 faculty PCs
HP b/w Printer
D002 Windows & Macintosh
Windows & Mac OS X
17 PCs & 5 Macs DVD-RW drives, SDXC card reader, FireWire and Thrunderbolt ports, HP b/w printer
D004 Windows Windows 34 + 1 Faculty PCs
HP Flatbed Scanner, HP b/w printer
D017 20 HP b/w printer. This lab is configured for a multiple boot as a test-bed for networking classes.
D018 28 student & 1 faculty PCs
HP b/w printer
D019 20 student & 1 faculty PCs
2 HP Flatbed Scanners, HP b/w printer
D026 29 HP Flatbed Scanner, HP b/w printer
D027 32 student & 1 faculty PCs
HP b/w Printer
D102 20 HP b/w printer, HP Flatbed Scanner

Academic Computing Facilities
B-5
Lab Platform Operating System # of Computers Hardware CM103 Windows Windows 36 student &
1 faculty PCs 2 HP ScanJet Flatbed Scanners, and a HP b/w printer
E012 13 student & 1 faculty PCs
HP ScanJet Flatbed Scanner, a Video Capture Card & VCR/DVD combo (for video capturing), and a HP b/w Printer
E219 25 student & 1 faculty PCs
HP b/w printer
E221 30 student & 1 faculty PCs
HP ScanJet Scanner and a HP 4015 DTN printer
F114 40 student & 1 faculty PCs
HP b/w printer
F210 20 student & 1 faculty PCs
HP Color Laser Printer and a HP b/w Printer
F222 40 student & 1 faculty PCs
HP b/w printer
G108 40 student & 1 faculty PCs
HP b/w Laserjet printer
G206 9 PCs HP b/w Laserjet printer
H101 Windows & Macintosh
Windows & Mac OS X
4 PCs & 2 Macs DVD-RW drives, SDXC card reader, FireWire and Thrunderbolt ports, Wacom Graphic Tablet, HP b/w Printer, HP Color LaserJet
Lakeside Windows Windows 20 PCs HP b/w Printer
TRLC Windows & Macintosh
Windows & Mac OS X
20 PCs & 3 Macs SDXC card reader, FireWire and Thrunderbolt ports,, HP b/w Printer
USC245 Windows Windows 24 PCs & 1 faculty PC HP b/w printer
USC300 Windows Windows 10 PCs HP b/w printer
USC345 Windows Windows 24 PCs & 1 faculty PC HP b/w printer

Academic Computing Facilities
B-6
Electronic Classrooms These classrooms are equipped with a lectern, housing a state-of-the-art computer, a document camera, and a converter box which channels signals from the video distribution system to the classroom. The output of these devices is displayed through a ceiling-mounted projector and control by a remote unit. The lectern computer is for Faculty and staff use only (see Electronic Classroom Control Panel in section G for instructions.) They are supported by the Department of Computer and Telecommunication Services. If you have a problem with the equipment in the rooms or any of the software in the computer, please contact Computer Services at ext. 4309.
Lecture Room Electronic Classroom Classrooms: AS102, B001, B002, B003, B004, B005, B008, B010, B011, B012, B014, B015, B016, B101, B102,
B103, B104, B105, B125, B126, CLC202, CLC206, CLC211, CLC303, CLC305, C001, C008, C011, C012, C101, C102, C103, C134, C135, C136, D003, D009, D120, F103B, F111, F115, F118, F119, F120, F121, F202, F203, F204, F205, F206, F207, F209, F212, F215, F221, F223, F224, F225, F226, F244, F245, G103, G138, G139, G201, G203, G212, H102, H115, H116, J103, J201, K101, K102, K141, L104, L112, L114, L115, USC111, USC145, USC151, USC153, USC154, USC160, USC246, USC251, USC253, USC260, USC311, USC337, USC351, USC353, USC354, USC360, WIS1, WIS2, WQ103, WQ104, WQ123, WQ203, WQ224 and WQ226
These are standard electronic classrooms. The rooms are designed to assist faculty with classroom lectures by providing a campus network and Internet access computer, document camera and media distribution to the classroom.
Large Lecture Room Electronic Classroom Classrooms: Alton Auditorium, PAC and TRLC. These large facilities have mobile lectern units that must be setup in a special manner. The components inside of the lectern are connected into a wall jack that is connected using a special cable.
Computer Lab Electronic Classroom
Classrooms: AS202, CLC114, CM103, D004, D018, D019, D027, E219, E221, F114, F210, F222, G108, USC245 and USC345
The computer lab electronic classroom are computer labs with overhead projection capabilities. These rooms are reserved through the Department of Computer and Telecommunication Services – do we schedule the labs or is it through event services and are designed for presenters who demonstrate while students follow with computers hands-on.
Reservation of Electronic Classrooms Various departments are involved in reserving the electronic classrooms. Under “Listing and Description of Electronic Classrooms” (next page), each lab description will have the name and the extension number of the contact person for reservations. Training is required for the use of the electronic lecterns in these classrooms. Training sessions are offered at and before the beginning of the fall and spring semesters. In the event of scheduling problems, alternative training solutions are available. Keys to access the electronic lectern equipment are issued at the training sessions.
E-Classroom Etiquette When you are using an electronic classroom, we are asking for your assistance in keeping these facilities functioning smoothly for all. We need your help in maintaining the physical security of the equipment and keeping the equipment available and in working condition.

Academic Computing Facilities
B-7
Before you leave the classroom, please be sure to do the following: 1. Turn off the projector -- Projector bulbs have life of 2000 hours. We have approximately 65 instructional hours
per week. If a projector is on for all of the instructional hours, it should last a few weeks longer than a semester. If it is left on beyond 2000 hours the bulb will need to be replaced sooner -- most likely at the end of the semester which, for the instructional program, is usually the worst possible time. Additionally, replacement bulbs are expensive (around $400 each). Please conserve the bulbs (and electricity).
2. Turn off the wireless mouse -- Depleted batteries will make the wireless mouse useless to the next person using the room. (You never know when you could be "the next person"). – Several of the devices are now equipped with disposable batteries. Please do not dispose of these batteries
3. Return wireless mice and remote controls to the lectern (so the next person can find them).
4. Lock the lectern (to help prevent equipment loss). If you have any questions, please call x4309.
Listing and Description of Electronic Classrooms Below is a list of all the electronic classrooms available to staff and faculty members. Base Software Install for every Electronic Classroom
Windows Applications: MS Office 2013 (Word, Excel, Access, PowerPoint), Firefox, Chrome and Internet Explorer (for access to the Internet and web based course systems) Course Applications: CLEA Astronomy, Managerial Accounting, Microcase, Minitab, QM, Rockford Accounting, SPSS, Winfract, Visual Analyst, Maple, SAS Programming Applications: BlueJ, Java Compiler, Visual Basic, Eclipse Web Browser Plug-ins: Adobe Acrobat Reader, Shockwave Player, Flash Player, Quicktime, Realplayer Electronic Classroom Hardware Configuration & Description
Equipment: Lectern, Projector, document camera, Computer
Operating System: Microsoft Windows Hardware: Intel Based Pentium Class Computer and CD/DVD-ROM, USB Flash Key Access
Electronic Classroom
Contact for Reservation Extension Type of Classroom Seating Capacity
Alton Auditorium
Event Services 4878 Large Lecture Facility 250
AS102 Event Services 4878 Electronic Classroom 80 AS202 JoAnn Kocher 4575 Computer Teaching Lab 20

Academic Computing Facilities
B-8
Electronic Classroom
Contact for Reservation Extension Type of Classroom Seating Capacity
AS203 Jo Ann Kocher 4575 Computer Teaching Lab 21 AS209 Jo Ann Kocher 4575 Computer Teaching Lab 24 AS234 Jo Ann Kocher 4575 Computer Teaching Lab 22 B001 Event Services 4878 Electronic Classroom 32 B002 Event Services 4878 Electronic Classroom 32 B003 Event Services 4878 Electronic Classroom 32 B004 Event Services 4878 Electronic Classroom 34 B005 Event Services 4878 Electronic Classroom 24 B008 Event Services 4878 Electronic Classroom 32 B010 Event Services 4878 Electronic Classroom 32 B011 Event Services 4878 Electronic Classroom 32 B012 Event Services 4878 Electronic Classroom 48 B014 Event Services 4878 Electronic Classroom 48 B015 Event Services 4878 Electronic Classroom 48 B016 Event Services 4878 Electronic Classroom 48 B101 Event Services 4878 Electronic Classroom 30 B102 Event Services 4878 Electronic Classroom 30 B103 Event Services 4878 Electronic Classroom 24 B104 Event Services 4878 Electronic Classroom 24 B105 Event Services 4878 Electronic Classroom 24 B125 Event Services 4878 Electronic Classroom 75 B126 Event Services 4878 Electronic Classroom 100 C001 Event Services 4878 Electronic Classroom 72 C008 Event Services 4878 Electronic Classroom 40 C009 Event Services 4878 Electronic Classroom 36 C011 Event Services 4878 Electronic Classroom 36 C012 Event Services 4878 Electronic Classroom 32 C101 Event Services 4878 Electronic Classroom 36 C134 Event Services 4878 Electronic Classroom 90 C135 Event Services 4878 Electronic Classroom 49 C136 Event Services 4878 Electronic Classroom 48 CM103 Jo Ann Kocher 4575 Computer Teaching Lab 36 CLC114 Brandy Pavia 609/347-2167 Computer Teaching Lab 22 CLC202 Brandy Pavia 609/347-2167 Electronic Classroom 25 CLC206 Brandy Pavia 609/347-2167 Electronic Classroom 25 CLC211 Brandy Pavia 609/347-2167 Electronic Classroom 75 CLC303 Brandy Pavia 609/347-2167 Electronic Classroom 25 CLC305 Brandy Pavia 609/347-2167 Electronic Classroom 40

Academic Computing Facilities
B-9
Electronic Classroom
Contact for Reservation Extension Type of Classroom Seating Capacity
D003 Event Services 4878 Electronic Classroom 34 D004 Jo Ann Kocher 4575 Computer Teaching Lab 36 D009 Event Services 4878 Electronic Classroom 38 D018 Jo Ann Kocher 4575 Computer Teaching Lab 28 D019 Jo Ann Kocher 4575 Computer Teaching Lab 20 D027 Jo Ann Kocher 4575 Computer Teaching Lab 32 D120 Event Services 4878 Electronic Classroom 35 E210 Event Services 4878 Electronic Classroom 30 E219 Nancy Messina 4505 Computer Teaching Lab 25 E221 Library 4734 Computer Teaching Lab 30 F111 Event Services 4878 Lecture Hall 75 F114 Jo Ann Kocher 4575 Computer Teaching Lab 40 F115 Event Services 4878 Electronic Classroom 35 F118 Event Services 4878 Electronic Classroom 35 F119 Event Services 4878 Electronic Classroom 35 F120 Event Services 4878 Electronic Seminar Room 21 F121 Event Services 4878 Electronic Classroom 35 F202 Event Services 4878 Electronic Classroom 28 F203 Event Services 4878 Electronic Classroom 32 F204 Event Services 4878 Electronic Classroom 36 F205 Event Services 4878 Electronic Classroom 38 F206 Event Services 4878 Electronic Classroom 30 F207 Event Services 4878 Electronic Classroom 60 F209 Event Services 4878 Electronic Classroom 40 F210 Jo Ann Kocher 4575 Computer Teaching Lab 20 F212 Event Services 4878 Electronic Classroom 42 F215 Event Services 4878 Electronic Classroom 35 F221 Event Services 4878 Electronic Classroom 35 F222 Jo Ann Kocher 4575 Computer Teaching Lab 40 F223 Event Services 4878 Electronic Classroom 40 F224 Event Services 4878 Electronic Classroom 40 F225 Event Services 4878 Electronic Classroom 35 F226 Event Services 4878 Electronic Classroom 35 F245 Event Services 4878 Electronic Classroom 34 H116 Event Services 4878 Electronic Classroom 32 G103 Event Services 4878 Electronic Classroom 24 G108 JoAnn Kocher 4575 Computer Teaching Lab 40 G138 Event Services 4878 Electronic Classroom 30

Academic Computing Facilities
B-10
Electronic Classroom
Contact for Reservation Extension Type of Classroom Seating Capacity
G139 Event Services 4878 Electronic Classroom 12 G201 Event Services 4878 Electronic Classroom 12 G203 Event Services 4878 Electronic Classroom 36 G212 Event Services 4878 Electronic Classroom 12 H115 Event Services 4878 Electronic Classroom 40 H116 Event Services 4878 Electronic Classroom 40 Holocaust Resource Center 4699 Electronic Classroom 20 K101 Event Services 4878 Electronic Classroom 40 K102 Event Services 4878 Electronic Classroom 48 K141 Event Services 4878 Electronic Classroom 46 L104 Event Services 4878 Electronic Classroom 36 L112 Event Services 4878 Electronic Classroom 113 L114 Event Services 4878 Electronic Classroom 12 L115 Event Services 4878 Electronic Classroom 47 PAC Dan Wright 4607 Large Lecture Facility 550 TRLC Housing Office A100 4332 Large Lecture Facility 200 USC111 Event Services 4878 Seminar Room USC145 Event Services 4878 Lecture Room 55 USC151 Event Services 4878 Life Sciences USC153 Event Services 4878 Life Sciences USC154 Event Services 4878 Life Sciences USC160 Event Services 4878 Lecture Room 55 USC245 JoAnn Kocher 4515 Computer Teaching Lab 24 USC246 Event Services 4878 Lecture Room 55 USC251 Event Services 4878 General Chemistry USC253 Event Services 4878 General Chemistry USC260 Event Services 4878 Lecture Room 55 USC311 Event Services 4878 Seminar Room USC337 Event Services 4878 Organic Lab USC345 JoAnn Kocher 4575 Computer Teaching Lab 24 USC346 Event Services 4878 Lecture Room 55 USC351 Event Services 4878 Genetics USC353 Event Services 4878 Advanced Lab USC354 Event Services 4878 Analytical USC360 Event Services 4878 Lecture Room 55 WIS1 Event Services or
Woodbine 4878 or 609/861-5355
Electronic Classroom

Academic Computing Facilities
B-11
Electronic Classroom
Contact for Reservation Extension Type of Classroom Seating Capacity
WIS2 Event Services or Woodbine
4878 or 609/861-5355
Electronic Classroom
WQ103 Event Services 4878 Electronic Classroom 71 WQ104 Event Services 4878 Electronic Classroom 33 WQ123 Event Services 4878 Electronic Classroom 33 WQ124 Event Services 4878 Electronic Classroom 71 WQ203 Staff 4869 Electronic Classroom
/Occupational Therapy 30
WQ224 Event Services 4878 Electronic Classroom 33 WQ226 Staff 4869 Electronic Classroom
/Physical Therapy 24
Portable Projection System Computer and Telecommunication Services also offers mobile projections system that can be used in any classroom. This unit will only be reserved to faculty and staff members. These units are equipped with:
• A Dell notebook PC computer, sound, Internet connection, a CD/DVD-RW drive. • A projection unit • A wheeled cart for transporting the equipment
To reserve a mobile projection unit:
• Complete the online Reservation Form available on our web site at http://compserv.stockton.edu You will receive a confirmation e-mail within a week. If only reserving the projection unit (without the notebook computer), you need to bring your computer to D001 ahead of time and test it with the unit
- IMPORTANT NOTICE -
The staff or faculty member is fully responsible for the proper usage and safe return of this equipment. The staff or faculty member must be present during the delivery and use of the equipment.

Academic Computing Facilities
B-12
Hours of Operation for Labs
-Fall & Spring Hours- (Labs are closed in observance of Thanksgiving and Easter. Limited hours on the weekends following.)
-Summer Hours- (Labs are closed in observance of Memorial and
Independence Day)
Arts and Science
8:00 am - 11:00 pm Monday - Thursday 8:00 am - 5:00 pm Friday 8:00 am – 4:00 pm Saturday 12:00 noon - 10:00 pm Sunday
8:00 am - 11:00 pm Monday - Thursday
F210 Labs
8:00 am – 11:00 pm Monday – Thursday 8:00 am – 5:00 pm Friday Closed Sunday
Closed
CM103 Lab
8:00 am - 11:00 pm. Monday - Thursday 8:00 am - 5:00 pm. Friday Closed Sunday
8:00am -11:00 pm Monday - Thursday Closed Friday - Sunday
D-Wing Labs
8:00 am - 11:00 pm Monday - Thursday 8:00 am - 5:00 pm Friday 8:00 am – 4:00 pm Saturday 12:00 noon - 10:00 pm Sunday
8:00am - 11:00 pm Monday - Thursday Closed Friday - Sunday
D102 Lab
8:00 am - 10:00 pm Monday – Thursday 8:00 am – 5:00 pm Friday Closed
F114 and F222 Labs
8:00 am – 11:00 pm Monday – Thursday 8:00 am – 5:00 pm Friday Closed Sunday
Closed
G108 Lab
8:00 am – 11:00 pm Monday – Thursday 8:00 am – 5:00 pm Friday Closed Saturday and Sunday
Closed
Residential Life Center & Lakeside Center Labs
Open 24 hours, 7 days a week Closed
During break periods, lab access is limited. Call the information line at 652-4447 and choose option #3 for break hours.
Fall
and
Spr
ing
Hou
rs S
um
mer S
ession H
ours

Using Computer Labs
C-1
C.Using Computer Labs Valid Student IDs Computer labs are available to all students, faculty and staff who have valid Stockton IDs. All other use will be considered unauthorized. Students may be asked to show ID before using the facilities. Active members of the Alumni Association are permitted to use the General Purpose, Non-teaching labs only. Alumni must possess and present a valid RSCNJ Alumni Association Identification Card upon request.
Logging onto Computers All of the computers located in the computer labs are connected to a centralized Windows network. Therefore, each user must logon to the network before resources will be available to them. Computer Services requires faculty, staff and students to authenticate to access the workstations using their Go Stockton Portal User ID and Password. Students are allocated 250MB of centralized disk storage space that are accessible to them via their My Documents folder on the desktop from any computer lab or the library. This is a more secure and reliable alternative to portable storage devices. Students and faculty will also continue to have access to the shared Scratch drive. To ensure the security of accounts, all users will be logged off of the machine after an inactivity period of 10 minutes. There will be a warning and countdown to logout that can be cancelled by the user.
Windows Desktop
Most applications and Internet resources available to staff, faculty and students are organized into folders and only accessible from the icons described below:
Windows Applications provides access to Internet resources and general-purpose Windows applications such as MS Office 2010 among others.
Course Applications contains course-specific software.
General Applications lists applications included in the Windows Start Menu under Programs, Accessories.
Programming Applications is primarily accessed by students taking computer programming courses.
Click here to report computer problems.
Current list of applications available in the lab
These two-page reference cards are available for Word, Excel, PowerPoint and Access.
Previews all the print jobs sent to the computer lab printer. However, you only have privileges to delete your own print jobs.
Course related files provided by your professor.
List of applications only available on certain computers.
Please, no drinking or eating in the labs

Using Computer Labs
C-2
Shutting Down/Logging Off When users are finished working on a computer in a lab, we ask that they properly shut down the machine before leaving. Turning the computer off without a proper shut down process may cause future system errors on that computer. If the computer is already on when you arrive, it is recommended to restart it before you use it. To shut down the computer follow the steps below. Windows Machines
1. Select the Start button 2. Select Shutdown and click on OK.
Macintosh Machines
1. Select Apple Menu (Apple in upper left hand corner) 2. Select Shut Down 3. Select Shut Down in the dialog box that pops up
Saving Your Work When using the computers in the labs, users must be responsible for saving his/her own work. In order to keep computers in good working order, Computer and Telecommunication Services performs periodic and unannounced maintenance on the machines, which include the deletion of all unauthorized files. Users, therefore, are strongly encouraged to store data onto their own media. Users are strongly encouraged to save their work every 10 minutes. Also when finished, make sure you close all your files before removing your diskette.
Memory Key / Flash Drives Memory keys, also known as USB keys or Flash Drives, connect to USB ports in front of the computer case in all the labs. After you insert the key, Windows sees it as another drive that can be accessed from any application. Users are encouraged to utilize flash keys that allow for encryption of files.
Tips for Protecting Your Files • Save your work and close down the software application you are using before removing disks or flash drives • Keep disks in a protective casing. • Keep Media Surface free from fingerprints, food and/or liquids • Keep disks in normal temperatures. Excessive heat or cold can quickly damage files • Keep flash drives and disks Virus free: you should check them for viruses on a regular basis. Viruses can
completely damage your files. (See Checking for Viruses below)
Checking for Viruses For your protection the academic computer labs are equipped with up-to-date anti-virus software. The virus software will automatically check for viruses whenever the drive is accessed. If a virus is detected a message on the screen will appear indicating that your files are infected, which virus it has found and the opportunity to clean the virus. Proceed with the cleaning process to remove virus from disk. (Note: Users are highly encouraged to install anti-virus software on their home machines and to check your files for viruses on a regular basis. Download the installer from the Computer and Telecommunications website, under the Student tab, Tech Support and Download) To check for viruses:
1. Open My Computer 2. Right click on the flash drive icon (Make sure your disk is inserted) 3. Click on the Scan for Viruses to start
For more information, login to the goStockton Portal and use the navigation bar in the Computer Services Channel.

Using Computer Labs
C-3
Virus Hoaxes Most Internet users are familiar with virus warnings which arrive in their mailbox. Many of these messages spread false information and ask you to forward them to other Internet users. Even though there are thousands of legitimate viruses discovered every year, there are some that don’t exist. For more information, go to the F-Secure Hoax Warnings Web page at www.f-secure.com/virus-info/hoax. If you receive electronic mail claiming to be a virus warning, please forward the message to [email protected] in Computer & Telecommunication Services. Please do not send it to the campus community. Computer & Telecommunication Services will investigate and will notify the campus.
Printing from the Labs Students at Stockton University need to be aware of practices regarding use of and printing from university computers in the computer labs and the library. These computers require users to first log-in using their GoStockton ID and password. (Although there are a few “public” computers in the library for the use of the general public, such PCs do not allow the user to print materials.) Each semester students are allocated an 800 printed side print quota. At the start of each semester you will be given a new allotment. University printers by default print on both sides of a piece of paper. A document that prints on a single side of a piece of paper counts as 1 side. A document that prints on both sides of a piece of paper counts 2 sides. Computer Services has developed a website at http://ppoints.stockton.edu that allows students to track the status of their allotment.
• It is critical that students remember to log off any university computer when they have finished their session. Failure to do so will mean that the next user will be able to print, using the allotted copies of the student still logged on to that machine. That same next user may also have access to other features associated with the original student’s account.
• Students who exhaust their printing quota should contact The Help Desk in D-wing to request having their allotment increase. Student will be provided a one-time additional allotment provided they have given a reasonable explanation as to why they have depleted their original allotment.
• Students should consult with individual faculty members regarding faculty policies and preferences on printing of both course materials and assigned papers, both to get the most from their allotted copies and to comply with any faculty restrictions on submitting papers printed on both sides of a sheet of paper.
• Students are also now allotted ample space on the university servers for saving files and documents. The space is associated with the individual GoStockton student account. This space will be found in “My Documents” after the individual student has logged on to a university computer. Students are advised to use this space to store documents instead of printing them.
Electronic Mail Computer accounts for faculty members are generated at the faculty member’s request. Account request forms are available in D-127. The username is usually the first seven characters of the last name followed by the first initial. For example, Susan L. Robertson would be assigned the username “robertss”. Faculty may choose to have a more descriptive alias to be used as their e-mail address. Continuing with the example, Susan Robertson may wish to designate her e-mail address as [email protected] or [email protected]. Students at Stockton are automatically assigned an e-mail account through Banner. Accounts are generated every semester and assigned to students during the registration period (Account cards are also available in D-127). Student usernames are all lower case and consist of the first 6 or 7 characters of the last name, first initial and digits as needed to make the username unique. Student e-mail addresses are [email protected].
Microsoft Outlook Microsoft Outlook is the standard e-mail system for faculty and staff. It is a personal information management and communication solution that provides users with tools for e-mail communication, group planning, and scheduling, and accessing the information you need -- all in one place.
Using Computer Labs
C-4
Email Attachments While email is an easy to use option for sharing files with other individuals, file sharing is not its primary function. Email systems are designed to transmit relatively small blocks of text to individual recipients. A separate message is generated for every recipient in the "To:", "CC:" and "BCC:" fields. This means, for example, that a single message with a 1MB attachment sent to 53 individuals uses 53MB of system disk space while the message is processed for transmission. Some general recommendations for attachments: • Check the attachment size before you send. If it is larger than 200KB, consider an alternate method of file
sharing. • Keep attachments as small as possible. While we have a fast network backbone on campus, Stockton
community members with dial-up access from off-campus will find it very frustrating to try to open very large attachment.
• If your attachment has a lot of graphics, creating a .PDF file with Adobe Acrobat can be very helpful in reducing the attachment size while maintaining the look of the original document. Classes in Adobe Acrobat are regularly offered on our training schedule and can also be scheduled for groups at mutually convenient times throughout the semester.
• If you receive a large attachment and you are using a dialup connection, save the attachment to your local hard drive before opening it.
• Burn the file(s) to a CD or DVD and send via US mail or other delivery service. Classes on using the CD/DVD burner are offered regularly on our training schedule and can also be scheduled for groups at mutually convenient times throughout the semester.
• Use a free online service to share large image files. Examples include Kodak Gallery (http://www.kodakgallery.com), Shutterfly (http://www.shutterfly.com), Dropbox and Snapfish (http://www.snapfish.com).
Email Caution Although Stockton has many measures in place to protect against harmful mail messages, some of these may still get through. One type of message that is particularly problematic is the “phishing” message. Phishing is a variation of unsolicited e-mail that involves tricking the recipient into believing that the message originated from a trusted source such as a bank, credit card company, insurance company, or retail store. These messages have the appearance of legitimacy, but ask the recipient to provide private information such as account numbers, usernames, and passwords. If you receive a message requesting personal authentication data, do not respond. Legitimate companies will not request this information via e-mail. If you have any doubts, contact the company through other means (telephone, fax, U.S. Mail). Other methods of protecting yourself from phishing scams include: • Never click on links in e-mail messages. Their true destination is often disguised. If you feel you must visit the
link, type it in manually, DON'T click on the link in the mail message. • Do not call telephone numbers included in suspicious messages. Look them up via an alternative source such as
the phone book, 411 operator, or AnyWho http://www.anywho.com • Check an online phishing archive to see if the message that you have received is a known phishing scam
http://www.millersmiles.co.uk/archives.php • Review all financial statements (e.g., checking account, credit card) carefully as soon as you receive them and
report any unusual activity immediately. Check your credit report periodically for any unusual activity. You can request a credit report through: • Experian http://www.experian.com
PO Box 9554, Allen, TX 75013 888-397-3742

Using Computer Labs
C-5
• Equifax http://www.equifax.com PO Box 740256, Atlanta, GA 303740 800-525-6285
• TransUnion http://www.transunion.com PO Box 6790, Fullerton, CA 92834 800-680-7289
If you fall victim to a phishing scam, file a complaint with the Federal Trade Commission at http://www.consumer.gov/idtheft/ You can report phishing scams online at The Antiphishing Working Group or MillerSmiles.

Using Computer Labs
C-6
Internet Access Stockton provides Internet access in the Academic computing facilities as well as our Residential Living/Learning communities. Both wired and wireless services are provided, so staff, faculty and students can freely surf the web and access worlds of information right from their laptop or desktop computers.
Computer Accounts In order to use the computers in the labs you do not need a personal account. However, in order to access certain resources (e.g., goStockton Portal, Email and Blackboard) within the computer labs, you do need certain accounts. Accounts on the central systems are generated for all registered students after the fall and spring registration period. Accounts remain active while students are attending Stockton and do not have to be renewed each semester (Computer accounts are closed for students who are not currently enrolled in classes at Stockton.) Students can also receive their account with their valid Stockton ID in room D127. Below is a list of systems and accounts available in the academic computing facilities:
Active Directory Account Faculty and staff accounts on the Active Directory server are used for accessing certain centrally stored data files (e.g., course class lists) and network printing. These accounts are generally created by the Help Desk staff when the office computer is set up. To request an Active Directory account, contact the Help Desk at extension 4309.
Exchange/Outlook Account The Exchange server will manage the electronic mail services for Stockton’s staff and faculty members. To request an Exchange/Outlook account, fill out an Account Request form and submit it to the Office of Computer and Telecommunication Services in D127. We are not using LOKI accounts any longer, authentication is now through the go.stockton portal accounts.
Blackboard 9 Blackboard 9 is a web based set of course tools designed to deliver online learning. This system is accessed through the My Courses channel on the goStockton Portal. Periodically, training is offered to interested faculty members.
Accounts for Printing in AS203/AS234 These accounts are restricted to students in the Visual Arts program. When you enroll in any of its computer graphics courses, you automatically get access to the Macintosh computers in both the labs and 1000 points for each class. This will enable you to print to the HP 8150, HP4550 (25 points per page), Xerox Phaser 7760 (200 points per page), the Epson 9890 and Epson 9890 & 7800 large format printer (225 points per square foot) and the Xante Platemaker (300 points per page). To purchase additional points, Art Students can use the PPoints site. The additional points are immediately available for student use. The charge for additional points will go to the student’s account with the Bursar’s office and can be paid in person at the Campus Center or online with a debit or credit card.
Accessing Online Services • If you have a problem with your PIN, please visit Student Records in CC203 • For online services using PIN access (except Student Web Services) allow 1 full business day for PIN change to
take effect • If you have a problem with your Username, Password or Activation Code, please visit Computer and
Telecommunication Services in D-127 Instructions for changing your password are available online at http://compserv.stockton.edu. Click on Student, Tech Support, Handouts, Changing Your Password
*** = Allow 30 minutes for synchronization after changing your password

Using Computer Labs
C-7
Scheduled Backup/Maintenance The listing below contains the regular schedule of backup/maintenance hours for university systems and resources. In the case of emergency maintenance/upgrade, the campus will be notified via portal announcement and/or email and postings on the Technology Resource Status page.
Frequency Day Time Systems Comment Weekly Sunday 12:01-5:00am goStockton Portal,
Internet Native Banner (INB), Self Service Banner (SSB), Blackboard
If no maintenance tasks are required, these systems will be returned to service upon completion of the backup.
Monthly 3rd Sunday
12:01-5:00am University home page, Outlook/Exchange, WebBoard
All systems will be returned to service upon completion of maintenance.
Quarterly TBA TBA TBA The affected systems, dates and times will be posted to the campus.
Yearly Winter Break
TBA TBA The affected systems, dates and times will be posted to the campus
Where to Get Help in the Labs Computer Lab Assistants Computer Lab Assistants are positioned in D001 (Lower D-Wing) during all hours of operation. These workers are available to assist you with questions you may have about using the computer labs. They can also provide a brief one-on-one support on the equipment and software available through the labs. (For detailed training please see information on the student portion of the Technology Training Program.)
Handouts For your convenience, complete handouts and quick reference cards are available to staff, faculty and students on the Web at http://compserv.stockton.edu. These step-by-step instruction guides are an excellent way to learn the basics of the software programs available in the labs.
Online Problem Report Double-click on the Problem Report icon on the computer desktop to report software or hardware problems to our computer technicians.
Stockton University Hardware & Software Support Guidelines (for personally-owned equipment only)
This guideline applies to all students, staff, and faculty using their own (non university-owned) computer equipment on or off campus.
The Office of Computer and Telecommunication Services is charged with providing for the computing and information communication needs of the university community. As part of that charge the department provides the technical services necessary to establish and maintain information, instructional delivery and communication systems that appropriately support the administrative, academic and auxiliary operations of the institution. The Department of Computer and Telecommunication Services is here to support the use of a personally owned computer for connectivity to our resources.

Using Computer Labs
C-8
Computer and Telecommunication services can provide telephone support to assist our community members through connectivity failures by:
• Assisting in the installation and configuration of connectivity software (e.g., VPN client) • Evaluating hardware/software issues that may be interfering with connectivity • Suggesting useful non-University resources
If your computer problem is beyond the scope of the Help Desk's ability to provide assistance, there are several options for you to consider:
1. Check your warranty information, and consult with your computer's manufacturer or vendor. They will have the best information about your computer hardware, and they will be able to tell you what free or low cost repair services you may qualify for as part of your warranty.
2. You may wish to contact a technician at a computer repair shop. There are several repair shops in Atlantic County - look in the Yellow Pages under Computers-Dealers. Computer Services does not provide recommendations for any particular repair shop. We suggest that you talk to staff at several shops to compare prices and services before making the choice to commit to one.

Wireless Network Access
D-1
D.Wireless Network Access If you have a notebook or device with a wireless network adapter (Wi-Fi), you can connect to the Internet from campus (RSC-Wireless). Upon opening your browser, the Stockton Access Network (SCAN) will prompt you to enter your Portal username and password. The system will provide you with unlimited access to the Internet, but if idle for more that 15minutes, your computer will be automatically disconnected. At this point, the SCAN system will prompt you to log in again to regain access to the Internet. Our wireless access is expanding each year. For updates on wireless coverage, login to the Computer and Telecommunication Services web site (compserv.stockton.edu), click on Faculty and Internet Connection under Internet Services.

Online Course Development Tools
E-1
E.Online Course Development Tools Computer and Telecommunication Services has Internet tools available to the Stockton community to aid faculty members in the development of online courses and to foster communication among staff, faculty and students.
Blackboard 9 Blackboard 9 is an integrated e-learning system for higher education. It combines tools with content management capabilities and options for personalization and customization of the learning experience. It provides options for accessing, managing, and migrating course content. Also instructors have the ability to pace the learning experience based on time and student performance. This system is integrated with Banner. Live course sections are automatically created and students are automatically enrolled. I am teaching 2 sections of ABCD2245. Can these be merged into 1 section on Blackboard? The answer is that this option is not available. Enrollment data comes from Banner. In order for the sections to be merged in Blackboard, they would have to be merged in Banner. They can’t be merged in Banner because then they would be seen as one course section, not 2 sections, and would be scheduled to meet in the same room at the same time. I want to start working on my Blackboard course before the start of the semester. When will it be available? You can work on any course at any time by taking advantage of using course development sections. If you would like to request a development section, use the online request form (See Blackboard 9 Development Section Request, next page, for more information.) The practice of creating the new live sections has been in place since the integration of Bb and the portal (Summer 2008). The guidelines are published in the “My Courses” channel and various other locations. The guideline that we use is 3-4 weeks before the beginning of the semester – no hard and fast dates – this is dependent upon the academic calendar. Loading up the new semester course sections involves making a global change to the current semester setting in Banner. This impacts many more functions than just Bb. From the user support perspective, we try to avoid overlapping with the semester currently in session. Otherwise we are suddenly receiving calls from students and faculty asking “What happened to my classes?” because it becomes necessary to change terms on the pull down menu in the portal. This is more of an issue in the summer because we have a greater number of online sections and a greater number of non-matriculated students and adjuncts who are not familiar with online environment. Another reason for delaying is to be sure that the course section offerings are as close as possible to what will ultimately be the course sections that end up running. In every semester there are course section cancellations, re-characterization (e.g., a course becomes a seminar), and section consolidations. If a faculty member is working in the live section rather than a development section and that section is renamed in response to changes like these s/he will lose access to that content. The content is not lost, but faculty access is lost and it is necessary for someone with Bb administrative access to find the "lost" section and move the content over to the new section. If a faculty member is working in a live section and needs to test various features s/he will have to override the term dates in order to do this testing. Overriding these dates also makes the live section visible to the students who would then have access to a course section that is not yet ready for them.
Online Course Development Tools
E-2
We strongly recommend that faculty work in development sections (see below) and move their content over to live sections at the latest practical date. That might be right after the live sections are created. It might be 2 or 3 days before the semester begins.
Blackboard 9 Development Section Request Development sections are used to create content for a new course or store content from a previously offered course that may be offered again in the future. Unlike “live” course sections that are deleted each year -- Fall course sections are deleted the following May, Spring and Summer course sections are deleted the following January -- development sections remain on the system for as long as you are at Stockton. A confirmation message will be sent to you via e-mail after the development section is created. If you have additional questions or concerns, please send a separate e-mail message. Please do not leave voice mail requests. To request the creation of a Blackboard development section, complete the online form at:
http://compser.stockton.edu The following information is required in order to complete the form: Your full name, username, e-mail address for confirmation message, development section name(s), and any special instructions.

Plagiarism Prevention System
F-1
F.Plagiarism Prevention System The University maintains a subscription to Turnitin.com, (www.turnitin.com) that includes three products: OriginalityCheck, GradeMark and PeerMark. The information below has been excerpted from the Turnitin.com web site: www.turnitin.com
• OriginalityCheck – checks submitted student papers against 20 + billion web pages, over 200 million student papers and some library databases and publications. http://turnitin.com/en_us/products/originalitycheck
• GradMark - is an online grading service in which standard and customized marks can be added directly
on the student’s paper. http://turnitin.com/en_us/products/grademark
• PeerMark – Provides structured and anonymous feedback by students of each other’s written work. http://turnitin.com/en_us/products/peermark
In order to use Turnitin, instructors must first register using the Stockton user number and password provided by Stockton’s Turnitin Administrator. After entering some personal information, the instructor chooses a personal password which allows the instructor to log in to the system. Next the instructor establishes a class site with a class enrollment number and password. The instructor then posts the class assignments and due dates. After registering in Turnitin, students upload their papers to the Turnitin class website. Faculty planning on using Turnitin should include a notice on their syllabus that Turnitin in will be used and ask students to register and submit their papers. Turnitin.com returns an “Originality Report” to the instructor’s Turnitin inbox usually in one hour but in peak times it may take up to 24 hours. This report shows the degree of similarity found to a web site or previously- submitted paper in their database. If the instructor has enabled the feature, the student also can view the Originality Report. In addition to the Originality Check, instructors can take advantage of the GradeMark and PeerMark features to provide students with additional feedback on their work. Turnitin provides excellent guides and demos on their website www.turnitin.com under Training. There are also several YouTube videos available from the Turnitin Academy http://www.youtube.com/user/TurnitinAcademy For step-by-step instructions, see Guide to Turnitin.com, a Plagiarism Prevention System on page J-28

Technology Training Program
G-1
G.Technology Training Program The best way to stay technically up to date is to attend the training classes available during the fall, spring and summer semesters at no charge to all of the Stockton community. The section that follows will give you detailed information on the program. The Computer Training Program at Stockton University is provided by the Department Computer and Telecommunication Services, FREE to faculty, staff and students. The workshops in this program cover the latest software packages and they are conducted with state-of-the-art training equipment for more powerful presentations. Students can also receive ULTRA credit for training workshops.
Custom Training Opportunities Custom training is also available for staff and faculty in need of additional technology related skills. Upon request, training sessions can be provided on the desire topic at a mutually agreeable date and time. Please contact Roberto Castillo for more information.
Location and Time of Training The times and locations of the training classes vary every semester. A complete training package that includes the schedule, course description and registration form, is distributed to staff and faculty members a month prior to the first day of class. For more information or to register online, visit the Computer and Telecommunication Services Web site at http://compserv.stockton.edu. The Computer Training Schedule for students is also posted on the Computer and Telecommunication Services Web Page. Students are required to register online at the above address.
Adobe Acrobat XI Instructor: Roberto Castillo
PDF files have become a standard format on the web. They can be created from almost any application and the electronic output looks the same as a snapshot of the printed output. Annotation tools can be used to it make it easy for readers to move through documents, share comments, and even connect to resources on the Internet. Security features allow for document protection, including password protection. Adobe Acrobat Reader is a browser plug-in that allows you to read .PDF files from the web. It can do much more than that. Using built-in navigation, selection, viewing, and searching tools you can work with documents in electronic form and eliminate paper print outs that can clutter your desktop and overflow your filing cabinet. Electronic forms are not covered in this seminar. Prior knowledge of the Internet, and at least one MS Office application (Word, Excel, PowerPoint, or Publisher) required.
Adobe Photoshop CS6: Fixing Common Image Flaws Instructor: Linda Feeney
Digital photography makes it easy to capture memories. Unfortunately, not all images turn out as well as we might like. This seminar focuses on improving images with common problems like red eye, over/underexposure, background clutter, and color correction. Pre-requisite: Experience with selection techniques in Adobe Photoshop (i.e., lasso, marquee, magic wand, quick mask).
Adobe Photoshop CS6: Introduction to Photo Composite Techniques Instructor: Linda Feeney
Masks and layers (in conjunction with selection techniques) make it easy to combine multiple images and reveal or conceal portions of the multiple images with fascinating results or blend images and textures Example: You recently attended a wedding and wanted to get a shot of the bride and groom in front of the church. You have a picture of the

Technology Training Program
G-2
bride and groom outside the reception hall and you have a picture of the church, but not a picture of both. You can combine these shots -- revealing the church or concealing the reception hall -- to produce the desired image. Sample images will be provided for hands-on work, but attendees are encouraged to bring their own images with them. Pre-requisite: Selection Techniques in Adobe Photoshop
Adobe Photoshop CS6: Selection Techniques Instructor: Linda Feeney
Digital photography is an incredibly creative medium. Photographs can be altered or combined to produce amazing results. This seminar will focus on selection, Selection tools allow you to choose portions of an image to be edited. Example: You have a photograph taken with a flash. Portions of the image are overexposed. Using selection techniques you can adjust the brightness and/or contrast of the overexposed portion of the image to bring the picture into balance. These tools will be covered in detail: marquee, lasso, pen, magic wand, quick mask, and alpha channel mask. Sample images will be provided for hands-on work, but attendees are encouraged to bring their own images with them. Pre-requisite: Experience in using basic digital image editing techniques
Advanced Features in MS Outlook Calendar Instructor: Roberto Castillo
The instructor will cover Calendar features such as organizing meetings, opening someone else’s folder, taking votes and setting permissions.
Advanced Features in MS Outlook E-mail Instructor: Roberto Castillo
The instructor will focus on more advanced features in e-mail such as creating signatures, using the advanced feature to find information, creating folders, flagging messages, dealing with junk mail and managing your address book (distribution lists)
Blogging Instructor: Bob Heinrich
A blog (short for weblog) is a web-based journal that is typically updated frequently and open for anyone to read. A wiki is similar to a blog; however, ownership of the wiki is distributed to numerous individuals who collectively add and edit web-accessible content. In addition to defining key concepts and related terminology, this session will provide an overview of the ways in which blogs and wikis are being used in higher education and beyond. Examples of their use at Stockton University will be presented. An exploration of the technologies used to create blogs and wikis will be a key component of this session, and participants will leave with knowledge of the resources on campus that support blog and wiki development.
Customizing Forms in Access Instructor: Roberto Castillo
Microsoft Access is a database management tool that helps you organize, sort and report information you need to access every day. After form objects are created with the Wizard, the Design View can be used to manipulate the content of these objects to create a more functional and easier to use object. In this workshop you will learn how to change the appearance of a form; Move, size, or align fields; Change label text or a control source; And add a field or control. Prerequisite: Basic knowledge of Access

Technology Training Program
G-3
Electronic Classroom Orientation & Media Scheduling Instructor: Bob Heinrich
In this course, you will learn how to take advantage of the advanced technology available to you in the classrooms at the university. The instructor will give an overview of how to operate the following components located within the lectern: • The computer and Zip drive • The AMX Synergy system from both the remote and the AMX
software. • The ELMO Document Camera. The course concludes with an overview of scheduling and playing events through our Media Distribution System. Lectern Keys will be distributed to faculty/staff members after completing the course.
First Look at Office 2013 Instructor: Roberto Castillo
An overview of the most important changes to MS Office 2013. Prerequisite: familiar with MS Office 2010
First Look at Windows 8.1 Instructor: Roberto Castillo
Windows 8 is the latest upgrade from Windows 7. We’ll take a tour around the newest Operating System (OS) from Microsoft and talk about some of the most important new features available in Windows 8.
Formulas and Functions in Excel Instructor: Roberto Castillo
Formulas are the heart and soul of a spreadsheet. Without formulas, Excel would be nothing more than a grid you could use to enter numbers and text. In this session, you’ll learn how formulas can do a lot more than just adding, subtracting, multiplying, and dividing. The instructor will also go over a selected number of Excel formulas you can use to create statistical, financial, and scientific calculations. Prerequisite: Basic knowledge of Excel
Increasing Editing Productivity in Word Instructor: Roberto Castillo
In this course, you'll learn how to take advantage of advanced editing and formatting techniques to speed up the creation of your documents. The following commands, discussed in class, will provide you with the tools needed to use Word more efficiently: Finding & Replacing, AutoCorrect, AutoText, Format Painter, Styles, Templates & Wizards, and Tables & TableAutoFormat. Prerequisite: knowledge of Word
Intro to Access Instructor: Roberto Castillo
Microsoft Access is a database management tool that helps you organize, sort and report information you need to access every day. Newly added features make this application easier to use. The instructor will show you how to combine these new options with old database concepts to quickly create database systems. The course will cover: understanding Objects, filtering information, manipulating Tables, designing simple Forms and Reports. Prerequisite: knowledge of Windows. Basic knowledge of Word and Excel helpful
Intro to Dreamweaver CS6 Instructor: Roberto Castillo
Dreamweaver is probably the most popular site building tool for serious web site designers. It is a powerful tool that easily integrates with other Adobe applications such as Fireworks and Flash. In this session, the instructor will guide you step by step through the process of creating a basic web site in Dreamweaver. Familiar with MS Word and the Internet.

Technology Training Program
G-4
Intro to Excel Instructor: Roberto Castillo
This introductory course will cover the basics of Excel. The course will cover: Retrieving and Saving a File, Formulas, Formatting (inserting, copying, moving and erasing data), Adjusting Rows and Columns, Creating a Chart, Printing and Quick Cursor Movements Around Your Worksheet. Also learn about the new features added to Excel such as the List Autofill option which allows you to apply existing formulas and formatting to new fields; and a new See-Through View option lets you preview your changes without deselecting highlighted cells. Prerequisite: knowledge of Windows
Intro to MS Outlook Instructor: Roberto Castillo
Microsoft Outlook is a messaging and personal information manager, or PIM. Outlook lets you send and receive e-mail messages, schedule appointments, and organize your contacts and addresses. It also reminds you of tasks you need to complete. You will learn the basics on how to compose, send and receive e-mail messages and manage your Calendar.
Intro to PowerPoint Instructors: Roberto Castillo
This workshop will help you get started working with PowerPoint , to quickly and easily create presentations. You will learn how to use & manipulate templates, outline your ideas, add & modify text and insert clip arts. Prerequisite: knowledge of Windows. Basic knowledge of Word helpful
Intro to Word Instructor: Roberto Castillo
This course will give you an introduction to Microsoft’s word processor: Word. Some of the topics that will be covered are the Ribbon and Dialog Boxes, the New, Open, Save & Close commands, The Font & Paragraph commands, The Table command, and the Print Preview command. Also learn about other features included in Word such as a drop-down font menu, a Click and Type option that makes indentation and alignment a snap; an improved Cut and Paste; and hundreds of new clip-art images. Prerequisite: Basic knowledge of Windows
Mail and E-mail Merge in Word Instructor: Roberto Castillo
Now as part of the Task Pane, the new Mail Merge Wizard lets you create customized letters, labels, envelopes, directories, e-mail messages, and faxes. It allows you to produce multiple documents by combining data such as names and addresses with a merge template that the user creates. The instructor will show you how to create different kinds of templates and how to merge the templates with a data file to generate letters and labels. Prerequisite: Basic knowledge of Word
Managing your Mailbox in Outlook Instructor: Roberto Castillo
Learn how to organize your Outlook information, your Mailbox. MS Outlook provides you with the tools you need to manually or automatically group and organize similar information. Some of the features, cover in this course, are creating folders, moving items manually or automatically to folders, using Categories, color coding e-mail messages and Archiving information. Prerequisite: Basic knowledge of Outlook.
Managing your Workbooks in Excel
In this class, you’ll learn how to work with and manage workbooks. You’ll learn how to move between the worksheets, add, rename, move,

Technology Training Program
G-5
Instructor: Roberto Castillo
and delete worksheets, split and freeze worksheets, add headers, footers, and page numbers, adjust the margins, page size and orientation, and how to create formulas that reference information from several different worksheets.
Managing Multiple Tables in Access Instructor: Roberto Castillo
In this workshop, the instructor will show you how to manipulate multiple tables by creating relational databases (one-to-many) with Queries and Subforms. Prerequisite: knowledge of Access
Technology Resources Instructor: Bob Heinrich and Linda Feeney
This session provides an overview of the technology resources provided by Computer and Telecommunication Services. Usage policies, reservation procedures, software installation, training, and support services are described. This will be an informal session and audience questions are encouraged.
The VLOOKUP Function in Excel Instructor: Roberto Castillo
If you use Excel frequently, sooner or later you are going to need to look up values in a table. Instead of scrolling through layers and layers of text to find your answer, the VLOOKUP function allows you to quickly and easily find values which are linked to a table. This way, Excel can do most of the work for you and you can get to the more difficult task of actually analyzing the data you find. Prerequisite: familiar with formulas and functions in MS Excel
Understanding Field Properties in Access Instructor: Roberto Castillo
A property is an attribute that defines an object’s appearance, behavior, or characteristics. For example, a car’s properties would include its color, make and model, and shape. A property for a numeric field might be the number of decimal places displayed or the maximum number of characters a field can hold. The instructor will show you how to work with a Table’s Field Properties to specify the kind of information the table can store. Prerequisite: knowledge of Access
Using PRS to Enhance Classroom Interaction Instructor: Bob Heinrich
This class will teach you how to experience the power of interactive PowerPoint in your classroom. With a student response system (SRS), otherwise referred to as personal response system (PRS) or clickers, your students can respond to your questions electronically and you can compile and post the results in real time.
Managing Lists in Excel Instructor: Roberto Castillo
The instructor will show you how to create an interactive table in Excel which will allow you to classify and summarize information. Topics covered in the course: Sort, AutoFilter and Advanced Filter, Form, Subtotals, the PivotTable, and Data Validation. Prerequisite: Basic knowledge of Excel
Using the StarBoard System Instructor: Bob Heinrich
StarBoard allows you to operate and annotate any software running on the lectern computer. It also save screenshots of your entire class presentation. The screenshots can then be burned into CDs and used as reference information by you or your students. There are two components to the StarBoard system:
• The StarTablet is a TFT display for annotating presentations and running computer based applications in meetings, classrooms and videoconferences. It allows pen-based users to operate or annotate any software application running on a

Technology Training Program
G-6
connected computer. The annotated images can be viewed on other displays connected to the computer including LCD projected images, or the latest plasma and rear projection systems.
• The StarBoard software allows users to move from running applications to annotating them with a single click operation.
The following features will be covered in class:
• Rollers, line types, and highlighters in pre-set and variable
colors and widths • Comprehensive stamp library • Character recognition software to run applications with
freehand writing • Object recognition software that converts freehand geometric
objects, such as circles and triangles, to smooth drafting quality geometric objects
• Object management software to Undo, Redo, Cut, Copy, Paste, color, adjust line width, etc.
• Thumbnail review capability to quickly scan through files of marked up presentations
• A spotlight tool which hones in on a specific area of the display
• Continuous scrolling through the pages of the presentation
Using your iPad Instructor: Roberto Castillo
The iPad is a multitouch display tablet computer designed by Apple Inc., primarily as a platform for apps to run audio-visual media including books, periodicals, movies, music, games, and web content. In this class, we’ll discuss basic configuration settings, managing apps, setting up your Stockton e-mail, using the touch screen display and customizing the Home screen.
Extracting Data with Queries in Access Instructor: Roberto Castillo
In this session you will learn how to harness the power of queries. First you will learn about all the different types of queries: simple select queries, parameter queries that prompt you for more information, crosstab queries that summarize records in an easy understand format, action queries that actually modify the records in your database. Prerequisite: knowledge of Access
Producing Professional Reports in Access Instructor: Roberto Castillo
If you have worked with forms in Design View, you are in somewhat familiar territory. The Design View of the Report Object allows you to change text properties; add lines, boxes, and graphics; summarize and organize information by adding totals by day, week or month to your report; and group your data. Prerequisite: Basic knowledge of Access
Working with Tables in Word Instructor: Roberto Castillo
Tables allow you to present information in an organized, attractive manner. In Microsoft Word, a table is a grid of rows and columns containing boxes (called cells) of text or graphics. Unlike a table that you might create with tabs, you can easily add or delete text in a grid-based table without affecting the arrangement of text in columns. Learn how to sort your information, add and delete columns and/or rows of data, and make your table stand out with borders, shading and

Technology Training Program
G-7
coloring options. Find out how many ways in which you can use tables.

Acceptable Use Standards
H-1
H.Acceptable Use Standards
STANDARDS CONCERNING ACCEPTABLE USAGE OF STOCKTON UNIVERSITY COMPUTING FACILITIES
(Revision Date: April 2011)
INTRODUCTION The purpose of this Statement is to reaffirm the Standards that apply to the acceptable use of Stockton University's computing and communication facilities, which include all computing, video, data and telecommunication hardware and software systems owned, leased, or granted to the university. These Standards are defined and established to assure the integrity, reliability and availability of our computing and communication facilities. The University is strongly committed to the goal of infusing advanced computer and communication technology into the fabric of the curriculum. Users are enthusiastically encouraged to explore and use the University's computing and communication facilities within the limits of these standards. The Standards set forth below apply to all users of Stockton University computing and communication facilities. Violations of any of these Standards may result in revocation of facility usage privileges and/or appropriate disciplinary action under the University's Campus Code of Conduct or applicable Federal and State laws and regulations (e.g., New Jersey Computer Crimes Act, N.J.S.A. 2C:20-23, et seq.). The Standards of acceptable computer and communication usage follow below along with explanatory discussion of their intent and applicability.
STANDARD 1 - Appropriate Use of Facilities Authorized use of and access to the University's computing and communication facilities is intended and permitted solely to support the legitimate educational, administrative and mission-centered programs of the institution. Discussion - Registered students may have access to these facilities for course-related instructional purposes. Members of the faculty and staff may have access to these facilities for institutionally recognized instructional or research purposes. Faculty and staff may also have access to administrative computing facilities, as needed, in accordance with their job responsibilities. Limited access to facilities may be granted to users such as Alumni Association members, government agencies, non-profit organizations, or organizations which support the interests and needs of the University based upon any usage guidelines established by the University. Resident students in good standing may have access to data and telecommunication facilities for personal use on a fee basis and pursuant to the Housing Lease Agreement. Authorization for use of and/or access to academic computing facilities is granted by the Assoc. Provost for Computer and Communication Services. Authorization for the use of and/or access to administrative computing facilities is granted by the Assoc. Provost for Computer and Communication Services and the Director or supervisor of the organizational unit that is the recognized custodian of the data for which access is requested.
STANDARD 2 - Appropriate Use of Accounts Computer accounts or other identifiers used to gain access to computer systems or data can be used only by the individual authorized to use the account or identifier and only for the purposes for which the account was granted. Discussion - Accounts or facilities are not to be used for the transmission of commercial or personal advertisements, solicitations, promotions, or for personal monetary gain that is inconsistent with University policy or federal and/or state statutes.

Acceptable Use Standards
H-2
Users shall not disclose the password associated with an account or otherwise make an account, computer system or data available to others who have not been authorized to use the account, computer system or data. Users are responsible for all usage of their accounts and/or PINS and are expected to take appropriate safeguards to assure that their account passwords and/or PINS are not known to others.
STANDARD 3 - Appropriate Use of Accessible Materials Users shall observe discretion when viewing materials using the University’s computing and communication facilities. Discussion - Censorship is not compatible with the goals of Stockton University; however, some computers may be dedicated to specific research or teaching missions that limit their use. The University does not limit access to any information due to its content when it meets the standard of legality and is viewed in a proper time, place and manner. Forms of expression that are not protected by the First Amendment and therefore may be subject to censorship by the University include: obscene material, child pornography or other material that violates state or federal statutes.
STANDARD 4 - Reliability and Integrity of Facilities Computer and communication facility users shall not knowingly develop, use or transmit through the University's facilities programs or data that interfere with, infiltrate or damage facilities. Discussion - Computer and communication users shall use great care that they do not use programs or utilities or engage in actions that interfere with, infiltrate or damage facilities. User shall not engage in any activity that may lead to unauthorized access to systems, accounts or data. Additionally, users must not attempt to circumvent or subvert system or network security measures. Any defects discovered in system security shall be reported immediately to the Associate Provost for Computer and Communication Services.
STANDARD 5 - Rules and Regulations It is prohibited to use electronic communication facilities such as mail, phone, Internet or systems with similar functions to send fraudulent, harassing, obscene, indecent, profane, intimidating, or unlawful messages that are sufficiently severe, pervasive, or persistent and are objectively offensive as to substantially disrupt or undermine a person’s ability to participate in or receive the benefits, services or opportunities of the University. Additionally, users are prohibited from using electronic communication facilities to access or attempt to access remote computing facilities without authorization from the remote site. Users shall adhere to the rules and regulations governing the use of facilities and equipment and the Code of Conduct. Discussion - Use of and access to computing and communication facilities, including computing laboratories, computer networks, telephony equipment and remote facilities accessed through local or wide area networks must be used in accordance with the University’s rules and regulations and not create a hostile work or educational environment based on severe or pervasive conduct.
STANDARD 6 - Proprietary Rights Users shall respect and observe proprietary rights associated with software, data, and documents. Discussion - Computer software, documents or files protected by copyright are not to be copied from or into computing facilities, except as permitted by license or law. Additionally, the number of copies and the distribution of copies must adhere to copyright restrictions and/or provisions. Further, type written or machine-readable documents protected by copyright are not to be reproduced or copied, unless permitted by the copyright owner or legally accepted “fair use”.

Acceptable Use Standards
H-3
STANDARD 7 - Privacy Users shall respect the privacy of other users. Discussion - Computer users shall not attempt or knowingly seek, provide, view, use, delete or modify information in, or obtain copies of files or programs belonging to other computer or telephony users without the permission of those users. Searching through non-public directories, libraries, or any other storage media to find unauthorized information is likewise prohibited. Further, computer users must not use the facilities to plagiarize or claim the intellectual or literary property of others. Users granted access to administrative data in which individuals are identifiable must respect the confidentiality of these data as well as any federal/state statutory requirements. Disclosure of data pertaining to students, for example, should be in accordance with the Family Rights and Privacy Act. Additionally, financial data should be protected in accordance with FTC Regulation 16 CRT Part 314. Any personally identifiable or otherwise confidential data that is stored on personal computers or removable storage devices or transmitted via email or electronically transferred must be protected by strong passwords and/or encrypted. (See Guidelines for Safeguarding Personally Identifiable and Confidential Information from Unauthorized or Accidental Disclosure). On most facilities, security systems are in place to prevent unwanted or unauthorized access. Any defects or weakness discovered in security systems should be immediately reported the Associate Provost for Computer and Communication Services or appropriate authority in cases not involving facilities under the auspices of the Office of Computer and Telecommunication Services. Under no circumstances shall computer or telephony users, other than authorized system administrators, access or attempt to access system security programs or files. Users of e-mail should be aware that electronic mail is recognized as the equivalent of a formal memorandum. The University’s e-mail systems are used to store and forward official university documents and support the academic and administrative operations of university. E-mail system files and messages are backed up to tape regularly as a precaution against accidental loss or hardware failure. Users are permitted to use their electronic mail account to receive limited unofficial or personal correspondence, provided such use does not adversely impact upon essential academic and administrative usage. E-mail and other electronic communication systems may not be highly secure. Users are therefore advised not to consider any of their work or personal e-mail and electronic communication correspondence on University servers to be private. The university reserves the right to inspect the content of electronic files when it has reasonable belief that the content of material would violate university policy, state or federal law. The university retains the right to review the content of any files when the content of such files is likely to be material to the alleged violation or in the death, illness, or separation of a user. The contents of the university’s e-mail and electronic communication systems may be subject to disclosure under a subpoena or other written request pursuant to authorized procedures, including requests made pursuant to the Open Public Records Act (OPRA). System administrators, operators and certain authorized technical staff may be allowed full access to files and programs during maintenance, routine backup operations, or in acting to fulfill assigned duties or safeguard the integrity and reliability of computing and communication facilities. Staff who are authorized such access shall respect the confidentiality of data stored. In the event that unauthorized computer or telephony system use is suspected, the staff member who detects or is informed of the suspected violation must notify the Associate Provost for Computer and Communication Services or appropriate authority (See, also, STANDARD 8.).
STANDARD 8 - System Safeguards Computing and communication facilities will be safeguarded to maintain the overall integrity and ensure reliability to all users. Discussion - Where, in the judgment of the Assoc. Provost for Computer and Communication Services or appropriate authority, an alleged violation of these Standards or other regulations presents a risk to the integrity of the University's computing and communication facilities and/or the orderly conduct of the operation, an individual’s

Acceptable Use Standards
H-4
access and use privileges may be suspended on an interim basis and a hearing may be held pursuant to the procedure described in the Campus Code of Conduct. Alleged violations also may be resolved informally pursuant to the procedure described in the Campus Code of Conduct under Informal Resolution or through the independent administrative action of the Assoc. Provost for Computer and Communication Services or an appropriate authority provided both parties agree to resolve the case in this manner.
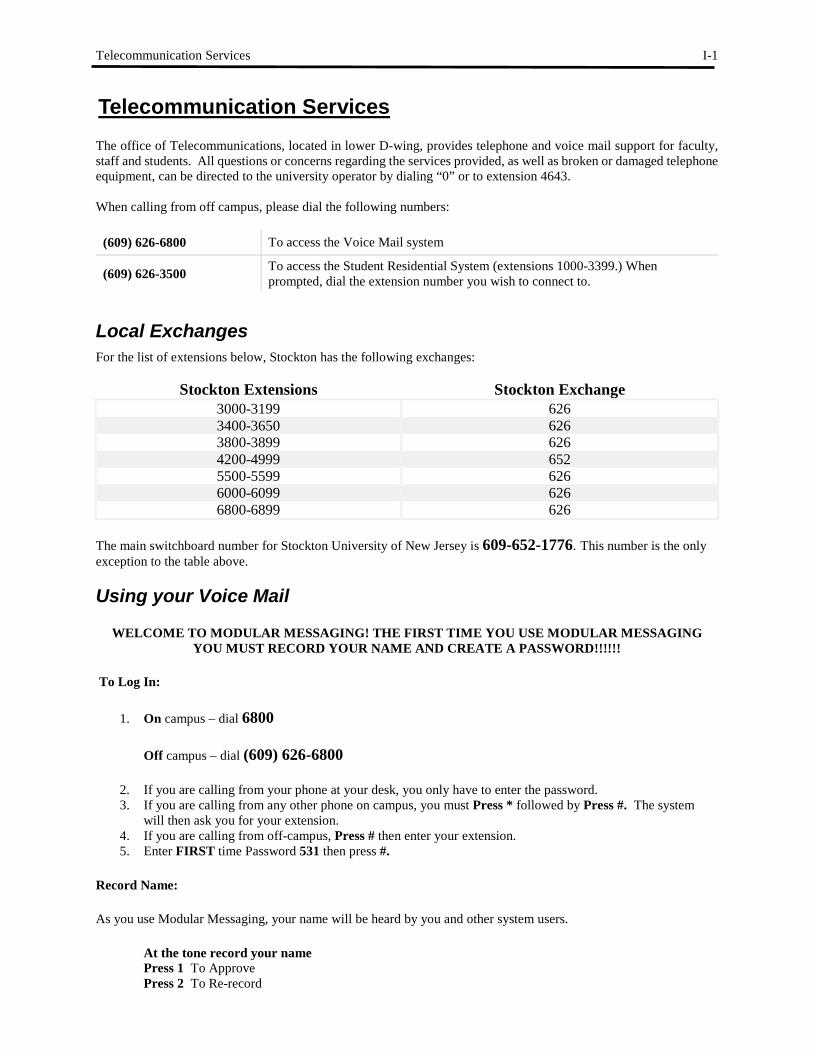
Telecommunication Services
I-1
I.Telecommunication Services The office of Telecommunications, located in lower D-wing, provides telephone and voice mail support for faculty, staff and students. All questions or concerns regarding the services provided, as well as broken or damaged telephone equipment, can be directed to the university operator by dialing “0” or to extension 4643. When calling from off campus, please dial the following numbers:
(609) 626-6800 To access the Voice Mail system
(609) 626-3500 To access the Student Residential System (extensions 1000-3399.) When prompted, dial the extension number you wish to connect to.
Local Exchanges For the list of extensions below, Stockton has the following exchanges:
Stockton Extensions Stockton Exchange 3000-3199 626 3400-3650 626 3800-3899 626 4200-4999 652 5500-5599 626 6000-6099 626 6800-6899 626
The main switchboard number for Stockton University of New Jersey is 609-652-1776. This number is the only exception to the table above.
Using your Voice Mail
WELCOME TO MODULAR MESSAGING! THE FIRST TIME YOU USE MODULAR MESSAGING YOU MUST RECORD YOUR NAME AND CREATE A PASSWORD!!!!!!
To Log In:
1. On campus – dial 6800
Off campus – dial (609) 626-6800
2. If you are calling from your phone at your desk, you only have to enter the password. 3. If you are calling from any other phone on campus, you must Press * followed by Press #. The system
will then ask you for your extension. 4. If you are calling from off-campus, Press # then enter your extension. 5. Enter FIRST time Password 531 then press #.
Record Name:
As you use Modular Messaging, your name will be heard by you and other system users.
At the tone record your name Press 1 To Approve Press 2 To Re-record

Telecommunication Services
I-2
Create Password:
You will be required to enter a new password with a minimum of 4 digits followed by the # sign. The maximum length of a password is 15 digits. You CANNOT use a consecutive number of the SAME number 4 times.
You must reenter your password for confirmation followed by the # sign.
To Create A Personal Greeting:
This is what callers will hear when they reach your mailbox.
Press 3 Anytime you wish to do anything concerning your greeting. Press 1 To create your greeting
Press 1 To indicate the greeting number you are going to record, then speak your greeting Press # To approve Press 0 To listen to your greeting
Voice Mail Message Storage
The voice message mailbox will hold a total of 35 minutes of messages.
Retention time for new, unopened or old messages is 30 days. After 30 days, messages are automatically deleted. There is NO warning.

Telecommunication Services
I-3
Modular Messaging System Quick Reference Guide RECORDING AND SENDING MESSAGES
GETTING MESSAGES YOU RECEIVED CREATING MULTIPLE PERSONAL GREETINGS
Sending voice or voice-fax messages 1. From the activity menu [1] 2. Record voice message 3. When finished [#] 4. Specify delivery address (see
below) 5. When finished [#] 6. Specify delivery options (see
below) 7. Send message [#]
Sending fax-only messages from fax machine
1. From the activity menu [1] 2. Bypass voice recording [#] 3. Specify delivery address (see
below) 4. When finished [#] 5. Specify delivery options (see
below) 6. Load document into fax
machine 7. Send message [#] 8. Press Start key on fax
machine Sending voice-fax messages by forwarding a fax
To send a fax to your own mailbox: 1. Log in to mailbox 2. From the activity menu [2] 3. Forward fax with optional
voice message [1] [2] 4. Record voice message 5. When finished [#] 6. Specify delivery address (see
below) 7. When finished [#] 8. Specify delivery options (see
below) 9. Send message [#]
Specifying delivery address • For voice user:
Enter user’s mailbox number, and press [#]
• For voice user name addressing: Press [*] [2], spell user’s name or name of personal list, and press [#]
• For personal list, press [*] [5] and then list number
• For fax user: Press [*] [*] [5], enter outside line number (if needed) and telephone number, and then press [#]
• To cancel address: press [*] [3]
• To cancel another address: press [*] [1] [*] [3]
• To list all recipients: press [*] [1]
Specifying delivery options • Make private/not private
(toggle) [1] • Make priority/not priority
(toggle) [2] • Schedule for future delivery
[3] • Attach a fax [5]
Listening to voice/e-mail messages 1. From the activity menu [2] 2. Listen to voice or e-mail message
[0] Responding to messages (optional)
After listening to your message, press [1] to respond to or forward the message. Then select one of the following:
• Call sender (exits mailbox) [0] • Reply to sender by voice mail [1] • Forward with comment at
beginning [2] • Record and address a new
message [4] • Reply to all recipients [5]
If you select any key from the above except [0]:
1. Record and address your message 2. When finished [#] & specify
delivery options 3. Send message [#]
Printing fax/e-mail messages 1. From the activity menu [2] 2. Listen to message header 3. Print fax or e-mail portions [*] [1] 4. Print to default machine [#]
OR • To print to the fax machine from
which you are calling [*] [6] OR
• To print to other fax machine you specify: – Press [*] [*] [5] – Enter outside line number (if
needed) and telephone number
– Press [#]
Creating, changing, deleting greetings 1. From the activity menu [3] 2. Do one of the following:
– Listen to a greeting [0] – Record or re-record a greeting
[1] – Delete a greeting [3]
3. Enter greeting number [1-3] 4. For optional greetings only, enter
the optional greeting number [1-9] 5. If Multilingual Call Answer is
enabled, select a language [1-3] 6. When finished [#]
Scanning greetings 1. From the activity menu [3] 2. Scan greetings [2]
Activating greetings 1. From the activity menu [3] 2. Activate greeting [5] 3. Enter greeting number [1-3] 4. For personal greeting only, you may
need to confirm your choice [1] 5. For optional greetings only, enter
the optional greeting number [1-9] Setting up rules for optional greetings
• Activate for all calls [0] • Activate for internal calls � external
calls � all calls (rotate) [1] • Activate for business hours � out of
business hours � any time (rotate) [2]
• Activate for busy � no answer � busy or no answer (rotate) [3]
• Deactivate for all calls [9] Reviewing optional greeting rules
1. From the activity menu [3] 2. Review optional greeting rules (in
the order they will be evaluated) [6] Setting up Call Me/Find Me/Notify Me options
1. From the activity menu [6] 2. Select one of the following:
- Call Me [1] - Find Me [2] - Notify Me [3]
3. Select one of the following: - Enable Call Me/Find Me [9] - Disable Call Me/Find Me [6]
GENERAL TIPS
Not sure which key to press? • Listen to Help at any time [*] [4] • Go back to activity menu [*] [7]
Want to save time? • Bypass greeting when recording
[1] • Bypass header when listening [0]
Want to adjust the way your messages are played?
• Faster [9] • Slower [8] • Louder [4] • Softer [7] • Skip forward [6] • Skip backward [5]
Want to configure Personal Operator? • To set up or change Personal
Operator [5] [6] Other options
• Transfer to covering extension [*] [0]
• Transfer to another mailbox [*] [8] • Make system wait [*] [9] • Access names or numbers
directory [*] [*] [6] • Disconnect [*] [*] [9]

J-1 Supplemental Documentation
J.Supplemental Documentation Microsoft Office Purchase Program – is this program still available? (For Stockton Employees only)

J-2 Supplemental Documentation
/w EPDw UKLTc1O
Outlook Web App 2013
MS Outlook Web App allows you to read and send e-mail messages, manage your calendar and edit your contacts from the Stockton University web site using a Web browser.
Getting There 1. In the goStockton Portal, click on the e-mail icon on the top right or at the goStockton Portal login page
(go.stockton.edu), click on Employee Email. 2. Skip steps 2& 3 if logged on to the Portal. If you click on Employee Email, enter your Outlook Username
and Password 3. Click on OK to sign on.
The Inbox Messages delivered to your mailbox are stored in your Inbox. New messages are displayed in boldface. Once read, messages revert back to normal typeface.
Compose a new message Sort messages
Navigation Bar
Respond to message Help

J-3 Supplemental Documentation
Creating a New Message Click on new mail to compose a new message
The Calendar Tool The Outlook Web Access Calendar allows you to create and track events. Co-workers are also able to check your meetings and appointments for their own scheduling purposes. 1. Click on the Calendar folder on the Navigation Bar (see screenshot on page 1.) 2. Click on the commands below (located above the calendar page) to
Send the completed message
Attach a document to your message
Create a new appointment
Switch to Daily, Weekly or Monthly view
Cancel the message
Add a picture to your message Insert your
Signature
Jump to a month and use the arrows to preview the next or previous years

J-4 Supplemental Documentation
Editing new and existing Appointments Click on new event in Calendar to create a new event. Double click on an existing appointment on the Calendar grid to open it.
Display a Reminder for the appointment
Enter the Subject and the Location of the meeting. This information will appear on the Calendar grid
Enter a description
Set the Date and Time
Save a new/existing appointment and go back to the Calendar Page
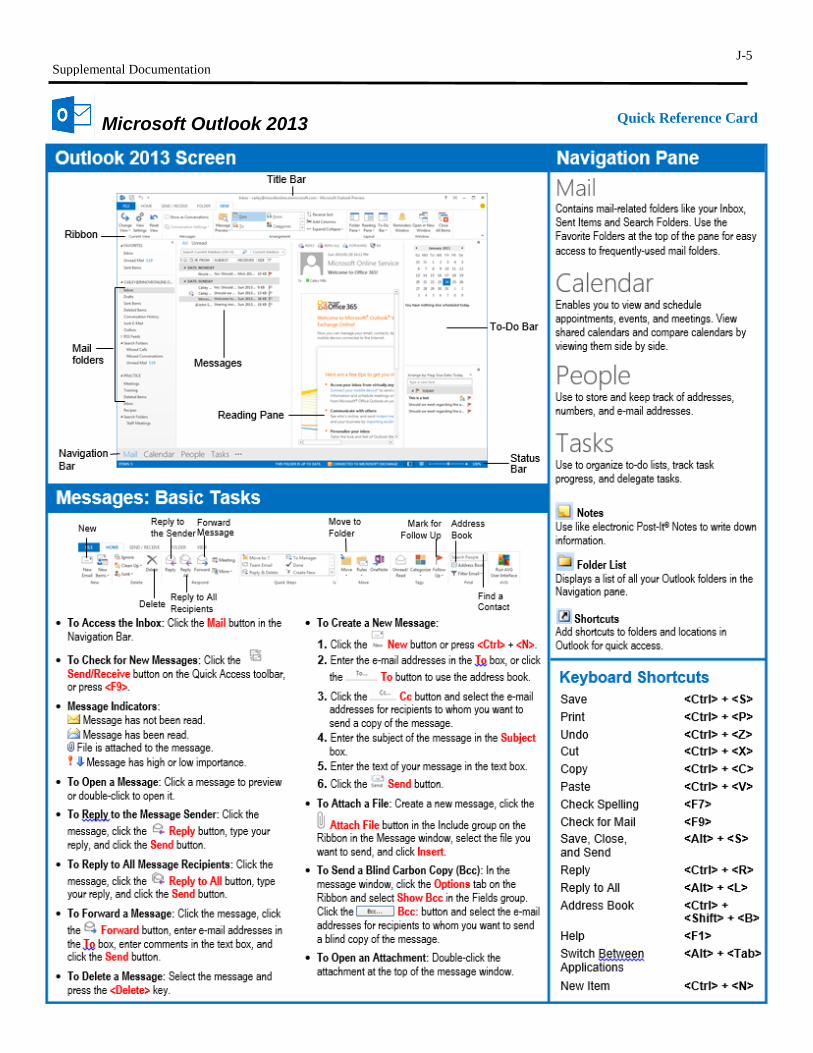
Supplemental Documentation J-5
Microsoft Outlook 2013 Quick Reference Card

Supplemental Documentation J-6

J-7 Supplemental Documentation
Managing your Outlook disk space Every Outlook/Exchange account is given 1GB of disk space. To view how much space you have used:
1. From the Outlook client Folder list, right click on your e-mail address (at the very top of the folder tree) 2. Click on Data File Properties and 3. Click on Folder Size
This will give you a total amount of space used and will show the disk space used by each folder. Attachments can eat up disk space very quickly. There may be a situation where you need to keep an e-mail message, but don't need the attachment. For example, if you send someone a message with an attachment, the message and attachment are stored in the Sent Items folder and are charged against your disk quota. You don't need a copy of the attachment because you created the file and it is already on your local hard drive. It is possible to keep the message, but remove the attachment and free up disk space. To save an attachment to your local hard drive and then remove the attachment from a message:
1. From the Outlook client, open the message containing the attachment 2. Right click on the attachment 3. Click on Save As... 4. Optional: Choose the save location and/or new filename 5. Click on Save 6. Right click on the attachment 7. Click on Remove

J-8 Supplemental Documentation
Changing your goStockton Portal Security Questions and Answers
1. Log into the goStockton portal. 2. In the top left corner of the portal window, click on the link labeled "My Account"
3. Scroll to the bottom of the screen to Secret Questions and Answers section 4. Click on the link labeled "Click Here"
5. This will open a new window. 6. Scroll to the bottom of the new window.
7. Enter your current password in the top box. 8. Enter desired questions and answers. Note that all except the first question may be changed to
whatever question you would like to use. Please be sure to read the guidelines above this box for valid questions and answers.
9. After completing all question/answers, click on the Submit Setup button to save.

J-9 Supplemental Documentation
Contingency Planning For Online Instruction 1. Due dates -- Avoid scheduling discussion/assignment submission/quizzes final due dates during late
evening and weekends. Computer and Telecommunication Services is not staffed for 24 x 7 support. System problems that occur during off times will not be resolved as quickly as those problems that occur when staff members are on duty. Students are likely to procrastinate, waiting until close to the deadline to submit. A deadline during off times will increase the likelihood of that they will not get support, if needed. It also increases the likelihood that you will receive erroneous reports of system problems. Best days/times for submissions Tue-Thur, 9:00 am to 4:00 pm Eastern time. Use a submission timeframe generous enough for those who cannot submit during the day to submit their work the night before. If you have students who live in a different time zone, please be sure that they are aware that due dates are Eastern time, not local time.
2. Adjustment Guidelines – Inform your students from the very beginning how you will handle a potential disruption. How will due dates be adjusted?
3. Faculty Communication -- How will you communicate any adjustments to your students?
a. Asynchronous communication -- There are several possibilities: • Class email -- every section has a mailing list accessible via Outlook (e.g.,
[email protected]) • Blackboard announcements • Blackboard email • Message posted on your course home page • Message posted in specially designated discussion topic • Voice mail message on your office phone • Message posted on your personal web page or blog
b. Synchronous communication -- List emergency meeting dates and times on your
syllabus and hold online office hours or meetings using • Blackboard Chat tool • Wimba Classroom – should this be Collaborate now?
4. Student Communication -- How do you want your students to communicate with you if they run
into individual problems like a family emergency, local computer failure, Internet outage or power failure? Do you want them to use one of the options listed in #3 or some other method?
5. Campus-wide Instructional Continuity Plan – In the event of a campus-wide emergency that prevents students from coming to campus (e.g., , inclement weather, widespread flu outbreak), the University has established a plan for instructional continuity using online resources. The strategies in this plan range from simple to comprehensive. You can find the full text of the plan online at http://www.stockton.edu/continuity . Please review this plan and keep in mind that these strategies may also be helpful to you in the event of your illness, injury, or personal emergency.

J-10 Supplemental Documentation
Browser Troubleshooting for Blackboard 9
There are specific browser (i.e., Internet Explorer, Firefox, Chrome) configuration requirements for accessing many online resources including Blackboard. A browser check utility is available on the goStockton Portal login page and also at http://aspweb.stockton.edu/BrowserCheck/. Students should run the browser check and resolve all browser issues to avoid access problems.
The browser check should be run again anytime the computer is updated or new hardware or software is installed. Student with browser problems can call the Help Desk for assistance 609-652-4309.
Troubleshooting Java Problems If you encounter other Java errors when trying use Blackboard or other online resources, you may need to uninstall old versions of Java and install the latest version.
Windows
Uninstall Java
1. Close your web browser and any other open programs 2. Click Start then Control Panel or Start then Settings then Control Panel 3. Open Add or Remove Programs in Windows XP, Programs and Features in Windows Vista, or Uninstall a
program in Windows 7 4. Click on each 'J2SE', 'JSSE' or 'Java' item in the list and click Remove in Windows XP or Uninstall in Vista
and Windows 7 5. Close the Control Panel and reboot your computer once all Java components have been removed 6. Proceed with reinstalling Java.

J-11 Supplemental Documentation Re-install/Install a new Java version
1. Open your web browser 2. Go to http://www.java.com and click on the blue “Free Download” button
3. When prompted, click on run to install the software, you may be prompted multiple times. 4. At the beginning of the install, be sure to uncheck the box that installs the MSN toolbar. Toolbars are
known to cause problems with Blackboard

J-12 Supplemental Documentation Automatic Java updates
Once you have successfully configured Blackboard and Java in your browser, you may wish to turn off automatic Java updates:
1. Click Start then Control Panel or Start then Settings then Control Panel 2. Select Java 3. On the Update tab, uncheck the option to check for updates automatically 4. Click Never check on the pop-up window to confirm 5. At any time in future if you do want to update your Java to address new security issues, repeat the steps
above and click Update Now on the Update tab 6. Click Ok to close the Java Control Panel 7. Close the Windows Control Panel window
Macintosh
Mac OS X has Java installed by default. You can install the latest version by clicking the blue Apple logo in the menu bar, then selecting Software Updates and clicking Update now, then follow the onscreen prompts. If you are having problems with Blackboard and Safari, it may help to clear the Java cache for installed Java plugins:
1. In Finder, go to Applications then Utilities then Java. 2. Double click Java 1.3.1 Plugin Settings then Cache and click the Clear JAR cache button 3. Double click Java 1.4.2 Plugin Settings then Cache then Clear 4. Close the Applications window.
If your computer uses Mac OS X 10.4.5 or later, the latest version of Java should be set as the currently used version:
1. Double click your hard drive icon and choose Applications then Utilities then Java J2SE5.0 and double click Java Preferences
2. In the top section set it to use 5.0 and in the bottom section drag J2SE 5.0 to the top of the list 3. In the Temporary Internet Files section, click Settings then Delete Files and Ok to delete applets,
applications and other files 4. Click Save for these settings 5. Close the Applications window.
This prevents Safari from using earlier Java versions for applets that are compatible with the later version.
If you have the latest version of Java installed and you are astill experiencing problems in the Portal and Blackboard, clear the cache on your browser and Java. Follow the instructions below:
Clearing your Browser Cache in Internet Explorer
1. Open Internet Explorer 2. Go to “Tools” 3. Now “Internet Options” 4. Look around for the Browsing History section, then click “Delete.”

J-13 Supplemental Documentation
5. You’ll get a new window, click on “Delete files…”
6. Click on Ok when it asks you to confirm, and there you have it.

J-14 Supplemental Documentation Clearing your Browser Cache in Firefox or Safari
1. Here’s the procedure for Safari.
2. And here’s the procedure for Firefox.
3. In Windows, Firefox will still have the same layout, but you’ll access the menu through Tools, then
Preferences.

J-15 Supplemental Documentation Clearing your Java Cache
1. Go to your control panel and double-click on Java.
2. Click on “Settings” under “Temporary Internet Files”
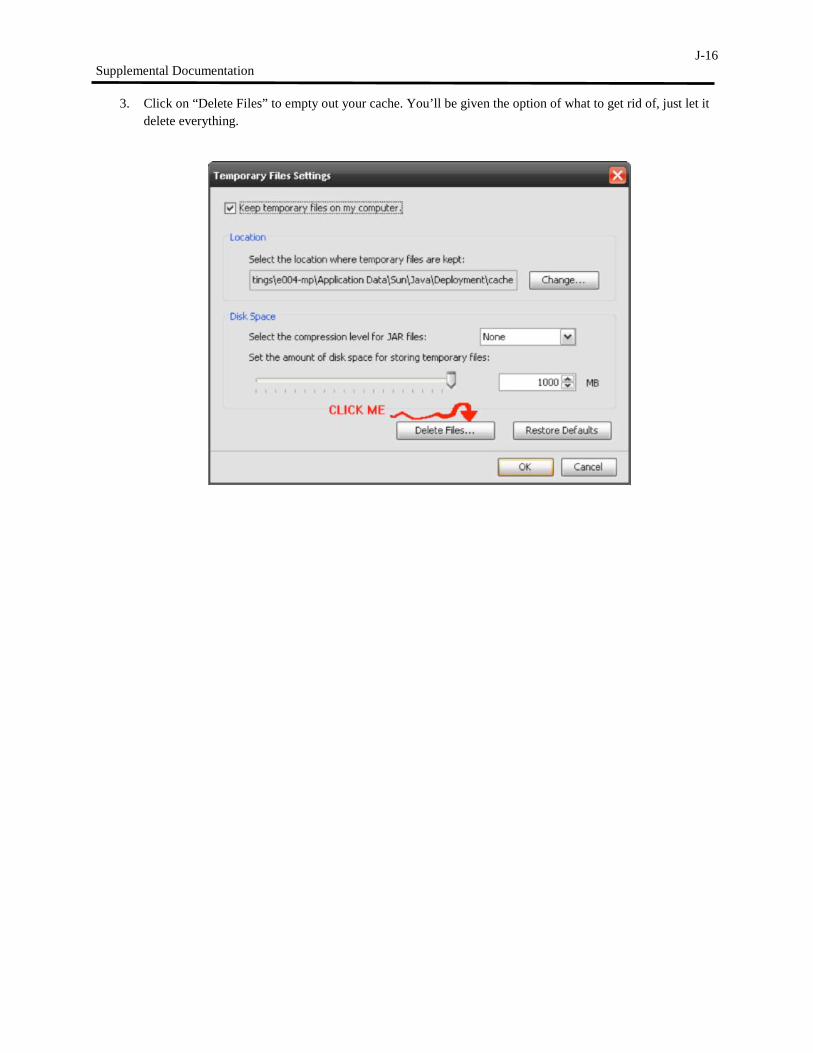
J-16 Supplemental Documentation
3. Click on “Delete Files” to empty out your cache. You’ll be given the option of what to get rid of, just let it delete everything.

J-17 Supplemental Documentation
Guidelines for Safeguarding Personally Identifiable and Confidential Information from Unauthorized or Accidental Disclosure Introduction
The purpose of this Statement is to reaffirm the Standards that apply in the matter concerning the safeguarding of administrative, personally identifiable or confidential data that has been entrusted to the University or to persons working on behalf of the University. These guidelines are applicable to the University’s computing and communications facilities, or any facility, service or device (privately owned, leased or granted), where such entrusted data are stored or accessed.
Terms and Definitions
For the purposes set forth in this document the University’s computing and communication facilities include all computing, video, data and telecommunication hardware and software systems owned, leased or granted to the university. Personally Identifiable Information (PII) refers to any data that identifies or can be used to identify, contact, or locate the person to whom such information pertains. This includes data that is used in a way that is personally identifiable, including linking it with identifiable information from other sources, or from which other personally identifiable information can easily be derived, including, but not limited to, name, address, phone number, fax number, external email address, financial profiles, social security number, drivers license number and credit card information. Administrative data refers to any data that are collected, maintained and used on administrative information systems that support the operations of the University. Confidential data refers to any data pertaining to individuals or the University that is sensitive, private, or of a personal nature, or data that is protected under a confidentiality agreement, regulation, law, or University procedure. The use of the term “institutional data” hereafter within this document is meant to refer to all personally identifiable information, administrative data or confidential data residing or accessible through the University’s computing and communication facilities, or any facility, service or device (privately owned, leased, or granted) containing data created by the University or entrusted to the University.
Guidelines
Authorized use of and access to the University's computing and communication facilities is intended and permitted solely to support the legitimate educational, administrative and mission-centered programs of the institution. Authorization for the use of and/or access to the University’s computing and communication facilities is granted by the Assoc. Provost of Computer and Communication Services and the Director or supervisor of the organizational unit that is the recognized steward and custodian of the data for which access is requested. Access to administrative data may be granted to individuals for the purpose of enabling them to fulfill specific job duties or contracted services or in furtherance of legitimate university business. Custodianship of data that is maintained on the university’s primary administrative information systems is detailed below. SYSTEM CUSTODIAN (Director or head of) Student Information System Admissions Admissions Office Shared Data Student Records Office
Records and Registration Student Records Office Financial Aid Financial Aid Office Student Receivables Bursar’s Office Academic Advising Advising Office Human Resource System Payroll Payroll Office Labor Distribution Office of the Dir. of Budget Personnel Records Human Resources Office

J-18 Supplemental Documentation
Benefit Record Human Resources Office Alumni and Development System
Advancement Records Alumni and Development Alumni Records Alumni and Development
Finance System Financial Account Office of the Dir. of Budget Accounts Payable Office of Accounts Payable Purchasing Purchasing Office E – Mail Systems Office of Computer Services Library Management System Office of the Director of the Library CBORD Board and Debit System Bursar’s Office Central Stores Central Stores Fixed Asset Inventory Office of the Controller Academic facilities and systems Office of Computer Services Housing Management systems Office of Housing and Residential Life Facilities Maintenance systems Office of Plant Management Learning Management systems Office of E-Learning Anyone who has access to institutional data must act to properly safeguard such data against unauthorized or accidental disclosure to a third party. Following are specific guidelines for the proper protection of institutional data. If you have any questions concerning data security, please contact the Office of Computer and Telecommunication Services.
Secure Access and Storage of Institutional Data – Institutional data must be protected from unauthorized access or accidental disclosure. Access to institutional data must, to the extent possible, be restricted using strong passwords (e.g., a password of greater than 8 characters, including special characters and numbers).
Securing Institutional Data on Backup or Removable Storage Devices– Employees may for specific job related purposes and with the approval of the appropriate data custodian copy or create and store institutional data to a removable storage device, PC, mobile device, cloud-based or remote facility. Removable media and mobile devices containing institutional data should always be kept in a place that is safe from theft, unauthorized access or accidental disclosure. Employees or other authorized personnel must take care to promptly remove institutional data that has been placed on desktop or portable computers, removable media, or cloud-based or remote facilities when the data is no longer needed for the specific purpose.
Device Access Security – Desktop and mobile devices that contain or provide access to institutional data must be password protected against unauthorized access. These computers and devices should be shut down when not in use for extended timeframes. Additionally, they should, when possible, be configured to require password re-authentication after no more than 20 minutes of inactivity.
Encrypting Institutional Data – Institutional data that is stored on a privately owned computer, mobile or removable storage devices, or cloud-based facility should be encrypted. Cost-free methods for encrypting and

J-19 Supplemental Documentation protecting data are readily available for most devices. (See detailed instructions on page J-20 under Protecting and Compressing Files in Windows.) Contact the Office of Computer Services for advice or assistance, if needed. Mobile computers, flash drives or removable drives acquired by the university for administrative purposes must be equipped and configured to automatically encrypt data.
Secure Transmittal of Data – Institutional data may only be transmitted to or from an external site, including external email accounts for specific job related purposes. Institutional data that are electronically transmitted to or from an external site, including an external email account, should be securely transmitted. When transmitted via email, institutional data should be encrypted, password protected and sent as an attachment to the email message. The password for the encrypted attachment must always be transmitted under separate cover or via telephone or voicemail. Some employees may for specific job related purposes need to transmit institutional data to a 3rd party (e.g., Financial Loan Processor, Bank, Credit Union, transfer institution). Whenever institutional data is transmitted to a 3rd party, it must be transmitted over a secure communication protocol, such as SSL, or Secure FTP. Contact the Office of Computer Services if you have questions concerning the secure transmittal of data.
Securing Paper Files – Institutional data that is kept in hard copy form must also be secured and protected. These data should be stored in a location that prevents unauthorized or accidental disclosure.
Effective Measures for Securing Institutional Data on Mobile Devices – Because of their portability mobile devices are more susceptible to loss and theft. Following are specific measures that should be observed to secure institutional data on mobile devices (privately or University owned) that contain institutional data. If you need assistance with any of these measures, please contact the Office of Computer and Telecommunication Services.
• Physically secure your device. Keep it with you or in a secured location. • Label the device with your name and a phone number where you can be reached in case the device is
found and the battery is dead or the device is otherwise unusable. • Enable device passcode or PIN protection features and select a passcode or PIN that is difficult to
guess. • Enable mobile device idle timeout (e.g., 5 minutes) and locking features. • If available, enable the feature that will erase data after 10 failed passcode attempts. • Delete any institutional data from the device when no longer needed • Encrypt institutional data on the device. All mobile devices and storage (e.g. flash drives) purchased
the University must have built in encryption and such encryption must be enabled. • Record make, model, serial numbers and MAC address of your mobile device and the date and place
of purchase. Keep your record in a location separate from your device. • Enable whole device encryption, if your device is so equipped. • Enable device tracking features. (e.g., Find My iPhone service) • Make a secure and encrypted backup of any institutional data (this is needed to not only retrieve data
but to also determine the extent of data disclosure, if any, in the case your device is lost or stolen). • If you are using a cloud service (e.g., iCloud) to back up or otherwise store your data use a strong
password. • Keep software up-to-date to protect against hacking attempts. • Only load apps or software on your device that come from a trusted source.
Reporting Lost or Stolen Devices or the Suspected Disclosure of Institutional Data – if you know or suspect that University property or a privately owned device containing institutional data has been lost or stolen promptly contact the campus police department. Additionally, promptly notify your unit manager of the incident and the Office of Computer and Telecommunications and request them to attempt to remotely locate your device and wipe email and MS Exchange data (or other data if possible) from the device. Most mobile devices store passwords so that mobile apps can automatically access remote computer applications without having ask the user to supply a username and password. To prevent unauthorized access to your data and accounts you should change your access passwords as soon as possible.
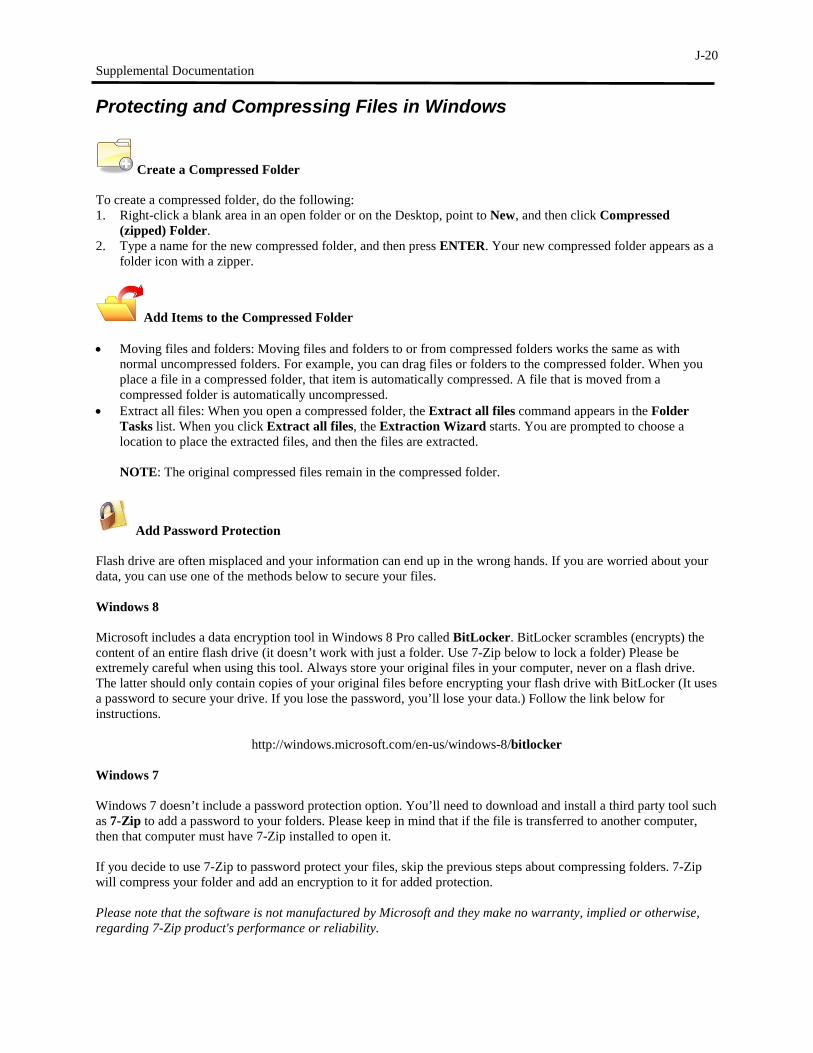
J-20 Supplemental Documentation
Protecting and Compressing Files in Windows
Create a Compressed Folder To create a compressed folder, do the following: 1. Right-click a blank area in an open folder or on the Desktop, point to New, and then click Compressed
(zipped) Folder. 2. Type a name for the new compressed folder, and then press ENTER. Your new compressed folder appears as a
folder icon with a zipper.
Add Items to the Compressed Folder • Moving files and folders: Moving files and folders to or from compressed folders works the same as with
normal uncompressed folders. For example, you can drag files or folders to the compressed folder. When you place a file in a compressed folder, that item is automatically compressed. A file that is moved from a compressed folder is automatically uncompressed.
• Extract all files: When you open a compressed folder, the Extract all files command appears in the Folder Tasks list. When you click Extract all files, the Extraction Wizard starts. You are prompted to choose a location to place the extracted files, and then the files are extracted.
NOTE: The original compressed files remain in the compressed folder.
Add Password Protection Flash drive are often misplaced and your information can end up in the wrong hands. If you are worried about your data, you can use one of the methods below to secure your files. Windows 8 Microsoft includes a data encryption tool in Windows 8 Pro called BitLocker. BitLocker scrambles (encrypts) the content of an entire flash drive (it doesn’t work with just a folder. Use 7-Zip below to lock a folder) Please be extremely careful when using this tool. Always store your original files in your computer, never on a flash drive. The latter should only contain copies of your original files before encrypting your flash drive with BitLocker (It uses a password to secure your drive. If you lose the password, you’ll lose your data.) Follow the link below for instructions.
http://windows.microsoft.com/en-us/windows-8/bitlocker Windows 7 Windows 7 doesn’t include a password protection option. You’ll need to download and install a third party tool such as 7-Zip to add a password to your folders. Please keep in mind that if the file is transferred to another computer, then that computer must have 7-Zip installed to open it. If you decide to use 7-Zip to password protect your files, skip the previous steps about compressing folders. 7-Zip will compress your folder and add an encryption to it for added protection. Please note that the software is not manufactured by Microsoft and they make no warranty, implied or otherwise, regarding 7-Zip product's performance or reliability.

J-21 Supplemental Documentation Windows XP Files and folders in compressed folders can be protected in Windows XP by using a password. To password protect the contents of a compressed folder: 1. Double-click the compressed folder that you want to password protect. 2. On the File menu, click Add a Password. 3. In the Password box, type the password that you want to use. Type the same password in the Confirm
Password box, and then click OK.
Installing 7-Zip
1. Download 7-Zip from http://www.7-zip.org/
2. Install using default options.

J-22 Supplemental Documentation
Using 7-Zip
1. Right click on the folder you wish to protect, click on 7-Zip and Add to archive.
2. Under Encryption, enter a password and make sure AES-256 is selected for the Encryption method.
A separate folder is created with the 7z extension name (folder name.7z).

J-23 Supplemental Documentation 3. To open the 7z folder, right click on it, click on 7-Zip and Open Archive.
4. Click on the folder name from the list to select it. 5. Click on Extract.
6. Click on the three dotted button to select the location where you want to extract the folder.
7. Enter the password and click on OK The password for a password-protected compressed file is not recoverable. If you lose the password, you will be unable to access the file.

J-24 Supplemental Documentation
Accessing Library Databases The Library Channel in the goStockton Portal is the starting point for serious research needs.
Library Catalog Search the Library’s book and video collection through the Library Catalog. The Catalog allows for author, title, subject searches. “Power Search” enables the searcher to conduct more focused searches utilizing various limiters and field searches (See University Library Web-Based Catalog System on page J-26 for more information.) How do I find a list of the videos the Library owns?
• Log into the Library Catalog library.stockton.edu • Select POWER SEARCH under the search box • When the next screen comes up scroll down to the TYPE line. Select VHS-DVD • Click SEARCH
The resulting list will show the Library’s video holdings in alphabetical order. Periodical Databases
Over 25,000 journals are available electronically from the Stockton library. These are periodicals indexed in our various electronic databases. Examples of some of the databases available are listed below:
ABI/Inform Academic Search premier Historical New York Times JSTOR Lexis-Nexis Academic Universe Omnifile Full Text Westlaw Campus

J-25 Supplemental Documentation These electronic research databases are available 24/7 through the library’s web pages. To find the electronic databases available to you, click on the DATABASES link in the Library Channel on the goStockton Portal.
Your Portal email account ID and Password serve as the ID and password to access these databases from off campus.
Journals and Magazines
To find if Stockton has a particular journal check the Stockton Journal List. It will give you the titles of the journals, the Library can access both in print and in full -text online.
What do I do if Stockton does not own the journal I need? First check the Stockton Journal List to be sure Stockton doesn't have the journal. If the library does not own a copy of the journal, you can submit an Interlibrary Loan Request using Illiad. This is available from the Library’s Homepage. Click on the Interlibrary Services link. The service is free but you need to register before using it.
What is the difference between using Google and using the Library resources? When you use Google or other search engines, you are searching a wide ocean of information. You are spreading your net very widely. Your chances are good for finding something but in the process you will have to cull through a lot of other fish to discard. Much of the information in search engines, like Google has not been reviewed for accuracy.
The library databases offer access to a more focused universe than the World Wide Web. These databases have been reviewed and selected to provide precision, depth and reliability. Material is usually copyrighted and not available elsewhere.
For help, either stop by the Information Desk or call 652-4266 and ask to speak to a librarian.
Library Phone Numbers Circulation Desk 652-4346 Information Desk 652-4266 Library Administration Office 652-4343

J-26 Supplemental Documentation
University Library Web-Based Catalog System Log in to the goStockton Portal and click on Library Catalog in the Library Channel on the Home tab. To begin searching, type a term in the search box and choose one of the following: • Words or phrase • Author • Title • Subject • Series • Periodical title Your search results may be a single catalog record or a list of catalog records. Click Power Search to further refine your initial search. On the right hand side, click Browsing to browse on authors, titles, subjects, series, or periodical titles. Click Call Number to search for a specific call number. Power Search combines search elements to refine a search, or limit a search based on criteria configured by the Library. You can also produce a browse list of specified items, or perform a call number search. Searches can include a single word or several words with operators and special punctuation. Combining Search Elements You combine search elements in Power Search by using Boolean operators. You can combine word or phrase, author, title, subject, series, and periodical title searches. • Type a Word or Phrase for a typical search.
• Type an Author to search for the name. You can search for an author by the first name, last name, or initials.
However, searching by an author's last name produces a more complete list of search results.
• Type a Title to search for an item by title. The search ignores articles as well as other stopwords.
• Type a Subject to search the subject index.
• Type a Series to search for a series title.
• Type a Periodical Title to search the periodical keyword index. Click Search to start your search or Reset to start over.

J-27 Supplemental Documentation Limiting the Search Use Power Search to limit your search based on criteria configured by the Library. • From the pull-down boxes select Language
Item Type Shelving Location
• You can have your search match on a particular part of a catalog record (such as keywords only) by selecting a
portion to Match On.
• In the Pubyear box, type the year the item was published.
• You can sort your power search results by selecting criteria in the Sort By box. Click Search to start your search. If you have questions, call a Librarian or the Information Desk at ext 4266.

J-28 Supplemental Documentation
Guide to Turnitin.com, a Plagiarism Prevention System STEP I Registering in Turnitin Go to www.turnitin.com
1. Click on “create a user profile” link (upper right of the screen) 2. Select your user type (student or instructor) and click next 3. Enter the Turnitin account number/class ID and the Turnitin password (provided by your institution’s
account administrator) 4. Enter your e-mail address 5. Fill out your profile information and give yourself a personal password 6. Once you have created your profile, click the start class setup wizard to create your first class
STEP II Setting up a class
1. On your homepage, you will see the class you created using the class setup wizard. If you want to create another class or if you did not use the class setup wizard, click the add a class link
2. On the class creation page, enter a class name and a class enrollment password (You will need to share this information with your students if you want them to upload their papers. The enrollment password is the password your students will use to enroll in your class. Pick a password that is easy for your students to remember and that contains all lowercase letters. If you want to let students enrolled in your class view their own Originality Reports, select yes using the pulldown. By default, students do not have access to their own reports.)
3. Click submit to add the class to your Turnitin homepage STEP III Submitting Papers
Students should be asked to upload their papers before submitting them to the instructors. Instructors should not submit student papers to Turnitin after receiving them from students. To do so, by sharing student work with a third party without their permission, may constitute a violation of FERPA.
Students register in Turnitin and join a class using the class ID number and class password provided by the Instructor. To submit paper students should do the following:
1. Click on the class name. The assignments created for the class will be listed there. 2. Click on the Submit button to the right of the assignment name. Select single file upload from the choose a
paper submission method. Click Browse button and select the file to upload from your computer or flash drive. Fill in the title of the paper. Click upload. Review the preview panel. Confirm that it is the correct version of the paper to send and click submit.
3. They will receive a digital receipt which will also be mailed to them.
Instructors should check their Turnitin box in 24 hours (or less), If the report icon is lit, the assignment has been checked and a report is ready. Click on the report icon to view.
More questions? Go to the Turnitin homepage, www.turnitin.com and click on New to Turnitin or Training.
Important change: Turnitin does not support Internet Explorer 8 as of July 1, 2014

J-29 Supplemental Documentation
Password Protection
System Security Begins With You There are two classifications of individuals who try to break into computer systems -- hackers and crackers. Hackers are individuals with proficient computer skills who exploit weaknesses in system programming in order control a computer system. Crackers break into computer accounts and damage the system using the privileges that are available to the stolen account or use the stolen account to mask their identity when attempting to break into other computer systems on the local network or the Internet. How can these renegades be foiled? The hacker is stopped by closing down the “holes” the s/he finds. Computer & Telecommunication Services regularly installs software patches to close down security holes and continuously monitors possible break-in points. The cracker is stopped by good password security and good password security is in your hands.
Keep your password secure Never tell someone else your password. Stockton University feels so strongly about this aspect of password protection that it is specifically stated in the acceptable use policy in Standard 2.
“Users may not disclose the password of an account or otherwise make the account available to others who have not been authorized to use the account. Users are responsible for all usage of their accounts and are expected to take appropriate safeguards to assure that their passwords are not known to others.”
Never write down your password. Anyone observing your login will see where it is located and can retrieve it for their use -- or misuse -- when you aren’t around. Even if they don’t observe your login, they will look for anything written down and posted in the vicinity of your workstation (e.g., the side of the monitor, bottom of the keyboard, on the keyboard tray.). Never send your password to someone else in an electronic mail message. You cannot be sure of the security measures taken on the systems that your message passes through or the security of the system where your message is delivered. Never use software that automates your login. This type of feature embeds your password into a configuration file or programmable keyboard key. Anyone sitting at your computer has immediate access to your password. Use a password that you can type easily and quickly. This will thwart anyone attempting to get your password by watching over your shoulder as you type.
Change your password regularly All of our central systems and file servers require you to change your password every ninety days. If you suspect someone might know your password, don’t wait for it to expire. Change it immediately!

J-30 Supplemental Documentation
Avoid password pitfalls Don’t pick a password that can be found in the dictionary. Our central computers check your password against a system dictionary, but there are many different dictionaries available. A word that is not in our system dictionary just might be in the crackers’ dictionary. This includes foreign language dictionaries as well. Don’t choose a password that uses personal information that someone could easily find out about you. This includes information such as:
• Your name, username, or nickname • Names or nicknames of friends, relatives, pets, or locations that are special to you • Numerical data about you such as birth date, social security number, license plate number,
phone number, address, or zip code • Technical terms or names of prominent individuals in your field of expertise • Variations of any of these (e.g., your nickname spelled backwards)
Don’t choose a password that others might also choose. You should avoid:
• Names of famous people such as sports figures, literary characters, mythological figures, biblical figures, actors, or political figures
• Names of computer systems or software products
• Any commercial brand names
• Names of cartoon characters or science fiction characters (especially Star Trek and Tolkein) Remember, the cracker wants to get into your account with as little trouble as possible. In addition to using dictionaries and password cracking programs, crackers also share lists of common passwords. The words below were extracted from a commonly used password list published on a cracker bulletin board. None of these types of words are likely to be in a dictionary, but a cracker will try them.
albany bacchus Batman beethoven beowulf berkeley berlin celtics Charon daemon disney egghead einstein euclid Fermat forsythe fourier gabriel garfield harvey Ingress kermit macintosh merlin michael mozart napoleon newton orwell osiris phoenix pierre polynomial rachmaninoff snoopy socrates toyota wombat yosemite
In addition to the types of words already mentioned, there are also non-words that should be avoided. Don’t use strings of all the same character, for example XXXXXXXX. Don’t use numeric patterns such as 246810. Don’t use keyboard patterns such as QWERTY or YTREWQ.
Choose a good password What is a good password? A good password is one that is easy to remember but hard to guess. There are several methods you can use. You can use real words as long as you use them wisely. One method is to concatenate two unrelated words. Example are LAMPFISH or BOATAPPLE. Another method takes this idea a step further. Use two common words, but separate them by a non-alphanumeric character. Examples are SPIDER_STAR or SILVER$BOOK. A third method is to intentionally misspell a word or words. For example, the word TEACHER could become TEECHUR.
J-31 Supplemental Documentation You can create a pseudo-word by alternating consonants with one or two vowels. These words are pronounceable and easy to remember, but hard to guess. Examples are BOUGAMIT or EXOJUK Finally, you can create a password like you might create a mnemonic device. Take a phrase that you can easily remember and use the first character of each word. If possible, include numbers and non-alphanumeric characters. For example, the phrase “Four score and seven years ago” could translate into the password 4SA7YA.
Changing Your Active Directory Password Once you have logged onto your computer, please use ONE of the following methods to change your password. METHOD 1 From your computer (Only from your office computer): 1. Log into a Windows machine using randomly generated password 2. Hold down Ctrl and Alt keys, then press Delete key 3. Click Change Password button 4. The “Username” and “Log On To” field will already be completed 5. Enter in the randomly generated password for “Old Password” 6. Enter your new password into the final two “New Password” areas 7. Press “OK” 8. Press “Log Off” 9. Now you may logon with your newly created password >> OR << METHOD 2 From Outlook Webmail (Not the Outlook client, but can be done from any computer): 1. Log on to Outlook webmail (https://webmail.stockton.edu) using randomly generated password 2. Down at the bottom left click “Options” 3. The second to last option over on the right pane will now be “Change Password” 4. Enter “Stockton” without the quotes for “Domain” 5. Enter in the randomly generated password for “Old Password” 6. Enter your new password into the final two “New Password” areas 7. Press “OK” 8. Logout of Webmail and Log back in using your new password If you have any problems please contact the helpdesk at x4309 for assistance.
J-32 Supplemental Documentation
Unsolicited E-mail (aka “spam”)
How would you like to re-finance your mortgage at an incredibly low interest rate? No? Well, how about a sure fire way to lose 25 pounds this weekend? Still not interested? Well then, visit our web page and get free webcam so you can keep an eye on your pet Schnauzer from your office PC.
Chance are, most members of the campus community have received messages like these. They are called "unsolicited commercial e-mail" (UCE) and are also known by the term "spam" after an old Monty Python comedy routine. No matter what you call these messages, they are annoying. They use up valuable bandwidth, disk space, and time.
There are strategies that the university has in place to reduce unwanted e-mail and there are strategies that members of the campus community can employ to help reduce the amount of unwanted e-mail they receive.
How does e-mail work? E-mail systems are very much like their hard copy cousins. When you wish to send a letter, you sit down with pencil and paper, commit your thoughts to paper, put the letter in an envelope, address it, affix postage, and drop it in a mailbox. The Postal Service reads the address and transports the letter to its destination. The recipient opens his/her mailbox and reads the letter or tosses it in the trash. In the Internet world, the postage is part of the fee you pay to access the Internet. You use an e-mail program to compose your message. You provide an address and send the message. A mail server determines how to route the message and sends it to another mail server at the destination computer for delivery. The recipient opens his/her mailbox and reads the message or files it in the electronic wastebasket.
Where does spam come from? Spam comes from exactly the same place that the junk mail in your home mailbox comes from. Someone has collected a list of addresses and has sent out a message expecting that the recipients will be interested.
Don’t Internet service providers have rules against spam? Yes, most of them do. Unfortunately, spammers rarely operate from the same electronic location for very long. Spammers generally "hit and run." They search the Internet for vulnerable systems, use them to send a slew of unwanted messages, and move on. Additionally, Internet service providers outside of the United States may view the Internet as a communication medium to be exploited for potential commercial gain and may not have policies banning spam.
How does a spammer get my e-mail address and how can I protect my e-mail address? Most of the time you give your address to a spammer. Here are some common scenarios and methods for defending against them.
Scenario: Users of a web site are required to register their e-mail address in order to gain access to information or purchase goods.
Defense: Before supplying your e-mail address, read the privacy policy for the site. Reputable sites will clearly spell out how any information provided will be used and often carry the TRUSTe logo. They will also allow you a choice of electing not to receive e-mail communications. If the site does not have a privacy statement or their policy indicates that they will provide your address to other organizations, don’t give them your address. Use an alternative method of contact (e.g., telephone, fax, US mail). Also, you should avoid using your Stockton address for personal transactions. Keep your business and personal communications separate. A variety of online services (e.g., Hotmail, Lycos, Yahoo) provide free and/or low cost web mail access for personal e-mail.
Scenario: Visitors to a web site sign the guest book and include their e-mail address
Defense: Don’t sign electronic guest books.

J-33 Supplemental Documentation Scenario: Web page owners post their e-mail addresses on their home page. These are then harvested by automated search programs.
Defense: Don’t use the "mailto:" tag that is built into HTML. Use javascript instead. A sample is of this code is available online at http://javascript.internet.com/page-details/email-protector.html
Scenario: E-mail users receive unsolicited messages even though they limit the distribution of their e-mail address.
Many unwanted messages can result from a computer infection. The best defense is to keep antivirus software up to date to prevent infection and scan regularly to detect infection. Newer worms check many files on the infected hard drive looking for e-mail addresses, not just the address book. These files include the browser cache (temporary files created by Internet Explorer or Netscape as you visit web pages), Word documents, and text files. Some worms even build likely addresses from words found in these files.
What is Stockton doing to reduce spam? Three major strategies are in place:
Reverse address look-up: Any mail message from a non-existent domain name is automatically rejected by the mail server. For example, a message from [email protected] would be rejected because "metropolis-daily-planet.com" does not exist.
Address blocking: Message deliveries are logged by the mail server. When messages are persistently sent from a particular network, and a complaint is lodge with Computer and Telecommunication Services, the university consults a variety of Internet database to determine if prior complaints have been filed. If an IP address has been blacklisted, it will be blocked.
Heuristic blocking: A special appliance sitting on the edge of the network monitors incoming mail. Messages that have specific characteristics of known spam are blocked before delivery. Since the installation of this device in Spring 2004, spam has been reduced by about 90%.
What about spam filters? Although filters are in use, filtering e-mail messages is a never-ending battle. Blocking usernames, domain names and subject lines will only work for a very short period of time. Spammers regularly change the text used in each of these fields and change the networks that they use. In addition, legitimate mail can be blocked by mistake.
What about using the unsubscribe process described in the e-mail message? Unless the unsolicited message is from a company that you know is legitimate, do NOT follow the unsubscribe instructions in the message. This will confirm that your address is active and can result in even more spam.
Is there anything else that can be done? The Direct Marketing Association sponsors an "opt-out" database of e-mail addresses that is used by its members. Although, it can be helpful in reducing unwanted e-mail, there are two problems. First, users have to keep re-subscribing. Records are only kept for two years. Second, most spammers are not members of the Direct Marketing Association and do not consult this database.
If you wish to register your e-mail address, visit their web site at
http://www.dmaconsumers.org/optoutform_emps.shtml
Although laws can’t stop unsolicited e-mail, they do provide for penalties. Contact your state and federal representatives to support for anti-spam legislation which requires companies to prove that e-mail recipients have "opted in."

J-34 Supplemental Documentation How should I handle unsolicited messages? You should delete unwanted messages and messages with the following characteristics:
-- Messages from unfamiliar usernames -- Messages from familiar usernames sending unexpected attachments -- Rejection notifications for messages you never sent -- Messages with garbled subject lines -- Messages with garbled text
If you are repeatedly receiving unwanted messages from the same apparent source or with the same subject line in your Stockton mail, forward the message to [email protected].

J-35 Supplemental Documentation
StockTalk Discussion List StockTalk is an e-mail discussion forum for Stockton employees. Employees may leave or rejoin the list at any time. Instructions for leaving and rejoining the list are attached to the bottom of each message. The sender of a message also receives a copy of his/her posting. The subject line of all messages from StockTalk include "[STOCKTALK-L]". Any replies to messages with this text in the subject line are sent to the entire list. To post a message to this list, log in to Outlook and send an email message to "StockTalk". To leave this list, log into Outlook and send an email message to [email protected] containing the following text: UNSUBSCRIBE STOCKTALK-L To rejoin the list at a later date, log in to Outlook and send an email message to [email protected] containing the following text: SUBSCRIBE STOCKTALK-L your-first-name your-last-name StockTalk is only accessible via your Outlook email account. All postings on the StockTalk list must be consistent with the University Code of Ethics and Acceptable Use Policy.

J-36 Supplemental Documentation
INSTRUCTIONS FOR TEST SCORING USING A NO. 2 PENCIL, OR A BLUE OR BLACK PEN, FILL IN A GENERAL PURPOSE ANSWER
SHEET WITH CORRECT RESPONSES TO BE USED AS THE KEY. CODE UNDER NAME: KEY, A SPACE, INSTRUCTOR'S LAST NAME, A SPACE AND INSTRUCTOR'S FIRST INITIAL OR YOU MAY CODE ANOTHER REFERENCE UNDER NAME. THE KEY MUST HAVE A 1 CODED UNDER LETTER J OF IDENTIFICATION NUMBER. A KEY MUST BE SUBMITTED FOR EACH COURSE AND EACH SECTION EVEN IF THE KEY IS THE SAME.
TO OMIT A QUESTION, LEAVE THE APPROPRIATE BUBBLE BLANK ON THE ANSWER KEY. (YOU MUST USE LIQUID WHITEOUT IF AN ANSWER WAS PREVIOUSLY CODED).
USE "A" AND "B" FOR TRUE AND FALSE RESPECTIVELY.
TO GIVE CREDIT FOR A QUESTION, CODE IN ALL THE BUBBLES FOR THAT QUESTION. IT WILL BE CODED AS AN ASTERISK ON THE REPORT. FOR SURVEYS, PLEASE CODE "A" AND "B" FOR EACH QUESTION TO ACCEPT ANY RESPONSE.
IF YOU SUBMIT MORE THAN ONE POSSIBLE ANSWER FOR ANY QUESTION ON THE ANSWER KEY, ANY ANSWER SUBMITTED BY A STUDENT WILL BE CONSIDERED CORRECT (EVEN A BLANK).
USE RED INK OR RED PENCIL TO MAKE UNSCANNED COMMENTS ON YOUR KEY.
ALSO USING A NO. 2 PENCIL, OR BLUE OR BLACK PEN, STUDENTS SHOULD COMPLETE A GENERAL PURPOSE ANSWER SHEET WITH THEIR RESPONSES TO EACH QUESTION, THEIR LAST NAME, FIRST INITIAL, AND SOCIAL SECURITY NUMBER UNDER LETTERS A-I OF IDENTIFICATION NUMBER.
SUBMIT TO COMPUTER SERVICES FOR PROCESSING, A COMPLETED TEST SCORING REQUEST FORM, ANSWER KEY, AND STUDENT ANSWER SHEETS. ANSWER SHEETS AND TEST SCORING REQUEST FORMS ARE AVAILABLE IN D-127, COMPUTER SERVICES. THE ANSWER SHEETS ALLOW 200 QUESTIONS WITH FIVE CHOICES (A-E).
WHEN USING INK, YOU MUST USE LIQUID WHITEOUT TO MAKE ANY CHANGES.
DO NOT ALLOW STUDENTS TO USE RED INK OR RED PENCIL.
PLEASE BRING WHITEOUT TO CLASS FOR STUDENTS TO CHANGE INK ANSWERS.
PLEASE MAKE SURE ALL FORMS ARE STACKED THE SAME WAY (THERE IS AN UPPER RIGHT CORNER CUT ON FORMS TO QUICKLY SIGHT CHECK BY).
TESTS ARE RUN MONDAY THROUGH FRIDAY AT 9 A.M. AND 2 P.M.

J-37 Supplemental Documentation
Guide to obtaining Class lists Online Class lists are available online in the goStockton Portal. On the Faculty Tab, in the Faculty Advising Tools channel, click on the Download Classlist to Excel link.
Class Distribution Lists We have added class distribution lists to the university’s e-mail system. These new distribution lists will allow Outlook users to easily e-mail to students enrolled in a particular class. Distribution lists are updated the week before each semester and every other day during the drop/add period. To use this feature, create a message and enter into the TO field the class acronym, number and section followed by @stockton.edu. For example, to mail to the students in CSIS 1180 009 you should enter:
[email protected] A personal e-mail account is created for each student when they enroll in the university for the first time. The class distribution lists e-mail to these addresses.
Distribution List for Preceptors This distribution list allows preceptors to send e-mail to all their students. Just type your username (first seven letters of your lastname plus first initial) at the to: prompt, followed by [email protected]. For example, professor John Doe would enter the following:

J-38 Supplemental Documentation
LAN School gives the instructor the ability to broadcast the Lectern PC to the Student Workstations and view individual Student Workstations at the Lectern PC in an Electronic Classroom. View a Student’s Screen: 1. Right Click on LAN School in the task bar 2. Select “LAN School Console” 3. Double click on the machine to view from the list of machines 4. When done click on Monitor on the tool bar and then Stop Viewing or Remote Controlling from the list Broadcast Lectern to Students: 1. Right Click on LAN School in the task bar 2. Select “Show Teacher’s Screen” 3. Select “Stop Showing Teacher’s Screen” to stop Blank Student Screens: 1. Right Click on LAN School in the task bar 2. Select “Blank All Screens” 3. Select “Unblank All Screens” to stop

J-39 Supplemental Documentation
Using the Classroom Control Systems This system provides the university community with an intuitive
LCD panel that can be used to remotely control several
aspects of the classroom including:
• Projector (Computer / Video)
• Sound (Speakers / Amplifier)
• Scheduled Media
• Lectern Computer
• Lighting*
• Screen Control*
In these classrooms, the Hitachi Starboard LCD Display works cooperatively and independently of the
computer to create a rich environment. The StarBoard is shown in the picture above, it features a pen
which can be used to annotate directly on its screen, allowing the user to write directly on an adjustable
and ergonomic surface while having the ability to integrate annotations within PowerPoint / Word.
The pen is also the primary means of controlling most of our electronic classrooms. The system has two
modes, presentation mode and control mode. If the StarBoard is displaying the control screen, you’ll see
some of the following options…
• ON / OFF
• Black Burst (Blacks out projector temporarily)
• Source / Local (Plays Video from TV network or DVD/VCR)
• Scheduled Media (Controls your pre-scheduled media event)
• Laptop (Allows you to connect a laptop to the projection and audio systems)
If you approach a StarBoard and do not see the aforementioned options on the screen, look in the bottom
center of the screen for a translucent block that reads
Using the pen, press this block to leave the presentation interface and return to the control interface.
FOR ALL ROOM SUPPORT, CALL EXTENSION #4309
RETURN TO CONTROL
* Not implemented in all rooms
Call x4309 for support

J-40 Supplemental Documentation Using the control interface, you can turn on the projector, use the Document Camera, and watch video
feeds without ever turning the computer on. The StarBoard touch panel features on-screen windows that
allow users to preview computer and video feeds while the system is off / blackbursted.
The system integrates the lectern computer with a laptop computer input, a document camera (found in
the pullout drawer), a DVD/VCR, and the campus video distribution system.
To begin, make sure the Starboard LCD Display is turned on. If there is no light on the front of the screen,
press the power button in the middle below the screen. The Starboard functions are controlled by the Stylus
Pen attached to the base. Make sure the Stylus power button, located on the top, is clicked in, and then
touch the tip to the screen. Using the pen you can turn the projector on and off, switch between the different
inputs sources, as well as control the PC with the stylus as a touch-screen mouse.
In addition to the connection to the video distribution system at the
Media Center, each room is equipped with a VCR/DVD player that
is controlled directly at the Starboard LCD Display. To play a
videotape, simply place the tape in the VCR, select DVD/VCR on
the left side of the Starboard display, and press play. To play a
DVD, press the DVD button on the window that appears when
DVD/VCR is pressed.
The following rooms are configured with the Starboard Control System: - are starboards being installed in the USC rooms?
A B B C D/E 100-F 200-F G/H J/K/M RES ALTON B001 B101 C001 D003 F103b F202 G108 J102 TRLC
B002 B102 C008 D004 F111 F203 G138 J102a LSL B003 B103 C009 D009 F114 F204 G139 J103 B004 B104 C011 D018 F115 F205 G201 J201 B005 B105 C012 D019 F118 F212 G203 K101 B008 B125 C102 D027 F119 F221 H102 K102 B010 B126 C103 D120 F120 F222 H116 K141 B011 C134 E210 F121 F223 B012 C135 HRC F224 B014 C136 F225 B015 F226 B016 F245
Control System Functions – At a Glance
TURN SYSTEM OFF WHEN NOT IN USE (including wireless presenter and stylus pen)
PLEASE LOCK PODIUM BEFORE LEAVING

J-41 Supplemental Documentation
1. Turn Projector On or Off, select “ON / OFF” on Starboard control interface 2. Select Computer, select the “PC” button using the stylus pen 3. Select Laptop Computer, select the “Laptop” button using the stylus pen 4. Select Document Camera, select “Doc-Cam/Elmo” using the stylus pen 5. Select the local VCR/DVD player, select “DVD/VCR” on tab at left of screen 6. Scheduled Media Events, select “Scheduled Media” to play events scheduled through the video
distribution system 7. Source Control: The “Source/Local” control allows you to watch cable channels 8. Audio control: The “Volume” and “Mute” buttons control audio of the selected device 9. Black Burst: - Will black-out projector display, without the need to power down the projector
FOR ALL ROOM SUPPORT, CALL EXTENSION #4309 Stylus Pen Operation Control of the system is made possible through the use of the stylus pen that is attached to the Starboard Monitor.
# 5 Local DVD/ VCR
# 6 Scheduled Events
# 5-6 Transport Controls
# 5 DVD menu Cursor
Touch here to enlarge - Use Tab “Minimize Video” to go to control
Selected Mode
# 9 Black Burst
# 1 On / Off
# 2-3-4 Inputs
# 7 Source
# 8 Vol / Mute
Touch here to enlarge – Use Tab “Return to control” to minimize

J-42 Supplemental Documentation
Wireless Presenter Operation
Laptop Connection To connect your laptop to the projector, open up the Cable Cubby on the top of the lectern. There are three cables inside: VGA for display, Ethernet for Internet access, and Stereo mini-jack for sound. After hooking up the VGA cable, set your laptop to the LCD option (FN + F8 on most laptop models). When setting up audio, plug the mini-jack into your headphone port. The network will automatically assign an IP address to give you Internet Access. If you have an Apple computer, an additional adapter may be required to connect the VGA cable (Computer| Services does not provide this accessory). USB Flash Key / Thumb Drive Access
Power button
Power
PC Volume Control
Previous Slide
Start/End Presentation
Black Screen/Return to Normal
Next Slide
Laser Pointer

J-43 Supplemental Documentation To access files from your USB thumb drive, plug it into the USB Port on the top of the lectern. Your drive will show up in My Computer
Document Camera Operation To use the document camera, select the Elmo button on the Starboard LCD Display. Turn on the device by flipping the power switch on the back ELMO Document Camera. Focus and Zoom controls are located on the front of the Document Camera base. Carefully unfold the arm(s) and please return to the folded position when finished.
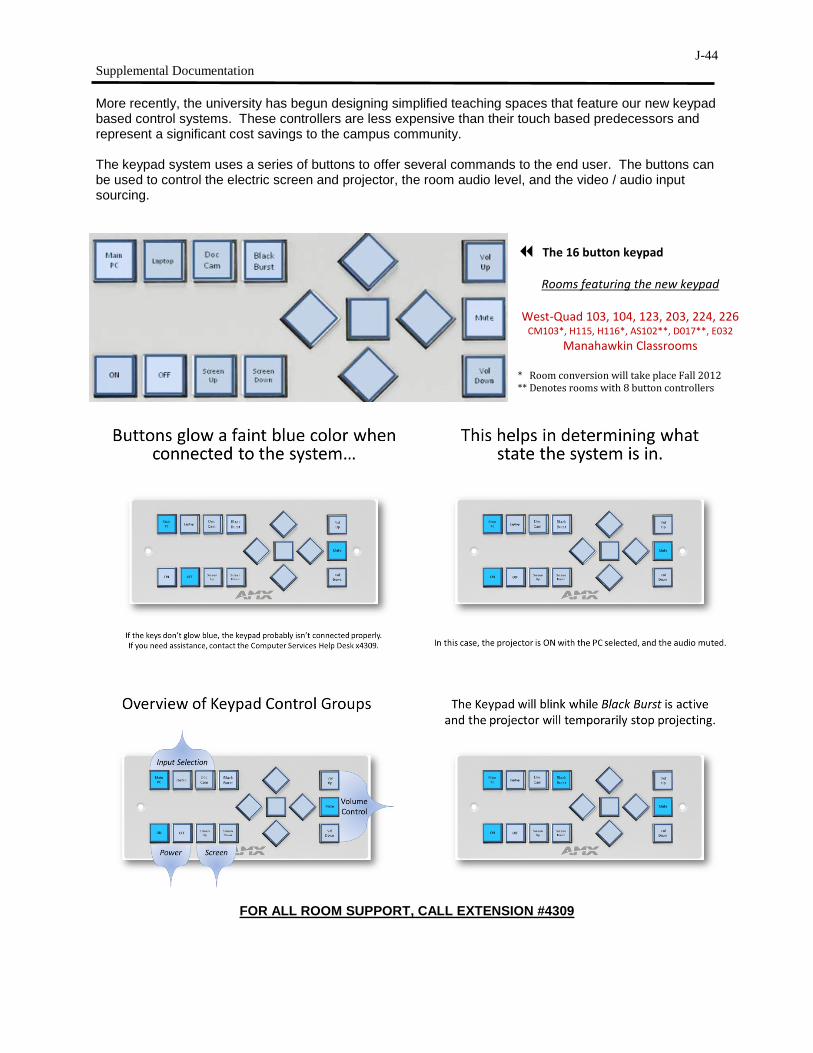
J-44 Supplemental Documentation More recently, the university has begun designing simplified teaching spaces that feature our new keypad based control systems. These controllers are less expensive than their touch based predecessors and represent a significant cost savings to the campus community. The keypad system uses a series of buttons to offer several commands to the end user. The buttons can be used to control the electric screen and projector, the room audio level, and the video / audio input sourcing.
FOR ALL ROOM SUPPORT, CALL EXTENSION #4309
The 16 button keypad
Rooms featuring the new keypad
West-Quad 103, 104, 123, 203, 224, 226 CM103*, H115, H116*, AS102**, D017**, E032
Manahawkin Classrooms * Room conversion will take place Fall 2012 ** Denotes rooms with 8 button controllers

J-45 Supplemental Documentation Note: Some classrooms do not have a StarBoard or do not use a StarBoard or keypad for control, these rooms are controlled using the Phoenix32 System. In
these rooms, classroom control is accomplished using an icon on the desktop of the
lectern computer. The Phoenix32 Icon is shown to the right. To use the Phoenix based systems, you must turn on the lectern PC.
The following rooms use the XGEN system.
Arts & Science C E Carnegie Library West Quad Bldg 80 AS110 AS203 CM103 E004 CLC110 CLC211 WQ216 Classroom AS139 AS209 E012 CLC114 CLC303 WQ220 Lab AS140 AS234 CLC202 CLC305 AS142 AS239 CLC206 AS202 AS241
Turn the podium workstation on and start Phoenix for Room Control
Phoenix32
Power Control
Transport Control For Scheduled Media Input Sourcing
Phoenix Control System

J-46 Supplemental Documentation
Using the Phoenix Handheld Remote Control The following table describes the control options for local televisions.
Operation Function Description
TV General The TV control buttons operate the classroom television. The following functions are always available. On/Off To turn on or off the classroom television power: • Press the ON/OFF button. NOTE: Only the educator can control television power. Volume To control television volume: • Press VOLUME (up) to increase volume. • Press VOLUME (down) to decrease volume. Mute To activate or deactivate the volume mute: • Press MUTE to turn the mute feature on and off. MODES The TX-CT5 has two operation modes, Media Mode and Local Mode. Local Mode The Local Mode is active whenever one of the following occurs: • There is no media scheduled to that classroom. Source • Press SOURCE (up) to select the next instructional channel. • Press SOURCE (down) to select the previous instructional channel. Media Mode The Media Mode is active whenever there is a media source, broadcast channel, or media plan scheduled to a classroom. Source • Press SOURCE (up) to pause current media, select next source
assignment, and then play assigned media source. • Press SOURCE (down) to pause current media, select previous
source assignment, and then play assigned media source. NOTE: You can select up to 10 sources.
The following table describes the head-end system media control features.
Operation Function Description
MEDIA CONTROL
The TX-CT5 has a standard set of motion control buttons located on the right side.
Motion Control Symbols To control the motion of the media, use the following buttons: PLAY STOP �� PAUSE FFWD (Fast forward) REV (Rewind) � FWD (Step forward) � REV (Step reverse)
J-47 Supplemental Documentation
Starboard Software Instructions
Loading the Starboard software Double click on the “Special Applications folder” and then double click on the “Starboard Software” icon. Click on the “Toolbar” setting on the left side because it will be easier to navigate using this plus other applications. If you prefer the Main Menu full screen you can click the “Full Screen” icon on the toolbar. Utilizing the software with the Pen Click on the “Standalone” icon on the toolbar. This will give you access to the PEN tool. PEN: If you click on the “Pen” icon you will be able to draw on the screen to highlight or emphasize an
item, but will not have mouse control until you click the icon “Mouse”. MOUSE: Clicking on the “Mouse” icon will give you normal access and the Pen at this point will not work. ADD: Clicking on “Add” will let you choose a “Background” to display if you wanted something
pertaining to a certain category. LIST: The “list” option will show you each slide or document you’ve saved and you can pick which one
you want to load. OPEN: If you click “open” and you will have access to “Favorites”, “Saved Data”, “other data”. PRINT: This will “print” one of slides saved in the saved data area. SETTINGS: Under this option you can manipulate the toolbar settings, pen settings, and calibration features,
but this will rarely be used. A Icon: This option is used for the “Simplewrite” program that needs to be loaded from the “Windows
Applications” folder. This feature will let you write actual characters with the pen inside spreadsheets, word documents, etc.
EXIT: This is very important: when clicking on “Exit” this is where you will save your data so it can be
accessed from the “Saved Data” area on the toolbar. In order for the Pen marks and changes to be saved that have to be saved in the “Saved Data” area that the Starboard software uses rather then a normal file on disk.
ACCESSORY: This icon has access to the following:
Spotlight: click on the spotlight area and drag around the screen to spot beam something on the screen. On-screen keyboard: clicking on this will let you use an onscreen keyboard if need be. Stopwatch: This feature will let you use a timer on the screen that can either start from 0 or countdown from a specific time you set.

J-48 Supplemental Documentation This is the toolbar listed below when the Mouse icon is enabled.
Pen Options WIDTH: This will let you change the Pen’s width for drawing lines. PALETTE: This option lets you choose a specific color or style to use with the Pen. You can also choose
“Add/Dlt” and make custom styles of your choice. ERASER: Lets you erase items you have drawn just like a pencil eraser. CLEAR: This will clear the whole document or page of Pen markings. The pen features are listed below on a more expanded toolbar:
Using Saved Data: When you first load up the toolbar for the Starboard Software click on the “Saved Data” icon. This is where anything you use the pen with is saved. This is on the local hard drive. To save it do disk, click on the “blue down arrow” on the left side of the file and then click “Save as a file”. This will enable you to save your file to disk so you can have a copy of it. This is also the area where you can just view, open, rename, or create a copy, of the files.
NOTE: The files created with Starboard will only open with the Starboard Software to edit and make changes, but if you want to view it on other computers you need to save it as an “HTML” file. For example: starboard.html.
Saving As an “Html” File: Click “SAVED DATA” on the Starboard toolbar Click on the blue button on the left and click “SAVE AS” and then choose a name followed by html. For example: starboard.html

J-49 Supplemental Documentation Saving As A PDF: Open your HTML file and then “PRINT” it using the “ADOBE PDF” instead of the default printer. The screen capture below is what you will see. Then SAVE it to your disk, CD, or wherever you want to save it.
Saving Files by BURNING TO CD
1. Double click on “Utilities” folder then double click on the “CreateCD” icon. 2. Then click the middle tab “Make a DATA CD”, then click to the right of it “Data CD Project”. 3. Then you basically find your file and drag it down to the bottom window or click on the file and then
click “add”. 4. Then click “Record” at the bottom, and then click “start recording” to burn the CD. 5. When it finishes, you can just click ok and exit out of the program and then remove the CD.
Starting a Lesson Plan
1. Load the Starboard Software. 2. Click “Standalone” 3. Then you will have the option buttons to alternate between which are “PEN” and “MOUSE” 4. Choose the program you want to screen capture, for instance PowerPoint. Click “Pen” to make changes
and then when you go back to clicking “MOUSE”, one slide will be created of that exact screen. 5. Continue to go through your lesson choosing different programs and editing with the “Pen” and then going
back to the “Mouse” in order for it to capture each slide. 6. When done click “EXIT” and name the file. This will save it in the “SAVED DATA” area which in turn
you can save from there as an HTML file.

Index
K-50
K.Index
A
Academic Computer Labs · B-1 Academic Support · A-1 Acceptable Use Standards · H-1
C
Checking for Viruses · C-2 Class Distribution Lists · J-37 Computer Accounts · C-6 Computer Training Program · G-1
D
Distribution List for Preceptors · J-37
E
Electronic Classrooms · B-6 Electronic Mail · C-3
G
Guide to obtaining Class lists from Dwing_Server for importation into Microsoft Excel: · J-37
Guidelines for the Reservation of Academic Computer Labs · B-2
H
Hours of Operation for Labs · B-12
I
Instructional Technology Resources · A-2 INSTRUCTIONS FOR TEST SCORING · J-36 Internet Access · C-6 Internet Plagiarism · F-1, J-28
L
LanSchool · J-38
Listing and Description of Computer Labs · B-3 Listing and Description of Electronic Classrooms
· B-7 Logging onto Computers · C-1
O
Office Hours · A-1 Online Course Development Tools · E-1 Online Problem Report · C-7
P
Password Protection · J-29 Phone Services · I-1 Portable Projection System · B-11 Printing from the Labs · C-3
R
Reservation of Academic Computer Labs · B-2 Reservation of Electronic Classrooms · B-6
S
Saving Your Work · C-2 Shutting Down/Logging Off · C-2 Software Installation Requests · B-2 Software Licensing · B-2 SPECIALIZED LABS · B-1 Starboard Software Instructions · J-47 Stockton University Library Web-Based Catalog
System · J-26 Supplemental Documentation · J-1
T
Tips For Protecting Your Files · C-2
U
Unsolicited E-mail · J-32 Using Computer Labs · C-1 Using The AMX Synergy Remote Control · J-46

Index
K-51
V
Virus Hoaxes · C-3
W
Web Page · A-2
Blackboard Course Request · E-2 Where to Get Help In the Labs · C-7 Who to call for help · A-1 Wireless Network Access · D-1

Computer & Telecommunication ServicesMain Office: D-127 | Phone: (609) 652-4335
Hours: 8:30 a.m. to 5:00 p.m. Monday – Friday (Fall and Spring)Hours: 8:00 a.m. to 5:15 p.m. Monday – Thursday (Summer)
compserv.stockton.edu
Computer & Telecommunication Services Help DeskOffice: D-121 | Phone: (609) 652-4309
E-mail: [email protected] vary with the academic calendar.
Please consult the goStockton Portal login page for current schedule.
New Jersey’s Distinctive Public UniversityStockton is an AA/EO institution.
COMPUTER AND TELECOMMUNICATION SERVICES