


Bahasa
Halaman
Hukum


Technical Report
StorageGRID Quick Start Guide
Deploying an Evaluation Bare Metal Grid Jeff Applewhite, NetApp
February 2021 | TR-4882
Abstract
This quick start guide provides a practical, step-by-step set of instructions that produce a working installation of
NetApp® StorageGRID®. The installation could be either on bare metal or on virtual machines (VMs) running on
CentOS or Red Hat Enterprise Linux (RHEL) 7.8. The approach is to perform an “opinionated” installation of six
StorageGRID containerized services onto three physical (or virtual) machines in a suggested layout and
storage configuration. Some customers might find it easier to understand the deployment process by following
the example deployment in this guide.
Updated for StorageGRID 11.4 deployed on CentOS or RHEL 7.8.
For a more in-depth understanding about StorageGRID and the installation process, see Ubuntu or Debian
installation in the product documentation.

2 StorageGRID Quick Start Guide © 2021 NetApp, Inc. All rights reserved.
TABLE OF CONTENTS
Orientation ........................................................................................................................................4
Preparation .......................................................................................................................................4
Compute requirements ...................................................................................................................................................4
Networking requirements................................................................................................................................................4
Storage requirements .....................................................................................................................................................5
Disk sizes per container type .........................................................................................................................................6
Physical host layout and requirements ..........................................................................................................................7
Preparing the nodes........................................................................................................................................................9
Optional storage setup with iSCSI .................................................................................................................................9
Preparing for Docker installation ..................................................................................................................................11
Installing Docker............................................................................................................................................................11
Node config file overview..............................................................................................................................................12
Preparing the node config files.....................................................................................................................................12
Perform the installation................................................................................................................... 14
Install StorageGRID dependencies and packages .....................................................................................................14
Validate the StorageGRID configuration......................................................................................................................14
Start the StorageGRID host service.............................................................................................................................15
Configure the grid and complete the installation ............................................................................ 16
High-level steps.............................................................................................................................................................16
Navigate to Grid Manager ............................................................................................................................................16
Specify the StorageGRID license information .............................................................................................................17
Add sites ........................................................................................................................................................................17
Specify grid network subnets .......................................................................................................................................18
Approve pending grid nodes ........................................................................................................................................19
Specifying NTP server information...............................................................................................................................23
Specify DNS server information ...................................................................................................................................24
Specify the StorageGRID system passwords .............................................................................................................25
Review your configuration and complete the installation............................................................................................26
Important note for upgrades ........................................................................................................... 27
Conclusion...................................................................................................................................... 28
Where to find additional information............................................................................................... 28
Version history................................................................................................................................ 28

3 StorageGRID Quick Start Guide © 2021 NetApp, Inc. All rights reserved.
LIST OF TABLES
Table 1) Compute requirements............................................................................................................................................4
Table 2) Storage requirements..............................................................................................................................................5
Table 3) Admin container disk size. ......................................................................................................................................6
Table 4) Storage container disk size. ....................................................................................................................................6
Table 5) Gateway container disk size. ..................................................................................................................................7
Table 6) Required disk storage for host 1.............................................................................................................................7
Table 7) Required disk storage for host 2.............................................................................................................................8
Table 8) Required disk storage for host 3.............................................................................................................................8
LIST OF FIGURES
Figure 1) Sample layout for three hosts. ...............................................................................................................................7

4 StorageGRID Quick Start Guide © 2021 NetApp, Inc. All rights reserved.
Orientation
Before you start your deployment, let’s examine the compute, storage, and networking requirements for
NetApp® StorageGRID® software. StorageGRID runs as a containerized service within Docker. In this
model, some requirements refer to the host operating system (the OS that hosts Docker, which is running
the StorageGRID software). And some of the resources are allocated directly to the Docker containers
running within each host. In this deployment, in order to maximize hardware usage, we are deploying two
services per physical host. For more information, continue on to the next section, “Preparation.”
Preparation
Compute requirements
Table 1 lists the supported minimum resource requirements for each type of StorageGRID node. These
are the minimum resources required for StorageGRID nodes.
Table 1) Compute requirements.
Type of node CPU cores RAM
Admin 8 24GB
Storage 8 24GB
Gateway 8 24GB
In addition, each physical Docker host should have a minimum of 16GB of RAM allocated to it for proper
operation. So, for example, to host any two of the services described in Table 1 together on one physical
Docker host, you would do the following calculation:
24 + 24 +16 = 64GB RAM
and
8 + 8 = 16 cores
Because many modern servers exceed these requirements, we combine six services (StorageGRID
containers) onto three physical servers.
Networking requirements
The three types of StorageGRID traffic include:
• Grid traffic (required). The internal StorageGRID traffic that travels between all nodes in the grid.
• Admin traffic (optional). The traffic used for system administration and maintenance.
• Client traffic (optional). The traffic that travels between external client applications and the grid, including all object storage requests from S3 and Swift clients.
You can configure up to three networks for use with the StorageGRID system. Each network type must
be on a separate subnet with no overlap. If all nodes are on the same subnet, a gateway address is not
required.
For this evaluation, we will deploy on two networks, which contain the grid and client traffic. It is possible
to add an admin network later to serve that additional function.
It is very important to map the networks consistently to the interfaces throughout all of the hosts. For
example, if there are two interfaces on each node, ens192 and ens224, they should all be mapped to the
same network or VLAN on all hosts. In this installation, the installer maps these into the Docker

5 StorageGRID Quick Start Guide © 2021 NetApp, Inc. All rights reserved.
containers as eth0@if2 and eth2@if3 (because the loopback is if1 inside the container) , and therefore a
consistent model is very important.
Note on Docker networking
StorageGRID uses networking differently from some Docker container implementations. It does not use
the Docker (or Kubernetes or Swarm) provided networking. Instead, StorageGRID actually spawns the
container as --net=none so that Docker doesn't do anything to network the container. After the container
has been spawned by the StorageGRID service, a new macvlan device is created from the interface
defined in the node configuration file. That device has a new MAC address and acts as a separate
network device that can receive packets from the physical interface. The macvlan device is then moved
into the container namespace and renamed to be one of either eth0, eth1, or eth2 inside the container. At
that point the network device is no longer visible in the host OS. In our example, the grid network device
is eth0 inside the Docker containers and the Client Network is eth2. If we had an admin network, the
device would be eth1 in the container.
Note: The new MAC address of the container network device might require promiscuous mode to be enabled in some network and virtual environments. This mode allows the physical device to receive and send packets for MAC addresses that differ from the known physical MAC address.
If running in VMWare vSphere, you must accept promiscuous mode, MAC address changes, and forged transmits in the port groups that will serve StorageGRID traffic when running CentOS or RHEL. Ubuntu or Debian works without these changes in most circumstances.
Storage requirements
The nodes each require either SAN-based or local disk devices of the sizes shown in Table 2.
Note: The numbers in Table 2 are for each StorageGRID service type, not for the entire grid or each physical host. Based on the deployment choices, we will calculate numbers for each physical host in “Physical host layout and requirements,” later in this document.
The paths or file systems marked with an asterisk will be created in the StorageGRID container
itself by the installer. No manual configuration or file system creation is required by the administrator, but the hosts need block devices to satisfy these requirements. In other words, the block device should appear by using the command lsblk but not be formatted or mounted within
the host OS.
Table 2) Storage requirements.
Node
type
LUN purpose Number of
LUNs
Minimum size
of LUN
Manual file
system required
Suggested node
config entry
All Admin Node
system space
* /var/local
(SSD helpful here)
One for each
Admin Node 90GB No BLOCK_DEVICE_
VAR_LOCAL =
/dev/mapper/A
DM-VAR-LOCAL
All nodes Docker storage
pool at
/var/lib/dock
er for
container
pool
One for each host (physical or
VM)
100GB per
container
Yes – etx4 NA – format and mount as host file system (not mapped into the
container)
Admin Admin Node audit logs (system data
in Admin container)
One for each
Admin Node 200GB
No BLOCK_DEVICE_
AUDIT_LOGS =

6 StorageGRID Quick Start Guide © 2021 NetApp, Inc. All rights reserved.
Node
type LUN purpose Number of
LUNs
Minimum size
of LUN
Manual file
system required
Suggested node
config entry
* /var/local/au
dit/export
/dev/mapper/A
DM-OS
Admin Admin Node tables (system data in
Admin container)
* /var/local/my
sql_ibdata
One for each
Admin Node
200GB
No BLOCK_DEVICE_
TABLES =
/dev/mapper/A
DM-MySQL
Storage
nodes
Object storage
(block devices)
* /var/local/ra
ngedb0 (SSD
helpful here)
* /var/local/ra
ngedb1
* /var/local/ra
ngedb2
Three for each storage
container
4000GB
No BLOCK_DEVICE_
RANGEDB_000 =
/dev/mapper/S
N-Db00
BLOCK_DEVICE_
RANGEDB_001 =
/dev/mapper/S
N-Db01
BLOCK_DEVICE_
RANGEDB_002 =
/dev/mapper/S
N-Db02
In this example, the disk sizes shown in Table 3 are needed per container type. The requirements per
physical host are described in “Physical host layout and requirements,” later in this document.
Disk sizes per container type
Admin container
Table 3) Admin container disk size.
Name Size (GiB)
Docker-Store 100 (per container)
Adm-OS 90
Adm-Audit 200
Adm-MySQL 200
Storage container
Table 4) Storage container disk size.
Name Size (GiB)
Docker-Store 100 (per container)
SN-OS 90
Rangedb-0 4096
Rangedb-1 4096

7 StorageGRID Quick Start Guide © 2021 NetApp, Inc. All rights reserved.
Name Size (GiB)
Rangedb-2 4096
Gateway container
Table 5) Gateway container disk size.
Name Size (GiB)
Docker-Store 100 (per container)
/var/local 90
Physical host layout and requirements
By combining the compute and network requirements shown in Table 3, you can get a basic set of
hardware required for this installation of three physical (or virtual) servers with 16 cores, 64GB of RAM,
and two network interfaces. If higher throughput is desired, it is possible to bond two or more interfaces
on the grid or Client Network and use a VLAN-tagged interface such as bond0.520 in the node config file.
If you expect more intense workloads, more memory for both the host and the containers is better.
As shown in Figure 1, these servers will host six Docker containers, two per host. The RAM is calculated
by providing 24GB per container and 16GB for the host OS itself.
Figure 1) Sample layout for three hosts.
Total RAM required per physical host (or VM) is 24 x 2 + 16 = 64GB.
Table 6 through Table 8 list the required disk storage for hosts 1, 2, and 3.
Table 6) Required disk storage for host 1.
Host 1 Size (GiB)
Docker Store
/var/lib/docker (File system) 200 (100 x 2)
Admin container

8 StorageGRID Quick Start Guide © 2021 NetApp, Inc. All rights reserved.
Host 1 Size (GiB)
BLOCK_DEVICE_VAR_LOCAL 90
BLOCK_DEVICE_AUDIT_LOGS 200
BLOCK_DEVICE_TABLES 200
Storage container
SN-OS
*/var/local
(Device)
90
*Rangedb-0
(Device)
4096
*Rangedb-1
(Device)
4096
*Rangedb-2
(Device)
4096
Table 7) Required disk storage for host 2.
Host 2 Size (GiB)
Docker Store
/var/lib/docker (Shared) 200 (100 x 2)
Gateway container
GW-OS */var/local 100
Storage container
*/var/local 100
Rangedb-0 4096
Rangedb-1 4096
Rangedb-2 4096
Table 8) Required disk storage for host 3.
Host 3 Size (GiB)
Docker Store
/var/lib/docker (Shared) 200 (100 x 2)
Gateway container

9 StorageGRID Quick Start Guide © 2021 NetApp, Inc. All rights reserved.
Host 3 Size (GiB)
*/var/local 100
Storage container
*/var/local 100
Rangedb-0 4096
Rangedb-1 4096
Rangedb-2 4096
The Docker Store was calculated by allowing 100GB per /var/local (per container) x two containers =
200GB.
Preparing the nodes
To prepare for the initial installation of StorageGRID, first install CentOS or RHEL version 7.8 and enable
SSH. Set up network interfaces, Network Time Protocol (NTP), DNS, and the host name according to
best practices. You need at least one enabled network interface on the grid network and another for the
Client Network. If you are using a VLAN-tagged interface, configure it as per the examples below.
Otherwise, a simple standard network interface configuration will suffice.
If you need to use a VLAN tag on the grid network interface, your configuration should have two files in
/etc/sysconfig/network-scripts/ in the following format:
# cat /etc/sysconfig/network-scripts/ifcfg-enp67s0
# This is the parent physical device
TYPE=Ethernet
BOOTPROTO=none
DEVICE=enp67s0
ONBOOT=yes
# cat /etc/sysconfig/network-scripts/ifcfg-enp67s0.520
# The actual device that will be used by the storage node file
DEVICE=enp67s0.520
BOOTPROTO=none
NAME=enp67s0.520
IPADDR=10.10.200.31
PREFIX=24
VLAN=yes
ONBOOT=yes
This example assumes that your physical network device for the grid network is enp67s0. It could also be
a bonded device such as bond0. Whether you are using bonding or a standard network interface, you
must use the VLAN-tagged interface in your node configuration file if your network port does not have a
default VLAN or if the default VLAN is not associated with the grid network. The StorageGRID container
itself does not untag Ethernet frames, so it must be handled by the parent OS.
Optional storage setup with iSCSI
If you are not using iSCSI storage, you must ensure that host1, host2, and host3 contain block devices of
sufficient size to meet their requirements. See Table 4 for host1, host2, and host3 storage requirements.
To set up storage with iSCSI, complete the following steps:
1. If you are using external iSCSI storage such as NetApp E-Series or NetApp ONTAP® data management software, install the following packages:

10 StorageGRID Quick Start Guide © 2021 NetApp, Inc. All rights reserved.
sudo yum install iscsi-initiator-utils
sudo yum install device-mapper-multipath
2. Find the initiator ID on each host.
# cat /etc/iscsi/initiatorname.iscsi
InitiatorName=iqn.2006-04.com.example.node1
3. Using the initiator name from step 2, map LUNs on your storage device (of the number and size
found in Table 2) to each storage node.
4. Discover the newly created LUNs with iscsiadm and log in to them.
# iscsiadm -m discovery -t st -p target-ip-address
# iscsiadm -m node -T iqn.2006-04.com.example:3260 -l
Logging in to [iface: default, target: iqn.2006-04.com.example:3260, portal: 10.64.24.179,3260]
(multiple)
Login to [iface: default, target: iqn.2006-04.com.example:3260, portal: 10.64.24.179,3260]
successful.
Note: For details, see Creating an iSCSI Initiator on the Red Hat Customer Portal.
5. To show the multipath devices and their associated LUN WWIDs, run the following command:
# multipath -ll
If you are not using iSCSI with multipath devices, simply mount your device by a unique path name
that will persist device changes and reboots alike.
/dev/disk/by-path/pci-0000:03:00.0-scsi-0:0:1:0
Important: Simply using /dev/sdx device names could cause issues later if devices are removed or
added.
If you are using multipath devices, modify the /etc/multipath.conf file to use aliases as follows.
Note: These devices might or might not be present on all nodes, depending on layout.
multipaths {
multipath {
wwid 36d039ea00005f06a000003c45fa8f3dc
alias Docker-Store
}
multipath {
wwid 36d039ea00006891b000004025fa8f597
alias Adm-Audit
}
multipath {
wwid 36d039ea00005f06a000003c65fa8f3f0
alias Adm-MySQL
}
multipath {
wwid 36d039ea00006891b000004015fa8f58c
alias Adm-OS
}
multipath {
wwid 36d039ea00005f06a000003c55fa8f3e4
alias SN-OS
}
multipath {
wwid 36d039ea00006891b000004035fa8f5a2
alias SN-Db00
}
multipath {
wwid 36d039ea00005f06a000003c75fa8f3fc
alias SN-Db01
}
multipath {

11 StorageGRID Quick Start Guide © 2021 NetApp, Inc. All rights reserved.
wwid 36d039ea00006891b000004045fa8f5af
alias SN-Db02
}
multipath {
wwid 36d039ea00005f06a000003c85fa8f40a
alias GW-OS
}
}
Before installing Docker in your host OS, format and mount the LUN or disk backing /var/lib/docker.
The other LUNs are defined in the node config file and are used directly by the StorageGRID containers.
That is, they do not show up in the host OS; they appear in the containers themselves, and those file
systems are handled by the installer.
If you are using an iSCSI-backed LUN, place something similar to the following line in your fstab file. As
noted, the other LUNs do not need to be mounted in the host OS but must show up as available block
devices.
/dev/disk/by-path/pci-0000:03:00.0-scsi-0:0:1:0 /var/lib/docker ext4 defaults 0 0
Preparing for Docker installation
To prepare for Docker installation, complete the following steps:
1. Create a file system on the Docker storage volume on all three hosts .
# sudo mkfs.ext4 /dev/sd?
If you are using iSCSI devices with multipath, use /dev/mapper/Docker-Store.
2. Create the Docker storage volume mount point:
# sudo mkdir -p /var/lib/docker
3. Add a similar entry for the docker-storage-volume-device to /etc/fstab.
/dev/disk/by-path/pci-0000:03:00.0-scsi-0:0:1:0 /var/lib/docker ext4 defaults 0 0
The following _netdev option is recommended only if you are using an iSCSI device. If you are
using a local block device _netdev is not necessary and defaults is recommended.
/dev/mapper/Docker-Store /var/lib/docker ext4 _netdev 0 0
4. Mount the new file system and view disk usage.
# sudo mount /var/lib/docker
[root@host1]# df -h | grep docker
/dev/sdb 200G 33M 200G 1% /var/lib/docker
5. Turn off swap and disable it for performance reasons.
$ sudo swapoff --all
6. To persist the settings, remove all swap entries from /etc/fstab such as:
/dev/mapper/centos-swap swap defaults 0 0
Important: Failing to disable swap entirely can severely lower performance.
7. Perform a test reboot of your node to ensure that the /var/lib/docker volume is persistent and
that all disk devices return.
Installing Docker
To install Docker, complete the following steps:
1. Configure the yum repo for Docker.

12 StorageGRID Quick Start Guide © 2021 NetApp, Inc. All rights reserved.
sudo yum install -y yum-utils
sudo yum-config-manager --add-repo \ https://download.docker.com/linux/centos/docker-ce.repo
2. Install the needed packages.
sudo yum install docker-ce docker-ce-cli containerd.io
3. Start Docker.
sudo systemctl start docker
4. Test Docker.
sudo docker run hello-world
5. Make sure that Docker runs on system start.
sudo systemctl enable docker
Node config file overview
At a high level, the node configuration process includes the following steps:
1. Create the /etc/storagegrid/nodes directory on all hosts.
sudo [root@host1 ~]# mkdir -p /etc/storagegrid/nodes
2. Create the needed files per physical host to match the container/node type layout. In this example,
we created two files per physical host on each host machine.
Note: The name of the file defines the actual node name for installation. For example, dc1-adm1.conf becomes a node named dc1-adm1.
− Host1:
dc1-adm1.conf
dc1-sn1.conf
− Host2:
dc1-gw1.conf
dc1-sn2.conf
− Host3:
dc1-gw2.conf
dc1-sn3.conf
Preparing the node config files
The following examples use the /dev/disk/by-path format. You can verify the correct paths by
running the following commands:
[root@host1 ~]# lsblk
NAME MAJ:MIN RM SIZE RO TYPE MOUNTPOINT
sda 8:0 0 90G 0 disk
├─sda1 8:1 0 1G 0 part /boot
└─sda2 8:2 0 89G 0 part
├─centos-root 253:0 0 50G 0 lvm /
├─centos-swap 253:1 0 9G 0 lvm
└─centos-home 253:2 0 30G 0 lvm /home
sdb 8:16 0 200G 0 disk /var/lib/docker
sdc 8:32 0 90G 0 disk
sdd 8:48 0 200G 0 disk
sde 8:64 0 200G 0 disk
sdf 8:80 0 4T 0 disk
sdg 8:96 0 4T 0 disk
13 StorageGRID Quick Start Guide © 2021 NetApp, Inc. All rights reserved.
sdh 8:112 0 4T 0 disk
sdi 8:128 0 90G 0 disk
sr0 11:0 1 1024M 0 rom
And these commands:
[root@host1 ~]# ls -l /dev/disk/by-path/
total 0
lrwxrwxrwx 1 root root 9 Dec 21 16:42 pci-0000:02:01.0-ata-1.0 -> ../../sr0
lrwxrwxrwx 1 root root 9 Dec 21 16:42 pci-0000:03:00.0-scsi-0:0:0:0 -> ../../sda
lrwxrwxrwx 1 root root 10 Dec 21 16:42 pci-0000:03:00.0-scsi-0:0:0:0-part1 -> ../../sda1
lrwxrwxrwx 1 root root 10 Dec 21 16:42 pci-0000:03:00.0-scsi-0:0:0:0-part2 -> ../../sda2
lrwxrwxrwx 1 root root 9 Dec 21 16:42 pci-0000:03:00.0-scsi-0:0:1:0 -> ../../sdb
lrwxrwxrwx 1 root root 9 Dec 21 16:42 pci-0000:03:00.0-scsi-0:0:2:0 -> ../../sdc
lrwxrwxrwx 1 root root 9 Dec 21 16:42 pci-0000:03:00.0-scsi-0:0:3:0 -> ../../sdd
lrwxrwxrwx 1 root root 9 Dec 21 16:42 pci-0000:03:00.0-scsi-0:0:4:0 -> ../../sde
lrwxrwxrwx 1 root root 9 Dec 21 16:42 pci-0000:03:00.0-scsi-0:0:5:0 -> ../../sdf
lrwxrwxrwx 1 root root 9 Dec 21 16:42 pci-0000:03:00.0-scsi-0:0:6:0 -> ../../sdg
lrwxrwxrwx 1 root root 9 Dec 21 16:42 pci-0000:03:00.0-scsi-0:0:8:0 -> ../../sdh
lrwxrwxrwx 1 root root 9 Dec 21 16:42 pci-0000:03:00.0-scsi-0:0:9:0 -> ../../sdi
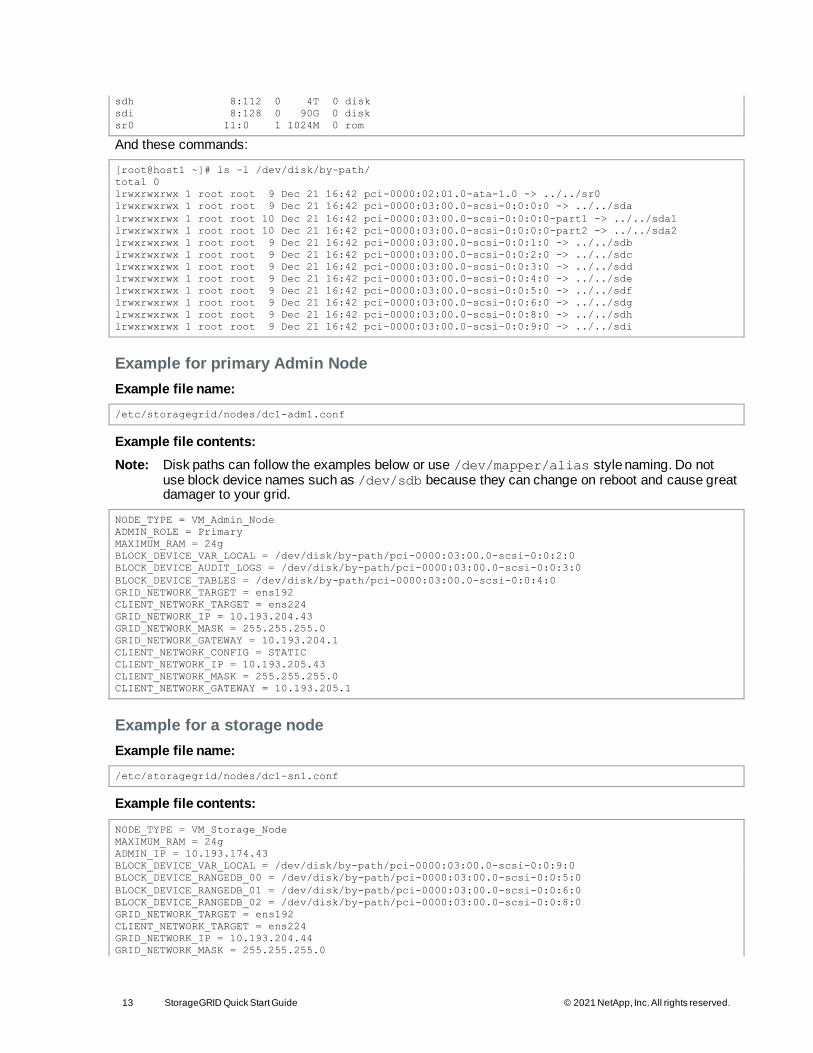
Example for primary Admin Node
Example file name:
/etc/storagegrid/nodes/dc1-adm1.conf
Example file contents:
Note: Disk paths can follow the examples below or use /dev/mapper/alias style naming. Do not use block device names such as /dev/sdb because they can change on reboot and cause great damager to your grid.
NODE_TYPE = VM_Admin_Node
ADMIN_ROLE = Primary
MAXIMUM_RAM = 24g
BLOCK_DEVICE_VAR_LOCAL = /dev/disk/by-path/pci-0000:03:00.0-scsi-0:0:2:0
BLOCK_DEVICE_AUDIT_LOGS = /dev/disk/by-path/pci-0000:03:00.0-scsi-0:0:3:0
BLOCK_DEVICE_TABLES = /dev/disk/by-path/pci-0000:03:00.0-scsi-0:0:4:0
GRID_NETWORK_TARGET = ens192
CLIENT_NETWORK_TARGET = ens224
GRID_NETWORK_IP = 10.193.204.43
GRID_NETWORK_MASK = 255.255.255.0
GRID_NETWORK_GATEWAY = 10.193.204.1
CLIENT_NETWORK_CONFIG = STATIC
CLIENT_NETWORK_IP = 10.193.205.43
CLIENT_NETWORK_MASK = 255.255.255.0
CLIENT_NETWORK_GATEWAY = 10.193.205.1
Example for a storage node
Example file name:
/etc/storagegrid/nodes/dc1-sn1.conf
Example file contents:
NODE_TYPE = VM_Storage_Node
MAXIMUM_RAM = 24g
ADMIN_IP = 10.193.174.43
BLOCK_DEVICE_VAR_LOCAL = /dev/disk/by-path/pci-0000:03:00.0-scsi-0:0:9:0
BLOCK_DEVICE_RANGEDB_00 = /dev/disk/by-path/pci-0000:03:00.0-scsi-0:0:5:0
BLOCK_DEVICE_RANGEDB_01 = /dev/disk/by-path/pci-0000:03:00.0-scsi-0:0:6:0
BLOCK_DEVICE_RANGEDB_02 = /dev/disk/by-path/pci-0000:03:00.0-scsi-0:0:8:0
GRID_NETWORK_TARGET = ens192
CLIENT_NETWORK_TARGET = ens224
GRID_NETWORK_IP = 10.193.204.44
GRID_NETWORK_MASK = 255.255.255.0

14 StorageGRID Quick Start Guide © 2021 NetApp, Inc. All rights reserved.
GRID_NETWORK_GATEWAY = 10.193.204.1
Example for Gateway Node
Example file name:
/etc/storagegrid/nodes/dc1-gw1.conf
Example file contents:
NODE_TYPE = VM_API_Gateway
MAXIMUM_RAM = 24g
ADMIN_IP = 10.193.204.43
BLOCK_DEVICE_VAR_LOCAL = /dev/disk/by-path/pci-0000:03:00.0-scsi-0:0:1:0
GRID_NETWORK_TARGET = ens192
CLIENT_NETWORK_TARGET = ens224
GRID_NETWORK_IP = 10.193.204.47
GRID_NETWORK_MASK = 255.255.255.0
GRID_NETWORK_GATEWAY = 10.193.204.1
CLIENT_NETWORK_IP = 10.193.205.47
CLIENT_NETWORK_MASK = 255.255.255.0
CLIENT_NETWORK_GATEWAY = 10.193.205.1
Perform the installation
Install StorageGRID dependencies and packages
To install the StorageGRID dependencies and packages, run the following commands:
[root@host1 rpms]# yum install -y python-netaddr
[root@host1 rpms]# rpm -ivh StorageGRID-Webscale-Images-11-4-0-11.4.0*.x86_64.rpm
[root@host1 rpms]# rpm -ivh StorageGRID-Webscale-Service-11-4-0-11.4.0*.x86_64.rpm
Validate the StorageGRID configuration
After you create the configuration files in /etc/storagegrid/nodes for each of your StorageGRID
nodes, you must validate the contents of those files.
To validate the contents of the configuration files, run the following command on each host:
sudo storagegrid node validate all
If the files are correct, the output shows PASSED for each configuration file:
If the configuration files are incorrect, the issues are shown as WARNING and ERROR. If any
configuration errors are found, you must correct them before you continue with the installation.

15 StorageGRID Quick Start Guide © 2021 NetApp, Inc. All rights reserved.
Start the StorageGRID host service
To start the StorageGRID nodes and ensure that they restart after a host reboot, you must enable and
start the StorageGRID host service.
To start the StorageGRID host service, complete the following steps.
1. Run the following commands on each host:
sudo systemctl enable storagegrid
sudo systemctl start storagegrid
Note: The start process might take some time on the initial run.
2. Run the following command to ensure the deployment is proceeding:
sudo storagegrid node status node-name
3. For any node that returns a status of Not-Running or Stopped, run the following command:
sudo storagegrid node start node-name
For example, given the following output you would start the dc1-adm1 node:
[user@host1]# sudo storagegrid node status
Name Config-State Run-State
dc1-adm1 Configured Not-Running
dc1-sn1 Configured Running

16 StorageGRID Quick Start Guide © 2021 NetApp, Inc. All rights reserved.
4. If you have previously enabled and started the StorageGRID host service (or if you aren’t sure
whether the service has been enabled and started), also run the following command:
sudo systemctl reload-or-restart storagegrid
Configure the grid and complete the installation
Complete the installation by configuring the StorageGRID system from the Grid Manager user interface
on the primary Admin Node.
High-level steps
Configuring the grid and completing the installation involves the following tasks:
1. Navigate to Grid Manager
2. Specify the StorageGRID license information
3. Add sites
4. Specify grid network subnets
5. Approve pending grid nodes
6. Specify NTP server information
7. Specify domain name system server information
8. Specify the StorageGRID system passwords
9. Review your configuration and complete installation
Navigate to Grid Manager
Use Grid Manager to define all of the information required to configure your StorageGRID system.
Before you begin, the primary Admin Node must be deployed and have completed the initial startup
sequence.
To use Grid Manager to define information, complete the following steps.
1. Access Grid Manager at the following address:
https://primary_admin_node_grid_ip
Alternatively, you can access Grid Manager on port 8443.
https://primary_admin_node_ip:8443
2. Click Install a StorageGRID System.
The page used to configure a StorageGRID grid is displayed.

17 StorageGRID Quick Start Guide © 2021 NetApp, Inc. All rights reserved.
Specify the StorageGRID license information
You must specify the name for your StorageGRID system and upload the license file provided by NetApp.
To specify the StorageGRID license information, complete the following steps:
1. On the License page, in the Grid Name field, enter a name for your StorageGRID system.
After installation, the name is displayed as the top level in the grid topology tree.
2. Click Browse, locate the NetApp License File (NLFunique_id.txt), and click Open.
The license file is validated, and the serial number and licensed storage capacity are displayed.
Note: The StorageGRID installation archive includes a free license that does not prov ide any support entitlement for the product. You can update to a license that offers support after installation.
3. Click Next.
Add sites
When you are installing StorageGRID, you must create at least one site. You can create additional sites
to increase the reliability and storage capacity of your StorageGRID system.
To add sites, complete the following steps:
1. On the Sites page, enter the site name.
2. To add additional sites, click the plus sign next to the last site entry and enter the name in the new
Site Name text box.
Add as many additional sites as required for your grid topology. You can add up to 16 si tes.

18 StorageGRID Quick Start Guide © 2021 NetApp, Inc. All rights reserved.
3. Click Next.
Specify grid network subnets
You must specify the subnets that are used on the grid network.
About this task
The subnet entries include the subnets for the grid network for each site in your StorageGRID system, in
addition to any subnets that must be reachable through the grid network (for example, the subnets
hosting your NTP servers).
If you have multiple grid subnets, the grid network gateway is required. All grid subnets specified must be
reachable through this gateway.
To specify grid network subnets, complete the following steps:
1. In the Subnet 1 text box, specify the CIDR network address for at least one grid network.
2. Click the plus sign next to the last entry to add an additional network entry.
If you have already deployed at least one node, click Discover Grid Networks Subnets to
automatically populate the grid network subnet list with the subnets reported by grid nodes that have
registered with Grid Manager.

19 StorageGRID Quick Start Guide © 2021 NetApp, Inc. All rights reserved.
3. Click Next.
Approve pending grid nodes
You must approve each grid node before it joins the StorageGRID system.
Note: Before you begin, all virtual and StorageGRID appliance grid nodes must be deployed.
To approve pending grid nodes, complete the following steps:
1. Review the Pending Nodes list and confirm that it shows all of the grid nodes you deployed.
Note: If a grid node is missing, confirm that it was deployed successfully.
2. Click the radio button next to a pending node that you want to approve.

20 StorageGRID Quick Start Guide © 2021 NetApp, Inc. All rights reserved.
3. Click Approve.
4. In General Settings, modify the settings for the following properties, as necessary.

21 StorageGRID Quick Start Guide © 2021 NetApp, Inc. All rights reserved.
− Site: The name of the site with which this grid node will be associated.
− Name: The host name that will be assigned to the node, and the name that will be displayed in Grid Manager. The name defaults to the name you specified during node deployment, but you can change the name as needed.
− NTP role: The NTP role of the grid node. The options are Automatic, Primary, and Client. Selecting the Automatic option assigns the Primary role to Admin Nodes, Storage nodes with Administrative Domain Controller (ADC) services, Gateway Nodes, and any grid nodes that have nonstatic IP addresses. All other grid nodes are assigned the client role.
Attention: Make sure that at least two nodes at each site can access at least four external
NTP sources. If only one node at a site can reach the NTP sources, timing issues will occur if that node goes down. In addition, designating two nodes per site as primary NTP sources ensures accurate timing if a site is isolated from the rest of the grid.
− ADC service (storage nodes only): Select Automatic to let the system determine whether the node requires the ADC service. The ADC service keeps track of the location and availability of
grid services. At least three storage nodes at each site must include the ADC service. You cannot add the ADC service to a node after it is deployed.
22 StorageGRID Quick Start Guide © 2021 NetApp, Inc. All rights reserved.
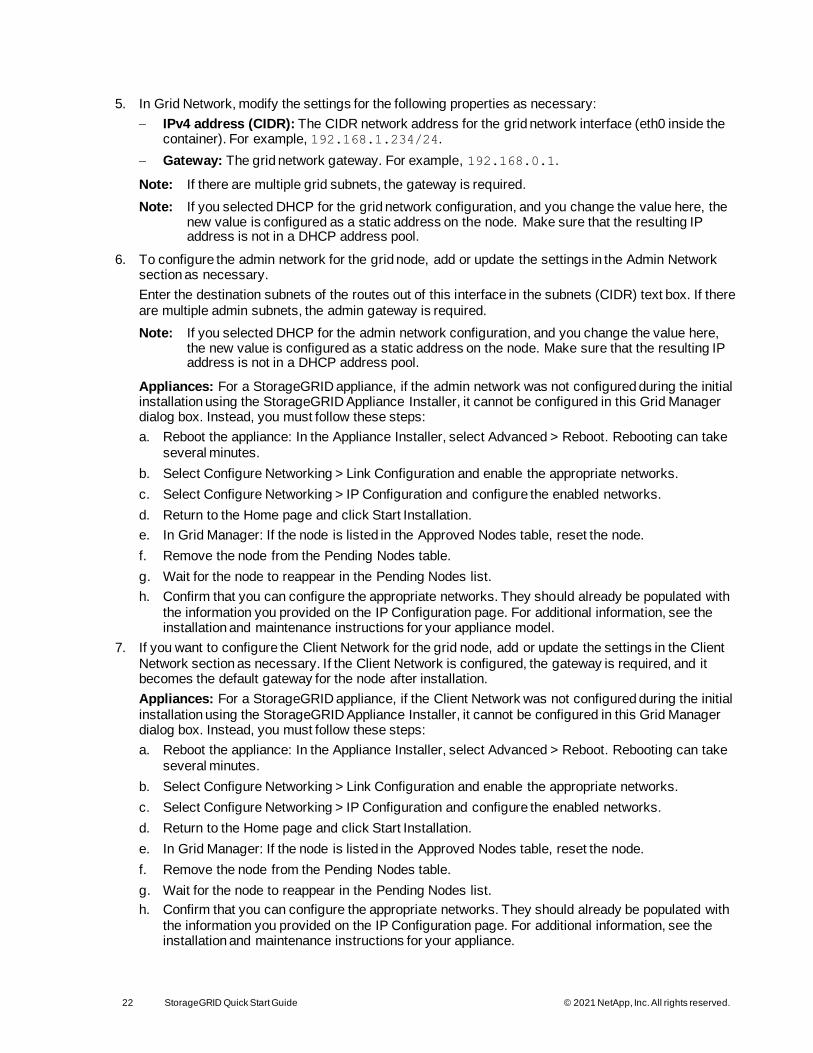
5. In Grid Network, modify the settings for the following properties as necessary:
− IPv4 address (CIDR): The CIDR network address for the grid network interface (eth0 inside the container). For example, 192.168.1.234/24.
− Gateway: The grid network gateway. For example, 192.168.0.1.
Note: If there are multiple grid subnets, the gateway is required.
Note: If you selected DHCP for the grid network configuration, and you change the value here, the new value is configured as a static address on the node. Make sure that the resulting IP address is not in a DHCP address pool.
6. To configure the admin network for the grid node, add or update the settings in the Admin Network section as necessary.
Enter the destination subnets of the routes out of this interface in the subnets (CIDR) text box. If there
are multiple admin subnets, the admin gateway is required.
Note: If you selected DHCP for the admin network configuration, and you change the value here, the new value is configured as a static address on the node. Make sure that the resulting IP address is not in a DHCP address pool.
Appliances: For a StorageGRID appliance, if the admin network was not configured during the initial installation using the StorageGRID Appliance Installer, it cannot be configured in this Grid Manager dialog box. Instead, you must follow these steps:
a. Reboot the appliance: In the Appliance Installer, select Advanced > Reboot. Rebooting can take
several minutes.
b. Select Configure Networking > Link Configuration and enable the appropriate networks.
c. Select Configure Networking > IP Configuration and configure the enabled networks.
d. Return to the Home page and click Start Installation.
e. In Grid Manager: If the node is listed in the Approved Nodes table, reset the node.
f. Remove the node from the Pending Nodes table.
g. Wait for the node to reappear in the Pending Nodes list.
h. Confirm that you can configure the appropriate networks. They should already be populated with
the information you provided on the IP Configuration page. For additional information, see the installation and maintenance instructions for your appliance model.
7. If you want to configure the Client Network for the grid node, add or update the settings in the Client
Network section as necessary. If the Client Network is configured, the gateway is required, and it becomes the default gateway for the node after installation.
Appliances: For a StorageGRID appliance, if the Client Network was not configured during the initial
installation using the StorageGRID Appliance Installer, it cannot be configured in this Grid Manager dialog box. Instead, you must follow these steps:
a. Reboot the appliance: In the Appliance Installer, select Advanced > Reboot. Rebooting can take
several minutes.
b. Select Configure Networking > Link Configuration and enable the appropriate networks.
c. Select Configure Networking > IP Configuration and configure the enabled networks.
d. Return to the Home page and click Start Installation.
e. In Grid Manager: If the node is listed in the Approved Nodes table, reset the node.
f. Remove the node from the Pending Nodes table.
g. Wait for the node to reappear in the Pending Nodes list.
h. Confirm that you can configure the appropriate networks. They should already be populated with
the information you provided on the IP Configuration page. For additional information, see the installation and maintenance instructions for your appliance.

23 StorageGRID Quick Start Guide © 2021 NetApp, Inc. All rights reserved.
8. Click Save.
The grid node entry moves to the Approved Nodes list.
9. Repeat steps 1–8 for each pending grid node you want to approve.
You must approve all nodes that you want in the grid. However, you can return to this page at any
time before you click Install on the Summary page. To modify the properties of an approved grid node, click its radio button and then click Edit.
10. When you have finished approving grid nodes, click Next.
Specifying NTP server information
You must specify the NTP configuration information for the StorageGRID system so that operations
performed on separate servers can be kept synchronized.
About this task
To prevent issues with time drift, you must specify four external NTP server references of Stratum 3 or
higher.
Note: When specifying the external NTP source for a production-level StorageGRID installation, do not use the Windows Time (W32Time) service on a version of Windows earlier than Windows Server 2016. The time service on earlier versions of Windows is not sufficiently accurate and is not supported by Microsoft for use in demanding environments like StorageGRID.
Support boundary to configure the Windows Time service for high-accuracy environments.
The external NTP servers are used by the nodes to which you previously assigned the primary NTP roles.

24 StorageGRID Quick Start Guide © 2021 NetApp, Inc. All rights reserved.
Attention: The Client Network is not enabled early enough in the installation process to be the only
source of NTP servers. Make sure that at least one NTP server can be reached over the grid network or
admin network.
To specify NTP server information, complete the following steps:
1. In the Server 1 to Server 4 text boxes, specify the IP addresses for at least four NTP servers.
2. If necessary, click the plus sign next the last entry to add more server entries.
3. Click Next.
Specify DNS server information
You must specify the DNS information for your StorageGRID system so that you can access external
servers using host names instead of IP addresses.
Specifying DNS server information allows you to use fully qualified domain name (FQDN) host names
rather than IP addresses for email notifications and NetApp AutoSupport® messages. NetApp
recommends specifying at least two DNS servers.
Attention: You should select DNS servers that each site can access locally in the event of
network islanding.
To specify DNS server information, complete the following steps:
1. In the Server 1 text box, specify the IP address for a DNS server.
2. If necessary, click the plus sign next to the last entry to add more servers.

25 StorageGRID Quick Start Guide © 2021 NetApp, Inc. All rights reserved.
A NetApp best practice is to specify at least two DNS servers. You can specify up to six DNS servers.
3. Click Next.
Specify the StorageGRID system passwords
To enter the passwords to use to secure your StorageGRID system, follow these steps :
1. In Provisioning Passphrase, enter the provisioning passphrase that will be required to make changes to the grid topology of your StorageGRID system. You should record this password in a secure place.
2. In Confirm Provisioning Passphrase, reenter the provisioning passphrase.
3. In Grid Management Root User Password, enter the password to use to access Grid Manager as the
root user.
4. In Confirm Root User Password, reenter the Grid Manager password.
5. (Optional) If you are installing a grid for proof of concept or demo purposes, deselect the Create Random Command Line Passwords option.

26 StorageGRID Quick Start Guide © 2021 NetApp, Inc. All rights reserved.
For production deployments, random passwords should always be used for security reasons.
Deselect the Create Random Command Line Passwords option only for demo grids if you want to use default passwords to access grid nodes from the command line using the root or admin account.
Attention: When you click Install on the Summary page, you are prompted to download the
Recovery Package file (sgws-recovery-packageid-revision.zip). You must download this
file to complete the installation. The passwords to access the system are stored in the
Passwords.txt file, contained in the Recovery Package file.
6. Click Next.
Review your configuration and complete the installation
To make sure that the installation completes successfully, carefully review the configuration information
you have entered. Follow these steps.
1. View the Summary page.
2. Verify that all of the grid configuration information is correct. Use the Modify links on the Summary
page to go back and correct any errors.
3. Click Install.
Note: If a node is configured to use the Client Network, the default gateway for that node switches
from the grid network to the Client Network when you click Install. If you lose connectivity, make sure that you are accessing the primary Admin Node through an accessible subnet. For more information, see "Network Installation and Provisioning."
4. Click Download Recovery Package.
When the installation progresses to the point where the grid topology is defined, you are prompted to download the Recovery Package file (.zip) and confirm that you can access the contents of this file.
You must download the Recovery Package file so that you can recover the StorageGRID system in
case one or more grid nodes fail.

27 StorageGRID Quick Start Guide © 2021 NetApp, Inc. All rights reserved.
Verify that you can extract the contents of the .zip file and then save it in two safe, secure, and
separate locations.
Attention: The Recovery Package file must be secured because it contains encryption keys
and passwords that can be used to obtain data from the StorageGRID system.
5. Select the I Have Successfully Downloaded and Verified the Recovery Package File option and then
click Next.
If the installation is still in progress, the Installation Status page opens. This page indicates the progress of the installation for each grid node.
When the Complete stage is reached for all grid nodes, the sign-in page for Grid Manager opens.
6. Sign in to Grid Manager as the root user with the password that you specified during the installation.
Important note for upgrades
The upgrade process for bare-metal nodes is different than that for appliances or VMware nodes. Before
performing an upgrade of a bare-metal node, you must first upgrade the RPM files on all hosts before
running the upgrade through the GUI.
[root@host1 rpms]# rpm -Uvh StorageGRID-Webscale-Images-11-*.x86_64.rpm
[root@host1 rpms]# rpm -Uvh StorageGRID-Webscale-Service-11-*.x86_64.rpm
Now you can proceed to the software upgrade through the GUI.

28 StorageGRID Quick Start Guide © 2021 NetApp, Inc. All rights reserved.
Conclusion
The steps outlined in this guide result in a working StorageGRID installation on six bare metal hosts. You
now have a working grid and Client Network, which are useful in most testing scenarios.
Where to find additional information
To learn more about the information that is described in this document, review the following documents
and/or websites:
• StorageGRID documentation resources https://www.netapp.com/data-storage/storagegrid/documentation/
• StorageGRID 11.4 Documentation Center https://docs.netapp.com/sgws-114/index.jsp
• NetApp Product Documentation
https://www.netapp.com/support-and-training/documentation/
Version history
Version Date Document version history
Version 1.0 February 2021 Initial release.

29 StorageGRID Quick Start Guide © 2021 NetApp, Inc. All rights reserved.
Refer to the Interoperability Matrix Tool (IMT) on the NetApp Support site to validate that the exact product and feature versions described in this document are supported for your specific environment. The NetApp IMT defines the product components and versions that can be used to construct configurations that are supported by NetApp. Specific results depend on each customer’s installation in accordance with
published specifications.
Copyright Information
Copyright © 2021 NetApp, Inc. All Rights Reserved. Printed in the U.S. No part of this document covered by copyright may be reproduced in any form or by any means—graphic, electronic, or mechanical, including photocopying, recording, taping, or storage in an electronic retrieval system—without prior written permission of the copyright owner.
Software derived from copyrighted NetApp material is subject to the following license and disclaimer:
THIS SOFTWARE IS PROVIDED BY NETAPP “AS IS” AND WITHOUT ANY EXPRESS OR IMPLIED WARRANTIES, INCLUDING, BUT NOT LIMITED TO, THE IMPLIED WARRANTIES OF MERCHANTABILITY AND FITNESS FOR A PARTICULAR PURPOSE, WHICH ARE HEREBY DISCLAIMED. IN NO EVENT SHALL NETAPP BE LIABLE FOR ANY DIRECT, INDIRECT, INCIDENTAL, SPECIAL, EXEMPLARY, OR CONSEQUENTIAL DAMAGES (INCLUDING, BUT NOT
LIMITED TO, PROCUREMENT OF SUBSTITUTE GOODS OR SERVICES; LOSS OF USE, DATA, OR PROFITS; OR BUSINESS INTERRUPTION) HOWEVER CAUSED AND ON ANY THEORY OF LIABILITY, WHETHER IN CONTRACT, STRICT LIABILITY, OR TORT (INCLUDING NEGLIGENCE OR OTHERWISE) ARISING IN ANY WAY OUT OF THE USE OF THIS SOFTWARE, EVEN IF ADVISED OF THE POSSIBILITY OF SUCH DAMAGE.
NetApp reserves the right to change any products described herein at any time, and without notice.
NetApp assumes no responsibility or liability arising from the use of products described herein, except as expressly agreed to in writing by NetApp. The use or purchase of this product does not convey a license under any patent rights, trademark rights, or any other intellectual property rights of NetApp.
The product described in this manual may be protected by one or more U.S. patents, foreign patents, or pending applications.
Data contained herein pertains to a commercial item (as defined in FAR 2.101) and is proprietary to
NetApp, Inc. The U.S. Government has a non-exclusive, non-transferrable, non-sublicensable, worldwide, limited irrevocable license to use the Data only in connection with and in support of the U.S. Government contract under which the Data was delivered. Except as provided herein, the Data may not be used, disclosed, reproduced, modified, performed, or displayed without the prior written approval of NetApp, Inc. United States Government license rights for the Department of Defense are limited to those rights identified in DFARS clause 252.227-7015(b).
Trademark Information
NETAPP, the NETAPP logo, and the marks listed at http://www.netapp.com/TM are trademarks of NetApp, Inc. Other company and product names may be trademarks of their respective owners.
TR-4882-0221
Top Related
Copyright © 2022 FDOKUMEN

