


Bahasa
Halaman
Hukum


Tags for Inside Zone
According to PFF (Pro Football Focus), in 2017, NFL teams ran inside zone on
28.4% of all run attempts. Since then, I am confident that inside zone has continued to
be one of the most prevalent run play utilized across all levels of football. A zone
concept has several specific pros that make it one of the most adaptable run schemes
in football.
The first pro of inside zone is its simplicity for offensive linemen. Of course there
are many variations of verbiage when it comes to rules by different teams, but if an
offensive linemen knows the direction of the zone scheme, he can adapt a hard-set rule
to be successful: protect playside, head up, then backside. The only way an offensive
linemen does not step playside is if defensive linemen is head up or to his inside shade.
A head up defensive lineman must be blocked and an inside shade will turn into a
double team from the backside. Understanding this basic concept allows this scheme to
be successful versus many fronts, blitzes, or stunts.
Another pro of incorporating inside zone is it is a versatile run scheme, that
allows an offense to make use of it in many different types of plays. This concept can be
utilized out of ALL personnel groupings and formations and can either be a “staple” of
an offense or a complementary piece. This scheme has become more popular because
it is a “cheap” way to get the quarterback-run-game going by placing defensive players
in conflict. Specific tags can be utilized to create variations within the run and it can be
utilized in RPOs and play action passes.
Throughout this article, we will look at several (not all) tags that can change the
appearance of inside zone. These tags are not limited to the formations and personnel

groups described, however, show basic steps to create an inside zone scheme
package.
INSIDE ZONE BASICS https://youtu.be/LDR2I0o53-U
The picture below diagrams a basic depiction of inside (tight zone) vs. a “over”
front (3 to strength, shade to backside) and a
4-2 box. Obviously, the higher the level of
competition, the more consistent of
defensive alignment teams will face. For
explanation purposes, we will look at this
base front vs. this run scheme. Adhering to
the rules mentioned, players block playside;
if no playside then head up; and if not head
up then double with backside OL. The RG
and RT both, have outside techniques to
their playside, meaning they will block them. Every OL coach is different and will teach
different ways to handle these techniques. The ultimate goal of these two blocks is to
keep these techniques playside and NOT allow these techniques to block the guard and
tackles face. Below is a visual representation of the steps needed (red is right foot, blue
is left).
In this tight zone
scheme, we want to
keep these techniques
to the playside and not
allow them backside.
The first step by the
guard and tackle is a
small step, that is
almost “pick up, put

down” to guard against any inside move. Coach the first step to be in-line with the
defender’s inside shoulder, closing the gap between. (Some coaches talk about 6” steps
in this situation, however, each player and play is different making it difficult to give a
concrete rule such as this). The next step with the left foot is gaining ground while
making sure the OL’s shoulders are as square as possible, guarding against another
inside move. The third step should again, gain ground, and split the defender in half
while engaging. A thought for the OL is that the defender can play head up or outside
but must NOT go inside. On the other hand, do not coach these players to “open the
gate” and allow penetration on the outside of the play.
The next portion of the play is
perhaps the most important. Since the
center has no one in his immediate,
playside gap or head up, he makes a
call with the LG to double team the
shade. This double team needs to get
vertical movement away from the line of
scrimmage. The center will take a hard
step with his left foot, punching immediately with his left hand with his eyes up. The LG
will take a playside step with his right foot and look to deposit the shade across the
center. The center’s mindset is to get vertical movement on the shade until a linebacker
shows. It is very important for his eyes to remain up on the playside, inside LB (shown
as Mike) in case he shows in the playside A gap. Again, coaches discuss leverage and
displacement different, depending on their theory of inside zone. Nothing is right or
wrong. The last piece is the LT working to the B gap linebacker (shown as Will). He will
take a playside step, protecting B gap in case the shade spikes to that gap or the Will
triggers immediately. This does not have to be a knockout block, however, if the LT
comes to balance and engages the Will, it will provide a great cutback for the running
back.

The running back’s path is slightly different depending on the front and blocks
that will take place. As a rule, he is to read the block by the center. Vs the 4-2 Over
front, shown at the beginning of the article, this run will hit either frontside A gap or
backside B gap. The double team on the shade with dictate this run. Vs an under front,
the OL will be able to have two double teams (creating the play commonly known as
“Duo”) pushing the read spot to the frontside A gap.
ZONE LOCK https://youtu.be/Ds_aG6G4DPU
One way to utilize inside zone in the RPO game is to “lock” the backside tackle
on the defensive end. This protects the quarterback for a throw and allows him to read
the movement of the Will or backside linebacker. Teams can also utilize this tag a run
scheme if they are getting a scrap-exchange action from the backside end and Will.
Versus this run scheme, backside linebackers (the
Will), will see a double team in his face and will look
to fill B gap. To combat this aggression, adding the
“lock” tag gives him a clear read and allows you to
throw quick game behind him. Many teams across all
levels of football utilize the “pop” route or double
slants off of this run scheme. If a defense knows they
have to combat inside zone and quick game they will slow down. Here, the quarterback
will read the backside linebacker (Mike) and if he triggers, the quarterback will throw the
pop route by the F. If the linebacker drops in coverage or stays flat-footed, the
quarterback will give the football.

As mentioned above, this tag is also a good way to combat any scrape exchange
that defenses employ to confuse the quarterback in the zone read game. As a
standalone call, zone lock gives the quarterback the freedom to read the backside
linebacker. If the Will fills B gap it is a give or throw, if
he scrape exchanges to C gap, the quarterback can
now can pull the ball and attack B gap (shown left).
Again, this tag is primarily used to throws off of,
however, can be utilized when teams try to bait a pull
read for the quarterback.
ZONE DIVIDE https://youtu.be/JgyQnhNKecA
Zone “Divide” is one of the most popular tags across all levels of football. This is
utilized in 11/20 personnel groupings (11-1 TE, 1 RB, 3 WR; 20-2 RB, 3 WR).
If you are fortunate enough to have a tight end/H back type player, this run can
be very effective. This action can come from an H back formation or a 2-back set out of
shotgun. Zone Divide is a great way to protect C gap to C gap and can be utilized as a
traditional run, RPO, or play action.
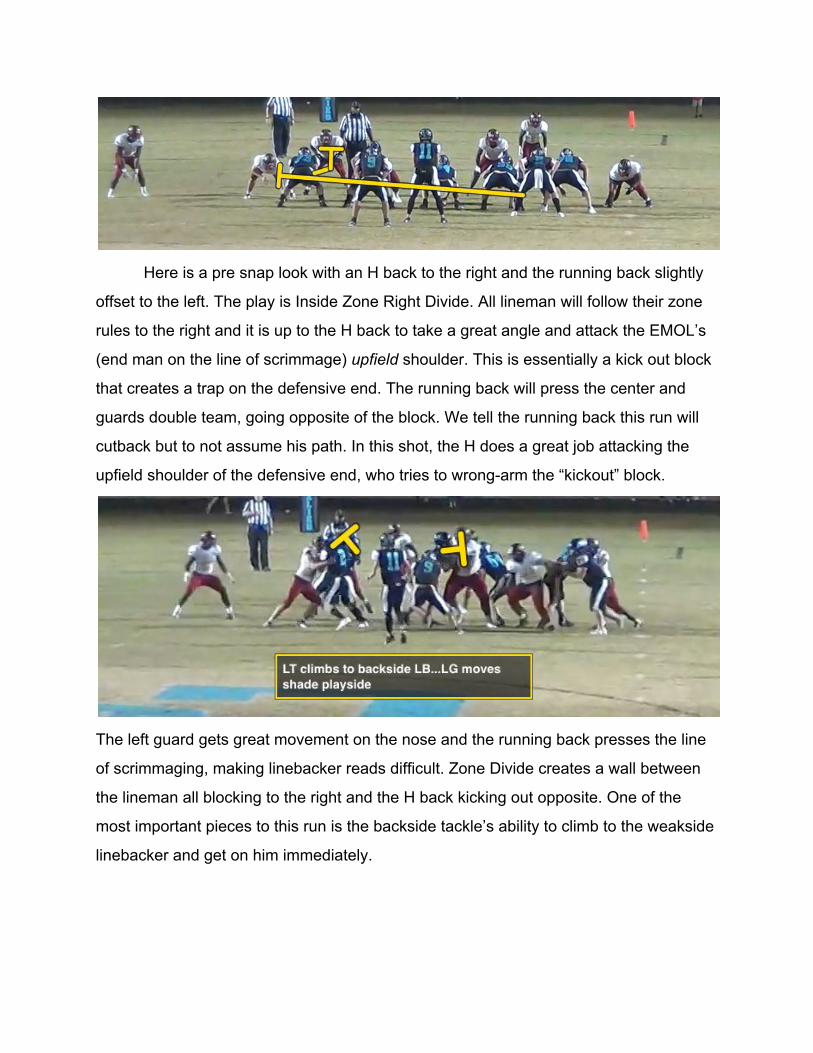
Here is a pre snap look with an H back to the right and the running back slightly
offset to the left. The play is Inside Zone Right Divide. All lineman will follow their zone
rules to the right and it is up to the H back to take a great angle and attack the EMOL’s
(end man on the line of scrimmage) upfield shoulder. This is essentially a kick out block
that creates a trap on the defensive end. The running back will press the center and
guards double team, going opposite of the block. We tell the running back this run will
cutback but to not assume his path. In this shot, the H does a great job attacking the
upfield shoulder of the defensive end, who tries to wrong-arm the “kickout” block.
The left guard gets great movement on the nose and the running back presses the line
of scrimmaging, making linebacker reads difficult. Zone Divide creates a wall between
the lineman all blocking to the right and the H back kicking out opposite. One of the
most important pieces to this run is the backside tackle’s ability to climb to the weakside
linebacker and get on him immediately.

Above is a great still-shot of the run as the running back clears the line of scrimmage. In
a perfect world all linemen would be able to stay square, however, the double team
does a great job of displacing the shade.
Zone Divide is a great way to safely combat blitz on a “run down” out of 11
personnel.
Above is a pre snap picture of the Will linebacker walked up in C gap for a blitz. In the
tight view, the defensive end has slid down to a head up 4 giving him the ability to play
B gap. The H back’s rule on Divide is to kick out the end man of the line of scrimmage,
in this situation he is the pressed linebacker. The left tackle’s rule comes into play here
as well. He still does not have a playside threat, however, he now has a head up threat
that he must account for.

As the linebacker blitzes off the edge, the H back does a great job of attacking his
upfield shoulder, creating a huge cutback lane for the running back. After the running
back has pressed the line of scrimmage, the backside double team and frontside base
blocks are displacing defensive lineman horizontally, leaving a cutback for the running
back.
Here is a look at Duo Divide and how it gives the running back a two-way go
depending on the double teams that take place up front (below). The run scheme is to
the offense’s left towards the shade, giving the offensive line 2 double teams (on the
shade and the 3 technique to the backside). The running back will press the Center’s
double team and make a cut off of his disposition. This particular run shows a great job
of vertically moving on the double team and muddying up the linebacker’s read.

ZONE BLUFF
To compliment Zone Divide, “Bluff” gives the defense the same look as Divide
except the H will avoid the end man away from the run and look to engage the D gap
defender. This tag gives the quarterback the ability to read the end man and have a
lead blocker if he is given a pull read. The D gap defender could be an outside
linebacker in a 4-4 or 3-4 scheme or could be a roll down safety in a 4-2-5 scheme.
Bluff is a great compliment to Divide because the only new teaching is for the H back.
He works across the formation and avoids the end man and turns up to the next level.
As the H back avoids the end it may slow him down, leaving C gap wider and giving the
quarterback a clearer read. This also gives the running back a larger cutback lane. In
this scheme we feel that it is important to not overcoach the H back as he engages in

the D gap defender. Often we tell him to, “take him where he wants to go”. In other
words, engage and run your feet, giving the quarterback a clear read on the run.
ZONE CIRCLE https://youtu.be/3tahSCSaSTQ
Zone “Circle” is the same concept as Bluff, however, the H back is arching the
end man lined up in front of him. We have Bluff and Circle as separate tags to make it
easier on the H back. This tag is very effective when tagged with a jet or orbit motion.
Along with Divide and Bluff, Circle does not change the offensive line’s scheme
at all. Bluff and Circle allows the quarterback read aspect to remain within the play,
while getting him a lead blocker out in front. This tag can be executed with an H back or
an attached tight end. In our offense we have the H back “duck walk” around when
arching to the next level. This duck walk is a series of 4 small steps before climbing to
the D gap defender. What this does is gives the illusion he is going down on the end but
then climbs. Like Bluff, this can cause uncertainty for the end man and make the
quarterback’s job easier. As the H back/tight end arcs, he forces the defensive end to
widen before he attacks the mesh point between the quarterback and the running back.
At this point, the quarterback has to make a decision whether to give the ball or pull it. If
he pulls it, he has a lead blocker out in front of him.

ZONE CIRCLE OPTION https://youtu.be/3tahSCSaSTQ
Zone Circle Option is a great way to get a triple option play out of a spread look.
This is something that is becoming more popular as teams look to utilize motion and
option principles to their spread personnel. This look can be accomplished with a
receiver in orbit motion or out of split backs from the gun. In our offense, both backs
have the ability to run zone and option, however, there may be a time in which you
assign a “dive” back and option back.
This scheme is great for teams that have a mobile quarterback and have multiple backs
that need to be on the field at the same time. This scheme can be done out of split
backs (as shown above) or out of pistol with a “sidecar” back. The quarterback should
not treat this give/pull read any different than a normal zone read or Circle tag.
ZONE CIRCLE/BLUFF BUBBLE/SMOKE
By tagging Circle or Bluff to your inside zone scheme, it gives the quarterback
the ability to run the football. A great way to save hits on the quarterback and get the
ball in a better athlete’s hand is to tag a bubble or smoke screen to the backside of the
run. This gives the quarterback another triple option read that stretches a defense
horizontally. If the quarterback gets a pull read, it forces a D gap player to make a
decision to defend a screen or a quarterback running at him.

ZONE LEAD https://youtu.be/7syKtro-2hg
Zone “Lead” is a tag that utilizes an H back on an iso block. This is commonly
known as zone “BOB” (big on big) or traditional “iso”. Below is Inside Zone Left Lead.
When Lead is called, it is an automatic “lock” call by the backside tackle. The H
back is leading to the backside linebacker (shown as Will) and takes the best path to get
there. Every week, the insertion of the H back can change depending on the front and
looks the defense can give. This run can give inside zone several different looks,
depending on where the H back aligns pre snap. By giving him a hard-set rule, the H
back can get to his assignment from the frontside or backside of the formation. Another

way to get to Lead is running zone towards the H back, sending him almost across the
formation to the weakside linebacker. This play can show linebackers flow to the
playside with the H back and running
back cutting backside. Again, the most
important aspect of this run is for the H
back to get reps identifying the bubble in
the defensive line to get the best entry to
the iso block. Lead is very similar to
Divide in that it protects the quarterback
from frontside C gap to backside C gap,
giving an offense the ability to throw
quick game and screens off of this run
action.
A popular RPO off of Zone Lead is a “glance” post by a single receiver. From the
defense’s perspective, they are getting an 11/20 personnel set and have to make a
decision defensively. If they decide to stay 2 high, the offense will have numbers in the
box and probably look to run the football. However, when teams look to run some sort of
sky coverage and roll down the boundary safety, they leave the boundary corner by
himself in ⅓ of the field in coverage.

In conclusion, Inside Zone provides an offense with flexibility in the run game,
screen game, and RPO game. When in 11/20 personnel, there are many tags that can
be implemented to catch defensive ends and linebackers off-guard throughout a game.
For more content, visit footballcoachescorner.com!
ALL VIDEO CLIPS
IZ RPOs → https://youtu.be/Ds_aG6G4DPU
IZ QB Read → https://youtu.be/LDR2I0o53-U
IZ Lead → https://youtu.be/7syKtro-2hg
IZ Divide → https://youtu.be/JgyQnhNKecA
IZ Circle → https://youtu.be/3tahSCSaSTQ
Copyright © 2022 FDOKUMEN

